

Planet IRT-1001ST, IRT-1001U, IRT-1002ST, IRT-1002U User Manual

Copyright Statement
Copyright ©1997 PLANET Corporation
No part of this publication may be reproduced in any form or by any
means or used to make any derivative such as translation,
transformation, or adaptation without permission from PLANET
Technology Corporation.
Trademarks
This guide and the accompanying product are each provided “as is,”
without warranty as to their performance, merchantability or fitness for
any particular purpose. PLANET Technical Corporation reserve the
right to revise this publication and to make changes to its contents at
any time, without obligation to notify any person or entity of such
revisions or changes.
Reversion
This guide is used for PLANET ISDN Router, IRT-1000 sreies:
Model: IRT-1001ST, IRT-1002ST,
IRT-1001U, IRT-1002U
Reversion: 1.0 (April, 1998)
Part No.: EMIRT1000


Table of Contents
INTRODUCTION.........................................................................................1
FEATURES.....................................................................................................1
Ease of Installation................................................................................... 2
ISDN Basic Rate Interface (BRI)...............................................................2
ISDN Leased Line.....................................................................................2
Multiple Networking Protocol Support......................................................3
Dial On Demand.......................................................................................3
Bandwidth On Demand .............................................................................3
Full Network Management........................................................................ 3
RADIUS (Remote Authentication Dial In User Service).............................4
PPP Security.............................................................................................4
MS (Microsoft) CHAP...............................................................................4
RIP-1/RIP-2..............................................................................................4
DHCP Support (Dynamic Host Configuration Protocol) ...........................5
Call Control.............................................................................................. 5
Data Compression.....................................................................................5
Networking Compatibility ......................................................................... 5
APPLICATIONS FOR YOUR IRT-1001 OR IRT-1002.........................................5
Internet Access..........................................................................................5
Internet Single User Account (SUA).......................................................... 6
Multiprotocol LAN-to-LAN Connection.....................................................6
Telecommuting Server...............................................................................6
WHAT THIS MANUAL COVERS ....................................................................... 6
WHAT THIS MANUAL DOESN’T COVER...........................................................7
OTHER RESOURCES ....................................................................................... 7
PACKING LIST ...............................................................................................8
ADDITIONAL INSTALLATION REQUIREMENTS..................................................8
BEFORE YOU BEGIN.................................................................................9
ROAD MAP AND FLOW...................................................................................9
COMPLETING THE WORKSHEET....................................................................10
Ordering Your ISDN Line .......................................................................11
Collecting General Setup Information.....................................................11
Collecting ISDN Phone Line Information................................................12

PLANET ISDN Router
iv
Collecting Ethernet Setup Information.................................................... 13
INSTALLATION........................................................................................19
A WARNING ON CONNECTION CABLES ........................................................ 19
CONNECTING YOUR COMPUTER AND YOUR IRT-1001 OR IRT-1002 ............. 20
Connecting the RS-232 Cable to the Router............................................20
Connecting an ISDN Line to the Router .................................................. 20
Connecting an Ethernet Cable to the Router........................................... 21
Connecting a Power Adapter to the Router ............................................. 21
THE YOUR IRT-1001 OR IRT-1002’S FRONT PANEL.....................................21
POWERING UP YOUR IRT-1001 OR IRT-1002............................................... 22
NAVIGATING THROUGH THE SYSTEM MANAGEMENT TERMINAL (SMT)
INTERFACE.................................................................................................. 23
SYSTEM MANAGEMENT TERMINAL INTERFACE SUMMARY.............................25
GENERAL SETUP.......................................................................................... 25
ISDN SETUP............................................................................................... 27
North American ISDN............................................................................. 27
DSS1 & 1TR6 ISDN ................................................................................ 28
ETHERNET SETUP........................................................................................30
General Ethernet Setup...........................................................................30
TCP/IP Ethernet Setup and DHCP..........................................................31
Novell IPX Ethernet Setup ......................................................................34
Bridge Ethernet Setup............................................................................. 34
CONFIGURING FOR INTERNET ACCESS............................................35
IP ADDRESSES AND THE INTERNET............................................................... 35
INTERNET ACCESS CONFIGURATION.............................................................37
SINGLE USER ACCOUNT............................................................................... 39
CONFIGURATION FOR SINGLE USER ACCOUNT ..............................................41
CONFIGURING BACKUP ISP ACCOUNTS ........................................................42
REMOTE NODE CONFIGURATION......................................................43
BANDWIDTH ON DEMAND............................................................................48
EDITING PPP OPTIONS ................................................................................ 50
DIAL-IN CONFIGURATION .................................................................... 53
TELECOMMUTING........................................................................................ 54
DIAL-IN SERVER APPLICATION.....................................................................54

IRT-1000 series User's Guide
v
DEFAULT DIAL-IN SETUP.............................................................................55
DIAL-IN USERS SETUP ................................................................................. 59
More on CLID.........................................................................................61
TCP/IP CONFIGURATION.......................................................................63
IP SUBNET MASK........................................................................................ 63
LAN-TO-LAN APPLICATION....................................................................... 64
Remote Node Setup................................................................................. 64
Static Route Setup...................................................................................67
NOVELL IPX CONFIGURATION............................................................ 71
IPX NETWORK ENVIRONMENT ....................................................................71
Frame Type............................................................................................. 71
Network Numbers.................................................................................... 71
IRT-1002 ON LAN WITH SERVER................................................................ 72
IRT-1002 ON LAN WITHOUT SERVER..........................................................72
IPX SPOOFING ............................................................................................72
IPX ETHERNET SETUP.................................................................................73
LAN-TO-LAN APPLICATION....................................................................... 74
Remote Node Setup................................................................................. 75
STATIC ROUTE SETUP..................................................................................77
BRIDGING CONFIGURATION................................................................81
IPX SPOOFING ............................................................................................81
BRIDGE ETHERNET SETUP............................................................................81
LAN-TO-LAN APPLICATION....................................................................... 83
Remote Node Setup................................................................................. 83
Default Dial-In Setup for Bridge............................................................. 84
Bridge Static Route Setup .......................................................................85
FILTER CONFIGURATION.....................................................................87
ABOUT FILTERING....................................................................................... 87
IRT-1000’S FILTER STRUCTURE ..................................................................88
CONFIGURING A FILTER SET ........................................................................88
CONFIGURING A FILTER RULE...................................................................... 91
TCP/IP Filter Rule..................................................................................91
Generic Filter Rule................................................................................. 95
Novell IPX Filter Rule ............................................................................97

PLANET ISDN Router
vi
SNMP...........................................................................................................99
ABOUT SNMP ............................................................................................99
CONFIGURING YOUR IRT-1002 FOR SNMP SUPPORT...................................99
SYSTEM SECURITY............................................................................... 103
CONFIGURING THE SMT PASSWORD .......................................................... 104
USING RADIUS AUTHENTICATION............................................................ 105
Installing a RADIUS Server .................................................................. 105
Configuring the IRT-1002 for RADIUS Authentication.......................... 106
Adding Users to the RADIUS Database................................................. 107
Using RADIUS Authentication for CLID............................................... 108
TELNET CONFIGURATION AND CAPABILITIES................................109
ABOUT TELNET CONFIGURATION............................................................... 109
TELNET CAPABILITIES ............................................................................... 110
Single Administrator............................................................................. 110
System Timeout..................................................................................... 110
SYSTEM MAINTENANCE......................................................................111
SYSTEM STATUS........................................................................................ 111
TERMINAL BAUD RATE.............................................................................. 114
LOG AND TRACE........................................................................................ 115
View Error Log ..................................................................................... 116
Syslog And Accounting.......................................................................... 116
DIAGNOSTIC ............................................................................................. 117
BACKUP CONFIGURATION.......................................................................... 120
RESTORE CONFIGURATION......................................................................... 121
SOFTWARE UPDATE...................................................................................121
COMMAND INTERPRETER MODE................................................................. 122
CALL CONTROL......................................................................................... 122
Call Control Parameters....................................................................... 123
Blacklist................................................................................................ 124
Budget Management ............................................................................. 124
Call History.......................................................................................... 125
TROUBLESHOOTING............................................................................127
PROBLEMS STARTING UP THE YOUR IRT-1001 OR IRT-1002...................... 127
None of the LEDs are on when you power up the router........................ 127

IRT-1000 series User's Guide
vii
Connecting the RS-232 cable, cannot access the SMT...........................127
PROBLEMS WITH THE ISDN LINE .............................................................. 128
The ISDN initialization failed................................................................ 128
The ISDN loopback test failed...............................................................128
PROBLEMS WITH THE LAN INTERFACE....................................................... 129
Can’t PING any station on the LAN...................................................... 129
PROBLEMS CONNECTING TO A REMOTE NODE OR ISP ................................. 129
PROBLEMS CONNECTING TO A REMOTE USER ............................................. 130
ISDN SWITCH TYPES ............................................................................131
PROVISIONING FOR U.S. SWITCHES............................................................ 131
Provisioning For the AT&T 5ESS Switches ........................................... 131
Provisioning For the Northern Telecom Switch..................................... 133
GLOSSARY .............................................................................................. 135


IRT-1000 series User's Guide
1
Introduction
Congratulations on your purchase of a PLANET IRT-1000 series
Remote Access Router. In a modem-sized box, your router offers
inexpensive yet complete telecommunications and Internetworking
solutions for your home or branch office. It is ideal for everything from
Internet browsing to receiving calls from Remote Dial-in Users and
making LAN-to-LAN connections to Remote Nodes.
Distinguishing features of the IRT-1000 series include support for a full
range of networking protocols such as TCP/IP (Transmission Control
Protocol/Internet Protocol, also known as IP), Novell IPX (Internet
Packet Exchange), and Transparent Bridging.
♦ IRT-1001ST: ISDN S/T interface, IP routing
♦ IRT-1001U : ISDN U interface, IP routing
♦ IRT-1002ST: ISDN S/T interface, IP/IPX routing, bridging
♦ IRT-1002U : ISDN U interface, IP/IPX routing, bridging
This complete solution also includes Remote Dial-in User support, an
Internet Single User Account (Network Address Translation) option,
extensive Network Management, and solid security features.
NOTE: Throughout the remainder of this manual, the term “IRT-
1001” refers to any IRT-1001ST or IRT-1001U, and the
term “IRT-1002” refers to any IRT-1002ST or IRT-1002U.
Features
Each IRT-1000 series router is packed with features that give it the
flexibility to provide a complete networking solution for almost any user.

PLANET ISDN Router
2
Ease of Installation
Your IRT-1001 or IRT-1002 is a self-contained unit that is quick and
easy to install. Physically, it resembles an external modem except for
the fact that it is a router and uses an Ethernet cable to connect to the
host network.
ISDN Basic Rate Interface (BRI)
Using a standard S/T or U Interface (the IRT-1001ST and IRT-1002ST
use the S/T interface, while the IRT-1001U and IRT-1002U use the U
interface) the IRT-1001ST and IRT-1002ST support a full range of
switch types. The switch type depends on the CO (Central Office) switch
your ISDN line is connected to. See the ISDN Switch Types chapter for
more information on North American, European, and Asian ISDN
firmware and switch types supported by these routers.
The two B-channels can be used independently for two destinations. Or
they can be bundled for one connection to support bandwidth-ondemand.
ISDN Leased Line
If the router is set up for an ISDN leased line (that is, if any option but
"Switch/Switch" or "Switch/Unused" is selected for the B Channel [Usage
control] in setup menu 2, [ISDN Setup], and the [Transfer Type control]
is set to Leased in either setup menu 4, [Internet Access Setup], or
setup menu 11.1, [Remote Node Profile]), the router will automatically
initialize the leased-line connection each time it is powered up or setup
menu 2, 4, or 11.1 is saved.
The IRT-1001ST and IRT-1002ST implement the PPP echo mechanism
for verifying ISDN leased line status. The setting of the Idle Timeout
control in setup menu 11.1 will be used as the interval between two
LCP_Echo_Req messages. It is supposed that there exists an echo
reply corresponding to an echo request. Whenever an echo request is
sent, the counter will be incremented by one.

IRT-1000 series User's Guide
3
The send counter will be reset to zero after an echo response is
received. The leased-line error recovery mechanism will be triggered
after the send counter reaches 4. If the Idle Timeout control is set to
zero, the PPP echo mechanism will not be used.
Multiple Networking Protocol Support
The IRT-1002 is a multi-protocol router. It supports TCP/IP, Novell IPX,
and Transparent Bridging.
Dial On Demand
The Dial On Demand feature allows a IRT-1001 or IRT-1002 to
automatically place a call to a Remote Node whenever there is traffic
coming from any workstation on the LAN to that remote site.
Bandwidth On Demand
Your IRT-1001 or IRT-1002 supports bandwidth up to 128 Kbps over a
single ISDN BRI line. It incorporates PPP/MP (Point-to-Point
Protocol/Multilink Protocol) to bundle two B channels over a BRI line. In
addition, the router dynamically allocates bandwidth between the two B
channels, increasing or decreasing bandwidth as needed to allow for
greater efficiency in data transfer. It supports BAP (Bandwidth Allocation
Protocol) and BACP (Bandwidth Allocation Control Protocol) to manage
the number of links in multilink bundle.
Full Network Management
The IRT-1002ST incorporates SNMP (Simple Network Management
Protocol) support and menu-driven network management via an RS-232
or Telnet connection. In addition, both the IRT-1001ST and the IRT1002ST offer the Call Detail Record (CDR) function to help you analyze
and manage your telephone bill.

PLANET ISDN Router
4
RADIUS (Remote Authentication Dial In User Service)
The RADIUS feature allows you to use a central external Unix-based
server to support thousands of users (IRT-1002ST only).
PPP Security
The IRT-1001 and IRT-1002 support PAP (Password Authentication
Protocol) and CHAP (Challenge Handshake Authentication Protocol).
MS (Microsoft) CHAP
Your IRT-1001 or IRT-1002 and a Microsoft Windows 95 or Windows NT
server can authenticate each other using Microsoft’ s proprietary CHAP
algorithm. No special setup is needed to support MS CHAP. Everything
is done through PPP negotiation between the router and the server.
RIP-1/RIP-2
Your IRT-1001 or IRT-1002 supports both RIP-1 and RIP-2 (Routing
Information Protocol versions 1 and 2) exchanges with other routers.
RIP version controls in setup menus 3.2 (TCP/IP and DHCP Ethernet
Setup) and 11.3 (Remote Node Network Layer Options) let you control
RIP use, and offer the following version options: RIP-1 (accept and send
RIP-1 messages only), RIP-2B (accept RIP-1 and RIP-2 messages, both
broadcast and multicast, and send RIP-2 messages in broadcast
format), and RIP-2M (accept RIP-1 and RIP-2 messages, both
broadcast and multicast, and send RIP-2 messages in multicast format).
(The suggested choice in both menus is RIP-2B, except in environments
where there are routers that do not understand RIP-2 packets at all.
“Broadcast,” above, means a destination MAC or IP host address
consisting of all binary ones; “multicast” means a MAC address of
01:00:5E:00:00:09 hex or an IP destination address of 224.0.0.9.)

IRT-1000 series User's Guide
5
DHCP Support (Dynamic Host Configuration Protocol)
DHCP (Dynamic Host Configuration Protocol) allows you to dynamically
and automatically assign IP address settings to hosts on your network.
Call Control
Your IRT-1001 or IRT-1002 provides budget management for outgoing
calls and maintains a “blacklist” of unreachable phone numbers in order
to save you the expense of unnecessary charges.
Data Compression
The IRT-1001 and IRT-1002 incorporate Stac data compression and
CCP (Compression Control Protocol).
Networking Compatibility
The IRT-1001 and IRT-1002 are compatible with remote access
products from other companies such as Ascend, Cisco, and 3Com.
Furthermore, they support Microsoft Windows 95 and Windows NT
remote access capability.
Applications For Your IRT-1001 or IRT-1002
Some applications for the IRT-1001 and IRT-1002 include:
Internet Access
Your IRT-1001 or IRT-1002 supports the TCP/IP protocol, which is the
language used for the Internet. It is also compatible with access servers
manufactured by major vendors such as Cisco and Ascend.

PLANET ISDN Router
6
Internet Single User Account (SUA)
For small office environments, the IRT-1001 and IRT-1002 offer a
Single User Internet Account (also known as a Network Address
Translator, or NAT) from an ISP (Internet Service Provider). This allows
multiple users on the LAN (Local Area Network) to access the Internet
concurrently for the cost of a single user.
Single User Account address mapping can also be used for LAN to LAN
connections.
Multiprotocol LAN-to-LAN Connection
The IRT-1001 and IRT-1002 can dial to or answer calls from another
remote access router connected to a different network. The IRT-1002
supports TCP/IP and Novell IPX, and has the capability to bridge any
Ethernet protocol.
Telecommuting Server
The IRT-1001 and IRT-1002 allow Remote Dial-in Users to dial in and
gain access to your LAN. This feature enables users that have
workstations with remote access capabilities, e.g., Windows 95, to dial in
using an ISDN terminal adapter (TA) to access the network resources
without physically being in the office.
What This Manual Covers
This manual is divided into five parts.
1. Part One—Getting Started—is structured as a step-by-step guide
to help you connect, install, and set up your IRT-1001 or IRT-1002
to operate on your LAN.

IRT-1000 series User's Guide
7
2. Part Two — The Internet—describes how to configure the router
to connect to the Internet.
3. Part Three — Setting Up Advanced Applications—describes
how to use the router for more advanced applications, such as
TCP/IP routing and Bridging.
4. Part Four — Advanced Management —provides information on
advanced management features for network managers.
5. Part Five — System Maintenance —describes maintenance
features for checking system status and logging errors.
Regardless of the application, it is important that you follow the steps
outlined in Part One to correctly connect your IRT-1001 or IRT-1002 to
your LAN. You can then refer to other chapters of the manual depending
on which applications you wish to use.
What This Manual Doesn’ t Cover
This manual assumes that you know how to use your computer and are
familiar with your communications software. If you have questions about
using either one, refer to the manual for the product.
Other Resources
For more information about your IRT-1001 or IRT-1002 check the
following sources:
♦ Quick Start Guide.
♦ Support disk.

PLANET ISDN Router
8
Packing List
Before you proceed further, check all items you received with your IRT1001 or IRT-1002 against this list to make sure nothing is missing. The
complete package should include:
♦ One IRT-1001 or IRT-1002 ISDN router.
♦ One power adapter.
♦ One RS-232 cable.
♦ One LAN straight cable.
♦ One Support Disk.
♦ This User’ s Guide.
Additional Installation Requirements
In addition to the contents of your package, there are other hardware
and software requirements you need before you can install and use your
router. These requirements include:
♦ An ISDN telephone line.
♦ An Ethernet connection to your computer.
♦ A computer equipped with an RS-232 port and communications
software configured to the following parameters:
◊ VT100 terminal emulation.
◊ 9600 Baud rate.
◊ No parity, 8 Data bits, 1 Stop bit.
After the router has been successfully connected to your network, you
can make future changes to the configuration using a Telnet client
application.

IRT-1000 series User's Guide
9
Before You Begin
To ensure successful installation of your IRT-1001 or IRT-1002, we
strongly recommend that you carefully follow the steps outlined in
the next two chapters. These chapters are designed as a guide for you
to collect the necessary information about your ISDN phone line and the
LAN that you will be connected to. Once this information has been
collected, it will be used to configure your router.
After you have successfully configured your IRT-1001 or IRT-1002, see
the appropriate chapters to set up your applications. For Internet
Access, see the Configuring for Internet Access chapter starting on page
35.
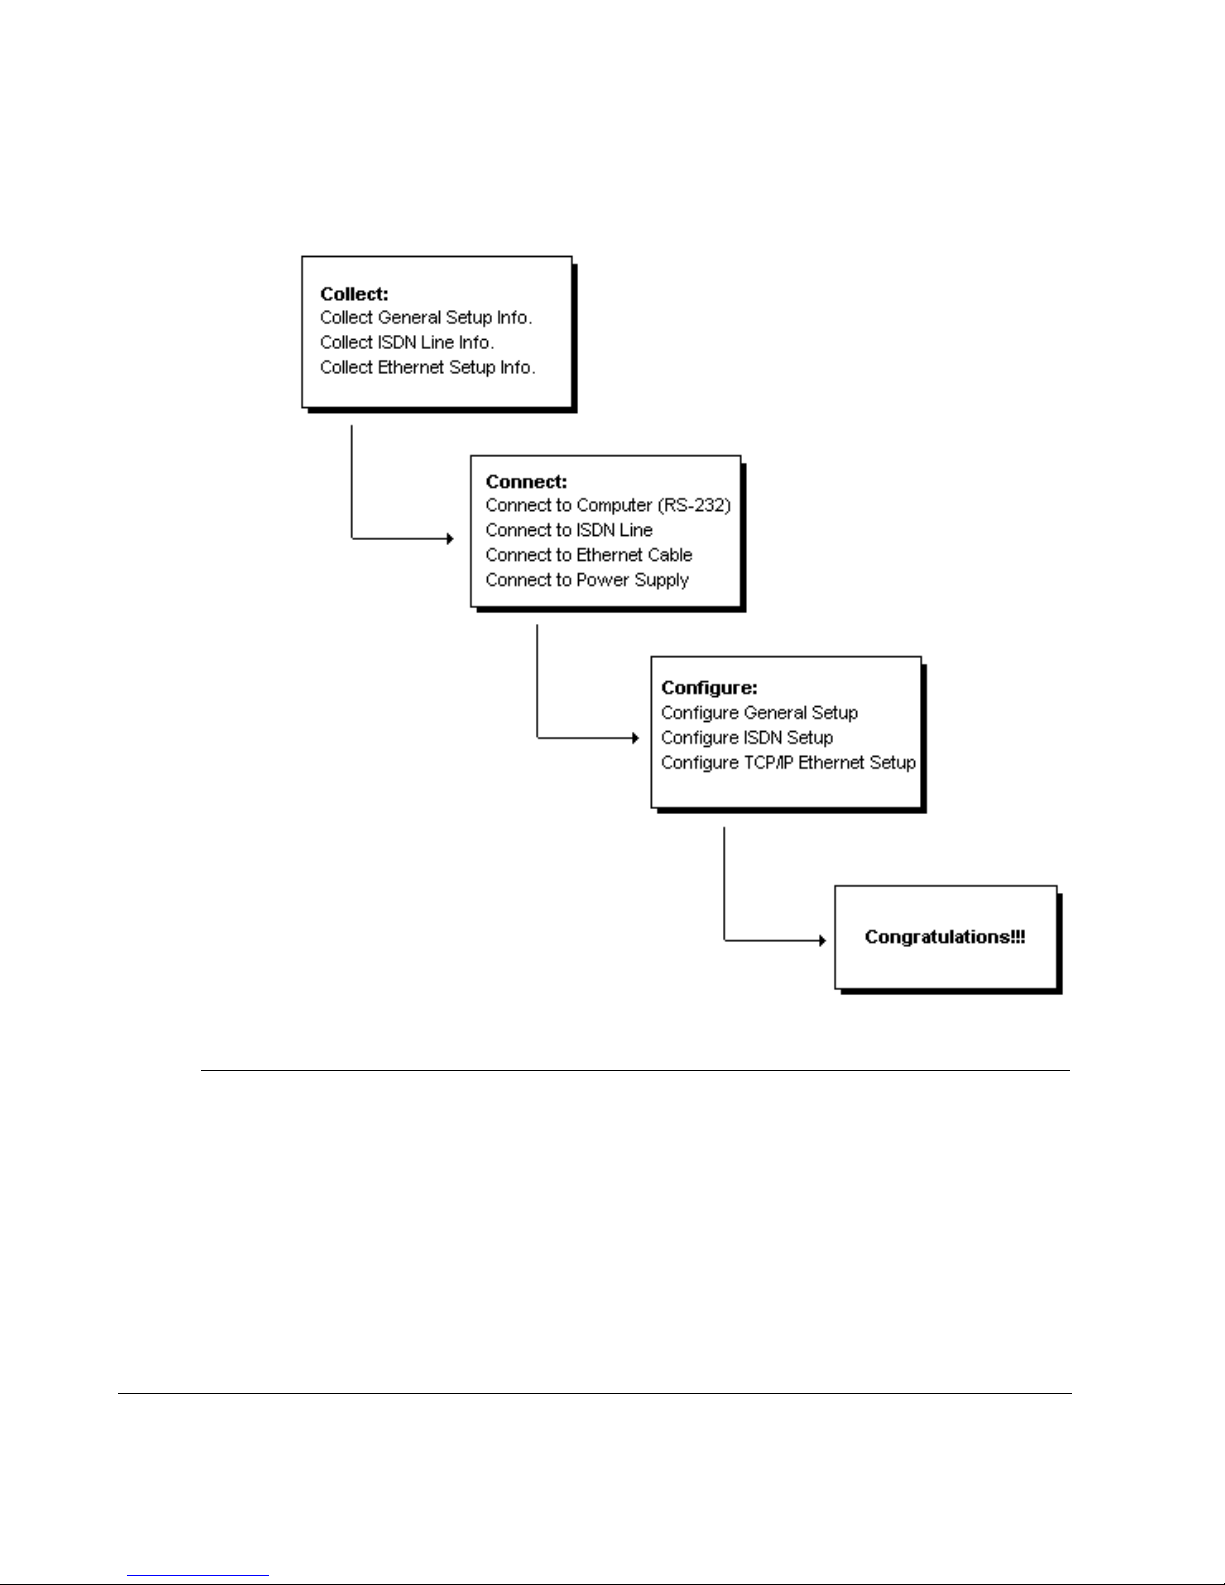
Road Map and Flow
The chart below is provided as a step by step guide to successfully
installing your IRT-1001 or IRT-1002.
PLANET ISDN Router
10
Completing the Worksheet
Before you continue, locate the worksheet at the end of this chapter.
This information worksheet has been provided to help you get through
setup and installation of your IRT-1001 or IRT-1002 as easily as
possible.

IRT-1000 series User's Guide
11
Ordering Your ISDN Line
If you do not have the ISDN line installed already, we suggest that you
order it from your telephone company as soon as possible to avoid the
long waiting period common when ordering a new line. Use the
information in this section to place the order (see the ISDN Switch
Types chapter for information on provisioning your ISDN line). If you
have already installed your ISDN line, you can check the following
section to make sure that you can use all the features of your IRT-1001
or IRT-1002.
1. Contact your local telephone company’ s ISDN Ordering Center.
2. Find out what type of ISDN service is available. Refer to the ISDN
Switch Types chapter to find out the provisioning information for
the appropriate switch type and ISDN service. For the U.S., the
IRT-1001U and IRT-1002U (U Interface) have been approved by
Bellcore and have IOC (ISDN Ordering Code) “S” Capability, EZISDN 1.
3. Provide your telephone company with the proper provisioning
information.
4. When the telephone company installs your ISDN line, be sure to
obtain the following information:
◊ ISDN switch type.
◊ ISDN telephone number(s).
◊ ISDN Service Profile Identifier (SPID) number(s) (only for
North America).
Collecting General Setup Information
Your IRT-1001 or IRT-1002 requires the following system information.
You can obtain all the pertinent information from your network
administrator. Record this information into the worksheet as it becomes
available. This worksheet will later be referred to as you configure your
router.

PLANET ISDN Router
12
♦ System Name—This is the name given to the router for
identification purposes. This name should be no more than 8
alphanumeric characters. Spaces are not allowed, but “-” and “_”
are accepted. This name can be obtained remotely via the SNMP
management protocol and will be displayed as the prompt when
the user enters Command Interpreter Mode.
♦ Route IP Field—For Internet access, you will need to enable the
Route IP Field. See the Configuring for Internet Access chapter
starting on page 35 for more details on configuring your router for
Internet access. To support Novell IPX, or Bridging, enable the
appropriate protocol and reference the related chapters for
detailed information.
You have now collected all of the general setup information you need.
Make sure that you have entered all the values onto the worksheet
before proceeding to the next section.
Collecting ISDN Phone Line Information
After you have successfully installed the ISDN phone line or if you
already have one installed, you need to use the ISDN line information to
complete the worksheet and configure your router. Your telephone
company can give you the following information to configure the Your
IRT-1001 or IRT-1002:
Switch Type Geography No. of Phone #s No. of SPIDs
AT&T 5ESS NI-1 North America 2 2
AT&T 5ESS Point to Point North America 1 0
AT&T 5ESS Multipoint North America 2 2
Northern Telecom NI-1 North America 2 2
Northern Telecom Custom North America 2 2
DSS1 Europe, Asia 2 N/A
1TR6 Germany 2 N/A
♦ Switch Type—This is the type of switch used by your telephone
company. Check with your telephone company and choose the
appropriate option on the worksheet. For North America, select
your ISDN switch type. For DSS1 and 1TR6, verify this field to
make sure that you have the proper firmware loaded.

IRT-1000 series User's Guide
13
♦ B Channel Usage—Determine which connection is appropriate
for your B channel and check the corresponding option on the
worksheet.
If your IRT-1001 or IRT-1002 is the only device using the ISDN line,
configure B Channel Usage to Switch/Switch so the router device
will use both B channels to communicate. If the router is sharing the
ISDN line with other devices, configure B Channel Usage to
Switch/Unused. If your IRT-1001 or IRT-1002 is on a leased line,
configure B channel usage to Leased/Leased or Leased/Switch,
depending on the setting of the line.
♦ Telephone Number(s)—Record on the worksheet the telephone
number(s) given to you by your ISDN provider. Some switch types
only have one telephone number. These phone numbers should
be in a standard digit format (for example, 5551212). Note that
these fields will only accept digits, so dash "—" and spaces will
not be accepted.
♦ SPID Number(s)—(For North America only) The SPID (Service
Profile Identifier) is a number used by a central office switch for
identification purposes. With the switch information, see the
previous table for the number of SPIDs you must enter.
You have now collected all of the necessary information about your
ISDN phone line. Make sure that these values are entered into your
worksheet before you continue to the next section. For DSS1 and 1TR6
ISDN, refer to the install chapter starting on page 18.
Collecting Ethernet Setup Information
This section assumes that you are setting up your router for a TCP/IP
connection. If you want to configure the system for other protocols (e.g.,
IPX), refer to the appropriate chapters.
♦ Ethernet Interface—Your IRT-1001 or IRT-1002 is equipped with
an NWay auto-sensing 10/100-Mbps port. Just plug in the cable,
and the router will automatically determine the network speed (10
Mbps or 100 Mbps) and mode (full or half duplex) based on the
capability and configuration of the attached device.

PLANET ISDN Router
14
♦ IP Address—An IP Address is required for TCP/IP protocol. The
IP Address is a unique 32-bit number assigned to your router. It is
written in dotted decimal notation (four 8-bit numbers, between 0
and 255, separated by periods), e.g., 192.68.203.5.
Record the IP Address into the worksheet as assigned by your
network administrator. Note that every machine on a TCP/IP network
(the global Internet, for example) must have a unique IP address; do
not assign an arbitrary address to any machine.
♦ IP Sub-net Mask—This field is required for TCP/IP protocol. An
IP address consists of two parts, the network ID and the host ID.
The IP Subnet Mask is used to specify the network ID portion of
the address, expressed in dotted decimal notation. Your IRT-1001
or IRT-1002 will automatically calculate this mask based on the IP
address that you assign. Unless you have special need for
subnetting, use the default mask as calculated by the router.
The table below lists some examples of IP subnet masks and the
number of hosts that are allowed. Consult your network administrator if
you are unsure of this value.
IP Subnet Mask Number of Host IDs Number of Bits
255.255.255.0 254 24
255.255.255.128 126 25
255.255.255.192 62 26
255.255.255.224 30 27
255.255.255.255 1 32

IRT-1000 series User's Guide
15
IRT-1001/IRT-1002 Setup and Installation Worksheet
General Setup Information
♦ System Name (for identification purposes):
_______________________________________
♦ Protocol(s):
___TCP/IP
___IPX (IRT-1002ST only)
___Bridging (IRT-1002ST only)
ISDN Setup Information
♦ Switch Type (check one):
___AT&T 5ESS NI-1
___AT&T Point to Point
___AT&T 5ESS Multipoint
___Northern Telecom NI-1
___Northern Telecom Custom
___DSS1
___1TR6
♦ B-Channel Usage (check one):
___Switch/Switch
___Switch/Leased
___Leased/Switch
___Leased/Unused
___Unused/Leased
___Leased/Leased
___Leased128

PLANET ISDN Router
16
___Switch/Unused
North American ISDN
♦ 1st Telephone Number:
_______________________________________
♦ 1st SPID Number:
_______________________________________
♦ 2nd Telephone Number:
_______________________________________
♦ 2nd SPID Number:
_______________________________________
DSS1 ISDN
♦ ISDN Data Number & Subaddress:
_______________________________________
♦ Outside Line Prefix Number:
_______________________________________
♦ PBX Number (S/T Bus Number):
_______________________________________
♦ Incoming Number Matching:
___MSN
___Calling Party Subaddress
___Don’ t Care
1TR6 ISDN:
♦ ISDN Data Number:
_______________________________________
♦ Outside Line Prefix Number:
_______________________________________
♦ PBX Number (S/T Bus Number):
_______________________________________
♦ Incoming Number Matching:

IRT-1000 series User's Guide
17
___EAZ
___Don’ t Care
Ethernet Setup Information
♦ IP Address:
_______._______._______._______
♦ IP Subnet Mask:
_______._______._______._______
Notes:

PLANET ISDN Router
18
This Page was deliberately left blank.
IRT-1000 series User's Guide
19
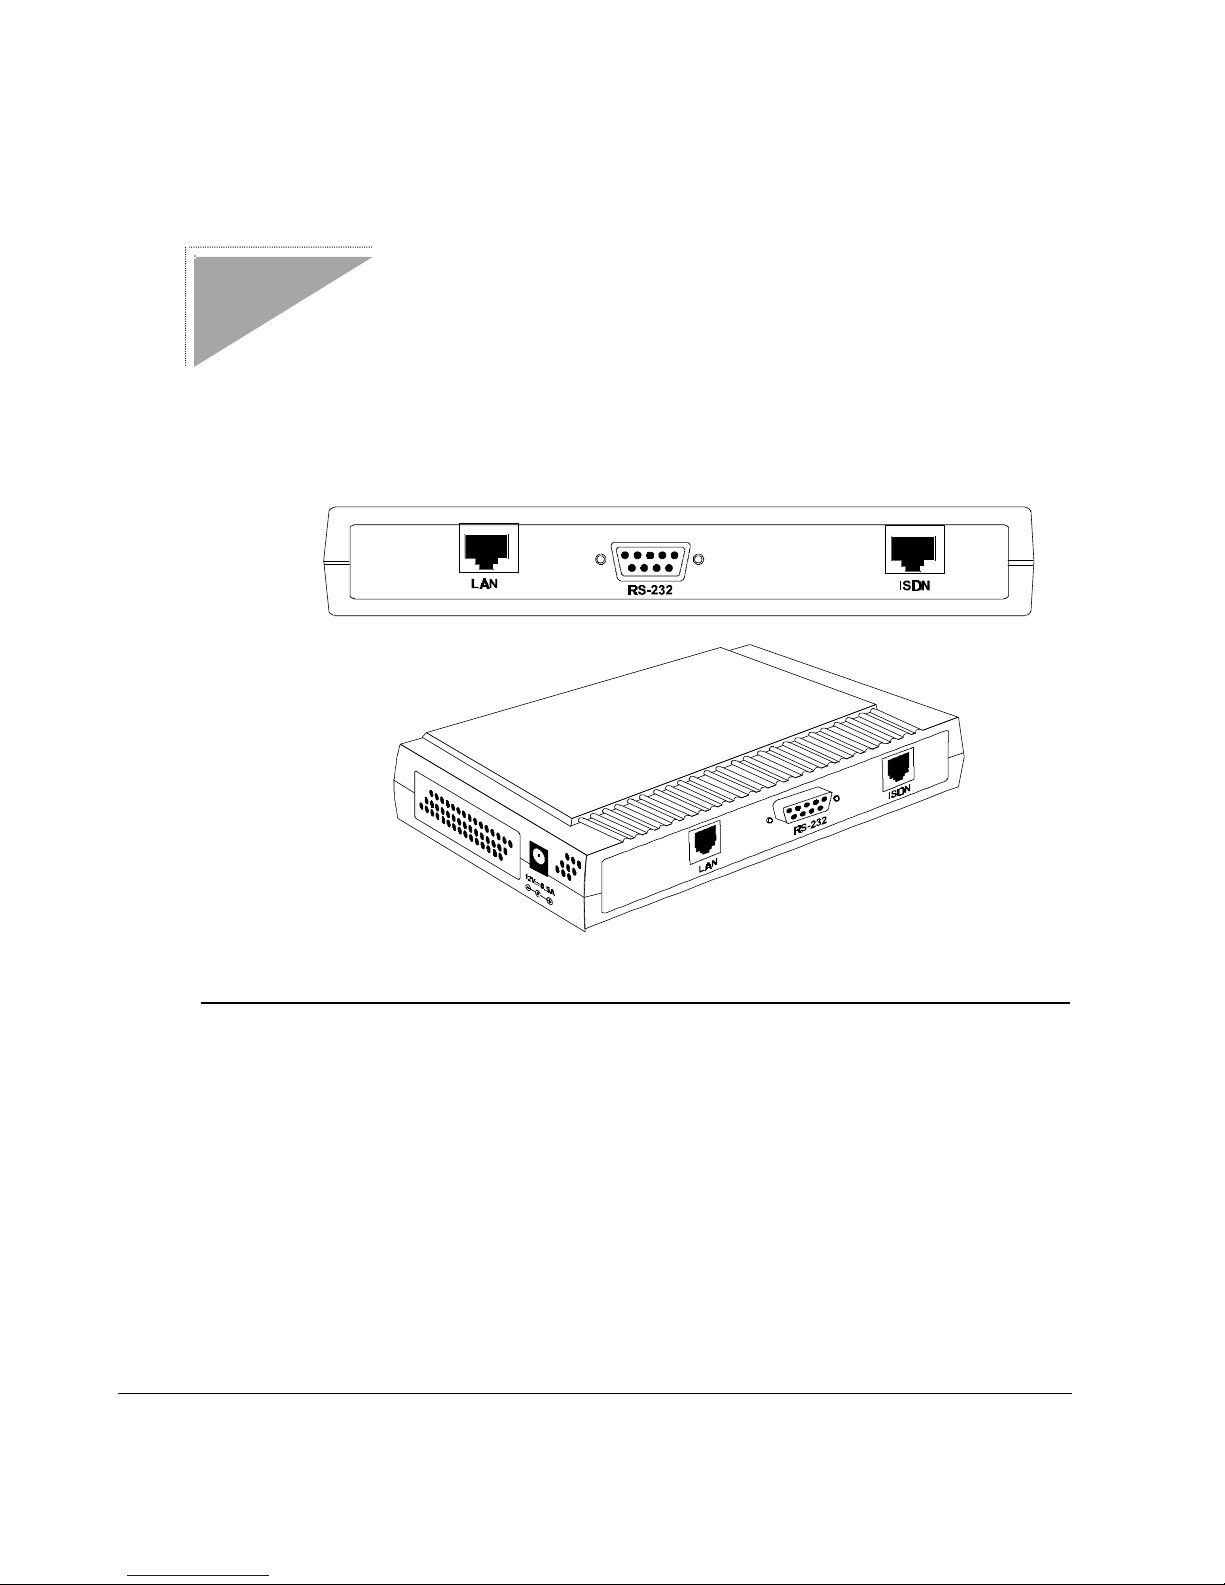
Installation
This chapter outlines how to connect your IRT-1001 or IRT-1002 to your
LAN and ISDN line. Refer to the diagram below to identify all of the
ports on your device when you make connections.
A Warning On Connection Cables
The RS-232, ISDN line, and Ethernet cable, are very similar to each
other. It is important that you use the correct cable for each connection;
otherwise, your router could be damaged.

PLANET ISDN Router
20
Connecting Your Computer and Your IRT-1001 or IRT1002
For the initial setup of your IRT-1001 or IRT-1002, you must use RS-232
and communications software.
After the router has been successfully installed, you can modify the
configuration through a remote Telnet connection. See the Telnet
Configuration and Capabilities chapter for detailed instructions on using
Telnet to configure your IRT-1001 or IRT-1002.
Connecting the RS-232 Cable to the Router
An RS-232 cable is included in your package. To connect this cable,
connect the 9-pin end of the cable to the DCE port on the router’ s back
panel. Connect the other end to the RS-232 cable connected to the
serial port (COM1, COM2, or any other COM port) of your computer.
Connecting an ISDN Line to the Router
Plug one end of your ISDN phone line into the socket on the rear panel
of the router labeled ISDN and the other end into the ISDN wall jack.
♦ S/T interface—This can only connect to your NT-1 (Network
Termination) device.
NOTE: Do not under any circumstances connect directly to the
ISDN wall jack.
♦ U interface—This allows you to connect directly to your ISDN
wall jack.

IRT-1000 series User's Guide
21
NOTE: The ISDN jack is for ISDN line connection only.
Connection of a phone line may result in damage to your
IRT-1000 product.
Connecting an Ethernet Cable to the Router
Your IRT-1001 or IRT-1002 is equipped with an RJ-45 jack for
connection to a 10BASE-T Ethernet or 100BASE-TX Fast Ethernet hub
or switch via a standard straight-through twisted-pair cable.
Connecting a Power Adapter to the Router
Plug a 12V DC, 500 mA power adapter into the jack on the router’ s side
panel labeled POWER
At this point, you should have connected the RS-232 cable, the ISDN
phone line, the Ethernet cable, and the power supply. You can now
power up your IRT-1001 or IRT-1002.
The Your IRT-1001 or IRT-1002’ s Front Panel
Names and descriptions of your router’ s front panel LEDs are given
below:
POWER—Comes on as soon as you connect the router to the power
supply.
STATUS—Should be blinking if the router is functioning properly.

PLANET ISDN Router
22
ISDN: LINK—Indicates that the router has an ISDN line connected to
the WAN interface and it has been successfully initialized.
ISDN: B1 and B2—On if there is an active WAN session on that
channel or if that channel is making or receiving a call.
LAN: 10/100—When you connect a network cable to the Your IRT-1001
or IRT-1002, the router will automatically detect the network speed. The
10/100 LED will light up if the LAN is operating at 100 Mbps.
LAN: Link/Act—When the LAN connection is ready but idle, the
Link/Act LED will shine steadily. When data are being transmitted or
received, this LED will blink off and on.
LAN: FDX/COL—The FDX/COL LED will shine green when the LAN
connection uses full-duplex signaling. It will flash yellow when the router
and another device on the LAN transmit at the same time. Occasional
collisions are normal. If collisions are too frequent, the LAN must be
reconfigured to reduce traffic loads.
Powering Up Your IRT-1001 or IRT-1002
When you power up your IRT-1001 or IRT-1002, the router will perform
several internal tests and do an ISDN line initialization. After ISDN line
initialization, the router will ask you to press ENTER to continue.
When you press ENTER, the router will display a login screen and ask
you to enter the password, as shown below:
 Loading...