

Page 1
www.planet.com.tw
Internet Telephony PBX
System
IPX-600
Copyright © PLANET Technology Corporation. All rights reserved.
Page 2

This installation guide introduces several practical
configuration examples of IP PBX deployment.
The configuration of IP PBX is very flexible and trunks are
scalable enough to support various network architectures.
Users could refer to these examples and build a larger
network involving multiple sites and advanced services.
www.planet.com.tw
Page 3
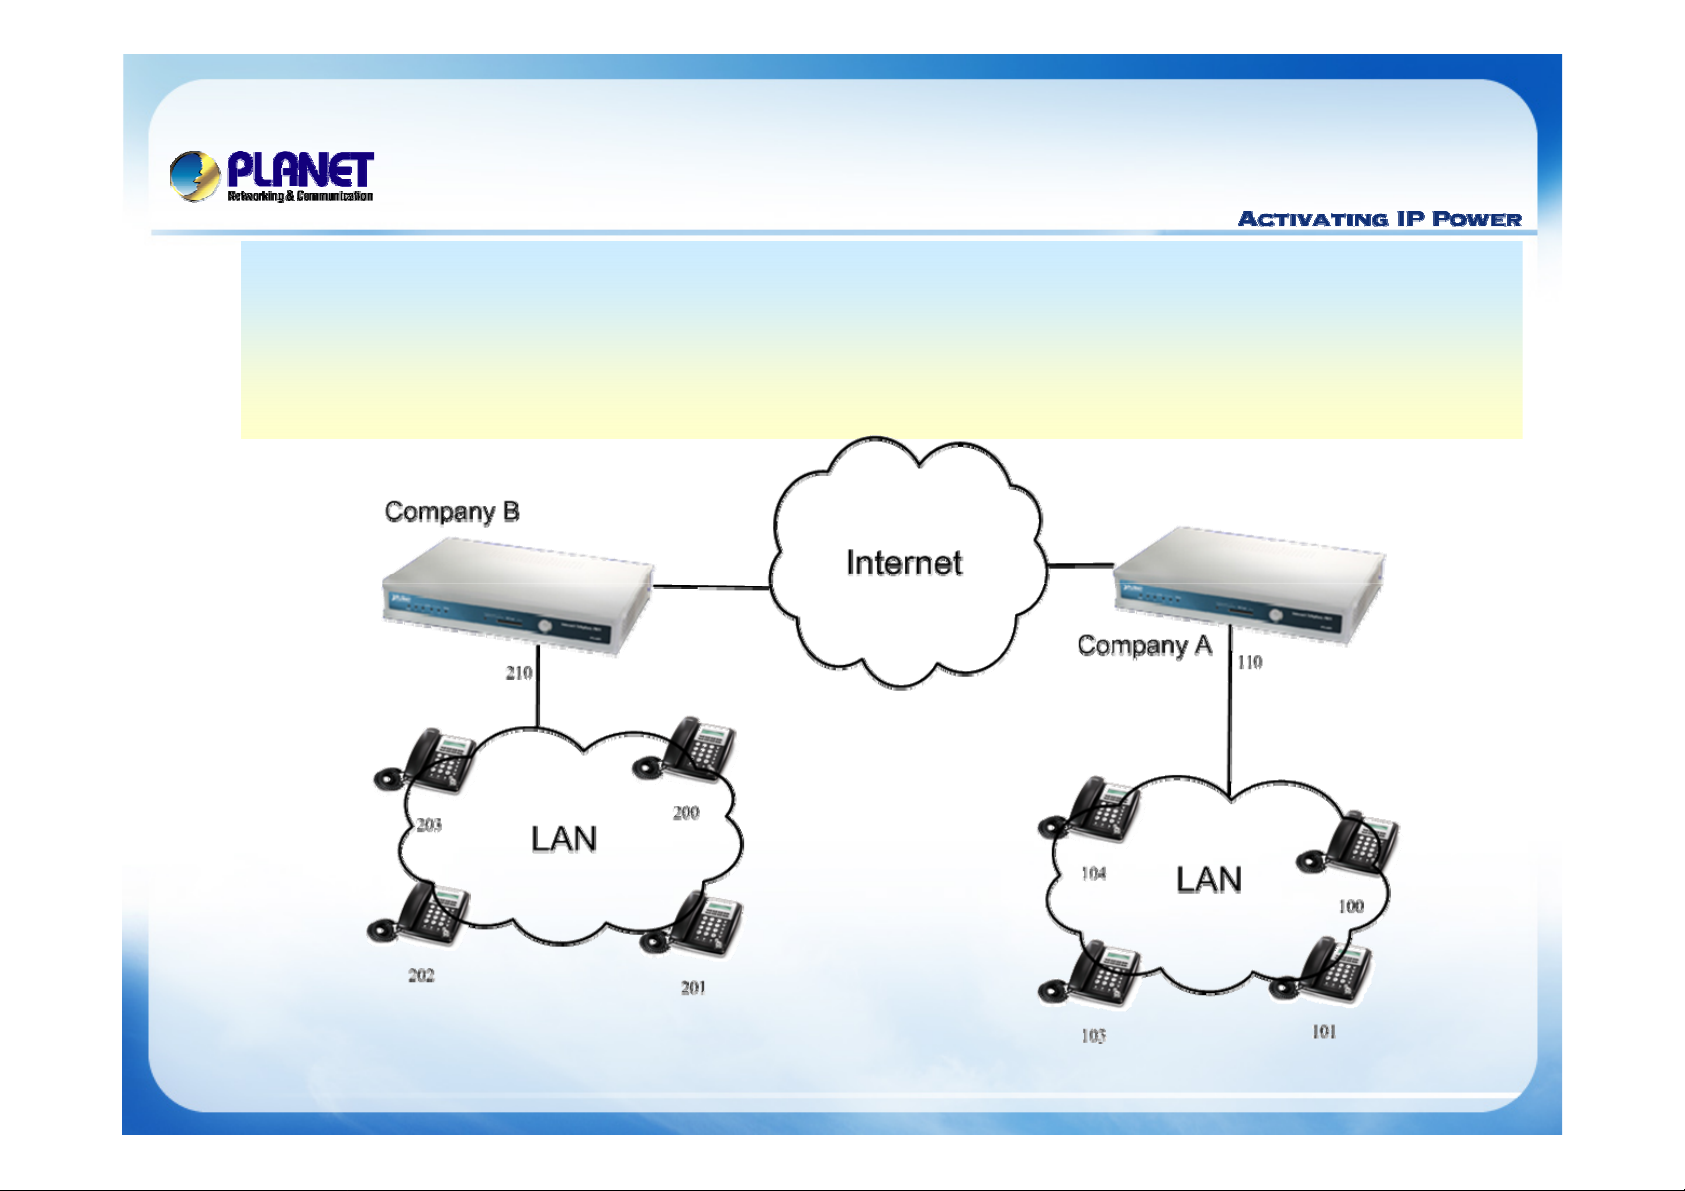
Case 1: Two--
Case 1: Two
Company B is the business partner of company A, These two
Company B is the business partner of company A, These two
Site Configuration
Site Configuration
companies decided to create a private SIP trunk to connect to ea
companies decided to create a private SIP trunk to connect to ea
other.
other.
ch
ch
www.planet.com.tw
3/ 15
Page 4

Case 1: Two--
Case 1: Two
z
This case describes the typical settings of a two--
z
This case describes the typical settings of a two
Site Configuration
Site Configuration
site configuration.
site configuration.
Accordingly,
Accordingly,
100 ~ 103 to reach company A.
100 ~ 103 to reach company A.
z
Via modify an route pattern with number of stripped digits equal
z
Via modify an route pattern with number of stripped digits equal
accordingly user A dialing 210
accordingly user A dialing 210
be stripped to be 200 when it actually got dialed out.
be stripped to be 200 when it actually got dialed out.
z
In both of the companies, all extensions can dial 210 or 110 to
z
In both of the companies, all extensions can dial 210 or 110 to
enter the auto attendant of the other IP PBX.
enter the auto attendant of the other IP PBX.
User A dials 200 ~ 203 to company B and User B dials
User A dials 200 ~ 203 to company B and User B dials
200
200
(The ext.
(The ext.
200
200
is in IP PBX B)
is in IP PBX B)
will
will
3,
3,
www.planet.com.tw
4/ 15
Page 5
Case 1: Two--
Case 1: Two
Site Configuration
Site Configuration
Click the [
Click the [
the IP PBX of company A, said IP PBX A and the IP PBX
the IP PBX of company A, said IP PBX A and the IP PBX
1
1
IPPBX A
2
2
Setup the WAN interface of
Setup the WAN interface of
the information of IP that provides by ISP
the information of IP that provides by ISP
of company B, said IP PBX B. If the IP PBXs not under
of company B, said IP PBX B. If the IP PBXs not under
the NAT, disable the STUN server.
the NAT, disable the STUN server.
IP PBX B
IP PBX B
Network Setup
Network Setup
follow
follow
] to set up the WAN interface for
] to set up the WAN interface for
Setup the WAN interface of
Setup the WAN interface of
follow the information of IP that
follow the information of IP that
provides by ISP
provides by ISP
IPPBX B
IP PBX A
IP PBX A
www.planet.com.tw
3
3
5/ 15
Page 6

Case 1: Two--
Case 1: Two
Site Configuration
Site Configuration
IPPBX A
4
4
Display Name:
Display Name:
number is for IP PBX B to dial
number is for IP PBX B to dial
to auto attendant)
to auto attendant)
Number:
Number:
Password:
Password:
GoTo
GoTo
210
210
210
210
VM after Ringing:3030
VM after Ringing:
Select the [
Select the [
proxy server account for the
proxy server account for the
210
210
(this
(this
IP PBX--
IP PBX
>Users Mgmt.
>Users Mgmt.
IP PBX A..
IP PBX A
] of
IP PBX A
] of
IP PBX A
to create
to create
IPPBX A
5
5
www.planet.com.tw
6/ 15
Page 7

Case 1: Two--
Case 1: Two
Site Configuration
Site Configuration
IPPBX A
Click the [
Click the [
configuration.
configuration.
www.planet.com.tw
6
6
Apply
Apply
] button to reload the IP PBX User Management
] button to reload the IP PBX User Management
7/ 15
Page 8

IPPBX A
7
7
Case 1: Two--
Case 1: Two
Add a Proxy Server registration
Add a Proxy Server registration
to registered PBX_B
to registered PBX_B
Site Configuration
Site Configuration
Name:
Name:
Number:
Number:
Password:
Password:
Proxy IP:
Proxy IP:
Proxy Port:
Proxy Port:
Select the [
Select the [
trunk which connect with IP PBX B.
trunk which connect with IP PBX B.
IP PBX--
IP PBX
>Proxy Server
>Proxy Server
PBX_B
PBX_B
110
110
123
123
210.66.155.72
210.66.155.72
5060
5060
] of
IP PBX A
] of
IP PBX A
9
9
to
create a SIP
to
create a SIP
IPPBX A
8
8
IPPBX A
www.planet.com.tw
Click the [
Click the [
Proxy Server configuration.
Proxy Server configuration.
Apply
Apply
] button to reload the IP PBX
] button to reload the IP PBX
8/ 15
Page 9

Case 1: Two--
Case 1: Two
Site Configuration
Site Configuration
IPPBX A
10
10
Select the
Select the
IP PBX--
[[IP PBX
PBX A
PBX A
trunk which connect
trunk which connect
with IP PBX B.
with IP PBX B.
Create a Call Route :
Create a Call Route :
Pattern :
Pattern :
is represent the unlimited length of wildcards.)
‘‘..’’is represent the unlimited length of wildcards.)
Drop Digits:
Drop Digits:
after going out the device when the dialed number matches patter
after going out the device when the dialed number matches patter
Route via:
Route via:
This Route is for user to dial 200 ~ 203 (or 210200 ~ 210203) th
This Route is for user to dial 200 ~ 203 (or 210200 ~ 210203) th
transferred to the ext no. that user dialed.
transferred to the ext no. that user dialed.
>Call Route
>Call Route
to
create a SIP
to
create a SIP
TO_PBX_B
TO_PBX_B
2xx (or 210.)
2xx (or 210.)
0 (or 3)
0 (or 3)
PBX_B
PBX_B
(The first few digit of the dialer number will be removed
(The first few digit of the dialer number will be removed
] of
IP
] of
IP
(The ‘‘xx’’
(The
IPPBX A
11
11
is used to represent the wildcard one digit and
is used to represent the wildcard one digit and
en the call be
en the call be
n.)
n.)
www.planet.com.tw
IPPBX A
12
12
Click the [
Click the [
Call Route configuration.
Call Route configuration.
Apply
Apply
] button to reload the IP PBX
] button to reload the IP PBX
9/ 15
Page 10

Case 1: Two--
Case 1: Two
Site Configuration
Site Configuration
Select the [
IPPBX B
13
13
Add User Account
Add User Account
Display Name:
Display Name:
number is for IP PBX A to dial
number is for IP PBX A to dial
to auto attendant)
to auto attendant)
Number:
Number:
110
110
Select the [
create proxy server account for the
create proxy server account for the
110
110
(this
(this
IP PBX--
IP PBX
>Users Mgmt.
>Users Mgmt.
] of
IP PBX A
] of
IP PBX A
IP PBX A..
IP PBX A
14
14
to
to
IPPBX B
Password:
Password:
GoTo
GoTo
www.planet.com.tw
VM after Ringing:3030
VM after Ringing:
110
110
10 / 15
Page 11

Case 1: Two--
Case 1: Two
Press Batch button add user
Press Batch button add user
accounts for IP phone
accounts for IP phone
First Number:
First Number:
Number of Users:44
Number of Users:
200
200
Site Configuration
Site Configuration
15
15
IPPBX B
Password:
Password:
Check Auto--
Check Auto
Check Call Group 1 or other
Check Call Group 1 or other
Check Pickup Group 1 or other
Check Pickup Group 1 or other
GoTo
GoTo
VM after Ringing:3030
VM after Ringing:
200
200
increase
increase
www.planet.com.tw
11 / 15
Page 12

Case 1: Two--
Case 1: Two
Site Configuration
Site Configuration
IPPBX B
16
16
Click the [
Click the [
www.planet.com.tw
Apply
Apply
] button to reload the IP PBX new account configuration.
] button to reload the IP PBX new account configuration.
12 / 15
Page 13

IPPBX B
Case 1: Two--
Case 1: Two
Add a Proxy Server registration
Add a Proxy Server registration
to registered PBX_A
to registered PBX_A
Site Configuration
Site Configuration
IPPBX B
Name:
Name:
Number:
Number:
Password:
Password:
Proxy IP:
Proxy IP:
Proxy Port:
Proxy Port:
17
17
Select the [
Select the [
create a SIP trunk which connect with IP PBX A.
create a SIP trunk which connect with IP PBX A.
IP PBX--
IP PBX
>Proxy Server
>Proxy Server
PBX_A
PBX_A
19
19
210
210
123
123
210.66.155.71
210.66.155.71
5060
5060
] of
IP PBX B
] of
IP PBX B
to
to
IPPBX B
18
18
www.planet.com.tw
Click the [
Click the [
Proxy Server configuration.
Proxy Server configuration.
Apply
Apply
] button to reload the IP PBX
] button to reload the IP PBX
13 / 15
Page 14

IPPBX B
Case 1: Two--
Case 1: Two
Select the
Select the
IP PBX--
[[IP PBX
>Call Route
>Call Route
Site Configuration
Site Configuration
] of
] of
IP
IP
IPPBX B
20
20
PBX BBtoto
PBX
trunk which connect
trunk which connect
with IP PBX A.
with IP PBX A.
Create a Call Route :
Create a Call Route :
Pattern :
Pattern :
is represent the unlimited length of wildcards.)
is represent the unlimited length of wildcards.)
Drop Digits:
Drop Digits:
after going out the device when the dialed number matches patter
after going out the device when the dialed number matches patter
Route via:
Route via:
This Route is for user to dial 100 ~ 103 (or 110100 ~ 110103) th
This Route is for user to dial 100 ~ 103 (or 110100 ~ 110103) th
transferred to the ext no. that user dialed.
transferred to the ext no. that user dialed.
create a SIP
create a SIP
TO_PBX_A
TO_PBX_A
1xx (or 110.)
1xx (or 110.)
0 (or 3)
0 (or 3)
PBX_B
PBX_B
(The first few digit of the dialer number will be removed
(The first few digit of the dialer number will be removed
(The ‘‘xx’’
(The
22
22
21
21
is used to represent the wildcard one digit and ‘‘..’’
is used to represent the wildcard one digit and
en the call be
en the call be
IPPBX B
n.)
n.)
www.planet.com.tw
Click the [
Click the [
Call Route configuration.
Call Route configuration.
Apply
Apply
] button to reload the IP PBX
] button to reload the IP PBX
14 / 15
Page 15

www.planet.com.tw
 Loading...