

Planet IPX-1800 User Manual

PLANET IPX-1800 user’s manual
Internet Telephony PBX System
IPX-1800
User’s Manual
1 of 49

PLANET IPX-1800 user’s manual
FCC Notice
This equipment has been tested and found to comply with the limits for a Class A digital device, pursuant
to Part 15 of FCC Rules. These limits are designed to provide reasonable protection against harmful
interference when the equipment is operated in a commercial environment. This equipment generates,
uses, and can radiate radio frequency energy and, if not installed in accordance with the instruction
manual, may cause harmful interference to radio communication. Operation of this equipment in a
residential area is likely to cause harmful interference in which case the user will be required to correct
the interference at the user’s own expense.
Disclaimer
PLANET Technology does not warrant that the hardware will work properly in all environments and
applications, and makes no warranty and representation, either implied or expressed, with respect to the
quality, performance, merchantability, or fitness for a particular purpose.
PLANET has made every effort to ensure that this User’s Manual is accurate; PLANET disclaims liability
for any inaccuracies or omissions that may have occurred.
Information in this User’s Manual is subject to change without notice and does not represent a
commitment on the part of PLANET. PLANET assumes no responsibility for any inaccuracies that may be
contained in this User’s Manual. PLANET makes no commitment to update or keep current the
information in this User’s Manual, and reserves the right to make improvements to this User’s Manual
and/or to the products described in this User’s Manual, at any time without notice. If you find information
in this manual that is incorrect, misleading, or incomplete, we would appreciate your comments and
suggestions.
CE Declaration of conformity
This equipment complies with the requirements relating to electromagnetic compatibility, EN 55022 class
A for ITE and EN 50082-1. This meets the essential protection requirements of the European Council
Directive 89/336/EEC on the approximation of the laws of the Member States relating to electromagnetic
compatibility.
Trademarks
All brand, company and product names are trademarks or registered trademarks of their respective
companies.
WEEE Warning
To avoid the potential effects on the environment and human health as a result of the p
of hazardous substances in electrical and electronic equipment, end users of electrical a
electronic equipment should understand the meaning of the crossed-out wheeled bin sy
Do not dispose of WEEE as unsorted municipal waste and have to collect such WEEE
separately.
resence
nd
mbol.
Revision
PLAENT IPX-1800 User’s Manual
Revision: 1 (Jan. 2006)
Part No. EM-IPX1800V1
2 of 49

PLANET IPX-1800 user’s manual
TABLE OF CONTENTS
INTRODUCTION..............................................................................................................................................5
1
1.1 OVERVIEW ..................................................................................................................................................5
1.2 INSTALLATION.............................................................................................................................................6
2 SYSTEM CONFIGURATION .........................................................................................................................8
2.1 TIME SETUP .................................................................................................................................................8
2.1.1 Time Zone Setup ....................................................................................................................................8
2.1.2 Date Setup..............................................................................................................................................8
2.2 WAN SETUP................................................................................................................................................9
2.2.1 Static......................................................................................................................................................9
2.2.2 DHCP ....................................................................................................................................................9
2.2.3 PPPoE ...................................................................................................................................................9
2.2.4 Lan only.................................................................................................................................................9
2.3 LAN SETUP ...............................................................................................................................................10
2.4 LAN ROUTING ..........................................................................................................................................10
2.5 DYNDNS SETUP........................................................................................................................................11
2.5.1 Enable DynDNS...................................................................................................................................11
2.5.2 Disable DynDNS..................................................................................................................................11
2.6 QOS SETUP................................................................................................................................................11
2.6.1 Enable QoS..........................................................................................................................................11
2.6.2 Disable QoS.........................................................................................................................................12
2.7 VIRTUAL SERVER ......................................................................................................................................12
2.8 MAINTENANCE..........................................................................................................................................12
2.8.1 SIP registration status .........................................................................................................................12
2.8.2 Call Detail Record...............................................................................................................................12
2.8.3 System event log...................................................................................................................................13
2.8.4 System storage usage...........................................................................................................................13
2.8.5 System storage backup.........................................................................................................................13
2.9 FIRMWARE UPGRADE.................................................................................................................................13
2.10 LOGOUT ....................................................................................................................................................13
2.11 SHUTDOWN ...............................................................................................................................................13
3 SERVICE CONFIGURATION ......................................................................................................................14
3.1 NTP SERVICE ............................................................................................................................................14
3.1.1 Enable NTP service .............................................................................................................................14
3.1.2 Disable NTP service............................................................................................................................14
3.2 SNMP SERVICE .........................................................................................................................................14
3.2.1 Enable SNMP service ..........................................................................................................................14
3.2.2 Disable SNMP service.........................................................................................................................14
3.3 STUN SERVICE..........................................................................................................................................15
3.3.1 Enable STUN service...........................................................................................................................15
3.3.2 Disable STUN service..........................................................................................................................15
3.4 TFTP SERVICE...........................................................................................................................................15
3.4.1 Enable TFTP service ...........................................................................................................................15
3.4.2 Disable TFTP service ..........................................................................................................................16
3.5 DHCP SERVICE .........................................................................................................................................17
3.5.1 Enable DHCP service..........................................................................................................................17
3.5.2 Disable DHCP service.........................................................................................................................18
3.6 IP PBX SERVICE........................................................................................................................................18
3.6.1 IP PBX global parameters...................................................................................................................18
3.6.2 Reload IP PBX configuration ..............................................................................................................19
3.6.3 Backup IP PBX configuration..............................................................................................................19
3.6.4 Restore IP PBX configuration .............................................................................................................19
3.6.5 Restart IP PBX service ........................................................................................................................19
3.6.6 Revert IP PBX configuration...............................................................................................................19
3 of 49

PLANET IPX-1800 user’s manual
IP PBX CONFIGURATION....................................................................................................................................20
3.7 USERGROUP CONFIGURATION ...................................................................................................................20
3.7.1 Add Usergroup.....................................................................................................................................20
3.7.2 Edit Usergroup ....................................................................................................................................21
3.7.3 Delete Usergroup.................................................................................................................................21
3.8 USER CONFIGURATION..............................................................................................................................22
3.8.1 Add User..............................................................................................................................................22
3.8.2 Edit User..............................................................................................................................................22
3.8.3 Delete User..........................................................................................................................................22
3.9 DEVICE CONFIGURATION ..........................................................................................................................23
3.9.1 IP Phone..............................................................................................................................................24
4.3.1.1 Add Device................................................................................................................................................ 24
4.3.1.2 Edit Device................................................................................................................................................24
4.3.1.3 Delete Device.............................................................................................................................................24
3.9.2 Analog Phone.......................................................................................................................................27
3.10 ROUTE CONFIGURATION ...........................................................................................................................28
3.10.1 Add Route........................................................................................................................................29
3.10.2 Edit Route........................................................................................................................................29
3.10.3 Delete Route....................................................................................................................................29
3.11 ROUTEGROUP CONFIGURATION.................................................................................................................30
3.11.1 Add Routegroup..............................................................................................................................30
3.11.2 Edit Routegroup..............................................................................................................................30
3.11.3 Delete Routegroup ..........................................................................................................................30
3.12 SIP TRUNK CONFIGURATION.....................................................................................................................31
3.12.1 Add SIP Tr unk.................................................................................................................................32
3.12.2 Edit SIP Trunk.................................................................................................................................32
3.12.3 Delete SIP Trunk.............................................................................................................................32
3.13 PSTN TRUNK CONFIGURATION.................................................................................................................34
3.13.1 Add PSTN Trunk.............................................................................................................................34
3.13.2 Edit PSTN Trunk.............................................................................................................................34
3.13.3 Delete PSTN Trunk .........................................................................................................................34
3.14 TRUNK TERMINAL.....................................................................................................................................36
3.14.1 Add Trunk Terminal........................................................................................................................36
3.14.2 Edit Trunk Terminal........................................................................................................................36
3.14.3 Delete Trunk Terminal....................................................................................................................36
3.15 POTS SETUP..............................................................................................................................................37
3.16 FEATURE CONFIGURATION........................................................................................................................38
3.16.1 Auto attendant.................................................................................................................................38
3.16.2 Call park.........................................................................................................................................39
3.16.3 Life line...........................................................................................................................................39
3.16.4 Meet-me conference........................................................................................................................40
3.16.5 Music on hold..................................................................................................................................41
3.16.6 Voicemail........................................................................................................................................43
3.16.7 Auto-attendant prompts...................................................................................................................44
3.16.8 Meet-me prompts.............................................................................................................................44
3.16.9 Voicemail prompts..........................................................................................................................45
4 EXAMPLE PROVISIONING......................................................................................................................... 46
4.1 INTERNAL EXTENSION CONFIGURATION ...................................................................................................46
4.2 CASE I: SINGLE-SITE CONFIGURATION......................................................................................................46
4.3 CASE II: TWO-SITE CONFIGURATION ........................................................................................................47
4 of 49

PLANET IPX-1800 user’s manual
1 Introduction
1.1 Overview
The IP PBX Administration Guide provides instructions for administering the IP PBX system. IP
PBX is an embedded call-processing server communicating with client stations with Session
Initiation Protocol (SIP). It migrates the telephony network and the data network of a small-tomedium business (SMB) company into a manageable converged network. IP PBX works with
various IP phones (desktop, WiFi, Bluetooth, and DECT), voice-over-IP (VoIP) gateways, and
analog telephone adapters to route calls among client phones, analog phones, and PSTN network.
Additional voice features such as conferencing, auto attendant, and voicemail are seamlessly
enabled to all phones. IP PBX also provides Internet access to all LAN devices through Network
Address Translation (NAT).
IP PBX provides call control and media relay services to SIP clients and applications. It performs
the following primary functions:
• SIP Registrar
• SIP Outbound Proxy with media relay
• SIP Gateway (FXO)
• SIP PBX for extension calls
• Auto attendant IVR
• Voice mail IVR
• Meet-me conference
IP PBX has a built-in suite of voice applications for supplementary services and therefore no
special-purpose hardware is required. This means the total cost of ownership of a converged
network enabled by IP PBX is lower than building separated infrastructures for legacy telephony
network and data network. Besides, it comes with a web-browsable interface to the data network
configuration and voice service provisioning, which brings the manageability of both networks
together to facilitate administration locally or remotely.
The IPX-1800 family includes two models for phone ports, part number with 03 for three FXO
(Foreigh eXchange Office) interface and the rest will be four-port model. In the following the
term “IPX-1800"will means the model of the family, “IP PBX” for PLANET IP PBX family
products, IPX-2000, IPX-1800.
5 of 49
PLANET IPX-1800 user’s manual
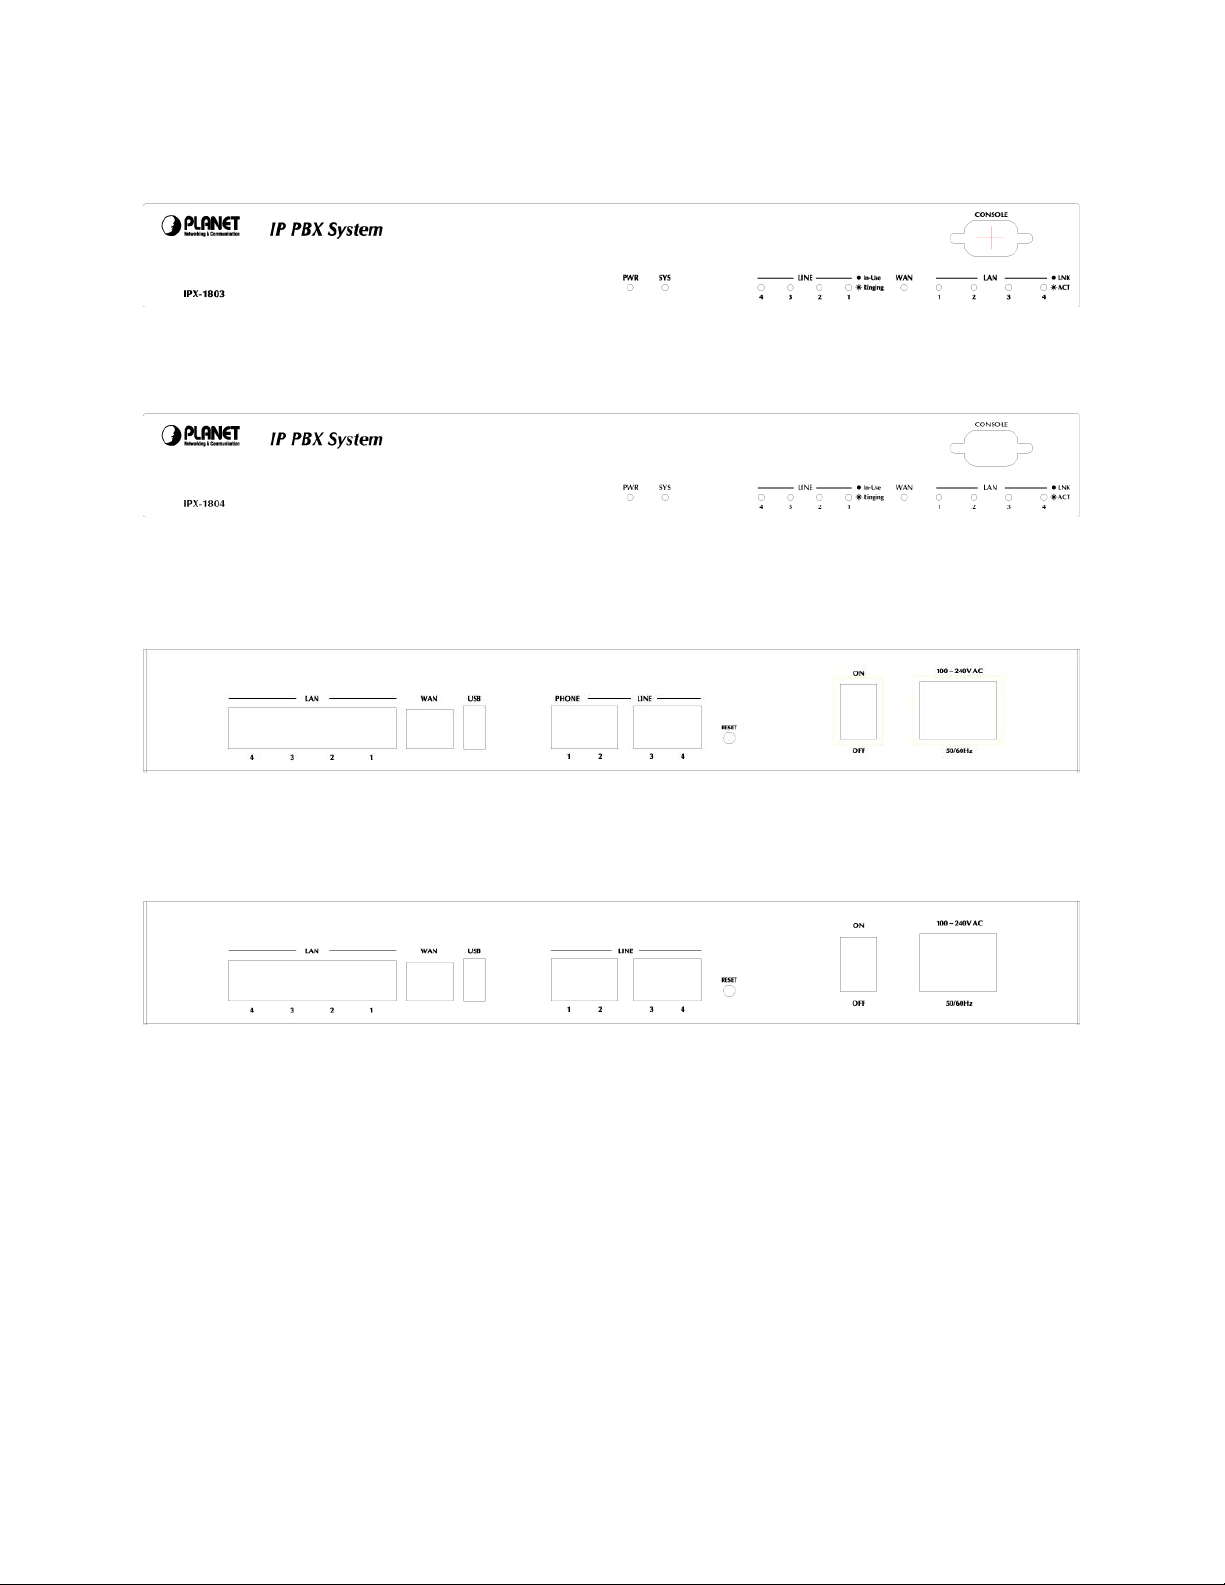
1.2 Panel of IPX-1800
IPX-1803 Front Panel
IPX-1804 Front Panel
IPX-1803 Rear Panel
IPX-1804 Rear Panel
6 of 49

PLANET IPX-1800 user’s manual
r
t
1.3 Installation
3. FXS port (lifeline)
5. WAN 6. LAN
Installation descriptions of IPX-1803
1. AC Power 110/220 Volt, 60 Hz
2. FXO ports 2~4 Connected directly to the PSTN analog line/CO line.
3. FXS port Connected Telephone to PBX for voice communication
4. USB por
2. FXO port 2~4
1. AC Powe
4. USB ports 1 external port with compliance to USB 1.1/2.0. Plug in a
USB hard drive for CDR/voicemail backup from the internal
storage.
5. WAN Connect to a broadband modem or a WAN router.
6. LAN Connect to a LAN switch.
7 of 49
PLANET IPX-1800 user’s manual
2 System Configuration
This section describes how to configure system parameters used by IP PBX. The factory default
of LAN IP address is 192.168.1.1. Connect to LAN port and the configuration Web interface
could be reached at
a certificate. Please accept it. Then, give default administrator ID and password (both are admin)
to log in for administration. The administrator password could be changed in the User
Management page under user ID admin.
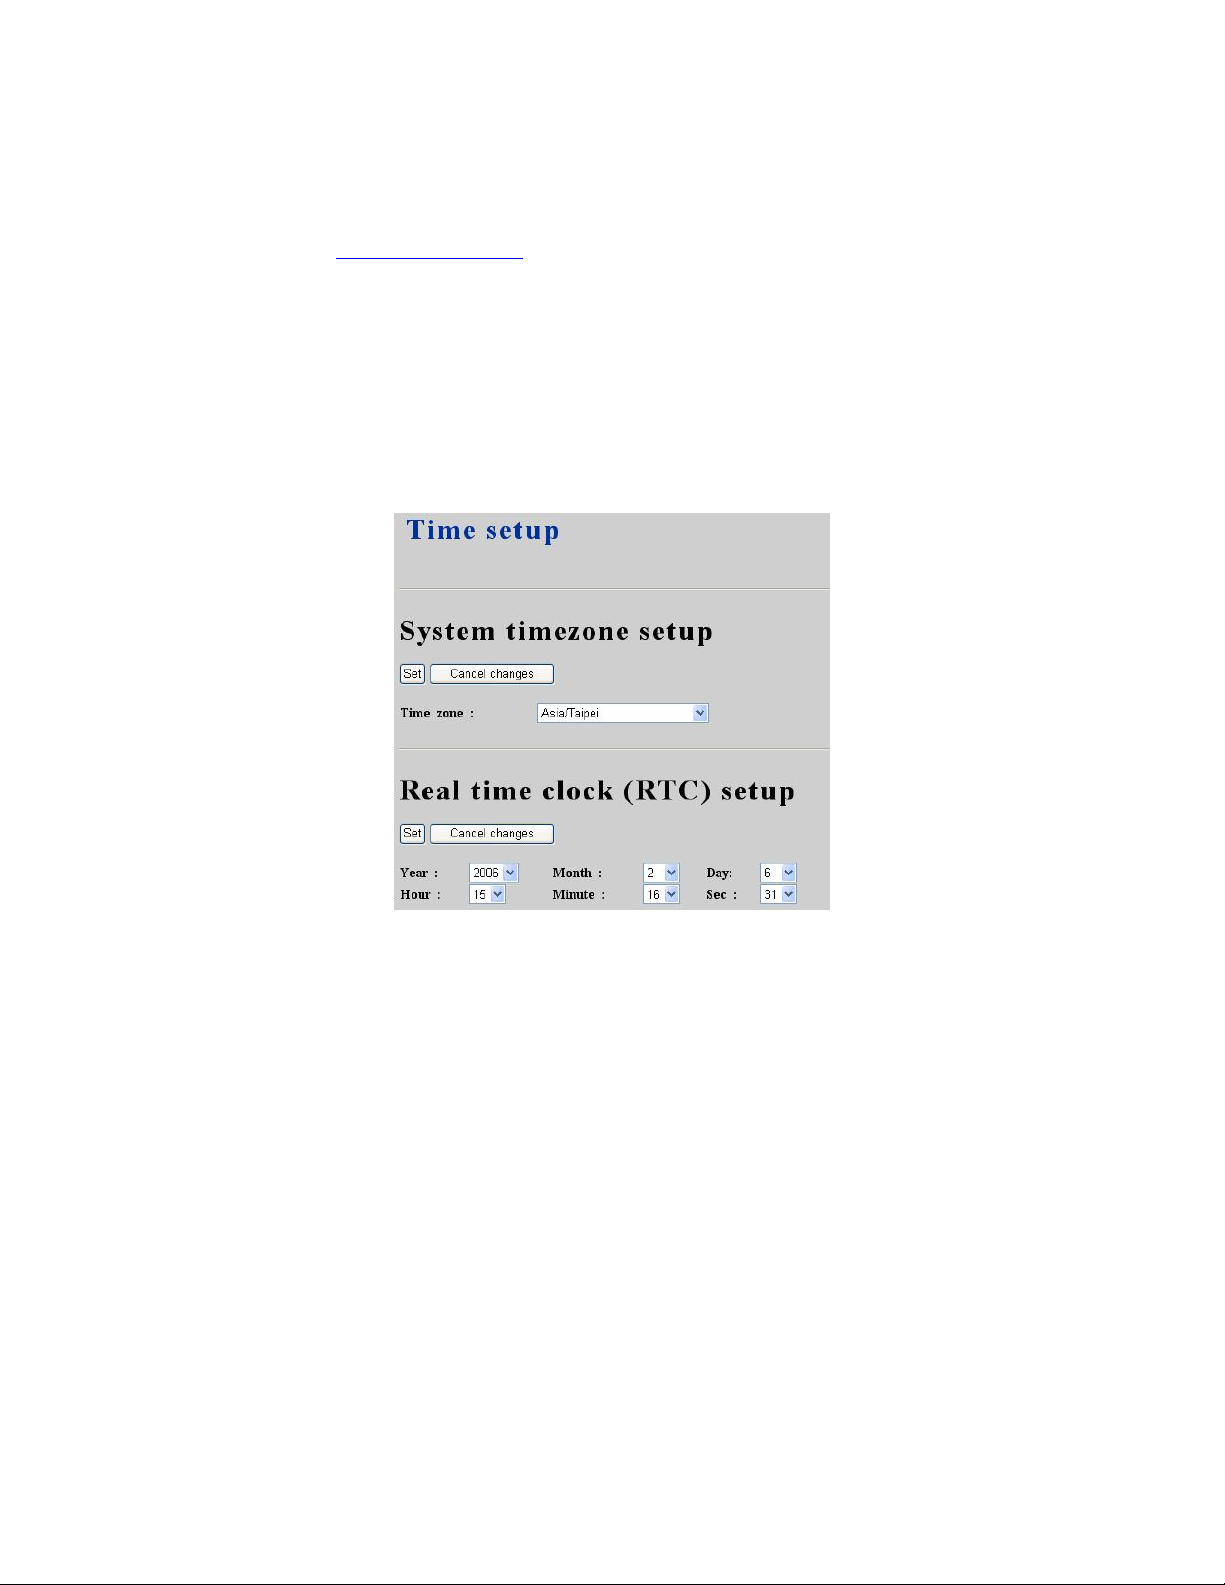
2.1 Time setup
The Time Setup page allows administrator to configure time zone and date for IP PBX. Select
System -> Time setup, current setting of time zone and date is displayed.
https://192.168.1.1/. Once connected, the browser will warn about accepting
2.1.1 Time Zone Setup
Choose time zone in drop-down list, then click Set button.
2.1.2 Date Setup
Choose year, month, day, hour, minute, and sec in drop-down lists respectively, then click Set
button.
8 of 49
PLANET IPX-1800 user’s manual
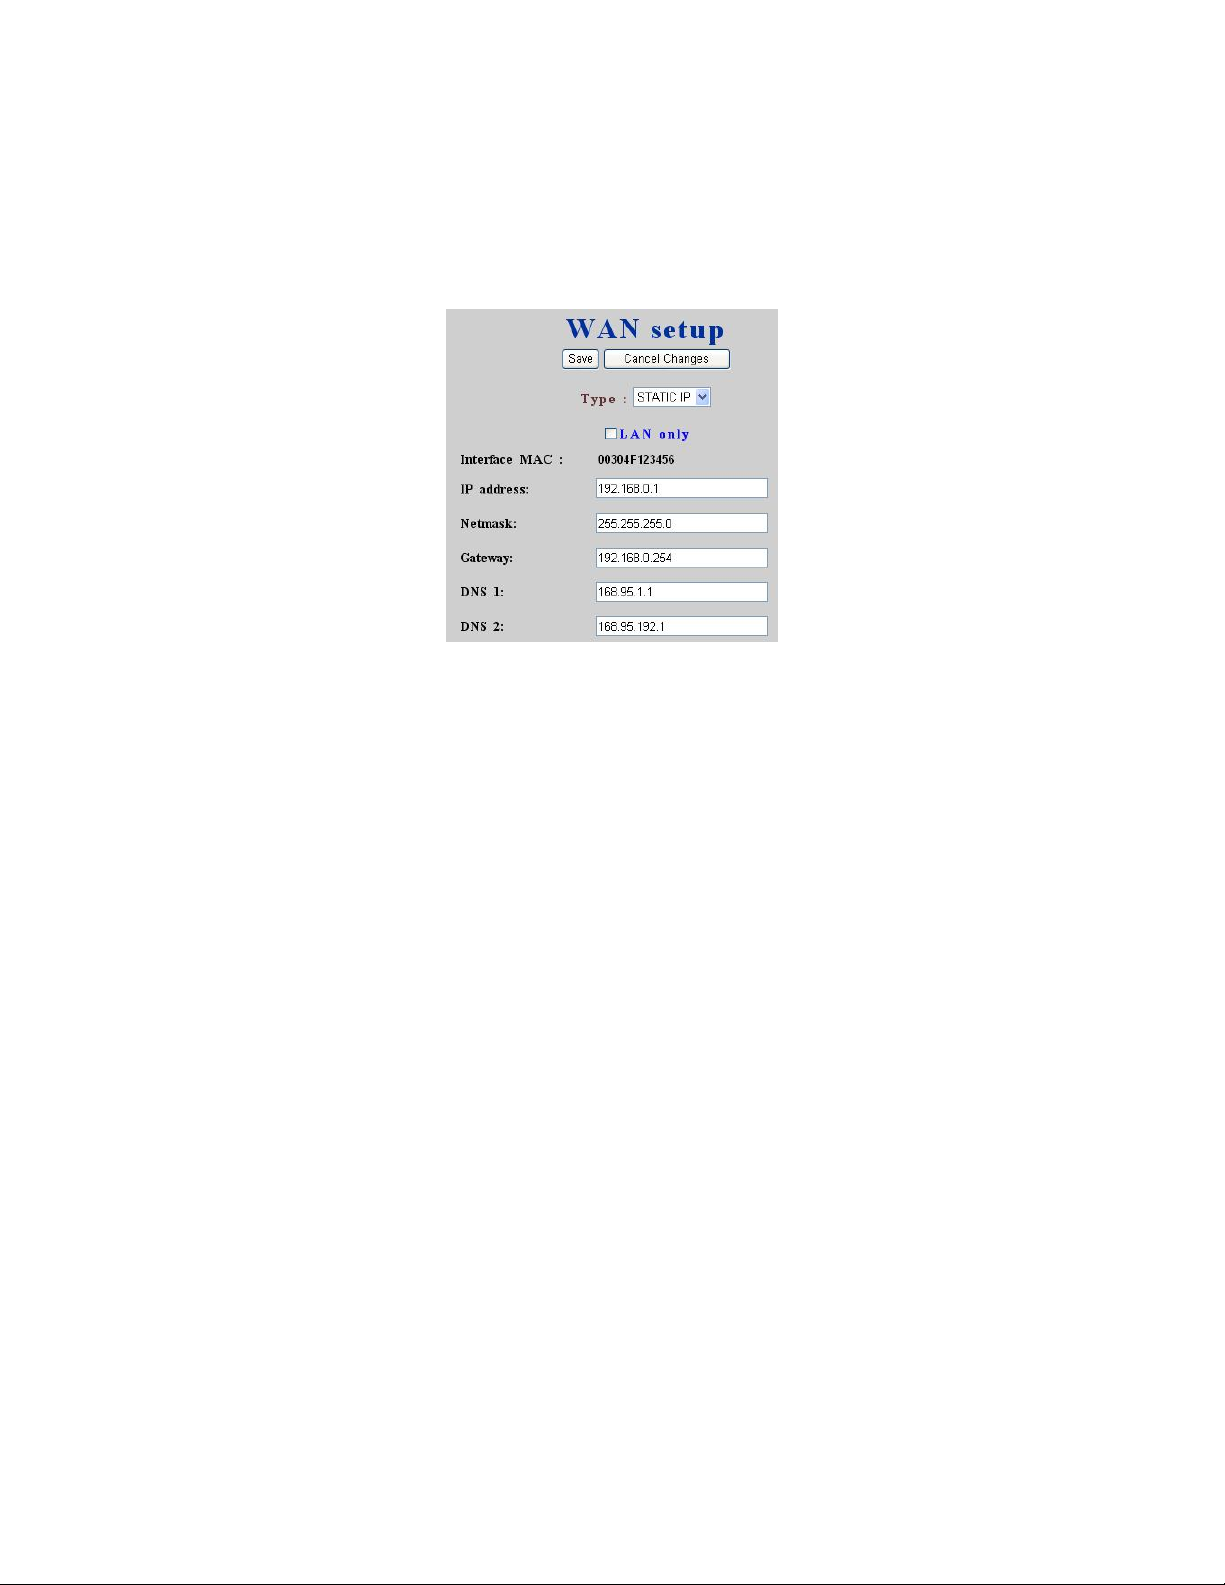
2.2 WAN setup
The WAN Setup page allows administrator to configure WAN network interface for IP PBX.
Select System -> WAN setup, current setting of WAN network interface is displayed, e.g. type,
IP address etc. Unless LAN only checkbox is checked, you can choose one of the three options
for your configuration, Static, DHCP, and PPPoE.
2.2.1 Static
You can choose Static IP in Type drop-down list, and manually configure the following
information:
• IP address
• Network mask
• Default gateway IP address
• Primary and secondary DNS servers
And, click Save button to submit.
2.2.2 DHCP
Simply choose DHCP in Type drop-down list, and then click Save button. The acquired IP
address, network mask, and default gateway information will be displayed when revisit this page
later.
2.2.3 PPPoE
Choose PPPoE in Type drop-down list, enter username and password, and then click Save
button. The PPPoE dialing will start right away. When there is an active connection, the page
will show the acquired IP address, network mask, and default gateway information. There will
also be a Disconnect button to disconnect connection when desired.
2.2.4 Lan only
Check Lan only to disable WAN IP setting but allow the configuration of default gateway and
primary/secondary DNS servers.
9 of 49

PLANET IPX-1800 user’s manual
2.3 LAN setup
The LAN Setup page allows administrator to configure LAN network interface for IP PBX.
Select System -> LAN setup, current settings of LAN network interface are displayed. You can
modify them by entering new IP address and network mask followed by clicking Save button.
Note that by default IP PBX grants IP addresses to LAN devices via DHCP and translates those
addresses into its WAN IP address for access beyond the LAN subnet. As a result, modifying the
system LAN IP subnet must also change DHCP pool and LAN Routing (if any) accordingly.
Besides, IP PBX service must be restarted.
2.4 LAN Routing
To enable static routing among LAN subnets, enter network info and the IP address of the
corresponding gateway in IP PBX’s LAN. It is important to assure that the given gateway IP
address sits in the IP PBX’s LAN. Each subnet requires an entry even multiple subnets share the
same gateway, unless masking does the same. Examples are adding IP Route IDs net1 and net2
with parameters 192.168.128.0/255.255.255.0, 192.168.129.0/255.255.255.0, shared gateway
192.168.1.254 respectively. Or, IP Route ID net1n2 with 192.168.128.0/255.255.254.0 and
gateway 192.168.1.254 would do the same. Added routes enable routing immediately after
clicking Save button, however, IP PBX service needs to be restarted to regard calls from
designated LAN subnets as LAN traffic.
10 of 49
PLANET IPX-1800 user’s manual
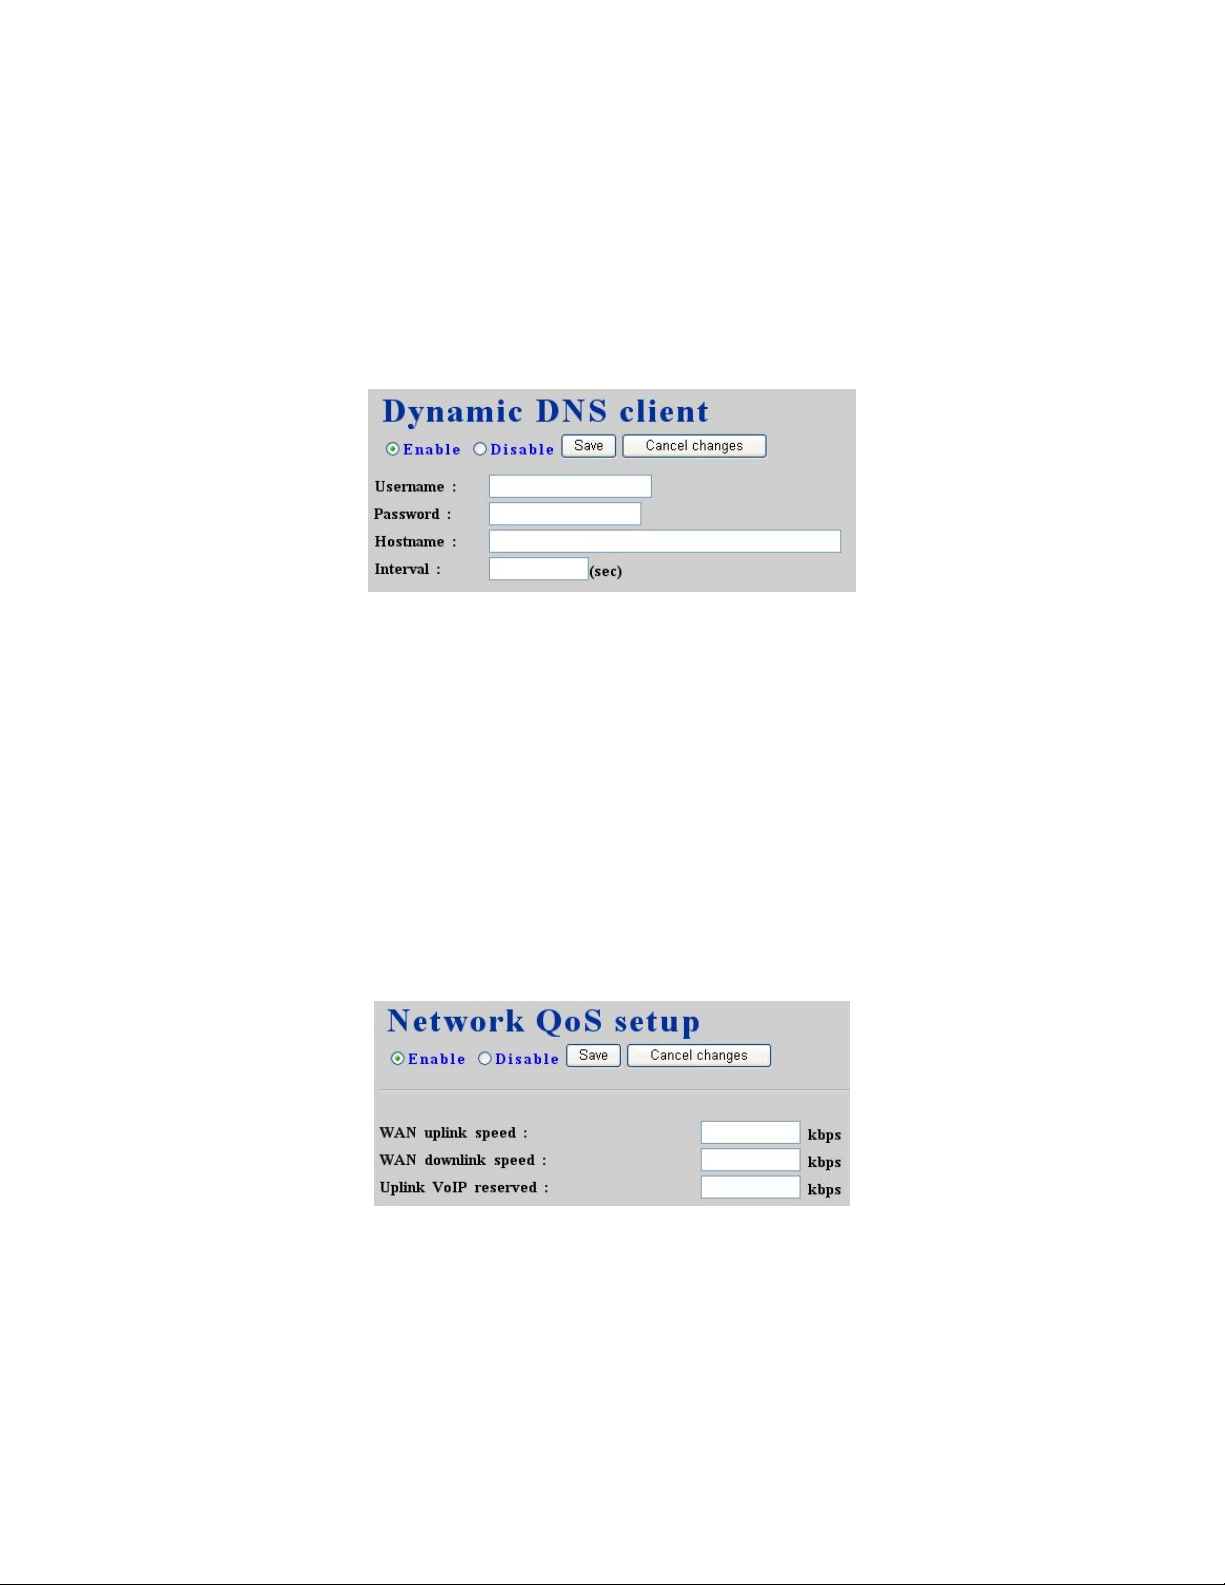
2.5 DynDNS setup
Dynamic WAN IP address causes difficulty for inbound connections from remote clients or IP
PBX systems. A popular work-around is to adopt domain names provided by DynDNS and run a
client on or behind the gateway router (or IP PBX). It is required to apply an account and create a
hostname in the account before configuration. Select Enable and give account info and refresh
interval to activate a DynDNS client. The client then uses Username and Password to access its
account and update the Hostname with the latest WAN IP address at DynDNS in Interval
seconds periodically.
2.5.1 Enable DynDNS
Select Enable radio button, enter the Username, Password, Hostname, and Interval, and then
click Save button. Typical hostname has a form of <hostname>.dyndns.org. The refresh interval
is usually between 60 – 600 seconds depending on the volatility of WAN IP assignment.
2.5.2 Disable DynDNS
Select Disable radio button, and then click Save button.
2.6 QoS setup
To assure the bandwidth reserved for the outgoing VoIP traffic over regular data traffic from
LAN, QoS Setup page offers three parameters to characterize the WAN link. By default QoS is
disabled since these parameters must be correctly given according to the actual WAN speed.
2.6.1 Enable QoS
Select Enable radio button, enter the WAN uplink speed, WAN downlink speed, and Uplink
VoIP reserved (bandwidth), and then click Save button. For a popular 2M/256K ADSL program,
the WAN uplink speed would be 256 and the WAN downlink speed would be 2048 since the
unit is in kbps. The Uplink VoIP reserved could be, say, 192 out of the total 256 kbps to allow 2
concurrent G.711 calls.
11 of 49
PLANET IPX-1800 user’s manual
2.6.2 Disable QoS
Select Disable radio button, and then click Save button.
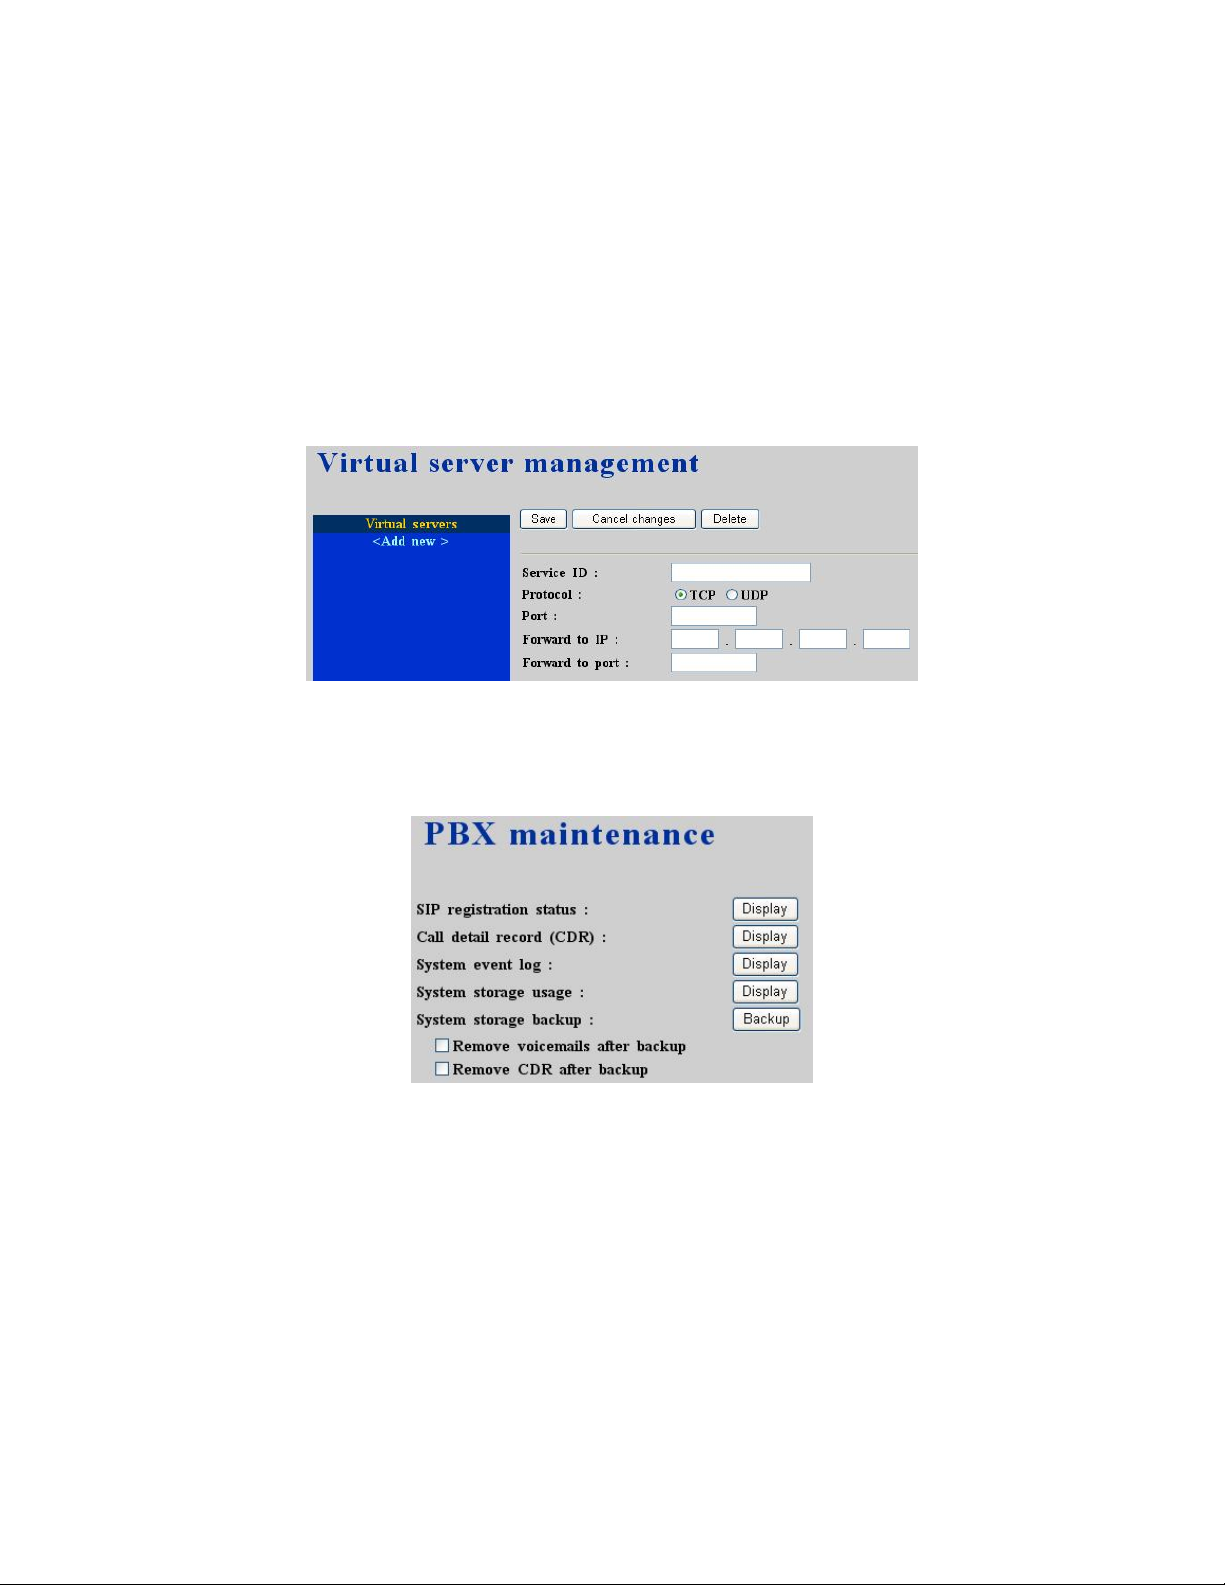
2.7 Virtual server
To enable access servers in LAN from a machine beyond WAN, select System -> Virtual
server to configure port mappings. Service ID names the service. Protocol and Port specify the
TCP/UDP port number on WAN IP to be forwarded to the Forward to port of Forward to IP
in LAN. Say 192.168.1.5 is a Mail Server to be seen from outside, one should configure TCP
port 25 to be forwarded to 192.168.1.5 port 25.
2.8 Maintenance
This page includes maintenance functions of IP PBX, from status display to storage backup, etc.
2.8.1 SIP registration status
This Display button lists registration status of each client and remote IP PBX and the IP/Port
from where they register. SIP trunk registrations, if any, are also shown in the end of the list.
Column Dynamic stands for whether the listed IP address is dynamic or specified. Reg.
Progress is the response code and message if registration has been attempted but not successful
so far. Slave Registrar column is used only under the stackable mode. It indicates with which
slave box a SIP client is registered. Blank means a client is registered with the master box.
2.8.2 Call Detail Record
CDR details each call record including calling and called numbers, channel (trunk if outbound)
in use, epochs when the call was made, answered, and ended, which yield the total and billable
durations. The last column denotes the disposition of a call like answered or not.
12 of 49
PLANET IPX-1800 user’s manual
2.8.3 System event log
Event log includes reported events from following system services: NTP, DNS, DHCP, and
PPPoE.
2.8.4 System storage usage
This displays the size and utilization percentage of the internal main system storage.
2.8.5 System storage backup
To back up internal main storage, click the Backup button and follow instructions to insert the
USB connector of an external USB drive. Options include whether to keep or remove CDR
and/or voicemails after backup. After a confirmation of the insertion, back starts a few seconds
later if the external USB drive is accessible and found enough available space. On a successful
backup, the name of the new folder created on the external drive will be displayed. Either the
backup is successful or failed, a user must remove the USB connector of the external drive.
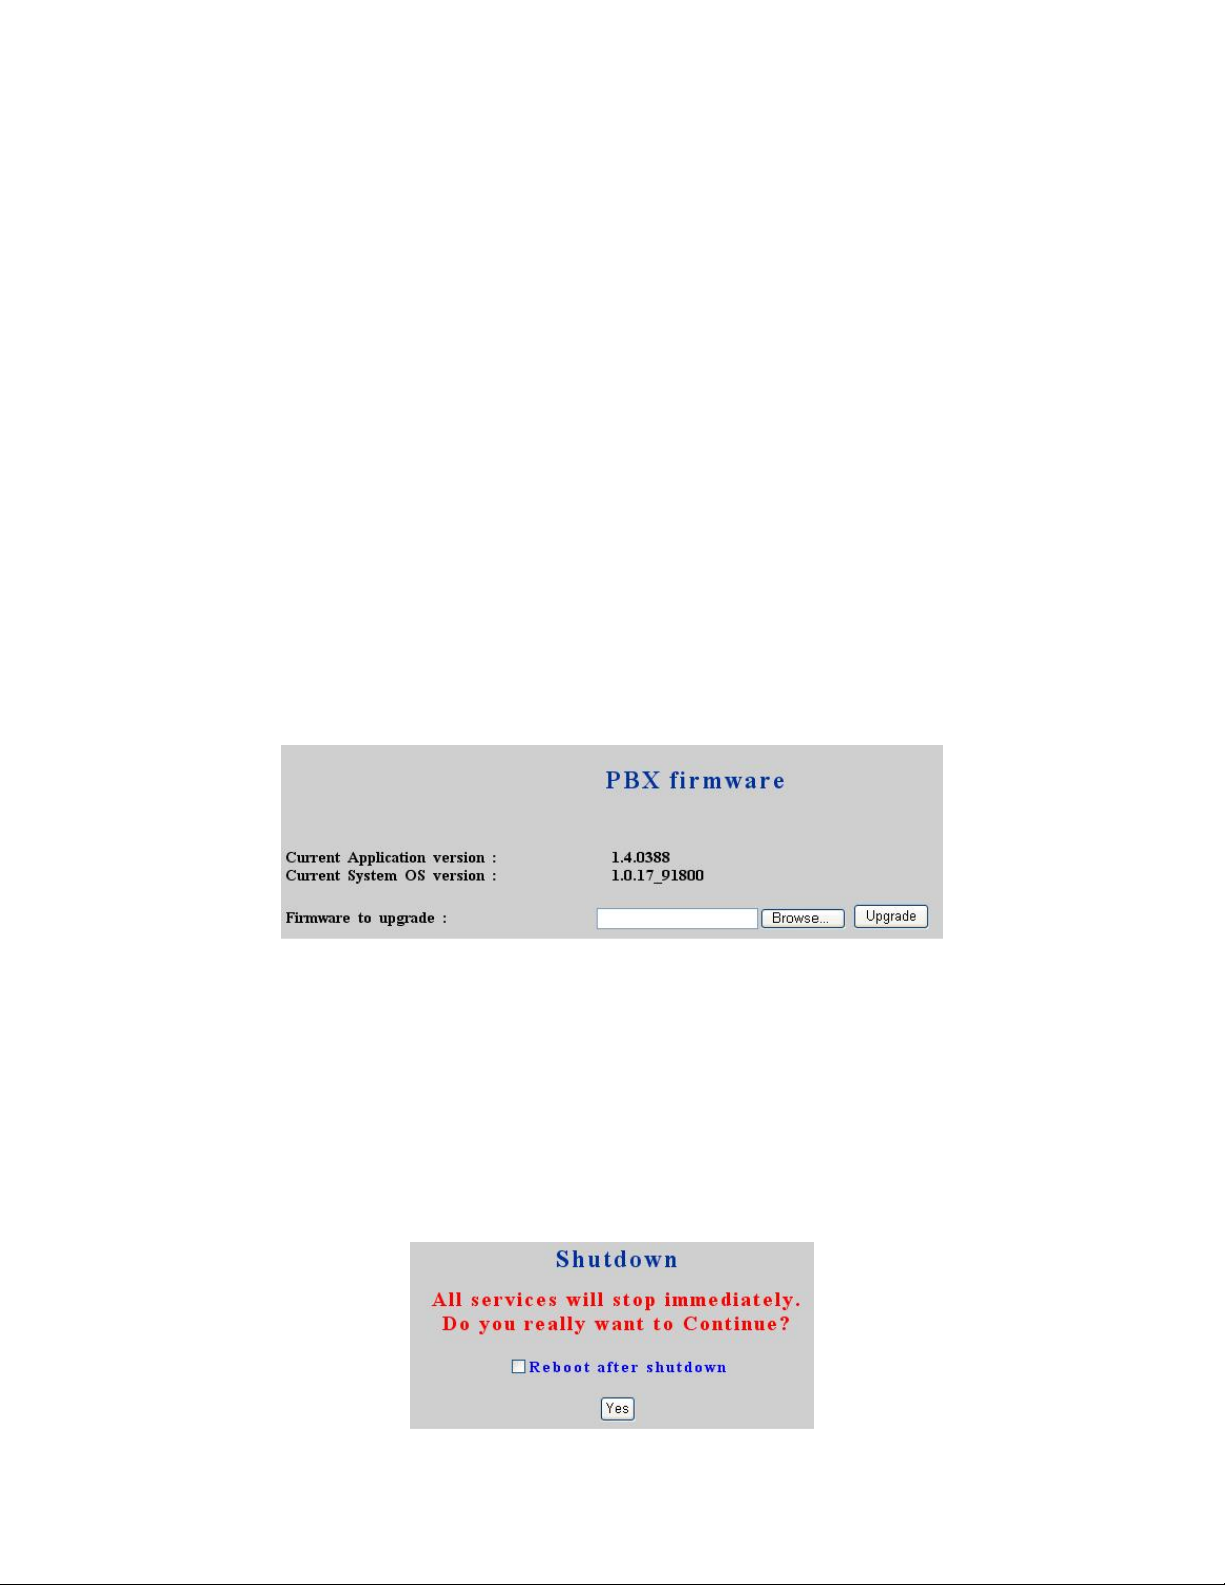
2.9 Firmware upgrade
The version of the running PBX firmware could be found in System -> PBX firmware. To
upgrade current firmware, locate a release file obtained from the vendor, and click Upgrade.
Note that the filename of firmware should not be changed, otherwise system will refuse to
upgrade with it.
2.10 Logout
Log out administrator and close browser windows.
2.11 Shutdown
By selecting System -> Shutdown, you can shutdown or reboot the machine after clicking the
Yes button in this page. In case such software reboot fails, press and release the hardware reset
button quickly will do the same.
13 of 49
PLANET IPX-1800 user’s manual
3 Service Configuration
This section describes details to configure various services built in the IP PBX.
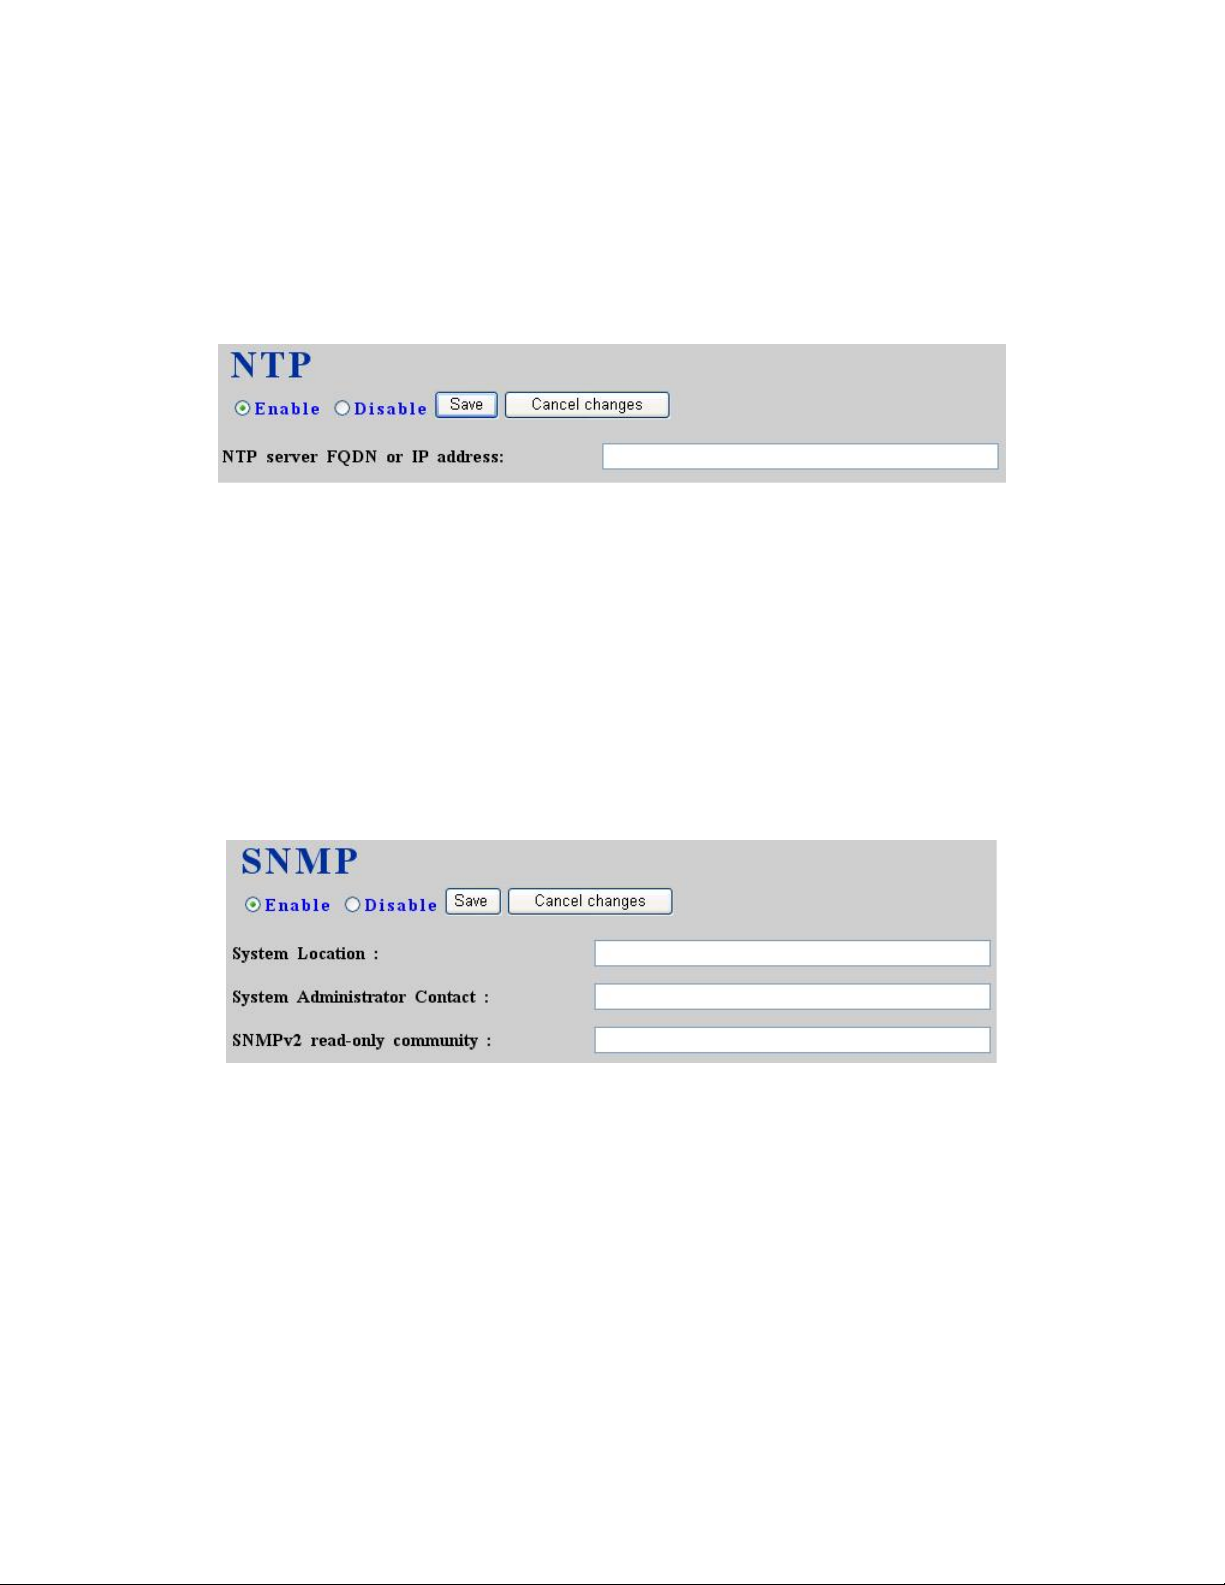
3.1 NTP service
Select Service -> NTP service to specify a NTP server for network time synchronization. You
can enable or disable NTP service at any time.
3.1.1 Enable NTP service
Select Enable radio button, enter the fully qualified domain name or the IP address of a NTP
server, and then click Save button.
3.1.2 Disable NTP service
Select Disable radio button, and then click Save button.
3.2 SNMP service
Select Service -> SNMP service to specify Simple Network Management Protocol (SNMP)
parameters for networking status retrieval. You can enable or disable SNMP service at any time.
3.2.1 Enable SNMP service
Select Enable radio button, enter System Location, Administrator Contact, read-only
community, and then click Save button. Example settings are Taipei Office, John Doe
admin@foobar.com, and public for the three fields.
3.2.2 Disable SNMP service
Select Disable radio button, and then click Save button.
14 of 49
PLANET IPX-1800 user’s manual
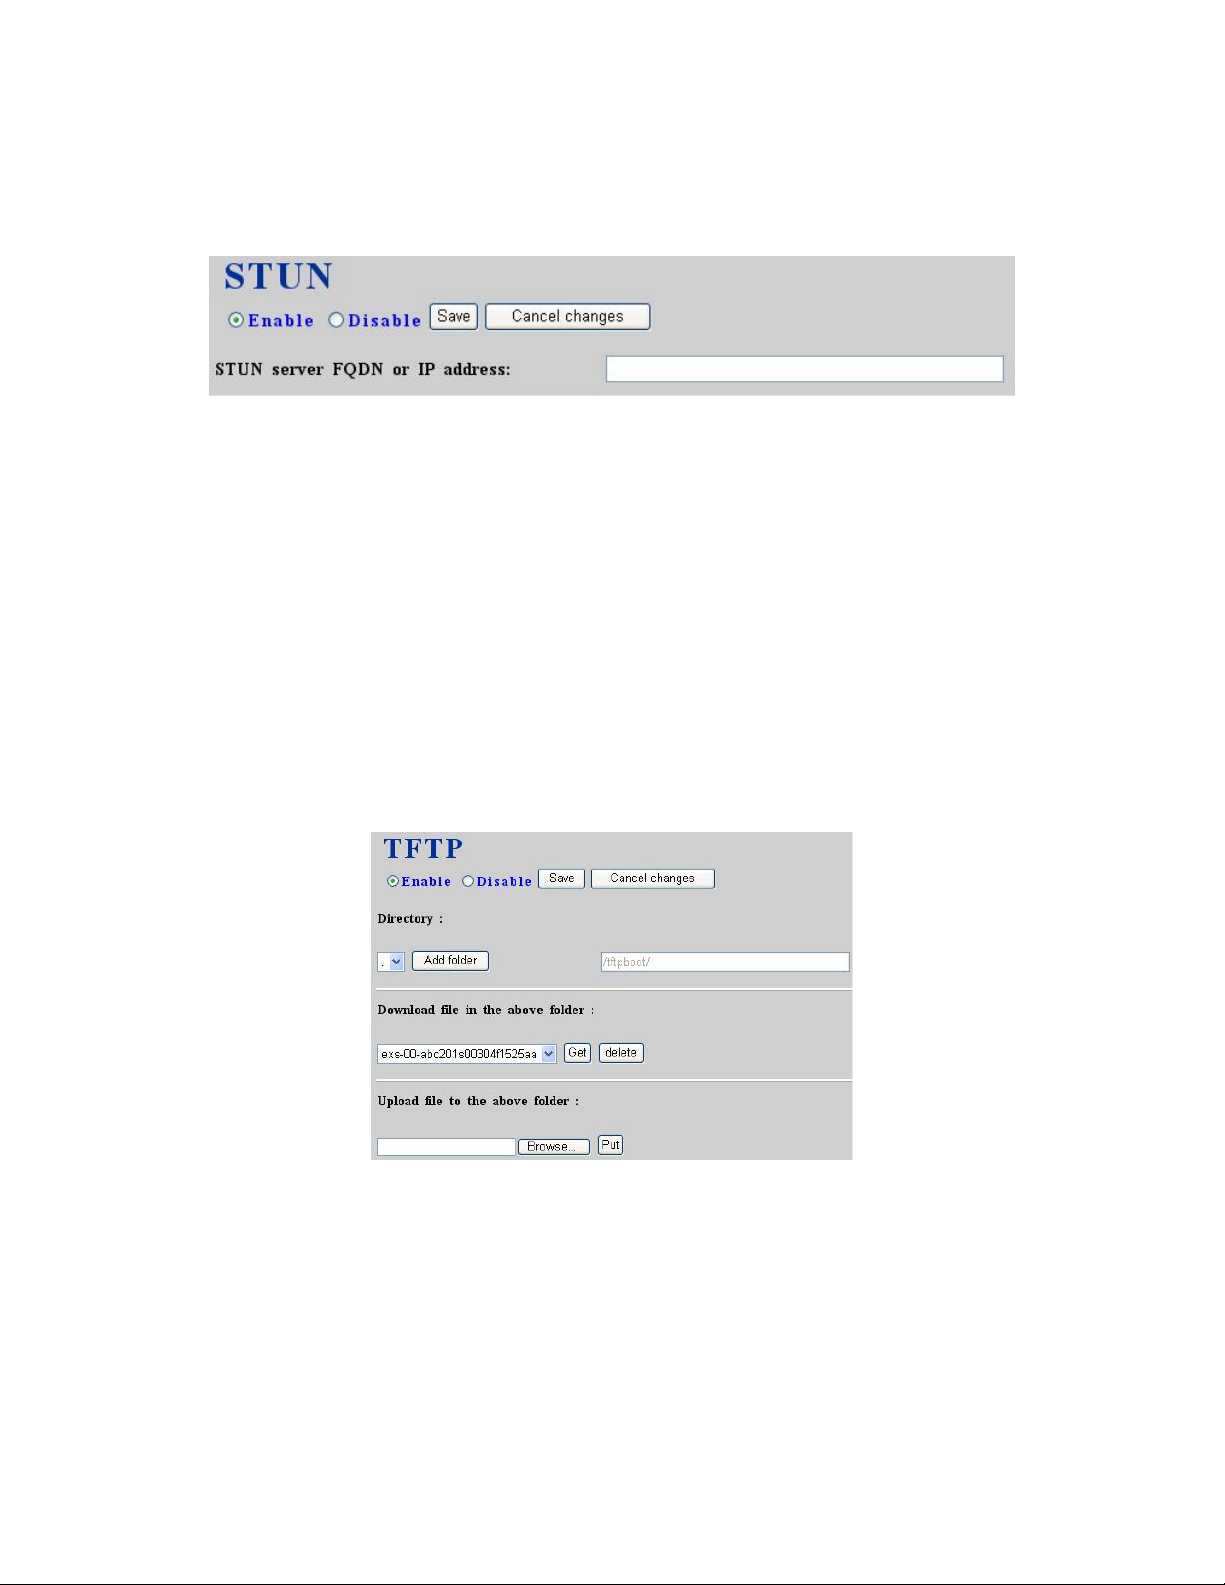
3.3 STUN service
Select Service -> STUN service to specify a Simple Traversal of UDP through NATs (STUN)
server for NAT traversal. You can enable or disable STUN service at any time.
3.3.1 Enable STUN service
Select Enable radio button, enter the fully qualified domain name or the IP address of a STUN
server, and then click Save button. IP PBX service needs to be reloaded to reflect the change.
3.3.2 Disable STUN service
Select Disable radio button, enter the fully qualified domain name or the static IP address of the
external WAN interface and then click Save button. Usually this address refers to the static
WAN IP address if there is a NAT device between the IP PBX and the Internet. If the WAN port
of IP PBX directly connects to Internet or it is unused, leave the address blank.
3.4 TFTP service
Select Service -> TFTP service, this page indicates current status of TFTP service. You can
enable or disable TFTP service at any time.
3.4.1 Enable TFTP service
Select Enable radio button, then click Save button. Afterwards, you are able to do file
management, e.g. upload and download files to and from IP PBX through TFTP service.
3.4.1.1 Change Directory
• Choose directory in Directory drop-down list.
By default, the root directory is /tftpboot. Initially, you might not be able to change
directory, since there is no folder created under /tftpboot yet.
15 of 49
 Loading...