

Page 1

Internet Monitor
IM-1000
User’s Manual
Page 2

Copyright
Copyright (C) 2006 PLANET Technology Corp. All rights reserved.
The products and programs described in this User’s Manual are licensed products of PLANET
Technology, This User’s Manual contains proprietary information protected by copyright, and this User’s
Manual and all accompanying hardware, software, and documentation are copyrighted.
No part of this User’s Manual may be copied, photocopied, reproduced, translated, or reduced to any
electronic medium or machine-readable form by any means by electronic or mechanical. Including
photocopying, recording, or information storage and retrieval systems, for any purpose other than the
purchaser's personal use, and without the prior express written permission of PLANET Technology.
Disclaimer
PLANET Technology does not warrant that the hardware will work properly in all environments and
applications, and makes no warranty and representation, either implied or expressed, with respect to the
quality, performance, merchantability, or fitness for a particular purpose.
PLANET has made every effort to ensure that this User’s Manual is accurate; PLANET disclaims liability
for any inaccuracies or omissions that may have occurred.
Information in this User’s Manual is subject to change without notice and does not represent a
commitment on the part of PLANET. PLANET assumes no responsibility for any inaccuracies that may
be contained in this User’s Manual. PLANET makes no commitment to update or keep current the
information in this User’s Manual, and reserves the right to make improvements to this User’s Manual
and/or to the products described in this User’s Manual, at any time without notice.
If you find information in this manual that is incorrect, misleading, or incomplete, we would appreciate
your comments and suggestions.
CE mark Warning
This is a class A device, in a domestic environment, this product may cause radio interference, in which
case the user may be required to take adequate measures.
Trademarks
The PLANET logo is a trademark of PLANET Technology.
This documentation may refer to numerous hardware and software products by their trade names. In most,
if not all cases, these designations are claimed as trademarks or registered trademarks by their respective
companies.
To avoid the potential effects on the environment and human health as a result of the presence
of hazardous substances in electrical and electronic equipment, end users of electrical and
electronic equipment should understand the meaning of the crossed-out wheeled bin symbol.
Do not dispose of WEEE as unsorted municipal waste and have to collect such WEEE
separately.
1
Page 3

Customer Service
For information on customer service and support for the Internet Monitor, please refer to the following
Website URL:
http://
www.planet.com.tw
Before contacting customer service, please take a moment to gather the following information:
♦ Internet Monitor serial number and MAC address
♦ Any error messages that displayed when the problem occurred
♦ Any software running when the problem occurred
♦ Steps you took to resolve the problem on your own
Revision
User’s Manual for PLANET Internet Monitor
Model: IM-1000
Rev: 1.0 (November, 2006)
PartNo.EM-IM1000v1
2
Page 4

Table of Contents
Chapter 1 Introduction .................................................................................. 5
1.1 Package Contents.......................................................................... 6
1.2 Front View ................................................................................... 7
1.3 Specification ................................................................................ 7
System
Chapter 2
2.1 Admin………………………………………………...............
2.2
2.3
2.4
2.5
2.6
2.7
System…………………………………………….................. 9
13
Interface IP……………………………………………............ 15
Setting………………………………………………...............
Date / Time……………………………………………...........
Permitted IPs…………………………………………….........
Language…………………………………………..…………. 24
Software Update……………………………………...............
16
22
23
25
User List
Chapter 3
3.1
User List…………………………………………….............. 26
Example……………………………... ………………………
29
IM Management
Chapter 4 IM Management…………………………………………….. 46
4.1 Configure…………………………………………………….. 47
4.2
4.3
Record
Chapter 5
Chapter 6
Chapter 7
7.1
7.2
7.3
7.4
Authentication………………………………………………… 53
Rule…………………………………………………………… 111
Setting……………………………………….………………. 133
User…………………………………………….……………. 136
Service………………………………………………............. 149
SMTP ………………………………….…………………..... 153
POP3 ………………………………….…………………...... 155
HTTP ………………………………….………………......... 157
IM ………………………………….……………………….. 159
3
Page 5

7.5
7.6
7.7
7.8
Anomaly Flow IP
Chapter 8
8.1
8.2
8.3
Local Disk
Chapter 9
9.1
9.2
Remote Backup
Chapter 10
10.1
10.2
Report
Chapter 11
11.1
Status
Chapter 12 Status…………………………………………........................ 203
12.1
12.2
12.3
12.4
Web SMTP ………………………………….……………… 161
Web POP3 ………………………………….………………. 163
FTP ………………………………….…………………….. . 165
TELNET ………………………………….………………... . 167
Anomaly Flow IP……………………………………………. 169
Setting………………………………………………………… 171
Virus Infected IP………………………………………….......
Intrusion IP………………………………………................... 176
Local Disk…………………………………………................ 179
Storage Time………………….................................................
Disk Space................................................................................. 181
Remote Backup……………………………………………… 183
Backup………………………………………………………… 184
Browse………………………………………………………… 193
Report……………………………………………................... 194
Storage Report……………………………………………….. 201
System Info……………….…………………………………..
ARP Table………………….……………………………........ 206
Record Info…………………………………………………... 207
Event Log…………………………………………………….. 209
173
180
204
4
Page 6

Chapter 1 Introduction
The innovation of the Internet has created a tremendous worldwide venue for Ebusiness and information sharing, but it also creates network resource and security
issues. These requests will be the primary concerned for the enterprise. The new model
of Planet’s Internet Monitor, IM-1000, a special designed of Internet monitor gateway,
provides monitoring many popular Internet services. The IM-1000 appliance offers
recording Web mails, SMTP / POP3 mails, IM (MSN, Yahoo Messenger, ICQ, and
QQ), HTTP (Web pages), FTP, and TELNET in the internal PCs and servers. It
prevents employees accessing personal network activities through the company's
network resources, improving the working efficiency, and keeping confidential
information records.
PRODUCT FEATURES
Monitor Web Mail, SMTP, POP3, IM, HTTP, FTP, and TELNET Contents
Records the Web mails, E-mails, IM contents (MSN, Yahoo Messenger, ICQ, and
QQ), HTTP (browsed web pages), FTP downloading and uploading data
information, and Telnet (BBS) contents.
Sniffer or Bridge Mode Deployment Administrator can choose Sniffer or
Bridge mode depends on the real network environment. Sniffer mode needs a hub
or core switch (support mirror port function) to link IM1000 Inbound port to the
any port of the hub or mirror port of core switch. Bridge mode links the IM-1000
Inbound port to firewall or gateway. Another Outbound port connects to the
internal network via hub or switch. H/W Bypass function also ensures the
network stability when the internet monitor is malfunction.
Record Backup Periodically backup the Web SMTP, Web POP3, SMTP, POP3,
HTTP, FTP, and Telnet records to the assigned NAS or file server. Administrator
5
Page 7

can download and unzip the recorded files from assigned NAS or file server via
PC.
Group Administrator Add the new group administrator and set different
privilege for every group administrator to view the user records. If the company's
internal network is divided in several groups, MIS can limit the view privilege to
the assigned administrator to view the records of certain groups without crossing
groups.
Daily Record of Specific User Record today's network activity of each user in
detail.
User Record and Service Record Search the specific user in user list and
monitor the user network activities. Search the service records by service name
and user to reduce the search time.
IP address or MAC address Record the internal user's network accessing
activities according to its IP or MAC address. Administrator can easily view the
stored records.
Remote Monitoring Use the web management interface, and no software to
install. Administrator can log in to view the records anytime or anyplace.
Optimal Storage Space Prompt Provides the optimal storage time and settings
in every service depends on daily network flow and service utilization.
Easy-to-use Web UI and Friendly Charts The IM-1000 provides the system
information and flow statistics displayed in friendly charts. Administrator can
easily analyze the network flow status by using these information.
Virus-Infected Alarm If the internal virus-infected PC keeping send packets to
paralyze the company's network, the IM-1000 would send the alarm message to
inform the user and administrator. Use Bridge mode to deploy the IM-1000 can
efficiently block the anomaly flow packets.
1.1 Package Contents
IM-1000 x 1
Power Cord x 1
Quick Installation Guide x 1
6
Page 8

User’s Manual CD x 1
Console cable x 1
Cat5 cross cable x 1
Cat5 cable x 1
Rack-mount ear x 2
1.2 Front View
LED Description
PWR Power is supplied to this device.
HD Blinks to indicate this devise is being to access the hard disk.
Inbound /
Outbound
Green Steady on indicates the port is connected to other
Orange Steady on indicates the port is connected at
network device.
Blink to indicates there is traffic on the port
100Mbps speed
1.3 Specification
Product Internet Monitor
Model IM-1000
Recommend maximum
concurrent user
Hardware
Ethernet
Console
Hard Disk
H/W Watch-Dog
Software
7
Inbound
Outbound
100
1 x 10/100 Based-TX RJ-45
1 x 10/100 Based-TX RJ-45
1 x RS-232 (DB-9)
160 GB
Auto reboot when detecting system fail
Page 9

Management
Network Connection
Concurrent Sessions
Inbound to Outbound
Throughput
Recommend concurrent
user
Internet Record
IM Management
Remote Backup /
Browse
Max. Department /
Group
User List
Anomaly Flow
Sub-Administrator
Remote Management
Firmware Upgrade
Configuration
Status
Web
Sniffer and Bridge mode
582,000
100Mbps
50~100
E-mail: SMTP, POP3
Web Mail : Yahoo, Hotmail, SINA, Gmail, Hinet, PChome, Seednet,
Sohu, 163, Tom, Yam
IM: MSN, MSN Web Messenger, Yahoo Messenger, ICQ, QQ
HTTP
FTP
Telnet
Sorting: by User Name or Service
Search
Login Notification: NetBIOS, MSN, Yahoo Messenger, ICQ
User Authentication: Authentication User, RADIUS, POP3, LDAP
E-Mail, Web Mail, HTTP, IM, FTP, Telnet
12
Black list (Logged User)
White list (Ignored User)
Auto Search User
Blaster Alarm: Enable Blaster Blocking, E-Mail / NetBIOS Alert
Notification, Co-Defense with Core Switch
Max entry: 400
Write Access
Group Admin
Remote Monitor
Web Management (Port Number) can be changeable
Permitted IPs (Max entry): 512
Web UI Log out
From Web UI
Save configuration to file
Load configuration from file
Load Default Setting (Factory Reset)
System Information: CPU, Hard Disk, Memory, and RAM Disk
Utilization
ARP Table
Record Session
Event Log
8
Page 10

Chapter 2 System
The system administration, refers the competency to manage the IM-1000. In this
Chapter, it will be define to the Admin, Interface IP, Setting, Date/ Time, Permitted IPs,
Language, Log out, and Software Update.
The IM-1000 is managed by the main system administrator. The main system
administrator can add or delete any system settings and monitor the system status. The
other group administrator have no competency to modify the system settings (the
administrator’s name is set by the system main administrator), only can monitor the
system status.
9
Page 11

Administrator:
Administrator/ Group administrator :
The name of system administrator and group administrator. Administrator is the
defult name of system administrator in IM-1000, and it cannot be canceled:
otherwise the group administrator can change or cancel it.
The default system administrator can add or modify the other administrator, and
also can decide if the group administrator have the competency to write into main
system.
On the other hand , the group administrator who has the write competency, can
modify the competency of default system administrator, only has the competency
to read.
There must be at least one administrator who have the competency to read and
write in IM-1000.
The default user name and password of system administrator in IM-1000 are admin and admin .
Privilege:
The administrator who has the competency to read/write, can change the system
settings, monitor the system status, to add and cancel other administrators.
The administrator who has the competency to read, only can monitor the system
status, but has no competency to change any settings.
Password/New Password/Confirm Password :
To add or modify the main group administrator password.
View Groups
The group administrator can divide the internal network into several groups .
And he can appoint the specifiy administrator to view the group but can not
view across groups.
10
Page 12

Interface IP:
Interface Address :
The administrator can set the IP login information in IM-1000.
Ping :
Enable the function, the user can send Ping (ICMP) packets to Interface.
HTTP :
Enable this function, the user can login IM-1000 Web UI through HTTP protocol.
HTTPS :
Enable this function, the user can login IM-1000 Web UI through HTTPS
protocol .
Download Bandwidth and Upstream Bandwidth :
The system administrator should set the accurate bandwidth of WAN, in order to
be the basic operation of IM-1000.
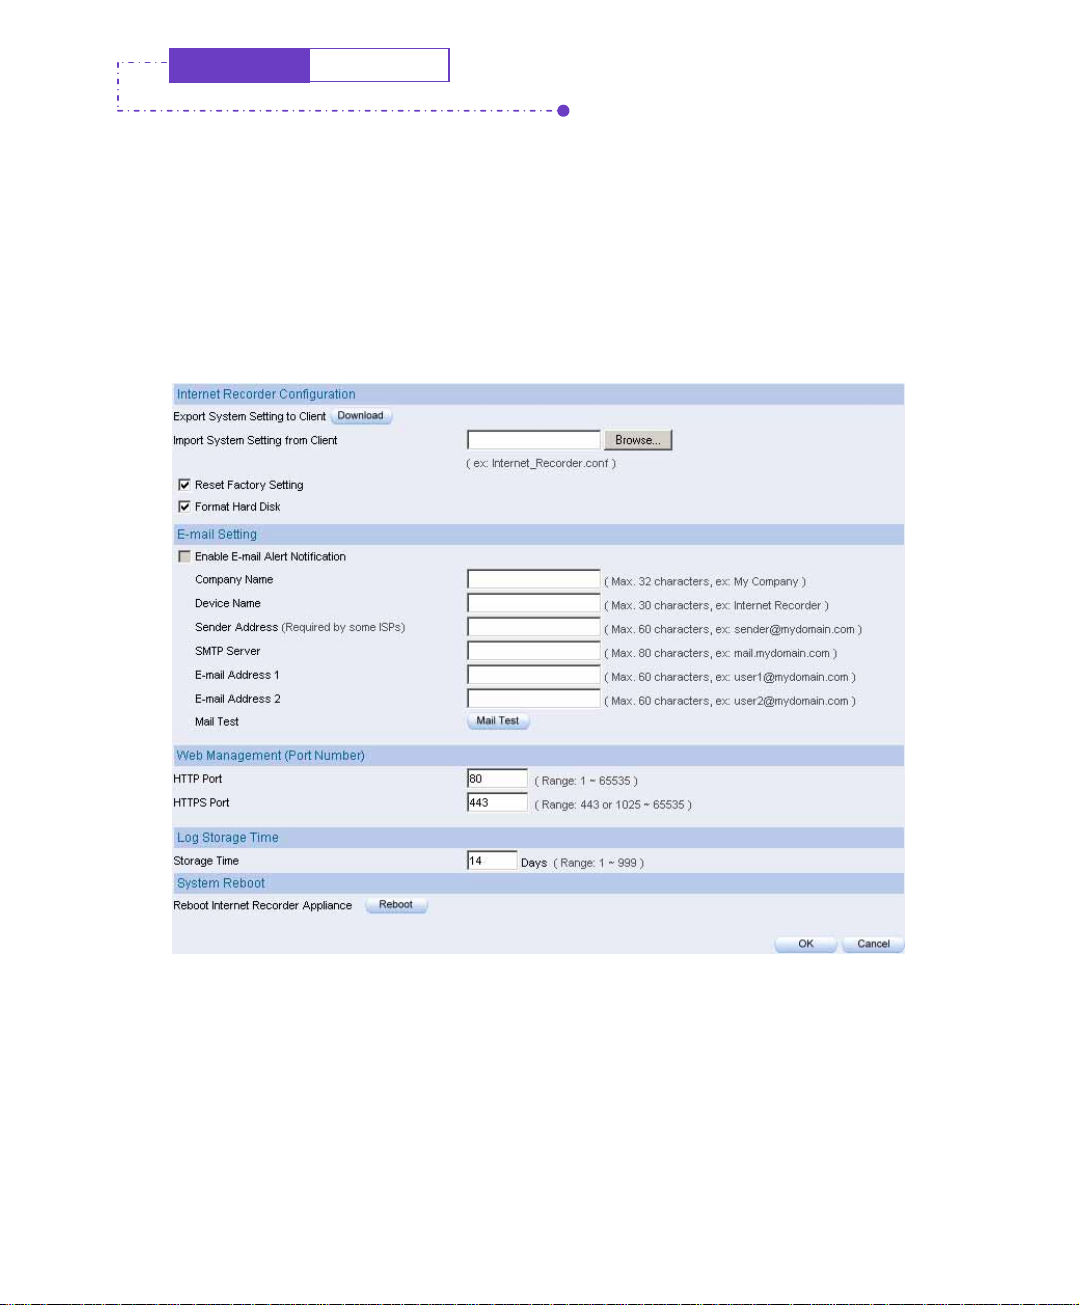
Setting:
Internet Recorder Configuration:
The system administrator can import or export the system settings, or they can also
reset the factory setting and format the disk.
E-mail Setting:
To activate this option , the system administrator will receive the cau tion message
automatically when IM-1000 is in the unpreditictable trouble.
11
Page 13

Web Management (Port Number) :
The system administrator can use the WebUI to manage IM-1000 anywhere. The
system manager can also change the port number of IM-1000.
When the port number of HTTP and HTTPS had been changed . If the system admini st rat or
want to log in to WebUI , then he must change the WebUI port number. (for example:
http://172.20.108.172:8080 and https:// 172.20.108.172:1025)
Log Storage Time
System administrator can set the log storage time.
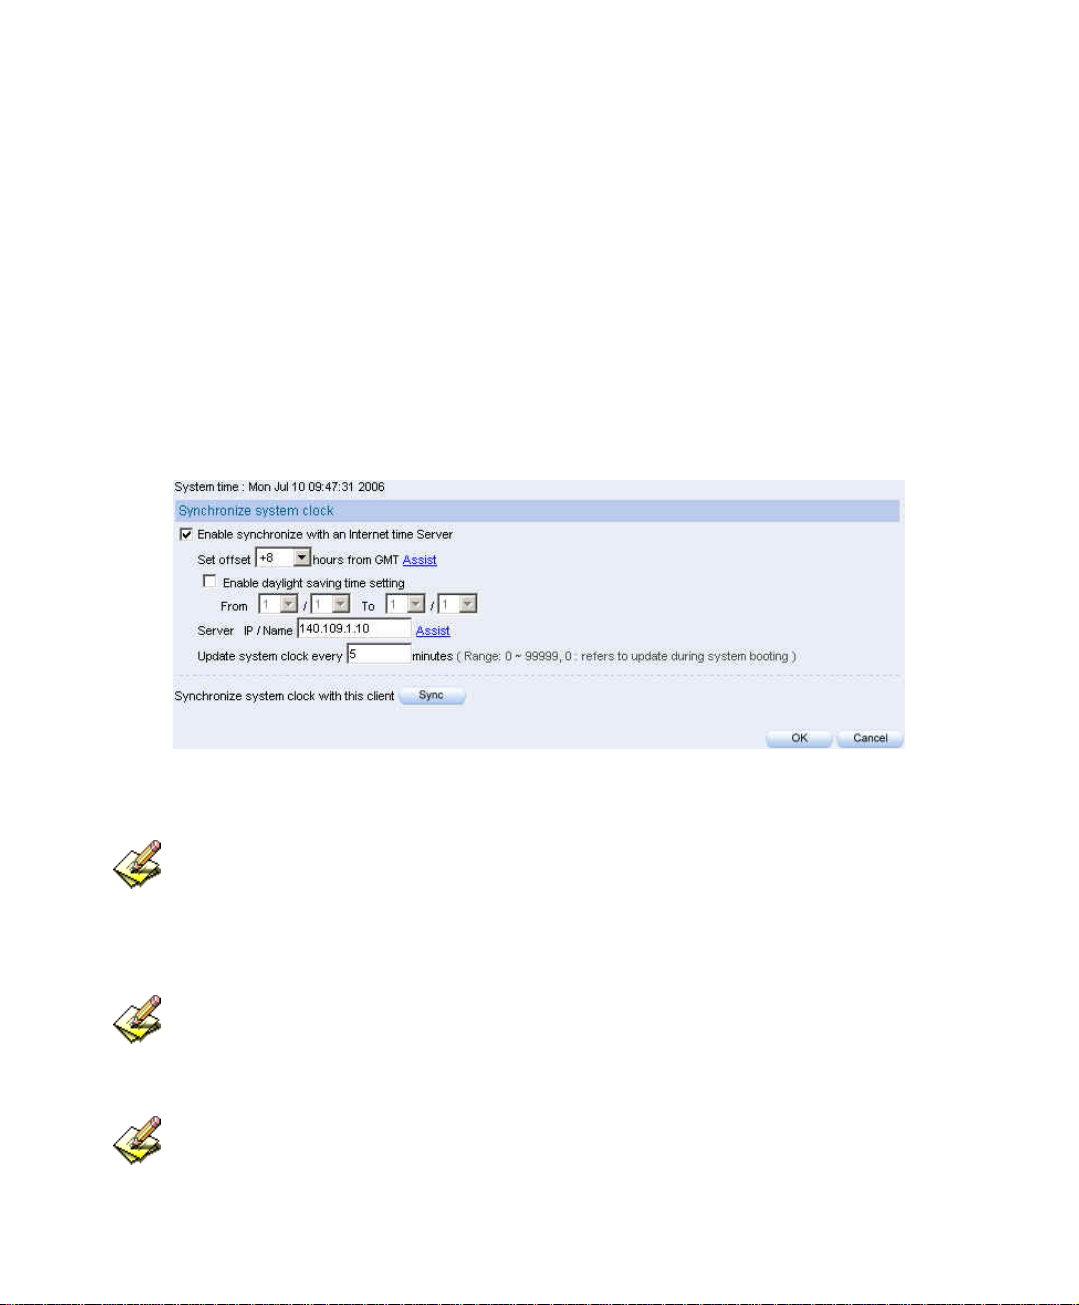
Date/Time:
Synchronize system clock:
This option can schronize the Date/Time in IM-1000, the administrator’s PC and
the WAN server.
GMT :
The international standard time(Greenwich Mean Time : GMT).
Daylight saving time:
Daylight saving time (also called DST, or Summer Time) is the portion of the year
in which a region's local time is advanced by (usually) one hour from its standard
official time.
12
Page 14
2.1 Admin
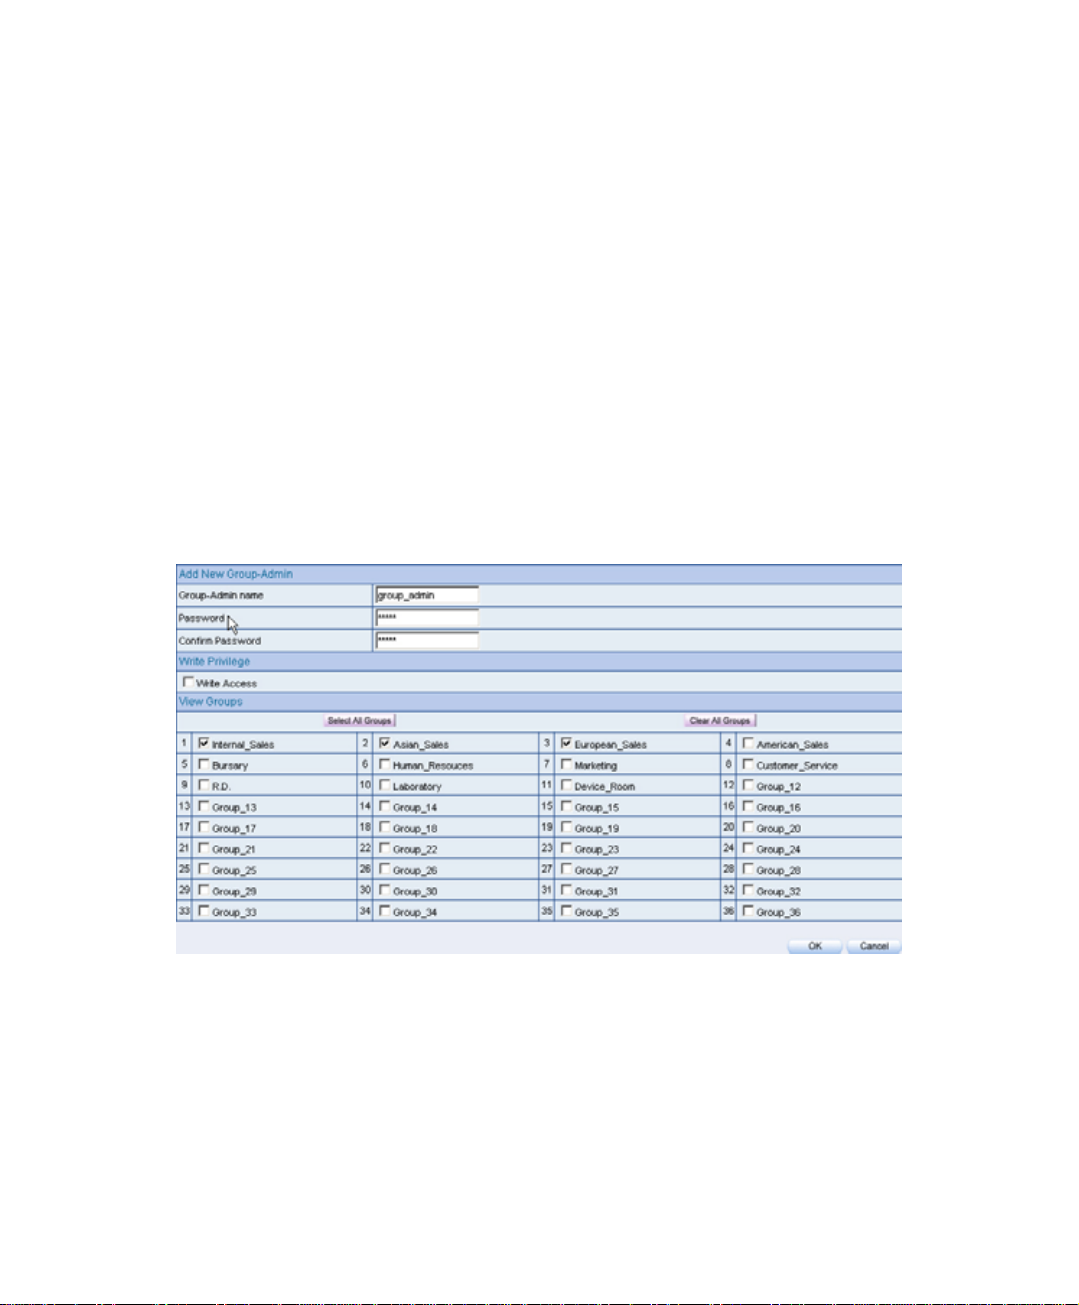
Step1. In admin setting window
,click the New-Group Admin .
Step2. In add new group-admin window
Group-Admin set group_admin.
Password enter 12345.
Confirm Password enter 12345.
In View Groups column, select the permitted group record to see.
, enter te following information:
Step3. Click OK to login the user or click cancel, to delete the new group
administrator.
Add new group-admin
13
Page 15
System
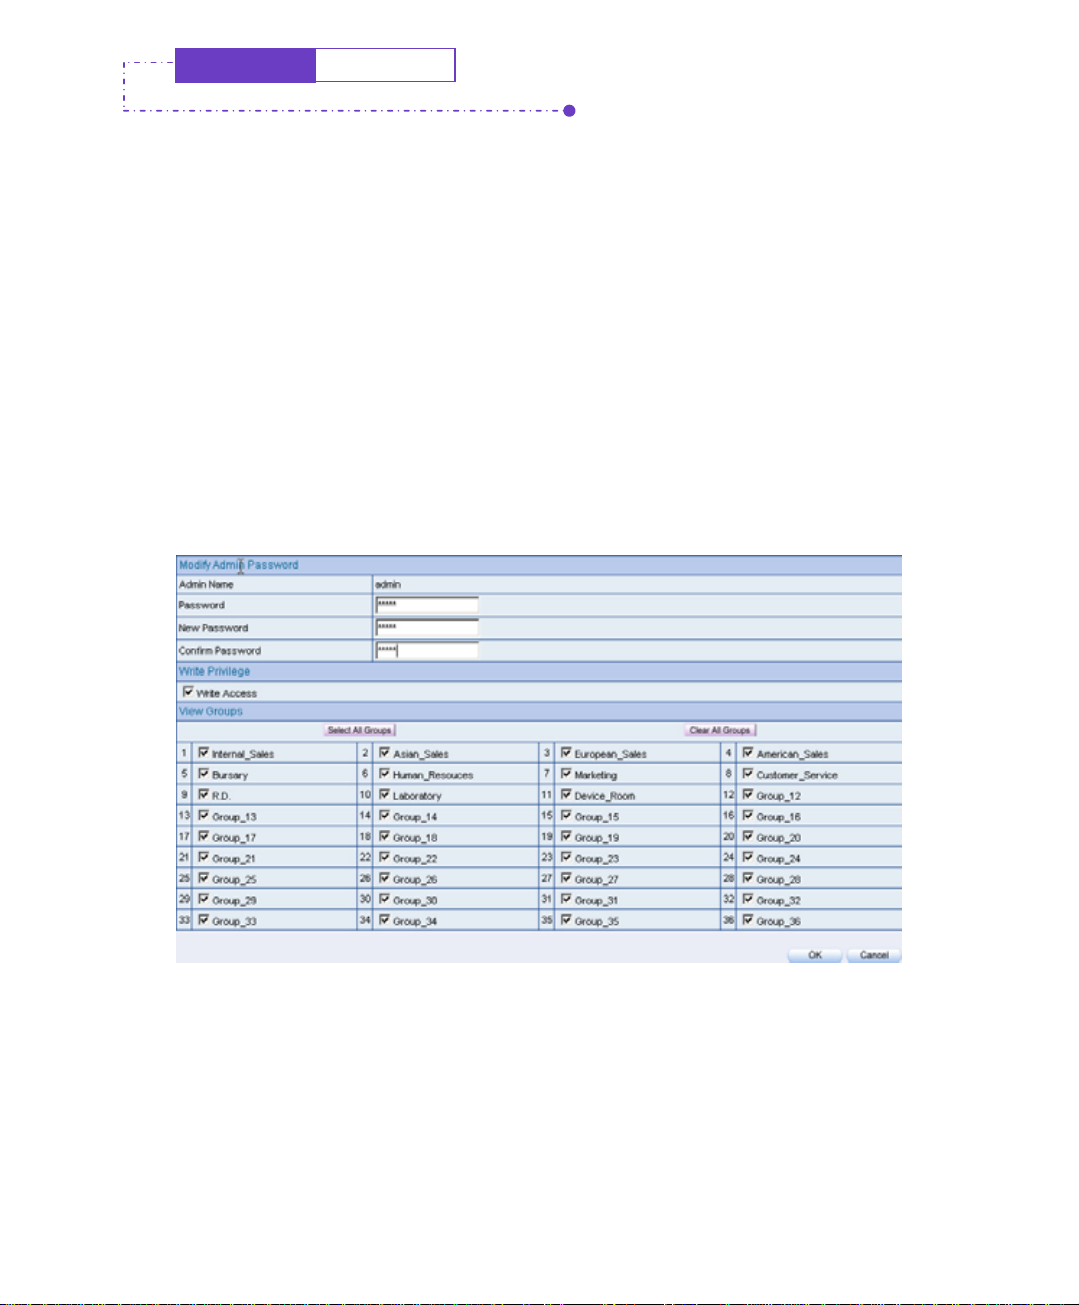
Admin
Step1. In admin find the administrator’s name that correspond to the right column,
then click modify.
Step2. In Modify admin password or modify group admin password window.
Enter the following information:
Password enter admin.
new Password enter 52364.
confirm Password enter 52364.
Step3. Click OK to modify the password or click cancel to cancel the setting.
To change the admin password
14
Page 16
2.2 Interface IP
Step1. In System
In IP Address, Netmask and Default Gateway column, enter the
available IP of the LAN subnet.
Enter DNS server 1 or DNS server 2.
Enter Max Downstream Bandwidth and Max Upstream
Bandwidth . ( ※ it depends on the applied flow statistics of the user. )
Enable the setting of Ping, HTTP and HTTPS function.
Click OK.
Æ Interface IP , enter the following setting :
The interface IP setting
Please do not cancel HTTP and HTTPS before setting the Interface IP, because it will let the
system administrator could not enter the Web UI of IM-1000.
15
Page 17

2.3 Setting
Step1. In System Setting, select Internet Recorder Configuration Æ Export
System setting to client, and click the download button at the right place.
Step2 When it appeared File Download window, click Save button, and it will
.
show where the file will be saved. Click Save button again。The settings of
IM-1000 will be copied to the appointed directory.
16
Page 18
System
Setting
Step1. In System Setting window, Internet Recorder Configuration Æ Imort
System Setting From Client, then click Browse button at right place.
Step2. In Choose File window, choose the directory of former saved file in IM-
1000, and choose the correct setting, then click Open.
Step3. Click the lower right OK, the window will closed.
Step4. Click the OK inside the confirm dialogue box, the setting will import to
IM-1000.
Confirm the import setting
17
Page 19
System
Setting
Step1. In SystemÆ Setting Æ Internet Recorder ConFiguration, select Reset
Factory Setting and Format Hard Disk.
. Step2 Click the OK in the lower right, it will restore to the factory setting of IM-
1000 and format the disk at the same time.
Select Resect Factory Setting
18
Page 20
System
Setting
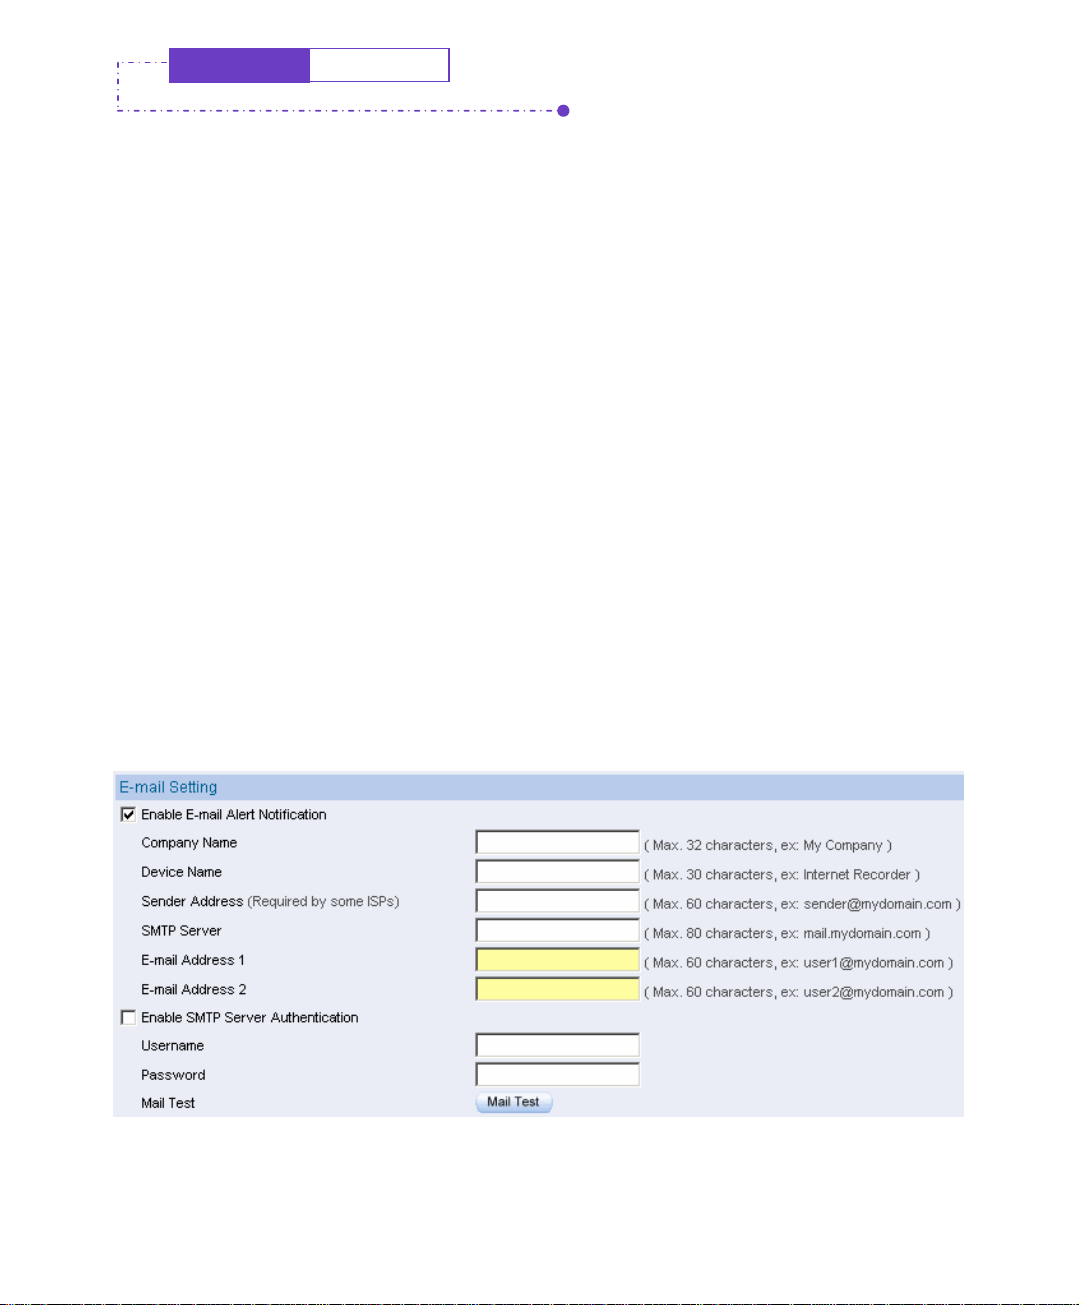
Step1. Select E-Mail Setting Æ Enable Email Alert Notification.
Step2. Company Name, enter the name of the company which belong the IM-
1000.
Step3. Device Name, enter the name of IM-1000.
Step4. Sender Address, sending the e-mail address of the sender.(Some of the
ISP have request to enter in the sender address column)
Step5. SMTP Server, enter the IP address of the delivered e-mail in SMTP
server.
Step6. E-Mail Address 1, enter the e-mail address in the first one position to
receive the alarm message.
Step7. E-Mail Address 2, enter the e-mail address in the second position to
receive the alarm message.
. Step8 Click the lower right OK to set the function of message alarm .
Enable the instant mail message alarm of IM-1000
19
Page 21

Click Mail Test button to test E-Mail address 1 and E-Mail address 2 , to see if the e-mail sending
address can receive the current caution message .
20
Page 22
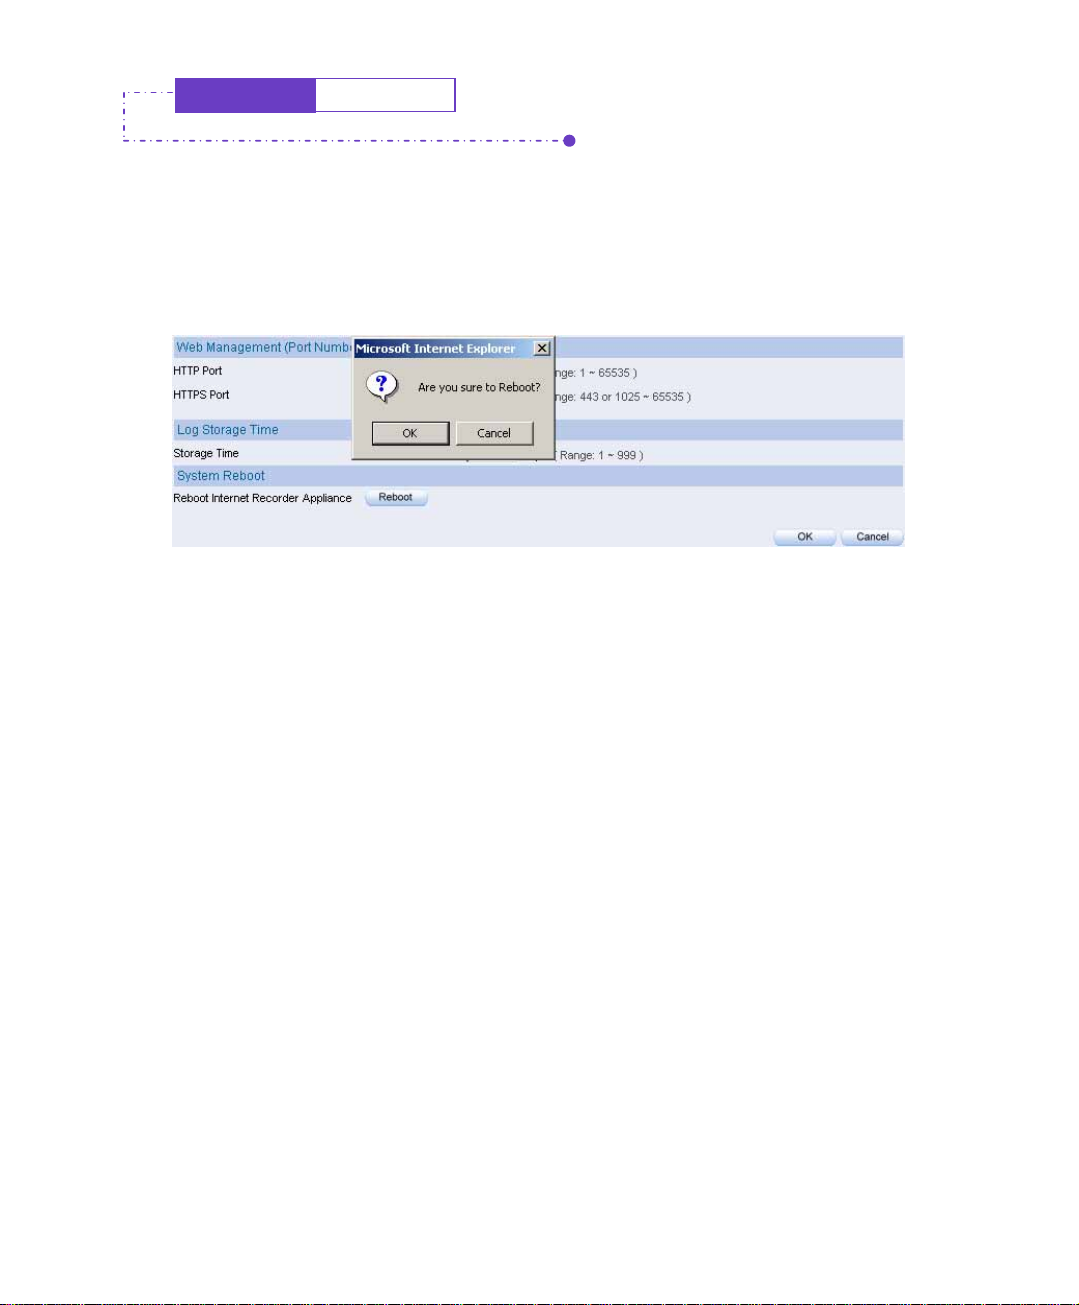
System
Setting
Step1. In Reboot Internet Recorder Appliance Æ Reboot button.
Step2. It will show “Are you sure to reboot ?”
Step3. Click OK to reboot IM-1000, or click Cancel to cancel reboot IM-1000.
Reboot the internet recorder appliance
21
Page 23
2.4 Date / Time
Step1. Select Enable Synchronize with an Internet Time Server.
Step2. Click Set Offset Hours from GMT pull down menu , and choose the
correct time.
Step3. Enter the Server IP address into Server IP/Name.
Step4. Enter the frquence of the updating time in Update system clock every
minutes.
System time setting
Select Synchronize Æ Sync button, the system time in IM-1000, will synchronize to the
administrator’s computer.
The settings of Set offset hours from GMT and Server IP can be entered with using Assist.
If the local area execute the daylight saving time, then enable the daylight saving time setting.
22
Page 24

2.5 Permitted IPs
Step1. In System Æ Permitted IPS Æ New Entry, add the new setting:
Name enter master.
IP Address enter 192.168.139.30.
Netmask enter 255.255.255.255 .
Service select Ping、 HTTP and HTTPS.
Click OK .
Complete Permitted IPs settings.
The Permitted IPs setting
Complete the Permitted IPs setting
If you want the Permitted IPs to be real working, then it must be connect from the administrator to
the interface of IM-1000 WebUI, but the settings of Ping, HTTP, and HTTPS all must be canceled.
Before you cancel the interface address of HTTP and HTTPS, you have to set the Permitted IPs first
or it will not connect to WebUI through the internet.
23
Page 25

2.6 Language
Step1. In System Æ Language, choose the Language you want, then Click OK.
Select the language version
24
Page 26
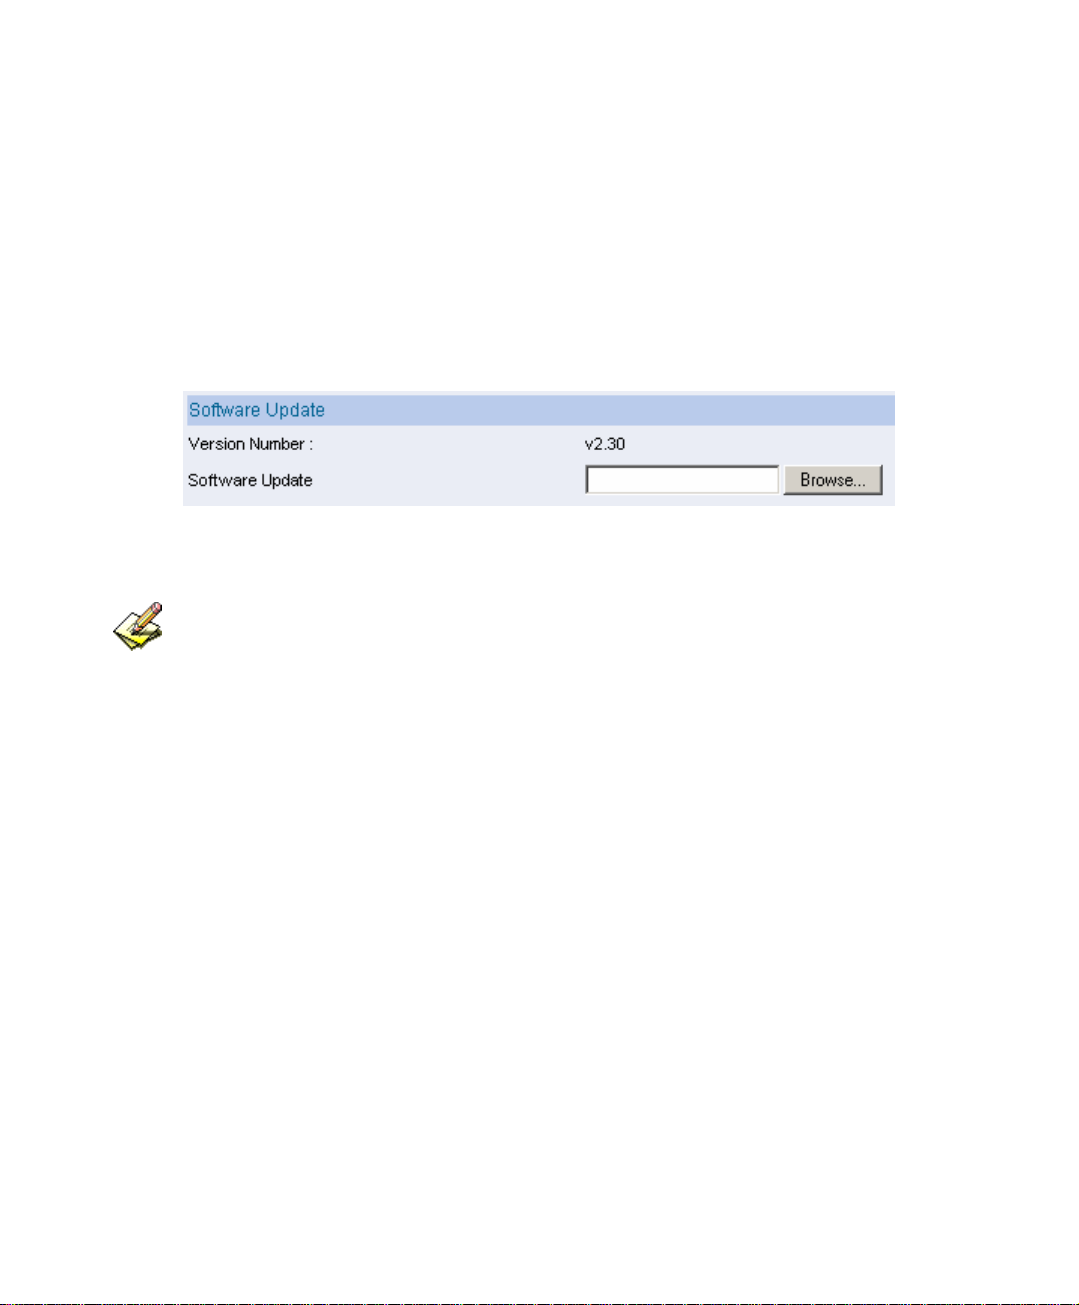
2.7 Software Update
Step1. In System
Æ Software Update, the user can update the firmware step by
step:
In Version Number, we can know the current version of the software.
Go on the internet to gain the newest version of the firmware and
download into the storage disk in IM-1000.
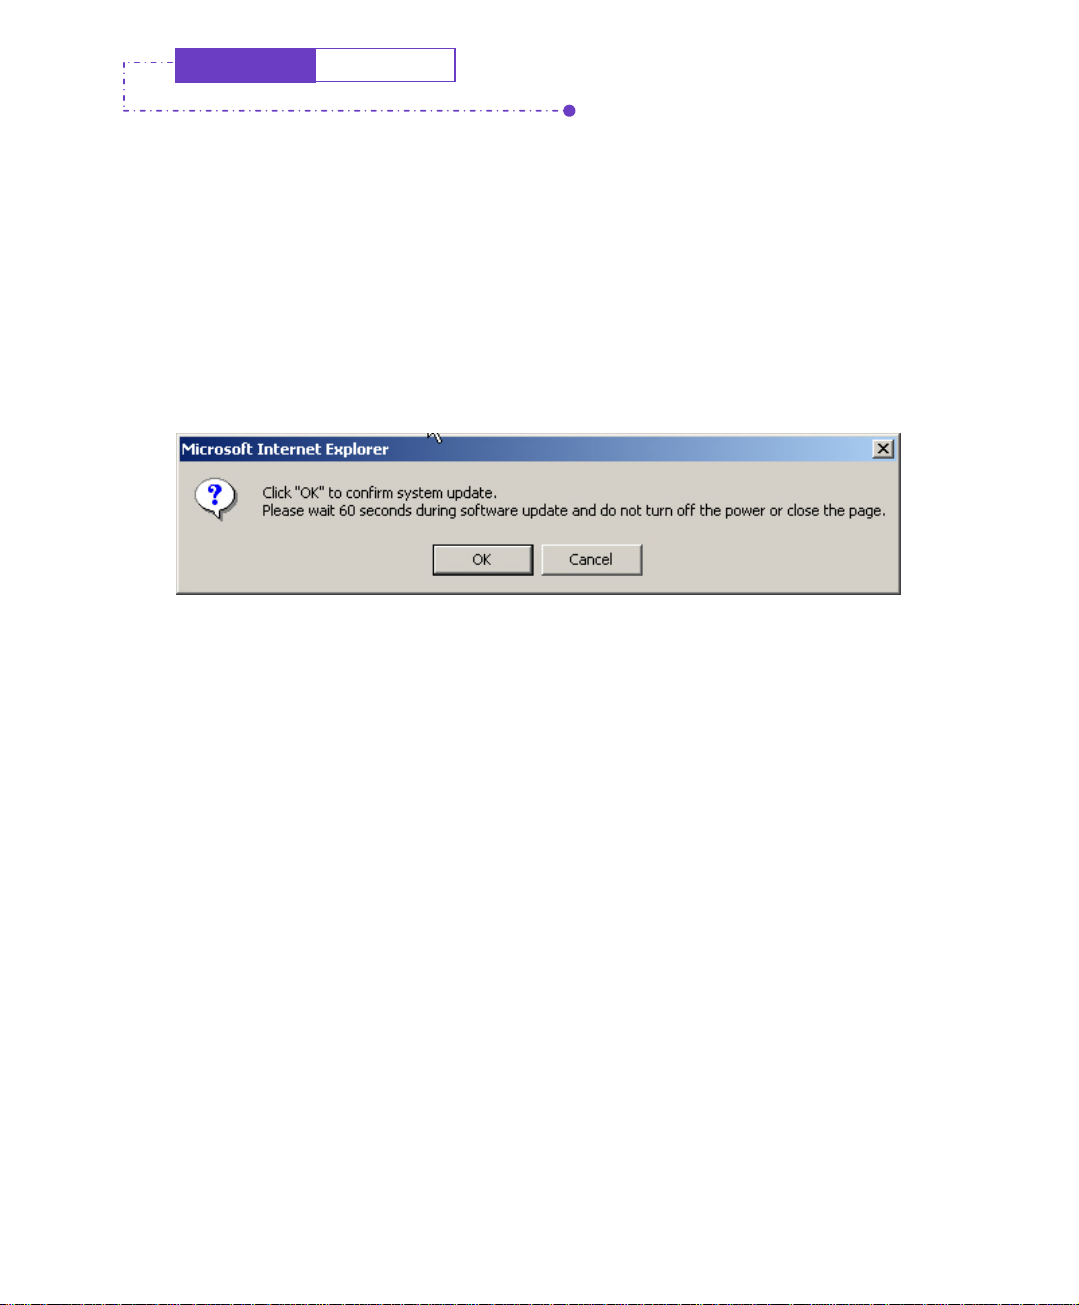
Click Browse
Æ Choose file, select the newest version of the software.
Click the lower right OK, it will running the update.
Software update
It need 3 minutes to update the software, and will reboot after updated the system . Please do not
turn it off, off line and exit the web page during the update or it will cause the error in IM-1000(It is
recommended using the LAN to update).
25
Page 27

Chapter 3 User List
This chapter is about the users can be monitored by the IM-1000. It can automatic
serch and add the new users, and the system administrator can add the lists by himself
or herself.
26
Page 28

Setting
User List Configuration:
Administrator can export the monitor user list and some related settings to the PC
or import these settings into IM-1000.
Department / Group :
The administrator can group the users according to the network structure, so that
he can manage the system more easily.
27
Page 29
We will setup three different user list in the application environment.
No. Environments
Example.1 The company can be divided into several departments , and part of
the user(department)settled in different subnet.
Example.2
Change the user list by import the user list configuration(excel
list).
28
Page 30

3.1 Example
The company can be divided into several departments, and part of the user
(department)settled in different subnet.
Step1. In User List Æ Setting, set the following settings:
To set the Department / Group depends on the real network
deployment.
Click OK
Set the user list
29
Page 31

User List
Example 1
Step2. In User List Æ Logged, add the new user.
Click of 172.19.0.0 subnet and the IM-1000 will search the new user
in the subnet.
Wait 1~2 minutes until search complete.
If system administrator want to search users in specific subnet, set the
search IP range and click search.
Select the new user to add , click New User.
Click search new user button
30
Page 32

Starting to search new user
31
Page 33

User List
Example 1
Select the new user to add
32
Page 34

Complete to add the new user
33
Page 35

User List
After finished the setting of System Æ Interface IP, system will set the subnet to be the first user
group in logged user list., which the interface correspond to.
Example 1
The IM-1000 can automatically add the user who has ever use the internet in logged user list.
In System Æ Interface IP, if the DNS server set to be the company’s internal DNS server, then the
IM-1000 will also look up the user DNS name correspond to the internal DNS server when searching the
user list.
When the searched PC has been set the PC or DNS name, then IM-1000 will use them to apply to
user name. The user name priorities are : PC name Æ DNS name Æ IP or MAC(It depends on the
setting of Record Æ Setting Æ User Name binds to IP or MAC address ).
34
Page 36

User List
Example 1
Step3. Modify the user in user list:
Click User Name of Ray.
User Name, enter Rayearth.
Department / Group , select Laboratory.
Click OK.
Click User Name of 172.19.1.254.
User Name, enter Gateway.
Department / Group, select Device_Room.
Select move this user to ignored user list.
Click OK, then the user will be removed to ignored user list.
Repeat the steps to complete modifying the user list
.
Select the user to modify
35
Page 37

User List
Example 1
Enter the user information to modify
Complete to modify the user information
36
Page 38

User List
Example 1
Select the user to modify
Enter the user information to modify
Move the user to ignored user list
37
Page 39

User List
Example 1
Fig. 2-12 Complete to modify all the user list
In Ignored user list, the system administrator can also select the user to move to logged user list.
38
Page 40

User List
Example 1
Step4. In User List Æ Logged, add the new subnet :
Click Add.
Subnet , enter 192.168.139.1.
Netmask, enter 255.255.255.0.
Add a New user to this Department / Group, select R.D.
Click OK
Add a new subnet
The Department / Group that selected by system administrator , which will become the default
Department / Group in this subnet.
Step5 Repeat Step 2 to Step 4 until finish to set the user list. .
39
Page 41

User List
Example 2
Change the user list by import the user list configuration(excel list).
Step1. In User List Æ Setting Æ User List Configuration Æ Export User List
to Client PC Æclick .
Step2. When it apprear File Download , click Save , choose the position to save
the download file.Click Save again. The user list settings will be saved in
IM-1000 .
Select the position to save the download file
Step3. Use excel to open the user list configuration settings(user_set.csv), and
enter the settings to modify.
40
Page 42

User List
The way to use the user list:( the contents of user_set.csv)
################################################
#Format:
# ~1 Group_1
…….
################################################
Department / Group :
~1 Internal_Sales
~2 Asian_Sales
…….
The number of
Department/Group.
The first subnet.
The first range of the
subnet.
User List :
192.168.139.0 255.255.255.0 1
192.168.139.30 Mail_Server * 0 00:0C:76:B7:96:3B 11
192.168.139.216 Rayearth 06 3 00:12:0E:2E:CF:DA 10
172.19.0.0 255.255.0.0 9
172.19.100.10 Hanson 21 3 00:E0:18:25:F4:BC 9
172.19.100.11 Hans * 3 00:02:44:8E:B7:C7 9
…….
Example 2
The name of
Department /
Group.
The first default subnet Group.
The first subnet
information .
How to use
the User List ?
The setting of
Department/Group:
The User List can set 36
Department / Group
PC Name
User Name User ‘s MAC
User’s IP
Logged / Ignored Name List
User’s Department/Group
The User’s first subnet
information .
User List
41
Page 43

User List
Example 2
Step4. Change the information of Department / Group
Change the 8th Department / Group information , and the original
Customer_Service will change into Support.
Add the 12th Department /Group information , and change Group_12
into R.D._2.
Change the Department / Group information from excel
42
Page 44

User List
Example 2
Step5. To add and modify the user information in the first subnet.
Change 192.168.139.216(Rayearth)Department / Group
th
information , and change the 10
Department / Group into 9th
Department / Group.
Insert a row under the user list in the first subnet, and enter the new
user information in the row.(User IP, User Name, PC Name, Logged
/ Ignored User List, User MAC, User Department / Group)
In the Logged / Ignored user information , the ” 0” number represents Ignored , the “ 3
“ number represents Logged .
The “ * “ symbol represents no information in the excel tablet.
43
Page 45

User List
Example 2
Step6. Add the third subnet and user’s information. Please enter the third subnet
basic information under the second subnet user list .(the range of IP,
Netmask, Default Group).
Please enter the basic user information under the third subnet.(User
IP, User Name, PC Name, Logged / Ignored List, User MAC, User
Department / Group).
There must be one blank row to divide the user list in two subnet.
44
Page 46

User List
Example 2
Step7. Save File(user_set.csv)
Step8. In User List Æ Setting, Click User List Configuration Æ Import User
List from Client PC
Æ Browse.
Step9. In the Choose File window, select the modified user list setting, then Click
Open.
To import the modified file
Step10. Click the lower right OK, the user list setting files will import into IM-
1000.
45
Page 47

Chapter 4 IM Management
IM Management includs 3 main parts:
Configure(Login Notice):
MIS engineer can customize the contents of IM login notice and IM-1000 can
also send the IM login notice to user while he / she uses the IM software.
Authentication:
MIS engineer can request user to pass the IM authentication first or IM-1000
will block the user’s IM connection.
Rule:
Default Rule:Can set the default rule of MSN, Yahoo, ICQ, and QQ.
Account Rule:Can set different rules for every IM account.
46
Page 48

4.1 Configure(Login Notice)
MIS engineer can customize the contents of IM login notice and IM-1000 can also send
the IM login notice to user while he / she uses the IM software.
Step1. Select which IM notification to be enabled.
Step2. In sender column, enter the sender name.
Step3. Fill in the notice content and click OK.
IM login notice setting
47
Page 49

IM Management
Login Notice
Types of Notification
NetBIOS Alert Notification:
IM-1000 will notice user by NetBIOS notification about he processed the IM
messages or activities after login to IM software.
MSN Alert Notification:
IM-1000 will notice user by msn notification about he processed MSN messages or
activities after login to MSN. (Only available in bridge mode)
ICQ Alert Notification:
IM-1000 will notice the user by ICQ notification about he processed ICQ messages
or activities after login to ICQ. (Only available in bridge mode)
Yahoo Alert Notification:
IM-1000 will notice the user by Yahoo notification about he processed Yahoo
messengers or activities after login to Yahoo messenger. (Only available in
bridge mode)
48
Page 50

NetBIOS login notification
49
Page 51

IM Management
Login Notice
MSN login notification
50
Page 52

ICQ login notification
51
Page 53

IM Management
Login Notice
Yahoo Messnger login notification
52
Page 54

4.2 Authentication
MIS engineer can request user to pass the IM authentication first or IM-1000 will block
the user’s IM connection. The user does not need to do any authentication once he/she
passes the IM authentication.
Terms
Authentication Messages
MIS engineer can customize the authentication messages. User will see the
authenticaiton messages while he/she login the authenticaiton screen.
User
It’s the built-in mechanism of user authentication.
RADIUS, Remote Authentication Dial-In User Service
It’s kind of remote authentication service of dial-in user.
POP3, Post Office Protocol
It’s the protocol used for receiving e-mails.
LDAP, Lightweight Directory Access Protocol
It’s a kind of directory access Protocol which combined the authentication
mechanism of SMTP, POP3, FTP, HTTP and RADIUS etc.
Shared Secret
The needed authentiction password which is used for IM-1000 and RADIUS server
to process the authentication.
802.1x RADIUS
802.1 x RADIUS is used for IM-1000 to do the authentication process to RADIUS
server which contained the wireless network mechanism.
Search Distinguished Name
It’s the identified name of LDAP server.
LDAP Filter
MIS engineer can assign the specific account of LDAP server.
53
Page 55

User Distinguished Name
It’s the needed account used for IM-1000 to process the authetication to LDAP
server.
54
Page 56

A
IM Management
uthentication
Authentication message setting
User login authentication
55
Page 57

A
IM Management
uthentication
How to use?
The Authentication function is only available in Bridge mode. If MIS engineer use
Sniffer mode to deploy IM-1000, then appliance cannot block the IM connection
and MIS engineer also cannot manage the internal user to use IM software. In other
words, IM-1000 can only record the user’s IM conversation contents while using
Sniffer mode.
If user’s IM account passed the authentication, then there is no more action of IM
authentication.
The Authentication function must apply to Rule function. For exapmle, if MIS
engineer wants to make rule setting of MSN.
MIS engineer select Rule Æ MSN Æ Accept; Always. It means user can use
MSN without passing authentication.
MSN MIS engineer select Rule Æ MSN Æ Authentication passed. That
means the user’s MSN account need to passed authentication or it will be
dropped.
User can not login MSN
MIS engineer can set one authentication accout instead of group of IM accounts to
process the IM authentication.
56
Page 58

IM-1000 provide four built-in authentication mode and also support to RADIUS,
POP3 and LDAP server authentication.
How to log in authentication interface?
Open the browser, then type “http://IM-1000 interface/auth”. For example,
http://192.168.1.1/auth
57
Page 59

IM Management
Example
We set 4 authentication application environments .
No. Method Environment
Ex. 1
Ex. 2
Ex. 3
Ex. 4
User(Built-in
mechanism)
RADIUS
POP3
LDAP
Internal user must pass the IM authentication then he/she
is allowed to create MSN connection. (Use the built-in
user authentication.)
Internal user must pass the IM authentication then he/she
is allowed to create Yahoo connection.【Use external
RADIUS Server authentication. ( Windows 2003 built-in
authentication.】
Internal user must pass the IM authentication then he/she
is allowed to create QQ connection.(Use external POP3
Server authentication.)
Internal user must pass the IM authentication then he/she
is allowed to create ICQ connection.【Use external
LDAP Server authentication.】
These examples used one to one method. For example, Built-in mechanism to MSN, RADIUS to
Yahoo, POP3 to QQ, LDAP to ICQ. If MIS engineer wants to create QQ account by built-in
mechanism, please refer to example 1.
58
Page 60

IM Management
Example 1
Internal user must pass the IM authentication, then he/she is allowed
to create MSN connection. (Use the built-in user authentication.)
. Step1 Add authentication user in Authentication Æ User.
Set the authentication user
Step2. Select IM Management Æ Rule Æ Default Rule Æ Accept :
Authentication passed and MSN Message not encrypted.
Default IM rule setting
Click OK.
59
Page 61

IM Management
Example 1
Step3. If the internal user want to use MSN, then he/she must apply the use
privilege of MSN from IM authentication management interface. The
management interface is:”http:// IM-1000 interface/auth”, Default setting
is http://192.168.1.1/auth:
Enter the Name and Password.
Enter the MSN account.
Click OK.
Authentication setting
60
Page 62

IM Management
Example 1
Authentication success
Step4 User can use the authenticated MSN account and there is no mor
. e
authentication to process in the future.
61
Page 63

IM Management
Example 2
Internal user must pass the IM authentication, then he/she is allowed
to create Yahoo connection.【Use external RADIUS Server
authentication. ( Windows 2003 built-in authentication.】
※ Deployment of Windows 2003 RADIUS Server
Step1. Click Start Æ Control Panel Æ Add / Remove Programs , select Add /
Remove Windows Components , then it shows the Windows Comonents
Wizard.
Step2. Select Networking Services , then click Detail
s.
Windows components wizard
62
Page 64

IM Management
Example 2
e Step3. Select Internet Authentication Servic
Add new network authentication service components
63
Page 65

IM Management
Example 2
Step4 Click Start Æ Control Panel Æ Administrative Tools , select
.
Network Authentication
Network Authentication
Control Panel Æ Administrative Tools , select
Service.
Service.
Select network authentication service
64
Page 66

IM Management
Example 2
t t Step5. Right click RADIUS Clients Æ New RADIUS ClienRight click RADIUS Clients Æ New RADIUS Clien
Add new RADIUS client
65
Page 67

IM Management
Example 2
Step6. Enter the Name and Client Address( It is the same as IM-1000 IP
Address ).
Add New RADIUS client name and IP address setting
66
Page 68

IM Management
Example 2
. Select RADISU Standard, enter the Shared secret and Confirm Share
secret ( It must be the same setting as RADIUS in IM-1000).
secret ( It must be the same setting as RADIUS in IM-1000).
d d Step7. Select RADISU Standard, enter the Shared secret and Confirm Share
Add new RADIUS client-vendor and shared secret
67
Page 69

IM Management
Example 2
y y Step8. Right click on Remote Access PoliciesÆ New Remote Access Polic. Right click on Remote Access PoliciesÆ New Remote Access Polic
Add new remote access policies
68
Page 70

IM Management
Example 2
Step9. Select Use the wizard to set up a typical policy for a common
scenario , and enter the Policy name
Add new remote access policies and policy name
69
Page 71

IM Management
Step10. Select Ethernet .
Example 2
The way to add new remote access policy
70
Page 72

IM Management
Step11. Select User
Example 2
Add new romote access policy user and group
71
Page 73

IM Management
Example 2
Step12. Select MD5-Challenge.
The authentication of add new remote access policy
72
Page 74

IM Management
Example 2
Step13. Right click on the Radius Æ Properties
The network authentication service setting
73
Page 75

IM Management
Example 2
Step14. Select Grant remote access permission, and Remove the original
setting, then click Add.
The RADIUS properties settings
74
Page 76

IM Management
Example 2
Step15. Add Service-Type.
Add new RADIUS properties attribute
Step16. Add Authenticate Only from the left side.
Add RADIUS properties service-type
75
Page 77

IM Management
Example 2
Step17. Click Edit Profile, select Authentication, and check Unencrypted
authentication (PAP , SPAP).
Edit RADIUS service-type dial-in property
76
Page 78

IM Management
Example 2
Step18. Add Auth User, click Start Æ Setting Æ Control
PanelÆAdministrative Tools, select Computer Management
Enter computer management
77
Page 79

IM Management
Example 2
Step19. Right click on Users, select New User.
Add new user
Step20. Complete the Windows 2003 RADIUS Server settings.
Secret. ( The setting must be the same as RADIUS server ).
The RADIUS server setting
Click Test, it can detect if the IM-1000 and RADIUS server can real working .
78
Step21. In Authentication Æ RADIUS function, enter IP, Port and Shared
Page 80

IM Management
Example 2
: Step22. Select IM Management Æ Rule Æ Default Rule Æ Yahoo Æ Accept
Authentication passed.
Default IM rule
Step23. If the internal user want to use MSN, then he/she must apply the use
privilege of MSN from IM authentication management interface. The
management interface is
http://IM-1000 interface/auth. Default setting is
http://192.168.1.1/auth.
Enter the Name and Password.
Enter the Yahoo account.
r
79
Page 81

IM Management
Example 2
Authentication setting
80
Page 82

IM Management
Click OK
Example 2
Authenticated successful
User can use the authenticated Yahoo account and there is no more
authentication to process.
81
Page 83
IM Management
Example 3
Internal user must pass the IM authentication, then he / she is
allowed to create QQ connection. 【Use external POP3 Server
authentication】
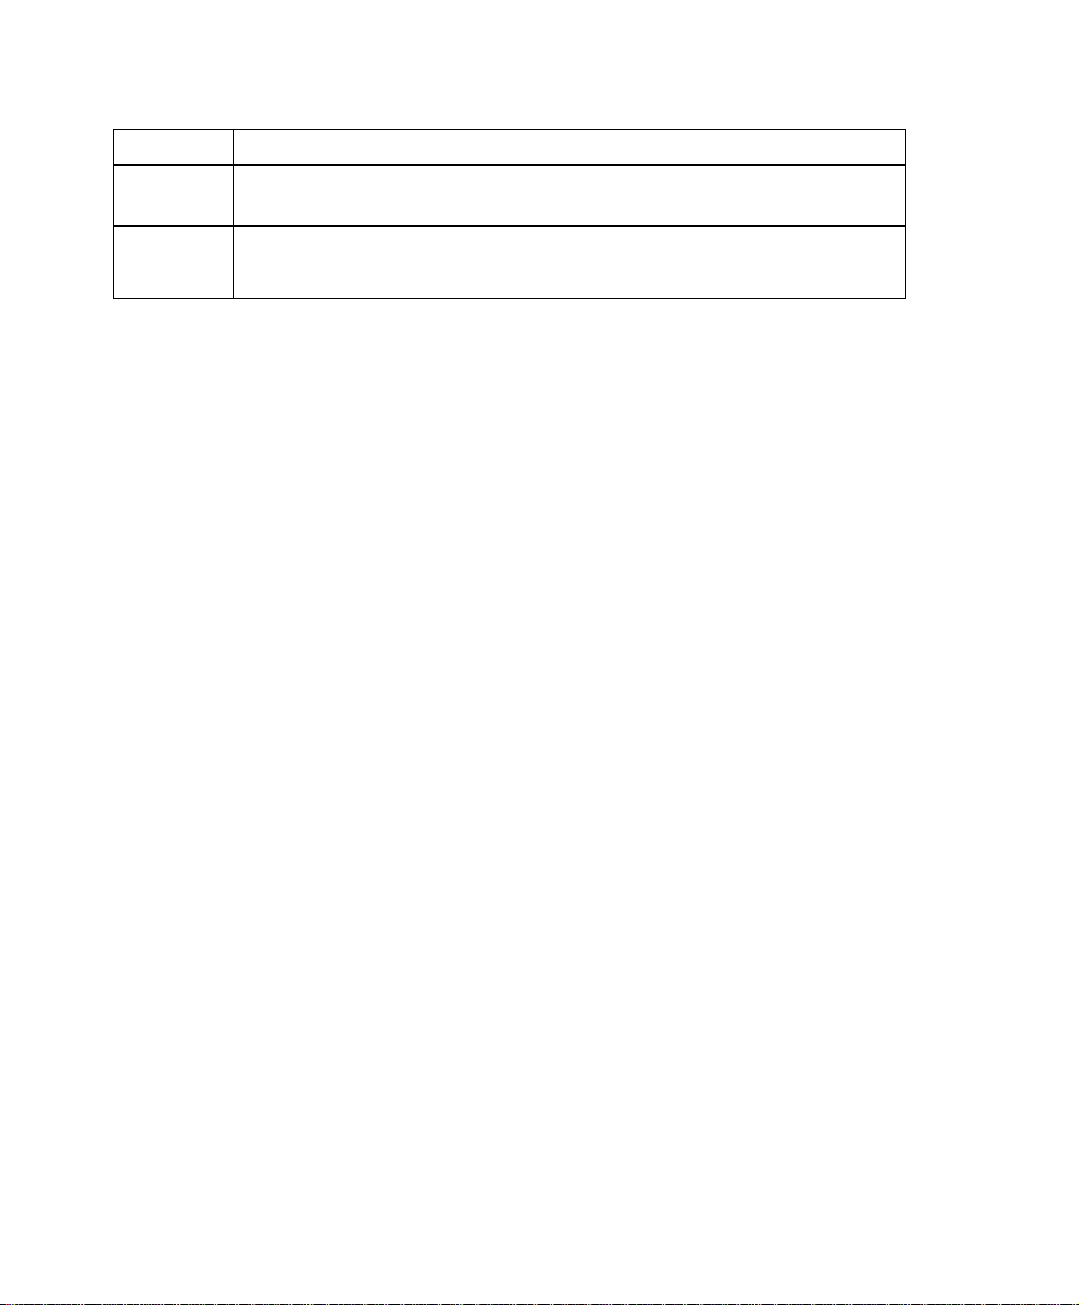
Step1. Select Accept : Authentication passed and QQ Password valid in IM
Management Æ Rule Æ Default Rule Æ QQ.
Set the QQ default rule
Step2. Enter the POP3 setting in Authentication Æ POP3:
POP3 setting
Click Test, to see if IM-1000 can connect to POP3 Server properly.
82
Page 84
IM Management
Example 3
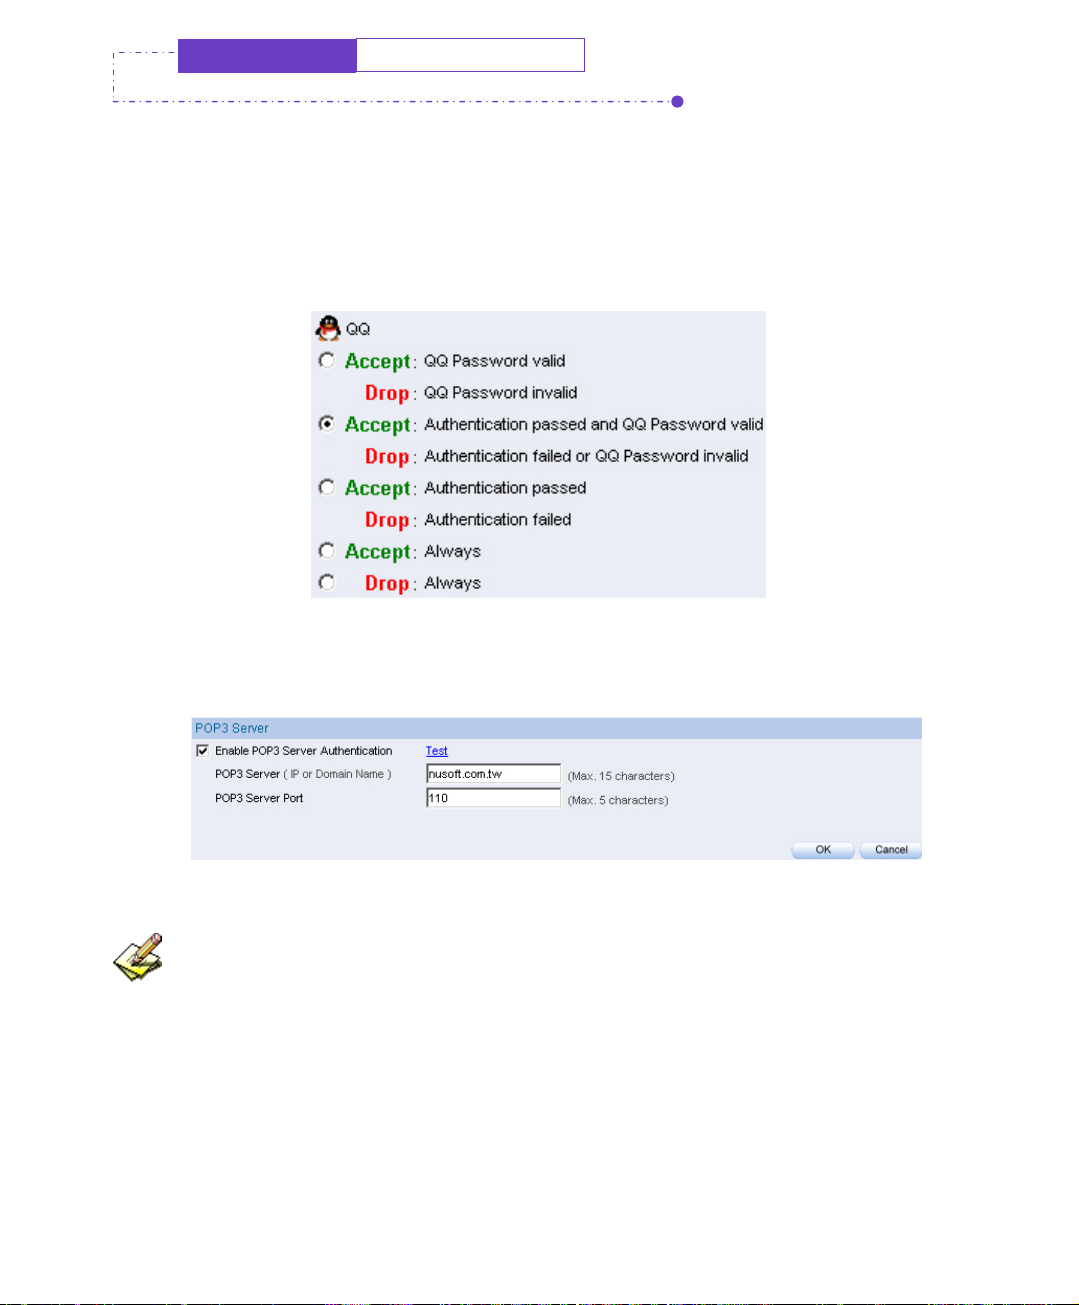
Step3. If the internal user want to use QQ account, then he/she must apply the use
privilege of MSN from IM authentication management interface. The
management interface is http; //IM-1000 interface/auth. Default setting is
http://192.168.1.1/auth.
Enter the POP3 Server account name and password. (It is the mail
account and password that used for receiving e-mails.)
Enter QQ account
Enter the QQ account and password
83
Page 85

IM Management
Click OK
Example 3
QQ account authenticated succeed
Step4. User can use the authenticated QQ account and there is no more
authentication to process in the future.
84
Page 86

IM Management
Example 4
Internal user must pass the IM authentication, then he/she is allowed
to create ICQ connection. Use external LADP Server authentication.
(Windows 2003 Server built-in authentication.)
Windows 2003 LDAP Server Deployment
Step1 Click Start Æ Program Æ Administrative Tools Æ Manage MIS
.
engineer Server.
Step2. In Manage MIS engineer Server window,click Add or remove a role
Æ Configure MIS engineer Server Wizard
.
Click add or remove a role
85
Page 87

IM Management
Example 4
t t Step3. In Preliminary Steps window , click NexIn Preliminary Steps window , click Nex
The Preliminary steps Web UI
86
Page 88

IM Management
Example 4
t. t. Step4 In Server Role window, select Active Directory and click Nexle window, select Active Directory and click Nex.
The server role window
87
Page 89

IM Management
Example 4
t. t. Step5. In Summary of Selections window , click Nex. In Summary of Selections window , click Nex
The summary of selections window
88
Page 90

IM Management
Example 4
t. t. Step6. In Active Directory Installation Wizard window, click Nex6. In Active Directory Installation Wizard window, click Nex
Active directory installation wizard
89
Page 91

IM Management
Example 4
t. t. Step7. In Operating System Compatibility window, click Nexg System Compatibility window, click Nex
The operating system compatibility window
90
Page 92

IM Managemnt
Example 4
Step8. In Domain Controller Type window, select Domain controller for a
. In Domain Controller Type window, select Domain controller for a
new domain click N
new domain click Next.
ext.
The domain controller type window
91
Page 93

IM Management
Example 4
Step9. In Create New Domain window, select Domain in a new forest, click
Next .
Create new domain window
92
Page 94
IM Management
Example 4
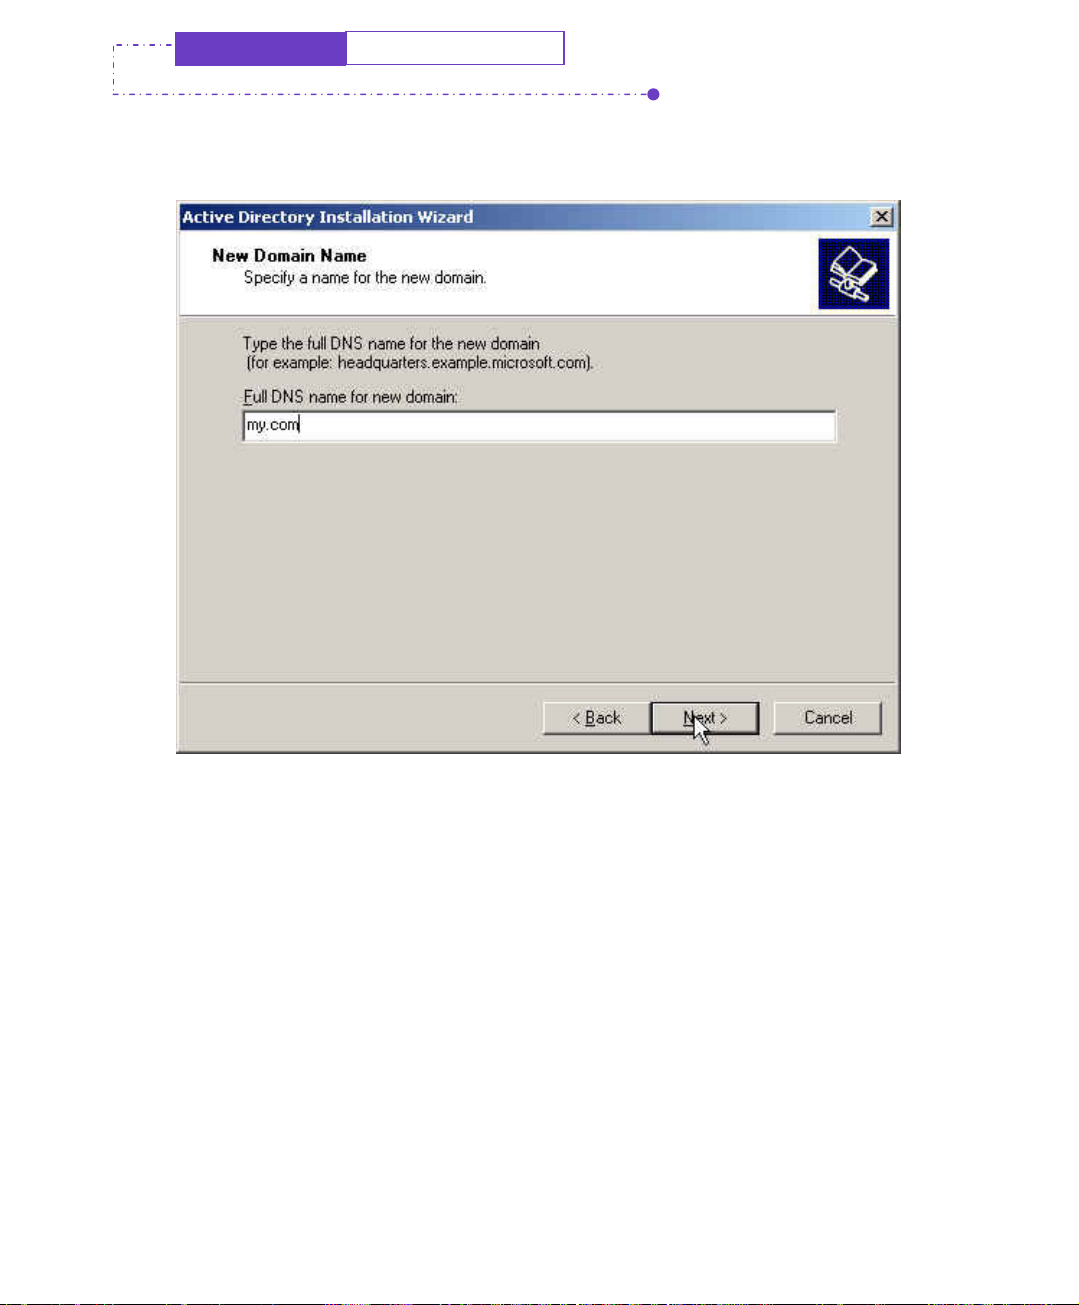
Step10. In New Domain Name window , enter the Full DNS name for new
domain , click Next.
The new domain name window
93
Page 95

IM Management
Example 4
Step11. In NetBIOS Domain Name window , enter the Domain NetBIOS
name , click Next.
The NetBIOS domain name window
94
Page 96

IM Management
Example 4
Step12. In Database and Log Folders window , enter the routes of Database
folder and Log folder , click Next.
The database and log folder window
95
Page 97

IM Management
Example 4
Step13. In Shared System Volume window, enter the Folder location, click
Next.
The shared system volume window
96
Page 98

IM Management
Example 4
Step14. In DNS Registration Diagnostics window , select I will correct the
problem later by configuring DNS manually(Advanced), click Next .
The DNS registration diagnostics window
97
Page 99

IM Management
Example 4
Step15. In Permissions window , select Permissions compatible only with
Windows 2000 or Windows Server 2003 operating systems, click Next.
The permissions window
98
Page 100

IM Management
Example 4
Step16. In Directory Services Restore Mode Administrator Password window,
enter the Restore Mode Password and Confirm password, click Next.
The directory services restore mode administrator password window
99
 Loading...