

Page 1

Shipping & Mailing
Postage Meters
SendPro® C,
SendPro®+
PCN 8H00
Operator Guide
US English Edition
SV63317 Rev D PDF
August 2019
Page 2

©2019 Pitney Bowes Inc.
All rights reserved. This book may not be reproduced in whole or in part in any fashion or stored in a
retrieval system of any type or transmitted by any means, electronically or mechanically, without the
express written permission of Pitney Bowes.
The use of this information by the recipient or others for purposes other than the training of customers on
Pitney Bowes equipment may constitute an infringement of intellectual property rights of Pitney Bowes,
and Pitney Bowes assumes no responsibility for any such use of the information.
We have made every reasonable effort to ensure the accuracy and usefulness of this manual. However,
we cannot assume responsibility for errors or omissions or liability for the misuse or misapplication of our
products.
Except as provided in writing, duly signed by an officer of Pitney Bowes, no license either express or
implied, under any Pitney Bowes or third party’s patent, copyright or other intellectual property rights is
granted by providing this information.
Page 3

Table of Contents
Sealing the envelope only, bypass all printing 34
Filling the moistener tank 35
1 - Quick start guide
Finding the Product Code Number (PCN) and
serial number 9
Navigating the Home screen on the SendPro
C, SendPro+ 10
Print a trackable label or print postage on an
envelope 12
Creating and printing a trackable label 15
Tracking a shipment 20
Using cost accounts to charge back Trackable
Labels postage costs 20
Adding a single Trackable Labels cost account 21
Printing postage on envelopes 22
Sending a First-Class letter envelope on
SendPro C, SendPro+ Model with PCN 8H00 24
Sending a large First-Class® envelope
SendPro C, SendPro+ Model with PCN 8H00 25
Sending Certified Mail on SendPro C,
SendPro+ Model with PCN 8H00 27
Installing the ink cartridge 35
Printing a test pattern 36
Supplies, ink cartridges, and options 37
Accessing the SendPro® Care application 39
2 - Connectivity information
Setting up a wired network connection on
SendPro C, SendPro+ Model with PCN 8H00 43
Setting up a wireless (WiFi) network
connection 44
Connecting to a hidden Wi-Fi network 45
Deleting a Wi-Fi network 46
Checking your network connection 47
Checking the MAC address for wired and
wireless networks 48
Setting up a proxy server 50
Sending an international letter on SendPro C,
SendPro+ Model with PCN 8H00 28
Sending mail using a Certificate of Mailing on
SendPro® C, SendPro®+ Model with
PCN 8H00 29
Using USPS special services 31
Adding a graphic to your envelope in Envelope
Printing 31
How to process ERR in Envelope Printing on
SendPro C, SendPro+ 32
Using the weighing platform for Envelope
Printing 33
Sealing envelopes 33
Pitney Bowes Operator Guide August 2019 iii
3 - Managing your machine
Creating or disabling the security PIN 53
Adjusting time zone and location code 54
Adjusting display brightness 54
Setting up Energy Saver on SendPro C,
SendPro+ Model with PCN 8H00 55
Managing your Pitney Bowes USPS Postage
Funds 55
Using USPS Informed Delivery 55
Page 4

Installing your SendPro C, SendPro+ 57
Installing a scale 62
Uploading system logs 62
Deleting addresses from the Trackable Label
address book 80
Editing addresses in the Trackable Label
address book 81
Managing your Trackable Labels cost accounts81
4 - Using Trackable Labels
Signing in and out of Trackable Labels 65
Creating and printing a trackable label 66
Creating a trackable label from the address
book 71
Creating a new trackable label sender address 71
Changing the sender address for Trackable
Labels 72
Creating an international trackable label 72
Printing a USPS return trackable label 73
Printing a USPS scan form 73
Reprinting a USPS, UPS or FedEx trackable
label 74
Canceling a UPS or FedEx trackable label 74
Getting a USPS refund for a trackable label 74
5 - Managing Trackable Labels
Use SendPro Online to perform these tasks for
your SendPro C machine 77
Using the Trackable Labels address book 78
About cost accounts for Trackable Labels 78
Turning Trackable Label cost accounts on or
off 78
Changing the default refill amounts for
Trackable Labels 79
Turning on address autofill 79
Searching addresses in the Trackable Label
address book 79
Adding new addresses to Trackable Labels
address book 80
Adding a single Trackable Labels cost account 81
Modifying a Trackable Label cost account 82
Refilling Trackable Labels postage 83
Setting up your FedEx account 83
Setting up your UPS account 84
Setting up default printing options 84
Managing Trackable Labels email notifications 85
Setting the default address for USPS return
labels 85
Determining how you spend your postage 86
Withdrawing money from your Trackable
Labels account 86
6 - Using Envelope Printing
Printing postage on envelopes 89
Checking your available Envelope Printing
postage 90
Refilling postage for your Envelope Printing
balance 91
Using accounts to charge back Envelope
Printing postage costs 92
Sending a First-Class letter envelope on
SendPro C, SendPro+ Model with PCN 8H00 93
Sending a large First-Class® envelope
SendPro C, SendPro+ Model with PCN 8H00 93
Sending Certified Mail on SendPro C,
SendPro+ Model with PCN 8H00 95
Sending an international letter on SendPro C,
SendPro+ Model with PCN 8H00 96
Printing a future date 97
Omitting the date from Envelope Printing for
SendPro C, SendPro+with model PCN 8H00 98
Pitney Bowes Operator Guide August 2019 iv
Page 5

Printing additional postage 98
Envelope Printing
Re-dating your mail 99
Using USPS special services 100
Entering weight manually for Envelope
Printing 100
Using the weighing platform for Envelope
Printing 102
Sealing the envelope only, bypass all printing 102
Sealing envelopes 103
Zeroing the scale 104
Adding insurance to your mail in Envelope
Printing 104
How to process ERR in Envelope Printing on
SendPro C, SendPro+ 105
Getting a USPS refund for damaged or
incorrectly printed mail in Envelope Printing 105
Adding a graphic to your envelope in
Envelope Printing 106
Creating a custom text message for your mail
on SendPro C, SendPro+ model with PCN
8H00 107
Adding a custom text message to your
envelope or tape 109
Editing or deleting a custom text message on
SendPro C, SendPro+ model with
PCN 8H00 111
Printing a graphic on your envelope without
printing postage 113
Adding an inscription to your envelope in
Envelope Printing 113
Printing only the date and time in Envelope
Printing 113
Uploading Envelope Printing transactions 116
Clearing or resetting the number of
mailpieces you've sent in Envelope Printing 118
Performing USPS postal inspections for
Envelope Printing 118
Updating postal rates or software for
Envelope Printing 119
Viewing the total Envelope Printing postage
spent 122
Viewing the Envelope Printing postage refill
history 122
Setting the Envelope Printing low funds
warning 122
Setting up a mailer ID 123
Updating the ZIP code 123
Managing accounts for Envelope Printing 123
Multi-level Envelope Printing accounts 124
Turning Envelope Printing account
passwords on and off 125
Creating an Envelope Printing account 126
Editing an Envelope Printing account 127
Deleting an Envelope Printing account 128
8 - View Print Reports
Printing a receipt when refilling postage for
Envelope Printing 131
Viewing the total Envelope Printing postage
spent 131
Viewing the Envelope Printing postage refill
history 131
Printing a report for the number of mailpieces
7 - Managing Envelope Printing
Confirming your meter update for Envelope
Printing 115
Changing the default refill amounts in
Pitney Bowes Operator Guide August 2019 v
115
sent in Envelope Printing 132
Printing Envelope Printing funds report 132
Running Envelope Printing account reports 133
Emailing an Envelope Printing account report 133
Page 6

Setting the Envelope Printing account report
period 135
Setting the Envelope Printing account report
preferences 136
Viewing the Trackable Labels history 137
9 - Mail Machine Maintenance
Key in Postage 171
Sections of the meter impression 172
Postal Security Device 172
Parts of the machine 173
Connections on the back of the machine 174
Specifications 174
Check the postage print quality on the
SendPro C, SendPro+ Model with
PCN 8H00 139
Printing a test pattern 139
Cleaning the print nozzles 140
Checking the ink level 140
Installing the ink cartridge 141
Change the ink waste pad on the SendPro C,
SendPro+ Model with PCN 8H00 142
Cleaning the printhead 144
Installing the printhead 149
Cleaning the moistener brush and wick
assembly 154
Filling the moistener tank 157
Avoiding envelope sealing issues 157
How to properly feed envelopes 158
Managing product email notifications 159
Moving your SendPro C, SendPro+ meter 160
12 - Technical Support
Contacting Pitney Bowes 177
A - SendPro Online
Importing Addresses 181
Exporting Addresses 185
Importing Cost Accounts 185
Exporting Cost Accounts 186
Exporting a History Report 186
Setting up and Managing a UPS Account 187
Setting up and Managing a FedEx Account 188
Managing Users 190
Inviting Users 192
Viewing Locations in SendPro Online and on
the SendPro C/SendPro+ 193
Creating an international trackable label 193
Printing a USPS scan form 194
10 - Supplies
Ordering supplies from your SendPro C,
SendPro+ Model with PCN 8H00 163
Supplies, ink cartridges, and options 166
11 - Machine Information
USPS requirements 171
Pitney Bowes Operator Guide August 2019 vi
Shipping Label Printing Defaults 194
Comparing Carrier Rates 195
B - Safety
Lithium Ion Battery 200
Agency Compliance Information 200
Important Safety Notes 200
Page 7

Note for California Customers Only on all
Models 202
C - Third party software
Third party software 204
Pitney Bowes Operator Guide August 2019 vii
Page 8

1 - Quick start guide
In this section
Finding the Product Code Number (PCN) and serial number 9
Navigating the Home screen on the SendPro C, SendPro+ 10
Print a trackable label or print postage on an envelope 12
Creating and printing a trackable label 15
Tracking a shipment 20
Using cost accounts to charge back Trackable Labels postage costs 20
Adding a single Trackable Labels cost account 21
Printing postage on envelopes 22
Sending a First-Class letter envelope on SendPro C, SendPro+
Model with PCN 8H00 24
Sending a large First-Class® envelope SendPro C, SendPro+
Model with PCN 8H00 25
Sending Certified Mail on SendPro C, SendPro+ Model with PCN
8H00 27
Sending an international letter on SendPro C, SendPro+ Model with
PCN 8H00 28
Sending mail using a Certificate of Mailing on SendPro® C,
SendPro®+ Model with PCN 8H00 29
Using USPS special services 31
Adding a graphic to your envelope in Envelope Printing 31
How to process ERR in Envelope Printing on SendPro C,
SendPro+ 32
Using the weighing platform for Envelope Printing 33
Sealing envelopes 33
Sealing the envelope only, bypass all printing 34
Filling the moistener tank 35
Installing the ink cartridge 35
Printing a test pattern 36
Page 9
Quick start guide
Supplies, ink cartridges, and options 37
Accessing the SendPro® Care application 39
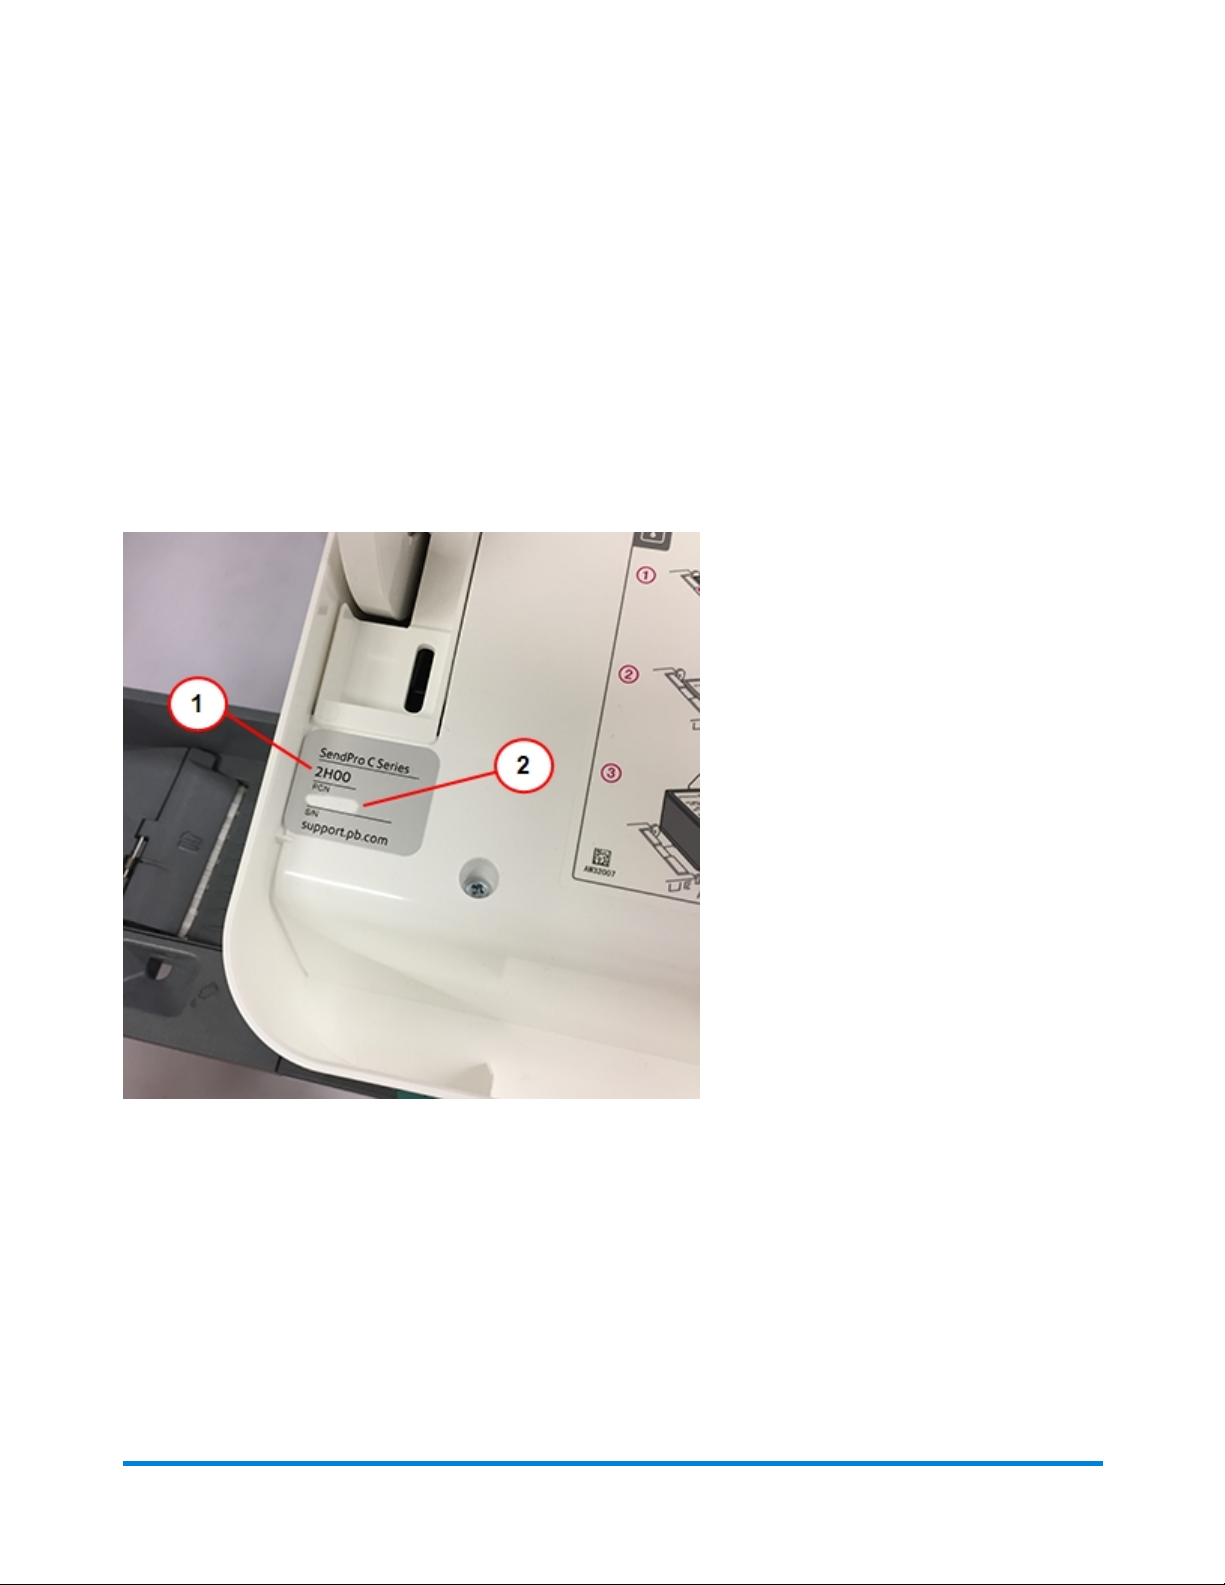
Finding the Product Code Number (PCN) and serial number
To locate the (1) Product Code Number (PCN) and the (2) 7-digit serial number, check the label on
the rear of the meter or under the display cover as shown here. Note that the serial number is blurred out
here for security reasons.
Pitney Bowes Operator Guide August 2019 9
Page 10
Quick start guide
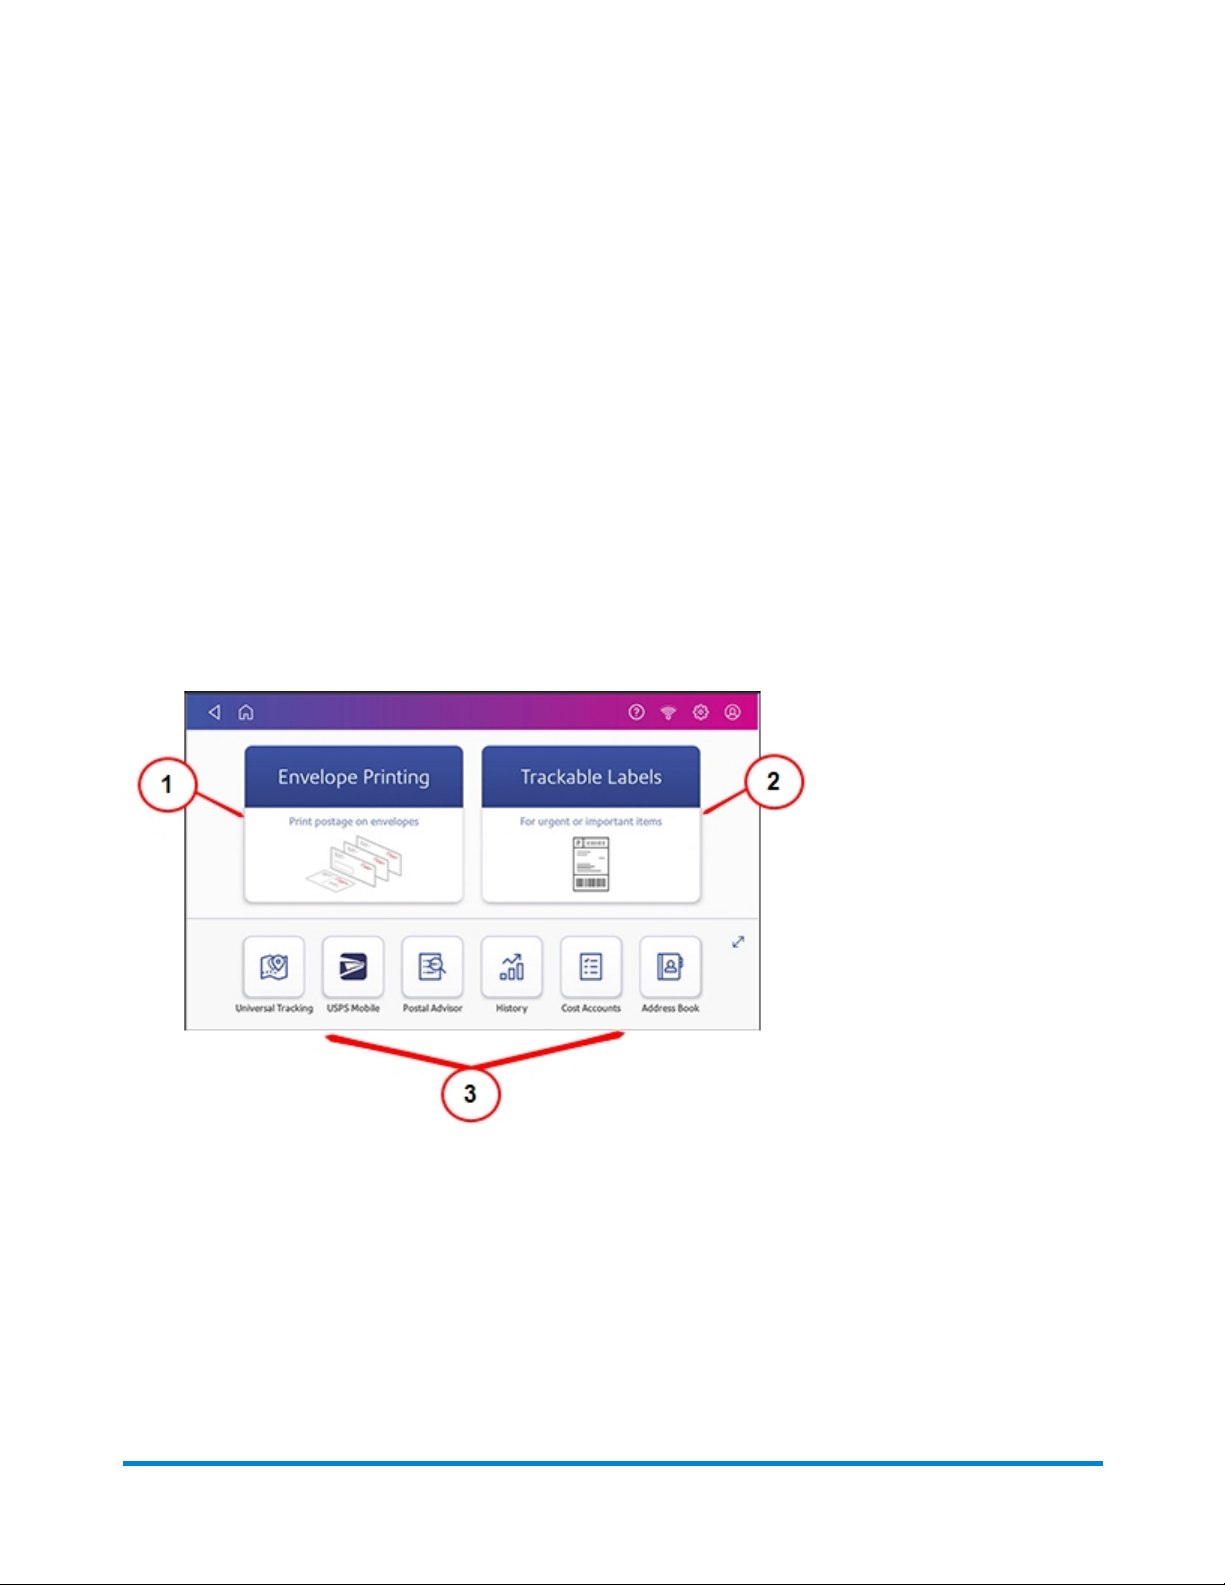
Navigating the Home screen on the SendPro C, SendPro+
The Home screen on the SendPro C, SendPro+ machine provides the starting point for creating either a
trackable shipping label or printing postage on an envelope.
For general purpose envelopes and post cards, print postage by tapping (1) Envelope Printing. For
important large envelopes or packages using USPS, USP®, or FedEx® start creating a shipping label by
tapping (2) Trackable Labels.
The application drawer (3) at the bottom of the screen provides access to a variety of applications to
support and enhance your SendPro C-Series device. For example, you can track shipments (Universal
Tracking), access address information (Address Book) and even check your network connection (Check
Network).
Pitney Bowes Operator Guide August 2019 10
Page 11

Quick start guide
To view all of the options in the application drawer, tap the double-headed arrow (4) on the right side of
the application drawer. Other options include the ability to track a shipment (Tracking), visit the USPS
postal website, and order supplies.
Note: The History icon in the applications drawer provides information about labels you have created
using the Trackable Labels application (Date, Recipient, Carrier, Tracking Number (USPS), Status, and
Label Amount). The History & Report application provides a history of the postage refill operations you
have performed for the Envelope Printing application.
Global Toolbar
The global toolbar located at the top of the Home screen appears at the top of every screen within the
Trackable Labels and Envelope Printing applications.
This toolbar allows you to view and change settings and defaults values for your machine and the
Trackable Labels and Envelope Printing applications.
(1) Back - Return to the previous screen.
(2) Home - Return to the Home screen from anywhere in Trackable Labels or Envelope Printing.
Pitney Bowes Operator Guide August 2019 11
Page 12

Quick start guide
(3) Support - Get information on how to perform tasks using Trackable Labels and Envelope
Printing using the SendPro Care app. Search online content or watch a video.
(4) Network - View the current network type (wireless or Ethernet) and status and strength (for
wireless connection). Allows you to turn wireless connection on or off. The icon here represents a
wireless connection.
(5) Settings - View or change your machine and application settings. For your machine, this
includes adjusting the screen brightness, setting sound notification levels, and viewing wireless or
Ethernet connection information. For the Envelope Printing this includes setting up automatic postage
refills, external scales and barcode scanners and performing maintenance on the mail postage printer.
For the Trackable Labels this includes managing your carrier accounts and setting up your shipping label
printer default values.
(6) Profile - View your profile (name and email for Trackable Label account), log out, or lock your
SendPro C device.
Print a trackable label or print postage on an envelope
With SendPro® C you can create either a trackable shipping label or print postage on an envelope. For a
shipping label, tap Trackable Labels on the Home screen. For postage, tap Envelope Printing on the
Home screen.
Use Trackable Labels to get the best pricing, free tracking and detailed delivery history for Priority Mail®
and other USPS package services. You can also send via UPS® or FedEx®. The packaging options and
benefits are almost identical. The process for creating a UPS or FedEx label is the same.
Pitney Bowes Operator Guide August 2019 12
Page 13
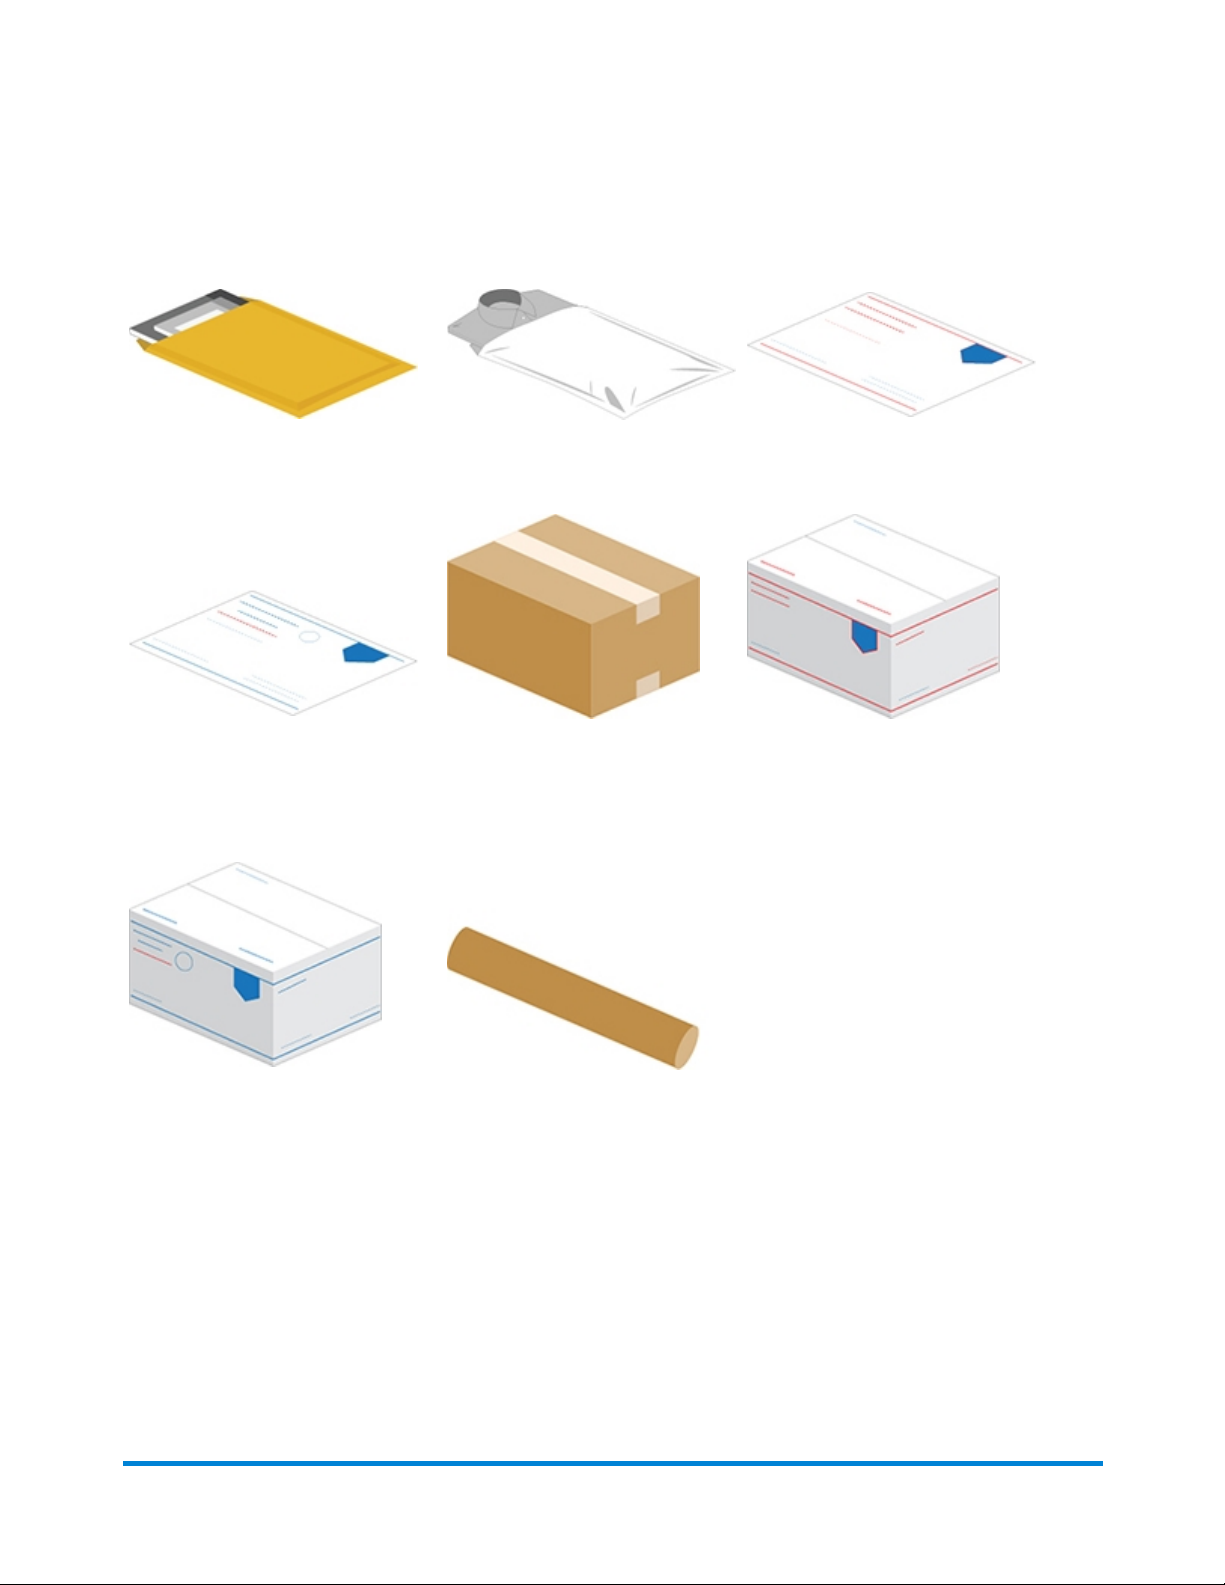
Use Trackable Labels for:
Quick start guide
Thick envelopes
USPS non flat rate envelopes
Poly mailers
Boxes USPS flat rate boxes
USPS flat rate envelopes
USPS non flat rate boxes
Pitney Bowes Operator Guide August 2019 13
Tube
Page 14

Quick start guide
Use Envelope Printing for:
Standard envelopes and postcards
Large envelopes
Pitney Bowes Operator Guide August 2019 14
Page 15
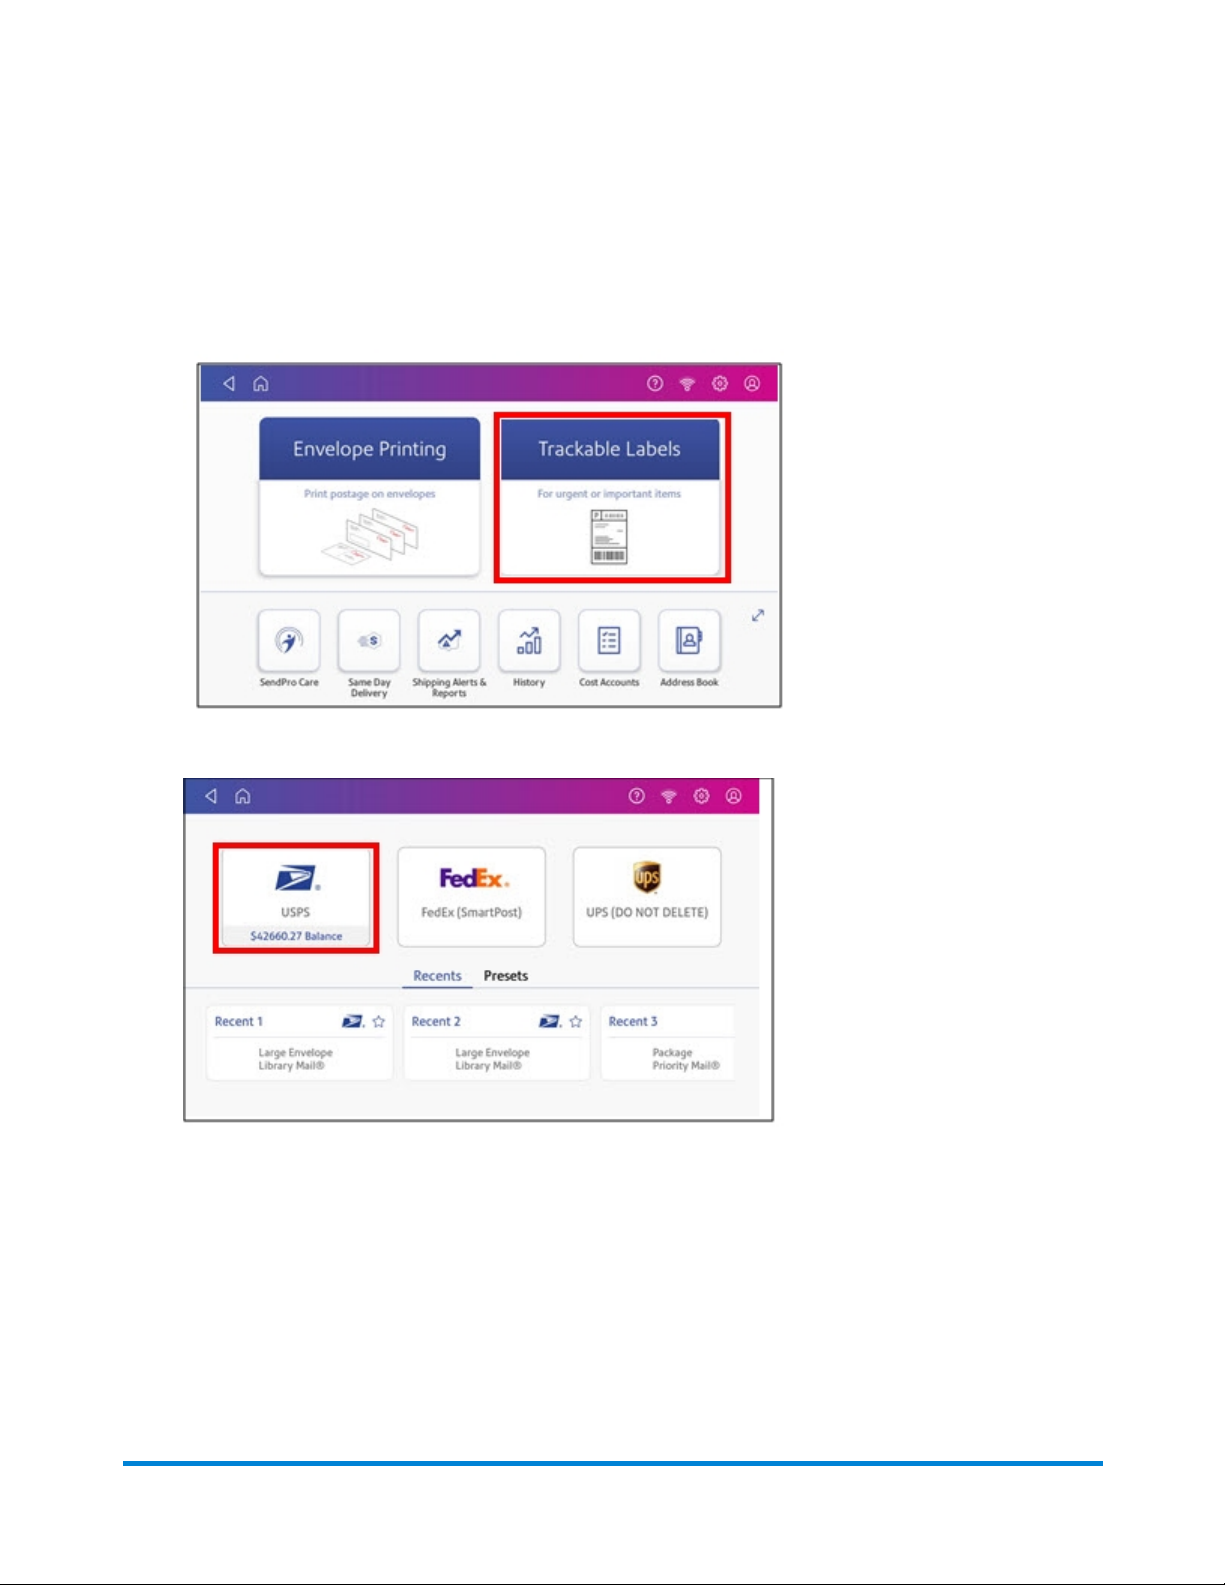
Creating and printing a trackable label
1. Tap Trackable Labels on the Home screen.
Quick start guide
2. Tap the carrier you want to use. For example, tap USPS.
Pitney Bowes Operator Guide August 2019 15
Page 16

Quick start guide
3. Verify that the sender address is correct. If not, tap on the Sender field and select a new address.
4. If you have enabled cost accounts on your SendPro® C, you must provide an account. If this field
contains an account, verify the account is correct. To change or add an account, tap on the Cost
Account field and select an account from the list.
5. Tap Continue.
Pitney Bowes Operator Guide August 2019 16
Page 17
Quick start guide
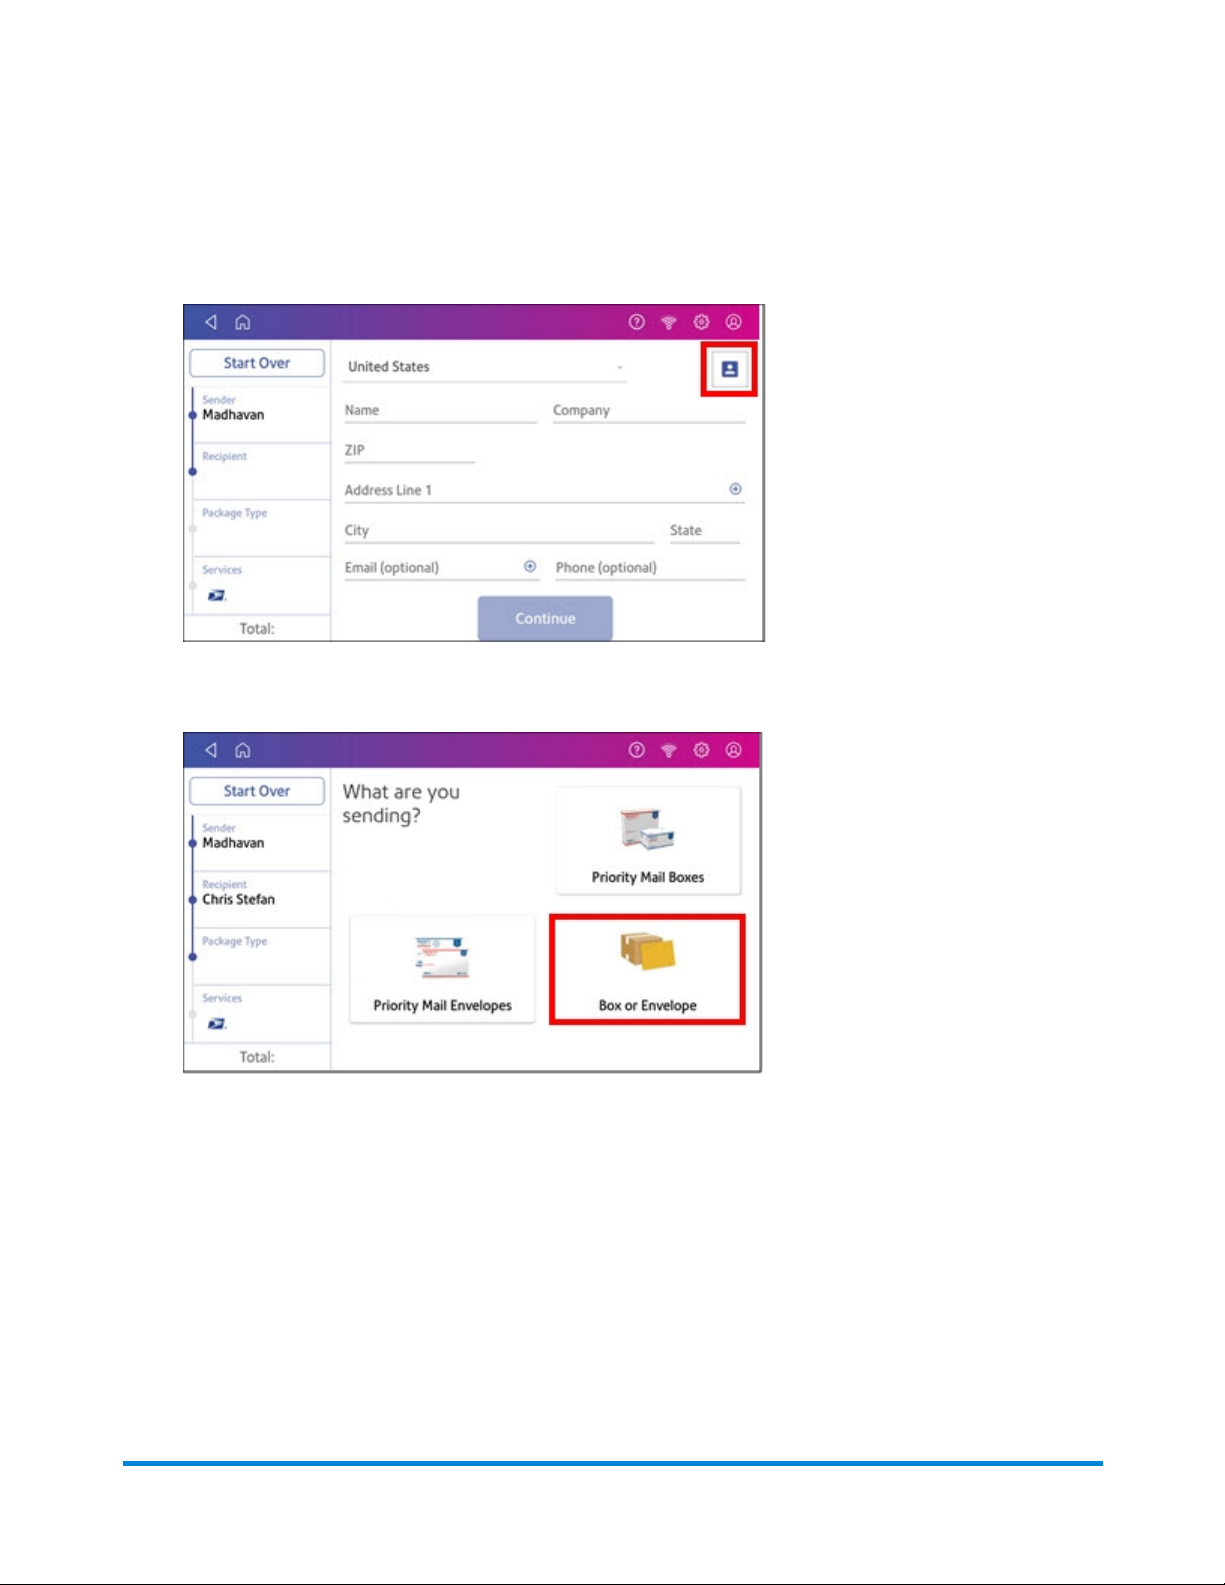
6. Enter the recipient address. You can manually enter the recipient information or select one from
the address book. To select one from the address book, tap the Address icon in the upper right
corner of the screen as shown here.
7. Tap Continue.
8. Tap a package type. For example, Box or Envelope.
Pitney Bowes Operator Guide August 2019 17
Page 18
Quick start guide
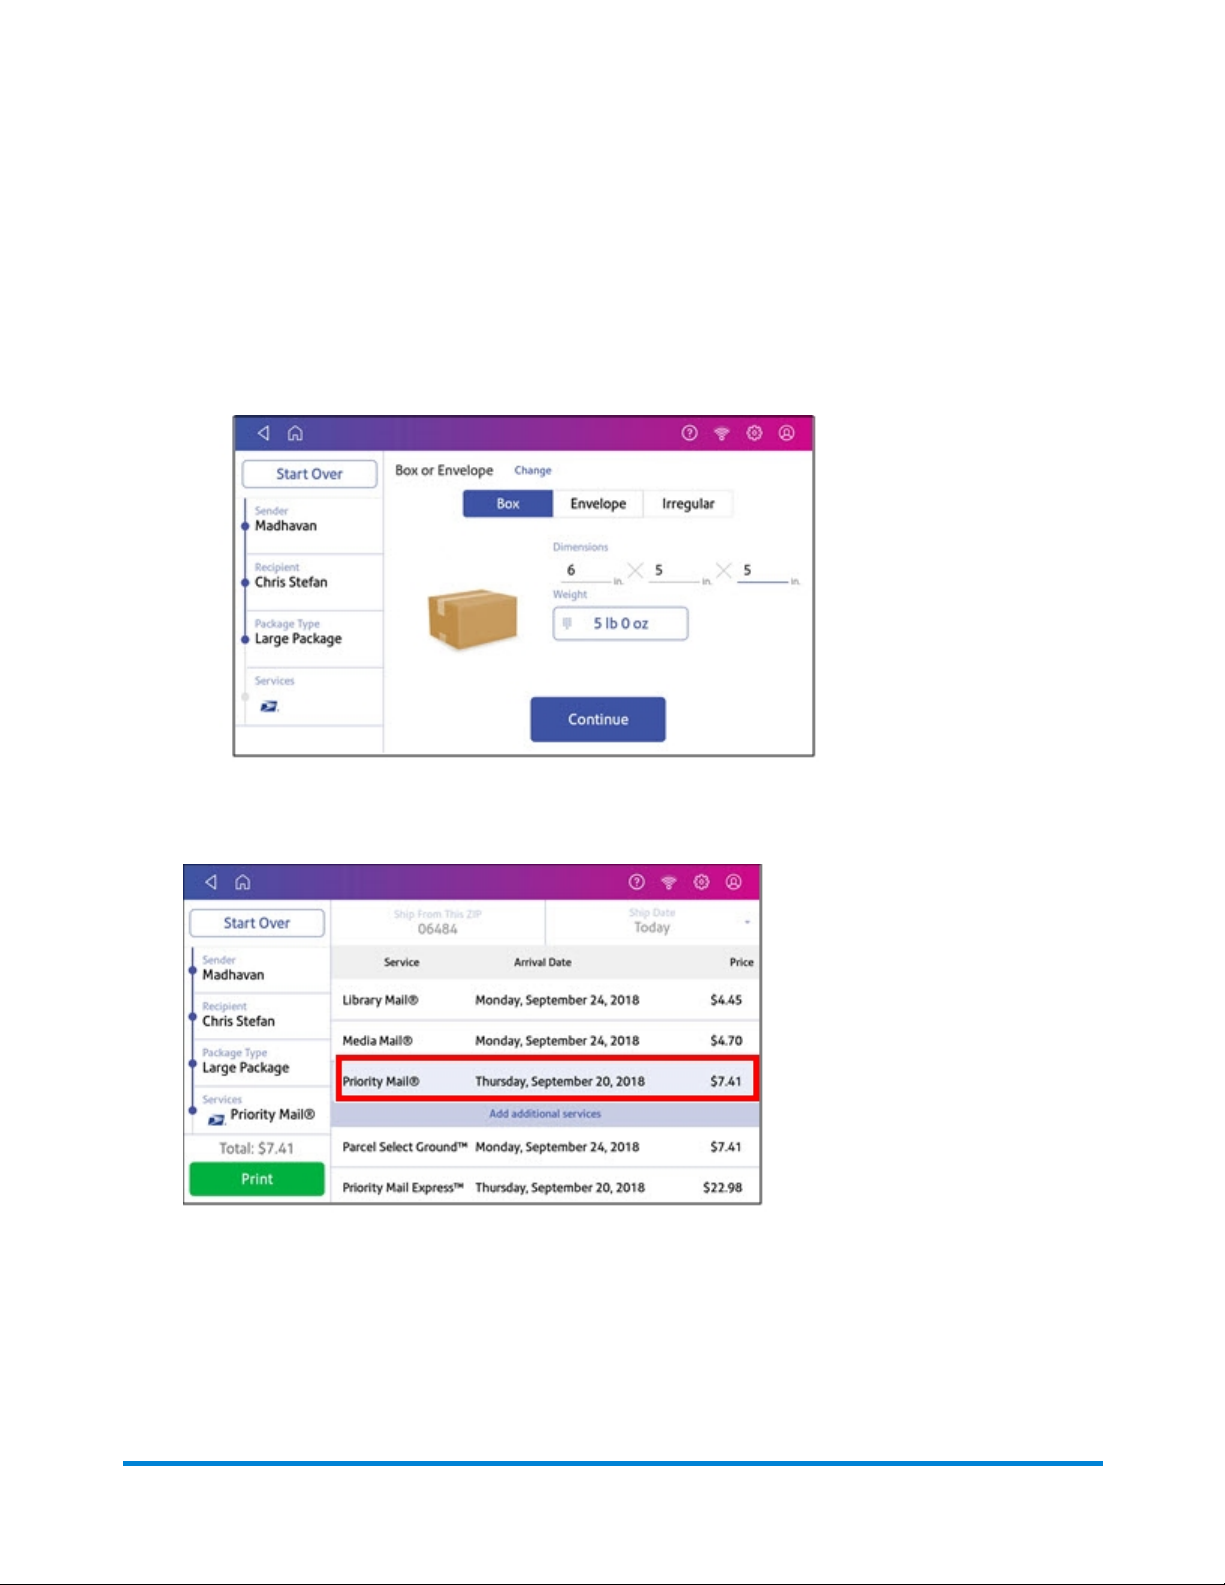
9. Enter the dimensions and the weight of the box or envelope:
l Tap each dimension and enter a value using the display keypad. Tap the green check mark
when done.
l If you have an attached scale, place the box or envelope on the scale and the weight appears
in the weight field. If you do not have a scale, tap on the Weight field and enter the value using
the keypad and then tap Apply.
10. Tap Continue.
11. Tap the service you want to use, in this example, Priority Mail.
Pitney Bowes Operator Guide August 2019 18
Page 19
Quick start guide
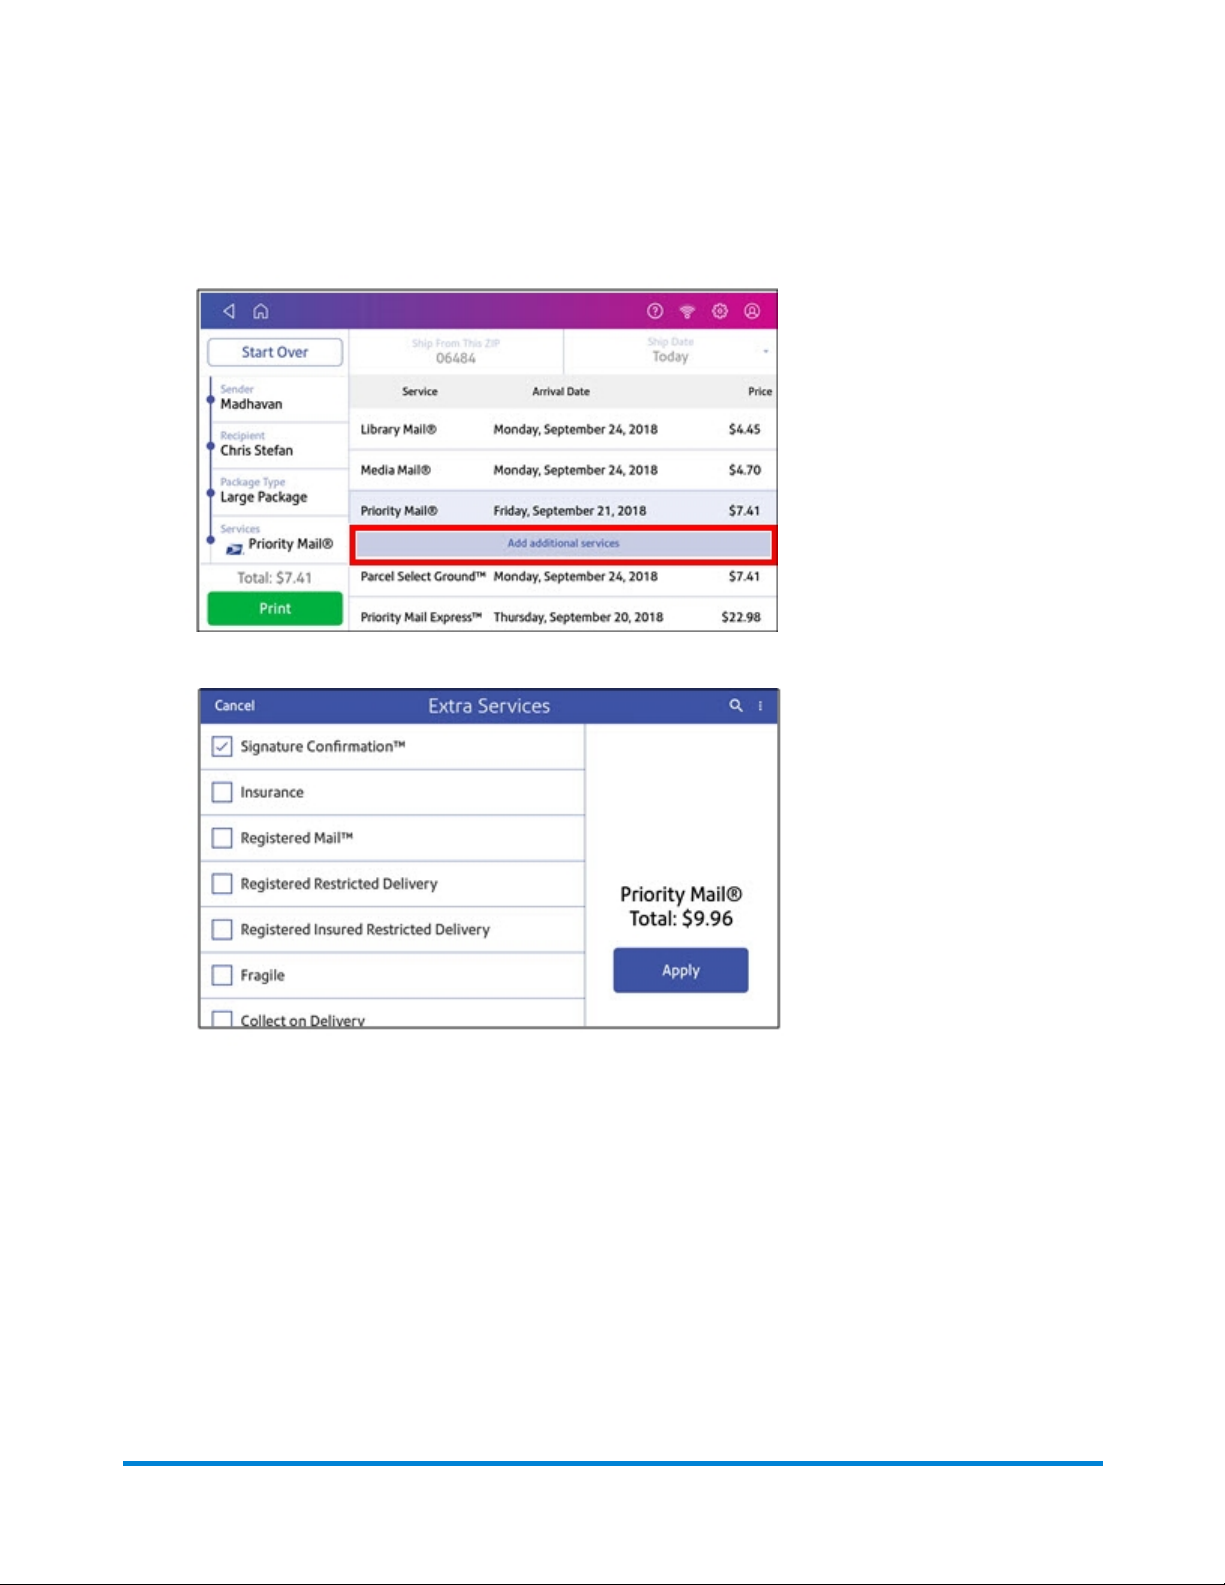
12. Tap Add additional service to add extra services. If you are not adding any special services, go
to step 14.
13. Select the extra service, in this example, Signature Confirmation.
14. You can continue to add additional services if necessary. Tap Apply when done.
15. Tap Print.
Pitney Bowes Operator Guide August 2019 19
Page 20
Quick start guide
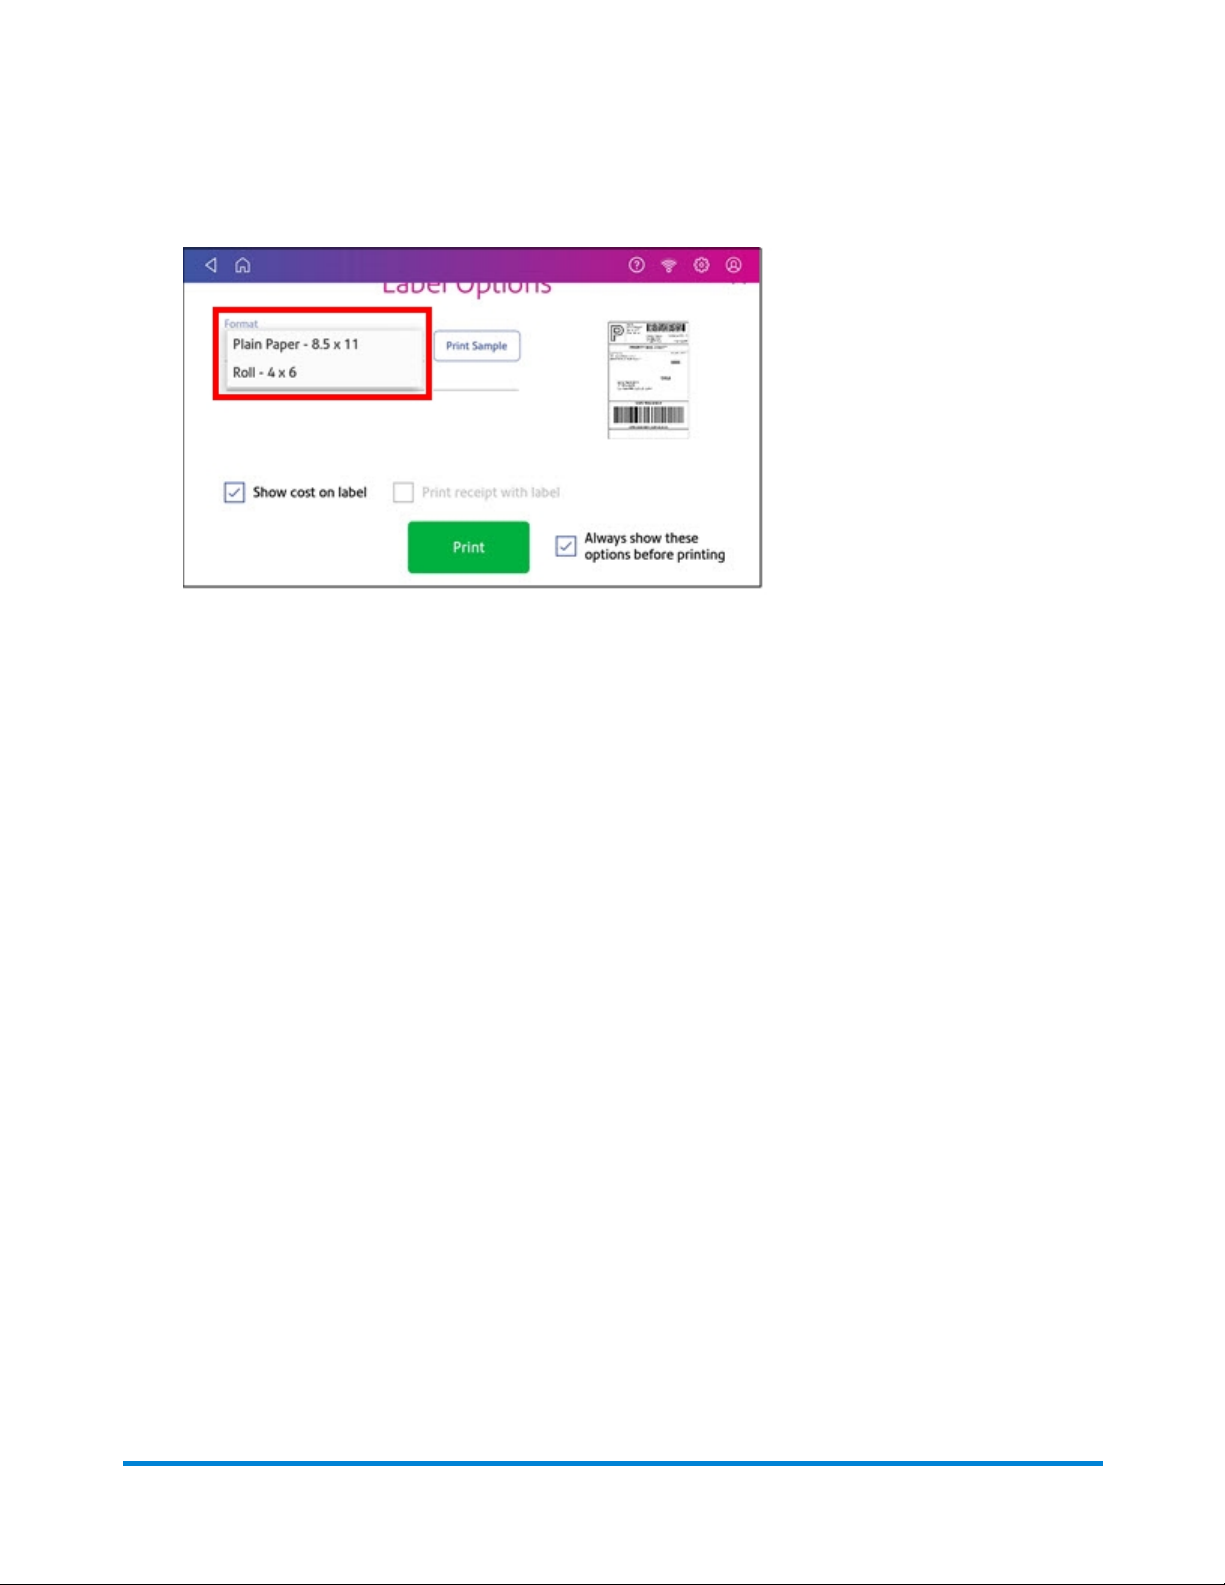
16. At the Label Options screen, tap Format and select the printer format. For example, tap Roll- 4x6.
Note: If you want to print a sample label first, tap the Print Sample button.
17. Tap Print again and the label prints.
l If prompted, enter the Sender and Recipient's phone number (required for some services).
18. The carrier screen reappears. You can now print another label.
Tracking a shipment
You can locate the tracking number for a trackable label by using the History button on the Home
screen. You can then use that tracking number to locate the shipment.
1. Tap Universal Tracking in the application drawer at the bottom of the Home screen.
2. Enter the carrier's tracking number in the field provided.
3. Tap Track.
4. The package status is displayed at the top of the screen.
Using cost accounts to charge back Trackable Labels postage costs
You can assign the costs for a trackable label to an account when you create the trackable label.
In order to use cost accounts to charge back your Trackable Labels postage costs you need to turn on the
cost accounts feature.
Pitney Bowes Operator Guide August 2019 20
Page 21

Quick start guide
1. Open Trackable Labels cost accounts by tapping the Cost Accounts icon in the application
drawer at the bottom of the Home screen.
2. Tap the Cost Account settings icon in the upper right corner of the Cost Accounts screen.
3. Tap the slider in the upper right so that it turns blue and ON display.
l If you want to make sure every trackable label is assigned an account, tap in the check box for
Require cost account for all shipments.
4. Once you turn cost accounts on, you will need to have at least 1 cost account to print a trackable
label.
Adding a single Trackable Labels cost account
Open your Trackable Label cost accounts by tapping the Cost Accounts icon in the application drawer
at the bottom of the Home screen. This opens the Cost Accounts screen.
Note: To import or export multiple cost accounts, use your SendPro® C user ID to log into SendPro
Online. In your web browser, go to https://login.pitneybowes.com/sendpro and sign in with your
SendPro C user ID and password.
1. Tap the plus sign + in the upper left corner of the Cost Accounts screen.
2. Enter the account name, up to 20 characters. Tap the green check mark when done. You can use
lower case letters, upper case letters, numerals and special characters for the account name.
Allowed special characters include:
l - hyphen
l _ dash
l ' single quote
l @ at sign
l . Period
l and optional description.
3. (Optional) Enter a description of the account, up to 200 characters.
4. Tap Enter (green check mark) when done. You can use the same types of characters as for the
account name.
5. Tap on the option button for Active or Inactive, whichever is appropriate for this account.
Pitney Bowes Operator Guide August 2019 21
Page 22
Quick start guide
6. To make this the account that is automatically used for all trackable labels, tap the checkbox for
Make this my default Cost Account.
7. Tap Apply.
Printing postage on envelopes
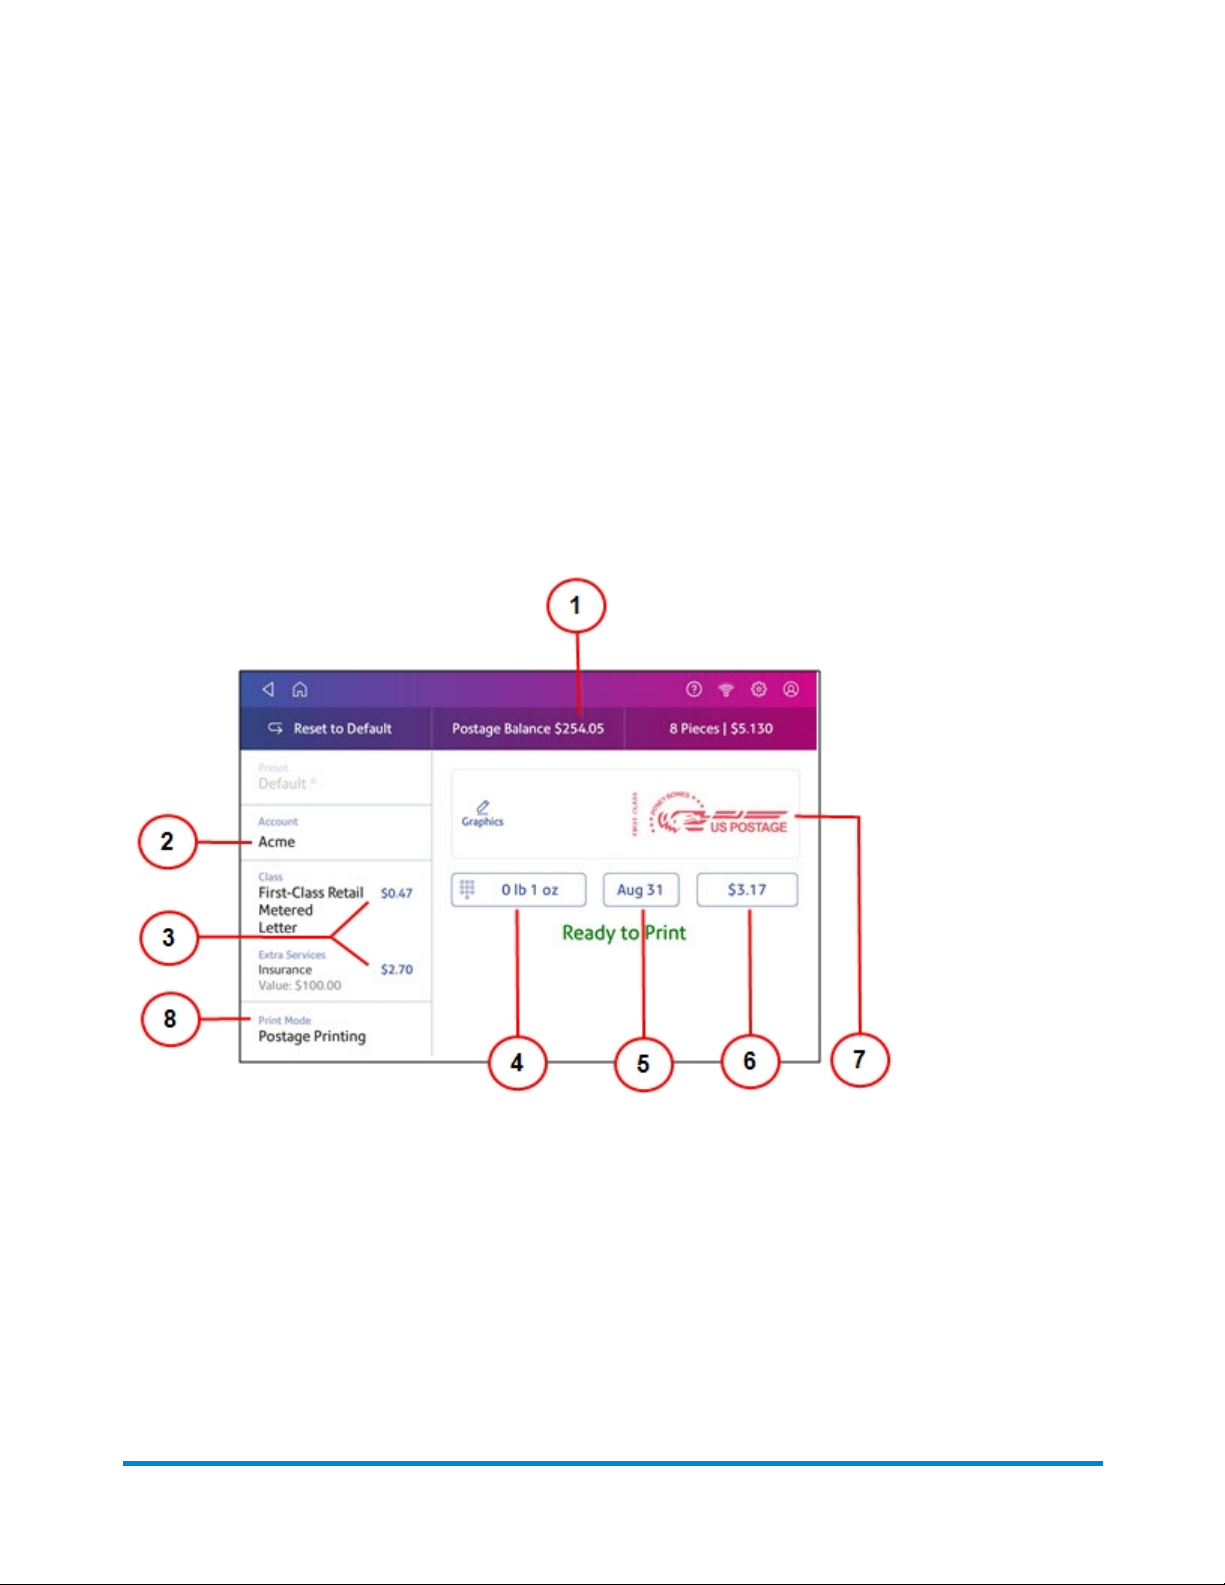
Tap Envelope Printing on the Home screen to open the Envelope Printing screen.
This screen is the starting point for printing postage on an envelope or tape. It also allows you to change
what you print on the envelope.
Within the mail screen you can:
1. View the balance of funds you have remaining in your meter.
2. Select an account by tapping Account (this option appears if your device has the account feature
enabled).
3. Tap Class to view the class and any extra services.
4. Tap the weight icon to view the weighing options (enter weight manually or using a scale).
5. Tap the date to view the date options.
Pitney Bowes Operator Guide August 2019 22
Page 23

Quick start guide
6. View the total postage amount.
7. Preview or add graphics.
8. Tap Print Mode to access the Print mode screen. This provides you with different printing modes
such as adding graphics to your envelope, adding more postage, or making corrections to the
date. You can also choose to only seal envelopes without printing any postage.
Scroll down to view additional options.
Pitney Bowes Operator Guide August 2019 23
Page 24

Quick start guide
9. Tap on the option you want to select the mode.
l Certificate of Mailing
l Date and Time Stamp
l Date Correction
l Graphic Only
l Postage Correction
l Postage Printing - printing postage on an envelope is the default mode.
l Seal Only- bypass all printing.
l Test Print - Check the quality of postage imprint
Sending a First-Class letter envelope on SendPro C, SendPro+ Model with PCN 8H00
If you are unsure of your SendPro C, SendPro+ model number, refer to Related topics.
1. Tap Envelope Printing on the Home screen.
2. If you have the accounting feature enabled on your machine:
a. Tap Account on the left side of the screen.
b. Select an account.
If you have only a single account, once you select that account the device will remember that
account the next time you start Envelope Printing.
3. Tap Class.
4. Tap Start Over to display a list of all the available classes.
5. Tap First-Class Retail Metered for a First-Class mail envelope.
6. Tap Letter.
7. Select any special services required.
8. Tap Apply.
9. Place the envelope on the scale. The weight appears in the weight button on the screen.
10. Place the envelope on the feed deck; the machine automatically feeds the envelope and prints the
postage.
Pitney Bowes Operator Guide August 2019 24
Page 25

Quick start guide
Note: If you have previously printed any envelopes, you may get a message that transactions are
being uploaded. Once the upload completes, you see the message "Transaction upload status, Upload
success" with a check mark. Tap the check mark.
Related topics:
l Finding the Product Code Number (PCN) and serial number
l Sending a large First-Class® envelope
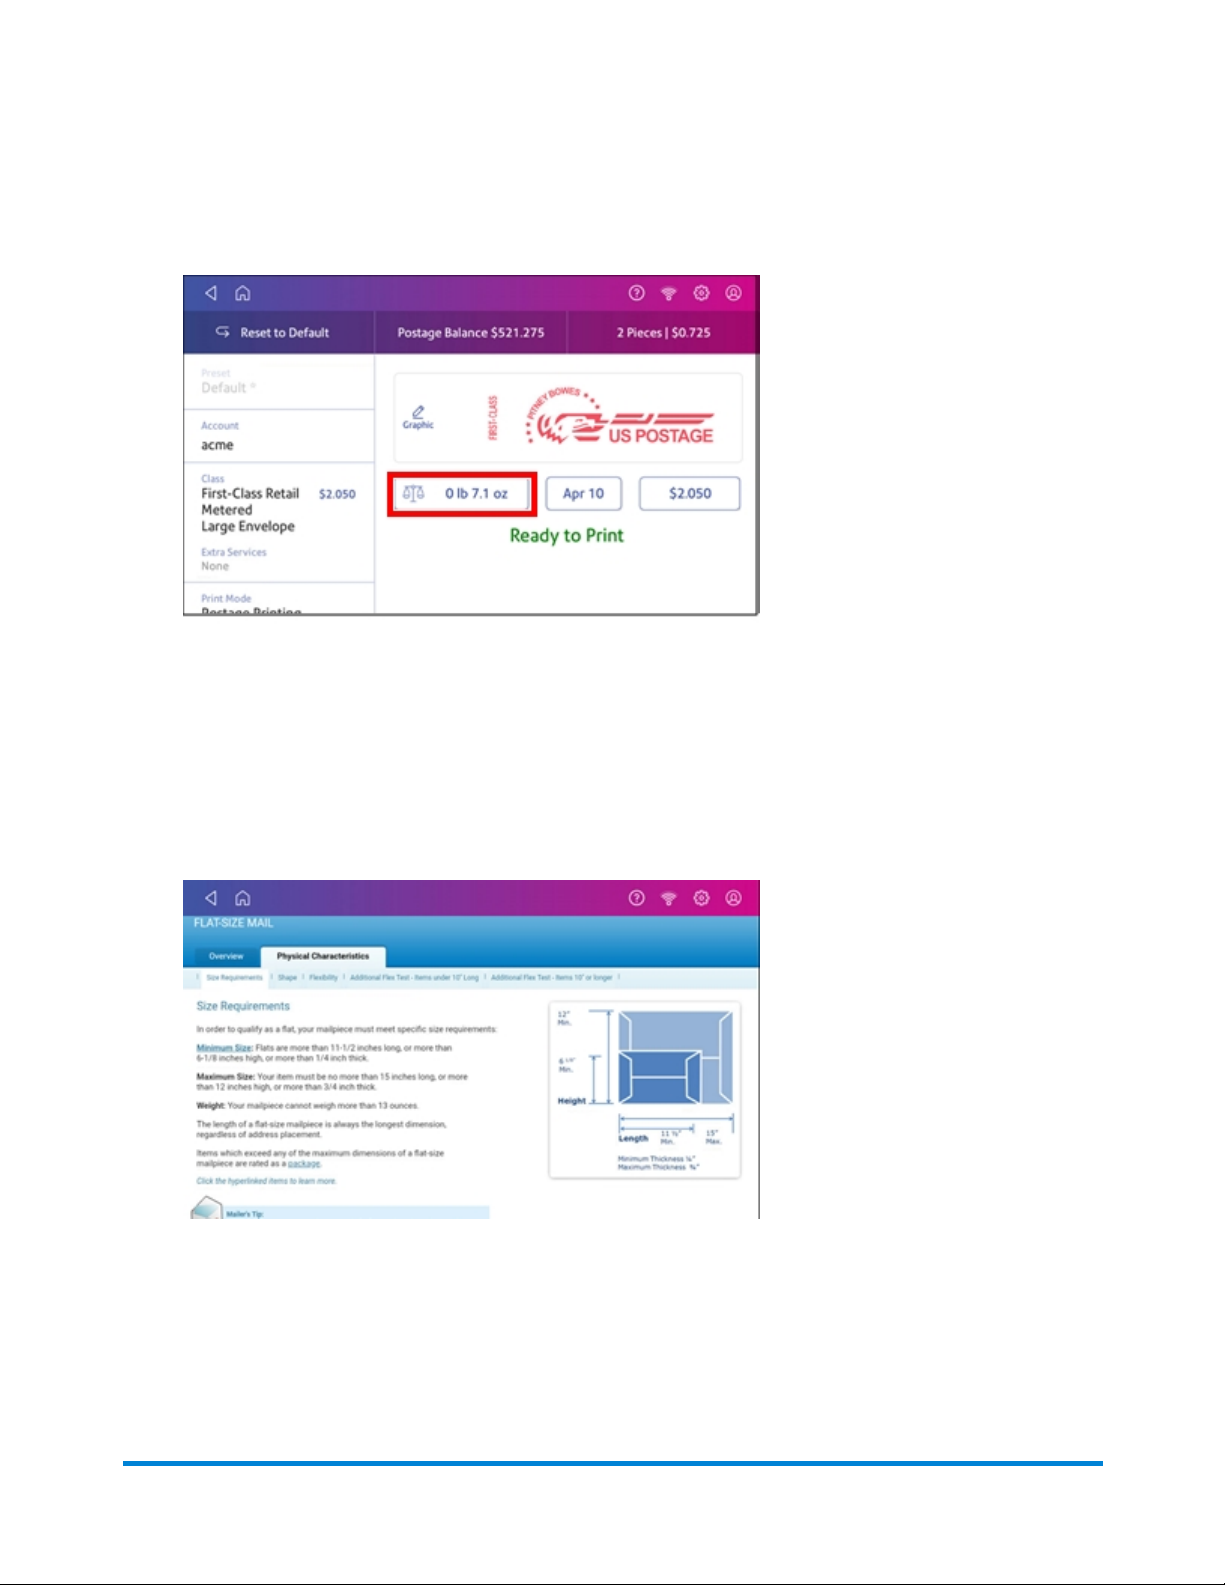
Sending a large First-Class® envelope SendPro C,
SendPro+ Model with PCN8H00
If you are unsure of your SendPro C, SendPro+ model number, refer to Related topics.
Before you select a rate for a large envelope or flat, you need to determine whether the mailpiece you are
sending is classified as a letter or flat (large envelope) according to the USPS.
If your mailpiece weighs more than 3.5 oz, the SendPro C, SendPro+ automatically sets the class to
Large Envelope regardless of the dimensions. If the mailpiece weighs less than 3.5 oz but has the
dimensions of a flat, you need to manually select Large Envelope when you choose the class.
To determine if your mailpiece meets all of the criteria for a flat (dimensions and weight), tap on the
Postal Advisor located in the application drawer on the SendPro C, SendPro+.The Postal Advisor also
provides information for multiple types and classes of mailpieces, including postcards, letters, and
parcels.
First weigh the mailpiece and measure the dimensions:
1. Tap Envelope Printing on the Home screen to open the Envelope Printing screen.
2. If you have the accounting feature enabled on your machine:
a. Tap Account on the left side of the screen.
b. Select an account.
If you have only a single account, once you select that account the device will remember that
account the next time you start Envelope Printing.
Pitney Bowes Operator Guide August 2019 25
Page 26
Quick start guide
3. Place the mailpiece on the scale. The weight displays in the weight button on the screen. You can
also weigh the mailpiece using any external postal scale.
4. Measure and record the dimensions of the mailpiece.
5. Tap the Home icon on the global toolbar to return to the Home screen.
6. Tap the double-headed arrow on the right side of the application drawer at the bottom of the
screen.
7. Tap the Postal Advisor icon.
8. Tap on Flats.
9. Tap on Physical Characteristics tab and see if your mailpiece is within the weight and size limits.
If the mailpiece if less than 3.5 oz, but has the dimensions of a flat:
1. Tap on the Home icon in the global toolbar.
2. Scroll back up to the Envelope Printing icon and tap on it.
Pitney Bowes Operator Guide August 2019 26
Page 27

Quick start guide
3. If you have the accounting feature enabled, tap Account on the left side of the screen and select
an account. If you do not have the accounting feature, go to step 3.
4. Tap Class.
5. Tap Start Over to display a list of all the available classes.
6. Tap First-Class Retail Metered for a First-Class mail envelope.
7. Tap Large Envelope.
8. Select any special services required.
9. Tap Apply.
10. Place the large envelope on the feed deck and the machine automatically feeds the envelope and
prints the postage.
l If the envelope is too thick to go through the feeder, use a tape sheet to print the postage.
l Apply the tape sheet label to the large envelope/flat.
Related topics:
l Finding the Product Code Number (PCN) and serial number
Sending Certified Mail on SendPro C, SendPro+ Model with PCN 8H00
If you are unsure of your SendPro C, SendPro+ model number, refer to Related topics.
Not all extra services like Certified Mail are available for all classes and only certain services can be
combined.
To find out more about Certified Mail, tap on the Postal Advisor icon in the application drawer at the
bottom of the Home screen. Scroll down until you reach the section on Extra Services.
1. Tap Envelope Printing on the Home screen.
2. If you have the accounting feature enabled on your machine:
a. Tap Account on the left side of the screen.
b. Select an account.
If you have only a single account, once you select that account the device will remember that
account the next time you start Envelope Printing..
3. Tap Class.
4. Tap Start Over to display a list of the available classes.
5. Tap a class that can be combined with Certified Mail (for example, First Class or Priority Mail).
6. Tap on the mailpiece type (for example, letter or large envelope).
Pitney Bowes Operator Guide August 2019 27
Page 28

Quick start guide
7. Tap on Certified as your extra service and tap Apply.
8. Depending on the type class and type of mailpiece:
l Enter the destination ZIP Code and tap Apply
l Enter the Mailer ID and tap Apply.
9. Enter the barcode from the label and tap Apply.
10. Run the mailpiece through the machine.
11. Place green Certified Mail label on the mailpiece. (USPS Label 3800-N)
Related topics:
l Finding the Product Code Number (PCN) and serial number
l Setting up a mailer ID
Sending an international letter on SendPro C, SendPro+ Model with PCN 8H00
If you are unsure of your SendPro C, SendPro+ model number, refer to Related topics.
1. Tap Envelope Printing on the Home screen.
2. If you have the accounting feature enabled on your machine:
a. Tap Account on the left side of the screen.
b. Select an account.
If you have only a single account, once you select that account the device will remember that
account the next time you start Envelope Printing.
3. Tap Class.
4. Tap Start Over to display a list of all the available classes.
5. Tap First-Class Mail Intl Retail for a First-Class mail envelope.
6. Tap Letter.
7. Tap in the Country field and use the keypad to enter the destination country.
8. Select any special services required.
9. Tap Apply.
10. Place the envelope on the scale. The weight appears in the weight button on the screen.
11. Place the envelope on the feed deck; the machine automatically feeds the envelope and prints the
postage.
Pitney Bowes Operator Guide August 2019 28
Page 29

Quick start guide
Note: If you have previously printed any envelopes, you may get a message that transactions are
being uploaded. Once the upload completes, you see the message "Transaction upload status, Upload
success" with a check mark. Tap the check mark.
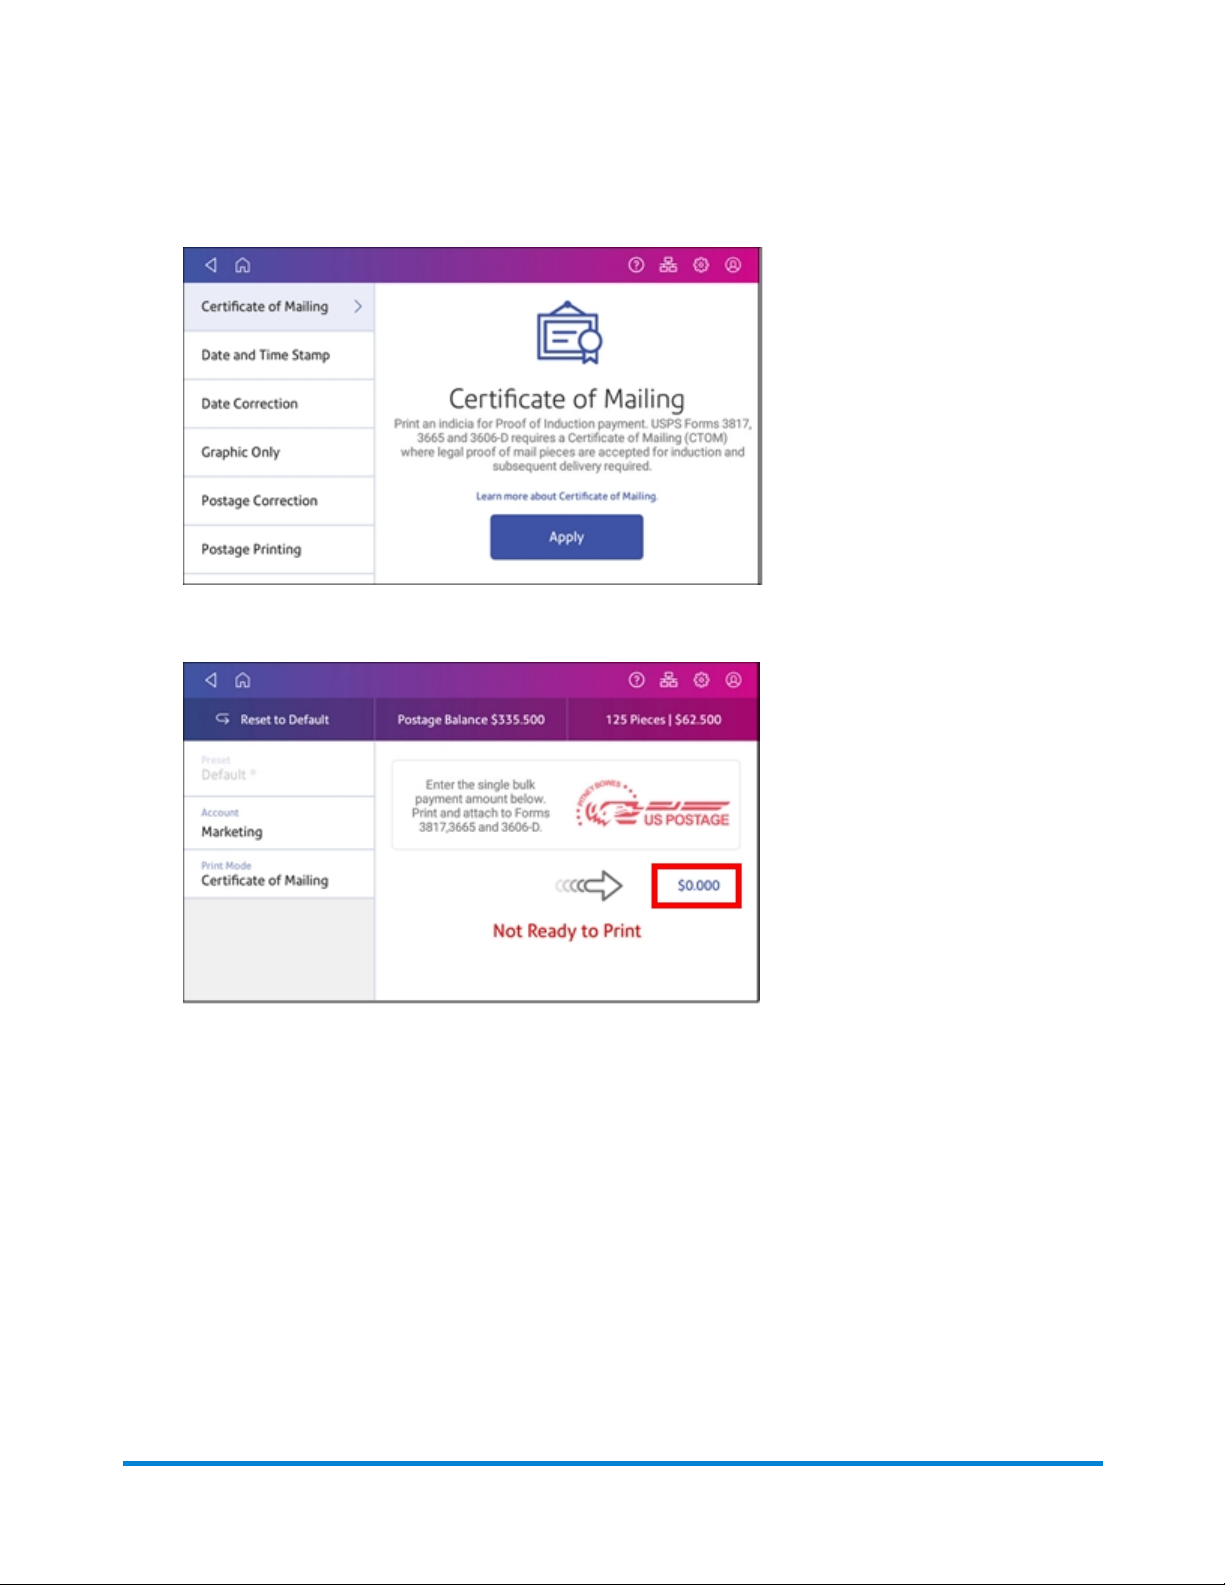
Sending mail using a Certificate of Mailing on SendPro®
C, SendPro®+ Model with PCN8H00
If you are unsure of your SendPro C, SendPro+ model number, refer to Related topics.
Purchase a Certificate of Mailing when you need to have proof that you’ve sent a letter or package.
A Certificate of Mailing is a receipt that provides evidence of the date that you took your mail to the Postal
Service™ for mailing.
1. Fill out the USPS postal forms 3606-D, 3665, or 3817 which can be obtained at the post office or
online at the USPS web site.
2. Calculate the fees for all of the mail pieces. This can include the cost of the Certificate of Mailing
fees as well as the total postage amount.
3. Tap Envelope Printing on the Home screen.
4. If you have the accounting feature enabled on your device:
a. Tap Account on the left side of the screen.
b. Select an account.
If you have only a single account, once you select that account the device will remember that
account the next time you start Envelope Printing.
5. Scroll down and tap Print Mode on the left side of the Envelope Printing screen.
Pitney Bowes Operator Guide August 2019 29
Page 30
Quick start guide
6. Tap on Certificate of Mailing.
7. Tap Apply.
8. Tap on the postage amount and use the keypad to enter the amount you calculated in step 2.
9. Feed the appropriate form (3606-D, 3665, or 3817) through the feeder so the meter stamp prints
on the form or on a tape strip that can be applied to the form. Alternatively, you can print the meter
stamp on each of the mail pieces that are included in the Certificate of Mailing.
10. Take the mail pieces and the printed form to the Post office. They will apply a round stamp proof of
induction mark that serves as legal proof that your items have been mailed.
Related topics
Finding the Product Code Number (PCN) and serial number
Pitney Bowes Operator Guide August 2019 30
Page 31

Quick start guide
Using USPS special services
1. Tap Envelope Printing on the Home screen.
2. Tap Class.
3. Tap Start Over to see a list of the available classes.
4. Tap the class you want. Sub classes display when they are available for your class.
a. For some classes, you must select the type of mail piece; for example, if you select First-Class
Retail Metered, you must select either Letter, Large Envelope, or Package.
b. Select any special services available for your class; for example: Insurance, COD, Certified, or
Registered.
5. Enter a ZIP code if required.
6. For some classes, you are prompted to either scan or manually enter the Electronic Certified
barcode from your label, and then to attach your label to your envelope or package.
7. Tap Apply.
Adding a graphic to your envelope in Envelope Printing
The SendPro® C meter comes with a set of standard graphic images that you can add to your envelopes
or tapes when you print your postage. Graphic ads are also known as ads, slogans or logos. Examples
include PLEASE OPEN IMMEDIATELY, RECYCLE and Season's Greetings.
Note: At this time, you cannot add your own custom graphics to your SendPro C meter.
Before you begin:
Weigh your envelope, select a class, and select any special services required.
1. Tap the Graphics icon on the Envelope Printing screen.
2. Select the graphic you want from the list of available graphics.
3. Tap Apply.
4. To verify that the envelope prints correctly, feed the envelope through the machine.
Pitney Bowes Operator Guide August 2019 31
Page 32

Quick start guide
How to process ERR in Envelope Printing on SendPro C, SendPro+
Tracking services are available when you use the weighing platform or Manual Weight entry method.
The following steps are based on using Priority class and the Electronic Certified service with Electronic
Return Receipt (ERR).
In order to use ERR, you must submit Form 5053, Bulk Proof of Delivery to the USPS. You will then be
provided with a 9-digit USPS Mailer ID. You need to enter this number when using ERR. The following
procedure is an example of how to use ERR.
1. Tap Envelope Printing on the Home screen.
2. Place the envelope or package on the scale.
3. Tap Class. If Priority Mail Retail is not the current class, tap Start Over and then select it from the
list of classes.
4. Tap Envelope or Package.
5. Type in the ZIP Code™ and then tap Apply.
6. Tap the check box for Electronic Certified in the Extra services list.
7. Tap Apply.
8. Enter the barcode number from your USPS PS Form 3800 using the keypad, or use the optional
barcode scanner. The barcode number should start with a 94.
9. Tap Continue when prompted to apply the barcode label on the envelope. The barcode appears
in the Class section on the left of the screen.
10. Place the envelope on the feed deck and the machine automatically feeds the envelope and prints
the postage.
Pitney Bowes Operator Guide August 2019 32
Page 33

Quick start guide
Using the weighing platform for Envelope Printing
1. Tap Envelope Printing on the Home screen.
2. Tap the weight button.
3. Tap the Scale option button.
4. Place the envelope on the weighing platform.
5. Tap Apply.
6. Tap Class on the Envelope Printing screen.
7. Tap the class you want. If necessary, select Start Over to display all of the class options.
8. Select any special services required.
9. Tap Apply.
10. Feed the envelope through the machine.
Sealing envelopes
This procedure describes how to seal envelopes whether you are printing postage on the envelopes or
only sealing the envelopes (no postage).
Pitney Bowes Operator Guide August 2019 33
Page 34

Quick start guide
1. Check the level of sealant in the moistener tank and add more if required.
2. When feeding an envelope, be sure to slide the envelope flap under the edge of the feed deck, so
the moistener can wet the flap.
Note: If the moistener tank is full and your envelopes do not seal correctly, clean or replace the
moistener brush and wick.
Sealing the envelope only, bypass all printing
1. Tap Envelope Printing on the Home screen.
2. Tap Print Mode on the lower left side of the Envelope Printing mail screen. You may have to
swipe up on the screen to see this option.
Pitney Bowes Operator Guide August 2019 34
Page 35

Quick start guide
3. Select Seal Only.
4. Tap Apply.
5. Place your envelope face up, flap down into the feeder. Be sure to slide the envelope flap under
the edge of the feed deck
Filling the moistener tank
1. Check the level of sealing solution in your moistener tank.
2. Add enough E-Z Seal® to bring the sealant level up to the bottom of the fill hole. Do not overfill
your tank.
3. If the tank is empty, allow 30 minutes for the moistener brush and wick to get completely saturated.
Installing the ink cartridge
1. Tap the Settings (gear) icon in the global toolbar.
2. Scroll down and tap Mail Printer Maintenance or Envelope Printer Maintenance.
3. Tap Install Ink.
4. Lift the cover. The ink cartridge moves to the front position.
5. Remove the ink cartridge, as shown on the label next to the cartridge holder.
6. Insert the new ink cartridge and close the cover. The cartridge repositions itself and the Mail
Printer Maintenance screen re-displays.
7. Perform a print test to ensure you get a good test print pattern.
Pitney Bowes Operator Guide August 2019 35
Page 36

Quick start guide
Important: Only use genuine Pitney Bowes ink cartridges. Non-Pitney Bowes cartridges can damage
your meter. If you need ink, order a genuine Pitney Bowes replacement ink cartridge. When your meter
shows the low ink warning an ink cartridge will be ordered for you automatically, if you are enrolled in the
AutoInk program. You can enable AutoInk through My Account on the Pitney Bowes web site.
Printing a test pattern
Printing a test pattern lets you see if your printhead is functioning properly or if you have enough ink in the
cartridge.
1. Tap the Settings (gear) icon in the global toolbar.
2. Scroll down and tap Mail Printer Maintenance or Envelope Printer Maintenance .
3. Tap Print Test Pattern.
4. When the message "Print a Test Pattern?" displays, feed the envelope through the machine.
5. Examine the pattern printed on the envelope:
l Tap Done if the lines are unbroken and match the "Good" test pattern shown on the display.
l Tap Clean Print Nozzle if the test pattern has missing or incomplete lines
n Once the cleaning operation completes, you must print another test pattern.
n If this new pattern still has broken or missing lines, you may need to replace the ink
cartridge or clean or replace the printhead.
Note: If you see no improvement in print quality, do not repeat the cleaning, as cleaning the print
nozzles consumes ink.
Pitney Bowes Operator Guide August 2019 36
Page 37

Quick start guide
Supplies, ink cartridges, and options
For pricing information, please go to the following web site:
https://www.pitneybowes.us/shop/ink-and-supplies/postage-meter-ink-supplies/sendpro-c-series/enus/storeus
Supplies for SendPro® C
Description Part Code Number (PCN)
Waste Ink Pad Kit 51A-P
Easy Seal Solution 601-9
E-Z Seal ® Sealing Solution - 4 pint size bottles 601-0
E-Z Seal ® Sealing Solution - 4 half gallon bottles 608-0
E-Z Seal ® Sealing Solution - 5 gallon Cubetainer 605-0
Moistener Brush, Wick and Grate 621-8
25 double sheets 612-9
150 double sheets 620-9
United We Stand™ Ad Patriotic tape sheets 613-9
Deluxe Cleaning Kit with Duster (canned air) CK0-3
Small Cleaning Kit with Duster (canned air) CK0-2
Office Equipment Cleaner CK0-4
Small Business Cleaning Kit (without canned air) CK0-1
Supply Pack for SendPro C 516-1 (check PCN and description)
Pitney Bowes Operator Guide August 2019 37
Page 38

Quick start guide
Supplies for Workstation w1110 Label Printer
Description Part Code Number (PCN)
Networked SendKit/w1110 Shipping Labels 6WB-F
Direct Thermal Labels 4" x 6" (6 rolls) 745-1
Ink Cartridges
Description Capacity Part Code Number
(PCN)
SendPro C red fluorescent ink cartridge 17 ml SL-798-0
SendPro C red fluorescent ink cartridge 35 ml 793-5
Optional Accessories
Description Part Code Number (PCN)
Integrated scale MP81
External USB scale with display MP82
Backlit scale mounted graphical display for MP82 scale MP00098
Backlit self-standing graphical tower display for MP82 scale MP00099
External USB platform scale (15/30 lb.) MT30
External USB platform scale (70 lb.) MP70
2.0 4-port USB Hub 552-3
I D barcode scanner IE02
Report Printer 1E50
Envelope drop stacker HZ80001
Pitney Bowes Operator Guide August 2019 38
Page 39

Quick start guide
Accessing the SendPro® Care application
The SendPro Care app is a self-help application that allows you to quickly get information about your
SendPro C, SendPro+.
If your SendPro C, SendPro+ has a PCN model number of 8H00, you can access the SendPro Care
app by tapping on the help icon (?) in the global toolbar, or by tapping on the Help button in the
application drawer.
If your SendPro C, SendPro+ has a PCN model number of 2H00, you can access the SendPro Care
app by tapping on the SendPro Care button in the application drawer. Note that tapping on the help icon
(?) in the global toolbar opens the on-system help.
If you are unsure of your SendPro C, SendPro+, model number, refer to Related topics.
The SendPro Care app automatically recognizes your device issues and provides recommendations for
resolving those issues. The app also provides:
l Real-time predictive updates, diagnostic, error notifications, and offers.
l Proactively prompts you with a solution that you can follow to resolve the error or issue.
l Essential tools and guides.
l Voice (mobile app) and text search to resolve issues quickly.
l Product health management and tracking.
l Account balances and case status.
l Spending and saving insights to track your budget more effectively.
Pitney Bowes Operator Guide August 2019 39
Page 40

Quick start guide
To learn how to use the SendPro Care app, tap on the i How to use icon on the main page of the
application.
To see how you can download the SendPro Care app to your mobile device, use a browser on your PC
and go to https://www.pitneybowes.com/us/campaign/sendprocare-app.html.
Related topics:
l Navigating the Home screen on the SendPro C, SendPro+
l Finding the Product Code Number (PCN) and serial number
Pitney Bowes Operator Guide August 2019 40
Page 41

This page intentionally left blank.
Page 42

2 - Connectivity information
In this section
Setting up a wired network connection on SendPro C, SendPro+
Model with PCN 8H00 43
Setting up a wireless (WiFi) network connection 44
Connecting to a hidden Wi-Fi network 45
Deleting a Wi-Fi network 46
Checking your network connection 47
Checking the MAC address for wired and wireless networks 48
Setting up a proxy server 50
Page 43

Connectivity information
Setting up a wired network connection on SendPro C,
SendPro+ Model with PCN8H00
If you are unsure of your SendPro C, SendPro+ model number, refer to Related topics.
For information about the connection settings required on your network, contact your IT department.
Once you have set up your connection, you can test the connection using the Check Network
application. The icon for this application is located in the application drawer at the bottom of the Home
screen. Refer to Related topics
First, determine the connection type:
1. Tap the Settings (gear) icon in the global toolbar.
2. Tap Wired.
3. Check to see which connection type is selected.
4. If your connection type is DHCP, follow the steps for DHCP. If your connection type is Static IP,
follow the steps for Static IP.
DHCP
1. Select DHCP.
2. Tap Connect.
3. If it does not connect, unplug the power cable.
4. Wait 2 minutes. The screen should turn off after 10 seconds.
5. Plug the power cable back in, ensuring that it is plugged directly into a wall outlet.
6. Quickly tap and release the power button to turn the meter back on.
7. Tap the Settings (gear) icon in the global toolbar.
8. Tap Wired (Ethernet) and make sure DHCP is selected.
9. Tap Connect.
Static
1. Select Static.
2. Contact your internal IT department to get and record the values you will need to enter for your
meter. These include: IP Address, Netmask, Gateway and DNS Address.
3. Enter the values you recorded in step 2 for the IP Address, Netmask, Gateway, and DNS
Address in the corresponding fields.
4. Tap Connect.
Pitney Bowes Operator Guide August 2019 43
Page 44

Connectivity information
5. If it fails to connect, remove the network cable from the back of the meter.
6. Tap the Connect button. Wait for the attempted connection to fail.
7. Plug the network cable back in.
8. Delete the values in the IP Address, Netmask, Gateway, and DNS Address fields.
9. Enter the IP Address, Netmask, Gateway, and DNS Address that you recorded in step 2.
10. Tap Connect.
NOTE: your device will remember the Static IP information even if you switch back to DHPC and
then back again. This information includes IP Address, Netmask, Gateway and DNS Address as
well as the proxy information.
If you use a proxy server, refer to Related topics.
Related topics:
l Finding the Product Code Number (PCN) and serial number
l Setting up a proxy server
l Checking your network connection
Setting up a wireless (WiFi) network connection
For information about the connection settings required on your network, contact your IT department.
Refer to the SendPro C connectivity guide for additional information.
1. Tap the Settings (gear) icon in the global toolbar.
2. Tap Wi-Fi in the Device & Network section.
3. Choose your WiFi network from the list. If your WiFi network is hidden, tap Add Network to add it.
4. Enter your WiFi password and identity.
Tip: Use the show password option to make sure that your password is entered correctly.
Pitney Bowes Operator Guide August 2019 44
Page 45

Connectivity information
5. If your network requires advanced network settings such as a proxy server or static IP address, tap
Advanced Options:
l To set up a proxy server:
a. Select Use Proxy.
b. Tap on the line and enter the information provided by your IT department.
l To set up a Static IP address:
a. Select the IP Setting menu and choose Static.
b. Tap on the line and enter the value provided by your IT department.
c. Tap the > in the green circle.
If you are unable to connect to the internet, if you get authentication errors, or you are unsure of the
correct settings for your network, check with your IT department.
Connecting to a hidden Wi-Fi network
1. Tap the Settings (gear) icon in the global toolbar.
2. Tap Wi-Fi in the Device & Network section to see a list of available networks.
3. Tap the Add Network button at the top of the Wi-Fi screen.
Pitney Bowes Operator Guide August 2019 45
Page 46

Connectivity information
4. Tap the down arrow next in the Security field and select the security method.
5. Tap Advanced Options to enter a static IP or set up a proxy.
6. Tap Connect when done.
Deleting a Wi-Fi network
1. Tap the Settings (gear) icon in the global toolbar.
2. Tap Wi-Fi in the Device & Network section to see a list of available networks.
Pitney Bowes Operator Guide August 2019 46
Page 47

Connectivity information
3. Tap on the network you want to delete. Note that you can only delete a network to which you have
previously connected.
The network details display.
4. Tap the Forget button to delete the network connection.
Checking your network connection
Tap the Check Network application icon in the application drawer at the bottom of the Home screen to
make sure your meter has access to all the required internet services. These provide updates on rate
information, sync your transaction data, and refill postage funds for the Envelope Printing and Trackable
Labels applications.
Pitney Bowes Operator Guide August 2019 47
Page 48

Connectivity information
If your device is behind a firewall, you may need an IT professional or someone who has access to your
network configuration to provide access to these services.
For more information on checking your network refer to these documents:
l SV63189 - SendPro C200-C425 Connectivity Guide
(at: https://www.pitneybowes.com/content/dam/support/product-documentation/sendpro-cseries/en/sendpro-c-series-connectivity-guide.pdf)
l SV63307 - SendPro C200-C425 Check Network Application User Guide
(at https://www.pitneybowes.com/content/dam/support/product-documentation/sendpro-cseries/en/sendpro-c-series-check-ntwk-app-user-guide.pdf)
Checking the MAC address for wired and wireless networks
There are two MAC addresses within the machine. It depends on your method of connection as to which
MAC address is used.
Wireless:
1. Tap the Settings (gear) icon in the global toolbar.
2. Tap Wi-Fi.
3. The MAC address appears above the list of wireless networks.
Wired:
1. Tap the Settings (gear) icon in the global toolbar.
2. Tap Wired (Ethernet).
Pitney Bowes Operator Guide August 2019 48
Page 49

Connectivity information
3. Tap Check Network. The "Checking Network Connections" screen displays. When the test
completes, tap on the View Details button in the "Connected to wired network" box.
The MAC address displays:
4. Tap X to close this window.
5. Tap Close, then the back arrow to return to the Home screen.
l If the MAC address does not display, try these steps:
1. Tap the Settings (gear) icon in the global toolbar.
2. Scroll down to the "Advanced Device Options" section and tap About This C-Series.
3. Scroll down to the "Base Network Info" section and locate the Mac Address field. This contains the
Pitney Bowes Operator Guide August 2019 49
Page 50

Connectivity information
MAC Address.
4. Tap Cancel in the upper left corner to return to the Home screen.
Setting up a proxy server
A proxy server is a computer that acts as a gateway between your local network (and your meter) and a
larger-scale network (such as the internet). Proxy servers provide increased performance and security.
1. Tap the Settings (gear) icon in the global toolbar.
2. Tap the Wi-Fi or Wired (Ethernet) option in the in the Device & Network section.
3. For Wi-Fi:
a. Select the network from the list.
b. Tap on the Advanced Options checkbox to select it.
c. Scroll down and tap on the drop-down arrow next to Proxy and select Manual.
For Wired (Ethernet):
a. Select either DCHP or Static IP
b. If you select DCHP, tap on the drop-down arrow next to Proxy Setting and select Manual.
4. For Proxy Hostname enter the IP address, HTTP or HTTPS proxy address of your proxy server.
5. For Proxy Port, enter the port the meter should use to send network traffic to the Proxy Server.
6. (Optional) Use Bypass to enter any specific URLs or URL patterns (such as internal addresses)
that you want to bypass the proxy.
7. If your Proxy Server requires authentication, select the Need Authentication check box and
additional fields will be displayed.
a. Enter the Proxy Username.
Note: This may be case sensitive for some proxy servers.
b. Enter the Proxy Password Note:
Note: This is case sensitive for proxy servers.
A proxy server works by intercepting connections between sender and receiver. All incoming data enters
through one port and is forwarded to the rest of the network via another port. By blocking direct access
between two networks, proxy servers make it much more difficult for hackers to get internal addresses
and details of a private network.
Refer to the SendPro C Connectivity Guide for additional information. You can view or download the
guide at the Pitney Bowes support site.
Pitney Bowes Operator Guide August 2019 50
Page 51

This page intentionally left blank.
Page 52

3 - Managing your machine
In this section
Creating or disabling the security PIN 53
Adjusting time zone and location code 54
Adjusting display brightness 54
Setting up Energy Saver on SendPro C, SendPro+ Model with PCN
8H00 55
Managing your Pitney Bowes USPS Postage Funds 55
Using USPS Informed Delivery 55
Installing your SendPro C, SendPro+ 57
Installing a scale 62
Uploading system logs 62
Page 53

Managing your machine
Creating or disabling the security PIN
Note: If you assigned a security PIN when you installed your SendPro® C meter, you must enter it
when you power your meter or after your meter enters sleep mode.
To create a security pin:
1. Tap the Settings (gear) icon in the global toolbar.
2. Tap the Security PIN option in the Device & Network section of the screen.
3. Tap the Create PIN button.
4. Enter a 4-digit numeric PIN using the keyboard on the display.
5. At the prompt, verify your PIN by entering it again.
To change or disable the security PIN:
1. Tap the Settings (gear) icon in the global toolbar. (gear) icon in the global toolbar.
2. Tap the Security PIN option in the Device & Network section of the screen.
3. Tap Change PIN or Turn OFF Security PIN.
4. At the prompt, enter your current security PIN.
To manually lock your machine:
1. Tap the user profile icon in the top right corner of the global toolbar.
2. Tap Lock this Device.
Pitney Bowes Operator Guide August 2019 53
Page 54

Managing your machine
3. Your screen saver displays shortly after Device is Locked screen displays.
If you forget your Security PIN, tap on the Forgot PIN? link to get help.
Adjusting time zone and location code
1. Tap the Settings (gear) icon in the global toolbar.
2. Tap Location & Time Zone.
3. Enter your new Location Code. See the list of location codes provided with your scale.
4. Enter the Time Zone.
5. Tap Apply.
When you move your scale to a new geographical location or add a new or different scale, you may need
to modify the Location and Time Zone values you entered when you installed your machine.
Adjusting display brightness
1. Tap the Settings (gear) icon in the global toolbar.
2. Tap Display Brightness in the Device & Network section of the screen.
3. Move the slider to adjust the brightness.
4. Tap the Back button or Home icon to exit the Settings screen.
Pitney Bowes Operator Guide August 2019 54
Page 55

Managing your machine
Setting up Energy Saver on SendPro C, SendPro+ Model with PCN 8H00
If you are unsure of your SendPro C, SendPro+ model number, refer to Related topics.
1. Tap the Settings (gear) icon in the global toolbar.
2. Tap Energy Saver.
3. Tap in the Time after inactivity to power down field.
4. Select the amount of time you will allow your device to remain inactive before it powers down. The
shorter the time you select, the more energy you save.
Related topics
l Finding the Product Code Number (PCN) and serial number
Managing your Pitney Bowes USPS Postage Funds
The Envelope Printing and Trackable Labels funds are managed in two separate accounts on the
SendPro® C.
Pitney Bowes offers two ways to fund postage for USPS mailing (Envelope Printing) and USPS shipping
(Trackable Labels) on your SendPro C-Series: Purchase Power® (a bill-me-later option) or Reserve
Account (a prepaid option). You must choose one payment method. You cannot use credit cards.
Note: Your shipping costs are billed directly to your UPS or FedEx account, when you use FedEx or
UPS as your shipping carrier.
Using USPS Informed Delivery
USPS Informed Delivery allows you to preview your mail and manage your packages scheduled to arrive
soon. Informed Delivery allows you to view greyscale images of the exterior, address side of letter-sized
mailpieces and track packages in one application.
For more information on USPS Informed Delivery, go to the USPS Informed Delivery website.
Pitney Bowes Operator Guide August 2019 55
Page 56

Managing your machine
To access USPS Informed Delivery on your SendPro® C:
1. Tap on the Informed Delivery icon in the application drawer at the bottom of the Home screen.
2. Enter your USPS.com Username and password.
l If this is the first time you are using Informed Delivery on your SendPro C you will be requested
to verify your USPS account. Follow the prompts to complete the verification process.
Pitney Bowes Operator Guide August 2019 56
Page 57

Installing your SendPro C, SendPro+
1. What's in the box.
Managing your machine
Pitney Bowes Operator Guide August 2019 57
Page 58

Managing your machine
2. Caution
a. Do not connect the SendPro C to a power source yet.
b. Be sure to grab the entire feeder and not just the flap.
3. Unpack SendPro C
a. Remove all the packing materials from your machine.
Pitney Bowes Operator Guide August 2019 58
Page 59

4. Install the printhead and ink cartridge.
a. Open the cover to access the ink carriage.
b. Remove the packing tape from the ink carriage and open the guard.
c. Unwrap the printhead and remove the protective strip.
Managing your machine
Pitney Bowes Operator Guide August 2019 59
Page 60

Managing your machine
d. Squeeze the tabs and slide the printhead pegs into the lower set of grooves.
e. Keep squeezing the tabs and push the printhead flush against the wall. Tabs will snap outward
when placed correctly.
! Performing this step correctly is critical in preventing damage to the system.
f. Unwrap the ink cartridge and make sure you remove the silver foil strip from the ink cartirdge.
g. Install the ink cartridge and close the guard.
Pitney Bowes Operator Guide August 2019 60
Page 61

h. Close the cover.
Managing your machine
5. Connect the SendPro C, SendPro+ to a power source and continue the installation
a. Connect your machine to a power source and turn on the power switch.
b. Wait for the system startup.... Then tap "Get Started" on the touchscreen and continue the
installation steps.
During the installation you will be prompted to enter the scale location code.
Related topics:
l Location codes for your scale
l SendPro C, SendPro+ Installation Instructions.
l SendPro C, SendPro+ Quick Tour
l Paying for Postage
Pitney Bowes Operator Guide August 2019 61
Page 62

Managing your machine
Installing a scale
If you did not install a scale when you installed your SendPro C meter you can do it at any time later.
To access step-by-step installation instructions for compatible scales:
1. Tap the Settings (gear) icon in the global toolbar.
2. Scroll to the bottom of the Settings screen, and tap Scale Installation Guides under the
Advanced Options section.
3. To view all of the available scales, swipe to the left on the screen.
4. Tap to select the appropriate scale, then tap Continue.
5. Follow the instructions displayed on your screen. To advance to the next step, swipe the screen to
the left.
Uploading system logs
Your meter creates a series of system logs that monitor a variety of operations on your device. Pitney
Bowes Technical Support may ask you to upload one or more of these logs.
Pitney Bowes Operator Guide August 2019 62
Page 63

1. Tap the Settings (gear) icon in the global toolbar.
2. Scroll down to the Advanced Device Options section.
3. Tap System Log Upload to see a list of the available logs.
4. Tap on the check box in front of any log that you wish to deselect.
5. Tap the Upload Selected Logs button.
Managing your machine
6. Once the upload completes, a confirmation message is displayed.
7. Tap Got It to close the message.
8. Select another log to upload, or swipe down from the top of the screen and then tap on the Home
icon to exit.
Pitney Bowes Operator Guide August 2019 63
Page 64

4 - Using Trackable Labels
In this section
Signing in and out of Trackable Labels 65
Creating and printing a trackable label 66
Creating a trackable label from the address book 71
Creating a new trackable label sender address 71
Changing the sender address for Trackable Labels 72
Creating an international trackable label 72
Printing a USPS return trackable label 73
Printing a USPS scan form 73
Reprinting a USPS, UPS or FedEx trackable label 74
Canceling a UPS or FedEx trackable label 74
Getting a USPS refund for a trackable label 74
Page 65

Using Trackable Labels
Signing in and out of Trackable Labels
1.
To sign out of Trackable Labels, tap the user profile icon in the top right corner of the global
toolbar. The user that is currently signed in displays.
2. Select Sign out.
To sign into Trackable Labels tap on the Trackable Labels icon on the Home screen. You will be
prompted to enter a name and password.
Pitney Bowes Operator Guide August 2019 65
Page 66

Using Trackable Labels
Creating and printing a trackable label
1. Tap Trackable Labels on the Home screen.
2. Tap the carrier you want to use. For example, tap USPS.
Pitney Bowes Operator Guide August 2019 66
Page 67

Using Trackable Labels
3. Verify that the sender address is correct. If not, tap on the Sender field and select a new address.
4. If you have enabled cost accounts on your SendPro® C, you must provide an account. If this field
contains an account, verify the account is correct. To change or add an account, tap on the Cost
Account field and select an account from the list.
5. Tap Continue.
Pitney Bowes Operator Guide August 2019 67
Page 68

Using Trackable Labels
6. Enter the recipient address. You can manually enter the recipient information or select one from
the address book. To select one from the address book, tap the Address icon in the upper right
corner of the screen as shown here.
7. Tap Continue.
8. Tap a package type. For example, Box or Envelope.
Pitney Bowes Operator Guide August 2019 68
Page 69

Using Trackable Labels
9. Enter the dimensions and the weight of the box or envelope:
l Tap each dimension and enter a value using the display keypad. Tap the green check mark
when done.
l If you have an attached scale, place the box or envelope on the scale and the weight appears
in the weight field. If you do not have a scale, tap on the Weight field and enter the value using
the keypad and then tap Apply.
10. Tap Continue.
11. Tap the service you want to use, in this example, Priority Mail.
Pitney Bowes Operator Guide August 2019 69
Page 70

Using Trackable Labels
12. Tap Add additional service to add extra services. If you are not adding any special services, go
to step 14.
13. Select the extra service, in this example, Signature Confirmation.
14. You can continue to add additional services if necessary. Tap Apply when done.
15. Tap Print.
Pitney Bowes Operator Guide August 2019 70
Page 71

Using Trackable Labels
16. At the Label Options screen, tap Format and select the printer format. For example, tap Roll- 4x6.
Note: If you want to print a sample label first, tap the Print Sample button.
17. Tap Print again and the label prints.
l If prompted, enter the Sender and Recipient's phone number (required for some services).
18. The carrier screen reappears. You can now print another label.
Creating a trackable label from the address book
You can also create a trackable label from within the Address Book.
1. Open the Trackable Label address book by tapping on the Address Book icon in the application
drawer at the bottom of the Home screen.
2. Locate the address you want to use for your trackable label.
3. Tap on the address to open it.
4. Tap on the Print Trackable Label button on the right side of the screen.
5. Follow the steps for creating and printing a trackable label.
Creating a new trackable label sender address
1. From the Home screen, tap Address Book.
2. Tap Recipients and select Senders.
3. Tap +.
Pitney Bowes Operator Guide August 2019 71
Page 72

Using Trackable Labels
4. Enter the Sender information.
5. When complete tap Save.
Changing the sender address for Trackable Labels
1. From the Home screen, tap Address Book.
2. Tap Recipients and select Senders.
3. Select the sender you wish to edit.
4. Tap the edit (pencil) icon.
5. Make your edits and tap Save. You will be returned to the address book.
Creating an international trackable label
Important note: In order to print an international label you need to connect your SendPro® C to an 8 1/2
x 11" 1E50 laser printer. You can also print an international label from your SendPro Online account
using any 8 1/2 x 11" printer.
The procedure for creating an international trackable label is the almost the same as that for creating a
domestic trackable label. The main difference is adding the information required for customs purposes.
You must declare package contents for U.S. customs when shipping internationally and to military mail.
After you have recorded the weight of the package you are prompted to enter the customs information.
This includes:
l Types of items in your shipment (documents, gifts or merchandise). Select either Abandon or
Return to Sender if the item cannot be delivered.
l Description for each item, where the item was made, the quantity of the items.
Note: In order to enter the description information you need to tap the Add an item button.
l Enter optional HS Tariff information if appropriate.
l Enter where the item was made
To add additional items tap Save and Add. If you are finished adding items, tap Save.
l Select the necessary AES Exemption information. For further information please refer to the
USPS.com Postal Explorer.
Pitney Bowes Operator Guide August 2019 72
Page 73

Using Trackable Labels
Once you have completed these steps, follow the same steps used to create and print a domestic
shipping label.
Printing a USPS return trackable label
1. Tap the History button on the home screen.
2. This opens the History screen with the tab for Shipments selected and displays all of your recent
shipments.
3. Find your label in the list or by using the search box (refer to Tracking or searching for a shipment).
4. To reveal the shipment's details, tap the shipment.
5. Tap Create Return Label. Tap Continue through the screens to confirm the Sender and
Recipient name and address.
6. If necessary, confirm the size and weight of the item.
7. Follow the same steps for creating and printing a trackable label.
Printing a USPS scan form
You can use the USPS Shipment Confirmation Acceptance Notice (SCAN) Form 5630 to save time.
Without SCAN Form 5630, the USPS needs to scan each individual shipping label. This can be time
consuming if there are a large number of international shipping labels. Instead of scanning each
individual shipping label, SCAN Form 5630 can be scanned once, and every international shipping label
from that day will be uploaded to the USPS systems.
You can enable USPS scan form printing on your SendPro® C.
1. Tap the Settings (gear) icon in the global toolbar.
2. Slide down to Shipping Settings, then tap Label Options.
3. Slide down to "Scan Form and Manifest Printing" and tap on the check box for Enable scan form
printing.
4. When you are ready to print the scan form, use your SendPro C user ID to sign in to SendPro
Online. In your web browser, go to https://login.pitneybowes.com/sendpro and sign in with
your SendPro C user ID and password.
5. In SendPro Online, select Print > USPS SCAN Form from the top menu bar.
Pitney Bowes Operator Guide August 2019 73
Page 74

Using Trackable Labels
Reprinting a USPS, UPS or FedEx trackable label
1. Tap the History icon in the application drawer at the bottom of the Home screen.
2. All of the trackable labels are listed by date, the latest date appearing first in the list. The Date
column corresponds to the date you purchased the postage.
3. Locate your label in the list. To sort by a different column, tap that column heading. To reverse the
sort order, tap the same column heading again.
4. Tap the shipment to open the details screen
5. Tap Reprint Label. Follow the same steps as you do for creating and printing a trackable label.
Canceling a UPS or FedEx trackable label
You can cancel a UPS or FedEx trackable label so the postage is not applied to your UPS or FedEx
invoice.
1. Tap the History icon in the application drawer on the Home screen.
2. All of the trackable labels are listed by date, the latest date appearing first in the list. The Date
column corresponds to the date you purchased the postage.
3. Locate your label in the list. To sort by a different column, tap that column heading. To reverse the
sort order, tap the same column heading again.
4. Tap the shipment to open the details screen
5. Tap Void. Select the checkbox when prompted to confirm you will not be using the label then tap
Continue.
Getting a USPS refund for a trackable label
You can request a refund up to 30 days from the date on which you first printed a trackable label. When
you request a refund for USPS trackable labels, the postage amount is credited to your postage balance.
The refund process can take up to 20 days because USPS wants see if it can detect your shipment in its
mailstream before crediting your account.
Note: For UPS and FedEx, when you cancel a trackable label the postage is not credited. Instead, it is
just not applied to your UPS or FedEx invoice.
1. Tap the History icon in the application drawer on the Home screen.
Pitney Bowes Operator Guide August 2019 74
Page 75

Using Trackable Labels
2. All of the trackable labels are listed by date, the latest date appearing first in the list. The Date
column corresponds to the date you purchased the postage.
3. Locate your label in the list. To sort by a different column, tap that column heading. To reverse the
sort order, tap the same column heading again.
4. Tap the shipment to open the details screen.
5. Tap Request Refund.
6. Select the agree box to agree to the conditions and then tap Continue.
Pitney Bowes Operator Guide August 2019 75
Page 76

5 - Managing Trackable Labels
In this section
Use SendPro Online to perform these tasks for your SendPro C
machine 77
Using the Trackable Labels address book 78
About cost accounts for Trackable Labels 78
Turning Trackable Label cost accounts on or off 78
Changing the default refill amounts for Trackable Labels 79
Turning on address autofill 79
Searching addresses in the Trackable Label address book 79
Adding new addresses to Trackable Labels address book 80
Deleting addresses from the Trackable Label address book 80
Editing addresses in the Trackable Label address book 81
Managing your Trackable Labels cost accounts 81
Adding a single Trackable Labels cost account 81
Modifying a Trackable Label cost account 82
Refilling Trackable Labels postage 83
Setting up your FedEx account 83
Setting up your UPS account 84
Setting up default printing options 84
Managing Trackable Labels email notifications 85
Setting the default address for USPS return labels 85
Determining how you spend your postage 86
Withdrawing money from your Trackable Labels account 86
Page 77

Managing Trackable Labels
Use SendPro Online to perform these tasks for your SendPro C machine
You need to perform the following Trackable Labels tasks using SendPro® Online instead of your
SendPro C, SendPro+ device. Using a browser on your PC, go to
https://login.pitneybowes.com/sendpro. You can use your SendPro C meter user ID and password to log
into SendPro Online, or you can log into your PB account and go to SendPro Online from there.
Importing and exporting
l Importing multiple Trackable Label addresses in SendPro Online and on the SendPro C
l Exporting Trackable Label addresses in SendPro Online and on the SendPro C
l Exporting Trackable Label history in SendPro Online and on the SendPro C
Setting up and managing carriers
l Setting up and managing a UPS account in SendPro Online and on the SendPro C
l Setting up and managing a FedEx account in SendPro Online and on the SendPro C
Printing
l Printing international labels (this can be done on your SendPro C device if you have an 8 1/2 x 11"
1E50 laser printer connected to it)
l Printing a USPS scan form
Cost accounting
l Importing Cost Accounts in SendPro Online and on the SendPro C
l Exporting Cost Accounts in SendPro Online and on the SendPro C
Managing a multi-user subscription
l Managing Users in SendPro Online and on the SendPro C (requires a multi-user subscription)
l Inviting Users in SendPro Online and on the SendPro C (requires a multi-user subscription)
l Viewing Multi-Locations in SendPro Online and on the SendPro C (requires a multi-user
subscription)
Comparing shipping rates with different carriers
l You can also use the SendPro Online application, Shipping Rate Selector to compare the cost
of shipping a package with different carriers.
Pitney Bowes Operator Guide August 2019 77
Page 78

Managing Trackable Labels
Using the Trackable Labels address book
Adding or Editing the Address Book
The SendPro® C address book verifies addresses for all carriers thereby ensuring accurate deliveries.
1. Tap the Address Book icon in the application drawer at the bottom of the Home screen.
2. The Address book allows you to add, edit or delete addresses within the book.
Using the Address Book to create a trackable label
You use the address book within the Trackable Labels application to change the sender's address and to
add a recipient's address when creating a trackable label.
About cost accounts for Trackable Labels
You can use cost accounts to keep track of how you are spending postage on trackable labels. You do
this by assigning an account to each trackable label you create. You can also assign a cost account to
each postage refill you perform.
You assign a cost account to a label within the Trackable Labels application while creating a trackable
label.
To view all of your cost accounts, tap the Cost Accounts icon in the application drawer at the bottom of
the Home screen. The Cost Accounts screen also allows you to add new accounts or edit existing ones.
Turning Trackable Label cost accounts on or off
Open your Trackable Label cost accounts by tapping the Cost Accounts icon in the application drawer
at the bottom of the Home screen. This opens the Cost Accounts screen.
1. Tap the Cost Account settings icon in the upper right corner of the Cost Accounts screen.
2. Tap the slider in the upper right so that it turns blue and ON display.
l If you want to make sure every trackable label is assigned an account, tap in the check box for
Require cost account for all shipments.
Pitney Bowes Operator Guide August 2019 78
Page 79

Managing Trackable Labels
3. You will need to create at least 1 cost account to print a trackable label. Refer to Adding a single
Trackable Label cost account.
Changing the default refill amounts for Trackable Labels
1. Tap the Settings (gear) icon in the global toolbar. (gear) icon on the Home screen.
2. Scroll to Shipping Settings.
3. Tap Shipping Refills.
4. Tap Auto-refill Postage.
5. Tap the box under Default refill amount for trackable labels.
6. Enter the amount.
7. Tap Apply.
Turning on address autofill
Autofill automatically fills in the address fields as you start to enter an address. This makes it easier and
quicker to enter addresses when creating trackable labels.
To turn on address autofill:
1. Tap the Settings (gear) icon in the global toolbar.
2. Scroll down to Shipping Settings.
3. Tap SendPro Experimental Features.
4. Tap on the check box for Use Geosearch.
Searching addresses in the Trackable Label address book
Open the Trackable Label address book by tapping on the Address Book icon in the application drawer
at the bottom of the Home screen.
l To search for an address, type a portion of the contact (name, company, street, etc.) in the text
field next to All. The address book displays matching addresses.
l Sort the address book by tapping Sort by and selecting how you want to sort (by Full Name,
Street, City ...)
Pitney Bowes Operator Guide August 2019 79
Page 80

Managing Trackable Labels
Note: The maximum number of addresses that can be displayed in the Trackable Label address book is
1000.
Once you find an address, you can select it and create a trackable label by tapping the Create Label
button.
Adding new addresses to Trackable Labels address book
To add a single address:
1. Open the Trackable Labels address book by tapping on the Address Book icon in the application
drawer at the bottom of the Home screen.
2. Add a new address by tapping the + icon and entering the contact information.
3. Tap Save when done.
Note: The maximum number of addresses that can be displayed in the Trackable Label address book is
1000.
To add multiple addresses:
To import multiple addresses to the address book on your SendPro® C, copy this link into your web
browser: https://login.pitneybowes.com/sendpro and sign in using your SendPro® C user ID. You
cannot import addresses from the SendPro® C meter.
Deleting addresses from the Trackable Label address book
Open the Trackable Label address book by tapping on the Address Book icon in the application drawer
at the bottom of the Home screen.
Delete an address by tapping on the address and then on the Delete icon shown here.Tap OK to confirm
you want to delete the address.
Pitney Bowes Operator Guide August 2019 80
Page 81

Managing Trackable Labels
Editing addresses in the Trackable Label address book
Open the Trackable Label address book by tapping on the Address Book icon in the application drawer
at the bottom of the Home screen.
Edit an address by tapping on the address and then on the Edit icon. Make your changes to the contact
information and then tap Save.
Managing your Trackable Labels cost accounts
This is for trackable label cost accounts
Managing your cost accounts includes:
l Turn on the cost accounts feature
l Adding a single cost account
l Modifying existing cost accounts
Open your Trackable Label cost accounts by tapping the Cost Accounts icon in the application drawer
at the bottom of the Home screen. This opens the Cost Accounts screen.
Adding a single Trackable Labels cost account
Open your Trackable Label cost accounts by tapping the Cost Accounts icon in the application drawer
at the bottom of the Home screen. This opens the Cost Accounts screen.
Pitney Bowes Operator Guide August 2019 81
Page 82

Managing Trackable Labels
Note: To import or export multiple cost accounts, use your SendPro® C user ID to log into SendPro
Online. In your web browser, go to https://login.pitneybowes.com/sendpro and sign in with your
SendPro C user ID and password.
1. Tap the plus sign + in the upper left corner of the Cost Accounts screen.
2. Enter the account name, up to 20 characters. Tap the green check mark when done. You can use
lower case letters, upper case letters, numerals and special characters for the account name.
Allowed special characters include:
l - hyphen
l _ dash
l ' single quote
l @ at sign
l . Period
l and optional description.
3. (Optional) Enter a description of the account, up to 200 characters.
4. Tap Enter (green check mark) when done. You can use the same types of characters as for the
account name.
5. Tap on the option button for Active or Inactive, whichever is appropriate for this account.
6. To make this the account that is automatically used for all trackable labels, tap the checkbox for
Make this my default Cost Account.
7. Tap Apply.
Modifying a Trackable Label cost account
Open your Trackable Label cost accounts by tapping the Cost Accounts icon in the application drawer
at the bottom of the Home screen. This opens the Cost Accounts screen.
You can activate or deactivate an existing account, make an account the default cost account, or modify
the description for the account.
Note: You cannot delete an existing account.
1. Tap on the cost account you want to modify in the Cost Account screen.
2. Tap the Edit icon on the right side of the screen.
Pitney Bowes Operator Guide August 2019 82
Page 83

Managing Trackable Labels
3. Tap the Active or Inactive option as appropriate.
4. To make this account the default, tap the check box for Make this my default Cost Account.
5. To change the description tap in the Description field and enter your changes.
6. Tap Apply when done with all your changes.
Refilling Trackable Labels postage
Your SendPro® C, SendPro®+ meter uses two separate postage accounts, one for Trackable Labels
and one for Envelope Printing. The funds for one cannot be used for the other.
To refill your Trackable Labels postage account:
1. Tap the Settings (gear) icon in the global toolbar.
2. Scroll down to Shipping Refills.
3. Tap Shipping Refills.Your meter displays Trackable Labels Postage Balance.
4. Tap the Refill Postage button on the upper right corner of the screen.
5. Use the numeric keypad to enter the amount you wish to refill.
6. Tap Refill Trackable Label Postage. When complete your meter displays the updated
Trackable Labels Postage Balance.
7. Tap the Home icon in the upper right corner of the global toolbar to return to the Home screen.
To view your Trackable Label postage refill history, sign into your SendPro Online account and export a
postage history report.
Related topics:
Exporting a History Report on SendPro Online
Setting up your FedEx account
In order to use the FedEx carrier for trackable labels, you need to set up your FedEx account using
SendPro® Online. You cannot set up a FedEx account on your SendPro® C meter. In your web
browser, go to https://login.pitneybowes.com/sendpro and sign in with your SendPro C user ID and
password.
Once you have set up your FedEx account using SendPro Online, you can view your account information
on your SendPro C meter:
Pitney Bowes Operator Guide August 2019 83
Page 84

Managing Trackable Labels
1. Tap the Settings (gear) icon in the global toolbar.
2. Scroll down to Shipping Settings.
3. Tap Carrier Settings.
4. Tap the Manage button next to FedEx.
Setting up your UPS account
In order to use the UPS carrier for trackable labels, you need to set up your UPS account using
SendPro® Online. You cannot set up a FedEx account on your SendPro® C meter. In your web
browser, go to https://login.pitneybowes.com/sendpro and sign in with your SendPro C user ID and
password.
Once you have set up your UPS account using SendPro Online, you can view your account information
on your SendPro C meter:
1. Tap the Settings (gear) icon in the global toolbar.
2. Scroll down to Shipping Settings.
3. Tap Carrier Settings.
4. Tap the Manage button next to UPS.
Setting up default printing options
1. Tap the Settings (gear) icon in the global toolbar.
2. Scroll down to Shipping Settings.
3. Tap Label Options.
4. To print the cost on the trackable label, tap the check box for Show cost on label.
5. To print a receipt with the label, tap the check box for Print receipt with label.
6. To select the print format, tap Format and select one of the following:
l Plain Paper - 8.5 x 11
l Roll - 4 x 6
7. To enable USPS scan form and manifest printing, tap the check box for Enable scan form
printing. Enter the ZIP code for the location from where you are shipping on the line provided.
Refer to Printing a USPS scan form for more information on scan forms.
Pitney Bowes Operator Guide August 2019 84
Page 85

Managing Trackable Labels
Managing Trackable Labels email notifications
You can use automated Trackable Labels email notifications to track shipments and know when they’ve
been delivered. You can also get notified when a label refund has been issued. There are three types of
notifications:
l Tracking Number Email: Emails a tracking number for each new shipping label automatically.
l Shipment Delivery Email: Emails a delivery confirmation for each new shipping label
automatically.
l Refund notifications: Emails a confirmation each time a label refund is credited to your postage
balance.
1. Tap the Settings (gear) icon in the global toolbar.
2. Scroll down to Shipping Settings.
3. Tap Automated Emails.
4. To enable tracking number and delivery confirmation emails to the sender or recipients, tap the
appropriate check boxes in the Tracking Number Email and Shipment Delivery Email sections.
5. To receive an email when a label refund is credited to your postage balance, enter the email
address on the Email Confirmation for Postage Refund line.
6. (Optional) To customize the subject for each email type, enter the subject in the Customize the
email subject line field.
Setting the default address for USPS return labels
You can set the recipient's address you want to use every time you create a USPS return label.
1. Tap the Settings (gear) icon in the global toolbar.
2. Scroll down to Shipping Settings.
3. Tap Return Labels.
4. Tap the check box for I want to use the same recipient address for all of my return labels.
5. Enter the address in the fields provided using the keypad on the screen. Tap the green check mark
when done.
Pitney Bowes Operator Guide August 2019 85
Page 86

Managing Trackable Labels
Determining how you spend your postage
You can see where you are spending your postage by viewing the Tracking Label Report. This report
includes a list of all of the shipping labels you have created along with their carriers and the amounts of
postage.
1. Tap the Settings (gear) icon in the global toolbar.
2. Scroll down to Shipping Settings.
3. Tap Shipment Reports.
4. To list by cost accounts, tap the menu button next to All Shipments column and select Summary
by Cost Account.
Withdrawing money from your Trackable Labels account
If you need to withdraw your funds from your Trackable Labels account, please call 1-877-213-7284 and
select option 3.
Pitney Bowes Operator Guide August 2019 86
Page 87

This page intentionally left blank.
Page 88

6 - Using Envelope Printing
In this section
Printing postage on envelopes 89
Checking your available Envelope Printing postage 90
Refilling postage for your Envelope Printing balance 91
Using accounts to charge back Envelope Printing postage costs 92
Sending a First-Class letter envelope on SendPro C, SendPro+
Model with PCN 8H00 93
Sending a large First-Class® envelope SendPro C, SendPro+
Model with PCN 8H00 93
Sending Certified Mail on SendPro C, SendPro+ Model with PCN
8H00 95
Sending an international letter on SendPro C, SendPro+ Model with
PCN 8H00 96
Printing a future date 97
Omitting the date from Envelope Printing for SendPro C,
SendPro+with model PCN 8H00 98
Printing additional postage 98
Re-dating your mail 99
Using USPS special services 100
Entering weight manually for Envelope Printing 100
Using the weighing platform for Envelope Printing 102
Sealing the envelope only, bypass all printing 102
Sealing envelopes 103
Zeroing the scale 104
Adding insurance to your mail in Envelope Printing 104
How to process ERR in Envelope Printing on SendPro C,
SendPro+ 105
Getting a USPS refund for damaged or incorrectly printed mail in
Envelope Printing 105
Page 89

Using Envelope Printing
Adding a graphic to your envelope in Envelope Printing 106
Creating a custom text message for your mail on SendPro C, SendPro+ model with PCN 8H00 107
Adding a custom text message to your envelope or tape 109
Editing or deleting a custom text message on SendPro C, SendPro+ model with PCN 8H00 111
Printing a graphic on your envelope without printing postage 113
Adding an inscription to your envelope in Envelope Printing 113
Printing only the date and time in Envelope Printing 113
Printing postage on envelopes
Tap Envelope Printing on the Home screen to open the Envelope Printing screen.
This screen is the starting point for printing postage on an envelope or tape. It also allows you to change
what you print on the envelope.
Within the mail screen you can:
1. View the balance of funds you have remaining in your meter.
2. Select an account by tapping Account (this option appears if your device has the account feature
enabled).
3. Tap Class to view the class and any extra services.
Pitney Bowes Operator Guide August 2019 89
Page 90

Using Envelope Printing
4. Tap the weight icon to view the weighing options (enter weight manually or using a scale).
5. Tap the date to view the date options.
6. View the total postage amount.
7. Preview or add graphics.
8. Tap Print Mode to access the Print mode screen. This provides you with different printing modes
such as adding graphics to your envelope, adding more postage, or making corrections to the
date. You can also choose to only seal envelopes without printing any postage.
9. Tap on the option you want to select the mode.
l Date and Time Stamp
l Date Correction
l Graphic Only
l Postage Correction
l Postage Printing - printing postage on an envelope is the default mode.
l Seal Only- bypass all printing.
Checking your available Envelope Printing postage
You can check your Envelope Printing postage balance on your meter at any time.
Your available postage is displayed on the Postage Balance button on the top of the Envelope Printing
screen.
View the amount available for postage in your Reserve or Purchase Power account:
Pitney Bowes Operator Guide August 2019 90
Page 91

Using Envelope Printing
l Tap Envelope Printing on the Home screen.
l Tap Postage Balance.
l Tap Refill Settings.
Refilling postage for your Envelope Printing balance
Before you begin:
Make sure your device is connected to the internet.
l For LAN connection, you will see the following connection icon in the global toolbar:
l If you have a wireless connection, you will see the following connection icon in the global toolbar:
If you see a line through the connection icon, it means you are not connected and will not be able to refill
your postage until you establish a network connection. Refer to Related topics below for information on
troubleshooting connection issues.
To refill your postage:
1. Tap Envelope Printing on the Home screen.
2. Tap Postage Balance.
3. Tap Refill Postage.
Pitney Bowes Operator Guide August 2019 91
Page 92

Using Envelope Printing
4. Enter your postage refill amount.
5. Tap Refill Mail Postage.
6. Tap View Receipt if you want to view or print a receipt.
7. Tap Done.
8. Your updated postage balance displays on the Envelope Printing screen.
The SendPro C uses two separate postage accounts, one for Trackable Labels and one for Envelope
Printing. The funds for one cannot be used for the other.
Related topics:
l Refilling your Trackable Labels postage.
Using accounts to charge back Envelope Printing postage costs
Envelope Printing uses a multi-level account structure and is separate from the Trackable cost accounts.
You can use accounts to charge back postage to departments or clients and run reports showing how
you spent your postage over specific time periods.
If accounts are enabled on your machine you must select an account when applying postage to an
envelope.
1. Tap on Account on the left side of the screen to see a list of available accounts.
2. Tap on the account you want to use for your mail.
Pitney Bowes Operator Guide August 2019 92
Page 93

Using Envelope Printing
Sending a First-Class letter envelope on SendPro C, SendPro+ Model with PCN 8H00
If you are unsure of your SendPro C, SendPro+ model number, refer to Related topics.
1. Tap Envelope Printing on the Home screen.
2. If you have the accounting feature enabled on your machine:
a. Tap Account on the left side of the screen.
b. Select an account.
If you have only a single account, once you select that account the device will remember that
account the next time you start Envelope Printing.
3. Tap Class.
4. Tap Start Over to display a list of all the available classes.
5. Tap First-Class Retail Metered for a First-Class mail envelope.
6. Tap Letter.
7. Select any special services required.
8. Tap Apply.
9. Place the envelope on the scale. The weight appears in the weight button on the screen.
10. Place the envelope on the feed deck; the machine automatically feeds the envelope and prints the
postage.
Note: If you have previously printed any envelopes, you may get a message that transactions are
being uploaded. Once the upload completes, you see the message "Transaction upload status, Upload
success" with a check mark. Tap the check mark.
Related topics:
l Finding the Product Code Number (PCN) and serial number
l Sending a large First-Class® envelope
Sending a large First-Class® envelope SendPro C,
SendPro+ Model with PCN8H00
If you are unsure of your SendPro C, SendPro+ model number, refer to Related topics.
Pitney Bowes Operator Guide August 2019 93
Page 94

Using Envelope Printing
Before you select a rate for a large envelope or flat, you need to determine whether the mailpiece you are
sending is classified as a letter or flat (large envelope) according to the USPS.
If your mailpiece weighs more than 3.5 oz, the SendPro C, SendPro+ automatically sets the class to
Large Envelope regardless of the dimensions. If the mailpiece weighs less than 3.5 oz but has the
dimensions of a flat, you need to manually select Large Envelope when you choose the class.
To determine if your mailpiece meets all of the criteria for a flat (dimensions and weight), tap on the
Postal Advisor located in the application drawer on the SendPro C, SendPro+.The Postal Advisor also
provides information for multiple types and classes of mailpieces, including postcards, letters, and
parcels.
First weigh the mailpiece and measure the dimensions:
1. Tap Envelope Printing on the Home screen to open the Envelope Printing screen.
2. If you have the accounting feature enabled on your machine:
a. Tap Account on the left side of the screen.
b. Select an account.
If you have only a single account, once you select that account the device will remember that
account the next time you start Envelope Printing.
3. Place the mailpiece on the scale. The weight displays in the weight button on the screen. You can
also weigh the mailpiece using any external postal scale.
4. Measure and record the dimensions of the mailpiece.
5. Tap the Home icon on the global toolbar to return to the Home screen.
6. Tap the double-headed arrow on the right side of the application drawer at the bottom of the
screen.
7. Tap the Postal Advisor icon.
8. Tap on Flats.
Pitney Bowes Operator Guide August 2019 94
Page 95

Using Envelope Printing
9. Tap on Physical Characteristics tab and see if your mailpiece is within the weight and size limits.
If the mailpiece if less than 3.5 oz, but has the dimensions of a flat:
1. Tap on the Home icon in the global toolbar.
2. Scroll back up to the Envelope Printing icon and tap on it.
3. If you have the accounting feature enabled, tap Account on the left side of the screen and select
an account. If you do not have the accounting feature, go to step 3.
4. Tap Class.
5. Tap Start Over to display a list of all the available classes.
6. Tap First-Class Retail Metered for a First-Class mail envelope.
7. Tap Large Envelope.
8. Select any special services required.
9. Tap Apply.
10. Place the large envelope on the feed deck and the machine automatically feeds the envelope and
prints the postage.
l If the envelope is too thick to go through the feeder, use a tape sheet to print the postage.
l Apply the tape sheet label to the large envelope/flat.
Related topics:
l Finding the Product Code Number (PCN) and serial number
Sending Certified Mail on SendPro C, SendPro+ Model with PCN 8H00
If you are unsure of your SendPro C, SendPro+ model number, refer to Related topics.
Pitney Bowes Operator Guide August 2019 95
Page 96

Using Envelope Printing
Not all extra services like Certified Mail are available for all classes and only certain services can be
combined.
To find out more about Certified Mail, tap on the Postal Advisor icon in the application drawer at the
bottom of the Home screen. Scroll down until you reach the section on Extra Services.
1. Tap Envelope Printing on the Home screen.
2. If you have the accounting feature enabled on your machine:
a. Tap Account on the left side of the screen.
b. Select an account.
If you have only a single account, once you select that account the device will remember that
account the next time you start Envelope Printing..
3. Tap Class.
4. Tap Start Over to display a list of the available classes.
5. Tap a class that can be combined with Certified Mail (for example, First Class or Priority Mail).
6. Tap on the mailpiece type (for example, letter or large envelope).
7. Tap on Certified as your extra service and tap Apply.
8. Depending on the type class and type of mailpiece:
l Enter the destination ZIP Code and tap Apply
l Enter the Mailer ID and tap Apply.
9. Enter the barcode from the label and tap Apply.
10. Run the mailpiece through the machine.
11. Place green Certified Mail label on the mailpiece. (USPS Label 3800-N)
Related topics:
l Finding the Product Code Number (PCN) and serial number
l Setting up a mailer ID
Sending an international letter on SendPro C, SendPro+ Model with PCN 8H00
If you are unsure of your SendPro C, SendPro+ model number, refer to Related topics.
Pitney Bowes Operator Guide August 2019 96
Page 97

Using Envelope Printing
1. Tap Envelope Printing on the Home screen.
2. If you have the accounting feature enabled on your machine:
a. Tap Account on the left side of the screen.
b. Select an account.
If you have only a single account, once you select that account the device will remember that
account the next time you start Envelope Printing.
3. Tap Class.
4. Tap Start Over to display a list of all the available classes.
5. Tap First-Class Mail Intl Retail for a First-Class mail envelope.
6. Tap Letter.
7. Tap in the Country field and use the keypad to enter the destination country.
8. Select any special services required.
9. Tap Apply.
10. Place the envelope on the scale. The weight appears in the weight button on the screen.
11. Place the envelope on the feed deck; the machine automatically feeds the envelope and prints the
postage.
Note: If you have previously printed any envelopes, you may get a message that transactions are
being uploaded. Once the upload completes, you see the message "Transaction upload status, Upload
success" with a check mark. Tap the check mark.
Printing a future date
With SendPro® C, you can print postage with a date in the future. If you miss today’s mail pickup, you
can print your postage with a future date.
1. Tap Envelope Printing on the Home screen.
2. Tap the date on the Envelope Printing screen. The calendar displays.
3. Tap Tomorrow or Another Date on the right-hand side of the calendar, depending on the date
you wish to print.
4. Tap Apply when you see the future date highlighted on the calendar.
5. The Envelope Printing screen displays the future date.
6. Place your envelope on the deck to automatically print your postage with a future date.
Pitney Bowes Operator Guide August 2019 97
Page 98

Using Envelope Printing
Note: The date on the postage should match the date when your mail goes to the post office. Your
machine automatically advances the printed date on the meter stamp (as well as its internally held date)
when the system time reaches 5:00 PM. This time cannot be changed.
Omitting the date from Envelope Printing for SendPro
C, SendPro+with model PCN 8H00
If you are unsure of your SendPro C model number, refer to Related topics.
This feature is only available for Meter Reply Mail when used with First-Class Retail Metered classes
which includes: Letter, Non-Machinable Letter, Large Envelope and Postcard. Meter Reply Mail refers to
a pre-printed return envelope, card or label on which the postage is prepaid.
You can choose to leave the date off your envelope. For example, if you are using your envelope as a
return mailing envelope, print your postage without a date.
1. Tap Envelope Printing on the Home screen.
2. Tap First-Class Retail Metered Letter on the left side of the Envelope Printing screen.
3. Scroll down on the Class & Extra Services screen and tap on the checkbox for Restricted Use
Return Mail.
4. A message appears informing you that no date will print. Tap Got it.
5. Tap Apply.
6. "Restricted Use Return Mail" appears in the Extra Services box on the left side of the Envelope
Printing screen.
Related topics:
Finding the Product Code Number (PCN) and serial number
Printing additional postage
If you do not have enough postage on a piece of mail you can add more postage directly on a blank area
on your envelope or on a tape.
1. Tap Envelope Printing on the Home screen.
2. Scroll down and tap Print Mode on the left side of the screen.
3. Tap Postage Correction.
4. Tap Apply.
Pitney Bowes Operator Guide August 2019 98
Page 99

Using Envelope Printing
5. Tap the postage amount.
6. Use the keypad to enter the additional postage amount.
7. Tap the check mark when done.
8. Turn your envelope over to the blank side, and place it on the deck to automatically feed it through
the machine.
Look for the word "Correction" on the postage mark. This is what it looks like.
Re-dating your mail
If you’ve already printed today’s date and postage on an envelope, but you missed your mail pickup, you
can re-date your mail. You must reprint a future date on the back of your envelope before you can mail it.
1. Tap Envelope Printing on the Home screen.
2. Scroll down and tap Print Mode on the left side of the Envelope Printing screen.
3. Tap Date Correction.
4. Tap Apply.
5. Tap on the date and the calendar displays.
Pitney Bowes Operator Guide August 2019 99
Page 100

Using Envelope Printing
6. Tap Tomorrow or Another Date on the right-hand side of the calendar, depending on the date
you need.
7. Tap Apply when the new date is highlighted on your calendar.
8. Turn your envelope over to the blank side, and place it on the deck to automatically feed your
envelope through the machine.
9. Check to ensure that the word “Redate” appears on the newly printed postage mark on the back of
your envelope. Your envelope is ready to mail.
Using USPS special services
1. Tap Envelope Printing on the Home screen.
2. Tap Class.
3. Tap Start Over to see a list of the available classes.
4. Tap the class you want. Sub classes display when they are available for your class.
a. For some classes, you must select the type of mail piece; for example, if you select First-Class
Retail Metered, you must select either Letter, Large Envelope, or Package.
b. Select any special services available for your class; for example: Insurance, COD, Certified, or
Registered.
5. Enter a ZIP code if required.
6. For some classes, you are prompted to either scan or manually enter the Electronic Certified
barcode from your label, and then to attach your label to your envelope or package.
7. Tap Apply.
Entering weight manually for Envelope Printing
Use this procedure when you know the weight of a mailpiece and you are not using the integrated
weighing platform.
Pitney Bowes Operator Guide August 2019 100
 Loading...