

Page 1

Shipping & Mailing
Inserting
Relay™ 2500, 3500,
4500
Inserting System
User Guide
US English Edition
SV63298 RevB
December 3, 2018
Page 2

©2018 Pitney Bowes Inc.
All rights reserved. This book may not be reproduced in whole or in part in any fashion or
stored in a retrieval system of any type or transmitted by any means, electronically or
mechanically, without the express written permission of Pitney Bowes.
The use of this information by the recipient or others for purposes other than the training of
customers on Pitney Bowes equipment may constitute an infringement of intellectual
property rights of Pitney Bowes, and Pitney Bowes assumes no responsibility for any such
use of the information.
We have made every reasonable effort to ensure the accuracy and usefulness of this
manual. However, we cannot assume responsibility for errors or omissions or liability for the
misuse or misapplication of our products.
Except as provided in writing, duly signed by an officer of Pitney Bowes, no license either
express or implied, under any Pitney Bowes or third party’s patent, copyright or other
intellectual property rights is granted by providing this information.
Page 3

About this Book
This guide is designed to support proper setup, operation, troubleshooting, and basic maintenance
activities associated with the Relay™ 2500, 3500 and 4500 Inserting Systems.
Version History
Document Part Number Release Date Comments
SV63298 Rev A October 1, 2018 Preliminary draft
SV63298 Rev B December 3, 2018 Initial release
Pitney Bowes Relay™ 2500, 3500, 4500 User Guide December, 2018 Page iii of 7
Page 4

This page intentionally left blank.
Page 5

Setting the Sealer 33
Setting the Paper Length 34
1 - Safety
Safety Information 2
Warning Labels and Cautions 4
2 - Product Overview
Product Overview 6
Relay Inserter - Component Overview 8
3 - Using the Touchscreen
Turning on the Touchscreen 12
Navigating the Touchscreen 13
Using the Touchscreen Keyboard 17
Changing the Touchscreen Display Language 18
Logging In 19
Managing Operator Usernames and
Passwords 20
Changing an Existing Job Name 22
Setting Fold A 35
Setting Fold B 36
Setting the Envelope Depth 37
Setting the Envelope Stop 38
Setting the Batch Counter 39
Confirming Job Setup 40
Running a Trial Piece 41
Programming a non-Scanning Job 43
Initiating Job Setup 44
Selecting a Job 45
Disabling Scanning 46
Setting the Fold Type 47
Setting Accumulation Options 49
Setting the Main Sheet Feeder 50
Setting the Second (Supplementary) Sheet
Feeder 52
Setting the Insert Feeder 53
Setting the Mode Type - Insertion or Fold Only 54
Setting the Sealer 55
Setting the Paper Length 56
Setting Fold A 57
Setting Fold B 58
Setting the Envelope Depth 59
4 - Product Overview
Programming a Scanning Job 25
Initiating Job Setup 26
Selecting a Job 27
Enabling Scanning (OMR or Barcode) 28
Setting the Fold Type 29
Setting the Main Scanning Sheet Feeder 30
Setting the Second (Supplementary) Sheet
Feeder 31
Setting the Insert Feeder 32
Pitney Bowes Relay™ 2500, 3500, 4500 User Guide December, 2018 Page vof 7
Setting the Envelope Stop 60
Setting the Batch Counter 61
Confirming Job Setup 62
Running a Trial Piece 63
Modifying an Existing Job 65
Deleting a Job 66
Page 6

5 - Running a Job
Running a Job 68
Turn on the Inserter 69
Turning on the Touchscreen 70
Logging In 71
Barcode Scanning Specifications 112
About Barcode Placement 114
Adjusting the Barcode Camera 117
Barcode Scanning Error Messages 118
Selecting a Job to Run 72
Loading the Sheet Feeder 73
Loading the Standard Envelope Feeder 77
Loading the High Capacity Envelope Feeder 79
Loading the Insert Feeder 83
Running a Trial Piece 87
Starting and Stopping the Inserter 89
Adding Sealer Solution 90
Adjusting the Drop Stacker 91
6 - OMR Scanning
About Optical Mark Recognition (OMR)
Scanning 94
About OMR Scanning and Feeders 95
About OMR Scanning Types 96
About OMR Scanning Marks 97
OMR Specifications 101
Standard OMR Position - Diagram 102
8 - Error Recovery and Clearing
Material Jams
Accumulation Jobs - Error Recovery 120
Empty Feeder - Error Recovery 121
OMR Message - Error Recovery 122
Clearing Material Jams 123
Clearing Material Jams in the Sheet Feeder 124
Clearing Material Jams in the Fold Plates 127
Clearing Material Jams in the Insert Trays 130
Clearing Material Jams in the Carriage
Assembly 133
Clearing Material Jams in the Envelope
Feeder Area 136
Clearing Material Jams in the Envelope Exit
Area 139
Clearing Material Jams in the Envelope
Inserting and Sealing Area 142
Clearing Material Jams in the Accumulation
Area 145
Adjusting the OMR Scanning Heads 103
OMR Scanning Error Messages 106
7 - Barcode Scanning
About Barcode Scanning 108
About 2D Barcode Data 109
Pitney Bowes Relay™ 2500, 3500, 4500 User Guide December, 2018 Page vi of 7
9 - Reports
About Reports 150
Generating Reports for Scanning Jobs 151
Generating Productivity Reports for Jobs 153
Page 7

10 - Troubleshooting
Troubleshooting Touchscreen and Inserter
Issues 156
Troubleshooting Envelope Issues 157
Troubleshooting Sheet Issues 158
Troubleshooting Insert Issues 159
Troubleshooting Double Detect Issues 160
Error Messages 161
11 - Specifications
Material Specifications 166
Inserter Specifications 172
Pitney Bowes Relay™ 2500, 3500, 4500 User Guide December, 2018 Page vii of 7
Page 8

1 - Safety
In this section
Safety Information 2
Warning Labels and Cautions 4
Page 9

Safety Information
Follow these precautions whenever you use your inserting system.
General Power Safety
l Place the system close to an easily accessible wall outlet
l Place the system in an accessible location to allow for proper venting of the equipment and to
facilitate servicing.
l Use the AC power adapter included with this device. Third party adapters may damage the device
l Plug the AC adapter directly into a properly grounded wall outlet located near the equipment and
easily accessible. Failure to properly ground the machine can result in severe personal injury
and/or fire.
Safety
l The AC adapter (power cord) is the primary means to disconnect this device from the AC supply.
l DO NOT use a wall outlet controlled by a wall switch or one that is shared with other equipment.
l DO NOT use an adapter plug on the line cord or wall outlet.
l DO NOT remove the ground pin from the line cord.
l DO NOT route the AC adapter power cord over sharp edges or trap it between furniture. Make
sure there is no strain on the power cord.
l If the unit becomes damaged, unplug it from the wall.
Operation
l Only trained personnel are permitted to operate this equipment. Training must include instruction
in operation under normal conditions and emergency situations.
l Read all instructions before attempting to operate the equipment.
l Use this equipment only for its intended purpose.
l Keep fingers, loose clothing, jewelry, long hair and neckties away from all moving parts.
l Avoid touching moving parts or materials while the machine is in use. Before clearing a jam, be
sure machine mechanisms come to a complete stop.
l Remove jammed material gently and carefully.
Pitney Bowes Relay™ 2500, 3500, 4500 User Guide December, 2018 Page 2of 174
Page 10

Safety
l DO NOT remove covers. Covers enclose hazardous parts that should only be accessed by
properly trained service personnel.
l DO NOT place lighted candles, cigarettes, cigars, etc., on the system.
l To prevent overheating, do not cover vent openings.
l Always follow specific occupational safety and health standards for your workplace.
l Before operating the main inserting machine with this device, make sure the machine has been
properly prepared and that any other personnel in the area are standing clear of the inserter.
l Immediately report any damaged or non-functioning components that renders the unit unsafe to
Service.
Maintenance
l Operation of this equipment without periodic maintenance will inhibit optimum operating
performance and could cause the equipment to malfunction.
l Use only approved supplies.
l To reduce the risk of fire or electrical shock, DO NOT attempt to remove covers or disassemble the
control panel or its base. The cabinet encloses hazardous parts.
l Improper storage and use of aerosol dusters or flammable aerosol dusters can cause an
explosive-like condition that could result in personal injury and / or property damage. Always read
instructions and safety precautions on the duster container label.
l Contact your system supplier for:
oSupplies
oMaterial Data Safety Sheets
oIf you damage the unit
If your stacker has an AC adapter
l Use the AC power adapter included with this device; third party adapters may damage the device
l To protect against electrical shock, plug the AC adapter power cord into a grounded wall outlet.
l DO NOT route the power cord for the AC adapter over sharp edges or trap it between it between
pieces of furniture. Make sure there is no strain on the power cord.
Pitney Bowes Relay™ 2500, 3500, 4500 User Guide December, 2018 Page 3of 174
Page 11

Safety
Warning Labels and Cautions
Pitney Bowes declines all liability in the event of material damage or bodily injury resulting from
negligence in the application of these precautions in respect to handling, operating, or servicing, even if
not expressly stated in these instructions.
Caution:
Moving mechanisms may result in personal injury. Keep hands, long hair, ties, jewelry
and loose clothing away from moving parts.
Pitney Bowes Relay™ 2500, 3500, 4500 User Guide December, 2018 Page 4of 174
Page 12

2 - Product Overview
In this section
Product Overview 6
Relay Inserter - Component Overview 8
Page 13

Product Overview
Product Overview
This section provides an overview of the hardware components and features of the three Relay inserter
models - Relay 2500, Relay 3500 and Relay 4500.
All Relays are equipped with pre-fold accumulation. (This module is located under the top cover of the
machine). Pre-fold accumulation enables the collection of mailpieces before folding, all in one operation.
It works the same for all fold types.
Relay Model Comparison - Hardware
Components Relay 2500 Relay 3500 Relay 4500
Sheet Feeder 1 2 2
Envelope Feeder shingle tray (1) shingle tray (1) elevator (1)
Insert Feeder 1 1 1
Integrated operator touchscreen* yes yes yes
* The touchscreen is a WiFi enabled device. If clients choose to utilize this network connection it is the
responsibility of the client to ensure the settings adhere to their IT department standards.
Pitney Bowes Relay™ 2500, 3500, 4500 User Guide December, 2018 Page 6of 174
Page 14

Product Overview
Product features
Relay models 2500, 3500, 4500 all have these features and options.
l Pre-fold accumulation (located on top of machine under top cover)
l 2D barcode scanning (optional)
l OMR (Optical Mark Recognition) scanning (optional)
l Sealing - safe seal (supports a complete envelope seal) and no seal option
l Fold options - single-fold, C-fold, Z-fold, double-fold
l Fold-only option (fold without insertion)
l Fully automatic material separation on sheet feeders
l Fully automatic setting of fold plates
l Fully automatic envelope separation
l Fully automatic double document detection (when selected)
l Manually fed, semi-automatic insertion of single and multi-sheet collations
l Job recall functionality
Pitney Bowes Relay™ 2500, 3500, 4500 User Guide December, 2018 Page 7of 174
Page 15
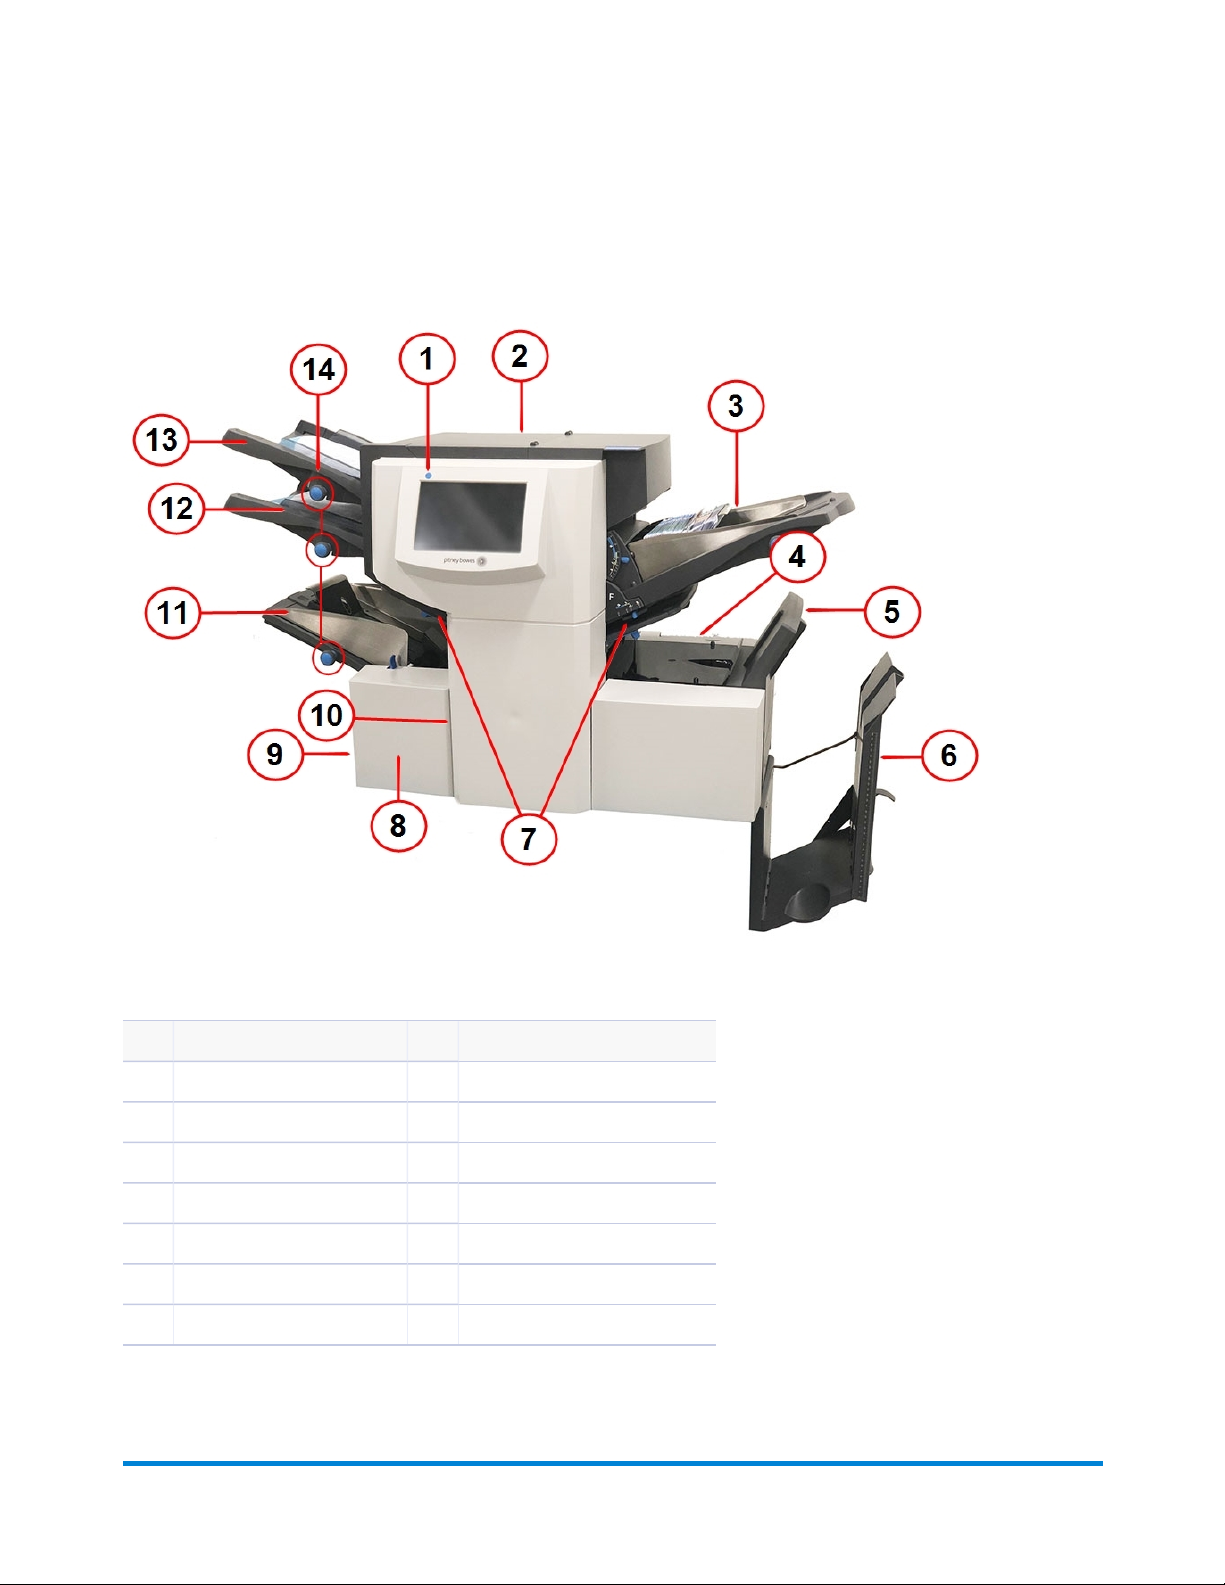
Relay Inserter - Component Overview
Product Overview
Relay 3500 Inserter (on the Relay 4500, the power switch and adjustment knobs are located on front panel)
Item Description Item Description
1 Touchscreen Power Button 8 Manual Advance Knob*
2 Accumulation Area* 9 Power Switch*
3 Insert Feeder 10 Measuring Scale*
4 Sealer Bottle** 11 Envelope Feeder
5 Envelope Inverter 12 Sheet Feeder 2
6 Drop Stacker*** 13 Sheet Feeder 1
7 Fold Plate 1 and 2 14 Side Guide Adjustment Knobs
* Not visible in this image
** Located in the back of the inserter
*** Document Inserter Vertical Stacker (DIVS) power stacker option available
Pitney Bowes Relay™ 2500, 3500, 4500 User Guide December, 2018 Page 8of 174
Page 16

Product Overview
Component Descriptions
l Touchscreen Power Button - turns on the touchscreen, an integrated interface to enter
commands, set up jobs, and change settings. Icons on the display show the system status.
l Accumulation area - accumulates the collation before folding.
l Insert Feeder - adds additional inserts to your envelope. Material fed from this feeder cannot be
folded by the inserter; especially suited to feeding pre-folded or thicker inserts.
l Sealer Bottle - provides sealing solution to the envelope sealer; located on the rear of the inserter
on the right side, under a hinged cover, labeled with the sealer icon.
l Envelope Inverter - transports envelope into the stacker face up.
l Drop Stacker - standard stacker, located at the exit of the inserter, it collects finished mailpieces.
This device can be latched against the inserter when not in use. An optional power stacker is
available, which offer greater capacity than the standard drop stacker.
l Fold Plate 1 and 2 - create the desired fold in material fed from the sheet feeder(s); the fold
plates are automatically set from the touchscreen.
l Manual Advance Knob - turns the inserter mechanisms manually to help clear material; located
under a cover on the front, left, lower corner of the inserter.
l Power Switch - turns the inserter on and off. (This is located on the front panel of the 4500.)
l Measuring Scale - used to help measure material and envelopes; located on the left side of the
inserter near the sheet feeders
l Envelope Feeder - feeds envelopes into the inserting area where they are filled with material
requested from the other feeder(s).
l Sheet Feeder 2 - feeds material that requires folding. Its functions are similar to those of sheet
feeder 1, but the manual feed option is NOT available from this feeder.
l Sheet Feeder 1 - this feeder is intended for feeding material that requires folding.
l Side Guide Adjustment Knobs - adjusts the side guides on the envelope feeder. (This is located
on the front panel of the 4500.)
Pitney Bowes Relay™ 2500, 3500, 4500 User Guide December, 2018 Page 9of 174
Page 17
Product Overview
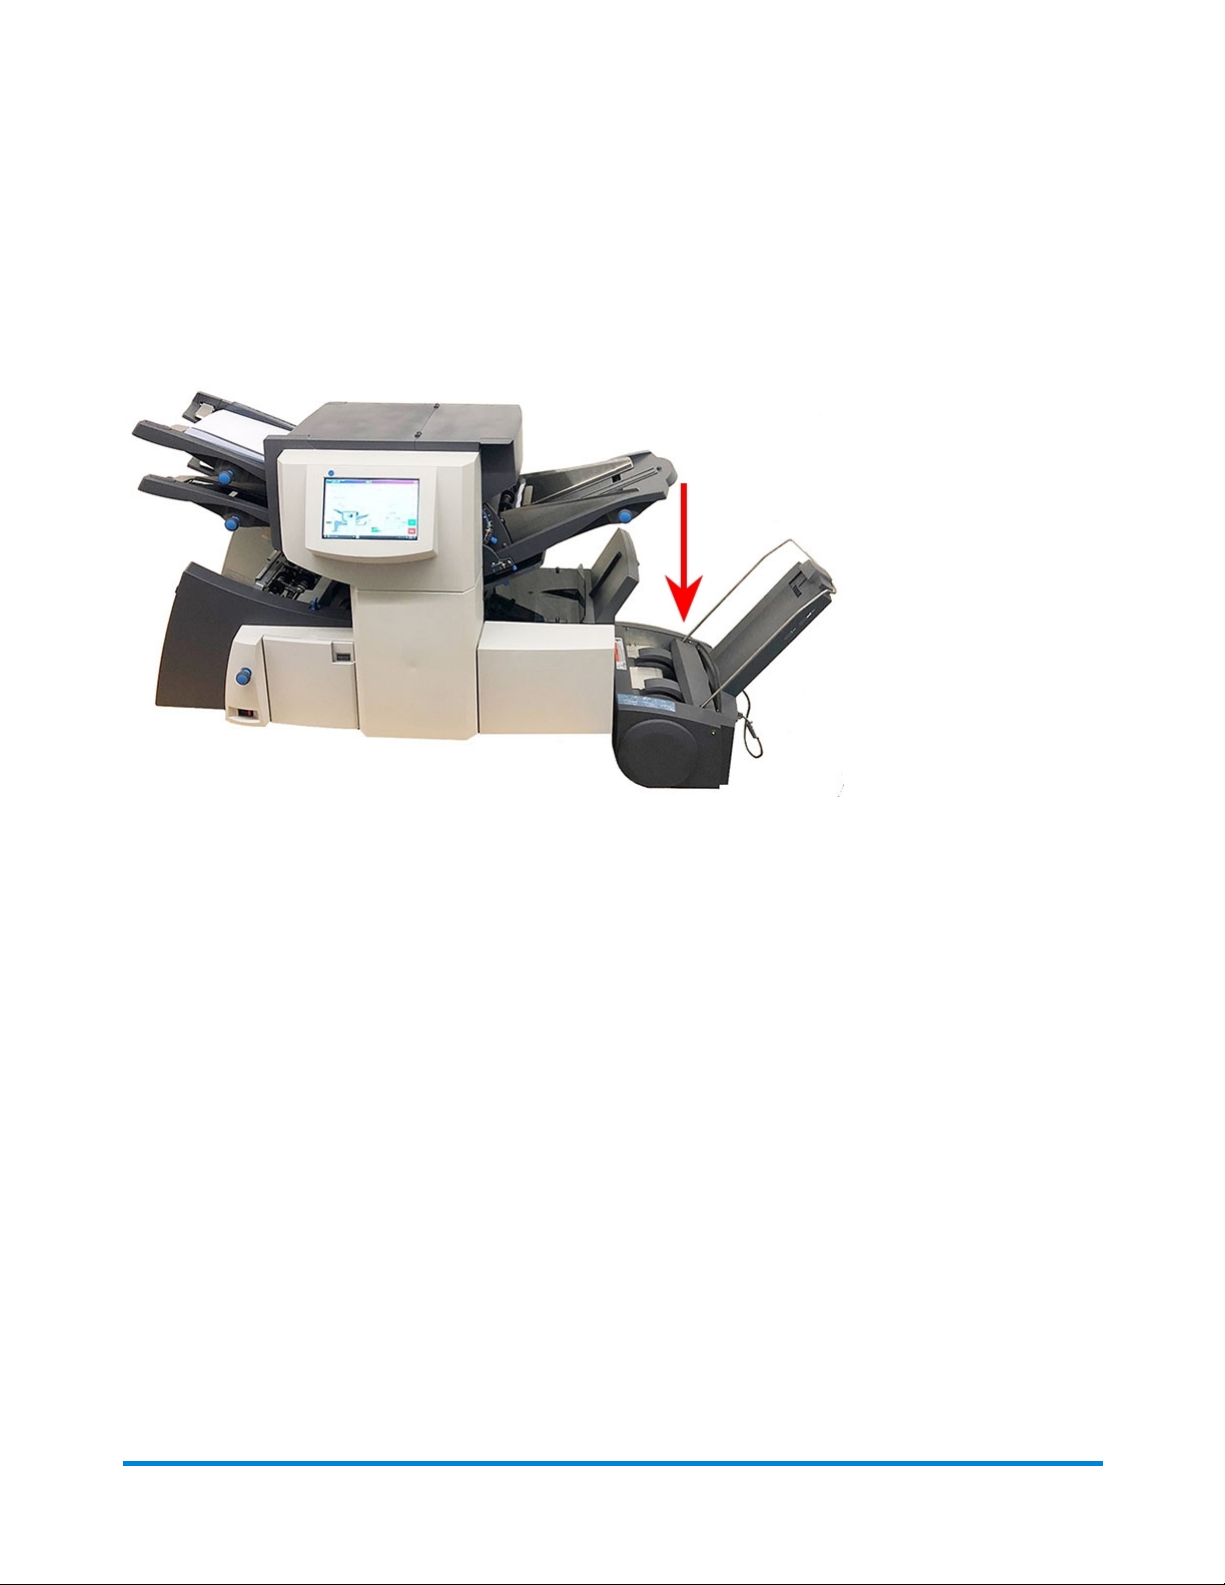
Optional Document Inserter Vertical Stacker (DIVS) - Power Stacker
Some Relay Inserters may have an optional power vertical stacker that is attached at the exit of the
inserter. Envelopes are stacked on top of each other, with the newest envelope on the bottom. This
keeps completed mailpieces in the same order as they are processed.
Pitney Bowes Relay™ 2500, 3500, 4500 User Guide December, 2018 Page 10 of 174
Page 18

3 - Using the Touchscreen
In this section
Turning on the Touchscreen 12
Navigating the Touchscreen 13
Using the Touchscreen Keyboard 17
Changing the Touchscreen Display Language 18
Logging In 19
Managing Operator Usernames and Passwords 20
Changing an Existing Job Name 22
Page 19
Using the Touchscreen
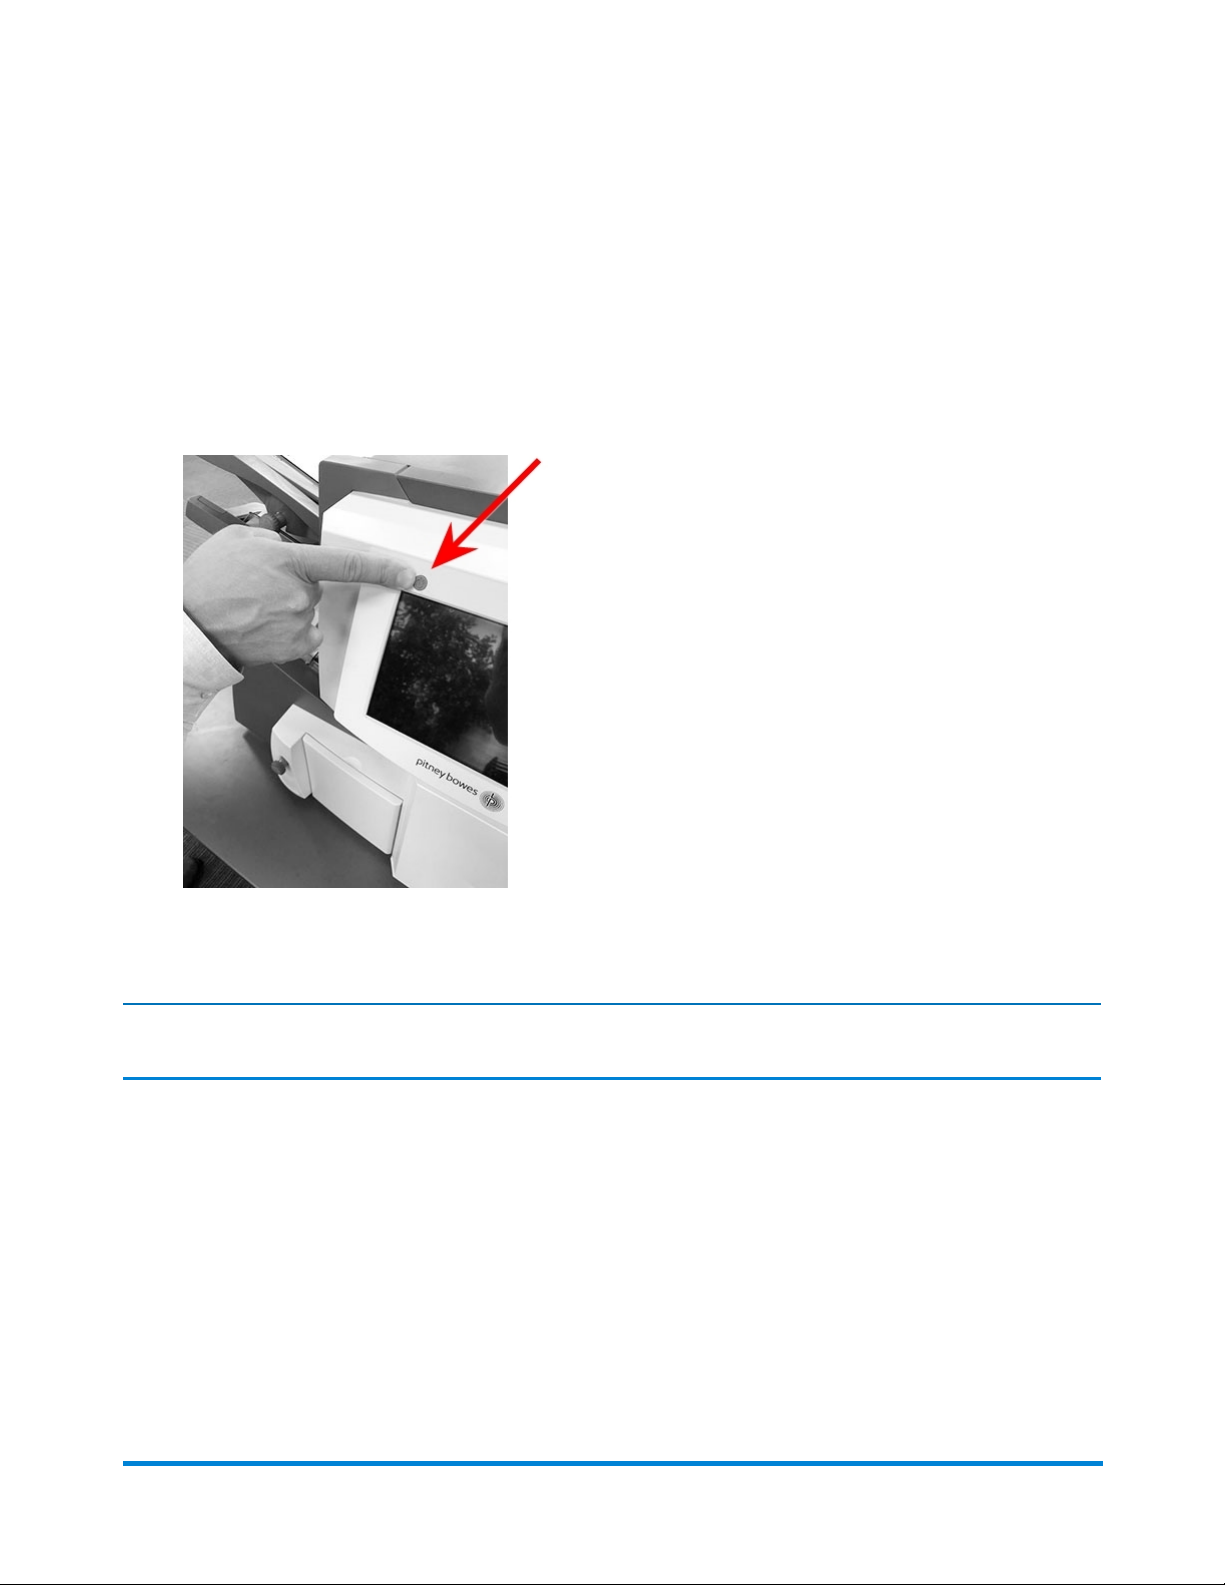
Turning on the Touchscreen
Be sure the inserter is powered up before turning on the touchscreen.
1. The ON/OFF power button is located on the top left of the touchscreen. Press and hold the power
button for a few seconds to turn the touchscreen on or off.
ON/OFF Power Button
NOTE: If the touchscreen is in sleep mode, lightly press the ON/OFF power button.
Pitney Bowes Relay™ 2500, 3500, 4500 User Guide December, 2018 Page 12 of 174
Page 20
Using the Touchscreen
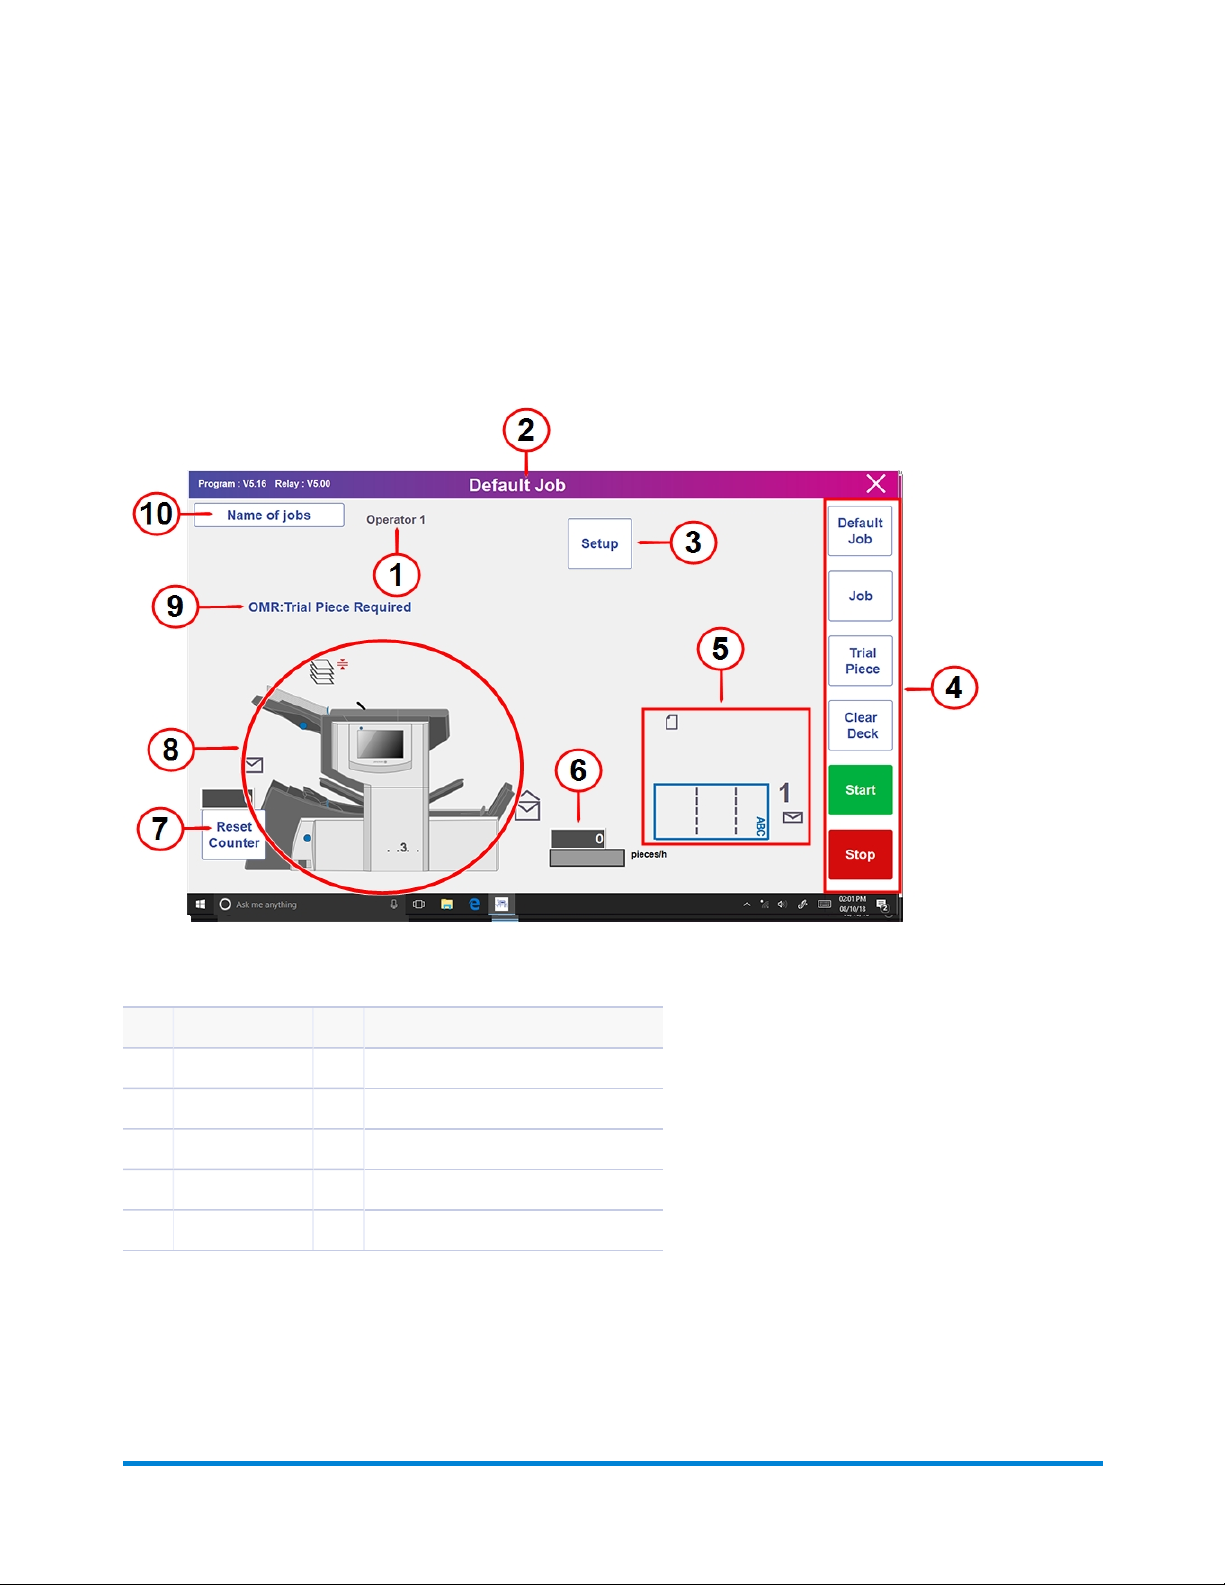
Navigating the Touchscreen
You can set up and run jobs using the integrated touchscreen. This section provides a basic overview of
the main touchscreen elements.
Integrated Touchscreen
Item Description Item Description
1 Operator Name 6 Speed Indicator
2 Job Name 7 Reset Counter
3 Setup Button 8 Inserter Model
4 Menu 9 Job Options and System Messages
5 Paper Area 10 Name of jobs Button
Pitney Bowes Relay™ 2500, 3500, 4500 User Guide December, 2018 Page 13 of 174
Page 21
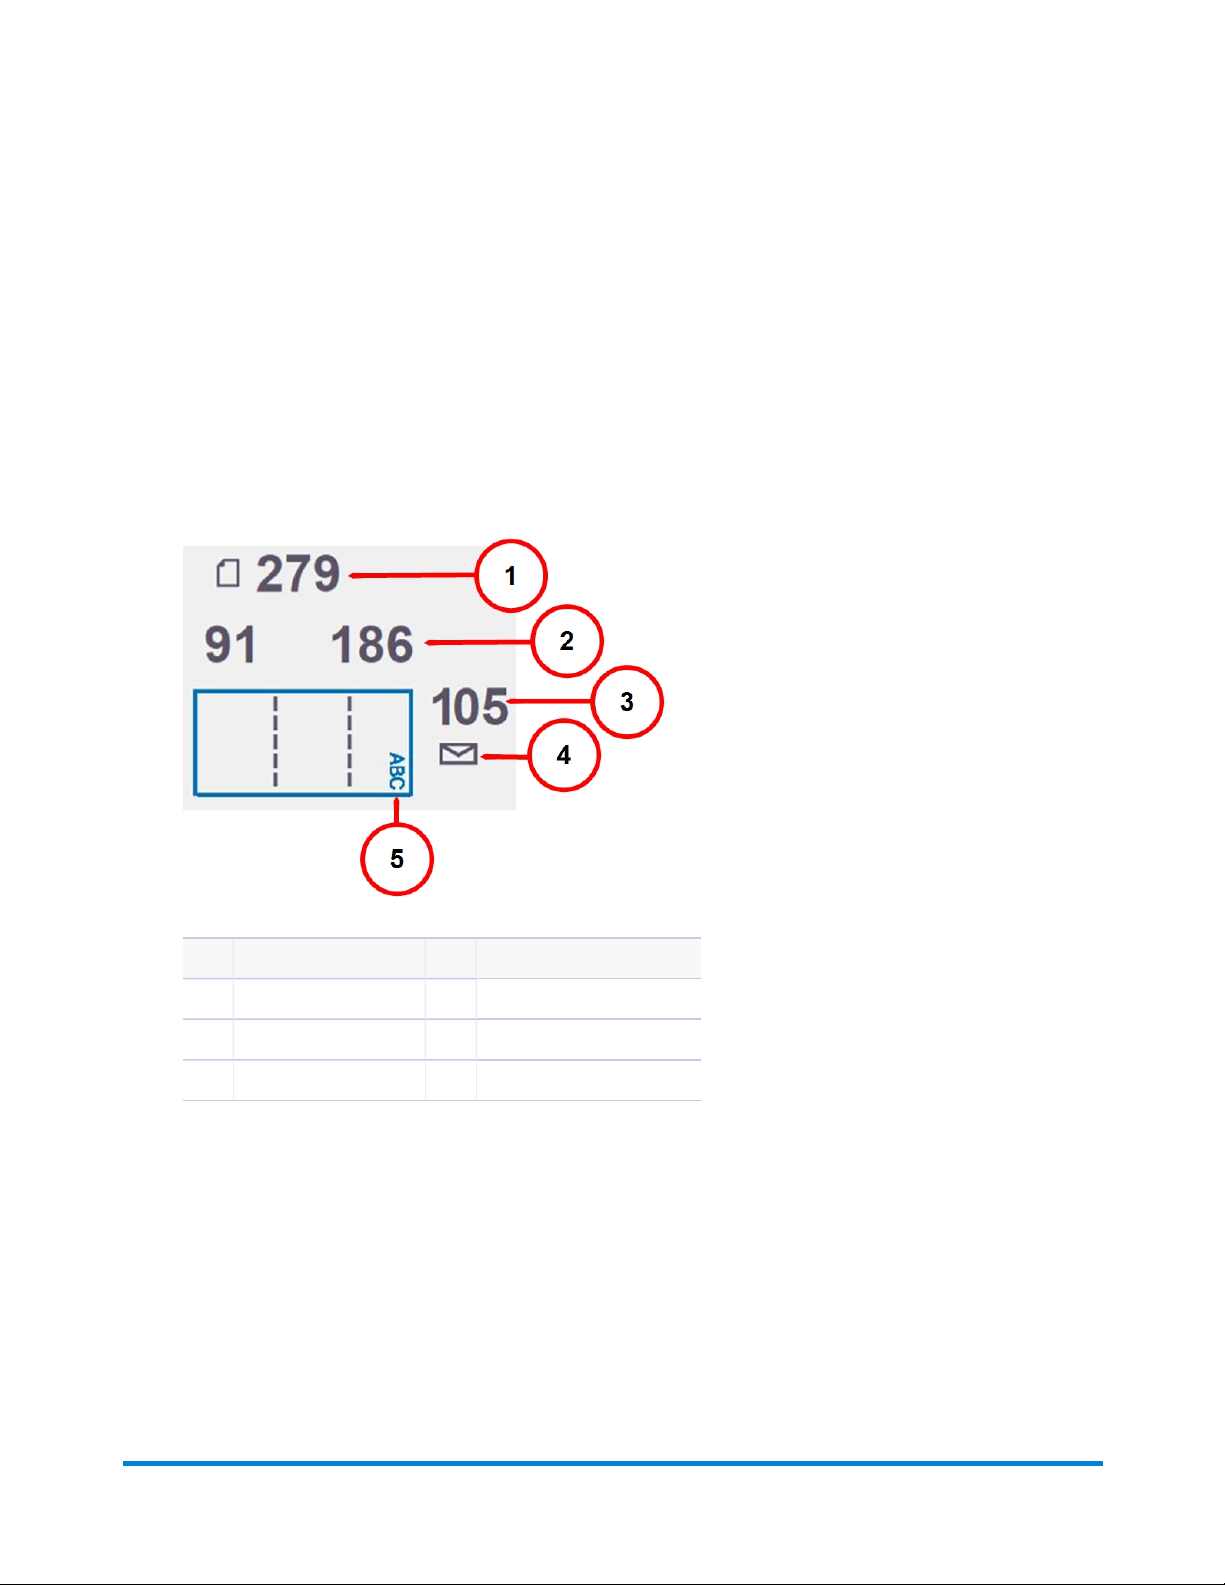
Using the Touchscreen
Touchscreen Descriptions
l Operator name - logged in operator
l Job Name - job name appears here
l Setup - tap to access setup mode to program jobs and change options in existing jobs
l Menu - set of buttons to select jobs, run a trial piece, start and stop the inserter, clear the deck
l Material Setup Area - uses icons and numbers to display material details - paper size, fold(s) set
for sheet feeder, envelope depth and address orientation
Item Description Item Description
1 Paper Length (mm) 4 Closed or Open Envelope
2 Fold Lines (mm) 5 Address Orientation
3 Envelope Depth (mm)
l Speed Indicator - number of mailpieces produced per hour
l Reset Counter - tap to reset the item counter; it ascends for each completed mailpiece that exits
the machine
l Inserter Model - visual representation of the inserter
l Job Options and System Messages - displays job options and system errors or messages
l Name of jobs - tap to access the change job name screen
Pitney Bowes Relay™ 2500, 3500, 4500 User Guide December, 2018 Page 14 of 174
Page 22
Using the Touchscreen
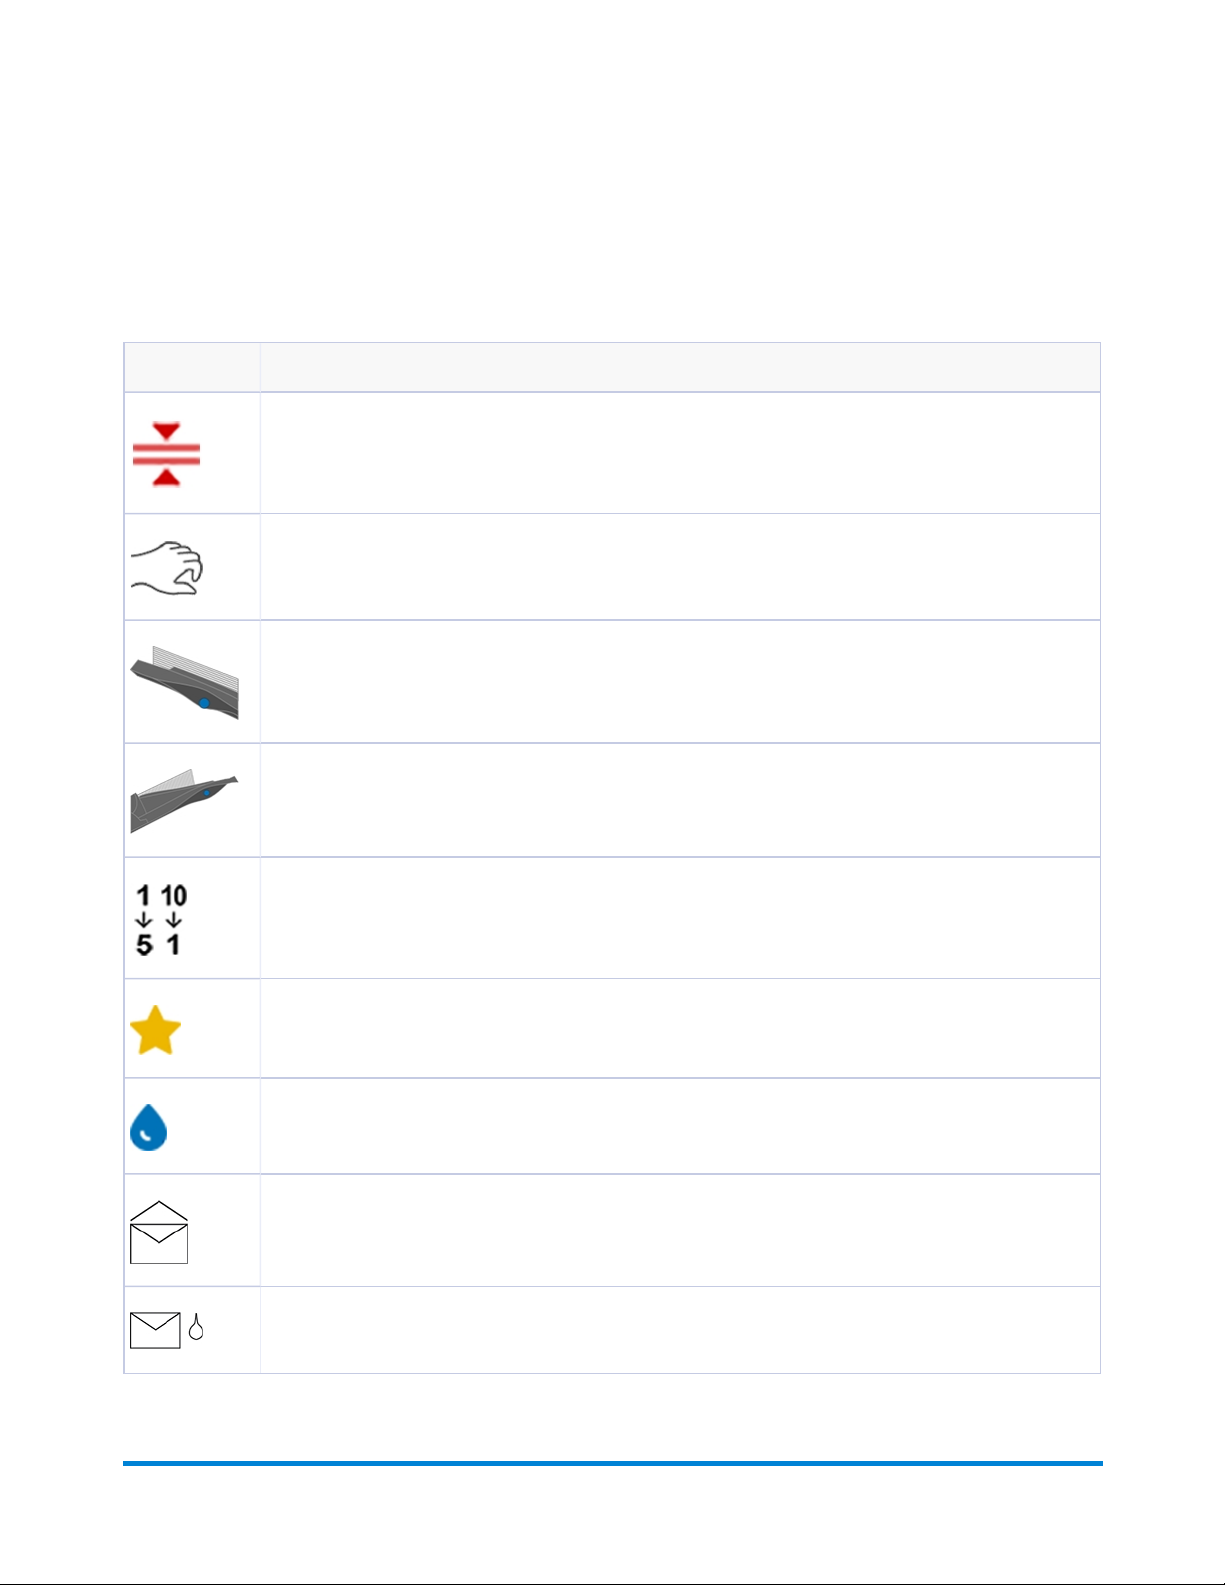
Touchscreen Icons
These icons display to help guide you through setting up and running a job. They indicate envelope
specifications, fold types, system status and messages, material jams and other job settings.
Icon Description
Indicates Double detect is on (Double detect stops the inserter if two or more sheets are fed
simultaneously.)
Indicates manual feed (icon displays next to feeder set for manual feed)
Indicates when a sheet feeder is being used (if the feeder is not being used the icon does not display)
Indicates when an insert feeder is being used (if the feeder is not being used the icon does not
display)
Indicates sheet order and quantity - order of sheets in the feeder and number of sheets accumulated
from that feeder
This icon displays next to the setting you are programming or changing to help guide you through the
setup process
Flashes when the sealer bottle needs refilling
Indicates the sealer unit is off (envelopes not sealed)
Indicates the sealer unit is on (automatic envelope sealing)
Pitney Bowes Relay™ 2500, 3500, 4500 User Guide December, 2018 Page 15 of 174
Page 23
Icon Description
Indicates there is no prime address sheet
Indicates prime address sheet is on the top, face up
Indicates prime address sheet is on the bottom, face down
Indicates a C-fold is selected
Using the Touchscreen
Indicates a Z-fold is selected
Indicates a double-fold is selected
Indicates a single-fold is selected
A warning symbol displays on the insert model, indicating a material stoppage; the position of the
symbol indicates where the stoppage has occurred.
Pitney Bowes Relay™ 2500, 3500, 4500 User Guide December, 2018 Page 16 of 174
Page 24

Using the Touchscreen
Using the Touchscreen Keyboard
Launching the keyboard
l The keyboard automatically launches when you tap in a text field to enter text.
Closing the keyboard
l The keyboard closes when you tap the Enter arrow key on the keyboard.
Pitney Bowes Relay™ 2500, 3500, 4500 User Guide December, 2018 Page 17 of 174
Page 25

Using the Touchscreen
Changing the Touchscreen Display Language
You can change the display language on the touchscreen to a non-English language.
1. Double-tap the inserter icon on the touchscreen desktop.
2. When the Operator List displays, tap the checkmark.
3. Select Language > Program from the main menu bar. A screen opens displaying country flags
associated with available languages.
4. Tap the flag that represents the language you want to display on the touchscreen. The flag screen
closes automatically and the new language displays.
5. Tap the checkmark.
6. Log in with your password or tap X to exit.
Pitney Bowes Relay™ 2500, 3500, 4500 User Guide December, 2018 Page 18 of 174
Page 26

Using the Touchscreen
Logging In
1. Double-tap the inserter icon on the touchscreen desktop.
2. When the List of operators dialog opens, highlight an Operator and tap the checkmark.
3. Tap in the Password field. When the keyboard launches, type the password in the field.
4. Tap the checkmark to log in.
Pitney Bowes Relay™ 2500, 3500, 4500 User Guide December, 2018 Page 19 of 174
Page 27

Using the Touchscreen
Managing Operator Usernames and Passwords
The Relay system comes with a set of default operator usernames and passwords. You can change
these default usernames and passwords to something unique to each operator. A maximum of 10
operators can be programmed into the touchscreen.
Default Operator Usernames and Passwords
Refer to these default usernames and passwords if you want to change them in your system.
Default Operator Usernames
Username Password Username Password
Operator 1 MDP1 Operator 6 MDP6
Operator 2 MDP2 Operator 7 MDP7
Operator 3 MDP3 Operator 8 MDP8
Operator 4 MDP4 Operator 9 MDP9
Operator 5 MDP5 Operator 10 MDP10
NOTE: The Supervisor password is 71.
Creating operator usernames (renaming default usernames)
You can rename a default Operator username to customize for your users.
1. Double-tap the inserter icon on the touchscreen desktop.
2. When the List of operators dialog displays, highlight a default Operator to rename (Operator 1 –
Operator 10).
3. Tap the checkmark.
4. Tap in the Password field. When the keyboard launches, type either the Supervisor (71) or the
default Operator password in the field.
5. Select File > Operators > Change from the main menu bar.
Pitney Bowes Relay™ 2500, 3500, 4500 User Guide December, 2018 Page 20 of 174
Page 28

Using the Touchscreen
6. Tap in the New Name field and type a new operator name using the touchscreen keyboard.
7. Tap the checkmark to log in or X to exit.
Changing operator passwords
1. Double-tap the inserter icon on the touchscreen desktop.
2. When the List of operators dialog opens, highlight an Operator and tap the checkmark.
3. Tap in the Password field. When the keyboard launches, type the current Operator password in
the field. (DO NOT tap the checkmark.)
4. Select File > Password > Change from the menu bar.
5. Tap in the New Password field and type the new password.
6. Tap in the Confirm field and type the new password again.
7. Tap the checkmark to accept the password.
8. Tap the checkmark to log in or X to exit.
Recovering lost operator passwords
This is a supervisor activity.
1. Double-tap the inserter icon on the touchscreen desktop.
2. When the List of operators dialog opens, select the Operator associated with the lost password
and tap the checkmark.
3. Tap in the Password field. When the keyboard launches, type the Supervisor password (71) in
the field. (DO NOT tap the checkmark.)
4. Select File > Password > Recover from the main menu bar. The recovered password displays in
the dialog box. (Record the password for future reference.)
5. Tap OK to close the dialog box.
6. Type the recovered password into the Password field.
7. Tap the checkmark to log in or X to exit.
Pitney Bowes Relay™ 2500, 3500, 4500 User Guide December, 2018 Page 21 of 174
Page 29

Using the Touchscreen
Changing an Existing Job Name
You can assign a new name to an existing job.
1. Double-tap the inserter icon on the touchscreen desktop.
2. When the List of operators dialog displays, highlight a default Operator to rename (Operator 1 –
Operator 10).
3. Tap the checkmark
4. Tap in the Password field. When the keyboard launches, type either the Supervisor (71) or the
Operator password in the field.
5. Tap the checkmark.
6. Tap the Name of jobs button.
7. When the Name of jobs list opens, highlight a job and tap Change.
8. Tap in the New Job Name field and type the new job name.
9. Tap the checkmark to accept the new job name.
10. Tap the checkmark to log in or X to close the Name of jobs window.
Pitney Bowes Relay™ 2500, 3500, 4500 User Guide December, 2018 Page 22 of 174
Page 30

4 - Product Overview
In this section
Programming a Scanning Job 25
Initiating Job Setup 26
Selecting a Job 27
Enabling Scanning (OMR or Barcode) 28
Setting the Fold Type 29
Setting the Main Scanning Sheet Feeder 30
Setting the Second (Supplementary) Sheet Feeder 31
Setting the Insert Feeder 32
Setting the Sealer 33
Setting the Paper Length 34
Setting Fold A 35
Setting Fold B 36
Setting the Envelope Depth 37
Setting the Envelope Stop 38
Setting the Batch Counter 39
Confirming Job Setup 40
Running a Trial Piece 41
Programming a non-Scanning Job 43
Initiating Job Setup 44
Selecting a Job 45
Disabling Scanning 46
Setting the Fold Type 47
Setting Accumulation Options 49
Setting the Main Sheet Feeder 50
Setting the Second (Supplementary) Sheet Feeder 52
Setting the Insert Feeder 53
Setting the Mode Type - Insertion or Fold Only 54
Setting the Sealer 55
Page 31

Product Overview
Setting the Paper Length 56
Setting Fold A 57
Setting Fold B 58
Setting the Envelope Depth 59
Setting the Envelope Stop 60
Setting the Batch Counter 61
Confirming Job Setup 62
Running a Trial Piece 63
Modifying an Existing Job 65
Deleting a Job 66
Pitney Bowes Relay™ 2500, 3500, 4500 User Guide December, 2018 Page 24 of 174
Page 32

Product Overview
Programming a Scanning Job
Follow these steps to program a scanning job. As you move through the various job settings, a star icon
displays next to the area you are programming, to help guide you through the process.
l Log in
l Initiate job setup
l Select a job
l Enable scanning (OMR On or Off)
l Set fold type
l Set the main scanning sheet feeder
l Set the second sheet feeder
l Set the insert feeder
l Set the sealer
l Set paper length
l Set fold A
l Set fold B
l Set envelope depth
l Set envelope stop
l Set batch counter
l Confirm job setup
l Run a trial piece
Pitney Bowes Relay™ 2500, 3500, 4500 User Guide December, 2018 Page 25 of 174
Page 33

Product Overview
Initiating JobSetup
1. Log in.
2. From the main screen, tap the Setup button. The Enter Access Code: field displays over the
inserter model and the keypad appears on the touchscreen display.
3. Using the keypad, type the Supervisor code (71) and tap the Enter key. The Enter Access
Code: field counts up or down to display the password code entered.
Item Description Item Description
1 Setup Button 4 Keypad
2 Job Options and Settings 5 Enter Key
3 Fast Scroll Buttons* 6 Enter Access Code Field
* These keys are used as a fast forward to move through large changes in job setup settings
4. Tap >> to accept the access code and advance to the job settings.
Pitney Bowes Relay™ 2500, 3500, 4500 User Guide December, 2018 Page 26 of 174
Page 34

Product Overview
Selecting a Job
You can select an existing job and modify the settings to fit a new job.
1. Tap the + and – buttons to scroll through the jobs; highlight the desired job. (The job name in the
screen banner changes to display the current jobs.)
2. Tap the >> to accept the job and advance to the first setting option.
NOTE: If you use an existing job, the old settings will be overwritten with the new settings selected.
Pitney Bowes Relay™ 2500, 3500, 4500 User Guide December, 2018 Page 27 of 174
Page 35

Product Overview
Enabling Scanning (OMR or Barcode)
1. To set the scanning options, tap the + and – buttons and select the option you want for the job.
OMR and Barcode Settings
Setting Scanning Description
OMR off - OMR scanning off
OMR on - OMR scanning
- Standard OMR mark positioning
OMR + Sequence - OMR scanning
- Wrap Around Sequence
- Standard OMR mark positioning
OMR + Select feed - OMR scanning + Select feed / Autobatch
- Standard OMR mark positioning
OMR + Select feed + Sequence - OMR scanning + Select feed / Autobatch
- Wrap Around Sequence OR barcode
- Standard OMR mark positioning
2D BCR On - 2D barcode scanning on
2. Tap the >> button to accept the selection and advance to the next setting.
Pitney Bowes Relay™ 2500, 3500, 4500 User Guide December, 2018 Page 28 of 174
Page 36

Product Overview
Setting the Fold Type
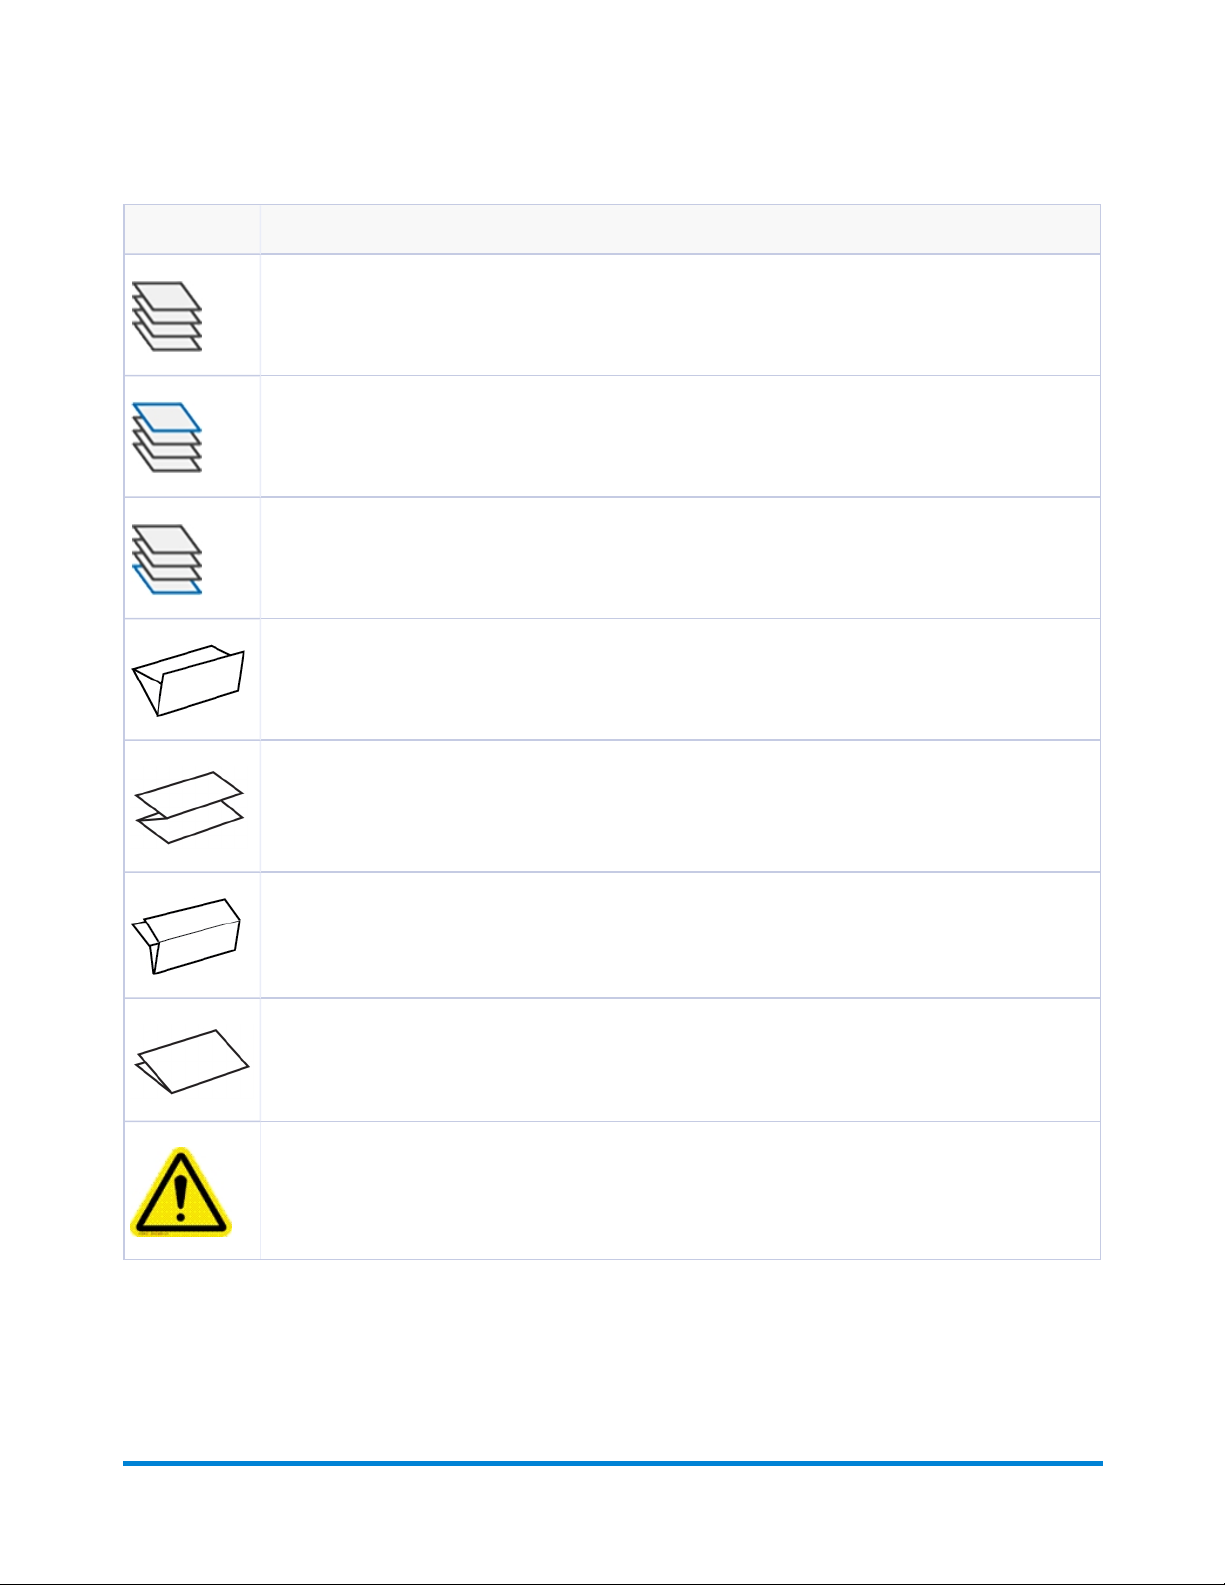
1. Tap the + and – buttons to scroll through the fold types.
Fold Types
Fold Description
C-fold
Z-fold
Double-fold
Single-fold
2. Tap the >> button to accept the fold type and advance to the next setting.
Paper Orientation
Depending on the fold type selected, the display shows the paper orientation for loading into the feeders.
Pitney Bowes Relay™ 2500, 3500, 4500 User Guide December, 2018 Page 29 of 174
Page 37

Setting the Main Scanning Sheet Feeder
The main sheet feeder is automatically set for you based on the fold type you selected.
l C- fold and double-fold - Sheet Feeder 1 is set as the main sheet feeder
l Z-fold and single fold - Sheet Feeder 2 is set as the main sheet feeder
1. Tap the + and – buttons to scroll through the job options.
Icon Option Description
Feeder On Feeder on
Product Overview
Double Detect Feeder running double detect. (Double detect stops the inserter if two
or more sheets are fed simultaneously.)
SF (Select Feed) Select feed on. (Select feed tells a feeder to feed one extra sheet per
envelope).
NOTE: If there is no feeder icon displayed, the feeder is not active for this job
2. Tap the >> button to accept the option and advance to the next setting.
Pitney Bowes Relay™ 2500, 3500, 4500 User Guide December, 2018 Page 30 of 174
Page 38

Product Overview
Setting the Second (Supplementary) Sheet Feeder
Set the options for the second scanning sheet feeder.
1. Tap the + and – buttons to scroll through the options.
Icon Option Description
Feeder On Feeder on
Double Detect Feeder running double detect. (Double detect stops the inserter if two
or more sheets are fed simultaneously.)
Select Feed Select feed on. (Select feed tells a feeder to feed one extra sheet per
envelope).
NOTE: If there is no feeder icon displayed, the feeder is not active for this job
2. Tap the >> button to accept the options and advance to the next setting.
Pitney Bowes Relay™ 2500, 3500, 4500 User Guide December, 2018 Page 31 of 174
Page 39

Product Overview
Setting the Insert Feeder
Determine if you want to use the insert feeder and how it will be used. Set the options accordingly.
1. Tap the + and - buttons to scroll through the options.
Icon Option Description
Feeder On Feeder on.
Double Detect On Feeder running double detect. (Double detect stops the inserter if two
or more sheets are fed simultaneously.)
Select Feed On .Select Feed on. (Select feed tells a feeder to feed one extra sheet per
envelope.)
NOTE: If there is no feeder icon displayed, the feeder is not active for this job
2. Tap the >> button to accept the option and advance to the next setting.
Pitney Bowes Relay™ 2500, 3500, 4500 User Guide December, 2018 Page 32 of 174
Page 40

Product Overview
Setting the Sealer
Decide whether you want to seal envelopes and then set the sealer.
1. Tap the + and – buttons to toggle the seal option to On or Off.
Icon Option Description
On Turns the sealer unit on for automatic sealing of envelopes. Make sure the sealer bottle is
full of E-Z Seal®.
Off Turns the sealer unit off. Envelopes will be processed unsealed.
2. Tap the >> button to accept the option and advance to the next setting.
Pitney Bowes Relay™ 2500, 3500, 4500 User Guide December, 2018 Page 33 of 174
Page 41

Setting the Paper Length
1. Use the scale on the side of the inserter cover to measure the paper.
Product Overview
l US letter - 279 mm (11 inches)
l A4 paper - 297 mm
2. Tap the + and – buttons to scroll through paper lengths (displayed in mm).
3. Tap the >> button to accept the paper length value and advance to the next setting.
Pitney Bowes Relay™ 2500, 3500, 4500 User Guide December, 2018 Page 34 of 174
Page 42

Product Overview
Setting Fold A
Depending on the fold type and paper length settings you selected earlier, the inserter suggests the
correct dimension for the first fold. Usually this setting will be fine.
If you want to keep the setting:
1. Tap the >> button to accept the option and advance to the next setting.
If you want to change the setting:
1. To change the standard fold setting, tap the + and – buttons until the length of required fold
displays.
NOTE: The inserter automatically limits your options to available specifications on your inserter.
As the length of fold A is changed, the dimensions of fold B change automatically to keep within
the correct paper length and inserter specifications.
2. Tap the >> button to accept the fold value and advance to the next setting.
Pitney Bowes Relay™ 2500, 3500, 4500 User Guide December, 2018 Page 35 of 174
Page 43

Product Overview
Setting Fold B
Similar to setting fold A, the inserter suggests the correct dimension for fold B.
If you want to keep the setting:
1. Tap the >> button to accept the option and advance to the next setting.
If you want to change the setting:
1. Tap the + and – buttons until the length of fold required displays. A star icon displays next to the
fold panel you are setting.
2. Tap the >> button to accept the fold value and advance to the next setting.
Pitney Bowes Relay™ 2500, 3500, 4500 User Guide December, 2018 Page 36 of 174
Page 44

Product Overview
Setting the Envelope Depth
1. Use the measuring scale on the front cover to measure the envelope depth.
2. Tap the + and – buttons to scroll through the measurements (displayed in mm).
3. Tap the >> button to accept the value and advance to the next setting.
Pitney Bowes Relay™ 2500, 3500, 4500 User Guide December, 2018 Page 37 of 174
Page 45

Product Overview
Setting the Envelope Stop
The stop has five positions numbered 1 to 5. Setting 3 is the standard setting for normal weight paper
with standard folds. A thinner, lighter insert requires a lower setting and a thicker, heavier insert requires
a higher setting.
1. Tap the + and – buttons to scroll through the envelope stop positions.
2. Tap the >> button to accept the position and advance to the next setting.
NOTE: After the envelope stop is set, the setting displays on the bottom of the inserter model on the
touchscreen. (For example, ..3.., for position 3.)
Pitney Bowes Relay™ 2500, 3500, 4500 User Guide December, 2018 Page 38 of 174
Page 46

Product Overview
Setting the Batch Counter
l Batch Counter On - If the batch counter is turned on, it allows pre-defined batches of finished
mailpieces to be automatically processed. When the batch is complete, the inserter automatically
stops.
l Batch Counter Off - If the batch counter is not turned on, the display counter counts the number
of items processed until you tap Reset Counter. Tap the Start button to begin processing the
next batch of mailpieces.
To set the batch counter:
1. Tap the + and – buttons to toggle the batch mode to On or Off.
NOTE: If the batch counter is set to on, the inserter prompts for batch quantity. The default
quantity is 50, but any value can be selected up to 999 by tapping the + and – buttons.
2. Tap the >> button to accept the setting.
Pitney Bowes Relay™ 2500, 3500, 4500 User Guide December, 2018 Page 39 of 174
Page 47

Product Overview
Confirming Job Setup
Job setup is now complete. Using the inserter model and icons, the touchscreen display shows all of the
selected job settings.
1. Review the job settings.
2. Tap the << and >> buttons to scroll back and change a setting.
3. When the setup changes are complete, tap the Setup button to accept the new settings and exit
setup mode.
The touchscreen displays the new job settings with the message Trial Piece Required.
4. Test the setup by running a trial piece.
NOTE: The inserter retains job settings until they are changed or deleted, even when the power is
disconnected.
Pitney Bowes Relay™ 2500, 3500, 4500 User Guide December, 2018 Page 40 of 174
Page 48

Product Overview
Running a Trial Piece
Run a trial piece to test the job settings.
1. Load material and tap the Trial Piece button on the menu.
NOTE: When the first job is run after powering up the system, the touchscreen displays the
message "Check / Clear Accumulator." This is to verify there are no pages staged in the
accumulator area. If this message is displayed:
a. Open the accumulator cover to check for pieces.
b. Remove any material.
c. Close the cover and tap Trial Piece.
2. Assess the unsealed trial piece to make sure everything inside the envelope is correct. If you need
to make changes to the settings:
a. Tap the Setup button on the main screen.
b. Log in with Supervisor password (71).
c. Tap the << >> buttons to scroll to the setting you wish to modify.
d. Tap the + and – buttons to scroll to the desired option.
3. When the setup changes are complete, tap the Setup button to accept the new settings and return
to run mode. The inserter saves the job with the new settings.
4. Run another trial piece to test the modified settings.
NOTE: Any time you modify settings you must run a trial piece.
Running trial pieces with linked feeding
When a trial piece is requested for a job where linked feeding is enabled, both feeders must be loaded, as
a trial piece will feed from each feeder. Two trial pieces are produced.
Pitney Bowes Relay™ 2500, 3500, 4500 User Guide December, 2018 Page 41 of 174
Page 49

Product Overview
Incorrect Address Position - Adjust Fold Setting
If the address is in the incorrect position when you run a trial piece, refer to these fold settings to help fine
tune the fold setting.
Fold Type Address too High Address too Low
C-fold Decrease Fold A Increase Fold A and increase Fold B by the same amount
Z- fold Increase Fold A Decrease Fold A and increase Fold B by the same amount
Single-fold Increase Fold A Decrease Fold A
Double-fold Decrease Fold A Increase Fold A
It is recommended that the fold is only adjusted by 0.20 inches (5 mm) each time.
Pitney Bowes Relay™ 2500, 3500, 4500 User Guide December, 2018 Page 42 of 174
Page 50

Product Overview
Programming a non-Scanning Job
Follow these steps to program a non-scanning job. As you move through the various job settings, a star
icon displays next to the area being programmed, to help guide you through the process.
l Log in
l Initiating job setup
l Select a job
l Disable scanning (OMR Off) (Skip this step if your inserter does not have scanning)
l Set fold type
l Set accumulation
l Set main sheet feeder
l Set second sheet feeder
l Set insert feeder
l Set mode type (insertion or fold)
l Set the sealer
l Set paper length
l Set fold A
l Set fold B
l Set envelope depth
l Set envelope stop
l Set batch counter
l Confirm job setup
l Run a trial piece
Pitney Bowes Relay™ 2500, 3500, 4500 User Guide December, 2018 Page 43 of 174
Page 51

Product Overview
Initiating JobSetup
1. Log in.
2. From the main screen, tap the Setup button. The Enter Access Code: field displays over the
inserter model and the keypad appears on the touchscreen display.
3. Using the keypad, type the Supervisor code (71) and tap the Enter key. The Enter Access
Code: field counts up or down to display the password code entered.
Item Description Item Description
1 Setup Button 4 Keypad
2 Job Options and Settings 5 Enter Key
3 Fast Scroll Buttons* 6 Enter Access Code Field
* These keys are used as a fast forward to move through large changes in job setup settings
4. Tap >> to accept the access code and advance to the job settings.
Pitney Bowes Relay™ 2500, 3500, 4500 User Guide December, 2018 Page 44 of 174
Page 52

Product Overview
Selecting a Job
You can select an existing job and modify the settings to fit a new job.
1. Tap the + and – buttons to scroll through the jobs; highlight the desired job. (The job name in the
screen banner changes to display the current jobs.)
2. Tap the >> to accept the job and advance to the first setting option.
NOTE: If you use an existing job, the old settings will be overwritten with the new settings selected.
Pitney Bowes Relay™ 2500, 3500, 4500 User Guide December, 2018 Page 45 of 174
Page 53

Disabling Scanning
If scanning (OMR or barcode) is enabled on your system, set it to OMR off.
1. When prompted, tap the + and – buttons to select OMR off.
2. Tap the >> button to accept the selection and advance to the next setting.
Product Overview
Pitney Bowes Relay™ 2500, 3500, 4500 User Guide December, 2018 Page 46 of 174
Page 54

Product Overview
Setting the Fold Type
1. Tap the + and – buttons to scroll through the fold types.
Fold Types
Icon Fold
C-fold
Z-fold
Double-fold
Single-fold
2. Tap the >> button to accept the fold type and advance to the next setting.
Pitney Bowes Relay™ 2500, 3500, 4500 User Guide December, 2018 Page 47 of 174
Page 55

Product Overview
Paper Orientation
Depending on the fold type selected, the display shows the paper orientation for loading into the feeders.
Pitney Bowes Relay™ 2500, 3500, 4500 User Guide December, 2018 Page 48 of 174
Page 56

Product Overview
Setting Accumulation Options
Accumulation allows multiple sheets to be fed from the sheet feeder into the envelope.
1. Tap the + and – buttons to scroll through the accumulation options.
2. If you set accumulation to ON:
a. Tap the >> button to set number of pages to feed in each envelope. (Accumulation = 2 to 10)
b. Tap the + and – buttons to enter the number of pages.
3. Tap the >> button to accept the option and advance to the next setting.
Inserter Accumulation Settings
Setting Description
Accumulation: OFF Only one page can be fed from each feeder
Accumulation from Main Multiple sheets will be folded together and inserted into the envelope. (Up to 5 sheets for
C-folds, Z-folds, up to 10 sheets for single-folds - a service adjustment may be required to
run more than 8 sheets - and up to 3 sheets for double-folds.)
Accumulation From Suppl A single address main is fed from the main feeder, and up to 4 additional sheets can be
collated from the second feeder
Accumulation = (2 to 10) If Accumulation is ON, select how many pages you want to feed into each envelope.
Pitney Bowes Relay™ 2500, 3500, 4500 User Guide December, 2018 Page 49 of 174
Page 57

Setting the Main Sheet Feeder
The main sheet feeder is automatically selected depending on the fold type you selected.
l C- fold and double-fold - Sheet Feeder 1 is set as the main sheet feeder
l Z-fold and single fold -Sheet Feeder 2 is set as the main sheet feeder
1. Tap the + and – buttons to scroll through the job options.
Icon Option Description
Feeder On Feeder on
Product Overview
Double Detect Feeder running double detect. (Double detect stops the inserter
if two or more sheets are fed simultaneously.)
Manual Feed Manually feeds collated sets; only available on sheet feeder 1.
The inserter waits for manual insertion of each set into sheet
feeder 1, after which it will fold and insert the set automatically.
Linked Feeding: On (only
available on Relay 3500 and
4500 models)
NOTE: If there is no feeder icon displayed, the feeder is not active for this job
Linked feeding on. (Feed comes from the first sheet feeder and
when empty, automatically switches feeding from the second
sheet feeder.)
2. Tap the >> button to accept the option and advance to the next setting.
Pitney Bowes Relay™ 2500, 3500, 4500 User Guide December, 2018 Page 50 of 174
Page 58

Product Overview
About Linked Feeding
Linked feeding can only be set on the main sheet feeder on non-scanning jobs. With linked feeding,
sheets are initially fed from the main sheet feeder. When that feeder is empty, the inserter automatically
switches feeding from the second sheet feeder.
While the job is running with linked feeding enabled, above the inserter model on the touchscreen the
display shows: 1 > 2 > 1. This confirms feeding automatically switches between feeders.
About the Manual Feed Option
l The manual feed setting allows you to run stapled sets of up to five sheets - a maximum of 100 lbs.
(400 gsm) per set. The maximum compressed thickness of the set after folding must not exceed
0.08 inches (2 mm).
l The inserter waits for manual insertion of each set into sheet feeder 1, after which it will fold and
insert the set automatically.
l When running manual feed mode, sheet feeder 2 becomes inoperable.
l The manual feed option is only available when Accumulation is set to OFF.
Pitney Bowes Relay™ 2500, 3500, 4500 User Guide December, 2018 Page 51 of 174
Page 59

Product Overview
Setting the Second (Supplementary) Sheet Feeder
Set the options for the second sheet feeder.
1. Tap the + and – buttons to scroll through the options.
Icon Option Description
Feeder On Feeder on.
Double Detect Feeder running double detect. (Double detect stops the inserter if two
or more sheets are fed simultaneously.)
NOTE: If there is no feeder icon displayed, the feeder is not active for this job
2. Tap the >> button to accept the option and advance to the next setting.
Pitney Bowes Relay™ 2500, 3500, 4500 User Guide December, 2018 Page 52 of 174
Page 60

Product Overview
Setting the Insert Feeder
Determine if you want to use the insert feeder and how it will be used. Set the options accordingly.
1. Tap the + and - buttons to scroll through the options.
Icon Option Description
Feeder On Feeder on.
Double Detect On Feeder running double detect. (Double detect stops the inserter if two
or more sheets are fed simultaneously.)
Select Feed On .Select Feed on. (Select feed tells a feeder to feed one extra sheet per
envelope.)
NOTE: If there is no feeder icon displayed, the feeder is not active for this job
2. Tap the >> button to accept the option and advance to the next setting.
Pitney Bowes Relay™ 2500, 3500, 4500 User Guide December, 2018 Page 53 of 174
Page 61

Product Overview
Setting the Mode Type - Insertion or Fold Only
This setting only appears if accumulation is not turned on. The inserter needs to know if the job requires
inserting material into an envelope or if it is a fold-only job.
l Insertion mode - activates the envelope feeder for a normal inserting job.
l Fold-Only mode - turns the envelope feeder off and sets the inserter to act as a folding module.
To set the mode type:
1. Tap the + and – buttons to toggle between the options.
2. Tap the >> button to accept the mode type and advance to the next setting.
Pitney Bowes Relay™ 2500, 3500, 4500 User Guide December, 2018 Page 54 of 174
Page 62

Product Overview
Setting the Sealer
This setting appears on non-scanning jobs only if insertion mode is turned on. Decide if you want to seal
envelopes and set the sealer.
1. Tap the + and – buttons to toggle the option to On or Off.
Icon Option Description
On Turns the sealer unit on for automatic sealing of envelopes. Make sure the sealer bottle is
full of E-Z Seal®.
Off Turns the sealer unit off. Envelopes will be ejected unsealed.
2. Tap the >> button to accept the option and advance to the next setting.
l If you selected either of the sheet feeders, continue to the Setting the Paper Length.
l If you are using the insert feeder only, folding is not possible; skip to Setting Envelope Depth.
Pitney Bowes Relay™ 2500, 3500, 4500 User Guide December, 2018 Page 55 of 174
Page 63

Setting the Paper Length
1. Use the scale on the side of the inserter cover to measure the paper.
Product Overview
l US letter - 279 mm (11 inches)
l A4 paper - 297 mm
2. Tap the + and – buttons to scroll through paper lengths (displayed in mm).
3. Tap the >> button to accept the paper length value and advance to the next setting.
Pitney Bowes Relay™ 2500, 3500, 4500 User Guide December, 2018 Page 56 of 174
Page 64

Product Overview
Setting Fold A
Depending on the fold type and paper length settings you selected earlier, the inserter suggests the
correct dimension for the first fold. Usually this setting will be fine.
If you want to keep the setting:
1. Tap the >> button to accept the option and advance to the next setting.
If you want to change the setting:
1. To change the standard fold setting, tap the + and – buttons until the length of required fold
displays.
NOTE: The inserter automatically limits your options to available specifications on your inserter.
As the length of fold A is changed, the dimensions of fold B change automatically to keep within
the correct paper length and inserter specifications.
2. Tap the >> button to accept the fold value and advance to the next setting.
Pitney Bowes Relay™ 2500, 3500, 4500 User Guide December, 2018 Page 57 of 174
Page 65

Product Overview
Setting Fold B
Similar to setting fold A, the inserter suggests the correct dimension for fold B.
If you want to keep the setting:
1. Tap the >> button to accept the option and advance to the next setting.
If you want to change the setting:
1. Tap the + and – buttons until the length of fold required displays. A star icon displays next to the
fold panel you are setting.
2. Tap the >> button to accept the fold value and advance to the next setting.
l Inserting jobs - continue to the Setting the Envelope Depth.
l Fold-only job - there are no more job settings, skip to Confirming the Job Setup.
Pitney Bowes Relay™ 2500, 3500, 4500 User Guide December, 2018 Page 58 of 174
Page 66

Product Overview
Setting the Envelope Depth
1. Use the measuring scale on the front cover to measure the envelope depth.
2. Tap the + and – buttons to scroll through the measurements (displayed in mm).
3. Tap the >> button to accept the value and advance to the next setting.
Pitney Bowes Relay™ 2500, 3500, 4500 User Guide December, 2018 Page 59 of 174
Page 67

Product Overview
Setting the Envelope Stop
The stop has five positions numbered 1 to 5. Setting 3 is the standard setting for normal weight paper
with standard folds. A thinner, lighter insert requires a lower setting and a thicker, heavier insert requires
a higher setting.
1. Tap the + and – buttons to scroll through the envelope stop positions.
2. Tap the >> button to accept the position and advance to the next setting.
NOTE: After the envelope stop is set, the setting displays on the bottom of the inserter model on the
touchscreen. (For example, ..3.., for position 3.)
Pitney Bowes Relay™ 2500, 3500, 4500 User Guide December, 2018 Page 60 of 174
Page 68

Product Overview
Setting the Batch Counter
l Batch Counter On - If the batch counter is turned on, it allows pre-defined batches of finished
mailpieces to be automatically processed. When the batch is complete, the inserter automatically
stops.
l Batch Counter Off - If the batch counter is not turned on, the display counter counts the number
of items processed until you tap Reset Counter. Tap the Start button to begin processing the
next batch of mailpieces.
To set the batch counter:
1. Tap the + and – buttons to toggle the batch mode to On or Off.
NOTE: If the batch counter is set to on, the inserter prompts for batch quantity. The default
quantity is 50, but any value can be selected up to 999 by tapping the + and – buttons.
2. Tap the >> button to accept the setting.
Pitney Bowes Relay™ 2500, 3500, 4500 User Guide December, 2018 Page 61 of 174
Page 69

Product Overview
Confirming Job Setup
Job setup is now complete. Using the inserter model and icons, the touchscreen display shows all of the
selected job settings.
1. Review the job settings.
2. Tap the << and >> buttons to scroll back and change a setting.
3. When the setup changes are complete, tap the Setup button to accept the new settings and exit
setup mode.
The touchscreen displays the new job settings with the message Trial Piece Required.
4. Test the setup by running a trial piece.
NOTE: The inserter retains job settings until they are changed or deleted, even when the power is
disconnected.
Pitney Bowes Relay™ 2500, 3500, 4500 User Guide December, 2018 Page 62 of 174
Page 70

Product Overview
Running a Trial Piece
Run a trial piece to test the job settings.
1. Load material and tap the Trial Piece button on the menu.
NOTE: When the first job is run after powering up the system, the touchscreen displays the
message "Check / Clear Accumulator." This is to verify there are no pages staged in the
accumulator area. If this message is displayed:
a. Open the accumulator cover to check for pieces.
b. Remove any material.
c. Close the cover and tap Trial Piece.
2. Assess the unsealed trial piece to make sure everything inside the envelope is correct. If you need
to make changes to the settings:
a. Tap the Setup button on the main screen.
b. Log in with Supervisor password (71).
c. Tap the << >> buttons to scroll to the setting you wish to modify.
d. Tap the + and – buttons to scroll to the desired option.
3. When the setup changes are complete, tap the Setup button to accept the new settings and return
to run mode. The inserter saves the job with the new settings.
4. Run another trial piece to test the modified settings.
NOTE: Any time you modify settings you must run a trial piece.
Running trial pieces with linked feeding
When a trial piece is requested for a job where linked feeding is enabled, both feeders must be loaded, as
a trial piece will feed from each feeder. Two trial pieces are produced.
Pitney Bowes Relay™ 2500, 3500, 4500 User Guide December, 2018 Page 63 of 174
Page 71

Product Overview
Incorrect Address Position - Adjust Fold Setting
If the address is in the incorrect position when you run a trial piece, refer to these fold settings to help fine
tune the fold setting.
Fold Type Address too High Address too Low
C-fold Decrease Fold A Increase Fold A and increase Fold B by the same amount
Z- fold Increase Fold A Decrease Fold A and increase Fold B by the same amount
Single-fold Increase Fold A Decrease Fold A
Double-fold Decrease Fold A Increase Fold A
It is recommended that the fold is only adjusted by 0.20 inches (5 mm) each time.
Pitney Bowes Relay™ 2500, 3500, 4500 User Guide December, 2018 Page 64 of 174
Page 72

Product Overview
Modifying an Existing Job
Modifying an existing job requires Supervisor level access.
1. Tap the Setup button on the main screen. The Enter Access Code: field displays over the
inserter model and the keypad appears on the touchscreen display.
2. Using the keypad, type the Supervisor code (71) and tap the Enter key. The Enter Access
Code: field counts up or down to display the password code entered.
3. Tap the >> button to accept the code and advance to the job selection.
4. Tap the + and – buttons to display the job you wish to modify.
5. Tap the >> button to accept the job selection and advance to the job programming settings.
6. Tap the << and >> button to scroll through the setting(s).
7. Tap the + and – buttons to scroll through the options or desired values.
8. Tap the >> button to accept the job setting.
9. Tap the Setup button to save the changes and exit setup mode.
Pitney Bowes Relay™ 2500, 3500, 4500 User Guide December, 2018 Page 65 of 174
Page 73

Product Overview
Deleting a Job
Deleting an existing job requires Supervisor level access.
1. Tap the Setup button on the main screen. The Enter Access Code: field displays over the
inserter model and the keypad appears on the touchscreen display.
2. Using the keypad, type the Supervisor code (71) and tap the Enter key. The Enter Access
Code: field counts up or down to display the password code entered.
3. Tap the >> button to accept the code and advance to the job selection.
4. Tap the + and – buttons to display the job you wish to delete.
5. Tap the X button to delete the job. The display shows “Do you want to delete this application?”
6. Tap the checkmark.
7. Tap the X button to delete the job. The display briefly shows “Deleting Job” as the job is erased.
8. Tap the Setup button to exit job setup mode.
Pitney Bowes Relay™ 2500, 3500, 4500 User Guide December, 2018 Page 66 of 174
Page 74

5 - Running a Job
In this section
Running a Job 68
Turn on the Inserter 69
Turning on the Touchscreen 70
Logging In 71
Selecting a Job to Run 72
Loading the Sheet Feeder 73
Loading the Standard Envelope Feeder 77
Loading the High Capacity Envelope Feeder 79
Loading the Insert Feeder 83
Running a Trial Piece 87
Starting and Stopping the Inserter 89
Adding Sealer Solution 90
Adjusting the Drop Stacker 91
Page 75

Running a Job
These activities assume the job has already been programmed.
l Turn on the inserter
l Turn on the touchscreen
l Log into the system
l Select a job
l Load the sheet feeders
l Load the envelope feeders
l Load the insert feeders
l Run a trial piece
Running a Job
l Start the inserter
l Fill the sealer (if needed)
l Adjust the stacker (if needed)
Pitney Bowes Relay™ 2500, 3500, 4500 User Guide December, 2018 Page 68 of 174
Page 76

Running a Job
Turn on the Inserter
1. Verify the power cord is connected to the socket on the back of the inserter.
2. Verify the power cord is plugged into a power outlet near the machine and is easily accessible.
3. Turn the power switch to the ON position.
Relay 4500 Model shown here
NOTE: On Relay Inserter 2500 and 3500 models, the power switch is located on the front, left side of
the inserter, under the envelope feeder.
Pitney Bowes Relay™ 2500, 3500, 4500 User Guide December, 2018 Page 69 of 174
Page 77

Running a Job
Turning on the Touchscreen
Be sure the inserter is powered up before turning on the touchscreen.
1. The ON/OFF power button is located on the top left of the touchscreen. Press and hold the power
button for a few seconds to turn the touchscreen on or off.
ON/OFF Power Button
NOTE: If the touchscreen is in sleep mode, lightly press the ON/OFF power button.
Pitney Bowes Relay™ 2500, 3500, 4500 User Guide December, 2018 Page 70 of 174
Page 78

Running a Job
Logging In
1. Double-tap the inserter icon on the touchscreen desktop.
2. When the List of operators dialog opens, highlight an Operator and tap the checkmark.
3. Tap in the Password field. When the keyboard launches, type the password in the field.
4. Tap the checkmark to log in.
Pitney Bowes Relay™ 2500, 3500, 4500 User Guide December, 2018 Page 71 of 174
Page 79

Running a Job
Selecting a Job to Run
When you log in, the touchscreen displays the last job run with the message "Trial Piece Required." This
is when you select the job you wish to run.
1. Tap the Job menu button to scroll through the jobs; keep tapping until the job you want displays.
You can also tap the Default Job button (most used job) if you want to run the inserter with the
default job settings.
2. Begin loading material; follow the steps in the next section.
Pitney Bowes Relay™ 2500, 3500, 4500 User Guide December, 2018 Page 72 of 174
Page 80

Running a Job
Loading the Sheet Feeder
Automatic Feed Jobs
1. Adjust the side guides to the width of the material. Once the guides are touching both sides of the
material, turn the side guide control 1/4-turn in the opposite direction. This sets the correct
clearance between the guides and the material.
Pitney Bowes Relay™ 2500, 3500, 4500 User Guide December, 2018 Page 73 of 174
Page 81

2. Aerate (fan) the stack of paper to ensure that individual sheets are not stuck together.
Running a Job
3. Jog the stack of paper back into alignment. The display indicates the correct orientation of the
paper.
Pitney Bowes Relay™ 2500, 3500, 4500 User Guide December, 2018 Page 74 of 174
Page 82

Running a Job
4. Place the stack of paper onto the feed deck. Allow the deck to move down and the top of the stack
of paper to slide under the feed roller.
Pitney Bowes Relay™ 2500, 3500, 4500 User Guide December, 2018 Page 75 of 174
Page 83

Running a Job
Manual Feed Jobs
If you select a manual feed job where sheet feeder 1 is set for manual feed of collated sets, DO NOT load
the sheet feeder. Instead, you will feed collated sets one at a time, by hand, as required.
1. Before running a manual feed job, pull back the lever. This opens the feed mechanism for manual
feed operation.
NOTE: Return this lever to its normal position when the feeder is used for automatic operation.
Pitney Bowes Relay™ 2500, 3500, 4500 User Guide December, 2018 Page 76 of 174
Page 84

Running a Job
Loading the Standard Envelope Feeder
The Relay 2500 and 3500 use a standard (tray style) sheet feeder to feed the outer envelope for the job.
1. Use the side guide adjustment knob to adjust the side guides to the width of the envelopes.
2. Once the guides are touching both sides of the envelope, turn the adjustment knob 1/4-turn in the
opposite direction. This sets the correct clearance between the guides and the envelope.
3. Aerate and fan the stack of envelopes so the individual envelopes are not stuck together.
Pitney Bowes Relay™ 2500, 3500, 4500 User Guide December, 2018 Page 77 of 174
Page 85

Running a Job
4. Place the envelopes on the feed deck with the flaps up and trailing. IMPORTANT! Check that the
lead edge of the first envelope is under the front feed roller and the stack of envelopes is shingled
on the deck.
5. Let the wedge slide down behind the stack so the envelops are supported.
Pitney Bowes Relay™ 2500, 3500, 4500 User Guide December, 2018 Page 78 of 174
Page 86

Running a Job
Loading the High Capacity Envelope Feeder
The Relay 4500 uses a high capacity (elevator style) envelope feeder to feed the outer envelopes.
1. Press the envelope feeder loading switch to lower the envelope feeder platform.
Pitney Bowes Relay™ 2500, 3500, 4500 User Guide December, 2018 Page 79 of 174
Page 87

Running a Job
2. Use the side guide adjustment knob to adjust the side guides to the width of the envelopes. Once
the guides are touching both sides of the envelope, turn the adjustment knob 1/4-turn in the
opposite direction. This sets the correct clearance between the guides and the envelope.
3. Aerate the stack of envelopes and fan it so the individual envelopes are not stuck together.
4. Place the stack of envelopes into the feeder with the flap side UP and flap LAST.
Pitney Bowes Relay™ 2500, 3500, 4500 User Guide December, 2018 Page 80 of 174
Page 88

Running a Job
5. Press the envelope feeder loading switch again to raise the envelope stack to the normal feeding
position.
Pitney Bowes Relay™ 2500, 3500, 4500 User Guide December, 2018 Page 81 of 174
Page 89

Loading envelopes without stopping the inserter
Shown here on the Relay 4500 with a high capacity (elevator style) envelope feeder.
1. Press the envelope feeder loading switch to lower the feeder platform.
Running a Job
2. Load envelopes as described earlier in this section.
3. Press the envelope feeder loading switch again. The envelope stack rises to the normal feeding
position and continues to process automatically.
Pitney Bowes Relay™ 2500, 3500, 4500 User Guide December, 2018 Page 82 of 174
Page 90

Running a Job
Loading the Insert Feeder
The insert feeder feeds items that do not require folding. The insert feeder may be removed if it is not
required fora job.
1. Use the side guide adjustment knob to adjust the side guides to the width of the inserts you are
running.
2. Once the guides are touching both sides of the insert, turn the adjustment knob 1/4-turn in the
opposite direction. This sets the correct clearance between the guides and the insert.
3. Refer to the labels located on the insert feeder and match the insert type (slip, reply envelope, prefolded, booklet) with the icon and color.
Identifying the Insert - If the label indicates a range of settings, we recommend you select a
higher number or letter for a thicker the insert.
Pitney Bowes Relay™ 2500, 3500, 4500 User Guide December, 2018 Page 83 of 174
Page 91

4. Set the blue separator gap lever to the number required.
Running a Job
5. Set the blue separator shield lever to the letter required.
Pitney Bowes Relay™ 2500, 3500, 4500 User Guide December, 2018 Page 84 of 174
Page 92

Running a Job
6. Aerate and fan the stack of inserts so the individual pieces are not stuck together.
7. Shingle the inserts and place them on the feed deck. Loading orientation can vary depending on
the inserts. Load inserts using these orientation guidelines.
Insert Type Orientation
Slip Face up, bottom edge first
Reply Envelope Face up, top edge first
Pre-folded Face up, closed edge first
Booklet Face up, bound edge first
Pitney Bowes Relay™ 2500, 3500, 4500 User Guide December, 2018 Page 85 of 174
Page 93

8. Let the wedge (material prop) slide down the stack to support the envelopes.
Running a Job
Pitney Bowes Relay™ 2500, 3500, 4500 User Guide December, 2018 Page 86 of 174
Page 94

Running a Job
Running a Trial Piece
Run a trial piece to test the job settings.
1. Load material and tap the Trial Piece button on the menu.
NOTE: When the first job is run after powering up the system, the touchscreen displays the
message "Check / Clear Accumulator." This is to verify there are no pages staged in the
accumulator area. If this message is displayed:
a. Open the accumulator cover to check for pieces.
b. Remove any material.
c. Close the cover and tap Trial Piece.
2. Assess the unsealed trial piece to make sure everything inside the envelope is correct. If you need
to make changes to the settings:
a. Tap the Setup button on the main screen.
b. Log in with Supervisor password (71).
c. Tap the << >> buttons to scroll to the setting you wish to modify.
d. Tap the + and – buttons to scroll to the desired option.
3. When the setup changes are complete, tap the Setup button to accept the new settings and return
to run mode. The inserter saves the job with the new settings.
4. Run another trial piece to test the modified settings.
NOTE: Any time you modify settings you must run a trial piece.
Running trial pieces with linked feeding
When a trial piece is requested for a job where linked feeding is enabled, both feeders must be loaded, as
a trial piece will feed from each feeder. Two trial pieces are produced.
Pitney Bowes Relay™ 2500, 3500, 4500 User Guide December, 2018 Page 87 of 174
Page 95

Running a Job
Incorrect Address Position - Adjust Fold Setting
If the address is in the incorrect position when you run a trial piece, refer to these fold settings to help fine
tune the fold setting.
Fold Type Address too High Address too Low
C-fold Decrease Fold A Increase Fold A and increase Fold B by the same amount
Z- fold Increase Fold A Decrease Fold A and increase Fold B by the same amount
Single-fold Increase Fold A Decrease Fold A
Double-fold Decrease Fold A Increase Fold A
It is recommended that the fold is only adjusted by 0.20 inches (5 mm) each time.
Pitney Bowes Relay™ 2500, 3500, 4500 User Guide December, 2018 Page 88 of 174
Page 96

Running a Job
Starting and Stopping the Inserter
l Tap the Start button on the touchscreen to begin automatic operation. The inserter runs until it
runs out of paper or you stop it.
l Tap the Stop button on the touchscreen to stop the inserter.
Pitney Bowes Relay™ 2500, 3500, 4500 User Guide December, 2018 Page 89 of 174
Page 97

Running a Job
Adding Sealer Solution
1. When the Add sealing solution icon flashes, add E-Z Seal® Solution.
Icon Description
Add sealing solution
2. Open the sealer bottle cover hinge located at the rear, right side of the inserter and remove the
bottle.
3. Fill the bottle with the solution to the level indicated.
4. Place the sealer bottle in position in the inserter and close the cover.
NOTE: If the sealer unit was completely empty, allow time for the fresh solution to soak through the
sealer before resuming operation. This helps ensure a good seal.
NOTE: We recommend Pitney Bowes E-Z Seal to minimize algae growth and scale build-up.
Pitney Bowes Relay™ 2500, 3500, 4500 User Guide December, 2018 Page 90 of 174
Page 98

Running a Job
Adjusting the Drop Stacker
If necessary, adjust the drop stacker to accommodate the job material.
1. Lift the lever at the rear of the stacker and adjust the stacker to one of the preset positions.
2. Lower the lever to lock the stacker into position.
NOTE: When not in use, the stacker can be raised and latched vertically against the exit area of the
inserter.
Pitney Bowes Relay™ 2500, 3500, 4500 User Guide December, 2018 Page 91 of 174
Page 99

This page intentionally left blank.
Page 100

6 - OMR Scanning
In this section
About Optical Mark Recognition (OMR) Scanning 94
About OMR Scanning and Feeders 95
About OMR Scanning Types 96
About OMR Scanning Marks 97
OMR Specifications 101
Standard OMR Position - Diagram 102
Adjusting the OMR Scanning Heads 103
OMR Scanning Error Messages 106
 Loading...