

Page 1

Quick Reference
Guide
(UK edition)
The mains power supply must be connected
If you have to move the meter, unplug/switch-off
at the mains socket. Do not remove the power
cord from the back of the meter.
S
e
t
t
i
n
g
P
o
s
t
a
g
e
at all times.
Page 2
s
l
o
r
t
n
o
C
n
i
t
n
i
r
P
e
g
a
t
s
o
P
g
Main
Controls &
Advance Date
Temporarily set the date ahead
Components
Ads
Select an ad to print
Setup
Use printer functions
no yes
Change Time Install Ink
Enable/Disable Lock Maintenance
Install Custom Ad Printer Test
Change Contrast
Change Dialing Prefix
Change Phone Number
Change Account Number
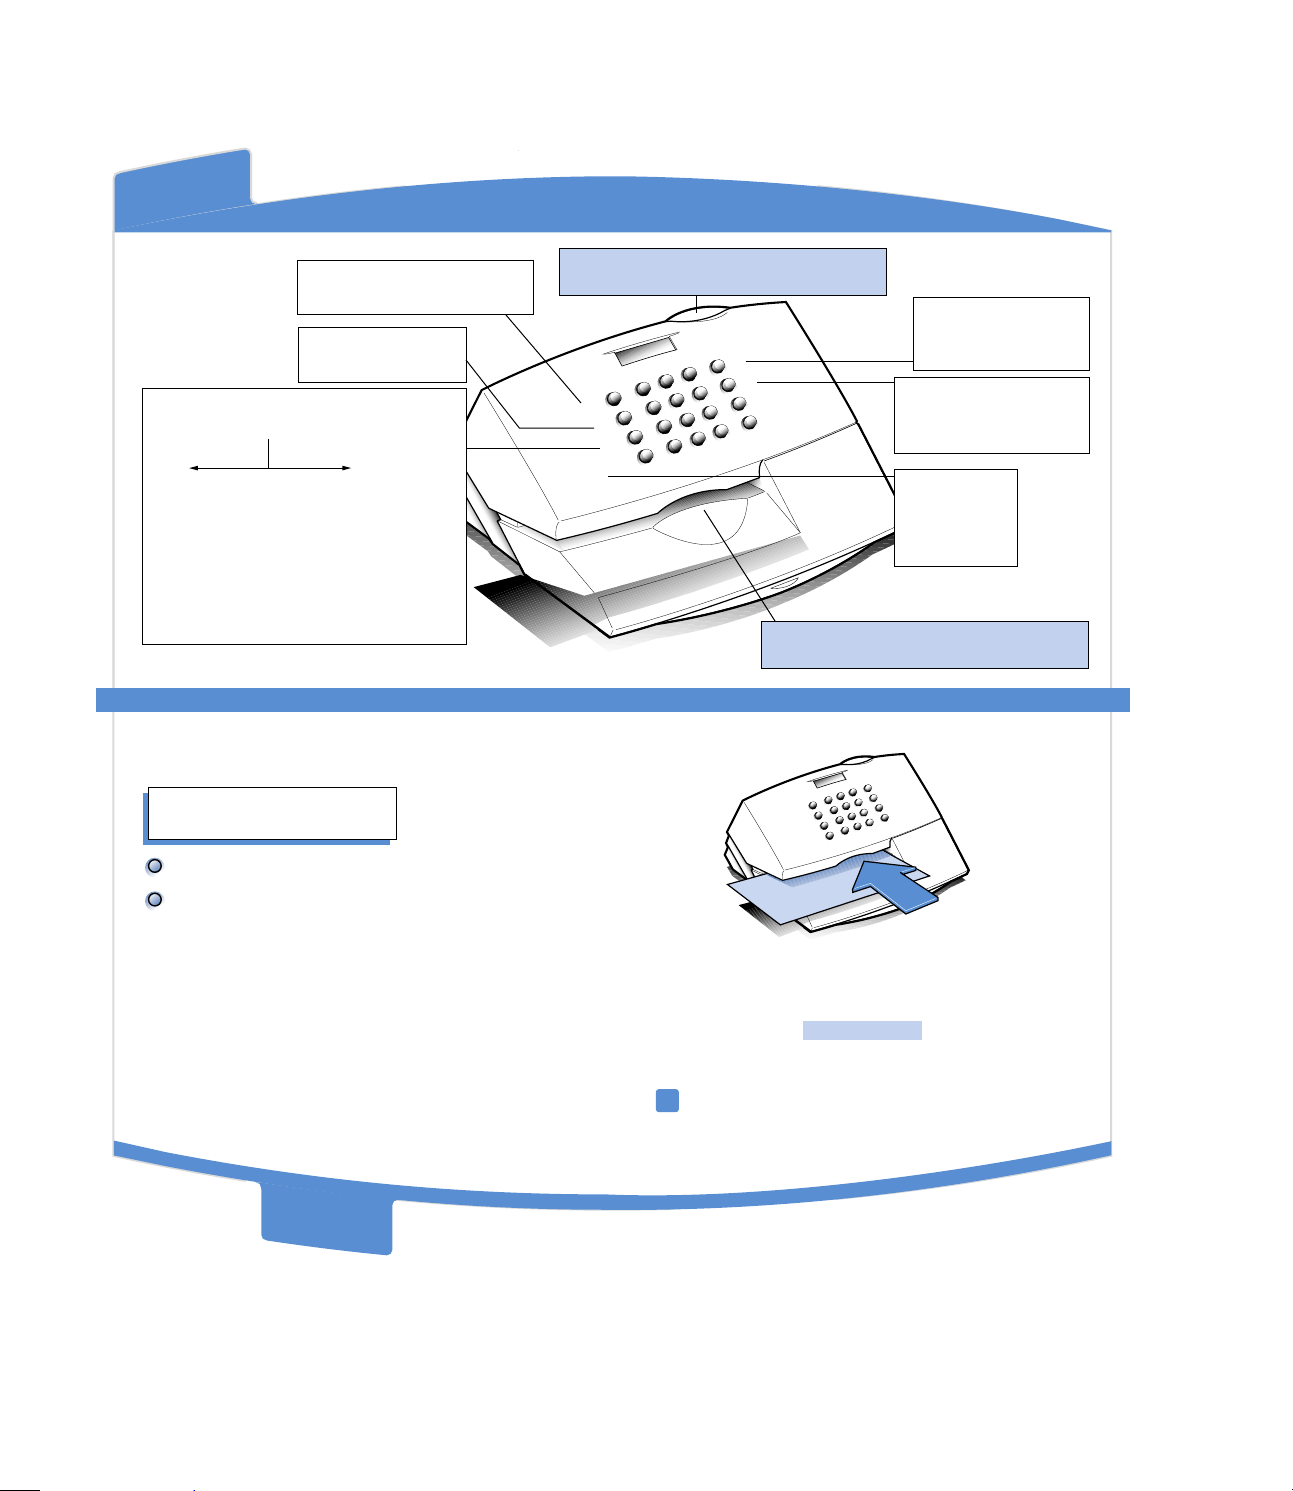
Setting the Postage Value
ENTER POSTAGE:
27
In ready mode, key in a postage amount.
Press Enter.
Card Slot
Used for Town Circle and Custom Ad Cards
Lock
3
Advance Date
Ads
Setup
Funds/Pieces
2
1
5
4
7
C
Refill
6
No
9
8
0
Yes
Enter
.
Mail Slot
Insert the envelope here to print postage
Printing Postage
Lock
3
2
Refill
1
6
5
No
4
Ads
Setup
Robert Jones
344 Main Street
Sacramento, CA 95814
9
Yes
8
Enter
7
.
0
C
Dave's Bike Shop
556 Summer Street
Stamford, CT 06902
Advance Date
Funds/Pieces
Lock
Prevents unauthorized
use of funds
Postage Refill
Add funds via
POSTAGE BY PHONE
Funds/Pieces
£ Available
£ Used
Pieces Printed
®
Two decimal places are assumed; you need not
enter the decimal point. For example, if you want
£0.27 key in 2 7 Enter.
Press the Clear key (C) if you want to change the
amount you entered.
C
o
n
t
r
o
l
s
P
r
i
n
t
i
n
g
P
o
s
t
a
g
e
Hold the envelope by the bottom.
▲▲
Insert it face up into the meter by aligning it with
the right wall and sliding it straight back until the
meter displays PLEASE WAIT.
The amount remains set until you change it.
If the meter stamp smears, the envelope is
!
too thick. Use a postage label to avoid
damaging the meter.
Page 3
C
u
F
&
l
l
i
f
e
R
s
e
c
e
i
P
/
s
d
n
e
m
i
T
&
e
t
a
D
e
g
n
a
h
Change Time To Set Date Ahead:
Press Setup key repeatedly until
CHANGE TIME? displays; press yes.
Set the time as follows:
01/08/00 10:42AM
PRESS 1- 2+ 3˙
Press Advance Date.
The current date displays.
Press Advance Date again to move the date ahead
one day at a time.
Press Enter to set the desired date and return to
ready mode.
To Reset to the Present Date:
Set time
back
Set time
ahead
Moves cursor
between hours
and minutes
Press Enter when time is correct.
Press Clear(C) key to return to
ready mode.
Press Advance Date. The date currently set
displays.
Press Clear (C). Today’s date displays.
Press Enter to set the date and return to ready mode.
ADVANCE DATE=
01/08/00
Refill - Adding Postage to the Meter Checking the Funds in the Meter
▲
Connect phone cord.
Press Postage Refill.
Key in refill amount (in £10 multiples); press
Enter. Meter dials POSTAGE BY PHONE®
Data Centre and automatically refills the
indicated amount.
▲
At INSERT FORM FOR RECEIPT prompt,
Press the Funds/Pieces key repeatedly to
view the following:
▲ ▲ ▲
Funds Available
Funds Used
Number of Mail Pieces Printed
Press Clear (C) to return to ready mode.
insert an envelope or label face up. (The
machine may not detect a single sheet of
paper). Save this receipt for your records.
Note: The phone number the meter dials is
!
stored in Setup. Do not change this number
unless directed by Pitney Bowes.
Checking your POSTAGE
BY PHONE® account balance:
▲
Connect phone cord.
Press Postage Refill.
Set postage to £0.00; press Enter.
Your account balance displays.
C
h
a
n
g
e
D
a
t
e
&
T
i
m
R
e
f
i
l
l
&
F
u
e
n
d
s
/
P
i
e
c
e
s
Page 4

L
/
s
d
A
t
s
a
r
t
n
o
C
k
c
o
l
n
U
&
k
c
o
To Turn on the Lock Function:
Assign a code using the CHANGE LOCK CODE?
function under Setup.
To Turn off the Lock Function:
Set the lock code to 0000.
To Change the Lock Code:
Press Setup repeatedly until
CHANGE LOCK CODE? displays; press yes.
Key in old code; press Enter.
Key in new code (4 digits); press Enter.
Press Clear (C) to return to ready mode.
Forgot your lock code?
?
Call the Helpline on 08705 213 213.
Selecting Ads
In ready mode, press Ads.
The currently selected ad,
if any, displays.
Press Ads repeatedly until the ad you
want displays; press Enter.
To Change Display Contrast:
Press Setup repeatedly until
CHANGE DISPLAY CONTRAST? displays;
press yes.
Press 1, 2, or 3. As you do so, the display
shows the change in contrast.
Press Enter to confirm your selection.
Press Clear (C) tor return to ready mode.
To Turn off Ad Printing:
Using the Ads key, set the
ad to NONE ; press Enter.
Custom ad designs or return address slogans can be
installed from Ad Cards. The meter stores your
personalised ad until you decide to change it. Call
the Helpline on 08705 213 213 to order custom
ads.
L
o
c
k
A
d
s
/
k
c
&
o
l
U
n
t
s
a
C
r
t
o
n
Page 5

Printer Maintenance
r
e
t
n
i
r
P
a
n
n
e
c
t
e
n
i
a
M
If lines are missing in the meter stamp, perform
maintenance to refresh the printhead.
Note: Printing an incomplete image may result in
invalid mail and wasted funds.
Examples of missing
lines in meter stamp.
2. Repeat maintenance if necessary.
▲
Examine the test print for print clarity.
If:
Same number of lines or fewer are missing:
perform maintenance and test print again.
More lines are missing: replace the ink cartridge
using the INSTALL INK CARTRIDGE function
described on the next page.
1. To refresh the printhead:
Press Setup.
At USE PRINTER FUNCTIONS? prompt, press
yes.
Answer no until PERFORM MAINTENANCE?
prompt displays.
Press yes to perform maintenance. Wait for
completion of process, about 1 minute.
▲
Insert an envelope or label to test.
Good test print.
If test print is complete, press Clear (C) to return to
ready mode.
Incomplete print. Refresh printhead.
Replace ink if necessary.
r
e
t
n
i
r
P
a
M
e
c
n
a
n
e
t
n
i
Page 6

R
e
p
l
a
c
i
n
g
t
h
I
n
k
C
e
a
r
t
r
i
d
g
e
Replacing the Ink Cartridge
Before replacing the ink cartridge, perform
maintenance as described on previous page.
1. Install Ink
Press the Setup key.
At USE PRINTER FUNCTIONS? prompt,
press yes.
At INSTALL INK CARTRIDGE? prompt,
press yes.
At ADD INK - PRESS ENTER WHEN
DONE prompt, lift meter cover.
3.
Prepare New Cartridge
▲▲
Prepare new cartridge for
installation by removing the tape
covering the vent and ink holes.
▲
Install new cartridge with label facing out.
Close ink cover making sure both blue tabs are
latched.
▲▲
Close meter cover.
Press Enter. The meter will refresh the printhead.
This procedure takes about one minute.
To avoid damage to the printer:
!
Do not leave printhead without ink cartridge in place.
Only replace the ink cartridge using the INSTALL
INK CARTRIDGE? function described below.
2.
Remove Empty Cartridge
Squeeze the tabs on the sides
of the ink cartridge cover and
rotate open.
▲▲
Remove old cartridge.
There will be ink on the bottom of the cartridge.
!
4.
Print Test Pattern
When prompted, insert paper for test.
▲▲
Check the test print. If lines are missing, perform
maintenance, as described on previous page.
If test print is complete, press Clear (C) to return
to ready mode.
Lock
3
2
Refill
1
6
5
No
4
Advance Date
Funds/Pieces
9
Yes
8
Enter
7
Ads
Setup
.
0
C
R
k
n
I
e
g
d
i
r
t
r
a
C
e
h
t
g
n
i
c
a
l
p
e
Page 7

T
r
o
u
b
l
e
s
h
o
o
t
i
n
g
Troubleshooting
Clearing errors
To clear most errors, press the Clear (C) key. If unsuccessful, unplug meter, wait 30 seconds, and reconnect.
General
Display difficult to read
Adjust display contrast using Setup key or move meter to
another location.
No power / Display is blank
Check outlet and power supply connection.
A four-digit number displays / METER ERROR:XXXX
Press Clear (C). If unsuccessful, unplug the meter, wait 30
seconds, and reconnect.
PRINTER JAMMED
The printhead is jammed. Remove any paper; press Clear (C).
REMOVE ENVELOPE
Town circle not installed, see Installation Guide.
Printing
Lines missing in meter stamp
Printer maintenance required. May be clogged nozzles or
low ink. Perform printer maintenance up to three times. If
more lines are out, change ink cartridge using
INK CARTRIDGE?
function. If problem persists, call
Pitney Bowes.
Meter stamp does not print
Printhead not primed with ink. Check that nozzle cap is
removed and that tape on cartridge is removed.
Meter stamp is smudged
Envelope is touching printhead during printing. Check that
envelope does not exceed 8mm (5/16”) thickness. Do not
place objects, such as paper clips, in the meter stamp area.
INSTALL
Postage
ACCOUNT BALANCE LOW
You do not have enough money in your account at the Data
Centre to pay for the refill amount. Perform refill procedure
for smaller amount or add funds to your account.
CANNOT REACH DATA CENTRE
Data Centre connection could not be made. Or…
DATA CENTRE PHONE IS BUSY
A busy signal was detected. Repeat call. If unsuccessful,
check the dialing prefix you may have added in the
DIAL PREFIX?
Setup Option. Try adding a decimal after
CHG
the prefix to have the meter pause before dialling the
preprogrammed number. Check that you are not using a
double adapter, extension lead or splitter box on your phone
line - if so, remove.
CONNECTION LOST-TRY AGAIN?
Data Centre was disconnected before the refill transaction
completed. Press yes to repeat the call.
Postage (continued)
NO DIAL TONE
No dial tone is found. Check phone cord is connected to
postage meter and wall outlet. If line is connected, check
that line is an analogue phone line.
NOT ENOUGH FUNDS
Insufficient funds in meter. Key in postage amount again. If
funds are low, perform refill procedure.
POSTAGE VALUE EXCEEDS LIMIT
The postage amount entered is larger than the maximum
amount the postage meter can print. Key in a lower amount.
REFILL TOO HIGH - MAX FUNDS LIMIT
Refill amount plus funds in meter exceeds maximum amount
meter can hold. Press Clear (C); enter a smaller amount.
LOW INK - ORDER CARTRIDGE SOON
Cartridge is low or out of ink. Replace cartridge using
INSTALL INK Printer function under Setup key. Call
Pitney Bowes on 08705 213 213 to order cartridges.
REFILL FAILED- CHECK ACCT#
Connection was made to Data Centre but transaction could
not take place. Check that correct POSTAGE BY PHONE
Account number is in Setup. If correct, try refill again.
u
o
r
T
e
l
b
®
g
n
i
t
o
o
h
s
Page 8

T
r
o
u
b
l
e
s
h
o
o
t
i
n
g
Refill Required
INSPECTION DUE - REFILL REQUIRED
No refill has been performed for 90 days. Press Refill. If
you do not want to add funds at this time, set the refill
amount to ‘0’.
INSPECTION REQUIRED - REFILL
No refill has been performed for 120 days. The refill
procedure MUST be performed or the postage meter will
stop operating. Press Refill. If you do not want to add
funds at this time, set the refill amount to ‘0’.
If you still have problems, call…
08705 213 213
Specifications
Equipment
Power: 230VAC, 50Hz, 1.2A
Maximum Imprint: £99.99
Refill Method: Postage by Phone
Refill Amount: £10 to £990 in £10 increments
Material
Minimum Size: 125 x 76mm (3" x 5")
Min Thickness: 0.18mm (0.007")
Max Thickness: 8mm (5/16")
Smart Card
CANNOT READ CARD
The card is inserted incorrectly. Remove the card and
reinsert with the gold circle facing you and towards the
bottom.
The card is inserted at the wrong prompt. Insert card only at
SETUP, INSTALL NEW AD or INSERT AD CARD prompts.
NO AD FOUND - CHECK CARD
The card inserted does not contain an ad. Check that you
inserted an ad card.
Lock Code
INCORRECT CODE
An incorrect lock code has been entered. Press Clear (C);
key in code again. If you cannot remember the correct code,
call Pitney Bowes.
Compliance
Pitney Bowes certifies that the E725
PersonalPost™ complies with the essential
requirements of the Low Voltage Directive 73/23/EEC,
the EMC Directive 89/336/EEC and the R&TTE
Directive 1999/5/EC.
The E725 has been designed to work on all PanEuropean Analogue Telecommunications Networks.
For a formal declaration of conformity, please contact
Compliance Engineering on +44 (0)1279 426731.
Supplies/Service/Help
08705 213 213
Call Pitney Bowes if your meter needs supplies or
service or if you have any questions.
S
u
p
p
l
i
e
s
S
e
r
v
i
c
e
Q
u
i
c
k
SAFETY!
Only use the power supply provided
with your PersonalPost™ meter.
e
d
i
R
e
f
e
n
r
e
u
G
e
c
 Loading...