

Page 1
Read this
first…
Quick Install
Guide
Inserting System
Welcome
IMPORTANT - READ THIS FIRST
before plugging in your system
Follow the steps in
this booklet to install
your DI200
OfficeRight™.
IMPORTANT: If you
purchased the
optional second
sheet feeder, unpack
and position it on
the desktop
BEFORE you follow
these instructions.
Page 2
step
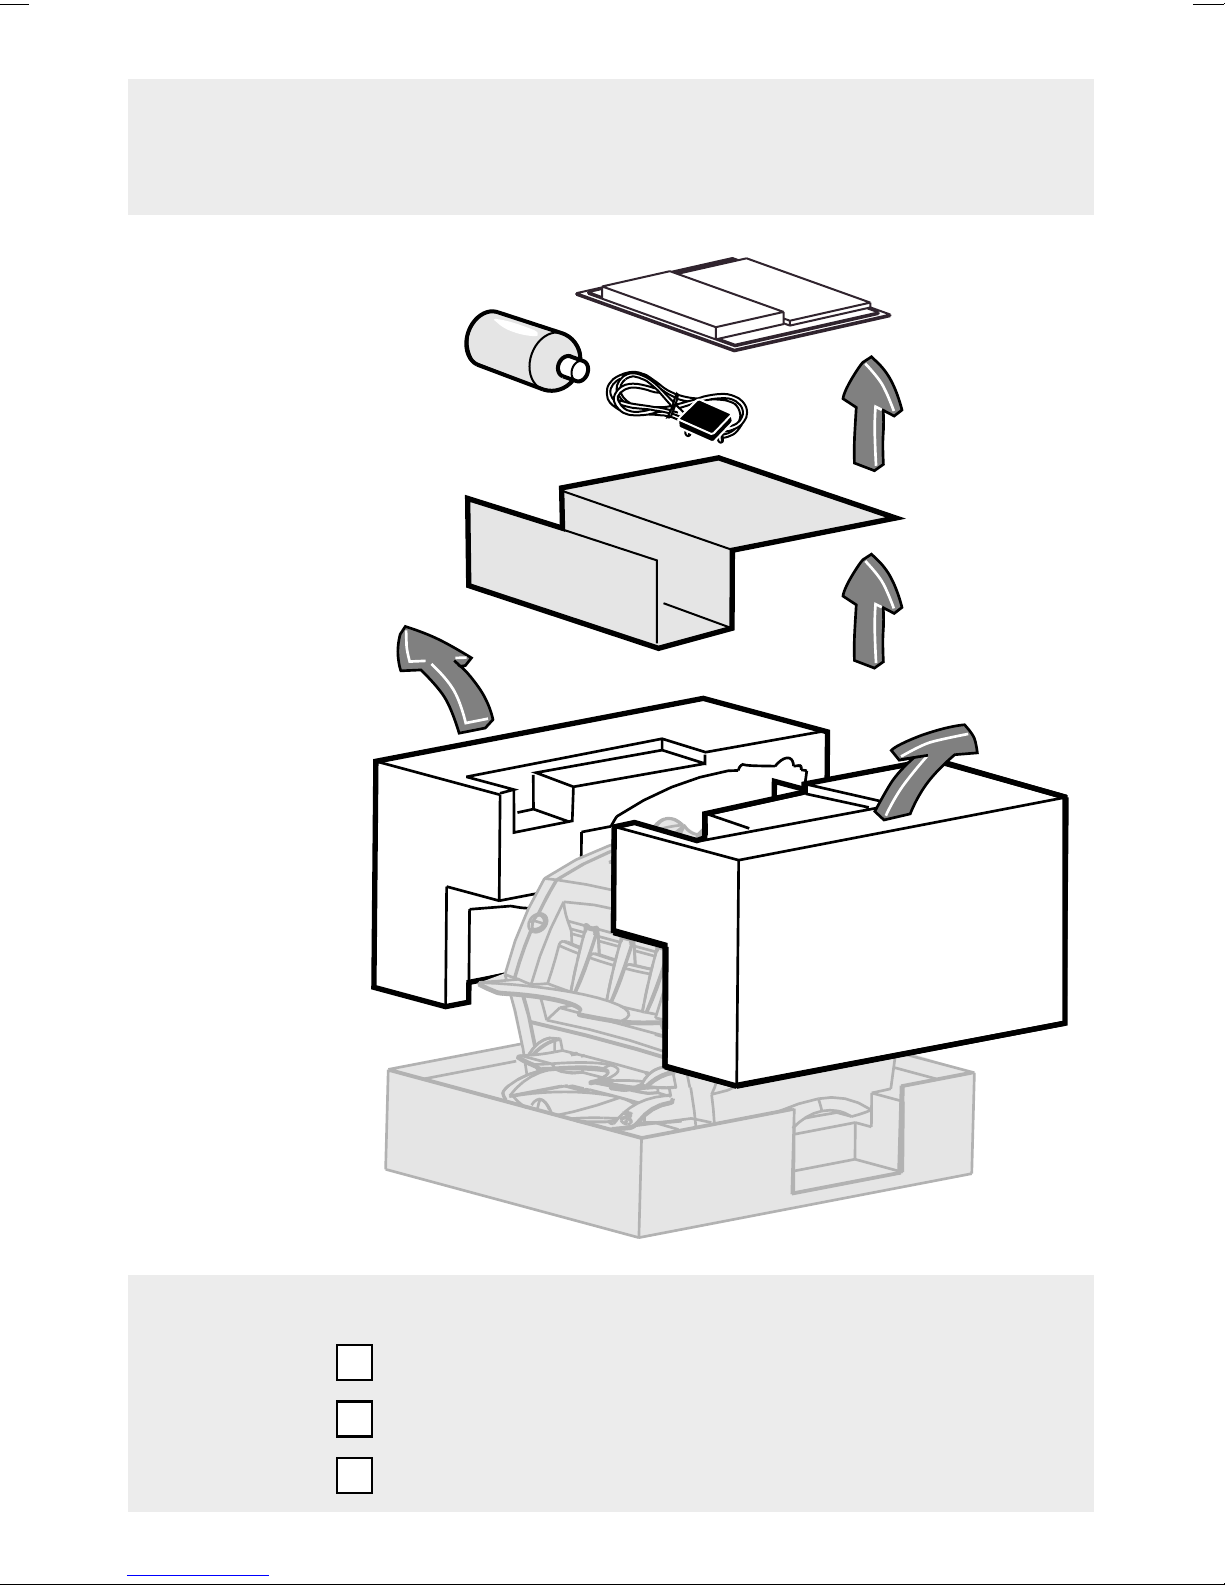
1. Unpack
a. Lift out the accessories
and put them
safely to one
side
b. Remove
cardboard
and foam
packing
Check that you have the following accessories:
Sample paper and envelopes (test material)
Bottle of E-Z Seal
Power Cord
®
Page 3
step
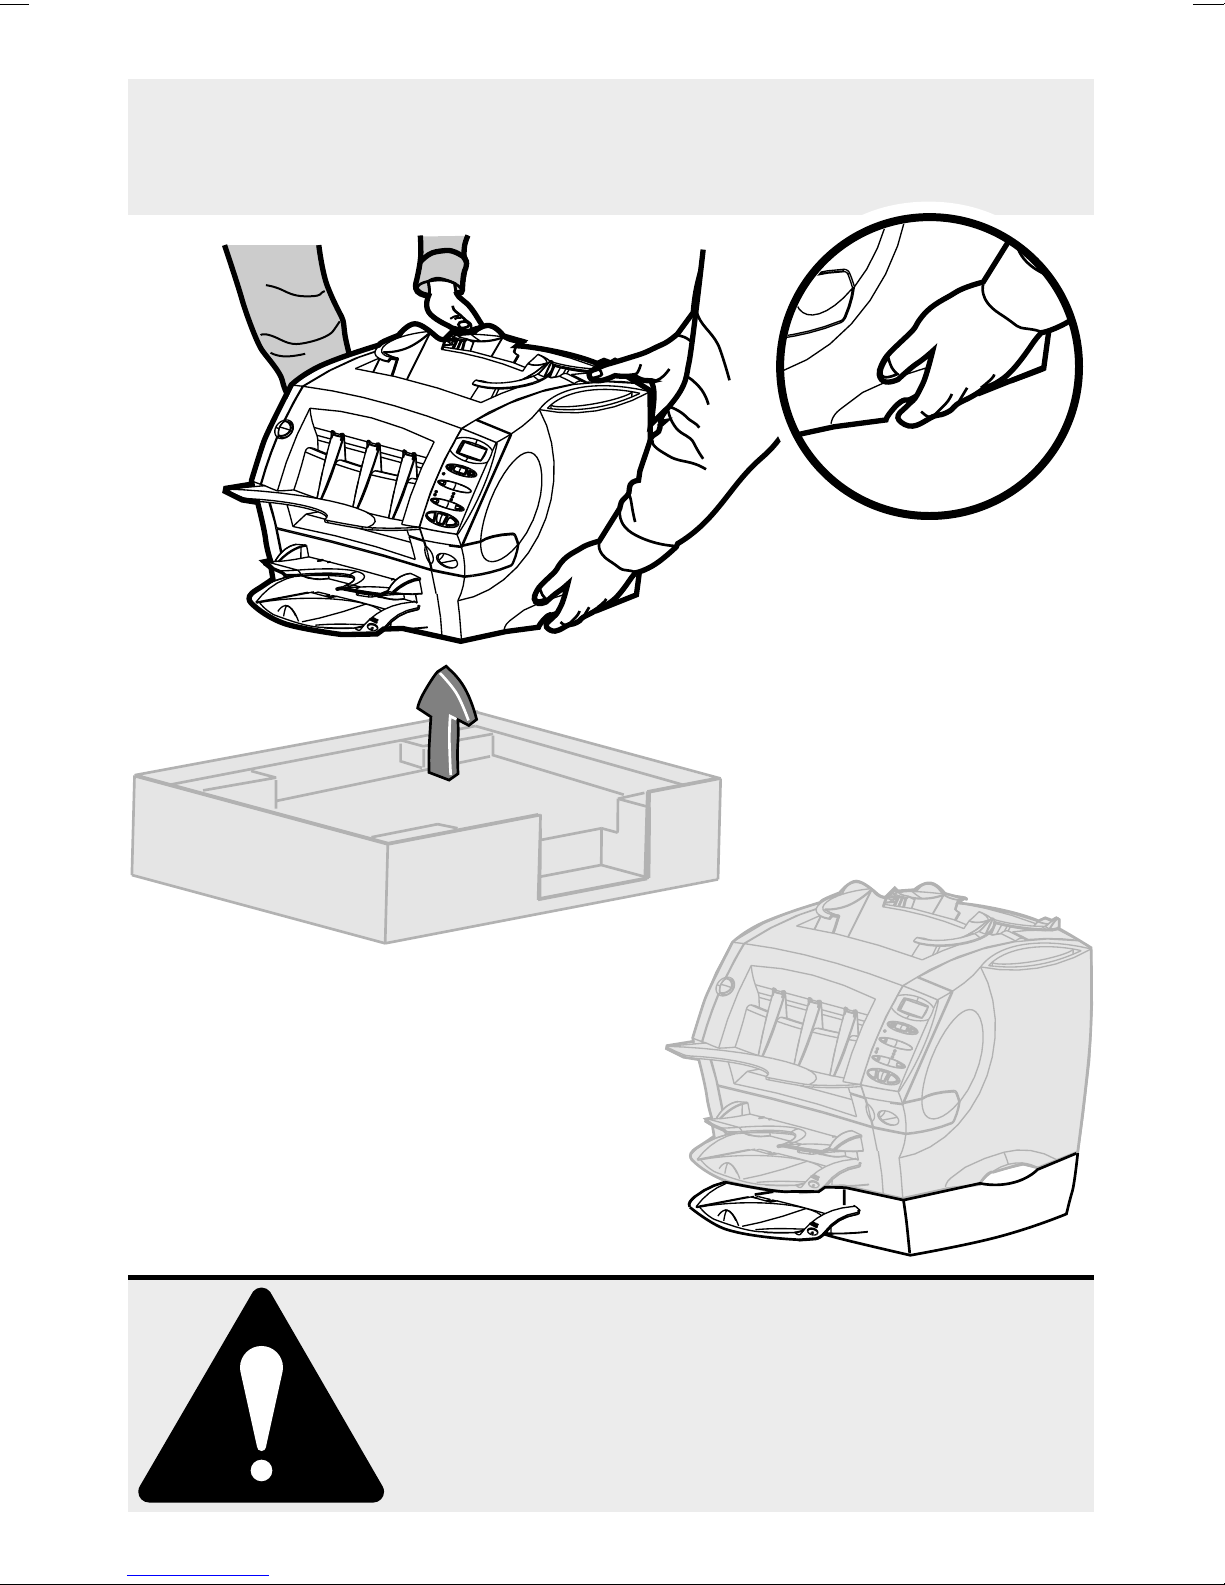
2. Locate
a. Lift the machine by
its handles and
place onto the
desk. See
“SAFETY
b. If you have the optional
2nd Sheet Feeder,
position the machine
onto the feeder now
SAFETY NOTICE!
NOTICE!” below
• Lift the machine only by its lifting handles.
• Lift correctly (bend knees and keep back straight).
• The machine weighs about 38 lb. (17.5kg)
We strongly recommend you get help to lift it.
Page 4
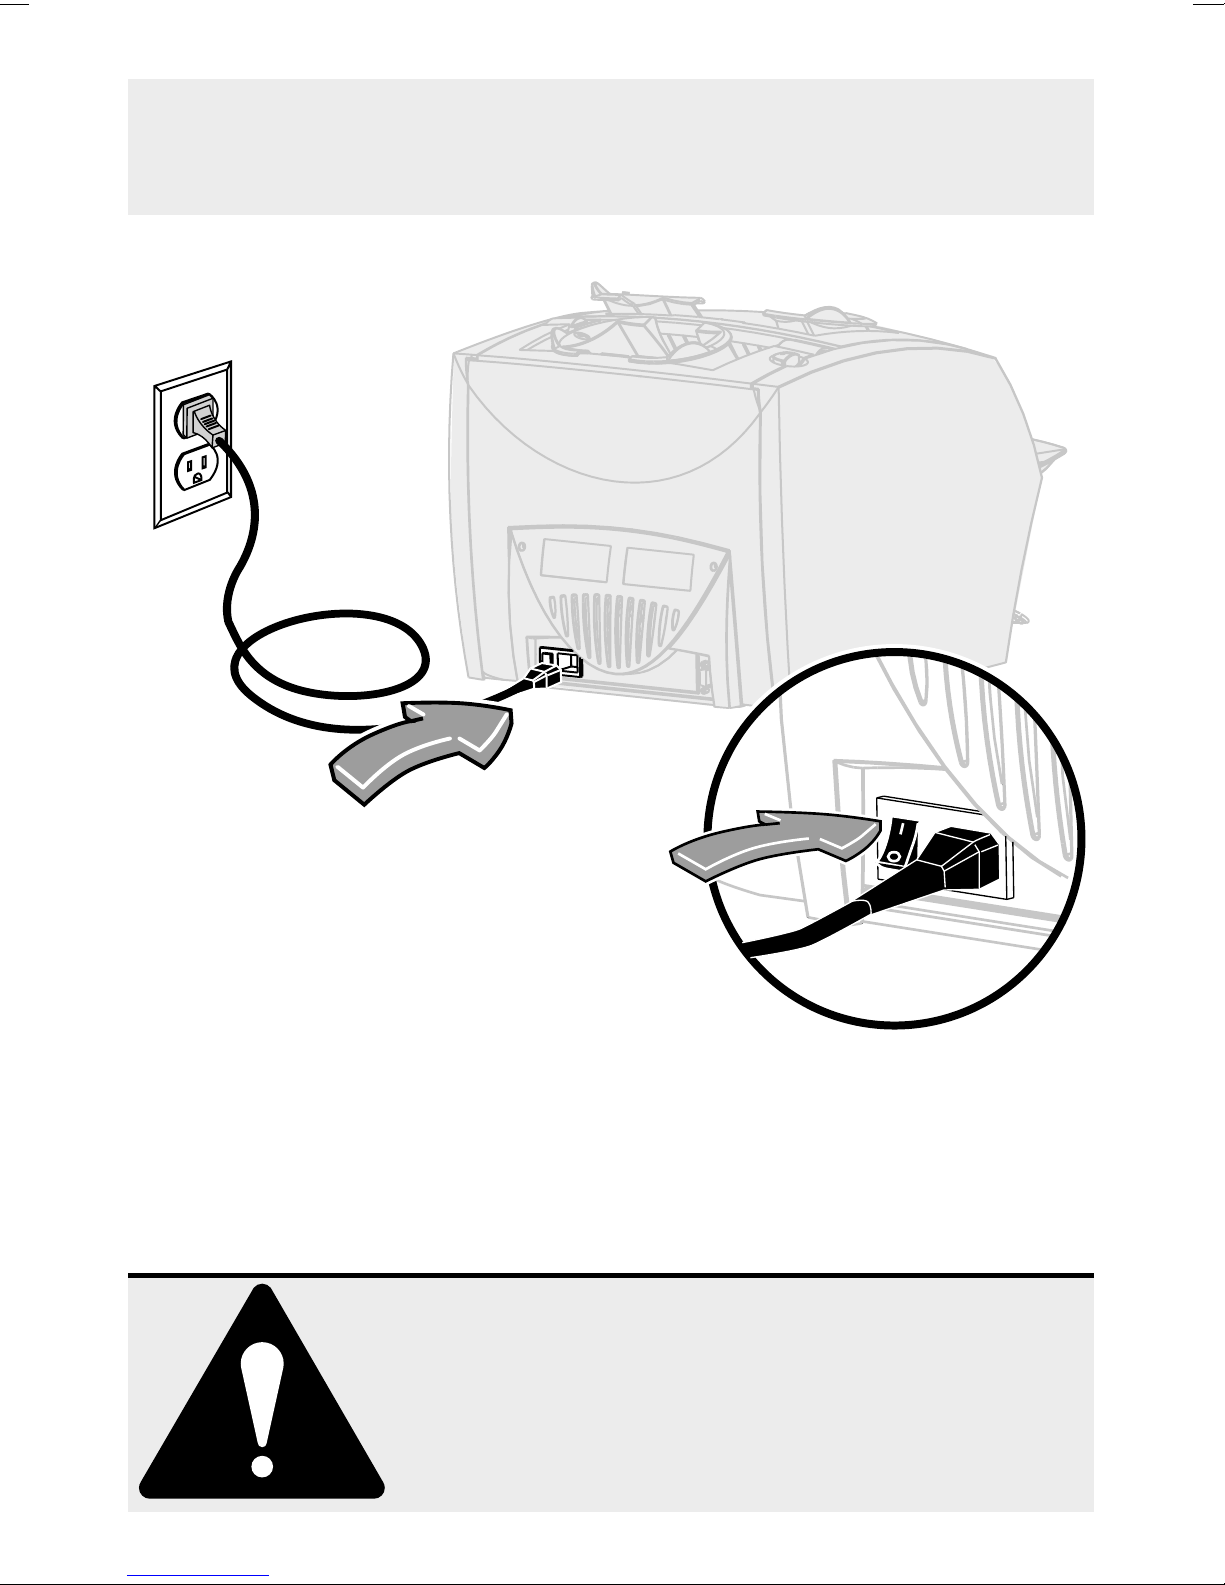
step
a. Connect
3. Connect and turn on
power cord
b. Turn machine ON.
The power switch
is on the back panel
next to the power
cord as shown here
c. Display will show “READY” in a few
seconds
SAFETY NOTICE!
• Locate the machine close to a power socket.
• Use the power cord supplied.
• See the
DI200 OfficeRight™ Operating Guide
complete safety and connection information.
for
Page 5

step
4. Fill moistener
a. Slide moistener open
b. Fill with E-Z Seal®.
Use the entire
bottle supplied
c. Slide moistener closed
The moistener takes about five minutes to become fully wet and
ready for use.
Continue with the steps in this booklet in the meantime.
Page 6

step
5. Load envelopes
We’ve included test paper and envelopes so you can practice using
the machine and check that it’s working OK…
a. Fan envelopes and tap stack to align edges
b. Place envelopes in feeder B
1
2
2
c. Slide side guides
until they just
touch envelopes.
If guides are too
tight, envelopes
may stall; if they
are too loose,
envelopes may
skew
Use test envelopes marked with the letter B.
IMPORTANT: Always fan (aerate) envelopes before loading. Load
envelopes RIGHT WAY UP and FACING YOU.
Slide guides until they just touch envelopes, but do not restrict enve-
lope feed. Use blue handles at rear of guides when moving them.
Page 7

step
6. Load sheets
a. Fan sheets and tap stack to align edges
b. Place sheets in feeder A1,
FACE DOWN and
BOTTOM EDGE FIRST
c. Push backstop in until it
just touches the stack
of sheets
Use test sheets marked with A1. Use Sheet Feeder A1 for sheets
that need folding.
IMPORTANT: Always fan (aerate) sheets before loading. Always
load sheets FACE DOWN and BOTTOM EDGE FIRST.
Page 8

step
7. Setup
a. Repeatedly
press button
until
Feeder A1
lights green
only
no yes
Menu / Enter
c. Repeatedly
press button
until Seal
lights green
Feeder A1
Seal
No Seal
Trial Piece Stop
Start
Feeder A2
2nd Page
Envelope Fdr B
Insert Fdr C
Fold Only
b. Repeatedly
press button
until
only
Envelope
Fdr B lights
green
A green indicator shows that a feeder or function is selected.
Repeatedly pressing the selection buttons (a, b and c above)
steps through the feeders and options available on your particular
machine.
Page 9

step
8. Run test job
a. Press
Trial Piece
button
no yes
Feeder A1
Seal
No Seal
Trial Piece Stop
Menu / Enter
Feeder A2
2nd Page
Envelope Fdr B
Insert Fdr C
Fold Only
Start
c. Press Stop
to stop
processing
The trial piece will not be sealed so you can check the contents of
the envelope. This is normal.
The counter will show the number of items processed.
b. If Trial Piece is
OK, press Start
Page 10

step
9. Congratulations!
Your DI200 OfficeRight™ is now ready to use
Yo u ’ll find your
ating Guide
sure to read it to get
the most out of your
DI200 OfficeRight™.
Oper-
here. Be
This Quick Install Guide allows you to unpack and test the
machine in the shortest possible time.
The
Operating Guide
It’s located in a slot in the top right hand cover of the machine as
shown above.
fully explains how to use your new system.
Page 11

Problems?
Always Check Your
If you experience any problems installing your equipment, please refer to the
Troubleshooting section in the
Web Support
Yo u ’ll find helpful answers to frequently asked questions at our web site.
Please go to
Phone Support ☎
If problems continue, technical assistance is readily available from the Pitney
Bowes Customer Support Center. Before you call, please have the following
information at hand:
❒ Product name: DI200 OfficeRight™
❒ Serial number: #__________________________. This is located on the
back cover of the machine.
❒ Nature of the problem: What happens and when does it happen?
Did the machine display an error message? What was it?
❒ The steps you've already taken to solve the problem and the results.
Then call:
www.pitneybowes.com/support
Operating Guide
Operating Guide
First
furnished with your machine.
In the USA 1.800.253.6565
In Canada 1.800.672.6937
Supplies
Pitney Bowes has made it easier than ever to order supplies—such as
E-Z Seal® (Item Code 601-0, USA only) and H200/H201 Moistener Wick
Replacement (Item Code 639-0)—that are designed specifically for your
DI200 OfficeRight™.
Order Online (USA Only)
Just point your browser to www.pitneybowes.com/supplies. You'll find a
complete, easy-to-navigate online store that offers a wide assortment of
genuine Pitney Bowes supplies at attractive prices.
Order by Phone
Our representatives will be happy to answer your questions and take your
order.
☎ In the USA, call 1.800.243.7824
☎ In Canada, call 1.800.672.6937
Ask for a PB Supply Catalog (USA Only)
Call the number above or e-mail us at supplies@pb.com.
Page 12

One Elmcroft Road
Stamford, Connecticut 06926-0700
www.pitneybowes.com
Pitney Bowes Canada
2200 Yonge Street Suite 100
Toronto, Ontario M4S 3E1
1.800.672.6937
IMPORTANT - READ THIS FIRST
before plugging in your system
*SV40189-QSREVA*
SV40189-QS Rev. A 9/02
© 2002 Pitney Bowes Inc.
Printed in England
 Loading...