

Page 1

Internet Fax Kit
User's Manual
For use with 5000/3500
Internet Fax Kit
User's Manual
For use with 5000/3500
Page 2
i
Do not place anything on the equipment that
contains water or chemical drug.
Do not place articles on the equipment such as
flower vases, potted plants, beverage cups,
cosmetics, containers of chemical drugs or water, or
small metallic articles. These substances, once
overturned and dropped inside of the equipment,
may cause a fire or electric shock.
Safety precautions
• Please read “Safety precautions” in the operation manual of the fax main unit.
• The following notations are used to alert the user to harm or damage that could result from mishandling due to negligence of
precautions.
Warning
This notation alerts the user to the potential for serious injury or death.
Caution
This notation alerts the user to the potential for bodily harm or damage to hardware.
• The following symbols are used to distinguish the types of alerts. (Shown below are the examples.)
This symbol indicates warning or caution. An illustration will give a concrete description.
This symbol indicates prohibition in handling. An illustration will give a concrete description.
This symbol indicates mandatory handling. An illustration will give a concrete description.
Never attempt to disassemble, repair or
modify the equipment.
It may cause electric shock or machine failure.
Request repairs from the Customer Information
Center.
When any of the following occurs, stop
operation immediately, unplug the power cable
of the fax main unit from power outlet, and
call our Information Center.
◆ Smoke generation or an unusually heated
machine housing
◆ Abnormal noise
Never attempt anything other than specified
in this manual.
It may cause unexpected accidents or machine
failure.
Warning
Caution
Page 3
ii
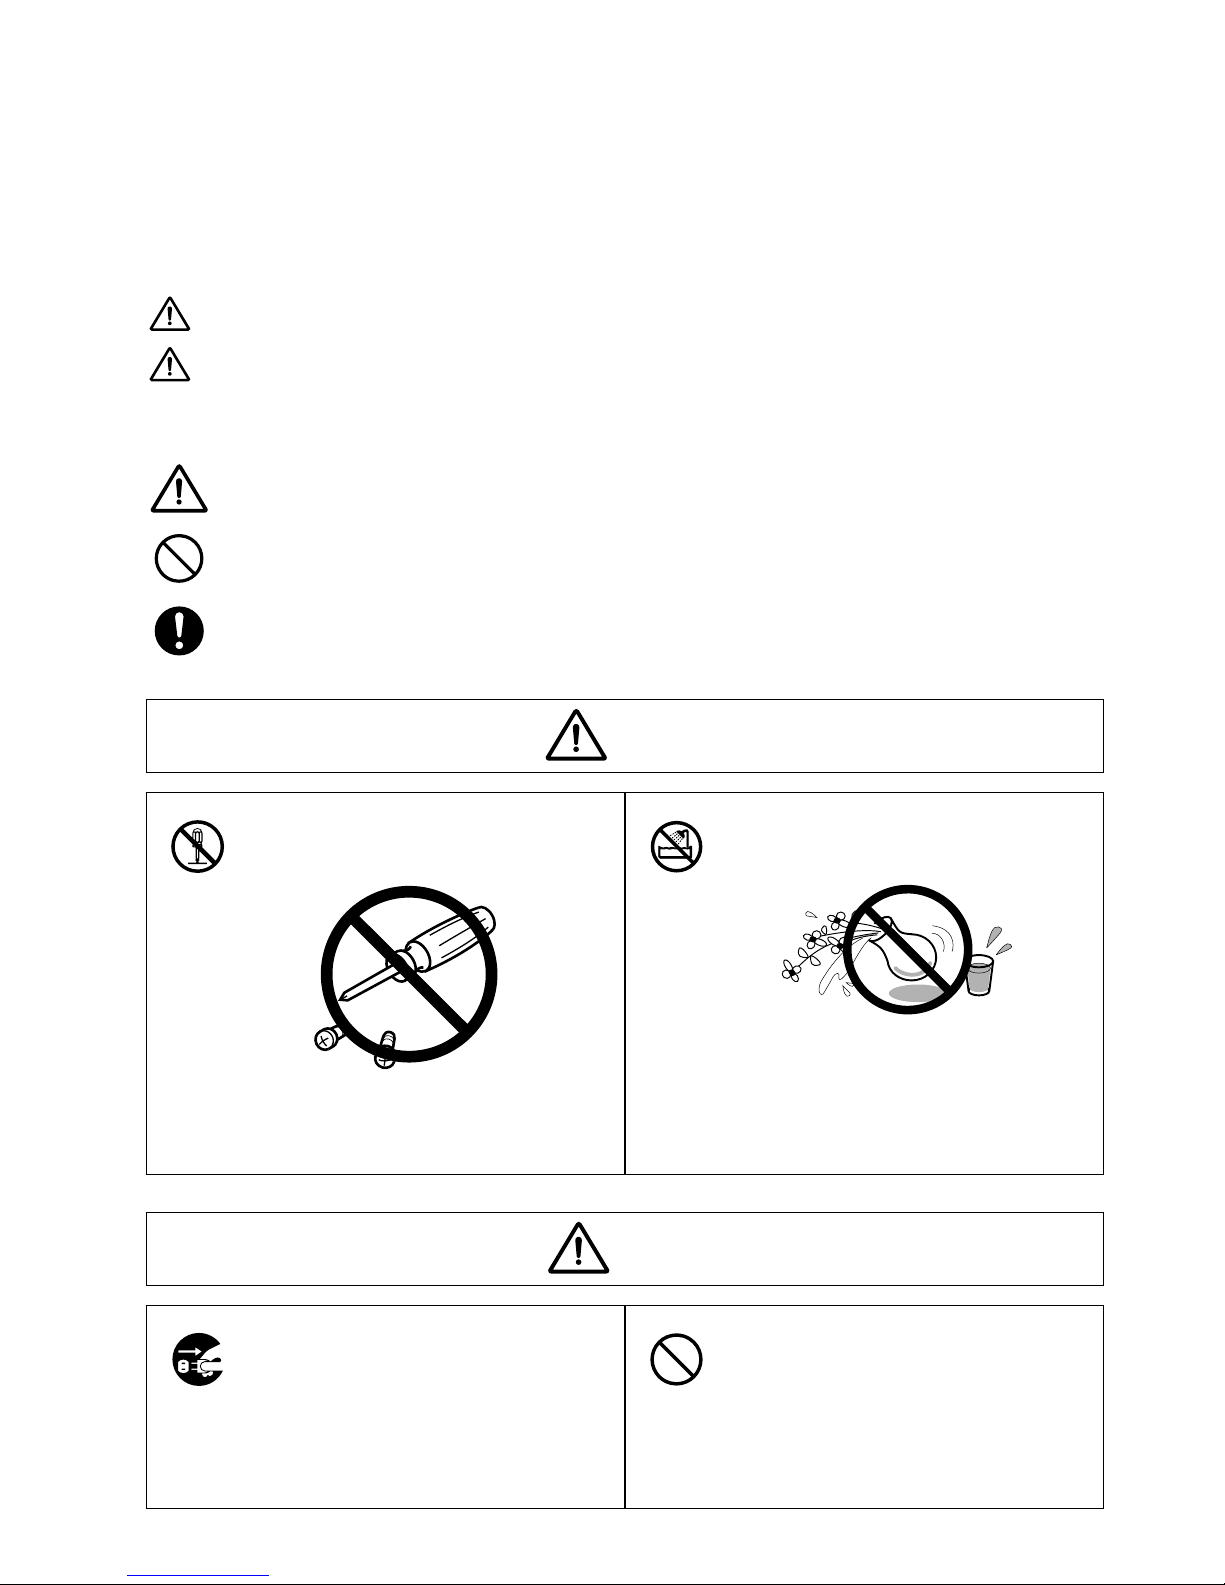
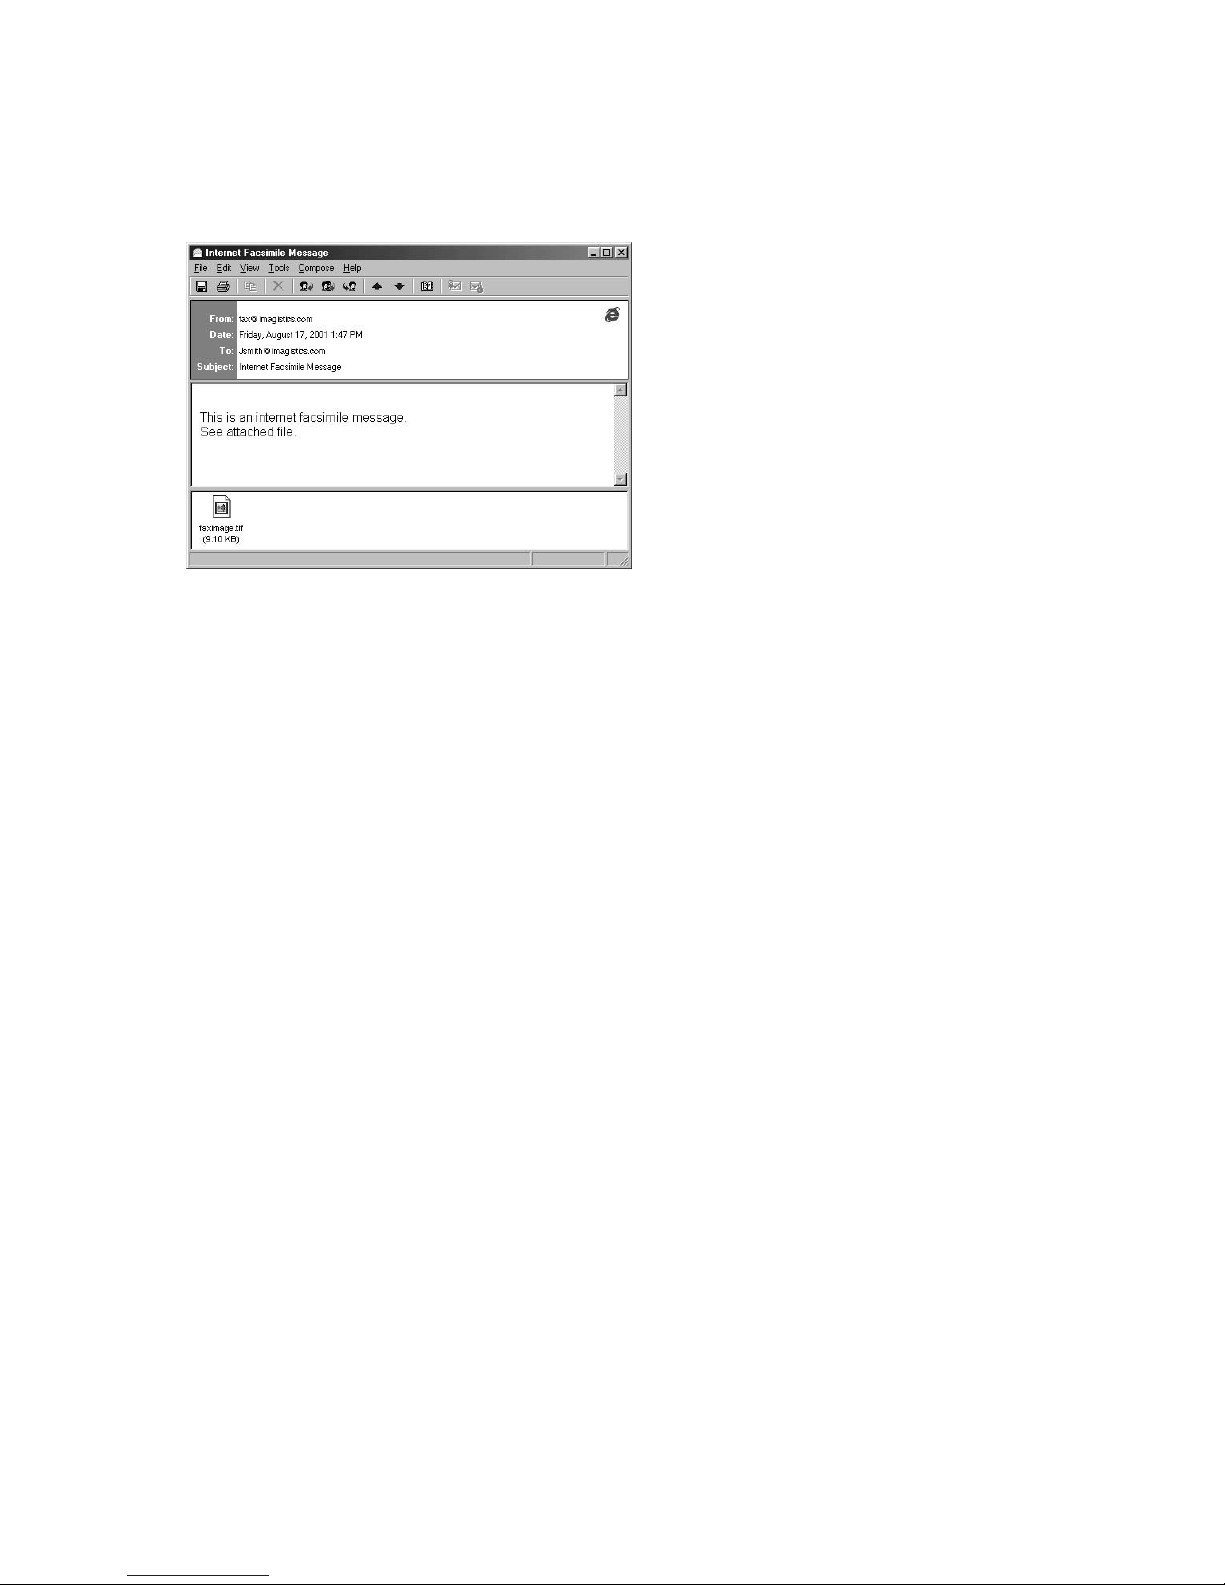
Internet fax transmission
Paper documents ,such as hand-written letters,can be transmitted by e-mail using the existing e-mail environment just like sending a fax. All you have to do is load the original and designate the recipient’s e-mail address
using a One-touch key or Speed-dialing.
Scanned data from the original is sent by e-mail as an image data attachment.
Internet mail reception
Internet F ax Kit allows you to receive and print a PC or internet fax mac hine transmitted e-mail automatically
or manually,depending on its setup configuration. However, if the received e-mail includes a file attachment in a
format other than TIFF-FX (Profile-S/F/J),such as Word, Excel, or PowerPoint,then Internet Fax Kit returns an
error message via e-mail.
Network management
With the use of a Web browser,a PC can perform such operations as Internet Fax Kit settings, display of transmission/reception history of e-mails and faxes,as well as registration of One-touch dial, etc..
PC
E-mail transmission/
reception history
Fax transmission/
reception history
One-touch dial setting
Speed-dial setting
LAN
P
r
i
n
t
o
u
t
E-mail
LAN
PC
Internet FAX
Internet FAX
Internet
PC
Internet FAX
E-mail
Original
document
LAN
PC
Internet FAX
Internet
PC
Internet FAX
Internet communication features
Page 4
iii
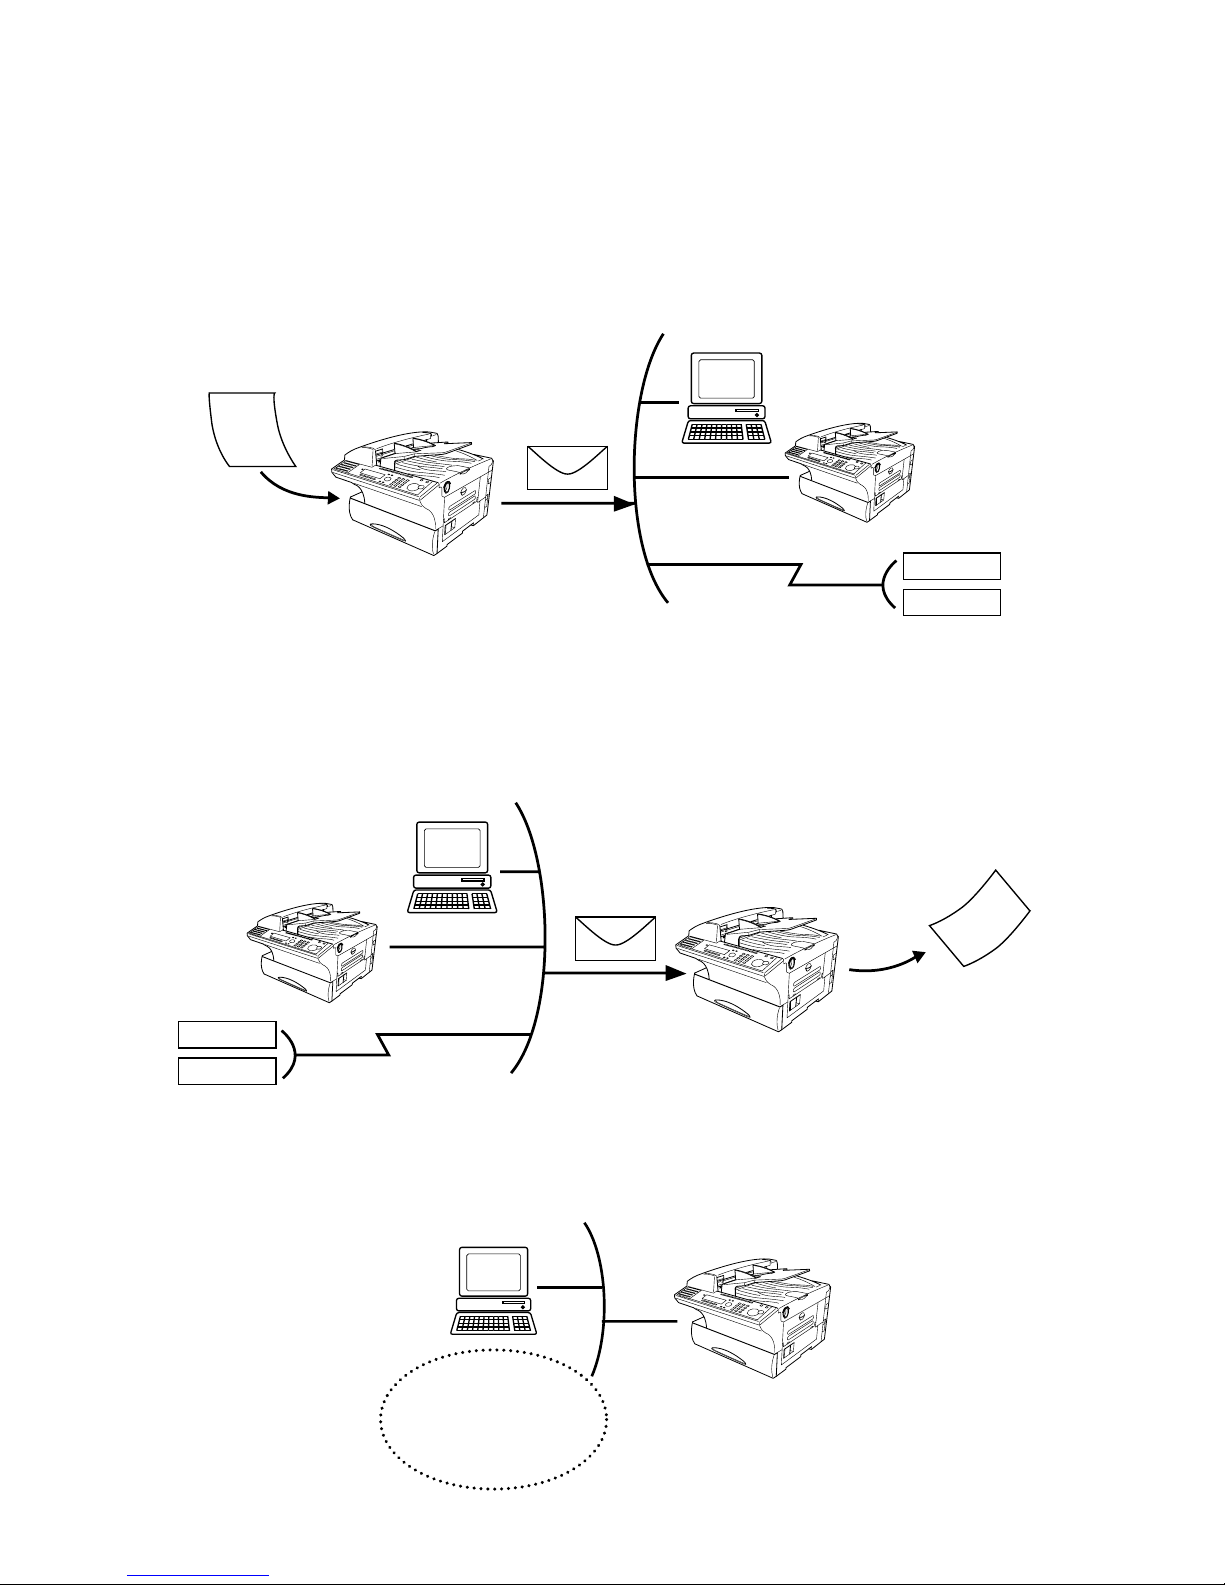
F orwarding fax document
This feature works with F-code box that is setup for “Relay box”. Internet Fax Kit can route documents received
in its F-code relay box to e-mail addresses and/or to other fax machines.
In order to route the received fax documents to the designated e-mail address(s) and/or other fax machine(s), the
F-code relay box should be configured with the proper sub-address and password.
F orwarding e-mail
Internet F ax Kit is capable of transferring the received Internet e-mail to the G3 facsimile(s) that designated fax
number in a e-mail text.
Also, you can setup either Internet Fax Kit prints the transferred document(s) or not.
P
r
i
n
t
o
u
t
Fax
Fax
Telephone line
Telephone line
Internet Fax Kit
E-mail
LAN
PC
Internet
PC
Fax
G3 Fax
Internet Fax Kit
F-Code
fax reception
Telephone line
E-mail
LAN
PC
Internet FAX
Internet
PC
Internet FAX
Page 5
iv
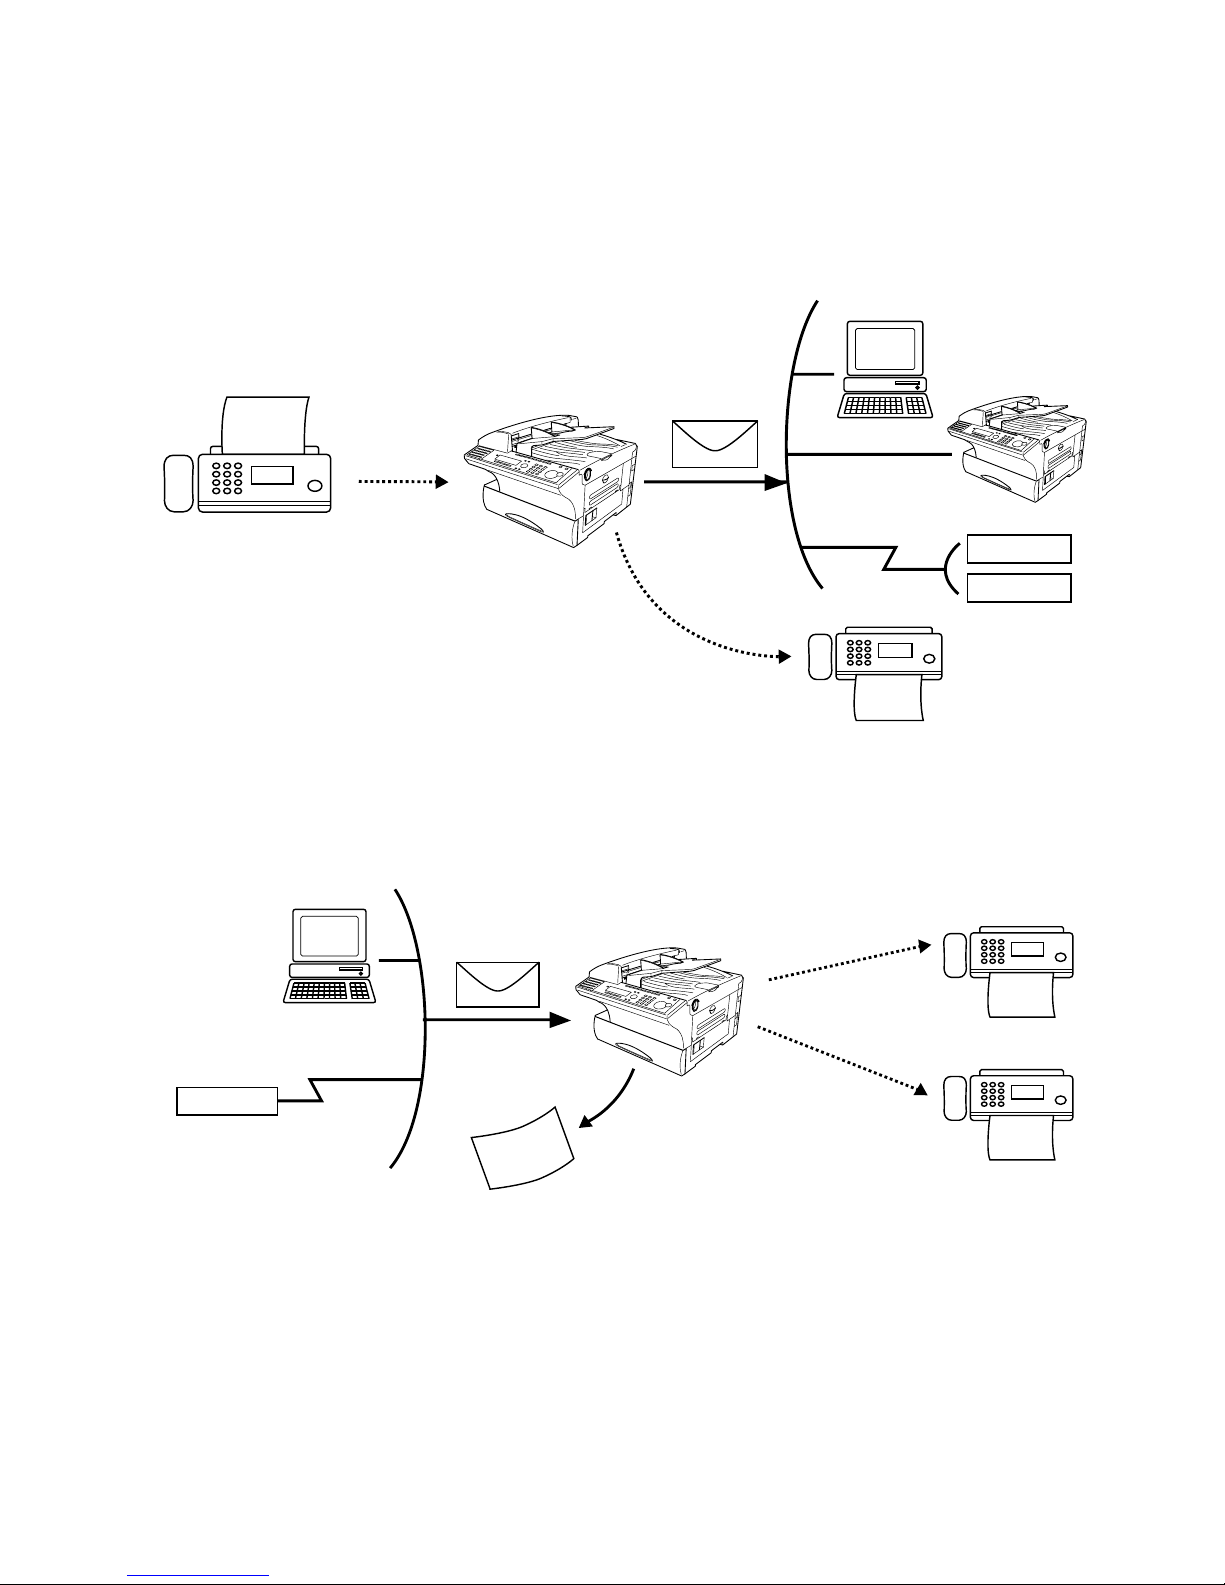
Internet relay broadcasting
Internet relay broadcasting is a powerful function that takes advantage of a remote Pitney Bowes Office
SystemsInternet FAX
(Internet F ax Kit) to reduce your total communication costs.
The internet relay station performs a relay broadcast, and the internet fax machine which sends the original document to the internet relay station has performed a relay broadcast initiation.Your fax machine can perform
either operation; in other words, your machine can either send to a “internet relay station”unit or be a “internet
relay station” unit.
Archive
With this feature,all transmitted and received fax and e-mail are collected at one place automatically so that an
administrator can easily keep track of the document flow.
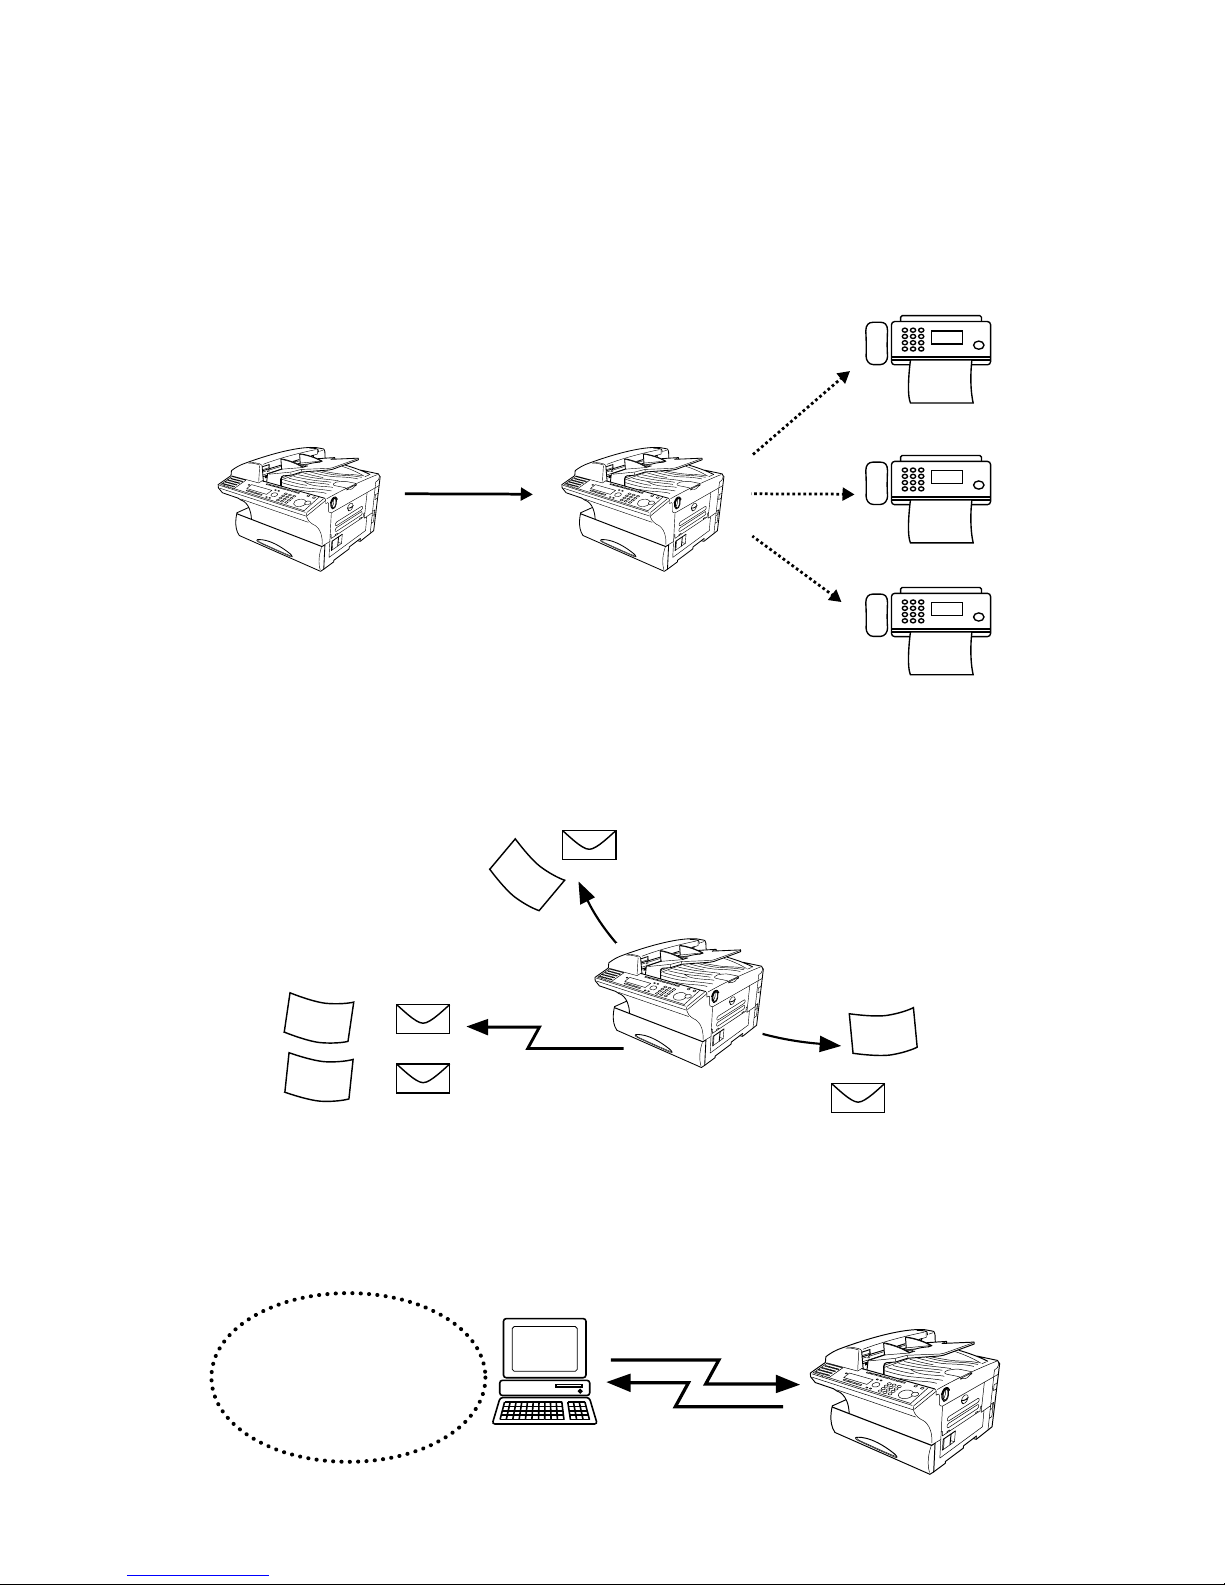
Programming or retrieving parameters using E-mail
With this feature,you can retrieve and program the e-mail environment, e-mail account user settings,
one-touch number, speed-dial number ,fax gateway, and retrieve the current journal data from your PC by sending the text e-mail message to Internet F ax Kit.
E-mail
PC
Internet Fax Kit
E-mail environment
Transmission/
reception history
One-touch dial setting
Speed-dial setting
E-mail
Internet Fax Kit
Transmitted E-mail
F
a
x
T
x
Transmission
Reception
Received E-mail
Transmitted E-mail
Received E-mail
F
a
x
R
x
F
a
x
T
x
F
a
x
R
x
Internet Fax KitInternet Fax Kit
Fax
Fax
Fax
Internet
Telephone line
Telephone line
T
elephone line
Page 6

v
Table of Contents
Safety precautions . . . . . . . . . . . . . . . . . . . . . . . . . . . . . . . . . . . . . . . . . . . . . . . . . . . . . . . . . . . . . . . . . . . . . . .i
Internet communication features . . . . . . . . . . . . . . . . . . . . . . . . . . . . . . . . . . . . . . . . . . . . . . . . . . . . . . . . . .ii
Installing Your Machine
Pre-Installation information . . . . . . . . . . . . . . . . . . . . . . . . . . . . . . . . . . . . . . . . . . . . . . . . . . . . . . . . . . . .1.2
Installation procedures . . . . . . . . . . . . . . . . . . . . . . . . . . . . . . . . . . . . . . . . . . . . . . . . . . . . . . . . . . . . . . . . .1.3
Setting your Time Zone . . . . . . . . . . . . . . . . . . . . . . . . . . . . . . . . . . . . . . . . . . . . . . . . . . . . . . . . . . . . . . . .1.4
Setting the Internet parameters . . . . . . . . . . . . . . . . . . . . . . . . . . . . . . . . . . . . . . . . . . . . . . . . . . . . . . . . .1.5
IP address and Subnet mask setting . . . . . . . . . . . . . . . . . . . . . . . . . . . . . . . . . . . . . . . . . . . . . . . . .1.5
Installation information registration . . . . . . . . . . . . . . . . . . . . . . . . . . . . . . . . . . . . . . . . . . . . . . . .1.6
Network environment setting . . . . . . . . . . . . . . . . . . . . . . . . . . . . . . . . . . . . . . . . . . . . . . . . . . . . . .1.7
E-mail environment setting . . . . . . . . . . . . . . . . . . . . . . . . . . . . . . . . . . . . . . . . . . . . . . . . . . . . . . . .1.8
E-mail account user registration . . . . . . . . . . . . . . . . . . . . . . . . . . . . . . . . . . . . . . . . . . . . . . . . . . . .1.9
Administrator registration . . . . . . . . . . . . . . . . . . . . . . . . . . . . . . . . . . . . . . . . . . . . . . . . . . . . . . . .1.11
System configuration
Programming or retrieving parameters using “Administration tool” . . . . . . . . . . . . . . . . . . . . . . . . . . . .2.2
What is “Administration tool for Internet Fax Kit”on the web? . . . . . . . . . . . . . . . . . . . . . . . . . . .2.2
Startup of “Administration tool for Internet Fax Kit” . . . . . . . . . . . . . . . . . . . . . . . . . . . . . . . . . . .2.2
Descriptions of “Administration tool for Internet Fax Kit” . . . . . . . . . . . . . . . . . . . . . . . . . . . . . . .2.2
Programming or retrieving parameters using E-mail . . . . . . . . . . . . . . . . . . . . . . . . . . . . . . . . . . . . . . .2.13
Using E-mail for Program or Retrieve Parameter (Device management by E-mail) . . . . . . . . . .2.13
Remote access setting on the Web . . . . . . . . . . . . . . . . . . . . . . . . . . . . . . . . . . . . . . . . . . . . . . . . . .2.14
Setting the command in the Subject line . . . . . . . . . . . . . . . . . . . . . . . . . . . . . . . . . . . . . . . . . . . .2.15
Programming and Retrieving E-mail environment settings. . . . . . . . . . . . . . . . . . . . . . . . . . . . . .2.16
Programming and Retrieving One-touch/Speed-dialing setting . . . . . . . . . . . . . . . . . . . . . . . . . .2.18
Programming and Retrieving F ax Gateway settings . . . . . . . . . . . . . . . . . . . . . . . . . . . . . . . . . . .2.19
Programming and Retrieving Account settings . . . . . . . . . . . . . . . . . . . . . . . . . . . . . . . . . . . . . . .2.21
Programming Your Machine
Programming an E-mail address into the one-touch keys . . . . . . . . . . . . . . . . . . . . . . . . . . . . . . . . . . . . .3.2
Programming an E-mail address into the speed-dial numbers . . . . . . . . . . . . . . . . . . . . . . . . . . . . . . . . .3.8
Programming an E-mail address into the group dial numbers . . . . . . . . . . . . . . . . . . . . . . . . . . . . . . . .3.14
Registration of a Mail Broadcast list . . . . . . . . . . . . . . . . . . . . . . . . . . . . . . . . . . . . . . . . . . . . . . . . . . . . .3.19
Basic Operation
Sending a document over the LAN . . . . . . . . . . . . . . . . . . . . . . . . . . . . . . . . . . . . . . . . . . . . . . . . . . . . . . .4.2
Registering To/Cc/Bcc fields in soft keys. . . . . . . . . . . . . . . . . . . . . . . . . . . . . . . . . . . . . . . . . . . . . . .4.2
Directly set a mail address and send. . . . . . . . . . . . . . . . . . . . . . . . . . . . . . . . . . . . . . . . . . . . . . . . .4.2
Sending using the one-touch key. . . . . . . . . . . . . . . . . . . . . . . . . . . . . . . . . . . . . . . . . . . . . . . . . . . . .4.4
Sending using a speed-dial number. . . . . . . . . . . . . . . . . . . . . . . . . . . . . . . . . . . . . . . . . . . . . . . . . .4.6
Sending using the EasyDial directory . . . . . . . . . . . . . . . . . . . . . . . . . . . . . . . . . . . . . . . . . . . . . . . .4.8
Broadcasting . . . . . . . . . . . . . . . . . . . . . . . . . . . . . . . . . . . . . . . . . . . . . . . . . . . . . . . . . . . . . . . . . . .4.10
Receive document via LAN . . . . . . . . . . . . . . . . . . . . . . . . . . . . . . . . . . . . . . . . . . . . . . . . . . . . . . . . . . . .4.19
Receiving e-mail from POP server . . . . . . . . . . . . . . . . . . . . . . . . . . . . . . . . . . . . . . . . . . . . . . . . . .4.19
Manual reception from POP server . . . . . . . . . . . . . . . . . . . . . . . . . . . . . . . . . . . . . . . . . . . . . . . . .4.19
Advanced Features
TTI transmittion . . . . . . . . . . . . . . . . . . . . . . . . . . . . . . . . . . . . . . . . . . . . . . . . . . . . . . . . . . . . . . . . . . . . . .5.2
TTI transmission setting . . . . . . . . . . . . . . . . . . . . . . . . . . . . . . . . . . . . . . . . . . . . . . . . . . . . . . . . . .5.2
TTI setting with the Soft Key . . . . . . . . . . . . . . . . . . . . . . . . . . . . . . . . . . . . . . . . . . . . . . . . . . . . . .5.2
Entering TTI transmission . . . . . . . . . . . . . . . . . . . . . . . . . . . . . . . . . . . . . . . . . . . . . . . . . . . . . . . .5.2
Subject line entry . . . . . . . . . . . . . . . . . . . . . . . . . . . . . . . . . . . . . . . . . . . . . . . . . . . . . . . . . . . . . . . . . . . . .5.3
Mail subject setting . . . . . . . . . . . . . . . . . . . . . . . . . . . . . . . . . . . . . . . . . . . . . . . . . . . . . . . . . . . . . . .5.3
Page 7

vi
Forwarding the received fax document to mail address . . . . . . . . . . . . . . . . . . . . . . . . . . . . . . . . . . . . . .5.5
Forwarding fax by using F-code relay box . . . . . . . . . . . . . . . . . . . . . . . . . . . . . . . . . . . . . . . . . . . . .5.5
Default relay setting . . . . . . . . . . . . . . . . . . . . . . . . . . . . . . . . . . . . . . . . . . . . . . . . . . . . . . . . . . . .5.12
Forwarding the received e-mail to fax . . . . . . . . . . . . . . . . . . . . . . . . . . . . . . . . . . . . . . . . . . . . . . . . . . .5.15
F ax Forwarding setting . . . . . . . . . . . . . . . . . . . . . . . . . . . . . . . . . . . . . . . . . . . . . . . . . . . . . . . . . . .5.15
Accepting F ax Forwarding requests / Rejecting Fax Forwarding requests . . . . . . . . . . . . . . . . . .5.16
Unconditional F ax forwarding of received e-mail . . . . . . . . . . . . . . . . . . . . . . . . . . . . . . . . . . . . . .5.17
Archive . . . . . . . . . . . . . . . . . . . . . . . . . . . . . . . . . . . . . . . . . . . . . . . . . . . . . . . . . . . . . . . . . . . . . . . . . . . . .5.18
Archive transmitted fax and Archive reception fax setting . . . . . . . . . . . . . . . . . . . . . . . . . . . . . .5.18
Archive transmitted mail and Archive reception mail . . . . . . . . . . . . . . . . . . . . . . . . . . . . . . . . . .5.21
Internet relay broadcasting
(Using F ax Gateway) . . . . . . . . . . . . . . . . . . . . . . . . . . . . . . . . . . . . . . . . . . . . . . . . . . . . . . . . . . . . . . . . .5.24
F ax Gateway setting . . . . . . . . . . . . . . . . . . . . . . . . . . . . . . . . . . . . . . . . . . . . . . . . . . . . . . . . . . . . .5.24
Sending fax via Internet relay . . . . . . . . . . . . . . . . . . . . . . . . . . . . . . . . . . . . . . . . . . . . . . . . . . . . .5.26
Troubleshooting
Troubleshooting . . . . . . . . . . . . . . . . . . . . . . . . . . . . . . . . . . . . . . . . . . . . . . . . . . . . . . . . . . . . . . . . . . . . . .6.2
Mail transmission error report . . . . . . . . . . . . . . . . . . . . . . . . . . . . . . . . . . . . . . . . . . . . . . . . . . . . .6.2
Mail reception error report . . . . . . . . . . . . . . . . . . . . . . . . . . . . . . . . . . . . . . . . . . . . . . . . . . . . . . . . .6.2
Other error report . . . . . . . . . . . . . . . . . . . . . . . . . . . . . . . . . . . . . . . . . . . . . . . . . . . . . . . . . . . . . . . .6.2
Appendix and Index
Main Specifications . . . . . . . . . . . . . . . . . . . . . . . . . . . . . . . . . . . . . . . . . . . . . . . . . . . . . . . . . . . . . . . . . . . .7.2
Glossary . . . . . . . . . . . . . . . . . . . . . . . . . . . . . . . . . . . . . . . . . . . . . . . . . . . . . . . . . . . . . . . . . . . . . . . . . . . . .7.3
Index . . . . . . . . . . . . . . . . . . . . . . . . . . . . . . . . . . . . . . . . . . . . . . . . . . . . . . . . . . . . . . . . . . . . . . . . . . . . . . .7.5
Page 8
vii
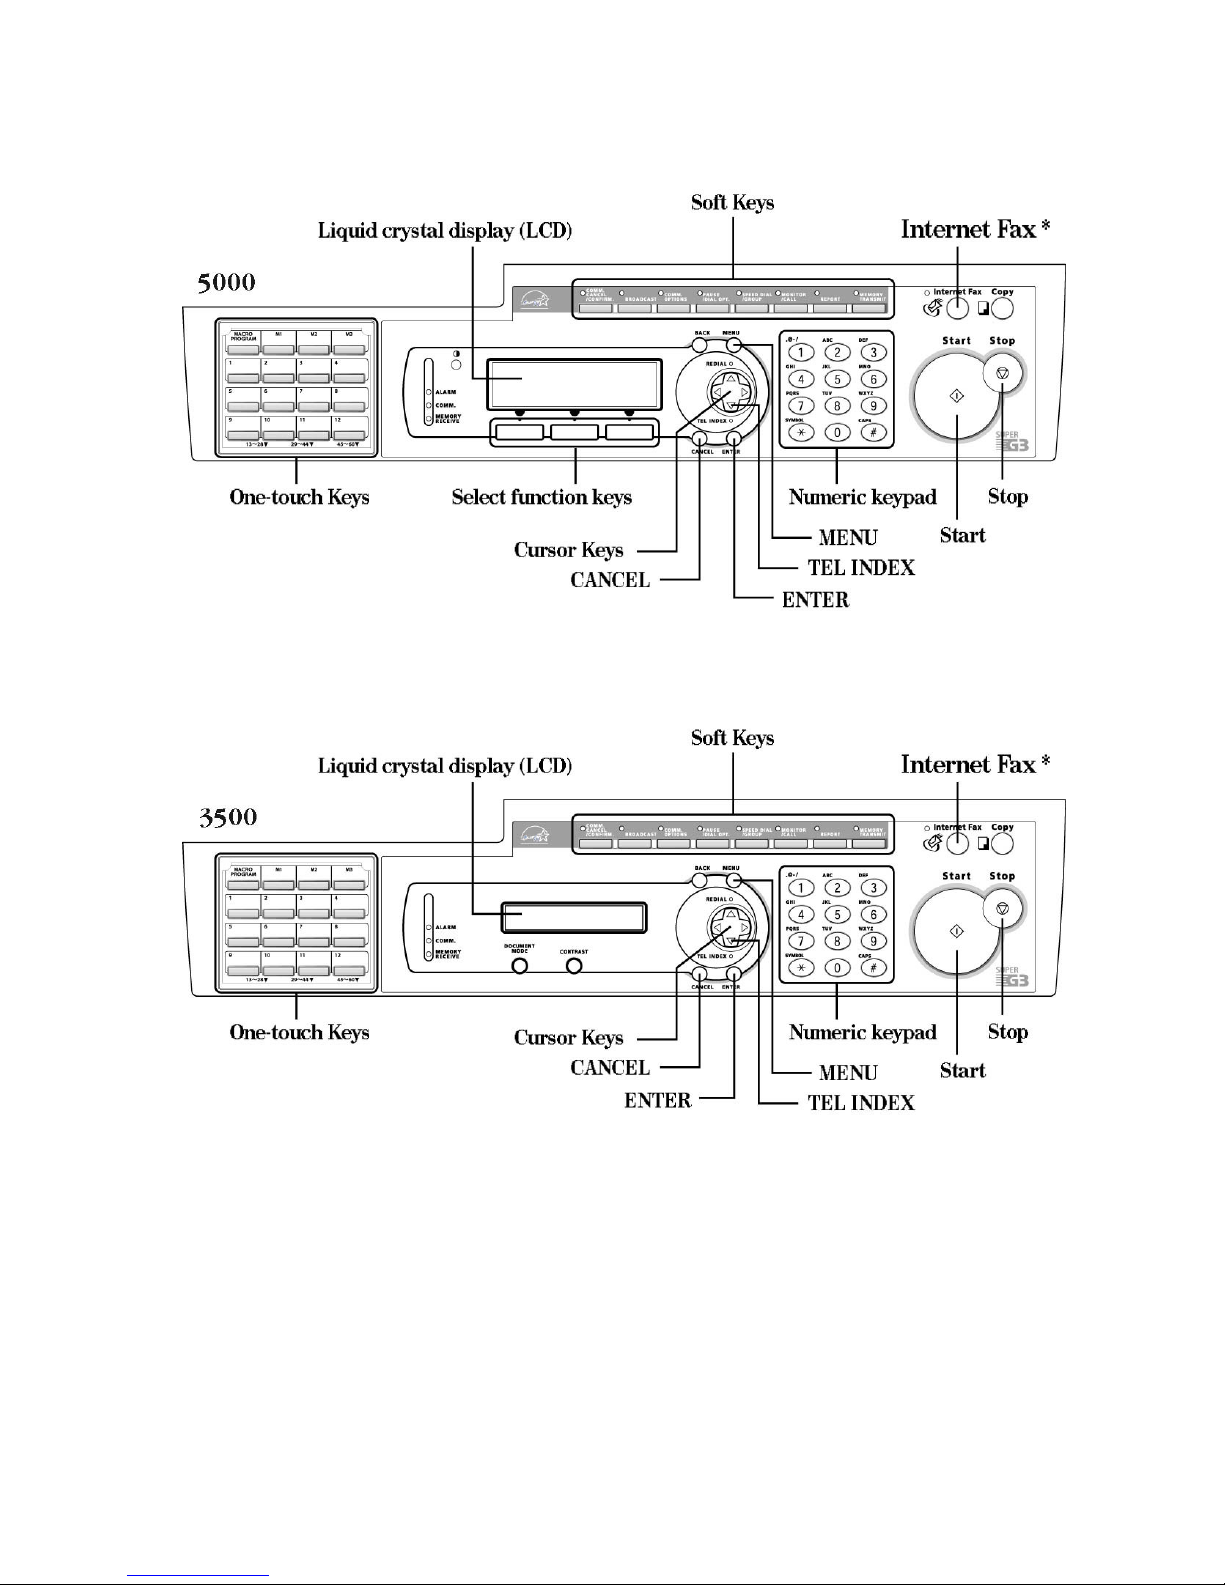
Control panel overview
* Internet Fax key is required to change from Fax mode to Internet F ax mode.
Press this key when you want to use the Internet Fax functions.
Page 9

viii
This page intentionally blank.
Page 10

Installing Your Machine
Pre-Installation information . . . . . . . . . . . . . . . . . . . . . . . . . . . . . . . . . . . . . . . . . . . 1.2
Installation procedures . . . . . . . . . . . . . . . . . . . . . . . . . . . . . . . . . . . . . . . . . . . . . . . 1.3
Setting your Time Zone . . . . . . . . . . . . . . . . . . . . . . . . . . . . . . . . . . . . . . . . . . . . . . . 1.4
Setting the Internet parameters . . . . . . . . . . . . . . . . . . . . . . . . . . . . . . . . . . . . . . . . 1.5
Page 11

1.2
For the total system to work properly via LAN, certain information must be set in advance. Please contact your
network administrator if you need any help.
Please set the following information before the installation.
Internet P arameters
Note: Internet F ax Kit can store up to 30 accounts, so the POP user name and POP password are registered
individually for each account.
Pre-Installation information
IP Address
Subnet Mask
SMTP Server Name or IP Address
Default Gateway IP Address
E-mail Address
DNS Server IP Address
POP Server Name or IP Address
POP User Name
POP Password (for security, do not write it here, but keep it in a safe place.)
Page 12

Carry out registrations in accordance with the following procedures.
1.3
Installation procedures
Time zone setting (See page 1.4)
E-mail environment setting (See page 1.8)
E-mail account user registration (See page 1.9)
Network environment setting (See page 1.7)
IP Address and Subnet mask setting (See page 1.5)
Administrator registration (See page 1.11)
If necessary ...
Installation information registration (See page 1.5)
Page 13

1.4
“Time Zone” setting is added to the “User Install” by pressing MENU, 9.
The Time Zone is required as part of the E-mail header information when sending Internet faxes .
1
Press MENU, 9.
5000 3500
2
Press ENTER repeatedly until the following display appears.
5000 3500
3
The LCD asks you to enter the Time Zone.
Using the cursor key, [ + ], [ - ], and numeric keypad, enter the Time Zone.
If your machine is 3500, use or to select “+”or “-”.
(Refer to the example of Time Zone below.)
Example of Time Zone:
GMT
--
11:00 Midway Island
GMT
--
10:00 Hawaii
GMT
--
9:00 Alaska
GMT
--
8:00 P acific Time (US & Canada)
GMT
--
7:00 Mountain Time (US & Canada)
GMT
--
6:00 Central Time (US & Canada)
GMT
--
5:00 Eastern Time (US & Canada)
GMT
--
4:00 Atlantic Time (Canada)
GMT
--
3:30 Newfoundland
GMT(Greenwich Mean Time):Dublin, Edinburgh, Lisbon, London
GMT + 01:00 Amsterdam, Berlin, Bern, Rome, Stockholm, Vienna
GMT + 02:00 Brussels,Copenhargen, Madrid, Paris
GMT +10:00 Guam
4
Press ENTER to save the setting. The LCD will show the next setting of “User Install”.
If you want to go back to the previous step,press BACK. Otherwise,press STOP to exit this mode.
Time Zone
+00:00
9.User Install
Time Zone
+00:00
[+ ][- ]
[Program] No.9
9 User Install
Setting Menu
4.Doc. Management
5.Print
9.User Install
Setting your Time Zone
Page 14

1.5
The internet parameters for Internet F ax Kit can be entered from the Web browser such as “Internet Explorer”
(4.0 or later) or “Netscape Communicator”(4.5 or Later). Before you use these tools to enter the internet parameter, you must do the following procedure to enter the correct IP address and subnet mask.
Contact your Network Administrator if you need any help.
IP address and Subnet mask setting
For 5000
1
Press MENU, 3, 8, 0, 1, ENTER.
2
The LCD asks if you want to set “IP Address”or “Subnet Mask”.
Example display:
3
Select “IP Address” using the cursor key. Then press ENTER.
4
Enter the IP address using the numeric keypad. Then press ENTER.
Note: To enter numbers less than 2 digits between the dots, use the cursor key to move the entry point.
To correct a wrong number entry,move the cursor with the cursor key and overwrite it.
5
Set the “Subnet Mask”using the same procedure as with “IP Address”.
6
Press “Exit”. When the LCD shows “To reflect change, please power off and on with the administrator”,
press [OK].
7
To reflect the setting, turn the power off and on.
For 3500
1
Press MENU, 3, 8, 1, ENTER.
2
Enter the IP address using the numeric keypad. Then press ENTER.
Note: To enter numbers less than 2 digits between the dots, use the cursor key to move the entry point.
To correct a wrong number entry,move the cursor with the cursor key and overwrite it.
3
Enter the subnet mask address using the numeric keypad. Then press ENTER.
4
Press STOP.
5
To reflect the settings, turn the power off and on.
Set Subnet Mask
255.255.255.000
Set IP Address
192.168.001.013
01.TCP/IP
Exit
IP Address : 192.168.001.013
Subnet Mask : 255.255.255.000
Setting the Internet parameters
Page 15
1.6
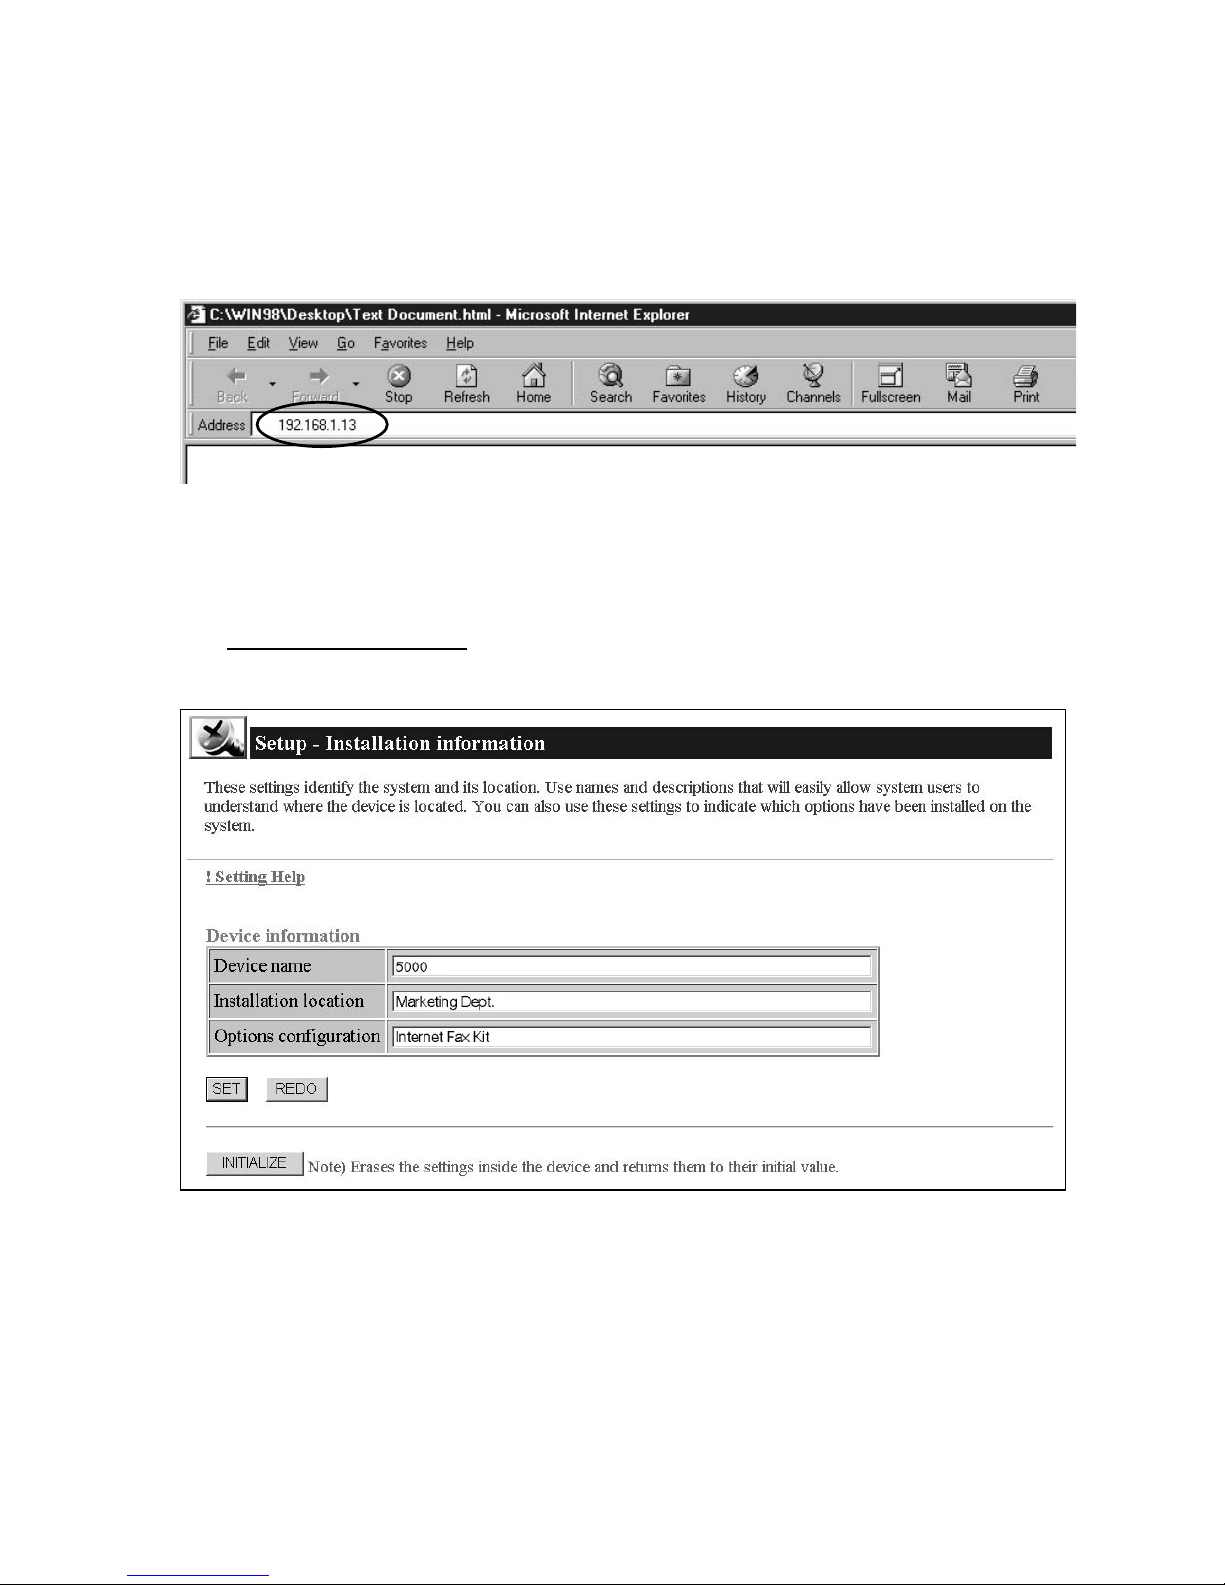
Installation information registration
Registration of device information makes it easier to identify the device.
Installation data, once registered, is fed into the device information for display.
1
Start up “Internet Explorer”(4.0 or later) or “Netscape Communicator” (4.5 or Later) on your PC.
Note: Use the latest browser version possible. Some old versions may not produce the correct display.
2
Enter the IP address of Internet F ax Kit in the address box,and press ENTER.
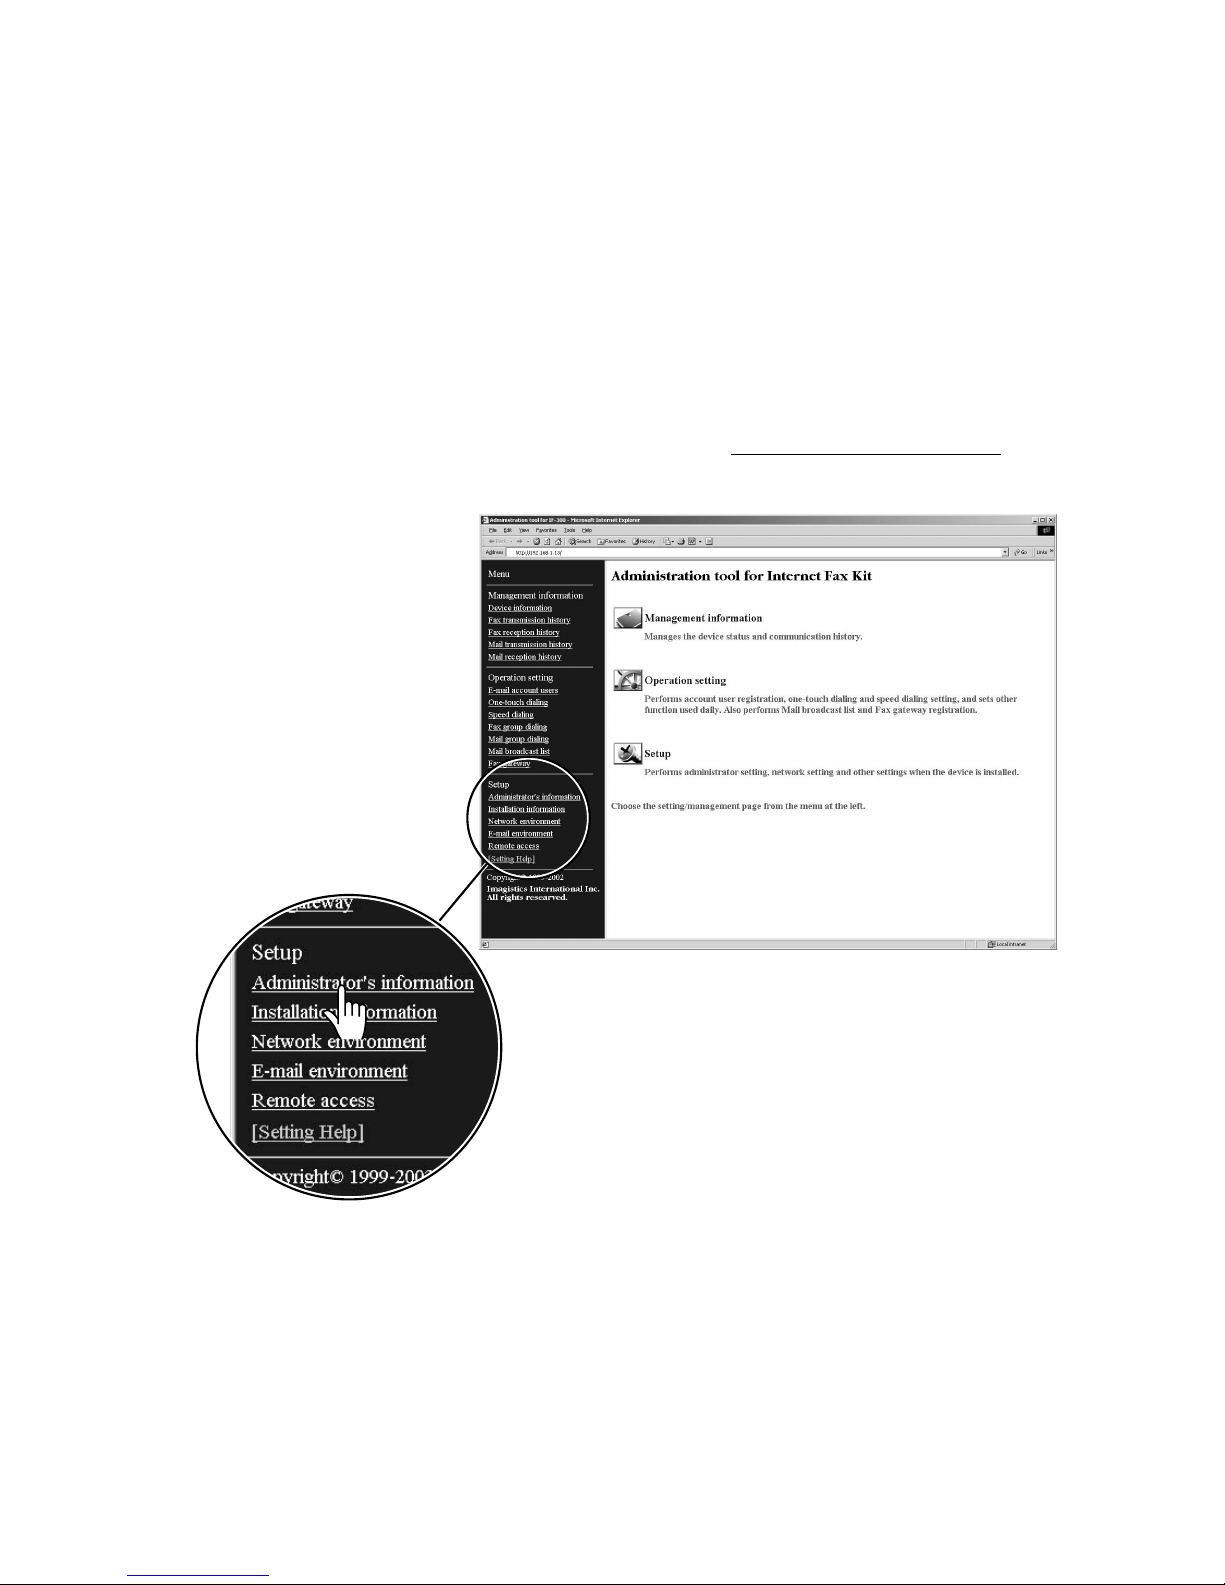
3
The “Administration tools for Internet Fax Kit” will be appear on your screen.
Note: If the “Administration tools for Internet Fax Kit” does not appear, double-check the IP address
in “Entering the IP address setting and Subnet mask”(see above), and carry out power off/on of the
fax machine to restart.
4
Click Instauration information under [Setup].
5
Fill in each of the following fields,and then click the [SET] button.
Page 16

1.7
Network environment setting
This setting is to establish the network connection of this device.
1
Start up “Administration tool for Internet Fax Kit”. Click Network environment under [Setup].
2
The IP address and Subnet mask you have entered will be appeared.
If necessary, enter Gateway address and DNS server address and then click [SET] button.
Gateway
“Gateway”collectively refers
to hardware and software
that interlink systems and
networks using different
protocols.
Page 17
1.8
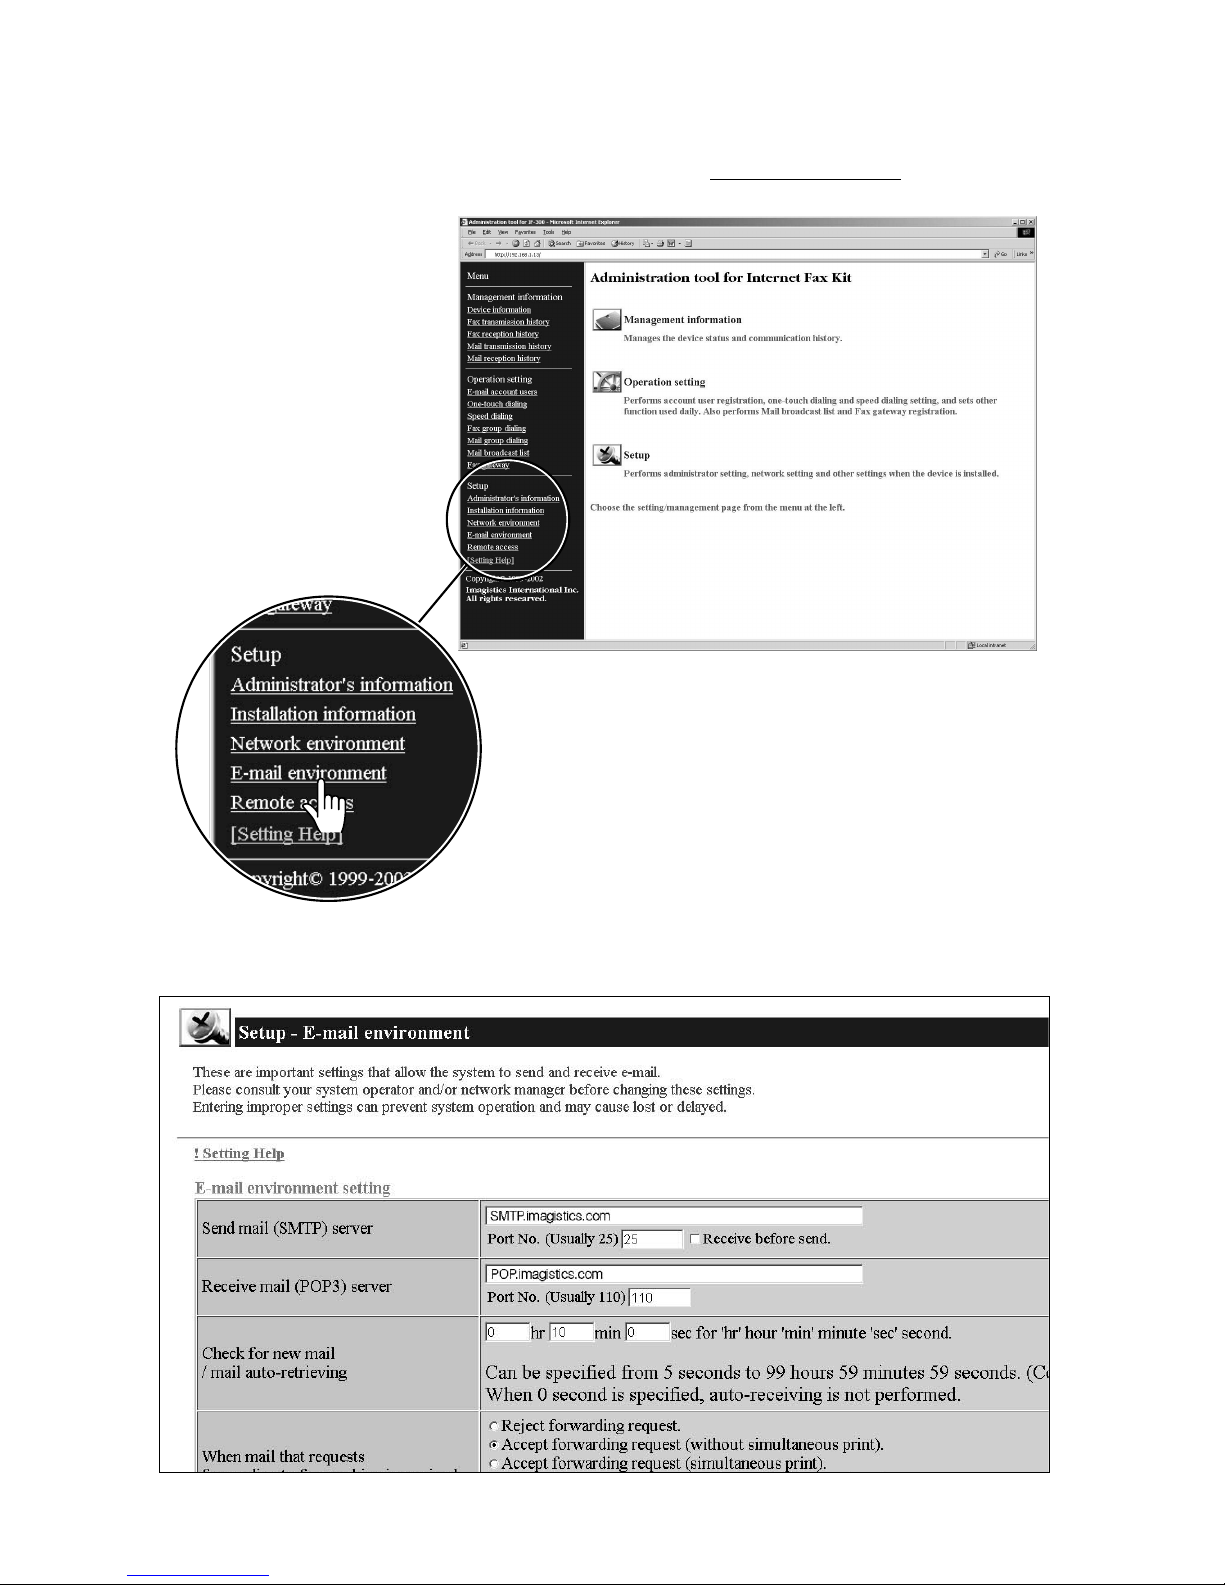
E-mail environment setting
This setting enables the device to perform e-mail transmission and reception.
1
Start up “Administration tool for Internet Fax Kit”. Click E-mail environment under [Setup].
2
Enter the “SMTP server name”and “POP server name”, and then click the [SET] button.
Page 18
1.9
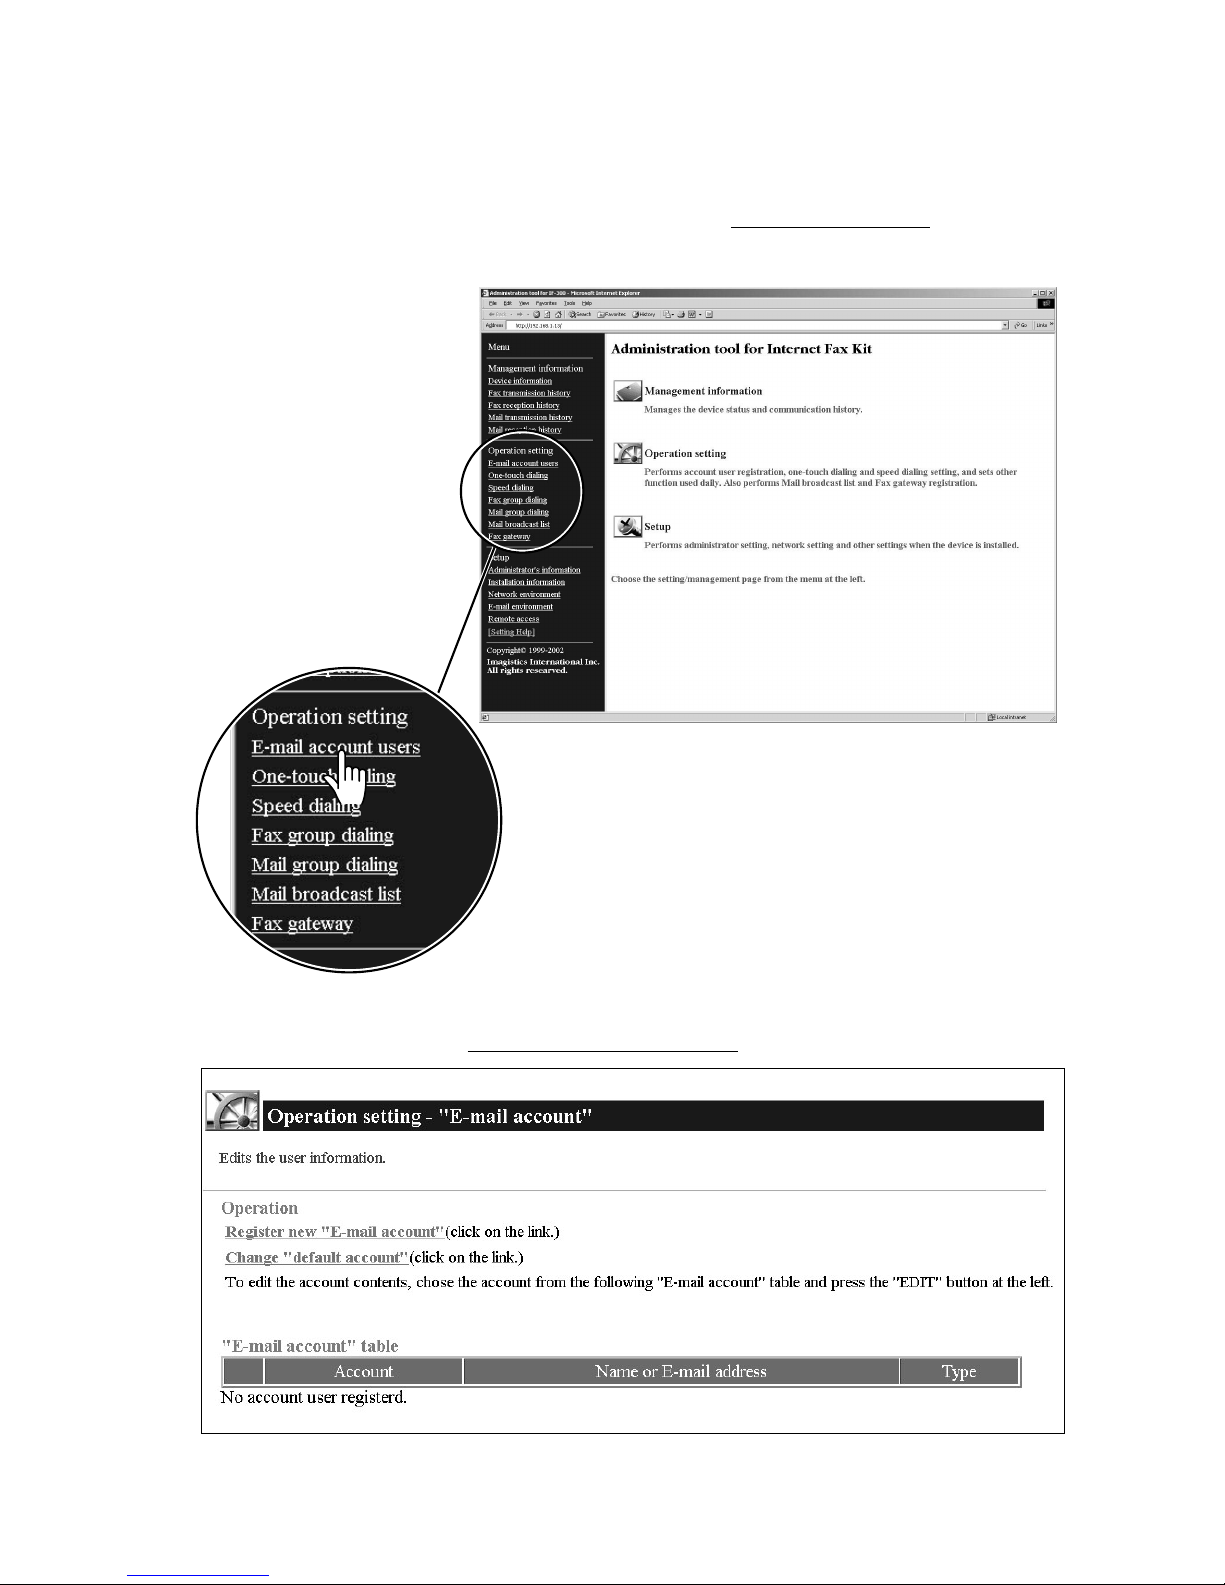
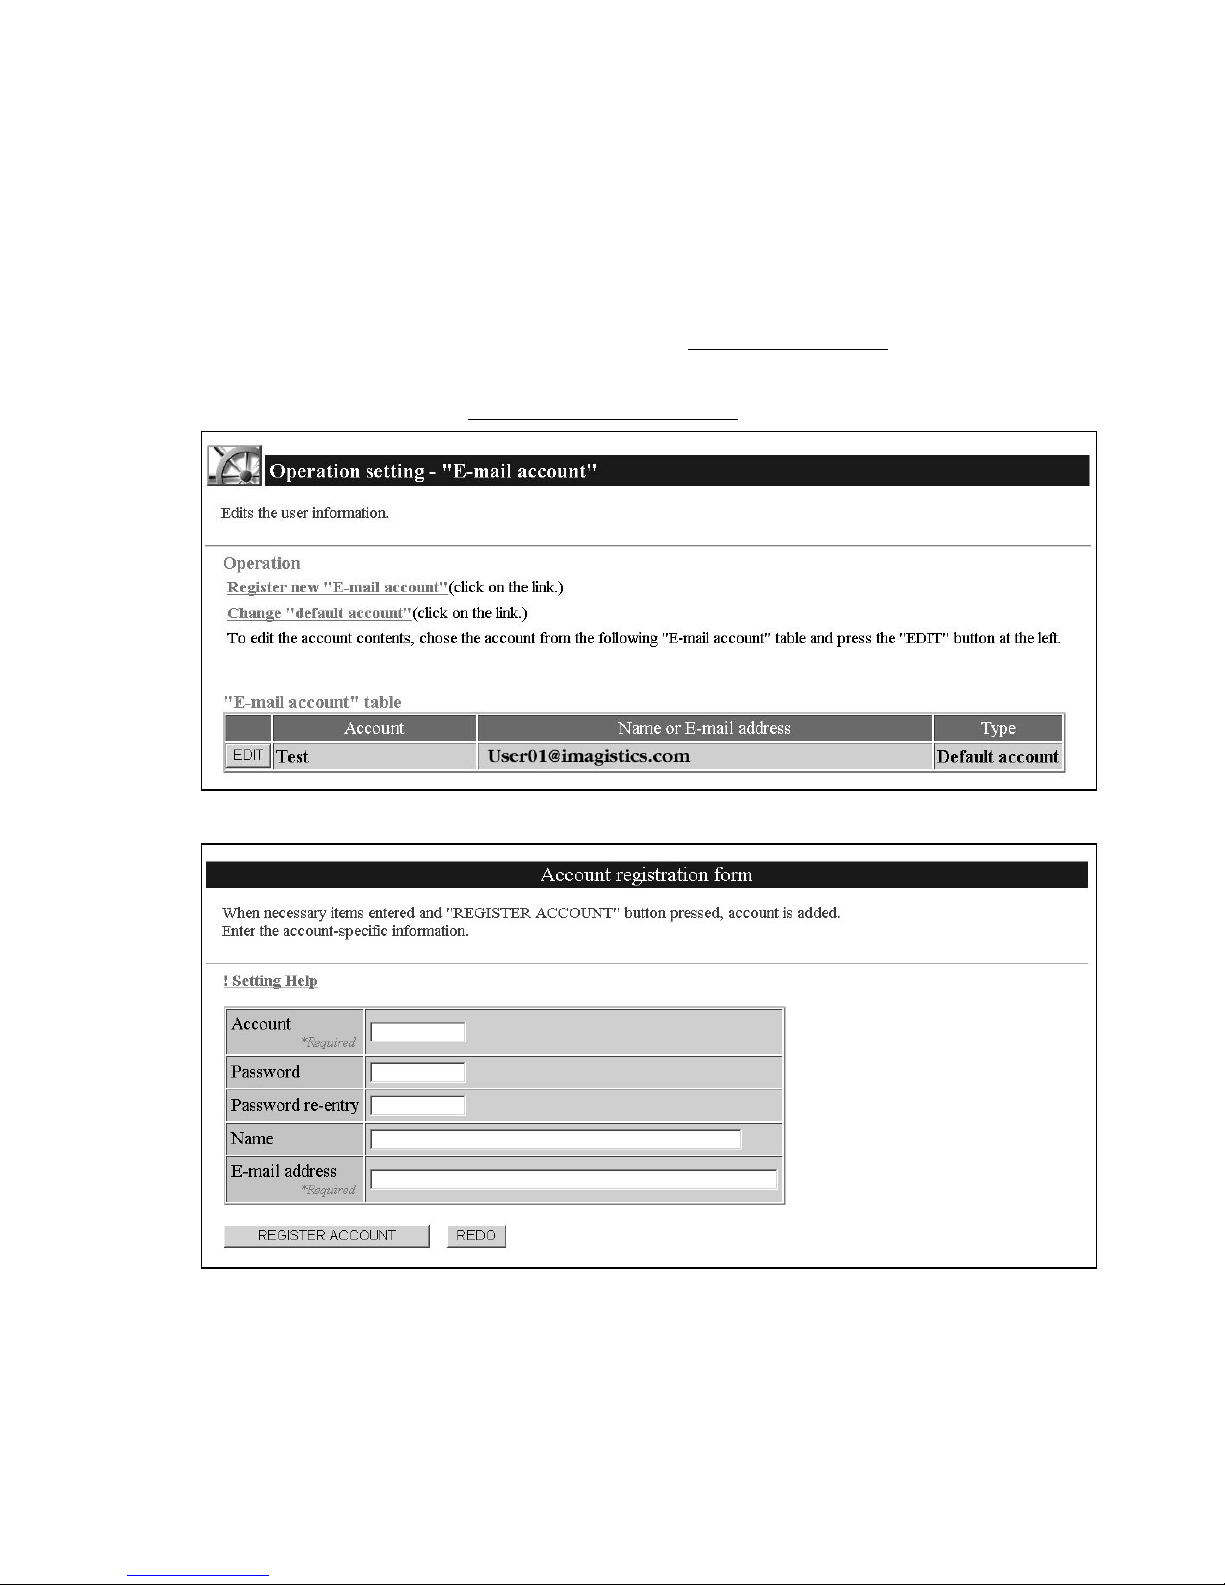
E-mail account user registration
Register a default account. A default account is an account used when the account cannot be specified when
forwarding received fax and archiving sent/received faxes. If the default account is not registered, some functions may not be available.
1
Start up “Administration tool for Internet Fax Kit”. Click E-mail account users under [Operation
setting].
2
To register a new account,click Register new “account user” .
Page 19
1.10
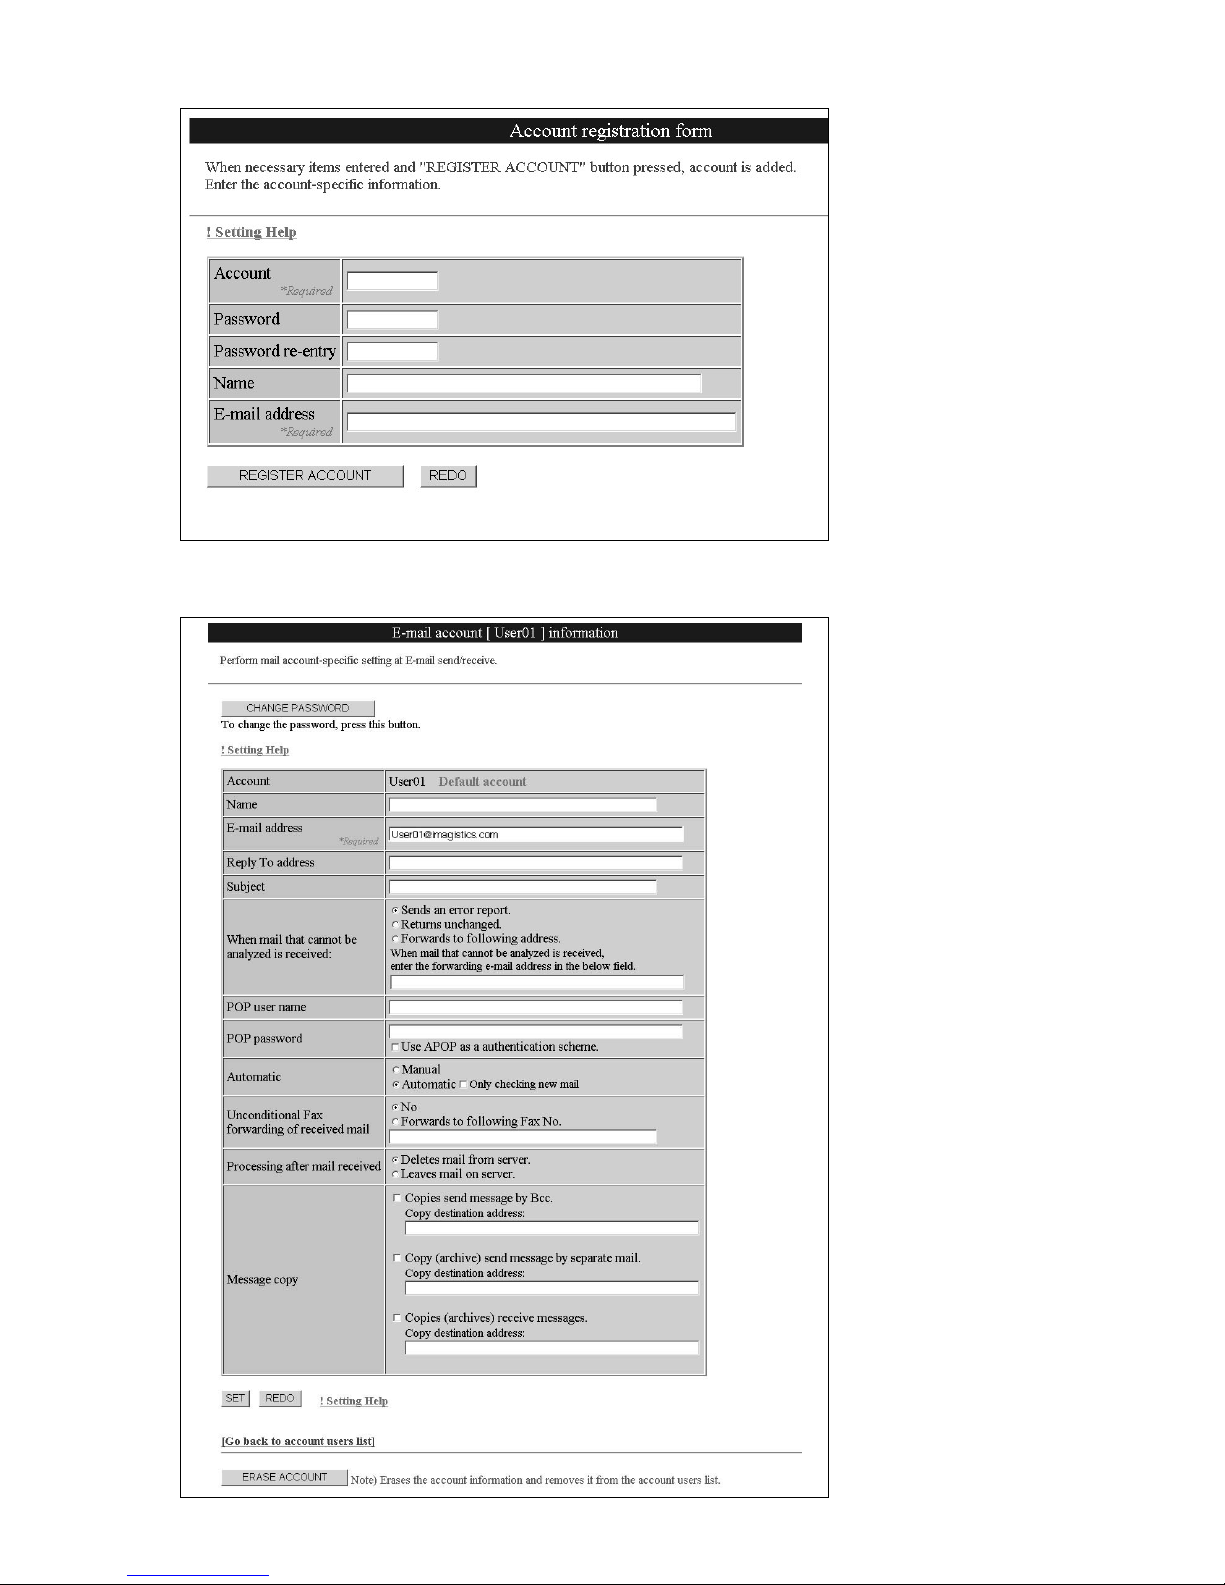
3
Fill in each of the following fields,and then click the [REGISTER ACCOUNT] button.
4
The information screen appears. If necessary, enter the POP user name and POP password, then click
[SET] button to register the entry.
Page 20
1.11
Administrator registration
What is administrator registration?
Administrator registration will enable the following:
◆ Authentication is requested whenever making or altering any device settings.
◆ Authentication is requested whenever making or altering a user registration.
◆ Authentication is requested whenever making or altering fax distribution settings.
Once an administrator has been identified for the system, the administrator’s password is needed to manage
account and to modify the system setting and administrator’s information
Registration of administrator information
1
Start up “Administration tool for Internet Fax Kit”. Click Administrator’
s Information
under
[Setup].
Page 21
1.12
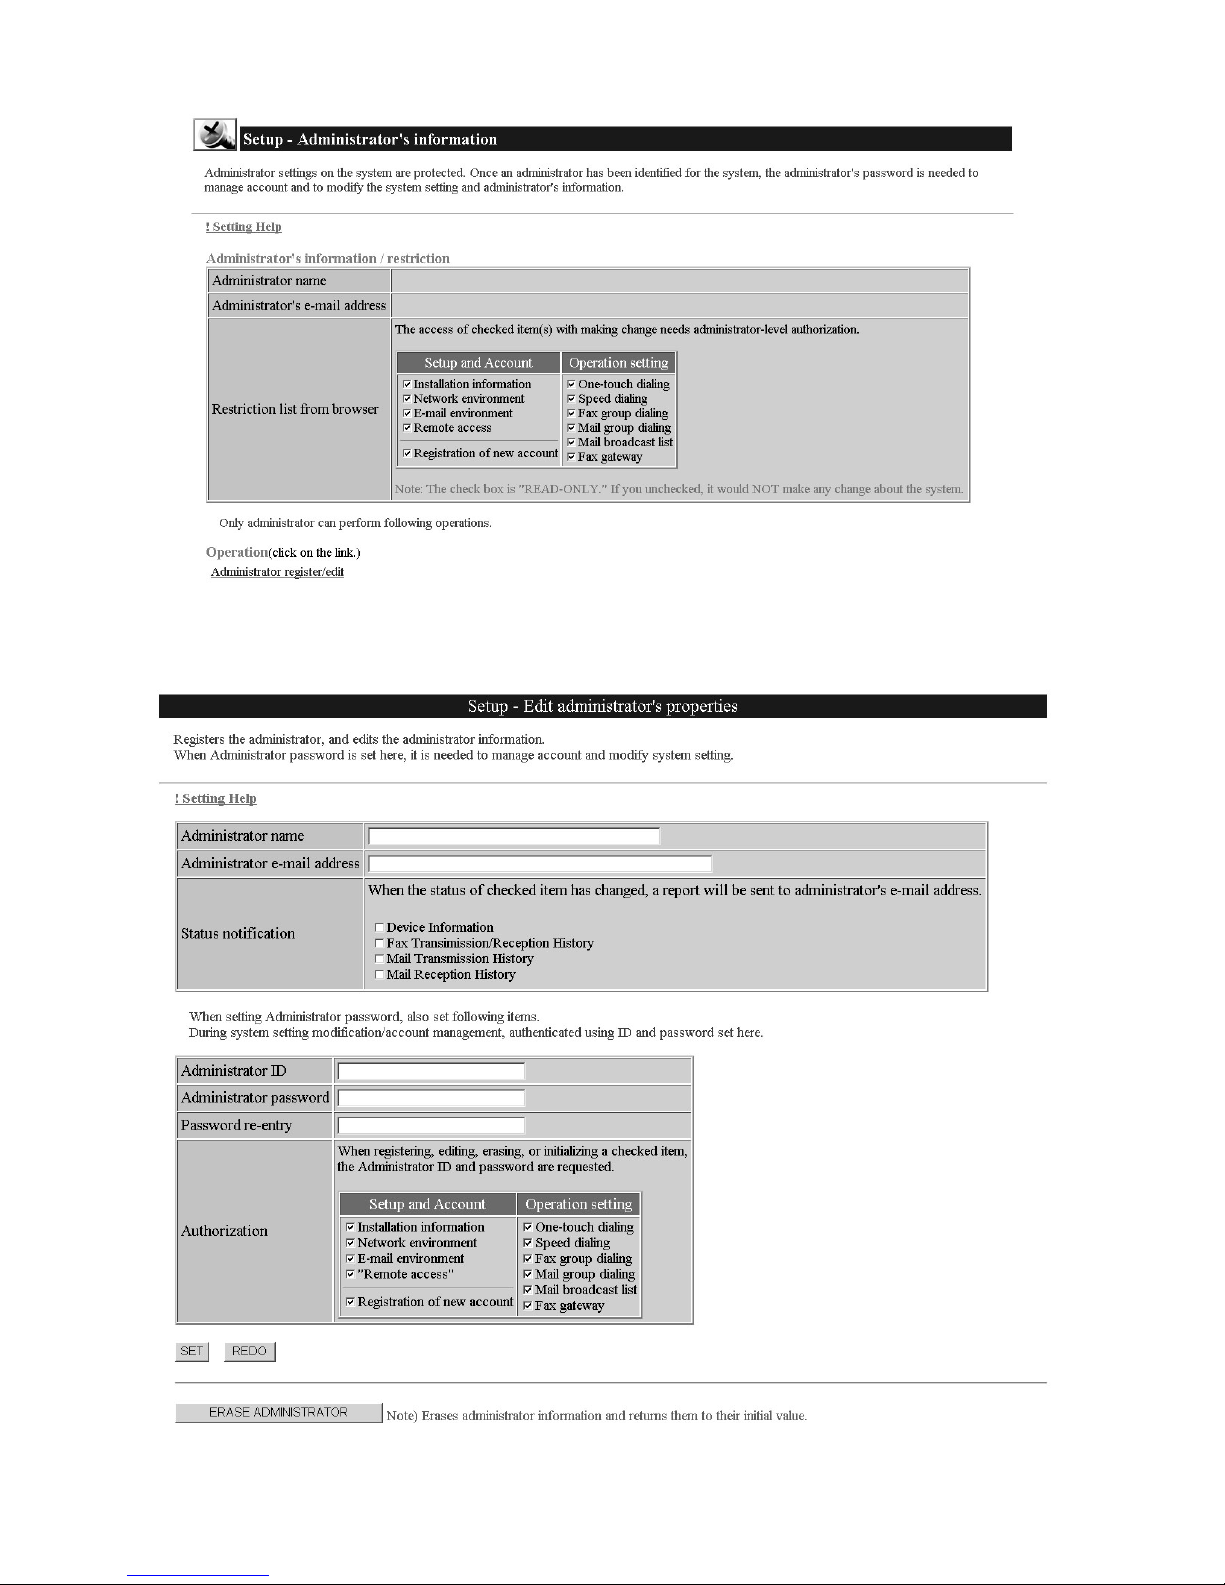
2
Administrator’s information screen will appear:
3
Click Administrator register/edit to edit the administrator’s information.
Fill in each of the following fields,and then click the [SET] button.
Note: For details on input items, refer to [Setting Help].
Page 22

System configuration
Programming or retrieving parameters using “Administration tool” . . . . . . . . . . . 2.2
Programming or retrieving parameters using E-mail . . . . . . . . . . . . . . . . . . . . . . 2.13
Page 23
2.2
Programming or retrieving parameters using “Administration tool”
What is “Administration tool for Internet Fax Kit” on the web?
“Administration tool for Internet Fax Kit”is the program that enables adjustment of settings and registration of
this device using a “Web browser”.
In addition to adjusting settings and registration,“Administration tool for Internet Fax Kit” enables management and browsing of device information.
Startup of “Administration tool for Internet Fax Kit”
1
Start up “Internet Explorer”(4.0 or later) or “Netscape Communicator” (4.5 or Later).
Note: Use the latest browser version possible. Some old versions may not produce the correct display.
2
Enter the IP address in the address box, and press “Enter” on your keyboard.
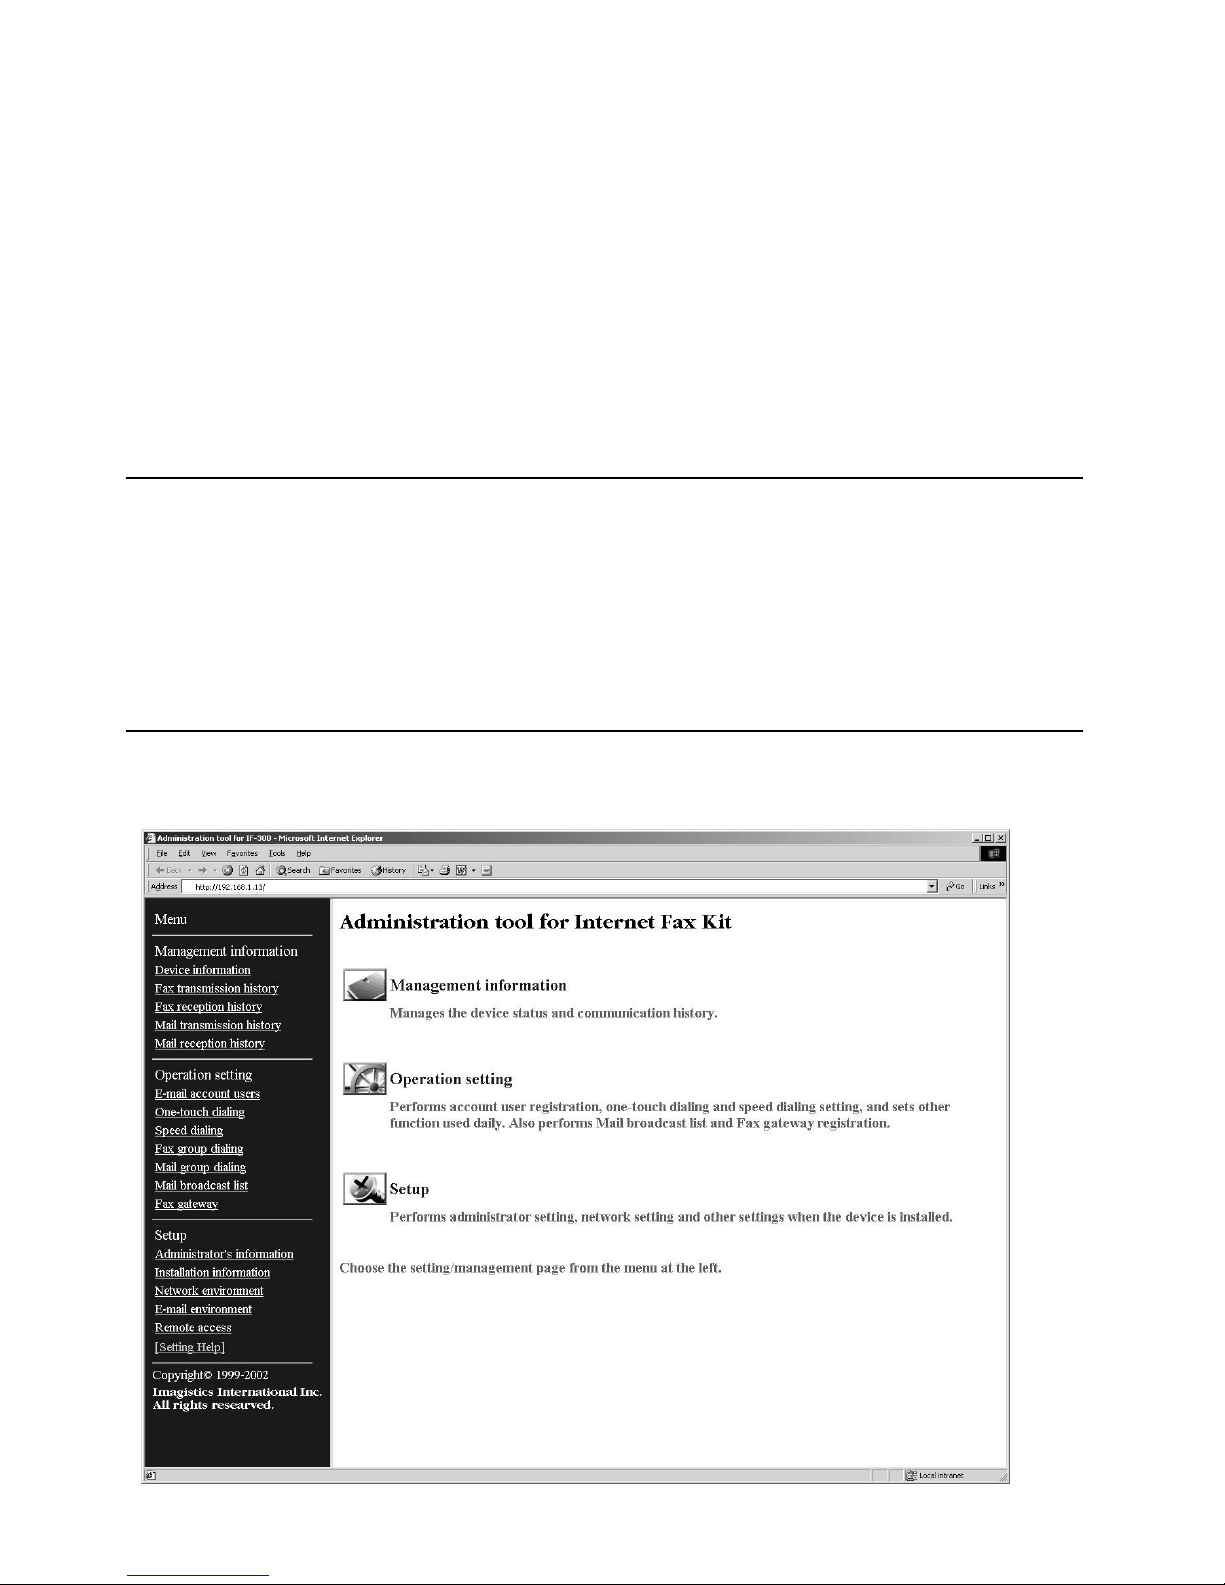
3
“Administration tool for Internet Fax Kit”screen will appear.
Descriptions of “Administration tool for Internet Fax Kit”
The following sections are item-by-item descriptions of “Administration tool for Internet Fax Kit”.
Page 24
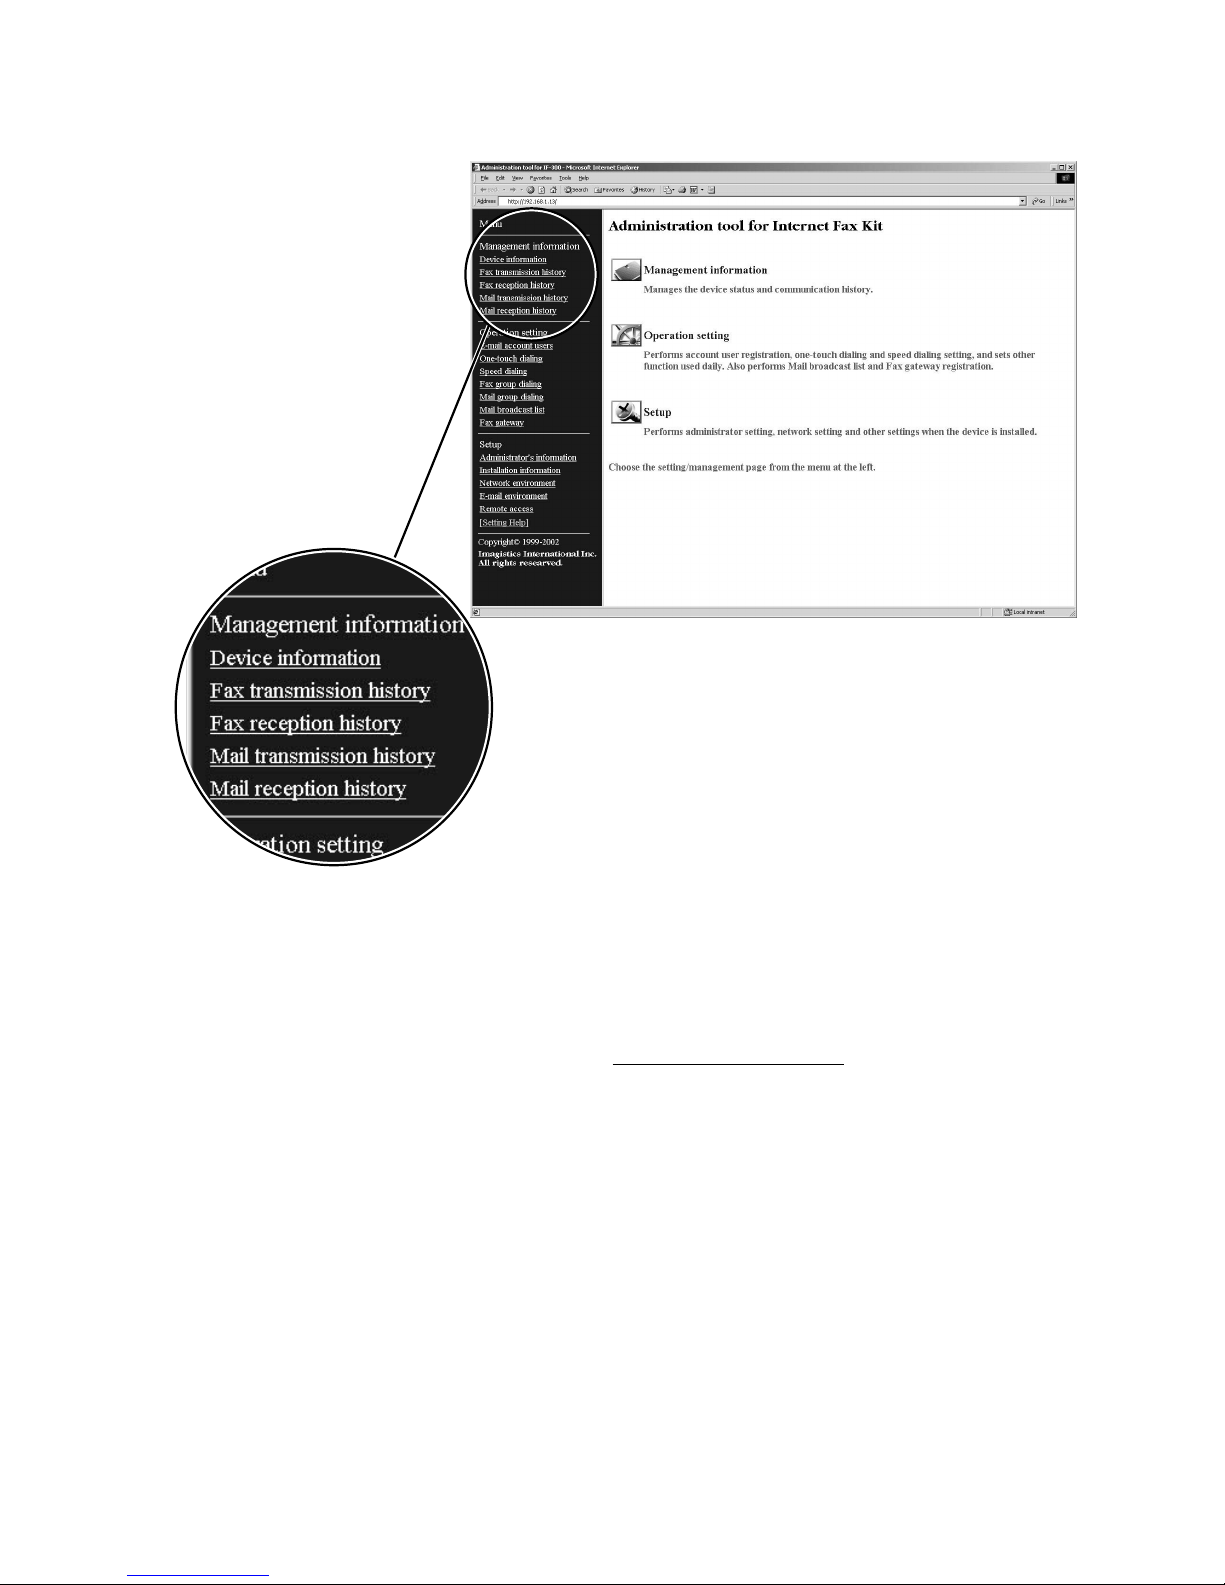
Management information
Information can be displayed to enable management of Internet Fax Kit’s status and management of the communication log.
Device information
Device information (Device name, Installation location, System options)
Device status (Speed and transmission system of network connection, telephone line status, scanner status,printer status, Unit name,Setting, paper remaining, Media in manual feed tray and cassette 1)
(Device information displays the data entered in Installation information
under [Setup].)
Fax transmission history
Displays fax transmission history
Fax reception history
Displays fax reception history
Mail transmission history
Displays sent E-mail items history
Mail reception history
Displays received E-mail items history
Internet F ax Kitrecords its 100 most recent fax and e-mail transactions.
2.3
Page 25
2.4
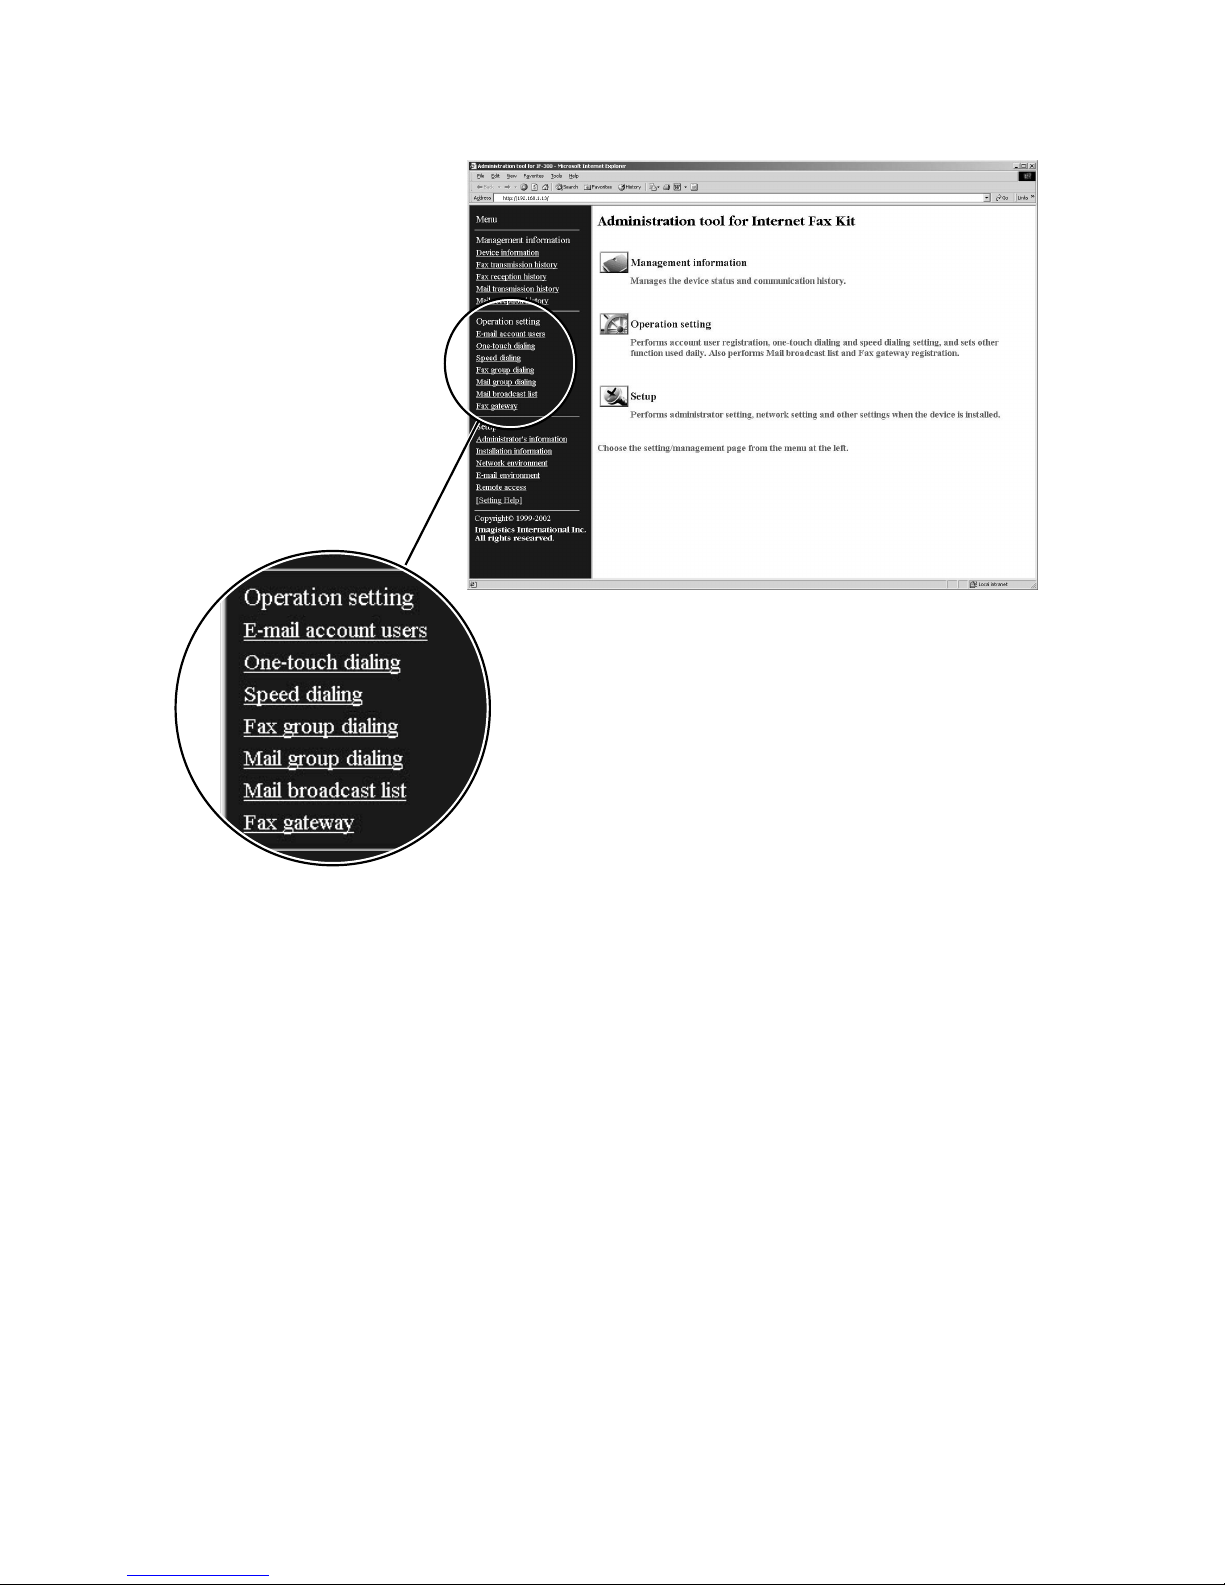
Operation setting
To carry out setting of routine functions, such as User registration,Fax and Mail group dialing,and One-touch
dial and Speed-dial settings.
E-mail account users
Enables new user registration, and deletion and editing of user account
One-touch dialing
Enables registration, deletion and editing of One-touch dial
Speed dialing
Enables registration, deletion and editing of Speed-dial
Fax group dialing
Performs Fax group dialing registration, list display, and erasing
Mail group dialing
Registers,lists, and erases mail only group
Mail Broadcast list
Manages,creates, and erases Mail Broadcast List
This list can be specified as the address when sending mail
Fax Gateway
Register F ax Gateway relayer and mail address that delivers fax from relayer
Page 26
2.5
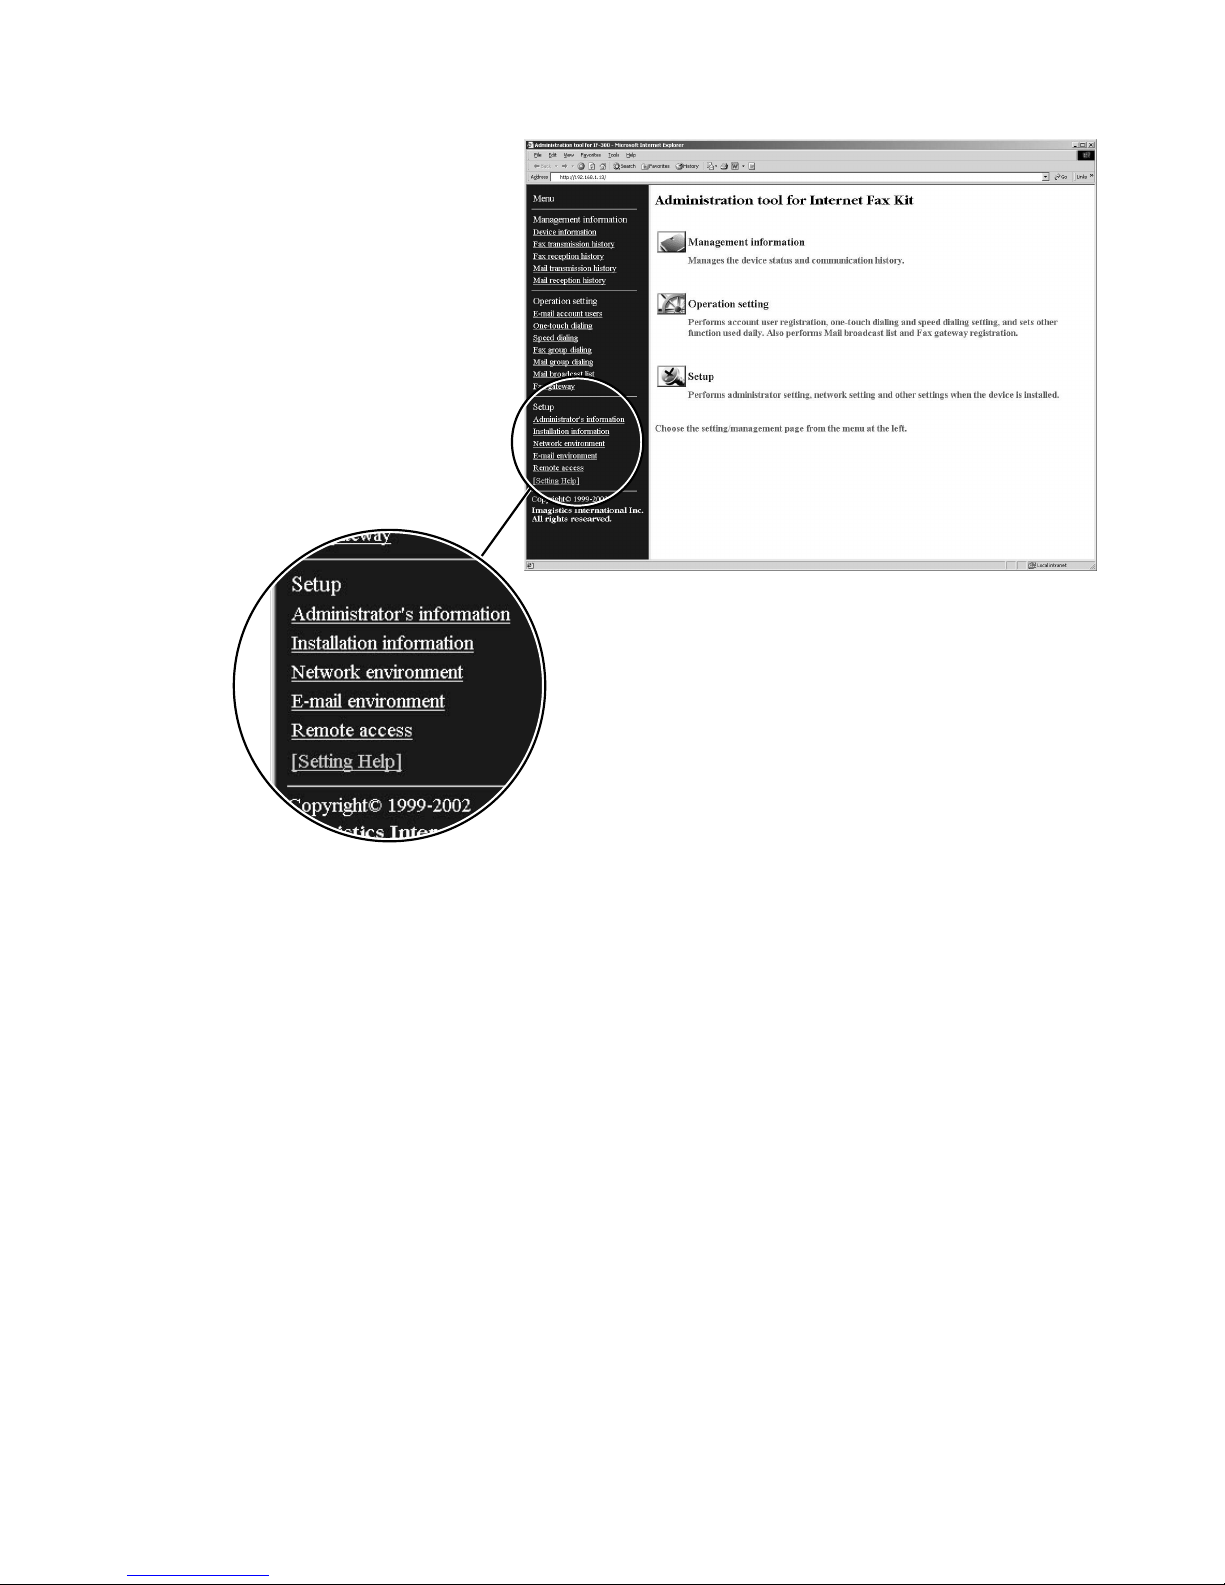
Setup
Setup settings such as E-mail environment and Network environment can be changed.
Administrator’s information
Enables registration of an administrator
Installation information
Enables registration of device information
Network environment
Enables establishment of a network connection
E-mail environment
Enables establishment of E-mail transmission and reception
Remote Access
This feature can refer, modify and erase the device setting by sending e-mail to the machine.
E-mail requires a password to be entered for access.
Page 27
2.6
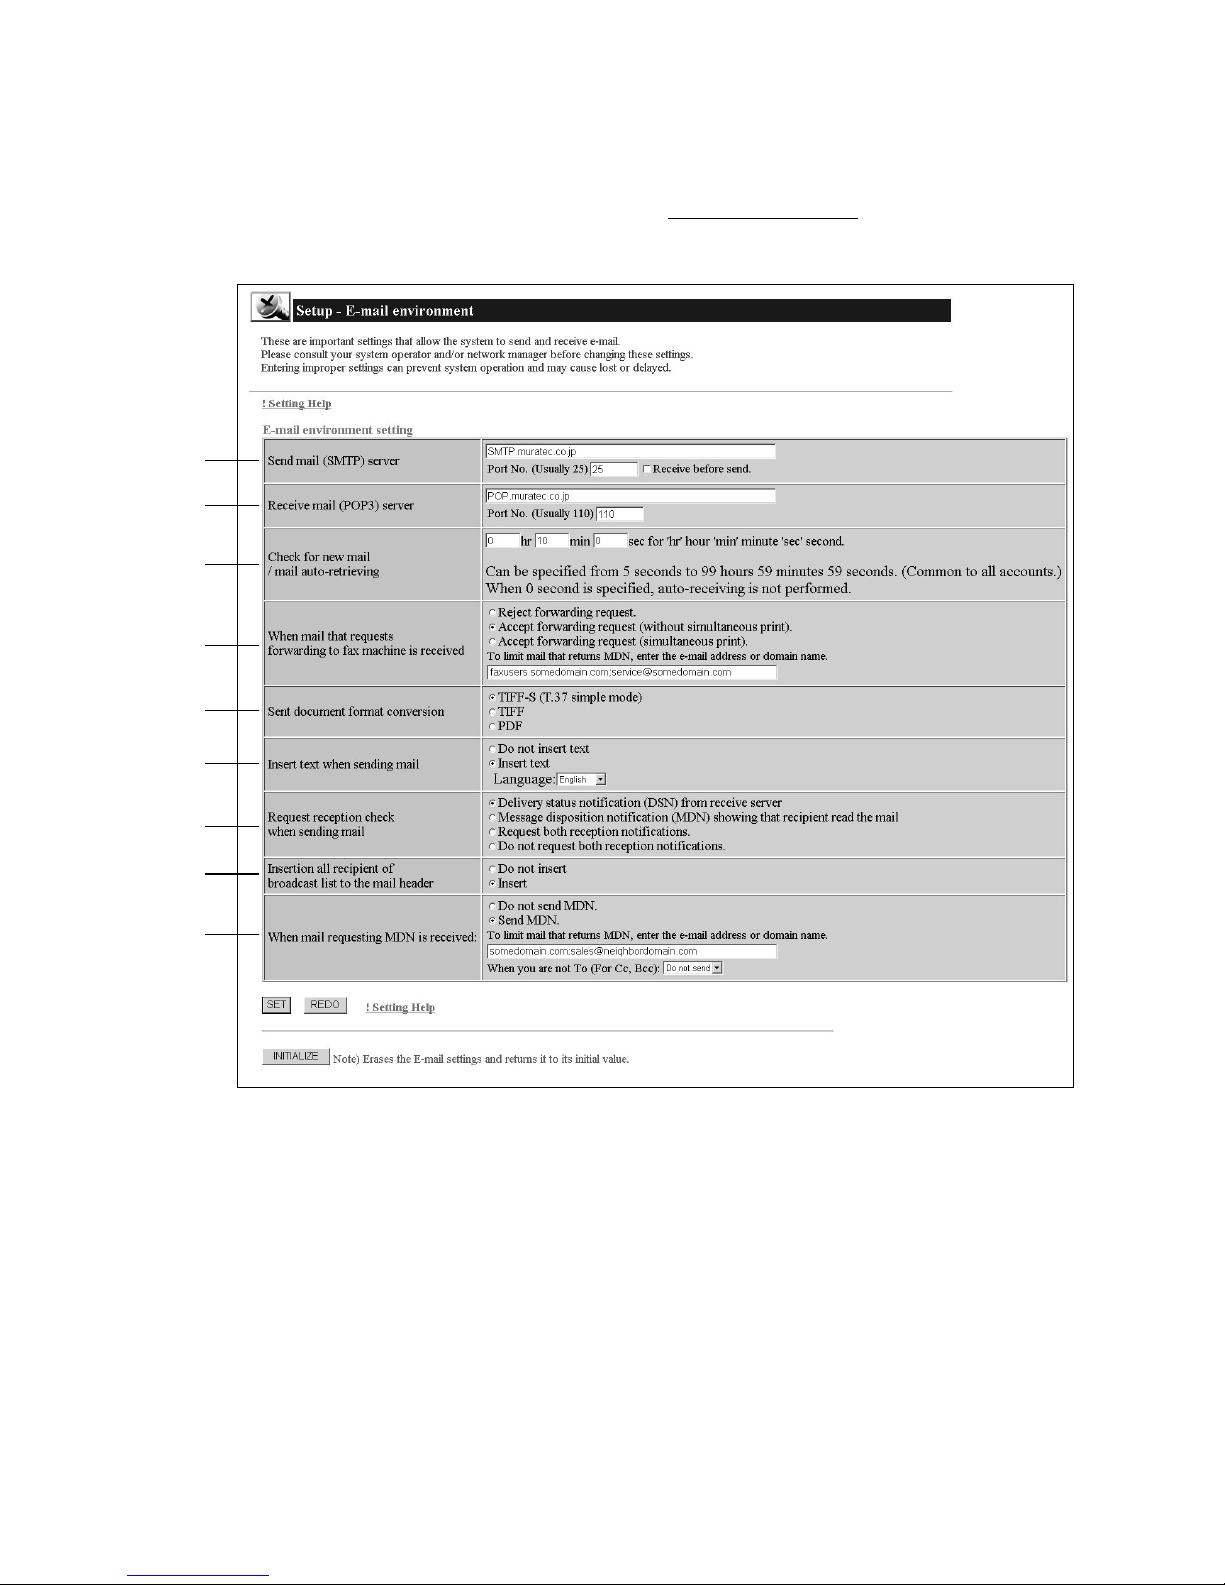
Setting E-mail environment
These are important settings that allow the system to send and receive E-mail. Please consult your system operator and/or network manager before entering these settings.Entering improper settings can prevent system
operation and may cause lost or delayed mail.
1
Start up “Administration tool for Internet Fax Kit”. Click E-mail environment under [Setup].
2
Fill in each of the following fields,and then click the [SET] button.
[SET] button
Click this button to register the entry.
[REDO] button
Click this button to retrieve the current settings.
[INITIALIZE] button
Click this button to restore the initial shipment settings.
A
B
C
D
E
F
G
H
I
Page 28

2.7
Descriptions
A. Send mail (SMTP) server
The SMTP server is used to send e-mail.
Enter the domain name or IP address of the SMTP server.
Enter the IP address with dot notation system (xxx.xxx.xxx.xxx).
The domain name can be entered with up to 50 characters.
B. Receive mail (POP3) server
The POP3 server is used to receive e-mail.
Enter the domain name or IP address of the POP3 server.
Enter the IP address with dot notation system (xxx.xxx.xxx.xxx).
The domain name can be entered with up to 50 characters.
Enter an IP address in both the SMTP and POP3 fields, even if the IP address is exactly the same for
both.
C. Check for new mail / mail auto retrieving
Set the time interval to check for new messages at the mail server.
Set the time from 5 seconds up to 99 hours 59 minutes 59 seconds.
The initial setting is 10 minutes.
D. When mail that requests forwarding to fax machine is received
When a received e-mail has an instruction to forward it to a fax machine, it is converted into fax
transmission data and forwarded to the fax machine.
This setting determines whether to comply with the forwarding request or not.
If complying with the request, it is also possible to accept the request only from an e-mail with a specific
e-mail address or domain name (after the @ mark in the e-mail address).
In this case, enter the e-mail address or domain name from which a request is accepted.
When making multiple entries, separate them with a semicolon (;).
A single e-mail address or domain name can be entered in up to 50 characters.
For multiple entries, up to 256 characters are allowed (including semicolons).
E. Send document format conversion
Set the file format for outgoing messages.
Messages are converted into any of the file formats set here when the recipient’s
e-mail address is entered directly or when forwarding a received fax with e-mail.
[TIFF-S (T.37 simple mode)]
The document is converted to TIFF format based on T.37 simple mode. T.37 is an international
standard for Internet fax. When a document is sent in simple mode format, it can be received
normally by other Internet fax devices. However, send documents are all converted to A4 size and
their resolution is converted to 200dpi.
[TIFF (Expansion)]
The document is converted to TIFF format, however it is sent at the original document size and
resolution selected during scanning or creation.
[PDF]
The document is converted to PDF format.
You can select a delivery file format for each one-touch number and speed dial number in your system.
When sending e-mail to an e-mail address entered manually, you can specify the file format by adding /S,
/F and /P at the end of the e-mail address.
Page 29
2.8
F. Insert text when sending mail
When sending e-mail from this device, the message is sent as an attached file.
Select whether to insert text in the e-mail message area.
When text is to be inserted, select the language as well.
Japanese text may not be reproduced correctly, depending on the recipient’s conditions.
When a subject and comments are entered in the transmission dialog box when sending from client PC
software,the entries will appear as the e-mail’s subject and text regardless of this setting.
G. Request reception check when sending mail
This setting determines whether to request delivery status notification (DSN) or message disposition
notification (MDN) when sending an e-mail.
However, the request for DSN or MDN may not be granted, depending on the mail server and the
recipient’s e-mail software.
H. Insertion all recipient of broadcast list to the mail header
Specifies whether or not the all recipient of broadcast list are inserted to the mail header.
I. When mail requesting MDN is received
Specifies whether or not the receiving end returns MDN when the received mail requests that MDN be
returned.
This item may also be set so that MDN is returned only for mail received from a specific e-mail address
or domain name (characters following @ of the e-mail address).
In this case, enter the e-mail address or domain name where MDN may be returned.
Use a semicolon (;) to separate e-mail addresses or domain names when you want to specify more than
one of them.
One e-mail address or domain name consists of up to 50 characters.
When multiple e-mail addresses or domain names are specified, a total of 256 characters can be entered
(including the separating semicolons).
Page 30
2.9
Setting E-mail account users
Registers the individual information, etc. needed to use this device to send and receive e-mail.
Using this feature, you can also register and/or edit user accounts as well as the default account.
Up to 30 accounts can be registered.
Note: A default account is an account used when the account cannot be specified when forwarding received fax
and archiving sent/received faxes. If the default account is not registered, some functions may not be
available.
Register new e-mail account
1
Start up “Administration tool for Internet Fax Kit”. Click E-mail account users under [Operation setting].
2
To register a new account,click Register new
“account user”
.
3
Fill in each of the following fields,and then click the [REGISTER ACCOUNT] button.
Page 31

2.10
4
The information screen appears. Check the contents and edit wrong entries if required.
Click [SET] button to register the entry.
Note: For details on input items, refer to [Setting Help].
Page 32

2.11
Changing the default account
1
To c hange the default account,click Change “default account” .
2
Choose a new default account and click the [EXECUTE] button to register the new entry.
Editing the account contents
1
To edit the account contents, choose the account from the following table and click [EDIT] button.
Page 33

2.12
2
The account authentication screen appears. Enter the password and click [SET] button.
Note: If you have not set the password previously, click [SET] button without entering any characters.
3
The E-mail account information screen appears. Edit the contents and click [SET] button.
Erase the account content
1
To erase the account,choose the account you want to erase and click [EDIT] button.
2
The account authentication screen appears. Enter the password and click [SET] button.
Note: If you have not set the password previously, click [SET] button without entering any characters.
3
The E-mail account information screen will appear.
To erase the account,click [ERASE ACCOUNT] button.
4
The Account erase check screen will appear.
To erase the account,click [ERASE] button.
Page 34

2.13
Programming or retrieving parameters using E-mail
Using E-mail for Program or Retrieve Parameter
(Device management by E-mail)
This feature is a convenient way of programming or retrieving One-touch,Speed-dial, Fax relay, E-mail environment, E-mail account and other function’s data from your PC, by sending an E-mail message to Internet Fax Kit.
You can request Internet Fax Kit perform the following commands by using your mail application’s “Subject” line
as a command-input field.
The followings are the items you can program and retrieve by E-mail.
Item Note
E-mail environment Some items are unavailable to program and retrieve
One-touch dial
Speed-dial
Offramp Gateway
E-mail account Some items are unavailable to program and retrieve
Fax transmission history Only to retrieve
Fax reception history Only to retrieve
Mail transmission history Only to retrieve
Mail reception history Only to retrieve
Page 35

2.14
Remote access setting on the Web
The following parameters can be entered on the Web.
1
Start up “Administration tool for Internet Fax Kit”and click Remote Access under [Setup].
2
Fill in the each of the following fields,and Click [SET] button.
Note: The password will be required to send a command by E-mail.
Page 36

2.15
Setting the command in the Subject line
After receiving the command that you enter in the “Subject”line of your E-mail message, Internet Fax
Kitperforms one of the following functions: Retrieving or Programming data.
You can enter two types of command in the “Subject” line.
1. To retrieve data : %get parameters#xxxx%
2. To program data : %set paramaters#xxxx%
The following is the list of available operations
* “
XXXX
” is the password for remote access.
Operation Title of E-mail
Setting One-touch dialing. %set-onetouch#xxxx%
Retrieving One-touch dialing. %get-onetouch#xxxx%
Setting Speed-dialing. %set-speed-dial#xxxx%
Retrieving Speed-dialing. %get-speed-dial#xxxx%
Setting fax relay gateway settings. %set-fax-gateway#xxxx%
Retrieving fax relay gateway settings. %get-fax-gateway#xxxx%
Setting E-mail environment settings. %set-email-settings#xxxx%
Retrieving E-mail environment settings. %get-email-settings#xxxx%
Editing already registered E-mail account. %set-account#xxxx%
Retrieving E-mail account. %get-account#xxxx%
Retrieving fax transmission journal. %get-fax-tx-log#xxxx%
Retrieving fax reception journal. %get-fax-rx-log#xxxx%
Retrieving mail transmission journal. %get-mail-tx-log#xxxx%
Retrieving mail reception journal. %get-mail-rx-log#xxxx%
Help. %get-command-help#xxxx%
Page 37

2.16
Programming and Retrieving E-mail environment settings.
The following is the list of parameters and values for available items.
Retrieving E-mail environment settings
When you want to retrieve E-mail environment settings by mail, enter the following title on the Subject line.
%get-email-settings#XXXX% (xxxx is a password.)
To edit the retrieved parameter, store the E-mail file as text (.txt) on your PC.
Example:
Sending E-mail
Note: When the mail is sent properly, you will receive mail that describes the E-mail environment settings with
the following format: %Parameter = Value
1
2
3
4
5
6
7
8
9
10
11
Parameter
receive-interval-time
accept-request-to-relay
relay-to-fax-accept-domain
relay-to-fax-and-print=
file-format
insert-text
insert-text-language
receipt-notification
ignore-mdn-request
request-mdn-accept-domain
reply-mdn-copy-message
Value
(Enter time in seconds)
yes/no
(Enter the mail address or domain
name to accept fax forwarding)
yes/no
tiff-s/tiff/pdf
yes/no
eng/jpn
none/dsn/mdn/both
yes/no
(Enter the mail address or domain
name to accept MDN request)
yes/no
Items
Mail auto-retrieving
When mail that requests forwarding
to fax machine is received
Domain/mail address that accepts
fax forwarding request
Simultaneous print out upon fax
forwarding
Sent document format conversion
TEXT ON/OFF
Insert text language
Request receipt verification when
sending mail
When mail requesting MDN is
received
Domain/mail address that accepts
MDN request
Whether to accept MDN request
when your mail is sent to you as Cc
or Bcc.
Page 38

2.17
Retrieving E-mail
Programming E-mail environment settings
To c hange or update the retrieved parameter, open the text file (.txt). Copy the body text and paste it on the body
of the newly created E-mail message. Delete any headers that may be present in the body of the E-mail.
When you want to program E-mail environment settings by mail, enter the following title on the Subject line.
%set-email-settings#xxxx% (xxxx is the password for remote access.)
Each parameter should be entered as follows: %P arameter = Value
Note: One parameter should be entered per line from the start of the line.
According to the e-mail software or mail server, the long parameter may be divided into two or more lines
automatically. In this case, after entering about 70 characters, press Enter key to start a new line and put
one space at the beginning of the next line.
Page 39

2.18
Programming and Retrieving One-touch/Speed-dialing setting
Retrieving One-touch/Speed-dialing settings
When you want to retrieve One-touch/Speed-dialing settings by mail,enter the following title on the Subject line.
%get-onetouch#xxxx% (xxxx is the password for remote access.)
%get-speed-dial#xxxx% (xxxx is the password for remote access.)
To edit the retrieved parameter, store the E-mail file as text (.txt) on your PC.
Note: When the mail is sent properly, you will receive mail that describes all One-touch/Speed-dialing settings.
Programming One-touch/Speed-dialing settings
To c hange or update the retrieved parameter, open the text file (.txt). Copy the body text and paste it on the body
of the newly created E-mail message. Delete any headers that may be present in the body of the E-mail.
When you want to program One-touch/Speed-dialing settings by mail,enter the following title on the Subject
line.
%set-onetouch#xxxx% (xxxx is the password for remote access.)
%set-speed-dial#xxxx% (xxxx is the password for remote access.)
Follow the following rules to program the settings:
1. All records should be enclosed with @start-record and @end-record.
2. You can not begin a new line in between @start-record and @end-record.
3. Do not enter other records on the lines containing @start-record and @end-record.
Each record should be entered as follows:
No.;Name;FaxNumber;MailAddress;FaxGroup;MailGroup;FileF ormat;
4. Each parameter in a record should be separated with a semicolon (;).
5. You can not enter more than one record per line.
6. Each record should start at the beginning of a new line.
Note: According to the e-mail software or mail server, the long parameter may be divided into two or more lines
automatically. In this case, after entering about 70 characters, press Enter key to start a new line and put
one space at the beginning of the next line.
1
2
3
4
5
6
Value
One-touch numbers or Speed-dialing numbers
Mail address (maximum of 50 characters)
Fax number (maximum of 40 characters)
Group numbers for fax No.1~32 used
For multiple entries, separate with commas.
Only effective when fax number is designated.
Group numbers for mail No.33~65 used
For multiple entries, separate with commas.
Only effective when mail address is designated
File format upon mail transmission
tiff-s/tiff/pdf
Only effective when mail address is designated
Parameter
No.
MailAddress
FaxNumber
FaxGroup
MailGroup
FileFormat
Page 40

2.19
Example
Programming and Retrieving Fax Gateway settings
Retrieving Fax Gateway settings
When you want to retrieve Fax Gateway settings by mail, enter the following title on the Subject line.
%get-fax-gateway#xxxx% (xxxx is a password for remote access)
To edit the retrieved parameter, store the E-mail file as text (.txt) on your PC.
Note: When the mail is sent properly, you will receive mail that contains a list of all Gateway registrations.
Programming Fax Gateway settings
To c hange or update the retrieved parameter, open the text file (.txt). Copy the body text and paste it on the body
of the newly created E-mail message. Delete any headers that may be present in the body of the E-mail.
When you want to program the Fax Gateway by mail, enter the following title on the Subject line.
%set-fax-gateway#xxxx% (xxxx is a password for remote access.)
Follow the following rules to program the settings.
1. All records should be enclosed with @start-record and @end-record.
2. You cannot begin a new line in between @start-record and @end-record.
3. Do not enter other records on the lines containing @start-record and @end-record.
Each record should be entered as follows:
No.;MailAddress;FaxNumber;
1
2
3
Value
Gateway number
Gateway mail address
Delivery fax number
For multiple entry, separate them with comma
Parameter
No.
mailaddress
FaxNumber
Page 41

2.20
Note: Separate each parameter with semicolon (;).
4. You can not enter more than one record per line.
5. Each record should start at the beginning of a new line.
Note: According to the e-mail software or mail server, the long parameter may be divided into two or more lines
automatically. In this case, after entering about 70 characters, press Enter key to start a new line and put
one space at the beginning of the next line.
Example
Page 42

2.21
Programming and Retrieving Account settings
The following is the list of parameters and values for available items.
Retrieving Account settings
When you want to retrieve account setting by mail, enter the following title on the Subject line.
%get-account#xxxx% (xxxx is a password for remote access.)
Follow the following rules to program the setting.
Enter the account name (account ID) and account password at the beginning of the line as follows:
%id= XXXX (
XXXX
: account name.)
%password= YYYY (
YYYY
: account password)
Note: The account ID (account name) and password should be entered with matching the case of letters.
Note: One parameter should be entered per line from the start of the line.
Note: According to the e-mail software or mail server, the long parameter may be divided into two or more lines
automatically. In this case, after entering about 70 characters, press Enter key to start a new line and put
one space at the beginning of the next line.
To edit the retrieved parameter, store the E-mail file as text (.txt) on your PC.
Items
Name
Mail address
Reply To address
Subject
When mail that cannot be analyzed is
received
Automatic reception ON/OFF
Mail check only
Automatic deletion
Copy send message by Bcc
Destination mail address of above
copy message
Copy send message by separate mail
Destination mail address of above
copy message
Copies receive message
Destination mail address of above
copy message
Unconditional FAX forwarding of
received mai
Fax number of unconditional
Fax forwarding of received mail
Parameter
Name
mailaddress
reply-to
subject
handling-junkmail
anto-receive
mail-check-only
auto-delete
copy-message
message-copy-address
archive-tx-message
tx-message-archive-address
archive-rx-message
rx-message-archive-address
forced-fax-relay
forced-relay-faxnumber
Value
(Enter name)
(Enter e-mail address)
(Enter the Reply to e-mail address)
(Enter the subject)
Report / Return / Forward-to (e-mail
addresses)
yes/no
yes/no
yes/no
yes/no
(Enter e-mail address)
yes/no
(Enter e-mail address)
yes/no
(Enter e-mail address)
yes/no
(Enter fax number)
Page 43

2.22
Programming Account settings
To c hange or update the retrieved parameter, open the text file (.txt). Copy the body text and paste it on the body
of the newly created E-mail message. Delete any headers that may be present in the body of the E-mail.
When you want to program an account by mail, enter the following title on the Subject line.
%set-acccount#XXXX% (xxxx is a password for remote access)
Follow the following rules to progr
am the setting.
Enter the account name (account ID) and account password at the beginning of the line as follows:
%id= XXXX (
XXXX
: account name.)
%password= YYYY (
YYYY
: account password)
Note: The account ID (account name) and password should be entered with matching the case of letters.
Note: One parameter should be entered per line from the start of the line.
Note: According to the e-mail software or mail server, the long parameter may be divided into two or more lines
automatically. In this case, after entering about 70 characters, press Enter key to start a new line and put
one space at the beginning of the next line.
As for the following functions,only retrieving functions are available.
Retrieving Fax transmission history
When you want to retrieve the Fax transmission history by mail, enter the following title on the Subject line.
%get-fax-tx-log#XXXX% (xxxx is a password for remote access.)
Note: F ax transmission history will be in the body of the mail that comes in response.
Each record will be separated by semicolons (;).
Retrieving Fax reception history
When you want to retrieve the Fax reception history by mail, enter the following title on the Subject line.
%get-fax-rx-log#XXXX% (xxxx is a password for remote access.)
Note: F ax reception history will be in the body of the mail that comes in response.
Each record will be separated by semicolons (;).
Retrieving Mail transmission history
When you want to retrieve the Mail transmission history by mail, enter the following title on the Subject line.
%get-mail-tx-log#XXXX% (xxxx is a password for remote access.)
Note: Mail transmission history will be in the body of the mail that comes in response.
Each record will be separated by semicolons (;).
Retrieving Mail reception history
When you want to retrieve the Mail reception history by mail, enter the following title on the Subject line.
%get-mail-rx-log#XXXX% (xxxx is a password for remote access.)
Note: Mail reception history will be in the body of the mail that comes in response.
Each record will be separated by semicolons (;).
Page 44

Programming Your
Machine
Programming an E-mail address into the one-touch keys . . . . . . . . . . . . . . . . . . . . 3.2
Programming an E-mail address into the speed-dial numbers . . . . . . . . . . . . . . . . 3.8
Programming an E-mail address into the group dial numbers . . . . . . . . . . . . . . . 3.14
Registration of a Mail Broadcast list . . . . . . . . . . . . . . . . . . . . . . . . . . . . . . . . . . . 3.19
Page 45

3.2
Programming an E-mail address into
the one-touch keys
What is one-touch dial?
Once a recipient’s data is registered in One-touch dialing,it can be displayed with a single touch of a button.
When communications are frequent with a recipient, this setting can save cumbersome entry jobs.
Your machine can store up to 56 One-touch numbers using the keys marked 01-56.
Both a mail address and a fax number can stored into a one-touch key.
Entering a one-touch number for 5000
Note: If your machine is 3500, see page 3.4.
1
Press MENU, 1, 1, 0, 1, ENTER. The LCD shows the empty one-touch number.
Note: If a one-touch number other than 01 appears on the LCD,it means that you have already entered a
number for 01.
2
Press one-touch key in which you want to store fax number and/or e-mail address,and then press ENTER.
3
Enter the fax number. Then press ENTER. A fax number can be up to 40 characters in length.
Note: Even when no fax number is entered, the LCD switches to the mail address registration screen.
4
Use the numeric keypad to enter a e-mail address. A mail address can be up to 50 characters in length.
Note: For details on c haracter and number entry,refer to the “5000 Operating Instructions”.
01:123-4567
Enter Mail Address
abcd@imagistics.com_
01:
Enter Mail Address
_
01:
Enter Fax Number
_
01.Enter One-Touch
Select One-Touch (01-56)
01:No Number Stored
Page 46

3.3
5
When the mail address is as you want it, press ENTER to store it. The LCD now shows:
6
Select “Location” and press ENTER. The LCD shows:
Note: If a Location ID is already registered in this one-touch key, it is shown on the LCD.If you wish to
change the location ID,press CANCEL to erase it and then enter another location ID.
7
Enter the Location ID. A number’s Location ID may be up to 24 characters in length.
(Regarding how to enter the character, refer to the “5000 Operating Instructions”.)
8
Press ENTER to save the setting.
9
Select “Format”and press ENTER.The LCD shows:
10
Select the file format using the cursor key and then press ENTER.
The document is converted to the file format that is set here when send e-mail and when the received fax
document is forwarded by the e-mail.
11
Select “Exit” and press ENTER.
The LCD will display the next empty one-touch number.
If you do want to enter another one-touch number, go back to step 2.
If you do not want to enter any more one-touch numbers,press STOP to finish.
Erasing a one-touch number for 5000
1
Press MENU, 1, 1, 0, 2, ENTER. The LCD shows the one-touch number you have already entered.
2
Select the one-touch key you want to erase.
Note: You can select the one-touch key by pressing that key on the control panel or using the cursor key.
3
Press ENTER.Then the LCD shows “OK to Erase?”.
4
Press [Yes] to erase the number.
Note: If you want to quit without erasing the one-touch number you’ve selected,press [No]. The LCD
will return to step 2.
5
To erase another one-touc h number, repeat steps 2–4. Otherwise, press STOP to return to standby mode.
Printing a list of one-touch numbers for 5000
To print out a list of one-touc h numbers, press MENU, 5, 1, 0, 5, ENTER.
01:123-4567,abcd@imagistics.
Mail File Format
TIFF-S PDF
TIFF
01:123-4567,abcd@imagistics.
Location Upper Case
_
01:123-4567,abcd@imagistics.
Exit
Location:Not Stored
Format :TIFF-S
Page 47

3.4
Entering a one-touch number for 3500
Note: If your machine is 5000, see page 3.2.
1
Press MENU, 1, 1, 1, ENTER. The LCD shows the empty one-touch number:
Note: If a one-touch number other than 01 appears on the LCD,it means that you have already entered a
number for 01.
2
Press or to select the one-touch key in which you want to store a number or change a previously
stored number.
Note: You can select the one-touch key by pressing that key on the control panel.
3
Press ENTER.The LCD shows:
4
Enter the fax number exactly and then press ENTER. The number can be up to 40 characters in length.
Note: Even when no fax number is entered, the LCD switches to the mail address registration screen.
5
Use the numeric keypad to enter a e-mail address. A mail address can be up to 50 characters in length.
Note: For details on c haracter and number entry,refer to the “3500 Operating Instructions”.
6
When the mail address is as you want it, press ENTER to store it. The LCD will show:
Note: If a Location ID is already registered in this one-touch key, it is shown on the LCD.If you wish to
change the location ID,press CANCEL to erase it and then enter another location ID.
7
Enter the Location ID. A number’s Location ID may be up to 24 characters in length.
(Regarding how to enter the character, refer to the “3500 Operating Instructions”.)
8
Press ENTER.The LCD shows:
9
Select the file format using the cursor key.
The document is converted to the file format that is set here when send e-mail and when the received fax
document is forwarded by the e-mail.
10
Press ENTER to save the setting.
The LCD will display the next empty one-touch number.
If you do want to enter another one-touch number, go back to step 2.
If you do not want to enter any more one-touch numbers,press STOP to finish.
02:Format :TIFF-S
/
/Enter
02:Name ;Upper
_
02:Address ;Lower
abcd@imagistics.com_
02:Address ;Lower
_
02:Fax Number
_
Select One-Touch
01:No Number Stored
Page 48

3.5
Erasing a one-touch number for 3500
1
Press MENU, 1, 1, 2, ENTER.The LCD shows the one-touch number you have already entered:
Note: If the one-touch number that appears is other than 01, it means that 01 is empty.
2
Press or to select the one-touch key you want to erase.
Note: You can select the one-touch key by pressing that key on the control panel.
3
Press ENTER.The following two displays will appear alternately:
Note: If you want to quit without erasing the one-touch number you’ve selected,press cancel.
The LCD will return to step 2.
4
Press ENTER to erase the number.
To erase another one-touc h number, repeat steps 2–4.
Otherwise, press STOP to return to standby mode.
Printing a list of one-touch numbers for 3500
To print a list of one-touc h numbers, press MENU, 5, 1, 0, 5, ENTER.
02:Erase One-Touch
No -> Cancel
02:Erase One-Touch
Yes -> Enter
Select One-Touch
01:123-4567
Page 49

3.6
You can also enter a one-touch number on the Web.
Registration from the browser
1
Start up “Administration tool for Internet Fax Kit”. Click One-touch dialing under [Operation setting].
2
Click a one-touch number on the one-touch dialing table to register.
Address Book – Import/Export
The address book registered into this equipment can be imported or exported as a CSV file.
Page 50

3.7
Click Address Book – Import/Export to perform import/export of one touch dial and speed dial registration data.
3
The one-touch dialing registration screen appears. Fill in the fields.
4
Click [SET] to register.
The next one-touch dialing registration screen appears.
If you want to see other one-touch dialing number, click <<Prev or Next>>.
If you want to see list of one-touch dialing,click List.
Erasing a one-touch number on the Web
1
Click [Erase] on the right of the one-touch dialing table.
2
The one-touch dial erase check screen appears. If you want to erase it, click the [ERASE] button.
Page 51

3.8
Programming an E-mail address into
the speed-dial numbers
What is speed-dial registration?
Once a recipient’s data is registered in speed-dialing,it can be displayed by entering a 3-digit number. When
communications are frequent with a recipient, this setting can save cumbersome entry jobs.
5000 can store up to 244 speed-dial numbers and 3500 can store up to 144 speed-dial numbers. One speed-dial
number can register both a mail address and a fax number.
Entering a speed-dial number for 5000
Note: If your machine is 3500, see page 3.10.
1
Press MENU, 1, 2, 0, 1, ENTER. The LCD shows the empty speed-dial number.
Note: If a speed-dial number other than 001 appears on the LCD,it means that you have already entered
a number for 001.
2
Using the cursor key, select the speed-dial number in which you want to store a number and/or e-mail
address,and then press ENTER.
Note: You can select the speed-dial number by directly entering that three-digit identifier code. When
entering the identifier code for speed-dial numbers less than 100, you must enter leading zeroes to
make three digits.For example,001-099.
3
Enter the fax number. Then press ENTER. A fax number can be up to 40 characters in length.
Note: Even when no fax number is entered, the LCD switches to the mail address registration screen.
4
Use the numeric keypad to enter a e-mail address. A mail address can be up to 50 characters in length.
Note: For details on c haracter and number entry,refer to the “5000 Operating Instructions”.
001:123-4567
Enter Mail Address
abcd@imagistics.com_
001:123-4567
Enter Mail Address
_
001:
Enter Fax Number
_
01.Enter Speed-Dial
Select Speed-Dial(001-244):_
001:No Number Stored
Page 52

3.9
5
When the mail address is as you want it, press ENTER to store it. The LCD now shows:
6
Select “Location” and press ENTER. The LCD shows:
Note: If a Location ID is already registered in this one-touch key, it is shown on the LCD.If you wish to
change the location ID,press CANCEL to erase it and then enter another location ID.
7
Enter the Location ID. A number’s Location ID may be up to 24 characters in length.
(Regarding how to enter the character, refer to the “5000 Operating Instructions”.)
8
Press ENTER to save the setting.
9
Select “Format”and press ENTER.The LCD shows:
10
Select the file format using the cursor key and then press ENTER.
The document is converted to the file format that is set here when send e-mail and when the received fax
document is forwarded by the e-mail.
11
Select “Exit” and press ENTER.
The LCD will display the next empty speed-dial number.
If you do want to enter another speed-dial number, go back to step 2.
If you do not want to enter any more speed-dial numbers,press STOP to finish.
Erasing a speed-dial number for 5000
1
Press MENU, 1, 2, 0, 2, ENTER. The LCD shows the speed-dial number you have already entered.
2
Select the speed-dial number which you want to erase.
Note: You can select the speed-dial number using the cursor key or directly entering that three-digit
identifier code.When entering the identifier code for speed-dial numbers less than 100, you must
enter leading zeroes to make three digits.For example,001-099.
3
Press ENTER.Then the LCD shows “OK to Erase?”.
4
Press [Yes] to erase the number.
Note: If you want to quit without erasing the speed-dial number you’ve selected, press [No]. The LCD
will return to step 2.
5
To erase another speed-dial number, repeat steps 2–4. Otherwise, press STOP to return to standby mode.
Printing a list of speed-dial numbers for 5000
To print out a list of speed-dial numbers, press MENU, 5, 1, 0, 6, ENTER.
001:123-4567,abcd@imagistics.c
Mail File Format
TIFF-S PDF
TIFF
001:123-4567,abcd@imagistics.c
Location Upper Case
_
001:123-4567,abcd@imagistics.c
Exit
Location:Not Stored
Format :TIFF-S
Page 53

3.10
Entering a speed-dial number for 3500
Note: If your machine is 5000, see page 3.8.
1
Press MENU, 1, 2, 1, ENTER.The LCD shows:
Note: If a speed-dial number other than 001 appears on the LCD,it means you have already entered a
number for 001.
2
Press or to select the speed-dial number in which you want to store a number or change a previously
stored number.
Note: You can select the speed-dial number by directly entering that three-digit identifier code. When
entering the identifier code for speed-dial numbers less than 100, you must enter leading zeroes to
make three digits.For example,001-099.
3
Press ENTER.The LCD shows:
4
Enter the fax number exactly and then press ENTER. The number can be up to 40 characters in length.
Note: Even when no fax number is entered, the LCD switches to the mail address registration screen.
5
Use the numeric keypad to enter a e-mail address. A mail address can be up to 50 characters in length.
Note: For details on c haracter and number entry,refer to the “3500 Operating Instructions”.
6
When the number is as you want it, press ENTER to store it. The LCD now shows:
Note: If a Location ID is already registered in this speed-dial number, it is shown on the LCD. If you wish
to change the location ID,press CANCEL to erase it and then enter another location ID.
7
Enter the Location ID. A number’s Location ID may be up to 24 characters in length.
(Regarding how to enter the character, refer to the “3500 Operating Instructions”.)
8
Press ENTER.The LCD shows:
9
Select the file format using the cursor key.
The document is converted to the file format that is set here when send e-mail and when the received fax
document is forwarded by the e-mail.
10
Press ENTER to save the setting.
The LCD will display the next empty speed-dial number.
If you do want to enter another speed-dial number, go back to step 2.
If you do not want to enter any more speed-dial numbers,press STOP to finish.
005:Format :TIFF-S
/
/Enter
005:Name ;Upper
_
005:Address ;Lower
abcd@imagistics.com_
005:Address ;Lower
_
005:Fax Number
_
Enter Speed Dial No.
001:No Number Stored
Page 54

3.11
Erasing a speed-dial number
1
Press MENU, 1, 2, 2, ENTER.The LCD shows:
2
Press or to select the speed-dial in which you want to erase.
Note: You can select the speed-dial number by directly entering that three-digit identifier code. When
entering the identifier code for speed-dial numbers less than 100, you must enter leading zeroes to
make three digits.For example,001-099.
3
Press ENTER.The following two displays will appear alternately:
Note: If you want to quit without erasing the speed-dial number you’ve selected, press CANCEL. The
LCD will return to step 2.
4
Press ENTER to erase the number.
To erase another speed-dial number, repeat steps 2–4.
Otherwise, press STOP to return to standby mode.
Printing a list of speed-dial numbers
To print a list of speed-dial numbers, press MENU, 5, 1, 0, 6, ENTER.
005:Erase Speed Dial
No -> Cancel
005:Erase Speed Dial
Yes -> Enter
Enter Speed Dial No.
001:9-555-584-6950
Page 55

3.12
2
Click the number in the list to be registered.
Address Book - Import/Export
The address book registered into this equipment can be imported or exported as a CSV file.
Click [Address Book - Import/Export] to perform import/export of One-touch dial and Speed-dial registration data.
Speed-dial registration can also be done from the browser as with One-touch dialing.
Registration from the browser
1
Start up “Administration tool for Internet Fax Kit”. Click Speed dialing under [Operation setting].
Page 56

3.13
3
The Speed-dialing screen appears. Fill in the fields and press the [SET] button to register.
Note: After you press the [SET] button, next Speed-dialing screen appears.
User information entered above can be checked on the control panel of the fax main unit.
Erasing a Speed-dial number on the Web
1
Click [Erase] on the right of the speed-dialing number table.
2
The speed-dial erase check screen appears. If you want to erase it, click the [ERASE] button.
Page 57

3.14
Programming an E-mail address into
the group dial numbers
What is group dial?
Group dialing makes it possible to transmit the mail to multiple recipients in a single operation.
If you frequently send the same mail to more than one location, store the one-touch key(s) or speed-dial
number(s) into a group.
For registering mail group dial numbers, use group numbers 33 through 64. (The numbers 01 through 32 are
used for fax group dial numbers.)
This function is specifically used for E-mail, therefore, only one-touch dial numbers and speed-dial numbers in
which mail addresses are stored can be registered.
Entering a group dial number for 5000
Note: If your machine is 3500, see page 3.16.
1
Press MENU, 1, 4, 0, 1, ENTER. The LCD shows the empty group number.
2
Using the cursor key, select the group number in which you want to store a number.
3
Press ENTER.The LCD shows:
4
Enter all the one-touch number(s) or the speed-dial number(s) you want to store into the group number by
pressing the one-touch key or
SPEED DIAL/GROUP
and the numeric keypad. A comma will be automatically
inserted between each number.
Note: YYYYYYYY: Stored mail address or name will be displayed
Up to 300 numbers can be registered in one group dial number.
5
Press ENTER to reflect the new setting.
6
The LCD will display the next empty group number.
If you do want to enter numbers for another group number, go back to step 2.
If you do not want to enter any more numbers,press STOP to return to standby mode.
01.Enter Mail Group
Select One-Touch / Speed-Dial
YYYYYYYY
33:[01],S001,[23]_
01.Enter Mail Group
Select One-Touch / Speed-Dial
33:_
01.Enter Mail Group
Select Group Number(33-64):_
33:No Number Stored
Page 58

3.15
Erasing a group dial number for 5000
1
Press MENU, 1, 4, 0, 2, ENTER.The LCD shows:
2
Using the cursor key, select the group number you want to erase.
3
Press ENTER. The LCD shows:
Note: If you want to quit without erasing the group number you’ve selected, press [No]. The machine will
return to step 2.
4
Press [Yes] to erase the number.
To erase another group number, repeat steps 2–4.
Otherwise, press STOP to return to standby mode.
Printing a list of group-dial number for 5000
To print out a list of Group-dial numbers, press MENU, 5, 1, 0, 7, ENTER.
02.Erase Mail Group
OK to Erase?
33:[01],S001,[23]
[ Yes ][ No ]
02.Erase Mail Group
Select Group Number(33-64):_
33:[01],S001,[23]
Page 59

3.16
Entering a group dial number for 3500
Note: If your machine is 5000, see page 3.14.
1
Press MENU, 1, 4, 1, ENTER. The LCD shows the empty group number.
2
Press or to select the mail group number in which you want to store a number.
3
Press ENTER.The LCD shows:
4
Enter all the one-touch number(s) or the speed-dial number(s) you want to store into the mail group number by pressing the one-touch key or speed dial/group and the numeric keypad.A comma will be
automatically inserted between each number.
Note: YYYYYYYY: Stored mail address or name will be displayed
Up to 200 numbers can be registered in one group dial number.
5
When all numbers are entered, press enter to store it.
6
The LCD will display the next empty mail group number.
If you do want to enter numbers for another mail group number, go back to step 2.
If you do not want to enter any more mail group numbers,press STOP to return to standby mode.
Erasing a call group
1
Press MENU, 1, 3, 2, ENTER.The LCD shows:
2
Press or to select the group number you w ant to erase.
3
Press ENTER.The following two displays will appear alternately:
Note: If you want to quit without erasing the mail group number you’ve selected, press CANCEL.
The LCD will return to step 2.
4
Press ENTER to erase the number.
To erase another group number, repeat steps 2–4.
Otherwise, press STOP to return to standby mode.
Printing a list of group-dial number for 3500
To print out a list of group-dial numbers, press MENU, 5, 1, 0, 7, ENTER.
01:Erase Group Dial
No -> Cancel
01:Erase Group Dial
Yes -> Enter
Enter Mail Group No.
33:[01],[03],S002
33:YYYYY
[01],[03],S002
33:Enter One-T/Speed
Enter Mail Group No.
33:No Number Stored
Page 60

3.17
Group dial numbers can also be registered, listed and deleted from the browser.
Entering a Mail group dial number
1
Start up “Administration tool for Internet Fax Kit”. Click Mail group dialing under [Operation
setting].
2
Click the mail group number you want to register.
Page 61

3.18
3
Press the [Register/Edit] button to enter the one-touch and/or speed-dial numbers to be registered.
4
To register one-touc h dialing, check the desired one-touch dialing number.
[Speed Dial Numbers] button
To register a speed dialing, press the this button. Check the desired speed-dialing number.
[SET] button
Click this button to register the entry.
Erasing and Listing of Mail group numbers.
Follow the same procedures as with one-touc h dialing.
Note: Registration, listing and deletion for Fax Group Dialing are performed following the same procedure.
Page 62

3.19
Registration of a Mail Broadcast list
What is a Mail Broadcast list?
When a Mail Broadcast List is used, one-time broadcast (maximum 3200 addresses) to multiple addresses (mail
address) is possible.
Mail Broadcast List registration is performed by uploading CSV (Comma Separated Values) files, and up to 3200
mail addresses can be registered in one Mail Broadcast List.
Setting of Mail Broadcast list
1
Start up “Administration tool for Internet Fax Kit”. Click Mail Broadcast list under [Operation
setting].
Page 63

3.20
2
Click the number in the list to be registered.
3
If there are no records in the list, the following screen appears. To create a new list, press the [New List]
button.
4
Click [Browse] button and choose table file (address list .csv), and then press the [UPLOAD] button.
[UPLOAD] button
Click this button to register the entry.
[RESET] button
Click this button to retrieve the current setting.
Page 64

3.21
The registered list will be shown as below .
[Replace List] button
Click this button to erase the entire list and create a new list having the same group No.
[ERASE List] button
Click this button to erase the list.
Page 65

3.22
This page intentionally blank.
Page 66

Basic Operation
Sending a document over the LAN . . . . . . . . . . . . . . . . . . . . . . . . . . . . . . . . . . . . . . 4.2
Receive document via LAN . . . . . . . . . . . . . . . . . . . . . . . . . . . . . . . . . . . . . . . . . . . 4.19
Page 67

4.2
Registering To/Cc/Bcc fields in soft keys.
When sending mail, you can select To/Cc/Bcc fields using the soft keys.
1
Press MENU, 2, 1, 0, 3, ENTER.
2
Press the soft key you want to register, and press ENTER.
3
The fields that can be registered are displayed on the LCD,so select “To/Cc/Bcc” with the cursor.
4
Press ENTER.
5
Press STOP to return to the standby screen.
6
To send,use the soft key, and select from To/Cc/Bcc.
Directly set a mail address and send.
For 5000
1
Place the document(s) face up, top edge first. Adjust the document guides — by sliding either of them to
the left or right — to fit the page(s) you’ll be sending.
2
Press Internet Fax to choose Internet FAX communication.
3
Select “To”, “cc” or “bcc” by pressing the soft key which assigned “To/Cc/Bcc” (see above).
4
Enter the full e-mail address by using the numeric keypad.
5
Press START. The machine starts to scan the document into memory. Then starts sending the e-mail
message.
If two or more accounts are registered, the LCD asks you to enter the account name to use for sending.
Enter Mail Account Name
Lower Case
_
[Default ][ List ]
Press START
To:abcde@domain_
A4 Fine Normal
[ Mode ][Contrast]
Enter Mail Address
To :_
A4 Fine Normal
[ Mode ][Contrast]
Sending a document over the LAN
Page 68

4.3
To use the default account,press [Default] or ENTER without entering any characters.
To use a different account,press [List], and use the cursor key to select the account name from the list,
then press ENTER.
If the account is configured with a password, enter the password, then press ENTER.
Note: The account password should be entered with matching the case of letters.
For 3500
1
Place the document(s) face up, top edge first. Adjust the document guides — by sliding either of them to
the left or right — to fit the page(s) you’ll be sending.
2
Press Internet Fax to choose Internet FAX communication.
3
Select “To”, “cc” or “bcc” by pressing the soft key which assigned “To/Cc/Bcc” (see above).
4
Enter the full e-mail address by using the numeric keypad.
5
Press START. The machine starts to scan the document into memory. Then starts sending the e-mail
message.
If two or more accounts are registered, the LCD asks you to enter the account name to use for sending.
To use the default account,press ENTER without entering any characters.
To use a different account,press to display the account name list, then use or to select the account
name, then press ENTER twice.
If the account is configured with a password, enter the password, then press ENTER.
Note: The account password should be entered with matching the case of letters.
Password ;Upper
_
AccountName;Upper
_
MailAddress;Lower
abcd@domain_
MailAddress;Lower
_
Enter Mail Account Password
Lower Case
_
Page 69

4.4
Sending using the one-touch key.
For 5000
1
Place the document(s) face up, top edge first. Adjust the document guides — by sliding either of them to
the left or right — to fit the page(s) you’ll be sending.
2
Press Internet Fax to choose Internet FAX communication.
3
Press one-touch key with which the mail address is registered.
The machine starts to scan the document into memory. Then starts sending the e-mail message.
If two or more accounts are registered, the LCD asks you to enter the account name to use for sending.
To use the default account,press [Default] or ENTER without entering any characters.
To use a different account,press [List], and use the cursor key to select the account name from the list,
then press ENTER.
If the account is configured with a password, enter the password, then press ENTER.
Note: The account password should be entered with matching the case of letters.
Enter Mail Account Password
Lower Case
_
Enter Mail Account Name
Lower Case
_
[Default ][ List ]
Enter Mail Address
To :_
A4 Fine Normal
[ Mode ][Contrast]
Page 70

4.5
For 3500
1
Place the document(s) face up, top edge first. Adjust the document guides — by sliding either of them to
the left or right — to fit the page(s) you’ll be sending.
2
Press Internet Fax to choose Internet FAX communication.
3
Press one-touch key with which the mail address is registered.
The machine starts to scan the document into memory. Then starts sending the e-mail message.
If two or more accounts are registered, the LCD asks you to enter the account name to use for sending.
To use the default account,press ENTER without entering any characters.
To use a different account,press to display the account name list, then use or to select the account
name, then press ENTER twice.
If the account is configured with a password, enter the password, then press ENTER.
Note: The account password should be entered with matching the case of letters.
Password ;Upper
_
AccountName;Upper
_
MailAddress;Lower
_
Page 71

4.6
Sending using a speed-dial number.
For 5000
1
Place the document(s) face up, top edge first. Adjust the document guides — by sliding either of them to
the left or right — to fit the page(s) you’ll be sending.
2
Press Internet Fax to choose Internet FAX communication.
3
Select “To”, “cc” or “bcc” by pressing the soft key which assigned “To/Cc/Bcc” (see page 4.2).
4
Press SPEED DIAL/GROUP and then enter 3-digits number (001 to 244) for speed-dial number you
want to use.The LCD shows the Location ID (or e-mail address) you stored:
5
Press START. The machine starts to scan the document into memory. Then starts sending the e-mail
message.
If two or more accounts are registered, the LCD asks you to enter the account name to use for sending.
To use the default account,press [Default] or ENTER without entering any characters.
To use a different account,press [List], and use the cursor key to select the account name from the list,
then press ENTER.
If the account is configured with a password, enter the password, then press ENTER.
Note: The account password should be entered with matching the case of letters.
Enter Mail Account Password
Lower Case
_
Enter Mail Account Name
Lower Case
_
[Default ][ List ]
Enter Mail Address
To :_
A4 Fine Normal
[ Mode ][Contrast]
Enter Mail Address
To :_
A4 Fine Normal
[ Mode ][Contrast]
Page 72

4.7
For 3500
1
Place the document(s) face up, top edge first. Adjust the document guides — by sliding either of them to
the left or right — to fit the page(s) you’ll be sending.
2
Press Internet Fax to choose Internet FAX communication.
3
Select “To”, “cc” or “bcc” by pressing the soft key which assigned “To/Cc/Bcc” (see page 4.2).
4
Press SPEED DIAL/GROUP and then enter 3-digits number (001 to 144) for speed-dial number you
want to use.The LCD shows the Location ID (or e-mail address) you stored:
5
Press START. The machine starts to scan the document into memory. Then starts sending the e-mail
message.
If two or more accounts are registered, the LCD asks you to enter the account name to use for sending.
To use the default account,press ENTER without entering any characters.
To use a different account,press to display the account name list, then use or to select the account
name, then press ENTER twice.
If the account is configured with a password, enter the password, then press ENTER.
Note: The account password should be entered with matching the case of letters.
Password ;Upper
_
AccountName;Upper
_
abcde@domain
To :S001_
MailAddress;Lower
_
Page 73

4.8
Sending using the EasyDial directory
Note: For detail of the Telephone index feature, refer to your fax machine’s operating instructions.
EasyDial directory dialing makes your autodialer (one-touch dialing and speed-dial dialing) even more like an
electronic phone book. EasyDial sorts and displays numbers alphabetically according to their Location IDs, so
you can find them and dial them easily.
To send using EasyDial:
For 5000
1
Place the document(s) face up, top edge first. Adjust the document guides — by sliding either of them to
the left or right — to fit the page(s) you’ll be sending.
2
Press Internet Fax to choose Internet FAX communication.
3
Select “To”, “cc” or “bcc” by pressing the soft key which assigned “To/Cc/Bcc” (see page 4.2).
4
Press TEL INDEX ( ). The LCD shows the first listing in your fax machine’s EasyDial directory:
The EasyDial directory sorts entries alphabetically in the following order:
(1) by alphabet, (2) by number and (3) by symbol.
5
Scroll through the listings to find the one you want.You do this by pressing the following cursor key:
• or to select the character set — alphabet, number or symbol — for the first character of the
Location ID.
• or to check different listings within that character set.
Note: The scrolling is “open-ended.” For example,when you run out of listings beginning with alphabet
“A”,pressing or automatically moves you into listings beginning with other characters.
Note: To quic kly searc h,press capital letter of Location ID using the numeric keypad.
6
When the LCD displays the name you want to dial,press ENTER.
7
Press START. The machine starts to scan the document into memory. Then starts sending the e-mail
message.
If two or more accounts are registered, the LCD asks you to enter the account name to use for sending.
Enter Mail Account Name
Lower Case
_
[Default ][ List ]
Press START
To: 01:ABC Shoji
Fine Normal
[ Mode ][Contrast]
Enter Mail Address
To :_
A4 Fine Normal
[ Mode ][Contrast]
Enter Mail Address
To :_
A4 Fine Normal
[ Mode ][Contrast]
Page 74

4.9
To use the default account,press [Default] or ENTER without entering any characters.
To use a different account,press [List], and use the cursor key to select the account name from the list,
then press ENTER.
If the account is configured with a password, enter the password, then press ENTER.
Note: The account password should be entered with matching the case of letters.
For 3500
1
Place the document(s) face up, top edge first. Adjust the document guides — by sliding either of them to
the left or right — to fit the page(s) you’ll be sending.
2
Press Internet Fax to choose Internet FAX communication.
3
Select “To”, “cc” or “bcc” by pressing the soft key which assigned “To/Cc/Bcc” (see page 4.2).
4
Press TEL INDEX ( ). The LCD shows the first listing in your fax machine’s EasyDial directory:
The EasyDial directory sorts entries alphabetically in the following order:
(1) by alphabet, (2) by number and (3) by symbol.
5
Scroll through the listings to find the one you want.You do this by pressing the following cursor key:
• or to select the character set — alphabet, number or symbol — for the first character of the
Location ID.
• or to check different listings within that character set.
Note: The scrolling is “open-ended.” For example,when you run out of listings beginning with alphabet
“A”,pressing or automatically moves you into listings beginning with other characters.
Note: To quic kly searc h,press capital letter of Location ID using the numeric keypad.
6
When the LCD displays the name you want to dial,press ENTER.
7
Press START. The machine starts to scan the document into memory. Then starts sending the e-mail
message.
If two or more accounts are registered, the LCD asks you to enter the account name to use for sending.
To use the default account,press ENTER without entering any characters.
To use a different account,press to display the account name list, then use or to select the account
name, then press ENTER twice.
AccountName;Upper
_
ABC Shoji
To :[01]_
MailAddressIndex [A]
ABC Shoji :[01]
MailAddress;Lower
_
Enter Mail Account Password
Lower Case
_
Page 75

4.10
If the account is configured with a password, enter the password, then press ENTER.
Note: The account password should be entered with matching the case of letters.
Broadcasting
Using the
BROADCAST
key
The fastest way to fax one document to many recipients is to broadcast it.
For 5000
1
Place the document(s) face up, top edge first. Adjust the document guides — by sliding either of them to
the left or right — to fit the page(s) you’ll be sending.
2
Press Internet Fax to choose Internet FAX communication.
3
Select “To”, “cc” or “bcc” by pressing the soft key which assigned “To/Cc/Bcc” (see page 4.2).
4
Press
BROADCAST
.
5
Enter the first e-mail address.Use either a one-touch number, a speed-dial number, a mail group number
or numeric keypad.
(Press SPEED DIAL/GROUP to switch between speed-dial numbers and mail group numbers.)
Note: If you enter characters by mistake,press CANCEL to erase them.
6
To add more e-mail addresses, press
BROADCAST
.Then enter the e-mail address as described in step 5.
You can send to up to 330 numbers for a broadcast.
Note: If you want to review the e-mail addresses you entered, press [Review].
If you want to erase any e-mail address,move the cursor on it and press [Erase].
When you are finished, press [Return] to return to the previous display.
To :abcd@domain.com
To :S001:Paris
[ Return ] [ Erase ]
To : 01:London
Press START
To: 01:onetouch@domain
Fine Normal
[ Review ][ Mode ][Contrast]
Press START
To: 01:onetouch@domain
A4 Fine Normal
[ Mode ][Contrast]
Enter Mail Address
To :_
A4 Fine Normal
[ Mode ][Contrast]
Password ;Upper
_
Page 76

4.11
7
After entering,press START. The machine starts to scan the document into memory. Then starts sending
the e-mail message to each address.
If two or more accounts are registered, the LCD asks you to enter the account name to use for sending.
To use the default account,press [Default] or ENTER without entering any characters.
To use a different account,press [List], and use the cursor key to select the account name from the list,
then press ENTER.
If the account is configured with a password, enter the password, then press ENTER.
Note: The account password should be entered with matching the case of letters.
For 3500
1
Place the document(s) face up, top edge first. Adjust the document guides — by sliding either of them to
the left or right — to fit the page(s) you’ll be sending.
2
Press Internet Fax to choose Internet FAX communication.
3
Press
BROADCAST
.
4
Select “To”, “cc” or “bcc” by pressing the soft key which assigned “To/Cc/Bcc” (see page 4.2).
5
Enter the first e-mail address.Use either a one-touch number, a speed-dial number, a mail group number
or numeric keypad.
6
To add more e-mail addresses, repeat steps 3 to 5.
You can send up to 230 numbers for a broadcast.
Note: If you enter characters by mistake,press
CANCEL
to erase them.
7
Press START. The machine starts to scan the document into memory. Then starts sending the e-mail
message.
If two or more accounts are registered, the LCD asks you to enter the account name to use for sending.
To use the default account,press ENTER without entering any characters.
To use a different account,press to display the account name list, then use or to select the account
name, then press ENTER twice.
AccountName;Upper
_
ABC Shoji
To :S001,Cc :[01]_
MailAddress;Lower
_
Enter Mail Account Password
Lower Case
_
Enter Mail Account Name
Lower Case
_
[Default ][ List ]
Page 77

4.12
If the account is configured with a password, enter the password, then press ENTER.
Note: The account password should be entered with matching the case of letters.
Using mail group number
The mail group number uses group numbers 33-64.
To use this feature, you must first preprogram the mail group number. (Refer to page 3.14 to 3.18.)
For 5000
1
Place the document(s) face up, top edge first. Adjust the document guides — by sliding either of them to
the left or right — to fit the page(s) you’ll be sending.
2
Press Internet Fax to choose Internet FAX communication.
3
Select “To”, “cc” or “bcc” by pressing the soft key which assigned “To/Cc/Bcc” (see page 4.2).
4
Press SPEED DIAL/GROUP twice.
5
Enter a mail group number (33-64).
Note: If you want to send a e-mail to several groups at a time,press broadcast then repeat steps 3–5.
6
After entering,press START. The machine starts to scan the document into memory. Then starts sending
the e-mail message to each address.
If two or more accounts are registered, the LCD asks you to enter the account name to use for sending.
To use the default account,press [Default] or ENTER without entering any characters.
To use a different account,press [List], and use the cursor key to select the account name from the list,
then press ENTER.
Enter Mail Account Name
Lower Case
_
[Default ][ List ]
Press START
To :G33
A4 Fine Normal
[ Mode ][Contrast]
Enter Group Number
To :G_
A4 Fine Normal
[ Mode ][Contrast]
Enter Mail Address
To :_
A4 Fine Normal
[ Mode ][Contrast]
Password ;Upper
_
Page 78

4.13
If the account is configured with a password, enter the password, then press ENTER.
Note: The account password should be entered with matching the case of letters.
For 3500
1
Place the document(s) face up, top edge first. Adjust the document guides — by sliding either of them to
the left or right — to fit the page(s) you’ll be sending.
2
Press Internet Fax to choose Internet FAX communication.
3
Select “To”, “cc” or “bcc” by pressing the soft key which assigned “To/Cc/Bcc” (see page 4.2).
4
Press SPEED DIAL/GROUP twice.
5
Enter a mail group number (33-64).
Note: If you want to send a e-mail to several groups at a time,press
BROADCAST
then repeat steps 3–5.
6
Press START. The machine starts to scan the document into memory. Then starts sending the e-mail
message.
If two or more accounts are registered, the LCD asks you to enter the account name to use for sending.
To use the default account,press ENTER without entering any characters.
To use a different account,press to display the account name list, then use or to select the account
name, then press ENTER twice.
If the account is configured with a password, enter the password, then press ENTER.
Note: The account password should be entered with matching the case of letters.
Password ;Upper
_
AccountName;Upper
_
Press Start
To :G33_
Enter Group No.
To :G_
MailAddress;Lower
_
Enter Mail Account Password
Lower Case
_
Page 79

4.14
Using mail broadcast list.
The mail broadcast list uses group numbers 65-96.
To use this feature, you must first preprogram the mail broadcast list. (Refer to page 3.19.)
For 5000
1
Place the document(s) face up, top edge first. Adjust the document guides — by sliding either of them to
the left or right — to fit the page(s) you’ll be sending.
2
Press Internet Fax to choose Internet FAX communication.
3
Select “To”, “cc” or “bcc” by pressing the soft key which assigned “To/Cc/Bcc” (see page 4.2).
4
Press SPEED DIAL/GROUP twice.
5
Enter a mail group number (65-96).
Note: If you want to send a e-mail to several groups at a time,press broadcast then repeat steps 3–5.
6
After entering,press START. The machine starts to scan the document into memory. Then starts sending
the e-mail message to each address.
If two or more accounts are registered, the LCD asks you to enter the account name to use for sending.
To use the default account,press [Default] or ENTER without entering any characters.
To use a different account,press [List], and use the cursor key to select the account name from the list,
then press ENTER.
If the account is configured with a password, enter the password, then press ENTER.
Note: The account password should be entered with matching the case of letters.
Enter Mail Account Password
Lower Case
_
Enter Mail Account Name
Lower Case
_
[Default ][ List ]
Press START
To :G65
A4 Fine Normal
[ Mode ][Contrast]
Enter Group Number
To :G_
A4 Fine Normal
[ Mode ][Contrast]
Enter Mail Address
To :_
A4 Fine Normal
[ Mode ][Contrast]
Page 80

4.15
For 3500
1
Place the document(s) face up, top edge first. Adjust the document guides — by sliding either of them to
the left or right — to fit the page(s) you’ll be sending.
2
Press Internet Fax to choose Internet FAX communication.
3
Select “To”, “cc” or “bcc” by pressing the soft key which assigned “To/Cc/Bcc” (see page 4.2).
4
Press SPEED DIAL/GROUP twice.
5
Enter a mail group number (33-64).
Note: If you want to send a e-mail to several groups at a time,press
BROADCAST
then repeat steps 3–5.
6
Press START. The machine starts to scan the document into memory. Then starts sending the e-mail
message.
If two or more accounts are registered, the LCD asks you to enter the account name to use for sending.
To use the default account,press ENTER without entering any characters.
To use a different account,press to display the account name list, then use or to select the account
name, then press ENTER twice.
If the account is configured with a password, enter the password, then press ENTER.
Note: The account password should be entered with matching the case of letters.
Password ;Upper
_
AccountName;Upper
_
Press Start
To :G33_
Enter Group No.
To :G_
MailAddress;Lower
_
Page 81

4.16
Mixed Broadcasting
Pressing the Internet Fax switches between Mail Address Input Mode and Fax Number Input Mode, meaning
you can simultaneously send mail and faxes.
For 5000
1
Place the document(s) face up, top edge first. Adjust the document guides — by sliding either of them to
the left or right — to fit the page(s) you’ll be sending.
2
Press Internet Fax to choose e-mail address input mode.
3
Press
BROADCAST
.
4
Select “To”, “cc” or “bcc” by pressing the soft key which assigned “To/Cc/Bcc” (see page 4.2).
5
Enter the e-mail address.Use either a one-touch number, a speed-dial number, a mail group number or
numeric keypad.
Note: If you enter characters by mistake,press CANCEL to erase them.
6
To add more e-mail addresses, repeat steps 3 to 5.
7
Press Internet Fax to choose fax number input mode. (The Internet Fax light goes out.)
8
Press
BROADCAST
.
9
Enter the fax number. Use either a one-touch number, a speed-dial number, a mail group number or
numeric keypad.
Note: If you enter characters by mistake,press CANCEL to erase them.
10
To add more fax numbers, repeat steps 8 to 9.
Note: If you want to review the e-mail addresses and fax numbers you have entered,press [Review].
To : 01:onetouch@domain
Fax:1234567
Cc :S001:speed@domain
[ Return ] [ Erase ]
Press START
1234567_
Fine Normal
[ Review ][ Mode ][Contrast]
Press START
_
Fine Normal
[ Review ][ Mode ][Contrast]
Press START
To: 01:onetouch@domain
A4 Fine Normal
[ Mode ][Contrast]
Enter Mail Address
To :_
A4 Fine Normal
[ Mode ][Contrast]
Page 82

4.17
If you want to erase any e-mail address or fax number, move the cursor on it and press [Erase].
When you are finished, press [Return] to return to the previous display.
11
Press START. The machine starts to scan the document into memory. Then starts sending the e-mail and
fax to each address.
If two or more accounts are registered, the LCD asks you to enter the account name to use for sending.
To use the default account,press [Default] or ENTER without entering any characters.
To use a different account,press [List], and use the cursor key to select the account name from the list,
then press ENTER.
If the account is configured with a password, enter the password, then press ENTER.
Note: The account password should be entered with matching the case of letters.
For 3500
1
Place the document(s) face up, top edge first. Adjust the document guides — by sliding either of them to
the left or right — to fit the page(s) you’ll be sending.
2
Press Internet Fax to choose e-mail address input mode.
3
Press
BROADCAST
.
4
Select “To”, “cc” or “bcc” by pressing the soft key which assigned “To/Cc/Bcc” (see page 4.2).
5
Enter the e-mail address.Use either a one-touch number, a speed-dial number, a mail group number or
numeric keypad.
Note: If you enter characters by mistake,press CANCEL to erase them.
6
To add more e-mail addresses, repeat steps 3 to 5.
7
Press Internet Fax to choose fax number input mode. (The Internet Fax light goes out.)
8
Press
BROADCAST
.
abcde@domain
To :S001_
abcde@domain
To :S001_
MailAddress;Lower
_
Enter Mail Account Password
Lower Case
_
Enter Mail Account Name
Lower Case
_
[Default ][ List ]
Page 83

4.18
9
Enter the fax number. Use either a one-touch number, a speed-dial number, a mail group number or
numeric keypad.
Note: If you enter characters by mistake,press CANCEL to erase them.
10
To add more fax numbers, repeat steps 8 to 9.
11
Press START. The machine starts to scan the document into memory. Then starts sending the e-mail and
fax to each address.
If two or more accounts are registered, the LCD asks you to enter the account name to use for sending.
To use the default account,press ENTER without entering any characters.
To use a different account,press to display the account name list, then use or to select the account
name, then press ENTER twice.
If the account is configured with a password, enter the password, then press ENTER.
Note: The account password should be entered with matching the case of letters.
Password ;Upper
_
AccountName;Upper
_
ABC Shoji
To :S001,[01]_
Page 84

4.19
Receiving e-mail from POP server
You can choose the automatic e-mail reception or manual e-mail reception using the “ Administration tool for
Internet F ax Kit”through the web browser. For default setting,Internet Fax Kit will query the POP server for
new e-mail at 10 second interval and if the new e-mail has arrived, retrieve and print it automatically.
Regarding the setting of POP parameters,refer to “Setting E-mail environment,”page 2.6 and “Setting E-mail
account users, ”page 2.9.
Manual reception from POP server
When you set the interval time to query the POP server for new e-mail to to 0 second, or check the “Only checking new mail” (not retrieve e-mail automatically), you should retrieve the e-mail manually.
To receive e-mail manually from POP server:
For 5000
1
Confirm that no documents is in the document feeder. Press Internet Fax at the standby screen.
2
Press START.
If two or more accounts are registered, the LCD asks you to enter the account name. Otherwise, skip to
step 5.
3
To use the default account,press [Default] or ENTER without entering any characters.
To use a different account,press [List], and use the cursor key to select the account name from the list,
then press ENTER.
4
If a password is configured for the registered account, enter the password, then press ENTER.
Receive Mail
Enter Password Lower Case
_
Select Mail Account Name
Account 01
Account 02
Account 03
Receive Mail
Enter Name Lower Case
[Default][ List ]
_
Enter Mail Address
To :_
Fine Normal
[ Mode ][Contrast]
Receive document via LAN
Page 85

4.20
5
Reception starts,and is automatically printed.
(Reception Screen)
Note: If there is no new mail, then the LCD displays the screen similar to that below.
For 3500
1
Confirm that no documents is in the document feeder. Press Internet Fax at the standby screen.
2
Press START.
If two or more accounts are registered, the LCD asks you to enter the account name. Otherwise, skip to
step 5.
3
To use the default account,press ENTER without entering any characters.
To use a different account,press to display the account name list, then use or to select the account
name, then press ENTER twice.
4
If the account is configured with a password, enter the password, then press ENTER.
Note: The account password should be entered with matching the case of letters.
5
Reception starts,and is automatically printed.
(Reception Screen)
Note: If there is no new mail, then the LCD displays the screen similar to that below.
No New Mail
** Receiving Mail **
Password ;Upper
_
Account 1
/
/Enter
AccountName;Upper
_
Receive Mail
Start/Stop
MailAddress;Lower
To :_
No New Mail
Feb 2 2002 12:00pm Mem:100%
Fine Normal
[ Mode ][Contrast]
Receive Mail
Feb 2 2002 12:00pm Mem:100%
Fine Normal
[ Mode ][Contrast]
Page 86

Advanced Features
TTI transmittion . . . . . . . . . . . . . . . . . . . . . . . . . . . . . . . . . . . . . . . . . . . . . . . . . . . . . 5.2
Subject line entry . . . . . . . . . . . . . . . . . . . . . . . . . . . . . . . . . . . . . . . . . . . . . . . . . . . . 5.3
Forwarding the received fax document to mail address . . . . . . . . . . . . . . . . . . . . . 5.5
Forwarding the received e-mail to fax . . . . . . . . . . . . . . . . . . . . . . . . . . . . . . . . . . 5.15
Archive . . . . . . . . . . . . . . . . . . . . . . . . . . . . . . . . . . . . . . . . . . . . . . . . . . . . . . . . . . . 5.18
Internet relay broadcasting (Using Fax Gateway) . . . . . . . . . . . . . . . . . . . . . . . . . 5.24
Page 87

5.2
TTI transmission setting
Every fax page you send arrives at the receiving machine with a single line of text at the very top of the page.
This text lists a name, called the Transmit Terminal Identifier (TTI), a fax number and . You can set the
machine to not send the TTI.
For 5000:
1
Press MENU, 2, 2, 0, 8, ENTER.The LCD shows:
2
Using the cursor key, select the mode you want. Then press ENTER to save the setting.
For 3500:
1
Press MENU, 2, 2, 0, 8, ENTER.The LCD shows:
2
Using the cursor key, select the mode you want. Then press ENTER to save the setting.
TTI setting with the Soft Key
Soft Keys are shortcut keys. You can assign a TTI function into one of the Soft Keys if desired.
Set TTI beforehand and press the Soft Key when you transmit a document. The function is ON when the light
is on. Press the Soft Key again to turn it off.
For details, refer to your fax machine’s Operating Instructions.
Entering TTI transmission
You can enter the name you want to appear at the top of faxes you send. You can enter three TTI.
For details, refer to your fax machine’s Operating Instructions.
TTI Tx :On
/
/Enter
08.TTI Transmission
ON
OFF
TTI transmittion
Page 88

5.3
Internet F ax Kit will automatically add the default Subject that was entered on the [E-mail account informa-
tion] screen in [E-mail account users] of “Administration tool for Internet Fax Kit” though the web
browser to the Subject line of all outgoing E-mails. If you want to set a different Subject for a particular mail,
follow the instructions below.
Mail subject setting
Note: The entered subject is only effective for e-mail transmission.And it will be discarded after finished that
e-mail transmission.
If you want to change the default subject,go to [E-mail account users] of the “Administration tool
for Internet Fax Kit” through the web browser and edit it.
For 5000:
1
During the e-mail sending operation, press COMM. OPTIONS. before you press START to start sending
the e-mail. The LCD shows “Communication Options”.
2
Select “Mail Subject” using the cursor key and press ENTER.
3
Enter the subject using the numeric keypad.You can enter up to 40 characters for the subject.
4
Press ENTER.
5
After entering the e-mail address,press START.
Press START
To :direct@domain_
Fine Normal
[ Mode ][Contrast]
Mail Subject
Upper Case
_
Communication Options
F-Code Transmit
F-Code Polling
Mail Subject
Subject line entry
Page 89

5.4
For 3500:
1
During the e-mail sending operation, press COMM. OPTIONS. before you press START to start sending
the e-mail. The LCD shows “Communication Options”.
2
Using the cursor key to select “Mail Subject” .
3
Press ENTER.
4
Enter the subject using the numeric keypad.You can enter up to 40 characters for the subject.
5
Press ENTER.
6
After entering the e-mail address,press START.
Press START
mail@domain_
Subject ;Upper
_
6.Mail Subject
/
/Enter
1.Delayed
/
/Enter
Page 90

5.5
Forwarding the received fax document to mail address
There are two way of forwarding the received fax document to e-mail address.
One way is forward only the fax document received into the F-code relay box with ITU-T sub-addrees.The
received fax document into the F-code relay box can be forwarded to e-mail address(es) and/or other fax
machine(s).
The other way of fax forwarding is forword all received fax documents to e-mail address(es).
Forwarding fax by using F-code relay box
This feature works with F-code relay box, which receives fax documents, then relays them to e-mail addresses
and/or other fax machines.For this feature works,you must program the F-code box to the relay box in advance.
To set the F-code box to the rela y box
For 5000:
Note: If your machine is 3500, see page 5.9.
1
Keep pen and paper with you as you follow these steps.As you decide on a sub-address and enter it into
your machine,write it down. Remember to:
(1) write down which box goes with which sub-address,(2) write down any passwords or I.D. codes you
enter, (3) keep these printed records in a safe place.
2
Press MENU, 3, 5, 0, 1, ENTER.The LCD shows:
3
Use the numeric keypad to enter the two-digit number (01-50) of the F-Code box you want to create or
modify.
4
Press ENTER.What you do next depends on whether you’re creating or modifying the F-Code box:
If creating — skip to step 6.
If modifying — the LCD asks you to enter the proper I.D.code.The LCD shows:
5
Use the numeric keypad to enter the 4-digit I.D.code (not the ITU-T sub-address and not the ITU-T password).Then press ENTER. Go to step 8.
Note: If you enter an invalid I.D.code, the fax machine rejects the attempt and aborts this operation.
Note: If you want to modify an existing F-Code box and want to change the box type,you first must erase
the old box, then create a new one.
02.PlanoOffice
EnterI.D.Code.
01.Set F-Code Box
Enter Box Number (01-50):_
01:No Number Stored
Page 91

5.6
6
The LCD now shows:
7
Select “Relay box” and then press ENTER.
8
The LCD shows:
9
Select “Box Name” and press ENTER.
10
Enter the name by using the numeric keypad then press ENTER.
An F-Code box’s name can be up to 16 characters in length.
11
Select “Sub-Address” and press ENTER.
The fax machine asks for this F-Code box’s sub-address.This is the numerical identifier you must enter in
order to communicate with any remote F-Code compatible fax.
12
Use the numeric keypad to enter the sub-address to identify this F-Code box and then press ENTER.
The sub-address can be up to 20 characters in length and include any combination of numbers and the
* and # characters (but no other non-numeric characters).
Note: No other F-Code box in this machine can have the same sub-address as the one you enter here.
Note: If you entered a sub-address already being used by another F-Code box, the machine beeps and
briefly displays “Already Stored”. The machine now returns you to step 11. Enter a different number for your F-Code box’s sub-address.
01:Relay Box
Location :Not Stored
TTI Type :Sender
Password :Not Stored
01.Relay Box
Enter Sub-Address
_
01:Relay Box
Box Name :NY Office
Sub-Address :Not Stored
Exit
01.Relay Box
Enter Box Name Upper Case
_
01:Relay Box
Exit
Box Name :Not Stored
Sub-Address :Not Stored
01:
Security Box
Bulletin Box
Relay Box
Page 92

5.7
13
Select “Password” and press ENTER. The LCD shows:
Note: You don’t need to have a password for the F-Code box. However, using a password will make your
F-Code communication much more secure.
14
Use the numeric keypad to enter this box’s ITU-T-compatible password. This password can be up to 20
characters in length and include any combination of numbers and the * and # characters (but no other
non-numerical characters).
15
Press ENTER.The LCD shows:
16
Select “Location” and press ENTER.The LCD shows:
17
Press Internet fax to toggle the fax number input mode and e-mail address input mode.
Enter e-mail address and/or the fax number using a one-touch key, a speed-dial number or a call group
number. You cannot use the numeric keypad to enter these numbers.
To add eac h number, press BROADCAST between each one,then enter the number.
You can specify up to 300 numbers for a remote unit.
Note: If you want to review the numbers you entered, press [Review].
If you want to erase any number, move the cursor on it and press [Erase].
When you finish to review, press [Return] to return to the previous display.
18
Press ENTER.The LCD shows:
01:Relay Box
Location : 01, 03,S001
TTI Type :Sender
Password :123456
[ Return ] [ Erase ]
To : 02:NY Office
Fax: 01:Plano Office
Bcc:S001:Japan office
01:Relay Box
Enter Mail Address
To :_
01:Relay Box
Enter Remote Fax Number
_
01:Relay Box
Location :Not Stored
TTI Type :Sender
Password :123456
01.Relay Box
Enter Password
_
Page 93

5.8
19
Select “TTI Type” and press ENTER.The LCD shows:
The machine asks for the type of TTI you w ant to appear on the faxes that are rela yed to other callers.
• Sender — Relay the document with sender unit’s TTI (don’t send your TTI).
• Both — Relay the document with both the sender unit’s TTI and your TTI.
• Yours — Relay the document with your TTI instead of the sender unit’s.
20
Using the cursor key, select the TTI you want.Then press ENTER. The LCD shows:
21
Select “Auto Print” and press ENTER.The LCD shows:
ON: Print the document automatically when it’s received.
OFF: The machine does not print it, but only relays it to the e-mail address and/or other fax machine.
22
Using the cursor key, select the mode you want.Then press ENTER.
23
Select “Exit” and press ENTER. The LCD shows:
The machine asks for your F-Code box’s four-digit security I.D. code. This is the I.D. code for the box’s security, which you use to enter before you can make any changes to this F-Code box.
Note: If you do not want to set or change the I.D .code, skip to step 26.
24
Decide on a four-digit I.D. code (0001-9999) for this F-Code box.Write it down, and put it in a safe place.
Important: Do not use 0000 as an I.D. code.
25
Use the numeric keypad to enter the four-digit I.D. code for this F-Code box and then press ENTER.
Important: After completing this step, you must know this code to access to this F-Code box. Be sure to
write it down.
26
Press STOP to finish and return to standby.
01.Relay Box
Enter I.D. Code
0000
01.Relay Box
Auto Print
ON
OFF
01:Relay Box
Auto Print :OFF
01:Relay Box
TTI Type
Sender Yours
Both
Page 94

5.9
For 3500:
Note: If your machine is 5000, see page 5.5.
1
Keep pen and paper with you as you follow these steps.As you decide on a sub-address and enter it into
your machine,write it down. Remember to:
(1) write down which box goes with which sub-address,(2) write down any passwords or I.D. codes you
enter, (3) keep these printed records in a safe place.
2
Press MENU, 3, 5, 1, ENTER.The LCD shows:
3
Use the numeric keypad to enter the two-digit number (01-50) of the F-Code box you want to create or
modify.
4
Press ENTER.What you do next depends on whether you’re creating or modifying the F-Code box:
If creating — skip to step 6.
If modifying — the LCD asks you to enter the proper I.D.code.The LCD shows:
5
Use the numeric keypad to enter the 4-digit I.D.code (not the itu-t sub-address and not the itu-t password).Then press ENTER. Skip to step 7.
Note: If you enter an invalid I.D.code, the fax machine rejects the attempt and aborts this operation.
Note: If you want to modify an existing F-Code box and want to change the box type,you first must erase
the old box, then create a new one.
6
The machine is now asking you to name this F-Code box.The LCD shows:
If you do not want to enter or change this F-Code box’s name, skip to step 8.
If you do want to enter or change this F-Code box’s name, go on to step 7.
7
Enter the name by using the numeric keypad.An F-Code box’s name can be up to 16 characters in length.
8
Press ENTER to save the box’s name and continue.The LCD shows:
The fax machine now asks for this F-Code box’s sub-address.This is the numerical identifier you must
enter in order to communicate with any remote F-Code compatible fax.
If you do not want to change an existing sub-address,skip to step 10.
9
Use the numeric keypad to enter the sub-address to identify this F-Code box.
The sub-address can be up to 20 characters in length and include any combination of numbers and the
* and # characters (but no other non-numeric characters).
Note: No other F-Code box in this machine can have the same sub-address as the one you enter here.
10
Press ENTER to save the sub-address.
Note: If you entered a sub-address already being used by another F-Code box, the machine beeps and
briefly displays “Sub-address in Use”.The machine now returns you to step 10. Please enter a
different number for your F-Code box’s sub-address.
03:Sub-Address No.
_
03:Box Name;Upper
_
03:Set F-Code Box
Enter I.D. Code:****
Select F-Code Box
01:No Number Stored
Page 95

5.10
11
Next, the machine asks for your F-Code box’s password. This is the password for itu-t-compatible F-Code
fax transactions.The lcd shows:
Note: You don’t need to have a password for the F-Code box. However, using a password will make your
F-Code communication much more secure.
If you do not want to enter or change this box’s password,skip to step 14.
12
Use the numeric keypad to enter this box’s ITU-T-compatible password. This password can be up to 20
characters in length and include any combination of numbers and the * and # characters (but no other
non-numerical characters).
Note: You cannot change the type of an existing F-Code box. If you’re modifying an existing F-Code box
and want to change the box type,you first must erase the old box, then create a new one.
13
Press ENTER to save the password.The LCD now shows:
14
Press or to select “Relay” and then press ENTER.
15
The machine asks for the fax number for the remote unit. The LCD shows:
Press Internet Fax to toggle the fax number input mode and e-mail address input mode.
Enter the e-mail address and/or fax number using a one-touch key, a speed-dial number or a call group
number. You cannot use the numeric keypad to enter these numbers.
To add eac h number, press BROADCAST between each one to insert a comma, then enter the number.
You can specify up to 200 numbers for a remote unit.
17
Press enter to save the settings.The LCD shows:
The machine asks for the type of TTI you w ant to appear on the faxes that are rela yed to other callers.
• Sender — Relay the document with sender unit’s TTI (don’t send your TTI).
• Both — Relay the document with both the sender unit’s TTI and your TTI.
• Yours — Relay the document with your TTI instead of the sender unit’s.
Press or until the mode you want appears.
18
Press ENTER to save the settings.The LCD shows:
On: Print the document automatically when it’s received.
Off: The machine does not print it,but only relays it to the other machine.
Auto Print :Off
/
/Enter
Select TTI :Sender
/
/Enter
Enter Mail Address
To :_
Enter Relay Number
_
Box Type :Bulletin
/
/Enter
03:Password
_
Page 96

5.11
Press or until the mode you want appears.
Then press ENTER to save the settings and go on to step 19.
19
The machine asks for your F-Code box’s four-digit security I.D. code. This is the I.D. code for the box’s security, which you use to enter before you can make any changes to this F-Code box.
If you do not want to set or change the I.D .code, skip to step 22.
20
Decide on a four-digit I.D. code (0001-9999) for this F-Code box.Write it down, and put it in a safe place.
Important: Do not use 0000 as an I.D. code.
21
Use the numeric keypad to enter the four-digit I.D. code for this F-Code box.
Important: After completing this step, you must know this code to access this F-Code box. Be sure to
write it down.
22
Press ENTER to save the F-Code box information.
23
To finish,press STOP.
03:Set F-Code Box
Enter I.D. Code:0000
Page 97

5.12
Default relay setting
When this feature on, all received fax document will be transferred to the designated e-mail address.
However there are some exceptions.These are as follows:
Not relayed when the documents are:
1. F-code confidential reception documents
2. Documents that are to be forwarded to another fax by F-code relay
3. Polling reception documents
4. F-code polling reception documents
5. Documents that are to be forwarded by F-code mail relay
Note: Relay Box can override this function. First turn off the Relay Box settings to use the Default Relay func-
tion.
To set the default relay setting:
For 5000:
1
Press MENU, 3, 8, 0, 3.
2
Press ENTER.
3
Use the cursor key to select “Setting” and press ENTER.
4
Use the cursor key to select “On” and press ENTER.
5
Use the cursor key to select “Location” and press ENTER.
03.Default Relay
Enter Mail Address
To :_
03.Default Relay
Exit
Setting :ON
Location :Not Stored
03.Default Relay
Setting
ON
OFF
03.Default Relay
Exit
Setting :OFF
Location :Not Stored
8.Internet Fax
01.TCP/IP
02.MAC Adress
03.Default Relay
Page 98

5.13
6
Enter e-mail address using a one-touch key, a speed-dial number or a mail group number.
Note: You cannot use the numeric keypad to enter e-mail address.
To add eac h number, press BROADCAST between each one,then enter the number.
You can specify up to 300 numbers for a remote unit.
Note: If you want to review the numbers you entered, press [Review].
If you want to erase any number, move the cursor on it and press [Erase].
When you finish to review, press [Return] to return to the previous display.
7
Press ENTER.The LCD will show:
8
Select “TTI Type” and press ENTER.
The machine asks for the type of TTI you w ant to appear on the faxes that are rela yed to other callers.
• Sender — Relay the document with sender unit’s TTI (don’t send your TTI).
• Both — Relay the document with both the sender unit’s TTI and your TTI.
• Yours — Relay the document with your TTI instead of the sender unit’s.
9
Using the cursor key, select the type of TTI you want,and then press ENTER.
10
Use the cursor key to select “ON” or “OFF” you want. Then press ENTER.
ON: The machine prints the received document and relays it to the e-mail address .
OFF: The machine does not print the received document, but only relays it to the e-mail address.
11
Select “Exit” then press ENTER.
12
Press STOP to finish and return to standby.
03.Default Realy
Auto Print
ON
OFF
03.Default Relay
TTI Type :Sender
Auto Print :OFF
03.Default Relay
TTI Type
Sender Yours
Both
03.Default Relay
TTI Type :Sender
Auto Print :OFF
[ Return ] [ Erase ]
To : 02:NY Office
Fax: 01:Plano Office
Bcc:S001:Japan office
Page 99

5.14
For 3500:
1
Press MENU, 3, 8, 3, ENTER.
2
Use the cursor key to select “On” and press ENTER.
3
Enter e-mail address using a one-touch key, a speed-dial number or a mail group number.
Note: You cannot use the numeric keypad to enter e-mail address.
To add eac h number, press BROADCAST between each one to insert a comma, then enter the number.
You can specify up to 200 numbers for a remote unit.
4
Press ENTER to save the settings.The LCD shows:
The machine asks for the type of TTI you w ant to appear on the faxes that are rela yed to other callers.
• Sender — Relay the document with sender unit’s TTI (don’t send your TTI).
• Both — Relay the document with both the sender unit’s TTI and your TTI.
• Yours — Relay the document with your TTI instead of the sender unit’s.
5
Press or until the mode you want appears.
6
Press ENTER to save the settings.The LCD shows:
ON: The machine prints the received document and relays it to the e-mail address .
OFF: The machine does not print the received document, but only relays it to the e-mail address.
7
Press or until the mode you want appears. Then press ENTER to save the settings.
8
Press STOP to finish and return to standby.
Auto Print :Off
/
/Enter
Select TTI :Sender
/
/Enter
ABC Shoji
To :[01]_
Enter Mail Address
To :_
Default Relay :Off
/
/Enter
Page 100

5.15
With this function, e-mail that contains the designated fax numbers in a text can be forwarded as a fax.
Fax Forw arding setting
All you have to do is to send mail with forwarding fax numbers in a text. Then Internet Fax Kit analyzes the
mail at the gateway and forwards e-mail messages to the fax numbers in the mail.
Note: Both F ax forwarding request and Fax forwarding are original Pitney Bowes Office Systems functions, so
both the requesting and distributing machines need to be Pitney Bowes Office Systems products.
Designate F ax Forwarding numbers in the text of the mail as follows:
FAXNO:=<
XXXX>
xxxx: forwarding fax number
1. Always begin from the start of the line.
2. As long as above condition is fulfilled, the number can be written anywhere in the text.
3. “FAXNO”can be written in either upper case or lower case.
4. Fax number can have a maximum of 40 digits per number, and a total of 30 fax numbers.
5. When you designate multiple numbers as a broadcast, separate them with comma (,).
Example: FAXNO:=<123-4567,987-6543>
6. Available numbers for broadcasting is dependent on the specifications of the fax used as a gateway.
7. However, if there is a wrong fax number in the mail when designating broadcasting, the mail will not be
forwarded, but an error report will be returned.
Example:
Forwarding the received e-mail to fax
 Loading...