

Page 1

Inserting System
Page 2

Statement of FCC Compliance
This equipment has been tested and found to comply with the limits for a Class A
digital device, pursuant to part 15 of the FCC rules. These limits are designed to
provide reasonable protection against interference when the equipment is operated
in a commercial environment. This equipment generates, uses, and can radiate radio
frequency energy and, if not installed and used in accordance with the instruction
manual, may cause interference to radio communications. Operation of this equipment
in a residential area is likely to cause interference, in which case the user will be
required to correct the interference at his own expense.
Canada
This class A digital apparatus complies with Canadian ICES-003.
Cet appareil numérique de la classe A est conforme á la norme NMB-003 du Canada.
CAUTION: Changes or modifications to this equipment not expressly approved by
the party responsible for compliance (Pitney Bowes) could void the user’s authority
to operate the equipment.
SV40189-OG Revision B June 2003 ©2003 Pitney Bowes Inc.
All rights reserved. This book may not be reproduced in whole or in part in any fashion
or stored in a retrieval system of any type or transmitted by any means, electronically
or mechanically, without the express, written permission of Pitney Bowes.
We have made every reasonable effort to ensure the accuracy and usefulness of this
manual; however, we cannot assume responsibility for errors or omissions or liability
for the misuse or misapplication of our products.
Due to our continuing program of product improvement, equipment and material
specifications as well as performance features are subject to change without notice.
OfficeRight is a trademark and E-Z Seal is a registered trademark of Pitney
Bowes.
Page 3

Contents
1. Introduction
Important Safety Information ...................................................... 2
About Your Machine .................................................................... 3
Machine Configurations .............................................................. 3
Machine Controls, Indicators and Features ................................ 4
The Controls ............................................................................... 6
2. Preparing and Loading
Connecting Power and Turning On ............................................. 8
Filling the Moistener ................................................................... 9
Loading the Sheet Feeders (Feeders A1 and A2) .................... 10
Loading the Envelope Feeder (Feeder B)................................. 11
Loading the Insert Feeder (Feeder C) ...................................... 12
3. Running Jobs
Job Listing ................................................................................ 13
Job 1: One Folded Sheet into an Envelope ............................ 15
Job 2: One Folded Sheet, No Envelope (Fold Only) .............. 16
Job 3: One Folded Sheet + One Insert into an Envelope ....... 17
Job 4: One Insert into an Envelope ........................................ 19
Job 5: Two Folded Sheets into an Envelope........................... 20
Job 6: Two Collated, Folded Sheets into an Envelope ........... 21
Job 7: Two Folded Sheets, No Envelope (Fold Only) ............. 22
Job 8: Two Collated, Folded Sheets, No Envelope
(Fold Only) ................................................................... 23
Job 9: Two Folded Sheets and an Insert into an Envelope .... 24
Job 10: Two Collated, Folded Sheets and an Insert into an
Envelope ...................................................................... 26
The Manual Feeder M .............................................................. 28
4. Advanced Menu Options
Reset Counter .......................................................................... 29
Change Paper Size................................................................... 30
Move the Address in the Window ............................................. 30
Sheet Double Detect On/Off ..................................................... 31
Insert Double Detect On/Off ..................................................... 32
Safe Seal On/Off....................................................................... 32
5. Reference
Error Messages ................................................................... 33-36
General Troubleshooting ........................................................... 37
Clearing Material Jams ............................................................. 38
Getting Help............................................................................. 39
Ordering Supplies ..................................................................... 40
Material Specifications.............................................................. 41
Machine Specifications ............................................................. 42
Index ....................................................................................... 43
Page
OfficeRight™ DI200
Operator’s Guide
1
Page 4

Safety
1. INTRODUCTION
Important Safety Information
• Please read all the instructions in this manual
operate your OfficeRight™ DI200. Save all instructions for future use.
WARNING! Always use the power cord supplied with
your machine and plug it into a
outlet that's located near the machine and easily
accessible. Failure to properly ground the machine can
result in severe personal injury and/or fire.
• DO NOT use a wall outlet controlled by a wall switch or one that is
shared with other equipment.
• Do not use an adapter plug on the line cord or wall outlet.
• Do not remove the ground pin from the line cord.
• Make sure the area in front of the wall outlet into which the machine is
plugged is free from obstruction.
• DO NOT route the power cord over sharp edges or trap it between
pieces of furniture. Make sure there is no strain on the power cord.
• To reduce the risk of fire or electrical shock, DO NOT attempt to
remove covers or disassemble the inserter. The cabinet encloses
hazardous parts. Refer servicing to qualified personnel.
• Keep fingers, long hair, jewelry and loose clothing away from moving
parts at all times.
• Never reach into the machine while it is running. Avoid touching
moving parts or materials while the machine is in use. Before clearing
a jam, be sure all machine mechanisms come to a complete stop.
• Know your equipment, especially
emergency.
• When removing jammed material, avoid using too much force to
protect against minor personal injury and damage to the equipment.
• Use the equipment only for its intended purpose.
• Always follow the specific occupational safety and health standards
prescribed for your workplace.
CAUTION! If you relocate an OfficeRight™ DI200 that
has the optional Second Sheet Feeder A2 installed,
remove it from the Second Sheet Feeder first—that is,
as you lift it clear, make sure it fully disengages from
the Second Sheet Feeder. Obtain help if necessary.
how to stop it in the event of an
before
you attempt to
properly grounded
wall
2
OfficeRight™ DI200
Operator’s Guide
Page 5
Introduction
About Your Machine
Your new OfficeRight™ DI200 is a compact folding and inserting machine
designed to speed the process of mail creation.
It has a minimal number of user adjustments and an intuitive, easy-to-use
control panel. This greatly simplifies machine operation and will enhance
the productivity of your mailing operation.
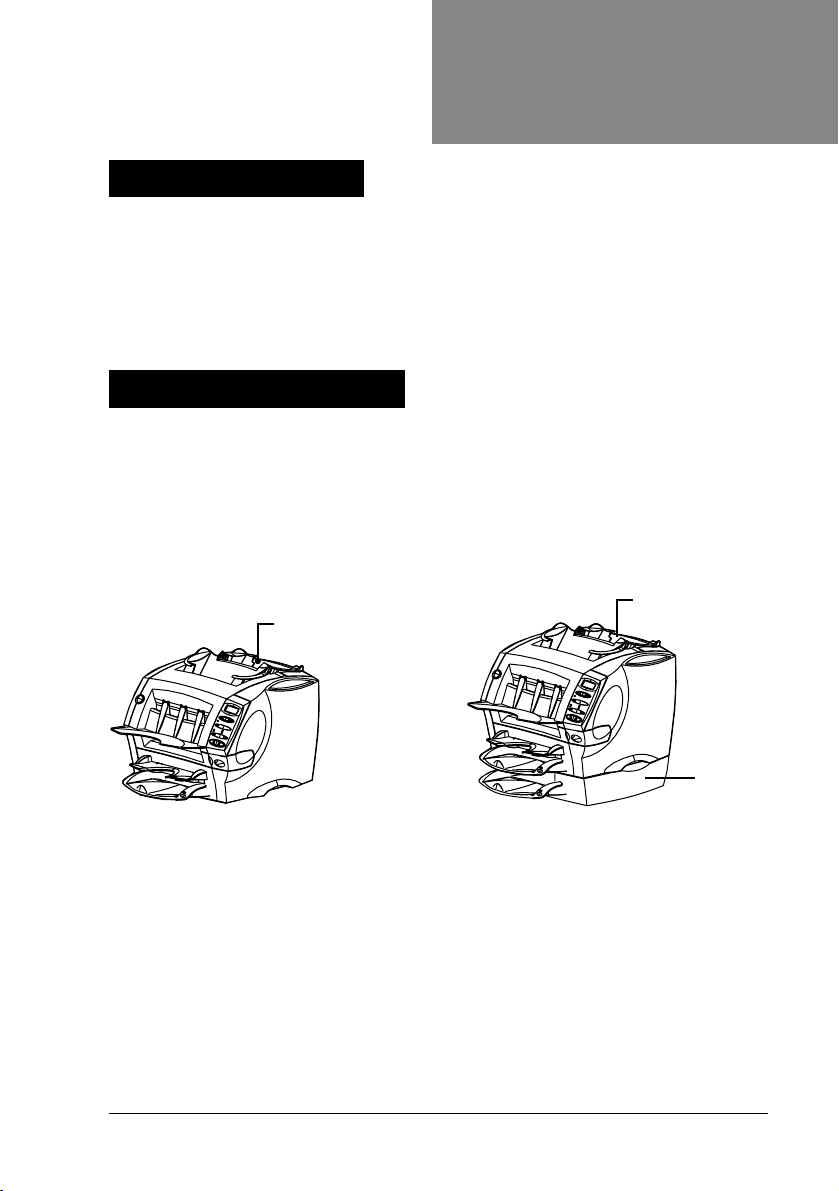
Machine Configurations
There are two configurations of the OfficeRight™ DI200 available. The
basic model is supplied with an insert feeder and one sheet feeder. The
second configuration is supplied with an insert feeder and two sheet
feeders.
insert feeder
insert feeder
Configuration 1
Basic machine with insert
feeder and one sheet feeder
OfficeRight™ DI200
Operator’s Guide
2nd sheet
feeder
Configuration 2
Machine with insert feeder
and a 2nd sheet feeder added
3
Page 6
Introduction
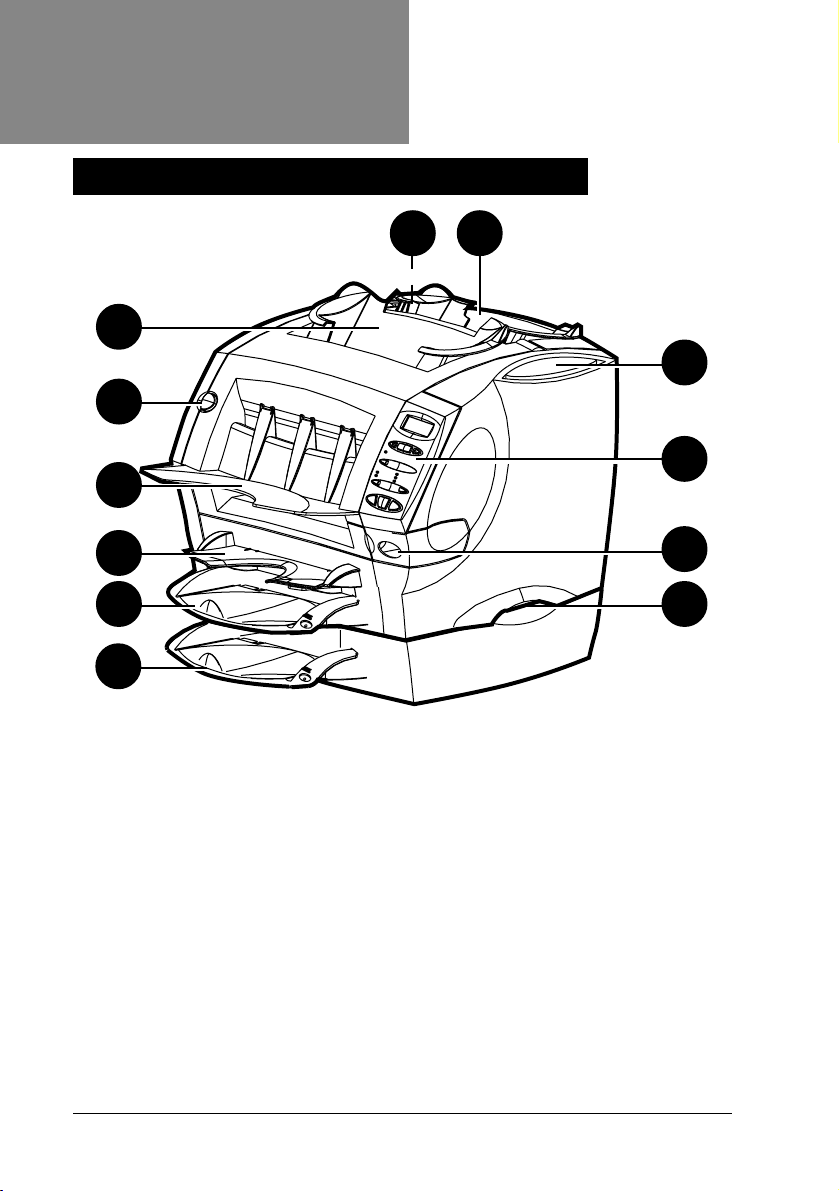
Machine Controls, Indicators and Features
1 2
12
11
10
3
4
9
8
7
1. Insert Cover E Release Button (Blue Button Marked E)
Press this button to release the insert cover if a jam occurs in this
area of the machine. The display prompts you if you need to open this
cover to remove jammed material.
2. Insert Feeder (Not on All Models)
Use this feeder to add additional inserts to your envelope. Material
fed from this feeder
feeder is especially suited to feeding pre-folded or thicker inserts.
3. Operating Guide Slot
Store this Operating Guide in the slot provided so that it doesn’t get
lost and is readily available when you need it.
4. Control Panel
This is where you enter commands and where the machine informs
you of its status. See pages 6 and 7 for a full explanation of what
each button does.
4
cannot
be folded by the inserter. However, this
OfficeRight™ DI200
Operator’s Guide
5
6
Page 7

Introduction
5. Moistener Tank
This tank contains E-Z Seal® solution or water to moisten and seal
envelope flaps. It slides out to the right for refilling and has an oval
level indicator window at the front so you can easily check fluid level.
6. Lifting Handles (One Each Side)
Always lift the OfficeRight™ DI200 using the side handles. DO NOT
lift the machine by any of the feeders or the stacker.
7. Second Sheet Feeder A2 (Optional)
You can add this feeder to the machine to enable folding and
inserting of a second sheet into the envelope. It functions in exactly
the same way as the standard sheet feeder, A1.
IMPORTANT: When you use both sheet feeders A1
and A2 together, always load the address bearing
sheet into sheet feeder A2. If you fail to do this, the
address won’t show in the envelope window. Always
load sheets into feeder A2
first,
that is, with the bottom edge of the sheet furthest into the
machine.
8. Standard Sheet Feeder A1
This feeder enables folding and inserting of a sheet into the envelope.
Always load sheets into this feeder
face down
face down
and
bottom edge
and
bottom edge first.
9. Manual Feeder M
Use this feeder to manually feed stapled sets of
each.
The machine waits for you to feed each set by hand into this
feeder before it folds and inserts the set automatically. Always feed
sheets into this feeder
the bottom edge of the sheet furthest into the machine.
10. Stacker
The machine delivers finished pieces to this area.
11. Front Cover D Release Button (Blue Button Marked D)
Press this button to release the front cover if a jam occurs in this area
of the machine. The display prompts you if you need to open this
cover to remove jammed material.
12. Envelope Feeder B
This feeder feeds envelopes into the inserting area where they are
filled with sheets or inserts from other feeders.
OfficeRight™ DI200
Operator’s Guide
face down
and
bottom edge first,
up to three sheets
that is, with
5
Page 8
Introduction
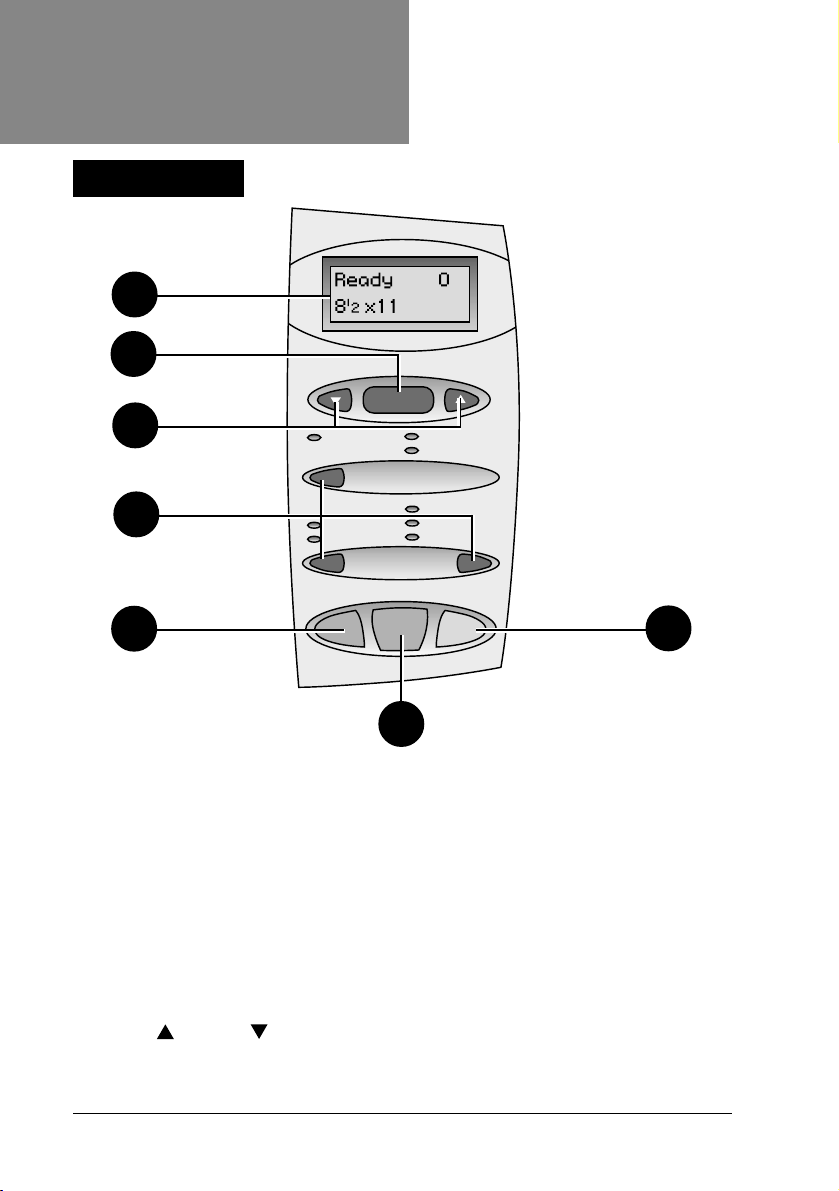
The Controls
1
2
3
4
Menu / Enter
no yes
Feeder A1
Seal
No Seal
Trial Piece Stop
Feeder A2
2nd Page
Envelope Fdr B
Insert Fdr C
Fold Only
Start
5
6
1. Display
Shows the current status of your OfficeRight™ DI200 and displays
prompts or error messages which help you in operating the machine.
2. Menu/Enter
Press this button to enter the menu options. Options available are:
• Reset Counter
• Change Paper Size. Choose 11” (letter size) or 14” (legal size)
• Move Address in Window
• Turn Sheet Double Detection On/Off
• Turn Insert Double Detection On/Off
• Turn Safe Seal On/Off
7
3. yes and no buttons
Once you’ve entered the menu using Menu/Enter, press these
buttons to answer yes or no to prompts. You also use them to change
(increase or decrease) settings offered by menu options.
6
OfficeRight™ DI200
Operator’s Guide
Page 9

Introduction
4. Selection Buttons and Indicator Lights
Press these buttons to step through the feeders and options that are
available on your machine.
Depending on your model configuration, some indicator lights and
associated feeders may be inoperable. If your model doesn’t have a
second sheet feeder, for example, the indicators associated with this
feeder will not light. This is normal.
A
green indicator
A
red indicator
combination of functions. Simply correct the error in selection and the
indicator(s) will change back to green.
An
unlit indicator
5. Trial Piece
After you’ve set up a job using the control panel, you
piece. If you press Start before running a trial piece, the machine
display will prompt you to run a trial piece first.
Press this button to run one fully collated piece as programmed via
the control panel. The envelope will not seal regardless of whether
the system has been told to seal or not. This allows you to inspect the
processed job to make sure that everything is inserted correctly and
that the address appears in the window.
The trial piece also allows the system to calibrate itself and set its
double detect feature, if selected.
6. Start
Press to begin automatic operation.
7. Stop
Press to stop automatic operation at the end of the next cycle.
shows that a feeder or function is selected for use.
shows that you selected an invalid (impossible)
means that the feeder or function is turned
must
IMPORTANT: Running the trial piece is an
function for the machine to perform. You
before a start every time you use a new batch of
material. This allows the system to re-calibrate in case
different batches of material vary slightly.
must
OFF.
run a trial
essential
do it
About the Sleep Mode
After 10 minutes of inactivity, the system enters a power-saving
“sleep mode” and displays Powersave On. Pressing any button will
wake the machine up. The machine remembers the last job setup.
OfficeRight™ DI200
Operator’s Guide
7
Page 10
Loading
2. PREPARING AND LOADING
This chapter explains how to connect and load the machine.
Once you understand the subjects covered in this chapter, you can quickly
set up and use the machine for a variety of jobs as explained later in
Chapter 3,
IMPORTANT: Before running a job, make sure your material meets our
published specifications (see
assure reliable operation and greatest productivity.
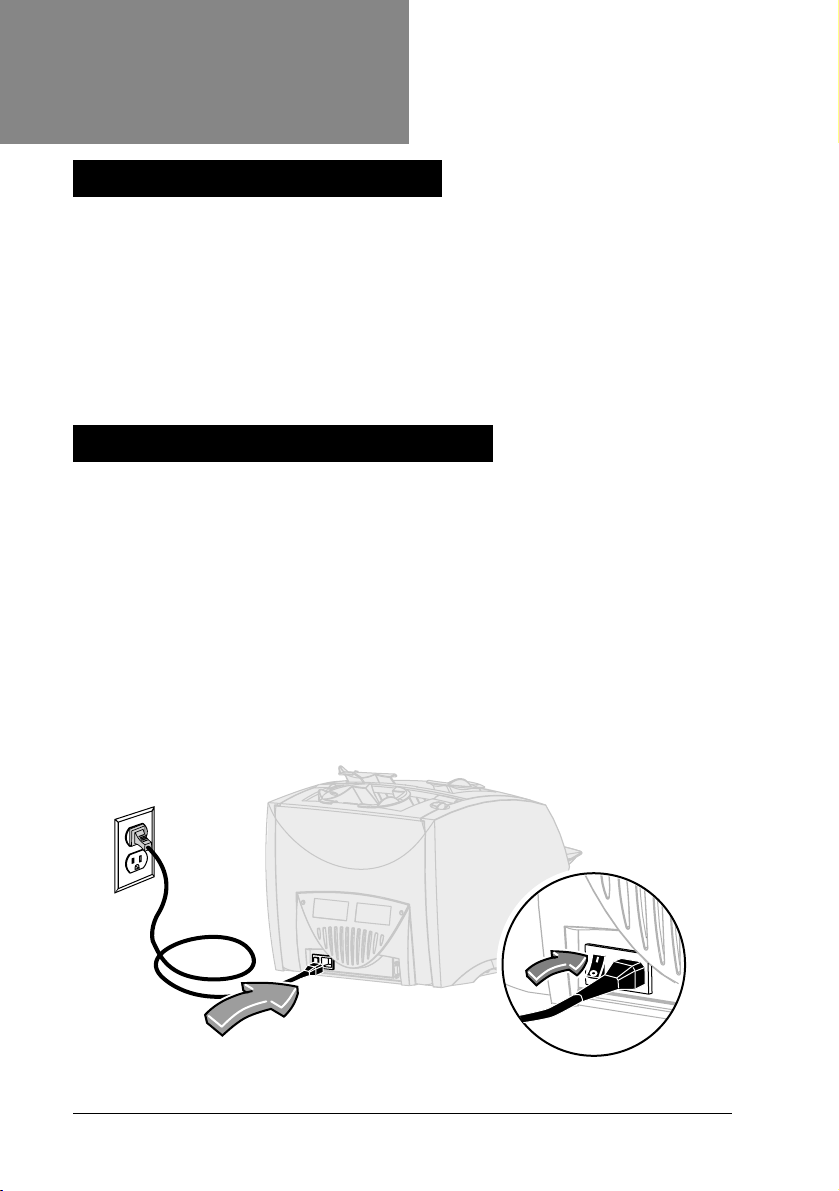
Connecting Power and Turning On
Running Jobs
.
Specifications
on page 41). This helps
WARNING! Read all the safety information on page 2
the machine.
Connect the power cord to the socket on the back of the machine.
Plug the power cord into a suitable power outlet. Make sure the power
outlet is near the machine and is easily accessible.
Turn the power switch ON. After a few seconds, the display shows
When turned ON, the machine remembers the last job setup, but resets
the item counter back to zero automatically.
before
connecting
Ready.
8
OfficeRight™ DI200
Operator’s Guide
Page 11
Loading
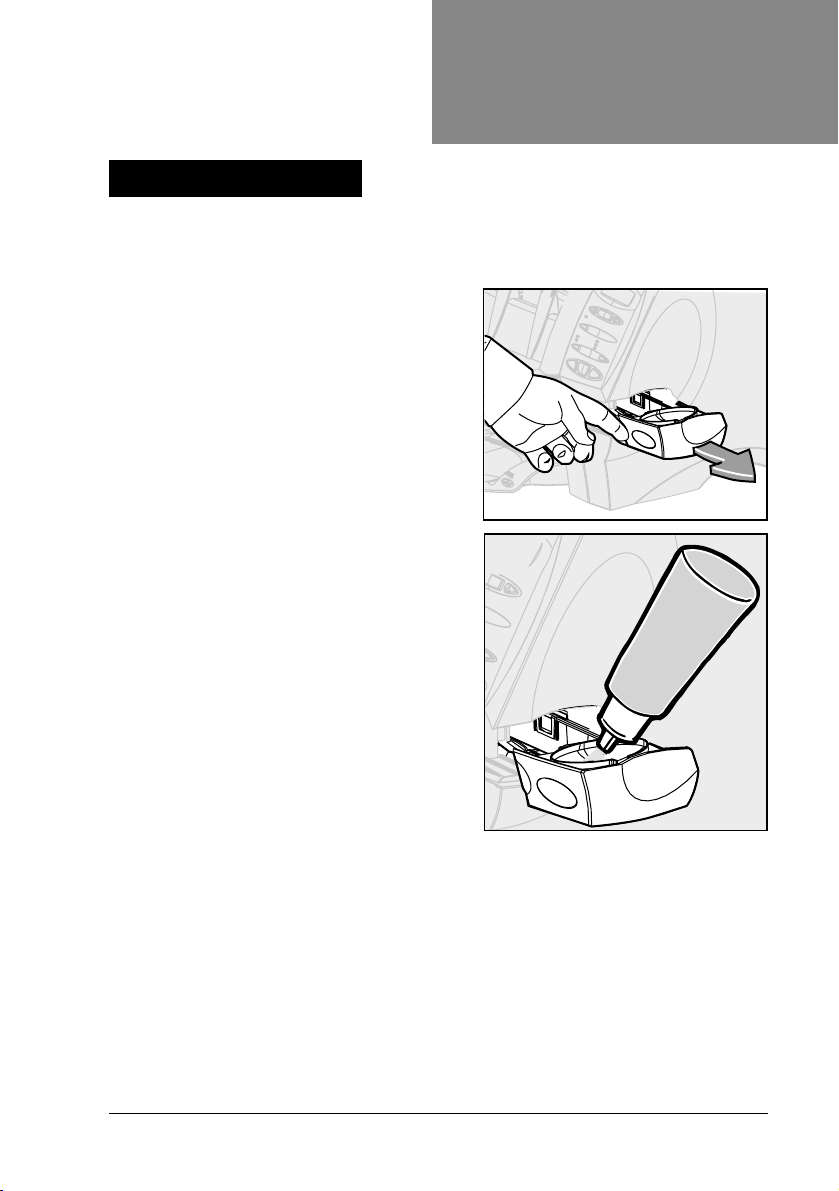
Filling the Moistener
Refill the moistener when the fluid gets low. Check fluid level through the
oval viewing window (figure, below right).
Slide the moistener out to the right.
IMPORTANT: Never open the
moistener while the machine is
processing material.
Carefully fill the moistener with E-Z
®
Seal
solution or water up to the “Max”
mark in the filler funnel.
We recommend E-Z Seal® to minimize
algae growth and scale buildup.
Slide the moistener back into the machine.
From the dry state, the moistener will take about five minutes to become
fully wet and ready for use.
OfficeRight™ DI200
Operator’s Guide
9
Page 12
Loading
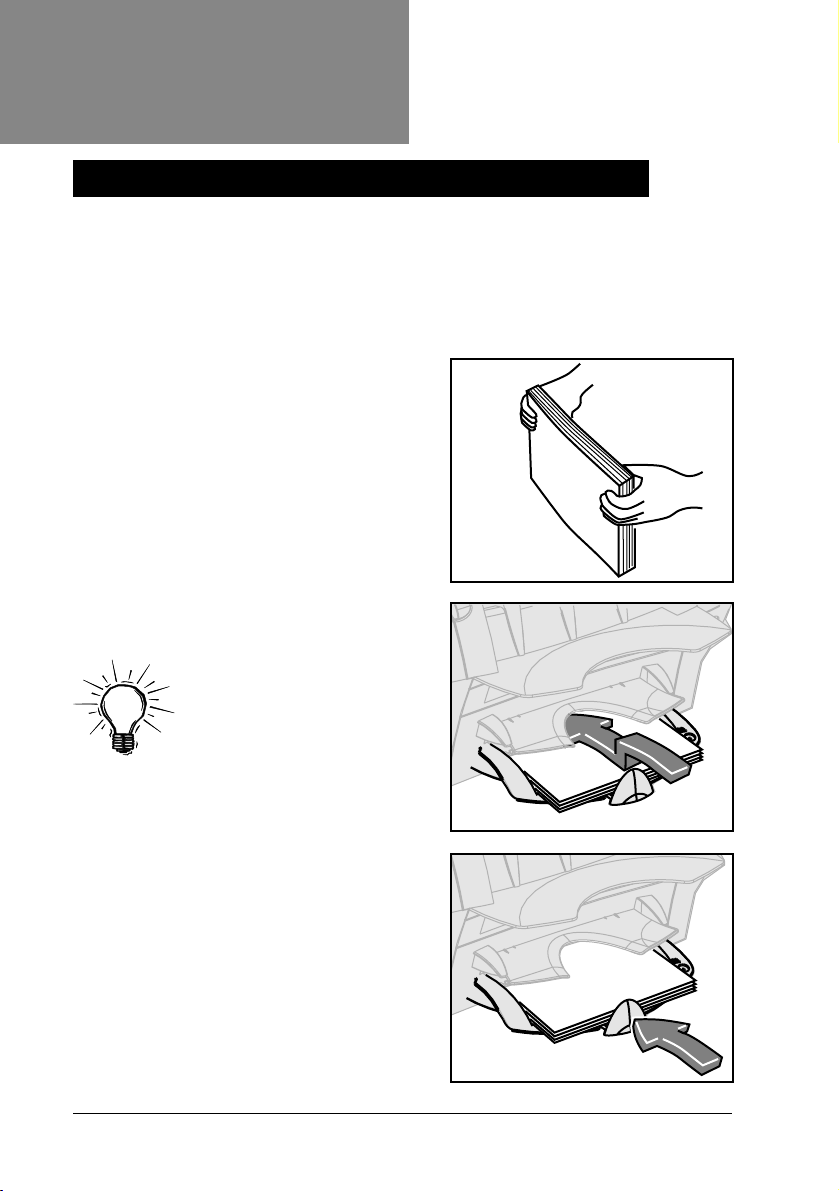
Loading the Sheet Feeders (Feeders A1 and A2)
Sheet Feeder A1 is common to all models and is located immediately
below the Manual Feeder M. Sheet Feeder A2 is an option on all models.
It allows the machine to insert a second folded sheet into an envelope.
Both feeders are used for sheets that require folding before inserting.
Load both feeders in exactly the same way.
Always fan (aerate) sheets before you
load them. This prevents them from
sticking together.
Then tap the stack of sheets onto a firm
surface to align the edges.
Place the sheets into Sheet Feeder A1
or A2 as required.
IMPORTANT: Always
load sheets into these
feeders
bottom edge first.
bottom edge of the
sheet is furthest into the machine.
face down
and
The
If you’re using both Sheet Feeders A1
and
A2 at the same time, you
the document printed with the address
into Sheet Feeder A2. If you load the
address-bearing document into Sheet
Feeder A1,
in the envelope window.
Slide the back stop in until it just
touches the paper stack.
10
the address won’t be visible
must
load
OfficeRight™ DI200
Operator’s Guide
Page 13
Loading
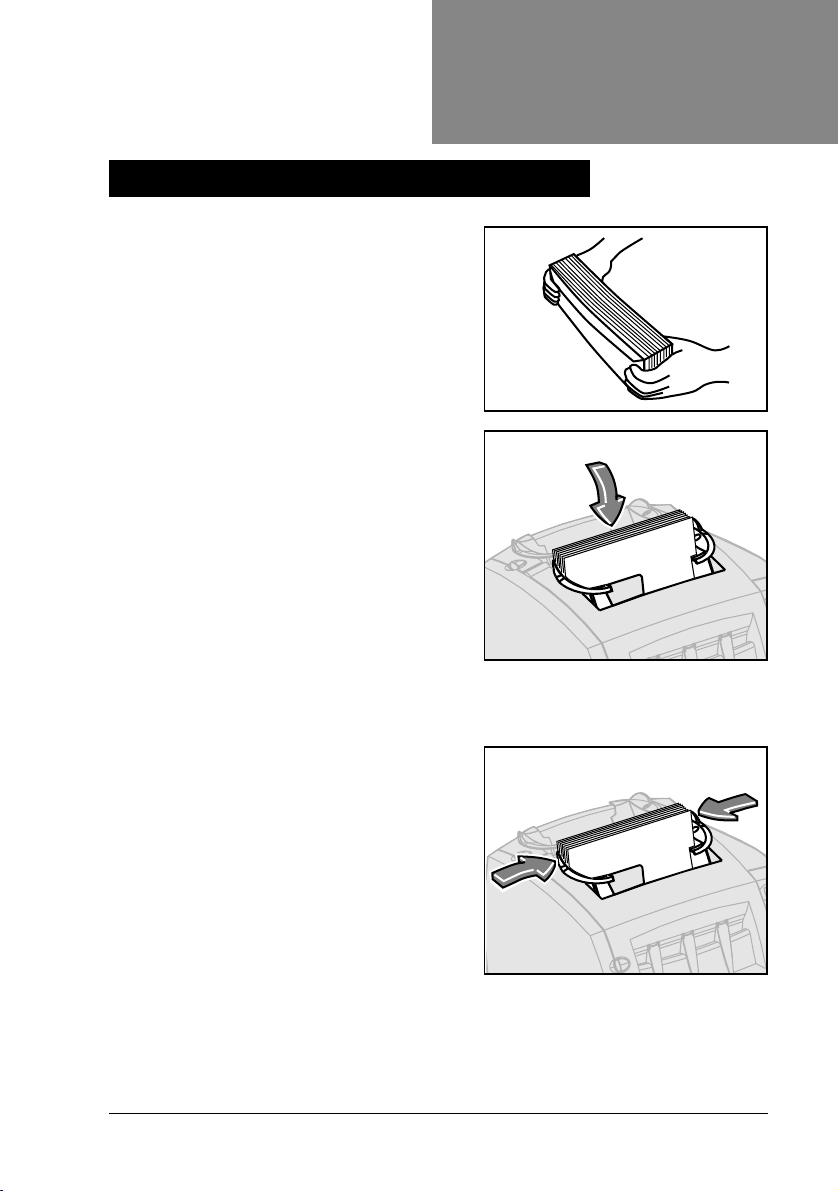
Loading the Envelope Feeder (Feeder B)
Always fan (aerate) envelopes before
you load them. This prevents them
from sticking together.
Then tap the stack of envelopes onto a
firm surface to align the edges.
IMPORTANT:
Load envelopes right way up and
facing you. This means that the
envelope flap is on the back of the
envelope and at the top. Any other
orientation will prevent the machine
from inserting properly.
Place the envelope stack into Feeder B
with the back envelope flat against the
feed belts. There’s no need to “shingle”
or stagger the envelope stack.
Slide the two side guides up to the
envelope stack then
off. Use the blue handles at the rear of
the guides when moving them.
The correct setting is achieved when
the guides control the envelopes but in
no way restrict their feed into the
machine or cause them to feed at an
angle (skew).
IMPORTANT: If the guides are too
tight, envelopes may not feed reliably; if the guides are too loose,
envelopes may skew as they feed into the machine.
OfficeRight™ DI200
slightly
Operator’s Guide
back them
11
Page 14
Loading
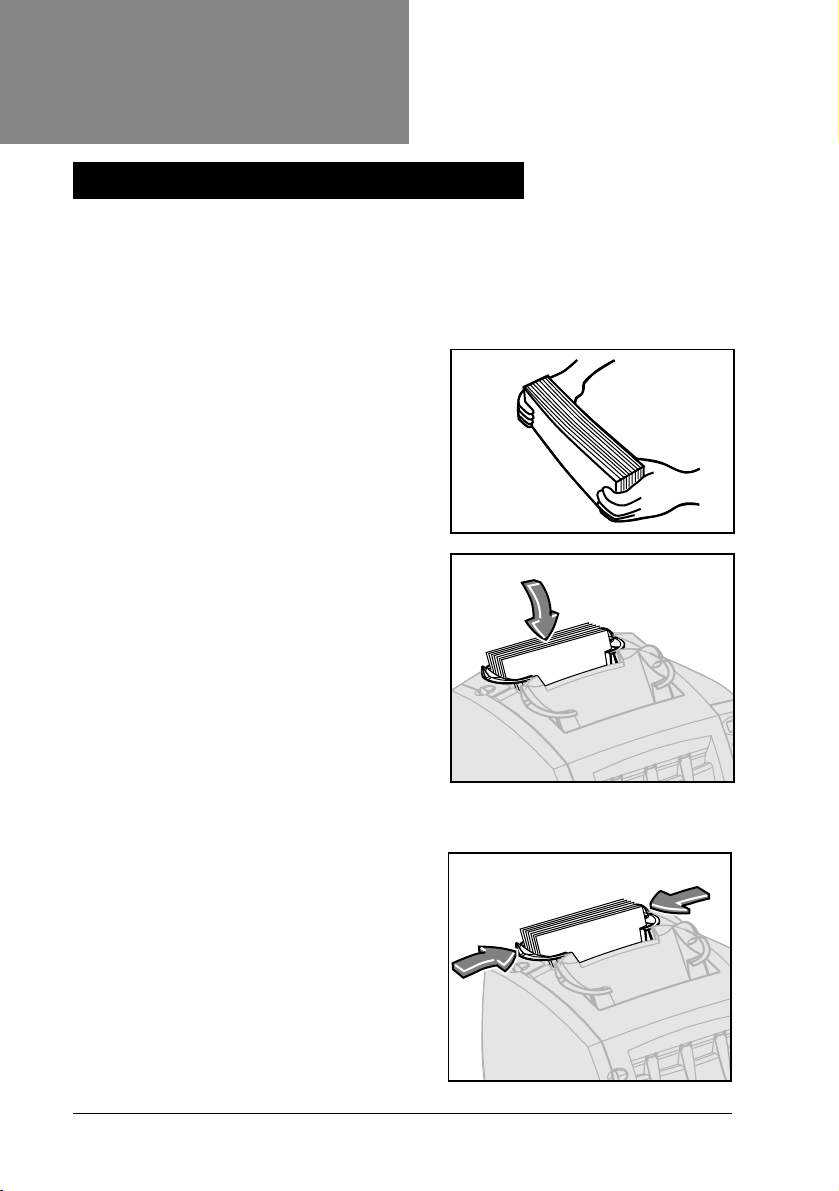
Loading the Insert Feeder (Feeder C)
Insert Feeder C is only available on certain machine configurations. Use
do not
this feeder to add additional inserts to your envelope that
folding by the machine. Feeder C is especially suited to feeding pre-folded
or thicker inserts such as business reply envelopes (BREs), response
cards and similar materials.
Always fan (aerate) inserts before you
load them. This prevents them from
sticking together.
Then tap the stack of inserts onto a firm
surface to align the edges.
Place the insert stack into Feeder C.
IMPORTANT: The orientation of the
insert stack depends on the nature of
the material being run. For pre-folded
inserts, it’s normally best to load with
the “closed” edge feeding first. You can
usually load business reply envelopes
right way up and facing you. However, if
the flaps are pulled open when feeding,
try loading the envelopes with the flaps
down and facing you.
require
Slide the two side guides up to the
insert stack then
Use the blue handles at the rear of the
guides when moving them.
IMPORTANT: The setting is correct
when the guides control the inserts but
in no way restrict their feed into the
machine or cause them to feed at an
angle (skew). If the guides are too tight,
inserts may not feed reliably; if they are
too loose, inserts may skew as they
feed into the machine.
12
slightly
back them off.
OfficeRight™ DI200
Operator’s Guide
Page 15

1 folded sheet
no envelope (fold only)
envelope
1 insert
Running
3. RUNNING JOBS
Chapter 1 explained the main features of the machine and how to use the
control panel. Chapter 2 described how to turn the machine ON and load the
feeders and moistener unit.
This chapter assumes you understand the content of the previous chapters.
It includes illustrations that identify the various jobs you can run on your
OfficeRight™ DI200, and then gives a table of quick steps to set up and run
each job.
Once you’re familiar with the machine, use this chapter as a quick reference
when you have to change a job setup.
The Manual Feeder M is used to feed stapled sets of up to three sheets by
hand. See page 28 for an explanation of how to set up and use this feeder.
Job Listing
ALL MODELS
1 folded sheet
MODELS with an INSERT FEEDER C
OfficeRight™ DI200
envelope
JOB 1 Page 15
1 insert
1 folded sheet
envelope
JOB 3 Page 17 JOB 4 Page 19
Operator’s Guide
JOB 2 Page 16
13
Page 16

Running
MODELS with an OPTIONAL SECOND SHEET FEEDER A2
2 folded sheets
envelope
JOB 5 Page 20 JOB 6 Page 21
2 folded sheets
no envelope (fold only)
JOB 7 Page 22 JOB 8 Page 23
MODELS with an INSERT FEEDER C and SECOND SHEET
FEEDER A2
1 insert
2 folded sheets
1 insert
2 folded sheets
(collated)
envelope
2 folded sheets
(collated)
no envelope (fold only)
2 folded sheets
(collated)
see note below
*
see note below
*
envelope
JOB 9 Page 24 JOB 10 Page 26
envelope
see note below
*
NOTE: Jobs marked with an asterisk (*) use the second sheet feeder, A2,
in “2nd Page” mode to feed 2-sheet collated sets. You must load sheets
into the feeder in their collated sequence: first page, second page, first
page, second page, etc., just as they are printed by a typical office laser
printer.
14
OfficeRight™ DI200
Operator’s Guide
Page 17

Job 1
One Folded Sheet into an Envelope
Model Required: Any OfficeRight™DI200
Notes: If your machine has the optional 2nd sheet
feeder A2, you can use it instead of A1, as long as
you load and select it as described in steps 1 and 3
below.
Step Action Tips More Details…
1 Make sure paper size Choose 11” or 14” Page 30
setting is correct
2 Load sheets Load face down Page 10
into Sheet Feeder and bottom edge first
A1
3 Load envelopes Load right way up Page 11
into Feeder B and facing you
4 Press button Make sure green Page 6, 7
to select Feeder A1 indicator lights
1 folded sheet
envelope
5 Press button to Make sure green Page 6, 7
select Envelope indicator lights
Fdr B
6 Press button to Make sure moistener has Page 6, 7
choose Seal or E-Z Seal
No Seal
7 Press Trial Piece Trial piece will not Page 6, 7
button and check seal—this is normal
trial piece
8 Press Start button Stop button will stop Page 6, 7
to run job machine at end of cycle
Problems? See
OfficeRight™ DI200
Error Messages,
Operator’s Guide
page 33, and
®
or water
Troubleshooting
, page 37
15
Page 18

Job 2
1 folded sheet
no envelope (fold only)
One Folded Sheet, No Envelope
(Fold Only)
Model Required: Any OfficeRight™DI200
Notes: If your machine has the optional 2nd sheet
feeder A2, you can use it instead of Feeder A1, as
long as you load and select it as described in steps 1
and 3 below.
Step Action Tips More Details…
1 Make sure paper size Choose 11” or 14” Page 30
setting is correct
2 Load sheets Load face down and Page 10
into Sheet Feeder bottom edge first
A1
3 Press button Make sure green Page 6, 7
to select Feeder A1 indicator lights
4 Press button to Make sure green Page 6, 7
select Fold Only indicator lights
5 Press Trial Piece Check trial piece Page 6, 7
button and look for a
6 Press
to run job machine at end of cycle
Problems? See
16
a good fold
Start button Stop button will stop Page 6, 7
Error Messages,
page 33, and
Troubleshooting
OfficeRight™ DI200
, page 37
Operator’s Guide
Page 19

Job 3
One Folded Sheet + One Insert
into an Envelope
Model Required: OfficeRight™DI200
Insert Feeder C
Notes: Inserts are pre-folded sheets or unfolded
items such as business reply envelopes, response
cards and similar items. If your machine has the
optional 2nd sheet feeder A2, you can use it instead
of Feeder A1, as long as you load and select it as described in steps 1 and 4
below.
Step Action Tips More Details…
1 Make sure paper size Choose 11” or 14” Page 30
setting is correct
2 Load sheets Load face down Page 10
into Sheet Feeder and bottom edge first
A1
3 Load envelopes Load right way up Page 11
into Feeder B and facing you
4 Load inserts Loading orientation Page 12
into Insert Feeder C depends on item
must
have an
1 insert
1 folded sheet
envelope
5 Press button Make sure green Page 6, 7
to select Feeder A1 indicator lights
6 Press button Make sure BOTH Page 6, 7
to select Envelope green indicators
Fdr B and Insert are lit
Fdr C
7 Press button to Make sure moistener Page 6, 7
choose Seal or has E-Z Seal
No Seal
OfficeRight™ DI200
Operator’s Guide
®
or water
Continues on next page...
17
Page 20

Job 3
One Folded Sheet + One Insert
into an Envelope (continued)
Step Action Tips More Details…
8 Press Trial Piece Trial piece will not Page 6, 7
button and check seal—this is normal
trial piece
9 Press Start button Stop button will stop Page 6, 7
to run job machine at end of cycle
Problems? See
Error Messages,
page 33, and
Troubleshooting
, page 37
18
OfficeRight™ DI200
Operator’s Guide
Page 21

Job 4
One Insert into an Envelope
Model Required: Your OfficeRight™ DI200
must
1 insert
have an Insert Feeder C.
Notes: Inserts are pre-folded sheets or unfolded
items such as business reply envelopes,
envelope
response cards and similar materials.
Step Action Tips For More Details…
1 Load envelopes Load right way up Page 11
into Feeder B and facing you
2 Load inserts Loading orientation Page 12
into Insert depends on item
Feeder C
3 Press button Make sure BOTH Page 6, 7
to select Envelope green indicators
Fdr B and Insert are lit
Fdr C
4 Press A1/A2 select Make sure NO Page 6, 7
button until both indicators are lit for
feeders and 2nd A1 or A2 or 2nd Page
Page are turned
OFF
5 Press button to choose Make sure moistener Page 6, 7
Seal or No Seal has E-Z Seal
6 Press Trial Piece button Trial piece will not Page 6, 7
and inspect trial piece seal—this is normal
7 Press Start button Stop button will stop Page 6, 7
to run job machine at end of cycle
Problems? See
OfficeRight™ DI200
Error Messages,
Operator’s Guide
page 33, and
®
or water
Troubleshooting
, page 37
19
Page 22

Job 5
Two Folded Sheets into an Envelope
Model Required: Your OfficeRight™ DI200
must
2 folded sheets
have the optional Sheet Feeder A2.
Notes: Run the address-bearing document from
envelope
Sheet Feeder A2 and a second sheet that needs
folding from Sheet Feeder A1.
Step Action Tips For More Details…
1 Make sure paper size Choose 11” or 14” Page 30
setting is correct
2 Load addressed sheets Load face down Page 10
into Sheet Feeder A2 and bottom edge first
3 Load second sheets Load face down Page 10
into Sheet Feeder A1 and bottom edge first
4 Load envelopes Load right way up Page 11
into Feeder B and facing you
5 Press button to select Make sure BOTH Page 6, 7
Feeders A1 and A2. green indicators are lit
6 Press button to select Make sure green Page 6, 7
Envelope Fdr B indicator lights
7 Press button to choose Make sure moistener Page 6, 7
Seal or No Seal has E-Z Seal
8 Press Trial Piece button Trial piece will not Page 6, 7
and check trial piece seal—this is normal
9 Press Start button Stop button will stop Page 6, 7
to run job machine at end of cycle
Problems? See
20
Error Messages,
page 33, and
®
or water
Troubleshooting
OfficeRight™ DI200
, page 37
Operator’s Guide
Page 23

Job 6
Two Collated, Folded Sheets into an
Envelope
Model Required: Your OfficeRight™ DI200
must
2 folded sheets
(collated)
have the optional Sheet Feeder A2.
Notes: This job uses the second sheet feeder
envelope
A2 in 2nd Page mode to feed two-sheet, collated
sets. Load sheets into the feeder in their collated
sequence: page one, page two, page one, page two and so on.
Step Action Tips For More Details…
1 Make sure paper size Choose 11” or 14” Page 30
setting is correct
2 Load sheets into Load face down Page 10
Sheet Feeder A2. and bottom edge first
See note above for
loading sequence
3 Load envelopes Load right way up Page 11
into Feeder B and facing you
4 Press button to select Make sure BOTH Page 6, 7
Feeder A2 and 2nd green indicators are lit
Page
5 Press button to select Make sure green Page 6, 7
Envelope Fdr B indicator lights
6 Press button to choose Make sure moistener Page 6, 7
Seal or No Seal has E-Z Seal
7 Press Trial Piece button Trial piece will not Page 6, 7
and check trial piece seal—this is normal
8 Press Start button Stop button will stop Page 6, 7
to run job machine at end of cycle
Problems? See
OfficeRight™ DI200
Error Messages,
Operator’s Guide
page 33, and
®
or water
Troubleshooting
, page 37
21
Page 24

Job 7
Two Folded Sheets, No Envelope
(Fold Only)
Model Required: Your OfficeRight™ DI200
have an optional Sheet Feeder A2.
must
2 folded sheets
no envelope (fold only)
Notes: Run the address-bearing document from
Sheet Feeder A2 and a second sheet that needs
folding from Sheet Feeder A1.
Step Action Tips For More Details…
1 Make sure paper size Choose 11” or 14” Page 30
setting is correct
2 Load addressed sheets Load face down Page 10
into Sheet Feeder A2 and bottom edge first
3 Load second sheets Load face down Page 10
into Sheet Feeder A1 and bottom edge first
4 Press button to select Make sure BOTH Page 6, 7
Feeder A1 and green indicators
Feeder A2 are lit
5 Press button to Make sure green Page 6, 7
select Fold Only indicator lights
6 Press Trial Piece button Check trial piece Page 6, 7
and check trial piece for a good fold
7 Press Start button Stop button will stop Page 6, 7
to run job machine at end of cycle
Problems? See
22
Error Messages,
page 33, and
Troubleshooting
OfficeRight™ DI200
, page 37
Operator’s Guide
Page 25

Two Collated, Folded Sheets,
No Envelope (Fold Only)
Job 8
Model Required: Your OfficeRight™ DI200
have an optional Sheet Feeder A2.
must
2 folded sheets
(collated)
no envelope (fold only)
Notes: This job uses the second sheet feeder
A2 in 2nd Page mode to feed two-sheet collated
sets. Load sheets into the feeder in collated sequence: first page, second
page, first page, second page and so on.
Step Action Tips For More Details…
1 Make sure that paper Choose 11” or 14” Page 30
size setting is correct
2 Load sheets into Load face down Page 10
Sheet Feeder A2. and bottom edge
See note above for first
loading sequence
3 Press button to select Make sure BOTH Page 6, 7
Feeder A2 and green indicators
2nd Page are lit
4 Press button to Make sure green Page 6, 7
select Fold Only indicator lights
5 Press Trial Piece button Check trial piece Page 6, 7
and check trial piece for a good fold
6 Press Start button Stop button will stop Page 6, 7
to run job machine at end of
cycle
Problems? See
OfficeRight™ DI200
Error Messages,
Operator’s Guide
page 33, and
Troubleshooting
, page 37
23
Page 26

Job 9
envelope
1 insert
2 folded sheets
Two Folded Sheets and an Insert
into an Envelope
Model Required: Your OfficeRight™ DI200
must
have the optional Sheet Feeder A2 and an Insert
Feeder C
Notes: Run the address-bearing document from
Sheet Feeder A2 and a second sheet that needs
folding from Sheet Feeder A1. Inserts are pre-folded sheets or unfolded
items such as business reply envelopes, response cards and similar
materials.
Step Action Tips For More Details…
1 Make sure that paper Choose 11” or 14” Page 30
size setting is correct
2 Load addressed sheets Load face down Page 10
into Sheet Feeder A2 and bottom edge first
3 Load second sheets Load face down Page 10
into Sheet Feeder A1 and bottom edge first
4 Load envelopes Load right way up Page 11
into Feeder B and facing you
5 Load inserts Loading orientation Page 12
into Insert Feeder C depends on item
6 Press button to select Make sure BOTH Page 6, 7
Feeder A1 and green indicators
Feeder A2 are lit
7 Press button to Make sure BOTH Page 6, 7
select Envelope Fdr green indicators
B and Insert Fdr C are lit
8 Press button to choose Make sure moistener Page 6, 7
24
Seal or No Seal has E-Z Seal
®
or water
OfficeRight™ DI200
Operator’s Guide
Page 27

Job 9
Two Folded Sheets and an Insert
into an Envelope (continued)
Step Action Tips For More Details…
9 Press Trial Piece button Trial piece will not Page 6, 7
and check trial piece seal—this is normal
10 Press Start button Stop button will stop Page 6, 7
to run job machine at end of
cycle
Problems? See
Error Messages,
page 33, and
Troubleshooting
, page 37
OfficeRight™ DI200
Operator’s Guide
25
Page 28

Job 10
Two Collated, Folded Sheets and an
Insert into an Envelope
Model Required: Your OfficeRight™ DI200
must
1 insert
2 folded sheets
(collated)
have the optional Sheet Feeder A2 and an Insert
Feeder C.
envelope
Notes: This job uses the second sheet feeder
A2 in 2nd Page mode to feed two-sheet, collated sets. Load sheets into
the feeder in collated sequence: first page, second page, first page,
second page and so on. Inserts are pre-folded sheets or unfolded items
such as business reply envelopes, response cards and so on.
Step Action Tips For More Details…
1 Make sure that paper Choose 11” or 14” Page 30
size setting is correct
2 Load sheets into Load face down Page 10
Sheet Feeder A2. and bottom edge first
See note above for
loading sequence
3 Load envelopes Load right way up Page 11
into Feeder B and facing you
4 Load inserts Loading orientation Page 12
into Insert Feeder C depends on item
5 Press button to select Make sure BOTH Page 6, 7
Feeder A2 and green indicators
2nd Page are lit
6 Press button to Make sure BOTH Page 6, 7
select Envelope green indicators
Fdr B and are lit
Insert Fdr C
7 Press button to choose Make sure moistener Page 6,7
Seal or No Seal has E-Z Seal
26
®
or water
OfficeRight™ DI200
Operator’s Guide
Page 29

Job 10
Two Collated, Folded Sheets and an
Insert into an Envelope (continued)
Step Action Tips For More Details…
8 Press Trial Piece button Trial piece will not Page 6, 7
and check trial piece seal—this is normal
9 Press Start button Stop button will stop Page 6, 7
to run job machine at end of
cycle
Problems? See
Error Messages,
page 33, and
Troubleshooting
, page 37
OfficeRight™ DI200
Operator’s Guide
27
Page 30

Manual Feed
The Manual Feeder M
All OfficeRight™ DI200 models have a Manual Feeder M that allows you
to feed stapled sets of
by the machine.
up to three sheets,
one set at a time, for processing
Using the manual feeder
can, however, use the manual feeder along with the envelope, insert, foldonly and sealer selections to run a variety of jobs manually.
To use the manual feeder, set up the machine as you normally would for
the job you’re running. The selections shown by the indicators for Sheet
Feeders A1 and/or A2 will be
apply to the manual job.
Feed stapled sets into the manual
feeder in the normal orientation for
sheets fed into the OfficeRight™
DI200; that is,
edge
first.
Take one stapled set and feed it gently
into the manual feed slot until the
machine automatically starts and draws
the set from you. The machine
processes the set and ejects it into the
stacker in the usual manner.
NOTES:
• Be sure to feed the set in squarely. If you feed it in at an angle, a poor
fold or jam could result.
• Feed the set into the machine gently. Very little force is needed.
• The first set will
“trial” feature allows you to inspect the processed job to make sure
that all pieces were inserted correctly and that the address appears in
the envelope window.
face down
automatically turns off both sheet feeders
ignored
and
bottom
not
seal even if you set up the system to do so. This
by the machine. All other selections
Feed sets
face down,
bottom edge
first
. You
28
CAUTION! Feeding more than three sheets in a set may
damage your machine.
OfficeRight™ DI200
Operator’s Guide
Page 31

4. ADVANCED MENU OPTIONS
The Menu
Press the
Menu/Enter
Button to get to the advanced menu options. These
allow you to:
• Reset the counter
Choose this option if you want to set the piece
counter back to zero.
• Change paper size
Menu / Enter
Choose this option to select letter-size
no yes
sheets (8-1/2 x 11 inches) or legal-size
sheets (8-1/2 x 14 inches).
Feeder A1
Feeder A2
2nd Page
• Move the address in the window
Select this menu option to center the
address vertically in the envelope window
• Turn sheet double detection on or off
Seal
No Seal
Trial Piece Stop
Envelope Fdr B
Insert Fdr C
Fold Only
Start
Turn this option on if you want the machine to
stop automatically when it senses a double feed.
• Turn insert double detection on or off
Turn this option on if you want the machine to stop automatically when
it detects a double insert feed.
• Turn safe seal on or off
Turn this option on if you need to improve envelope sealing quality.
The above options appear in the order listed. To scroll through them, press
the
Menu/Enter
press the
as they appear. To return to the
Menu/Enter
button repeatedly until you see the option you want. Or
Menu/Enter
button once and answer
Ready
screen at any time, press the
no
to each of the options
button repeatedly.
Reset Counter
This option allows you to reset the
counter to zero. To access it, press the
Menu/Enter
Prompts:
Press
no
( ) to go to the next menu option.
OfficeRight™ DI200
button once. The screen
Reset Counter?
yes
( ) to reset the counter and return to the ready screen. Press
Operator’s Guide
ResetReset
Reset
ResetReset
Counter?Counter?
Counter?
Counter?Counter?
29
Page 32

The Menu
Change Paper Size
Choose this menu option to select the
paper (sheet) size you want to run. You
can set your OfficeRight™ DI200 to
process letter-size sheets (8-1/2 x 11
inches) or legal-size sheets (8-1/2 x 14
inches).
Press the
current paper size selection:
1/2 x 14 Change Size?
Press
Press
size setting. Press the
Ready
Please note that the paper size setting applies to
feeders: that is, Sheet Feeder A1; the optional Sheet Feeder A2 (if your
machine is so equipped); and Manual Feeder M.
Menu/Enter
yes
( ) to change paper size. The display confirms the change.
no
( ) to go to the next menu option without changing the paper
screen.
IMPORTANT: Always make sure the sheets you load are
the same size you’ve set the machine to run. If you load the
wrong size sheets, the machine will jam.
button repeatedly until the display shows the
Paper: 8-1/2 x 11 Change Size?
Menu/Enter
button repeatedly to go back to the
Paper: 8-1/2 x 11Paper: 8-1/2 x 11
Paper: 8-1/2 x 11
Paper: 8-1/2 x 11Paper: 8-1/2 x 11
Change Size?Change Size?
Change Size?
Change Size?Change Size?
Paper: 8-1/2 x 14Paper: 8-1/2 x 14
Paper: 8-1/2 x 14
Paper: 8-1/2 x 14Paper: 8-1/2 x 14
Change Size?Change Size?
Change Size?
Change Size?Change Size?
or
Paper: 8-
all
your machine’s sheet
CAUTION: DO NOT intermix sheet sizes in the same job.
The machine will jam if you attempt to do so.
Move the Address in the Window
This menu option allows you to change the length of the fold panel so that
the address is centered in the envelope window. Make this adjustment if
the address in your trial piece appears to be too high or too low in the
window.
Make the adjustment by entering a number from 1 to 9. The
number, the
30
lower
the address will appear in the window.
OfficeRight™ DI200
higher
the
Operator’s Guide
Page 33

The Menu
Press the
until the screen displays:
in window?
Press
The screen displays:
(where X is the current setting)
Set the desired number using the
reach the setting you want, press the
takes you to the next menu option.
Run another trial piece and check it. If the address is centered in the
window, press
the procedure until you get the result you want.
Pressing
window takes you to the next menu option.
Menu/Enter
yes
( ) to enter the function.
Start
no
( ) when you have the option to move the address in the
button repeatedly
Move address
Shift...X
yes
to run your job. If the address is not centered, repeat
Move addressMove address
Move address
Move addressMove address
In window?In window?
In window?
In window?In window?
Shift.. XShift.. X
Shift.. X
Shift.. XShift.. X
Down Down
Down
Down Down
( ) and
Menu/Enter
no
( ) buttons. When you
button to confirm it. This
Up Up
Up
Up Up
Sheet Double Detect On/Off
This option lets you turn the sheet feeder(s) double document detection on
or off.
When turned on…
The machine stops automatically when it senses a double feed (two
sheets feed when only one should). If you’re running a job with individually
addressed inserts, it’s best to turn double detection on.
When turned off…
The machine ignores any double feeds that may occur. You may want to
turn double detection off if you’re running a mail job and it is of little
concern if a mail recipient receives duplicate sheets.
Press the
until the display shows the sheet DD
status:
Press
double detect status. The display will confirm the change. Press
go to the next menu option without changing this setting.
Turn safe seal on/off
OfficeRight™ DI200
Menu/Enter
Sheet DD is On (Off). Change?
yes
( ) to change the sheet
button repeatedly
Operator’s Guide
Sheet DD isSheet DD is
Sheet DD is
Sheet DD isSheet DD is
On. Change?On. Change?
On. Change?
On. Change?On. Change?
no
( ) to
31
Page 34

The Menu
Insert Double Detect On/Off
This option lets you turn the insert feeder’s double document detection on
or off.
When turned on…
The machine records the thickness of the piece. When you start the run,
the machine automatically stops when it senses a double feed.
When turned off…
The machine ignores any double feeds that may occur. You may want to
leave double detection off if you are running a mail job and occasional
duplicate inserts are not a concern.
Press the
until the display shows the insert DD
status:
Press
firms the change. Press
detection setting remains unchanged.
Menu/Enter
Insert DD is On (Off). Change?
yes
( ) to change the insert double detect setting. The display con-
button repeatedly
no
( ) to go to the next option. The double
Insert DD isInsert DD is
Insert DD is
Insert DD isInsert DD is
On. Change?On. Change?
On. Change?
On. Change?On. Change?
Safe Seal On/Off
This option allows you to turn safe seal on or off. If you’re having problems
with envelope flaps not sticking, try turning this option on.
Safe seal slows the machine slightly, allowing more time for moisture to
transfer onto the envelope flap during the seal cycle. Some gums require
this added time to break down properly and become sticky. This function
therefore produces a better seal on many types of envelopes.
Press the
peatedly until the display shows the
safe seal status:
Change?
Press
change. Press
safe seal setting.
Menu/Enter
yes
( ) to change the safe seal status. The display confirms the
button re-
Safe Seal is On (Off).
no
( ) to exit from the menu options without changing the
Safe Seal isSafe Seal is
Safe Seal is
Safe Seal isSafe Seal is
On. Change?On. Change?
On. Change?
On. Change?On. Change?
32
OfficeRight™ DI200
Operator’s Guide
Page 35

Reference
5. REFERENCE
Error Messages
Message Meaning and Action
CANNOT No sheet feeder has been selected in the job setup. The
SHIFT display automatically times out from this message after
ADDRESS two seconds and moves on to the turn double detect
ON INSERTS On/Off menu function.
CLOSE The machine has detected that the front cover D is open.
COVER D Check that cover D is closed properly.
CLOSE The machine detected that the rear cover E is open.
COVER E Check that cover E is closed properly.
CHECK AREAS Check for an unsuccessful clearance of a jam between
A1 & D the sheet feeder A1 and the collation area. Remove the
paper in sheet feeder A1, open front cover D and check
that the machine is clear of material. Close front cover
D, reload and start run.
CHECK AREAS This could be due to an unsuccessful clearance of a jam
A1, A2 & D between the sheet feeders A1, A2 and the collation area.
Remove the paper in sheet feeders A1, A2, open front
cover D and check that the machine is clear of material.
Close front cover D, reload and start run.
CHECK / CLEAR Inserts failed to feed. Check that the side guides in feeder
INSERT FDR C C are not too tight. Reload feeder C and start run.
CHECK SHEET Sheet feeder A1 out of paper, failed to feed or a jam was not
FEEDER A1 cleared successfully from this area. Remove the paper in
sheet feeder A1, reload and start run.
OfficeRight™ DI200
Operator’s Guide
33
Page 36

Reference
Message Meaning and Action
CHECK SHEET Sheet feeder A2 out of paper, failed to feed or a jam was not
FEEDER A2 cleared successfully from this area. Remove the paper in
sheet feeder A2, reload and start run.
CHECK SHEET The machine has detected a material jam between sheet
FEEDER A2 feeder A2 and the collation area. Open the front cover
LIFT COVER D cover D and remove all material inside. Close frontcover
REMOVE ALL D. Remove material from sheet feeder A2. Reload and
start run.
CLEAR FEEDER This is due to the Manual Feeder M being blocked prior to
M powering the machine up or starting it up. Check that there’s
no material in the feeder. If there is, remove it and restart.
CLEAR This could be due either to a previous jam not being
STACKER AREA cleared correctly in the stacker area or there is a jam
in the stacker area. Check that stacker area is clear.
Remove any material and resume run.
DOUBLE FEED The machine has detected a double feed from sheet feeder
CHECK FDR A1 A1. Remove the paper in sheet feeder A1, reload and start
run.
DOUBLE FEED The machine has detected a double feed from sheet feeder
CHECK FDR A2 A2. Remove the paper in sheet feeder A2, reload and start
run.
FOLD ONLY Fold only has been selected but no sheets, either
REQUIRES from feeder A1 or A2 (if applicable), have been selected.
SHEETS In this state the indicators for sheet feeder A1 will be red,
not green. Press the sheet feeder selection button until the
required feeder is selected.
34
OfficeRight™ DI200
Operator’s Guide
Page 37

Reference
Message Meaning and Action
INSERT The machine has detected a double feed from the
DOUBLE FEED insert feeder. Lift cover D and remove material. Reload
inserts and start run.
LIFT COVER D This state could be produced by any kind of material
REMOVE ALL crash in or near the insertion area, or a previous jam
not being cleared correctly. It can also be caused by
dust covering a sensor. Open front cover D and remove any material in the machine. Also blow out any
dust that may have accumulated in the area. Close
cover D and start run.
LIFT COVER D This could be due to a previous envelope jam not being
REMOVE ENV cleared correctly in the insertion area. Open front
D, remove envelope and start run. If no envelope
is visible in the machine, remove all material visible in
the feeder then reload and start run.
OPEN COVER E This could be due to a previous jam not being cleared
REMOVE ALL correctly. Open rear cover E and remove any material
in the machine. Close rear cover E and start run.
POWER ON/OFF Turn off power to the machine, wait for a minute and
then turn the power back on.
RELOAD Feeder B may be out of envelopes, or an envelope
ENVELOPES feed failed or was slow. Check that there are envelopes
loaded. If not, reload and start run. If there are
envelopes, check that the side guides on feeder B are
not too tight and that you have not overloaded the
envelopes. Reload feeder B and start run.
RELOAD Insert feeder C is empty. Reload inserts and start
INSERTS run.
OfficeRight™ DI200
Operator’s Guide
35
Page 38

Reference
Message Meaning and Action
REMOVE ALL This could be due to a material jam in fold plate 1 or near
FROM D & E the insertion area. Open front cover D and remove any
material that’s there. Close cover D. Open rear cover E and
remove any material in the area. Close rear cover E and start
run.
REMOVE ALL This is due to a poor feed from manual feeder M. Check
FROM M & D that there’s no material in manual feeder M. If there is,
remove it. Also open front cover D and remove any material
inside. Close front cover D, reload and start run.
REMOVE SHEET A sheet has failed to feed from sheet feeder A1. Remove
FROM A1 paper from A1, then reload and start run.
REPLACE Check that sheet feeder A1 is pushed fully into position.
FDR A1 TRAY
SHEETS Envelopes have been selected but no sheet feeder was
REQUIRED selected. The indicators for sheet feeder A1 and envelopes
will be red. Press the sheet feeder selection button until the
required feeder is selected.
SYSTEM ERROR This is an unrecoverable system error. Please call
CALL SERVICE Pitney Bowes for assistance at 1.800.253.6565 (USA) or
1.800.672.6937 (Canada).
36
OfficeRight™ DI200
Operator’s Guide
Page 39

Reference
General Troubleshooting
Poor folding
If you’re running perforated material, the machine may have problems
folding. If a machine fold almost corresponds with the perforation, a “box
fold” may occur. This happens when another fold is created just off of the
perforation and buckles slightly, creating, in effect, a third fold.
If this happens, adjust the machine fold slightly. Run a trial piece and
inspect the fold. If there is a box fold, access the advanced menu options
and select
and re-run a trial piece. Inspect the fold again and, if required, change the
move address in window
Machine stops for doubles that aren’t there
If you have a problem with incorrect double detection, it may be due to the
fact that you are using a new batch of material that is slightly thicker. Try
running a new trial piece.
When you ran the original trial piece, the machine calibrated itself to the
original material thickness. When it senses the new, thicker material, the
system thinks that a double was fed. You can turn double detection off if
an occasional duplicate insert is not important (see pages 31 and 32).
move address in window
function until the box fold is eliminated.
. Change the setting higher or lower
Machine feeds doubles without stopping
Check that double detection is turned on. See page 31. Make sure you’ve
run a trial piece. This automatically sets the double detector. See page 7.
Envelope flaps won’t seal
• Check that Seal is selected (green indicator lit). See page 7.
• Check that the moistener isn’t empty. See page 9.
• Try selecting safe seal mode. See page 32.
Address position wrong or address doesn’t appear in envelope
window
• Is the addressed sheet loaded properly? See page 10.
• Is the addressed sheet in Sheet feeder A2 (if installed)?
• Try adjusting the address position. See page 30.
OfficeRight™ DI200
Operator’s Guide
37
Page 40

Reference
Inserts or business reply envelopes feed poorly from Insert Feeder
Changing the orientation of the insert stack may help. For pre-folded
inserts it’s normally best to load with the closed edge feeding first.
Business reply envelopes can normally be loaded right way up and facing
you. However, if the flaps are pulled open when feeding, try loading with
the flaps down and facing you.
Following installation of Sheet Feeder 2, the system doesn’t work
• Check that the OfficeRight™ DI200 is correctly located onto Sheet
Feeder 2.
• Turn the machine off, wait a few seconds and then turn it back on.
• Check that no debris (dust, paper, etc.) has fallen into the Sheet
Feeder 2 electrical connector.
Clearing Material Jams
First, remove all paper from the affected
feeders as indicated on the display.
Then, if neccessary, clear sheets
…from sheet feeders/manual feeder
If the display indicates a jam in the sheet
feeder(s) or manual feeder areas, pull
the feeder assembly from the machine
as shown. Then carefully remove any
stalled material from the machine.
…from area beneath cover D
If the display indicates a jam beneath
cover D, press the blue button marked D
to release the cover. Lift the cover using
the finger grips on each side of the
stacker. Then carefully remove any
stalled material from the machine.
When closing the cover, latch it closed
by pressing down on the finger grips or
the central part of the cover in front of
the envelope feeder. DO NOT press
down on the stacker.
38
Button D
Continues on next page...
OfficeRight™ DI200
Operator’s Guide
Page 41

Reference
…from area beneath cover E
If the display indicates a jam beneath
cover E, press the blue button marked
E to release the cover. Push the cover
backwards to gain full access.
Then carefully remove any stalled
material from the machine.
Button E
Getting Help
Should you experience a problem with your OfficeRight™DI200, please
refer to the troubleshooting information starting on page 37. In many
cases, it should help you resolve the problem.
There may be times when you need additional help to solve a problem, or
you may want more information about how to handle a particular OfficeRight Mailer™ application.
Online Support
We encourage you to visit
The site offers helpful answers to frequently asked questions.
Phone Support
Technical help is readily available from our customer support line.
Before You Call...
Please have the following information at hand—
❒ Product name: OfficeRight™ DI200
❒ Serial number: This is located on the machine’s back cover.
❒ Nature of the problem: What happens and when does it happen? Did
the machine display an error message? What was it?
❒ The steps you've already taken to solve the problem and the results.
Then call:
http://www.pitneybowes.com/support
☎
In the USA 1.800.522.0020
In Canada 1.800.672.6937
OfficeRight™ DI200
Operator’s Guide
39
Page 42

Reference
Ordering Supplies
Pitney Bowes has made it easier than ever to order supplies—such as E-Z
®
Seal
(Item Code 601-0, USA only) and Moistener Wick Replacement
(Item Code 639-0)—that are designed specifically for your OfficeRight™
DI200.
Ordering Online (USA Only)
Just point your browser to http://www.pitneybowes.com/supplies
You'll find a complete, easy-to-navigate online store that offers a wide
assortment of genuine Pitney Bowes supplies at attractive prices. Be sure
to take advantage of special quantity pricing and online discounts.
Ordering by Phone
Our representatives will be happy to answer your questions and take your
order.
☎ In the USA, call 1.800.243.7824
☎ In Canada, call 1.800.672.6937
Requesting a PB Supply Catalog (USA Only)
Call the number above or e-mail us at supplies@pb.com.
40
OfficeRight™ DI200
Operator’s Guide
Page 43

Reference“
Reference
Material Specifications
Sheet Feeders A1 and/or A2:
Sheet Size Letter (8-1/2 x 11”) or Legal (8-1/2 x 14”)
Paper Weight 20 to 24 lb. bond
Capacity 80 sheets of 20 lb. bond maximum
Limitations DO NOT run NCR or litho/inkjet coated papers
Insert Feeder C (Optional):
Sheet Size Width: 5 to 8-3/4”
Depth: 3-3/8 to 3-7/8”
Material Weight Unfolded document: 18 lb. bond to 80 lb. card
stock
Trifolded document: 18 to 24 lb. bond
Capacity 60 Business Reply Envelopes, 24 lb. bond,
maximum
Type Suitable for pre-folded, single panel inserts,
business reply envelopes, etc.
Envelope Feeder B:
Envelope Size Number 10 only
Width: 9-1/2”
Depth: 4-1/8”
Envelope Weight 18 to 24 lb. bond
Capacity 60 envelopes, 24 lb. bond, maximum
Envelope Flap Type Executive (triangular) flap
Envelope Flap Length 1-1/4” to 2-1/4”
End Clearance End clearance between the contents (inserts)
and envelope must be a minimum of 1/4” on
each side (1/2” overall). Take this
measurement with
envelope.
Depth Clearance The contents must allow a minimum clearance
of 1/4” below the flap crease after insertion
into the envelope.
OfficeRight™ DI200
Operator’s Guide
all
contents placed into the
41
Page 44

Reference
Manual Feeder M
You can process stapled sets of up to three sheets of 20 lb. bond
paper. Sheet Feeders A1 and A2 are not designed to work in
conjunction with the Manual Feeder. We DO NOT recommend using
glossy/coated sheets.
Sealer Capacity
The machine can seal up to a maximum of 1,000 envelopes
between refills.
Stacker
Stacker capacity is up to 60 filled envelopes, depending on the
contents of envelope.
Material Requirements
Materials should be of good quality and properly stored.
Recommended storage conditions: 18 to 25°C; 40 to 60% relative
humidity.
Reference
Machine Specifications
Physical Dimensions
Width 17-3/8”
Depth 20-3/4”
Height 14-3/8” (without optional sheet feeder 2)
17-3/8” (with optional sheet feeder 2)
Weight 38 lb. (17.5kg)
Electrical
115V, 60Hz, 1A
Speed
Up to a maximum of 900 cycles per hour
Due to our continuing program of product improvement, equipment and material specifications are subject to change without notice. Physical dimensions are approximate.
42
OfficeRight™ DI200
Operator’s Guide
Page 45

Index
A
Address
Not Centered in Window 37
Position Wrong 37
Address-Bearing Sheet
Considerations when Using Sheet
Feeder A2 5
C
Cannot shift address on Inserts
Error Message 33
Check Areas A1 & D
Error Message 33
Check Areas A1, A2 & D
Error Message 33
Check Sheet Feeder A1
Error Message 33
Check Sheet Feeder A2
Error Message 34
Check/Clear Insert Fdr C
Error Message 33
Clear Feeder M
Error Message 34
Clear Stacker Area
Error Message 34
Close Cover D
Error Message 33
Close Cover E
Error Message 33
Configurations, Machine 3
Control Panel
Location and Function of 4
Controls, Front Panel
Illustration and explanation of 6
Controls, Machine 4
Counter
Resetting the Piece 29
D
Display, Front Panel 6
Double Detection
Insert
Turning On and Off 32
Sheet
Turning On and Off 31
Double Feed Check Fdr A2
Error Message 34
Doubles (Double Feed)
False Detection of 37
Machine Fails to Stop for 37
E
E-Z Seal®
Importance of 9
Envelope Feeder
Loading 11
Envelope Feeder B
Location and Function of 5
Equipment Specifications 41
Error Message
Check Areas A1 & D 33
Close Cover D 33
Replace Fdr A1 Tray 36
Error Messages
Cannot Shift Address on Inserts 33
Check Areas A1, A2 & D 33
Check Sheet Feeder A1 33
Check Sheet Feeder A2 34
Check/Clear Insert Fdr C 33
Clear Feeder M 34
Clear Stacker Area 34
Double Feed Check Fdr A2 34
Fold Only Requires Sheets 34
Insert Double Feed 35
Lift Cover D Remove All 35
Lift Cover D Remove Env 35
Open Cover E Remove All 35
Power On/Off 35
Reload Envelopes 35
Reload Inserts 35
OfficeRight™ DI200
Operator’s Guide
43
Page 46

Index
Remove All from D & E 36
Remove All from M & D 36
Remove Sheet from A1 36
Sheets Required 36
System Error 36
F
Feed, Manual 28
Fold Only Requires Sheets
Error Message 34
Folds Poor 37
Front Cover D Release Button
Location and Function of 5
H
Help, Getting 39
I
Indicator Lights, Control Panel 7
Insert Cover E Release Button
Location and Function of 4
Insert Double Feed
Error Message 35
Insert Feeder
Loading the 12
Insert Feeder (Optional)
Location and Function of 4
Inserts Feed Poorly 38
J
Jam Clearance 38
Jams
Clearing from Area Beneath Cover D
38
Clearing from Sheet Feeders 38
Job Setup
One Folded Sheet + One Insert into
an Envelope 17, 18
One Folded Sheet into an Envelope
15
One Folded Sheet, no Envelope
(Fold Only) 16
One Insert into an Envelope 19
Two Collated, Folded Sheets and an
Insert into an 26, 27
Two Collated, Folded Sheets into an
Envelope 21
Two Collated, Folded Sheets, No
Envelope (Fold Only) 23
Two Folded Sheets and an Insert
into an Envelope 24
Two Folded Sheets and an Insert
into an Envelope (c 25
Two Folded Sheets into an Envelope
20
Two Folded Sheets, No Envelope
(Fold Only) 22
Job Setups
Illustrated Guide to 13, 14
Jobs, Running 13
L
Lift Cover D Remove All
Error Message 35
Lift Cover D Remove Env
Error Message 35
Lifting Handles
Location and Function of 5
Loading
Envelope Feeder 11
Insert Feeder 12
Sheet Feeders 10
M
Machine Configurations 3
Machine Controls, Indicators and
Features 4
Machine Specifications 42
Manual Feed 28
Manual Feeder M
Location and Function of 5
Material Specifications 41
Menu Options
Address, Centering in Window 30
44
OfficeRight™ DI200
Operator’s Guide
Page 47

Index
Advanced 29
Double Detection
Turning On and Off 32
Double Detection , Sheet
Turning On and Off 31
Paper Size, Changing 30
Reset Counter 29
Safe Seal Feature
Turning On and Off 32
Menu/Enter Button 6
Moistener
Filling the 9
Moistener Tank
Location and Function of 5
N
No Button, Function of 6
O
Open Cover E Remove All
Error Message 35
Operating Guide Slot
Location of 4
Ordering Supplies 40
P
Paper Size, Changing 30
Perforations
Problems Cause By 37
Phone Support 39
Power Connection 8
Power On/Off
Error Message 35
Problems.
R
Reload Envelopes
Error Message 35
Reload Inserts
Error Message 35
Remove All from D & E
Error Message 36
See
Troubleshooting
Remove All from M & D
Error Messages 36
Remove Sheet from A1
Error Message 36
Replace Fdr A1 Tray
Error Message 36
Running Jobs 13
S
Safe Seal Feature
Turning On and Off 32
Safety Information 2
Sealing
Poor
How to correct 32
Sealing, Envelope
Poor 37
Second Sheet Feeder A2
Location and Function of 5
Selection Buttons, Control Panel 7
See
Setting Up a Job.
Illustrated Guide to
Sheet Feeders A1 and A2
Loading 10
Sheets Required
Error Message 36
Sleep Mode, Explained 7
Specifications
Machine 42
Material 41
Standard Sheet Feeder A1
Location and Function of 5
Start Button, Control Panel 7
Stop Button, Control Panel 7
Supplies, Ordering 40
System Error
Error Message 36
System Won't Work with Sheet Feeder
2 38
Job Setups:
OfficeRight™ DI200
Operator’s Guide
45
Page 48

Index
T
Technical Support 39
Trial Piece, Purpose of 7
Troubleshooting 37
Address Position Wrong 37
Double Feeds Don't Stop Machine
37
Envelope Seals Bad 37
False Doubles 37
Folds Bad 37
Inserts Feed Poorly 38
System Won't Work 38
Turning Machine On 8
W
Web Address, Pitney Bowes 39
Y
Yes Button, Function of 6
46
OfficeRight™ DI200
Operator’s Guide
Page 49

Operating Guide
One Elmcroft Road
Stamford, Connecticut 06926-0700
www.pitneybowes.com
Pitney Bowes Canada
2200 Yonge Street Suit 100
Toronto, Ontario M4S 3E1
1.800.672.6937
SV40189-OG Rev. B 6/03
*SV40189-OGREVB*
© 2003 Pitney Bowes Inc.
Printed in England
 Loading...