

Page 1

Offi ceRight™ Folding Machine
DF800/DF900
Operator Guide
English Version
Page 2

Page 3

Table of Contents
Chapter 1 Introduction
Safety ................................................................................1-1
To The Operator ................................................................1-3
About your System ............................................................1-3
Machine Configurations .....................................................1-4
Stacker ..............................................................................1-4
System Options .................................................................1-5
Machine Identification DF800/DF900 ................................1-6
Control Panel .....................................................................1-8
Fold Options ......................................................................1-9
Sheet Orientation Icons ...................................................1-10
Chapter 2 Operation
About this Chapter .............................................................2-1
Connecting Power .............................................................2-1
Language ...........................................................................2-1
Select a Job .......................................................................2-2
Feed Tray Setup for a Folding Job ....................................2-3
Setting up the Tray Stacker ...............................................2-5
Setting up the Conveyor Stacker .......................................2-6
Run a Trial Piece ...............................................................2-7
Running the Job
Manual Feed
Crossfold (optional extra for DF900 only) ........................2-10
................................................................2-7
......................................................................2-8
Chapter 3 Job Functions
Introduction ........................................................................3-1
Supervisor Access Code ...................................................3-1
Create a Job ......................................................................3-2
Create From ......................................................................3-7
Edit a Job ...........................................................................3-8
Delete Job .........................................................................3-8
iSDC820A
Page 4

Table of Contents
ii SDC820A
Chapter 4 Troubleshooting
Troubleshooting Tips .........................................................4-1
General Troubleshooting ...................................................4-2
Adjusting Double Detect Position ......................................4-5
Clearing Material Stalls ......................................................4-7
Removal and Replacement ..............................................4-8
Chapter 5 Reference
Machine Specifications ......................................................5-1
Material Specifications .......................................................5-2
Compliance ........................................................................5-4
Service ...............................................................................5-6
Operator/ Supervisor Training Check List ..........................5-7
Page 5

Table of Contents
Contacts Information List
USA Contacts
Product Name - DF800 / DF900
For frequently asked questions, go to: www.pb.com and click on
•
Customer Support.
To place requests for service or training, go to: www.pb.com and
•
click on My Account.
•
To order supplies and accessories, call the Supply Line™ at:
1.800.243.7824 or go to: www.pb.com and click on Online Store.
•
To view and pay invoices online, go to: www.pb.com and click on
My Account.
•
To view inventory, go to: www.pb.com and click on My Account.
To view material safety data sheets, call the Pitney Bowes
•
Supply Line™ at: 1.800.243.7824 or go to: www.pb.com and
click on Customer Support.
For direct questions, call: 1.800.522.0020. Customer Service
•
•
Representatives are available Monday through Friday, 8:00 AM
- 8:00 PM ET.
Canada Contacts
Product Name - DF800 / DF900
For frequently asked questions or to order supplies, go to: www.
•
pitneybowes.ca
For direct questions, call: 1.800.672.6937. Customer Service
•
Representatives are available Monday through Friday, 8:30 AM
- 4:00 PM ET.
Other Country Contacts
Contact information is given in a separate publication supplied
•
with the product.
iiiSDC820A
Page 6

Page 7

1 • Introduction
Safety
Follow the normal safety precautions for all office equipment:
• Use only Pitney Bowes approved supplies, in particular aerosol
dusters. Improper storage and use of aerosol dusters or
flammable aerosol dusters can cause an explosive-like condition
that could result in personal injury and/or property damage.
Never use aerosol dusters labeled flammable and always read
instructions and safety precautions on the duster label.
• To obtain supplies, please contact our Supply Line™ to place
orders. Material Safety Data Sheets can be obtained on the web
or from our Supply Line™. Refer to the Contact Information List
for more information.
• Use the power cord supplied with the machine and plug it into
a properly grounded wall outlet located near the machine and
easily accessible. Failure to properly ground the machine can
result in severe personal injury and/or fire.
• Avoid touching moving parts or materials while the machine is
in use. Keep hands, loose clothing, jewellery and long hair away
from all moving parts.
• Do not remove covers or defeat safety interlock switches. Covers
enclose hazardous parts that should only be accessed by
properly trained service personnel. Immediately report to service
any damaged or non-functioning components that renders the
unit unsafe.
• Place the unit in an accessible location to allow for proper
venting of the equipment and to facilitate servicing.
• The power cord wall plug is the primary means of disconnecting
the machine from the AC supply.
• Do not use an adapter plug on the line cord or wall outlet.
• Do not remove the ground pin from the line cord.
1-1SDC820A
Page 8

1 • Introduction
• Avoid using wall outlets that are controlled by wall switches, or
shared with other equipment.
• Do not route the power cord over sharp edges or trap between
furniture.
• Ensure there is no strain on the power cord and that it does not
become jammed between the equipment, walls or furniture.
• Be certain the area in front of the wall receptacle into which the
machine is plugged is free from obstruction.
• Before clearing a stoppage, be sure machine mechanisms come
to a stop.
• When removing stalled material, avoid using too much force to
protect against minor personal injury and damaging equipment.
• To prevent overheating, do not cover any vent openings.
• Operation of this equipment without periodic maintenance will
inhibit optimum operating performance and could cause the
equipment to malfunction. Contact your machine supplier for
required service schedule.
• Read all instructions before attempting to operate the equipment.
• Use this equipment only for its intended purpose.
• Always follow the specific occupational safety and health
standards for your workplace.
1-2 SDC820A
Page 9

Introduction • 1
To the Operator
These instructions explain how to setup and use your OfficeRight™
DF800/DF900 Folding Machine with your chosen Stacker. Please
spend a few moments reading through them; understanding what the
system does and how it does it will keep problems to a minimum and
help you get the best performance from it.
Before setting up and using the system, you should be thoroughly
familiar with its controls, programming options and setup procedure.
About your System
Your OfficeRight™ DF800/DF900 is a folding machine, equipped
with two fold plates which allow it to produce different types of folds
(see page 1-9 Fold Options for details). The DF900 also has an
optional kit available, enabling it to cross-fold sheets (see page 2-10
for more cross-fold information).
The folder has a pre-programmable feature allowing up to 20 job
definitions to be stored for automatic setting and running of the
machine.
Standard Features
The OfficeRight™ DF800/DF900 offers an impressive array of
standard features. Among them:
• Fully automatic material seperation on sheet feeder.
• Fold adjustment capabilities.
• Fully automatic double-detect, when selected.
• Choice of Single fold, C fold, Z fold, Double fold, Gate
fold, Offset C Fold or Offset Z fold.
• Total of 20 jobs, 19 of which can be edited and saved by
a supervisor.
• Multi-function operator controls.
• Easy to use self prompting display.
• Out-of-material and stoppage detection.
• Batch count control.
• Manual feed facility.
Options
Optional Cross-Fold Kit on the DF900 which adds Cross-
•
fold capabilities. (see page 2-10 for more information).
Choice of Stackers to suit your level of use and
•
requirements.
1-3SDC820A
Page 10

1 • Introduction
Machine Configurations
The following machine configurations are available:
• DF800 (A4 Folding Machine) with Tray Stacker.
• DF900 (A3 Folding Machine) with Conveyor Stacker CS88.
Conveyor Stacker CS88 (Can be added as an additional
•
feature to the DF800)
• High Capacity Extension (Can be added as an additional
feature to either DF800 or DF900 with a Conveyor Stacker
CS88 already attached).
Cross-fold Kit (An optional extra feature on the DF900 Only).
•
IMPORTANT: Model and features availability varies by country.
Contact your machine supplier for more information.
Inclusion within this guide does not guarantee availability of a
particular model or feature within your country.
Stacker
Tray Stacker
Your OfficeRight™ Folder DF800 Machine comes equipped with
a Tray Stacker. This stacker sits on the table and collects exiting
material.
Conveyor Stacker CS88 - DF900 (optional extra for DF800)
Your OfficeRight™ Folder DF900 Machine comes equipped with
a Conveyor Stacker. A Conveyor Stacker can be added to your
DF800 as an optional extra. This stacker allows organised collation
of material on exit of your folding machine. It is able to hold larger
quantities of exiting material and is recommended for all frequently
used machines. Contact your sales representative for further
information.
High Capacity Extension (optional extra)
The High Capacity Stacker is an optional extra to your OfficeRight™
Folder DF800/DF900. The High Capacity Stacker is an extension to
the Conveyor Stacker and is able to hold larger quantities of material
which results in the stacker needing to be emptied less often. If you
run regular large quantity jobs, the High Capacity Extension may
be a beneficial addition to your OfficeRight™ Folder DF800/DF900
system. Contact your sales representative for further information.
1-4 SDC820A
Page 11

System Options
Introduction • 1
OfficeRight™ DF800
with Tray Stacker
OfficeRight™ DF900
or DF800 with
Conveyor Stacker
CS88
(Optional Extra on DF800)
OfficeRight™ DF800 or DF900
with High Capacity Extension
The High Capacity Extension can be added to both the OfficeRight™
Folder DF800 or DF900 if it is already equiped with a Conveyor
Stacker.
1-5SDC820A
Page 12

1 • Introduction
1-6 SDC820A
Machine Identification OfficeRight™ Folder
DF800/DF900
Top Access Cover (and Manual Advance Knob - A)
Lift the Top Access Cover to reveal the Manual Advance Knob
(see inset photo). The Manual Advance Knob can be used to
manually turn the machine mechanisms to assist in clearing a
material stoppage.
Sheet Feeder
The Sheet Feeder automatically feeds material that requires
folding. It can automatically detect if more than one sheet
feeds (Double Detect).
In addition, the sheet feeder can be set to ‘Manual Feed’ (see
item 6). This allows manual feed of stapled or unstapled sets
of up to 5 sheets of 80g/m2 (20lb) paper.
1
2
1
5
3
6
4
7
2
8
9
10
model shown DF900
12
11
A
Page 13

Introduction • 1
Fold Plate 1 (P1)
3
This Fold Plate is used to create the desired fold in material fed
from the Sheet Feeder. The Fold Plates are automatically set
from the Control Panel.
Information Label
4
This overlay offers quick reference information regarding the
fold options available when setting the machine.
Side Guides
5
The side guides are adjusted to control the alignment of sheets
being fed into the machine.
Manual Feed Lever
6
Position this lever to the right to set the machine to ‘Manual
Feed’ (see Page 2-11 for information on Manual Feed Jobs).
Position the lever to the left again for ‘Automatic Feed’.
Paper Adjust Lever (DF900 Only)
7
Position this lever to the left to adjust the tension of the Feed
Plate when using A3 sheets/larger sheets.
Fold Plate 2 (P2)
8
This Fold Plate is used to create the desired fold in material fed
from the Sheet Feeder. The Fold Plates are automatically set
from the Control Panel.
Control Panel
9
This is where you enter commands and where the machine
informs you of its status with the use of symbols and icons. Full
details of each key function are given on the following page.
Side Guide Adjuster
10
Use this knob to adjust the side guides (see item 5).
Skew Adjust
Use this knob to adjust the angle that material feeds into the
11
machine to correct slight alignment issues.
Stacker (not illustrated)
12
The Tray Stacker or Conveyor Stacker locates at the exit of the
machine to collect folded sheets. A High Capacity Extension is
also available.
1-7SDC820A
Page 14

1 • Introduction
Trial Piece Clear Deck
Start Stop
Back
Screen Keys
Control Panel
Control Panel Buttons
Trial Piece
Press to run a single test piece so you can check machine setup.
You must run a Trial Piece before you press Start to begin automatic
operation.
Clear Deck
Press this key to jog material clear of the machine following a
stoppage and make it ready for automatic operation.
Start
Starts automatic operation.
Stop
Stops automatic operation at the end of the next cycle. A double
press of the Stop key will stop the machine immediately.
Back
This key returns the machine to the previous screen, where
appropriate.
Screen Keys
These are the four oval keys located directly to the right of the
display. These keys correspond to the changeable options on the
display alongside them and therefore are not labelled.
1-8 SDC820A
Page 15

Introduction • 1
Fold Options
The OfficeRight™ DF800/DF900 Folding Machines are capable of
producing seven different fold types.
Fold Type Description Icon (as shown on
Single Fold Sheet folded once. The folds
can be adjusted to custom
lengths.
Z Fold Also known as Accordion fold.
Sheet folded twice in a zig-zag
of equal lengths.
C Fold Also known as Letter fold.
Sheet folded twice into the
centre, so that the sides overlap
and all sides are of almost
equal length.
Gate Fold Sheet folded twice into the
centre so that the edges join in
the centre without overlapping.
Control Panel)
Double Fold Sheet folded once and then the
folded sheet is folded a second
time creating a double fold.
Offset C Fold Sheet folded twice into the
centre with overlapping sides of
custom lengths.
Offset Z Fold Sheet folded twice in a zig-zag
with custom lengths.
1-9SDC820A
Page 16

1 • Introduction
Sheet Orientation Icons
The following icons indicate the required sheet orientation in the feed
tray and output stacker for each type of fold.
The ♦ symbol indicates the front panel/ address panel (depending
on your job) of the material being folded. This helps to detemine the
required orientation of material as it is fed into the machine.
Single-fold.
Gate-fold.
C Fold / Offset C Fold.
Z-fold / Offset Z Fold.
Double-fold.
1-10 SDC820A
Page 17

2-1SDC820A
2 • Operation
About this Chapter
This chapter explains functions on the machine required to run a job.
These include:
• Selecting and running a pre-programmed Job Definition
• Loading the feeder
• Using the Manual Feeder
Crossfolding (DF900 with Crossfold Kit only)
Functions related to creating, editing and deleting Job Definitions are
covered in Chapter 3 ‘Job Functions’.
Connecting Power
Read the safety information on page 1-1 before
connecting the machine.
Connect the power cord to the socket on the left side of the machine.
Plug the power cord into a suitable power outlet. Make sure the
power outlet is near the machine and is easily accessible.
Turn the power switch ON.
•
Image of power switch
Image of power switch
Language
Your machine will start set to the the default language. The default
language is set by the engineer at the time of installation.
To choose a different language for this use select Menu and then
Display Preferences soft keys before selecting the Language option.
you can then scroll through to choose any another language that is
set up on your machine.
Page 18

2 • Operation
2-2 SDC820A
Select a job
This section assumes the job to be run has already been created. If
the job has not been created, refer to Chapter 3 Job Functions.
A few seconds after the machine is switched on, the Home Screen
will appear. The last Job Definition selected will be loaded, with
the message ‘Ready to Run Trial Piece’ displayed at the top of the
screen.
If the job loaded is not the one required, press the Select Job
Screen Key. A list of Job Definitions that have been created and
stored appears on the screen. Then...
• If you are certain which job you want, press the
Screen Keys to select the job that you require and then
press the OK Screen Key to confirm.
• If you need confirmation of the job details, press the
Screen Keys to select a job and then press the
Summary Screen Key to view the job details.
You may access loading details from either the Home Screen or the
Job Summary screen by pressing the
Loading Details Screen Key.
Job
To exit the Load Tray, Loading Details or Job Summary screens
select OK or Done until you return to the Trial Piece screen.
Page 19
Operation • 2
Feed Tray setup for a Folding Job
This section describes setting up and loading the Feed Tray for
automatic feed of sheets.
If you select a Manual Feed job (where the Feed Tray is set for
manual feed of sheets), the Feed Tray should not be loaded with
material. This is because the sheets are manually fed one set at a
time. See Manual Feed on page 2-8 for more information.
To process a Crossfold job (available as an option on the DF900
only), refer to the Crossfold Setup procedure on page 2-10.
You can view information about the feed requirements for your job.
1. Press the Loading Details and then Load Tray Screen Keys.
2. Adjust the Side Guides to
the width of the sheets being
fed, using the Side Guide
Adjustment Knob, then backoff a 1/4 of a turn. This will
set the correct clearance
between the guides and the
material.
3. Take the stack of sheets
and aerate it to ensure the
individual sheets are not
stuck together.
4. Jog the stack back into
alignment.
2-3SDC820A
Page 20

2 • Operation
2-4 SDC820A
5. The display will indicate with a ♦ symbol the correct orientation
of the paper needed to achieve the chosen fold type (see page
1-9 for more fold type information).
6. The Feed Tray takes the
sheet stack aligned in a
similar way to many printers
and photocopiers.
Place the stack onto the Feed
Tray Deck.
Depress the Feed Tray Deck
and slide the stack fully under
the feed roller.
7. The DF900 is capable of
feeding large sheets. The
marker on the Side Guide will
indicate the correct position
for the Paper Adjustment
Lever.
Match the position of the
Paper Adjustment Lever to
the setting shown on the
Feed Tray.
Position 1 is the normal
position for standard sized
sheets.
Position 2 increases the
tension on the lift plate for
larger sheets (e.g. A3).
Remember to reset the lever
after completion of the job.
Now go to Setting up the Conveyor Stacker on Page 2-6.
Position 1
Position 2
Page 21

Setting up the Tray Stacker
The Tray Stacker is provided as standard
with your OfficeRight™ Folder DF800
Machine.
Folded material will exit the machine and
will be neatly stacked in the Tray Stacker.
The stacker tray can be extended by pulling
the tray outwards to match the size of the
material being processed.
Before attaching or removing the
stacker pull the collection tray to
its full extension, so that the tray
does not catch under the machine
when unhooking.
Operation • 2
The stacker is fitted to the
machine with two hooks which
slide into the apertures at the
base of the machine.
Note: Opening the Exit Path Cover before proceeding can assist
in attaching or removing the stacker. This is because it allows
ease of access to the apertures.
2-5SDC820A
Page 22

2 • Operation
2-6 SDC820A
Setting up the Conveyor Stacker CS88
The Conveyor Stacker is the
standard stacker unit provided
with your OfficeRight™
Folder DF900 Machine and is
available as an option on your
OfficeRight™ Folder DF800.
It is fitted to the machine with
two hooks which slide into the
apertures at the exit of the
machine.
If you are using the Conveyor
Stacker, it will need to be set up
before commencing a job.
During job setup the screen will
show a stacker setup number.
Lift the Stacker Roller and place
both ends in the corresponding
number slot.
Note: Ensure that both ends are
in the correct number slot or this
could result in material skew on
exit of the machine.
When stacker setup is complete, continue with running a Trial Piece
as described on the next page.
High Capacity Extension
The High Capacity Extension is an optional extension to the
Conveyor Stacker. The High Capacity Extension will allow you to run
a large volume of material before needing to empty the stacker.
Connect the High Capacity Extension to the end of the Conveyor
Stacker with the hooks through the key holes. You can then secure
the Extension to the Stacker with the Thumb Screw.
Page 23

Operation • 2
Run a Trial Piece
A Trial Piece is required to enable you to check the processed
material and to allow the machine to calibrate itself for the material
being run.
Press the Trial Piece key. The machine runs a single sheet or
manually fed set which exits the machine for you to check. The
machine then asks if the Trial Piece is OK.
If the Trial Piece is OK you can begin running the job (see below).
If the Trial Piece is not OK minor changes to the job settings can
be made at this stage. Select Adjust Job to access further screens
which allow you to make changes to your job and then Re-Run Trial
to confirm changes.
The machine will now ask you whether you wish to save the
changes. Select Yes or No screen keys as required. All jobs except
the Operator Job require Supervisor access to save changes.
Running the Job
After confirming the Trial Piece is OK...
You are taken back to the Home screen which indicates ‘Ready to
Run’.
Press the Start key to commence automatic operation.
The machine operates until:
● materialrunsout
● theStop key is pressed
● thebatchcountisreached(ifbatchcountisbeingused)
Batch Count
If the Batch Count function was set when the job was created, the
machine stops automatically after processing the required number of
items. The End of Batch Count screen displays to inform you that the
batch is complete. Select the OK Screen Key. Remove the batch and
press Start to commence processing of a new batch, if needed.
To Reset the Counters, at the Home Screen, select the Reset
Counters Soft Key. You can then reset the batch count, piece count
or both.
2-7SDC820A
Page 24

2 • Operation
2-8 SDC820A
Manual Feed
This section describes the setup for manual feed of sheets or sets.
For sets on manual feed you must specifically ensure that the
material complies with Material Specifications (See Material
Specifications on Page 5-2).
If you are selecting a job that has already been saved, you can
check to see whether the job definition is set to Manual Feed in the
Job Summary screen.
Adjustments for Manual Feed Jobs
Move the Manual Feed Lever
to the right, which opens the
Separator Assembly for Manual
Feed operation.
Adjust the Side Guide to the width
of the sheets being fed, using
the Side Guide Adjustment Knob,
then back-off a 1/4 of a turn. This
will set the correct clearance
between the guides and the
material.
Note: When using manual feed the material weight should not
exceed 5 sheets of 80gsm or a total weight of 400gsm. The machine
speed is automatically limited to Level 1 for ease of use when
running a manual feed job.
Set up the Stacker as described on Page 2-5/2-6.
Page 25

Operation • 2
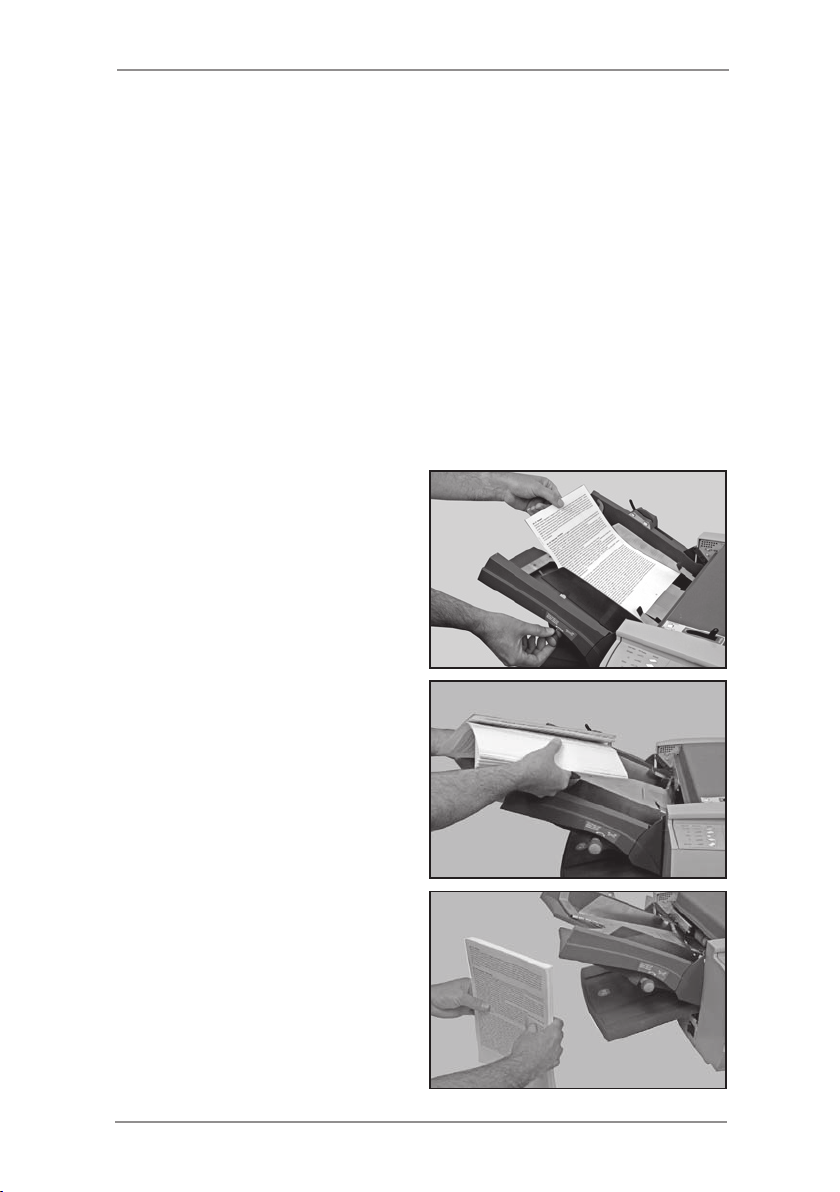
Feeding a Manual Feed Job
A Manual Feed job requires that sheets or sets are individually
inserted by hand into the feed rollers.
Press the
wait for the motor to start, then
carefully feed material under the
feed roller by hand. The machine
will take the sheet or set and
process it.
You can accept the Trial Piece or adjust the job and re-run the job as
described on page 2-7.
Trial Piece key and
WARNING: Hold the material loosely and keep your
fingers away from the Feed Roller at all times when
processing Manual Feed jobs. See image above.
When ready, press the Start key and feed material one set at a time.
If the machine times out or is stopped by pressing the Stop key, it
may be restarted by pressing the Start key again. When you have
completed feeding the sets you require, the machine can be left to
time out (stop running) or the Stop key can be pressed to confirm
that the job is complete.
Note: On completion of your Manual Feed job, remember to reset
the Manual Feed Lever to its standard setting (Automatic Feed)
before leaving the machine.
2-9SDC820A
Page 26

2 • Operation
2-10 SDC820A
Crossfold (optional extra on OfficeRight™ DF900)
The crossfold kit is sold as an optional extra on the A3 folder (DF900)
only. This kit allows you to fold material that has already been folded
by the machine a second time perpendicular to the first fold. This kit
is engineer installed.
Setting up a Crossfold Job
Initially run a Single Fold folding job with equal length panels to
provide the first fold, by following the instructions in Create a Job on
page 3-2 of this guide or by selecting an exisiting single fold job as
described in Select a Job on page 2-2.
You are now working with folded material and need to setup a
crossfold job for your second fold. Prior to this, follow the instructions
below to physically set the folder to process the pre-folded material.
Setting Machine for Crossfold Job
1. Adjust the Side Guides to
the width of the sheets being
fed, using the Side Guide
Adjustment Knob, then backoff a 1/4 of a turn. This will
set the correct clearance
between the guides and the
material.
2. Set the Manual/ Auto feed
lever to Manual (to the right).
Page 27

3. Open the top cover.
4. Lift the Crossfold paper path.
Crossfold Paper Path
Caution: When the crossfold kit is fitted and you need
to move the roller, you must first set the machine
to ‘Manual Feed’ using the Manual Feed Lever to
prevent damage to the separator roller and separator
pad.
5. Unlock the Upper Blue Lever
and slide the Feed Roller
Housing to the Front Side
Guide aligning the marker on
the housing to the marking on
the Side Guide.
Operation • 2
6. Lock the blue lever.
7. Remove the Feed Tray.
2-11SDC820A
Page 28

2 • Operation
8. Unlock the separator pad
(lower blue lever), and align
with the separator roller and
relock in position.
Note: When using Manual Feed
on a Crossfold job, the Separator
Roller and Pad must be in the
central position and the Manual
Feed Lever must be set to
Manual.
9. Refit the Feed Tray.
10. Close the top cover
11. Set the Manual Feed Lever back to Auto.
12. Lift the weighted roller.
13. Load material with the
crease/ folded edge under the
weighted roller.
NOTE:
number of sheets in the tray
in Auto mode is 20.
14. Lower the weighted roller
back into position, over the
creased/ folded edge of the
material.
After setting up the machine and setting the stacker follow the
Create a Job setup on page 3-2 of this guide and select the crossfold
option when asked before proceeding with your crossfold job. If
your crossfold job is already saved as a job continue as described in
Select a Job on page 2-2.
The Maximum
Weighted Roller
2-12 SDC820A
Page 29

3-1SDC820A
3 • Job functions
Introduction
This chapter describes the job administration functions.
All of the functions are set by following a sequence of screens and
answering simple questions presented on the display. Therefore,
this chapter does not take you through every function step by step. It
gives you background information on the function and offers helpful
tips to get the best out of your machine.
To administer most jobs on the system you will require Supervisor
Access as explained below. This is to protect these jobs from
unauthorised changes.
An operator without Supervisor Access can select a job to use from
the saved job library. However, if the required job is not available, or
if a one off job is required, an operator can create a special job called
‘-operator job-’. Only one operator job is stored in the machine. It is
the same as any other job except that it cannot be renamed and will
therefore be overwritten when a new operator job is created.
Supervisor Access Code
Many of the following functions will require you to enter a Supervisor
Access Code during the process. This prevents unauthorised access
to functions mainly relating to administration of jobs.
Your installing engineer will tell you the Supervisor Access Code. If
you wish, you can write it in the box on this page as a reminder.
However, please be aware that this is then available to anyone
using this Operator Guide and so you may wish to make a note
of it and keep it in a more secure location.
The Supervisor Access Code cannot be changed from the one given
to you by the installing engineer. You will remain logged on, and
therefore supervisor functions remain available to all users until such
time as you log out of supervisor mode (see page 3-7 for how to log
off).
Supervisor Access Code:
Entering the Code
When asked to enter the Supervisor Access Code, use the
screen keys to highlight the first digit of the code on the Numeric
Matrix displayed, and confirm this digit by pressing Select. Repeat
for the each digit. When complete, select Done.
Page 30

3 • Job Functions
Create a Job
This section describes how to create and save a new job. The
machine can store a maximum of 19 configurable job definitions,
plus the ‘-operator job-’.
The machine asks you a number of specific, easy-to-answer
questions about the make up of the finished piece in order to create
the Job Definition.
Some of the questions asked will be based on the answers
previously given and so the sequence will vary from job to job.
To Create a Job press the Menu screen key and then Manage Jobs.
Then select the option to Create Job. The set up process takes you
through several easy steps to set up your job.
Note:
If you select Create Job and the maximum number of saved jobs
has been reached, the machine informs you. If you wish to save
the new job into the job library, you must cancel and proceed with
deleting another job before creating a new one. Alternatively you can
proceed by overwriting the ‘-operator job-’.
The following sections give background information on each function
that needs to be defined when creating a job.
Select type of job
You may be asked whether you want to save your job as an Operator
job or a Supervisor job.
An Operator Job, as previously described, can be created without
supervisor access and overwrites any existing Operator Job.
A Supervisor Job requires Supervisor Access to save it to the job
library.
3-2 SDC820A
Page 31

Job Functions • 3
Fold Types
Seven fold types are available. See Fold Options on Page 1-9 of this
guide. The fold type dictates how the sheet will be folded before it
exits the machine.
Once a fold type is selected and the new job is created, the display
indicates the correct orientation of the paper for loading into the Feed
Tray.
Note:
Later in the Create Job sequence you are able to specify custom fold
lengths to modify your basic fold. See Fold Panel Lengths on Page
3-4.
Paper Length
Select the paper length.
Use the scale on the machine
to measure the sheet length, if
necessary.
Quick reference:
A4 Paper length – 297mm
A3 Paper length – 420mm
US Letter length – 11" (279mm)
US 11x17 sheet length – 17" (430mm)
Select a relevant preset length (i.e. US Letter/ A4) by screen key or
select Custom and then press the +/- keys until the length of your
paper (in millimetres) is displayed. When the paper length is correct,
press OK…
3-3SDC820A
Page 32

3 • Job Functions
Fold Panel Lengths
It is possible to dictate the fold panel lengths/fold positions on your
job within the boundaries of the sheet length and the machine
capabilities.
Depending on the settings previously made for fold type and paper
length, the machine suggests the correct fold dimensions. Therefore,
most times, this setting will not require alteration.
If you want to change the ‘standard’ setting, press the
the length of the fold required (in millimetres) is displayed.
The highlighted, flashing icon on the screen shows the fold panel you
are adjusting.
Note: The fold panel marked with a diamond (♦) should be adjusted
first as this will minimise interaction on adjustment of the other
panels.
The machine will automatically limit your choices to what is
physically possible within the machine specifications. For example,
as you change the length of a fold panel, you will see the dimension
of the other fold panel(s) automatically changing to keep within paper
length and machine specifications.
When the setting is correct, select
fold panel length setting, if required.
Once all fold panel lengths are correct, select the
Next Panel to advance to the next
+/- keys until
Done Screen Key.
3-4 SDC820A
Page 33

Job Functions • 3
Feed Options
If your job is running sheets automatically from the Feed Tray, select
Automatic Feed.
If you are feeding sheets or sets individually, select Manual Feed.
The Manual Feed setting allows stapled or unstapled sets of up to 5
sheets (to a maximum of 400g/m2 (105lb) per set) to be run. Manual
Feed may also be used to feed single sheets of special material (see
Page 3-6).
For more details on Manual Feed, see page 2-8 of this guide.
Crossfold Options (Additional Kit Required, DF900 Only)
This function allows a single-fold job to be run through the machine
again so that a further fold can be made at right-angles to the first
fold (a cross fold).
See Crossfold Setup on page 2-10 of this guide.
If your system does not have a crossfold option, this screen will not
display during your create job procedure.
Double Detect
The double detector stops the machine if more than one sheet
simultaneously feeds from the feeder. The Double Detect function
can be run on single sheet jobs only and will stop the machine when
a double feed occurs. This allows the operator to identify the double
feed and to remove the sheets before proceeding with the job.
Double detect can be used on material up to 120gsm.
If you have selected manual feed or crossfold options, this screen
will not display during your create job procedure as Double Detect is
not available in these modes.
3-5SDC820A
Page 34

3 • Job Functions
Special Material
Some thicker or densely printed material may not process efficiently
with the standard machine settings. If you plan to use such material
the machine must be programmed for ‘Special Material’ during Job
Setup to avoid mis-operation. This option should only be taken if
found to be necessary. Run a Trial Piece or trial batch to test.
Set Speed
The speed that the folder can run with it’s maximum throughput is
dependant on the job type and material being fed. This is not always
the maximum speed that the machine can operate at.
The Set Speed screen allows you to increase or decrease the
machine’s running speed when you press the Start key.
The speed can also be adjusted as required once the machine is
running.
Press the Set Speed soft key and then use the Faster or Slower
Screen Keys to set the speed. Then select OK to confirm.
This mode is not available when running a manual feed job as the
speed is automatically set to Level 1.
Batch Counter
The Batch Counter allows you to automatically process pre-defined
batches (number/quantities of pieces) of finished material. When
the batch is complete, the machine stops automatically. Remove the
batch and press Start to begin a new batch, if required.
If Batch Counter is not selected, the display counter will simply
count the number of items processed until reset by pressing Reset
Counter.
When asked to enter the Batch Count, use the screen keys
to highlight the first digit of the count you require on the Numeric
Matrix displayed, and confirm this digit by pressing Select. Repeat
for subsequent digits. When complete, select Done. Leaving the
batch count field blank turns the batch counter off for the job and the
job will run until the material runs out, the machine times out or you
press the Stop key.
3-6 SDC820A
Page 35

Job Functions • 3
Enter Job Name
When job setup is now complete, the Enter Job Name screen
prompts you to name and save the job. If you are saving an operator
job, this screen will not appear as the job will always have the
‘-operator job-’ name.
When asked to enter the Job name, use the screen keys to
highlight the first digit of the name on the Alpha/Numeric Matrix
displayed, and confirm this digit by pressing Select. Repeat for the
subsequent digits. When complete, select Done.
Note: Further characters can be displayed for selection at any time
by selecting ‘abc’ or ‘ABC’ (some countries will have a Next option
for more characters).
The display shows the new job with the message ‘Ready for Trial
Piece’. Run a Trial Piece to confirm settings. See Page 2-7 of this
guide for how to run a Trial Piece.
Job settings are retained by the machine even with power
disconnected and may be recalled as required.
Logging Out of Supervisor Mode
If you are logged in as a Supervisor you must log out by pressing
the Stop key whilst the Menu screen is displayed. If you do not,
the machine will remain logged on and all supervisor functions will
remain accessible to any user.
Create From
If you wish to create a NEW Job Definition which is SIMILAR to an
existing job and leave the existing Job Definition untouched, use the
Create From function.
Press the Menu screen key and then Manage Jobs. Then select
Create From.
This function allows you to select the similar existing job and edit it
as in Edit Jobs (See page 3-8 of this guide). You are prompted to
save it with a new job name before you make any changes.
3-7SDC820A
Page 36

3 • Job Functions
Edit Job
The Edit Job function is used to change a Job Definition, and
so always overwrites the original Job Definition in the machine’s
memory (even if the Job Name has been edited).
If you wish to create a NEW Job Definition which is similar to an
existing job and leave the existing Job Definition untouched, use the
Create From function described on page 3-7.
Press the Menu Screen Key and then Manage Jobs. Then select
Edit Job. Select the job you wish to edit and then follow the easy
steps to complete the editing process. Press Save and Exit when
complete.
Delete Job
To erase an existing job from memory:
Press the
Delete Job.
Use the Screen Keys to select the job you wish to delete. Then
select Delete Job.
You may review the definitions of the job you are about to delete by
selecting the Job Summary Screen Key prior to deletion.
Select
delete the job.
Menu screen key and then Manage Jobs. Then select
Confirm Delete to confirm that you wish to permanently
3-8 SDC820A
Page 37

4 • Troubleshooting
Troubleshooting Tips
In most cases, the machine will generate a message when a
problem occurs, and the display will offer advice on how to rectify the
problem immediately.
This Operating Guide contains additional troubleshooting information
which, with the troubleshooting sources above, should resolve most
problems.
If problems related to material handling persist, make sure your
material conforms to the material specifications given in Chapter 5
- Reference, of this guide.
If you still cannot resolve the problem, call your machine supplier for
help. Contact details can be found:
• On the back cover of this guide
• In the System Information option in the menus:
At the Home Screen, select Menu.
Then select System Information.
4-1SDC820A
Page 38
4 • Troubleshooting
General Troubleshooting
Problem Remedy Page
MACHINE
Blank Screen
No power. Check power cord is firmly
connected and wall socket is
switched ON.
Machine not
switched ON.
Display adjustment
set incorrectly.
Turn power switch (located on the
left side of machine) ON.
Change the display contrast and
brightness to an acceptable setting.
At the Home Screen, select Menu.
Then select Display Preferences.
2-1 (see
also 1-1
safety)
2-1 (see
also 1-1
safety)
Performance
Machine runs
slowly.
Language
The wrong
language is
displayed on the
screen.
The machine speed can be
dependant on the job being run.
Check the machine’s speed setting
using the Edit function, or whilst the
job is running to ensure it is set to a
suitable level.
Turn the machine off and then after
a few seconds on again. This will
revert the language to default.
To change the language, at the
Home Screen, select Menu, then
Display Preferences, and then
Language Soft Keys.
3-6
4-2 SDC820A
Page 39

Troubleshooting • 4
Problem Remedy Page
SHEETS
Poor Sheet Feed
Feed Tray side
guides set
incorrectly.
Sheets loaded
incorrectly.
Paper Adjustment
Lever setting
incorrect (DF900
only).
Sheets skewing as
they feed through
the machine.
DF900 Fail to Feed
with photocopied
sheets
Set guides to sheet width and back
off 1/4 turn.
Make sure stack has been fanned
before loading.
Ensure the Paper Adjustment
Lever is set to the correct paper
size (especially if feeding larger
material) DF900 only.
Use the Skew Adjustment Knob to
correct. See Skew Adjust in Poor
Folding and check side guides
adjustment.
Remove some of the material stack
from the feeder. Large quantities of
photocopied sheets which can be
wavy can sometimes cause feed
problems when stacked in large
quantities.
2-3
2-3
2-4
4-3SDC820A
Page 40

4 • Troubleshooting
Problem Remedy Page
SHEETS
Poor Folding
A fold length is
incorrect, causing
a ‘box fold’ or third
fold.
Sheets skewing as
they feed through
the machine.
Run a Trial Piece. Say No to Trial
Piece OK? and adjust the fold
positions.
Check the Side Guides are
adjusted correctly. If this does not
correct the problem-
Use the Skew Adjustment Knob to
correct the paper skew.
2-7 &
3-4
2-3
Tip: It may be beneficial to set up a
single fold job to run when adjusting
skew to make the adjustment
results more apparent.
Sheets creasing
as they exit the
machine. (DF900
Only).
Conveyor Stacker CS88
The material
entering the
Conveyor Stacker
does not stack
correctly.
4-4 SDC820A
Reduce the running speed. Lighter
material and larger sheets can
sometimes crease when folding.
Slowing the machine down will
allow the material to be folded
crease free.
The Conveyor Stacker may not
be set up correctly. Adjust the
Conveyor Stacker wheels by
moving them closer or further away
to maximise their effectiveness.
3-6
Page 41

Troubleshooting • 4
Problem Remedy Page
DOUBLE DETECT
Machine stops for ‘doubles’ that aren’t there or feeds ‘doubles’
without stopping
Double Detect is
not turned ON.
Material does not
meet specifications
for Double Detect.
Double Detect
is not correctly
calibrated.
Material is too
densely printed on
the leading edge of
the material.
Check Double Detect status.
Press the Select Job Screen Key
and then press the Job Summary
Screen Key to view the job details.
Correct loading or have Supervisor
correct Job Definition as necessary.
Material weight must be between
60 g/m2 and 120 g/m2 (16lb and
32lb). For material outside these
limits, turn Double Detect off.
Run a Trial Piece whenever a
new batch of material is loaded to
recalibrate Double Detect. The new
batch might be of slightly different
thickness.
Change the double-detect position
to read material in a less densely
printed position. See Adjusting
Double Detect Position below.
3-5
5-2
2-7
Adjusting Double Detect Position
If you continually get doubles detected when no doubles exist, it may
be that the machine’s Double Detect sensors are being confused by
densely printed areas on the sheets.
The sensors detect along the centre line of the sheets in a
predefined window of approximately 27mm (1”) length, the default
starting position of this window is approximately 5mm (0.2”) from the
lead edge.
When Double Detect errors are sensed, the dialogue displayed will
give the option to change the Double Detect position.
4-5SDC820A
Page 42

4 • Troubleshooting
Initially, re-run a Trial Piece and select the OK Screen Key without
making any adjustments. This will re-calibrate the Double Detect
function.
If there are still Double Detect problems, select the Change Position
Screen Key and change the distance (shown as X on the diagram
below) from the lead edge to the start of the Double Detect window.
This allows you to move the window down the sheet to a less
densely printed area.
The machine will limit this adjustment relative to the size of the
material.
If the print density on your material does not allow you to allocate a
27mm (1”) Double Detect window which can sense accurately, you
will be required to turn Double Detect off for this job.
Leading Edge
5mm
Adjustable
Dimension
X
DENSE PRINTING
(0.2”)
(1”)
27mm
Double
Detect
Window
DENSE PRINTING
5mm
Trailing Edge
4-6 SDC820A
(0.2”)
Page 43

Troubleshooting • 4
Clearing Material Stalls
Your machine has been designed to assure maximum performance.
In the event of a material stall, the display indicates where the stall
has occurred and suggests remedial action.
First press
the machine. The sections below tell you how to gain access to the
material if necessary.
Top Cover
Lift Top Cover to access
Manual Advance Knob and
stalled material. (See page
1-6/1-7).
Manual Feed Lever before
attempting to remove any
stalled material to prevent
damage to the machine.
Clear Deck in an attempt to feed the material through
CAUTION: It is
recommended
that you lower the
The Manual Advance Knob (A)
Having located the material,
you may need to use the
Manual Advance Knob to
manually feed material out of
the rollers, etc.
Folder Access Cover (B)
Lift the blue lever to raise the
Rear Access Cover. This will
allow access to any stalled
material and rollers at the
exit (right hand side) of the
machine.
4-7SDC820A
Page 44

4 • Troubleshooting
Removal and Replacement
Removal & Replacement of Fold Plates
To remove....
Pull the two blue levers gently
outwards on either side of the
Fold Plate simultaneously. Pull
the plate straight outwards
from the machine.
If removing Fold Plate 2, lift the
plate slightly before pulling out
from the machine.
To replace…
Place the Fold Plate into its location guides in the frame. Pull the two
blue levers gently outwards on either side of the Fold Plate. Push the
Fold Plate gently into the machine. The plate will automatically drop
into its correct location and the levers can be released.
4-8 SDC820A
Page 45

Troubleshooting • 4
Removal & Replacement of the Feed Tray
To remove…
Lift the rear of the tray slightly
and pull it straight outwards
from the machine (to the left).
Note:
If the tray is loaded, gently
press the material down
against the spring to prevent
it sliding forward as the tray is
removed.
CAUTION: Ensure that the Manual Feed Lever is set to
Automatic Feed before removing or replacing the Feed
Tray. This is because if the Manual Feed mechanism is
lowered when the Feed Tray is removed or replaced it
could cause damage to your machine.
To replace…
Remove all material from the tray. Place the tray into its location
guides in the side frame. Lift the rear of the tray slightly and push
it into the machine. The tray will automatically drop into its correct
location. Reload the tray as described on page 2-3 of this guide.
4-9SDC820A
Page 46

4 • Troubleshooting
4-10 SDC820A
Page 47

5 • Reference
Machine Specifications
Physical Dimensions
Length (without stacker) DF800 645mm (25.4”)
(without stacker) DF900 660mm (26”)
Depth DF800 515mm (20.3”)
DF900 585mm (23”)
Height DF800 460mm (18”)
DF900 545mm (24.5”)
Folder Weight DF800 22kg
DF900 29kg
Tray Stacker Weight 1kg
Conveyor Stacker CS88 Weight 6kg
High Capacity Extension Weight 5kg
Weights stated do not include material.
Noise Level
Running DF800 Approx 74dBA (80gsm,C Fold,Speed 3)
71dBA <81dBA dependant on material and
running speed.
DF900 Approx 74dBA (80gsm,C Fold,Speed 4)
65dBA <88dBA dependant on material and
running speed.
Please note that when running at sound levels over 80dBA (First
Action Level), operator hearing protection must be provided. For
sound levels over 85dBA (Second Action Level), the use of hearing
protection is mandatory.
Electrical 100-240VAC, 50/60Hz, 5A
Maximum Speed:
Actual folder throughput may vary, depending on the material used,
machine condition and operator skill.
DF800: Up to a maximum speed of 13,000 cycles per hour.
DF900: Up to a maximum speed of 20,000 cycles per hour.
ALL SPECIFICATIONS ARE SUBJECT TO CHANGE WITHOUT
NOTIFICATION AND ARE SUBJECT TO TEST
5-1SDC820A
Page 48

5 • Reference
Material Specifications
Minimum Material size: DF800 127mm (5”) Length
127mm (5”) Width
DF900 127mm (5”) Length
127mm (5”) Width
Maximum Material size: DF800 406 mm (16”) Length
229 mm (9”) Width
DF900 432mm (17”) Length
305mm (12”) Width
Paper weights: DF800 Minimum
Maximum 120
55g/m2 (15 lbs)
g/m2 (32 lbs)
DF900 Minimum 55g/m2 (15 lbs)
Maximum 200g/m2 (53 lbs)
Double-detect Minimum 55g/m
2
(16 lbs)
Maximum 120g/m2 (32 lbs)
Cross-fold Pre-folded material
2
Minimum 55g/m
(15 lbs)
Maximum 100g/m2 (27 lbs)
Fold configurations: Fold Panel Min/ Max Dimensions
Fold Panel 1
Minimum DF800/DF900 80mm (3.15”)
Maximum DF800 235mm (9.25”)
Maximum DF900 320 mm (12.6”)
Fold Panel 2
Minimum DF800/DF900 75 mm (3”)
Maximum DF800 235mm (9.25”)
Maximum DF900 325mm (12.8”)
ALL SPECIFICATIONS ARE SUBJECT TO CHANGE WITHOUT
NOTIFICATION AND ARE SUBJECT TO TEST
5-2 SDC820A
Page 49

Reference • 5
Stacker capacity: Tray Stacker
Maximum 135 finished pieces of C-Folded
A4 (Letter) Sheets of 80g/m2 (20lb).
Conveyor Stacker
Maximum 500 finished pieces of C-Folded
A4 (Letter) Sheets of 80g/m2 (20lb).
High Capacity Extension (attached to
Standard Stacker)
Maximum 1000 finished pieces of C-Folded
A4 (Letter) Sheets of 80g/m2 (20lb).
Manual Feed Mode
DF800/DF900: Stapled or unstapled sets up to five sheets of
80g/m2 (20lb) to a maximum total weight of 400g/m2 (105lb) per set
can be processed through the Manual Feed Mode.
Manual Feed Requirements
Glossy/Coated ‘Special’ material is not recommended.
•
If stapled sets are used, no staples can be in an area of 35mm
•
(1.4”) both sides of the centre line of the material being fed.
Staples must be horizontal to lead edge to prevent
•
catching/damage to the machine.
NOTE: The machine speed when running a Manual Feed or
Crossfold job is limited to Setting 1 (4,100 per hour).
Material Requirements
For best performance, use only materials approved by your machine
supplier.
Materials should be good quality and properly stored. Rotate your
material stock so that older material is used first.
Recommended Storage conditions: 18
Relative humidity: 40% to 60%
Low humidity could cause sheets to stick together because of static
charge; high humidity can cause paper to become limp and curled.
ALL SPECIFICATIONS ARE SUBJECT TO CHANGE WITHOUT
NOTIFICATION AND ARE SUBJECT TO TEST
˚C to 25˚C
5-3SDC820A
Page 50

5 • Reference
Compliance
Conforms to the Following:
FCC Rules
This equipment has been tested and found to comply with the limits
for a Class A digital device, pursuant to part 15 of the FCC rules.
These limits are designed to provide reasonable protection against
interference when the equipment is operated in a commercial
environment. This equipment generates, uses, and can radiate
radio frequency energy and, if not installed and used in accordance
with the instruction manual, may cause interference to radio
communications. Operation of this equipment in a residential area is
likely to cause interference, in which case the user will be required to
correct the interference at his own expense.
CAUTION: Changes or modifications to this equipment not expressly
approved by the party responsible for compliance could void the
user’s authority to operate the equipment.
It is certified that the system complies with all applicable
Directives of the European Union.
For a formal Declaration of Conformity please contact Compliance
Engineering. Contact information is given in the front of this guide or
on a separate document supplied with your system.
WARNING: This is a Class A product. In a domestic environment this
product may cause radio interference in which case the user may be
required to take adequate measures.
5-4 SDC820A
Page 51

Reference • 5
Electromagnetic
Electromagnetic
US: FCC Part 15 Class A, subparts as applicable
Canada: ICES-003
EU: EMC Directive 2004/108/EEC, referencing EN55022 and
EN61000-3
Australia and New Zealand: AS/NZS 3548 (Equivalent to EN55022)
Safety
US: CTUVUS
Canada: CSA Approval, Standard C22.2 as applicable
EU: EN60950 & TUVGS. x CB CERTIFIED
5-5SDC820A
Page 52

5 • Reference
Service
Service for your new OfficeRight™ Folder DF800 or DF900 Machine
is available throughout the world.
Should you have questions about your machine, or require service or
assistance with your particular application, please call your machine
supplier.
Your machine supplier will also offer a service maintenance contract
to keep your machine in top condition at nominal cost.
Contact details can be found:
• On the separate leaflet supplied with your system.
• In the System Information option in the menus:
At the Home Screen, select Menu.
Then select System Information.
5-6 SDC820A
Page 53

Reference • 5
Operator/Supervisor Training Check list
During initial Operator Training, the following aspects of the machine
should be described:
Sheet Feeder
Manual Feeding
Access Areas and Fold Plates
Manual Advance Knob
Measuring Scale
Crossfold Options (if applicable DF900 only)
Control Panel
Screen Keys, Hard Keys
Relevant Stacker
High Capacity Extension (if applicable)
Power Switch
Screens for operator(s):
• Select Job – select and run a sample job
• Trial Piece
• Running a Job
• Manual Feed
• Menu: Language
Display adjustments
System Information
5-7SDC820A
Page 54

5 • Reference
Job Functions
• Supervisor Access/ Operator Access
• Create Job
• Edit Job
• Create From
• Delete Job
Stoppage Recovery
Maintenance/ Cleaning
The following operators have been trained on this equipment:
Name Level Date
Operator
Supervisor
Operator
Supervisor
Operator
Supervisor
Operator
Supervisor
Operator
Supervisor
Operator
Supervisor
5-8 SDC820A
Page 55

Page 56

Elizabeth Way,
Harlow, Essex, CM19 5BD, UK
www.pitneybowes.co.uk
For Service and Supplies
PB Form SDC820A (11-08)
© Pitney Bowes Limited, 2008
We have made every reasonable effort to assure the accuracy and usefulness of this
guide, however we cannot assume responsibility for errors or omissions or liability for
the misuse or misapplication of our products.
Printed in the UK
Printed on recyclable paper
*SDC820A*
 Loading...