

Page 1

DF200
DF270
DF370
www.imagistics.com
Operating Manual
For use with Imagistics and Pitney Bowes DF200/270/370 copier/printers.
Page 2

Technical Support:
To speak to a technical support representative:
Call the Imagistics Digital Technical Support Line at 1-800-243-5556
To request on-site maintenance or service: Call 1-800-243-5556
Supplies:
To order Supplies: Call the Imagistics Copier/Printer Supply Line at 1-800-462-6797
Description/Order Number
Printpowder Toner (Black) /460-4
*Imaging Unit (Black) /460-8
Staples for 9749 Finisher /847-3
Staples for 9748 Finisher /472-4
Staples for 9747 Finisher /472-3
Copier Paper (8 1/2" x 11") / 471-1
Copier Paper (8 1/2" x 14") / 462-1
Copier Paper (8 1/2" x 14") / 462-1
Staples for 9864 Finisher /472-4
Staples for 9865 Finisher /472-3
* Note: This item can only be installed by an Imagistics Customer Service
Copier Paper (8 1/2" x 11") / 471-1
Representative and should be kept on hand for preventative maintenance.
Copier Paper (8 1/2" x 14") / 462-1
®
How much to
keep on hand
2 Bottles
1 Cartridge
1 Box
1 Box
1 Box
4 Cartons
2 Cartons
2 Cartons
1 Box (3 Cartridges)
1 Box (3 Cartridges)
4 Cartons
2 Cartons
Copier Paper (11" x 17") / 471-2
Model: DF200/DF270/DF370
2 Cartons
2 Boxes
Serial Number:
Page 3

SAFETY INFORMATION
This section contains detailed instructions on the operation and maintenance of this machine. To
achieve optimum utility of this device, all operators should care fu l l y read and follow the instructions
in this manual. Please keep this manual in a handy place near the machine.
Please read the next section before using this device. It contains important information related
to use r safety and prev entin g equipm ent problems.
Make sure you observe all of the precautions listed in this manual.
*Please note that some parts of the contents of this section may not correspond with the purchased
product.
■
■ Warning and Precaution Symbols
■ ■
Ignoring this warning could cause serious injury or
eve n deat h.
Ignoring this caution could cause injury or damage to
property.
■■■■ Meaning of Symbols
A triangle indicates a danger against which you should take precaution.
A diagonal line indicates a prohibited course of action.
A black circle indicates an imperative course of action.
This symbol warns against cause burns.
This symbol warns against dismantling the device.
This symbol indicates you must unplug the device.
P-1
PL 02
Page 4

• Do not modify this product, as a fire, electrica l shock, o r breakd o w n could result.
If the product employs a laser, the laser beam source could cause blindness.
• Do not a t t empt to remove the covers and panels which have been fixed to the
product. Some product s have a high-v oltage part or a laser beam source inside that
could cause an electrical shock or blindness.
• Only use the power cord supplied in the package. Failure to use this cord could
result in a fire or electrical shock.
• Use only the specified power source voltage. Failure to do that could result in a
fire or electrical shock.
• Do not use a multiple outlet adapter to connect any other appliances or machines.
Use of a powe r outlet for more tha n the marked curr ent v alue could res ul t in a fire
or elec tr ic al shock .
Do not unplug and plug in the power cord with a wet hand, as an electrical shock
coul d re su lt.
Plug the power cord all the way into the power outlet. Failure to do this could
result in a fire or electrical shock.
• Do not scratch, abrade, place a heavy object on, heat, twist, bend, pull on, or damage th e pow e r co rd. Us e of a damag ed power cord (exposed co re wire , bro ke n
wire, etc.) could result in a fire or breakdown.
Should any of these c ondi tio ns be fou nd, immed iatel y t urn O FF the po we r swi tch ,
unplug the power cord from the power outlet, and then call your authorized service representative.
• In princi pl e, do not us e an ext ens ion cord. U se of an exte nsi on co rd could caus e a
fire or electrical shock. Contact your authorized service representative if an
extension cord is required.
P-2
Page 5

Do not place a flo wer v a se or other cont aine r tha t conta in s water , or meta l clips or
other small metallic objects on this product. Spilled water or metallic objects
dropped inside the product could result in a fire, electrical shock, or breakdown.
Should a piece of metal, water, or any other similar foreign matter get inside the
product, immediat el y turn OFF the po wer swit ch, unpl ug th e pow er cor d from the
power o u tle t, and then ca ll your a uthorized s ervice representa tive.
• If this product becomes inordinately hot or emit s smoke, or unusual odor or noise,
immed iately tu rn OFF the powe r sw itch, u n plug the powe r co rd from the p owe r
outlet, an d the n call your authori zed ser vice r epr es entat iv e. If you keep on usi ng i t
as is, a fire or electrical shock could result.
• If this product has been dropped or its cover damaged, immediately turn OFF the
power switch, unplug the power cord from the power outlet, and then call your
authorized service representative. If you keep on using it as is, a fire or electrical
shock could result.
Do not throw the toner cartridge or toner into an open fl ame. The hot to ner m ay
scatter an d ca use burn s or othe r damage.
Connect the power cord to an electrical outlet that is equipped with a grounding
terminal.
P-3
Page 6

• Do not use flammable sprays, liquids, or gases near this product, as a fire could
result.
• Do not leave a toner unit or drum unit in a place within easy reach of children.
Licking or ingesting any of these things could injure your health.
• Do not let any object plug the ventilation holes of this product. Heat could accumulate inside the product, resulting in a fire or malfunction.
• Do not install this product at a site that is exposed to direc t sunlight, or nea r an air
conditioner or heating apparatus. The resultant temperature changes inside the
product could cause a malfunction, fire, or electrical shock.
• Do not pla ce the pr oduc t in a dusty pl ac e, or a site exposed to soot or steam, near a
kitchen table, bath, or a humidifier. A fire, electrical shock, or breakdown could
result.
• Do not place this product on an unstable or tilted bench, or in a location subject to
a lot of vibration and shock. It could drop or fall , c a using pe r sonal i njury or
mechanical breakdown.
• After installing this product, mount it on a secure base. If the unit moves or falls,
it may cause personal injury.
• Do not store toner units and PC drum units near a floppy disk or watch that are
susceptible to magnetism. They could cause these products to malfunction.
The inside of this product has areas subject to high temperature, which may cause
burns. When checking the inside of t h e unit for malfunc t io ns such as a paper misfeed, do no t touc h t he l oc ati o ns (arou nd t h e fus i ng unit, etc. ) which are indi c at ed b y
a “Caution ! High Temperature !” warning label.
Do not place an y ob ject s ar ound t he po wer plug as th e pow er plug ma y be dif f ic ult
to pull out when an emergency occurs.
The socket -o utle t sha ll be instal le d near the ma chine and sha ll be eas ily ac ces si ble
as the power plug may be difficult to pull out when an emergency occurs.
P-4
Page 7

• Always use this product in a well ventilated location. Operating the product in a
poorly ventilated room for an extended period of time could injure your health.
Ventil ate the roo m a t reg u lar interva ls.
• Whenever moving this product, be sure to disconnect the power cord and other
cabl es. Failu re to do this could damage the cord or cable, resulting in a fire, electrical shock, or breakdown.
• When moving this product, always hold it by the locations specified in the operator’s manual or other documents. If the unit falls it may cause severe personal
injury. The product may also be damaged or malfunction.
• Remove the pow er plug f rom the ou tlet more than o n e ti me a year an d clea n the
area between the plug terminals. Dust that accumulates between the plug terminals may cause a fire.
• When unplugging the power cord, be sure to hold onto the plug. Pulling on the
power cord could damage the cord, resulting in a fire or electrical shock.
P-5
Page 8

Precautions for Routine Use
• Do not store toner units, P C drum u nits , and ot her suppl ies an d co nsu mables in a
place subject to direct sunlight and high temperature and humidity, as poor
image quality and malfunction could result.
• Do not attempt to replace the tone r unit an d PC drum unit i n a place expos e d to
direct sunlight. If the PC drum is exposed to intense light, poor image quality
could result.
• Do no t unpack a tone r unit or PC d rum unit until the ver y time of use. Do not
leave an unpacked unit standing. Install it immediately or poor image quality
could result.
• Do not keep toner units and PC drum units in an upright position or upside
down, as poor image quality could result.
• Do not throw or dr op a to ne r unit or PC drum uni t as poor i m age q u ality could
result.
• Do not use this product in an area where ammonia or other gases or chemicals
are present. Failure to do so may shorten the service life of the product, cause
damage or decrease performance.
• Do not use this product in an environment with a temperature outside the ra ng e
specified in the operator’s manual, as a breakdown or malfunction could result.
• Do n ot attempt to feed stapled paper , carbon paper or aluminum foil through thi s
product, as a malfunction or fire could result.
Do not touch or scratch the surface of the toner unit, developing roller and the
PC drum, as poor image quality could result.
Use the supplies and consumables recommended by the dealer. Use of any supply or consumable not recommended could result in poor image quality and
breakdown.
P-6
Page 9

Miscellaneous
• Do not rest your weight on the control panel, as a malfunction could result.
• Normal international communications may at times not be possible depending
on line co nditi ons.
• If tap or well water is used in a humidifier, impurities in the water are discharged
into the air an d may be deposite d insid e the pri nter, result ing in poo r imag e quality. It is recommended that pure water that does not contain any impurities be
used in the humidifier.
• The cooling fan may be activated au t om atically, but this sugg est s no prob lems.
• Ni-MH (Nickel Metal Hydride) Batteries are installed inside machine as back up
memor y batter ies. Please d ispose accor ding to local, st a te and federal regulations.
P-7
PL 01 FAX
Page 10

As an ENERGY STAR® Partner, we have determined that this
machine meets the
NERGY STAR® Guidelines for energy efficiency.
E
What is an ENERGY STAR® Products?
An ENERGY STAR® product has a sp ecia l feat ure tha t a llo ws it to auto mati cally switch t o a “low-power
mode” after a period of inactivity. An
money on utility bills and helps protect the environment.
NERGY STAR® product uses energy m o re efficie nty, saves you
E
Page 11

This operator’s manual explains how to operate the ma chine and replenish its supplies. It also gives
some troubleshooting tips as well as general precautions to be observed when operating the machine.
To ensure the best performance and effective use of your machine, read this manual care fully until you
familiarize yourself thoroughly with its operation and features. After you have read thr ough t he
manual, keep it ready for reference.
Please use this m an ual as a quick and handy refe rence tool for immediately clarifying any questions
which may arise.
MC-F02
For the U.S.A. Users
FCC Part 15-Radio Frequency Devices
i
NOTE: This equipment has been tested and found to comply with the limits for a Class A digital
device, pursuant to Part 15 of the FCC Rules. These limits are designed to provide reasonable
protection against harmful interference when the equipment is operated in a commercial enviro n men t.
This equipmen t generates, uses, and radia te radio frequency en erg y and if no t installe d and us ed in
accordance with the instruction manual, may cause harmful interference to radio communications.
Operation of this equipment in a residential area is likely to cause harmful interference in which case
the user wi ll be required to correct the interferenc e at his own expense .
WARNING: The design and production of this unit conform to FCC Regulations, and any changes or
modifications must be registered w ith the FC C and are subject to FCC c ontrol. An y changes made by
purchaser or user without first contacting the manufacturer will be subject to penalty under FCC
regulations.
FCC-F02
This device must be used with shi elded interface cabl es . The use of non-shield cables is likely to result
in interferen ce with rad io com m u nications and is p r ohibite d under FCC rules.
For Canada Users
Interference-Causing Equipment Standard (ICES-003 Issue 3)
This Class A digital apparatus complies with Canadian ICES-003.
Cet appareil numérique de la classe A est conforme à la norm e NMB-003 du Canada.
IC-F03
Page 12

ii
Contents
Safet y Inf o r ma ti o n ......... .. .......... .. .......... ... .. .......... .. .......... .. .......... .. .......... ... .. ...... viii
Terms and Symbols for the Type of Originals and Copy Paper ......................... xiv
Chapter 1 Safety Notes
1. Installing the Copier
Install a t ion Site ..................... .......... ................... .......... .......... ......... ................ 1-2
Power S ource ............ .......... ......... ........................... .......... ......... ..................... 1-2
Space Requirements........................................................................................ 1-2
2. Precautions for Use
Opera ti ng Environm ent........... .......... .......... ................... .......... .......... ......... .... 1-3
Acoustic noise................................................................................................. 1-3
Using the Machine Properly ........................................................................... 1-3
Movin g the Machine... .......... .......... ......... .......... .......... ................... .......... ...... 1-3
Care of Machine Supplies.............................. ............................................ ..... 1-4
Legal Restrictions on Copying....................................................................... 1-4
Chapter 2 Getting to Know Your Copier/Fax
1. Typical Copies You Can Make with Your Copier
Typical copies you can make with your copier.............................................. 2-2
2. System Over view
System Overview .................. ............................................ .............................. 2-6
DF200/DF270/DF370 and Options ................................................................ 2-6
Option ........................................................................................................... 2-12
A view from the Ou tside....... .......... ......... .......... .......... .......... ......... .......... .... 2-16
Inside the Machine........................................................................................ 2-17
Fax Options: Identific ation an d F u nctions ......... .......... .......... ......... .......... .... 2-18
3. Control Panel Keys and Touch Panel
Contr ol Panel Keys and I n di cators . ......... ... .......... ......... .................... ......... .. 2-19
What is the Touch Panel? ............................................................................. 2-20
Opera ti ng the Touch P anel ............... .......... .......... ......... .................... ......... .. 2-20
How t h e B asic Screen is Or g anized......... .......... .......... .......... ......... .......... .... 2-20
Icons.............................................................................................................. 2-24
4. Turning ON and OFF and Initial Mode
Turnin g O N and O F F....... .......... ................... .......... .......... ......... ................... 2-25
When M achine is Turn ed ON .............. ................... .......... ......... .......... ... ...... 2-25
Initia l M o de........ ......... ... .. .......... .. .......... .. ... .......... .. .......... .. .......... .. ... ......... .. 2-25
5. Placing the Original
Using th e Docume n t F eeder ....................... .......... ......... .......... ................... .. 2-26
Loadin g the Ori g in als in Docu ment Fee der.. .................... ......... .......... ......... 2-27
Placin g the Orig in al on the Gl as s ..... .......... .......... ................... .......... ......... .. 2-30
Mixed Orig. D etection ............ .......... .......... .......... ......... .......... ................... .. 2-32
6. Auxiliary Functions
Auxil ia r y Fu n ct io n s ......... ... ......... ... ......... ... .......... .. .. .......... ... ......... ... ......... .. 2-33
Chapter 3 Making Copies
1. Basic Copying Overview
Basic Copying Overview................................................................................ 3-2
2. Selecting the Paper
Paper S ize ............ .......... ......... ........................... .......... .......... ......................... 3 - 4
Manual Bypas s C o p yi n g......... .......... ... ......... .......... .. .......... .......... .. .......... ...... 3-7
Page 13

3. Selecting the Zoom
Zoom Ratio................................................................................................... 3-12
4. Selecting the Finishing Function
Finish i n g Fu n ct io n s ............ ... .......... .. .......... .. ... ......... ... ......... ... .......... .. .. ...... 3-18
Selecting th e Fin i s hing Func tion............ ................... .......... .......... ......... ...... 3-20
Hints for Stapling Position ........................................................................... 3-26
Hints for Stapling ......................................................................................... 3-30
Hints for Hole-Punching Position ................................................................ 3-30
5. Selecting the Original Copy Type
Original Cop y Type...... .......... ......... .......... .................... ......... .......... ........ 3-31
▼
Selecting the Original Copy Type ............................................................ 3-34
▼
▼
Some Precautions for Making Copies.......................................................... 3-41
Handy Feature Available from Initial Mode Setting.................................... 3-41
6. Selecting the Density
Image Density .............................................................................................. 3-42
7. Auxiliary Functions
Cover ............................................................................................................ 3-44
Page Insertion............................................................................................... 3-46
OHP Interleaving................... ....................................................................... 3-50
File Margin ................................................................................................... 3-54
Edge/Frame Erase ........................................................................................ 3-56
Image Repeat................................................................................................ 3-58
Distribution................................................................................................... 3-60
Separate Scan ............................................................................................... 3-61
8. Using Memory Recall
Memo r y Recall.. .......... ... .. .......... .. .......... .. .......... .. ... .......... .. .......... .. .......... .. . 3-62
iii
Contents
Chapter 4 Typical Function Combinations
1. Making Different Types of Copy
Reading the Tabl e.................... .......... .......... ......... .................... .......... ......... ... 4-2
Using 1-Sided Originals................................................................................. 4-3
Using 2-Sided Originals with Filing Margin along Left Edges..................... 4-9
Using 2-Sided Originals with Filing Margin along Top Edges................... 4-15
2. Using Large-Size Originals
Precautions When Making Copies on 11×17 L or Lega l L........ .......... ........ 4-21
Chapter 5 Using the Facsimile
1. Using the Facsimile
Basic Faxing Procedures ................................................................................ 5-2
2. Sending Docum ents
Quick Memory Transm i s s i on.. .......... .......... ......... .................... .......... ......... ... 5-4
Using One-T ou ch Dial ing for Transm is sion...... .......... ......... .......... .......... ..... 5-6
Using Abbreviated D ialing for Transmission ........... .......... .......... ......... ........ 5-7
Using Facsimile Program for Transmission................................................... 5-8
Adjusting Facs imile Ima ge Quality.......... .......... .......... ......... .......... .......... ..... 5 -9
Adjusting Facs imile Contrast ..... ................... .......... .......... ......... .......... ........ 5-10
Adjusting Facs imile Red u ction ........... .......... .................... ......... .......... ........ 5-12
Defining the Area of Document to be Scanned for Transmission ............... 5-14
Chain Dialing ......... .......... ................... .......... .......... .......... ................... ........ 5-16
Settin g the Comm unicati on Mode .......... ................... .......... .......... ......... ...... 5-18
Page 14

iv
Contents
When Transmiss io n Fails...... .......... ......... .......... .................... ......... .......... .... 5-19
3. Receiving Documents
Automatic Reception and Manual Reception............................................... 5-20
On Receiving D ocuments... ......... .......... .......... ......... .................... .......... ...... 5-2 0
4. Using Facsimile as Telephone
Using Y o ur F ax Machin e as a Telephone ............... .......... ......... .......... ......... 5-22
5. Using Activity List
Activi ty List........................ ......... .......... .......... ......... .................... .......... ...... 5-2 4
Specif i c Items That Can be Checke d w ith Acti v ity List .... .......... .......... .. .... 5-24
Selecting a Function Available from Activity List....................................... 5-25
Chapter 6 Various Ways of Using Your Facsimile
1.Various Ways of Transmitting Documents
Serial B r o adcast T r ansmissi o n.......... ... ......... .......... .. .......... .......... .. .......... ...... 6-2
Manual Transm is sion.......... ......... ... ......... .......... ... ......... .......... .......... .. .......... . 6-4
Relay Transm is sion... .......... ................... .......... ......... .......... .......... .......... ........ 6- 5
Real Tim e Tra ns m i ssion ..... ......... ... .. .......... .. .......... .. ... .......... .. .......... .. ... ........ 6- 6
Priority Tran s mission..... ................... .......... .......... ......... .......... .......... ......... .... 6-7
Timer Tr ansmiss ion................ .......... .......... ........................... ......... .......... ...... 6-8
2in1 Transmis sion....... .......... .......... ......... .................... .......... ......... .......... ...... 6-9
2-Side d Tr a nsmission ........... .. .......... ... ......... ... .. .......... .. .......... .. ... .......... .. .... 6-10
TX Mark er .... ......... .......... .......... .......... ......... .......... .......... ......... .......... ......... 6-1 2
TSI Information............................................................................................ 6-14
Destination I n s ertion... .......... .......... ......... .......... .......... ................... .......... .... 6-15
TX Report ...................... .......................... .......... .......... .......... ......... .......... .... 6-16
Remote Copy ................................................................................................ 6-17
Passwo r d TX...... .. .. .......... ... ......... ... .. .......... .. .......... .. ... .......... .. .......... .. ......... 6-18
2. Using Bulletin Boards
Postin g a Document on a Bullet in Board.... .......... ......... .......... .......... .. ......... 6-1 9
Down lo ad i n g a Docu m e n t f rom a Bullet in Board (Ret riev e).... .......... ... ...... 6-2 2
3. Using Applied Functions
Pollin g TX..... ................... .......... .......... ......... .......... ................... .......... ......... 6-24
Pollin g Receptio n and Sta rt Timer........... .......... .......... ................... .......... .... 6-26
4. Various Ways of Receiving Documents
Manual Reception.. ... .......... ......... ... ......... .......... .......... .. .......... .......... .. ......... 6-28
Passwo r d R eception....... .. ... ......... ... ......... ... .. .......... .. .......... ... ......... ... .. ......... 6-29
5. Using F CODE
What is F C ODE? ............ .......... .. .......... .. .......... .......... .. .......... .......... .. ......... 6-30
Chapter 7 Setting the Utility Mode
1. Using the Utility Mode
Progra m ming a n d S etting Screens........... .......... .......... .......... ......... .......... ...... 7-2
List of P r o gramming/Sett in g I tems...... ......... ... ......... .......... .................... ........ 7-4
2. Required Initial Programming Items and Confirmation of Initial Settings
Requir e d I n it ia l P r o gramming I t ems ............ ... .. .......... .. .......... .. .......... ... ........ 7- 8
Checki ng the Init i al S e ttings... .......... .......... .. .......... .......... .. .......... .. .......... ...... 7-8
3. Entering Characters
Alphanumeric Screen.................................................................................... 7-10
Enteri ng Letters ......... ................... .......... .......... ................... .......... .......... ...... 7-11
Enteri ng S y m bols....................... .......... ......... .................... ......... .......... ......... 7-1 1
Page 15

4. Job Memory Input and Job Recall
Job Memory I nput................. .......... ......... .................... ......... .......... .......... ... 7 - 12
Recal li ng a Job f rom Memor y........... .......... ......... .......... .......... ................... . 7-15
5. Meter Count
Using Meter C ou nt......... ................... .......... ......... .......... .................... ......... . 7-16
6. Settings in User Management
Settin g the Conf i rmation Beep and Alarm Volume....... .......... .......... ......... . 7-17
Using the Deh umidify F u nction........ .......... ......... .......... .................... ......... . 7-18
Using the Toner Replenisher Functi on................. .......... .......... .......... ......... . 7-19
Panel Cleanin g...... .. .......... .......... .. .......... .......... .. .......... ......... ... .......... ......... . 7-20
Data Send ..................................................................................................... 7-20
7. Settings for Report
Printing Repo rts an d Lists ............... ......... .......... .......... ................... .......... ... 7-21
Chapter 8 User’s Choice and FAX Input
1. Making the User’s Choice Settings
User’s Choice Functions ................................................................................ 8-2
Makin g the User’s Choic e Set tings..... .......... .......... .......... ................... .......... 8-7
2. Settings for FAX Input
FAX Inp u t Items........ ......... .................... .......... ......... .......... .......... ................. 8-8
Selecting F A X Input........... .......... .......... .......... ......... .......... .......... ......... ........ 8-9
Settin g Abbreviated D ialing Numbers ............. ......... .......... .......... ......... ...... 8-10
Settin g One- To uch Diali n g N umbers..... ................... .......... .......... ......... ...... 8-16
Settin g Indexes................. .......... ......... .......... .......... ................... .......... ........ 8-22
Settings for Facsimile Program s .................................................................. 8-23
FAX Pr o gr am Proced u res ................... .......... .......... .......... ......... .......... ........ 8-24
Regis te ring Re lay Gro u ps .......... ......... .......... .................... ......... .......... ........ 8-33
Self-Abbreviated Di aling ............................ ......... .......... .......... .......... .......... 8-34
Settin g up a Bulleti n Board ...................... .......... .......... ......... .......... .......... ... 8 - 35
Bultn. Procedures ......................................................................................... 8-36
Registering Account (Account Input).......................................................... 8-38
Account Input Procedures............................................................................ 8-40
v
Contents
Chapter 9 Using the Admin. Management Mode
1. Settings in Admin. Management
Admin. Management Mode............................................................................ 9-2
Settin g Admin . Mana g e ment... .......... .......... ................... .......... .......... ......... ... 9-2
Functions of Admin. Management................................................................. 9-3
2. Settings for Administrator Set
Administrato r Set ........... ......... ........................... .......... ......... ......................... 9-4
3. Settings for Copy Track
Copy Track........ .......... .................... ......... .......... .......... ................... .......... ..... 9-6
4. Settings for Input Accounts
Input Accounts............................................................................................. 9-12
Input Accounts Procedures........................................................................... 9-14
5. Setti ngs for Initial Settings
Initia l Settin g s ... ... .......... ......... ... ......... .......... .......... .. .......... .......... ......... ... ... 9- 18
Initia l Settin g s Pr oc ed ures....... .......... .. .......... .......... .......... .. .......... ......... ...... 9-20
6. Settings for FAX Recept Settings
FAX Rece p t ( Re ception ) Set tings ..... .. ... .......... .. .......... .. .......... .. .......... .. ... ... 9-24
Page 16

vi
Contents
FAX Recept Settings Pr ocedur es..................... ......... .......... .......... .......... ...... 9-26
7. Settings for FAX Trans. Settings
FAX T r ans. Se ttings .................. .......... ......... .......... .......... ......... .......... ......... 9-2 8
FAX T r ans. Se ttings Pro cedures....... .......... .......... ......... .......... .......... ......... .. 9-30
8. Settings for Account Meter
Accoun t Meter P r o cedures.. .. .......... ......... ... .......... ......... ... ......... .......... ......... 9-31
9. Settings for Report Settings
Repor t Se t ti n g s..... .. ... .......... .. .......... .. ... ......... ... ......... ... .......... .. .......... .. ... ...... 9-3 2
Repor t Se t ti n g s Pr o c ed u r es..... ... .......... .. .......... .. .......... .. ... ......... ... .......... .. .... 9-32
10. Settings for Report Printing
Repor t Pr in t in g............ ... ......... ... .......... .. .......... .. ... ......... ... ......... ... .......... .. .... 9-33
Repor t Pr in t in g P ro cedures............... ... ......... ... ......... ... .......... .. .. .......... ... ...... 9-33
Chapter 10 When a Message Appears
1. When the Message “Replenish paper.” Appears
Adding pape r .................. ......... .......... .......... .......... ................... .......... ......... .. 10-2
Memorize Paper Size .................................................................................... 10-8
2. When the Message “Please add toner.” Appears
Replacing the Toner Bottle........ .......... ......... .......... .......... ......... .......... ....... 10-1 0
3. When the Message “Stapler empty.” Appears
Reloading th e Sta ple Cartr id ge......... .......... ................... .......... .......... ......... 10-12
4. When the Message “Please change Imaging Unit.” Appears
Chang ing the Imaging Un it............. ................... .......... .......... ......... .......... .. 1 0- 1 6
5. When the Message “Misfeed detected.” Appears
Misfeed Locatio n Displays...................... .......... .......... .......... ......... ............ 10-18
Misfeed Clearin g Procedures............... ......... .......... .......... ................... ....... 10- 19
6. When the Me ssage “Cannot staple.” Appears
Clearing the Staple Misfeed ......... .......... .......... ................... .......... .......... .... 10-34
7. When a Size Error Message Appears
Clearing a Size Error................................................................................... 10-38
8. Replacing the TX Marker Stamp (Spare TX Marker STAMP)
How to Replace the TX Marker Stamp (Spare TX Marker STAMP) ........ 10-40
9. Whe n the Message “A malfunction w as detected.” Appears
When th e messag e “ A malfunction was dete cted.” appears.............. ......... 10-41
10. What Does Each Message Mean?
What d o e s each messa ge m ea n ? ............ .. .......... ... ......... ... ......... ... .......... .... 10-42
11. When This Type of Copy is Produced
When this type of copy is produced............................................................ 10-43
12. The Machine is not Functioning as Designed
The machine is not functioning as designed............................................... 10-46
13. Facsimile is not Functioning Properly.
Transm ission Fai lu r es................ .......... ......... .................... ......... .......... ....... 10-47
Recep ti o n Failu r es ...... .......... ................... .......... .......... .......... ......... ............ 10-48
Telephone Problems ................................................................................... 10-49
Chapter 11 Miscellaneous
1. Speci fications
Specifications................................................................................................ 11-2
2. Care of the Copier
Cleaning...................................................................................................... 11-10
Page 17

Index
vii
Contents
3. Function Combination Matrix
Funct io n Combination Ma trix. .......... .......... ......... .......... .................... ........ 11-12
Conditions for Combined Functions.......................................................... 11-14
4. Description of Paper Size and Zoom Ratio Table
List o f Paper Sizes and Zoom Ratios....... .......... .......... ......... .......... .......... . 11-15
5. Terms and Definitions
Terms and Definitions................................................................................ 11-16
6. Power Failure
Should Power Failure Occurs..................................................................... 11-18
Page 18

viii
Safety Inf or matio n
FCC Part 68-Telecomunication Devices
This equipmen t complie s with Pa rt 68 of the FCC rules . On the re ar panel of this equipm ent is a label that
contains, among othe r info rmation, the FCC regi stra tio n number and Ringer Equi v alen ce Number (REN)
for this equipment. If requested, provide this information to your telephone company.
This equipment uses THE FOLLO WI N G USOC JACKS: RJ11C.
The REN is useful to determine the quantity of devices you may connect to your telephone line and still
have all of those devic es ring when your number is called. In most, but not all areas, the sum of the RENs
of all devices should not exceed five (5.0). To be certain of the number of devices you may connect to
your line, as determined by the REN, you should call your local telephone company to determine the
maximum REN for your calling area.
If your telephone equipment causes harm to the telephone network, the Telephone Company may
discontinu e your serv ice temporarily. If possible, they will notify you in advance. But if advance notice
isn’t pra ctical, you w il l b e not ifi e d as soon a s possible. You will be advised of your right to file a
complaint with the FCC.
Your telephone company may make change s to its facilities, equipment, operations, or procedures that
could affect the proper operation of your equipment. If they do, you will be given a dvance notice so as to
give you an opportunity to maintain uni nterrup te d service .
If you experience trouble with this equipment, please contact:
Imagistics International Inc.
100 Oakview Drive
Trumbull, Connecticut 06611
Phone: 1-(800) 243-5556
The telephone company may ask you to disconnect this equipment from the network until the problem
has been corrected or you are sure that the equipment is not malfunctioning.
This equipmen t may not be use d on coin ser vic e provi ded by the t eleph one compan y. Conne ction t o par ty
lines is subj ect to state tariffs. (Co ntact your state pub lic utility commission or corporation commission
for information.)
CUSTOMER INFORMATION FOR PRIVATELY OWNED COIN PHONES
To comply with state tariffs, the telephone company must be given notification prior to connection.
In some states, prior approval of connection must be obtained from the state Public Utility Commission,
Public Service Commission or state Corporation Commission.
Warning for the Setting of He ader and Footer
The Telephone Consumer Protection Act of 1991 makes it unlawful for any person to use a computer or
other electronic device to send any message via a telephone fax machine unless such message clearly
contains in a mar gin at the top or bott om of each transmitte d page or on the f irst pa ge of the tran smiss ion,
the date and time it is sent and an identification of the business or other entity, or other individual sending
the message and the telephone number of the sending machine or such business, other entity, or
individual.
In order to program this information into your fax machine, you should complete the following steps.
(Refer to Chapter 8 and Chapter 9 Advance Operation page 8-39, 8-40, 9-13, 9-15, 9-28 and 9-30)
Page 19

Safety Information
IC CS-03-Telecomunication Devices
NOTICE:
Industry Canada (IC) label identifies certified equipment. This certification means that the equipment
meets certain telecommunications network protective, operational, and safety requirements. IC does not
guarantee the equipment will operate to the user’s satisfaction.
Before ins tall ing t his equipm en t, u sers should ens ure that it is per missi ble to be conn ected to the f aci li ti es
of the local telecommunications company. The equipment must also be installed using an acceptable
method of conn ectio n. I n some c ases, the compan y’s inside wir ing as soci ated wi th a single li ne individual
service may be extended by means of a certified connector assembly (telephone extension cord). The
customer should be aw are that compl iance with the a bove condit i o ns may not prevent degradation of
service in some situations.
Repairs to certified equipment should be made by an authorized Canadian maintenance facility
designated by the supplier. Any repairs or alterations made by the user to this equipment, or equipment
malfunctions, may g ive the telecommunications company cause to request t he user to disconnect the
equipment.
Users should ensure for their own protection that the electrical ground connections of the power utility,
telephone lines, and internal metallic water pipe system, if present, are connected together. This
precaution may be particula rly i mp ortant in rural areas.
ix
CAUTION:
Users should not attempt to make such connections themselves, but should contact the appropriate
electric inspection authority, or electrician, as appropriate.
NOTICE:
The Ring er Equivalence Nu mber (REN)
maximum number of termin als allowed to be connected to a telephone interface. The termination on an
interface may consist of any combination of devices subject only to the requirement that the sum of the
Ringer Equivalen ce Numbe r s o f all the devi ces does not exceed 5. REN=0.4
If you experience trouble with this equipment, please contact:
Pitney Bowes of Canada Ltd.
2200 Yonge Street, Third Floor Suite 100
Toronto, Ontario M4S3E1
Tel: (416) 484-3915
assigned to each terminal device provides an indication of the
Page 20

x
Safety Information
Laser Sa fe ty
This is a digital machine which operates by means of a laser. There is no possibility of danger from the
laser, provided the machine is operated according to the instructions in this manual.
Since radiation emitted by the laser is completely confined within protective housing, the laser beam
cannot escape from the machine during any phase of user operation.
This machine is certified as a Class 1 laser product. This means the machine does not produce hazardous
laser radiation.
Internal Laser Radiation
Maximum Average Radiant Power: 19.5 µW (DF200/DF270) / 27.8 µW (DF370) at the laser aperture of
the print head unit.
Wavelength: 770-795 nm (DF200/DF270)
775-795 nm (DF370)
This product employs a Class 3b laser diode that emits an invisible laser beam.
The laser di ode and the scanning polygon mirror are incorporated in the print head unit.
The print head unit is NOT A FIELD SERVICE ITEM.
Therefore, the print head unit should not be opened under any circumstances.
Print H ea d
4015O022AB
Laser Apertu re of
the Print H e ad U n it
1166O263AB
This figure s hows the view insid e the Right Door
with the Imaging Unit removed.
Page 21

xi
Safety Information
CDRH regulation
This machine is certified as a Class 1 Laser product under Radiation Performance Standard according to
the Food, Drug and Cosmetic Act of 1990. Compliance is mandatory for Laser products marketed in the
United States a nd i s repor ted to the Center for De vic es and Ra dio logica l Heal th ( CDRH) of the U.S. Food
and Drug Administration of t he U. S. Department of Health and H uma n Se r v ices (DHHS). Th is me a ns
that the device does not produce hazardous laser radiation.
The label shown to page xiii indicates compliance with the CDRH regulations and must be attached to
laser products mark eted in the Unit ed States.
CAUTION
Use of controls, adjustments or performance of procedures other than those specified in this
manual may result in hazardous radiation exposure.
This is a semiconductor laser. The maximum power of the laser diode is 5 mW (DF200/DF270) / 15 mW
(DF370) and the wavelength is 770-795 nm (DF200/DF270) / 775-795 nm (DF370).
Notice for Ni-MH Batteries
Ni-MH (Nickel Metal Hydride) Batteries are installed inside machine as back up memory batteries.
Please dispose according to loca l, stat e an d federal regulations.
Page 22

xii
Safety Information
For European Users
CAUTION
Use of controls, adjustments or performance of procedures other than those specified in this manual
may result in hazardous radiation exposure.
This is a semiconductor laser. The maximum power of the laser diode is 5 mW (DF200/DF270) / 15
mW (DF370) and the wavelength is 770-795 nm (DF200/DF270) / 775-795 nm (DF370).
For Denmark Users
ADVARSEL
Usynlig laserstråling ved åbning, når sikkerhedsafbrydere er ude af funktion. Undgå udsættelse for
stråling. Klasse 1 laser produkt der opfylder IEC60825 sikkerheds kravene.
Dansk: Dette er en halvlederlaser. Laser diodens højeste st yrke er 5 mW (D F20 0/DF270) / 15 mW
(DF370) og bølgelængden er 770-795 nm (DF200/DF270) / 775-795 nm (DF370).
For Finland, Sweden Users
LOUKAN 1 LASERLAITE
KLASS 1 LASER APPARAT
VAROITUS!
Laitteen Käyttämi nen muulla kuin tässä käyttöohjeessa mainitulla tavalla saattaa al tistaa käyttäjän
turvallisuusluokan 1 ylittäväl le näkymättömälle lasersäteilylle.
Tämä on puolijohdelaser. Laserdiodin suurin teho on 5 mW (DF200/DF270) / 15 mW (DF370) ja
aallonpituus on 770-795 nm (DF200/DF270) / 775-795 nm (DF370).
VARNING!
Om apparaten används på annat sätt än i denna bruksanvisning specificerats, kan användaren utsättas
för osynlig laserstrålning, som överskrider gränsen för laserklass 1.
Det här är en halvledarlaser. Den maximala effekten för laserdioden är 5 mW (DF200/DF270) / 15 mW
(DF370) och våglängden är 770-795 nm (DF200/DF270) / 775-795 nm (DF370).
VARO!
Avattaessa ja s uojalukitus ohitettaessa olet alttiina näkymät tömälle lasersät eilylle. Älä katso säteeseen.
VARNING!
Osynlig laserstrålning när denna del är öppnad och spärren är urkopplad. Betrakta ej strålen.
For Norway Users
ADVERSEL
Dersom apparatet brukes på annen måte enn spesifisert i denne br uksanvisning, kan brukeren utsettes
for unsynlig laserstråling som overskrider grensen for laser klass 1.
Dette en halvleder laser. Maksimal effekt till laserdiode er 5 mW (DF200/DF270) / 15 mW (DF370) og
bølgelengde er 770-795 nm (DF200/DF270) / 775-795 nm (DF370).
Page 23

Laser Safety Label
A laser safety label is attached to the o u tside of the m achine as shown below.
Manufacturer’s
Name Plate
Laser safety label
4015O258EB
The Manu facturer’s Name Plate is affixed at th e p o sition illustrated abov e.
Please write down the Mode l Name and Serial No. of your copier here.
xiii
Safety Information
4015O259AA
Model:
Serial No.
Ozone Release
NOTE
= Locate the Machine in a Well Ventilated Room =
A negligible amount of ozone is generated during normal operation of this machine. An unpleasant
odor may , however, be created in poorly ventilated rooms during extensive machine operations. For a
comfortable , healthy, and safe operat ing environment, it is recommended that the room well
ventilated.
REMARQUE
= Placer l’appareil dans une pièce largement ventilée =
Une quantité d'ozone négligable est dégagée pendant le fonc tionnement de l’appareil quand cel u i -c i
est utilisé normalement. Cependant, une odeur désagréable peut être ressentie dans les pièces dont
l'aératio n est insuf fisante et lorsque une utilisation prolongée de l’appareil est effectuée. Pour avoir la
certitude de travailler dans un environnement réunissant des conditions de confort, santé et de
sécurité, il est préférable de bien aérer la pièce ou se trouve l’appareil.
Acoustic Noise
For European Users
Machine Noise Regulation 3 GSGV, 18.01.1991 : The sound pressure level at the operator position
according to EN 27779 is equal to or less than 70dB(A).
Page 24

xiv
Terms and Symbols for the Type of Originals and Copy Paper
A few special te r ms a nd s y m bols are used in this manual to de signate t yp es of ori gi nal s and co p y paper.
This page explains about these terms and symbols.
Feeding Direction (copy paper path)
In this copi er syste m, copy pape r is ta ken up from t he ri ght-han d side of the c opier, fed through th e c opier
toward the left-hand si de, and ejec ted face down onto th e Copy Tray. In the figur e below, the direct ion in
which the copy paper is fed, as indicated by the arrow, is called the “feeding direction.”
“Width” and “Length”
1139O1610A
Terms and Symbo ls U sed
1139O1610A
4015O019AB
When we talk about the size of the original or copy,
we call side A “width” and side B “length.”
A: Width
B: Length
<Lengthwise >
When the origin al or cop y ha s a “le ngth” l onger tha n
its “width,” we call it “lengthwise” and use symbol
“L” or “ .”
<Crosswise >
1139O1620A
When the original or copy has a “length” shorter
than it s “width,” we call it “crosswise” and use
symbol “C” or “ .”
Page 25

Chapter 1
Safety N ot es
1-1
Chapter 1
Safety Notes
Page 26

1-2
1. Install ing the Cop ie r
Installation Site
To ensure utmost safety and prevent possible malfunctions of the copier, install it in a location which
Chapter 1Safety Notes
meets the following requirements.
A place away from a curtain or the like that may catch fire and burn easily.
◆
An area where there is no possibility of being splashe d with wat er or other typ es of liquid.
◆
An area free from direct sunlight.
◆
A place out of the direct air stream of an air conditioner, heater, or ventilator.
◆
A well-ventilated place.
◆
A dry place.
◆
A dust-free location.
◆
An area not subject to undue vibration.
◆
A stable and level lo cation.
◆
A place where ammonia or ot her organic gas is not generated.
◆
A place which does not put the operator in the direct stream of exhaust from the copier.
◆
A place which is not near any kind of heating device.
◆
Power Source
The power source voltage requirements are as follows :
Use a power source with little voltage f lu ctuation.
◆
Voltage Fluctuation : Wit hin ± 10% (127V : +6%, −10%)
Frequency F luctua tion : Withi n ± 3H z
Space Requirements
To ensure easy copier operation, supply replacements, and service maintenance, adhere to the
recommended space require ments de tail ed below. Allo w a cleara nce of 12 -1/4 inc h or more a t the b ack of
the copier for a ventilation duct and replacement of the toner bottle.
65-3/4
58-1/2
41-3/4
<With 9729, 9749, 9867, 9753 and 9752 mounted>
4015O023AD
Unit: Inch
Page 27

2. Precautions for Use
Operating Environment
1-3
The operating environmental requirements of the machine are as follows :
Temperat ure : 10°C to 32°C (50°F to 90°F) wit h a fluctuat i on of 10°C (18°F) per hour.
Humidity : 15% to 85% with a fluctuation of 10% per hour.
Acoustic nois e
<For European Users Only>
Machine Noise Regulation 3 GSGV, 18.01.1991 : The sound pressure level at the operator positio n
according to EN 27779 is equal to or less than 70dB(A).
Using the Machine Properly
T o ensure optimum performance of the machine, follow the precautions listed below.
NEVER place a heavy object on the machine or subject the machine to shocks.
◆
NEVER open any doors, or turn OFF the machine while the machine is making copies.
◆
NEVER bring any magnetized object or use flammable sprays near the machine.
◆
NEVER remodel the machine, as a fire or electrical shock could result.
◆
ALWAYS insert th e power plug all the wa y into the outlet.
◆
ALWAYS ma ke sure that the outlet is v isible, clear of the machine or machine cabinet.
◆
ALWAYS provide good ventilation when making a large number of continuous copies.
◆
NOTE
= Locate the Machine in a Well Ventilated Room =
A negligible amount of ozone is generated during normal operation of this machine. An unpleasant
odor may , however, be created in poorly ventilated rooms during extensive machine operations. For a
comfortable , healthy, and safe operat ing environment, it is recommended that the room well
ventilated.
Chapter 1Safety Notes
REMARQUE
= Placer l’appareil dans une pièce largement ventilée =
Une quantité d'ozone négligable est dégagée pendant le fonc tionnement de l’appareil quand cel u i -c i
est utilisé normalement. Cependant, une odeur désagréable peut être ressentie dans les pièces dont
l'aératio n est insuf fisante et lorsque une utilisation prolongée de l’appareil est effectuée. Pour avoir la
certitude de travailler dans un environnement réunissant des conditions de confort, santé et de
sécurité, il est préférable de bien aérer la pièce ou se trouve l’appareil.
Moving the Machine
If you need to transport the machine over a long distance, consult your Technical Representative.
Page 28

1-4
2. Precautions for Use
Care of Machine Supplies
Use the following precautions when handling the machine supplies (toner, paper, etc.).
Chapter 1
Store the paper, toner , and other sup pli es in a pla ce free from direct sunlig ht and a wa y from any heati ng
◆
apparatu s. Ke ep them in a dry, cool, clean environment.
Store paper , which has bee n remov e d from i ts wrap per b ut no t loade d into the drawe r , in a seal ed pla stic
◆
bag in a cool, dark place.
Keep supplies o ut of the rea ch of children.
◆
Safety Notes
If your hands become soiled with toner, wash them with soap and water immediately.
◆
Legal Restrictions on Copying
Certain types of documents must never be copied by the machine for the purpose or with the intent to
pass copies of such documents off as the original. The following is not a complete list but is meant to be
used as a guide to responsible copying.
Financial Instruments
• Personal Checks
• Travelers Checks
• Money Orders
• Certificates of Deposit
• Bonds or other Certificates of Indebtedness
• Stock Certificates
Legal Documents
• Food Stamps
• Pos tage Stamps (cancel ed or uncanceled)
• Ch ecks or Draf ts drawn by Government Agencies
• Internal Revenue Stamps (canceled or uncanceled)
• Passports
• Immigration Papers
• Motor Vehicle Licenses and Titles
• House and Property Titles and Deeds
General
• Identification Cards, Badges, or Insignias
• Copyrighted Works without permission of the copyright owner
In addition, it is prohibited under any circumstances
Art without permission of the copyright owner.
When in doubt about the nature of a document, consult with legal counsel.
to copy do mestic or foreign c u rrencies or Works of
Page 29

Chapter 2
Getting to Know Your Copier/Fax
2-1
Chapter 2
Getting to Kno w Your Copier/Fax
Page 30

2-2
1. Typical Copies You Can Make with Your Copier
Typical copies you can m ake with your copier
Here’s a sample of the features the mach ine is equipped with to make different types of copies. For
specifi c operations, see the relevant pages in dicated by ☞ p.
Original Copy
Single-sided Single-sided
Chapter 2
Double-sided Single-sided
▼
▼
Orig. Copy
▼
Orig.
☞p.3-31
4002O012AA
Copy
Getting to Kno w Your Copier/Fax
4002O014AA
2-in-1 4-in-1
Orig.
Copy
Single-sided Double-sided
Book Single-sided
▼
Orig. Copy
▼
Orig.
Orig.
4002O133AB
Copy
4002O015AA
Copy
Booklet
Orig.
4002O016AA
4002O017AA
Copy
4002O018AA
Page 31

2-3
1. Typical Copies You Can Make with Your Copier
Mixed Original Detection
☞p.2-32
Mixed Orig. Detection
Copy
Finishing
Orig.
☞p.3-18
Sort Staple
Orig.
Copy
Orig.
4002O052AA
Group Hole Punch
Orig.
Copy
Orig.
Chapter 2
4002O029AA
Copy
4002O019AA
Getting to Kno w Your Copier/Fax
Copy
Zoom Ratio
☞p.3-12
Reduce, Full size, Enlarge, X/Y Zoom
Orig.
4002O053AA
Copy
4002O311EA
4002O022AA
Page 32

2-4
1. Typical Copies You Can Make with Your Copier
Auxiliary Functions
Cover ☞p.3-44 Page Insertion ☞p.3-46
Orig. Copy
Chapter 2
4002O023AA
OHP Interleaving ☞p.3-50 File Margin ☞p.3-54
Orig.
Copy
Getting to Kno w Your Copier/Fax
4002O025AA
Orig. Copy
Orig.
Copy
4002O024AA
4002O070AA
Erase ☞p.3-56 Image Repeat ☞p.3-58
Orig.
Copy
4002O071AA
Orig.
Copy
4002O072AA
Page 33

1. Typical Copies You Can Make with Your Copier
Distribution☞p.3-60 Separate Scan☞p.3-61
2-5
Orig.
Copy
4002O075AA
Orig.
Copy
4002O049AB
Chapter 2
Getting to Kno w Your Copier/Fax
Page 34

2-6
2. System O verview
System Ov er view
The following overview presents the machine and the a vai la ble options along with a brief explanation of
the function of each. Refer to “Con trol Panel Keys a nd Indicators” (☞p.2-19) for use of the Touch Panel
and control panel.
DF200/DF270/DF370 and Options
<DF200>
Chapter 2
<DF270/DF370>
Getting to Kno w Your Copier/Fax
4015O025AB
<DF200>
Original Cover Kit 4011015302 <Option>
Holds the original in position on the Original
Glass.
Duplex i n g Do cu m ent Feeder 9729 <O p tio n >
Automatically feeds originals one page after
another for scanning. It is also capable of
automatically turning over 2-sided originals for
scanning data on both sides.
Automatic Document Feeder AF-9 <Option>
Performs automatic feeding of multiple
originals.
Shift Tray 9750 <Option>
Permits sorting or grouping of copies.
4015O026AB
1166O007AA
1166O014AA
1166O008AA
Job Tray 9751 <Option>
Performs sorting and grouping of copies. You
can select the bins for output according to the
application in User’s Choice.
1166O011AA
1166O012AA
Page 35

2. Syst em Overview
Duplex Unit 9752 <Option>
Automatically turns over 1-sided copies to print
data on both sides.
2-7
4015O028AB
4015O027AA
4015O027AA
1166O190AA
Paper Feed Unit 9867 <Option>
Holds up to 500 sheets of paper and easily
adjusts to different paper sizes.
Paper Feed Unit 9753 <Option>
Holds up to 500 sheets of paper.
Copy Table <Option>
Adjusts the height of the machine.
Copy Desk <Option>
Adjusts the height of the machine.
Chapter 2
Getting to Kno w Your Copier/Fax
1166O191AB
8MB Memory, 16MB Memory,
32MB Memory <Option>
To expand the mem o r y c ap a ci ty of the ma ch i n e.
Printer Controlle r Pi 3502 <Option>
When installed on the machine, enables the
mac hine to perfor m printing functions.
Network Application kit-2 <Option>
Allows the DF200 to send mail and also be used
as a printer.
Page 36

2-8
2. System Overview
<DF270>
Original Cover Kit 4011015302 <Option>
Holds the original in position on the Original
Glass.
Duplexing Document Feeder 9729
<Option>
Automatically feeds originals one page after
another for scanning. It is also capable of
Chapter 2
automatically turning over 2-sided originals for
scanning data on both sides.
Automatic Document Feeder AF-9 <Option>
Performs automatic feeding of multiple
originals.
Finisher 97 47 <Option>
Permits sorting, grouping, punching or sortstapling of copies.
1166O007AA
1166O014AA
1166O008AA
Getting to Kno w Your Copier/Fax
Finisher 97 48 <Option>
Permits sorting, grouping or sort-stapling of
copies.
Option Tray DL3700030 <Option>
Mounted on a Finisher 9747 or Finisher 9748
when the machine is equipped with a Printer
Controller; serves as exit tray for exclusive use
of printer.
Mailbin Finisher 9749 <Option>
In addition to t he fu nctions of t he Fi nishe r , it can
sort or group output into 5 bins. Bin assignment
is available from the PC.
4002O099AA
4002O099AA
4015O218AA
4002O102AA
Shift Tray 9750 < O ptio n>
Permits sorting or grouping of copies.
1166O011AA
Page 37

1166O012AA
2-9
2. Syst em Overview
Job Tray 9751 <Option>
Performs sorting and grouping of copies. You
can select the bins for output according to the
applications in User’s Choice.
4015O028AB
4015O027AA
4015O027AA
1166O190AA
Duplex Unit 9752 <Option>
Automatically turns over 1-sided copies to print
data on both side s.
Paper Feed Unit 9753 <Option>
Holds up to 500 sheets of paper.
Paper Feed Unit 9867 <Option>
Holds up to 500 sheets of paper and easily
adjusts to different paper sizes.
Copy Table <Option>
Adjusts the he ight of the machine.
Copy Desk <Option>
Adjusts the height of the machine.
Chapter 2
Getting to Kno w Your Copier/Fax
1166O191AB
4015O029AA
Large Capacity Cabinet 9866
<Option>
Holds up to 2,500 sheets of paper.
8MB Memory, 16MB Memory,
32MB Memory <Option>
To expand the memory capacity of the machine.
Printer Controller Pi3502 <Option>
When installed on the machine, enables the
machine to perform printing functions.
Network Application kit-2 <Option>
Allows the DF270 to send mail and also be used
as a printer.
Page 38

2-10
2. System Overview
<DF370>
Chapter 2
Getting to Kno w Your Copier/Fax
Original Cover Kit 4011015302 <Option>
Holds the original in position on the Original
Glass.
Duplex i ng D o cument F eed er 9729
<Option>
Automatically feeds originals one page after
another for scanning. It is also capable of
automatically turning over 2-sided originals for
scanning data on both sides.
Automatic Document Feeder AF-9 <Option>
Performs automatic feeding of multiple
originals.
Finisher 9747 <Option>
Permits sorting, grouping, punching or sortstapling of cop ies .
Finisher 9748 <Option>
Permits sorting, grouping or sort-stapling of
copies.
1166O007AA
1166O014AA
1166O008AA
4002O099AA
Option Tray DL3700030 <Option>
Mounted on a Finisher 9747 or Finisher 9748
when the machine is equipped with a Printer
Controller; serves as exit tray for exclusive use
of printer.
Mailbin Finisher 9749 <Option>
In addition to the functi ons of the Fini sher, it can
sort or group output into 5 bins. Bin assignment
is available f r om the PC.
Shift Tray 9750 <Option>
Permits sorting or grouping copies.
4002O099AA
4015O218AA
4002O102AA
1166O011AA
Page 39

1166O012AA
2-11
2. Syst em Overview
Job Tray 9751 <Option>
Performs sorting and grouping of copies. You
can select the bins for output according to the
applications in User’s Choice.
4015O028AB
4015O027AA
4015O027AA
1166O190AA
Duplex Unit 9752 <Standard Equipment>
Automatically turns over 1-sided copies to print
data on both sides.
Paper Feed Unit 9753 <Option>
Holds up to 500 sheets of paper.
Paper Feed Unit 9867 <Option>
Holds up to 500 sheets of paper and easily
adjusts to different paper sizes.
Copy Table <Option>
Adjusts the he ight of the machine.
Copy Desk <Option>
Adjusts the he ight of the machine.
Chapter 2
Getting to Kno w Your Copier/Fax
1166O191AB
4015O029AA
Large Capacity Cabinet 9866
<Option>
Holds up to 2,500 sheets of paper.
8MB Memory, 16MB Memory,
32MB Memory <Option>
To expand the memory capacity of the machine.
Printer Controller Pi3502 <Option>
When installed on the machine, enables the
machine to perform printing functions.
Net work Appli cation kit-2 <Option>
Allows the DF370 to send mail and also be used
as a printer.
Page 40

2-12
2. System Overview
Option
Chapter 2
1 2 3 4 2 5
6
7 8
9
10 11
Getting to Kno w Your Copier/Fax
4015O030AB
4015O031AB
12
13
14
15
16
17
4015O032AB
Page 41

2. Syst em Overview
Duplexing Document Feeder 9729
Docume n t Ex i t Tray : R ec eives originals which have bee n s canned by the machine.
1
Misfeed Clearing Guide : Open when clearing an original that has been misfed.☞p.10-22
2
Document Feed Tray : Load the originals to be scanned face up on this tray.
3
Document Guide Plate : Slide the guide plate to the size of the originals.
4
Single Feed Tray : Insert a single sheet into this tray to make a copy or copies of it.
5
2-13
Automatic Do cument Feeder AF-9
Print Lamp : Lights green while the original is being scanned. Lights orange when a
6
trouble occurs.
Misfeed Clearing Guide : Open when clearing an original that has been misfed.☞p.10-23
7
Document Guide Plate : Slide the guide plate to the size of the originals.
8
Feed Tray Extender : Slide this extender out when placing originals of large size.
9
Docume n t Ex i t Tray : R ec eives originals which have bee n s canned by the machine.
10
Document Stopper : Slide this stopper out whenever originals of a large size have been
11
loaded.
Original Cover 4011015302
Original Pad : Holds the original placed on the Original Glass in position.
12
Duplex Unit 9752
Lock Release Lever : Used to open the Duplex Unit to clear a misfed sheet of paper.
13
☞p.10-21
Duplex Unit : Automatically turns over 1-sided copies to print data on both sides.
14
Paper Feed Unit 9867/Paper Feed Unit 9753
Drawer : Holds up to 500 sheets of paper.☞p.10-5
15
* The drawer lamp starts blinking when paper in the drawer is low and
lights orange steadily as soon as it runs out.
Drawer : Holds up to 500 sheets of paper and easily adjusts to different paper
16
sizes.☞p.10-6
* The drawer lamp starts blinking when paper in the drawer is low and
lights orange steadily as soon as it runs out.
Chapter 2
Getting to Kno w Your Copier/Fax
Large Capacity Cabinet 9866
Drawer : Holds up to 2,500 sheets of paper.☞p.10-7
17
Page 42

2-14
2. System Overview
Chapter 2
24
23
22
21
20
19
18
4015O032AB
Getting to Kno w Your Copier/Fax
27
25
26
28
29
31
30
4015O033AA
32
4002O116AA
4015O034AA
Page 43

2. Syst em Overview
Finisher 9747/Finisher 9748
Grip : Ho ld to slide t h e Fin isher away from the machine to clear a m is f ed
18
sheet of paper or perform other service job.☞p.10-24
Front Door : Open to clear a misfed sheet of paper.
19
Bottom Of f set Tray : Receives sorted paper by shifting.
20
Top Offset Tray : Receives plain paper or Card.
21
Option Offset Tray : Receives the type of paper assigned by the PC.
22
Option Tray Cover : Open to clear a misfed sheet of paper.☞p.10-24
23
Upper Cover : Open to clear a misfed sheet of paper.☞p.10-24
24
Mailbin Finisher 9749
Mail Bins : Receive copied paper.
25
Bottom Of f set Tray : Receives sorted paper by shifting.
26
Top Offset Tray : Receives plain paper or Card.
27
Top Offset Tray Cover : Open to clear a misfed sheet of paper.☞p.10-30
28
Stapler Cover : Open to replace the staple cartridge.
29
Grip : Ho ld to slide t h e Fin isher away from the machine to clear a m is f ed
30
sheet of paper or perform other service job.☞p.10-30
<Precautions When Using a Finisher>
2-15
Chapter 2
NEV E R place an object und er the Botto m Of f s e t
Tray. Anyth in g that is p laced under the Bottom
Offset Tray can interfere with the tray when it is
lower ed after a copy has been fed o nto it, wh ich
could result in a malfunction.
Do not place an
objec t here.
4002O276AA
Shift Tray 9750
Shift Tray : Receives copy sets sorted by bin shifting.
31
Job Tray 9751
Job Tray : Can receive a maximum of 100 finished copies.
32
Getting to Kno w Your Copier/Fax
Page 44

2-16
2. System Overview
A view from the Outside
Chapter 2
Getting to Kno w Your Copier/Fax
1
2
3
4
7
8
9
10
11
12
5
13
6
4015O225AA
Control Panel : Set the various functions of the machine. ☞p.2-19
1
Non-Sort Tray : A page or pages of a document received through the fax or copies
2
made are fed out into this tray.
Power Switch : Open the cover, and you will find the Power Switch to turn ON and
3
OFF the machine. ☞p.2-25
1st Drawer : Holds up to 250 sheets of paper and easily adjusts to diff ere nt paper
4
(Multi Purpose Cassette) sizes.☞p.10-2
* The drawer lamp starts blinking when paper in the drawer is low
and lights orange steadily as soon as it runs out.
2nd Drawer : Holds up to 500 sheets of paper. ☞p.10-5
5
* The drawer lamp starts blinking when paper in the drawer is low
and lights orange steadily as soon as it runs out.
* Standard on DF270/DF370.
Original Glass : Place your original face down on this glass. ☞p.2-30
6
Display Contrast Control Knob: Use to adjust the brightness of the Touch Panel.
7
Total Counter : Shows the total number of printed pages produced so far.
8
Upper Right Door : Open to clear a misfed sheet of paper.☞p.10-19
9
Right Door : Open to replace the Imaging Unit or clear a misfed sheet of paper.
10
☞p.10-19
Lock Release Leve r [R1] : Use to unlock the Right Door to replace the Imaging Unit or clear a
11
misfed sheet of paper.☞p.10-19
Manual Bypass Tray : Use for manual feeding of single sheets of paper into the
12
machine.☞p.3-7
Side Panel : Open to clear a misfed sheet of paper. ☞p.10-19
13
Page 45

Inside the Machine
1
2-17
2. Syst em Overview
Chapter 2
2
4015O036AB
Lock Release Lever [R2] : Pull up to clear a misfed sheet of paper.☞p.10-19
1
Green Hooks : Pull to slide out the Imaging Unit.☞p.10-19
2
<Precaution for Opening/Closing the Right Door>
When opening or closing the Right Door , be
carefu l n ot to touc h the Image Transfer
Roller: A malfunction could result.
Image Transfer Roller
4015O024AA
Getting to Kno w Your Copier/Fax
Page 46

2-18
2. System Overview
Fax Options: Identification and Functions
G3 MULTIPORT SERIES 2:
Accommodates a number of lines to permit independent operation of each.
TX Marker STAMP UNIT:
• Uses stamp to show user that a document has been scanned.
• Can be mounted only on the Automatic Document Feeder.
Chapter 2
4015O226AA
1 2
345
4015O250CA
Getting to Kno w Your Copier/Fax
Socket for LAN Cable <Option>
1
For details, see the Operator’s Manual for the
Netwo r k I nterface Card .
7
8
Conne ctor for an Extra Telephone Set
2
Port 1 Line Connector (for subscriber line)
3
Parallel Port <Option>
4
For details, see the Operator’s Manual for the
Printer Driver.
Used when a Printer Controller is mounted
5
6
4015O248EC
(option).
Port 2 Line Connector (for subscriber line)
6
Socket for LAN Cable <Option>
7
For details, see Network Application
Operator’s Manual.
Used when a Printer Controller is mounted
8
(option).
*1 [4], [5], and [8] are used only when a Printer Controller is mounted.
*2 [1] is used only when a Network Interface Card is mounted.
*3 [6] is used only when a G3 MULTIPORT SERIES 2 is mounted.
*4 [7] is used only when a Network Application kit-2 is mounted.
Page 47

3. Contr o l P a nel Keys a nd Touch Panel
Control Panel Keys and Indicators
2-19
1
Touch Panel
1
• Use to make settings for, and programming of,
various copying functions.☞p.2-20
Utility Key
2
• Press to show th e Utility Mode me nu.☞p.7-2
Mode Check Key
3
• Lists the current settings on the screen.
From this screen you can access the setting
screen of a particular function and change or
cancel the setting as necessar y.☞p.2-33
• Access to register the current settings in a
program.☞p.7-12
Pause Key
4
• Useful to provide dial waiting periods, such as
when accessing public lines from an extension
line or receiving inform ation services.
Copy Key
5
• Press to select the Copy mode.
Fax/Scan Key
6
• Press to select the Fax mode or Scanner mode.
For details of Scanner mode, see the operator’s
manual for the Scanner.
Extra Scan
7
• Press to select the Scanner mode.
For details, see the operator’s manual for the
Network Application.
2 3 5
14
13
Access Mode Key
8
• P ress to ente r the acces s number. ☞p.2-35
• This key becomes valid only when Copy Track
of the Administrator mode available from User’s
Choice is set.
Interrupt Key
9
• Press to interrupt a current job with a different
one.
Press again to return to the previous job.
☞p.2-33
• Lights to indicate that the machine is in the
Interrupt mode.
Pane l R es et Key
10
• P r ess to initialize all settings.☞p.2-33
Clear Key
11
Press to:
• Reset the multi-cop y entry to “1.”
• Clear the settings entered from the 10-Key Pad
and other numeric values previously
programmed.
Stop Key
12
Press to:
• Stop a print cycle.
• Stop a scanni ng cycle.
10-Key Pad
13
• Use to set the various numeric values, including
the number of copies to be made.
12
4
4015O261EA
11
6
7
8
9
10
Chapter 2
Getting to Kno w Your Copier/Fax
Star t Key
14
• P ress to start a scanning or print cycle.
Page 48

2-20
3. Control Panel Keys and Touch Panel
What is the T ouch Panel?
The Touch Panel is the screen on which you can make settings for, and program, the variou s copying
functions offered by the machine. When you turn ON the Power Switch, the Basic screen as shown
below appears on the Touch Panel.
Note that some of the Touch Panel screens used i n the Opera tor ’ s Manual may be dif fe rent from what you
actually see on your machine.
Operating the Touch Panel
Chapter 2
You need only to lightly touch the key shown on the Touch Panel to select or activate the function
represented by the key.
NOTE
NEVER pres s the Touch P anel wit h forc e or use a hard or pointed objec t to pr es s it, as a damag ed panel
could result.
How the Basic Screen is Organized
Copier screen: For using the copying functions
Supplementary Function Keys
1
Message Display
2
Getting to Kno w Your Copier/Fax
Function Display
3
Set Function
4
Sub-message Display
4016P184CA
Auto-mode Screen:
Used for both facsimiles and copying without
specifying which function is to be used.
4017P345EA 4016P251CA
Useful Tips
• When the optional Network Application kit-2 is mounted, the Scanner screen can be displayed for
using the various Scanner functions.
• Us er’ s Choice all ows you to select the Copier, FAX, or Auto-mode Scr e en as default acc or di ng to your
particular needs. ☞p.8-2
5
FAX Screen:
Used to select va rious facsimile functions.
Page 49

Supplementary Function Keys
1
2-21
3. Control Panel K eys and Touch Panel
Shows the different supplementary function keys
that can be selected to set the corresponding
supplementary function.
When any of these keys is touched, the
corresponding supplementary function screen
appears.
ex.) Auxiliary Function
Message Display
2
ex.) Add paper
Function Display
3
4016P068CA
4017P161EA
* Touching Basics returns you to the Basic screen.
Shows the current machine status , operating
instructions and precautions, and other data,
inclu ding th e number of copies selected.
Shows the basic function keys that can be selected
to set the corresponding basic function.
Touching a basic function ke y shows the
corresponding basic function screen.
* What is shown inside the key is the current
setting.
Chapter 2
Getting to Kno w Your Copier/Fax
ex.) Zoo m Ratio
Set Function
4
ex.) Orig. Copy: Single-Sided Double-Sided
▼
4017P015EA
4016P060CA
▼
Shows graphic representations of the current
settings.
* To check for m ore details of the set functions,
press the Mode Check key.☞p.2-33
Page 50

2-22
3. Control Panel Keys and Touch Panel
Sub-message Display
5
Chapter 2
Shows icons that represent various data on the job
being run, such as: the amount of memory space
still ava ilable for use, toner-empty condition, and
paper-empty condition.
* To c heck fo r the s etti ngs of th e currentl y rese rved
job, touch [Acti vity List]. ☞p.2-36
Getting to Kno w Your Copier/Fax
ex.) Now copying.
4016P134CA
Page 51

2-23
3. Control Panel K eys and Touch Panel
Chapter 2
Getting to Kno w Your Copier/Fax
Page 52

2-24
3. Control Panel Keys and Touch Panel
Icons
Icon Explanation
Dialing Now dialing.
Dial Wait Waiting to re-dial.
Chapter 2
Getting to Kno w Your Copier/Fax
Copying Now copying.
Scanning Now scanning a facsimile document.
Receiving Now receiving a facsimile.
Sending Now sending a facsimile.
Polling TX Wait A document is waiting for polling transmission.
Document on Bulletin Board
Printing Now printing.
Print Waitin g Proce s sing the next prin t job.
Data being received Receiving data for PC print.
Data rema ins PC print data left in memo ry.
Automatic Reception OFF Manual reception is set.
Paper empty Add paper. ☞p.10-2
A document that has been registered on the Bulletin
Board.
Lack of Tone r Tone r is low. Replace the Toner Bottle. ☞p.10-10
Replace I/U
Maintenance Call Machine needs service. Call your Tech. Rep.
Document Received A document received in the mailbox.
Access Mode
Need to change the Imaging Unit. Call your Te ch.
Rep.
An account has been selected with the Access Mode
key with [100 Accounts 2] set for the “Copy Track”
function.
Page 53

2-25
4. Turn ing ON and OF F and Initial Mode
Turning ON and OFF
• Turning the Machine ON:
Open the cover and press the Powe r Switch to
the (ON) position.
• Turning the Machine OFF:
Open the cover and press the Powe r Switch to
the (OFF) position.
4015O229AA
When Machine is Turned O N
When the Power Switch is turned ON, the Start key lights orange.
In a few seconds, the message “Now war ming-up. Ready to scan.” appears and the Start key lights g reen.
The machine t hereafter enable s its auto copy start function. ☞p.2-33
At this ti me, however, pressing the Start k ey will not st art a copy cycle. The DF200/DF270 machine
needs a warm-up peri od of about 60 seconds (a t room t emperatu re of 23°C) , and DF 370 needs a warm-up
period of about 70 seconds (at room temperature of 23°C).
Chapter 2
Getting to Kno w Your Copier/Fax
Initial Mode
When the Power Switch is turned ON, the Basic screen appears on the Touch Panel. The settings on this
screen are called the ini t ial mode, serving as the reference for all pa n el settings to b e made later.
No. o f c o pi es selected: 1
Finishing : Non-Sort
Zoom : Full size (×1.000)
Paper : Auto Paper
Density : Auto Exposure (Text mode)
Orig. Copy : Single-Sided Single -S ided
4016P067CA
Useful Tip
User’ s Choice can be used to change any of the settings of initial mode. ☞p. 8-2
▼
▼
Page 54

2-26
5. Placing the Original
Using the Document Feeder
The docume nt feeder aut omati ca ll y feeds or igi nal she ets pla ced on the Docume nt Feed T ray, one by one,
to let the machine scan the data on each original. After the machine completes scanning the data, the
document feeder automatically ejects it onto the Document Exit Tray. To ensure the best performance
and most effective use of the document feeder, use the appropriate type of originals as detailed below.
Use of unsuitable types of originals could result in an original misfeed or a damaged original.
Originals Suitable for the Document Feeder
Chapter 2
<Duplexing Document Feeder>
Types of Originals: Sheets (Plain paper)
1-sided Original (weighing 13-1/4 lb to 29-1/4 lb)
2-sided Original (weighing 16 lb to 24 lb)
Mixed Original Detection mode (weighing 16 lb to 24 lb)
Original Size:1-Sided Original, 2-Sided Original mode
: 11×17 L to 5-1/2×8-1/2 L
Mixed Original Detection mode
: 11×17 L to Letter
<Automatic Document Feeder>
Types of Originals: Sheets (Plain paper)
Single feeding: Paper weight 10-3/4 lb to 21-3/4 lb
Getting to Kno w Your Copier/Fax
Origi n al Size: 1-Sided Original, 2-S i d ed Original mode
Multip le feedin g: Pap er we ight 14 lb to 21-3/4 lb
11×17 L to 5-1/2×8-1/2
Mixed Original Detection mode
11×17 L to 5-1/2×8-1/2 C
Unsuitable Originals
• Typing paper, paraffin paper, and other thin paper
•Card
• Originals greater than 11×17 L or smaller than 5-1/2×8-1/2
• Transparencies, translucent paper
• Wrinkled, dog-eared, curled, or torn originals
• Clipped or stapled originals
• Carbon-backed originals
* For any of these types of originals, raise the document feeder and place the original on the glass to let
the machine scan it. ☞p.2-30
Page 55

Loading the Originals in Document F eed er
Automatic Do cument Feeder
Slide the Document Guide Plate to the size of
1
the originals.
Feed Tray Extender
2-27
5. Placing the Original
Document Stopper
4015O043AA
Useful Tip
Slide the Feed Tray Extender and Document
Stopper out when loading originals of a size
larger than Letter.
Neatly load stack of originals face up on the
2
Docume n t Feed Tray.
4015O044AB
NOTES
• The max imum number of ori ginals that can be
loaded is 70.
• Make sure that the top level of the original
stack does not exceed the
marking.
▼
• Make sure that the Document Guide Plate is
touching the edges of the original stack. If it’s
not pressed snugly against the original stack,
skewed fe ed i n g co u l d resul t.
• You can make copies automatically from
originals of assorted sizes loaded in the
Automatic Document Feeder. ☞p.2-32
4015O045AB
4015O046AB
• If you need to load your original in a direction
different from these examples, set “Original
Direction” on the Touch Panel. ☞p.3-35
• To send a facsimile, load the original in the
Autom at i c Doc u ment Feeder s o th a t its longer
side is placed against the Document Guide
Plate. If the original is loaded with its shorter
side against the Document Guide Plate, the
receiving party may receive it in a reduced size.
Press the Start key. The orig inals will be fe d
3
into the Automatic Document Feeder,
starting with the top page.
NOTES
• The mach ine c an sen d by fac simil e the i mag e of
the original of a nonstandard s i ze a s long as it
falls within the following sizes.
Minimum
4015O266EA
Maximum
• The machine may fail to read the areas of 1/2
inch margins on top, bottom, right, and left
edges of the original if it is to be sent by
facsimile.
Chapter 2
Getting to Kno w Your Copier/Fax
NOTES
• When loading the original in the Automatic
Document Fe eder, load it in the direction as
shown in the illustration.
4015O267EA
Page 56

2-28
5. Placing the Original
Duplexing Document Feeder
Slide the Document Guide Plate to the size of
1
the originals.
Chapter 2
NOTES
• When loading the original in the Duplexing
Document Feeder , load it in the directi on shown
below.
P
1166O021AA
Neatly load stack of originals face up on the
2
Documen t Feed Tr ay.
Getting to Kno w Your Copier/Fax
NOTES
• The maximum number of originals that can be
loaded is 50.
• The machi ne can s can a d ocume nt consis tin g of
50 or more pages at one time.☞p.3-61
• Make sure that the top level of the original
stack does not exceed the
• Make sure that the Document Guide Plate is
touching the edges of the original stack. If it's
not pressed snugly against the original stack,
skewed fe eding could result.
• You can make copies automatically fr om
originals of assorted sizes loaded in the
Duplexing Document Feeder.☞p.2-32
marking.
▼
4015O244AA
4015O041AB
P
4015O042AB
• If you need to load your original in a direction
different from these examples, set “Original
Direction” on the Touch Panel. ☞p.3-35
• To send a facsimile, load the original in the
Duplex i ng Document Feeder s o th at its longer
side is placed against the Document Guide
Plate. If the original is loaded with its shorter
side against the Document Guide Plate, the
rec eiving party may recei ve it in a re duced size .
Press the Start key. The originals will be fed
3
into the Duplexing Document Feeder,
starting with the top page.
NOTE
The machin e may fail to read the areas of 1/2
inch margins on to p, bott om, ri ght, and left e dges
of the original i f it is to be sent by facsimile.
4015O267EA
Page 57

5. Placing the Original
<Using the SA DF Mode>
In this mode, you insert your originals one by one into the document feeder to make a copy or copies.
When you insert the original, th e machi ne auto mat ically starts the copy cycle.
NOTES
• Originals appropriate for the SADF Mode.
Type: Plain paper
Weight: 9-1/4 lb to 53-1/4 lb
Size: 11
• The following features will be canceled when using the SADF mode:
2-sided Original, 2-in-1 Original, Book, Sort, Group, Staple, Cover, Page Insertion, Number
Stamping, manual feeding, Original Direction, and Margin.
1
17 L to 5-1/2×8-1/2
×
Open t h e Sin g le Feed Tray and slide t h e
Guide Plate to the size of the original.
2-29
Chapter 2
1166O025AA
Make sure that the Start key is lit green.
2
Then in sert the or ig i nal face dow n i n to th e
Single Feed Tray.
1166O026AB
NOTES
• Be sure to place only one o riginal at a time.
• Be sure to correct any fold or curl in the
original beforehand.
The original is automatically taken up and
3
the copy cycle starts.
Getting to Kno w Your Copier/Fax
Making sure that the Start key lights green
4
again, insert the next original.
Page 58

2-30
5. Placing the Original
Placing the Original on the Glass
Differe nt methods are used to place the origina l dependi ng on its typ e. Use the procedure approp riate for
your original. If you are using a document feeder, see ☞p.2-26.
NOTES
• If you place your original directly on the Original Glass, place it i n the direction illust rated be low.
Chapter 2
4015O047AB 4015O048AB
• If you need to place your origin a l in a direction different from these examples, set “Original
Direction” on the Touch Panel.☞p. 3-35
• The machine may fail to read the areas of 1/2 inch margins on top, bottom, right, and left edges of the
original if it is to be sent by facsimile.
Getting to Kno w Your Copier/Fax
Sheet Originals
<Using plain paper or types of originals not
suitable for the document feeder>
Raise the Original Cover (document feeder)
1
and place the original face down on the
Original Glass.
4015O267EA
1166O027AA
Position th e or iginal i n the right rear corner
2
with the marker on the scale.
Original Scales
1166O192AA
Gently lower the Original Cover.
3
NOTE
To send a facsimile, place the original so that its
shorter side is placed against the Original Width
Scale on the right. If the original is placed with
its longer side against the Original Width Scale,
the receiving party may receive it in a reduced
size.
Page 59

2-31
5. Placing the Original
Highly Transparent Originals
<Using transparencies and translucent paper for
the original>
Place the original in the same way as the
1
sheet o r ig in als.
Place a blank sheet of paper of the same size
2
over the original.
Blank
Sheet of
Paper
1166O028AA
Gently lower the Original Cover (document
3
feeder).
Making Copies from a Book Using Book Copy Mode
<When placing an open book or magazine>
Place the open book so that its top edge is at
1
the rear of the machine and the cen t er of the
book is aligned with the Book Marker
indicated on the Original Length Scale.
4015O049AB
Original Length Scale
Gently lower the Original Cover.
2
NOTES
• If the original is thick, scan the data with the
Original Cover raised.
• Do not look directly at the Original Glass
surface during a scanning sequence , si nc e a
strong beam of light is emitted.
• Not positioning the open book properly will
result in copies with pages in incorrect order.
• B e sure to raise the Or iginal Cover 15 ° or mor e
before placing the original. If the Original
Cover is rais ed to an angle l e s s than 15°, the
machin e may fail to select the correct paper
size or zoom ratio.
Book Marker
1166O186AA
Chapter 2
Getting to Kno w Your Copier/Fax
°
15
1166O187AA
• Do not place an original weighing more than 61/2 lb on the Original Glass.
• When placing an open book, do not press the
book hard on the Original Glass, as trouble
could result.
Page 60

2-32
5. Placing the Original
Mixed Orig. Detection
The Mixed Original Detecti on function enables the machine to make copies aut omatica lly from origina ls
of ass orted sizes loaded in the docu m ent feede r.
Orig. Copy
Chapter 2
Auto Paper
Auto Size
When Lette r is set for Pap er
4002O296EB
NOTE
The mac hine may no t be a ble to staple copies of different size s made with Mixed Orig. Detection and
Auto Paper selected.
Getting to Kno w Your Copier/Fax
Load the stack of originals so that the rear
1
edge of each original is pressed against the
rear Docum e n t G u id e Plat e. Th en, slide th e
front Document Guide Plate against the front
edges of the original s with the greatest width.
NOTE
The maximum number of originals that can be
loaded is 50 sheets.
Touch [Mixed Orig. Detection].
2
<Duplexing Document Feeder>
4015O147AA
NOTE
The maximum number of originals that can be
loaded is 50 sheets.
Useful Tip
<Automati c Document Feeder>
User’s Ch oice allow s yo u to d efaul t to Mixed
Original Detection. ☞p.8-3
4016P185CA
1166O188AB
Page 61

6. Auxiliary Functions
Auxiliary Functions
2-33
Panel Resetting
The Panel Reset key resets all control panel
settings to default settings, including the number
of copies and zoom ratio. The setti ngs just made
would also be cleared.
Useful Tips
• The Panel Reset key enables you to cancel all
previous settings with one touch of the key.
• To avoid miscopy, be sure to press this key
before making any setting for your own copy
job.
Auto Copy Start
If you load originals into the document feeder or
place an original on the glass and press the Start
key while the machine is warming up after it has
been turned ON, the Auto Copy Start function
allows that copy process to start as soon as the
machine completes warm up.
Interrupt
Use this function to interrupt a current job and run
a different one for urgent need. Pressing the
Interrupt key will stop the current operation,
allowing you to copy a different document or send
it by facsimil e.
Pressin g th e ke y a seco nd t ime wi ll let the mac hine
leave t he Interrupt mo de, returning to the previous
operation.
Mode Check
By pressing the Mode Check key on the control
panel, you can che ck or ch ange or st ore t he curr ent
settings.
<Copy Mode>
4016P186CA
• When you touch [Exit] after having checked the
currently set funcions, the Basic screen
reappears.
• To change a particular funcion, touch the
corresponding key and then make the necessary
change.
• To register the current settings, touch the [Job
Mem Input] key. The Program register screen
will then appear.☞p.7-12
<Facsimil e Mode>
Chapter 2
Getting to Kno w Your Copier/Fax
NOTES
• To cancel a n Int err upt cycl e , p r es s t h e I nte rru pt
key.
• The Panel Reset key does not cancel the
Interrupt mode.
Useful Tips
• Pressing the Interrupt key sets the machine into
the initial mode, except for the finishing
function which is Non-Sort.
• Custom Zoom and X/Y Zoom cannot be se t in
the Interrupt mode. Cover, Page Insertion and
OHP Interleaving cann ot be set i n the Int errupt
mode, eit her.
4016P486CA
• Whe n you touc h [Ente r] a fter ha ving c heck ed the
currently set functions , the Basic screen
reappears.
• To change a particular function, touch the
corresponding key and then make the necessary
change.
• It is also possible to add or delete a receiving
party, and to check for details of the settings
made.
Page 62

2-34
6. Auxiliary Functions
Auto Panel Rese t
If no key on the control panel is pressed within 1
min after a copy cycle has been completed or
copying settings made, the Auto Panel Reset
function is activated to return the machine to the
default settings.
Useful Tip
Chapter 2
The time for the machine to activate Auto Panel
Reset Function can be selected. The Auto Panel
Reset function can even be disabled. For details,
see “User’s Choice.” ☞p.8-4
Energy Save Mode
To save electricty, the machi n e enters the Energy
Save Mode a given peri od of ti me after the la st
activity .
The initial setting is 15 min.
T o canc el the Ener gy Sa ve Mod e, p res s any k e y on
the control panel or raise the Original Cover or
Getting to Kno w Your Copier/Fax
place an original on the document feeder.
Useful Tip
The time for the machi ne to e n ter the Ener gy
Save Mode can be selected from 1 min to 240
min. For details, see “User’s Choice.”☞p.8-4
Sleep
To save electricity, the machine automatically
enters the Sleep mode a given period of time after
the last activity. Sleep saves more electricity, but
takes longer to be activated, than Ener gy Save.
The initial setting is as follows:
30 min for DF200
60 min for DF270/DF370
To cancel the Sleep mode, press any key on the
control panel , raise the Origina l Co ver, or place an
original in the document feeder.
Useful Tip
The time for the machine to enter the Sleep mode
can be selected from 15 min to 240 min. Sleep
can even be disabled. For details, see “User’s
Choice.”☞p.8-4
LCD Back-light Off
To save electricity, the machine enters the LCD
Back-light OFF function a given period of time
after the last activity.
The initial setting is 1 min.
T o cance l the LCD Back- lig ht OFF function, press
any key on the contr ol panel or raise the Original
Cover or place an original on the document feeder.
Useful Tip
The time for the machine to enter the LCD Back-
light OFF function can be selected from 1 min to
240 min. For details, see “User’s Choice.” ☞p.8-
4
Page 63

Access Code/Access Number
If an access number has been programmed, it
allows only de sign at ed per sons to u se t he machin e,
or a supervisor to keep track of the number of
copies made and the number of documents sent by
facsimile by a particular ac count.
NOTES
• If an access number has been programmed, a
copy can be made or a facsimile can be sent
only after the access number (100 Accounts) or
the account number (1000 Accounts) has been
input to the machine.
<“Access Code” Prompt Screen>
6. Auxiliary Functions
NOTES
• If “100 Accounts” is set, touch the desired
account key or touch the account number key
and then enter the 4-digit account number
before entering the acc es s code.
• To correct the 4-digit access code enter ed, pres s
the Clear key, t hen enter t h e n ew number.
When the access mode screen changes to the
2
initial screen, you can start the desired
operation.
When the copy cycle is complete, press the
3
Access key again.
Alarm Screen
A sc reen as s hown below ap pears when a
1
paper misfeed or other malfunction occurs in
the Fax mode.
2-35
Chapter 2
Getting to Kno w Your Copier/Fax
4016P492CA
• Before you can use this function, you must first
turn “ON” the “Copy Track” function of the
Administrator Mode available from Utility
Mode. ☞p.9-6
<Entering the Access Code>
From the 10-Key Pad, enter the 4-digit
1
access code or 3-digit access number, and
press the Access Mode key.
123
456
789
0C
1134P438DA
4016P179CB
To u ch ing [Clo se ] wi ll cl os e th e al ar m s cr een ,
2
allowing you to perform functions that are
not concerned with the malfunctioning spot.
4016P489CA
Useful Tip
Touching [Alarm] will allow you to confirm the
specific malfunctioning spot.
Page 64

2-36
6. Auxiliary Functions
Auto-Mode Screen
This screen can be used for both facsimile and
copying without sp ecifying which function is to be
used.
Chapter 2
The machin e determines the copying or facsimile
function by the number of digits entered from the
10-Key Pad.
DF200/DF270:
If the number entered is 2 digits or less,
the machine considers that it is the
Getting to Kno w Your Copier/Fax
The Function Dis play shows the copying program
key [1] and facsimile one-touch keys [1] to [4],
allowing you to directly set the facsimile or
copying function.
Pressing the Copy key or Fax/Scan key on the
control panel will allow you to select the
corresponding screen, either Copy or Fax.
number of copi es to be made and s tarts a
copy cycle.
If the number entered is 3 digits or more,
the machine considers that it is a fax
number and sends the document by
facsimile.
DF370:
If the number entered is 3 digits or less,
the machine considers that it is the
number of copi es to be made and s tarts a
copy cycle.
If the number entered is 4 digits or more,
the machine considers that it is a fax
number and sends the document by
facsimile.
4017P345EA
One-Touch Dialing
Frequently c alled numbers can be progra mmed for
one-touch dialing, which allows you to specify the
destination number by simply touching the
corresponding one-touch key.
“Using One-Touch Dialing for Transmission.”
☞p.5-6
Activity List
The Activity List is available on the screen,
allowing you to check the results and status of the
documents that are reserved for transmission,
being transmitted, and that have been transmitted,
as well as the documents received. “Activity List”
☞p.5-24
Page 65

Quitting an Operation
Pressing the Stop key will interrupt the current
operation, including scanning and printing.
Press the Stop key while a document i s bein g
1
scanned or printed.
4015O262CA
Touch the operation key of your choice.
2
2-37
6. Auxiliary Functions
Chapter 2
4016P188CB
Useful Tip
Touching [Cancel] will cancel the quitting
operation.
Touch [Enter].
3
Useful Tip
Pressing the Start key will re sume the operation
which has been suspended.
Getting to Kno w Your Copier/Fax
Page 66

2-38
6. Auxiliary Functions
Chapter 2
Getting to Kno w Your Copier/Fax
Page 67

Chapter 3
Making Copies
3-1
Chapter 3
Making Copies
Page 68

3-2
1. Basic Copying Overview
Basic Copying Overview
The most basic copying job is to make full-size (×1.000) copies of the original.
Press t h e Cop y key ( st ep 1), plac e th e orig in al in posit io n (s t ep 2), s e t th e number o f cop i es to b e made
(step 9), and press the Start ke y (step 10). This will allow you to make full-si ze copie s of the same size as
the original.
(*Automatically selected in the initial mode are Auto Paper, Full Size, and Auto Exposure.)
The selections you make on the Touch Panel will change the exposure level, zoom ratio, the type
of copy and so on.
1. Press the Copy key t o s how th e C opy screen.
Chapter 3
2. Placing the Original.
Making Copies
Load the origin als in the document
feeder.
• Changing the paper size
• Changing the Zoom Ratio
• Sorting copies
• Stapling copies
• Punching holes in copies
☞p.2-27
4015O219CA
Raise the Original Cover and place the original
face down on the Origin al Glass.☞p.2-30
4015O244AA
Selecting the ba si c functions.
3. Touch [Paper].
☞p.3-4
4. Touch [Zoom].
☞p.3-12
5. Touch [Finishing].
☞p.3-18
4016P067CA
1166O027AA
4017P015EA
• Mak ing copies from a book
• Saving paper to make copies
Selecting the Original Copy Type.
6. Touch [Orig. Copy].☞p.3-31
▼
▼
4016P109CA
Page 69

• Changing the exposure level
• Leaving a file marg in on the copy
• Using OHP Interleaving
9. Setting the number of copies.
3-3
1. Basic Copying Overview
Selecting the exposure level.
7.Touch [Density].
☞p.3-42
4016P110CA
Selecting th e a uxi liary func tions.
8. Touch [Auxiliary].
☞p.3-44
Chapter 3
4016P068CA
From the 10-Key Pad, set the desired number of copies
to be ma de.
* The maximum number of copies that can be set is as
follows:
99 for DF200/DF270
999 for DF370
Useful Tip
There is no limit to the number of copies set in the initial
mode. Administrator Set can, however, be used to limit the
maximum number of copies to be set in the range from 1 to
99.☞p.9-4
* If you have entered an incorrect n umber, press th e Clear
key, then enter the correct number.
10. Pressing the Start key.
When you press the Start key, the machine starts the
copy cy cl e.
* To stop the copy cycle, press the Stop key.☞p.2-37
Making Copies
1166O030AA
1166O244EA
Useful Tip
The number of pages of dat a the mach ine can scan at one time is about 40 for DF200 and about 120 for
DF270/DF370 based on an Letter standard or iginal.
If optional Memory is installed, it expands the scanning capacity up to about 280 pages.
Page 70

3-4
2. Selecting the Paper
Touch [Basics] and [Paper] to show the screen that allows you to select the paper.
Chapter 3
Paper Si ze
Auto Paper
In the Auto Paper mode, the machine
automatically selects the paper of optimum size
according to the siz e of th e o riginal being used and
Making Copies
zoom ratio selected for use.
Touch [Auto Paper].
1
4017P001EA
NOTES
• The original sizes that can be detected in the
Auto Paper mode are 11
L, and Letter C. The machine may not be able
to detect, or may detect erroneously, the si ze of
an original of a ny other size or irregular size.
(Mounting an optional part will enable the
machin e to dete ct 5-1/2
L, A4 L, A4 C, and B5 C. For details, ask your
Tech. Rep.)
• When wrinkled, dog-eared, or curled originals
are used, select the paper size bef ore making
copies.
• When the document feeder is used, the machine
determines the paper size when the first
original is taken up and fed in. It then uses that
paper size fo r the subsequent originals (except
in the Mixed Original Detection mode).
4017P001EA
17 L, Legal L, Letter
×
8-1/2 L, FLS, A3 L, B4
×
Useful Tips
• This mode is efficient when you want to make
copies on paper of the same size as your
originals automatically.
• Priority settings for the initial mode can be
made with User’s Choice.☞p.8-2
Page 71

3-5
2. Selecting the Paper
Manual Selection
The paper size can be set manually.
Touch [Paper] on the Basic screen, and the
1
Touch P anel shows w h ich drawer holds
which paper size.
Touch the desired paper size key.
2
4017P001EA
Auto Drawer Switching
If the drawer currently selecte d for use runs out of
paper and there is another drawer loaded with
paper of the same size and in the same direction,
the machine automatically selects that second
drawer to continue copying.
Useful Tip
This feature is a great advantage when you need
to make a large number of copies on the same
size paper.
<DF200>
You can make up to 2,250 copies without
interruption if, for example, the 250-sheet
drawer is combined with four 500-sheet
drawers.
<DF270/DF370>
You can make up to 3,750 copies without
interruption if, for example, the 250-sheet
draw e r is combined with two 500-sheet
drawers and a Large Capacity Cabi net.
Chapter 3
Making Copies
4017P002EA
1st Dr aw e r 4th Draw er
1 4
2nd Drawer 5th Drawer
2 5
3rd Drawer Manual Bypass Tray
3
* Some keys are not available on the Touch Panel,
depending on the type of options mounted on
the machine.
Page 72

3-6
2. Selecting the Paper
Special Paper Setting
If the symbol , , appears on the
paper size key on the Touch Panel, it means that
drawer has been designated for special paper.
Chapter 3
The machine provides three different types of
special paper setting, each having a specific
purpose as detaile d b elow .
The setting can be made with User’s Choice.
☞p.8-2
Making Copies
: Recycled p a pe r
S
This setting precludes the Auto Paper mode. You
may be using both recycled as well as plain pap er
loaded in your machine. If, for example, you
choose this setting for the drawer loaded with
recycle d p aper, the machine will no t s e lect that
particular drawer in the Auto Paper mode. This
allows you to make copies on plain paper first.
S
2
4017P003EA
: Disabling 2-sided copying
2
This setting precludes 2-sided copying.
: Exclusive paper
This setting precludes both Auto Paper mode and
Automatic Drawer Switching. Choose this setting
when using paper for cover/inserts (e.g., colored
paper), to prevent that paper from being used for
other purposes.
Page 73

2. Selecting the Paper
Manua l B ypass Co pying
• Use Manual Bypass to make copies on paper not loaded in any drawer, or to copy onto OHP
transparencies, Card, or any other special paper.
• The setting of the paper size is needed for manual bypass copying.
Paper that Can be Used for Manual Bypass
◆Types of Paper
Plain paper (we ighing 16 lb to 24 lb), recycled paper
Card (weighing 24-1/4 lb to 41-3/4 lb), labels
OHP tr ansparencies
◆Paper Size
Max. Size: 11-11/16×17
Minimum Size: 3-9/16×5-1/2
Using the Manual Bypass Tray
3-7
Chapter 3
Place the original on the Original Glass and
1
make the control panel settings.
Swing down the Manual B ypass Tray.
2
4015O050AB
Slide the Paper Guides to the size of the
3
paper and insert a sheet of paper.
4015O051AB
NOTES
• Correct any curl if you are using C ar d.
• When making copies on Card, OHP
transpa rencies, or labels, the following
functions cannot be used: 2-sided copying,
Booklet Creation, Staple, and Hole Punch.
• The copy will be made on the side fac ing down .
Useful Tip
Continuous multi pl e copies can be made if Card,
OHP transparencies, or labels are loaded in the
1st Drawer. ☞p.10-2
Making Copies
Page 74

3-8
2. Selecting the Paper
Chapter 3
Select the desired paper size.
4
4017P004EA
Touch [OHP/Card] and select the type of
5
paper.
Making Copies
<Using Metric Size Paper>
Touching [Metric] on the screen given in step 4
opens a screen that allows you to select an metric
paper siz e.
4017P006EA
Useful Tip
Touching [Inch] returns you to the screen that
allows you to select a inch paper size.
4017P005EA
Useful Tip
Select Card when labels have been loaded.
Touch [Enter].
6
Press the Start key.
7
Useful Tip
The machine automatically starts the copy cycle
when paper i s inserted i nto the Ma nu al Bypass
Tray after the fir st copy .
Page 75

3-9
2. Selecting the Paper
<Us ing Nonstand ard Si z e Paper>
• Touch [Custom Size] on the screen given in step
4.
4017P007EA
• Touch [▼] or [▲] to set the whole number for X
and touch [X]. The underline moves to the
fractional part. Set the fraction with [▼] or [▲].
Now the value for X has been fixed.
<Calling up a Paper Size from Memory>
You can store the most frequently used paper sizes
in memory and recall th em later as necessary.
• Touch [Custom Size] on the screen given in step
4.
Chapter 3
4017P007EA
• From among the two sizes previously stored in
memory, select the desired one.
Making Copies
• Do the same for [Y] .
• Touch [Enter].
4017P008EA
4017P009EA
Useful Tip
It’s a good idea to store frequently used paper
sizes in memory.☞p.3-10
• Touch [Enter].
Page 76

3-10
2. Selecting the Paper
Memorize Paper Size
Chapter 3
Touch [Custom Size].
1
4017P007EA
Touch [Memorize Paper Size].
2
Making Copies
4017P010EA
Touch [▼] or [▲] to set the whole number
3
for X and touch [X]. The underline moves to
the fraction al part. Set the fraction with [▼]
or [▲]. Now the value for X has been fixed.
Touch [▼] or [▲] to set the whole number
4
for Y and touch [Y]. The underline moves to
the fractional part. Set the fraction with [▼]
or [▲]. Now the value for Y has been fixed.
4017P012EA
Touch [1] or [2].
5
4017P013EA
NOTE
When a new paper size is stored in a key number,
the old one stored in that key number is lost.
4017P011EA
Touch [Enter].
6
Page 77

Changing the Paper Size
If you change the paper size in mid-operation
while making copies continuously through the
Manual Bypass Tray, the paper size must be set
again.
Touch [Paper] and then [Bypass].
1
4017P014EA
Select the desired copy paper size.
2
3-11
2. Selecting the Paper
Chapter 3
Touch [OHP/ Card] a nd then s elect the type
3
of paper.
Touch [Enter].
4
Making Copies
4017P004EA
4017P005EA
Page 78

3-12
3. Selecting the Zoom
Zoom Ratio
When you touch [Zoom] after touching [Basics] on the Touch Panel, a screen appears that allows you to
set the zoom ratio. There are six different ways to choose from to set the zoom ratio. Select according to
your need.
Chapter 3
Auto Size
In the Auto Size mode, the machine automatically
selects the zoom ratio according to the size of the
Making Copies
original being used and the paper size selected for
use.
T ou ch [ Auto S i ze] to se t th e mac hin e into t he
1
Auto Size mode.
Select the paper size.
2
“Selecting the Paper”☞p.3-4
4017P016EA
4017P015EA
Useful Tips
• This mode is very helpful for neat filing w hen
you need to make copies from originals of
assorted size s.
• Priority settings for the initial mode can be
made with User’s Choice.☞p.8-2
Selecting the Fixed Zoom
The machi ne provides the most frequently used
zoom ratios ready for immediate use.
Touch the appropriat e original-to-cop y-s ize
1
representation key. There are four reduction
and four enlargement ratios.
NOTE
When the document feeder is used, the machine
determine s the zoom ratio when the fir st or iginal
is taken up and fed in and uses that zoom ratio
for subsequent originals (except in the Mixed
Original Detection mode).
4017P017EA
When you touch [Full Size], full size
(×1.000) will be selected.
Page 79

3-13
3. Selecting the Zoom
For a Slightly Smaller Image
This function lets you make a copy slightly
reduced in image size from that of the original.
Touch [Minimal] and set the zoom ratio.
1
4017P018EA
Useful Tips
•A value of ×0.930 has been factoryprogrammed in [Mi nimal], but that ratio can be
changed as necessary.☞p.3-16
• This is a handy way of making a copy, without
losing any portion of the original image, from
an original which has an i mage area cove ri n g
its entire surface.
Using Zoom Up/Down Keys
Touching [▼] or [▲] changes the zoom ratio in
0.001 increments. You can hold down the key to
change the ratio quickly.
Hold down [▼] or [▲] until the desired
1
zoom ratio is reached.
4017P019EA
Useful Tips
• To save time, first select the fixed zoom ratio
nearest to the target ratio before using [
[
].
▲
• The zoom ratio can be set in the range between
0.250 and ×4.000.
×
▼
] or
Chapter 3
Making Copies
Page 80

3-14
3. Selecti ng the Zoom
Using the 10-Key Pad
You can use the 10-Key Pad to directly enter the
zoom ratio.
<Same ratio for X and Y>
Touch [Custom Zoom].
1
Chapter 3
Enter the Zoom Ratio from the 10-Key Pad.
2
Making Copies
4017P020EA
<Usin g th e X / Y Zoom>
Touch [Custom Zoom].
1
Touch [X/Y Zoom].
2
4017P020EA
1166O030AA
Useful Tip
Example: ×1.300
Press 1, 3, 0, and 0, in that order.
1149O160BA
• To c o rrec t a rat io , p ress th e Cle a r key and then
enter t h e co rrect one.
• The zoom ratio can be s et in the range betwee n
0.250 and ×4.000.
×
Touch [Enter].
3
4016P021CA
Touch [Reduce] or [Enlarge].
3
4017P022EA
Useful Tip
The zoom ratio can range between ×1.001 and
4.000 if Enla r g e is sele cted and betwee n ×0.250
×
and ×1.000 if Reduce is selected.
Page 81

3-15
3. Selecting the Zoom
Touch [X] and enter the zoom ratio from the
4
10-Key Pad.
4017P023EA
Useful Tip
To correct a ra ti o, p ress the Cl ea r key and then
enter the correct one.
Touch [Y] and enter the zoom ratio from the
5
10-Key Pad.
Touch [Enter].
6
Calling up a Ratio from Memory
Yo u c an stor e the most fre que n tly used zoom
ratios in memory and recall them later as
necessary.
Touch [Custom Zoom].
1
4017P020EA
From among the two ratios previ ously store d
2
in memory and [Minimal], select the desired
one.
Chapter 3
Making Copies
4016P024CA
Useful Tip
It’s a good idea for you to store frequently used
zoom ratios in memory.☞p.3-16
Touch [Enter].
3
Page 82

3-16
3. Selecti ng the Zoom
Storing a Ratio in Memory
Chapter 3
Touch [Custom Zoom].
1
4017P020EA
Touch [Memorize Zoom Ratio].
2
Making Copies
Useful Tip
Example: ×1.300
Press 1, 3, 0, and 0, in that order.
1149O160BA
• To correct a ratio, press the Clear key and then
enter the correct one.
• The ratio from Memory can range bet ween
0.250 and ×4.000.
×
• The [Minimal] ratio can range between
and ×0.999.
Touch memory location key [1], [2] or
4
[Minimal] to store the set zoom ratio.
0.900
×
Using the 10 -Key Pad, enter the desired
3
zoom ratio.
4016P025CA
4016P026CA
4016P027CA
* When the ke y i s to uched, the rat io is shown on
the key, indicating that it has been stored in
memory.
NOTE
When a new ratio is stored, the old one is erased.
Touch [Enter].
5
Page 83

3-17
3. Selecting the Zoom
Chapter 3
Making Copies
Page 84

3-18
4. Selecting the Finishing Function
When you touch [Finishing] after touching [Basics] on the Touch Panel, a screen appears that allows you
to set a particular finishing function.
4017P029EA
Chapter 3
Finishing Functions
Non-Sort
Orig. Copy
Making Copies
All copies are fed out without being sorted,
grouped, stapled or punched.
Touch [Non-Sort].
Sort
Group
Orig.
Orig.
4002O055AA
Copy
This function is effective wh en making m u ltiple
copies from multiple originals. Copies are sorted
into complete sets of the originals.
Touch [Sort].
4002O056AA
Copy
The copies made from each original a re se parat ed
into groups. Each group contains the same
number of copies.
Touch [Group].
4002O057AA
Page 85

3-19
4. Selecti ng th e Finishing Function
Staple
Hole Punch
Orig.
Orig.
Copy
4002O058AA
Copy
<Only when the Finisher/Mailbin Finisher is
mounted>
This function is effective wh en making m u ltiple
copies from multiple originals. Copies are sorted
or grouped into complete sets of the originals and
then stapled.
Touch [Staple].
Chapter 3
<Only when the Finisher 9747/Mailbin Finisher
is mounted>
Holes are punched in the copy sets or stacks for
filing. It can be combined with Non-Sort, Sort,
Group or Staple.
Touch [Hole Punch].
Making Copies
4002O285EA
Useful Tip
The machine has been factory-set to automatically switch between Sort and Non-Sort depending on the
number of originals and the number of copies to be made. It has also been set to automatically select
Non-Sort in the initial mode. These default settings can be changed with User’s Cho ic e .☞p.8-2
Page 86

3-20
4. Selecting the Finishing Function
Selecting the Finishing Function
Non-Sort
Touch [Non-Sort].
1
Chapter 3
NOTE
Card and OHP tr anspar encie s should be used for
making copies in Staple and Punch.
Making Copies
4017P028EA
Sort/Group
Touch [Sort] or [Group].
1
4017P029EA
NOTES
• S eparat e Scan will be automaticall y activate d if
an original is place directly on the Original
Glass in the Sort mode.☞p.3-61
• If the machine is equipped with a S hift Tray,
Fin isher, or Mailbi n F i nishe r, copies are fed out
in a sawtooth manner. If the machine is
equipped with a Job Tray, or if it is not fitted
with a Shift Tray, Finisher, or Mailbin Finisher,
copies are fed out in a crisscross manner .
• Crisscross sorting is possible o n ly when all o f
the following conditi ons are met:
• The machine is loaded with paper of the same
size, but in two different directions.
• The machine is loaded with paper of the same
type, but in tw o different directions.
• Mixed Original Detection is not set in Auto
Paper.
• None of the Staple, Hole Punch, Page
Insertion, Cover, or Image Repeat functions
are set.
• An original i s placed o n the Original Glass,
while drawer is yet to be selected.
Page 87

Useful Tips
• Shift Sorting
The sorted copy sets are stacked in the same
direction, but in a sawtooth manner by shifting
the tray to the front or rear for each set.
4002O061AB
• Crisscross Sorting
The sorted copy set s a re stacked i n a crisscross
manner, one set stacked lengthwise on top of
another set stacked crosswise.
3-21
4. Selecti ng th e Finishing Function
Chapter 3
4002O062AB
• Shift Grouping
The grouped copy stacks are stacked in the
same direc tion, but in a saw tooth manner by
shifting th e tray t o t he front or rear for each
stack.
4002O063AB
• Crisscross Grouping
The grouped copy stacks are stacked in a
crisscr oss manner, one stack stac ked lengt hwise
on top of another stack stacked crosswise.
Making Copies
4002O064AB
Page 88

3-22
4. Selecting the Finishing Function
Staple
<When Finisher 9747 is mounted>
Touch the desired finishing function key.
1
Chapter 3
Touch the stapling key of your choice.
2
Making Copies
You have a choi ce of the following two stapling
types:
•Corner Staple
Paper size : 11×17 L to Le tter
Type of paper : Plain paper,
A
•2-Point Staple
A
* When you touch a stapling key in the Non-
Sort mode, the Finisher is automatically set
into the Sort mode.
recycled paper
Number of sheets : 2 to 50
4015O001AA
Paper size : 11×17 L to Le tter
Type of paper : Plain paper,
recycled paper
Number of sheets : 2 to 50
4002O068AA
4017P029EA
4017P030EA
Touch [Select Position].
3
4017P031EA
Touch the desired stapling type.
4
4016P032CA
Touch [Enter].
5
NOTES
• Stapling is not possible in the Interrupt mode.
• Check the correct direction of the originals
when making copies in the Staple mode.
☞p.3-26
• Stapling position cannot be specified if Corner
Staple is selected. It can, however, be specified
if Corner Staple is combined with Hole Punch.
• If an original is p laced dire ctly on the Or ig inal
Glass in the Staple mode, Separate Scan is
automatic ally set.☞p.3-61
• M ake sure that the maximum number of sheets
to be stapled together is not exceeded when
making copies in the Staple mode.
Page 89

3-23
4. Selecti ng th e Finishing Function
<When Finisher 9748 or Mailbin Finisher is
mounted>
Touch the desired finishing function key.
1
4016P033CA
Touch [Corner Staple].
2
NOTES
• W hen [Corner Staple ] is touched with Non-Sort
selected, the Fi nisher is automatically set into
the Sort mode.
• Stapling is not possible in the Interrupt mode.
• Stapli ng posi tion canno t be specified if the
machine is equipped with a Finisher 9748 or
Mailbin Finisher. When a Mailbin Finisher is
mounted, however, stapling position can be
specified if the function is combined with Hole
Punch.
• Check the correct d irection of the originals
when making copies in the Staple mode.
☞p.3-26
• If an original is placed directly on the Original
Glass in a Staple mode, Separate Scan is
automatic ally set.☞p.3-61
• M ake sure t hat t he maximum number of sheets
to be stapled together is not exceeded when
making copies in the Staple mode.
Chapter 3
Making Copies
4016P034CA
With Corner Staple, the staple is driven into the
copies at the location shown below :
Paper size : 11×17 L to L etter
A
4015O001AA
Type of paper : Plain paper,
No. of s heets to be sta pled together:
Mailbin Finisher : 2 to 50
Finisher : 2 to 30
recycled paper
Page 90

3-24
4. Selecting the Finishing Function
Hole Punch
<Only when the Finisher 9747/Mailbin Finisher is
mounted>
Touch the desired finishing function key.
1
Chapter 3
Touch [Hole Punch].
2
Making Copies
4017P029EA
Useful Tips
• If you do not select a hole-punching position,
the machine automat ically sets the Hole Punch
position according to the original feeding
direction as illustrated below.
Orig.
Orig.
• When making copies from either the
Copy
1155O789EA
Copy
155O790EA
11×17 L
size, the machine automatically specifies the
hole punching position as shown below.
Orig.
Copy
4017P035EA
NOTES
• The siz es of the paper f or Hole Punc h are
and Letter C.
L
11×17
• Hole Punch is not possible in the Interrup t
mode.
• When making copies in the Hole Punch Mode,
make sur e to lo ad the ori gin als in th e doc ument
feeder in the correct direction. ☞p.3-30
1155O791EA
Page 91

[Select Position] key:
Use this key when you want to place your original
in a direction other than the standard or make
punch holes in positions other than those made
automatically.
Touch [Select Position].
1
4017P036EA
Touch the desired hole-punching position.
2
3-25
4. Selecti ng th e Finishing Function
Chapter 3
4017P037EA
Useful Tip
If [OFF] is selected, the mac hine automatically
determines t he hole -punc hing pos ition according
to the applicable original feeding direction.
Touch [Enter].
3
Making Copies
Page 92
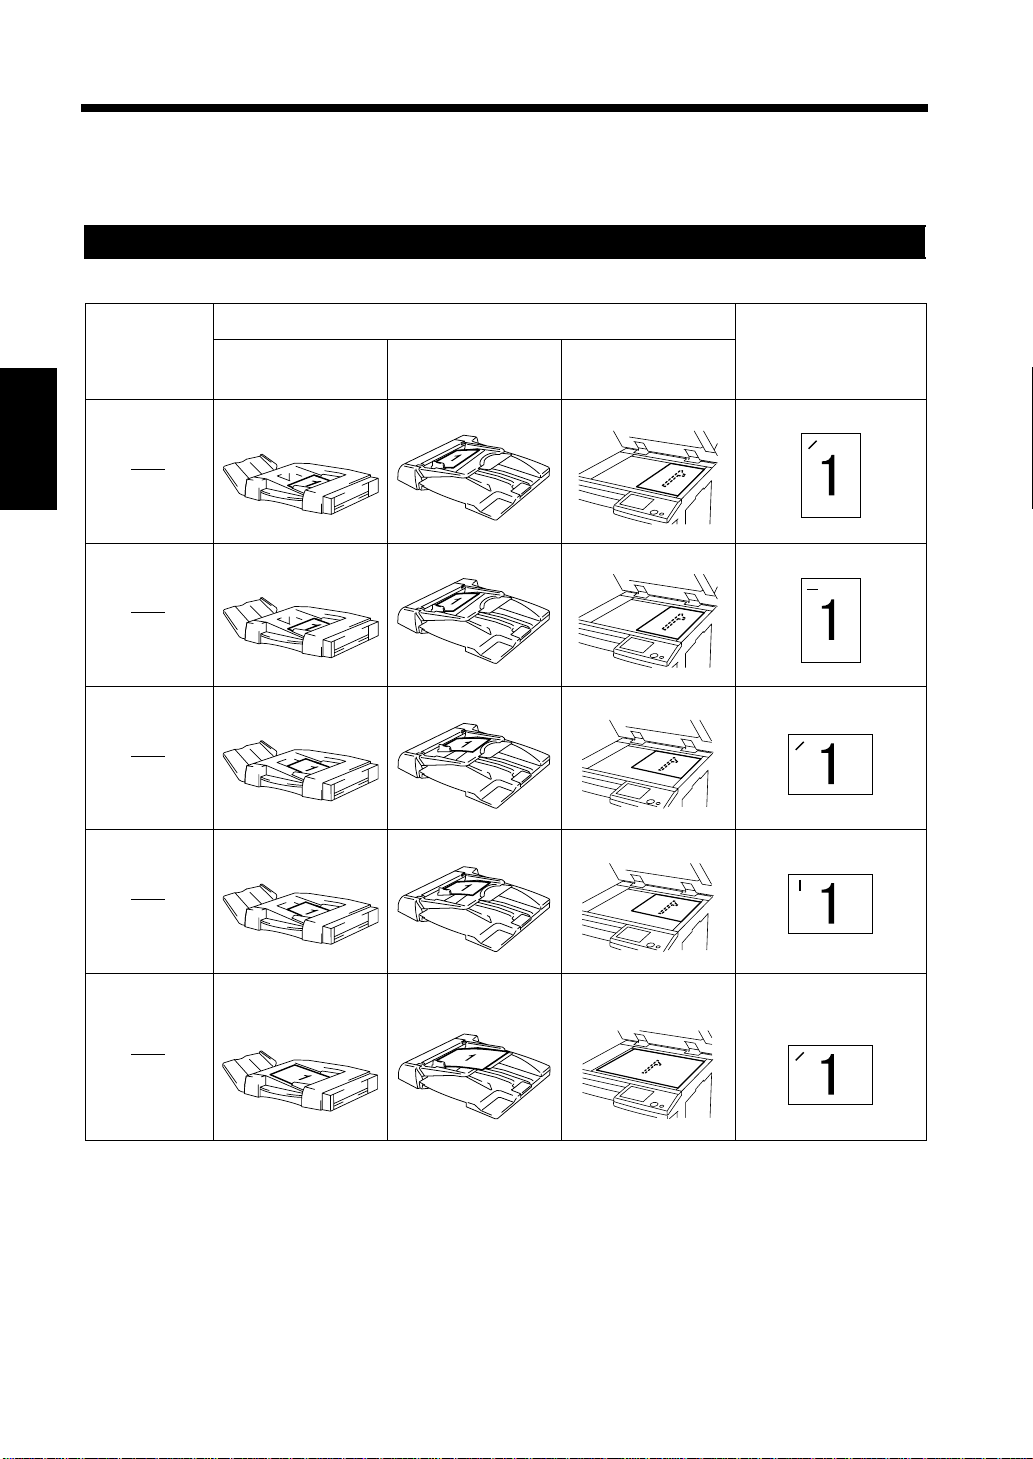
3-26
4. Selecting the Finishing Function
Hints for Stapling Position
The staple is placed at different positions depending on the size and orientation of the paper.
Study this diagram to select the correct paper size according to the desired stapling position.
Finisher 9747
<Selec ti n g th e Corner St aple>
Loading the Originals
Panel Display
Chapter 3
Using Duplexing
Document Feeder
Using Automatic
Docume n t Feeder
Through Original
Glass
Original : Letter C Origi nal : L etter C Original : Letter C Paper Size : Letter C
Stapling Position
4015O052AC 4015O053AC
4015O054AD
4002O358AA
Original : Letter C Origi nal : L etter C Original : Letter C Paper Size : Le tter L
Making Copies
4015O052AC 4015O053AC
4015O054AD
4002O353AA
Origi na l : L e tter L Original : Let te r L Original : Le tt er L P ap e r S i ze :Letter C
4015O055AC 4015O056AC 4015O057AD 4002O359AA
Original : Le tter L Original : Letter L Original : L etter L Paper Size : Letter L
4015O055AC 4015O056AC 4015O057AD 4002O355AA
Original : 11×17 L,
Legal L
Original : 11 ×17 L,
Legal L
Original : 11×17 L,
Legal L
Original : 11×17 L,
Legal L
4015O061AC 4015O062AC 4015O063AD 4002O359AA
Page 93

<Selecting the 2-Point Staple>
Panel D i s p lay
Using Duplexing
Document Feeder
Original : Letter C Original : Letter C Original : Letter C Paper Size : Letter C
4012P038CA
Loading the Originals
Using Automatic
Docum ent Feeder
4. Selecti ng th e Finishing Function
Through Original
Glass
3-27
Stapling Position
1155O430AA
1155O431AA
4012P038CA
1155O431AA
1155O430AA
4012P038CA
4015O052AC
4015O053AC
4015O054AD
4015O002AA
Original : Letter C Original : Letter C Original : Letter C Paper Size : Letter L
4015O052AC
4015O053AC
4015O054AD
4015O003AA
Original : Letter L Original : Letter L Original : Letter L Paper Size : Letter C
4015O055AC
4015O056AC
4015O057AD 4015O004AA
Original : Letter L Original : Letter L Original : Letter L Paper Size : Letter L
4015O055AC 4015O056AC 4015O057AD 4015O005AA
Original : 11×17 L,
Legal L
Original : 11×17 L,
Legal L
Original : 11×17 L,
Legal L
Original : 11 ×17 L,
Legal L
Chapter 3
Making Copies
1155O430AA
4015O061AC
4015O062AC
4015O063AD 4015O005AA
NOTES
• Set “Auto Size” if you staple at the position shown in the above list.
• Set “Original Direction” if you place your original in a direction different from these examples.
☞p.3-35
Page 94

3-28
4. Selecting the Finishing Function
Finisher 9748
<Selec ti n g th e Corner St aple>
Panel Display
Using Duplexing
Document Feeder
Original : Letter C Origi nal : L etter C Original : Letter C Paper Size : Letter C
Loading the Originals
Using Automatic
Docume n t Feeder
Through Original
Glass
Stapling Position
4015O052AC 4015O053AC
4015O054AD
Origi na l : L e tter L Original : Let te r L Original : Le tt er L Paper Size : Letter L
Chapter 3
4015O055AC 4015O056AC 4015O057AD 4002O355AA
Original : 11×17 L,
Legal L
Original : 11 ×17 L,
Legal L
Original : 11×17 L,
Legal L
Making Copies
4015O061AC 4015O062AC 4015O063AD 4002O359AA
NOTE
Set “Original Direction” if you place your original in a direction different from these examples.
☞p.3-35
4002O358AA
Original : 11×17 L,
Legal L
Page 95

Mailbin Finisher
<Selecting t he Corner Staple >
Panel D i s p lay
Using Duplexing
Document Feeder
Original : Letter C Original : Letter C Original : Letter C Paper Size : Letter C
Loading the Originals
Using Automatic
Docum ent Feeder
4. Selecti ng th e Finishing Function
Through Original
Glass
3-29
Stapling Position
4015O052AC 4015O053AC
4015O054AD
4002O358AA
Original : Letter L Original : Letter L Original : Letter L Paper Size : Letter L
4015O055AC 4015O056AC 4015O057AD 4002O359AA
Original : 11×17 L,
Legal L
4015O061AC 4015O062AC 4015O063AD 4002O359AA
Original : 11×17 L,
Legal L
Original : 11×17 L,
Legal L
Original : 11 ×17 L,
Legal L
NOTE
Set “Original Direction” if you place your original in a direction different from these examples.
☞p.3-35
Chapter 3
Making Copies
Page 96

3-30
4. Selecting the Finishing Function
Hints for Stapling
When copies are made using the stapling function, the stapled copy sets may not be neatly stacked on the
tray o r may even fall off t he tray u n less certain conditions are met regarding the number of copies to be
stapled and the number of copy sets to be made. Use the following table as guide when making copies.
Copy Set Capacity
When Mailbin Finisher is
Mounted
Chapter 3
No. of Copies Stapled
2 copies 100 sets 100 sets 200 sets
3 to 5 copies 80 sets 80 sets 150 sets
6 to 10 copies 60 sets 60 sets 100 sets
11 to 20 copies 40 sets 40 sets 50 sets
21 to 30 copies 60 sets 33 sets 33 sets
31 to 40 copies 60 sets - 25 sets
41 to 50 copies 60 sets - 20 sets
When Finisher 9747 is Mounted When Finisher 9748 is Mounted
11×17 L to Letter 11×1 7 L to Letter 11 ×17 L to Le tter
Hints for Hole-Punching Position
Note the correct direction of the originals if the copies are to be punched using Hole Punch.
Making Copies
Panel
Using Duplexing
Document Feeder
Punched Hole Position
1170P097EA
1166O107EA
Punched Hole Position
1170P098EA
4015O217EB
Using Automatic
Document Feeder
Through Original Glass
Punched Hole Position Punched Hole Position
4015O215EA
Punched Hole Position
4015O213EB
Punched Hole Position
1166O109EB
4015O211EB
Page 97

3-31
5. Selecting the Original Copy Type
When you touch [Orig. Copy] on the Touch Panel, a screen appears that allows you to choose the
orig. copy type.
▼
Original Copy Type
Single-Sided Single-Sided
▼
▼
Select Single-Sided Single-Sided to make a 1sided copy from a 1-sided original.
▼
▼
▼
Double-Sided Single-Sided
▼
<Only when the document feeder is mounted>
Select Double-Sided Single-Sided to make two
▼
1-sided copies from a 2-sided original.
1166O049AA
Single-Sided Double-Sided
▼
<Only when the Duplex Unit is mounted.>
Select Single-Sided Double-Sided t o make a 2-
▼
sided copy from two 1-sided originals.
Double-Sided Double-Sided
▼
<Only when a document feeder and Duplex Unit
are mounted >
Select Double-Sided Double-Sided to make a 2-
▼
1166O053AA
sided copy from a 2-sided original.
Chapter 3
Making Copies
1166O050AA
Single-Sided Single-[2in1]
Select Single-Sided Single-[2in1] to make a 1-
▼
▼
sided side-by-side copy , through reduction, from
two 1-sided originals.
1166O051AA
Single-Sided Double-[2in1]
▼
<Only when the Duplex Unit is mounted.>
Select Single-Sided Double-[2in1] to make a 2-
▼
sided copy, through reduction, from four 1-sided
originals. Each pair of originals will be placed
side-by-side on either side of the copy.
1166O054AA
Double-Sided Single-[2in1]
▼
<DF270/DF370 only>
<Only when the document feeder is mounted>
Select Double - S ided Single-[2in1] to make a 1-
▼
side d side-by-si de copy, through reduction, from a
2-sided original.
1166O055AA
Double-Sided Double-[2in1]
▼
<DF270/DF370 only>
<Only when a document feeder and Duplex Unit
are mounted >
Select Double - S ided Double-[2in1] to make a
▼
2-sided side-by-si de copy , through reduc tion, from
two 2-sided originals.
1166O052AB
1166O056AB
Page 98

3-32
5. Selecting the Original Copy Type
Single-Sided Single-[4in1]
▼
▼
<DF270/DF370 only>
Select Single-Sided Single-[4in1] to copy four
▼
differ ent 1-sid ed origi nals ont o one side of a sing le
sheet of paper.
Single-Sided Double-[4in1]
Chapter 3
▼
<DF370 only>
<Only when the Duplex Unit is mounted.>
Select Single-Side d Double-[4in1] to copy eight
▼
different 1-sided originals onto both sides of a
single sheet of paper, e ach side containing four
pages of the originals.
Making Copies
1166O057AA
Double-Sided Single-[4in1]
▼
<DF370 only>
<Only when a document feeder is mounted>
Select Double - S ided Single-[4in1] to cop y two
▼
different 2-sided originals (4 pages) onto one side
of a single sheet of paper.
1166O061AA
Double-Sided Double-[4in1]
▼
<DF370 only>
<Only when a document feeder and Duplex Unit
are mounted >
Select Double- Sided Double-[4in1] to cop y four
▼
different 2-sided originals (8 pages) onto both
sides of a single sheet of paper, each side
containing four pages of the originals.
4015O260AA
Single-Sided Booklet Creation
▼
<DF270/DF370 only>
<Only when the Duplex Unit is mounted>
Select Single-Sided Booklet Creation to copy
▼
four dif fere nt 1-s ided ori gin als o nto both side s of a
single sheet of paper. The pages will be in correct
order when the page is folded in half.
1166O067AA
1166O062AC
Page 99

3-33
Book/Separation S ingle-Sided
Select Book/Sepa ration Single-Sided to make 1-
▼
▼
sided page-by-page copies of an open book.
1166O059AB
Book/Spreadsheet Single-Sided
Select Book/Spreadsheet Single-Sided to make
▼
▼
a 1-sided cop y f r om an o p en book.
1166O060AA
Single-[2in1] Single-Sided
▼
<Only when the Duplexing Document Feeder is
mounted>
Select Single-[2in1] Single-Sided to make 1-
▼
sided page-by-page copies of a 1-sided original
which is the result of 2-in-1 copying.
5. Selecting the Original Copy Type
Book/Separation Double-Sided
▼
▼
<Only when the Duplex Unit is mounted>
Select Book/Separation Double-Sided to make a
▼
2-sided c o py of an open book.
1166O063AA
Book/Spreadsheet Double-Sided
▼
<Only when the Duplex Unit is mounted>
Select Book/Spread sheet Double-Sided to make
▼
a 2-sided copy from an open book with the pages
in pr op e r s equence.
1166O064AB
Double-[2in1] Single-Sided
▼
<Only when the Duplexing Document Feeder is
mounted>
Select Double-[2in1] Single-Sided to make 1-
▼
sided page-by-page copies of a 2-sided original
which is the result of 2-in-1 copying.
Chapter 3
Making Copies
1166O065AA
1166O069AA
Page 100

3-34
5. Selecting the Original Copy Type
Selecting the Original Copy Type
▼
▼
Using Single-Sided or Double-Sided Originals
Load the or ig inals.
1
4015O244AA
NOTE
Chapter 3
If an Automatic Document Feeder is used to copy
2-sided origin als, the fir st side of e ach original i s
scanned and the n the doc ument s et i s tur ned o ve r
to let the machi ne s can the second side of each
original.
Select the original type.
2
Making Copies
NOTES
• When 2-in-1, 4-in-1, or Booklet function is
selected, the machine automatically selects a
default zoom ratio. You can, however, opt for
not recalling the default zoom ratio, see User’s
Choice. ☞p.8-2
• User’s Choice also allows you to program a
specific page order for 4-in-1. ☞p.8-2
<DF200 only>
To copy using Double-[2in1]:
• Touch Double-[2in1].
Select the desired copy type.
3
4016P039CA
4016P040CA
4017P041EA
<DF270/DF370 only>
To copy using Double-[2in1], Booklet,
Single-[4in1], Double-[4in1]
• Touch [4in1/Booklet].
• Select the desired copy type and touch
[Enter].
4016P042DA
 Loading...