

DF260/360DF260/360
User's ManualUser's Manual
Part Number DL3600140

Using the Copier Properly
To ensure the optimum performance of the copier, follow the precautions listed below.
• Never place a heavy object on the copier.
• Never subject the copier to shocks.
• Never open any doors or turn the copier off while the copier is making copies.
• Never bring any magnetized object near the copier.
• Never use flammable sprays, liquids or gases near the copier.
• Never modify the copier, as a fire or electrical shock could result.
• Never remove any panel or cover which is secured. The copier contains high voltage
components which can cause electrical shock.
• Never tamper with the laser mechanism in laser-equipped models, as blindness or
other injury may result.
• Never drop paper clips, staples or other small pieces of metal through the vents or
other openings in the copier, as a fire or electrical shock can result.
• Never place containers of liquid on the copier .If liquids get inside the copier, they can
cause fire or electrical shock. If a piece of metal or any liquid gets inside the copier,
immediately turn the copier off, unplug the power cord and call your technical
representative. A fire or electrical shock can result if the copier remains plugged in or
is operated after metal or liquid gets inside.
• Never leave the copier running if it becomes unusually hot, or if smoke or an unusual
odor or noise is detected. Should any of these conditions occur, immediately turn the
copier off, unplug the power cord and call your technical representative. A fire or
electrical shock can result if the copier remains plugged in under any of these
conditions.
• Always insert the power plug all the way into the outlet.
• Always make sure that the outlet is visible, clear of the copier or copier cabinet.
• Always provide good ventilation when making a large number of continuous copies.
• Never pull on the power cord, and always hold the plug when unplugging the power
cord. A damaged cord could result in a fire or cause an electrical shock.
• Never unplug the power cord with a wet hand, as it could cause an electrical shock.
• Always unplug the power cord before moving the copier. Moving the copier with the
power cord plugged in can damage the cord resulting in a fire or causing an electrical
shock.
• Always unplug the power cord when the copier is not going to be used for a long time.
• Never place a heavy object on the power cord, or pull or bend it, as a fire or electrical
shock can result.
• Always ensure that the copier does not sit on or roll onto the power cord or
communications cable of other electrical equipment, as malfunctioning equipment or
a fire could result.
• Always ensure that the power cord or communications cable of other electrical
equipment does not become wedged into the copier mechanism, as malfunctioning
equipment or a fire could result.
• Always use the correct power voltage, as improper voltage can cause a fire or
electrical shock.
Using the Copier Properly
• Never use a multiple outlet adapter, as a fire or electrical shock can result.
• Should the power cord become damaged, immediately turn the copier off, unplug the
power cord and call your technical representative. A damaged cord can result in a fire
or cause an electric shock.
• If an extension cord is needed, use one with a greater rated capacity than the
maximum power requirements of the copier. The use of an extension cord that falls
short of supporting the maximum power requirements can result in overheating or a
fire.
• Always unplug the copier whenever anything unusual is observed during operation.
Make sure that the outlet is nearby and clear of the copier and furniture.
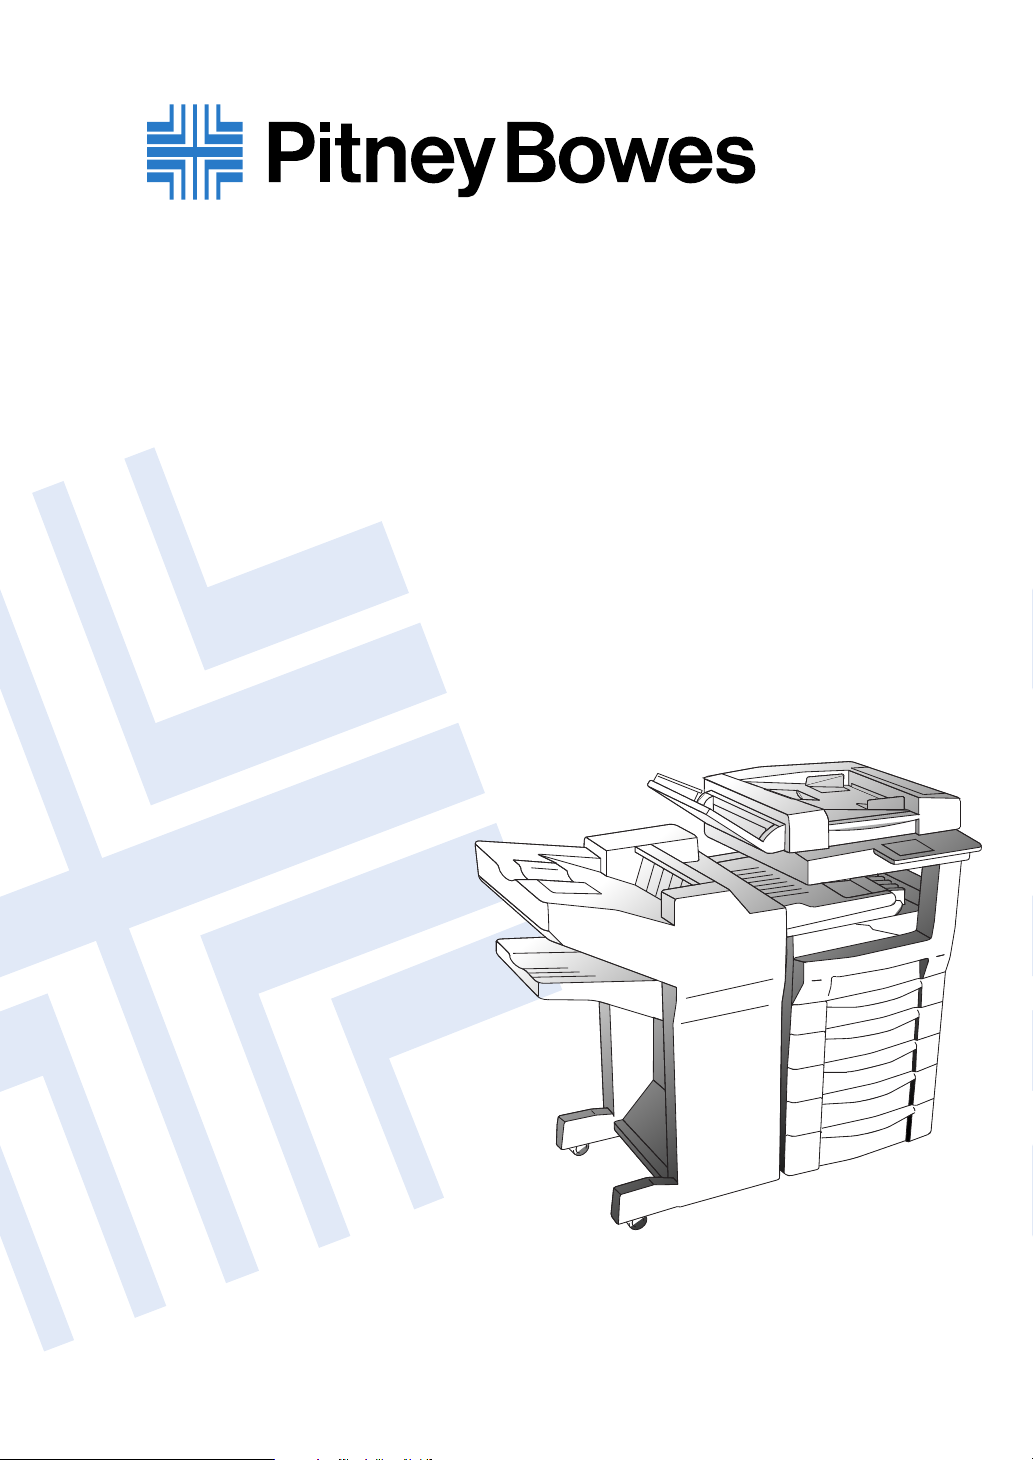
• Never touch the electrical contacts inside the right door and underneath the Imaging
Unit, as an electrostatic discharge may damage the copier.
Electrical Contacts
1166O264AB
=Locate the Copier in a Well Ventilated Room=
A negligible amount of ozone is generated during normal operation of this copier. An
unpleasant odor may, however, be created in poorly ventilated rooms during extensive
copier operations. For a comfortable, healthy and safe operating environment, it is
recommended that the room be well ventilated.
=Placer le copieur dans une pièce largement ventilée=
Une quantité d’ozone négligeble est dégagée pendant le fonctionnement du copieur
quand celui-ci est utilisé normalement. Cependant, une odeur désagréable peut être
ressentie dans les pièces dont l’aération est insuffisante et lorsqu’une utilisation
prolongée du copieur est effectuée. Pour avoir la certitude de travailler dans un
environnement réunissant des conditions de confort, santé et de sécurité, il est
préférable de bien aérer la pièce ou se trouve le copieur.

As an ENERGY STAR®Partner, we have determined that this
machine meets the
efficiency.
ENERGY STAR
®
Guidelines for energy
What is an ENERGY STAR®Product?
An ENERGY STAR®product has a special feature that allows it to automatically switch to a “low-power
mode” after a period of inactivity. An
money on utility bills and helps protect the environment.
ENERGY STAR
®
product uses energy more efficienty, saves you

This operator’s manual explains how to operate the copier and replenish its supplies. It also givessome
troubleshooting tips as well as general precautions to be observed when operating the copier.
To ensure the best performance and effective use of your copier, read this manual carefully until you
familiarize yourself thoroughly with the copier’s operation and features. After you have read through
the manual, keep it ready for reference.
Please use this manual as a quick and handy reference tool for immediately clarifying any questions
which may arise.
To order supplies, please call the Pitney Bowes Copier/Printer Supply Line at 1-800-462-6797
MC-F01
WARNING
This equipment has been tested and found to comply with the limits for a Class A digital device,
pursuant to Part 15 of the FCC Rules. These limits are designed to provide reasonable protection
against harmful interference when the equipment is operated in a commercial environment. This
equipment generates, uses, and can radiate radio frequency energy and if not installed and used in
accordance with the instruction manual, may cause harmful interference to radio communications.
Operation of this equipment in a residential area is likely to cause harmful interference in which case
the user will be required to correct the interference at his own expense.
i
The design and production of this unit conforms to FCC Regulations, and any changes or modifications
must be registered with the FCC and are subject to FCC control. Any changes made by the purchaser or
user without first contacting the manufacturer will be subject to penalty under FCC regulations.
FCC-F01
This Class A digital apparatus complies with Canadian ICES-003.
Cet appareil numérique de la classe A est conforme à la norme NMB-003 du Canada.
IC-F03

ii
Contents
Using the Copier Properly
Terms and Symbols for the Type of Originals and Copy Paper .....................viii
Safety Information
FCC PART 68-TELECOMUNICATION DEVICES ......................................ix
WARNING FOR THE SETTING OF HEADER AND FOOTER ..................ix
USER INSTRUCTIONS (For Canada Users) ...................................................x
IC CS-03-TELECOMUNICATION DEVICE ..................................................x
Laser Safety ......................................................................................................xi
Internal Laser Radiation ....................................................................................xi
For the United States .........................................................................................xi
Laser Safety Label ...........................................................................................xii
Notice for Ni-MH Batteries .............................................................................xii
Installing the Copier ........................................................................................xiii
Installation Site ...............................................................................................xiii
Power Source ..................................................................................................xiii
Space Requirements ........................................................................................xiii
Precautions for Use
Operating Environment ...................................................................................xiv
Using the Copier Properly ..............................................................................xiv
Moving the Copier ..........................................................................................xiv
Care of Copier Supplies ..................................................................................xiv
Note on making multiple copies ......................................................................xv
Legal Restrictions on Copying ........................................................................xv
Precaution for Opening/Closing the R ight D oor ............................................. xv
Product Features
Copy Functions ...............................................................................................xvi
Fax Functions ................................................................................................xviii
Terms and Definitions
Chapter 1 Introduction
1. Names and Functions of Parts
2. Using the Control Panel
Name and description of control panel components .....................................1-10
3. Using the Touch Panel
Name and function of touch panel components ............................................1-12
Details of Main Screens ................................................................................1-12
Automatically returning to initial screen ......................................................1-13
Automatic back light .....................................................................................1-13
4. Initial Screen
Auto-mode Screen, FAX Screen, and Copy Screen .....................................1-14
Auto-mode Screen ........................................................................................1-14
Copy Screen ..................................................................................................1-15
FAX Screen ...................................................................................................1-15
5. Users and User Management Mode
6. Handling Documents
7. Notes on Handling Documents
8. Quitting an Operation
9. Interruption
Interrupt key ..................................................................................................1-26
10. Confirming the Settings
Mode Check Key ..........................................................................................1-27

Chapter 2 Copying a Document
1. Copying a Document
2. Selecting the Copy Paper Size for Copying
Copy Paper Size .............................................................................................2-5
Special Paper Mode ........................................................................................ 2-8
3. Selecting the Zoom Ratio for Copying
Zoom ..............................................................................................................2-9
4. Adjusting the Density for Copying
Density ......................................................................................................... 2-13
5. Copying Figures and Photos
Image Quality ............................................................................................... 2-15
Chapter 3 Sending and Receiving Documents
1. Sending a Document
Quick Memory Transmission ......................................................................... 3-2
2. Using One-Touch Dialing for Transmission
One-Touch Dialing ......................................................................................... 3-7
3. Using Abbreviated Dialing for Transmission
Abbreviated Dialing .......................................................................................3-8
4. Using Facsimile Program Dialing for Transmission
Facsimile Program Dialing ............................................................................. 3-9
5. Sending Fine Print and Photos
Image Quality ............................................................................................... 3-10
6. Adjusting Contrast for Transmission
Contrast ........................................................................................................3-12
7. Sending Documents in their Original Size Irrespective of the Recipient's
Paper Size
Reduction ..................................................................................................... 3-14
8. Selecting the Area of the Document to be Scanned and Transmitted
Scan Area ..................................................................................................... 3-16
9. Combining One-Touch Key and Dialed Input for Transmission
Chain Dialing ............................................................................................... 3-18
10. Receiving a Document
Automatic Reception .................................................................................... 3-20
11. Making and Receiving a Telephone Call
iii
Contents
Chapter 4 Advanced Copying Procedures
1. Using the Sort Mode while Copying
Sort, Group .....................................................................................................4-2
2. Stapled Binding
Stapling ........................................................................................................... 4-4
3. Hole Punching for Filing
Hole Punching ................................................................................................ 4-6
4. Single Setting for Mixed Sized Documents
Mixed Original Detection ............................................................................... 4-8
5. Selecting the Document and Copy Format
Orig. Copy Screen ..................................................................................... 4-10
6. Attaching Cover Sheets
Cover Sheets .................................................................................................4-19
7. Inserting Separators

iv
Contents
Page Insertion ...............................................................................................4-21
8. Copying on OHP Interleaving
OHP Interleaving ..........................................................................................4-23
9. Setting up File Margins
File Margin ...................................................................................................4-26
10. Erasing Some Parts of the Document for Copying
Edge/Frame Erase .........................................................................................4-27
11. Multi-Copying of a Document on One Sheet of Copy Paper
Image Repeating ...........................................................................................4-28
12. Numbering the Copy Paper per Set of Copies
Distribution ...................................................................................................4-30
13. Erasing the Peripheral Area around a Document
Small Original Adjustment ...........................................................................4-32
14. Scanning a Large Partitioned Document for Copying
Separate Scanning .........................................................................................4-33
15. Using Copy Programs
Copy Program ...............................................................................................4-35
16. Combining Copy Functions
Chapter 5 Transmission Methods
1. Confirming the Communications Status
2. Sending a Document to Multiple Destinations
Serial Broadcast Transmission ........................................................................5-6
3. Sending a Document after Talking on the Telephone
Manual Transmission ......................................................................................5-8
4. Relaying a Document via Another Facsimile
Relay Transmission .........................................................................................5-9
5. Sending a Document without Storing It in Memory
Real Time Transmission ...............................................................................5-11
6. Sending a Document while a Stored Document is Waiting to be Sent
Priority Transmission .................................................................................... 5-12
7. Sending a Document at a Specified Time
Timer Transmission ......................................................................................5-13
8. Sending Two Pages as One
2-to-1 Transmission ......................................................................................5-14
9. Sending a 2-Sided Document
2-Sided Transmission ...................................................................................5-15
10. Printing a TX Marker
TX Marker ....................................................................................................5-16
11. Printing TS I Information
TSI ................................................................................................................5-18
12. Printing the Recipient's Name on a Transmitted Document
Destination Insertion .....................................................................................5-20
13. Printing a Transmission Report
Transmission Report .....................................................................................5-21
14. Printing a Specified Number of Copies at the Receiving Side
Remote Copying ...........................................................................................5-23
15. Using Password for Transmission
Password Transmission .................................................................................5-24
16. Allowing the Recipient to Control Transmission of Your Document
Polling Transmission ....................................................................................5-25

17. F CODE
18. Registering a Document on a B ulletin Board
Chapter 6 Reception Methods
1. Receiving a Document after Talking on the Telephone
Manual Reception .......................................................................................... 6-2
2. Using a Password to Receive a Document
Password Reception ....................................................................................... 6-3
3. Controlling the Sender’s Facsimile to Retrieve a Document
Polling Reception and Start Timer .................................................................6-4
4. Downloading a Document from a Bulletin Board
Retrieve ..........................................................................................................6-5
Chapter 7 Before Registration and Setting
1. Registration/Settings List
2. Required Initial Registration/Settings and Confirmation
3. Entering Characters
Chapter 8 Basic Settings
1. Setting the Date and Time
Time & Date ................................................................................................... 8-2
2. Setting the Monitor Speaker and the Buzzer Volume
Sound Volume ................................................................................................ 8-3
v
Contents
Chapter 9 Registration and Setting Operations
1. Accessing the Administrator Management Screen
2. Registering Self-ID to be Printed or Displayed at the Destination
Self-ID ............................................................................................................ 9-3
3. Registering a Telephone Number
Self-Telephone Number ................................................................................. 9-4
4. Registering Names
TSI Information .............................................................................................. 9-5
5. Setting the Line Type
6. Selecting Either an Extension or External Line
PSTN/Extension Line Switch ......................................................................... 9-7
7. Setting the Initial Screen to be Displayed
Priority Screen ................................................................................................ 9-8
8. Setting the Initial Destination Specification Screen to be Displayed
Priority Facsimile Screen ............................................................................. 9-10
9. Settings for Handling the Received Documents
Settings for Received Documents ................................................................ 9-12
10. Setting the Management Mode
User Management Mode .............................................................................. 9-14
11. Registering the Administrator Number
Administrator Number ................................................................................. 9-15
12. Registering the Password for Password Communications
Communication Password ............................................................................ 9-16
13. Setting the Time to Save Documents that could not be Sent
Memory Holding Timer ............................................................................... 9-17
14. Registering Users

vi
Contents
User Registration ..........................................................................................9-18
15. Settings for Transmission
Transmission Settings ...................................................................................9-22
16. Setting the Reception Mode
Reception Settings ........................................................................................9-25
17. Settings for Report Printing
Report Settings ..............................................................................................9-29
18. Settings for Copying
Copy Settings ................................................................................................9-31
19. Settings for Printing
Printing Settings ............................................................................................9-35
20. Settings for Saving Power
Power Saving Settings ..................................................................................9-37
21. Confirming the Usage Status of Each User on the Screen
Number of Sheets Printed and Transmitted ..................................................9-39
22. Confirming the Accumulated Number of Pages
Chapter 10 Registrations and Settings for Each User
1. Amending User Data
Chapter 11 Registrations and Settings for Convenient Usage
1. Registering a Number for One-Touch Key
One-touch Dialing .........................................................................................11-2
2. Registering a Number for Abbreviated Dialing
Abbreviated Dialing ...................................................................................... 11-7
3. Registering an Index for One-Touch Keys
Index ...........................................................................................................11-11
4. Registering Communication Conditions in Facsimile Program Keys
Facsimile Program ......................................................................................11-12
5. Registering Relay Groups
6. Registering an Abbreviated Number for Receiving a Relay S tatus Report
Your Abbreviated Dialing ..........................................................................11-21
7. Establishing a Bulletin Board
8. Registering Copy Programs
Copy Programs ...........................................................................................11-25
Chapter 12 Reports and Lists
1. Confirming the Transmission Status
Activity Report (TX) ....................................................................................12-2
2. Confirming the Reception Status
Activity Report (RX) ....................................................................................12-3
3. Confirming the Documents Registered on the Bulletin Board
Bulletin Board List ........................................................................................12-4
4. Confirming the Setting Status per User
User List ........................................................................................................12-5
5. Confirming the Usage Status per User through Reports
User Account Report ....................................................................................12-7
6. Confirming the Setting Status per Function
Setting List ....................................................................................................12-8
7. Confirming the Registered Details in One-Touch Dialing

One-Touch Dial# List ................................................................................... 12-9
8. Confirming the Registered Details in Abbreviated Dialing
Abbr. Dial# List ..........................................................................................12-10
9. Confirming the Registered Details in the Facsimile Program
FAX Program List ...................................................................................... 12-11
10. Confirming the Registered Details in the Relay Group
Relay Group List ........................................................................................12-12
Chapter 13 Routine Care
1. Loading Paper
2. Replacing the Imaging Unit and Toner Bottle
3. Replacing the TX Marker Stamp
4. Adding Staples
5. Cleaning
Chapter 14 Troubleshooting
1. If the Following Icons and Alarm Messages Are Displayed
Icons ............................................................................................................. 14-2
Alarm Messages ........................................................................................... 14-3
2. Document Misfeed
3. Paper Misfeed
4. Troubleshooting
During Stand-by Mode ............................................................................... 14-17
Copying ...................................................................................................... 14-18
Transmission .............................................................................................. 14-20
Reception ....................................................................................................14-21
Telephone ...................................................................................................14-22
5. Power Failure
6.Condensation
Anti-Condensation Procedure/Anti-Condensation Function ..................... 14-24
7. When the Print is Faint
Toner Replenishment ................................................................................. 14-25
vii
Contents
Chapter 15 Miscellaneous
1. Specifications
Index
viii
Pitney BowesTerms and Symbols for the Type of Originals and Copy Paper
A few special terms and symbols are used in this manual to designate types of originals and copy paper.
This page explains about these terms and symbols.
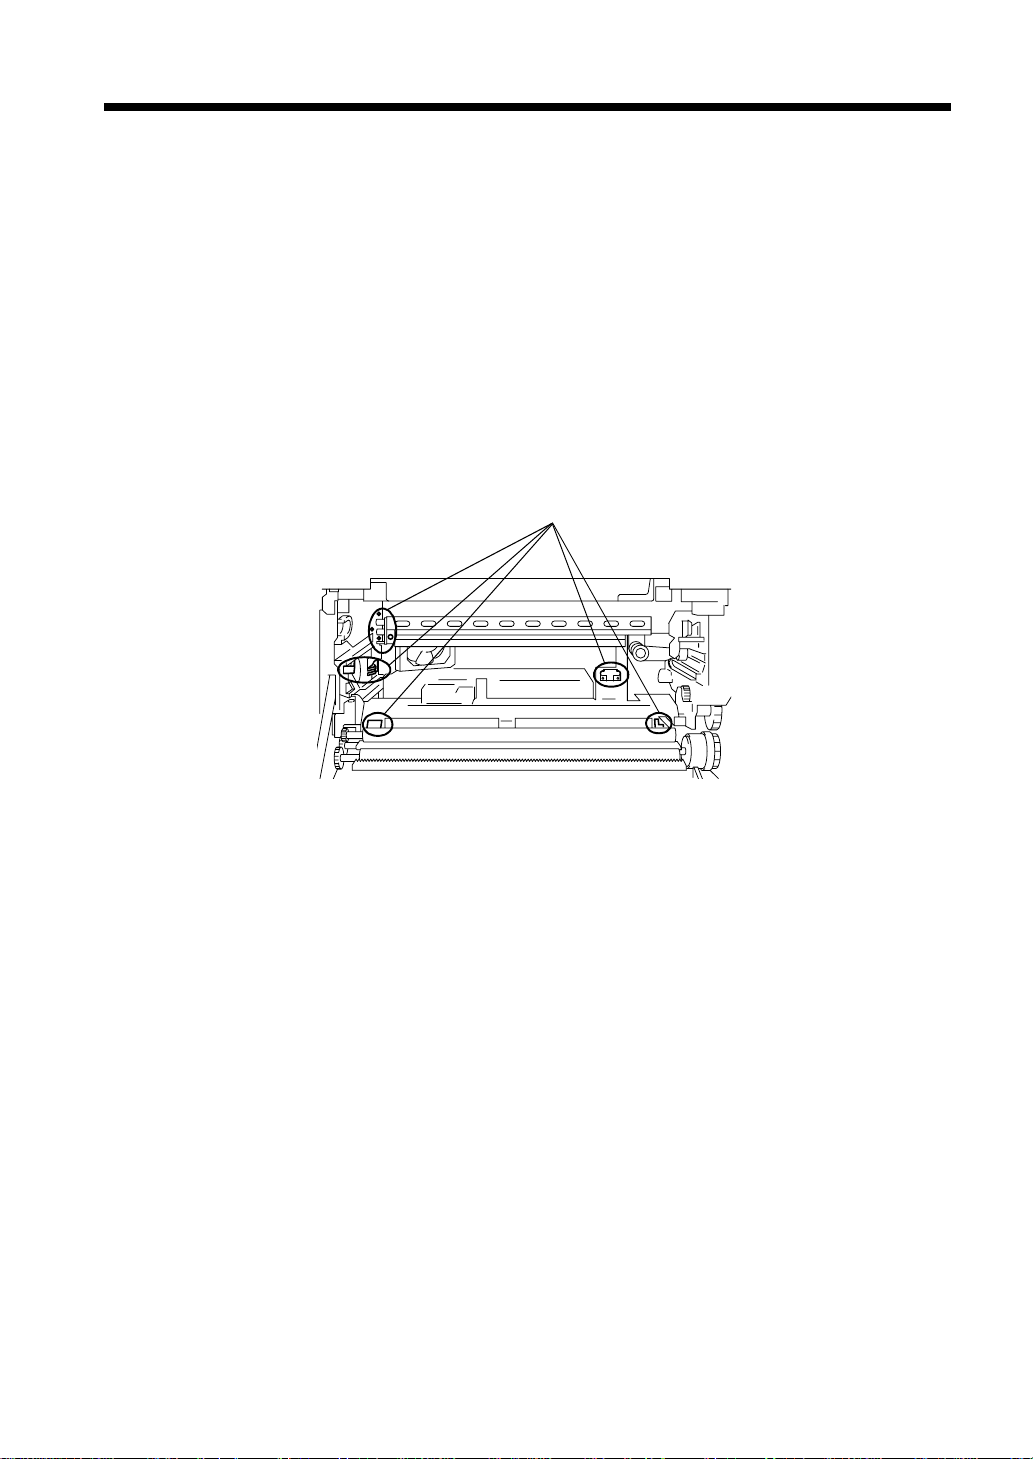
Feeding Direction (copy paper path)
In this copier system,copy p aper is taken up from the right-hand side of the copier, fed through the copier
toward the left-hand side, and ejected face down onto the Copy Tray. In the figure below, the direction in
which the copy paper is fed, as indicated by the arrow, is called the “feeding direction.”
“Width” and “Length”
1139O1610A
Terms and Symbols Used
1139O1610A
1166O216AC
When we talk about the size of the original or copy,
we call side A “width” and side B “length.”
A: Width
B: Length
<Lengthwise >
When the original or copy has a “length” longer than
its “width,” we call it “lengthwise” and use symbol
“L” or “ .”

1139O1620A
ix
<Crosswise >
Whentheoriginalorcopyhasa“length”shorter
than its “width,” we call it “crosswise” and use
symbol “C” or “ .”

Safety Information
FCC PART 68-TELECOMUNICATION DEVICES
This equipment complies with Part 68 of the FCC rules. On the rear panel of this equipment is a label that
contains, among other information, the FCC registration number and Ringer EquivalenceNumber (REN)
for this equipment. If requested, provide this information to your telephone company.
This equipment uses THE FOLLOWING USOC JACKS: RJ11C.
The REN is useful to determine the quantity of devices you may connect to your telephone line and still
have all of those devices ring when your number is called. In most, but not all areas, the sum of the RENs
of all devices should not exceed five (5.0). To be certain of the number of devices you may connect to
your line, as determined by the REN, you should call your local telephone company to determine the
maximum REN for your calling area.
If your telephone equipment causes harm to the telephone network, the Telephone Company may
discontinue your service temporar ily. If possible, they will notify you in advance.But if advance notice is
not practical, you will be notified as soon as possible. You will be advised of your right to file a complaint
with the FCC.
Your telephone company may make changes to its facilities, equipment, operations, or procedures that
could affect the proper operation of your equipment. If they do, you will be given advance notice so as to
give you an opportunity to maintain uninterrupted service.
x
If you experience trouble with this equipment, please contact:
Pitney Bowes Office Systems
100 Oakview Drive
Trumbull, Connecticut 06611
Phone: (203) 365-7000
The telephone companymay ask you to disconnect this equipment from the network until the problem has
been corrected or you are sure that the equipment is not malfunctioning.
This equipmenPitney Bowest may not be used on coin service provided by the telephone company.
Connection to party lines is subject to state tariffs. (Contact your state public utility commission or
corporation commission for information.)
CUSTOMER INFORMATION FOR PRIVATELY OWNED COIN PHONES
To comply with state tariffs, the telephone company must be given notification prior to connection.
In some states, prior approval of connection must be obtained from the state Public Utility Commission,
Public Service Commission or state Corporation Commission.
WARNING FOR THE SETTING OF HEADER AND FOOTER
The Telephone Consumer Protection Act of 1991 makes it unlawful for any person to use a computer or
other electronic device to send any message via a telephone fax machine unless such message clearly
contains in a margin at the top or bottom of each transmitted page or on the first page of the transmission,
the date and time it is sent and an identification of the business or other entity, or other individual sending
the message and the telephone number of the sending machine or such business, other entity, or
individual.
In order to program this information into your fax machine, you should complete the following steps.
(Refer to Chapter 9 and Chapter 10 Advance Operation page 9-5, 9-22 and 10-7)

Safety Information
USER INSTRUCTIONS (For Canada Users)
IC CS-03-TELECOMUNICATION DEVICE
NOTICE:
Industry Canada (IC) label identifies certified equipment. This certification means that the equipment
meets certain telecommunications network protective, operational, and safety requirements. IC does not
guarantee the equipment will operate to the user’s satisfaction.
Before installing this equipment, users should ensure that it is permissible to be connected to the facilities
of the local telecommunications company. The equipment must also be installed using an acceptable
method of connection.In some cases, the company’sinside wiring associatedwith a single lineindividual
service may be extended by means of a certified connector assembly (telephone extension cord). The
customer should be aware that compliance with the above conditions may not prevent degradation of
service in some situations.
Repairs to certified equipment should be made by an authorized Canadian maintenance facility
designated by the supplier. Any repairs or alterations made by the user to this equipment, or equipment
malfunctions, may give the telecommunications company cause to request the user to disconnect the
equipment.
xi
Users should ensure for their own protection that the electrical ground connections of the power utility,
telephone lines, and internal metallic water pipe system, if present, are connected together. This
precaution may be particularly important in rural areas.
CAUTION:
Users should not attempt to make such connections themselves, but should contact the appropriate
electric inspection authority, or electrician, as appropriate.
NOTICE:
The Ringer Equivalence Number (REN)
maximum number of terminals allowed to be connected to a telephone interface. The termination on an
interface may consist of any combination of devices subject only to the requirement that the sum of the
Ringer Equivalence Numbers of all the devices does not exceed 5.
If you experience trouble with this equipment, please contact:
Pitney Bowes of Canada LTD
2200 Yonge Street Third Floor Suite 100
Toronto, Ontario M4S3E1
Tel: (416) 484-3915
assigned to each terminal device provides an indication of the
xii
Safety Information
Laser Safety
This is a digital machine which operates by means of a laser. There is no possibility of danger from the
laser, provided the machine is operated according to the instructions in this manual.
Since radiation emitted by the laser is completely confined within protective housing, the laser beam
cannot escape from the machine during any phase of user operation.
This machine is certified as a Class 1 laser product. This means the machine does not produce hazardous
laser radiation.
Internal Laser Radiation
Maximum Average Radiant Power: 36.7 (mW) at the laser aperture of the print head unit.
Wavelength: 770-810 nm
This product employs a Class IIIb Laser Diode that emits an invisible laser beam.
The Laser Diode and Scanning Polygon Mirror are incorporated in the print head unit.
The print head unit is NOT A FIELD SERVICE ITEM.
Therefore, the print head unit should n ot be opened under any circumstances.
Laser Aperture of
the Print Head Unit
Print Head
1166O234AA
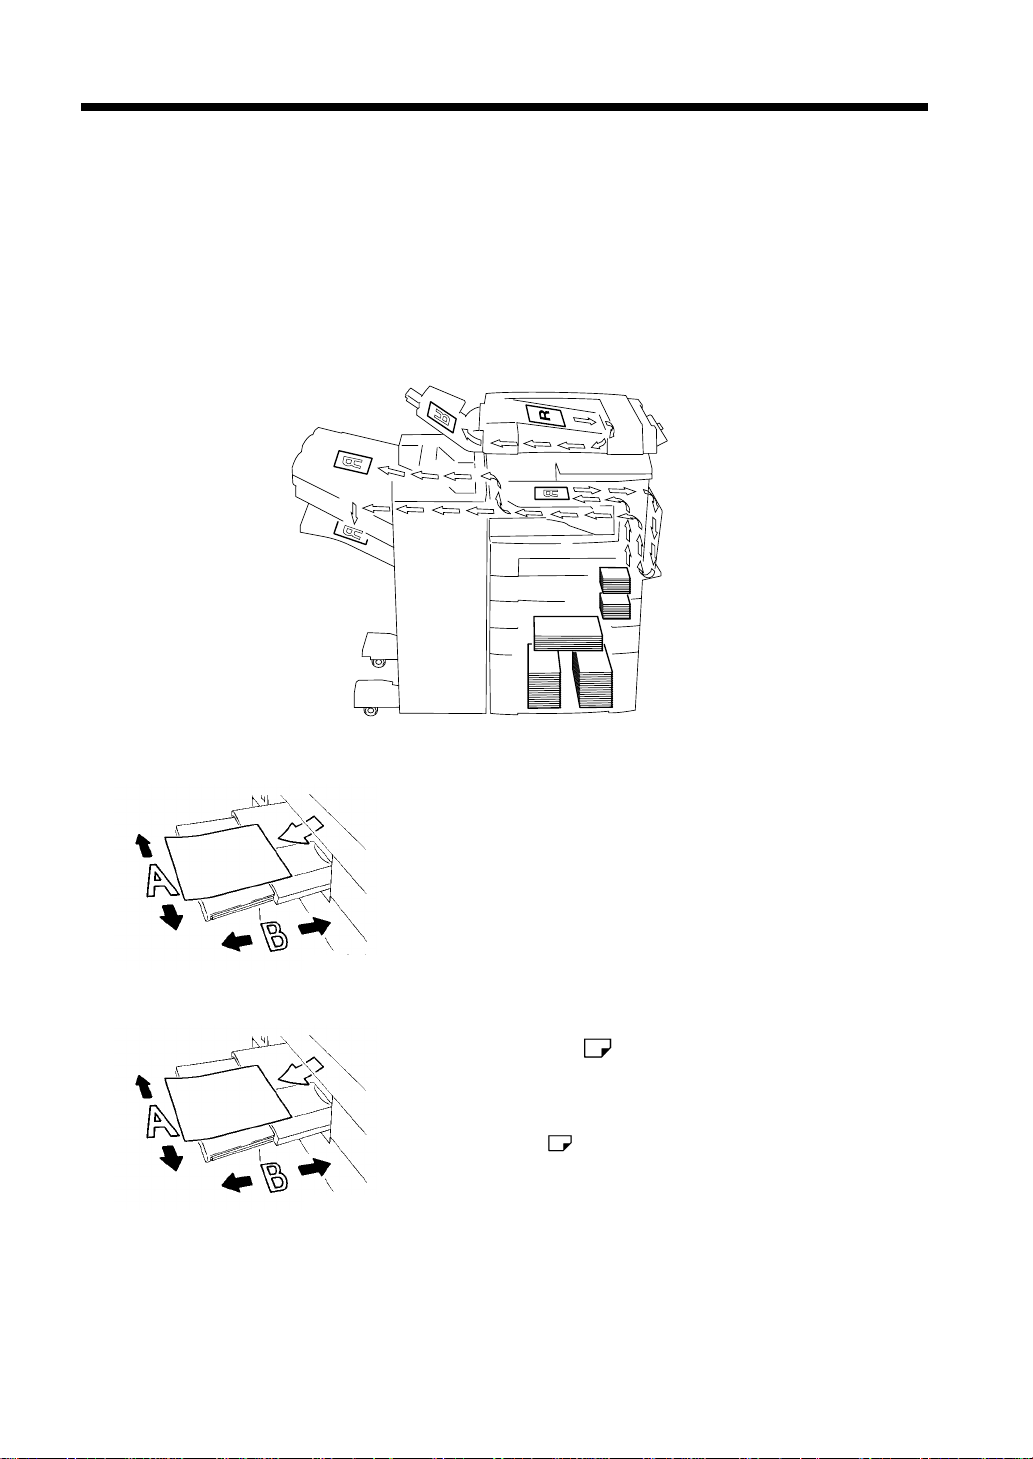
1166O263AB
This figure shows the view inside the Right Door
with the Imaging Unit removed.
For the United States
CDRH regulation
This copier is certified as a Class 1 Laser product under the Radiation Performance Standard according to
the Food, Drug and Cosmetic Act of 1990. Compliance is mandatory for Laser products marketed in the
United States and is reported to the Center for Devices and Radiological Health (CDRH) of the U.S. Food
and Drug Administration of the U. S. Department of Health and Human Services (DHHS). This means
that the device does not produce hazardous laser radiation.
The label shown on page xii indicates compliance with the CDRH regulations and must be attached to
laser products marketed in the United States.
CAUTION: Use of controls, adjustments or performance of procedures other than those
specified in this manual may result in hazardous radiation exposure.
This is a semiconductor laser. The maximum power of the laser diode is 5mW and the wavelength is 770810nm.
Laser Safety Label
A laser safety label is attached to the outside of the copy machine as shown below.
<DF260>
Laser safety label
For United States
xiii
Safety Information
R
Pitney Bowes Office Systems
100 Oakview Drive
Trumbull, Connecticut 06611
1166O497CB
Model: DF260
Pitney Bowes Inc.
<DF360>
Laser safety label
For United States
R
Pitney Bowes Office Systems
100 Oakview Drive
Trumbull, Connecticut 06611
1166O496CB
Model: DF360
Pitney Bowes Inc.
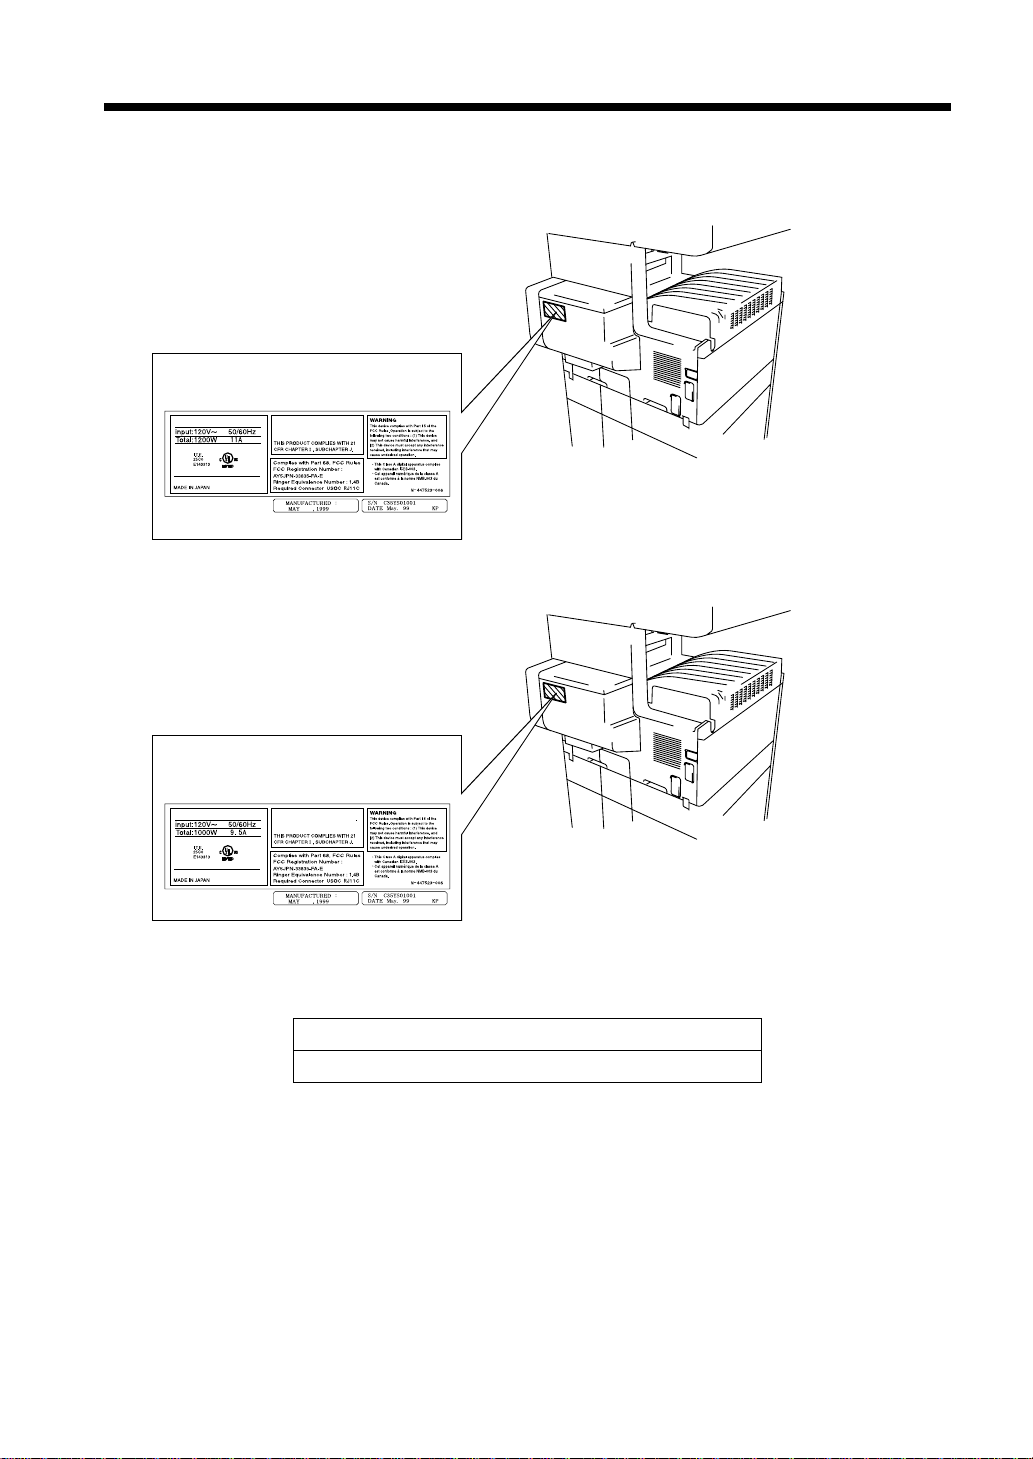
The Manufacturer’s Name Plate is affixed at the position illustrated above.
Please write down the Model Name and Serial No. of your copier here.
1166O251AC
1166O251AC
Model:
Serial No.
Notice for Ni-MH Batteries
This product uses a Ni-MH battery for memory backup. There is no need for the user to replace the
backup Ni-MH battery. Changing the batteries by the user can destroy data. When the battery needs
replacement, therefore, consult your Pitney Bowes Service Representative.
Installing the Copier
Installation Site
To ensure utmost safety and prevent possible malfunctions of the copier, install it in a location which
meets the following requirements.
◆A place away from a curtain or the like that may catch fire and burn easily.
◆An area where there is no possibility of being splashed with water or other types of liquid.
◆An area free from direct sunlight.
◆A place out of the direct air stream of an air conditioner, heater, or ventilator.
◆A well-ventilated place.
◆A dry place.
◆A dust-free location.
◆An area not subject to undue vibration.
◆A stable and level location.
◆A place where ammonia or other organic gas is not generated.
◆A place which does not put the operator in the direct stream of exhaust from the copier.
◆A place which is not near any kind of heating device.
Power Source
The power source voltage requirements are as follows:
xiv
◆Use a power source with little voltage fluctuation.
Voltage Fluctuation : Within ± 10%
Frequency Fluctuation : Within ± 0.3%
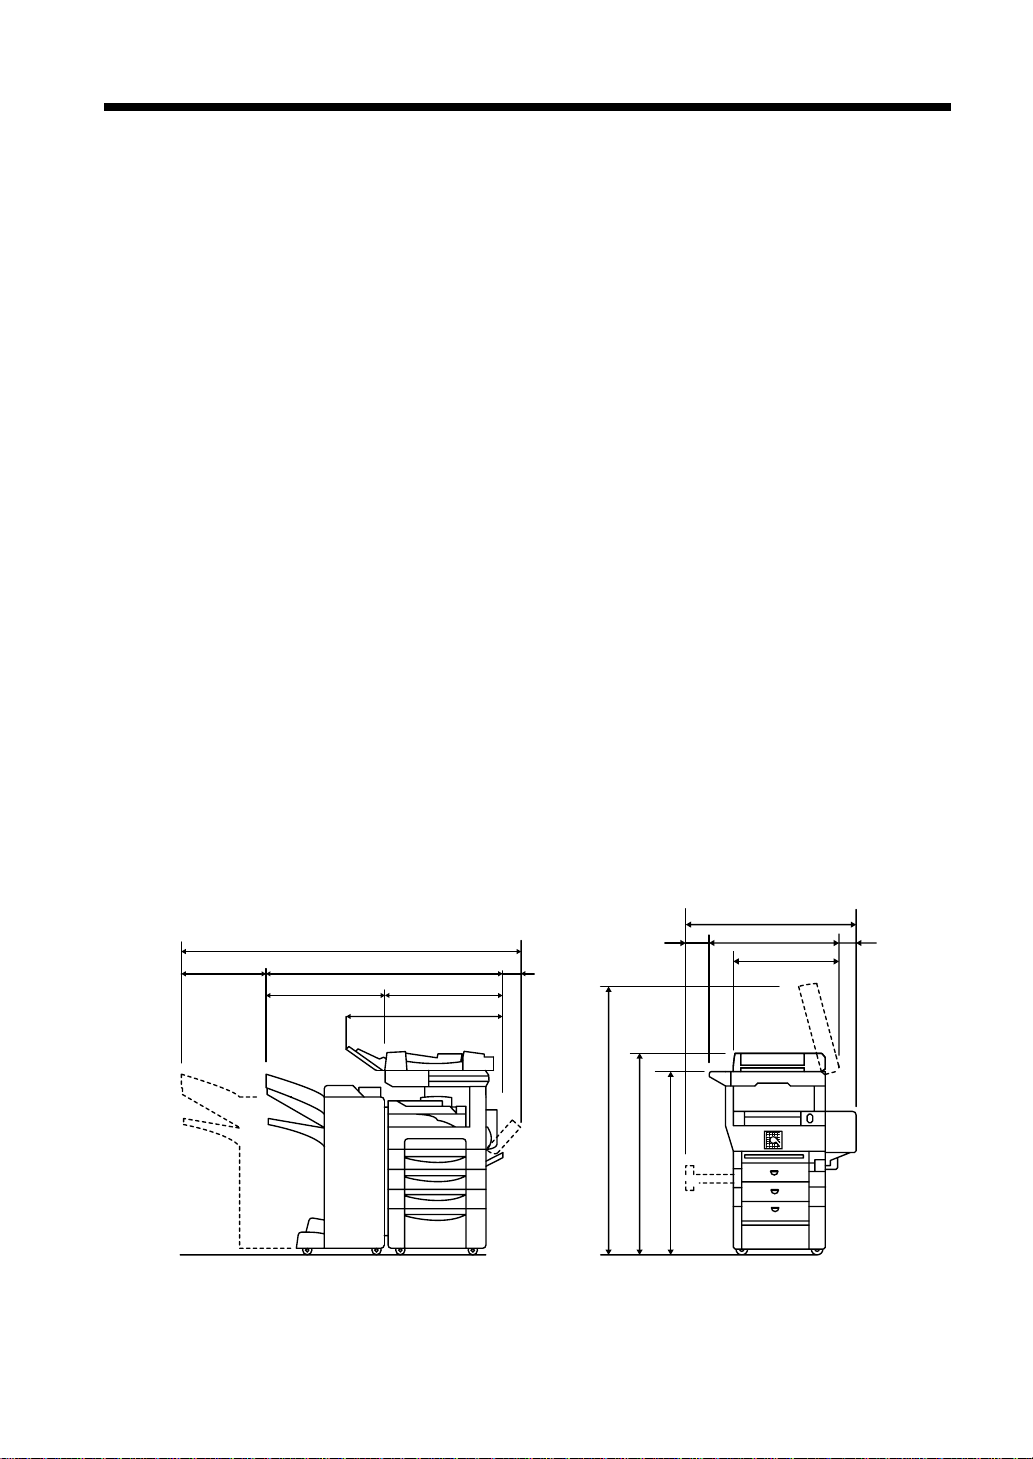
Space Requirements
To ensure easy copier operation, supply replacements, and service maintenance, adhere to the
recommended space requirements detailed below. Allow a clearance of 6” or more at the back of the
copier as there is a ventilation duct.
40-1/2”
64”
49-1/4”9-1/2” 5-1/2”
23-1/4”25-3/4”
32-1/2”
26-3/4”
22”
58-1/2”
40”
44-1/4”
1-1/4”12-1/2”
<With 9608, 9612, 9632, 9635 and 9628 mounted>
1166O253CC
Unit: Inch

xv
Precautions for Use
Operating Environment
The operating environmental requirements of the copier are as follows.
Temperature : 10°C to 32°C (50°F to 89.6°F) with a fluctuation of 10°C (18°F) per hour.
Humidity : 15% to 85% with a fluctuation of 20% per hour.
Using the Copier Properly
To ensure the optimum performance of the copier, follow the precautions listed below.
◆NEVER place a heavy object on the copier or subject the c opier to shocks.
◆NEVER open any doors, or turn OFF the copier while the copier is making copies.
◆NEVER bring any magnetized object or use flammable sprays near the copier.
◆NEVER remodel the copier as a fire or electrical shock could result.
◆ALWAYS insert the power plug all the way into the outlet.
◆ALWAYS make sure that the outlet is visible, clear of the copier or copier cabinet.
◆ALWAYS provide good ventilation, especially during extensive operation.
NOTE
= Locate the Copier in a Well Ventilated Room =
A negligible amount of ozone is generated during normal operation of this copier. An unpleasant odor
may, however, be created in poorly ventilated rooms during extensive copier operations. For a
comfortable, healthy, and safe operating environment, it is recommended that the room be well
ventilated.
REMARQUE
= Placer le copieur dans une pièce largement ventilée =
Une quantité d’ozone négligable est dégagée pendant le fonctionnement du copieur quand celui-ci est
utilisé normalement. Cependant, une odeur désagréable peut être ressentie dans les pièces dont
l’aération est insuffisante et lorsque une utilisation prolongée du copieur est effectuée. Pour avoir la
certitude de travailler dans un environnement réunissant des conditions de confort, santé et de
sécurité, il est préférable de bien aérer la pièce ou se trouve le copieur.
Moving the Copier
If you need to transport the copier over a long distance, consult your Technical Representative.
Care of Copier Supplies
Use the following precautions when handling the copier supplies (toner, paper, etc.).
◆Store the paper, toner, and other supplies in a place free from direct sunlight and away from any heating
apparatus. Keep them in a dry,cool, clean environment.
◆Store p aper, which has been removedfrom its wrapper but not loaded into the drawer, in a sealed plastic
bag in a cool, dark place.
◆Keep supplies out of the reach of children.
◆If your hands become soiled with toner, wash them with soap and water immediately.

xvi
Precautionsfor Use
Note on making multiple copies
If you make smaller than Legal size copies during a multi-copy cycle, there is a possibility that the
copying speed will be reduced due to a rise in fusing temperature. The copying speed will automatically
return to normal when t he optimum fusing temperature is re-established.
Legal Restrictions on Copying
Certain types of documents must never be copied by the copier for the purpose or with the intent to pass
copies of such documents off as the original. The following is not a complete list but is meant to be used
as a guide to responsible copying.
Financial Instruments
• Personal Checks
• Travelers Checks
•MoneyOrders
• Certificates of Deposit
• Bonds or other Certificates of Indebtedness
• Stock Certificates
Legal Documents
•FoodStamps
• Postage Stamps (canceled or uncanceled)
• Checks or Drafts drawn by Government Agencies
• Internal Revenue Stamps (canceled or uncanceled)
•Passports
• Immigration Papers
• Motor Vehicle Licenses and Titles
• House and Property Titles and Deeds
General
•Identification Cards, Badges, or Insignias
•Copyrighted Works without permission of t he copyright owner
In addition, it is prohibited under any circumstances
Art without permission of the copyright owner.
When in doubt about the nature of a document, consult with legal counsel.
to copy domestic or foreign currencies or Works of
Precaution for Opening/Closing the Right Door
When opening or closing the Right Door,use
care not to touch the Image Transfer Roller,
as a malfunction could result.
Image Transfer Roller
1166O284AA
xvii
Product Features
Copy Functions
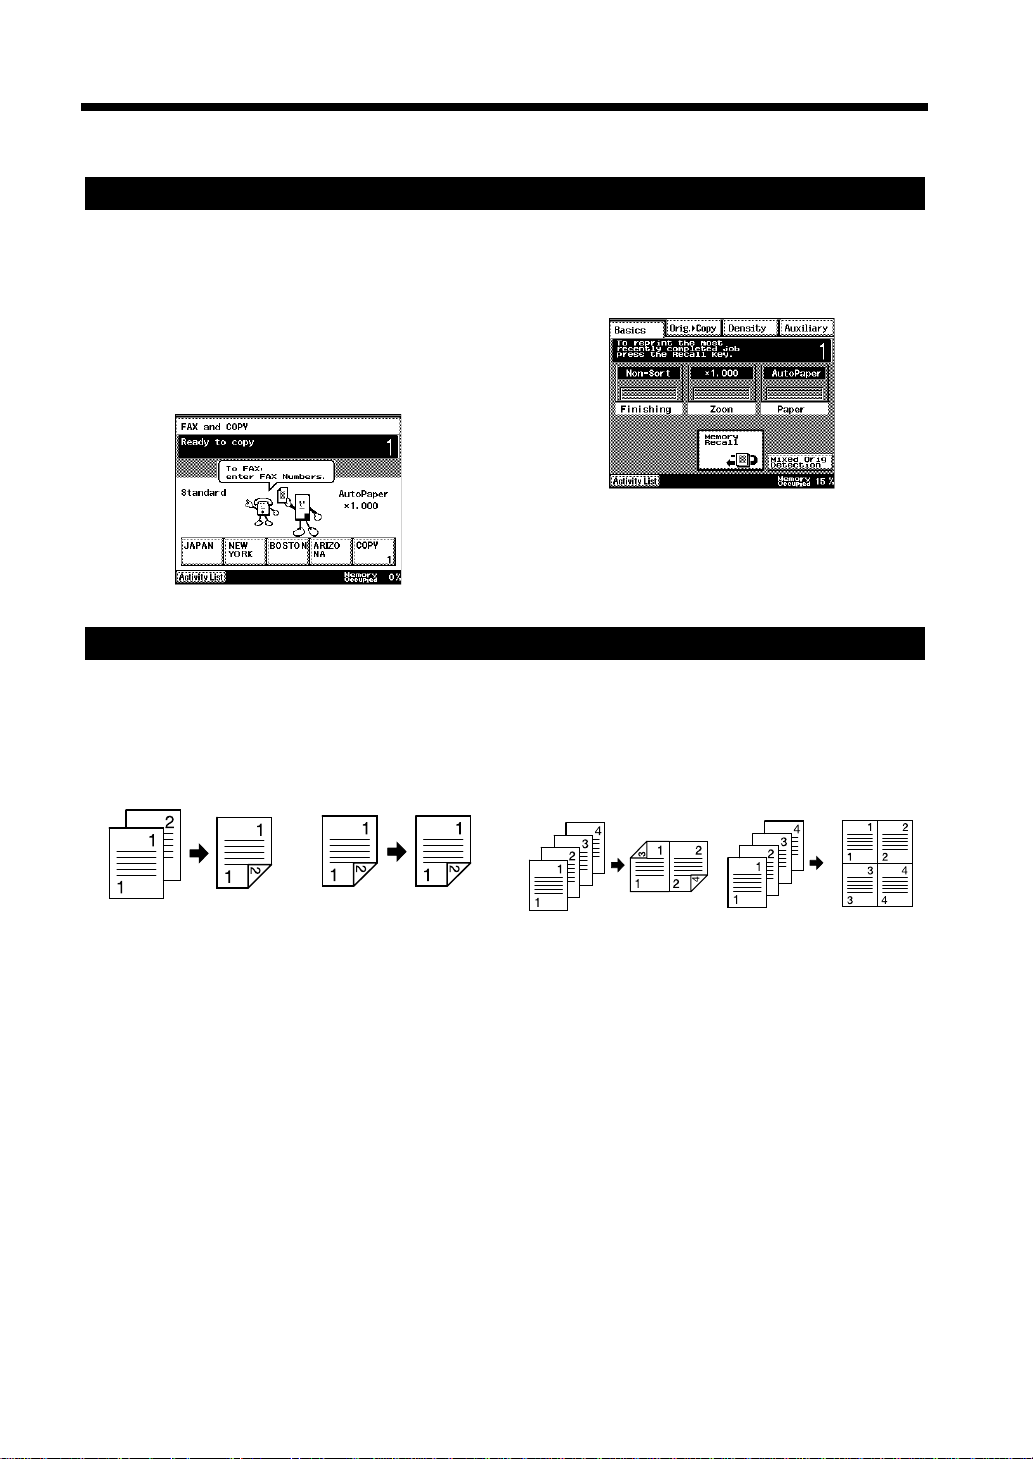
Easy copy operations
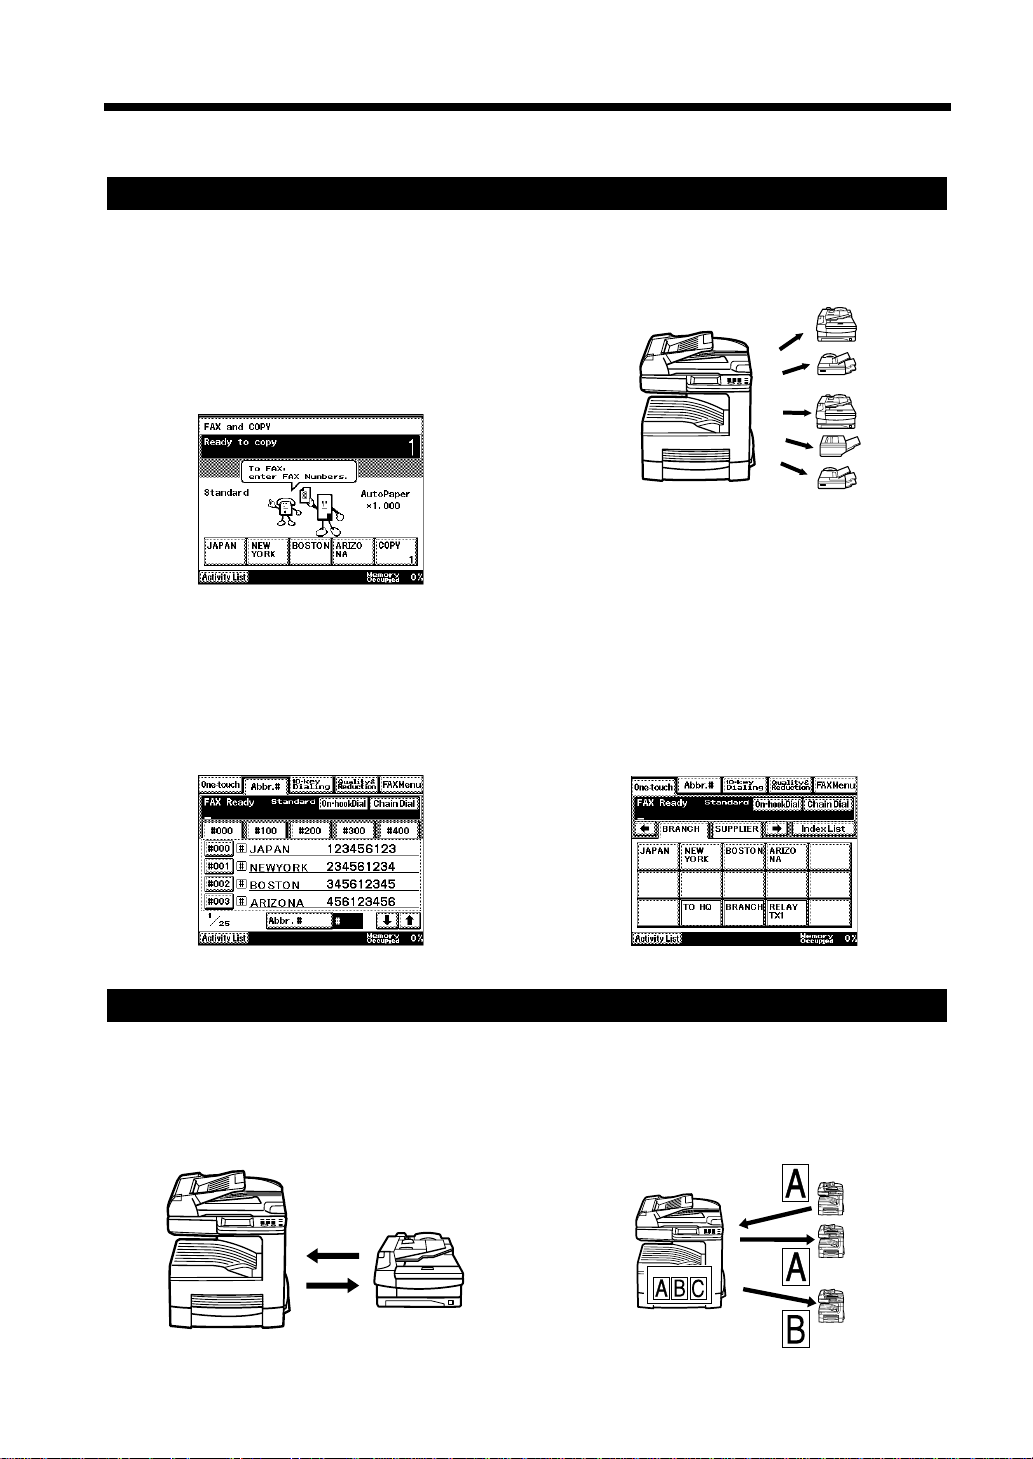
Auto-mode screen ☞p. 1-14
By inputting the number of pages to be copied or
the destination’s fax number, the unit will
automatically select the Copy or Fax mode.
Copying and sending a facsimile is possible
without switching between Copy and FAX menu
screens.
1171P001EB
Memory Recall ☞p. 2-2
The copy settings and the scanned image are saved
in the memory for repeated copying.
1171P002EA
Saving paper
2-Sided Copying ☞p. 4-10
2-Sided Copying can be made for 1-Sided, 2Sided, and booklet documents.
1-Sided
document
1166o050AA
2-Sided
document
1166o054AA
2-to-1 Copying ☞p. 4-11
4-to-1 Copying ☞p. 4-11
Multiple pages of a document can be copied onto a
single sheet of paper.
1-Sided
document
1166O052AB
1-Sided
document
1166O057AA
xviii
Product Features
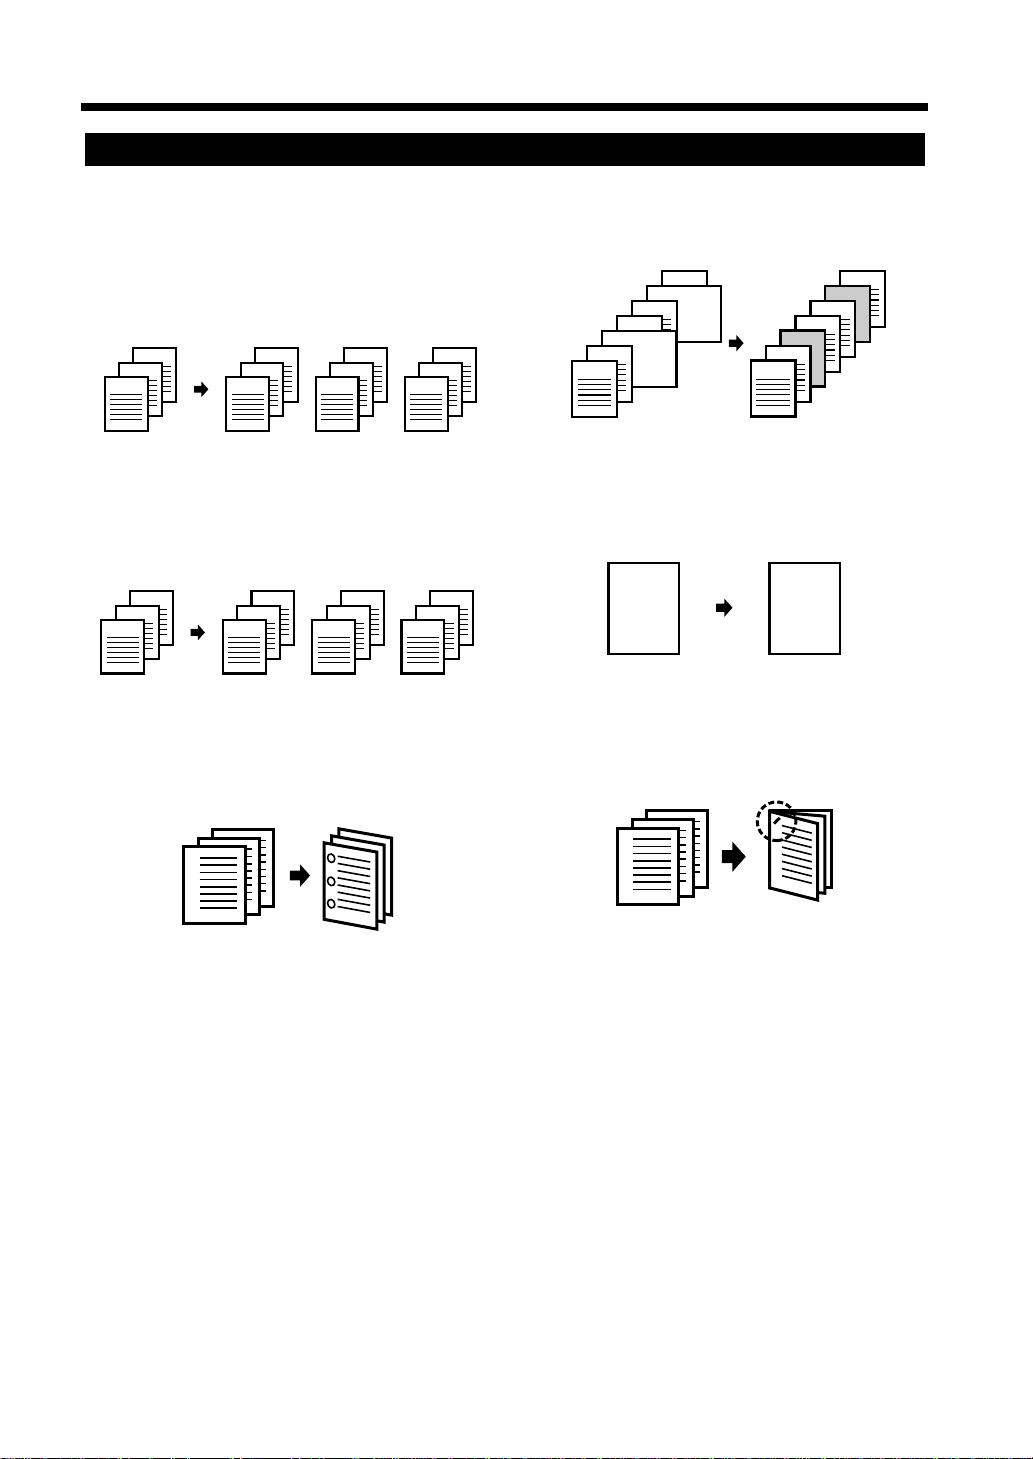
Other copying functions
Sort, Group ☞p. 4-2
This function is useful when making two or more
sets of copies. Each set can be printed out in the
order of the original document (sort), or the same
page can be printed out the required number of
times (group).
3
2
1
3
2
1
3
2
1
3
2
1
Page Insertion ☞p. 4-21
A different type of paper, such as colored paper,
can be inserted into the copy set.
5
4
3
3
2
1
2
1
5
4
3
1166O290AA
Distribution ☞p. 4-30
A reference number can be printed in the
background on each copy set.
3
2
1
1
001
3
2
1
002
3
2
1
003
1166O292AA
Hole Punching ☞p. 4-6
The copies that are s orted by the sort or group
function can be hole punched for filing.
1166O294AA
1166O291AA
Image Repeat ☞p. 4-28
The image of a document can be repeatedly copied
onto one sheet of copy paper.
3
2
A
AA
AA
1166O293AA
Stapling ☞p. 4-4
The copies that are sorted by the sort or group
function can be stapled.
1166O295AA
Fax Functions
Easy Fax operations
Auto-mode screen ☞p. 1-14
By inputting the number of pages to be copied or
the destination’s fax number, the unit will
automatically select the Copy or Fax mode.
Copying and sending a facsimile is possible
without switching between Copy and FAX menu
screens.
1171P001EB
xix
Product Features
Serial Broadcast Transmission ☞p. 5-6
Serial broadcast transmission allows you to send a
document to up to 210 recipients at the same time.
1166O296AB
One-Touch Dialing ☞p. 3-7
Abbreviated Dialing ☞p. 3-8
By registering a frequently used destination’s
number, it is possible to transmit a facsimile
successfully with an easy operation.
1171P003EA
Offering/Receiving Information service
Polling Transmission ☞p. 5-25
Polling Reception ☞p. 6-4
The recipient can operate the facsimile of the
sender to receive a document transmitted by the
sender.
Facsimile Program Dialing ☞p. 3-9
Various functions and destinations that are used
frequently can be registered in a facsimile program
key in advance. By just pressing these keys,
multiple functions can be set at the same time.
1171P004EA
Bulletin Board ☞p. 5-30
Retrieve ☞p. 6-5
Documents can be made available to anyone by
establishing a mailbox with a particular theme in
the facsimile.
Receiving
Calling
sender
1166O297AB
Bulletin Board
1166O298AB
xx
Product Features
Reducing Communication Cost
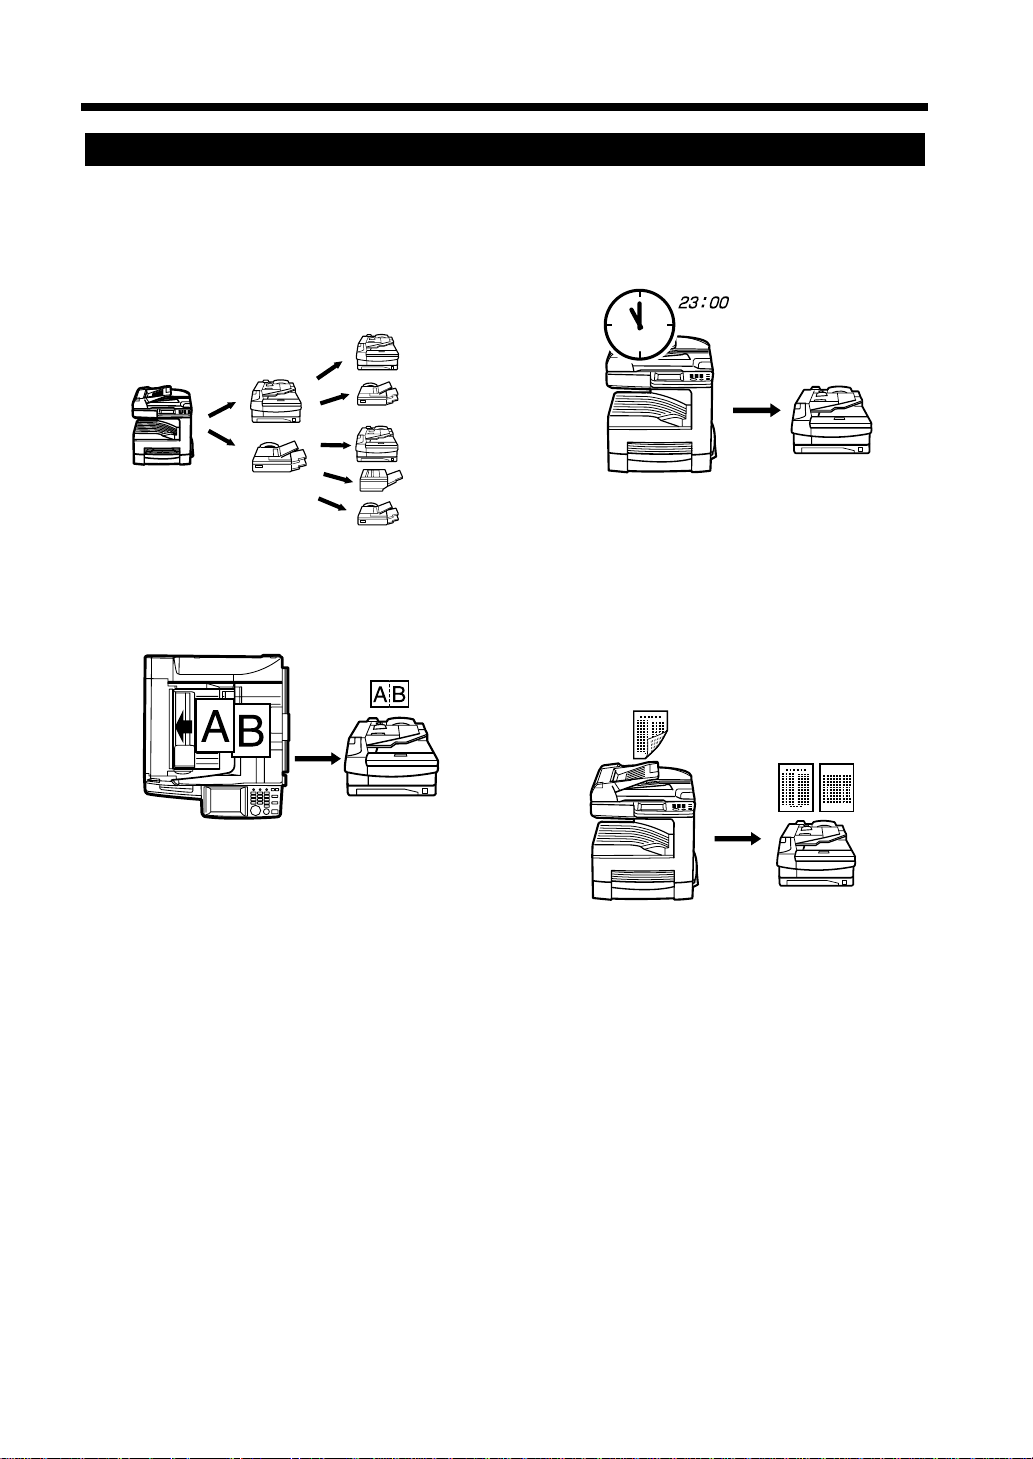
Relay Transmission ☞p. 5-9
Your facsimile (acting as the relay controller) can
send a document first to another facsimile (acting
as a relay station), which in turn sends the
document to the facsimiles of multiple recipients
(acting as receiving st ations).
Timer Transmission ☞p. 5-13
The timer transmission allows automatic
transmission by specifying a time late in the night
when the call charge is lower.
Originating
station
Relay
station
Receiving
station
1166O299AB
2-to-1 Transmission☞p. 5-14
Two pages of a document can be sent as one page.
1166O301AA
1166O300AB
2-Sided Transmission ☞p. 5-15
A 2-Sided document can be sent as is. It is not
necessary to transmit the document two times by
transmitting the front face and back face
separately.
1166O302AB

xxi
Terms and Definitions
Terms Definition
Automatic Document
Feeder
Auto-Redialing Automatically redials when the line is busy. When the other documents
Batch Transmission A mailing post to which recipients and time for transmission are
Booklet Document Bound documents such as books or catalogs. To transmit or copy these
Book Scanner Scans bound documents such as books or catalogs, etc.
Bulletin Board When a mail box is established in the memory and information is
Dialing with 10-Key Pad Input numbers directly by using the 10-Key Pad.
Automatically feeds and scans multiple pages of a document one by one
when placed on the feeder.
are saved in the memory, the next document is transmitted in order until
the redialing starts.
registered. When a mailing post is established in the memory by
registering recipients and time for transmission, a document can be sent
from the post at the registered time. The document can be transmitted to
the recipients at a time late in the night when the call charge is lower, or
transmitted to the overseas sales offices just-in-time.
By using this function the sender can save time and money for
transmission. This is because the sender does not have to do a setting
and resetting for every transmission when there are a number of
recipients. ☞p.11-12
documents, use the book scanner.
assigned, the information can be discl osed to anyone who wants to read
it. ☞p. 5-30, 6 -5, 11-22
F CODE F CODE provides a mailbox function using codes such as Sub-Address
(SUB), SelectivePolling (SEP), and Password (PWD) defined in the G3
standard of the International Telecommunications Union (ITU-T). F
CODE enables confidential transmission and bulletin board
communications between facsimiles that support F CODE.
G3 communications Communications in conformance with the G3 standard, an International
Standard for facsimile communications via an analog line (general
subscriber line).
G3 Multi-Port Allows simultaneous comunication (transmission and reception) on
both lines.
Example: Transmission/Transmission
Transmission/Reception
Reception/Reception
xxii
Terms and Definitions
Terms Definition
General subscriber line Analog telephone lines (Public network)
JBIG coding method New method of data compression/decompression standardized by the
Joint Bi-level Image Expert Working Group, a subcommittee of the
International Telecommunications Union (ITU-T). Effective for
transferring large and high resolution image data such as GSR.
Manual reception Receiving a document after talking on the telephone.
Manual transmission Transmitting a document after talking on the telephone.
Memory Stores fax and copy image data. By installing expanded memory, much
more image data can be stored in the memory.
Memory reception When the paper runs out during a facsimile reception, the data is
automatically stored in the memory, and printed out after print paper is
loaded.
Even if the paper runs out when a recipient is out or late in the night, the
facsimile receives a document successfully.
On-hook Dialing Dials without picking up a hand set. Touch to use this
On-hook Dial
function.
PBX PBX is an abbreviation of private branch exchange. Exchange
equipment is installed in a company or a plant to connect a number of
telephone sets with multiple station lines to enable telecommunications
between the telephone sets.
Push button signal A signal used on the telephone line. It is used when calling on the push
button line or using push button services. By touching , the
Tone
touch-tone (PB) line becomes available even if a dial phone line
(DP10pps, DP20pps) is connected.
Quick memory
transmission
Immediately transmits a document by quickly scanning and storing it in
the memory when transmission is possible. ☞p. 3-2
Super G3 High speed facsimile transmission mode via analog line recommended
by the International Telecommunications Union (ITU-T).
Using the V.34 facsimile modem and the JBIG coding method, it is
possible to transmit in 2 seconds or under 3 seconds. (When an A4 size
document on which approx. 700 characters are printed is transmitted in
the standard image quality, 3.85 line/mm.)

xxiii
Terms and Definitions

xxiv
Terms and Definitions

Chapter 1
1-1
Chapter 1Introduction
Introduction
1-2
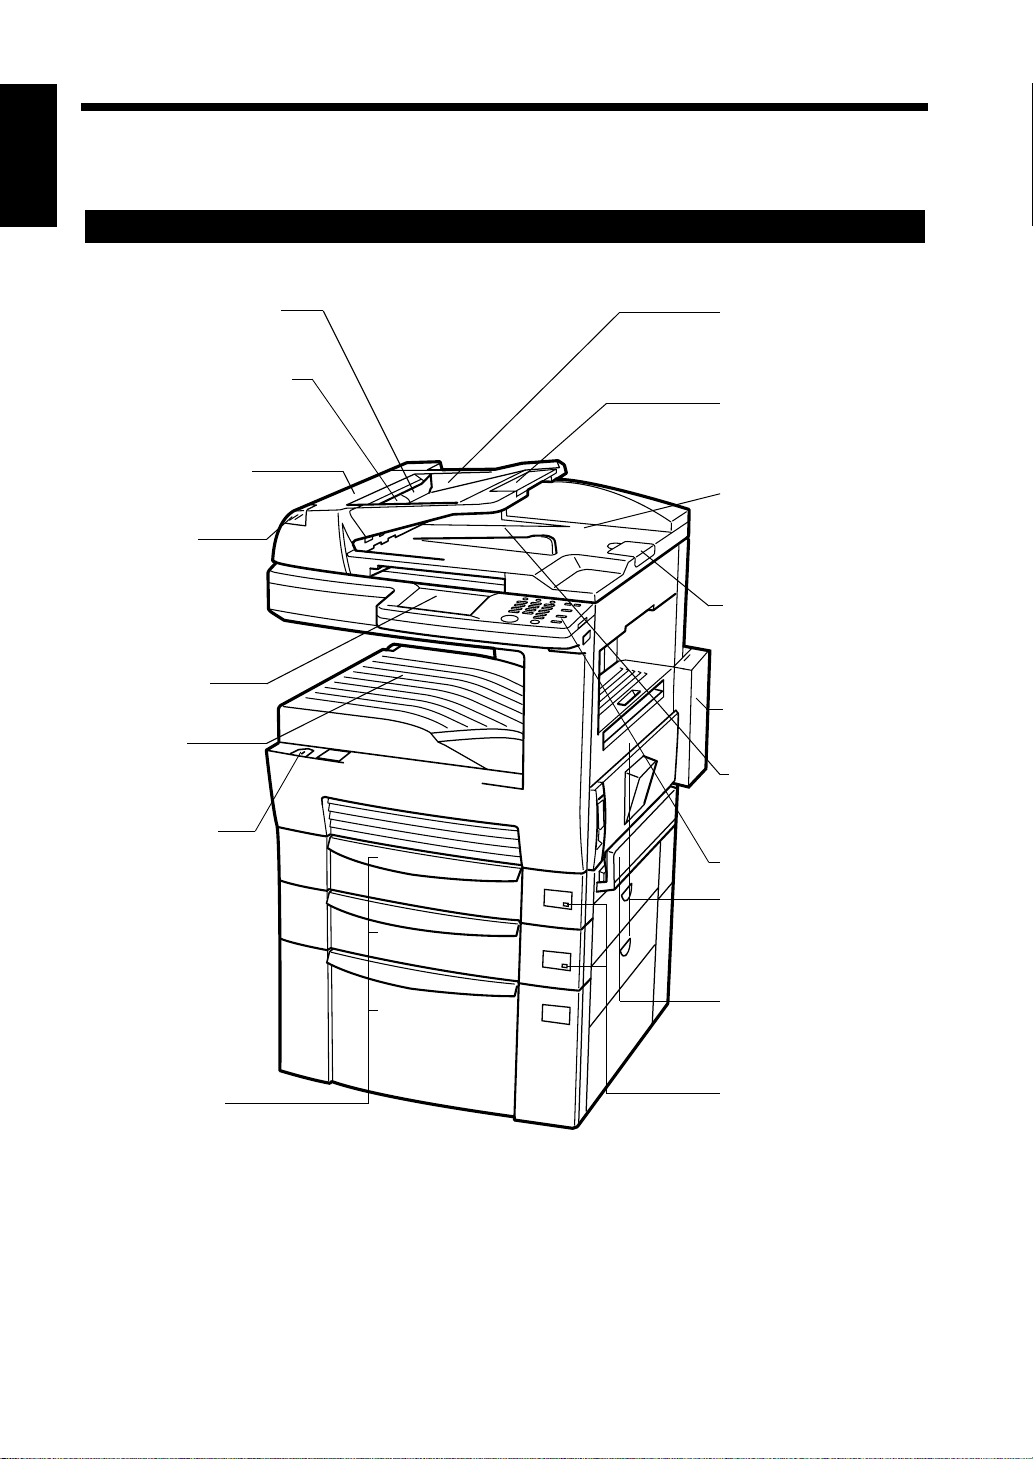
1. Names and Functi ons of Parts
This section providesthe names and explains the basic functions of various parts of the product.
For a description of the operation and touch panels, refer to “Using the Control Panel” ☞p.1-10 and
“Using the Touch Panel” ☞p.1-12.
Chapter 1
Overview
<Principal Parts>
Automatic Document
Feeder
Introduction
Document Guide Plate
Adjustable to the width
of the document
Document Feeder
Cover
Print Lamp
Green during
printing, red if
a print alarm is
generated.
Touch Panel
Exit Tray
Paper is fed out
here.
Power Switch
Document Feed Tray
To hold the document.
Removable.
Extension Guide
Can be pulled out for
large documents.
Document Cover
To be opened when
using the book scanner.
Stopper
Lift this up when
scanning large
documents.
Cover
(for Toner Bottle)
Document Exit Tray
Scanned documents
are fed out here.
Control Panel
Side Cover
Can be opened to
remove misfed paper.
Paper Drawer
Manual Bypass Tray
Can be opened for
manual paper feeding.
No Paper Lamp
Turns on when paper
runs out.
1166O303AB

1-3
1. Names and Functions of Parts
1166O304AA
Chapter 1Introduction
Brightnes s C ontrol
T o contr ol the contrast of the touch
panel.
Total Counter
Shows the total number of copies
made so far.
<When the Document Cover is Open>
Document Pad Document Cover
Document Scanning Area
Glass Surface
Book Scanner
With the document cover
opened, you can see the glass
surface on which a document
can be placed for
transmission or copying.
1166O305AB

1-4
1. Names and Functions of Parts
<Back View>
Chapter 1
• Standard Type
Introduction
TEL
LINE
Line Connector
(for common telephone line)
Connector for an
Extra Telephone set
• For Model Supporting G3 Multi-Port Model
LINE
PORT2
OPTION
Line port 2 connector
(for telephone line)
LINE
TEL
PORT1
Line port 1 connector
(for telephone line)
Connector for an Extra Telephone set
OPTION
Socket for Option
Interface
Before connecting an extra telephone set,
check the type of line to be met. Some types
of telephone sets may be unusable. For
details, contact your Pitney Bowes service
representative.
Power Inlet
1166O306AE
Ground Terminal

Detachment of the Document Feed Tray
• Swing upright before lifting up to remove the Document Feed Tray.
• Follow the same procedure in reverse to reattach.
1-5
1. Names and Functions of Parts
Chapter 1Introduction
1166O307AB

1-6
1. Names and Functions of Parts
DF260 and Options
Chapter 1
Introduction
Original Cover <Option>
Holds the original in position on the Original Glass.
AutomaticDocument Feeder 9606 <Option>
Performs automatic feeding of multiple originals.
1166O016AA
1166O007AA
1166O008AA
Finisher 9612 <Option>
Permits sorting, grouping, punching or sort-stapling of
copies.
Mailbin Finisher 9720 <Option>
In addition to the functions of the 9612, it can sort or
groupoutput into 5 bins. Bin assignment is available from
the PC.
ShiftTray(9613)<Option>
Performs sorting and grouping of copies.
Job Tray (9614) <Option>
Performs sorting and grouping of copies.
You can select the bins for output according to the
application in User’s Choice.
1166O120AA
1166O121AA
1166O011AA
1166O012AA

1166O015AA
1166O014AA
1166O009AA
1166O009AA
1. Names and Functions of Parts
Duplexing Document Feeder 9608 <Option>
In addition to the automatic feeding of multiple originals,
it can automatically turn over 2-sided originals for making
copies of both sides.
Duplex Unit 9628 <Option>
Automatically turns over 1-sided copies to make 2-sided
copies.
Paper Feed Unit 9632 <Option>
Holds up to 500 sheets of paper.
Paper Feed Unit 9635 <Option>
Holds up to 250 sheets of paper and easily adjusts to
different paper sizes.
1-7
Chapter 1Introduction
1166O190AA
1166O191AB
1166O010AA
Copy Table 9616 <Option>
Adjusts the height of the copier.
Copy Desk 9617 <Option>
Adjusts the height of the copier.
Large Capacity Cabinet 9638 <Option>
Holds up to 2,500 sheets of paper.
16MB Memory, 32MB Memory <Option>
Expands the memory capacity of the copier.
TX Marker <Option>
Select the TX Marker function to confirm t hat each page
of your document has b een successfully scanned.
Printer Controller 9681 <Option>
When installed on the machine, the machine can perform
as a printer.

1-8
1. Names and Functions of Parts
DF360 and Options
Chapter 1
Introduction
Original Cover <Option>
Holds the original in position on the Original Glass.
1166O206AA
1166O007AA
AutomaticDocument Feeder 9607 <Option>
Performs automatic feeding of multiple originals.
Finisher 9612 <Option>
Permits sorting, grouping, punching or sort-stapling of
copies.
Mailbin Finisher 9720 <Option>
In addition to the function of the 9612, it can sort or
groupoutput into 5 bins. Bin assignment is available from
the PC.
1166O008AA
1166O120AA
1166O121AA
Job Tray (9614) <Option>
Performs sorting and grouping of copies.
You can select the bins for output according to the
application in User’s Choice.
1166O012AA

1166O014AA
1166O009AA
1166O009AA
1. Names and Functions of Parts
Duplexing Document Feeder 9608 <Option>
In addition to the automatic feeding of multiple originals,
it can automatically turn over 2-sided originals for
making copies of both sides.
Paper Feed Unit 9632 <Option>
Holds up to 500 sheets of paper.
Paper Feed Unit 9635 <Option>
Holds up to 250 sheets of paper and easily adjusts to
different paper sizes.
1-9
Chapter 1Introduction
1166O190AA
1166O191AB
1166O010AA
Copy Table9616 <Option>
Adjusts the height of the copier.
Copy Desk 9617 <Option>
Adjusts the height of the copier.
Large Capacity Cabinet 9638 <Option>
Holds up to 2,500 sheets of paper.
16MB Memory, 32MB Memory <Option>
Expands the memory capacity of the copier.
TX Marker <Option>
Select the TX Marker function to confirm t hat each page
of your document has b een successfully scanned.
Printer Controller 9681 <Option>
When installed on the machine, the machine can perform
as a printer.

1-10
2. Using the Control Panel
Name and description of control panel components
The control panel is used to operate this product. See “Using the Touch Panel” ☞p.1-12.
Chapter 1
1 2 3 4 5 6
Introduction
Utility Mode Check Pause Fax
Copy
Access
7
Interrupt
8
9
Start
Stop
Panel Reset
10
1112
1166O339AB
1
Touch Panel
Shows various screen s a nd messages.
2
Utility Key
13
☞p.1-12
Press this key for registration and settings.
3
Mode Check Key
Press this key to confirm the setting status of each function.
4
Pause Key
Press this key for a preset pause of about three seconds when dialing. It is useful to provide dial
waiting periods, such as when accessing public lines from an extension line or receiving
information services. A pause may also be inserted when registering a telephone number in a onetouch key and abbreviated dialing.
5
Fax Key
Press this key to send a facsimile. When the lamp is lit, the facsimile function is available for use.
6
Copy Key
Press this key to copy. When the lamp is lit, the copy function is available for use.
7
Access Key
Press this key for the user management mode.
10-key Pad
8
Press these keys to enter a facsimile number, the number of copies, or any other figures to be
registered.
9
Interrupt Key
Press this key to interrupt a copy cycle. The lamp is lit during interruption.

2. Using the Control Panel
10
Panel Reset Key
Press this key to reset the touch panel settings.
11
Clear Key
If this key is pressed while the copy menu is displayed, the number of copies is reset to ’1’. If this
key is pressed while entering facsimile numbers or registering figures, it clears the details that have
been entered.
12
Stop Key
Press this key to stop operations, such as transmission or copying.
13
Start Key
Press this key to copy, or start transmission or reception after talking. Wh en the power is turned on ,
the lamp on this button is lit. Copy and transmission are available while the lamp is green. Copy and
transmission are unavailable if the lamp is orange. In this case, please wait until it changes to green.
1-11
Chapter 1Introduction

1-12
3. Using the Touch Panel
The touch panel is used to specify the functions of the co pier and facsimile, and is use d to register various
functions.
Examples of touch panel displays shown in this operator’s manual may differ from the actual panel
Chapter 1
display.
Name and function of touch panel components
Introduction
1171P009EA
•Keys / Tabs
Keys and tabs such as and are used to select operations. By touching
different keys and tabs you can select different copy and transmission/reception functions from menus
and register various information. There are two types of keys. One type of keys changes the screen
when touched. The other type of keys se lects a funct ion. In the l atter case, the key changes from nor mal
(dark letters on a white background) to highlighted (white letters on a dark background) when touched.
•Message
A message explaining an operational procedure, e.g. “Ready to copy”, is displayed.
• Status display zone
Displays icons to indicate the occupied volume of the memory and the equipment status.
• Alarm display zone
Displays icons to warn of a lack of pap er or a paper mi sfeed.
FAX Menu Orig. Copy
▼
Supplementary Function Keys
Message
Keys
Status and alarm display
Details of Main Screens
<User Selection>
1171P010EA
This screen is displayed to manage information on individual users (when the user management mode
has been set to ). Please select a user before starting operations.
Limited

1-13
3. Using the Touch Panel
<Utility>
1171P011EB
This screen is used to set various options and to output reports.
<Status Display>
1171P012EB
While the equipment is running, its operational status is indicated by icons at the bottom of th e touch
panel. The main icons that are shown during n ormal usage are descri bed below. For information about
icons other than these, refer to “If the Following Icons and Alarm Messages Are Displayed” on page 14-
2.
Icons
Meaning
Chapter 1Introduction
Dialing Now dialing
Dial Wait Waiting to re-dial
Copying Now copying
Scanning Now scanning a facsimile document
Receiving Now receiving a facsimile
Sending Now sending a facsimile
Automatically returning to initial screen
If a selected screen, such as a menu screen, is left open, the touch panel automatically retur ns to the initial
screen after a certain period of time has passed. “Settings for Saving Power”
☞p. 9-37
Either facsimile or copier screen can be set as the initial screen. “Setting the Initial Screen to be
Displayed”
☞p. 9-8
Automatic back light
The touch panel automatically turns off to save power if it has not been used for a while. If it turns off, it
will light if the panel or a key is touched. “Settings for Saving Power”
☞p. 9-37

1-14
4. Initial Screen
Auto-mode Screen, FAX Screen, and Copy Screen
The screen which is displayed when the equipment is ready to begin operations for copying, facsimile
Chapter 1
transmission and reception, and registration / setting is called the initial screen. The initial screen can be
selected from three types to suit the way you normally use the equipment.
Useful Tips
• The initial screen can be selected from thr ee types, namely , “Auto-mode scr een”, “FAX screen”, and
“Copy screen”, to suit the way you normally use the equipment. “Setting the Initial Screen to be
Introduction
Displayed”
• “Auto-mode screen” has been set at the factory.
☞ p.9-8
Auto-mode Screen
This screen can be used for both facsimiles and copying without specifying which function is used.
1171P001EB
Facsimile numbers registered for one-touch keys
1 to 4 and copy program 1 are displayed.
• When the 10-key Pad is used to enter a figure of four digits or more, or a figure starting with ’0’, and
then the Start key is pressed, the equipment automatically determines it to be a facsimile number and
starts transmission. When a three-digit number or less (other than numbers st arting with ’0’ ) is entered,
the equipment determines that to be the number of copies required and starts copying. (This describes
the DF360. For the DF260 it is “3 or more” and “2 or less” respectively.)
• When the Copy key on the control panel is pressed, the copy menu screen is displayed. To select the
copy function, please press the Copy key.
• When the Fax key on the control panel is pressed, the facsimile menu screen is displayed. To select the
facsimile function, please press the Fax key.
• When the Auto-mode screen has been selected as the priority screen, pressing the Panel Reset key twice
on the copy or facsimile menu screens will return to the Auto-mode screen.

Copy Screen
1-15
4. Initial Screen
This screen is used to select various copying functions. If this equipment is mainly used as a copier, this
screen can be set as the initial screen.
1171P009EA
When the Fax key on the control panel is pressed, the facsimile menu screen is displayed.
To select the facsimile function, please press the Fax key.
FAX Screen
This screen is used to select various facsimile functions. If the equipment is mainly used to send
facsimiles, it may be convenient to set this screen as the initial screen.
The facsimile number selection screen displayed first can be selected from , ,
10-key Dialing Index List One-touch
or screens. The screen is preselected when the equipment is
shipped. “Setting the Initial Destination Specification Screen to be Displayed”
<One-touch Screen>
This displays facsimile numbers that are set for one-touch dialing.
One-touch Abbr.#
☞p. 9-10
Chapter 1Introduction
1171P004EA
• There are 20 one-touch screens in total, and up to 300 numbers can be registered
(15 numbers per screen ´ 20).
• When the Copy key on the control panel is pressed, the copy menu screen is displayed. Press the Copy
key to select the copy function.
• When is touched, the abbreviated dialing screen is displayed.
• When is touched, the dial input screen is displayed.
• When is touched, the screen to set the Image Quality, Contrast, and Reduction
Abbr.#
10-key Dialing
Quality&Reduction
functions for facsimile transmissions is displayed.
• When is touched, the screen to set the various communication functions is displayed.
FAX Menu

1-16
4. Initial Screen
<Abbreviated Dialing Screen>
This screen displays the facsimile numbers that are set for abbreviated dialing.
Chapter 1
Introduction
1171P003EA
• Up to 500 numbers can be registered (including the 300 one-touch dial destinations).
• When the Copy key on the control panel is pressed, the copy menu screen is displayed. Press the Copy
key to select the copy function.
• When is touched, the One-touch screen is displayed.
• When is touched, t he dial input screen is disp layed.
• When is touched, the screen to set the Image Quality, Contrast, and Reduction
One-touch
10-key Dialing
Quality&Reduction
functions for facsimile transmissions is displayed.
• When is touched, the screen to set the various communication functions is displayed.
FAX Menu
<10-Key Dialing Screen>
Use this screen to enter a facsimile number by using the 10-key Pad.
1171P013EA
• When the Copy key is pressed on the control panel, the copy menu screen is d isplay ed. Press the C opy
key to select the copy function.
• When is touched, the One-touch screen is displayed.
• When is touched, the abbreviated dial screen is displayed.
• When is touched, the screen to set the Image Quality, Contrast, and Reduction
One-touch
Abbr.#
Quality&Reduction
functions for facsimile transmissions is displayed.
• When is touched, the screen to set the various communication functions is displayed.
FAX Menu

1-17
4. Initial Screen
<Index List Screen>
This screen displays an index list for classifying the one-touch keys.
1171P014EA
• There are 20 index keys in total, and up to 15 one-touch keys can be registered per index key.
• When the Copy key is pressed on the control panel, the copy menu screen is displayed. Press the Copy
key to select the copy function.
• When is touched, the One-touch screen is displayed.
• When is touched, the abbreviated dial screen is displayed.
• When is touched, the dial input screen is displayed.
• When is touched, the screen to set the Image Quality, Contrast, and Reduction
Enter
Abbr.#
10-key Dialing
Quality&Reduction
functions for facsimile transmissions is displayed.
Chapter 1Introduction

1-18
5. Users and User Management Mode
Different settings can be saved for each user of the equipment, and unauthorized use can be prevented
by pre-registering approved users.
• Those who are registered in the equipment are called ’users’. Users can use the mailbox or any other
Chapter 1
functions that have been specified for the user once they are registered. “F CODE”
• The usage status for each user can be confirmed. Unauthorized use of the equipment can be prevented
by registering a password for each user. “Registering Users”
Useful Tips
• Users are registered using the Administrator Maintenance Screen. “Registering Users”
Introduction
• Registered user data can be amended by the users. “Amending User Data” ☞p. 10-2
☞p. 9-18
When users are to be restricted
Please set up and operate as follows.
Registration / Settings Before Use Operation When Used
When users are restricted
by passwords
When users are not
restricted by passwords
User Manage-
ment Mode
Limited Required Yes Required Required
LimitedRequiredNoRequired
User
Registration
User
Registration
User Selection
☞p. 5-27
Operation
☞p. 9-18
Password
Input
Not
required
When users are not restricted
Please set up and operate as follows.
User Manage-
ment Mode
When used with common
settings
When users
are not
restricted
When used
with
individual
settings
by
passwords
When users
are
restricted
by
passwords
Open
Open Required No Required
Open Required Yes Required Required
Registration / Setting Before Use Operation When Used
User
Registration
Not
required
User
Registration
-
User Selection
Operation
Not
required
Password
Input
Not
required
Not
required

User Selection
1-19
5. Users and User Management Mode
Press the Access key.
1
Select user.
2
1171P015EB
Useful Tip
When specified by user number, touch
User Number
enter the user number.
Use the 10-key Pad to enter the (four-digit)
3
Access Number.
and use the 10-key Pad to
Press the Access key.
4
The initial screen is displayed.
NOTES
• When users are restricted, the Access key
must be pressed once the task is finished to
prevent unauthorized usage after completing
copying or tr ansmission.
• When the Access key is pressed, all settings
for copy and facsimile functions ar e r eset, and
the screen returns to the user selection screen.
Chapter 1Introduction
1171P016EA
NOTE
When no access number is regist ered, the in itial
screen is displayed instead.

1-20
6. Handling Documents
This section explains how to place a document for transmission or copying. A document can be inserted
in two different ways. Please read this before starting to transmit or copy a document. “Notes on
Handling Documents”
Chapter 1
Useful Tips
• The Automatic Document Feeder automatically feeds a document page by page for transmission or
copying.
• The Book Scanner is used when transmitting or copying documents that cannot be handled by the
Automatic Document Feeder, such as books or catalogues.
Introduction
Loading a Document in the Document Feeder
☞p.1-22
<Automatic Document Feeder>
Place the document to be transmitted or copied
face up.
Extension Guide
Stopper
1166O340AA
Place the document to be transmitted or copied
face up.
<Duplexing Document Feeder>
1166O341AA
1. Place the document with the side to be transmitted or copied facing up at the left of the Document
Feed Tray (right for the Duplexing Document Feeder). The documents will be sent in order from the
top of the pile.
2. Position the document firmly against the left in the document tray (right for the Duplexing Document
Feeder) and adjust the Document Guide Plate(s) to the width of the document. Pull out the Extension
Guide and lift the stopper for a large document.
3. Insert the document gently until it reaches the edge.
Loading a Document on the Book Scanner
Place the document in the top right-hand corner.
1166O342AA
1. Open the Document Cover and place the document with transmission or copying side facing down
and flush with the glass surface.
2. Position the document in the top right-hand corner of the glass surface.
3. For transmission, the document should be placed with its longer side against the back edge of the
glass surface. If placed with the shorter side against the back, the whole document may be reduced
when transmitted.
4. When under is used, adjust the center of the document to the
Book
Orig. Copy
▼
mark on the Book Scanner.
5. Close the Document Cover if possible, otherwise leave the Cover open.

6. Handling Documents
Placing a Document in the Single Feed Tray
• A document can be inserted into the automatic Duplexing Document Feeder one sheet at a time.
• The following functions cannot be used while the Single Feed Tray is in use:
2-Sided documents, 2-to-1 Document, Book, Sorting, Grouping, Stapl ing , Cover Sheet, Page Insertion,
Distribution, Copying with the Bypass Tray, Direction of Original, and Margin.
Place the document to be transmitted or copied face down.
1166O343AA
1. Open the Single Feed Tray.
2. Adjust the document guide to the width of the document.
3. Check that the lamp on the Start key is green.
4. Insert the document gently with the copying side facing down so that it is flush with the edge.
1-21
Chapter 1Introduction

1-22
7. Notes on Handling Documents
There are a number of points to note when handling documents.
Points to note when the documents are placed in the Document Feeder
Chapter 1
• Adjust the Document Guide Plates to the width of the document.
The document may be fed in askew if incorrectly adjusted.
• Remove any paper clips or staples from the documents.
• When the document is glued or tap e flags ar e attached, place th e document on the glass . Do not lo ad the
document in the document feeder. Glue or tape flags may cause misfeed or affect scanning Image
Quality when it remains on the scanning area.
Introduction
• Ensure that any correction fluid or ink has completely dried before inserting the document.
• If the Document Feed Cover is opened while using the Automatic Docum ent Feeder to transmit or copy,
the scanning operation will be suspended.
• Do not open the Document Feed Cover while scanning or copying.
• Ensure that no documents are left on the Book Scanner.
Documents must be removed, otherwise the scanner may not operate correctly.
Points to note when the documents are placed on the Book Scanner
• Ensure that any correction fluid or ink has completely dried before placing the document.
• When scanning a thick document, do not attempt to force the document cover closed. Excessive force
may cause damage.
• Ensure that no documents are left in the Automatic Document Feeder. If any documents are left in the
feeder, they must be removed.
• The size of a document may not be detected in the case of the types of document listed below. In this
case, select the size before use. For transmission, “Selecting the Area of the Document to be Scanned
and Transmitted”
- Dark documents.
- Transparencies, such as OHP Paper and tracing paper.
- Unusually shaped or long documents.
- Documents with raised (embossed) characters.
- Unusually shaped documents (those other than rectangular).
- Documents smaller than Letter (8-1/2" ´ 11") or Letter (11" ´ 8-1/2").
- Documents bigger than Ledger (11" ´ 17").
• When used with the Document Cover open.
• If the document paper is thin, marks on the Document Cover may be scanned. In this case, place a blank
sheet that is the same size as the document paper on top of the document.
• If the document is not a regular size (s uch as letter or legal), the copier selects the neares t regular size as
the document size.
• When placing a document on the g lass, open the do cument cov er to an angle o f at least 15º to ens ure the
document size is correctly detected. Failure to open the documen t cover by at least 15º may result in th e
document size not being detected correctly.
• Do not place anything heavier than 6.6lbs. on the glass surface.
• Do not press the document d own too hard when placing a book or simi lar docum ent on the gl ass, as this
may damage the equipment.
• A very bright light is emitted while scanning. Do not look directly at the glass surface while scanning.
☞p. 3-16. For copying, “Selecting the Copy Paper Size” ☞p. 2-5.

1-23
7. Notes on Handling Documents
Maximum and Minimum Document Sizes
• Document sizes from 5- 1/2" ´ 4" to 1 1-3/4" ´ 39 -1/4" c an be copi ed or t ransm itted using t he Aut omatic
Document Feeder. If a document is of an irregular size, the size limits that can be scanned are shown
below.
1/2"
4"
5-1/2"
39-1/4"
11-3/4"
Maximum
Minimum
1166O344AA
1/2"
1/2" 1/2"
1166O345AA
• It may not be possible to scan the outer 1/2" of a document.
• Any size of document up to Ledger (11" ´ 17") can be copied or transmitted using the Book Scanner.
Number of Concurrently Loadable Pages
Up to 70 pages of a document can be loaded in the Automatic Document Feeder at a time (or 50 pages
when the automatic Duplexing Document Feeder is used) . (Fine quality pape r is defined as that weighing
between 14lbs. and 22lbs. in the duodecimo system of measurement.)
When placing a document, make sure that the document does not exceed the
▼ mark.
Chapter 1Introduction
Transmitting Ledger size Documents
When a ledger sized document is transmitted, it will automatically be reduced according to the paper size
of the facsimile it is being sent to. To send ledger sized documents in their original size, select
nonreduced transmission. “Sending Documents in their Original Size Irrespective of the Recipient’s
Paper Size”
Destination
facsimile’ paper size
☞p. 3-14
Original paper size
Ledger (11" ´ 17") Legal
Ledger (11" ´ 17") Original size Original size
Legal Reduced to legal size Original size
Letter Reduced to letter size Reduced to letter size

1-24
7. Notes on Handling Doc uments
Handling Difficult Documents
<Using the Book Scanner or Document Carrier Sheet>
Chapter 1
The types of documents listed below may become jammed or result in a distorted image when
transmitted or copied using the automatic document feeder. The book scanner or the optional carrier sheet
should be used to handle these documents. It may be better to copy such documents prior to trans mission .
• Chemically processed or coated documents such as thermal paper and carbon-coated paper
• Torn, wrinkled or fol ded documents
• Documents coated on the front or back
Introduction
• Thin documents (11lbs. or less)
• Unusually shaped documents (those other than rectangular)
<Using the Book Scanner>
The book scanner must be used to copy or transmit the following types of documents.
• Bound documents such as books
• Thick paper documents (22lbs. or more)
• T aped or glued docu ments

8. Quitting an Operation
This section describes how to quit an operation.
1-25
Press the Stop keyation.
Press the Stop key to quit when setting functions
or registering information. When the equipment is
operating, the function that is currently being used
is displayed on the touch panel, so touch the key
for the function that you want to stop. After
selecting the operation that you want to stop, the
operation stops. If either the Stop key
or is pressed once again without
Cancel
selecting the function to be suspended, the
operation returns to the original status.
If the Stop key is pressed while copying, operation
is halted. When halted, copying can be resumed by
pressing the Start key.
Utility Mode Check Pause Fax
Start
Stop
Copy
Access
Interrupt
Panel Reset
1166O346AB
Touch Cancel
The registration or setting screen can be cancelled
by touching when is displayed
on either screen.
Cancel Cancel
1171P018EA
Chapter 1Introduction
1171P017EA
Press the Panel Reset key
When the Panel Reset key is pressed, all settings
for copy and facsimile functions are cleared.
Utility Mode Check Pause Fax
Start
Stop
Copy
Access
Interrupt
Panel Reset
1166O346AB

1-26
9. Interruption
Interrupt key
Copying or printing operations can be suspended to allow other documents to be copied or transmitted.
Chapter 1
NOTES
• Interruption is impossible while sca nning a document for facsimile transmission.
• When a facsimile is received while operation is interrupted, the received data is stored in the
memory without being printed.
Introduction
For instructions on how to print the data out, refer to “Confirming the Communications Status”
5-2.
• Sorting, grouping, stapling, and hole punching cannot be done when an operation is interrupted.
• The lamp on the Interrupt key is lit while an operation is being interrupted.
How to Interrupt an Operation.
Press the Interrupt key.
1
☞p.
Utility Mode Check Pause Fax
Start
Stop
Copy
Access
Interrupt
Panel Reset
1166O346AB
Useful Tip
To cancel the interruption, press the Interrupt
key once again.
Copy or transmit the document.
2
Useful Tips
• To copy a document press the Copy key.
“Copying a Document”
☞p. 2-2
• To send a facsimile press the Fax key.
“Sending a Document” ☞p. 3-2
Press the Interrupt key again.
3
The copier returns to pre-interruption status.
Useful Tip
The interrupted operation can be continued.

10. Confirming the Settings
Mode Check Key
1-27
The settings for communication or copying functions can be confirmed before transmission or copying.
Useful Tips
• The Mode Check key on the control panel is used to co nfirm the settings. The sc reens for confirming
settings are classified as follows:
FAX:
• Destination confirmation screen
The specified destination can be confirmed. The destination of the call or facsimile can also be
modified or added.
• Quality/Reduction confirmation screen
The settings for image quality, density, reduction, and scanning area can be confirmed. The settings
can also be amended.
• FAX Menu confirma tio n screen
The settings for facsimile functions that have been set in the FAX menu can be confirmed. The
settings can also be cancelled or reset.
Copying:
• Settings confirmation screen
The copy functions that have been set can be confirmed. The settings can also be cancelled or reset.
Functions that have been set can be registered in a copy program as well. “Registering Copy
Programs” ☞p. 11-25
Confirming the Settings of the Facsimile
Press the Mode Check key on the FAX
1
screen.
Utility Mode Check Pause Fax
Access
Interrupt
Confirm the settings.
2
Start
Stop
Panel Reset
<Check the Destination comfirmation
screen.>
• Touch to confirm the number.
Dest.
1171P019EA
Copy
1166O346AB
NOTE
When the Mode Check key is pressed, this
screen is displayed initially.
Useful Tips
• Description of the screen
: Indicates a numb er select ed by one-touch
dialing.
: Indicates a number entered using
abbreviated di al ing .
: Indicates a number entered using the 10-
key Pad.
• When multiple destinations are sel ected;
Up to four numbers can be displayed at a time.
If some numbers are not displayed, touch
¯
to check them.
• To add destinations
Touch to select numbers
Add Dest.
• To delete a destination
Select the key for the number to be deleted, and
touch .
Del.
• To confirm the communications mode, etc.
Select the key for the number to be confirmed,
and touch .
Detail
Chapter 1Introduction

1-28
10. Confirming the Settings
<Confirming settings on the
Quality/Reduction Confirmation Screen>
Chapter 1
• Touch to confirm
settings.
Quality/Reduction
Introduction
1171P020EA
Useful Tips
• Confirming settings
The current settings are displayed above each
key.
• To modify settings:
Touch the key for the function to be modified
and change the setting. See the explanations of
each function in this manual for instructions on
the settings.
<Confirming settings on the FAX menu
Confirmation Screen>
• Touch to confirm settings.
FAX Menu
1171P021EB
NOTE
The TSI is required on all facsimile
transmissions. It is unlawful to turn this feature
off. ☞p.ix
Useful Tips
• Confirming settings:
The key for a function that has been selected is
highlighted.
• To cancel settings:
Touch the key for the function to be canceled.
The appearance of the key returns to normal.
Touch .
3
Enter
The FAX screen returns.

Confirming Settings for Copying
1-29
10. Confirming the Settings
Press the Mode Check key on the Copy
1
screen.
Confirm settings.
2
1171P022EA
Useful Tip
To register a copy program:
Touch to register the
functions that have been selected in a copy
program. “Register i ng Copy Programs”
☞p. 11-25
3
Job Mem Input
Touch .
Exit
Chapter 1Introduction
The Copy screen returns.

1-30
10. Confirming the Settings
Chapter 1
Introduction

Chapter 2
2-1
Chapter 2Copying a Document
Copying a Document

2-2
1. Copying a Document
There are two ways to copy - one using the Document Feeder, and the other using the Book Scanner.
Multiple documents can be copied at a time when the Document Feeder is used. The Book Scanner is
used to copy documents that cannot be run through the Document Feeder, such as books and catalogues.
Chapter 2
1166O347AB
Auto-mode Screen:
• It is ready to copy whenever this screen is displayed.
• If a four digit (three-digits for the DF260) or longer number, or a number beginning with ’0’ (facsimile
number), is input, it automatically switches to facsimile transmission mode.
Copy Screen:
Copying a Document
• It is ready to copy whenever this screen is displayed.
FAX Screen:
• When this screen is displayed, press the Copy key to copy.
Memory Recall Function:
• This product first scans the documents and then stores them in the memo ry before s tarting to copy them.
The image data of the document stored in the memory can be saved after copying and copied
repeatedly. This function is called memory recall.
• Use of the Memory Recall function must be set in advance. “Settings for Copying”
☞p. 9-31
Copying with the Document Feeder
Load the document in the Automatic
1
Document Feeder.
“Handling Documents”
Press the Copy key.
2
Start
Utility Mode Check Pause Fax
Stop
☞p. 1-20
Copy
Access
Interrupt
Panel Reset
1166O346AB
Use the 10-key Pad to enter the desired
3
number of copies.
1171P009EA
Useful Tips
• To change the number of copies, press the
C
key.
• Up to 999 copies can be set for DF360. For
DF260, up to 99 copies can be set.

1. Copying a Document
Copying with the Book Scanner
2-3
Press the Start key.
4
Copying starts.
Useful Tips
• Press the Stop key to stop copying. Press the
Panel Reset key repeatedly to return to the
initial screen.
• If the Memory is full, retry the copying
function a short while later if the facsimile is
being used. If the paper has run out, restock
the paper drawer. “Loading Paper”
☞p. 13-2
Open the Document Cover and place the
1
document on the Glass Surface.
“Handling Documents”
Close the Document Cover.
2
Press the Copy key.
3
Utility Mode Check Pause Fax
Start
Use the 10-key Pad to enter the desired
4
number of copies.
☞p.1-20
Stop
Access
Interrupt
Panel Reset
Chapter 2Copying a Document
Copy
1166O346AB
1171P009EA
Useful Tips
• To change the number of copies, press the
C
key.
• Up to 999 copies can be set for DF360. For
DF260, up to 99 copies can be set.
Press the Start key.
5
Copying starts.
Useful Tip
Press the Stop key to stop copying. Press the
Panel Reset key repeatedly to return to the
initial screen.

2-4
1. Copying a Docu m e nt
Repeat Copying of the Same
Document (Memory Recall)
Touch .
1
Chapter 2
NOTES
Memory Recall
• is displayed only when
Copying a Document
the memory recall function is available.
• The memory recall function is not available in
the following cases.
–When the power is turned off
–When a new document is scanned
(when the Start key is pressed)
–When the Access key or the Interrupt key is
pressed
–When the Panel Reset key is pressed while
printing is suspended
Memory Recall
1171P002EA
–When the Auto-mode screen is used for
copying
Press the Start key.
2
1171P023EB
Copying s tarts.
NOTE
It is recommended that the Panel Reset key be
pressed to delete confidential document data
after copying.

2-5
2. Selecting the Copy Paper Size for Copying
Copy Paper Size
When two or more types of papers are loaded, the paper size can automatically be selected in accor -dance
with the document size. It can also be selected manually.
The copier automatically reduces or enlarges the copied image size in accordance with the copy paper
size if Auto Size is selected as the zoom ratio when printing on a different size paper to the original
document. “Selecting the Zoom Ratio for Copying”
☞p. 2-9
Automatic Paper Selection Function automatically selects the paper in accordance with the document
size, direction, and zoom ratio. The automatic paper selection function has been preset in the factory. It
can also be set to select a determined copy paper drawer as a priority. “Settings for Copying”
☞p. 9-31
If an irregularly sized document is set (any size other th an Letter or Leg al), the docu ment size may no t be
detected correctly, and may be copied on the wrong size paper or not at all. In this case, manually select
the copy paper drawer.
Useful Tips
• When the Automatic Document Feeder is used for copying, the copy size will be determined by the
first page of the document, and it will continue to copy on the same size paper as the first page for
the remainder. (This does not apply to the case when the ’Mixed Original Detection’ setting has been
selected.)
• When Letter size paper is selected for copying, even if the document and paper direction differ, the
direction of the p aper ca n autom aticall y be rotated by 90º for copying. (This function cannot be us ed
when the Book Scanner is used for copying after selecting the paper.)
Using the Paper Drawer
Load the document in the unit.
1
“Handling Documents”
Press the Copy key.
2
Utility Mode Check Pause Fax
☞p. 1-20
Copy
Select , and touch .
3
Basics Paper
Chapter 2Copying a Document
Access
Interrupt
Start
Stop
Panel Reset
1166O346AB
1171P009EA

2-6
2. Selecting the Copy Paper Size for Copying
Select the Paper Drawer.
4
Chapter 2
1171P024EA
When the automatic paper selection function has
been selected by touching the key,
Auto Paper
paper will automatically be selected in accordance
with the document size and zoom ratio.
Useful Tip
The paper size and direction are displayed on
the keys that show the paper drawers. Select the
Copying a Document
paper drawer in accordance with the document
size and direction.
1st Drawer
1
2nd Drawer
2
3rd Drawer Tray
3
Press the Start key.
5
4th Drawer
4
Manual Bypass
Copying s tarts.
Select , and touch .
3
Touch .
4
Basics Paper
1171P009EA
Bypass
1171P025EA
NOTES
• The screen of step 5 is shown if paper is
loaded onto the Manual Bypass Tray without
touching .
Bypass
• Only one set can be copied when using the
Manual Bypass Tray.
Copying with the Manual Bypass Tray
Load the document in the unit.
1
“Handling Documents”
Press the Copy key.
2
Start
Utility Mode Check Pause Fax
Stop
☞p. 1-20
Copy
Access
Interrupt
Panel Reset
1166O346AB
Select the paper size and type.
5
1171P026EA
<Regular Size (Letter or Legal sized)>
• Touch the paper size.
NOTE
Selection should be made in accordance with
the paper size and direction.

2-7
2. Selecting the Copy Paper Size for Copying
<Metric Size Paper>
•Touch .
• Select the paper size, and touch .
Metric
Enter
1171P027EA
NOTE
Selection should be made in accordance with
the paper size and direction.
<Irregular Size Paper>
•Touch .
• Touch or and enter a horizontal
Custom Size
▼ ▲
length (X) and vertical length (Y) and touch
Enter
.
<Copying on OHP film or Card>
•Touch .
• Select the paper type and touch .
OHP/Card
Enter
1171P029EA
NOTES
• OHP film or Card can be used for copying
when loaded in the 1st Drawer.
• The Card setting sh oul d be sel ected when
printing postcards or labels.
Touch .
6
Enter
Chapter 2Copying a Document
1171P028EA
Useful Tips
• To select , touch and to
X Y
move the cursor.
• Enter the sizes (i nch) after
touching or , lengths of
X Y
between 5-1/2” to 17” can be selected for
“X” and between 3-9/16 ” to 11-1 1/16” can be
selected for “Y”.

2-8
2. Selecting the Copy Paper Size for Copying
Special Paper Mode
Load a sheet of paper onto the Manual
7
Bypass Tray.
Chapter 2
• Open the Manual Bypass Tray.
• Place a sheet of paper on the tray.
• Adjust the guides to the paper width.
• Insert the paper until the paper hits the stop.
Copying a Document
NOTES
• Set the document with the side to be copied
face down.
• Set the document in accordance with the size
and direction of the selected paper.
• Load a single sheet of paper at once.
• Do not use wrinkled, folded, or damp paper
and paper that is already printed on one side
to avoid a paper misfeed.
• Try to insert the paper slightly deeper once
the paper hits the stop.
• If a large sheet of paper is used, support the
loose end by hand so that it does not bend
down.
• When a postcard or thick paper is used,
straighten out the shape before inserting.
• When thick paper, OHP film, postcards, or
labels are used for copying, do not select any
of the 2-Sided copying, Booklet, Stapling, or
Hole punching functions.
Copying s tarts.
Useful Tip
To copy two or more sheets, consecutive
copying is possible by setting the appropriate
amount of paper on the Manual Bypass Tray.
1166O348AA
When , or is displayed on the
paper size selection key, the special paper mode is
set for the paper drawer.
“Settings for Printing”
There are three types of special paper modes as
follows.
If this mode has been set, the paper drawer in
which recycled paper has been loaded is not
selected when the automatic paper selection
function is selected. For example, if both normal
and recycled paper are loaded in separate paper
drawers and the normal paper is mainly used, the
normal paper is selected in priority when copying
by setting this mode for recycled paper.
2-Sided copying is impossible by setting this
mode.
If this mode has been set, the paper is not selected
automatically. Erroneous usage of colored paper
that is intended for use as cover sheets or
separators can be avoided by setting this mode.
S
: Recycled paper
S
: 2-Sided copying is impossible
2
: Special paper
Useful Tips
• When the Special Paper Mode is set,
installing the same size paper in two drawers
or more allows the copier to automatically
switch between paper drawers to continue
copying if paper in the first drawer runs out
during copying.
• The paper size selection is reset by touching
the Panel Reset key or will be reset once the
Auto-Reset period has expired. “Settings for
Saving Power”
Copying” ☞p. 9-31
2
☞p. 9-35
1171P030EA
☞p. 9-37 “Settings for

2-9
3. Selecting the Zoom Ratio for Copying
Zoom
The copier can reduce or enlarge the size of copies. The zoom ratio can be set automatically in
accordance with the copy paper size to be copied, or can be set at any size.
1166O349AB
The zoom ratio can be selected in the following ways.
• Full-Size : The document is copied in the same size as the original regardless
of the copy paper size.
• Auto-Size : The optimal zoom ratio is automatically selected in accordance
with the size of the document that has been set and the selected
paper.
• Fixed Zoom (Letter, Legal, etc.) : Zoom ratios for copying regular-size documents onto regular-size
copy paper have already been set in touch panel keys.
• Zoom Up/Zoom Down : The desired zoom ratio can be set in increments of 0.1%.
• Slightly Smaller Image : The document can be copied at a slightly smaller size than the
original by simply touching the key. This is useful
when copying documents with writing at the very edge of the
paper. The zoom ratio can also be changed.
• Custom Zoom : The desired zoom ratio can be set using the 10-key Pad.
• X/Y Zoom : These zoom ratios can be set for the document length and width
when copying.
• Zoom Memory Input : Up to two most-frequently-used zoom ratios can be registered.
Minimal
Chapter 2Copying a Document
Selecting the Zoom
Load the document in the unit.
1
“Handling Documents”
Press the Copy key.
2
Utility Mode Check Pause Fax
Start
Stop
☞p. 1-20
Copy
Access
Interrupt
Panel Reset
1166O346AB
Select , and touch .
3
Select the zoom ratio.
4
Basics Zoom
1171P009EA
1171P031EB

2-10
3. Selecting the Zoom Ratio for Copying
<Setting the Full-Size>
•Touch .
Full-Size
<Setting the Automatic Zoom Ratio>
•Touch .
Auto Size
NOTE
Irregular size documents (any size other than
Letter or Legal) may be copied with an
Chapter 2
inappropriate zoom ratio. In this case, the
appropriate zoom ratio should be selected
manually.
<Setting the Fixed Zoom Ratio>
• Select either an enlargement or a reduction
key for the desired zoom ratio.
Copying a Document
NOTE
Select the key in accordance w ith the d ocument
and copy paper sizes.
<Using the Zoom Up/Zoom Down key>
• Use or to select the zoom ratio.
▼ ▲
<Slightly Smal ler Image Copies>
•Touch .
Minimal
1171P032EA
Useful Tips
• The zoom ratio for slightly reduced copies can
be changed. “Registering the Zoom ratio”
☞p. 2-11
• The factory setting is 93%.
<Custom Zoom Ratio>
•Touch .
Custom Zoom
• Use the 10-key Pad to enter the zoom ratio
and touch .
Enter
Useful Tips
• Every time is touched, the zoom ratio
▼
decreases by 0.001 (0.1%).
• Every time is touched, the zoom ratio
▲
increases by 0.001 (0.1%).
• The zoom ratio can be changed more quickly
by holding down the key.
1171P033EA
Useful Tips
• Figures ranging from 0.250 (25%) to 4.000
(400%) can be selected as the zoom ratio. For
example, for 0.645 (64.5%), press <0>, <6>,
<4> and <5> in that order on the 10-key
Pad.
• Press the key to clear the figure.
C

2-11
3. Selecting the Zoom Ratio for Copying
<Setting the X/Y Zoom>
•Touch .
•Touch .
Custom Zoom
X/Y Zoom
1171P034EA
• Use the 10-key Pad to enter the zoom ratio
for width and length , and
touch .
X Y
Enter
1171P035EA
• Use the 10-key Pad to enter the zoom ratio
before selecting , , or ,
and touch .
1 2 Minimal
Enter
1171P037EA
Useful Tips
• When touching , , or
1 2 Minimal
after entering the zoom ratio, the zoom ratio
is registered on the selected key.
• Figures ranging from 0.250 (25%) to 4.000
(400%) can be selected as the zoom ratio for
1 2
or , and figures ranging from 0.900
(90%) to 0.999 (99.9%) for . For
Minimal
example, for 0.645 (64. 5%), press <0>, <6>,
<4> and <5> in that order on the 10-key
Pad.
• Press the key to clear the figures.
C
Chapter 2Copying a Document
Useful Tips
• Enter figures after touching or .
X Y
• Figures ra ngi ng from 0.250 (25%) to 1.000
(100%) can be selected a s the zoom rat io. For
example, for 0.645 (64.5%), press <0>, <6>,
<4> and <5> in that order on the 10-key
Pad.
• Press the key to clear the figures.
C
<Registering the Zoom ratio>
•Touch .
•Touch .
Custom Zoom
Zoom Mem Input
1171P036EA
<Using the Registered Zoom ratio for
Copying>
•Touch .
• Select or and touch .
Custom Zoom
1 2
Enter
1171P038EA
Useful Tip
The zoom ratio that has been r egister ed in
2
or is set.
Press the Start key.
5
Copying starts.
1

2-12
3. Selecting the Zoom Ratio for Copying
Useful Tip
The zoom ratio selection is r eset by pr essi ng the
Panel Reset key or will be reset after the AutoReset period has expired.
“Settings for Saving Power”
☞p. 9-37
“Settings for Copying” ☞p. 9-31
Chapter 2
Copying a Document

2-13
4. Adjusting the Den sity for Copying
Density
The density can be adjusted to suit the darkness of the text and the background of the document being
copied. For example, if the document is printed on dark colored paper, adjust the density so that the text
is clearly printed.
Density can be adjusted in the following ways. The document is copied in the same size as the original
regardless of the copy paper size.
• Automatic density: Determines the density of the document, and automatically selects
the optimal density for printing.
• Manual density: If the desired density is not realized by the automatic density
function, the density can be manually set at a 9 different levels.
Ajusting the Density
Load the document in the unit.
1
“Handling Documents”
Press the Copy key.
2
Utility Mode Check Pause Fax
Start
Density
Touch .
3
Stop
☞p.1-20
Copy
Access
Interrupt
Panel Reset
1166O346AB
Touch , , or to
4
select the density.
NOTE
When is selected for the image quality,
the automatic density function cannot be used.
Touch or to adjust the
density manually.
Auto Lighter Darker
1171P039EB
Photo
Lighter Darker
Chapter 2Copying a Document
1171P009EA
Useful Tips
Auto
• is highlighted when selected.
• Every time is touched, the printing
is lightened, whereas touching
Lighter
Darker
darkens it.
Press the Start key.
5
Copying starts.

2-14
4. Adjusting the Density for Copying
Useful Tips
• Select as follows in accordance with the
document type:
Density Document Type
Chapter 2
Lighter
▲
Normal
▼
Darker
Darker document (such as a
newspaper or blueprint)
▲
Normal
▼
Text is light or printed in
color
• The density selection is reset by pressing the
Panel Reset key or will be reset after the AutoReset period has expir ed . “Settings f or Saving
Power”
Copying a Document
☞p. 9-31
☞p. 9-37 “Settings for Copying”

2-15
5. Copying Figures and Photos
Image Quality
Documents to be copied may include text, drawings and/or photographs. The copier allows you to select
an appropriate Image Quality function for clear copying.
1166O350AC
Select the Image Quality function in accordance with the document type by touching the following keys.
• Text: To be selected when copying documents mainly consisting of text.
• Photo: To be selected when copying documents with photos, or lighter and
darker parts.
• Text+Photo: To be selected when copying docu ments with rough ly equal portions
of text and photos.
Chapter 2Copying a Document
Setting the Image Quality
Load the document in the unit.
1
“Handling Documents”
Press the Copy key.
2
Start
Density
Touch .
3
Utility Mode Check Pause Fax
☞p.1-20
Stop
Copy
Access
Interrupt
Panel Reset
1171P009EA
1166O346EB
Select the desired image quality from
4
Text Photo Text+Photo
,, and .
1171P040EB
NOTE
Photo
When is selected, the automatic
density function cannot be used.
Press the Start key.
5
Copying starts.
Useful Tip
The image quality selectio n i s reset by press ing
the Panel Reset key or will be reset after the
Auto-Reset period has expired.
“Settings for Saving Power”
☞p. 9-37
“Settings for Copying” ☞p. 9-31

2-16
5. Copying Figures an d Photo s
Chapter 2
Copying a Document

Chapter 3
3-1
Chapter 3
Sending and Receiving Documents
Sending and Receiving Documents

3-2
1. Sending a Document
Quick Memory Transmission
The Quick Memory Transmission sends a document by quickly scanning and storing it in memory. You
can start to send the next document even while the previous document is being sent. The scanned
documents can be retrieved immediately, so there is no need to wait for them to be transmitted.
Chapter 3
1166O351AB
Useful Tips
• The type of telephone line may need to be set in accordance with the type being used.
“Setting the Line Type” ☞p. 9-6
• Using the Auto-mode Screen:
Transmission is possible from this screen just by entering a number with four digits or more for
DF360 and three digits for DF260, or a number starting with "0" (facsimile numbers).
• Using the FAXScreen:
Transmission is possible directly from this screen.
• Using the Copy Screen:
Sending and Receiving Documents
Press the Fax key beforetransmission.
Using the Automatic Document Feeder
Load the document in the unit.
1
“Handing Documents” ☞p.1-20
Press the Fax key.
2
Utility Mode Check Pause Fax
Start
Stop
Copy
Access
Interrupt
Panel Reset
1166O346AB
Touch .
3
10-key Dialing
1171P004EA

Use the 10-key Pad to enter the facsimile
4
number of the destination.
1171P041EA
Useful Tip
If a wrong number has been entered, press the
C
5
key and re-enter from the beginning.
Press the Start key.
Transmission starts.
1. Sending a Document
Using the Book Scanner
Open the Document Cover to place the
1
document on the Glass Surface.
“Handling Documents” ☞ p.1-20
Close the Document Cover.
2
Press the Fax key.
3
Utility Mode Check Pause Fax
Interrupt
4
Touch
Start
10-key Dialing
Stop
Panel Reset
.
3-3
Copy
Access
Chapter 3
1166O346AB
Useful Tips
• To quit transmission, press the Stop key and
select the action to be suspended.
“Quitting an Operation” ☞p. 1-25
• When the memory is full, re-try transmission
after waiting for a while.
1171P004EB
Use the 10-key Pad to enter the facsimile
5
number of the destination.
1171P041EA
Useful Tip
If a wrong number has been entered, press
C
the key and re-enter from the beginning.
Sending and Receiving Documents

3-4
1. Sending a Document
Press the Start key.
6
Useful Tip
When the memory is full, re-try transmission
after waiting for a while.
Chapter 3
Touch after scanning all
7
documents to be sent.
Scan End
1171P042EA
Press the Start key.
8
1171P044EA
Transmission starts.
Useful Tip
To suspend transmission, press the Stop key, and
select the action to be suspended.
“Quitting an Operation” ☞p. 1-25
Useful Tip
When scanning multiple documents, place the
Sending and Receiving Documents
next document on the Glass Surface and press
the Start key while the screen indicates
RestartScan
to continue scanning.
1171P043EA

3-5
1. Sending a Document
Calling the destination and transmitting the document
• Using the Automatic Document Feeder:
When this machine is not transmitting or receiving any documents other than yours, it starts to call the
destination as soon as the first page of the document has been scanned, and begins transmission. If this
machine is transmitting or receiving another document, it scans all of your documents, and only calls
the recipient's number after the preceding transmission o r reception has finished, t o transmit your
document.
• Using the Book Scanner:
Press the Start key after scanning all the pages of the document. This machine will start to call the
destination's number and transmit your document.
• Up to 64 documents can be stored in the memory. If 64 documents have already been stored or the
memory is full, no more documents can stored.
How to select the communications mode (Only for products supporting the G3 Multi-Port model.)
Chapter 3
1171P405EA
1171P402EA
• Select a communication mode as follows. When a key is highlighted, the mode is enabled.
G3-1 When sending to a G3 facsimile using a telephone line via Port 1.
G3-2 When sending to a G3 facsimile using a telephone line via Port 2.
• Communications mode returns to the original setting after each transmission. “Setting for
Transmission” ☞ p. 9-22
To Confirm the Destination
• While transmitting a document or a line is busy, you can confirm whether the destination's number is
correct. “Confirming the Settings” ☞ p.1-27
When the Memory is full
• When a large number of documents are stored in the memory (when the occupied volume of the
memory is nearly 100%), transmission may become impossible. In this case, wait until memory
becomes available.
• If a document could not be transmitted, the document is stored in the memory for retransmission.
It can be erased to free up memory. “Confirming the Settings” ☞ p.1-27
Sending and Receiving Documents

3-6
1. Sending a Document
Using Direct Dialing to communicate with Overseas Destinations
• If the country code and destination's number are entered after the international code, you may hear a
busy tone during dialing and transmission may not be possible. In this case, to insert a six-second pause,
press the Pause key twice after entering the international code, and enter the rest of the number.
“Sending a Document after Talking on the Telephone” ☞ p. 5-8
F Code Communication
• Communication using F CODE is possible.
“F CODE” ☞ p. 5-27
If Transmission is Unsuccessful
• A non-transmission report is printed whenever a document cannot be transmitted due to the recipient's
facsimile being busy or other factors. Non-transmission reports contain part of the first page of the
document that could not be sent. However, this may not apply to unsaved transmissions. If nontransmission reports are not required, change the s etting.
Chapter 3
“Settings for Report Printing” ☞ p. 9-29
TSI
Sending and Receiving Documents
The following document has not been transmitted. Try to retransmit.
USER NAME :SALES
DESTINATION :NEW YORK
DEST. TEL# :123451234
F CODE :12345
PAGES :0 sheets
RESULT :BUSY
IMAGE
Result Details of Communications Status
E
Destination is engaged.
BUSY
E
The line is busy.
E
The destination is unable to receive.
NO ANS
E
The destination does not answer the telephone.
E
Communications are suspended.
INTERR
E
The memory is full.
F.MEM
E
Communications with all destinations were unsuccessful.
NG
(THU) JUL 15 1999 11:32
CHICAGO
DOCUMENT# :5114316-761
TIME STORED :11:10, 7/15
TIME SENT :11:10, 7/15
DURATION :
MODE :
P.1
1166O352CC
Data and time of
printing the report
Transmission details
• If a document could not be transmitted, it can be re-send. To re-send, touch and then
touch to identify the document that could not be sent.
• If either the key or key is displayed on the touch panel, re-transmission is
TX
Re-TX Dest. chng
Activity List
possible without resetting the document. Transmission to the same recipient is possible by pressing
Re-TX Dest. chng
. When is pressed, the recipient can be changed for re-transmission.

2. Using One-Touch Dialing for Transmission
One-Touch Dialing
If the destination's number is registered in advance, the desired number can be selected by just pressing
the appropriate One-Touch key.
Useful Tips
• The destination's number must be registered as a One-touch key in advance.
There are 20 screens for One-touch dialing, and up to 300 numbers can be registered (15 numbers
per screen
• If One-touch keys are categorized into branch offices or clients, or by region such as U.S.A. and
Japan, for example, it is easier t o find the desired one-touch key by using the index keys.
“Registering an Index for One-Touch Keys” ☞p. 11-11
´ 20 screens). “Registering a Number for One-Touch Key” ☞p. 11-2
3-7
UsingOne-TouchKeyfor
Transmission
Load the document in the unit.
1
“Handling Documents” ☞p.1-20
Press the Fax key.
2
.
Utility Mode Check Pause Fax
Start
Touch the One-touch key for the desired
3
destination.
Stop
Copy
Access
Interrupt
Panel Reset
1166O346AB
Useful Tips
• To select multiple destinations, touch all the
desired destination keys. The keys of the
selected destinations are highlighted.
• To correct an entry, an entry can be cancelled
by touching the same key again. Then touch
the correct destination key.
Press the Start key.
4
Touch after confirming the
5
destination and the document number, etc.
Enter
1171P045EA
Transmission starts.
Chapter 3
Sending and Receiving Documents
1171P004EA
Useful Tip
How to use the index: the first index screen is
automatically displayed. Touch the index tabs,
¬ ® Index List
,or tofindthedesired
one-touch key.
NOTE
The screen automatically returns to the original
screen even if you don’t touch .
Enter

3-8
3. Using Abbreviated Dialing for Transmission
Abbreviated Dialing
Transmission is possible by selecting a destination using Abbreviated Dialing.
It is easier to find the destination's number if the abbreviated dialing numbers are categorized, such as
usingnumbersfrom100to199forclientsand200to299forbranchoffices,whenregisteringnumbersin
One-touch Dialing or Abbreviated Dialing.
Useful Tip
The destination's number must be registered as a One-touch or AbbreviatedDialing number in advance.
Up to 500 numbers can be registered (including the 300 numbers for One-touch Dialing). “Registering
a Number for One-Touch Key” ☞p. 11-2
“Registering a Number for Abbreviated Dialing” ☞p. 11-7
Using Abbreviated Dialing for
Chapter 3
transmission
Load the document in the unit.
1
“Handling Documents” ☞p.1-20
Press the Fax key.
2
Utility Mode Check Pause Fax
Copy
Use the 10-key Pad to enter the three-digit
4
Abbreviated Dialing number.
Sending and Receiving Documents
3
Start
Touch .
Abbr.#
Access
Interrupt
Stop
Panel Reset
1171P046EA
Useful Tip
1166O346AB
#000 #400
Use to and to find the
¯
desired number, and then touch the key for the
selected recipient.The 10-keyPadcan be used to
enter abbreviated dialing numbers (000 to 499)
after touching on the 10-key Dialing Screen.
Press the Start key.
5
#
Transmission starts.
1171P004EA

3-9
4. Using Facsimile Program Dialing for Transmission
Facsimile Program Dial ing
If the various functions that can be used for communications (such as Image Quality settings and 2-to-1
Transmission) are registered as a facsimile program key in advance, just touching these keys will start
transmission without having to select the communications functions each time. It is easy to set up a
multiple transmission by registering multiple recipients in a single facsimile program key, and to set up a
transmission to be sent at the same time every day by registering the transmission time.
Useful Tip
Destination numbers and communications function must be registered as Facsimile Program keys in
advance. U p to 30 numbers can be registered as program keys. However, the total registered number of
Facsimile Program keys and One-touch keys cannot exceed 300.
“Registering Communication Conditions in Facsimile Program Keys” ☞p. 11-12
Using a Facsimile Program for
Transmission
Load the document in the unit.
1
“Handling Documents” ☞p.1-20
Press the Fax key.
2
Utility Mode Check Pause Fax
Start
Touch the Facsimile Program key to be used.
3
Stop
Copy
Access
Interrupt
Panel Reset
1166O346AB
Press the Start key.
4
Transmission starts.
NOTE
If a time specification has been registered, the
document is stored in the memory and
transmission starts at the specified time.
Chapter 3
Sending and Receiving Documents
1171P004EA
Useful Tips
• Facsimile Program keys are those with
borders.
• The first index screen is automatically
displayed.
Touch the index tabs, or
¬ ® Index List
to find the desired Facsimile program key.

3-10
5. Sending Fine Print and Photos
Image Quality
Documents to be transmitted may include very fine print, detailed drawings, and photographs.
Selecting the appropritate Image Quality for the document type ensures the document is transmitted
clearly.
1166O353AB
Chapter 3
Setting the Image Quality
Load the document in the unit.
1
“Handling Documents” ☞p.1-20
Press the Fax key.
2
Utility Mode Check Pause Fax
Touch and select the Image
4
Quality.
.
Copy
Quality
Sending and Receiving Documents
3
Access
Interrupt
Start
Touch .
Quality&Reduction
Stop
Panel Reset
1166O346AB
1171P004EA
Select the destination.
5
“Sending a Document” ☞p. 3-2
“Using One-Touch Dialing for
Transmission” ☞p. 3-7
“Using Abbreviated Dialing for
Transmission” ☞p. 3-8
Press the Start key.
6
Transmission starts.
1171P047EA

Select the Image Quality to suit the document type
Document Type Image Quality Setting
Normal sized characters (handwriting, etc.) Standard
3-11
5. Sending Fine Print and Photos
Fine print (newspaper, etc.) or detailed drawings
Fine
Super Fine
Halftone (photos, etc.) and text Text + Photo
Halftone (photos, etc.)
GSR
Super GSR
• If the destination's facsimile does not support Super Fine, Super GSR, or Text + Photo, then the
document is transmitted in Fine or GSR.
• When GSR, Super GSR or Text + Photo is selected, the Image Quality may deteriorate depending on
the quality and the paper size of the destination's facsimile.
• Transmission of the document with a photo(s) included may produce srtipes across the photo(s),
depending on the original, but the stripes are not the result of trouble. If the stripes are too distinctive,
select GSR or Super GSR when sending the document.
Useful Tip
Settings for image quality return to the original setting after each transmission.
“Settings for Transmission” ☞p. 9-22
Chapter 3
Sending and Receiving Documents

3-12
6. Adjusting Contrast for Transmission
Contrast
You can adjust the contrast to suit the darkness of the characters and paper used when sending a
document. For example, if the characters are printed on colored paper, adjust the contrast so that the
transmitted document is printed clearly.
Chapter 3
Adjusting Contrast
Load the document in the unit.
1
“Handling Documents” ☞p.1-20
Press the Fax key.
2
Sending and Receiving Documents
Touch .
3
Utility Mode Check Pause Fax
Access
Interrupt
Start
Stop
Panel Reset
1166O346AB
Quality&Reduction
1171P004EA
1166O351AB
Touch .
4
Copy
Select the Contrast.
5
Contrast
1171P047EA
1171P048EA
Useful Tip
Five contrast levels are available. The
transmitted document gets lighter each time
Lighter
gets darker each time is touched (when
is touched (used fordark paper), andit
Darker
characters are faint or printed in color).
Select the destination.
6
“Sending a Document” ☞p. 3-2
“Using One-Touch Dialing for
Transmission” ☞p. 3-7
“Using Abbreviated Dialing for
Transmission” ☞p. 3-8

Press the Start key.
7
Transmission starts.
Useful Tips
• “Adjusting Contrast According to Document
Type”
Contrast Document Type
Lighter
For dark paper (newspaper or blueprints, etc.)
▲
Normal
▼
Darker
▲
For normal documents
▼
For faint or colored print
3-13
6. Adjusting Contrast for Transmission
• The contrast selection automatically returns
to itsoriginalstatusaftereachtransmission.
“Settings for Transmission” ☞p. 9-22
Chapter 3
Sending and Receiving Documents

3-14
7. Sending Documents in their Original Size Irrespectiveof the Recipient's Paper Size Reduction
When a document smaller than ledger (11" ´ 17") is sent, it is normally sent in its original size.
Otherwise, the document is automatically reduced to the paper size of recipient's facsimile (automatic
size reduction). If automatic size reduction is not required or the document must be sent in its original
size, select the nonreduction mode. The area of the scanned document that matches the paper s ize of the
recipient's facsimile is sent.
Chapter 3
1166O354AB
Setting the Nonreduction Mode
Load the document in the unit.
1
“Handling Documents” ☞p.1-20
Touch .
4
Reduction/Area
2
Sending and Receiving Documents
3
Press the Fax key.
Utility Mode Check Pause Fax
Start
Touch .
Quality&Reduction
Stop
Copy
Access
Interrupt
Panel Reset
1166O346AB
1171P004EA
Touch .
5
Reduction
1171P047EA
1171P049EA

7. Sending Documents in their Original Size Irrespective of the Recipient's Paper Size
Touch , and then touch
6
No Reduction
Enter
.
1171P050EA
3-15
Scanning the Document when Nonreduction Mode is Selected
When nonreduction mode is selected, transmission
is as follows.
<Direction of Document Insertion>
• When using the Automatic Document Feeder.
B
Useful Tip
When is selected, this equipment
automatically adjusts the size of the document to
that of the paper used by the recipient when
transmitting. When is selected,
the area of the document that will fit on the paper
used by the recipient's facsimile will be sent at its
original size.
7
8
Useful Tip
The setting for size reduction returns to
Auto Size
No Reduction
Select the destination.
“Sending a Document” ☞p. 3-2
“Using One-Touch Dialing for
Transmission” ☞p. 3-7
“Using Abbreviated Dialing for
Transmission” ☞p. 3-8
Press the Start key.
Transmission starts.
Auto Size
after each transmission.
1166O392AA
• When using the Duplexing Document Feeder.
B
1166O355AA
<How the Document is Transmitted>
• When a ledger-size document is sent in
nonreduction mode and received on letter size
paper.
Document Transmitted image
ledger size
letter size
1166O356AA
Chapter 3
Sending and Receiving Documents
NOTES
• After transmission, the document may be
reducedin size when printed depending on the
model of the destination's facsimile.
• Note that when transmitting to the same
model on this machine, the reduction mode
may be set at the receiver side due to the
factory default setting.

3-16
8. Selecting the Area of the Document to be Scanned and Transmitted
Scan Area
The area of the document to be scanned can be specified. Part of a large document can be sent, or
irregular-size documents (sizes other than letter or ledger) can be sent at regular size.
Selecting the Scan Area
1
2
Chapter 3
Load the document in the unit.
“Handling Documents” ☞p.1-20
Press the Fax key.
Utility Mode Check Pause Fax
Start
Stop
Copy
Access
Interrupt
Panel Reset
1166O346AB
Touch .
5
Selecttheareatobescannedand
6
touch .
Scan Area
1171P051EA
Enter
3
Sending and Receiving Documents
4
Touch .
Touch .
Quality&Reduction
1171P004EA
Reduction/Area
1171P047EA
1171P052EA
Useful Tip
Touch a key to adjust the size and direction of the
area of the document to be scanned.
When is touched, the scanned
areathat most closely matches the document size
is automatically set.
7
8
AutoDetect.
Select the destination.
“Sending a Document” ☞p. 3-2
“Using One-Touch Dialing for
Transmission” ☞p. 3-7
“Using Abbreviated Dialing for
Transmission” ☞p. 3-8
Press the Start key.
Transmission starts.

8. Selecting the Area of the Document to be Scanned and Transmitted
Useful Tips
• The area scanned by the book scanner should
be checked against the mark on the periphery
of the glass surface. For example, when letter
(8-1/2"
´ 11") is selected, the part of the
document within the dotted area shown in the
following diagram is sent.
LTR.
LTR.
1166O357AA
• The setting for the scanned area returns to
Auto Detect.
after each transmission.
3-17
Chapter 3
Sending and Receiving Documents

3-18
9. Combining One-Touch Key and Dialed Input for Transmission
Chain Dialing
Multiple One-touch keys can be used together to call a destination. This is called a Chain Dialing
function. For example, pre-registered switchboard and extension numbers for a destination on separate
One-touch keys can be combined for dialing.
Useful Tips
• Chain Dialing is possible by using the 10-key Pad input or abbreviated dialing in combination with a
One-touch key.
• Numbers up to 192 digits long can be dialed when chain dialing is used for transmission. (Numbers
of up to 40 digits long are displayed on the touch panel.)
Using Chain Dialing for Transmission
Chapter 3
Sending and Receiving Documents
Load the document in the unit.
1
“Handling Documents” ☞p.1-20
Press the Fax key.
2
Utility Mode Check Pause Fax
Touch .
3
Chain Dial
Start
Stop
Copy
Access
Interrupt
Panel Reset
1166O346AB
Select the destination.
4
<When a One-touch key is Used>
• Touch the One-touch key.
“Using One-Touch Dialing for
Transmission”
☞p. 3-7
Useful Tips
• When a One-touch key is touched, is
displayed.
• T o confirm the Number, when the cursor is
moved to after is
10-key Dialing
touched, the number that has been registered
in the one-touch key is displayed.
¬ ®
Use to move the cursor.
1171P004EA
1171P053EA
• To continue the number, touch the next Onetouch key to select the next part of the number.

3-19
9. Combining One-Touch Key and Dialed Input for Transmission
<Using Abbreviated Dialing>
• T ouch and enter the
Abbr.#
Abbreviated Dialing number.
“Using Abbreviated Dialing for
Transmission” ☞p. 3-8
Useful Tips
• When the abbreviated dialing number is
entered, is displayed.
#
• To confirm the number, when the cursor is
moved to after is
# 10-key Dialing
touched, the number that has been registered
in the Abbreviated Dialing number key is
displayed.
¬ ®
Use to move the cursor.
1171P054EA
• To continue the number, enter the next
Abbreviated Dialing number to select the next
part of the number.
Press the Start key.
5
Transmission starts.
Chapter 3
<Using the 10-key Pad>
• T ouch and use the 10-
10-key Dialing
key Pad to enter the number.
“Sending a Document” ☞p. 3-2
1171P055EA
Useful Tip
To re-enter the number,use to move the
¬ ®
cursor and re-enter individual digits, or press
C
the key and re-enter the whole number.
Delete
When is touched, the character above
the cursor is deleted.
Sending and Receiving Documents

3-20
10. Receiving a Document
Automatic Reception
If the copier is in Automatic Reception mode, documents will be received automatically without any
operation. This section explains the size of documents that can be received and what this system does if
the paper runs out.
Chapter 3
1166O358AA
Useful Tips
• There are basically two ways to receive a document - namely Automatic Reception and Manual
Reception. With Manual Reception, the document is only received after the handset i s lifted to accept
the call. The factory setting is Automatic Reception.
For Automatic Reception, “Setting the Reception Mode” ☞p. 9-25
For Manual Reception, “Receiving a Document after Talking on the Telephone” ☞p. 6-2
• While receiving a document, the touch panel displays the receiving indicator.
Sending and Receiving Documents
1171P056EA
• When reception is complete, the machine beeps.
“Confirming the Communication Status” ☞p. 5-2
• When the paper runs out, the touch panel displaysan alarm to indicate the lack of paper and the “no
paper” red lamp on the Paper Drawer Lights.
(When the paper is running low, the light flashes red [Except for the Large Capacity Cabinet].)
• The received document is stored in the memory and is automatically printed once the appropriate
size paper is installed.
• If the memory becomes full during reception, the remaining portion of the document cannot be
received.
• Once the memory is full, no further documents can be received.

10. Receiving a Document
Useful Tips
• The sizes of documents that can be received are ledger (11"
letter .
• If paper that is not the same size as the original document is installed in the copier, one size larger
paper is used or the document image is automatically reduced.
For example, if a ledger-size document is received by the copier where only letter-sized paper is
loaded, the document is reduced to the size of letter.
“Settings of Handling the Received Documents” ☞p. 9-12
• When letter size documents are received, they are automatically rotated by 90° and can be printed
even though the documents were inserted in a different direction to the paper (Rotation Print).
• A received document cannot be printed on paper from the Manual Bypass Tray.
´17"), legal (8-1/2"´14"), letter and
3-21
When Receiving Long Documents
When a document is received that is longer than the normal paper sizes (letter or ledger (11"
document image is reduced as shown below. In this case, the optimal reduction ratio is automatically
selected to fit the image onto the paper.
Reduction
´17")), the
A
A
Received document (original size)
Useful Tip
If the received document is too long to be printed on the paper even when reduced by 60%, the image is
divided and printed on more than one page. In this case, the transition area (where the image is divided)
is printed on both pages. (If larger paper is installed, the image will be printed on it without being
divided.) The maximum reduction ratio can be changed. The “Cut off” mode can also be selected, in
which case the excess area is ignored when printing. When “Cut off” mode is selected, the maximum
length to be cut off can be set.
“Setting the Reception Mode” ☞p. 9-25
Paper
1166O359AA
Chapter 3
Sending and Receiving Documents

3-22
11. Making and Receiving a Telephone Call
This machine can be used to make and receive telephone calls. This section provides instructions on how
to use this machine as a telephone.
Useful Tips
• An extra telephone set is required to use the telephone function.
• Push button services are available even if using a Dial Pulse Line. Touch after calling the
destination to send Touch Tone Line (PB) signals.
Tone
Making a Call
Press the Fax key.
1
Pick up the handset.
2
Chapter 3
NOTE
Make sure that you hear the dial tone from the
handset.
Select the number to dial.
3
Sending and Receiving Documents
1171P057EA
The ringing tone should be heard.
“Sending a Document” ☞p. 3-2
“Using One-Touch Dialing for
Transmission” ☞p. 3-7
“Using Abbreviated Dialing for
Transmission” ☞p. 3-8
Making a Call with the Handset in
Place
Press the Fax key.
1
Touch .
2
NOTE
Make sure that you can hear the dial tone from
the monitor speaker.
On-hook Dial
1171P058EA
If the call is answered, talk.
4
Hang up the handset after talking.
5

Select the destination.
3
11. Making and Receiving a Telephone Call
Receiving a Telephone Call
Pick up the handset when the telephone
1
rings.
“Setting the Reception Mode” ☞p. 9-25
NOTE
If you are expecting a telephone call, change the
setting to manual reception in advance.
3-23
1171P059EA
The ring tone should be heard from the
Monitor Speaker.
“Sending a Document” ☞p. 3-2
“Using One-Touch Dialing for
Transmission” ☞p. 3-7
“Using Abbreviated Dialing for
Transmission” ☞p. 3-8
When you hear your call being answered,
4
pick up the handset and talk.
Useful Tip
To send a document, you can send a facsimile
simply by inserting the document and pressing
the Start key.
Hang up the handset after talking.
5
Hang up the handset after talking.
2
Chapter 3
Sending and Receiving Documents

3-24
11. Making and Receivinga Telephone Call
Chapter 3
Sending and Receiving Documents

4-1
Chapter 4
Advanced Copying Procedures
Chapter 4Advanced Copying Procedures

4-2
1. Using the Sort Mode while Copying
Sort, Group
This function is useful when making two or more sets of copies. Each set can be printed out in the order
of the original document (Sort), or the same page can be printed out the required number of times
(Group). When many pages of documents need to be copied for multiple sets, such as documents for
meetings, they can easily be sorted using this function.
NOTE
To make copies using the sort mode, the same sized copy paper should be loaded in separate paper
drawers in different directions, or the optional Shift Tray, Finisher or Mail-bin Finisher is required.
• Sort : The documents are copied and sorted in the same page order as that of the original
document per set.
3
2
1
Group : Each page of the document is copied separately the required number of times and grouped.
•
Chapter 4
3
2
1
• Non-Sort : The required number o f p ages is copi ed in the same order as that of the original
document without being sorted or grouped.
3
2
Advanced Copying Procedures
1
3
2
1
1
1
1
3
2
2
2
1
1
1
1166O363AA
3
2
1
2
2
2
3
3
3
2
1
1166O290AA
3
3
3
1166O362AA
Sorting Procedure
Load the document in the unit.
1
“Handling Documents” ☞p. 1-20
Press the Copy key.
2
Touch .
3
Finishing
1171P009EA
 Loading...