

Page 1

XW-BTS5
WIRELESS SPEAKER SYSTEM
Enceinte sans fil
Sistema de Altavoces Inalámbrico
Wireless speaker system
Diffusore Wireless
Draadloos speaker systeem
Operating Instructions
Mode d’emploi
Manual de instrucciones
Bedienungsanleitung
Istruzioni per l’uso
Handleiding
-K/-W
Page 2
IMPORTANT
CAUTION
RISK OF ELECTRIC SHOCK
The lightning flash with arrowhead symbol,
within an equilateral triangle, is intended to
alert the user to the presence of uninsulated
“dangerous voltage” within the product’s
enclosure that may be of sufficient
magnitude to constitute a risk of electric
shock to persons.
WARNING
This equipment is not waterproof. To prevent a fire or
shock hazard, do not place any container filled with liquid
near this equipment (such as a vase or flower pot) or
expose it to dripping, splashing, rain or moisture.
WARNING
Before plugging in for the first time, read the following
section carefully.
The voltage of the available power supply differs
according to country or region. Be sure that the power
supply voltage of the area where this unit will be used
meets the required voltage (e.g., 230 V or 120 V) written
on the AC adapter label.
WARNING
To prevent a fire hazard, do not place any naked flame
sources (such as a lighted candle) on the equipment.
VENTILATION CAUTION
When installing this unit, make sure to leave space around
the unit for ventilation to improve heat radiation (at least
10 cm at top, 10 cm at rear, and 10 cm at each side).
WARNING
Slots and openings in the cabinet are provided for
ventilation to ensure reliable operation of the product,
and to protect it from overheating. To prevent fire hazard,
the openings should never be blocked or covered with
items (such as newspapers, table-cloths, curtains) or by
operating the equipment on thick carpet or a bed.
Operating Environment
Operating environment temperature and humidity:
+5 °C to +35 °C (+41 °F to +95 °F); less than 85 %RH
(cooling vents not blocked)
Do not install this unit in a poorly ventilated area, or in
locations exposed to high humidity or direct sunlight (or
strong artificial light)
WARNING
Store small parts out of the reach of children and infants. If
accidentally swallowed, contact a doctor immediately.
CAUTION:
TO PREVENT THE RISK OF ELECTRIC
SHOCK, DO NOT REMOVE COVER (OR
BACK). NO USER-SERVICEABLE PARTS
INSIDE. REFER SERVICING TO QUALIFIED
SERVICE PERSONNEL.
D3-4-2-1-3_A1_En
D3-4-2-1-4*_A1_En
D3-4-2-1-7a_A1_En
D3-4-2-1-7b*_A1_En
D3-4-2-1-7c*_A1_En
DO NOT OPEN
If the AC plug of this unit does not match the AC
outlet you want to use, the plug must be removed and
appropriate one fitted. Replacement and mounting of
an AC plug on the power supply cord of this unit should
be performed only by qualified service personnel.
If connected to an AC outlet, the cut-off plug can
cause severe electrical shock. Make sure it is properly
disposed of after removal.
The equipment should be disconnected by removing the
mains plug from the wall socket when left unused for a
long period of time (for example, when on vacation).
CAUTION
The
completely shut off all power from the AC outlet. Since
the power plug serves as the main disconnect device for
the unit, you will need to unplug it from the AC outlet
to shut down all power. Therefore, make sure the unit
has been installed so that the power plug can be easily
unplugged from the AC outlet in case of an accident.
To avoid fire hazard, the power plug should also be
unplugged from the AC outlet when left unused for a
long period of time (for example, when on vacation).
This product is for general household purposes. Any
failure due to use for other than household purposes
(such as long-term use for business purposes in a
restaurant or use in a car or ship) and which requires
repair will be charged for even during the warranty
period.
The exclamation point within an equilateral
triangle is intended to alert the user to the
presence of important operating and
maintenance (servicing) instructions in the
literature accompanying the appliance.
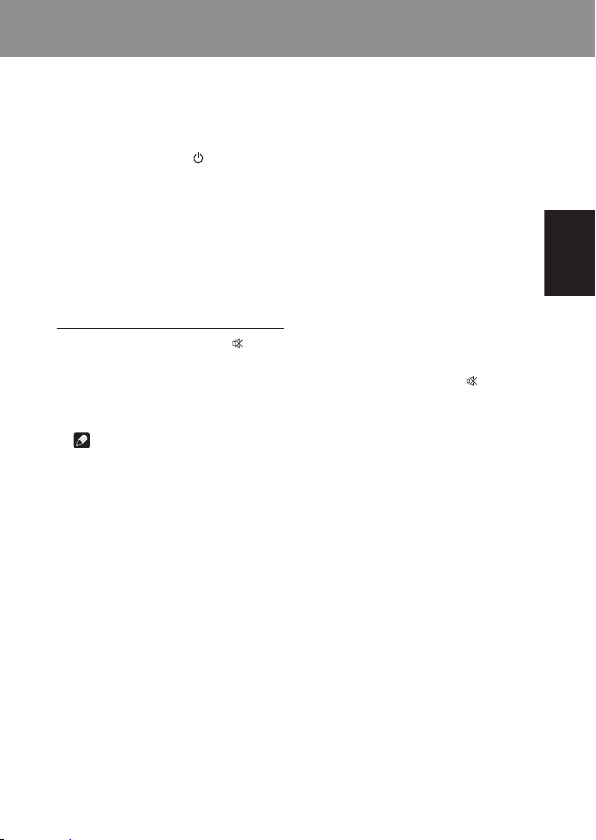
STANDBY/ON
switch on this unit will not
D3-4-2-1-1_A1_En
D3-4-2-2-1a_A1_En
D3-4-2-2-2a*_A1_En
K041_A1_En
2
Page 3
POWER-CORD CAUTION
Handle the power cord by the plug. Do not pull out the
plug by tugging the cord and never touch the power cord
when your hands are wet as this could cause a short circuit
or electric shock. Do not place the unit, a piece of furniture,
etc., on the power cord, or pinch the cord. Never make a
knot in the cord or tie it with other cords. The power cords
should be routed such that they are not likely to be stepped
on. A damaged power cord can cause a fire or give you an
electrical shock. Check the power cord once in a while.
When you find it damaged, ask your nearest PIONEER
authorized service center or your dealer for a replacement.
AC adapter CAUTION
• Make sure to grasp the body of the AC adapter when
removing it from the power outlet. If you pull the
power cord, it may become damaged which could lead
to fire and/or electrocution.
• Do not attempt to plug in or remove the AC adapter
with wet hands. This may result in electrocution.
• Do not insert the power cord of AC adapter into a
power outlet where the connection remains loose
despite inserting the prongs all the way into the outlet.
Heat may be generated which could lead to fire.
Consult with the retailer or an electrician regarding
replacement of the power outlet.
If you want to dispose this product, do not mix it with general household waste. There is a separate collection system for used
electronic products in accordance with legislation that requires proper treatment, recovery and recycling.
Private households in the member states of the EU, in Switzerland and Norway may return their used electronic products free of charge to
designated collection facilities or to a retailer (if you purchase a similar new one).
For countries not mentioned above, please contact your local authorities for the correct method of disposal.
By doing so you will ensure that your disposed product undergoes the necessary treatment, recovery and recycling and thus prevent potential
negative effects on the environment and human health.
S002*_A1_En
Store the AC adapter out of the reach of children and
infants.
The AC adapter cord may accidentally wind around the
neck and it may cause suffocation.
Radio wave caution
This unit uses a 2.4 GHz radio wave frequency, which is a
band used by other wireless systems (Microwave ovens
and Cordless phones, etc.). In this event noise appears
in your television image, there is the possibility this unit
(including products supported by this unit) is causing
signal interference with the antenna input connector of
your television, video, satellite tuner, etc. In this event,
increase the distance between the antenna input connector
and this unit (including products supported by this unit).
• Pioneer is not responsible for any malfunction of the
compatible Pioneer product due to communication
error/malfunctions associated with your network
connection and/or your connected equipment. Please
contact your Internet service provider or network
device manufacturer.
• A separate contract with/payment to an Internet
service provider is required to use the Internet.
K058b_A1_En
English
Discover the benefits of registering your product online at
http://www.pioneer.co.uk
(or
http://www.pioneer.eu
3
).
Page 4

Table of Contents
Before Start .....................................................................................5
Accessory Check Up
Connect the Left and Right Speaker
Connect DC Power
Part names and functions ..............................................................7
Main view
Rear view
Back Panel
Top Panel
Getting started ................................................................................9
Turning on
APS mode
Bluetooth Audio playback ...........................................................10
Other Connections ........................................................................14
Additional Information ................................................................15
Troubleshooting
Cautions on use
Specifications
* There will not be additional notification in this booklet if there is/ or will be any design
change to the product itself.
* Thank you for the purchase of Pioneer product, please read Operating Instructions
before use for the 1st time for correct operation. Keep this Operating Instructions for
your future reference.
Switching type power adapter
Slide the power plug along the
guide rails of the AC adapter as
shown in the figure below until
there is an audible click.
4
Page 5
Before Start
1. Accessory Check Up
Check the following items when opening the package:
• AC adapter × 1 (include Power Plug × 1)
• Speaker cable × 1
• Rubber foot × 8
• Warranty card × 1
• Operating Instructions (This Document)
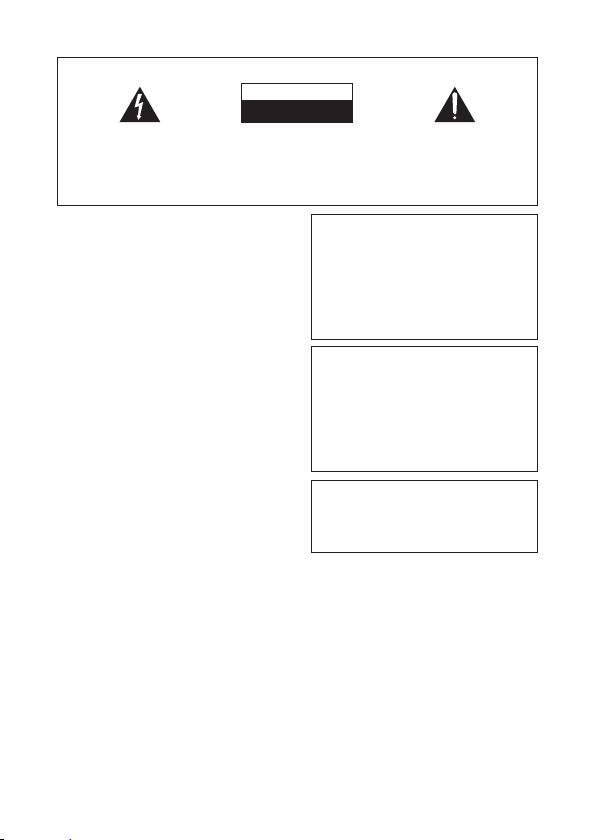
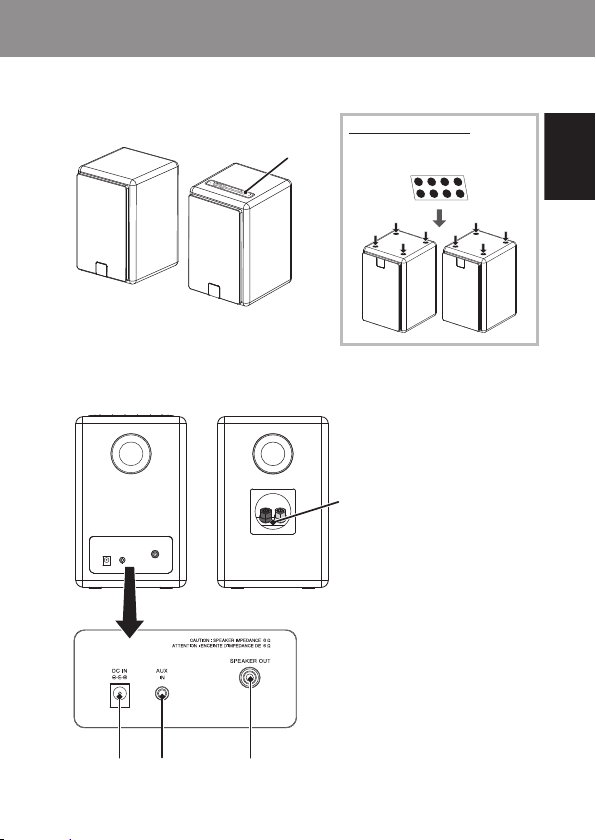
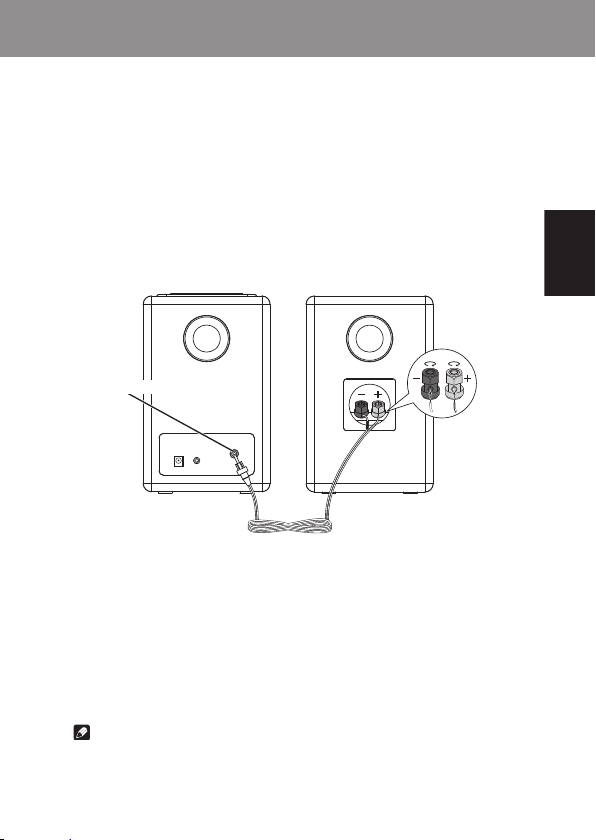
2. Connect the Left and Right Speaker
Rear side of Right Speaker Rear side of Left Speaker
SPEAKER OUT Jack
Speaker cable
1.Unscrew the terminal a few turns until there is enough space to insert the exposed wire.
2.Connect the wire with a red belt to the red (+) terminal, and the wire with a black belt to
the black (−) terminal.
3.Once the wire is in position, tighten the terminal until the wire is firmly clamped.
4.Connect the pin plug to the SPEAKER OUT Jack of the right speaker.
Note
• To avoid magnetic interference or unwanted noise, never place this product too close to
any radiation devices.
English
5
Page 6
Before Start
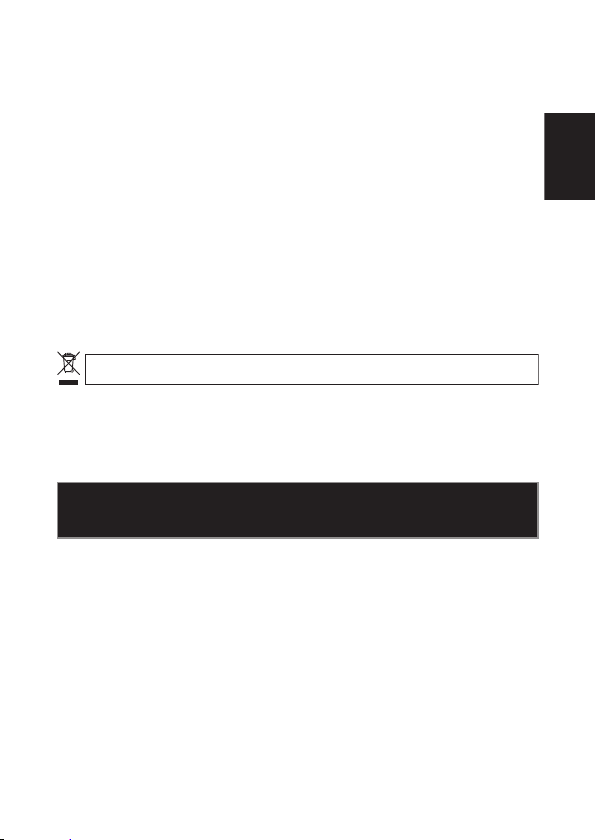
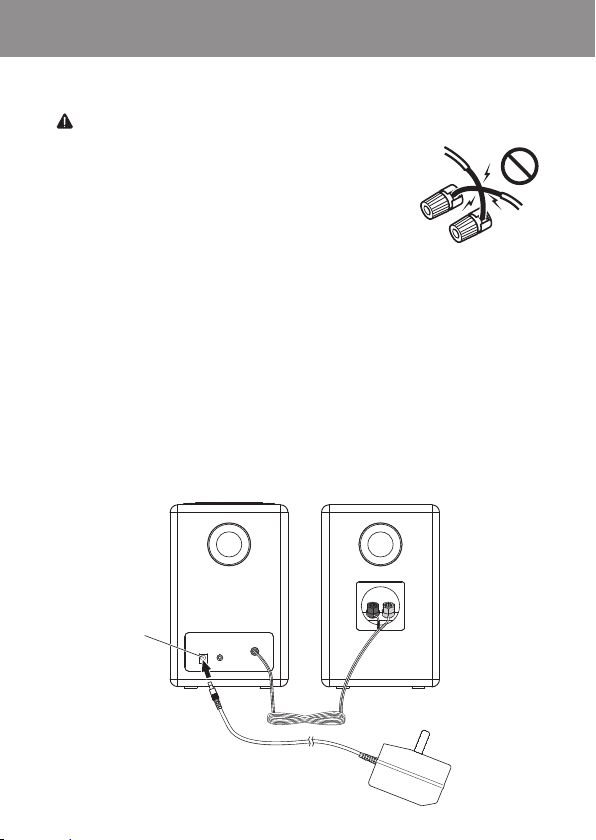
CAUTION
• These speaker terminals carry HAZARDOUS LIVE voltage.
To prevent the risk of electric shock when connecting or
disconnecting the speaker cables, disconnect the power cord
before touching any uninsulated parts.
• Do not connect the supplied speakers with any other amplifier.
This may result in malfunction or fire.
• Do not let the bare speaker wires touch each other.
• Do not attach these speakers to the wall or ceiling, as they may cause injury in the event of
a fall.
• Do not allow any objects to fall into or to be placed in the bass reflex ducts.
• Do not stand or sit on the speakers. You may be injured.
3. Connect DC Power
• Connect the AC adaptor’s DC plug to the DC IN jack on the back panel. Then connect the
power plug on the other end to the power outlet.
• Use only the AC adapter included in this package, do not use the power adapter of different
specification.
Rear side of
Right Speaker
DC IN
Incorrect
Rear side of
Left Speaker
6
Page 7
Part names and functions
Main view
Left Speaker
Rear view
12 3
Right Speaker
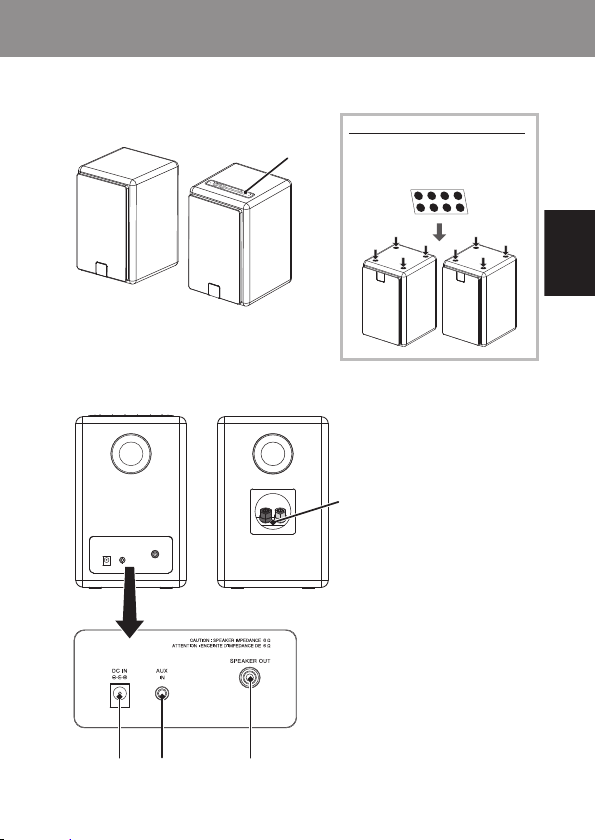
Back Panel
Top panel
(page 8)
Left SpeakerRight Speaker
Attaching Rubber feet
Apply the accessory rubber feet to
the bottom surface of the unit.
4
1.
DC IN Jack
Connect the AC adapter.
2.
AUX IN Jack
Connect auxlliary components.
3.
SPEAKER OUT Jack for Left Speaker
Connect the pin plug of Speaker cable.
4.
Speaker Terminal
Connect the Speaker cable.
English
7
Page 8
Part names and functions
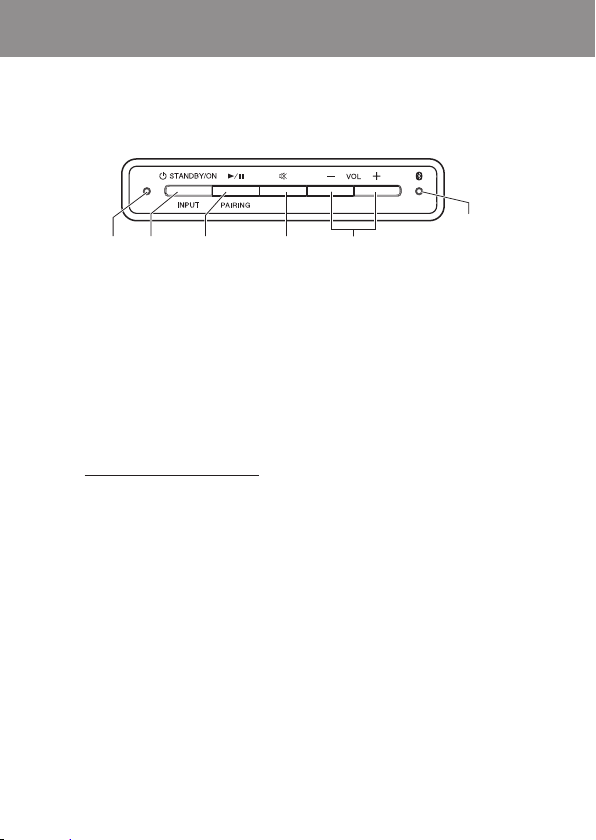
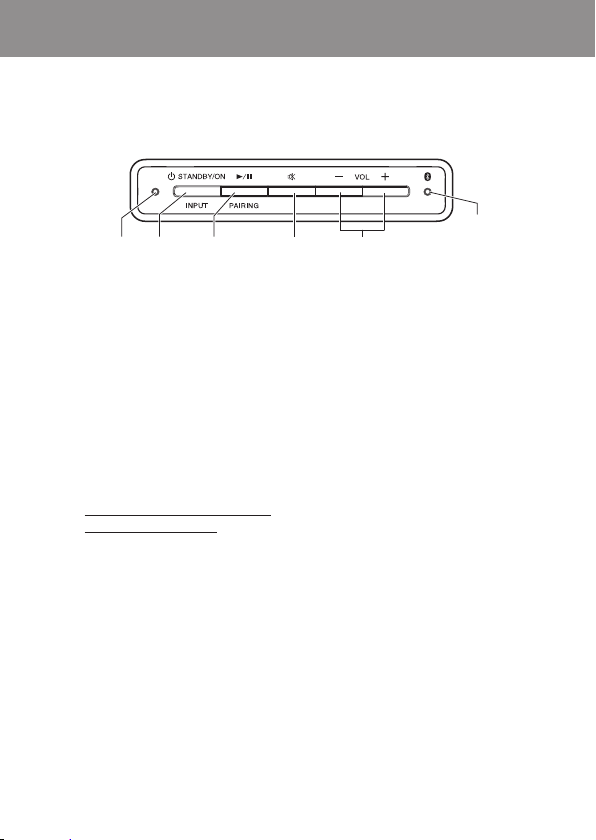
Top Panel
12 3 4 5
6
1.
MODE Indicator
• Light up Indicate green when the unit is
in Bluetooth mode.
• Light up Indicate orange when the unit
is in AUX mode.
• In the standby mode, light up Indicate
red for 3 seconds when APS
• In the standby mode, light up Indicate
green for 3 seconds when APS is ON.
2.
STANDBY/ON
• Switch between standby and on.
Press and hold to go into standby.
INPUT
• Switch the mode of Bluetooth and AUX.
3.
Play / Pause
• Play/pause/resume playback.
PAIRING
• Press and hold to perform pairing with
Bluetooth device.
*1
is OFF.
4.
Mute
• Silence the unit or restore the sound.
Blink MODE Indicator during Mute.
※
• In the standby mode, press and hold
to switch between APS on and off.
5.
VOL + /
-
• Adjust the listening volume.
The listening volume has a range
※
from 0 to 30 (however, the unit is not
equipped with a display to visually
indicate the volume level). (Default
setting: 10)
6.
Bluetooth Indicator
• Light up Indicate blue when Bluetooth
device is connected.
• Blink during waiting for Bluetooth
connection.
• Blink quickly for Bluetooth pairing.
*1
Refer to page 9 for APS.
8
Page 9
Getting started
Turning on
Press
[ STANDBY/ON]
This unit switches to the last select mode.
button. The indicator would light.
APS mode
• After this unit is kept inactive for 20 minutes, it automatically switches to the standby mode.
• When 5 minutes before switching to the standby mode automatically, the indicator starts to
blink.
How to turn off the APS mode
• Press and hold
indicator lights red for about 3 seconds.
• If the APS mode is turned on again, Press and hold
and the indicator lights green for about 3 seconds.
• When you play at low volume, this unit might switch to the standby mode automatically.
Please increase the volume, or turn off the APS mode.
Note
[ (Mute)]
to turn off the APS mode in the standby mode and the
button
[ (Mute)]
in the standby mode
button
English
9
Page 10
Bluetooth Audio playback
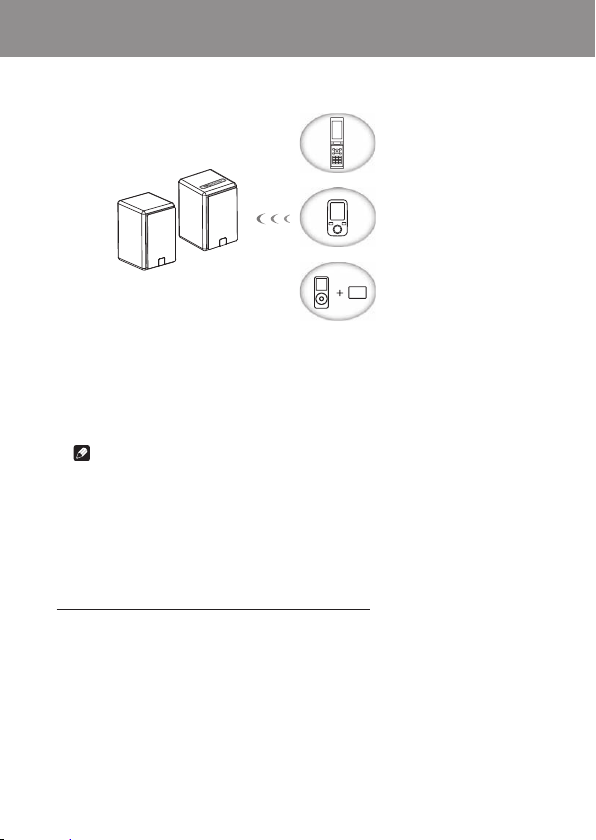
Bluetooth wireless technology
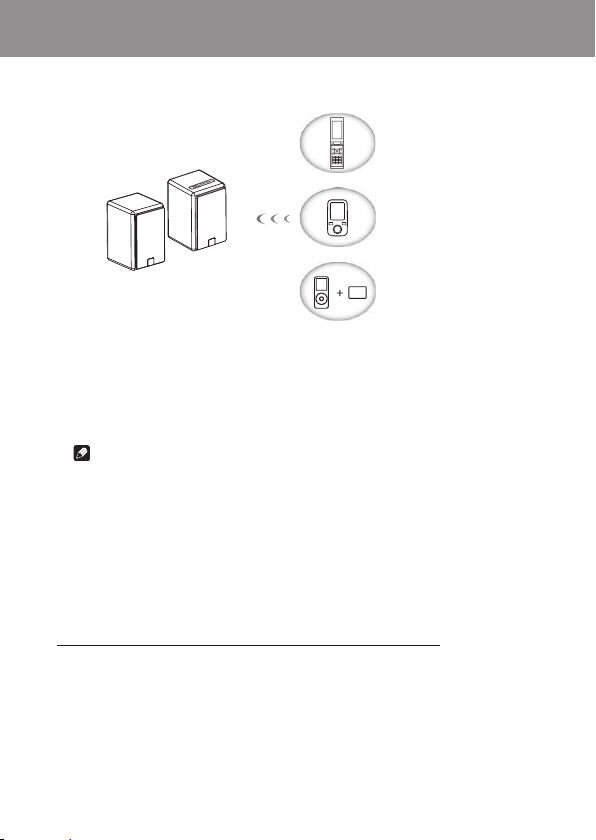
This product enables you to enjoy listening to music wirelessly from a Bluetooth wireless
technology enabled device (cell phone, digital music player, etc.).
from a non-Bluetooth wireless technology enabled device using a Bluetooth audio transmitter
available in stores. For details, refer to the user manual for the Bluetooth wireless technology
enabled device.
Note
*1
• The Bluetooth wireless technology enabled device must support A2DP profiles.
• Pioneer does not guarantee proper connection and operation of this unit with all
Bluetooth wireless technology enabled devices.
• The Bluetooth
®
word mark and logos are registered trademarks owned by Bluetooth SIG,
Inc. and any use of such marks by PIONEER CORPORATION is under license. Other
trademarks and trade names are those of their respective owners.
Pairing this unit and Bluetooth wireless technology device
To enjoy music from a Bluetooth wireless technology enabled device, pairing is required
with this product. Make sure to perform pairing first time you operate the system or any time
pairing data is cleared.
“Pairing” is the step necessary to register Bluetooth wireless technology device to enable
Bluetooth communications. For more details, see also the operating instructions of your
Bluetooth wireless technology device.
• Pairing is required when you first use Bluetooth wireless technology device and this unit.
• To enable Bluetooth communication, pairing should be done with both of your system and
Bluetooth wireless technology device.
enabled device:
Cell phone
Bluetooth wireless technology
enabled device:
Digital music player
Device not equipped with Bluetooth
wireless technology:
Digital music player
+
Bluetooth audio transmitter
(commercially available)
*1
You can also enjoy music
10
Page 11

Bluetooth Audio playback
1. Press [INPUT] button to select Bluetooth mode.
(Mode Indicator:
green).
2. Press and hold [PAIRING] button until you hear 2 consecutive “beep”
sounds. Then, the blue indicator on the top panel blinks quickly and
the unit will enter the pairing mode.
3. Switch on the Bluetooth wireless technology device that you want to
perform pairing with, place the device within 1 m of the system, and
set it to the pairing mode.
Pairing begins.
• In case of entering PIN code, use “0000”.
( Only “0000” works for PIN code in this product. )
4. When Bluetooth wireless technology device has connected, the blue
indicator on the top panel will change from blinking to lit.
5. Start playback of music contents stored in Bluetooth wireless
technology device.
Connect the Latest Paired Bluetooth wireless technology Device
When the unit is switch on again to Bluetooth mode next time, it will be connected
automatically with equipment that has the latest connected device already.
Connect previous Paired Bluetooth Device
1. If you want to connect other paired device instead of the latest
paired one, please make sure the Bluetooth connection of the latest
device dis-connect. Then, the blue indicator on the top panel blinks
slowly and the unit will change the waiting for connection mode.
*Alternatively, there is also a way to switch the unit in pairing mode.
2. Switch on other paired device, and select this unit from this device
Bluetooth list.
3. Connection with other devices is successful, the blue indicator will
change from blinking to lit.
• Operating range of Bluetooth audio is up to 10 m (Measured in open space. Walls and
structures may affect range of device.)
English
11
Page 12

Bluetooth Audio playback
Radio wave caution
This unit uses a 2.4 GHz radio wave frequency, which is a band used by other wireless systems
(see list below). To prevent noise or interrupted communication, do not use this unit nearby
such devices, or make sure these devices are switched off during use.
• Cordless phones
• Cordless facsimiles
• Microwave ovens
• Wireless LAN devices
• Wireless AV equipment
• Wireless controllers for game systems
• Microwave-based health aids
• Some baby monitors
Other, less common, equipment that may operate on the same frequency:
• Anti-theft systems
• Amateur radio stations (HAM)
• Warehouse logistic management systems
• Discrimination systems for train or emergency vehicles
Note
• In the event noise appears in your television image, there is the possibility that a
Bluetooth wireless technology enabled device or this unit (including products supported
by this unit) are causing signal interference with the antenna input connector of your
television, video, satellite tuner, etc. In this event, increase the distance between the
antenna input connector and the Bluetooth wireless technology enabled device or this
unit (including products supported by this unit).
• If there is something obstructing the path between this unit (including devices
supported by this unit) and the device equipped with Bluetooth wireless technology (such
as a metal door, concrete wall, or insulation containing tinfoil), you may need to change
the location of your system to prevent signal noise and interruptions.
12
Page 13

Bluetooth Audio playback
Scope of operation
Use of this unit is limited to home use. (Transmission distances may be reduced depending
on communication environment).
In the following locations, poor condition or inability to receive radio waves may cause the
audio to be interrupted or stopped:
• In reinforced concrete buildings or steel framed or ironframed buildings.
• Near large metallic furniture.
• In a crowd of people or near a building or obstacle.
• In a location exposed to the magnetic field, static electricity or radio wave interference
from radio communication equipment using the same frequency band (2.4 GHz) as this
unit, such as a 2.4 GHz wireless LAN device or microwave oven.
• If you live in a heavily populated residential area(apartment, townhouse, etc.) and if
your neighbor’s microwave is placed near your system, you may experience radio wave
interference. If this occurs, move your unit to a different place. When the microwave is not
in use, there will be no radio wave interference.
Radio wave reflections
The radio waves received by this unit include the radio wave coming directly from the device
equipped with Bluetooth wireless technology (direct wave) and waves coming from various
directions due to reflections by walls, furniture and building (reflected waves). The reflected
waves (due to obstacles and reflecting objects) further produce a variety of reflected waves
as well as variation in reception condition depending on locations. If the audio cannot be
received properly due to this phenomenon, try moving the location of the device equipped
with Bluetooth wireless technology a little. Also note that audio may be interrupted due to the
reflected waves when a person crosses or approaches the space between this unit and the
device equipped with Bluetooth wireless technology.
English
13
Page 14
Other Connections
• Before making or changing the connections, switch off the power and disconnect the
power plug from the power outlet.
• When playing music through AUX mode, the music volume will vary depending on the
volume of the music player. If there is distortion when the volume is set at max, lower the
music player’s volume and to avoid distortion.
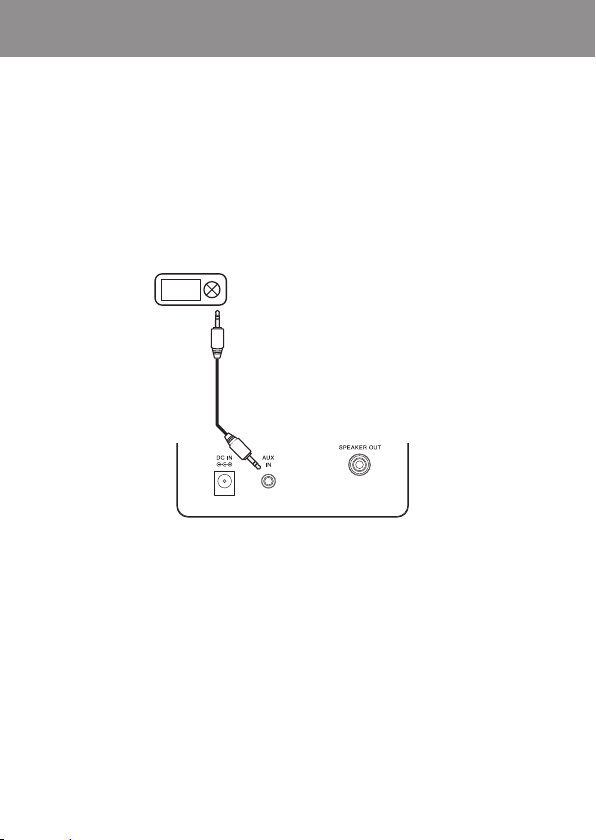
1. Connecting auxiliary components
Connect the back panel AUX IN jack to your auxiliary playback component.
Digital audio
player, etc.
Stereo mini-plug cable
(commercially available)
This unit’s back panel
2. Press [INPUT] button. (Mode indicator : orange)
3. Start playback of the auxiliary component.
14
Page 15

Additional Information
Troubleshooting
WARNING
• Never remove the casing of this apparatus.
Incorrect operation is often mistaken for trouble or malfunction. If you think that there is
something wrong with this component, check the points below. Sometimes the trouble may
lie in another component. Inspect the other components and electrical appliances being
used. If the trouble cannot be rectified even after checking the points below, ask your nearest
Pioneer authorized service center or your dealer to carry out repair work.
• If the unit does not operate normally due to external effects such as static electricity,
disconnect the power plug from the outlet and insert it again to return to normal operating
conditions.
Problem Remedy
The power does not turn on. • Disconnect the power plug from the outlet, and
Power automatically switches
to standby without user action.
No sound is output when a
mode is selected.
insert again.
• When no device is connected to the selected the
AUX IN jack and this unit is not operated for 20
minutes or more after AUX mode is selected, power
will automatically turn OFF. (Only when APS mode
(page 9) is ON.)
• Make sure the component is connected correctly.
English
15
Page 16

Additional Information
Problem Remedy
The Bluetooth wireless
technology device cannot be
connected or operated. Sound
from the Bluetooth wireless
technology device is not emitted
or the sound is interrupted.
* The line-of-sight transmission distance is an estimate. Actual transmission distances
supported may differ depending on surrounding conditions.
• Check that no object that emits electromagnetic
waves in the 2.4 GHz band (microwave oven,
wireless LAN device or Bluetooth wireless
technology apparatus) is near the unit. If such an
object is near the unit, set the unit far from it. Or,
stop using the object emitting the electromagnetic
waves.
• Check that the Bluetooth wireless technology device
is not too far from the unit and that obstructions are
not set between the Bluetooth wireless technology
device and the unit. Set the Bluetooth wireless
technology device and the unit so that the distance
between them is less than about 10 m* and no
obstructions exist between them.
• The Bluetooth wireless technology device may not
be set to the communication mode supporting the
Bluetooth wireless technology.
Check the setting of the Bluetooth wireless
technology device.
• Check that pairing is correct. The pairing setting
was deleted from this unit or the Bluetooth wireless
technology device. Reset the pairing.
• Check that the profile is correct. Use a Bluetooth
wireless technology device that supports A2DP
profile.
16
Page 17

Additional Information
Cautions on use
When moving this unit
When moving this unit, press
[ STANDBY/ON]
unplug the power cord.
Damage may occur when another device is
connected to the AUX IN jack.
Place of installation
• Do not place this unit on top of a TV or
color monitor.
Also, install it away from cassette
decks and other devices easily affected
by magnetic forces.
Avoid the following locations:
• Places exposed to direct sunlight
• Humid or poorly ventilated places
• Extremely hot places
• Places exposed to vibrations
• Places in which there is much dust or
cigarette smoke
• Places exposed to soot, steam, or heat
(kitchens, etc.)
Do not place objects on this unit
Do not place any objects on top of this unit.
Do not obstruct the ventilation holes.
Do not use this unit on shaggy rugs, beds,
sofas, etc., or wrapped in cloth, etc. Doing
so will prevent the heat from dispersing,
leading to damage.
button, and then
Do not expose to heat.
Do not place this unit on top of an amplifier
or other components that generate heat.
When rack mounting it, to avoid the heat
given off by the amplifier or other audio
components, place it on a shelf below the
amplifier.
• Turn off the power of this unit when
not using it.
• Depending on signal conditions,
striped patterns may appear on a TV
screen and noise may enter the sound
of radio broadcasts when the power of
this unit is on. If this happens, turn off
the power of this unit.
Cleaning the this unit
• Unplug the power cord from the power
outlet when cleaning this unit.
• Clean this unit using a soft cloth.
For tough dirt, apply some neutral
detergent diluted in 5 to 6 parts water
to a soft cloth, wring out thoroughly,
wipe off the dirt, and then wipe again
with a soft, dry cloth.
• Alcohol, thinner, benzene, insecticides,
etc., could cause the print or paint to
peel off. Also, leaving rubber or vinyl
products in contact with this unit for
long periods of time could mar the
cabinet.
• When using chemical-impregnated
wipes, etc., read the cautions included
with the wipes carefully.
English
17
Page 18

Additional Information
Specifications
• Amplifier section
RMS Power Output:
Front Left/Right . . . . . . . . . . . 25 W + 25 W
(RMS, 1 kHz, 10 %, T.H.D., 6 Ω)
• Speaker section
System . . . . . . . . . . . . . . . . . . . . 2-way system
Speakers:
Tweeter. . . . . . . . . . 2.5 cm cone × 1/each
Woofer . . . . . . . . . . . 10 cm cone × 1/each
Frequency range . . . . . . . . . . .50 Hz to 20 kHz
• Miscellaneous
Power requirements
. . . . . . . . . . . . AC 100 V to 240 V, 50 Hz/60 Hz
Power consumption . . . . . . . . . . . . . . . . . 48 W
In standby . . . . . . . . . . . . . . . . . . . . . 0.5 W
Dimensions
. . 140 mm (W) x 218 mm (H) x 160 mm (D)/each
Weight (without package and adapter). . . . 3.8 kg
• Accessories
Speaker cable . . . . . . . . . . . . . . . . . . . . . . . . . 1
AC adapter . . . . . . . . . . . . . . . . . . . . . . . . . . . . 1
Rubber foot . . . . . . . . . . . . . . . . . . . . . . . . . . . 8
Warranty card . . . . . . . . . . . . . . . . . . . . . . . . . 1
Operating instructions (This document)
DC 20 V, 2.4 A
Note
• Specifications and the design are
subject to possible modifications
without notice, due to improvements.
18
Page 19

Page 20
IMPORTANT
ATTENTION
DANGER D´ELECTROCUTION
Ce symbole de l’éclair, placé dans un
triangle équilatéral, a pour but d’attirer
l’attention de l’utilisateur sur la présence, à
l’intérieur du coffret de l’appareil, de
“tensions dangereuses” non isolées d’une
grandeur suffisante pour représenter un
risque d’électrocution pour les êtres
humains.
AVERTISSEMENT
Cet appareil n’est pas étanche. Pour éviter les risques
d’incendie et de décharge électrique, ne placez près de
lui un récipient rempli d’eau, tel qu’un vase ou un pot
de fleurs, et ne l’exposez pas à des gouttes d’eau, des
éclaboussures, de la pluie ou de l’humidité.
AVERTISSEMENT
Avant de brancher l’appareil pour la première, lisez
attentivement la section suivante.
La tension de l’alimentation électrique disponible
varie selon le pays ou la région. Assurez-vous que la
tension du secteur de la région où l’appareil sera utilisé
correspond à la tension requise (par ex. 230 V ou 120 V),
indiquée sur l’étiquette de l’adaptateur secteur.
AVERTISSEMENT
Pour éviter les risques d’incendie, ne placez aucune
flamme nue (telle qu’une bougie allumée) sur l’appareil.
PRÉCAUTION DE VENTILATION
Lors de l’installation de l’appareil, veillez à laisser un
espace suffisant autour de ses parois de manière à
améliorer la dissipation de chaleur (au moins 10 cm sur le
dessus, 10 cm à l’arrière et 10 cm de chaque côté).
AVERTISSEMENT
Les fentes et ouvertures du coffret sont prévues pour la
ventilation, pour assurer un fonctionnement stable de
l’appareil et pour éviter sa surchauffe. Pour éviter les
risques d’incendie, ne bouchez jamais les ouvertures et ne
les recouvrez pas d’objets, tels que journaux, nappes ou
rideaux, et n’utilisez pas l’appareil posé sur un tapis épais
ou un lit.
Milieu de fonctionnement
Température et humidité du milieu de fonctionnement :
De +5 °C à +35 °C (de +41 °F à +95 °F) ; Humidité relative
inférieure à 85 % (orifices de ventilation non obstrués)
N’installez pas l’appareil dans un endroit mal ventilé ou un
lieu soumis à une forte humidité ou en plein soleil (ou à
une forte lumière artificielle).
AVERTISSEMENT
Gardez les pièces de petite taille hors de la portée des
bébés et des enfants. En cas d’ingestion accidentelle,
veuillez contacter immédiatement un médecin.
ATTENTION:
POUR ÉVITER TOUT RISQUE
D’ÉLECTROCUTION, NE PAS ENLEVER LE
COUVERCLE (NI LE PANNEAU ARRIÈRE).
AUCUNE PIÈCE RÉPARABLE PAR
L’UTILISATEUR NE SE TROUVE À
L’INTÉRIEUR. ONFIER TOUT ENTRETIEN À
UN PERSONNEL QUALIFIÉ UNIQUEMENT.
D3-4-2-1-3_A1_Fr
D3-4-2-1-4*_A1_Fr
D3-4-2-1-7a_A1_Fr
D3-4-2-1-7b*_A1_Fr
D3-4-2-1-7c*_A1_Fr
NE PAS OUVRIR
Si la fiche d’alimentation secteur de cet appareil ne
convient pas à la prise secteur à utiliser, la fiche doit être
remplacée par une appropriée. Ce remplacement et la
fixation d’une fiche secteur sur le cordon d’alimentation
de cet appareil doivent être effectués par un personnel
de service qualifié. En cas de branchement sur une
prise secteur, la fiche de coupure peut provoquer une
sérieuse décharge électrique. Assurez-vous qu’elle est
éliminée correctement après sa dépose.
L’appareil doit être déconnecté en débranchant sa fiche
secteur au niveau de la prise murale si vous prévoyez
une période prolongée de non utilisation (par exemple
avant un départ en vacances).
ATTENTION
L’interrupteur
pas complètement celui-ci de sa prise secteur. Comme
la fiche d’alimentation fait office de dispositif de
déconnexion du secteur, elle devra être débranchée de
la prise secteur pour que l’appareil soit complètement
hors tension. Par conséquent, veillez à installer
l’appareil de telle manière que la fiche d’alimentation
puisse être facilement débranchée de la prise secteur
en cas d’accident. Pour éviter tout risque d’incendie, la
fiche d’alimentation devra aussi être débranchée de la
prise secteur si vous prévoyez une période prolongée
de non-utilisation (par exemple, avant un départ en
vacances).
Ce produit est destiné à une utilisation domestique
générale. Toute panne due à une utilisation autre qu’à
des fins privées (comme une utilisation à des fins
commerciales dans un restaurant, dans un autocar ou
sur un bateau) et qui nécessite une réparation sera aux
frais du client, même pendant la période de garantie.
Ce point d’exclamation, placé dans un
triangle équilatéral, a pour but d’attirer
l’attention de l’utilisateur sur la présence,
dans les documents qui accompagnent
l’appareil, d’explications importantes du
point de vue de l’exploitation ou de
l’entretien.
STANDBY/ON
D3-4-2-1-1_A1_Fr
D3-4-2-2-1a_A1_Fr
de cet appareil ne coupe
D3-4-2-2-2a*_A1_Fr
K041_A1_Fr
2
Page 21
NOTE IMPORTANTE SUR LE CABLE D’ALIMENTATION
Tenir le câble d’alimentation par la fiche. Ne pas
débrancher la prise en tirant sur le câble et ne pas
toucher le câble avec les mains mouillées. Cela risque de
provoquer un court-circuit ou un choc électrique. Ne pas
poser l’appareil ou un meuble sur le câble. Ne pas pincer
le câble. Ne pas faire de noeud avec le câble ou l’attacher
à d’autres câbles. Les câbles d’alimentation doivent être
posés de façon à ne pas être écrasés. Un câble abîmé peut
provoquer un risque d’incendie ou un choc électrique.
Vérifier le câble d’alimentation de temps en temps.
Contacter le service après-vente PIONEER le plus proche
ou le revendeur pour un remplacement.
Avertissement au sujet de l’adaptateur secteur
• Pour débrancher l’adaptateur secteur de la prise
d’alimentation, veillez à bien saisir l’adaptateur par
son boîtier. Si vous tirez sur le cordon d’alimentation,
celui-ci peut s’endommager et présenter un risque d’un
incendie, de choc électrique, et/ou d’électrocution.
• N’essayez pas de brancher ou de débrancher
l’adaptateur secteur avec des mains humides. Ceci
constitue un risque de choc électrique ou de mort par
électrocution.
• Ne branchez pas le cordon d’alimentation de
l’adapateur secteur dans une prise de courant don’t
la connexion ne serait pas ferme bien que les broches
de la fiche soient insérées à fond dans la prise. Il
pourrait se produire un dégagement de chaleur au
niveau de la prise, avec un risque d’incendie. Pour
le remplacement d’une prise d’alimentation de votre
installation domestique, veuillez contacter votre
revendeur ou un technicien qualifié.
Rangez l’adaptateur secteur hors de portée des petits
enfants.
Le cordon de l’adaptateur secteur pourrait s’enrouler par
accident autour du cou et causer un étouffement.
Si vous souhaitez vous débarrasser de cet appareil, ne le mettez pas à la poubelle avec vos ordures ménagères. Il existe un système de
collecte séparé pour les appareils électroniques usagés, qui doivent être récupérés, traités et recyclés conformément à la législation.
Les habitants des états membres de l’UE, de Suisse et de Norvège peuvent retourner gratuitement leurs appareils électroniques usagés aux
centres de collecte agréés ou à un détaillant (si vous rachetez un appareil similaire neuf).
Dans les pays qui ne sont pas mentionnés ci-dessus, veuillez contacter les autorités locales pour savoir comment vous pouvez vous débarrasser
de vos appareils.
Vous garantirez ainsi que les appareils dont vous vous débarrassez sont correctement récupérés, traités et recyclés et préviendrez de cette façon
les impacts néfastes possibles sur l’environnement et la santé humaine.
S002*_A1_Fr
Précaution concernant les ondes radio
Cet appareil utilise comme onde radio une fréquence de 2,4
GHz, c’est-à-dire une bande utilisée par d’autres systèmes
sans fil (Fours à micro-ondes, téléphones sans fil, etc.).
Si des parasites apparaissent sur les images télévisées, il
est possible que cet appareil (y compris ceux qu’il prend
en charge) provoquent des interférences sur le connecteur
d’entrée de votre téléviseur, les images vidéo, le tuner
satellite, etc. Dans ce cas, augmentez la distance entre
la prise d’entrée d’antenne et cet appareil (y compris les
produits pris en charge par cet appareil).
• Pioneer n’est pas responsable d’un mauvais
fonctionnement du produit Pioneer compatible due
à une erreur/défaillance de la connexion réseau et/
ou de l’appareil raccordé. Veuillez contacter votre
fournisseur de service Internet ou le fabricant du
périphérique du réseau.
• Un abonnement payant auprès d’un fournisseur
d’accès Internet est nécessaire pour utiliser Internet.
K058b_A1_Fr
Français
Découvrez les nombreux avantages offerts en enregistrant votre produit en ligne maintenant sur
http://www.pioneer.fr
(ou
http://www.pioneer.eu
).
3
Page 22
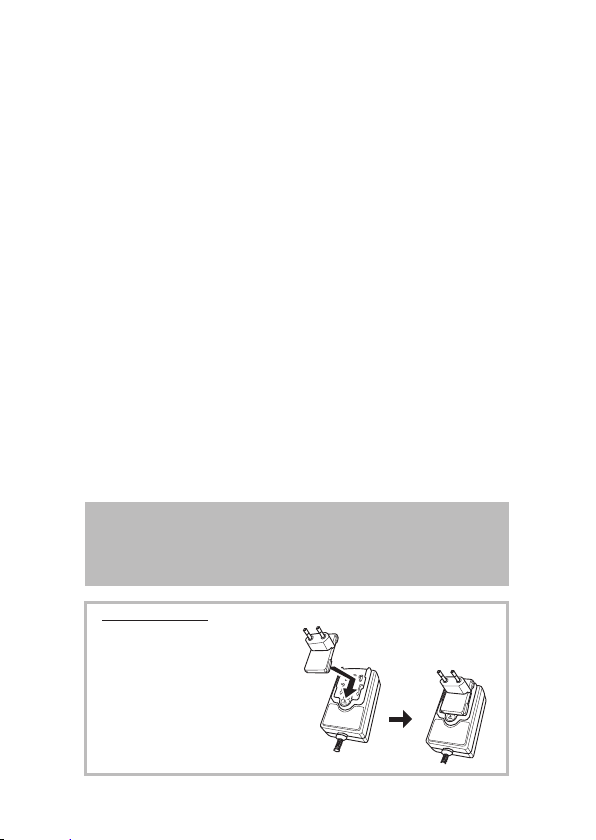
Table des matières
Avant de commencer ......................................................................5
Vérification des accessoires
Connectez les enceintes gauche et droite
Connexion de l’alimentation CC
Nom et fonctions des composants ................................................7
Vue principale
Vue arrière
Panneau arrière
Panneau supérieur
Pour commencer .............................................................................9
Mise sous tension
Mode APS
Lecture audio Bluetooth ...............................................................10
Autres connexions ........................................................................14
Informations additionnelles .........................................................15
Guide de dépannage
Précautions d’utilisation
Spécifications
* Il n’y aura pas de notifications supplémentaires dans ce livret s’il a ou aura des
modification de conception du produit lui-même.
* Merci d’avoir acheté un produit Pioneer, veuillez lire le mode d’emploi avant d’utiliser
l’appareil pour la première fois. Conservez ce mode d’emploi pour une référence
ultérieure.
Adaptateur secteur
Poussez la partie connecteur
correspondant à votre région
dans les glissières de guidage
de l’adaptateur secteur, comme
indiqué sur la figure ci-dessous,
jusqu’à ce qu’un déclic se produise.
4
Page 23
Avant de commencer
1. Vérification des accessoires
Vérifiez les articles suivants lors de l’ouverture de l’emballage:
• Adaptateur secteur × 1 (connecteur d’adaptateur secteur × 1)
• Câble d’enceinte × 1
• Pied en caoutchouc × 8
• Carte de garantie × 1
• Mode d’emploi (ce document)
2. Connectez les enceintes gauche et droite
Face arrière de l’enceinte droite Face arrière de l’enceinte gauche
Prise SPEAKER OUT
Câble d’enceinte
1.Dévissez la borne de quelques tours jusqu’à ce qu’il y ait un espace suffisant pour y
insérer le fil nu.
2.Branchez le fil à bande rouge sur la borne rouge (+), et le fil à bande noire sur la borne
noire (−).
3.Une fois le fil en place, revissez la borne jusqu’à ce que le fil soit parfaitement
immobilisé.
4.Branchez la fiche sur la prise SPEAKER OUT de l’enceinte droite.
Français
Remarque
• Pour éviter toute interférence magnétique ou bruit, ne placez pas ce produit trop près d’un
appareil à rayonnement.
5
Page 24
Avant de commencer
ATTENTION
• Les bornes des haut-parleurs sont sous une tension ACTIVE
DANGEREUSE.
Pour éviter tout risque de décharge électrique lors du
branchement et du débranchement des câbles de haut-parleur,
débranchez le cordon d’alimentation avant de toucher des
parties non isolées.
• Ne raccordez les enceintes fournies à aucun autre amplificateur.
Un dysfonctionnement ou un incendie pourraient se produire.
• Ne laissez pas les fils nus des enceintes entrer en contact l’un avec l’autre.
• Ne suspendez pas ces enceintes à un mur ou au plafond, car ils pourraient blesser
quelqu’un en cas de chute.
• Ne laissez aucun objet pénétrer ou tomber à l’intérieur de l’évent bass-reflex.
• Ne vous tenez pas debout sur les enceintes et ne vous asseyez pas dessus. Vous pourriez
vous blesser.
3. Connexion de l’alimentation CC
• Connectez la fiche CC de l’adaptateur secteur à la prise DC IN sur le panneau arrière. Puis
connectez la fiche d’alimentation qui se trouve à l’autre extrémité sur une prise secteur.
• Utilisez uniquement l’adaptateur secteur fourni dans ce paquet et n’utilisez aucun autre
adaptateur secteur de spécifications différentes.
Face arrière
de l’enceinte
droite
Incorrect
Face arrière
de l’enceinte
gauche
DC IN
6
Page 25
Nom et fonctions des composants
Vue principale
Enceinte gauche
Vue arrière
12 3
Panneau supérieur
Enceinte droite
Enceinte gaucheEnceinte droite
Panneau arrière
(page 8)
Fixation des pieds en caoutchouc
Fixez les pieds en caoutchouc
fournis sur la surface inférieure de
l’appareil.
4
1.
Prise DC IN
Connectez l’adaptateur secteur.
2.
Prise AUX IN
Connectez les appareils auxiliaires.
3.
Prise SPEAKER OUT pour l’enceinte
gauche
Branchez la fiche du câble d’enceinte.
4.
Borne de l’enceinte
Branchez le câble d’enceinte.
Français
7
Page 26
Nom et fonctions des composants
Panneau supérieur
12 3 4 5
6
1.
Indicateur MODE
• S’allume en vert quand l’appareil est
en mode Bluetooth.
• S’allume en orange quand l’appareil
est en mode AUX.
• En mode de veille, s’allume en rouge
pendant 3 seconde quand APS
réglé sur OFF (hors service).
• En mode de veille, s’allume en vert
pendant 3 seconde quand APS est
réglé sur ON (en service).
2.
STANDBY/ON
• Met l’appareil en veille et sous tension.
Maintenez la touche en foncée pour
mettre l’appareil en veille.
INPUT
• Commute le mode entre Bluetooth et
AUX.
3.
Lecture/pause
• Lecture/pause/reprise de lecture.
PAIRING
• Maintenez la touche enfoncée pour le
pairage d’un périphérique Bluetooth.
4.
Sourdine
• Coupe le son de l’appareil ou rétablit
le son.
L’indicateur MODE clignote
※
pendant la sourdine.
*1
est
• En mode de veuille, maintenez
enfoncée la touche pour mettre APS
en et hors service.
5.
VOL + /
-
• Ajuste le volume d’écoute.
Le volume d’écoute peut être ajusté
※
dans une page de 0 à 30 (cependant,
l’appareil n’est pas muni d’un
affichage visuel affichant le niveau
de volume). (Réglage par défaut: 10)
6.
Indicateur Bluetooth
• S’allume en bleu pour indiquer qu’un
périphérique Bluetooth est connecté.
• Clignote pendant l’attente de la
connexion Bluetooth.
• Clignote rapidement pour le pairage
Bluetooth.
*1
Reportez-vous à la page 9 pour APS.
8
Page 27
Pour commencer
Mise sous tension
Appuyez sur la touche [ STANDBY/ON]. L’indicateur s’allume.
L’appareil commute sur le dernier mode sélectionné.
Mode APS
• Si l’appareil est laissé inactif pendant 20 minutes, il commute automatiquement en mode
de veille.
• L’indicateur comment à clignoter 5 minutes avant la mise automatique en mode de veille.
Comment mettre hors service le mode APS
• Maintenez enfoncée la touche
mode de veille de façon que l’indicateur s’allume en rouge pendant 3 secondes.
• Si le mode APS est mis de nouveau en service, maintenez enfoncée la touche
en mode de veille de façon que l’indicateur s’allume en vert pendant 3 secondes.
Remarque
• Lors d’une lecture à faible niveau de volume, l’appareil peut commuter automatiquement
sur le mode veille. Veuillez augmenter le volume ou mettre hors service le mode APS.
[ (Sourdine)]
pour mettre hors service le mode APS en
[ (Sourdine)]
Français
9
Page 28
Lecture audio Bluetooth
Périphérique muni de la technologie
Ce produit vous permet d’écouter de la musique sans fil à partir d’un périphérique technologie
sans fil Bluetooth (téléphone portable, lecture musical numérique, etc.).
écouter de la musique d’un périphérique non technologie sans fil Bluetooth en utilisant un
émetteur audio Bluetooth en vente dans le commerce. Pour les détails, reportez-vous au mode
d’emploi de l’appareil technologie sans fil Bluetooth.
Remarque
*1
• Le périphérique utilisant la technologie sans fil Bluetooth doit être compatible avec les
profile A2DP.
• Pioneer ne garantie pas la connexion correcte ni le fonctionnement de cet appareil avec
tous les périphérique utilisant la technologie sans fil Bluetooth.
• La marque de mot et les logos Bluetooth
®
sont des marques déposées appartenant à
Bluetooth SIG, Inc. et toute utilisation de ces marques par PIONEER CORPORATION
est faite sous licence. Les autres marques de commerce ou noms commerciaux sont la
propriété de leur propriétaire respectif.
sans fil Bluetooth:
Téléphone portable
Périphérique muni de la technologie
sans fil Bluetooth:
Lecteur musical numérique
Périphérique non muni de la
technologie sans fil Bluetooth:
Lecteur musical numérique
+
Transmetteur audio Bluetooth
(en vente dans le commerce)
*1
Vous pouvez aussi
Pairage de cet appareil et de l’appareil à technologie sans fil Bluetooth.
Pour profiter de la musique à partir d’un périphérique à technologie sans fil Bluetooth, le
pairage de cet appareil est nécessaire. Assurez-vous de réaliser le pairage la première fois que
vous utilisez le système ou chaque fois que les données sont effacées.
Le “pairage” est l’étape essentielle pour enregistrer un périphérique muni de la technologie
sans fil Bluetooth afin de permettre les communications Bluetooth. Pour en savoir plus,
reportez-vous aussi au mode d’emploi de votre périphérique muni de la technologie sans fil
Bluetooth.
10
Page 29

Lecture audio Bluetooth
• Le pairage est nécessaire quand vous utilisez pour la première fois un appareil muni de la
technologie sans fil Bluetooth et cet appareil.
• Pour autoriser la communication Bluetooth, le pairage doit être réalisé à la fois avec votre
système et le périphérique muni de la technologie sans fil Bluetooth.
1. Appuyez sur la touche [INPUT] pour sélectionner le mode Bluetooth.
(Indicateur de mode: vert)
2. Maintenez enfoncée la touche [PAIRING] sur la télécommande jusqu’à
ce que vous entendiez deux “bips” consécutifs. Puis, l’indicateur bleu
sur le panneau supérieur clignote rapidement et l’appareil entre en
mode de pairage.
3. Mettez sous tension le périphérique muni de la technologie sans fil
Bluetooth pour laquelle vous souhaitez réaliser le pairage, placez
le périphérique à moins d’1 m du système et placez le en mode de
pairage.
Le pairage commence.
• En cas d’entre le code PIN, utilisez “0000”.
( Le code PIN “0000” seulement marche pour ce produit. )
4. Quand le périphérique muni de la technologie sans fil Bluetooth
est connecté, l’indicateur bleu sur le panneau supérieur s’arrête de
clignoter et reste allumé.
5. Démarrez la lecture du contenu musical mémorisé sur le périphérique
muni de la technologie sans fil Bluetooth.
Connectez le dernier périphérique muni de la technologie sans fil Bluetooth pour lequel le
pairage a été réalisé
La prochaine fois que l’appareil est mis sous tension en mode Bluetooth, il se connecte
automatiquement à l’appareil qui a été connecté en dernier.
Connexion d’un appareil Bluetooth apparié précédent
1. Si vous souhaitez connecter un autre appareil apparié à la place du
dernier appareil apparié, assurez-vous que la connexion Bluetooth
du dernier appareil est déconnectée. Puis, l’indicateur bleu sur le
panneau supérieur clignote doucement et l’appareil passe du mode
de veille en mode de connexion.
*Ou alors, il y a une autre façon de mettre l’appareil en mode de pairage.
11
Français
Page 30

Lecture audio Bluetooth
2. Mettez sous tension l’autre appareil apparié et sélectionnez cet
appareil à partir de la liste des périphériques Bluetooth.
3. La connexion avec les autres périphériques a réussi et l’indicateur
bleu arrête de clignoter et reste allumé.
• La plage de fonctionnement de l’audio Bluetooth est de 10 m maximum. (Mesuré en
espace ouvert. Les murs et les structures peuvent affecter la plage du périphérique.)
Précaution au sujet des ondes radio
Cet appareil utilise une fréquence radio de 2,4 GHz, qui est une bande utilisée par les
autres systèmes sans fil (voir la liste ci-dessous). Pour éviter le bruit ou l’interruption de la
communication, n’utilisez pas cet appareil près de tels autres appareils, ou assurez-vous que
ces périphériques sont hors tension pendant l’utilisation.
• Téléphone sans fil
• Télécopie sans fil
• Four à micro-ondes
• Périphérique réseau sans fil
• Appareil AV sans fil.
• Contrôleur sans fil pour console de jeu
• Assistant de santé à micro-ondes
• Certains moniteurs pour bébés
Autres appareils moins ordinaires qui peuvent fonctionner sur la même fréquence:
• Systèmes anti-vol
• Stations radio amateur (HAM)
• Systèmes de gestion d’entrepôts logistiques
• Systèmes de discrimination pour les véhicules ferroviaires ou d’urgence
Remarque
• Dans le cas où du bruit apparaît sur l’image de votre téléviseur, il est possible qu’un
périphérique sans fil Bluetooth activé ou cet appareil (y compris les produits pris en
charge par cet appareil) cause des interférences du signal avec le connecteur d’entrée
d’antenne de votre téléviseur, platine vidéo, tuner satellite, etc Dans ce cas, augmentez
la distance entre le connecteur d’entrée d’antenne et le périphérique sans fil Bluetooth
activé ou cet appareil (y compris les produits pris en charge par cet appareil).
12
Page 31

Lecture audio Bluetooth
• S’il y a quelque chose qui bloque le chemin entre cet appareil (y compris les
périphériques pris en charge par cet appareil) et le périphérique muni de la technologie
sans fil Bluetooth (comme une porte en métal, mur en béton ou isolation contenant du
papier d’aluminium), vous devrez peut-être modifier l’emplacement de votre système
pour empêcher le bruit et les interruptions.
Plage d’utilisation
L’utilisation de cet appareil est limitée à une utilisation domestique. (La distance de
transmission peut être réduite en fonction de l’environnement de communication.)
Dans les endroit suivant, des mauvaises conditions ou une impossibilité de recevoir les ondes
radio peuvent entraîner une interruption ou un arrêt du son.
• Dans les constructions en béton armé ou en acier ou les bâtiments à structure métallique.
• Près d’un grand meuble en métal.
• Dans une foule ou près d’un immeuble ou d’un obstacle.
• Dans un endroit exposé à un champ magnétique, à de l’électricité statique ou des
interférence d’ondes radio d’un appareil de communication radio utilisant la même bande
de fréquence (2,4 GHz) que cet appareil, comme un appareil réseau sans fil 2,4 GHz ou un
four à micro-ondes.
• Si vous habitez dans une zone résidentielle très peuplée (appartement, maison en ville,
etc.) et que le four à micro-ondes de votre voisin est placé près de votre système, vous
pouvez faire l’expérience d’interférence d’ondes radio. Si cela se produit, déplacez votre
appareil dans un endroit différent. Quand les micro-ondes ne sont pas utilisées, il n’y a pas
d’interférences radio.
Réflexions des ondes radio
Les ondes radio reçues par cet appareil comprennent les ondes radio provenant directement
de l’appareil muni de la technologie sans fil Bluetooth (onde directe) et les vagues venant
de directions différentes en raison de la réflexion des murs, des meubles et des bâtiments
(ondes réfléchies). Les ondes réfléchies (en raison des obstacles et des objets réfléchissants)
produisent en outre une variété d’ondes réfléchies ainsi que des variations dans les conditions
de réception selon les endroits. Si le son ne peut pas être reçu correctement en raison de ce
phénomène, essayez de déplacer un peu l’emplacement de l’appareil muni de la technologie
sans fil Bluetooth. Notez également que le son peut être interrompu en raison des ondes
réfléchies quand une personne traverse ou s’approche de l’espace entre cet appareil et le
périphérique muni de la technologie sans fil Bluetooth.
Français
13
Page 32

Autres connexions
• Avant de faire ou de changer les connexions, mettez l’appareil hors tension et débranchez
la fiche d’alimentation de la prise secteur.
• Lors de la lecture d’une musique avec le mode AUX, le volume de la musique varie en
fonction du volume du lecteur musical. S’il y a une distorsion quand le volume est réglé au
maximum, réduisez le volume du lecture musical pour éviter la distorsion.
1. Connexion d’appareils auxiliaires
Connectez la prise AUX IN du panneau arrière à l’appareil de lecture auxiliaire.
Lecteur audio
numérique, etc.
Câble à mini-fiche stéréo
(en vente dans le commerce)
Le panneau arrière de cet appareil
2. Appuyez sur la touche [INPUT]. (Indicateur de mode: orange)
3. Démarrez la lecture de l’appareil auxiliaire.
1414
Page 33

Informations additionnelles
Guide de dépannage
AVERTISSEMENT
• Ne démontez jamais le boîtier de cet appareil.
On prend souvent une opération incorrecte pour un problème ou un mauvais fonctionnement.
Si vous pensez qu’il y a un problème avec cet appareil, vérifiez les points ci-dessous. Parfois,
le problème peut aussi venir d’un autre appareil. Inspectez les autres appareils et les prises
électriques utilisées. Si le problème ne peut pas être corrigé même après la vérification des
points ci-dessous, consultez votre
centre de service autorisé Pioneer le plus proche ou votre revendeur pour une réparation.
• Si l’appareil ne fonctionne pas normalement à cause d’effets extérieurs tels que de
l’électricité statique, débranchez la fiche secteur de la prise murale et rebranchez-la pour
rétablir les conditions de fonctionnement normales.
Problème Remède
L’appareil ne se met pas sous
tension.
L’appareil se met
automatiquement en veille si
aucune opération de l’utilisateur
n’est effectuée.
Aucun son n’est sorti quand un
mode est sélectionné.
• Débranchez la fiche secteur de la prise murale et
rebranchez-la.
• Quand aucun appareil n’est connecté au
sélectionné à la prise AUX IN, et que c’est appareils
ne fonctionne pas pendant 20 minutes ou plus
après sélection du mode AUX, l’appareil se met
automatiquement hors tension. (Uniquement
quand le mode APS (page 9) est en service (ON).)
• Assurez-vous que l’appareil est connecté
correctement.
Français
15
Page 34

Informations additionnelles
Problème Remède
Un appareil muni d’e la
technologie sans fil Bluetooth
ne peut pas être connecté ni
commandé. Le son de l’appareil
muni de la technologie sans fil
Bluetooth n’émet pas ou le son
est interrompu.
* La distance de transmission en ligne droite est une estimation. La distance actuelle des
transmission peut différer en fonction des conditions de l’environnement.
• Vérifiez qu’aucun objet émettant des ondes
électromagnétique dans la bande 2,4 GHz (four à
micro-ondes, appareil réseau sans fil ou appareil
muni de la technologie sans fil Bluetooth) est près
de l’appareil. Si un tel objet est près de l’appareil,
éloigné l’appareil de lui. Ou alors, arrêtez d’utiliser
l’objet émettant les ondes électromagnétiques.
• Vérifiez que l’appareil muni de la technologie sans
fil Bluetooth n’est pas trop loin de l’appareil et
qu’il n’y a pas d’obstacle entre l’appareil muni de
la technologie sans fil Bluetooth et cet appareil.
Placez l’appareil muni de la technologie sans fil
Bluetooth et cet appareil de façon que la distance
entre eux soit inférieure à 10 m* et qu’aucun
obstacle ne se trouve entre eux.
• L’appareil muni de la technologie sans fil
Bluetooth n’est peut-être pas réglé sur un mode de
communication prenant en charge la technologie
sans fil Bluetooth.
Vérifiez le réglage de l’appareil muni de la
technologie sans fil Bluetooth.
• Vérifiez si le pairage est correct. Le réglage du
pairage a été supprimé de cet appareil ou de
l’appareil muni de la technologie sans fil Bluetooth.
Refaites le pairage.
• Vérifiez si le profile est correct. Utilisez un appareil
muni de la technologie sans fil Bluetooth prend en
charge le profile A2DP.
16
Page 35

Informations additionnelles
Précautions d’utilisation
Lors du déplacement de cet appareil
Lors du déplacement de cet appareil, puis
appuyez sur la touche
et débranchez le cordon d’alimentation.
Il y a des risques de dommage quand un
autre appareil est connecté à la prise AUX
IN.
Emplacement d’installation
• Ne placez pas cet appareil sur un
téléviseur ou un moniteur couleur.
De plus, installez-le à l’écart des
platines à cassette ou d’autres
appareils affectées par les forces
magnétiques.
Évitez les emplacements suivants
• Les endroits exposées directement au
soleil.
• Les endroits humides ou mal ventilés
• Les endroits très chauds
• Les endroits exposés aux vibrations
• Les endroits où il y a trop de poussière
ou de fumée de cigarette
• Les endroits exposés à la suie, à la
vapeur ou à la chaleur (cuisines, etc.)
[ STANDBY/ON]
Ne déposez aucun objet sur l’appareil
Ne posez rien sur le dessus de cet appareil.
Ne bouchez pas les orifices de ventilation.
N’utilisez pas cet appareil sur une
couverture, un lit, un canapé,etc. ou quand
il est enveloppé dans un tissu, etc. Cela
empêchera la chaleur de se disperser et
cela pourrait entraîner des dommages.
Ne l’exposez pas à la chaleur.
Ne placez pas cet appareil sur un
amplificateur ou un autre appareil qui
génère de la chaleur.
Lors d’un montage sur bâti, placez-le sur
l’étagère se trouvant sous l’amplificateur
pour éviter la chaleur dégagée par
l’amplificateur ou les autres appareils audio.
• Mettez cet appareil hors tension quand
vous ne l’utilisez pas.
• En fonction des conditions du signal,
des bandes peuvent apparaître sur un
écran de télévision et du bruit peut
perturber le son de la radio lorsque
l’alimentation de l’appareil est allumé.
Si cela se produit, mettez cet appareil
hors tension.
Français
17
Page 36

Informations additionnelles
Nettoyage de cet appareil
• Débranchez le cordon d’alimentation
de la prise secteur murale lors du
nettoyage de cet appareil.
• Essuyez cet appareil avec un chiffon
doux. Pour les saletés tenace,
appliquer un détergent neutre dilué
dans 5 à 6 parties d’eau sur un chiffon
doux, essorez-le soigneusement,
essuyez les saletés, puis essuyez avec
un chiffon doux et sec.
• L’alcool, les diluants, le benzène, les
insecticides, etc, peuvent entraîner un
écaillement de l’impression ou de la
peinture. De plus, laisser des produits
en caoutchouc ou en vinyle en contact
avec l’appareil pendant longtemps
pourrait ternir le boîtier.
• Lorsque vous utilisez des lingettes
imprégnés de produits chimiques, etc,
lisez attentivement les précautions
fournies avec les lingettes.
Spécifications
• Section de l’amplificateur
Puissance de sortie (RMS)
Avant gauche/droite . . . . . . . 25 W + 25 W
(RMS, 1 kHz, 10 %, D.H.T., 6 Ω)
• Section des enceintes
Système . . . . . . . . . . . . . . . . . Système 2 voies
Enceintes:
Tweeter. . . . . Cône de 2,5 cm × 1/chaque
Haut-parleur de graves
. . . . . . . . . . . . Cône de 10 cm × 1/chaque
Plage de fréquences . . . . . . . 50 Hz à 20 kHz
• Divers
Alimentation
. . . . . . . . . . . . . CA 100 V à 240 V, 50 Hz/60 Hz
CC 20 V, 2,4 A
Consommation . . . . . . . . . . . . . . . . . . . . .48 W
En veille . . . . . . . . . . . . . . . . . . . . . . . 0,5 W
Dimensions
. . . . 140 mm (L) x 218 mm (H) x 160 mm (P)/
chaque
Poids (sans l’emballage et l’adaptateur)
. . . . . . . . . . . . . . . . . . . . . . . . . . . . . . . . . . 3,8 kg
• Accessoires
Câble d’enceinte . . . . . . . . . . . . . . . . . . . . . . . 1
Adaptateur CA . . . . . . . . . . . . . . . . . . . . . . . . 1
Pied en caoutchouc . . . . . . . . . . . . . . . . . . . . 8
Carte de garantie . . . . . . . . . . . . . . . . . . . . . . 1
Mode d’emploi (ce document)
Remarque
• Les caractéristiques et la présentation
peuvent être modifiées sans avis à fin
d’amélioration.
18
Page 37

Page 38

IMPORTANTE
RISK OF ELECTRIC SHOCK
La luz intermitente con el símbolo de punta
de flecha dentro un triángulo equilátero.
Está convenido para avisar el usuario de la
presencia de “voltaje peligrosa” no aislada
dentro el producto que podría constituir un
peligro de choque eléctrico para las
personas.
ADVERTENCIA
Este aparato no es impermeable. Para evitar el riesgo
de incendio y de descargas eléctricas, no ponga ningún
recipiente lleno de líquido (como pueda ser un vaso
o un florero) cerca del aparato ni lo exponga a goteo,
salpicaduras, lluvia o humedad.
ADVERTENCIA
Antes de enchufar el aparato a la corriente, lea la sección
siguiente con mucha atención.
La tensión de la red eléctrica es distinta según el país o
región. Asegúrese de que la tensión de la alimentación
de la localidad donde se proponga utilizar este aparato
corresponda a la tensión necesaria (es decir, 230 V ó 120
V) indicada en la etiqueta del adaptador de CA.
ADVERTENCIA
Para evitar el peligro de incendio, no ponga nada con
fuego encendido (como pueda ser una vela) encima del
aparato.
PRECAUCIÓN PARA LA VENTILACIÓN
Cuando instale este aparato, asegúrese de dejar espacio
en torno al mismo para la ventilación con el fin de mejorar
la disipación de calor (por lo menos 10 cm encima, 10 cm
detrás, y 10 cm en cada lado).
ADVERTENCIA
Las ranuras y aberturas de la caja del aparato
sirven para su ventilación para poder asegurar un
funcionamiento fiable del aparato y para protegerlo contra
sobrecalentamiento. Para evitar el peligro de incendio,
las aberturas nunca deberán taparse ni cubrirse con nada
(como por ejemplo, periódicos, manteles, cortinas) ni
ponerse en funcionamiento el aparato sobre una alfombra
gruesas o una cama.
Entorno de funcionamiento
Temperatura y humedad del entorno de funcionamiento
+5 °C a +35 °C; menos del 85 % de humedad relativa
(rejillas de refrigeración no obstruidas)
No instale este aparato en un lugar mal ventilado, ni en
lugares expuestos a alta humedad o a la luz directa del sol
(o de otra luz artificial potente).
ADVERTENCIA
Guarde las piezas pequeñas fuera del alcance de los
niños y bebés. En caso de ingestión accidental, acuda de
inmediato al médico.
ATENCIÓN:
PARA PREVENIR EL PELIGRO DE CHOQUE
ELÉCTRICO NO REMOVER LA TAPA NI LAS
PARTES DENTRO NO UTILIZADAS,
LLAMAR UNA PERSONA CUALIFICADA.
D3-4-2-1-3_A1_Es
D3-4-2-1-4*_A1_Es
D3-4-2-1-7a_A1_Es
D3-4-2-1-7b*_A1_Es
D3-4-2-1-7c*_A1_Es
CAUTION
DO NOT OPEN
Si la clavija del cable de alimentación de CA de este
aparato no se adapta a la toma de corriente de CA
que usted desea utilizar, deberá cambiar la clavija por
otra que se adapte apropiadamente. El reemplazo y
montaje de una clavija del cable de alimentación de
CA sólo deberá realizarlos personal de servicio técnico
cualificado. Si se enchufa la clavija cortada a una toma
de corriente de CA, puede causar fuertes descargas
eléctricas. Asegúrese de que se tira de la forma
apropiada después de haberla extraído.
El aparato deberá desconectarse desenchufando la
clavija de la alimentación de la toma de corriente
cuando no se proponga utilizarlo durante mucho tiempo
(por ejemplo, antes de irse de vacaciones).
PRECAUCIÓN
El interruptor de la alimentación
este aparato no corta por completo toda la alimentación
de la toma de corriente de CA. Puesto que el enchufe
de alimentación hace las funciones de dispositivo
de desconexión de la corriente para el aparato, para
desconectar toda la alimentación del aparato deberá
desenchufar el enchufe de la toma de corriente de CA.
Por lo tanto, asegúrese de instalar el aparato de modo
que el enchufe de alimentación pueda desenchufarse
con facilidad de la toma de corriente de CA en caso de
un accidente. Para evitar correr el peligro de incendio, el
enchufe de alimentación también deberá desenchufarse
de la toma de corriente de CA cuando no se tenga la
intención de utilizarlo durante mucho tiempo de forma
continua (por ejemplo, antes de irse de vacaciones).
Este producto es para tareas domésticas generales.
Cualquiera avería debida a otra utilización que tareas
domésticas (tales como el uso a largo plazo para
motivos de negocios en un restaurante o el uso en un
coche o un barco) y que necesita una reparación hará
que cobrarla incluso durante el período de garantía.
2
El punto exclamativo dentro un triángulo
equilátero convenido para avisar el usuário
de la presencia de importantes
instrucciones sobre el funcionamiento y la
manutención en la libreta que acompaña el
aparato.
D3-4-2-1-1_A1_Es
D3-4-2-2-1a_A1_Es
STANDBY/ON
D3-4-2-2-2a*_A1_Es
de
K041_A1_Es
Page 39

PRECAUCIONES CONCERNIENTES A LA MANIPULACIÓN
DEL CABLE DE ALIMENTACIÓN
Tome el cable de alimentación por la clavija. No extraiga
la clavija tirando del cable. Nunca toque el cable de
alimentación cuando sus manos estén mojadas, ya que
esto podría causar cortocircuitos o descargas eléctricas.
No coloque la unidad, algún mueble, etc., sobre el cable
de alimentación. Asegúrese de no hacer nudos en el cable
ni de unirlo a otros cables. Los cables de alimentación
deberán ser dispuestos de tal forma que la probabilidad de
que sean pisados sea mínima. Una cable de alimentación
dañado podrá causar incendios o descargas eléctricas.
Revise el cable de alimentación está dañado, solicite el
reemplazo del mismo al centro de servicio autorizado
PIONEER más cercano, o a su distribuidor.
PRECAUCIONES relativas al adaptador de CA
• Asegúrese de sujetar el adaptador de CA cuando lo
desenchufe de la toma de corriente. Si tira del cable
de alimentación, el adaptador podría resultar dañado y
como consecuencia podría producirse un incendio y/o
una descarga eléctrica.
• No intente enchufar ni desenchufar el adaptador de
CA con las manos húmedas. Podría producirse una
descarga eléctrica.
• No inserte el cable de alimentación del adaptador de
CA en una toma de corriente en la que la conexión
esté suelta, pese a poder insertar las clavijas
completamente.
Podrían generarse altas temperaturas y provocar un
incendio.
Para cambiar la toma de corriente póngase en
contacto con el distribuidor o con un electricista.
Mantenga el adaptador de CA fuera del alcance de los
niños.
El cable del adaptador de CA podría enrollarse alrededor
del cuello accidentalmente y provocar asfixia.
Si desea deshacerse de este producto, no lo mezcle con los residuos generales de su hogar. De conformidad con la legislación
vigente, existe un sistema de recogida distinto para los productos electrónicos que requieren un procedimiento adecuado de
tratamiento, recuperación y reciclado.
Las viviendas privadas en los estados miembros de la UE, en Suiza y Noruega pueden devolver gratuitamente sus productos electrónicos usados
en las instalaciones de recolección previstas o bien en las instalaciones de minoristas (si adquieren un producto similar nuevo).
En el caso de los países que no se han mencionado en el párrafo anterior, póngase en contacto con sus autoridades locales a fin de conocer el
método de eliminación correcto.
Al actuar siguiendo estas instrucciones, se asegurará de que el producto de desecho se somete a los procesos de tratamiento, recuperación y
reciclaje necesarios, con lo que se previenen los efectos negativos potenciales para el entorno y la salud humana.
Registre su producto en
S002*_A1_Es
http://www.pioneer.es
Precaución con las ondas de radio
Esta unidad emplea una frecuencia de onda de radio de
2,4 GHz, frecuencia que también utilizan otros sistemas
inalámbricos como hornos microondas, teléfonos
inalámbricos, etc. En el caso de que aparezca ruido en
la imagen de su televisor, existe la posibilidad de que
esta unidad (o los productos compatibles con ella) estén
causando interferencias en la señal con el conector de
entrada de la antena de su televisión, vídeo, sintonizador
satélite, etc. Si esto ocurre, aumente la distancia de
separación entre el conector de entrada de la antena y esta
unidad (y los productos compatibles con ella).
• Pioneer no es responsable del mal funcionamiento de
los productos compatibles con Pioneer por motivos
de mal funcionamiento o errores de comunicación
relacionados con su conexión de red y/o el equipo
que haya conectado. Póngase en contacto con su
proveedor de servicios de Internet o con el fabricante
del dispositivo de red.
• Para utilizar Internet es necesario firmar un contrato
independiente con un proveedor de servicios de
Internet o realizar el pago correspondiente.
K058b_A1_Es
(o en
http://www.pioneer.eu)
Descubra los beneficios de registrarse on-line:
Español
3
Page 40

Índice
Antes de comenzar .........................................................................5
Contenido de la caja
Conecte los altavoces izquierdo y derecho
Conexión de la alimentación de CC
Funciones y nombres de los componentes ...................................7
Vista principal
Vista trasera
Panel posterior
Panel superior
Primeros pasos ................................................................................9
Encendido
Modo APS
Reproducción de audio mediante Bluetooth ..............................10
Otras conexiones ..........................................................................14
Información adicional ...................................................................15
Solución de problemas
Precauciones de uso
Especificaciones
* No se incluirán notificaciones adicionales en este manual en caso de que se
produzcan modificaciones en el diseño del producto.
* Gracias por adquirir un producto Pioneer. Lea las instrucciones de funcionamiento
antes de utilizarlo por primera vez para hacerlo de forma correcta. Guarde estas
instrucciones de funcionamiento para usarlas como referencia en el futuro.
Adaptador de corriente, de tipo conmutado
Deslice el enchufe de alimentación
a lo largo de las guías del adaptador
de CA, tal y como se indica en la
figura inferior, hasta que oiga un
clic.
4
Page 41

Antes de comenzar
1. Contenido de la caja
Asegúrese de que la caja contiene los siguientes elementos al abrirla:
• Adaptador de CA × 1 (incluye Enchufe × 1)
• Cable para altavoz × 1
• Pies de goma × 8
• Tarjeta de garantía × 1
• Instrucciones de funcionamiento (este manual)
2. Conecte los altavoces izquierdo y derecho
Parte trasera del altavoz derecho Parte trasera del altavoz izquierdo
Toma
SPEAKER OUT
Cable para altavoz
1.Desenrosque el terminal unas cuantas vueltas hasta que haya espacio suficiente para
insertar el cable expuesto.
2.Conecte el cable con la cinta roja al terminal rojo (+), y el cable con la cinta negra al
terminal negro (−).
3.Una vez que el cable esté en la posición correcta, apriete el terminal hasta que el cable
quede fijado.
4.Conecte el conector de clavija a la toma SPEAKER OUT del altavoz derecho.
Español
Nota
• Para evitar interferencias magnéticas o ruidos no deseados, no coloque este producto
demasiado cerca de dispositivos de radiación.
5
Page 42

Antes de comenzar
PRECAUCIÓN
• Por estos terminales de altavoz circula tensión ACTIVA que
es PELIGROSA.
Para evitar el peligro de descargas eléctricas al conectar o
desconectar los cables de altavoz, desenchufe el cable de
alimentación antes de tocar las partes de los cables que no
están aisladas.
• No conecte los altavoces suministrados con ningún otro
amplificador.
Esto podría producir un fallo de funcionamiento o un incendio.
• No permita que los cables del altavoz pelados entren en contacto entre sí.
• No fije estos altavoces a la pared ni al techo, ya que podrían provocar lesiones en el caso
de que se cayesen.
• No permita que ningún objeto se caiga ni se coloque sobre los conductos reflectores de
bajos.
• No se ponga de pie ni se siente sobre los altavoces. Podría sufrir lesiones.
3. Conexión de la alimentación de CC
• Conecte el enchufe de CC del adaptador de CA a la toma DC IN situada en el panel
posterior. A continuación, conecte el enchufe en el otro extremo de la toma de corriente.
• Utilice únicamente el adaptador de CA incluido en la caja, no utilice un adaptador de
corriente de otras características.
Parte trasera
del altavoz
derecho
DC IN
Incorrecto
Parte trasera
del altavoz
izquierdo
6
Page 43

Funciones y nombres de los componentes
Vista principal
Altavoz izquierdo
Vista trasera
12 3
Altavoz derecho
Altavoz izquierdoAltavoz derecho
Panel posterior
Panel superior
(página 8)
7
Colocación de las patas de goma
Coloque las patas de goma en la
superficie inferior de la unidad.
4
1.
Toma DC IN
Conecte el adaptador de CA.
2.
Toma AUX IN
Conecte componentes auxiliares.
3.
Toma SPEAKER OUT para el altavoz
izquierdo
Conecte el conector de clavija del cable
del altavoz.
4.
Terminal del altavoz
Conecte el cable del altavoz.
Español
Page 44

Funciones y nombres de los componentes
Panel superior
12 3 4 5
6
1.
Indicador de MODO
• Se ilumina en color verde cuando la
unidad está en modo Bluetooth.
• Se ilumina en color naranja cuando la
unidad está en modo AUX.
• En el modo de espera, se ilumina en
color rojo durante 3 segundos cuando
el modo APS
• En el modo de espera, se ilumina
en color verde durante 3 segundos
cuando el modo APS está activado.
2.
STANDBY/ON
• Cambia la unidad entre modo de
espera y encendido.
Mantenga el botón pulsado para
cambiar al modo de espera.
INPUT
• Cambia entre el modo Bluetooth y el
modo AUX.
3.
Reproducción / Pausa
• Inicia/pausa/reanuda la reproducción.
PAIRING
• Mantenga pulsado el botón para
iniciar la sincronización con un
dispositivo Bluetooth.
*1
está desactivado.
4.
Silencio
• Silencia la unidad o restablece el
sonido.
Cuando el sonido está silenciado el
※
indicador MODE parpadea.
• En el modo de espera, mantenga
pulsado el botón para activar y
desactivar APS.
5.
VOL + /
-
• Ajuste del volumen de escucha.
El ajuste de escucha de volumen
※
oscila entre el 0 y el 30. Sin
embargo, la unidad no cuenta con
una pantalla que indique de forma
visual el nivel de volumen (ajuste
predeterminado: 10).
6.
Indicador de Bluetooth
• Se ilumina en color azul cuando hay
un dispositivo Bluetooth conectado.
• Parpadea mientras está a la espera
de la conexión de un dispositivo
Bluetooth
• Cuando la unidad se está
sincronizando por medio de la
conexión Bluetooth, el indicador
parpadea rápidamente.
*1
Consulte la página 9 para obtener
información sobre APS.
8
Page 45

Primeros pasos
Encendido
Pulse el botón [ STANDBY/ON]. El indicador se encenderá.
La unidad cambia al último modo seleccionado.
Modo APS
• Tras 20 minutos de inactividad, esta unidad cambia automáticamente al modo de espera.
• 5 minutos antes de cambiar automáticamente al modo de espera, el indicador empieza a
parpadear.
Cómo desactivar el modo APS
• Mantenga pulsado el botón
espera, y el indicador se iluminará en color rojo durante 3 segundos.
• Si el modo APS se vuelve a encender, mantenga pulsado el botón
modo de espera y el indicador se iluminará en color verde durante aproximadamente 3
segundos.
Nota
• Cuando se reproduce a un volumen bajo, puede que la unidad cambie a modo de espera
automáticamente. Suba el volumen o desactive el modo APS.
[ (Silencio)]
para desactivar el modo APS en el modo de
[ (Silencio)]
en el
Español
9
Page 46

Reproducción de audio mediante Bluetooth
Dispositivo equipado con tecnología
Este producto le permite disfrutar de su música de forma inalámbrica desde un dispositivo
equipado con tecnología inalámbrica Bluetooth (teléfono móvil, reproductor de música
digital, etc.).
*1
También puede disfrutar de su música desde un dispositivo no equipado con
tecnología inalámbrica Bluetooth utilizando un transmisor de audio Bluetooth que podrá
encontrar a la venta. Si desea obtener información detallada, consulte el manual del usuario
del dispositivo equipado con tecnología inalámbrica Bluetooth.
Nota
*1
• El dispositivo equipado con tecnología inalámbrica Bluetooth debe ser compatible con
perfiles A2DP.
• Pioneer no garantiza que la conexión se realice correctamente ni que esta unidad
funcione con cualquier dispositivo equipado con tecnología inalámbrica Bluetooth.
• La marca literal y los logotipos Bluetooth
®
son marcas registradas propiedad de
Bluetooth SIG, Inc., y cualquier uso de dichas marcas por PIONEER CORPORATION
se hace bajo licencia. Otras marcas y nombres comerciales son propiedad de sus
respectivos propietarios.
inalámbrica Bluetooth:
Teléfono móvil
Dispositivo equipado con tecnología
inalámbrica Bluetooth:
Reproductor de música digital
Dispositivo sin tecnología
inalámbrica Bluetooth:
Reproductor de música digital
+
Transmisor de audio Bluetooth
(a la venta)
Sincronización de la unidad y de un dispositivo con tecnología inalámbrica Bluetooth
Para disfrutar de un dispositivo equipado con tecnología inalámbrica Bluetooth deberá
sincronizarlo con este producto. Asegúrese de llevar a cabo el proceso de sincronización la
primera vez que utilice el sistema o siempre que se eliminen los datos de sincronización.
La “sincronización” es el paso necesario para registrar el dispositivo con tecnología
inalámbrica Bluetooth y habilitar las comunicaciones mediante Bluetooth. Si desea obtener
más información, consulte, también, las instrucciones de funcionamiento del dispositivo con
tecnología inalámbrica Bluetooth.
10
Page 47

Reproducción de audio mediante Bluetooth
• La sincronización es indispensable cuando utiliza por primera vez un dispositivo con
tecnología inalámbrica Bluetooth y esta unidad.
• Para habilitar las comunicaciones mediante Bluetooth, debe llevar a cabo la sincronización
tanto con el sistema como con el dispositivo con tecnología inalámbrica Bluetooth.
1. Pulse el botón [INPUT] para seleccionar el modo Bluetooth. (Color del
indicador: verde)
2. Mantenga pulsado el botón [PAIRING] hasta que oiga dos pitidos
consecutivos. A continuación, el indicador se iluminará en color
azul y parpadeará rápidamente, y la unidad pasará al modo de
sincronización.
3. Encienda el dispositivo con tecnología inalámbrica Bluetooth con
el que desea sincronizar la unidad, coloque el dispositivo a 1 m del
sistema y active el modo de sincronización del dispositivo.
Comienza la sincronización.
• En caso de tener que introducir un código PIN, utilice “0000”.
(con este producto solo funciona el código PIN “0000”. )
4. Al conectar el dispositivo con tecnología inalámbrica Bluetooth, el
indicador azul del panel superior dejará de parpadear y se quedará
fijo.
5. Empiece a reproducir el contenido musical almacenado en el
dispositivo con tecnología inalámbrica Bluetooth.
Conexión del último dispositivo con tecnología inalámbrica Bluetooth sincronizado
La próxima vez que se active el modo Bluetooth de la unidad, esta se conectará
automáticamente con el equipo del último dispositivo conectado previamente.
Español
Conexión de los dispositivos Bluetooth sincronizados previamente
1. Si desea conectar otro dispositivo sincronizado en lugar del último
dispositivo que sincronizó, asegúrese de desconectar la conexión
Bluetooth del último dispositivo sincronizado. A continuación, el
indicador se iluminará en color azul y parpadeará lentamente, y la
unidad pasará al modo de espera de conexión.
*Como alternativa, existe otro método para activar el modo sincronización en la unidad.
11
Page 48

Reproducción de audio mediante Bluetooth
2. Encienda otro dispositivo sincronizado y seleccione esta unidad en la
lista de conexiones Bluetooth del dispositivo.
3. La conexión con otros dispositivos se ha realizado con éxito. El
indicador azul dejará de parpadear y se quedará fijo.
• El alcance de funcionamiento del audio Bluetooth es de hasta 10 m (distancias calculadas
en un espacio abierto. Las paredes y otras estructuras pueden afectar al alcance del
dispositivo).
Precaución con las ondas de radio
Esta unidad emplea una frecuencia de onda de radio de 2,4 GHz, frecuencia que también
utilizan otros sistemas (consulte la siguiente lista). Para evitar la presencia de ruidos o
interrupciones en la comunicación, no coloque la unidad cerca de tales dispositivos, o
asegúrese de que esos dispositivos están apagados mientras utiliza esta unidad.
• Teléfonos inalámbricos
• Faxes inalámbricos
• Hornos microondas
• Dispositivos con LAN inalámbrica
• Equipo de AV inalámbrico
• Mandos de videoconsola inalámbricos
• Equipos médicos por microondas
• Algunos vigilabebés
Otros equipos menos comunes que puedan utilizar la misma frecuencia:
• Sistemas antirrobo
• Emisoras de radioaficionados (HAM)
• Sistemas de gestión logística de almacenes
• Sistemas de discriminación para trenes y vehículos de emergencia
Nota
• En el caso de que aparezca ruido en la imagen de su televisor, existe la posibilidad de
que un dispositivo con tecnología inalámbrica Bluetooth o esta unidad (o los productos
compatibles con la misma) estén causando interferencias en la señal con el conector
de entrada de la antena de su televisor, vídeo, sintonizador satélite, etc. Si esto ocurre,
aumente la distancia de separación entre el conector de entrada de la antena y el
dispositivo con tecnología Bluetooth o esta unidad (incluidos los productos compatibles
con la misma).
12
Page 49

Reproducción de audio mediante Bluetooth
• Si algún objeto está obstaculizando la línea de visión entre esta unidad (o los
dispositivos compatibles con la misma) y el dispositivo equipado con tecnología
inalámbrica Bluetooth (como por ejemplo una puerta de metal, un muro de hormigón
o un sistema de aislamiento con papel de aluminio), tendrá que cambiar el sistema de
lugar para evitar la aparición de ruidos en la señal y de interrupciones.
Alcance de funcionamiento
Esta unidad está diseñada para un uso doméstico (es posible que las distancias de
transmisión se reduzcan en función de los entornos de comunicación).
En los siguientes lugares, la mala calidad de las ondas de radio o la incapacidad para
recibirlas puede provocar que el sonido se interrumpa o se corte:
• En edificios de hormigón reforzado o en edificios con estructura de hierro o acero.
• En las proximidades de estructuras metálicas de gran tamaño.
• En una zona en la que se congrega una multitud de personas o cercas de edificios u
obstáculos.
• En un lugar expuesto a campos magnéticos, electricidad estática o interferencias de ondas
de radio generadas por equipos de radiocomunicaciones que utilicen la misma banda de
frecuencia (2,4 GHz) que esta unidad, tales como dispositivos con LAN inalámbrica de 2,4
GHz o microondas.
• Si vive en una zona residencial con una alta densidad de población (apartamentos, casas
adosadas, etc.) y el microondas de su vecino está colocado cerca de su sistema, puede
experimentar interferencias de ondas de radio. Si esto ocurre, cambie su unidad de sitio.
Cuando el microondas no esté funcionando, no experimentará interferencias de ondas de
radio.
Reflejo de las ondas de radio
Las ondas de radio que recibe esta unidad incluyen las ondas de radio que provienen
directamente del dispositivo equipado con tecnología inalámbrica Bluetooth (onda directa)
y las ondas procedentes de varias direcciones, debido a las ondas que se reflejan en las
paredes, los muebles y los edificios. Las ondas reflejadas (por obstáculos y objetos reflectores)
producen, además, una variedad de ondas reflejadas y una variación en las condiciones de
recepción dependiendo de la ubicación. Si el sonido no se puede recibir correctamente debido
a este fenómeno, trate de cambiar de lugar el dispositivo equipado con tecnología inalámbrica
Bluetooth. Además, debe tener en cuenta que es posible que se interrumpa el sonido debido a
las ondas reflejadas cuando una persona cruza o se acerca al espacio de separación entre la
unidad y el dispositivo con tecnología inalámbrica Bluetooth.
Español
13
Page 50

Otras conexiones
• Antes de realizar o cambiar conexiones, apague la unidad y desenchufe el cable de
alimentación de la toma de corriente.
• Al reproducir música en modo AUX, el volumen de la música puede variar en función del
volumen del reproductor de música. Si el sonido está distorsionado cuando el volumen
está al máximo, baje el volumen del reproductor de música.
1. Conexión de componentes auxiliares
Conecte su componente de reproducción auxiliar al conector AUX IN del panel posterior.
Reproductor de
audio digital, etc.
Cable mini conector estéreo
(disponible en tiendas)
Panel posterior de la unidad
2. Pulse el botón [INPUT]. (Color del indicador: naranja)
3. Inicie la reproducción del componente auxiliar.
14
Page 51

Información adicional
Solución de problemas
ADVERTENCIA
• No retire nunca la carcasa de este aparato.
A menudo, se confunde un funcionamiento incorrecto con problemas o fallos de
funcionamiento. Si piensa que la unidad presenta un fallo de funcionamiento, compruebe los
puntos siguientes. Algunas veces el problema puede residir en otro componente. Revise los
demás componentes y los aparatos eléctricos que utilice. Si el problema persiste tras haber
comprobado todos los puntos que aparecen a continuación, póngase en contacto con su
centro de servicio autorizado por Pioneer más cercano o con su proveedor para que lleve a
cabo los trabajos de reparación pertinentes.
• Si la unidad no funciona con normalidad debido a factores externos tales como la
electricidad estática, desenchufe el cable de alimentación de la toma y vuelva a enchufarlo
para restablecer las condiciones normales de funcionamiento.
Problema Solución
La unidad no se enciende. • Desenchufe el cable de alimentación de la toma y
La unidad cambia
automáticamente al modo de
espera sin que el usuario haga
nada.
Al seleccionar un modo, no se
oye nada.
enchúfelo de nuevo.
• Cuando no se ha conectado ningún dispositivo
a la base al conector AUX IN, según se hubiera
seleccionado, y la unidad no se utiliza durante 20
minutos o más después de haber AUX el modo, la
unidad se apagará automáticamente (únicamente
cuando el modo APS (página 9) está encendido).
• Asegúrese de que el componente esté conectado
correctamente.
Español
15
Page 52

Información adicional
Problema Solución
El dispositivo con tecnología
inalámbrica Bluetooth no
funciona o no se puede
conectar. El dispositivo
con tecnología inalámbrica
Bluetooth no emite ningún
sonido o el sonido se
interrumpe.
* La distancia visual de transmisión es una estimación. Las distancias de transmisión
reales pueden variar en función de las condiciones del entorno.
• Compruebe que no haya ningún objeto que emita
ondas electromagnéticas en la banda de 2,4 GHz
(microondas, dispositivo de LAN inalámbrica o
aparatos con tecnología inalámbrica Bluetooth)
cerca de la unidad. Si hay algún objeto de esas
características cerca de la unidad, coloque la
unidad lejos de él. O deje de utilizar el objeto que
emite las ondas electromagnéticas.
• Compruebe que el dispositivo con tecnología
inalámbrica Bluetooth no se encuentra demasiado
lejos de la unidad y que no haya obstáculos
colocados entre el dispositivo con tecnología
inalámbrica Bluetooth y la unidad. Coloque el
dispositivo con tecnología inalámbrica Bluetooth
y la unidad de forma que la distancia entre ambos
sea inferior a 10 m* y que no haya obstáculos entre
ellos.
• Es posible que el dispositivo con tecnología
inalámbrica Bluetooth no esté configurado en
el modo de comunicación compatible con la
tecnología inalámbrica Bluetooth. Compruebe
la configuración del dispositivo con tecnología
inalámbrica Bluetooth.
• Compruebe que la sincronización se ha
efectuado correctamente. La configuración de la
sincronización se ha eliminado de esta unidad o del
dispositivo con tecnología inalámbrica Bluetooth.
Reinicie la sincronización.
• Compruebe que el perfil es el correcto. Utilice un
dispositivo con tecnología inalámbrica Bluetooth
compatible con los perfiles A2DP.
16
Page 53

Información adicional
Precauciones de uso
Cambio de ubicación de la unidad
Antes de mover esta unidad, pulse el botón
[ STANDBY/ON]
de alimentación.
Si hay algún dispositivo conectado al
conector AUX IN, podrían producirse
daños.
Lugar de instalación
• No coloque esta unidad encima del
televisor o de un monitor en color.
No la instale tampoco cerca de
pletinas para cassette ni de otros
dispositivos que puedan verse
afectados fácilmente por las fuerzas
magnéticas.
Evite las siguientes ubicaciones:
• Lugares expuestos a la luz solar
directa
• Lugares húmedos o con mala
ventilación
• Lugares con temperaturas
extremadamente altas
• Lugares expuestos a las vibraciones
• Lugares en los que haya mucho polvo
o humo de tabaco
• Lugares expuestos al hollín, al vapor o
al fuego (cocinas, etc.)
No coloque objetos sobre esta unidad
No coloque ningún objeto encima de esta
unidad.
No tape los orificios de ventilación.
No utilice esta unidad colocándola sobre
alfombras, camas, sofás, etc., ni envuelta
en tela, etc. Al hacerlo, impediría que se
dispersara el calor y podrían provocarse
daños.
y desenchufe el cable
No la exponga al calor.
No coloque esta unidad encima de un
amplificador ni de otros componentes que
generen calor.
Si desea montarla en bastidor, colóquela en
una balda inferior a la del amplificador para
evitar el calor que desprende este último u
otros componentes de audio.
• Apague la unidad cuando no la esté
utilizando.
• Dependiendo de las condiciones de
la señal, pueden aparecer líneas en
la pantalla del televisor y pueden
introducirse ruidos en el sonido de las
emisoras de radio cuando la unidad
está encendida. Si esto ocurre, apague
la unidad.
Limpieza de la unidad
• Desenchufe el cable de alimentación
de la toma de corriente antes de
limpiar la unidad.
• Limpie la unidad con un paño suave.
Si la superficie está sucia, aplique
detergente neutro diluido en cinco o
seis partes de agua en un paño suave,
escúrralo bien, limpie la suciedad y,
por último, pase un paño suave y seco.
• Algunos productos tales como alcohol,
disolvente, benceno, insecticidas,
etc., podrían dañar la superficie de la
unidad. Además, si deja productos
de goma o vinilo en contacto con la
unidad durante periodos prolongados
de tiempo, podría estropearse la
carcasa.
• Antes de utilizar toallitas impregnadas
con productos químicos, etc. lea
detenidamente las advertencias
incluidas con las toallitas.
Español
17
Page 54

Información adicional
Especificaciones
• Características del amplificador
Potencia de salida RMS:
Delantero izquierdo/derecho
. . . . . . . . . . . . . . . . . . . . . . . . . 25 W + 25 W
(RMS, 1 kHz, 10 %, T.H.D., 6 Ω)
• Características de los altavoces
Sistema: . . . . . . . . . . . . . .Sistema de dos vías
Altavoces:
Tweeter. . . . . . . . . . . . . . 1 cono de 2,5 cm
Altavoz . . . . . . . . . . . . . . . 1 cono de 10 cm
Intervalo de frecuencia
. . . . . . . . . . . . . . . . . . . . . de 50 Hz a 20 kHz
• Otros
Requisitos de electricidad
. . . . . . . . . .CA de 100 V, a 240 V, 50 Hz/60 Hz
CC 20 V, 2,4 A
Consumo de energía . . . . . . . . . . . . . . . . 48 W
En modo de espera . . . . . . . . . . . . . . 0,5 W
Dimensiones
. . . . 140 mm (anchura) × 218 mm (altura) ×
160 mm (profundidad)/cada uno
Peso (sin la caja ni el adaptador) . . . . . 3,8 kg
• Accesorios
Cable para altavoz . . . . . . . . . . . . . . . . . . . . . 1
Adaptador de CA . . . . . . . . . . . . . . . . . . . . . . 1
Pie de goma . . . . . . . . . . . . . . . . . . . . . . . . . . 8
Tarjeta de garantía . . . . . . . . . . . . . . . . . . . . . 1
Instrucciones de funcionamiento (este
manual)
Nota
• Las especificaciones y el diseño están
sujetos a posibles modificaciones sin
previo aviso, con el fin de mejorar el
producto.
18
Page 55

Page 56

WICHTIG
CAUTION
RISK OF ELECTRIC SHOCK
Das Blitzsymbol in einem Dreieck weist den
Benutzer darauf hin, dass eine
Berührungsgefahr mit nicht isolierten Teilen
im Geräteinneren, die eine gefährliche
Spannung führen, besteht. Die Spannung
kann so hoch sein, dass sie die Gefahr eines
elektrischen Schlages birgt.
WARNUNG
Dieses Gerät ist nicht wasserdicht. Zur Vermeidung
der Gefahr von Brand und Stromschlag keine Behälter
mit Flüssigkeiten (z.B. Blumenvasen und -töpfe) in die
Nähe des Gerätes bringen und dieses vor Tropfwasser,
Spritzwasser, Regen und Nässe schützen.
WARNUNG
Vor dem erstmaligen Anschluss des Gerätes an das
Stromnetz bitte den folgenden Hinweis sorgfältig beachten.
Die Netzspannung ist je nach Land verschieden. Vor
der Inbetriebnahme des Gerätes sicherstellen, dass die
örtliche Netzspannung mit der auf dem Typenschild an
der Netadapter-Label angegebenen Nennspannung (z.B.
230 V oder 120 V) übereinstimmt.
WARNUNG
Keine Quellen offener Flammen (z.B. eine brennende
Kerze) auf dieses Gerät stellen.
VORSICHTSHINWEIS ZUR BELÜFTUNG
Bei der Aufstellung dieses Gerätes muss für einen
ausreichenden Freiraum gesorgt werden, um eine
einwandfreie Wärmeabfuhr zu gewährleisten (mindestens
10 cm oberhalb des Gerätes, 10 cm hinter dem Gerät und
jeweils 10 cm an der Seite des Gerätes).
WARNUNG
Im Gerätegehäuse sind Ventilationsschlitze und andere
Öffnungen vorgesehen, die dazu dienen, eine Überhitzung
des Gerätes zu verhindern und einen zuverlässigen Betrieb
zu gewährleisten. Um Brandgefahr auszuschließen,
dürfen diese Öffnungen auf keinen Fall blockiert oder mit
Gegenständen (z.B. Zeitungen, Tischdecken und Gardinen)
abgedeckt werden, und das Gerät darf beim Betrieb nicht
auf einem dicken Teppich oder Bett aufgestellt sein.
Betriebsumgebung
Betriebstemperatur und Betriebsluftfeuchtigkeit:
+5 °C bis +35 °C, 85 % rel. Feuchte max.
(Ventilationsschlitze nicht blockiert)
Eine Aufstellung dieses Gerät an einem unzureichend
belüfteten, sehr feuchten oder heißen Ort ist zu vermeiden,
und das Gerät darf weder direkter Sonneneinstrahlung
noch starken Kunstlichtquellen ausgesetzt werden.
ACHTUNG:
UM SICH NICHT DER GEFAHR EINES
ELEKTRISCHEN SCHLAGES
AUSZUSETZEN, DÜRFEN SIE NICHT DEN
DECKEL (ODER DIE RÜCKSEITE)
ENTFERNEN. IM GERÄTEINNEREN
BEFINDEN SICH KEINE VOM BENUTZER
REPARIERBAREN TEILE.
ÜBERLASSEN SIE REPARATUREN DEM
QUALIFIZIERTEN KUNDENDIENST.
D3-4-2-1-3_A1_De
D3-4-2-1-4*_A1_De
D3-4-2-1-7a_A1_De
D3-4-2-1-7b*_A1_De
D3-4-2-1-7c*_A1_De
DO NOT OPEN
WARNUNG
Lagern Sie kleine Teile außerhalb der Reichweite von
Kindern oder Kleinkindern. Suchen Sie, wenn es zu einem
zufälligen Verschlucken gekommen ist, unverzüglich einen
Arzt auf.
Falls der Netzstecker des Netzkabels dieses
Gerätes nicht in die Zusatzsteckdose einer anderen
Komponente passt, muss er gegen einen Netzstecker
der geeigneten Ausführung ausgewechselt werden.
Ein derartiger Austausch des Netzsteckers muss vom
Kundendienstpersonal vorgenommen werden. Wenn
der vom Netzkabel abgeschnittene ursprüngliche
Netzstecker in eine Netzsteckdose eingesteckt wird,
besteht akute Stromschlaggefahr! Daher ist unbedingt
dafür zu sorgen, dass der abgeschnittene Netzstecker
sofort vorschriftsmäßig entsorgt wird.
Vor einem längeren Nichtgebrauch des Gerätes,
beispielsweise während des Urlaubs, sollte der
Netzstecker aus der Netzsteckdose gezogen werden,
um das Gerät vollständig vom Netz zu trennen.
ACHTUNG
Der
das Gerät nicht vollständig vom Stromnetz. Da der
Netzstecker als Haupttrennvorrichtung für das Gerät
fungiert, muss er aus der Netzsteckdose gezogen
werden, um das Gerät vollständig vom Netz zu trennen.
Daher sollte das Gerät so aufgestellt werden, dass
der Netzstecker bei einem Unfall einfach aus der
Netzsteckdose gezogen werden kann. Um Brandgefahr
auszuschließen, sollte der Netzstecker auch bei
einem längerem Nichtgebrauch des Geräts von der
Netzsteckdose getrennt werden (beispielsweise
während des Urlaubs).
Dieses Gerät ist für den Heimgebrauch vorgesehen.
Falls bei Einsatz zu einem anderem Zweck (z.B.
Langzeitgebrauch zu gewerblichen Zwecken in einem
Restaurant oder Betrieb in einem Fahrzeug bzw. Schiff)
eine Funktionsstörung auftritt, die eine Reparatur des
Gerätes erforderlich macht, werden die Reparaturkosten
dem Kunden selbst dann in Rechnung gestellt, wenn
die Garantiefrist noch nicht abgelaufen ist.
Ein Ausrufezeichen in einem Dreieck weist
den Benutzer auf wichtige Bedienungs- und
Wartungsanweisungen in den Dokumenten
hin, die dem Gerät beiliegen.
STANDBY/ON
-Schalter dieses Gerätes trennt
D3-4-2-1-1_A1_De
D3-4-2-2-1a_A1_De
D3-4-2-2-2a*_A1_De
K041_A1_De
2
Page 57

VORSICHT MIT DEM NETZKABEL
Fassen Sie das Netzkabel immer am Stecker. Ziehen
Sie nicht am Kabel selbst, und fassen Sie das Netzkabel
niemals mit nassen Händen an, da dies einen Kurzschluss
oder elektrischen Schlag verursachen kann. Stellen Sie
nicht das Gerät, Möbelstücke o.ä. auf das Netzkabel; sehen
Sie auch zu, dass es nicht eingeklemmt wird. Machen
Sie niemals einen Knoten in das Netzkabel, und binden
Sie es nicht mit anderen Kabeln. Das Netzkabel sollte so
gelegt werden, dass niemand darauf tritt. Ein beschädigtes
Netzkabel kann einen Brand oder elektrischen Schlag
verursachen. Prüfen Sie das Netzkabel von Zeit zu Zeit.
Sollte es beschädigt sein, wenden Sie sich an Ihre nächste
autorisierte PIONEER-Kundendienststelle oder Ihren
Händler, um es zu ersetzen.
Netzadapter - ACHTUNG
• Fassen Sie den Netzadapter beim Herausziehen aus
der Netzsteckdose unbedingt nur an seinem Körper
an. Ziehen am Kabel kann Schäden verursachen, die
zu Bränden oder Stromschlägen führen können.
• Versuchen Sie auf keinen Fall, den Netzadapter mit
nassen Händen in die Steckdose einzuführen oder
aus ihr herauszuziehen. Dies kann zu Stromschlägen
führen.
• Stecken Sie das Netzkabel des Netzadapters auf
keinen Fall in eine Netzsteckdose, in der der Anschluss
lose bleibt, obwohl die Stifte vollständig eingeführt
worden sind.
Es kann zu Hitzeentwicklungen kommen, die zu einem
Brand führen könnten.
Wenden Sie sich an den Händler oder an einen
Elektriker, um die Netzsteckdose auszutauschen.
Lagern Sie den Netzadapter außerhalb der Reichweite
von Kindern oder Kleinkindern.
Das Netzkabel des Netzadapters könnte sich zufällig um
den Hals winden und zum Ersticken führen.
Mischen Sie dieses Produkt, wenn Sie es entsorgen wollen, nicht mit gewöhnlichen Haushaltsabfällen. Es gibt ein getrenntes
Sammelsystem für gebrauchte elektronische Produkte, über das die richtige Behandlung, Rückgewinnung und Wiederverwertung
gemäß der bestehenden Gesetzgebung gewährleistet wird.
Privathaushalte in den Mitgliedsstaaten der EU, in der Schweiz und in Norwegen können ihre gebrauchten elektronischen Produkte an
vorgesehenen Sammeleinrichtungen kostenfrei zurückgeben oder aber an einen Händler zurückgeben (wenn sie ein ähnliches neues Produkt
kaufen).
Bitte wenden Sie sich in den Ländern, die oben nicht aufgeführt sind, hinsichtlich der korrekten Verfahrensweise der Entsorgung an die örtliche
Kommunalverwaltung.
Auf diese Weise stellen Sie sicher, dass das zu entsorgende Produkt der notwendigen Behandlung, Rückgewinnung und Wiederverwertung
unterzogen wird, und so mögliche negative Einflüsse auf die Umwelt und die menschliche Gesundheit vermieden werden.
S002*_A1_De
Warnhinweis zu Funkwellen
Dieses Gerät arbeitet mit einer Funkwellenfrequenz von
2,4 GHz, einem Frequenzband, das auch von anderen
drahtlosen Systemen genutzt wird (Mikrowellenherde
und drahtlose Telefone usw.). In diesem Fall erscheint
Rauschen im Fernsehbild, und es besteht die Möglichkeit,
dass dieses Gerät (einschließlich der von diesem Gerät
unterstützten Produkte) Signalinterferenzen mit dem
Antenneneingang Ihres Fernsehgeräts, Videogeräts,
Satellitentuners usw. verursacht. Erhöhen Sie in einem
solchen Fall den Abstand zwischen dem Antenneneingang
und diesem Gerät (einschließlich der von diesem Gerät
unterstützten Produkte).
• Pioneer ist nicht verantwortlich für irgendwelche
Störungen der kompatiblen Pioneer-Produkte infolge
von Kommunikationsfehlern/-störungen, die auf
Ihren Netzanschluss und/oder Ihr angeschlossenes
Gerät zurückzuführen sind. Bitte wenden Sie sich in
Ihren Internetanbieter oder an den Hersteller Ihres
Netzwerkgeräts.
• Ein getrennter Vertrag mit einem Internetanbieter ist
erforderlich, um das Internet verwenden zu können.
K058b_A1_De
Deutsch
Bitte nutzen Sie die Möglichkeit zur Registrierung Ihres Produktes unter
http://www.pioneer.co.de
(oder
http://www.pioneer.eu
3
).
Page 58

Inhaltsverzeichnis
Vor der Inbetriebnahme .................................................................5
Überprüfen des mitgelieferten Zubehörs
Anschließen des linken und des rechten Lautsprechers
Anschließen der Gleichstromversorgung
Bezeichnungen und Funktionen der Teile ....................................7
Hauptansicht
Rückansicht
Rückwand
Oberseite
Erste Schritte ...................................................................................9
Einschalten
APS-Modus
Bluetooth-Audiowiedergabe .......................................................10
Weitere Anschlüsse ......................................................................14
Zusätzliche Informationen ...........................................................15
Störungsbeseitigung
Vorsichtshinweise zum Gebrauch
Technische Daten
* Sollten Änderungen am Design des Produktes vorgenommen werden, erfolgt keine
zusätzliche Benachrichtigung in dieser Bedienungsanleitung.
* Wir danken Ihnen dafür, dass Sie sich für dieses Produkt von Pioneer entscheiden
haben. Bitte lesen Sie diese Bedienungsanleitung vor der Erstinbetriebnahme
aufmerksam durch, um das Produkt korrekt zu bedienen. Bitte bewahren Sie diese
Bedienungsanleitung für spätere Bezugnahme griffbereit auf.
Umschalt-Stromadapter
Schieben Sie den Stromstecker
die Führungsschienen des
Wechselstrom- Adapters entlang,
wie es in der Abbildung unten
dargestellt ist, bis ein Klick zu hören
ist.
4
Page 59

Vor der Inbetriebnahme
1. Überprüfen des mitgelieferten Zubehörs
Bitte vergewissern Sie sich, dass die folgenden Artikel im Verpackungskarton enthalten sind:
• Netzadapter × 1 (einschließlich Netzstecker × 1)
• Lautsprecherkabel × 1
• Gummifüße × 8
• Garantiekarte × 1
• Bedienungsanleitung (dieses Dokument)
2. Anschließen des linken und des rechten Lautsprechers
Rückseite des rechten
Lautsprechers
Rückseite des linken
Lautsprechers
Buchse SPEAKER OUT
Lautsprecherkabel
1.Schrauben Sie die Klemme um einige Drehungen auf, bis genug Platz vorhanden ist, um
den freiliegenden Draht einzuführen.
2.Schließen Sie den Draht mit der roten Markierung an die rote Klemme (+) und den Draht
mit der schwarzen Markierung an die schwarze Klemme (−) an.
3.Nachdem Sie den Draht eingeführt haben, ziehen Sie die Klemme gut fest, bis der Draht
richtig festgeklemmt ist.
4.Führen Sie den Stiftstecker in die Buchse SPEAKER OUT des rechten Lautsprechers ein.
Hinweis
• Um magnetische Störungen oder unerwünschtes Rauschen zu vermeiden, achten
Sie darauf, dass sich dieses Produkt immer in einem ausreichenden Abstand von
Strahlungsgeräten befinden.
5
Deutsch
Page 60

Vor der Inbetriebnahme
ACHTUNG
• An den Lautsprecherklemmen dieses Gerätes liegt eine
potentiell GEFÄHRLICHE Spannung an.
Zur Vermeidung von Stromschlaggefahr ist unbedingt darauf
zu achten, den Netzstecker beim Anschließen und Abtrennen
der Lautsprecherkabel von der Netzsteckdose zu trennen,
bevor irgendwelche nicht isolierten Teile berührt werden.
• Verwenden Sie die mitgelieferten Lautsprecher nicht mit einem
anderer Lautsprecher.
Anderenfalls könnte eine Funktionsstörung oder ein Brand auftreten.
• Achten Sie darauf, dass sich die blanken Drähte nicht berühren.
• Befestigen Sie diese Lautsprecher nicht an der Wand oder an der Decke, da sie bei einem
Fall zu Verletzungen führen können.
• Achten Sie darauf, dass keine Gegenstände in die Bassreflexöffnungen fallen bzw. hinein
gelegt werden.
• Stellen oder setzen Sie sich nicht auf die Lautsprecher. Sie könnten sich dabei verletzen.
3. Anschließen der Gleichstromversorgung
• Schließen Sie den Gleichstromstecker des Netzadapters an die Buchse DC IN an der
Rückwand des Gerätes an. Schließen Sie dann den Stecker am anderen Ende des Kabels
an eine Wandsteckdose an.
• Verwenden Sie nur den mit diesem Gerät mitgelieferten Netzadapter, aber keinen
Netzadapter mit unterschiedlichen Spezifikationen.
Rückseite
des rechten
Lautsprechers
Falsch
Rückseite
des linken
Lautsprechers
DC IN
6
Page 61

Bezeichnungen und Funktionen der Teile
Hauptansicht
Linker Lautsprecher
Rückansicht
12 3
Rechter Lautsprecher
Linker LautsprecherRechter Lautsprecher
Rückwand
Oberseite
(Seite 8)
7
Befestigen der Gummifüße
Befestigen Sie die mitgelieferten
Gummifüße an der Unterseite des
Geräts.
4
1.
Buchse DC IN
Diese Buchse dient zum Anschließen
des Netzadapters.
2.
Buchse AUX IN
Diese Buchse dient zum Anschließen
einer zusätzlichen Komponente.
3.
Buchse SPEAKER OUT für den
linken Lautsprecher
Stecken Sie den Stiftstecker des
Lautsprecherkabels ein.
4.
Lautsprecherklemme
Schließen Sie das Lautsprecherkabel an.
Deutsch
Page 62

Oberseite
Bezeichnungen und Funktionen der Teile
6
12 3 4 5
1.
MODUS-Anzeige
• Diese Anzeige leuchtet grün, wenn
das Gerät auf den Bluetooth-Modus
geschaltet ist.
• Diese Anzeige leuchtet orangefarben,
wenn die Anzeige auf den AUX-Modus
geschaltet ist.
• Im Bereitschaftsmodus leuchtet diese
Anzeige 3 Sekunden lang rot, wenn
*1
-Modus ausgeschaltet ist.
der APS
• Im Bereitschaftsmodus leuchtet diese
Anzeige 3 Sekunden lang grün, wenn
der APS-Modus eingeschaltet ist.
2.
STANDBY/ON
• Mit dieser Taste wird das Gerät
eingeschaltet bzw. in den
Bereitschaftsmodus umgeschaltet.
Drücken und halten Sie die Taste, um
das Gerät in den Bereitschaftsmodus
umzuschalten.
INPUT
• Diese Taste dient zum Umschalten
zwischen dem Bluetooth-Modus und
dem AUX-Modus.
3.
Wiedergabe-/Pausentaste
• Diese Taste dient zur Wiedergabe,
Pausieren der Wiedergabe und
Fortsetzung der Wiedergabe.
PAIRING
• Drücken und halten Sie diese Taste,
um dieses Gerät mit einem BluetoothGerät zu paaren.
4.
Stummschaltung
• Diese Taste dient zum Stummschalten
bzw. Wiederherstellen der
Tonwiedergabe.
Wenn die Tonwiedergabe
※
stummgeschaltet ist, blinkt die
MODUS-Anzeige.
• Drücken und halten Sie diese Taste
im Bereitschaftsmodus, um den APS
Modus ein- und auszuschalten.
5.
VOL + /
-
• Stellen Sie die Wiedergabelautstärke
ein.
Die Wiedergabelautstärke kann
※
zwischen 0 und 30 eingestellt
werden (doch ist das Gerät nicht
mit einem Display ausgestattet,
auf dem der Lautstärkepegel
visuell angezeigt werden könnte).
(Standardeinstellung: 10)
6.
Bluetooth-Anzeige
• Diese Anzeige leuchtet blau, wenn ein
Bluetooth-Gerät angeschlossen ist.
• Diese Anzeige blinkt beim Warten
auf die Herstellung der BluetoothVerbindung.
• Im Falle einer Bluetooth-Paarung
blinkt die Anzeige schnell.
*1
Siehe Seite 9 für weitere Hinweise zum
APS-Modus.
8
Page 63

Erste Schritte
Einschalten
Drücken Sie die Taste [ STANDBY/ON]. Die Anzeige leuchtet.
Dieses Gerät schaltet auf den zuletzt gewählten Modus um.
APS-Modus
• Wenn dieses Gerät 20 Minuten lang nicht verwendet wird, schaltet es automatisch in den
Bereitschaftsmodus um.
• Fünf Minuten, bevor das Gerät automatisch in den Bereitschaftsmodus umschaltet, beginnt
die Anzeige zu blinken.
So schalten Sie den APS-Modus aus
• Drücken und halten Sie die Taste
Bereitschaftsmodus auszuschalten. Dabei leuchtet die Anzeige 3 Sekunden lang rot.
• Um den APS-Modus erneut einzuschalten, drücken und halten Sie die Taste
[ (Stummschaltung)]
lang grün.
Hinweis
• Wenn Sie die Wiedergabe bei niedrigem Lautstärkepegel durchführen, schaltet das
Gerät ggf. automatisch in den Bereitschaftsmodus um. Bitte erhöhen Sie die Lautstärke,
oder schalten Sie den APS-Modus aus.
[ (Stummschaltung)]
, um den APS-Modus im
im Bereitschaftsmodus. Dabei leuchtet die Anzeige 3 Sekunden
9
Deutsch
Page 64

Bluetooth-Audiowiedergabe
Gerät mit drahtloser
Dieses Produkt ermöglicht Ihnen die drahtlose Musikwiedergabe über ein Gerät mit
drahtloser Bluetooth-Technologie (Handy, digitaler Musikplayer usw.).
Musikwiedergabe über ein Gerät ohne drahtlose Bluetooth-Technologie durchführen, indem
Sie einen im Fachhandel erhältlichen Bluetooth-Audiosender verwenden. Einzelheiten dazu
finden Sie in der Bedienungsanleitung des Geräts mit Bluetooth-Technologie.
Hinweis
*1
• Das Gerät mit drahtloser Bluetooth-Technologie muss A2DP-Profile unterstützen.
• Pioneer bietet keine Gewähr für einen einwandfreien Anschluss und Betrieb dieses
Geräts mit allen Arten von Geräten, die mit drahtloser Bluetooth-Technologie
ausgestattet sind.
• Die Bluetooth
®
-Wortmarke und -Logos sind eingetragene Marken der Bluetooth SIG,
Inc. Jede Nutzung dieser Marken durch die PIONEER CORPORATION erfolgt unter
entsprechender Lizenz. Andere Marken und Markennamen sind das Eigentum ihrer
jeweiligen Inhaber.
Bluetooth-Technologie:
Handy
Gerät mit drahtloser
Bluetooth-Technologie:
Digitaler Musikplayer
Gerät ohne drahtlose
Bluetooth-Technologie:
Digitaler Musikplayer
+
Bluetooth-Audiosender
(im Fachhandel erhältlich)
*1
Sie können die
Paaren dieses Geräts und eines Geräts mit drahtloser Bluetooth-Technologie
Um die Musikwiedergabe von einem Gerät mit Bluetooth-Technologie zu genießen, ist
eine Paarung mit diesem Gerät erforderlich. Achten Sie unbedingt darauf, die Paarung bei
der erstmaligen Inbetriebnahme des Geräts oder nach einem Löschen der Paarungsdaten
auszuführen.
Bei der „Paarung“ handelt es sich um einen Schritt, der zur Registrierung eines Geräts mit
drahtloser Bluetooth-Technologie erforderlich ist, um die Bluetooth-Kommunikation zu
ermöglichen. Weitere Einzelheiten hierzu finden Sie in der Bedienungsanleitung Ihres mit
drahtloser Bluetooth-Technologie ausgestatteten Geräts.
10
Page 65

Bluetooth-Audiowiedergabe
• Die Ausführung der Paarung ist erforderlich, wenn Sie ein mit Gerät mit drahtloser
Technologie zum ersten Mal mit diesem Gerät verwenden.
• Um die Bluetooth-Kommunikation zu ermöglichen, sollte die Paarung sowohl mit Ihrem
Gerät und mit dem Gerät mit drahtloser Bluetooth-Technologie ausgeführt werden.
1. Drücken Sie die Taste [INPUT], um den Bluetooth-Modus zu wählen.
(Modus-Anzeige: grün)
2. Drücken und halten Sie die Taste [PAIRING], bis Sie zwei
aufeinanderfolgende „Pieptöne“ hören. Dann blinkt die blaue
Anzeige auf der Oberseite des Geräts schnelle, und das Gerät schaltet
auf den Paarungsmodus um.
3. Schalten Sie das Gerät mit drahtloser Bluetooth-Technologie, mit
dem Sie die Paarung durchführen möchten, ein, bringen Sie es in eine
Entfernung von unter 1 m von diesem Gerät, und stellen Sie es auf
den Paarungsmodus.
Der Paarungsvorgang beginnt.
• Geben Sie „0000“ für den PIN-Code ein.
(Bei diesem Produkt kann nur „0000“ für den PIN-Code verwendet werden.)
4. Wenn das Gerät mit drahtloser Bluetooth-Technologie angeschlossen
wird, wechselt die Anzeige auf der Oberseite des Geräts von einem
Blinken auf ein durchgehendes Leuchten.
5. Beginnen Sie mit der Wiedergabe der Musikdaten auf dem Gerät mit
drahtloser Bluetooth-Technologie.
Anschließen des zuletzt gepaarten Geräts mit drahtloser Bluetooth-Technologie
Wenn Sie dieses Gerät das nächste Mal auf den Bluetooth-Modus stellen, stellt es automatisch
die Verbindung mit dem Gerät her, das zuletzt angeschlossen wurde.
Anschließen des vorher gepaarten Bluetooth-Geräts
1. Wenn Sie nicht das zuletzt gepaarte, sondern ein früher gepaartes
Gerät wiedergeben möchten, unterbrechen Sie die BluetoothVerbindung des zuletzt gepaarten Geräts. Dann blinkt die blaue
Anzeige auf der Oberseite des Geräts langsam, und das Gerät schaltet
auf den Wartezustand für den Anschluss um.
*Alternativ können Sie das Gerät auch im Paarungsmodus umschalten.
11
Deutsch
Page 66

Bluetooth-Audiowiedergabe
2. Schalten Sie das andere gepaarte Gerät ein, und wählen Sie dieses
Gerät aus der Bluetooth-Liste des genannten Geräts aus.
3. Ist die Verbindung mit anderen Geräten erfolgreich, so wechselt die
blaue Anzeige von einem Blinken auf ein durchgehendes Leuchten.
• Die Reichweite für die Bluetooth-Audiowiedergabe ist bis zu 10 m. (Gemessen in offenem
Raum. Wände und Strukturen können die Reichweise des Geräts beeinträchtigen.)
Warnhinweis zu Funkwellen
Dieses Gerät arbeitet mit einer Funkwellenfrequenz von 2,4 GHz, einem Frequenzband, das
auch von anderen drahtlosen Systemen genutzt wird (siehe die Liste weiter unten). Betreiben
Sie diese Anlage nicht in der Nähe solcher Geräte, oder stellen Sie sich, dass diese während
des Betriebs dieses Geräts ausgeschaltet sind, damit es nicht zu Rauscheinstreuungen oder
Unterbrechungen der Kommunikation kommt.
• Kabellose Telefone
• Kabellose Faxgeräte
• Mikrowellenherde
• Drahtlose LAN-Geräte
• Drahtlose AV-Geräte
• Drahtlose Steuergeräte für Videospielkonsolen
• Geräte der Gesundheitstechnik, die mit Mikrowellen arbeiten
• Bestimmte Baby-Monitoren
Andere, weniger verbreitete Geräte, die auf der gleichen Frequenz arbeiten können:
• Diebstahlverhütungsanlagen
• Amateurfunkanlagen (HAM)
• Verwaltungssysteme für Lagerhaus-Logistik
• Identifizierungssystemen für Züge oder Rettungsfahrzeuge
Hinweis
• Wenn Rauschen im Fernsehbild erscheint, besteht die Möglichkeit, dass ein Gerät mit
drahtloser Bluetooth-Technologie oder dieses Gerät (einschließlich der von diesem
Gerät unterstützten Produkte) Signalinterferenzen mit dem Antenneneingang Ihres
Fernsehgeräts, Videogeräts, Satellitentuners usw. verursacht. Erhöhen Sie in einem
solchen Fall den Abstand zwischen dem Antenneneingang und dem Gerät mit drahtloser
Bluetooth-Technologie oder diesem Gerät (einschließlich der von diesem Gerät
unterstützten Produkte).
12
Page 67

Bluetooth-Audiowiedergabe
• Wenn irgendein Gegenstand den Weg zwischen diesem Gerät (einschließlich der
von diesem Gerät unterstützten Produkte) und dem Gerät mit drahtloser BluetoothTechnologie behindert (z. B. eine Metalltür, eine Betonwand oder eine Isolierung mit
Aluminiumfolie), kann eine Veränderung des Aufstellortes dieses Geräts erforderlich
sein, um Rauschen und Signalunterbrechungen zu verhindern.
Einsatzbereich
Dieses Gerät ist ausschließlich für den Heimgebrauch vorgesehen. (Je nach den Bedingungen
der Kommunikationsumgebung kann sich die maximale Übertragungsentfernung verringern.)
An den folgenden Standorten kann es aufgrund von schlechten Bedingungen oder der
Unmöglichkeit, Funkwellen zu empfangen, zu Tonunterbrechungen oder dem Abbruch der
Audioverbindung kommen:
• In Stahlbetonbauten oder Häusern mit Stahl- oder Eisenträgern.
• In der Nähe von großen Möbelstücken aus Metall.
• In einer Menschenmenge oder in der Nähe eines Gebäudes oder Hindernisses.
• An einem Standort, der einem Magnetfeld, statischer Elektrizität oder HF-Einstreuungen
von Funkanlagen ausgesetzt ist, die das gleiche Frequenzband (2,4 GHz) wie dieses Gerät
nutzen, z. B. ein drahtloses 2.4 GHz-LAN-Gerät oder ein Mikrowellenherd.
• Wenn Sie in einem dichtbesiedelten Wohngebiet (Appartement, Stadthaus usw.) wohnen
und sich der Mikrowellenherd Ihres Nachbarn in der Nähe Ihrer Anlage befindet, kann dies
zu HF-Einstreuungen führen. Stellen Sie Ihr Gerät in einem solchen Fall an einem anderen
Ort auf. Wenn der Mikrowellenherd nicht in Betrieb ist, treten keine HF-Störungen auf.
Funkwellenreflektionen
Dieses Gerät empfängt sowohl die direkt von einem Gerät mit drahtlosen BluetoothTechnologie übermittelten Wellen (direkte Wellen) als auch Wellen, die aufgrund von
Reflektionen an Wänden, Möbelstücken und Gebäudeteiler aus verschiedenen Richtungen
eintreffen (reflektierte Wellen). Abhängig vom Standort erzeugen die (aufgrund von
Hindernissen und reflektierenden Objekten) reflektierten Wellen ihrerseits verschiedene
Arten von reflektierten Wellen sowie Veränderungen in den Empfangsverhältnissen. Wenn
die Audiosignale aufgrund dieses Phänomens nicht einwandfrei empfangen werden können,
verändern Sie probeweise den Aufstellort des Geräts mit drahtloser Bluetooth-Technologie
geringfügig. Bitte beachten Sie außerdem, dass der Empfang von Audiosignalen auch durch
reflektierte Wellen unterbrochen werden kann, wenn sich eine Person dem Raum zwischen
diesem Gerät und dem Gerät mit drahtloser Bluetooth-Technologie nähert oder diesen kreuzt.
Deutsch
13
Page 68

Weitere Anschlüsse
• Bevor Sie irgendwelche Anschlüsse durchführen oder verändern, schalten Sie das Gerät
aus und trennen Sie den Netzstecker von der Netzsteckdose.
• Bei der Musikwiedergabe im AUX-Modus hängt Lautstärkepegel vom Lautstärkepegel ab,
der am Musikplayer eingestellt wurde. Sollte eine Klangverzerrung auftreten, wenn der
Lautstärkepegel auf den Höchstwert eingestellt ist, verringern Sie den Lautstärkepegel des
Musikplayers, um die Verzerrung aufzuheben.
1. Anschließen von zusätzlichen Komponenten
Schließen Sie eine zusätzliche Wiedergabekomponente an die Buchse AUX IN an der
Rückwand des Geräts an.
Digitaler
Audioplayer usw.
Stereo-Ministeckerkabel
(im Fachhandel erhältlich)
Rückwand dieses Geräts
2. Drücken Sie die Taste [INPUT]. (Modus-Anzeige: orangefarben)
3. Beginnen Sie mit der Wiedergabe der angeschlossenen Komponente.
14
Page 69

Zusätzliche Informationen
Störungsbeseitigung
WARNUNG
• Entfernen Sie unter keinen Umständen das Gehäuse dieses Geräts.
Häufig ist ein Bedienungsfehler die Ursache einer vermeintlichen Störung. Wenn Sie
vermuten, dass eine Funktionsstörung dieses Geräts vorliegt, überprüfen Sie bitte zunächst
die Hinweise der nachstehenden Tabelle. Manchmal kann die Ursache der Störung auch in
einem anderen Gerät liegen. Überprüfen Sie die angeschlossenen Komponenten sowie andere
im Betrieb befindliche Elektrogeräte. Wenn sich eine Störung anhand der unten angegebenen
Abhilfemaßnahmen nicht beseitigen lässt, wenden Sie sich bitte zwecks Reparatur des Geräts
an Ihren Fachhändler oder eine Pioneer-Kundendienststelle.
• Wenn das Gerät aufgrund externer Einwirkungen wie statischer Elektrizität nicht richtig
funktioniert, trennen Sie den Netzstecker von den Netzsteckdose, und schließen Sie ihn
dann wieder an, wonach der normale Betrieb fortgesetzt werden kann.
Problem Abhilfemaßnahme
Das Gerät lässt sich nicht
einschalten.
Das Gerät schaltet selbsttätig in
den Bereitschaftsmodus um.
Keine Tonwiedergabe nach der
Wahl eines Modus
• Trennen Sie den Netzstecker von der
Netzsteckdose, und schließen Sie ihn dann erneut
an.
• Wenn kein Gerät an den momentan gewählten die
Buchse AUX IN angeschlossen ist und dieses Gerät
mindestens 20 Minuten lang nicht bedient wird
oder mehr nach AUX-Modus gewählt ist, schaltet es
sich automatisch aus. (Nur wenn der APS-Modus
(Seite 9) eingeschaltet ist.)
• Vergewissern Sie sich, dass die Komponente
korrekt angeschlossen ist.
15
Deutsch
Page 70

Zusätzliche Informationen
Problem Abhilfemaßnahme
Ein Gerät mit drahtloser
Bluetooth-Technologie kann
nicht angeschlossen oder
bedient werden. Das Gerät
mit drahtloser BluetoothTechnologie gibt keinen
Ton aus, oder es treten
Tonunterbrechungen auf.
* Bei der Angabe zur Sichtlinien-Übertragungsentfernung handelt es sich lediglich um
einen Richtwert. Die tatsächlich unterstützte Übertragungsentfernung richtet sich nach
den jeweiligen Umgebungsbedingungen.
• Vergewissern Sie sich, dass sich kein Gerät, das
elektromagnetische Wellen auf dem 2.4 GHz-Band
abgibt, in der Nähe dieses Geräts befindet (z. B. ein
Mikrowellenherd, ein drahtloses LAN-Gerät oder
ein Gerät mit drahtloser Bluetooth-Technologie).
Falls sich ein derartiges Gerät in der Nähe befindet,
sorgen Sie für einen größeren Abstand zu diesem
Gerät. Oder schalten Sie das Gerät aus, das
elektromagnetische Wellen abgibt.
• Vergewissern Sie sich, dass sich das Gerät
mit drahtloser Bluetooth-Technologie nicht in
einem zu großen Abstand von diesem Gerät
befindet und dass sich keine Hindernisse auf
dem Übertragungsweg zwischen dem Gerät mit
drahtloser Bluetooth-Technologie und diesem
Gerät befinden. Stellen Sie das Gerät mit drahtloser
Bluetooth-Technologie in einem Abstand von
weniger als 10 m* von diesem so Gerät auf, dass
sich keine Hindernisse auf dem Übertragungsweg
befinden.
• Das Gerät mit drahtloser BluetoothTechnologie ist möglicherweise nicht auf einem
Kommunikationsmodus eingestellt, der die
drahtlose Bluetooth-Technologie unterstützt.
Überprüfen Sie die Einstellung des Geräts mit
drahtloser Bluetooth-Technologie.
• Vergewissern Sie sich, dass die Paarung korrekt
ausgeführt wurde. Die Paarungseinstellung
wurde aus dieser Anlage oder aus dem Gerät mit
drahtloser Bluetooth-Technologie gelöscht. Führen
Sie die Paarung erneut aus.
• Vergewissern Sie sich, dass das Profil korrekt ist.
Verwenden Sie ein drahtloses Bluetooth-Gerät, das
das A2DP-Profil unterstützt.
16
Page 71

Zusätzliche Informationen
Vorsichtshinweise zum Gebrauch
Bewegen dieses Geräts
Bevor Sie dieses Gerät bewegen,
vergewissern Sie sich bitte, drücken Sie
dann die Taste
trennen Sie das Netzkabel ab.
Wenn ein anderes Gerät die Buchse
AUX IN angeschlossen wird, kann es zu
Beschädigungen kommen.
Aufstellort
• Stellen Sie dieses Gerät nicht
Vermeiden Sie die folgenden Aufstellorte:
• Orte mit direkter Sonneneinstrahlung
• Feuchte oder unzureichend belüftete
• Besonders heiße Orte
• Orte, die Erschütterungen ausgesetzt
• Orte mit besonders großer
• Orte, die Ruß, Dampf oder Hitze
[ STANDBY/ON]
auf ein Fernsehgerät oder einen
Farbbildschirm. Stellen Sie das Gerät
auch in einiger Entfernung von einem
Kassettendeck oder anderen Geräten
auf, die leicht von magnetischen
Kräften beeinflusst werden.
Orte
sind
Staubentwicklung oder viel
Zigarettenrauch
ausgesetzt sind (Küchen usw.)
, und
Stellen Sie keine Gegenstände auf
dieses Gerät
Stellen Sie keine Gegenstände auf dieses
Gerät.
Blockieren Sie die Lüftungsöffnungen
nicht.
Verwenden Sie das Gerät nicht auf
struppigen Teppichen, Betten, Sofas usw.
oder in ein Tuch eingehüllt. Anderenfalls
kann die Hitze nicht entweichen, was zu
einer Beschädigung des Geräts führen
kann.
Halten Sie das Gerät von Hitze fern.
Stellen Sie dieses Gerät nicht auf einen
Lautsprecher oder eine andere Komponente,
die Wärme erzeugt.
Bei der Rackmontage sollte das Gerät
auf einem Regal unter dem Verstärker
aufgestellt werden, damit es nicht der
Wärme ausgesetzt ist, die vom Verstärker
oder der anderen Komponente abgestrahlt
wird.
• Schalten Sie dieses Gerät aus, wenn
Sie es nicht verwenden.
• Je nach den Signalbedingungen
können Streifen auf dem
Fernsehbildschirm erscheinen bzw.
Rauschen kann bei Radioprogrammen
auftreten, wenn dieses Gerät
eingeschaltet ist.. Schalten Sie das
Gerät in einem solchen Fall bitte aus.
Deutsch
Reinigen dieses Geräts
• Trennen Sie das Netzkabel von der
Netzsteckdose, bevor Sie dieses Gerät
reinigen.
17
Page 72

Zusätzliche Informationen
• Verwenden Sie ein weiches Tuch,
um dieses Gerät zu reinigen. Bei
starker Verschmutzung tauchen
Sie ein weiches Tuch in ein mit 5
oder 6 Teilen Wasser verdünntes
neutrales Reinigungsmittel, wringen
Sie es gründlich aus, wischen Sie
den Schmutz ab, und wischen Sie
anschließend mit einem weichen,
trockenen Tuch nach.
• Alkohol, Farbverdünner, Benzol,
Insektenvertilgungsmittel usw.
könnten zum Ablösen des
Oberflächenfinish führen. Auch
Gummi oder Vinylprodukte, die lange
in Kontakt mit dem Gerät bleiben,
könnten zu einer Beschädigung des
Gehäuses führen.
• Bei Verwendung von Wischtüchern,
die mit Chemikalien getränkt sind,
lesen Sie bitte aufmerksam die
Vorsichtshinweise für die Verwendung
dieser Wischtücher.
Technische Daten
• Verstärkerteil
Effektive Ausgangsleistung
Frontkanal links/rechts . . . . 25 W + 25 W
(Effektivwert, 1 kHz, Gesamtklirrfaktor 10 %,
an 6 Ω)
• Lautsprecherteil
System . . . . . . . . . . . . . . . . . . 2-Wege-System
Lautsprecher:
Hochtöner . . . . . . je 2,5 cm Konustyp × 1
Tieftöner . . . . . . . . je 10 cm Konustyp × 1
Frequenzgang . . . . . . . . . . . .50 Hz bis 20 kHz
• Sonstiges
Stromversorgung
. . .100 V – 240 V Wechselspannung, 50 Hz/60 Hz
Gleichstrom 20 V, 2,4 A
Leistungsaufnahme . . . . . . . . . . . . . . . . .48 W
Im Bereitschaftsmodus . . . . . . . . . . 0,5 W
Abmessungen
. . . . . . . . . . . . . je 140 mm (B) x 218 mm (H) x
160 mm (T)
Gewicht (ohne Verpackung und
Adapter) . . . . . . . . . . . . . . . . . . . . . . . . . . 3,8 kg
• Mitgeliefertes Zubehör
Lautsprecherkabel . . . . . . . . . . . . . . . . . . . . . 1
Netzadapter . . . . . . . . . . . . . . . . . . . . . . . . . . . 1
Gummifüße . . . . . . . . . . . . . . . . . . . . . . . . . . . 8
Garantiekarte . . . . . . . . . . . . . . . . . . . . . . . . . 1
Bedienungsanleitung (dieses Dokument)
Hinweis
• Änderungen der technischen Daten
und der äußeren Aufmachung
im Sinne der ständigen
Produktverbesserung bleiben jederzeit
vorbehalten.
18
Page 73

Page 74

IMPORTANTE
ATTENTION
DANGER D´ELECTROCUTION
NE PAS OUVRIR
Il simbolo del lampo con terminale a forma
di freccia situato all’interno di un triangolo
equilatero serve ad avvisare l’utilizzatore
della presenza di una “tensione pericolosa”
non isolata nella struttura del prodotto che
potrebbe essere di un’intensità tale da
provocare scosse elettriche all’utilizzatore.
ATTENZIONE
Questo apparecchio non è impermeabile. Per prevenire
pericoli di incendi o folgorazioni, non posizionare nelle
vicinanze di questo apparecchio contenitori pieni di liquidi
(quali vasi da fiori, o simili), e non esporre l’apparecchio a
sgocciolii, schizzi, pioggia o umidità.
ATTENZIONE
Prima di collegare per la prima volta l’apparecchio alla
sorgente di alimentazione leggere attentamente la sezione
che segue.
La tensione della sorgente di elettricità differisce da
Paese a Paese e da regione a regione. Verificare che la
tensione di rete della zona in cui si intende utilizzare
l’apparecchio sia quella corretta, come indicato
l’adattatore CA etichetta dell’apparecchio stesso (ad es.:
230 V o 120 V).
ATTENZIONE
Per evitare il pericolo di incendi, non posizionare
sull’apparecchio dispositivi con fiamme vive (ad esempio
una candela accesa, o simili).
AVVERTENZA PER LA VENTILAZIONE
Installare l’apparecchio avendo cura di lasciare un certo
spazio all’intorno dello stesso per consentire una adeguata
circolazione dell’aria e migliorare la dispersione del calore
(almeno 10 cm sulla parte superiore, 10 cm sul retro, e 10
cm su ciascuno dei lati).
ATTENZIONE
L’apparecchio è dotato di un certo numero di fessure e
di aperture per la ventilazione, allo scopo di garantirne
un funzionamento affidabile, e per proteggerlo dal
surriscaldamento. Per prevenire possibili pericoli di incendi
le aperture non devono mai venire bloccate o coperte con
oggetti vari (quali giornali, tovaglie, tende o tendaggi, ecc.),
e l’apparecchio non deve essere utilizzato appoggiandolo
su tappeti spessi o sul letto.
Condizioni ambientali di funzionamento
Gamma ideale della temperatura ed umidità dell’ambiente
di funzionamento:
da +5 °C a +35 °C, umidità relativa inferiore all‘85 %
(fessure di ventilazione non bloccate)
Non installare l’apparecchio in luoghi poco ventilati, o in
luoghi esposti ad alte umidità o alla diretta luce del sole (o
a sorgenti di luce artificiale molto forti).
ATTENZIONE:
PER EVITARE IL RISCHIO DI SCOSSE
ELETTRICHE, NON RIMUOVERE IL
COPERCHIO (O IL RETRO). NON CI SONO
PARTI INTERNE LA CUI MANUTENZIONE
POSSA ESSERE EFFETTUATA
DALL’UTENTE. IN CASO DI NECESSITÀ,
RIVOLGERSI ESCLUSIVAMENTE A
PERSONALE DI SERVIZIO QUALIFICATO.
D3-4-2-1-3_A1_It
D3-4-2-1-4*_A1_It
D3-4-2-1-7a_A1_It
D3-4-2-1-7b*_A1_It
D3-4-2-1-7c*_A1_It
Il punto esclamativo in un triangolo
equilatero serve ad avvisare l’utilizzatore
della presenza di importanti istruzioni di
funzionamento e manutenzione riportate nel
libretto allegato al prodotto.
D3-4-2-1-1_A1_It
ATTENZIONE
Conservare le pile lontano dalla portata dei bambini e
dei bebè. Se viene inghiottito accidentalmente, recarsi
immediatamente da un medico.
Se la spina del cavo di alimentazione di questo
apparecchio non si adatta alla presa di corrente
alternata di rete nella quale si intende inserire la spina
stessa, questa deve essere sostituita con una adatta
allo scopo. La sostituzione della spina del cavo di
alimentazione deve essere effettuata solamente da
personale di servizio qualificato. Dopo la sostituzione, la
vecchia spina, tagliata dal cavo di alimentazione, deve
essere adeguatamente eliminata per evitare possibili
scosse o folgorazioni dovute all’accidentale inserimento
della spina stessa in una presa di corrente sotto
tensione.
Se si pensa di non utilizzare l’apparecchio per un
relativamente lungo periodo di tempo (ad esempio,
durante una vacanza), staccare la spina del cavo di
alimentazione dalla presa di corrente alternata di rete.
AVVERTENZA
L’interruttore principale (
dell’apparecchio non stacca completamente il flusso di
corrente elettrica dalla presa di corrente alternata di rete.
Dal momento che la spina di alimentazione costituisce
l’unico dispositivo di distacco dell’apparecchio dalla
sorgente di alimentazione, la spina stessa deve essere
staccata dalla presa di corrente alternata di rete per
sospendere completamente qualsiasi flusso di corrente.
Verificare quindi che l’apparecchio sia stato installato
in modo da poter procedere con facilità al distacco della
spina di alimentazione dalla presa di corrente, in caso
di necessità. Per prevenire pericoli di incendi, inoltre, la
spina di alimentazione deve essere staccata dalla presa
di corrente alternata di rete se si pensa di non utilizzare
l’apparecchio per periodi di tempo relativamente lunghi
(ad esempio, durante una vacanza).
Questo prodotto è destinato esclusivamente all’uso
domestico. Eventuali disfunzioni dovute ad usi diversi
(quali uso prolungato a scopi commerciali, in ristoranti,
o uso in auto o su navi) e che richiedano particolari
riparazioni, saranno a carico dell’utente, anche se nel
corso del periodo di garanzia.
STANDBY/ON
D3-4-2-2-1a_A1_It
)
D3-4-2-2-2a*_A1_It
K041_A1_It
2
Page 75

AVVERTIMENTO RIGUARDANTE IL FILO DI
ALIMENTAZIONE
Prendete sempre il filo di alimentazione per la spina. Non
tiratelo mai agendo per il filo stesso e non toccate mai il
filo con le mani bagnati, perchè questo potrebbe causare
cortocircuiti o scosse elettriche. Non collocate l’unità,
oppure dei mobili sopra il filo di alimentazione e controllate
che lo stesso non sia premuto. Non annodate mai il
filo di alimentazione nè collegatelo con altri fili. I fili di
alimentazione devono essere collocati in tal modo che non
saranno calpestati. Un filo di alimentazione danneggiato
potrebbe causare incendi o scosse elettriche. Controllate il
filo di alimentazione regolarmente. Quando localizzate un
eventuale danno, rivolgetevi al più vicino centro assistenza
autorizzato della PIONEER oppure al vostro rivenditore per
la sostituzione del filo di alimentazione.
Adattatore CA - AVVERTENZA
• Per estrarre l’adattatore CA dalla presa di rete lo
si deve afferrare direttamente per il proprio corpo.
Non lo si deve afferrare per il cavo, pena il rischio di
danneggiarlo con conseguente possibilità di scosse
elettriche o incendio.
• Non inserire né estrarre l’adattatore CA dalla presa di
rete con le mani bagnate. Si potrebbe infatti ricevere
una scossa elettrica.
• Non usare una presa di rete che non permetta di
mantenervi collegato saldamente l’adattatore CA
anche quando la pina è inserita a fondo.
Si potrebbe infatti generare calore con conseguente
pericolo d’incendio.
In tale situazione si raccomanda di rivolgersi al proprio
rivenditore o a un elettricista per fare sostituire le
presa.
Conservare l’adattatore CA lontano dai bambini.
Qualora divenisse oggetto di gioco, infatti, avvolgendosi
attorno al collo il cavo potrebbe soffocarli.
Se si vuole eliminare questo prodotto, non gettarlo insieme ai rifiuti domestici. Esiste un sistema di raccolta differenziata in conformità
alle leggi che richiedono appositi trattamenti, recupero e riciclo.
I privati cittadini dei paesi membri dell’UE, di Svizzera e Norvegia, possono restituire senza alcun costo i loro prodotti elettronici usati ad appositi
servizi di raccolta o a un rivenditore (se si desidera acquistarne uno simile).
Per i paesi non citati qui sopra, si prega di prendere contatto con le autorità locali per il corretto metodo di smaltimento.
In questo modo, si è sicuri che il proprio prodotto eliminato subirà il trattamento, il recupero e il riciclo necessari per prevenire gli effetti
potenzialmente negativi sull’ambiente e sulla vita dell’uomo.
S002*_A1_It
Avvertenza sulle onde radio
Questo apparecchio fa uso di onde radio nella banda da 2,4
GHz normalmente usata in apparecchi wireless quali, ad
esempio, forni a microonde e telefoni cellulari. Gli eventuali
disturbi visualizzati sullo schermo di un televisore posto
nelle vicinanze possono essere causati proprio da questo
apparecchio, eventualmente anche attraverso i dispositivi
ad esso collegati, per interferenza sulla presa d’antenna
del televisore o di altri apparecchi quali ricevitori video
e sintonizzatori satellitari. In tal caso si suggerisce di
aumentare la distanza tra l’apparecchio e tali connettori.
• Pioneer rifiuta ogni responsabilità per qualsiasi tipo
di malfunzionamento causato da errori e/o problemi
di comunicazione associati alla connessione di rete
e/o al collegamento di questo apparecchio con altri
prodotti con esso compatibili. Per la risoluzione di
tali problemi si prega di rivolgersi al fornitore della
connessione Internet o al produttore di tali apparecchi.
• Per la connessione a Internet è necessario
sottoscrivere un apposito contratto a pagamento con
un fornitore di tale servizio.
K058b_A1_It
Italiano
Registra il tuo prodotto su
http://www.pioneer.it
E scopri subito quali vantaggi puoi ottenere!
(o
http://www.pioneer.eu
)
3
Page 76

Indice
Prima di usare l’apparecchio ..........................................................5
Controllo degli accessori
Collegare i diffusori destro e sinistro
Collegamento dell’adattatore CA
Nome e funzione delle parti ..........................................................7
Vista principale
Vista posteriore
Pannello posteriore
Pannello superiore
Per iniziare .......................................................................................9
Accensione
Modo APS
Riproduzione di un lettore Bluetooth .........................................10
Altri collegamenti .........................................................................14
Informazioni aggiuntive ...............................................................15
Risoluzione dei problemi
Avvertenze per l’uso
Dati tecnici
* Questo manuale non fornisce notifiche aggiuntive sulle eventuali differenze
nell’aspetto dell’apparecchio effettivamente venduto.
* Grazie per avere acquistato questo apparecchio Pioneer. Prima d’iniziare a usarlo
si raccomanda di leggere con attenzione le istruzioni per l’uso qui fornite. È
inoltre consigliabile mantenere il manuale a portata di mano per ogni necessità di
consultazione.
Commutare sul tipo di adattatore di corrente
Fate scivolare la spina di corrente
lungo i binari della guida
dell’adattatore AC, come mostrato
nella figura qui sotto, fino a quando
non sentirete uno scatto.
4
Page 77

Prima di usare l’apparecchio
1. Controllo degli accessori
All’apertura della confezione verificare l’avvenuta fornitura delle seguenti parti:
• N. 1 adattatore CA (compresa spina di corrente n. 1)
• N. 1 cavo diffusore
• N. 8 piedini di gomma
• N. 1 scheda di garanzia
• Istruzioni per l’uso (questo documento)
2. Collegare i diffusori destro e sinistro
Lato posteriore del
diffusore destro
Presa SPEAKER OUT
1.Svitare alcune volte la presa sino a quando offre spazio a sufficienza per l’inserimento
del filo.
2.Collegare alla presa rossa (+) il filo con banda rossa e alla presa nera (−) quello con
banda nera.
3.Una volta inseriti i fili serrare bene le prese sino a bloccarli bene in posizione.
4.Collegare lo spinotto alla presa SPEAKER OUT del diffusore destro.
Lato posteriore del
diffusore sinistro
Cavo diffusore
Italiano
Nota
• Per evitare le interferenze elettromagnetiche o i disturbi si suggerisce di non collocare
l’apparecchio vicino ad altre fonti emittenti.
5
Page 78

Prima di usare l’apparecchio
AVVERTENZA
• I terminali degli altoparlanti sono sotto tensione, alla stessa
PERICOLOSA tensione della corrente di rete.
Per prevenire rischi di folgorazioni nel corso delle operazioni di
collegamento o di distacco dei cavi degli altoparlanti, staccare
il cavo di alimentazione principale prima di toccare qualsiasi
parte non isolata.
• Non collegare questi diffusori a un altro amplificatore.
Si potrebbe infatti verificare un malfunzionamento o un incendio.
• Impedire che i conduttori metallici dei fili dei diffusori si tocchino.
• Non fissare i diffusori su una parete o sul soffitto, pena il rischio di lesioni qualora cadano.
• Impedire la penetrazione di corpi estranei nei condotti bass reflex.
• Non sedere né salire sui diffusori. Cadendo ci si potrebbe infatti ferire.
3. Collegamento dell’adattatore CA
• Collegare la spina c.c. dell’adattatore CA alla presa DC IN del pannello posteriore.
Collegare quindi l’adattatore alla presa di rete.
• Usare esclusivamente l’adattatore CA fornito con l’apparecchio.
Lato posteriore
del diffusore
destro
DC IN
Sbagliato!
Lato posteriore
del diffusore
sinistro
6
Page 79

Nome e funzione delle parti
Vista principale
Diffusore sinistro
Vista posteriore
12 3
Pannello superiore
(pagina 8)
Diffusore destro
Diffusore sinistroDiffusore destro
Pannello posteriore
Fissaggio dei piedini di gomma
Fissare sul fondo dell’apparecchio i
piedini di gomma accessori.
4
1.
Presa DC IN
Vi si collega l’adattatore CA.
2.
Presa AUX IN
Vi si collega un componente ausiliario.
3.
Presa SPEAKER OUT per diffusore
sinistro
Collegarvi lo spinotto del cavo per
diffusore.
4.
Prese del diffusore
Collegarvi il cavo del diffusore.
7
Italiano
Page 80

Pannello superiore
12 3 4 5
Nome e funzione delle parti
6
1.
Indicatore del modo
• Quando l’apparecchio è impostato nel
modo Bluetooth si accende di colore
verde.
• Quando l’apparecchio è impostato
nel modo AUX si accende di colore
arancione.
• Mentre l’apparecchio è in standby,
quando la funzione APS
si accende per tre secondi di colore
rosso.
• Mentre l’apparecchio è in standby,
quando la funzione APS si attiva si
accende per tre secondi di colore
verde.
2.
STANDBY/ON
• Accende o pone l’apparecchio in
standby.
Per porlo in standby occorre premerlo
a lungo.
INPUT
• Commuta tra modo Bluetooth e modo
AUX.
3.
Riproduzione/pausa
• Avvia, sospende o riprende la
riproduzione.
PAIRING
• Quando premuto a lungo avvia
l’accoppiamento di una periferica
Bluetooth.
*1
si disattiva
4.
Silenziamento
• Azzera o ripristina il volume al livello
precedente.
Durante il silenziamento il relativo
※
l’indicatore lampeggia.
• Quando l’apparecchio è in standby,
premendolo a lungo attiva o disattiva
la funzione APS.
5.
VOL + / -
• Regola il volume d’ascolto.
Il livello del volume d’ascolto è
※
regolabile da 0 a 30 (l’apparecchio
tuttavia non lo indica visivamente).
L’impostazione predefinità è 10.
6.
Indicatore Bluetooth
• Si accende di colore blu quando si
collega all’apparecchio una periferica
Bluetooth.
• In attesa della connessione lampeggia.
• Durante l’accoppiamento Bluetooth
lampeggia velocemente.
*1
Per informazioni sulla funzione APS si
prega di vedere a pagina 9.
8
Page 81

Per iniziare
Accensione
Premere il tasto [ STANDBY/ON]. Il corrispondente indicatore si accende.
L’apparecchio attiva l’ultimo modo selezionato in ordine di tempo.
Modo APS
• Dopo 20 minuti d’inattività l’apparecchio si porta automaticamente in standby.
• 5 minuti prima del passaggio automatico in standby l’indicatore inizia a lampeggiare.
Come disattivare il modo APS
• Mentre l’apparecchio è in standby premere a lungo il tasto
disattivare il modo APS; l’indicatore si accende di colore rosso per circa tre secondi.
• Se il modo APS si riattiva, mentre l’apparecchio è in standby premere nuovamente a lungo
[ (Silenziamento)]
il tasto
Nota
• Durante la riproduzione a basso volume l’apparecchio potrebbe portarsi
automaticamente in standby. Si suggerisce quindi di tenere il volume più alto o di
disattivare il modo APS.
; l’indicatore si accende di colore verde per circa tre secondi.
9
[ (Silenziamento)]
per
Italiano
Page 82

Riproduzione di un lettore Bluetooth
Periferica Bluetooth:
Con questo apparecchio è possibile ascoltare la musica trasmessa in modo wireless da una
periferica senza fili Bluetooth tecnologia abilitato quale, ad esempio, un telefono cellulare e un
lettore digitale.
*1
Con l’ausilio di un comune trasmettitore audio Bluetooth è altresì possibile
ascoltare la musica inviata da una periferica non senza fili Bluetooth tecnologia abilitato. Per
informazioni dettagliate si prega di vedere il manuale d’uso della periferica senza fili Bluetooth
tecnologia abilitato d’interesse.
Nota
*1
• La periferica Bluetooth usata deve essere compatibile con il profilo A2DP.
• Pioneer non garantisce la correttezza di connessione e d’uso con questo apparecchio di
tutte le periferiche Bluetooth esistenti.
• Il marchio nominale e il logo Bluetooth
®
sono marchi registrati di proprietà di Bluetooth
SIG, Inc. e sono utilizzati in licenza da PIONEER CORPORATION. Tutti gli altri marchi
registrati e marchi nominali sono marchi dei rispettivi proprietari.
telefono cellulare
Periferica Bluetooth:
lettore digitale
Periferica non Bluetooth:
lettore digitale
+
Trasmettitore audio Bluetooth
(del tipo comunemente
disponibile in commercio)
Accoppiamento delle periferiche Bluetooth con l’apparecchio
Per ascoltare la musica di una periferica senza fili Bluetooth tecnologia abilitato è innanzi
tutto necessario accoppiarla con questo apparecchio. L’accoppiamento deve essere eseguito
la prima volta che s’intende usare una periferica Bluetooth con l’apparecchio ed ogni volta
dopo averne cancellato i dati di accoppiamento.
“Accoppiamento” è la procedura necessaria affinché una periferica Bluetooth possa
comunicare con l’apparecchio principale, cioè questo stesso apparecchio. Per maggiori
informazioni al riguardo si prega altresì di vedere le istruzioni per l’uso di tale periferica.
• L’accoppiamento deve essere eseguito prima di usare una periferica Bluetooth con
l’apparecchio.
10
Page 83

Riproduzione di un lettore Bluetooth
• Per eseguire l’accoppiamento, cioè l’abilitazione della comunicazione wireless, sono
necessari sia la periferica Bluetooth sia questo apparecchio.
1. Premere il tasto [INPUT] selezionare il modo Bluetooth. (L’indicatore
del modo si accende di colore verde .)
2. Premere il tasto [PAIRING] sino a udire due segnali acustici
consecutivi. L’indicatore blu del pannello superiore inizia a
lampeggiare velocemente e l’apparecchio accede al modo di
accoppiamento.
3. Accendere la periferica Bluetooth da accoppiare, avvicinarla a meno
di 1 metro dall’apparecchio e impostarla nel modo di accoppiamento.
L’accoppiamento di avvia.
• Come codice PIN inserire “0000”.
(Questo apparecchio accetta esclusivamente il codice PIN “0000”.)
4. Quando una periferica Bluetooth è connessa all’apparecchio
l’indicatore blu del pannello superiore di quest’ultimo cessa di
lampeggiare per rimanere acceso di luce fissa.
5. Avviare la riproduzione dalla periferica Bluetooth.
Connessione dell’ultima periferica Bluetooth connessa
La volta successiva che s’imposterà l’apparecchio nel modo Bluetooth esso tenterà
automaticamente di connettersi all’ultima periferica Bluetooth connessa in ordine di tempo.
Connessione di una periferica Bluetooth usata in precedenza
1. Per collegare una periferica Bluetooth usata in precedenza è innanzi
tutto necessario disconnettere l’ultima usata in ordine di tempo.
L’indicatore blu del pannello superiore inizierà così a lampeggiare
lentamente e l’apparecchio accederà al modo di connessione.
* È altresì possibile selezionare la periferica durante l’accoppiamento.
2. Accendere la periferica Bluetooth d’interesse e dall’elenco delle
periferiche Bluetooth selezionare questo apparecchio.
3. All’ottenimento della connessione l’indicatore blu cessa di
lampeggiare per rimanere acceso di luce fissa.
11
Italiano
Page 84

Riproduzione di un lettore Bluetooth
• La portata efficace della funzione Bluetooth audio è 10 metri (misurata in uno spazio libero;
può tuttavia essere influenzata negativamente dalla presenza di pareti e/o altre strutture).
Avvertenza sulle onde radio
Questo apparecchio fa uso di onde radio nella banda da 2,4 GHz normalmente usata in
numerosi altri apparecchi wireless (vedere l’elenco che segue). Per impedire la generazione
di rumore e l’interruzione della comunicazione si raccomanda di non usarli vicino a questo
apparecchio, oppure accertarsi che siano spenti.
• Telefoni senza filo
• Fax senza filo
• Forni a microonde
• Dispositivi LAN wireless
• Apparecchi AV funzionanti su LAN wireless
• Controllori wireless per videogiochi
• Dispositivi medicali a microonde
• Monitor di piccole dimensioni
Altri apparecchi meno comuni operanti alla stessa frequenza:
• Sistemi antifurto
• Stazioni per radioamatori (HAM)
• Sistemi di gestione dei magazzini
• Sistemi di distinzione per treni e veicoli d’emergenza
Nota
• Gli eventuali disturbi visualizzati sullo schermo di un televisore posto nelle vicinanze
possono essere causati proprio da una periferica Bluetooth o da questo stesso
apparecchio, anche attraverso i dispositivi ad esso collegati, per interferenza sulla presa
d’antenna del televisore stesso o di altri apparecchi quali ricevitori video e sintonizzatori
satellitari. In tal caso si suggerisce di aumentare la distanza tra l’apparecchio e/o la
periferica Bluetooth e tali connettori.
• La presenza di ostacoli tra l’apparecchio e la periferica Bluetooth, ad esempio porte
metalliche, pareti di cemento armato o pannelli isolanti contenenti carta stagnola, può
costringere a cambiare la posizione dell’apparecchio stesso in modo da prevenire la
generazione di rumore o l’interruzione delle comunicazioni.
12
Page 85

Riproduzione di un lettore Bluetooth
Ambito d’uso dell’apparecchio
Questo apparecchio è destinato all’uso domestico. (La distanza di trasmissione potrebbe
ridursi secondo l’ambiente di comunicazione.)
A causa di ostacoli che potrebbero ridurre la capacità di ricezione delle onde radio, l’audio
potrebbe subire interruzioni o cessare del tutto nei seguenti ambienti d’uso dell’apparecchio:
• In edifici di cemento armato.
• Nei pressi di arredi metallici.
• In presenza di molte persone o eccessivamente vicino ad altri edifici od ostacoli.
• In presenza di campi magnetici, scariche elettrostatiche o disturbi radio causati da
apparati di comunicazione radio funzionanti nella medesima banda di frequenza (2,4 GHz)
dell’apparecchio, oppure ancora dispositivi LAN wireless o forni a microonde.
• Nelle zone residenziali molto popolate (condomini, agglomerati residenziali ecc.) e qualora
il forno a microonde del vicino sia posto a breve distanza dall’apparecchio. In tal caso si
suggerisce di spostarlo. Naturalmente le interferenze cesserebbero non appena spento il
forno.
Riflessi di onde radio
Le onde radio ricevute dall’apparecchio includono sia quelle dirette emesse dalla periferica
Bluetooth collegata, anche dette “onde dirette”, sia quelle indirette causate dal riflesso su
ostacoli quali pareti, arredi ed edifici circostanti, anche dette “onde riflesse”. In funzione
dell’ambiente d’uso dell’apparecchio le onde riflesse a loro volta generano altre onde riflesse
che influiscono variamente sulle condizioni di ricezione. Se a causa di questo fenomeno
l’apparecchio non riceve correttamente i segnali audio si suggerisce di provare a spostare
lievemente la periferica Bluetooth. Tali segnali potrebbero inoltre subire interruzioni a causa
delle onde riflesse generate al passaggio di persone o dal loro avvicinamento allo spazio tra
l’apparecchio e la periferica Bluetooth.
Italiano
13
Page 86

Altri collegamenti
• Prima di eseguire o cambiare un collegamento si raccomanda di spegnere l’apparecchio e
di scollegarne il cavo di alimentazione dalla presa di rete.
• Durante la riproduzione di musica nel modo AUX il volume potrebbe variare secondo
quello del lettore esterno collegato. In caso di distorsione del suono con volume regolato
al massimo è opportuno ridurlo.
1. Collegamento di un componente ausiliario
Collegare il componente ausiliario alla presa AUX IN del pannello posteriore.
Lettore audio
digitale ecc.
Comune cavo con
mini-spinotto stereo
Pannello posteriore
2. Premere il tasto [INPUT]. (L’indicatore del modo si accende di colore
arancione .)
3. Avviare la riproduzione dal componente ausiliario connesso.
14
Page 87

Informazioni aggiuntive
Risoluzione dei problemi
ATTENZIONE
• Non aprire mai l’apparecchio.
Spesso quando un apparecchio non opera nel modo atteso si pensa che sia affetto
da problemi o malfunzionamenti. Se si pensa che l’apparecchio non stia funzionando
correttamente si suggerisce innanzi tutto di cercare la soluzione tra quelle qui oltre proposte.
A volte il problema risiede in un componente esterno collegato. Si suggerisce perciò di
controllare ogni componente collegato all’apparecchio, ma anche gli elettrodomestici in uso
nelle vicinanze. Qualora il problema riscontrato persista anche dopo avere eseguito i controlli
di seguito suggeriti si raccomanda di rivolgersi al più vicino rivenditore Pioneer per gli
interventi del caso.
• Se l’apparecchio non funziona correttamente a causa di effetti esterni quale, ad
esempio, l’elettricità statica, si suggerisce di provare a scollegarlo dalla presa di rete e di
ricollegarvelo.
Problema Rimedio
L’apparecchio non si accende. • Scollegare e ricollegare il cavo di alimentazione alla
L’apparecchio si pone
automaticamente in standby
senza alcun intervento da parte
dell’utilizzatore.
Anche dopo avere selezionato
uno dei modi d’uso
l’apparecchio non emette alcun
suono.
presa di rete.
• Quando non vi è collegato né un componente
esterno attraverso la presa AUX IN dopo 20 minuti
d’inutilizzo una volta selezionato il modo AUX d’uso
l’apparecchio si spegne automaticamente (tuttavia
solo quando è attivato il modo APS; vedere a
pagina 9).
• Accertarsi che il componente esterno sia
correttamente collegato.
Italiano
15
Page 88

Informazioni aggiuntive
Problema Rimedio
La periferica Bluetooth non
si connette, oppure non è
utilizzabile. Oppure la periferica
Bluetooth connessa non
emette alcun suono o questo
s’interrompe.
* La distanza in linea d’aria è solo stimata. L’effettiva portata della comunicazione può
variare secondo le condizioni ambientali.
• Verificare che nelle vicinanze dell’apparecchio
non vi siano altri apparecchi, ad esempio un forno
a microonde, un dispositivo LAN wireless o una
periferica Bluetooth, operanti in trasmissione nella
banda da 2,4 GHz. Se necessario spostare questo
apparecchio. Alternativamente spegnere gli altri
apparecchi.
• Verificare che la periferica Bluetooth non sia
eccessivamente lontana da questo apparecchio
e che tra i due non siano frapposti ostacoli. La
distanza massima tra i due apparecchi deve essere
10 metri* e non vi devono essere ostacoli frapposti.
• La periferica Bluetooth potrebbe non essere
impostata per funzionare nel modo Bluetooth.
Controllarne le impostazioni.
• Verificare che l’accoppiamento sia avvenuto
correttamente. I dati di accoppiamento potrebbero
essere stati cancellati dall’apparecchio o dalla
periferica Bluetooth stessa. Eseguirne nuovamente
l’accoppiamento.
• Verificare che si stia usando il profilo corretto.
Occorre usare periferiche compatibili con i profili
A2DP.
16
Page 89

Informazioni aggiuntive
Avvertenze per l’uso
Prima di spostare l’apparecchio
Prima di spostare l’apparecchio, si deve
quindi spegnere con il tasto
e se ne deve scollegare il cavo di
ON]
alimentazione.
L’apparecchio si può danneggiare se alla
presa AUX IN si collega un componente del
tipo non previsto.
Luogo d’installazione
• Non collocare l’apparecchio sul
televisore o un monitor a colori.
Tenerlo inoltre lontano dai lettori
a cassetta e dagli altri componenti
facilmente sensibili ai campi
elettromagnetici.
Non installare l’apparecchio:
• In punti esposti alla luce solare diretta
• In luoghi umidi e/o poco ventilati
• In luoghi molto caldi
• In punti soggetti a vibrazioni
• In luoghi molto polverosi o con molto
fumo di sigaretta
• In luoghi con fuliggine, vapore o molto
riscaldati, ad esempio in cucina
Non usare l’apparecchio come
supporto per altri oggetti.
Non collocare oggetti sopra l’apparecchio.
Non bloccarne le aperture di ventilazione.
Non usare l’apparecchio su tappeti, letti e
poltrone con pelo lungo, né avvolgerlo in
un tessuto né in qualsiasi altro modo. In
caso contrario si potrebbe danneggiare a
causa della mancata dispersione del calore
interno.
[ STANDBY/
Non riscaldare in alcun modo
l’apparecchio.
Non collocare l’apparecchio su un
amplificatore o un altro componente che
genera calore.
In caso di montaggio a rack, per evitare che
subisca il calore emesso dall’amplificatore
o da altri componenti audio è opportuno
installarlo sotto di essi.
• Si raccomanda di tenere spento
l’apparecchio quando non lo si usa.
• Quando l’apparecchio è acceso, a
seconda delle condizioni del segnale
sullo schermo del televisore possono
apparire disturbi a strisce mentre
l’audio delle stazioni radio potrebbe
disturbato. In tal caso è sufficiente
spegnere l’apparecchio stesso.
Pulizia dell’apparecchio
• Prima di pulire l’apparecchio è
raccomandabile scollegarne il cavo di
alimentazione dalla presa di rete.
• La pulizia deve essere fatta solo con
l’ausilio di un panno morbido. In caso
di sporcizia persistente si può bagnare
il panno con del detergente neutro
diluito in cinque o sei parti d’acqua,
strizzandolo bene prima strofinare
l’apparecchio che andrà poi asciugato
con un panno morbido e asciutto.
• Non usare alcol né solventi, benzene,
insetticida o prodotti analoghi, poiché
causerebbero l’asportazione del
rivestimento e delle indicazioni.
17
Italiano
Page 90

Informazioni aggiuntive
Evitare altresì di lasciare oggetti
di gomma o vinile a contatto con
l’apparecchio per lungo tempo, pena il
suo danneggiamento.
• Prima di usare prodotti impregnati
di sostanze chimiche per la
pulizia esterna dell’apparecchio si
raccomanda di leggerne attentamente
le avvertenze d’uso.
Dati tecnici
• Amplificatore
Potenza RMS:
Diffusori destro e sinistro . . 25 W + 25 W
(RMS, 1 kHz, 10 %, distorsione armonica
totale, 6 Ω)
• Diffusori
Sistema . . . . . . . . . . . . . . . . . . Sistema a 2 vie
Diffusori:
Tweeter. . . .cono da 2,5 cm × 1/ciascuno
Woofer . . . . cono da 10 cm × 1/ciascuno
Gamma di frequenze . . . . . da 50 Hz a 20 kHz
• Varie
Alimentazione elettrica
. . . . . . . . . . CA da 100 V a 240 V, 50 Hz/60 Hz
DC 20 V, 2,4 A
Consumo elettrico . . . . . . . . . . . . . . . . . . 48 W
In standby . . . . . . . . . . . . . . . . . . . . . 0,5 W
Dimensioni
. . . . . . . . . . . 140 mm (largh) x 218 mm (alt) x
160 mm (prof) ciascuno
Peso (senza confezione né adattatore)
. . . . . . . . . . . . . . . . . . . . . . . . . . . . . . . . . . 3,8 kg
• Accessori
Cavo diffusore . . . . . . . . . . . . . . . . . . . . . . . . . 1
Adattatore CA . . . . . . . . . . . . . . . . . . . . . . . . . 1
Piedine di gomma . . . . . . . . . . . . . . . . . . . . . 8
Scheda di garanzia . . . . . . . . . . . . . . . . . . . . . 1
Istruzioni per l’uso (questo documento)
Nota
• I dati tecnici e l’aspetto
dell’apparecchio sono soggetti
a modifiche migliorative senza
preavviso.
18
Page 91

Page 92

BELANGRIJK
CAUTION
RISK OF ELECTRIC SHOCK
De lichtflash met pijlpuntsymbool in een
gelijkzijdige driehoek is bedoeld om de
aandacht van de gebruikers te trekken op
een niet geïsoleerde “gevaarlijke spanning”
in het toestel, welke voldoende kan zijn om
bij aanraking een elektrische shock te
veroorzaken.
WAARSCHUWING
Dit apparaat is niet waterdicht. Om brand of een
elektrische schok te voorkomen, mag u geen voorwerp
dat vloeistof bevat in de buurt van het apparaat zetten
(bijvoorbeeld een bloemenvaas) of het apparaat op andere
wijze blootstellen aan waterdruppels, opspattend water,
regen of vocht.
WAARSCHUWING
Lees zorgvuldig de volgende informatie voordat u de stekker
de eerste maal in het stopcontact steekt.
De bedrijfsspanning van het apparaat verschilt
afhankelijk van het land waar het apparaat wordt
verkocht. Zorg dat de netspanning in het land waar
het apparaat wordt gebruikt overeenkomt met de
bedrijfsspanning (bijv. 230 V of 120 V) aangegeven op
de netstroomadapter label.
WAARSCHUWING
Om brand te voorkomen, mag u geen open vuur (zoals een
brandende kaars) op de apparatuur zetten.
BELANGRIJKE INFORMATIE BETREFFENDE DE VENTILATIE
Let er bij het installeren van het apparaat op dat er
voldoende vrije ruimte rondom het apparaat is om een
goede doorstroming van lucht te waarborgen (tenminste
10 cm boven, 10 cm achter en 10 cm aan de zijkanten van
het apparaat).
WAARSCHUWING
De gleuven en openingen in de behuizing van het apparaat
zijn aangebracht voor de ventilatie, zodat een betrouwbare
werking van het apparaat wordt verkregen en oververhitting
wordt voorkomen. Om brand te voorkomen, moet u ervoor
zorgen dat deze openingen nooit geblokkeerd worden
of dat ze afgedekt worden door voorwerpen (kranten,
tafelkleed, gordijn e.d.) of door gebruik van het apparaat op
een dik tapijt of een bed.
Gebruiksomgeving
Temperatuur en vochtigheidsgraad op de plaats van
gebruik:
+5 °C tot +35 °C, minder dan 85 % RH (ventilatieopeningen
niet afgedekt)
Zet het apparaat niet op een slecht geventileerde plaats en
stel het apparaat ook niet bloot aan hoge vochtigheid of
direct zonlicht (of sterke kunstmatige verlichting).
WAARSCHUWING:
OM HET GEVAAR VOOR EEN ELEKTRISCHE
SHOCK TE VOORKOMEN, DEKSEL (OF
RUG) NIET VERWIJDEREN.
AAN DE BINNENZIJDE BEVINDEN ZICH
GEEN ELEMENTEN DIE DOOR DE
GEBRUIKER KUNNEN BEDIEND WORDEN.
ENKEL DOOR GEKWALIFICEERD
PERSONEEL TE BEDIENEN.
D3-4-2-1-3_A1_Nl
D3-4-2-1-4*_A1_Nl
D3-4-2-1-7a_A1_Nl
D3-4-2-1-7b*_A1_Nl
D3-4-2-1-7c*_A1_Nl
DO NOT OPEN
WAARSCHUWING
Berg kleine onderdelen op buiten het bereik van kinderen
en peuters. Raadpleeg onmiddellijk een arts als ze per
ongeluk zijn ingeslikt.
Als de netstekker van dit apparaat niet geschikt is voor
het stopcontact dat u wilt gebruiken, moet u de stekker
verwijderen en een geschikte stekker aanbrengen.
Laat het vervangen en aanbrengen van een nieuwe
netstekker over aan vakkundig onderhoudspersoneel.
Als de verwijderde stekker per ongeluk in een
stopcontact zou worden gestoken, kan dit resulteren in
een ernstige elektrische schok. Zorg er daarom voor dat
de oude stekker na het verwijderen op de juiste wijze
wordt weggegooid.
Haal de stekker van het netsnoer uit het stopcontact
wanneer u het apparaat geruime tijd niet denkt te
gebruiken (bijv. wanneer u op vakantie gaat).
LET OP
De
koppelt het apparaat niet volledig los van het lichtnet.
Aangezien er na het uitschakelen van het apparaat
nog een kleine hoeveelheid stroom blijft lopen, moet u
de stekker uit het stopcontact halen om het apparaat
volledig van het lichtnet los te koppelen. Plaats het
apparaat zodanig dat de stekker in een noodgeval
gemakkelijk uit het stopcontact kan worden gehaald.
Om brand te voorkomen, moet u de stekker uit het
stopcontact halen wanneer u het apparaat langere tijd
niet denkt te gebruiken (bijv. wanneer u op vakantie
gaat).
Dit apparaat is bestemd voor normaal huishoudelijk
gebruik. Indien het apparaat voor andere doeleinden
of op andere plaatsen wordt gebruikt (bijvoorbeeld
langdurig gebruik in een restaurant voor zakelijke
doeleinden, of gebruik in een auto of boot) en als
gevolg hiervan defect zou raken, zullen de reparaties in
rekening gebracht worden, ook als het apparaat nog in
de garantieperiode is.
Het uitroepteken in een gelijkzijdige
driehoek is bedoeld om de aandacht van de
gebruiker te trekken op de aanwezigheid van
belangrijke bedienings- en
onderhoudsinstructies in de handleiding bij
dit toestel.
STANDBY/ON
schakelaar van dit apparaat
D3-4-2-1-1_A1_Nl
D3-4-2-2-1a_A1_Nl
D3-4-2-2-2a*_A1_Nl
K041_A1_Nl
2
Page 93

WAARSCHUWING NETSNOER
Pak het netsnoer beet bij de stekker. Trek de stekker er
niet uit door aan het snoer te trekken en trek nooit aan het
netsnoer met natte handen aangezien dit kortsluiting of
een elektrische schok tot gevolg kan hebben. Plaats geen
toestel, meubelstuk o.i.d. op het netsnoer, en klem het niet
vast. Maak er nooit een knoop in en en verbind het evenmin
met andere snoeren. De netsnoeren dienen zo te worden
geleid dat er niet per ongeluk iemand op gaat staan. Een
beschadigd netsnoer kan brand of een elektrische schok
veroorzaken. Kontroleer het netsnoer af en toe. Wanneer
u de indruk krijgt dat het beschadigd is, dient u bij uw
dichtstbijzijnde erkende PIONEER onderhoudscentrum of
uw dealer een nieuw snoer te kopen.
WAARSCHUWINGEN Netstroomadapter
• Pak de behuizing van de netstroomadapter vast
wanneer u deze uit het stopcontact haalt. Als u aan
het stroomsnoer trekt, kan dit beschadigd raken, wat
kan leiden tot brand en/of elektrische schokken.
• Probeer de netstroomadapter in geen geval met natte
handen in het stopcontact te doen of eruit te halen.
Dit kan leiden tot elektrische schokken.
• Steek de stekker van het stroomsnoer van de
netstroomadapter niet in een stopcontact waarin de
stekker niet goed vast blijft zitten, ook al worden de
poten helemaal het stopcontact in gestoken.
Hierdoor kan warmteontwikkeling optreden, wat kan
leiden tot brand.
Raadpleeg uw dealer of een elektricien over
vervanging van het stopcontact in kwestie.
Bewaar de netstroomadapter buiten bereik van kinderen
en babies.
Het snoer van de netstroomadapter kan per ongeluk rond
de nek verstrikt raken, wat kan leiden tot verstikking.
Deponeer dit product niet bij het gewone huishoudelijk afval wanneer u het wilt verwijderen. Er bestaat een speciaal wettelijk
voorgeschreven verzamelsysteem voor de juiste behandeling, het opnieuw bruikbaar maken en de recycling van gebruikte
elektronische producten.
In de lidstaten van de EU, Zwitserland en Noorwegen kunnen particulieren hun gebruikte elektronische producten gratis bij de daarvoor
bestemde verzamelplaatsen of een verkooppunt (indien u aldaar een gelijkwaardig nieuw product koopt) inleveren.
Indien u zich in een ander dan bovengenoemd land bevindt kunt u contact opnemen met de plaatselijke overheid voor informatie over de juiste
verwijdering van het product.
Zodoende zorgt u ervoor dat het verwijderde product op de juiste wijze wordt behandeld, opnieuw bruikbaar wordt gemaakt, t gerecycleerd en het
niet schadelijk is voor de gezondheid en het milieu.
S002*_A1_Nl
Waarschuwing radiogolven
Dit toestel maakt gebruik van radiogolven met een
frequentie van 2,4 GHz, een band die ook gebruikt wordt
door andere draadloze systemen (draadloze telefoons,
magnetronovens enz.). Als u merkt dat uw televisiebeeld
gestoord wordt, is het mogelijk dat dit toestel (inclusief
door dit toestel ondersteunde apparatuur) interferentie
veroorzaakt met de signalen die binnenkomen via de
antenne-ingang van uw televisie, video, satellietontvanger
enz. Vergroot in een dergelijk geval de afstand tussen de
ingangsaansluiting voor de antenne en dit toestel (inclusief
door dit toestel ondersteunde apparatuur).
• Pioneer kan niet aansprakelijk worden gesteld voor
storingen of foutieve werking van het geschikte
Pioneer product door communicatiefouten/storingen
die samenhangen met uw netwerkverbinding en/of
de aangesloten apparatuur. Raadpleeg uw Internetprovider of de fabrikant van uw netwerkapparatuur.
• Er is een aparte overeenkomst/betaling vereist met/
aan een internet service provider om gebruik te
kunnen maken van het internet.
K058b_A1_Nl
Ontdek nu de voordelen van online registratie! Registreer uw Pioneer product via
http://www.pioneer.nl - http://www.pioneer.be
(of
http://www.pioneer.eu)
Nederlands
3
Page 94

Inhoudsopgave
Voor u begint ..................................................................................5
Controleren van de accessoires
Sluit de linker luidspreker aan op de rechter luidspreker
Gelijkstroom aansluiten
Functies en namen van de onderdelen .........................................7
Vooraanzicht
Achteraanzicht
Achterpaneel
Bovenpaneel
Van start ..........................................................................................9
Aan zetten
APS-stand (spaarstand)
Bluetooth audioweergave ...........................................................10
Overige aansluitingen ..................................................................14
Aanvullende informatie ...............................................................15
Oplossen van problemen
Waarschuwingen in het gebruik
Technische gegevens
* Er zal geen aanvullende kennisgeving worden gegeven op dit document als er een
verandering wordt/is doorgevoerd in het product zelf.
* Hartelijk dank voor het aanschaffen van dit Pioneer product; leest u alstublieft de
bedieningshandleiding goed door voor gebruik zodat u er zeker van kunt zijn dat u het
product correct bedient. Bewaar deze bedieningshandleiding zodat u er later nog eens
iets in op kunt zoeken.
Schakelende voedingsadapter
Schuif de netstekker over
de geleidingsrails van de
wisselstroomadapter zoals
aangegeven op onderstaande
afbeelding totdat u een klikgeluid
hoort.
4
Page 95

Voor u begint
1. Controleren van de accessoires
Controleer na het openen van de verpakking of de volgende items aanwezig zijn:
• Netstroomadapter × 1 (inclusief netstekker × 1)
• Luidsprekerkabel × 1
• Rubber voetje × 8
• Garantiekaart × 1
• Bedieningshandleiding (dit document)
2. Sluit de linker luidspreker aan op de rechter luidspreker
Achterkant van de rechter
luidspreker
SPEAKER OUT aansluiting
Achterkant van de linker
luidspreker
Luidsprekerkabel
1. Draai de aansluiting een stukje los tot er genoeg ruimte is om het ontblote draadeind in
te brengen.
2. Sluit de draad met de rode markering aan op de rode (+) aansluiting en de draad met de
zwarte markering op de zwarte (−) aansluiting.
3. Breng de draad in positie en draai vervolgens de aansluiting aan totdat de draad goed
vastgeklemd zit.
4. Steek de penstekker in de SPEAKER OUT aansluiting van de rechter luidspreker.
Opmerking
• Om magnetische interferentie of ongewenste ruis te voorkomen, mag u dit product niet
te dicht bij apparatuur plaatsen die elektromagnetische straling produceert.
5
Nederlands
Page 96

Voor u begint
LET OP
• Op deze luidsprekeraansluitingen staat een GEVAARLIJKE
spanning.
Om een elektrische schok te voorkomen bij het aansluiten
en losmaken van de luidsprekerkabels, moet u de stekker uit
het stopcontact halen voordat u niet geïsoleerde onderdelen
aanraakt.
• Sluit de meegeleverde luidsprekers niet aan op een andere versterker.
Dit kan resulteren in storingen of brand.
• Zorg ervoor dat de blootliggende delen van de luidsprekerdraden elkaar niet kunnen raken.
• Bevestig deze luidsprekers niet aan een wand of aan het plafond, want dan kunnen ze
letsel veroorzaken wanneer ze vallen.
• Zorg ervoor dat er geen voorwerpen in de basreflexkanalen terecht komen.
• Ga niet op de luidsprekers zitten of staan. U zou daardoor letsel kunnen oplopen.
3. Gelijkstroom aansluiten
• Doe de gelijkstroomstekker van de netstroomadapter in de DC IN aansluiting op het
achterpaneel. Doe vervolgens de stekker aan het andere uiteinde in het stopcontact.
• Gebruik uitsluitend de netstroomadapter die wordt meegeleverd met het toestel en gebruik
in geen geval een netstroomadapter met andere technische gegevens.
Achterkant
van de rechter
luidspreker
DC IN
Incorrect
Achterkant
van de linker
luidspreker
6
Page 97

Functies en namen van de onderdelen
Vooraanzicht
Linker luidspreker
Achteraanzicht
12 3
Rechter luidspreker
Linker luidsprekerRechter luidspreker
Achterpaneel
Bovenpaneel
(bladzijde 8)
7
Bevestigen van de rubber voetjes
Bevestig de als accessoire
meegeleverde rubber voetjes aan
de onderkant van het toestel.
4
1.
DC IN aansluiting
Sluit hierop de netstroomadapter aan.
2.
AUX IN aansluiting
Sluit hierop externe apparatuur aan.
3.
SPEAKER OUT aansluiting voor de
linker luidspreker
Sluit hierop de penstekker van de
luidsprekerkabel aan.
4.
Luidsprekeraansluiting
Sluit hier de luidsprekerkabel op aan.
Nederlands
Page 98

Bovenpaneel
12 3 4 5
Functies en namen van de onderdelen
6
1.
Standindicator
• Licht groen op wanneer het toestel in
de Bluetooth stand staat.
• Licht oranje op wanneer het toestel in
de AUX stand voor externe apparatuur
staat.
• Licht 3 seconden lang rood op
wanneer het toestel uit (standby) staat
*1
is uitgeschakeld.
en APS
• Licht 3 seconden lang groen op
wanneer het toestel uit (standby) staat
en APS is ingeschakeld.
2.
STANDBY/ON
• Hiermee schakelt u het toestel uit
(standby) of aan.
Houd deze toets ingedrukt om het
toestel uit (standby) te zetten.
INPUT
• Hiermee kunt u schakelen tussen
Bluetooth en AUX.
3.
Weergave / Pauze
• Pauzeren/hervatten weergave
PAIRING
• Houd deze toets ingedrukt om het
toestel te koppelen aan een ander
Bluetooth apparaat.
4.
Geluid uit
• Hiermee kunt u de geluidsweergave
uitschakelen of weer inschakelen.
De standindicator zal gaan
※
knipperen wanneer de
geluidsweergave is uitgeschakeld.
• Houd deze toets ingedrukt wanneer
het toestel uit (standby) staat om de
APS spaarstand aan of uit te zetten.
5.
VOL + /
-
• Stel het luistervolume in.
Het luistervolume heeft een
※
instelbereik van 0 t/m 30 (het toestel
heeft echter geen display om het
volumeniveau visueel aan te geven).
(Standaardinstelling: 10)
6.
Bluetooth indicator
• Licht blauw op wanneer er verbinding
is met Bluetooth apparatuur.
• Knippert terwijl er wordt gewacht
op het maken van een Bluetooth
verbinding.
• Knippert snel bij het maken van een
Bluetooth koppeling.
*1
Raadpleeg pagina 9 voor de APS-
spaarstand.
8
Page 99

Van start
Aan zetten
Druk op de [ STANDBY/ON] toets. De indicator zal gaan branden.
Het toestel schakelt over naar laatst gebruikte stand.
APS-stand (spaarstand)
• Wanneer het toestel 20 minuten lang aan staat maar niet wordt gebruikt, zal het zichzelf
automatisch uit (standby) zetten.
• 5 Minuten voordat het toestel automatisch wordt uitgeschakeld, zal de indicator gaan
knipperen.
Uitschakelen van de APS-spaarstand
• Houd terwijl het toestel uit staat de
ongeveer 3 seconden lang rood oplicht om de APS-spaarstand uit te schakelen.
• Als u de APS-spaarstand weer wilt inschakelen, moet u nog eens terwijl het toestel uit staat
[ (Geluid uit)]
de
groen oplicht.
Opmerking
• Het is mogelijk dat dit toestel automatisch wordt uitgeschakeld wanneer er met een zeer
laag volume wordt weergegeven. Zet in dat geval het volume hoger, of schakel de APSspaarstand uit.
toets ingedrukt houden zodat de indicator ongeveer 3 seconden lang
[ (Geluid uit)]
9
toets ingedrukt zodat de indicator
Nederlands
Page 100

Bluetooth audioweergave
Apparaat dat is voorzien van
Dit product stelt u in staat om draadloos naar muziek te luisteren van apparatuur die is
voorzien van Bluetooth draadloze technologie (mobiele telefoon, digitale muziekspeler enz.).
U kunt ook luisteren naar muziek van die niet is voorzien van Bluetooth draadloze technologie
met behulp van een in de handel verkrijgbare Bluetooth audiozender. Voor details dient u de
handleiding van de apparatuur voorzien van Bluetooth draadloze technologie te raadplegen.
Opmerking
*1
• De apparatuur voorzien van Bluetooth draadloze technologie moet A2DP-profielen
ondersteunen.
• Pioneer kan geen juiste verbinding en bediening garanderen van dit toestel met alle
apparatuur die voorzien is van Bluetooth draadloze technologie.
• Het merk Bluetooth
®
en de logo’s daarvan zijn gedeponeerde handelsmerken van
Bluetooth SIG, Inc. PIONEER CORPORATION gebruikt deze onder licentie. Andere
handelsmerken en handelsnamen zijn eigendom van de respectieve eigenaren.
Bluetooth draadloze technologie:
Mobiele telefoon
Apparaat dat is voorzien van
Bluetooth draadloze technologie:
Digitale muziekspeler
Apparaat dat niet is voorzien van
Bluetooth draadloze technologie:
Digitale muziekspeler
+
Bluetooth audiozender
(los verkrijgbaar)
*1
Koppelen van dit toestel en apparatuur met Bluetooth draadloze technologie
Om te kunnen profiteren van apparatuur voorzien van Bluetooth draadloze technologie, moet
deze eerst aan dit product gekoppeld worden. Voer het koppelen (paren/pairing) uit wanneer u
het systeem de eerste keer gebruikt of als de koppelingsgegevens zijn gewist.
Koppelen (“pairing”; paren) is nodig om het apparaat met Bluetooth draadloze technologie
te registreren en zo Bluetooth communicatie mogelijk te maken. Zie de handleiding van uw
apparatuur met Bluetooth draadloze technologie voor meer details.
• Koppelen (“pairing”) is vereist wanneer u de apparatuur met Bluetooth draadloze
technologie en dit toestel voor het eerst samen gebruikt.
10
 Loading...