

Page 1

X-HM70DAB
-K
NETWORK CD RECEIVER SYSTEM
XC-HM70DAB
Discover the benefits of registering your product online at
Operating Instructions
-K
NETWORK CD RECEIVER
http://www.pioneer.co.uk (or http://www.pioneer.eu).
Page 2
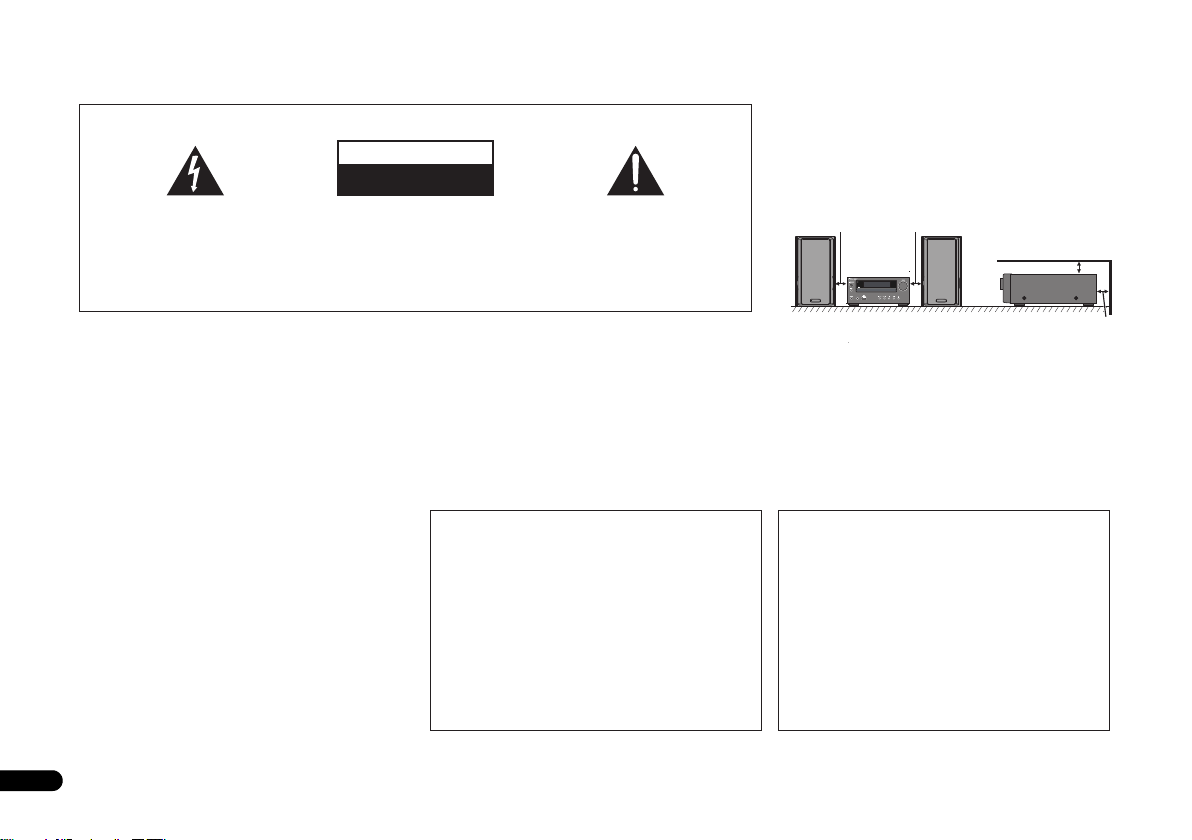
10 cm 10 cm
10 cm
10 cm
AUDIO IN
The exclamation point within an equilateral
triangle is intended to alert the user to the
presence of important operating and
maintenance (servicing) instructions in the
literature accompanying the appliance.
The lightning flash with arrowhead symbol,
within an equilateral triangle, is intended to
alert the user to the presence of uninsulated
“dangerous voltage” within the product’s
enclosure that may be of sufficient
magnitude to constitute a risk of electric
shock to persons.
CAUTION:
TO PREVENT THE RISK OF ELECTRIC
SHOCK, DO NOT REMOVE COVER (OR
BACK). NO USER-SERVICEABLE PARTS
INSIDE. REFER SERVICING TO QUALIFIED
SERVICE PERSONNEL.
CAUTION
RISK OF ELECTRIC SHOCK
DO NOT OPEN
IMPORTANT
D3-4-2-1-1_A1_En
WARNING
This equipment is not waterproof. To prevent a fire or
shock hazard, do not place any container filled with liquid
near this equipment (such as a vase or flower pot) or
expose it to dripping, splashing, rain or moisture.
D3-4-2-1-3_A1_En
Operating Environment
Operating environment temperature and humidity:
+5 °C to +35 °C (+41 °F to +95 °F); less than 85 %RH
(cooling vents not blocked)
Do not install this unit in a poorly ventilated area, or in
locations exposed to high humidity or direct sunlight (or
strong artificial light)
D3-4-2-1-7c*_A1_En
WARNING
Before plugging in for the first time, read the following
section carefully.
The voltage of the available power supply differs
according to country or region. Be sure that the
power supply voltage of the area where this unit
will be used meets the required voltage (e.g., 230 V
or 120 V) written on the rear panel.
D3-4-2-1-4*_A1_En
WARNING
To prevent a fire hazard, do not place any naked flame
sources (such as a lighted candle) on the equipment.
D3-4-2-1-7a_A1_En
If the AC plug of this unit does not match the AC
outlet you want to use, the plug must be removed
and appropriate one fitted. Replacement and
mounting of an AC plug on the power supply cord of
this unit should be performed only by qualified
service personnel. If connected to an AC outlet, the
cut-off plug can cause severe electrical shock. Make
sure it is properly disposed of after removal.
The equipment should be disconnected by removing
the mains plug from the wall socket when left unused
for a long period of time (for example, when on
vacation).
D3-4-2-2-1a_A1_En
VENTILATION CAUTION
When installing this unit, make sure to leave space
around the unit for ventilation to improve heat radiation
(at least 10 cm at top, 10 cm at rear, and 10 cm at each
side).
WARNING
Slots and openings in the cabinet are provided for
ventilation to ensure reliable operation of the product,
and to protect it from overheating. To prevent fire
hazard, the openings should never be blocked or
covered with items (such as newspapers, table-cloths,
curtains) or by operating the equipment on thick carpet
or a bed.
D3-4-2-1-7b*_A1_En
CAUTION
The STANDBY/ON switch on this unit will not
completely shut off all power from the AC outlet.
Since the power cord serves as the main disconnect
device for the unit, you will need to unplug it from the
AC outlet to shut down all power. Therefore, make
sure the unit has been installed so that the power
cord can be easily unplugged from the AC outlet in
case of an accident. To avoid fire hazard, the power
cord should also be unplugged from the AC outlet
when left unused for a long period of time (for
example, when on vacation).
D3-4-2-2-2a*_A1_En
2
En
Page 3
CAUTION
This product is a class 1 laser product classified
under the Safety of laser products, IEC 60825-1:2007.
CLASS 1 LASER PRODUCT
D58-5-2-2a_A1_En
Condensation
If the player is moved suddenly from a cold place into a
warm room (in winter, for example) or if the
temperature in the room in which the player is installed
rises suddenly due to a heater, etc., water droplets
(condensation) may form inside (on operating parts and
the lens). When condensation is present, the player will
not operate properly and playback is not possible. Let
the player stand at room temperature for 1 or 2 hours
with the power turned on (the time depends on the
extent of condensation). The water droplets will
dissipate and playback will become possible.
Condensation can also occur in the summer if the
player is exposed to the direct wind from an
air-conditioner. If this happens, move the player to a
different place.
This product is for general household purposes. Any
failure due to use for other than household purposes
(such as long-term use for business purposes in a
restaurant or use in a car or ship) and which requires
repair will be charged for even during the warranty
period.
S005_A1_En
K041_A1_En
3
En
Page 4
Thank you for purchasing this PIONEER product. To obtain the best performance from this product, please read this manual carefully. It will guide you in operating your PIONEER product.
Contents
Accessories. . . . . . . . . . . . . . . . . . . . . . . . . . . . . . 4
Before you start . . . . . . . . . . . . . . . . . . . . . . . . . 5
General. . . . . . . . . . . . . . . . . . . . . . . . . . . . . . . . . . . . 5
Loading the batteries . . . . . . . . . . . . . . . . . . . . . . . . . 5
Controls and Displays . . . . . . . . . . . . . . . . . . . . . 6
Remote control. . . . . . . . . . . . . . . . . . . . . . . . . . . . . . 6
Front Panel. . . . . . . . . . . . . . . . . . . . . . . . . . . . . . . . . 7
Speaker system (X-HM70DAB only) . . . . . . . . . . . . . . 7
Connecting your equipment . . . . . . . . . . . . . . . 8
Aerial connection . . . . . . . . . . . . . . . . . . . . . . . . . . . . 8
Speaker connection . . . . . . . . . . . . . . . . . . . . . . . . . . 9
Using other subwoofer . . . . . . . . . . . . . . . . . . . . . . . . 9
Connecting a TV, etc. . . . . . . . . . . . . . . . . . . . . . . . . . 9
Connecting to the network through LAN interface . . 10
AC power connection . . . . . . . . . . . . . . . . . . . . . . . . 10
General control . . . . . . . . . . . . . . . . . . . . . . . . . 11
To turn the power on. . . . . . . . . . . . . . . . . . . . . . . . . 11
Setting the clock. . . . . . . . . . . . . . . . . . . . . . . . . . . . 11
Enhancing your system . . . . . . . . . . . . . . . . . . . . . . 12
Listening to a CD or MP3/WMA disc. . . . . . . . . 13
Disc playback . . . . . . . . . . . . . . . . . . . . . . . . . . . . . . 13
Various disc functions . . . . . . . . . . . . . . . . . . . . . . . 13
Advanced CD or MP3/WMA disc playback . . . . . . . . 14
MP3/WMA folder mode (only for MP3/WMA files) . . 15
Listening to the iPod, iPhone or iPad . . . . . . . 17
Supported iPod, iPhone and iPad models: . . . . . . . . 17
Connecting your iPod/iPhone . . . . . . . . . . . . . . . . . . 17
To remove adaptor for iPod or iPhone . . . . . . . . . . . . 17
To insert iPad adaptor. . . . . . . . . . . . . . . . . . . . . . . . 17
Playing an iPod, iPhone or iPad . . . . . . . . . . . . . . . . 18
Listening to USB mass storage device/
MP3 player . . . . . . . . . . . . . . . . . . . . . . . . . . . . . 19
Connecting a USB device . . . . . . . . . . . . . . . . . . . . . 19
Playing a USB device . . . . . . . . . . . . . . . . . . . . . . . . 19
Playback with NETWORK feature. . . . . . . . . . . 20
Listening to Internet radio stations . . . . . . . . . . . . . 20
Playing back audio files stored on components on the
network . . . . . . . . . . . . . . . . . . . . . . . . . . . . . . . . . . 21
Playing back your favorite songs . . . . . . . . . . . . . . . 21
Network setup menu. . . . . . . . . . . . . . . . . . . . . . . . 21
Network connection requirements . . . . . . . . . . . . . 22
About network playback . . . . . . . . . . . . . . . . . . . . . 22
Glossary . . . . . . . . . . . . . . . . . . . . . . . . . . . . . . . . . 23
Listening to the FM radio . . . . . . . . . . . . . . . . . 24
Using the Radio Data System (RDS). . . . . . . . . 25
An introduction to RDS . . . . . . . . . . . . . . . . . . . . . . 25
Listening to the DAB. . . . . . . . . . . . . . . . . . . . . 26
Using the auto scan function manually. . . . . . . . . . 26
Selecting DAB stations . . . . . . . . . . . . . . . . . . . . . . 26
Displaying DAB radio information. . . . . . . . . . . . . . 26
DAB setup. . . . . . . . . . . . . . . . . . . . . . . . . . . . . . . . 27
Timer and sleep operation . . . . . . . . . . . . . . . . 28
Setting the wake-up timer . . . . . . . . . . . . . . . . . . . . 28
Sleep operation . . . . . . . . . . . . . . . . . . . . . . . . . . . . 28
Additional Information . . . . . . . . . . . . . . . . . . 29
Troubleshooting chart . . . . . . . . . . . . . . . . . . . . . . . 29
Condensation . . . . . . . . . . . . . . . . . . . . . . . . . . . . . 31
If problem occurs . . . . . . . . . . . . . . . . . . . . . . . . . . 31
Factory reset, clearing all memory. . . . . . . . . . . . . . 31
Before transporting the unit . . . . . . . . . . . . . . . . . . 31
Care of compact discs. . . . . . . . . . . . . . . . . . . . . . . 31
Cleaning the cabinet . . . . . . . . . . . . . . . . . . . . . . . . 31
Caution for when the unit is installed in a rack with a
glass door . . . . . . . . . . . . . . . . . . . . . . . . . . . . . . . . 31
About playable music file formats . . . . . . . . . . . . . . 32
About status messages. . . . . . . . . . . . . . . . . . . . . . 32
Specifications . . . . . . . . . . . . . . . . . . . . . . . . . . . . . 33
About iPod/iPhone/iPad . . . . . . . . . . . . . . . . . . . . . 33
Software License Notice . . . . . . . . . . . . . . . . . . . . . 34
X-HM70DAB Network CD Receiver System consisting of
main unit and speaker system.
XC-HM70DAB Network CD Receiver consisting of main unit.
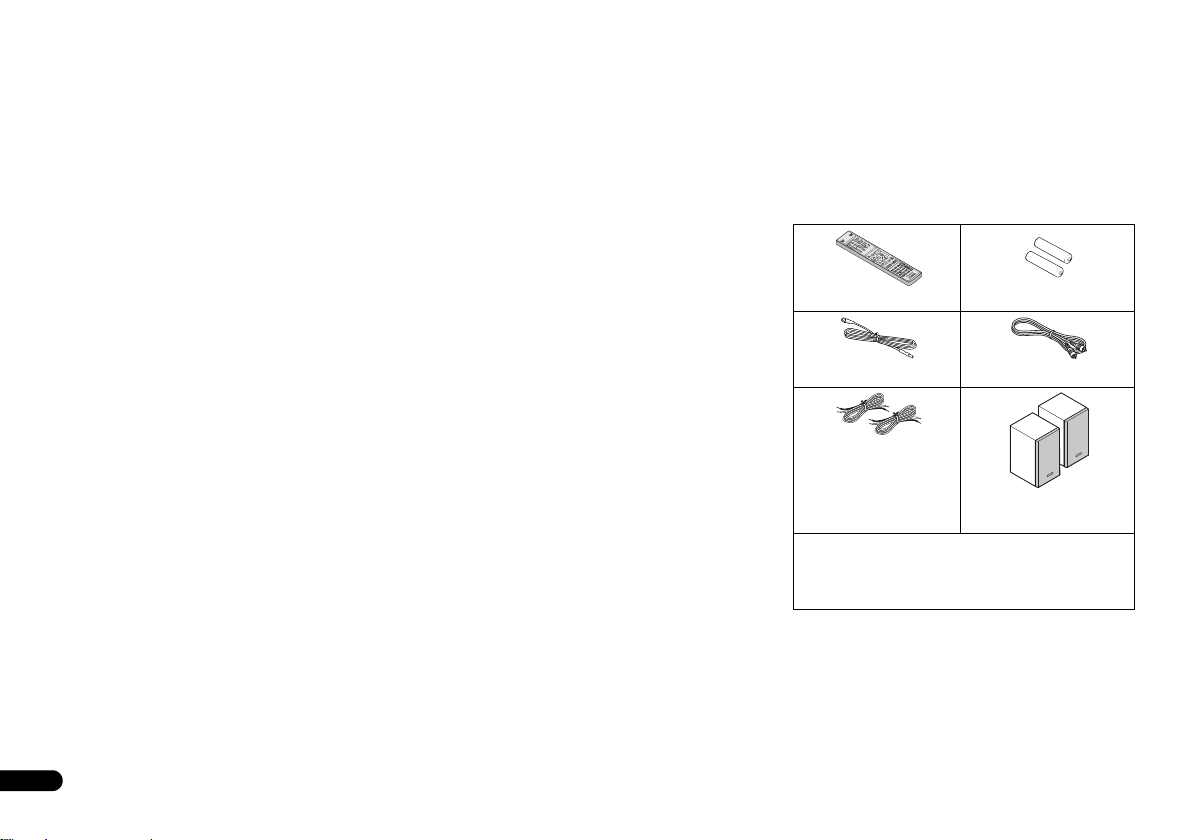
Accessories
Please confirm that the following accessories are included.
o
Remote control x 1
DAB/FM aerial x 1
Speaker wires x 2
(X-HM70DAB only)
Power cord
Warranty card
These operating instructions
“AAA” size battery x 2
Video cable x 1
Speaker x 2
(X-HM70DAB only)
4
En
Page 5
Before you start
CAUTION
CAUTION
Before you start
General
• Use the unit on a firm, level surface free from vibration.
• Place the speakers at least 30 cm away from any CRT TV
to avoid colour variations across the TV screen. If the
variations persist, move the speakers further away from
the TV. LCD TV is not prone to such variation.
•Keep the unit away from direct sunlight, strong magnetic
fields, excessive dust, humidity and electronic/electrical
equipment (home computers, facsimiles, etc.) which
generate electrical noise.
•Do not place anything on top of the unit.
•Do not expose the unit to moisture, to temperatures
higher than 60°C (140°F) or to extremely low
temperat
•If your system does not work properly, disconnect the AC
• In case of an electrical storm, unplug the unit for safety.
•Hold the AC power plug by the head when removing it
•The AC power plug is used as a disconnect device and
• Do not remove the outer cover, as this may result in
• The ventilation should not be impeded by covering the
•No naked flame sources, such as lighted candles, should
• Attention should be drawn to the environmental aspects
•The apparatus is designed for use in moderate climates.
ures.
power lead from the wall socket. Plug the AC power lead
back in, and then turn on your system.
from the wall socket, as pulling the lead can damage
internal wires.
shall always remain readily operable.
electric shock. Refer internal service to your local
PIONEER service facility.
ventilation openings with items, such as newspapers,
tablecloths, curtains, etc.
be placed on the apparat
of battery disposal.
us.
• The voltage used must be the same as that specified on
this unit. Using this product with a higher voltage other
than that which is specified is dangerous and may result
in a fire or other type of accident causing damage.
PIONEER will not be held responsible for any damage
resulting from use of this unit with a voltage other than
that which is specified.
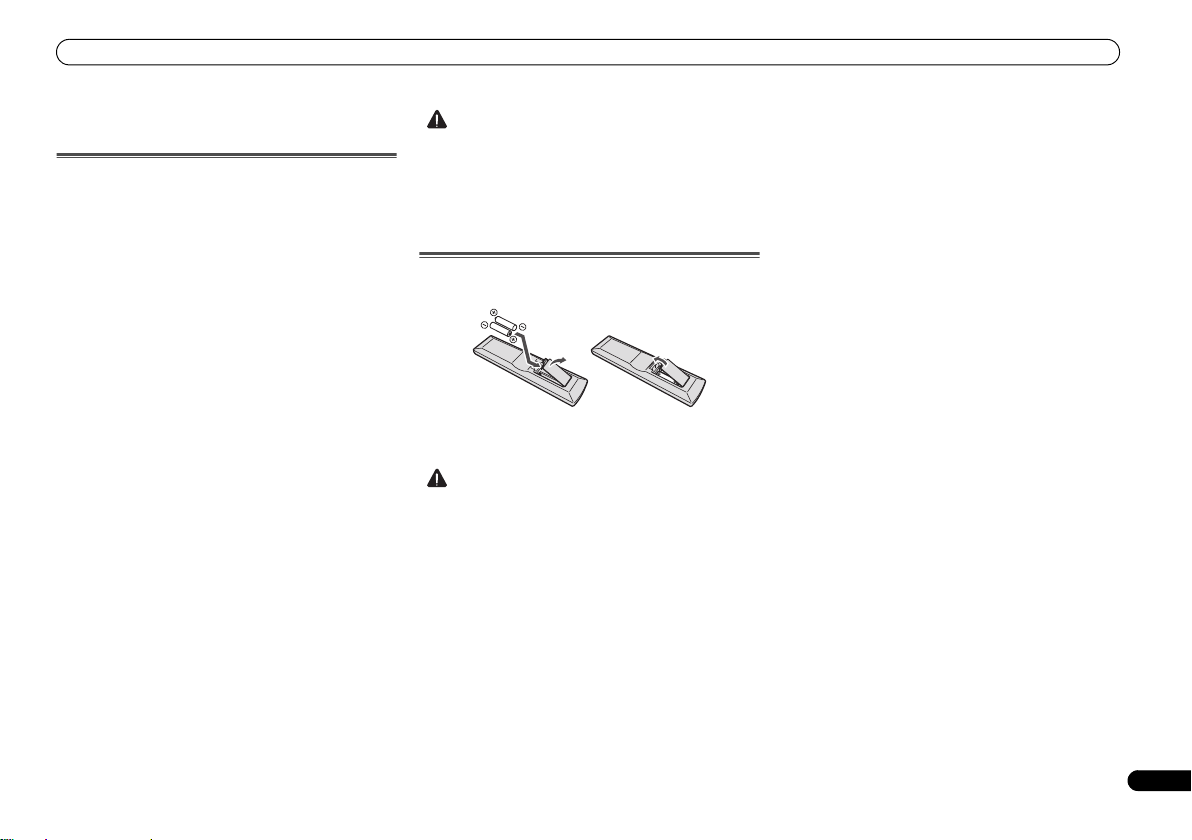
Loading the batteries
The batteries included with the unit are to check initial
operations; they may not last over a long period. We
recommend using alkaline batteries that have a longer life.
•Incorrect use of batteries may result in such hazards as
leakage and bursting. Observe the following precautions:
-
Never use new and old batteries together.
-
Insert the plus and minus sides of the batteries properly
according to the marks in the battery case.
-
Batteries with the same shape may have different
voltages. Do not use different batteries together.
-
When disposing of used batteries, please comply with
governmental regulations or environmental public
instruction’s rules that apply in your country or area.
• Do not use or store batteries in direct sunlight or other
excessively hot place, such as inside a car or near a
heater. This can cause batteries to leak, overheat, explode
or catch fire. It can also reduce the life or performance of
batteries.
5
En
Page 6
Controls and Displays
Controls and Displays
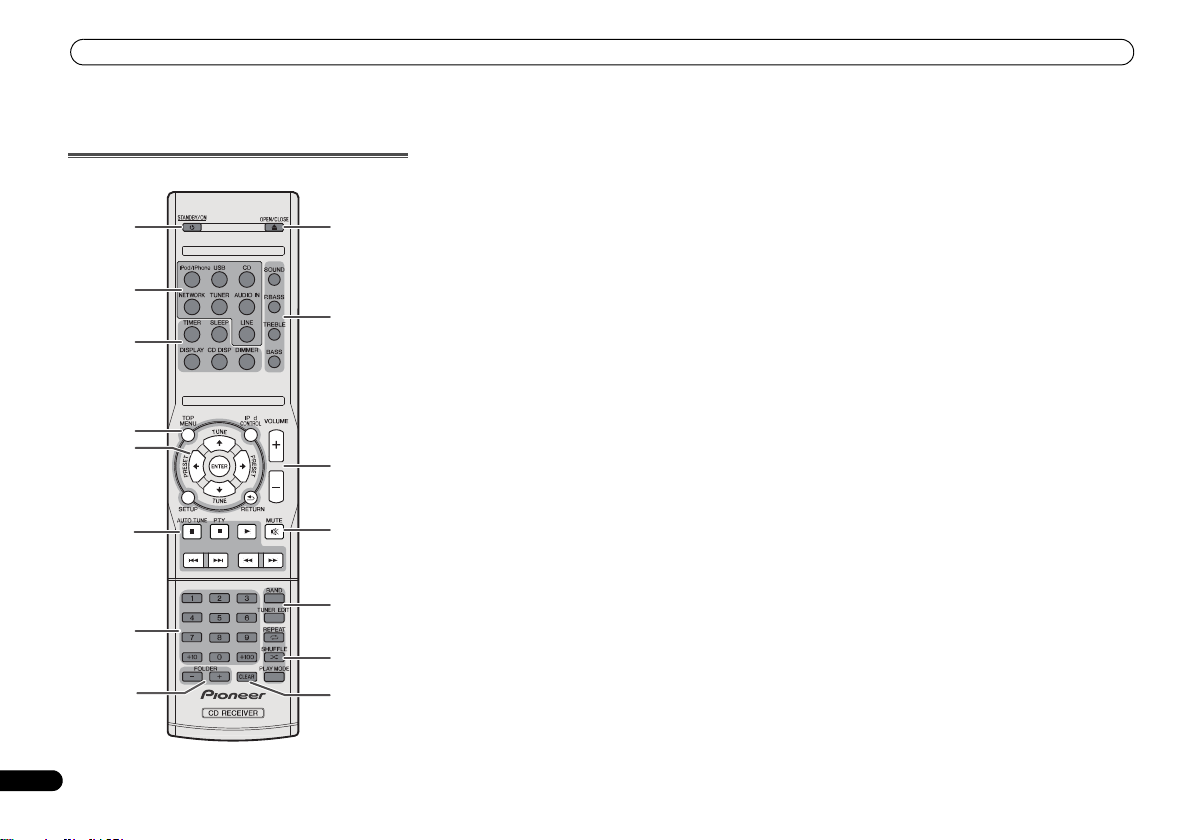
Remote control
1
2
3
4
O
5
6
7
8
9
10
11
12
13
14
15
1 STANDBY/ON
Switches the receiver between standby and on (page 11).
2 Input function buttons
Use to select the input source to this receiver.
3 CD Receiver control buttons
DIMMER – Dims or brightens the display. The brightness
can be controlled in four steps (page 11).
SLEEP – Press to change the amount of time before the
receiver switches into standby (30 min. – 60 min. – 90
min. – Off). You can check the remaining sleep time at
any time by pressing SLEEP once (page 28).
TIMER – Use for setting the clock, as well as for setting
and checking the timers (page 11, 28).
DISPLAY – Display the MP3/WMA disc or RDS
information.
CD DISP – Display the disc information (page 15).
4 CD Receiver control buttons
TOP MENU – Press to display the iPod Top menu
(page 18).
iPod CONTROL – Switches between the iPod controls
and the receiver controls (page 18).
SETUP – Press to access the receiver setup menu
(page 11).
RETURN – Confirm and exit the current menu screen.
5
///
Use to select/switch system settings and modes, and to
confirm actions.
Use TUNE / can be used to find radio frequencies and
PRESET / can be used to select preset radio stations
(page 24).
6 Playback control buttons
The main buttons (, , etc.) are used to control each
function after you have selected it using the input function
buttons.
AUTO TUNE – Use to start DAB Auto Scan function
(page 26).
PTY – Use to search for RDS program types (page 25).
7 Numeric buttons
Use to enter the number (page 14).
(TUNE
/
, PRESET
/
), ENTER
8 FOLDER +/-
Use to select the folder of the MP3/WMA disc (page 15).
9 OPEN/CLOSE
Use to open or close the disc tray (page 13).
10 Sound control buttons
Adjust the sound quality (page 12).
11 Volume control buttons
Use to set the listening volume (page 11).
12 MUTE
Mutes/unmutes the sound (page 12).
13 Tuner control buttons
BAND – Switches between FM ST (stereo) and FM
MONO radio bands (page 24).
TUNER EDIT – Memorizes/names stations for recall
(page 24).
14 Playback mode buttons
REPEAT – Press to change repeat play setting from a CD,
iPod or USB (page 14).
SHUFFLE – Press to change shuffle play setting from a
CD, iPod or USB (page 14).
PLAY MODE – Press to change the playback mode
between CD and MP3/WMA disc (page 14).
15 CLEAR
Use to clear the programmed play (page 15).
6
En
Page 7
Controls and Displays
TIMER
VOLUME
PHONES AUDIO IN
USB
5 V
2.1 A
1
9
6
7
8 11 12 13 14 15
52
3
4
10
TIMER
VOLUME
PHONES AUDIO IN
USB
5 V
2.1 A
STANDBY/ON
Remote sensor
7 m
Make sure nothing comes into contact
with the speaker diaphragms when you
remove the speaker grilles.
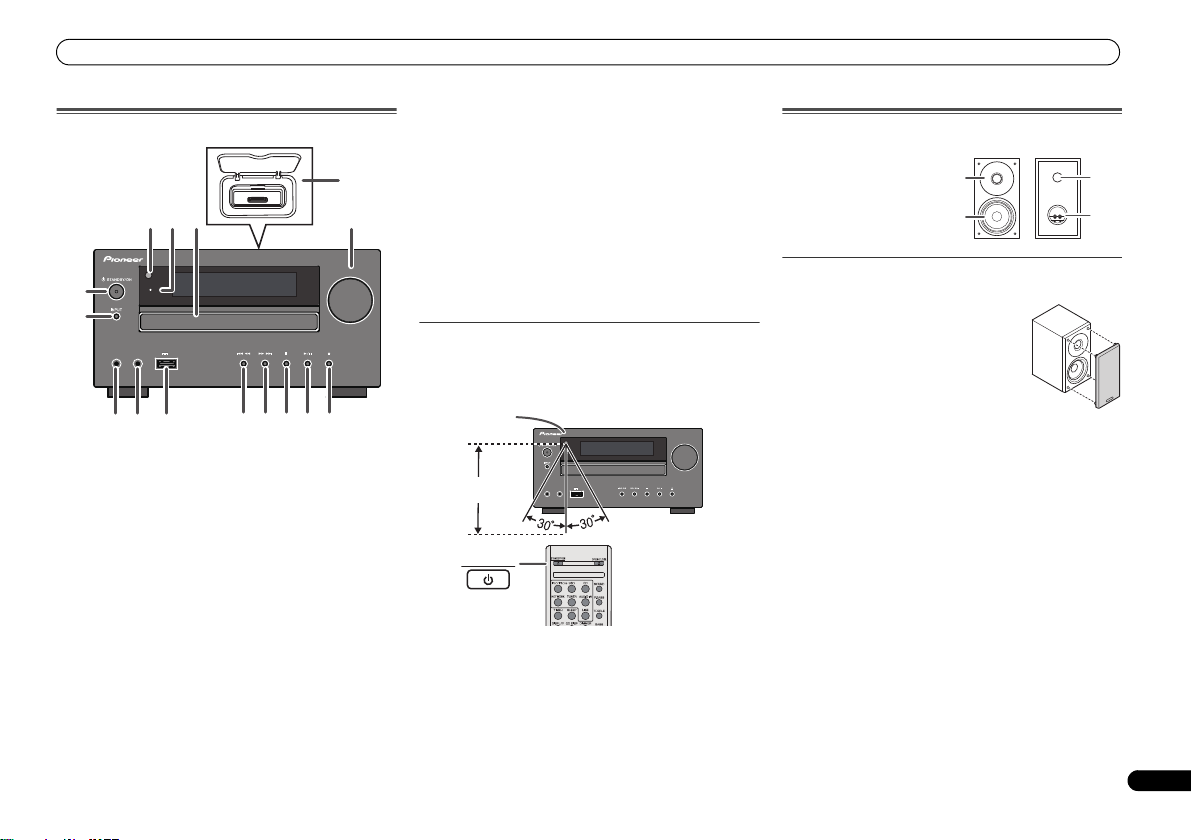
Front Panel
1 Remote Sensor
Receives the signals from the remote control.
2 Timer Indicator
Lights when the timer is set (page 28).
3 Disc Tray
Place the disc, label side up (page 13).
4 iPod or iPhone Docking Station
Dock iPod/iPhone (page 17).
5 Volume Control
Use to set the listening volume (page 11).
6 STANDBY/ON Button
Switches the receiver between standby and on (page 11).
7 INPUT Button
Selects the input source (page 12).
8 Headphone Socket
Use to connect headphones. When the headphones are
connected, there is no sound output from the speakers
(page 12).
9 AUDIO IN Socket
Use to connect an auxiliary component using a stereo
minijack cable (page 12).
10 USB Terminal
Use to connect your USB mass storage device or Apple iPad
as an audio source (page 19).
11 Tune Down, Skip Down Button
Selects the desired track or folder to be played back.
12 Tune Up, Skip Up Button
Selects the desired track or folder to be played back.
13 Stop Button
Use to stop the playback.
14 Play or Pause Button
Stops playback or resumes playback from the pause point.
15 Disc Tray Open/Close Button
Use to open or close the disc tray (page 13).
Speaker system (X-HM70DAB only)
1 Dome-Tweeter
2 Woofer
3 Bass Reflex Duct
4 Speaker Terminal
1
2
Speaker grilles are removable
3
4
Test of the remote control
Check the remote control after checking all the connections.
Point the remote control directly at the remote sensor on the
unit. The remote control can be used within the range shown
below:
7
En
Page 8
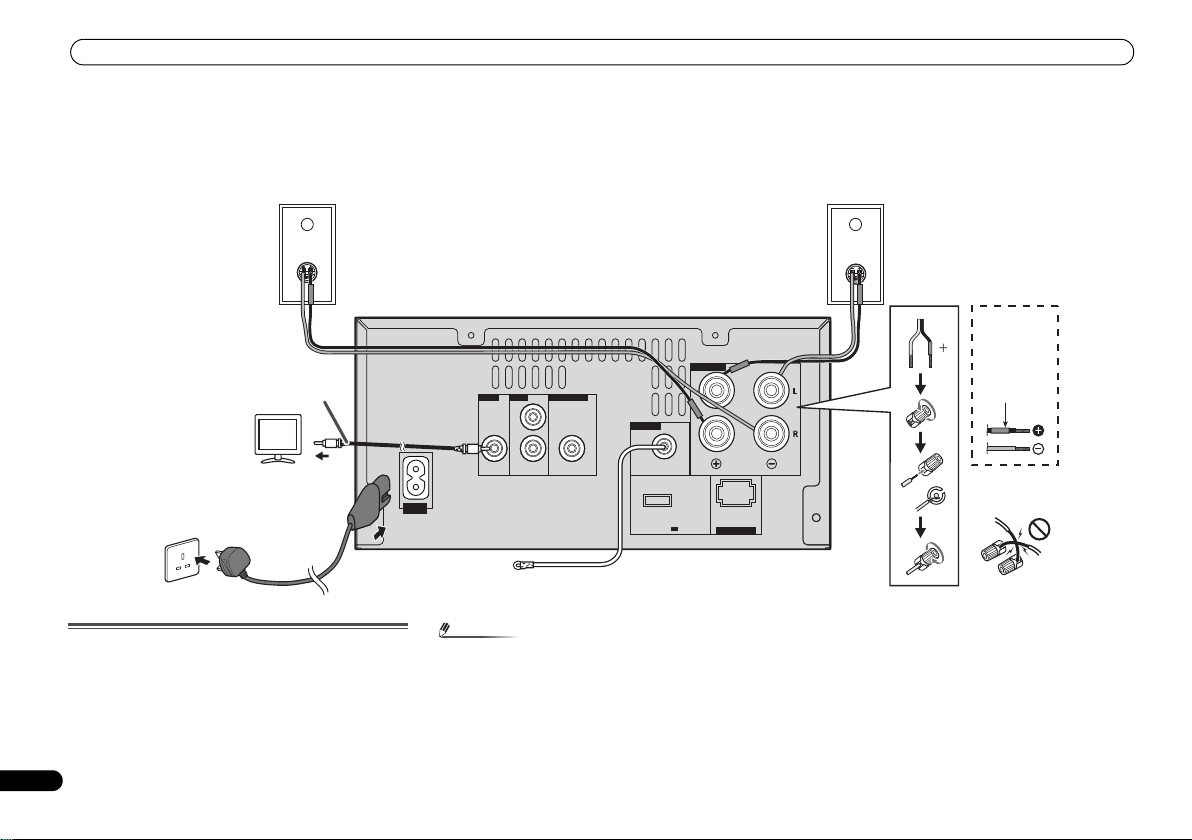
Connecting your equipment
Note
DC OUTPUT
for WIRELESS LAN
(OUTPUT 5 V
0.6 A MAX)
LAN(10/100
)
SPEAKERS
ANTENNA
OUT
IN
PREOUT
L
R
VIDEO LINE
SUBWOOFER
DAB / FM
Right
speaker
Left
speaker
TV
Video cable
Wall socket
(AC 220 V to 240 V,
50 Hz)
Red tube
X-HM70DAB
provided
speaker wire
Incorrect
To video input
socket
DAB/FM aerial
Connecting your equipment
Before making or changing the connections, switch off the power and disconnect the power cord from the AC outlet.
Aerial connection
Supplied DAB/FM aerial:
Connect the supplied DAB/FM aerial wire to the DAB/FM
socket and position the DAB/FM aerial wire in the direction
where the strongest signal can be received.
8
En
AC IN
•Placing the aerial on the unit or near the AC power lead
may cause noise pickup. Place the aerial away from the
unit for better reception.
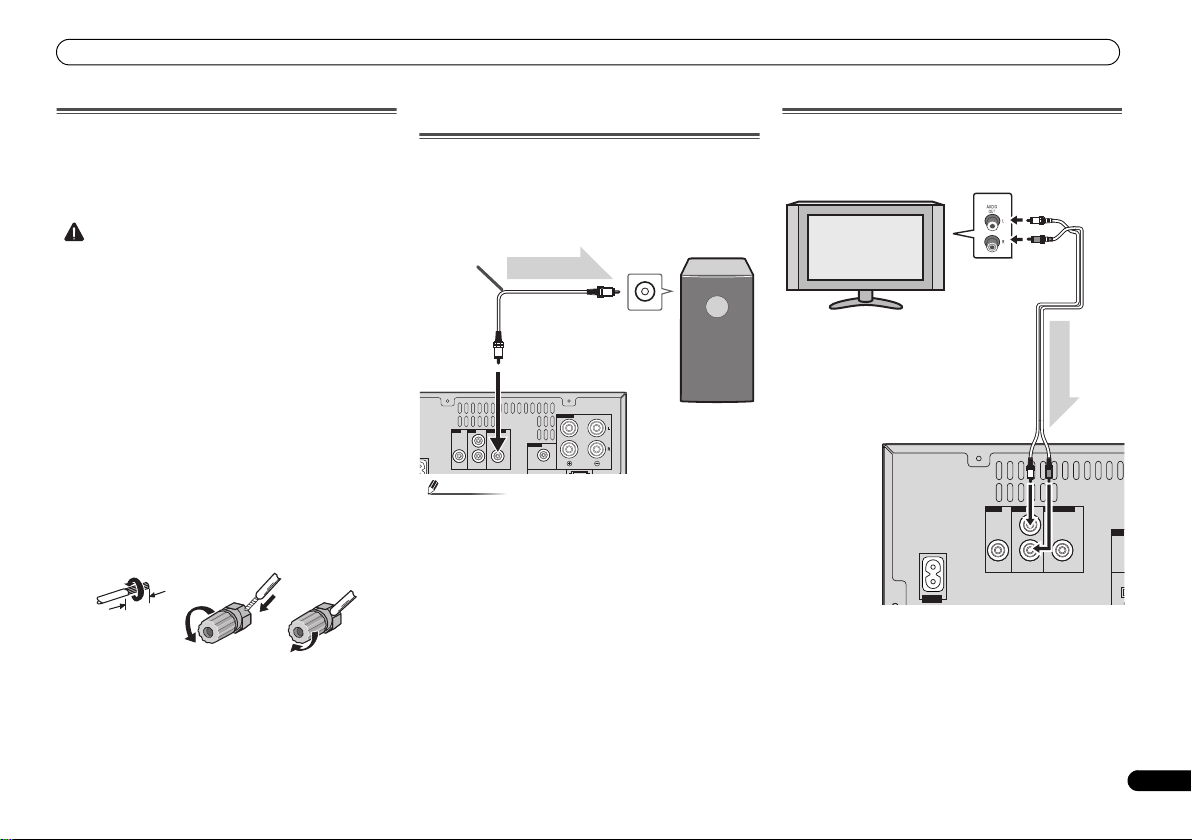
Page 9
Connecting your equipment
CAUTION
Note
10 mm
SPEAKERS
ANTENNA
OUT
IN
PREOUT
L
R
VIDEO LINE SUBWOOFER
DAB / FM
Main unit
Audio cable
(commercially
available)
Audio signal
To audio input
socket
To SUBWOOFER
PREOUT socket
Commercially
available subwoofer
(amplifier built in)
SPEAKERS
ANTENNA
OUT
IN
PREOUT
L
R
VIDEO LINE SUBWOOFER
DAB / FM
AC IN
Audio signal
TV To audio
output sockets
Audio cable
(commercially
available)
Main unit
To LINE
input
sockets
Speaker connection
•The provided speaker wire with the red tube is for the plus
(+) terminal. Connect the wire with red tube to the plus
(+) terminal, and other wire to the minus (
•Use speakers with an impedance of 4 ohms as lower
impedance speakers can damage the unit.
•These speaker terminals carry HAZARDOUS LIVE
voltage. To prevent the risk of electric shock when
connecting or disconnecting the speaker cables,
disconnect the power cord before touching any
uninsulated parts.
• Do not mistake the right and the left channels. The right
speaker is the one on the right side when you face the
unit.
• Do not let the bare speaker wires touch each other.
•Make sure that all the bare speaker wire is twisted
together and inserted fully into the speaker terminal. If
any of the bare speaker wire touches the back panel, it
may cause the power to cut off as a safety measure.
If not using the provided speaker wire
Bare wire connections
1 Twist exposed wire strands together.
2 Loosen terminal and insert exposed wire.
3 Tighten terminal.
12 3
X-HM70DAB only:
• Do not install your speakers overhead on the ceiling or
wall. The grill is designed to be detachable, and as such it
may fall and cause damage or personal injury if installed
overhead.
• Do not allow any objects to fall into or to be placed in the
bass reflex ducts.
–) terminal.
•Do not stand or sit on the speakers. You may be injured.
Using other subwoofer
You can connect a subwoofer with an amplifier to the
SUBWOOFER PREOUT socket.
• No sound is heard from the subwoofer without a built-in
amplifier.
Connecting a TV, etc.
Connect to the TV using an audio cable.
To select Line In function:
• On main unit: Press INPUT button repeatedly until Line In
is displayed.
•On remote control: Press LINE button.
9
En
Page 10
Connecting your equipment
Note
CAUTION
DC OUTPUT
for WIRELESS LAN
(OUTPUT 5 V
0.6 A MAX)
LAN(10/100
)
SPEAKERS
ANTENNA
DAB / FM
to LAN port
LAN cable
(sold separately)
Router
Modem
Internet
DC OUTPUT
for WIRELESS LAN
(OUTPUT 5 V
0.6 A MAX)
LAN(10/100
)
SPEAKERS
ANTENNA
DAB / FM
DC 5V WPS
Ethernet
WAN
RT
Internet
Modem
Router
Wireless LAN converter (AS-WL300)
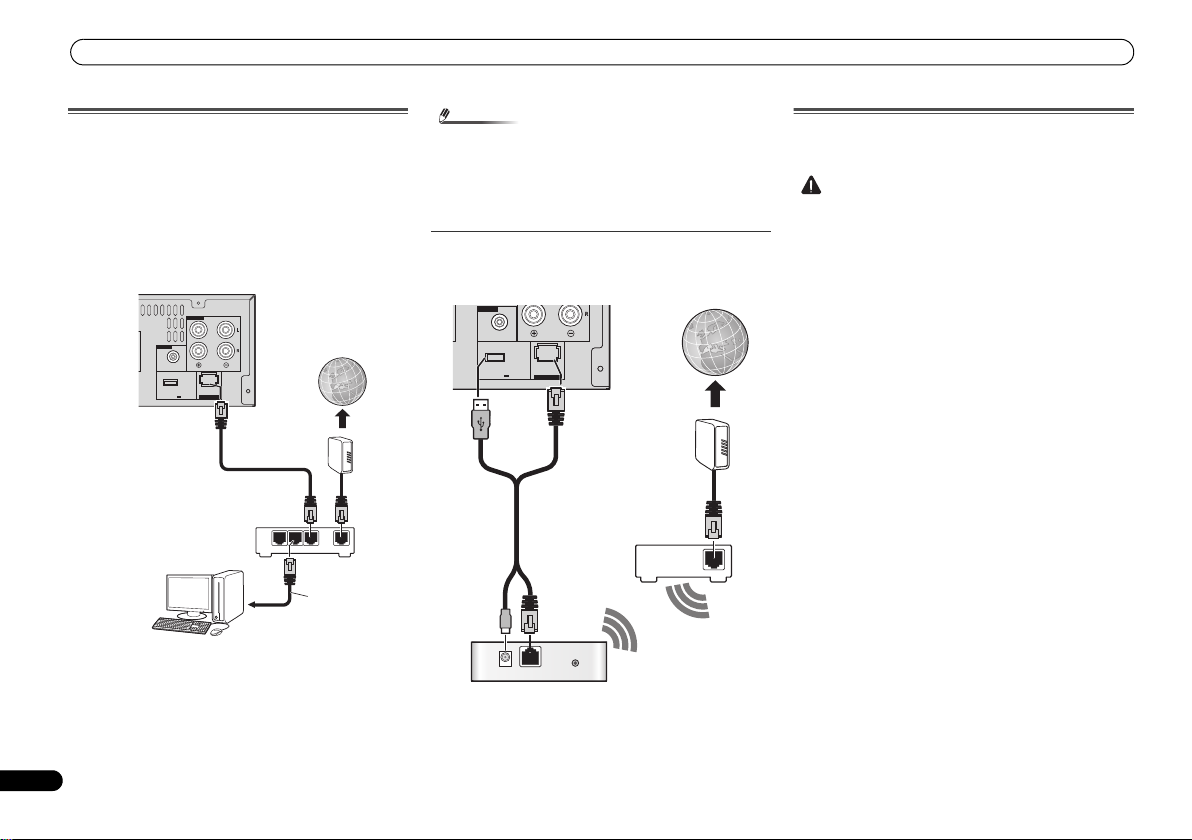
Connecting to the network through LAN
interface
By connecting this receiver to the network via the LAN
terminal, you can listen to Internet radio stations. To listen to
Internet radio stations, you must sign a contract with an ISP
(Internet Service Provider) beforehand.
When connected in this way, you can play audio files stored
on the components on the network, including your computer,
using NETWORK functions.
LAN
321
Connect the LAN terminal on this receiver to the LAN
terminal on your router (with or without the built-in DHCP
server function) with a straight LAN cable (CAT 5 or higher).
Turn on the DHCP server function of your router. In case your
router does not have the built-in DHCP server
necessary to set up the network manually. For details, see
Network setup menu on page 21.
10
En
WAN
function, it is
•Refer to the operation manual of the equipment you have
as the connected equipment and connection method
may differ depending on your Internet environment.
• When using a broadband Internet connection, a contract
with an Internet service provider is required. For more
details, contact your nearest Internet service provider.
Connecting to a wireless LAN
Wireless connection to the network is possible through a
wireless LAN connection. Use the separately sold AS-WL300
for connection.
For details, refer to the operating instructions of the wireless
LAN converter (AS-WL300).
AC power connection
After checking all the connections have been made correctly,
plug the AC power lead of this unit into the wall socket.
•Unplug the AC power lead from the wall socket if the unit
will not be in use for a prolonged period of time.
• Handle the power cord by the plug. Do not pull out the
plug by tugging the cord and never touch the power cord
when your hands are wet as this could cause a short
circuit or electric shock. Do not place the unit, a piece of
furniture, etc., on the power cord, or pinch the cord. Never
make a knot in the cord or tie it with other cords. The
power cords should be routed such that they are not likely
to be stepped on. A damaged power cord can cause a
or give you an electrical shock. Check the power cord
once in a while. When you find it damaged, ask your
nearest PIONEER authorized service center o r your dealer
for a replacement.
• Do not use any power cord other than the one supplied
with this unit.
• Do not use the supplied power cord for any purpose other
than that described above.
fire
Page 11
General control
Note
Note
CAUTION
General control
To turn the power on
Press the STANDBY/ON button to turn the power on.
After use:
Press the STANDBY/ON button to enter the power stand-by
mode.
•However, if iPod/iPhone is docked, the unit turns charge
mode. “iPod charge” will be displayed.
•During iPod charge mode, press the STANDBY/ON
button to turn the power on.
• Remove iPod to turn the power stand-by mode.
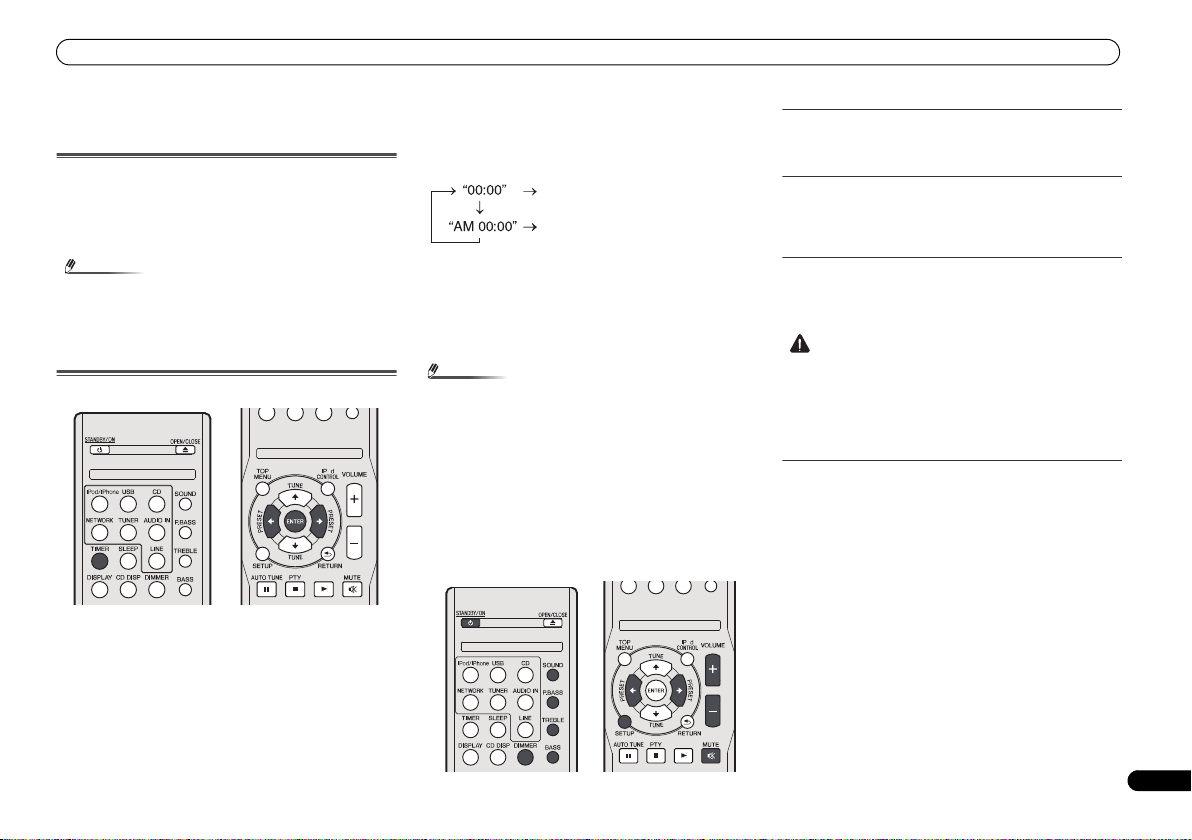
Setting the clock
O
In this example, the clock is set for the 24-hour (00:00)
display.
1 Press TIMER button on the remote control.
The current date and time are displayed.
The first time you use the clock, you are taken to the clock
adjust mode.
2 Press ENTER button.
/
3Use
4Use
press ENTER.
5Use
6Use
confirm.
To confirm the time display:
Press the TIMER button. The time display will appear for
about 10 seconds.
• When power supply is restored after unit is plugged in
again or after a power failure, reset the clock (See below).
To readjust the clock:
Perform “Setting the clock” from step 1. If the “Clock” does
not appear in step 2, step 4 (for selecting the 24-hour or 12hour display) will be skipped.
to set the day, then press ENTER.
/
to select 24-hour or 12-hour display, then
The 24-hour display will appear.
(00:00 - 23:59)
The 12-hour display will appear.
(AM 00:00 - PM 11:59)
/
to set the hour, then press ENTER.
/
to set the minute, then press ENTER to
To change the 24-hour or 12-hour display:
1 Clear all the programmed contents.
Refer to Factory reset, clearing all memory on page 31 for
details.
2 Perform “Setting the clock” from step 1 onwards.
O
Display brightness control
Press DIMMER button to dims the display brightness. The
brightness can be controlled in four steps.
Volume auto fade-in
If you turn off and on the main unit with the volume set to 41
or higher, the volume starts at 40 and fades in to the last set
level.
Volume control
Turn the volume knob towards VOLUME (on main unit) or
press VOLUME +/- (on remote control) to increase or
decrease the volume.
• The sound level at a given volume setting depends on
speaker efficiency, location, and various other factors. It
is advisable to avoid exposure to high volume levels. Do
not turn the volume on to full at switch on. Listen to music
at moderate levels. Excessive sound pressure from
earphones and headphones can cause hearing loss.
Auto power down setup
Set to automatically turn off the receiver after a specified time
has passed (when the power has been on with no operation
for several hours).
• Default setting: 6H
1 Press SETUP on the remote control.
•If APD does not appear, press / to select APD.
2Use
/
to specify the amount of time to allow before
the power is turned off (when there has been no
operation).
• You can select 2, 4 or 6 hours, or off (if no automatic
shutoff is desired).
3 When you’re finished, press RETURN.
11
En
Page 12
General control
Note
Note
Portable audio player, etc.
Audio cable (not supplied)
Muting
The volume is muted temporarily when pressing the MUTE
button on the remote control. Press again to restore the
volume.
P.bass control
When the power is first turned on, the unit will enter the
P.bass mode which emphasises the bass frequencies. To
cancel the P.bass mode, press the P.BASS button on the
remote control.
Bass control
Press the BASS button, then press / to adjust the bass.
Treble control
Press the TREBLE button, then press / to adjust the
treble.
Equaliser
When the SOUND button is pressed, the current mode
setting will be displayed. To change to a different mode, press
the SOUND button repeatedly until the desired sound mode
appears.
No equalization.
FLAT
Equaliser off.
JAZZ
For rock music.
For game.
For classical music.
For classical music.
For pop music.
For pop music.
Vocals are enhanced.
Vocals are enhanced.
For jazz.
For jazz.
GAME
CLASSIC
POPS
VOCAL
Input function
When the INPUT button on main unit is pressed, the current
function will change to different mode. Press the INPUT
button repeatedly to select desired function.
CD DABFM Stereo
NETWORK
•The backup function will protect the memorised function
mode should there be a power failure or the AC power
lead becomes disconnected.
USB
iPodLINEAUDIO IN
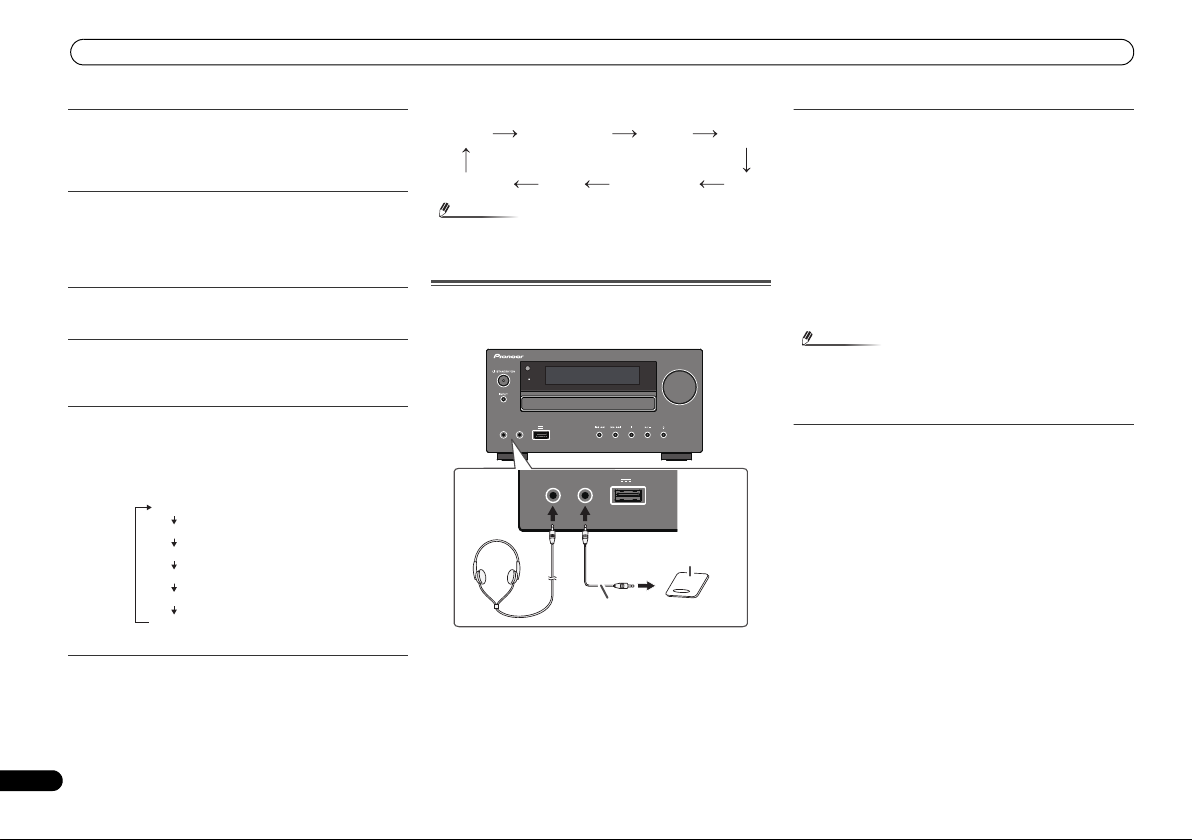
Enhancing your system
The connection lead is not included. Purchase a
commercially available lead as shown below.
VOLUME
USB
2.1 A
PHONES AUDIO IN
TIMER
USB
2.1 A
5 V
PHONES AUDIO IN
5 V
Listening to the playback sounds of portable
audio player, etc.
1 Use a connection lead to connect the portable audio
player etc. to the AUDIO IN socket.
2 Press the STANDBY/ON button to turn the power on.
3 Press the AUDIO IN button on the remote control or
INPUT button repeatedly on main unit to select AUDIO
IN function.
4 Play the connected equipment.
• If volume level of the connected device is too high, sound
distortion may occur. Should this happen, lower the
volume of the connected device. If volume level is too low,
increase the volume of the connected device.
•To prevent noise interference, place the unit away from
the television.
• When using video equipment, connect the audio output
to this unit and the video output to a television.
Headphones
• Do not turn the volume on to full at switch on and listen
to music at moderate levels. Excessive sound pressure
from earphones and headphones can cause hearing loss.
•Before plugging in or unplugging the headphone, reduce
the volume.
•Be sure your headphone has a 3.5 mm diameter plug and
impedance between 16 and 50 ohms. The recommended
impedance is 32 ohms.
• Plugging in the headphone disconnects the speakers
automatically. Adjust the volume using the VOLUME
control.
12
En
Page 13

Listening to a CD or MP3/WMA disc
CAUTION
Note
Listening to a CD or MP3/
WMA disc
STANDBY/ON
STANDBY/ON
INPUT
INPUT
This system can play back a standard CD, CD-R/RW in the CD
format and CD-R/RW with MP3 or WMA files, but cannot
record on them. Some audio CD-R and CD-RW discs may not
be playable due to the state of the disc or the device that was
used for recording.
MP3:
MP3 is a form of compression. It is an acronym which stands
for MPEG Audio Layer 3. MP3 is a type of audio code which is
processed by significant compression from the original audio
source with very little loss in sound quality.
• This system supports MPEG-1/2/2.5 Audio Layer 3
(Sampling rates: 8 kHz to 48 kHz; Bit rates: 32 kbps to 320
kbps).
•During VBR file playback, time counter in the display may
differ from its actual playback time.
WMA:
WMA files are Advanced System Format files that include
audio files which are compressed with Windows Media
Audio codec. WMA is developed by Microsoft as an audio
format file for Windows Media Player.
• This system supports WMA (Sampling rates: 32 kHz/44.1
kHz/48 kHz; Bit rates: 32 kbps to 320 kbps).
PHONES AUDIO IN
PHONES AUDIO IN
TIMER
TIMER
USB
USB
2.1 A
2.1 A
5 V
5 V
VOLUME
VOLUME
Disc playback
1 Press the STANDBY/ON button to turn the power on.
2 Press the CD button on the remote control or INPUT
button repeatedly on the main unit to select CD
function.
3 Press the button to open the disc tray.
4 Place the disc on the disc tray, label side up.
USB
2.1A
5V
AUDIO IN
PHONES
5 Press the button to close the disc tray.
6 Press the / ( ) button to start playback. After the
last track is played, the unit will stop automatically.
•Do not place two discs in one disc tray.
•Do not play discs of special shapes (heart, octagon, etc).
It may cause malfunctions.
•Do not push the disc tray whilst it is moving.
•If the power fails whilst the tray is open, wait until the
power is restored.
•Be sure to place 8 cm disc in the middle of the disc tray.
•Due to the structure of the disc information, it takes
longer to read an MP3/WMA disc than a normal CD
(approximately 20 to 90 seconds).
•“MP3” or “WMA” will appear after the unit reads
information on an MP3 or WMA disc.
• When the end of the last track is reached during fast
forward, “END” will appear on the display and CD
operation will be paused. When the beginning of the first
track is reached during fast reverse, the unit will enter the
playback mode (only for CD).
•Rewritable multi-session discs with unfinished writing,
can still be played.
•If TV or radio interference occurs during CD operation,
mo
ve the unit away from the TV or radio.
Various disc functions
Remote
control
Operation
Press in the stop mode.
Press in the playback
mode.
Press in the playback
mode. Press the /
button to resume
playback from the
paused point.
Press in the playback
or stop mode.
If you press the button
in the stop mode, press
the / button to start
the desired track.
Press in the playback
mode.
Release the button to
resume playback.
Function Main unit
Play
Stop
Pause
Track up/
down
Fast
forward/
reverse
Resume:
1 You can resume the track you stopped.
While a disc is playing, press the button.
2 The system stores the track you stopped and is
blinking on the display.
To restart play, press the / ( ) button.
Play resumes from the beginning of the track you stopped.
To cancel the resume playback:
Press the button.
13
En
Page 14

Listening to a CD or MP3/WMA disc
Note
Note
Selected track number
PROGRAM
P - 01 ← T005
Advanced CD or MP3/WMA disc playback
Direct track search
By using the numeric buttons, the desired tracks on the
current disc can be played.
Use the numeric buttons on the remote control to select
the desired track whilst playing the selected disc.
• The numeric buttons allow you to select up to number 9.
• When selecting number 100 or higher, use the “+100”
button.
• When selecting number 10 or higher, use the “+10”
button.
A. For example, to choose 13
1 Press the “+10” button.
2 Press the “3” button.
CD
F008 T001 00:00
B. For example, to choose 130
1 Press the “+100” button.
2 Press the “+10” button three times.
3 Press the “0” button.
•A track number higher than the number of tracks on the
disc cannot be selected.
14
En
•During shuffle play, direct track search is not possible.
To stop playback:
Press the button.
Repeat play
Repeat play can play one track, all tracks or a programmed
sequence continuously.
•During repeat play, “ ” appears.
CD
F008 T001 00:00
To repeat one track:
Press the REPEAT button repeatedly until “Repeat One”
appears. Press the / ( ) button.
To repeat all tracks:
Press the REPEAT button repeatedly until “Repeat All”
appears. Press the / ( ) button.
To repeat desired tracks:
Perform steps 1 - 5 in “Programmed play” section on this
page and then press the REPEAT button repeatedly until
“Repeat All” appears.
To cancel repeat play:
Press the REPEAT button repeatedly until “Repeat Off”
appears and “ ” disappears.
Shuffle play
The tracks on the disc can be played in shuffle order
automatically.
•During shuffle play, “ ” appears.
CD
F008 T001 00:00
To shuffle play all tracks:
Press the SHUFFLE button on the remote control.
To cancel shuffle play:
Press the SHUFFLE button and “ ” disappears.
•If you press the button during shuffle play, you can
move to the track selected next by the shuffle operation.
On the other hand, the button does not allow you to move
to the previous track. The beginning of the track being
played will be located.
• In shuffle play, the unit will select and play tracks
automatically. (You cannot select the order of the tracks.)
•After performing repeat play, be sure to press the
button. Otherwise, the disc will play continuously.
Programmed play (CD)
You can choose up to 32 selections for playback in the order
you like.
1 Whilst in the stop mode, press the PLAY MODE button
on the remote control to enter the programming save
mode.
PROGRAM
P - 01 ← T--
2 Press the or button or numeric buttons on the
remote control to select the desired track.
Page 15

Listening to a CD or MP3/WMA disc
Note
PROGRAM
P - 01 ← F--- T---
Media layer example
Folder
Audio file
Root
Layer 1Layer 2Layer 3Layer 4Layer 5
Session order
3 Press the ENTER button to save the track number.
4 Repeat steps 2 - 3 for other tracks. Up to 32 tracks can
be programmed. If you make a mistake, the
programmed tracks can be cleared by pressing the
CLEAR button.
5 Press the / ( ) button to start playback.
Programmed play (MP3/WMA)
1 Whilst in the stop mode, press the PLAY MODE button
until ‘PROGRAM’ appears to enter the programming
save mode.
Every time you press the PLAY MODE button, the playback
mode changes.
2 Press the or , or numeric buttons on the
remote control to select the desired folder.
PROGRAM
P - 01 ← F002 T---
Then press the or button or numeric buttons on the
remote control to select the desired tracks.
P - 01 ← F002 T005
3 Press the ENTER button to save the folder and track
number.
4 Repeat steps 2 - 3 for other folder/tracks. Up to 32 tracks
can be programmed.
5 Press the / ( ) button to start playback.
Adding tracks to the programme:
Stop the playing mode, then follow steps 2 - 3 to add tracks.
The new tracks will be stored after the last track of the
previous programme.
To cancel the programmed play mode:
During programmed stop mode, press the button. Press
the PLAY MODE but ton to s el ect th e ba sic play mode, and all
the programmed contents will be cleared.
PROGRAM
Displaying disc information:
Press CD DISP repeatedly to change to the display of the
elapsed playback time and the remaining playback time of
the CD.
Various track information can be displayed while an MP3/
WMA disc is playing. Press DISPLAY.
• When a disc is ejected, the programme is automatically
cancelled.
•If you press the STANDBY/ON button to enter the standby mode or change the function from CD to another, the
programmed selections will be cleared.
•During the programme operation, shuffle play is not
possible.
• The control butto ns to change displays differ between the
discs: for CD, CD DISP is used; for MP3/WMA disc,
DISPLAY is used.
MP3/WMA folder mode (only for MP3/WMA
files)
To play back MP3/WMA (Windows Media Audio) file
There are many music sites on the internet that you can
download MP3/WMA (Windows Media Audio) music files.
Follow the instructions from the website on how to download
the music files. You can then play back these downloaded
music files by burning them to a CD-R/RW disc.
•Your downloaded song/files are for personal use only. Any
other usage of the song without owner’s permission, is
against the law.
About folder playback order
If MP3/WMA files are recorded in several folders, a folder
number will be set to each folder automatically.
Press PLAY MODE to select the folder playback mode.
These folders can be selected by the FOLDER +/- button on
the remote control. If there is no supported file formats inside
the selected folder, the folder is skipped and the next folder
will be selected.
Example: How to set folder number if MP3/WMA format files
are recorded as below figure.
1 ROOT folder is set as folder 1.
2 Playback will be in the order of the diagram below.
3 For CD MP3/WMA, 255 numbers of folders and files
inclusive of the folders which have non playable files
can be read.
1
2
3
4
6
7
8
1
1
2
2
3
1
2
4
3
5
5
1
2
1
6
7
8
9
15
En
Page 16

Listening to a CD or MP3/WMA disc
Note
Total folders
Total tracks
Folder number First track number in the
folder
File name display
Folder name
display
Music title
display*
Artist name
display*
Album name display*
Total folders and Total tracks (Stopping)
Folder number and Track number (Playing)
Procedure to playback MP3/WMA disc with folder
mode on
O
To play back CD-R/RW.
1 Press the CD button, and load an MP3/WMA disc. Press
the PLAY MODE button to select the folder playback
mode.
Disc info will be displayed.
FOLDER
F008 T005
2 Press FOLDER +/- to select desired playback folder.
(Folder mode on)
Playback will start.
FOLDER
F005 T003 00:01
• Title, Artist and Album name are displayed if they are
recorded on the disc.
•In case of playback with the folder mode on, press
FOLDER +/-, and the folder can be selected even though
it is in playback/pause mode. It will continue playback/
pause mode in the 1st track of the selected folder.
•Display content can be changed by pressing the DISPLAY
button.
*The song title, artist name, and the album name will only be
displayed during playback.
To cancel the folder playback mode, stop the playback, press
the PLAY MODE button, and select the normal playback
mode.
• If “Can’t Play” is displayed, it means “Copyright protected
WMA file” or “Not supported playback file” is selected.
16
En
Page 17

Listening to the iPod, iPhone or iPad
Important
Note
CAUTION
iPhone
iPhone (bottom)
Dock connector
iPhone dock
iPhone connector
Insert the tip of a screwdriver ("–" type, small)
into the adaptor hole as shown and lift upward
to remove.
Listening to the iPod,
iPhone or iPad
Supported iPod, iPhone and iPad models:
• iPod touch (4th/3rd/2nd/1st generation)
• iPod classic
• iPod with video
• iPod nano (6
• iPhone 4/3GS/3G
•iPad
• Pioneer cannot under any circumstances accept
responsibility for any direct or indirect loss arising from
any inconvenience or loss of recorded material resulting
from the iPod failure.
• This system has been developed and tested for the
software version of iPod/iPhone/iPad indicated on the
website of Pioneer (http://pioneer.jp/homeav/support/ios/
eu/).
• Installing software versions other than indicated on the
website of Pioneer to your iPod/iPhone/iPad may result in
incompatibility with this system.
• Once iPod or iPhone is connected to the unit it will begin
charging.
•You can recharge the iPad when the power is on or during
iPod Charge Mode.
• When connecting the iPad, use only an iPad dedicated
cable.
• Connect iPad to the USB terminal.
• iPod and iPhone are licensed for reproduction of noncopyrighted materials or materials the user is legally
permitted to reproduce.
• Features such as t
this receiver, and we recommend switching the equalizer
off before connecting.
th/5th/4th/3rd/2nd/1st
he equalizer cannot be controlled using
generation)
Connecting your iPod/iPhone
• When connecting an iPod/iPhone units, always use the
universal dock adapter provided with your iPod/iPhone, or
a commercially adapter designed to support iPod/iPhone.
The iPod/iPhone cannot be connected without a universal
dock adapter; attempting to connect an iPod/iPhone
without a universal dock adapter will cause damage or
malfunction.
•Unplug all accessories from the iPod or iPhone before
inserting it into the dock.
1 Open the dock cover by pulling up.
2 Attach the Universal dock adapter to iPod/iPhone
connector port on this unit.
• An iPod/iPhone universal dock adapter is not supplied
with this unit.
When attaching the Universal dock adapter, be sure to orient
the front-back directions of the Universal dock adapter
correctly. To attach, first place the protruding tabs on the
front side of the adapter into the depressions on the iPod/
iPhone connector port and press into position. When
attaching the adapter, be careful not to strike the connectors.
3 Connect your iPod/iPhone.
• If an iPod/iPhone is connected when this unit is in
standby mode, the power will turn on and playback of the
iPod/iPhone will begin.
To remove adaptor for iPod or iPhone
To insert iPad adaptor
1 Insert the iPad connector to the iPad.
17
En
Page 18

Listening to the iPod, iPhone or iPad
Note
Important
Tip
Important
2 Connect the iPad to the unit via USB connector.
• USB connector do not support VIDEO out.
Playing an iPod, iPhone or iPad
This receiver has a dedicated iPod terminal that will allow you
to control playback of audio content from your iPod using the
controls of this receiver.
• If you connect your iPod to the receiver and it doesn’t
work properly, switch off the receiver and reconnect the
iPod to it. If this doesn’t seem to work, try resetting your
iPod.
1 Switch on the receiver and your TV.
2 Switch the TV input so that it connects to the receiver.
3 If iPod or iPhone is connected via the iPod dock, press
iPod/iPhone to select the iPod input.
If iPad (or iPod/iPhone) is connected via the USB
terminal, press USB to select the USB input.
The front panel display shows Please Wait while the receiver
verifies the connection and retrieves data from the iPod.
When the display shows Top Menu you’re ready to play
music from the iPod.
•If after pressing
Disconnected, try switching off the receiver and
reconnecting the iPod to the receiver.
• The controls of your iPod will be inoperable when
connected to this receiver.
iPod/iPhone
the display shows iPod
Playing back files stored on an iPod
To navigate songs on your iPod, you can take advantage of
the OSD of your TV connected to this receiver. You can also
control all operations for music in the front panel display of
this receiver.
• Note that non-roman characters in the title are displayed
as ‘*’.
•This feature is not available for photos or video clips on
your iPod.
Finding what you want to play
When your iPod is connected to this receiver, you can browse
songs stored on your iPod by playlist, artist, album name,
song name, genre or composer, similar to using your iPod
directly.
1Use
/
to select a category, then press ENTER to
browse that category.
•To return to the previous level any time, press RETURN.
2Use
/
to browse the selected category (e.g.,
albums).
•Use / to move to previous/next levels.
3 Continue browsing until you arrive at what you want to
play, then press
•If you’re in the song category, you can also press ENTER
to start playback.
to start playback.
Basic playback controls
This receiver’s remote control buttons can be used for basic
playback of files stored on an iPod.
•Press iPod/iPhone to switch the remote control to the
iPod/iPhone operation mode.
O
Switches between the iPod controls and the
receiver controls
This allows you to switch between performing iPod
operations via the receiver remote control or on the iPod
itself.
Press iPod CONTROL to switch to the iPod controls.
•Press iPod CONTROL a gai n t o s wi tc h ba ck to th e receiver
controls when you’re done.
• You cannot use this function, when an iPod of fifth
generation or iPod nano of first generation is connected.
18
En
Page 19

Listening to USB mass storage device/MP3 player
Important
Note
Important
USB mass
storage device
Listening to USB mass
storage device/MP3
player
Connecting a USB device
It is possible to listen to two-channel audio using the USB
interface on the front of this receiver.
Switch the receiver into standby then connect your USB
device to the USB terminal on the front panel of this
receiver.
•This receiver does not support a USB hub.
• If iPad is connected, the unit will begin charging.
VOLUME
TIMER
USB
PHONES AUDIO IN
2.1 A
5 V
Playing a USB device
• Pioneer cannot guarantee compatibility (operation and/or
bus power) with all USB mass storage devices and
assumes no responsibility for any loss of data that may
occur when connected to this receiver.
•Compatible USB devices include external magnetic hard
drives, portable flash memory (particularly keydrives) and
digital audio players (MP3 players) of format FAT16/32. It
is not possible to connect this receiver to a personal
computer for USB playback.
• With large amounts of data, it may take longer for the
receiver to read the contents of a USB device.
• If the file selected cannot be played back, this receiver
automatically skips to the next file playable.
• When the file currently being played
assigned to it, the file name is displayed in the OSD
instead; when neither the album name nor the artist
name is present, the row is displayed as a blank space.
• Note that non-roman characters in the playlist are
displayed as ‘*’.
•Make sure the receiver is in standby when disconnecting
the USB device.
back has no title
1 Switch on the receiver and your TV.
2 Switch the TV input so that it connects to the receiver.
3 Press USB on the remote control to switch the receiver
to the USB function.
Please Wait appears in the OSD as this receiver starts
recognizing the USB device connected. After the recognition,
a playback screen appears in the OSD and playback starts
automatically.
Basic playback controls
This receiver’s remote control buttons can be used for basic
playback of files stored on USB devices.
•Press USB to switch the remote control to the USB
operation mode.
O
If a USB Error message lights in the display, try following the
points below:
• Switch the receiver off, then on again.
• Reconnect the USB device with the receiver switched off.
• Select anot her input source (like CD), then switch back to
USB.
• Use a dedicated AC adapter (supplied with the device) for
USB power.
If this doesn’t remedy the problem, it is likely your USB device
is incompatible.
• This includes playback of WMA/MP3/MPEG-4 AAC files
(except files with copy-protection or restricted playback).
19
En
Page 20

Playback with NETWORK feature
Important
Note
Playback with NETWORK
feature
This receiver is equipped with the LAN terminal and you can
enjoy the following features by connecting your components
to these terminals.
• Listening to Internet radio stations
You can select and listen to your favorite Internet radio
station from the list of Internet radio stations created,
edited, and managed by the SHOUTcast database
service.
See Listening to Internet radio stations below.
• Playback the music files stored in PCs
You can playback a lot of musics stored in your PCs using
this unit.
See Playing back audio files stored on components on
the network on page 21.
-
Besides a PC, you can also play back audio files stored
on your other components with the built-in media server
function based on DLNA 1.0 or DLNA 1.5 framework and
protocols (i.e. network-capable hard disks and audio
systems).
• When you play back audio files, ‘Please Wait’ is displayed
before playback starts. The display may continue for
several seconds depending on the type of file.
• In case a domain is configured in a Windows network
environment, you cannot access a PC on the network
while you are logged onto the domain. Instead of logging
onto the domain, log onto the local machine.
•There are cases where the time elapsed may not be
correctly displayed.
1 Switch on the receiver and your TV.
See Connecting to the network through LAN interface on
page 10.
2 Switch the TV input so that it connects to the receiver.
3 Press NETWORK on the remote control to switch the
receiver to the NETWORK function.
It may take several seconds for this receiver to access the
network. The following screen appears when the NETWORK
is selected as the input function.
Main Menu
Internet
Now Playing
Favorites Settings
4Use
/
to select the category you want to play back,
and then press ENTER.
Select a category from the following list:
• Now Playing – Display the Current status and station
information.
• Internet Radio – Listening the SHOUTcast internet radio
via network.
Music
Radio
Library
• Music Library – Playback the music files stored in PCs.
• Favorites – Favorite songs currently being registered.
• Settings – Perform NETWORK function settings.
5Use
/
to select the folder, music files or Internet
radio station to play back, and then press ENTER.
Press / to scroll up and down the list and select the
desired item. When you press ENTER, playback starts with
the playback screen being displayed for the selected item. To
return to the list screen, press RETURN.
When the items are displayed over multiple pages, use /
to quickly display different pages.
6 Repeat step 5 to play back the desired song.
For detailed operating instructions, refer to the section
shown below.
•Internet radio stations – See Listening to Internet radio
stations below.
• Music files stored in PCs – See Playing back audio files
stored on components on the network on page 21.
Listening to Internet radio stations
Internet radio is an audio broadcasting service transmitted
via the Internet. There are a large number of Internet radio
stations broadcasting a variety of services from every corner
of the world. Some are hosted, managed, and broadcast by
private individuals while others are by the corresponding
traditional terrestrial radio stations or radio networks.
Whereas terrestrial, or OTA (over-the-air), radio stations are
geographically restricted on the range of radio waves
broadcast from a transmitter through the air, Internet radio
stations are accessible from anywhere in the world, as long
as there is a connection to the Internet, as services are not
transmitted through the air but are delivered over the World
Wide Web. On this receiver you can select Internet radio
stations by genre as well as by region.
Depending on the Internet line conditions, the sound may not
be smooth when playing Internet radio.
• To listen to Internet radio stations, you must have highspeed broadband Internet access. With a 56 K or ISDN
modem, you may not enjoy the full benefits of Internet
radio.
•The port number varies depending on the Internet radio
station. Check the firewall settings.
•Broadcasts may be stopped or interrupted depending on
the Internet radio station. In this case, you cannot listen
to a radio station selected from the list of Internet radio
stations.
About list of Internet radio
The list of Internet radio stations on this receiver is created,
edited, and managed by the SHOUTcast database service.
20
En
Page 21

Playback with NETWORK feature
Note
Main Menu
Now Playing
Favorites Settings
Internet
Radio
Music
Library
Playing back audio files stored on
components on the network
You can perform the following operations with the remote
control of this receiver. Note that some buttons are not
available for operation depending on the category currently
being played back.
•Press NETWORK to switch the remote control to the
NETWORK operation mode.
O
/
2Use
3Use
– Selected item will begin playing
to select audio file or Internet radio station,
and then press ENTER.
/
to select playback or delete options and then
press ENTER.
– Deletes selected item from Favorites folder
• Select to undo previous operation.
Network setup menu
Setting up the network to listen to Internet radio on this
receiver.
1 Select ‘Settings’ from the Main Menu.
Main Menu
Now Playing
Internet
Radio
Library
Settings
Network
Music
General
1 Select ‘Network’ from the Settings menu.
Settings
Network
General
2 Select ‘Modes’ from the Network Settings menu.
In case you make changes to the network configuration
without the DHCP server function, make the corresponding
changes to the network settings of this receiver.
Network Modes
1 of
1
DHCP
STATIC
Network Settings
Modes
Status
1 of
1
Playing back your favorite songs
Registering audio files and Internet radio stations
While Playing back a song, press
Favor”, and then press ENTER.
The selected song is then registered in the Favorites folder.
Note that only the audio files stored on components on the
network can be registered.
Playing and deleting audio files and Internet radio
stations in and from the Favorites folder
1 Select ‘Favorites’ from the Main Menu.
/
to select “Add to
Favorites Settings
2 Select the setting you want to adjust.
• Network – Adjust settings for the network (see Network
settings below).
• General – Use to reset all network connection settings to
their initial, factory-setting condition (see General settings
on page 22).
Network settings
In case the router connected to the LAN terminal on this
receiver is a broadband router (with a built-in DHCP server
function), simply turn on the DHCP server function, and you
will not need to set up the network manually. You must set up
the network as described below only when you have
connected this receiver to a broadband router without a
DHCP server function. Before you set up the network, consult
with your ISP or the network manager for the required
settings. It is advised that you also refer to the operation
manual supplied with your network component.
1 of
1
1 of
1
• DHCP (default setting) – Select if the server is DHCP
compatible.
-
When DHCP is selected, connection will begin
automatically. Connection is complete when network
connection details are displayed. Press ENTER to return
to the previous screen.
• STATIC – To connect to the server manually, follow the
instructions listed below.
-
Press to delete the immediately preceding character.
-
Press to switch between character types.
-
Press / to choose the desired character from those
displayed and press ENTER.
-
Once input is complete, or if you wish to cancel the
input operation, press until OK/CANCEL is
displayed, then use / to choose either OK or
CANCEL and press ENTER.
•If STATIC is selected, the settings will be as follows.
21
En
Page 22

Playback with NETWORK feature
-
IP (IP address)
The IP address to be entered must be defined within the
following ranges. If the IP address defined is beyond the
following ranges, you cannot play back audio files
stored on components on the network or listen to
Internet radio stations.
Class A: 10.0.0.1 to 10.255.255.254
Class B: 172.16.0.1 to 172.31.255.254
Class C: 192.168.0.1 to 192.168.255.254
-
MASK (Subnet Mask)
In case an xDSL modem or a terminal adapter is directly
connected to this receiver, enter the subnet mask
provided by your ISP on paper. In most cases, enter
255.255.255.0.
-
Gateway (Default Gateway)
In case a gateway (router) is connected to this receiver,
enter the corresponding IP address.
-
DNS (DNS server)
Enter the DNS server address you received in writing
from your internet service provider.
• Select Status from the Network Settings menu to show
your current network connection mode and details.
General settings
1 Select ‘General’ from the Settings menu.
Settings
Network
General
2 Select the item you want to set up from the General
Settings menu.
• Factory Settings – Use to reset all network connection
settings to their initial, factory-setting condition.
-
When “Warning: All Settings will be lost! Are you
sure?” is displayed, select and press ENTER. While
the settings are being reset, the screen will display a
“Please Wait” message. Resetting is complete once the
screen returns to the Main Menu.
-
To quit the resetting, select .
1 of
1
General Settings
Factory Settings
About
22
En
• About – Displays the MAC address of this receiver.
DLNA
Network connection requirements
The NETWORK allows you to play music on media servers
connected on an identical Local Area Network (LAN) as the
receiver. This unit allows for the playing of files stored on the
following:
•PCs running Microsoft Windows Vista or XP with
Windows Media Player 11 installed
•PCs running Microsoft Windows 7 with Windows Media
Player 12 installed
•DLNA-compatible digital media servers (on PCs or other
components)
To play back audio files stored on components on the
network or listen to Internet radio stations, you must turn on
the DHCP server function of your router. In case your router
does not have the built-in DHCP server function, it is
necessary to set up the network manually. Otherwi
cannot play back audio files stored on components on the
network or listen to Internet radio stations. Network setup
menu on page 21 for more on this.
Authorizing this receiver
In order to be able to play with NETWORK, this receiver must
be authorized. This happens automatically when the receiver
makes a connection over the network to the PC. If not, please
authorize this receiver manually on the PC. The authorization
(or permission) method for access varies depending on the
type of server currently being connected. For more
information on authorizing this receiver, refer to the
1 of
instruction manual of your server.
1
se, you
About network playback
The network playback function of this unit uses the following
technologies:
Windows Media Player
See Windows Media Player 11/ Windows Media Player 12 on
page 23 for more on this.
DLNA CERTIFIED™ Audio Player
The Digital Living Network Alliance (DLNA) is a cross-
industry organization of consumer electronics, computing
industry and mobile device companies. Digital Living
provides consumers with easy sharing of digital media
through a wired or wireless network in the home.
The DLNA certification logo makes it easy to find products
that comply with the DLNA Interoperability Guidelines. This
unit complies with DLNA Interoperability Guidelines v1.5.
When a PC running DLNA server software or other DLNA
compatible device is connected to this player, some setting
changes of software or other devices may be required. Please
refer to the operating instructions for th
for more information.
TM
DLNA
, the DLNA Logo and CERTIFIEDTM are trademarks,
service marks, or certification marks of the Digital Living
Network Alliance.
Content playable over a network
• Even when encoded in a compatible format, some files
may not play correctly.
e software or device
• Movie or Photo files cannot be played back.
•There are cases where you cannot listen to an Internet
radio station even if the station can be selected from a list
of radio stations.
• Some functions may not be supported depending on the
server type or version used.
•Supported file formats vary by server. As such, files not
supported by your server are not displayed on this unit.
For more information check with the manufacturer of
your server.
Page 23

Playback with NETWORK feature
About playback behavior over a network
• Playback may stall when the PC is switched off or any
media files stored on it are deleted while playing content.
•If there are problems within the network environment
(heavy network traffic, etc.) content may not be displayed
or played properly (playback may be interrupted or
stalled). For best performance, a 100BASE-TX connection
between player and PC is recommended.
•If several clients are playing simultaneously, as the case
may be, playback is interrupted or stalled.
•Depending on the security software installed on a
connected PC and the setting of such software, network
connection may be blocked.
Pioneer is not responsible for any malfunction of the pla
and/or the NETWORK features due to communication error/
malfunctions associated with your network connection and/
or your PC, or other connected equipment. Please contact
your PC manufacturer or Internet service provider.
“Windows Media™” is a trademark of Microsoft Corporation.
This product includes technology owned by Microsoft
Corporation and cannot be used or distributed without a
license from Microsoft Licensing, Inc.
Microsoft®, Windows®7, Windows®Vista, Windows®XP,
Windows®2000, Windows®Millennium Edition, Windows®98,
and WindowsNT® are either registered trademarks or
trademarks of Microsoft Corporation in the United States and/
or other countries.
yer
Glossary
aacPlus
AAC decoder uses aacPlus developed by Coding Technologies.
(www.codingtechnologies.com)
FLAC
FLAC (Free Lossless Audio Codec) is an audio format allows
lossless codec. Audio is compressed in FLAC without any
loss in quality. For more details about FLAC, visit the
following website: http://flac.sourceforge.net/
Windows Media
Windows Media is a multimedia framework for media
creation and distribution for Microsoft Windows. Windows
Media is either a registered trademark or trademark of
Microsoft Corporation in the U.S. and/or other countries. Use
an application licensed by Microsoft Corporation to author,
distribute, or play Windows Media formatted content. Using
an application unauthorized by Microsoft Corporation is
subject to malfunction.
Windows Media DRM
Windows Media DRM is a DRM (Digital Rights Management)
service for the Windows Media platform. It is designed to
provide secure delivery of audio and/or video content over an
IP network to a PC or other playback device in such a way that
the distributor can control how that content is used. The
WMDRM-protected content can only be played back on a
component supporting the WMDRM service.
Windows Media Player 11/
Windows Media Player 12
Windows Media Player is software to deliver music, photos
and movies from a Microsoft Windows computer to home
stereo systems and TVs.
With this software, you can play back files stored on the PC
through various devices wherever you like in your home.
This software can be downloaded from Microsoft’s website.
• Windows Media Player 11 (for Windows XP or Windows
Vista)
• Windows Media Player 12 (for Windows 7)
For more information check the official Microsoft website.
23
En
Page 24

Listening to the FM radio
Note
Listening to the FM radio
The following steps show you how to tune in to FM radio
broadcasts using the automatic (search) and manual (step)
tuning functions. Once you are tuned to a station you can
memorize the frequency for recall later. See Saving station
presets below for more on how to do this.
1 Press TUNER to select the tuner.
2 Use BAND to change the band “FM“, if necessary.
Each press switches the band between FM (stereo or mono) .
3 Tune to a station.
There are three ways to do this:
Automatic tuning
To search for stations in the currently selected band,
press and hold TUNE / for about a second. The
receiver will start searching for the next station, stopping
when it has found one. Repeat to search for other
stations.
Manual tuning
To change the frequency one step at a time, press
TUNE /.
High speed tuning
Press and hold TUNE / for high speed tuning.
Release the button at the frequency you want.
– Lights when a normal broadcast channel.
– Lights when a stereo FM broadcast is being received in
auto stereo mode.
24
En
Improving FM sound
If the or indicators don’t light when tuning to an FM
station because the signal is weak, set the receiver to the
mono reception mode.
Press BAND to select FM MONO.
This should improve the sound quality and allow you to enjoy
O
the broadcast.
Saving station presets
If you often listen to a particular radio station, it’s convenient
to have the receiver store the frequency for easy recall
whenever you want to listen to that station. This saves the
effort of manually tuning in each time. This unit can
memorize up to 40 stations.
O
1 Tune to a station you want to memorize.
See Listening to the FM radio above for more on this.
2 Press TUNER EDIT.
The preset number is blinking.
3 Press PRESET
want.
You can also use the numeric buttons. See Direct track search
on page 14.
4 Press ENTER.
The preset number stop blinking and the receiver stores the
station.
•If the receiver is left disconnected from the AC power
outlet for over a month, the station memories will be lost
and will have to be reprogrammed.
• Stations are stored in stereo. When the station is stored
in the FM MONO mode, it shows as when recalled.
/
to select the station preset you
Listening to station presets
You will need to have some presets stored to do this. See
Saving station presets above if you haven’t done this already.
Press PRESET
want.
You can also use the numeric buttons.
/
to select the station preset you
Naming preset stations
For easier identification, you can name all of your preset
stations.
1 Choose the station preset you want to name.
See Listening to station presets above for how to do this.
2 Press TUNER EDIT twice.
The cursor at the first character position is blinking on the
display.
3 Input the name you want.
Choose a name up to eight characters long.
•Use / to select character position.
•Use / to select characters.
• The name is stored when ENTER is pressed.
Page 25

Using the Radio Data System (RDS)
Note
Note
Using the Radio Data
System (RDS)
An introduction to RDS
Radio Data System (RDS) is a system used by most FM radio
stations to provide listeners with various kinds of
information—the name of the station and the kind of show
they’re broadcasting, for example.
One feature of RDS is that you can search by type of program.
For example, you can search for a station that’s broadcasting
a show with the program type, JAZZ.
You can search the following program types:
NEWS – News
AFFAIRS – Current Affairs
INFO – General Information
SPORT – Sport
EDUCATE – Educational
DRAMA – Radio plays, etc.
CULTURE – National or
regional culture, theater, etc.
SCIENCE – Science and
technology
VARIED – Usually talk-based
material, such as quiz shows
or interviews.
POP M – Pop music
ROCK M – Rock music
EASY M – Easy listening
LIGHT M – ‘Light’ classical
music
CLASSICS – ‘Serious’ classical
music
OTHER M – Music not fitting
above categories
WEATHER – Weather reports
FINANCE – Stock market
reports, commerce, trading,
etc.
CHILDREN – Programs for
children
SOCIAL – Social affairs
RELIGION – Programs
concerning religion
PHONE IN – Public expressing
their views by phone
TRAVEL – Holiday-type travel
rather than traffic
announcements
LEISURE – Leisure interests
and hobbies
JAZZ – Jazz
COUNTRY – Country music
NATION M – Popular music in
a language other than English
OLDIES – Popular music from
the ’50s and ’60s
FOLK M – Folk music
DOCUMENT – Documentary
O
Searching for RDS programs
You can search for a program type listed above.
1 Press TUNER then press BAND to select the FM band.
• RDS is only possible in the FM band.
2 Press PTY.
SEARCH shows in the display.
3 Press PRESET
want to hear.
4 Press ENTER to search for the program type.
The system starts searching through the station presets for a
match, stopping when it was found one. Repeat to search for
other stations.
If NO PTY is displayed it means the tuner couldn’t find that
program type at the time of the search.
•RDS searches station presets only. If no stations have
been preset, or if the program type could not be found
among the station presets NO PTY is displayed. FINISH
means the search is complete.
/
to select the program type you
Displaying RDS information
Use the DISPLAY button to display the different types of RDS
information available.
Press DISPLAY for RDS information.
Each press changes the display as follows:
• Radio Text (RT) – Messages sent by the radio station. For
example, a talk radio station may provide a phone number
as RT.
•Program Service Name (PS) – The name of the radio
station.
•Program Type (PTY) – This indicates the kind of program
currently being broadcast.
•Current tuner frequency (FREQ)
• If any noise is picked up while displaying the RT scroll,
some characters may be displayed incorrectly.
• If you see NO TEXT in t he RT display, it means no RT data
is sent from the broadcast station. The display will
automatically switch to the PS data display (if no PS data,
NO NAME is displayed).
•In the PTY display, NO PTY may be shown.
• In addition, there are thr ee other program types, ALARM,
ALARMTST, and NO TYPE. ALARM and ALARMTST are
used for emergency announcements. NO TYPE appears
when a program type cannot be found.
25
En
Page 26

Listening to the DAB
DAB SIGNAL
SERVICES
MULTIPLEX
(ENSEMBLE)
SERVICES
COMPONENTS
(STATIONS)
O
DAB
Scanning...
Listening to the DAB
DAB (Digital Audio Broadcasting) is a digital transmission
system where audio signals are converted to digital signals
for broadcasting.
DAB is broadcast as a group of data called multiplex
(ensemble) which may contain one or more stations
(services). Each station contains a primary service and there
may be one or more secondary services.
This allows several programmes or services to be transmitted
on a single frequency.
1 Press TUNER to select the tuner.
2 Press the BAND button repeatedly to select the "DAB".
DAB
Station name
BBC
News
Using the auto scan function manually
Using DAB for the very first time
The very first time you use DAB, press the AUTO TUNE
button to run the Auto Scan.
If a new DAB station is introduced, or you move to a ne w area,
you can run the Auto Scan function again.
Press the AUTO TUNE button.
Selecting DAB stations
1 Press the TUNE
2 Press the ENTER button to listen to the service.
The station is tuned.
/
button to select the DAB service.
BBC
<BBC5Live>
While the primary service is selected, brackets < > are
displayed. While the secondary service is selected, brackets (
) are displayed.
BBC
(BBC5Live)
If you select a station that cannot be received properly, “DAB
No Tuned” is displayed.
BBC
DAB No Tuned
Displaying DAB radio information
Press the DISPLAY button repeatedly to display more
information about the selected DAB station.
Program Type
Displays the type of program.
BBC
News
SNR (Signal Noise Rate)
Noise may be generated and reception quality may become
poor according to Signal Noise Rate. If reception quality is
poor, move the antenna in different directions to find a
position where the good rate is displayed.
BBC
SNR:100
DLS (Dynamic Label Segment)
When tuned to a station that's broadcasting DLS text data,
the text will scroll across the display.
BBC
All the late
Scroll
26
En
Page 27

Listening to the DAB
FREQ:239.200MHz
BBC
BITRATE:192kbps
BBC
Audio Mode
Displays the station’s audio mode (stereo or mono).
BBC
DAB Stereo
Frequency
Displays the frequency of the current multiplex.
Multiplex Name
Displays the name of the current multiplex.
BBC
BBC Station
Bitrate
Displays the station's bit rate.
DAB setup
Use the following functions and settings to set up DAB digital
radio.
1 Press the TOP MENU button and
the item to be set.
2 Press the ENTER button.
The items are explained below.
DRC
The DRC (Dynamic Range Control) function lets you change
the dynamic range of the received sound depending on the
content of the broadcast so that the sound is easier to hear
even when the volume is low.
Press the / button to select the following options, and
then press the ENTER button.
DRC:Off : DRC is switched off.
Any DRC level broadcast will be ignored. This is the default
setting.
DRC:On : Applies DRC level as sent with the broadcast.
/
button to select
Component Reset
Deletes all the stations.
While “Reset: Yes?” appears, press the ENTER button.
After “Resetting...” disappears, unplug the AC Power lead
and wait for 5 seconds or more.
27
En
Page 28

Timer and sleep operation
O
Timer and sleep operation
Setting the wake-up timer
Timer playback:
The unit turns on and plays the desired source (CD, TUNER,
USB or iPod/iPhone) at a preset time.
Before setting timer:
• Check that the clock is set to the correct time (Setting the
clock on page 11). If it is not set, you cannot use the timer
function.
•For timer playback: Plug in USB or load discs or iPod to
be played.
1 Press STANDBY/ON button.
2 Press and hold TIMER button for more than two
seconds.
/
3Press
seconds, then press ENTER.
4 Select the source you want played.
Use / button to select CD, TUNER, USB or iPod/iPhone
function.
5 Press ENTER.
6 Set the day(s) of the week.
Use /button to choose the day(s).
button to select ‘Timer Set’ within ten
The timer can be set as follows.
EVERYDAY SUNDAY MONDAY
TUESDAY WEDNESDAY THURSDAY
FRIDAY SATURDAY MON-FRI
TUE-SAT SAT-SUN
7 Press ENTER.
8 Set the switch-on time.
Use /button to set the hour, then press ENTER.
Set the minute in the same way, pressing ENTER when you’re
done.
9 Set the switch-off time.
Set as above, pressing
10 Use
/
11 Press ENTER.
The TIMER indicator light, and the settings are confirmed in
the display.
12 Press STANDBY/ON to enter the power stand-by mode.
ENTER
button to set the volume.
when done.
Turning the wake-up timer on/off
If you have already set the wake-up timer, you can switch it
on/off.
1 When the power is on, press and hold TIMER button for
two seconds.
2Press
/
within ten seconds, then press ENTER.
When ‘
the settings are confirmed in the display.
3 When ‘Timer On’ is selected, press STANDBY/ON to set
the stand-by mode.
button to select ‘Timer On’ or ‘Timer Off’
Timer On
’ is selected, the timer indicator light, and
Reusing the memorised timer setting
The timer setting will be memorised once it is entered. To
reuse the same setting, perform the following operations.
1 When the power is on, press and hold TIMER button for
two seconds.
/
2Press
seconds, then press ENTER.
The TIMER indicator light, and the settings are confirmed in
the display.
button to select ‘Timer Call’ within ten
Sleep operation
Press SLEEP to change the amount of time before the
receiver switches into standby (30 min. – 60 min. – 90
min. – Off).
• You can check the remaining sleep time at any time by
pressing SLEEP once.
28
En
Page 29

Additional Information
Additional Information
Troubleshooting chart
Many potential problems can be resolved by the owner
without calling a service technician.
If something is wrong with this product, check the following
before calling your authorized PIONEER dealer or service
centre.
General
The clock is not set to the correct time.
Did a power failure occur?
Reset the clock. (Refer to page 11)
When a button is pressed, the unit does not respond.
Set the unit to the power stand-by mode and then turn it back
on.
If the unit still malfunctions, reset it. (Refer to page 31)
No sound is heard.
Is the volume level set to “Min”?
Are the headphones connected?
Are the speaker wires disconnected?
CD player
Playback does not start.
Playback stops in the middle or is not performed properly.
Is the disc loaded upside down?
Does the disc satisfy the standards?
Is the disc distorted or scratched?
Playback sounds are skipped, or stopped in the middle of a
track.
Is the unit located near excessive vibrations?
Is the disc very dirty?
Has condensation formed inside the unit?
Remote control
The remote control does not operate.
Is the AC power lead of the unit plugged in?
Is the battery polarity correct?
Are the batteries dead?
Is the distance or angle incorrect?
Does the remote control sensor receive strong light?
Tuner
The radio makes unusual noises continuously.
Is the unit placed near the TV or computer?
Is the DAB/FM aerial placed properly? Move the aerial away
from the AC power lead if it is located nearby.
DAB reception is poor.
Check the connections, and adjust the location and position
of aerial. After that, execute Auto Scan function manually
(Refer to page 26).
If the reception environment changed by removal, etc.,
execute Auto Scan function manually (Refer to page 26).
USB
Device cannot be detected.
Is there any MP3/WMA file available?
Is the device properly connected?
Is it an MTP device?
Does the device contain AAC file only?
Playback does not start.
Is it a copyright protected WMA file?
Is it a false MP3 file?
iPod and iPhone
No sound is produced. No image appears on the TV/monitor.
The iPod or iPhone is not playing.
The iPod or iPhone is not properly connected to the unit.
Is the AC power lead of the unit plugged in?
The video cable is not properly connected.
The TV/monitor’s input selection is not pr operly set.
Audio from the iPod/iPhone cannot be heard via the
headphones connected to the unit.
iPod or iPhone will not charge.
The iPod or iPhone is not making full contact with the
connector.
Using iPod (3rd generation).
The iPod or iPhone is not supported. Refer to Supported iPod,
iPhone and iPad models: on page 17 for compatible models.
“This accessory is not made to work with iPhone” or “This
accessory is not supported by iPhone” appears on iPhone
screen.
The iPhone battery is low. Please charge the iPhone.
iPhone is not properly docked.
NETWORK feature
Cannot access the network.
The LAN cable is not firmly connected. Firmly connect the
LAN cable (page 10).
The router is not switched on. Switch on the router.
Internet security software is currently installed in the
connected component. There are cases where a component
with Internet security sof tware installed cannot be accessed.
The audio component on the network which has been
switched off is switched on. Switch on the audio component
on the network before switching on this receiver.
Playback does not start while ‘Please Wait’ continues to be
displayed.
The component is currently disconnected from this receiver or
the power supply. Check whether the component is properly
connected to this receiver or the power supply.
The PC or Internet radio is not properly operated.
The corresponding IP address is not properly set. Switch on
the built-in DHCP server function of your router, or set up the
network manually according to your network environment
(page 21).
The IP address is being automatically configured. The
automatic configuration process takes time. Please wait.
The audio files stored on components on the network, such
as a PC, cannot be played back.
Windows Media Player 11 or Windows Media Player 12 is not
currently installed on your PC. Install Windows Media Player
11 or Windows Media Player 12 on your PC.
Audio files were recorded in formats other than MP3, WAV
(LPCM only), MPEG-4 AAC, FLAC, and WMA. Play back audio
files recorded in MP3, WAV (LPCM only), MPEG-4 AAC, FLAC,
or WMA. Note that some audio files recorded in these formats
may not be played back on this receiver.
Audio files recorded in MPEG-4 AAC or FLAC are being played
back on Windows Media Player 11 or Windows Media Player
12. Audio files recorded in MPEG-4 AAC or FLAC cannot be
played back on Windows Media Player 11 or Windows Media
Player 12. Tr y using another server. Refer to the operation
manual supplied with your server.
The component connected to the network is not properly
operated.
-
Check whether the component is affected by special
circumstances or is in the sleep mode.
-
Try rebooting the component if necessary.
29
En
Page 30

Additional Information
The component connected to the network does not permit file
sharing. Try changing the settings for the component
connected to the network.
The folder stored on the component connected to the network
has been deleted or damaged. Check the folder stored on the
component connected to the network.
Cannot access the component connected to the network.
The component connected to the network is not properly set. If
the client is automatically authorized, you need to enter the
corresponding information again. Check whether the
connection status is set to “Do not authorize”.
There are no playable audio files on the component connected
to the network. Check the audio files stored on the component
connected to the network.
Audio playback is undesirably stopped or disturbed.
The audio file currently being played back was not recorded in
a format playable on this receiver.
-
Check whether the audio file was recorded in a format
supported by this receiver.
-
Check whether the folder has been damaged or corrupted.
-
Note that there are cases where even the audio files listed as
playable on this receiver cannot be played back or displayed
(page 22).
The LAN cable is currently disconnected. Connect the LAN
cable properly (page 10).
There is heavy traffic on the network with the Internet being
accessed on the same network. Use 100BASE-TX to access
the components on the network.
Cannot access Windows Media Player 11 or Windows Media
Player 12.
In case of Windows Media Player 11: You a re currently logged
onto the domain through your PC with Windows XP or
Windows Vista installed. Instead of logging onto the domain,
log onto the local machine (page 20).
In case of Windows Media Player 12: You a re currently logged
onto the domain through your PC with Windows 7 installed.
Instead of logging onto the domain, log onto the local
machine (page 20).
Cannot listen to Internet radio stations.
The firewall settings for components on the network are
currently in operation. Check the firewall settings for
components on the network.
You are currently disconnected from the Internet. Check the
connection settings for components on the network, and
consult with your network service provider if necessary
(page 21).
30
En
The broadcasts from an Internet radio station are stopped or
interrupted. There are cases where you cannot listen to some
Internet radio stations even when they are listed in the list of
Internet radio stations on this receiver (page 20).
The NETWORK function cannot be operated with the
buttons on the remote control.
The remote control is not currently set to the NETWORK
mode. Press NETWORK to set the remote control to the
NETWORK mode (page 20).
Troubleshooting of wireless LAN
Network cannot be accessed via wireless LAN.
Wireless LAN converter’s power is not on (Wireless LAN
converter’s “Power”, “WPS” and “Wireless” indicators are not
all lit). Check that the USB cable connecting the wireless LAN
converter to the receiver’s DC OUTPUT for WIRELESS LAN
terminal is properly connected.
The LAN cable is not firmly connected. Firmly connect the
LAN cable (page 10).
Wireless LAN converter and base unit (wireless LAN router,
etc.) are too far apart or there is an obstacle between them.
Improve the wireless LAN environment by moving the wireless
LAN converter and base unit closer together, etc.
There is a microwave oven or other device generating
electromagnetic waves near the wireless LAN environment.
-
Use the system in a place away from microwave ovens or
others device generating electromagnetic waves.
-
Avoid using devices generating electromagnetic waves as
much as possible when using the system with the wireless
LAN.
Multiple wireless LAN converters are connected to the
wireless LAN router. When connecting multiple wireless LAN
converters, their IP addresses must be changed. For example,
if the wireless LAN router’s IP address is “192.168.1.1”, set the
first wireless LAN converter’s IP address to “192.168.1.249”,
the second wireless LAN converter’s IP address to
“192.168.1.248”, using values between 2 and 249 (such as
“249” and “248”) that are not assigned to other wireless LAN
converters or to other devices.
Wireless LAN connections cannot be established between the
wireless LAN converter and base unit (wireless LAN router,
etc.).
-
With the wireless LAN converter connected to the receiver,
turn the receiver’s power off, unplug the power cord from the
power outlet, then plug the power cord back in and turn the
receiver’s power on.
-
The wireless LAN converter must be set in order to establish
wireless LAN connections. For details, refer to the operating
instructions of the wireless LAN converter.
The wireless LAN converter is properly connected to the
receiver and the wireless LAN converter’s indicators are lit,
but the wireless LAN converter cannot be set from the receiver
(the settings screen cannot be displayed).
If Network Modes in the receiver’s Network Settings is set
to STATIC and the IP address has been set manually, the IP
address set in the wireless LAN converter may not match. In
the receiver’s Network Settings, set Network Modes to
DHCP. After the setting is completed, turn the receiver’s
power off. Next, turn the receiver’s power back on and check
whether the wireless LAN converter’s settings can be
displayed with the receiver.
If the settings can be displayed, change the IP address
settings of the receiver and wireless LAN converter as
necessary.
The IP address settings of the receiver and wireless LAN
converter do not match the settings of the wireless LAN
router, etc.
Check the IP address settings of the receiver and wireless
LAN converter (including the Network Modes).
If the receiver’s Network Modes is DHCP, turn the receiver’s
power off, then turn the power back on.
Check that the IP addresses of the receiver and wireless LAN
converter match the settings of the wireless LAN router, etc.
If the receiver’s Network Modes is STATIC, set an IP address
matching the network of the base unit (wireless LAN router,
etc.).
For example, if the wireless LAN router ’s IP address is
“192.168.1.1”, set the receiver’s IP address to “192.168.1.XXX”
(*1), the subnet mask to “255.255.255.0”, the gateway and
DNS to “192.168.1.1”.
Next, set the wireless LAN converter’s IP address to
“192.168.1.249” (*2).
(*1) Set the “XXX” in “192.168.1.XXX” to a number between 2
and 248 that is not assigned to other devices.
(*2) Set the “249” in “192.168.1.249” to a number between 2
and 249 that is not assigned to other devices.
Try making the wireless LAN converter’s advanced settings.
The wireless LAN converter can be connected to a computer
to make the advanced wireless LAN settings. For details, see
the CD-ROM included for the wireless LAN converter. Check
the settings of the wireless LAN router, etc., then change the
settings of the wireless LAN converter.
Note, however, that making the advanced wireless LAN
Page 31

Additional Information
Note
CAUTION
CAUTION
YES
Correct
NO
settings will not necessarily improve the wireless LAN
environment. Be careful when changing the settings.
The access point is set to conceal the SSID. In this case, the
SSID may not be displayed on the access point list screen. If
not, set the SSID, etc., by making the wireless LAN converter
settings on the receiver manually.
The access point’s security settings use WEP 152-bit length
code key or shared key authentication. The receiver does not
support WEP 152-bit length code key or shared key
authentication.
Network connections cannot be established even when the
above measures are taken. Reset the wireless LAN converter.
After this, redo the wireless LAN converter ’s settings.
-
About resetting
1. Check that the wireless LAN converter’s power is on.
2. Press the wireless LAN converter’s reset button for at least
3 seconds.
3. Release the reset button.
When the wireless LAN converter is restarted, the resetting
procedure is completed.
Condensation
Sudden temperature changes, storage or operation in an
extremely humid environment may cause condensation
inside the cabinet (CD pickup, etc.) or on the transmitter on
the remote control. Condensation can cause the unit to
malfunction. If this happens, leave the power on with no disc
in the unit until normal playback is possible (about 1 hour).
Wipe off any condensation on the transmitter with a soft
cloth before operating the unit.
If problem occurs
When this product is subjected to strong external
interference (mechanical shock, excessive static electricity,
abnormal supply voltage due to lightning, etc.) or if it is
operated incorrectly, it may malfunction.
If such a problem occurs, do the following:
1 Set the unit to the stand-by mode and turn the power
on again.
2 If the unit is not restored in the previous operation,
unplug and plug in the unit again, and then turn the
power on.
• If neither operation above restores the unit, clear all the
memory by resetting it.
Factory reset, clearing all memory
If iPod or iPhone is connected to the unit, disconnect it.
1 Press the STANDBY/ON button to enter the power
stand-by mode.
2 Press both STANDBY/ON button and button on the
unit.
‘RESET YES?’ appears.
3 Press / ( ) button.
‘RESET...’ appears.
If you don’t press / ( ) button within 10 minutes after
STEP 2, RESET MODE is canceled.
•This operation will erase all data stored in memory
including clock, timer settings, tuner preset, and CD
programme.
Before transporting the unit
Remove the iPod, USB memory device and disc from the
unit. Then, set the unit to the power stand-by mode. Carrying
the unit with iPod or USB memory device left docked or discs
left inside might damage the unit.
Care of compact discs
Compact discs are fairly resistant to damage, however
mistracking can occur due to an accumulation of dirt on the
disc surface. Follow the guidelines below for maximum
enjoyment from your CD collection and player.
•Do not write on either side of the disc, particularly the
non-label side from which signals are read. Do not mark
this surface.
•Keep your discs away from direct sunlight, heat, and
excessive moisture.
• Always hold the CDs by the edges. Fingerprints, dirt, or
water on the CDs can cause noise or mistracking. If a CD
is dirty or does not play properly, clean it with a soft, dry
cloth, wiping straight out from the c
radius.
entre, along the
Cleaning the cabinet
Periodically wipe the cabinet with a soft cloth and a diluted
soap solution, then with a dry cloth.
• Do not use chemicals for cleaning (petrol, paint thinner,
etc.). It may damage the cabinet.
•Do not apply oil to the inside of the unit. It may cause
malfunctions.
Caution for when the unit is installed in a rack
with a glass door
Do not press the OPEN/CLOSE on the remote control to
open the disc tray while the glass door is closed. The door will
hamper the movement of the disc tray, and the unit could be
damaged.
31
En
Page 32

Additional Information
About playable music file formats
The USB and NETWORK function of this receiver supports the following music file formats.
• Note that some file formats are not available for playback although they are listed as
playable file formats. Also, the compatibility of file formats varies depending on the type of
server. Check with your server to ensure the compatibility of file formats supported by your
server.
Category Extension Stream
a
MP3
WAV .wav LPCM Sampling frequency 44.1 kHz, 48 kHz, 96 kHz
WMA .wma WMA2/7/8 Sampling frequency 44.1 kHz to 48 kHz
AAC .m4a
.mp3MPEG-1 Audio
.aac
Layer-3
WMA9 Sampling frequency 44.1 kHz to 48 kHz
MPEG-4 AAC LC
MPEG-4 HE AAC
(aacPlus v1/2)
Sampling frequency 44.1 kHz to 48 kHz
Quantization bitrate 16 bit
Channel 2 ch
Bitrate 32 kbps to 320 kbps
VBR/CBR Supported/Supported
Quantization bitrate 16 bit, 20 bit, 24 bit
Channel 2 ch
Quantization bitrate 16 bit
Channel 2 ch
Bitrate 32 kbps to 320 kbps
VBR/CBR Supported/Supported
Quantization bitrate 16 bit
Channel 2 ch
Bitrate 32 kbps to 320 kbps
VBR/CBR Supported/Supported
Sampling frequency 44.1 kHz to 48 kHz
Quantization bitrate 16 bit
Channel 2 ch
Bitrate 16 kbps to 320 kbps
VBR/CBR Supported/Supported
32
En
Category Extension Stream
FLAC .flac FLAC Sampling frequency 44.1 kHz, 48 kHz, 96 kHz
Quantization bitrate 16 bit, 24 bit
Channel 2 ch
Bitrate —
a “MPEG Layer-3 audio decoding technology licensed from Fraunhofer IIS and Thomson multimedia.”
About status messages
Refer to the following information when you come up with a status message while operating
the NETWORK function.
Status messages Descriptions
List empty, Add from Now Playing... The list is empty. Please add from Now Playing.
No item There are no items.
Rescanning devices... Rescanning. Please wait.
Unsupported Format This format is not supported.
Server Connection Error Cannot connect to server.
Error opening stream This is a stream error.
Already in favorites This is already registered in your favorites.
Unsupported item This item is not supported by this receiver.
Unknown error An unidentified error has occurred.
Connection Error... Cannot connect to network.
Page 33

Additional Information
Specifications
As part of our policy of continuous improvement, PIONEER
reserves the right to make design and specification changes
for product improvement without prior notice. The
performance specification figures indicated are nominal
values of production units. There may be some deviations
from these values in individual units.
*The specifications are applicable when the power supply is
230 V.
Amplifier section
RMS Power Output . . . . . . . . . . . . . . . . . . . . . . .50 W + 50 W
Guaranteed speaker impedance. . . . . . . . 4 ohms to 16 ohms
Headphones . . . . . . . . . . . . . . . . . . . recommended: 32 ohms
Tuner section
Frequency Range
FM . . . . . . . . . . . . . . . . . . . . . . . . . . . . 87.5 MHz to 108 MHz
DAB . . . . . . . . . . . 174.928 MHz to 239.200 MHz (BAND III)
Antenna Input (DAB/FM). . . . . . . . . . . . 75 ohms unbalanced
Video section
Signal level (Composite) . . . . . . . . . . . . . . . . 1 Vp-p (75 ohms)
Network section
LAN terminal. . . . . . . . . . . . . . . . . . . . . . . . . . . . . Ethernet jack
Other connectors
Power supply
Front USB connector . . . . . . . . . . . . . . . . . . . . . . . 5 V, 2.1 A
iPod connector . . . . . . . . . . . . . . . . . . . . . . . . . . . . 5 V, 1.0 A
Rear DC output connector (for Wireless LAN)
. . . . . . . . . . . . . . . . . . . . . . . . . . . . . . . . . . . . . . . 5 V, 600 mA
Miscellaneous
Power source . . . . . . . . . . . . . . . . . . AC 220 V to 240 V, 50 Hz
Power consumption
Power on . . . . . . . . . . . . . . . . . . . . . . . . . . . . . . . . . . . . . 80 W
Power stand-by. . . . . . . . . . . . . . . . . . . . . . . . . 0.5 W or less
Dimensions
Width. . . . . . . . . . . . . . . . . . . . . . . . . . . . . . . . . . . . . 215 mm
Height . . . . . . . . . . . . . . . . . . . . . . . . . . . . . . . . . . . . 111 mm
Depth. . . . . . . . . . . . . . . . . . . . . . . . . . . . . . . . . . . . . 353 mm
(1 kHz, 10 % T.H.D., 4 ohms)
10BASE-T/100BASE-TX
Weight . . . . . . . . . . . . . . . . . . . . . . . . . . . . . . . . . . . . . . . . 4.7 kg
Speaker (X-HM70DAB only)
Type
2-way type speaker system
2.5 cm Dome-Tweeter
12 cm Woofer
Maximum input power . . . . . . . . . . . . . . . . . . . . . . . . . . . .50 W
Impedance . . . . . . . . . . . . . . . . . . . . . . . . . . . . . . . . . . .4 ohms
Dimensions
Width . . . . . . . . . . . . . . . . . . . . . . . . . . . . . . . . . . . . . 148 mm
Height . . . . . . . . . . . . . . . . . . . . . . . . . . . . . . . . . . 263.5 mm
Depth. . . . . . . . . . . . . . . . . . . . . . . . . . . . . . . . . . . . . 208 mm
Weight . . . . . . . . . . . . . . . . . . . . . . . . . . . . . . . . . . . 2.7 kg/each
About iPod/iPhone/iPad
“Made for iPod,” “Made for iPhone” and “Made for iPad”
mean that an electronic accessory has been designed to
connect specifically to iPod, iPhone, or iPad, respectively,
and has been certified by the developer to meet Apple
performance standards. Apple is not responsible for the
operation of this device or its compliance with safety and
regulatory standards. Please note that the use of this
accessory with iPod, iPhone, or iPad may affect wireless
performance.
iPad, iPhone, iPod, iPod classic, iPod nano and iPod touch are
trademarks of Apple Inc., registered in the U.S. and other
countries.
33
En
Page 34

Additional Information
Software License
Notice
The licenses for the open
source software used on this
product is shown below.
Disclaimer for Third
Party Content
Access to content provided by
third parties requires a high
speed internet connection
and may also require account
registration and a paid
subscription.
Third party content services
may be changed, suspended,
interrupted, or discontinued
at any time without notice,
and Pioneer disclaims any
liability in connection with
such occurrences.
Pioneer does not represent or
warrant that content services
will continue to be provided or
available for a particular
period of time, and any such
warranty, express or implied,
is disclaimed.
expat
Copyright (c) 1998, 1999, 2000 Thai Open
Source Software Center Ltd and Clark
Cooper Copyright (c) 2001, 2002 Expat
maintainers.
Permission is hereby granted, free of
charge, to any person obtaining a copy of
this software and associated
documentation files (the “Software”), to
deal in the Software without restriction,
including without li mitation the rights to
use, copy, modify, merge, publish,
distribute, sublicense, and/or sell copies of
the Software, and to permit persons to
whom the Software is furnished to do so,
subject to the following conditions: The
above copyright notice and this permissi
notice shall be included in all copies or
substantial portions of the Software.
34
En
THE SOFTWARE IS PROVIDED “AS IS”,
WITHOUT WARRANTY OF ANY KIND,
EXPRESS OR IMPLIED, INCLUDING BUT
NOT LIMITED TO THE WARRA NTIES OF
MERCHANTABILITY, FITNESS FOR A
PARTICULAR PURPOSE AND
NONINFRINGEMENT. IN NO EVENT SHALL
THE AUTHORS OR COPYRIGHT HOLDERS
BE LIABLE FOR ANY CLAIM, DAMAGES OR
OTHER LIABILITY, WHETHER IN AN
ACTION OF CONTRACT, TORT OR
OTHERWISE, ARISING FROM, OUT OF OR
IN CONNECTION WITH THE SOFTW ARE
OR THE USE OR OTHER DEALINGS IN THE
SOFTWARE.
libjpeg-6b
This software is based in part on the work of
the Independent JPAG Group.
libpng
This copy of the libpng notices is provided
for your convenience. In case of any
discrepancy between this copy and the
notices in the file png.h that is included in
the libpng distribution, the latter shall
prevail.
COPYRIGHT NOTICE, DISCLAIMER, and
LICENSE:
If you modify libpng you may insert
additional notices immediately following
this sentence.
libpng versions 1.2.6, August 15, 2004,
through 1.2.35, February 14, 2009, are
Copyright (c) 2004, 2006-2008 Glenn
Randers-Pehrson, and are distributed
according to the same disclaimer and
license as libpng-1.2.5 with the following
individual added to the list of Contributing
Authors
Cosmin Truta
libpng versions 1.0.7, July 1, 2000, through
1.2.5 - October 3, 2002, are
ght (c) 2000-2002 Glenn Randers-
ri
Copy
Pehrson, and are distributed according to
the same disclaimer and license as libpng-
1.0.6 with the following individuals added to
the list of Contributing Authors
Simon-Pierre Cadieux
Eric S. Raymond
Gilles Vollant
and with the following additions to the
disclaimer:
There is no warranty against
interference with your enjoyment of the
library or against infringement. There is
no warranty that our efforts or the
library will fulfill any of your particular
purposes or needs. This library is
provided with all faults, and the entire
risk of satisfactory quality, performance,
ccuracy, and effort is with the user.
a
on
libpng versions 0.97, January 1998, through
1.0.6, March 20, 2000, are
Copyright (c) 1998, 1999 Glenn RandersPehrson, and are distributed according to
the same disclaimer and license as libpng-
0.96, with the following individuals added to
the list of Contributing Authors:
Tom Lane
Glenn Randers-Pehrson
Willem van Schaik
libpng versions 0.89, June 1996, through
0.96, May 1997, are
Copyright (c) 1996, 1997 Andreas Dilger
Distributed according to the same
disclaimer and license as libpng-0.88, with
the following individuals added to the list of
Contributing Authors:
John Bowler
Kevin Bracey
Sam Bushell
Magnus Holmgren
Greg Roelofs
Tom Tanner
bpng versions 0.5, May 1995, through 0.88,
li
January 1996, are
Copyright (c) 1995, 1996 Guy Eric Schalnat,
Group 42, Inc.
For the purposes of this copyright and
license, “Contributing Authors” is defined
as the following set of individuals:
Andreas Dilger
Dave Martindale
Guy Eric Schalnat
Paul Schmidt
Tim Wegner
The PNG Reference Library is supplied “AS
IS”. The Contributing Authors and Group
42, Inc. disclaim all warranties, expressed
or implied, including, without limitation, the
warranties of merchantability and of fitness
for any purpose. The Contributing Authors
and Group 42, Inc. assume no l
direct, indirect, incidental, special,
exemplary, or consequential damages,
which may result from the use of the PNG
Reference Library, even if advised of the
possibility of such damage.
Permission is hereby granted to use, copy,
modify, and distribute this source code, or
portions hereof, for any purpose, without
fee, subject to the following restrictions:
1. The origin of this source code must not
be misrepresented.
2. Altered versions must be plainly marked
as such and must not be
misrepresented as being the original
source.
3. This Copyright notice may not be
ved or altered from any source or
remo
altered source distribution.
The Contributing Authors and Group 42,
Inc. specifically permit, without fee, and
encourage the use of this source code as a
component to supporting the PNG file
format in commercial products. If you use
this source code in a product,
iability for
acknowledgment is not required but would
be appreciated. A “png_get_copyright”
function is available, for convenient use in
“about” boxes and the like:
printf(“%s”,png_get_copyright(NULL));
Also, the PNG logo (in PNG format, of
course) is supplied in the files “pngbar.png”
bar.jpg” (88x31) and
and “png
“pngnow.png” (98x31).
Libpng is OSI Certified Open Source
Software. OSI Certified Open Source is a
certification mark of the Open Source
Initiative.
Glenn Randers-Pehrson
glennrp at users.sourceforge.net
February 14, 2009
libxml2
Except where otherwise noted in the source
code (e.g. the files hash.c, list.c and the trio
files, which are covered by a similar licence
but with different Copyright notices) all the
files are:
Copyright (C) 1998-2003 Daniel Veillard. All
Rights Reserved.
Permission is hereby granted, free of
charge, to any person obtaining a co py of
this software and associated
documentation files (the “Software”), to
deal in the Software without restriction,
including without limitation the rights to
use, copy, modify, merge, publish,
distribute, sublicense, and/or sell copies of
the Software, and to permit persons to
whom the Software is furnis
subject to the following conditions:
The above copyright notice and this
permission notice shall be included in all
copies or substantial portions of the
Software.
THE SOFTWARE IS PROVIDED “AS IS”,
WITHOUT WARRANTY OF ANY KIND,
EXPRESS OR IMPLIED, INCLUDING BUT
NOT LIMITED TO THE WARRANTIES OF
MERCHANTABILITY, FITNESS FOR A
PARTICULAR PURPOSE AND
NONINFRINGEMENT. IN NO EVENT SHALL
THE DANIEL VEILLARD BE LIABLE FOR
ANY CLAIM, DAMAGES OR OTHER
LIABILITY, WHETHER IN AN ACTION OF
CONTRACT, TORT OR OTHERWISE,
ARISING FROM, OUT OF OR IN
CONNECTION WITH THE SOFTWARE OR
THE USE OR OTHER DEALINGS IN THE
SOFTWARE.
Except as contained in this notice, the
name of Daniel Veillard shall not be used in
advertising or otherwise to promote the
sale, use or other dealings in this Software
without prior written authorization from
him.
libssh2
Copyright (c) 2004-2007 Sara Golemon
sarag@libssh2.org
hed to do so,
Copyright (C) 2006-2007 The Written Word,
Inc. All rights reserved.
Redistribution and use in source and binary
forms, with or without modification, are
permitted provided that the following
conditions are met:
Redistributions of source code must retain
the above copyright notice, this list of
conditions and the following disclaimer.
Redistributions in binary form must
reproduce the above copyright notice, this
list of conditions and the following
disclaimer in the documentation and/or
other materials provided with the
distribution.
Neither the name of the copyri
nor the names of any other contributors
may be used to endorse or promote
products derived from this software without
specific prior written permission.
THIS SOFTWARE IS PROVIDED BY THE
COPYRIGHT HOLDERS AND
CONTRIBUTORS “AS IS” AND ANY
EXPRESS OR IMPLIED WARRANTIES,
INCLUDING, BUT NOT LIMITED TO, THE
IMPLIED WARRANTIES OF
MERCHANTABILITY AND FITNESS FOR A
PARTICULAR PURPOSE ARE
DISCLAIMED. IN NO EVENT SHALL THE
COPYRIGHT OWNER OR CONTRIBUTORS
BE LIABLE FOR ANY DIRECT, INDIRECT ,
INCIDENTAL, SPECIAL, EXEMPLARY, OR
CONSEQUENTIAL DAMAGES
(INCLUDING, BUT NOT LIMITED TO,
PROCUREMENT OF SUBSTITUTE GOODS
OR SERVICES; LOSS OF USE, DATA, OR
PROFITS; OR BUSINESS INTERRUPTION)
HOWEVER CAUSED AND ON ANY THEORY
OF LIABILITY, WHETHER IN CONTRACT,
STRICT LIABILITY, OR TORT (INCLUDING
NEGLIGENCE OR OTHERWISE) ARISING
IN ANY WAY OUT OF THE USE OF THIS
SOFTWARE, EVEN IF ADVISED OF THE
POSSIBILITY OF SUCH DAMAGE.
uuid
Copyright (C) 1999 Andreas Dilger
Copyright (C) 2007 Theodore Ts’o.
Redistribution and use in source and binary
forms, with or without modification, are
permitted provided that the following
conditions are met:
1. Redistributions of source code mus t
retain the above copyright notice, and
the entire permission notice in its
entirety, including the disclaimer of
warranties.
2. Redistributions in binary form must
reproduce the above copyright notice,
this list of conditions and the following
disclaimer in the documentation and/or
other materials provided with the
distribution.
ght holder
3. The name of the author may not be used
to endorse or promote prod
from this software without specific prior
written permission.
THIS SOFTWARE IS PROVIDED “AS IS”
AND ANY EXPRESS OR IMPLIED
WARRANTIES, INCLUDING, BUT NOT
LIMITED TO, THE IMPLIED WARRANTIES
OF MERCHANTABILITY AND FITNESS FOR
A PARTICULAR PURPOSE, ALL OF WHICH
ARE HEREBY DISCLAIMED. IN NO EVENT
SHALL THE AUTHOR BE LIABLE FOR ANY
DIRECT, INDIRECT, INCIDENTAL, SPECIAL,
EXEMPLARY, OR CONSEQUENTIAL
DAMAGES (INCLUDING, BUT NOT LIMITED
TO, PROCUREMENT OF SUBSTITUTE
GOODS OR SERVICES; LOSS OF USE,
DATA, OR PROFITS; OR BUSINESS
INTERRUPTION) HOWEVER CAUSED AND
ON ANY THEORY OF LIABILITY, WHETHER
IN CONTRACT, STRICT LIABILITY, OR TORT
(INCLUDING NEGLIGENCE OR
OTHERWISE) ARISING IN ANY WAY OUT
OF THE USE OF THIS SOFTWARE, EVEN IF
NOT ADVISED OF THE POSSIBILITY OF
SUCH DAMAGE.
OpenSSL
The OpenSSL toolkit stays under a dual
license, i.e. both the conditions of the
OpenSSL License and the original SSLeay
license apply to the toolkit. See below for
the actual license texts. Actually both
licenses are BSD-style Open Source
licenses. In case of any license issues
related to OpenSSL please contact opensslcore@openssl.org.
OpenSSL License
Copyright (c) 1998-2008 The OpenSSL
Project. All rights reserved.
Redistribution and use in source and binary
forms, with or without modification, are
permitted provided that the following
conditions are met:
1. Redistributio ns of source code must
retain the above copyright notice, this
list of conditions and the following
disclaimer.
2. Redistributions in binary form must
reproduce the above copyright notice,
this list of conditions and the following
disclaimer in the documentation and/or
other materials provided with the
distribution.
3. All advertising materials mentioning
features or use of this software must
display the following acknowle dgment:
“This product includes software
veloped by the OpenSSL Project for
de
use in the OpenSSL Toolkit. (http://
www.openssl.org/)”
ucts derived
Page 35

Additional Information
4. The names “OpenSSL Toolkit” and
“OpenSSL Project” must not be used to
endorse or promote products derived
from this software without prior written
permission. For written permission,
please contact openssl-
core@openssl.org.
5. Products derived from this software
may not be called “OpenSSL” nor may
“OpenSSL” appear in their names
without prior written permission of the
OpenSSL Project.
6. Redistributions of any form whatsoever
must retain the following
knowledgment:
ac
“This product includes software
developed by the OpenSSL Project for
use in the OpenSSL Toolkit (http://
www.openssl.org/)”
THIS SOFTWARE IS PROVIDED BY THE
OpenSSL PROJECT “AS IS” AND ANY
EXPRESSED OR IMPLIED WARRANTIES,
INCLUDING, BUT NOT LIMITED TO, THE
IMPLIED WARRANTIES OF
MERCHANTABILITY AND FITNESS FOR A
PARTICULAR PURPOSE ARE
DISCLAIMED. IN NO EVENT SHALL THE
OpenSSL PROJECT OR ITS
CONTRIBUTORS BE LIABLE FOR ANY
DIRECT, INDIRECT, INCIDENTAL, SPECIAL,
EXEMPLARY, OR CONSEQUENTIAL
DAMAGES (INCLUDING, BUT NOT LIMITED
TO, PROCUREMENT OF SUBSTITUTE
GOODS OR SERVICES;
LOSS OF USE, DATA, OR PROFITS; OR
BUSINESS INTERRUPTION) HOWEVER
CAUSED AND ON ANY THEORY OF
LIABILITY, WHETHER IN CONTRACT,
STRICT LIABILITY, OR TORT (INCLUDING
NEGLIGENCE OR OTHERWISE) ARISING
IN ANY WAY OUT OF THE USE OF THIS
SOFTWARE, EVEN IF ADVISED OF THE
POSSIBILITY OF SUCH DAMAGE.
This product includes cryptographic
software written by Eric Young
(eay@cryptsoft.com). This product
includes software written by Tim Hudson
(tjh@cryptsoft.com).
Original SSLeay License
Copyright (C) 1995-1998 Eric Young
(eay@cryptsoft.com) All rights reserved.
This package is an SSL implementation
written by Eric Young (eay@cryptsoft.com).
The implementation was written so as to
conform with Netscapes SSL. This library is
free for commercial and non-commercial
use as long as the following conditions are
aheared to. The following conditions apply
to all code found in this distribution, be it
the RC4, RSA, lhash, DES, etc., code; not
just the SSL code. The SSL documentation
included with this distribution is covered by
the same copyright terms except that the
holder is Tim Hudson (tjh@cryptsoft.com).
Copyright remains Eric Young's, and as
such any Copyrigh
not to be removed.
If this package is used in a product, Eric
Young should be given attribution as the
author of the parts of the library used.
This can be in the form of a textual message
at program startup or in documentation
(online or textual) provided with the
package.
Redistribution and use in source and binary
forms, with or without modification, are
permitted provided that the following
conditions are met:
1. Redistributions of source code must
2. Redistributions in binary form must
3. All advertising materials mentioning
4. If you include any Windows specific
THIS SOFTWARE IS PROVIDED BY ERIC
YOUNG “AS IS” AND ANY EXPRESS OR
IMPLIED WARRANTIES, INCLUDING, BUT
NOT LIMITED TO, THE IMPLI ED
WARRANTIES OF MERCHANTABILITY
AND FITNESS FOR A PARTICULAR
PURPOSE ARE DISCLAIMED. IN NO
EVENT SHALL THE AUTHOR OR
CONTRIBUTORS BE LIABLE FOR ANY
DIRECT, INDIRECT, INCIDENTAL, SPECIAL,
EXEMPLARY, OR CONSEQUENTIAL
DAMAGES (INCLUDING, BUT NOT LIMITED
TO, PROCUREMENT OF SUBSTITUTE
GOODS OR SERVICES; LOSS OF USE,
DATA, OR PROFITS; OR BUSINESS
INTERRUPTION) HOWEVER CAUSED AND
ON ANY THEORY OF LIABILITY, WHETHER
IN CONTRACT, STRICT LIABILITY, OR TORT
(INCLUDING NEGLIGENCE OR
OTHERWISE) ARISING IN ANY WAY OUT
OF THE USE OF THIS SOFTWARE, EVEN IF
ADVISED OF THE POSSIBILITY OF SUCH
DAMAGE.
t notices in the code are
retain the copyright notice, this list of
conditions and the following disclaimer.
reproduce the above copyright notice,
this list of conditions and the following
laimer in the documentation and/or
disc
other materials provided with the
distribution.
features or use of this software must
display the following
acknowledgement:
“This product includes cryptographic
software written by Eric Young
(eay@cryptsoft.com)”
The word ‘cryptographic’ can be left out
if the rouines from the library being
used are not cryptographic related :-).
code (or a derivative thereof) from the
irectory (application code) you
apps d
must include an acknowledgement:
“This product includes software written
by Tim Hudson (tjh@cryptsoft.com)”
The licence and distribution terms for any
publically available version or derivative of
this code cannot be changed. i.e. this code
cannot simply be copied and put under
another distribution licence [including the
GNU Public Licence.]
GNU GENERAL PUBLIC LICENSE
and GNU LESSER GENERAL
PUBLIC LICENSE
This product includes the following
software licensed for use under the terms of
GNU General Public License v2, GNU
Lesser General Public License v2.1 or LGPL
v2.0.
– Linux Kernel Copyright(C) 2009 Linux
Torvalds. Licensed Under GPLv2
– uClibc Copyright (C) 2000-2008 Erik
Andersen. Licensed underLGPLv2.1
–DirectFB (c) Copyright 2001-2007 The
DirectFB Organization (directfb.org)
(c) Copyright 2000-2004 Convergence
(integrated media) GmbH. Licenced
under LGPLv2.1
– ffmpeg (c) Copyright 2000-2004
Convergence (integrated media)
GmbH. Licenced under LGPLv2.1
–glib Copyright 2007-2008 The GTK+
Team. Licenced under GPLv2
– libalsa Copyri
– libid3tag Copyright (C) 2000-2004
– libmad Copyright (C) 2000-2004
– libsoup Copyright (C) 2005-2011 The
– Lite 2002-2008 (c) Copyright 2001-
– dbus-glib Licenced under GPLv2
– gssdp Licenced under GPLv2
– GnuTLS Copyright (C) 2006, 2007,
–gupnp Licenced under LG
–gupnp-av Licenced under LGPLv2
– libgcrypt Copyright 2000, 2002, 2003,
– gee Licenced under LGPLv2.1
– TabLib Licenced under LGPLv2.0
–vlc Copyright(C) 1998-2008 the
– rygel Licensed under LGPLv2.0
ght 2009 ALSA Project.
Licenced under LGPLv2.1
Underbit Technologies, Inc. Licenced
under GPLv2
Underbit Technologies, Inc. Licenced
under GPLv2
GNOME Project. Licensed under
GPLv2
2007 The DirectFB Organization
(directfb.org) Copyright (C) 2000-2004
Convergence (integrated media)
GmbH Licensed under LGPLv2.1
2008, 2009 Simon Josefsson
Copyright (C) 2000, 2001, 2002, 2003,
2004, 2005 Nikos
Mavrogiannopoulos. Licenced under
GPLv2
2004, 2007, 2008,2009 Free Software
Foundation, Inc. Licenced under
GPLv2
VideoLAN team. Licensed under
GPLv2
PLv2
– dbus Licenced under GPLv2
– tslib. Licensed under LGPLv2.0
–FUSE Copyright (C) 2001-2007 Miklos
Szeredi. Licensed under GPLv2
–libiconv Copyright (C) 2007 Free
Software Foundation, Inc. Licensed
under LGPLv2
–Libgpg-error Copyright 2003, 2004,
2005, 2006, 2007 g10 Code GmbH.
Licensed under GPLv2
–busybox Copyright (C) 1998-2008 Erik
Andersen, Rob Landley, Denys
Vlasenko and others
GPLv2
–faad Copyright (C) 2003-2005 M.
Bakker, Nero AG. Licensed under
GPLv2
You can get corresponding open source
code from the following URL.
http://www.oss-pioneer.com/homeav/AVR
We are unable to answer any questions
about the source code for the open source
software.
NO WARRANTY
BECAUSE THE ABOVE PROGRAMS ARE
LICENSED FREE OF CHARGE, THERE IS
NO WARRANTY FOR THE PROGRAMS, TO
THE EXTENT PERMITTED BY APPLICABLE
LAW. EXCEPT WHEN OTHERWISE STATED
IN WRITING, THE COPYRIGHT HOLDERS
AND/OR OTHER PARTIES PROVIDE THE
PROGRAMS “AS IS” WITHOUT WARRANTY
OF ANY KIND, EITHER EXPRESSED OR
IMPLIED, INCLUDING, BUT NOT LIMITED
TO, THE IMPLIED WARRANTIES OF
MERCHANTABILITY AND FITNESS FOR A
PARTICULAR PURPOSE. THE ENTIRE RISK
AS TO THE QUALITY AND PERFORMANCE
OF THE PROGRAMS IS WITH YOU.
SHOULD THE PROGRAMS PROVE
DEFECTIVE, YOU ASSUME THE COST OF
ALL NECESSARY SERVICING, REPAIR OR
CORRECTION.
IN NO EVENT UNLESS REQUIRED BY
APPLICABLE LAW OR AGREED TO IN
WRITING WILL ANY COPYRIGHT HOLDER,
OR ANY OTHER PARTY WHO MAY MODIFY
AND/OR REDISTRIBUTE THE PROGRAMS
AS PERMITTED ABOVE, BE LIABLE TO YOU
FOR DAMAGES, INCLUDING ANY
GENERAL, SPECIAL, INCIDENTAL OR
CONSEQUENTIAL DAMAGES ARISING
OUT OF THE USE OR INABILITY TO USE
THE PROGRAMS (INCLUDING BUT NOT
LIMITED TO LOSS OF DATA OR DATA
BEING RENDERED INACCURATE OR
LOSSES SUSTAINED BY YOU OR THIRD
PARTIES OR A FAILURE OF THE
PROGRAMS TO OPERATE WITH ANY
OTHER PROGRAMS), EVEN IF SUCH
HOLDER OR OTHER PARTY HAS BEEN
ADVISED OF THE POSSIBILITY OF SUCH
DAMAGES.
Please refer to each license for further
information
. Licensed under
“(www.gnu.org/licenses/gpl-2.0.html,
www.gnu.org/licenses/old-licenses/lgpl-
2.1.html,
www.gnu.org/licenses/old-licenses/lgpl-
2.0.html)”
GNU GENERAL PUBLIC LICENSE
Version 2, June 1991
Copyright (C) 1989, 1991 Free Software
Foundation, Inc.
51 Franklin Street, Fifth Floor, Boston, MA
02110-1301, USA
Everyone is permitted to copy and distribute
verbatim copies of this license document,
but changing it is not allowed.
Preamble
The licenses for most software are designed
to take away your freedom to share and
change it. By contrast, the GNU General
Public License is intended to guarantee
your freedom to share and change free
software--to make sure the software is free
for all its users. This General Public License
applies to most of the Free Software
Foundation's software and to any other
program whose authors commit to using it.
(Some other Free Software Foundation
software is covered by the GNU Lesser
General Public License instead.) You can
apply it to your programs, too.
When we speak of free software, we are
to freedom, not price. Our General
referring
Public Licenses are designed to make sure
that you have the freedom to distribute
copies of free software (and charge for this
service if you wish), that you receive source
code or can get it if you want it, that you can
change the software or use pieces of it in
new free programs; and that you know you
can do these things.
To protect your rights, we need to make
restrictions that forbid anyone to deny you
these rights or to ask you to surrender the
rights. These restrictions translate to
certain responsibilities for you if you
distribute copies of the software,
modify it.
For example, if you distribute copies of such
a program, whether gratis or for a fee, you
must give the recipients all the rights th at
you have. You must make sure that they,
too, receive or can get the source code. And
you must show them these terms so they
know their rights.
We protect your rights with two steps: (1)
copyright the software, and (2) offer you this
license which gives you legal permission to
copy, distribute and/or modify the software.
Also, for each author’s protection and ours,
we want to make certain that everyone
understands that there i
this free software. If the software is
modified by someone else and passed on,
or if you
s no warranty for
we want its recipients to know that what
they have is not the original, so that any
problems introduced by others will not
reflect on the original authors’ reputations.
Finally, any free program is threatened
constantly by software patents. We wish to
avoid the danger that redistributors of a free
program will individually obtain patent
licenses, in effect making the program
proprietary. To prevent this, we have made it
clear that any patent must be licensed for
everyone’s free use or not licensed at all.
The precise term
copying, distribution and modification
follow.
TERMS AND CONDITIONS FOR
COPYING, DISTRIBUTION AND
MODIFICATION
0. This License applies to any program or
1. You may copy and distribute verbatim
s and conditions for
other work which contains a notice
placed by the copyright holder saying it
may be distributed under the terms of
this General Public License. The
“Program”, below, refers to any such
program or work, and a “work based on
the Program” means either the
Program or any derivative work under
copyright law: that is to say, a work
containing the Program or a portion of
it, either verbatim or with modifications
and/or translated into another
uage. (Hereinafter, translation is
lang
included without limitation in the term
“modification”.) Each licensee is
addressed as “you”.
Activities other than copying,
distribution and modificatio n are not
covered by this License; they are outside
its scope. The act of running the
Program is not restricted, and the
output from the Program is covered
only if its contents constitute a work
based on the Program (independent of
having been made by running the
Program). Whether tha t i s true depends
on what the Program does.
copies of the Program’s source code as
ve it, in any medium, provided
you recei
that you conspicuously and
appropriately publish on each copy an
appropriate copyright notice and
disclaimer of warranty; keep intact all
the notices that refer to this License and
to the absence of any warranty; and give
any other recipients of the Program a
copy of this License along with the
Program.
You may charge a fee for the physical
act of transferring a copy, and you may
at your option offer warranty protection
in exchange for a fee.
35
En
Page 36

Additional Information
2. You may modify your copy or copies of
the Program or any portion of it, thus
forming a work based on the Program,
and copy and distribute such
modifications or work under the terms
of Section 1 above, provided that you
also meet all of these conditions:
a)You must cause the modified files to
carry prominent notices stating that
you changed the files and the date of
any change.
b)You must cause any work that you
distribute or publish, that in whole or
in part contains or is derived from the
Program or any part thereof, to be
licensed as a whole at no charge to all
third parties under the terms of
License.
c)If the modified program normally
reads commands interactively when
run, you must cause it, when started
running for such interactive use in
the most ordinary way, to print or
display an announcement including
an appropriate copyright notice and a
notice that there is no warranty (or
else, saying that you provide a
warranty) and that users may
redistribute the program under these
conditions, and telling the user how
to view a copy of this License.
(Exception: if the Program itself is
interactive but does not normally
print such an announcement, your
work based on the Program is not
uired to print an announcement.)
req
These requirements apply to the
modified work as a whole. If identifiable
sections of that work are not derived
from the Program, and can be
reasonably considered independent
and separate works in themselves, then
this License, and its terms, do not apply
to those sections when you distribute
them as separate works. But when you
distribute the same sections as part of a
whole which is a work based on the
Program, the distribution of the whole
must be on the terms of this License,
whose permissions for other licensees
extend to the entire whole, and thus to
each and every part regardless of who
e it.
wrot
Thus, it is not the intent of this section to
claim rights or contest your rights to
work written entirely by you; rather, the
intent is to exercise the right to control
the distribution of derivative or
collective works based on the Program.
In addition, mere aggregation of
another work not based on the Program
with the Program (or with a work based
on the Program) on a volume of a
storage or distribution medium does
not bring the other work under the
scope of this License.
36
En
3. You may copy and distribute the
Program (or a w
Section 2) in object code or executable
form under the terms of Sections 1 an d
2 above provided that you also do one of
the following:
a)Accompany it with the complete
b)Accompany it with a written offer,
this
c)Accompany it with the information
The source code for a work means the
preferred form of the work for making
modifications to it. For an executable
work, comple
the source code for all modules it
contains, plus any associated interface
definition files, plus the scripts used to
control compilation and installation of
the executable. However, as a special
exception, the source code distributed
need not include anything that is
normally distributed (in either source or
binary form) with the major
components (compiler, kernel, and so
on) of the operating system on which
the executable runs, unless that
component itself accompanies the
executable.
If distribution of executable or object
code is made by offering access to copy
from a designated place, then offering
equivalent access to copy the source
cod
distribution of the source code, even
though third parties are not compelled
to copy the source along with the object
code.
4. You may not copy, modify, sublicense,
or distribute the Program except as
expressly provided under this License.
Any attempt otherwise to copy, modify,
sublicense or distribute the Program is
void, and will automatically terminate
ork based on it, under
corresponding machine-readable
source code, which must be
distributed under the terms of
Sections 1 and 2 above on a medium
customarily used for software
interchange; or,
valid for at least three years, to give
any third party, for a charge no more
than your cost of physically
performing source distribution, a
complete machine-read
the corresponding source code, to be
distributed under the terms of
Sections 1 and 2 above on a medium
customarily used for software
interchange; or,
you received as to the offer to
distribute corresponding source
code. (This alternative is allowed only
for noncommercial distribution and
only if you received the program in
object code or executable form with
such an offer, in accord with
Subsection b above.)
te source code means all
e from the same place counts as
able copy of
your rights under this License.
However, parties who have received
copies, or rights, from you under this
License will not have their licenses
terminated so long as such parti
remain in full compliance.
5. You are not required to accept this
License, since you have not signed it.
However, nothing else grants you
permission to modify or distribute the
Program or its derivative works. These
actions are prohibited by law if you do
not accept this License. Therefore, by
modifying or distributing the Program
(or any work based on the Program),
you indicate your acceptance of this
License to do so, and all its terms and
conditions for copying, distributing or
modifying the Program or works based
on it.
6. Each time you red
(or any work based on the Program), the
recipient automatically receives a
license from the original licensor to
copy, distribute or modify the Program
subject to these terms and conditions.
You may not impose any further
restrictions on the recipients' exercise
of the rights granted herein. You are not
responsible for enforcing compliance
by third parties to this License.
7. If, as a consequence of a court
judgment or allegation of patent
infringement or for any other reason
(not li
conditions are imposed on you (whether
by court order, agreement or otherwise)
that contradict the conditions of this
License, they do not excuse you from
the conditions of this License. If you
cannot distribute so as to satisfy
simultaneously your obligations under
this License and any other pertinent
obligations, then as a consequence you
may not distribute the Program at all.
For example, if a patent license would
not permit royalty-free redistribution of
the Program by all those who receive
copies directly or indirectly through you,
then the only way you could satisfy both
it and this License would be to refrain
entirel
Program.
If any portion of this section is held
invalid or unenforceable under any
particular circumstance, the balance of
the section is intended to apply and the
section as a whole is intended to apply
in other circumstances.
It is not the purpose of this section to
induce you to infringe any patents or
other property right claims or to contest
validity of any such claims; this section
has the sole purpose of protecting the
integrity of the free software distribution
system, which is implemented by public
license practices. Many people have
istribute the Program
mited to patent issues),
y from distribution of the
made generous contributions to the
de range of software distributed
wi
through that system in reliance on
consistent application of that system; it
es
is up to the author/donor to decide if he
or she is willing to distribute software
through any other syst em and a
licensee cannot impose that choice.
This section is intended to make
thoroughly clear wha t is bel iev ed to b e a
consequence of the rest of this License.
8. If the distribution and/or use of the
Program is restricted in certain
countries either by patents or by
copyrighted interfaces, the original
copyright holder who places the
Program under this License may add an
explicit geographi
limitation excludin g those countries, so
that distribution is permitted only in or
among countries not thus excluded. In
such case, this License incorporates
the limitation as if written in the body of
this License.
9. The Free Software Foundation may
publish revised and/or new versions of
the General Public License from time to
time. Such new versions will be similar
in spirit to the present version, but may
differ in detail to address new problems
or concerns.
Each version is given a distinguishing
version number. If the Program
specifies a version number of this
License which applies to it and “any
later version”, you have the option of
lowing the terms and conditions
fol
either of that version or of any later
version published by the Free Software
Foundation. If the Program does not
specify a version number of this
License, you may choose any version
ever published by the Free Software
Foundation.
10. If you wish to incorporate parts of the
Program into other free programs
whose distribution conditions are
different, write to the author to ask for
permission. For software which is
copyrighted by the Free Software
Foundation, write to the Free So
Foundation; we sometimes make
exceptions for this. Our decision will be
guided by the two goals of preserving
the free status of all derivatives of our
free software and of promoting the
sharing and reuse of software generally.
NO WARRANTY
11. BECAUSE THE PROGRAM IS
LICENSED FREE OF CHARGE, THERE
IS NO WARRANTY FOR THE
PROGRAM, TO THE EXTENT
PERMITTED BY APPLICABLE LAW.
EXCEPT WHEN OTHERWISE STATED
IN WRITING THE COPYRIGHT
HOLDERS AND/OR OTHER PARTIES
cal distribution
PROVIDE THE PROGRAM “AS IS”
WITHOUT WARRANTY OF ANY KIND,
EITHER EXPRESSED OR IMPLIED,
INCLUDING, BUT NOT LIMITED TO, TH E
IMPLIED WARRANTIES OF
MERCHANTABILITY AND FITNESS FOR
A PARTICULAR PURPOSE. THE
ENTIRE RISK AS TO THE QUALITY AND
PERFORMANCE OF THE PROGRAM IS
WITH YOU. SHOULD THE PROGRAM
PROVE DEFECTIVE, YOU ASSUME THE
COST OF ALL NECESSARY SERVICING,
REPAIR OR CORRECTION.
12. IN NO EVENT UNLESS REQUIRED BY
APPLICABLE LAW OR AGREED TO IN
WRITING WILL ANY COPYRIGHT
HOLDER, OR ANY OTHER PARTY WHO
MAY MODIFY AND/OR REDISTR IBUTE
THE PROGRAM AS PERMITTED
ABOVE, BE LIABLE TO YOU FOR
DAMAGES, INCLUDING ANY
GENERAL, SPECIAL, INCIDENTAL OR
CONSEQUENTIAL DAMAGES ARISING
OUT OF THE USE OR INABILITY TO USE
THE PROGRAM (INCLUDING BUT NOT
LIMITED TO LOSS OF DATA OR DATA
BEING RENDERED INACCURATE OR
LOSSES SUSTAINED BY YOU OR
THIRD PARTIES OR A FAILURE OF THE
PROGRAM TO OPERATE WITH ANY
OTHER PROGRAMS), EVEN IF SUCH
HOLDER OR OTHER PARTY HAS BEEN
ADVISED OF THE POSSIBILITY OF
SUCH DAMAGES.
END OF TERMS AND
CONDITIONS
How to Apply These Terms to
Your New Programs
If you develop a new program, and you want
it to be of the greatest possible use to the
public, the best way to achieve this is to
make it free software which everyone can
redistribute and change under these terms.
To do so, attach the following notices to the
program. It is safest to attach them to the
start of each source file to most effectively
convey the exclusion of warranty; and each
file should have at least the “copyright” line
and a pointer to where the full notice is
ftware
found.
one line to give the program’s name and an
idea of what it does.
Copyright (C) yyyy name of author
This program is free software; you can
redistribute it and/or modify it under the
terms of the GNU General Public License as
published by the Free Software Foundation;
either version 2 of the License, or (at your
option) any later versi
This program is distributed in the hope that
it will be useful, but WITHOUT ANY
WARRANTY; without even the implied
warranty of MERCHANTABILITY or FITNESS
FOR A PARTICULAR PURPOSE. See the
GNU General Public License for more
details.
You should have received a copy of the GNU
General Public License
along with this program; if not, write to the
Free Software Foundation, Inc., 51 Franklin
Street, Fifth Floor, Boston, MA 02110-1301,
USA.
Also add information on how to contact you
by electronic and paper mail.
If the program is interactive, make it output
a short notice like this when it starts in an
interactive mode:
Gnomovision version 69, Copyright (C) year
name of author
Gnomovision comes with ABSOLUTELY NO
WARRANTY; for d
is free software, and you are welcome to
redistribute it under certain conditions;
type ‘show c’ for details.
The hypothetical commands ‘show w’ and
‘show c’ should sho w the appropriate parts
of the General Public License. Of course,
the commands you use may be called
something other than ‘show w’ and ‘show
c’; they could even be mouse-clicks or
menu items--whatever suits your program.
You should also get your employer (if you
work as a programmer) or your school, if
any, to sign a “copyright disclaimer” for the
program, if necessary. Here is a sample;
alter the names:
Yoyodyne, Inc., hereby disclaims all
copyrig
‘Gnomovision’ (which makes passes at
compilers) written by James Hacker.
signature of Ty Coon, 1 April 1989
Ty Coon, President of Vice
This General Public License does not
permit incorporating your program into
proprietary programs. If your program is a
subroutine library, you may consider it
more useful to permit linking proprietary
applications with the library. If this is what
you want to do, use the GNU Lesser General
Public License instead of this License.
GNU LESSER GENERAL PUBLIC
LICENSE
Version 2.1, February 1999
Copyright (C) 1991, 1999 Free Software
Foundation, Inc.
51 Franklin Street, Fifth Floor, Boston, MA
02110-1301 USA
on.
Everyone is permitted to copy and distribute
verbatim copies of this license document,
but changing it is not allowed.
etails type ‘show w’. This
ht interest in the program
Page 37

Additional Information
[This is the first released version of the
Lesser GPL. It also counts as the successor
of the GNU Library Public License, version
2, hence the version number 2.1.]
Preamble
The licenses for most software are designed
to take away your freedom to share and
change it. By contrast, the GNU General
Public Licenses are intended to guarantee
your freedom to share and change free
software--to make sure the software is free
for all its users.
This license, the Lesser General Public
License, applies to some specially
designated software packages--typically
libraries--of the Free Software Foundation
and other authors who decide to use it. You
can use it too, but we suggest you first think
carefully about whether this license or the
ordinary General Public License is the
better strategy to use in any particular ca
based on the explanations below.
When we speak of free software, we are
referring to freedom of use, not price. Our
General Public Licenses are designed to
make sure that you have the freedom to
distribute copies of free software (and
charge for this service if you wish); that you
receive source code or can get it if you want
it; that you can change the software and
use pieces of it in new free programs; and
that you are informed that you can do these
things.
To protect your rights, we need to make
restrictions that forbid distributors to deny
you these rights or to ask you to surrender
hts. These restrictions translate to
these rig
certain responsibilities for you if you
distribute copies of the library or if you
modify it.
For example, if you distribute copies of the
library, whether gratis or for a fee, you must
give the recipients all the rights that we
gave you. You must make sure that they,
too, receive or can get the source code. If
you link other code with the library, you
must provide complete object files to the
recipients, so that they can relink them with
the library after making changes to the
library and recompil
show them these terms so they know their
rights.
We protect your rights with a two-step
method: (1) we copyright the library, and (2)
we offer you this license, which gives you
legal permission to copy, distribute and/or
modify the library.
To protect each distributor, we want to
make it very clear that there is no warranty
for the free library. Also, if the library is
modified by someone else and passed on,
the recipients should know that what they
have is not the original version, so that the
original author's reputation will not be
affected by problems that might be
introduc
ing it. And you must
ed by others.
Finally, software patents pose a constant
threat to the existence of any free program.
We wish to make sure that a company
cannot effectively restrict the users of a free
program by obtaining a restrictive license
from a patent holder. Therefore, we insist
that any patent license obtained for a
version of the library must be consistent
with the full freedom of use specified in this
license.
Most GNU software, including some
libraries, is covered by the ordinary GNU
General Public License. This license, the
GNU Lesser General Public License,
applies to certain designated librarie
is quite different from the ordinary General
Public License. We use this license for
certain libraries in order to permit linking
those libraries into non-free programs.
When a program is linked with a library,
whether statically or using a shared library,
se,
the combination of the two is legally
speaking a combined work, a derivative of
the original library. The ordinary General
Public License therefore permits such
linking only if the entire combination fits its
om. The Lesser General
criteria of freed
Public License permits more lax criteria for
linking other code with the library.
We call this license the “Lesser” General
Public License because it does Less to
protect the user's freedom than the ordinary
General Public License. It also provides
other free software developers Less of an
advantage over competing non-free
programs. These disadvantages are the
reason we use the ordinary General Public
License for many libraries. However, the
Lesser license provides advantages in
certain special circumstances.
, on rare occasions, there may
For example
be a special need to encourage the widest
possible use of a certain library, so that it
becomes a de-facto standard. To achieve
this, non-free programs must be allowed to
use the library. A more frequent case is that
a free library does the same job as widely
used non-free libraries. In this case, there is
little to gain by limiting the free library to
free software only, so we use the Lesser
General Public License.
In other cases, permission to use a
particular library in non-free programs
enables a greater number of people
a large body of free software. For example,
permission to use the GNU C Library in nonfree programs enables many more people
to use the whole GNU operating system, as
well as its variant, the GNU/Linux operating
system.
Although the Lesser General Public License
is Less protective of the users’ freedom, it
does ensure that the user of a program that
is linked with the Library has the freedom
and the wherewithal to run that program
using a modified version of the Library.
The precise terms and conditions for
ng, distribution and modification
copyi
follow. Pay close attention to the difference
between a “work based on the library” and a
“work that uses the library”. The former
contains code derived from the library,
whereas the latter must be combined with
the library in order to run.
TERMS AND CONDITIONS FOR
COPYING, DISTRIBUTION AND
MODIFICATION
0. This License Agreement applies to an y
software library or other program which
s, and
contains a notice placed by the
copyright holder or other authorized
party saying it may be distributed under
the terms of this Lesser General Public
License (also called “this License”).
Each licensee is addressed as “you”.
A “library” means a collection of
software functions and/or data
prepared so as to be conveniently linked
with application program s (which use
some of those functions and data) to
form executables.
The “Library”, below, refers to any such
software library or work which has been
uted under these terms. A “work
distrib
based on the Library” means either the
Library or any derivative work under
copyright law: that is to say, a work
containing the Library or a portion of it,
either verbatim or with modifications
and/or translated straightforwardly into
another language. (Hereinafter,
translation is included without
limitation in the term “modification”.)
“Source code” for a work means the
preferred form of the work for making
modifications to it. For a library,
mplete source code means all the
co
source code for all modules it contains,
plus any associated interface definition
files, plus the scripts used to control
compilation and installation of the
library.
Activities other than copying,
distribution and modification are not
covered by this License; they are outside
its scope. The act of running a program
using the Library is not restricted, and
output from such a program is covered
to use
only if its contents constitute a work
based on the Library (independent of
the use of the Library in a tool for writing
it). Whether that is true depends on
at the Library does and what the
wh
program that uses the Library does.
1. You may copy and distribute verbatim
copies of the Library's complete source
code as you receive it, in any medium,
provided that you conspicuously and
appropriately publish on each copy an
appropriate copyright notice and
disclaimer of warranty; keep intact all
the notices that refer to this License and
to the absence of any warranty; and
distribute a copy of this License along
with the Library.
You may charge a fee for the physical
act of transferring a copy, and you may
at your option offer warranty prot
in exchange for a fee.
2. You may modify your copy o r copies of
the Library or any portion of it, thus
forming a work based on the Library,
and copy and distribute such
modifications or work under the terms
of Section 1 above, provided that you
also meet all of these conditions:
a)The modified work must itself be a
software library.
b)You must cause the files modified to
carry prominent notices stating that
you changed the files and the date of
any change.
c)You must cause the whole of the work
to b e lic ense d at n o cha rge to all third
parties under the terms of this
License.
d)If a facility in the modified Library
refers to a function or a table of data
be supplied by an application
to
program that uses the facility, other
than as an argument passed when
the facility is invoked, then you must
make a good faith effort to ensure
that, in the event an application does
not supply such function or table, the
facility still operates, and performs
whatever part of its purpose remains
meaningful.
(For example, a function in a library to
compute square roots has a purpose
that is entirely well-defined independent
of the application. Therefore,
Subsection 2d requires that any
application-supplied function or table
used by this function must be optional:
the application does not supply it, the
if
square root function must still compute
square roots.)
These requirements apply to the
modified work as a whole. If identifiable
sections of that work are not derived
from the Library, and can be reasonably
considered independent and separate
works in themselves, then this License,
and its terms, do not apply to those
sections when you distribute them as
separate works. But when you distribute
the same sections as part of a whole
which is a work based on the Library,
the distribution of the whole must be on
the terms of this License, whose
permissions for other licensees extend
to the entire whole, and thus to each
and every part reg
it.
ection
ardless of who wrote
Thus, it is not the intent of this section to
claim rights or contest your rights to
work written entirely by you; rather, the
intent is to exercise the right to control
the distribution of derivative or
collective works based on the Library.
In addition, mere aggregation of
another work not based on the Library
with the Library (or with a work based on
the Library) on a volume of a storage or
distribution medium does not bring the
other work under the scope of
License.
3. You may opt to apply the terms of the
ordinary GNU General Public License
instead of this License to a given copy of
the Library. To do this, you must alter all
the notices that refer to this License, so
that they refer to the ordinary GNU
General Public License, version 2,
instead of to this License. (If a newer
version than version 2 of the ordinary
GNU General Public License has
appeared, then you can specify that
version instead if you wish.) Do not
make any other change in these
notices.
Once this change is made in a given
copy, it is irreversible for that copy, so
the ordinary GNU General Public
License applies to all subsequent
copies and der
that copy.
This option is useful when you wish to
copy part of the code of the Library into
a program that is not a library.
4. You may copy and distribute the Library
(or a portion or derivative of it, under
Section 2) in object code or executable
form under the terms of Sections 1 and
2 above provided that you accompany it
with the complete corresponding
machine-readable source code, which
must be distributed under the terms of
Sections 1 and 2 above on a medium
customarily used for software
interchange.
If distribution of object code is made by
ng access to copy from a
offeri
designated place, then offering
equivalent access to copy the source
code from the same place satisfies the
requirement to distribute the source
code, even though third parties are not
compelled to copy the source along
with the object code.
5. A program that contains no derivative of
any portion of the Library, but is
designed to work with the Library by
being compiled or linked with it, is
called a “work that uses the Library”.
Such a work, in isolation, is not a
derivative work of the Library, and
therefore falls outside the scope of this
License.
ivative works ma
this
de from
ever, linking a “work that uses the
How
Library” with the Library creates an
executable that is a derivative of the
Library (because it contains portions of
the Library), rather than a “work that
uses the library”. The executable is
therefore covered by this License.
Section 6 states terms for distribution of
such executables.
When a “work that uses the Library”
uses material from a header file that is
part of the Library, the object code for
the work may be a derivative work of the
Library even though the source code is
not. Whether this is true is espe
significant if the work can be linked
without the Library, or if the work is itself
a library. The threshold for this to be true
is not precisely defined by law.
If such an object file uses only
numerical parameters, data structure
layouts and accessors, and small
macros and small inline functions (ten
lines or less in length), then the use of
the object file is unrestricted,
regardless of whether it is legally a
derivative work. (Executables
containing this object code plus
portions of the Library will still fall under
Section 6.)
Otherwise, if the work is a derivative of
the Library, you may distribute the
object code for the work under the
s of Section 6. Any executables
term
containing that work also fall under
Section 6, whether or not they are linked
directly with the Library itself.
6. As an exception to the Sections above,
you may also combine or link a “work
that uses the Library” with the Library to
produce a work containing portions of
the Library, and distribute that work
under terms of your choice, provided
that the terms permit modification of
the work for the customer’s own use
and reverse engineering for debugging
such modifications.
You must give prominent notice with
each copy of the work that the Library i
used in it and that the Library and its
use are covered by this License. You
must supply a copy of this License. If the
work during execution displays
copyright notices, you must include the
copyright notice for the Library among
them, as well as a reference directing
the user to the copy of this License.
Also, you must do one of these things:
a)Accompany the work with the
complete corresponding machinereadable source code for the Library
including whatever changes were
used in the work (which must be
distributed under Sections 1 and 2
above); and, if the work is an
executable linked with the Library,
cially
s
37
En
Page 38

Additional Information
with the complete machine-readable
“work that uses the Library”, as object
code and/or source code, so that the
user can modify the Library and then
relink to produce a modified
executable containing the modified
Library. (It is understood that the user
who changes the contents of
definitions files in the Library will not
necessarily be able to recompile the
application to use the modified
definitions.)
b)Use a suitable sh ared library
mechanism for linking with the
Library. A suitable mechanism is one
that (1) uses at run time a copy of the
library already present on the user's
computer system, rather than
copying library functions into the
table, and (2) will operate
execu
properly with a modified version of the
library, if the user installs one, as long
as the modified version is interfacecompatible with the version that the
work was made with.
c)Accompany the work with a written
offer, valid for at least three years, to
give the same user the materials
specified in Subsection 6a, above, for
a charge no more than the cost of
performing this distribution.
d)If dist ribution of the work is made by
offering access to copy from a
designated place, offer equivalent
access to copy the above specified
materials from the same place.
Verify that the user has already
e)
received a copy of these materials or
that you have already sent this user a
copy.
For an executable, the required form of
the “work that uses the Library” must
include any data and utility programs
needed for reproducing the executable
from it. However, as a special exception,
the materials to be distributed need not
include anything that is normally
distributed (in either source or binary
form) with the major components
(compiler, kernel, and so on) of the
operating system on which the
executable runs, unless that
mponent itself accompanies the
co
executable.
It may happen that this requirement
contradicts the license restrictions of
other proprietary libraries that do not
normally accompany the operating
system. Such a contradiction means
you cannot use both them and the
Library together in an executable that
you distribute.
7. You may place li brary facilities that are a
work based on the Library side-by-side
in a single library together with other
library facilities not covered by this
38
En
License, and distribute such a
combined library, provided that the
stribution of the work based
separate di
on the Library and of the other library
facilities is otherwise permitted, and
provided that you do these two things:
a)Accompany the combined library
with a copy of the same work based
on the Library, uncombined with any
other library facilities. This must be
distributed under the terms of the
Sections above.
b)Give prominent notice with the
combined library of the fact that part
of it is a work based on the Library,
and explaining where to find the
accompanying uncombined form of
the same work.
8. You may not copy, modify, sublicense,
link with, or distribute the Library except
expressly provided under this
as
License. Any attempt otherwise to copy,
modify, sublicense, link with, or
distribute the Library is void, and will
automatically terminate your rights
under this License. However, parties
who have received copies, or rights,
from you under this License will not
have their licenses terminated so long
as such parties remain in full
compliance.
9. You are not required to accept this
License, since you have not signed it.
However, nothing else grants you
permission to modify or distribute the
derivative works. These
Library or its
actions are prohibited by law if you do
not accept this License. Therefore, by
modifying or distributing the Library (or
any work based on the Library), you
indicate your acceptance of this
License to do so, and all its terms and
conditions for copying, distributing or
modifying the Library or works based on
it.
10. Each time you redistribute the Library
(or any work based on the Library), the
recipient automatically receives a
license from the original licensor to
copy, distribute, link with or modify the
subject to these terms and
Library
conditions. You may not impose any
further restrictions on the recipients’
exercise of the rights granted herein.
You are not responsible for enforcing
compliance by third parties with this
License.
11. If, as a consequence of a court
judgment or allegation of patent
infringement or for any other reason
(not limited to patent issues),
conditions are imposed on you (whether
by court order, agreement or otherwise)
that contradict the conditions of this
License, they do not excuse you from
the conditions of this License. If you
nnot distribute so as to satisfy
ca
simultaneously your obligations under
this License and any other pertinent
obligations, then as a consequence you
may not distribute the Library at all. For
example, if a patent license would not
permit royalty-free redistribution of the
Library by all those who receive copies
directly or indirectly through you, then
the only way you could satisfy both it
and this License would be to refrain
entirely from distribution of the Library.
If any portion of this section is held
invalid or unenforceable under any
particular circumstance, the balance of
the section is intended to apply, and the
section as a whole is intended to apply
er circumstances.
in oth
It is not the purpose of this section to
induce you to infringe any patents or
other property right claims or to contest
validity of any such claims; this section
has the sole purpose of protecting the
integrity of the free software distribution
system which is implemented by public
license practices. Many people have
made generous contributions to the
wide range of software distributed
through that system in reliance on
consistent application of that system; it
is up to the author/donor to decide if he
or she is willing to distribute software
through any other system and a
licensee cannot impose that choice.
s section is intended to make
Thi
thoroughly clear wha t is bel iev ed to b e a
consequence of the rest of this License.
12. If the distribution and/or use of the
Library is restricted in certain countries
either by patents or by copyrighted
interfaces, the original copyright holder
who places the Library under this
License may add an explicit
geographical distribution limitation
excluding those countries, so that
distribution is permitted only in or
among countries not thus excluded. In
such case, this License incorporates
the limitation as if written in the body of
this License.
13. The Free Software Foundation may
publish revised and/or new
the Lesser General Public License from
time to time. Such new versions will be
similar in spirit to the present version,
but may differ in detail to address new
problems or concerns.
Each version is given a distinguishing
version number. If the Library specifies
a version number of this License which
applies to it and “any later version”, you
have the option of following the terms
and conditions either of that version or
of any later version published by the
Free Software Foundation. If the Library
versions of
does not specify a license version
number, you may choose any version
lished by the Free Software
ever pub
Foundation.
14. If you wish to incorporate parts of the
Library into other free programs whose
distribution conditions are
incompatible with these, write to the
author to ask for permission. For
software which is copyrighted by the
Free Software Foundation, write to the
Free Software Foundation; we
sometimes make exceptions for this.
Our decision will be guided by the two
goals of preserving the free status of all
derivatives of our free software and of
promoting the sharing and reuse of
are generally.
softw
NO WARRANTY
15. BECAUSE THE LIBRARY IS LICENSED
FREE OF CHARGE, THERE IS NO
WARRANTY FOR THE LIBRARY, TO THE
EXTENT PERMITTED BY APPLICABLE
LAW. EXCEPT WHEN OTHERWISE
STATED IN WRITING THE COPYRIGHT
HOLDERS AND/OR OTHER PARTIES
PROVIDE THE LIBRARY “AS IS”
WITHOUT WARRANTY OF ANY KIND,
EITHER EXPRESSED OR IMPLIED,
INCLUDING, BUT NOT LIMITED TO, THE
IMPLIED WARRANTIES OF
MERCHANTABILITY AND FITNESS FOR
A PARTICULAR PURPOSE. THE
ENTIRE RISK AS TO THE QUALITY AND
PERFORMANCE OF THE LIBRARY IS
WITH YOU. SHOULD THE LIBRARY
PROVE DEFECTIVE, YOU ASSUME THE
COST OF ALL NECESSARY SERVICING,
REPAIR OR CORRECTION.
16. IN NO EVENT UNLESS REQUIRED BY
APPLICABLE LAW OR AGREED TO IN
WRITING WILL ANY COPYRIGHT
HOLDER, OR ANY OTHER PARTY WHO
MAY MODIFY AND/OR REDISTRIBU TE
THE LIBRARY AS PERMITTED ABOVE,
BE LIABLE TO YOU FOR DAMAGES,
INCLUDING ANY GENERAL, SPECIAL,
INCIDENTAL OR CONSEQUENTIAL
DAMAGES ARISING OUT OF THE USE
OR INABILITY TO USE THE LIBRARY
(INCLUDING BUT NOT LIMITED TO
LOSS OF DATA OR DATA BEING
RENDERED INACCURATE OR LOSSES
SUSTAINED BY YOU OR THIRD
PARTIES OR A FAILURE OF THE
LIBRARY TO OPERATE WITH ANY
OTHER SOFTWARE), EVEN IF SUCH
HOLDER OR OTHER PARTY HAS BEEN
ADVISED OF THE POSSIBILITY OF
SUCH DAMAGES.
END OF TERMS AND
CONDITIONS
How to Apply These Terms to
Your New Libraries
If you develop a new library, and you want it
to be of the greatest possible use to the
public, we recommend making it free
software that everyone can redistribute and
change. You can do so by permitting
redistribution under these terms (or,
alternatively, under the terms of the
ordinary General Public License).
To apply these terms, attach the following
notices to the library. It is safest to attach
them to the start of each source file to most
effectively convey the exclusion of warranty;
and each file should have at least the
“copyright” line and a pointer to where the
full notice is found.
one line to give the library's name and an
idea of what it does.
Copyright (C) year name of author
s free software; you can
This library i
redistribute it and/or modify it under the
terms of the GNU Lesser General Public
License as published by the Free Software
Foundation; either
version 2.1 of the License, or (at your option)
any later version.
This library is distributed in the hope that it
will be useful, but WITHOUT ANY
WARRANTY; without even the implied
warranty of MERCHANTABILITY or FITNESS
FOR A PARTICULAR PURPOSE. See the
GNU Lesser General Public License for
more details.
You should have received a copy of the GNU
Lesser General Public License along with
this library; i f not , write to the Free Software
Foundation, Inc., 51 Franklin Street, Fifth
Floor, Boston, MA 02110-1301 USA
Also add informatio
by electronic and paper mail.
You should also get your employer (if you
work as a programmer) or your school, if
any, to sign a “copyright disclaimer” for the
library, if necessary. Here is a sam ple; alter
the names:
Yoyodyne, Inc., hereby disclaims all
copyright interest in the library ‘Frob’ (a
library for tweaking knobs) written by James
Random Hacker.
signature of Ty Coon, 1 April 1990
Ty Coon, President of Vice
That’s all there is to it!
n on how to contact you
Page 39

Additional Information
39
En
Page 40

http://www.pioneer.co.uk
http://www.pioneer.eu
Download an electronic version of this manual from our website.
PIONEER CORPORATION
1-1, Shin-ogura, Saiwai-ku, Kawasaki-shi, Kanagawa 212-0031, Japan
PIONEER ELECTRONICS (USA) INC.
P.O. BOX 1540, Long Beach, California 90801-1540, U.S.A. TEL: (800) 421-1404
PIONEER ELECTRONICS OF CANADA, INC.
340 Ferrier Street, Unit 2, Markham, Ontario L3R 2Z5, Canada TEL: 1-877-283-5901, 905-479-4411
PIONEER EUROPE NV
Haven 1087, Keetberglaan 1, B-9120 Melsele, Belgium TEL: 03/570.05.11
PIONEER ELECTRONICS ASIACENTRE PTE. LTD.
253 Alexandra Road, #04-01, Singapore 159936 TEL: 65-6472-7555
PIONEER ELECTRONICS AUSTRALIA PTY. LTD.
5 Arco Lane, Heatherton, Victoria, 3202, Australia, TEL: (03) 9586-6300
PIONEER ELECTRONICS DE MEXICO S.A. DE C.V.
Blvd.Manuel Avila Camacho 138 10 piso Col.Lomas de Chapultepec, Mexico, D.F. 11000 TEL: 55-9178-4270
K002_B3_En
Printed in China
© 2011 PIONEER CORPORATION.
All r
ights reserved.
<5707-00000-595-0S>
 Loading...