

Page 1

X-HM10
-K/-S
X-HM20
-K/-S
CD Receiver System
|
Micro chaîne CD
|
Sistema receptor de CD
|
CD-Receiversystem | Sistema CD con amplificatore |
CD Receiver System | Система ресивера CD
Operating Instructions | Mode d’emploi | Bedienungsanleitung |
Istruzioni per I’uso | Manual de instrucciones | Handleiding |
Инструкции по эксплуатации
Discover the benefits of registering your product online at
http://www.pioneer.co.uk
(or http://www.pioneer.eu).
Découvrez les nombreux avantages offerts en enregistrant votre produit en ligne
maintenant sur
http://www.pioneer.fr
(ou http://www.pioneer.eu).
Bitte nutzen Sie die Möglichkeit zur Registrierung Ihres Produktes
unter
http://www.pioneer.de
(oder http://www.pioneer.eu)
Registra il tuo prodotto su
http://www.pioneer.it
(o http://www.pioneer.eu) e
scopri subito quali vantaggi puoi ottenere!
Registre su producto en
http://www.pioneer.es
(o en http://www.pioneer.eu) Descubra los beneficios de registrarse on-line:
Ontdek nu de voordelen van online registratie! Registreer uw Pioneer product via
http://www.pioneer.nl - http://www.pioneer.be
(of http://www.pioneer.eu).
Зарегистрируйте Baшe изделие на
http://www.pioneer-rus.ru
(или
http://www.pioneer.eu). Oзнакомьтесь с преимуществами регистрации в Интернет
MO04
Page 2
WARNING
This equipment is not waterproof. To prevent a fire or
shock hazard, do not place any container filled with
liquid near this equipment (such as a vase or flower
pot) or expose it to dripping, splashing, rain or
moisture.
D3-4-2-1-3_A1_En
WARNING
Before plugging in for the first time, read the following
section carefully.
The voltage of the available power supply differs
according to country or region. Be sure that the
power supply voltage of the area where this unit
will be used meets the required voltage (e.g., 230 V
or 120 V) written on the rear panel.
D3-4-2-1-4*_A1_En
WARNING
To prevent a fire hazard, do not place any naked flame
sources (such as a lighted candle) on the equipment.
D3-4-2-1-7a_A1_En
Operating Environment
Operating environment temperature and humidity:
+5 °C to +35 °C (+41 °F to +95 °F); less than 85 %RH
(cooling vents not blocked)
Do not install this unit in a poorly ventilated area, or in
locations exposed to high humidity or direct sunlight (or
strong artificial light)
If the AC plug of this unit does not match the AC
outlet you want to use, the plug must be removed
and appropriate one fitted. Replacement and
mounting of an AC plug on the power supply cord of
this unit should be performed only by qualified
service personnel. If connected to an AC outlet, the
cut-off plug can cause severe electrical shock. Make
sure it is properly disposed of after removal.
The equipment should be disconnected by removing
the mains plug from the wall socket when left unused
for a long period of time (for example, when on
vacation).
D3-4-2-1-7c*_A1_En
D3-4-2-2-1a_A1_En
VENTILATION CAUTION
When installing this unit, make sure to leave space
around the unit for ventilation to improve heat radiation
(at least 10 cm at top, 10 cm at rear, and 10 cm at each
side).
10 cm 10 cm
10 cm
10 cm
WARNING
Slots and openings in the cabinet are provided for
ventilation to ensure reliable operation of the product,
and to protect it from overheating. To prevent fire
hazard, the openings should never be blocked or
covered with items (such as newspapers, table-cloths,
curtains) or by operating the equipment on thick carpet
or a bed.
D3-4-2-1-7b*_A1_En
CAUTION
The STANDBY/ON switch on this unit will not
completely shut off all power from the AC outlet.
Since the power cord serves as the main disconnect
device for the unit, you will need to unplug it from the
AC outlet to shut down all power. Therefore, make
sure the unit has been installed so that the power
cord can be easily unplugged from the AC outlet in
case of an accident. To avoid fire hazard, the power
cord should also be unplugged from the AC outlet
when left unused for a long period of time (for
example, when on vacation).
D3-4-2-2-2a*_A1_En
This product is for general household purposes. Any
failure due to use for other than household purposes
(such as long-term use for business purposes in a
restaurant or use in a car or ship) and which requires
repair will be charged for even during the warranty
period.
K041_A1_En
Page 3
Condensation
If the player is moved suddenly from a cold place into a
warm room (in winter, for example) or if the
temperature in the room in which the player is installed
rises suddenly due to a heater, etc., water droplets
(condensation) may form inside (on operating parts and
the lens). When condensation is present, the player will
not operate properly and playback is not possible. Let
the player stand at room temperature for 1 or 2 hours
with the power turned on (the time depends on the
extent of condensation). The water droplets will
dissipate and playback will become possible.
Condensation can also occur in the summer if the
player is exposed to the direct wind from an
air-conditioner. If this happens, move the player to a
different place.
S005_A1_En
B
E-3
Page 4
ENGLISH
l X-HM10/X-HM20 CD Receiver System consisting of main unit and speaker system.
Introduction
Thank you for purchasing this PIONEER product. To obtain the best performance from this product, please read this
manual carefully. It will guide you in operating your PIONEER product.
Special Note
Supply of this product does not convey a license nor imply any right to distribute content created with this product in
revenue-generating broadcast systems (terrestrial, satellite, cable and/or other distribution channels), revenue-generating
streaming applications (via Internet, intranets and/or other networks), other revenue-generating content distribution
systems (pay-audio or audio-on-demand applications and the like) or on revenue-generating physical media (compact
discs, digital versatile discs, semiconductor chips, hard drives, memory cards and the like). An independent license for
such use is required. For details, please visit http://mp3licensing.com
MPEG Layer-3 audio coding technology licensed from Fraunhofer IIS and Thomson.
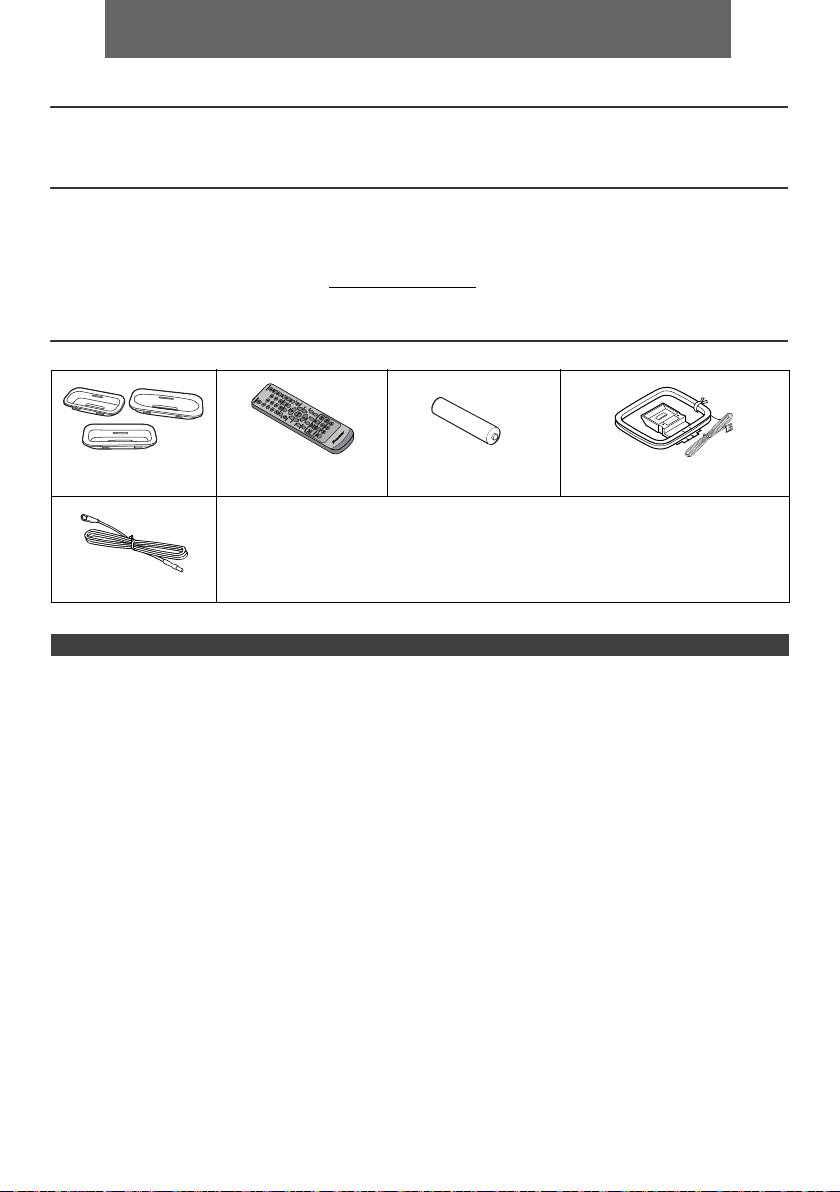
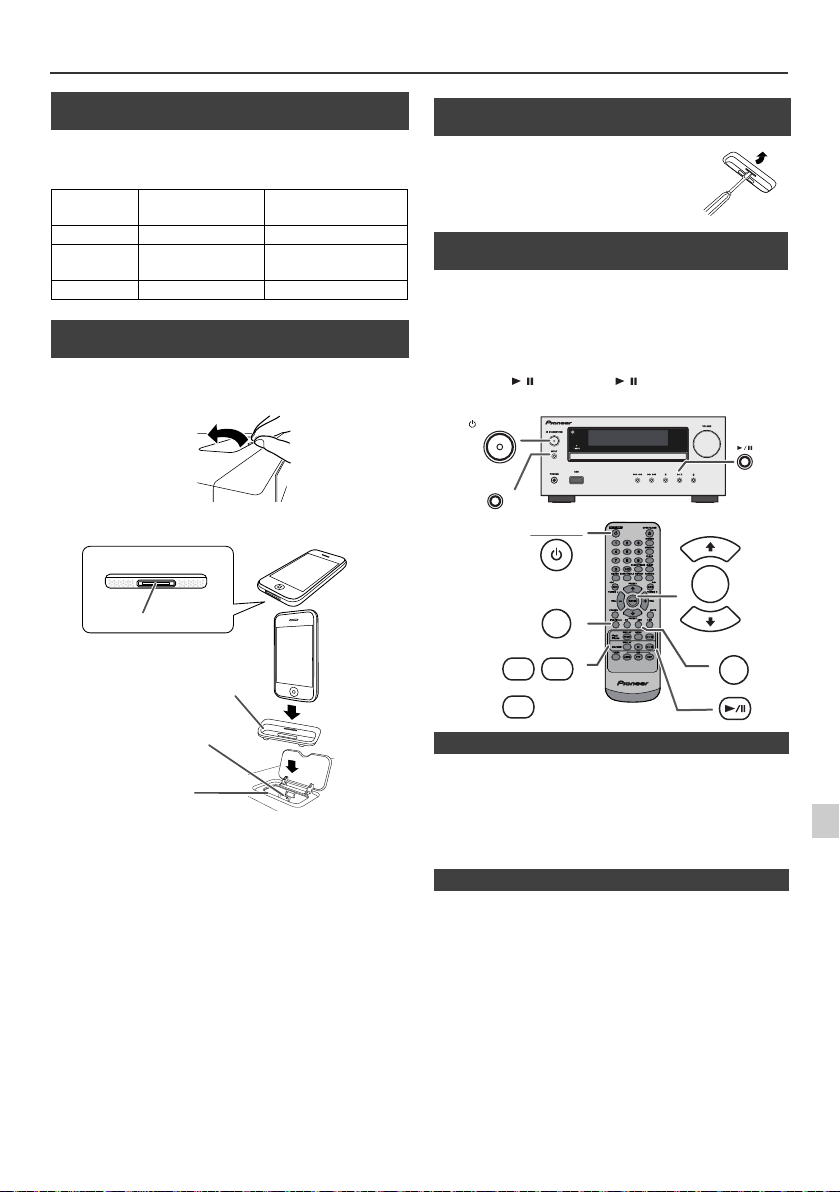
Accessories
Please confirm that the following accessories are included.
iPhone adaptors x 3
(X-HM20 only)
FM aerial x 1
Remote control x 1 “AA” size battery x 1 AM loop aerial x 1
Power cord
Warranty card
These operating instructions
CONTENTS
General Information
Page
Precautions . . . . . . . . . . . . . . . . . . . . . . . . . . . . . . . . . . 5
Controls and indicators . . . . . . . . . . . . . . . . . . . . . . 5 - 6
Preparation for Use
System connections . . . . . . . . . . . . . . . . . . . . . . . . . 7 - 8
Remote control . . . . . . . . . . . . . . . . . . . . . . . . . . . . . . . 8
Basic Operation
General control . . . . . . . . . . . . . . . . . . . . . . . . . . . . . . . 9
Setting the clock (Remote control only) . . . . . . . . . 9 - 10
iPod, iPhone and iPad
Listening to the iPod, iPhone or iPad
(X-HM20 only). . . . . . . . . . . . . . . . . . . . . . . . . . . . 10 - 12
CD or MP3/WMA disc Playback
Listening to a CD or MP3/WMA disc . . . . . . . . . . . . . 13
Advanced CD or MP3/WMA disc playback . . . . . .14 - 15
MP3/WMA folder mode
(only for MP3/WMA files) . . . . . . . . . . . . . . . . . . . 15 - 16
USB
Page
Listening to USB mass storage
device/MP3 player . . . . . . . . . . . . . . . . . . . . . . . . 16 - 17
Advanced USB playback . . . . . . . . . . . . . . . . . . . . . . .17
Radio
Listening to the radio . . . . . . . . . . . . . . . . . . . . . . . . . . 18
Advanced Features
Using the Radio Data System (RDS) . . . . . . . . . 19 - 21
Timer and sleep operation
(Remote control only) . . . . . . . . . . . . . . . . . . . . . 21 - 23
Headphones . . . . . . . . . . . . . . . . . . . . . . . . . . . . . . . 23
References
Troubleshooting chart . . . . . . . . . . . . . . . . . . . . . 24 - 25
Maintenance . . . . . . . . . . . . . . . . . . . . . . . . . . . . . . . .25
Specifications . . . . . . . . . . . . . . . . . . . . . . . . . . . . . . .26
Notice . . . . . . . . . . . . . . . . . . . . . . . . . . . . . . . . . . . . . .27
En-4
Page 5

Precautions
1
9
6
7
8 10 11 12 13 14
52 3
4
X-HM20 only
n General
l Use the unit on a firm, level surface free from vibration.
l Place the speakers at least 30 cm away from any CRT
TV to avoid colour variations across the TV screen. If
the variations persist, move the speakers further away
from the TV. LCD TV is not prone to such variation.
l Keep the unit away from direct sunlight, strong
magnetic fields, excessive dust, humidity and
electronic/electrical equipment (home computers,
facsimiles, etc.) which generate electrical noise.
l Do not place anything on top of the unit.
l Do not expose the unit to moisture, to temperatures
higher than 60°C (140°F) or to extremely low
temperatures.
l If your system does not work properly, disconnect the
AC power lead from the wall socket. Plug the AC power
lead back in, and then turn on your system.
l In case of an electrical storm, unplug the unit for safety.
l Hold the AC power plug by the head when removing it
from the wall socket, as pulling the lead can damage
internal wires.
l The AC power plug is used as a disconnect device and
shall always remain readily operable.
l Do not remove the outer cover, as this may result
in electric shock. Refer internal service to your
local PIONEER service facility.
Controls and indicators
iPod/iPhone functions are only available for X-HM20.
l The ventilation should not be impeded by covering the
ventilation openings with items, such as newspapers,
tablecloths, curtains, etc.
l No naked flame sources, such as lighted candles,
should be placed on the apparatus.
l Attention should be drawn to the environmental
aspects of battery disposal.
l The apparatus is designed for use in moderate
climates.
Warning:
The voltage used must be the same as that specified on
this unit. Using this product with a higher voltage other
than that which is specified is dangerous and may result in
a fire or other type of accident causing damage. PIONEER
will not be held responsible for any damage resulting from
use of this unit with a voltage other than that which is
specified.
n Volume control
The sound level at a given volume setting depends on
speaker efficiency, location, and various other factors. It is
advisable to avoid exposure to high volume levels. Do not
turn the volume on to full at switch on. Listen to music at
moderate levels. Excessive sound pressure from
earphones and headphones can cause hearing loss.
n Front panel
1. Remote sensor . . . . . . . . . . . . . . . . . . . . . . . . . . . 8
2. Timer indicator . . . . . . . . . . . . . . . . . . . . . . . . . . 22
3. Disc Tray . . . . . . . . . . . . . . . . . . . . . . . . . . . . . . . 13
4. Docking Station for iPod or iPhone . . . . . . . . . 11
5. Volume Control . . . . . . . . . . . . . . . . . . . . . . . . . . . 9
6. STANDBY/ON Button . . . . . . . . . . . . . . . 11, 13, 18
7. INPUT Button . . . . . . . . . . . . . . . . 9, 11, 13, 16, 18
8. Headphone Socket. . . . . . . . . . . . . . . . . . . . . . . 23
9. USB Terminal . . . . . . . . . . . . . . . . . . . . . . . . . . . 16
Page
10. Tuner Preset Down, CD/USB Track Down,
iPod/iPhone Skip Down . . . . . . . . . . . . . . . . .12, 13
11. Tuner Preset Up, CD/USB Track Up,
iPod/iPhone Skip Up . . . . . . . . . . . . . . . . . . .12, 13
12. Disc/USB Stop Button . . . . . . . . . . . . . . . . . . 12, 13
13. Disc/USB/iPod/iPhone Play or
Pause Button . . . . . . . . . . . . . . . . . . . . . . . . .12, 13
14. Disc Tray Open/Close Button . . . . . . . . . . . . . . 13
En-5
Page
Page 6
Controls and indicators (continued)
*11, 13, 31, 32 buttons are only available for X-HM20.
1 4 5 6 7
8910 11 1312 141516
28272624 2523221918 2120
17
2 3
2
1
3
1
2
3
4
5
6
7
8
9
10
11*
12
13*
14
15
16
17
18
19
20
21
22
24
25
26
27
28
29
30
31*
33
35
36
23
32*
34
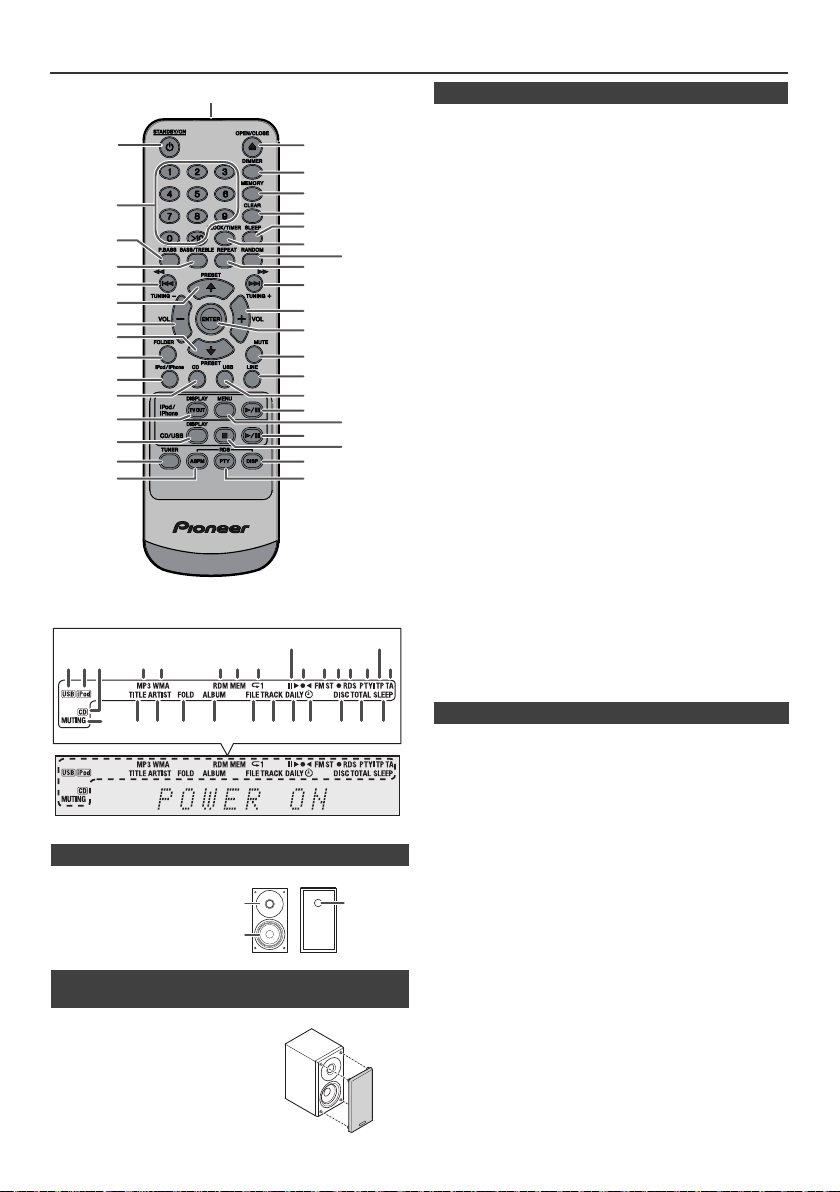
n Remote control
1. Remote Control Transmitter . . . . . . . . . . . . . . . . .8
2. STANDBY/ON Button. . . . . . . . . . . . . .9, 11, 13, 21
3. Numeric Buttons . . . . . . . . . . . . . . . . . . . . . . . . .14
4. P.Bass Button. . . . . . . . . . . . . . . . . . . . . . . . . . . . .9
5. Bass/Treble Button . . . . . . . . . . . . . . . . . . . . . . . .9
6. Tuning Down, Skip Down, Fast Reverse,
Time Down Button . . . . . . .9, 12, 13, 16, 18, 19, 21
7. Tuner Preset Up Button,
iPod Cursor Up. . . . . . . . . . . . . . . . . .11, 12, 16, 18
8. Volume Down Button . . . . . . . . . . . . . . . . . . . . . . .9
9. Tuner Preset Down Button,
iPod Cursor Down . . . . . . . . . . . . . . .11, 12, 16, 18
10. Folder Button . . . . . . . . . . . . . . . . . . . . . . . . . . . . 16
11. iPod/iPhone Button . . . . . . . . . . . . . . . . . . . . . . .11
12. CD Button . . . . . . . . . . . . . . . . . . . . . . . . . . . . . . .13
13. iPod/iPhone DISPLAY TV OUT Button . . . . .11, 12
14. CD/USB DISPLAY Button. . . . . . . . . . . . . . . . . . . 16
15. Tuner Button . . . . . . . . . . . . . . . . . . . . . . . . . .18, 19
16. RDS ASPM Button . . . . . . . . . . . . . . . . . . . . . . . .19
17. Open/Close Button. . . . . . . . . . . . . . . . . . . . . . . .13
18. Dimmer Button . . . . . . . . . . . . . . . . . . . . . . . . . . . .9
19. Memory Button. . . . . . . . . . . . . . . . . . . . . . . .14, 18
20. Clear Button . . . . . . . . . . . . . . . . . . . . . . . . . .14, 18
21. Sleep Button. . . . . . . . . . . . . . . . . . . . . . . . . . . . . 23
22. Clock/Timer Button . . . . . . . . . . . . . . . . . . . . .9, 22
23. Random Button . . . . . . . . . . . . . . . . . . . . . . . 12, 14
24. Repeat Button. . . . . . . . . . . . . . . . . . . . . . . . .12, 14
25. Tuning Up, Skip Up, Fast Forward,
Time Up Button . . . . . . . . .9, 12, 13, 16, 18, 19, 21
26. Volume Up Button . . . . . . . . . . . . . . . . . . . . . . . . .9
27. Enter Button . . . . . . . . . . . . . . . . . . . . . . . . 9, 11, 12
28. Mute Button . . . . . . . . . . . . . . . . . . . . . . . . . . . . . .9
29. Line Button. . . . . . . . . . . . . . . . . . . . . . . . . . . .8, 25
30. USB Button . . . . . . . . . . . . . . . . . . . . . . . . . . . . . 16
31. iPod/iPhone Play/Pause Button . . . . . . . . . . . . . 12
32. iPod/iPhone Menu Button . . . . . . . . . . . . . . . . . .12
33. CD/USB Play/Pause Button. . . . . . . . . . .12, 13, 14
34. CD/USB Stop Button . . . . . . . . . . . . . . . . . . . 13, 14
35. RDS Display Button . . . . . . . . . . . . . . . . . . . . . . 19
36. RDS PTY Button. . . . . . . . . . . . . . . . . . . . . . . . . . 19
Page
n Speaker system
1. Tweeter
2. Woofer
3. Bass Reflex Duct
n Speaker grilles are removable
(X-HM20 only)
Make sure nothing comes into contact
with the speaker diaphragms when
you remove the speaker grilles.
n Display
1. USB Indicator . . . . . . . . . . . . . . . . . . . . . . . . . . . .16
2. iPod Indicator . . . . . . . . . . . . . . . . . . . . . . . . . . . .10
3. CD Indicator . . . . . . . . . . . . . . . . . . . . . . . . . . . . .13
4. MP3 Indicator . . . . . . . . . . . . . . . . . . . . . . . . . . . . 13
5. WMA Indicator . . . . . . . . . . . . . . . . . . . . . . . . . . . 13
6. RDM (Random) Indicator. . . . . . . . . . . . . . . . . . . 14
7. MEM (Memory) Indicator . . . . . . . . . . . . . . . . . . . 14
8. Repeat Indicator. . . . . . . . . . . . . . . . . . . . . . . . . . 14
9. Play/Pause Indicator . . . . . . . . . . . . . . . . . . . . . . 12
10. Tuning FM/AM Indicator . . . . . . . . . . . . . . . . . . .18
11. FM Stereo Mode Indicator . . . . . . . . . . . . . . . . . .18
12. Stereo Station Indicator. . . . . . . . . . . . . . . . . . . .18
13. RDS Indicator . . . . . . . . . . . . . . . . . . . . . . . . . . . .19
14. PTY Indicator . . . . . . . . . . . . . . . . . . . . . . . . . . . . 19
15. TP Indicator . . . . . . . . . . . . . . . . . . . . . . . . . . . . .19
16. TA Indicator . . . . . . . . . . . . . . . . . . . . . . . . . . . . .19
17. Muting Indicator . . . . . . . . . . . . . . . . . . . . . . . . . . .9
18. Title Indicator . . . . . . . . . . . . . . . . . . . . . . . . . . . . 16
19. Artist Indicator . . . . . . . . . . . . . . . . . . . . . . . . . . . 16
20. Folder Indicator . . . . . . . . . . . . . . . . . . . . . . . . . . 16
21. Album Indicator . . . . . . . . . . . . . . . . . . . . . . . . . .16
22. File Indicator. . . . . . . . . . . . . . . . . . . . . . . . . . . . .16
23. Track Indicator . . . . . . . . . . . . . . . . . . . . . . . . . . .14
24. Daily Timer Indicator . . . . . . . . . . . . . . . . . . . . . .21
25. Once Timer Indicator . . . . . . . . . . . . . . . . . . . . . .21
26. Disc Indicator . . . . . . . . . . . . . . . . . . . . . . . . . . . .13
27. Total Indicator. . . . . . . . . . . . . . . . . . . . . . . . . . . .16
28. Sleep Indicator . . . . . . . . . . . . . . . . . . . . . . . . . . .23
Page
En-6
Page 7
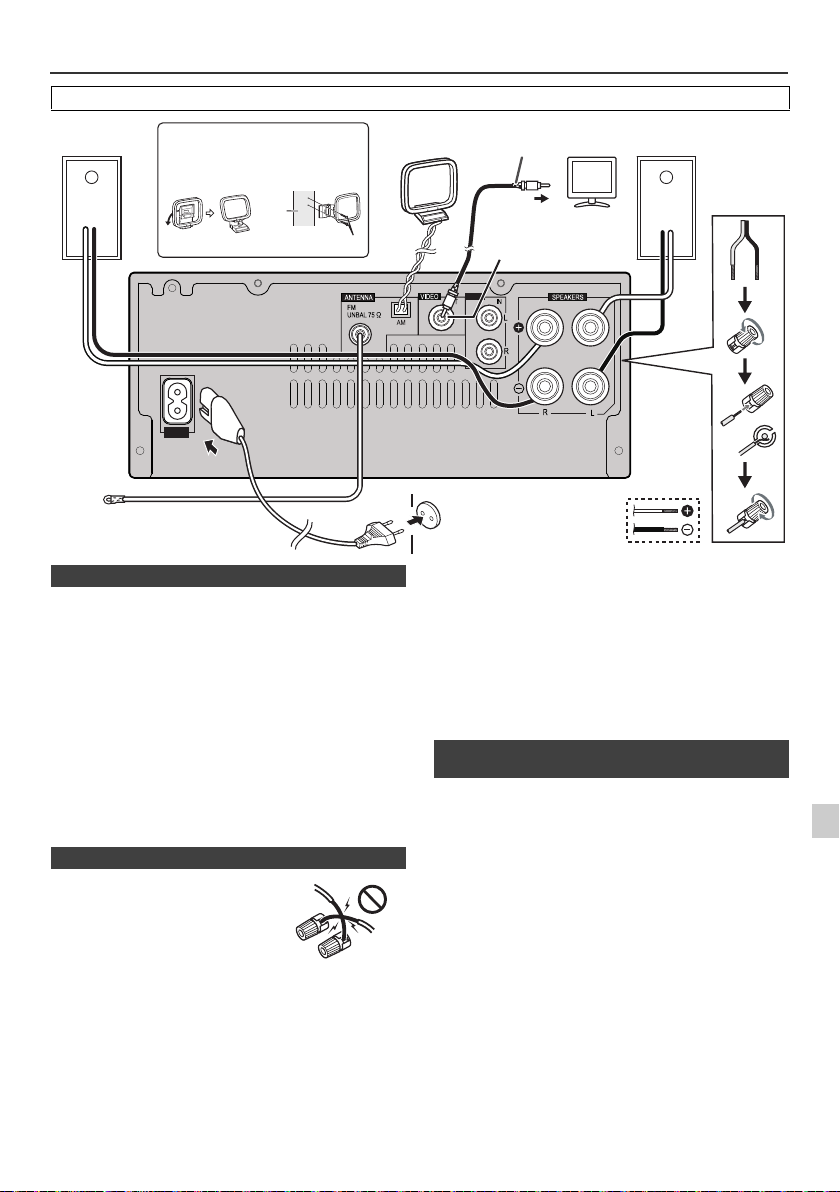
System connections
AUX
LINE
LOOP
AC IN
Right
speaker
FM aerial
To video input socket
screws (not supplied)
wall
< Attaching
to the wall >
< Assembling >
Wall socket
(AC 220 V to 240 V,
50 Hz/60 Hz)
Installing the AM loop aerial
Video cable
(not supplied)
TV
AM loop
aerial
Left
speaker
Video out socket
(X-HM20 only)
Incorrect
Before making or changing the connections, switch off the power and disconnect the power cord from the AC outlet.
l
These speaker terminals carry HAZARDOUS LIVE voltage.
n Aerial connection
Supplied FM aerial:
Connect the FM aerial wire to the FM 75 ohms socket and
position the FM aerial wire in the direction where the
strongest signal can be received.
External FM aerial:
Use an external FM aerial (75 ohms coaxial cable) for
better reception. When an external FM aerial is used,
disconnect the supplied FM aerial wire.
Supplied AM loop aerial:
Connect the AM loop aerial to the AM terminal. Position
the AM loop aerial for optimum reception. Place the AM
loop aerial on a shelf, etc., or attach it to a stand or a wall
with screws (not supplied).
Note:
Placing the aerial on the unit or near the AC power lead
may cause noise pickup. Place the aerial away from the
unit for better reception.
n Speaker connection
l
Twist exposed wire strands together.
l Connect the red wire to the plus
(+) terminal, and other wire to the
minus (–) terminal.
l Use speakers with an impedance
of 4 ohms ohms, as lower
impedance speakers can damage
the unit.
To prevent the risk of electric shock when connecting or
disconnecting the speaker cables, disconnect the power
cord before touching any uninsulated parts.
l Do not attach these speakers to the wall or ceiling, as
they may cause injury in the event of a fall.
Do not mistake the right and the left channels. The right
l
speaker is the one on the right side when you face the
unit.
l Do not let the bare speaker wires touch each other.
l Do not allow any objects to fall into or to be placed in
the bass reflex ducts.
Do not stand or sit on the speakers. You may be injured.
l
n Connecting iPod or iPhone to TV
(X-HM20 only)
Photo and video files from iPod or iPhone can be viewed
by connecting the system to TV/monitor.
If the TV/monitor has a video input, connect it to the
VIDEO OUT socket at the back of the unit and set the TV
Out on the iPod or iPhone unit to “ON” position.
Note:
Please make sure to set iPod unit to either NTSC or PAL
to match your TV signal. Please visit Apple’s homepage
for further information.
En-7
Page 8
System connections (continued)
AUX
LINE
LOOP
AC IN
Audio signal
TV
To audio
output sockets
Audio cable
(commercially
available)
Main unit
To L I NE
input
sockets
STANDBY/ON
7 m
Remote sensor
Remote control
n AC power connection
After checking all the connections have been made
correctly, plug the AC power lead of this unit into the wall
socket.
Note:
Unplug the AC power lead from the wall socket if the unit
will not be in use for a prolonged period of time.
Caution:
l Handle the power cord by the plug part. Do not pull out
the plug by tugging the cord, and never touch the
power cord when your hands are wet, as this could
cause a short circuit or electric shock. Do not place the
unit, a piece of furniture, or other object on the power
cord or pinch the cord in any other way. Never make a
knot in the cord or tie it with other cables. The power
cords should be routed so that they are not likely to be
stepped on. A damaged power cord can cause a fire or
give you an electric shock. Check the power cord once
in a while. If you find it damaged, ask your nearest
Pioneer authorized independent service company for a
replacement.
l Do not use any power cord other than the one supplied
with this unit.
l Do not use the supplied power cord for any purpose
other than that described above.
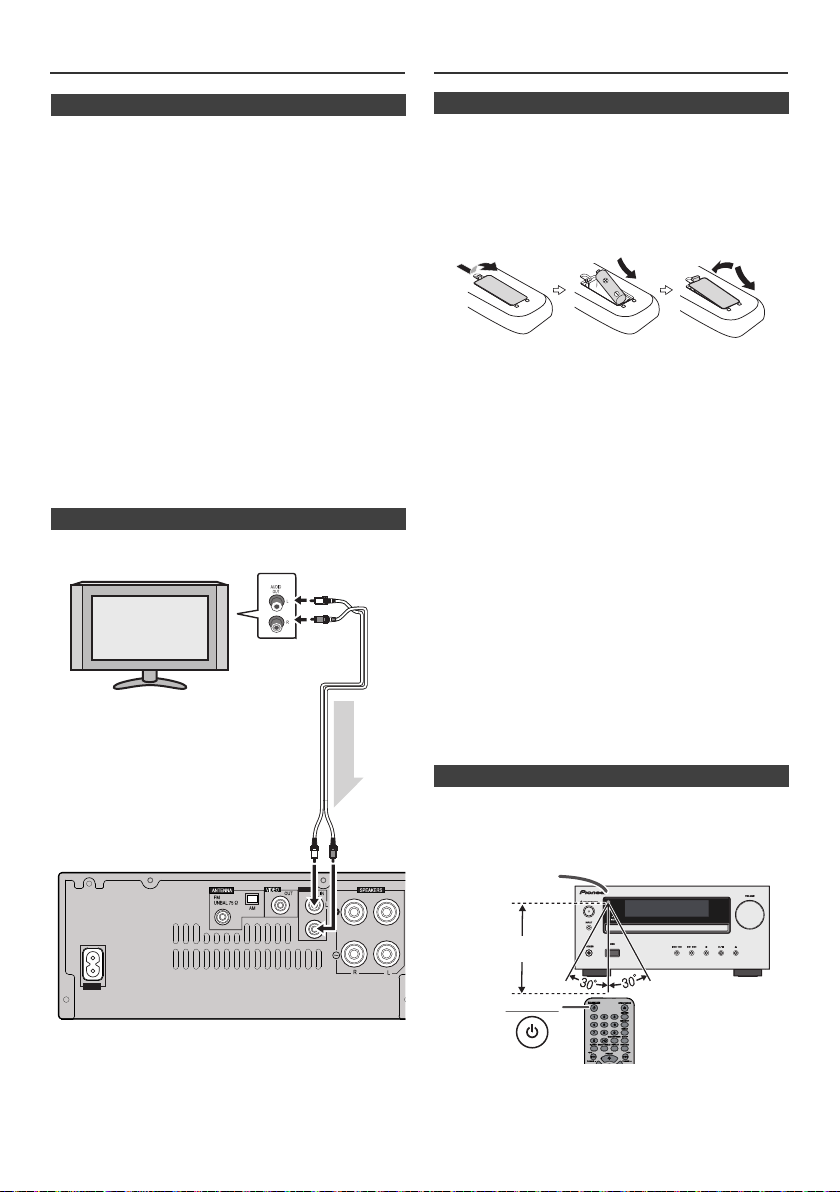
n Connecting a TV, etc.
Connect to the TV using an audio cable
.
n Battery installation
Open the battery cover.
1
Insert the supplied battery according to the direction
2
indicated in the battery compartment.
When inserting or removing the battery, push it towards the
(–) battery terminal.
Close the cover.
3
WARNNIG:
l Do not use or store
excessively hot place, such as inside a car or near a
heater. This can cause the
explode or catch fire. It can also reduce the life or
performance of
Caution:
l
Remove the battery if the unit will not be used for a long
period of time. This will prevent potential damage due to
battery leakage.
l
Do not use rechargeable battery (nickel-cadmium battery,
etc.).
l
Installing the battery incorrectly may cause the unit to
malfunction.
Notes concerning use:
l
Replace the battery if the operating distance is reduced or
if the operation becomes erratic. Purchas an “AA” size
battery.
l
Periodically clean the transmitter on the remote control
and the sensor on the unit with a soft cloth.
l
Exposing the sensor on the unit to strong light may
interfere with operation. Change the lighting or the
direction of the unit if this occurs.
l
Keep the remote control away from moisture, heat, shock,
and vibrations.
l When disposing of used
governmental regulations or environmental public
instruction's rules that apply in your country or area.
battery
battery
in direct sunlight or other
battery
to leak, overheat,
.
battery
, please comply with
n Test of the remote control
Check the remote control after checking all the connections.
Point the remote control directly at the remote sensor on the
unit. The remote control can be used within the range shown
below:
To select Line In function:
l
On main unit: Press INPUT button repeatedly until
Line In is displayed.
l
On remote control: Press LINE button
repeatedly until Line In is displayed.
En-8
Page 9
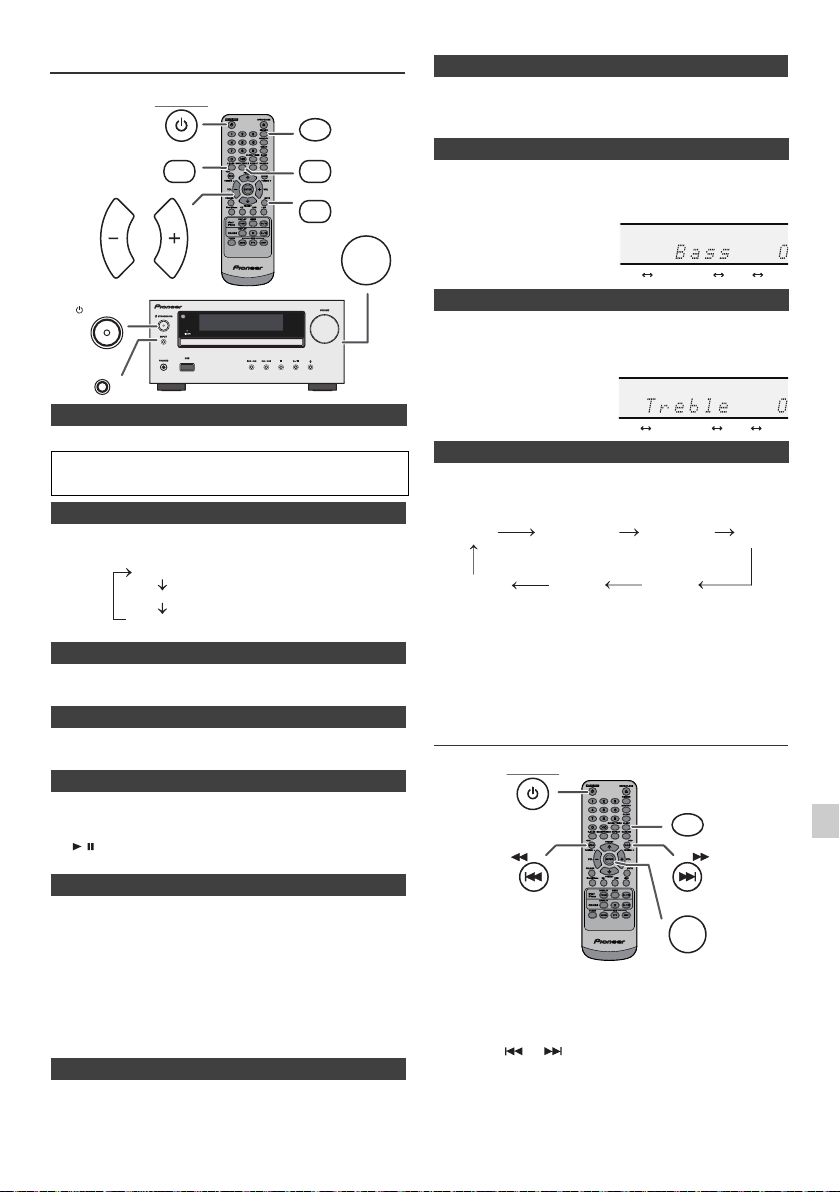
General control
(Display is dim).
(Display gets dimmer).
(Display is bright).
-5 -4 +4 +5
........
-5 -4 +4 +5
........
FM STEREO
FM MONO
USB
iPod
Line In
CD AM
(X-HM20 only)
STANDBY/ON
P.BASS
VOL VOL
DIMMER
BASS/TREBLE
MUTE
VOLUME
n P.Bass control
When the power is first turned on, the unit will enter the P.bass mode
which emphasises the bass frequencies. To cancel the P.bass mode,
press the P.BASS button on the remote control.
n Bass control
1
Press the BASS/TREBLE button to select “Bass”.
2
Within 5 seconds, press the VOL (+ or –) button to adjust the
bass.
STANDBY/ON
INPUT
n To turn the power on
Press the STANDBY/ON button to turn the power on.
After use:
Press the STANDBY/ON button to enter the power stand-by mode.
n Display brightness control
To dim the display brightness, press the DIMMER button on the
remote control.
Dimmer 1
Dimmer 2
Dimmer Off
n Volume auto set-in
If you turn off and on the main unit with the volume set to 17 or higher,
the volume starts at 16.
n Volume control
Turn the volume knob towards VOLUME (on main unit) or press VOL
+/– (on remote control) to increase or decrease the volume.
n Auto power on function
When you press any of the following buttons, the unit turns on.
l
iPod / iPhone, CD, USB, LINE, TUNER on the remote control:
Selected function is activated.
l
/ button on the main unit: The unit turns on and playback of
the last function will start (CD, TUNER, USB, iPod, LINE IN)
n Auto power off function
The main unit will enter the stand-by mode (when iPod/iPhone is not
docked) after 15 minutes of inactivity during:
iPod/iPhone: No connection.
CD / USB: In the stop mode.
LINE IN:No detection of input signal or very low sound audibility.
Note:
X-HM20 only: However, if iPod/iPhone is docked, the unit will begin
charging.
“Charge Mode” will be displayed during standby mode.
n Muting
The volume is muted temporarily when pressing the MUTE button on
the remote control. Press again to restore the volume.
n Treble control
1
Press the BASS/TREBLE button to select “Treble”.
2
Within 5 seconds, press the VOL (+ or –) button to adjust the
treble.
n Function
When the INPUT button on main unit is pressed, the
current function will change to different mode. Press the
INPUT button repeatedly to select desired function.
Note:
The backup function will protect the memorised function
mode for a few hours should there be a power failure or the
AC power lead becomes disconnected.
Setting the clock (Remote control
only)
STANDBY/ON
CLOCK/TIMER
TUNING −
TUNING +
ENTER
In this example, the clock is set for the 24-hour (00:00) display.
Press the STANDBY/ON button to turn the power on.
1
2
Press the CLOCK/TIMER button.
3
Within 10 seconds, press the ENTER button. To adjust the day,
press the or button and then press the ENTER button.
En-9
Page 10
Setting the clock (Remote control
only) (continued)
4 Press the or button to select 24-hour or 12-
hour display and then press the ENTER button.
The 24-hour display will appear.
(00:00 - 23:59)
The 12-hour display will appear.
(AM 12:00 - PM 11:59)
5
To adjust the hour, press the or button and then
press the ENTER button. Press the or button
once to advance the time by 1 hour. Hold it down to
advance continuously.
6
To adjust the minutes, press the or button and
then press the ENTER button. Press the or
button once to advance the time by 1 minute.
To confirm the time display:
Press the CLOCK/TIMER button. The time display will appear
for about 5 seconds.
Note:
When power supply is restored after unit is plugged in again
or after a power failure, reset the clock (page 9).
To readjust the clock:
Perform “Setting the clock” from step 1. If the “Clock” does not
appear in step 2, step 4 (for selecting the 24-hour or 12-hour
display) will be skipped.
To change the 24-hour or 12-hour display:
1 Clear all the programmed contents. [Refer to “Factory
reset, clearing all memory” on page 25 for details.]
2 Perform “Setting the clock” from step 1 onwards.
Note:
The timer setting will reset if the power cord is pulled out
or when there is a blackout.
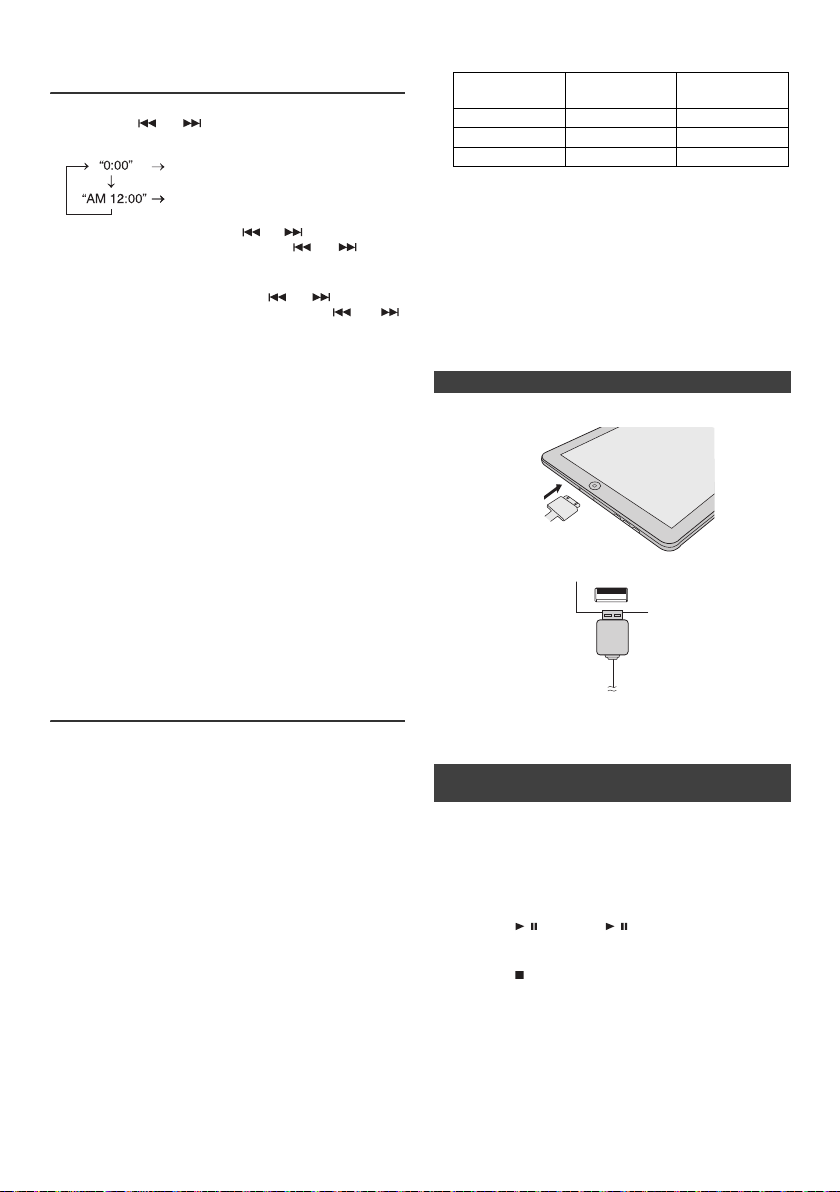
l Charging terminal for iPod, iPhone and iPad:
Condition
USB function NO YES
Other function YES NO
Stand-by YES NO
l The message “This accessory is not made to work with
iPhone” or similar, may appear on the iPhone screen
when:
- battery is low.
- the iPhone is not properly docked (eg. slanting).
if this occure, remove and re-dock the iPhone.
This product is made for iPhone. To prevent random
l
interference when iPod/iPhone is docked, the
headphone output is disabled and "HP INVALID" will
be displayed.
You may also experience brief audio interference
during incoming calls.
Docking
station
USB terminal
n iPad connection (USB Terminal)
Insert the connector to the the iPod, iPhone or iPad.
1
2 Connect the iPad to the unit via USB connector.
Listening to the iPod, iPhone or iPad
(X-HM20 only)
Supported iPod, iPhone and iPad models:
l
iPad
l
iPhone 4
l
iPhone 3GS
l
iPhone 3G
l
iPhone
l
iPod touch (4th generation)
l
iPod touch (3rd generation)
l
iPod touch (2nd generation)
l
iPod touch (1st generation)
l
iPod classic
l
iPod nano (6th generation)
l
iPod nano (5th generation)
l
iPod nano (4th generation)
l
iPod nano (3rd generation)
l
iPod nano (2nd generation)
Notes:
l This system has been developed and tested for the
software version of iPod/iPhone/iPad indicated on the
website of Pioneer (http://pioneer.jp/homeav/support/
ios/eu).
l Installing software versions other than indicated on the
website of Pioneer to your iPod/iPhone/iPad may result
in incompatibility with this system.
Note:
USB connector do not support VIDEO out.
n iPod, iPhone or iPad Playback (USB
Terminal)
1 Press the STANDBY/ON button to turn the power on.
2 Press the USB button on the remote control or INPUT
button repeatedly on the main unit to select USB
fnction.
3 Connect iPod, iPhone or iPad to the unit. "iPod" will
appear.
4 Press the / (CD/USB / ) button to start playback.
Note:
Stop button ( ) is invalid during iPod, iPhone or iPad
playback.
En-10
Page 11
Listening to the iPod, iPhone or iPad (X-HM20 only) (continued)
iPhone
Dock connector
iPhone (bottom)
Connector for iPhone
Dock for iPhone
Adaptor for iPhone
n iPod and iPhone adaptor connection
(Docking Station)
Note:
Please use the adaptor supplied with your iPod or iPhone
unit.
iPhone
Adaptor No.
iPhone
Description
Capacity
12 iPhone 4GB & 8GB & 16GB
15 iPhone 3G,
iPhone 3GS
8GB & 16GB & 32GB
19 iPhone 4 16GB & 32GB
n To insert adaptor for iPod or iPhone
(Docking Station)
Open the docking station for iPod and iPhone by pulling
1
up.
2 Insert the adaptor for iPod and iPhone into unit and
connect your iPod or iPhone.
n To remove adaptor for iPod or iPhone
(Docking Station)
Insert the tip of a screwdriver (“–” type,
small) into the adaptor hole as shown
and lift upward to remove.
n iPod or iPhone playback
(Docking Station)
Press the STANDBY/ON button to turn the power on.
1
2
Press the iPod/iPhone button on the remote control or
INPUT button repeatedly on the main unit to select iPod
function.
3
Insert iPod or iPhone unit in iPod dock of main unit.
4
Press the / (iPod/iPhone / ) button to start playback.
STANDBY/ON
INPUT
PRESET
ENTER
PRESET
USB
iPod/
iPhone
CD/USB
DISPLAY
TV OUT
DISPLAY
STANDBY/ON
iPod/iPhone
MENU
Caution:
Unplug all accessories from the iPod or iPhone before
inserting it into the dock.
n iPhone playback
l
Sound will only switch from iPhone to the main unit after
authentication process is completed in approximately 10
seconds.
l
Incoming calls will pause the playback.
l
Once the calls are answered, the conversation can only be
heard through the built-in iPhone speaker. Turn on the
iPhone speaker or undock the iPhone to start conversation.
n To disconnect iPod, iPhone or iPad
Simply remove the iPod or iPhone from the docking station or
iPad from USB terminal. It is safe to do so even during playback.
En-11
Page 12
Listening to the iPod, iPhone or iPad
REPEAT
RANDOM
PRESET
PRESET
(X-HM20 only) (continued)
n Watching videos on a TV connected to
iPod or iPhone
Press the DISPLAY TV OUT button for more than 2 seconds.
1
“TV Display” will appear on display.
2
Press the ENTER button to start playback.
Notes:
l
If the TV Out setting is already turned on at video menu, the
video is automatically displayed on the TV screen when
ENTER key is pressed.
l
TV out display is not support through USB terminal. (iPad)
l
To return to watching video on iPod or iPhone screen, press
the MENU button to enter video menu. Then press the
DISPLAY TV OUT button for more than 2 seconds until “iPod
Display” appears.
l
During iPod or iPhone video playback, pressing the
DISPLAY TV OUT button will not toggle video out display
between iPod and TV.
Caution:
l
Unplug all accessories for the iPod or iPhone before inserting
it into the iPod docking station.
l Stop button ( ) at main unit is invalid during iPod
function.
n Navigating the iPod, iPhone or iPad menus
1
Press the iPod/iPhone MENU button to view the menu on
iPod, iPhone or iPad unit. Press it again to go back to
previous menu.
2
Use the PRESET (
menu and then press ENTER button.
Note:
When navigating the iPod, iPhone or iPad menu with remote
control, do not operate any of the buttons on the iPod or iPhone
unit. The volume level is adjusted by pressing the VOL (+ or –)
button on the main unit or the remote control. Adjusting the
volume on the iPod, iPhone or iPad units give no effect.
iPod and iPhone operations:
The operations described below depend on the generation iPod
and iPhone you are using.
System on operation:
When the main unit is powered on, iPod, iPhone or iPad units will
automatically power on when docked in the unit.
System off (stand-by operation):
When the main unit is turned to stand-by mode, the docked iPod,
iPhone or connected iPad unit will automatically turn to stand-by
mode.
or
) button to select an item on the
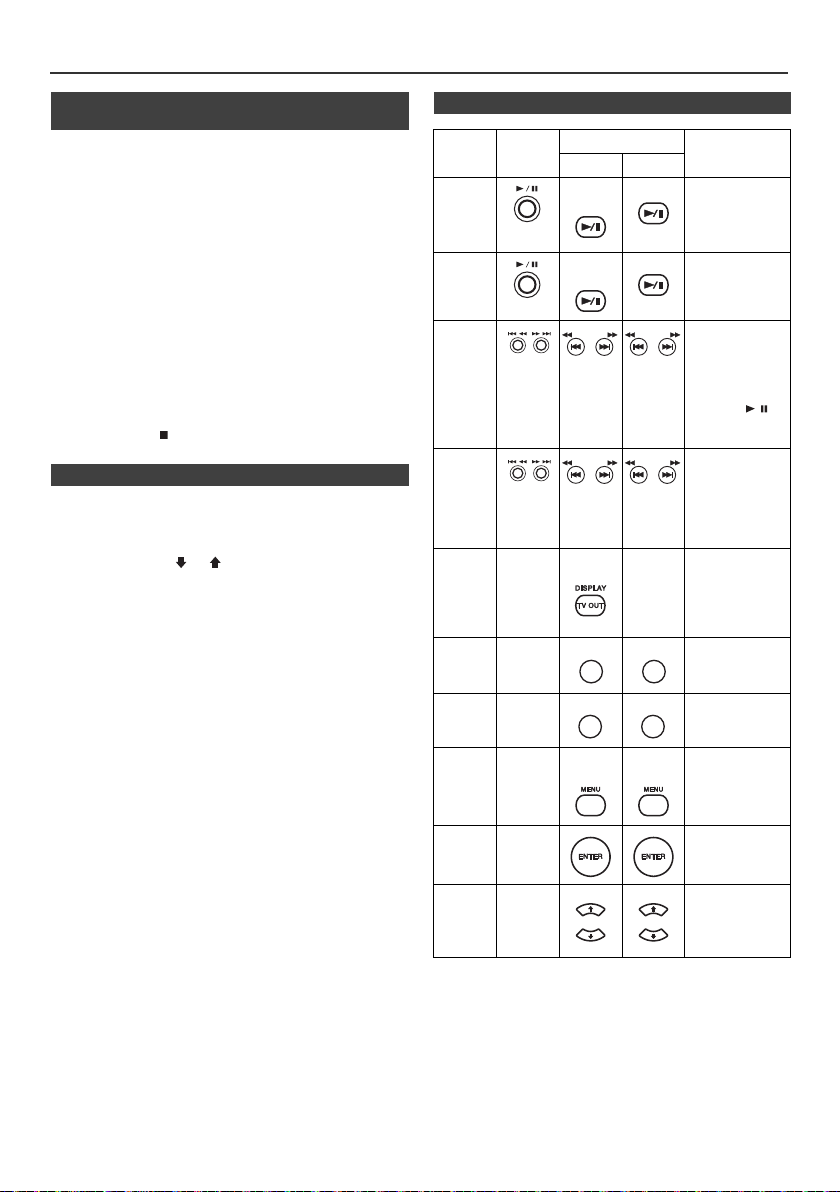
n Various iPod, iPhone and iPad functions
Function
Play
Pause
Track
up/ down
Fast
forward/
reverse
Display
Repeat
Shuffle
iPod
Menu
iPod
Enter
iPod
Cursor
Up/Down
Main
unit
____
____
____
____
____
____
Remote control
Dock USB
iPod/
CD/USB
iPhone
iPod/
CD/USB
iPhone
TUNING −
TUNING −
TUNING +
TUNING +
TUNING −
TUNING −
iPod/
iPhone
REPEAT
RANDOM
iPod/
iPhone
PRESET
PRESET
TUNING +
TUNING +
____
iPod/
iPhone
Operation
Press in the
pause mode.
Press in the
playback mode.
Press in the
playback or
pause mode.
If you press the
button in the
pause mode,
press the /
button to start the
desired track.
Press and hold
down in the
playback mode.
Release the
button to resume
playback.
Press for more
than 2 seconds to
toggle the video
out display
between iPod or
TV.
Press to toggle
repeat mode.
Press to toggle
shuffle mode.
Press to view the
iPod menu during
iPod function.
Press to confirm
the selection.
Press to select
the iPod menu.
En-12
Page 13
Listening to a CD or MP3/WMA disc
PHONES
USB
TUNING −
TUNING +
STANDBY/ON
INPUT
OPEN/CLOSE
STANDBY/ON
TUNING −
CD
TUNING +
Caution:
l
Do not place two discs in one disc tray.
l
Do not play discs of special shapes (heart, octagon, etc). It
may cause malfunctions.
l
Do not push the disc tray whilst it is moving.
l
If the power fails whilst the tray is open, wait until the power
is restored.
l
If TV or radio interference occurs during CD operation, move
the unit away from the TV or radio.
l
Be sure to place 8 cm disc in the middle of the disc tray.
l
Due to the structure of the disc information, it takes longer to
read an MP3/WMA disc than a normal CD (approximately 20
to 90 seconds).
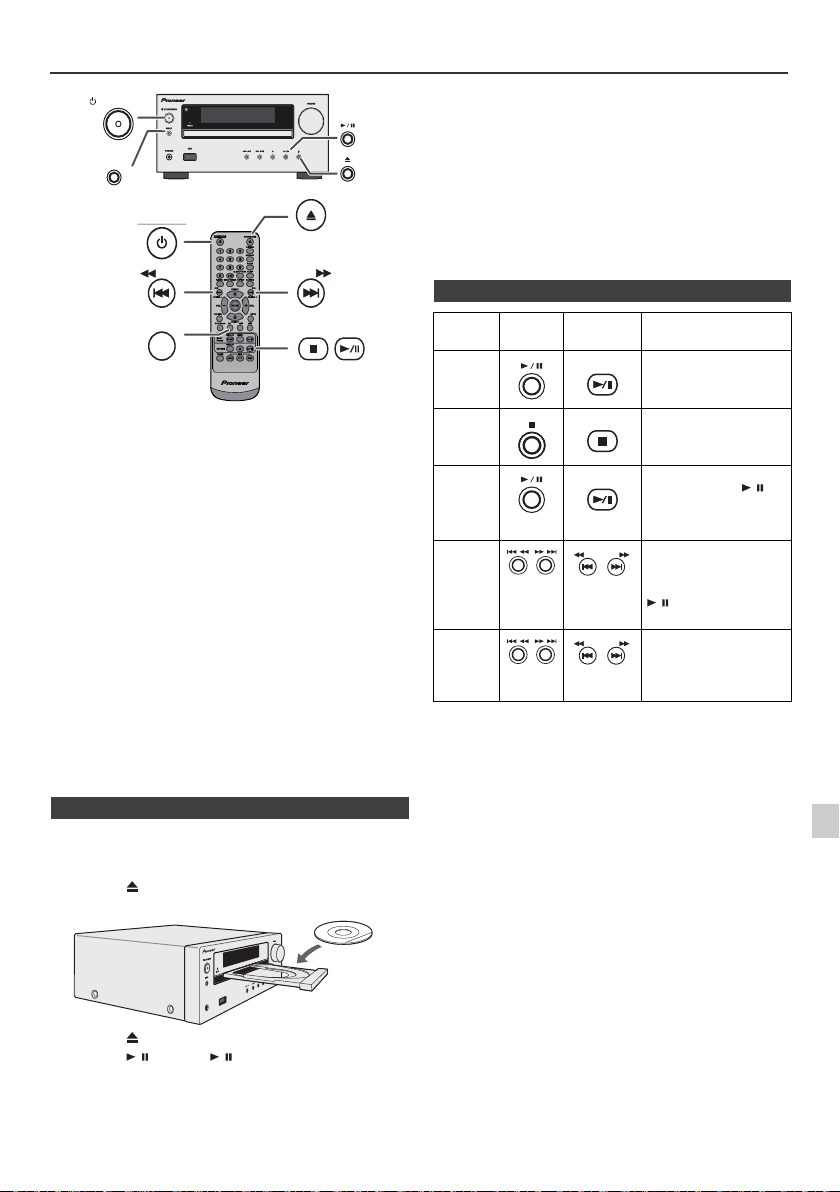
n Various disc functions
Function Main unit
Play
Remote
control
CD/USB
Operation
Press in the stop mode.
This system can play back a standard CD, CD-R/RW in the CD
format and CD-R/RW with MP3 or WMA files, but cannot record
on them. Some audio CD-R and CD-RW discs may not be
playable due to the state of the disc or the device that was used
for recording.
MP3:
MP3 is a form of compression. It is an acronym which
stands for MPEG Audio Layer 3. MP3 is a type of audio code
which is processed by significant compression from the
original audio source with very little loss in sound quality.
l
This system supports MPEG 1 Layer 3 and VBR files.
l
During VBR file playback, time counter in the display may
differ from its actual playback time.
l
Bitrate which is supported by MP3 is 32 kbps to 320 kbps.
WMA:
WMA files are Advanced System Format files that include
audio files which are compressed with Windows Media
Audio codec. WMA is developed by Microsoft as an audio
format file for Windows Media Player.
l
“MP3” and “WMA” indicator will light up after the unit reads
information on an MP3 or WMA disc.
l
Bitrate which is supported by WMA is 64 kbps to 160 kbps.
n Disc playback
Press the STANDBY/ON button to turn the power on.
1
2
Press the CD button on the remote control or INPUT button
repeatedly on the main unit to select CD function.
3
Press the button to open the disc tray.
4
Place the disc on the disc tray, label side up.
Stop
Pause
Track up/
down
Fast
forward/
reverse
CD/USB
CD/USB
TUNING −
TUNING +
Press in the playback
mode.
Press in the playback
mode. Press the /
button to resume
playback from the paused
point.
Press in the playback or
stop mode.
If you press the button in
the stop mode, press the
/ button to start the
desired track.
Press and hold down in
the playback mode.
Release the button to
resume playback.
5
Press the button to close the disc tray.
6
Press the / (CD/USB /) button to start playback. After
the last track is played, the unit will stop automatically.
En-13
Page 14
Advanced CD or MP3/WMA disc playback
Selected track number
Selected track number
DIMMER
MEMORY
REPEAT
RANDOM
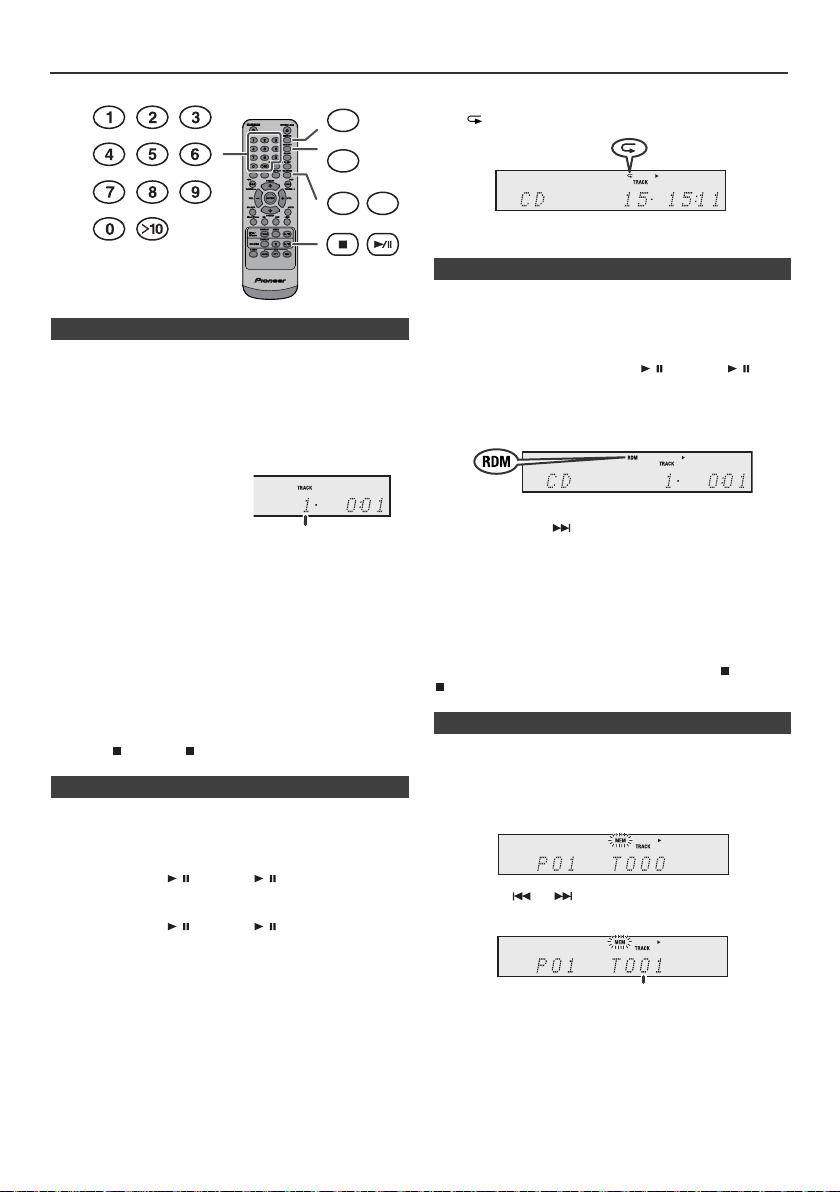
n Direct track search
By using the Numeric buttons, the desired tracks on the
current disc can be played.
Use the Numeric buttons on the remote control to select
the desired track whilst playing the selected disc.
l
The Numeric buttons allow you to select up to number 9.
l
When selecting number 10 or higher, use the “>10”
button.
A. For example, to choose 13
1
Press the “>10” button once.
2
Press the “1” button.
3
Press the “3” button.
B. For example, to choose 130
1
Press the “>10” button twice.
2
Press the “1” button.
3
Press the “3” button.
4
Press the “0” button.
Notes:
l
A track number higher than the number of tracks on the
disc cannot be selected.
l
During random play, direct search is not possible.
To stop playback:
Press the (CD/USB ) button.
n Repeat play
Repeat play can play one track, all tracks or a programmed
sequence continuously.
To repeat one track:
Press the REPEAT button repeatedly until “Repeat One”
appears. Press the / (CD/USB / ) button.
To repeat all tracks:
Press the REPEAT button repeatedly until “Repeat All”
appears. Press the / (CD/USB / ) button.
To repeat desired tracks:
Perform steps 1 - 5 in “Programmed play” section on this
page and then press the REPEAT button repeatedly until
“Repeat All” appears.
To cancel repeat play:
Press the REPEAT button repeatedly until “Normal” appears
and “ ” disappears.
Note:
During repeat play, random play is not possible.
n Random play
The tracks on the disc can be played in random order
automatically.
To random play all tracks:
Press and hold down RANDOM button on the remote control
until “Random” appears. Press the / (CD/USB / )
button.
To cancel random play:
Press the RANDOM button until “RDM” indicator disappears.
Notes:
l
If you press the button during random play, you can
move to the track selected next by the random operation.
On the other hand, the button does not allow you to move
to the previous track. The beginning of the track being
played will be located.
l
In random play, the unit will select and play tracks
automatically. (You cannot select the order of the tracks.)
l
During random play, repeat play is not possible.
Caution:
After performing repeat play, be sure to press the (CD/USB
) button. Otherwise, the disc will play continuously.
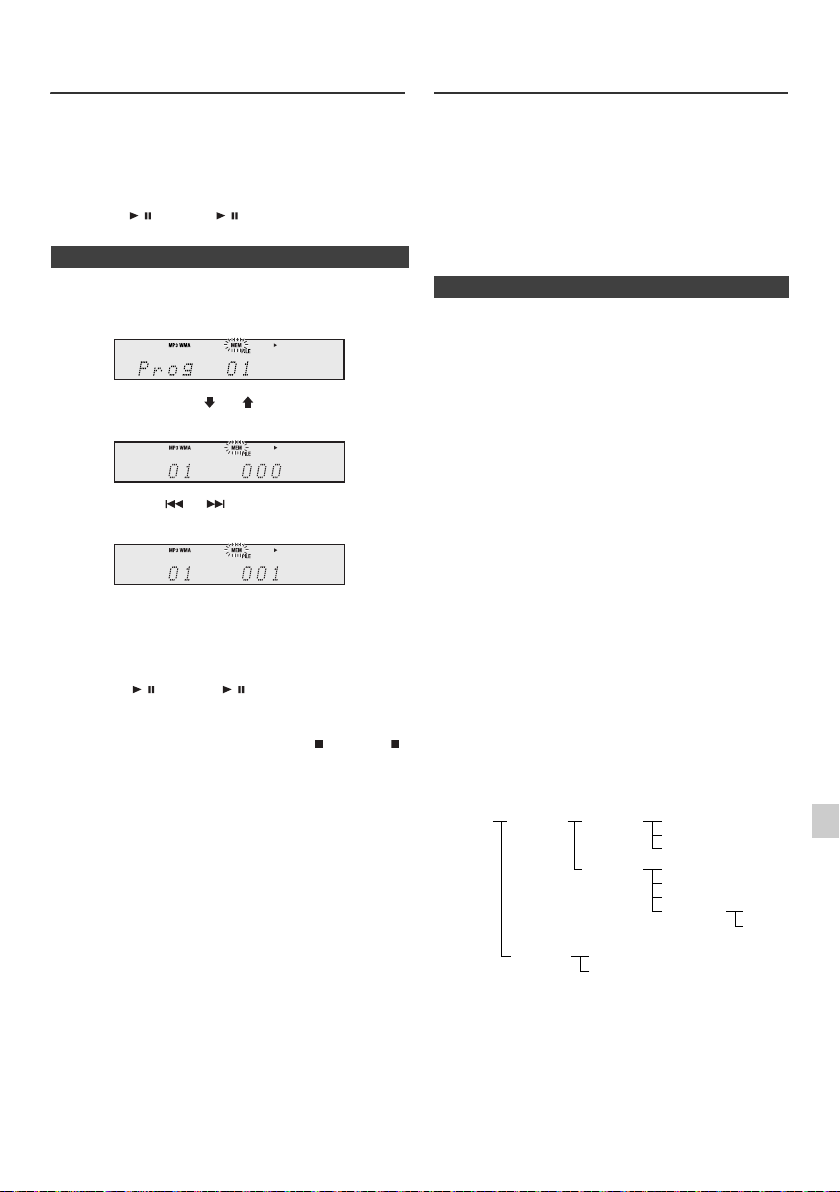
n Programmed play (CD)
You can choose up to 32 selections for playback in the order
you like.
1
Whilst in the stop mode, press the MEMORY button on the
remote control to enter the programming save mode.
2
Press the or buttons on the remote control to
select the desired track.
3
Press the MEMORY button to save the track number.
En-14
Page 15
Advanced CD or MP3/WMA disc
ROOT
(FOLDER 1)
FOLDER A
(FOLDER 2)
FOLDER B
(FOLDER 3)
FILE 9
FILE 10
FILE 3
FILE 4
FILE 5
FILE 6
FILE 7
FILE 8
FOLDER E
(FOLDER 6)
FOLDER C
(FOLDER 4)
FOLDER D
(FOLDER 5)
FILE 1
FILE 2
playback (continued)
4 Repeat steps 2 - 3 for other tracks. Up to 32 tracks can
be programmed. If you want to check the programmed
tracks, press the MEMORY button repeatedly. If you
make a mistake, the programmed tracks can be cleared
by pressing the CLEAR button.
5
Press the / (CD/USB / ) button to start playback.
n Programmed play (MP3/WMA)
1
Whilst in the stop mode, press the MEMORY button to
enter the programming save mode.
2 Press the PRESET
control to select the desired folder.
Then press the or button on the remote control
to select the desired tracks.
3 Press the MEMORY button to save the folder and track
number.
4 Repeat steps 2 - 3 for other folder/tracks. Up to 32
tracks can be programmed.
5 Press the / (CD/USB / ) button to start playback.
To cancel the programmed play mode :
During programmed stop mode, press the (CD/USB )
button. The display will show “Memory Clear” and all the
programmed contents will be cleared.
Adding tracks to the programme:
If a programme has been previously stored, the “MEM”
indicator will be displayed. Press the MEMORY button.
Then follow steps 2 - 3 to add tracks.
Notes:
l When a disc is ejected, the programme is automatically
cancelled.
l If you press the STANDBY/ON button to enter the
stand-by mode or change the function from CD to
another, the programmed selections will be cleared.
l During the programme operation, random play is not
possible.
(
or ) button on the remote
MP3/WMA folder mode (only for MP3/
WMA files)
To play back MP3/WMA (Windows Media Audio) file
There are many music sites on the internet that you can
download MP3/WMA (Windows Media Audio) music files.
Follow the instructions from the website on how to
download the music files. You can then play back these
downloaded music files by burning them to a CD-R/RW
disc.
l Your downloaded song/files are for personal use only.
Any other usage of the song without owner’s
permission, is against the law.
n About folder playback order
If MP3/WMA files are recorded in several folders, a folder
number will be set to each folder automatically.
These folders can be selected by the FOLDER button on
the remote control. If there is no supported file formats
inside the selected folder, the folder is skipped and the
next folder will be selected.
Example: How to set folder number if MP3/WMA format
files are recorded as below figure.
ROOT folder is set as folder 1.
1
2 As for folders inside ROOT folder (Folder A and Folder
B), the folder which is recorded earlier on the disc will be
set as folder 2 and folder 3.
3 As for folder inside Folder A (Folder C and Folder D), the
folder which is recorded earlier on the disc will be set as
folder 4 and folder 5.
4 Folder E that is inside Folder D will be set as folder 6.
l The folder and file order information which is recorded
on the disc depends on the writing software. There
maybe possibilities that this unit will playback the files
not according to our expected playback order.
l For CD MP3/WMA, 99 numbers of folders and 999 files
inclusive of the folders which have non playable files
can be read.
Folder mode on/off can be operated by the FOLDER
button on the remote control. Files that are played when
folder mode is set to the on position, may differ from those
played back when folder mode is turned off.
En-15
Page 16
MP3/WMA folder mode (only for MP3/
MP3 indicator
WMA indicator
TOTAL indicator
Total number of files
Total number of folder
First track number
in the folder
FOLDER
indicator
FOLDER number
File name display Folder display
Title display
Album display
Counter display
Artist display
INPUT
USB
USB
PRESET
PRESET
FOLDER
TUNING −
TUNING +
DISPLAY
CD/USB
WMA files) (continued)
Listening to USB mass storage
device/MP3 player
TUNING −
PRESET
FOLDER
PRESET
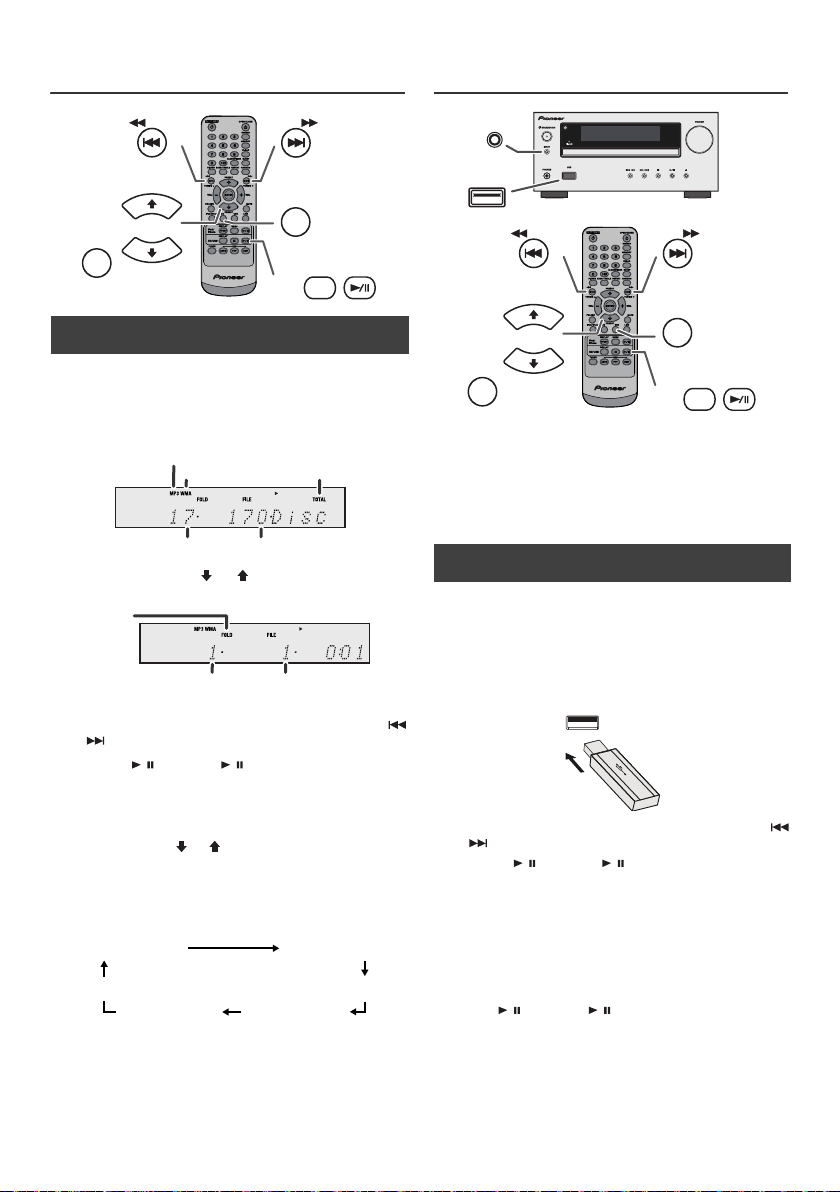
n Procedure to playback MP3/WMA disc with
folder mode on
TUNING +
CD
DISPLAY
CD/USB
To play back CD-R/RW.
Press the CD button, and load an MP3/WMA disc.
1
Press the FOLDER button and disc info will be
displayed.
2 Press the PRESET
(
or ) button to select desired
playback folder. (Folder mode on)
3 Select desired file to be played back by pressing the
or button.
4 Press the / (CD/USB / ) button. Playback will start
and file name will be displayed.
l Title, Artist and Album name are displayed if they are
recorded on the disc.
l In case of playback with the folder mode on, press
the PRESET ( or ) button, and the folder can be
selected even though it is in playback/pause mode.
It will continue playback/pause mode in the 1st track
of the selected folder.
l Display content can be changed by pressing the CD/
USB DISPLAY button.
Notes:
l This product is not compatible with MTP and AAC file
systems from USB mass storage device or MP3
player.
l Some external storage devices may not operate with
this system.
l Operation of external storage devices (USB memory
devices, external hard disks, etc.) is not guaranteed.
n To play back USB/MP3 player with folder
mode off
Press the USB button on the remote control or INPUT
1
button repeatedly on main unit to select USB function.
Connect the USB memory device that has MP3/WMA
format files on the unit. When the USB memory is
connected to the main unit, the device information will
be displayed.
2 Select desired file to be played back by pressing the
or button.
3 Press the / (CD/USB / ) button. Playback will start
and the file name will be displayed.
l Title, Artist and Album name are displayed if they are
recorded in the USB memory device.
l Display content can be changed by pressing the CD/
USB DISPLAY button.
Note:
To pause playback:
Press the / (CD/USB / ) button.
Note:
If “Not Support” is displayed, it means “Copyright
protected WMA file” or “Not supported playback file” is
selected.
En-16
Page 17
Listening to USB mass storage
device/MP3 player (continued)
n To play back USB/MP3 player with folder
mode on
Press the USB button on the remote control or INPUT
1
button repeatedly on main unit to select USB function.
Connect the USB memory device that has MP3/WMA
format files on the unit. When the USB memory is
connected to the main unit, the device information will
be displayed.
2 Press the FOLDER button, and press the PRESET
or ) button to select desired playback folder. To start
playback with folder mode on, go to step 4. To change
the playback folder, press the PRESET
to select another folder.
3 Select desired file to be played back by pressing the
or button.
4 Press the / (CD/USB / ) button. Playback will start
and the file name will be displayed.
l Title, Artist and Album name are displayed if they are
recorded in the USB memory device.
l Display content can be changed by pressing the CD/
USB DISPLAY button.
(
or ) button
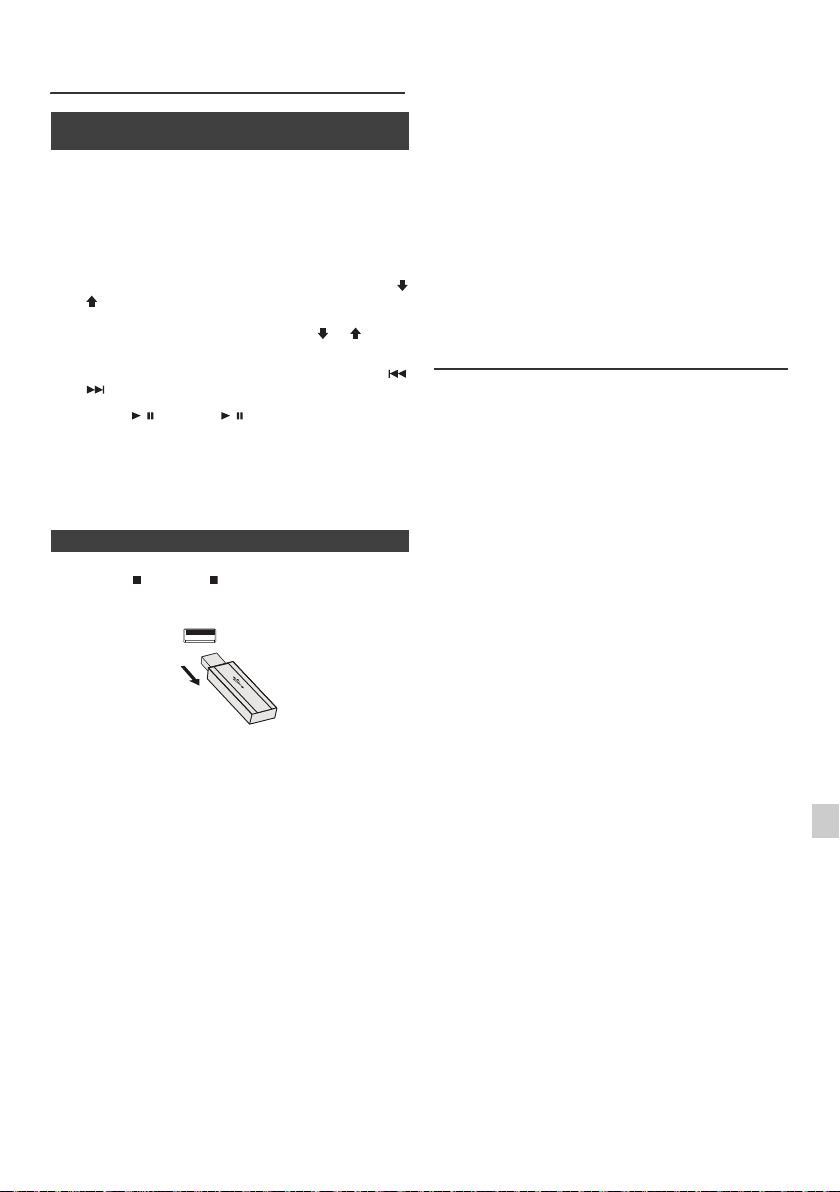
n To remove USB memory device
Press the (CD/USB ) button to stop playback.
1
2 Disconnect USB memory device from the USB terminal.
Notes:
l PIONEER will not be held liable for the loss of data
whilst the USB memory device is connected to the
audio system.
l Files compressed in MP3 and/or WMA format can be
played back when connected to the USB terminal.
l This USB memory’s format supports FAT 16 or FAT
32.
l PIONEER cannot guarantee that all USB memory
devices will work on this audio system.
l USB cable is not recommended for use in this audio
system to connect to USB memory device. Use of the
USB cable will affect the performance of this audio
system.
l This USB memory cannot be operated via USB hub.
l The USB terminal in this unit is not intended for a PC
connection but is used for music streaming with a USB
memory device.
l External HDD-storage cannot be played back via USB
terminal.
l If the data inside the USB memory is large, it may take
longer time for the data to be read.
(
l This product can play WMA and MP3 files. It will
automatically detect the file type being played. If
unplayable file is played on this product, “Not Support”
is indicated and the file will be automatically skipped.
This will take a few seconds. If abnormal indications
appear on the display due to the unspecified file, turn
off the unit and then turn it on again.
l This product relates to USB mass storage devices and
MP3 players. It may however face some irregularities
due to various unforeseen reasons from some devices.
Should this happen, turn off the unit and then turn it on
again.
l The USB port is only intended for direct connection to
a USB memory device without any cable.
l During CD function, MP3 player will not be charging.
l “Not support” will be displayed if you connect an iPod
to USB terminal when the USB function is selected.
Advanced USB playback
The following functions are the same as CD
operations:
Direct track search . . . . . . . . . . . . . . . . . . . . . . . . . . . 14
Repeat play . . . . . . . . . . . . . . . . . . . . . . . . . . . . . . . . .14
Random play . . . . . . . . . . . . . . . . . . . . . . . . . . . . . . . .14
Programmed play (MP3/WMA). . . . . . . . . . . . . . . . . .15
Notes:
l If USB memory device is not connected, “USB No
Media” will be shown on the display.
l This unit only supports “MPEG-1 Audio Layer-3”
format. (Sampling Frequency is 32 kHz, 44.1 kHz, 48
kHz)
l Playback order for MP3 files may differ depending on
the writing software used during file download.
l Bitrate which is supported by MP3 is 32 kbps to 320
kbps, WMA is 64 kbps to 160 kbps.
l For MP3/WMA files, please put “.MP3” “.WMA”
extension. Files cannot be played back if there is no
MP3/WMA extension.
l Playlists are not supported on this unit.
l This unit can display Folder Name or File Name up to
32 characters.
l Maximum total number of MP3/WMA files is 999.
l Total number of folders read is 99 including folder with
non-playable file. However, the display shows only
folder with MP3 files.
l The display playback time may not be displayed
correctly when playing back a variable bitrate file.
l The ID3TAG information supported are TITLE,
ARTIST and ALBUM only. Title name, artist name and
album name can be displayed by pressing the
DISPLAY button during file playback or pause mode.
l WMA meta tag also supports title, artist and album
name which are recorded in WMA files. Copyright
protected WMA files cannot be played back.
Page
En-17
Page 18
Listening to the radio
CLEAR
STANDBY/ON
INPUT
MEMORY
TUNING −
TUNER
TUNING +
PRESET
PRESET
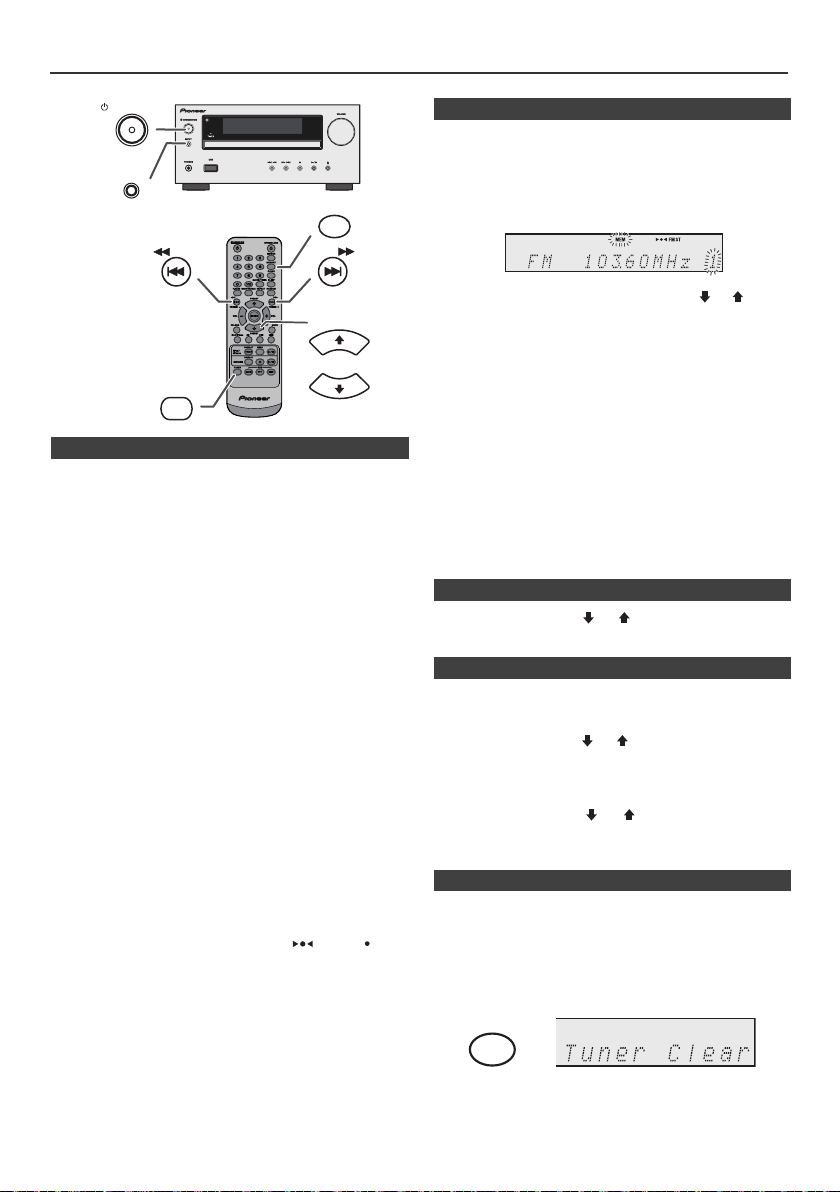
n Tuning
Press the STANDBY/ON button to turn the power on.
1
2 Press the TUNER button repeatedly to select the
desired frequency band (FM or AM).
3 Press the TUNING + or - button on the remote control to
tune in to the desired station.
l Manual tuning:
Press the TUNING
to the desired station.
l Auto tuning:
When the TUNING + or - button is pressed for more
than 0.5 seconds, scanning will start automatically
and the tuner will stop at the first receivable
broadcast station.
Notes:
l When radio interference occurs, auto scan tuning may
stop automatically at that point.
l Auto scan tuning will skip weak signal stations.
l To stop the auto tuning, press the TUNING + or - button
again.
l When an RDS (Radio Data System) station is tuned in,
the frequency will be displayed first, and then the RDS
indicator will light up. Finally, the station name will
appear.
l Full auto tuning can be achieved for RDS stations
“ASPM”, see page 19.
To receive an FM stereo transmission:
l Press the TUNER button to select stereo mode and
“ST” indicator will be displayed. “ ” and “ ” will
appear when an FM broadcast is in stereo.
l If the FM reception is weak, press the TUNER button
to extinguish the “ST” indicator. The reception changes
to monaural, and the sound becomes clearer.
+
or - button repeatedly to tune in
n Memorising a station
You can store 40 AM and FM stations in memory and
recall them at the push of a button. (Preset tuning)
Perform steps 1 - 3 in “Tuning”.
1
2 Press the MEMORY button.
3 Within 30 seconds, press the PRESET
to select the preset channel number. Store the stations
in memory, in order, starting with preset channel 1.
4 Within 30 seconds, press the MEMORY button to store
that station in memory. If the “MEMORY” and preset
number indicators disappear before the station is
memorised, repeat the operation from step 2.
(
or ) button
5 Repeat steps 1 - 4 to set other stations, or to change a
preset station. When a new station is stored in the
memory, the station previously memorised for that
preset channel number will be erased.
Note:
The backup function protects the memorised stations for a
few hours should there be a power failure or the AC power
lead become disconnected.
n To recall a memorised station
1 Press the PRESET
seconds to select the desired station.
(
or ) button for less than 0.5
n To scan the preset stations
The stations saved in the memory can be scanned
automatically. (Preset memory scan)
1
Press the PRESET ( or ) button for more than 0.5
seconds. The preset number will flash and the
programmed stations will be tuned in sequentially, for 5
seconds each.
2 Press the PRESET
desired station is located.
(
or ) button again when the
n To erase entire preset memory
Press the TUNER button on remote control or press the
1
INPUT button on main unit repeatedly to select Tuner
function.
2 In Tuner function, press the CLEAR button until “Tuner
Clear“ appears.
En-18
Page 19
Using the Radio Data System (RDS)
RDS
TUNING −
TUNING +
TUNER
ASPM PTY DISP
Station name (PS) Programme type (PTY)
Frequency Radio text (RT)
No PS No PTY
FM 98.80 MHz
No RT
RDS is a broadcasting service which a growing
number of FM stations provide. These FM stations
send additional signals along with their regular
programme signals. They send their station names,
and information about the type of programme such as
sport, music, etc.
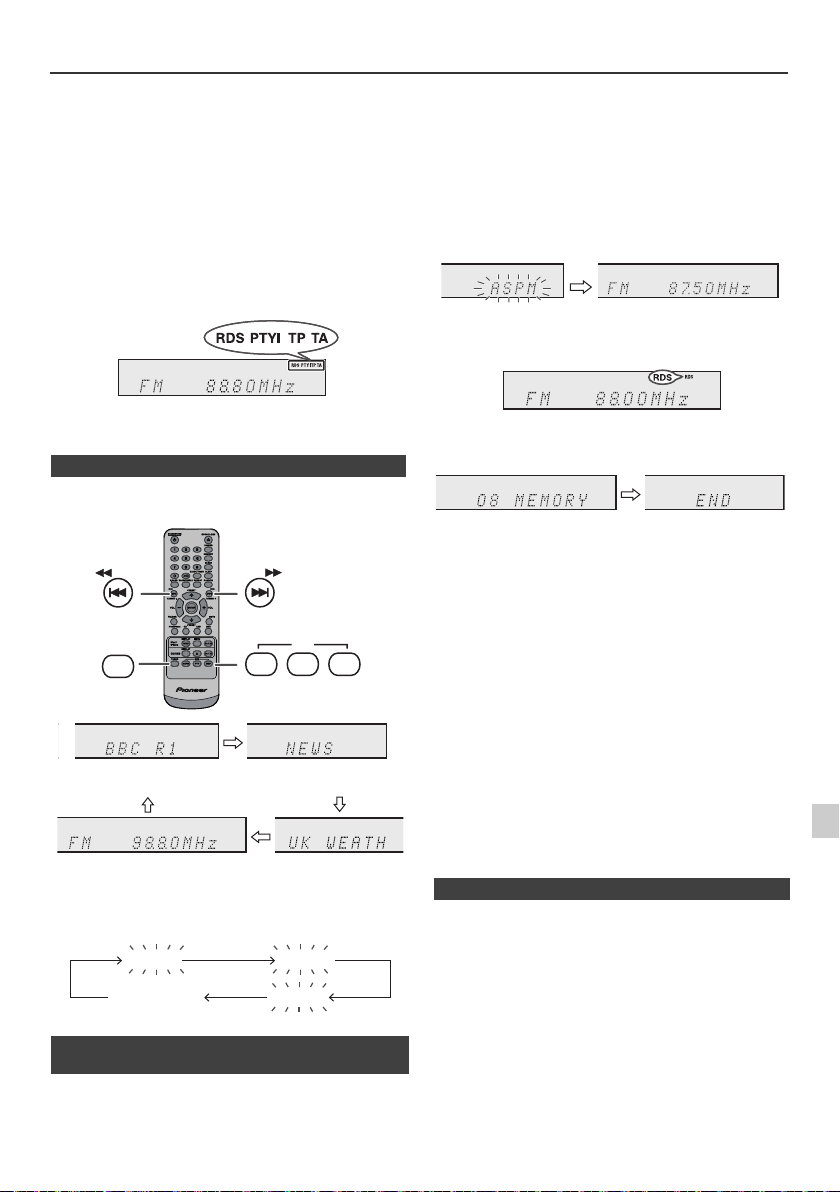
When tuned to an RDS station, “RDS” and the station
name will be displayed.
“TP” (Traffic Programme) will appear on the display when
the received broadcast carries traffic information, and “TA”
(Traffic Announcement) will appear whilst a traffic
information is on air.
“PTYI” (Dynamic PTY Indicator) will appear whilst the
Dynamic PTY station is received.
If you have already stored some stations in memory, the
number of new stations you can store will be less.
1 Press the TUNER button on the remote control or
INPUT button repeatedly on the main unit to select
TUNER function.
2 Press and hold down the RDS ASPM button on the
remote control.
1 After “ASPM” has flashed for about 4 seconds,
scanning will start (87.50 - 108.00 MHz).
2 When an RDS station is found, “RDS” will appear
for a short time and the station will be stored in
memory.
You can control the RDS by using the buttons on the
remote control only.
n Information provided by RDS
Each time the RDS DISPLAY button is pressed, the
display will switch as follows:
When tuning in to a station other than an RDS station or
to an RDS station which sends weak signal, the display
will change in the following order:
n Using the Auto Station Programme
Memory (ASPM)
Whilst in the ASPM operation mode, the tuner will
automatically search for new RDS stations. Up to 40
stations can be stored.
3 After scanning, the number of stations stored in
memory will be displayed for 4 seconds, and then
“END” will appear for 4 seconds.
To stop the ASPM operation before it is complete:
Press the RDS ASPM button whilst it is scanning for
stations.
The stations which are already stored in memory will be
kept there.
Notes:
l If the same station is broadcasting on different
frequencies, the strongest frequency will be stored in
memory.
l Any station which has the same frequency as the one
stored in memory will not be stored.
l If 40 stations have already been stored in memory, the
scan will be aborted. If you want to redo the ASPM
operation, erase the preset memory.
l If no station have been stored in memory, “END” will
appear for about 4 seconds.
l If the RDS signals are very weak, station names may
not be stored in memory.
l The same station name can be stored in different
channels.
l In a certain area or during certain time periods, the
station names may temporarily be different.
n Notes for RDS operation
If any of the following events occur, it does not mean
that the unit is faulty:
l “PS”, “No PS” and a station name appear alternately,
and the unit does not operate properly.
l If a particular station is not broadcasting properly or a
station is conducting tests, the RDS reception function
may not work properly.
l When you receive an RDS station whose signal is too
weak, information like the station name may not be
displayed.
l “No PS”, “No PTY” or “No RT” will flash for about 5
seconds, and then the frequency will be displayed.
En-19
Page 20

Using the Radio Data System (RDS) (continued)
Notes for radio text:
l The first 14 characters of the radio text will appear for
4 seconds and then they will scroll across the display.
l If you tune in to an RDS station which is not
broadcasting any radio text, “No RT” will be displayed
when you switch to the radio text position.
l Whilst radio text data is received or when the text
contents change, “RT” will be displayed.
n To recall stations in memory
To specify programmed types and select stations
(PTY search):
You can search a station by specifying the programme
type (news, sports, traffic programme, etc. ... see page 20)
from the stations in memory.
1
Press the TUNER button on the remote control or
INPUT button repeatedly on the main unit to select
TUNER function.
2 Press the RDS PTY button on the remote control.
“SELECT” and “PTY TI” will appear alternately for
about 6 seconds.
3 Within 6 seconds, press the or button to select
the programme type.
Each time the button is pressed, the programme type
will appear. If the button is held down for more than
0.5 seconds, the programme type will appear
continuously.
4 Whilst the selected programme type is flashing (within
6 seconds), press the RDS PTY button again.
After the selected programme type has been lit for 2
seconds, “SEARCH” will appear, and the search
operation will start.
Notes:
l If the display has stopped flashing, start again from
step 2. If the unit finds a desired programme type, the
corresponding channel number will lit for about
8 seconds, and then the station name will remain it.
l If you want to listen to the same programme type of
another station, press the RDS PTY button whilst the
channel number or station name is flashing. The unit
will look for the next station.
l If no station can be found, “NOT FOUND” will appear
for 4 seconds.
If you select the traffic programme:
If you select the traffic programme (TP) in step 3, “TP” will
appear.
(This does not mean that you can listen to the traffic
information at that time.)
When the traffic information is broadcast, “TA” will appear.
Descriptions of the PTY (Programme Type) codes, TP
(Traffic Programme) and TA (Traffic Announcement)
You can search for and receive the following PTY, TP and
TA signals.
NEWS Short accounts of facts, events and
AFFAIRS Topical programme expanding or
INFO Programmes whose purpose is to impart
SPORT Programme concerned with any aspect of
EDUCATE Programme intended primarily to
DRAMA All radio plays and serials.
CULTURE Programmes concerned with any aspect
SCIENCE Programmes about the natural sciences
VARIED Used for mainly speech-based
POP M Commercial music, which would
ROCK M Contemporary modern music, usually
EASY M Current contemporary music considered
LIGHT M Classical music for general, rather than
CLASSICS Performances of major orchestral works,
OTHER M Musical styles not fitting into any of the
WEATHER Weather reports and forecasts and
FINANCE Stock Market reports, commerce, trading,
CHILDREN For programmes targeted at a young
publicly expressed views, reportage and
actuality.
enlarging upon the news, generally in
different presentation style or concept,
including debate, or analysis.
advice in the widest sense.
sport.
educate, of which the formal element is
fundamental.
of national or regional culture, including
language, theatre, etc.
and technology.
programmes usually of lightentertainment nature, not covered by
other categories. Examples include:
quizzes, panel games, personality
interviews.
generally be considered to be of current
popular appeal, often featuring in current
or recent record sales charts.
written and performed by young
musicians.
to be “easy-listening”, as opposed to Pop,
Rock or Classical, or one of the
specialised music styles, Jazz, Folk or
Country. Music in this category is often
but not always, vocal, and usually of short
duration.
specialist appreciation. Examples of
music in this category are instrumental
music, and vocal or choral works.
symphonies, chamber music, etc., and
including Grand Opera.
other categories. Particularly used for
specialist music of which Rhythm & Blues
and Reggae are examples.
meteorological information.
etc.
audience, primarily for entertainment and
interest, rather than where the objective is
to educate.
En-20
Page 21
Using the Radio Data System (RDS)
STANDBY/ON
TUNING −
TUNING +
CLOCK/TIMER
ENTER
Once timer
Daily timer
Start
Stop
1 minute or more
Start
Stop
(continued)
Timer and sleep operation (Remote
control only)
SOCIAL Programmes about people and things
RELIGION Any aspect of beliefs and faiths,
PHONE IN Involving members of the public
TRAVEL Features and programmes concerned
LEISURE Programmes concerned with
JAZZ Polyphonic, syncopated music
COUNTRY Songs which originate from, or continue
NATION M Current Popular Music of the Nation or
OLDIES Music from the so-called “golden age” of
FOLK M Music which has its roots in the musical
DOCUMENT Programme concerned with factual
TEST Broadcast when testing emergency
ALARM Emergency announcement made under
TP Broadcasts which carry traffic
TA Traffic announcements are being
that influence them individually or in
groups. Includes: sociology, history,
geography, psychology and society.
involving a God or Gods, the nature of
existence and ethics.
expressing their views either by phone
or at a public forum.
with travel to near and far destinations,
package tours and travel ideas and
opportunities. Not for use for
announcements about problems,
delays, or roadworks affecting
immediate travel where TP/TA should
be used.
recreational activities in which the
listener might participate. Examples
include, Gardening, Fishing, Antique
collecting, Cooking, Food & Wine, etc.
characterised by improvisation.
the musical tradition of the American
Southern States. Characterised by a
straightforward melody and narrative
story line.
Region in that country's language, as
opposed to International “Pop” which is
usually US or UK inspired and in
English.
popular music.
culture of a particular nation, usually
played on acoustic instruments. The
narrative or story may be based on
historical events or people.
matters, presented in an investigative
style.
broadcast equipment or receivers.
exceptional circumstances to give
warning of events causing danger of a
general nature.
announcements.
broadcast.
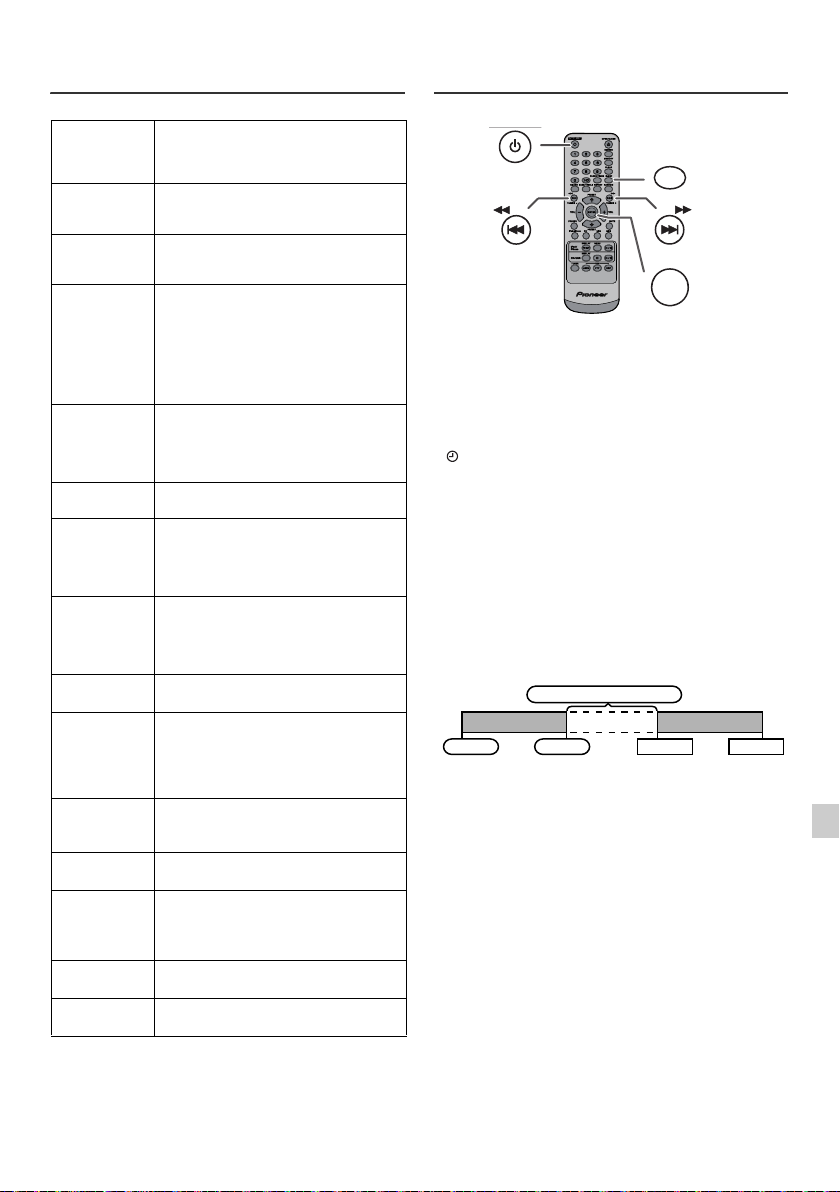
Timer playback:
The unit turns on and plays the desired source (CD,
TUNER, USB, iPod, LINE IN) at a preset time.
This unit has 2 types of timer: ONCE TIMER and
DAILY TIMER.
Once timer:
Once timer play works for one time only at a preset time.
(“ ” indicator).
Daily timer:
Daily timer play works at the same preset time every day
that we set. For example, set the timer as a wake-up call
every morning.
(“DAILY” indicator).
Using the once timer and daily timer in combination:
For example, use the once timer to listen to a radio
programme, and use the daily timer to wake up.
1 Set the daily timer (page 21).
2 Set the once timer (page 21).
En-21
Page 22
Timer and sleep operation (Remote control only) (continued)
n Timer playback
Before setting timer:
l Check that the clock is set to the correct time (refer to
page 9). If it is not set, you cannot use the timer
function.
l For timer playback: Plug in USB or load discs or dock
iPod to be played.
1 Press the STANDBY/ON button to turn the power on.
2 Press and hold the CLOCK/TIMER button.
3 Within 30 seconds, press the or button to
select “Once” or “Daily”, and press the ENTER button.
4 Within 30 seconds, press the or button to
select "Timer set", and press the ENTER button.
5 To select the timer playback source (CD, TUNER, USB,
iPod, LINE IN), press the or button. Press the
ENTER button.
When you select the tuner, select a station by pressing
the or button, and then press the ENTER
button. If a station has not been programmed, “No
Preset” will be displayed and timer setting will be
cancelled.
6 To adjust the day, press the or button and then
press the ENTER button.
7 Press the ENTER button to adjust the hour. Press the
or button and then press the ENTER button.
8 To adjust the minutes, press the or button and
then press the ENTER button.
9 Set the time to finish as in steps 7 and 8 above.
10 Adjust the volume using the
then press the ENTER button. Do not turn the volume
up too high.
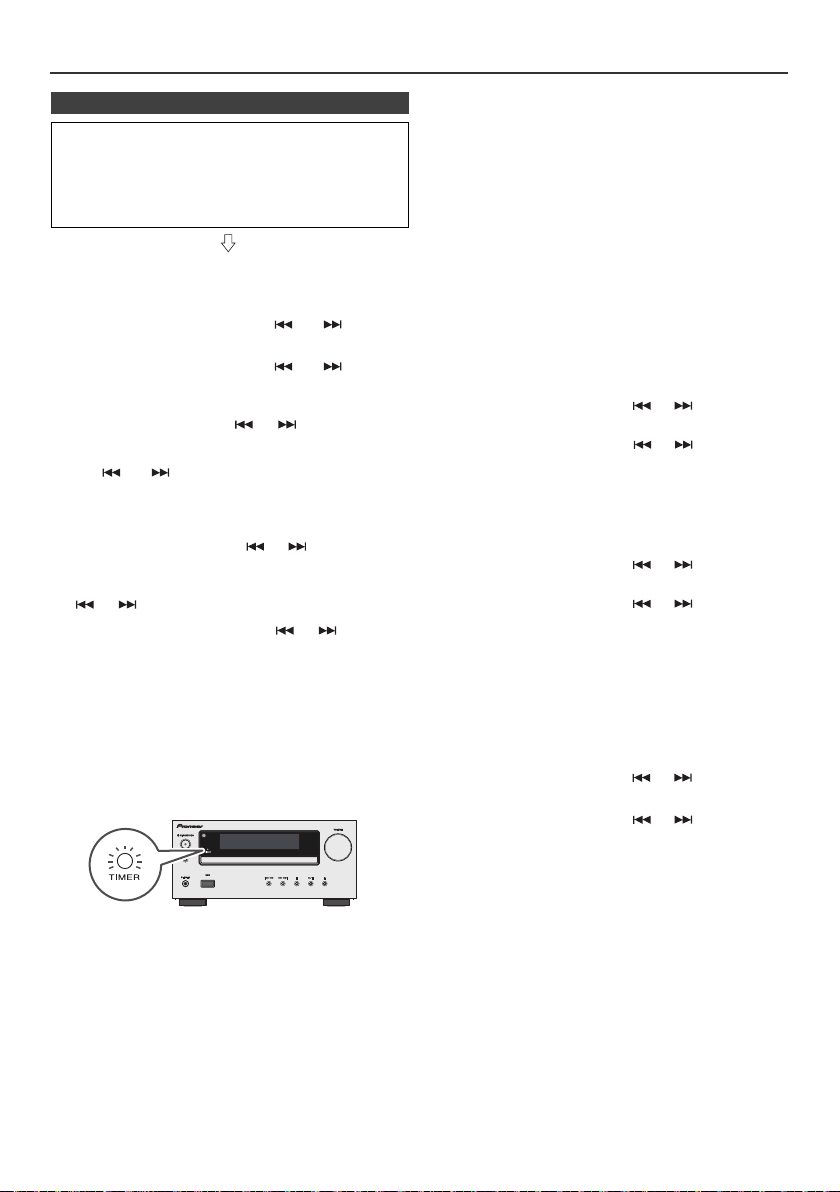
11 Press the STANDBY/ON button to enter the power
stand-by mode. The “TIMER” indicator lights up and
the unit is ready for timer playback.
12 When the preset time is reached, playback will start.
The volume will increase gradually until it reaches the
preset volume. The timer indicator will blink during
timer playback.
VOL (+ or –)
button, and
13 When the timer end time is reached, the system will
enter the power stand-by mode automatically.
Once timer:
The timer will be cancelled.
Daily timer:
The timer operates at the same time every day. It will
continue until the daily timer setting is cancelled.
Cancel the daily timer when it is not in use.
Notes:
l When performing timer playback using another unit
connected to the USB terminal, select “USB” or “LINE
IN” in step 5.
l This unit will turn on or enter the power stand-by mode
automatically. However, the connected unit will not turn
on or off. To stop the timer playback, follow step
“Cancelling the timer setting” of this page.
Checking the timer setting:
1 Turn the power on and press and hold down the
CLOCK/TIMER button.
2 Within 30 seconds, press the or button to select
“Once” or “Daily”, and press the ENTER button.
3 Within 30 seconds, press the or button to select
"Timer Call", and press the ENTER button.
Cancelling the timer setting:
1 Turn the power on and press and hold down the
CLOCK/TIMER button.
2 Within 30 seconds, press the or button to select
“Once” or “Daily”, and press the ENTER button.
3 Within 30 seconds, press the or button to select
"Timer Off", and press the ENTER button. Timer will be
cancelled (the setting will not be cancelled).
Reusing the memorised timer setting:
The timer setting will be memorised once it is entered. To
reuse the same setting, perform the following operations.
1 Turn the power on and press and hold down the
CLOCK/TIMER button.
2 Within 30 seconds, press the or button to select
“Once” or “Daily”, and press the ENTER button.
3 Within 30 seconds, press the or button to select
"Timer On", and press the ENTER button.
4 Press the STANDBY/ON button to enter the power
stand-by mode.
Note:
The clock setting will reset if the power cord is pulled out
or when there is a blackout.
En-22
Page 23
Timer and sleep operation (Remote
Desired time1-99 minutes
Sleep operation will
automatically stop
Sleep timer
setting
Timer playback
setting
End
time
Timer playback
start time
control only) (continued)
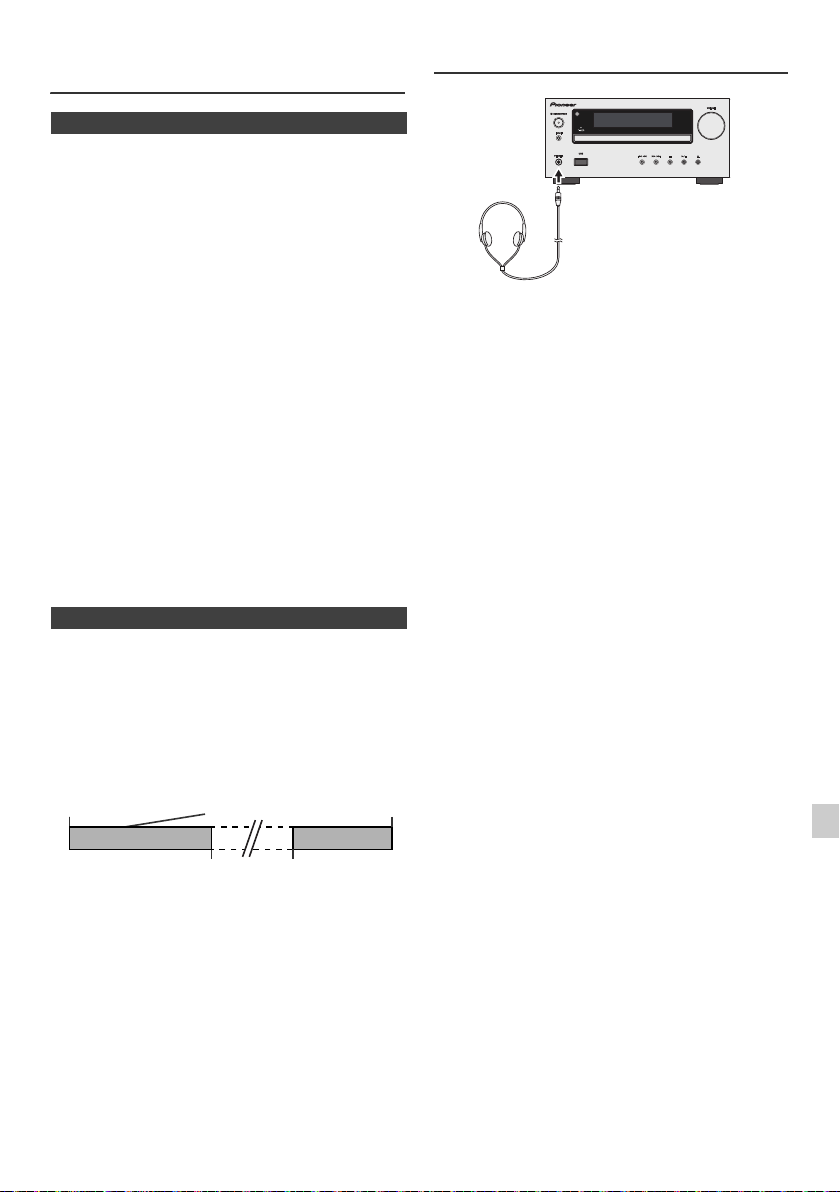
n Sleep operation
The radio, compact disc, iPod, USB and Line In can all be
turned off automatically.
1
Play back the desired sound source.
2 Press the SLEEP button.
3 Within 5 seconds, press the Numeric button to set the
time (1 minute - 99 minutes)
4 “SLEEP” will appear.
5 The unit will enter the power stand-by mode
automatically after the preset time has elapsed. The
volume will be turned down 1 minute before the sleep
operation finishes.
To confirm the remaining sleep time:
1 Whilst “SLEEP” is indicated, press the SLEEP button.
To cancel the sleep operation:
Press the STANDBY/ON button whilst “SLEEP” is
indicated. To cancel the sleep operation without setting the
unit to the stand-by mode, proceed as follows.
1 Whilst “SLEEP” is indicated, press the SLEEP button.
2 Within 5 seconds, press the “0” button twice until
“SLEEP 00” appears.
n To use timer and sleep operation together
Sleep and timer playback:
For example, you can fall asleep listening to the radio and
wake up to CD in the next morning.
1
Set the sleep time (see above, steps 1 - 5).
2 Whilst the sleep timer is set, set the timer playback
(steps 2 - 9, page 22).
Headphones
l Do not turn the volume on to full at switch on and listen
to music at moderate levels. Excessive sound pressure
from earphones and headphones can cause hearing
loss.
l Before plugging in or unplugging the headphone,
reduce the volume.
l Be sure your headphone has a 3.5 mm diameter plug
and impedance between 16 and 50 ohms. The
recommended impedance is 32 ohms.
l Plugging in the headphone disconnects the speakers
automatically. Adjust the volume using the VOLUME
control.
l X-HM20 only: Audio from the iPod/iPhone cannot be
heard via the headphones connected to the unit. “HP
INVALID” will be displayed if you connect the
headphones when the iPod/iPhone function is
selected.
En-23
Page 24

Troubleshooting chart
Many potential problems can be resolved by the owner
without calling a service technician.
If something is wrong with this product, check the following
before calling your authorized PIONEER dealer or service
centre.
n General
Symptom Possible cause
l The clock is not set
to the correct time.
l When a button is
pressed, the unit
does not respond.
l No sound is heard. l Is the volume level set to
n CD player
Symptom Possible cause
l Playback does not
start.
l Playback stops in
the middle or is not
performed properly.
l Playback sounds are
skipped, or stopped
in the middle of a
track.
n Remote control
Symptom Possible cause
l The remote control
does not operate.
l Did a power failure occur?
Reset the clock. (Refer to
page 9)
l Set the unit to the power
stand-by mode and then
turn it back on.
l If the unit still malfunctions,
reset it. (Refer to page 25)
“Min”?
l Are the headphones
connected?
l Are the speaker wires
disconnected?
l Is the disc loaded upside
down?
l Does the disc satisfy the
standards?
l Is the disc distorted or
scratched?
l Is the unit located near
excessive vibrations?
l Is the disc very dirty?
l Has condensation formed
inside the unit?
l Is the AC power lead of the
unit plugged in?
l Is the battery polarity
correct?
l Is the battery dead?
l Is the distance or angle
incorrect?
l Does the remote control
sensor receive strong
light?
n USB
Symptom Possible cause
l Device cannot
be detected.
l Playback does
not start.
l Wrong time
display.
l Wrong file name
display.
l Is there any MP3/WMA file
available?
Is the device properly connected?
l
l Is it an MTP device?
l Does the device contain AAC
file only?
l Is it a copyright protected
WMA file?
l Is it a false MP3 file?
l Is Variable Bitrate file being
played back?
Is the File Name written in
l
Chinese or Japanese characters?
n iPod and iPhone (X-HM20 only)
Symptom Possible cause
l No sound is
produced.
No image
appears on the
TV/monitor.
l iPod or iPhone
will not charge.
“This accessory is
l
not made to work
with iPhone” or
“This accessory is
not supported by
iPhone” appears
on iPhone screen.
The iPod or iPhone is not playing.
l
l The iPod or iPhone is not
properly connected to the unit.
l Is the AC power lead of the
unit plugged in?
l The video cable is not properly
connected.
l The TV/monitor’s input
selection is not properly set.
l The iPod TV out feature has
not been set to output video.
l
Audio from the iPod/iPhone cannot
be heard via the headphones
connected to the unit.
l The iPod or iPhone is not
making full contact with the
connector.
l Using iPod (3
l The iPod or iPhone is not
supported. Refer to page 10
for compatible models.
l The iPod or iPhone unit cannot
be charged whilst the main unit
is in USB mode.
l The iPhone battery is low.
Please charge the iPhone.
l iPhone is not properly docked.
rd
generation).
n Tuner
Symptom Possible cause
l The radio makes
unusual noises
continuously.
l Is the unit placed near the
TV or computer?
l Is the FM aerial or AM loop
aerial placed properly?
Move the aerial away from
the AC power lead if it is
located nearby.
En-24
Page 25
Troubleshooting chart (Continued)
NO YES
Correct
n Condensation
Sudden temperature changes, storage or operation in an
extremely humid environment may cause condensation
inside the cabinet (CD pickup, etc.) or on the transmitter
on the remote control. Condensation can cause the unit to
malfunction. If this happens, leave the power on with no
disc in the unit until normal playback is possible (about 1
hour). Wipe off any condensation on the transmitter with a
soft cloth before operating the unit.
n If problem occurs
When this product is subjected to strong external
interference (mechanical shock, excessive static
electricity, abnormal supply voltage due to lightning, etc.)
or if it is operated incorrectly, it may malfunction.
If such a problem occurs, do the following:
1 Set the unit to the stand-by mode and turn the power on
again.
2
If the unit is not restored in the previous operation, unplug
and plug in the unit again, and then turn the power on.
Note:
If neither operation above restores the unit, clear all the
memory by resetting it.
n Factory reset, clearing all memory
Press the STANDBY/ON button to turn the power on.
1
2 Press the LINE button button on the remote control or
INPUT button repeatedly on the main unit to select
LINE IN function.
3 In LINE IN function, press the button on the
main unit press and hold the button until "RESET"
appears.
n Care of compact discs
Compact discs are fairly resistant to damage, however
mistracking can occur due to an accumulation of dirt on
the disc surface. Follow the guidelines below for maximum
enjoyment from your CD collection and player.
l Do not write on either side of the disc, particularly the
non-label side from which signals are read. Do not
mark this surface.
l Keep your discs away from direct sunlight, heat, and
excessive moisture.
l Always hold the CDs by the edges. Fingerprints, dirt, or
water on the CDs can cause noise or mistracking. If a
CD is dirty or does not play properly, clean it with a soft,
dry cloth, wiping straight out from the centre, along the
radius.
Maintenance
n Cleaning the cabinet
Periodically wipe the cabinet with a soft cloth and a diluted
soap solution, then with a dry cloth.
Caution:
l Do not use chemicals for cleaning (petrol, paint thinner,
etc.). It may damage the cabinet.
l Do not apply oil to the inside of the unit. It may cause
malfunctions.
Caution:
This operation will erase all data stored in memory
including clock, timer settings, tuner preset, and CD
programme.
n Before transporting the unit
Remove the iPod, USB memory device and disc from the
unit. Then, set the unit to the power stand-by mode.
Carrying the unit with iPod or USB memory device left
docked or discs left inside might damage the unit.
En-25
Page 26
Specifications
As part of our policy of continuous improvement,
PIONEER reserves the right to make design and
specification changes for product improvement without
prior notice. The performance specification figures
indicated are nominal values of production units. There
may be some deviations from these values in individual
units.
n General
Power source AC 220 V to 240 V, 50 Hz/60 Hz
Power
consumption
Dimensions Width: 215 mm
Weight 3.8 kg (X-HM20)
n Amplifier
Output power RMS: 15 W + 15 W (1 kHz, 10 %
Output terminals Speakers: 4 ohms
Input terminals Line in (Analog input):
n CD player
Type Single disc multi-play compact disc
Signal readout Non-contact, 3-beam
D/A converter Multi bit D/A converter
Frequency
response
Dynamic range 90 dB (1 kHz)
Power on:
45 W (X-HM20)
30 W (X-HM10)
Power stand-by: 0.4 W
Height: 99 mm
Depth: 300 mm
3.7 kg (X-HM10)
T.H.D., 4 ohms)
20 Hz to 20 kHz
Video output (X-HM20 only): 1 Vp-p
Headphones: 16 ohms
(recommended: 32 ohms)
500 mV/47 k ohms
player
semiconductor laser pickup
20 Hz to 20 000 Hz
n USB
USB host interface l Complies with USB 1.1 (Full
Support file l MPEG 1 Layer 3
Bitrate support l MP3 (32 kbps to 320 kbps)
Other l Maximum total number of
File system
support
Speed)/2.0 Mass Storage
Class.
l Support Bulk only and CBI
protocol.
l WMA (Non DRM)
l WMA (64 kbps to 160 kbps)
MP3/WMA files is 999.
l Maximum total number of
folders is 99 INCLUSIVE of
root directory.
l The ID3TAG information
supported are TITLE, ARTIST
and ALBUM only.
l Supports ID3TAG version 1
and version 2.
l Support USB devices with
Microsoft Windows/DOS/FAT
12/FAT 16/ FAT 32.
l 2 kbyte block length for sector.
n Tuner
Frequency range FM: 87.5 MHz to 108 MHz
Preset 40 (FM and AM station)
AM: 522 kHz to 1,620 kHz
n Speaker
X-HM20
Type 2-way type speaker system
Maximum input
power
Impedance 4 ohms
Dimensions Width: 132 mm
Weight 2.0 kg/each
5 cm Tweeter
10 cm Woofer
15 W
Height: 260 mm
Depth: 173 mm
X-HM10
Type 2-way type speaker system
Maximum input
power
Impedance 4 ohms
Dimensions Width: 132 mm
Weight 1.6 kg/each
Piezoelectric Tweeter
10 cm Woofer
15 W
Height: 260 mm
Depth: 158 mm
En-26
Page 27

Notice
About iPod/iPhone/iPad:
"Made for iPod", "Made for iPhone" and "Made for iPad" mean that
an electronic accessory has been designed to connect specifically
to iPod, iPhone, or iPad, respectively, and has been certified by the
developer to meet Apple performance standards. Apple is not
responsible for the operation of this device or its compliance with
safety and regulatory standards. Please note that the use of this
accessory with iPod, iPhone, or iPad may affect wireless
performance.
iPad, iPhone and iPod are trademarks of Apple Inc., registered in
the U.S. and other countries.
© 2011 PIONEER CORPORATION.
All rights reserved.
En-27
Page 28
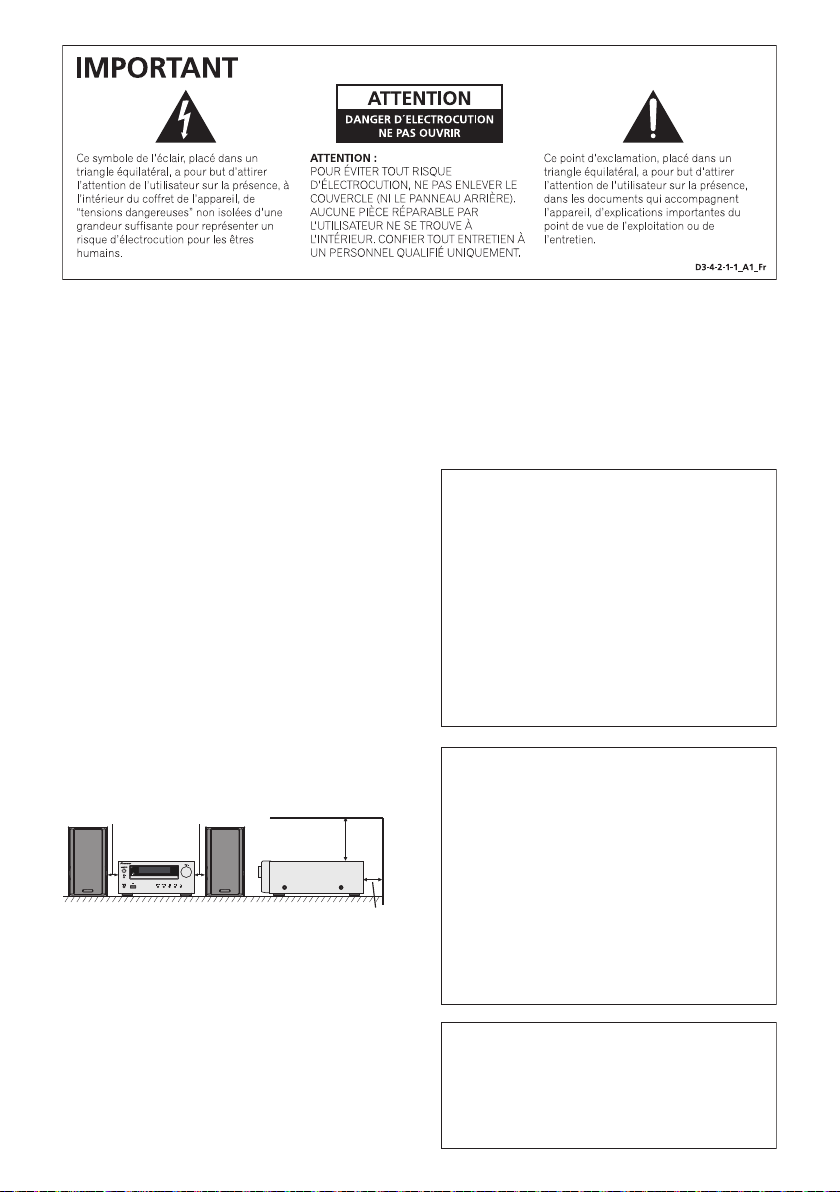
AVERTISSEMENT
T
Cet appareil n’est pas étanche. Pour éviter les risques
d’incendie et de décharge électrique, ne placez près de
lui un récipient rempli d’eau, tel qu’un vase ou un pot
de fleurs, et ne l’exposez pas à des gouttes d’eau, des
éclaboussures, de la pluie ou de l’humidité.
D3-4-2-1-3_A1_Fr
AVERTISSEMENT
Milieu de fonctionnement
empérature et humidité du milieu de fonctionnement :
De +5 °C à +35 °C (de +41 °F à +95 °F) ; Humidité
relative inférieure à 85 % (orifices de ventilation non
obstrués)
N’installez pas l’appareil dans un endroit mal ventilé ou
un lieu soumis à une forte humidité ou en plein soleil
(ou à une forte lumière artificielle).
D3-4-2-1-7c*_A1_Fr
Avant de brancher l’appareil pour la première, lisez
attentivement la section suivante.
La tension de l’alimentation électrique disponible
varie selon le pays ou la région. Assurez-vous que
la tension du secteur de la région où l’appareil sera
utilisé correspond à la tension requise (par ex. 230
V ou 120 V), indiquée sur le panneau arrière.
D3-4-2-1-4*_A1_Fr
Si la fiche d’alimentation secteur de cet appareil ne
convient pas à la prise secteur à utiliser, la fiche doit
être remplacée par une appropriée. Ce
remplacement et la fixation d’une fiche secteur sur le
cordon d’alimentation de cet appareil doivent être
effectués par un personnel de service qualifié. En cas
de branchement sur une prise secteur, la fiche de
coupure peut provoquer une sérieuse décharge
AVERTISSEMENT
Pour éviter les risques d’incendie, ne placez aucune
flamme nue (telle qu’une bougie allumée) sur
l’appareil.
D3-4-2-1-7a_A1_Fr
PRÉCAUTION DE VENTILATION
électrique. Assurez-vous qu’elle est éliminée
correctement après sa dépose.
L’appareil doit être déconnecté en débranchant sa
fiche secteur au niveau de la prise murale si vous
prévoyez une période prolongée de non utilisation
(par exemple avant un départ en vacances).
D3-4-2-2-1a_A1_Fr
Lors de l’installation de l’appareil, veillez à laisser un
espace suffisant autour de ses parois de manière à
améliorer la dissipation de chaleur (au moins 10 cm sur
le dessus, 10 cm à l’arrière et 10 cm de chaque côté).
10 cm 10 cm
10 cm
ATTENTION
L’interrupteur STANDBY/ON de cet appareil ne
coupe pas complètement celui-ci de sa prise secteur.
Comme le cordon d’alimentation fait office de
dispositif de déconnexion du secteur, il devra être
débranché au niveau de la prise secteur pour que
l’appareil soit complètement hors tension. Par
conséquent, veillez à installer l’appareil de telle
manière que son cordon d’alimentation puisse être
10 cm
AVERTISSEMENT
Les fentes et ouvertures du coffret sont prévues pour la
ventilation, pour assurer un fonctionnement stable de
l’appareil et pour éviter sa surchauffe. Pour éviter les
risques d’incendie, ne bouchez jamais les ouvertures et
ne les recouvrez pas d’objets, tels que journaux, nappes
ou rideaux, et n’utilisez pas l’appareil posé sur un tapis
épais ou un lit.
D3-4-2-1-7b*_A1_Fr
facilement débranché de la prise secteur en cas
d’accident. Pour éviter tout risque d’incendie, le
cordon d’alimentation sera débranché au niveau de
la prise secteur si vous prévoyez une période
prolongée de non utilisation (par exemple avant un
départ en vacances).
D3-4-2-2-2a*_A1_Fr
Ce produit est destiné à une utilisation domestique
générale. Toute panne due à une utilisation autre qu'à
des fins privées (comme une utilisation à des fins
commerciales dans un restaurant, dans un autocar
ou sur un bateau) et qui nécessite une réparation
sera aux frais du client, même pendant la période de
garantie.
K041_A1_Fr
Page 29
Condensation
Si vous transportez sans transition le lecteur d’un
endroit froid dans un pièce chaude (en hiver, par
exemple), ou si la température de la pièce où se trouve
le lecteur augmente rapidement, des gouttelettes d’eau
(condensation) peuvent se former à l’intérieur du
lecteur (sur les pièces et la lentille). En cas de
condensation, le lecteur ne fonctionne pas
correctement et la lecture n’est pas possible. Laissez le
lecteur en service pendant 1 ou 2 heures à la
température ambiante (pour que l’humidité ait le temps
de s’évaporer). Les gouttelettes d’eau se dissiperont et
la lecture sera de nouveau possible.
De la condensation peut aussi se former en été si le
lecteur est exposé à l’air d’un climatiseur. Dans ce cas,
éloignez le lecteur du climatiseur.
S005_A1_Fr
F-3
Page 30
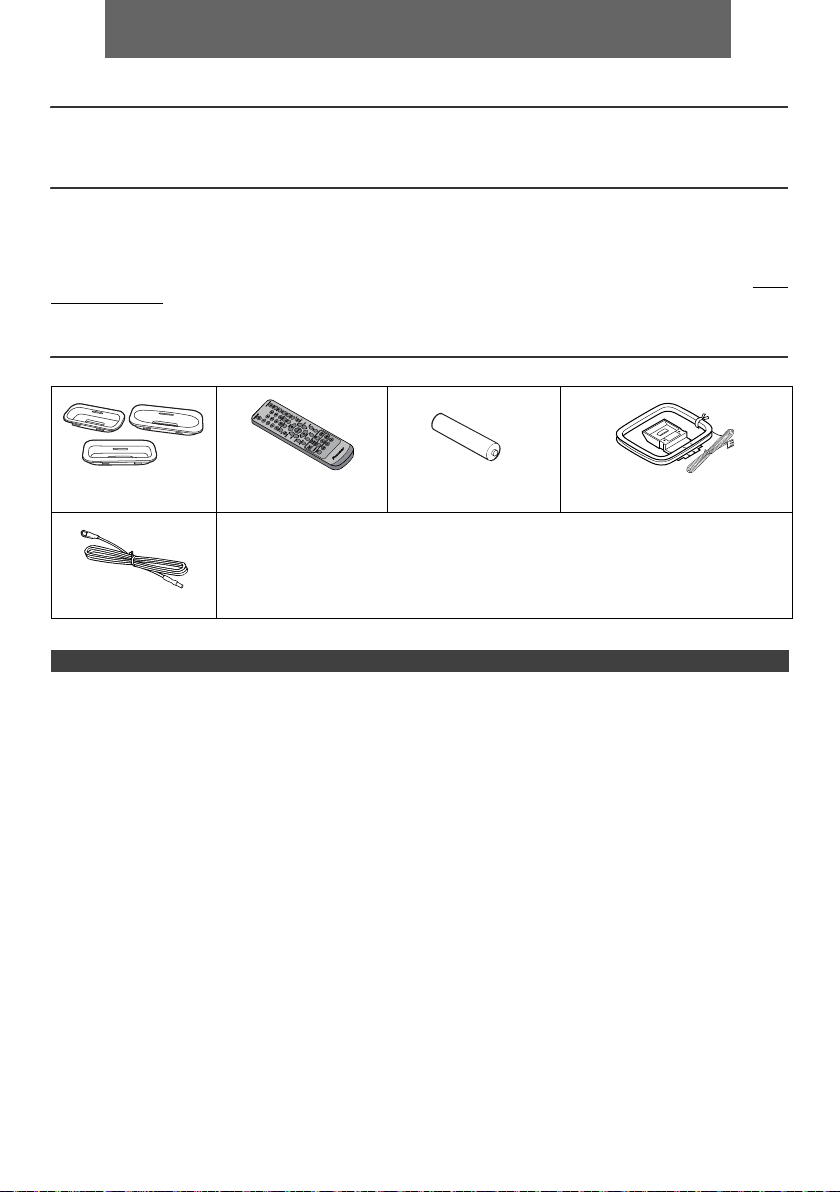
FRANÇAIS
l Micro chaîne CD X-HM10/X-HM20, composé d'une unité principale et d'enceintes.
Introduction
Nous vous remercions d’avoir porté votre choix sur ce produit PIONEER. Pour en tirer le meilleur parti, veuillez lire ce
mode d’emploi très attentivement. Il vous guidera dans l’utilisation de votre produit PIONEER.
Note spéciale
La fourniture de ce produit ne procure pas de licence et n'implique aucun droit de distribution de contenu créé avec ce
produit par un système de transmission (terrestre, satellite, câble et/ou d'autres canaux de distribution) commercial, par
des applications de « streaming » (par l'intermédiaire de l'internet, des intranets et/ou d'autres réseaux) commerciales,
par d'autres systèmes de distribution de contenu (applications audio à la demande et similaires) commerciaux, ou sur
des médias physiques (disques compacts, DVD, circuits intégrés, disques durs, cartes mémoire et similaires)
engrangeant des revenus. Pour de tels usages, une license séparée est exigée. Pour les détails, veuillez visiter http://
mp3licensing.com.
Technologie audio de codage MPEG Layer-3 licenciée par Fraunhofer IIS et Thomson.
Accessoires
Veuillez vérifier la présence des accessoires suivants.
Adaptateurs iPhone x 3
(X-HM20 uniquement)
Antenne FM x 1
Télécommande x 1 Pile « AA » x 1 Cadre-antenne PO x 1
Cordon d’alimentation
Carte de garantie
Ce mode d’emploi
TABLE DES MATIÈRES
Page
Informations générales
Précautions . . . . . . . . . . . . . . . . . . . . . . . . . . . . . . . . . 5
Commandes et voyants . . . . . . . . . . . . . . . . . . . . . .5 - 6
Avant l’utilisation
Raccordement du système . . . . . . . . . . . . . . . . . . . 7 - 8
Télécommande . . . . . . . . . . . . . . . . . . . . . . . . . . . . . . . 8
Fonctionnement de base
Commande générale . . . . . . . . . . . . . . . . . . . . . . . . . . 9
Réglage de l’horloge
(Seulement par télécommande) . . . . . . . . . . . . . . . 9 - 10
iPod, iPhone et iPad
Lecture à partir d’un iPod, iPhone ou iPad
(X-HM20 uniquement). . . . . . . . . . . . . . . . . . . . . . 10 - 12
Lecture de disques MP3/WMA ou CD
Écoute d’un CD ou d’un disque MP3/WMA . . . . . . . . 13
Lecture avancée de disques MP3/WMA ou
CD. . . . . . . . . . . . . . . . . . . . . . . . . . . . . . . . . . . . . 14 - 15
Mode dossier MP3/WMA (seulement pour des fichiers
MP3/WMA) . . . . . . . . . . . . . . . . . . . . . . . . . . . . . . 15 - 16
USB
Page
Lecture mémoire de grande capacité
USB/lecteur MP3 . . . . . . . . . . . . . . . . . . . . . . . . . 16 - 17
Lecture USB avancée . . . . . . . . . . . . . . . . . . . . . . . . . 17
Radio
Écoute de la radio . . . . . . . . . . . . . . . . . . . . . . . . . . . .18
Fonctions avancées
Utilisation du système RDS (Radio Data
System) . . . . . . . . . . . . . . . . . . . . . . . . . . . . . . . . 19 - 21
Opérations programmées et mise en arrêt différée
(Seulement par télécommande) . . . . . . . . . . . . . 21 - 23
Casque . . . . . . . . . . . . . . . . . . . . . . . . . . . . . . . . . . . 23
Références
Dépannage . . . . . . . . . . . . . . . . . . . . . . . . . . . . . 24 - 25
Entretien . . . . . . . . . . . . . . . . . . . . . . . . . . . . . . . . . . 25
Spécifications . . . . . . . . . . . . . . . . . . . . . . . . . . . . . . .26
Avis. . . . . . . . . . . . . . . . . . . . . . . . . . . . . . . . . . . . . . . . 27
Fr-4
Page 31

Précautions
1
9
6
7
8 10 11 12 13 14
52 3
4
X-HM20
uniquement
n Général
l Installer l’appareil sur un socle stable, horizontal et
exempt de vibrations.
l Placer les enceintes à une distance d’au moins 30 cm
de tout téléviseur CRT afin d’éviter les variations de
couleurs à travers l’écran du téléviseur. Si les
variations persistent, éloigner les enceintes du
téléviseur. Le téléviseur LCD n’est pas enclin à de
telles variations.
l Mettre l’appareil à l’abri du soleil, du champ
magnétique, de la poussière excessive ou de
l’humidité. On l’écartera aussi d’un appareil
électronique (ordinateur domestique, télécopieur, etc.)
qui provoquerait des parasites.
l Ne rien placer sur l’appareil.
l Mettre l’appareil à l’abri de l’humidité, de la chaleur
excessive (supérieure à 60°C) ou du froid excessif.
l Si le système ne fonctionne pas correctement,
débrancher et rebrancher le système. Rebrancher le
système et le rallumer.
l En cas d’orage, débrancher l’appareil.
l Débrancher le cordon d’alimentation en le tenant par la
fiche pour ne pas abîmer les fils internes.
l La prise CA est utilisée comme dispositif de
déconnexion et doit rester aisément accessible.
l Ne pas ôter l’enveloppe, on s’exposera à la
secousse électrique. Pour toute réparation interne,
s’adresser au revendeur PIONEER.
l Veiller à ne pas couvrir les ouvertures de ventilation de
journaux, de nappes, de rideaux, etc.
l Ne poser aucune source de flamme nue, telle qu’une
bougie, sur l’appareil.
l Il faut traiter une pile usée selon la réglementation
environnementale.
l L’appareil est conçu pour une utilisation en climat
tempéré.
Avertissement :
Respecter la tension indiquée sur l’appareil. Le
fonctionnement sur une tension plus élevée est
dangereux et risque de provoquer un incendie ou tout
autre type d’accident. PIONEER ne sera pas tenu pour
responsable des dommages causés par le non-respect de
la tension spécifiée.
n Commande de volume
Le niveau sonore émis à un réglage donné du volume
dépend, entre autres facteurs, du rendement des
enceintes et du lieu d’utilisation. Il est conseillé d’éviter
l’exposition à des niveaux de volume élevés. Éviter de trop
élever le volume. Écoutez de la musique à des niveaux
modérés. Un volume sonore excessif émis par les
écouteurs et le casque peut endommager l’ouïe.
Commandes et voyants
Les fonctions iPod/iPhone sont disponibles sur le modèle X-HM20 uniquement.
n Façade
1. Capteur de télécommande. . . . . . . . . . . . . . . . . . 8
2. Voyant de minuterie . . . . . . . . . . . . . . . . . . . . . . 22
3. Tiroir de disque . . . . . . . . . . . . . . . . . . . . . . . . . 13
4. Station d'accueil pour iPod ou iPhone . . . . . . . 11
5. Commande de volume . . . . . . . . . . . . . . . . . . . . . 9
6. Touche STANDBY/ON. . . . . . . . . . . . . . . 11, 13, 18
7. Touche de INPUT . . . . . . . . . . . . . 9, 11, 13, 16, 18
8. Prise de casqu . . . . . . . . . . . . . . . . . . . . . . . . . . 23
9. Borne USB . . . . . . . . . . . . . . . . . . . . . . . . . . . . . 16
Page
10. Préréglage bas du tuner, plage CD/USB bas,
saut de l’iPod/iPhone bas . . . . . . . . . . . . . . . 12, 13
11. Préréglage haut du tuner, plage CD/USB haut,
saut de l’iPod/iPhone haut . . . . . . . . . . . . . .12, 13
12. Touche d’arrêt Disque / USB. . . . . . . . . . . . . 12, 13
13. Touche de lecture ou de pause du disque/USB/
iPod/iPhone . . . . . . . . . . . . . . . . . . . . . . . . . .12, 13
14. Touche d’ouverture/fermeture de tiroir de
disque . . . . . . . . . . . . . . . . . . . . . . . . . . . . . . . . . .13
Fr-5
Page
Page 32

Commandes et voyants (suite)
*Les touches 11, 13, 31, 32 sont disponibles sur le modèle X-HM20
uniquement.
1 4 5 6 7
8910 11 1312 141516
28272624 2523221918 2120
17
2 3
1
2
3
4
5
6
7
8
9
10
11*
12
13*
14
15
16
17
18
19
20
21
22
24
25
26
27
28
29
30
31*
33
35
36
23
32*
34
n Télécommande
1. Émetteur de télécommande . . . . . . . . . . . . . . . . .8
2. Touche STANDBY/ON . . . . . . . . . . . . . 9, 11, 13, 21
3. Touches numérotées . . . . . . . . . . . . . . . . . . . . . . 14
4. Touche P.Bass . . . . . . . . . . . . . . . . . . . . . . . . . . . .9
5. Touche des graves/aigus . . . . . . . . . . . . . . . . . . .9
6. Touche de syntonisation bas, saut bas, inversion
rapide, temps bas . . . . . . .9, 12, 13, 16, 18, 19, 21
7. Touche de préréglage haut du tuner,
curseur haut iPod. . . . . . . . . . . . . . . .11, 12, 16, 18
8. Touche de volume bas . . . . . . . . . . . . . . . . . . . . 9
9. Touche de préréglage bas du tuner, curseur bas
iPod . . . . . . . . . . . . . . . . . . . . . . . . . . .11, 12, 16, 18
10. Touche de répertoire . . . . . . . . . . . . . . . . . . . . . . 16
11. Touche iPod/iPhone . . . . . . . . . . . . . . . . . . . . . . .11
12. Touche CD . . . . . . . . . . . . . . . . . . . . . . . . . . . . . .13
13. Touche iPod/iPhone DISPLAY TV OUT. . . . .11, 12
14. Touche CD/USB DISPLAY . . . . . . . . . . . . . . . . . .16
15. Touche de la source radio. . . . . . . . . . . . . . .18, 19
16. Touche RDS ASPM . . . . . . . . . . . . . . . . . . . . . . . 19
17. Touche d’ouverture/fermeture . . . . . . . . . . . . . .13
18. Touche gradateur . . . . . . . . . . . . . . . . . . . . . . . . . .9
19. Touche de mémoire . . . . . . . . . . . . . . . . . . . .14, 18
20. Touche d’annulation . . . . . . . . . . . . . . . . . . . 14, 18
21. Touche de sommei. . . . . . . . . . . . . . . . . . . . . . . .23
22. Touche d’horloge/minuterie . . . . . . . . . . . . . .9, 21
23. Touche de lecture aléatoire. . . . . . . . . . . . . .12, 14
24. Touche de lecture répétée. . . . . . . . . . . . . . .12, 14
25. Touche de syntonisation haut, saut haut, avance
rapide, temps haut. . . . . . .9, 12, 13, 16, 18, 19, 21
26. Touche volume haut . . . . . . . . . . . . . . . . . . . . . . .9
27. Touche ENTER . . . . . . . . . . . . . . . . . . . . . .9, 11, 12
28. Touche de silence . . . . . . . . . . . . . . . . . . . . . . . . .9
29. Touche de la source ligne . . . . . . . . . . . . . . . .8, 25
30. Touche USB . . . . . . . . . . . . . . . . . . . . . . . . . . . . .16
31. Touche lecturee/pause iPod/iPhone. . . . . . . . . . 12
32. Touche Menu de l’iPod/iPhone . . . . . . . . . . . . . .12
33. Touche lecture/pause CD/USB . . . . . . . .12, 13, 14
34. Touche d’arrêt CD/USB . . . . . . . . . . . . . . . . .13, 14
35. Touche d’affichage RDS . . . . . . . . . . . . . . . . . . .19
36. Touche RDS PTY . . . . . . . . . . . . . . . . . . . . . . . . .19
Page
n Enceinte acoustique
1. Haut-parleur d’aigus
2. Woofer
3. Évent de baffle
réflex
1
2
n Les grilles des enceintes peuvent être
retirées (X-HM20 uniquement)
Veiller à ce que rien n’entre en contact
avec les membranes de haut-parleurs
lorsque les grilles sont retirées.
n Affichage
1. Voyant USB . . . . . . . . . . . . . . . . . . . . . . . . . . . . . 16
2. Voyant iPod. . . . . . . . . . . . . . . . . . . . . . . . . . . . . .10
3. Voyant CD . . . . . . . . . . . . . . . . . . . . . . . . . . . . . . .13
4. Voyant MP3 . . . . . . . . . . . . . . . . . . . . . . . . . . . . . . 13
5. Voyant WMA . . . . . . . . . . . . . . . . . . . . . . . . . . . . . 13
6. Voyant RDM (Lecture aléatoire) . . . . . . . . . . . . .14
7. Voyant MEM (Mémoire) . . . . . . . . . . . . . . . . . . . . 14
8. Voyant de répétition . . . . . . . . . . . . . . . . . . . . . . . 14
9. Voyant de lecture/pause . . . . . . . . . . . . . . . . . . .12
10. Voyant de syntonisation FM/AM . . . . . . . . . . . . .18
3
11. Voyant de mode FM stéréo . . . . . . . . . . . . . . . . .18
12. Voyant de la station stéréo . . . . . . . . . . . . . . . . .18
13. Voyant RDS . . . . . . . . . . . . . . . . . . . . . . . . . . . . . . 19
14. Voyant PTY . . . . . . . . . . . . . . . . . . . . . . . . . . . . . . 19
15. Voyant TP . . . . . . . . . . . . . . . . . . . . . . . . . . . . . . . 19
16. Voyant TA . . . . . . . . . . . . . . . . . . . . . . . . . . . . . . .19
17. Voyant de sourdine . . . . . . . . . . . . . . . . . . . . . . . .9
18. Voyant de titre. . . . . . . . . . . . . . . . . . . . . . . . . . . . 16
19. Voyant de l’artiste. . . . . . . . . . . . . . . . . . . . . . . . . 16
20. Voyant de dossier . . . . . . . . . . . . . . . . . . . . . . . . 16
21. Voyant de l’album . . . . . . . . . . . . . . . . . . . . . . . . .16
22. Voyant du fichier . . . . . . . . . . . . . . . . . . . . . . . . .16
23. Voyant de plage . . . . . . . . . . . . . . . . . . . . . . . . . .14
24. Voyant de programmation quotidienne . . . . . . .21
25. Voyant de programmation unique . . . . . . . . . . . 21
26. Voyant de disque . . . . . . . . . . . . . . . . . . . . . . . . .13
27. Voyant de total . . . . . . . . . . . . . . . . . . . . . . . . . . .16
28. Voyant de mise en arrêt différée . . . . . . . . . . . .23
Page
Fr-6
Page 33

Raccordement du système
AUX
LINE
LOOP
AC IN
Enceinte
droite
Antenne FM
Vers la prise d’entrée vidéo
vis (non fournies)
Mur
< Fixation
au mur >
< Montage >
Prise murale
(220 V à 240 V CA,
50 Hz/60 Hz)
Mise en place du cadre PO
Câble vidéo
(non fourni)
Téléviseur
Cadre-
antenne PO
Enceinte
gauche
Prise de sortie vidéo
(X-HM20 uniquement)
Incorrect
Avant d'effectuer ou de modifier les raccordements, mettez l'appareil hors tension et débranchez le cordon
d'alimentation au niveau de la prise secteur.
l
Les bornes des haut-parleurs sont sous une tension
n Raccordement des antennes
Antenne FM fournie :
Raccorder l’antenne FM à la prise FM 75 OHMS et diriger
l’antenne FM vers la direction qui assure la meilleure
réception.
Antenne extérieure FM :
Utiliser une antenne extérieure FM (câble coaxial
75 ohms) pour obtenir une meilleure réception.
Déconnecter le câble d’antenne FM fourni lorsqu’on utilise
une antenne FM extérieure.
Cadre-antenne PO fourni :
Raccorder le cadre-antenne PO à la prise AM. Orientez le
cadre antenne PO de manière à obtenir une réception
optimale. Le positionner, par exemple, sur une étagère ou
l’attacher sur un support ou à un mur au moyen de vis (non
incluses).
Note :
Éloigner l’antenne de l’appareil ou du cordon
d’alimentation pour assurer une meilleure réception.
Placez l’antenne loin de l’unité pour une meilleure
réception.
n Raccordement des enceintes
l
Torsadez ensemble les brins de fils
dénudés.
l Connectez le fil rouge à la borne
plus (+) et l'autre fil à la borne
moins (–).
l Utilisez des enceintes de 4 ohms
d'impédance ; des enceintes
d'impédance inférieure pourraient
endommager l'appareil.
DANGEREUSE. Pour éviter tout risque de décharge
électrique lors du branchement et du débranchement des
câbles de haut-parleur, débranchez le cordon
d’alimentation avant de toucher des parties non isolées.
l N'installez pas ces enceintes au mur ou au plafond, car
elles pourraient provoquer des blessures en cas de
chute.
Ne pas prendre le canal droit pour le canal gauche.
l
L’enceinte de droite est celle située à droite quand on se
place devant le système.
l Ne pas laisser se toucher les fils dénudés des
enceintes.
l Ne rien placer ou laisser pénétrer dans l’évent de baffle
réflex.
Éviter de monter (ou s’asseoir) sur les enceintes. On
l
risque de se blesser en tombant.
n Branchement d’un iPod ou d’un iPhone au
Les fichiers photo et vidéo de iPod ou iPhone peuvent être
visualisés en raccordant le système à un téléviseur/écran.
Si le téléviseur/écran est équipé d’une entrée vidéo, la
connecter à la prise VIDEO OUT au dos de l’appareil et
placer le commutateur TV Out de iPod ou iPhone en
position « On ».
Note :
Vérifier que le réglage de l’appareil iPod, soit NTSC soit
PAL, est le même que celui du signal du téléviseur. Visiter
téléviseur (X-HM20 uniquement)
la page d’accueil d’Apple pour plus d’informations.
Fr-7
Page 34

Raccordement du système (suite)
AUX
LINE
LOOP
AC IN
Signal audio
Téléviseur
Vers les prises de
sortie audio
Câble audio
(disponible dans
le commerce)
Appareil
Ver s les
prises
d’entrée LINE
STANDBY/ON
7 m
Capteur de
télécommande
Télécommande
n Branchement du cordon d’alimentation
Après avoir vérifié tous les raccordements, brancher
l’appareil.
Note :
Débrancher le cordon d’alimentation secteur de la prise
murale si l’appareil doit rester inutilisé pendant une longue
période.
Attention :
l Tenez le cordon d’alimentation par sa prise lorsque
vous le manipulez. Ne débranchez pas l’appareil en
tirant sur le cordon et ne touchez jamais le cordon
d’alimentation avec les mains mouillées ; vous pourriez
provoquer un court-circuit ou prendre un choc
électrique. Ne placez pas l’appareil, un meuble ou tout
autre objet sur le cordon d’alimentation, et évitez de le
pincer de toute autre manière. Ne faites jamais de
nœud dans le cordon et ne le liez jamais avec d’autres
câbles. Les cordons d’alimentation doivent être
acheminés de façon à ce qu’on ne puisse pas marcher
dessus. Un cordon d’alimentation endommagé peut
provoquer un incendie ou un choc électrique. Vérifiez
l’état du cordon de temps à autre. Si le cordon est
endommagé, demandez-en le remplacement auprès
du service après-vente agréé Pioneer le plus proche.
l Utilisez uniquement le cordon d’alimentation fourni
avec cet appareil.
l N’utilisez pas le cordon d’alimentation fourni pour un
usage autre que celui décrit ci-dessus.
n Raccordement d’un téléviseur, etc.
Raccorder au téléviseur à l’aide d’un câble audio
.
n Mise en place des pile
Ouvrir le couvercle des piles.
1
Insérez la pile fournie dans le sens indiqué sur le
2
compartiment de la pile.
Pour insérez ou retirer la pile, poussez-la en direction de la
borne (–).
Fermer le couvercle.
3
Avertissement :
l N’utilisez pas et ne conservez pas les piles en les
laissant exposées à la lumière directe du soleil ou dans
un endroit excessivement chaud, tel qu’une voiture ou
à proximité d’un appareil de chauffage. La pile
risquerait de fuir, de surchauffer, d'exploser ou de
s'enflammer. Leur durée de vie ou leur performance
pourrait également être réduite.
Attention :
l
Retirez la pile de l’appareil si vous prévoyez de ne pas
utiliser ce dernier pendant une longue période. Ceci
évitera les dégâts potentiels dus à une fuite des piles.
l
N’utilisez pas de pile rechargeable (pile nickel-cadmium,
etc.).
l
Une pile mal installée peut causer un mauvais
fonctionnement de l’appareil.
Notes sur l’utilisation :
l
Remplacez la pile lorsque la distance de fonctionnement
de la télécommande est réduite ou lorsque cette dernière
ne répond plus correctement. Achetez une pile de type
« AA ».
l
Avec un chiffon doux, nettoyer régulièrement l’émetteur
de la télécommande et le capteur de l’appareil.
l
L’exposition du capteur de l’appareil à une lumière forte
peut interférer avec le fonctionnement. Si ce problème
arrive, changer la luminosité ou la direction de l’appareil.
l
Mettre la télécommande à l’abri de l’humidité, la chaleur,
le choc et les vibrations.
l Pour vous débarrasser des piles usagées, veuillez
vous conformer à la réglementation et aux instructions
relatives à l’environnement en vigueur dans votre pays
ou région.
n Essai de la télécommande
Vérifier la télécommande après avoir fait correctement tous
les raccordements.
Diriger la télécommande vers le capteur placé sur l’appareil.
La télécommande peut être utilisée dans le rayon illustré cidessous :
Pour sélectionner la fonction d'entrée de ligne :
l
Sur l'appareil principal : Appuyer sur la touche INPUT à
plusieurs reprises jusqu'à ce que Line In s'affiche.
l
Sur la télécommande : Appuyez de manière répétée sur
la touche LINE jusqu’à ce que l’indication Line In s’affiche.
Fr-8
Page 35

Commande générale
(La luminosité est faible).
(La luminosité est encore plus faible).
(La luminosité est vive).
-5 -4 +4 +5
........
-5 -4 +4 +5
........
FM STEREO
FM MONO
USB
iPod
Line In
CD AM
(X-HM20 uniquement)
STANDBY/ON
P.BASS
VOL VOL
STANDBY/ON
INPUT
DIMMER
BASS/TREBLE
n Pour allumer l’appareil
Appuyer sur la touche STANDBY/ON pour allumer l’appareil.
Après utilisation :
Appuyer sur la touche STANDBY/ON pour passer en veille.
n Contrôle de la luminosité de l’affichage
Pour atténuer la luminosité de l'affichage, appuyer sur la touche
DIMMER de la télécommande.
Dimmer 1
Dimmer 2
Dimmer Off
n Réglage automatique du volume initial
Si vous mettez en marche ou si vous arrêtez l'appareil avec le
volume réglé au niveau 17 ou supérieur, le volume se règle
automatiquement sur 16.
n Commande de volume
Tourner le bouton du volume vers VOLUME (sur l’appareil principal)
ou appuyer sur VOL +/– (sur la télécommande) pour augmenter ou
baisser le volume.
n Fonction de mise en route automatique
À la pression de l’une des touches suivantes, l’appareil s’allume.
l
iPod / iPhone, CD, USB, LINE, TUNER de la télécommande : La
fonction sélectionnée est activée.
l
Touche / de l’appareil principal : L’appareil s’allume et la
lecture de la dernière fonction démarre (CD, TUNER, USB, iPod,
LINE IN)
n Fonction mise en arrêt automatique
L'appareil principal entrera en mode de veille (lorsque l'iPod/iPhone
n'est pas raccordé) après 15 minutes d'inactivité pendant:
iPod/iPhone : Pas de connexion.
CD / USB : En mode d’arrêt.
LINE IN : Pas de signal d'entrée détecté ou niveau sonore très faible.
Note :
X-HM20 uniquement : Cependant, si l'iPod/iPhone est raccordé,
l'appareil commencera à se recharger.
L'indication « Charge Mode » s'affiche lorsque l'appareil est en mode
veille.
n Silence
Le son est coupé temporairement quand on appuie sur la touche
MUTE de la télécommande. Appuyer de nouveau pour restaurer le
volume.
MUTE
VOLUME
n Touche P.Bass
Lors de la première mise sous tension de l’appareil, le mode P.bass
est activé. Ce mode accentue les fréquences graves. Pour annuler le
mode P.bass, appuyez sur la touche P.BASS de la télécommande.
n Commande des graves
1
Appuyer sur la touche BASS/TREBLE pour sélectionner « Bass ».
2
Avant 5 secondes, appuyer sur la touche VOL (+ ou –) pour
ajuster les graves.
n Contrôle des aigus
1
Appuyer sur la touche BASS/TREBLE pour sélectionner
« Treble ».
2
Avant 5 secondes, appuyer sur la touche VOL (+ ou –) pour
ajuster les aigus.
n Fonction
Une pression sur la touche INPUT de l’appareil principal
fait passer de la fonction en cours à un autre mode.
Appuyer sur la touche INPUT à plusieurs reprises pour
sélectionner la fonction désirée.
Note :
La fonction de sauvegarde protègera le mode de fonction
mémorisé pendant quelques heures en cas de panne de
courant ou de débranchement du cordon d’alimentation CA.
Réglage de l’horloge (Seulement par
télécommande)
STANDBY/ON
CLOCK/TIMER
TUNING −
Dans cet exemple, l’horloge est réglée sur l’affichage 24
heures (00:00).
1
Appuyer sur la touche STANDBY/ON pour allumer l’appareil.
2
Appuyer sur la touche CLOCK/TIMER.
3
Avant 10 secondes, appuyer sur la touche ENTER. Pour régler
les jour, appuyer sur la touche ou puis appuyer sur la
touche ENTER.
TUNING +
ENTER
Fr-9
Page 36

Réglage de l’horloge (Seulement par
télécommande) (suite)
4
Appuyer sur la touche ou pour sélectionner le système
24 ou 12 heures et presser la touche ENTER.
L’affichage sur 24 heures apparaît.
(00:00 - 23:59)
L’affichage sur 12 heures apparaît.
(AM 12:00 - PM 11:59)
5
Pour régler l’heure, appuyer sur la touche ou et
appuyer sur la touche ENTER. Appuyer sur la touche
ou une fois pour avancer de 1 heure. Pour avancer
rapidement, on la maintiendra enfoncée.
6
Pour régler les minutes, appuyer sur la touche ou
et appuyer sur la touche ENTER. Appuyer sur la touche
ou pour avancer de 1 minute.
Pour vérifier l’heure :
Appuyer sur la touche CLOCK/TIMER. L’afficheur indiquera
l’heure pour 5 secondes environ.
Note :
Remettre l'horloge à l'heure lorsque l'alimentation est rétablie
après que l'appareil ait été rebranché ou après une panne
d'électricité (page 9).
Pour remettre l’horloge à l’heure :
Suivre « Réglage de l’horloge » depuis l’étape 1. Si « Clock »
n’apparaît pas à l’étape 2, sauter l’étape 4 (sélection de
l’affichage 24 ou 12 heures).
Pour passer à l’affichage 24 heures ou 12 heures :
1 Effacer tous les contenus programmés. [Pour plus de
détails, se reporter à « Réinitialisation des réglages
d’usine, effacement de toute la mémoire » à la page
25.]
2 Effectuer le « Réglage de l’horloge » à partir de l’étape
1.
Note :
Le réglage du minuteur est réinitialisé lorsque le cordon
d'alimentation est débranché ou en cas de panne de courant.
l L’installation sur votre iPod/iPhone/iPad de versions
de logiciel autres que celles indiquées sur le site Web
de Pioneer peut provoquer des problèmes
d’incompatibilité avec ce système.
l Prise de recharge pour iPod, iPhone et iPad :
État
Fonction USB NON OUI
Autre fonction OUI NON
Veille OUI NON
l Le message « Cet accessoire n'est pas prévu pour être
utilisé avec un iPhone » ou un message similaire peut
apparaître sur l'écran de l'iPhone lorsque :
- la batterie est déchargé.
- l'iPhone n'est pas correctement installé sur la station
d'accueil (par ex. : de travers).
Si cela se produit, retirez puis reconnectez l'iPhone
sur la station d'accueil.
Ce produit est conçu pour fonctionner avec l'iPhone.
l
Pour éviter les problèmes d'interférences lorsqu'un
iPod/iPhone est connecté, la sortie casque est
désactivée et l'indication « HP INVALID » s'affiche.
Il peut y avoir de brèves interférences durant les
appels d’arrivée
Station
d'accueil
Prise USB
n Connexion d'un iPad (Prise USB)
Insérez le connecteur dans l'iPod, l'iPhone ou l'iPad.
1
2 Raccordez l’iPad à l’appareil via la prise USB.
Lecture à partir d’un iPod, iPhone ou
iPad (X-HM20 uniquement)
Modèles d’iPod, iPhone et iPad pris en charge :
l
iPad
l
iPhone 4
l
iPhone 3GS
l
iPhone 3G
l
iPhone
l
iPod touch (4
l
iPod touch (3
l
iPod touch (2
l
iPod touch (1
l
iPod classic
l
iPod nano (6
l
iPod nano (5
l
iPod nano (4
l
iPod nano (3
l
iPod nano (2
Notes :
l Ce système a été développé et testé pour la version du
logiciel iPod/iPhone/iPad indiquée sur le site Web de
Pioneer (http://pioneer.jp/homeav/support/ios/eu).
ème
génération)
ème
génération)
ème
génération)
ème
génération)
ème
génération)
ème
génération)
ème
génération)
ème
génération)
ème
génération)
Note :
La prise USB ne prend pas en charge la sortie vidéo.
n Lecture à partir d'un iPod, iPhone ou iPad
(prise USB)
1 Appuyez sur le bouton STANDBY/ON pour mettre
l'appareil sous tension.
2 Appuyez de manière répétée sur la touche USB de la
télécommande ou utilisez le bouton INPUT de l'appareil
pour sélectionner la fonction USB.
3 Connectez l'iPod, l'iPhone ou l'iPad à l'appareil.
L'indication « iPod » s'affiche.
4 Appuyez sur la touche / (CD/USB / ) pour
commencer la lecture.
Note :
La touche d'arrêt ( ) est désactivée pendant la lecture à
partir d'un iPod, iPhone ou iPad.
Fr-10
Page 37

Lecture à partir d’un iPod, iPhone ou iPad (X-HM20 uniquement) (suite)
iPhone
Connecteur du logement
iPhone (bas)
Connecteur
pour iPhone
Station d'accueil
pour iPhone
Adaptateur pour iPhone
n Connexion de l’adaptateur iPod et iPhone
(Station d’accueil)
Note :
S’il vous plaît utilisez l’adaptateur four ni avec votre iPod ou
iPhone.
Adaptateur
iPhone n°
Description de
l’iPhone
Capacité
12 iPhone 4GB & 8GB & 16GB
15 iPhone 3G,
iPhone 3GS
8GB & 16GB & 32GB
19 iPhone 4 16GB & 32GB
n Pour insérer l’adaptateur iPod ou iPhone
(Station d’accueil)
Ouvrez la station d'accueil pour iPod/iPhone en tirant
1
vers le haut.
2 Insérez l'adaptateur pour iPod/iPhone dans l'appareil
et connectez votre iPod ou iPhone.
n Pour retirer l'adaptateur pour iPod ou
iPhone (Station d’accueil)
Insérer la pointe d’un tournevis (« – »
type, petit) dans l’orifice de l’adaptateur
comme indiqué et lever vers le haut
pour le retirer.
n Lecture à partir d'un iPod ou iPhone
(Station d’accueil)
Appuyer sur la touche STANDBY/ON pour allumer l’appareil.
1
2
Appuyer sur la touche iPod/iPhone de la télécommande ou
sur la touche INPUT à plusieurs reprises sur l’appareil
principal pour sélectionner la fonction iPod.
3
Insérer l’appareil iPod ou iPhone dans le logement iPod de
l’appareil principal.
4
Pour déclencher la lecture, appuyer sur la touche /
(iPod/iPhone / ).
STANDBY/ON
INPUT
PRESET
ENTER
PRESET
USB
iPod/
iPhone
CD/USB
DISPLAY
TV OUT
DISPLAY
STANDBY/ON
iPod/iPhone
MENU
Attention :
Débranchez tous les accessoires du iPod ou du iPhone avant
de l’insérer dans le logement.
n Lecture de l’iPhone
l
Le son n’est transmis de iPhone à l’appareil principal qu’une
fois le processus d’authentification terminé, dans les
10 secondes environ.
l
Les appels entrant mettent la lecture en pause.
l
Une fois le téléphone décroché, la conversation ne peut
s’entendre qu’à travers le hautparleur intégré de iPhone.
Activez le hautparleur de iPhone ou retirez iPhone du
logement pour commencer la conversation.
n Pour débrancher l'iPod, iPhone ou iPad
Retirez simplement l'iPod ou l'iPhone de la station d'accueil ou
l'iPad de la prise USB. Il n’y a aucun danger à le faire même
pendant la lecture.
Fr-11
Page 38

Lecture à partir d’un iPod, iPhone ou iPad
TUNING −
TUNING +
TUNING −
TUNING +
TUNING −
TUNING +
TUNING −
TUNING +
REPEAT
RANDOM
PRESET
PRESET
(X-HM20 uniquement) (suite)
n Regarder des vidéos sur une TV connectée
à iPod ou iPhone
Appuyer sur la touche DISPLAY TV OUT pendant plus de
1
2 secondes. « TV Display » va s’afficher.
2
Appuyer sur la touche ENTER pour démarrer la lecture.
Notes :
l
Si le paramètre Sortie TV est déjà activé dans le menu vidéo,
la vidéo va s’afficher automatiquement sur l’écran de TV
lorsque la touche ENTER sera pressée.
l
L'affichage vidéo vers un téléviseur n'est pas pris en charge
par la prise USB. (iPad)
l
Pour revenir au visionnage vidéo sur l’écran de l’iPod ou
iPhone, appuyer sur la touche MENU pour accéder au menu
vidéo. Puis appuyez sur la touche DISPLAY TV OUT
pendant 2 secondes jusqu’à ce que apparaisse « iPod
Display ».
l
Pendant la lecture vidéo de l’iPod ou iPhone, le fait d’appuyer
sur la touche DISPLAY TV OUT ne fera pas basculer
l’affichage vidéo entre l’iPod et le téléviseur.
Attention :
l
Débrancher tous les accessoires de l’iPod ou iPhone avant
de l’insérer dans le logement iPod.
l La touche Stop ( ) de l’appareil est inactive pendant
que la fonction iPod est utilisée.
n Navigation dans les menus de l’iPod,
iPhone ou iPad
Appuyez sur le bouton MENU de l'iPod/iPhone/iPad pour
1
afficher le menu sur l'iPod/iPhone/iPad. Appuyez de nouveau
dessus pour revenir au menu précédent.
2
Utilisez la touche PRESET (
champ dans le menu et puis appuyez sur la touche ENTER.
Note :
Pendant la navigation dans le menu de l’iPod, iPhone ou iPad
avec la télécommande, ne manipuler aucune touche sur
l’appareil iPod ou iPhone. Le niveau du volume est réglé en
appuyant sur la touche VOL (+ ou –) de l’appareil principal ou de
la télécommande. Le réglage du volume sur l'iPod/iPhone/iPad
est sans effet.
Fonctionnement de l’iPod et iPhone :
Les opérations décrites ci-dessous dépendent de la génération
d’iPod et iPhone utilisée.
Système en fonctionnement :
Lorsque l'appareil est sous tension, le fait de raccorder un iPod,
iPhone ou iPad à l'appareil met automatiquement l'iPod, l'iPhone
ou l'iPad en marche.
Arrêt du système (mise en veille) :
Lorsque l'appareil est mis en pause, l'iPod/iPhone branché sur la
station d'accueil ou l'iPad connecté à l'appareil passe
automatiquement en mode veille.
ou
) pour sélectionner un
n Fonctions iPod, iPhone et iPad
Fonction
Lecture
Pause
Plage
haut/bas
Avance
rapide/
inversion
Affichage
Répétition
Lecture
aléatoire
Menu
iPod
Entrer
iPod
Curseur
haut /
bas iPod
Appareil
principal
____
____
____
____
____
____
Télécommande
Logement
iPod/
iPhone
iPod/
iPhone
iPod/
iPhone
RANDOM
iPod/
iPhone
PRESET
PRESET
REPEAT
USB
CD/USB
CD/USB
____
iPod/
iPhone
Opération
Appuyer pour
passer en mode
pause.
Presser en mode
de lecture.
Appuyer pour
passer en mode
lecture ou pause.
Si l’on appuie sur
la touche en
mode pause,
appuyer sur la
touche / pour
lancer la plage
désirée.
Presser en mode
de lecture et la
maintenir
enfoncée.
Relâcher la
touche pour
reprendre la
lecture.
Appuyez sur la
touche pendant
plus de
2 secondes pour
permuter
l'affichage vidéo
entre l'iPod et le
téléviseur.
Appuyez pour
confirmer la
sélection.
Appuyez pour
basculer en
mode aléatoire.
Appuyez pour
voir le menu iPod
durant la fonction
iPod.
Appuyez pour
confirmer la
sélection.
Appuyez pour
sélectionner le
menu iPod.
Fr-12
Page 39

Écoute de disques MP3/WMA ou CD
PHONES
USB
TUNING −
TUNING +
STANDBY/ON
INPUT
OPEN/CLOSE
STANDBY/ON
TUNING −
CD
Ce système peut lire un disque CD standard, un disque CD-R/
RW en format CD et un CD-R/RW avec un fichier MP3 ou WMA,
mais ne peut pas enregistrer sur ces types de CD. Certains
disques audio CD-R et CD-RW peuvent être illisibles à cause de
l’état du disque ou du dispositif utilisé pour l’enregistrement.
MP3 :
MP3 est un format de compression. Il s’agit de l’acronyme
de MPEG Audio Layer 3. MP3 est un code audio qui permet
de compresser des données audio de façon significative
sans altérer la qualité sonore.
l
Ce système supporte les fichiers MPEG 1 Layer 3 et VBR.
l
Pendant la lecture d’un fichier VBR, le compteur sur l’afficher
peut différer du temps de lecture en cours.
l
Le débit binaire supporté par MP3 est de 32 kbps à 320 kbps.
WMA :
Les fichiers WMA sont des fichiers Advanced System
format qui comprennent des fichiers audio compressés à
l’aide du codec Windows Media Audio. WMA est développé
par Microsoft comme étant un fichier sonore compatible
avec Windows Media Player.
l
Le voyant « MP3 » et « WMA » s’allumera après la lecture
des informations sur un disque MP3 ou WMA.
l
Le débit binaire supporté par WMA est de 64 kbps à
160 kbps.
n Lecture de disque
1
Appuyer sur la touche STANDBY/ON pour allumer l’appareil.
2
Appuyez sur la touche CD de la télécommande ou sur la
touche INPUT à plusieurs reprises sur l’appareil principal pour
sélectionner la fonction de CD.
3
Appuyer sur la touche pour ouvrir le tiroir de disque.
4
Mettre le disque sur le tiroir, côté étiqueté vers le haut.
TUNING +
Attention :
l
Ne placez pas deux disques dans un seul tiroir de disque.
l
Ne pas utiliser de disques de formes spéciales (coeur,
octogone, etc.). Ce dernier peut mal fonctionner.
l
Ne pas pousser le tiroir en cours de mouvement.
l
S’il se produit une panne de courant alors que le tiroir est
ouvert, attendre le rétablissement du courant.
l
En cas de parasites sur télévision ou radio au cours de
l’utilisation de disques, éloigner l’appareil du téléviseur ou du
poste de radio.
l
Penser à placer le disque de 8 cm au centre du tiroir de
disque.
l
L’appareil prend plus de temps (environ 20 à 90 secondes)
pour lire un disque MP3/WMA qu’un CD ordinaire à cause de
la structure de ses informations.
n Diverses fonctions de disque
Fonction Appareil
principal
Lecture
Arrêt
Pause
Plage
haut/bas
Avance
rapide/
inversion
Télécomm
ande
CD/USB
CD/USB
CD/USB
TUNING −
TUNING +
Opération
Presser en mode d’arrêt.
Presser en mode de
lecture.
Presser en mode de
lecture. Appuyer sur la
touche / pour
reprendre la lecture
depuis le point d’arrêt.
Presser en mode de
lecture ou d’arrêt. Si vous
appuyez sur ces touches
à l’arrêt, appuyez sur la
touche / pour
commencer la lecture de
la piste souhaitée.
Presser en mode de
lecture et la maintenir
enfoncée.
Relâcher la touche pour
reprendre la lecture.
5
Appuyer sur la touche pour fermer le tiroir de disque.
6
Pour déclencher la lecture, appuyer sur la touche / (CD/
/
). Après la lecture de la dernière plage, l’appareil
USB
s’arrête automatiquement.
Fr-13
Page 40

Lecture avancée de disques MP3/WMA ou CD
Numéro de la plage
choisie
Numéro de la plage choisie
DIMMER
MEMORY
REPEAT
RANDOM
n Recherche directe de morceaux
Vous pouvez utiliser les touches numérotées pour
sélectionner et lire les pistes souhaitées du disque inséré
dans le lecteur.
Utilisez les touches numérotées de la télécommande
pour sélectionner la piste souhaitée pendant que
l’appareil est en train de lire le disque.
l
Les touches numérotées permettent de sélectionner un
numéro de piste jusqu’à 9.
l
Pour sélectionner le numéro 10 ou supérieur, utiliser la
touche « >10 ».
A. Par exemple, pour choisir
13
1
Appuyer une fois sur la
touche « >10 ».
2
Appuyer sur la touche « 1 ».
3
Appuyer sur la touche « 3 ».
B. Par exemple, pour choisir 130
1
Appuyer deux fois sur la touche « >10 ».
2
Appuyer sur la touche « 1 ».
3
Appuyer sur la touche « 3 ».
4
Appuyer sur la touche « 0 ».
Notes :
l
Un numéro de plage supérieur au nombre de plages sur
le disque ne peut pas être sélectionné.
l
La recherche directe n'est pas possible en mode de
lecture aléatoire.
Arrêt de la lecture :
Appuyer sur la touche (CD/USB ).
n Lecture répétée
Avec répétition lecture, l’appareil peut relire continuellement
un piste, tous les pistes ou une séquence programmée.
Pour répéter la lecture d’un piste :
Pressez plusieurs fois la touche REPEAT jusqu’à ce
qu’apparaisse « Repeat One ». Appuyer sur la touche /
(CD/USB / ).
Pour répéter tous les morceaux :
Pressez plusieurs fois la touche REPEAT jusqu’à ce
qu’apparaisse « Repeat All ». Appuyer sur la touche /
(CD/USB / ).
Pour répéter des morceaux souhaités :
Suivre les étapes 1 - 5 dans le chapitre « Lecture des
morceaux programmés » sur cette page, puis appuyer sur la
touche REPEAT à plusieurs reprises jusqu’à ce que « Repeat
All » s’affiche.
Pour annuler la répétition :
Pressez plusieurs fois la touche REPEAT ce qu’apparaisse
« Normal » et que disparaisse « ».
Note :
Pendant la lecture de répétition, la lecture au hasard est
indisponible.
n Lecture aléatoire
Les plages du disque peuvent être lues automatiquement en
ordre aléatoire.
Pour lire tous les morceaux dans un ordre aléatoire :
Appuyez sur la touche RANDOM de la télécommande sans
la relâcher jusqu’à ce que l’indication « Random »
apparaisse. Appuyer sur la touche / (CD/USB / ).
Pour annuler la lecture aléatoire :
Appuyez sur la touche RANDOM jusqu’à ce que l’indication «
RDM » disparaisse.
Notes :
l
Si l’on appuie sur la touche pendant la lecture au
hasard, il est possible d’aller à la plage suivante dans la
sélection de la lecture au hasard. Cependant, la touche
ne permet pas de revenir à la plage précédente. Le début
de la plage courante sera repéré.
l
Lors de la lecture au hasard, l’appareil reproduit des
morceaux dans un ordre aléatoire. (Il est impossible de
spécifier un ordre.)
l
Pendant la lecture au hasard, la lecture de répétition est
indisponible.
Attention :
Après avoir effectué une lecture répétée, veiller à appuyer sur
la touche (CD/USB ). Sinon, le disque sera lu
continuellement.
n Lecture des morceaux programmés (CD)
On peut sélectionner 32 morceaux (maxi) pour la lecture
dans un ordre souhaité.
En mode d’arrêt, appuyer sur la touche MEMORY de la
1
télécommande pour passer en mode de sauvegarde de
programme.
2
Appuyer sur les touches ou de la télécommande
pour sélectionner la plage souhaitée.
3
Appuyer sur la touche MEMORY pour stocker le numéro
de morceau.
Fr-14
Page 41

Lecture avancée de disques MP3/
ROOT
(FOLDER 1)
FOLDER A
(FOLDER 2)
FOLDER B
(FOLDER 3)
FILE 9
FILE 10
FILE 3
FILE 4
FILE 5
FILE 6
FILE 7
FILE 8
FOLDER E
(FOLDER 6)
FOLDER C
(FOLDER 4)
FOLDER D
(FOLDER 5)
FILE 1
FILE 2
WMA ou CD (suite)
4
Renouveler les étapes 2 - 3 pour d’autres morceaux.
32 plages au total sont programmables. Pour vérifier les
plages programmées, appuyer à plusieurs reprises sur la
touche MEMORY. En cas d’erreur, les plages
programmées peuvent être effacées en appuyant sur la
touche CLEAR.
5
Pour déclencher la lecture, appuyer sur la touche / (CD/
USB / ).
n Lecture des morceaux programmés
(MP3/WMA)
En mode d’arrêt, appuyer sur la touche MEMORY pour
1
entrer en mode d’enregistrement de programme.
2 Appuyer sur la touche PRESET
télécommande pour sélectionner le dossier souhaité.
Appuyer ensuite sur la touche ou de la
télécommande pour sélectionner la plage souhaitée.
3 Appuyer sur la touche MEMORY pour stocker le
numéro du dossier et de la plage.
4 Répéter les étapes 2 - 3 pour programmer d’autres
dossiers/plages. 32 plages au total sont
programmables.
5 Pour déclencher la lecture, appuyer sur la touche /
(CD/USB / ).
Pour annuler la lecture des morceaux programmés :
En mode d’arrêt programmé, appuyez sur la touche
(CD/USB ). L’indication « Memory Clear » apparaît sur
l’écran et tous les contenus programmés sont effacés.
Ajout de morceaux au programme :
Si un programme a été précédemment mémorisé, le
voyant « MEM » s’affiche. Appuyez sur la touche
MEMORY. Puis suivez les étapes 2 et 3 pour ajouter des
pistes.
Notes :
l Lorsqu’un disque est éjecté, le programme est
automatiquement annulé.
l Si vous appuyez sur la touche STANDBY/ON pour
entrer en mode de veille ou pour passer de la fonction
CD à une autre, les sélections programmées seront
effacées.
l La lecture au hasard n’est pas utilisable pour la lecture
des morceaux programmés.
(
ou ) de la
Mode dossier MP3/WMA (seulement
pour des fichiers MP3/WMA)
Pour lire un fichier MP3/WMA (Windows Media Audio)
Il y a de nombreux sites de musique sur l’Internet d’où on
peut télécharger des fichiers musicaux MP3/WMA
(Windows Media Audio). Suivre les instructions de ces
sites pour télécharger ce type de fichiers. Il est alors
possible de lire ces fichiers musicaux téléchargés en les
gravant sur un disque CD-R/RW.
l Les chansons/fichiers téléchargés sont pour usage
personnel seulement. Toute autre utilisation d’une
chanson sans la permission du propriétaire est illégale.
n Sur l’ordre de lecture des dossiers
Si des fichiers MP3/WMA sont présents dans plusieurs
dossiers, un nombre sera automatiquement attribué à
chaque dossier.
On peut sélectionner les dossiers à l’aide de la touche
FOLDER sur la télécommande. Si le dossier sélectionné
contient des formats de fichier qui ne sont pas supportés,
le dossier est sauté et le dossier suivant est sélectionné.
Exemple : Attribution des nombres de dossier si des
fichiers MP3/WMA sont présents, tel que dans la figure cidessous.
1
Le dossier ROOT est programmé comme dossier 1.
2 Quant aux dossiers dans le dossier ROOT (dossiers A
et B), celui qui est enregistré le premier sur le disque
sera programmé comme dossier 2 et 3.
3 Pour ce qui est des dossiers dans le dossier A (dossiers
C et D), celui qui est enregistré le premier sur le disque
sera programmé comme dossier 4 et 5.
4 Le dossier E dans le dossier D sera programmé comme
dossier 6.
l L’information relative à l’ordre des dossiers et des
fichiers écrits sur le disque dépend du logiciel
d’écriture. Il est possible que l’appareil ne lise pas les
fichiers selon l’ordre prévu.
l Pour les CD contenant des fichiers MP3/WMA,
l'appareil peut gérer et lire jusqu'à 99 dossiers et
999 fichiers, en incluant les dossiers qui contiennent
des fichiers non lisibles.
L’activation/désactivation du mode dossier peut s’effectuer
via la touche FOLDER de la télécommande. Les fichiers
qui sont lus avec mode dossier activé diffèrent de ceux lus
avec mode dossier désactivé.
Fr-15
Page 42

Mode dossier MP3/WMA (seulement
CD
PRESET
PRESET
FOLDER
DISPLAY
TUNING −
TUNING +
CD/USB
Voyant MP3
Voyant WMA
Voyant TOTAL
Nombre total de fichiers
Nombre total de dossier
Premier numéro de
plage dans le dossier
Voyan t
FOLDER
Nombre de
Dossier
Affichage du nom du fichier
Affichage du dossi
Affichage du title
Affichage de
l’artiste
Affichage Counter
Affichage de
l’album
INPUT
USB
USB
PRESET
PRESET
FOLDER
TUNING −
TUNING +
DISPLAY
CD/USB
pour des fichiers MP3/WMA) (suite)
n Procédure de lecture de disques MP3/
WMA avec le mode dossier activé
Pour lire des CD-R/RW.
Appuyer sur la touche CD et charge un disque MP3/
1
WMA. Appuyer sur la touche FOLDER et les données
du disque s'afficheront.
2 Appuyer sur la touche PRESET
sélectionner le dossier de lecture de votre choix. (Mode
dossier activé)
3 Sélectionner le fichier à lire en appuyant sur la touche
ou .
4 Appuyer sur la touche / (CD/USB / ). La lecture
commence et le nom du fichier s’affiche.
l Les noms du titre, de l’artiste et de l’album s’affichent
s’ils sont enregistrés sur le disque.
l En cas de lecture avec le mode FOLDER activé,
appuyez sur la touche PRESET
dossier pourra être sélectionné même l’appareil est
en mode lecture/pause. Le mode lecture/pause
reprendra à la première piste du dossier sélectionné.
l Les informations affichées peuvent être changées
en appuyant sur la touche CD/USB DISPLAY.
Note :
Si « Not support » s’affiche, cela signifie qu’on a
sélectionné « Copyright protected WMA file » (fichier
WMA protégé par copyright) ou « Not supported playback
file » (le fichier à lire n’est pas supporté).
(
ou ) pour
(
ou ), et le
Lecture mémoire de grande capacité
USB/lecteur MP3
Notes :
l Ce produit n'est pas compatible avec les systèmes de
fichiers MTP et AAC utilisés sur certains périphériques
de stockage de masse USB ou lecteurs MP3.
l Certains périphériques de stockage externe peuvent
ne pas fonctionner avec ce système.
l Le fonctionnement des périphériques de stockage
externe (clés mémoires USB, disques durs externes,
etc.) n'est pas garanti.
n Lecture à partir d’un dispositif USB/MP3
avec le mode dossier désactivé
Appuyer sur la touche USB de la télécommande ou sur
1
la touche INPUT à plusieurs reprises sur l’appareil
principal pour sélectionner la fonction de USB. Brancher
à l’appareil le dispositif Mémoire USB ayant les fichiers
MP3/WMA. Après le branchement, les informations du
dispositif s’affichent.
2 Sélectionner le fichier à lire en appuyant sur la touche
ou .
3 Appuyer sur la touche / (CD/USB / ). La lecture
commence et le nom du fichier s’affiche.
l Le titre, le nom de l’artiste et de l’album s’affichent
s’ils sont enregistrés dans le dispositif de mémoire
USB.
l Les informations affichées peuvent être changées
en appuyant sur la touche CD/USB DISPLAY.
Note :
Pour mettre en pause la lecture :
Appuyer sur la touche / (CD/USB / ).
Fr-16
Page 43

Lecture mémoire de grande capacité
USB/lecteur MP3 (suite)
n Lire à partir d’un dispositif USB/MP3 avec
le mode dossier activé
Appuyer sur la touche USB de la télécommande ou sur
1
la touche INPUT à plusieurs reprises sur l’appareil
principal pour sélectionner la fonction de USB. Brancher
à l’appareil le dispositif Mémoire USB ayant les fichiers
MP3/WMA. Après le branchement, les informations du
dispositif s’affichent.
2 Appuyer sur la touche FOLDER et puis sur la touche
PRESET
(
Pour commencer la lecture avec le mode dossier activé,
passer à la sixième étape. Pour changer le dossier lu,
appuyer sur la touche PRESET
sélectionner un autre dossier.
3 Sélectionner le fichier à lire en appuyant sur la touche
4 Appuyer sur la touche / (CD/USB / ). La lecture
commence et le nom du fichier s’affiche.
l Le titre, le nom de l’artiste et de l’album s’affichent
l Les informations affichées peuvent être changées
n Enlever le dispositif de mémoire USB
Appuyer sur la touche (CD/USB ) pour arrêter la
1
lecture.
2 Débrancher le dispositif de mémoire USB de la borne
USB.
Notes :
l PIONEER ne pourra être tenu pour responsable de la
perte de données lorsque le dispositif de mémoire USB
est raccordé au système audio.
l Les fichiers compressés au format MP3 et/ou WMA
peuvent être lus une fois raccordés à la borne USB.
l Ce format USB supporte FAT 16 ou FAT 32.
l PIONEER ne garantit pas le fonctionnement de tous
les dispositifs de mémoire USB avec ce système
audio.
l Il est déconseillé d’utiliser un câble USB pour
raccorder un dispositif de mémoire USB à ce système
audio. L’utilisation d’un câble USB affecterait les
performances du système audio.
l Ce dispositif USB ne peut pas fonctionner via un hub
USB.
l La borne USB de cet appareil n’est pas prévue pour
une connexion à un ordinateur, mais est utilisée pour
la lecture de musique avec un dispositif de mémoire
USB.
l La mémoire HDD externe ne peut pas être lue via la
borne USB.
l Si les données contenues dans le dispositif de
mémoire USB sont volumineuses, la lecture peut
prendre plus de temps.
ou ) pour sélectionner le dossier désiré.
(
ou ) pour
ou .
s’ils sont enregistrés dans le dispositif de mémoire
USB.
en appuyant sur la touche CD/USB DISPLAY.
l Ce produit peut lire les fichiers WMA et MP3. Il
détectera automatiquement le type de fichier en cours
de lecture. En cas de fichier illisible, « Not Support »
est indiqué et le fichier est automatiquement ignoré.
Cela peut prendre quelques secondes. Si des
indications anormales apparaissent sur l’afficheur à
cause d’un fichier non spécifié, éteindre l’appareil et le
rallumer.
l Ce produit se relie à des dispositifs de stockage de
masse USB et des lecteurs MP3. Toutefois, certaines
irrégularités peuvent se produire pour diverses raisons
imprévues pour certains dispositifs. Si cela se produit,
éteindre l’appareil et le rallumer.
l La borne USB est uniquement prévue pour la
connexion directe au dispositif de mémoire USB sans
câble.
l Le lecteur MP3 ne se chargera pas en fonction CD.
l L’indication « Not Support » s’affiche si vous connectez
un iPod à la prise USB lorsque la fonction USB est
sélectionnée.
Lecture USB avancée
Les fonctions suivantes sont les mêmes que pour les
CD :
Recherche directe de morceaux . . . . . . . . . . . . . . . .14
Lecture répétée . . . . . . . . . . . . . . . . . . . . . . . . . . . . . .14
Lecture au hasard. . . . . . . . . . . . . . . . . . . . . . . . . . . .14
Lecture des morceaux programmés (MP3/WMA) . .15
Notes :
l Si le dispositif de mémoire USB n’est pas connecté,
« USB No Media » s’affichera sur l’écran.
l Le seul format supporté par cet appareil est « MPEG-
1 Audio Layer 3 ». (La fréquence d’échantillonnage est
32 kHz, 44,1 kHz, 48 kHz)
l L’ordre de lecture des fichiers MP3 peut varier en
fonction du logiciel d’écriture utilisé lors du
téléchargement des fichiers.
l Le débit binaire supporté par le MP3 est compris entre
32 kbps à 320 kbps et entre 64 kbps à 160 kbps pour
le WMA.
l Veuillez ajouter l’extension « .MP3 » ou « .WMA » pour
les fichiers MP3/WMA. Les fichiers ne peuvent pas
être sans extension MP3/WMA.
l Les listes de lecture ne sont pas supportées par cet
appareil.
l Le nombre maximum de caractères du nom d’un
dossier ou d’un fichier pouvant être affiché par cet
appareil est 99.
l Le nombre maximum total de fichiers MP3/WMA est de
999.
l Le nombre total de dossiers gérés et lus par l'appareil
est de 99, en incluant les dossiers qui contiennent des
fichiers non lisibles. Toutefois, seuls les dossiers
contenant des fichiers MP3 et WMA sont affichés.
l Le temps de lecture de l’affichage peut ne pas être
affiché correctement lors de la lecture d’un fichier à
débit binaire variable.
l Les informations d’ID3TAG supportées sont
uniquement TITLE, ARTIST et ALBUM. Il est possible
d’afficher le nom du titre, le nom de l’artiste et le nom
de l’album en appuyant sur la touche DISPLAY
pendant la lecture du fichier ou en mode pause.
l La fonction méta repère WMA est compatible avec les
noms de titre, d’artiste et de l’album enregistrés dans
les fichiers WMA. Les fichiers WMA protégés par
copyright ne peuvent pas être lus.
Fr-17
Page
Page 44

Écoute de la radio
CLEAR
STANDBY/ON
INPUT
MEMORY
TUNING −
TUNER
TUNING +
PRESET
PRESET
n Accord
Appuyer sur la touche STANDBY/ON pour allumer
1
l’appareil.
2 Appuyer à plusieurs reprises sur la touche TUNER pour
sélectionner une gamme d’ondes souhaitée (FM ou
AM).
3 Appuyer sur la touche TUNING + ou - sur la
télécommande pour faire l’accord sur la station
souhaitée.
l Accord manuel :
Appuyer plusieurs fois sur la touche TUNING + ou pour syntoniser la station désirée.
l Accord automatique :
Si on presse la touche TUNING + ou - plus de 0,5
seconde, le tuner part en recherche et se cale sur la
première station qu’il capte.
Notes :
l La recherche automatique s’arrêtera dès qu’il se
produira des parasites.
l Le balayage automatique sautera des stations à faible
puissance.
l Pour arrêter la syntonisation automatique, réappuyer
sur la touche TUNING + ou - .
l Lorsque le tuner capte une station RDS (Radio Data
System), la fréquence en est affichée, puis le voyant
RDS s’allume. Le nom de la station apparaît ensuite.
l L’accord automatique s’achève complètement pour la
mémorisation automatique (ASPM) de stations RDS
(voir page 19).
Pour recevoir une émission FM stéréo :
l Appuyer sur la touche TUNER pour sélectionner le
mode stéréo, et l’indicateur « ST » s’affiche. « » et
« » apparaît lorsque l’émission FM captée est en
stéréo.
l Si la réception en FM n’est pas bonne, appuyer sur la
touche TUNER pour éteindre « ST ». La réception
passe en mono, mais le son devient plus clair.
n Mise en mémoire d’une station
Il est possible de stocker 40 stations en PO et en FM et de
les rappeler par la simple pression d’une touche. (Accord
de présélection)
Suivre les étapes 1 - 3 dans « Accord ».
1
2 Appuyer sur la touche MEMORY.
3 Avant 30 secondes, appuyer sur la touche PRESET
ou ) pour sélectionner le numéro de présélection.
Stocker des stations en mémoire dans l’ordre à partir du
canal de présélection 1.
(
4 Avant 30 secondes, appuyer sur la touche MEMORY
pour mettre la station en mémoire. Si les voyants «
MEMORY » et le numéro de préréglage disparaissent
avant la mémorisation de la station, répéter l’opération
à partir de l’étape 2.
5 Renouveler les étapes 1 - 4 pour mémoriser d’autres
stations ou remplacer une station mise en mémoire.
Lorsqu’une nouvelle station est mémorisée, la station
mémorisée auparavant sur le même numéro de chaîne
sera effacée.
Note :
La fonction de protection conserve les stations en
mémoire pendant plusieurs heures même s’il se produit
une panne de courant ou un débranchement de l’appareil.
n Rappel d’une station mémorisée
1 Sélectionner la station souhaitée en appuyant sur la
touche PRESET
(
ou ) moins de 0,5 seconde.
n Pour balayer les stations préréglées
On peut balayer les stations mises en mémoire
automatiquement. (Balayage dans la mémoire de
présélection)
1
Appuyer pendant plus de 0,5 seconde sur la touche
PRESET
mettent à clignoter et l’appareil se cale sur chaque
station pendant 5 secondes.
2 Réappuyer sur la touche PRESET
station souhaitée est localisée.
(
ou ). Les numéros de présélection se
(
ou ) lorsque la
n Pour effacer toute la mémoire
1
Appuyez de manière répétée sur la touche TUNER de
la télécommande ou utilisez le bouton INPUT sur
l'appareil pour sélectionner la fonction Tuner.
2 Lorsque la fonction Tuner est sélectionnée, appuyez sur
la touche CLEAR jusqu'à ce que l'indication « Tuner
Clear » apparaisse.
Fr-18
Page 45

Utilisation du système RDS (Radio Data System)
RDS
TUNING −
TUNING +
TUNER
ASPM PTY DISP
Nom de station (PS)
Type de programme (PTY)
Fréquence Texte radio (RT)
No PS No PTY
FM 98.80 MHz
No RT
RDS est un service de radiodiffusion qu’offrent de
plus en plus de stations FM. Elles peuvent diffuser
leurs programmes avec signaux supplémentaires tels
que leur nom de station. Sont envoyés le nom de la
station et les informations concernant le type de
programme, tel que sport, musique, etc.
Lorsque l’appareil capte une station RDS, les lettres
« RDS » et le nom de station s’inscrivent sur l’afficheur.
« TP » (programme routier) s’affiche lorsque l’émission
captée porte des informations routières et « TA »
(annonce routière) apparaît lorsque l’information routière
est en cours de diffusion.
« PTYI » (Voyant PTY dynamique) apparaît pendant la
réception d’une station PTY dynamique.
On peut commander le RDS seulement à l’aide des
touches de la télécommande.
n Informations données par RDS
Chaque fois que la touche RDS DISPLAY est pressée,
l’affichage change comme suit :
Lorsqu’il s’agit d’une station non-RDS ou d’une station
RDS portant de faibles signaux, l’affichage change
comme suit :
n Mémorisation automatique de stations
(ASPM)
En mode ASPM, le tuner recherche automatiquement de
nouvelles stations RDS. Jusqu’à 40 stations
programmables.
Fr-19
S’il y a des stations déjà mises en mémoire, le nombre de
stations mémorisables est réduit d’autant.
1 Appuyez sur la touche TUNER de la télécommande ou
sur la touche INPUT à plusieurs reprises sur l’appareil
principal pour sélectionner la fonction de TUNER.
2 Appuyer sur la touche RDS ASPM de la
télécommande et la maintenir enfoncée.
1 Le voyant « ASPM » clignote pendant environ 4
secondes, et le balayage démarre (87,50 - 108,00
MHz).
2 Lorsqu’une station RDS est détectée, « RDS »
s’affiche un instant et la station est mise en
mémoire.
3 Une fois le balayage terminé, le nombre de stations
mémorisées s’affiche pendant 4 secondes, puis
« END » apparaît pendant 4 secondes.
Pour interrompre l’opération ASPM en cours :
Appuyer sur la touche RDS ASPM pendant le balayage
des stations.
Les stations préalablement mises en mémoire restent
inchangées.
Notes :
l Si une station diffuse sur deux fréquences différentes,
la plus forte sera mise en mémoire.
l L’appareil ignore une station utilisant la même
fréquence que celle de la station déjà mise en
mémoire.
l S’il y a 40 stations déjà stockées en mémoire, la
recherche sera annulée. Pour refaire l’opération
ASPM, effacer des stations.
l Si aucune stations n’est mise en mémoire, l’appareil
affiche « END » pendant 4 secondes environ.
l Si des signaux RDS sont faibles, le nom de station peut
ne pas être mémorisé.
l Il est possible de stocker une station dans deux canaux
différents.
l Selon la région ou l’époque de l’année, les noms de
stations peuvent changer.
n Notes pour le fonctionnement RDS
Il ne s’agit pas d’un mauvais fonctionnement même si
l’un des cas suivants se présente :
l L’appareil affiche alternativement « PS », « No PS » et
un nom de station.
l Lorsqu’il s’agit d’une station ne diffusant pas
correctement ou d’une station en cours d’essai, la
fonction RDS ne fonctionne pas de façon souhaitée.
l S’il s’agit d’une station RDS portant de faibles signaux,
l’appareil n’arrive pas à afficher le nom de la station.
l « No PS », « No PTY » ou « No RT » clignote environ
5 secondes et la fréquence s’affiche.
Page 46

Utilisation du système RDS (Radio Data System) (suite)
Notes pour le texte radio :
l Les 14 premiers caractères de text radio restent
affichés pendant 4 secondes, puis ils se déplacent sur
l’afficheur.
l Si on capte une station RDS n’émettant pas de texte
radio, l’appareil affiche « No RT » au passage en
position de texte radio.
l L’appareil affiche « RT » pendant la réception de texte
radio ou chaque fois que le texte change.
n Pour rappeler une station en mémoire
Pour écouter une station souhaitée en spécifiant le
type de programme (recherche PTY) :
On peut rechercher une des stations mises en mémoire
en désignant le type de programme (actualités, sports,
informations routières, etc. ... voir page 20).
Appuyez sur la touche TUNER de la télécommande ou
1
sur la touche INPUT à plusieurs reprises sur l’appareil
principal pour sélectionner la fonction de TUNER.
2 Appuyer sur la touche RDS PTY sur la télécommande.
« SELECT » et « PTY TI » apparaîtront en alternance
pendant environ 6 secondes.
3 Avant 6 secondes, appuyer sur la touche ou
pour sélectionner le type de programme.
Chaque fois que la touche est pressée, le type de
programme se modifie. Si on maintient la touche
enfoncée plus de 0,5 seconde, le type affiché change
rapidement.
4 Pendant le clignotement du type de programme (c.-à-
d. avant 6 secondes), appuyer sur la touche RDS PTY.
Le type de programme sélectionné reste éclairé
pendant 2 secondes, puis « SEARCH » apparaît et
l'opération de recherche démarre.
Notes :
l Si l’affichage arrête de clignoter, renouveler l’opération
depuis l’étape 2. Lorsque l’appareil trouve le type de
programme souhaité, le numéro du canal
correspondant s’allume pour 8 secondes et le nom de
station reste allumé ensuite.
l Pour écouter le même type de programme d’une autre
station, appuyer sur la touche RDS PTY avant que le
numéro de canal (ou le nom de station) ne cesse de
clignoter. L’appareil recherche alors une autre station.
l Si aucune station n’est trouvée, « NOT FOUND »
apparaît pendant 4 secondes.
Si on choisit le programme d’informations routières :
Si on désigne le programme routier (TP) à l’étape 3, « TP
» apparaît.
(Cela ne signifie pas que les informations routières sont
en cours de diffusion.)
Si les informations routières sont en cours de diffusion,
« TA » apparaît.
Codes PTY (type de programme), TP (information
routière) et TA (annonce routière)
On peut rechercher et recevoir les signaux PTY, TP et TA
suivants.
NEWS Programme d’informations, dépêches,
AFFAIRS Programmes approfondis sur actualités,
INFO Programme pour conseils dans un sens
SPORT Programme sur les sports.
EDUCATE Programme éducatif, fondamental.
DRAMA Feuilletons.
CULTURE Programmes de la culture nationale ou
SCIENCE Programmes sur la science naturelle et
VARIED Programmes de conversation de type
POP M Programmes musicaux, variétés, hit-
ROCK M Musiques modernes contemporaines,
EASY M Musique contemporaine de type
LIGHT M Musique classique générale, non
CLASSICS Musique orchestrale, symphonies,
OTHER M Musique non classable comme Rhythm
WEATHER Programme météo.
FINANCE Commerce, marketing, stocks, etc.
CHILDREN Programmes visés aux jeunes,
SOCIAL Programmes sur les personnages et les
événements, reportages et actualités.
généralement avec une présentation ou
conception différente, y compris un
débat ou une analyse.
très large.
régionale, comprenant les langues, le
théâtre, etc.
la technologie.
divertissement, non classables dans
d’autres catégories. Par exemple, jeux,
interview, etc.
parade, etc.
écrites et jouées par de jeunes
musiciens.
« écoute facile », opposée à pop, rock,
classique. La musique de cette catégorie
est souvent vocale et de courte durée.
spécialisée. Instrumentale, vocale ou
choeur.
musique de chambre, opéra, etc.
& Blues, Reggae, etc. Particulièrement
utilisés pour la musique spécialisée,
comme le Rhythm & Blues ou le Reggae.
divertissement, renseignements utiles.
choses, y compris la sociologie,
l’histoire, la géographie, la psychologie et
la société.
Fr-20
Page 47

Utilisation du système RDS (Radio
STANDBY/ON
TUNING −
TUNING +
CLOCK/TIMER
ENTER
Programmation quotidienne
Programmation unique
Départ
Arrêt
1 minute ou plus
Départ
Arrêt
Data System) (suite)
RELIGION Programmes relatifs aux religions. Foi,
PHONE IN Programmes ouverts au public.
TRAVEL Programmes sur tous les types de
LEISURE Programmes concernant les loisirs
JAZZ Musique polyphonique et syncopée,
COUNTRY Musique populaire issue de la tradition
NATION M Musique populaire du monde en version
OLDIES Musique populaire, vieux succès.
FOLK M Musique qui a l’origine de la culture
DOCUMENT Programme documentaire, présenté
TEST Émission pour l’essai d’un émetteur ou
ALARM Annonce urgente, dans un cas
TP Indique qu’il s’agit d’une station
TA Informations routières en cours de
Dieu, dieux, l’existence et l’éthique.
Entretien par téléphone ou au forum.
voyages : proximité, lointain, forfait,
astuce, etc. Non pour les informations
routières (travaux, délai, etc.) affectant
un voyage immédiat qui utilise TP/TA.
auxquels les auditeurs peuvent
participer. Jardinage, pêche, antiquités,
cuisine, vins, etc.
caractérisée par improvisation.
musicale dans le sud des États-Unis.
Caractérisée par une mélodie directe et
une façon narrative.
originale et non en anglais.
musicale d’un pays particulier, souvent
accompagnée d’instruments
acoustiques. Les paroles peuvent être
basées sur une affaire historique ou le
peuple.
dans un style d’enquête.
d’un récepteur d’urgence.
exceptionnel, qui avertit d’un danger à
venir.
émettant des informations routières.
diffusion.
Opérations programmées et mise en
arrêt différée (Seulement par
télécommande)
Lecture programmée :
L’appareil s’allume et lance la lecture de la source (CD,
TUNER, USB, iPod, LINE IN) désirée à une heure
prédéfinie.
Cet appareil dispose de 2 types de minuteries : ONCE
TIMER et DAILY TIMER.
Programmation unique :
La programmation unique se déroule une seule fois à
l’heure programmée.
(Voyant « »).
Programmation quotidienne :
La programmation quotidienne se déroule tous les jours à
la même heure. Par exemple, régler la minuterie pour se
réveiller chaque matin.
(Voyant «DAILY»).
Programmations unique et quotidienne à la fois :
Par exemple, utiliser la programmation unique pour
écouter une émission de radio et la programmation
quotidienne comme réveil.
1 Effectuer la programmation quotidienne (page 21).
2 Réglez l’alarme unique (page 21).
Fr-21
Page 48

Opérations programmées et mise en arrêt différée
(Seulement par télécommande) (suite)
n Lecture programmée
Avant de régler la minuterie :
l Vérifier que l’horloge est à l’heure (voir page 9). Si
l’horloge n’est pas à l’heure, on ne peut pas
programmer une opération.
l Pour la lecture programmée : Connecter un dispositif
USB ou charger les disques ou installer l’iPod à lire.
1 Appuyer sur la touche STANDBY/ON pour allumer
l’appareil.
2 Maintenir la touche CLOCK/TIMER enfoncée.
3 Avant 30 secondes, appuyer sur la touche ou
pour sélectionner « Once » ou « Daily » et presser sur
la touche ENTER.
4 Avant 30 secondes, appuyer sur la touche ou
pour sélectionner « Timer set » et presser sur la touche
ENTER.
5 Pour sélectionner une source pour la lecture
programmée (CD, TUNER, USB, iPod, LINE IN),
appuyer sur la touche ou . Appuyer sur la
touche ENTER.
S’il s’agit du tuner, sélectionner une station en agissant
sur la touche ou et appuyer sur la touche
ENTER. Si aucune station n’a été programmée, « No
Preset » s’affiche et la programmation s’annule.
6 Pour régler les jour, appuyer sur la touche ou
puis appuyer sur la touche ENTER.
7 Appuyez sur la touche ENTER pour régler l’heure.
Appuyez sur la touche ou , puis appuyez sur la
touche ENTER.
8 Pour régler les minutes, appuyer sur la touche ou
et appuyer sur la touche ENTER.
9 Programmer l’heure d’arrêt comme décrit dans les
étapes 7 et 8.
10 Réglez le volume à l'aide des touches VOL (+ ou -),
puis appuyez sur la touche ENTER. Éviter de trop
élever le volume.
11 Appuyer sur la touche STANDBY/ON pour passer en
veille. Le voyant « TIMER » s’allume, indiquant que
l’appareil est prêt à la lecture programmée.
12 À l’heure programmée, la lecture ou l’enregistrement
se déclenche. Le volume augmente graduellement
jusqu’au niveau préréglé. Le voyant de la minuterie
clignotera pendant la lecture programmée.
13 À l’heure de fin, le système se met en veille
automatiquement.
Programmation unique :
L’opération programmée s’annule.
Programmation quotidienne :
La minuterie fonctionne à la même heure chaque jour.
Il continuera jusqu’à ce que le paramétrage quotidien
soit annulé. Annuler celle-ci si elle n’est plus
nécessaire.
Notes :
l Lors de l’utilisation de la fonction de minuterie d’arrêt
avec un équipement connecté à la prise USB,
sélectionnez « USB » ou « LINE IN » à l’étape 5.
l L’appareil entre automatiquement en mode de veille.
Toutefois, l’unité connectée ne se met pas sous/hors
tension. Pour arrêter la lecture programmée, suivre les
étapes « Effacer le réglage de l’alarme » décrites
dans cette page.
Vérification du réglage de l’alarme :
1 Allumer le système et maintenir la touche CLOCK/
TIMER enfoncée.
2 Avant 30 secondes, appuyer sur la touche ou
pour sélectionner « Once » ou « Daily » et presser sur
la touche ENTER.
3 Dans les 30 secondes, appuyez sur la touche ou
pour sélectionner l'option « Timer Call », puis
appuyez sur la touche ENTER.
Effacer le réglage de l’alarme :
1 Allumer le système et maintenir la touche CLOCK/
TIMER enfoncée.
2 Avant 30 secondes, appuyer sur la touche ou
pour sélectionner « Once » ou « Daily » et presser sur
la touche ENTER.
3 Dans les 30 secondes, appuyez sur la touche ou
pour sélectionner l'option « Timer Off », puis
appuyez sur la touche ENTER. L’opération programmée
s’annule (le contenu de la programmation restera
valable).
Réutilisation de l’opération programmée en mémoire :
Le paramétrage du programmateur sera mémorisé une
fois entré. Pour réutiliser le même paramétrage, faites les
opérations suivantes.
1 Allumer le système et maintenir la touche CLOCK/
TIMER enfoncée.
2 Avant 30 secondes, appuyer sur la touche ou
pour sélectionner « Once » ou « Daily » et presser sur
la touche ENTER.
3 Dans les 30 secondes, appuyez sur la touche ou
pour sélectionner l'option « Timer On », puis
appuyez sur la touche ENTER.
4 Appuyer sur la touche STANDBY/ON pour passer en
veille.
Note :
Le réglage de l'horloge est réinitialisé lorsque le cordon
d'alimentation est débranché ou en cas de panne de
courant.
Fr-22
Page 49

Opérations programmées et mise en
Durée programmée
1-99 minutes
La mise en arrêt
différée s’arrête
Déclenchement de
la mise en arrêt
différée
Programmation de
la lecture
Fin d’opération
Heure de départ pour
la lecture programmée
arrêt différée (Seulement par
télécommande) (suite)
n Mise en arrêt différée
La lecture des sources radio, CD, iPod, USB et Line In
peuvent être arrêtées automatiquement.
Allumer la source souhaitée.
1
2 Appuyer sur la touche SLEEP.
3 Utilisez les touches numérotées dans un délai de
5 secondes pour régler l’heure. (1 minute ~ 99 minutes)
4 « SLEEP » apparaît.
5 Le temps préréglé écoulé, l’appareil entrera
automatiquement en attente. Le niveau sonore baisse
dans la dernière minute de la lecture programmée.
Pour vérifier la durée pour la mise en arrêt différée :
1 Pendant « SLEEP » est affiché, appuyer sur la touche
SLEEP.
Annulation de la mise en arrêt différée :
Appuyer sur la touche STANDBY/ON pendant l’affichage
de « SLEEP ». Pour annuler la mise en arrêt différée sans
mettre le système en attente, procéder comme suit.
1 Pendant « SLEEP » est affiché, appuyer sur la touche
SLEEP.
2 Avant 5 secondes, appuyer sur la touche « 0 » à deux
reprises jusqu’à ce que « SLEEP 00 » apparaisse.
Casque
l Ne pas tourner le volume à fond à la mise en route et
écouter la musique à des niveaux modérés. Un volume
sonore excessif émis par les écouteurs et le casque
peut endommager l’ouïe.
l Avant de brancher ou de débrancher le casque,
réduire le niveau sonore.
l Utiliser un casque muni d’une fiche de 3,5 mm de
diamètre et ayant une impédance de 16 à 50 ohms.
L’impédance préconisée est de 32 ohms.
l Le branchement du casque déconnecte
automatiquement les enceintes. Régler le volume en
agissant sur la commande VOLUME.
l X-HM20 uniquement: Le son d'un iPod/iPhone
connecté à l'appareil ne peut pas être écouté au
moyen d'un casque ou d'écouteurs branché(s) sur la
prise casque de l'appareil. L’indication
« HP INVALID » s’affiche si vous connectez un casque
ou des écouteurs lorsque la fonction iPod/iPhone est
sélectionnée.
n Pour utiliser l’opération programmée et la
mise en arrêt différée
Mise en arrêt différée et lecture programmée :
Par exemple, on peut s’endormir en écoutant la radio et se
réveiller le lendemain matin avec un CD favori.
Régler la durée pour la mise en arrêt différée (voir ci-
1
dessus , étapes 1 - 5).
2 Alors que le minuteur de mise en sommeil est réglé,
lecture programmée (étapes 2 - 9, page 22).
Fr-23
Page 50

Dépannage
De nombreux problèmes potentiels peuvent être résolus
par l’utilisateur avant de faire appel à un technicien de
service.
Si le cas se présente, se reporter au tableau ci-dessous
avant de prendre contact avec un revendeur ou un centre
de réparation agréés par PIONEER.
n Général
Problème Cause
l L’horloge n’est pas à
l’heure.
l L’appareil ne répond
pas à la pression
d’une touche.
l Aucun son n’est
entendu.
n Lecteur CD
Problème Cause
l La lecture ne
démarre pas.
l La lecture s’arrête au
milieu ou ne se fait
pas correctement.
l La lecture est
intermittente ou
s’arrête.
n Télécommande
Problème Cause
l La télécommande ne
fonctionne pas.
n Tuner
Problème Cause
l L’émission
radiodiffusée est
parasitée
consécutivement.
l Y a-t-il eu une panne de
courant ?
Remettre l’horloge à
l’heure. (Voir page 9)
l Mettre l’appareil en veille
et le rallumer.
l S’il fonctionne toujours
mal, réinitialiser. (Voir
page 25)
l Le volume est-il réglé sur
« Min » ?
l Le casque est-il branché ?
l Les fils des enceintes sont-
ils débranchés ?
l Le disque est-il mis à
l’envers ?
l Le disque satisfait-il à la
norme ?
l Le disque est-il déformé ou
rayé ?
l L’appareil subit-il des
vibrations?
l Le disque est-il encrassé ?
l Une condensation est-elle
formée dans l’appareil ?
l L’appareil est-il branché
sur secteur ?
l Les polarités des pile sont-
elles respectées ?
l La pile est-elle hors
d’usage ?
l La distance et l’angle sont-
ils corrects ?
l Le capteur de
télécommande reçoit-il
une forte lumière ?
l L’appareil se trouve-t-il à
proximité d’un téléviseur
ou d’un PC ?
l L’antenne FM ou le cadre-
antenne PO est-il placé à
proximité ? Éloigner
l’antenne du cordon
d’alimentation.
n USB
Problème Cause
l Impossible de
détecter le
périphérique.
l La lecture ne
démarre pas.
l Affichage de
l’heure erroné.
l Affichage du
nom du fichier
erroné.
l Des fichiers MP3/WMA sont-t-
ils disponibles ?
Le périphérique est-il
l
correctement raccordé ?
l Le périphérique est-il de type
MTP ?
l Le périphérique ne contient-il
que des fichiers AAC ?
l Le fichier WMA est-il protégé
par un copyright ?
l Le fichier MP3 est-il
endommagé ?
l Un fichier à débit binaire
variable est-il en cours de
lecture ?
Le nom de fichier apparaît-il
l
caractères chinois ou japonais ?
n iPod et iPhone (X-HM20 uniquement)
Problème Cause
l Aucun son n’est
produit. Aucune
image n’apparaît
sur le téléviseur/
écran.
l L’iPod ou iPhone
ne se charge
pas.
« This accessory
l
is not made to
work with iPhone »
ou « This
accessory is not
supported by
iPhone » apparaît
sur l’écran de
iPhone.
iPod ou iPhone n’est pas lu.
l
l iPod ou iPhone n’est pas
correctement raccordé à
l’appareil.
l L’appareil est-il branché sur
secteur ?
l Le câble vidéo n’est pas
correctement raccordé.
l La sélection d’entrée
télévision/écran n’est pas
correctement réglée.
l La fonction de sortie TV de
l’iPod n’a pas été réglée pour
la sortie vidéo.
l Le son d'un iPod/iPhone
connecté à l'appareil ne peut
pas être écouté au moyen d'un
casque ou d'écouteurs
branché(s) sur la prise casque
de l'appareil.
l Le contact entre iPod ou
iPhone et le connecteur n’est
pas complet.
l L’iPod utilisé est de (3
génération).
l L’iPod ou l’iPhone n’est pas
pris en charge. Pour des
modèles compatibles, se
reporter à la page 10.
l L'iPod/iPhone ne peut pas être
rechargé lorsque l'unité
principale est en mode USB.
l La batterie de iPhone est
faible. Veuillez recharger
iPhone.
l L’iPhone n’est pas raccordé
correctement.
ème
Fr-24
Page 51

Dépannage (suite)
NON OUI
Correct
n Condensation
Un changement brusque de température et la
conservation ou l’utilisation dans un lieu très humide
peuvent occasionner une formation de condensation à
l’intérieur de l’appareil (cellule porte-laser CD, etc.) ou sur
l’émetteur de la télécommande. La condensation peut
provoquer des dysfonctionnements de l’appareil. Si cela
se produit, laisser l’appareil allumé sans disque jusqu’à ce
qu’une lecture normale redevienne possible (environ
1 heure). Essuyer toute condensation sur l’émetteur avec
un chiffon doux avant de faire fonctionner l'appareil.
n Si le problème survient
Si l’appareil a subi une force extérieure (chocs, électricité
statique, surtension due à un foudre, etc.) ou une
mauvaise manipulation, il peut mal fonctionner.
Si un tel problème survient, procéder comme suit :
1 On mettra l’appareil en attente et le rallumera.
2
Si la démarche précédente ne permet pas le retour à un
fonctionnement normal de l’appareil, débranchez-le de la
prise de courant et rebranchez-le et enfin rallumer
l’appareil.
Note :
Si l’appareil n’est toujours pas remis en état, il faut le
réinitialiser pour effacer toute la mémoire.
n Réinitialisation des réglages d’usine,
effacement de toute la mémoire
Appuyez sur la touche STANDBY/ON pour mettre
1
l'appareil sous tension.
2 Appuyez de manière répétée sur la touche LINE de la
télécommande ou sur le bouton INPUT de l'appareil
pour sélectionner la fonction LINE IN.
3 Lorsque la fonction LINE IN est sélectionnée, appuyez
sur le bouton de l'appareil et maintenez le
bouton enfoncé jusqu'à ce que l'indication
« RESET » soit affichée.
n Entretien de disques compact
Le compact disc résiste bien aux dommages, mais il peut
se produire un mauvais alignement dû à l’encrassement
de la surface du disque. Afin de profiter au maximum des
disques et de ce lecteur, suivre les conseils ci-dessous.
l Éviter d’écrire sur le disque, notamment sur la face non
munie d’une étiquette. La lecture se fait sur cette face.
l Éviter d’exposer les disques directement au soleil, à la
chaleur et à l’humidité.
l Tenir le compact disc par les bords. Les traces de
doigts, la saleté et l’eau sur le compact disc sont à
l’origine de bruit ou d’un alignement erroné. Si le
compact disc est encrassé ou ne fonctionne pas
correctement, nettoyer le disque avec un chiffon doux
et sec. Essuyer du centre vers la périphérie, en ligne
droite.
Entretien
n Nettoyage du coffret
Essuyer régulièrement le coffret à l’aide d’un chiffon doux
et d’une solution d’eau savonneuse, puis essuyer à l’aide
d’un chiffon sec.
Attention :
l Éviter d’utiliser des produits chimiques (essence,
diluant, etc.) pour le nettoyage. Cela pourrait
endommager l’enveloppe.
l Ne pas lubrifier l’appareil. Ce dernier peut mal
fonctionner.
Attention :
Cette opération efface toutes les données en mémoire :
réglages pour horloge, minuterie, présélection de tuner et
programmes CD.
n Avant de transporter l’appareil
Retirer l’iPod, le dispositif de mémoire USB et le disque de
l’appareil. Puis mettez l’appareil en mode de veille.
Transporter l’appareil alors que l’iPod ou le dispositif de
mémoire USB est installé ou que des disques sont restés
à l’intérieur peut endommager l’appareil.
Fr-25
Page 52

Spécifications
PIONEER se réserve le droit d’apporter des modifications
à la présentation et aux caractéristiques des appareils à
fin d’amélioration. Les chiffres des spécifications de
performance donnés sont les valeurs nominales des
appareils à la production. Ces valeurs peuvent être
légèrement différentes en fonction de chaque appareil.
n Général
Alimentation 220 V à 240 V CA, 50 Hz/60 Hz
Consommation Allumé :
Dimensions Largeur : 215 mm
Poids 3,8 kg (X-HM20)
n Amplificateur
Puissance de
sortie
Bornes de sortie Enceintes : 4 ohms
Bornes d’entrée Entrée de ligne (entrée analogique) :
n Lecteur CD
Type Lecteur de disque simple compacts
Procédé de
lecture
N/A Convertisseur N/A multi-bits
Réponse en
fréquence
Gamme
dynamique
45 W (X-HM20)
30 W (X-HM10)
En veille : 0,4 W
Hauteur : 99 mm
Profondeur : 300 mm
3,7 kg (X-HM10)
RMS : 15 W + 15 W (1 kHz, 10% de
D.H.T.,4 ohms )
20 Hz à 20 kHz
Sortie vidéo (X-HM20 uniquement):
1 Vc-c
Casque : 16 ohms
(recommandé : 32 ohms)
500 mV/ 47 k ohms
Sans contact, par laser à semiconducteur à 3 faisceaux
20 Hz à 20 000 Hz
90 dB (1 kHz)
n USB
Interface hôte USB l Conforme au standard USB
Fichier supporté l MPEG 1 Layer 3
Débit binaire
supporté
Autres l
Support du
système de
fichiers
1.1 (Vitesse pleine)/2.0
Mémoire de grande capacité.
l Support Bulk uniquement et
protocole CBI.
l WMA (Non DRM)
l MP3 (32 kbps à 320 kbps)
l WMA (64 kbps à 160 kbps)
Le nombre maximal total de
fichiers MP3/WMA est de 999.
l Le nombre maximal total de
dossiers est de 99, répertoire
racine COMPRIS.
l Les informations d’ID3TAG
supportées sont uniquement
TITLE, ARTIST et ALBUM.
l Support des ID3TAG version 1
et version 2.
l Support des dispositifs USB
avec Microsoft Windows/DOS/
FAT 12/ FAT 16/ FAT 32.
l Longueur de bloc 2 Ko pour le
secteur.
n Tuner
Gamme de
fréquences
Préréglage 40 (station FM et AM)
FM : 87,5 MHz à 108 MHz
AM : 522 kHz à 1 620 kHz
n Enceinte
X-HM20
Type Enceinte à 2 voies
Puissance d’entrée
maximale
Impédance 4 ohms
Dimensions Largeur : 132 mm
Poids 2,0 kg /chacune
Haut-parleur d'aigus – 5 cm
Haut-parleur de graves de 10 cm
15 W
Hauteur : 260 mm
Profondeur : 173 mm
Type Enceinte à 2 voies
Puissance d’entrée
maximale
Impédance 4 ohms
Dimensions Largeur : 132 mm
Poids 1,6 kg /chacune
Haut-parleur d’aigus
piézoélectrique
Haut-parleur de graves de 10 cm
15 W
Hauteur : 260 mm
Profondeur : 158 mm
Fr-26
X-HM10
Page 53

Avis
À propos de l'iPod/iPhone/iPad :
Les accessoires électroniques portant la mention « Made for iPod »,
« Made for iPhone » et « Made for iPad » ont été conçus pour
fonctionner respectivement avec un iPod, un iPhone ou un iPad et
sont certifiés conformes aux exigences d’Apple par le fabricant.
Apple n’est pas responsable pour le fonctionnement de cet appareil
ou de sa compatibilité avec les normes réglementaires et de
sécurité. Veuillez noter que l’emploi de cet accessoire avec un iPod,
iPhone ou iPad peut affecter les performances sans fil.
iPad, iPhone et iPod sont des marques commerciales d’Apple Inc.,
déposées aux États-Unis et dans d’autres pays.
© 2011 PIONEER CORPORATION.
Tous droits de reproduction et de traduction
réservés.
Fr-27
Page 54

ADVERTENCIA
Este aparato no es impermeable. Para evitar el riesgo
de incendio y de descargas eléctricas, no ponga ningún
recipiente lleno de líquido (como pueda ser un vaso o
un florero) cerca del aparato ni lo exponga a goteo,
salpicaduras, lluvia o humedad.
D3-4-2-1-3_A1_Es
ADVERTENCIA
Antes de enchufar el aparato a la corriente, lea la sección
siguiente con mucha atención.
La tensión de la red eléctrica es distinta según el
país o región. Asegúrese de que la tensión de la
alimentación de la localidad donde se proponga
utilizar este aparato corresponda a la tensión
necesaria (es decir, 230 V ó 120 V) indicada en el
panel posterior.
D3-4-2-1-4*_A1_Es
ADVERTENCIA
Para evitar el peligro de incendio, no ponga nada con
fuego encendido (como pueda ser una vela) encima del
aparato.
D3-4-2-1-7a_A1_Es
Entorno de funcionamiento
Temperatura y humedad del entorno de funcionamiento
+5 °C a +35 °C; menos del 85 % de humedad relativa
(rejillas de refrigeración no obstruidas)
No instale este aparato en un lugar mal ventilado, ni en
lugares expuestos a alta humedad o a la luz directa del
sol (o de otra luz artificial potente).
Si la clavija del cable de alimentación de CA de este
aparato no se adapta a la toma de corriente de CA
que usted desea utilizar, deberá cambiar la clavija por
otra que se adapte apropiadamente. El reemplazo y
montaje de una clavija del cable de alimentación de
CA sólo deberá realizarlos personal de servicio
técnico cualificado. Si se enchufa la clavija cortada a
una toma de corriente de CA, puede causar fuertes
descargas eléctricas. Asegúrese de que se tira de la
forma apropiada después de haberla extraído.
El aparato deberá desconectarse desenchufando la
clavija de la alimentación de la toma de corriente
cuando no se proponga utilizarlo durante mucho
tiempo (por ejemplo, antes de irse de vacaciones).
D3-4-2-1-7c*_A1_Es
D3-4-2-2-1a_A1_Es
PRECAUCIÓN PARA LA VENTILACIÓN
Cuando instale este aparato, asegúrese de dejar
espacio en torno al mismo para la ventilación con el fin
de mejorar la disipación de calor (por lo menos 10 cm
encima, 10 cm detrás, y 10 cm en cada lado).
10 cm 10 cm
10 cm
10 cm
ADVERTENCIA
Las ranuras y aberturas de la caja del aparato sirven
para su ventilación para poder asegurar un
funcionamiento fiable del aparato y para protegerlo
contra sobrecalentamiento. Para evitar el peligro de
incendio, las aberturas nunca deberán taparse ni
cubrirse con nada (como por ejemplo, periódicos,
manteles, cortinas) ni ponerse en funcionamiento el
aparato sobre una alfombra gruesas o una cama.
D3-4-2-1-7b*_A1_Es
PRECAUCIÓN
El interruptor de la alimentación STANDBY/ON de
este aparato no corta por completo toda la
alimentación de la toma de corriente de CA. Puesto
que el cable de alimentación hace las funciones de
dispositivo de desconexión de la corriente para el
aparato, para desconectar toda la alimentación del
aparato deberá desenchufar el cable de la toma de
corriente de CA. Por lo tanto, asegúrese de instalar el
aparato de modo que el cable de alimentación pueda
desenchufarse con facilidad de la toma de corriente
de CA en caso de un accidente. Para evitar correr el
peligro de incendio, el cable de alimentación también
deberá desenchufarse de la toma de corriente de CA
cuando no se tenga la intención de utilizarlo durante
mucho tiempo seguido (por ejemplo, antes de irse de
vacaciones).
D3-4-2-2-2a*_A1_Es
Este producto es para tareas domésticas generales.
Cualquiera avería debida a otra utilización que tareas
domésticas (tales como el uso a largo plazo para
motivos de negocios en un restaurante o el uso en un
coche o un barco) y que necesita una reparación hará
que cobrarla incluso durante el período de garantía.
K041_A1_Es
Page 55

Acerca de la condensación
Si el reproductor se traslada repentinamente de un
lugar frío a una habitación caliente (en invierno, por
ejemplo) o si la temperatura de la habitación donde
está instalado el reproductor sube repentinamente
debido a una calefacción, etc., en el interior del aparato
(en las piezas de funcionamiento y en la lente) podrán
formarse gotas de agua (condensación). Cuando haya
condensación, el reproductor no funcionará bien y la
reproducción no será posible. Deje sin funcionar el
reproductor a la temperatura ambiental durante 1 ó 2
horas con la alimentación conectada (el tiempo
depende de la cantidad de condensación). Las gotas de
agua se disiparán y será posible reproducir. La
condensación se puede producir también en el verano
si el reproductor se expone a la salida de aire frío de un
acondicionador de aire. Si pasa esto, traslade el
reproductor a un lugar diferente.
S005_A1_Es
S-3
Page 56

ESPAÑOL
l Sistema receptor de CD X-HM10/X-HM20, consistente en una unidad principal y un sistema de altavoces.
Introducción
Muchas gracias por haber adquirido este producto PIONEER. Lea atentamente este manual para conseguir el mejor
rendimiento del aparato. Le servirá también como guía operativa de este producto PIONEER.
Notas especiales
El suministro de este producto no transmite una licencia ni implica algun derecho de distribución del contenido creado
con este producto por medio de entradas provenientes de los sistemas de radiodifución (terrestre, satelitar, cable y/u
otros canales de distribución), entradas provenientes del uso de la red (vía Internet, intranets y/o otras redes), otros de
los sistemas de distribución regulados (aplicaciones pay-audio o audio-on-demand y similares) o a travès de material
mediático (discos compactos, discos digitales reescribibles, semiconductor chips, disco duro, tarjetas de memoria y
similares). Se requiere una licencia independiente para dichos usos. Para màs detalles, visite por favor el sito http://
mp3licensing.com
Tecnología de codificación del audio MPEG Layer-3 licenciada por Fraunhofer IIS y Thomson.
Accesorios
Verifique que estén incluidos los accesorios siguientes.
Adaptadores del
iPhone x 3
(sólo X-HM20)
Antena de FM x 1
Controlador remoto x 1 Pila del tamaño “AA” x 1 Antena de cuadro de AM x 1
Cable de alimentación
Tarjeta de garantía
Estas instrucciones de funcionamiento
ÍNDICE
Página
Información general
Precauciones . . . . . . . . . . . . . . . . . . . . . . . . . . . . . . . . 5
Controles e indicadores . . . . . . . . . . . . . . . . . . . . . . 5 - 6
Preparación para su utilización
Conexiones del sistema . . . . . . . . . . . . . . . . . . . . . . 7 - 8
Controlador remoto . . . . . . . . . . . . . . . . . . . . . . . . . . . 8
Funcionamiento básico
Control general . . . . . . . . . . . . . . . . . . . . . . . . . . . . . . . 9
Ajuste del reloj (Solamente del control remoto) . . . 9 - 10
iPod, iPhone y iPad
Audición de un iPod, iPhone o iPad
(sólo X-HM20) . . . . . . . . . . . . . . . . . . . . . . . . . . . . 10 - 12
Reproducción de CD o disco de MP3/WMA
Escuchando un CD o disco de MP3/WMA . . . . . . . . . 13
Reproducción avanzada de CD o disco de
MP3/WMA . . . . . . . . . . . . . . . . . . . . . . . . . . . . . . . 14 - 15
Modo de carpeta del MP3/WMA (solamente para los
ficheros de MP3/WMA) . . . . . . . . . . . . . . . . . . . . . 15 - 16
USB
Página
Escuchando a través del dispositivo de almacenamiento
USB/ player MP3 . . . . . . . . . . . . . . . . . . . . . . . . . 16 - 17
Reproducción avanzada USB . . . . . . . . . . . . . . . . . . .17
Radio
Audición de la radio . . . . . . . . . . . . . . . . . . . . . . . . . . .18
Características avanzadas
Empleo del sistema
de datos radiofónicos (RDS) . . . . . . . . . . . . . . . . 19 - 21
Operación del temporizador y de desconexión automática
(Solamente del control remoto) . . . . . . . . . . . . . . 21 - 23
Auriculares . . . . . . . . . . . . . . . . . . . . . . . . . . . . . . . . . 23
Referencias
Cuadro para localización de averías . . . . . . . . . . 24 - 25
Mantenimiento . . . . . . . . . . . . . . . . . . . . . . . . . . . . . . .25
Especificaciones técnicas . . . . . . . . . . . . . . . . . . . . . . 26
Nota . . . . . . . . . . . . . . . . . . . . . . . . . . . . . . . . . . . . . . .27
Es-4
Page 57

Precauciones
1
9
6
7
8 10 11 12 13 14
52 3
4
Sólo X-HM20
n Generalidades
l Use el aparato sobre una superficie nivelada y firme,
en un lugar que no esté expuesto a vibraciones.
l Ubique los altavoces al menos a 30 cm de distancia de
cualquier TV CRT para evitar las variaciones de color
en la pantalla del TV. Si la variación persiste, mueva los
altavoces más lejos del TV. El TV con pantalla LCD no
es susceptible a tal variación.
l Mantenga el aparato apartado de la luz directa del sol,
fuertes campos magnéticos, polvo excesivo, humedad
y de equipos electrónicos/eléctricos (computadoras
del hogar, facsímiles, etc.) que generan ruido eléctrico.
l No ponga nada encima del aparato.
l No exponga el aparato a la humedad, a temperaturas
superiors a 60° ni a temperaturas muy bajas.
l Si su sistema no funciona correctamente, desconecte
el cable de alimentación de CA de la toma de CA.
Enchufe otra vez el cable de alimentación de CA, y
luego conecte la alimentación del sistema.
l Si se produce una tormenta con rayos, desenchufe el
aparato por razones de seguridad.
l Sujete la clavija de alimentación de CA al quitar esta
clavija del tomacorriete. Si la quita tirando del cable
puede romper o estropear los hilos y conexiones
internas.
l El enchufe de la corriente CA es utilizado como un
dispositivo de desconexión y seguirá siendo siempre
fácil de operar.
l No quite la tapa exterior dado que pueden
l La ventilación no debe impedirse al cubrir las
l Las fuentes de llamas abiertas, tales como velas
l Deberá prestarse atención a los aspectos del medio
l El aparato está diseñado para funcionar en climas
Advertencia:
Se debe usar la misma tensión que la especificada en el
aparato. Si usa este aparato con una tensión más alta que
la especificada, es peligroso y puede provocar incendios
o accidentes que causen daños. PIONEER no asumirá
responsabilidad alguna por cualquier daño de este
aparato que resulte del uso de una tensión distinta a la
especificada.
n Control de volumen
El nivel de sonido como una función del volumen depende
de eficiencia del altavoz, de la localización, y de otros
factores. Es recomendable evitar la exposición a altos
niveles de volumen. No ponga el volumen al máximo
cuando lo encienda. Escuche música a niveles
moderados. La presión acústica excesiva de los
auriculares y los cascos puede causar la pérdida del
sentido auditivo.
Controles e indicadores
Las funciones de iPod/iPhone sólo están disponibles para X-HM20.
producirse descargas eléctricas. Solicite el
servicio técnico a un centro de servicio local
PIONEER.
aberturas de ventilación con cosas como periódicos,
tapetes, cortinas, etc.
encendidas no deben colocarse encima del aparato.
ambiente al deshacerse de las pila.
moderados.
n Panel frontal
1. Sensor remoto . . . . . . . . . . . . . . . . . . . . . . . . . . . 8
2. Indicador del temporizador . . . . . . . . . . . . . . . 22
3. Bandejas de discos . . . . . . . . . . . . . . . . . . . . . . 13
4. Estación de acoplamiento para iPod o
iPhone . . . . . . . . . . . . . . . . . . . . . . . . . . . . . . . . . 11
5. Control de volumen . . . . . . . . . . . . . . . . . . . . . . . 9
6. Botón de STANDBY/ON . . . . . . . . . . . . . 11, 13, 18
7. Botón de INPUT . . . . . . . . . . . . . . 9, 11, 13, 16, 18
8. Toma de auriculares . . . . . . . . . . . . . . . . . . . . . 23
9. Terminal USB . . . . . . . . . . . . . . . . . . . . . . . . . . . 16
Página
10. Preconfiguración del sintonizador descendente,
pista de CD/USB hacia abajo, saltear iPod/iPhone
hacia abajo . . . . . . . . . . . . . . . . . . . . . . . . . . .12, 13
11. Preconfiguración del sintonizador ascendente,
pista de CD/USB hacia arriba, saltear iPod/iPhone
hacia arriba . . . . . . . . . . . . . . . . . . . . . . . . . . .12, 13
12. Botón de paro de Disco/USB . . . . . . . . . . . .12, 13
13. Botón de pausa o reproducción del disco/USB/
iPod/iPhone . . . . . . . . . . . . . . . . . . . . . . . . . .12, 13
14. Botón de abertura/cierre de la bandeja de
discos . . . . . . . . . . . . . . . . . . . . . . . . . . . . . . . . . . 13
Es-5
Página
Page 58

Controles e indicadores (continuación)
32*
27
19
26
25
4
7
10
5
8
16
6
2
3
1
18
17
31*
36
35
30
9
11*
13*
14
15
20
28
29
33
34
12
21
22
24
23
*Los botones 11, 13, 31, 32 sólo están disponibles para X-HM20.
1 4 5 6 7
8910 11 1312 141516
28272624 2523221918 2120
17
2 3
2
1
3
n Sistema de altavoces
1. Altavoz de agudos
2. Altavoz de graves
3. Conducto de
reflexión de graves
n Las rejillas de los altavoces son extraíbles
(sólo X-HM20)
Asegúrese de que no haya nada en
contacto con los diafragmas de los
altavoces al retirar las rejillas.
n Controlador remoto
1. Transmisor de control remoto . . . . . . . . . . . . . . . 8
2. Botón de STANDBY/ON . . . . . . . . . . . .9, 11, 13, 21
3. Botones numéricos . . . . . . . . . . . . . . . . . . . . . . .14
4. Botón de P.Bass . . . . . . . . . . . . . . . . . . . . . . . . . . 9
5. Botón triple/graves . . . . . . . . . . . . . . . . . . . . . . . .9
6. Botón de sintonización descendente, saltear
hacia abajo, retroceso rápido, reducción del
tiempo . . . . . . . . . . . . . . . . . 9, 12, 13, 16, 18, 19, 21
7. Botón de preconfiguración del sintonizador
ascendente, cursor del iPod hacia arriba
. . . . . . . . . . . . . . . . . . . . . . . . . . . . . . .11, 12, 16, 18
8. Botón bajar volumen . . . . . . . . . . . . . . . . . . . . . 9
9. Botón de preconfiguración del sintonizador
descendente, cursor
del iPod hacia abajo. . . . . . . . . . . . . .11, 12, 16, 18
10. Botón de carpeta . . . . . . . . . . . . . . . . . . . . . . . . 16
11. Botón de iPod/iPhone . . . . . . . . . . . . . . . . . . . . .11
12. Botón de CD . . . . . . . . . . . . . . . . . . . . . . . . . . . .13
13. Botón de iPod/iPhone DISPLAY TV OUT . . .11, 12
14. Botón CD/USB DISPLAY . . . . . . . . . . . . . . . . . . . 16
15. Botón Tuner . . . . . . . . . . . . . . . . . . . . . . . . . .18, 19
16. Botón de RDS ASPM . . . . . . . . . . . . . . . . . . . . . .19
17. Botón Abrir/Cerrar . . . . . . . . . . . . . . . . . . . . . . . . 13
18. Botón de regulador . . . . . . . . . . . . . . . . . . . . . . . . 9
19. Botón de memoria . . . . . . . . . . . . . . . . . . . . .14, 18
20. Botón de Borrado . . . . . . . . . . . . . . . . . . . . .14, 18
21. Botón dormir . . . . . . . . . . . . . . . . . . . . . . . . . . . .23
22. Botón del reloj/temporizador . . . . . . . . . . . . .9, 21
23. Botón Random . . . . . . . . . . . . . . . . . . . . . . . .12, 14
24. Botón Repeat . . . . . . . . . . . . . . . . . . . . . . . . .12, 14
25. Botón de sintonización ascendente, saltear hacia
arriba, avance rápido, incremento
del tiempo . . . . . . . . . . . . .9, 12, 13, 16, 18, 19, 21
26. Botón subir volumen . . . . . . . . . . . . . . . . . . . . . .9
27. Botón Enter. . . . . . . . . . . . . . . . . . . . . . . . .9, 11, 12
28. Botón silenciador. . . . . . . . . . . . . . . . . . . . . . . . . .9
29. Botón Line . . . . . . . . . . . . . . . . . . . . . . . . . . . .8, 25
30. Botón de USB . . . . . . . . . . . . . . . . . . . . . . . . . . . 16
31. Botón de reproducir/pausa del iPod / iPhone . . 12
32. Botón del menú del iPod/iPhone . . . . . . . . . . . . 12
33. Botón de CD/reproducción
USB/pausa . . . . . . . . . . . . . . . . . . . . . . . . 12, 13, 14
34. Botón de paro de CD/USB. . . . . . . . . . . . . . .13, 14
35. Botón de visualización RDS . . . . . . . . . . . . . . . .19
36. Botón de RDS PTY. . . . . . . . . . . . . . . . . . . . . . . . 19
n Pantalla
1. Indicador USB . . . . . . . . . . . . . . . . . . . . . . . . . . . 16
2. Indicador iPod . . . . . . . . . . . . . . . . . . . . . . . . . . .10
3. Indicador de CD . . . . . . . . . . . . . . . . . . . . . . . . . .13
4. Indicador de MP3 . . . . . . . . . . . . . . . . . . . . . . . . . 13
5. Indicador de WMA . . . . . . . . . . . . . . . . . . . . . . . .13
6. Indicador de RDM (Aleatorio) . . . . . . . . . . . . . . . 14
7. Indicador de MEM (Memoria) . . . . . . . . . . . . . . .14
8. Indicador de reproducción . . . . . . . . . . . . . . . . . 14
9. Indicador reproducir/Pausa . . . . . . . . . . . . . . . .12
10. Indicador de sintonizar FM/AM. . . . . . . . . . . . . .18
11. Indicador del modo de FM en estéreo . . . . . . . .18
12. Indicador de la estación estéreo . . . . . . . . . . . .18
13. Indicador RDS . . . . . . . . . . . . . . . . . . . . . . . . . . .19
14. Indicador de PTY . . . . . . . . . . . . . . . . . . . . . . . . .19
15. Indicador de TP . . . . . . . . . . . . . . . . . . . . . . . . . .19
16. Indicador de TA . . . . . . . . . . . . . . . . . . . . . . . . . . 19
17. Indicador de silencio . . . . . . . . . . . . . . . . . . . . . . . 9
18. Indicador de título . . . . . . . . . . . . . . . . . . . . . . . . 16
19. Indicador de artista . . . . . . . . . . . . . . . . . . . . . . . 16
20. Indicador de carpeta . . . . . . . . . . . . . . . . . . . . . .16
21. Indicador de álbum . . . . . . . . . . . . . . . . . . . . . . .16
22. Indicador de archivo . . . . . . . . . . . . . . . . . . . . . .16
23. Indicador de pista . . . . . . . . . . . . . . . . . . . . . . . . 14
24. Indicador del temporizador diario . . . . . . . . . . .21
25. Indicador del temporizador para una vez . . . . .21
26. Indicador de discos . . . . . . . . . . . . . . . . . . . . . . . 13
27. Indicador total . . . . . . . . . . . . . . . . . . . . . . . . . . .16
28. Indicador de desconexión automática . . . . . . .23
Es-6
Página
Página
Page 59

Conexiones del sistema
AUX
LINE
LOOP
AC IN
Altavoz
derecho
FM Antena
A la toma de entrada de vídeo
Tornillos (no suministrados)
pared
< Fijación a
la pared >
< Montaje >
Toma de pared
(220 V a 240 V de
CA, 50 Hz/60 Hz)
Instalación de la antena de
cuadro de AM
Cable de vídeo
(no suministrados)
Televisor
Antena de
cuadro de AM
Altavoz
izquierdo
Toma de salida de
vídeo (sólo X-HM20)
Incorrecto
Antes de realizar o cambiar las conexiones, apague el sistema y desenchufe el cable de alimentación de la toma de
CA.
l
Por estos terminales de altavoz circula tensión ACTIVA
n Conexión de la antena
Antena de FM suministrada:
Conecte el cable de la antena de FM a la toma FM
75 OHMS y oriente el cable de la antena de FM en la
dirección que proporcione la mejor recepción posible.
Antena externa de FM:
Utilice una antena de FM externa (cable coaxial de
75 ohmios) para obtener una mejor recepción. Cuando se
utilice una antena externa de FM, desconecte el cable de
antena que viene con el aparato.
Antena de cuadro de AM suministrada:
Conecte la antena de lazo al terminal de AM. Coloque el
lazo antena AM de forma tal que la recepción sea óptima.
Posisionela en un estante, etc., o únala a un soporte o una
pared con la ayuda de tornillos (no provistos).
Nota:
Si pone la antena sobre el aparato o cerca del cable de
alimentación de CA, podrá causarse generación de ruido.
Ponga la antena separada del aparato para obtener una
recepción mejor.
n Conexión de los altavoces
l
Enrolle los filamentos del cable
sobre sí mismos.
l Conecte el cable rojo al terminal
positivo (+), y el otro cable al
terminal negativo (–).
l Utilice altavoces con una
impedancia de 4 ohms; si utiliza
altavoces con una impedancia
inferior, podría dañar la unidad.
que es PELIGROSA. Para evitar el peligro de descargas
eléctricas al conectar o desconectar los cables de altavoz,
desenchufe el cable de alimentación antes de tocar las
partes de los cables que no están aisladas.
l No instale estos altavoces en la pared ni en el techo,
ya que si se desprendieran podrían lastimar a alguien.
No confunda los canales derecho e izquierdo. El altavoz
l
derecho es el que está en el lado derecho cuando se mira
el aparato desde delante.
l No deje que los cables desnudos de los altavoces se
pongan en contacto entre sí.
l No deje que ningún objeto caiga en el interior de los
conductos de reflejo de graves, y no ponga nada en
ellos.
No se suba ni se siente encima de los altavoces. Podría
l
herirse.
n Conexión de un iPod o iPhone al televisor
Se pueden ver fotografías y vídeo del iPod o iPhone
conectando el sistema a una TV/monitor. Si el TV/monitor
posee una entrada de video, conéctelo a la toma de
VIDEO OUT en la parte trasera de la unidad y establezca
la salida del TV en la unidad de iPod o iPhone en la
posición “ON”.
Nota:
Asegúrese de ajustar la unidad iPod a NTSC o PAL para
coincidir con su señal de televisión. Visite la página
(sólo X-HM20)
principal de Apple para obtener más información.
Es-7
Page 60

Conexiones del sistema
AUX
LINE
LOOP
AC IN
Señal de audio
Televisor
A las tomas de
salida de audio
Cable de audio
(comercialment
e disponible)
Unidad principal
A las tomas
de entrada
LINE
STANDBY/ON
7 m
Sensor remoto
(continuación)
n Conexión de la alimentación de CA
Después de comprobar que se hayan hecho correctamente
todas las conexiones, enchufe el cable de alimentación de CA de
este aparato en la toma de la pared.
Nota:
Desenchufe el cable de corriente CA del toma de la pared si no
se utilizará la unidad durante un largo período de tiempo.
Precaución:
l
Sujete el cable de alimentación por la parte del enchufe. No
desconecte la clavija tirando del cable; nunca toque el cable
de alimentación con las manos mojadas, ya que esto puede
causar cortocircuitos o descargas eléctricas. No coloque el
equipo, un mueble ni ningún objeto encima del cable de
alimentación. No dañe el cable de alimentación. No anude el
cable ni lo ate a otros cables. Los cables de alimentación
deben ser tendidos de manera tal que la probabilidad de que
alguien los pise sea mínima. Un cable de alimentación
dañado puede causar incendios y descargas eléctricas.
Revise el cable de alimentación cada cierto tiempo. Si
encuentra que está dañado, pida un cable de recambio al
representante autorizado de Pioneer más cercano.
l
No utilice un cable de alimentación distinto del que se
suministra con esta unidad.
l
No utilice el cable de alimentación suministrado con la
unidad para ningún propósito excepto el descrito más arriba.
n Conectar una TV, etc.
Conectar a la TV con un cable de audio
.
Controlador remoto
n Instalación de las pila
Abra la cubierta de las baterías.
1
Introduzca la pila suministrada con el equipo siguiendo la
2
dirección indicada en el compartimiento de las pilas.
Al introducir o extraer las pilas, empújelas hacia el ter minal
(–) de la pila.
Cierre la cubierta.
3
Advertencia:
l No utilice ni guarde las pilas en lugares expuestos a la
luz solar directa o en lugares con un calor excesivo,
como el interior de un coche o cerca de un calefactor.
Ello podría ocasionar la fuga del electrolito de la pila, o
que la misma se sobrecalentara, explotara o ardiera.
También puede reducir la vida o el rendimiento de las
mismas.
Precaución:
l
Quite las pilas cuando no utilice la unidad durante
períodos largos de tiempo. Así prevendrá daños
potenciales debido a pérdidas de las pila.
l
No utilice pilas recargables (pila de níquel-cadmio, etc.).
l
Si las pilas no se instalan correctamente, pueden causar
fallos de funcionamiento de la unidad.
Notas sobre el uso:
l
Cambie la pila si la distancia operativa se reduce o el
funcionamiento es errático. Adquiera una pila de tamaño
“AA”.
l
Limpie periódicamente el transmisor del controlador
remoto y el sensor del aparato con un paño suave.
l
Exponer el sensor de la unidad a una luz muy fuerte
podría interferir con el funcionamiento. Cambie la fuente
de luz o la ubicación de la unidad si esto ocurre.
l
Mantenga el controlador remoto en lugares sin excesiva
humedad o calor y no lo someta a golpes ni vibraciones.
l Cuando se deshaga de las pilas usadas, asegúrese de
cumplir las disposiciones gubernamentales o las
normas de las instituciones medioambientales
públicas que rijan en su país o región.
n Prueba del controlador remoto
Compruebe el controlador remoto después de haber
comprobado todas las conexiones.
Oriente directamente el controlador remoto al sensor remoto
del aparato. Se podrá emplear el controlador remoto dentro
del alcance mostrado a continuación:
Para seleccionar la función Línea de entrada:
l
En la unidad principal: Pulse el botón INPUT
repetidamente hasta que aparezca Línea de entrada.
l
En el controlador remoto: Pulse repetidamente el botón
LINE hasta que aparezca Line In en pantalla.
Es-8
Page 61

Control general
Dimmer 1
Dimmer 2
Dimmer Off
(La pantalla del display se muestra atenuada).
(La pantalla del display se muestra más atenuada).
(La pantalla del display se muestra muy iluminada).
-5 -4 +4 +5
........
-5 -4 +4 +5
........
FM STEREO
FM MONO
USB
iPod
Line In
CD AM
(sólo X-HM20)
STANDBY/ON
TUNING −
TUNING +
CLOCK/TIMER
ENTER
STANDBY/ON
P.BASS
VOL VOL
STANDBY/ON
DIMMER
BASS/TREBLE
MUTE
VOLUME
n Silencio
El volumen se silencia temporalmente cuando pulsa el botón MUTE
del telemando. Pulse otra vez para restablecer el volumen.
n Control P.Bass
Cuando se activa la alimentación por primera vez, la unidad entrará en
modo P.bass, que enfatiza las frecuencias de bajos. Para cancelar el
modo P.bass, pulse el botón P.BASS del mando a distancia.
n Control de graves
1
Pulse el botón BASS/TREBLE para seleccionar “Bass”.
2
Durante 5 segundos, pulse el botón VOL (+ o –) para ajustar los
graves.
INPUT
n Para conectar la energía
Pulse el botón STANDBY/ON para conectar la alimentación.
Después del uso:
Pulse el botón STANDBY/ON para entrar en el modo de reserva de
alimentación.
n Control de brillo de pantalla
Para atenuar el brillo de la pantalla pulse el botón DIMMER en el
mando a distancia.
n Fijación automática del volumen
Si apaga la unidad principal cuando el volumen se encuentra en la
posición 17 o un valor superior, al encenderla de nuevo el volumen
estará en la posición 16.
n Control de volumen
Gire el botón del volumen hacia VOLUME (en la unidad principal) o
presione VOL +/– (en el control remoto) para aumentar o disminuir
el volumen.
n Función de activación automática
Cuando pulsa alguno de los botones siguientes, se conecta la
alimentación del aparato.
l
iPod / iPhone, CD, USB, LINE, TUNER en el control remoto: Se
activa la función seleccionada.
l
Botón / de la unidad principal: La unidad se enciende y se
iniciará la reproducción de la última función (CD, TUNER, USB,
iPod, LINE IN).
n Función de apagado automático
La unidad principal entrará en modo de espera (cuando el iPod/
iPhone no está conectado) al cabo de 15 minutos de inactividad
durante:
iPod/iPhone: Sin conexión.
CD / USB: En el modo de parada.
LINE IN: no se detecta ninguna señal de entrada o la audibilidad del
sonido es muy débil.
Nota:
Sólo X-HM20: Sin embargo, cuando el iPod/iPhone está conectado,
la unidad comenzará a cargarse.
Durante el modo de espera se mostrará “Charge Mode”.
n Control de agudos
1
Pulse el botón BASS/TREBLE para seleccionar “Treble”.
2
Dentro de los 5 segundos siguientes, pulse el botón VOL (+ o –)
para ajustar los agudos.
n Función
Cuando pulse el botón INPUT o la unidad principal, la función actual
cambiará a un modo diferente. Pulse el botón INPUT repetidamente
para seleccionar la función deseada.
Nota:
La función de copia de seguridad protegerá el modo de función
memorizado durante algunas horas en caso de fallo de electricidad
o de desconexión del cable de alimentación CA.
Ajuste del reloj (Solamente del
control remoto)
En este ejemplo, el reloj está ajustado para la visualización de
24 horas (00:00).
Pulse el botón STANDBY/ON para conectar la alimentación.
1
2
Pulse el botón CLOCK/TIMER.
3
Dentro de los siguientes 10, pulse el botón ENTER. Para ajustar
el día, pulse el botón o y, luego, el botón ENTER.
Es-9
Page 62

Ajuste del reloj (Solamente del
control remoto) (continuación)
4
Pulse el botón o para seleccionar la visualización de
24 horas o la de 12 horas y luego pulse el botón ENTER.
Aparecerá el visualizador de 24 horas.
(00:00 - 23:59)
Aparecerá el visualizador de 12 horas.
(AM 12:00 - PM 11:59)
5
Pulse el botón o para ajustar la hora y luego
pulse el botón ENTER. Pulse el botón o una vez
para adelantar la hora en 1 hora. Manténgalo pulsado
para adelantarla continuamente.
6
Pulse el botón o para ajustar los minutos y luego
pulse el botón ENTER. Pulse el botón o una vez
para avanzar la hora en 1 minuto.
Para comprobar la visualización de la hora:
Pulse el botón CLOCK/TIMER. Aparecerá la visualización de
la hora durante unos 5 segundos.
Nota:
Cuando se restablece la alimentación eléctrica después de
volver a conectar la unidad o después de un fallo eléctrico,
configure el reloj (página 9).
Para reajustar el reloj:
Efectúe “Ajuste del reloj” desde el paso 1. Si “Clock” no
aparece en el paso 2, se saltará el paso 4 (para
seleccionar la visualización de 24 horas o de 12 horas).
Para cambiar la visualización de 24 horas o de 12 horas:
1 Borre todo el contenido programado. [Para más
detalles, consulte “Reinicio de Fábrica, Limpiando
Toda la Memoria” de la página 25.]
2 Efectúe “Ajuste del reloj” desde el paso 1 en adelante.
Nota:
Si extrae el cable de alimentación o se produce un
apagón, el temporizador se reinicializará.
l Terminal de carga para iPod, iPhone e iPad:
Condición
Función USB NO SÍ
Otra función SÍ NO
Modo de espera SÍ NO
l Es posible que en la pantalla del iPhone se muestre
“Este accesorio no ha sido diseñado para funcionar
con un iPhone”, u otro mensaje similar, cuando:
- la pila esté agotándose
- el iPhone no se haya colocado correctamente en la
estación de acoplamiento (por ej., esté inclinado).
En tal caso, retire el iPhone de la estación de
acoplamiento y vuelva a colocarlo.
Este producto ha sido diseñado para ser utilizado con
l
un iPhone. Para impedir una interferencia aleatoria
cuando el iPod/iPhone se encuentre en la estación de
acoplamiento, la salida de auriculares queda
desactivada, al tiempo que se muestra “HP INVALID”.
Puede también experimentar una breve interferencia
de sonido durante las llamadas entrantes.
Estación de
acoplamiento
Terminal USB
n Conexión de un iPad (terminal USB)
Introduzca el conector en el iPod, iPhone o iPad.
1
2 Conecte el iPad a la unidad mediante un conector USB.
Audición de un iPod, iPhone o iPad
(sólo X-HM20)
Modelos soportados de iPod, iPhone e iPad:
l
iPad
l
iPhone 4
l
iPhone 3GS
l
iPhone 3G
l
iPhone
l
iPod touch (4a generación)
l
iPod touch (3a generación)
l
iPod touch (2a generación)
l
iPod touch (1a generación)
l
iPod classic
l
iPod nano (6a generación)
l
iPod nano (5a generación)
l
iPod nano (4a generación)
l
iPod nano (3a generación)
l
iPod nano (2a generación)
Notas:
l Este sistema se ha desarrollado y probado para la
versión de software de iPod/iPhone/iPad indicada en
la página web de Pioneer (http://pioneer.jp/homeav/
support/ios/eu).
l Si instala versiones de software distintas de las
indicadas en la página web de Pioneer en su iPod/
iPhone/iPad, puede derivar en la incompatibilidad con
este sistema.
Nota:
El conector USB no soporta salida de VIDEO.
n Reproducción de un iPod, iPhone o iPad
(terminal USB)
1 Pulse el botón STANDBY/ON para encender el
aparato.
2 Pulse el botón USB del mando a distancia o pulse
repetidamente el botón INPUT de la unidad principal
para seleccionar la función USB.
3 Conecte el iPod, iPhone o iPad a la unidad. Se
mostrará “iPod”.
4 Para iniciar la reproducción, pulse el botón / (CD/
USB / ).
Nota:
Durante la reproducción de un iPod, iPhone o iPad, el
botón Stop ( ) no es válido.
Es-10
Page 63

Audición de un iPod, iPhone o iPad (sólo X-HM20) (continuación)
iPhone
Dock conector
iPhone (inferior)
Conector de iPhone
Estación de
acoplamiento para
iPhone
Adaptador de iPhone
n Conexión de adaptador iPod y iPhone
(Estación de acoplamiento)
Nota:
Utilice el adaptador proporcionado con su unidad iPod o
iPhone.
N°.
Adaptador
iPhone
Descripción
iPhone
Capacidad
12 iPhone 4GB & 8GB & 16GB
15 iPhone 3G,
8GB & 16GB & 32GB
iPhone 3GS
19 iPhone 4 16GB & 32GB
n Para inserter el adaptador iPod y iPhone
(Estación de acoplamiento)
Abra la estación de acoplamiento para iPod e iPhone
1
tirando de ella hacia arriba.
2 Introduzca el adaptador de iPod e iPhone en la unidad,
y conecte su iPod o iPhone.
n Para retirar el adaptador de iPod o iPhone
(Estación de acoplamiento)
Inserte la punta de un destornillador (de
tipo “–”, pequeño) en el agujero del
adaptador del tal y como se indica y
levántelo hacia arriba para retirarlo.
n Reproducción de un iPod o iPhone
(Estación de acoplamiento)
Pulse el botón STANDBY/ON para conectar la alimentación.
1
2
Pulse el botón iPod/iPhone en el control remoto o el botón
INPUT repetidamente en la unidad principal para
seleccionar la función de iPod.
3
Inserte la unidad iPod o iPhone en el puerto del iPod de la
unidad principal.
4
Pulse el botón / (iPod/iPhone / ) para iniciar la
reproducción.
STANDBY/ON
INPUT
PRESET
ENTER
PRESET
USB
iPod/
iPhone
CD/USB
DISPLAY
TV OUT
DISPLAY
STANDBY/ON
iPod/iPhone
MENU
Precaución:
Desconecte todos los accesorios de iPod o iPhone antes de
insertarlo en el puerto.
n Reproducción de iPhone
l
El sonido sólo cambiará del iPhone a la unidad principal
después de que se completa el proceso de autenticación en
aproximadamente 10 segundos.
l
Las llamadas entrantes interrumpirán la reproducción.
l
Cuando las llamadas son respondidas, la conversación sólo
se puede escuchar por el altavoz incorporado del iPhone.
Encienda el altavoz del iPhone o desconecte el iPhone para
comenzar la conversación.
n Desconexión de un iPod, iPhone o iPad
Basta con retirar el iPod o iPhone de la estación de
acoplamiento, o el iPad del terminal USB. Es seguro hacerlo así
incluso durante la reproducción.
Es-11
Page 64

Audición de un iPod, iPhone o iPad
TUNING −
TUNING +
TUNING −
TUNING +
REPEAT
REPEAT
RANDOM
PRESET
PRESET
(sólo X-HM20) (continuación)
n Ver vídeos en un televisor conectado al
iPod o iPhone
Pulse el botón DISPLAY TV OUT durante más de
1
2 segundos. Aparecerá “TV Display” en pantalla.
2
Pulse el botón ENTER para iniciar la reproducción.
Notas:
l
Si la configuración de salida de TV ya se encuentra activada
en el menú del vídeo, el vídeo aparecerá automáticamente
en la pantalla del televisor cuando pulse la tecla ENTER.
l
El terminal USB no permite la visualización a través del
televisor. (iPad)
l
Para volver a la visualización del vídeo en la pantalla del iPod
o iPhone, pulse el botón MENU para entrar en el menú de
vídeo. Luego presione el botón DISPLAY TV OUT durante
más de 2 segundos hasta que aparezca “iPod Display”.
l
Durante la reproducción del vídeo de iPod o iPhone, si pulsa
el botón DISPLAY TV OUT no alternará la visualización de
salida de vídeo entre el iPod y el televisor.
Precaución:
l
Desconecte todos los accesorios del iPod o iPhone antes de
insertarlo en el puerto del iPod.
l El botón Stop ( ) de la unidad principal no es válido
mientras opera un iPod.
n Navegación de los menús de iPod, iPhone
o iPad
Para ver el menú en el iPod, iPhone o iPad, pulse el botón
1
MENU del iPod/iPhone. Púlselo de nuevo para volver al
menú anterior.
2
Utilice el botón PRESET (
opción del menú y luego pulse el botón ENTER.
Nota:
Al navegar por el menú del iPod, iPhone o iPad con el control
remoto, no opere ninguno de los botones de la unidad iPod o
iPhone. El nivel de volumen se ajusta cuando pulsa el botón VOL
(+ o –) de la unidad principal o del controlador remoto. El ajuste
de volumen en el iPod, iPhone o iPad no surtirá ningún efecto.
Funcionamiento del iPod y iPhone:
Las operaciones descritas abajo dependen de la generación del
iPod y iPhone que esté utilizando.
Sistema en funcionamiento:
Cuando la unidad principal esté encendida, el iPod, iPhone o
iPad se encenderán automáticamente al ser colocados en la
estación de acoplamiento.
Sistema apagado (funcionamiento en espera):
Cuando coloque la unidad principal en modo de espera, el iPod
e iPhone que haya en la estación de acoplamiento, o el iPad
conectado, se colocarán automáticamente en modo de espera.
o
) para seleccionar una
n Diversas funciones del iPod, iPhone e iPad
Función Unidad
principal
Reproducción
Pausa
Pista
siguiente/
anterior
Avance
rápido/
Retroceso
rápido
Pantalla
Repetir
Aleatorio
Menú
iPod
Entrada
al iPod
iPod
cursor
arriba/
abajo
____
____
____
____
____
____
Controlador remoto
Dock USB
iPod/
CD/USB
iPhone
iPod/
CD/USB
iPhone
TUNING −
iPhone
iPhone
iPod/
RANDOM
iPod/
PRESET
PRESET
TUNING +
TUNING −
____
iPod/
iPhone
Funcionamiento
Púlselo en el
modo pausa.
Pulse en el modo
de reproducción.
Pulse en el modo
de reproducción
TUNING +
o pausa. Si pulsa
el botón en el
modo de pausa,
pulse el botón
/ para iniciar
la pista deseada.
Pulse y
mantenga
pulsado el modo
de reproducción.
Suéltelo para
volver a la
reproducción.
Pulse esta tecla
durante más de
dos segundos
para cambiar la
pantalla de salida
de vídeo entre el
iPod y el televisor.
Pulse para to
cambiar el modo
repetir.
Pulse para
cambiar al modo
aleatorio.
Pulse para ver el
menú del iPod
durante la
function del iPod.
Pulse para
confirmar la
selección.
Pulse para
seleccionar el
menú del iPod.
Es-12
Page 65

Escuchando un CD o disco de MP3/WMA
PHONES
USB
STANDBY/ON
INPUT
OPEN/CLOSE
STANDBY/ON
TUNING −
CD
Este sistema puede reproducir un CD estándar, CD-R/RW en el
formato CD y CD-R/RW con archivos MP3 o WMA, pero no
puede grabar en ellos. Es posible que algunos discos CD-R y
CD-RW de audio no puedan reproducirse debido al estado del
disco o al aparato utilizado para su grabación.
MP3:
MP3 es una forma de compresión. Es un acrónimo que
significa MPEG Audio Layer 3. MP3 es un tipo de código de
audio que se procesa mediante compresión significante
desde la fuente de audio original con muy poca pérdida en
la calidad del sonido.
l
El sistema soporta archivos MPEG 1 Layer 3 y VBR.
l
Durante la reproducción de archivos VBR, el contador de
tiempo del visualizador podría diferir del tiempo real de
reproducción.
l
Bitrate soportado por MP3 tiene 32 kbps a 320 kbps.
WMA:
Los archivos WMA son un formato de sistema avanzado de
archivos que incluye archivos de audio que están
comprimidos con un codec de audio de Windows. El WMA
fue desarrollado por Microsoft como un formato de audio
para el reproductor Windows Media.
l
El indicador “MP3” y “WMA” se encenderá después de que
la unidad lea información en un disco de MP3 o WMA.
l
Bitrate soportado por WMA tiene 64 kbps a 160 kbps.
n Reproducción de discos
1
Pulse el botón STANDBY/ON para conectar la alimentación.
2
Pulse el botón CD en el control remoto o el botón INPUT
repetidamente en la unidad principal para seleccionar la
función de CD.
3
Pulse el botón para abrir la bandeja de discos.
4
Ponga el disco en la bandeja de discos, con la cara de la
etiqueta hacia arriba.
TUNING +
6
Pulse el botón / (CD/USB /) para iniciar la
reproducción. Después de la última pista del disco, la unidad
parará automáticamente.
Precaución:
l
No ponga dos discos en una misma bandeja de disco.
l
No reproduzca discos de formas especiales (en forma de
corazón, octagonales. etc.). Podría causar mal
funcionamiento.
l
No empuje la bandeja de discos mientras está moviendo.
l
Si hay un corte de alimentación eléctrica mientras la bandeja
está abierta, espere a que se restaure la alimentación.
l
Si hay interferencias de televisión o radio durante el
funcionamiento del reproductor de CD, coloque el aparato
alejado de la televisión o de la radio.
l
Asegúrese de poner el disco de 8 cm en el centro de las
bandejas de discos.
l
Debido a la estructura de la información del disco, tarda más
en leer un disco MP3/WMA que un disco CD normal
(aproximadamente 20 a 90 segundos).
n Distintas funciones de los discos
Función Unidad
principal
Reproducción
Parada
Pausa
Pista
siguiente/
anterior
Avance
rápido/
Retroceso
rápido
Controlador
remoto
CD/USB
CD/USB
CD/USB
TUNING −
TUNING +
TUNING −
TUNING +
Funcionamiento
Pulse el modo de parada.
Pulse en el modo de
reproducción.
Pulse en el modo de
reproducción. Pulse el
botón / para reanudar
la reproducción a partir
del punto en el que se
pausó.
Púlselo en el modo de
reproducción o parada. Si
pulsa el botón en modo
de parada, pulse el botón
/ para empezar la
pista deseada.
Pulse y mantenga
pulsado el modo de
reproducción.
Suéltelo para volver a la
reproducción.
5
Pulse el botón para cerrar la bandeja de discos.
Es-13
Page 66

Reproducción avanzada de CD o disco de MP3/WMA
REPEAT
MEMORY
DIMMER
RANDOM
Número de la pista
seleccionada
Número de la pista seleccionada
Para cancelar la repetición de la reproducción:
Presione varias veces el botón REPEAT hasta que aparezca
“Normal” y desparezca “ ”.
Nota:
Durante la repetición de reproducción, la reproducción
aleatoria no es posible.
n Reproducción aleatoria
n Búsqueda directa de pistas
Puede reproducir las pistas deseadas del disco actual
mediante los botones numéricos.
Utilice los botones numéricos del mando a distancia
para seleccionar la pista deseada mientras se reproduce
el disco seleccionado.
l
Los botones numéricos le permiten elegir hasta el número
9.
l
Para seleccionar el número 10 o superior, emplee el
botón “>10”.
A. Por ejemplo, para
seleccionar 13
1
Pulse una vez el botón “>10”.
2
Pulse el botón “1”.
3
Pulse el botón “3”.
B. Por ejemplo, para seleccionar 130
1
Pulse el botón “>10” dos veces.
2
Pulse el botón “1”.
3
Pulse el botón “3”.
4
Pulse el botón “0”.
Notas:
l
No puede seleccionar un número de pista más alto que el
número de pistas en el disco.
l
Durante la reproducción aleatoria no es posible utilizar la
búsqueda directa.
Para detener la reproducción:
Presione el botón (CD/USB ).
n Repetición de la reproducción
La repetición de lectura de una pista se puede realizar, todas
las pistas o una secuencia programada continuamente.
Para escuchar nuevamente una pista:
Presione varias veces el botón REPEAT hasta que aparezca
“Repeat One”. Presione el botón / (CD/USB / ).
Para repetir todas las pistas:
Presione varias veces el botón REPEAT hasta que aparezca
“Repeat All”. Presione el botón / (CD/USB / ).
Para repetir las pistas deseadas:
Efectúe los pasos 1 - 5 de la sección “Reproducción
programada” de esta página y luego pulse repetidamente el
botón REPEAT hasta que aparezca “Repeat All”.
Las pistas del disco se pueden reproducir en orden aleatorio
automáticamente.
Para reproducir aleatoriamente todas las pistas:
Pulse y mantenga presionado el botón RANDOM del mando
a distancia hasta que aparezca “Random”. Presione el botón
/ (CD/USB /).
Para cancelar la reproducción aleatoria:
Pulse el botón RANDOM hasta que desaparezca el indicador
“RDM”.
Notas:
l
Si usted presiona el botón durante la reproducción
aleatoria, usted puede ir a la próxima pista seleccionada
por la operación aleatoria. Por otra parte, el botón no
permite ir a la pista anterior. El principio de la pista a leeer
será localizado.
l
En la reproducción aleatoria, la unidad seleccionará y
reproducirá las pistas automáticamente. (No puede
seleccionar el orden de las pistas.)
l
Durante la reproducción aleatoria, la repetición de
reproducción no es posible.
Precaución:
Después de realizar la repetición, asegúrese de apretar el
botón (CD/USB ). De lo contrario, el disco se reproducirá
continuamente.
n Reproducción programada (CD)
Podrá seleccionar hasta 32 selecciones para la reproducción
en el orden que usted prefiera.
Durante el modo de stop, presione el botón de MEMORY
1
del control remoto para introducir el modo y salvar la
programación.
2
Presione los botones o en el mando a distancia
para seleccionar la pista deseada.
3
Pulse el botón MEMORY para almacenar el número de pista.
Es-14
Page 67

Reproducción avanzada de CD o
ROOT
(FOLDER 1)
FOLDER A
(FOLDER 2)
FOLDER B
(FOLDER 3)
FILE 9
FILE 10
FILE 3
FILE 4
FILE 5
FILE 6
FILE 7
FILE 8
FOLDER E
(FOLDER 6)
FOLDER C
(FOLDER 4)
FOLDER D
(FOLDER 5)
FILE 1
FILE 2
disco de MP3/WMA (continuación)
4
Repita los pasos 2 - 3 para otras pistas. Podrán
programarse hasta 32 pistas. Si desea verificar las pistas
programadas, pulse repetidamente el botón MEMORY. Si
se ha cometido un error, se pueden borrar las pistas
programadas pulsando el botón CLEAR.
5
Pulse el botón / (CD/USB / ) para iniciar la
reproducción.
n Reproducción programada (MP3/WMA)
1
Mientras esté en el modo de parada, pulse el botón
MEMORY para entrar en el modo de almacenamiento
de programación.
2 Pulse el botón PRESET
distancia para seleccionar la carpeta deseada.
A continuación pulse el botón o en el mando a
distancia para seleccionar las pistas deseadas.
3 Pulse el botón MEMORY para guardar la carpeta y el
número de pista.
4 Repita los pasos 2 – 3 para otras carpetas/pistas.
Podrán programarse hasta 32 pistas.
5 Pulse el botón / (CD/USB / ) para iniciar la
reproducción.
Para cancelar el modo de reproducción programada:
Durante el modo de parada programada, pulse el botón
(CD/USB ). La pantalla mostrará “Memory Clear” y
todos los contenidos programados se borrarán.
Para añadir pistas al programa:
Si un programa ha sido almacenado anteriormente, el
indicador “MEM” se visualizará. Pulse el botón MEMORY.
Después, para añadir pistas, siga los pasos 2 – 3.
Notas:
l Cuando se expulsa un disco, el programa se cancela
automáticamente.
l Si pulsa el botón STANDBY/ON para entrar en el
modo de reserva o cambia la función desde CD a otra
función, se borrarán las selecciones programadas.
l Durante el funcionamiento programado, no es posible
la reproducción aleatoria.
(
o ) en el mando a
Modo de carpeta del MP3/WMA
(solamente para los ficheros de MP3/
WMA)
Para escuchar los ficheros MP3/WMA (Windows
Media Audio)
Existen muchos sitos internet donde usted puede
descargar ficheros de música MP3/WMA (Audio de los
Medios de Windows). Siga las instrucciones del website
acerca de cómo descargar los archivos de la música.
Podrá reproducir estos archivos de música descargados
grabándolos en un disco CD-R/RW.
l Sus cansiones/ficheros descargados son solamente
para uso personal. Cualquier otro uso de la canción sin
la autorización del dueño es contra la ley.
n Sobre el orden de playback de la carpeta
Si los archivos de MP3/WMA están registrados en varias
carpetas, el número de cada una será fijado
automáticamente.
Estas carpetas se pueden seleccionar a través del botón
FOLDER del mando a distancia. Si no son soportados los
formatos del fichero en el interior de la carpeta
seleccionada, se saltará y se seleccionará la próxima.
Ejemplo: Cómo fijar número de la carpeta si el formato de
los archivos MP3/WMA están registrados como en la
figura de abajo.
1
La carpeta de ROOT se fija como carpeta 1.
2 Así como para las carpetas situadas dentro de la
carpeta ROOT (la carpeta A y B), la carpeta que sea
grabada antes en el disco se establecerá como carpeta
2 y carpeta 3.
3 De las carpetas incluidas en la carpeta A (carpeta C y
carpeta D), la carpeta que se registre primero en el
disco será agregada como carpeta 4 y carpeta 5.
4 La carpeta E que esta dentro de la D será renominada
carpeta 6.
l El orden de la información registrada en la carpeta y el
archivo del disco dependen del software de escritura.
Es posible que esta unidad lea los archivos no en base
al orden previsto de lectura que esperamos.
l Para CD MP3/WMA, pueden leerse 99 números de
carpetas y 999 archivos, incluyendo las carpetas que
no contengan archivos reproducibles.
El modo carpeta on/off puede ser operado a través del
botón FOLDER del mando a distancia. Los archivos que
se leen en el modo de encendido se diferencian de los
leídos en el modo apagado.
Es-15
Page 68

Modo de carpeta del MP3/WMA
Indicador de MP3
Indicador de WMA
Indicador de
TOTAL
Número total de archivos
Número total de carpetas
Primer número de
pista en la carpeta
Indicador de
la CARPETA
Número de la
CARPETA
Visualización de la carpeta
Nombre del archivo
visualizado
Visualización del título
Visualización
del album
Visualización del contador
Visualización del
artista
INPUT
USB
USB
PRESET
PRESET
FOLDER
TUNING −
TUNING +
DISPLAY
CD/USB
(solamente para los ficheros de MP3/
WMA) (continuación)
Escuchando a través del dispositivo
de almacenamiento USB/ player MP3
TUNING −
PRESET
FOLDER
PRESET
n
Procedimiento para escuchar el disco del
TUNING +
CD
CD/USB
MP3/WMA con el modo de carpeta activado
Para reproducir CD-R/RW.
1
Presione el botón CD y cargue un disco de MP3/WMA.
Pulse el botón FOLDER para visualizar la información del
disco.
2
Pulse el botón PRESET ( o ) para seleccionar el
fichero que desea a reproducir. (Modo carpeta activado)
3 Seleccione el archivo a escuchar deseado presionando
el botón o .
4 Presione el botón / (CD/USB / ). El playback
iniciará y el nombre del archivo será visualizado.
l Se mostrará el título, artista y nombre del álbum si
esa información está registrada en el disco.
l En el caso de la reproducción con el modo de
carpeta activo, pulse el botón PRESET
podrá seleccionar la carpeta aunque se encuentre
en modo de reproducción/pausa. Seguirá en modo
de reproducción/pausa en la primera pista de la
carpeta seleccionada.
l El contenido del display puede ser cambiado
presionando el botón de CD/USB DISPLAY.
Nota:
Si no se visualiza “Not Support”, significa que está
seleccionado “Copyright protected WMA file” o “Not
supported playback file”.
DISPLAY
(
o ) y
Notas:
l Este producto no es compatible con sistemas de
archivos MTP y AAC procedentes de un dispositivo de
almacenamiento masivo USB o de un reproductor
MP3.
Es posible que algunos dispositivos de almacenamiento
l
externo no funcionen con este sistema.
l No se garantiza el funcionamiento de dispositivos de
almacenamiento externo (dispositivos de memoria
USB, discos duros externos, etc.).
n Reproducir reproductor USB/MP3 con el
modo carpeta desactivado
Pulse el botón USB del controlador remoto o el botón
1
INPUT de la unidad principal repetidamente para
seleccionar la función de USB. Conecte el dispositivo
de memoria del USB a la unidad con los archivos con el
formato MP3/WMA. Cuando la memoria del USB está
conectada a la unidad principal, la información del
dispositivo será visualizada.
2 Seleccione el archivo a escuchar deseado presionando
el botón o .
3 Presione el botón / (CD/USB / ). El playback
iniciará y el nombre del archivo será visualizado.
l Se visualizan el nombre del título, del artista y del
álbum si están registrados en el dispositivo de
memoria del USB.
l El contenido del display puede ser cambiado
presionando el botón de CD/USB DISPLAY.
Nota:
Para detener el playback:
Presione el botón / (CD/USB / ).
Es-16
Page 69

Escuchando a través del dispositivo
de almacenamiento USB/ player MP3
(continuación)
n Reproducir reproductor USB/MP3 con el
modo carpeta activado
Pulse el botón USB del controlador remoto o el botón
1
INPUT de la unidad principal repetidamente para
seleccionar la función de USB. Conecte el dispositivo
de memoria del USB a la unidad con los archivos con el
formato MP3/WMA. Cuando la memoria del USB está
conectada a la unidad principal, la información del
dispositivo será visualizada.
2
Pulse el botón FOLDER, y pulse el botón PRESET ( o
) para seleccionar la carpeta que se desea escuchar.
Para iniciar la reproducción en el modo fichero, siga al
paso 4. Para cambiar la carpeta a escuchar, presione
PRESET ( o ) para seleccionar otra.
3 Seleccione el archivo a escuchar deseado presionando
el botón o .
4 Presione el botón / (CD/USB / ). El playback
iniciará y el nombre del archivo será visualizado.
l Se visualizan el nombre del título, del artista y del
álbum si están registrados en el dispositivo de
memoria del USB.
l El contenido del display puede ser cambiado
presionando el botón de CD/USB DISPLAY.
n
Para quitar el dispositivo de la memoria USB
1
Pulse el botón (CD/USB ) para parar la reproducción.
2
Desconecte el dispositivo de memoria USB del terminal.
Notas:
l PIONEER no se hará responsabile de la pérdida de
datos durante la conexión del dispositivo de memoria
del USB al sistema audio.
l Los archivos comprimidos en formato MP3 y/o WMA
se pueden reproducir cuando están conectados al
terminal USB.
l Esta memoria USB soporta formatos FAT 16 o FAT 32.
l PIONEER no puede garantizar que todos los
dispositivos de memoria USB funcionarán en esté
sistema audio.
l No se recomienda el uso de cables USB en este
sistema de audio así como la conexión a un dispositivo
de memoria USB. El uso de un cable USB afectará el
funcionamiento de su sistema audio.
l Esta memoria USB no se puede operar por medio del
hub USB.
l El terminal USB en esta unidad no esta destinado a
una conexión de PC sino para reproducción de música
con un dispositivo de memoria USB.
l El almacenamiento HDD externo no se puede
reproducir via USB.
l En caso que sean tantos los datos en el interior de la
memoria USB, pueden tomar más tiempo su lectura.
Es-17
l Este producto puede reproducir archivos WMA y MP3.
Detectará automáticamente el tipo de archivo que se
está reproduciendo. Si se reproduce un archivo
inejecutable en este producto, aparecerá la indicación,
“Not Support” y se omitirá automáticamente el archivo.
Esto tardará unos cuantos segundos. Si aparecen
indicaciones en la pantalla debido a un archivo no
especificado, apague la unidad y vuélvala a encender.
l Este producto hace referencia a dispositivos de
almacenamiento masivo USB y reproductores MP3.
Sin embargo puede afrontar algunas irregularidades
debido a diferentes razones improvistas de algunos
dispositivos. En caso de que esto ocurra, apague la
unidad y vuélvala a encender.
l El dispositivo de memoria USB se conecta
directamente al puerto USB sin necesidad de ningún
cable.
l Durante la función de CD, el reproductor de MP3 no se
cargará.
l Si conecta un iPod a un terminal USB y la función USB
ha sido seleccionada, se mostrará “Not Support”.
Reproducción avanzada USB
Las funciones siguientes son las mismas que las
operaciones de CD:
Búsqueda directa de pistas . . . . . . . . . . . . . . . . . . . . 14
Repetición de la reproducción . . . . . . . . . . . . . . . . . 14
Reproducción aleatoria . . . . . . . . . . . . . . . . . . . . . . . 14
Reproducción programada (MP3/WMA). . . . . . . . . . 15
Notas:
l Si el dispositivo de memoria USB no esta conectado,
aparecera “USB No Media” en pantalla.
l Esta unidad soporta solamente el formato “MPEG-1
Audio Layer-3”. (La frecuencia de muestreo son
32 kHz, 44,1 kHz, 48 kHz)
l El orden de reproducción para archivos MP3 puede
variar dependiendo del software de escritura utilizado
durante la descarga del archivo.
l El Bitrate que es admitido por el MP3 es 32 kbps a
320 kbps, el WMA es 64 kbps a 160 kbps.
l Para los archivos de MP3/WMA, por favor ponga la
extensión del “.MP3” y del “.WMA”. Los archivos no
pueden se pueden leer si no tienen la extensión MP3/
WMA.
l Las listas de reproducción no se admiten en esta
unidad.
l Esta unidad puede visualizar el Nombre de la Carpeta
o del Archivo hasta 32 caracteres.
l El número total máximo de archivos MP3/WMA es de
999.
l El número total de carpetas leídas es de 99,
incluyendo la carpeta con archivos no reproducibles.
Sin embargo, en la pantalla del display únicamente se
mostrará la carpeta con archivos MP3.
l El tiempo de reproducción puede no visualizarse
correctamente cuando se reproduce un archivo bitrate
variable.
l La información ID3TAG permitida es sólo la de TITLE,
ARTIST y ALBUM. Puede visualizarse el nombre del
título, del álbum y del artista pulsando el botón
DISPLAY durante la reproducción del archivo o modo
de pause.
l La etiqueta de meta WMA tiene también el título, el
artista y el nombre del álbum que está registrado en los
archivos del WMA. Los archivos WMA protegidos por
copyright no se pueden reproducir.
Página
Page 70

Audición de la radio
CLEAR
STANDBY/ON
INPUT
MEMORY
TUNING −
TUNER
TUNING +
PRESET
PRESET
n Sintonización
Pulse el botón STANDBY/ON para conectar la
1
alimentación.
2 Pulse repetidamente el botón TUNER para seleccionar
la banda de frecuencia deseada (FM o AM).
3 Presione el botón TUNING + o – del mando a distancia
para seleccionar la estación deseada.
l Sintonización manual:
Pulse el botón TUNING + o – repetidamente para
sintonizar la emisora deseada.
l Sintonización automática:
Cuando se pulse el botón TUNING + o – durante más
de 0,5 segundos, la exploración se iniciará
automáticamente y el sintonizador se parará en la
primera emisora difusora que pueda recibirse.
Notas:
l Cuando ocurren interferencias de radio, la
sintonización por exploración automática puede
detenerse automáticamente en este punto.
l La sintonización por exploración automática saltará las
emisoras que tengan señales débiles.
l Para detener la sintonización automática, pulse de
nuevo el botón TUNING + o –.
l Cuando se haya sintonizado una emisora RDS
(sistema de datos radiofónicos), la frecuencia se
visualizará primero, y luego se encenderá el indicador
RDS. Finalmente, aparecerá el nombre de la emisora.
l La sintonización completamente automática se puede
realizar para “ASPM” de emisoras RDS, vea la página
19.
Para recibir una transmisión de FM en estéreo:
l Pulse el botón TUNER para seleccionar modo stereo y
se mostrará el indicador “ST”. “ ” y “ ” aparecerá
cuando una difusión de FM sea en estéreo.
l Si la recepción de FM es débil, pulse el botón TUNER
para que se apague el indicador “ST”. La recepción
cambia a monoaural, y el sonido se hace más claro.
n Memorización de una emisora
Podrá almacenar 40 emisoras de AM y FM en la memoria
y llamarlas pulsando un botón. (Sintonización
preajustada)
Realice los pasos 1 - 3 en “Sintonización”.
1
2 Pulse el botón MEMORY.
3 Antes de 30 segundos, pulse el botón PRESET
para seleccionar el número de canal predefinido.
Almacene las emisoras en la memoria por orden,
empezando por el canal preconfigurado 1.
4 Antes de 30 segundos, pulse el botón MEMORY para
almacenar esa emisora en la memoria. Si desaparecen
los indicadores del número preconfigurado y de
“MEMORY” antes de memorizarse la emisora, repita la
operación desde el paso 2.
5 Repita los pasos 1 - 4 para configurar otras emisoras o
para cambiar una emisora preconfigurada. Cuando una
nueva estación es almacenada en la memoria, la
estación memorizada previamente para ese número de
canal será borrada.
Nota:
La función de seguridad protege todas las emisoras
memorizadas durante algunas horas en el caso de una
falla de alimentación o de la desconexión del cable de
alimentación de CA.
(
o
n Para llamar una emisora memorizada
1 Pulse el botón PRESET
0,5 segundos para seleccionar la emisora deseada.
(
o ) durante menos de
n Para explorar las emisoras preajustadas
Las emisoras almacenadas en la memoria pueden
explorarse automáticamente. (Exploración de memoria
preconfigurada)
1
Pulse el botón PRESET ( o ) durante más de
0,5 segundos. El número preconfigurado parpadeará y
se recibirán consecutivamente las emisoras
programadas durante 5 segundos cada una.
2 Pulse de nuevo el botón PRESET
localice la emisora deseada.
n
Para borrar toda la memoria preconfigurada
(
o ) cuando se
1 Pulse el botón TUNER del mando a distancia o pulse
repetidamente el botón INPUT de la unidad principal
para seleccionar la función Tuner.
2 Desde la función Tuner, pulse el botón CLEAR hasta
que se muestre “Tuner Clearr”.
)
Es-18
Page 71

Empleo del sistema de datos radiofónicos (RDS)
RDS
TUNING −
TUNING +
TUNER
ASPM PTY DISP
Nombre de la emisora (PS)
Tipo de programa (PTY)
Frecuencia Texto de radio (RT)
No PS No PTY
FM 98.80 MHz
No RT
RDS es un servicio de radiodifusión proporcionado
por un número cada día mayor de emisoras de FM.
Estas emisoras de FM emiten señales adicionales al
mismo tiempo que las señales normales del
programa. Emiten los nombres de emisoras e
información sobre el tipo de programa, como por
ejemplo los deportivos, musicales, etc.
Cuando se sintonice una emisora RDS, se visualizará
“RDS” y el nombre de la emisora.
Aparecerá “TP” (programa de tráfico) en el visualizador
cuando la difusión recibida tenga información de tráfico, y
aparecerá “TA” (anuncios de tráfico) mientras se esté
difundiendo información del tráfico.
Aparecerá “PTYI” (indicador PTY dinámico) mientras se
reciba una emisora con PTY dinámico.
Usted puede controlar el RDS usando solamente los
botones del mando a distancia.
n Información proporcionada por RDS
Cada vez que se pulse el botón RDS DISPLAY, la
visualización cambiará del modo siguiente:
Cuando sintonice una emisora que no sea una emisora
RDS, o una emisora RDS que emite señales débiles, la
visualización cambiará en el orden siguiente:
n Empleo de la memoria de programación
automática de emisoras (ASPM)
Mientras esté en el modo de operación del ASPM, el
sintonizador buscará automáticamente las nuevas
emisoras RDS. Podrán memorizarse hasta 40 emisoras.
Es-19
Si usted ya ha almacenado algunas emisoras en la
memoria, el número de emisoras nuevas que podrán
almacenarse será inferior.
1 Pulse el botón TUNER del control remoto o el botón
INPUT de la unidad principal repetidamente para
seleccionar la función de TUNER.
2 Mantenga pulsado el botón de RDS ASPM del mando
a distancia.
1 Después de haber parpadeado “ASPM” durante
unos 4 segundos, se iniciará la exploración
(87,50 - 108,00 MHz).
2 Cuando se encuentre una emisora RDS, aparecerá
“RDS” durante un momento, y la emisora se
almacenará en la memoria.
3 Después de la exploración, se visualizará el
número de emisoras almacenadas en la memoria
durante 4 segundos, y luego aparecerá “END”
durante 4 segundos.
Para parar la operación de ASPM antes de que haya
finalizado:
Pulse el botón RDS ASPM durante la exploración de
emisoras.
Las emisoras que ya están almacenadas en la memoria
seguirán igual.
Notas:
l
Si se está difundiendo la misma emisora en distintas
frecuencias, la frecuencia más potente se almacenará en la
memoria.
l
No se almacenarán las emisoras que tengan la misma
frecuencia que la que está almacenada en la memoria.
l
Si ya se han almacenado 40 emisoras en la memoria, se
interrumpirá la exploración. Si desea volver a realizar la
operación de ASPM, borre la memoria de preajustes.
l
Si no se han almacenado emisoras en la memoria,
aparecerá “END” durante unos 4 segundos.
l
Si las señales RDS son muy débiles, es posible que los
nombres de emisora no se almacenen en la memoria.
l
El mismo nombre de emisora puede almacenarse en
distintos canales.
l
Es posible que en ciertas áreas o durante ciertos períodos de
tiempo, los nombres de emisora sean momentáneamente
distintos.
n Notas sobre la operación RDS
Si ocurre algo de lo que se menciona a continuación,
no significa que el aparato esté averiado:
Aparecerán “PS”, “No PS” y el nombre de una emisora
l
alternadamente, y el aparato no funcionará correctamente.
l
Si una emisora en particular no está difundiendo
correctamente o una emisora está realizando pruebas, la
función de recepción RDS no funcionará correctamente.
l
Cuando reciba una emisora RDS cuya señal sea demasiado
débil, es posible que no se visualice información tal como la
del nombre de emisora.
l
“No PS”, “No PTY” o “No RT” parpadearán durante unos 5
segundos, y entonces se visualizará la frecuencia.
Page 72

Empleo del sistema de datos radiofónicos (RDS) (continuación)
Notas para el texto de radio:
l Los prime
visualizarán durante 4 segundos y luego se desplazarán
por el visualizador.
l
Si sintoniza una emisora RDS que no está difundiendo
texto de radio, se visualizará “No RT” cuando usted
cambie a la posición del texto de radio.
l
Mientras se están recibiendo datos de texto radiofónico o
cuando cambia el contenido del texto, se visualiza “RT”.
ros 14 caracteres del texto radiofónico se
n Para llamar emisoras de la memoria
Para especificar tipos programados y seleccionar
emisoras (búsqueda de PTY):
Podrá buscar una emisora especificando el tipo de
programa (noticias, deportes, programas de tráfico, etc.;
vea la página 20) entre las emisoras memorizadas.
Pulse el botón TUNER del control remoto o el botón
1
INPUT de la unidad principal repetidamente para
seleccionar la función de TUNER.
2 Presione el botón de RDS PTY del mando a distancia.
“SELECT” y “PTY TI” aparecerán alternativamente
durante unos 6 segundos.
3 Antes de que transcurran 6 segundos, pulse el botón
o para seleccionar el tipo de programa.
Cada vez que pulse el botón, el tipo de programa
aparecerá. Si mantiene pulsado el botón durante más
de 0,5 segundos, el tipo de programa aparecerá
continuamente.
4 Mientras esté parpadeando el tipo de programa
seleccionado (antes de 6 segundos), pulse de nuevo el
botón RDS PTY.
Después de que el tipo de programa seleccionado
haya estado encendido durante 2 segundos,
aparecerá “SEARCH” y se iniciará la operación de
búsqueda.
Notas:
l Si la pantalla ha dejado de parpadear, empiece de
nuevo desde el paso 2. Si la unidad encuentra un tipo
de programa deseado, el número de canal
correspondiente se iluminará durante 8 segundos y el
nombre de la emisora permanecerá encendido.
l Si desea escuchar el mismo tipo de programa de otra
emisora, pulse el botón RDS PTY mientras parpadea
el número de canal o el nombre de emisora. El aparato
buscará la siguiente emisora.
l Si no se encuentra ninguna emisora, aparecerá “NOT
FOUND” durante 4 segundos.
Si selecciona el programa de tráfico:
Si ha seleccionado el programa de tráfico (TP) en el paso
3, aparecerá “TP”.
(Esto no significa que usted pueda escuchar la
información de tráfico en ese momento.)
Cuando se esté difundiendo información de tráfico,
aparecerá “TA”.
Descripciones de los códigos de PTY (tipo de
programa), de TP (programa de tráfico), y de TA
(anuncio de tráfico)
Podrá buscar y recibir las siguientes señales PTY, TP, y
TA .
NEWS Menciones cortas de acontecimientos,
AFFAIRS Programación de tópicos que abarca
INFO Programe el propósito que aconseje de
SPORT Programa relacionado con cualquier
EDUCATE Programa cuyo objetivo principal es la
DRAMA Todas las novelas y seriales de radio.
CULTURE Programas relacionados con cualquier
SCIENCE Programas sobre ciencias naturales y
VARIED Se emplea principalmente para
POP M Música comercial, que generalmente
ROCK M Música moderna contemporánea,
EASY M Música contemporánea actual
LIGHT M Música clásica de apreciación general,
CLASSICS Interpretaciones de grandes trabajos
OTHER M Los estilos musicales que no entran en
WEATHER Informes del tiempo e información y
FINANCE Informes del mercado de la bolsa,
puntos de vista de eventos y publicidad,
informes y actualidad.
noticias, generalmente en distinto estilo
o concepto de presentación, incluyendo
debates o análisis.
la mejor forma en el sentido más amplio.
aspecto deportivo.
educación, en el que el elemento formal
es fundamental.
aspecto de cultura nacional o regional,
incluyendo idioma, teatro, etc.
tecnología.
programas que se basan en
conversación, normalmente de ligera
naturaleza de entretenimiento, y que no
están cubiertos en otras categorías. Por
ejemplo: Adivinanzas, juegos de grupo,
entrevistas con personalidades.
puede considerarse como de agrado
actual popular, que normalmente se
refleja en las listas de discos más
vendidos.
normalmente escrita e interpretada por
músicos jóvenes.
considerada como de “fácil audición”, en
contraste con la música pop, rock, o
clásica, o uno de los estilos musicales
especializados, jazz, folk, o country. La
música de esta categoría es la mayor
parte de veces de vocalistas, y
normalmente de corta duración.
más que de especialistas. Los ejemplos
musicales de esta categoría son música
instrumental, y trabajos de vocalistas y
corales.
orquestales, sinfonías, música de
cámara, etc. incluyendo la gran ópera.
ninguna otra categoría. En particular, se
emplea para música especializada de
Rhythm & Blues y Reggae.
predicciones meteorológicas.
comercio, etc.
Es-20
Page 73

Empleo del sistema de datos
STANDBY/ON
TUNING −
TUNING +
CLOCK/TIMER
ENTER
Temporizador diario
Temporizador para una vez
Inicio
Parada
1 minuto o más
Inicio
Parada
radiofónicos (RDS) (continuación)
CHILDREN Para programas orientados a
SOCIAL Programas sobre gente e influencias
RELIGION Cualquier aspecto de creencias y fe,
PHONE IN Incluye a miembros del público que
TRAVEL
LEISURE Programas relacionados con
JAZZ Música polifónica síncopa
COUNTRY Canciones que se originan o continúan
NATION M Música popular actual del país o región
OLDIES Música de la denominada “época de
FOLK M Música que se arraiga en la cultura
DOCUMENT Programas relacionados con asuntos
TEST Difusión para programar equipos o
ALARM Anuncios de emergencia hechos en
TP Programas en los que se ofrecen
TA En este momento se están difundiendo
audiencias jóvenes, principalmente
para entretenimiento e interés, en lugar
de ser educativos.
individuales o de grupos. Incluye:
sociología, historia, geografía,
psicología, y sociedad.
sobre Dios o dioses, la naturaleza de la
existencia y ética.
expresan sus puntos de vista ya sea por
teléfono o en un foro público.
Características y programas relacionados
con los viajes a destinos cercanos o
lejanos, viajes de grupos, e ideas y
oportunidades de viajes. No se incluyen
anuncios sobre problemas, retardos, ni
obras en carreteras que afectan el
desplazamiento inmediato donde deben
usarse las emisoras TP/TA.
actividades de recreo en las que los
oyentes pueden participar. Como
ejemplo se incluyen la jardinería, pesca,
colección de antigüedades, cocina,
comidas y vinos, etc.
caracterizada por la improvisación.
la tradición musical de los estados
americanos del sur. Se caracteriza por
una melodía directa y línea narrativa.
en el idioma nacional, en contraste con
la música “Pop” internacional que
normalmente está inspirada en la de
EE.UU. o Inglaterra y es en inglés.
oro” de la música popular.
musical de un país en particular,
normalmente tocada con instrumentos
acústicos. La narrativa o la letra pueden
basarse en acontecimientos históricos
o en gente.
reales, presentados en estilo de
investigación.
receptores de difusión de emergencia.
circunstancias excepcionales o avisos
de acontecimientos que causan peligro
de naturaleza general.
anuncios sobre el tráfico.
anuncios de tráfico.
Operación del temporizador y de
desconexión automática (Solamente
del control remoto)
Reproducción con temporizador:
La unidad se enciende y reproduce la fuente deseada
(CD, TUNER, USB, iPod, LINE IN) a la hora
predeterminada.
Este aparato tiene 2 tipos de temporizadores: ONCE
TIMER y DAILY TIMER.
Temporizador para una vez:
El timer funciona por una vez solamente a la hora
memorizada.
(Indicador “ ”).
Temporizador diario:
El temporizador diario de la escucha funciona a la misma
hora preconfigurada cada día que establezcamos. Por
ejemplo, ajuste el temporizador para despertarse cada
mañana.
(Indicador “DAILY”).
Empleo combinado del temporizador para una vez y el
temporizador diario:
Por ejemplo, emplee el temporizador para una vez para
escuchar un programa de radio, y emplee el temporizador
diario para despertar.
1 Ajuste el temporizador diario (página 21).
2 Ajuste el temporizador puntual (página 21).
Es-21
Page 74

Operación del temporizador y de desconexión automática (Solamente del
control remoto) (continuación)
n Reproducción con temporizador
Antes de ajustar el temporizador:
l Compruebe que el reloj esté ajustado a la hora
correcta (vea la página 9). Si no está ajustado, no
podrá emplear la función del temporizador.
l Para reproducción con temporizado: Inserte el USB o
cargue discos o conecte el puerto del iPod para
reproducirlos.
1 Pulse el botón STANDBY/ON para conectar la
alimentación.
2 Pulse y mantenga pulsado el botón CLOCK/TIMER.
3 Antes de que transcurran 30 segundos, pulse el botón
o para seleccionar “Once” o “Daily”, y pulse el
botón ENTER.
4 Antes de que transcurran 30 segundos, pulse el botón
o para seleccionar “Timer set”, y pulse el
botón ENTER.
5 Para seleccionar la fuente de temporizador de
reproducción (CD, TUNER, USB, iPod, LINE IN),
presione el botón o . Pulse el botón ENTER.
Cuando haya seleccionado el sintonizador, seleccione
una emisora pulsando el botón o , y luego
pulse el botón ENTER. Si no se ha programado
ninguna emisora, se visualizará “No Preset” y se
cancelará la hora ajustada.
6 Para ajustar el día, pulse el botón o y, luego, el
botón ENTER.
7 Pulse el botón ENTER para ajustar la hora. Pulse el
botón o y luego pulse el botón ENTER.
8 Pulse el botón o para ajustar los minutos y
luego pulse el botón ENTER.
9 Ajuste el tiempo de finalización como en los pasos 7 y
8 de arriba.
10 Ajuste el volumen mediante el botón VOL (+ o –), y a
continuación pulse el botón ENTER. No aumente
demasiado el volumen.
11 Pulse el botón STANDBY/ON para entrar en el modo
de reserva de alimentación. El indicador del “TIMER”
se enciende y la unidad está lista para temporizar el
playback.
12 Cuando se alcanza el tiempo actual, el playback
iniciará a funcionar. El volumen se incrementará
gradualmente hasta que se llegue al volumen
preajustado. El indicador del temporizador parpadeará
durante la reproducción del temporizador.
13 Cuando se llegue al final de la hora de parada del
temporizador, el sistema se establecerá
automáticamente en el modo de reser va de alimentación.
Temporizador para una vez:
Se cancelará el temporizador.
Temporizador diario:
El temporizador funciona a la misma hora cada día.
Continuará hasta que se cancele el ajuste del
temporizador diario. Cancele el temporizador diario
cuando no lo emplee.
Notas:
l Cuando realice la reproducción por temporizador
utilizando otra unidad conectada al terminal USB,
seleccione “USB” o “LINE IN” en el paso 5.
l Esta unidad se activará o accederá al modo de espera
automáticamente. No obstante, la unidad conectada
no se encenderá ni apagará. Para detener la
reproducción del temporizador, siga el paso
“Cancelar la configuración del temporizador” de
esta página.
Comprobar las características del temporizador:
1 Encienda el equipo y pulse y mantenga pulsado el
botón CLOCK/TIMER.
2 Antes de que transcurran 30 segundos, pulse el botón
o para seleccionar “Once” o “Daily”, y pulse el
botón ENTER.
3 Antes de que transcurran 30 segundos, pulse el botón
o para seleccionar “Timer Call”, y pulse el botón
ENTER.
Cancelar la configuración del temporizador:
1 Encienda el equipo y pulse y mantenga pulsado el
botón CLOCK/TIMER.
2 Antes de que transcurran 30 segundos, pulse el botón
o para seleccionar “Once” o “Daily”, y pulse el
botón ENTER.
3 Antes de que transcurran 30 segundos, pulse el botón
o para seleccionar “Timer Off”, y pulse el botón
ENTER. Se cancelará el temporizador (no se cancelará
el contenido ajustado).
Reutilización del ajuste memorizado del
temporizador:
El ajuste del temporizador se memorizará una vez se haya
introducido. Para emplear de nuevo el mismo ajuste,
efectúe las operaciones siguientes.
1 Encienda el equipo y pulse y mantenga pulsado el
botón CLOCK/TIMER.
2 Antes de que transcurran 30 segundos, pulse el botón
o para seleccionar “Once” o “Daily”, y pulse el
botón ENTER.
3 Antes de que transcurran 30 segundos, pulse el botón
o para seleccionar “Timer On”, y pulse el botón
ENTER.
4 Pulse el botón STANDBY/ON para entrar en el modo de
reserva de alimentación.
Nota:
Si extrae el cable de alimentación o se produce un
apagón, el reloj se reinicializará.
Es-22
Page 75

Operación del temporizador y de
Hora deseada
1-99 minutos
La función de
desconexión
automática se parará
automáticamente
Ajuste del temporizador
de desconexión
automática
Ajuste del
playback
Hora de
parada
Se detiene
automáticamente la
operación de
desconexión automática
desconexión automática (Solamente
del control remoto) (continuación)
n Operación de desconexión automática
Tanto la radio como el CD, iPod, USB y Line In pueden
apagarse automáticamente.
Reproduzca la fuente de sonido deseada.
1
2 Pulse el botón SLEEP.
3 Antes de 5 segundos, pulse el botón numérico para
ajustar la hora. (1 minuto ~ 99 minutos)
4 “SLEEP” aparecerá.
5 El aparato se establecerá automáticamente en el modo
de reserva de la alimentación después de haber
transcurrido el tiempo preajustado. El volumen se
reducirá 1 minuto antes de terminar la operación de
desconexión automática.
Para confirmar el tiempo remanente de desconexión
automática:
1 Mientras se indica “SLEEP”, pulse el botón SLEEP.
Para cancelar la operación de desconexión
automática:
Pulse el botón STANDBY/ON mientras se indique
“SLEEP”. Para cancelar la operación de desconexión
automática sin ajustar el sistema en el modo de reserva,
realice lo siguiente.
1 Mientras se indica “SLEEP”, pulse el botón SLEEP.
2 Durante 5 segundos, pulse dos veces el botón “0” hasta
que aparezca “SLEEP 00”.
Auriculares
l No gire el interruptor de volumen al máximo y escuche
la música a niveles moderados. La presión acústica
excesiva de los auriculares y los cascos puede causar
la pérdida del sentido auditivo.
l Antes de enchufar o desenchufar los auriculares, baje
el volumen.
l Asegúrese de que sus auriculares tengan una clavija
de 3,5 mm de diámetro y una impedancia de
16 ohmios a 50 ohmios. La impedancia recomendada
es de 32 ohmios.
l Si se enchufan los auriculares, se desconectan
automáticamente los altavoces. Ajuste el volumen
empleando el control VOLUME.
l Sólo X-HM20: El audio procedente del iPod/iPhone no
puede escucharse a través de los auriculares
conectados a la unidad. Si conecta los auriculares
cuando la función de iPod/iPhone ha sido
seleccionada, se mostrará “HP INVALID”.
n Para utilizar simultáneamente la operación
del temporizador y de desconexión
automática
Desconexión automática y reproducción con
temporizador:
Por ejemplo, podrá irse a dormir escuchando la radio y
despertarse con el sonido de un CD la mañana siguiente.
Ajuste el tiempo de desconexión automática (véase
1
más arriba, los pasos 1 - 5).
2 Mientras se ajusta el temporizador de dormir, fije la
alarma de reproducción (pasos 2 - 9, página 22).
Es-23
Page 76

Cuadro para localización de averías
Muchos posibles problemas podrán ser solucionados por el
propietario sin tener que llamar al técnico en reparaciones.
Si parece que falla algo en este producto, compruebe la
tabla siguiente antes de llamar a su concensionario
PIONEER autorizado o a un centro de reparaciones.
n Generalidades
Síntoma Causa posible
l El reloj no está
ajustado a la hora
correcta.
l Cuando se pulsa un
botón, el aparato no
responde.
l No se oye ningún
sonido.
n Reproductor de CD
Síntoma Causa posible
La reproducción no
l
se inicia.
l
La reproducción se
detiene a mitad o no
se lleva a cabo
correctamente.
l
Se producen saltos
en el sonido de
reproducción o se
detiene el sonido de
reproducción a mitad
de una pista.
n Controlador remoto
Síntoma Causa posible
l El control remoto no
funciona.
l ¿Se ha producido un corte
de la alimentación?
Reajuste el reloj. (Consulte
la página 9)
l Ponga el aparato en el
modo de reserva de
alimentación y entonces
vuelva a conectar la
alimentación del aparato.
l Si el aparato funciona
defectuosamente,
repóngalo. (Consulte la
página 25)
l ¿Se ha ajustado el nivel de
volumen a “Min”?
l ¿Están enchufados los
auriculares?
l ¿Están desconectados los
cables de los altavoces?
l
¿Se ha insertado el disco al
revés?
l
¿Satisface el disco las
normas?
l
¿Está deformado o rayado
el disco?
l
¿Está el aparato situado
cerca de vibraciones
excesivas?
l
¿Está muy sucio el disco?
l
¿Se ha formado
condensación de humedad
en el interior del aparato?
¿Está enchufado el cable
l
de alimentación de CA del
aparato?
l
¿Se respeta la polaridad de
la pila?
l
¿Se han agotado las pilas?
l
¿Es la distancia o ángulo
incorrecto?
l
¿Está el sensor de control
remoto recibiendo una luz
fuerte?
n Sintonizador
Síntoma Causa posible
La radio produce
l
continuamente
ruido anormal.
n USB
Síntoma Causa posible
No se detecta el
l
dispositivo.
l
La reproducción
no se inicia.
l
Hora en pantalla
errónea.
l
Nombre de
archivo en
pantalla errónea.
n iPod e iPhone (sólo X-HM20)
Síntoma Causa posible
No se produce
l
ningún sonido.
No aparece
ninguna imagen
en el televisor/
monitor.
l
iPod o iPhone no
se cargará.
l
“This accessory is
not made to work
with iPhone” o “
This accessory is
not supported by
iPhone” Aparece
en la pantalla del
iPhone.
Es-24
l
¿Está el aparato cerca del
televisor o de una
computadora?
l
¿La antena de FM o la antena
de cuadro de AM están
correctamente situadas?
Separe la antena del cable de
alimentación de CA está
demasiado cerca.
l
¿Hay algún archivo MP3/WMA
disponible?
l
¿Está el dispositivo conectado
correctamente?
l
¿Es un dispositivo MTP?
l
¿El dispositivo contiene sólo
archivos AAC?
l
¿Está el un archivo WMA
protegido por copyright?
l
¿Es el MP3 falso?
l
¿Se está reproduciendo un
archivo de velocidad variable?
l
¿El nombre del archivo está
escrito con caracteres chinos o
japoneses?
l
No se está reproduciendo el
iPod o iPhone.
l
El iPod o iPhone no está
conectado adecuadamente a la
unidad.
l
¿Está enchufado el cable de
alimentación de CA del
aparato?
l
El cable de vídeo no está
conectado adecuadamente.
l
La selección de televisor/
monitor de entrada no está
fijada adecuadamente.
l
La función salida de iPod TV no
ha sido establecida para salida
de video.
l
El audio procedente del iPod/
iPhone no puede escucharse a
través de los auriculares
conectados a la unidad.
l
El iPod o iPhone no hace
contacto total con el conector.
l
Utilizando un iPod (3a
generación).
l
No es compatible con el iPod o
iPhone. Consulte la página 7
para obtener información sobre
los modelos compatibles.
l
Si la unidad principal está en el
modo USB, el iPod o el iPhone
no podrán cargarse.
l
La batería del iPhone es baja.
Cargue el iPhone.
l
El iPhone no está
correctamente conectado al
puerto.
Page 77

Cuadro para localización de averías
NO SÍ
Correcto
(continuación)
n Condensación
Los cambios súbitos de la temperatura, y el almacenaje u
operación en lugares muy húmedos pueden causar
condensación de humedad dentro de la caja (Lectura del
CD, etc.) o en el transmisor del controlador remoto. La
condensación puede provocar que el aparato funcione
incorrectamente. Si así sucede, deje la alimentación
conectada sin ningún disco en el aparato hasta que sea
posible la reproducción normal (aproximadamente 1
hora). Frote la humedad condensada en el transmisor con
un paño suave antes de poner el aparato en
funcionamiento.
n Si ocurre algún problema
Si se somete este producto a fuertes interferencias
externas (golpes mecánicos, electricidad estática
excesiva, tensión de alimentación anormal debido a
rayos, etc.) o si se opera incorrectamente, puede
funcionar mal.
Si ocurre uno de estos problemas, haga lo siguiente:
1 Ponga el aparato en el modo de reserva y conecte de
nuevo la alimentación.
2
Si no se restaura la unidad en la operación previa,
desenchufe y vuelva a enchufar la unidad, a continuación
encienda la unidad.
Nota:
Si el aparato no se repone con ninguna de las operaciones
anteriores, borre toda la memoria reponiéndolo.
n Reinicio de Fábrica, Limpiando Toda la
Memoria
Para encender el aparato, pulse el botón STANDBY/
1
ON.
2 Para seleccionar la función LINE IN, pulse el botón
LINE del mando a distancia o pulse repetidamente el
botón INPUTde la unidad principal.
3 Desde la función LINE IN, pulse el botón de la
unidad principal y pulse y mantenga presionado el
botón hasta que se muestre “RESET”.
n Cuidados de los discos compactos
Los discos compactos son bastante resistentes a posibles
daños, sin embargo se puede producir un mal
seguimiento de la pista debido a una acumulación de
polvo en la superficie de los discos. Tenga presente las
instrucciones siguientes para poder disfrutar lo máximo
posible de su colección de discos compactos y de este
reproductor.
l No escriba en ninguna cara del disco, particularmente
en la cara que no tiene etiqueta donde se leen las
señales musicales. No estropee esta superficie.
l Mantenga los discos alejados de los rayos directos del
sol, de focos de calor y de humedad excesiva.
l Sujete siempre los discos por sus bordes. Huellas
digitales, polvo o agua en los discos compactos
pueden causar ruidos o un mal seguimiento de la pista.
Si un disco compacto está sucio o no se reproduce
adecuadamente, límpielo con un paño seco y suave,
pasándolo en dirección del centro hacia afuera a lo
largo del radio.
Mantenimiento
n Limpieza del mueble
Limpie periódicamente el mueble con un paño suave y
una solución jabonosa diluida, y luego séquelo con un
paño seco.
Precaución:
l No use productos químicos para la limpieza (gasolina,
diluyentes de pintura, etc.). Podría dañar el mueble.
l No aplique aceite al interior del aparato. Podría causar
mal funcionamiento.
Precaución:
Esta operación borrará todos los datos almacenados en la
memoria incluyendo los ajustes del reloj y del
temporizador, preajustes del sintonizador, y el programa
de CD.
n Antes de transportar el aparato
Retire el dispositivo de memoria USB, el iPod y el disco de
la unidad. Luego, coloque la unidad en modo de ahorro de
energía. Transportar la unidad con el dispositivo de
memoria del USB o el iPod conectado o con discos
adentro de ella puede provocar daños en la unidad.
Es-25
Page 78

Especificaciones técnicas
Como parte de la política de mejoras continuas,
PIONEER se reserva el derecho de realizar cambios en el
diseño y especificaciones para la mejora del producto sin
previo aviso. Las figuras indicadas que especifican el
rendimiento son valores nominales de los aparatos de
producción. Puede haber algunas desviaciones de estos
valores en los aparatos individuales.
n Generalidades
Fuente de
alimentación
Consumo de
potencia
Dimensiones Ancho: 215 mm
Peso 3,8 kg (X-HM20)
n Amplificador
Potencia de
salida
Terminales de
salida
Terminales de
entrada
n Reproductor de CD
Tipo Reproductor de discos compactos
Lectura de las
señales
Convertidor D/A Conversor de multi bit D/A
Respuesta de
frecuencia
Gama dinámica 90 dB (1 kHz)
220 V a 240 V de CA, 50 Hz/60 Hz
Alimentación conectada:
45 W (X-HM20)
30 W (X-HM10)
Reserva de alimentación: 0,4 W
Alto: 99 mm
Profundo: 300 mm
3,7 kg (X-HM10)
RMS: 15 W + 15 W
(1 kHz,10% de DA, 4 ohmios)
Altavoces: 4 ohmios
20 Hz a 20 kHz
Salida de vídeo (sólo X-HM20):
1 Vp-p
Auriculares: 16 ohmios
(recomendada: 32 ohmios)
Línea de entrada (entrada
analógica):
500 mV/ 47 k ohmios
con reproducción múltiple de un
único disco
Fonocaptor de láser semiconductor
de 3 rayos, sin contacto
20 Hz a 20.000 Hz
n USB
Interfaz host USB l Cumple con la clase de
Fichero de ayuda l MPEG 1 Layer 3
Bitrate soporte l MP3 (32 kbps a 320 kbps)
Otros l
Soporte de
sistema de
archivos
almacenamiento en masa de
USB 1.1 (Alta Velocidad)/ 2.0.
l Sólo Volumen de Soporte y
protocolo CBI.
l WMA (No DRM)
l WMA (64 kbps a 160 kbps)
El número total máximo de
archivos MP3/WMA es de 999.
l El número total máximo de
carpetas es de 99
INCLUYENDO las del
directorio raíz.
l La información ID3TAG
permitida es sólo la de TITLE,
ARTIST y ALBUM.
l Admite la versión 1 y 2 de
ID3TAG.
l Admite dispositivos USB con
Microsoft Windows/DOS/FAT
12/ FAT 16/ FAT 32.
l Longitud de bloqueo de
2 kbytes por sector.
n Sintonizador
Gama de
frecuencias
Predeterminado 40 (Estación de FM y AM)
FM: 87,5 MHz a 108 MHz
AM: 522 kHz a 1.620 kHz
n Altavoz
X-HM20
Tipo
Potencia máxima
de entrada
Impedancia 4 ohmios
Dimensiones Ancho: 132 mm
Peso 2,0 kg/cada uno
Tipo
Potencia máxima
de entrada
Impedancia 4 ohmios
Dimensiones Ancho: 132 mm
Peso 1,6 kg/cada uno
Sistema de altavoces del tipo de 2 vías
Altavoz para frecuencias altas de
5 cm
Altavoz de bajos de 10 cm
15 W
Alto: 260 mm
Profundo: 173 mm
X-HM10
Sistema de altavoces del tipo de 2 vías
Altavoz piezoeléctrico de agudos
Altavoz de bajos de 10 cm
15 W
Alto: 260 mm
Profundo: 158 mm
Es-26
Page 79

Nota
Acerca de iPod/iPhone/iPad:
“Made for iPod”, “Made for iPhone” y “Made for iPad” significan que
un accesorio electrónico ha sido diseñado para ser conectado
específicamente a un iPod, iPhone o iPad, respectivamente, y ha
sido homologado por quien lo desarrolló para cumplir con las
normas de funcionamiento de Apple. Apple no es responsable del
funcionamiento de este aparato ni de que cumpla con las normas
de seguridad y reguladoras. Tenga presente que el empleo de este
accesorio con un iPod, iPhone o iPad puede afectar la operación
inalámbrica.
iPad, iPhone e iPod son marcas comerciales de Apple Inc.,
registradas en los EE.UU. y en otros países.
© 2011 PIONEER CORPORATION.
Todos los derechos reservados.
Es-27
Page 80

WARNUNG
Dieses Gerät ist nicht wasserdicht. Zur Vermeidung der
Gefahr von Brand und Stromschlag keine Behälter mit
Flüssigkeiten (z.B. Blumenvasen und -töpfe) in die
Nähe des Gerätes bringen und dieses vor Tropfwasser,
Spritzwasser, Regen und Nässe schützen.
D3-4-2-1-3_A1_De
WARNUNG
Vor dem erstmaligen Anschluss des Gerätes an das
Stromnetz bitte den folgenden Hinweis sorgfältig
beachten.
Die Netzspannung ist je nach Land verschieden.
Vor der Inbetriebnahme des Gerätes sicherstellen,
dass die örtliche Netzspannung mit der auf dem
Typenschild an der Rückwand des Gerätes
angegebenen Nennspannung (z.B. 230 V oder 120
V) übereinstimmt.
D3-4-2-1-4*_A1_De
WARNUNG
Keine Quellen offener Flammen (z.B. eine brennende
Kerze) auf dieses Gerät stellen.
D3-4-2-1-7a_A1_De
VORSICHTSHINWEIS ZUR BELÜFTUNG
Bei der Aufstellung dieses Gerätes muss für einen
ausreichenden Freiraum gesorgt werden, um eine
einwandfreie Wärmeabfuhr zu gewährleisten
(mindestens 10 cm oberhalb des Gerätes, 10 cm hinter
dem Gerät und jeweils 10 cm an der Seite des Gerätes).
10 cm 10 cm
10 cm
10 cm
WARNUNG
Im Gerätegehäuse sind Ventilationsschlitze und andere
Öffnungen vorgesehen, die dazu dienen, eine
Überhitzung des Gerätes zu verhindern und einen
zuverlässigen Betrieb zu gewährleisten. Um
Brandgefahr auszuschließen, dürfen diese Öffnungen
auf keinen Fall blockiert oder mit Gegenständen (z.B.
Zeitungen, Tischdecken und Gardinen) abgedeckt
werden, und das Gerät darf beim Betrieb nicht auf
einem dicken Teppich oder Bett aufgestellt sein.
D3-4-2-1-7b*_A1_De
Betriebsumgebung
Betriebstemperatur und Betriebsluftfeuchtigkeit:
+5 °C bis +35 °C, 85 % rel. Feuchte max.
(Ventilationsschlitze nicht blockiert)
Eine Aufstellung dieses Gerät an einem unzureichend
belüfteten, sehr feuchten oder heißen Ort ist zu
vermeiden, und das Gerät darf weder direkter
Sonneneinstrahlung noch starken Kunstlichtquellen
ausgesetzt werden.
Falls der Netzstecker des Netzkabels dieses Gerätes
nicht in die Zusatzsteckdose einer anderen
Komponente passt, muss er gegen einen Netzstecker
der geeigneten Ausführung ausgewechselt werden.
Ein derartiger Austausch des Netzsteckers muss vom
Kundendienstpersonal vorgenommen werden. Wenn
der vom Netzkabel abgeschnittene ursprüngliche
Netzstecker in eine Netzsteckdose eingesteckt wird,
besteht akute Stromschlaggefahr! Daher ist
unbedingt dafür zu sorgen, dass der abgeschnittene
Netzstecker sofort vorschriftsmäßig entsorgt wird.
Vor einem längeren Nichtgebrauch des Gerätes,
beispielsweise während des Urlaubs, sollte der
Netzstecker aus der Netzsteckdose gezogen werden,
um das Gerät vollständig vom Netz zu trennen.
ACHTUNG
Der STANDBY/ON-Schalter dieses Gerätes trennt das
Gerät nicht vollständig vom Stromnetz. Um das Gerät
vollständig vom Netz zu trennen, muss der Netzstecker
aus der Netzsteckdose gezogen werden. Daher sollte
das Gerät so aufgestellt werden, dass stets ein
unbehinderter Zugang zur Netzsteckdose gewährleistet
ist, damit der Netzstecker in einer Notsituation sofort
abgezogen werden kann
. Um Brandgefahr
auszuschließen, sollte der Netzstecker vor einem
längeren Nichtgebrauch des Gerätes, beispielsweise
während des Urlaubs, grundsätzlich von der
Netzsteckdose getrennt werden.
Dieses Gerät ist für den Heimgebrauch vorgesehen.
Falls bei Einsatz zu einem anderem Zweck (z.B.
Langzeitgebrauch zu gewerblichen Zwecken in einem
Restaurant oder Betrieb in einem Fahrzeug bzw. Schiff)
eine Funktionsstörung auftritt, die eine Reparatur des
Gerätes erforderlich macht, werden die Reparaturkosten
dem Kunden selbst dann in Rechnung gestellt, wenn
die Garantiefrist noch nicht abgelaufen ist.
D3-4-2-1-7c*_A1_De
D3-4-2-2-1a_A1_De
D3-4-2-2-2a*_A1_De
K041_A1_De
Page 81

Ü
ACHTUNG
Bei diesem Gerät handelt es sich zwar um ein Laserprodukt der Klasse 1, das entsprechend dem Standard
Sicherheit für Laserprodukte IEC 60825-1:2007 klassifiziert ist, doch enthält es eine Laserdiode einer höheren Klasse
als 1. Um einen stets sicheren Betrieb zu gewährleisten, weder irgendwelche Abdeckungen entfernen, noch
versuchen, sich zum Geräteinneren Zugang zu verschaffen.
Wartungsarbeiten sind grundsätzlich dem Kundendienstpersonal zu überlassen.
Das Gehäuse ist mit dem unten abgebildeten Warnaufkleber versehen.
Lage des Aufklebers: innen im Gerät
ber Kondensation
Wenn der Spieler plötzlich aus der Kälte in einen
warmen Raum gebracht wird (z. B. im Winter) oder
wenn die Temperatur in dem Raum, in dem der Spieler
aufgestellt ist, plötzlich aufgrund eines Heizlüfters usw.
ansteigt, können sich im Inneren des Geräts
Wassertropfen (Kondensation) bilden (auf beweglichen
Teilen und der Linse). Wenn es zu Kondensation
kommt, arbeitet der Spieler nicht ordnungsgemäß, und
die Wiedergabe ist nicht möglich. Lassen Sie den
Spieler für 1 bis 2 Stunden bei Raumtemperatur
eingeschaltet (die erforderliche Dauer hängt vom
Ausmaß der Kondensation ab). Die Wassertropfen
verdampfen und die Wiedergabe ist wieder möglicht.
Zu Kondensation kann es auch im Sommer kommen,
wenn der Spieler direkt dem Luftzug aus einer
Klimaanlage ausgesetzt wird. Stellen Sie den Spieler in
diesem Fall an einem anderen Ort auf.
S005_A1_De
G-3
Page 82

DEUTSCH
l Das CD-Receiversystem X-HM10/X-HM20 besteht aus der Haupteinheit und dem Lautsprechersystem.
Einführung
Vielen Dank für den Kauf dieses PIONEER-Produktes. Lesen Sie dieses Handbuch sorgfältig durch, um eine
bestmögliche Leistung zu erreichen. Es führt Sie in den Betrieb dieses Produkts von PIONEER ein.
Besonderer Hinweis
Durch die Lieferung dieses Produktes wird weder eine direkte Lizenz noch ein implizite Recht erteilt, Inhalte die mit
diesem Produkt erstellt wurden, in kommerziellen Rundfunk Systemen (terrestrische, Satelliten, Kabel und/oder anderen
Vertriebskanälen), in kommerziellen „streaming“ Anwendungen (via Internet, Intranet und/ oder andere Netzwerke),
anderen kommerziellen Inhalte vermittelnden Systemen (Pay-Audio oder Audio-On-Demand und dergleichen) oder auf
kommerziellen körperlichen Medien (Compact Discs, DVDs, Halbleiter Bauteilen, Festplatten, Speicherkarten und
dergleichen zu verteilen). Für eine solche Nutzung ist eine eigenständige Lizenz erforderlich. Für weitere Einzelheiten,
siehe http://mp3licensing.com
MPEG Layer-3 Audiokodierungstechnologie unter Lizenz von Fraunhofer IIS und Thomson.
Zubehör
Prüfen Sie, ob die folgenden Zubehörteile vorhanden sind.
iPhone-Adaptern x 3
(nur X-HM20)
UKW-Antenne x 1
Fernbedienung x 1 „AA“-Batterie x 1 MW-Rahmenantenne x 1
Netzkabel
Garantiekarte
Die vorliegende Bedie
INHALT
Seite
Allgemeine Informationen
Zur Beachtung . . . . . . . . . . . . . . . . . . . . . . . . . . . . . . . 5
Bedienungselemente und Anzeigen . . . . . . . . . . . . 5 - 6
Vorbereitung für die Inbetriebnahme
Anschluß des Systems . . . . . . . . . . . . . . . . . . . . . . . 7 - 8
Fernbedienung . . . . . . . . . . . . . . . . . . . . . . . . . . . . . . . 8
Grundbedienung
Allgemeine Bedienungen . . . . . . . . . . . . . . . . . . . . . . . 9
Einstellen der Uhr (Nur Fernbedienung). . . . . . . . . 9 - 10
iPod, iPhone und iPad
Anhören von iPod, iPhone oder iPad
(nur X-HM20) . . . . . . . . . . . . . . . . . . . . . . . . . . . . 10 - 12
Wiedergabe von CDs oder MP3/WMA-Discs
Hören einer CD oder MP3/WMA-Disk . . . . . . . . . . . . 13
Weitere Wiedergabe von CDs oder MP3/WMA-
Discs . . . . . . . . . . . . . . . . . . . . . . . . . . . . . . . . . . . 14 - 15
MP3/WMA-Ordnermodus (nur bei MP3/WMA-
Dateien). . . . . . . . . . . . . . . . . . . . . . . . . . . . . . . . . 15 - 16
USB
Seite
Hören von USB-Massenspeicher MP3-Player . . . 16 - 17
Fortgeschrittene USB-Wiedergabe . . . . . . . . . . . . . . . 17
Rundfunk
Rundfunkempfang . . . . . . . . . . . . . . . . . . . . . . . . . . . . 18
Weitere Funktionen
Benutzen des Radio-Daten-Systems (RDS) . . . . 19 - 21
Timer- und Sleep-Funktion
(Nur Fernbedienung) . . . . . . . . . . . . . . . . . . . . . . 21 - 23
Kopfhörer . . . . . . . . . . . . . . . . . . . . . . . . . . . . . . . . . . 23
Referenzen
Fehlersuchtabelle . . . . . . . . . . . . . . . . . . . . . . . . . 24 - 25
Wartung . . . . . . . . . . . . . . . . . . . . . . . . . . . . . . . . . . . 25
Technische Daten . . . . . . . . . . . . . . . . . . . . . . . . . . . . 26
Hinweis . . . . . . . . . . . . . . . . . . . . . . . . . . . . . . . . . . . . .27
De-4
Page 83

Zur Beachtung
1
9
6
7
8 10 11 12 13 14
52 3
4
Nur X-HM20
n Allgemeines
l Das Gerät auf eine feste, ebene und
erschütterungsfreie Unterlage stellen.
l Stellen Sie die Lautsprecher mind. 30 cm vom CRT-TV-
Gerät auf, um Farbabweichungen auf dem
Fernsehbildschirm zu vermeiden. Wenn es weiterhin
zu Abweichungen kommt, vergrößern Sie den Abstand
zwischen Lautsprechern und TV-Gerät noch mehr.
LCD TV ist für solche Abweichungen nicht anfällig.
l Das Gerät fernhalten von direktem Sonnenlicht,
starken Magnetfeldern, sehr staubigen Orten,
Feuchtigkeit und elektronischen/elektrischen Geräten
(Heimcomputer, Fernkopierer usw.), die elektrisches
Rauschen erzeugen.
l Nichts auf das Gerät stellen.
l Das Gerät nicht Feuchtigkeit, Temperaturen von über
60°C oder extrem niedrigen Temperaturen aussetzen.
l Wenn das System nicht richtig arbeitet, das Netzkabel
von der Netzsteckdose trennen. Das Netzkabel wieder
anschließen und dann das System einschalten.
l Bei einem Gewitter ist es am sichersten, wenn das
Netzkabel herausgezogen wird.
l Das Netzkabel immer am Stecker aus der
Netzsteckdose ziehen, niemals am Kabel ziehen, da
das Ziehen des Kabels innere Kabellitzen beschädigen
kann.
l Der Stromstecker wird benutzt, um das Gerät vom
Stromnetz zu trennen und muss zu jeder Zeit bequem
erreichbar sein.
Bedienungselemente und Anzeigen
iPod-/iPhone-Funktionen stehen nur für X-HM20 zur Verfügung.
l Die Abdeckung nicht entfernen, weil dies zu einem
elektrischen Schlag führen kann. Interne Wartung
sollte von Ihrem PIONEER-Kundendienstzentrum
ausgeführt werden.
l Durch Bedecken der Belüftungsöffnungen mit
Gegenständen wie Zeitungen, Tischtüchern,
Vorhängen usw. wird die Belüftung blockiert und sollte
vermieden werden.
l Es sollten keine unbedeckten Flammenquellen wie
angezündete Kerzen auf dem Gerät abgestellt werden.
l Sie sollten auf die Umweltaspekte bei der
Batterieentsorgung achten.
l Das Gerät ist für die Verwendung in mildem Klima
konstruiert.
Warnung:
Nur mit der auf diesem Gerät angegebenen Spannung
verwenden. Der Betrieb des Produktes mit einer
Spannung, die höher ist als die angegebene, ist gefährlich
und kann zu einem Brand oder anderen Unfällen mit
Beschädigung führen. PIONEER kann nicht für Schäden
verantwortlich gemacht werden, die aus dem Betrieb mit
einer unvorschriftsmäßigen Spannung resultieren.
n Lautstärkeregelung
Bei einer gegebenen Lautstärkeeinstellung hängt der
Schallpegel von der Effizienz und der Anordnung der
Lautsprecher sowie von weiteren Faktoren ab. Es wird
empfohlen, sich nicht hohen Schallpegeln auszusetzen.
Schalten Sie das Gerät nicht bei voller Lautstärke ein.
Hören Sie Musik bei geringer Lautstärke. Überhöhter
Schalldruck von den Kopfhörern kann zu einem
Hörverlust führen.
n Gerätevorderseite
1. Fernbedienungssensor . . . . . . . . . . . . . . . . . . . . 8
2. Timer-Anzeige. . . . . . . . . . . . . . . . . . . . . . . . . . . 22
3. Disc-Schublade. . . . . . . . . . . . . . . . . . . . . . . . . . 13
4. Andockstation fur iPod oder iPhone . . . . . . . . 11
5. Lautstärkeregler . . . . . . . . . . . . . . . . . . . . . . . . . 9
6. STANDBY/ON-Taste . . . . . . . . . . . . . . . . 11, 13, 18
7. INPUT-Taste. . . . . . . . . . . . . . . . . . 9, 11, 13, 16, 18
8. Kopfhörerbuchse . . . . . . . . . . . . . . . . . . . . . . . . 23
9. USB-Anschluß . . . . . . . . . . . . . . . . . . . . . . . . . . 16
Seite
10. Tuner Preset Down, CD-USB-Erkennung, iPod /
iPhone-Skip Up. . . . . . . . . . . . . . . . . . . . . . . .12, 13
11. Tuner Preset Up, CD / USB-Erkennung, iPod /
iPhone-Skip Down . . . . . . . . . . . . . . . . . . . . . 12, 13
12. Disc / USB Stopp-Taste . . . . . . . . . . . . . . . . .12, 13
13. Disc / USB / iPod / iPhone Wiedergabe-oder
Pausetaste . . . . . . . . . . . . . . . . . . . . . . . . . . . 12, 13
14. Taste zum Öffnen/Schließen der CD-
Schublade. . . . . . . . . . . . . . . . . . . . . . . . . . . . . . .13
Seite
De-5
Page 84

Bedienungselemente und Anzeigen (Fortsetzung)
*Die Tasten 11, 13, 31 und 32 sind nur für X-HM20 verfügbar.
1 4 5 6 7
8910 11 1312 141516
28272624 2523221918 2120
17
2 3
1
2
3
4
5
6
7
8
9
10
11*
12
13*
14
15
16
n Lautsprecher
1.
Hochtonlautsprecher
2. Tieftöner
3. Bassreflex-Öffnung
n Die Lautsprechergrills sind abnehmbar
(nur X-HM20)
ßitle vorsichtig die Lautsprechergilter
abnehmen oder aufstecken, um
Beschädigungen der Lautsprecher
membranen zu vermeiden!
1
2
17
18
19
20
21
22
24
25
26
27
28
29
30
31*
33
35
36
23
32*
34
3
De-6
n Fernbedienung
1. Fernbedienungssender . . . . . . . . . . . . . . . . . . . . 8
2. STANDBY/ON-Taste . . . . . . . . . . . . . . .9, 11, 13, 21
3. Zifferntasten . . . . . . . . . . . . . . . . . . . . . . . . . . . . .14
4. P.Bass-Taste . . . . . . . . . . . . . . . . . . . . . . . . . . . . .9
5. Bass/Treble -Taste . . . . . . . . . . . . . . . . . . . . . . . . .9
6. Tuning Down-, Skip Down-, Schnellrücklauf-, Time
Down-taste . . . . . . . . . . . . . 9, 12, 13, 16, 18, 19, 21
7. Tuner Preset Up Taste, iPod Curser Up
. . . . . . . . . . . . . . . . . . . . . . . . . . . . . . .11, 12, 16, 18
8. Taste um die Lautstärke zu reduzieren . . . . . . . 9
9. Tuner Preset down, iPod-Curser Down
. . . . . . . . . . . . . . . . . . . . . . . . . . . . . . .11, 12, 16, 18
10. Ordner-Taste . . . . . . . . . . . . . . . . . . . . . . . . . . . 16
11. iPod/iPhone-Taste . . . . . . . . . . . . . . . . . . . . . . . .11
12. CD-Taste . . . . . . . . . . . . . . . . . . . . . . . . . . . . . . . .13
13. iPod/iPhone DISPLAY TV OUT . . . . . . . . . . .11, 12
14. Taste CD/USB DISPLAY. . . . . . . . . . . . . . . . . . . .16
15. Tuner-Taste . . . . . . . . . . . . . . . . . . . . . . . . . . .18, 19
16. RDS ASPM-Taste . . . . . . . . . . . . . . . . . . . . . . . . .19
17. CD-Fach Öffnen / Schließen . . . . . . . . . . . . . . . . 13
18. Dimmertaste . . . . . . . . . . . . . . . . . . . . . . . . . . . . . .9
19. Speichern . . . . . . . . . . . . . . . . . . . . . . . . . . . .14, 18
20. Löschtaste . . . . . . . . . . . . . . . . . . . . . . . . . . .14, 18
21. Sleep-Taste . . . . . . . . . . . . . . . . . . . . . . . . . . . . .23
22. Uhr/Timer . . . . . . . . . . . . . . . . . . . . . . . . . . . . .9, 22
23. Random-Taste . . . . . . . . . . . . . . . . . . . . . . . .12, 14
24. Repeat-Taste. . . . . . . . . . . . . . . . . . . . . . . . . . 12, 14
25. Tuning Up-, Skip Up-, Schnellvorlauf-,
Time Up-taste . . . . . . . . . . .9, 12, 13, 16, 18, 19, 21
26. Taste um die Lautstärke zu erhöhen . . . . . . . . . .9
27. Enter-Taste . . . . . . . . . . . . . . . . . . . . . . . . . 9, 11, 12
28. Stumm-Taste. . . . . . . . . . . . . . . . . . . . . . . . . . . . . .9
29. Line-Taste . . . . . . . . . . . . . . . . . . . . . . . . . . . . . 8, 25
30. USB-Taste . . . . . . . . . . . . . . . . . . . . . . . . . . . . . .16
31. iPod /iPhone Wiedergabe- / Pausetaste. . . . . . .12
32. iPod/iPhone-Menue . . . . . . . . . . . . . . . . . . . . . . .12
33. CD-/USB-Wiedergabe-/Anhaltetaste. . . .12, 13, 14
34. CD-/USB-Stopptaste . . . . . . . . . . . . . . . . . . . 13, 14
35. RDS-Anzeigetaste . . . . . . . . . . . . . . . . . . . . . . . .19
36. Taste für RDS-Programmart/
Verkehrsinformations- Suchlauf. . . . . . . . . . . . . 19
Seite
n Anzeige
1. USB-Anzeige . . . . . . . . . . . . . . . . . . . . . . . . . . . .16
2. iPod-Anzeige . . . . . . . . . . . . . . . . . . . . . . . . . . . .10
3. CD Anzeige. . . . . . . . . . . . . . . . . . . . . . . . . . . . . .13
4. MP3-Anzeige . . . . . . . . . . . . . . . . . . . . . . . . . . . .13
5. WMA-Anzeige . . . . . . . . . . . . . . . . . . . . . . . . . . .13
6. RDM (Zufallswiedergabe)-Anzeige . . . . . . . . . . .14
7. MEM (Speicher)-Anzeige . . . . . . . . . . . . . . . . . . .14
8. Wiedergabe-Anzeige . . . . . . . . . . . . . . . . . . . . . .14
9. Wiedergabe- / Pausetaste . . . . . . . . . . . . . . . . . .12
10. Einstellen von UKW/MW-Anzeige. . . . . . . . . . . . 18
11. UKW-Stereo-Betriebsartenanzeige . . . . . . . . . . 18
12. Stereo-Sender-Anzeige . . . . . . . . . . . . . . . . . . . .18
13. RDS-Anzeige . . . . . . . . . . . . . . . . . . . . . . . . . . . . 19
14. PTY-Anzeige. . . . . . . . . . . . . . . . . . . . . . . . . . . . .19
15. TP-Anzeige . . . . . . . . . . . . . . . . . . . . . . . . . . . . . . 19
16. TA-Anzeige . . . . . . . . . . . . . . . . . . . . . . . . . . . . . .19
17. Stummschaltungstaste . . . . . . . . . . . . . . . . . . . . . 9
18. Titelanzeige . . . . . . . . . . . . . . . . . . . . . . . . . . . . . 16
19. Interpretenanzeiger . . . . . . . . . . . . . . . . . . . . . . .16
20. Ordner-Anzeige . . . . . . . . . . . . . . . . . . . . . . . . . .16
21. Albumanzeiger . . . . . . . . . . . . . . . . . . . . . . . . . . .16
22. Dateianzeiger . . . . . . . . . . . . . . . . . . . . . . . . . . . .16
23. Track-Anzeige. . . . . . . . . . . . . . . . . . . . . . . . . . . . 14
24. Tägliche Timer-Anzeige. . . . . . . . . . . . . . . . . . . . 21
25. Einmalige Timer-Anzeige . . . . . . . . . . . . . . . . . . 21
26. Disc-Anzeiger . . . . . . . . . . . . . . . . . . . . . . . . . . . 13
27. Gesamtanzeige. . . . . . . . . . . . . . . . . . . . . . . . . . .16
28. Schlummer-Anzeige . . . . . . . . . . . . . . . . . . . . . .23
Seite
Page 85

Anschluß des Systems
AUX
LINE
LOOP
AC IN
Rechter
Lautsprecher
UKW-Antenne
An Video-Eingang
Schrauben (nicht mitgeliefert)
wand
< Montieren
an der Wand >
< Montage >
Wandsteckdose
(Wechselspannung 220 V
bis 240 V, 50 Hz/60 Hz)
Installieren der MW-Rahmenantenne
Video-Kabel
(nicht mitgeliefert)
Fernseher
MW-
Rahmenantenne
Linker
Lautsprecher
Video-Ausgangsbuchse
(nur X-HM20)
Falsch
Schalten Sie, ehe Sie die Anschlüsse vornehmen oder ändern, den Strom aus und ziehen Sie das Netzkabel aus der
Wechselstrom-Steckdose.
l
An den Lautsprecherklemmen dieses Gerätes liegt eine
n Anschluß der Antennen
Mitgelieferte UKW-Antenne:
Den UKW-Antennendraht an die Buchse FM 75 OHMS
anschließen und danach in die Richtung verlegen, wo das
stärkste Empfangssignal erhalten wird.
UKW-Außenantenne:
Verwenden Sie eine FM-Außenantenne (75 Ohm
Koaxialkabel), um einen besseren Empfang zu erhalten.
Wenn eine UKW-Außenantenne verwendet wird,
mitgeliefertes UKW-Antennenkabel abnehmen.
Mitgelieferte MW-Rahmenantenne:
Schließen Sie die MW-Rahmenantenne an die MWBuchsen an. Danach die MW-Rahmenantenne für
optimalen Empfang ausrichten. Die MW-Rahmenantenne
auf ein Bord usw. stellen oder an einen Ständer bzw. eine
Wand mit Schrauben (nicht mitgeliefert) anbringen.
Hinweis:
Wenn sich die Antenne auf dem Gerät oder in der Nähe
des Netzkabels befindet, kann Rauschen aufgefangen
werden. Für besseren Empfang die Antenne weiter vom
Gerät entfernt stellen.
n Anschluß der Lautsprecher
l
Verdrillen Sie die freiliegenden
Drahtlitzen miteinander.
l Schließen Sie den roten Draht an
den Plus-Anschluss (+) und den
anderen Draht an den MinusAnschluss (–) an.
l Verwenden Sie Lautsprecher mit
einer Impedanz von 4 Ohm, da
Lautsprecher mit einer
niedrigeren Impedanz die Einheit
beschadigen konnen.
potentiell GEFÄHRLICHE Spannung an. Zur Vermeidung
von Stromschlaggefahr ist unbedingt darauf zu achten, den
Netzstecker beim Anschließen und Abtrennen der
Lautsprecherkabel von der Netzsteckdose zu trennen,
bevor irgendwelche nicht isolierten Teile berührt werden.
l Montieren Sie diese Lautsprecher nicht an der Wand
oder an der Decke, da sie, wenn sie herabfallen,
Verletzungen verursachen können.
Niemals den rechten und linken Kanal verwechseln. Der
l
rechte Lautsprecher befindet sich auf der rechten Seite,
wenn Sie vor dem Gerät stehen.
l Die blanken Lautsprecherkabel dürfen keinen Kontakt
aufweisen.
l Keine Gegenstände in die Bassreflex-Öffnungen fallen
lassen oder einlegen.
Sie sollten nicht auf den Lautsprechern stehen oder
l
sitzen. Sie können sich verletzen.
n Anschließen eines iPods oder iPhones an
Sie können Foto- und Videodateien vom iPod oder
iPhone-Gerät anschauen, indem Sie das Gerät an einen
Fernseher/Monitor anschließen. Wenn der Fernseher/
Monitor einen Video-Eingang hat, können Sie diesen mit
der VIDEO OUT Buchse auf der Rückseite des Gerätes
verbinden und stellen Sie den TV-Ausgang im iPod oder
iPhone auf „On“.
Hinweis:
Kontrollieren Sie, ob die NTSC- oder PAL-Einstellung vom
iPod dieselbe wie ihr Fernsehersignal ist. Besuchen Sie
den Fernseher (nur X-HM20)
die Homepage von Apple für weitere Informationen.
De-7
Page 86

Verwendung anderer Subwoofer
AUX
LINE
LOOP
AC IN
Audiosignal
Fernseher
An AudioAusgang
Audiokabel
(im Handel
erhältlich)
Hauptgerät
An VideoEingang
STANDBY/ON
7 m
Fernbedienungssensor
Fernbedienung
n Netzanschluß
Prüfen, daß alle Anschlüsse richtig gemacht worden sind,
und dann das Netzkabel dieses Geräts an die Steckdose
anschließen.
Hinweis:
Wenn das Gerät längere Zeit nicht verwendet wird, das
Netzkabel aus der Wandsteckdose ziehen.
Vo rs ic ht :
l Beim Anschließen und Trennen des Netzkabels immer
den Stecker anfassen. Ziehen Sie den Stecker nicht
durch Ziehen am Kabel heraus, und berühren Sie das
Netzkabel niemals mit nassen Händen, da dies einen
Kurzschluss oder einen elektrischen Schlag
verursachen könnte. Das Gerät, Möbelstücke oder
andere Gegenstände nicht auf das Netzkabel stellen
und jegliches Einklemmen des Netzkabels vermeiden.
Niemals einen Knoten ins Netzkabel machen oder es
an anderen Kabeln festbinden. Das Netzkabel sollte so
verlegt werden, dass niemand darauf treten kann. Ein
beschädigtes Netzkabel kann einen Brand oder einen
elektrischen Schlag verursachen. Überprüfen Sie das
Netzkabel hin und wieder. Bei Beschädigung wenden
Sie sich bitte wegen Ersatz an die nächste PioneerKundendienststelle.
l Verwenden Sie kein anderes Netzkabel als das mit
dieser Einheit mitgelieferte.
l Verwenden Sie das mitgelieferte Netzkabel für keinen
anderen Zweck als oben beschrieben.
n Anschließen eines Fernsehgeräts, usw.
Mit einem Audio-Kabel an das TV anschließen.
n Einsetzen der Batterie
Öffnen Sie den Deckel des Batteriefachs.
1
Legen Sie die mitgelieferte Batterie in der Richtung in das
2
Batteriefach ein, die dort angezeigt ist.
Drucken Sie die Batterie beim Einlegen oder Entfernen in
Richtung des negativen Pols des Batterieanschlusses (–).
Schließen Sie den Deckel.
3
Warnung:
l Verwenden oder lagern Sie die Batterie nicht bei
direktem Sonnenlicht oder an anderen heißen Plätzen
wie beispielsweise in einem Auto oder nahe an einen
Heizer. Dies kann dazu fuhren, dass es zu Leckagen,
zur Uberhitzung oder zur Explosion der Batterie oder
zu einem Brand kommt. Es kann ebenfalls die
Lebensdauer oder die Leistung der Batterie verringern.
Vor si ch t:
l
Entfernen Sie die Batterie, wenn die Einheit über einen
längeren Zeitraum nicht verwendet wird. Dadurch
vermeiden Sie eventuelle Schäden durch Auslaufen der
Batterien.
l
Verwenden Sie keine wiederaufladbaren Batterien
(Nickel-Kadmium-Batterie usw.).
l
Falsches Installieren der Batterie kann zum Versagen der
Einheit führen.
Hinweise zur Verwendung:
l
Tauschen Sie die Batterie aus, wenndie Betriebsdistanz
verringert ist oder wenn der Betrieb unregelmäßig wird.
Kaufen Sie eine Batterie der Größe „AA“.
l
Den Sender auf der Fernbedienung und den Sensor am
Gerät mit einem weichen Tuch regelmäßig reinigen.
l
Wenn der Sensor am Gerät starkem Licht ausgesetzt
wird, kann der Betrieb beeinträchtigt werden. Verändern
Sie die Beleuchtung oder die Ausrichtung des Gerätes,
wenn dies auftritt.
l
Die Fernbedienung nicht Feuchtigkeit, Hitze, Stoß oder
Erschütterungen aussetzen.
l Bitte entsorgen Sie gebrauchte Batterien
entsprechend den gesetzlichen Bestimmungen oder
den allgemein bekannten Umweltbestimmungen in
Ihrem Land oder Ihrer Region.
n Test der Fernbedienung
Alle Anschlüsse und dann die Fernbedienung überprüfen.
Die Fernbedienung direkt auf den Fernbedienungssensor am
Gerät richten. Die Fernbedienung kann im unten gezeigten
Bereich verwendet werden:
Die Funktion Line In wählen:
l
Am Hauptgerät: Drücken Sie wiederholt die INPUT Taste, bis Line In angezeigt wird.
l
Auf der Fernbedienung: Drücken Sie die Line-Taste
wiederholt, bis „Line In“ angezeigt wird.
De-8
Page 87

Allgemeine Bedienungen
(Display ist gedimmt).
(Display wird gedimmt).
(Display ist hell).
-5 -4 +4 +5
........
-5 -4 +4 +5
........
FM STEREO
FM MONO
USB
iPod
Line In
CD AM
(nur X-HM20)
STANDBY/ON
P.BASS
VOL VOL
STANDBY/ON
INPUT
n Einschalten der Stromversorgung
Zum Einschalten der Stromversorgung die STANDBY/ON-Taste
drücken.
Nach Gebrauch:
Um in den Bereitschaftsbetrieb zu schalten, die STANDBY/ONTaste drücken.
n Display helligkeitsregler
Um die Helligkeit der Anzeige zu verdunkeln, drücken Sie die
DIMMER-Taste auf der Fernbedienung.
Dimmer 1
Dimmer 2
Dimmer Off
n Automatische Einstellung der Lautstärke
Wenn Sie die Haupteinheit bei einer auf 17 oder höher eingestellten
Lautstärke aus- und einschalten, startet die Lautstärke bei 16.
n Lautstärkeregelung
Drehen Sie den Lautstärkeregler in Richtung VOLUME (am
Hauptgerät) oder drücken Sie die Taste VOL +/– (auf der
Fernbedienung), um die Lautstärke zu erhöhen oder zu senken.
n Automatische Netzeinschaltung
Wenn Sie eine der folgenden Tasten drücken, schaltet sich das
Gerät ein.
l
iPod / iPhone, CD, USB, LINE, TUNER auf der Fernbedienung:
Die ausgewählte Funktion ist aktiviert.
l
/ -Taste auf dem Hauptgerät: Das Gerät schaltet ein und die
Wiedergabe startet von der zuletzt benutzten Funktion (CD,
TUNER, USB, iPod, LINE IN)
n Automatische ausschaltfunktion
Wenn die Haupteinheit 15 Minuten nicht aktiv ist, wird sie
automatisch in den Stand-By-Modus versetzt (wenn iPod/iPhone
nicht angedockt sind) während:
iPod/iPhone: Kein Anschluss.
CD / USB: Im Stop-Modus.
LINE IN: Keine Erkennung eines Input-Signals oder sehr geringe
Hörbarkeit des Tons.
Hinweis:
Nur X-HM20: Sobald das iPod/iPhone jedoch angeschlossen ist,
beginnt das Aufladen.
Während des Standby-Modus wird „Charge Mode“ angezeigt.
n Stummschaltung
Die Lautstärke wird kurzfristig stumm geschaltet, wenn die MUTETaste auf der Fernbedienung gedrückt wird. Drücken Sie nochmals
DIMMER
BASS/TREBLE
MUTE
VOLUME
die Taste, um die Lautstärke wieder herzustellen.
n P.Bass-Regelung
Wenn der Strom erstmals eingeschaltet wird, gelangt die Einheit in
den P.Bass- Modus, in dem die Bassfrequenzen betont werden.
Drücken Sie, um den P.BASS-Modus aufzuheben, die Taste B.Bass
auf der Fernbedienung.
n Klang einstelung (Bass)
1
Drücken Sie die BASS/TREBLE-Taste und wählen Sie „Bass“.
2
Drücken Sie innerhalb von 5 Sekunden die VOL (+ oder –)-Taste
und stellen Sie den Bass ein.
n Klang einstelung (Höhen)
1
Drücken Sie die BASS/TREBLE-Taste und wählen Sie „Treble“.
2
Drücken Sie innerhalb von 5 Sekunden die VOL (+ oder –)-Taste
und stellen Sie den Treble ein.
n Funktion
Drücken sie am Hauptgerät die INPUT-Taste, so ändert
sich die aktuelle Funktion in einen anderen Modus.
Drücken Sie mehrere Male die INPUT-Taste, um die
gewünschte Funktion auszuwählen.
Hinweis:
Mit der Speicherschutzfunktion bleibt die gespeicherte
Funktion einige Stunden erhalten, selbst wenn ein
Stromausfall eintreten sollte oder das AC-Netzkabel
getrennt wird.
Einstellen der Uhr (Nur Fernbedienung)
STANDBY/ON
CLOCK/TIMER
TUNING −
In diesem Beispiel ist die Uhr für die 24-Stunden-Anzeige
(00:00) eingestellt.
Zum Einschalten der Stromversorgung die STANDBY/ON-Taste
1
drücken.
2
Die CLOCK/TIMER-Taste drücken.
3
Drücken Sie innerhalb von 10 Sekunden die ENTER-Taste. Um
den Tag anzupassen, die Taste oder und dann die
ENTER-Taste drücken.
TUNING +
ENTER
De-9
Page 88

Einstellen der Uhr (Nur Fernbedienung)
(Fortsetzung)
4
Die oder -Taste drücken, um 24- oder 12-StundenAnzeige zu wählen, und dann die ENTER-Taste betätigen.
Die 24-Stunden-Anzeige erscheint.
(00:00 - 23:59)
Die 12-Stunden-Anzeige erscheint.
(AM 12:00 - PM 11:59)
5
Stellen Sie die Stunde mit der oder ein und
bestätigen Sie mit der ENTER-Taste. Die oder Taste einmal drücken, um die Uhrzeit um 1 Stunde
vorzustellen. Halten Sie sie gedrückt, um weiter
vorzustellen.
6
Um den Minuten anzupassen, die Taste oder und
dann die ENTER-Taste drücken. Die oder -Taste
einmal drücken, um die Uhrzeit um 1 Minute vorzustellen.
Überprüfen der Zeitanzeige:
Die CLOCK/TIMER-Taste drücken. Die Zeitanzeige erschein t
ca. 5 Sekunden lang.
Hinweis:
Wenn die Stromzufuhr nach dem erneuten Anschließen des
Gerätes oder nach einem Stromausfall wieder hergestellt ist,
stellen Sie die Uhrzeit erneut ein (Seiten 9).
Nachstellen der Uhr:
Die Schritte im Abschnitt „Einstellen der Uhr“ ab 1
durchführen. Wenn „Clock“ im Schritt 2 nicht erscheint, wird
der Schritt 4 (zum Anwählen der 24-Stunden- oder
12-Stunden-Anzeige) übersprungen.
Verändern der 24-Stunden- oder 12-Stunden-Anzeige:
1 All die programmierten Inhalte löschen. [Nähere
Informationen siehe „Werkseinstellung, Löschen des
Speichers“ auf Seite 25.]
2 Führen Sie die Schritte im Abschnitt „Einstellen der
Uhr“ ab Schritt 1 durch.
Hinweis:
Die Timer-Einstellung wird zurückgesetzt, wenn das
Netzkabel herausgezogen wird oder wenn es einen
Stromausfall gibt.
Anhören von iPod, iPhone oder iPad
(nur X-HM20)
Unterstützte iPod-, iPhone oder iPad-Modelle:
l
iPad
l
iPhone 4
l
iPhone 3GS
l
iPhone 3G
l
iPhone
l
iPod touch (4
l
iPod touch (3
l
iPod touch (2
l
iPod touch (1
l
iPod classic
l
iPod nano (6
l
iPod nano (5
l
iPod nano (4
l
iPod nano (3
l
iPod nano (2
Hinweise:
l Dieses System wurde für die Software- Version der auf
der Website von Pioneer angezeigten iPod-/iPhone
und iPad- Modelle entwickelt und getestet (http://
pioneer.jp/homeav/support/ios/eu).
ten
generation)
ten
generation)
ten
generation)
ten
generation)
ten
generation)
ten
generation)
ten
generation)
ten
generation)
ten
generation)
l Das Installieren von anderen Software- Versionen als
den auf der Website von Pioneer angezeigten auf
Ihrem iPod/iPhone/iPad kann dazu führen, dass diese
inkompatibel mit diesem System werden.
l Lade-Anschluss für iPod, iPhone und iPad:
Bedingung Andockstation
USB-Funktion NEIN JA
Andere Funktion JA NEIN
Standby JA NEIN
l Die Meldung „Dieses Zubehör eignet sich nicht für die
gemeinsame Verwendung mit iPhone“ oder ähnlich
kann auf dem iPhone-Bildschirm erscheinen, wenn:
- die Batterie schwach ist.
- das iPhone nicht richtig angedockt ist (z. B. schief)
Wenn dies der Fall ist, entfernen Sie das iPhone und
docken Sie es wieder an.
l Dieses Produkt wurde für iPhone hergestellt. Zur
Vorbeugung einer zufälligen Beeinträchtigung,
wenn das iPod/iPhone angedockt wird, werden die
Kopfhörer ausgeschaltet, und „HP INVALID“
(Kopfhörer deaktiviert) wird angezeigt.
Es könnten auch kurze Tonstörungen während
ankommenden Anfrufen auftreten.
n iPod-Anschluss (USB-Anschluss)
Führen Sie den Anschlussstecker in das iPod/iPhone
1
oder iPad ein.
2 Schließen Sie das iPad über den USB-
Anschlussstecker an die Einheit an.
Hinweis:
Der USB-Anschlussstecker unterstützt nicht den VIDEO-Ausgang.
n iPod-/-iPhone- oder iPad-Wiedergabe
(USB-Anschluss)
1 Drücken Sie zum Einschalten des Stroms die Taste
STANDBY/ON.
2 Drücken Sie zur Wahl der USB-Funktion die USB-Taste
auf der Fernbedienung oder wiederholt die INPUTTaste auf der Haupteinheit.
3 Schließen Sie das iPod, das iPhone oder das iPad an
die Einheit an. Es erscheint „iPod“.
4 Drücken Sie für den Start der Wiedergabe die Taste
/ (CD/USB / ).
Hinweis:
Während der iPod-/iPhone- oder iPad-Wiedergabe ist die
Stopp-Taste ( ) deaktiviert.
De-10
USB-
Anschluss
Page 89

Anhören von iPod, iPhone oder iPad (nur X-HM20) (Fortsetzung)
iPhone
Dockanschluss
iPhone (Unterseite)
Anschlussstecker
für das iPhone
Dock für das iPhone
Adapter für das iPhone
n Anschließen des iPod und iPhone-
Adapters (Andock-Station)
Hinweise:
Bitte benutzen Sie den mit Ihrem iPod oder iPhone
mitgelieferten Adapter.
iPhone-
Adapter Nr.
iPhone-
Beschreibung
Speicherkapazität
12 iPhone 4GB & 8GB & 16GB
15 iPhone 3G,
iPhone 3GS
8GB & 16GB & 32GB
19 iPhone 4 6GB & 32GB
n Den iPod oder iPhone-Adapter einstecken
(Andock-Station)
Andockstation für das iPod und das iPhone durch
1
Hochziehen.
2 Führen Sie den Adapter für das iPod und das iPhone
in die Einheit ein und schließen Sie Ihr iPod oder
iPhone an.
n Entfernen des Adapters für das iPod oder
das iPhone (Andock-Station)
Stecken Sie die Spitze eines
Schraubenziehers (kleiner
Schlitzschraubenzieher „–“) wie gezeigt
in die Öffnung im Adapter und heben
Sie ihn an, um ihn zu entfernen.
n iPod- oder iPhone-Wiedergabe
(Andock-Station)
Zum Einschalten der Stromversorgung die STANDBY/ON-
1
Taste drücken.
2
Drücken Sie die iPod/iPhone-Taste auf der Fernbedienung
oder wiederholt die INPUT-Taste am Hauptgerät, um die
iPod-Funktion zu wählen.
3
Stecken Sie das iPod oder iPhone in die iPodDockingstation am Hauptgerät.
4
Drücken Sie die / (iPod/iPhone / )-Taste, um mit der
Wiedergabe zu beginnen.
STANDBY/ON
INPUT
PRESET
ENTER
PRESET
USB
iPod/
iPhone
CD/USB
DISPLAY
TV OUT
DISPLAY
STANDBY/ON
iPod/iPhone
MENU
Vorsicht:
Ziehen Sie alle Zubehörteile aus dem iPod oder iPhone,
bevor Sie diesen in das Dock stecken.
n iPhone-Wiedergabe
l
Der Ton schaltet nur dann vom iPhone auf das Hauptgerät
um, wenn der Authentifizierungsvorgang nach ungefähr
10 Sekunden abgeschlossen wurde.
l
Eingehende Anrufe unterbrechen die Wiedergabe.
l
Bei Annahme der Anrufe hören Sie das Gespräch nur über
den eingebauteniPhone-Lautsprecher. Schalten Sie den
iPhone-Lautsprecher ein oder trennen Siedas iPhone, um
das Gespräch zu beginnen.
n iPod, iPhone oder iPad trennen
Entfernen Sie einfach das iPod oder das iPhone von der
Andockstation oder das iPad vom USB-Anschluss. Dies ist auch
während der Wiedergabe sicher.
De-11
Page 90

Anhören von iPod, iPhone oder iPad
REPEAT
RANDOM
PRESET
PRESET
(nur X-HM20) (Fortsetzung)
n Videos vom iPod oder iPhone
wiedergeben
Drücken Sie mindestens 2 Sekunden auf die DISPLAY TV
1
OUT-Taste. „TV Display“ erscheint auf der Anzeige.
2
Drücken Sie die ENTER-Taste, um mit der Wiedergabe zu
beginnen.
Hinweise:
l
Wenn im Video-Menü die Einstellung TV-Ausgang aktiviert
ist, wird das Video automatisch auf dem Fernsehschirm
angezeigt, wenn die ENTER-Taste gedrückt wird.
l
Vom USB-Anschluss wird die TV-out-Anzeige nicht
unterstützt. (iPad)
l
Drücken Sie die MENU-Taste, um das Video-Menü
aufzurufen und das Video erneut auf dem iPod- oder iPhoneBildschirm anzuzeigen. Drücken Sie dann mindestens
2 Sekunden auf die DISPLAY TV OUT-Taste bis „iPod
Display“ erscheint.
l
Während der iPod-Videowiedergabe wird durch das Dürcken
der DISPLAY TV OUT-Taste nicht zwischen der Anzeige auf
dem iPod und dem Fernseher gewechselt.
Vorsicht:
l
Ziehen Sie allen Zubehörteile aus dem iPod oder iPhone,
bevor Sie diesen in das iPod-Dock stecken.
l Während der iPod-Funktion ist die Stopp- Taste ( ) an
der Haupteinheit ungültig.
n Navigieren in den iPod-, iPhone- oder iPad-
Menüs
1
Drücken Sie die Menü-Taste des iPods/iPhones/iPads, um
das Menü auf der iPod-, der iPhone- oder der iPad-Einheit zu
sehen. Drücken Sie die Taste erneut, um zum vorherigen
Menü zurückzukehren.
2
Benutzen Sie die PRESET (
gewünschten Stelle im Menü zu gelangen und drücken Sie
oder
)-Taste, um zur
dann die ENTER-Taste.
Hinweis:
Benutzen Sie keine Taste am iPod, iPhone oder iPad selbst,
wenn sie mithilfe der Fernbedienung durch die iPod oder iPhoneMenüs navigieren. Die Lautstärke wird durch drücken der VOL
(+ oder –) -Tasten am Hauptgerät oder auf der Fernbedienung
geregelt. Das Einstellen der Lautstärke auf der iPod-, der
iPhone- oder der iPad-Einheit hat keinen Effekt.
Betrieb von iPod und iPhone:
Die nachfolgend beschriebenen Funktionen hängen davon ab,
welche Generation iPod und iPhone Sie benutzen.
System in Betrieb:
Wenn die Haupteinheit eingeschaltet ist, wird die iPod-, die
iPhone- oder die iPad-Einheit eingeschaltet, wenn sie in der
Einheit angedockt ist.
System ausgeschaltet (Bereitschaftsbetrieb):
Wenn die Haupteinheit in den Standby-Modus geschaltet wird,
werden das angedockte iPod oder iPhone oder die
angeschlossene iPad-Einheit automatisch in den StandbyModus geschaltet.
n Verschiedene iPod-, iPhone- und iPad-
Funktionen
Funktion
Hauptgerät
Fernbedienung
Betrieb
Dock USB
iPod/
Wiedergabe
Pause
Nächste/
vorige
Nummer
Schneller
Vorlauf/
Rücklauf
Anzeige
Wiederholung
Abspielen in
willkürlicher
Reihenfolge
iPodMenü
iPod
Eingabe
iPodCursor
Aufwärts/
Abwärts
TUNING −
TUNING −
____
____
____
____
____
____
iPhone
iPod/
iPhone
TUNING +
TUNING +
iPod/
iPhone
REPEAT
RANDOM
iPod/
iPhone
PRESET
PRESET
CD/USB
CD/USB
TUNING −
TUNING +
TUNING −
TUNING +
____
iPod/
iPhone
Drücken im
Pausebetrieb.
Drücken während
der Wiedergabe.
Drücken Sie hierauf
im Abspiel- oder
Pausebetrieb.
Wenn Sie im
Pausebetrieb auf
die Taste drücken,
müssen Sie auf die
/-Taste
drücken, um die
gewünschte
Nummer zu starten.
In der WiedergabeBetriebsart
gedrückt halten.
Lösen Sie die
Taste, um die
Wiedergabe
fortzusetzen.
Mehr als
2 Sekunden lang
drücken, um die
Video-out-Anzeige
zwischen iPod und
TV umzuschalten.
Drücken, um zum
Wiederholungsbetrieb
zu schalten.
Drücken
, um zum
Abspielen in
willkürlicher
Reihenfolge
umzuschalten.
Drücken, um
während der iPodFunktion das iPodMenü aufzurufen.
Taste drücken, um
die Auswahl zu
bestätigen.
Antippen, um das
iPod-Menü zu
öffnen.
De-12
Page 91

CDs oder MP3/WMA-Discs wiedergeben
PHONES
USB
TUNING −
TUNING +
STANDBY/ON
INPUT
OPEN/CLOSE
STANDBY/ON
TUNING −
CD
Diese Anlage kann Standard-CDs und -CD-R/RWs im CDFormat sowie CD-R/RWs mit MP3- oder WMA-Dateien
wiedergeben, sie kann diese aber nicht bespielen. Einige
Audio-CD-Rs/CD-RWs können nicht abspielbar sein,
abhängend vom Zustand der zur Aufnahme verwendeten
Disc oder Vorrichtung.
MP3:
MP3 ist ein Kompressionsformat. Es ist eine Abkürzung für
MPEG Audio Layer 3. MP3 ist eine Art von Audiocode, der
durch erheblicher Datenreduzierung von der
ursprünglichen Tonquelle mit sehr geringem
Tonqualitätsverlust verarbeitet wird.
l
Dieses System unterstützt MPEG 1 Layer 3- und VBRDateien.
l
Während der Wiedergabe einer VBR-Datei kann das
Zeitzählwerk im Display von ihrer tatsächlichen
Wiedergabezeit abweichen.
l
MP3 unterstützt Bitgeschwindigkeiten von 32 Kbps bis
320 Kbps.
WMA:
WMA-Dateien sind Advanced-System-Format-Dateien, die
Audiodateien enthalten, die mit dem Windows-MediaPlayer-Codec komprimiert wurden. WMAs wurden von
Microsoft als Audioformatdateien für den Windows Media
Player entwickelt.
l
Die Anzeige „MP3“ und „WMA“ wird aufleuchten, nachdem
das Gerät Daten von einer MP3- bzw. einer WMA-Disc
gelesen hat.
l
WMA unterstützt Bitgeschwindigkeiten von 64 Kbps bis
160 Kbps.
n CD/-Wiedergabe
Zum Einschalten der Stromversorgung die STANDBY/ON-
1
Taste drücken.
2
Drücken Sie die CD-Taste auf der Fernbedienung oder
wiederholt die INPUT-Taste am Hauptgerät, um die CDFunktion zu wählen.
3
Zum Öffnen der Disc-Schublade die -Taste drücken.
4
Die Disc mit der Etikettenseite nach oben weisend auf die
Disc-Schublade legen.
TUNING +
5
Zum Schließen der Disc-Schublade die -Taste drücken.
6
Die / (CD/USB /) -Taste drücken, um mit der
Wiedergabe zu begin- nen. Ist der letzte Track abgespielt,
stoppt das Gerät automatisch.
Vorsicht:
l
Legen Sie nicht zwei Discs in eine Disc-Schublade.
l
Spielen Sie keine Discs mit speziellen Formen (Herz oder
Achteck) ab. Das kann zu Störungen führen.
l
Die Disc-Schublade nicht berühren, wenn sich diese bewegt.
l
Wenn bei offener Schublade ein Stromausfall eintritt, warten
Sie, bis die Stromversorgung wieder hergestellt wird.
l
Wenn Radio- oder Fernsehempfang durch den CD-Betrieb
gestört wird, das Gerät weiter entfernt vom Radio oder
Fernseher aufstellen.
l
8 cm-Discs unbedingt in die Mitte der Disc-Schublade legen.
l
Aufgrund der Struktur seiner Disc-Information braucht es
länger zum Lesen einer MP3/WMA-Disc als bei einer
normalen CD (ungefähr 20 bis 90 Sekunden).
n Verschiedene Disc-Funktionen
Funktion
Wiedergabe
Stopp
Pause
Nächste/
vorige
Nummer
Schneller
Vorlauf/
Rücklauf
Hauptgerät
Fernbedienung
CD/USB
CD/USB
CD/USB
TUNING −
TUNING +
Betrieb
In der Stopp-Betriebsart
drücken.
Drücken während der
Wiedergabe.
Drücken während der
Wiedergabe. Die Taste
/ drücken, um die
Wiedergabe ab der
unterbrochenen Stelle
fortzusetzen.
In der Wiedergabe- oder
Stopp-Betriebsart
drücken. Wenn Sie die
Taste im Stopp-Modus
drücken, drücken Sie die
/ -Taste, um den
gewünschten Track zu
starten.
In der WiedergabeBetriebsart gedrückt
halten.
Lösen Sie die Taste, um
die Wiedergabe
fortzusetzen.
De-13
Page 92

Weitere Wiedergabe von CDs oder MP3/WMA-Discs
Nummer des gewünschten
Tracks eingeben
Nummer des gewünschten Tracks eingeben
DIMMER
MEMORY
REPEAT
RANDOM
n Direkter Titel-Suchlauf
Die gewünschten Tracks auf der momentan eingelegten Disc
können durch Verwendung der Zifferntasten abgespielt
werden.
Verwenden Sie die Zifferntasten auf der Fernbedienung
zur Wahl des gewünschten Tracks, während die
gewählte Disc abgespielt wird.
l
Die Zifferntasten ermöglichen Ihnen die Wahl bis zur
Nummer 9.
l
Beim Wählen der Nummer 10 oder darüber ist die „>10“Taste zu verwenden.
A. Zum Beispiel Wahl von 13
1
Die „>10“-Taste einmal
drücken.
2
Die „1“-Taste drücken.
3
Die „3“-Taste drücken.
B. Zum Beispiel Wahl von 130
1
Die „>10“-Taste zweimal drücken.
2
Die „1“-Taste drücken.
3
Die „3“-Taste drücken.
4
Die „0“-Taste drücken.
Hinweise:
l
Es kann keine höhere Titelnummer als die Anzahl von
Titeln auf der Disc gewählt werden.
l
Während der Wiedergabe in zufälliger Reihenfolge ist das
direkte Suchen nicht möglich.
Beenden der Wiedergabe:
Die (CD/USB )-Taste drücken.
n Wiederholte Wiedergabe
Bei der wiederholten Wiedergabe können ein Titel, alle Titel
oder eine programmierte Reihenfolge fortlaufend abgespielt
werden.
Wiederholen eines Titels:
Drücken Sie wiederholt die Taste REPEAT, bis die Meldung
„Repeat One“ erscheint. Die / (CD/USB / )-Taste
drücken.
Wiederholen aller Titel:
Drücken Sie wiederholt die Taste REPEAT, bis die Meldung
„Repeat All“ erscheint. Die / (CD/USB / )-Taste
drücken.
Wiederholen von gewünschten Titeln:
Schritte 1 - 5 im Abschnitt „Programmierte Wiedergabe“
durchführen und dann die Taste REPEAT wiederholt
drücken, bis „Repeat All“ erscheint.
Beenden der wiederholten Wiedergabe:
Drücken Sie wiederholt die REPEAT-Taste, bis „Normal“
erscheint und „ “ verschwindet.
Hinweise:
Während der wiederholten Wiedergabe ist eine
Zufallswiedergabe nicht m
n Zufallswiedergabe
Die Tracks einer Disc können automatisch in der
Zufallswiedergabe abgespielt werden.
Zufallswiedergabe aller Titel:
Drücken Sie die RANDOM-Taste auf der Fernbedienung und
halten Sie sie gedrückt, bis „Random“ erscheint. Die /
(CD/USB / )-Taste drücken.
Beenden der Zufallswiedergabe:
Drücken Sie die RANDOM-Taste, bis die „RDM“-Anzeige
erlischt.
Hinweise:
l
Drückt man während der Zufallswiedergabe die Taste, können Sie bei der Zufallswiedergabe zum
nächsten Track springen. Die taste ermöglicht Ihnen
jedoch nicht, zum vorherigen Titel zurückzukehren. Der
Anfang des laufenden Titels wird gefunden.
l
Bei der Zufallswiedergabe wählt und spielt das Gerät
automatisch Titel. (Sie können die Titelfolge nicht
auswählen.)
l
Während der Zufallswiedergabe ist eine wiederholte
Wiedergabe nicht möglich.
Vorsicht:
Drücken Sie nach einer Wiederholung die (CD/USB ) Taste. Sonst wird die Disc fortlaufend wiedergegeben.
n Programmierte Wiedergabe (CD)
Zur Wiedergabe können Sie bis zu 32 Titel in der
gewünschten Reihenfolge wählen.
1
In der Stopp-Betriebsart die MEMORY-Taste auf der
Fernbedienungdrücken, um in die
Programmspeicherungs-Betriebsart zuschalten.
2
Die oder -Taste auf der Fernbedienung drücken,
um den gewünschten Titel auszuwählen.
3
Die MEMORY-Taste drücken, um die Titelnummer zu
sichern.
ö
glich.
De-14
Page 93

Weitere Wiedergabe von CDs oder
ROOT
(FOLDER 1)
FOLDER A
(FOLDER 2)
FOLDER B
(FOLDER 3)
FILE 9
FILE 10
FILE 3
FILE 4
FILE 5
FILE 6
FILE 7
FILE 8
FOLDER E
(FOLDER 6)
FOLDER C
(FOLDER 4)
FOLDER D
(FOLDER 5)
FILE 1
FILE 2
MP3/WMA-Discs (Fortsetzung)
4
Für weitere Titel die Schritte 2 - 3 wiederholen. Bis zu
32 Titel können programmiert werden. Drücken Sie
wiederholt die MEMORY-Taste, um die eingespeicherten
Titel zu überprüfen. Wenn Sie einen Fehler machen,
können die programmierten Titel durch Drücken der
CLEAR-Taste gelöscht werden.
5
Die / (CD/USB / ) -Taste drücken, um mit der
Wiedergabe zu begin- nen.
n Programmierte Wiedergabe (MP3/WMA)
1
In der Stopp-Betriebsart die MEMORY-Taste drücken,
um in die Programmspeicherungs-Betriebsart zu
schalten.
2 Drücken Sie die PRESET
Fernbedienung, um den gewünschten Ordner
auszuwählen.
Drücken Sie dann die oder -Taste auf der
Fernbedienung, um die gewünschten Titel
auszuwählen.
3 Drücken Sie die MEMORY-Taste, um die Ordner- und
Titelnummer zu speichern.
4 Für weitere Ordner/Titel die Schritte 2 – 3 wiederholen.
Bis zu 32 Titel können programmiert werden.
5 Die / (CD/USB / ) -Taste drücken, um mit der
Wiedergabe zu begin- nen.
Abbrechen der programmierten Wiedergabe:
Drücken Sie während des programmierten Stopp-Modus
die (CD/USB )-Taste. Auf der Anzeige erscheint
„Memory Clear“ und alle programmierten Inhalte werden
gelöscht.
Hinzufügen von Titeln zum Programm:
Wenn ein Programm früher abgespeichert worden ist, wird
die „MEM“-Anzeige angezeigt. Drücken Sie die Taste
MEMORY. Dann folgen die Schritte 2 – 3, um Tracks
hinzuzufügen.
Hinweise:
l Wenn eine Disc herausgenommen wird, wird das
Programm automatisch annulliert.
l Wenn Sie die STANDBY/ON-Taste drücken, um in die
Bereitschafts-Betriebsart zu schalten oder um von CD
auf eine andere Funktion umzuschalten, werden die
programmierten Titel gelöscht.
l Während der Programm-Operation ist
Zufallswiedergabe nicht möglich.
(
oder )-Taste auf der
MP3/WMA-Ordnermodus (nur bei
MP3/WMA-Dateien)
Wiedergabe von MP3/WMA-Dateien (Windows Media
Audio)
Im Internet gibt es zahlreiche Musik-Seiten, von denen
man Musik-Dateien MP3/WMA (Windows Media Audio)
herunterladen kann. Befolgen Sie die Anweisungen auf
der Website für das Herunterladen dieser Musikdateien.
Sie können diese heruntergeladenen Musikdateien durch
Brennen einer CD-R/RW Disc abspielen.
l Die heruntergeladenen Song/Dateien sind nur für den
persönlichen Gebrauch bestimmt. Jedwede andere
Nutzung des Songs ohne Zustimmung des
Eigentümers ist rechtswidrig.
n Informationen zur Ordner-
Wiedergabereihenfolge
Bei der Aufnahme von MP3/WMA-Dateien in mehreren
Ordnern wird für jeden Ordner automatisch eine
Ordnernummer vergeben.
Diese Ordner können mit Hilfe der FOLDER-Taste auf der
Fernbedienung ausgewählt werden. Ordner, in denen
keine Dateien mit unterstütztem Dateiformat vorhanden
sind, werden übersprungen, und der nächste Ordner wird
ausgewählt.
Beispiel: Einstellen der Ordnernummer, wenn Dateien im
MP3/WMA-Format wie nach folgender Abbildung
aufgezeichnet werden.
Der ROOT-Ordner ist als Ordner 1 festgelegt.
1
2 Wie bei Ordnern im ROOT-Ordner (Ordner A und
Ordner B) wird der zuvor auf der Disc aufgenommene
Ordner als Ordner 2 und Ordner 3 festgelegt.
3 Wie bei Ordnern im Ordner A (Ordner C und Ordner D)
wird der zuvor auf der Disc aufgenommene Ordner als
Ordner 4 und Ordner 5 festgelegt.
4 Ordner E in Ordner D existiert, wird als Ordner 6
festgelegt.
l Die Informationen zu Ordner- und Dateireihenfolge
sind von der Aufzeichnungssoftware abhängig. Es
kann vorkommen, dass das Gerät die Dateien nicht in
der erwarteten Reihenfolge abspielt.
l Bei CD MP3/WMA können 99 Verzeichnisse und 999
Dateien einschließlich der Verzeichnisse, die keine
abspielbaren Dateien enthalten, gelesen werden.
Der Ordnermodus kann mit der FOLDER-Taste auf der
Fernbedienung ein-/ausgeschaltet werden. Die bei
eingeschaltetem Ordnermodus wiedergegebenen
Dateien sind andere als bei ausgeschaltetem
Ordnermodus.
De-15
Page 94

MP3/WMA-Ordnermodus (nur bei
CD
PRESET
PRESET
FOLDER
DISPLAY
TUNING −
TUNING +
CD/USB
MP3-Anzeige
WMA-Anzeige
TOTAL-Anzeige
Gesamtanzahl der Dateien
Gesamtzahl von Ordner
Erste Titelnummer
im Ordner
Ordneranzeige
Ordnernummer
Anzeige Dateiname Ordneranzeige
Anzeigetitel
Anzeige Album
Zählwerk
Anzeige Künstler
INPUT
USB
USB
PRESET
PRESET
FOLDER
TUNING −
TUNING +
DISPLAY
CD/USB
MP3/WMA-Dateien) (Fortsetzung)
n Wiedergabe einer MP3/WMA-CD bei
eingeschaltetem Ordnermodus
Zur Wiedergabe einer CD-R/RW.
CD-Taste drücken und eine MP3/WMA-Disc laden.
1
Drücken Sie die FOLDER-Taste und die DiscInformation wird angezeigt.
2 Drücken Sie die PRESET
gewünschten Wiedergabe-Ordner zu wählen.
(Ordnermodus eingeschaltet)
3 Gewünschte, wiederzugebende Datei durch Drücken
der oder -Taste auswählen.
4 Die / (CD/USB / )-Taste drücken. Die Wiedergabe
beginnt und der Dateiname wird angezeigt.
l Wenn auf der Disc aufgenommen, werden Titel,
Künstler und Album-Name angezeigt.
l Drücken sie bei der Wiedergabe mit aktiviertem
Folder-Modus die Taste PRESET
der Folder kann gewählt werden, auch wenn er sich
im Wiedergabe-/Anhalte-Modus befindet. Im ersten
Track des gewählten Folders wird der Wiedergabe-/
Anhalte-Modus fortgesetzt.
l Der Anzeigeinhalt kann durch Drücken der CD/USB
DISPLAY-Taste geändert werden.
Hinweis:
Die Anzeige „Not Support“ bedeutet, dass eine
„Copyright-geschützt WMA-Date“ oder eine „Nicht
unterstützte Wiedergabedatei“ ausgewählt wurde.
(
oder ) -Taste, um den
(
oder ), und
Hören von USB-Massenspeicher
MP3-Player
Hinweise:
l Dieses Produkt ist mit MTP- oder AAC-Dateisystemen
von USB- Massenspeichern oder MP3-Playern nicht
kompatibel.
l Es ist möglich, dass einige externe Speichermedien
von diesem System nicht unterstützt werden.
l Das Funktionieren von externen Speichermedien
(USB-Sticks, externe Festplatten usw.) wird nicht
garantiert.
n Wiedergabe vom USB-/MP3-Player mit
deaktiviertem Ordner-Modus
Die USB-Taste auf der Fernbedienung oder die INPUT-
1
Taste auf der Haupteinheit wiederholt drücken, um die
USB-Funktion auszuwählen. Das USB-Speichergerät
mit den gespeicherten Dateien im MP3/WMA-Format
mit dem Gerät verbinden. Wenn der USB-Speicher mit
dem Hauptgerät verbunden ist, werden die
Geräteinformationen angezeigt.
2 Gewünschte, wiederzugebende Datei durch Drücken
der oder -Taste auswählen.
3 Die / (CD/USB / )-Taste drücken. Die
Wiedergabe beginnt und der Dateiname wird angezeigt.
l Der Name des Titels, des Künstlers und des Albums
wird angezeigt, sofern diese Informationen auf dem
USB-Speichergerät gespeichert sind.
l Der Anzeigeinhalt kann durch Drücken der CD/USB
DISPLAY-Taste geändert werden.
Hinweis:
Unterbrechen der Wiedergabe (Pause):
Die / (CD/USB / )-Taste drücken.
De-16
Page 95

Hören von USB-Massenspeicher
MP3-Player (Fortsetzung)
n Wiedergabe vom USB-/MP3-Player mit
aktiviertem Ordner-Modus
Die USB-Taste auf der Fernbedienung oder die INPUT-Taste
1
auf der Haupteinheit wiederholt drücken, um die USBFunktion auszuwählen. Das USB-Speichergerät mit den
gespeicherten Dateien im MP3/WMA-Format mit dem Gerät
verbinden. Wenn der USB-Speicher mit dem Hauptgerät
verbunden ist, werden die Geräteinformationen angezeigt.
2
FOLDER-Taste drücken. Dann PRESET ( oder )-Taste
drücken, um den gewünschten Wiedergabeordner zu wählen.
Zur Wiedergabe im Ordnermodus mit Schritt 4 fortfahren. Zum
Wechseln des Wiedergabeordner die PRESET ( oder )Taste drücken, um einen anderen Wiedergabeordner zu
wählen.
3
Gewünschte, wiederzugebende Datei durch Drücken der
oder -Taste auswählen.
4
Die / (CD/USB / )-Taste drücken. Die Wiedergabe
beginnt und der Dateiname wird angezeigt.
l
Der Name des Titels, des Künstlers und des Albums wird
angezeigt, sofern diese Informationen auf dem USBSpeichergerät gespeichert sind.
l
Der Anzeigeinhalt kann durch Drücken der
-Taste geändert werden.
DISPLAY
n Entfernen der USB-Speicher
Drücken Sie die (CD/USB )-Taste, um die
1
Wiedergabe zu stoppen.
2 USB-Speichergerät vom USB-Anschluß trennen.
Hinweise:
PIONEER ist nicht für den Verlust von Daten während
l
des Anschlusses des USB-Speichergeräts an das
Audiosystem verantwortlich.
l
In MP3 und/oder WMA-Formaat komprimierte Dateien
können abgespielt werden, wenn das Gerät am USBAusgang angeschlossen ist.
l
Das Format dieses USB-Speichers unterstützt FAT 16
oder FAT 32.
l
PIONEER kann nicht gewährleisten, dass alle USBSpeichergeräte mit diesem Audiosystem funktionieren.
l
Das USB-Kabel ist nicht für dieses Audio-System, da es
am USB-Speichergerät angeschlossen ist. Die
Verwendung des USB-Kabels wird die Aktivität des
Audio-Systems beeinflussen.
l
Dieser USB-Speicher kann nicht über USB-Hub
betrieben werden.
l
Der USB-Anschluß dieses Geräts ist nicht für eine PCVerbindung sondern für Musikstreaming mit einem
USB-Speichergerät vorgesehen.
l
Externer HDD Speicher kann nicht über den USBAnschluß dieses Geräts wiedergegeben werden.
l
Bei hohem Datenvolumen im USB-Speicher kann das
Lesen der Daten länger dauern.
CD/USB
l Dieses Produkt kann WMA und MP3 Dateien
wiedergeben. Es wird automatisch den
wiederzugebenden Dateityp erkennen. Falls eine nicht
wiederzugebende Datei auf diesem Gerät
wiedergegeben wird, wird „Not Support“ angezeigt und
die Datei wird automatisch übersprungen. Dies dauert
einige Sekunden. Falls, wegen der nicht spezifizierten
Datei eine ungewöhnliche Anzeige im Display
erscheint, schalten Sie das Gerät aus und
anschließend wieder an.
l Dieses Produkt versteht USB-Massenspeichergeräte
und MP3-Player. Manchmal kann es aber zu
Unregelmäßigkeiten kommen, wenn unerwartete
Probleme an einigen Geräten auftreten. Sollte dies
vorkommen, schalten Sie das Gerät aus und
anschließend wieder an.
l Die USB-Schnittstelle ist nur zur direkten Verbindung
an ein USB-Speichermedium ohne Kabel gedacht.
l Während der CD-Funktion wird der MP3-Player nicht
geladen.
l „Not Support“ wird angezeigt, wenn Sie bei gewählter
USB-Funktion einen iPod an einen USB-Anschluss
anschließen.
Fortgeschrittene USB-Wiedergabe
Die folgenden Funktionen sind die gleichen wie für CDs:
Direkter Titel-Suchlauf . . . . . . . . . . . . . . . . . . . . . . . . 14
Wiederholung . . . . . . . . . . . . . . . . . . . . . . . . . . . . . . . 14
Zufallswiedergabe . . . . . . . . . . . . . . . . . . . . . . . . . . . 14
Programmierte Wiedergabe (MP3/WMA) . . . . . . . . .15
Hinweise:
l Ist kein USB-Speicher angeschlossen, so erscheint in
der Anzeige „USB No Media“.
l Dieser Gerät unterstützt nur das Format „MPEG-1
Audio Layer-3“. (Samplefrequenz fs ist 32 kHz,
44,1 kHz, 48 kHz)
l Die Playbackreihenfolge für MP3-Dateien kann je nach
beim Herunterladen verwendeter Software variieren.
l Die von MP3 unterstützte Bitrate beträgt 32 Kbps bis
320 Kbps, WMA ist 64 Kbps bis 160 Kbps.
l Für MP3/WMA-Dateien bitte die Dateierweiterung
„.MP3“ bzw. „.WMA“ verwenden. Dateien können nicht
wiedergegeben, wenn die Dateierweiterung nicht MP3/
WMA ist.
l Wiedergabelisten werden von diesem Gerät nicht
unterstützt.
l Dieses Gerät kann Ordnernamen oder Dateiname von
bis zu 32 Zeichen anzeigen.
l Die maximale Anzahl an MP3/WMA-Dateien beträgt
999.
l Die Gesamtzahl von gelesenen Verzeichnissen ist 99
einschließlich von Verzeichnissen mit nicht
abspielbaren Dateien. Das Display zeigt jedoch nur
Verzeichnisse mit MP3-Dateien.
l Bei der Wiedergabe einer Datei mit variabler Bitrate
wird die Wiedergabezeit möglicherweise nicht korrekt
angezeigt.
l TITLE, ARTIST und ALBUM sind die einzigen
unterstützten ID3TAG Informationen. Der Name des
Titels, Künstlers und des Albums können während der
Wiedergabe der Datei oder im Pausenmodus durch
Drücken der DISPLAY-Taste angezeigt werden.
l WMA-Meta-Tag unterstützt auch Titel-, Künstler- und
Albumnamen, die in WMA-Dateien gespeichert sind.
Durch Copyright geschützt WMA-Dateien können nicht
wiedergegeben werden.
De-17
Seite
Page 96

Rundfunkempfang
CLEAR
STANDBY/ON
INPUT
MEMORY
TUNING −
TUNER
TUNING +
PRESET
PRESET
n Abstimmung
Zum Einschalten der Stromversorgung die STANDBY/
1
ON-Taste drücken.
2 Die TUNER-Taste wiederholt drücken, um das
gewünschte Frequenzband (FM oder AM)
auszuwählen.
3 Die TUNING + oder - -Taste auf der Fernbedienung
drücken, um den gewünschten Sender einzustellen.
l Manuelle Abstimmung:
Drücken Sie wiederholt die TUNING + oder - -Taste,
um den gewünschten Sender einzustellen.
l Abstimmautomatik:
Wenn die TUNING + oder - -Taste mehr als
0,5 Sekunden gedrückt wird, startet der
Sendersuchlauf automatisch, und der Tuner stoppt
am zuerst empfangbaren Rundfunksender.
Hinweise:
l Wenn Rundfunkstörung auftritt, kann der
Sendersuchlauf im selben Augenblick automatisch
stoppen.
l Der Sendersuchlauf überspringt Sender von
schwachem Signal.
l Zum Stoppen der Abstimmautomatik die TUNING
oder - -Taste noch einmal drücken.
l Wenn ein RDS (Radio-Daten-System)-Sender
eingestellt wird, wird die Frequenz zuerst angezeigt,
und dann leuchtet die RDS-Anzeige. Danach erscheint
der Sendername.
l Für mit „ASPM“ gespeicherte RDS-Sender kann
vollautomatische Abstimmung erzielt werden (siehe
Seite 19).
Empfangen einer UKW-Stereosendung:
l Drücken Sie die TUNER-Taste und wählen Sie Stereo.
In der Anzeige erscheint „ST“. „ “ und „ “ erscheint,
wenn eine UKW-Sendung in Stereo ist.
l Bei schwachem UKW-Empfang die TUNER-Taste
drücken, so daß die „ST“-Anzeige erlischt. Der
Empfang schaltet auf Mono, und der Klang wird klarer.
n Abspeichern eines Senders
Sie können 40 MW- und UKW-Sender abspeichern und
per Tastendruck abrufen. (Vorabstimmung)
1
Führen Sie die Schritte 1 - 3 unter „Abstimmung“ durch.
2 Die MEMORY-Taste drücken.
3 Innerhalb von 30 Sekunden die Taste PRESET
)
drücken, um die Vorwahlkanalnummer anzuwählen.
Die Sender einspeichern, und dabei der Reihe nach mit
dem Vorwahlkanal 1 beginnen.
4 Innerhalb von 30 Sekunden die MEMORY-Taste
drücken, um den Sender abzuspeichern. Wenn vor dem
Speichern des Senders die „MEMORY“- und
Festsendernummernanzeigen erlöschen, die mit dem
Schritt 2 beginnende Bedienung wiederholen.
5 Die Schritte 1 - 4 wiederholen, um andere Sender zu
speichern oder einen Festsender zu ändern. Wenn ein
neuer Sender gespeichert wird, wird der Sender
gelöscht, der vorher für diesen voreingestellten Kanal
gespeichert wurde.
Hinweis:
Die Speicherschutzfunktion sorgt dafür, dass im Falle
eines Stromausfalls oder wenn die Stromzufuhr
unterbrochen wird, die gespeicherten Sender für einige
Stunden erhalten bleiben.
n Abrufen eines gespeicherten Senders
1 Die PRESET
0,5 Sekunden drücken, um den gewünschten Sender
zu wählen.
(
oder )-Taste weniger als
n Festsender-Suchlauf
Die abgespeicherten Sender können automatisch
abgetastet werden. (Festsenderspeicher-Suchlauf)
1
Drücken sie länger als 0,5 Sekunden die PRESET
oder )-Taste. Die Festsendernummer blinkt und die
programmierten Sender werden nacheinander folgend
je 5 Sekunden lang empfangen.
+
2 Die Taste PRESET
wenn der gewünschte Sender gefunden wird.
(
oder ) noch einmal drücken,
n Löschen aller gespeicherten Sender
1
Drücken Sie die TUNER-Taste auf der Fernbedienung
oder wiederholt die INPUT-Taste auf der Haupteinheit,
um die Tuner-Funktion zu wählen.
2 Drücken Sie in der Tuner-Funktion die CLEAR-Taste,
bis „Tuner Clear“ erscheint.
(
oder
(
De-18
Page 97

Benutzen des Radio-Daten-Systems (RDS)
RDS
TUNING −
TUNING +
TUNER
ASPM PTY DISP
Sendername (PS) Programmart (PTY)
Frequenz Radiotext (RT)
No PS No PTY
FM 98.80 MHz
No RT
RDS ist ein Rundfunkdienst, der heute von einer
zunehmenden Zahl von UKW-Sendern angeboten
wird. Diese UKW-Sender senden neben ihren
regulären Programmsignalen zusätzliche Signale. Sie
können ihren Sendernamen und Informationen über
die Programmart wie Sport, Musik usw. senden.
Wenn ein RDS-Sender eingestellt wird, werden „RDS“
und der Sendername angezeigt.
„TP“ (Verkehrsfunkkennung) erscheint auf dem Display,
wenn die empfangene Sendung die Verkehrsinformation
trägt; „TA“ (Verkehrsdurchsagekennung) erscheint,
während eine Verkehrsinformation auf Sendung ist.
Während des Empfangs des Dynamic-PTY-Senders
erscheint „PTYI“ (Dynamic-PTY-Anzeige).
Ein RDS-Sender kann mit Hilfe der Tasten auf der
Fernbedienung eingestellt werden.
n RDS-INFORMATIONEN
Bei jedem Druck auf die RDS DISPLAY-Taste ändert
sich das Display wie folgt:
Wenn Sie einen anderen Sender als einen RDS-Sender
oder einen RDS-Sender, dessen Signal schwach ist,
einstellen, ändert sich das Display in folgender
Reihenfolge:
n Benutzen des automatischen
Senderspeichers (ASPM)
In der ASPM-Betriebsart sucht der Tuner automatisch
nach neuen RDS-Sendern. Bis zu 40 Sender können
gespeichert werden.
Wenn einige Sender bereits abgespeichert sind, verringert
sich die Zahl der speicherbaren neuen Sender
entsprechend.
1 Drücken Sie die TUNER-Taste auf der Fernbedienung
oder wiederholt die INPUT-Taste am Hauptgerät, um
die TUNER-Funktion zu wählen.
2 Drücken Sie die RDS ASPM-Taste auf der
Fernbedienung.
1 „ASPM“ blinkt etwa 4 Sekunden lang, dann beginnt
der Suchlauf (87,50 - 108,00 MHz).
2 Wenn ein RDS-Sender gefunden wird, erscheint
„RDS“ eine kurze Weile, und der Sender wird
abgespeichert.
3 Nach Abschluß des Suchlaufs wird die Zahl der
abgespeicherten Sender 4 Sekunden lang angezeigt
und dann erscheint „END“ 4 Sekunden lang.
Abbrechen des ASPM Betriebes, ehe er
abgeschlossen ist:
Drücken Sie während des Sendersuchlaufs die RDS
ASPM-Taste.
Die bereits abgespeicherten Sender bleiben im Speicher.
Hinweise:
l Wenn derselbe Sender auf verschiedenen
Frequenzen sendet, wird die stärkste Frequenz
abgespeichert.
l Jeder Sender, der die gleiche Frequenz hat wie ein
bereits gespeicherter, wird nicht noch einmal
gespeichert.
l Sind bereits 40 Sender abgespeichert, wird der
Suchlauf abgebrochen. Wenn Sie die ASPMOperation noch einmal durchführen möchten, müssen
Sie den Festsenderspeicher löschen.
l Wenn keine Sender abgespeichert worden sind,
erscheint „END“ etwa 4 Sekunden lang.
l Bei sehr schwachen RDS-Signalen können keine
Sendernamen abgespeichert werden.
l Derselbe Sendername kann in verschiedenen Kanälen
gespeichert werden.
l In einem gewissen Gebiet oder in gewissen
Zeiträumen können die Sendernamen vorübergehend
verschieden sein.
n Hinweise zum RDS-Betrieb
Wenn eines der folgenden Ereignisse eintritt,
bedeutet dies nicht, daß das Gerät defekt ist:
l „PS“, „No PS“ und ein Sendername erscheinen
abwechselnd, und das Gerät funktioniert nicht richtig.
l Wenn ein spezifischer Sender nicht richtig sendet oder
ein Sender Prüfungen durchführt, kann die RDSEmpfangsfunktion nicht richtig arbeiten.
l Wenn ein RDS-Sender, dessen Signal zu schwach ist,
empfangen wird, können Informationen wie z.B. der
Sendername nicht angezeigt werden.
l „No PS“, „No PTY“ oder „No RT“ blinkt etwa
5 Sekunden lang, und dann wird die Frequenz
angezeigt.
De-19
Page 98

Benutzen des Radio-Daten-Systems (RDS) (Fortsetzung)
Hinweise zum Radiotext:
l Die ersten 14 Zeichen des Radiotextes erscheinen
4 Sekunden lang; danach rollen sie über das Display.
l Wenn Sie einen RDS-Sender einstellen, der keinen
Radiotext sendet, wird beim Schalten in die RadiotextPosition „No RT“ angezeigt.
l Während des Empfangs der Radiotext-Daten oder
beim Ändern des Textinhalts wird „RT“ angezeigt.
n Abrufen von abgespeicherten Sendern
Bestimmen von Programmarten und Wählen von
Sendern (PTY-Suchlauf):
Sie können einen Sender von den abgespeicherten
Sendern suchen, indem Sie die Programmart
(Nachrichten, Sport, Verkehrsfunk usw. ... siehe Seite 20)
bestimmen.
Drücken Sie die TUNER-Taste auf der Fernbedienung
1
oder wiederholt die INPUT-Taste am Hauptgerät, um
die TUNER-Funktion zu wählen.
2 Drücken Sie auf der Fernbedienung die RDS PTY-
Ta st e .
„SELECT“ und „PTY TI“ erscheinen etwa 6 Sekunden
lang abwechselnd.
3 Innerhalb von 6 Sekunden die Taste oder
drücken, um die Programmart auszuwählen.
Bei jedem Tastendruck erscheint die Programmart.
Wird die Taste länger als 0,5 Sekunden gedrückt
gehalten, erscheint die Programmart fortlaufend.
4 Während die ausgewählte Programmart blinkt
(innerhalb von 6 Sekunden), die RDS PTY-Taste noch
einmal drücken.
Die gewählte Programmart leuchtet 2 Sekunden lang,
dann erscheint „SEARCH“, und der Suchlauf beginnt.
Hinweise:
l Hat das Display zu blinken aufgehört, wiederholen Sie
das Verfahren ab Schritt 2. Wird eine gewünschte
Programmart gefunden, blinkt die entsprechende
Kanalnummer 8 Sekunden lang; danach leuchtet der
Sendername ständig.
l Wenn Sie einen anderen Sender hören möchten, der
dieselbe Programmart ausstrahlt, die RDS PTY-Taste
drücken, während die Kanalnummer oder der
Sendername blinkt. Das Gerät sucht dann nach einem
nächsten Sender.
l Wenn kein Sender gefunden werden kann, erscheint
„NOT FOUND“ 4 Sekunden lang.
Wenn Sie den Verkehrsfunk auswählen:
Wenn Sie in Schritt 3 den Verkehrsfunk (TP) auswählen,
erscheint „TP“.
(Dies bedeutet nicht, daß Sie zu der Zeit die
Verkehrsinformation hören können.)
Wenn die Verkehrsinformation gesendet wird, erscheint
„TA“.
Beschreibungen der PTY (Programmartenkennung)Codes, TP (Verkehrsfunkkennung) und TA
(Verkehrsdurchsagekennung)
Sie können die folgenden PTY-, TP- und TA-Signale
suchen und empfangen.
NEWS Kurze Beschreibungen über Fakten,
AFFAIRS Programm über aktuelle Nachrichten, im
INFO Beratungsprogramm (im weitesten
SPORT Sportprogramm.
EDUCATE Bildungsprogramm (fundamental).
DRAMA Alle Hörspiele und Serien.
CULTURE Kulturprogramme (national oder
SCIENCE Programme über Naturwissenschaft und
VARIED Unterhaltungsprogramme, die von den
POP M Populäre Musik, oft abhängend von den
ROCK M Moderne Musik, normalerweise
EASY M Aktuelle Unterhaltungsmusik im
LIGHT M Populäre, klassische Musik. Zum
CLASSICS Aufführungen von hauptsächliche
OTHER M Musikstile, die keiner der anderen
WEATHER Wetterberichte, -vorhersagen und -
FINANCE Börsenberichte, Handel, Geschäft usw.
CHILDREN Programme, die auf ein junges Publikum
SOCIAL Programme für Personen und über
Ereignisse und öffentlich ausgedrückte
Ansichten, Reportagen und Tatsachen.
allgemeinen in verschiedener
Behandlungsweise oder Konzeption,
einschließlich Debatte oder Analyse.
Sinne).
regional, einschließlich Sprache, Theater
usw.)
Technik.
anderen Kategorien nicht abgedeckt
werden. Beispiele: Quiz, Ratespiele,
Interviews mit bekannten
Persönlichkeiten.
gegenwärtigen oder letzten
Plattenverkaufslisten.
geschrieben und aufgeführt von jungen
Musikern.
Gegensatz zu Pop, Rock oder Klassik
oder speziellen Musikrichtungen wie
Jazz oder Country. Die Musik dieser
Kategorie ist oft, aber nicht immer, vokal
und im Allgemeinen kurz.
Beispiel Instrumentalmusik und Vokaloder Chorwerke.
Orchesterstücken, Sinfonien,
Kammermusik usw. einschließlich
großer Oper.
Kategorien zugeordnet werden können.
Besonders spezielle Musikrichtungen
wie Rythm & Blues oder Reggae.
information.
abgezielt sind (in erster Linie
Unterhaltung und Interesse).
Themen, die sie persönlich oder als
Gruppe betreffen: Zum Beispiel
Soziologie, Geschichte, Geographie,
Psychologie und Gesellschaft.
De-20
Page 99

Benutzen des Radio-Daten-Systems
STANDBY/ON
TUNING −
TUNING +
CLOCK/TIMER
ENTER
Once-Timer
Daily-Timer
Start
Stopp
1 Minute oder länger
Start
Stopp
(RDS) (Fortsetzung)
Timer- und Sleep-Funktion (Nur
Fernbedienung)
RELIGION Glauben einschließlich eines Gottes
PHONE IN Mitglieder der Öffentlichkeit, die ihre
TRAVEL Features und Programme über Reisen
LEISURE Programme über Freizeitaktivitäten, an
JAZZ Polyphone, synkopierte Musik,
COUNTRY Songs, die aus der musikalischen
NATION M Gegenwärtige populäre Musik der
OLDIES Musik aus dem sogenannten „goldenen
FOLK M Musik, die der musikalischen Kultur
DOCUMENT Programme über sachliche
TEST Sendung beim Prüfen von
ALARM Information über Naturkatastrophen.
TP Sendungen, in denen
TA Verkehrsdurchsagen sind auf Sendung.
oder Göttern, der Natur der Existenz
und Ethik.
Ansichten telefonisch oder im
öffentlichen Forum äußern.
in nahe und ferne Orte, Pauschalreisen
sowie Reiseideen und-gelegenheiten.
Nicht verwendet für Durchsagen über
Probleme, Verzögerungen oder
Straßenbauarbeiten, welche die
augenblickliche Reise beeinflussen, wo
TP/TA benutzt werden sollte.
denen der Hörer (die Hörerin)
teilnehmen könnte. Zum Beispiel
Gartenarbeit, Fischen,
Antiquitätensammlung, Kochen,
Nahrung & Wein usw.
charakterisiert durch Improvisation.
Tradition der Südstaaten von Amerika
entstehen oder sie fortsetzen.
Charakterisiert durch eine schlichte
Melodie und narrative Handlung.
Nation oder des Gebiets in
Muttersprache, im Gegensatz zu
internationalem „Pop“ in Englisch, der
normalerweise von Amerika oder
Großbritannien inspiriert ist.
Zeitalter“ populärer Musik.
einer besonderen Nation entspricht,
normalerweise gespielt auf akustischen
Instrumenten. Die Erzählung oder Story
kann sich auf geschichtliche Ereignisse
oder Leute stützen.
Angelegenheiten, präsentiert in einem
recherchierenden Stil.
Notsendegerät oder Empfängern.
Verkehrsdurchsagen gebracht werden.
Timer-Wiedergabe:
Das Gerät schaltet sich ein und gibt die gewünschte
Quelle (CD, TUNER, USB, iPod, LINE IN) zur
voreingestellten Zeit wieder.
Das Gerät besitzt 2 Timer-Arten: ONCE TIMER und
DAILY TIMER.
Once-Timer:
Die Once-Timer-Wiedergabe funktioniert nur einmal zu
der voreingestellten Zeit.
(„ “-Anzeige).
Daily-Timer:
Die tägliche Timer-Wiedergabe funktioniert täglich zu der
von uns voreingestellten Zeit. Den Timer einstellen, um
beispielsweise jeden Morgen aufzuwachen.
(„DAILY“-Anzeige).
Gemeinsame Verwendung des Once- und des Daily-
Timers:
Verwenden Sie z.B. den Once-Timer zum Aufnehmen
eines Rundfunkprogramms und den Daily-Timer zum
Wecken.
1 Den Daily-Timer einstellen (Seite 21).
2 Stellen Sie den Einmal-Timer ein (Seite 21).
De-21
Page 100

Timer- und Sleep-Funktion (Nur Fernbedienung) (Fortsetzung)
n Timer-Wiedergabe
Vor dem Einstellen des Timers:
l Prüfen, ob die Uhr richtig gestellt ist (siehe Seite 9).
Wenn nicht eingestellt, können Sie nicht die TimerFunktion verwenden.
l Timer-Wiedergabe: Stecken Sie den USB-Kabel ein,
legen Sie die Diskette ein oder schließen Sie den
iPod an.
1 Zum Einschalten der Stromversorgung die STANDBY/
ON-Taste drücken.
2 Halten Sie die CLOCK/TIMER-Taste gedrückt.
3 Innerhalb von 30 Sekunden die Taste oder
drücken, um „Once“ oder „Daily“ anzuwählen; danach
die ENTER-Taste betätigen.
4 Innerhalb von 30 Sekunden die Taste oder
drücken, um „Timer set“ anzuwählen; danach die
ENTER-Taste betätigen.
5 Wählen Sie die Quelle für die Timer-Wiedergabe (CD,
TUNER, USB, iPod, LINE IN) mit der Taste oder
. Die ENTER-Taste drücken.
Wenn Sie den Tuner wählen, einen Sender mit Hilfe
der Taste oder auswählen, und dann die
ENTER-Taste drücken. Wenn kein Sender
programmiert worden ist, wird „No Preset“ angezeigt,
und die Timer-Einstellung wird annulliert.
6 Um den Tag anzupassen, die Taste oder und
dann die ENTER-Taste drücken.
7 Drücken Sie, um die Stunde einzustellen, die ENTER-
Taste. Drücken Sie die - oder -Taste und dann
die ENTER-Taste.
8 Um den Minuten anzupassen, die Taste oder
und dann die ENTER-Taste drücken.
9 Nach den Schritten 7 und 8 die Endzeit einstellen.
10 Stellen Sie die Lautstärke mit der VOL (+ oder -)-Taste
ein und drücken Sie dann die ENTER-Taste. Stellen
Sie die Lautstärke nicht zu hoch ein.
11 Um in den Bereitschaftsbetrieb zu schalten, die
STANDBY/ON-Taste drücken. Die „TIMER“-Anzeige
leuchtet auf, und das Gerät ist bereit zur TimerWiedergabe.
12 Beim Erreichen der voreingestellten Zeit beginnt
Wiedergabe. Die Lautstärke erhöht sich allmählich, bis
sie den voreingestellten Pegel erreicht. Während der
Timer-Wiedergabe blinkt Timer-Anzeige .
13 Beim Erreichen der Timer-Endzeit schaltet das System
automatisch in die Bereitschafts-Betriebsart.
De-22
Once-Timer:
Der Timer wird deaktiviert.
Daily-Timer:
Der Timer wird zur gleichen Zeit am Tag aktiv. Dies
dauert an, bis die Daily-Timer-Einstellung annulliert
wird. Bei Nichtverwendung den Daily-Timer
deaktivieren.
Hinweise:
l Wählen sie bei der Ausführung der Timer-Wiedergabe
unter Verwendung einer anderen, an den USBAnschluss angeschlossenen Einheit in Schritt 5 „USB“
oder „LINE IN“.
l Dieses Gerät schaltet sich automatisch in den Stand-
by-Modus. Das angeschlossene Gerät schaltet sich
jedoch nicht ein oder aus. Befolgen Sie Schritt „Timer-
Einstellungen löschen“ auf dieser Seite, um die
Timer-Wiedergabe anzuhalten.
Timer-Einstellungen überprüfen:
1 Schalten Sie den Strom ein und halten Sie die CLOCK/
TIMER-Taste gedrückt.
2 Innerhalb von 30 Sekunden die Taste oder
drücken, um „Once“ oder „Daily“ anzuwählen; danach
die ENTER-Taste betätigen.
3 Drücken Sie innerhalb von 30 Sekunden die Taste
oder , um „Timer Call“ zu wählen, und drücken Sie
dann die ENTER-Taste.
Timer-Einstellungen löschen:
1 Schalten Sie den Strom ein und halten Sie die CLOCK/
TIMER-Taste gedrückt.
2 Innerhalb von 30 Sekunden die Taste oder
drücken, um „Once“ oder „Daily“ anzuwählen; danach
die ENTER-Taste betätigen.
3 Drücken Sie innerhalb von 30 Sekunden die Taste
oder , um „Timer Off“ zu wählen, und drücken Sie
dann die ENTER-Taste. Der Timer wird deaktiviert (die
eingestellten Inhalte werden nicht annulliert).
Wiederverwendung der gespeicherten
Timereinstellung:
Die Timer-Einstellung wird abgespeichert, wenn sie
einmal eingegeben wird. Um dieselbe Einstellung wieder
zu verwenden, die folgenden Bedienungsschritte
durchführen.
1 Schalten Sie den Strom ein und halten Sie die CLOCK/
TIMER-Taste gedrückt.
2 Innerhalb von 30 Sekunden die Taste oder
drücken, um „Once“ oder „Daily“ anzuwählen; danach
die ENTER-Taste betätigen.
3 Drücken Sie innerhalb von 30 Sekunden die Taste
oder , um „Timer On“ zu wählen, und drücken Sie
dann die ENTER-Taste.
4 Um in den Bereitschaftsbetrieb zu schalten, die
STANDBY/ON-Taste drücken.
Hinweis:
Die Uhr-Einstellung wird zurückgesetzt, wenn das
Netzkabel herausgezogen wird oder wenn es einen
Stromausfall gibt.
 Loading...