

Pioneer X-HX2000, X-HX3000, X-HX5000, X-HX05, X-HX33 Operating Instruction
...
Operating Instructions
CD/RECEIVER SYSTEM
X-HX700/2000
X-HX3000/5000
X-HX05/33/55/77/99
X-HMD01/03
2
READ INSTRUCTIONS — All the safety and operating
instructions should be read before the product is
operated.
RETAIN INSTRUCTIONS — The safety and operating
instructions should be retained for future reference.
HEED WARNINGS — All warnings on the product and
in the operating instructions should be adhered to.
FOLLOW INSTRUCTIONS — All operating and use
instructions should be followed.
CLEANING — Unplug this product from the wall outlet
before cleaning. The product should be cleaned only
with a polishing cloth or a soft dry cloth. Never clean
with furniture wax, benzine, insecticides or other
volatile liquids since they may corrode the cabinet.
ATTACHMENTS — Do not use attachments not
recommended by the product manufacturer as they
may cause hazards.
WATER AND MOISTURE — Do not use this product
near water — for example, near a bathtub, wash
bowl, kitchen sink, or laundry tub; in a wet basement;
or near a swimming pool; and the like.
ACCESSORIES — Do not place this product on an
unstable cart, stand, tripod, bracket, or table. The
product may fall, causing serious injury to a child or
adult, and serious damage to the product. Use only
with a cart, stand, tripod, bracket, or table
recommended by the manufacturer, or sold with
the product. Any mounting of the product should
follow the manufacturer’s instructions, and should
use a mounting accessory recommended by the
manufacturer.
CART — A product and cart combination should be
moved with care. Quick stops, excessive force, and
uneven surfaces may cause the product and cart
combination to overturn.
VENTILATION — Slots and openings in the cabinet are
provided for ventilation and to ensure reliable
operation of the product and to protect it from
overheating, and these openings must not be
blocked or covered. The openings should never be
blocked by placing the product on a bed, sofa, rug,
or other similar surface. This product should not be
placed in a built-in installation such as a bookcase or
rack unless proper ventilation is provided or the
manufacturer’s instructions have been adhered to.
POWER SOURCES — This product should be operated
only from the type of power source indicated on the
marking label. If you are not sure of the type of
power supply to your home, consult your product
dealer or local power company.
LOCATION – The appliance should be installed in a
stable location.
NONUSE PERIODS – The power cord of the appliance
should be unplugged from the outlet when left unused for a long period of time.
GROUNDING OR POLARIZATION
÷ If this product is equipped with a polarized alternating
current line plug (a plug having one blade wider than
the other), it will fit into the outlet only one way. This
is a safety feature. If you are unable to insert the plug
fully into the outlet, try reversing the plug. If the plug
should still fail to fit, contact your electrician to
replace your obsolete outlet. Do not defeat the
safety purpose of the polarized plug.
÷ If this product is equipped with a three-wire
grounding type plug, a plug having a third (grounding)
pin, it will only fit into a grounding type power outlet.
This is a safety feature. If you are unable to insert the
plug into the outlet, contact your electrician to
replace your obsolete outlet. Do not defeat the
safety purpose of the grounding type plug.
POWER-CORD PROTECTION — Power-supply cords
should be routed so that they are not likely to be
walked on or pinched by items placed upon or
against them, paying particular attention to cords at
plugs, convenience receptacles, and the point where
they exit from the product.
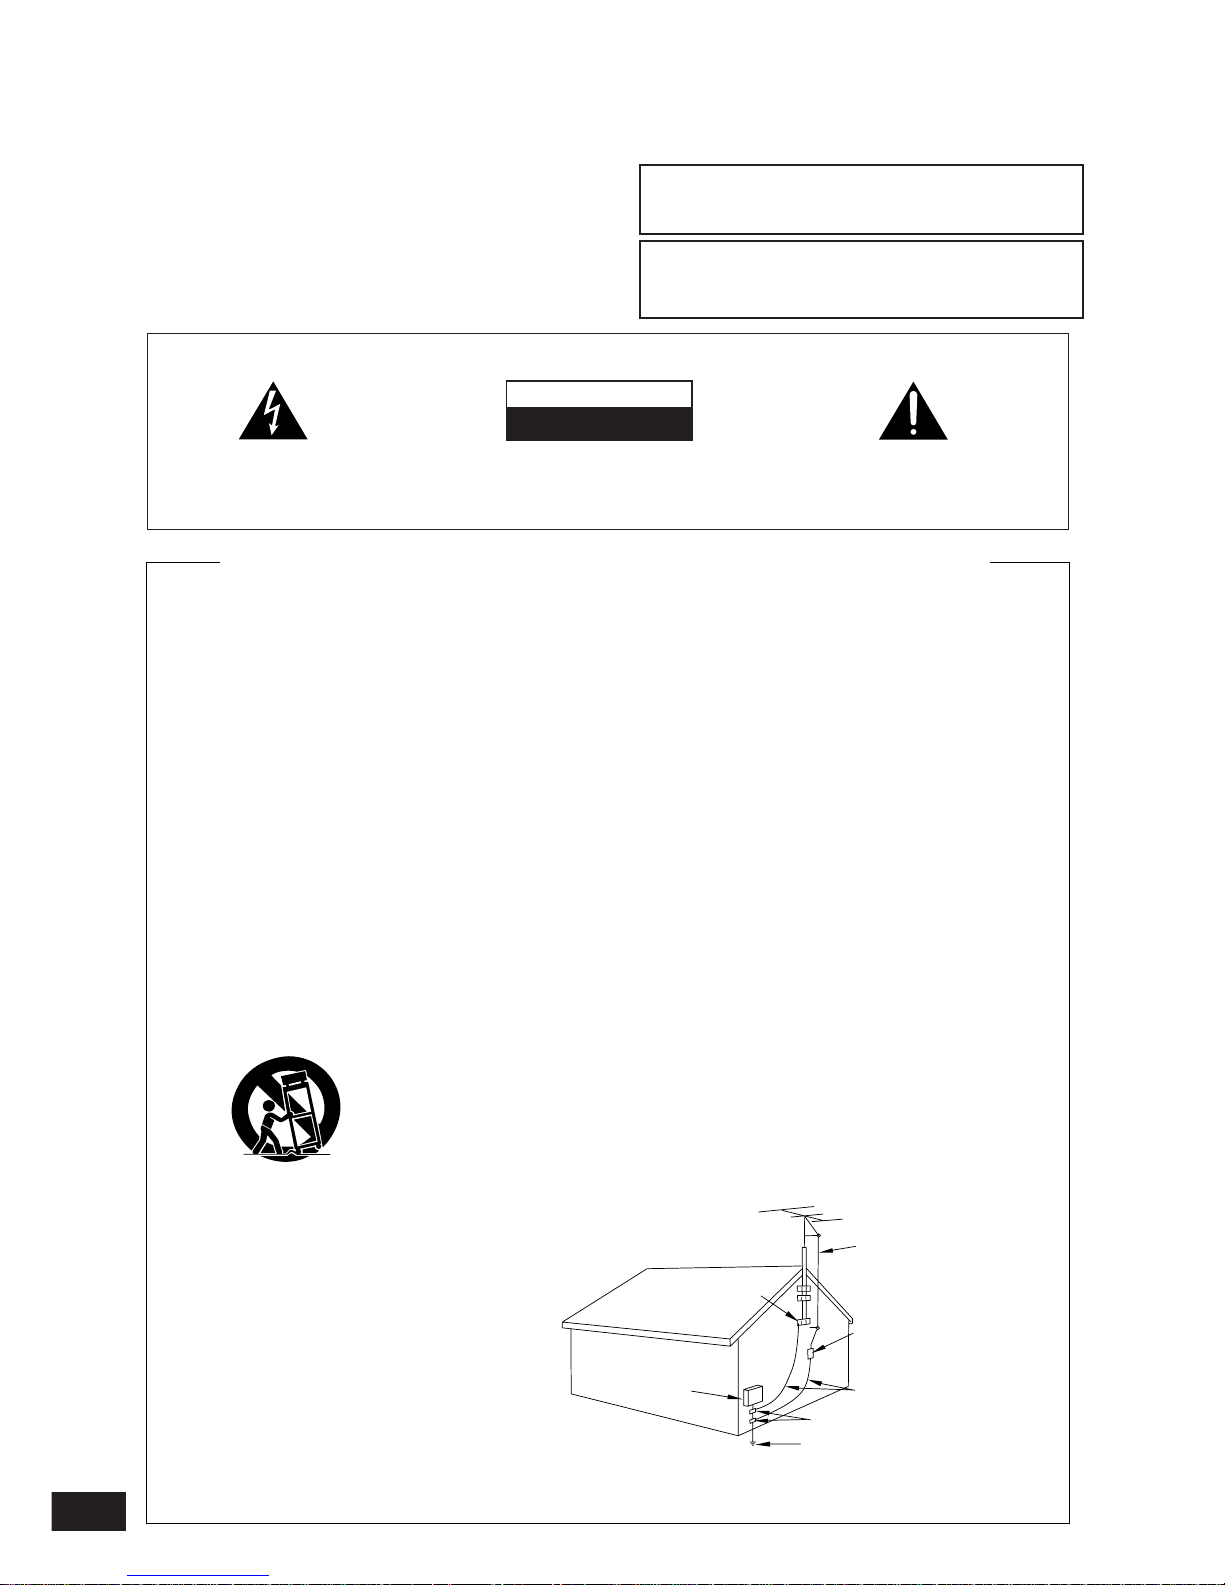
OUTDOOR ANTENNA GROUNDING — If an outside
antenna or cable system is connected to the product,
be sure the antenna or cable system is grounded so
as to provide some protection against voltage surges
and built-up static charges. Article 810 of the National
Electrical Code, ANSI/NFPA 70, provides information
with regard to proper grounding of the mast and
supporting structure, grounding of the lead-in wire
to an antenna discharge unit, size of grounding
conductors, location of antenna-discharge unit,
connection to grounding electrodes, and
requirements for the grounding electrode. See Figure
A.
LIGHTNING — For added protection for this product
during a lightning storm, or when it is left unattended
and unused for long periods of time, unplug it from
the wall outlet and disconnect the antenna or cable
system. This will prevent damage to the product
due to lightning and power-line surges.
POWER LINES — An outside antenna system should
not be located in the vicinity of overhead power lines
or other electric light or power circuits, or where it
can fall into such power lines or circuits. When
installing an outside antenna system, extreme care
should be taken to keep from touching such power
lines or circuits as contact with them might be fatal.
OVERLOADING — Do not overload wall outlets,
extension cords, or integral convenience receptacles
as this can result in a risk of fire or electric shock.
OBJECT AND LIQUID ENTRY — Never push objects of
any kind into this product through openings as they
may touch dangerous voltage points or short-out
parts that could result in a fire or electric shock.
Never spill liquid of any kind on the product.
SERVICING — Do not attempt to service this product
yourself as opening or removing covers may expose
you to dangerous voltage or other hazards. Refer all
servicing to qualified service personnel.
DAMAGE REQUIRING SERVICE — Unplug this product
from the wall outlet and refer servicing to qualified
service personnel under the following conditions:
÷ When the power-supply cord or plug is damaged.
÷ If liquid has been spilled, or objects have fallen into
the product.
÷ If the product has been exposed to rain or water.
÷ If the product does not operate normally by following
the operating instructions. Adjust only those controls
that are covered by the operating instructions as an
improper adjustment of other controls may result in
damage and will often require extensive work by a
qualified technician to restore the product to its
normal operation.
÷ If the product has been dropped or damaged in any
way.
÷ When the product exhibits a distinct change in
performance — this indicates a need for service.
REPLACEMENT PARTS — When replacement parts
are required, be sure the service technician has used
replacement parts specified by the manufacturer or
have the same characteristics as the original part.
Unauthorized substitutions may result in fire, electric
shock, or other hazards.
SAFETY CHECK — Upon completion of any service or
repairs to this product, ask the service technician to
perform safety checks to determine that the product
is in proper operating condition.
WALL OR CEILING MOUNTING — The product should
not be mounted to a wall or ceiling.
HEAT — The product should be situated away from heat
sources such as radiators, heat registers, stoves, or
other products (including amplifiers) that produce
heat.
IMPORTANT SAFETY INSTRUCTIONS
GROUND
CLAMP
ANTENNA
DISCHARGE UNIT
(NEC SECTION 810-20)
GROUNDING CONDUCTORS
(NEC SECTION 810-21)
GROUND CLAMPS
POWER SERVICE GROUNDING
ELECTRODE SYSTEM
(NEC ART 250, PART H)
ELECTRIC
SERVICE
EQUIPMENT
Fig. A
ANTENNA
LEAD IN
WIRE
NEC — NATIONAL ELECTRICAL CODE
The lightning flash with arrowhead symbol, within an
equilateral triangle, is intended to alert the user to the
presence of uninsulated "dangerous voltage" within the
product's enclosure that may be of sufficient magnitude
to constitute a risk of electric shock to persons.
RISK OF ELECTRIC SHOCK
DO NOT OPEN
CAUTION
IMPORTANT
CAUTION:
TO PREVENT THE RISK OF ELECTRIC SHOCK, DO NOT
REMOVE COVER (OR BACK). NO USER-SERVICEABLE
PARTS INSIDE. REFER SERVICING TO QUALIFIED
SERVICE PERSONNEL.
The exclamation point within an equilateral triangle is
intended to alert the user to the presence of important
operating and maintenance (servicing) instructions in the
literature accompanying the appliance.
Thank you for buying this Pioneer product.
Please read through these operating instructions so you
will know how to operate your model properly.
After you have finished reading the instructions, put
them away in a safe place for future reference.
In some countries or regions, the shape of the power
plug and power outlet may sometimes differ from that
shown in the explanatory drawings. However, the
method of connecting and operating the unit is the same.
WARNING: TO PREVENT FIRE OR SHOCK HAZARD, DO
NOT EXPOSE THIS APPLIANCE TO RAIN OR MOISTURE.
This product complies with the Low Voltage Directive
(73/23/EEC), EMC Directives (89/336/EEC, 92/31/EEC)
and CE-Marking Directive (93/68/EEC).
THE POWER SWITCH IS SECONDARY CONNECTED
AND THEREFORE DOES NOT SEPARATE THE UNIT
FROM MAINS POWER IN THE STANDBY POSITION.
3
PREPARATIONS
IMPORTANT
FOR USE IN THE UNITED
KINGDOM
The wires in this mains lead are coloured in
accordance with the following code :
Blue : Neutral
Brown : Live
If the plug provided is unsuitable for your socket
outlets, the plug must be cut off and a suitable plug
fitted.
Do not connect either wire to the earth terminal of a
three pin plug.
NOTE
After replacing or changing a fuse, the fuse cover in the
plug must be replaced with a fuse cover which corresponds to the colour of the insert in the base of the plug
or the word that is embossed on the base of the plug, and
the appliance must not be used without a fuse cover. If
lost replacement fuse covers can be obtained from:
your dealer.
Only 5 A fuses approved by B.S.I. or A.S.T.A to B.S.
1362 should be used.
The cut-off plug should be disposed of and must not be
inserted into any 13 amp socket as this can result in electric
shock. The plug or adaptor or the distribution panel should
be provided with 5 amp fuse. As the colours of the wires in
the mains lead of this appliance may not correspond with
coloured markings identifying the terminals in your plug,
proceed as follows :
The wire which is coloured blue must be connected to the
terminal which is marked with the letter N or coloured black.
The wire which is coloured brown must be connected
to the terminal which is marked with the letter L or coloured
red.
[FOR EUROPEAN MODEL]
CAUTION
This product contains a laser diode of higher
class than 1. To ensure continued safety, do not
remove any covers or attempt to gain access to
the inside of the product.
Refer all servicing to qualified personnel.
The following caution label appear on your player.
Location: rear of the player
CLASS 1
LASER PRODUCT
This equipment has been tested and found to comply with the limits for a Class B digital device, pursuant to Part 15 of the FCC Rules.
These limits are designed to provide reasonable protection against harmful interference in a residential installation. This equipment
generates, uses, and can radiate radio frequency energy and, if not installed and used in accordance with the instructions, may cause
harmful interference to radio communications. However, there is no guarantee that interference will not occur in a particular
installation. If this equipment does cause harmful interference to radio or television reception, which can be determined by turning
the equipment off and on, the user is encouraged to try to correct the interference by one or more of the following measures:
– Reorient or relocate the receiving antenna.
– Increase the separation between the equipment and receiver.
– Connect the equipment into an outlet on a circuit different from that to which the receiver is connected.
– Consult the dealer or an experienced radio/TV technician for help.
Information to User
Alteration or modifications carried out without appropriate authorization may invalidate the user's right to operate the equipment.
CAUTION : USE OF CONTROLS OR ADJUSTMENTS OR PERFORMANCE OF PROCEDURES OTHER THAN THOSE
SPECIFIED HEREIN MAY RESULT IN HAZARDOUS RADIATION EXPOSURE.
CAUTION : THE USE OF OPTICAL INSTRUMENTS WITH THIS PRODUCT WILL INCREASE EYE HAZARD.
CAUTION:
This product satisfies FCC regulations when shielded
cables and connectors are used to connect the unit to
other equipment. To prevent electromagnetic interference
with electric appliances such as radios and televisions,
use shielded cables and connectors for connections.
[For Canadian model]
This Class B digital apparatus meets all
requirements of the Canadian Interference Causing Equipment Regulations.
[Pour le modèle Canadien]
Cet appareil numérique de la Classe B
respecte toutes les exigences du Règlement
sur le matériel brouilleur du Canada.
IMPORTANT NOTICE
[For U.S.and Canadian models]
The serial number for this equipment is located on the
rear panel.
Please write this serial number on your enclosed
warranty card and keep it in a secure area. This is for
your security.
[For Canadian model]
CAUTION:
TO PREVENT ELECTRIC SHOCK DO NOT
USE THIS (POLARIZED) PLUG WITH AN EXTENSION
CORD. RECEPTACLE OR OTHER OUTLET UNLESS THE
BLADES CAN BE FULLY INSERTED TO PREVENT BLADE
EXPOSURE.
ATTENSION: POUR PREVENIR LES CHOCS
ELCTRIQUES NE PAS UTILISER CETTE FICHE DE
COURANT OU UNE AUTRE SORTIE DE COURANT, SAUF
SI LES LAMES PEUVENT ETRE INSEREES A FOND SANS
EN LAISSER AUCUNE PARTIE A DECOUVVERT.

4
PREPARATIONS.............................. 5
Checking Package Contents ....................5
Disc Handling Instructions ......................6
Layout Options .........................................7
Connecting System Components ...........8
Inserting Batteries in Remote Control
Unit.....................................................12
What’s What............................................13
Opening/Closing the Front Door...........15
Turning the Power On/Off......................16
Setting the Time .....................................17
LISTENING TO MUSIC ................. 18
Listening to CDs .....................................18
Listening to the Radio............................21
Listening to Other Audio Equipment....24
Setting the Mood with EQ Playback .....26
Listening with Power Bass ....................27
TIMER OPERATION ...................... 28
Wake-up Timer: Set playback to start
at a specified time .............................28
Sleep Timer: Auto power shut-off
after a specified length of time ........31
APPENDIX ..................................... 32
Troubleshooting .....................................32
Error Messages ......................................34
Maintenance ...........................................34
Specifications .........................................35
Table of Contents
5
PREPARATIONS
PREPARATIONS
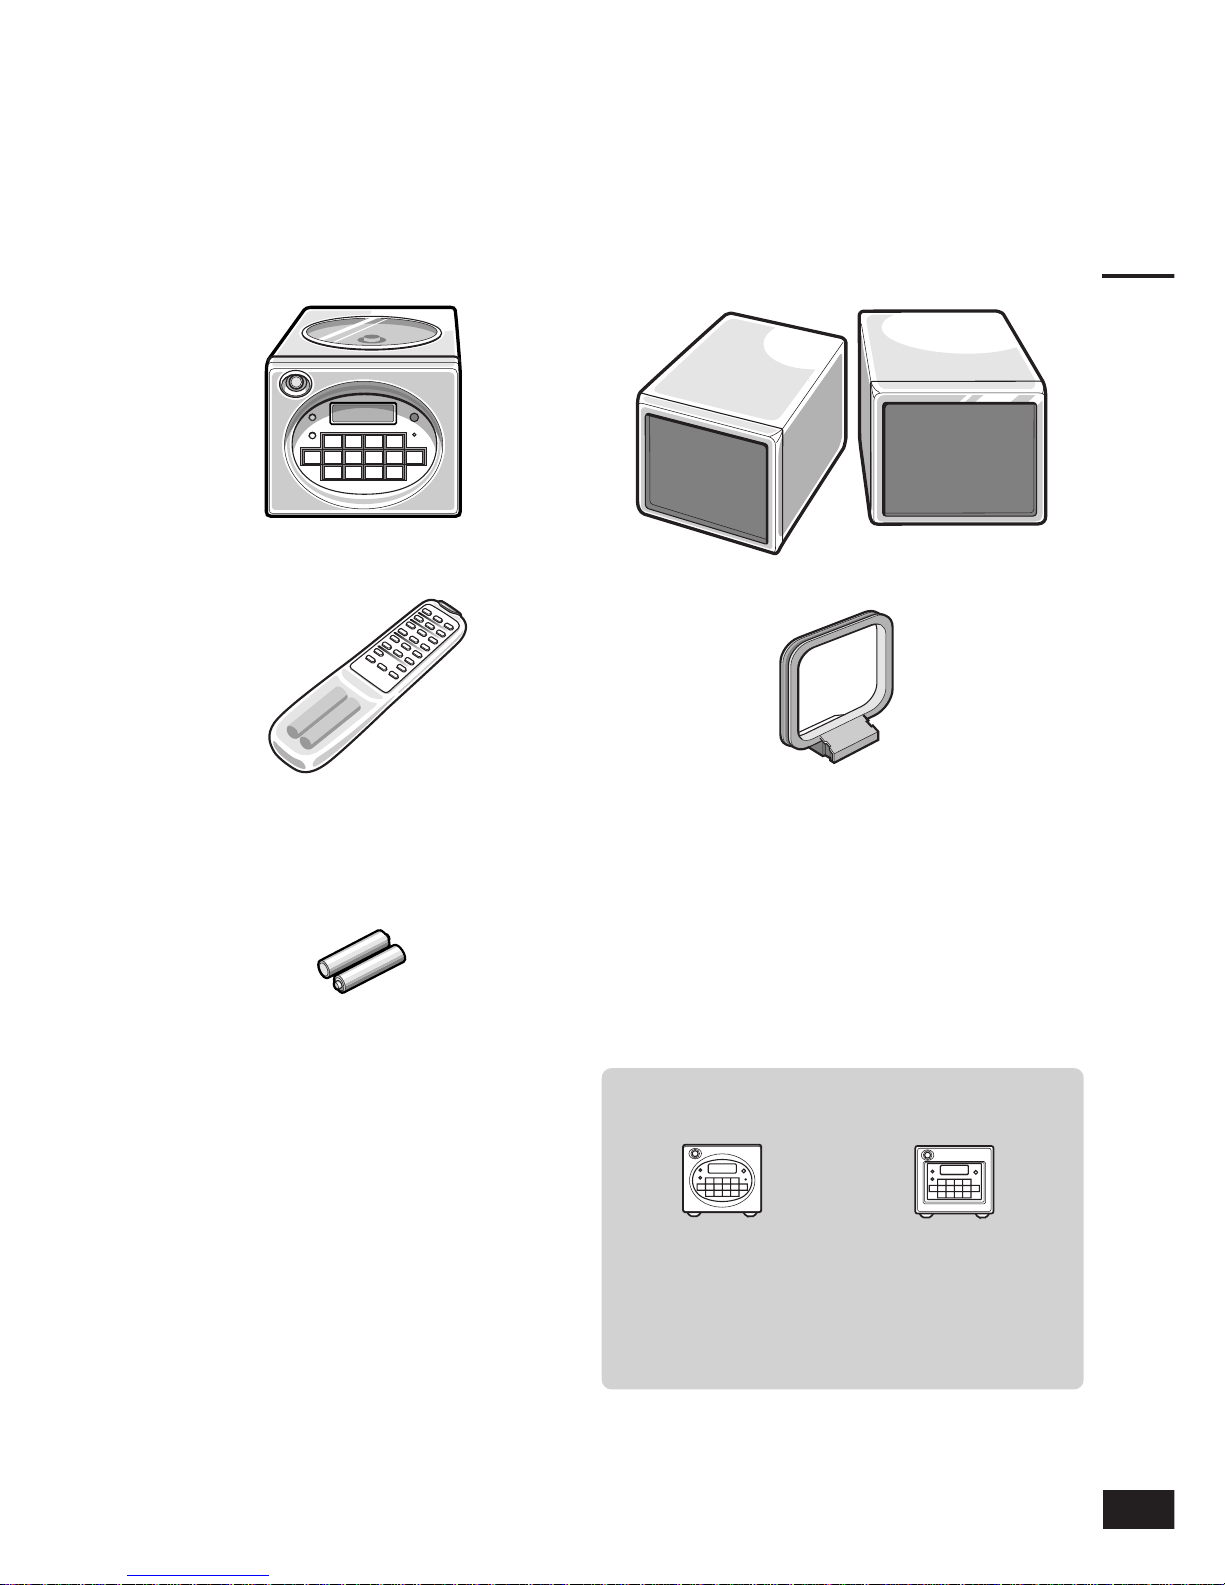
Make sure that all of the following components are present after unpacking your Pioneer
CD/Receiver System.
Checking Package Contents
CD/receiver
Speakers (2)
AM loop antenna
(The illustration shows
the AM loop antenna
after assembly)
“AA” (R6) batteries for remote control (2)
Documentation
• Warranty card
• Operating Instructions (this document)
Both types include the same functions and
operate in the same way. The illustrations in
this manual are of the oval type.
Remote control
There are two front panel types:
and
Oval type
Square type
6
Caution
Use only discs that bear this logo. Use of other
discs may damage this equipment.
'
How to pick up and hold discs
Never touch the recorded side (the reflective
side).
Storage
• Store discs in their cases and avoid storage
locations that are hot and/or humid, extremely cold, or exposed to direct sunlight.
• Be sure to read the caution points noted on
the discs.
Caution
• Do not use CDs that have nonstandard
shapes. Heart-shaped or other non-circular
CDs should not be used, since they can
damage the CD player.
• Also, do not use discs that have been damaged (including discs that are cracked or
warped).
Disc Handling Instructions
Disc cleaning
• Dirty discs may cause skipping or poor sound
quality during playback.
• We recommend using the separately sold
disc cleaning kit (JV-D11).
• To clean stubborn dirt, dip a soft cloth in
water and wring it well before wiping the
disc. Afterward, use a dry cloth to remove
remaining moisture from the disc.
• Do not use volatile cleaning fluids such as
benzine or thinner. Also, anti-static record
spray products should not be used on CDs.
Caution
Do not apply stickers, labels, or inscriptions on
the labeled side of discs. Adhesive from labels
may cause problems such as disc eject failures.
Such problems can occur when using rented
discs with pre-applied labels, so make sure
there is no exposed adhesive on the discs
before loading them.
Wipe gently from
center to outer edge.
Do not wipe along grain.

7
PREPARATIONS
Layout Options
The CD/Receiver System has separate speakers
that offer you a variety of layout options.
Please note the caution points below before
deciding how to set up your system.
Note with caution that when all three components (CD/receiver and two speakers) are
stacked vertically, they are not very stable and
can easily fall over if bumped. We therefore do
not recommend such vertical stacking without a
rack.
Layout Precautions
Storage locations
• Make sure the location is secure and stable.
Avoid unsteady stands or tables that may
cause system components to fall and become
damaged.
• Do not set up the system in an area that is
exposed to direct sunlight or is close to a
heater.
The component cases may become warped
or faded or other damage may occur when
the system is stored in such areas.
Do not stack anything on top of the
CD/receiver.
The CD/receiver has a top cover that opens
when loading or unloading CDs. While other
components can be stacked on top of the
speakers, the CD/receiver must be set up with
space above it for opening the top cover.
Do not set the CD/receiver on its
side.
Be sure that the CD/receiver is set upright on its
footpads. Setting the receiver in any other
position may result in CD playback problems.
If the CD/receiver is placed on top of a speaker
Vibrations from high-volume playback may
cause skipping during playback.
Speaker precautions
• To avoid risk of malfunctions or overheating,
do not connect this CD/Receiver System’s
speakers to other audio amplifiers.
• This system’s speakers are designed to
insulate magnetic field, so color distortion or
other problems are not likely to occur in TVs
or other equipment placed next to these
speakers. In rare cases where such magnetic
interference occurs, turn off the TV’s power
and wait 15 to 30 minutes before turning it
back on. If the problem persists, move the
speakers farther away from the TV.
If using a cordless phone
Noise may occur when a cordless phone is
used in close proximity to the CD/Receiver
System. To avoid this, do not approach the
system when using a cordless phone.
Warnings
Whether you are stacking your system
components, setting them in a rack, or
along a wall, always be sure to leave
enough space around the components to
allow ventilation. Avoid the following types
of setup locations, which tend to block the
ventilation holes. Improper ventilation
causes heat buildup which could eventually
start a fire.
• Setting components on their backs or
sides
• Inserting components into narrow spaces
with poor ventilation
• Setting components on top of soft
materials such as pillows or blankets
• Covering components with a tablecloth or
other material while in use
8
1
2
2
3
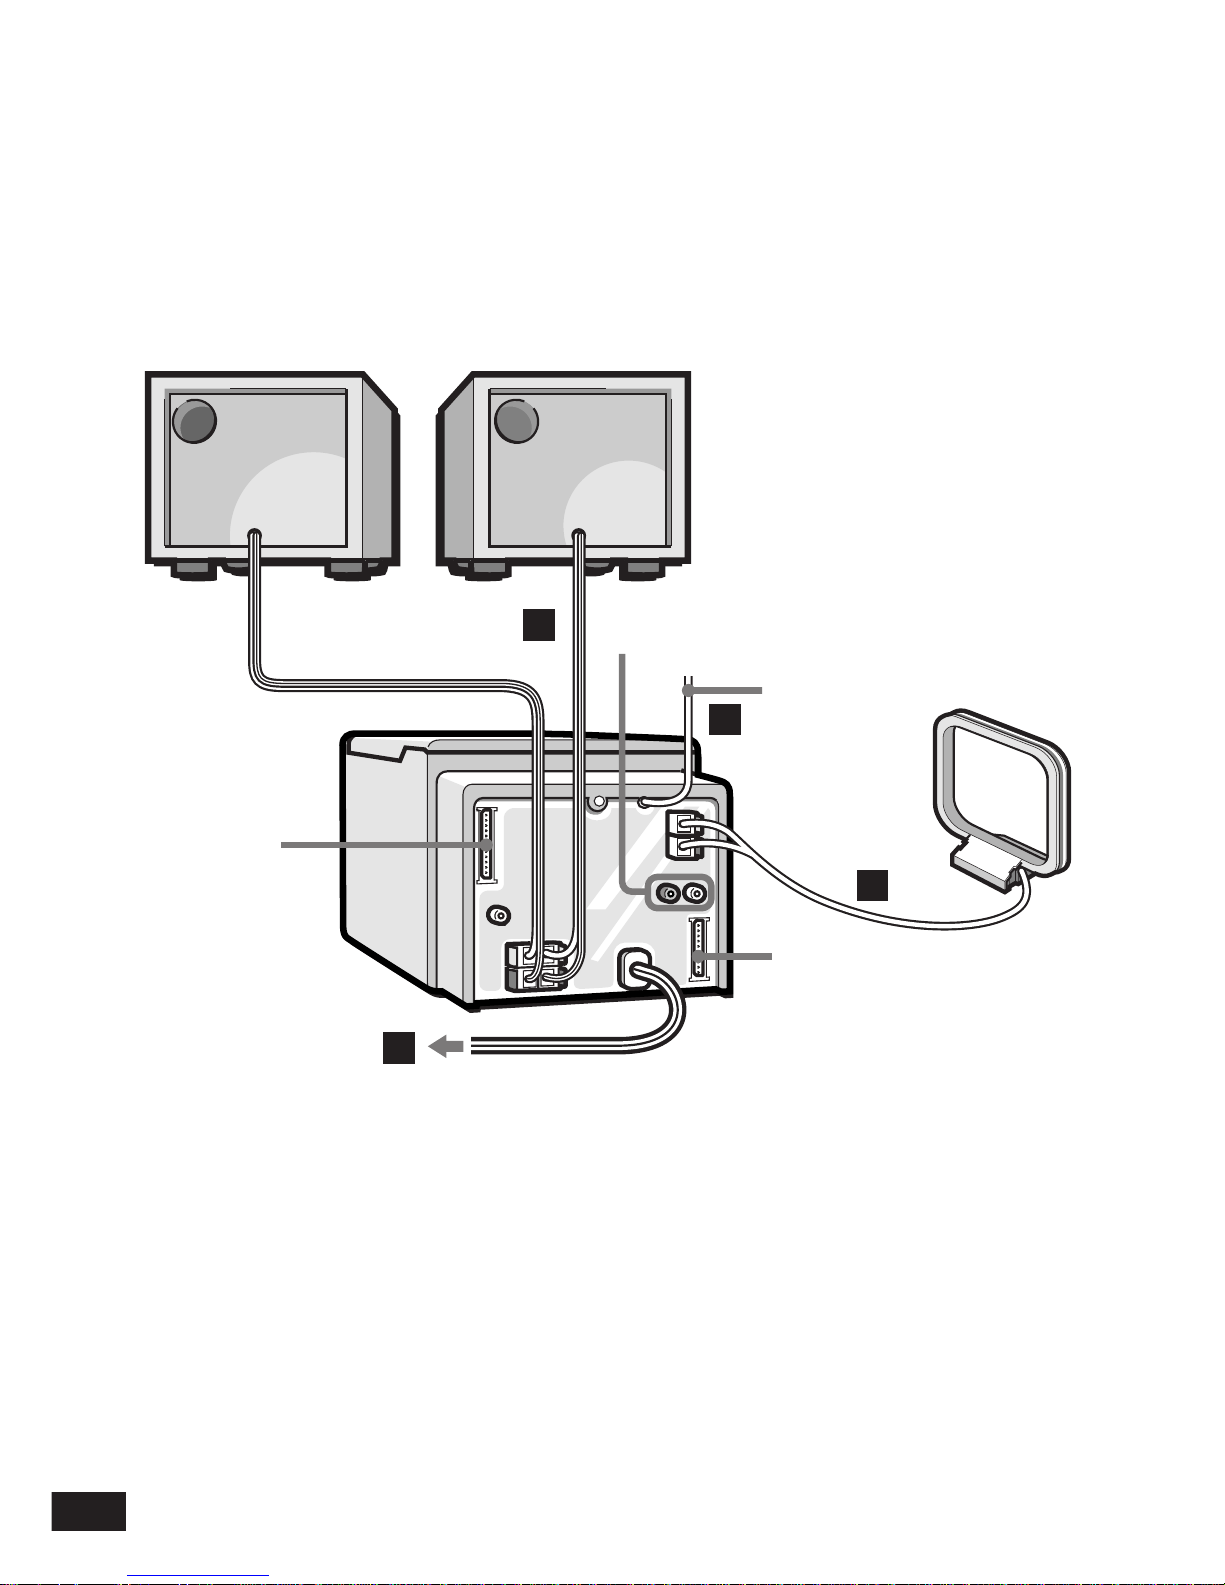
Connecting System Components
Before making or changing the connections, switch off the power switch and disconnect the power
cord from the AC outlet.
Left speaker
Right speaker
AUX jack (see page 11)
CD/receiver
FM antenna
Power cord
AM loop antenna
* In this manual, the “MD recorder” indicates the following optional models unless otherwise noted:
• MJ-HX700/2000/3000/5000,
• MJ-HX33/55/77, and
• MJ-HMD01/03.
These are designed exclusively for this CD/Receiver System.
Used for connecting the
optional MD
recorder*
Used for connecting the
optional MD recorder*

9
PREPARATIONS
1
Connect speakers to CD/receiver
1
Connect the speaker cords to the
speaker terminals of the CD/receiver.
Shift the tab to open the speaker terminal,
insert a wire from the speaker cord, then set
the tab back to close the speaker terminal.
One wire of the two-wire speaker cord is
marked with a line. Insert this wire into the
negative (·) terminal, and the other into
the positive (ª) terminal.
After closing the terminals, pull gently on
each wire to make sure that it is securely
connected.
R
L
L
R
For optimum stereo playback
If you want to ensure optimum stereo effects
during playback, be sure to place the left and
right speakers in similar, balanced positions (at
similar height or distance from the wall, etc.).
Also, make sure that the right and left speakers
are connected to the corresponding right and
left terminal pairs.
Connect the
left speaker
to these
terminals.
R
L
Connect the
right
speaker to
these
terminals.
10
Set up antenna
1
Assemble the AM loop antenna.
2
Connect the AM loop antenna.
Connect the AM loop
antenna’s two-wire cord
to the CD/receiver’s AM
antenna terminal.
Either wire can be
connected to the
terminal marked as the
ground terminal (H)*.
Shift the tab to open a terminal, insert a wire
from the antenna cord, then set the tab back
to close the terminal.
After closing the terminals, pull gently on
each wire to make sure that it is securely
connected.
* This ground terminal is used for noise reduction. It
is not a safety-related ground connection.
Antenna setup location
Set up the AM loop antenna on a flat surface and shift
the antenna around to find the direction which provides
the best AM (MW/LW) reception.
If the AM reception is poor in every direction, try setting
the antenna farther away from the CD/receiver.
Wall-mounted setup
Use two screws or push-pins to mount the
antenna on a wall.
Direction of FM antenna
The FM antenna can be left hanging from the CD/
receiver.
If the FM (UKW) reception is poor, extend the antenna
straight out and then change its angle to find the location
with the best reception. Use a fastener such as adhesive
tape to fasten the antenna to a wall or other vertical
surface.
Connecting System Components
2

11
PREPARATIONS
Connection to other audio equipment
The CD/Receiver System can be used to play output
from other audio equipment connected to the CD/
receiver’s AUX terminals.
♦ Playing output from headphone terminal
of audio equipment
To do this, use an audio cord (commercially
available) that has two RCA (phono) plugs on one
end and one stereo mini-plug on the other end.
Connect the dual-plug end to the CD/receiver’s AUX
terminals and the single-plug end to the headphone
terminal of the connected equipment (portable
cassette player, portable CD player, etc.).
♦ Playing output from LINE OUT terminal
of audio equipment
To do this, use an audio cord (commercially
available) that has two RCA (phono) plugs on each
end. Connect one dual-plug end to the CD/receiver’s
AUX terminals and the other dual-plug end to the
LINE OUT terminal of the connected equipment (MD
player, DAT deck etc.).
3
Connect power cord
Insert the power cord into a wall outlet.
When connecting the power cord for the first
time
The time flashes on the CD/receiver’s display panel.
See page 17 for instructions on setting the time.
Listening with headphones
To connect headphones, open the CD/receiver’s front
door and insert the headphone jack into the
“PHONES” jack (stereo mini-plug jack). See page 15
for instructions on opening the front door.
Output via the speakers is automatically muted
when the headphones are connected.
CD/receiver’s display panel
Time (flashing)
,,,
,,,
,,,
,,,
PHONES jack
AUX terminals
Headphone
terminal
AUX terminals
LINE OUT
terminals
 Loading...