

Pioneer Xdj-xz User Manual
pioneerdj.com/support/
rekordbox.com
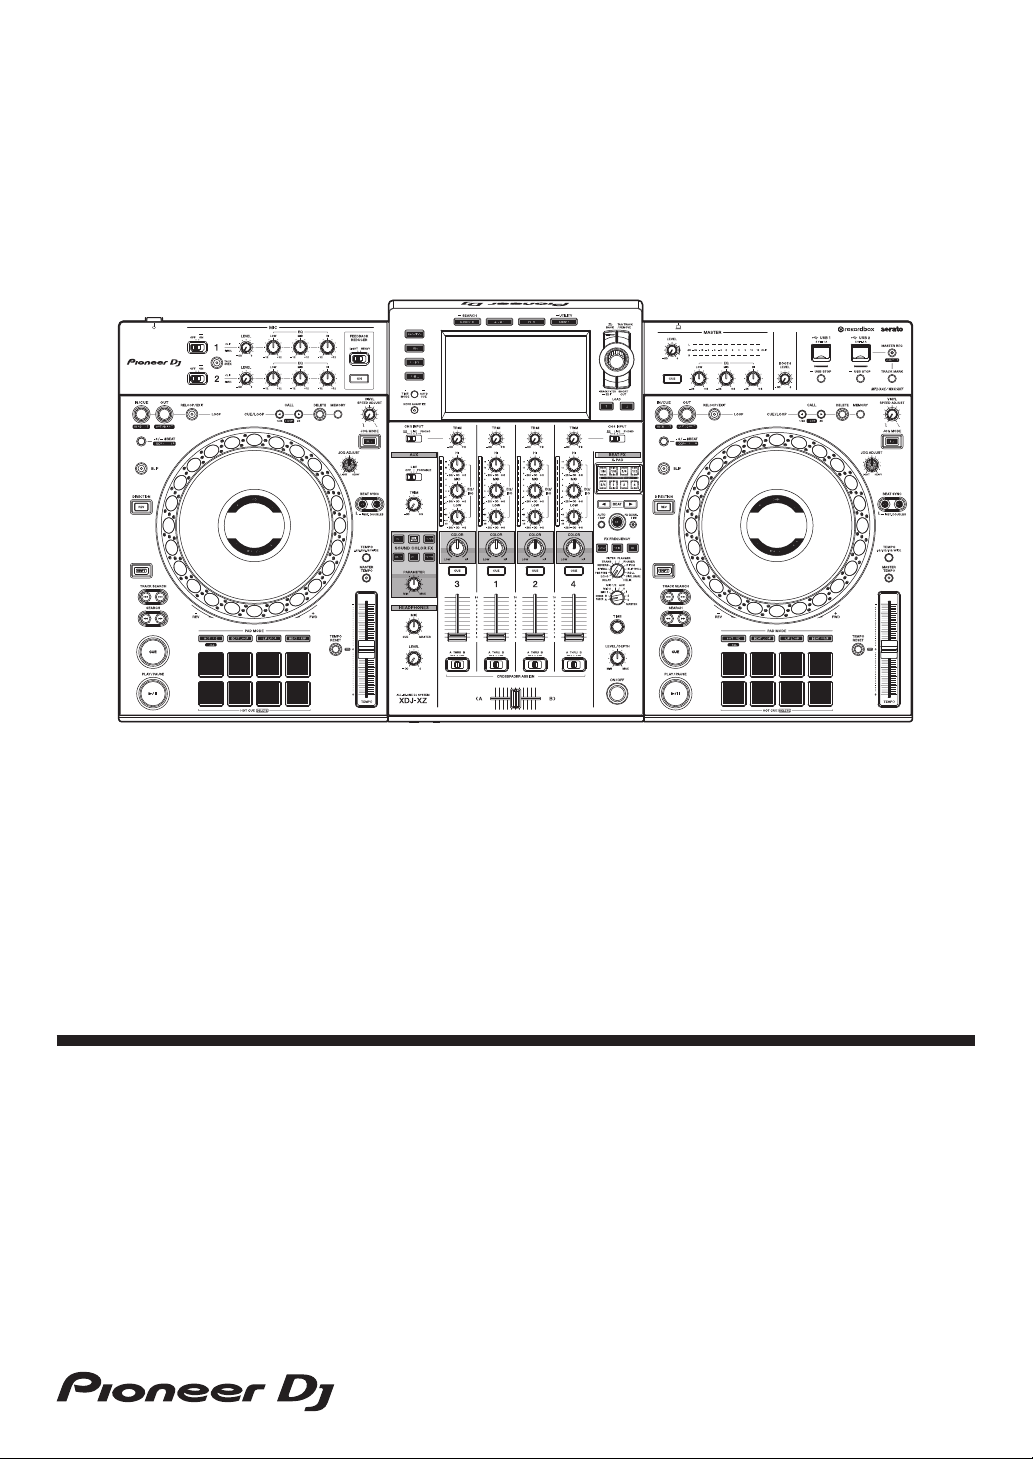
XDJ-XZ
All-In-One DJ System
For the latest software information, FAQs and other support information for this product, visit the above websites.
Operating Instructions

How to read this manual
Thank you for choosing this Pioneer DJ product.
• Be sure to read this manual and the “Operating Instructions (Quick
Start Guide)” which are also included with this product. Both
documents include important information that you should understand
before using the unit. In particular, be sure to read the IMPORTANT
SAFETY INSTRUCTIONS.
• In this manual, the names of channels, buttons and terminals that
appear on the product, and the names of menus, etc. in the software
on your PC/Mac are indicated within square brackets ([ ]). (e.g.
[CH1], [CUE] button, [Help] menu)
• Please note that the screens and specifications of the software, as
well as the external appearance and specifications of the hardware,
were still under development at the time this manual was created and
may differ from the final specifications.
2
En

Contents
How to read this manual............................................................... 2
Before you start.........................................................................5
Acquiring the manual.................................................................... 5
Supported sources........................................................................ 6
Supported media .......................................................................... 6
Supported music file formats ........................................................ 7
Preparing the software................................................................ 10
Installing the audio driver software ............................................. 14
Setting utility software................................................................. 20
USB connection (LINK Export) driver software for rekordbox
(Mac/Windows) ........................................................................... 22
Connections.............................................................................23
Connecting input/output terminals .............................................. 23
Part names and functions ...................................................... 29
Power section ............................................................................. 29
USB device section..................................................................... 30
Deck section ............................................................................... 32
Jog display section ..................................................................... 36
Browse section ........................................................................... 66
Mixer/effect section..................................................................... 92
Operation ............................................................................... 111
Turning the power on................................................................ 111
Turning the power off................................................................ 111
Connecting and disconnecting USB devices ............................ 111
Playing tracks ........................................................................... 112
Outputting sound ...................................................................... 115
Using the Quantize function...................................................... 116
En
3

Contents
Calling up settings stored on a USB device connected
to the unit .................................................................................. 118
Changing the color set in the USB device connected
to the unit .................................................................................. 119
Changing the settings............................................................... 119
Auto play mode......................................................................... 120
Auto standby setting ................................................................. 120
Talkover function ...................................................................... 121
Language settings .................................................................... 122
Correcting deviation in the touch display calibration................. 122
Setting preferences................................................................... 123
Using DJ software................................................................. 128
Operating DJ software .............................................................. 128
Additional information..........................................................130
Troubleshooting........................................................................ 130
Error messages ........................................................................ 131
Cleaning the touch display........................................................ 131
iPhone/iPod .............................................................................. 132
Trademarks and registered trademarks.................................... 133
Software license notice............................................................. 134
Cautions on copyrights ............................................................. 135
4
En

Before you start
Acquiring the manual
The unit’s Operating Instructions (Quick Start Guide)
• IMPORTANT SAFETY INSTRUCTIONS are included.
Visit the Pioneer DJ support page below.
pioneerdj.com/support/
rekordbox Introduction / Operating Instructions
• Introduction explains how to setup rekordbox.
• Operating Instructions explains details on operating rekordbox.
Visit the rekordbox website below.
rekordbox.com/manual
5
En
Before you start
Supported sources
This unit supports the following sources.
• USB devices
• PC/Mac
Supported media
The unit can play music files stored on USB mass storage devices
(external hard disks, portable flash memory devices, etc.).
Folder levels Up to 8 levels (files in folders beyond the 8th
level can’t be played.
Maximum number of
folders
Maximum numbers of files Unlimited (files beyond the 10 000th file
Supported file systems FAT16, FAT32, HFS+ (NTFS and exFAT
• Tracks managed by rekordbox can be played by connecting a USB
cable to a mobile device running rekordbox (iOS/Android).
For the latest supported devices, visit the Pioneer DJ support page.
pioneerdj.com/support/
• For details on rekordbox (iOS/Android), see the rekordbox online
support website (rekordbox.com).
• It takes time to read a connected USB device if the device contains
many folders and files.
Unlimited (folders beyond the 10 000th
folder within a single folder can’t be
displayed.)
within a single folder can’t be displayed.)
aren’t supported.)
Unsupported USB devices
• Optical disc devices such as external DVD/CD drives
En
6

Before you start
• A USB hub
• iPod (Music data on iPhone or iPod touch can only be played on this
unit if it is added to the rekordbox (iOS/Android) library.)
Cautions on using USB devices
• Some USB devices may not operate properly when connected to this
unit. Pioneer DJ will accept no responsibility whatsoever for the loss
of data stored by the user on USB devices, or other direct or indirect
problems arising due to the connection of USB devices to this unit.
• When a current above the permissible level is passed through the
USB device insertion slot of this unit, the USB indicator will flash.
Communication may be stopped by stopping the power supply to the
USB device. To return to normal conditions, please remove the USB
device connected to this unit. Avoid re-using the USB device for
which an excess current has been detected. If the unit doesn’t return
to the normal condition (no communication) after you remove the
USB device, turn the power of this unit off and then on again.
• If multiple partitions are set on the USB device, only the first partition
can be used. (When rekordbox library information is present, the
partition containing the rekordbox library information has priority.)
• USB devices equipped with flash card readers may not operate
properly when connected to this unit.
• Depending on the USB device you are using, the desired
performance may not be achieved.
Supported music file formats
This unit supports the following music file formats.
MP3
File extension: .mp3
Compatible formats: MPEG-1 AUDIO LAYER-3
En
7

Before you start
Bit depth: 16 bit
Bit rate: 32 kbps to 320 kbps
Sampling frequency: 32 kHz, 44.1 kHz, 48 kHz
Encoding method: CBR, VBR
AAC
File extension: .m4a, .aac, .mp4
Compatible formats: MPEG-4 AAC LC, MPEG-2 AAC LC
Bit depth: 16 bit
Bit rate: 16 kbps to 320 kbps
Sampling frequency: 32 kHz, 44.1 kHz, 48 kHz
Encoding method: CBR, VBR
WAV
File extension: .wav
Compatible formats: WAV
Bit depth: 16 bit, 24 bit
Sampling frequency: 44.1 kHz, 48 kHz
Encoding method: Uncompressed PCM
AIFF
File extension: .aif, .aiff
Compatible formats: AIFF
Bit depth: 16 bit, 24 bit
Sampling frequency: 44.1 kHz, 48 kHz
Encoding method: Uncompressed PCM
MP3 files
MP3 files support constant bit rate (CBR) and variable bit rate (VBR)
files. Files in both bit rates can be played with this unit, but the
searching speed is slower for VBR files than for CBR files. To prioritize
operability, we recommend recording files in CBR.
En
8

Before you start
AAC files
• AAC is the abbreviation for “Advanced Audio Coding”, a basic format
of audio compression technology used for MPEG-2 and MPEG-4.
• The file format and extension of AAC data depend on the application
used to create the data.
• AAC files with the “.m4a” (encoded with iTunes®), “.aac” or “.mp4”
extension can be played with this unit. Copyright-protected files such
as those purchased from the iTunes Store can’t be played. Some
files can’t be played with this unit depending on the version of iTunes
used to encode the files.
ID3 tags
The tag information types which can be registered from a music file are
ID3 tags (v1, v1.1, v2.2.0, v2.3.0 and v2.4.0) or meta tags.
Music file artwork
JPEG files with the extension of “.jpg” or “.jpeg” can be added to music
files as artwork.
• Images larger than 800 x 800 pixels can’t be displayed.
Character displays
To display the information such as track names written in local
character codes other than Unicode, select the language in the
[LANGUAGE] setting.
Language settings (page 122)
9
En

Before you start
Preparing the software
Music management software rekordbox, Serato DJ Pro and the driver
software aren’t included with the unit.
Visit the rekordbox website, Serato website and Pioneer DJ support
page to download rekordbox, Serato DJ Pro and the driver software
respectively.
• You’re responsible for preparing your PC/Mac, network devices and
other elements needed to connect to the internet.
About rekordbox and rekordbox dj
• rekordbox is comprehensive music management software designed
for DJs. Music files on your PC/Mac and mobile devices can be
managed (analysis, setting, creation and history storage) by using
the music management software rekordbox. Excellent DJ
performances can be achieved by using music files managed by
rekordbox together with the unit.
• rekordbox dj is the professional performance application for
rekordbox. You can use rekordbox dj by entering the rekordbox dj
license key on the supplied license key card.
• For information on the latest system requirements, visit the
rekordbox website below.
rekordbox.com/system
• Be sure to use the latest version and latest service pack for your
operating system.
• Operation isn’t guaranteed on all PC/Mac models, even if the system
requirements are met.
• Depending on power-saving settings and other conditions of the PC/
Mac, the CPU and hard disk may not provide sufficient processing
capabilities. For laptops in particular, make sure the PC/Mac is in the
best condition to provide constant high-level performance when
using rekordbox (e.g. by keeping the AC power connected).
En
10

Before you start
• To use the internet, you need a separate contract with an internet
service provider, which you may have to pay for.
Installing the rekordbox software
For details on installing the rekordbox, refer to the “rekordbox
Introduction.”
rekordbox.com/manual
rekordbox (iOS/Android)
You can play tracks managed on rekordbox on this unit by connecting
a mobile device running rekordbox (iOS/Android) with this unit using a
USB cable. For supported devices, see rekordbox.com.
• For details on installing rekordbox (iOS/Android), see
rekordbox.com.
Using the online support website
Before making inquiries on rekordbox operating procedures or
technical issues, read the rekordbox (Mac/Windows) user’s manual
and online manual and refer to the FAQ on the rekordbox online
support page.
rekordbox.com
11
En

Before you start
About the Serato DJ Pro software
Serato DJ Pro delivers all the features and performance to meet the
demands of DJs at the top of their game and sets the new standard for
digital DJ software.
• Serato DJ Pro is plug and play with this unit. Download the latest
version from the Serato website at serato.com.
• For help regarding Serato DJ Pro, visit support.serato.com.
This manual mainly focuses on explaining the hardware functions
of the unit.
Downloading the Serato DJ Pro software manual
1 Downloading the Serato DJ Pro software manual
http://serato.com/
2Click [Serato DJ Pro] in the [Products] menu.
3Click [Downloads].
4Click [Manuals and downloads].
5 Select the Serato DJ Pro software manual in the language you
need.
12
En

Before you start
Downloading the Serato DJ Pro software
1 Visit the Serato website.
http://serato.com/
2Click [Serato DJ Pro] in the [Products] menu.
The Serato DJ Pro download page is displayed.
• The download page is subject to change.
• For information on the latest system requirements, compatibility, and
supported operating systems of Serato DJ Pro, visit the website
below.
https://serato.com/dj/pro/downloads
13
En

Before you start
Installing the audio driver software
About the audio driver software
This dedicated driver software is required for the unit to output sound
from your PC/Mac. To use this unit while connected to your PC/Mac on
which a Windows or macOS is installed, install the driver software on
your PC/Mac in advance.
Notes on installation
• Read Software end user license agreement carefully before installing
the driver software.
• The driver installer includes installation programs in the following 12
languages.
English, French, German, Italian, Dutch, Spanish, Portuguese,
Russian, Chinese (simplified characters), Chinese (traditional
characters), Korean, Japanese.
• When using an operating system in languages other than the above,
select [English] for the installation procedure.
• The driver software is compatible with the following operating
systems.
–Mac:
macOS Mojave 10.14, macOS High Sierra 10.13, macOS Sierra
10.12 (latest update)
– Windows:
®
Windows
32-bit version or 64-bit version
(latest service pack)
• Turn this unit off, then disconnect the USB cable between this unit
10, Windows® 8.1, Windows® 7
and your PC/Mac.
• Close all the applications running on your PC/Mac before installation.
En
14

Before you start
• If you connect this unit to your PC/Mac without installing the driver
software first, an error may occur on your PC/Mac depending on the
system environment.
Obtaining the driver software
1 Visit the Pioneer DJ support page.
pioneerdj.com/support/
2Click [Software & firmware updates].
3Click [XDJ-XZ] under [ALL-IN-ONE DJ SYSTEM].
4Click [Drivers].
5Click [Download link], then save the file.
15
En

Before you start
Installation procedure (Mac)
Do not connect the unit to your Mac until installation is complete.
1 Unzip the downloaded driver software (XDJXZM###dmg.zip).
“###” indicates the driver software’s version.
2 Double-click [XDJ-XZ_M_#.#.#.dmg].
“#.#.#” indicates the driver software’s version.
3 Double-click [XDJ-XZAudioDriver.pkg].
4 Read the information displayed on the screen and click [Continue]
to proceed.
5 When the end user license agreement appears, select the
language for the installation, read [Software end user license
agreement] carefully, and then click [Continue].
6Click [Agree] box if you agree to the contents of the [Software end
user license agreement].
If you don’t agree to the contents of the [Software end user license
agreement], click [Disagree] and stop installation.
7 Follow the on-screen instructions to install.
16
En
Before you start
Installing the driver software on macOS Mojave 10.14 /
macOS High Sierra 10.13
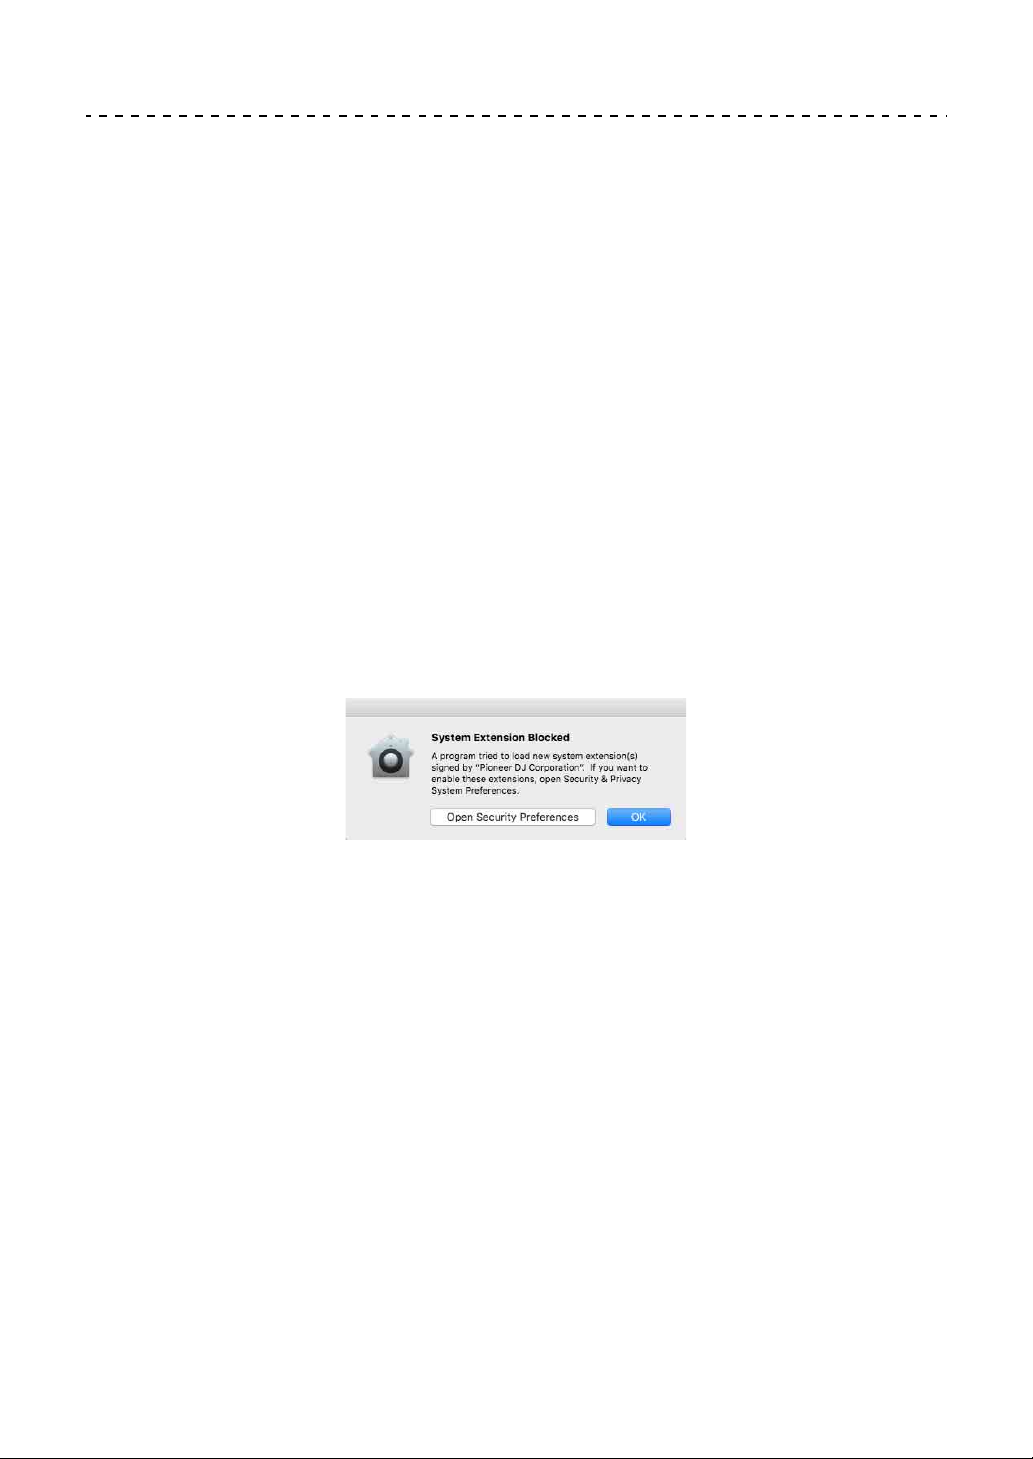
A new security feature has been added to macOS Mojave 10.14 /
macOS High Sierra 10.13.
When installing Pioneer DJ driver software on these versions of
macOS, driver software authentication is required.
If you’re installing the driver software for the first time and you’re
using macOS Mojave 10.14 / macOS High Sierra 10.13, you need
to follow the steps below. If the driver software was installed on
macOS or OS X before you updated to macOS Mojave 10.14 /
macOS High Sierra 10.13, you don’t need to follow these steps.
1 Install Pioneer DJ’s driver software in macOS Mojave 10.14 or
macOS High Sierra 10.13.
The following dialog box will appear during driver software installation.
2Click [Open Security Preferences].
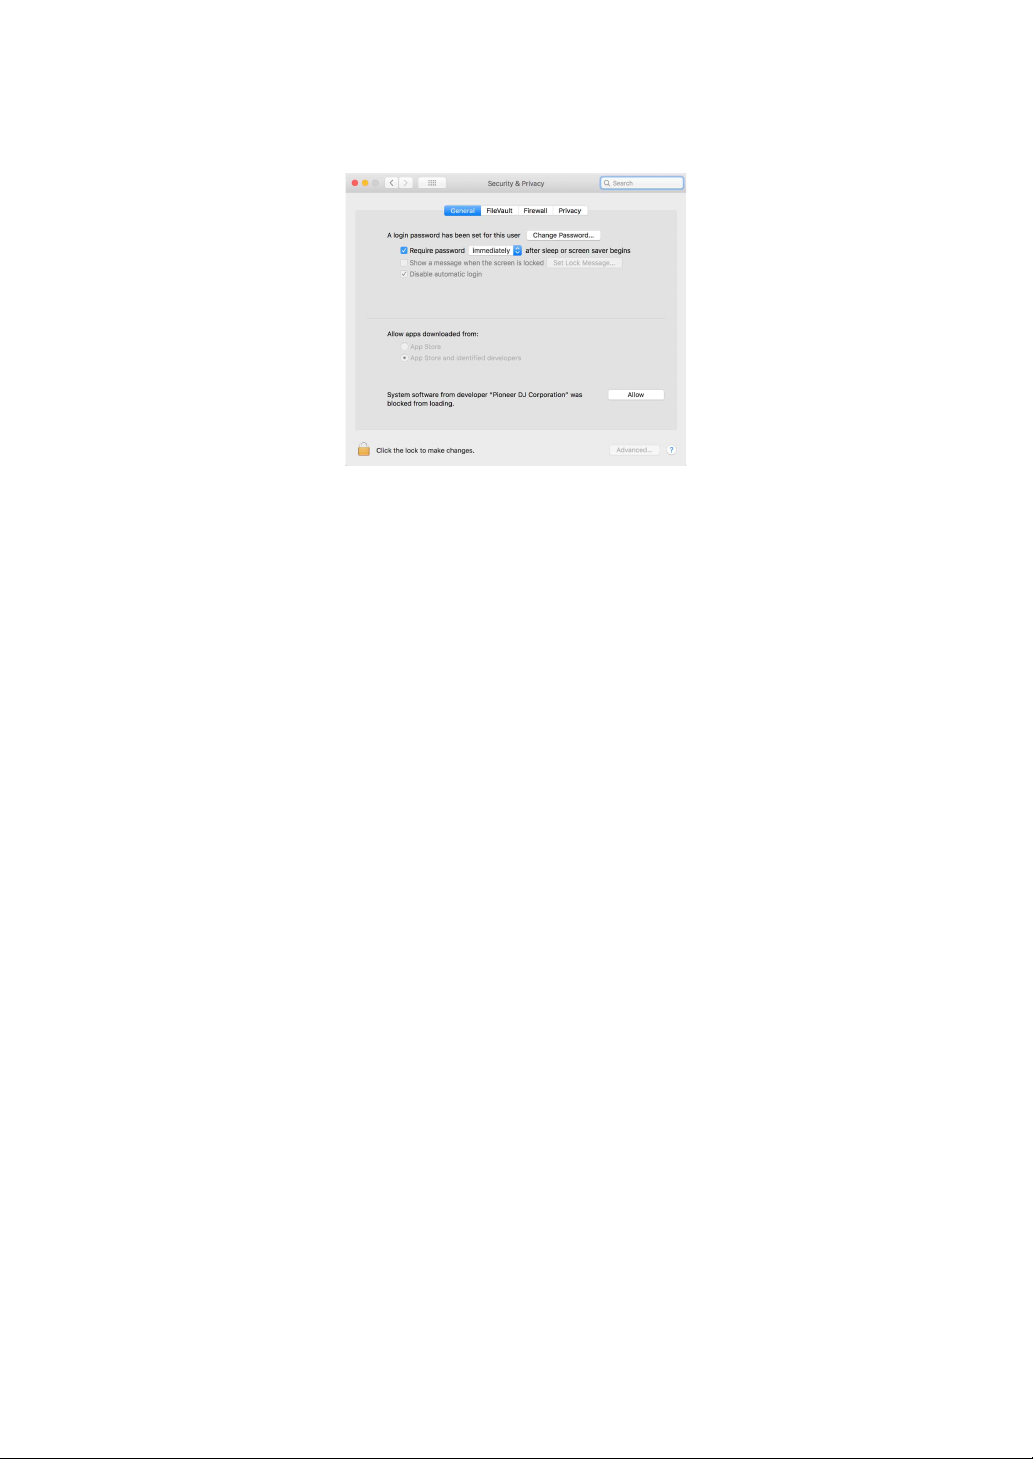
The [Security & Privacy] dialog box is displayed.
3Check that [System software from developer “Pioneer DJ
Corporation” was blocked from loading.] appears at the bottom
of the screen.
This message will be displayed for 30 minutes after you start the installation of
the driver software.
17
En
Before you start
If it isn’t displayed, reinstall the driver software.
4Click [Allow] at the bottom right of the screen.
5 When this unit is connected to a Mac, disconnect the USB cable
and then reconnect it again.
18
En

Before you start
Installation procedure (Windows)
Do not connect the unit to your PC until installation is complete.
• Log into your PC as administrator before starting the installation.
1 Unzip the downloaded driver software (XDJXZ####exe.zip).
“####” indicates the driver software’s version.
2 Double-click [XDJ-XZ_#.###.exe].
“#.###” indicates the driver software’s version.
3 When the language selection screen appears, select the language
for the installation and then click [OK].
4 Read [Software end user license agreement] carefully, select
[I agree.] if you agree to the contents, and click [OK].
If you don’t agree to the contents, click [Cancel] to cancel the installation.
5 Follow the on-screen instructions to install.
19
En

Before you start
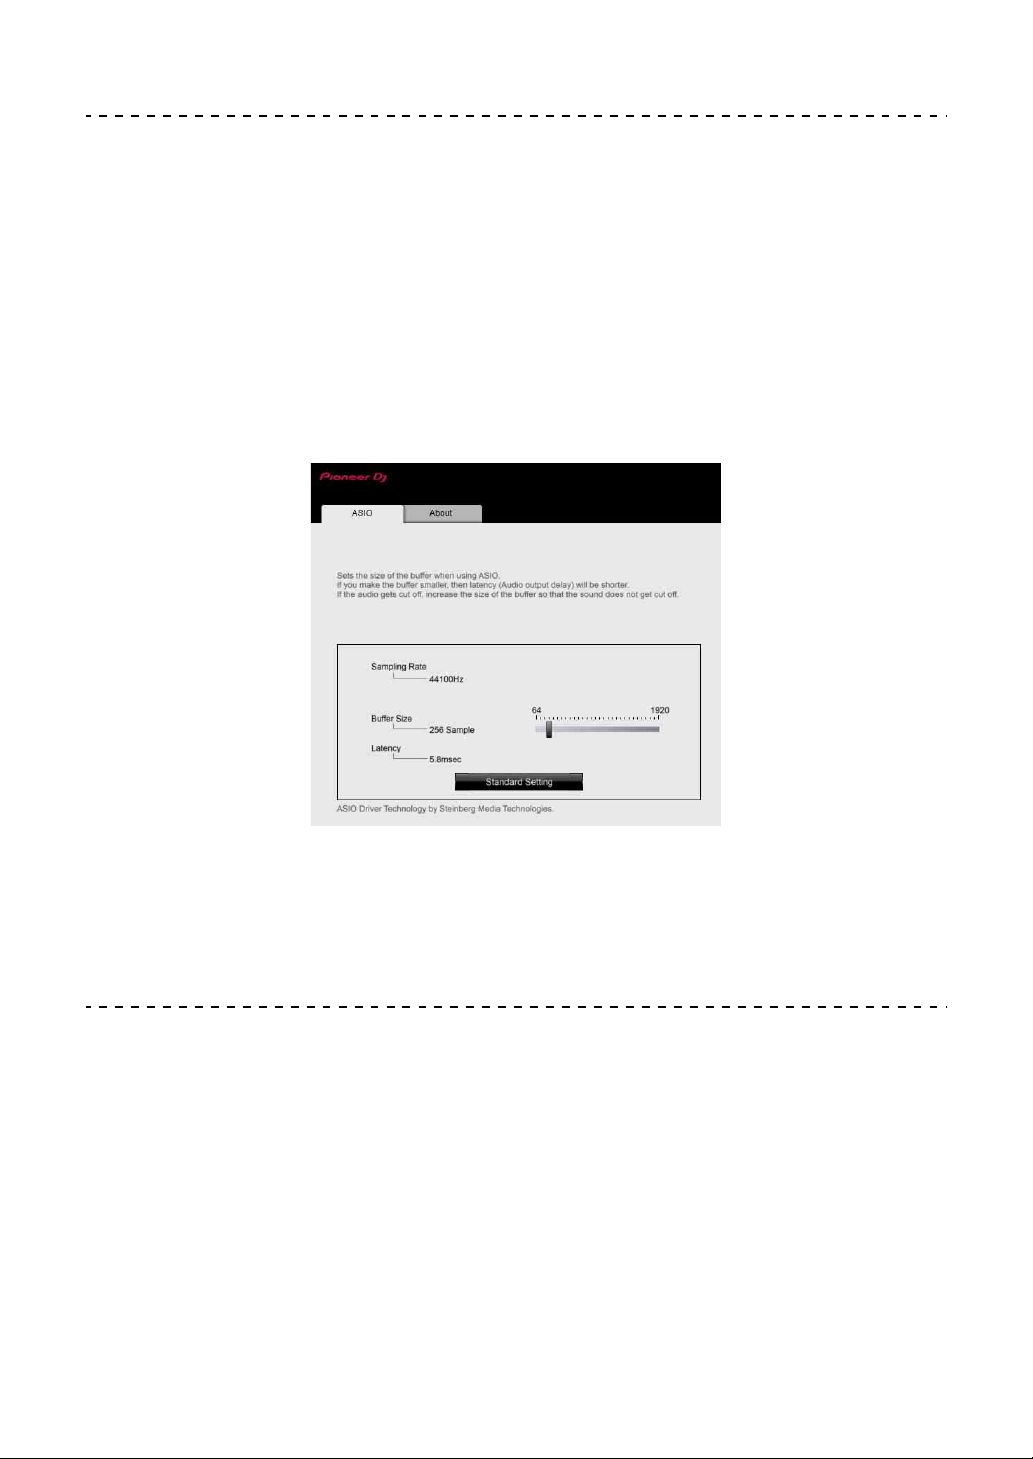
Setting utility software
You can use the setting utility to perform the checks and settings
described below.
• Adjusting the buffer size (when ASIO is used) (page 21)
• Checking the version of the driver software (page 21)
Displaying the setting utility
For Mac
In Finder, open the [Applications] folder, then click the [Pioneer] >
[XDJ-XZ] > [XDJ-XZ driver version display utility].
For Windows 10
In the [Start] menu, click [Pioneer] > [XDJ-XZ Setting Utility].
For Windows 8.1
In [Apps view], click [Pioneer] > [XDJ-XZ Setting Utility].
For Windows 7
In the Windows [Start] menu, click [All Programs] > [Pioneer] >
[XDJ-XZ] > [XDJ-XZ Setting Utility].
20
En
Before you start
Adjusting the buffer size (when ASIO is used)
You can use this feature only with a Windows operating system.
• If an application using the unit as the default audio device (DJ
software, etc.) is running, quit the application before adjusting the
buffer size.
• Display the setting utility before starting.
Click the [ASIO] tab.
• If a large buffer size is set, drops in audio data (breaks in the sound)
occur less easily, but the time lag due to the delay in the transfer of
the audio data (latency) increases.
Checking the version of the driver software
• Display the setting utility before starting.
Click the [About] tab.
En
21

Before you start
USB connection (LINK Export) driver software for rekordbox (Mac/Windows)
• Dedicated driver software is required for connecting the unit and
rekordbox (Mac/Windows) via USB (LINK Export).
• For details on installing the driver software, visit the Pioneer DJ
support page.
pioneerdj.com/support/
22
En
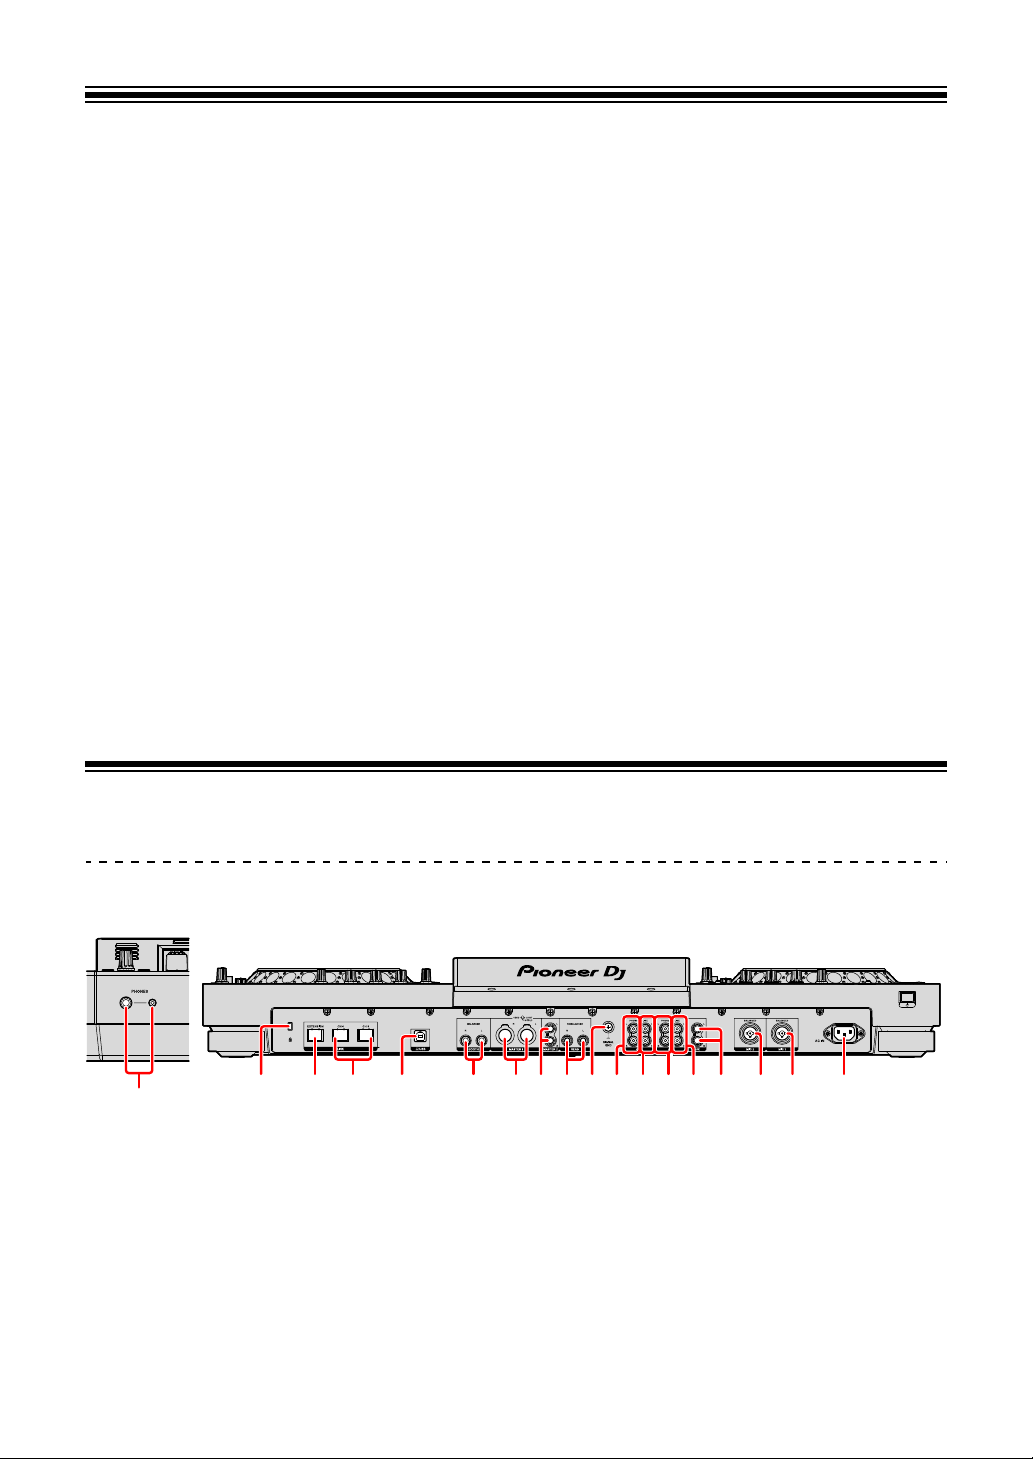
Connections
2 5 14 153 164 6 97 11 12 11 128 10 13
1
• Only connect the power cord to a power outlet after you’ve made all
other connections.
• Turn off the unit and disconnect the power cord from the outlet before
connecting different devices or changing connections.
• Refer to the operating instructions for any devices you want to
connect.
• Be sure to use the supplied power cord.
• Connect the unit to your PC/Mac directly using the supplied USB
cable.
• Use the shielded LAN cable supplied with the connecting device
when you connect to the [LINK (CH3/CH4)] terminal.
• When sharing music files or information using PRO DJ LINK, don’t
disconnect the LAN cable.
Connecting input/output terminals
Front panel, rear panel
1 PHONES output terminals
Connects your headphones.
Stereo phone plugs (ø 6.3 mm) and stereo mini phone plugs (ø 3.5 mm) can
be used.
23
En

Connections
2 Kensington security slot
Connects a cable lock for security.
3 LINK (EXTENSION) terminal
Use this terminal for expanding PRO DJ LINK.
Connects the LAN terminal, etc. of the PC/Mac running rekordbox.
4 LINK (CH3/CH4) terminals
Connects the LINK terminal of the Pioneer DJ’s DJ player. (PRO DJ LINK)
5 USB port
Connects your PC/Mac.
6 BOOTH output terminals
Outputs for a booth monitor.
• Be sure to use the [BOOTH] output terminals for a balanced output. If they
are connected to an unbalanced input (such as RCA or TS) with a TRS to
RCA converter cable, TS cable, etc., the sound quality may be lowered or
noise may occur.
7 MASTER1 output terminals
Connects a powered speaker, a power amplifier, etc.
• Do not connect a device that provides phantom power, or the power cord of
another product, to these terminals.
• B e sure to use the [MASTER1] output terminals for a balanced output. If they
are connected to an unbalanced input (such as RCA) with an XLR to RCA
converter cable (or converter adapter), etc., the sound quality may be
lowered or noise may occur. Use the [MASTER2] output terminals for an
unbalanced input (such as RCA).
8 MASTER2 output terminals
Connects a powered speaker, a power amplifier, etc.
9 SEND output terminals
Outputs the sound from the channel specified with the [BEAT FX] channel
selector switch to the external device such as a DJ sampler.
En
24

Connections
10 SIGNAL GND terminal
Connects the ground wire of a turntable to reduce noise that occurs when a
turntable is connected.
11 PHONO input terminals
Connects a phono level (for MM cartridges) output device (turntable, etc.). Do
not input a line level signal.
12 LINE input terminals
Connects a line level output device (DJ player, etc.).
13 AUX input terminals
Connects a line level output device (DJ player, etc.) or a portable player.
14 MIC2 input terminal
Connects a microphone.
15 MIC1 input terminal
Connects a microphone.
16 AC IN terminal
Connects to a power outlet.
25
En

Connections
(1)
(2)
PC/Mac
rekordbox
(3)
Basic style
You will use tracks prepared on your PC/Mac running rekordbox.
For operations on rekordbox, see the rekordbox (Mac/Windows) user’s
manual in the [Help] menu of rekordbox (Mac/Windows). You can also
connect up to 2 DJ players with the PRO DJ LINK connections by using
a LAN cable (CAT5e).
PRO DJ LINK (USB Export)
You can use rekordbox music files and data on a memory device such
as a flash memory device or a hard disk drive without using your PC/
Mac. You can make performances using information such as playlists,
cues, loop points and Hot Cues prepared on rekordbox.
(1) To power outlet, (2) Power cord (supplied), (3) USB device on which
rekordbox data is stored
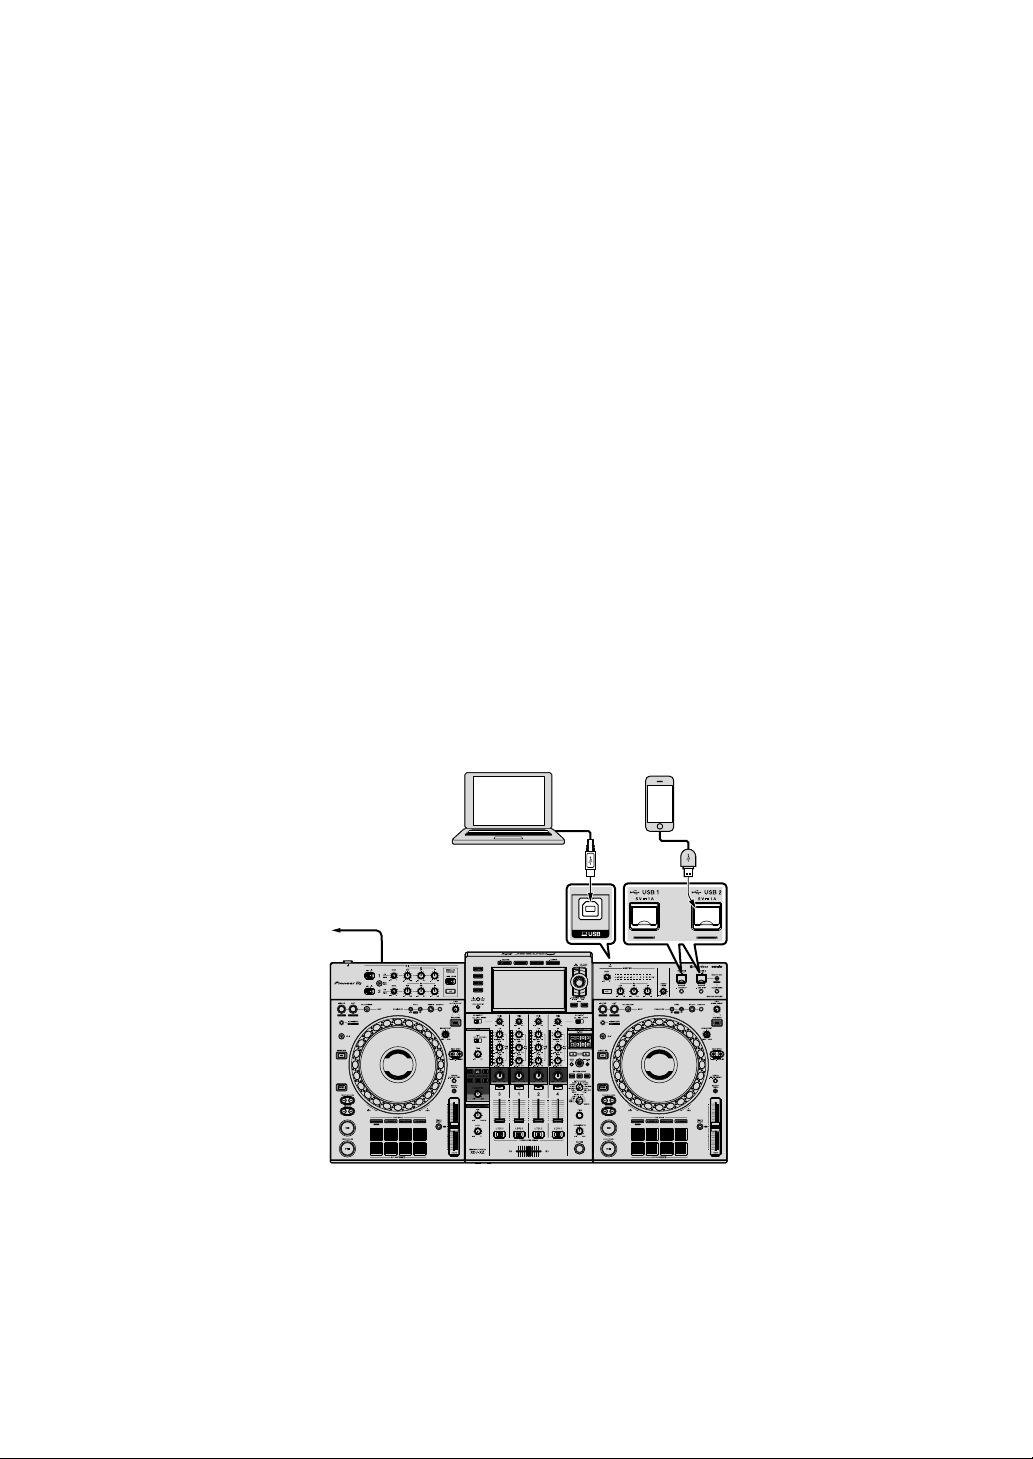
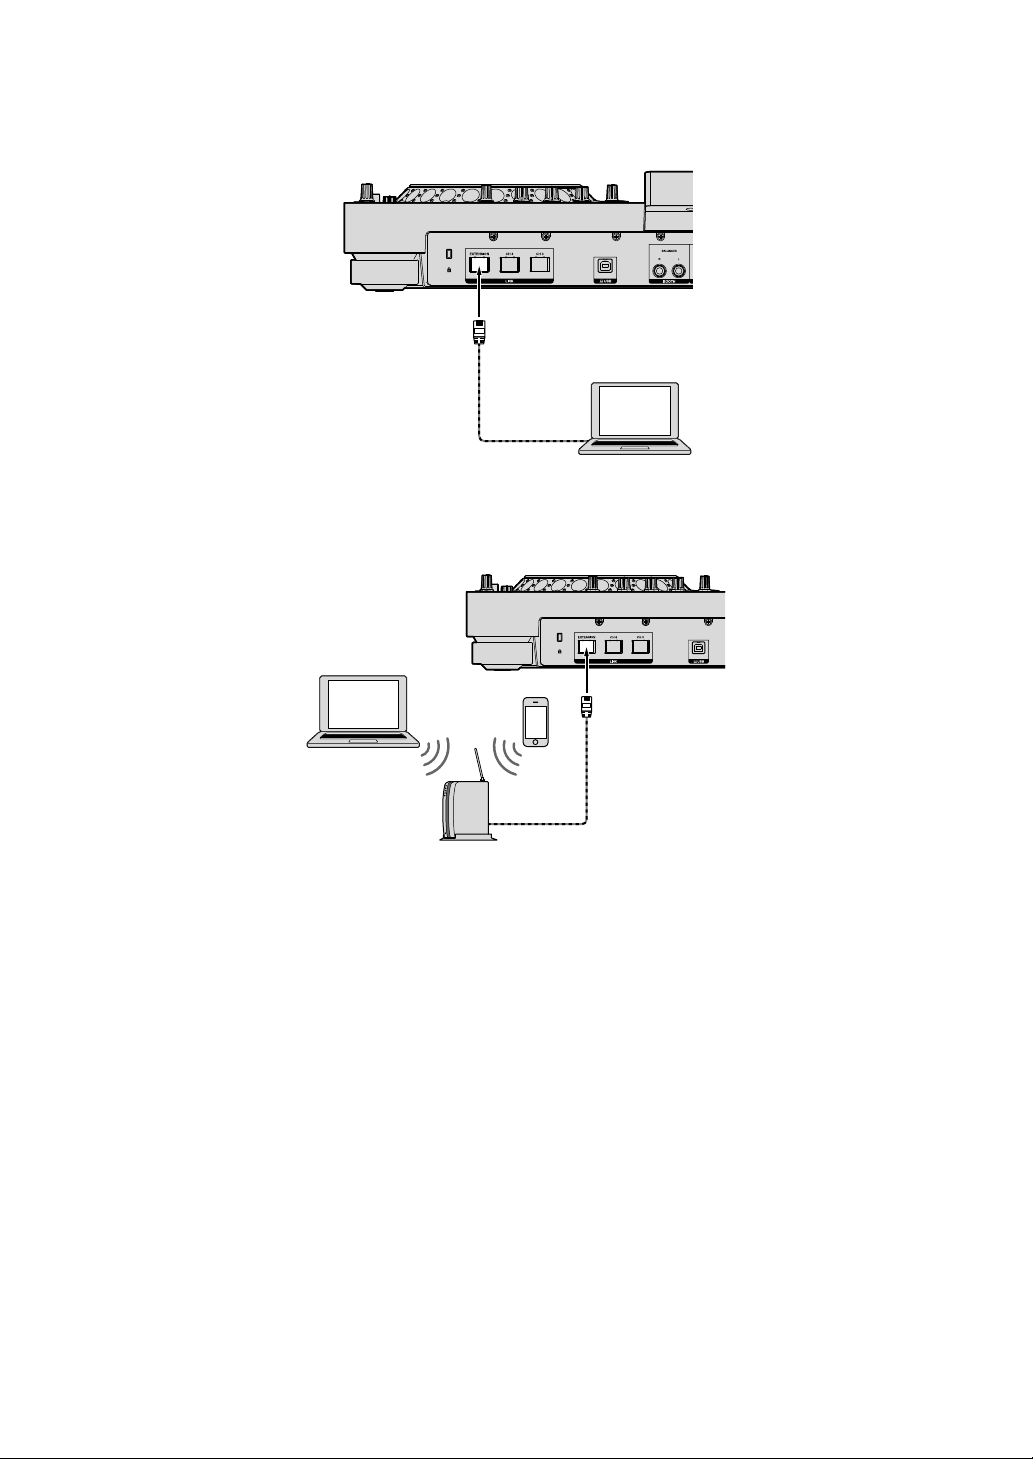
PRO DJ LINK (LINK Export)
• You can select and play tracks managed on rekordbox on this unit by
plugging the unit into your PC/Mac running the app using a USB
cable, LAN cable (CAT5e) or wireless LAN (Wi-Fi) router. You can
make performances using information such as playlists, cues, loop
points and Hot Cues prepared on rekordbox.
En
26
Connections
(2)
(3)
rekordbox
• You can select and play tracks managed on rekordbox on this unit by
plugging the unit into a mobile device running rekordbox (iOS/
Android) using a USB cable or wireless LAN (Wi-Fi) router.
• Prepare a cable for connecting this unit with an iPhone or iPod.
• Install the driver software on your PC/Mac running rekordbox (Mac/
Windows) before plugging the unit into the PC/Mac via USB (LINK
Export). For details, see: USB connection (LINK Export) driver
software for rekordbox (Mac/Windows) (page 22)
Compatible iPhone and iPod
• Made for iPhone Xs Max, iPhone Xs, iPhone X
R, iPhone X, iPhone
8, iPhone 8 Plus, iPhone 7, iPhone 7 Plus, iPhone SE, iPhone 6s,
iPhone 6s Plus, iPhone 6, iPhone 6 Plus, iPhone 5s and iPod touch
(6th generation).
• For the latest compatible models, see rekordbox.com.
When using a USB cable
PC/Mac
(1)
(1) To power outlet, (2) Power cord (supplied) (3) Mobile device
running rekordbox
• If you connect the rekordbox (iOS/Android) to the unit, you can’t load
a track from rekordbox (iOS/Android) to the linked DJ player.
En
27
Connections
PC/Mac
rekordbox
(1)
(2)
PC/Mac
rekordbox
When using a LAN cable
When using a wireless LAN router and access point
(1) Mobile device running rekordbox, (2) Wireless LAN router and
access point
En
28
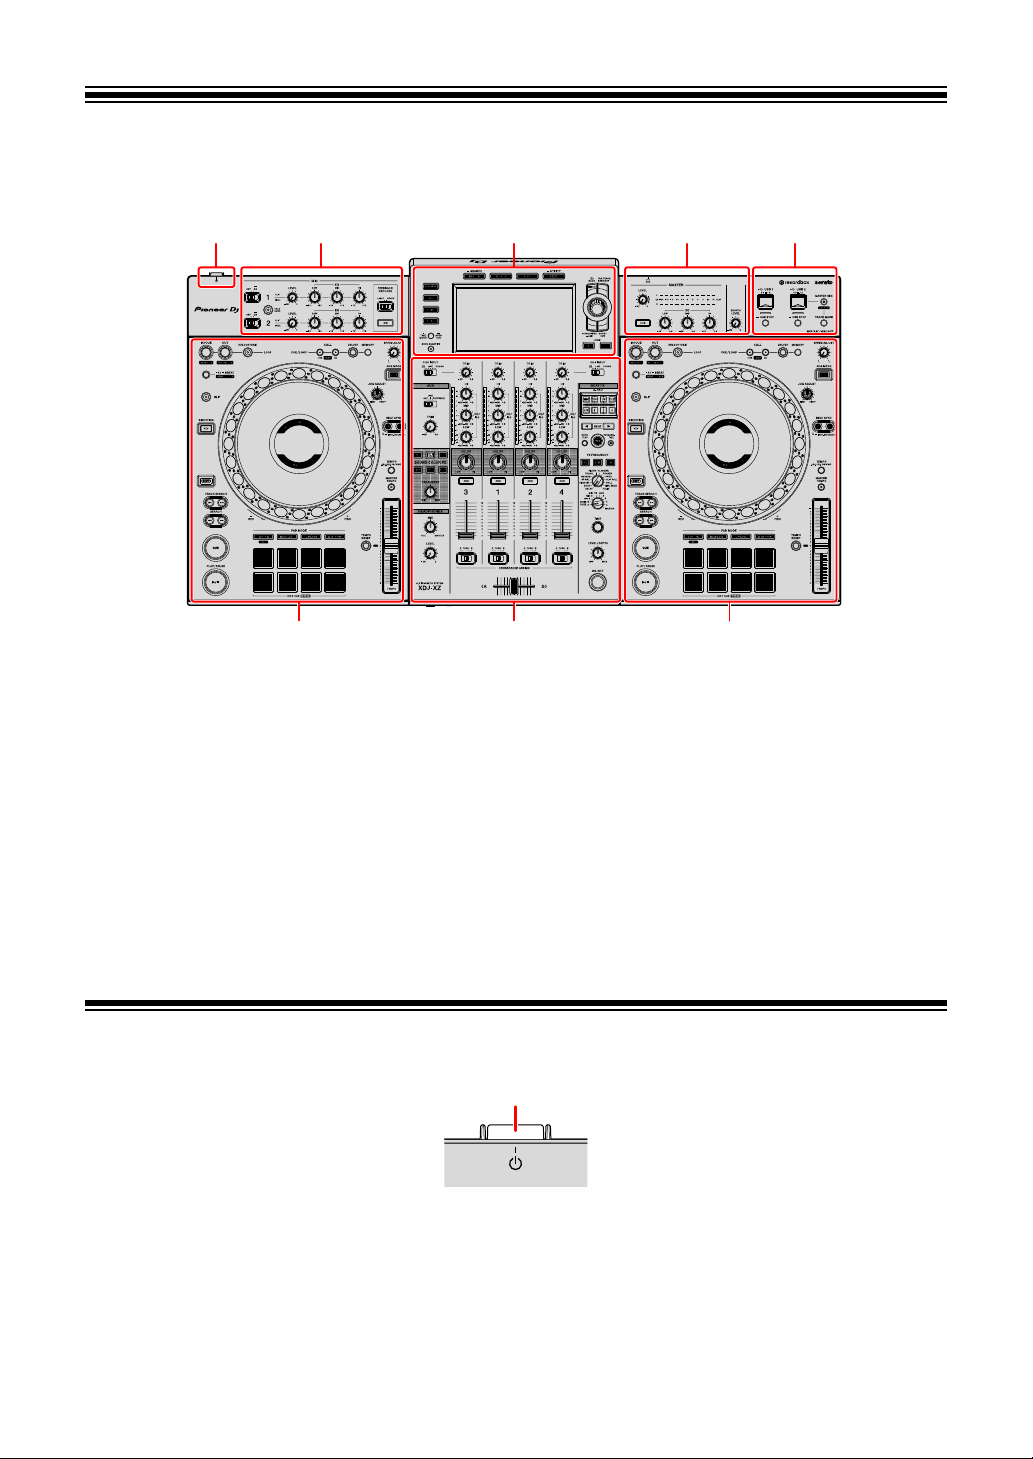
Part names and functions
25
3
451
53
1
1 Power section (page 29)
2 USB device section (page 30)
3 Deck section (page 32)
4 Browse section (page 66)
5 Mixer/effect section (page 92)
Power section
1 1 switch
Switches the unit between power on and off.
Read more: Turning the power on (page 111)
En
29
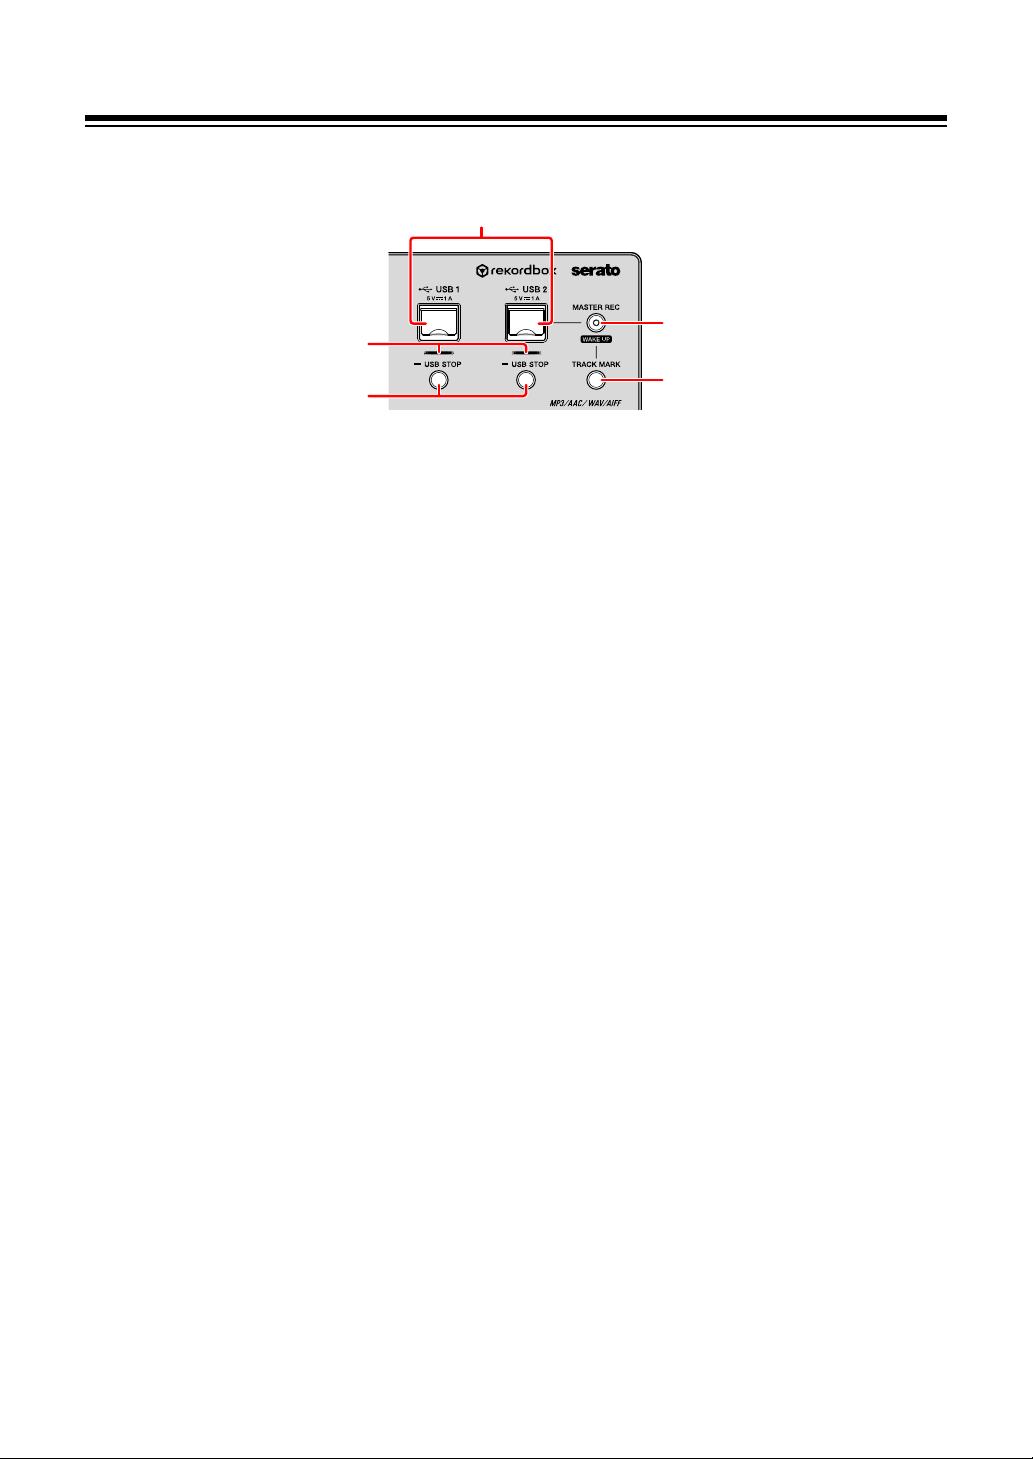
Part names and functions
4
2
1
5
3
USB device section
1 USB 1, 2 STOP buttons
Press for over 2 seconds before disconnecting USB devices from this unit.
Read more: Connecting and disconnecting USB devices (page 111)
2 USB 1, 2 indicators
Lights or flashes when this unit is communicating with the USB device.
Read more: Connecting and disconnecting USB devices (page 111)
3 USB 1, 2 slots
Connects USB devices.
Read more: Connecting and disconnecting USB devices (page 111)
4 MASTER REC (WAKE UP) button
• MASTER REC: Records sound output from the unit on a USB device
connected to the USB2 slot.
Read more: Recording the performance (page 31)
• WAKE UP: Cancels Standby mode.
Read more: Auto standby setting (page 120)
5 TRACK MARK button
Splits a track while the track is being recorded on the USB device.
Read more: Splitting a track while recording (page 31)
30
En
 Loading...