

Pioneer XDJ-RX Operation Manual
DJ SYSTEM
XDJ-RX
http://pioneerdj.com/support/
The Pioneer DJ support site shown above offers FAQs, information on software and various other types of
information and services to allow you to use your product in greater comfort.
http://rekordbox.com/
For inquiries on rekordbox™, please see the online support site indicated above.
Operating Instructions

Contents
How to read this manual
! Thank you for buying this Pioneer product.
Be sure to read both this manual and the Operating Instructions
(Quick Start Guide). Both contain important information that you
should understand before using this product.
! In this manual, names of channels and buttons indicated on the
product, names of menus in the software, etc., are indicated within
square brackets ([ ]). (e.g. [CH1], [CUE] button, [Start] menu)
Before start
Features ....................................................................................................... 3
Before you start
Supported sources ..................................................................................... 4
Usable media .............................................................................................. 4
Playable music file formats ....................................................................... 4
Preparing the software ............................................................................... 5
Connections
Connecting the input/output terminals .................................................... 6
Part names and functions
Power section .............................................................................................. 9
USB device section ..................................................................................... 9
Deck section .............................................................................................. 10
Browse section ......................................................................................... 17
Mixer section ............................................................................................. 23
Effect section ............................................................................................. 25
Operation
Turning the power on ............................................................................... 27
Turning the power off ............................................................................... 27
Connecting and disconnecting USB devices ........................................ 27
Playback .................................................................................................... 27
Playing the rekordbox library on a computer or mobile device ............ 27
Outputting sound ..................................................................................... 27
Mixing using the faders ............................................................................ 28
Using quantize function ........................................................................... 28
Changing the settings
About the auto-play mode ........................................................................ 29
About the auto standby function ............................................................. 29
About language settings .......................................................................... 29
Setting preferences .................................................................................. 29
Using the DJ software
Installing the driver software ................................................................... 30
Operating DJ software by MIDI interface ............................................... 31
Additional information
Troubleshooting ........................................................................................ 32
Error messages ......................................................................................... 33
List of icons displayed on the main unit display section ....................... 34
About iPod/iPhone ................................................................................... 34
About trademarks and registered trademarks ...................................... 34
Cautions on copyrights ............................................................................ 34
En
2
Before start
Before start
Features
The unit is a DJ system integrating a DJ player and DJ mixer in a single
unit and carrying over the high operability of Pioneer’s DJ products —
the world standard for club equipment. You can play it like a real DJ
using the music stored on your USB device or computer.
rekordbox(Mac/Windows)/rekordbox(iOS/
Android)
The downloadable, free music management software or smartphone
application rekordbox can be used to manage (analysis, settings,
creation, history storage) music files on computers or mobile devices.
Using music files managed with rekordbox in combination with the unit
makes it possible to achieve outstanding DJ performances.
! The rekordbox version for Mac/Windows is described in this manual,
as rekordbox (Mac/Windows) and the rekordbox version for mobile
devices as rekordbox (iOS/Android). rekordbox is used to simultaneously indicate the editions of rekordbox (Mac/Windows) and rekordbox (iOS/Android), and to indicate the rekordbox function.
USB EXPORT
rekordbox music files and management data can be exchanged using a
USB device.
rekordbox LINK Export
When the unit and the computer are connected by LAN cable, the
rekordbox music files and management data can be directly transferred,
which can eliminate the need to export them to a USB device. The unit
and the computer can also be connected wirelessly using a wireless
LAN router (or wireless LAN access point).
HOT CUE
The unit is equipped with a hot cue function for starting playback instantaneously from cue points that have been set in advance by simply pressing a button.
Four hot cues can be set per deck.
AUTO BEAT LOOP
Based on the BPM of tracks, this function loop-plays the tracks by automatically setting the loop out point.
LOOP SLICE
It divides a loop into 4 sections, and has a loop slice function which can
repeatedly play the divided sections.
QUANTIZE
The unit is equipped with a Quantize function letting you set points on
beat for tracks analyzed with rekordbox, even if buttons are pressed
roughly. When setting auto loop beats and beat effects, the points are
automatically set to the beat nearest the position at which the button
was pressed. With this unit, accurate, on-beat performances are possible without breaking the rhythm of the currently playing sound even
when using hot cues and other functions during playback.
SLIP MODE
It has a sleep mode function which continues to play back the tracks in
background during the Loop/Reverse/Scratch/Hot Cue/Loop Slice/Pause
operations. This enables innovative DJ performances without changing
the track’s development, even after Loop/Reverse/Scratch/Hot Cue/Loop
Slice/Pause.
SOUND CARD
The unit is equipped with a MIDI interface. It also has a built-in sound
card, allowing simple connections to other devices.
DISPLAY
The unit has a color LCD that is as big as 7-inches. When selecting
sound tracks, you can view not only the text data, but also the jacket photos corresponding to that track. The combination of an easy-to understand GUI display of music files and an easy-to-operate rotary selector
lets you select tracks without stress. The unit also simultaneously displays zoomable enlarged waveforms of the track on two decks. Playing
status and SYNC status of each deck can be checked instantly.
USB REC
Sound played on this unit during DJ performances can easily be
recorded on USB devices (flash memory devices, etc.). The recorded
sound can also be played on this unit.
BEAT SYNC
This function can be used to automatically synchronize the tempo (BPM)
and beat positions on the left and right decks based on the track’s beat
grid information as analyzed with rekordbox. Genuine beat mixing is easily possible without moving the [TEMPO] sliders.
BEAT EFFECTS
The unit is equipped with eight types of BEAT EFFECTS that have been
well-received in the DJM series. Various renderings can be achieved by
using effects in conjunction with BPM.
SOUND COLOR FX
The unit is equipped with four effects allowing the sound to be changed
in various ways. The mood of the sound can be easily modified, by simply
pressing a button and turning the control.
3-BAND ISOLATOR
This unit is equipped with a 3-band equalizer allowing the volume of
the high, medium and low frequency ranges to be adjusted separately.
Not only can the tone be adjusted to your tastes, the sound for a certain
range can be turned completely off by turning the control all the way
counterclockwise (isolator function).
STANDARD LAYOUT
The unit carries over the control panel layout of the Pioneer CDJ/DJM
series, the world standard for DJ units. It can be used just like a DJ
equipment that is permanently installed in the club.
En
3
Before you start
Supported sources
This unit supports the sources listed below.
! USB devices
= Usable media (p. 4 )
! Computer
= Playing the rekordbox library on a computer or mobile device
(p. 27 )
Usable media
This unit supports USB mass storage class USB devices (external hard
disks, portable flash memory devices, digital audio players, etc.).
Folder layers
Max. number of folders 999 folders
Max. number of files
Supported file systems FAT16, FAT32
Tracks managed by rekordbox can be played by connecting the mobile device on
!
which the rekordbox (iOS/Android) is installed via a USB device.
For the latest supported devices, see the below-mentioned Pioneer support DJ
site.
http://pioneerdj.com/support/
! For rekordbox (iOS/Android), see the user’s manual rekordbox (iOS/Android).
! When there are many folders or files, some time may be required for loading.
! Folders and files exceeding the limits cannot be displayed.
Max. 8 layers (files in folders beyond the 8th
layer cannot be played)
10 000 files
USB devices that cannot be used
! Optical disc type devices such as external DVD/CD drives, etc., are
not supported.
!
USB hubs cannot be used.
! iPod cannot be used. (Music data on iPod touch or iPhone can only
be played on this unit if it is added to the rekordbox (iOS/Android)
library.)
= iPod and iPhone that can be connected to this product (p. 7 )
Cautions on using USB devices
! Some USB devices may not operate properly. Please note that
Pioneer will accept no responsibility whatsoever for loss of data
stored by the user on USB devices or other direct or indirect problems arising due to connection of USB devices to this unit.
! When the current above the permissible level is passed through the
USB device insertion slot of this unit, the USB indicator will flash.
The communication may be stopped by stopping the power supply to
the USB device. To return to normal conditions, please remove the
USB device connected to this unit. Avoid re-using the USB device
for which the excess current has been detected. If you cannot return
to the normal condition (cannot communicate) using the abovementioned procedure, turn this unit’s power off then back on.
! If multiple partitions are set on the USB device, only the first partition
can be used. (When rekordbox library information is present, the
partition containing the rekordbox library information has priority.)
! USB devices equipped with flash card readers may not operate.
! Depending on the USB device you are using, the desired perfor-
mance may not be achieved.
Playable music file formats
This unit supports music files in the formats shown below.
Type File extension Compatible formats Bit depth Bit rate Sampling frequency
MP3 .mp3 MPEG-1 AUDIO LAYER-3 16 bit 32 kbps to 320 kbps 32 kHz, 44.1 kHz, 48 kHz CBR, VBR
AAC .m4a, .aac and .mp4
WAV .wav WAV 16 bit, 24 bit — 44.1 kHz, 48 kHz Uncompressed PCM
AIFF .aif, .aiff AIFF 16 bit, 24 bit — 44.1 kHz, 48 kHz Uncompressed PCM
About MP3 files
MP3 files include constant bit rate (CBR) and variable bit rate (VBR) files.
Both types can be played on this unit, but the searching speed is slower
for VBR files than for CBR files. To prioritize operability, we recommend
recording files in CBR.
MPEG-4 AAC LC 16 bit 16 kbps to 320 kbps 32 kHz, 44.1 kHz, 48 kHz CBR, VBR
MPEG-2 AAC LC 16 bit 16 kbps to 320 kbps 32 kHz, 44.1 kHz, 48 kHz CBR, VBR
About ID3 tags
The tag information types which can be registered from a music file are
ID3 tags (v1, v1.1, v2.2.0, v2.3.0, and v2.4.0) or meta tags.
About music file artwork
About AAC files
! AAC is the abbreviation of “Advanced Audio Coding”, a basic format
of audio compression technology used for MPEG-2 and MPEG-4.
! The file format and extension of AAC data depends on the applica-
tion used to create the data.
! On this unit, in addition to AAC files encoded with iTunes® and with
the extension “.m4a”, files with the extensions “.aac” and “.mp4” files
can also be played. However, AAC files that are copyright-protected,
such as those purchased from the iTunes Store, cannot be played.
Also, depending on the version of iTunes in which the file was
encoded, it may not be possible to play the file.
The file format for artwork images that can be added to music files is
JPEG (extensions: “.jpg” or “.jpeg”).
! Files larger than 800 x 800 dots cannot be displayed.
About character displays
MP3/AAC
When displaying track names, etc., to display characters written in local
codes other than Unicode, change the [LANGUAGE] setting.
=
About language settings (p. 29 )
Encoding
method
En
4

Preparing the software
Music management software rekordbox and driver software are not
included.
To use rekordbox and the driver software, access the rekordbox site and
Pioneer DJ Support site, and download the software.
= Installing the driver software (p. 30 )
! The user is responsible for preparing the computer, network devices
and other elements of the Internet usage environment required for a
connection to the Internet.
About rekordbox
rekordbox is a software program allowing users who have purchased
a Pioneer DJ player supporting rekordbox to manage music files to be
used for DJ performances.
Music file can be managed in various ways (analysis, setting, creation,
history saving) by using the music management software rekordbox. An
excellent DJ performance can be achieved by using the music files managed by rekordbox together with this unit.
Acquiring rekordbox (Mac/Windows)
1 Open your web browser on your computer, and
access the rekordbox site.
http://rekordbox.com/
2 Click [Download] in the rekordbox site and download
rekordbox from the download page.
! For inquiries on rekordbox (Mac/Windows), please see the support
site indicated above.
Before you start
About rekordbox (iOS/Android)
Tracks managed by rekordbox can be played by connecting the mobile
device on which the rekordbox (iOS/Android) is installed via a USB
device. For the supported devices, see the Pioneer DJ support site
(http://pioneerdj.com/support/). For rekordbox (iOS/Android), see the
rekordbox (iOS/Android) user’s manual.
! For details on installing rekordbox (iOS/Android), see the Pioneer
website (http://rekordbox.com/).
Using the online support site
Before making inquiries on rekordbox operating procedures or technical
issues, read the rekordbox user’s manual, and check the FAQ provided
on the rekordbox online support site.
<rekordbox online support site>
http://rekordbox.com/
En
5
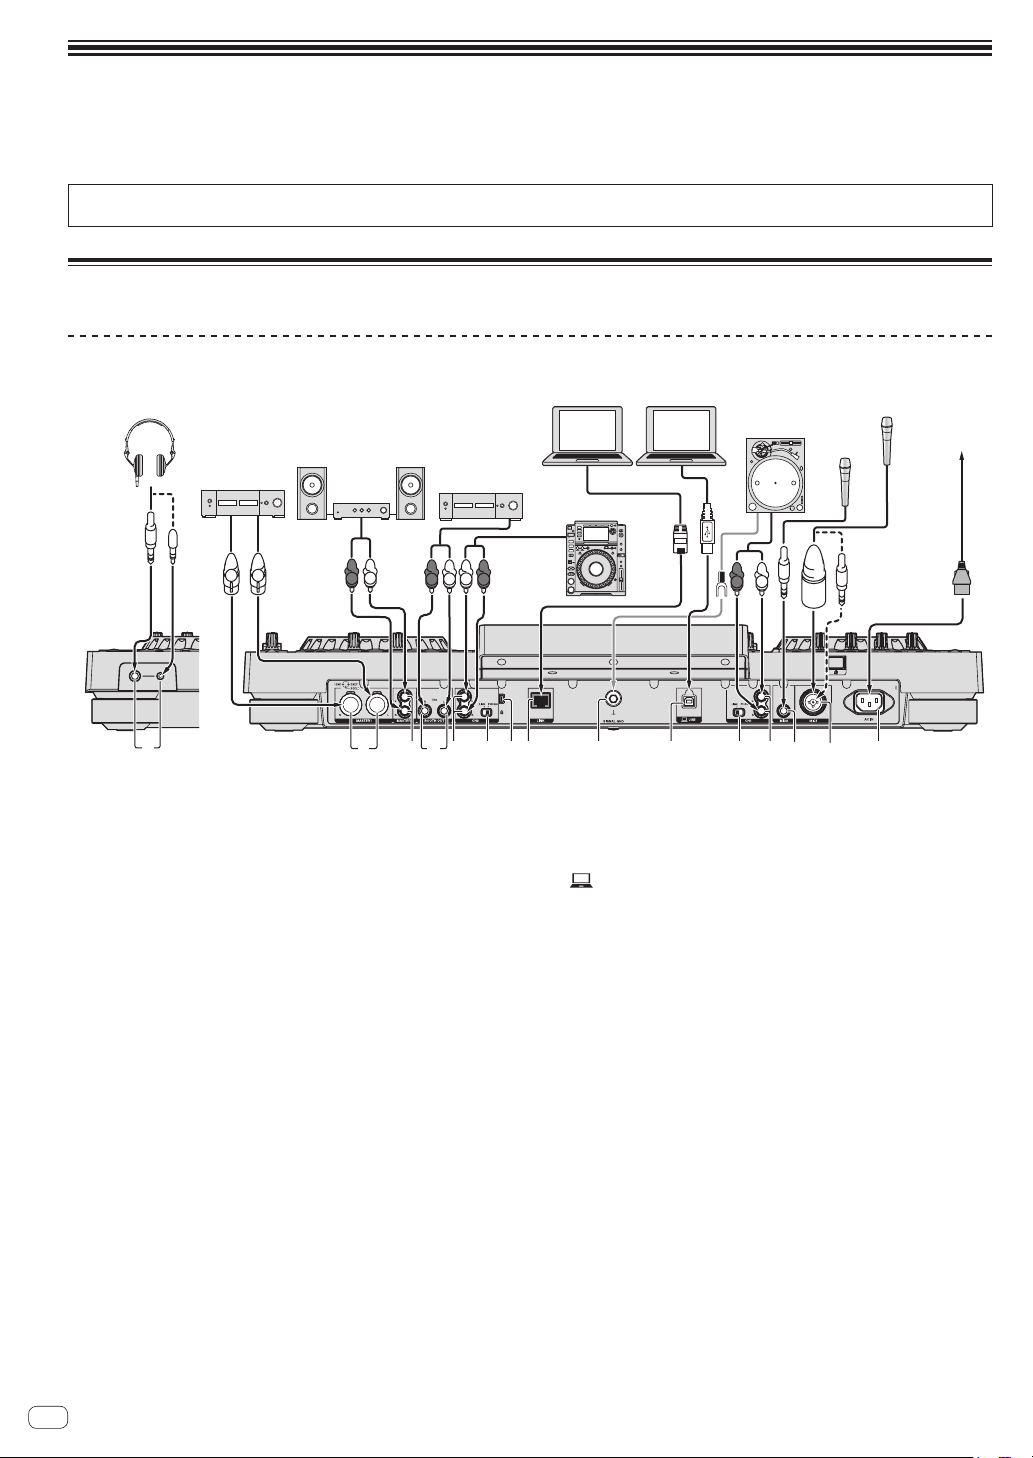
Connections
Rear panel
Computer
! Connect the power cord after all the connections between devices have been completed.
! Be sure to turn off the power and unplug the power cord from the power outlet whenever making or changing connections.
! Refer to the operating instructions for the component to be connected.
! Be sure to use the included power cord.
! When using a LAN cable for connection, be sure to use either the LAN cable included with this product or an STP (shielded twisted pair) cable.
! Do not disconnect the LAN cable when music files and/or information are being shared using PRO DJ LINK.
Connecting the input/output terminals
Rear panel, front panel
Headphones
Power amplifier,
powered speakers,
etc.
R
Power amplifier,
powered speakers, etc.
L
Power amplifier
(for booth monitor)
L
R
R
1 62 3 4 5 7
Front panel
1 PHONES terminals
Connect headphones here.
Both stereo phone plugs (Ø 6.3 mm) and stereo mini phone plugs
(Ø 3.5 mm) can be used.
! There are two output terminals (one for a stereo phone jack and
one for a mini-phone jack), but do not use both terminals simultaneously. If one is connected or disconnected while the other one
is being used, the volume of the other one in use may increase or
drop suddenly.
2 MASTER1 terminals
Connect a power amplifier, powered speakers, etc., here.
Be sure to use these as balanced outputs. Be careful not to acci-
dentally insert the power cord of another unit.
3 MASTER2 terminals
Connect a power amplifier, powered speakers, etc., here.
4 BOOTH OUT terminals
This is an output terminal for a booth monitor.
5 LINE/PHONO terminals
Connect a phono level output device (analog player (for MM cartridges), etc.) or a line level output device (DJ player, etc.) here.
Switch the terminals’ function according to the connected device
using the [LINE, PHONO] selector switch on this unit’s rear panel.
6 LINE, PHONO selector switch
Switches the function of the [LINE/PHONO] terminals.
7 Kensington security slot
8 LINK terminal
Connect the LAN cable (included) here.
rekordbox
DJ player
L
L
R
8
9
DJ
software
a
Analog player
L
R
6 5b
Microphone
Microphone
c
To power outlet
Power cord
d
9 SIGNAL GND terminal
Connects an analog player’s ground wire here. This helps reduce
noise when the analog player is connected.
a USB terminal
Connect to a computer.
! A USB hub cannot be used.
! To maintain performance, connect the unit and the computer
directly using a USB cable compatible with USB 2.0.
b MIC2 terminal
Connects a microphone here.
c MIC1 terminal
Connects a microphone here.
d AC IN
Connect this to a power outlet.
! Connect the power cord after all the connections between
devices have been completed.
! Be sure to use the included power cord.
En
6
Basic style
Computer
Playback on this unit is performed mainly using tracks prepared with rekordbox installed on a computer.
For rekordbox operations, see the rekordbox (Mac/Windows) user’s manual. You can see the rekordbox (Mac/Windows) user’s manual from [Help]
menu of rekordbox (Mac/Windows).
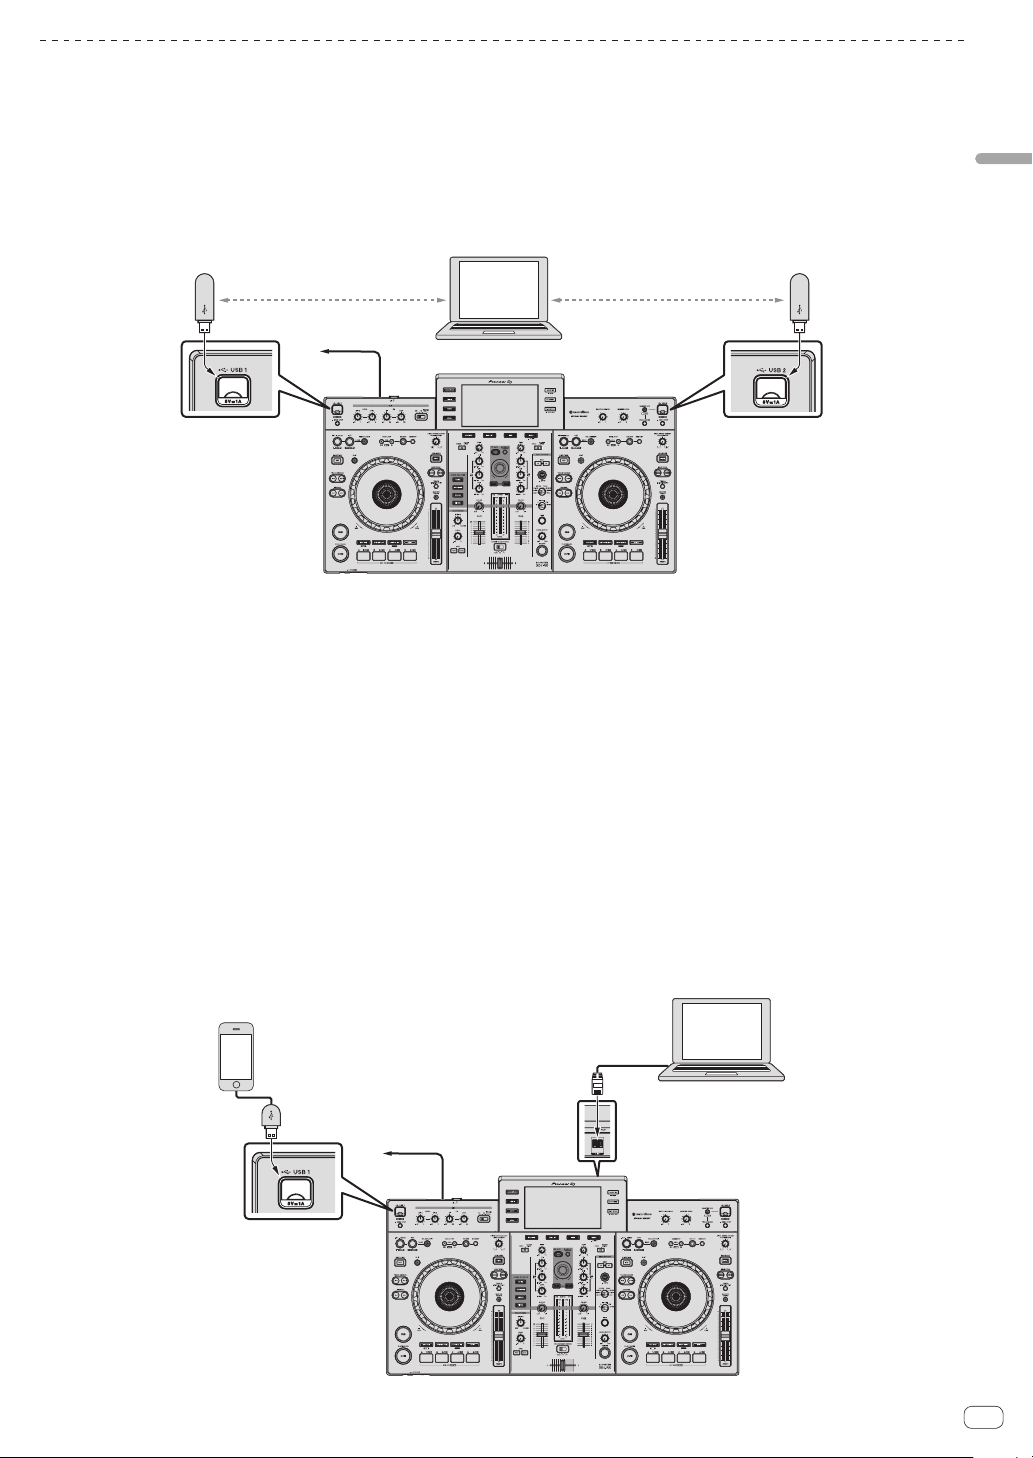
PRO DJ LINK (USB Export)
rekordbox music files and data can be exchanged with this unit using a memory device (flash memory, hard disk, etc.), eliminating the need to take a
computer into the DJ booth. Such information as playlists, cues, loops and hot cues set in advance with rekordbox can be used for playback.
USB device on which
rekordbox data is recorded
To power outlet
rekordbox
Power cord
USB device on which
rekordbox data is recorded
PRO DJ LINK (LINK Export)
! Tracks in rekordbox can be selected and played when the computer is taken into a DJ booth and connected to a computer on which rekordbox is
installed by LAN cable (CAT5e) or wireless LAN (Wi-Fi) router. Performances can be held using such information as playlists, cues, loops and hot
cues that have been set ahead of time with rekordbox.
! Tracks in rekordbox can be selected and played when connected to a mobile device on which rekordbox (iOS/Android) is installed by USB cable or
wireless LAN (Wi-Fi) router. Performances can be held using such information as playlists, cues, loops and hot cues that have been set ahead of
time with rekordbox.
! With wired LAN connections, one computer on which rekordbox is installed can be connected. The unit cannot be connected to a player compatible
to PRO DJ LINK.
With wireless LAN (Wi-Fi) connections, up to two computers or mobile devices on which rekordbox is installed can be connected.
!
! Use the wireless router (available in the market) and access point (available in the market) which can obtain a sufficient communication speed
such as IEEE802.11n, IEEE802.11g etc. Depending on the signal conditions in the usage environment or the wireless router and access point, PRO
DJ LINK connections may not operate properly.
iPod and iPhone that can be connected to this product
! This product is compatible with iPhone 6 Plus, iPhone 6, iPhone 5s, iPhone 5c, iPhone 5, iPhone 4s, iPhone 4, iPhone 3GS, and iPod touch (3rd,
4th, 5th generation).
! For the latest supported devices, see the below-mentioned Pioneer support DJ site.
http://pioneerdj.com/support/
Using a LAN cable/USB cable
Connections
Mobile device on which
rekordbox is installed
To power outlet
Power cord
rekordbox
Computer
En
7
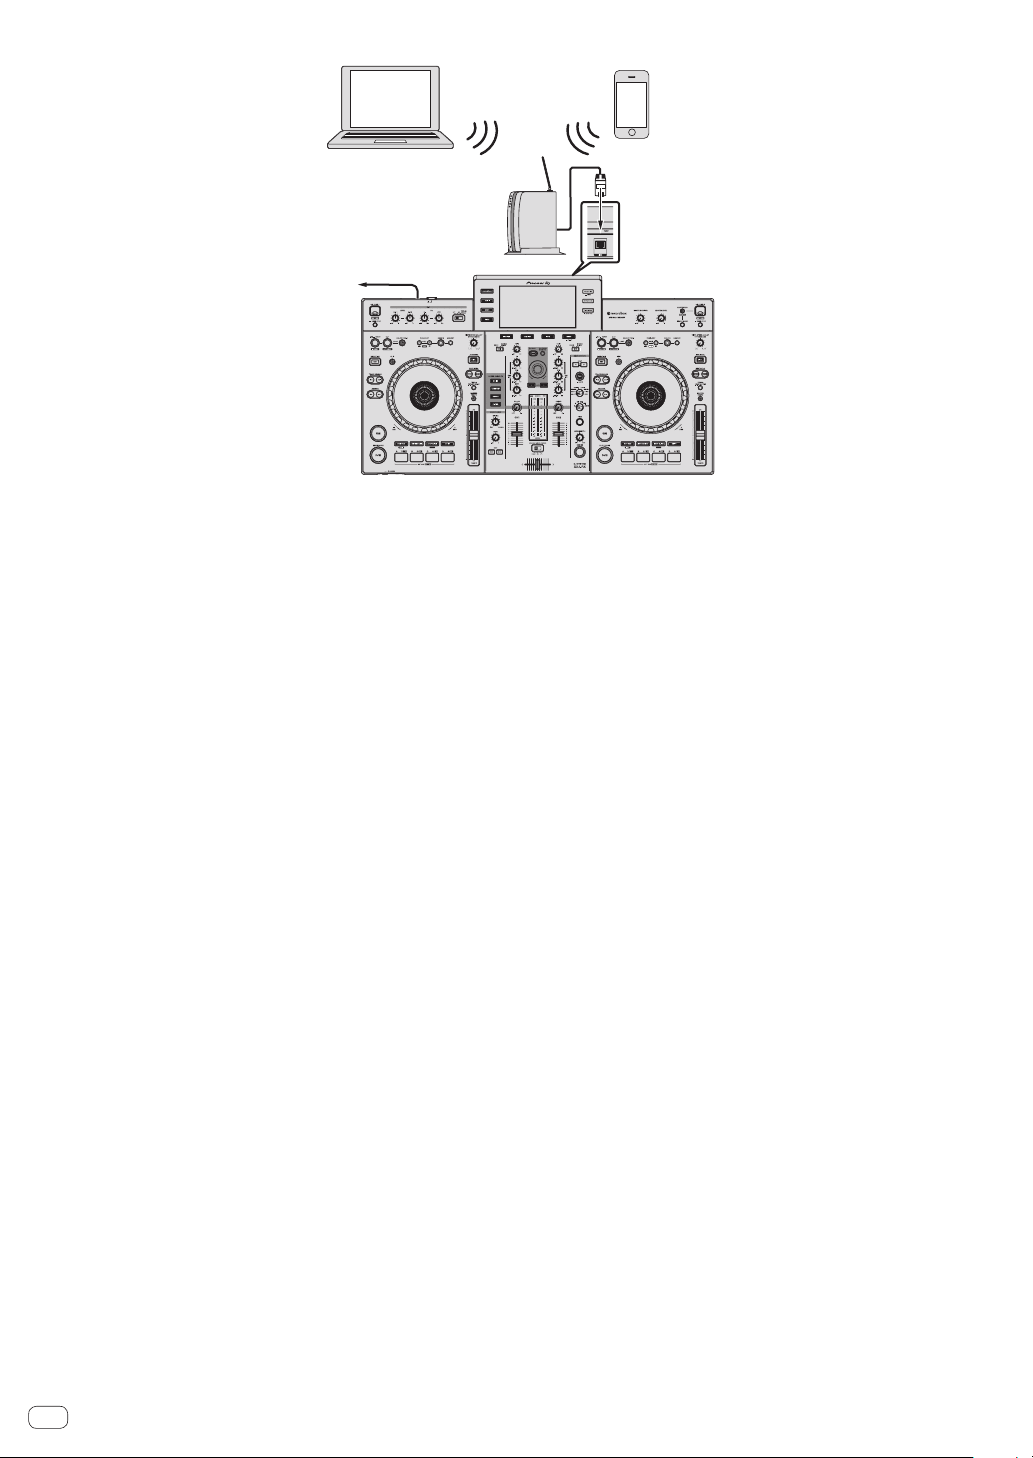
Using a wireless router and access points
To power outle
rekordbox
Computer
Power cord
t
Wireless router and
access point
Mobile device on which
rekordbox is installed
8
En
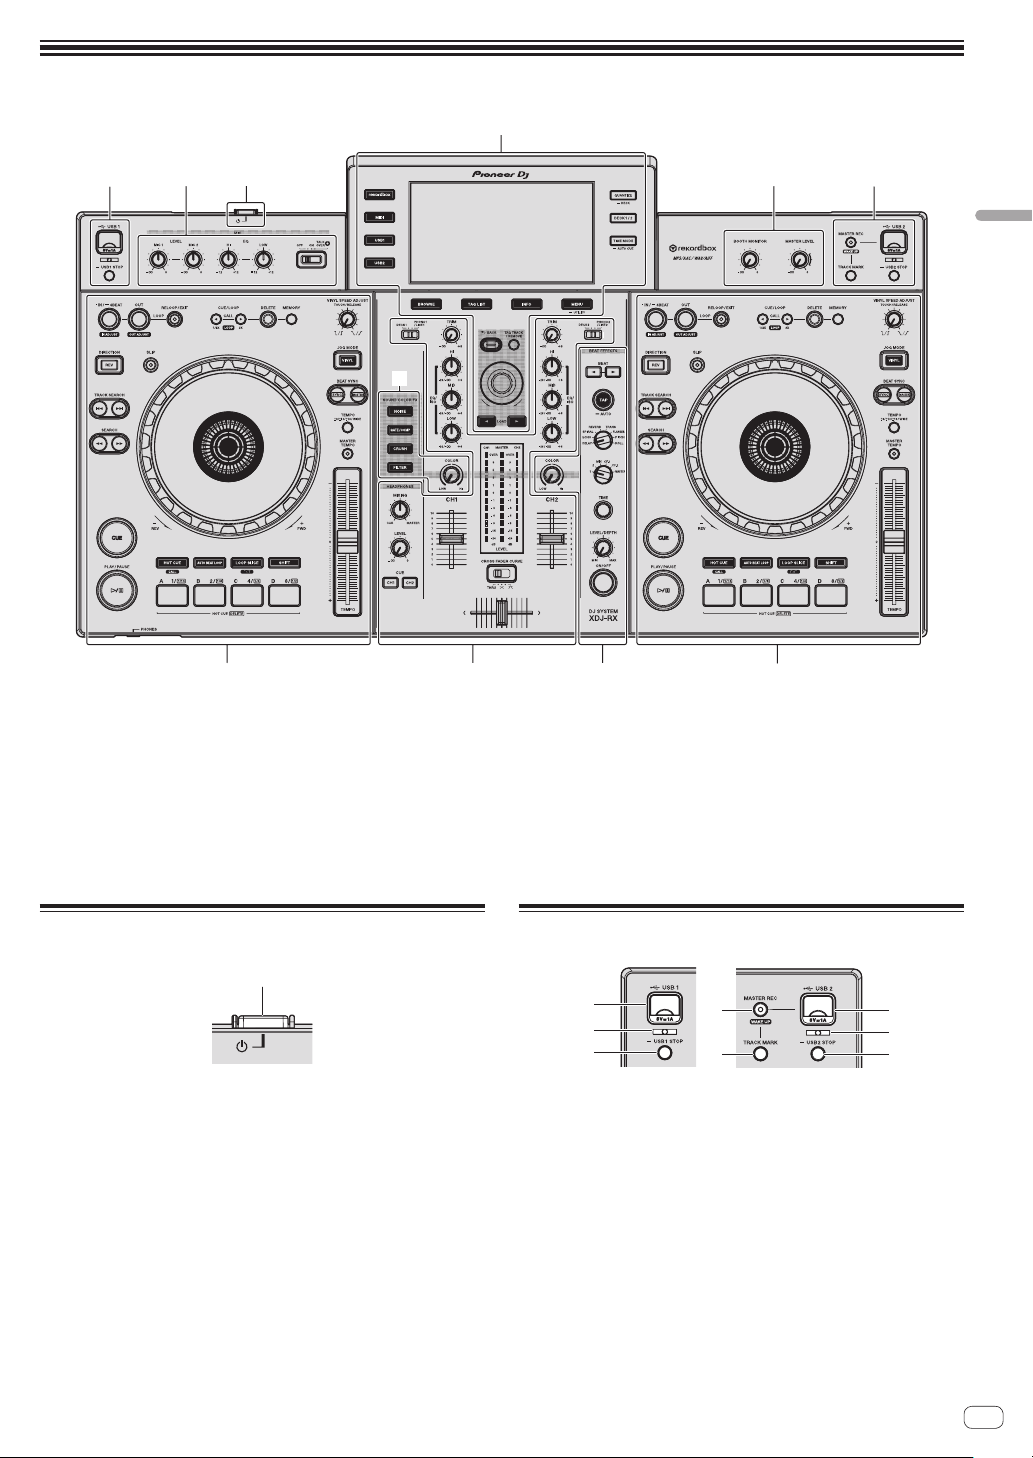
Part names and functions
3
4
6
5
3
1
2
3
1
2
3
5 5
1 Power section (page 9 )
2 USB device section (page 9 )
3 Deck section (page 10 )
4 Browse section (page 17 )
5 Mixer section (page 23 )
6 Effect section (page 25 )
12 2
Power section
Part names and functions
6
USB device section
1 u switch
Press to turn the power on and off.
= Turning the power on (p. 27 )
1
4
5
1 Device insertion slot for USB 1, 2
Insert USB devices here.
= Connecting and disconnecting USB devices (p. 27 )
2 USB 1,2 indicator
It lights, flashes when this unit is communicating with the USB
device.
= Connecting and disconnecting USB devices (p. 27 )
3 USB1,2 STOP button
Press this for over 2 seconds before disconnecting USB devices from
this unit.
= Connecting and disconnecting USB devices (p. 27 )
En
9
4
1
7
2
3
5
6
8
b
a
9
c
d e
q
p
4 MASTER REC (WAKE UP) button
! MASTER REC: This is used to record the sound output from the
unit on a USB device inserted in the device insertion slot for
USB2.
= Recording the performance (p. 10 )
! WAKE UP: Cancels the auto standby mode.
= About the auto standby function (p. 29 )
5 TRACK MARK button
It divides the tracks when they are being recorded on the USB device.
= Splitting tracks while recording (p. 10 )
Recording the performance
The same sound as the sound being output from the [MASTER1] terminal can be recorded as a WAV file on a USB device.
! The name of the files created when the sound is recorded is in the
format [REC***.WAV] (*** is a 3-digit number).
1 Insert the USB device in the USB2 device insertion
slot.
2 Press the [MASTER REC (WAKE UP)] button.
Recording starts.
The [MASTER REC (WAKE UP)] button flashes.
! When the [MASTER REC (WAKE UP)] button is pressed again, the
[MASTER REC (WAKE UP)] button turns off and recording stops.
! The recording capacity of a 1 GB USB device is about 90 minutes.
Splitting tracks while recording
Press the [TRACK MARK] button while recording.
The currently recording track is split and stored on the USB device.
The file is divided right at the point where the [TRACK MARK] button
is pressed. From this point onwards, the sound can continue to be
recorded as a new file.
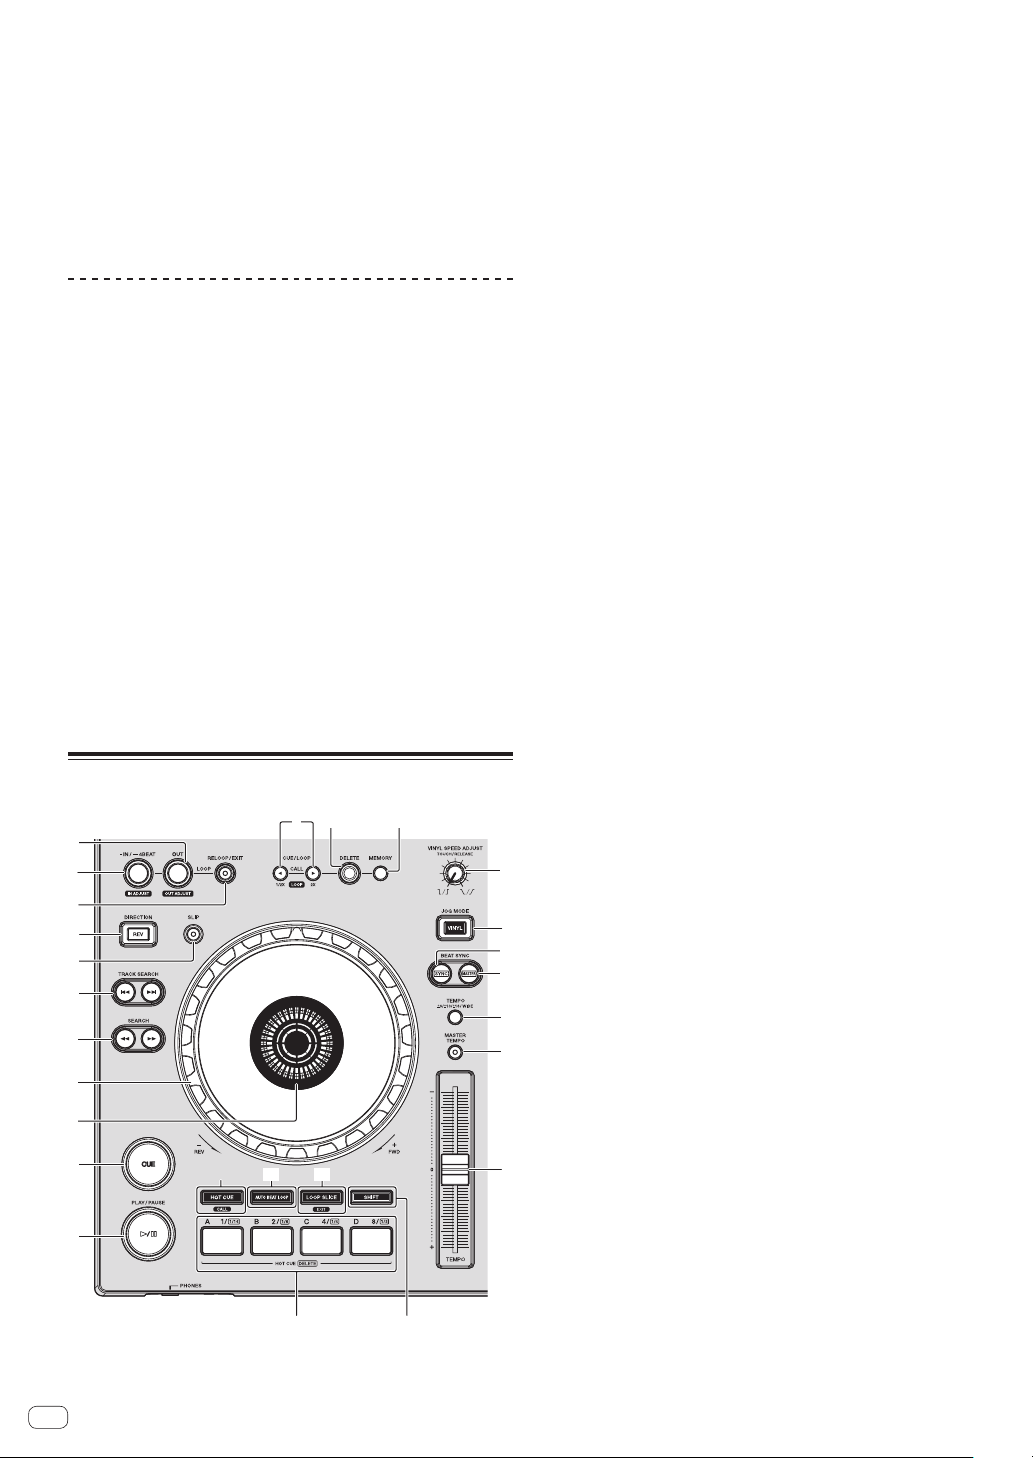
Deck section
o
nm
1 LOOP IN/4BEAT (IN ADJUST) button
Use this to set and fine-adjust the loop in point.
= Setting loops (p. 13 )
2 LOOP OUT (OUT ADJUST) button
Use this to set and fine-adjust the loop out point.
= Setting loops (p. 13 )
3 RELOOP/EXIT button
Use this to return to loop playback (reloop) or cancel loop playback
(loop exit).
= Returning to Loop playback (Reloop) (p. 13 )
= Canceling Loop playback (Loop Exit) (p. 13 )
4 DIRECTION, REV button
Use this to turn reverse playback on and off.
This lights when playing in the reverse direction.
= Playing in reverse (p. 12 )
5 SLIP button
= Using the slip mode (p. 15 )
6 TRACK SEARCH o, p buttons
Use these to search for the beginnings of tracks.
7 SEARCH m, n buttons
The track is forwarded/reversed while the button is held in.
= Forward and reverse scanning (p. 11 )
8 Jog dial
! Scratch
When the [VINYL] mode is set and the jog dial is turned while
touching a metal part on its top, the sound is played according to
the direction and speed at which the jog dial is turned.
= Operating the jog dial (p. 12 )
! Pitch bend
The playing speed can be adjusted by turning the outer part of
the jog dial during playback.
= Operating the jog dial (p. 12 )
9 Jog dial display section
= Jog dial display section (p. 19 )
a CUE button
Sets a cue point or moves the cue point.
= Setting Cue (p. 12 )
f
b f (PLAY/PAUSE) button
Use this to play/pause tracks.
g
h
i
j
k
= Playback (p. 11 )
c CUE/LOOP CALL, c (LOOP 1/2X), d (LOOP 2X) buttons
Use these to call out stored cue and loop points.
= Calling out stored cue or loop points (p. 14 )
When pressed during loop playback, the loop is cut or extended.
= Cutting loops (Loop Cut) (p. 13 )
= Extending loops (loop doubling) (p. 13 )
d DELETE button
Use this to delete cue and loop points.
= Deleting stored cue or loop points (p. 14 )
e MEMORY button
l
Use this to store cue and loop points in the memory.
= Storing cue or loop points (p. 13 )
f VINYL SPEED ADJUST TOUCH/RELEASE control
Use this to adjust the speed at which playback slows down and stops
when the top of the jog dial is pressed and the speed at which normal playback resumes when the top of the jog dial is released.
= Adjusting the playback and stopping speeds (p. 12 )
g JOG MODE (VINYL) button
Use this to switch between the [VINYL] mode and normal mode.
= Switching the jog dial mode (p. 12 )
10
En

h SYNC button
Synchronizes to the master deck’s tempo.
= Using the SYNC function (p. 16 )
i MASTER button
Use this to set the track loaded in this unit as the master for the beat
sync function.
= Using the SYNC function (p. 16 )
j TEMPO RANGE button
The [TEMPO] slider’s range of variation switches each time this is
pressed.
= Selecting the playing speed adjustment range (p. 11 )
k MASTER TEMPO button
Use this to turn the master tempo function on and off.
= Adjusting the playing speed without changing the pitch (Master
Tempo) (p. 11 )
l TEMPO slider
Use this to adjust the track playing speed.
= Adjusting the playing speed (Tempo control) (p. 11 )
m HOT CUE/CALL button
You can use this button to switch to the Hot Cue function.
= Using hot cues (p. 14 )
n AUTO BEAT LOOP button
You can use this button to switch to the Auto Beat Loop function.
= Using Auto Beat Loops (p. 14 )
o LOOP SLICE/EXIT button
You can use this button to switch to the Loop Slice function.
= Using Loop Slice (p. 15 )
p SHIFT button
When the Performance button is pressed while keeping the [SHIFT]
button pressed, a different function is called out.
q Performance buttons
Using with the hot cue function
= Using hot cues (p. 14 )
Using with the Auto Beat Loop function
= Using Auto Beat Loops (p. 14 )
Using with the Loop Slice function
= Using Loop Slice (p. 15 )
Finding the beginnings of tracks (Track
Search)
Press one of the [TRACK SEARCH o, p] buttons.
Press the [p] to move to the beginning of the next track.
When [o] is pressed, playback returns to the beginning of the currently playing track. When pressed twice in a row, playback returns to
the beginning of the previous track.
! It is not possible to move to a different category or folder with the
track search function.
Super fast search
Turn the jog dial while pressing one of the [SEARCH m,
n] buttons.
The track is fast-forwarded/fast-reversed in the direction in which the jog
dial is spun.
! When the [SEARCH m, n] button is released, this function is
canceled.
! When you stop the jog dial from spinning, normal playback resumes.
! The fast-forward/fast-reverse speed can be adjusted according to the
speed at which the jog dial is spun.
Super fast track search
Turn the jog dial while pressing one of the
[TRACK SEARCH o, p] buttons.
The track is advanced at high speed in the direction in which the jog dial
was turned.
Adjusting the playing speed (Tempo
control)
Move the [TEMPO] slider forward or backward.
The playing speed increases when the slider is moved to the [+] side
(towards you), decreases when the slider is moved to the [–] side (away
from you).
The rate at which the playing speed is changed is indicated on the main
unit display.
Part names and functions
Playback
Press the [f (PLAY/PAUSE)] button.
If the auto-play mode of the [UTILITY] screen is OFF, the track is played
to the end, then the stop mode is set. The next track is not played.
Pausing
During playback, press the [f (PLAY/PAUSE)] button.
! Playback resumes when [f (PLAY/PAUSE)] button is pressed
again.
Forward and reverse scanning
Press one of the [SEARCH m, n] buttons.
The track is scanned in the forward or reverse direction while one of the
[SEARCH m, n] buttons is pressed.
! If the auto-play mode of the [UTILITY] screen is OFF, you cannot
rewind to the previous track or skip ahead to the next track.
! It is not possible to move to a different category or folder during
forward or reverse scanning.
Selecting the playing speed adjustment range
Press the [TEMPO RANGE] button.
The playing speed adjustment range switches each time the button is
pressed.
[WIDE, ±16, ±10, ±6] is displayed on the main unit display.
! Adjustment is possible in units of 0.02 % when [±6] % is selected,
0.04 % when [±10] % or [±16] % is selected, and 0.5 % when [WIDE]
is selected.
! The [WIDE] adjustment range is ±100 %. When set to –100 %, play-
back stops.
Adjusting the playing speed without changing
the pitch (Master Tempo)
Press the [MASTER TEMPO] button.
The [MASTER TEMPO] button lights. The pitch does not change even
when the playing speed is changed with the [TEMPO] slider.
! The sound is digitally processed, so the sound quality changes.
En
11
 Loading...