

Page 1
DJ Controller
DDJ-SP1
http://pioneerdj.com/support/
The Pioneer DJ support site shown above offers FAQs, information on software and various other types of
information and services to allow you to use your product in greater comfort.
http://serato.com/
For the latest version of the Serato DJ software, access Serato.com and download the software from there.
Operating Instructions (Advanced Edition)
Page 2
Contents
How to read this manual
! Thank you for buying this Pioneer product.
Be sure to read this booklet and the “Operating Instructions (Basic
Edition)” included with this unit. Both include important information
that should be fully understood before using this product.
! In this manual, names of screens and menus displayed on the prod-
uct and on the computer screen, as well as names of buttons and
terminals, etc., are indicated within brackets. (e.g.: [LOAD] button,
[AUTO LOOP] control)
! Please note that the screens and specifications of the software
described in this manual as well as the external appearance and
specifications of the hardware are currently under development and
may differ from the final specifications.
! Please note that depending on the operating system version, web
browser settings, etc., operation may differ from the procedures
described in this manual.
This manual consists mainly of descriptions of the functions of this
unit as hardware. For details about operating the Serato DJ software,
see the Serato DJ software’s manual, and for instructions on operating Serato DJ-certified devices, see the respective devices’ operating
instructions.
Before start
Features ....................................................................................................... 3
Operating environment .............................................................................. 3
About the Serato Video software ............................................................... 3
Connections and part names
Connections ................................................................................................ 4
Part names and functions ......................................................................... 4
Basic Operation
Starting the system ..................................................................................... 8
Importing tracks.......................................................................................... 8
Loading tracks ............................................................................................. 8
Playing tracks .............................................................................................. 8
Using the performance pads ..................................................................... 8
Using effects ............................................................................................... 8
Switching the effect’s tempo mode .......................................................... 9
Quitting the system .................................................................................... 9
Advanced Operation
Using auto loops ....................................................................................... 10
Using the performance pads ................................................................... 10
Using the sampler velocity mode ............................................................ 13
Using effects ............................................................................................. 13
Using Serato Video ................................................................................... 15
Using the slip mode .................................................................................. 18
Changing this unit’s settings................................................................... 20
Additional information
Troubleshooting ........................................................................................ 23
Using as a controller for other DJ software ............................................ 24
About trademarks and registered trademarks ...................................... 24
Cautions on copyrights ............................................................................ 24
En
2
Page 3
Before start
Before start
Features
This unit is a DJ controller that carries over the operability and reliability
of Pioneer DJ equipment that has gained a high reputation among many
professional DJs and clubs. It supports and is designed specifically for
use with “Serato DJ”, the DJ software by Serato. Adding this unit to a
digital DJ system consisting of a Pioneer DJ player or turntable and a
Serato DJ-supporting mixer, or a DJ controller and Serato DJ makes it
possible to bring out the best in the performance functions provided by
Serato DJ to achieve a wide variety of performance possibilities intuitively and with a highly operable interface.
Furthermore, this unit also supports “Serato Video”, a plug-in software
application adding video mixing control capabilities to Serato DJ, so
video performances can be created with simple operations during DJ
performances.
“PERFORMANCE PADS”
This unit is equipped with large performance pads allowing the four
functions of Serato DJ (Hot Cue, Roll, Slicer and Sampler) to be operated
with dynamic actions (tapping, tapping repeatedly, etc.). The pads are in
rubber, so they can be operated without getting tired, even during long
performances. When using the Sampler mode, users can select one of
four velocity curves to achieve dynamically inflected performances.
Unique multi-facet design & Professional
Build Quality
In consideration of portability and installation in DJ booths, this unit has
a thin, horizontally long 2-deck, 2-effect unit style maximizing the performance of Serato DJ. In addition, aluminum material is used for the top
panel to achieve robustness and a design with a solid, luxurious look.
Furthermore, rubber is used for the pads and knobs, making for not only
high sense of quality but also high operability.
“Serato DJ” Supported
This unit supports the “Serato DJ” software, which offers a great number
of functions required for DJ performances. All of this unit’s buttons and
controls are preset to work with the software, so DJ performances can
be conducted simply by connecting this unit to a computer. In addition, Pioneer has collaborated with Serato to jointly develop the “Slip”
function.
“SLIP MODE”
This unit is equipped with a “Slip Mode” function with which the music
continues in the background while loops, hot cues, etc., are being
played. This enables DJ performances that leave the development of the
original music unchanged, even after loops, hot cues, etc., have finished
playing.
“Serato Video” Supported
This unit supports Serato Video, a plug-in software application adding
video mixing control capabilities to Serato DJ. The unit is equipped with
a “Serato Video control mode” for controlling the video effects, transition
effects, etc., offered by Serato Video, and Serato Video can be operated
intuitively using this unit’s buttons and controls.
Operating environment
The equipment and software below are required in order to operate this
unit.
DJ controller or DJ mixer
A separate Serato DJ-certified mixer (e.g. DJM-900SRT) or controller
(e.g. DDJ-S1) is required.
Serato DJ software
Serato DJ is a DJ software application by Serato. DJ performances are
possible by connecting the computer on which this software is installed
to this unit.
! Serato DJ is not included with this unit. Download the latest version
of Serato DJ from the Serato site below.
http://serato.com/
! For information on the Serato DJ software, contact Serato.
Computer on which the Serato DJ software operates
A USB 2.0 port is required to connect the computer with this unit.
A total of two USB 2.0 ports are required on the computer: one for this
unit, one for the Serato DJ-certifiable DJ mixer or DJ controller.
Environment allowing connection to the Internet
An environment allowing connection to the Internet is required for such
operations as downloading Serato DJ and Serato Video.
Note on using an Internet connection
! A separate contract with and payment to a provider offering Internet
services is required.
About the Serato Video software
Serato Video is a software plug-in for Serato DJ allowing DJ performances with sound and video.
Minimum operating environment
Windows Mac
Operating system Microsoft Windows 7
CPU Intel
Required memory 2 GB or more of RAM
Free space on hard
disk
Graphics card
! For the latest information on the required operating environment for Serato
Video, see “Software Info” under “DDJ-SP1” on the Pioneer DJ support site.
http://pioneerdj.com/support/
! Operation is not guaranteed on all computers, even if all the required operating
environment conditions indicated here are fulfilled.
! Depending on the computer’s status (power savings setting, etc.), the process-
ing capabilities of the CPU or hard disk may be insufficient. When using a
notebook computer in particular, always use Serato Video with the computer
connected to an AC power source and set to the high performance mode.
! Operating System support assumes you are using the latest point release for
that version.
®
processor, Core™ Duo 2.0 GHz or greater
5 GB or greater
NVIDIA GeForce
or higher
®
8400 or higher, or ATI Radeon™ X1650
Mac OS X: 10.8, 10.7 and
10.6
En
3
Page 4
Connections and part names
DDJ-S1, etc.
1
3
4
2
34
2
1
PANEL SELECT
ON
FX
SELECT
ON
FX
SELECT
ON
FX
SELECT
TAP
FX
MODE
43215
789a
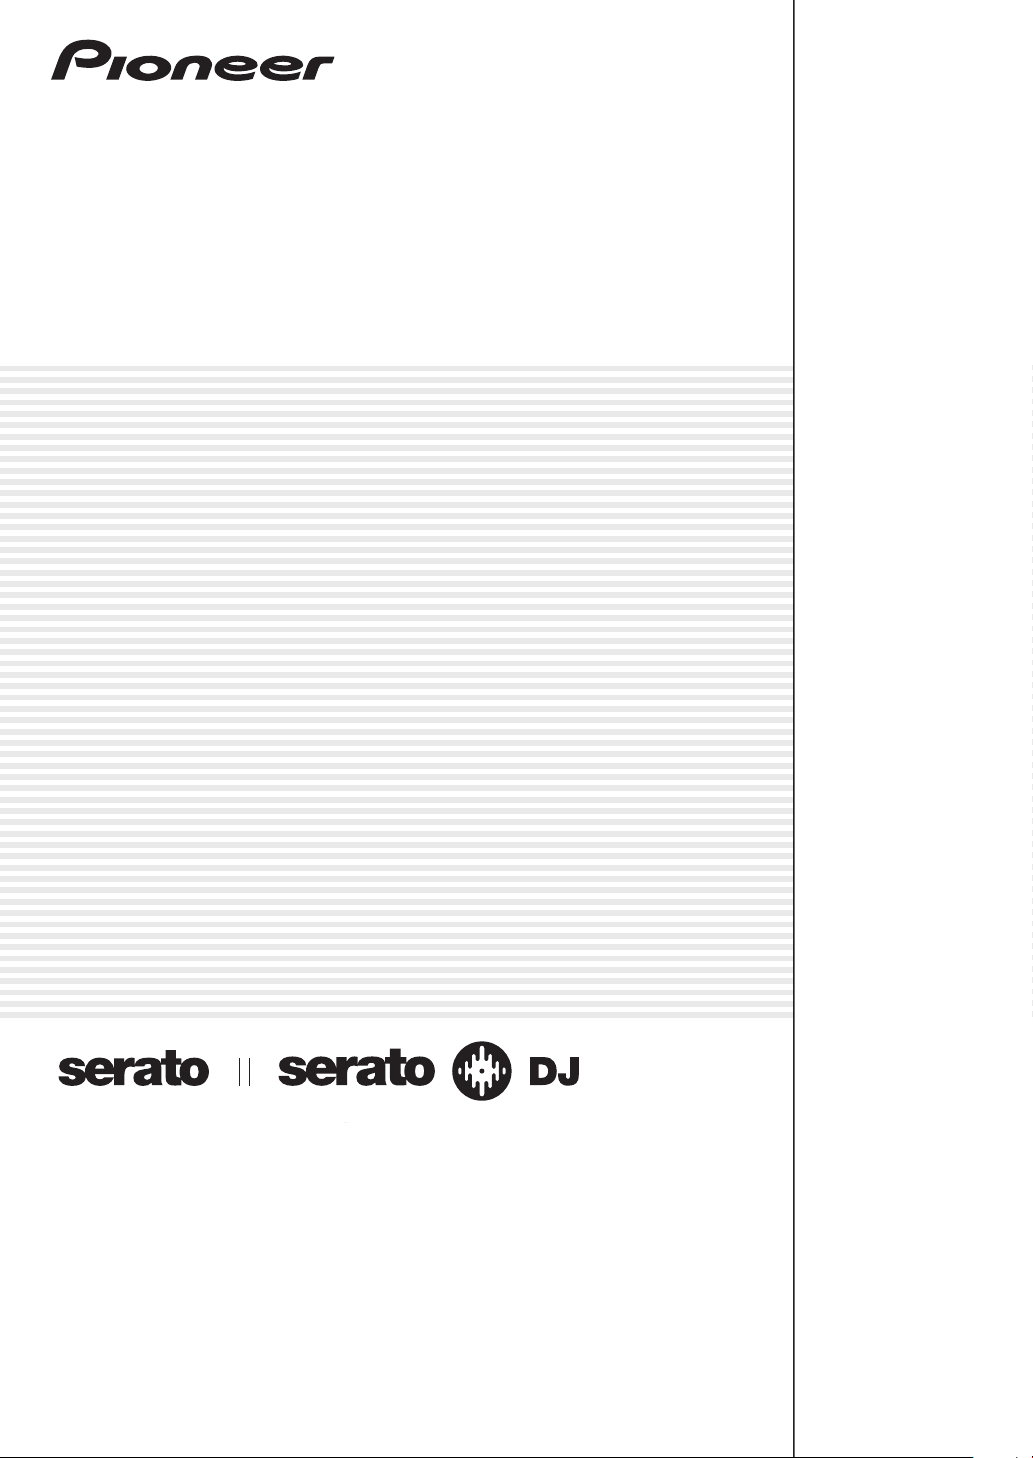
Connections
When using in combination with a DJ mixer
DJ Mixer
USB cable
USB cable
Audio cable
Computer
Analog player
SYNC
DDJ-SP1
Audio cable Audio cable
Analog player
DJM-900SRT, etc.
Audio cable
DJ player
When using in combination with a DJ controller
DJ player
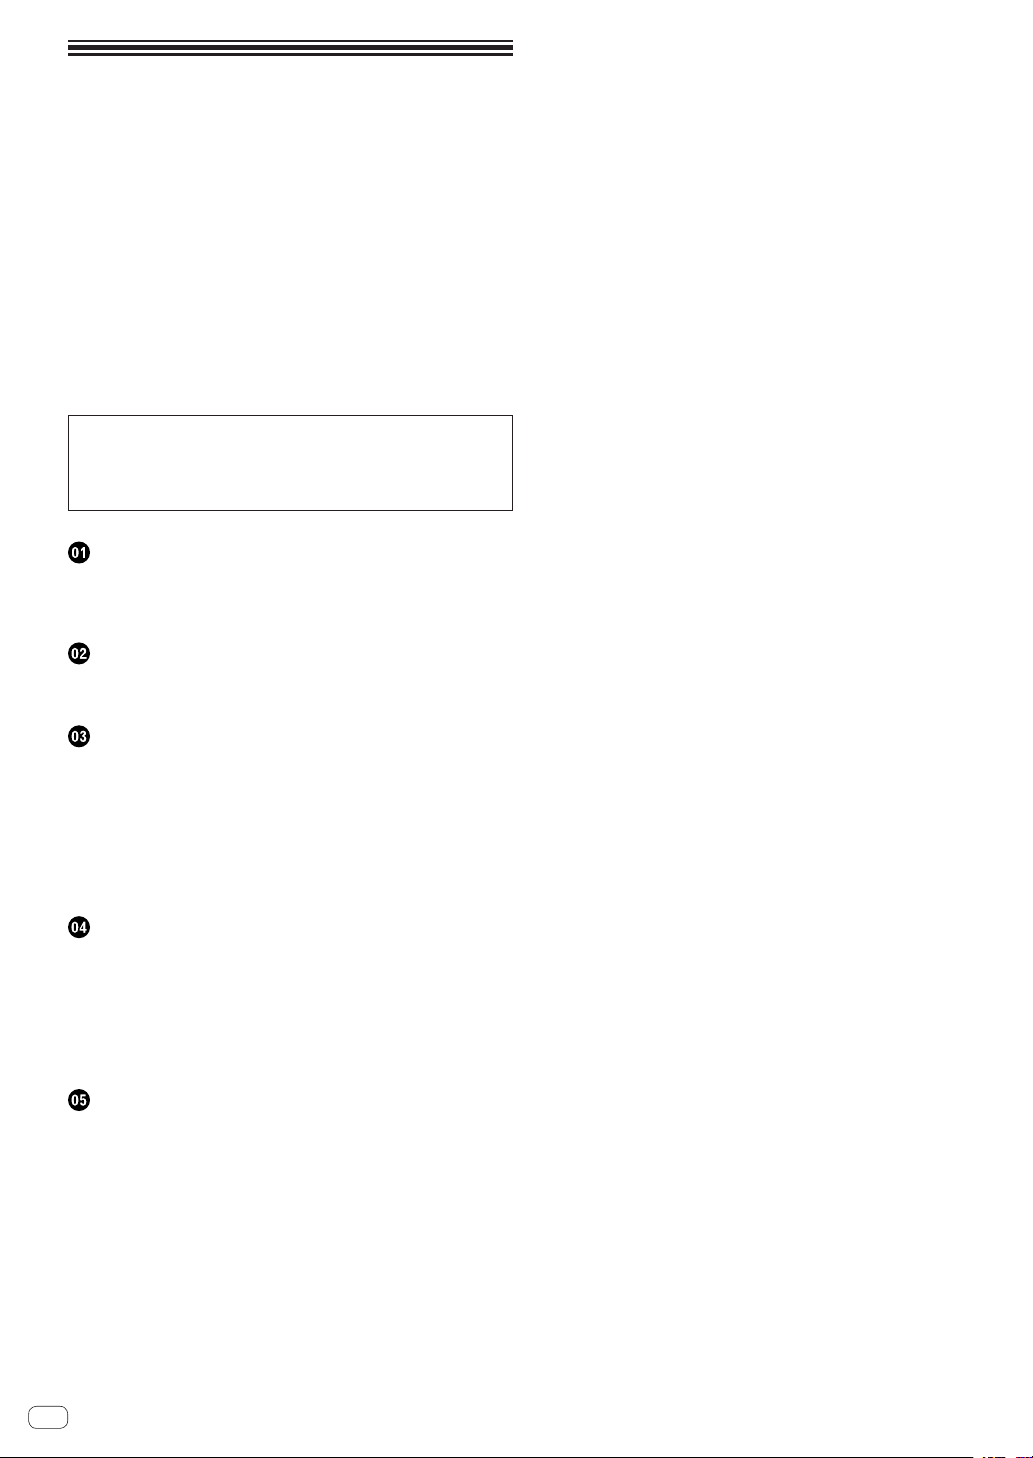
Part names and functions
The typical functions of the buttons and controls when using Serato DJ
are described below.
1
3
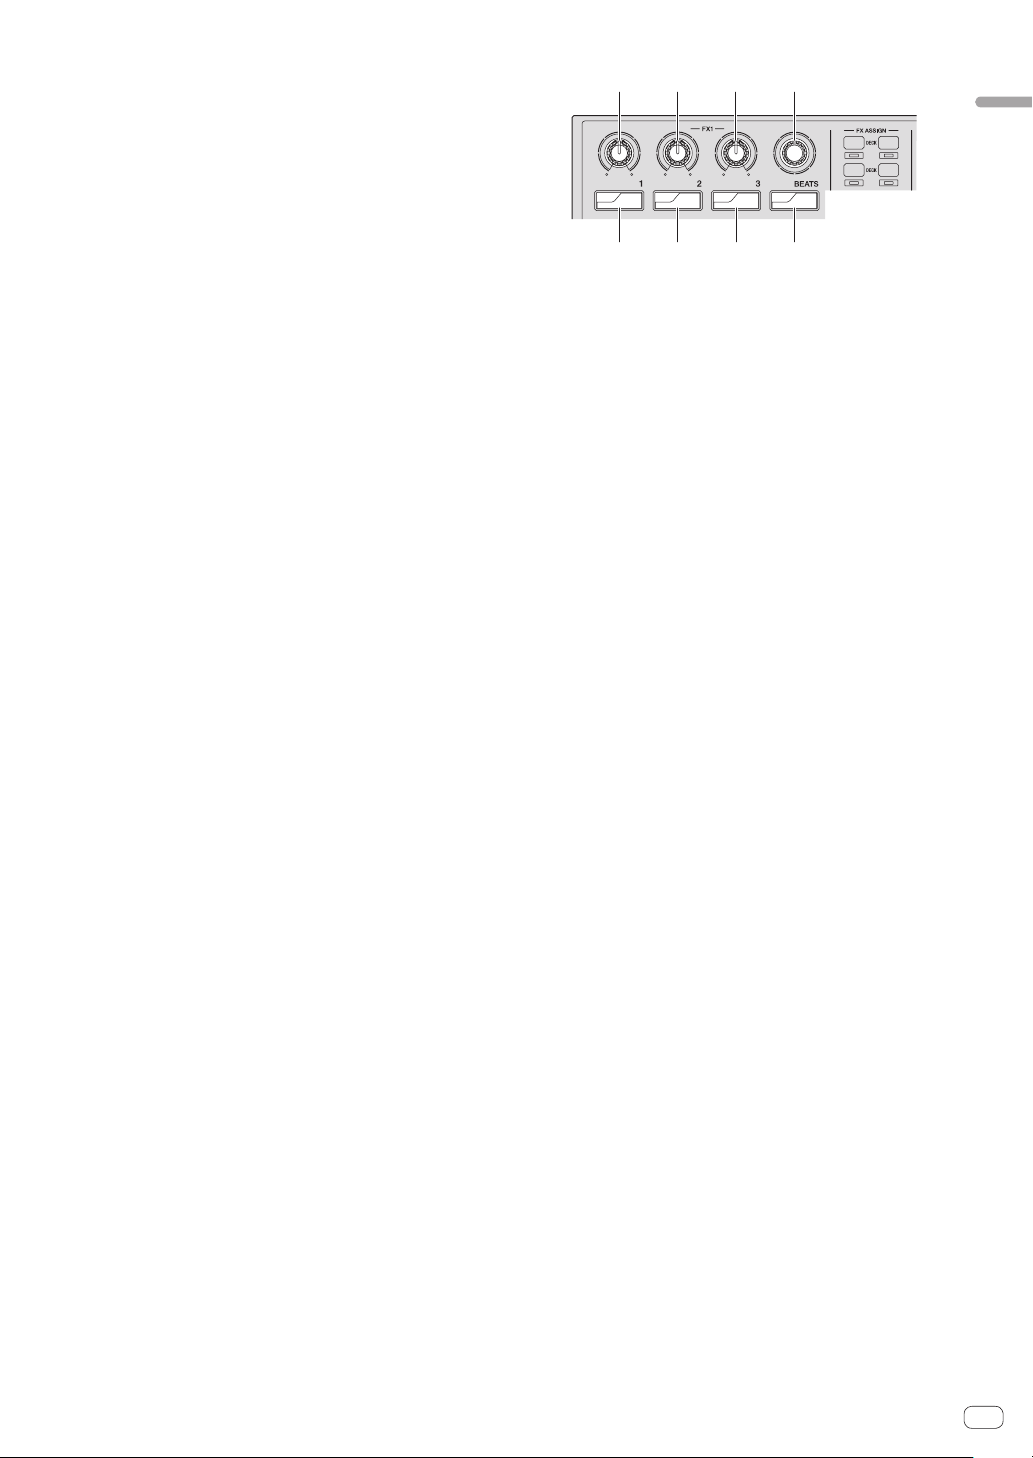
1 Effect section
2 Deck section
3 Browser section
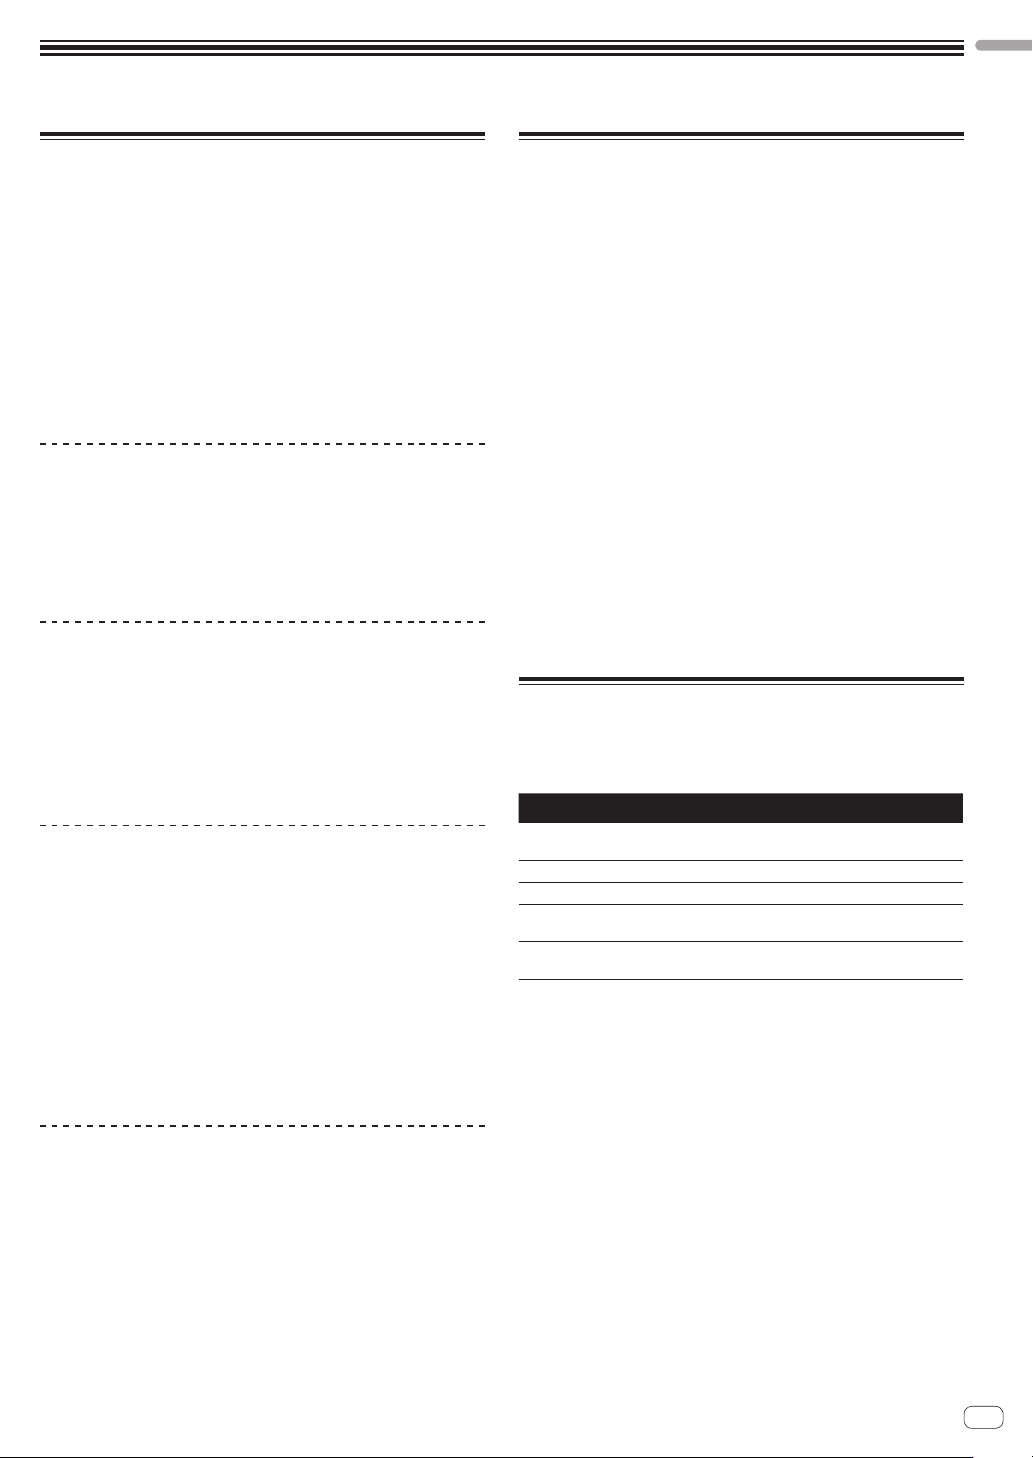
Effect section
When the Serato Video control mode is off
2
4
En
DJ Controller
SYNC
DDJ-SP1
1 2
10
10
9
9
8
8
7
7
6
6
5
5
4
4
3
3
2
2
1
1
0
0
0 0
2X1/2X
USB cable
USB cable
Computer
6
There are two DJ-FX modes for Serato DJ effects, the “single FX mode”
and the “multi FX mode”. The items that can be adjusted depend on
which mode is set.
! Multi FX mode: Up to three effects can be selected per effect unit,
and each effect has one adjustable parameter.
! Single FX mode: One effect can be selected per effect unit and there
are multiple adjustable parameters.
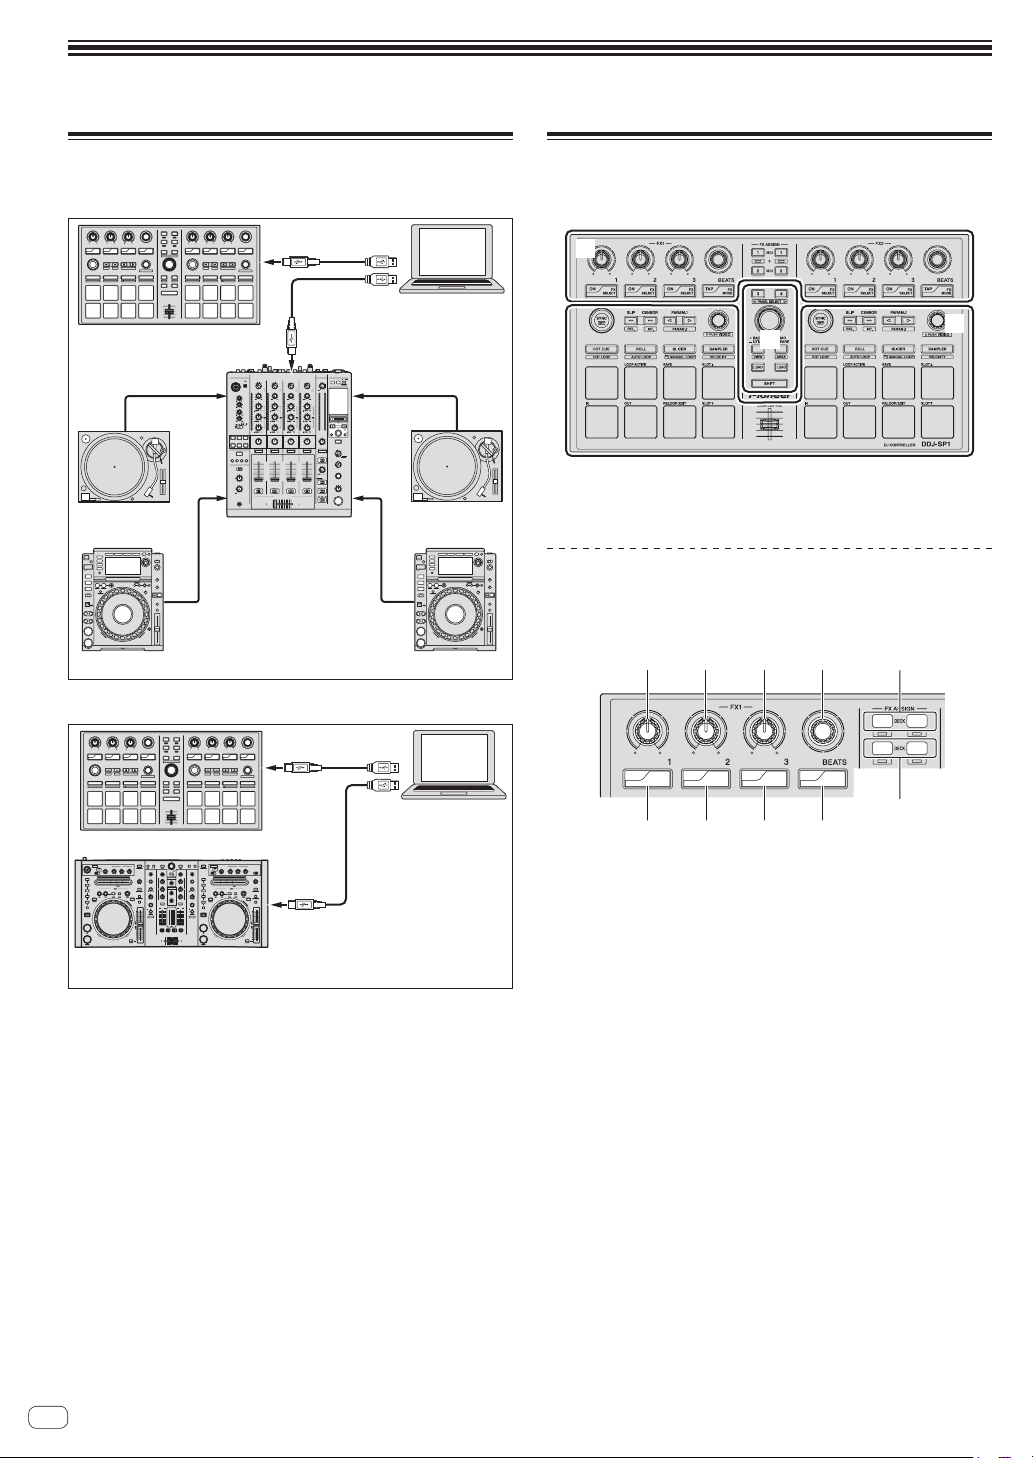
1 Effect parameter 1 control
Multi FX mode:
Adjusts the first effect’s parameter.
Single FX mode:
Adjusts effect parameter 1.
2 Effect parameter 2 control
Multi FX mode:
Adjusts the second effect’s parameter.
Single FX mode:
Adjusts effect parameter 2.
3 Effect parameter 3 control
Multi FX mode:
Adjusts the third effect’s parameter.
Single FX mode:
Adjusts effect parameter 3.
4 FX BEATS control
Adjusts the effect time.
Page 5
5 FX ASSIGN 1 buttons
1
3
4
2
34
2
1
PANEL SELECT
ON
FX
SELECT
ON
FX
SELECT
ON
FX
SELECT
TAP
FX
MODE
4321
Press:
The button on the left turns FX1 on and off for deck 1.
The button on the right turns FX2 on and off for deck 1.
[SHIFT] + press:
The button on the left turns FX1 on and off for deck 3.
The button on the right turns FX2 on and off for deck 3.
6 FX ASSIGN 2 buttons
Press:
The button on the left turns FX1 on and off for deck 2.
The button on the right turns FX2 on and off for deck 2.
[SHIFT] + press:
The button on the left turns FX1 on and off for deck 4.
The button on the right turns FX2 on and off for deck 4.
7 TAP button
Press:
When the [TAP] button is pressed three times or more while in the
auto-tempo mode, the mode switches to the manual tempo mode.
When the [TAP] button is pressed for over 1 second while in the
manual-tempo mode, the mode switches to the auto tempo mode.
= Switching the effect’s tempo mode (p.9)
[SHIFT] + press:
Switches the DJ-FX mode. The mode switches between the multi FX
mode and single FX mode each time the button is pressed.
8 Effect parameter 3 button
Multi FX mode:
Press:
Turns the third effect on and off.
[SHIFT] + press:
Switches the third effect’s type.
Single FX mode:
Press:
Switches effect parameter 5 or turns the effect parameter on and off.
[SHIFT] + press:
Switches the effect type.
9 Effect parameter 2 button
Multi FX mode:
Press:
Turns the second effect on and off.
[SHIFT] + press:
Switches the second effect’s type.
Single FX mode:
Press:
Switches effect parameter 4 or turns the effect parameter on and off.
[SHIFT] + press:
Switches the effect type.
a Effect parameter 1 button
Multi FX mode:
Press:
Turns the first effect on and off.
[SHIFT] + press:
Switches the first effect’s type.
When the Serato Video control mode is on
Connections and part names
5678
When using Serato Video, when the Serato Video control mode is on,
some of the controls and buttons in the effect section can be used to
operate Serato Video functions.
1 Effect parameter 1 control
Adjusts the video effect slot 1 video effect.
= Switching to the Serato Video control mode (p.17)
2 Effect parameter 2 control
Adjusts the video effect slot 2 video effect.
3 Effect parameter 3 control
Control on left: Adjusts the image effect’s opacity.
Control on right: Adjusts the text effect’s opacity.
4 FX BEATS control
Switches the fader transition type.
5 TAP button
Press:
The fader transition type switches in order each time the [TAP] but-
ton is pressed.
[SHIFT] + press:
Turns the fader transition crossfader link on and off.
6 Effect parameter 3 button
Press:
Button on left: Turns the image effect on and off.
Button on right: Turns the text effect on and off.
[SHIFT] + press:
Button on left: Switches the image effect’s animation.
Button on right: Switches the text effect’s animation.
7 Effect parameter 2 button
Press:
Turns the video effect slot 2 video effect on and off.
[SHIFT] + press:
Switches the video effect slot 2 effect type.
8 Effect parameter 1 button
Press:
Turns the video effect slot 1 video effect on and off.
[SHIFT] + press:
Switches the video effect slot 1 effect type.
Single FX mode:
Press:
Turns the effect on/off.
[SHIFT] + press:
Switches the effect type.
En
5
Page 6
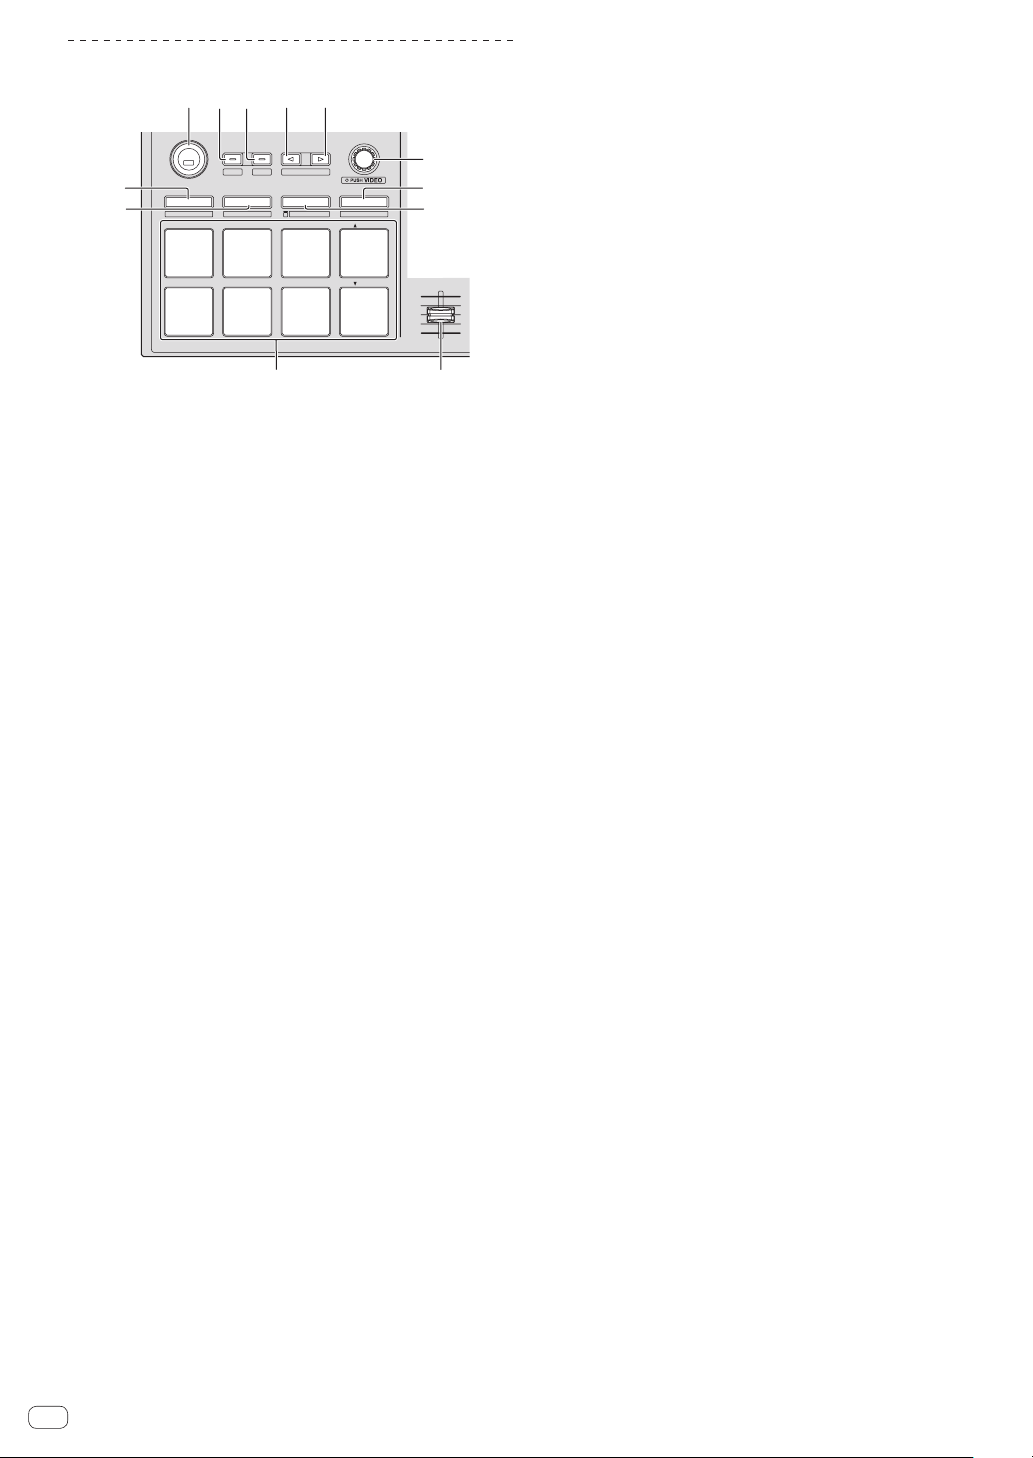
Deck section
PANEL SELECT
• BACK
— UTILITY
LOAD
PREPARE
VIEW
LOAD LOAD
AREA
SHIFT
SAMPLER VOL
REL.
INT.
PARAM.2
SLIP
CENSOR
PARAM.1
AUTO LOOP
HOT CUE
HOT LOOP
ROLL
AUTO LOOP
SLICER
MANUAL LOOP
SAMPLER
VELOCITY
IN OUT
LOOPACTIVE
RELOOP / EXIT
SAVE
SLOT
SLOT
SYNC
OFF
a
b
89
1
23 44
5
6
7
1 SYNC button
Press:
The tempos (pitches) and beat grids between tracks on multiple
decks can be synchronized automatically.
[SHIFT] + press:
Cancels the sync mode.
2 SLIP button
Press:
Turns the slip mode on and off.
7 SLICER mode button
Press:
Sets the slicer mode.
! The mode switches between slicer mode 1 and slicer mode 2
each time the button is pressed.
! To cancel the slicer mode, press one of the [ROLL] mode,
[SAMPLER] mode or [HOT CUE] mode buttons.
= Using the Slicer function (p.11)
[SHIFT] + press:
Sets the manual loop mode.
= Using manual loops (p.12)
8 SAMPLER VOLUME fader
Adjusts the sampler’s overall sound level.
9 Performance pads
Used for hot cue, hot loop, loop roll, auto loop, slicer, manual loop
and sampler playback.
a ROLL mode button
Press:
Sets the roll mode.
[SHIFT] + press:
Sets the auto loop mode.
= Using auto loops (p.12)
b HOT CUE mode button
Press:
Sets the hot cue mode.
= Using hot cues (p.10)
[SHIFT] + press:
Sets Serato DJ to the relative mode.
3 CENSOR button
Press:
The track is played in the reverse direction while the [CENSOR] button is pressed, and normal playback resumes when the button is
released.
[SHIFT] + press:
Sets Serato DJ to the internal mode.
4 PARAM.1/PARAM.2 button
Press:
Sets a parameter for the loop roll, auto loop, slicer, manual loop and
sampler modes.
[SHIFT] + press:
Sets a different parameter for the auto loop, slicer and manual loop
modes.
= Using the performance pads (p.10)
5 AUTO LOOP control
Turn:
Selects the auto loop loop beat.
Press:
Turns the auto loop function on and off.
[SHIFT] + press:
Switches to the mode for using Serato Video.
6 SAMPLER mode button
Press:
Sets the sampler mode.
[SHIFT] + press:
Sets the sampler velocity mode.
= Using the sampler velocity mode (p.13)
[SHIFT] + press:
Sets the hot loop mode.
= Using hot loops (p.12)
En
6
Page 7
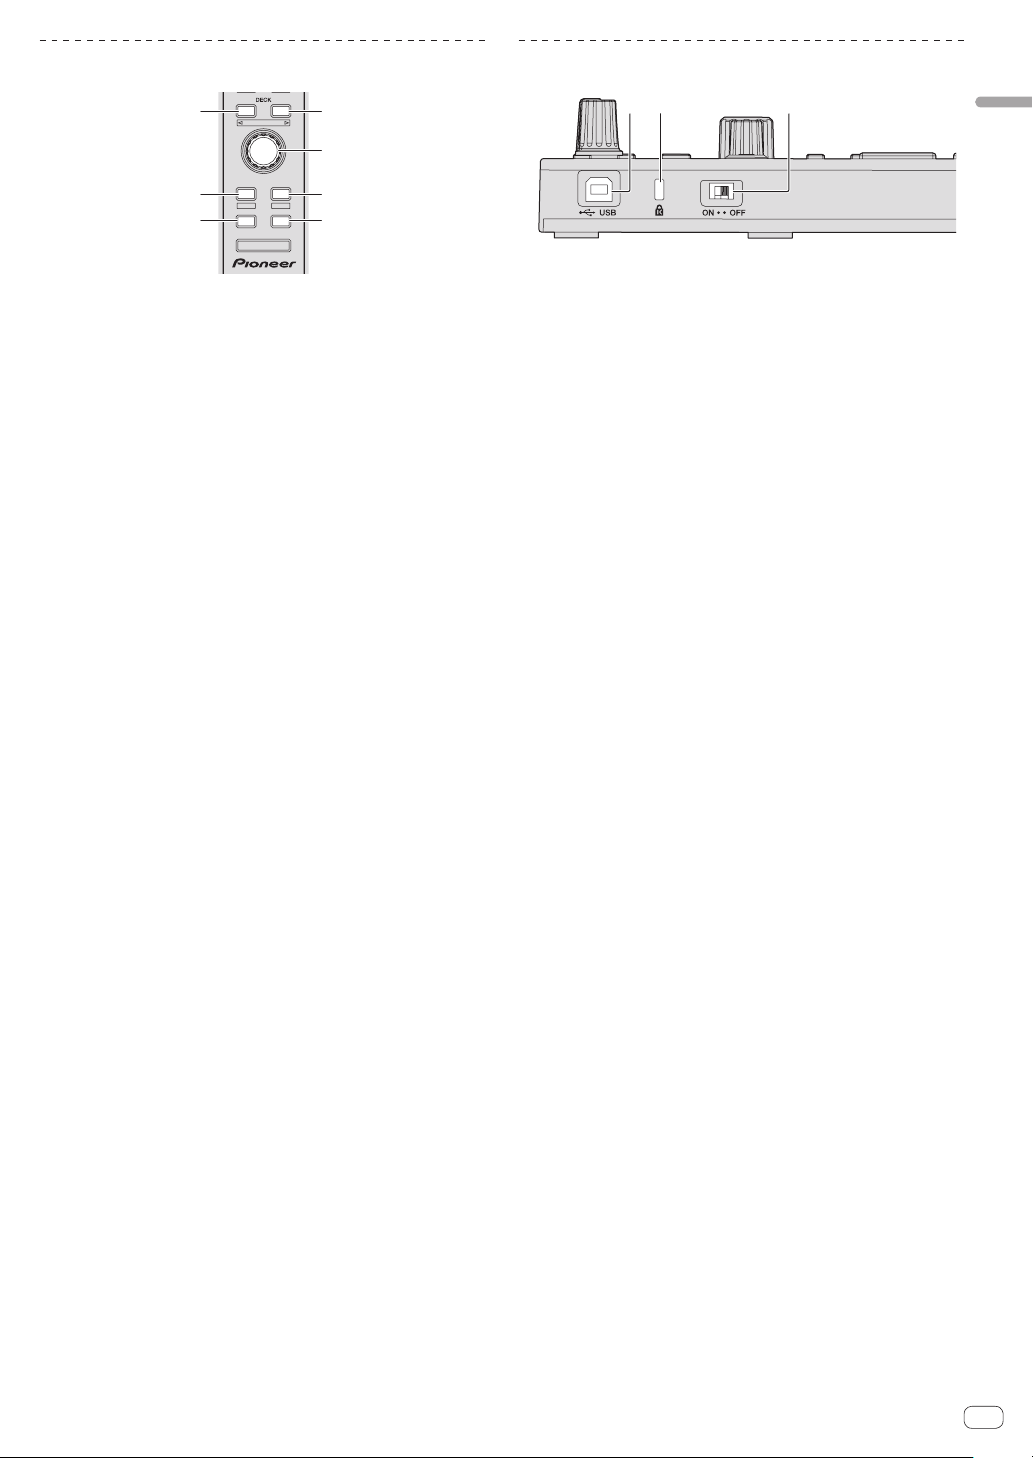
Browser section
2
3
5
44
11
Main unit side panel
34
PANEL SELECT
LOAD
• BACK
PREPARE
— UTILITY
AREA
VIEW
LOAD LOAD
SHIFT
1 DECK button
Press:
Selects the deck to be used.
The [DECK] button lights when deck 3 or deck 4 is selected. It does
not light when deck 1 or deck 2 is selected.
[SHIFT] + press:
Selects and opens the [REC] panel, [DJ-FX] panel or [SP-6] panel.
2 Rotary selector
Turn:
The cursor in the library or on the [CRATES] panel moves up and
down.
Press:
The cursor moves between the [CRATES] panel and library each time
the rotary selector is pressed.
The cursor on the [Files] panel moves to a lower layer.
The cursor on the [Browse] panel moves to the next category.
3 LOAD PREPARE (AREA) button
Press:
Loads tracks to the [Prepare] panel.
12 3
DIMMER MOD E
1 USB port
Connect to a computer.
! USB hubs cannot be used.
2 Kensington security slot
3 DIMMER switch
ON: Sets the LED’s brightness to dim.
OFF: Sets the LED’s brightness to bright.
! Power consumption can be decreased by setting the LED’s
brightness to dim.
Disconnect the USB cable connected to this unit before switching
the [DIMMER] switch from the [ON] position to the [OFF] position.
The indicators will not get brighter if the switch is set to the [OFF]
position while the USB cable is connected.
Connections and part names
[SHIFT] + press:
Selects and opens the [Files] panel, [Browse] panel, [Prepare] panel
or [History] panel.
4 LOAD button
Press:
Loads the selected track onto the currently selected deck.
! When the [LOAD] button is pressed twice, the tracks loaded in
the selected deck on the opposite side are loaded into the deck
whose [LOAD] button was pressed. When this is done while
a track is playing, the track is played from the same position.
(Instant Double)
5 BACK button
Press:
The cursor moves between the [CRATES] panel and library each time
the button is pressed.
Press for over 1 second:
Switches to the utilities mode.
= Changing this unit’s settings (p.20)
[SHIFT] + press:
Switches the Serato DJ layout.
En
7
Page 8
Basic Operation
12
54 54 54
Starting the system
The computer and Serato DJ-certifiable DJ controller or DJ mixer must
be connected beforehand.
! For instructions on operating the Serato DJ software and the Serato
DJ-certifiable DJ mixer or DJ controller, see their respective operating instructions.
1 Connect the Serato DJ-certifiable DJ mixer or DJ
controller to the computer by USB cable.
2 Turn on the computer’s power.
3 Turn on the power of the Serato DJ-certifiable DJ
mixer or DJ controller.
4 Launch Serato DJ.
! When using Windows 7
From the Windows [Start] menu, click the [Serato DJ] icon under
[All Programs] > [Serato] > [Serato DJ].
! For Mac OS X
In Finder, open the [Applications] folder, then click the [Serato DJ]
icon.
5 Connect this unit to your computer via a USB cable.
When this unit and Serato DJ are properly connected, this unit’s pad
mode button (by default the [HOT CUE] mode button) lights.
! This unit operates with the operating system’s standard driver. There
is no need to install separate driver software for this unit.
Importing tracks
Operate the Serato DJ software to add tracks to the library.
! For instructions on operating the Serato DJ software and the Serato
DJ-certifiable DJ mixer or DJ controller, see their respective operating instructions.
Using the performance pads
The performance pads control the hot cue, hot loop, loop roll, auto loop,
slicer, manual loop and sampler functions.
These functions are switched using the respective pad mode buttons
(the [HOT CUE] mode button, [ROLL] mode button, [SLICER] mode button and [SAMPLER] mode button).
This example describes using the hot cue mode.
! For ways to use the other pad modes, see Using the performance
pads on page 10.
1 Press the [HOT CUE] mode button.
The [HOT CUE] mode button lights and the mode switches to the hot
cue mode.
2 In the play or pause mode, press a performance pad
to set the hot cue point.
When a hot cue point is set, that performance pad lights.
3 Press the performance pad at which the hot cue point
was set.
Playback starts from the hot cue point.
Using effects
Serato DJ includes two effects units, FX1 and FX2. These effects can be
applied to the overall sound or to the sound of the selected deck. Here
we describe the procedure for operating this unit to assign effects unit 1
(FX1) when Serato DJ’s DJ-FX mode is set to the multi-FX mode.
For details, see Advanced Operation on page 10.
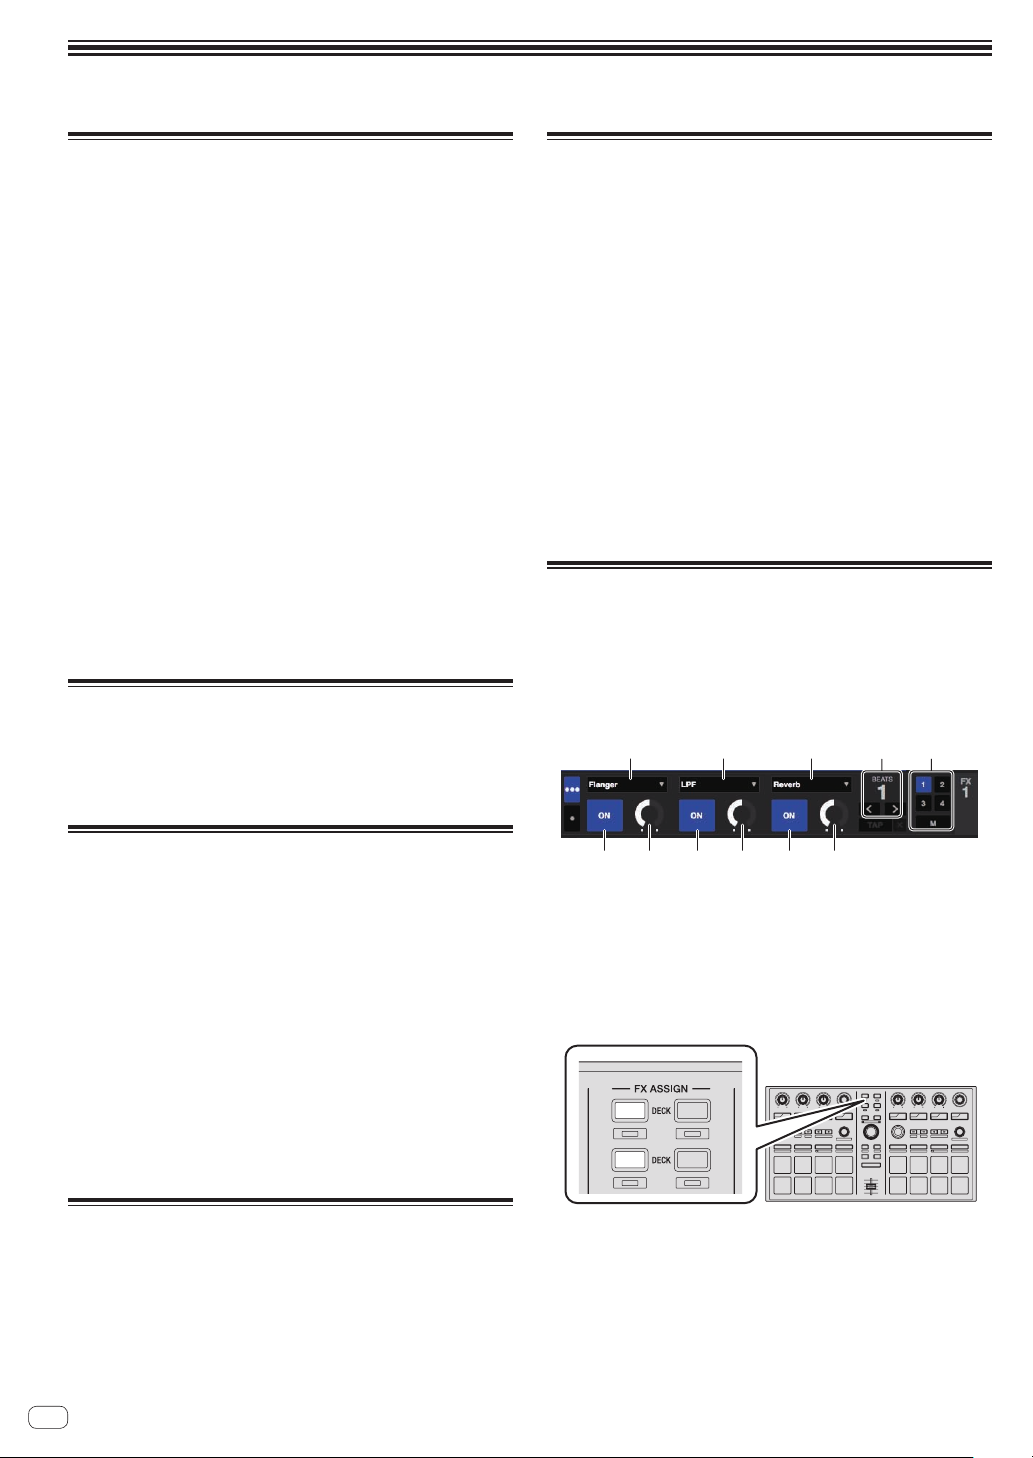
Serato DJ effects unit screen display
1 1
3
Loading tracks
1 Press this unit’s [BACK] button or rotary selector and
move the cursor to the crates panel on the computer’s
screen.
2 Turn the rotary selector to select the crate, etc.
3 Press the rotary selector and move the cursor to the
library on the computer’s screen.
4 Turn the rotary selector and select the track.
5 Press the [LOAD] button to load the selected track
onto the deck.
To load the track onto deck 3 or deck 4, first press the [DECK] button so
that it lights. The deck onto which tracks are loaded is associated with
deck selection.
Playing tracks
Operate the DJ player, analog player, DJ controller, etc., to play the track.
! For instructions on operating the Serato DJ software and the Serato
DJ-certifiable DJ mixer or DJ controller, see their respective operating instructions.
En
8
1 This displays the currently selected type of effect.
2 This displays the effect time.
3 The number of the deck to which that effects unit is assigned is
highlighted.
4 This displays the effect parameter status.
5 This displays whether the effect is on or off.
1 Press the [FX ASSIGN] button on the left side to select
the deck to which the effect is to be assigned.
1
1
1
22
Press the [FX ASSIGN] 1 button to assign the effect to deck 1, the
[FX ASSIGN] 2 button to assign the effect to deck 2.
! Press the [FX ASSIGN] 1 button while pressing the [SHIFT] but-
ton to assign the effect to deck 3, press the [FX ASSIGN] 2 button
while pressing the [SHIFT] button to assign the effect to deck 4.
! To apply the effects to the overall (master) sound, click [M] on the
computer.
1
3
4
SLIP
SYNC
2342
ON
Page 9

2 Press the effect parameter 1 button while pressing
34
34
34
the [SHIFT] button to select the first effect type.
To select the second effect type, press the effect parameter 2 button
while pressing the [SHIFT] button.
To select the third effect type, press the effect parameter 3 button while
pressing the [SHIFT] button.
1
1
3
2
2
ON
SELECT
ON
FX
SELECT
ON
FX
SELECT
TAP
FX
MODE
FX
4
The currently selected effect type is displayed on the Serato DJ screen.
3 Press the effect parameter 1 button to turn the first
effect on.
Press the effect parameter 2 button to turn the second effect on.
Press the effect parameter 3 button to turn the third effect on.
Switching the effect’s tempo mode
With Serato DJ effects, there are two ways to set the effect’s tempo: with
the “auto tempo mode” and the “manual tempo mode”.
! By default, the auto tempo mode is set.
Basic Operation
Auto tempo mode
The track’s BPM value is used as the basis for the effect’s tempo.
Manual tempo mode
The BPM value used as the effect’s basis is calculated from the interval
at which the [TAP] button is tapped.
Switching to the manual tempo mode
1
1
3
2
2
ON
SELECT
ON
FX
SELECT
ON
FX
SELECT
TAP
FX
MODE
FX
4
The [ON] button of the corresponding effect is highlighted on the Serato
DJ screen.
4 Operate the effect parameter 1 control to adjust the
parameter of the first effect.
Operate the effect parameter 2 control to adjust the parameter of the
second effect.
Operate the effect parameter 3 control to adjust the parameter of the
third effect.
ON
SELECT
ON
FX
SELECT
ON
FX
SELECT
FX
5 Turn the [FX BEATS] control to adjust the effect time.
While in the auto tempo mode, press the [TAP] button
three times.
! When the [TAP] button is pressed for over 1 second while in the
manual-tempo mode, the mode switches to the auto tempo mode.
Quitting the system
1 Quit Serato DJ.
When the software is closed, a message for confirming that you want to
close it appears on the computer’s screen. Click [Yes] to close.
2 Disconnect the USB cable from your computer.
1
1
3
2
2
ON
SELECT
ON
FX
SELECT
ON
FX
SELECT
TAP
FX
FX
MODE
4
En
9
Page 10

Advanced Operation
The descriptions from this point on are for functions not described in
the Serato DJ software manual that are specifically for when this unit
and Serato DJ are used in combination.
Using auto loops
There are two ways to perform the auto loop operation: using the performance pads and using the [AUTO LOOP] control.
! Auto loops can also be operated using the performance pads.
For details, see Using auto loops on page 12.
1 During playback, turn the [AUTO LOOP] control.
Sets the loop length by the specified number of beats.
2 Press the [AUTO LOOP] control.
A loop with the set number of beats is created automatically according
to the BPM of the currently playing track and loop playback begins.
! Even during auto looping, the loop length can be adjusted by
turning the [AUTO LOOP] control.
Canceling auto looping
Using the Loop Roll function
When a performance pad is pressed, a loop with the number of beats
assigned to that pad is set and loop playback continues as long as the
pad is being pressed.
During loop roll playback, normal playback with the original rhythm continues in the background. When loop roll playback is canceled, playback
resumes from the position reached in the background at the point loop
roll playback was canceled.
1 Press the [ROLL] mode button.
The [ROLL] mode button lights and the mode switches to the roll mode.
2 Press the [PARAM.1/PARAM.2c] or [PARAM.1/
PARAM.2d] button.
The loop roll beats assigned to the performance pads switch each time
one of the buttons is pressed.
The following four settings can be made:
1 4 beats from 1/32
2 8 beats from 1/16
3 16 beats from 1/8
4 32 beats from 1/4
For example, with the “8 beats from 1/16” setting, the pads’ settings are
as shown below.
During auto looping, press the [AUTO LOOP] control.
When the loop out point is reached, playback does not return to the loop
in point but continues normally.
Using the performance pads
Using hot cues
With this function, playback can be started instantaneously from the
position at which a hot cue is set.
! Up to eight hot cue points can be set and saved per track.
1 Press the [HOT CUE] mode button.
The [HOT CUE] mode button lights and the mode switches to the hot
cue mode.
2 In the play or pause mode, press a performance pad
to set the hot cue point.
The hot cue points are assigned to the respective performance pads as
shown below.
Hot cue1 Hot cue2 Hot cue3 Hot cue4
Hot cue5 Hot cue6 Hot cue7 Hot cue8
1/16 beat 1/8 beat 1/4 beat 1/2 beat
1 beat 2 beats 4 beats 8 beats
The range of beats set for the loop roll is displayed on the computer’s
screen.
3 Press and hold one of the performance pads.
A loop roll with the number of beats assigned to the pad that was
pressed is played. Playback continues in the background during loop roll
playback.
! The number beats in the currently playing loop roll can be
changed by turning the [AUTO LOOP] control during loop roll
playback.
4 Release the performance pad.
Loop roll playback is canceled, and playback resumes from the position
reached in the background.
3 Press the performance pad at which the hot cue point
was set.
Playback starts from the hot cue point.
! Set hot cue points can be cleared by pressing a performance pad
while pressing the [SHIFT] button.
En
10
Page 11

Using the Slicer function
Sliced sections 1 to 8
Domain
78
11
…
The specified range is divided into eight equal sections, and these eight
sliced sections are assigned to the respective performance pads. While
one of the performance pads is pressed, the sound for the section
assigned to that pad is played in a loop.
While the sound for the section assigned to the pad is playing in a loop,
playback with the original rhythm continues in the background. When
the pad is released and loop playback stops, playback resumes from the
position reached in the background at that point.
! The slicer function cannot be used with tracks for which no beatgrid
is set. For details on setting beatgrids, see the Serato DJ software
manual.
1 Press the [SLICER] mode button.
The [SLICER] mode button lights and the mode switches to slicer mode 1.
2 Press the [SLICER] mode button to select the slicer
mode.
The mode switches between slicer mode 1 and slicer mode 2 each time
the button is pressed.
= About slicer mode 1 and slicer mode 2 (p.11)
3 Press the [PARAM.1/PARAM.2c] or [PARAM.1/
PARAM.2d] button while pressing the [SHIFT] button.
Set the domain for the slicer function. The value set for the domain
switches each time one of the buttons is pressed while pressing the
[SHIFT] button.
The domain can be set to one of six settings: 2 beats, 4 beats, 8 beats, 16
beats, 32 beats or 64 beats.
The eight equal sections into which the range specified with the domain
setting have been sliced are assigned to the respective performance
pads as shown below.
1234 56
Section1 Section2 Section3 Section4
Section5 Section6 Section7 Section8
4 Press the [PARAM.1/PARAM.2c] or [PARAM.1/
PARAM.2d] button.
Set the quantization for the slicer function. The value set for the quantization switches each time one of the buttons is pressed.
The quantization can be set in four ways: 1/8, 1/4, 1/2 and 1.
The length of the loop which is played while the pad is being pressed
can be changed with the “QUANTIZATION” setting. For example, when
“QUANTIZATION” is set to “1”, the entire section assigned to the pad is
played in a loop, and when “QUANTIZATION” is set to “1/2”, only the first
half of the section assigned to the pad is played in a loop.
5 Press and hold one of the performance pads.
When the pad is pressed and held, the sound is played in a loop.
! The length of loop playback differs depending on the quantization
setting.
When the pad is released, the track returns to the position that is playing
in the background.
About slicer mode 1 and slicer mode 2
Slicer mode 1
When the playback position advances to the end of the range that has
been sliced into eight equal sections, the range shown on the display
switches to the next eight sliced sections, and these sliced sections
are assigned to the respective pads, replacing the previously assigned
sections.
2
345678
12345678
2
Slicer mode 2
When the playback position advances to the end of the range that was
sliced into eight equal parts, the playback position returns to the beginning of the range that was sliced into eight equal parts.
12345678
Using the sampler function
Tracks loaded in the sampler slots of the sampler (SP-6) can be played
with the performance pads.
1 Press the left or right [DECK] button while pressing
the [SHIFT] button to open the [SP-6] panel on the
computer’s screen.
2 Press the [SAMPLER] mode button.
The [SAMPLER] mode button lights and the mode switches to the sampler mode.
3 Press the [PARAM.1/PARAM.2c] or [PARAM.1/
PARAM.2d] button.
Switch the sampler (SP-6) bank. The sampler has four banks, A, B, C and D,
and each bank has six slots.
4 Select the track from the library on the computer’s
screen, then press a performance pad while pressing the
[SHIFT] button.
The selected track is loaded into the sample slot.
With the Serato DJ software, when a track is loaded into the sampler
slot, that setting is held.
5 Press a performance pad.
The sound for the slot assigned to the pad that was pressed is played.
Slot1 Slot2 Slot3 Slot4
Slot5 Slot6
! When a performance pad is pressed while pressing the [SHIFT]
button, the sound of the slot that is currently playing stops.
Advanced Operation
En
11
Page 12

Using hot loops
With this function, loops can be saved and called out.
! Only the loop in point is actually saved. Up to eight hot loops can be
set and saved per track.
1 Press the [HOT CUE] mode button while pressing the
[SHIFT] button.
The [HOT CUE] mode button flashes, and the unit switches to the hot
loop mode.
2 During playback, press a performance pad.
The loop in point is set at the hot cue slot and loop playback starts.
! The length of the loop at this time is the number of beats set for
auto looping.
The loop in points are assigned to the performance pads as shown
below.
Loop 1 Loop 2 Loop 3 Loop 4
Loop 5 Loop 6 Loop 7 Loop 8
! With the hot loop function, the hot cue point is used as the loop in
point.
If a performance pad at which a hot cue point is already set is
pressed, loop playback starts from that hot cue point.
3 During loop playback, press the [PARAM.1/
PARAM.2c] button.
The loop length is cut in half.
The same effect can be achieved by turning the [AUTO LOOP] control
counterclockwise.
4 During loop playback, press the [PARAM.1/
PARAM.2d] button.
The loop length is doubled.
The same effect can be achieved by turning the [AUTO LOOP] control
clockwise.
5 During loop playback, press the [PARAM.1/
PARAM.2c] or [PARAM.1/PARAM.2d] button while
pressing the [SHIFT] button.
The loop moves, remaining the same length (loop shift).
6 While pressing the [SHIFT] button, press the same
performance pad.
The track returns to the set loop in point and loop playback continues.
7 Press the same performance pad again.
Loop playback is canceled.
2 Press the [PARAM.1/PARAM.2c] or [PARAM.1/
PARAM.2d] button.
The auto loop beats assigned to the performance pad switch each time
one of the button is pressed.
The following four settings can be made:
1 4 beats from 1/32
2 8 beats from 1/16
3 16 beats from 1/8
4 32 beats from 1/4
For example, when set to “16 beats from 1/8”, the pad’s setting is as
shown below.
1/8 beat 1/4 beat 1/2 beat 1 beat
2 beats 4 beats 8 beats 16 beats
The beat range set for auto looping is displayed on the computer’s
screen.
3 Press a performance pad.
A loop with the number of beats assigned to the pad that was pressed
is played.
4 Press the [PARAM.1/PARAM.2c] or [PARAM.1/
PARAM.2d] button while pressing the [SHIFT] button.
The loop moves, remaining the same length (loop shift).
5 Press the same performance pad again.
Loop playback is canceled.
Using manual loops
With this function, any section of the track can be played in a loop.
1 Press the [SLICER] mode button while pressing the
[SHIFT] button.
The [SLICER] mode button flashes and the unit switches to the manual
loop mode.
In the manual loop mode, the respective performance pads function as
described below.
Pad 1 Not used
Pad 2 Loop active (no move to loop in point)
Pad 3 Save loop in free loop slot (for auto loops only)
Pad 4 Move cursor among loop slots (upwards)
Pad 5 Set loop in point
Pad 6 Set loop out point
Pad 7 Resume loop playback/cancel loop playback
Pad 8 Move cursor among loop slots (downwards)
Using auto loops
When a performance pad is pressed, a loop with the number of beats
assigned to the pad is set, and loop playback continues even when you
release your finger from the pad.
1 Press the [ROLL] mode button while pressing the
[SHIFT] button.
The [ROLL] mode button flashes and the unit switches to the auto loop
mode.
En
12
HOT CUE
HOT LOOP
ROLL
AUTO LOOP
LOOPACTIVE
SLICER
MANUAL LOOP
SAVE
SLOT
SAMPLER
VELOCITY
1 2 3 4
IN OUT
RELOOP / EXIT
SLOT
5 6 7 8
2 Press pad 4 or pad 8 to select the loop slot at which
you want to save the loop.
When the loop is set, it is automatically saved in the loop slot selected
here.
If a new loop is set while a loop slot at which a loop is saved is selected,
the saved loop is overwritten with the new loop.
Page 13

3 Press pad 5 during playback or while pausing.
12
54 54 54
231
544444
Loop In Point is set.
4 Press pad 6.
The loop out point is set, and loop playback begins.
To cancel loop playback, press pad 2 or pad 7.
5 During loop playback, press the [PARAM.1/
PARAM.2c] button.
The loop length is cut in half.
6 During loop playback, press the [PARAM.1/
PARAM.2d] button.
The loop length is doubled.
7 Press the [PARAM.1/PARAM.2c] or [PARAM.1/
PARAM.2d] button while pressing the [SHIFT] button.
The loop moves, remaining the same length (loop shift).
Calling out saved loops
1 Press pad 4 or pad 8 to select the loop slot.
2 Press pad 7.
The loop is called out from the selected loop slot and loop playback
resumes.
To turn the loop function on without moving to the loop in point, press
pad 2.
Turning the sampler velocity mode off
When the [SAMPLER] mode button is pressed, the [SAMPLER] mode
button stops flashing, remaining lit, and the mode switches to the normal sampler mode (the sampler velocity mode turns off).
! In the utilities mode, the velocity curve and after-touch function can
be set.
When after-touch is enabled, the sample’s volume level changes
while the performance pad is pressed according to the strength at
which the pad is pressed. Also, in the utilities mode, the method for
entering the sampler velocity mode can be changed.
For details, see Changing this unit’s settings on page 20.
Using effects
Serato DJ includes two effect units: FX1 and FX2. Their effects can be
applied to the overall sound or to the selected deck. Here we explain how
to operate this unit to assign effect unit 1 (FX1).
Serato DJ effects unit screen display
Multi FX mode: Up to three effects can be selected per effect unit, and
each effect has one adjustable parameter.
1 1
3
Advanced Operation
Fine-adjusting the loop in point (loop in adjust)
1 During loop playback, press pad 5.
Pad 5 flashes and the unit switches to the loop in point adjustment
mode.
2 Turn the [AUTO LOOP] control.
Fine-adjust the loop in point.
3 Press pad 5 again.
The loop in point adjustment mode is canceled and the unit returns to
normal loop playback.
Fine-adjusting the loop out point (loop out
adjust)
1 During loop playback, press pad 6.
Pad 6 flashes and the unit switches to the loop out point adjustment
mode.
2 Turn the [AUTO LOOP] control.
Fine-adjust the loop out point.
3 Press pad 6 again.
The loop out point adjustment mode is canceled and the unit returns to
normal loop playback.
Using the sampler velocity mode
When the sampler velocity mode is on, the sample volume level changes
according to the strength with which the performance pads are tapped.
The volume level increases when the performance pads are tapped
strongly, decreases when they are tapped weakly.
When the sampler velocity mode is off, the sound is triggered at the
volume level set with the Serato DJ software, regardless of the strength
with which the performance pads are tapped.
Turning the sampler velocity mode on
When the [SAMPLER] mode button is pressed while pressing the
[SHIFT] button, the [SAMPLER] mode button flashes and the sampler
velocity mode turns on.
Single FX mode: One effect can be selected per effect unit and there are
multiple adjustable parameters.
1 This displays the currently selected type of effect.
2 This displays the effect time.
3 The number of the deck to which that effects unit is assigned is
highlighted.
4 This displays the effect parameter status.
5 This displays whether the effect is on or off.
Operating in the multi FX mode
1 Press the [TAP] button while pressing the [SHIFT] button
to switch Serato DJ’s DJ-FX mode to the multi FX mode.
The mode switches between the multi FX mode and single FX mode each
time the buttons are operated.
2 Press the [FX ASSIGN] button on the left side to select
the deck to which the effect is to be assigned.
1
1
1
22
Press the [FX ASSIGN] 1 button to assign the effect to deck 1, the
[FX ASSIGN] 2 button to assign the effect to deck 2.
! Press the [FX ASSIGN] 1 button while pressing the [SHIFT] but-
ton to assign the effect to deck 3, press the [FX ASSIGN] 2 button
while pressing the [SHIFT] button to assign the effect to deck 4.
! To apply the effects to the overall (master) sound, click [M] on the
computer.
1
3
4
SLIP
SYNC
2342
ON
En
13
Page 14

3 Press the effect parameter 1 button while pressing
34
34
34
34
34
the [SHIFT] button to select the first effect type.
To select the second effect type, press the effect parameter 2 button
while pressing the [SHIFT] button.
To select the third effect type, press the effect parameter 3 button while
pressing the [SHIFT] button.
1
1
3
2
2
ON
SELECT
ON
FX
SELECT
ON
FX
SELECT
TAP
FX
MODE
FX
4
The currently selected effect type is displayed on the Serato DJ screen.
4 Press the effect parameter 1 button to turn the first
effect on.
Press the effect parameter 2 button to turn the second effect on.
Press the effect parameter 3 button to turn the third effect on.
Operating in the single FX mode
1 Press the [TAP] button while pressing the [SHIFT]
button to switch Serato DJ’s DJ-FX mode to the single FX
mode.
The mode switches between the multi FX mode and single FX mode each
time the buttons are operated.
2 Press the [FX ASSIGN] button on the left side to select
the deck to which the effect is to be assigned.
1
1
1
1
3
22
4
SLIP
SYNC
2342
ON
1
1
3
2
2
ON
SELECT
ON
FX
SELECT
ON
FX
SELECT
TAP
FX
MODE
FX
4
The [ON] button of the corresponding effect is highlighted on the Serato
DJ screen.
5 Operate the effect parameter 1 control to adjust the
parameter of the first effect.
Operate the effect parameter 2 control to adjust the parameter of the
second effect.
Operate the effect parameter 3 control to adjust the parameter of the
third effect.
ON
SELECT
ON
FX
SELECT
ON
FX
SELECT
FX
6 Turn the [FX BEATS] control to adjust the effect time.
1
1
3
2
2
ON
SELECT
ON
FX
SELECT
ON
FX
SELECT
TAP
FX
MODE
FX
! It is also possible to set the BPM value to be used as the basis
for the effect time from the interval at which the [TAP] button is
tapped.
For details, see Switching the effect’s tempo mode on page 9.
4
Press the [FX ASSIGN] 1 button to assign the effect to deck 1, the
[FX ASSIGN] 2 button to assign the effect to deck 2.
! Press the [FX ASSIGN] 1 button while pressing the [SHIFT] button
to assign the effect to deck 3, press the [FX ASSIGN] 2 button while
pressing the [SHIFT] button to assign the effect to deck 4.
3 Press one of the effect parameter buttons while
pressing the [SHIFT] button to select the effect type.
The selected effect is displayed on the Serato DJ screen.
4 Press the effect parameter 1 button to turn the effect on.
1
1
3
2
2
ON
SELECT
ON
FX
SELECT
ON
FX
SELECT
TAP
FX
MODE
FX
4
The effect switches between on and off each time the button is pressed.
! The effect’s [ON] button is highlighted on the Serato DJ screen.
5 Operate the effect parameter 2 button or the effect
parameter 3 button to switch the effect’s parameter.
1
1
3
2
2
ON
SELECT
ON
FX
SELECT
ON
FX
SELECT
TAP
FX
MODE
FX
! For some types of effects, it is only possible to turn the parameter on
and off.
! Depended on the selected effect, the button may not light even when
it is operated.
4
14
En
Page 15

6 Operate the effect parameter control(s) to adjust the
34
effect’s parameter(s).
Installation Procedure (Windows)
1 Unzip the downloaded file, then double-click the
unzipped file to launch the installer.
ON
SELECT
ON
FX
SELECT
ON
FX
SELECT
FX
7 Turn the [FX BEATS] control to adjust the effect time.
1
1
3
2
2
ON
SELECT
ON
FX
SELECT
ON
FX
SELECT
TAP
FX
MODE
FX
4
! It is also possible to set the BPM value to be used as the basis
for the effect time from the interval at which the [TAP] button is
tapped.
For details, see Switching the effect’s tempo mode on page 9.
Using Serato Video
For detailed instructions on operating Serato Video, a description of
its functions and information on usable codecs, see the Serato Video
operating instructions.
Acquiring Serato Video
Access the Pioneer DJ support site below.
http://pioneerdj.com/support/
Instructions on acquiring Serato Video are provided on this unit’s support page.
1 Access the Pioneer DJ support site and click [Software
Info] under [DDJ-SP1].
2 Click the link to the Serato Video download page.
Following the instructions on the screen, input your e-mail address,
password and the voucher code indicated on the Serato Video voucher
included with this unit.
Advanced Operation
2 Read the terms of the license agreement carefully,
and if you agree, select [I accept the terms in the license
agreement], then click [Next].
! If you do not agree to the contents of the license agreement, click
[Cancel] to cancel installation.
3 Select the type of installation for Serato Video, then
click [Next].
Installing Serato Video
! In order to install Serato Video on the computer, Serato DJ must
already be installed.
En
15
Page 16

4 Click [Install] to start installing Serato Video.
2 Click [Continue].
The message of successful installation appears once installation is
completed.
5 Click [Finish] to quit the Serato Video installer.
Installation procedure (Mac OS X)
1 Double-click the downloaded file.
The Serato Video.pkg icon appears. Double-click it to launch the Serato
Video installer.
3 Read the terms of the license agreement carefully,
and if you agree, click [Agree].
! If you do not agree to the contents of the license agreement, click
[Disagree] to quit installation.
4 Click [Install] to start installing Serato Video.
16
The message of successful installation appears once installation is
completed.
En
Page 17

5 Click [Close] to quit the Serato Video installer.
Enabling use of Serato Video with Serato DJ
Authorizing Serato Video
Serato Video must be authorized in order to use it with Serato DJ.
1 Launch Serato DJ and make the Serato Video settings.
After installing Serato Video, launch Serato DJ and display the screen at
[SETUP] > [Expansion Packs].
2 Input the Serato Video serial number.
From the [Expansion Packs] screen, select [Serato Video] from among
the [AVAILABLE EXPANSION PACKS].
Next, check [Enable Serato Video], input the serial number you have
obtained, then click [OK].
! To obtain the serial number, you must input the voucher code
indicated on the Serato Video voucher included with this unit
after accessing the link to this unit’s support site on the Pioneer
DJ support site.
Switching to the Serato Video control mode
1 Use the [LOAD] button to load the video file onto a deck.
2 Press the left or right [AUTO LOOP] control while
pressing the [SHIFT] button to switch the mode.
1
1
AUTO LOOP
This unit switches to the Serato Video control mode.
When the left or right [AUTO LOOP] control is pressed again while
pressing the [SHIFT] button, the mode for controlling Serato Video is
canceled.
! In this mode, the DJ-FX effects cannot be control from this unit.
! To control Serato Video, advanced MIDI must be disabled in the utili-
ties mode.
For details, see Changing this unit’s settings on page 20.
SYNC
2342
Using the video effects
Up to two video effects can be set for each of the left and right channels.
Here we explain the procedure for operating the left channel’s video
effects.
Operating the effect slot 1 video effect
1 Press the effect parameter 1 button while pressing the
[SHIFT] button and select the video effect for effect slot 1.
2 Press the effect parameter 1 button to turn on the
selected video effect.
3 Turn the effect parameter 1 control to adjust the
parameter of the selected video effect.
Advanced Operation
Operating the effect slot 2 video effect
1 Press the effect parameter 2 button while pressing
the [SHIFT] button and select the video effect for effect
slot 2.
2 Press the effect parameter 2 button to turn on the
selected video effect.
3 Turn the effect parameter 2 control to adjust the
parameter of the selected video effect.
Using the image effects
Making the preparations for using the image
effects
The main operations are performed on the [IMAGE EFFECTS] panel on
the computer’s screen.
1 Click on the video panel on the computer’s
screen to open the [IMAGE EFFECTS] panel.
2 Click [Image] and select the image file.
For the formats of image files that can be used, see Serato Video’s
instructions.
En
17
Page 18

3 While pressing this unit’s [SHIFT] button, press the
effect parameter 3 button on the left side to select the
animation for the image effect.
4 Operate the pad displayed to the right of [Alignment]
to adjust the image effect’s display position.
5 From the pull-down menu to the right of [Animation],
select the animation’s options.
Select the animation’s scrolling method, speed, etc.
6 Operate the [Size] control to adjust the image effect’s
size.
7 Click [L], [M] or [R] to the right of [Output] to select
the image effect’s output channel.
[L]: Left channel
[M]: Mixed output
[R]: Right channel
8 Click .
The adjustments are saved.
Operating image effects
1 Press the effect parameter 3 button on this unit’s left
side to turn the image effect on.
2 Turn the effect parameter 3 control on this unit’s left
side to adjust the image effect’s opacity.
Operating the text effect
1 Press the effect parameter 3 button on this unit’s
right side to turn the text effect on.
2 Turn the effect parameter 3 control on this unit’s right
side to adjust the text effect’s opacity.
Using the fader transition function
Here we explain the operation for using the crossfader of the DJ mixer or
DJ controller used in combination with this unit to switch from the left
channel’s video to the right channel’s video.
1 Turn the left or right [FX BEATS] control to select the
type of transition effect.
When the left or right [TAP] button is pressed, the transition effect type
switches in order.
2 Press the left or right [TAP] button while pressing the
[SHIFT] button to turn on the crossfader link.
When the crossfader link is on, it is possible to switch from the left channel’s video to the right channel’s video using the crossfader of the DJ
mixer or DJ controller connected to the computer.
3 Slide the crossfader of the DJ mixer or DJ controller
connected to the computer from the left to the right.
The video switches from the left channel’s video to the right channel’s
video.
Using text effects
Making the preparations for using the text
effects
The main operations are performed on the [TEXT EFFECTS] panel on the
computer’s screen.
1 Click on the video panel on the computer’s
screen to open the [TEXT EFFECTS] panel.
2 Using the computer’s keyboard, input the text you
want to display into the text input field.
3 Click [Font] and set the font.
The font’s style, color and size can be set.
4 While pressing this unit’s [SHIFT] button, press the
effect parameter 3 button on this unit’s right side to
select the animation for the text effect.
5 Operate the pad displayed to the right of [Alignment]
to adjust the text effect’s display position.
6 From the pull-down menu to the right of [Animation],
select the animation’s options.
Select the animation’s scrolling method, speed, etc.
7 Click [L], [M] or [R] to the right of [Output] to select
the text effect’s output channel.
[L]: Left channel
[M]: Mixed output
[R]: Right channel
Using the slip mode
When the slip mode is turned on, normal playback with the original
rhythm continues in the background while loops or hot cues are being
played. When loop or hot cue playback is canceled, normal playback
resumes from the position to which the track has advanced while the
loop or hot cue was playing. The slip function can be used for a variety of
performances, without breaking rhythm.
The slip function can be used when the pad mode is set to the hot cue,
hot loop, auto loop, or manual loop mode.
! The [SLIP] button lights when the slip mode is set and flashes while
the sound is being played in the background.
Slip hot cue
1 Press the [HOT CUE] mode button.
The pad mode is set to the hot cue mode.
2 Set the hot cue.
Press a performance pad to set the hot cue.
3 Press the [SLIP] button.
The mode switches to the slip mode.
To cancel the slip mode, press the [SLIP] button again.
4 During playback, press and hold a performance pad.
Playback starts from the position at which the hot cue was set. Playback
continues as long as the performance pad is pressed.
Normal playback continues in the background while the hot cue is
playing.
5 Release your finger from the performance pad.
Playback starts from the position reached in the background.
8 Click .
The adjustments are saved.
En
18
Page 19

Slip hot looping
Manual slip looping
1 Press the [HOT CUE] mode button while pressing the
[SHIFT] button.
The pad mode is set to the hot loop mode.
2 Press the [SLIP] button.
The mode switches to the slip mode.
To cancel the slip mode, press the [SLIP] button again.
3 Press a performance pad.
Loop playback starts from the loop in point assigned to the pad that was
pressed.
! The length of the loop is the number of beats set for auto looping.
Normal playback continues in the background even during loop
playback.
4 Press the same performance pad again.
Looping is canceled and playback starts from the position reached in the
background.
Auto slip looping
There are two ways to perform the auto loop operation: using the performance pads and using the [AUTO LOOP] control. Auto slip looping is
possible with both methods.
Auto slip looping using the performance pads
1 Press the [ROLL] mode button while pressing the
[SHIFT] button.
The pad mode is set to the auto loop mode.
2 Press the [SLIP] button.
The mode switches to the slip mode.
To cancel the slip mode, press the [SLIP] button again.
3 Press a performance pad.
A loop with the number of beats assigned to the pad that was pressed
is played.
Normal playback continues in the background even during loop
playback.
4 Press the same performance pad again.
Looping is canceled and playback starts from the position reached in the
background.
Auto slip looping using the [AUTO LOOP] control
1 Press the [SLIP] button.
The mode switches to the slip mode.
To cancel the slip mode, press the [SLIP] button again.
2 Turn the [AUTO LOOP] control.
Select the number of beats for the auto loop.
3 Press the [AUTO LOOP] control.
A loop with the specified number of beats is set and loop playback starts.
Normal playback continues in the background even during loop
playback.
4 Press the [AUTO LOOP] control again.
Looping is canceled and playback starts from the position reached in the
background.
Creating a loop and slipping it
1 Press the [SLICER] mode button while pressing the
[SHIFT] button.
The pad mode is set to the manual loop mode.
2 Press the [SLIP] button.
The mode switches to the slip mode.
To cancel the slip mode, press the [SLIP] button again.
3 Press pad 5 to set the loop in point, then press pad 6.
The loop out point is set and loop playback starts.
Normal playback continues in the background even during loop
playback.
HOT CUE
HOT LOOP
ROLL
AUTO LOOP
LOOPACTIVE
SLICER
MANUAL LOOP
SAVE
SLOT
SAMPLER
VELOCITY
1 2 3 4
IN OUT
RELOOP / EXIT
SLOT
5 6 7 8
4 Press pad 2 or pad 7.
Looping is canceled and playback starts from the position reached in the
background.
Slipping using a loop in a loop slot
1 Press the [SLICER] mode button while pressing the
[SHIFT] button.
The pad mode is set to the manual loop mode.
2 Press the [SLIP] button.
The mode switches to the slip mode.
To cancel the slip mode, press the [SLIP] button again.
3 Press pad 4 or pad 8 to select the loop you want to
play.
4 Press pad 7.
The selected loop is called out and loop playback starts.
Normal playback continues in the background even during loop
playback.
5 Press pad 7 or pad 2 again.
Looping is canceled and playback starts from the position reached in the
background.
Advanced Operation
En
19
Page 20

Changing this unit’s settings
34
MIDI
code
performance pad is pressed
MIDI
code
performance pad is pressed
MIDI
code
performance pad is pressed
MIDI
code
performance pad is pressed
34
The following settings can be changed:
Setting preferences
Name of selected item Initial settings
Sampler velocity mode velocity curve
selection
Sampler velocity mode after-touch
setting
Setting of method to enter sampler
velocity mode
Setting of DJ software to be used Use Serato DJ
Demo mode setting Turn demo mode on
Setting of slip mode flashing Slip mode flashing enabled
Setting of illumination when tracks are
loaded
Advanced MIDI settings Advanced MIDI disabled
Curve 1
After-touch disabled
Enter sampler velocity mode when
[SAMPLER] button pressed while pressing [SHIFT] button.
Illumination type 1
Curve 2
Min. Max.
Strength which
Curve 3
Min. Max.
Strength which
Changing the sampler velocity mode’s
velocity curve setting
Use the procedure below to set the sampler velocity mode’s velocity
curve. You can choose one of four types of velocity curves.
! By default, curve 1 is set.
1 Press the [BACK] button for over 1 second to switch
to the utilities mode.
2 Turn the rotary selector so that the FX1 effect
parameter 1 button flashes.
1
1
3
2
2
ON
SELECT
ON
FX
SELECT
ON
FX
SELECT
TAP
FX
MODE
FX
3 Use the performance pads on the left to select the
velocity curve.
The currently selected velocity curve is indicated by which pads are
flashing.
Curve 1 Curve 2 Curve 4Curve 3
Curve 1
4
Curve 4
Min. Max.
Strength which
4 Press the rotary selector.
This saves the parameters that have been set in this unit’s memory.
While the parameters are being saved, the eight buttons in the effect section flash. Do not disconnect the USB cable from this unit during this time.
5 Press the [BACK] button.
This unit switches from the utilities mode back to normal operation.
Enabling the sampler velocity mode’s
after touch setting
When the sampler velocity mode is turned on for this unit’s performance
pads, the after touch setting can be turned on and off.
After touch setting disabled: The sampler volume changes according
to the strength with which the performance pad is initially pressed, but
does not keep changing while the pad is held after it is initially pressed.
After touch setting enabled: The sampler volume changes according to
the strength with which the performance pad is initially pressed and the
strength with which the pad is held after it is initially pressed.
! By default, the after touch setting is disabled.
1 Press the [BACK] button for over 1 second to switch
to the utilities mode.
2 Turn the rotary selector so that the FX1 effect
parameter 2 button flashes.
En
20
Min. Max.
Strength which
1
3
2
ON
SELECT
ON
FX
SELECT
ON
FX
SELECT
TAP
FX
MODE
FX
4
3 Press pad 1 or pad 2 on the left performance pads.
! Pad 1 flashing: After-touch disabled
! Pad 2 flashing: After-touch enabled
1
2
Page 21

4 Press the rotary selector.
34
34
This saves the parameters that have been set in this unit’s memory.
While the parameters are being saved, the eight buttons in the effect section flash. Do not disconnect the USB cable from this unit during this time.
5 Press the [BACK] button.
This unit switches from the utilities mode back to normal operation.
Changing the way the sampler velocity
mode is entered
The way the sampler velocity mode is entered can be changed.
! By default, the unit is set to enter the sampler velocity mode when
the [SAMPLER] button is pressed while pressing the [SHIFT] button.
1 Press the [BACK] button for over 1 second to switch
to the utilities mode.
2 Turn the rotary selector so that the FX1 effect
parameter 3 button flashes.
1
1
3
2
2
ON
SELECT
ON
FX
SELECT
ON
FX
SELECT
TAP
FX
MODE
FX
4
3 Press pad 1 or pad 2 on the left performance pads.
! Pad 1 flashing: Enter sampler velocity mode when [SAMPLER] but-
ton pressed while pressing [SHIFT] button.
! Pad 2 flashing: Enter sampler velocity mode when [SAMPLER] but-
ton pressed for over 1 second.
4 Press the rotary selector.
This saves the parameters that have been set in this unit’s memory.
While the parameters are being saved, the eight buttons in the effect section flash. Do not disconnect the USB cable from this unit during this time.
5 Press the [BACK] button.
This unit switches from the utilities mode back to normal operation.
Using DJ software other than Serato DJ
To use this unit as a controller for operating DJ software other than
Serato DJ, change this setting.
! By default, the unit is set to use Serato DJ.
1 Press the [BACK] button for over 1 second to switch
to the utilities mode.
2 Turn the rotary selector so that the FX1 [TAP] button
flashes.
1
1
3
2
2
ON
SELECT
ON
FX
SELECT
ON
FX
SELECT
TAP
FX
MODE
FX
4
Disabling the demo mode
On this unit, the demo mode is set if no operation is performed for 10
minutes under normal usage conditions. This demo mode can be turned
off.
! By default, the demo mode is on.
! When any control or button on this unit is operated while in the
demo mode, the demo mode is canceled.
1 Press the [BACK] button for over 1 second to switch
to the utilities mode.
2 Turn the rotary selector so that the FX2 effect
parameter 1 button flashes.
1
1
3
2
2
4
34
ON
SELECT
ON
FX
SELECT
ON
FX
SELECT
TAP
FX
MODE
FX
3 Press pad 1 on the left performance pads.
! Pad 1 lit: Turns demo mode on
! Pad 1 off: Turns demo mode off
4 Press the rotary selector.
This saves the parameters that have been set in this unit’s memory.
While the parameters are being saved, the eight buttons in the effect
section flash. Do not disconnect the USB cable from this unit during this
time.
5 Press the [BACK] button.
This unit switches from the utilities mode back to normal operation.
Setting of slip mode flashing
When slip mode flashing is enabled, the buttons and controls related to
the slip mode (the [AUTO LOOP] control, [HOT CUE] mode button, etc.)
flash when the [SLIP] button is pressed. With this setting, the flashing of
the buttons can be disabled.
! By default, slip mode flashing is enabled.
1 Press the [BACK] button for over 1 second to switch
to the utilities mode.
2 Turn the rotary selector so that the FX2 effect
parameter 2 button flashes.
1
1
3
2
2
4
34
3 Press pad 1 or pad 2 on the left performance pads.
HOT CUE
HOT LOOP
ON
FX
SELECT
ROLL
AUTO LOOP
LOOPACTIVE
ON
SELECT
SAVE
FX
SLICER
MANUAL LOOP
ON
SELECT
FX
SLOT
TAP
SAMPLER
VELOCITY
MODE
FX
Advanced Operation
3 Press pad 1 on the left performance pads.
! Pad 1 lit: Software other than Serato DJ used
! Pad 1 off: Serato DJ used
4 Press the rotary selector.
This saves the parameters that have been set in this unit’s memory.
While the parameters are being saved, the eight buttons in the effect
section flash. Do not disconnect the USB cable from this unit during this
time.
5 Press the [BACK] button.
This unit switches from the utilities mode back to normal operation.
1 2 3 4
IN OUT
RELOOP / EXIT
5 6 7 8
! Pad 1 flashing: Slip mode flashing enabled
! Pad 2 flashing: Slip mode flashing disabled
SLOT
En
21
Page 22

4 Press the rotary selector.
This saves the parameters that have been set in this unit’s memory.
While the parameters are being saved, the eight buttons in the effect
section flash. Do not disconnect the USB cable from this unit during this
time.
5 Press the [BACK] button.
This unit switches from the utilities mode back to normal operation.
Changing the setting of the illumination
when tracks are loaded
The pattern with which the illumination lights when tracks are loaded
can be switched.
! By default, illumination type 1 is set.
1 Press the [BACK] button for over 1 second to switch
to the utilities mode.
2 Turn the rotary selector so that the FX2 effect
parameter 3 button flashes.
1
1
3
2
2
4
34
3 Press pad 1 or pad 2 on the left performance pads.
The currently set value is indicated by which pads are flashing.
! Pad 1 flashing: Illumination type 1 selected
! Pad 2 flashing: Illumination type 2 selected
4 Press the rotary selector.
This saves the parameters that have been set in this unit’s memory.
While the parameters are being saved, the eight buttons in the effect
section flash. Do not disconnect the USB cable from this unit during this
time.
5 Press the [BACK] button.
This unit switches from the utilities mode back to normal operation.
ON
SELECT
ON
FX
SELECT
ON
FX
SELECT
TAP
FX
MODE
FX
1 Press the [BACK] button for over 1 second to switch
to the utilities mode.
2 Turn the rotary selector so that the FX2 [TAP] button
flashes.
1
1
3
2
2
4
34
ON
SELECT
ON
FX
SELECT
ON
FX
SELECT
TAP
FX
MODE
FX
3 Press pad 1 or pad 2 on the left performance pads.
! Pad 1 flashing: Advanced MIDI settings disabled
! Pad 2 flashing: Advanced MIDI settings enabled
4 Press the rotary selector.
This saves the parameters that have been set in this unit’s memory.
While the parameters are being saved, the eight buttons in the effect
section flash. Do not disconnect the USB cable from this unit during this
time.
5 Press the [BACK] button.
This unit switches from the utilities mode back to normal operation.
Enabling the advanced MIDI setting
The advanced MIDI function will be used with future feature enhancements to the Serato DJ software. When the advanced MIDI function
is enabled, the effect parameter controls, [FX BEATS] control, effect
parameter buttons and [TAP] button switch to special MIDI codes when
this unit’s [AUTO LOOP] control is pressed while pressing the [SHIFT]
button.
! By default, the advanced MIDI setting is disabled.
! To control Serato Video with this unit, disable the advanced MIDI
setting.
Buttons and controls to which advanced MIDI settings
are applied
1
1
3
2
2
4
ON
ON
FX
MODE
34
PANEL SELECT
• BACK
— UTILITY
VIEW
LOAD LOAD
SAMPLER VOL
SELECT
SYNC
OFF
LOAD
PREPARE
HOT CUE
HOT LOOP
AREA
SHIFT
IN OUT
ON
FX
FX
SELECT
SELECT
PARAM.1
SLIP
CENSOR
REL.
PARAM.2
INT.
ROLL
SLICER
AUTO LOOP
MANUAL LOOP
LOOPACTIVE
SAVE
RELOOP / EXIT
DJ CONTROLLER
22
ON
HOT CUE
HOT LOOP
IN OUT
En
ON
ON
FX
SELECT
SELECT
SLIP
CENSOR
SYNC
OFF
REL.
INT.
ROLL
AUTO LOOP
LOOPACTIVE
TAP
FX
FX
SELECT
AUTO LOOP
PARAM.1
PARAM.2
SLICER
SAMPLER
MANUAL LOOP
VELOCITY
SLOT
SAVE
SLOT
RELOOP / EXIT
FX
TAP
AUTO LOOP
SAMPLER
VELOCITY
SLOT
SLOT
DDJ-SP1
FX
MODE
Page 23

Additional information
Troubleshooting
! Incorrect operation is often mistaken for trouble or malfunction. If you think that there is something wrong with this component, check the points
below and the [FAQ] for the [DDJ-SP1] on the Pioneer DJ support site.
http://pioneerdj.com/support/
Sometimes the problem may lie in another component. Inspect the other components and electrical appliances being used. If the problem cannot
be rectified, ask your nearest Pioneer authorized service center or your dealer to carry out repair work.
! This unit may not operate properly due to static electricity or other external influences. In this case, proper operation may be restored by turning the
power off, waiting 1 minute, then turning the power back on.
Problem Check Remedy
The power is not turned on. Is the included USB cable properly connected? Connect the included USB cable properly.
Is the supply of power from the connected computer’s USB port insufficient?
This unit is not recognized. (The pad
mode button does not light.)
The indicators are dim. Is the [DIMMER] switch set to the [ON] position? Set the [DIMMER] switch to the [OFF] position.
The sampler volume does not change
while the performance pad is being
pressed according to the strength
with which the pad is pressed.
Tracks are not displayed in the library. Have music files been imported? Import the music files properly.
Serato Video cannot be controlled. Is Serato Video installed? Access the Pioneer DJ support site (http://pioneerdj.com/support/), acquire
DJ-FX (effects) cannot be controlled. Is the edge of the [AUTO LOOP] control shining? The Serato Video control mode is set.
Tracks cannot be loaded onto deck 3
or deck 4.
Is the included USB cable properly connected? Connect the included USB cable properly.
Are you using a USB hub? USB hubs cannot be used. Connect the computer and this unit directly using
Is a Serato DJ-certified controller, audio interface
or mixer connected to the computer?
Are you using the latest version of the Serato DJ
software?
Is after-touch disabled? Switch to the utilities mode and enable after-touch.
Is a crate or subcrate that does not contain any
tracks selected?
Is the [DECK] button lit? Press the [DECK] button, then once it lights press the [LOAD] button.
Connect to a USB port providing sufficient power.
If devices not being used for the DJ performance are connected to other USB
ports, also disconnect them to provide sufficient power.
Try running the connected computer with the power supplied from an AC power
source rather running it on the battery.
the included USB cable.
Connect the Serato DJ-certified devices to the computer using USB cables.
Update the software to the latest version.
Disconnect the USB cable connected to this unit before switching the
[DIMMER] switch from the [ON] position to the [OFF] position. The indicators
will not get brighter if the switch is set to the [OFF] position while the USB cable
is connected.
For details on importing music files, see the Serato DJ software manual.
Either select a crate or subcrate that contains any tracks or add tracks to the
crate or subcrate.
Serato Video from this unit’s support page then install it.
Press the [AUTO LOOP] control on the left or right side while pressing the
[SHIFT] button to cancel this mode.
Additional information
En
23
Page 24

Using as a controller for other DJ software
The DDJ-SP1 also outputs the operating data for the buttons and
controls in MIDI format. If you connect a computer with a built-in MIDIcompatible DJ software via a USB cable, you can operate the DJ software on this unit.
To use as a controller to operate DJ software other than the Serato DJ
software, switch to the setting for using software other than the Serato
DJ software in the utilities mode. Also, make the DJ software’s MIDIrelated settings.
! For details, see your DJ software’s operating instructions.
About MIDI messages
For details on this unit’s MIDI messages, see “List of MIDI Messages”.
! “List of MIDI Messages” can be acquired from the following URL:
http://pioneerdj.com/support/
About trademarks and registered trademarks
! Pioneer is a registered trademark of PIONEER CORPORATION.
! Microsoft, Windows and Windows Vista are either registered trade-
marks or trademarks of Microsoft Corporation in the United States
and/or other countries.
! Mac, Mac OS and Finder are trademarks of Apple Inc., registered in
the U.S. and other countries.
! Intel and Intel Core are trademarks of Intel Corporation in the U.S.
and/or other countries.
! Serato DJ and Serato Video are registered trademarks of Serato.
The names of companies and products mentioned herein are the trademarks of their respective owners.
This product has been licensed for nonprofit use. This product has not
been licensed for commercial purposes (for profit-making use), such
as broadcasting (terrestrial, satellite, cable or other types of broadcasting), streaming on the Internet, Intranet (a corporate network) or other
types of networks or distributing of electronic information (online digital music distribution service). You need to acquire the corresponding
licenses for such uses. For details, see http://www.mp3licensing.com .
Cautions on copyrights
Recordings you have made are for your personal enjoyment and according to copyright laws may not be used without the consent of the copyright holder.
! Music recorded from CDs, etc., is protected by the copyright laws of
individual countries and by international treaties. It is the full respon-
sibility of the person who has recorded the music to ensure that it is
used legally.
! When handling music downloaded from the Internet, etc., it is the
full responsibility of the person who has downloaded the music to
ensure that it is used in accordance with the contract concluded
with the download site.
— The specifications and design of this product are subject to change
without notice.
© 2013 PIONEER CORPORATION. All rights reserved.
PIONEER CORPORATION
1-1, Shin-ogura, Saiwai-ku, Kawasaki-shi, Kanagawa 212-0031, Japan
<DRI1145-A>
En
24
 Loading...