

Page 1

DAB+ Digital Radio Adaptor with Bluetooth
SDA-11DAB Operation Manual
Page 2

Declaration of Conformity with regard to the Radio
Equipment Directive 2014/53/EU
Manufacturer:
Pioneer Corporation
28-8, Honkomagome 2-chome, Bunkyo-ku,
Tokyo 113-0021, Japan
[*] SDA-11DAB
English:
Hereby, Pioneer declares that the radio equipment type [*] is in compliance
with Directive 2014/53/EU. The full text of the EU declaration of
conformity is available
at the following internet address: http://www.pioneer-car.eu/compliance
Suomi:
Pioneer vakuuttaa, että radiolaitetyyppi [*] on direktiivin 2014/53/EU
mukainen.
EU-vaatimustenmukaisuusvakuutuksen täysimittainen teksti on saatavilla
seuraavassa internetosoitteessa: http://www.pioneer-car.eu/compliance
Nederlands:
Hierbij verklaar ik, Pioneer, dat het type radioapparatuur [*] conform is met
Richtlijn 2014/53/EU. De volledige tekst van de EU-conformiteitsverklaring
kan worden geraadpleegd op het volgende internetadres:
http://www.pioneer-car.eu/compliance
Français:
Le soussigné, Pioneer, déclare que l’équipement radioélectrique du type [*]
est conforme à la directive 2014/53/UE. Le texte complet de la déclaration
UE de conformité est disponible à l’adresse internet suivante:
http://www.pioneer-car.eu/compliance
Svenska:
Härmed försäkrar Pioneer att denna typ av radioutrustning [*]
överensstämmer med direktiv 2014/53/EU. Den fullständiga texten till EUförsäkran om överensstämmelse finns på följande webbadress:
http://www.pioneer-car.eu/compliance
Dansk:
Hermed erklærer Pioneer, at radioudstyrstypen [*] er I overensstemmelse
med direktiv 2014/53/EU. EU-overensstemmelseserklæringens fulde tekst
kan finds på følgende internetadresse: http://www.pioneercar.eu/compliance
EU Representative’s & Importer:
Pioneer Europe NV
Haven 1087, Keetberglaan 1, 9120
Melsele, Belgium
http://www.pioneer-car.eu
Page 3

Deutsch:
Hiermit erklärt Pioneer, dass der Funkanlagentyp [*] der Richtlinie
2014/53/EU entspricht. Der vollständige Text der EUKonformitätserklärung ist unter der folgenden Internetadresse verfügbar:
http://www.pioneer-car.eu/compliance
Ελληνικά:
Με την παρούσα ο/η Pioneer, δηλώνει ότι ο ραδιοεξοπλισμός [*] πληροί την
οδηγία 2014/53/ΕΕ. Το πλήρες κείμενο της δήλωσης συμμόρφωσης ΕΕ
διατίθεται στην ακόλουθη ιστοσελίδα στο διαδίκτυο: http://www.pioneer-
car.eu/compliance
Italiano:
Il fabbricante, Pioneer, dichiara che il tipo di apparecchiatura radio [*] è
conforme alla direttiva 2014/53/UE. Il testo completo della dichiarazione di
conformità UE è
disponibile al seguente indirizzo Internet: http://www.pioneercar.eu/compliance
Español:
Por la presente, Pioneer declara que el tipo de equipo radioeléctrico [*] es
conforme con la Directiva 2014/53/UE. El texto completo de la declaración
UE de conformidad
está disponible en la dirección Internet siguiente: http://www.pioneercar.eu/compliance
Português:
O(a) abaixo assinado(a) Pioneer declara que o presente tipo de equipamento
de rádio [*] está em conformidade com a Diretiva 2014/53/UE. O texto
integral da declaração de conformidade está disponível no seguinte endereço
de Internet: http://www.
pioneer-car.eu/compliance
Čeština:
Tímto Pioneer prohlašuje, že typ rádiového zařízení [*] je v souladu se
směrnicí 2014/53/EU. Úplné znění EU prohlášení o shodě je k dispozici na
této internetové adrese: http://www.pioneer-car.eu/compliance
Eesti:
Käesolevaga deklareerib Pioneer, et käesolev raadioseadme tüüp [*] vastab
direktiivi 2014/53/EL nõuetele. ELi vastavusdeklaratsiooni täielik tekst on
kättesaadav järgmisel internetiaadressil: http://www.pioneercar.eu/compliance
Magyar:
Page 4

Pioneer igazolja, hogy a [*] típusú rádióberendezés megfelel a 2014/53/EU
irányelvnek.
Az EU-megfelelőségi nyilatkozat teljes szövege elérhető a következő
internetes címen: http://www.pioneer-car.eu/compliance
Latviešu valoda:
Ar šo Pioneer deklarē, ka radioiekārta [*] atbilst Direktīvai 2014/53/ES.
Pilns ES atbilstības deklarācijas teksts ir pieejams šādā interneta vietnē:
http://www.pioneer-car.eu/compliance
Lietuvių kalba:
Aš, Pioneer, patvirtinu, kad radijo įrenginių tipas [*] atitinka Direktyvą
2014/53/ES.
Visas ES atitikties deklaracijos tekstas prieinamas šiuo interneto adresu:
http://www.pioneer-car.eu/compliance
Malti:
B’dan, Pioneer, niddikjara li dan it-tip ta’ tagħmir tar-radju [*] huwa
konformi mad-Direttiva 2014/53/UE. It-test kollu tad-dikjarazzjoni ta’
konformità tal-UE huwa
disponibbli f’dan l-indirizz tal-Internet li ġej: http://www.pioneercar.eu/compliance
Slovenčina:
Pioneer týmto vyhlasuje, že rádiové zariadenie typu [*] je v súlade so
smernicou 2014/53/EÚ. Úplné EÚ vyhlásenie o zhode je k dispozícii na
tejto internetovej adrese: http://www.pioneer-car.eu/compliance
Slovenščina:
Pioneer potrjuje, da je tip radijske opreme [*] skladen z Direktivo
2014/53/EU.
Celotno besedilo izjave EU o skladnosti je na voljo na naslednjem spletnem
naslovu: http://www.pioneer-car.eu/compliance
Română:
Prin prezenta, Pioneer declară că tipul de echipamente radio [*] este în
conformitate cu Directiva 2014/53/UE. Textul integral al declarației UE de
conformitate este
disponibil la următoarea adresă internet: http://www.pioneercar.eu/compliance
български:
С настоящото Pioneer декларира, че този тип радиосъоръжение [*] е в
съответствие с Директива 2014/53/ЕС. Цялостният текст на ЕС
декларацията за съответствие може да се намери на следния интернет
адрес: http://www.pioneer-car.eu/compliance
Polski:
Page 5

Pioneer niniejszym oświadcza, że typ urządzenia radiowego [*] jest zgodny
z dyrektywą 2014/53/UE. Pełny tekst deklaracji zgodności UE jest dostępny
pod
następującym adresem internetowym: http://www.pioneercar.eu/compliance
Norsk:
Herved Pioneer erklærer at radioutstyr type [*] er i samsvar med direktiv
2014/53/EU.
Den fullstendige teksten i EU-samsvarserklæringen er tilgjengelig på
følgende internettadresse: http://www. pioneer-car.eu/compliance
Íslenska:
Hér með Pioneer lýsir yfir að tegund þráðlausan búnað [*] er í samræmi við
tilskipun 2014/53/ESB. The fullur texti af ESB-samræmisyfirlýsingu er í
boði á eftirfarandi veffangi: http://www.pioneer-car.eu/compliance
Hrvatski:
Pioneer ovime izjavljuje da je radijska oprema tipa [*] u skladu s
Direktivom 2014/53/EU. Cjeloviti tekst EU izjave o sukladnosti dostupan je
na sljedećoj internetskoj adresi: http://www.pioneer-car.eu/compliance
Türk:
Burada. Pioneer radyo ekipmani turunun [*] 2014/53/EU direktiflerine
uyumlu oldugunu beyan eder. Avrupa uyumluluk beyaninin tam metni
belirtilen
internet sitesinde mevcuttur: http://www.pioneer-car.eu/compliance
English:
[Bluetooth specifications]
Output power: +4 dBm Maximum (Power class 2)
Frequency band(s): 2 400 MHz to 2 483.5 MHz
Français:
[Spécifications Bluetooth]
Puissance de sortie : +4 dBm maximum (Classe de
puissance 2)
Bande(s) de frequences : 2 400 MHz a 2 483,5 MHz
Italiano:
[Specifiche Bluetooth]
Potenza continua: +4 dBm massimo (classe di potenza 2)
Banda di frequenza: da 2 400 MHz a 2 483,5 MHz
Español:
[Especificaciones de Bluetooth]
Potencia de salida: +4 dBm maximo (clase de potencia 2)
Page 6

Banda(s) de frecuencia: de 2 400 MHz a 2 483,5 MHz
Deutsch:
[Bluetooth-Spezifikationen]
Ausgangsleistung: maximal +4 dBm (Leistungsklasse 2)
Frequenzband/-bander: 2 400 MHz bis 2 483,5 MHz
Nederlands:
[Bluetooth-specificaties]
Uitgangsvermogen: +4 dBm maximaal (vermogensklasse 2)
Frequentieband(en): 2 400 MHz tot 2 483,5 MHz
English:
[FM transmitter specifications]
Output power: 50 nW e.r.p. (-43 dBm e.r.p.) maximum
Frequency band(s): 87,6 MHz to 107,9 MHz
Français:
[Spécifications transmetteur FM]
Puissance de sortie : 50 nW e.r.p. (-43 dBm e.r.p.) maximum
Bande(s) de frequences : 87,6 MHz to 107,9 MHz
Italiano:
[Specifiche Trasmettitore fm]
Potenza continua: 50 nW e.r.p. (-43 dBm e.r.p.) massimo
Banda di frequenza: 87,6 MHz to 107,9 MHz
Español:
[Especificaciones de transmisor FM]
Potencia de salida: 50 nW e.r.p. (-43 dBm e.r.p.) maximo
Banda(s) de frecuencia: 87,6 MHz to 107,9 MHz
Deutsch:
[FM-Sender -Spezifikationen]
Ausgangsleistung: maximal 50 nW e.r.p. (-43 dBm e.r.p.)
Frequenzband/-bander: 87,6 MHz to 107,9 MHz
Nederlands:
[FM-zender -specificaties]
Uitgangsvermogen: 50 nW e.r.p. (-43 dBm e.r.p.) maximaal
Frequentieband(en): 87,6 MHz to 107,9 MHz
Dansk
[FM-sender specifikationer]Udgangseffekt: 50 nW e.r.p. (-43 dBm e.r.p.)
maksimum Frekvensbånd (er): 87,6 MHz til 107,9 MHz
Page 7
English
This guide is intended to guide you through the basic functions of this unit.
For details, please refer to the operation manual stored on the website.
http://www.pioneer-car.eu
Before You Start
Thank you for purchasing this PIONEER product.
To ensure proper use, please read through this guide before using this
product. It is especially important that you read and observe WARNINGS
and CAUTIONS in this guide. Please keep the guide in a safe and
accessible place for future reference.
If you want to dispose this product, do not mix it with general household
waste. There is a separate collection system for used electronic products in
accordance with legislation that requires proper treatment, recovery and
recycling.
Private households in the member states of the EU, in Switzerland and
Norway may return their used electronic products free of charge to
designated collection facilities or to a retailer (if you purchase a similar new
one).
For countries not mentioned above, please contact your local authorities for
the correct method of disposal. By doing so you will ensure that your
disposed product undergoes the necessary treatment, recovery and recycling
and thus prevent potential negative effects on the environment and human
health.
WARNING
Do not attempt to service this product by yourself. Servicing of
this product by persons without training and experience in
electronic equipment and automotive accessories may be
Page 8
dangerous and could expose you to the risk of electric shock,
injury or other hazards.
Do not attempt to operate the unit while driving. Make sure to pull off
the road and park your vehicle in a safe location before attempting to
use the controls on the device.
CAUTION
Do not allow this unit to come into contact with moisture and/or
liquids. Electrical shock could result. Also, damage to this unit,
smoke, and overheating could result from contact with liquids.
Always keep the volume low enough to hear outside sounds.
This product is evaluated in moderate and tropical climate condition
under the Audio, video and similar electronic apparatus - Safety
requirements, EN62368-1
The SDA-11DAB is designed to be used with the provided dual USB
power adaptor only.
If you experience problems
Should this unit fail to work properly, please contact your dealer or
nearest authorised PIONEER Service Station
Safety Instructions
1. Do not use this product near water.
2. Clean with dry cloth.
3. Do not block any ventilation openings.
4. Do not use near heat objects.
5. Use only accessories provided by manufacturer.
6. Do not allow this product to become exposed to water, steam, sand
or other environmental hazards.
7. Do not leave this product where excessive heat could cause damage.
8. Make sure that nothing affects the operation of the air bags or
vehicle operating systems, safety feature or hazard lamps.
Pioneer is not liable for any damage, due to installation or use of the
product.
Page 9
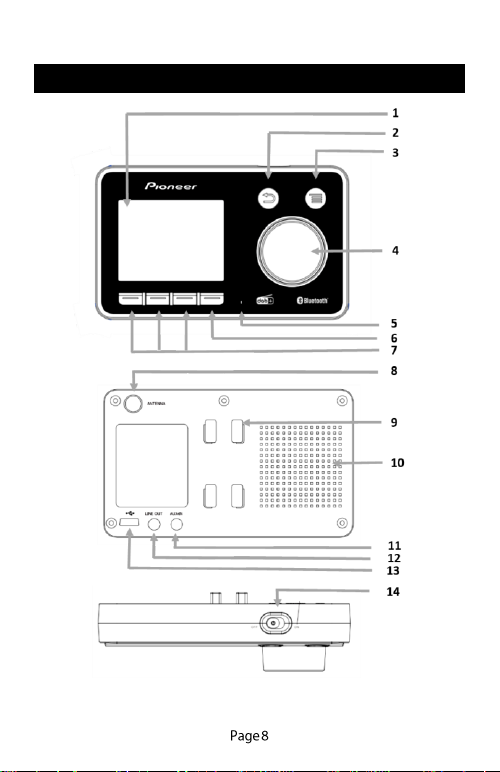
Control Unit and Connectors
Page 10

Controls
Included in the box
Page 11

1. Main unit, DAB+ adaptor
2. DAB+ active antenna
3. Micro USB Power Cable
4. 3.5mm Audio Cable
5. Dual USB power adaptor
6. Dash mount stand
7. Windscreen mount stand
8. Installation tool
9. Cleaning wipes
10. Safety strap
Note: All accessories are designed to work specifically with SDA-
11DAB. Please do not use third party accessories as these may not
work and cause negative impact to DAB reception performance.
1. The antenna should be mounted vertically along the A-Pillar as
indicated in the diagram. ATTENTION! Correct antenna
installation is important for good DAB+ reception.
2. Gently lower the car roof liner with the help of the provided
installation tool, insert the magnetic grounding tap and ensure the
magnetic tap contacts to the metal roof of the car. Since it is
magnetic, it should “click” into place. Make sure the magnetic
grounding tap is straight after attaching it to the roof of the car.
3. Ensure the windshield is clean and dry before attaching the
antenna on the glass. Do not stick down the antenna before
Page 12

you are sure that the glass lets the signal through, and where
you stick it, make sure the antenna film does not overlap
with the heating wires, which will affect the reception
performance.
4. Now remove the adhesive backing from the antenna
amplifier box and stick to the dry windshield glass, gently
applying pressure to remove any air bubbles.
5. Install the antenna cable behind the A-Pillar with the help of
installation tool and connect it to Pioneer SDA-11DAB
6. Do not attach the DAB+ antenna over heating wires, in a
place that obstructs the driver's view, or in a place that can
experience interference from metal.
Note: Ensure that the signal gets through the window. Heat wires
and certain forms of shading or sun filter, may cause the signal to
not pass through.
Antenna cable installed
inside
A-Pillar
Antenna film
Antenna Amplifier Box
Magnetic grounding tap
Antenna cable
Antenna amplifier box
Antenna film
Page 13

Dashboard Mounting
1. Bond strength is dependent upon the amount of adhesive-to-
surface contact developed. Apply firm application pressure
to develop better adhesive contact & thus improving bond
strength.
2. To obtain optimum adhesion, the dashboard bonding
surfaces must be clean and dry.
3. Application to surfaces at temperatures below 10°C (50°F) is
not recommended because the adhesive becomes too firm to
adhere readily. However once correctly applied low
temperatures holding is generally satisfactory.
Windscreen Mount and Safety Strap
1. To obtain optimum adhesion, make sure the windscreen is
fully clean and dry using the supplied cleaning wipe.
2. To avoid the windscreen mount from falling down, and
damaging your dashboard, you may attach the windscreen
mount to the safety strap (included in the box), for additional
safety.
Frequently Used Operations
Button
Operation
Rotary
Commander
- Rotate for navigating the menus.
- Rotate for the previous/next station.
- Press to confirm operation, play/pause or
answer/end a call.
- Long press to reject a call, or activate BT
pairing mode when in BT source.
- In DAB station list, long press to activate
ABC search.
Return
Button
- Long press to instantly dim the LCD and
button illumination brightness.
- Press to confirm and return to previous
menus or to cancel an active Traffic
Announcement.
- In DAB source, press to show a list of
DAB stations.
Page 14
Menu
Button
- Long press to enter menu settings.
- Press to change audio source.
Preset
Buttons
- Long press to store preset stations.
- Press to recall preset stations.
Next Preset
Row Button
- Press to switch to the next row of presets
(1-3 / 4-6).
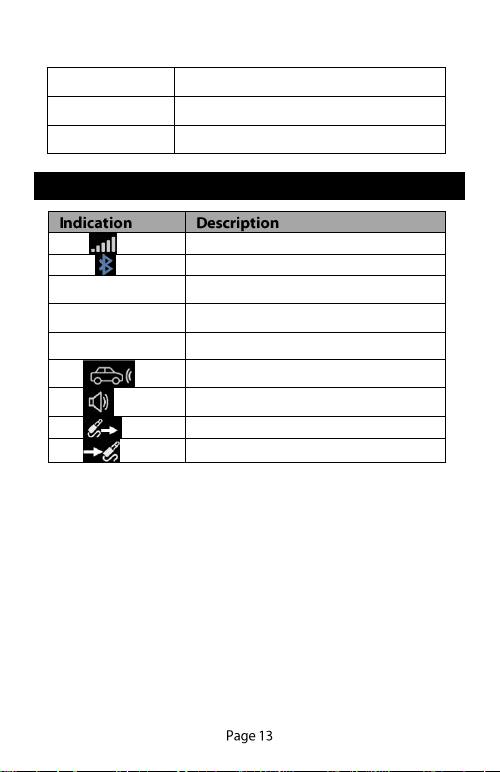
Display Indication
DAB signal level.
Bluetooth is activated.
TA
DAB Traffic Announcement (TA) is
activated.
SF
DAB Service Following (SF) is
activated .
87.5MHz
FM transmission frequency.
Handsfree voice is via the car speakers.
Handsfree voice through the built-in
speaker.
Line Out to car stereo
Aux-In to the SDA-11DAB
Page 15

Operation
SDA-11DAB
1. Mount the SDA-11DAB to the windshield or dashboard.
2. Connect the antenna to the antenna input at the back of SDA-
11DAB
3. Connect the USB power supply cable to the back of SDA-
11DAB and the other end to the dual USB power adaptor.
Plug the dual USB power adaptor to the vehicle 12V cigarlighter socket.
4. Turn on the power switch on the top of the unit and the
device will automatically scan for DAB+ channels and store
them in the memory of the device.
5. Once the auto scan is completed, you can select any available
DAB+ station using the “ROTARY COMMANDER”.
Connecting SDA-11DAB to Vehicle Stereo Using FMTransmission:
1. The default setting is 87.6 MHz. Press and hold the “MENU”
button to enter menu settings, use the “ROTARY
COMMANDER” to select “System Settings”, then “Audio
Out”, then select “FM Transmitter”. Press and hold
“ROTARY COMMANDER” to activate the automatic
scanning of a “vacant” FM transmission frequency, should
you wish to change the FM frequency.
Page 16

2. After auto scanning has completed, and a “vacant” frequency
is found, press the “RETURN” button to confirm and return to
the previous menu, or it will automatically confirm and exit
the setting after 3 seconds. The selected “vacant” frequency
will be shown at the top of the display, e.g. 87.6MHz
3. Tune your vehicle FM radio system to match the selected
“vacant” frequency for transmission of the audio signal from
SDA-11DAB to your car stereo audio system wirelessly via
FM.
Select FM Transmitting Frequency (Manual Mode):
1. Press and hold the “MENU” button to enter menu, use the
“ROTARY COMMANDER” to select “System Settings” and
“Audio Out” and then select “FM Transmitter”, turn
“ROTARY COMMANDER” to select your vacant frequency
(based on your experience with known vacant frequencies in
your area) which you would like to receive by your car stereo.
2. Once it is selected, press the “RETURN” button to confirm
and goes to previous menu or the screen will go back to
DAB+ source automatically after 3 seconds and the selected
frequency will be shown at the top of the display, e.g.
87.6MHz.
Note: “Vacant frequency” means there is no FM radio broadcasting
content or noise when the frequency is selected.
Connecting SDA-11DAB to Vehicle Stereo Using AUX
Cable (Line-Out):
1. Press and hold the “MENU” button to enter menu setting, use
the “ROTARY COMMANDER” to select “System Settings”,
then “Audio Out” and then select “Line Out”. Press
“ROTARY COMMANDER”. To confirm, press “RETURN”
button to return to previous menu. The line out icon “ ”
will be displayed at the top of the display.
2. Connect the supplied 3.5mm Aux cable to the “LINE OUT”
connector of the SDA-11DAB and the other end of the cable into the
AUX-IN input on your vehicle stereo system. Change the vehicle
stereo source to AUX to enjoy audio sound from the SDA-11DAB,
through your vehicle speakers.
Page 17

Note: In “Line Out” mode, there is no FM transmission to the
vehicle stereo. Audio is transferred via the cable instead.
Tuning DAB+ Stations/Services:
1. Press the “MENU” button until “DAB+ Radio” source is
selected.
2. Use the “ROTARY COMMANDER” to select the desired
DAB+ station
3. Or press and hold “MENU” button to select “Station List” and
use “ROTARY COMMANDER” to select the desired DAB+
station and press the “ROTARY COMMANDER” button to
confirm. Press “RETURN” button to return back to the
previous/main menu.
DAB Alphabetical (ABC) Stations Search:
1. In DAB source, press “RETURN” button to bring up the station
list, or press and hold “MENU” button enter menu and select
“Station List”, In either of these two modes, press and hold
“ROTARY COMMANDER” to show ABC in middle of the
screen,
2. Turn “ROTARY COMMANDER” to select the desired
alphabetic letter, then press “ROTARY COMMANDER” again
to search for a list of DAB stations with that desired alphabetic
letter. (If no station starting with the chosen letter is available,
“Not found” is displayed. Please select another letter or station).
3. Turn “ROTARY COMMANDER” to select a specific station
and press it again to confirm. Press “RETURN” button to exit
menu.
Updating DAB+ Station List:
1. Press and hold the “MENU” button to enter menu and to select
“DAB Settings”, then “List Update” to perform an auto scan of
all available stations.
Note: For normal use, you do not have to perform the
“Updating Stations” every time you use the car DAB+ radio
unless there are newly added DAB+ channels, then you may
need to perform the “Updating Stations” again.
Note: For normal use, you don’t have to perform the “Updating
Stations” every time you use SDA-11DAB, unless there are newly
Page 18

added DAB+ channels, then you may need to perform the “Updating
Stations” again.
Service Information: DAB+ source:
The Service Information display -The Service Information data will be
displayed with scrolling text which is being broadcasted from the
station. While listening to DAB+, the display will show the followings
if applicable:
1. Channel Name
2. Multiplex Name(DLS)
3. Signal Strength
4. FM Transmitting Frequency
5. Bluetooth Connection Status
6. Audio Out/In Status Indicator
7. Service Following On status
8. Traffic Announcements ON status
9. Hands free audio output selection
10. Time and date
11. Preset station name in short form
Display Time and Date:
1. In DAB source, whenever the Rotary Commander is rotated,
the last line of the LCD display will show the time and date
which is broadcasting from the DAB station. After 3 seconds,
the last line will automatically return to show the short form of
the DAB preset station name.
2. If there is no preset stored, the last line of LCD display will
always show time and date.
Service Following (SF) ON/OFF:
1. Press and hold “MENU” button to enter menu, select “DAB
settings” then “Service Following (SF)”. Use “ROTARY
COMMANDER” to select “On” or “Off” and press it to
confirm. Then press “RETURN” to exit menu.
2. When Service Following is on, the “SF” white icon will
appear at the top of the display. Repeat the same procedure to
turn OFF the service following function and the “SF” icon
will disappear from the LCD screen.
Page 19

Note: Upon certain situations, you may want to turn off the SF
function to prevent the product from switching between equally
strong transmitters from different areas. In this instance, it is
recommended to turn off the SF function.
Traffic Announcements (TA) ON/OFF:
1. Press and hold the “MENU” button to enter menu setting,
select “DAB Settings” and “Traffic Announcement”, then
choose “On” or “Off”. SDA-11DAB default setting for Traffic
Announcements is ON.
2. When Traffic Announcement is set to “On”, a white icon
“TA” will appear at the top of the display. During traffic
announcement broadcasting, the white “TA” icon will turn red
and turn white when the TA broadcast is finished.
3. To cancel an active Traffic Announcement, simply press the
“RETURN” button, the SDA-11DAB will return to the DAB
station you were listening to.
Note: It is recommended to enable the traffic announcements
function if you want to receive important traffic information. When
TA is ON and while you are listening to music through Bluetooth
streaming from your phone or through Aux-In, the device will
automatically switch to traffic announcements when a TA signal is
detected.
Program Type (PTY):
1. The scanned and stored DAB stations will be grouped into 4
program types:
a. News/Info
b. Popular
c. Classics
d. Others
2. To select program type, press and hold “MENU” button to
enter menu, select “DAB Settings” and “Program Type”
3. Use “ROTARY COMMANDER” to scroll and select the
desired program type and a list of the selected type will be
displayed.
4. Press the “ROTARY COMMANDER” to select and press it
again to confirm. Then press “RETURN” button to exit.
Page 20

Station Group:
1. To select station group, press and hold “MENU” button to
enter menu, select “DAB Settings” and “Station Group”. A
list of DAB ensemble will be displayed
2. Use “ROTARY COMMANDER” to scroll and select the desired
DAB ensemble and a list of DAB stations will be displayed.
3. Press the “ROTARY COMMANDER” to select and press it
again to confirm. Then press “RETURN” button to exit.
Ever Scroll:
1. Press and hold “MENU” to enter menu setting, use
“ROTARY COMMANDER” to select “DAB Settings” and
“Ever Scroll”
2. If “Ever Scroll” is set to “Off”, the DLS text information will
only scroll once. If it is set to “On”, the DLS text will be
scrolling continuously. SDA-11DAB default setting for Ever
Scroll is ON.
Manage Preset Stations
Store Preset Stations:
You can store your favourite DAB+ stations using the direct preset hard
key buttons (1-6) on the front of the device:
1. In DAB source, use the “ROTARY COMMANDER’ to
select a DAB+ station.
2. Press and hold preset button (1-3 buttons from left to right) to
store your favourite preset DAB+ stations. When the first
preset is stored, the short form DAB station name, e.g. “BBC
R3” will be shown above the preset button.
3. Repeat the same procedure to store your favourite preset.
Press the 4th button “>>” to store more favourite presets, via
the hard key preset buttons.
4. You can recall these favourite stations anytime by pressing
preset 1-6.
You may program and store more up to 30 preset stations by using
the following procedure:
Page 21

1. In DAB source, to select a DAB+ station by turning the
“ROTARY COMMANDER”, then press and hold
“ROTARY COMMANDER” to pop up “Store Presets” menu
and a list of vacant space to store, turn “ROTARY
COMMANDER” to choose the location (1-30), press it again
to store and a message of “Stored Successfully” will be
displayed. Press “RETURN” button to exit menu.
2. Or in DAB source, press and hold “MENU” to enter menu,
select “Preset Settings” and “Store Presets”, turn “ROTARY
COMMANDER” to select location. Press “ROTARY
COMMANDER” again to store and a message of “Stored
successfully” will be displayed. Press “RETURN” button to
exit menu.
1. You can easily recall your favourite DAB+ stations by simply
pressing the direct preset hard key button 1-6 on the front of device.
2. Or in DAB source, press and hold “MENU” to enter menu, select
“Preset Settings”, “Recall Presets”, use “ROTARY COMMANDER”
to select preset (1-30). Press “ROTARY COMMANDER” again to
recall the preset station and press “RETURN” to exit menu.
Removal of Preset Stations:
To delete all your favourite DAB+ preset stations, press and hold the
“MENU” button to enter menu, use the “ROTARY COMMANDER”
to select “Preset Settings” and “Delete All Presets”. If “YES” is
selected, a message of “Delete Successfully” will be pop up and all the
stored presets will be deleted.
Managing Bluetooth
Pairing a Bluetooth Enabled Phone:
1. Press and hold “MENU” button to enter menu setting, select
“Bluetooth” and then “On” to activate Bluetooth. A white
Bluetooth icon” ” will be shown at the top of the display
2. Press “MENU” button until you find “Bluetooth” source.
3. In “Bluetooth” mode, press and hold the “ROTARY
COMMANDER” to activate the SDA-11DAB device into
Page 22

pairing mode, a message of “Pairing in progress” will be shown
and the white Bluetooth icon will flash.
4. From your phone, turn on Bluetooth and search for Bluetooth
devices, a list of available Bluetooth devices will be displayed.
5. Select “SDA-11DAB” in the device list and once connection is
established, the flashing white Bluetooth icon will stop flashing
and change to blue colour, indicating the “SDA-11DAB” is now
connected to the phone.
6. During “Paring In Progress” mode, if you want to stop, you can
always press “RETURN” button to stop searching and return to
non-connected mode.
7. To disconnect an existing connected phone, press and hold
the “ROTARY COMMANDER” to force SDA-11DAB into
pairing mode to connect to another phone.
Note: During the process of re-connecting to last connected phone,
the Bluetooth icon at the top of the display will be flashing and stop
flashing when it is re-connected. A flashing white Bluetooth icon
indicates the Bluetooth is not connected. Once it is connected, the
icon will stop flashing and change to blue colour.
Manage Phone Calls:
1. When there is an incoming call, SDA-11DAB rings with a
ringtone, the message “Incoming Call…” will be displayed.
Press “ROTARY COMMANDER” once to answer the call
and at the same time the speaker volume and talk time will be
displayed on the LCD screen. You may turn the “ROTARY
COMMANDER” to adjust the volume level.
2. If you want to decline the incoming call, press and hold the
“ROTARY COMMANDER”.
3. To end a current call, press the “ROTARY COMMANDER”.
NOTE: There is no caller ID or phone book transfer
Note: There is no caller ID or phone book transfer with SDA-
11DAB.
Page 23

Bluetooth Handsfree Voice Using Built-In Speaker or
Vehicle Stereo via FM-Transmission:
1. Press and hold the “MENU” button to enter menu setting,
2. Use the “ROTARY COMMANDER” to scroll down the
menu to select “System Settings”, “Handsfree Speaker”, then
select “Built-in Speaker” or “Car Stereo Speaker”.
3. If “Built-in Speaker” is selected, an icon of “ ” will be
shown at the top of the display. If “Car Stereo Speaker” is
selected, an icon of “ ” will be displayed.
4. Turn the “ROTARY COMMANDER” to adjust the voice
volume to your desired level when it is in “Built-in Speaker”
mode.
5. When it is in “Car Stereo Speaker” mode, the voice volume
can only be adjusted by car stereo volume control.
Note: The built-in speaker only works for phone call when it is
connected via Bluetooth. When the “Car Stereo Speaker” is selected,
the phone voice is via the car stereo by either using Line Out or FM
transmitter.
Bluetooth Music Playback Using Vehicle Stereo via FMTransmission:
1. In Bluetooth mode with your phone paired/connected, select
the music file from your phone and playback via Bluetooth
source. (Refer to your phone user guide for more information).
2. In the “Audio Out” menu, make sure you have selected “FM
Transmitter” mode
3. Press “ROTARY COMMANDER” button to play or pause the
music playback
4. Turn “ROTARY COMMANDER” to select previous or next
song.
Note:
1. Once your phone is paired to SDA-11DAB, the connection
between both devices will be automatically re-established
each time you enter your vehicle if SDA-11DAB is powered
on. SDA-11DAB automatically connects itself to the last
paired phone you used with it. If you want to connect SDA11DAB to another phone you already paired but not the last
Page 24

one, you have to first disconnect the last phone by selecting
“Forget this Device” in your Phone Bluetooth setting. Then
press and hold the “ROTARY COMMANDER” to enter
pairing mode again.
2. You may pair up to eight Bluetooth devices with SDA-
11DAB.
3. If you want to connect SDA-11DAB to another phone while
the first phone is still in connection, you may force the first
phone to disconnect by press and hold “ROTARY
COMMANDER” to enter pairing mode again and a flashing
Bluetooth icon will appear at the top of the display. Then you
may pair to a new phone. This operation only works when the
new phone has not been paired with SDA-11DAB before.
Bluetooth ON/OFF:
Press and hold the “MENU” button to enter menu setting, use
“ROTARY COMMANDER” to select “Bluetooth” and press
“ROTARY COMMANDER” to choose “On” or “Off” and press
“RETURN” to exit menu.
Changing menu colour
The colour of the LCD display illumination can be set to five
different combinations to match your vehicle interior:
1. Press and hold “MENU” button to enter menu setting, use
“ROTARY COMMANDER” to select “System Settings” and
“Colour Settings”
2. Use the “ROTARY COMMANDER” to scroll and select your
desired colour of “White”, “Red”, “Amber”, “Green” or
“Blue”.
Connecting AUX-IN audio source
1. SDA-11DAB features a 3.5mm AUX-IN jack at the back of the
device. External third party devices can be fed wirelessly*
through FM transmission (*Device dependant and requires
Bluetooth connection method) to your car stereo audio system,
or via the Aux-In input connector.
Page 25

2. To connect an external music player, press the “MENU” button
until you see “AUX IN” source, at the same time, the Aux-IN
icon will be displayed. Connect an external audio source to
the “AUX IN” jack at the back of SDA-11DAB with the
provided 3.5mm audio cable.
Dual USB Charger
You can charge a third party device, using the USB cable from your
device, thanks to the Dual USB power adaptor supplied with the
SDA-11DAB. (Charging Power Output: 5V, 1A).
LCD and Button Dimmer Control
1. When driving at night, you can control the brightness level of
the colour LCD display and button light by pressing and
holding the “RETURN” button to dim the light. Press and
hold the “RETURN” button again to return to normal
brightness level.
2. You may also press and hold the “MENU” button to enter
menu setting, use “ROTARY COMMANDER” to select
“System Settings” and “Button Dimmer” or “LCD Dimmer”,
then select “On” or “Off”.
LCD Timer
1. When driving at night, you may wish to turn off the LCD
display
2. Press and hold the “MENU” button to enter menu setting.
3. Use “ROTARY COMMANDER” to select “System Settings”
and “LCD Timer” to select “15 seconds”, “30 seconds” or
“Always On”.
4. When “15 seconds” is selected, the LCD display backlight
will turn off after 15 seconds, making the screen black.
Page 26

Select Language
1. Press and hold the “MENU” button to enter menu setting.
2. Use the “ROTARY COMMANDER” to scroll up or down to
select “System Settings” and “Language”, then press “ROTARY
COMMANDER” to select your desired language and press
“RETURN” button to exit menu.
Factory Reset
1. Press and hold the “MENU” button to enter menu setting.
2. Use the “ROTARY COMMANDER” to scroll up or down to
select “Factory Reset” and “Yes” to reset the factory settings.
Software Version of the device
1. Press and hold the “MENU” button to enter menu.
2. Use the “ROTARY ENCODER” to scroll up or down to select
“System Settings” and “Software Version”, the screen will show
the current software version of the device.
Firmware Update
1. To update the firmware of the SDA-11DAB, you need to
download the latest firmware from the Pioneer website
www.pioneer-car.eu to your PC.
2. Connect SDA-11DAB to your PC using a USB cable. Press and
hold the “MENU” button to enter menu setting, select “System
Settings” and “Firmware Update”, then choose “Yes”, SDA-
11DAB will then appear in the PC as an external storage device,
copy the firmware from your PC to SDA-11DAB.
3. Then choose “Yes” to proceed on the SDA-11DAB. A message
of “Updating –XX%” will be displayed showing the progress of
updating. When update is completed, the device will re-start
automatically.
Page 27

Additional Information
Troubleshooting
1. No display.
The USB cable is not properly connected to the dual USB power
adaptor or the main DAB unit.
The dual USB power adaptor is not properly installed in the car
cigarette power socket.
Please check the unit is turned on at the top of the SDA-11DAB.
2. The sound is intermittent.
You may be using a device, such as car digital video recorder (or
Dashcam), GPS tracker, wireless phone charger or LED light
inside the car that could cause interference. Try to move the
electronic devices away from the SDA-11DAB and antenna cable.
If you are parking in front of a large LED display, the interference
from the LED display may cause DAB reception interference. Try
to move away from the LED display.
Some car air-conditioning or heaters may cause interference to
the DAB reception.
3. Poor DAB reception.
The antenna connection and positioning maybe incorrect.
-- Make sure to use the provided active DAB antenna with
magnetic tap attached. Do not try to use third-party antenna as
this can influence DAB performance.
-- Make sure the magnetic tap of antenna is inserted into
the roof top metal of the car and in a straight line manner.
-- Make sure the antenna film is straight and stuck to the
Windscreen, approximately 2cm from A-pillar.
Make sure to use the supplied Dual USB power adaptor
instead of third-party USB adaptor.
Make sure the area you are in is able to receive a DAB signal.
4. The sound from the Bluetooth audio source is not played back.
There is a call in progress on a Bluetooth-connected cellular
phone. The sound will be played back when the call is
Page 28

terminated.
A Bluetooth-connected cellular phone is currently being
operated. Stop using the cellular phone.
The connection between the cellular phone and the DAB unit is
not established correctly after a call made by Bluetoothconnected cellular phone. Make the connection again.
5. No sound is produced.
Try to tune the vehicle stereo FM radio frequency to match
with the DAB FM transmission frequency if you are using FM
transmission
Ensure the vehicle stereo is in Aux-In mode if you are using
Line Out method.
Copyright and Trademark
1. Bluetooth
The Bluetooth® word mark and logos are registered trademarks
owned by the Bluetooth SIG, Inc. and any use of such marks by
Pioneer Corporation is under license. Other trademarks and trade
names are those of their respective owners.
Product Specification
1. Product Model: SDA-11DAB
2. Radio format support: DAB+, FM Transmitter and
DAB to DAB Service Following
3. DAB+ frequency: Band III (174 –240 MHz)
4. FM transmission frequency: 87,6—107,9 MHz
5. Bluetooth: Version 4.0
6. Speaker phone output: 1.0W, 8Ω
7. Aux-In: 3.5mm stereo jack
8. Line Out: 3.5mm stereo jack
9. Power Output: DC 5V 1A
10. Power Source: Car Cigar-lighter Socket (DC 12V /
24V 1A)
11. Main unit dimension: 115mm x 70mm x 36mm
12. Main unit weight: 113g
NOTE: Specifications and the design are subject to modifications without notice.
 Loading...