

Page 1
TECHNICAL MANUAL (Ver.1.1A)
PLASMA DISPLAY : PDP-501MX/PDP-V501X
TABLE-TOP STAND: PDK-5001
SPEAKER SYSTEM: PDP-S02-LR
This manual provides precautions and information for installation, preparation, and handling of the plasma display and
its dedicated mounting hardware.
Before installation and preparation work, choose a safe and appropriate site after thorough consideration of construction,
materials used, strength, and surroundings. If the adequate safeguards are not in place, immediately halt the installation
process and discontinue marketing activities.
CAUTION
Exclamation marks placed within triangles are
intended to alert users to the presence of important
safety information. Be sure to read instructions
indicated by this symbol.
About Mounting/Installation
•The product is sold under the assumption that installation will be performed by experienced, qualified experts. Refer all mounting and installation work
to qualified personnel, or consult the nearest
PIONEER dealer for assistance.
•We accept no responsibility for accident or loss resulting from failure to select an appropriate installation site, or for those occurring during assembly, installation, mounting, or operation of this product, or
resulting from modifications made to the product,
or from natural calamities.
PRECAUTIONS
•We accept no responsibility for losses resulting from
the use of parts other than those supplied by us.
•We guarantee the performance of our products only
when they are assembled and adjusted as described in
this manual.
•The specifications and external designs shown in this
manual are subject to change without notice.
1
Page 2

Table of Contents
FEATURES.................................................................................................................................................4
SPECIFICATIONS
2.1 Specifications.....................................................................................................................................................6
2.2 External dimensions.........................................................................................................................................10
2.3 Controls and connectors..................................................................................................................................12
2.4 Remote control unit..........................................................................................................................................14
INSTALLATION
3.1 Installation site requirements...........................................................................................................................16
3.2 Installation Conditions......................................................................................................................................18
3.2.1 Heat dissipation.......................................................................................................................................18
3.2.2 Calculating heat quantity..........................................................................................................................19
3.2.3 Product mounting holes...........................................................................................................................19
3.2.4 Mount surface warping............................................................................................................................21
3.3 Installation Procedures.....................................................................................................................................22
3.3.1 Transportation precautions......................................................................................................................22
3.3.2 Unpacking................................................................................................................................................22
3.3.3 Temporary installation using packing materials.......................................................................................23
3.3.4 Re-packing...............................................................................................................................................23
3.3.5 Wiring......................................................................................................................................................24
3.4 Special Installation............................................................................................................................................26
3.4.1 Mounting to fittings.................................................................................................................................26
3.4.2 Hanging on the wall.................................................................................................................................28
3.4.3 Embedding in the wall.............................................................................................................................30
3.4.4 Ceiling suspension (with wires)...............................................................................................................34
HOW TO USE THE STANDARD MOUNT EQUIPMENT
4.1 Standard mount equipment features and characteristics.................................................................................36
4.2 Handling the standard mount equipment.........................................................................................................37
4.2.1 Handling precautions...............................................................................................................................37
4.2.2 Precautions for installation contractors....................................................................................................37
4.3 Table-top Stand: PDK-5001..............................................................................................................................38
4.3.1 Specifications...........................................................................................................................................38
4.3.2 Assembling the stand..............................................................................................................................39
4.3.3 Mounting to the main unit.......................................................................................................................40
4.4 Plasma Display Ceiling Suspension Hardware (one-sided type): PDK-5002 NOT AVALABLE IN USA 42
4.4.1 Specifications...........................................................................................................................................42
4.4.2 Assembling and installing the mounting hardware and mounting the plasma display............................44
4.5 Tiltable Plasma Display Wall-Mount Hardware: PDK-5006 NOT AVALABLE IN USA 48
4.5.1 Specifications...........................................................................................................................................48
4.5.2 Assembling the mounting hardware and mounting the plasma display..................................................50
4.6 Speaker System: PDP-S02-LR..........................................................................................................................54
4.6.1 Specifications...........................................................................................................................................54
4.6.2 Mounting to the main unit.......................................................................................................................55
4.6.3 Mounting with the plasma ceiling-suspension hardware (PDK-5002).....................................................56
4.6.4 Mounting with PDK-5006 (wall-mounting hardware)...............................................................................58
ADJUSTMENTS
5.1 Before Beginning Adjustments........................................................................................................................60
5.1.1 Operating mode.......................................................................................................................................60
5.1.2 Combination use of remote, unit operation panel, and PC......................................................................61
5.1.3 List of supported input signals.................................................................................................................62
5.1.4 List of adjustable and settable items.......................................................................................................65
5.1.5 Last memory............................................................................................................................................69
5.1.6 Aging........................................................................................................................................................69
5.2 Normal Operating Mode...................................................................................................................................70
5.2.1 About the normal operating mode...........................................................................................................70
5.3 Menu Mode......................................................................................................................................................71
5.3.1 About menu mode...................................................................................................................................71
5.3.2 Example of menu mode operation..........................................................................................................72
2
Page 3

Table of Contents
5.3.3 Settings in Menu Mode ...........................................................................................................................74
1) Setting the three-dimensional Y/C separator .......................................................................................74
2) ABL On/Off ..........................................................................................................................................74
3) MP mode On/Off .................................................................................................................................74
4) Auto power off.....................................................................................................................................76
5) Setting up peripheral equipment .........................................................................................................77
6) Setting the input signal format ............................................................................................................78
7) Setting the clamp position ...................................................................................................................79
8) Setting the color system......................................................................................................................81
5.3.4 Menu Layers............................................................................................................................................82
1) Adjustments at Menu Layers-1 of 2 ....................................................................................................82
2) Adjustments at Menu Layers-2 of 2 ....................................................................................................83
5.4 Integrator Mode ...............................................................................................................................................85
5.4.1 About the integrator mode ......................................................................................................................85
5.4.2 Example of integrator mode operation ....................................................................................................86
5.4.3 Adjustments and settings in the integrator mode ...................................................................................88
1) Adjusting the PICTURE parameters.....................................................................................................88
2) Adjusting the WHITE BALANCE parameters.......................................................................................89
3) Adjusting the SCREEN parameters .....................................................................................................90
4) Setting the color mode ........................................................................................................................91
5) Setting the baud rate ...........................................................................................................................92
6) Mirror mode.........................................................................................................................................93
7) Setting STD-RGB .................................................................................................................................94
8) Adjusting the side mask ......................................................................................................................95
9) Initializing adjustments (TOTAL INITIALIZE) ........................................................................................96
5.4.4 Integrator mode menu layers ..................................................................................................................97
5.4.5 PICTURE and WHITE BALANCE parameter memory area table .............................................................98
5.4.6 SCREEN parameter memory area table ................................................................................................100
5.5 RS-232C Adjustment Mode ...........................................................................................................................103
5.5.1 About the RS-232C adjustment mode...................................................................................................103
5.5.2 Interface.................................................................................................................................................104
5.5.3 List of RC-232C commands...................................................................................................................105
5.5.4 About the GET commands ....................................................................................................................107
5.6 Combination Connection ................................................................................................................................108
5.6.1 Connections...........................................................................................................................................108
5.6.2 Assigning IDs.........................................................................................................................................110
5.7 KEY LOCK/UNLOCK.......................................................................................................................................113
5.7.1 Functions ...............................................................................................................................................113
5.7.2 How to switch KEY LOCK/UNLOCK......................................................................................................113
OPERATING PRECAUTIONS AND RECOMMENDATIONS ................................................................ 114
6.1 About pseudo-contour....................................................................................................................................114
6.2 Cautions .........................................................................................................................................................114
Maintenance and Cleaning................................................................................................................... 115
CAUTION
• To prevent injury and material damage, thoroughly read this manual and all labels found on equipment before
attempting to mount, install, move, or adjust the product.
• Do not install the unit outside or in open air. Doing so will lead to water seepage into the system, resulting in fire
or electric shock.
• Be especially careful when working around parts of the system that have sharp edges.
• When performing installation work from a height, take suitable precautions to guard against falling. Set up a barrier
around the work site to prevent accidentally-dropped objects from injuring persons standing or walking below.
• Keep all foreign objects out of the unit. Do not tamper with the unit, or fire or electric shock may result.
• Observe the following operating environmental limitations:
Temperature: 0 to 40°C
Humidity: 20 to 80%
• Install the unit only in properly ventilated areas.
3
Page 4

Features
Features and Functions of the PDP-501MX Plasma Display
• High-definition XGA wide panel
The Display uses a high-definition XGA wide panel, which provides 1280 x 768 resolution with more than 980.000
pixels. This resolution is more than 2.5 times higher than that of conventional panels, and enables multimedia
information to be reproduced more vividly and accurately than ever before.
• Clear, high-quality image
Provides 8-bit RGB in 256 gradations/16.77 million colors. A new exclusive technology developed by Pioneer eliminates
the pseudo-contour anomaly, that is typically observed in plasma displays.
• Unrivalled brightness
A brightness of 350 cd/m2 (white peak, for panel unit), which is the highest so far for XGA panels, has been achieved by
maximizing light-emitting efficiency.
• Flat, lightweight design
The Pioneer plasma display monitor is also unrivalled in compactness: the 50-inch screen is only 98 mm in depth, and
weighs only 43.0 kg. It can therefore be mounted at locations where conventional displays are difficult to install.
• Supports a variety of signals from computers
Full specification PC are supported in video modes from VGA (640 x 480 resolution) to XGA (1024 x 762 resolution). The
SXGA (1280 x 1024 resolution) mode also accommodates PC signals, although a summary replay approach is employed
in this mode. The use of a dedicated video card also allowed access to a display of 1280 x 768 resolution, as well. This
monitor also supports HDTV broadcasts*.
Note:
* To display HDTV images on this monitor, an HDTV decoder, additionally.
• Optimized for industrial/public-address use
• An RS-232C interface is provided for control from the exterior
• The combination terminal enables a single PC to control multiple monitor systems
• The integrator mode enables more precise adjustments than ever before
• A color temperature (white balance) switching function is provided for retakes, and a key-lock feature prevents
accidental or unauthorized use of the monitor
• Multiple input and output terminals (four inputs and eight outputs) are provided
4
Page 5

Features
5
Page 6

Specifications
2.1 Specifications (U.S. Model and Taiwanese Model)
Light-emitting panel: ...... 50-inch plasma display panel
Aspect ratio: ...........................................................16:9
PEL: ................................. 1280 x 768 (XGA supported)
PEL pitch: ................ 0.858 (H·RGB trio) x 0.808 (V) mm
Gradation: ........................256/16.77 million full colours
Intensity: ..........350 cd/m
Viewing angle:....... Horizontal: more than 160 degrees
Input/output
INPUT 1
Connector type: see NOTE 1 and NOTE 2
RCA jack
(composite video signal, 1 Vp-p/75Ω input)
BNC terminal
(composite video signal, 1 Vp-p/75Ω input)
Mini-Din, 4-pin/S terminal
(S2 video signal, Y: 1Vp-p; C: 0.286 Vp-p/75Ω input)
Output (BNC, under 75Ω output): Yes (see NOTE 3
and NOTE 4)
INPUT 2
Connector type:
RCA jack x 3
(Y: 1 Vp-p; color difference: 0.7 Vp-p/ 75Ω input)
INPUT 3
Connector type:
BNC terminal x 5
(GRB: video section 0.7 Vp-p; sync section 0.3 Vpp/75Ω input) (HD/CS; VD: TTL level/ 75Ω and 2.2
kΩ inputs switchable)
INPUT 4
Connector type:
Mini D-sub, 15-pin (GBR: video section 0.7 Vp-p;
sync section 0.3 Vp-p/75Ω input) (HD/CS; VD: TTL
level/2.2 kΩ input)
Output (Mini D-sub, 15-pin; 75Ω output: Yes (see NOTE
4)
* Microsoft Plug & Play (VESA DDC 1/2B) supported
2
(white peak, separate panel)
Vertical: more than 160 degrees
Control Terminal
RS-232C (for control using a PC)
Connector type: D-sub, 9-pin
Baud rate: 1200, 2400, 4800, 9600, 19200 bps
(NOTE 5)
Combination In/Out Terminal
For simultaneous control of multiple units
Connector type: Mini-Din, 6-pin (NOTE 6)
Power requirements: .... AC 120 V, 60 Hz (U.S. Model)
AC 110 V, 60 Hz (Taiwanese Model)
In-rush: ..................................................... less than 25A
Power factor: ........................................ more than 0.95
Consumption: .......... 555 W (NOTE 7) (3 W in standby)
External dimensions (WxHxD): ...1218 x 714 x 98 mm
(47-31/32(W) x 28-1/8(H) x 3-7/8(D) inch)
Weight:............................................................... 43.0 kg
(94 lbs. 130z.)
Operating temperature:................. 0 to 40°C (NOTE 8)
(32 to 104°F)
Operating humidity:..................................... 20 to 80%
Operating atmospheric pressure:......... 0.9 to 1.1 atm
Storage limitations
Temperature: ........................................ –10 to +45°C
(14to 113°F)
Humidity: ................................................... 20 to 80%
Atmospheric pressure: ........................ 0.6 to 1.5 atm
Stacking: ................................. Fewer than three tiers
Standard Accessories
Power cord ............................................................ x 1
AC adapter plug (3p to 2p)
...................................x 1 (Taiwanese Model only)
RCA/BNC conversion adaptor
...................................x 1 (Taiwanese Model only)
Remote control unit............................................... x 1
AA battery.............................................................. x 2
Wipe cloth ............................................................. x 1
Speed clamp.......................................................... x 2
Bead band.............................................................. x 2
Operation manual .................................................. x 1
Warranty card ........................................................ x 1
6
Page 7
Specifications
NOTE 1 To prevent malfunctions and breakdowns, avoid
connecting the RCA jack and BNC terminal
simultaneously, since they are electrically
connected to each other inside the body.
NOTE 2 If the RCA jack or the BNC terminal is connected
at the same time as the S terminal, signals
received at the S terminal receive priority.
NOTE 3 Signals received at the RCA jack or BNC terminal
are sent from this terminal. Signals received at
the S terminal are not.
NOTE 4 No signal is sent in power-off or standby status.
NOTE 5 Defaults to 4800 bps. This setting can be
changed from the remote or from a PC.
NOTE 6 Connection cables are optional and are not
supplied as standard equipment. Use
commercially-available Mini-Din 6-pin cables
(straight).
NOTE 7 Allow for 600 VA of consumption per unit.
NOTE 8 The correct operating environmental
temperature may vary, depending on the
installation site. (Refer to Section 3: Installation.)
VESA is a registered trademark of the Video Electronics
Standards Association.
Specifications and external designs are subject to change
without notice.
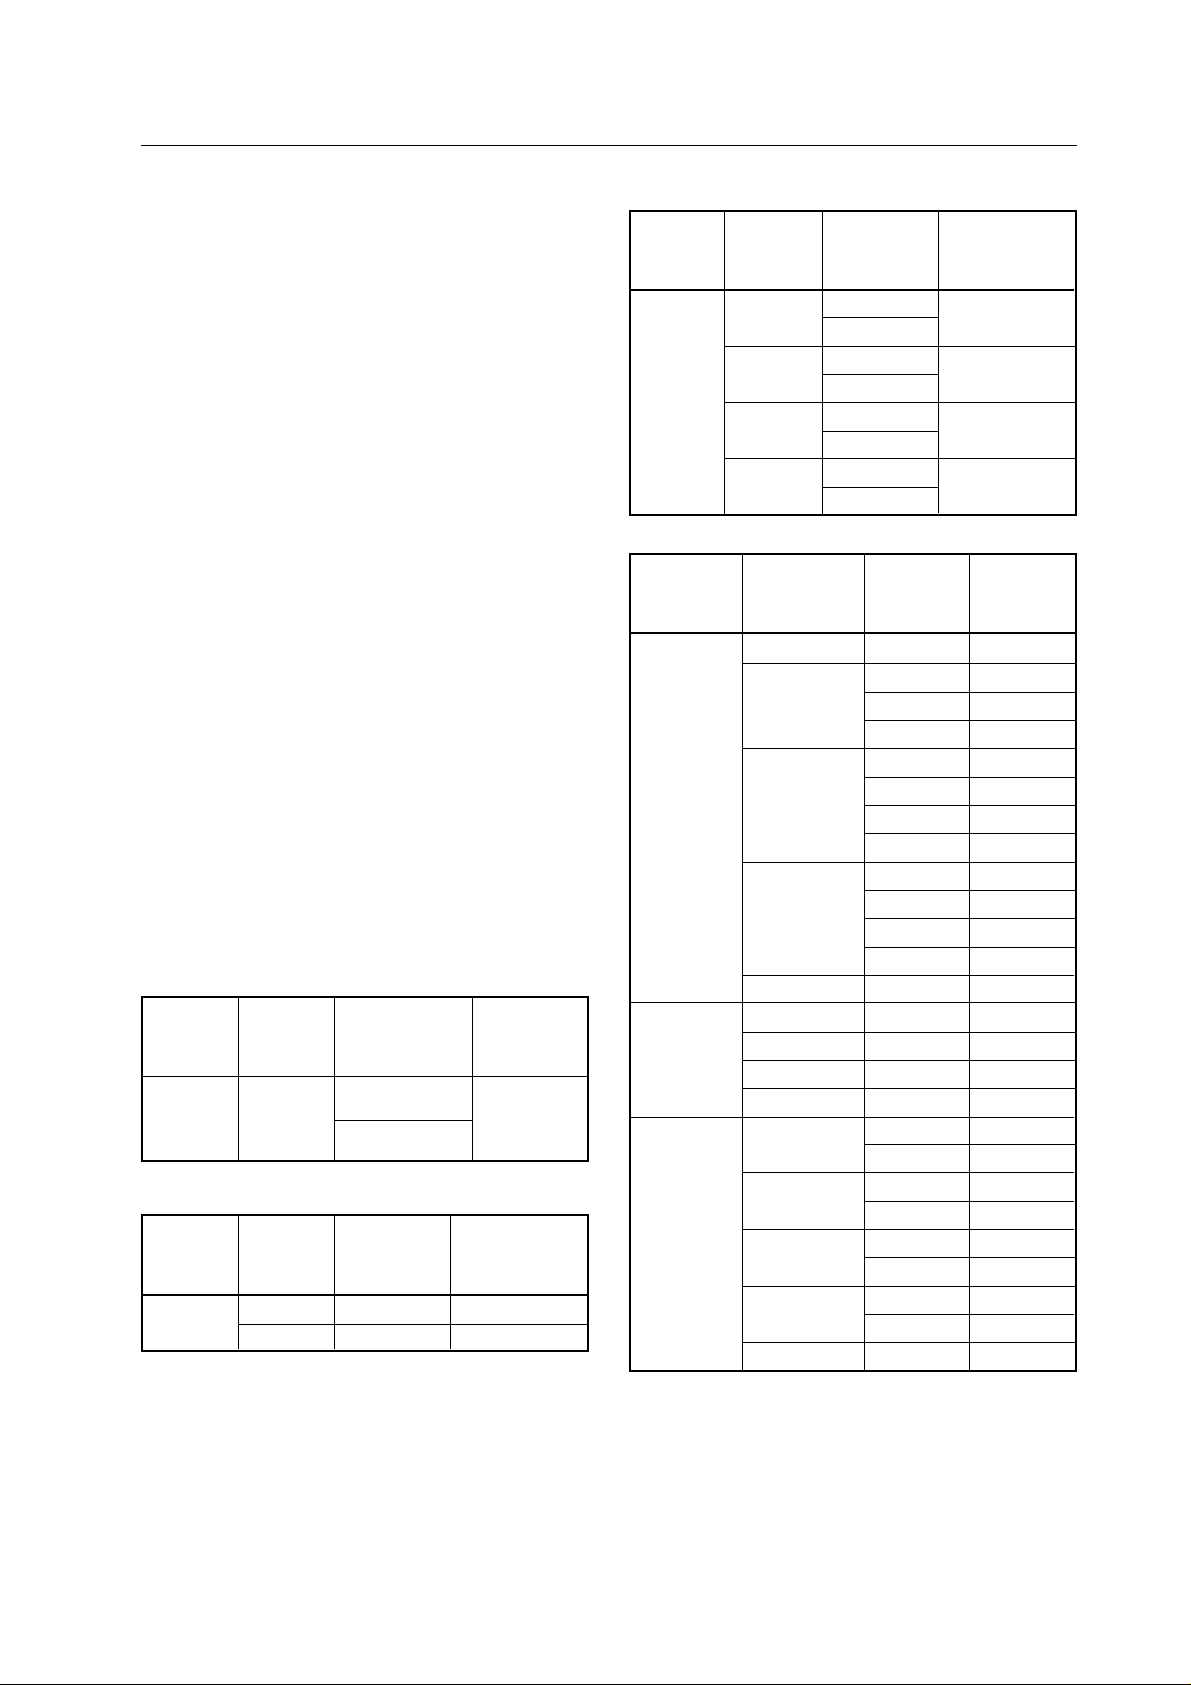
Signals supported by INPUT 1
Vertical
Frequency
Fv (Hz)
Horizontal
Frequency
Fh (kHz)
Signal
Format
Remarks
Composite
60
15.7
NTSC
S video signal
Signals supported by INPUT 2
Vertical
Frequency
Fv (Hz)
60
Horizontal
Frequency
Fh (kHz)
15.7
31.5
Signal
Format
Component
Component
Remarks
Signals supported by INPUT 3/4 (video) —1 of 2
Vertical
Frequency
Fv (Hz)
60
Horizontal
Frequency
Fh (kHz)
15.7
Signal
Format
RGB
(Note 9)
Remarks
SDTV 480i
Component
31.5
RGB
SDTV 480p
Component
33.8
RGB
HDTV 1080i
Component
45.0
RGB
HDTV 720p
Component
Signals supported by INPUT 3/4 (PC signals) —2 of 2
Model
Name
PC/AT
compatibles
Macintosh
NEC
PC-9800
Dot x line
640 x 400
640 x 480
800 x 600
1024 x 768
1280 x 1024
640 x 480
832 x 624
1024 x 768
1152 x 870
640 x 400
640 x 480
800 x 600
1024 x 768
1280 x 1024
Vertical
Frequency
Fv (Hz)
70.1
59.9
72.8
75
56.3
60.3
72.2
75
60
70.1
75
87
(Note 11)
60
66.7
74.6
74.9
75.1
56.4
70.1
59.9
75
60.3
75
70.1
75
60
Horizontal
Frequency
Fh (kHz)
31.5
31.5
37.9
37.5
35.2
37.9
48.1
46.9
48.4
56.5
60
35.5
(Note 10)
64(Note 10)
35
49.7
60.2
68.7
(Note 10)
24.8
31.5
31.5
37.5
37.9
46.9
56.5
60
64
(Note 10)
NOTE 9 Can be reproduced depending on settings in
integrator mode, but primary quality images are
not available.
NOTE 10 Simplified reproduction.
NOTE 11 Interlaced signal (frame frequency of 43.5 Hz)
NEC is a trademark of NEC Corp.
PC-9800® is a registered trademark of NEC Corp.
Macintosh® is a registered trademark of Apple Computer, Inc.
7
Page 8

Specifications
2.1 Specifications (EURO Model)
Light-emitting panel: ...... 50-inch plasma display panel
Aspect ratio: ...........................................................16:9
PEL: ................................. 1280 x 768 (XGA supported)
PEL pitch: ............... 0.858 (H)(RGB trio) x 0.808 (V) mm
Gradation: ........................256/16.77 million full colours
Intensity: ..........350 cd/m
Viewing angle:............ Horizontal 160 degrees or more
Inputs/outputs
INPUT 1
Connector type: NOTE 1 and NOTE 2
RCA jack
(composite video signal, 1 Vp-p/75Ω input)
BNC terminal
(composite video signal, 1 Vp-p/75Ω input)
Mini-Din, 4-pin/S terminal
(S2 video signal, Y: 1Vp-p; C:0.286 Vp-p/75Ω input)
Output (BNC, 75Ω output): Yes (see NOTE 3 and NOTE
4)
INPUT 2
Connector type
RCA jack x 3
(Y: 1 Vp-p; color difference: 0.7 Vp-p/ 75Ω input)
INPUT 3
Connector type:
BNC terminal x 5 (GBR:video section 0.7 Vp-p; sync
section 0.3 Vp-p/75Ω input) (HD/CS; VD: TTL level/
75Ω and 2.2 kΩ inputs, switchable)
INPUT 4
Connector type:
Mini D-sub, 15-pin (GBR: video section 0.7 Vp-p;
sync section 0.3 Vp-p/75Ω input) (HD/CS; VD: TTL
level/2.2 kΩ input)
Output (Mini D-sub, 15-pin; 75Ω input: Yes (NOTE 4)
* Microsoft Plug & Play (VESA DDC 1/2B) supported
2
(white peak, separate panel)
Vertical: 160 degrees or more
Control Terminal
RS-232C (for control using a PC)
Connector type: D-sub, 9-pin
Baud rate: 1200, 2400, 4800, 9600, 19200 bps
(NOTE 5)
Combination Input/Output Terminal
Used for simultaneous control of multiple units
Connector type: Mini-Din, 6-pin (NOTE 6)
Power requirements: ............. AC 100-240 V, 50/60 Hz
Electric current: .......................... 5.6 to 2.3 A (NOTE 7)
In-rush: .................................................... less than 25 A
Power factor: ........................................ more than 0.95
External dimensions (WxHxD): ...1218 x 714 x 98 mm
(47-31/32(W) x 28-1/8(H) x 3-7/8(D) inch)
Weight:............................................................... 43.0 kg
(94 lbs. 130z.)
Operating temperature:................. 0 to 40°C (NOTE 8)
(32 to 104°F)
Operating humidity:.....................................20 to 80%
Operating atmospheric pressure:......... 0.9 to 1.1 atm
Storage limitations
Temperature: ........................................ –10 to +45°C
(14 to 113°F)
Humidity: ................................................... 20 to 80%
Atmospheric pressure: ........................ 0.6 to 1.5 atm
Stacking: ................................. Fewer than three tiers
Standard accessories
Power cord ............................................................ x 1
RCA/BNC conversion adaptor................................ x 3
Remote control unit............................................... x 1
AA battery..............................................................x 2
Wipe cloth .............................................................x 1
Speed clamp.......................................................... x 2
Bead band..............................................................x 2
Operation manual .................................................. x 1
Warranty card ........................................................ x 1
8
Page 9
Specifications
NOTE 1 To prevent malfunctions and breakdowns, avoid
connecting the RCA jack and BNC terminal
simultaneously, since they are electrically
connected to each other inside the body.
NOTE 2 If the RCA jack or the BNC terminal is connected
at the same time as the S terminal, signals
received at the S terminal receive priority.
NOTE 3 Signals received at the RCA jack or BNC terminal
are sent from this terminal. Signals received at
the S terminal are not.
NOTE 4 No signal is sent in power-off or standby status.
NOTE 5 Defaults to 4800 bps. This setting can be
changed from the remote or from a PC.
NOTE 6 Connection cables are optional and are not
supplied as standard equipment. Use
commercially available Mini-Din 6-pin cables
(straight).
NOTE 7 Allow for 600 VA of consumption per unit.
NOTE 8 The correct operating environmental
temperature may vary, depending on the
installation site. (Refer to Section 3: Installation.)
VESA is a registered trademark of the Video Electronics
Standards Association.
Specifications and external designs are subject to change
without notice.
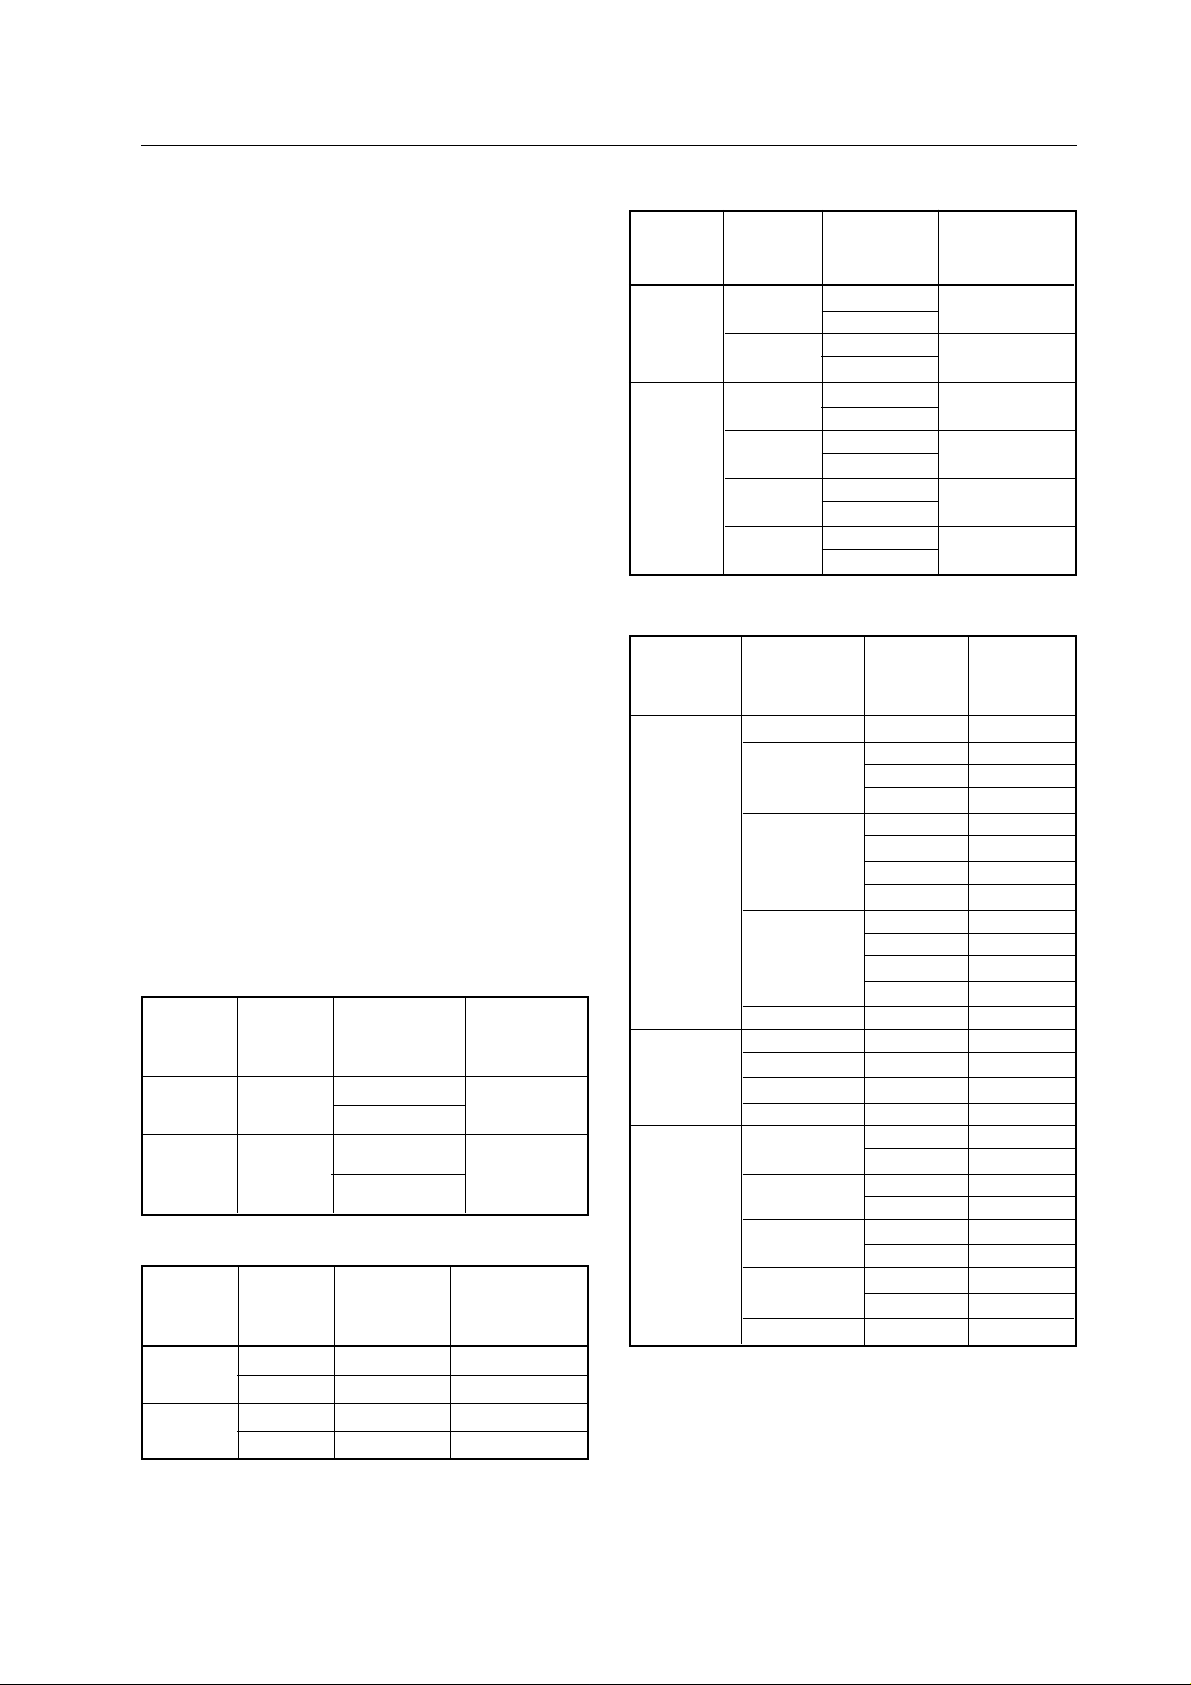
Signals supported by INPUT 1
Vertical
Frequency
Fv (Hz)
50
60
Horizontal
Frequency
Fh (kHz)
15.6
15.7
Signal
Format
Composite
S video signal
Composite
S video signal
Remarks
PAL, SECAM
NTSC
4.43 NTSC
Signals supported by INPUT 2
Vertical
Frequency
Fv (Hz)
50
60
Horizontal
Frequency
Fh (kHz)
15.6
31.3
15.7
31.5
Signal
Format
Component
Component
Component
Component
Remarks
Signals supported by INPUT 3/4 (video) —1 of 2
Vertical
Frequency
Fv (Hz)
50
Horizontal
Frequency
Fh (kHz)
15.6
Signal
Format
RGB
Remarks
(Note 9)
Component
31.3
RGB
Component
60
15.7
RGB
Component
31.5
RGB
Component
33.8
RGB
Component
45.0
RGB
Component
Signals supported by INPUT 3/4 (PC signals)—2 of 2
Model
Name
PC/AT
compatibles
Macintosh
NEC
PC-9800
Dot x line
640 x 400
640 x 480
800 x 600
1024 x 768
1280 x 1024
640 x 480
832 x 624
1024 x 768
1152 x 870
640 x 400
640 x 480
800 x 600
1024 x 768
1280 x 1024
Vertical
Frequency
Fv (Hz)
70.1
59.9
72.8
75
56.3
60.3
72.2
75
60
70.1
75
87
(Note 11)
60
66.7
74.6
74.9
75.1
56.4
70.1
59.9
75
60.3
75
70.1
75
60
Horizontal
Frequency
Fh (kHz)
31.5
31.5
37.9
37.5
35.2
37.9
48.1
46.9
48.4
56.5
60
35.5
(Note 10)
64(Note 10)
35
49.7
60.2
68.7
(Note 10)
24.8
31.5
31.5
37.5
37.9
46.9
56.5
60
64
(Note 10)
NOTE 9 Can be reproduced depending on settings in
integrator mode, but primary quality images are
not available.
NOTE 10 Simplified reproduction.
NOTE 11 Interlaced signal (frame frequency of 43.5 Hz)
NEC is a trademark of NEC Corp.
PC-9800® is a registered trademark of NEC Corp.
Macintosh® is a registered trademark of Apple Computer, Inc.
9
Page 10
External Dimensions
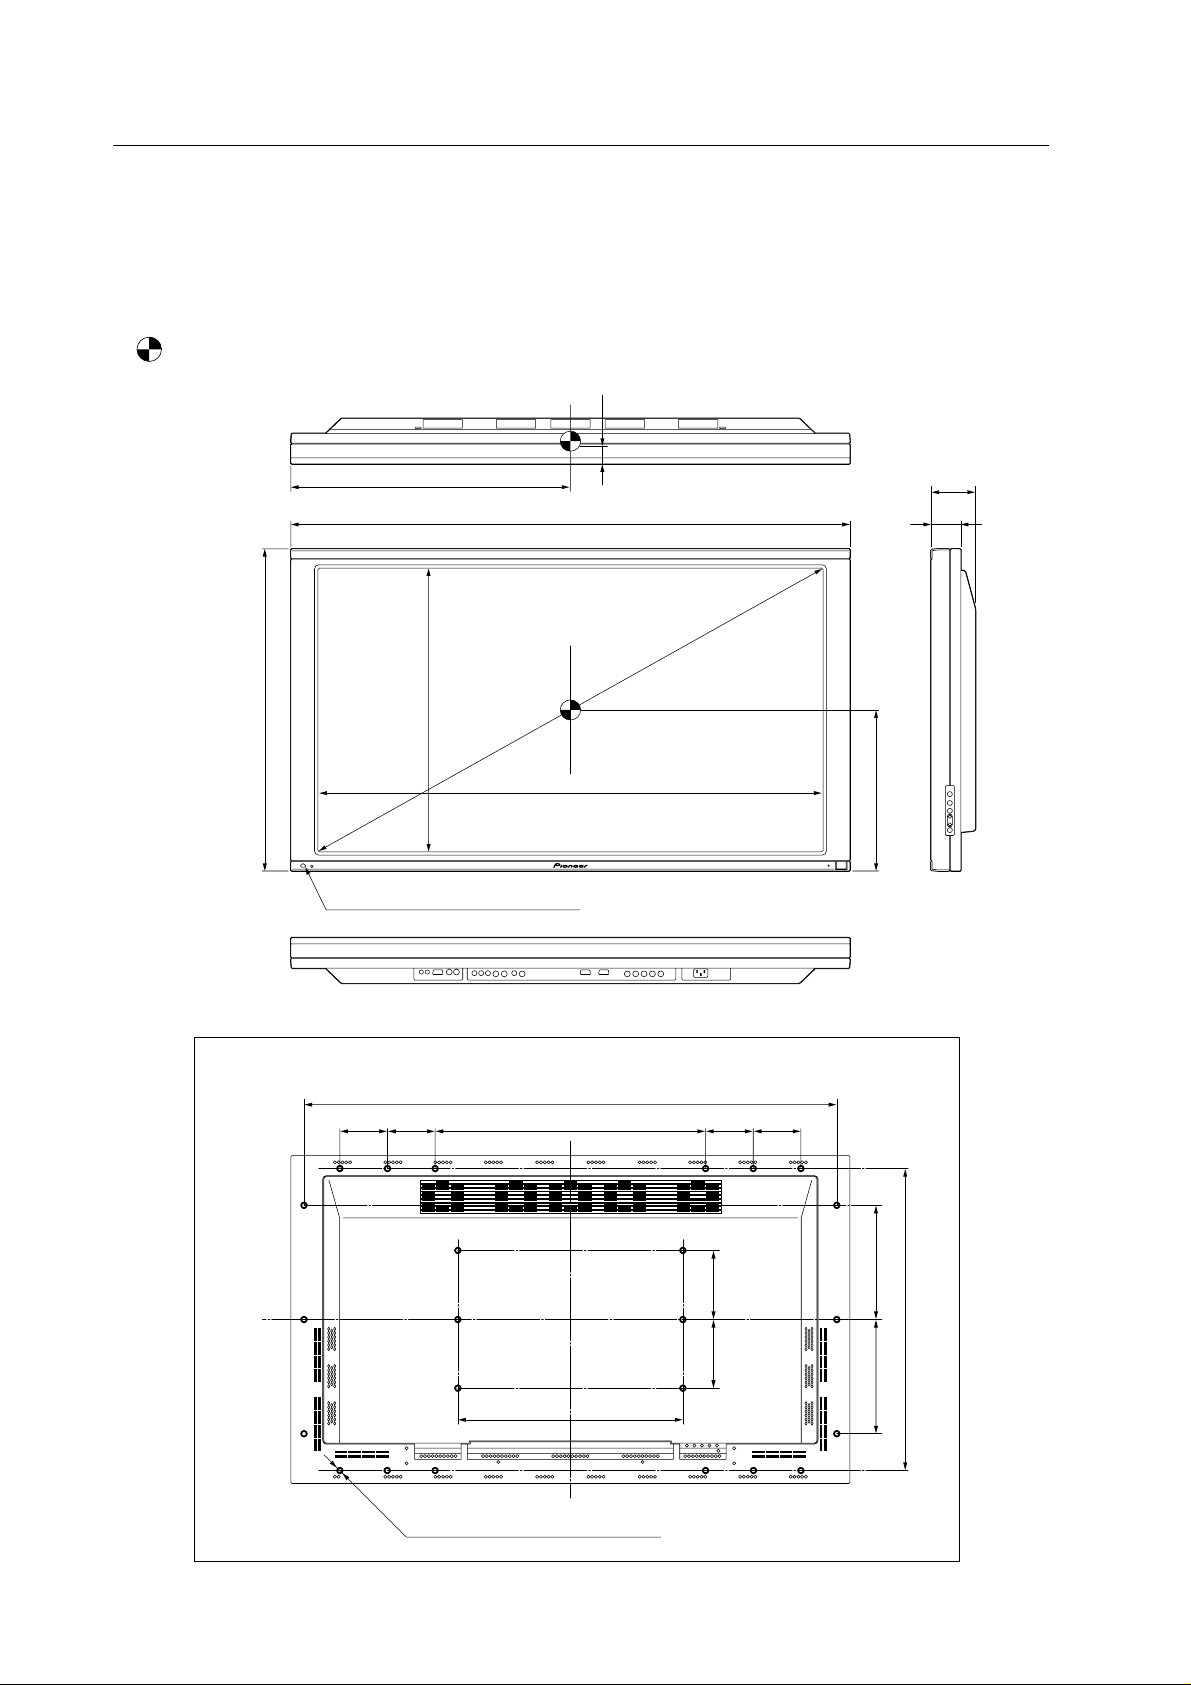
2.2 External Dimensions
Weight: 43.0 kg
Material: Front: Resin; Rear: Resin
Treatment: Front: Laser-satin gray paint; Rear: Laser-satin gray paint
For packaging information, refer to 3.3.2 Unpacking
: Center of gravity
(Unit: mm)
31
714
609
628
Light sensor for the remote
1218
1108
98.5
65.5
357
10
Rear View
1162
104 590 104 104
104
496
24-M8 (ø16 mm, with hole rivet)
250
150
660
150
250
Page 11
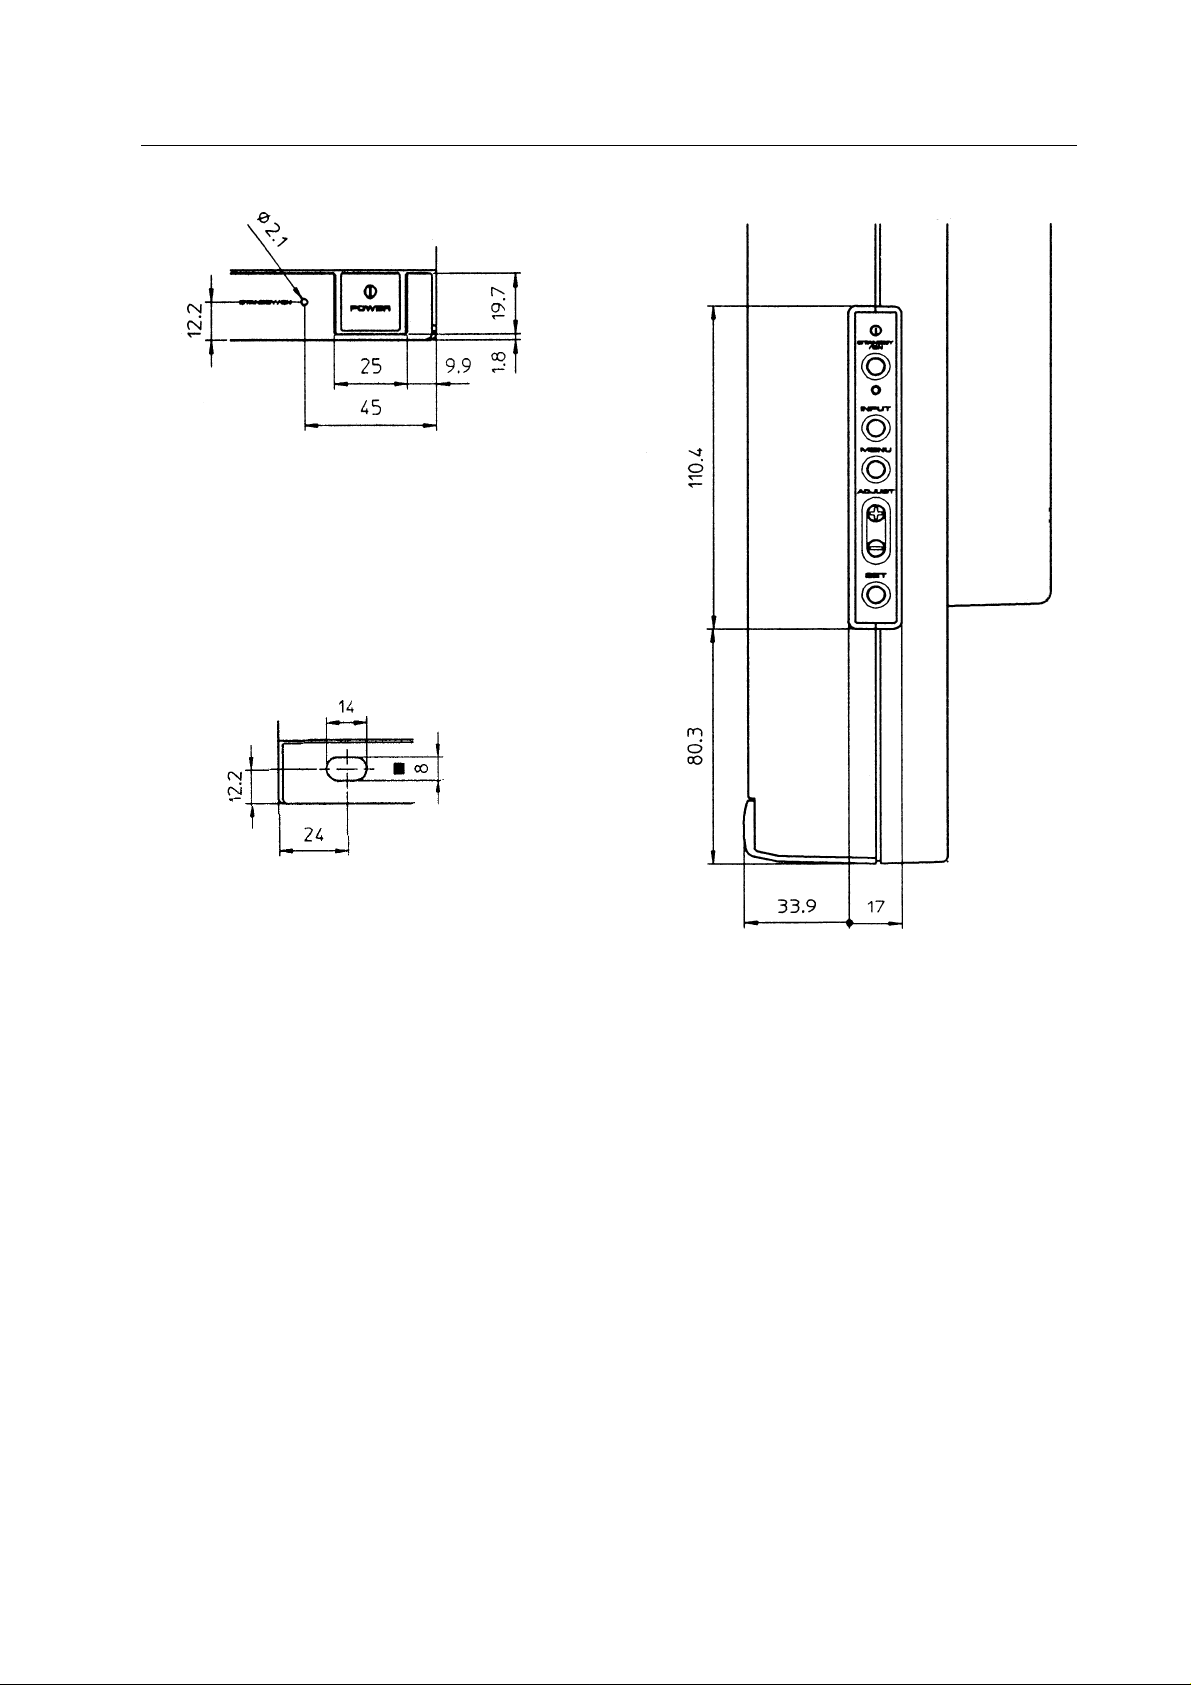
External Dimensions
< Main Switch > < Main Unit Operation Panel >
< Light Sensor for the Remote >
11
Page 12
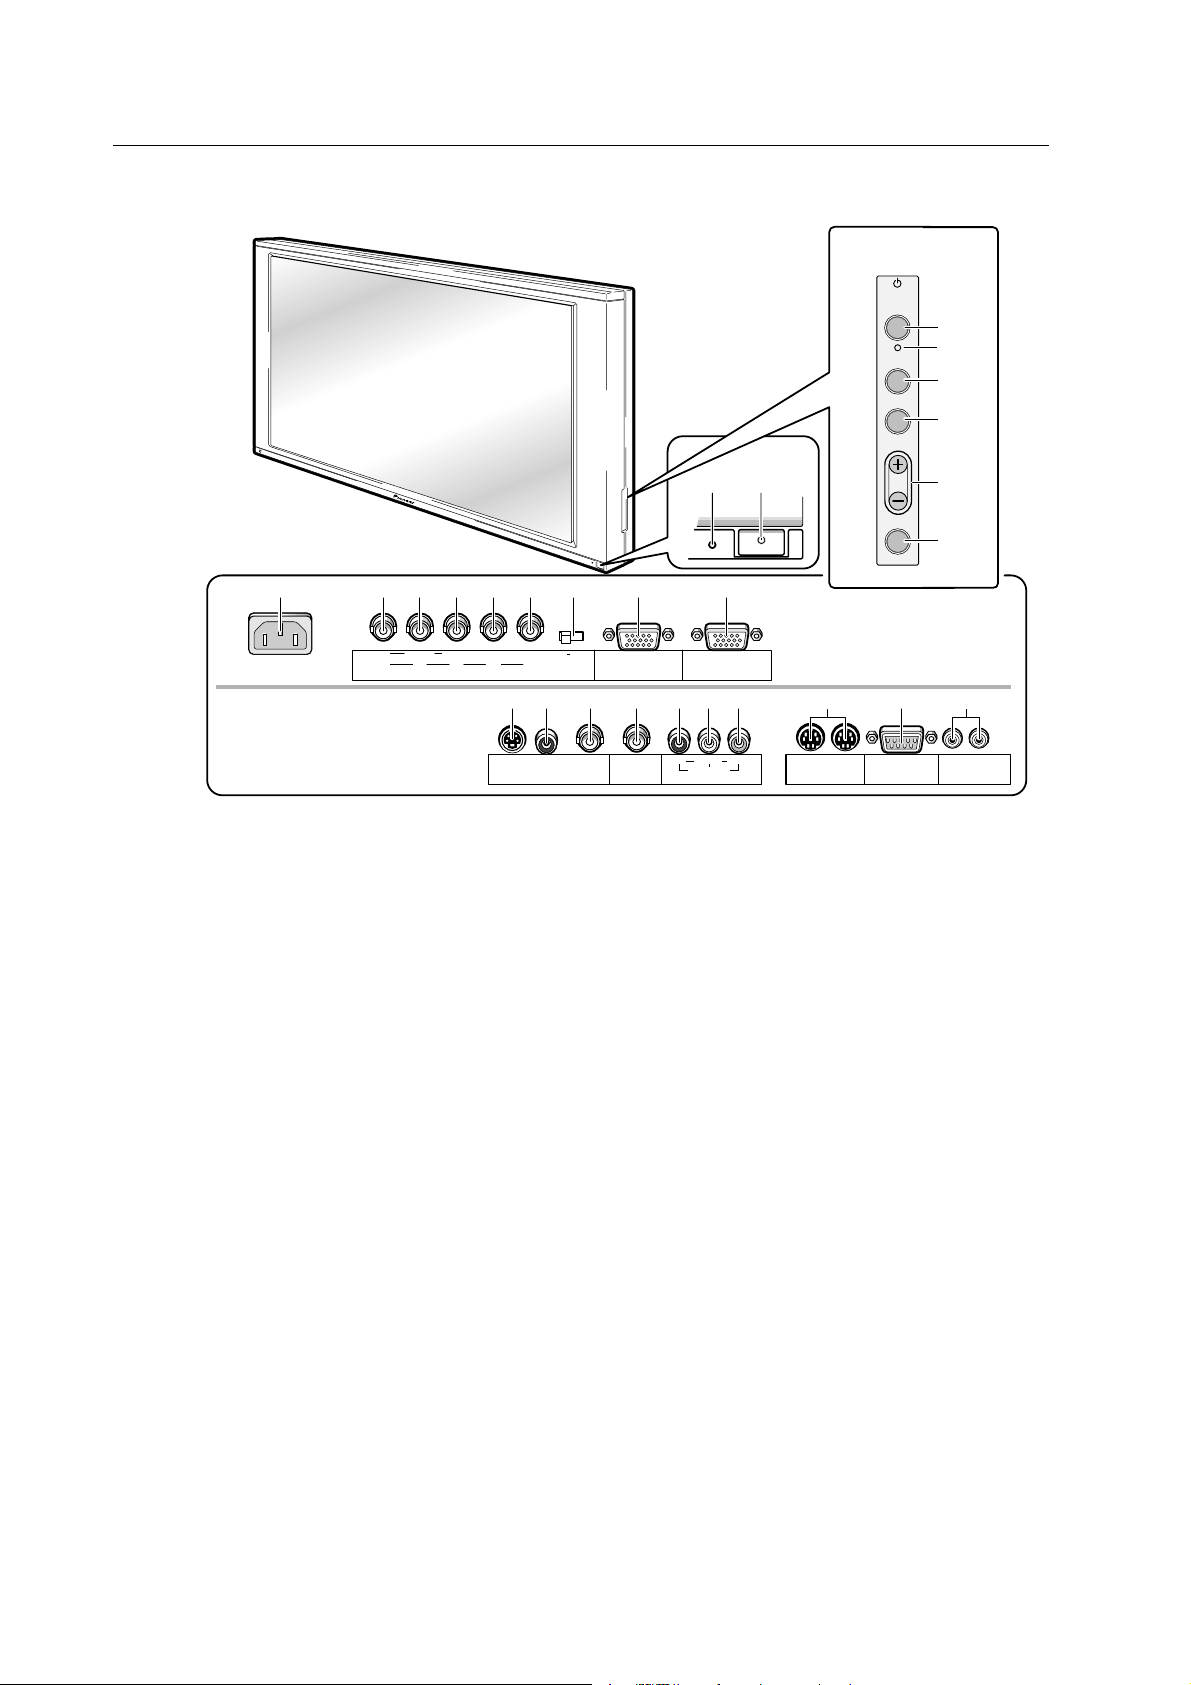
Controls and Connectors
2.3 Controls and Connectors
< Operation Panel >
STANDBY
/ON
3
8
INPUT
4
MENU
5
ADJUST
9 0 ! @ # $
YCB/PB
GBRHDVD
INPUT 3(ON SYNC) (H/V SYNC)
~=-
C
R/PR
S - VIDEO VIDEO C
< Main Power Switch Section >
1 STANDBY/ON indicator
Red indicates standby status, green indicates powering
on.
2 POWER switch
Turns main power on or off.
< Control Panel >
3 Power switch
Toggles unit on or off (standby).
4 INPUT switch
Used to select inputs
5 MENU switch
Switches the menu screen on or off.
6 ADJUST buttons
Used to move the cursor on the menu screen or to
increment/decrement adjustment values
7 SET button
Used to select an adjustment item in the menu screen
or to change settings
8 KEY LOCK/UNLOCK button (hidden)
Renders the operation panel and remote operative or
inoperative.
75Ω 2.2kΩ
INPUT 4 OUTPUT
(INPUT 4)
% ^ & * ( ) _
INPUT 1
OUTPUT
(INPUT 1)
B/PB CR/PR
C. VIDEO
INPUT 2 CONBINATION
Y
< Connectors >
9 AC INLET
INPUT 3 Inputs
These RGB inputs are composed of five BNC terminals,
0 to !. They also support the component video signal
(settings required in the menu screen).
0 Green Input: 75Ω
Receives signals of G, G with sync, and Y.
- Blue Input: 75Ω
Receives signals of B, CB, and PB.
= Red Input: 75Ω
Receives signals of R, CR, and PR.
~ Horizontal and Composite Sync Signal Input: 75Ω/
2.2kΩ
Receives signals of HD, and H/V Sync.
! Vertical Sync Signal Input: 75Ω/2.2 kΩ
Receives a VD signal.
@ Sync Signal Input Impedance switch
Used to switch input impedance for items ~ and !
between 75Ω and 2.2 kΩ.
21
SET
POWER
< Connectors >
(at the rear of the main unit)
+ ™¡
IN OUT IN OUT
RS - 232C
6
7
Î
CONTROL
12
Page 13

Controls and Connectors
INPUT 4 Input
# INPUT 4 input terminal
Mini D-Sub 15-pin terminal for connection of RGB
signals
This terminal also supports component signals (settings
required in the menu screen).
This terminal supports Microsoft Plug & Play (VESA
DDC 1/2B).
(VESA is a registered trademark of the Video Electronics
Standards Association.)
INPUT 4 Output
$ INPUT 4 output terminal
Signals fed to the INPUT 4 input terminal # are sent
from this output terminal. No signal is sent when power
is switched off, or in standby status.
NOTE: When the unit is connected in a series using
this output terminal, up to five units can be
connected including the unit to which signals
are first input. If you use separate sync or
composite sync signal, over 4.8 Vp-p sync level
is necessary between the video source and the
first unit, under the condition of 2.2 kΩ input
impedance.
INPUT 2 Input
Component video input terminals composed of three RCA
jacks ( to _.
( Y Input: 75Ω
) CB and PB Input: 75Ω
_ CR and PR Input: 75Ω
Control
+ Combination Input and Output terminals
Used for simultaneous control of multiple units
(Refer to 5.6 Combination Connections)
NOTE: No ABL linkage function is provided. These
terminals are incompatible with multiprojections such as the RM-V4800V.
¡ Control connector (conforming to RS-232C)
Used to make adjustments or settings externally
™ SR IN/OUT terminals
For SR connection (refer to the operation manual) to
AV units from Pioneer
NOTE: This product does not support RU-V107 wired
remote control units.
INPUT 1 Inputs
% S2 Video Input terminal (S terminal)
^ Video Input terminal (RCA jack)
& Video Input terminal (BNC terminal)
To prevent malfunctions and breakdowns, avoid
connecting the RCA jack and BNC terminal
simultaneously, since they are electrically connected
to each other inside the body.
INPUT 1 Output
* Video Output terminal
Signals fed to the INPUT 1 Video Input ^ or & are
sent from this output terminal. This terminal does not
carry signals received at the S-input terminal %. No
signal is available at this output terminal when power
is switched off, or in standby status.
NOTE: When the unit is connected in a series using
this output terminal, up to five units can be
connected including the unit to which signals
are first input.
13
Page 14

Remote Control Unit
2.4 Remote Control Unit
Power switch
Used to turn the system on or off
(standby)
Full Auto-Zoom button
Used to turn full auto-zoom on or off
Display button
Used to view status of inputs or
settings
Menu button
Used to turn the menu screen on
or off
Set button
Used to select adjustment items in
the menu screen or to change
current settings
STANDBY/ON
INPUT2
VIDEO
C.VIDEO
S-VIDEO
( RCA )
DISPLAY
MENU
PLASMA DISPLAY
REMOTE CONTROL UNIT
FULL AUTO
INPUT3 INPUT4INPUT1
RGB
( BNC )
ZOOM
SET
RGB
( D-sub )
SCREEN
SIZE
Input switches
Used to select inputs
Screen Size switch
Used to select screen size
Adjustment buttons
Used to move the cursor in the
menu screen or to adjust various
settings
Î
14
Page 15

Remote Control Unit
15
Page 16
Installation Site Requirements
3.1 Installation Site Requirements
If the site requires modifications or special preparations for installation of the plasma display or its mounting hardware,
obtain permission in advance from the building owner or building authorities. To ensure installation safety, it is also
important to determine the strength of the installation site with the help of the original building contractor.
Safety Precautions
1) Structure of the installation site
Make sure you thoroughly understand the structure of the installation site before determining the most suitable installation
method. Buildings vary in structure and materials, and the appropriate mounting hardware will differ accordingly. When
drilling into walls, always remain aware of internal electrical wiring and pipes.
2) Weight capacity of the installation site
Select a location with a weight capacity sufficient to support the total weight of the display and mounting hardware.
3) Horizontal and flat surfaces
Select a flat and surface place for instruction and attach mounting hardware parallel to the pace of installation. Install the
unit so that the load is evenly applied to the ceiling or wall, as well as on mounting components such as hang bolts.
4) Sufficient work space
Select a location with sufficient space for installation work. The installation work should be conducted by more than two
persons.
5) Nearby equipment
Air conditioning ducts or lamps located near the installation site may be subject to dust, extreme temperatures, humidity,
and condensation during installation. Take suitable measures to protect them.
6) Safe locations
Do not install the unit where it may be easily reached or leaned against. Avoid locations subject to high vibration or
severe impacts.
7) Lighting conditions
• Consider existing lighting and sunlight angles when creating the installation layout. Extremely bright lighting can
reduce the visibility and quality of the display image.
• In extremely bright surroundings, adjusting screen intensity may not result in perceptibly brighter images. Keep in
mind that extreme intensity settings can reduce system service life.
8) Installation partially outdoors
The unit is designed for indoor use and is not suited for open-air use. Installation at locations even just partially exposed
to the elements may lead to malfunctions or breakdown caused by any of the following:
• Water and dust
• Change in temperature and humidity
• Salt-bearing wind
Direct sunlight upon the display degrades image quality. In installing the display, avoid sites exposed to direct sunlight.
16
Page 17

Installation Site Requirements
9) Temperature and humidity conditions
• The installation site should meet the following conditions:
• Operating temperatures: 0 to 40 °C (largely depending on installation conditions)
• Operating humidity: 20 to 80%
• Storage temperature: –10 to +45 °C
• Storage humidity: 20 to 90%
• Operating atmospheric pressure: 0.9 to 1.1 atm
• Storage atmospheric pressure: 0.6 to 1.5 atm
• We recommend against installing electronic products such as this unit in locations subject to high humidity. If the unit
is to be installed in a location subject to relatively high humidity, observe the following:
• Never install the unit in locations that fail to meet the conditions specified above
• Make sure the unit is grounded
• Prevent condensation
• Do not allow water or liquids to enter the unit
10) Beware of condensation
One of the chief problem sources during winter is condensation. Rapid temperature fluctuations can deposit airborne
water vapor inside the unit or on the screen, degrading performance. If condensation occurs, turn the unit off and leave
it off for one hour or so. It is also good practice to increase room temperature gradually.
11) Power requirements
• This unit functions properly when powered at ±10% of its rated voltage. High impedance characteristics of lines at
the installation site may distort the voltage output wave form, effectively reducing voltage. If any of the following
occurs, inspect the main wiring.
• Significant voltage drop between the switchboard and the plasma display
• Significant changes in voltage when switching unit power on or off
• When calculating heat quantity, allow for 600 VA of consumption per unit
• The in-rush current upon powering up will be approximately 25 A
12) Effectire remote-control distance
This display emits weak infrared radiation. If other products controlled with infrared remote controls are placed nearby,
remote control function may be affected. In such cases, move them away from the display.
Depending on installation conditions, the range of the unit’s own remote control may be reduced by infrared emitted by
the screen.
The screen’s infrared intensity will vary, depending on the image displayed.
17
Page 18
Installation Conditions
3.2 Installation Conditions
3.2.1 Heat dissipation
This unit has openings for effective ventilation at locations marked by arrows in the illustration below. To allow proper
dissipation of heat from the unit, avoid blocking or covering any of these openings.
345
10
70
96.5 35
45
75
Ø 5
Fan (4 in number)
54
85
215
255
Air flow through the openings: All four fans exhaust hot air from the unit. All openings not assisted by fans serve as
air inlets. If the unit is hung from or embedded into a wall, special operating temperature limits and other limitations
may apply. Refer to 3.4 Special Installation.
18
Page 19
Installation Conditions
3.2.2 Calculating heat quantity
.
For power consumption, allow for 600 VA ( 600 W) per unit. Since most of the power consumed is transformed into
=
.
heat, power consumption may be regarded as roughly equal to generated heat.
1 Conversion to calories
[W] x 0.86 = [kcal/h]
Heat generated per display: 600 W x 0.86 = 516 kcal/h
2 Conversion to British Thermal Units (BTU)
[W] x 3.41 = [BTU/h] Heat generated per unit: 600 W x 3.41 = 2046 BTU/h
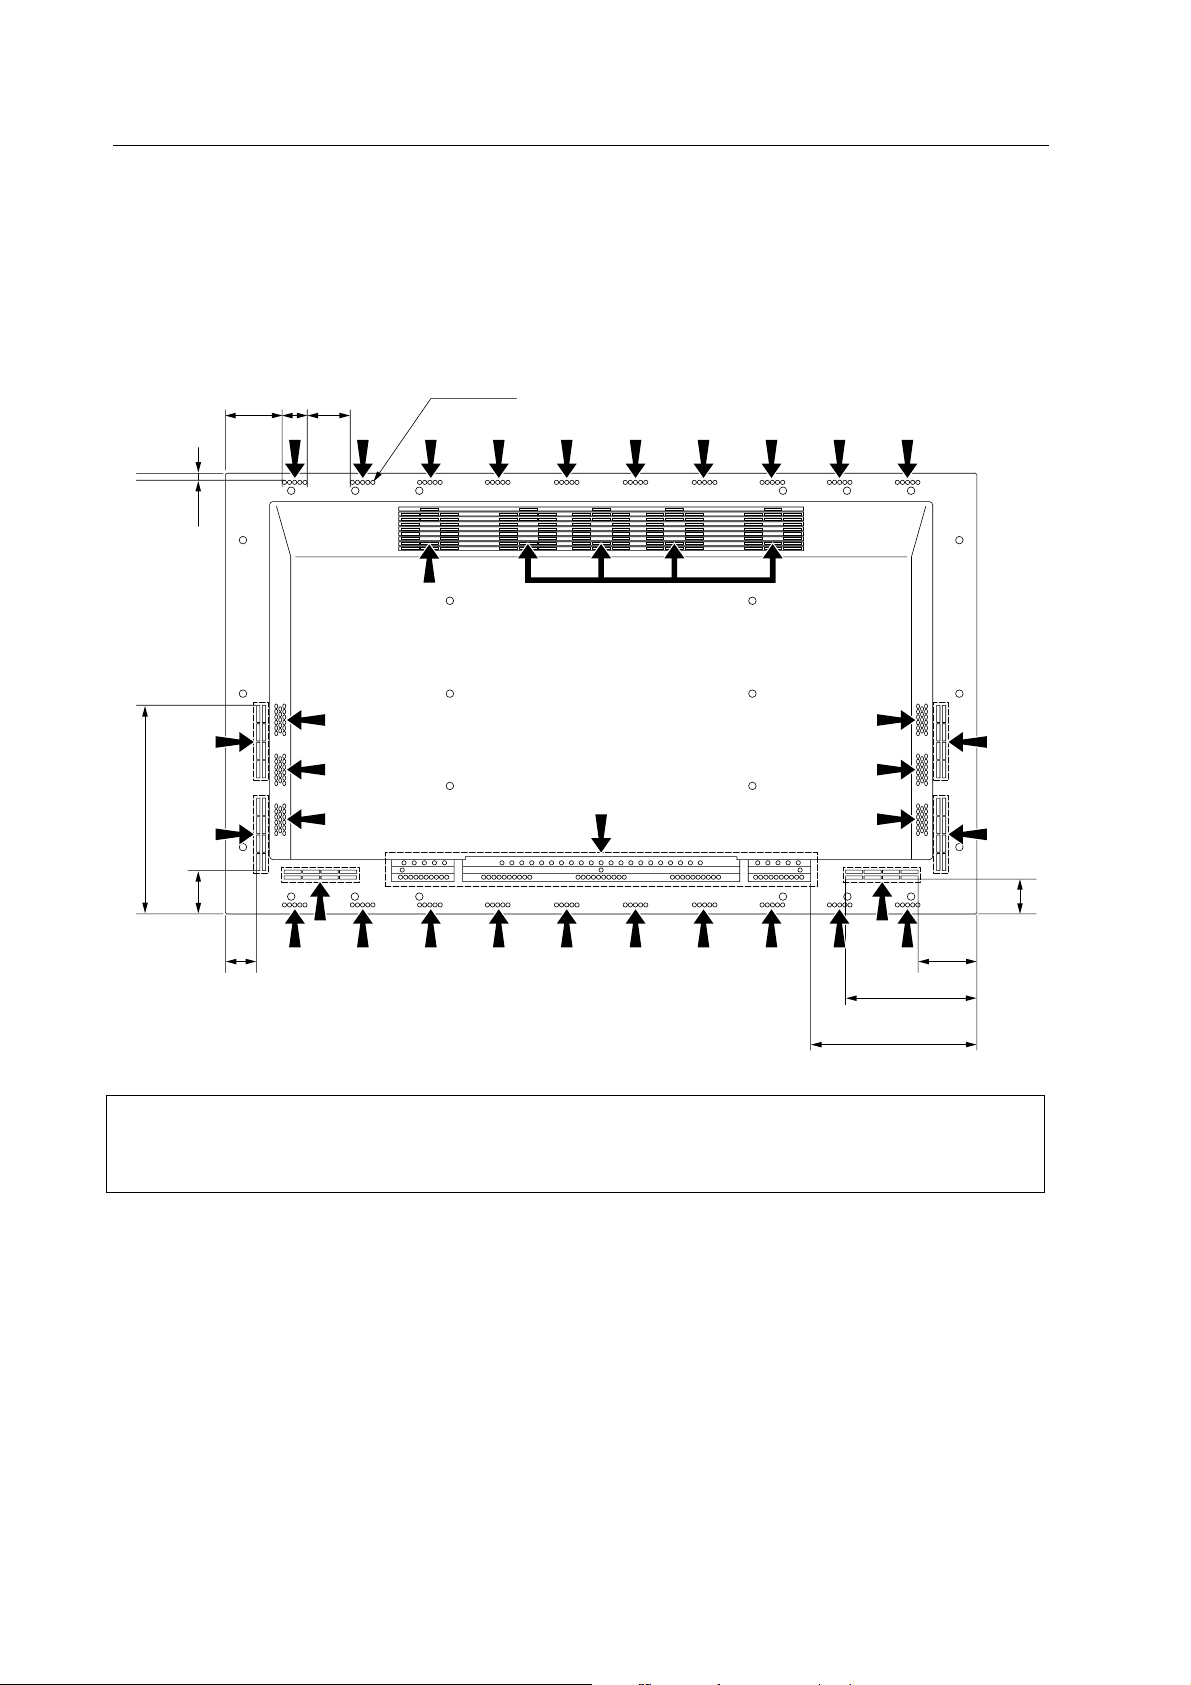
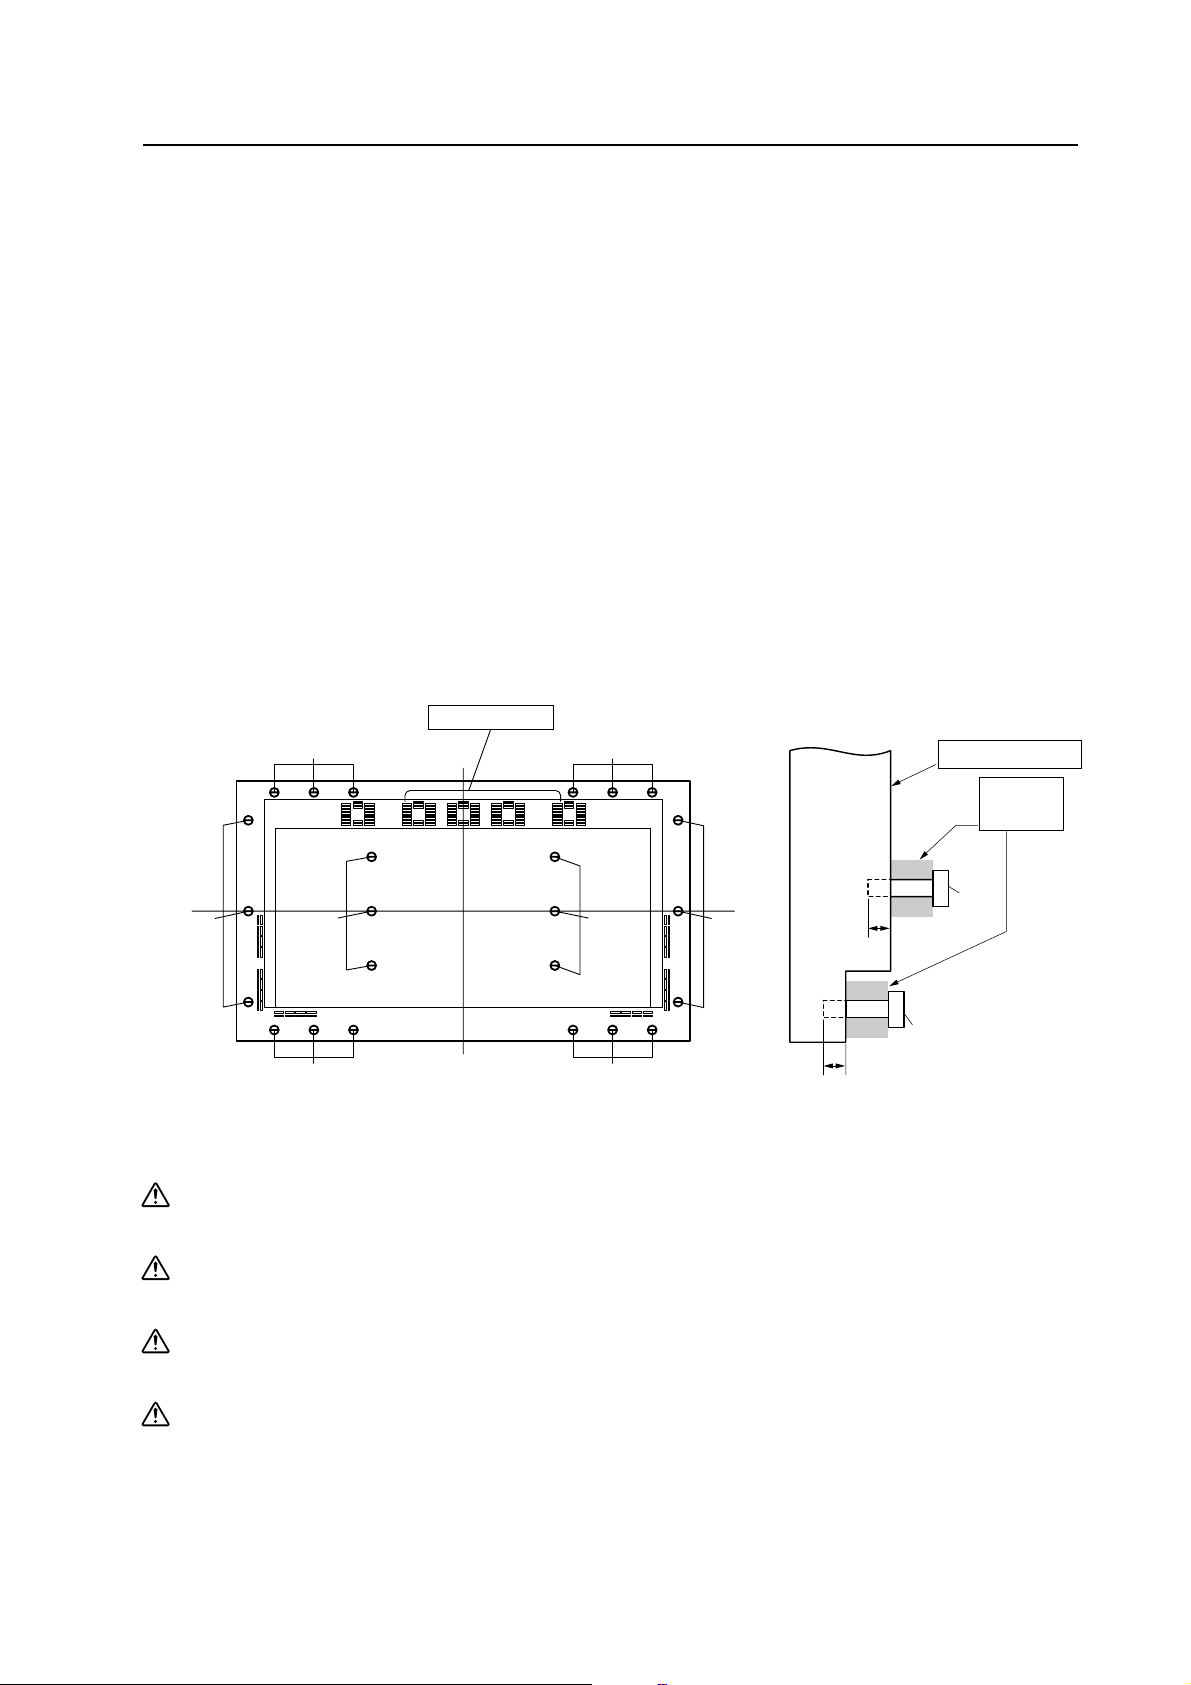
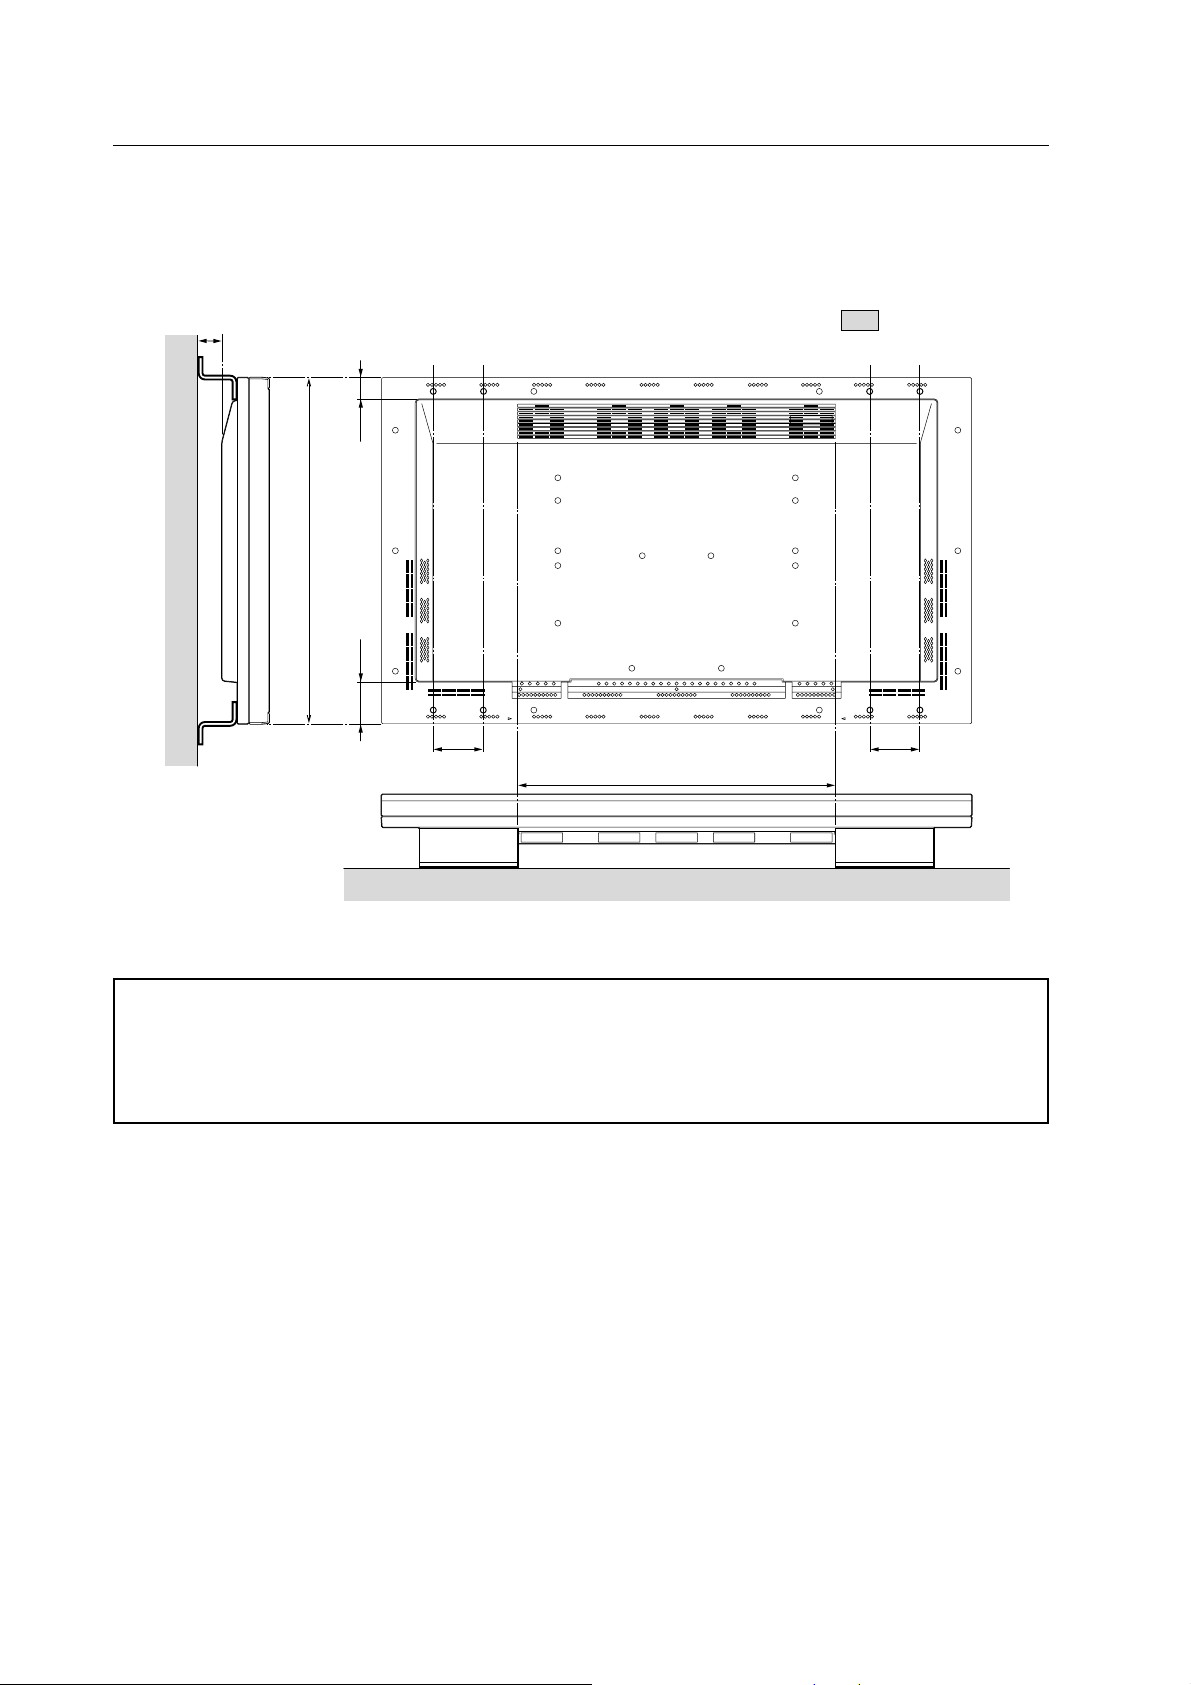
3.2.3 Product mounting holes
We recommend using mounting hardware available from Pioneer. If you use other mounting hardware, attach them to
the unit using the M8-bolt holes provided in the unit. Remove the hole rivets, depending on the particular mounting
hardware used. Tighten bolts with a torque between 50 and 80 kg.cm. Applying a torque beyond these limits may lead
to nut failure.
• Locations of useble mount holes are shown below. (Caps, or plugs, can be removed by turning them with a coin or
another device.)
Hole “a”: in 6 locations
Hole “b”: in 18 locations
Mounting Surface
Hole “b”
Air outlet (Fan)
Hole “b”
The main
Hole “b”
Hole “a”
Hole “b”
Center line
Hole “a”
Hole “b
Rear View
Center
line
Hole “b”
unit
10 to 23mm
Side View
Hole “a”
Bolt
10 to 17mm
Hole “b”
Bolt
Always use a minimum four mounting holes, evenly distributed on opposite sides of both the horizontal and
vertical center lines.
Use bolts that can be driven 10 to 17-mm into holes “a” or 10 to 23-mm into holes “b,” as shown in the Side View
above.
Do not block or cover air outlets and openings for ventilation on the rear panel. Take precautions to prevent fouling
walls behind the product with exhaust air discharged from the air outlets.
Mount
hardware,
etc.
This unit incorporates glass components. Install only on flat surfaces.
19
Page 20
Installation Conditions
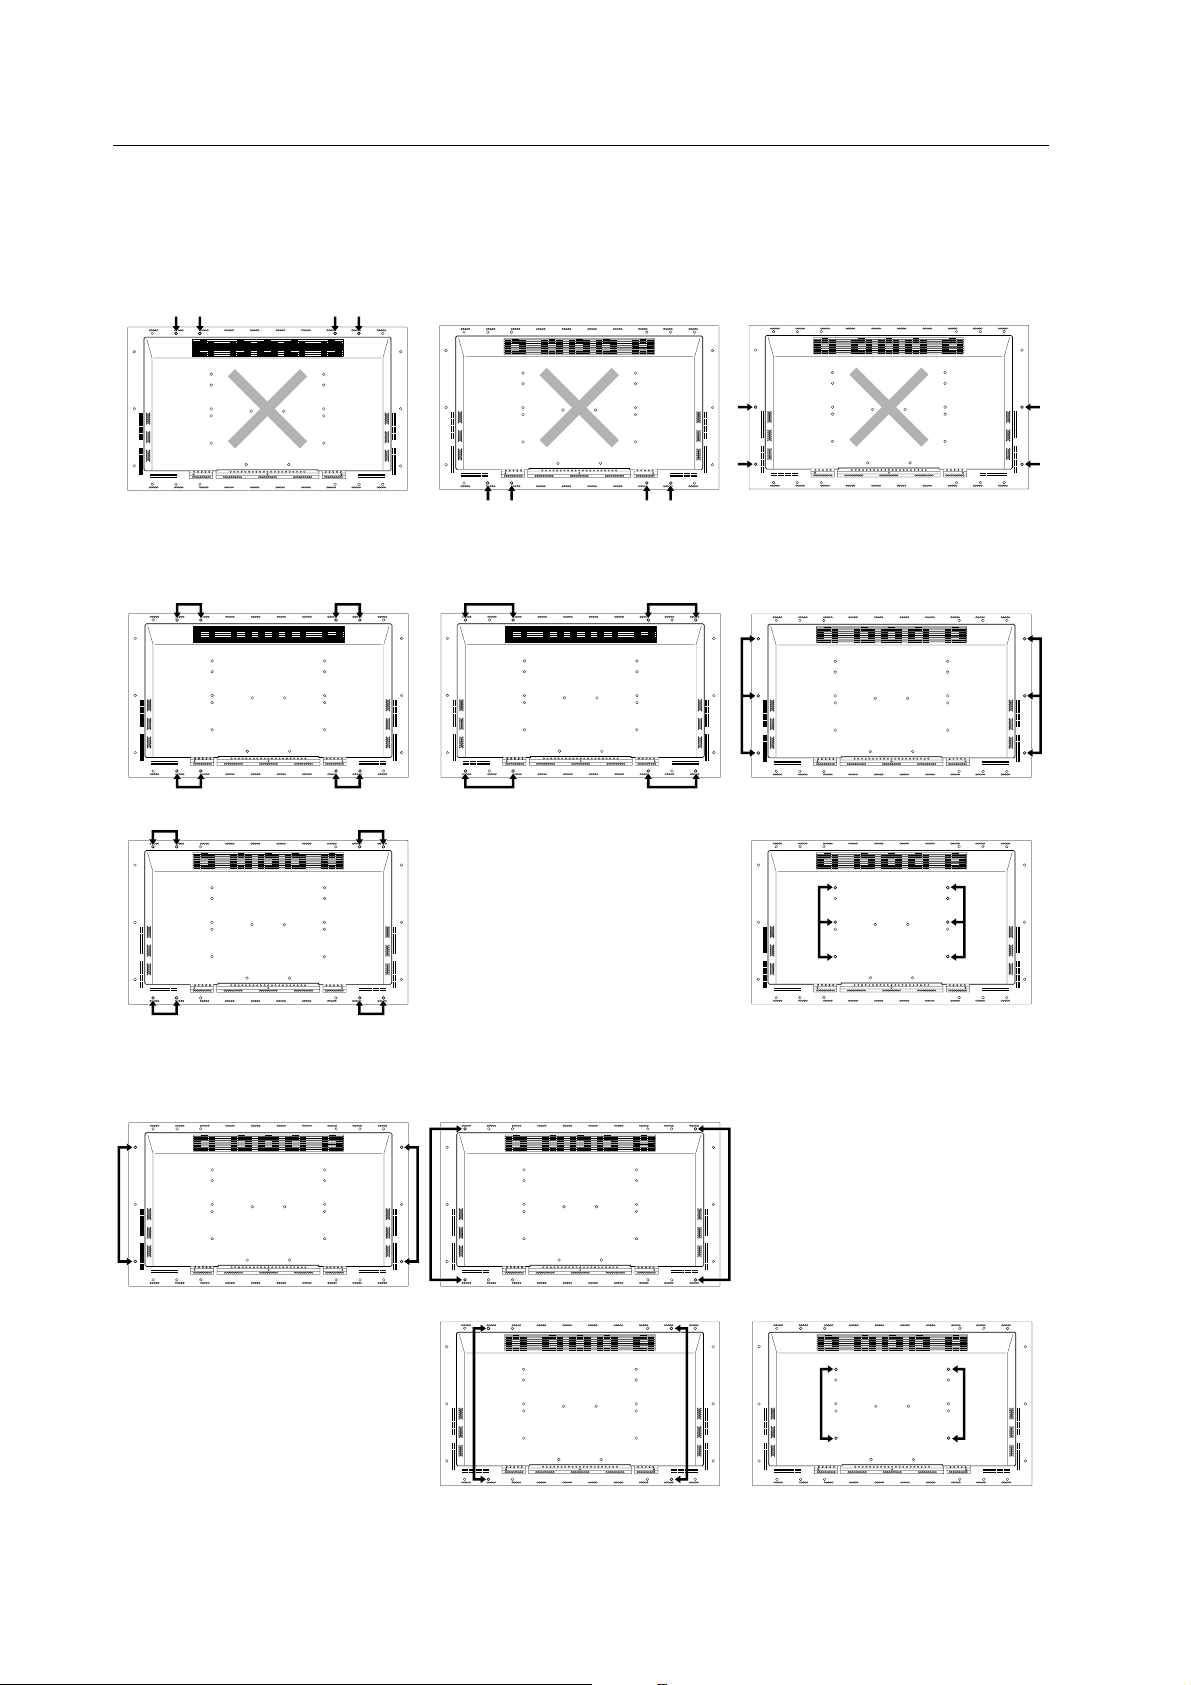
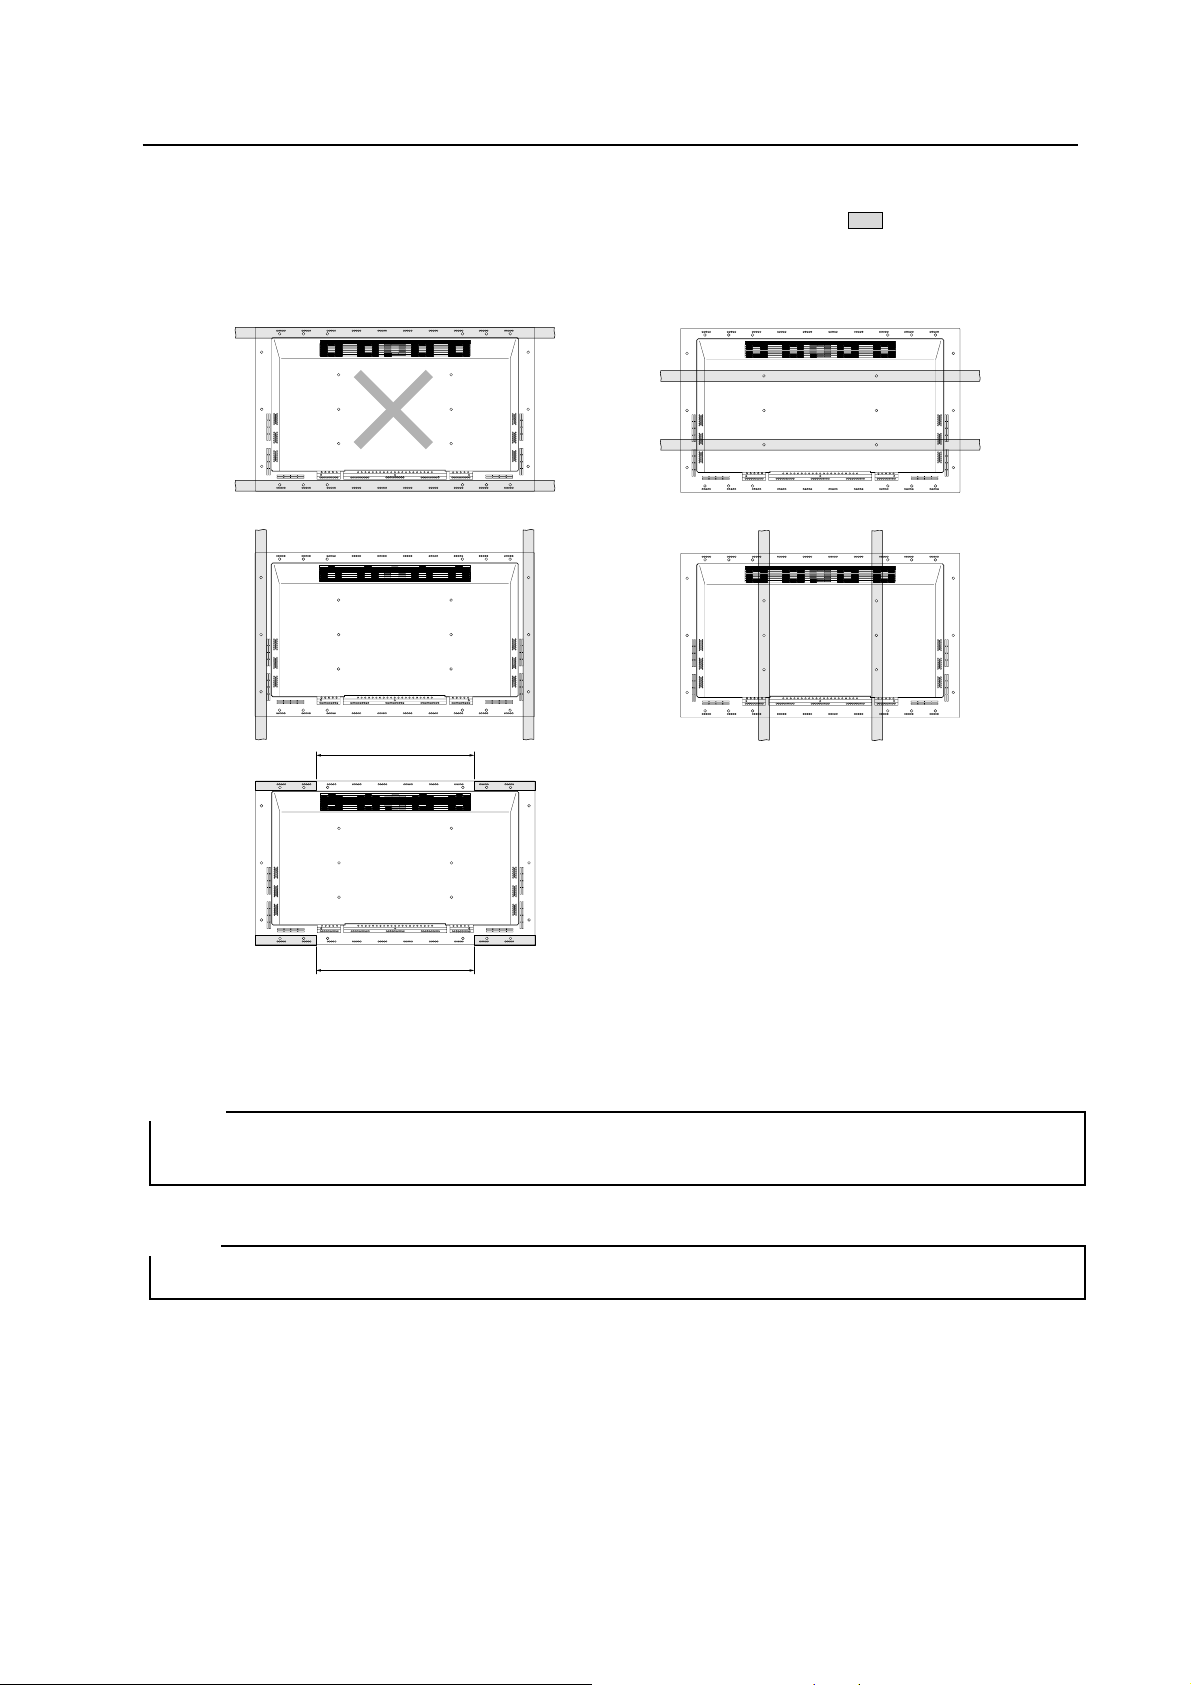
This unit is designed to be mounted using four bolt holes. For additional safety, we recommend securing it at six to
eight points on opposite sides of the horizontal and vertical center lines, as shown in the illustration below. Do not
secure the unit at four points arranged in a single row, as shown below.
Methods for securing — Unfavorable examples
Methods for securing — Favorable examples
A. Secured at eight points
C. Secured at four points
(with mounting hardware attached to the sides)
B. Secured at six points
20
Page 21
D. Secured at four points (with mounting hardware attached horizontally)
(Take proper precautions to prevent pinching the power cord or signal cables)
Installation Conditions
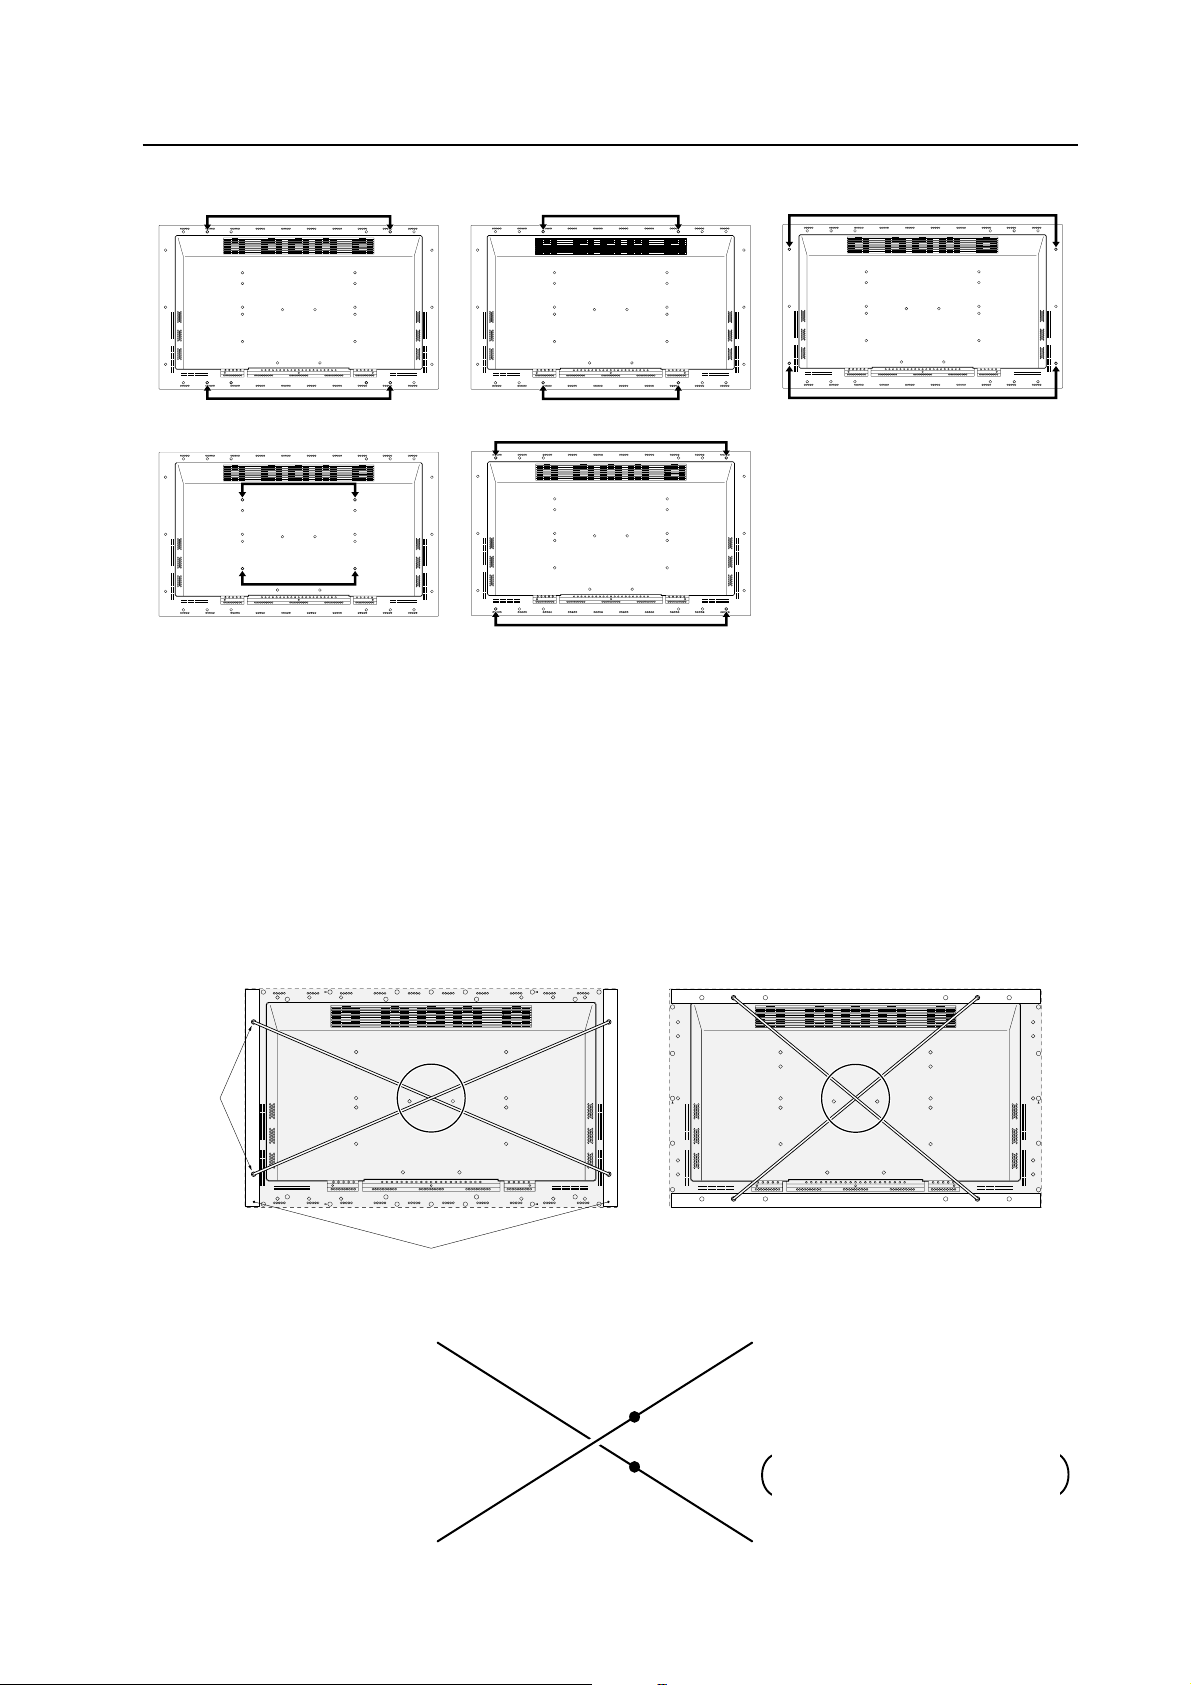
3.2.4 Mounting surface warping
The display section incorporates glass. Before mounting the product, perform the following to confirm that the display
is free of warps exceeding 1 mm.
1 Referring to the illustration below, diagonally extend string of maximum 0.1-mm diameter through the bolt mount
openings. Strings thus arranged should be completely free of slack.
2 Measure the clearance (L) between the strings at their point of intersection. Distortion is expressed by: Distortion =
L x 2.
3 If L is found to be 0, pass the strings through the other bolt mount openings and repeat the measurements. Any
value of L greater than 0 indicates the presence of distortion. If the measured values in both cases is 0, the distortion
is negligible.
A
Mount
bolt
holes
Plasma Display Mount
Surface (Mount Brackets)
A
String
String
A
C
Magnified veiw of section A
D
Point E is the center point of string
segment A-B.
F
E
Point F is the center point of string
segment C-D.
Clearance between points E and F = L
points E and F shown displaced for
illustrative purposes
B
21
Page 22
Installation Procedures
3.3 Installation Procedures
3.3.1 Transportation precautions
1 Any transportation of the unopened unit in its packaging should be done by more than two persons. To avoid
breakage, do not lift the package by the packing bands.
2 When transporting or storing the unit, always position it vertically - never horizontally. Horizontal transportation or
storage invalidates the product warranty.
3 In transportation or storage, never stack more than three units. This warning is also indicated on the upper face of
the carton.
4 For transportation or storage, observe the warnings and instructions found on the upper surface of the carton.
5 The front of the display is glass-bearing. Always take precautions to prevent sharp objects from striking this side.
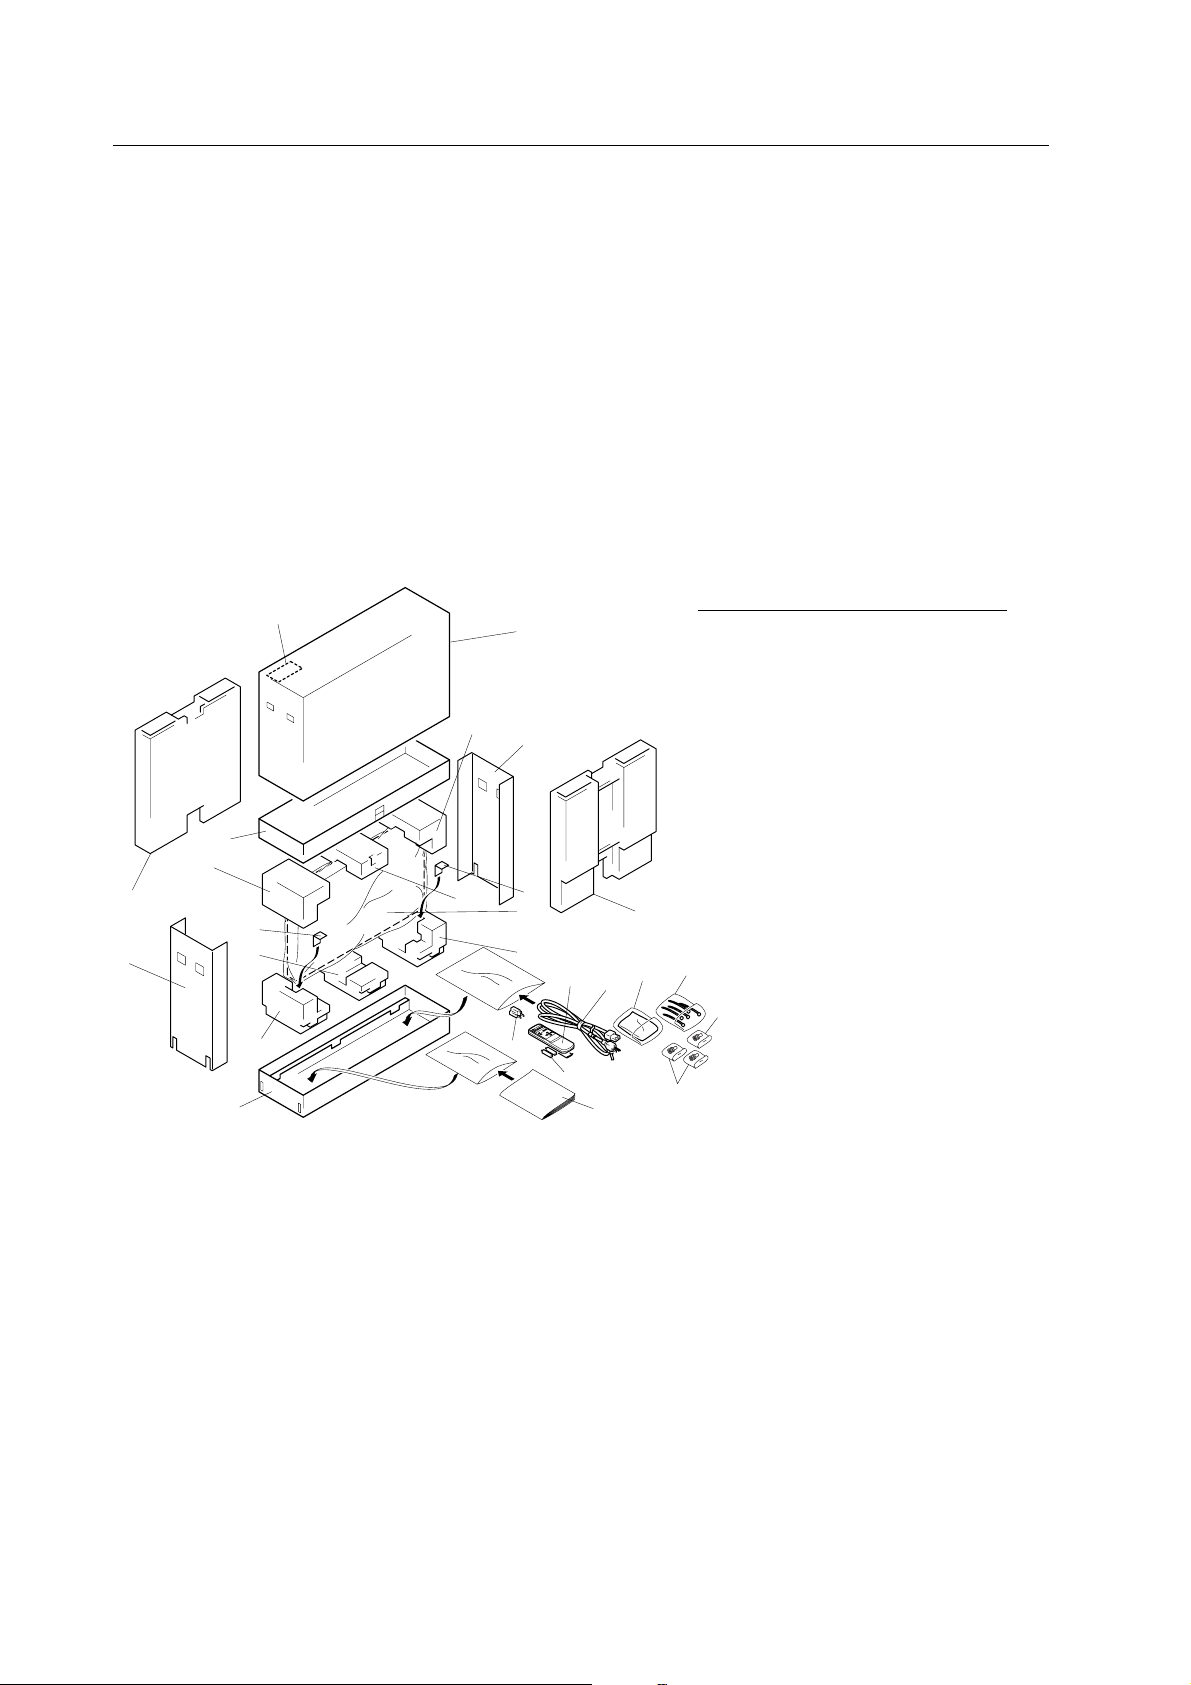
3.3.2 Unpacking
1) Package specifications: 1382 (W) x 888 (H) x 454 (D), 58.0 kg
Ref.No. Terms:
17
1
1 Upper face of the carton
2 Carton cover
3 Side carton
7
3
4 Lower face of the carton
5 Upper pad L
6 Upper pad C
2
5
23
12
10
11
14
15
16
13
21
19
20
22
11
3
9
8
4
6
7 Upper pad R
8 Under pad L
9 Under pad C
10 Under pad R
11 Carton spacer
18
12 Miller mat
20
13 Power cord
14 Remote control (CU-PDP002)
15 2 manganese AA batteries, R6P
16 Operating manual
17 Warrantee card
18 Binder assembly
19 Wiping cloth
20 Adapter plug
(EURO Model, Taiwanese only)
21 Front carton
22 Rear carton
23 AC conversion plug
(Taiwanese only)
22
Page 23
Installation Procedures
2) Unpacking procedures
1 Remove the packing bands.
2 Slowly lift and remove the upper carton [“top portion of the packaging”].
3 Lift and remove the reinforcement packaging. (Upper protective pad C is held in place by adhesive tape)
4 Remove the L and R upper cartons.
5 Remove the side, front, and rear cartons.
(At this stage, the product is supported by packing materials)
6 Remove the operating manual and accessories, which are secured to the lower carton by adhesive tape.
7 Remove the unit. (This should be performed by more than two persons)
3) Transportation of the unpacked unit
If it needs to be moved, the unit should be lifted by more than two persons.
• Avoid moving the unit by dragging it on the floor.
• Move the unit slowly, taking care to prevent scraping or striking the delicate front protective panel.
• Remove the protective film only after all work and preparations for the installation site, including clean-up
following unpacking, are complete.
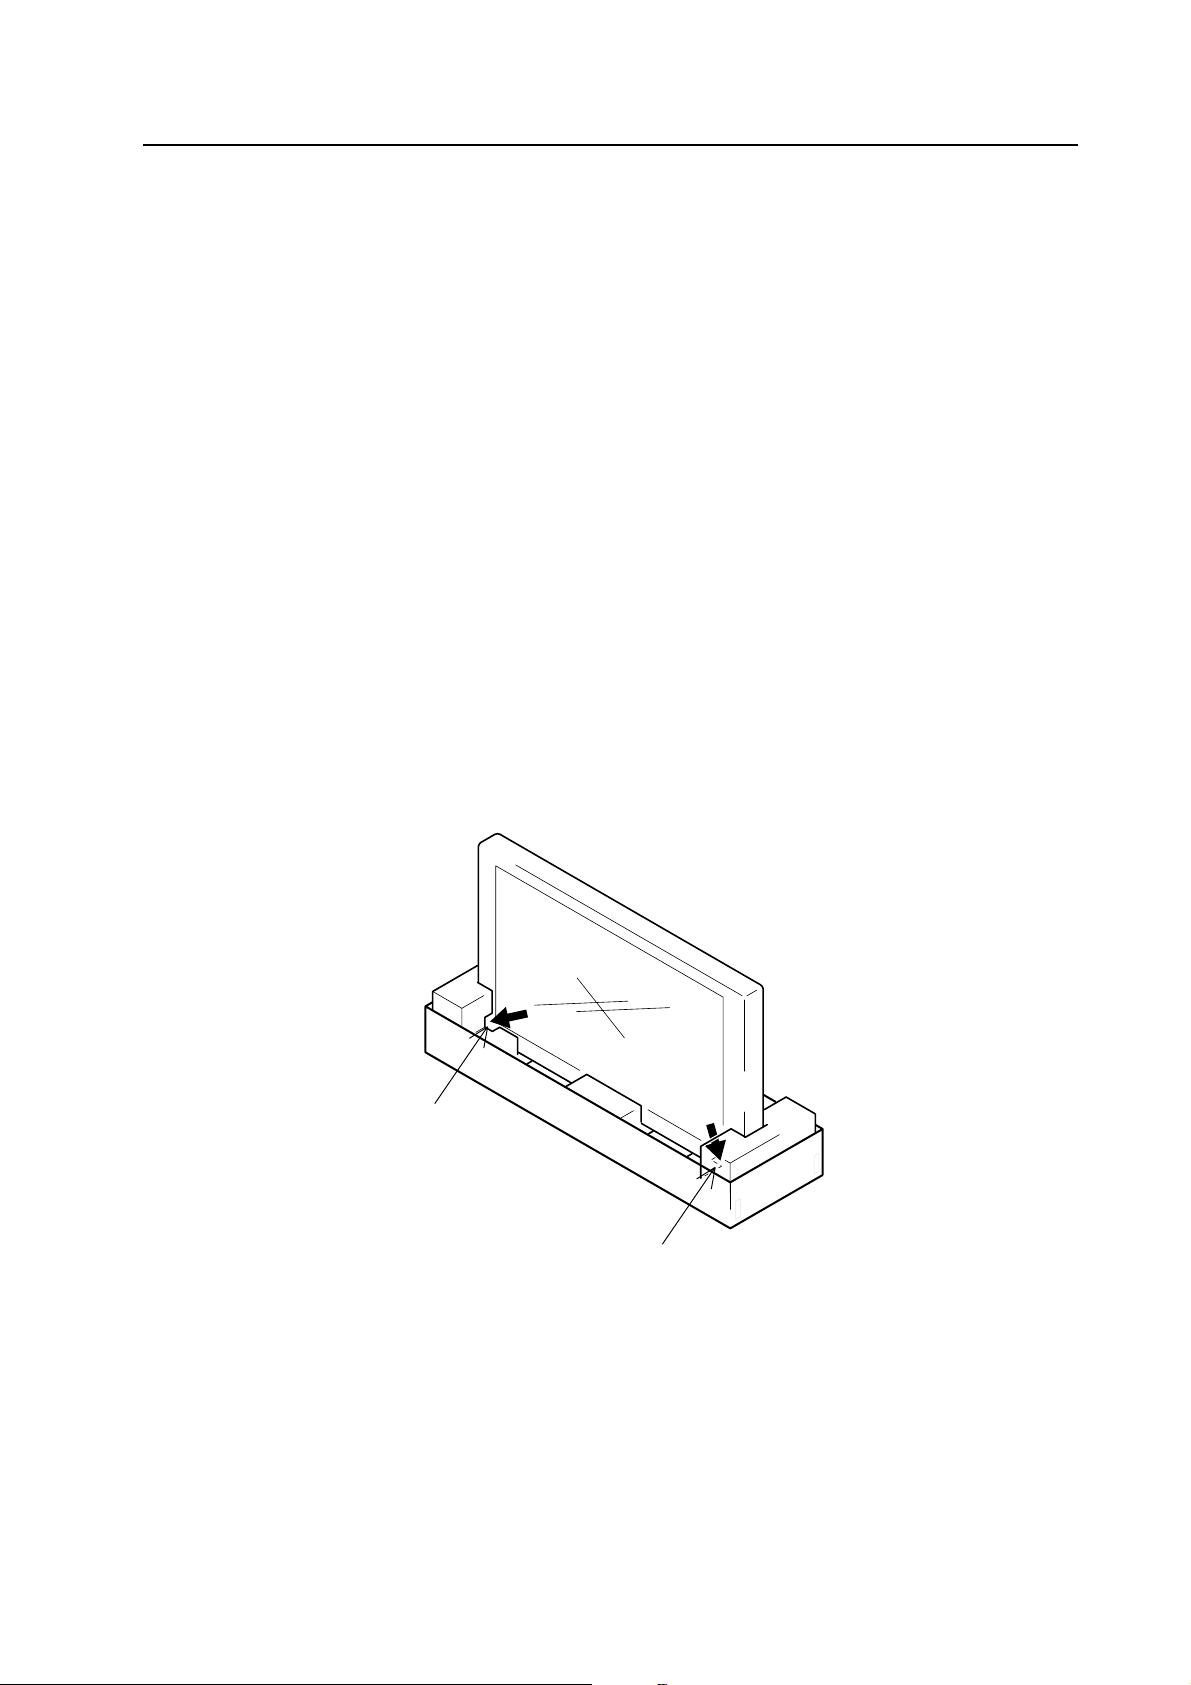
3.3.3 Temporary installation using packing materials
The lower carton and pads may be used as a temporary stand for the unit.
Connections to and from the unit can be made after the side, rear, and front cartons are removed. At this point, the
power switch and remote control may also be operated, but this installation should be regarded as temporary.
Always secure the unit to the mounting hardware after pre-installation wiring and adjustments are complete. Never
attempt to move the unit while supported only by cartons.
Cutout allowing control
of using the remote
Cutout providing access to
the power switch
3.3.4 Re-packing
If the unit needs to be re-packed, observe the following guidelines:
• Pack by performing the steps described in 3.3.2 Unpacking in reverse order. The mirro mat must be positioned
so that the shiny film surface faces outward and its soft surface faces inward (toward the unit).
• Restore all accessories to their original locations. Secure with adhesive tape to prevent damage during transportation.
• Check that no carton spacer is dislodged. Rearrange dislodged carton spacers so they are securely positioned
between the unit and the lower pads, and secure with adhesive tape. This guards against instability during
packaging or transportation.
23
Page 24

Installation Procedures
3.3.5. Wiring
1) Connecting the power cable
• Refer to the section on Power Cord Connection on page 26 of the operating manual.
• For power source specifications, refer to 3.1 Installation Conditions, paragraph 11.
2) Connecting signal cables
(1)Connection to PCs
• Refer to the section with this heading in the operating manual, on pages 21 to 22.
(2)Connection to video units
• Refer to the section with this heading in the operating manual, on pages 23 to 25.
(3)Important Notes
• Use coaxial cables. As a rough guide, use 3C-2V cables for lengths up to 15 meters and 5C-2V cables for
lengths up to 30 meters. Use thicker cables for computer signals, since these signals are more likely to
degrade: 5C-2V cables, for example, for 15-meter lengths. Generally, thicker cables will produce more reliable connections. You can also improve signal quality by minimizing cable length.
• Video cables plugged into video inputs and outputs close to dimmers, neon signs, air-conditioning units, or
cables for wired broadcasts may occasionally deliver slightly corrupted images.
3) Processing wires
• Be especially careful in selecting wiring lengths for permanent layouts. For temporary installations for occasional events, this isn’t quite so important.
• Arrange and secure cables so they will not be subject to direct load or physical force. For temporary installations, securing cables with string should be perfectly adequate. For permanent installations, secure by more
reliable means.
24
Page 25
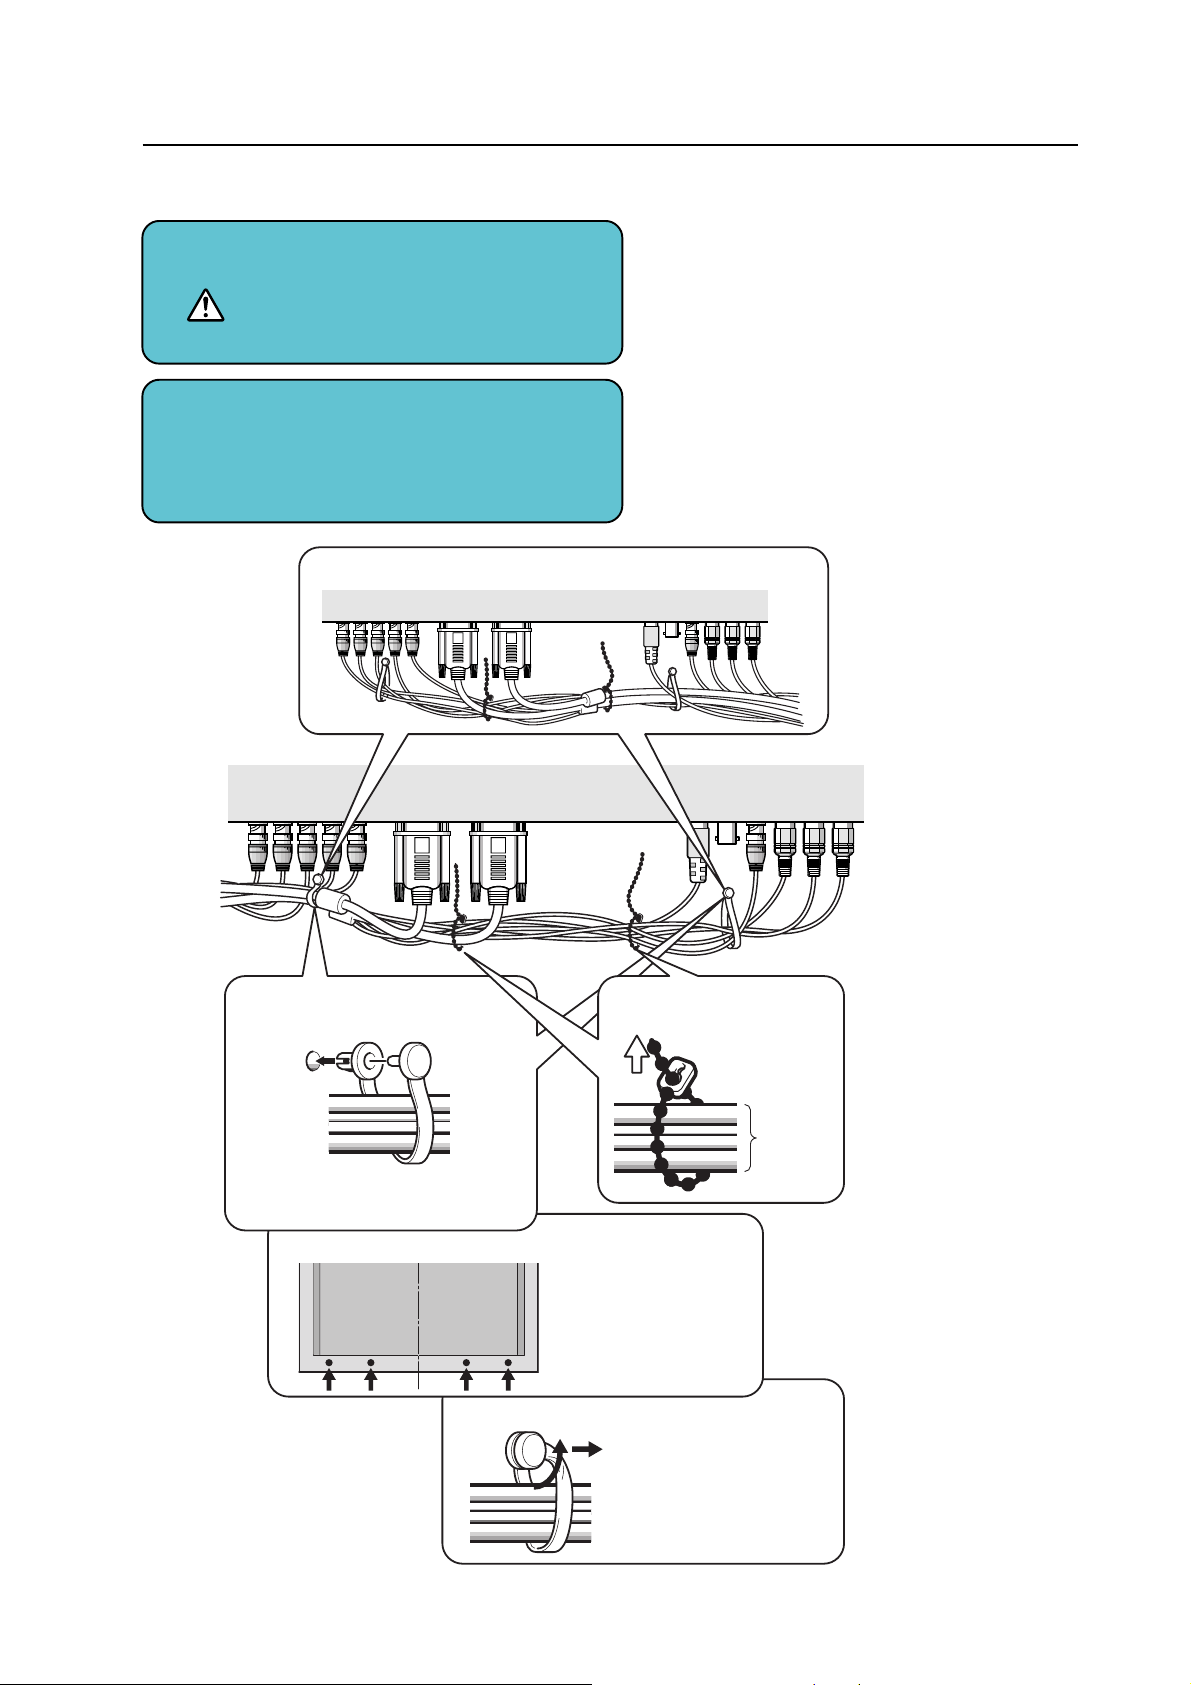
4) Arranging and securing cables with speed clamps and bead bands
Fasten cables using the supplied speed clamps.
1
Remember that speed clamps are not
easily removed, once fastened.
Secure cables with the supplied bead bands.
2
• Cables may also be drawn around to the right, viewed from
this side.
Installation Procedures
1 Secure cables with speed
clamps.
2
1
Insert part 1 into an opening in
the rear cover, then insert part 2,
as shown.
Fastening points for speed clamps
* Display viewed from the rear.
2 Bundle cables using
bead bands.
Cords
Bundled cables can be
drawn to the left or right.
Depending on specific
requirements, you may use
the four openings indicated
by solid circles (¶).
How to unlock the speed clamp
Use a pair of pliers to twist
the clamp by at least a
quarter-turn and pull
outward. Remember that this
procedure entails risk of
damaging the clamp.
25
Page 26
Special Installation (Mounting to fitting)
3.4 Special Installation
The unit can be hung from or embedded in a wall, but such special installations impose additional limitations on
operating temperatures and other operational factors. Examine installation methods and the ambient conditions for
your installation site while referring to paragraphs 3.1 to 3.3 in this manual.
Measurements discussed in this manual assume the following conditions:
• A 100% white input is supplied.
• Sufficient aging has been completed.
Make all measurements under identical conditions. The aging period required for correct measurement will be two
and a harf hours, depending on the space available at the installation site.
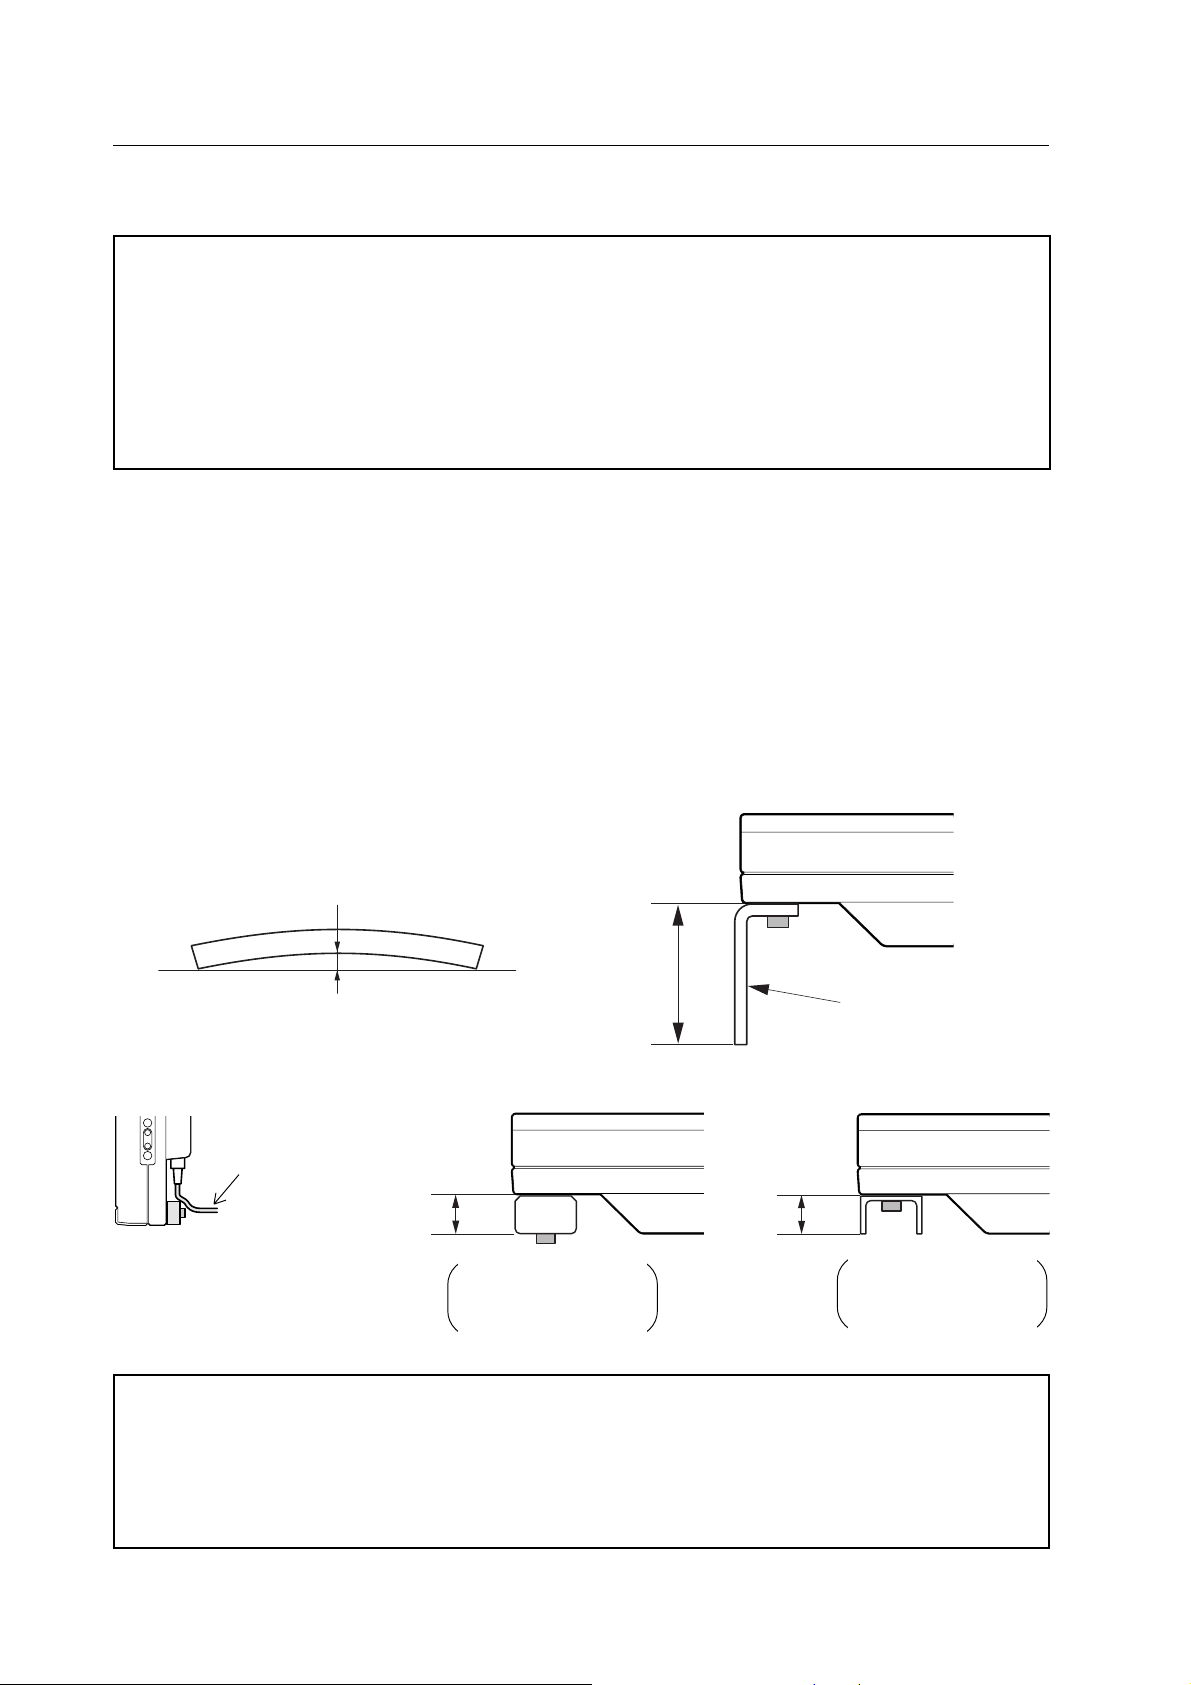
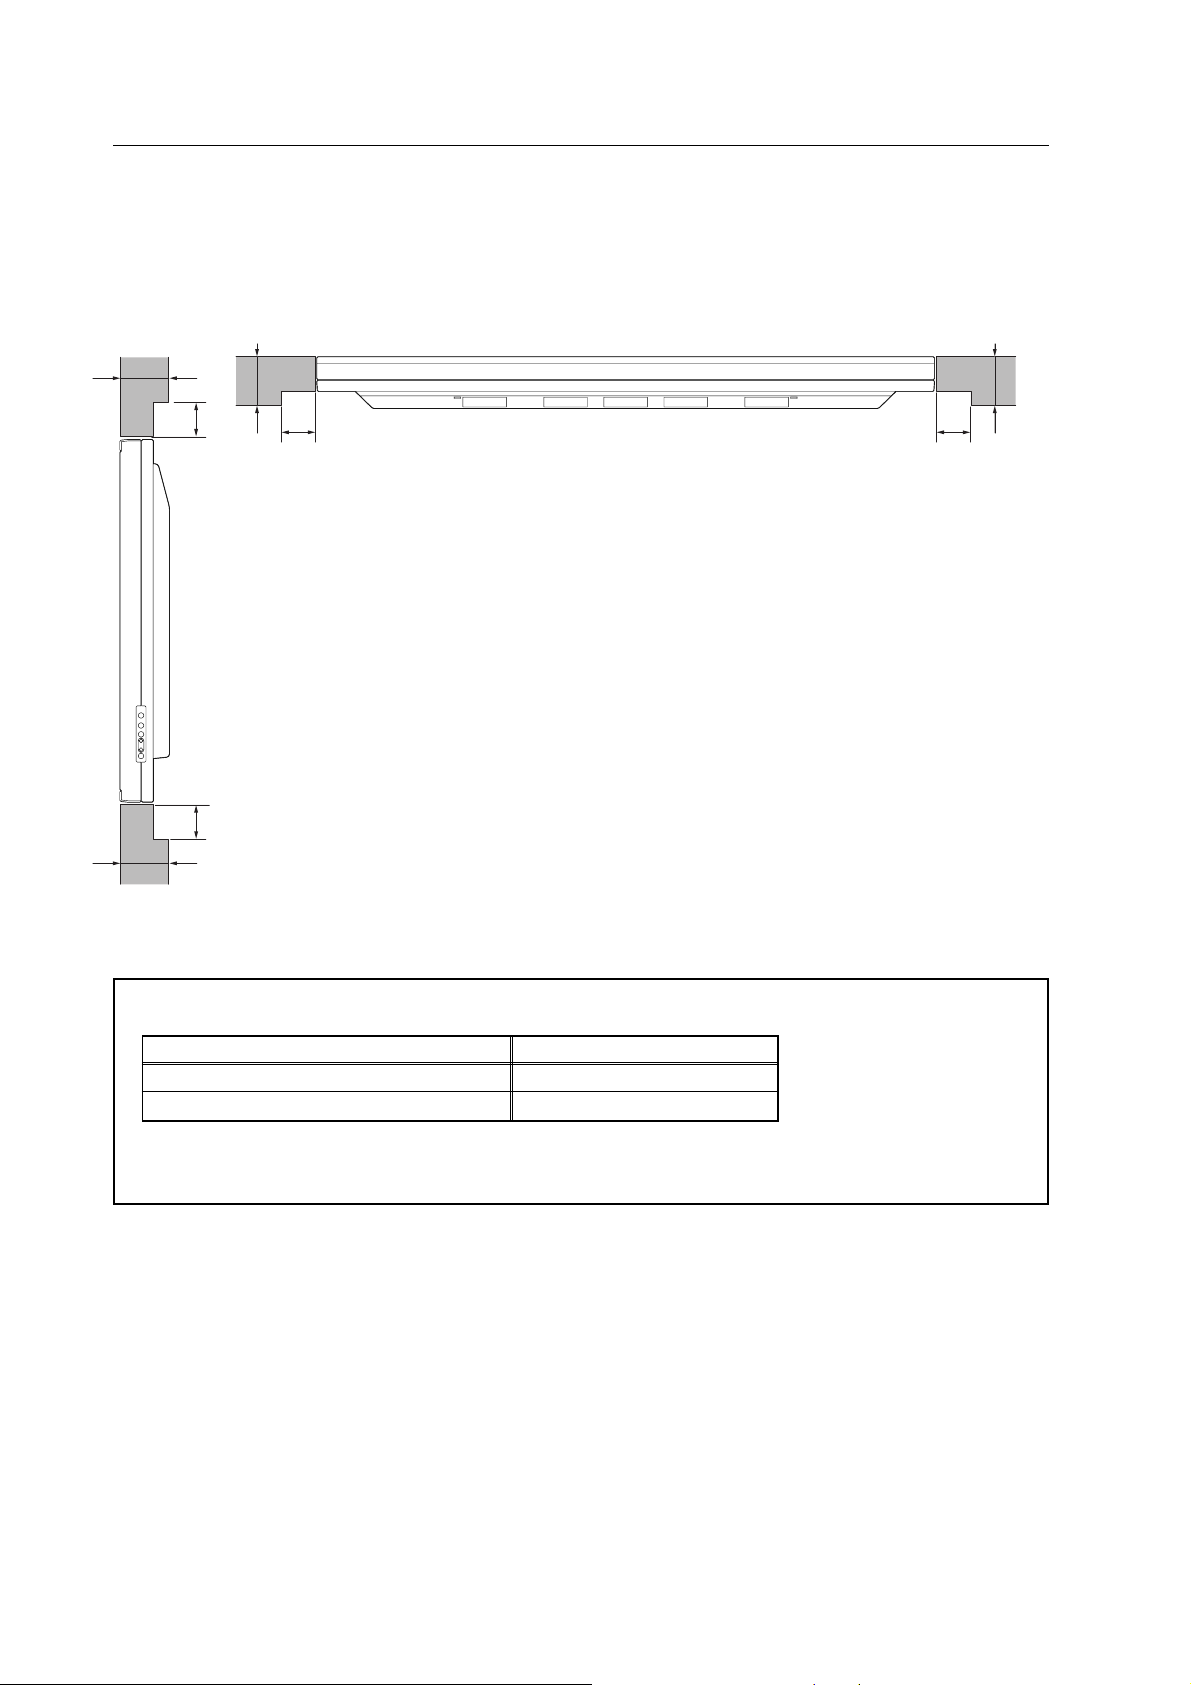
3.4.1 Mounting to fittings
Observe the following guidelines when mounting the unit to fittings. Notes 2 to 7 apply to all cases of mounting-tofitting.
1 During mounting to fitting, keep the space around the unit free of all objects and obstructions.
2 Any unit deformation/warping occurring as a result of installation should be less than 1 mm.
3 Never block or cover openings, aside from those shown as blocked on the page to the right.
4 The fittings should have a thickness of less than 20 mm. (This limit does not apply to fittings in examples 2 and 4
in the page to the right.)
5 L-shaped fittings should have a thickness of less than 100 mm.
6 The strength of the fittings must be adequate to bear the weight of the display.
7 Take precautions to avoid sharply bending the power cable.
1mm MAX
Less than
Maximum allowable deformation/
warping is 1 mm.
Arrange the power cable
so that minimum stress is
placed on it.
Less than
20 mm
No thickness limitations
in examples 2 and 4 on
the page to the right
100 mm
Less than
20 mm
* Operating Temperature Restrictions
• Ambient temperature: 0 to 40 °C
* Operating Temperature Restrictions for Upside-Down Installations
• Ambient temperature: 0 to 35 °C
This method of installation should be avoided in cases illustrated by examples 1 and 4 above.
L-shaped fitting
No thickness limitations
in examples 2 and 4 on
the page to the right
26
Page 27
Examples of Mounting to Fittings
Special Installation (Mounting to fitting)
Example 1)
Example 3)
* Never block this
opening.
Less than
35 mm
Less than
35 mm
Example 2)
Example 4)
27
Page 28
Special Installation (Hanging from wall)
3.4.2 Hanging on the wall
Carefully read the following before attempting to mount the unit on a wall, and observe the various limitations specified
below. Be sure to mount the unit so that twisting, bending or any other deformation of the unit does not exceed 1 mm.
A
48mm
88mm
Avoid blocking or covering this
104mm
area on the upper and lower sides.
Shaded areas ( ) indicate attachment
points for mounting hardware.
104mm
* Operating Temperature Restrictions
• Ambient temperature, regardless of clearance A: 0 to 40 °C (or 0 to 35 °C when the PDP-S02-LR speaker system
is installed)
* Operating Temperature Restrictions for Upside-down Installations
• Ambient temperature, regardless of clearance A: 0 to 30 °C
NOTE: Different temperature restrictions apply to the PDK-5006. Refer to 4.5 Tiltable Plasma Display Mount Hardware.
In wall-mounting installation, allow adequate space (a clearance of 300 mm or more) above and below the
monitor set, as well as on the right and left.
28
Page 29
Special Installation (Hanging from wall)
Methods for Securing: Basic methods for securing are shown below.
Avoid blocking or covering areas, aside from those indicated by ( ). The method indicated
with cross-hatching should be avoided. Before attaching the unit to fittings, double-check that
the thickness and height of the fittings and the number of fixing bolts is correct. (Also refer to
3.4.1 Mounting to Fittings.)
More than 700 mm
More than 700 mm
NOTE 1
Heated air is exhausted from the interior of the unit by fans. Before installation, consider the heat nesistance of the
wall or other surfaces behind the unit. Exhaust temperatures can be 30°C( C higher than the outside temperature.
NOTE 2
For wall-mounting, bundle the cables so they don’t obstruct ventilation.
29
Page 30
Special Installation (Embedding in the wall)
3.4.3 Embedding in the wall
Carefully read the following before trying to embed the unit in a wall, and make sure you observe all the limitations
specified below. Be sure to mounting the unit so that twisting, bending, or any other deformation of the unit does not
exceed 1 mm.
(1) Embedding in walls with space provided behind the unit.
X (Front of the unit)
B
A
A
B
A
B
< Viewed from the Right Side >
* Operating Temperature Restrictions
Y (Rear of the unit)
< Viewed from Above >
A
B
Temperatures in space X and Y
A: No restrictions; B: 0 to 170 mm 0 to 40 °C
A: No restrictions; B: 170 to 370 mm 0 to 35 °C
* Operating Temperature Restrictions for Upside-down Installations
* Upside-down mounting is unavailable when embedding/installing this device in a wall.
30
Page 31

Special Installation (Embedding in the wall)
Methods for Securing: Basic methods for securing are shown below.
Avoid blocking or covering areas, aside from those indicated by (
with cross-hatching should be avoided. Before attaching the unit to fittings, double-check that
the thickness and height of the fittings and the number of fixing bolts is correct. (Also refer to
3.4.1 Mounting to Fittings)
). The method indicated
More than 700 mm
More than 700 mm
Temperature Measurement Points (Informative)
50mm
50mm
• Make measurements at a distance 5 cm from the unit, without directly subjecting the thermometer to fan exhaust.
• For spaces where temperature fluctuations are likely, gather additional measurement points for an adequate data set.
31
Page 32

Special Installation (Embedding in the wall)
(2) Embedding in walls with no space provided behind the unit
Fan Exhaust Temperature Measurement Point: Z
Less than
70 mm
A
X (Front of the unit)
Y (Rear of the unit)
< Viewed from Above >
Less
than 70
mm
B
A
10mm
A
»
B
»
Air Flow within
the Space
A
< Viewed from the Right Side >
We do not recommend installation in narrow enclosed areas.
• If the unit must be installed in a narrow area, the following conditions must be met:
A ≥ mm
B ≤ mm
• Ensure proper ventilation in space Y indicated in the illustration with an air conditioner or fan, to prevent
heated air from stagnating. Observe the temperature restrictions specified below. If heated air stagnates inside
the area, temperatures at points may rise high enough to produce breakdowns or fire. Confirm that the inner walls
are capable of resisting heat and fire (their composition should be fireproof), allowing for worst-case instances. Air
should flow in the direction indicated by the arrow (from points without fans to points with fans).
* Operating Temperature Restrictions
Temperatures in space X and Y
A: No restriction; B: 100 to 300 mm 0 to 30˚ C 54˚C
A: No restriction; B: more than 300 mm 0 to 35˚ C –57˚ C
* Operating Temperature Restrictions for Upside-Down Installations
* Upside-down mounting is unavailable when the unit is embedded/installed into a wall.
Fan exhaust temperature
at Z: Upper limit
32
Page 33

Special Installation (Embedding in the wall)
Methods for securing: Basic methods for securing the device are shown below. Avoid blocking or covering areas, aside
from those indicated by
Before attaching the unit to fittings, double-check that the thickness and height of the fittings
and the number of fixing bolts is correct. (Also refer to 3.4.1 Mounting to Fittings)
. The method indicated with cross-hatching should be avoided.
More than 700 mm
More than 700 mm
33
Page 34

Special Installation (Ceiling-suspension (with wires))
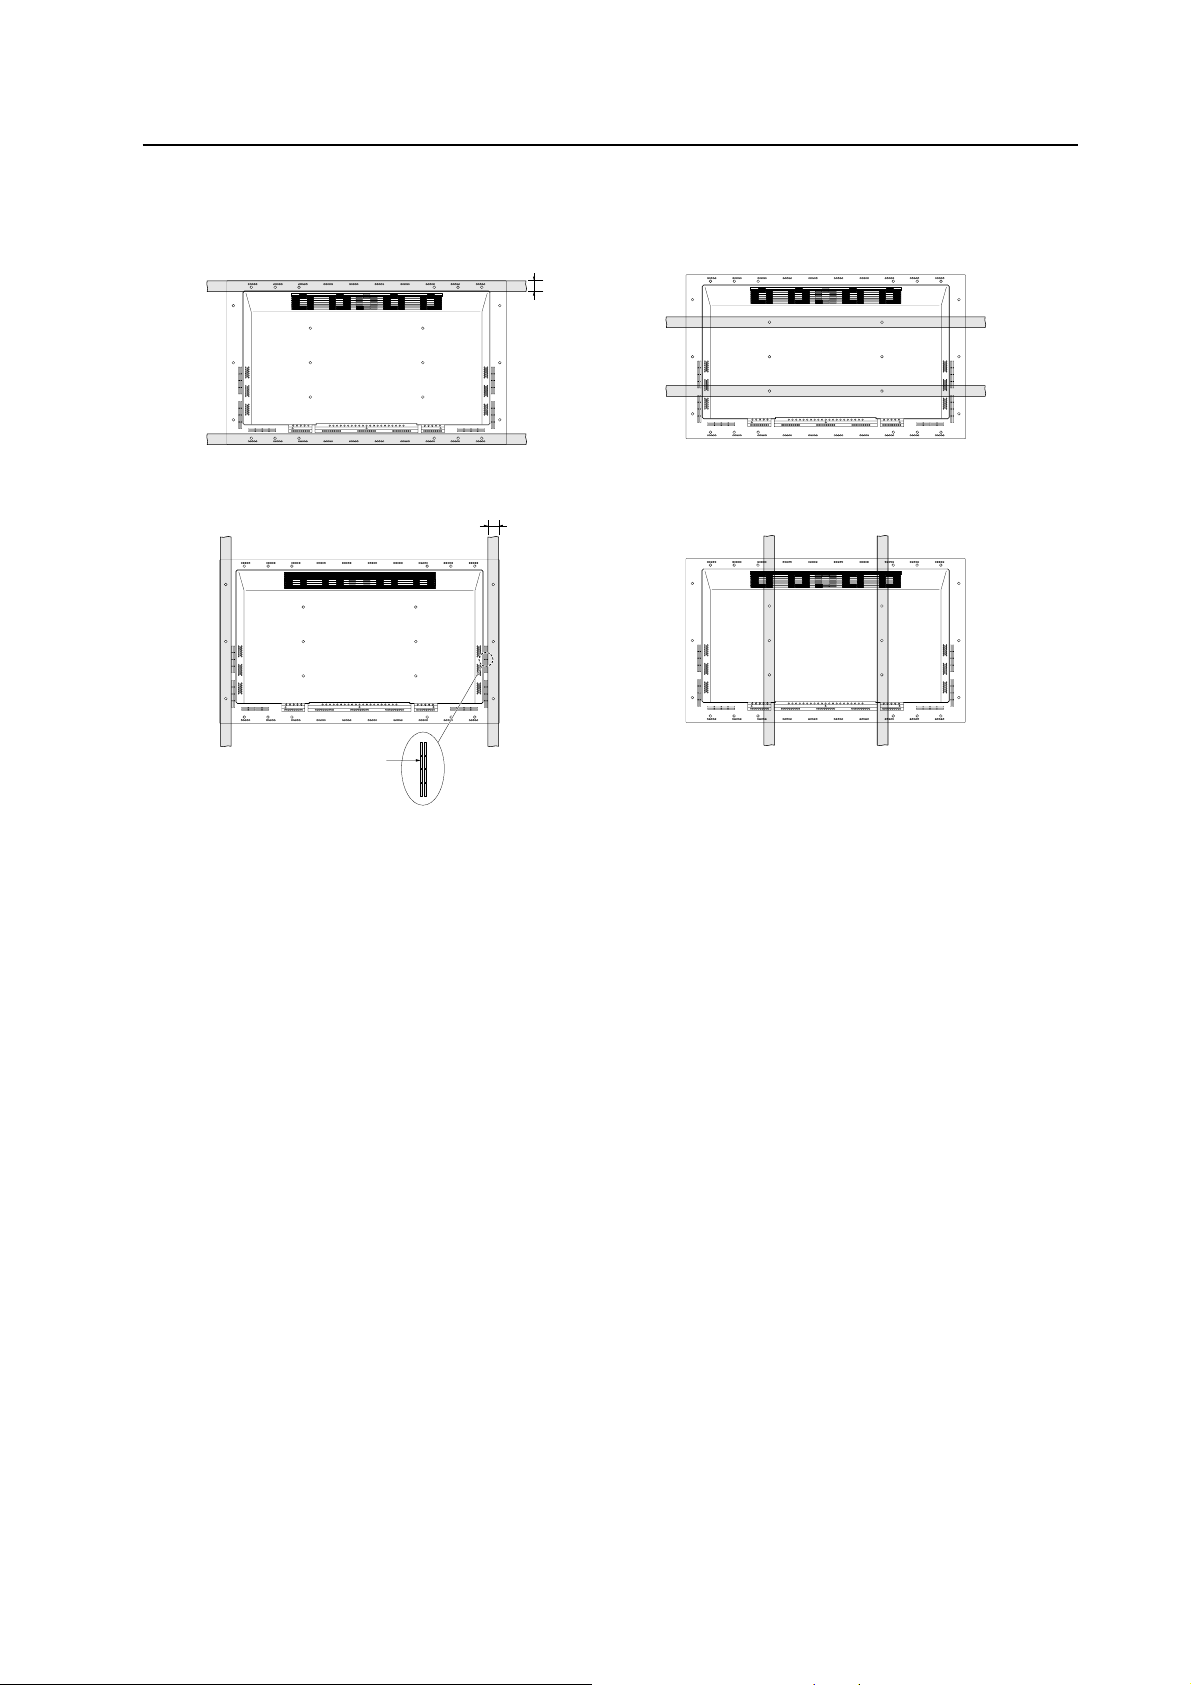
3.4.4 Ceiling-suspension (with wires)
When suspending from ceilings, attach the unit either at rows A and B or at rows C and D to keep it free of deforming
forces. In addition, the unit must be fastened at more than four points, with these points distributed symmetrically on
opposite sides of the vertical and horizontal center lines.
C
A
When suspending from a ceiling, use the brackets shown
at right to prevent concentrating loads on the upper two
fixing points.
For additional safety, secure the wires to separate fittings
or parts of the ceiling.
Use mount screws composed of material stronger than
soft steel, and use hexagonal bolts.
Use wires adequate for the combined weight of the unit
(43.0 kg) and the weight of the support brackets.
D
B
Wires
* Operating Temperature Restrictions
• Same as in 3.4.2 Hanging on the wall.
* Operating Temperature Restrictions for Upside-down Installations
• Same as in 3.4.2 Hanging on the wall.
34
Bracket
Page 35

Special Installation (Ceiling-suspension (with wires))
Methods for securing: Basic methods for securing the device are shown below. Avoid blocking or covering areas, aside
from those indicated by
Before attaching the unit to fittings, double-check that the thickness and height of the fittings
and the number of fixing bolts is correct. (Also refer to 3.4.1 Mounting to Fittings)
. The method indicated with cross-hatching should be avoided.
More than 700 mm
More than 700 mm
35
Page 36

Standard mounting equipment features and characteristics
4.1 Standard mounting equipment features and characteristics
In addition to reliability and the vivid display resulting from its large screen area, brightness, and image quality, the
plasma display (PDP-501MX/PDP-V501X) is thin and lightweight, enabling mounting at locations not possible for traditional
displays.
We considered various mount patterns and operating conditions during the design of the plasma display (PDP-501MX/
PDP-V501X). A wide range of standard mounting equipment is available for easy mounting.
• Table-top Stand: PDK-5001
This on-board support designed for the plasma display enables vertical use of the display.
• Plasma Display Ceiling-suspension Hardware (one-side type):PDK-5002
A simple rod-type mounting components, permitting display panning over a range of (45 degrees and up to 25-degree
downward tilting from horizontal. Mount depth is less than 170 mm (in vertical position, without optional speaker).
This hardware enables installation of the unit in a wide range of locations.
• Tiltable wall-suspended hardware: PDK-5006
Permits tilting of the display downward from horizontal by up to 25 degrees. Mount depth is less than 125 mm (in
vertical position, without optional speaker). This hardware permits a wide range of viewing angles.
• Speaker system: PDP-S02-LR
This vertical twin-speaker system, with a newly developed elliptical unit 4.5 cm wide on top and bottom with a 2.5-cm
dome cone tweeter in between, provides improved sound-field localization. Despite its compact 7.4-cm cabinet, the
speaker system is capable of offering powerful dynamic sound reproduction. (Note that when the speaker is mounted
to the main unit itself, the operation panel of the main unit is inaccessible.)
36
Page 37

Handling the Standard Mounting Equipment
4.2 Handling the Standard Mounting Equipment
4.2.1 Handling precautions
This section of the manual discusses ways to mount, install, and handle the mounting equipment exclusively designed
for our plasma displays. Mounting should be performed by qualified experts. Refer all installation and mounting work to
qualified persons, or request assistance from a Pioneer dealer.
4.2.2 Precautions for installation contractors
1) Before starting installation
Read the specifications provided in 3.1 Installation Conditions.
2) During installation
Carefully read the discussion provided in this section of the manual. The installation work should be performed by
more than two people.
3) After installation
After installing the mounting equipment, check for adequate strength and properly tightened screws. Repeat this
inspection after mounting the display.
4) Delivering to the customer
(1)Explaining operating precautions
We ask the mounting contractor to explain the following precautions to the customer after mounting and installation
work is complete. Even if the particulars of an installation happen to be letter-perfect, your work may be perceived
as inadequate unless you are patient and thorough in providing these precautions.
¶ The following are highly dangerous and must be avoided at all times:
• Any sudden application of force, including pushing or pulling
• Splashing water on the unit
• Placing any object on the unit
• Touching mount screws and other mounting components
¶ For worry-free use of the unit:
• If any problem arises, the user should immediately ask the installation contractor to conduct inspections and
repairs.
• To guard against accidents, ask the user not to make any tilt or height adjustments. Such work should be
referred to the installation contractor.
(2)Mounting contractor contact form
We ask the mounting and installation contractor to complete the contractor contact form supplied with the unit
and to give it to the end-user after post-installation inspections are complete and the above precautions have been
explained.
(3)Periodic inspection
Over time, various internal parts or components of the suspension/mounting hardware may render the installation
unreliable, possibly leading to the display breaking free of its mounting. Please recommend periodic inspections.
37
Page 38

Table-top Stand: PDK-5001
4.3 Table-top Stand: PDK-5001
4.3.1 Specifications
External dimensions.... 700 (W) x 400 (D) x 469 (H) mm
Weight .......................... 4.0 kg (mounting hardware only)
47 kg (mounting hardware + plasma display)
Finish ............................ Paint
Package dimensions.... 726 (W) x 425 (D) x 100 (H) mm
Package weight ........... 6.6 kg
Accessories
Base ................................................. x 1
Stand pipe, L .................................... x 1
Stand pipe, R.................................... x 1
Vertical pipe ..................................... x 1
Screw (4 x 12) .................................. x 6
Bolt (M6 x 40) .................................. x 2
Cap................................................... x 2
Hexagonal wrench ........................... x 1
Flat washer ...................................... x 4
Mount bolt (M8 x 300) ..................... x 4
Turning-over protective bolt ............. x 2
Operating instractions...................... x 1
38
Page 39

Table-top Stand: PDK-5001
4.3.2 Assembling the stand
7 Assembling Procedure 1
1. Place the base upside-down.
2. Insert the left and right stand pipes into the base. (CAUTION !: Insert pipes so they face in the proper direction.)
3. Fasten the pipes to the base with the supplied screws. (Tighten the central screws first.)
Screw (4 x 12)
Stand pipe, L
Base
* Tighten these screws first.
Screw (4 x 12)
7 Assembly procedure 2
1. Align the vertical pipe with openings in the left and right stand pipes.
2. Tighten bolts with the supplied hexagonal wrench to secure the vertical pipe.
3. Insert caps into openings in the left and right stand pipes.
Vertical pipe
Stand pipe, R
* Insert the pipe so the larger openings
face outward.
Cap
Bolt (M6 x 40)
Hexagonal
wrench
Hole
Cap
Bolt (M6 x 40)
39
Page 40

Table-top Stand: PDK-5001
4.3.3 Mounting to the main unit
7 Mounting procedures
Step 1 Place the display face down, remove hole rivets, and align the assembled stand to the display mount openings.
Step 2 Secure the stand by tightening washers and bolts with the supplied hexagonal wrench.
1.Lay a soft sheet beneath the display to protect it against scratches.
2.The mount work should be conducted on a flat surface, such as a table.
CAUTIONS
3.Do not over-tighten bolts.
4.Align screw holes in the stand to the mount nuts found on the display as precisely as possible.
5.The displays weight (more than 43kg) and thinness makes it unstable. Enlist at least two other persons
when mounting the display.
Bolt (number required: four)
Washer (number required: four)
Stand
Sheet
Step 3 After mounting the stand to the display, fas-
ten the assembly to the floor to prevent it from
turning over.
Fastening to the floor
• Fasten the assembly to the
floor using appropriate
commercially-available
screws.
• Fasten the assembly to the floor using appropriate commercially-available clamps.
Hole rivet (number required: four)
An Alternative method
1. Remove hole rivets from the rear of the display.
2. Mount the supplied turning-over protective bolts.
3. Using strings, mount the display/stand assembly to
the wall or to a column.
(Repeat the procedure for both the left and right
sides.)
2
3
Insert spacers of appropriate
thickness beneath the stand
base.
40
1
Use appropriate commercially-available strings and
hooks.
Page 41

7 Mount locations for securing-to-floor screws
* Secure the assembly to the floor using M6 screws at least 20 mm long.
558
152
108
292
325
656.6
533
7 Dimensional drawings (with display PDP-501MX/PDP-V501X)
Table-top Stand: PDK-5001
27
130.7
765
Unit: mm
150
258
1218
700
37
469
400
41
Page 42

THIS ITEM IS NOT AVAILABLE. PLEASE CONTACT PIONEER FOR INFORMATION
4.4 Plasma Display Ceiling Suspension Hardware (one-side type):PDK-5002
4.4.1 Specifications
External dimensions.................1218 (W) x 300 (D) x 1162 (H) mm
(with plasma display in horizontal position)
Weight.......................................14.6 kg (mounting hardware only)
57.6 kg (mounting hardware + plasma display)
Adjustable range of angles......Horizontal to 25 degrees below horizontal, 45 degrees left/right
Material......................................Steel pipe for general material (STK-MR)
Finish..........................................Semi-matte black paint
Package dimensions.................1270 (W) x 725 (D) x 230 (H) mm
Package weight.........................24.0 kg
Accessories
Monitor mount bolt...........................................x 6
Flange nut.........................................................x 6
Hexagonal socket head bolt (M5 x 16).............x 1
Hexagonal socket head bolt (M6 x 10).............x 1
Hexagonal socket head bolt (M6 x 30).............x 1
Hexagonal socket head bolt (M8 x 75).............x 2
Hexagonal socket head bolt (M10 x 85)...........x 2
Flat washer, ø8.................................................x 2
Flat washer, ø10...............................................x 2
Spring washer, ø8.............................................x 2
Spring washer, ø10...........................................x 2
Hole cover.........................................................x 1
Spacer...............................................................x 1
Pattern..............................................................x 1
Operating instractions.......................................x 1
Mount contractor contact form.........................x 1
The appropriate types of screws and other display/mounting components will depend on the strength and composition
of the ceiling. Prepare them separately.
*Operating Temperature Restrictions
•Ambient temperature: 0 to 40˚C
*Operating Temperature Restrictions for Upside-down Installations
•Ambient temperature: 0 to 35˚C
•Others factors: Maintain sufficient clearance between the display and the wall (at least 300 mm)
42 THIS ITEM IS NOT AVAILABLE. PLEASE CONTACT PIONEER FOR INFORMATION
Page 43

THIS ITEM IS NOT AVAILABLE. PLEASE CONTACT PIONEER FOR INFORMATION
External dimensions
300
200
ø60.5
200
300
1218
4-ø13.5 to 22
1162
14
806
25°
ø240.5
118.7
256
102
ø70
170
325
51
45°
R659
R617
45°
This circle shows the path that the outermost part of
the plasma display follows when it is rotated about a
vertical axis after having been tilted sideways by 25˚
(Without optional sperker)
Maximum sideways tilt: 45˚
This circle shows the path that the outermost part of
the plasma display follows when it is rotated about a
vertical axis after having been tilted sideways by 25˚
(Without optional sperker)
THIS ITEM IS NOT AVAILABLE. PLEASE CONTACT PIONEER FOR INFORMATION 43
Page 44

THIS ITEM IS NOT AVAILABLE. PLEASE CONTACT PIONEER FOR INFORMATION
4.4.2 Assembling and installing the mounting hardware, and mounting the plasma display
1)Preparations
You will need the following tools. Make sure you have them at hand before beginning work.
• Wrench or spanner (subtense 12 mm)
• Hexagonal wrench (subtense 4 mm, for M5 bolts)
• Hexagonal wrench (subtense 5 mm, for M6 bolts)
• Hexagonal wrench (subtense 6 mm, for M8 bolts)
• Hexagonal wrench (subtense 8 mm, for M10 bolts)
You’ll also need tools for ceiling work.
2)Assembling and installing the mounting hardware
1Confirm that the monitor brackets (left and right) are firmly mounted to the monitor frame and insert the center rod
through monitor frame and the spacer into the post COMP. Secure the post COMP and the center rod with two
hexagonal socket head bolts (M8 x 75).
2Tighten the vibration-preventing hexagonal socket head bolt (M5 x 16).
3Select the installation site, then apply the supplied pattern to the ceiling, drill the suitable holes, and mount the
ceiling flange COMP. The appropriate types of screws and other display/mounting components will depend on the
strength and composition of the particular ceiling.
4Insert the post COMP into the ceiling flange COMP and secure the two with two hexagonal socket head bolts (M10
x 85).
5Tighten the vibration-preventing hexagonal socket head bolt (M6 x 10).
•Firmly tighten all bolts.
•After mounting the mounting hardware, but before mounting the plasma display, confirm the strength of the
mount portion of the ceiling.
•For additional safety, use the holes in the ceiling flange COMP, as shown. (Use parts strong enough to support the
weight of the display)
Anchor
Ceiling flange COMP
Safety wire
Shackle
Foundation ceiling
Example:
Securing to a foundation ceiling with
shackle and safety wire.
Bolt
NOTE: Safety wires serve as important backups in keeping the unit securely mounted.
44 THIS ITEM IS NOT AVAILABLE. PLEASE CONTACT PIONEER FOR INFORMATION
Page 45

THIS ITEM IS NOT AVAILABLE. PLEASE CONTACT PIONEER FOR INFORMATION
Pattern
Ceiling flange
COMP
Hexagonal socket
head bolt
(for tilt angle adjustment)
(M6 x 10)
[SME60H 100KHz]
Flat washer
[WC100FZK]
Spring washer
[WS100FZK]
Hexagonal socket head bolt
(M10 x 85)
[SME100H850FZK]
Hexagonal socket
head bolt (for tilt angle
adjustment)
(M6 x 10)
[SME60H100FZK]
Cable hole
Post COMP
Spacer
Center rod
Flat washer
[WC80FZK]
Hexagonal socket head bolt
(M5 x 16)
[SME50H160FZK]
Hexagonal socket head bolt
(M8 x 75)
[SME80H750FZK]
Spring washer
[WS80FZK]
Monitor frame
Monitor bracket
Hole cover
Used to hide holes
drilled in the ceiling
NOTE 1: Tighten all the mount screws at the specified points.
NOTE 2: The mounting screws must be strong enough to support the weight of the mounting hardware.
THIS ITEM IS NOT AVAILABLE. PLEASE CONTACT PIONEER FOR INFORMATION 45
Page 46

THIS ITEM IS NOT AVAILABLE. PLEASE CONTACT PIONEER FOR INFORMATION
3)Mounting the plasma display
1Remove the hole rivets (quantity: six) from the rear of the plasma display.
2Mount the supplied monitor mount bolt assembly (three per side) to the mount openings at the rear of the display.
3Loosen the upper mount screws securing the left and right monitor bracket and tilt the brackets to full extension. (Do
NOT loosen the lower screws.)
4Lift the plasma display and insert the monitor mount bolt assemblies into the monitor brackets.
5
To avoid twisting and deforming the plasma display, always tighten the nut for the monitor mount bolt assembly
(three per side) after loosening the upper mount screws of the monitor brackets.
6Adjust the tilt of the plasma display (tiltable 25 degrees for horizontal).
Determine the desired angle, then retighten the upper mount screws for both the left and right monitor brackets.
Holes in the monitor brackets serve as angle marks (in 5- degree increments).
7Adjust the left and right rotational angle of the plasma display (panning over a range of 45 degrees on each side).
Hold the monitor frame and rotate the display to the desired angle, then secure the display assembly by tightening
the vibration-preventing hexagonal socket head bolts (M6 x 30).
8Connect cables to the display by running them through cable openings in the post COMP. If the cables are too thick
to pass through cable openings in the post COMP, connect them to the display directly or replace with thinner
cables.
Hexagonal socket head bolt
(vibration preventive)
(M6 x 30)
[SME60H300FZK]
7
Holes serving as
angle marks
6
Connection cable
Post COMP
4
To connector on the main unit
3
1 Hole rivet
2 Monitor mount bolt assembly
46 THIS ITEM IS NOT AVAILABLE. PLEASE CONTACT PIONEER FOR INFORMATION
Page 47

THIS PAGE IS INTENTIONALLY BLANK
47
Page 48

THIS ITEM IS NOT AVAILABLE. PLEASE CONTACT PIONEER FOR INFORMATION
4.5 Tiltable Plasma Display Wall-Mount Hardware: PDK-5006
4.5.1 Specifications
External dimensions..............1218 (W) x 98.5 (D) x 714 (H) mm
Weight.....................................30.8 kg (mounting hardware only)
73.5 kg (mounting hardware + plasma display)
Material...................................Resin on front plate on rear
Finish.......................................Laser-satin gray paint on front semi-matte black paint on rear
Accessories
Vertical frame (left and right)........................................x 2
Horizontal frame...........................................................x 2
Hexagonal socket head flange bolt...............................x 8
Monitor mount bolt (with washer)................................x 8
Washer.........................................................................x 4
Hexagonal wrench........................................................x 1
*Operating Temperature Restrictions
•Ambient temperature: 0 to 40˚C
*Operating Temperature Restrictions for Upside-down Installations
•Upside-down installation is unavailable with the PDK-5006.
In wall-mounting installation, allow adequate space (a clearance of 300 mm or more) above and below the
monitor set, as well as on the right and left.
48 THIS ITEM IS NOT AVAILABLE. PLEASE CONTACT PIONEER FOR INFORMATION
Page 49

THIS ITEM IS NOT AVAILABLE. PLEASE CONTACT PIONEER FOR INFORMATION
25˚
(390)
(125.1)
38
(36.6)
589
400
32
20
6.6
1194
(1218)
910
455
355
555
655
14- ø 21 (23 x ø 35)
810
14-ø (ø 23)
1162
1214
32
39.6
40
40
(714)
THIS ITEM IS NOT AVAILABLE. PLEASE CONTACT PIONEER FOR INFORMATION 49
Page 50

THIS ITEM IS NOT AVAILABLE. PLEASE CONTACT PIONEER FOR INFORMATION
4.5.2 Assembling the mounting hardware and mounting the plasma display
1)Precautions
•Make sure you distinguish correctly between vertical frames for left and right. Both should be mounted so their
hexagonal sockets face outward.
•The horizontal frames should be mounted so their smaller openings face the wall. A total of eight openings are
provided in the horizontal frames for wall-mounting. (A total of fourteen openings are provided in the PDK-5006 itself.)
2)Assembly procedure
1Loosen screw a and separate one end of the hook from the screw.
2Hold the upper part of the vertical frame and open to an approximate width of 10 cm.
a
Loosen the screw until you can no longer
see its end through this opening.
3Mount the horizontal frame to the vertical frames.
Vertical frame (left)
Horizontal frame
Vertical frame (right)
Hexagonal sockets
facing outward
Hexagonal
socket head
flange bolt
a
Hexagonal socket head
flange bolt
This surface should face the wall.
Hexagonal socket head
flange bolt
Horizontal frame
This side should face the wall. (The
Hexagonal
socket head
flange bolt
smaller holes should face the wall.)
Positioning the screw with a finger-tip, tighten
the screw with a hexagonal wrench.
50 THIS ITEM IS NOT AVAILABLE. PLEASE CONTACT PIONEER FOR INFORMATION
Hexagonal
wrench
Page 51

THIS ITEM IS NOT AVAILABLE. PLEASE CONTACT PIONEER FOR INFORMATION
3)Mounting monitor-fastening bolts to the plasma display
1Mount the monitor-fastening bolts to the four rear corners of the plasma display.
Monitor-
1162
590
590
24-M8 (with 16ø Hole rivet)
104104104104
150 150
250 250
660
Monitorfastening bolt
Monitorfastening bolt
fastening bolt
Monitorfastening bolt
The nuts of the monitorfastening bolts should be
tightened so that their
surface is level with the
screw.
2Mounting the assembled mounting hardware to the wall
1. Firmly fasten the mounting hardware to the wall at a minimum of four points b, using appropriate screws or bolts.
Make sure that the screws and bolts are appropriate for the wall’s strength and composition.
CAUTION
Before mounting to the wall, check that the fittings have adequate strength.
bb
bb
THIS ITEM IS NOT AVAILABLE. PLEASE CONTACT PIONEER FOR INFORMATION 51
Page 52

THIS ITEM IS NOT AVAILABLE. PLEASE CONTACT PIONEER FOR INFORMATION
2.After mounting the mounting hardware to the wall with the screws, fully extend the left and right vertical frames
as shown and tighten the left and right screws (c).
Wall side
c
3Mounting the plasma display
1.Two persons should firmly hold the left and right sides of the plasma display, as shown. Insert four monitorfastening bolts into appropriate openings in the wall-suspension hardware. Insert the two lower bolts before the
upper two.
Tighten the screw from above
to keep the bolt from working
loose.
Display
Tighten the nut.
2.After performing the above step, adjust the installation angle, as discussed on the next page.
Insert the monitorfastening bolt into
opening in the
wall-suspension
hardware and
lower it into the
cutout.
52 THIS ITEM IS NOT AVAILABLE. PLEASE CONTACT PIONEER FOR INFORMATION
Page 53

THIS ITEM IS NOT AVAILABLE. PLEASE CONTACT PIONEER FOR INFORMATION
4)Adjusting the angle
This mounting hardware can be tilted 25 degrees, without set increments. This work should be done by two people.
1Loosen screw c on the left and right vertical frames.
2While sliding the arm down, push the display to the desired angle.
3Once the desired angle is reached, tighten screw c on the left and right frames.
a
When mounting the display flush or parallel to the wall,
c
secure the movable and fixed portions of the mount frame
by tightening the screws a, as shown. This prevents
accidental tilting of the display. You must also tighten the
left and right c screws.
After mounting the unit at an angle, an additional
reinforcement measure can be taken by attaching an
appropriate wire flat bar using screws (a).
THIS ITEM IS NOT AVAILABLE. PLEASE CONTACT PIONEER FOR INFORMATION 53
Measuring the opening distance x enables approximate
angle values to be determined.
X Angle
181mm 5˚
236mm 10˚
290mm 15˚
341mm 20˚
Page 54

Speaker System: PDP-S02-LR
4.6 Speaker System: PDP-S02-LR
4.6.1 Specifications
External dimensions........................................ 74 (W) x 103 (D) x 714 (H) mm
1368 (W) x 103 (D) x 714 (H) (with plasma display PDP-501MX/PDPV501X mounted)
Weight.............................................................2.9 kg
48.8 kg (with plasma display PDP-501MX/PDP-V501X mounted)
Cabinet ............................................................Stagger-connection closed type, magnetically-shielded design (EIAJ)
Speaker (three-way)
Low (Woofer)....................................... Ecliptic cone
Mid (Mid-range) ...................................Ecliptic cone
High (Tweeter) .....................................2.5-cm dome
Nominal impedance ........................................8 ohms
Playback frequency ......................................... 50 to 60,000 Hz
Output sound pressure ................................... 82 dB/W (1m)
Permissible input
Maximum output (EIAJ)....................... 12 W
Rated input (EIAJ) ................................4W
Crossover frequency .......................................4 kHz
Accessories (for one set of speakers) .............Speaker cord x2, Flat head screw x4, Hexagonal socket head screw x4,
Hexagonal wrench x1, Washer M8 (ø25) x 4, Washer (ø15) x4, Mount
components x4, Warranty card x1, Operating Instractions x1
External dimensions (with plasma display PDP-501MX/PDP-V501X mounted)
Center of gravity
(Unit: mm)
31
684
1368
1218 74
98.5
103
713
357
54
Page 55

Speaker System: PDP-S02-LR
4.6.2 Mounting to the main unit
Two mounting methods are available. Proceed as follows.
1 Mounting to the sides of the display
• The figure illustrates how to mount the speaker to the
right side of the display.
[PDP-502]
UP
[PDP-501MX/PDP-V501X]
UP
Cushion
Mount
components
Flat screw
2 Mounting using commercially-available mounting
components
• This speaker system comes with M8 washers (ø25)
for mounting the system using commercially-available
mounting components.
• Use either the center set of two mount openings or
the lower set, which is designed for use with
commercially-available mounting components. The two
mount openings for either set are not level; the supplied
washer provides the necessary compensation.
UP
Secure at either pair of
points, with the washer
Washer, M8
(ø25)
fitted to the lower
opening to level it with
the upper opening.
Hole rivet
Washer (ø15)
Hexagonal
screw
1. Remove the lower two hole rivets from the rear of the
display. (The hole rivet can be removed using a coin or
other device.)
2. Mount the supplied mounting components to the
speakers. (Take care to keep the protective cushioning
from peeling off.)
3. Find the left and right speakers (check for “Left” and
“Right” marks) and mount the speakers to the display,
with the cushioning facing the display and the “UP”
mark up, by first tightening the lower, then the upper
mounting components. (At this point, the mounting
components are only tightened temporarily.)
4. Securely tighten the flat screws to mount the mounting
components firmly to the display, while positioning
mounting components to ensure even clearance
between the speaker and the display.
• The use of screws other than those supplied may
prevent secure installation or correct operation. Use
only the supplied mount screws.
• If you must move the display after the speakers have
been mounted, grasp the lower part of the display
instead of the speakers.
Connection to a stereo amplifier
1. Switch off power to the stereo amp.
2. Use the supplied speaker cable to connect the speaker
input to the amp output. The red input terminal (the
terminal at the right in the illustration) is positive (+).
The black terminal (at the left in the illustration) is
negative (–).
1 Pare the insulation
from the ends of the
cable and twist the
bare wires.
2 Press the level and insert
the ends of the twisted
wires into the proper
openings. Release the
lever.
Negative ·
terminal
To negative ·
terminal
(Output from the stereo amp)
Positive ª
terminal
To positive ª
terminal
55
Page 56

Speaker System: PDP-S02-LR
4.6.3 Mounting with the plasma display ceiling-suspension hardware (PDK-5002)
Monitor mount bolt
Monitor mount bolt
Hole rivet
Figure 2
When mounting the plasma display with the optional speakers to the ceiling-suspension hardware, first attach the
speakers to the display with monitor mount bolts, as shown in Figure 2. Next, referring to Figure 3, use the upper left
and right monitor mount bolts, which are not used for mounting the speaker system, to fasten the ceiling-suspension
hardware to the display using the washers (25 mm in outside diameter) supplied with the optional speaker.
Follow the normal mounting procedure to attach the mounting hardware to the display.
Mounting the optional speakers to the display makes it difficult to access the monitor mount bolts. Take care while
performing mounting work.
56
Page 57

Monitor mount bolt
Speaker System: PDP-S02-LR
Washer 25 mm in o.d.
(supplied with optional speaker)
Plasma display ceiling mount bracket
R730°
R689°
45°
Figure 3
45°
This circle shows the path that the outermost part
of the plasma display follows when it is rotated
about a verticalaxis axis after having been tilted
sideways by 25˚
Maximum sideways tilt: 45˚
This circle shows the path that the outermost part
of the plasma display follows when it is rotated
about a verticalaxis axis after having been tilted
sideways by 25˚
57
Page 58

Speaker System: PDP-S02-LR
4.6.4 Mounting with PDK-5006 (wall-mounting hardware)
Washer 15 mm in o.d.
(supplied with optional speaker)
Hexagonal socket
head button bolt
(supplied with
optional speaker)
Monitor mount bolt
Hole rivet
Figure 4
When mounting the plasma display with the optional speakers to the ceiling-suspension hardware, first fasten the
speakers to the display with monitor mount bolts and the hexagonal socket head button bolts and washers (outer
diameter:15 mm) that are supplied with the optional speaker, as shown in Figure 4. Next, referring to Figure 5, use the
upper left and right monitor mount bolts, which are not used to mount the speaker system, to attach the wall mount
hardware to the display using the washers (outer diameter:25 mm) supplied with the optional speakers.
Then follow normal mounting procedures to secure the mounting hardware to the display.
Mounting the optional speakers to the display makes it difficult to access the monitor mount bolts. Take care while
performing mounting work.
58
Page 59

Monitor mount bolt
Speaker System: PDP-S02-LR
Washer 25 mm in o.d.
(supplied with optional speaker)
Wall-mounting hardware
Monitor mount bolt
Figure 5
59
Page 60

Before Beginning Adjustments
5.1 Before Beginning Adjustments
You can make adjustments to the unit in the following ways:
• With the operating panel of the main unit
• With the remote control unit
• With a PC (through RS-232C control)
Make sure you’ve thoroughly read and understood the following before making any adjustments.
5.1.1 Operating mode
The unit has the following four major operating modes:
Standby Status
(Note 1)
2 Menu Mode
MENU
DISPLAY
<PON>
1 Normal Operating Mode
STANDBY/ONMENU
3 Integrator Mode
<POF>STANDBY/ON
<AJY>
<AJN>
MENU
4 RS232C Adjustment Mode
indicates operating mode and status.
indicates button operations on the remote or on the main unit’s operating panel.
< > indicates RS-232C command operations.
Note 1: Refer to “5.4.1 About Integrator Mode.”
1) Normal Operating Mode
Intended for video playback, this mode enables the following basic operations:
• Switching to STANDBY status (POWER OFF)
• Input switching
• Screen-size switching
• Full auto-zoom On/Off
• Key Lock/Unlock switching (this must be done using a button found only on the main unit.)
• Switching to Menu or RS-232C adjustment mode
Additionally, Normal operating mode also enables some of the RS-232C controls (as discussed in “5.6.2 RS-232C
Commands”).
2) Menu Mode
Use this mode to set picture quality, image position, and other characteristics.
Refer to “5.3 Menu Mode” for further details.
The mode allows you to change adjustment data within certain limits, based on values adjusted in Integrator or
RS-232C adjustment modes (discussed later).
For more information, refer to “5.3 Menu Mode.”
60
Page 61

Before Beginning Adjustments
3) Integrator Mode
This mode provides adjustment functions for the integrator.
White balance adjustment and various other setting items are available in addition to those in Menu mode.
Refer to “5.4 Integrator Mode” for further details.
4) RS-232C Adjustment Mode
This mode enables various adjustments and settings using a PC.
Some adjustment items are available only in this mode.
Refer to “5.5 RS-232C Adjustment Mode” for further details.
Combination use of remote, Unit operation panel, and PC.
5.1.2 Combination in use of remote, unit operating panel, and PC
• The remote, and the operating panel of the main unit may be used together.
Example: You can enter Menu mode through the operating panel of the main unit, then make adjustments
using the remote.
• Depending on which has transmitted the more recent command, either the remote or the operating panel(of the
main unit), or RS-232C may originate the command currently in effect.
Example: Operation
Press the MENU button on the remote
(or on the operating panel of the main
unit)
= Enters Menu mode.
At this time, the only available RS-232C commands are:
• <AJY>
• <POF>
Action
Now, issue an <AJY> command from
a PC.
NOTE: The remote does not have a KEY LOCK/UNLOCK button.
= Menu mode is disabled and RS-232C adjustment mode
is activated. At this time, only the following options are
available from the remote(or the operating panel of the
main unit):
• Power switch
• MENU button
• KEY LOCK/UNLOCK button
61
Page 62

Before Beginning Adjustments
5.1.3 List of supported input signals
1) Input (Video) Signals Supported (For U.S. and Taiwanese Models)
INPUT 1
Vertical
Frequency
Fv (Hz)
60
INPUT 2
Vertical
Frequency
Fv (Hz)
60
INPUTs 3 and 4
Vertical
Frequency
Fv (Hz)
60
Horizontal
Frequency
Fh (kHz)
15.7
Horizontal
Frequency
Fh (kHz)
15.7
31.5
Horizontal
Frequency
Fh (kHz)
15.7
31.5
33.8
45.0
Signal Format
Composite
S-Video Signal
Signal Format
Component
Component
Signal Format
RGB
Component
RGB
Component
RGB
Component
RGB
Component
Screen Size
4:3 FULL ZOOM CINEMA
NORMAL WIDE WIDE
Screen Size
4:3 FULL ZOOM CINEMA
NORMAL WIDE WIDE
Screen Size
4:3 FULL ZOOM CINEMA
NORMAL WIDE WIDE
: Supported signals and screen sizes
: Can be reproduced depending on settings in Integrator mode, but
primary picture quality is not available.
NATURAL
NATURAL
NATURAL
FULL
AUTO
ZOOM
FULL
AUTO
ZOOM
FULL
AUTO
ZOOM
Remarks
NTSC
Remarks
Remarks
SDTV 480i
SDTV 480p
HDTV 1080i
HDTV 720p
62
Page 63

1) Input (Video) Signals Supported (For Euro Model)
INPUT 1
Vertical
Frequency
Fv (Hz)
50
Horizontal
Frequency
Fh (kHz)
15.6
Signal Format
Composite
4:3 FULL ZOOM CINEMA
NORMAL WIDE WIDE
S-Video Signal
60
15.7
Composite
S-Video Signal
INPUT 2
Screen Size
Before Beginning Adjustments
FULL
NATURAL
AUTO
ZOOM
Remarks
PAL, SECAM
NTSC, 4.43 NTSC
Vertical
Frequency
Fv (Hz)
Horizontal
Frequency
Fh (kHz)
50
60
INPUTs 3 and 4
Vertical
Frequency
Fv (Hz)
Horizontal
Frequency
Fh (kHz)
50
60
15.6
31.3
15.7
31.5
15.6
31.3
15.7
31.5
33.8
45.0
Signal Format
Component
Component
Component
Component
Signal Format
RGB
Component
RGB
Component
RGB
Component
RGB
Component
RGB
Component
RGB
Component
Screen Size
4:3 FULL ZOOM CINEMA
NORMAL WIDE WIDE
NATURAL
Screen Size
4:3 FULL ZOOM CINEMA
NORMAL WIDE WIDE
NATURAL
FULL
AUTO
ZOOM
FULL
AUTO
ZOOM
Remarks
Remarks
: Supported signals and screen sizes
: Can be reproduced depending on settings in Integrator mode, but
primary picture quality is not available.
63
Page 64

Before Beginning Adjustments
2) Input (PC) Signals Supported
INPUTs 3 and 4
Vertical
Model
PC/AT
compatible
Macintosh
Dot x Line
640 x 400
640 x 480
800 x 600
1024 x 768
1280 x 1024
640 x 480
832 x 624
1024 x 768
Frequency
Fv (Hz)
87
70.1
59.9
72.8
75
56.3
60.3
72.2
75
60
70.1
75
(Note 1)
60
66.7
74.6
74.9
Horizontal
Frequency
Fh (kHz)
31.5
31.5
37.9
37.5
35.2
37.9
48.1
46.9
48.4
56.5
60
35.5
64
35
49.7
60.2
Screen Size and Display area (dot x line)
ORIGINAL 4: 3 FULL ZOOM
NORMAL
640 x 400 1000 x 624 1276 x 768
640 x 480 1024 x 768 1276 x 768
640 x 480
640 x 480
800 x 600 960 x 720 1280 x 720
800 x 600 960 x 720 1280 x 720
800 x 600 960 x 720 1280 x 720
800 x 600 960 x 720 1280 x 720
1024 x 768 1280 x 768
1024 x 768 1280 x 768
1024 x 768 1280 x 768
1024 x 768 1280 x 768
960 x 768 1276 x 768 1276 x 768
640 x 480 1024 x 768 1276 x 768
832 x 624 1000 x 748 1280 x 748
1024 x 768 1280 x 768
NEC PC-9800
1152 x 870
640 x 400
75.1
56.4
70.1
640 x 480
59.9
75
800 x 600
60.3
75
1024 x 768
70.1
75
1280 x 1024
60
NOTE 1: Interlaced signal (frame frequency of 43.5 Hz)
PC-9800® is a registered trademark of NEC Corporation.
Macintosh® is a registered trademark of Apple Computer Inc.
NEC is a trademark of NEC Corporation.
68.7
24.8
31.5
31.5
37.5
37.9
46.9
56.5
60
64
640 x 400 1000 x 624 1276 x 768
640 x 400 1000 x 624 1276 x 768
640 x 480 1024 x 768 1276 x 768
640 x 480
800 x 600 960 x 720 1280 x 720
800 x 600 960 x 720 1280 x 720
1024 x 768 1280 x 768
1024 x 768 1280 x 768
1024 x 768 1280 x 768
960 x 768 1276 x 768 1276 x 768
: Supported
: Video can be reproduced, but details are unclear.
: Simplified reproduction; details are not reproduced.
64
Page 65

Before Beginning Adjustments
3) About Screen Size
1 Screen size when video signals are received: Refer to the operating manual.
2 Screen size when PC signals are received:
• ORIGINAL
Images are reproduced with the input signal’s dot and
line numbers corresponding to the unit’s dot and line numbers at a 1-to-1 ratio. “dot and line” represents screen
size or display area. Input signals are reproduced with the
highest possible fidelity.
1280 dots
Screen Example:
When inputting a
640 x 480 signal =
• 4:3 NORMAL
Enables reproduction of input signals in full width, preserving the original aspect (vertical-to-horizontal ratio).
Screen Example: When inputting a 640 x 480 signal =
• FULL
Enables reproduction of input signals in full width on a
16-to-9 ratio screen.
A
Original image
A
Image
reproduced
Screen
640 dots
1280 dots
A
1024 dots
1280 dots
480 lines
768 lines768 lines
Screen Example: When inputting a 640 x 480 signal =
• ZOOM
Enabled only for 1280 x 1024 signals. Reproduction is
made with the input signal’s dot and line numbers corresponding to those of the unit at a 1-to-1 ratio, but the top
or the bottom of the image will not be visible, as shown.
(Vertical scrolling is available with “V.POSI.” in Menu
mode.)
NOTE: The figures are for illustrative purposes only.
768 lines768 lines
A
1280 dots
1024 lines
A
65
Page 66

Before Beginning Adjustments
5.1.4 List of adjustable and settable items
1) Menu Mode
INPUT 1
VIDEO
COMPOSITE
/S-VIDEO
Note 1
Note 3
CONTRAST
BRIGHT
COLOUR
TINT
SHARP
C. TEMP
R LEVEL
G LEVEL
B LEVEL
H. POSITION
V. POSITION
CLK FREQ.
CLK PHASE
3D Y/C MODE Note 6
ABL
MP MODE
AUTO POWER OFF
INPUT SETTING
SIGNAL
COLOR SYS Note 7
CLAMP
Variable
Range
±32 STEP x 3
±32 STEP x 3
±32 STEP x 2
±32 STEP x 2
±32 STEP x 3
±2 STEP
±32 STEP
±32 STEP
±32 STEP
±64 STEP Note 2
±4 STEP Note 2
±32 STEP x 2
±8 STEP x 1
STILL/MOTION
RGB/COMP1/COMP2
AUTO/NTSC/PAL/
SECAM/4.43NTSC
MODE 1/MODE 2
One-Step
Incre-
ment
x 1(+)
x 2(–)
x 1(+)
x 2(–)
x 1(+)
x 2(–)
ON/OFF
ON/OFF
OFF/ON
PC/VIDEO
INPUT 2
VIDEO
COMPO-
NENT
Note 1
Note 5
INPUT 3
VIDEO PC
COMPO- RGB RGB
NENT
Note 1 Note 1
Note 4
INPUT 4
VIDEO PC
COMPO- RGB RGB
NENT
Note 1 Note 1
Note 4
Note 1: V.POSITION can’t be adjusted when screen size is set to ZOOM or CINEMA WIDE. But V.SCROLL remains
available (refer to “5.2.1 2 Screen-Size Switching”).
Note 2: The one-step increment may vary, depending on input signal and screen size. The range of adjustable values is
also bounded (a limiter is inserted).
Note 3: Can’t be set for S-video signal input.
Note 4: May be set only when inputting a signal of 60-Hz vertical frequency and 31.5-kHz horizontal frequency. (With
all other input signals, setting occurs automatically.)
Note 5: RGB can’t be selected.
Note 6: For U.S. and Taiwanese models.
Note 7: For EURO models.
66
Page 67

2) Integrator Mode
Before Beginning Adjustments
Adjustment
CONTRAST
BRIGHT
COLOUR
TINT
SHARP
DETAIL
H. POSITION
V. POSITION
CLK FREQ.
CLK PHASE
R HIGH
G HIGH
B HIGH
R LOW
G LOW
B LOW
SIDE MASK R
SIDE MASK G
SIDE MASK B
COLOUR MODE
BAUD RATE
MIRROR MODE
STD-RGB
Variable Range
Median Value in
Parentheses
0 to (128) to 255
0 to (128) to 255
0 to (64) to 127
0 to (64) to 127
0 to (128) to 255
0 to (128) to 255
0 to (128) to 255 Note 1
0 to (128) to 255 Note 1
64 to (128) to 192
0 to (8) to 16
0 to (128) to 255
0 to (128) to 255
0 to (128) to 255
0 to (128) to 255
0 to (128) to 255
0 to (128) to 255
0 to (128) to 255
0 to (128) to 255
0 to (128) to 255
1/2
1200 to 19200 Note 2
OFF/XY
OFF/ON
INPUT 1
VIDEO
COMPOSITE
/S-Video
INPUT 2
VIDEO
COMPO-
NENT
INPUT 3
VIDEO PC
COMPO- RGB RGB
NENT
INPUT 4
VIDEO PC
COMPO- RGB RGB
NENT
Note 1: The one-step increment may vary, depending on input signal and screen size. The range of adjustment values
is also bounded (a limiter is inserted).
Note 2: Switchable in five steps.
* For RS-232C adjustment mode, refer to “5.3.3 List of RS-232C Commands.”
67
Page 68

Before Beginning Adjustments
68
Page 69

Before Beginning Adjustments
5.1.5 Last memory
The last memory timing used by the unit is given in the table below. Remember, no last memory function is executed
if you perform the following without meeting these timing requirements:
• Switch off main power
• Unplug the power cord from the outlet; and
• Switch off the outlet breaker.
Item
Operation in Normal operating
mode
• Power switch On/Off
• Input function
• Screen size
• Full auto-zoom On/Off
• Key Lock/Unlock
Adjustments and settings in
Menu mode
Adjustments and settings in
Integrator mode
Adjustments and settings in
RS-232C adjustment mode
Memory Timing
• About four seconds after the end of operation
• When entering the STANDBY status through remote operation, through the operating panel of
the main unit, or by issuing an RS-232C command
• When switched to Menu mode as a result of a MENU button action
• When switched to RS-232C adjustment mode by an <AJY> command
NOTE: Among the RS-232C commands available in Normal operating mode, some are not stored
in last memory when used in this mode. See “5.5.1 About the RS-232C Adjustment Mode.”
• Approximately four seconds after the end of operation
• When entering the STANDBY status through remote operation, through the operating panel of
the main unit, or by issuing an RS-232C command
• When returning to the previous screen with the SET button
• When exiting Menu mode with the MENU button (restoring the unit to Normal operating mode)
• When exiting Menu mode with the KEY LOCK/UNLOCK button (switching unit to Normal operating mode and entering the KEY LOCK status)
• When switching to RS-232C adjustment mode with an <AJY> command
• When switching over to another input signal mode (i.e., to another signal frequency).
• When automatically exiting Menu mode after persistence of no-signal status for approximately
eight minutes (restoring the unit to Normal operating mode)
• Approximately four seconds after the end of operation
• When entering the STANDBY status through remote operation, through the operating panel of
the main unit, or by issuing an RS-232C command
• When returning to the previous screen with the SET button
• When exiting Integrator mode with the MENU button (restoring the unit to Normal operating
mode)
• When exiting Integrator mode with the KEY LOCK/UNLOCK button (switching the unit to Normal
operating mode and entering the KEY LOCK status)
• When switching to RS-232C adjustment mode with an <AJY> command
• When switching over to another input signal mode (i.e., to another signal frequency).
• When automatically exiting Integrator mode after persistence of no-signal status for approximately three minutes (restoring unit to Normal operating mode)
• Approximately four seconds after the end of operation
• When entering the STANDBY status through remote operation, through the operating panel of
the main unit, or by issuing an RS-232C command
• When changing adjustment or setting items using PC commands
• When exiting RS-232C adjustment mode with an <AJY> command (restoring the unit to Normal
operating mode)
• When exiting RS-232C adjustment mode with the KEY LOCK/UNLOCK button (switching to
Normal operating mode and invoking KEY LOCK status)
• When switching to Menu mode with the MENU button.
NOTE: If you start or stop the entire system by switching a breaker on or off, allow enough time for the last memory
function to perform by satisfying the timing requirements given above. Note that this practice causes count
errors on the hour meter.
5.1.6 Aging
After switching on power to the unit, input signals to perform aging until the unit stabilizes. Use signals that are unlikely
to cause the displayed images to be “burned” onto the screen: signals such as a 100% white signal or animations from
LDs are recommended. This should take about thirty minutes. This ensures precision adjustments.
NOTE: Display of still images over extended periods can lead to the above-mentioned “burning.”
69
Page 70

Normal Operating Mode
5.2 Normal Operating Mode
5.2.1 About normal operating mode
Normal operating mode enables the following:
1 Input switching
• Pressing one of INPUT buttons, 1-4 —> Input switches over to the selected input.
• Pressing the INPUT button on the operating panel of the main unit —> This switches the input to the next input.
2 Screen-size switching
• Repeatedly pressing the SCREEN SIZE button on the remote changes screen size in the following sequence:
At INPUT 1 or 2, or when reproducing video signals via INPUT 3 or 4
= FULL = ZOOM = CINEMA WIDE = NATURAL WIDE = 4:3 NORMAL =
When reproducing PC signals via INPUT 3 or 4
= ORIGINAL = 4:3 NORMAL = FULL = ZOOM =
NOTE: • During video playback, switching screen size to ZOOM or CINEMA WIDE permits scrolling the screen
up and down with the 5 and ∞ buttons (V-SCROLL function). The V-scroll function provides the following
variable ranges:
±25 steps on ZOOM
±15 steps on CINEMA WIDE
See “5.1.3 List of supported input signals.”
• Displays with “(TYPE)” appended, such as FULL (TYPE), will sometimes appear, indicating a simplified
reproduction.
• Check for possible copyright infringement before using the screen-size switching feature of this unit in
restaurants, hotels, or other public venues, or for commercial purposes.
3 Display call
• Press the DISPLAY button on the remote.
= The current input function, the incoming signal’s horizontal and vertical frequencies, current screen size, and
other characteristics are displayed on the screen.
NOTE: The horizontal and vertical frequencies shown are intended to be representative and may differ from
actual signal frequencies.
4 Full auto zoom
This function automatically sets the most appropriate screen size for the picture being played back.
• Press the FULL AUTO ZOOM button on the remote.
= Pressing the button toggles the Full Auto Zoom function on or off.
Action • For 4:3 image playback = Switches to NATURAL WIDE.
• For vista-ratio image playback = Switches to CINEMA WIDE.
• For cine-scope ratio or 16:9 image playback = Switches to ZOOM.
NOTE: • This function is available only when INPUT 1 is in use or when a standard speed (horizontal frequency of
15.75 kHz, vertical frequency of 60 Hz) component video signal is received through INPUT 2, 3, or 4.
• For 4:3 image playback, dark scenes such as a night background may sometimes cause the screen to
switch to CINEMA WIDE or ZOOM. To guard against this, switch FULL AUTO ZOOM off.
• Parts of the uppermost or lowermost edge of the image may be clipped, or black bands displayed,
depending on the LDs or video tapes in use.
• When an S1 video signal is detected, the screen size automatically switches to FULL, whether or not
FULL AUTO ZOOM is switched On or Off.
• When an S2 video signal is detected, the screen size automatically switches to ZOOM, whether or not
FULL AUTO ZOOM is switched On or Off.
5 Some RS-232C commands are also available. Refer to “5.5 RS-232C Adjustment Mode.”
70
Page 71

Menu Mode
5.3 Menu Mode
5.3.1 About menu mode
1) How to enter/exit Menu mode
• To enter Menu mode and to display the menu screen (refer to “5.3.2. Operation Example in Menu Mode”), press
the MENU button on the remote or on the operating panel of the main unit in normal operating mode. To return to
Normal operating mode, press the MENU button.
2) Remember the following:
(1)You can’t change the input while in Menu mode. Select the input for the adjustment or setting you intend to
perform before entering Menu mode.
(2)Menu mode is cancelled automatically and Normal operating mode restored in the following cases:
• When switching over to another input signal mode (i.e., to another signal frequency)
• When no control is operated for a period of approximately eight minutes
• When the KEY LOCK/UNLOCK button on the operating panel of the main unit is pressed
(3)For adjustments in Menu mode, refer to the operation manual.
(4)When making adjustments, we recommend using video signals that you actually intend to use.
71
Page 72

Menu Mode
5.3.2 Example of menu mode operation
Adjusting contrast is discussed below as an example of one basic operation in Menu mode.
STANDBY
/ON
INPUT
MENU
PLASMA DISPLAY
REMOTE CONTROL UNIT
CU-PDP002
VIDEO
STANDBY/ON
S-VIDEO
INPUT2
DISPLAY
C.VIDEO
( RCA )
FULL AUTO
ZOOM
INPUT3 INPUT4INPUT1
RGB
( BNC )
( D-sub )
RGB
SCREEN
SIZE
MENU
SET
Î
ADJUST
SET
Step Switch the display to the menu screen
(activating Menu mode)
Remote Main Unit
MENU
MENU
MAIN MENU
3PICTURE
V MEMORY
SCREEN
]
RESET
AUTO POWER OFF
SET UP
MENU : MENU OFF
∞ : SEL. SET : NEXT
The currently selected item is
highlighted in heliotrope.
72
Step Select PICTURE.
Remote Main Unit
‘
SET
ADJUST
‘
SET
PICTURE
3CONTRAST
BRIGHT
COLOUR
]
TINT
SHARP
C. TEMP
EXIT
∞ : SEL. SET : ADJ.
The currently selected item is
highlighted in heliotrope.
Page 73

Step Select CONTRAST.
Remote Main Unit
ADJUST
‘
‘
Menu Mode
PICTURE
SET
SET
]
Step Make adjustments.
Remote Main Unit
ADJUST
]
Press the SET button to return to the screen in step 2.
To make other adjustments, repeat steps 2-4.
Step Complete the procedure.
Remote Main Unit
MENU
MENU
]
CONTRAST
23 : ADJ. SET : EXIT
PICTURE
CONTRAST
23 : ADJ. SET : EXIT
Restores Normal operating mode.
73
Page 74

Menu Mode
5.3.3 Settings in menu mode
1) Setting the Three-Dimensional Y/C Separator (For U.S. model and Taiwanese model)
A three-dimensional Y/C separator is built into the INPUT 1 video-input circuitry. To correct blurred images, as found
in sports images or other videos recording swift motions, set 3D Y/C MODE to MOTION.
1 Select SET UP. 2 Move the cursor to 3D Y/C MODE and press the
SET button to change the setting. The SET button
toggles 3D Y/C MODE between STILL and
MOTION.
Screen 1 Screen 2
MAIN MENU
PICTURE
V MEMORY
SCREEN
RESET
AUTO POWER OFF
3SET UP
MENU : MENU OFF
5 : SEL. SET : NEXT
SET UP
33D Y/C MODE : STILL
EXIT
∞ : SEL. SET : CHANGE
• Conditions that allow adjustments: Composite signal received via INPUT 1
• Factory preset: STILL
2) ABL ON/OFF
Setting ABL to ON during playback of PC signals increases screen brightness.
Setting ABL to ON increases screen brightness, but image intensity varies with changes in input signal.
If change in intensity is unsatisfactory, set ABL to OFF.
Differences between ABL ON and OFF (illustration)
ABL set to OFF ABL set to ON
(Example 1)
(Example 2)
The intensity levels of input signals are For images with relatively high overall brightness,
reproduced as is. no significant change occurs (example 1). But for
74
dimmer images, peak intensity images are brighter
when reproduced (example 2).
Page 75

Menu Mode
1 Select SET UP. 2 Move the cursor to ABL and use the SET button to
change the current setting. Pressing the SET button
toggles ABL between ON and OFF.
Screen 1 Screen 2
MAIN MENU
PICTURE
V MEMORY
SCREEN
RESET
AUTO POWER OFF
3SET UP
MENU : MENU OFF
5 : SEL. SET : NEXT
• Conditions that allow adjustments: PC signals incoming
• Factory preset: ON
3) MP Mode On/Off
This accommodates video signal processing when reproducing PC signals. We advise setting MP MODE OFF for
still images and ON for motion pictures.
<About MP Mode>
For noninterlaced signals (such as those from PCs) and for animation found in game software, striped shadows may
sometimes appear in the moving portion of the image. This phenomenon, known as pseudo-contour, results from
the plasma display’s tone wedge characteristic. You can set MP mode ON to reduce pseudo-contour, but the tone
wedge may become slightly blurred,depending on the signal.
NOTE:MP mode has no effect on 1024 x 768, 87-Hz signals (interlaced), whether MP is ON or OFF.
SET UP
INPUT SETTING : PC
SIGNAL : RGB
CLAMP : MODE1
3ABL : OFF
MP MODE : OFF
EXIT
5∞ : SEL. SET : CHANGE
1 Select SET UP. 2 Move the cursor to MP MODE and set the mode
with the SET button.
Pressing the SET button toggles mode ON or OFF.
Screen 1 Screen 2
MAIN MENU
PICTURE
V MEMORY
SCREEN
RESET
AUTO POWER OFF
3SET UP
MENU : MENU OFF
5 : SEL. SET : NEXT
SET UP
INPUT SETTING : PC
SIGNAL : RGB
CLAMP : MODE1
ABL : OFF
3MP MODE : OFF
EXIT
5∞ : SEL. SET : CHANGE
• Conditions that allow adjustments: PC signals supplied
• Factory preset: ON
75
Page 76

Menu Mode
4) Auto Power-Off
This features automatically switches power to standby when no video signal is detected for at least eight minutes.
Setting AUTO POWER OFF to ON activates this function.
1 Select AUTO POWER OFF. 2 Move the cursor to SETTING and change the setting
using the SET button.
Pressing the SET button toggles AUTO POWER
OFF ON or OFF.
Screen 1 Screen 2
MAIN MENU
PICTURE
V MEMORY
SCREEN
RESET
3AUTO POWER OFF
SET UP
MENU : MENU OFF
5∞ : SEL. SET : NEXT
AUTO POWER OFF
3SETTING : ON
EXIT
∞ : SEL. SET : CHANGE
• Changing the current AUTO POWER OFF setting in step 2 enables the new setting for all inputs.
• Factory preset: OFF
NOTE: To switch on power to the unit again, press the power switch on the remote or the operating panel of the
main unit. (No function is provided for automatic power-on on detection of a video signal.)
76
Page 77

Menu Mode
5) Setting Up Peripheral Equipment
A unit function automatically identifies signals from a PC and signals from DVD players or other AV units. But
depending on the signal, this function may not always work. In such cases, you must set the input settings manually.
This setting needs to be made separately for INPUT 3 and INPUT 4.
Examples: • When connecting AV units = INPUT SETTING: VIDEO
• When connecting PCs =[INPUT SETTING: PC
1 Select SET UP. 2 Move the cursor to INPUT SETTING and change
the setting using the SET button.
Pressing the SET button toggles the setting
between VIDEO and PC.
Screen 1 Screen 2
MAIN MENU
PICTURE
V MEMORY
SCREEN
RESET
AUTO POWER OFF
3SET UP
MENU : MENU OFF
5 : SEL. SET : NEXT
SET UP
3INPUT SETTING : VIDEO
SIGNAL : RGB
CLAMP : MODE1
EXIT
5∞ : SEL. SET : CHANGE
• Conditions that allow adjustments: When signals for INPUT 3 or 4 are not automatically identified.
• Factory preset: INPUT 3 to PC
INPUT 4 to PC
NOTE:• INPUT 2 is dedicated to component video signals and set to VIDEO. It does not support PC signals.
• 31.5 kHz x 60 Hx or 15.7 kHz x 60 Hz signals in INPUT 3/4 mode. (The unit does not automatically configure
itself).
77
Page 78

Menu Mode
6) Setting the Input Signal Format
INPUTS 3 and 4 support RGB and two component video signal types. INPUT 2 supports two component video signal
types. Thus, you must make the appropriate settings for the particular component.
This setting needs to be made separately for INPUTs 2, 3, and 4, as described below.
Example: • To reproduce RGB signals = SIGNAL: RGB
• To reproduce HDIV signals = SIGNAL: COMPONENT 1 (Note 1)
• To reproduce DVD players = SIGNAL: COMPONENT 2 (Note 1)
Note 1: Or try selecting COMPONENT 1 or 2 to determine which provides the best possible natural picture color.
1 Select SET UP. 2 Move the cursor to SIGNAL and change the setting
using with the SET button.
Pressing the SET button moves settings through
the sequence RGB, COMPONENT 1, and
COMPONENT 2.
Screen 1 Screen 2
MAIN MENU
PICTURE
V MEMORY
SCREEN
RESET
AUTO POWER OFF
3SET UP
MENU : MENU OFF
5 : SEL. SET : NEXT
SET UP
INPUT SETTING : VIDEO
3SIGNAL : RGB
CLAMP : MODE1
EXIT
5∞ : SEL. SET : CHANGE
• Conditions that allow adjustments: When reproducing video signals (other than PC signals) via INPUT 2, 3,
or 4. (For PC signals, input setting is set to RGB.)
• Factory preset: INPUT 2 to COMPONENT 2
INPUT 3 to RGB
INPUT 4 to RGB
78
Page 79

Menu Mode
7) Setting the Clamp Position
Plugging in RGB (G ON SYNC) signals and a sync signal simultaneously may produce inappropriate intensity
reproduction, with an over-bright screen or images with a greenish cast. If this occurs, set CLAMP to MODE 2. For
most situations, leave CLAMP to MODE 1.
Clamp pulse (a timing pulse necessary for intensity reproduction) is generated in two ways, “a” and “b,” as shown
in Figure 1.
Figure 1 Generation of a clamp pulse
a. Generating a clamp pulse from separate
sync
Clamp effective area
G (Green)
H (Sync signal)
Clamp pulse
b. Generating a clamp pulse from G ON
SYNC
Clamp effective area
G (G ON SYNC)
Clamp pulse
Figure 2 When a sync signal is supplied simultaneously with G ON SYNC
Clamp effective area
G (G ON SYNC)
H (Sync signal)
Clamp pulse Clamp out of timing
(In CLAMP MODE 1)
Clamp pulse Correct clamp timing
(In CLAMP MODE 2)
Sync signals are monitored in CLAMP MODE 1, and the unit is automatically switched to generate a clamp pulse by
method “a” shown in Figure 1 in the presence of sync signal, and by method “b” in the absence of a sync signal. But
when a sync signal is fed simultaneously with G ON SYNC, the unit perceives a sync signal and generates a clamp
pulse as shown in “a” in Figure 1. The generated clamp pulse is mistimed, making correct reproduction of intensity
impossible. In this case, unplug the sync signal or set CLAMP to MODE 2.
In CLAMP MODE 2, the clamp pulse is generated by method “b” in Figure 1, whether or not a sync signal is present,
ensuring correct reproduction of intensity.
NOTE: The figures above are for illustrative purposes only.
79
Page 80

Menu Mode
1 Select SET UP. 2 Move the cursor to CLAMP 5.3.4 Menu Layers and
use the SET button to change the setting.
Pressing the SET button toggles clamp mode
between MODE 1 and MODE 2.
Screen 1 Screen 2
MAIN MENU
PICTURE
V MEMORY
SCREEN
RESET
AUTO POWER OFF
3SET UP
MENU : MENU OFF
5 : SEL. SET : NEXT
• Conditions that allow adjustments: PC signals received via INPUT 3 or 4
VIDEO/RGB signal received via INPUT 3 or 4
• Factory preset: INPUT 3 to MODE 1
INPUT 4 to MODE 1
SET UP
INPUT SETTING : PC
SIGNAL : RGB
3CLAMP : MODE1
ABL : OFF
MP MODE : OFF
EXIT
5∞ : SEL. SET : CHANGE
80
Page 81

Menu Mode
8) Setting the Colour System (For EURO models)
Normally the colour system is used in its AUTO mode. However, if no proper image or no colour is delivered, change
the mode, as follows.
1 Select SET UP. 2 Move the cursor to COLOUR SYS, and press the
SET button to change the setting.
Repeatedly pressing the SET button offers the
following options in sequence:
AUTO = NTSC = PAL = SECAM = 4.43 NTSC
Screen 1 Screen 2
MAIN MENU
PICTURE
V MEMORY
SCREEN
RESET
AUTO POWER OFF
3SET UP
MENU : MENU OFF
5 : SEL. SET : NEXT
• Set-able condition: Composite signals incoming via INPUT 1
• Factory preset: AUTO
SET UP
3COLOUR SYS : AUTO
EXIT
∞ : SEL. SET : CHANGE
81
Page 82

Menu Mode
5.3.4 Menu layers
1) Adjustments at Menu Layers — 1 of 2 (each screen shows an example: details differ depending on selections
at layers)
MAIN MENU
PICTURE
3V MEMORY
SCREEN
RESET
AUTO POWER OFF
SET UP
MENU : MENU OFF
5∞ : SEL. SET : NEXT
In INPUT 1
(SCREEN not selectable)
MAIN MENU
PICTURE
3V MEMORY
SCREEN
RESET
AUTO POWER OFF
SET UP
MENU : MENU OFF
5∞ : SEL. SET : NEXT
In INPUT 2, or in INPUT 3/4
with Input Signal Format set to
COMPONENT 1 or COMPONENT 2
(Displays shown in the screen
are the same as above)
PICTURE
CONTRAST
3BRIGHT
COLOUR
TINT
SHARP
C. TEMP
EXIT
5∞ : SEL. SET : ADJ.
(Note 2)
PICTURE
CONTRAST
3BRIGHT
R LEVEL
G LEVEL
B LEVEL
EXIT
5∞ : SEL. SET : ADJ.
V MEMORY
MODE : RECALL
STANDARD
MEMORY 1 : SPORTS
3MEMORY 2 : CINEMA
MEMORY 3 : GAME
MEMORY 4 : USER 4
EXIT
5∞ : SEL. SET : RECALL
V MEMORY (RGB)
MODE : RECALL
STANDARD
MEMORY A
3MEMORY B
MEMORY C
MEMORY D
EXIT
5∞ : SEL. SET : RECALL
PICTURE
CONTRAST
23 : ADJ. SET : EXIT
PICTURE
TINT
23 : ADJ. SET : EXIT
(Note 2)
V MEMORY
MODE : MEMORY
VALUE : USER
MEMORY 1 : SPORTS
3MEMORY 2 : CINEMA
MEMORY 3 : GAME
MEMORY 4 : USER 4
EXIT
5∞ : SEL. SET : MEMORY
V MEMORY (RGB)
MODE : MEMORY
VALUE : USER
MEMORY A
3MEMORY B
MEMORY C
MEMORY D
EXIT
5∞ : SEL. SET : MEMORY
MAIN MENU
PICTURE
3V MEMORY
SCREEN
RESET
AUTO POWER OFF
SET UP
MENU : MENU OFF
5∞ : SEL. SET : NEXT
In INPUT 3/4 with Input Setting
set to VIDEO and Input Signal
Format to RGB
(Display in the screen are the
same as above)
MAIN MENU
PICTURE
3V MEMORY
SCREEN
RESET
AUTO POWER OFF
SET UP
MENU : MENU OFF
5∞ : SEL. SET : NEXT
In INPUT 3/4 with Input Setting
set to PC
(Displays in the screen are the
same as above)
V MEMORY (PC)
MODE : RECALL
STANDARD
MEMORY A
3MEMORY B
MEMORY C
MEMORY D
EXIT
5∞ : SEL. SET : RECALL
SCREEN
H. POSI. +10
3V. POSI. +10
CLK FRQ
EXIT
5∞ : SEL. SET : ADJ.
SCREEN
H. POSI. +10
3V. POSI. +10
CLK FRQ
CLK PHS
EXIT
5∞ : SEL. SET : ADJ.
RESET
ADJUST RESET ?
YES 23 NO
2 : SEL. SET : EXIT
(Note 1)
V MEMORY (PC)
MODE : MEMORY
VALUE : USER
MEMORY A
3MEMORY B
MEMORY C
MEMORY D
EXIT
5∞ : SEL. SET : MEMORY
SCREEN
H. POSITION : +10
23 : ADJ. SET : EXIT
Note 1: V.POSI. cannot be selected when the screen size is set to ZOOM or CINEMA WIDE.
Note 2: TINT adjustment in unavailable for PAL/SECAM signal inputs.
82
Page 83

Menu Mode
2) Adjustments at Menu Layers — 2 of 2 (each screen shows an example: details differ depending on selections
at layers)
In INPUT 1
(SCREEN not selectable)
MAIN MENU
PICTURE
3V MEMORY
SCREEN
RESET
AUTO POWER OFF
SET UP
MENU : MENU OFF
5∞ : SEL. SET : NEXT
AUTO POWER OFF
3SETTING : OFF
EXIT
∞ : SEL. SET : CHANGE
In INPUT 2, or in INPUT 3/4
with Input Signal Format set
to COMPO-NENT 1 or
COMPONENT 2
(Displays shown in the screen
are the same as above)
In INPUT 3/4 with Input Setting
set to VIDEO and Input Signal
Format to RGB
(Display in the screen are the
same as above)
MAIN MENU
PICTURE
3V MEMORY
SCREEN
RESET
AUTO POWER OFF
SET UP
MENU : MENU OFF
5∞ : SEL.
MAIN MENU
PICTURE
3V MEMORY
SCREEN
RESET
AUTO POWER OFF
SET UP
MENU : MENU OFF
5∞ : SEL.
SET : NEXT
SET : NEXT
Note 5)
SET UP
33D Y/C MODE : STILL
EXIT
5∞ : SEL. SET : CHANGE
SET UP
3COLOUR SYS : AUTO
EXIT
5∞ : SEL. SET : CHANGE
SET UP
INPUT SETTING : VIDEO
3SIGNAL : COMPONENT 1
CLAMP : MODE 2
EXIT
5∞ : SEL. SET : CHANGE
Note 1), Note 2)
SET UP
INPUT SETTING : VIDEO
3SIGNAL : RGB
CLAMP : MODE 1
EXIT
5∞ : SEL. SET : CHANGE
In INPUT 3/4 with
Input Setting set to PC
(Displays in the screen are the
same as above)
MAIN MENU
PICTURE
3V MEMORY
SCREEN
RESET
AUTO POWER OFF
SET UP
MENU : MENU OFF
5∞ : SEL.
SET : NEXT
SET UP
INPUT SETTING : PC
3SIGNAL : RGB
CLAMP : MODE 1
ABL : ON
MP MODE: ON
EXIT
5∞ : SEL.
Note 3)
Note 1: In INPUT 2, INPUT SETTING is fixed to VIDEO.
Note 2: CLAMP is fixed to MODE 2 when the input signal format (“SIGNAL”) is set to COMPONENT 1 or 2.
Note 3: The input signal format (“SIGNAL”) is fixed to RGB when INPUT SETTING is at PC.
Note 4: INPUT SETTING is automatically switched over depending on incoming signals.
Note 5: For U.S. models as well as for TAIWAN models.
Note 6: For EURO models.
Note 4)
83
Page 84

Menu Mode
84
Page 85

Integrator Mode
5.4 Integrator Mode
5.4.1 About the integrator mode
1) Enabling Integrator Mode
• You must first release the Integrator Mode Protect,which is engaged at the time of shipment. The Protect should
be released only once to eudle initial adjustments to be made in the integrator mode immediately following delivery
of the unit.
<How to release Protect> In Standby, switch on power to the unit by pressing these three buttons on the remote,
in the following order:
DISPLAY button = MENU button = POWER button
(This procedure should be complete within three seconds.)
This releases the Integrator Mode Protect and invokes Integrator mode.
The Integrator Mode Protect release is stored in last memory. You do not need to repeat the procedure thereafter to
enter the Integrator mode.
2) Entering the Integrator Mode
• Once the Integrator Mode Protect is released, place the unit in Integrator mode by doing the following:
<Procedure> In standby, switch on power to the unit using the remote or the operating panel of the main unit, as
follows:
MENU button = POWER button
(This procedure should be complete within three seconds.)
3) When Entering the Integrator Mode
• The picture quality and clock adjustments (refer to the operating manual) made in MENU mode, except for CLK
PHS adjustment, are all set to standard positions (median values).
4) Data Adjusted in Integrator Mode
• Parameters for PICTURE, WHITE BALANCE, and SCREEN (refer to “5.4.3,” paragraphs 1) to 3) are stored in
memory by input function and signal. Up to four signal modes may be stored when inputting PC signals. When
adjusting five modes of input signals, the oldest adjustment data is erased from memory.
5) To Exit Integrator Mode
• Press the MENU button on the remote or on the operating panel of the main unit to restore the unit to Normal
operating mode. It is also important to plug in signals previously.
6) Notes
(1)The input can’t be switched while in the Integrator mode. Make sure you have switched to the appropriate input
before entering the Integrator mode. It is also important to plug in signals previously.
(2) The Integrator mode is automatically disabled:
• When switching over to another input signal mode (i.e., to another signal frequency).
• When no operation occurs for a period of approximately three minutes
• When you press the KEY LOCK/UNLOCK button on the operating panel of the main unit
(3)For adjustments and settings, feed the video signals you actually use in the production run.
85
Page 86

STANDBY
/ON
MENU
Integrator Mode
5.4.2 Example of integrator mode operation
Illustrative adjustments of CONTRAST in the Integrator mode are discussed below.
STANDBY
/ON
INPUT
MENU
PLASMA DISPLAY
REMOTE CONTROL UNIT
CU-PDP002
VIDEO
STANDBY/ON
S-VIDEO
INPUT2
DISPLAY
C.VIDEO
( RCA )
FULL AUTO
ZOOM
INPUT3 INPUT4INPUT1
RGB
( BNC )
( D-sub )
RGB
SCREEN
SIZE
MENU
SET
Î
ADJUST
SET
Step Put the unit into Standby and do the following.
Remote Main Unit
MENU
‘
(Within three
seconds)
STANDBY/ON
‘
]
NOTE: Different procedures are required if the Integrator Mode Protect is not yet
released. Refer to “5.4.1 About Integrator Mode.”
MENU
3PICTURE
WHITE BALANCE
SCREEN
ADDITIONAL SET UP
TOTAL INITIALIZE
The currently selected item is
highlighted in heliotrope.
86
Step Select the item to adjust.
Remote Main Unit
‘
SET
ADJUST
‘
SET
]
PICTURE
3CONTRAST 128
BRIGHT 128
COLOUR 64
TINT 64
SHARP 128
DETAIL 128
INITIALIZE
EXIT
The currently selected item is
highlighted in heliotrope.
Page 87

Step Select CONTRAST.
Remote Main Unit
ADJUST
Integrator Mode
‘‘
SET
SET
PICTURE
]
CONTRAST 128
Step Make adjustments.
Remote Main Unit
ADJUST
PICTURE
]
CONTRAST 128
Press the SET button to return to the screen in step 2.
To continue to make other adjustments, repeat steps 2 to 4.
Step To complete your adjustments, exit Integrator
mode.
Remote Main Unit
MENU
Or Or
STANDBY/ON
MENU
STANDBY
/ON
Entering Normal operating mode.
]
Entering STANDBY.
]
Although it is possible to
exit Integrator mode in
other ways, such as by
switching off the main
power, to ensure that
your adjustments are
saved to memory, we
advise following the
procedures shown at left.
87
Page 88

Integrator Mode
5.4.3 Adjustments and settings in the Integrator mode
For detailed information on button operations, refer to “5.4.2 Example of Integrator mode operation.”
1) Adjusting the PICTURE parameters
PICTURE parameters here include CONTRAST, BRIGHT, COLOUR, TINT, SHARP, and DETAIL. They differ slightly
from the picture quality items adjustable in Menu mode.
NOTE: TINT adjustment is unavailable for PAL/SECAM signal inputs.
1 Before entering the Integrator mode, switch the unit to the
specific input (one of INPUTs 1-4) in which adjustments will
be made. (Refer to “5.4.1 About Integrator Mode.”)
The ID number of the set of items will be indicated in the
upper right corner of the screen, where “– –” is displayed
in the illustration.
Select PICTURE.
2 Select the desired adjustment item.
Selecting INITIALIZE in screen 2 resets all PICTURE
parameters to their default values. (Refer to “5.4.3,”
paragraph 9).)
Select EXIT in screen 2 to return to screen 1.
3 Make the necessary adjustments.
NOTE: COLOUR, TINT, SHARP, and DETAIL can’t be
adjusted if INPUT 3/4 is set to RGB.
]
]
Screen 1
MENU – –
3PICTURE
WHITE BALANCE
SCREEN
ADDITIONAL SET UP
TOTAL INITIALIZE
Screen 2
PICTURE – –
3CONTRAST 128
BRIGHT 128
COLOUR 64
TINT 64
SHARP 128
DETAIL 128
INITIALIZE
EXIT
Screen 3
PICTURE – –
Make adjustments using the “2“ and “3” buttons on the
remote or the “–” and “+” buttons on the operating panel
of the main unit.
Values set and adjusted here, except for DETAIL, serve as
median values when adjustments are made in Menu mode.
Press the SET button to return to screen 2.
<Adjustable Range> 0 to 255 for CONTRAST, BRIGHT, SHARP, and DETAIL
0 to 127 for COLOUR and TINT
* About DETAIL
Smaller + DETAIL Value = Larger
Screen noise reduced Details of fine images (of the lawn, for example)
become distinct.
]
CONTRAST 128
88
Page 89

2) Adjusting the WHITE BALANCE Parameters
WHITE BALANCE parameters include R HIGH, G HIGH, B HIGH, R LOW, G LOW, and B LOW.
Integrator Mode
1 Before entering the Integrator mode, switch the unit to the
specific input (INPUTs 1-4) in which you intend to make
adjustments. (Refer to “5.4 .1About Integrator Mode.”)
The ID number of the set of items will be indicated in the
upper right corner of the screen, where “– –”is displayed in
the illustration.
Select WHITE BALANCE.
2 Select the desired adjustment item.
Selecting INITIALIZE on screen 2 resets all WHITE
BALANCE parameters to their default values. (Refer to
“5.4.3,” paragraph 9).)
Select EXIT in screen 2 to return to screen 1.
3 Make the necessary adjustments.
Adjustments can be made using the “2“ and “3” buttons
on the remote or the “–” and “+” buttons on the operating
panel of the main unit.
]
]
]
Screen 1
MENU – –
PICTURE
3WHITE BALANCE
SCREEN
ADDITIONAL SET UP
TOTAL INITIALIZE
Screen 2
WHITE BALANCE – –
3R HIGH 128
G HIGH 128
B HIGH 128
R LOW 128
G LOW 128
B LOW 128
INITIALIZE
EXIT
Screen 3
WHITE BALANCE – –
Press the SET button to return to screen 2.
<Adjustable Range> 0 to 255 for every item
R HIGH 128
89
Page 90

Integrator Mode
3) Adjusting the SCREEN Parameters
SCREEN parameters include H.POSI., V.POSI., CLK FRQ, and CLK PHS.
1 Before entering the Integrator mode, switch the unit to the
specific input (one of INPUTs 2-4) in which you intend to make
adjustments. (Refer to “5.4.1 About Integrator Mode.”)
The ID number of the set of items will be indicated in the
upper right corner of the screen, where “– –” is displayed in
the illustration.
Select SCREEN.
2 Select the desired adjustment item.
Selecting INITIALIZE on screen 2 resets all SCREEN
parameters to their default values. (Refer to “5.4.3,” paragraph
9).)
Select EXIT in screen 2 to return to screen 1.
3 Make the necessary adjustments.
NOTE: CLK PHS can only be adjusted when INPUT 3/4 is
set to PC.
NOTE: V.POSI. can’t be adjusted when the screen size is
set to ZOOM or CINEMA WIDE.
(V.POSI is also adjustable in ZOOM mode if a
1280 x1024 signal is input from a PC at 60 Hz.)
]
]
]
Screen 1
MENU – –
PICTURE
WHITE BALANCE
3SCREEN
ADDITIONAL SET UP
TOTAL INITIALIZE
Screen 2
SCREEN – –
3H. POSI. 128
V. POSI. 128
CLK FRQ 128
CLK PHS 8
INITIALIZE
EXIT
Screen 3
SCREEN
H. POSITION 128
Adjustments can be made using the “2“ and “3” buttons
on the remote(or the “∞“ and “5” buttons for V.POSI.), or
the “–” and “+” buttons on the operating panel of the main
unit.
Values set and adjusted for H.POSI., V.POSI., and CLK FRQ serve as median values when adjustments are made
in Menu mode.
CLK PHS has the same data as the CLK PHS accessible in Menu mode.
Press the SET button to return to screen 2.
<Adjustable Range> 0 to 255 for H.POSI. and V.POSI.
64 to 192 (median: 128) for CLK FRQ
0 to 16 for CLK PHS
<Adjusting Order> For the sake of efficiency, make adjustments in the following order:
V.POSI. = H.POSI. = CLK FRQ = H.POSI. = CLK PHS
90
Page 91

Integrator Mode
4) Setting the Colour Mode
In addition to normal color mode (COLOUR MODE 1), this unit also provides a COLOUR MODE 2, with PICTURE and
WHITE BALANCE parameters preset for maximum performance in picture reshooting in TV studios. Use the mode
appropriate for the situation.
This unit is factory preset to COLOUR MODE 1.
1 Enter Integrator mode (refer to “5.4.1 About Integrator
Mode”).
The ID number of the set of adjustment items will be
indicated in the upper right corner of the screen where “– –
” is displayed in the illustaration.
Select ADDITIONAL SET UP.
2 Move the cursor to COLOUR MODE and select the desired
color mode with the SET button.
Pressing the SET button toggles the color mode between 1
and 2.
COLOUR MODE affects every input (INPUTs 1-4) without
exception. All inputs are immediately switched to the same
color mode when a selection is made in step 3.
Select EXIT in screen 2 to return to screen 1.
NOTE: The current COLOUR MODE can be identified by the ID display color.
Cyan: COLOUR MODE 1
White:COLOUR MODE 2
]
Screen 1
]
Screen 2
MENU – –
PICTURE
WHITE BALANCE
SCREEN
3ADDITIONAL SET UP
TOTAL INITIALIZE
ADDITIONAL SET UP – –
3COLOUR MODE : 1
BAUD RATE : 4800BPS
HOUR METER : 00123
MIRROR MODE : OFF
STD-RGB : OFF
SIDE MASK ADJ.
EXIT
91
Page 92

Integrator Mode
5) Setting the Baud Rate
When controlling or adjusting the unit from a PC, the RS-232C port can be set to one of five baud rates: 1200, 2400,
4800, 9600 and 19200 bps. The factory-preset value is 4800 bps.
1 Enter Integrator mode (refer to “5.4.1 About Integrator
Mode”).
The ID number of the set of adjustment items will be
indicated in the upper right corner of the screen, where
“– –” is displayed in the illustration.
Select ADDITIONAL SET UP.
2 Move the cursor to BAUD RATE and select the desired value
with the SET button.
You can cycle through the available values by repeatedly
pressing the SET button: 1200BPS = 2400BPS = 4800BPS
= 9600BPS = 19200BPS =
BAUD RATE applies to each input (INPUTs 1-4) without
exception. All inputs are immediately switched to the baud
rate set in step 2.
Select EXIT in screen 2 to return to screen 1.
]
]
Screen 1
MENU – –
PICTURE
WHITE BALANCE
SCREEN
3ADDITIONAL SET UP
TOTAL INITIALIZE
Screen 2
ADDITIONAL SET UP – –
COLOUR MODE : 1
3BAUD RATE : 4800BPS
HOUR METER : 00123
MIRROR MODE : OFF
STD-RGB : OFF
SIDE MASK ADJ.
EXIT
Set the unit baud rate to match that of the PC in use. With long RS-232C cables, we recommend using lower baud
rates.
92
Page 93

Integrator Mode
MAKUHARI
6) Mirror Mode
This mode enables you to reproduce incoming images upside down and the left side of the original appearing on the
right and the right side on the left.
(Activated, this mode is, like the colour mode, effective on whichever input function (INPUTs 1-4) is selected.)
This mode is intended for smart cable arrangement, making it possible to draw bundled cables upwards (towards the
ceiling) when this display is mounted upside down using the ceiling hanging hardware PDK-5002.
MAKUHARI
MIRROR MODE OFF MIRROR MODE-XY
NOTES: • This function is not available when standard rate RGB signals (15.6 kHz x 50 Hz, 15.7 kHz x 60 Hz) are
reproducing (no images would show up).
• In using the PDK-5002 mount kit, observe the operating temperature and other limitations specified under
the heading, 4.4. Plasma display ceiling hanging hardware.
1 Enter the Integrator mode (refer to “5.4.1 About the
Integrator Mode”).
The ID number of the set of adjustment items will be
indicated in the upper right corner of the screen, where “–
–” is displayed in the illustration.
Select ADDITIONAL SET UP.
2 Move the cursor to MIRROR MODE and set the mode to
XY or OFF with the SET button.
Pressing the SET button toggles Mirror mode between OFF
and XY.
MIRROR MODE applies to each input (INPUTs 1-4) without
exception. All inputs are immediately switched to XY or OFF
set in step 2.
Select EXIT in screen 2 to return to screen 1.
]
]
Screen 1
MENU – –
PICTURE
WHITE BALANCE
SCREEN
3ADDITIONAL SET UP
TOTAL INITIALIZE
Screen 2
ADDITIONAL SET UP – –
COLOUR MODE : 1
BAUD RATE : 4800BPS
HOUR METER : 00123
3MIRROR MODE : OFF
STD-RGB : OFF
SIDE MASK ADJ.
EXIT
93
Page 94

Integrator Mode
7) Setting STD-RGB
The STD-RGB needs to be set to ON when letting the display show standard rate (15.6 kHz x 50 Hz or 15.7 kHz x 60
Hz) RGB signals coming from external RGB processors or similar units.
(With STD-RGB set to OFF, no standard rate RGB signals show up on the display screen.)
The primary image quality is not, however, ensured when the STD-RGB is set to ON because this setting simplifies
the video signal processing.
]
]
Screen 1
MENU – –
PICTURE
WHITE BALANCE
SCREEN
3ADDITIONAL SET UP
TOTAL INITIALIZE
Screen 2
ADDITIONAL SET UP – –
COLOUR MODE : 1
BAUD RATE : 4800BPS
HOUR METER : 00123
MIRROR MODE : OFF
3STD-RGB : OFF
SIDE MASK ADJ.
EXIT
1 Enter the Integrator mode (refer to “5.4.1 About the
Integrator Mode”).
The ID number of the set of adjustment items will be
indicated in the upper right corner of the screen, where
“– –”is displayed in the illustration.
Select ADDITIONAL SET UP.
2 Move the cursor to STD-RGB and change the setting with
the SET button.
Pressing the SET button toggles STD-RGB between ON and
OFF.
STD-RGB applies to INPUTs 3 and 4 simultaneously.
Changing the setting in step 2 switches both inputs
immediately to ON or OFF.
Select EXIT in screen 2 to return to screen 1.
Note: The mirror mode (see 5-3-4, paragraph 6) is not available when a RGB signal is replayed at standard speeds
(15.7 kHz x 60 Hz or 15.6 kHz x 50 Hz); in this case no images are displayed on the screen in Mirror mode.
94
Page 95

Integrator Mode
8) Adjusting the Side Mask
The side mask adjusts the brightness of no-image areas appearing on the fringe of the screen when the screen size
is set to 4:3 NORMAL or to ORIGINAL, for example. The brightness of each colour of RGB can be adjusted separately.
(Adjusting the side mask momentarily causes the screen size to be switched over.) In adjusting the side mask, think
of how video signals develop with time and also of a balance in the brightness between the adjacent display sets.
NOTE: SIDA MARK adjustment is unavailable for (4.5kHz x 60Hz or 33.75kHz x 60Hz) signal inputs.
1 Enter the Integrator mode (refer to “5.4.1 About Integrator
Mode”).
The ID number of the set of adjustment items will be
indicated in the upper right corner of the screen, where “–
–” is displayed in the illustration.
Select ADDITIONAL SET UP.
2 Select SIDE MASK ADJ.
The screen size switches to ORIGINAL or 4:3 NORMAL.
Select EXIT in screen 2 to return to screen 1.
]
]
Screen 1
MENU – –
PICTURE
WHITE BALANCE
SCREEN
3ADDITIONAL SET UP
TOTAL INITIALIZE
Screen 2
ADDITIONAL SET UP – –
COLOUR MODE : 1
BAUD RATE : 4800BPS
HOUR METER : 00123
MIRROR MODE : OFF
STD-RGB : OFF
3SIDE MASK ADJ.
3 Select the desired option.
Select EXIT in screen 3 to return to screen 2.
4 Make the necessary adjustments.
Adjustments can be made using the “2“ and “3” buttons
on the remote or the “–” and “+” buttons on the operating
panel of the main unit.
Each item may be set to a value from 0 through 255.
Press the SET button to return to screen 2.
SIDE MASK ADJ. applies to each input (INPUTs 1-4) without
exception. All inputs after the SIDE MASK adjustments are
made in step 3 are automatically switched to the set value.
]
]
EXIT
Screen 3
ADDITIONAL SET UP – –
SIDE MASK ADJ.
3R LEVEL 128
G LEVEL 128
B LEVEL 128
EXIT
Screen 4
ADDITIONAL SET UP – –
SIDE MASK ADJ.
R LEVEL 128
95
Page 96

Integrator Mode
9) Initializing Adjustments (TOTAL INITIALIZE)
You can restore adjustments made in the Integrator mode to their factory-preset values. PICTURE, WHITE BALANCE,
and SCREEN parameters (refer to “5.4.3”, paragraphs 1), 2), and 3)) can be restored simultaneously to their initial
settings.
1 Before entering the Integrator mode, switch the unit to the
input (INPUTs 1-4) with parameters you want to restore to
their initial settings. (Refer to “5.4.1 About Integrator
Mode.”)
For initialization, input signals that would be used in an actual
production run. Make sure that the current color mode is
set to the made in which you want to restore parameters
to factory presets (refer to “5.4.3,” paragraph 4)).
The ID number of the set of items will be indicated in the
upper right corner of the screen, where “– –” is displayed
in the illustration.
Select TOTAL INITIALIZE.
2 Move the cursor to YES using the “2“ button on the remote
or the “-” button on the operating panel of the main unit
and press the SET button. This restores the following
parameters to their factory-preset values and returns the
unit to screen 1:
• PICTURE parameters (refer to “5.4.3,” paragraph 1).)
• WHITE BALANCE parameters (refer to “5.4.3,” paragraph
2).)
• SCREEN parameters (refer to “5.4.3,” paragraph 3).)
]
]
Screen 1
MENU – –
PICTURE
WHITE BALANCE
SCREEN
ADDITIONAL SET UP
3TOTAL INITIALIZE
Screen 2
TOTAL INITIALIZE – –
INITIALIZE ?
YES23NO
2
: SEL.
SET : EXIT
Move the cursor to NO and press the SET button to return to screen 1.
* The following items may not be initialized:
ADDITIONAL SET UP items in Integrator mode • COLOUR MODE
• BAUD RATE
• HOUR METER
• MIRROR MODE
• STD-RGB
• SIDE MASK ADJ.
SET UP items in Menu mode • INPUT SETTING
• SIGNAL
• CLAMP
• ABL
• MP MODE
• 3D Y/C MODE (for U.S. and Taiwanese models)
• COLOUR SYS (for EURO models)
AUTO POWER OFF in Menu mode
V MEMORY in Menu mode
96
Page 97

PICTURE
CONTRAST 128
PICTURE
YES2 3 NO
INITIALIZE ?
WHITE BALANCE
R HIGH 128
WHITE BALANCE
YES2 3 NO
INITIALIZE ?
SCREEN
H. POSITION 128
SCREEN
YES2 3 NO
INITIALIZE ?
ADDITIONAL SET UP
SIDE MASK ADJ.
3 R LEVEL 128
R LEVEL 128
G LEVEL 128
B LEVEL 128
EXIT
ADDITIONAL SET UP
SIDE MASK ADJ.
PICTURE
3 BRIGHT 128
COLOUR 64
TINT 64
SHARP 128
DETAIL 128
CONTRAST 128
INITIALIZE
EXIT
PICTURE
3 BRIGHT 128
CONTRAST 128
INITIALIZE
EXIT
WHITE BALANCE
3 G HIGH 128
R HIGH 128
INITIALIZE
EXIT
B HIGH 128
R LOW 128
G LOW 128
B LOW 128
SCREEN
V. POSI. 128
3 H. POSI. 128
INITIALIZE
EXIT
CLK FRQ 128
SCREEN
V. POSI. 128
3 H. POSI. 128
INITIALIZE
EXIT
CLK FRQ 128
CLK PHS 8
ADDITIONAL SET UP
COLOUR MODE : 1
3BAUD RATE : 4800BPS
HOUR METER : 00123
MIRROR MODE :XY
STD-RGB :OFF
SIDE MASK ADJ.
EXIT
TOTAL INITIALIZE
YES2 3 NO
INITIALIZE ?
MENU
3 WHITE BALANCE
SCREEN
ADDITIONAL SET UP
TOTAL INITIALIZE
PICTURE
MENU
3 WHITE BALANCE
SCREEN
ADDITIONAL SET UP
TOTAL INITIALIZE
PICTURE
--
--
--
--
--
--
--
--
--
--
--
--
--
--
--
--
--
2 : SEL.
SET : EXIT
2 : SEL.
SET : EXIT
2 : SEL.
SET : EXIT
2 : SEL.
SET : EXIT
Integrator Mode
5.4.4 Integrator mode menu layers (each screen shows an example: details differ depending on
selections at layers)
In INPUT 1
(SCREEN not selectable)
Note 5
Note 1
Note 2
In INPUT other than 1
(Displays in the screen is the
same as above)
Note 1: Only while in INPUT 2 or
INPUT 3/4 with SIGNAL set
to COMPONENT.
Note 2: Only while in INPUT 3/4 with
SIGNAL set to RGB.
Note 3: Only while in INPUT 2 or
INPUT 3/4 with INPUT
SETTING at VIDEO
Note 4: Only while in INPUT 3/4 with
INPUT SETTING at PC.
Note5:TINT adjustment in
unavailable for PAL/
SECAM signal inputs.
Note 3
Note 4
97
Page 98

Integrator Mode
5.4.5 PICTURE and WHITE BALANCE parameter memory area table
The FACTORY area is a read-only memory.
Note 1: EURO models only.
Note 2: U.S models and TAIWAN models only.
Note 3: TINT not adjustable while in PAL or SECAM positions.
Picture Quality Adjustment
Data for Use in Menu Mode
Colour Mode 2: Provides a separate memory area table having
Reproduce
Picture Quality
the same structure as Colour Mode 1.
Colour Mode 1
INPUT 1
INPUT 2
[Component, Horiz. 15.6 kHz x Vert. 50 Hz] (Note 1)
[Component, Horiz. 31.3 kHz x Vert. 50 Hz] (Note 1)
[Component, Horiz. 15.7 kHz x Vert. 60 Hz]
[Component, Horiz. 31.5 kHz x Vert. 60 Hz]
[FACTORY]
[NTSC]
[PAL] (Note 1)
[SECAM] (Note 1)
[4.43 NTSC] (Note 1)
[FACTORY]
Picture Quality Adjustment Data
for Use in Integrator Mode
• CONTRAST
• BRIGHT
• COLOUR
• TINT (Note3)
• SHARP
• DETAIL
• CONTRAST • R HIGH
• BRIGHT
• COLOUR
• TINT
• SHARP
• DETAIL
• G HIGH
• B HIGH
• R LOW
• G LOW
• B LOW
• G HIGH
• B HIGH
• R LOW
• G LOW
• B LOW
• R HIGH
INPUT 3
CONTINUED ON THE NEXT PAGE
VIDEO Sig.,
Component
[Component, Horiz. 15.6 kHz x Vert. 50 Hz] (Note 1)
[Component, Horiz. 31.3 kHz x Vert. 50 Hz] (Note 1)
[Component, Horiz. 15.7 kHz x Vert. 60 Hz]
[Component, Horiz. 31.5 kHz x Vert. 60 Hz]
[Component, Horiz. 33.8 kHz x Vert. 60 Hz] (Note 2)
[Component, Horiz. 45.0 kHz x Vert. 60 Hz] (Note 2)
[FACTORY]
VIDEO Sig.,
RGB
[RGB, Horiz. 15.6 kHz x Vert. 50 Hz] (Note 1)
[RGB, Horiz. 31.3 kHz x Vert. 50 Hz] (Note 1)
[RGB, Horiz. 15.7 kHz x Vert. 60 Hz]
[RGB, Horiz. 31.5 kHz x Vert. 60 Hz]
[RGB, Horiz. 33.8 kHz x Vert. 60 Hz] (Note 2)
[RGB, Horiz. 45.0 kHz x Vert. 60 Hz] (Note 2)
[FACTORY]
PC (Personal Computer) Sig.
[PC Sig. Picture Quality Adjustment Data 1]
[PC Sig. Picture Quality Adjustment Data 1]
[PC Sig. Picture Quality Adjustment Data 1]
[PC Sig. Picture Quality Adjustment Data 1]
[FACTORY]
• CONTRAST • R HIGH
• BRIGHT
• COLOUR
• TINT
• SHARP
• DETAIL
• CONTRAST • R HIGH
• BRIGHT • G HIGH
• CONTRAST • R HIGH
• BRIGHT • G HIGH
• G LOW
• B LOW
• G LOW
• B LOW
• G LOW
• B LOW
• G HIGH
• B HIGH
• R LOW
• B HIGH
• R LOW
• B HIGH
• R LOW
98
Page 99

CONTINUED FROM THE PREVIOUS PAGE
Integrator Mode
INPUT 4
VIDEO Sig.,
Component
[Component, Horiz. 15.6 kHz x Vert. 50 Hz] (Note 1)
[Component, Horiz. 31.3 kHz x Vert. 50 Hz] (Note 1)
[Component, Horiz. 15.7 kHz x Vert. 60 Hz]
[Component, Horiz. 31.5 kHz x Vert. 60 Hz]
[Component, Horiz. 33.8 kHz x Vert. 60 Hz] (Note 2)
[Component, Horiz. 45.0 kHz x Vert. 60 Hz] (Note 2)
[FACTORY]
VIDEO Sig.,
RGB
[RGB, Horiz. 15.6 kHz x Vert. 50 Hz] (Note 1)
[RGB, Horiz. 31.3 kHz x Vert. 50 Hz] (Note 1)
[RGB, Horiz. 15.7 kHz x Vert. 60 Hz]
[RGB, Horiz. 31.5 kHz x Vert. 60 Hz]
[RGB, Horiz. 33.8 kHz x Vert. 60 Hz] (Note 2)
[RGB, Horiz. 45.0 kHz x Vert. 60 Hz] (Note 2)
[FACTORY]
PC (Personal Computer) Sig.
[PC Sig. Picture Quality Adjustment Data 1]
[PC Sig. Picture Quality Adjustment Data 1]
[PC Sig. Picture Quality Adjustment Data 1]
[PC Sig. Picture Quality Adjustment Data 1]
[FACTORY]
• CONTRAST • R HIGH
• BRIGHT
• COLOUR
• TINT
• SHARP
• DETAIL
• CONTRAST • R HIGH
• BRIGHT • G HIGH
• CONTRAST • R HIGH
• BRIGHT • G HIGH
• B LOW
• B LOW
• B LOW
• G HIGH
• B HIGH
• R LOW
• G LOW
• B HIGH
• R LOW
• G LOW
• B HIGH
• R LOW
• G LOW
99
Page 100

Integrator Mode
5.4.6 SCREEN parameter memory area table
The memory area for SCREEN parameters has the following structure, and has no FACTORY area.
The SCREEN parameters are set to median values when performing INITIALIZE, for example.
The SCREEN parameters cannot be adjusted when selecting INPUT 1.
Note 1: EURO models only.
Note 2: U.S. models and TAIWAN models only.
Note 3: CLK PHS is effective both on the Menu and the Integrator mode at one time.
Reproduce
Screen
Data
Screen Adjustment Data for
Use in Menu Mode
(Note 3)
INPUT 2 [Component, Horiz. 15.6 kHz x Vert. 50 Hz] (Note 1)
INPUT 3
Screen Adjustment Data for
Use in Integrator Mode
• H.POSI.
• V.POSI.
[Component, Horiz. 31.3 kHz x Vert. 50 Hz] (Note 1)
[Component, Horiz. 15.7 kHz x Vert. 60 Hz]
[Component, Horiz. 31.5 kHz x Vert. 60 Hz]
• H.POSI.
VIDEO Sig., Component
[Component, Horiz. 15.6 kHz x Vert. 50 Hz] (Note 1)
[Component, Horiz. 31.3 kHz x Vert. 50 Hz] (Note 1)
[Component, Horiz. 15.7 kHz x Vert. 60 Hz]
[Component, Horiz. 31.5 kHz x Vert. 60 Hz]
[Component, Horiz. 33.8 kHz x Vert. 60 Hz] (Note 2)
[Component, Horiz. 45.0 kHz x Vert. 60 Hz] (Note 2)
VIDEO Sig., RGB
[RGB, Horiz. 15.6 kHz x Vert. 50 Hz] (Note 1)
[RGB, Horiz. 31.3 kHz x Vert. 50 Hz] (Note 1)
[RGB, Horiz. 15.7 kHz x Vert. 60 Hz]
[RGB, Horiz. 31.5 kHz x Vert. 60 Hz]
[RGB, Horiz. 33.8 kHz x Vert. 60 Hz] (Note 2)
[RGB, Horiz. 45.0 kHz x Vert. 60 Hz] (Note 2)
PC (Personal Computer) Sig.
[640 x 400, PC-9800 (56.4 Hz)]
[640 x 400, PC-9800, PC/AT compatibles (70.1 Hz)]
[640 x 480, PC-9800, PC/AT compatibles (59.9 Hz)]
[640 x 480, PC-9800, PC/AT compatibles (75 Hz)]
[800 x 600, PC-9800, PC/AT compatibles (60.3 Hz)]
[800 x 600, PC-9800, PC/AT compatibles (75 Hz)]
[1024 x 768, PC-9800, PC/AT compatibles (70.1 Hz)]
[1024 x 768, PC-9800, PC/AT compatibles (75 Hz), Macintosh (74.9 Hz)]
[1028 x 1024, PC-9800, PC/AT compatibles (60 Hz)]
[640 x 480, PC/AT compatibles (72.8 Hz)]
[800 x 600, PC/AT compatibles (56.3 Hz)]
[800 x 600, PC/AT compatibles (72.2 Hz)]
[1024 x 768, PC/AT compatibles (60 Hz)]
[1024 x 768, PC/AT compatibles (87 Hz) (Interlace)]
[640 x 480, Macintosh (66.7 Hz)]
[832 x 624, Macintosh (74.6 Hz)]
[1152 x 870, Macintosh (75.1 Hz)]
• V.POSI.
• H.POSI.
• V.POSI.
• CLK PHS
• H.POSI.
• V.POSI.
• CLK FRQ
• CLK FRQ
• CLK FRQ
• CLK FRQ
• Data at
<ZOOM> time
• CLK FRQ
• CLK PHS
• H.POSI.
• V.POSI.
CONTINUED ON THE NEXT PAGE
PC-9800® is a registered trademark of NEC Corporation.
Macintosh® is a registered trademark of Apple Computer Inc.
100
 Loading...