

Page 1

Plasma Display
Écran à plasma
PDP-505HD
Operating Instructions
Mode d‘emploi
Page 2

SAFETY PRECAUTIONS
○○○○○○○○○○○○○○○○○○○○○○○○○○○○○○○○○○○○○○○○○○○○○○○○○○○○○○○○○○○○○○
○○○○○○○○○○○○○○○○○○○○○○○○○○○○○○○○○○○○○○○○○○○○○○○○○○○○○○○○○○○○○○○○○○○○○○○○○○○○○○○○○○○
IMPORTANT
NGLISH
NGLISH
E
E
The lightning flash with arrowhead symbol, within
an equilateral triangle, is intended to alert the user to
the presence of uninsulated “dangerous voltage”
within the product’s enclosure that may be of
sufficient magnitude to constitute a risk of electric
shock to persons.
CAUTION
RISK OF ELECTRIC SHOCK
DO NOT OPEN
CAUTION:
TO PREVENT THE RISK OF ELECTRIC
SHOCK, DO NOT REMOVE COVER (OR
BACK). NO USER-SERVICEABLE PARTS
INSIDE. REFER SERVICING TO QUALIFIED
SERVICE PERSONNEL.
The exclamation point within an equilateral triangle
is intended to alert the user to the presence of
important operating and maintenance (servicing)
instructions in the literature accompanying the
appliance.
WARNING: TO PREVENT FIRE OR SHOCK HAZARD, DO
NOT EXPOSE THIS APPLIANCE TO RAIN OR MOISTURE.
The following symbols are found on labels
attached to the product. They alert the
operators and service personnel of this
IMPORTANT NOTICE
The serial number for this equipment is located on the rear
panel. Please write this serial number on your enclosed
warranty card and keep it in a secure area. This is for your
security.
CAUTION: This product may be used only with the
Model PDK-5001 stand. Use with other stands may result in
instability causing possible injury.
equipment to any potentially dangerous
conditions.
CAUTION
This symbol refers to a hazard or unsafe
practice which can result in personal injury
or property damage.
WARNING
This symbol refers to a hazard or unsafe
practice which can result in severe personal
injury or death.
This equipment has been tested and found to comply with the limits for a Class B digital device, pursuant to Part 15 of the FCC Rules. These
RECAUTIONS
limits are designed to provide reasonable protection against harmful interference in a residential installation. This equipment generates,
uses, and can radiate radio frequency energy and, if not installed and used in accordance with the instructions, may cause harmful interference
to radio communications. However, there is no guarantee that interference will not occur in a particular installation. If this equipment does
SAFETY P
cause harmful interference to radio or television reception, which can be determined by turning the equipment off and on, the user is
encouraged to try to correct the interference by one or more of the following measures:
– Reorient or relocate the receiving antenna.
– Increase the separation between the equipment and receiver.
– Connect the equipment into an outlet on a circuit different from that to which the receiver is connected.
– Consult the dealer or an experienced radio/TV technician for help.
Information to User
Alteration or modifications carried out without appropriate authorization may invalidate the user’s right to operate the equipm ent.
CAUTION: This product satisfies FCC regulations when shielded cables and connectors are used to connect the unit to other
equipment. To prevent electromagnetic interference with electric appliances such as radios and televisions, use shielded cables
and connectors for connections.
This Class B digital apparatus complies with Canadian ICES-003.
i
<ARE1349> En
Page 3

○○○○○○○○○○○○○○○○○○○○○○○○○○○○○○○○○○○○○○○○○○○○○○○○○○○○○○○○○○○○○○
IMPORTANT SAFETY INSTRUCTIONS
SAFETY PRECAUTIONS
READ INSTRUCTIONS — All the safety and operating
instructions should be read before the product is
operated.
RETAIN INSTRUCTIONS — The safety and operating
instructions should be retained for future
reference.
HEED WARNINGS — All warnings on the product and
in the operating instructions should be adhered to.
FOLLOW INSTRUCTIONS — All operating and use
instructions should be followed.
CLEANING — Unplug this product from the wall outlet
before cleaning. The product should be cleaned
only with a polishing cloth or a soft dry cloth. Never
clean with furniture wax, benzine, insecticides or
other volatile liquids since they may corrode the
cabinet.
ATTACHMENTS — Do not use attachments not
recommended by the product manufacturer as
they may cause hazards.
WATER AND MOISTURE — Do not use this product
near water — for example, near a bathtub, wash
bowl, kitchen sink, or laundry tub; in a wet
basement; or near a swimming pool; and the like.
ACCESSORIES — Do not place this product on an
unstable cart, stand, tripod, bracket, or table. The
product may fall, causing serious injury to a child
or adult, and serious damage to the product. Use
only with a cart, stand, tripod, bracket, or table
recommended by the manufacturer, or sold with
the product. Any mounting of the product should
follow the manufacturer’s instructions, and should
use a mounting accessory recommended by the
manufacturer.
CART — A product and cart combination should be
moved with care. Quick stops, excessive force,
and uneven surfaces may cause the product and
cart combination to overturn.
VENTILATION — Slots and openings in the cabinet
are provided for ventilation and to ensure reliable
operation of the product and to protect it from
overheating, and these openings must not be
blocked or covered. The openings should never
be blocked by placing the product on a bed, sofa,
rug, or other similar surface. This product should
not be placed in a built-in installation such as a
bookcase or rack unless proper ventilation is
provided or the manufacturer’s instructions have
been adhered to.
POWER SOURCES — This product should be operated
only from the type of power source indicated on
the marking label. If you are not sure of the type
of power supply to your home, consult your
product dealer or local power company.
LOCATION — The appliance should be installed in a
stable location.
NONUSE PERIODS — The power cord of the
appliance should be unplugged from the outlet
when left unused for a long period of time.
GROUNDING OR POLARIZATION
÷ If this product is equipped with a polarized
alternating current line plug (a plug having one
blade wider than the other), it will fit into the outlet
only one way. This is a safety feature. If you are
unable to insert the plug fully into the outlet, try
reversing the plug. If the plug should still fail to fit,
contact your electrician to replace your obsolete
outlet. Do not defeat the safety purpose of the
polarized plug.
÷ If this product is equipped with a three-wire
grounding type plug, a plug having a third
(grounding) pin, it will only fit into a grounding type
power outlet. This is a safety feature. If you are
unable to insert the plug into the outlet, contact
your electrician to replace your obsolete outlet. Do
not defeat the safety purpose of the grounding
type plug.
POWER-CORD PROTECTION — Power-supply cords
should be routed so that they are not likely to be
walked on or pinched by items placed upon or
against them, paying particular attention to cords
at plugs, convenience receptacles, and the point
where they exit from the product.
OUTDOOR ANTENNA GROUNDING — If an outside
antenna or cable system is connected to the
product, be sure the antenna or cable system is
grounded so as to provide some protection against
voltage surges and built-up static charges. Article
810 of the National Electrical Code, ANSI/NFPA
70, provides information with regard to proper
grounding of the mast and supporting structure,
grounding of the lead-in wire to an antenna
discharge unit, size of grounding conductors,
location of antenna-discharge unit, connection to
grounding electrodes, and requirements for the
grounding electrode. See Figure A.
LIGHTNING — For added protection for this product
during a lightning storm, or when it is left
unattended and unused for long periods of time,
unplug it from the wall outlet and disconnect the
antenna or cable system. This will prevent damage
to the product due to lightning and power-line
surges.
POWER LINES — An outside antenna system should
not be located in the vicinity of overhead power
lines or other electric light or power circuits, or
where it can fall into such power lines or circuits.
When installing an outside antenna system,
extreme care should be taken to keep from
touching such power lines or circuits as contact
with them might be fatal.
OVERLOADING — Do not overload wall outlets,
extension cords, or integral convenience
receptacles as this can result in a risk of fire or
electric shock.
GROUND
CLAMP
OBJECT AND LIQUID ENTRY — Never push objects
of any kind into this product through openings as
they may touch dangerous voltage points or shortout parts that could result in a fire or electric shock.
Never spill liquid of any kind on the product.
SERVICING — Do not attempt to service this product
yourself as opening or removing covers may
expose you to dangerous voltage or other hazards.
Refer all servicing to qualified service personnel.
DAMAGE REQUIRING SERVICE — Unplug this
product from the wall outlet and refer servicing to
qualified service personnel under the following
conditions:
÷ When the power-supply cord or plug is damaged.
÷ If liquid has been spilled, or objects have fallen
into the product.
÷ If the product has been exposed to rain or water.
÷ If the product does not operate normally by
following the operating instructions. Adjust only
those controls that are covered by the operating
instructions as an improper adjustment of other
controls may result in damage and will often
require extensive work by a qualified technician to
restore the product to its normal operation.
÷ If the product has been dropped or damaged in
any way.
÷ When the product exhibits a distinct change in
performance — this indicates a need for service.
REPLACEMENT PARTS — When replacement parts
are required, be sure the service technician has
used replacement parts specified by the
manufacturer or have the same characteristics as
the original part. Unauthorized substitutions may
result in fire, electric shock, or other hazards.
SAFETY CHECK — Upon completion of any service
or repairs to this product, ask the service technician
to perform safety checks to determine that the
product is in proper operating condition.
HEAT — The product should be situated away from
heat sources such as radiators, heat registers,
stoves, or other products (including amplifiers) that
produce heat.
ANTENNA
LEAD IN
WIRE
ANTENNA
DISCHARGE UNIT
(NEC SECTION 810-20)
NGLISH
NGLISH
E
E
RECAUTIONS
SAFETY P
ELECTRIC
SERVICE
EQUIPMENT
Figure A
GROUNDING CONDUCTORS
(NEC SECTION 810-21)
GROUND CLAMPS
POWER SERVICE GROUNDING
ELECTRODE SYSTEM
(NEC ART 250, PART H)
NEC – NATIONAL ELECTRICAL CODE
<ARE1349> En
ii
Page 4
SAFETY PRECAUTIONS
○○○○○○○○○○○○○○○○○○○○○○○○○○○○○○○○○○○○○○○○○○○○○○○○○○○○○○○○○○○○○○
FEDERAL COMMUNICA TIONS COMMISSION
DECLARA TION OF CONFORMITY
NGLISH
NGLISH
E
E
This device complies with part 15 of the FCC Rules. Operation is subject to the following
two conditions: (1) This device may not cause harmful interference, and (2) this device
must accept any interference received, including interference that may cause undesired
operation.
Product Name: Plasma Display
Model Number: PDP-505HD
Product Category: Class B Personal Computers & Peripherals
Responsible Party Name: PIONEER ELECTRONICS SERVICE, INC.
Address: P.O. BOX 1760, LONG BEACH, CA., 90801-1760 U.S.A.
Phone: (800)421-1625
For Consumer URL http://www.Pioneerelectronics.com
Thank you very much for purchasing this PIONEER product.
Before using your Plasma Display, please carefully read the
“Safety Precautions” and these “Operating Instructions”
so you will know how to operate the Plasma Display
properly. Keep this manual in a safe place. You will find it
useful in the future.
RECAUTIONS
SAFETY P
Notes on Installation Work:
This product is marketed assuming that it is installed by qualified
personnel with enough skill and competence. Always have an
installation specialist or your dealer install and set up the product.
PIONEER cannot assume liabilities for damage caused by
mistake in installation or mounting, misuse, modification or a
natural disaster.
Note for Dealers:
After installation, be sure to deliver this manual to the customer
and explain to the customer how to handle the product.
iii
<ARE1349> En
Page 5
FEATURES
○○○○○○○○○○○○○○○○○○○○○○○○○○○○○○○○○○○○○○○○○○○○○○○○○○○○○○○○○○○○○○
÷ Incorporation of high performance XGA wide
plasma panel.
The XGA wide panel incorporates pioneering
developments that have allowed realization of more than
2.5 times the data capacity of the VGA panel used at the
TV broadcasting level until now*. With a definition of
1280 pixels horizontal and 768 pixels vertical, the XGA
wide panel provides unsurpassed reproduction of a wide
range of images from DVD players, peripheral
components, and computers.
* When the screen aspect is 4:3
VGA: 640 pixels x 480 pixels
XGA: 1024 pixels x 768 pixels
÷ Achievement of XGA class high level luminance
Even in the case of luminance, which is difficult to keep
consistent with the level of definition, using originally
developed PIONEER technology for optimization, a top
level luminance has been achieved at this definition.
÷ Realization of thin 3-27/32 inches (9.8 cm) unit
depth while retaining a maximum class level 50
inch screen
As well as producing a 50 inch wide screen, which has
been difficult to do with a direct view CRT, the extremely
thin 3-27/32 inches (9.8 cm) unit depth size opens up
completely new possibilities to how viewing rooms may
be designed.
○○○○○○○○○○○○○○○○○○○○○○○○○○○○○○○○○○○○○○○○○○○○○○○○○○○○○○○○○○○○○○○○○○○○○○○○○○○○○○○○○○○
NGLISH
NGLISH
E
E
÷ Unlimited placement possibilities
Designed to be attached to a wall, set on a table top
stand or placed on a floor rack, this unit can be installed
many ways.
÷ Optional table top stand (sold separately)
Stand designed specifically for PDP-505HD table top
placement. (For details, please consult the dealer where
this unit was purchased.)
÷ Designed to conserve energy
This product has been designed to minimize power
consumption when the power is in standby. The value of
the power consumption in standby mode is 0.6 W.
ROCEEDING
AND FUNCTIONS
BEFORE P
PART NAMES
<ARE1349> En
1
Page 6
CONTENTS
○○○○○○○○○○○○○○○○○○○○○○○○○○○○○○○○○○○○○○○○○○○○○○○○○○○○○○○○○○○○○○
○○○○○○○○○○○○○○○○○○○○○○○○○○○○○○○○○○○○○○○○○○○○○○○○○○○○○○○○○○○○○○○○○○○○○○○○○○○○○○○○○○○
SAFETY PRECAUTIONS......................... i
NGLISH
NGLISH
BEFORE PROCEEDING .......................... 3
E
E
How to use this manual........................................ 3
Checking supplied accessories ............................ 5
PART NAMES AND FUNCTIONS.......... 6
Main unit................................................................ 6
Remote control unit .............................................. 7
Connection panel .................................................. 8
INSTALLATION AND CONNECTIONS.... 9
Installation of the unit........................................... 9
About the input jacks on this unit...................... 10
Connection to INPUT1 ........................................ 10
Connection to INPUT2 ........................................ 10
Connection to INPUT3 and INPUT4................... 11
About DTV Set Top Box connection .................. 14
Control cord connection..................................... 15
Power cord connection....................................... 15
How to route cables............................................ 16
SETTING UP THE SYSTEM................. 17
Setup after connection ....................................... 17
OPERATIONS ....................................... 20
Selecting an input source................................... 20
Screen size selection .......................................... 22
POWER SAVE ...................................................... 26
Labeling the Inputs ............................................. 27
AND FUNCTIONS
PROCEEDING
DISPLAY PANEL ADJUSTMENTS ...... 28
Understanding the MENU screens.................... 28
Picture adjustments ............................................ 29
Viewing a fast moving picture
(3D Y/C LEVEL)................................................. 32
Reducing the amount of digital noise
in the video image (3D NR LEVEL)................. 33
Adjusting the color temperature
of the screen (COLOR TEMP).......................... 34
Setting the FILM MODE...................................... 35
Viewing in a bright location
(HIGH CONTRAST) .......................................... 36
Making the PC image brighter (ABL)................. 37
Adjusting the screen........................................... 38
OPERATING OTHER DEVICES ............ 39
Remote code set up ............................................ 39
Remote control unit functions ........................... 42
ADDITIONAL INFORMATION.............. 49
Resetting the unit to factory set defaults .......... 49
Cleaning............................................................... 49
Insering the batteries in the remote
control unit....................................................... 50
Operating range of the remote control unit ..... 50
Troubleshooting .................................................. 51
Specifications ...................................................... 54
Explanation of Terms.......................................... 57
BEFORE
PART NAMES
2
<ARE1349> En
Page 7
BEFORE PROCEEDING
○○○○○○○○○○○○○○○○○○○○○○○○○○○○○○○○○○○○○○○○○○○○○○○○○○○○○○○○○○○○○○
○○○○○○○○○○○○○○○○○○○○○○○○○○○○○○○○○○○○○○○○○○○○○○○○○○○○○○○○○○○○○○○○○○○○○○○○○○○○○○○○○○○
○○○○○○○○○○○○○○○○○○○
How to use this manual
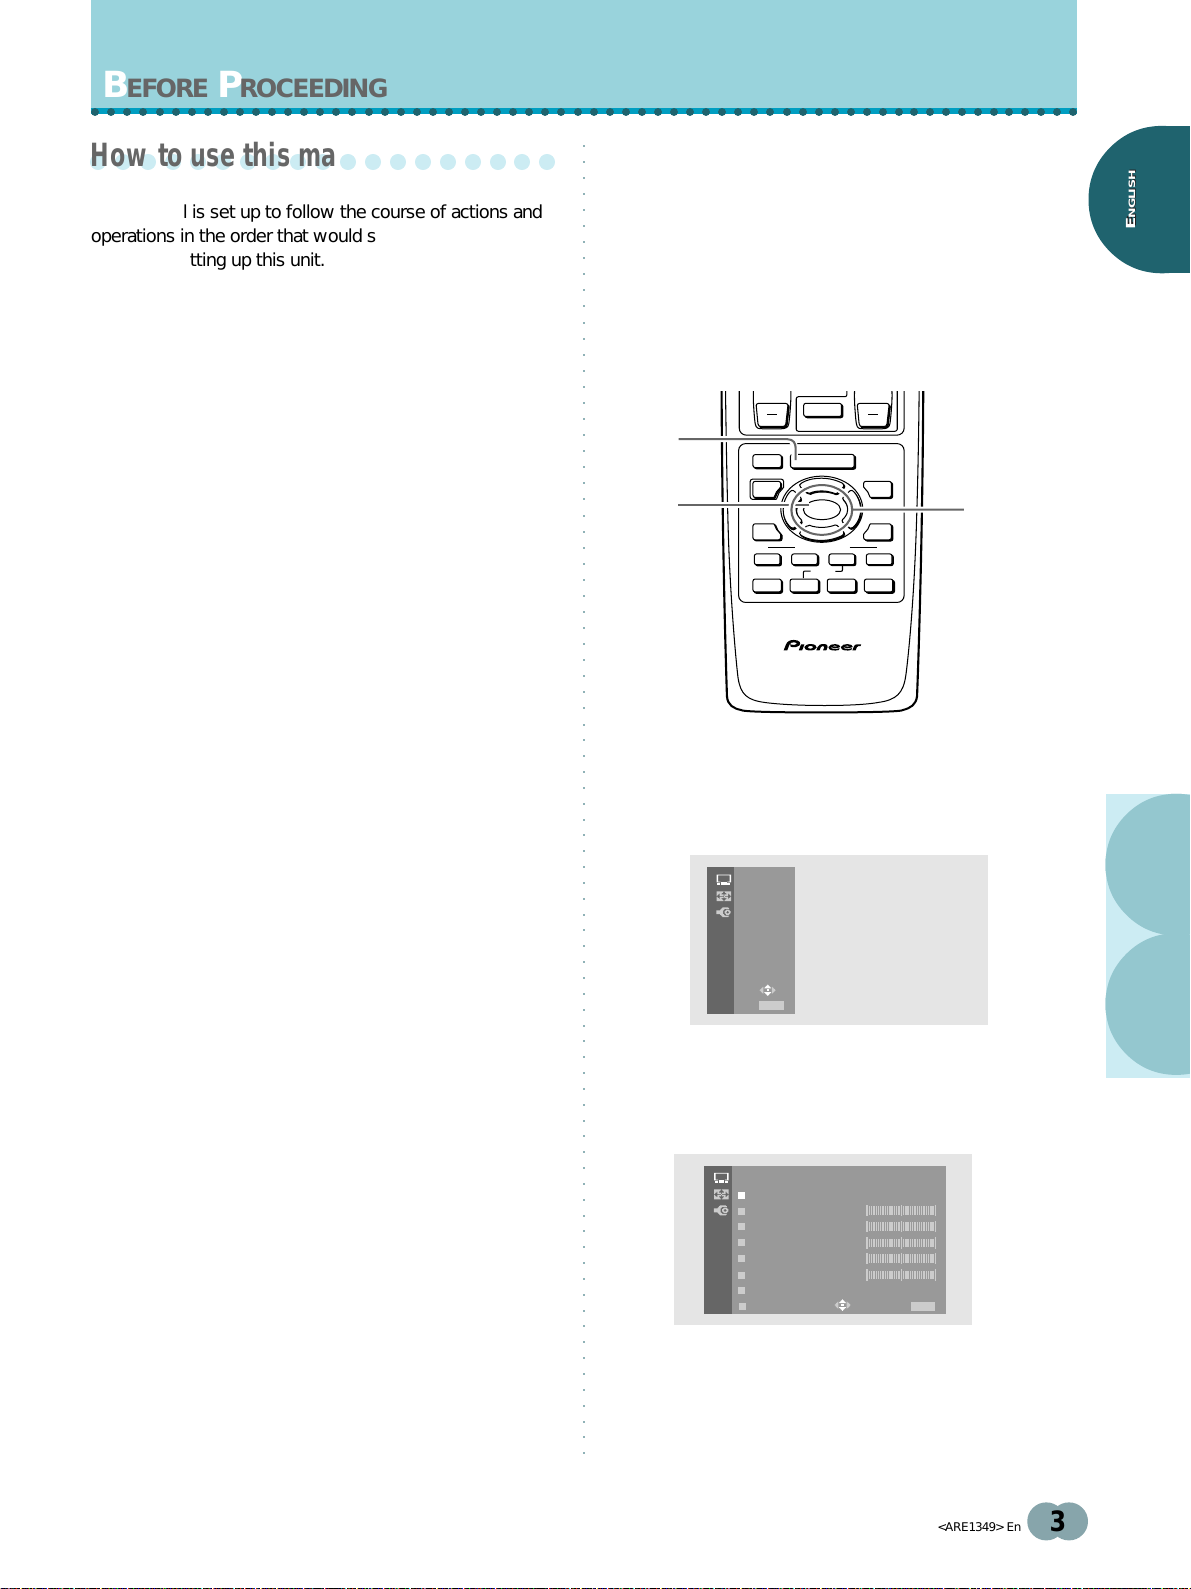
The following example is an actual operation that shows
how one might adjust the contrast of the picture. The
This manual is set up to follow the course of actions and
operations in the order that would seem most logical for
someone setting up this unit.
screens shown at each step are provided as a visual
guide to confirm that the procedure is proceeding as it
should. Please familiarize yourself with this process
before continuing on with the rest of this manual.
NGLISH
NGLISH
E
E
Once the unit has been taken out of the box, and it has
been confirmed that all the parts have been received, it
may be beneficial to look over the section “Part Names
and Functions” starting on page 6 to become acquainted
with the plasma monitor and remote control unit, as their
respective buttons and controls will be referred to
throughout this manual. For descriptions of the remote
control unit buttons used to control other components in
your system, refer to the section “Operating Other
Devices” starting on page 39.
The section “Installation and Connections” starting on
page 9 covers all the necessary points regarding
installation of the plasma display and connections to a
wide variety of components.
The section “Setting Up the System” starting on page 17
covers the necessary on-screen menu settings to
establish correct linkage between the plasma display and
connected components. Depending on the connections
made, this section may or not be necessary.
The section “Operations” starting on page 20 covers the
basic procedures used to operate the plasma display.
The section “Display Panel Adjustments” starting on
page 28 describes how to use the on-screen menus to
make picture quality and screen adjustments.
About operations in this manual
Operations in this manual are outlined in step by step
numbered procedures. Most of the procedures are
written in reference to the remote control unit unless the
button or control is only present on the main unit.
However, if a button or control on the main unit has the
same or similar name as that on the remote control unit,
that button can be used when performing operations.
When using the remote control unit to operate the main
unit or to navigate on-screen menus in the procedures
prior to page 38, be sure the mode switch is set to
“TV/VCR”.
Example) To adjust the contrast of the picture.
1,6
2,3,5
CH
TV/SAT/DTV/DVD
EDIT/
LEARN
SOURCE SAT/DTV
POWER
%
DVD
TOP MENU
MENU
FAVORITES
1 7 3 ¡
84
CU-PDP008
PLASMA DISPLAY REMOTE CONTROL UNIT
MUTING
RECEIVER
MENU
%
SET/
SELECT
%
VCR REC
%
VOL
GUIDE
(SAT)/DTV
INFO
¢
Î
2,3,4
1 Press MENU to display the menu screen.
The menu screen appears.
PICTURE
SCREEN
SET UP
USE:
END: MENU
.
2 Press 5/∞ to select PICTURE, then press
SET/SELECT.
The PICTURE adjustment menu screen appears.
PICTURE
MOD E : STD
CONTRAST
BLACK LVL .
COLOR
TINT
SHARP
OTHER
EX IT
USE:
END: MENU
ROCEEDING
AND FUNCTIONS
BEFORE P
PART NAMES
(continued)
<ARE1349> En
3
Page 8

BEFORE PROCEEDING
○○○○○○○○○○○○○○○○○○○○○○○○○○○○○○○○○○○○○○○○○○○○○○○○○○○○○○○○○○○○○○
3 Press 5/∞ to select CONTRAST, then press
○○○○○○○○○○○○○○○○○○○○○○○○○○○○○○○○○○○○○○○○○○○○○○○○○○○○○○○○○○○○○○○○○○○○○○○○○○○○○○○○○○○
SET/SELECT.
NGLISH
NGLISH
E
E
The CONTRAST adjustment screen appears.
CONTRAST
USE:
END: MENU
4 Press 2/3 to adjust the CONTRAST setting.
The CONTRAST setting is adjusted.
CONTRAST
USE:
END: MENU
5 When you have finished adjusting the CONTRAST
setting, press SET/SELECT to return to the
PICTURE adjustment menu screen.
PICTURE
MODE :USER(STD )
CONTRAST
BLACK LVL .
COLOR
TINT
SHARP
AND FUNCTIONS
PROCEEDING
BEFORE
PART NAMES
OTHER
EX IT
Having made an adjustment to the CONTRAST
setting, the MODE setting displays “USER (STD)” to
USE:
END: MENU
indicate that the current screen mode is a user
modified mode based on the standard screen
defaults. Additionally, “USER” is automatically set for
the MODE setting (page 30).
6 Press MENU to close the menu screen.
The menu screen disappears, and the video image of
the currently selected input source is restored.
4
<ARE1349> En
Page 9
○○○○○○○○○○○○○○○○○○○○○○○○○○○○○○○○○○○○○○○○○○○○○○○○○○○○○○○○○○○○○○
○○○○○○○○○○○○○○○○○○○
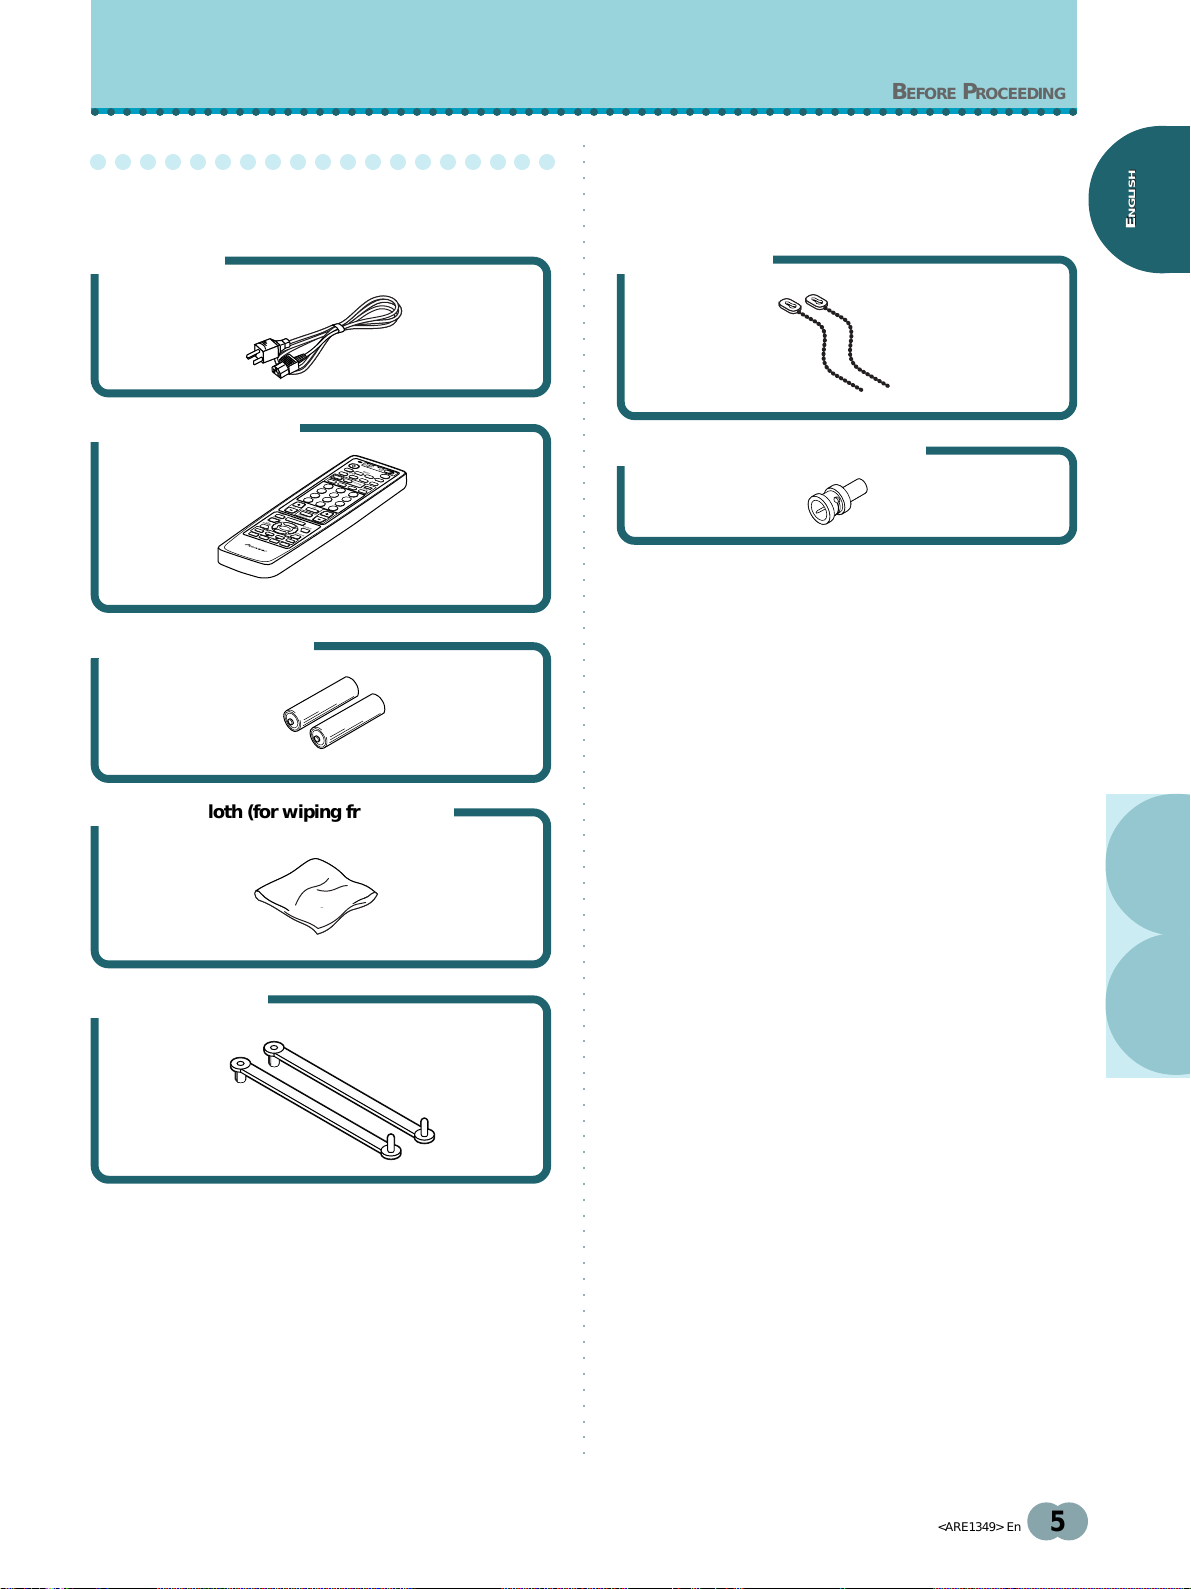
Checking supplied accessories
○○○○○○○○○○○○○○○○○○○○○○○○○○○○○○○○○○○○○○○○○○○○○○○○○○○○○○○○○○○○○○○○○○○○○○○○○○○○○○○○○○○
BEFORE PROCEEDING
Check that the following accessories were supplied.
1 Power cord
2 Remote control unit
TV
/VCR
CBL
/SAT
DTV
STANDBY/ON
DVD
12
/LD
INPUT
SCREEN
MODE
AUTO
POWER
3
STILL
INPUT
4
AUDIO
RE
DISPLAY
CEIV
CC
ER
1
CLEAR
DTV
VIEW
MODE
2
4
3
5
7
6
8
9
0
CH
CH
EN
CH
TER
RETURN
MUTING
EDIT/
R
LEA
EC
EIVER
VOL
R
N
SOURCE SAT/DTV
TV/SA
POWER
T/DTV/D
MENU
VD
DVD
TOP MENU
%
MENU
%
SET/
SELECT
1
GUIDE
%
%
FAVORITES
(SAT)/DTV
7
84
VCR REC
INFO
3
¡
¢
CU-PDP008
PLASMA DISPLAY REMOTE CONTROL UNIT
Î
3 AA (LR6) batteries x 2
6 Bead band x 2
7 Pin/BNC conversion adaptor x 1
÷ Operating Instructions
÷ Warranty
NGLISH
NGLISH
E
E
4 Cleaning cloth (for wiping front panel)
5 Speed clamp x 2
AND FUNCTIONS
PART NAMES
<ARE1349> En
5
Page 10
PART NAMES AND FUNCTIONS
○○○○○○○○○○○○○○○○○○○○○○○○○○○○○○○○○○○○○○○○○○○○○○○○○○○○○○○○○○○○○○
○○○○○○○○○○○○○○○○○○○○○○○○○○○○○○○○○○○○○○○○○
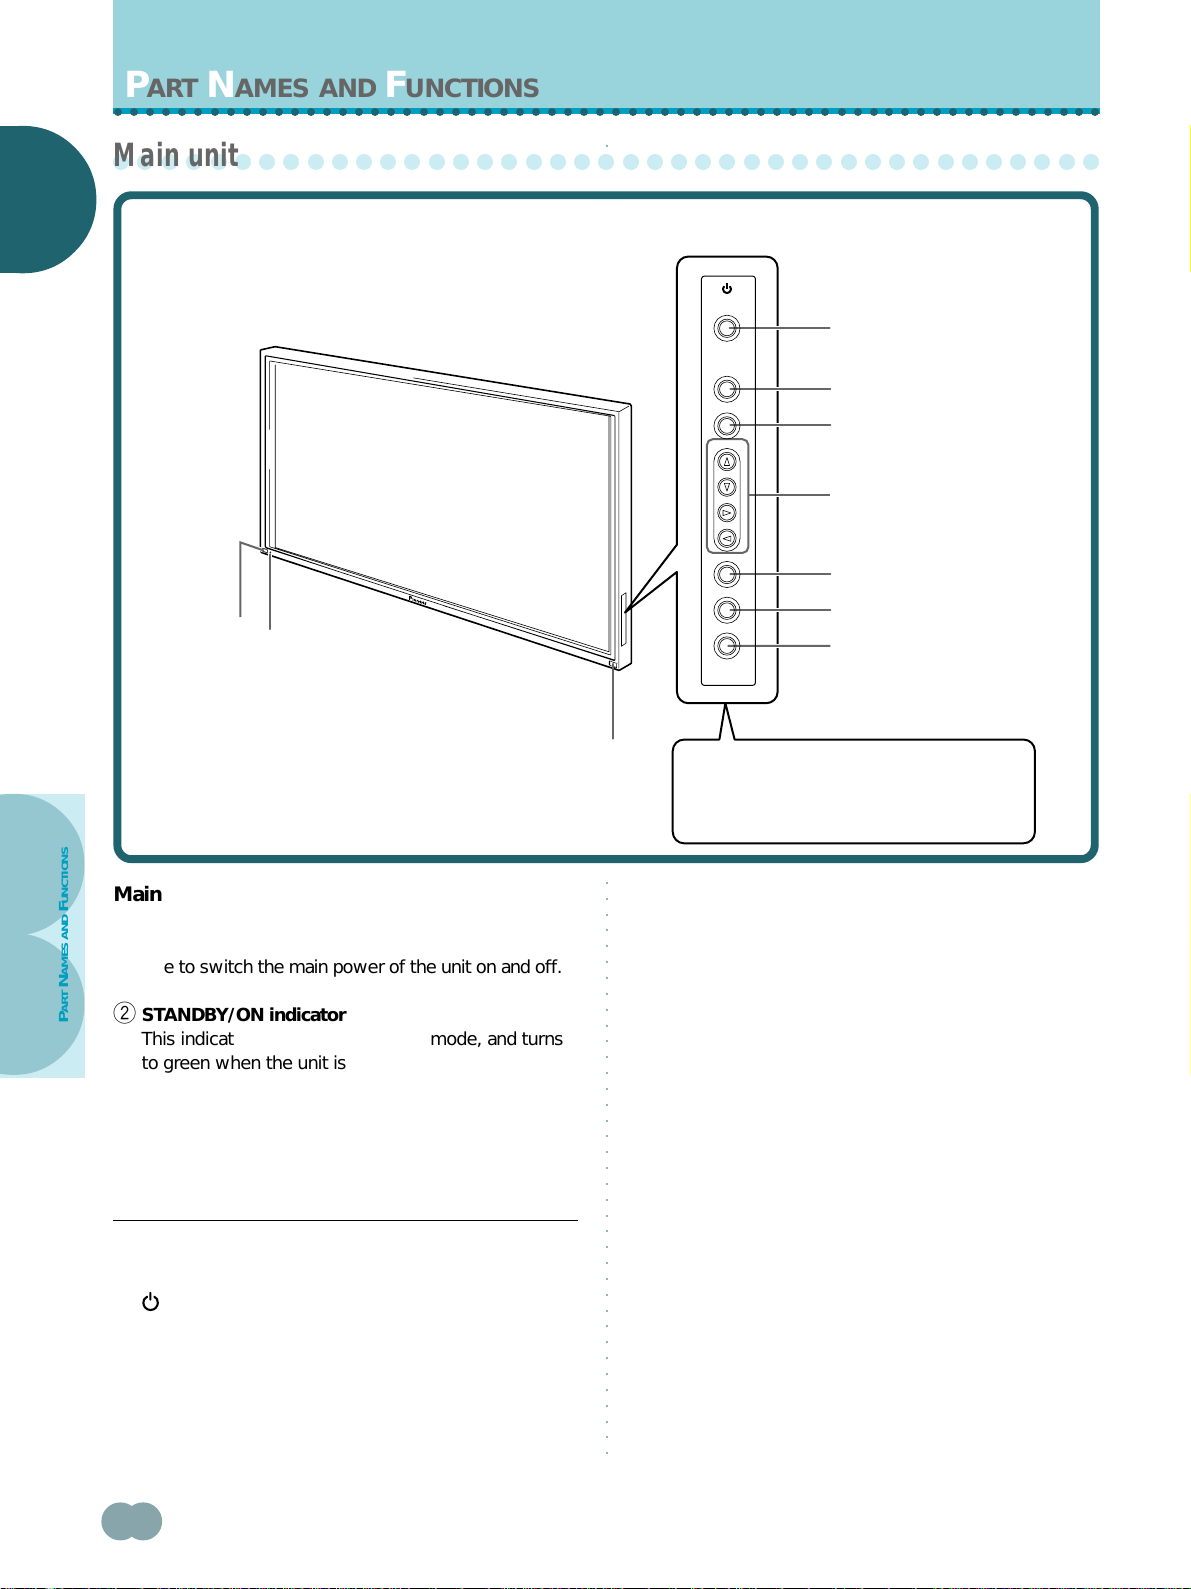
Main unit
NGLISH
NGLISH
E
E
Main unit
○○○○○○○○○○○○○○○○○○○○○○○○○○○○○○○○○○○○○○○○○○○○○○○○○○○○○○○○○○○○○○○○○○○○○○○○○○○○○○○○○○○
Operation panel on the main unit
STANDBY/ON
4
INPUT
MENU
ADJUST
5
6
7
SET
8
9
0
1
S.MODE
RETURN
2
Main unit
AND FUNCTIONS
1 Main power switch
Use to switch the main power of the unit on and off.
2 STANDBY/ON indicator
PART NAMES
This indicator is red during standby mode, and turns
to green when the unit is in the operation mode
(page 20).
3 Remote control sensor
Point the remote control toward the remote sensor to
operate the unit (page 50).
Operation panel on the main unit
4 STANDBY/ON button
Press to put the display in operation or standby mode
(page 20).
3
Note
When optional speakers have been connected,
the operation panel on the main unit will not be
operable.
6 MENU button
Press to open and close the on-screen menu (pages
17 to 38).
7 ADJUST (5/∞/2/3) buttons
Use to navigate menu screens and to adjust various
settings on the unit.
Usage of cursor buttons within operations is clearly
indicated in the on-screen display (pages 17 to 38).
8 SET button
Press to adjust or enter various settings on the unit
(pages 17 to 38).
9 S.MODE button
Press to manually select the screen size (page 22).
0 RETURN button
Press to reset the unit to factory set defaults
(page 49).
5 INPUT button
Press to select input (page 20).
6
<ARE1349> En
Page 11
○○○○○○○○○○○○○○○○○○○○○○○○○○○○○○○○○○○○○○○○○○○○○○○○○○○○○○○○○○○○○○
○○○○○○○○○○○○○○○○○○○○○○○○○○○○○○○○○○○○○○○○○
Remote control unit
○○○○○○○○○○○○○○○○○○○○○○○○○○○○○○○○○○○○○○○○○○○○○○○○○○○○○○○○○○○○○○○○○○○○○○○○○○○○○○○○○○○
PART NAMES AND FUNCTIONS
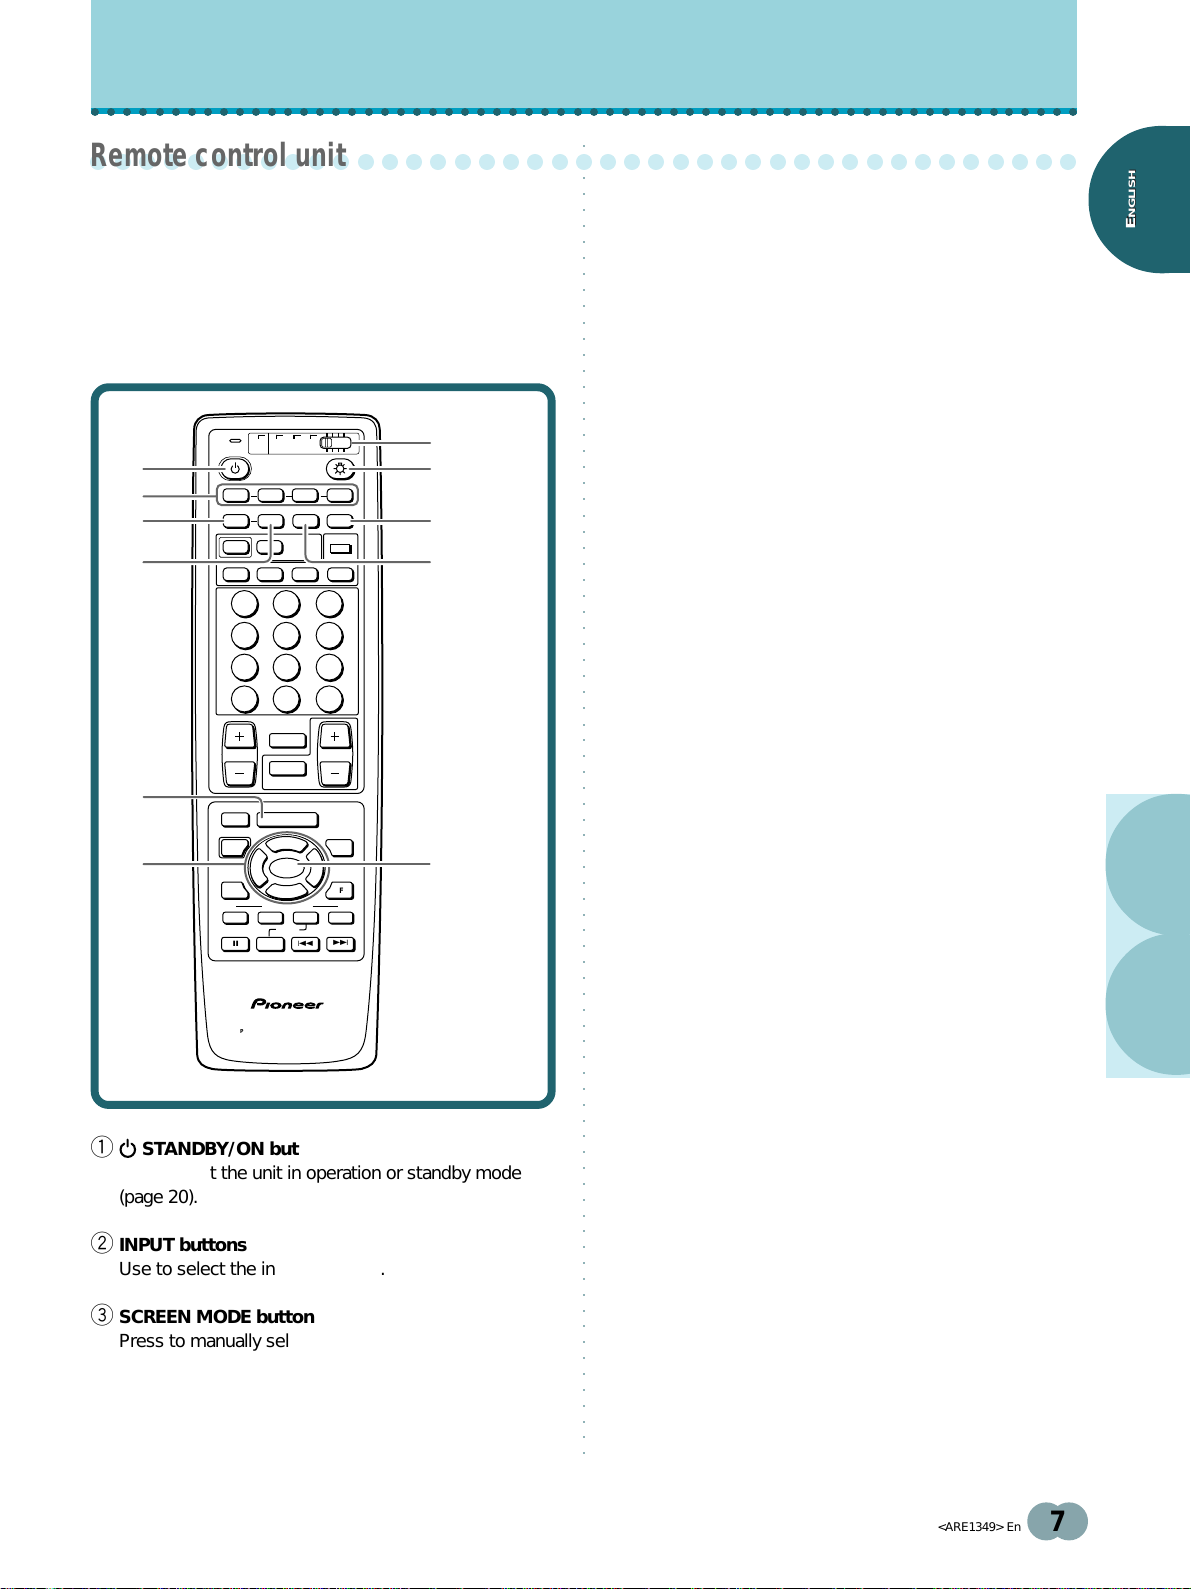
This unit incorporates the use of a “learning” remote
control unit. This page describes the buttons and controls
4 AUTO SCREEN button
Use for automatic selection of screen size (page 23).
directly connected with the functioning of the main panel
unit. For more information about how this remote control
can be used in conjunction with your other components,
please refer to the sections “Remote code set up” on
5 MENU button
Press to open and close the on-screen menu
(pages 17 to 38).
page 39 and “Remote control unit functions” on page 42”.
6 ADJUST (5/∞/2 /3) buttons
Use to navigate menu screens and to adjust various
TV
DTV
DVD
CBL
/VCR
/LD
/SAT
17
2
3
4
STANDBY/ON
INPUT
1234
SCREEN
MODE
POWER
INPUT
AUDIO CC
AUTO STILL
RECEIVER
CLEAR
DISPLAY
DTV
VIEW
MODE
Mode switch
8
9
1 2 3
4 5 6
7 8 9
0
CH
RETURN
MUTING
RECEIVER
TV/SAT/DTV/DVD
MENU
%
SET/
SELECT
%
FAVORITES
VCR REC
ENTER
%
CH
VOL
GUIDE
(SAT) /DTV
INFO
¢
0
CH
5
6
EDIT/
LEARN
SOURCE SAT/DTV
POWER
%
DVD
TOP MENU
MENU
1 7 3 ¡
84
settings on the unit.
Usage of cursor buttons within operations is clearly
indicated at the bottom the on-screen menu display
(pages 17 to 38).
7 Light button
When this button is pressed, all the buttons on the
remote control unit will light. The lighting will turn off
if no operations are performed within five seconds.
This button is used for performing operations in dark
places.
8 DISPLAY button
Press to view the unit’s current input and setup mode
(page 21).
9 STILL button
Use to freeze the image currently displayed on the
screen (page 21).
0 SET/SELECT button
Press to adjust or enter various settings on the unit
(pages 17 to 38).
NGLISH
NGLISH
E
E
AND FUNCTIONS
CU-PDP008
PLASMA DISPLAY REMOTE CONTROL UNIT
Î
1 STANDBY/ON button
Press to put the unit in operation or standby mode
(page 20).
2 INPUT buttons
Use to select the input (page 20).
3 SCREEN MODE button
Press to manually select the screen size (page 22).
Notes
÷ When operating this unit using these buttons, be sure to set
the mode switch of the remote control unit to “TV/VCR”. (The
remote control unit operates this unit only when the mode
switch is set to “TV/VCR”.)
÷ This page covers only buttons that operate this unit. Buttons
that are not covered on this page are used to operate other
devices (pages 39 to 48).
<ARE1349> En
PART NAMES
7
Page 12
PART NAMES AND FUNCTIONS
○○○○○○○○○○○○○○○○○○○○○○○○○○○○○○○○○○○○○○○○○○○○○○○○○○○○○○○○○○○○○○
○○○○○○○○○○○○○○○○○○○○○○○○○○○○○○○○○○○○○○○○○
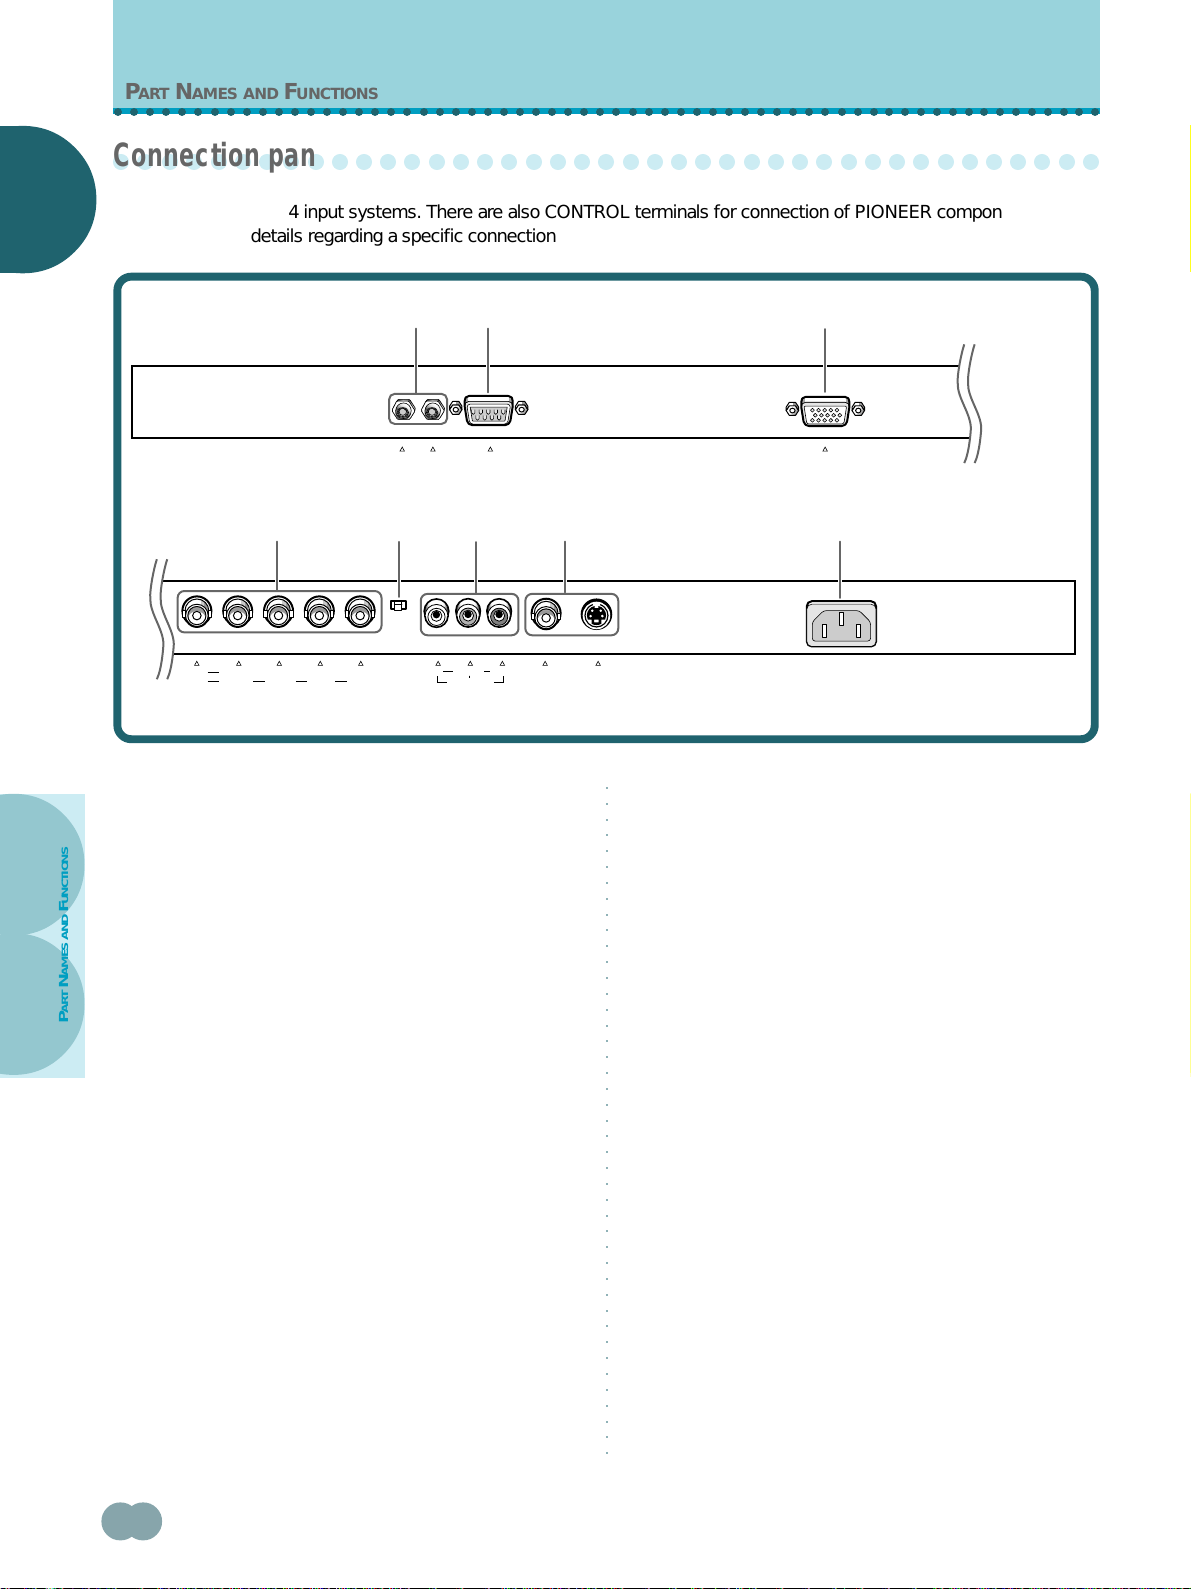
Connection panel
NGLISH
NGLISH
On this unit there are 4 input systems. There are also CONTROL terminals for connection of PIONEER components with
E
E
the Î mark. For details regarding a specific connection format, refer to the page written in parenthesis.
○○○○○○○○○○○○○○○○○○○○○○○○○○○○○○○○○○○○○○○○○○○○○○○○○○○○○○○○○○○○○○○○○○○○○○○○○○○○○○○○○○○
Bottom view
4
Y
CB/PBCR/P
G B R
[ON SYNC] [H/V SYNC]
INPUT3
R
HD VD
1 CONTROL IN/OUT
For connection of PIONEER components that bear the
Î mark. Making CONTROL connection enables
control of this unit as a component in a system
(page 15).
2 FACTORY ADJUSTMENT TERMINAL
AND FUNCTIONS
DO NOT MAKE ANY CONNECTIONS TO THIS
TERMINAL.
PART NAMES
This terminal is used in the factory setup.
3 INPUT4
For connection of a personal computer (PC) or similar
component. Make sure that the connection made
corresponds to the format of the signal output from
the connected component (pages 11 to 13).
4 INPUT3
For connection of components that have RGB or
component output jacks such as a personal computer,
DVD player, or external RGB decoder (pages 11 to 13).
1 2 3
IN
OUT
CONTROL
5 6
75Ωj2.2kΩ
FACTORY ADJUSTMENT
Y
CB/P
B
C-VIDEO
INPUT2
TERMINAL
CR/P
R
7 8
S-VIDEOVIDEO
INPUT1
5 Synchronizing signal impedance selector switch
Depending on the connections made at INPUT3, it
may be necessary to set this switch to match the
output impedance of the connected component’s
synchronization signal.
When the output impedance of the component’s
synchronization signal is above 75 Ω, set this switch
to the 2.2 kΩ position (pages 12 and 13).
6 INPUT2
For connection of DVD player with component video
output (page 10).
7 INPUT1
For connection of components that have an S-video or
composite video output jack such as a video deck,
video camera, laser disc player, or DVD player (page 10).
Note: It is possible to have connections made to both
the VIDEO and S-VIDEO jacks at the same time.
However, if simultaneous signals are received, the
S-video signal is given priority (page 10).
ANALOG
R G B
AC INLET
INPUT4
8
8 AC INLET
Use to connect the supplied power cord to an AC
outlet (page 15).
<ARE1349> En
Page 13
INSTALLATION AND CONNECTIONS
○○○○○○○○○○○○○○○○○○○○○○○○○○○○○○○○○○○○○○○○○○○○○○○○○○○○○○○○○○○○○○
○○○○○○○○○○○○○○○○○○○○○○○○○○○○○○○○○○○○○○○○○○○○○○○○○○○○○○○○○○○○○○○○○○○○○○○○○○○○○○○○○○○
○○○○○○○○○○○○○○○○○○○
Installation of the unit
Installation using the optional PIONEER stand or
installation bracket
÷ Please be sure to request installation or mounting of this unit
or the installation bracket by an installation specialist or the
dealer where purchased.
÷ When installing, be sure to use the bolts provided with the
stand or installation bracket.
÷ For details concerning installation, please refer to the
instruction manual provided with the stand or installation
bracket.
Installation using accessories other than the
PIONEER stand or installation bracket (sold
separately)
÷ When possible, please install using parts and accessories
manufactured by PIONEER. PIONEER will not he held
responsible for accident or damage caused by the use of parts
and accessories manufactured by other companies.
÷ For custom installation, please consult the dealer where the
unit was purchased, or a qualified installer.
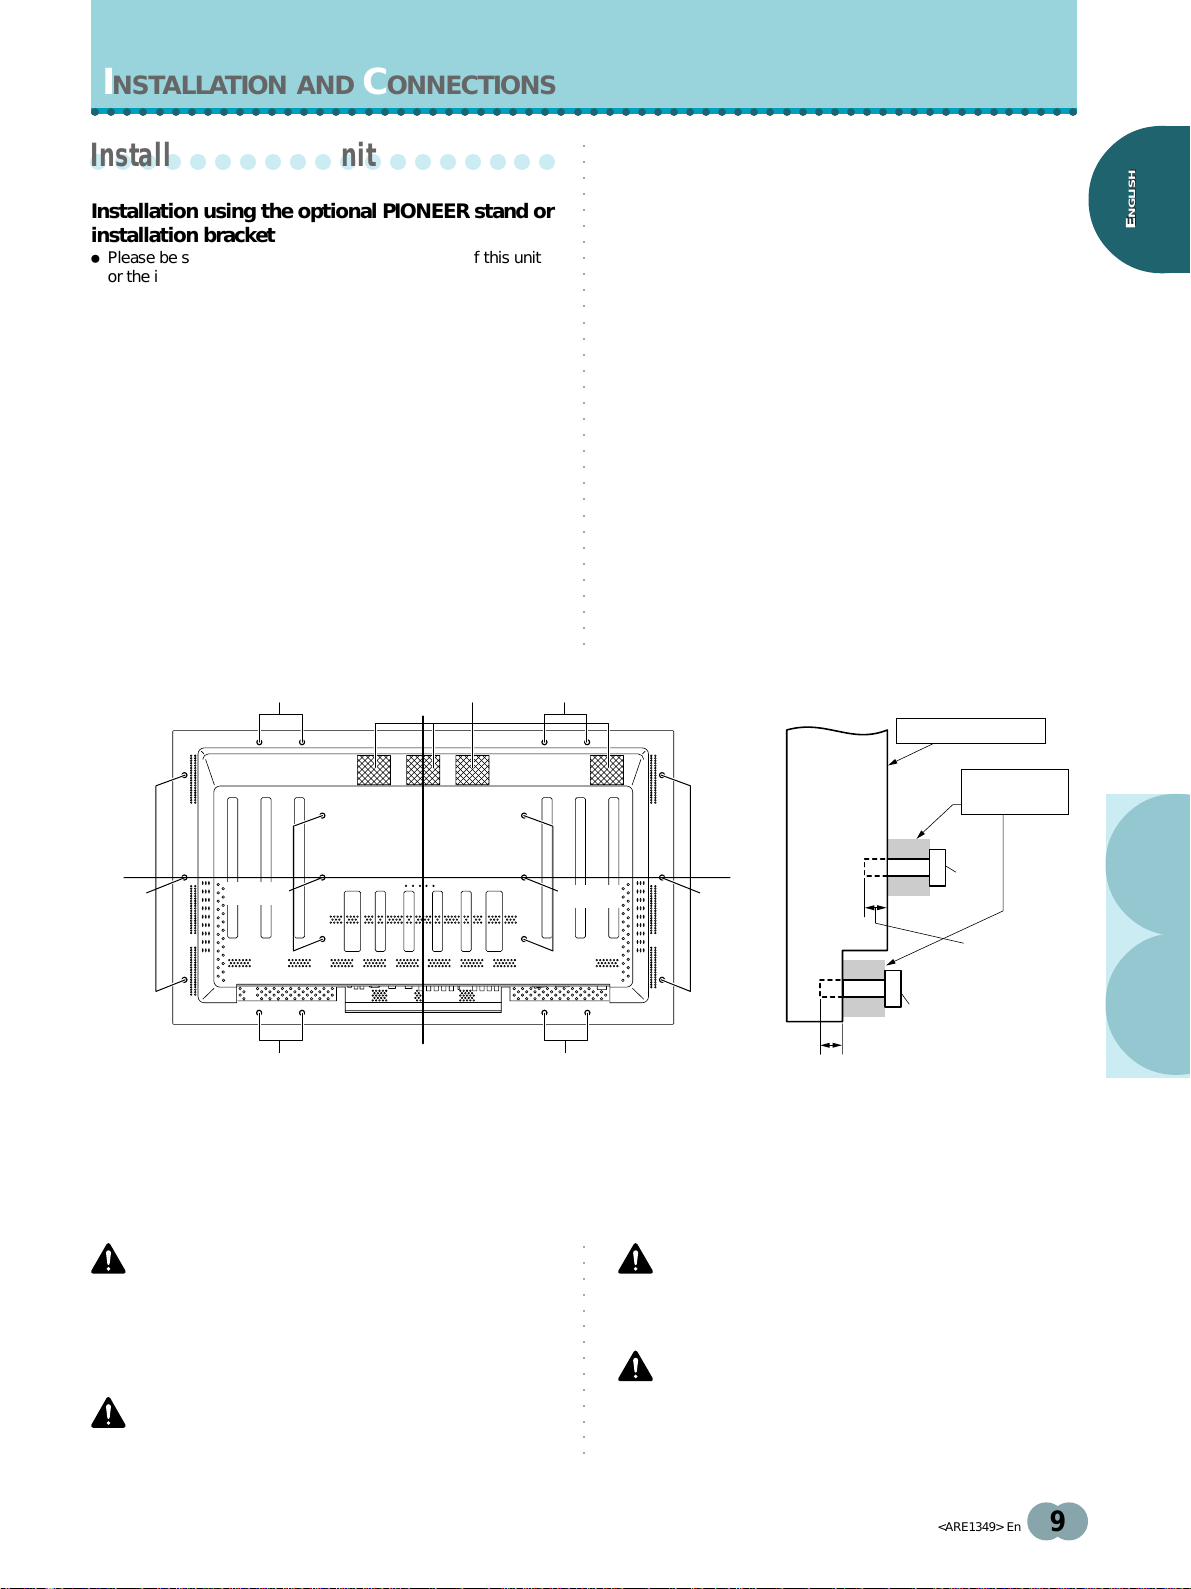
Wall-mount installation of the unit
This unit has been designed with bolt holes for
wall-mount installation, etc.. The installation holes that
can be used are shown in the diagram below. (Caps can
be removed by turning with a screwdriver, coin, or similar
tool.)
÷ Be sure to attach in 4 or more locations above and
below, left and right of the center line.
÷ Use bolts that are long enough to be inserted 1/2 inch
(12 mm) to 13/16 inch (20 mm) into the main unit from
the attaching surface for both a holes and b holes.
Refer to the side view diagram below.
÷ As this unit is constructed with glass, be sure to install
it on a flat, unwarped surface.
NGLISH
NGLISH
E
E
b hole
b hole
a hole
Vents (fan)
Center line
Rear view diagram
b hole
a hole
b holeb hole
Center line
b hole
Attaching surface
Main unit
b hole
1/2 inch (12 mm) to
13/16 inch (20 mm)
Side view diagram
Installation
bracket, etc..
a hole
Bolt
1/2 inch (12 mm) to
13/16 inch (20 mm)
Bolt
AND CONNECTIONS
INSTALLATION
CAUTION
To avoid malfunction, overheating of this unit, and possible fire
hazard, make sure that the vents on the main unit are not
blocked when installing. Also, as hot air is expelled from the
vents, be careful of deterioration and dirt build up on rear surface
wall, etc..
CAUTION
Please be sure to use an M8 (Pitch = 1.25 mm) bolt. (Only this
size bolt can be used.)
CAUTION
Because this unit weighs about 94 lbs 13 oz (about 43 kg) and
has little depth making it unstable, please use 2 people or more
when packing, carrying or installing.
CAUTION
This unit incorporates a thin design. To ensure safety if vibrated
or shaken, please be sure to take measures to prevent the unit
from tipping over.
<ARE1349> En
9
Page 14
INSTALLATION AND CONNECTIONS
○○○○○○○○○○○○○○○○○○○○○○○○○○○○○○○○○○○○○○○○○○○○○○○○○○○○○○○○○○○○○○
○○○○○○○○○○○○○○○○○○○
About the input jacks on this unit
NGLISH
NGLISH
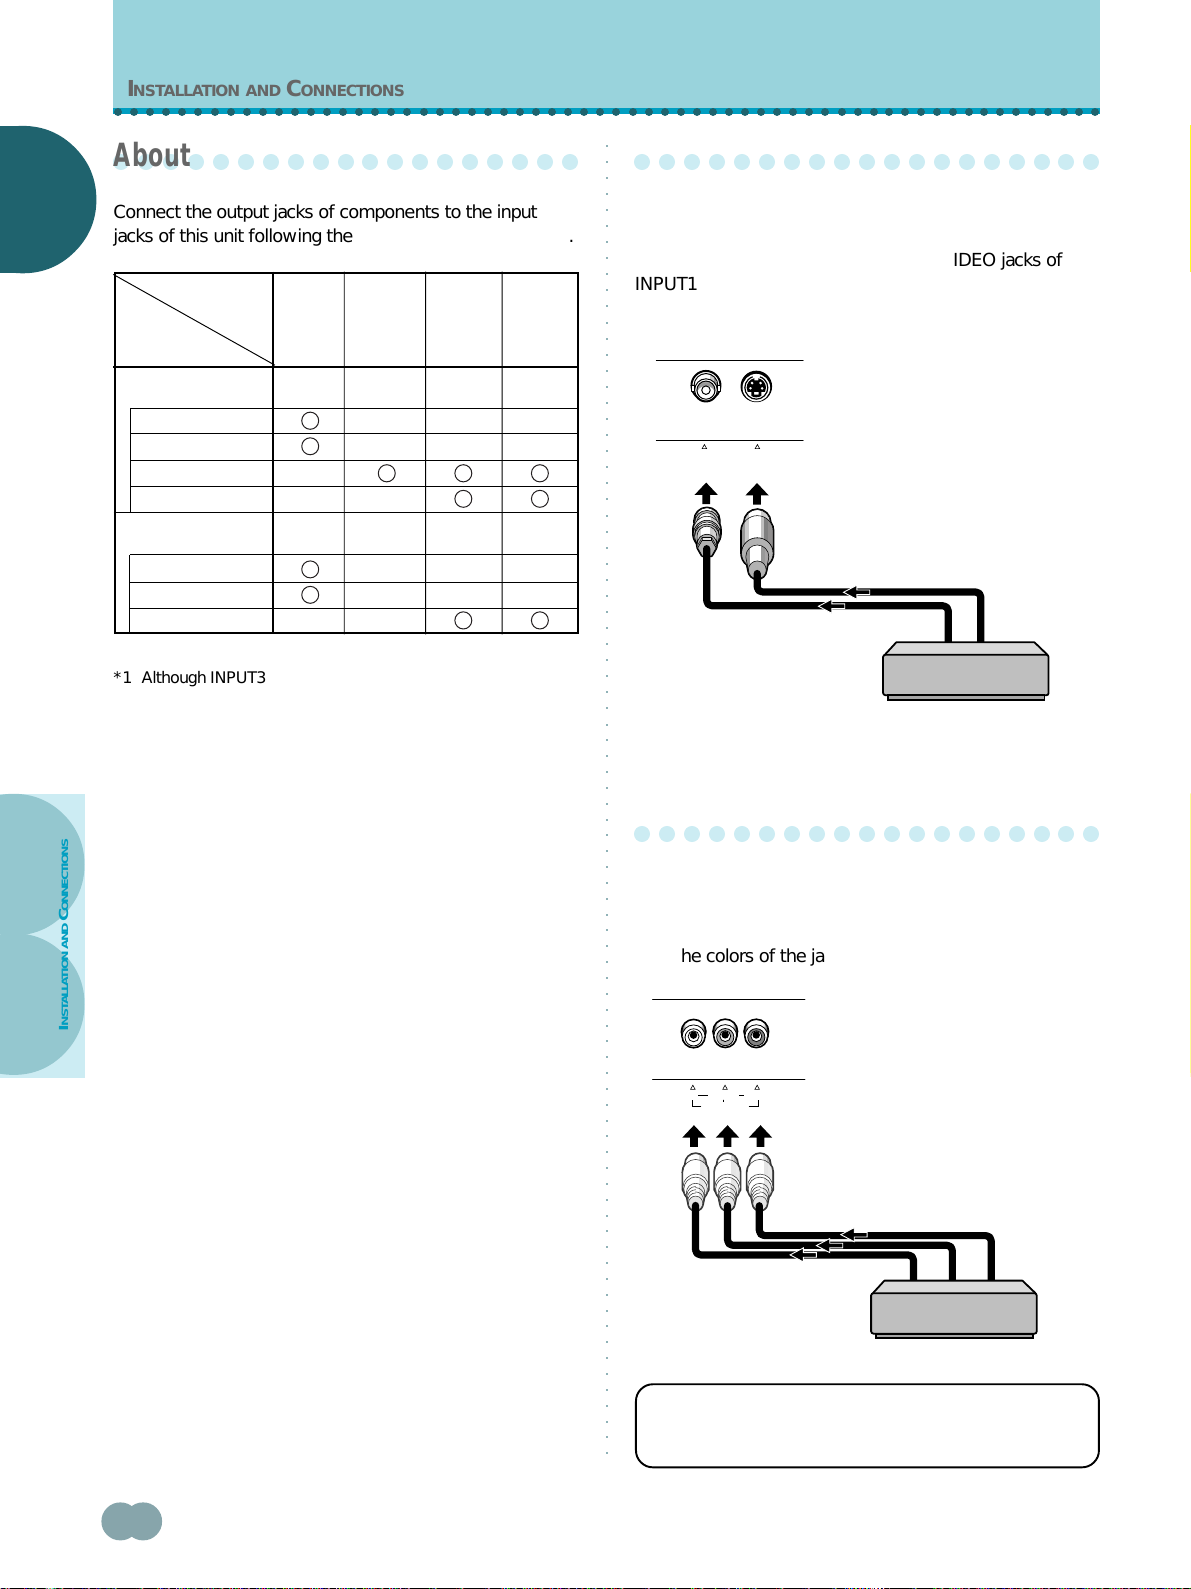
Connect the output jacks of components to the input
E
E
jacks of this unit following the list below (pages 10 to 14).
Input of
this unit
Connected
component
and signals
INPUT1 INPUT2 INPUT4
INPUT3
AV component
Composite video
S video
Component video
RGB
Personal computer
(PC)
Composite video
S video
*3
*3
RGB
*1
○○○○○○○○○○○○○○○○○○○○○○○○○○○○○○○○○○○○○○○○○○○○○○○○○○○○○○○○○○○○○○○○○○○○○○○○○○○○○○○○○○○
○○○○○○○○○○○○○○○○○○○
Connection to INPUT1
Connect an AV component that has a video or S-video
output jack to the INPUT1 jacks on the main unit. It is
possible to use both the VIDEO and S-VIDEO jacks of
INPUT1 at the same time for the connection. However, if
*1
simultaneous signals are received, the S-video signal is
given priority.
S-VIDEOVIDEO
INPUT1
*2
*1 Although INPUT3 and INPUT4 are compatible with various
kinds of signals, setup using the on-screen menu is
necessary after connections are made in order match the
characteristics of the source component (pages 17 to 19).
*2 INPUT4 is compatible with Microsoft’s Plug & Play (VESA
DDC 1/2B). INPUT3 is not compatible with this.
*3 Depending on the video output board of the computer, this
type of connection may not be possible.
AND CONNECTIONS
INSTALLATION
AV component
If necessary, use the Pin/BNC conversion adapter to
make connections.
○○○○○○○○○○○○○○○○○○○
Connection to INPUT2
Connect an AV component that has component video
output jacks to the C-VIDEO input jacks on this unit. Be
sure to match the colors of the component cable plugs
with the colors of the jacks on both components.
CR/P
CB/P
R
B
Y
C-VIDEO
INPUT2
10
AV component
For the screen sizes and input signals that INPUT1 and
INPUT2 are compatible with, please refer to
supplement 1 (page 55).
<ARE1349> En
Page 15
○○○○○○○○○○○○○○○○○○○○○○○○○○○○○○○○○○○○○○○○○○○○○○○○○○○○○○○○○○○○○○
○○○○○○○○○○○○○○○○○○○
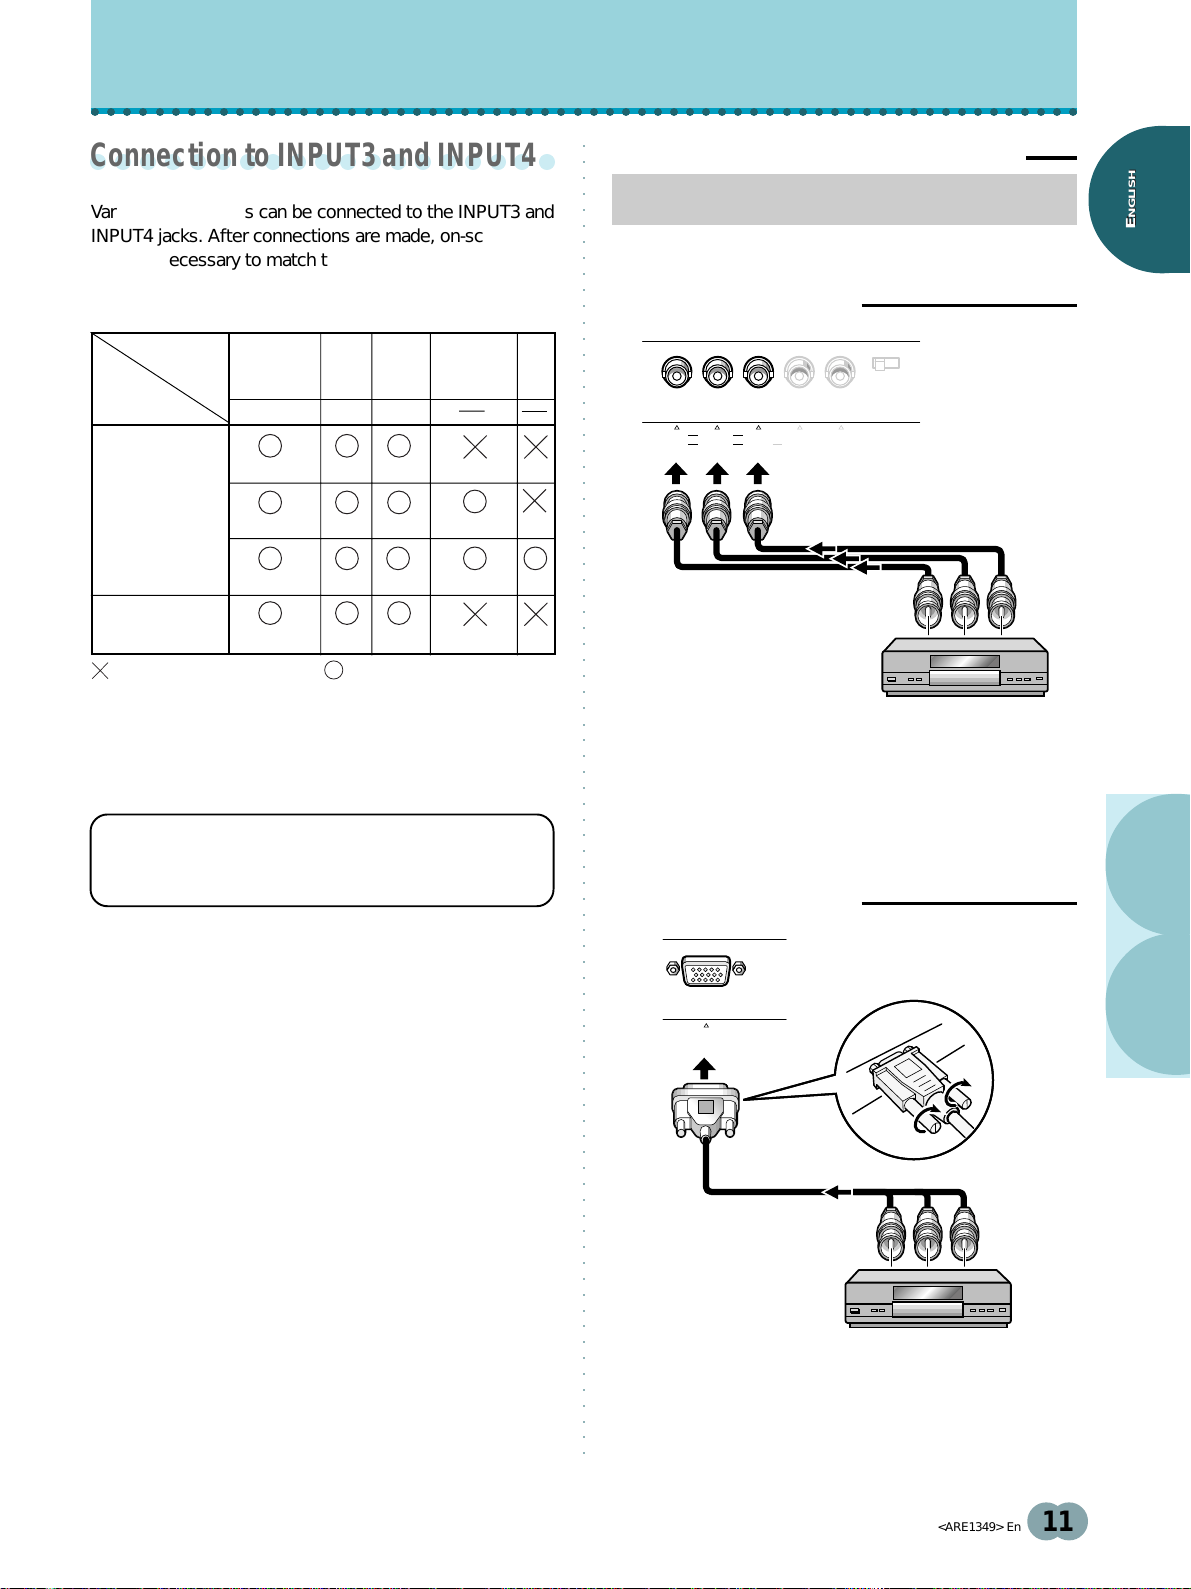
Connection to INPUT3 and INPUT4
○○○○○○○○○○○○○○○○○○○○○○○○○○○○○○○○○○○○○○○○○○○○○○○○○○○○○○○○○○○○○○○○○○○○○○○○○○○○○○○○○○○
Connection to AV components
INSTALLATION AND CONNECTIONS
Connection to AV component that has
Various components can be connected to the INPUT3 and
INPUT4 jacks. After connections are made, on-screen
setup is necessary to match the characteristics of the
connected component. Please see pages 17 to 19 for
on-screen setup after connection.
component video jacks
Make component video connections for AV components
with component video output capability.
When connecting to INPUT3
NGLISH
NGLISH
E
E
INPUT3
jack
Output source
[ON SYNC]
GBR
CB/PB CR/PR
Y
[H/V SYNC]
HD VD
Video component/
personal
computer (PC)
G ON SYNC
R
B
with RGB output
RG
B
G
B
H/V SYNC
HD
Video component
with component
video output
Y
(CB/PB)R(CR/PR)
: Do not connect anything. : Connect to this jack.
Note
Components compatible with INPUT3 are also compatible with
INPUT 4.
When making connections to INPUT4, please refer to
supplement 3 on page 57.
For the screen sizes and input signals that
INPUT3 and INPUT4 are compatible with, please
refer to supplements 1 and 2 (pages 55 and 56).
VD
Y CB/P
G B R HD VD
C
B
R/PR
INPUT3(ON SYNC) (H/V SYNC)
75Ωj2.2kΩ
On-screen setup is necessary after connection.
Please see pages 17 and 18.
INPUT3 jacks are all BNC jacks.
If necessary, use Pin/BNC conversion adapters to make
connections.
When connecting to INPUT4
ANALOG
R G B
INPUT4
On-screen setup is necessary after connection.
Please see pages 17 and 18.
AND CONNECTIONS
INSTALLATION
<ARE1349> En
11
Page 16
INSTALLATION AND CONNECTIONS
○○○○○○○○○○○○○○○○○○○○○○○○○○○○○○○○○○○○○○○○○○○○○○○○○○○○○○○○○○○○○○
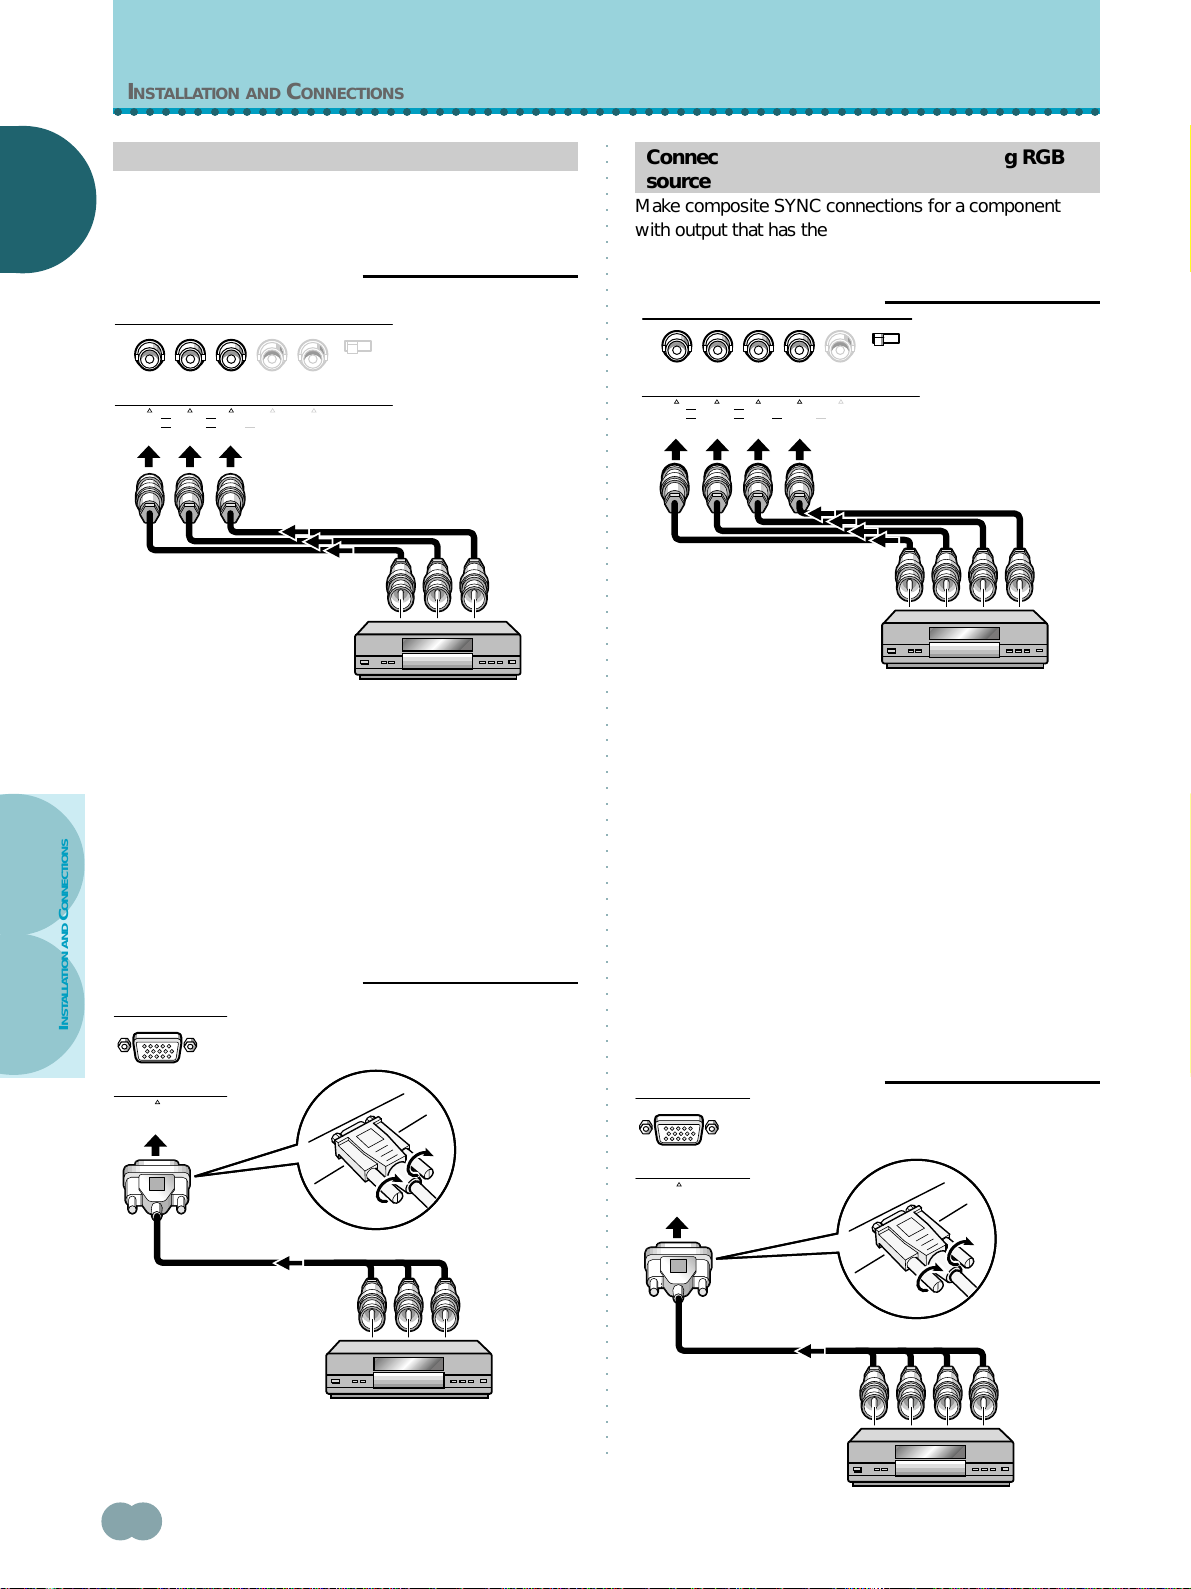
Connection of G ON SYNC analog RGB source
Make G ON SYNC connections for an AV component with
output that has the synchronization signal layered on top
NGLISH
NGLISH
E
E
of the green signal.
○○○○○○○○○○○○○○○○○○○○○○○○○○○○○○○○○○○○○○○○○○○○○○○○○○○○○○○○○○○○○○○○○○○○○○○○○○○○○○○○○○○
Connection of composite SYNC analog RGB
source
Make composite SYNC connections for a component
with output that has the vertical synchronization signal
layered on top of the horizontal synchronization signal.
When connecting to INPUT3
When connecting to INPUT3
Y CB/P
G B R HD VD
C
B
R/PR
INPUT3(ON SYNC) (H/V SYNC)
75Ωj2.2kΩ
On screen setup is necessary after connection.
Please see pages 17 to 19.
Notes
÷ When making G ON SYNC connections, do not make any
connections to the VD or HD jacks. If connections are made,
the picture may be not displayed normally.
÷ When using a computer connected by the G ON SYNC
connection, on-screen adjustment for G ON SYNC is
necessary (pages 17 to 19).
AND CONNECTIONS
Please read your PC’s instruction manual throughly.
When connecting to INPUT4
INSTALLATION
ANALOG
R G B
INPUT4
Y CB/P
G B R HD VD
C
B
R/PR
INPUT3(ON SYNC) (H/V SYNC)
75Ω j 2.2kΩ
When using INPUT3, set the impedance selector switch
to match the output impedance of the connected
component’s synchronization signal.
When the output impedance of the component’s
synchronization signal is above 75 Ω, set this switch to
the 2.2 kΩ position.
On-screen setup is necessary after connection.
Please see pages 17 to 19.
Notes
÷ When making composite SYNC connections, do not connect
anything to the VD jack. If connected to, the picture may not
be displayed properly.
÷ On some types of Macintosh® components, G ON SYNC and
composite SYNC are both output. With this type of
component, please connect using the G ON SYNC connection
(as shown left).
When connecting to INPUT4
On screen setup is necessary after connection.
Please see pages 17 to 19.
12
<ARE1349> En
ANALOG
R G B
INPUT4
On-screen setup is necessary after connection.
Please see pages 17 to 19.
Page 17
○○○○○○○○○○○○○○○○○○○○○○○○○○○○○○○○○○○○○○○○○○○○○○○○○○○○○○○○○○○○○○
○○○○○○○○○○○○○○○○○○○○○○○○○○○○○○○○○○○○○○○○○○○○○○○○○○○○○○○○○○○○○○○○○○○○○○○○○○○○○○○○○○○
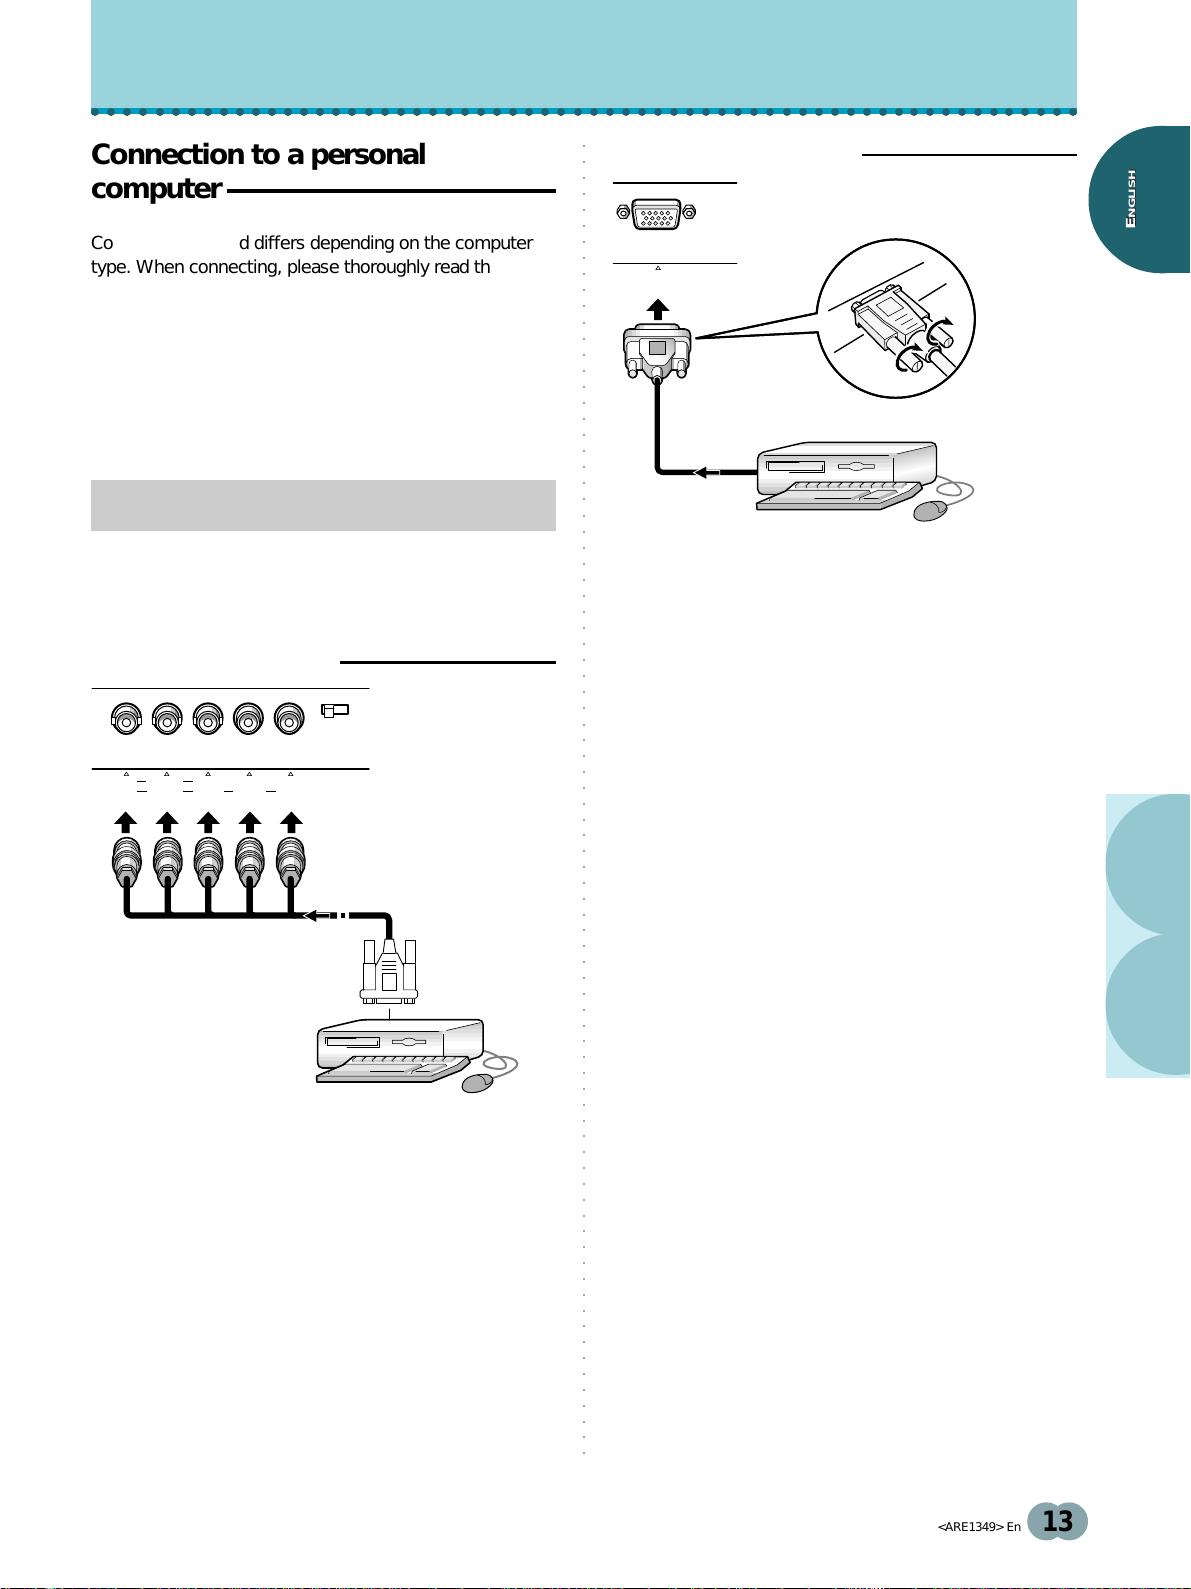
Connection to a personal
When connecting to INPUT4
INSTALLATION AND CONNECTIONS
computer
Connection method differs depending on the computer
type. When connecting, please thoroughly read the
computer’s instruction manual.
Before making connections, be sure to make sure that
the personal computer’s power and this unit’s main
power is off.
For the PC input signals and screen sizes that this unit is
compatible with, please refer to supplement 2 (page 56).
Connection of separate SYNC analog RGB
source
Make separate SYNC connections for a component that
has RGB output separated into 5 output signals: green,
blue, red, horizontal synchronization signal, and vertical
synchronization signal.
When connecting to INPUT3
ANALOG
R G B
INPUT4
Connect the cable corresponding to the shape of the
input terminal on this unit and the personal computer’s
output terminal.
Secure by tightening the terminal screws on both units.
After connecting, on-screen setup is necessary.
Please see pages 17 to 19.
NGLISH
NGLISH
E
E
Y CB/P
G B R HD VD
C
B
R/PR
INPUT3(ON SYNC) (H/V SYNC)
75Ω j 2.2kΩ
When using INPUT3, set the impedance selector switch
to match the output impedance of the connected
component’s synchronization signal.
When the output impedance of the component’s
synchronization signal is above 75 Ω, set this switch to
the 2.2 kΩ position.
On-screen setup is necessary after connection.
Please see pages 17 to 19.
Note
Depending on the type of computer model being connected, a
conversion connector or adapter etc. provided with the computer
or sold separately may be necessary.
For details, please read your PC’s instruction manual or consult
the maker or nearest dealer of your computer.
AND CONNECTIONS
INSTALLATION
<ARE1349> En
13
Page 18

INSTALLATION AND CONNECTIONS
○○○○○○○○○○○○○○○○○○○○○○○○○○○○○○○○○○○○○○○○○○○○○○○○○○○○○○○○○○○○○○
○○○○○○○○○○○○○○○○○○○
About DTV Set Top Box connection
○○○○○○○○○○○○○○○○○○○○○○○○○○○○○○○○○○○○○○○○○○○○○○○○○○○○○○○○○○○○○○○○○○○○○○○○○○○○○○○○○○○
To ensure proper connection, please carefully read the
NGLISH
NGLISH
instruction manual supplied with the DTV Set Top Box.
E
E
The Set Top Box output signals that this unit is compatible
with are as follows.
Signal type
HDTV
SDTV
Dot x Line, Scanning
(aspect)
1920 x 1080 i (16 : 9)
1280 x 720 p (16 : 9)
704 x 480 i (16 : 9)
704 x 480 i (4 : 3)
640 x 480 i (4 : 3)
704 x 480 p (16 : 9)
704 x 480 p (4 : 3)
640 x 480 p (4 : 3)
Signal Format
Component
RGB
Composite
S Video
Component
RGB
Component
RGB
Jacks where connection is possible
INPUT1
INPUT4INPUT3INPUT2
AND CONNECTIONS
INSTALLATION
14
<ARE1349> En
Page 19
○○○○○○○○○○○○○○○○○○○○○○○○○○○○○○○○○○○○○○○○○○○○○○○○○○○○○○○○○○○○○○
○○○○○○○○○○○○○○○○○○○○○○○○○○○○○○○○○○○○○○○○○○○○○○○○○○○○○○○○○○○○○○○○○○○○○○○○○○○○○○○○○○○
○○○○○○○○○○○○○○○○○○○
Control cord connection
○○○○○○○○○○○○○○○○○○○
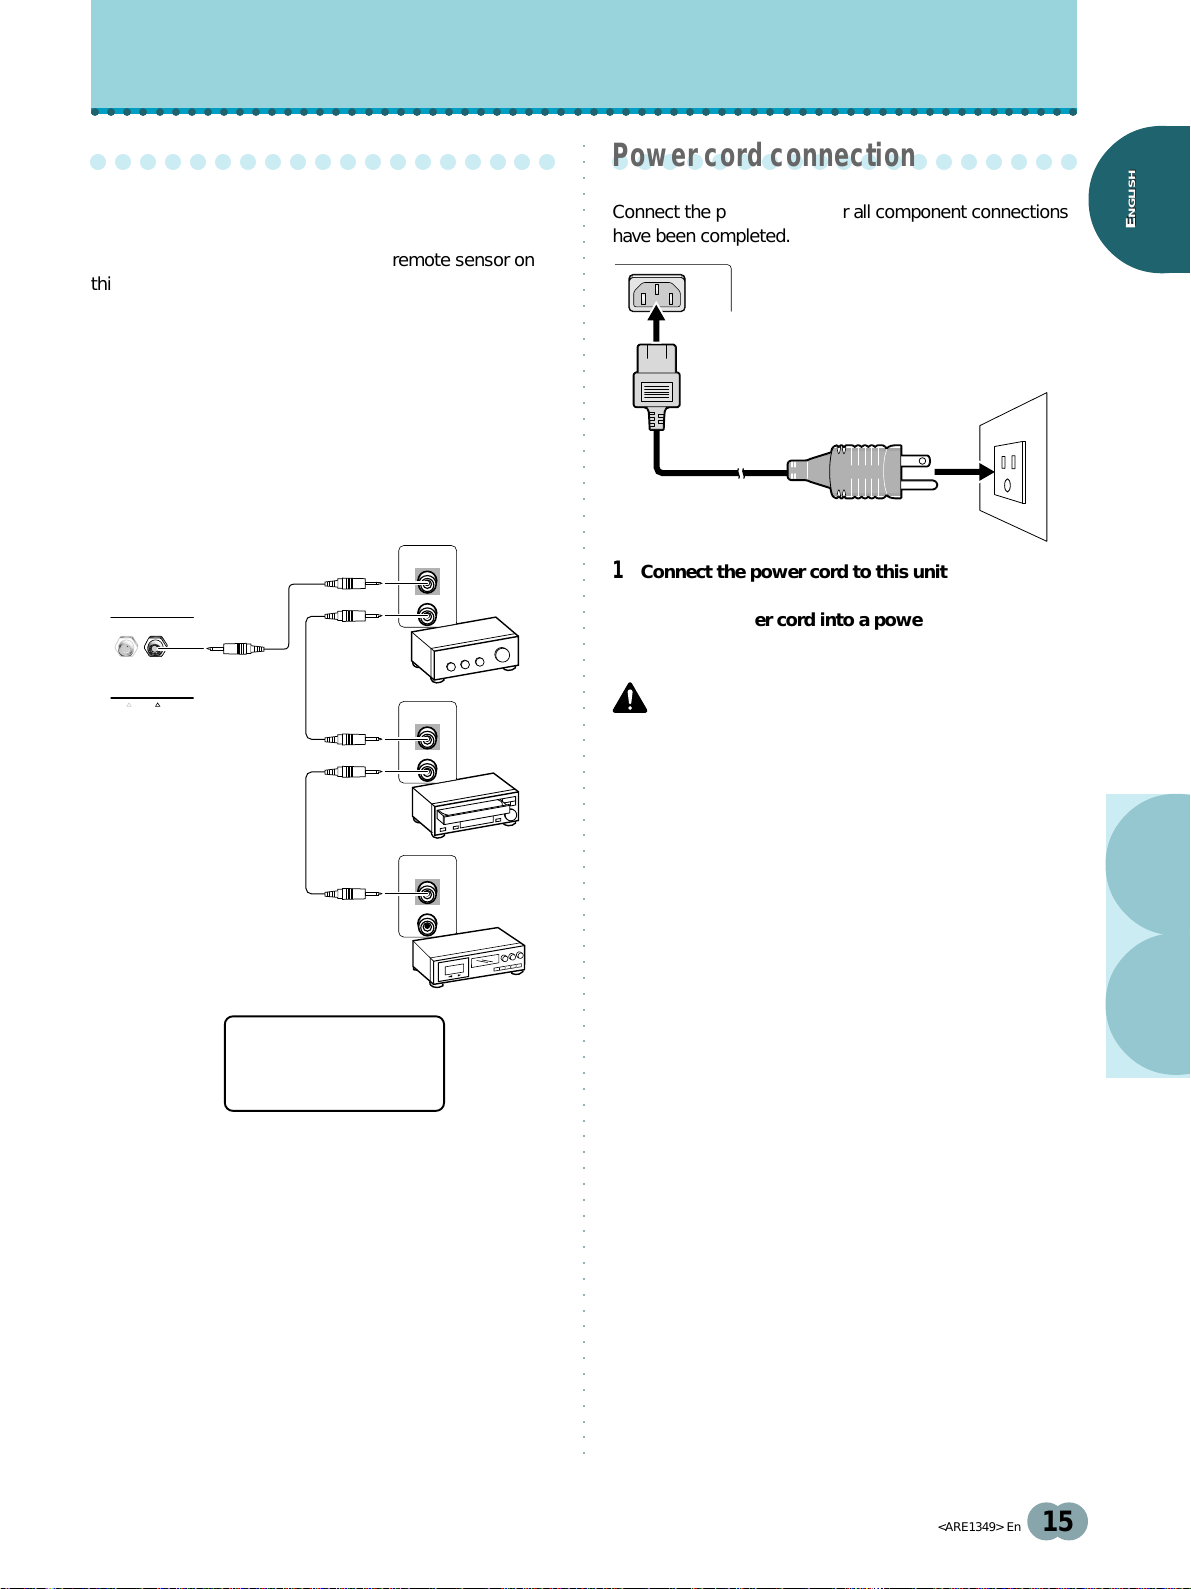
Power cord connection
INSTALLATION AND CONNECTIONS
When control cord connections are made, remote control
operation of connected PIONEER components that bear
the Î logo mark is done through the remote sensor on
this unit.
When the connection is made to the CONTROL IN jack
on another unit, the remote sensor of that component will
no longer receive signals. Point the remote control unit of
the connected component at the remote control sensor
on this unit to control.
Notes
÷ Make sure the power is turned off when making
connections.
÷ Please complete all component connections before
making control cord connections.
CONTROL
IN
Main Unit
IN OUT
CONTROL
OUT
CONTROL
IN
OUT
CONTROL
IN
OUT
Connect the power cord after all component connections
have been completed.
1
2
1 Connect the power cord to this unit.
2 Plug the power cord into a power outlet.
CAUTION
÷ Use only the power cord provided.
÷ Do not use a power supply voltage other than that indicated
(AC 120 V, 60 Hz) as this may cause fire or electric shock.
÷ For the plasma display, a three-core power cord with a ground
terminal is used for efficiency protection. Always be sure to
connect the power cord to a three-pronged outlet and make
sure that the cord is properly grounded. If you use a power
source converter plug, use an outlet with a ground terminal
and screw down the ground line.
NGLISH
NGLISH
E
E
The control cables (not
supplied) are monaural
cables with mini plugs (no
resistance).
AND CONNECTIONS
INSTALLATION
<ARE1349> En
15
Page 20
INSTALLATION AND CONNECTIONS
○○○○○○○○○○○○○○○○○○○○○○○○○○○○○○○○○○○○○○○○○○○○○○○○○○○○○○○○○○○○○○
○○○○○○○○○○○○○○○○○○○○○○○○○○○○○○○○○○○○○○○○○○○○○○○○○○○○○○○○○○○○○○○○○○○○○○○○○○○○○○○○○○○
○○○○○○○○○○○○○○○○○○○
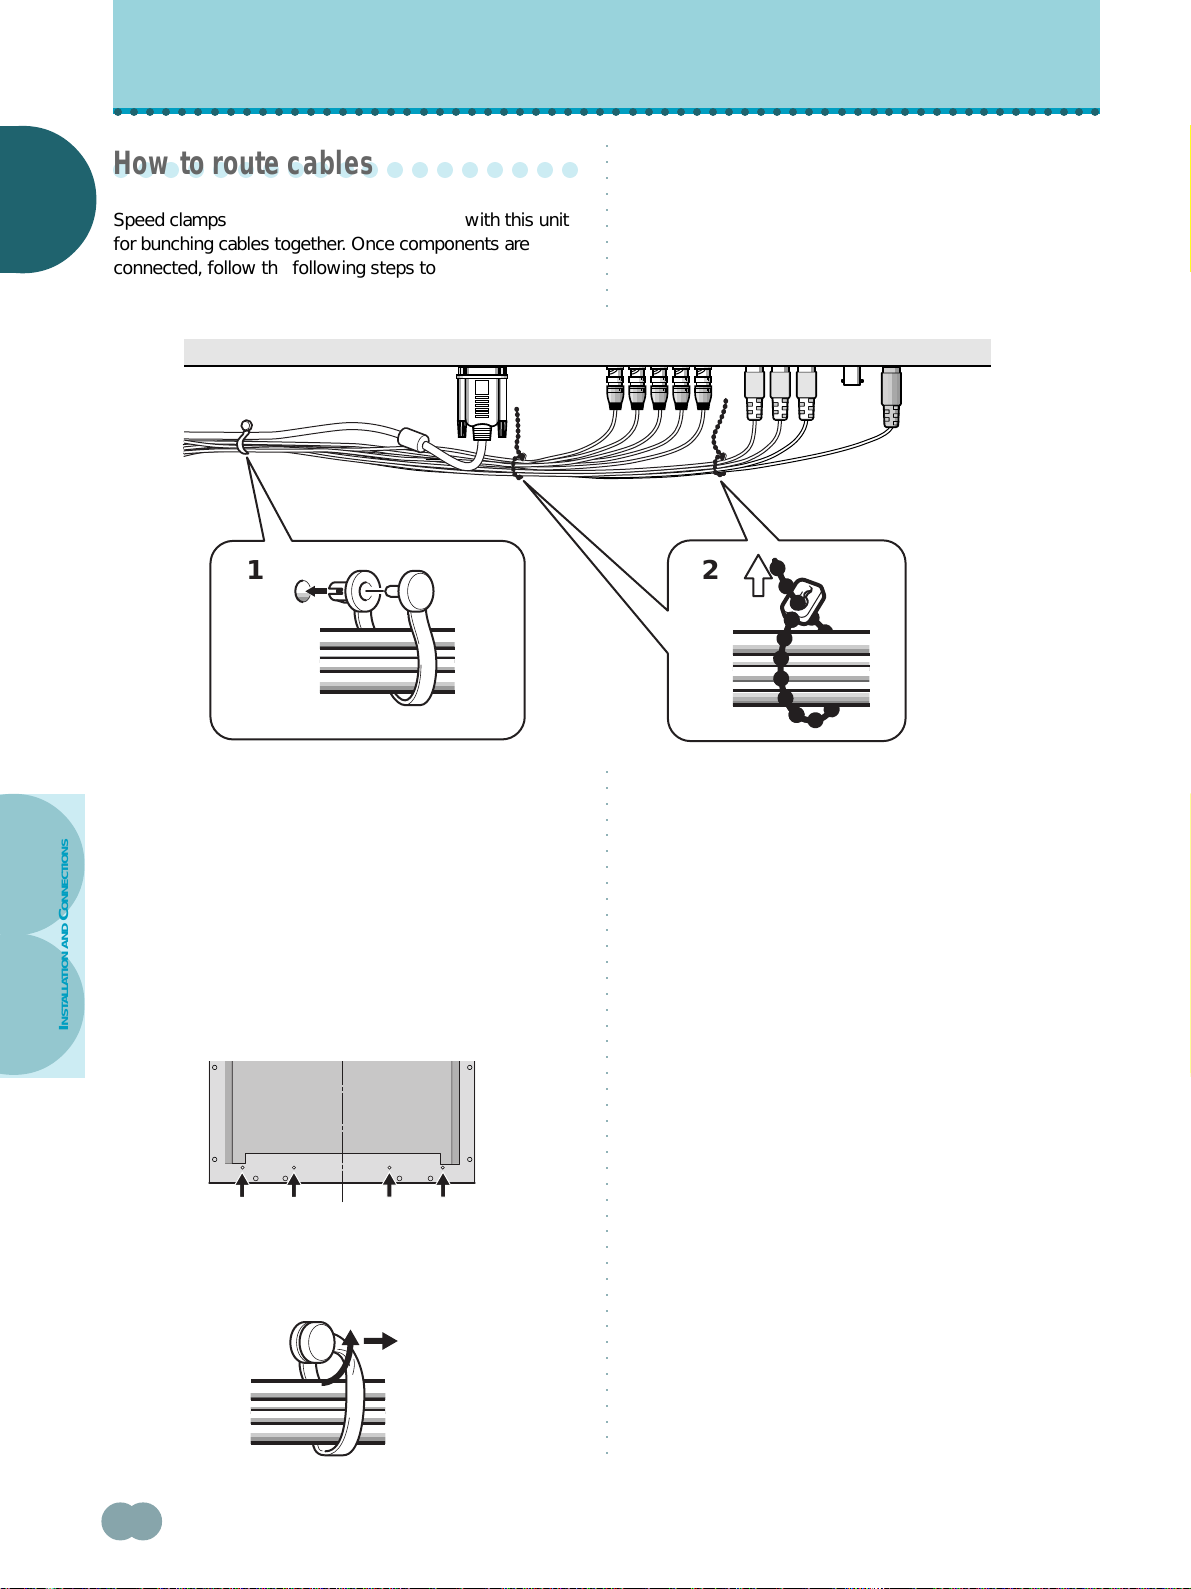
How to route cables
NGLISH
NGLISH
E
Speed clamps and bead bands are included with this unit
E
for bunching cables together. Once components are
connected, follow the following steps to route cables.
* As viewed from the rear of the display.
1
2
1
1 Organize cables together using the provided
speed clamps.
Insert 1 into an appropriate hole on the rear of the
unit, then snap 2 into the back of 1 to fix the clamp.
Speed clamps are designed to be difficult to undo
AND CONNECTIONS
INSTALLATION
once in place. Please attach carefully.
To attach the speed clamps to the main unit
Connect the speed clamps using the 4 holes marked with
÷ below, depending on the situation.
2
2 Bunch separated cables together and secure
them with the provided bead bands.
Note
Cables can be routed to the right or left.
To remove speed clamps
Using pliers, twist the clamp 90° and pull it outward.
In some cases the clamp may have deteriorated over
time and may be damaged when removed.
16
<ARE1349> En
Page 21
SETTING UP THE SYSTEM
○○○○○○○○○○○○○○○○○○○○○○○○○○○○○○○○○○○○○○○○○○○○○○○○○○○○○○○○○○○○○○
○○○○○○○○○○○○○○○○○○○○○○○○○○○○○○○○○○○○○○○○○○○○○○○○○○○○○○○○○○○○○○○○○○○○○○○○○○○○○○○○○○○
○○○○○○○○○○○○○○○○○○○
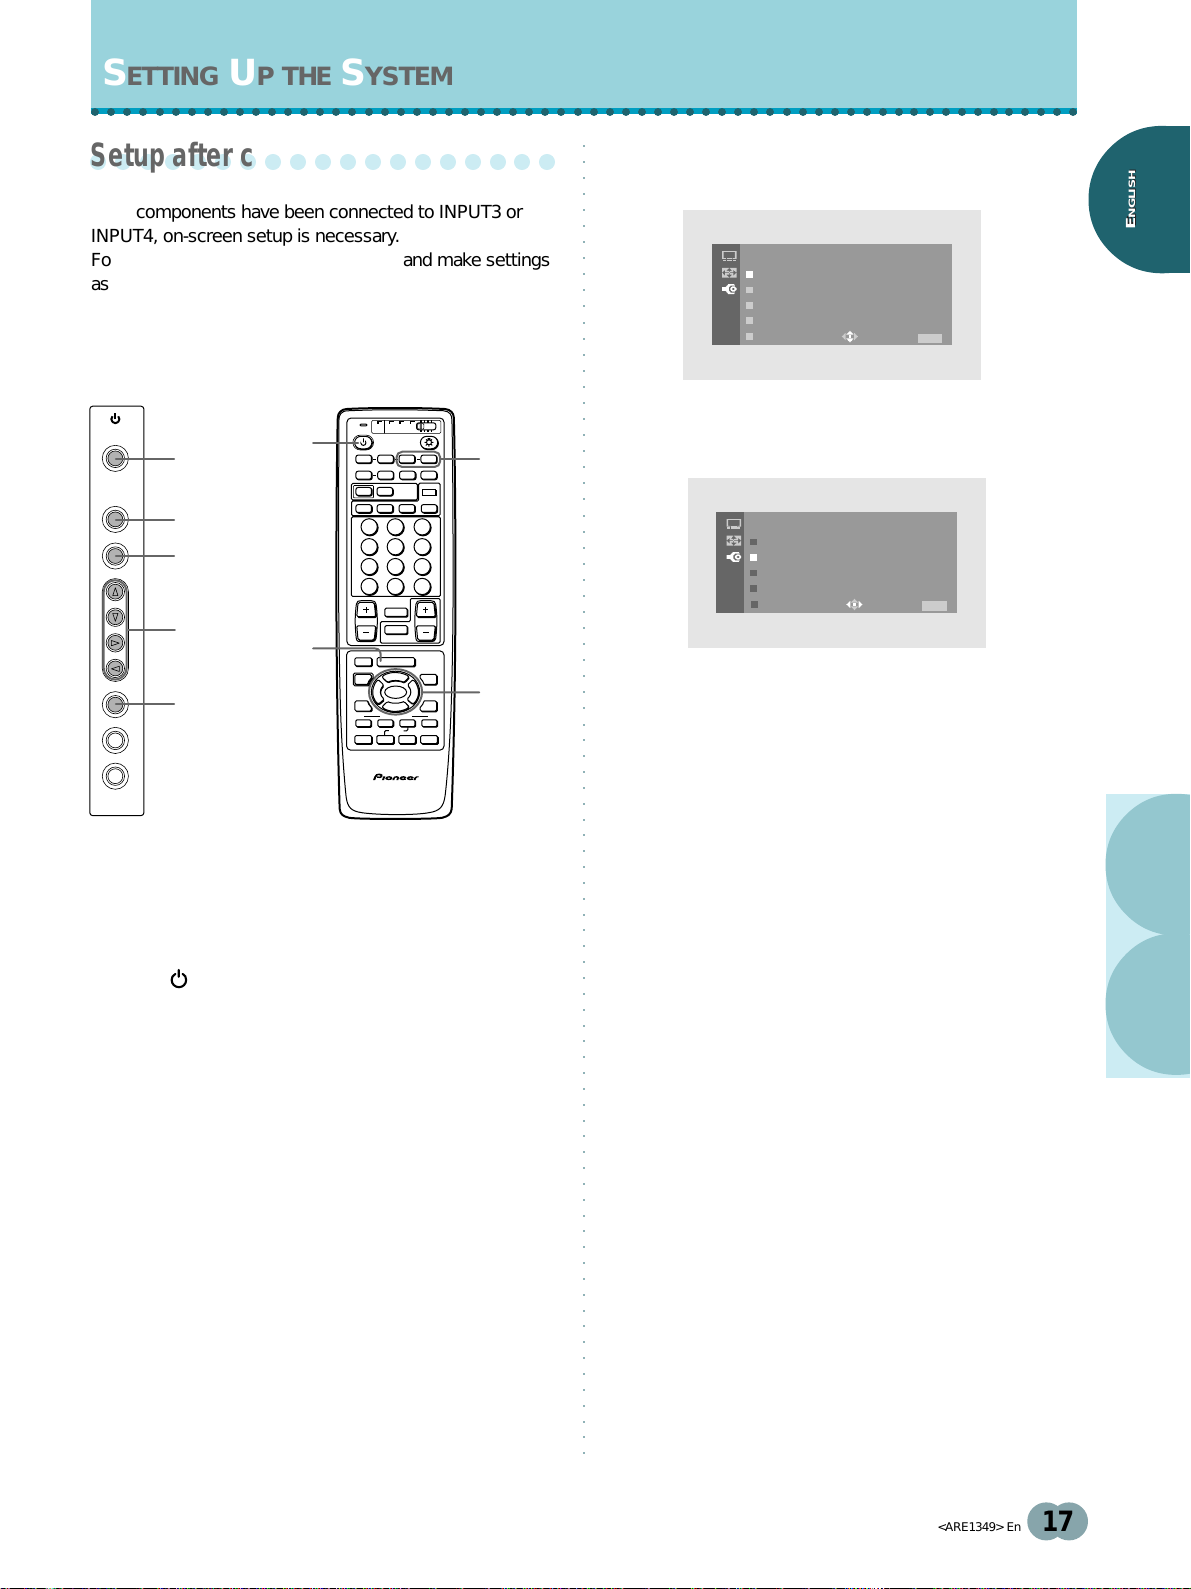
Setup after connection
5 Press 5/∞ to select SET UP, then press
SET/SELECT.
After components have been connected to INPUT3 or
INPUT4, on-screen setup is necessary.
Follow the procedure described below and make settings
as they apply to the type of components connected.
(Procedures are written in reference to the remote control
unit unless the button or control is only present on the
main unit.)
TV
DTV
DVD
CBL
STANDBY/ON
INPUT
MENU
ADJUST
SET
S.MODE
RETURN
2
3
4,10
5,6,7
8,9
5,6,7
8,9
2
4,10
/VCR
/LD
/SAT
STANDBY/ON
INPUT
1234
SCREEN
MODE
AUTO STILL
POWER
INPUT
RECEIVER
AUDIO CC
CLEAR
1 2 3
4 5 6
7 8 9
0
CH
RETURN
CH
MUTING
RECEIVER
TV/SAT/DTV/DVD
EDIT/
LEARN
MENU
SOURCE SAT/DTV
%
POWER
SET/
SELECT
%
%
DVD
TOP MENU
%
MENU
FAVORITES
1 7 3 ¡
VCR REC
84
CU-PDP008
PLASMA DISPLAY REMOTE CONTROL UNIT
ENTER
DISPLAY
CH
VOL
(SAT)/DTV
3
DTV
VIEW
MODE
GUIDE
5,6,7
INFO
8,9
¢
Î
SET UP
L
S
TLABE
USE:
:POWER SAVE FOF
:
L
END: MENU
S
IGNA :PC
G
ON YNCFOF
I
NPU
E
XIT
6 Press 5/∞ to select SIGNAL, then press
SET/SELECT.
SET UP
S
IGNA :V IDEO PC
G
ON YNCFOF
I
NPU
E
XIT
L
S
TLABE
USE:
:POWER SAVE FOF
:
L
END: MENU
7 Press 2/3 to select the input signal.
When a personal computer is connected, set to “PC”.
When a component other than a personal computer is
connected, set to “VIDEO”.
After selecting, press SET/SELECT to enter your
selection.
NGLISH
NGLISH
E
E
1 Switch MAIN POWER on the main unit to the on
position to turn the main power on.
The STANDBY/ON indicator lights red.
2 Press STANDBY/ON to put the unit in the
operation mode.
The STANDBY/ON indicator turns green.
3 Select INPUT3 or INPUT4.
4 Press MENU to display the menu screen.
The menu screen appears.
Note
Steps 6 to 7 are necessary when inputting a signal of horizontal
frequency 31.5kHz/vertical frequency 60Hz. For signals of other
frequencies, settings are done automatically, and therefore
cannot be performed.
P THE SYSTEM
SETTING U
<ARE1349> En
17
Page 22
SETTING UP THE SYSTEM
○○○○○○○○○○○○○○○○○○○○○○○○○○○○○○○○○○○○○○○○○○○○○○○○○○○○○○○○○○○○○○
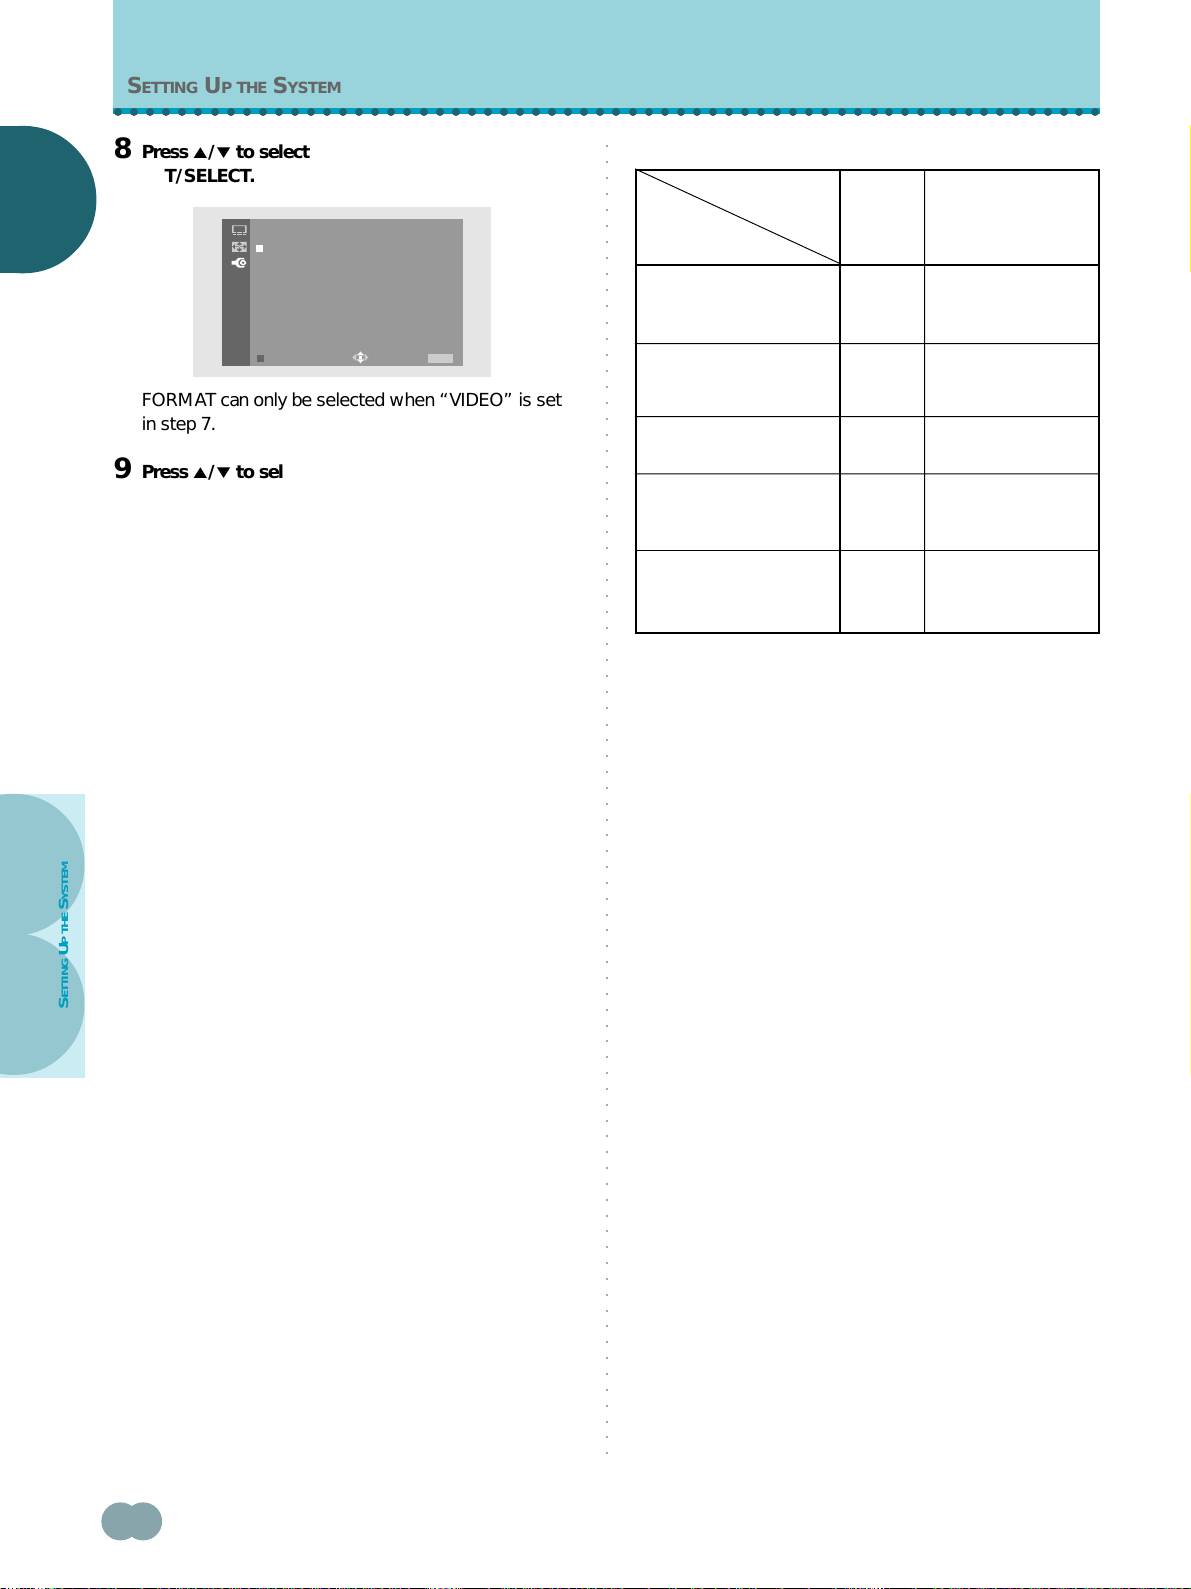
8 Press 5/∞ to select FORMAT, then press
○○○○○○○○○○○○○○○○○○○○○○○○○○○○○○○○○○○○○○○○○○○○○○○○○○○○○○○○○○○○○○○○○○○○○○○○○○○○○○○○○○○
Set SIGNAL and FORMAT as follows.
SET/SELECT.
NGLISH
NGLISH
E
E
SET UP
FORMAT : COMPONENT1
EX IT
COMPONENT2
RGB
USE:
FORMAT can only be selected when “VIDEO” is set
in step 7.
9 Press 5/∞ to select the input signal format.
The table in the right column on this page shows what
settings are appropriate and available for the type of
connections made.
After selecting, press SET/SELECT to enter your
selection.
END: MENU
Connected
component
Component video output
of a DTV Set Top Box with
HDTV output
Component video output
of a DTV Set Top Box with
SDTV output
Component video output
of a DVD player, etc.
RGB video output of a
video deck etc., with RGB
output
RGB video output of a PC
SET UP
FORMATSIGNAL
VIDEO COMPONENT 1*
VIDEO COMPONENT 2*
VIDEO
VIDEO
PC
COMPONENT 2*
RGB
RGB (Fixed to RGB
when SIGNAL is set
to “PC”.)
10When the setup is completed, press MENU to exit
the menu screen.
Notes
÷ Make this setup for each input (INPUT3 and INPUT4).
÷ When selecting a PC signal or when SIGNAL is set to “PC”,
FORMAT cannot be selected.
÷ When FORMAT is set to “COMPONENT” (1 or 2), “G ON
SYNC” cannot be set.
÷ Please refer to page 19 for details concerning G ON SYNC
setup.
* Select either COMPONENT 1 or 2 depending on which setting
provides the most natural picture color for the component
connected.
Note
When a DTV Set Top Box is connected, please also refer to
“About DTV Set Top Box connection” on page 14.
P THE SYSTEM
SETTING U
18
<ARE1349> En
Page 23
○○○○○○○○○○○○○○○○○○○○○○○○○○○○○○○○○○○○○○○○○○○○○○○○○○○○○○○○○○○○○○
CH
VOL
○○○○○○○○○○○○○○○○○○○○○○○○○○○○○○○○○○○○○○○○○○○○○○○○○○○○○○○○○○○○○○○○○○○○○○○○○○○○○○○○○○○
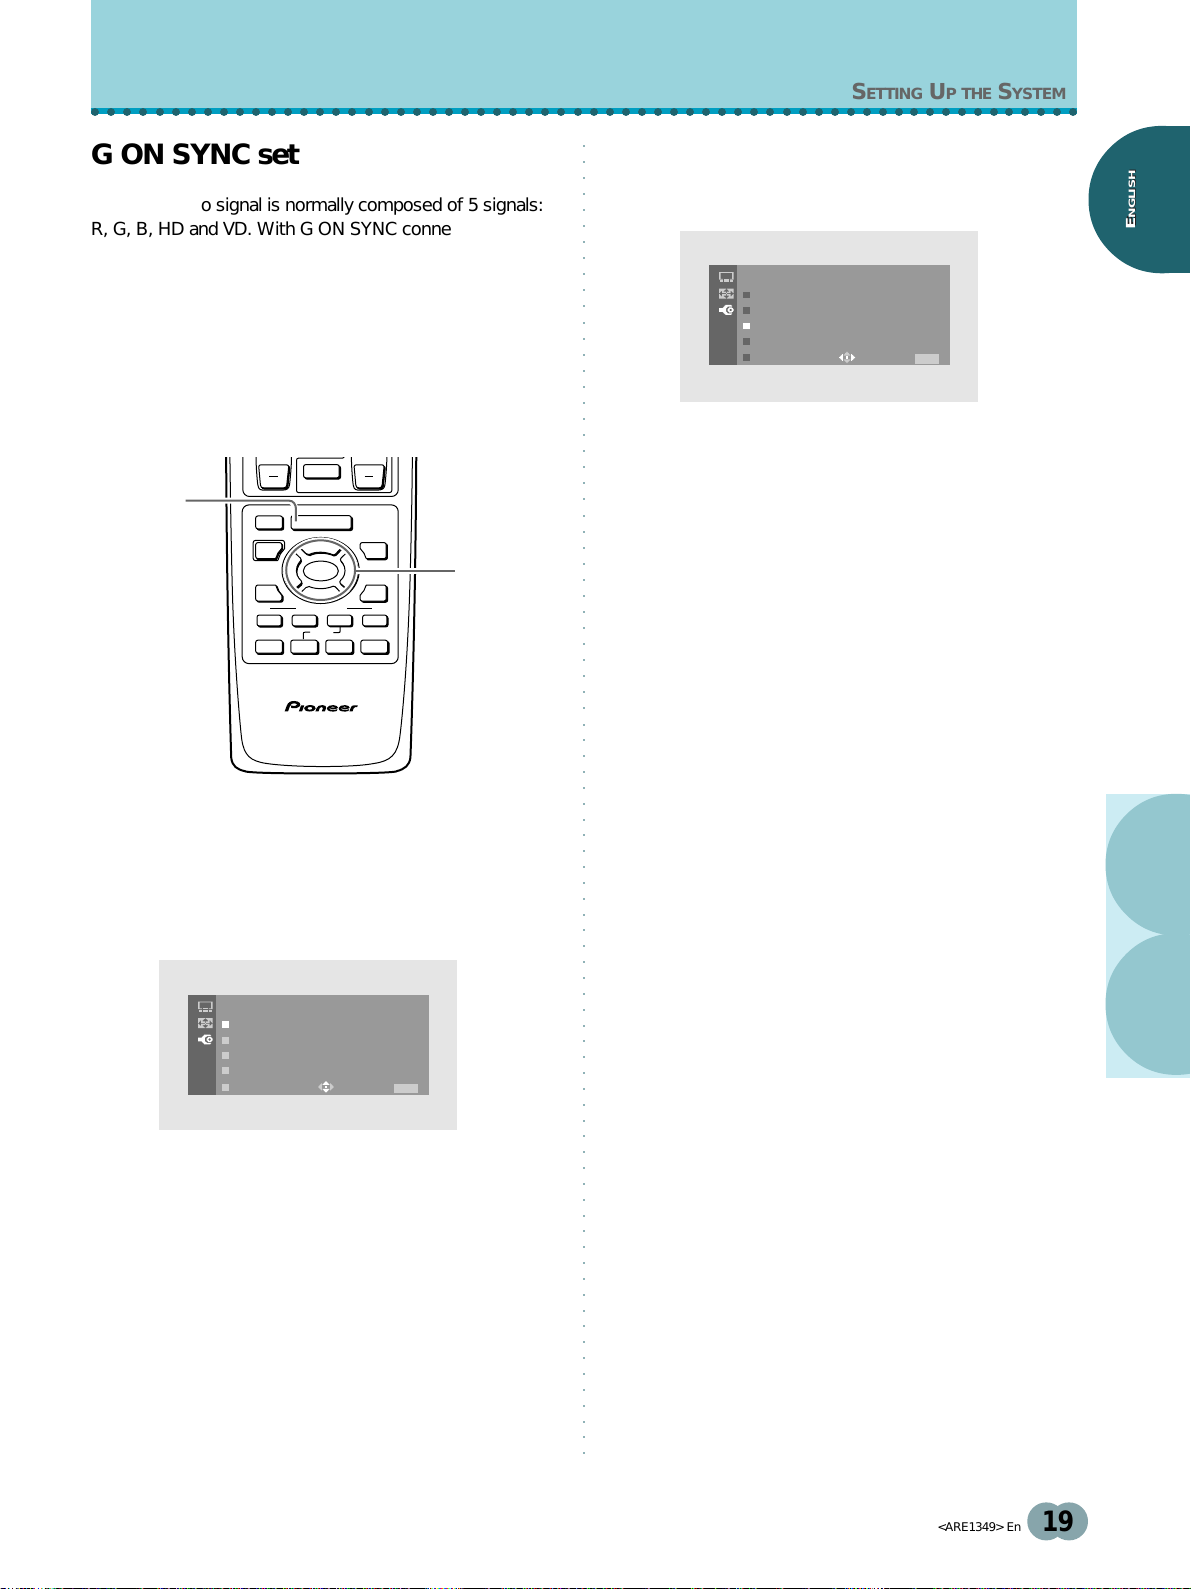
G ON SYNC setup
3 Press 5/∞ to select G ON SYNC, then press
SETTING UP THE SYSTEM
SET/SELECT.
The RGB video signal is normally composed of 5 signals:
R, G, B, HD and VD. With G ON SYNC connection,
however, the signal is composed of 3 signals: R, G (G, HD
and VD combined) and B.
If the component being used is a model where G ON
SYNC connection is carried out, the following on-screen
setup is necessary.
SET UP
S
L
IGNA :PC
G
ON YNCNOOF
S
I
NPU
TLABE
XIT
USE:
E
:POWER SAVE FOF
:
L
F
END: MENU
Setup of G ON SYNC connection
4 Press 2/3 to select G ON SYNC setting.
After selecting, press SET/SELECT to enter your
selection.
5 When the setup is completed, press MENU to
close the menu screen.
Notes
÷ Make this G ON SYNC setting for each applicable input
(INPUT3 and INPUT4).
÷ When using this setup, be sure to carefully check the signal
output of the component that you are using. For details, please
refer to the instruction manual supplied with the component
you are connecting.
÷ If the screen becomes bright and turns a greenish color, set
G ON SYNC to ON.
÷ G ON SYNC connection is carried out on some Macintosh
computers.
1,5
MUTING
RECEIVER
TV/SAT/DTV/DVD
EDIT/
LEARN
MENU
SOURCE SAT/DTV
TOP MENU
%
POWER
%
DVD
MENU
FAVORITES
1 7 3 ¡
84
CU-PDP008
PLASMA DISPLAY REMOTE CONTROL UNIT
SET/
SELECT
%
VCR REC
%
GUIDE
(SAT)/DTV
INFO
2,3,4
¢
Î
1 Press MENU to display the menu screen.
The menu screen appears.
NGLISH
NGLISH
E
E
2 Press 5/∞ to select SET UP, then press
SET/SELECT.
SET UP
S
IGNA :PC
G
ON YNCFOF
I
NPU
E
XIT
L
S
TLABE
USE:
:POWER SAVE FOF
:
L
END: MENU
P THE SYSTEM
SETTING U
<ARE1349> En
19
Page 24
OPERATIONS
○○○○○○○○○○○○○○○○○○○○○○○○○○○○○○○○○○○○○○○○○○○○○○○○○○○○○○○○○○○○○○
○○○○○○○○○○○○○○○○○○○○○○○○○○○○○○○○○○○○○○○○○○○○○○○○○○○○○○○○○○○○○○○○○○○○○○○○○○○○○○○○○○○
○○○○○○○○○○○○○○○○○○○
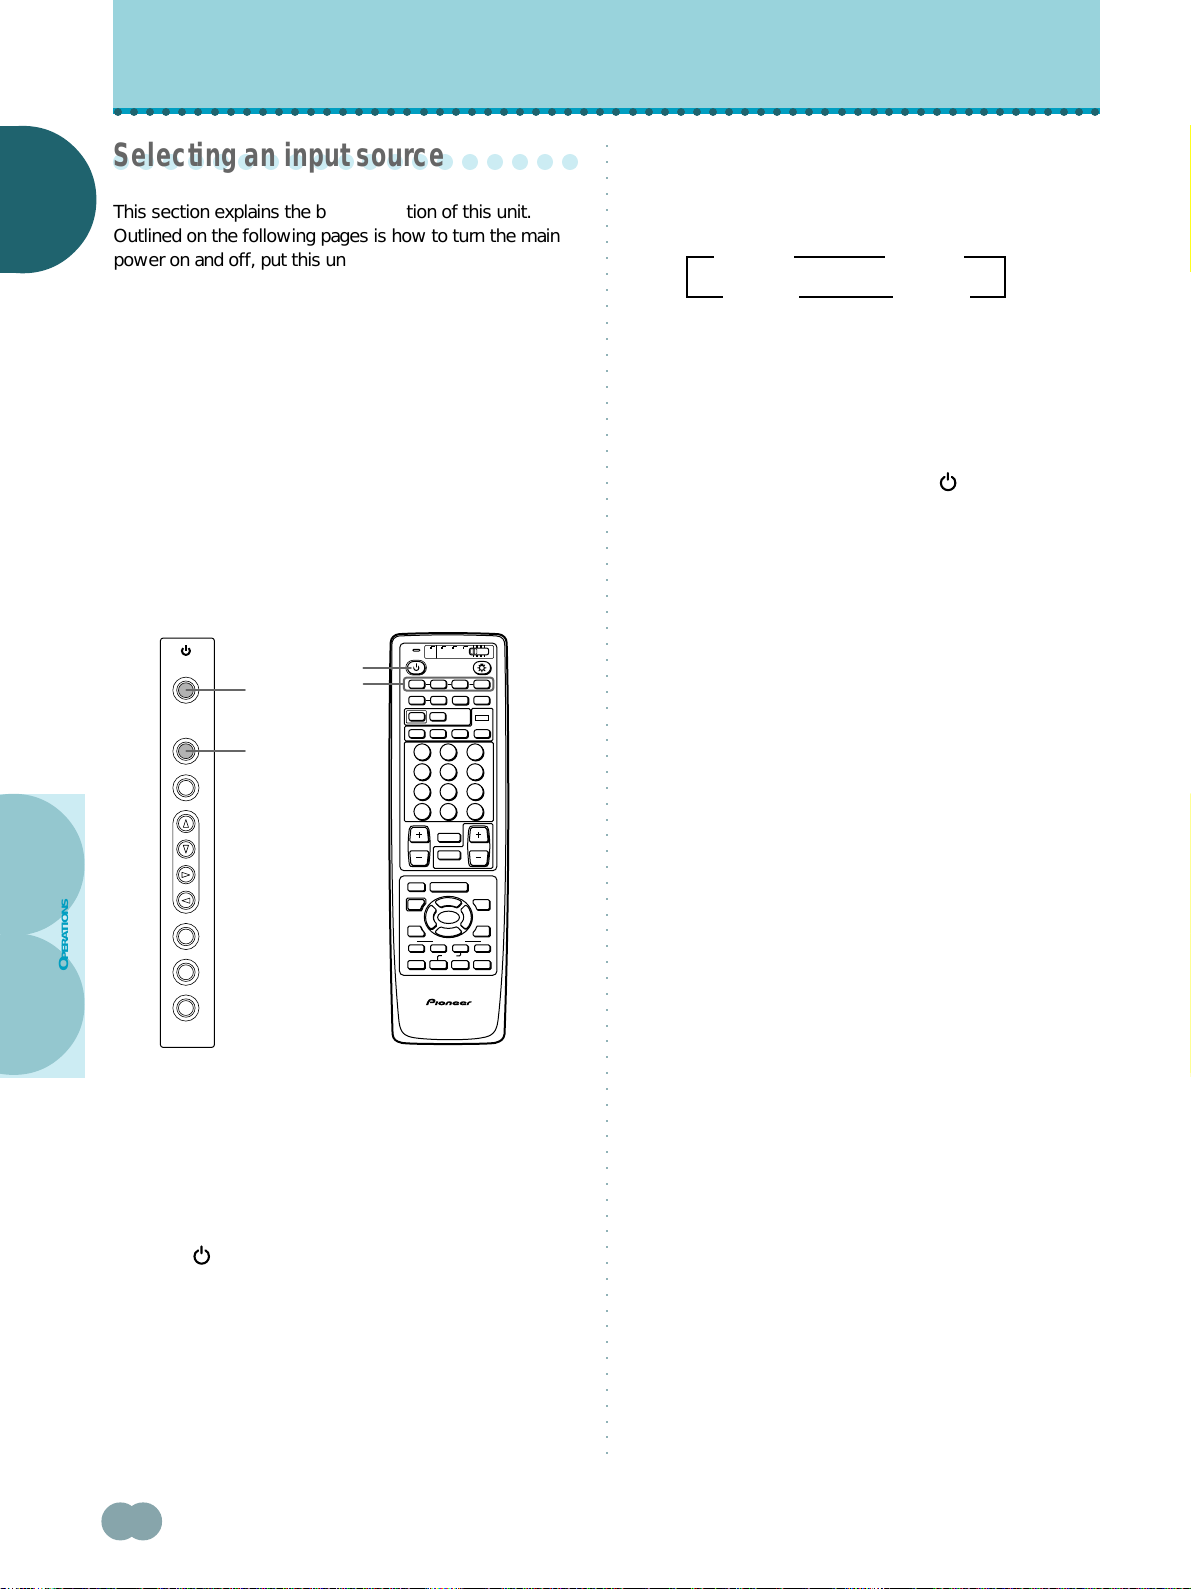
Selecting an input source
NGLISH
NGLISH
This section explains the basic operation of this unit.
E
E
Outlined on the following pages is how to turn the main
power on and off, put this unit in the operation or standby
mode and how to select connected components.
3 Press INPUT on the remote control unit or the
main unit to select the input.
On the control panel of the main unit, input changes
each time INPUT is pressed as follows.
3
INPUT1
INPUT4
2
3
INPUT2
INPUT3
2
Before you begin, make sure you have:
÷ Made connections between this unit and AV
components or personal computer as described in the
section “Installation and Connections” starting on
page 9.
÷ Set up the on-screen menu to input signals from
components connected to INPUT3 and INPUT4 as
described in the section “Setting Up the System” on
page 17.
If no connections are made to these terminals,
on-screen setup is not necessary.
OPERATIONS
STANDBY/ON
INPUT
MENU
ADJUST
SET
S.MODE
RETURN
2,4
3
2,4
3
MODE
POWER
AUDIO CC
LEARN
SOURCE SAT/DTV
POWER
TOP MENU
MENU
TV
DTV
DVD
CBL
/VCR
/LD
/SAT
STANDBY/ON
INPUT
1234
SCREEN
DISPLAY
AUTO STILL
INPUT
RECEIVER
DTV
VIEW
CLEAR
MODE
1 2 3
4 5 6
7 8 9
CH
ENTER
0
CH
RETURN
CH
VOL
MUTING
RECEIVER
TV/SAT/DTV/DVD
EDIT/
MENU
%
GUIDE
SET/
SELECT
%
%
DVD
1 7 3 ¡
CU-PDP008
PLASMA DISPLAY REMOTE CONTROL UNIT
(SAT)/DTV
%
INFO
FAVORITES
VCR REC
84
¢
÷ Input cannot be changed when a menu screen is
displayed.
÷ When a signal from a personal computer is input, if
the signal is not compatible with this unit, “OUT OF
RANGE” will appear on the screen.
4 When viewing is finished, press STANDBY/ON
to put the unit in standby mode.
The STANDBY/ON indicator will blink and then remain
lit (red) indicating that the standby mode is engaged.
Operation is not possible while the STANDBY/ON
indicator is blinking (red).
5 Switch MAIN POWER on the main unit to the off
position to turn the main power off.
CAUTION
Please do not leave the same picture displayed on the screen for
a long time. Doing so may cause a phenomenon known as
“screen burn” which leaves a ghost, or residual, image of the
picture on the screen.
Î
the main unit
Remote control unitOperation panel of
1 Switch MAIN POWER on the main unit to the on
position to turn the main power on.
The STANDBY/ON indicator lights red.
2 Press STANDBY/ON to put this unit in the
operation mode.
The STANDBY/ON indicator turns green.
20
<ARE1349> En
Page 25
OPERATIONS
○○○○○○○○○○○○○○○○○○○○○○○○○○○○○○○○○○○○○○○○○○○○○○○○○○○○○○○○○○○○○○
To create a still image of the video
○○○○○○○○○○○○○○○○○○○○○○○○○○○○○○○○○○○○○○○○○○○○○○○○○○○○○○○○○○○○○○○○○○○○○○○○○○○○○○○○○○○
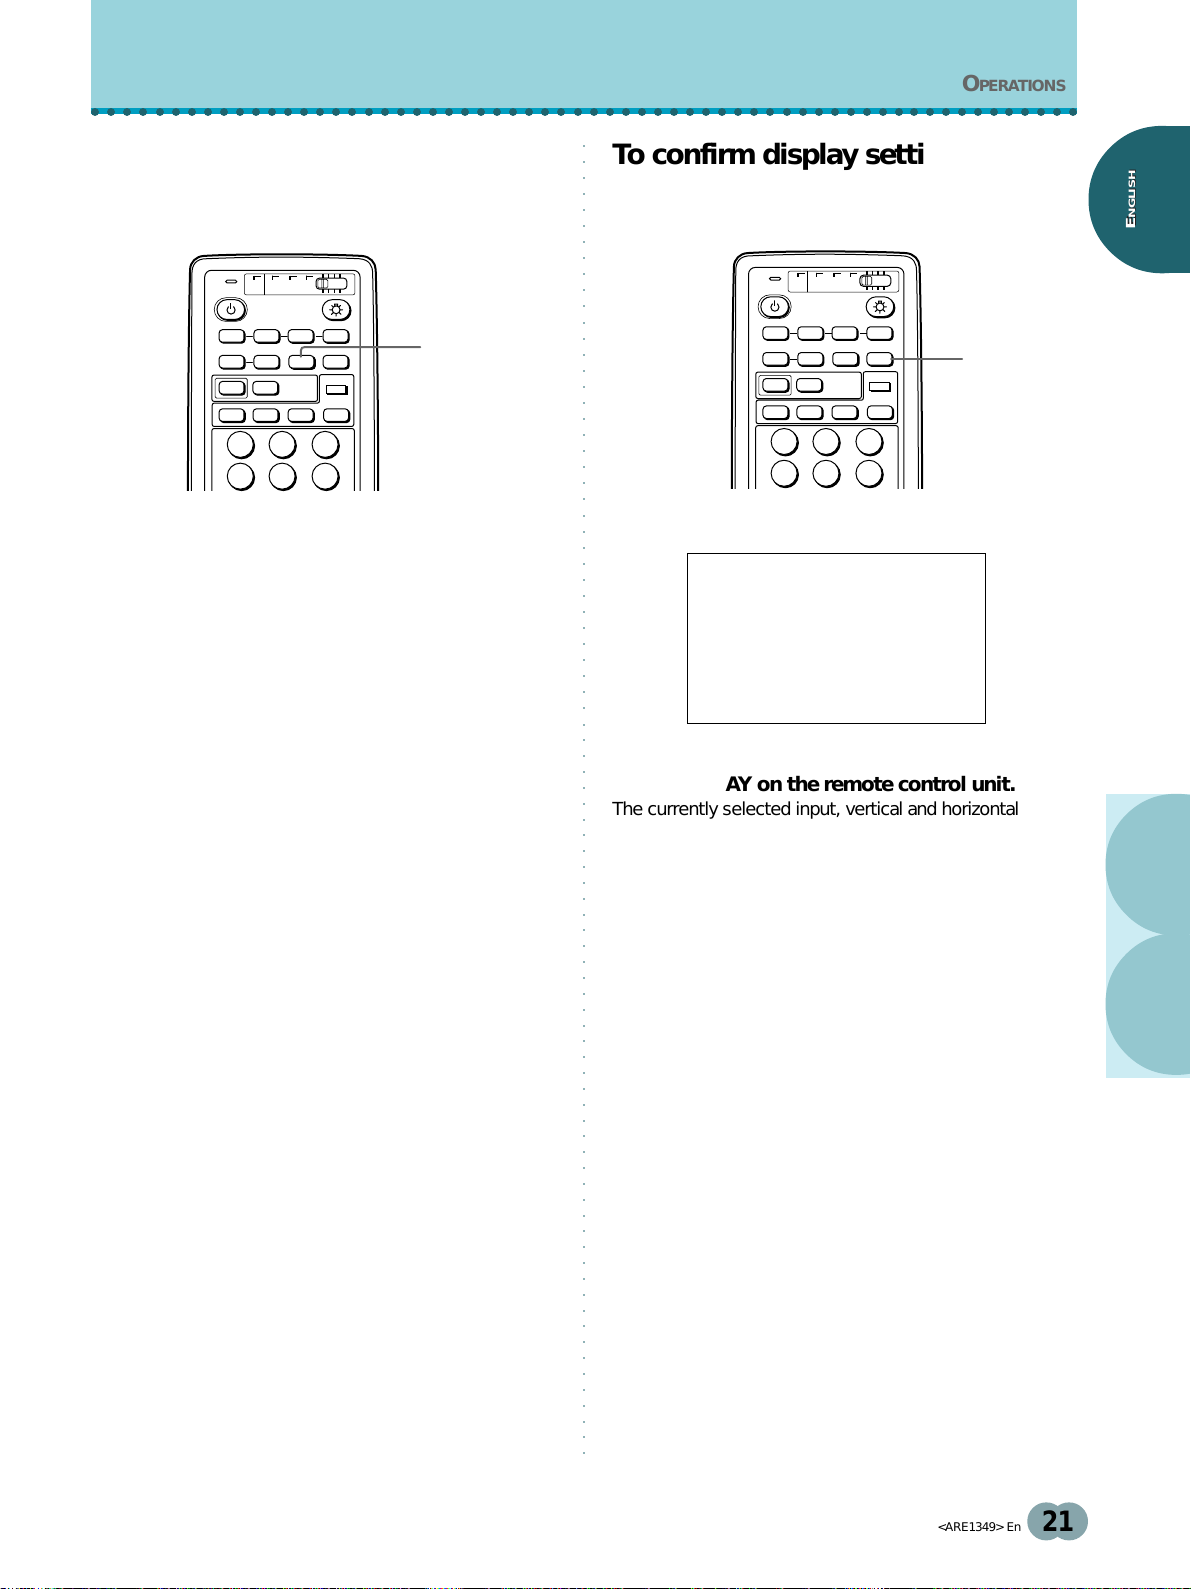
To confirm display settings
image on the screen
TV
DTV
DVD
TV
DTV
DVD
CBL
/VCR
/LD
/SAT
STANDBY/ON
INPUT
1234
SCREEN
MODE
POWER
INPUT
AUDIO CC
AUTO STILL
RECEIVER
CLEAR
DISPLAY
DTV
VIEW
MODE
1 2 3
4 5 6
STILL
CBL
/VCR
/LD
/SAT
STANDBY/ON
INPUT
1234
SCREEN
MODE
POWER
INPUT
AUDIO CC
AUTO STILL
RECEIVER
CLEAR
DISPLAY
DTV
VIEW
MODE
1 2 3
4 5 6
DISPLAY
NGLISH
NGLISH
E
E
Press STILL on the remote control unit.
The image currently being viewed is preserved on the
screen. This function is convenient for viewing things on
the screen that would normally be cleared before there
was ample time to view it (recipes in a cooking program
for example).
Pressing STILL again returns to unit to normal display of
the input source.
Notes
÷ Though the video image on the screen is frozen, the video
signal is not paused.
÷ Normal display of the video input source is restored after 3
minutes even if STILL has not been pressed again.
PU
INPCT4
GB
R
8
.kHZFH: 4
000
.HZFV: 6
STD
UFLL
Press DISPLAY on the remote control unit.
The currently selected input, vertical and horizontal
frequencies, PICTURE mode, screen size, AUTO SCREEN
setting, and input signal format are displayed on the
screen for approximately 3 seconds.
Notes
÷ The vertical and horizontal frequencies are displayed only
when INPUT3 or INPUT4 is selected to receive an RGB signal.
When receiving a component video signal, only the horizontal
frequency is displayed.
÷ The vertical and horizontal frequencies that are displayed are
approximations, and may be slightly different from the actual
values.
OPERATIONS
<ARE1349> En
21
Page 26
OPERATIONS
○○○○○○○○○○○○○○○○○○○○○○○○○○○○○○○○○○○○○○○○○○○○○○○○○○○○○○○○○○○○○○
○○○○○○○○○○○○○○○○○○○○○○○○○○○○○○○○○○○○○○○○○○○○○○○○○○○○○○○○○○○○○○○○○○○○○○○○○○○○○○○○○○○
○○○○○○○○○○○○○○○○○○○
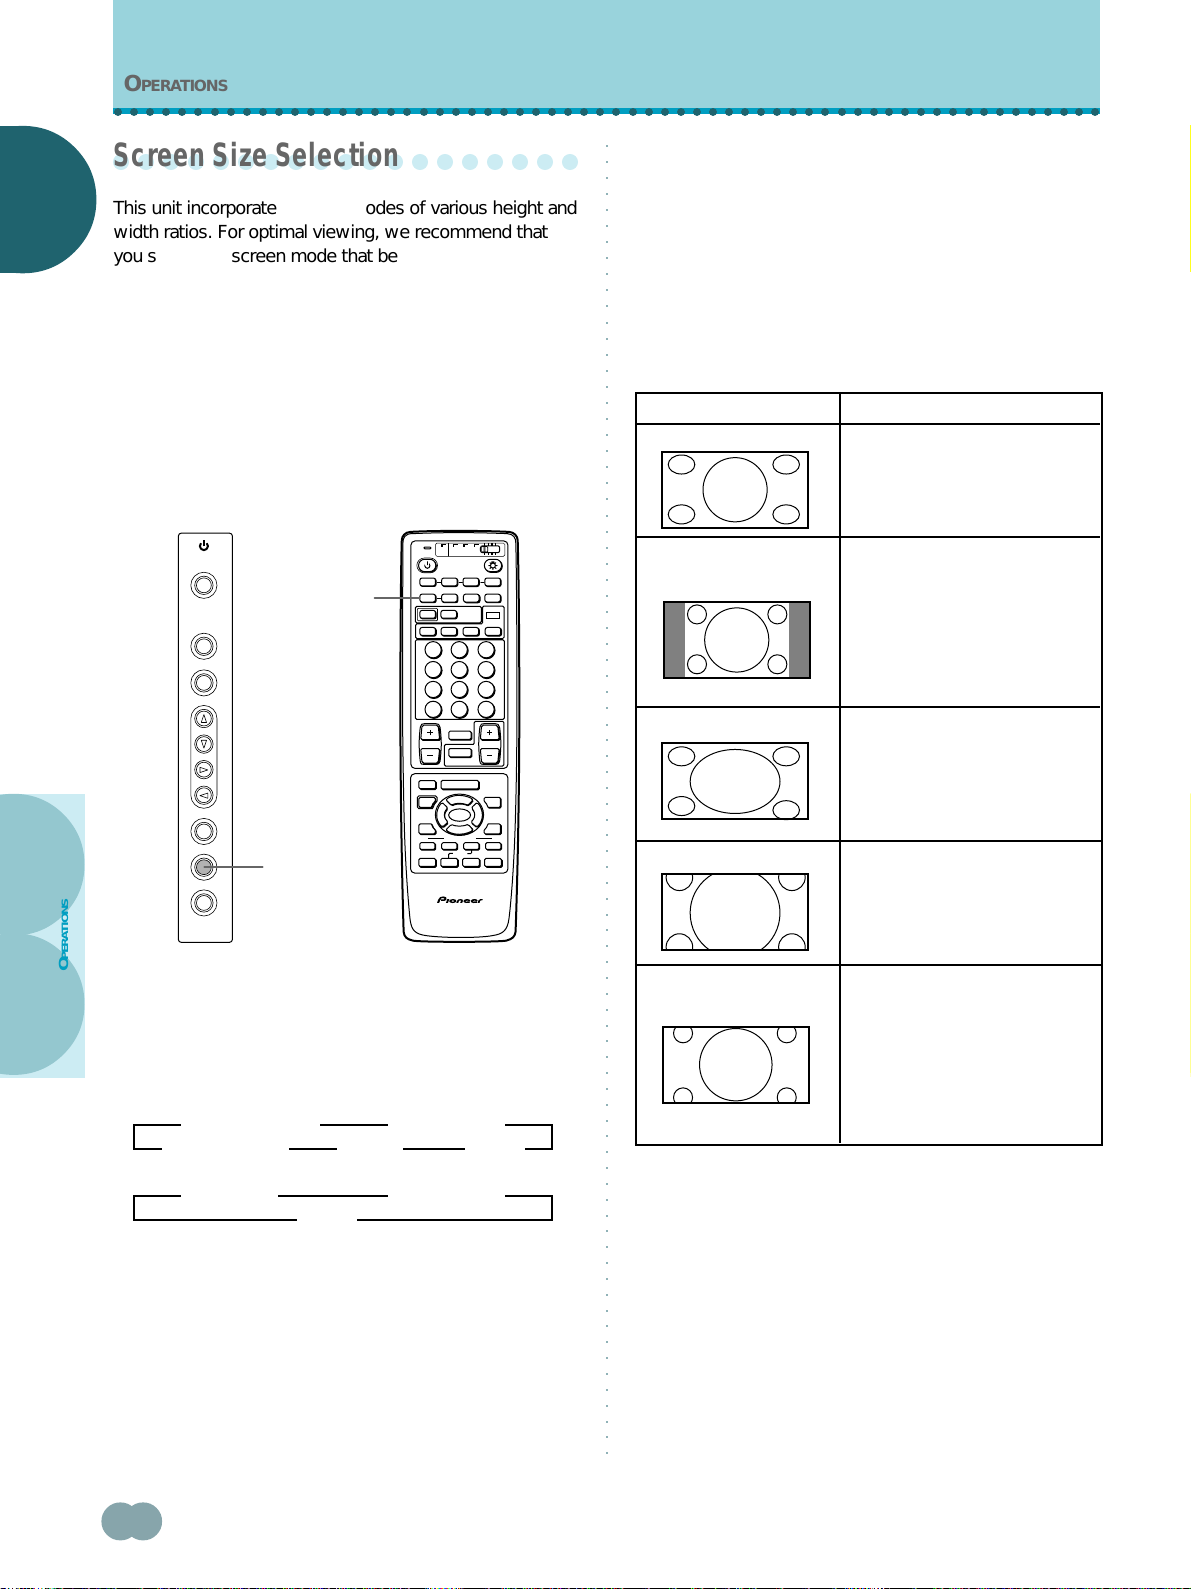
Screen Size Selection
This unit incorporates screen modes of various height and
NGLISH
NGLISH
E
E
width ratios. For optimal viewing, we recommend that
you select the screen mode that best matches the video
source that you are viewing. Although these modes are
designed for full display of a picture on a wide screen, it is
our hope that you make use of them with a full
understanding of the manufacturer’s intentions.
Manual selection (SCREEN MODE)
The size of the picture or the picture’s range projected on
the screen can be manually changed between 5 different
screen sizes described in the table on this page.
TV
DTV
CBL
/VCR
STANDBY/ON
INPUT
MENU
ADJUST
SET
S.MODE
RETURN
SCREEN
MODE
S.MODE
/SAT
STANDBY/ON
INPUT
1234
SCREEN
MODE
AUTO STILL
POWER
INPUT
RECEIVER
AUDIO CC
CLEAR
1 2 3
4 5 6
7 8 9
0
CH
RETURN
CH
MUTING
RECEIVER
TV/SAT/DTV/DVD
EDIT/
LEARN
MENU
SOURCE SAT/DTV
%
POWER
SET/
SELECT
%
DVD
TOP MENU
%
MENU
FAVORITES
1 7 3 ¡
VCR REC
84
CU-PDP008
PLASMA DISPLAY REMOTE CONTROL UNIT
DVD
/LD
DISPLAY
DTV
VIEW
MODE
CH
ENTER
VOL
GUIDE
%
(SAT)/DTV
INFO
¢
Î
Notes
÷ When the NATURAL WIDE, CINEMA WIDE, ZOOM, or FULL
setting is used to display a non-wide screen 4:3 picture fully on
a wide screen, a portion of the picture may be cut off or
appear deformed.
÷ Please note that when this unit is used for business or public
viewing purposes and the CINEMA WIDE mode or ZOOM
screen modes are used to compress or stretch the screen
picture, this may violate the rights of the author protected
under copyright law.
During video signal input
How the picture looks
NATURAL WIDE
4:3 NORMAL
FULL
ZOOM
Suitable for when viewing news or
sports programs. Movies or sports
programs can be viewed with an
expansive powerful image.
Suitable for when viewing news or
sit coms. Video software can be
viewed in its original screen frame
size. (To prevent screen burn on
this unit, the displayed position of
the screen frame will be slightly
different each time the power is
turned on.)
Suitable for wide screen images
(squeeze).
Mainly suitable for viewing
Cinemascope size and other such
movie images. Provides a more
expansive, powerful image.
OPERATIONS
Press SCREEN MODE to select the size.
The screen size changes each time SCREEN MODE on
the remote control, or S.MODE on the main unit is
pressed as follows.
For video signals
3 NATURAL WIDE 3 4.3 NORMAL
ZOOM 2CINEMA WIDE 2
For PC signals
3 ORIGINAL 3 4.3 NORMAL
FULL 2
22
<ARE1349> En
FULL 2
Mainly suitable for viewing Vista
CINEMA WIDE
size and other such movie images.
Provides a more expansive,
powerful image. This screen size
is convenient when viewing a
Cinemascope size image that has
subtitles.
(For screen sizes when the video signal of a personal
computer is input, please see pages 25 and 56.)
Page 27
OPERATIONS
○○○○○○○○○○○○○○○○○○○○○○○○○○○○○○○○○○○○○○○○○○○○○○○○○○○○○○○○○○○○○○
○○○○○○○○○○○○○○○○○○○○○○○○○○○○○○○○○○○○○○○○○○○○○○○○○○○○○○○○○○○○○○○○○○○○○○○○○○○○○○○○○○○
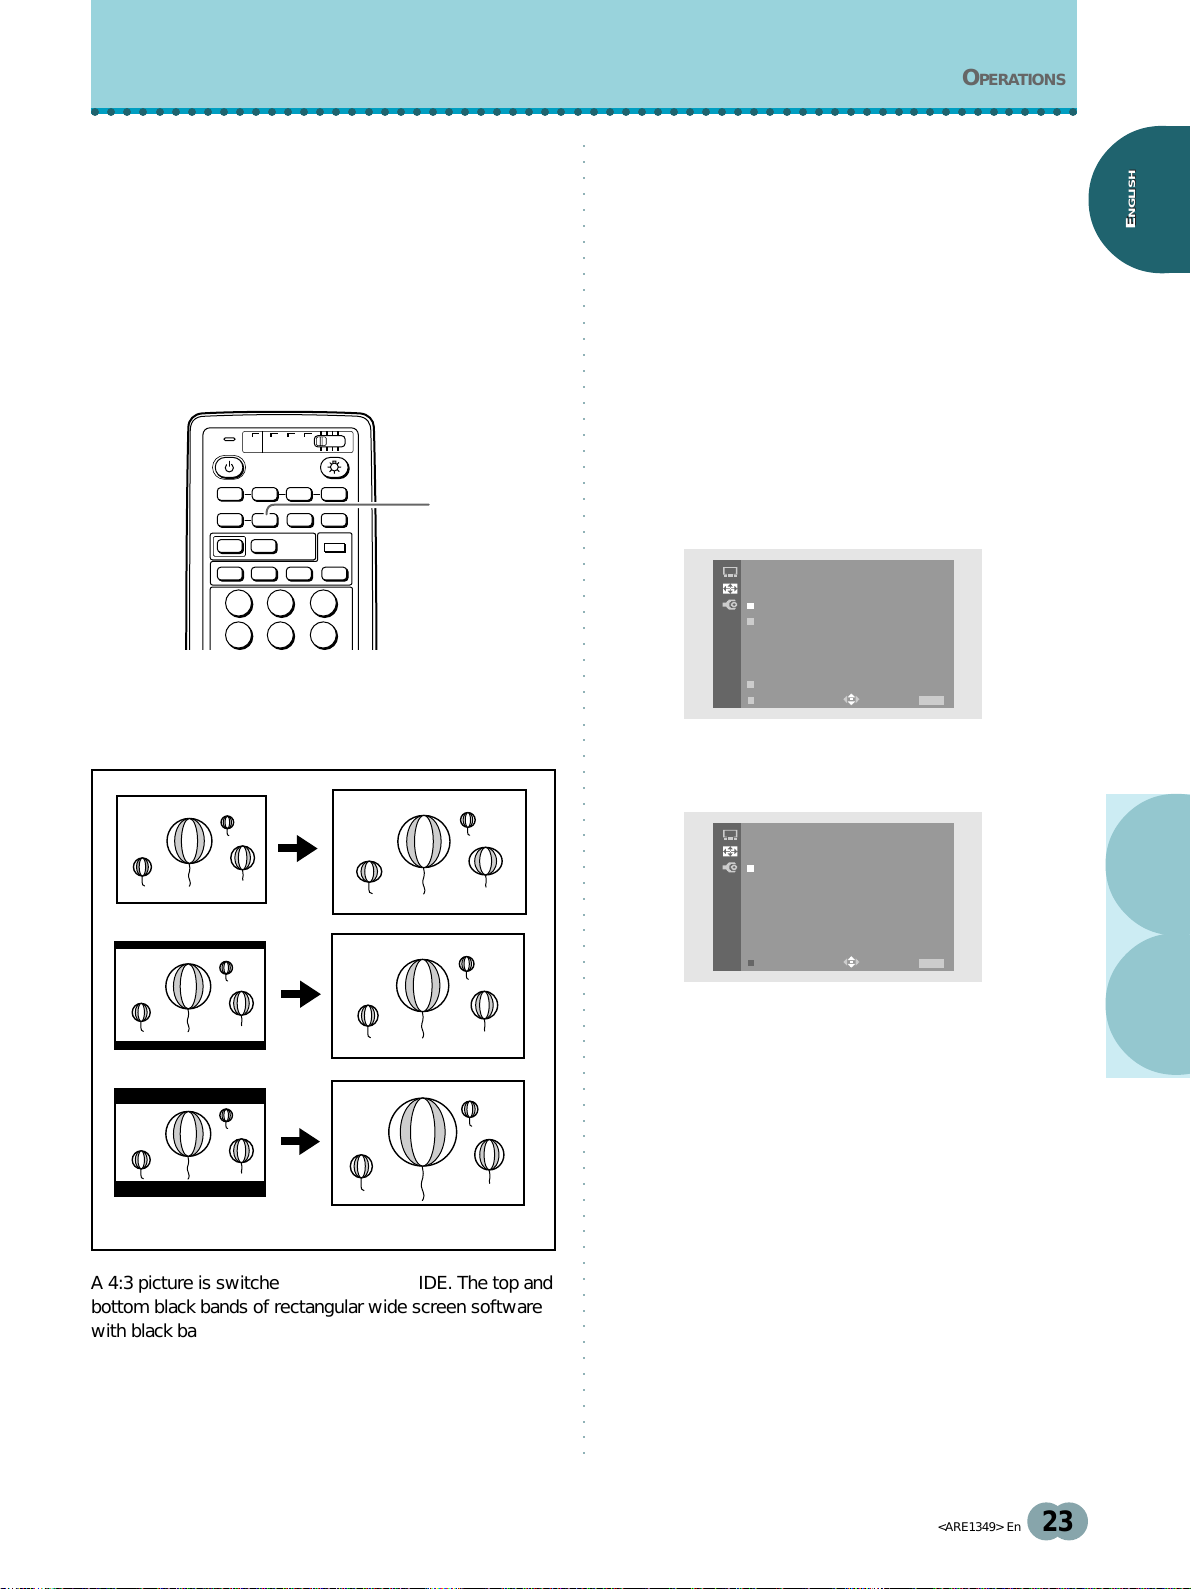
Auto selection (AUTO SCREEN)
A number of different video formats will appear on the
screen in a space smaller than the actual screen size in
order to preserve the aspect ratio of the original format.
The AUTO SCREEN function identifies what type of
format is being displayed and automatically selects a
screen size that takes advantage of the entire screen size.
Please note, however, that the original source aspect and
screen may not be preserved when this function is used.
Using the remote control unit
Notes
÷ For some DVD/LD and video software being used, upper or
lower portions of the picture may be cut, or parts of the black
bands may be viewable.
÷ Screen size may automatically change according to some
types of video signals regardless of whether AUTO SCREEN is
turned on or off (page 25).
Using the menu screen
The AUTO SCREEN function can also be turned on and
off using the on-screen menu.
NGLISH
NGLISH
E
E
TV
DTV
DVD
CBL
/VCR
/LD
/SAT
STANDBY/ON
INPUT
1234
SCREEN
MODE
AUTO STILL
POWER
INPUT
AUDIO CC
RECEIVER
CLEAR
DISPLAY
DTV
VIEW
MODE
AUTO
SCREEN
1 2 3
4 5 6
Press AUTO SCREEN on the remote control unit.
AUTO SCREEN rotates between on and off each time the
button is pressed.
Normal
NATURAL WIDE (AUTO)
1 Press MENU to display the menu screen.
The menu screen appears.
2 Press 5/∞ to select SCREEN, then press
SET/SELECT.
SCREEN
INC EMA WI DE
AUTO SCREEN :OF F
V . POS I T I ON :
OTHER
EX IT
USE:
0
END: MENU
3 Press 5/∞ to select AUTO SCREEN, then press
SET/SELECT.
SCREEN
INC EMA WI DE
AUTO SCREEN :ON
EX IT
USE:
OFF
END: MENU
OPERATIONS
Vista size
CINEMA WIDE (AUTO)
ZOOM (AUTO)
Cinemascope size or
16:9 size
A 4:3 picture is switched to NATURAL WIDE. The top and
bottom black bands of rectangular wide screen software
with black bands (Vista size, Cinemascope size etc.) will
be cut and an easy to view screen size selected.
4 Press 5/∞ to select AUTO SCREEN setting.
After selecting, press SET/SELECT to enter your
selection.
5 When you have finished, press MENU to exit the
on-screen menu.
AUTO SCREEN will be active once the menu screen is
closed.
Notes
÷ The AUTO SCREEN function detects the brightness of the
image and automatically switches the screen size to an
appropriate size. Therefore, in the case of dark images such as
night scenes, it may not switch to the appropriate screen size.
In such cases, turn the AUTO SCREEN function off.
÷ The AUTO SCREEN function can work only when an NTSC,
480i signal is input.
÷ Please note that the picture may disappear momentarily or be
disturbed when switching between different screen modes.
<ARE1349> En
23
Page 28

OPERATIONS
○○○○○○○○○○○○○○○○○○○○○○○○○○○○○○○○○○○○○○○○○○○○○○○○○○○○○○○○○○○○○○
○○○○○○○○○○○○○○○○○○○○○○○○○○○○○○○○○○○○○○○○○○○○○○○○○○○○○○○○○○○○○○○○○○○○○○○○○○○○○○○○○○○
Moving the screen position
4 Press 5/∞ to adjust the V.POSITION setting.
upward or downward
NGLISH
NGLISH
E
E
When a vista size movie etc., is viewed at the CINEMA
WIDE or ZOOM setting, the image may not be centered
on the screen, and may extend past the edge of the
screen.
In this case, adjust the screen to an clearly viewable
position using the V. POSITION setting in the SCREEN
menu.
CH
RETURN
1,5
CH
TV/SAT/DTV/DVD
EDIT/
LEARN
SOURCE SAT/DTV
POWER
%
DVD
TOP MENU
MENU
1 7 3 ¡
84
MUTING
RECEIVER
MENU
%
SET/
SELECT
%
FAVORITES
VCR REC
%
VOL
GUIDE
(SAT)/DTV
INFO
¢
2,3,4
Adjustable range:
÷ CINEMA WIDE setting : –15 to 15
÷ ZOOM setting : –25 to 25
After selecting, press SET/SELECT to enter your
selection.
5 When you have finished, press MENU to exit the
on-screen menu.
Note
The V.POSITION setting can be used only for signals compatible
with the screen size of CINEMA WIDE or ZOOM (NTSC, 480i or
480p).
1 Press MENU to display the menu screen.
The menu screen appears.
2 Press 5/∞ to select SCREEN, then press
SET/SELECT.
OPERATIONS
SCREEN
INC EMA WI DE
AUTO SCREEN :OF F
V . POS I T I ON :
OTHER
EX IT
USE:
0
END: MENU
3 Press 5/∞ to select V.POSITION, then press
SET/SELECT.
USE:
0V . POS I T I ON :
END: MENU
24
<ARE1349> En
Page 29
OPERATIONS
○○○○○○○○○○○○○○○○○○○○○○○○○○○○○○○○○○○○○○○○○○○○○○○○○○○○○○○○○○○○○○
○○○○○○○○○○○○○○○○○○○○○○○○○○○○○○○○○○○○○○○○○○○○○○○○○○○○○○○○○○○○○○○○○○○○○○○○○○○○○○○○○○○
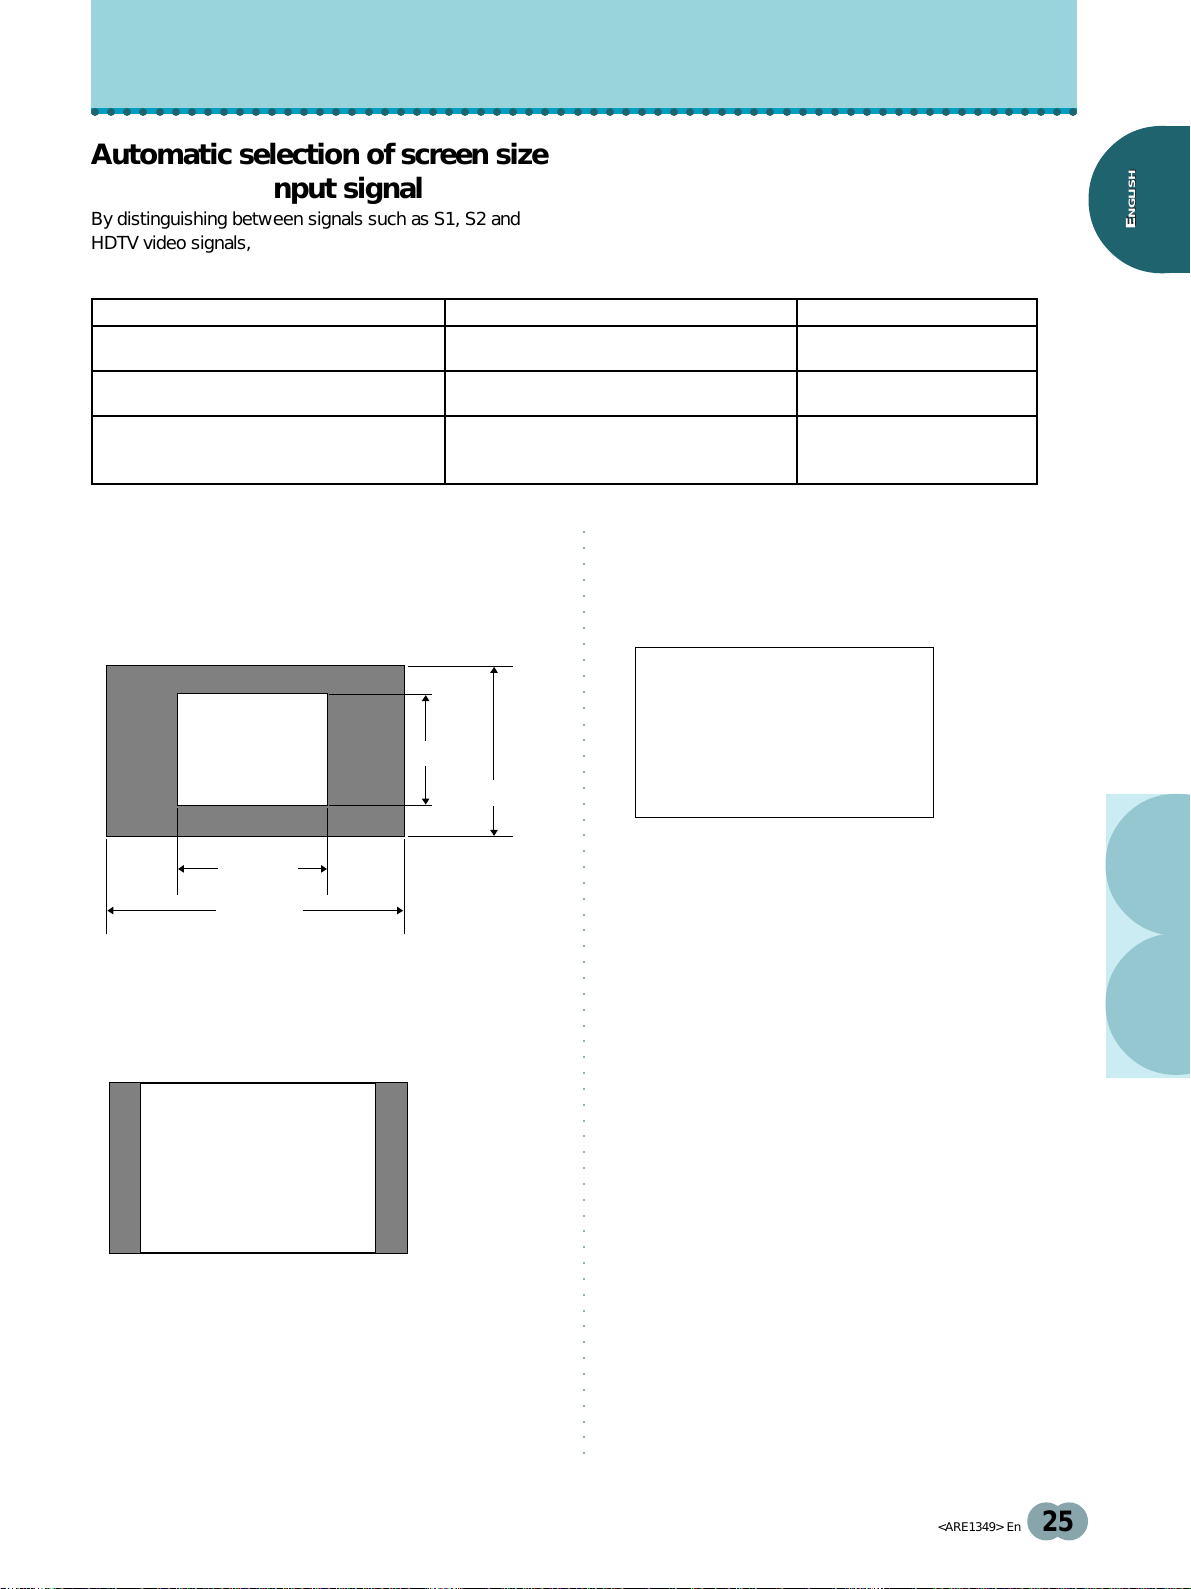
Automatic selection of screen size
according to input signal
By distinguishing between signals such as S1, S2 and
HDTV video signals, screen size is automatically selected
and the following indicators are displayed on the screen.
Input signal Operation Screen indication
NGLISH
NGLISH
E
E
When S1 video signal (squeeze) is input
When S2 video signal (letterbox) is input
When HDTV signal (1920 x 1080 i, 1280 x 720 p) is
input
During personal computer signal input
1 ORIGINAL
The input signal and the screen maintain a dot to line ratio
of 1:1 and is thus highly faithful to the source.
A
640 dots
1280 dots
“FULL” screen size is automatically selected.
“ZOOM” screen size is automatically selected.
“FULL” screen size is automatically selected.
480 lines
768 lines
FULL (S1)
ZOOM (S2)
FULL (HD)
3 FULL
The display is presented with a widescreen aspect ratio
of 16:9 and fills the entire screen.
A
(Illustration shows 640 x 480 input.)
2 4:3 NORMAL
The display fills the screen as much as possible without
altering the aspect ratio of the input signal.
A
<ARE1349> En
OPERATIONS
25
Page 30
OPERATIONS
○○○○○○○○○○○○○○○○○○○○○○○○○○○○○○○○○○○○○○○○○○○○○○○○○○○○○○○○○○○○○○
○○○○○○○○○○○○○○○○○○○○○○○○○○○○○○○○○○○○○○○○○○○○○○○○○○○○○○○○○○○○○○○○○○○○○○○○○○○○○○○○○○○
○○○○○○○○○○○○○○○○○○○
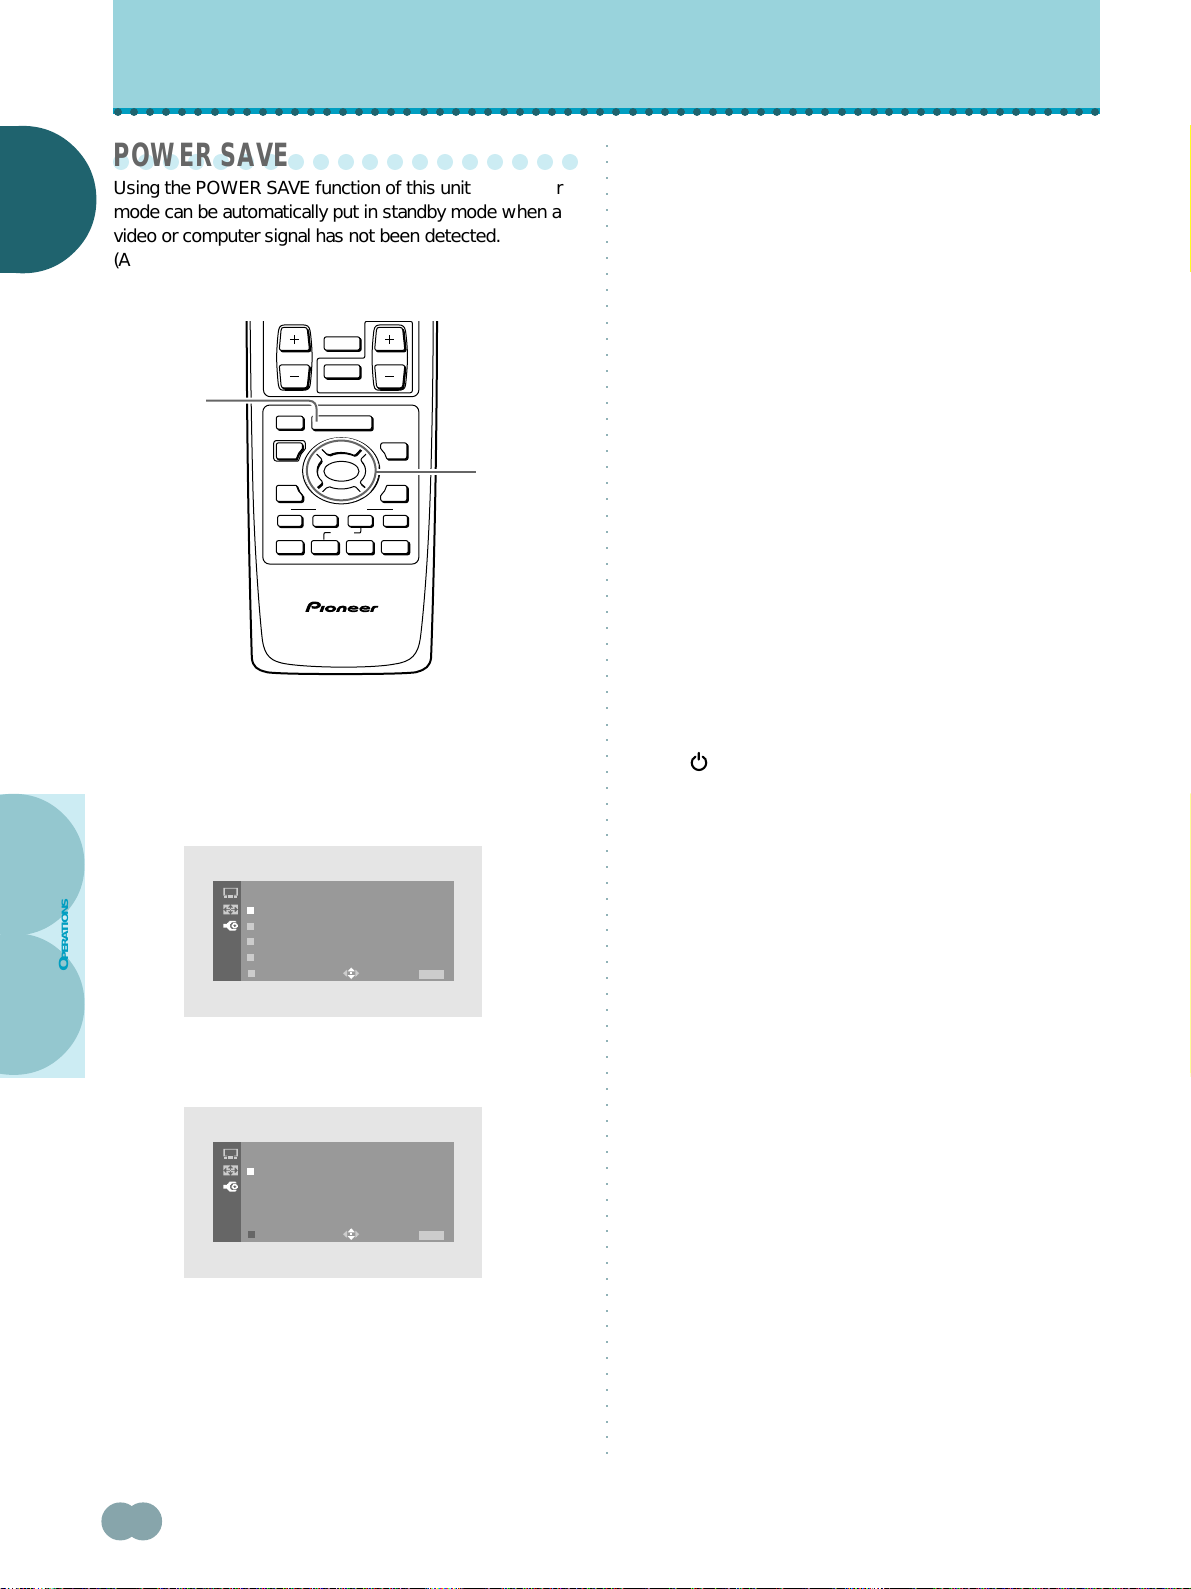
POWER SAVE
Using the POWER SAVE function of this unit, the power
NGLISH
NGLISH
mode can be automatically put in standby mode when a
E
E
video or computer signal has not been detected.
(An indication will appear on the screen before the
standby mode is engaged).
CH
RETURN
1,5
CH
TV/SAT/DTV/DVD
EDIT/
LEARN
SOURCE SAT/DTV
POWER
%
DVD
TOP MENU
MENU
1 7 3 ¡
84
CU-PDP008
PLASMA DISPLAY REMOTE CONTROL UNIT
MUTING
RECEIVER
MENU
%
SET/
SELECT
%
FAVORITES
VCR REC
%
VOL
GUIDE
(SAT)/DTV
INFO
¢
Î
2,3,4
4 Press 5/∞ to select the POWER SAVE mode.
÷ When “OFF” is selected, this unit will stay in
operation mode regardless of whether a
synchronization signal is input or not.
÷ When “MODE1” is selected, this unit will be put in
standby mode automatically if no new
synchronization signal is input for 8 minutes.
÷ When “MODE2” is selected, this unit will be put in
the POWER SAVE mode automatically if no new
synchronization signal is input. However, if the
synchronization signal is restored, this unit is put
back in operation mode.
After selecting, press SET/SELECT to enter your
selection.
5 When the setup is finished, press MENU to exit
the menu screen.
Notes
• The POWER SAVE setting is common to all inputs (INPUT1 to
INPUT4).
• When SIGNAL is set to “VIDEO”, “MODE2” cannot be
selected.
1 Press MENU to display the menu screen.
The menu screen appears.
2 Press 5/∞ to select SET UP, then press
SET/SELECT .
OPERATIONS
SET UP
S
IGNA :PC
G
ON YNCFOF
I
NPU
E
XIT
L
S
TLABE
USE:
:POWER SAVE FOF
:
L
END: MENU
3 Press 5/∞ to select POWER SAVE, then press
SET/SELECT.
SET UP
E
XIT
USE:
:POWER SAVE OMDE1
OMDE2
F
OF
END: MENU
To put the unit in operation mode again
Press STANDBY/ON on the main unit or remote
control unit.
When the unit is in the POWER SAVE mode, resuming
PC operation or pressing INPUT on the main unit or
remote control unit can also put the unit in operation
mode again.
26
<ARE1349> En
Page 31

OPERATIONS
○○○○○○○○○○○○○○○○○○○○○○○○○○○○○○○○○○○○○○○○○○○○○○○○○○○○○○○○○○○○○○
○○○○○○○○○○○○○○○○○○○○○○○○○○○○○○○○○○○○○○○○○○○○○○○○○○○○○○○○○○○○○○○○○○○○○○○○○○○○○○○○○○○
○○○○○○○○○○○○○○○○○○○
Labeling the inputs
This function enables you to apply a label of up to 8
characters for each of the 4 inputs.
MUTING
1,9
RECEIVER
TV/SAT/DTV/DVD
EDIT/
LEARN
MENU
SOURCE SAT/DTV
POWER
TOP MENU
MENU
%
GUIDE
SET/
SELECT
%
%
FAVORITES
%
(SAT)/DTV
INFO
DVD
2,3,4,5,
6,7,8
6 Press 5/∞ to select LABEL, then press
SET/SELECT.
The character window opens, and the cursor is moved
to the bottom right corner of the character window.
SET UP
I
L
E
NPUT LABE
:
ABE L
XIT
I
ABC E FGHI JK LMN
OPQ S TUVWXYZ1 2
345 7890 /– ._
NPUT 3
D
R
6
USE:
L
END: MENU
1 Press MENU to display the menu screen.
The menu screen appears.
2 Press 5/∞ to select SET UP, then press
SET/SELECT.
7 Press 5/∞/2/3 to navigate the cursor around the
character window. Press SET/SELECT to add a
character to the label.
NGLISH
NGLISH
E
E
SET UP
S
IGNA :PC
G
ON YNCFOF
I
NPU
E
XIT
L
S
TLABE
USE:
:POWER SAVE FOF
:
L
END: MENU
3 Press 5/∞ to select INPUT LABEL, then press
SET/SELECT.
I
NPUT
L
ABE L
E
XIT
I
NPUT LABE
:
I
NPUT
:
I
NPUT
USE:
L
4
4
END: MENU
SET UP
4 Press 5/∞ to select INPUT, then press
SET/SELECT.
I
NPUT:I
E
XIT
I
NPUT LABE
NPUT 1
I
NPUT 2
I
NPUT 3
I
NPUT 4
USE:
L
END: MENU
SET UP
SET UP
I
L
E
NPUT LABE
:
A ABEL
XIT
I
ABC EFGHI J KLMN
OPQ S TUVWXYZ1 2
345 7890 /– ._
NPUT 3
D
R
6
USE:
L
END: MENU
Each time SET/SELECT is pressed, the currently
selected character is added to the label to create a
label of up to 8 characters long.
SET UP
I
L
E
NAPUT LABE
:
AABEL
XIT
AAAAAA
ABC EFGHI J KLMN
D
OPQ S TUVWXYZ1 2
R
345 7890 /– ._
6
USE:
L
END: MENU
8 When the label is finished, move the cursor
position to the bottom right corner of the
character window and press SET/SELECT.
The character window disappears. The input and its
corresponding label are displayed.
SET UP
I
NPUT
L
ABE L
I
NPUT LABE
:
I
NP
UT3
:
A
AA
AAAAA
L
OPERATIONS
5 Press 5/∞ to select the input you want to create a
label for, then press SET/SELECT.
When the input is changed on the menu screen, the
currently selected input is also changed.
SET UP
I
L
E
NPUT
ABE L
XIT
I
NPUT LABE
:
I
NPUT 3
:
I
NPUT 3
USE:
L
END: MENU
E
XIT
USE:
END: MENU
9 When the setup is finished, press MENU to exit
the menu screen.
Note
When these characters are selected in the character window, the
following occurs.
: A space is input.
: The character input mode is exited.
<ARE1349> En
27
Page 32

DISPLAY PANEL ADJUSTMENTS
○○○○○○○○○○○○○○○○○○○○○○○○○○○○○○○○○○○○○○○○○○○○○○○○○○○○○○○○○○○○○○
○○○○○○○○○○○○○○○○○○○○○○○○○○○○○○○○○○○○○○○○○○○○○○○○○○○○○○○○○○○○○○○○○○○○○○○○○○○○○○○○○○○
○○○○○○○○○○○○○○○○○○○
Understanding the MENU screens
Pressing the MENU button on the remote control unit
NGLISH
NGLISH
opens the MAIN MENU screen. The MAIN MENU screen
E
E
is the primary starting screen for all internal system
adjustments and functions divided up into the PICTURE
adjustment screen, SCREEN adjustment screen, and SET
UP screen.
Select the desired menu item using 5/∞ on the remote
control unit or the main unit, then press SET/SELECT to
perform the desired operations and settings.
2 Press 5/∞ to select the appropriate submenu and
press SET/SELECT.
÷ Use the PICTURE adjustment screen to modify the
actual video image that appears on the screen
(pages 29 to 37).
PICTURE
SCREEN
SET UP
.
When a video signal is input, and the on-screen menu is
displayed, the SCREEN MODE is changed to “FULL”.
When the on-screen menu is turned off, or if the SCREEN
adjustment menu is selected, the screen returns to the
SCREEN MODE that had been previously displayed.
To use the menu screens
CH
RETURN
CH
1,3
2
ADJUSTMENTS
DISPLAY PANEL
1 Press MENU to display the menu screen.
TV/SAT/DTV/DVD
EDIT/
LEARN
SOURCE SAT/DTV
POWER
%
DVD
TOP MENU
MENU
FAVORITES
1 7 3 ¡
84
CU-PDP008
PLASMA DISPLAY REMOTE CONTROL UNIT
MUTING
RECEIVER
MENU
%
SET/
SELECT
%
VCR REC
%
VOL
GUIDE
(SAT)/DTV
INFO
¢
Î
The menu screen appears.
USE:
END: MENU
÷ Use the SCREEN adjustment screen to make the
settings and adjustments of the screen according to
the input signal (pages 23, 24, and 38).
PICTURE
SCREEN
SET UP
USE:
END: MENU
.
2
÷ Use the SET UP screen to make various settings or
to coordinate this unit with externally connected
components (pages 17 to 19, 26, and 27).
PICTURE
SCREEN
SET UP
USE:
END: MENU
.
28
<ARE1349> En
PICTURE
SCREEN
SET UP
USE:
END: MENU
3 To close the menu screen, press MENU.
.
On screen indicators
USE: Indicates in light blue the buttons that can be used
in the currently displayed menu screen .
END: End is for turning off the menu screen by pressing
the MENU button.
EXIT: To return to the previous menu screen, use the 5
or ∞ button to move to EXIT and then press
SET/SELECT.
Page 33

○○○○○○○○○○○○○○○○○○○○○○○○○○○○○○○○○○○○○○○○○○○○○○○○○○○○○○○○○○○○○○
DISPLAY PANEL ADJUSTMENTS
○○○○○○○○○○○○○○○○○○○○○○○○○○○○○○○○○○○○○○○○○○○○○○○○○○○○○○○○○○○○○○○○○○○○○○○○○○○○○○○○○○○
○○○○○○○○○○○○○○○○○○○
Picture adjustments
This unit has three programmed picture quality settings in
memory that are designed for use with various video
genre. You can select a programmed setting that best
suits your needs, or adjust the settings to obtain the
picture quality you desire. These modified settings can
then be stored in memory and called up whenever you
want.
Selecting one of the programmed
picture quality settings
1,5
2,3,4
CH
TV/SAT/DTV/DVD
EDIT/
LEARN
SOURCE SAT/DTV
POWER
%
DVD
TOP MENU
MENU
FAVORITES
1 7 3 ¡
84
MUTING
RECEIVER
MENU
%
SET/
SELECT
%
VCR REC
%
VOL
GUIDE
(SAT)/DTV
INFO
¢
2,3,4
4 Press 2/3 to select the setting.
The following settings can be selected:
÷ STD .......... Sets standard picture quality.
÷ MOVIE ..... Reduces contrast making dark images
easier to see. Effective for movies that
have many dark images such as night
scenes, etc..
÷ GAME ...... Lowers the relative contrast of video
games and personal computer images
to minimize discomfort to the eyes. This
will minimize bad effects such as
discolored spots or stains on the display
panel of the unit.
÷ USER........ Calls up the picture quality that the user
has set. Modifications can be made to
any of the above settings to create the
USER setting (page 30).
After selecting, press SET/SELECT to enter your
selection.
5 Press MENU to exit the menu screen.
NGLISH
NGLISH
E
E
CU-PDP008
PLASMA DISPLAY REMOTE CONTROL UNIT
Î
1 Press MENU to display the menu screen.
The menu screen appears.
2 Press 5/∞ to select PICTURE, then press
SET/SELECT.
PICTURE
MOD E : STD
CONTRAST
BLACK LVL .
COLOR
TINT
SHARP
OTHER
EX IT
USE:
END: MENU
3 Press 5/∞ to select MODE, then press
SET/SELECT.
Notes
÷ Make these adjustments for each input (INPUT1 to INPUT4)
and for each signal type (video or PC).
÷ When HIGH CONTRAST is set to “ON” and a PC signal is
being input, MOVIE and GAME are not available.
Screen burn caution
Please read the following to ensure long term regular
use of this product.
As video games and still picture playback can cause
screen burn or have other negative effects on this
unit’s screen, be sure to select the GAME mode
setting and to limit use to under 2 hours at a time. After
playing a video game, etc., please view a normal
picture etc., at the natural wide screen setting for more
than 3 times the length of video game play. A moving
picture has the effect of relieving screen burn playback
and also reduces harmful effects within the display.
ADJUSTMENTS
DISPLAY PANEL
MODE : STD MOVIE GAME USER
USE:
END: MENU
<ARE1349> En
29
Page 34

DISPLAY PANEL ADJUSTMENTS
○○○○○○○○○○○○○○○○○○○○○○○○○○○○○○○○○○○○○○○○○○○○○○○○○○○○○○○○○○○○○○
○○○○○○○○○○○○○○○○○○○○○○○○○○○○○○○○○○○○○○○○○○○○○○○○○○○○○○○○○○○○○○○○○○○○○○○○○○○○○○○○○○○
Saving screen adjustments to the
4 Make any necessary adjustments to the screen
settings as described on the next page.
USER mode setting
NGLISH
NGLISH
The USER mode can be set for each of the four video
E
E
signal inputs (INPUT1 to 4) and the two PC signal inputs
(INPUT3 and 4).
÷ If any of the programmed modes (STD, MOVIE, or
GAME) are adjusted, a new USER mode is created
based on the programmed settings. The base mode
will be listed in parenthesis.
÷ When HIGH CONTRAST is set to “ON” and a PC
TV
DTV
DVD
2,5
3,4
CBL
/VCR
/LD
/SAT
STANDBY/ON
INPUT
1
1234
SCREEN
MODE
POWER
AUDIO CC
AUTO STILL
INPUT
RECEIVER
CLEAR
DISPLAY
MODE
DTV
VIEW
1 2 3
4 5 6
7 8 9
CH
ENTER
0
CH
RETURN
CH
EDIT/
LEARN
SOURCE SAT/DTV
POWER
DVD
TOP MENU
MENU
1 7 3 ¡
84
MUTING
RECEIVER
TV/SAT/DTV/DVD
SELECT
%
FAVORITES
MENU
SET/
VCR REC
VOL
%
GUIDE
%
(SAT) /DTV
%
INFO
¢
3,4
signal is being input, MOVIE and GAME are not
available.
PICTURE
MOD E : USER (STD )
CONTRAST
BLACK LVL.
COLOR
TINT
SHARP
OTHER
EX IT
USE:
END: MENU
5 When you have finished making adjustments,
press MENU to exit the menu screen.
CU-PDP008
PLASMA DISPLAY REMOTE CONTROL UNIT
Î
1 Press the appropriate INPUT selector button to
display the input source on the screen.
ADJUSTMENTS
2 Press MENU to display the menu screen.
The menu screen appears.
DISPLAY PANEL
3 Press 5/∞ to select PICTURE, then press
SET/SELECT.
PICTURE
MOD E : STD
CONTRAST
BLACK LVL .
COLOR
TINT
SHARP
OTHER
EX IT
USE:
END: MENU
30
<ARE1349> En
Page 35

○○○○○○○○○○○○○○○○○○○○○○○○○○○○○○○○○○○○○○○○○○○○○○○○○○○○○○○○○○○○○○
CH
VOL
DISPLAY PANEL ADJUSTMENTS
○○○○○○○○○○○○○○○○○○○○○○○○○○○○○○○○○○○○○○○○○○○○○○○○○○○○○○○○○○○○○○○○○○○○○○○○○○○○○○○○○○○
Adjusting the picture quality
The PICTURE adjustment screen provides the adjustment
items listed in the right column.
MUTING
1,5
2,3,4
RECEIVER
TV/SAT/DTV/DVD
EDIT/
LEARN
MENU
SOURCE SAT/DTV
TOP MENU
MENU
%
POWER
%
DVD
FAVORITES
1 7 3 ¡
84
CU-PDP008
PLASMA DISPLAY REMOTE CONTROL UNIT
SET/
SELECT
%
VCR REC
%
GUIDE
(SAT)/DTV
INFO
2,3,4
¢
Î
1 Press MENU to display the menu screen.
The menu screen appears.
2 Press 5/∞ to select PICTURE, then press SET/SELECT .
PICTURE
MOD E : STD
CONTRAST
BLACK LVL .
COLOR
TINT
SHARP
OTHER
EX IT
USE:
END: MENU
When viewing an image from a personal computer
from INPUT3 or INPUT4, the following screen is
displayed.
PICTURE
MOD E : TDS
C
A
ONT R ST
B
LACK LVL .
O
THE
R
E
XIT
USE:
END: MENU
3 Press 5/∞ to select the adjustment item, then
press SET/SELECT.
4 Press 2/3 to adjust the picture quality as desired.
Change from the center position is saved to the USER
mode setting (page 30).
After selecting, press SET/SELECT to enter your
selection.
5 When you have finished making adjustments,
press MENU to exit the menu screen.
Note
Make these adjustments for each input (INPUT1 to INPUT4) and
for each signal type (video or PC).
PICTURE mode adjustment items
Below are brief descriptions of the options that can be set
at PICTURE and PICTURE OTHER in the PICTURE
adjustment screen.
PICTURE adjustment:
CONTRAST ............. Adjust according to the surrounding
brightness so that the picture can be
seen clearly.
BLACK LVL. ............. Adjust so that the dark parts of the
picture can be seen clearly.
COLOR.................... Adjust to the desired depth. (Setting
to a slightly deep color will create a
natural looking picture.)
TINT......................... Adjust so that skin color looks
normal.
SHARP .................... Normally set to the center position.
To create a softer picture, set to the
left of center. To create a sharper
picture, set to the right of center.
PICTURE OTHER adjustment:
R LEVEL .................. Adjust the amount of red in the
picture.
G LEVEL .................. Adjust the amount of green in the
picture.
B LEVEL .................. Adjust the amount of blue in the
picture.
For details regarding a specific adjustment, refer to the
page written in parenthesis.
3D Y/C LEVEL ......... (page 32)
3D NR LEVEL .......... (page 33)
COLOR TEMP ......... (page 34)
FILM MODE............ (page 35)
HIGH CONTRAST.... (page 36)
ABL ......................... (page 37)
NGLISH
NGLISH
E
E
ADJUSTMENTS
DISPLAY PANEL
CONTRAST
USE:
END: MENU
Note
Separate picture adjustments may be stored for when HIGH
CONTRAST is set to “ON” and “OFF”.
<ARE1349> En
31
Page 36

DISPLAY PANEL ADJUSTMENTS
○○○○○○○○○○○○○○○○○○○○○○○○○○○○○○○○○○○○○○○○○○○○○○○○○○○○○○○○○○○○○○
○○○○○○○○○○○○○○○○○○○○○○○○○○○○○○○○○○○○○○○○○○○○○○○○○○○○○○○○○○○○○○○○○○○○○○○○○○○○○○○○○○○
○○○○○○○○○○○○○○○○○○○
Viewing a fast moving picture
3 Press 5/∞ to select OTHER, then press
SET/SELECT.
(3D Y/C LEVEL)
NGLISH
NGLISH
E
E
When viewing a fast moving picture such as might be
experienced with a sports program, setting this mode to
an appropriate level as determined by the video source
will reduce picture blur, and produce a clearer image.
÷ This setting can be adjusted along 5 points with “1”
PICTURE
OTHER
3D Y/C
3D NR
COLOR
FILM
HIGH
EX IT
LEVEL : 3
LEVEL : 1
T
EMP : S T D
M
DE : O
O
NTRAST
C
O
USE:
:
FF
OF
F
END: MENU
recommended for viewing sources with a lot of action
and ”5” recommended when viewing still images.
4 Press 5/∞ to select 3D Y/C LEVEL, then press
SET/SELECT.
3D Y/C LVL.:3
USE:
END: MENU
1,6
2,3,4,5
CH
EDIT/
LEARN
SOURCE SAT/DTV
POWER
%
DVD
TOP MENU
MENU
1 7 3 ¡
84
MUTING
RECEIVER
TV/SAT/DTV/DVD
MENU
%
SET/
SELECT
%
FAVORITES
VCR REC
%
VOL
GUIDE
(SAT)/DTV
INFO
2,3,4,5
¢
CU-PDP008
PLASMA DISPLAY REMOTE CONTROL UNIT
1 Press MENU to display the menu screen.
The menu screen appears.
ADJUSTMENTS
2 Press 5/∞ to select PICTURE, then press
SET/SELECT.
DISPLAY PANEL
PICTURE
MOD E : STD
CONTRAST
BLACK LVL .
COLOR
TINT
SHARP
OTHER
EX IT
USE:
Î
END: MENU
5 Press 2/3 to set the mode to a level between 1
and 5 as needed.
If the setting is changed from “3”, it is saved to the
USER mode setting (page 30).
After selecting, press SET/SELECT to enter your
selection.
6 When the setup is finished, press MENU to exit
the menu screen.
Notes
÷ “3” is set when this unit is shipped from the factory.
÷ 3D Y/C LEVEL setting is possible only when INPUT1 is
selected to receive a composite video signal.
32
<ARE1349> En
Page 37

○○○○○○○○○○○○○○○○○○○○○○○○○○○○○○○○○○○○○○○○○○○○○○○○○○○○○○○○○○○○○○
○○○○○○○○○○○○○○○○○○○○○○○○○○○○○○○○○○○○○○○○○○○○○○○○○○○○○○○○○○○○○○○○○○○○○○○○○○○○○○○○○○○
○○○○○○○○○○○○○○○○○○○
Reducing the amount of digital
3 Press 5/∞ to select OTHER, then press
SET/SELECT.
noise in the video image
DISPLAY PANEL ADJUSTMENTS
(3D NR LEVEL)
When viewing a video image via the INPUT1 S-VIDEO
jack, it is possible to reduce the amount of digital noise in
the luminance and chromanance channels of the S-video
signal.
÷ This setting can be adjusted along 5 points with “1”
indicating a low level of digital noise reduction and ”5”
indicating a high level of digital noise reduction.
1,6
2,3,4,5
CH
TV/SAT/DTV/DVD
EDIT/
LEARN
SOURCE SAT/DTV
POWER
%
DVD
TOP MENU
MENU
1 7 3 ¡
84
CU-PDP008
PLASMA DISPLAY REMOTE CONTROL UNIT
MUTING
RECEIVER
MENU
%
SET/
SELECT
%
FAVORITES
VCR REC
%
VOL
GUIDE
(SAT)/DTV
INFO
¢
Î
2,3,4,5
4 Press 5/∞ to select 3D NR LEVEL, then press
SET/SELECT.
5 Press 2/3 to set the mode to a level between 1
and 5 as needed.
If the setting is changed from “1”, it is saved to the
USER mode setting (page 30).
After selecting, press SET/SELECT to enter your
selection.
PICTURE
OTHER
3D Y/C
3D NR
COLOR
FILM
HIGH
EX IT
3D NR LEVEL : 1
LEVEL : 3
LEVEL :1
T
EMP : ST D
M
DE : O
O
NTRAST
C
O
USE:
USE:
:
FF
OF
F
END: MENU
END: MENU
NGLISH
NGLISH
E
E
1 Press MENU to display the menu screen.
The menu screen appears.
2 Press 5/∞ to select PICTURE, then press
SET/SELECT.
PICTURE
MOD E : STD
CONTRAST
BLACK LVL .
COLOR
TINT
SHARP
OTHER
EX IT
USE:
END: MENU
6 When the setup is finished, press MENU to exit
the menu screen.
Notes
÷ “1” is set when this unit is shipped from the factory.
÷ 3D NR LEVEL setting is possible only when INPUT1 is
selected to receive an S-video signal.
ADJUSTMENTS
DISPLAY PANEL
<ARE1349> En
33
Page 38

DISPLAY PANEL ADJUSTMENTS
○○○○○○○○○○○○○○○○○○○○○○○○○○○○○○○○○○○○○○○○○○○○○○○○○○○○○○○○○○○○○○
○○○○○○○○○○○○○○○○○○○○○○○○○○○○○○○○○○○○○○○○○○○○○○○○○○○○○○○○○○○○○○○○○○○○○○○○○○○○○○○○○○○
○○○○○○○○○○○○○○○○○○○
Adjusting the color temperature of
the screen (COLOR TEMP)
NGLISH
NGLISH
E
E
This function enables the video image to be set to one of
five different tones.
1,6
2,3,4,5
CH
EDIT/
LEARN
SOURCE SAT/DTV
POWER
%
DVD
TOP MENU
MENU
1 7 3 ¡
84
CU-PDP008
PLASMA DISPLAY REMOTE CONTROL UNIT
MUTING
RECEIVER
TV/SAT/DTV/DVD
MENU
%
SET/
SELECT
%
FAVORITES
VCR REC
%
VOL
GUIDE
(SAT)/DTV
INFO
¢
Î
2,3,4,5
3 Press 5/∞ to select OTHER, then press
SET/SELECT.
PICTURE
OTHER
3D Y/C
3D NR
COLOR
FILM
HIGH
EX IT
LEVEL : 3
LEVEL : 1
T
EMP : S T D
M
DE : O
O
NTRAST
C
O
USE:
:
FF
OF
F
END: MENU
4 Press 5/∞ to select COLOR TEMP, then press
SET/SELECT.
STDPC.TEM
:
USE:
END: MENU
1 Press MENU to display the menu screen.
The menu screen appears.
2 Press 5/∞ to select PICTURE then press
SET/SELECT.
PICTURE
MOD E : STD
ADJUSTMENTS
DISPLAY PANEL
CONTRAST
BLACK LVL .
COLOR
TINT
SHARP
OTHER
EX IT
USE:
END: MENU
5 Press 2/3 to select COLOR TEMP setting.
Select the color temperature setting that best
matches your preferences and viewing environment.
÷ NEWS: Causes the colors displayed to appear in
cooler hues than those in LIVE.
÷ LIVE: Causes the colors displayed to appear in
cooler hues.
÷ STD: Causes the colors displayed to appear in
normal hues.
÷ FILM: Causes the colors displayed to appear in
warmer hues.
÷ B&W: Causes the colors displayed to appear in
warmer hues than those in FILM.
If the setting is changed from “STD”, it is saved to
the USER mode setting (page 30).
After selecting, press SET/SELECT to enter your
selection.
6 When the setup is finished, press MENU to exit
the menu screen.
Note
“STD” is set when this unit is shipped from the factory.
34
<ARE1349> En
Page 39

○○○○○○○○○○○○○○○○○○○○○○○○○○○○○○○○○○○○○○○○○○○○○○○○○○○○○○○○○○○○○○
DISPLAY PANEL ADJUSTMENTS
○○○○○○○○○○○○○○○○○○○○○○○○○○○○○○○○○○○○○○○○○○○○○○○○○○○○○○○○○○○○○○○○○○○○○○○○○○○○○○○○○○○
○○○○○○○○○○○○○○○○○○○
Setting the FILM MODE
3 Press 5/∞ to select OTHER, then press
SET/SELECT.
The FILM MODE function automatically detects movie
film recorded at 24 frames per second, and converts it
into a high quality progressive video image delivering the
picture at the same rate as it was recorded.
÷ Normally, this function should be set to “HQ” (High
Quality), however, occasionally this setting may cause
slight syncopation problems with the audio track. If you
are bothered by this, select “STD” (Standard). If “OFF”
is selected, normal progressive signal processing is
performed.
1,6
2,3,4,5
CH
TV/SAT/DTV/DVD
EDIT/
LEARN
SOURCE SAT/DTV
POWER
%
DVD
TOP MENU
MENU
FAVORITES
1 7 3 ¡
84
CU-PDP008
PLASMA DISPLAY REMOTE CONTROL UNIT
MUTING
RECEIVER
MENU
%
SET/
SELECT
%
VCR REC
%
VOL
GUIDE
(SAT)/DTV
INFO
¢
Î
2,3,4,5
PICTURE
OTHER
3D Y/C
3D NR
COLOR
FILM
HIGH
EX IT
LEVEL : 3
LEVEL : 1
T
EMP : S T D
M
DE : O
O
NTRAST
C
O
USE:
:
FF
OF
F
END: MENU
4 Press 5/∞ to select FILM MODE, then press
SET/SELECT.
F.MODE:HQ S TD OF F
USE:
END: MENU
5 Press 2/3 to select FILM MODE setting.
If the setting is changed from “OFF”, it is saved to
the USER mode setting (page 30).
After selecting, press SET/SELECT to enter your
selection.
NGLISH
NGLISH
E
E
1 Press MENU to display the menu screen.
The menu screen appears.
2 Press 5/∞ to select PICTURE, then press
SET/SELECT.
PICTURE
MOD E : STD
CONTRAST
BLACK LVL .
COLOR
TINT
SHARP
OTHER
EX IT
USE:
END: MENU
6 When the setup is finished, press MENU to exit
the menu screen.
Notes
÷ “OFF” is set when this unit is shipped from the factory.
÷ FILM MODE setting is possible only with NTSC, 480i sources.
ADJUSTMENTS
DISPLAY PANEL
<ARE1349> En
35
Page 40

DISPLAY PANEL ADJUSTMENTS
○○○○○○○○○○○○○○○○○○○○○○○○○○○○○○○○○○○○○○○○○○○○○○○○○○○○○○○○○○○○○○
○○○○○○○○○○○○○○○○○○○○○○○○○○○○○○○○○○○○○○○○○○○○○○○○○○○○○○○○○○○○○○○○○○○○○○○○○○○○○○○○○○○
○○○○○○○○○○○○○○○○○○○
Viewing in a bright location
3 Press 5/∞ to select OTHER, then press
SET/SELECT.
(HIGH CONTRAST)
NGLISH
NGLISH
E
E
When viewing a picture in a bright location, setting this
mode to “ON” will enable you to obtain a clear video
image.
÷ Set this mode to “OFF” when not viewing in a bright
location.
1,6
2,3,4,5
CH
TV/SAT/DTV/DVD
EDIT/
LEARN
SOURCE SAT/DTV
POWER
%
DVD
TOP MENU
MENU
FAVORITES
1 7 3 ¡
84
MUTING
RECEIVER
MENU
%
SET/
SELECT
%
VCR REC
%
VOL
GUIDE
(SAT)/DTV
INFO
¢
4 Press 5/∞ to select HIGH CONTRAST, then press
SET/SELECT.
2,3,4,5
PICTURE
OTHER
3D Y/C
3D NR
COLOR
FILM
HIGH
EX IT
HIGH CONT.:ON OFF
LEVEL : 3
LEVEL : 1
T
EMP : S T D
M
DE : O
O
NTRAST
C
O
USE:
USE:
:
FF
OF
F
END: MENU
END: MENU
CU-PDP008
PLASMA DISPLAY REMOTE CONTROL UNIT
1 Press MENU to display the menu screen.
The menu screen appears.
2 Press 5/∞ to select PICTURE, then press
SET/SELECT.
ADJUSTMENTS
DISPLAY PANEL
PICTURE
MOD E : STD
CONTRAST
BLACK LVL .
COLOR
TINT
SHARP
OTHER
EX IT
USE:
Î
END: MENU
5 Press 2/3 to select HIGH CONTRAST setting.
Separate picture adjustments may be stored for when
HIGH CONTRAST is set to “ON” and “OFF”.
After selecting, press SET/SELECT to enter your
selection.
6 When the setup is finished, press MENU to exit
the menu screen.
Notes
÷ “OFF” is set when this unit is shipped from the factory.
÷ The MOVIE and GAME picture mode options are not available
when HIGH CONTRAST is turned to “ON”.
36
<ARE1349> En
Page 41

○○○○○○○○○○○○○○○○○○○○○○○○○○○○○○○○○○○○○○○○○○○○○○○○○○○○○○○○○○○○○○
DISPLAY PANEL ADJUSTMENTS
○○○○○○○○○○○○○○○○○○○○○○○○○○○○○○○○○○○○○○○○○○○○○○○○○○○○○○○○○○○○○○○○○○○○○○○○○○○○○○○○○○○
○○○○○○○○○○○○○○○○○○○
Making the PC image brighter
4 Press 5/∞ to select ABL, then press SET/SELECT.
(ABL)
Set this mode to “ON” to brighten the image during PC
signal input.
When ABL is set to “ON”, the brightness of the image
will change according to changes in the input signal. If
you are bothered by changes to brightness during
operation, set this mode to “OFF”.
1,6
2,3,4,5
CH
TV/SAT/DTV/DVD
EDIT/
LEARN
SOURCE SAT/DTV
POWER
%
DVD
TOP MENU
MENU
1 7 3 ¡
84
CU-PDP008
PLASMA DISPLAY REMOTE CONTROL UNIT
MUTING
RECEIVER
MENU
%
SET/
SELECT
%
FAVORITES
VCR REC
%
VOL
GUIDE
(SAT)/DTV
INFO
¢
Î
2,3,4,5
ABL :ON OFF
USE
:
END
MENU
:
5 Press 2/3 to select ABL setting.
If the setting is changed from “ON”, it is saved to the
USER mode setting (page 30).
After selecting, press SET/SELECT to enter your
selection.
6 When the setup is finished, press MENU to exit
the menu screen.
Notes
÷ “ON” is set when this unit is shipped from the factory.
÷ ABL mode setting is only possible during PC signal input.
NGLISH
NGLISH
E
E
1 Press MENU to display the menu screen.
The menu screen appears.
2 Press 5/∞ to select PICTURE, then press
SET/SELECT.
PICTURE
MOD E : TDS
C
A
ONT R ST
B
LACK LVL .
O
THE
R
E
XIT
USE:
END: MENU
3 Press 5/∞ to select OTHER, then press
SET/SELECT.
PICTURE
O
THER
RLEVLE
G
E
LEV L
E
BLEVL
N
ABL :
O
EXI T
USE:
END: MENU
ADJUSTMENTS
DISPLAY PANEL
<ARE1349> En
37
Page 42

DISPLAY PANEL ADJUSTMENTS
○○○○○○○○○○○○○○○○○○○○○○○○○○○○○○○○○○○○○○○○○○○○○○○○○○○○○○○○○○○○○○
○○○○○○○○○○○○○○○○○○○○○○○○○○○○○○○○○○○○○○○○○○○○○○○○○○○○○○○○○○○○○○○○○○○○○○○○○○○○○○○○○○○
○○○○○○○○○○○○○○○○○○○
Adjusting the screen
NGLISH
NGLISH
Adjust when INPUT2, INPUT3 or INPUT4 is selected.
E
E
(Adjustments on this page cannot be made when INPUT
1 is selected.)
The SCREEN adjustment screen provides the adjustment
items listed in the right column.
MUTING
1,6
2,3,4,5
RECEIVER
TV/SAT/DTV/DVD
EDIT/
LEARN
MENU
SOURCE SAT/DTV
POWER
TOP MENU
MENU
%
GUIDE
SET/
SELECT
%
%
FAVORITES
%
(SAT)/DTV
DVD
INFO
2,3,4,5
4 Press 5/∞ to select the adjustment item, then
press SET/SELECT.
H . POS I T I ON : 0
USE:
END: MENU
5 Press 2/3 to carry out the adjustment.
Use 5/∞ for the adjustments of V.POSITION.
After selecting, press SET/SELECT to enter your
selection.
1 Press MENU to display the menu screen.
The menu screen appears.
2 Press 5/∞ to select SCREEN, then press
SET/SELECT.
SCREEN
INC EMA WI DE
AUTO SCREEN :OF F
V . POS I T I ON :
OTHER
EX IT
USE:
3 Press 5/∞ to select OTHER, then press
SET/SELECT.
E
ADJUSTMENTS
DISPLAY PANEL
S
C
OTHER
When viewing an image from a personal computer,
the following screen is displayed.
N
SCREEN
CR E
INE
INC EMA WI DE
THOER
MOD E : S T D
H . POS I T I ON : 0
V . POS I T I ON:
V.POSIT
H.POSI T
CLK FRE
EX IT
EX IT
SCREEN
FULL
H . POS I T I ON : 0
O
THE
E
XIT
M
AW
R
USE:
USE
USE:
I
ION
ION
Q.
:
DE
:
:
0
0
0V . POS I T I ON:
END: MENU
END: MENU
:
END
END: MENU
6 When adjustment is finished, press MENU to exit
the menu screen.
Note
Make these adjustments for each input (INPUT2 to INPUT4) and
for each signal (pages 55 and 56).
SCREEN mode adjustment items
Below are brief descriptions of the options that can be set
in the SCREEN mode.
H.POSITION ............ Adjust the picture’s position to the
left or right.
V.POSITION............. Adjust the picture’s position upward
or downward.
CLK FREQ. .............. Adjust letter breakup or noise on the
screen. This setting adjusts the
unit’s internal clock signal frequency
0
0
MENU
CLK PHASE ............. Adjust so that there is minimum
Notes
÷ When INPUT1 is selected, OTHER cannot be selected.
÷ V. POSITION adjustment when the screen size is set to ZOOM
or CINEMA WIDE cannot be performed as shown in the menu
screen in step 3. To adjust the vertical position of the screen,
please follow the procedure on page 24 starting from step 2.
÷ When CLK FREQ. adjustment is carried out, the H.POSITION
setting may have to be re-adjusted.
÷ If the adjustment items in the SCREEN mode are adjusted
excessively, the picture may not be displayed properly.
that corresponds to the input video
signal.
flicker of screen letters or color
misalignment. This setting adjusts
the phase of the internal clock signal
adjusted by the CLK FREQ. setting.
38
<ARE1349> En
SCREEN OTHER
FULL
E
XIT
USE:
.CLK FREQ
ECLK PHAS
END: MENU
Page 43

OPERATING OTHER DEVICES
○○○○○○○○○○○○○○○○○○○○○○○○○○○○○○○○○○○○○○○○○○○○○○○○○○○○○○○○○○○○○○
○○○○○○○○○○○○○○○○○○○○○○○○○○○○○○○○○○○○○○○○○○○○○○○○○○○○○○○○○○○○○○○○○○○○○○○○○○○○○○○○○○○
○○○○○○○○○○○○○○○○○○○
Remote code set up
To operate other manufacturers' audio/video components
using the remote control unit supplied with the plasma
display panel, remote control signals need to be set.
There are two methods of setting remote control signals.
÷ Programming the other manufacturers' remote control
signal presets into this remote control unit.
÷ Learning other manufacturers' remote control signals
directly from the remote control units of the other
components.
Programming other
manufacturers’ remote control
signal presets
TV
DTV
DVD
LED indicator
2
CBL
/VCR
/LD
/SAT
STANDBY/ON
INPUT
1234
SCREEN
MODE
POWER
AUDIO CC
AUTO STILL
INPUT
DISPLAY
RECEIVER
CLEAR
1 2 3
4 5 6
7 8 9
RETURN
MUTING
RECEIVER
TV/SAT/DTV/DVD
MENU
SELECT
%
FAVORITES
VCR REC
CH
ENTER
0
CH
VOL
%
SET/
%
(SAT) /DTV
%
CH
EDIT/
LEARN
SOURCE SAT/DTV
POWER
DVD
TOP MENU
MENU
1 7 3 ¡
84
MODE
VIEW
GUIDE
INFO
1
DTV
2,3
¢
2 Simultaneously press EDIT and the number
button “1”.
The LED indicator starts blinking.
3 Select the desired manufacturer.
Select from the table on the following page.
Ex) To select a PHILIPS LD player, press the number
buttons “2” and “4” in succession to enter the
number 24.
÷ If the LED indicator blinks rapidly when the number
buttons are pressed, there has been an error. Input
the number again.
÷ After setting, you can automatically use the remote
control in the usual manner.
Notes
÷ To exit the EDIT mode during this operation, press EDIT again.
÷ If the mode switch position is changed while in EDIT mode,
EDIT mode is canceled.
÷ After step 1 and step 2, if you do not press any buttons for
one minute (no operation), the EDIT mode is canceled.
÷ When programming remote control signal presets, make sure
that the learn setting has been reset (page 41).
÷ If the table on the following page does not include the
manufacturer of your component, or the remote control does
not work even after the correct code is entered, you can have
the remote control unit learn its signal using the LEARN mode
of the remote control unit outlined on page 41.
÷ The default setting is “00” for all mode switch settings.
NGLISH
NGLISH
E
E
THER DEVICES
OPERATING O
CU-PDP008
PLASMA DISPLAY REMOTE CONTROL UNIT
Î
1 Set the mode switch to match the device to which
you want to preset the remote control signal.
Ex) To select DVD/LD, move the switch to the fourth
position as shown below.
TV
/VCR
CBL
/SA T
DTV
DVD
/LD
<ARE1349> En
39
Page 44

OPERATING OTHER DEVICES
○○○○○○○○○○○○○○○○○○○○○○○○○○○○○○○○○○○○○○○○○○○○○○○○○○○○○○○○○○○○○○
Manufacturer's preset remote control signals
NGLISH
NGLISH
E
E
DTV
CBL/SAT VCR DVD/LD
OTHER DEVICES
OPERATING
00
01
02
03
04
05
06
07
08
09
10
11
12
13
14
15
16
17
18
19
20
21
22
23
24
25
26
27
28
29
30
31
32
33
34
35
36
50
PIONEER
—
—
—
—
—
—
—
—
—
—
—
—
—
—
—
—
—
—
—
—
—
—
—
—
—
—
—
—
—
—
—
—
—
—
—
—
SHARP
PIONEER1 (CABLE)
PIONEER 2 (CABLE)
JERROLD 1 (CABLE)
JERROLD 2 (CABLE)
JERROLD 3 (CABLE)
JERROLD 4 (CABLE)
JERROLD 5 (CABLE)
JERROLD 6 (CABLE)
JERROLD 7 (CABLE)
JERROLD 8 (CABLE)
JERROLD 9 (CABLE)
JERROLD 10 (CABLE)
S. A. 1 (CABLE)
S. A. 2 (CABLE)
S. A. 3 (CABLE)
S. A. 4 (CABLE)
ZENITH 1 (CABLE)
ZENITH 2 (CABLE)
ZENITH 3 (CABLE)
—
PIONEER (SAT)
RCA 1 (SAT)
RCA 2 (SAT)
SONY (SAT)
—
—
—
—
—
—
—
—
—
—
—
—
—
—
PIONEER
FISHER
FISHER
FISHER
GOLDSTAR
HITACHI
HITACHI 2
HITACHI 3
MAGNAVOX 2
MITSUBISHI
MITSUBISHI 2
MITSUBISHI 3
MITSUBISHI 4
MITSUBISHI 5
MITSUBISHI 6
PANASONIC
PANASONIC 2
PANASONIC 3
RCA
RCA 2
RCA 3
SANYO
SANYO 2
SANYO 3
SHARP
SHARP 2
SHARP 3
SONY (BETA)
SONY (VHS)
SONY (8mm)
TOSHIBA
JVC
JVC 2
JVC 3
JVC 4
JVC 5
ZENITH
—
PIONEER (DVD)
PANASONIC (DVD)
SAMSUNG (DVD)
SONY (DVD)
TOSHIBA (DVD)
JVC (DVD)
—
—
—
—
—
—
—
—
—
—
—
—
—
—
PIONEER (LD)
KENWOOD (LD)
PANASONIC 1 (LD)
PANASONIC 2 (LD)
PHILIPS (LD)
RCA (LD)
SONY (MDP)
SONY (LD)
—
—
—
—
—
—
—
—
—
—
Operations can be performed using remote control button
with the same markings (pages 43 to 48).
40
<ARE1349> En
Page 45

OPERATING OTHER DEVICES
○○○○○○○○○○○○○○○○○○○○○○○○○○○○○○○○○○○○○○○○○○○○○○○○○○○○○○○○○○○○○○
○○○○○○○○○○○○○○○○○○○○○○○○○○○○○○○○○○○○○○○○○○○○○○○○○○○○○○○○○○○○○○○○○○○○○○○○○○○○○○○○○○○
To learn remote control signals
To operate other manufacturers' remote control signals
that cannot be preset using the remote control unit, have
the remote control unit learn these signals.
LED indicator
2,5
3
TV
DTV
DVD
CBL
/VCR
/LD
/SAT
STANDBY/ON
INPUT
1234
SCREEN
MODE
AUTO STILL
POWER
INPUT
RECEIVER
AUDIO CC
CLEAR
1 2 3
4 5 6
7 8 9
RETURN
MUTING
RECEIVER
TV/SAT/DTV/DVD
SELECT
%
FAVORITES
0
MENU
SET/
VCR REC
CH
ENTER
CH
%
%
%
CH
EDIT/
LEARN
SOURCE SAT/DTV
POWER
DVD
TOP MENU
MENU
1 7 3 ¡
84
DISPLAY
DTV
VIEW
MODE
VOL
GUIDE
(SAT) /DTV
INFO
¢
1
2
4 Point the transmitters of both remote control
units toward each other with about 0.8 to 2.0 inch
(2 to 5 cm) between them, and press the POWER
button of the other manufacturer's remote control
unit.
CU-PDP008
PLASMA DISPLAY REMOTE CONTROL UNIT
Î
0.8 to 2.0 inch (2 to 5 cm)
The LED indicator blinks.
÷ If the LED indicator blinks once, return to step 3 to
learn functions for other buttons.
÷ If the LED indicator flashes four times, it indicates
an error has occurred. Return to step 3 to redo the
learning.
÷ If the LED indicator flashes four times even after
having redone the learning, it means that the
learning capacity has reached its maximum.
Î
REMOTE CONTROL UNIT
AUDIO/VIDEO PRE-PROGRAMMED
NGLISH
NGLISH
E
E
CU-PDP008
PLASMA DISPLAY REMOTE CONTROL UNIT
Î
Example) To learn the operation to turn the VCR power
on.
1 Set the mode switch to TV/VCR (first position)
when a video cassette recorder is connected.
2
Simultaneously press LEARN and number button 2.
The LED indicator begins blinking.
3 Press SOURCE POWER to establish the target
operation.
The LED indicator remains lit.
Buttons which can be learned are as follows.
VCR SOURCE POWER, CH (+), CH (–), 8, 1, 7, 3, ¡,
¶ (VCR REC)
CABLE SOURCE POWER, CH (+), CH (–), CH RETURN,
CH ENTER, 1 to 9, 0
SAT SOURCE POWER, 2, 3, 5, ∞, SET/SELECT, CH (+),
CH (–), (SAT) INFO
SAT MENU, SAT GUIDE, CH ENTER, 1 to 9, 0
DTV SOURCE POWER, CH (+), CH (–), CH RETURN,
CH ENTER, 1 to 9, 0, •(dot), GREEN, RED, YELLOW,
2, 3, 5, ∞, SET/SELECT, DVT MENU, DTV GUIDE,
DTV INFO, DTV AUDIO, CC, CLEAR, VIEW MODE
DVD SOURCE POWER, ¢, 4, 8, 1, 7, 3, ¡, 2,
3, 5, ∞, SET/SELECT, DVD MENU, DVD TOP
MENU
LD SOURCE POWER, ¢, 4, 8, 1, 7, 3, ¡
5 When LEARN is pressed, the LEARN mode is
exited, and the remote control unit returns to
normal operation.
Notes
÷ To exit the LEARN mode during a learning operation, press
LEARN again.
÷ If the mode switch position is changed while in LEARN mode,
the LEARN mode is canceled.
÷ After steps 2 and 3, if you do not press a button for one
minute (no operation), the LEARN mode is canceled.
÷ There are some remote control signals which cannot be
learned.
To reset the LEARN setting
Have the LED blinking as in step 2 and then press and
hold the remote control unit’s STANDBY/ON button
pressed for at least 2 seconds.
Note
It is necessary to reset the learn setting when you program the
remote control signal presets.
THER DEVICES
OPERATING O
÷ CABLE/SAT and DVD/LD cannot be selected at the same time.
÷ (SAT) INFO has no remote control signals preset.
<ARE1349> En
41
Page 46

REMOTE CONTROL UNIT FUNCTIONS
○○○○○○○○○○○○○○○○○○○○○○○○○○○○○○○○○○○○○○○○○○○○○○○○○○○○○○○○○○○○○○
○○○○○○○○○○○○○○○○○○○○○○○○○○○○○○○○○○○○○○○○○○○○○○○○○○○○○○○○○○○○○○○○○○○○○○○○○○○○○○○○○○○
TV
DTV
DVD
NGLISH
NGLISH
E
E
T ransmitting LED
3
4
CBL
/VCR
/LD
/SAT
STANDBY/ON
INPUT
1234
SCREEN
MODE
AUTO STILL
POWER
INPUT
AUDIO CC
RECEIVER
CLEAR
DISPLAY
DTV
VIEW
MODE
2
1 2 3
4 5 6
7 8 9
6
1
CH
EDIT/
LEARN
SOURCE SAT/DTV
POWER
DVD
TOP MENU
MENU
1 7 3 ¡
84
RETURN
MUTING
RECEIVER
TV/SAT/DTV/DVD
MENU
SET/
SELECT
%
FAVORITES
VCR REC
CH
ENTER
0
CH
VOL
%
GUIDE
%
(SAT) /DTV
%
INFO
¢
5
Remote control unit setting buttons
1 EDIT/LEARN button
EDIT: When the EDIT/LEARN button is pressed at the
same time as number button 1, the mode will change
to preset code edit mode. (page 39.)
UNIT FUNCTIONS
LEARN: When the EDIT/LEARN button is pressed at
the same time as number button 2, the unit’s
capability to learn and store command codes from
other remote control units will be activated. (page 41.)
REMOTE CONTROL
2 Mode switch
Use to switch the remote control unit modes.
Receiver control buttons
When a Pioneer receiver is connected to this unit, the
receiver can be operated using buttons 3 to 6.
When another company’s receiver is connected to this
unit, have the signals for 3 to 6 learned (page 41).
3 RECEIVER POWER button (STANDBY/ON)
Turns receiver power on and off.
CU-PDP008
PLASMA DISPLAY REMOTE CONTROL UNIT
4 RECEIVER INPUT button
5 RECEIVER VOL (volume) +, – buttons
6 RECEIVER MUTING button
Î
Selects the input source connected to the receiver.
Adjusts receiver volume level.
Press the plus button (+) to increase the volume and
the minus button (-) to decrease it.
Use to mute the receiver volume temporarily.
42
<ARE1349> En
Page 47

○○○○○○○○○○○○○○○○○○○○○○○○○○○○○○○○○○○○○○○○○○○○○○○○○○○○○○○○○○○○○○
○○○○○○○○○○○○○○○○○○○○○○○○○○○○○○○○○○○○○○○○○○○○○○○○○○○○○○○○○○○○○○○○○○○○○○○○○○○○○○○○○○○
TV
DTV
DVD
CBL
/VCR
/LD
/SAT
STANDBY/ON
INPUT
1234
SCREEN
MODE
POWER
INPUT
AUDIO CC
AUTO STILL
RECEIVER
CLEAR
DISPLAY
VIEW
MODE
DTV
Mode switch
1 2 3
4 5 6
7 8 9
RETURN
MUTING
RECEIVER
TV/SAT/DTV/DVD
MENU
SELECT
%
FAVORITES
VCR REC
CH
ENTER
0
CH
VOL
%
GUIDE
SET/
%
(SAT) /DTV
%
INFO
7
¢
8
1
2
4
5
CH
EDIT/
LEARN
SOURCE SAT/DTV
POWER
DVD
TOP MENU
MENU
1 7 3 ¡
84
36
REMOTE CONTROL UNIT FUNCTIONS
NGLISH
NGLISH
E
E
CU-PDP008
PLASMA DISPLAY REMOTE CONTROL UNIT
VCR control buttons
When the mode switch is set to TV/VCR, the remote
control unit can operate both the main unit (TV) (page 7)
and your VCR.
If the VCR is preset by “Remote code set up”, the
remote control unit button will function as follows when
the mode switch of the remote control unit is set to VCR.
When the input selector button having the same number
as the input terminal connecting the VCR is pressed, the
VCR can be operated using buttons 1 to 8.
VCR which are made by other makers and are not preset
can also be operated using the remote control unit if
buttons 1 to 8 have learnt the functions (page 41).
1 CH (channel) +, – buttons
Press to select the channel of the TV tuner on the
VCR.
2 SOURCE POWER button
Turns the power of the VCR on and off.
Î
4 1 (REW) button
Rewinds the tape and allows picture search.
5 7 (STOP) button
Stop the tape transport.
6, 8 VCR REC (record) button
Press both buttons at the same time to start
recording.
7 ¡ (FF) button
Rapidly advances the tape and allows picture search.
8 3 (PLAY) button
Selects playback.
UNIT FUNCTIONS
REMOTE CONTROL
3 8 (PAUSE/STILL) button
Set pauses and still pictures.
<ARE1349> En
43
Page 48

REMOTE CONTROL UNIT FUNCTIONS
○○○○○○○○○○○○○○○○○○○○○○○○○○○○○○○○○○○○○○○○○○○○○○○○○○○○○○○○○○○○○○
○○○○○○○○○○○○○○○○○○○○○○○○○○○○○○○○○○○○○○○○○○○○○○○○○○○○○○○○○○○○○○○○○○○○○○○○○○○○○○○○○○○
TV
DTV
DVD
NGLISH
NGLISH
E
E
CBL
/VCR
/LD
/SAT
STANDBY/ON
INPUT
1234
SCREEN
MODE
POWER
AUDIO CC
AUTO STILL
INPUT
RECEIVER
CLEAR
DISPLAY
DTV
VIEW
MODE
Mode switch
1 2 3
1
4 5 6
7 8 9
2
3
CH
EDIT/
LEARN
SOURCE SAT/DTV
POWER
DVD
TOP MENU
MENU
1 7 3 ¡
84
RETURN
MUTING
RECEIVER
TV/SAT/DTV/DVD
MENU
SET/
SELECT
%
FAVORITES
VCR REC
CH
ENTER
0
CH
VOL
%
GUIDE
%
(SAT) /DTV
%
INFO
¢
4
5
CABLE control buttons
CABLE and SAT cannot be selected at the same time.
When the mode switch is set to CBL/SAT the cable
converter connected to this unit can be operated using
the buttons 1 to 5.
UNIT FUNCTIONS
Cable converters which are made by other makers and
are not preset can also be operated using the remote
control unit if buttons 1 to 5 have learnt the functions
(page 41).
REMOTE CONTROL
1 Direct channel selection buttons
Press the button (or buttons) that corresponds to the
channel that you wish to watch.
2 CH (channel) +, – buttons
Press plus (+) or minus (–) to tune in a higher or lower
channel.
CU-PDP008
PLASMA DISPLAY REMOTE CONTROL UNIT
3 SOURCE POWER button
4 CH ENTER button*
5 CH RETURN (channel return) button*
* Some manufacturers do not preset ENTER and CH RETURN.
Î
Turns the power of the cable converter on and off.
Fix the selected channel with the direct channel
selection buttons.
Press to switch between the current channel and the
channel you were watching immediately before.
Use these buttons to learn if necessary.
44
<ARE1349> En
Page 49

○○○○○○○○○○○○○○○○○○○○○○○○○○○○○○○○○○○○○○○○○○○○○○○○○○○○○○○○○○○○○○
○○○○○○○○○○○○○○○○○○○○○○○○○○○○○○○○○○○○○○○○○○○○○○○○○○○○○○○○○○○○○○○○○○○○○○○○○○○○○○○○○○○
TV
DTV
DVD
CBL
/VCR
/LD
/SAT
STANDBY/ON
INPUT
1234
SCREEN
MODE
POWER
AUDIO CC
AUTO STILL
INPUT
RECEIVER
CLEAR
DISPLAY
DTV
VIEW
MODE
REMOTE CONTROL UNIT FUNCTIONS
Mode switch
1 2 3
1
4 5 6
7 8 9
2
3
CH
EDIT/
LEARN
SOURCE SAT/DTV
POWER
DVD
TOP MENU
MENU
1 7 3 ¡
84
RETURN
MUTING
RECEIVER
TV/SAT/DTV/DVD
MENU
SET/
SELECT
%
FAVORITES
VCR REC
CH
ENTER
0
CH
VOL
5
6
%
GUIDE
%
(SAT) /DTV
%
INFO
¢
7
4
8
NGLISH
NGLISH
E
E
CU-PDP008
PLASMA DISPLAY REMOTE CONTROL UNIT
SAT control buttons
CABLE and SAT cannot be selected at the same time.
When SAT is preset by “Remote code set up”, the
remote control unit buttons will function as shown below.
÷ When a satellite broadcast tuner is connected to this
unit, press the input selector button that has the same
number as the connected input terminal and set the
mode switch to CBL/SAT. The tuner can be operated
using buttons 1 to 8.
÷ Satellite broadcast tuners which are made by other
makers and are not preset can also be operated with
the remote control unit if buttons 1 to 8 have learnt
the functions (page 41).
1 Direct channel selection buttons
Press the button (or buttons) that corresponds to the
channel that you wish to watch.
2 CH (Channel) +, – buttons
Press plus (+) or minus (–) to tune in a higher or lower
channel.
Î
4 Select/Set buttons (SET/SELECT, 2, 3, 5, ∞)
2, 3, 5, ∞: Press the button to select items on the
SAT GUIDE screen or SAT menu screen.
SET/SELECT: Press to activate the selected function.
5 CH ENTER button
Fix the selected channel with the direct channel
selection buttons.
÷ This button is not preset. Use this button to learn if
necessary.
6 SAT MENU button
When this button is pressed, the satellite broadcasting
menu will be displayed.
7 SAT GUIDE button
When this button is pressed, the satellite broadcasting
guide screen will be displayed.
8 (SAT) INFO button*
When this button is pressed, information on satellite
broadcasting will be displayed.
UNIT FUNCTIONS
REMOTE CONTROL
3 SOURCE POWER button
Turns the power of the SAT (digital satellite system
tuner) on and off.
* (SAT) INFO button has no remote control signals preset. Learn
the operation if necessary.
<ARE1349> En
45
Page 50

REMOTE CONTROL UNIT FUNCTIONS
○○○○○○○○○○○○○○○○○○○○○○○○○○○○○○○○○○○○○○○○○○○○○○○○○○○○○○○○○○○○○○
○○○○○○○○○○○○○○○○○○○○○○○○○○○○○○○○○○○○○○○○○○○○○○○○○○○○○○○○○○○○○○○○○○○○○○○○○○○○○○○○○○○
TV
DTV
DVD
NGLISH
NGLISH
E
E
1
2
3
CBL
/VCR
/LD
/SAT
STANDBY/ON
INPUT
1234
SCREEN
MODE
POWER
INPUT
AUDIO CC
AUTO STILL
RECEIVER
CLEAR
DISPLAY
DTV
VIEW
MODE
1 2 3
4 5 6
Mode switch
7
8
7 8 9
4
5
6
CH
EDIT/
LEARN
SOURCE SAT/DTV
POWER
DVD
TOP MENU
MENU
1 7 3 ¡
84
0
RETURN
MUTING
RECEIVER
TV/SAT/DTV/DVD
MENU
SET/
SELECT
%
FAVORITES
VCR REC
CH
ENTER
CH
VOL
9
0
-
%
GUIDE
%
(SAT) /DTV
%
INFO
¢
=
~
!
@
DTV control buttons
When the mode switch is set to DTV, your DTV Set Top
Box can be operated using buttons 1 to @ of this remote
control unit.
Even if your DTV Set Top Box is not preset the remote
control signals, buttons 1 to @ will be available by
UNIT FUNCTIONS
performing the learning function of this remote control
unit (page 41).
1 CC button
REMOTE CONTROL
Displays captions during closed-caption broadcasts.
2 DTV AUDIO button
Press to select the audio mode during multiaudio
broadcasts.
3 Direct channel selection buttons
Press the button (or buttons) that corresponds to the
channel that you wish to watch.
4 (DOT) button
Used in channel selection.
CU-PDP008
PLASMA DISPLAY REMOTE CONTROL UNIT
5 CH (channel) +, – button
6 SOURCE POWER button
7 CLEAR button
8 VIEW MODE button
9 CH ENTER button
0 CH RETURN (channel return) button
Î
Press plus (+) or minus (–) to tune in a higher or lower
channel.
Turn the power of the DTV tuner on and off.
Press to clear the on-screen display.
Press to adjust the picture size.
Fix the selected channel with the direct channel
selection buttons.
Press to switch between the current channel and the
channel you were watching immediately before.
46
<ARE1349> En
Page 51

○○○○○○○○○○○○○○○○○○○○○○○○○○○○○○○○○○○○○○○○○○○○○○○○○○○○○○○○○○○○○○
○○○○○○○○○○○○○○○○○○○○○○○○○○○○○○○○○○○○○○○○○○○○○○○○○○○○○○○○○○○○○○○○○○○○○○○○○○○○○○○○○○○
TV
DTV
DVD
CBL
/VCR
/LD
/SAT
STANDBY/ON
INPUT
1234
SCREEN
1
2
3
MODE
AUTO STILL
POWER
INPUT
AUDIO CC
1 2 3
4 5 6
RECEIVER
CLEAR
DISPLAY
DTV
VIEW
MODE
REMOTE CONTROL UNIT FUNCTIONS
Mode switch
7
8
7 8 9
RETURN
MUTING
RECEIVER
TV/SAT/DTV/DVD
MENU
SET/
SELECT
%
FAVORITES
VCR REC
CH
ENTER
0
CH
VOL
9
0
-
%
GUIDE
%
(SAT) /DTV
%
INFO
¢
=
~
!
@
4
5
6
CH
EDIT/
LEARN
SOURCE SAT/DTV
POWER
DVD
TOP MENU
MENU
1 7 3 ¡
84
NGLISH
NGLISH
E
E
- DTV MENU button
When this button is pressed, the DTV menu screen
will be displayed.
= DTV GUIDE button
When this button is pressed, the DTV guide screen
will be displayed.
~ Select/Set buttons (SET/SELECT, 2, 3, 5, ∞)
2, 3, 5, ∞: Press the button to select items on the
DTV menu screen.
SET/SELECT: Press to activate the selected function.
! DTV INFO button
When this button is pressed, information on DTV will
be displayed.
@ FAVORITE CH/Colored (blue, green, red and
yellow) buttons
FAVORITE CH: Used for making FAVORITE CH
settings with the DTV tuner.
Blue, Green, Red, Yellow: Used to make selections
from the DTV tuner menu.
CU-PDP008
PLASMA DISPLAY REMOTE CONTROL UNIT
Î
UNIT FUNCTIONS
REMOTE CONTROL
Note
Some manufacturers do not preset all the buttons. Use these
buttons to learn if necessary.
<ARE1349> En
47
Page 52

○○○○○○○○○○○○○○○○○○○○○○○○○○○○○○○○○○○○○○○○○○○○○○○○○○○○○○○○○○○○○○
○○○○○○○○○○○○○○○○○○○○○○○○○○○○○○○○○○○○○○○○○○○○○○○○○○○○○○○○○○○○○○○○○○○○○○○○○○○○○○○○○○○
TV
DTV
DVD
NGLISH
NGLISH
E
E
CBL
/VCR
/LD
/SAT
STANDBY/ON
INPUT
1234
SCREEN
MODE
POWER
AUDIO CC
INPUT
AUTO STILL
RECEIVER
CLEAR
DISPLAY
VIEW
MODE
DTV
Mode switch
REMOTE CONTROL UNIT FUNCTIONS
1 2 3
4 5 6
7 8 9
RETURN
MUTING
RECEIVER
TV/SAT/DTV/DVD
MENU
SET/
SELECT
%
FAVORITES
VCR REC
CH
ENTER
0
CH
VOL
%
GUIDE
%
(SAT) /DTV
%
INFO
7
8
9
¢
0
CH
EDIT/
LEARN
SOURCE SAT/DTV
3
5
6
POWER
DVD
TOP MENU
MENU
1 7 3 ¡
84
41
2
CU-PDP008
PLASMA DISPLAY REMOTE CONTROL UNIT
Î
DVD/LD control buttons
DVD and LD cannot be selected at the same time.
If the DVD/LD is preset by “Remote code set up”, the remote
control unit button will function as follows when the mode
switch of the remote control unit is set to DVD/LD.
When the input selector button having the same number as
UNIT FUNCTIONS
the input terminal connecting a DVD player or LD player is
pressed, these players can be operated using buttons 1 to
- (buttons 7, 8 and - are for DVD players only).
DVD player/LD player which are made by other makers
REMOTE CONTROL
and are not preset can also be operated using the remote
control unit if buttons 1 to - have learnt the functions
(page 41).
1 ¢ (CHAPTER SEARCH) button
Pressing quickly once takes you to the start of the
next chapter. Each time you press it, you move ahead
to the start of the next chapter.
2 4 (CHAPTER SEARCH) button
Pressing quickly once takes you to the start of the
chapter currently playing. Each time you press it, you
move back to the start of the previous chapter.
3 SOURCE POWER button
Turns the power of the DVD/LD player on and off.
5 1 (SCAN) button
Continue pressing to scan in the reverse direction.
6 7 (STOP) button
Playback is stopped when pressing once.
With some DVD/LD players, pressing the button twice
may open the disc tray.
7 DVD MENU button (DVD only)
When this button is pressed, the DVD menu will be
displayed.
8 Select/Set buttons (SET/SELECT, 2, 3, 5, ∞)
(DVD only)
2, 3, 5, ∞: Press the button to select items on the
DVD menu screen.
SET/SELECT: Press to activate the selected function.
9 ¡ (SCAN) button
Continue pressing for fast forward.
0 3 (PLAY) button
Selects playback.
- DVD TOP MENU button (DVD only)*
For details, refer to the DVD player’s instructions
manual.
4 8 (PAUSE/STILL) button
Set pauses and still pictures.
48
<ARE1349> En
* Some manufacturers do not preset DVD TOP MENU. Use this
button to learn if necessary.
Page 53

ADDITIONAL INFORMATION
○○○○○○○○○○○○○○○○○○○○○○○○○○○○○○○○○○○○○○○○○○○○○○○○○○○○○○○○○○○○○○
○○○○○○○○○○○○○○○○○○○○○○○○○○○○○○○○○○○○○○○○○○○○○○○○○○○○○○○○○○○○○○○○○○○○○○○○○○○○○○○○○○○
○○○○○○○○○○○○○○○○○○○
Resetting the unit to factory set
○○○○○○○○○○○○○○○○○○○
Cleaning
defaults
When the unit is in the operation mode, press
RETURN on the control panel on the main unit.
STANDBY/ON
INPUT
MENU
ADJUST
SET
S.MODE
RETURN
RETURN
Initial mode
Input selector : Set to INPUT1
PICTURE
MODE : STD
SCREEN
Parameters : Set to 0
AUTO SCREEN : OFF
MODE : NATURAL WIDE (VIDEO)
ORIGINAL (PC)*
V.POSITION : Set to 0
SET UP
POWER SAVE : OFF
SIGNAL/FORMAT: – / COMPONENT2 (INPUT2)
PC / RGB (INPUT3)
PC / RGB (INPUT4)
G ON SYNC: OFF (INPUT3)
OFF (INPUT4)
STILL : OFF
Regular cleaning will extend the life and performance of
this unit. The recommended way to clean the display and
related parts is described below.
Before cleaning, be sure to unplug the power cord from
the power outlet.
Cleaning the display panel body and remote
control
Do not under any circumstances use solvents such as
benzine or thinner for cleaner. Use of such liquids may
cause deterioration or peeling of paint from the display or
remote control unit.
Wipe the display and remote control gently with a soft
cloth. In the case of excessive dirt buildup, dampen a soft
cloth with a diluted neutral cleaning detergent and after
wringing the cloth thoroughly, wipe the component and
then dry it with a dry soft cloth.
Cleaning the screen
After dusting, wipe the screen gently using the supplied
cleaning cloth or a soft cloth. Do not use tissue or a rough
cloth. As the surface of the screen is easily scratched, do
not rub it or hit it with a hard object.
Cleaning the vents
As a general rule, use a vacuum cleaner about once a
month to clean the vents on the rear panel of the display
of dust buildup (set the vacuum cleaner to its weakest
setting when doing this).
Using the unit without cleaning it of dust will cause the
internal temperature to increase, resulting in possible
breakdown or fire.
Vents
Vents
NGLISH
NGLISH
E
E
INFORMATION
ADDITIONAL
VentsVents
* When the unit receives a signal which is not compatible with
the ORIGINAL screen size, it selects another compatible
screen size in order of 4:3 NORMAL and FULL.
Notes
÷ The PICTURE mode “USER” settings are preserved.
÷ INPUT LABEL settings are preserved.
÷ HIGH CONTRAST settings are preserved.
Vents
<ARE1349> En
49
Page 54

ADDITIONAL INFORMATION
○○○○○○○○○○○○○○○○○○○○○○○○○○○○○○○○○○○○○○○○○○○○○○○○○○○○○○○○○○○○○○
○○○○○○○○○○○○○○○○○○○○○○○○○○○○○○○○○○○○○○○○○○○○○○○○○○○○○○○○○○○○○○○○○○○○○○○○○○○○○○○○○○○
○○○○○○○○○○○○○○○○○○○
Inserting the batteries in the remote
○○○○○○○○○○○○○○○○○○○
Operating range of the remote
control unit
NGLISH
NGLISH
E
E
While pressing down
lightly, slide in the
direction of the arrow.
Two AA (LR6)
batteries
9
(
(
9
When handling the remote control unit
÷ Do not drop or shake the remote control.
÷ Do not use the remote control unit in a location subject to
direct sunlight, heat radiation from a heater, or in a place
subject to excessive humidity.
÷ When the remote control unit’s batteries begin to wear out,
the operable distance will gradually become shorter. When this
occurs, replace all batteries with new ones as soon as
possible.
CAUTION
÷ Insert batteries so that the plus (+) and minus (–) sides are
INFORMATION
ADDITIONAL
aligned according to the markings in the battery case.
÷ Do not mix new batteries with used ones.
÷ The voltage of batteries may differ even if they are the same
shape. Please do not mix different kinds of batteries together.
÷ When not using the remote control unit for a long period of
time (1 month or more), remove the batteries from the remote
control unit to prevent leaking of battery fluid. If battery liquid
has leaked, thoroughly wipe the inside of the case until all
liquid is removed, and then insert new batteries.
÷ Do not charge, short, disassemble or throw the provided
batteries in a fire.
control unit
When operating the remote control unit, point it at the
remote sensor (Î) located on the front panel of the main
unit. The remote control unit is operable up to 23 feet
(7 m) from the unit and within a 30 angle on each side of
the sensor.
23 feet (7 m)
30˚
TV
/VCR
CBL
/SAT
DTV
STANDBY/ON
DVD
12
/LD
SCREEN
INPUT
MODE
AUTO
POWER
3
STILL
INPUT
AUDIO
RECEIVER
CC
1
CLEAR
DTV
VIEW
2
MODE
4
3
5
7
6
8
9
0
CH
CH
ENTER
CH
RETURN
MUTING
EDIT/
RECEIVER
LEARN
VOL
SOURCE SAT/DTV
TV/SAT/DTV/DVD
POWER
MENU
DVD
TOP MENU
%
MENU
%
SET/
SELECT
1
GUIDE
%
%
FAVORITES
7
(SAT)/DTV
84
V
INFO
C
R
R
3
E
C
¡
¢
C
U-PD
PLASM
P008
A D
ISPLAY REM
O
TE C
O
NTR
O
Î
L U
N
IT
If you are having difficulty with operation of the
remote control unit
÷ The remote control unit may not operate if there are objects
placed between it and the display.
÷ Operational distance will gradually become shorter as the
batteries begin to wear out, replace weak batteries with new
ones as soon as possible.
÷ This unit discharges infrared rays from the screen. Placing a
video deck or other component that is operated by an infrared
remote control unit near this unit may hamper that
component’s reception of the remote control’s signal, or
prevent it from receiving the signal entirely. Should this occur,
move the component to a position further away from this unit.
÷ Depending on the installation surroundings, this unit’s remote
control unit may be influenced by the infrared rays discharged
from the plasma display, hampering reception of its rays or
limiting its operational distance. The strength of infrared rays
discharged from the screen will differ according to the picture
displayed.
30˚
4
DISPLAY
Remote Sensor
50
<ARE1349> En
Page 55

○○○○○○○○○○○○○○○○○○○○○○○○○○○○○○○○○○○○○○○○○○○○○○○○○○○○○○○○○○○○○○
○○○○○○○○○○○○○○○○○○○
Troubleshooting
○○○○○○○○○○○○○○○○○○○○○○○○○○○○○○○○○○○○○○○○○○○○○○○○○○○○○○○○○○○○○○○○○○○○○○○○○○○○○○○○○○○
ADDITIONAL INFORMATION
What may at first seem to be an malfunction, may be
remedied with a quick check.
Please check to see if a warning is displayed on the
screen. If displayed, refer to page 53 and check the
mode. If there is no display check to see if the problem is
listed below. The problem may also be caused by
something other than this unit so please also check the
other components being used such as a video deck. If the
problem can still not be solved please consult the dealer
where this unit was purchased.
General problems
Problem Possible Solution
÷ No power.
÷ Unit cannot be operated.
÷ Remote control does not
operate.
÷ Picture is cut off.
÷ Strange color, light color, or
dark, or color misalignment..
÷ Power is suddenly turned
off.
÷ No picture.
÷ Is the power cord disconnected? (page 15)
÷ Has the MAIN POWER switch been switched on? (page 6)
÷ External influences such as lightning, static electricity, etc., may cause improper operation. In this
case, operate the unit after first turning the main power on/off, or unplugging the power cord and
re-plugging it in after 1 to 2 minutes.
÷ Are batteries inserted with polarity (+, –) correctly aligned? (page 50)
÷ Are batteries worn out? (Replace with new batteries).
÷ Is there a plug inserted in the CONTROL IN terminal?
Because reception of the remote control’s signal will not be possible if a plug is inserted, please
check connections (page 15).
÷ Is the selected screen size correct?
Switch to another screen size (pages 22 to 25).
÷ Are SCREEN mode adjustments such as picture size made correctly? (page 38).
÷ Adjust the picture tone (page 31).
÷ Is the room too bright?
The picture may look dark in a room that is too bright.
÷ The unit’s internal temperature has increased. (Air vents are blocked.)
Remove any objects blocking vent or clean (page 49).
÷ Is the POWER SAVE mode set to “MODE1” or “MODE2”? (page 2 6)
÷ Is connection to other components correct? (pages 10 to 13)
÷ Has setup been done correctly after connection? (pages 17 to 19)
÷ Is the correct input selected? (page 20)
÷ Is a non-compatible signal being input? (pages 10, 14, 55 and 56)
÷ Is picture adjustment correct? (page 31)
NGLISH
NGLISH
E
E
INFORMATION
ADDITIONAL
Cleaning the vents
As a general rule, use a vacuum cleaner about once a
month to clean the vents on the rear panel of the display
of dust buildup (set the vacuum cleaner to its weakest
setting when doing this).
Using the unit without cleaning it of dust will cause the
internal temperature to increase, resulting in possible
breakdown or fire.
<ARE1349> En
51
Page 56

ADDITIONAL INFORMATION
○○○○○○○○○○○○○○○○○○○○○○○○○○○○○○○○○○○○○○○○○○○○○○○○○○○○○○○○○○○○○○
○○○○○○○○○○○○○○○○○○○○○○○○○○○○○○○○○○○○○○○○○○○○○○○○○○○○○○○○○○○○○○○○○○○○○○○○○○○○○○○○○○○
Problems commonly mistaken
as breakdown
NGLISH
NGLISH
E
E
÷ The screen is displayed in a
small size.
÷ Letter breakup on screen.
÷ A sharp sound is sometimes
heard from the cabinet.
÷ Bright portions of image
appear to be loosing
intensity.
÷ Speckles or noise appears on
screen.
÷ Stripes appear on the screen.
÷ Operation is not possible.
÷ Sound is heard from inside
the unit.
Problem Possible Solution
÷ Check the input signal compatibility chart (pages 55 and 56).
÷ Is an appropriate screen size selected? (pages 22 and 25)
÷ Adjust using SCREEN mode on the menu screen (page 38).
If there is still no improvement, this unit may be limiting the displayable range. Check the
personal computer input signal compatibility chart (pages 55 and 56).
÷ Expansion/contraction caused by surrounding temperature change may result in sound being
heard from the cabinet. This is not a malfunction.
÷ When the video input signal’s level is too high, the bright portions may appear to be losing their
intensity.
Increase the adjustment level of the contrast and check the picture (page 31).
÷ May be caused by radio wave interference from appliances with motors such as hair dryers,
electric vacuum cleaners, electric power drills, ignition systems of cars, motorcycles etc., switch
devices such as thermostats etc., neon signs or electrical discharge from power lines etc..
÷ May be caused by radio wave mingling from TV station, FM station, amateur radios, public radios
(simplified radios) etc., or a nearby personal computer, TV, or video/audio component.
÷ Strong magnets in the vicinity may cause picture distortion and similar problems.
÷ External influences such as lightning strike, static electricity etc., may cause improper operation.
In this case, operate the unit after first turning the main power ON/OFF, or unplugging the power
cord and re-plugging it in after 1 to 2 minutes.
÷ Sound of fan revolving. This is not a malfunction.
Although this unit incorporates high precision technology
in its design, please understand that there may be
extremely slight pixel breakup, or light emission fault.
Note
In order to protect this unit’s panels and circuitry, the revolving
INFORMATION
speed of the interval fan will be automatically increased in order
to cool the inside of the unit when the surrounding temperature
exceeds 104 °F (40 °C). (The sound of the fan will become louder
ADDITIONAL
at this time). Please operate this unit in a location with a
surrounding temperature under 104 °F (40 °C).
Additional cautions
÷ If the power is automatically turned off during operation
of this unit, the following reasons may be the cause.
1 Is the POWER SAVE mode set to “MODE1” or
“MODE2”? (page 26)
2 The surrounding temperature has risen above 104 °F
(40 °C). Please operate this unit in a location with a
surrounding temperature under 104 °F (40 °C).
3 The vents are blocked or the internal temperature
has risen abnormally due to abnormal heat
generation of internal parts etc..
If the power is automatically turned off for a reason
other than the above reasons, there could be a
malfunction. In this case, unplug the power cord from
the power outlet and request repair from your nearest
sales outlet.
÷ The plasma display panel of this unit is very bright and
viewing it a close distance will cause eye strain.
We recommend that you view the screen from a
suitable distance (9.8 to 19.7 feet (3 to 6m)).
52
<ARE1349> En
Page 57

○○○○○○○○○○○○○○○○○○○○○○○○○○○○○○○○○○○○○○○○○○○○○○○○○○○○○○○○○○○○○○
○○○○○○○○○○○○○○○○○○○○○○○○○○○○○○○○○○○○○○○○○○○○○○○○○○○○○○○○○○○○○○○○○○○○○○○○○○○○○○○○○○○
About the plasma panel’s
protection function
The brightness of this display will deteriorate slightly
when an image with little movement such as a
photograph or computer image is continuously displayed.
CAUTION
Panel sticking and after-image lag
÷ Displaying the same images such as still images for a
long time may cause after-image lagging.
This may occur in the following two cases.
ADDITIONAL INFORMATION
This is caused by the plasma panel’s protection function
which detects images with slight movement and
automatically adjusts brightness to protect the display,
and is not a malfunction.
This function starts approximately 5 minutes after the
power has been turned on or after input has been
switched.
1.After-image lagging due to remaining electrical load
When image patterns with very high peak luminance are
displayed for more than 1 minute, after-image lagging may
occur due to the remaining electric load. The after-images
remaining on the screen will disappear when moving images
are displayed. The time for the after-images to disappear
depends on the luminance of the still images and the time
About the self diagnosis mode
they had been displayed.
Messages appear on the bottom of this unit’s screen to
indicate operation or connection faults. After message
confirmation, check the condition of the unit.
2.After-image lagging due to sticking
Avoid displaying the same images continuously over a long
period of time with the Plasma Display. When images of the
If this message appears
OUT OF RANGE
or
PLEASE CHANGE
RESOLUTION
OR REFRESH RATE
THERMAL WARNING!
PLEASE SHUT DOWN
÷ A incompatible signal is being
÷ Turn off main power (page 6).
÷ Has the room temperature
÷ If the unit’s vents are blocked,
Please do this
input. Check the PC input
signal compatibility chart on
page 56 and change the
output signal setting on the
computer side.
exceeded 40 °C (104 °F) ?
Reduce the room temperature.
unblock them.
same pattern are displayed continuously for several hours or
displayed for a short period of time every day, after -images
may remain on the screen due to the sticking of the
fluorescent materials. In this case, these images may
decrease if moving images are displayed after them, but
basically they will not disappear .
NGLISH
NGLISH
E
E
INFORMATION
ADDITIONAL
<ARE1349> En
53
Page 58

ADDITIONAL INFORMATION
○○○○○○○○○○○○○○○○○○○○○○○○○○○○○○○○○○○○○○○○○○○○○○○○○○○○○○○○○○○○○○
○○○○○○○○○○○○○○○○○○○○○○○○○○○○○○○○○○○○○○○○○○○○○○○○○○○○○○○○○○○○○○○○○○○○○○○○○○○○○○○○○○○
○○○○○○○○○○○○○○○○○○○
Specifications
NGLISH
NGLISH
General
E
E
Light emission panel ............ 50 inch plasma display panel
Number of pixels.............................................. 1280 x 768
Power supply ........................................... AC 120 V, 60 Hz
Power consumption ................................................ 468 W
Standby power consumption ................................... 0.6 W
External dimensions........ 1218 (W) x 714 (H) x 98 (D) mm
......................... 47-31/32 (W) x 28-1/8 (H) x 3-7/8 (D) inch.
Weight............................................... 43 kg (94 lbs. 13 oz.)
Operating temperature range ..... 32 to 104 °F (0 to 40 °C)
Operating atmospheric pressure range
........................................ 0.8 to 1.1 atmospheric pressure
INPUT 4
Input Mini D-Sub 15 pin (socket connector)
1 RGB signal (G ON SYNC compatible)
RGB ... 0.7 Vp-p/75 Ω/no sync.
HD/CS, VD ... TTL level
/positive and negative polarity
2.2 kΩ
G ON SYNC
... 1.0 Vp-p/75 Ω/negative sync.
*Compatible with Microsoft’s Plug & Play
(VESA DDC1/2B)
2 Component video signal
Y ... 1 Vp-p/75 Ω/negative sync.
B/PB, CR/PR
C
... 0.525 Vp-p/75 Ω
(75% satulation level)
Control
Input/output
Video
INPUT 1
FACTORY ADJUSTMENT TERMINAL
... D-Sub 9 pin (pin connector)
CONTROL IN/OUT ... monaural mini jack (x2)
Input 1 BNC jack
÷ Composite video signal
1 Vp-p/75 Ω/negative sync.
2 S terminal (Mini DIN 4 pin)
Y . . . 1 Vp-p/75 Ω/negative sync.
C . . .0.286 Vp-p/75 Ω
Accessories
Power cord....................................................................... 1
Pin/BNC conversion adaptor ............................................ 1
Remote control unit ......................................................... 1
AA (LR6) batteries ............................................................ 2
Cleaning cloth................................................................... 1
INPUT 2
Input Component video jacks
Pin jack (x3)
Y . . . 1 Vp-p/75 Ω/negative sync.
CB/PB, CR/PR
... 0.525 Vp-p/75 Ω
(75% satulation level)
Speed clamp .................................................................... 2
Bead band ........................................................................ 2
Warranty........................................................................... 1
Operating Instructions...................................................... 1
÷ Due to improvements, specifications and design are subject to
change without notice.
INFORMATION
INPUT 3
Input BNC jack (x5)
ADDITIONAL
1 RGB signal (G ON SYNC compatible)
RGB ... 0.7 Vp-p/75 Ω/no sync.
HD/CS, VD ... TTL level
/positive and negative polarity/
75 Ω or 2.2 kΩ
(impedance switch)
G ON SYNC ...
1 Vp-p/75 Ω/negative sync.
54
2 Component video signal
Y ... 1 Vp-p/75 Ω/negative sync.
B/PB, CR/PR
C
... 0.525 Vp-p/75 Ω
(75% satulation level)
<ARE1349> En
Page 59

○○○○○○○○○○○○○○○○○○○○○○○○○○○○○○○○○○○○○○○○○○○○○○○○○○○○○○○○○○○○○○
ADDITIONAL INFORMATION
Supplement 1
1-1 Video signal compatibilty table (INPUT1, INPUT2)
INPUT of
this unit
INPUT1
INPUT2
Vertical
frequency
Fv (Hz)
60
60
Horizontal
frequency
Fh (kHz)
15.734
15.734
31.5
Signal format
Composite
S
Component
Component
1-2 Video signal compatibilty table (INPUT3, INPUT4)
Vertical
frequency
Fv (Hz)
60
Horizontal
frequency
Fh (kHz)
15.734
31.5
33.75
45.0
Signal format
Component
RGB
Component
RGB
Component
RGB
Component
RGB
4.3 NORMAL FULL ZOOM
4.3
NORMAL
Screen size
FULL ZOOM
Screen size
CINEMA
WIDE
CINEMA
WIDE
NATURAL
WIDE
NATURAL
WIDE
Remarks
NTSC
480i (DVD)
480p (DVD)
Remarks
480i (SDTV)
480p (SDTV)
1080i (HDTV)
720p (HDTV)
NGLISH
NGLISH
E
E
INFORMATION
ADDITIONAL
<ARE1349> En
55
Page 60

ADDITIONAL INFORMATION
○○○○○○○○○○○○○○○○○○○○○○○○○○○○○○○○○○○○○○○○○○○○○○○○○○○○○○○○○○○○○○
Supplement 2
PC signal compatibilty table (INPUT3, INPUT4)
NGLISH
NGLISH
E
E
Resolution
(Dot x line)
Vertical
frequency
Horizontal
frequency
ORIGINAL FULL
Screen size (Dot x line)
Remarks
4.3 NORMAL
640x400
640x480
800x600
832x624
1024x768
1152x870
1280x1024
: Optimal picture. Adjustment of picture position, frequency, phase etc., may be necessary.
: Picture will be reproduced but some fine detail will be hard to see.
: Simple reproduction. Fine detail will not be reproduced. Screen size will be displayed as “~
TYPE”.
56.4Hz
70.1Hz
60Hz
66.7Hz
72Hz
75Hz
56Hz
60Hz
72Hz
75Hz
74.6Hz
43Hz
Interlace
60Hz
70Hz
75Hz
(74.9Hz)
75.1Hz
60Hz
24.8kHz
31.5kHz
31.5kHz
35.0kHz
37.9kHz
37.5kHz
35.2kHz
37.9kHz
48.1kHz
46.9kHz
49.7kHz
35.5kHz
48.4kHz
56.5kHz
60.0kHz
(60.2kHz)
68.7kHz
64.0kHz
640x480
±
±
±
800x600
±
±
±
832x624
1024x768
1024x768
±
±
1024x768
±
±
±
1024x768
±
±
±
1024x748
1024x768
960x768
1280x768
±
1280x768
±
±
±
1280x768
±
±
±
1280x748
1280x768
1280x768
±
±
1280x768
1280x768
NEC PC-9800
NEC PC-9800
Apple Macintosh 13”
Apple Macintosh 16”
( ) indicates
Apple Macintosh 19”
Apple Macintosh 21”
: Not available.
INFORMATION
ADDITIONAL
56
<ARE1349> En
Page 61

○○○○○○○○○○○○○○○○○○○○○○○○○○○○○○○○○○○○○○○○○○○○○○○○○○○○○○○○○○○○○○
○○○○○○○○○○○○○○○○○○○○○○○○○○○○○○○○○○○○○○○○○○○○○○○○○○○○○○○○○○○○○○○○○○○○○○○○○○○○○○○○○○○
Supplement 3
○○○○○○○○○○○○○○○○○○○
Explanation of Terms
ADDITIONAL INFORMATION
Signal assignment of INPUT 4 (Mini D-Sub 15
pin socket connector)
5 1
Aspect ratio
The TV screen’s width to height ratio is referred to as its aspect
ratio. The aspect ratio on standard TVs is 4:3 and on wide TVs or
High Definition TVs it is 16:9.
NGLISH
NGLISH
E
E
10
Pin No.
1
2
3
4
5
6
7
8
9
10
11
12
13
14
15
6
15 11
Input
R or CR/PR
G or Y
B or CB/PB
NC (No Connection)
GND
GND
GND
GND
DDC + 5V
GND
NC (No Connection)
DDC SDA
HD or H/V SYNC
VD
DDC SCL
S jack (S VIDEO jack)
This jack separates and transmits the video signal as two signals;
the luminance (Y) signal and the color(C) signal. Because of this,
picture reproduction is superior to that obtained at the composite
input/output jacks.
S-video signal
The video signal is composed of two signals; the chroma signal
(color signal) which reproduces color and the luminance signal
which reproduces light and darkness. With standard video
components, these two signals are combined into one and are
handled as a video signal referred to as the “composite signal”.
The S-video signal, however, is a signal that handles these two
signals separately. Because they are not combined as in the
composite video signal, the high quality of both signals can be
retained.
S1 VIDEO signal/S2 VIDEO signal
This refers to signals that include wide screen picture data such
as squeeze or letterbox data with the color signal (C) that is input
through the S VIDEO jack.
Component video signal
General term for video signal format composed of the Y.CB.CR,
Y.PB.PR and Y.B-Y.R-Y luminance signal + color signal.
The component video signal is sometimes simply called the
“color difference signal”.
Macintosh is a registered trademark of Apple Computer, Inc.
Microsoft is a registered trademark of Microsoft Corporation.
PC-9800 is a trademark of NEC Corporation.
NEC is a trademark of NEC Corporation.
VESA is a registered trademark of Video Electronics Standards
Association.
Sun Microsystems is a registered trademarks of Sun
Microsystems, Inc.
G ON SYNC
This indicates a video signal in the form of a synchronization
signal added to the G (GREEN) signal of the R.G.B signal.
VGA
VGA is short for “Video Graphics Array”.
Generally this indicates a 640 dot x 480 line resolution.
XGA
General term for “eXtended Graphic Array”.
Generally this indicates a 1024 dot x 768 line resolution.
Interlace
The lines that make up a single screen are split into two and
displayed in two passes over the screen quick succession. The
first pass displays the odd numbered horizontal lines of the
screen. Using the decay of the first pass, the even lines are then
displayed to produce the video image.
Progressive
The single screen is not broken down into two parts. Rather, the
entire image is shown on the screen. Especially in the production
of still images, text, graphics, and images with a lot of horizontal
lines, it is possible to view a clear video image with greatly
reduced flicker in areas of detail.
INFORMATION
ADDITIONAL
<ARE1349> En
57
Page 62

PRECAUTIONS DE SECURITE
○○○○○○○○○○○○○○○○○○○○○○○○○○○○○○○○○○○○○○○○○○○○○○○○○○○○○○○○○○○○○○
○○○○○○○○○○○○○○○○○○○○○○○○○○○○○○○○○○○○○○○○○○○○○○○○○○○○○○○○○○○○○○○○○○○○○○○○○○○○○○○○○○○
IMPORTANT
FRANÇAIS
Ce symbole de l'éclair, placé dans un triangle
équilatéral, a pour but d'attirer l'attention de
l'utilisateur sur la présence, à l'intérieur du coffret
de l'appareil, de "tensions dangereuses" non isolées
d'une grandeur suffisante pour représenter un
risque d'électrocution pour les êtres humains.
ATTENTION: AFIN DE PREVENIR TOUS RISQUES DE
CHOC ELECTRIQUE OU DE DEBUT D'ENCENDIE, NE PAS
EXPOSER CET APPAREIL A L'HUMIDITE OU A LA PLUIE.
REMARQUE IMPORT ANTE
Le numéro de modèle et le numéro de série de ce Téléviseur de
projection figurent sur le panneau arrière.
Veuillez noter le numéro de série sur la carte de garantie ci-jointe et
gardez-la dans un lieu sûr pour la consulter ultérieurement.
ATTENTION: Ce produit peut seulement être utilisé
avec le socle, modèle PDK-5001. L’utilisation d’autres socles
peut entraîner une instabilité pouvant causer des blessures.
A TTENTION
RISQUE DE CHOC ELECTRIQUE
NE PAS OUVRIR
ATTENTION: Pour éviter tout risque
d'électrocution, ne pas enlever le couvercle
(ni le panneau arrière).
Aucune pièce réparable par l'utilisateur ne
se trouve à l'intérieur. Confier tout entretien
à un personnel qualifié uniquement.
Les symboles suivants figurent dans ce manuel
et sur les étiquettes collées sur le produit. Ils
avertissent les utilisateurs et les techniciens qui
travaillent sur cet appareil des conditions
potentiellement dangereuses.
Ce symbole fait référence à un risque ou à
une pratique dangereuse qui peut provoquer
une blessure grave ou la mort.
Ce symbole fait référence à un risque ou à
une pratique dangereuse qui peut provoquer
une blessure ou des dégâts matériels.
Ce point d'exclamation, placé dans un triangle
équilatéral, a pour but d'attirer l'attention de
l'utilisateur sur la présence, dans les documents
qui accompagnent l'appareil, d'explications
importantes du point de vue de l'exploitation ou
de l'entretien.
AVERTISSEMENT
ATTENTION
Cet appareil a été testé est trouvé conforme avec les limites des appareils numériques de classe B, conformément à l’article 15 du
règlement FCC. Ces limites sont conçues pour offrir une protection raisonnable contre les interférences nuisibles dans une
installation résidentielle. Cet appareil génère, utilise et peut émettre de l’énergie radiofréquence et, s’il n’est pas installé et utilisé
selon les instructions, peut causer des interférences nuisibles aux communications radio. Cependant, il n’y a aucune garantie que
de telles interférences ne se produisent pas pour une installation particulière. Si cet appareil causait des interférences nuisibles à
DE SECURITE
la réception radio ou télévisée, ce qui peut être déterminé en mettant l’appareil hors et sous tension, vous être encouragé à
essayer de corriger ces interférences à l’aide de l’une ou plusieurs mesures suivantes:
– Réorientez ou déplacez l’antenne réceptrice.
PRECAUTIONS
– Augmentez l’espace entre l’appareil est le récepteur.
– Connectez l’appareil sur une prise secteur appartenant à un circuit différent de celui sur lequel le récepteur est connecté.
– Consultez votre revendeur ou un technicien radio/télévision expérimenté.
Avis à l’Utilisateur
Les altérations ou les modifications effectués sans autorisation appropriée peuvent invalider les droits de l’utilisateur à faire
fonctionner l’appareil.
ATTENTION: Ce pr oduit satisfait aux règlements FCC quand des câbles et des connecteurs blindés sont utilisés pour connecter
cet appareil avec les autres appareils. Pour éviter les interférences électromagnétiques avec les appareils électriques tels que des
radios ou des téléviseurs, utilisez des câbles et des connecteurs blindés pour la connexion.
Cet appareil numérique de la classe B est conforme à la norme NMB-003 du Canada.
i
<ARE1349> Fr
Page 63

○○○○○○○○○○○○○○○○○○○○○○○○○○○○○○○○○○○○○○○○○○○○○○○○○○○○○○○○○○○○○○
IMPORTANTES CONSIGNES DE SÉCURITÉ
PRECAUTIONS DE SECURITE
LISEZ LES INSTRUCTIONS — Toutes les consignes
de sécurité et de fonctionnement doivent être lues
avant la mise en service de l’appareil.
CONSERVEZ LES INSTRUCTIONS — Les consignes
de sécurité et de fonctionnement doivent rester,
pour information, à portée de main.
TENEZ COMPTE DES MISES EN GARDE — Toutes
les mises en garde, aussi bien sur l’appareil que
dans le mode d’emploi, doivent être prises en
compte.
SUIVEZ LES INSTRUCTIONS — Toutes les instructions
de fonctionnement et d’utilisation doivent être
respectées.
NETTOYAGE — Débranchez l’appareil de la prise
électrique avant de le nettoyer. Utilisez uniquement
un chiffon doux et sec. N’employez jamais de cire,
de benzine, d’insecticide ou autre liquide volatile
car ils risquent d’endommager le boîtier.
FIXATIONS — Utilisez uniquement les systèmes de
fixation recommandés par le fabricant afin d’éviter
tout problème.
EAU ET HUMIDITÉ — N’utilisez pas cet appareil à côté
de l’eau, par exemple près d’une baignoire, d’une
cuvette pleine, d’un évier ou d’un lavabo ; ne le
posez pas sur une surface humide, ni près d’une
piscine, etc.
ACCESSOIRES — Ne placez pas cet appareil sur un
chariot, un support, un trépied ou une table instable.
Il risque en effet de tomber et de blesser
sérieusement un enfant ou un adulte, et d’être
endommagé. Utilisez uniquement un chariot,
support, trépied ou table recommandés par le
fabricant ou fournis avec le matériel. Tout montage
doit s’effectuer selon les instructions du fabricant,
avec les éléments recommandés.
CHARIOT — L’ensemble formé par le matériel et le
chariot doit être déplacé avec précaution. Des arrêts
brusques, une force trop importante et des surfaces
inégales risquent de faire chavirer le tout.
VENTILATION — Des rainures et des ouvertures
pratiquées dans le boîtier assurent la ventilation de
l’appareil et évitent toute surchauffe, ce qui garantit
un fonctionnement fiable. N’obstruez pas ces grilles
de ventilation. Ainsi, ne placez jamais l’appareil sur
un lit, un sofa, une couverture ou une surface
similaire. Ce matériel ne doit pas être enfermé, par
exemple dans une bibliothèque ou une armoire, sauf
si une ventilation correcte est assurée ou si les
recommandations du fabricant sont respectées.
ALIMENTA TION ÉLECTRIQUE — Ce matériel doit être
utilisé uniquement avec le type d’alimentation
électrique indiqué sur l’étiquette. Si vous ne
connaissez pas le type de courant utilisé chez vous,
consultez le revendeur ou la compagnie
d’alimentation électrique de votre région.
EMPLACEMENT — L ’appareil doit être installé dans un
environnement stable.
PÉRIODES D’INUTILISATION — Le cordon
d’alimentation de l’appareil doit être débranché de
la prise pour une longue période d’inutilisation.
TERRE OU POLARISATION
÷ Si cet appareil est équipé d’une fiche pour courant
alternatif polarisé (c’est-à-dire avec une broche plus
large que l’autre), celle-ci ne peut-être branchée que
d’une seule manière. Il s’agit d’une mesure de
sécurité. En effet, si vous ne parvenez pas à
l’enficher complètement, essayez dans l’autre sens.
Si vous n’arrivez toujours pas à la brancher,
contactez un électricien pour faire remplacer votre
prise obsolète. Ne refusez pas la sécurité qu’apporte
la fiche polarisée.
÷ Si cet appareil est équipé d’une fiche de type terre
avec trois fils, c’est-à-dire avec une troisième broche
(mise à la terre), il ne peut être branché que sur
une prise de terre. Il s’agit d’une mesure de sécurité.
Si vous ne parvenez pas à insérer à fond cette fiche,
contactez un électricien pour faire remplacer votre
prise de courant obsolète. Ne refusez pas la sécurité
qu’apporte la mise à la terre.
PROTECTION DU CORDON D’ALIMENTA TION — Le
cordon d’alimentation doit être placé de manière à
ce que personne ne risque de marcher dessus et
qu’il ne se retrouve pas coincé sous d’autres
éléments, surtout au niveau de la fiche, de la prise
de courant et du point de sortie de l’appareil.
MISE À LA MASSE DE L ’ANTENNE EXTÉRIEURE —
Si une antenne extérieure ou un système de câblage
sont raccordés à l’appareil, vérifiez que cette
antenne ou ce câblage sont à la masse de manière
à vous prémunir contre les surtensions et
l’électricité statique. L ’article 810 du NEC (National
Electrical Code), ANSI/NFPA 70, fournit des
instructions sur la mise à la masse correcte du
pylône et du système de fixation et du câble
d’entrée vers une unité de décharge d’antenne, la
taille des conducteurs pour la mise à la masse,
l’emplacement de l’unité de décharge d’antenne,
le raccordement aux électrodes de mise à la masse
et les exigences relatives à ces électrodes. Voir la
Figure A.
ORAGE — Pour protéger ce produit pendant les orages,
ou quand il est laissé sans surveillance ou inutilisé
pendant une longue période de temps, débranchezle de la prise murale et déconnectez l’antenne ou
le système de câble. Cela le protégera des
dommages causés par les orages ou les surtensions
de ligne.
LIGNES ELECTRIQUES — Le système d’antenne
extérieure ne doit pas être situé à proximité de
lignes électriques aériennes, lumières électriques
ou autres circuits d’alimentation, ou dans un endroit
où il peut tombé sur une telle ligne électrique ou
circuit. Lors de l’installation d’un système d’antenne
extérieure, faites très attention de ne pas toucher
de telles lignes électriques ou circuits, car un tel
contact pourrait entraîner la mort.
SURCHARGE — Ne surchargez pas les prises murales,
les rallonges électriques ou les prises murales
incorporées, car cela pourrait provoquer un incendie
ou une électrocution.
BOITIER
ELECTRIQUE
FIXATION DE
MISE A LA TERRE
Fig. A
PENETRATION D’OBJETS ET DE LIQUIDES —
N’insérez jamais d’objet quel qu’il soit dans ce
produit par les ouvertures du boîtier, car il risquerait
de toucher un point de tension dangereux ou courtcircuiter une partie, ce qui pourrait entraîner un
incendie ou une électrocution. Ne versez jamais de
liquide sur ce produit.
REPARATION — N’essayez pas de réparer ce produit
vous-même, car ouvrir le produit ou retirer ses
couvercles peut vous exposer à une tension
dangereuse ou à d’autres risques. Pour toute
réparation, référez-vous à un personnel qualifié.
DOMMAGES NECESSITANT UNE REPARATION —
Débranchez ce produit de la prise murale et
contactez un réparateur qualifié dans les conditions
suivantes:
÷ Quand le cordon d’alimentation secteur est
endommagé.
÷ Si un liquide a été renversé ou si des objets sont
tombés dans le produit.
÷ Si le produit a été exposé à la pluie ou à l’eau.
÷ Si le produit ne fonctionne pas normalement en
suivant les instructions du mode d’emploi. Ajustez
seulement les commandes décrites dans le mode
d’emploi suivant, car un ajustement ou une
commande incorrecte peut endommager l’appareil
et nécessitera souvent qu’un technicien qualifié
travaille pendant longtemps pour remettre le produit
en état de fonctionnement normal.
÷ Si le produit est tombé ou a été endommagé d’une
autre façon.
÷ Quand le produit affiche un changement évident
dans ses performances — cela indique que vous
avez besoin de le faire réparer.
PIECES DE RECHANGE — Quand des pièces de
rechange sont nécessaires, assurez-vous que le
réparateur utilise les pièces de rechange spécifiées
par le fabricant ou ayant les mêmes caractéristiques
que les pièces originales. Un remplacement nonautorisé peut entraîner un incendie, une
électrocution ou d’autres risques.
VERIFICATION DE SECURITE — Après la réalisation
de tout entretien ou réparation de ce produit,
demandez au technicien de réaliser des vérifications
de sécurité pour vérifier que ce produit est en état
de fonctionnement correct.
CHALEUR — Le produit doit être situé à l’écart des
sources de chaleur comme les radiateurs, les
registres chauds, les cuisinières ou tous les produits
(incluant les amplificateurs) qui produisent de la
chaleur.
CABLE D’ENTREE
D’ANTENNE
UNITE DE DECHARGE DE
L’ANTENNE
(NEC, SECTION 810-20)
CONDUCTEURS DE MISE
A LA TERRE
(NEC, SECTION 810-21)
FIXATIONS POUR LA MISE A LA MASSE
ELECTRODE POUR LA MISE A
LA MASSE DU SYSTEME
ELECTRIQUE
(NEC, ART. 250, SECTION H)
NEC — NATIONAL ELECTRICAL CODE
FRANÇAIS
DE SECURITE
PRECAUTIONS
<ARE1349> Fr
ii
Page 64

PRECAUTIONS DE SECURITE
○○○○○○○○○○○○○○○○○○○○○○○○○○○○○○○○○○○○○○○○○○○○○○○○○○○○○○○○○○○○○○
Commission fédérale des communications (FCC)
Déclaration de conformité
FRANÇAIS
Cet appareil est conforme avec l’article 15 du règlement FCC. Son fonctionnement est
sujet aux deux conditions suivantes: (1) Cet appareil ne doit pas causer d’interférences
nuisibles et (2) cet appareil doit accepter les interférences reçues, y compris les
interférences pouvant provoquer un fonctionnement indésirable.
Nom du produit: Écran à plasma
Numéro du modèle: PDP-505HD
Catégorie du produit: Périphériques et ordinateurs personnels de classe B
Nom du responsable: PIONEER ELECTRONICS SERVICE, INC.
Adresse: P.O. BOX 1760, LONG BEACH, CA., 90801-1760 U.S.A.
Numéro de téléphone: (800)421-1625
Pour les consommateurs: URL http://www.Pioneerelectronics.com
Nous vous remercions vivement d’avoir fait l’acquisition de
ce produit PIONEER.
Avant d’utiliser votre écran à plasma, veuillez lire
attentivement les “Précautions de Sécurité” ainsi que la
présente “Mode d’emploi” de manière à utiliser l’ecran à
DE SECURITE
plasma correctement.
Conservez ce manuel dans un endroit sûr. Il vous sera
sûrement utile dans les mois ou les années qui suivent.
PRECAUTIONS
Remarques sur l’installation:
Ce produit est vendu en assumant qu’il sera installé par un
personnel suffisamment expérimenté et qualifié. Faites toujours
réaliser le montage et l’installation par un spécialiste ou par votre
revendeur.
PIONEER ne peut être tenu responsable pour tout dommage
causé par une erreur d’installation ou de montage, une mauvaise
utilisation ou un désastre naturel.
Remarque pour le revendeur:
Après l’installation, assurez-vous de remettre ce mode d’emploi
à l’utilisateur et de lui expliquer comme utiliser ce produit.
iii
<ARE1349> Fr
Page 65

PARTICULARITÉS
○○○○○○○○○○○○○○○○○○○○○○○○○○○○○○○○○○○○○○○○○○○○○○○○○○○○○○○○○○○○○○
÷ Utilisation d’un écran large XGA à plasma, aux
performances élevées
Cet écran large XGA bénéficie de perfectionnements qui
permettent l’emploi de 2,5 fois plus de données que dans
le cas d’un écran de télévision VGA actuel*.
Avec une résolution horizontale de 1280 pixels et une
définition verticale de 768 pixels, l’écran large XGA
autorise la reproduction inégalée d’images fournies par un
lecteur de DVD, un ordinateur ou un périphérique.
* Avec une image de 4:3.
VGA: 640 pixels x 480 pixels
XGA: 1024 pixels x 768 pixels
÷ Obtention d’une luminance de niveau XGA
Grâce à l’emploi de techniques originales d’optimisation
développées par PIONEER, il est possible d’obtenir une
luminance de très haute valeur tout en conservant les
valeurs de résolution affichées.
÷ Profondeur réduite (9,8 cm) pour un écran
appartenant à la catégorie des 50 pouces
Non seulement la largeur du panneau est de 50 pouces,
ce qui pour un tube cathodique n’irait pas sans quelques
problèmes, mais encore la profondeur est très réduite
puisqu’elle atteint à peine 9,8 cm, ce qui ouvre un champ
de possibilités tout à fait nouveau dans la manière de
concevoir un salon d’écoute et de visualisation.
○○○○○○○○○○○○○○○○○○○○○○○○○○○○○○○○○○○○○○○○○○○○○○○○○○○○○○○○○○○○○○○○○○○○○○○○○○○○○○○○○○○
FRANÇAIS
÷ Nombreuses possibilités d’installation
Conçu pour être fixé au mur, posé sur une table ou monté
sur un support, cet écran à plasma s’accommode donc de
diverses installations.
÷ Socle de table optionnel (vendues séparément)
Ce socle a été conçu spécialement pour placer le PDP505HD sur une table. (Pour de plus amples détails,
veuillez consulter votre revendeur.)
÷ Conception visant à économiser l’énergie
Cet écran à plasma a été conçu pour consommer aussi
peu d’énergie que possible lorsqu’il se trouve en veille.
En effet, dans ce mode de fonctionnement, la
consommation atteint à peine 0,6 Watt.
ET LEURS RÔLES
COMMENCER
AVANT DE
LES DIFFÉRENTS ORGANES
<ARE1349> Fr
1
Page 66

TABLE DES MATIÈRES
○○○○○○○○○○○○○○○○○○○○○○○○○○○○○○○○○○○○○○○○○○○○○○○○○○○○○○○○○○○○○○
○○○○○○○○○○○○○○○○○○○○○○○○○○○○○○○○○○○○○○○○○○○○○○○○○○○○○○○○○○○○○○○○○○○○○○○○○○○○○○○○○○○
PRECAUTIONS DE SECURITE ............... i
AVANT DE COMMERCER...................... 3
FRANÇAIS
Comment utiliser ce mode d’emploi................... 3
Vérification des accessoires fournis.................... 5
LES DIFFÉRENTS ORGANES ET
LEURS RÔLES .................................... 6
Appareil ................................................................. 6
Télécommande ..................................................... 7
Panneau de raccordement ................................... 8
INSTALLATION ET RACCORDEMENTS .....
Installation de l’écran à plasma ........................... 9
Prises d’entrée de l’écran à plasma................... 10
Raccordement de INPUT1 .................................. 10
Raccordement de INPUT2 .................................. 10
Raccordements de INPUT3 et INPUT4 .............. 11
Raccordement au boîtier DTV............................ 14
Raccordement du cordon de commande
d’ensemble....................................................... 15
Raccordement du cordon d’alimentation ......... 15
Comment faire cheminer les câbles.................. 16
MISE EN OEUVRE DE L’ENSEMBLE .... 17
Mise en oeuvre après raccordement................. 17
FFONCTIONNEMENT ........................... 20
Choix de la source .............................................. 20
Choix du format de l’image ............................... 22
COMMENCER
RGANES ET LEURS RÔLES
AVANT DE
ÉCONOMIE D’ÉNERGIE ...................................... 26
Etiquetage des entrées ....................................... 27
9
AJUSTEMENT DU PANNEAU
D’AFFICHAGE ................................... 28
Relations entre les pages de MENU.................. 28
Réglages de l’image ........................................... 29
Visualisation d’une image animée
(3D Y/C MODE)................................................. 32
Réduction du bruit numérique dans l’image
vidéo (3D NR LEVEL) ....................................... 33
Réglage de la température de couleur de
l’image (COLOR TEMP) ................................... 34
Utilisation de FILM MODE.................................. 35
Utilisation en ambiance lumineuse (HIGH
CONTRAST) ..................................................... 36
Augmentation de la luminosité de l’image du
PC (ABL) ........................................................... 37
Réglage de l’image ............................................. 38
UTILISATION D’AUTRES APPAREILS .....
Mise en oeuvre des codes de télécommande .. 39
Fonctions Assurées Par Le Boîtier De
Télécommande ................................................ 42
INFORMATIONS COMPLÉMENTAIRES ....
Rétablissement des valeurs par défaut............. 49
Nettoyage ............................................................ 49
Mise en place des piles de la télécommande... 50
Utilisation de la télécommande......................... 50
Guide de dépannage .......................................... 51
Caractéristiques techniques............................... 54
Glossaire.............................................................. 57
39
49
LES DIFFÉRENTS O
2
<ARE1349> Fr
Page 67

AVANT DE COMMENCER
○○○○○○○○○○○○○○○○○○○○○○○○○○○○○○○○○○○○○○○○○○○○○○○○○○○○○○○○○○○○○○
○○○○○○○○○○○○○○○○○○○○○○○○○○○○○○○○○○○○○○○○○○○○○○○○○○○○○○○○○○○○○○○○○○○○○○○○○○○○○○○○○○○
○○○○○○○○○○○○○○○○○○○
Comment utiliser ce mode d’emploi
Ce mode d’emploi s’organise autour d’explications
classées dans l’ordre qui nous a paru le plus logique à
quelqu’un qui prendrait possession de l’écran à plasma
pour la première fois.
L’exemple suivant montre comment vous pouvez
effectivement régler le contraste de l’image. Les
illustrations permettent de vérifier visuellement que les
étapes se déroulent bien comme il convient. Examinez
cet exemple avant de poursuivre la lecture du mode
d’emploi.
FRANÇAIS
Après avoir retiré l’écran à plasma de son emballage et
vous être assuré que toutes les accessoires sont
présents, nous vous suggérons de lire la section “Les
différents organes et leurs rôles” qui débute à la page 6
de manière à vous familiariser avec les organes et les
commandes de l’écran à plasma et de sa télécommande.
Pour la description des touches de la télécommande qui
peuvent être utilisées pour agir sur d’autres appareils de
la chaîne, reportez-vous à la section “Fonctionnement
d’autres appareils” qui débute à la page 39.
La section “Installation et raccordements” qui débute à la
page 9, couvre tous les aspects de l’installation de l’écran
à plasma et des raccordements à effectuer avec les
autres appareils de l’installation.
La section “Mise en oeuvre de l’ensemble” qui débute à
là page 17 traite des réglages à réaliser à partir des
menus affichés de façon à intégrer le fonctionnement de
l’écran à plasma à celui des autres appareils de
l’installation. En fonction des raccordements réalisés, il
peut être inutile de lire cette section.
La section “Fonctionnement” qui débute à la page 20,
couvre les méthodes de base d’utilisation de l’écran à
plasma.
La section “Réglages de l’écran à plasma” qui débute à la
page 28, traite des questions de réglage de l’image et de
l’écran à l’aide des pages de menu.
Description des modes
opératoires
Les modes opératoires sont présentés sous la forme
d’étapes numérotées. La plupart sont rédigés en tenant
compte des possibilités de la télécommande, à moins
que la touche ou la commande ne soient présentes que
sur l’écran à plasma. A noter qu’une touche ou une
commande de l’écran à plasma ayant le même nom
qu’une touche ou une commande de la télécommande,
jouent les mêmes rôles.
Avant d’utiliser le boîtier de télécommande pour agir sur
l’écran à plasma ou sur les pages de menu
conformément aux méthodes décrites avant la page 38,
assurez-vous que le commutateur de mode du boîtier est
bien sur la position “TV/VCR”.
Exemple) Pour régler le contraste de l’image
1,6
2,3,5
CH
TV/SAT/DTV/DVD
EDIT/
LEARN
SOURCE SAT/DTV
POWER
%
DVD
TOP MENU
MENU
FAVORITES
1 7 3 ¡
84
CU-PDP008
PLASMA DISPLAY REMOTE CONTROL UNIT
MUTING
RECEIVER
MENU
%
SET/
SELECT
%
VCR REC
%
VOL
GUIDE
(SAT)/DTV
INFO
¢
Î
2,3,4
1 Appuyez sur la touche MENU pour afficher la page
de menu.
La page de menu s’affiche.
PICTURE
SCREEN
SET UP
USE:
END: MENU
.
2 Utilisez les touches 5/∞ pour choisir l’option
PICTURE, puis appuyez sur la touche SET/SELECT.
La page de menu de réglage PICTURE, s’affiche.
PICTURE
MOD E : STD
CONTRAST
BLACK LVL .
COLOR
TINT
SHARP
OTHER
EX IT
USE:
END: MENU
(voir page suivante)
ET LEURS RÔLES
COMMENCER
AVANT DE
LES DIFFÉRENTS ORGANES
<ARE1349> Fr
3
Page 68

AVANT DE COMMENCER
○○○○○○○○○○○○○○○○○○○○○○○○○○○○○○○○○○○○○○○○○○○○○○○○○○○○○○○○○○○○○○
3 Utilisez les touches 5/∞ pour choisir l’option
○○○○○○○○○○○○○○○○○○○○○○○○○○○○○○○○○○○○○○○○○○○○○○○○○○○○○○○○○○○○○○○○○○○○○○○○○○○○○○○○○○○
CONTRAST, puis appuyez sur la touche
SET/SELECT.
FRANÇAIS
La page de menu de réglage CONTRAST, s’affiche.
CONTRAST
USE:
END: MENU
4 Utilisez les touches 2/3 pour choisir la valeur du
paramètre CONTRAST.
Le contraste est réglé.
CONTRAST
USE:
END: MENU
5 Lorsque vous avez terminé le réglage du
contraste, appuyez sur la touche SET/SELECT
pour afficher une nouvelle fois la page de menu de
réglage PICTURE.
PICTURE
MODE :USER(STD )
CONTRAST
BLACK LVL .
COMMENCER
RGANES ET LEURS RÔLES
AVANT DE
LES DIFFÉRENTS O
Après avoir réglé le contraste, le paramètre MODE
COLOR
TINT
SHARP
OTHER
EX IT
USE:
END: MENU
prend la valeur “USER(STD)” pour indiquer que le
mode actuel est le mode par défaut modifié par
l’utilisateur. Par ailleurs, la valeur “USER” est
automatiquement donnée au paramètre MODE
(page 30).
6 Appuyez sur la touche MENU pour abandonner la
page de menu.
La page de menu disparaît et l’image vidéo de la
source présentement sélectionnée est rétablie.
4
<ARE1349> Fr
Page 69

○○○○○○○○○○○○○○○○○○○○○○○○○○○○○○○○○○○○○○○○○○○○○○○○○○○○○○○○○○○○○○
○○○○○○○○○○○○○○○○○○○
Vérification des accessoires
○○○○○○○○○○○○○○○○○○○○○○○○○○○○○○○○○○○○○○○○○○○○○○○○○○○○○○○○○○○○○○○○○○○○○○○○○○○○○○○○○○○
AVANT DE COMMENCER
fournis
Assurez-vous que les accessoires suivants font partie de
la fourniture.
FRANÇAIS
1 Cordon d’alimentation
2 Boîtier de télécommande
TV
/VCR
CBL
/SAT
DTV
STANDBY/ON
DVD
12
/LD
INPUT
SCREEN
MODE
AUTO
POWER
3
STILL
INPUT
4
AUDIO
R
DISPLAY
ECE
CC
IVER
1
CLEAR
DTV
VIEW
MODE
2
4
3
5
7
6
8
9
0
CH
CH
ENTER
CH
RETURN
MUTING
EDIT/
REC
LEA
EIVER
VOL
RN
SOURCE SAT/DTV
TV/SAT/D
POWER
TV/DVD
MENU
DVD
TOP MENU
%
MENU
%
SET/
SELECT
1
GUIDE
%
%
FAVORITES
(SAT)/DTV
7
84
VCR REC
INFO
3
¡
¢
CU-PDP008
PLASMA DISPLAY REMOTE CONTROL UNIT
Î
3 2 piles AA (LR6)
4 Chiffon de nettoyage (pour essuyer l’écran)
6 2 serre-cable
7 Adaptateur Fiche/BNC x 1
÷ Mode d’emploi
÷ Carte de garantie
ET LEURS RÔLES
5 2 colliers rapides
<ARE1349> Fr
LES DIFFÉRENTS ORGANES
5
Page 70

LES DIFFÉRENTS ORGANES ET LEURS RÔLES
○○○○○○○○○○○○○○○○○○○○○○○○○○○○○○○○○○○○○○○○○○○○○○○○○○○○○○○○○○○○○○
○○○○○○○○○○○○○○○○○○○○○○○○○○○○○○○○○○○○○○○○○
Apareil
○○○○○○○○○○○○○○○○○○○○○○○○○○○○○○○○○○○○○○○○○○○○○○○○○○○○○○○○○○○○○○○○○○○○○○○○○○○○○○○○○○○
FRANÇAIS
Appareil
1
2
Panneau de commande de l’écran à plasma
STANDBY/ON
4
INPUT
MENU
ADJUST
5
6
7
SET
S.MODE
RETURN
8
9
0
3
Remarque
Lorsque les enceintes sont montées sur l’écran
à plasma, le panneau de commande devient
indisponible.
Appareil
1 Interrupteur d’alimentation
RGANES ET LEURS RÔLES
Utilisez cet interrupteur pour mettre l’écran à plasma
sous tension, ou hors tension.
2 Témoin STANDBY/ON
LES DIFFÉRENTS O
Lorsque l’écran à plasma est en veille, ce témoin est
de couleur rouge; il s’éclaire de couleur verte quand
l’écran à plasma est en fonctionnement (page 20).
3 Capteur de télécommande
Dirigez le faisceau de télécommande vers ce capteur
(page 50).
Panneau de commande de l’écran à plasma
4 Touche STANDBY/ON
Appuyez sur cette touche pour mettre l’écran en
service ou en veille (page 20).
5 Touche INPUT
Appuyez sur cette touche pour choisir le signal
d’entrée (page 20).
6 Touche MENU
Appuyez sur cette touche pour ouvrir ou fermer les
menus s’affichant sur l’écran (pages 17 à 38).
7 Touche ADJUST (5/∞/2/3)
Utilisez ces touches pour naviguer dans les menus et
choisir des valeurs de réglage.
L’usage de ces touches est clairement indiqué sur les
pages de menu affichées sur l’écran (pages 17 à 38).
8 Touche SET
Appuyez sur cette touche pour définir une valeur ou
valider un choix (pages 17 à 38).
9 Touche S.MODE
Appuyez sur cette touche pour choisir manuellement
le format de l’image (page 22).
0 Touche RETURN
Appuyez sur cette touche pour rétablir les réglages
usine (page 49).
6
<ARE1349> Fr
Page 71

○○○○○○○○○○○○○○○○○○○○○○○○○○○○○○○○○○○○○○○○○○○○○○○○○○○○○○○○○○○○○○
○○○○○○○○○○○○○○○○○○○○○○○○○○○○○○○○○○○○○○○○○
Télécommande
○○○○○○○○○○○○○○○○○○○○○○○○○○○○○○○○○○○○○○○○○○○○○○○○○○○○○○○○○○○○○○○○○○○○○○○○○○○○○○○○○○○
LES DIFFÉRENTS ORGANES ET LEURS RÔLES
Cet écran à plasma est doté d’un boîtier de
télécommande disposant d’une fonction d’apprentissage.
Sur cette page, sont décrites les touches et les
4 Touche AUTO SCREEN
Utilisez cette touche pour choisir automatiquement la
taille de l’image (page 23).
commandes qui sont en rapport direct avec les fonctions
assurées par le panneau principal de l’écran à plasma.
Pour de plus amples détails concernant la manière
d’utiliser ce boîtier de télécommande avec d’autres
5 Touche MENU
Appuyez sur cette touche pour ouvrir ou fermer les
menus s’affichant sur l’écran (pages 17 à 38).
appareils, reportez-vous à la page 39, “Mise en oeuvre
des codes de télécommande” et à la page 42, “Fonctions
assurées par le boîtier de télécommande”.
6 Touches ADJUST (5/∞/2 /3)
Utilisez ces touches pour naviguer dans les menus et
choisir des valeurs de réglage.
L’usage de ces touches est clairement indiqué sur les
TV
DTV
DVD
CBL
/VCR
/LD
/SAT
17
2
3
4
STANDBY/ON
INPUT
1234
SCREEN
MODE
POWER
INPUT
AUDIO CC
AUTO STILL
RECEIVER
CLEAR
DISPLAY
DTV
VIEW
MODE
Commutateur
de mode
8
9
1 2 3
4 5 6
7 8 9
0
CH
RETURN
MUTING
RECEIVER
TV/SAT/DTV/DVD
MENU
%
SET/
SELECT
%
FAVORITES
VCR REC
ENTER
%
CH
VOL
GUIDE
(SAT) /DTV
INFO
¢
0
CH
5
6
EDIT/
LEARN
SOURCE SAT/DTV
POWER
%
DVD
TOP MENU
MENU
1 7 3 ¡
84
pages de menu affichées sur l’écran (pages 17 à 30).
7 Touche d’éclairage
Quand vous appuyez sur cette touche, les touches de
la télécommande s’éclairent. L’éclairage cesse si vous
ne procédez à aucune opération pendant 5 secondes.
Cette touche vous facilite l’utilisation de la
télécommande dans l’obscurité.
8 Touche DISPLAY
Appuyez sur cette touche pour afficher le nom de
l’entrée et de mode de fonctionnement actuels
(page 21).
9 Touche STILL
Appuyez sur cette touche pour geler l’image présente
sur l’écran (page 21).
0 Touche SET/SELECT
Appuyez sur cette touche pour définir une valeur ou
valider un choix (pages 17 à 38).
Remarques
÷ Avant d’utiliser le boîtier de télécommande pour agir sur
l’écran à plasma, assurez-vous que le commutateur de mode
CU-PDP008
PLASMA DISPLAY REMOTE CONTROL UNIT
Î
du boîtier est bien sur la position “TV/VCR”. (Le boîtier de
télécommande ne peut agir sur l’écran à plasma que si le
commutateur de mode est placé sur la position “TV/VCR”.)
÷ Sur cette page, ne figurent que les touches qui agissent sur
l’écran à plasma. Les touches qui ne sont pas mentionnées
sur cette page sont destinées au fonctionnement des autres
1 Touche STANDBY/ON
appareils (pages 39 à 48).
Appuyez sur cette touche pour mettre l’écran en
service ou en veille (page 20).
FRANÇAIS
ET LEURS RÔLES
LES DIFFÉRENTS ORGANES
2 Touches INPUT
Utilisez ces touches pour choisir le signal d’entrée
(page 20).
3 Touche SCREEN MODE
Appuyez sur cette touche pour choisir manuellement
le format de l’image (page 22).
<ARE1349> Fr
7
Page 72

LES DIFFÉRENTS ORGANES ET LEURS RÔLES
○○○○○○○○○○○○○○○○○○○○○○○○○○○○○○○○○○○○○○○○○○○○○○○○○○○○○○○○○○○○○○
○○○○○○○○○○○○○○○○○○○○○○○○○○○○○○○○○○○○○○○○○
Panneau de raccordement
Cet écran à plasma comporte 4 possibilités d’entrée. Ce panneau porte également des prises CONTROL pour le
FRANÇAIS
raccordement à d’autres appareils PIONEER portant la marque Î. Pour de plus amples détails concernant les
○○○○○○○○○○○○○○○○○○○○○○○○○○○○○○○○○○○○○○○○○○○○○○○○○○○○○○○○○○○○○○○○○○○○○○○○○○○○○○○○○○○
raccordements, reportez-vous aux pages indiquées entre parenthèses.
Vue arrière
4
Y
CB/PBCR/P
G B R
[ON SYNC] [H/V SYNC]
INPUT3
R
HD VD
1 CONTROL IN/OUT
Utilisez ces prises pour le raccordement de l’écran à
plasma à d’autres appareils PIONEER portant la
marque Î. Cela fait, cet écran peut être considéré, du
point de vue des commandes, comme faisant partie
de l’ensemble (page 15).
RGANES ET LEURS RÔLES
2 CONNECTEUR DE RÉGLAGE USINE
N’EFFECTUEZ AUCUN RACCORDEMENT SUR CE
CONNECTEUR.
LES DIFFÉRENTS O
Ce connecteur est destiné à permettre les réglages
usine.
3 INPUT4
Utilisez ces prises pour le branchement d’un
ordinateur personnel (PC) ou d’un appareil similaire.
Choisissez la prise en fonction de la nature du signal
fourni par l’appareil connecté (page 11 à 13).
4 INPUT3
Utilisez cette prise pour brancher un appareil
fournissant un signal RVB ou des composantes de
signal, tel qu’un ordinateur personnel, un lecteur de
DVD ou décodeur RVB (page 11 à 13).
1 2 3
IN
OUT
CONTROL
5 6
75Ωj2.2kΩ
FACTORY ADJUSTMENT
Y
CB/P
B
C-VIDEO
INPUT2
TERMINAL
CR/P
R
7 8
S-VIDEOVIDEO
INPUT1
5
Sélecteur d’impédance du signal de synchronisation
Selon le raccordement de la prise INPUT3, il peut être
nécessaire de modifier la position de ce sélecteur de
manière à adapter l’appareil à l’impédance de sortie du
signal de synchronisation.
Si l’impédance de sortie du signal de synchronisation
est supérieure à 75 Ohms, placez ce sélecteur sur la
position 2,2 kOhms (pages 12 et 13).
6 INPUT2
Pour le raccordement à un lecteur de DVD capable de
fournir en sortie les composantes vidéo (page 10).
7 INPUT1
Pour le raccordement aux appareils qui possèdent une
prise de sortie S-vidéo, ou une prise de sortie de vidéo
composite, tels que les magnétoscopes, caméras vidéo,
lecteur de LaserDisc ou lecteur de DVD (page 10).
Remarque: Il est possible d’effectuer un
raccordement simultané sur les prises VIDEO et SVIDEO. Toutefois, si le signal S-vidéo est présent, il a
la priorité (page 10).
ANALOG
R G B
AC INLET
INPUT4
8
8 AC INLET
Utilisez cette prise pour le branchement de la fiche du
cordon d’alimentation fourni (page 15).
<ARE1349> Fr
Page 73

INSTALLATION ET RACCORDEMENTS
○○○○○○○○○○○○○○○○○○○○○○○○○○○○○○○○○○○○○○○○○○○○○○○○○○○○○○○○○○○○○○
○○○○○○○○○○○○○○○○○○○○○○○○○○○○○○○○○○○○○○○○○○○○○○○○○○○○○○○○○○○○○○○○○○○○○○○○○○○○○○○○○○○
○○○○○○○○○○○○○○○○○○○
Installation de l’écran à plasma
Installation à l’aide du support ou de la fixation
PIONEER en option
÷ Que ce soit à l’aide du support ou de la fixation, l’installation
de l’écran à plasma doit être réalisée par un technicien
compétent ou par le revendeur.
÷ Lors de l’installation, utilisez les boulons fournis avec le
support ou la fixation.
÷ Pour de plus amples détails concernant l’installation, reportez-
vous aux instructions qui accompagnent le support ou la
fixation.
Installation à l’aide d’accessoires autres que le
support ou la fixation PIONEER (vendus
séparément)
÷ Dans toute la mesure du possible, utilisez des pièces et des
accessoires fabriqués par PIONEER. PIONEER ne pourra être
tenue responsable des accidents et dommages qui
résulteraient de l’utilisation de pièces ou d’accessoires
fabriqués par des tiers.
÷ Pour effectuer une installation personnalisée, consultez le
revendeur ou un technicien compétent.
Accrochage de l’écran à plasma à un mur
L’écran à plasma possède des perçages destinés à
permettre sa fixation sur un mur, etc. Les perçages qui
peuvent être utilisés sont indiqués sur le schéma cidessous. (Les caches peuvent être retirés au moyen d’un
tournevis, d’une pièce de monnaie ou d’un outil similaire.)
÷ L’écran à plasma doit être maintenu en 4 points
(minimum) placés au-dessus et au-dessous de l’axe
horizontal, et à droite et à gauche de l’axe vertical.
÷ Dans le cas des perçages a et b, utilisez des boulons
dont la longueur est telle qu’ils pénètrent dans l’écran à
plasma de 12 mm au moins et de 20 mm au plus.
Reportez-vous à la vue de côté ci-dessous.
÷ L’écran à plasma est muni d’une vitre qui interdit sa
pose sur une surface qui n’est pas plane.
FRANÇAIS
Ouïes
d’aération
(ventilateur)Perçage b
Perçage b
Perçage a
Axe
Vue arrière
ATTENTION
Pour éviter toute anomalie de fonctionnement, une surchauffe de
l’écran à plasma et un incendie, veillez, en fin d’installation, à ce
que les ouïes d’aération ne soient pas obstruées. Par ailleurs, de
l’air chaud étant évacué par les ouïes d’aération, l’accumulation
de poussières sur la surface d’installation et sa détérioration
progressive sont à considérer.
ATTENTION
Assurez-vous d’utiliser un boulon M8 (pas = 1,25 mm). (Seule
cette taille de boulon peut être utilise’e)
Perçage b
Perçage a
Perçage bPerçage b
Surface de pose
Fixation,
etc.
Appareil
Axe
Perçage b
Perçage b
12 à 20 mm
Perçage a
Boulon
12 à 20 mm
Boulon
Vue de côté
ATTENTION
Compte tenu de son poids (Environ 43 kg) et de sa profondeur
réduite, l’écran à plasma est peu stable; nous conseillons que le
déballage et l’installation soient effectués par 2 personnes.
ATTENTION
L’épaisseur de cet écran à plasma est très réduite. Veillez à ce
qu’il ne puisse pas se renverser s’il est soumis à des vibrations.
RACCORDEMENTS
INSTALLATION ET
<ARE1349> Fr
9
Page 74

INSTALLATION ET RACCORDEMENTS
○○○○○○○○○○○○○○○○○○○○○○○○○○○○○○○○○○○○○○○○○○○○○○○○○○○○○○○○○○○○○○
○○○○○○○○○○○○○○○○○○○
Prises d’entrée de l’écran à plasma
○○○○○○○○○○○○○○○○○○○○○○○○○○○○○○○○○○○○○○○○○○○○○○○○○○○○○○○○○○○○○○○○○○○○○○○○○○○○○○○○○○○
○○○○○○○○○○○○○○○○○○○
Raccordement de INPUT1
Branchez les sorties des appareils sur les entrées de
FRANÇAIS
celui-ci en tenant compte du tableau qui suit (pages 10 à
14).
Entrées sur
Appareils
reliés et
signaux fournis
Appareil audiovisuel
Vidéo composite
S-vidéo
Composantes vidéo
RVB
Ordinateur personnel
(PC)
Vidéo composite
S-vidéo
RVB
*1 Bien que INPUT3 et INPUT4 soient prévues pour accepter
*2 INPUT4 est compatible Microsoft Plug & Play (VESA DDC 1/
*3 Selon la carte de sortie vidéo de l’ordinateur, ce type de
ET RACCORDEMENTS
cet écran à
plasma
INPUT1 INPUT2 INPUT4
*3
*3
INPUT3
différents signaux, un réglage général à l’aide des menus
affichés sur l’écran est nécessaire pour adapter l’écran à
plasma aux caractéristiques de la source (pages 17 à 19).
2B). L’entrée INPUT3 n’est pas compatible.
raccordement peut être impossible.
Reliez aux prises INPUT1 de l’appareil principal un
appareil audiovisuel qui possède une prise de sortie vidéo
ou S-vidéo. Il est possible d’effectuer un raccordement
simultané sur les prises VIDEO et S-VIDEO de INPUT1.
Toutefois, si le signal S-vidéo est présent, il a la priorité.
*1
*1
S-VIDEOVIDEO
INPUT1
*2
Appareil audiovisuel
Le cas échéant, utilisez l’adaptateur fiche/BNC pour
effectuer la liaison.
○○○○○○○○○○○○○○○○○○○
Raccordement de INPUT2
Reliez aux prises d’entrée C-VIDEO de l’écran à plasma,
un appareil audiovisuel possédant des prises de sortie
pour composantes vidéo. Veillezz à ce que les couleurs
des fiches du câble de liaison soient assorties à celles des
fiches de l’appareil.
INSTALLATION
CR/P
CB/P
R
B
Y
C-VIDEO
INPUT2
Appareil audiovisuel
Pour connaître les tailles d’image et les signaux
d’entrée avec lesquels INPUT1 et INPU2 sont
compatibles, reportez-vous au supplément 1 (page 55).
10
<ARE1349> Fr
Page 75

○○○○○○○○○○○○○○○○○○○○○○○○○○○○○○○○○○○○○○○○○○○○○○○○○○○○○○○○○○○○○○
○○○○○○○○○○○○○○○○○○○
Raccordements de INPUT3 et
INPUT4
○○○○○○○○○○○○○○○○○○○○○○○○○○○○○○○○○○○○○○○○○○○○○○○○○○○○○○○○○○○○○○○○○○○○○○○○○○○○○○○○○○○
Raccordement
d’un appareil vidéo
INSTALLATION ET RACCORDEMENTS
Raccordement d’un appareil vidéo pourvu de
Divers appareils peuvent être reliés aux prises INPUT3 et
INPUT4. Cela fait, un réglage général à l’aide des menus
affichés sur l’écran est nécessaire pour adapter l’appareil
aux caractéristiques de la source. Pour cette opération,
veuillez vous reporter aux pages 17 à 19.
Prise
INPUT3
Source
extérieure
Appareil vidéo,
ordinateur
personnel (PC)
avec sortie RVB
[ON SYNC]
GBR
CB/PB CR/PR
Y
G ON SYNC
R
B
RG
B
[H/V SYNC]
HD VD
H/V SYNC
prises pour composantes vidéo
Effectuez les raccordements des composantes vidéo des
appareils audiovisuels ayant les prises de sortie convenables.
Pour le raccordement à INPUT3
Y CB/P
G B R HD VD
C
B
R/PR
INPUT3(ON SYNC) (H/V SYNC)
75Ωj2.2kΩ
FRANÇAIS
G
Appareil vidéo avec
sortie des
composantes vidéo
: Ne reliez rien sur cette prise. : Reliez cette prise.
Y
B
(CB/PB)R(CR/PR)
HD
Remarque
Les appareils compatibles avec INPUT3 sont également
compatibles avec INPUT4.
Pour le raccordement à INPUT4, veuillez vous reporter au
supplément 3, page 57.
Pour connaître les formats d’image et les
signaux d’entrée pour lesquels INPUT3 et
INPUT4 sont compatibles, reportez-vous aux
suppléments 1 à 2 (pages 55 à 56).
VD
Un réglage général à l’aide des menus affichés sur l’écran
est nécessaire après raccordement.
Reportez-vous aux pages 17 et 18.
Les prises INPUT3 sont du type BNC.
Le cas échéant, utilisez un adaptateur Fiche/BNC pour
effectuer les raccordements.
Pour le raccordement à INPUT4
ANALOG
R G B
INPUT4
RACCORDEMENTS
INSTALLATION ET
Un réglage général à l’aide des menus affichés sur l’écran
est nécessaire après raccordement. Reportez-vous aux
pages 17 et 18.
<ARE1349> Fr
11
Page 76

INSTALLATION ET RACCORDEMENTS
○○○○○○○○○○○○○○○○○○○○○○○○○○○○○○○○○○○○○○○○○○○○○○○○○○○○○○○○○○○○○○
Raccordement d’une source analogique RVB
fournissant le signal de synchronisation sur le
vert (G ON SYNC)
FRANÇAIS
Raccordement d’une source analogique RVB fournissant
le signal de synchronisation sur le vert (G ON SYNC).
○○○○○○○○○○○○○○○○○○○○○○○○○○○○○○○○○○○○○○○○○○○○○○○○○○○○○○○○○○○○○○○○○○○○○○○○○○○○○○○○○○○
Raccordement d’une source analogique RVB
fournissant des signaux composites de
synchronisation
Utilisez cette solution si l’appareil fournit un signal de synchronisation
verticale placé au-dessus du signal de synchronisation horizontale.
Pour le raccordement à INPUT3
Y CB/P
G B R HD VD
C
B
R/PR
INPUT3(ON SYNC) (H/V SYNC)
75Ωj2.2kΩ
Un réglage général à l’aide des menus affichés sur l’écran
est nécessaire après raccordement. Reportez-vous aux
pages 17 à 19.
Remarques
÷ Si vous utilisez G ON SYNC, ne branchez rien sur les prises VD
ou HD. Dans le cas contraire, l’image peut être déformée.
÷ Si vous utilisez la méthode G ON SYNC pour raccorder
l’ordinateur, un réglage à l’aides des menus affichés sur l’écran
est nécessaire (pages 17 à 19).
Veuillez lire attentivement le mode d’emploi de l’ordinateur.
ET RACCORDEMENTS
Pour le raccordement à INPUT4
INSTALLATION
ANALOG
R G B
INPUT4
Pour le raccordement à INPUT3
Y CB/P
G B R HD VD
C
B
R/PR
INPUT3(ON SYNC) (H/V SYNC)
75Ω j 2.2kΩ
Si vous utilisez la prise INPUT3, placez le sélecteur d’impédance de
manière à adapter l’appareil à l’impédance de sortie du signal de
synchronisation.
Si l’impédance de sortie du signal de synchronisation est supérieure à
75 Ohms, placez ce sélecteur sur la position 2,2 kOhms.
Un réglage général à l’aide des menus affichés sur l’écran
est nécessaire après raccordement.
Reportez-vous aux pages 17 à 19.
Remarques
÷ Si vous utilisez le signal de synchronisation composite, ne
branchez rien sur la prise VD. Dans le cas contraire, l’image
peut être déformée.
÷ Certains appareils Macintosh® fournissent les signaux G ON
SYNC et de synchronisation composite. En ce cas, effectuez le
raccordement sur G ON SYNC (ci-contre).
Pour le raccordement à INPUT4
Un réglage général à l’aide des menus affichés sur l’écran
est nécessaire après raccordement. Reportez-vous aux
pages 17 à 19.
12
<ARE1349> Fr
ANALOG
R G B
INPUT4
Un réglage général à l’aide des menus affichés sur l’écran est
nécessaire après raccordement. Reportez-vous aux pages 17 à 19.
Page 77

○○○○○○○○○○○○○○○○○○○○○○○○○○○○○○○○○○○○○○○○○○○○○○○○○○○○○○○○○○○○○○
○○○○○○○○○○○○○○○○○○○○○○○○○○○○○○○○○○○○○○○○○○○○○○○○○○○○○○○○○○○○○○○○○○○○○○○○○○○○○○○○○○○
Raccordement à un ordinateur
Pour le raccordement à INPUT4
INSTALLATION ET RACCORDEMENTS
personnel
La méthode de raccordement dépend du type de
l’ordinateur. Avant d’effectuer les raccordements, veuillez
lire attentivement le mode d’emploi de l’ordinateur.
Avant tout raccordement veillez à ce que l’écran à plasma
et l’ordinateur soient tous deux hors tension.
Pour les signaux d’entrée PC et les tailles d’écran avec
lesquelles cet appareil est compatible, reportez-vous au
supplément 2 (page 56).
Raccordement d’une source analogique RVB
avec signaux de synchronisation séparés
Utilisez cette possibilité si la source RVB peut fournir 5
signaux séparés: vert, bleu, rouge, synchronisation
horizontale et synchronisation verticale.
Pour le raccordement à INPUT3
ANALOG
R G B
INPUT4
Branchez le câble entre la prise d’entrée de l’écran à
plasma et la prise de sortie de l’ordinateur personnel.
Serrez soigneusement les vis des connecteurs à chaque
extrémité du câble.
FRANÇAIS
Y CB/P
G B R HD VD
C
B
R/PR
INPUT3(ON SYNC) (H/V SYNC)
75Ω j 2.2kΩ
Si vous utilisez la prise INPUT3, placez le sélecteur
d’impédance de manière à adapter l’appareil à
l’impédance de sortie du signal de synchronisation.
Si l’impédance de sortie du signal de synchronisation est
supérieure à 75 Ohms, placez ce sélecteur sur la position
2,2 kOhms.
Un réglage général à l’aide des menus affichés sur l’écran
est nécessaire après raccordement. Reportez-vous aux
pages 17 à 19.
Un réglage général à l’aide des menus affichés sur l’écran
est nécessaire après raccordement. Reportez-vous aux
pages 17 à 19.
Remarque
Selon le type de l’ordinateur, un adaptateur (fourni avec
l’ordinateur ou vendu séparément) peut être nécessaire pour
effectuer le raccordement ci-dessus.
Veuillez consulter le mode d’emploi de l’ordinateur ou le
revendeur.
RACCORDEMENTS
INSTALLATION ET
<ARE1349> Fr
13
Page 78

INSTALLATION ET RACCORDEMENTS
○○○○○○○○○○○○○○○○○○○○○○○○○○○○○○○○○○○○○○○○○○○○○○○○○○○○○○○○○○○○○○
○○○○○○○○○○○○○○○○○○○
Raccordement au boîtier DTV
○○○○○○○○○○○○○○○○○○○○○○○○○○○○○○○○○○○○○○○○○○○○○○○○○○○○○○○○○○○○○○○○○○○○○○○○○○○○○○○○○○○
Pour effectuer les raccordements convenables, lisez
attentivement le mode d’emploi fourni avec le boîtier
FRANÇAIS
DTV.
Les signaux de sortie du boîtier avec lesquels cet écran à
plasma est compatible, sont donnés dans le tableau cidessous.
ET RACCORDEMENTS
Type de signal
HDTV
SDTV
Point x Ligne, balayage
(Format d’image)
1920 x 1080 i (16 : 9)
1280 x 720 p (16 : 9)
704 x 480 i (16 : 9)
704 x 480 i (4 : 3)
640 x 480 i (4 : 3)
704 x 480 p (16 : 9)
704 x 480 p (4 : 3)
640 x 480 p (4 : 3)
Format du signal
Composantes
RVB
Composite
S-vidéo
Composantes
RVB
Composantes
RVB
Prises qui peuvent être utilisées
INPUT1 INPUT4INPUT3INPUT2
INSTALLATION
14
<ARE1349> Fr
Page 79

○○○○○○○○○○○○○○○○○○○○○○○○○○○○○○○○○○○○○○○○○○○○○○○○○○○○○○○○○○○○○○
○○○○○○○○○○○○○○○○○○○○○○○○○○○○○○○○○○○○○○○○○○○○○○○○○○○○○○○○○○○○○○○○○○○○○○○○○○○○○○○○○○○
○○○○○○○○○○○○○○○○○○○
Raccordement du cordon de
○○○○○○○○○○○○○○○○○○○
Raccordement du cordon
INSTALLATION ET RACCORDEMENTS
commande d’ensemble
Après avoir relié le cordon de commande d’ensemble, à
d’autres appareils PIONEER portant la marque Î, le
fonctionnement de ces appareils peut être commandé à
distance à partir du boîtier de télécommande fourni.
Lorsqu’un appareil est relié par l’intermédiaire de la prise
CONTROL IN, le capteur de télécommande l’appareil en
question devient insensible aux signaux de
télécommande. Vous devez donc diriger le boîtier de
télécommande vers le capteur de télécommande de
l’écran à plasma.
Remarques
÷ Avant tout raccordement veillez à ce que les appareils
soient hors tension.
÷ Effectuez tous les raccordements ordinaires puis les
raccordements du cordon de commande d’ensemble.
CONTROL
Appareil
IN
OUT
d’alimentation
FRANÇAIS
Branchez le cordon d’alimentation après que tous les
raccordements ont été réalisés.
1
2
1 Branchez une extrémité du cordon d’alimentation
sur cet écran à plasma.
2 Branchez l’autre extrémité du cordon sur une prise
secteur.
IN OUT
CONTROL
CONTROL
CONTROL
Les cordons de
commande (non fournis)
sont prévus pour des
signaux monophoniques,
et sont munis de minifiches (sans résistance).
OUT
OUT
IN
IN
ATTENTION
÷ N’utilisez que le cordon fourni.
÷ Alimentez l’écran à plasma à partir de la tension prescrite
(120 Volts CA, 60 Hz); tout autre tension peut provoquer un
incendie ou une secousse électrique.
÷ L’écran à plasma doit être alimenté par un cordon à deux
conducteurs plus un conducteur de masse. Assurez-vous que
la fiche du cordon d’alimentation est bien branchée sur une
prise secteur à 3 broches, dont une est effectivement reliée à
la masse. En cas d’utilisation d’un adaptateur, le conducteur de
masse doit tout de même être relié à la terre.
RACCORDEMENTS
INSTALLATION ET
<ARE1349> Fr
15
Page 80

INSTALLATION ET RACCORDEMENTS
○○○○○○○○○○○○○○○○○○○○○○○○○○○○○○○○○○○○○○○○○○○○○○○○○○○○○○○○○○○○○○
○○○○○○○○○○○○○○○○○○○○○○○○○○○○○○○○○○○○○○○○○○○○○○○○○○○○○○○○○○○○○○○○○○○○○○○○○○○○○○○○○○○
○○○○○○○○○○○○○○○○○○○
Comment faire cheminer les câbles
Des colliers rapides et des serre-câble sont fournis pour
FRANÇAIS
lier les câbles en tre eux. Après raccordements des
appareils, procédez aux opérations qui suivent.
* Vue de l’arrière de l’écran.
1
2
1
1 Groupez les câbles en utilisant les colliers rapides
fournis.
Introduisez la partie 1 dans un des perçages à
l’arrière de l’écran à plas ma puis insérez 2 à l’arrière
de 1 pour assurer la fixation.
Les colliers rapides sont conçus pour que l’ouverture
ET RACCORDEMENTS
INSTALLATION
soit difficile. Fermez-les soigneusement.
Fixation des colliers rapides à l’écran à plasma
Engagez les colliers rapides dans les trous 4 repérés par
÷ sur l’illustration ci-dessous.
2
2 Liez les câbles et assurez leur maintien au
moyen des serre-câble fournis.
Remarque
Les câbles peuvent cheminer d’un côté ou de l’autre.
Pour retirer les colliers rapides
A l’aide d’une pince, tordez le collier de 90° puis tirez-le
vers vous. Avec le temps, le collier peut se détériorer et il
peut être nécessaire de la remplacer après que vous
l’avez retiré.
16
<ARE1349> Fr
Page 81

MISE EN OEUVRE DE L’ENSEMBLE
○○○○○○○○○○○○○○○○○○○○○○○○○○○○○○○○○○○○○○○○○○○○○○○○○○○○○○○○○○○○○○
○○○○○○○○○○○○○○○○○○○○○○○○○○○○○○○○○○○○○○○○○○○○○○○○○○○○○○○○○○○○○○○○○○○○○○○○○○○○○○○○○○○
○○○○○○○○○○○○○○○○○○○
Mise en oeuvre après
raccordement
Après le raccordement des appareils aux prises INPUT3
ou INPUT4, des réglages à l’aide des menus affichés sur
l’écran sont nécessaires.
Procédez aux opérations décrites ci-dessous et effectuez
les réglages en fonction des appareils connectés.
(Les modes opératoires supposent l’utilisation de la
télécommande, à moins que la commande ne soit
disponible que sur l’écran à plasma.)
TV
DTV
DVD
CBL
/VCR
/LD
STANDBY/ON
INPUT
MENU
ADJUST
SET
S.MODE
RETURN
2
3
4,10
5,6,7
8,9
5,6,7
8,9
2
4,10
/SAT
STANDBY/ON
INPUT
1234
SCREEN
MODE
AUTO STILL
POWER
INPUT
RECEIVER
AUDIO CC
CLEAR
1 2 3
4 5 6
7 8 9
ENTER
0
CH
RETURN
CH
MUTING
RECEIVER
TV/SAT/DTV/DVD
EDIT/
LEARN
MENU
SOURCE SAT/DTV
%
POWER
SET/
SELECT
%
%
DVD
TOP MENU
%
MENU
FAVORITES
1 7 3 ¡
VCR REC
84
CU-PDP008
PLASMA DISPLAY REMOTE CONTROL UNIT
DISPLAY
CH
VOL
(SAT)/DTV
3
DTV
VIEW
MODE
GUIDE
5,6,7
INFO
8,9
¢
Î
5 Utilisez les touches 5/∞ pour choisir l’option SET
UP puis appuyez sur la touche SET/SELECT.
SET UP
S
IGNA :PC
G
ON YNCFOF
I
NPU
E
XIT
L
S
TLABE
USE:
:POWER SAVE FOF
:
L
END: MENU
6 Utilisez les touches 5/∞ pour choisir l’option
SIGNAL puis appuyez sur la touche SET/SELECT.
SET UP
S
IGNA :V IDEO PC
G
ON YNCFOF
I
NPU
E
XIT
L
S
TLABE
USE:
:POWER SAVE FOF
:
L
END: MENU
7 Utilisez les touches 2/3 pour choisir le signal
d’entrée.
Choisissez “PC” si un ordinateur personnel est relié à
l’écran à plasma. Si un appareil vidéo autre qu’un
ordinateur est relié à l’écran à plasma, choisissez
“VIDEO”.
After selecting, press SET/SELECT to enter your
selection.
FRANÇAIS
1 Sur l’écran à plasma, placez l’interrupteur MAIN
POWER sur la position permettant la mise sous
tension de l’écran.
Le témoin STANDBY/ON s’éclaire de couleur rouge.
2 Appuyez sur la touche STANDBY/ON pour
mettre l’écran à plasma en service.
Le témoin STANDBY/ON s’éclaire de couleur verte.
3 Choisissez INPUT3 ou INPUT4.
4 Appuyez sur la touche MENU pour afficher la page
de menu.
La page de menu s’affiche.
Remarque
Les opérations 6 à 7 sont nécessaires lorsque le signal d’entrée a
une fréquence de 31,5 kHz (horizontalement) et de 60 Hz
(verticalement).
Pour les signaux à d’autres fréquences, les réglages sont
effectués automati quement et ne peuvent donc pas être
modifiés.
DE L’ENSEMBLE
MISE EN OEUVRE
<ARE1349> Fr
17
Page 82

MISE EN OEUVRE DE L’ENSEMBLE
○○○○○○○○○○○○○○○○○○○○○○○○○○○○○○○○○○○○○○○○○○○○○○○○○○○○○○○○○○○○○○
8 Utilisez les touches 5/∞ pour choisir l’option
FORMAT puis appuyez sur la touche SET/SELECT.
○○○○○○○○○○○○○○○○○○○○○○○○○○○○○○○○○○○○○○○○○○○○○○○○○○○○○○○○○○○○○○○○○○○○○○○○○○○○○○○○○○○
Choisissez pour SETTING et SIGNAL les valeurs du
tableau ci-dessous.
FRANÇAIS
SET UP
FORMAT : COMPONENT1
EX IT
COMPONENT2
RGB
USE:
END: MENU
FORMAT ne peut être choisi que si “VIDEO” a été
choisi à l’étape 7.
9 Utilisez les touches 5/∞ pour choisir le format du
signal d’entrée.
Le tableau figurant dans la colonne de droite donne
les réglages disponibles et convenables en fonction
des raccordements effectués.
Cela fait, appuyez sur la touche SET/SELECT pour
valider votre choix.
10Appuyez sur la touche MENU pour abandonner la
page de menu lorsque la mise en oeuvre est
terminée.
Remarques
÷ Effectuez cette mise en oeuvre pour chaque entrée (INPUT3
ou INPUT4).
÷ Si vous avez choisi un signal d’ordinateur ou la valeur “PC”
pour SIGNAL, la valeur “FORMAT” ne peut pas être
sélectionnée.
÷ Si vous avez donné la valeur “COMPONENT” (1 ou 2) à
DE L’ENSEMBLE
l’option FORMAT, “G ON SYNC” devient indisponible.
÷ Pour de plus amples détails concernant la valeur de G ON
SYNC, reportez-vous à la page 19.
SET UP
Appareil relié
Sortie des composantes
vidéo d’un boîtier DTV
avec sortie HDTV
Sortie des composantes
vidéo d’un boîtier DTV
avec sortie SDTV
Sortie des composantes vidéo
d’un lecteur de DVD, etc.
Sortie vidéo RVB d’un
magnétoscope, etc. muni
d’une sortie RVB
Sortie vidéo RVB d’un
ordinateur
* Choisissez COMPONENT 1 ou COMPONENT 2 selon celui de
ces réglages qui fournit les couleurs les plus naturelles pour
l’appareil connecté.
VIDEO COMPONENT 1*
VIDEO COMPONENT 2*
VIDEO
VIDEO
PC
FORMATSIGNAL
COMPONENT 2*
RGB
RGB (Obligatoirement
“RGB” si SETTING a
pour valeur “PC”.)
Remarque
Si un boîtier DTV est branché, reportez-vous à la page 14,
“Raccordement au boîtier DTV”.
MISE EN OEUVRE
18
<ARE1349> Fr
Page 83

○○○○○○○○○○○○○○○○○○○○○○○○○○○○○○○○○○○○○○○○○○○○○○○○○○○○○○○○○○○○○○
CH
VOL
○○○○○○○○○○○○○○○○○○○○○○○○○○○○○○○○○○○○○○○○○○○○○○○○○○○○○○○○○○○○○○○○○○○○○○○○○○○○○○○○○○○
Mise en oeuvre pour G ON SYNC
3 Utilisez les touches 5/∞ pour choisir l’option G
MISE EN OEUVRE DE L’ENSEMBLE
ON SYNC puis appuyez sur la touche SET/SELECT.
En principe, la source RVB fournit 5 signaux séparés: vert,
bleu, rouge, synchronisation horizontale et
synchronisation verticale. Si le raccordement est effectué
au moyen de la prise G ON SYNC, 3 signaux seulement
sont disponibles: rouge, vers (synchronisations
horizontale et verticale) et bleu.
Si l’appareil utilisé est d’un modèle tel que la liaison G ON
SET UP
S
L
IGNA :PC
G
ON YNCNOOF
S
I
NPU
TLABE
XIT
USE:
E
:POWER SAVE FOF
:
L
F
END: MENU
SYNC est employée, la page de mise en oeuvre suivante
devient nécessaire.
FRANÇAIS
Mise en oeuvre de G ON SYNC
MUTING
1,5
RECEIVER
TV/SAT/DTV/DVD
EDIT/
LEARN
MENU
SOURCE SAT/DTV
TOP MENU
MENU
%
POWER
%
DVD
FAVORITES
1 7 3 ¡
84
CU-PDP008
PLASMA DISPLAY REMOTE CONTROL UNIT
SET/
SELECT
%
VCR REC
%
GUIDE
(SAT)/DTV
INFO
2,3,4
¢
Î
1 Appuyez sur la touche MENU pour afficher la page
de menu.
La page de menu s’affiche.
2 Utilisez les touches 5/∞ pour choisir l’option SET
UP puis appuyez sur la touche SET/SELECT.
4 Utilisez les touches 2/3 pour choisir G ON SYNC.
Cela fait, appuyez sur la touche SET/SELECT pour
valider votre choix.
5 Appuyez sur la touche MENU pour abandonner la
page de menu lorsque la mise en oeuvre est
terminée.
Remarques
÷ Effectuez cette mise en oeuvre pour chaque entrée (INPUT3
ou INPUT4).
÷ Avant d’utiliser cette possibilité, vérifiez soigneusement le
signal de sortie de l’appareil utilisé. Pour de plus amples
détails concernant cette question, veuillez vous reporter au
mode d’emploi de l’appareil en question.
÷ Si l’écran devient lumineux et prend une couleur verdâtre,
choisissez la valeur ON pour G ON SYNC.
÷ Certains ordinateurs Macintosh sont prévus pour un
raccordement de type G ON SYNC.
DE L’ENSEMBLE
MISE EN OEUVRE
SET UP
S
IGNA :PC
G
ON YNCFOF
I
NPU
E
XIT
L
S
TLABE
USE:
:POWER SAVE FOF
:
L
END: MENU
<ARE1349> Fr
19
Page 84

FONCTIONNEMENT
○○○○○○○○○○○○○○○○○○○○○○○○○○○○○○○○○○○○○○○○○○○○○○○○○○○○○○○○○○○○○○
○○○○○○○○○○○○○○○○○○○○○○○○○○○○○○○○○○○○○○○○○○○○○○○○○○○○○○○○○○○○○○○○○○○○○○○○○○○○○○○○○○○
○○○○○○○○○○○○○○○○○○○
Choix de la source
Cette section explique le fonctionnement de base. Nous
FRANÇAIS
abordons, dans les pages qui suivent, la manière de
mettre sous tension, ou hors tension, l’écran à plasma, de
le mettre en service ou en veille, et de choisir un appareil
parmi ceux qui sont connectés.
3 Appuyez sur la touche INPUT de l’écran à plasma
ou du boîtier de télécommande pour choisir
l’entrée.
Chaque fois que vous appuyez sur la touche INPUT
du panneau de commande de l’écran à plasma, une
nouvelle entrée est sélectionnée, comme ceci:
3
INPUT1
3
INPUT2
Avant tout, assurez-vous que:
÷ Effectuez les raccordements entre l’écran à plasma et
l’ordinateur personn el conformément aux instructions
de la section “Installation et raccordements” qui
débute à la page 9.
÷ Les réglages de mise en oeuvre ont été réalisés, pour
les appareils connectés à INPUT3 et INPUT4,
conformément à la section “Mise en oeuvre de
l’ensemble”, page 17.
Si aucun appareil n’est relié à ces prises, aucune mise
en oeuvre n’est requise.
TV
DTV
CBL
/VCR
/SAT
STANDBY/ON
INPUT
1234
SCREEN
MODE
AUTO STILL
POWER
INPUT
RECEIVER
AUDIO CC
CLEAR
1 2 3
4 5 6
7 8 9
0
CH
RETURN
CH
MUTING
RECEIVER
TV/SAT/DTV/DVD
EDIT/
LEARN
MENU
SOURCE SAT/DTV
%
POWER
SET/
SELECT
%
DVD
TOP MENU
%
MENU
FAVORITES
1 7 3 ¡
VCR REC
84
CU-PDP008
PLASMA DISPLAY REMOTE CONTROL UNIT
FONCTIONNEMENT
STANDBY/ON
INPUT
MENU
ADJUST
SET
S.MODE
RETURN
2,4
3
2,4
3
INPUT4
2
INPUT3
2
÷ L’entrée ne peut pas être modifiée quand un menu
est affiché.
÷ Si le signal fourni par l’ordinateur n’est pas
compatible avec cet écran à plasma, la mention
“OUT OF RANGE” apparaît sur l’écran.
4 Lorsque vous avez fini de regarder les images,
appuyez sur la touche
placer l’écran à plasma en veille.
Le témoin STANDBY/ON clignote puis demeure
éclairé (rouge) indiquant ainsi que l’écran est en veille.
DVD
/LD
Les commandes ne sont pas reçues quand le témoin
clignote (rouge).
DISPLAY
DTV
VIEW
MODE
5 Mettez l’écran à plasma hors tension au moyen de
l’interrupteur MAIN POWER que porte le panneau
de commande.
CH
ENTER
VOL
Précaution
GUIDE
%
(SAT)/DTV
INFO
¢
Î
Ne laissez pas la même image affichée sur l’écran pendant une
longue période. Cela peut causer une détérioration de l’écran (on
parle de “brûlage” de l’écran) qui se traduit par la persistence de
cette image atténuée.
STANDBY/ON pour
Panneau de commande
de l’écran à plasma
Boîtier de
télécommande
1 Mettez l’écran à plasma sous tension au moyen de
l’interrupteur MAIN POWER que porte le panneau
de commande.
Le témoin STANDBY/ON s’éclaire de couleur rouge.
2 Appuyez sur la touche STANDBY/ON pour
mettre l’écran à plasma en service.
Le témoin STANDBY/ON s’éclaire de couleur verte.
20
<ARE1349> Fr
Page 85

FONCTIONNEMENT
○○○○○○○○○○○○○○○○○○○○○○○○○○○○○○○○○○○○○○○○○○○○○○○○○○○○○○○○○○○○○○
Pour obtenir une image vidéo
○○○○○○○○○○○○○○○○○○○○○○○○○○○○○○○○○○○○○○○○○○○○○○○○○○○○○○○○○○○○○○○○○○○○○○○○○○○○○○○○○○○
Pour vérifier les réglages
arrêtée
TV
DTV
DVD
TV
DTV
DVD
CBL
/VCR
/LD
/SAT
STANDBY/ON
INPUT
1234
SCREEN
MODE
AUTO STILL
POWER
INPUT
AUDIO CC
RECEIVER
CLEAR
DISPLAY
DTV
VIEW
MODE
1 2 3
4 5 6
STILL
CBL
/VCR
/LD
/SAT
STANDBY/ON
INPUT
1234
SCREEN
MODE
AUTO STILL
POWER
INPUT
AUDIO CC
RECEIVER
CLEAR
DISPLAY
DTV
VIEW
MODE
1 2 3
4 5 6
DISPLAY
FRANÇAIS
Appuyez sur la touche STILL de la
télécommande.
L’image présentement affichée sur l’écran est figée.
Cette disposition est utile pour prendre connaissance de
choses qui, autrement, seraient trop éphémères (une
recette de cuisine, par exemple).
Une nouvelle pression sur la touche STILL permet de
rétablir la situation normale.
Remarques
÷ Bien que l’image affichée soit gelée, le signal vidéo n’est pas
interrompu.
÷ Même si vous n’appuyez pas sur la touche STILL, l’image
fournie par le signal vidéo appliqué à l’entrée est rétablie au
bout de 3 minutes.
PU
INPCT4
GB
R
8
.kHZFH: 4
000
.HZFV: 6
STD
UFLL
Appuyez sur la touche DISPLAY
Le nom de l’entrée choisie, les fréquences horizontale et
verticale de balayage, la valeur retenue pour PICTURE, le
format de l’image et la valeur choisie pour AUTO
SCREEN, s’affichent pendant environ 3 secondes.
Remarques
÷ Les valeurs des fréquences horizontale et verticale de
balayage ne sont affichées que si INPUT3 ou INPUT4 ont été
sélectionnées pour recevoir un signal RVB. Si l’appareil reçoit
les composantes vidéo, seule la fréquence horizontale de
balayage est indiquée.
÷ Les valeurs affichées pour les fréquences horizontale et
verticale de balayage ne sont qu’approximatives et peuvent
être légèrement différentes des valeurs réelles.
FONCTIONNEMENT
<ARE1349> Fr
21
Page 86

FONCTIONNEMENT
○○○○○○○○○○○○○○○○○○○○○○○○○○○○○○○○○○○○○○○○○○○○○○○○○○○○○○○○○○○○○○
○○○○○○○○○○○○○○○○○○○○○○○○○○○○○○○○○○○○○○○○○○○○○○○○○○○○○○○○○○○○○○○○○○○○○○○○○○○○○○○○○○○
○○○○○○○○○○○○○○○○○○○
Choix du format de l’image
Cet écran à plasma est en mesure d’afficher des images
FRANÇAIS
ayant des hauteurs et des largeurs différentes. Nous vous
conseillons de choisir le format correspondant le mieux à
la source vidéo. Bien que ces modes aient été imaginés
pour l’affichage d’une image sur grand écran, nous
espérons que vous les emploierez en tenant compte des
intentions qui ont prévalu à leur choix.
Sélection manuelle (SCREEN
MODE)
La taille de l’image projetée sur l’écran, ou son format,
peut être choisie manuellement parmi les 5 tailles
différentes mentionnées sur cette page.
Remarques
÷ Si vous utilisez un format grand écran tel que NATURAL WIDE,
CINEMA WIDE, ZOOM ou FULL pour afficher une image au
format standard de 4/3, une portion de l’image peut être
coupée ou déformée.
÷ Sachez que si vous utilisez les formats CINEMA WIDE ou
ZOOM pour comprimer ou étirer une image et si vous
présentez cette image au public, par exemple à des fins
commerciales, il se peut que vous violiez les droits de l’auteur.
Avec un signal d’entrée vidéo
Représentation
schématique de l’image
NATURAL WIDE
Pour les informations et les
reportages sportifs. Les films et
les reportages sportifs donnent
lieu à des images puissantes.
TV
STANDBY/ON
INPUT
MENU
ADJUST
SET
S.MODE
RETURN
SCREEN
MODE
S.MODE
/VCR
STANDBY/ON
1234
SCREEN
MODE
POWER
AUDIO CC
1 2 3
4 5 6
7 8 9
CH
EDIT/
LEARN
SOURCE SAT/DTV
POWER
DVD
TOP MENU
MENU
1 7 3 ¡
84
CU-PDP008
PLASMA DISPLAY REMOTE CONTROL UNIT
FONCTIONNEMENT
Appuyez sur la touche SCREEN MODE pour
choisir un format.
Chaque pression sur la touche SCREEN MODE de la
télécommande, ou sur la touche S.MODE de l’écran à
plasma, change le format de l’image, comme ceci:
Dans le cas des signaux vidéo
3 NATURAL WIDE 3 4.3 NORMAL
Dans le cas des signaux provenant d’un PC
3 ORIGINAL 3 4.3 NORMAL
FULL 2
CBL
/SAT
INPUT
AUTO STILL
INPUT
0
CH
RETURN
MUTING
RECEIVER
TV/SAT/DTV/DVD
MENU
%
SET/
SELECT
%
%
FAVORITES
VCR REC
DTV
RECEIVER
DVD
/LD
DISPLAY
DTV
VIEW
CLEAR
MODE
4:3 NORMAL
Pour les informations et les comédies de
situation. Le format d’un enregistrement
vidéo n’est pas modifié.
(Pour éviter tout brûlage de l’écran, la
position de l’image est légèrement
différente chaque fois que l’écran est
mis en service.)
CH
ENTER
VOL
FULL
Pour les images grand format
(écrasement).
GUIDE
%
(SAT)/DTV
INFO
¢
ZOOM
Pour les films en Cinémascope et
autres techniques voisines.
L’image est vaste et puissante.
Î
CINEMA WIDE
Pour les images Vista. Les images
sont vastes et puissantes. Ce
format convient également aux
images de films en Cinémascope
et sous-titrés.
(Pour de plus amples détails concernant les formats
d’image dans le cas où le signal vidéo provient d’un
FULL 2ZOOM 2CINEMA WIDE 2
ordinateur, reportez-vous aux pages 25 et 56.)
22
<ARE1349> Fr
Page 87

FONCTIONNEMENT
○○○○○○○○○○○○○○○○○○○○○○○○○○○○○○○○○○○○○○○○○○○○○○○○○○○○○○○○○○○○○○
○○○○○○○○○○○○○○○○○○○○○○○○○○○○○○○○○○○○○○○○○○○○○○○○○○○○○○○○○○○○○○○○○○○○○○○○○○○○○○○○○○○
Sélection automatique (AUTO
SCREEN)
Un certain nombre de formats vidéo différents s’affichent
sur l’écran dans un espace plus petit que l’écran de
manière que le rapport de la largeur à la hauteur de
l’image soit toujours conservé. La fonction AUTO
SCREEN identifie le type du format affiché et choisit
automatiquement le format tel que l’image occupe la plus
grande surface de l’écran. Sachez, toutefois, que l’aspect
et le format d’origine de l’image ne sont pas
nécessairement préservés par cette fonction.
Utilisation du boîtier de télécommande
TV
DTV
DVD
CBL
/VCR
/LD
/SAT
STANDBY/ON
INPUT
1234
SCREEN
MODE
AUTO STILL
POWER
INPUT
AUDIO CC
1 2 3
4 5 6
RECEIVER
CLEAR
DISPLAY
DTV
VIEW
MODE
AUTO
SCREEN
Remarques
÷ Certains DVD/LD et certains enregistrements vidéo entraînent
la suppression d’une partie de l’image, ou la présence d’une
partie des bandes noires.
÷ Le format de l’image peut être modifié automatiquement par
certains signaux vidéo, quel que soit le réglage effectué par
ailleurs à l’aide de la touche AUTO SCREEN (page 25).
Utilisation de la page de menu
Vous pouvez également utiliser la page de menu pour
mettre en service, ou hors service, la fonction AUTO
SCREEN.
1 Appuyez sur la touche MENU pour afficher la page
de menu.
La page de menu s’affiche.
2 Utilisez les touches 5/∞ pour choisir l’option
SCREEN puis appuyez sur la touche SET/SELECT.
SCREEN
INC EMA WI DE
AUTO SCREEN :OF F
V . POS I T I ON :
0
FRANÇAIS
Appuyez sur la touche AUTO placée sur le boîtier de
télécommande.
La fonction est mise en service, ou hors service, chaque
fois que vous appuyez sur la touche AUTO SCREEN.
Normal
Format Vista
Format Cinémascope
ou 16:9
NATURAL WIDE (AUTO)
CINEMA WIDE (AUTO)
ZOOM (AUTO)
OTHER
EX IT
USE:
END: MENU
3 Utilisez les touches 5/∞ pour choisir l’option
AUTO SCREEN puis appuyez sur la touche
SET/SELECT.
SCREEN
INC EMA WI DE
AUTO SCREEN :ON
EX IT
USE:
OFF
END: MENU
4 Utilisez les touches 5/∞ pour choisir la valeur de
l’option AUTO SCREEN.
Cela fait, appuyez sur la touche SET/SELECT pour
valider votre choix.
5 Appuyez sur la touche MENU pour abandonner la
page de menu lorsque la mise en oeuvre est
terminée.
La fonction AUTO SCREEN n’opère qu’après la
fermeture de la page de menu.
FONCTIONNEMENT
Une image 4/3 est affichée au format NATURAL WIDE.
Les bandes noires, en haut et en bas de l’image (formats
Vista, Cinemascope, etc.), sont supprimées et une image
plus agréable est affichée.
Remarques
÷
La fonction AUTO SCREEN détecte la luminosité de l’image et choisit
automatiquement le format convenable. Dans le cas d’une scène très
sombre, le format approprié peut être difficile à déterminer. En ce
cas, mettez la fonction AUTO SCREEN hors service.
÷
La fonction AUTO SCREEN n’agit qu’avec un signal NTSC, 480i.
÷ Lors du passage d’un format d’image à un autre, l’image peut
être déformée, ou disparaître momentanément.
<ARE1349> Fr
23
Page 88

FONCTIONNEMENT
○○○○○○○○○○○○○○○○○○○○○○○○○○○○○○○○○○○○○○○○○○○○○○○○○○○○○○○○○○○○○○
○○○○○○○○○○○○○○○○○○○○○○○○○○○○○○○○○○○○○○○○○○○○○○○○○○○○○○○○○○○○○○○○○○○○○○○○○○○○○○○○○○○
Changement de la position de
l’image
FRANÇAIS
Dans le cas où une image Vista, etc., est affichée avec le
format CINEMA WIDE ou ZOOM, un décentrage peut
être constaté qui peut aller jusqu’à la coupure de l’image
par le bord physique de l’écran.
Dans ce cas, réglez l’écran au moyen de l’option
V.POSITION du menu SCREEN pour que l’image soit bien
visible.
4 Utilisez les touches 5/∞ pour choisir la valeur de
V.POSITION.
Plages de réglage:
÷ CINEMA WIDE : –15 à 15
÷ ZOOM setting : –25 à 25
Cela fait, appuyez sur la touche SET/SELECT pour
valider votre choix.
5 Appuyez sur la touche MENU pour abandonner la
page de menu lorsque la mise en oeuvre est
terminée.
CH
RETURN
1,5
CH
TV/SAT/DTV/DVD
EDIT/
LEARN
SOURCE SAT/DTV
POWER
%
DVD
TOP MENU
MENU
1 7 3 ¡
84
MUTING
RECEIVER
MENU
%
SET/
SELECT
%
FAVORITES
VCR REC
%
VOL
GUIDE
(SAT)/DTV
INFO
¢
1 Appuyez sur la touche MENU pour afficher la page
de menu.
La page de menu s’affiche.
2 Utilisez les touches 5/∞ pour choisir l’option
SCREEN puis appuyez sur la touche SET/SELECT.
FONCTIONNEMENT
SCREEN
INC EMA WI DE
AUTO SCREEN :OF F
V . POS I T I ON :
0
Remarque
L’option V.POSITION ne peut être utilisée que pour les signaux
compatible avec les formats d’image CINEMA WIDE et ZOOM
(NTSC, 480i ou 480p).
2,3,4
OTHER
EX IT
USE:
END: MENU
3 Utilisez les touches 5/∞ pour choisir l’option
V.POSITION puis appuyez sur la touche
SET/SELECT.
0V . POS I T I ON :
END: MENU
24
USE:
<ARE1349> Fr
Page 89

FONCTIONNEMENT
○○○○○○○○○○○○○○○○○○○○○○○○○○○○○○○○○○○○○○○○○○○○○○○○○○○○○○○○○○○○○○
○○○○○○○○○○○○○○○○○○○○○○○○○○○○○○○○○○○○○○○○○○○○○○○○○○○○○○○○○○○○○○○○○○○○○○○○○○○○○○○○○○○
Choix automatique du format de
l’image en fonction du signal
d’entrée
Le format de l’image est automatiquement choisi en
considérant la nature (S1, S2 ou HDTV) du signal vidéo et
les indications suivantes sont affichées sur l’écran.
Signal d’entrée Format retenu Indication affichée
FRANÇAIS
Signal vidéo S1 (écrasement)
Signal vidéo S2 (letter box)
Signal HDTV
(1920 x 1080 i, 1280 x 720 p)
Avec un signal d’entrée provenant d’un
ordinateur personnel
1 ORIGINAL
Le signal d’entrée et l’image sont dans un rapport point à
ligne de 1/1 et sont donc tout à fait fidèles à la source.
A
640 points
1280 points
(L’illustration concerne une entrée 640 x 480.)
Le format “FULL” est automatiquement choisi.
Le format “ZOOM” est automatiquement choisi.
Le format “FULL” est automatiquement choisi.
480 lignes
768 lignes
FULL (S1)
ZOOM (S2)
FULL (HD)
3 FULL
L’image a le format 16/9 et remplit l’écran.
A
FONCTIONNEMENT
2 4:3 NORMAL
L’image remplit l’écran autant que possible mais le format
n’est pas modifi.
A
<ARE1349> Fr
25
Page 90

FONCTIONNEMENT
○○○○○○○○○○○○○○○○○○○○○○○○○○○○○○○○○○○○○○○○○○○○○○○○○○○○○○○○○○○○○○
○○○○○○○○○○○○○○○○○○○○○○○○○○○○○○○○○○○○○○○○○○○○○○○○○○○○○○○○○○○○○○○○○○○○○○○○○○○○○○○○○○○
○○○○○○○○○○○○○○○○○○○
ÉCONOMIE D’ÉNERGIE
Grâce à la fonction POWER SAVE, l’écran à plasma peut
être automatiquement placé en veille quand aucun signal
FRANÇAIS
vidéo ni aucun signal d’ordinateur n’est détecté. (Une
indication s’affiche sur l’écran avant le passage en veille.)
CH
RETURN
1,5
CH
TV/SAT/DTV/DVD
EDIT/
LEARN
SOURCE SAT/DTV
POWER
%
DVD
TOP MENU
MENU
1 7 3 ¡
84
MUTING
RECEIVER
MENU
%
SET/
SELECT
%
FAVORITES
VCR REC
%
VOL
GUIDE
(SAT)/DTV
INFO
¢
2,3,4
4 Appuyez 5/∞ la touche SET pour choisir le mode
de POWER SAVE.
÷ Avec “OFF”, l’écran à plasma demeure en
fonctionnement qu’un signal de synchronisation soit
présent à l’entrée ou non.
÷ Avec “MODE1”, l’écran à plasma passe
automatiquement en veille si aucun nouveau signal
de synchronisation n’est appliqué à l’entrée pendant
8 minutes.
÷ Avec “MODE2”, l’écran à plasma passe
automatiquement en mode d’économie d’énergie si
aucun nouveau signal de synchronisation n’est
appliqué à l’entrée. Toutefois, si le signal de
synchronisation est rétabli, l’écran retrouve sont
fonctionnement.
Cela fait, appuyez sur la touche SET/SELECT pour
valider votre choix.
5 Appuyez sur la touche MENU pour abandonner la
CU-PDP008
PLASMA DISPLAY REMOTE CONTROL UNIT
Î
page de menu dès que les réglages sont terminés.
1 Appuyez sur la touche MENU pour afficher la page
de menu.
La page de menu s’affiche.
2 Utilisez les touches 5/∞ pour choisir l’option SET
UP puis appuyez sur la touche SET/SELECT.
FONCTIONNEMENT
SET UP
S
IGNA :PC
G
ON YNCFOF
I
NPU
E
XIT
L
S
TLABE
USE:
:POWER SAVE FOF
:
L
END: MENU
3 Utilisez les touches 5/∞ pour choisir l’option
POWER SAVE puis appuyez sur la touche
SET/SELECT.
SET UP
E
XIT
USE:
:POWER SAVE OMDE1
OMDE2
F
OF
END: MENU
Remarque
÷ Le réglage de la fonction d’économie d’énergie concerne
toutes les entrées (INPUT1 à INPUT4).
÷ Si la valeur de l’option SIGNAL est “VIDEO”, “MODE2” n’est
plus disponible.
Pour replacer l’écran à plasma en
fonctionnement
Appuyez sur la touche STANDBY/ON de l’écran ou de
la télécommande.
Si l’écran à plasma est en mode d’économie d’énergie, et
si vous rétablissez le fonctionnement de l’ordinateur, ou
appuyez sur la touche INPUT de l’écran ou de la
télécommande, vous replacez l’écran à plasma en
fonctionnement.
26
<ARE1349> Fr
Page 91

FONCTIONNEMENT
○○○○○○○○○○○○○○○○○○○○○○○○○○○○○○○○○○○○○○○○○○○○○○○○○○○○○○○○○○○○○○
○○○○○○○○○○○○○○○○○○○○○○○○○○○○○○○○○○○○○○○○○○○○○○○○○○○○○○○○○○○○○○○○○○○○○○○○○○○○○○○○○○○
○○○○○○○○○○○○○○○○○○○
Etiquetage des entrées
Cette fonction vous permet d’étiqueter chacune des 4
entrées au moyen d’un nom de 8 caractères.
MUTING
1,9
RECEIVER
TV/SAT/DTV/DVD
EDIT/
LEARN
MENU
SOURCE SAT/DTV
POWER
TOP MENU
MENU
%
GUIDE
SET/
SELECT
%
%
FAVORITES
%
(SAT)/DTV
INFO
DVD
2,3,4,5,
6,7,8
6 Utilisez les touches 5/∞ pour choisir l’option
LABEL puis appuyez sur la touche SET/SELECT.
La fenêtre de frappe des caractères s’ouvre et le
curseur occupe la position inférieure droite.
SET UP
I
L
E
NPUT LABE
:
ABE L
XIT
I
ABC E FGHI JK LMN
OPQ S TUVWXYZ1 2
345 7890 /– ._
NPUT 3
D
R
6
USE:
L
END: MENU
FRANÇAIS
1 Appuyez sur la touche MENU pour afficher la page
de menu.
La page de menu s’affiche.
2 Utilisez les touches 5/∞ pour choisir l’option SET
UP puis appuyez sur la touche SET/SELECT.
SET UP
S
IGNA :PC
G
ON YNCFOF
I
NPU
E
XIT
3
Utilisez les touches 5/∞ pour choisir l’option INPUT
L
S
TLABE
USE:
:POWER SAVE FOF
:
L
END: MENU
LABEL puis appuyez sur la touche SET/SELECT.
I
NPUT
L
ABE L
E
XIT
I
NPUT LABE
:
I
NPUT
:
I
NPUT
USE:
L
4
4
END: MENU
SET UP
4 Utilisez les touches 5/∞ pour choisir l’option
INPUT puis appuyez sur la touche SET/SELECT.
7 Utilisez les touches 5/∞/2/3 pour déplacer le
curseur sur cette fenêtre. Appuyez sur la touche
SET/SELECT pour ajouter un caractère au nom.
SET UP
I
L
E
NPUT LABE
:
A ABEL
XIT
I
ABC EFGHI J KLMN
OPQ S TUVWXYZ1 2
345 7890 /– ._
NPUT 3
D
R
6
USE:
L
END: MENU
Chaque fois que vous appuyez sur la touche
SET/SELECT, le caractère que vous avez choisi est
ajouté au nom, jusqu’à concurrence de 8 caractères.
SET UP
I
L
E
NAPUT LABE
:
AABEL
XIT
AAAAAA
ABC EFGHI J KLMN
D
OPQ S TUVWXYZ1 2
R
345 7890 /– ._
6
USE:
L
END: MENU
8 Lorsque l’étiquetage est terminé, placez le curseur
à la partie inférieure droite de la fenêtre puis
appuyez sur la touche SET/SELECT.
La fenêtre de frappe des caractères se ferme. Le
numéro de l’entrée et son étiquette s’affichent.
FONCTIONNEMENT
I
NPUT:I
E
XIT
I
NPUT LABE
NPUT 1
I
NPUT 2
I
NPUT 3
I
NPUT 4
USE:
L
END: MENU
SET UP
5 Utilisez les touches 5/∞ pour choisir l’entrée que
vous désirez nommer, puis appuyez sur la touche
SET/SELECT.
Si l’entrée est changée sur la page de menu, l’entrée
choisie actuellement est changée aussi.
SET UP
I
L
E
NPUT
ABE L
XIT
I
NPUT LABE
:
I
NPUT 3
:
I
NPUT 3
USE:
L
END: MENU
SET UP
I
NPUT
L
ABE L
E
XIT
I
NPUT LABE
:
I
NP
UT3
:
A
AA
AAAAA
USE:
L
END: MENU
9 Appuyez sur la touche MENU pour abandonner la
page de menu lorsque la mise en oeuvre est
terminée.
Remarque
Quand ces caractères sont choisis dans la fenêtre de frappe, les
choses suivantes se produisent.
: un espace est entré.
: Le mode de frappe de caractères est quitté.
<ARE1349> Fr
27
Page 92

AJUSTEMENT DU PANNEAU D’AFFICHAGE
○○○○○○○○○○○○○○○○○○○○○○○○○○○○○○○○○○○○○○○○○○○○○○○○○○○○○○○○○○○○○○
○○○○○○○○○○○○○○○○○○○○○○○○○○○○○○○○○○○○○○○○○○○○○○○○○○○○○○○○○○○○○○○○○○○○○○○○○○○○○○○○○○○
○○○○○○○○○○○○○○○○○○○
Relations entre les pages de MENU
Quand vous appuyez sur la touche MENU du boîtier de
télécommande, la page MAIN MENU s’affiche. La page
FRANÇAIS
MAIN MENU est la première page de réglage de laquelle
découlent la page PICTURE, la page SCREEN et la page
SET UP.
2 Utilisez les touches 5/∞ pour choisir le menu
secondaire convenable puis appuyez sur la touche
SET/SELECT.
÷ Utilisez la page PICTURE pour modifier l’image
vidéo apparaissant sur l’écran (pages 29 à 37).
Utilisez les touches 5/∞ de la télécommande ou l’appareil
principal pour choisir le poste de menu puis appuyez sur
la touche SET/SELECT pour effectuer les opérations et
les réglages désirés.
Quand un signal vidéo est entré et que le menu sur écran
est affiché, le mode SCREEN MODE est changé en
“FULL”. Quand le menu sur écran est mis hors service,
ou si le menu d’ajustement SCREEN est choisi, l’écran
retourne au mode SCREEN MODE que a été
précédemment affiché.
Utilisation des pages de menu
CH
RETURN
ANNEAU D’AFFICHAGE
1,3
CH
TV/SAT/DTV/DVD
EDIT/
LEARN
SOURCE SAT/DTV
POWER
2
%
DVD
TOP MENU
MENU
FAVORITES
1 7 3 ¡
84
CU-PDP008
PLASMA DISPLAY REMOTE CONTROL UNIT
MUTING
RECEIVER
MENU
%
SET/
SELECT
%
VCR REC
%
VOL
GUIDE
(SAT)/DTV
INFO
¢
Î
PICTURE
SCREEN
SET UP
USE:
END: MENU
.
÷ Utilisez la page SCREEN pour modifier les réglages
de l’écran en fonction du signal d’entrée (page 23,
24 et 38).
PICTURE
SCREEN
SET UP
USE:
END: MENU
2
• Utilisez la page SET UP pour effectuer divers
réglages, en particulier lorsque l’écran à plasma est
.
relié à d’autres appareils (pages 17 à 19 et 26 et 27).
PICTURE
SCREEN
SET UP
.
AJUSTEMENT DU P
1 Appuyez sur la touche MENU pour afficher la page
de menu.
La page de menu s’affiche.
PICTURE
SCREEN
28
<ARE1349> Fr
SET UP
USE:
END: MENU
.
USE:
END: MENU
3 Appuyez sur la touche MENU pour abandonner la
page de menu.
Indications affichées sur l’écran:
USE: Indique, en bleu clair, les touches que vous pouvez
utiliser sur la page de menu affichée.
END: Abandon de la page de menu en appuyant sur la
touche MENU.
EXIT: Pour revenir à la page de menu précédente,
utilisez les touches 5/∞ de manière à atteindre
EXIT puis appuyez sur la touche SET/SELECT.
Page 93

○○○○○○○○○○○○○○○○○○○○○○○○○○○○○○○○○○○○○○○○○○○○○○○○○○○○○○○○○○○○○○
AJUSTEMENT DU PANNEAU D’AFFICHAGE
○○○○○○○○○○○○○○○○○○○○○○○○○○○○○○○○○○○○○○○○○○○○○○○○○○○○○○○○○○○○○○○○○○○○○○○○○○○○○○○○○○○
○○○○○○○○○○○○○○○○○○○
Réglages de l’image
Cet écran à plasma possède, en mémoire, 3 jeux de
réglages de qualité d’image, chacun convenant bien à un
type d’enregistrement vidéo. Vous pouvez choisir le jeu
de réglages qui vous plaît, ou modifier un jeu de réglages
pour obtenir une certaine image. Ces réglages modifiés
peuvent également être mis en mémoire en vue d’une
utilisation future.
Sélection d’un jeu de réglages
1,5
2,3,4
CH
TV/SAT/DTV/DVD
EDIT/
LEARN
SOURCE SAT/DTV
POWER
%
DVD
TOP MENU
MENU
FAVORITES
1 7 3 ¡
84
MUTING
RECEIVER
MENU
%
SET/
SELECT
%
VCR REC
%
VOL
GUIDE
(SAT)/DTV
INFO
¢
2,3,4
4 Utilisez les touches 2/3 pour choisir la valeur
convenable.
Les valeurs suivantes sont possibles:
÷ STD .......... Image de qualité standard.
÷ MOVIE ..... Réduction du contraste de manière que
les scènes sombres soient plus
agréables à regarder. Convient bien aux
films comprenant de nombreuses
scènes de nuit.
÷ GAME ...... Réduction du contraste relatif des
images de jeu vidéo et d’ordinateur afin
de diminuer la fatigue visuelle. Les
effets des points décolorés et des
taches de l’écran sont également
atténués.
÷ USER........ Utilisation des réglages définis par
l’utilisateur. Vous pouvez modifier un
des réglages ci-dessous pour créer le
réglage USER (page 30).
Après sélection, appuyez sur la touche SET/SELECT
pour valider votre choix.
FRANÇAIS
CU-PDP008
PLASMA DISPLAY REMOTE CONTROL UNIT
Î
1 Appuyez sur la touche MENU pour afficher la page
de menu.
La page de menu s’affiche.
2 Utilisez les touches 5/∞ pour choisir l’option
PICTURE, puis appuyez sur la touche SET/SELECT.
PICTURE
MOD E : STD
CONTRAST
BLACK LVL .
COLOR
TINT
SHARP
OTHER
EX IT
USE:
END: MENU
3 Utilisez les touches 5/∞ pour choisir l’option
MODE, puis appuyez sur la touche SET/SELECT.
5 Appuyez sur la touche MENU pour abandonner la
page de menu.
Remarques
÷ Effectuez ces réglages pour chaque entrée (INPUT1 à INPUT4)
et chaque signal (vidéo ou ordinateur).
÷ Quand HIGH CONTRAST est réglé sur “ON” et qu’un signal
d’ordinateur est entré, MOVIE et GAME sont indisponibles.
Prévention des brûlages d’écran
Veuillez lire ce qui suit et vous aidera à maintenir l’écran
à plasma dans de bonnes conditions.
Les jeux vidéo et les images fixes peuvent provoquer
un phénomène de brûlage d’écran; assurez-vous donc,
chaque fois que vous utilisez cet écran pour un jeu, de
choisir le mode GAME et de limiter l’utilisation à 2
heures. A la suite d’un jeu vidéo, etc., projetez sur
l’écran des images habituelles pendant une durée au
moins 3 fois supérieure à celle du jeu vidéo. En effet,
une image animée a pour effet d’estomper le brûlage
d’écran et de réduire les effets néfastes que le jeu
vidéo peut avoir eu sur l’écran.
ANNEAU D’AFFICHAGE
AJUSTEMENT DU P
MODE : STD MOVIE GAME USER
USE:
END: MENU
<ARE1349> Fr
29
Page 94

AJUSTEMENT DU PANNEAU D’AFFICHAGE
○○○○○○○○○○○○○○○○○○○○○○○○○○○○○○○○○○○○○○○○○○○○○○○○○○○○○○○○○○○○○○
○○○○○○○○○○○○○○○○○○○○○○○○○○○○○○○○○○○○○○○○○○○○○○○○○○○○○○○○○○○○○○○○○○○○○○○○○○○○○○○○○○○
Sauvegarde des réglages d’écran
4 Effectuez les réglages d’image de la manière
décrite à la page suivante.
grâce au mode USER
Le mode USER peut être utilisé indépendamment pour
FRANÇAIS
chacune des entrées vidéo (INPUT1 à 4) et pour chacune
des entrées provenant de l’ordinateur personnel (INPUT3
et 4).
÷ Si vous modifiez un des modes en mémoire (STD,
MOVIE ou GAME), un nouveau mode USER se
trouve créé, qui tient compte des valeurs
précédentes. Le mode ayant servi de base est
indiqué entre parenthèses.
÷ Quand HIGH CONTRAST est réglé sur “ON” et
TV
DTV
DVD
2,5
3,4
CBL
/VCR
/LD
/SAT
STANDBY/ON
INPUT
1
1234
SCREEN
MODE
POWER
AUDIO CC
AUTO STILL
INPUT
RECEIVER
CLEAR
DISPLAY
MODE
DTV
VIEW
1 2 3
4 5 6
7 8 9
CH
ENTER
0
CH
RETURN
CH
EDIT/
LEARN
SOURCE SAT/DTV
POWER
DVD
TOP MENU
MENU
1 7 3 ¡
84
MUTING
RECEIVER
TV/SAT/DTV/DVD
SELECT
%
FAVORITES
MENU
SET/
VCR REC
VOL
%
GUIDE
%
(SAT) /DTV
%
INFO
¢
3,4
qu’un signal d’ordinateur est entré, MOVIE et
GAME sont indisponibles.
PICTURE
MOD E : USER (STD )
CONTRAST
BLACK LVL.
COLOR
TINT
SHARP
OTHER
EX IT
USE:
END: MENU
5 Appuyez sur la touche MENU pour abandonner la
page de menu.
CU-PDP008
PLASMA DISPLAY REMOTE CONTROL UNIT
Î
1 Appuyez sur la touche INPUT convenable de
manière à afficher sur l’écran le signal fourni par la
source.
ANNEAU D’AFFICHAGE
2 Appuyez sur la touche MENU pour afficher la page
de menu.
AJUSTEMENT DU P
La page de menu s’affiche.
3 Utilisez les touches 5/∞ pour choisir l’option
PICTURE puis appuyez sur la touche SET/SELECT.
PICTURE
MOD E : STD
CONTRAST
BLACK LVL .
COLOR
TINT
SHARP
OTHER
EX IT
USE:
END: MENU
30
<ARE1349> Fr
Page 95

○○○○○○○○○○○○○○○○○○○○○○○○○○○○○○○○○○○○○○○○○○○○○○○○○○○○○○○○○○○○○○
CH
VOL
AJUSTEMENT DU PANNEAU D’AFFICHAGE
○○○○○○○○○○○○○○○○○○○○○○○○○○○○○○○○○○○○○○○○○○○○○○○○○○○○○○○○○○○○○○○○○○○○○○○○○○○○○○○○○○○
Réglage de la qualité de l’image
La page de réglages PICTURE permet d’avoir accès aux
paramètres mentionnés dans la colonne de droite.
MUTING
1,5
2,3,4
RECEIVER
TV/SAT/DTV/DVD
EDIT/
LEARN
MENU
SOURCE SAT/DTV
TOP MENU
MENU
%
POWER
%
DVD
FAVORITES
1 7 3 ¡
84
CU-PDP008
PLASMA DISPLAY REMOTE CONTROL UNIT
SET/
SELECT
%
VCR REC
%
GUIDE
(SAT)/DTV
INFO
2,3,4
¢
Î
4 Réglez la qualité de l’image à l’aide des touches
2/3.
Le changement de position centrale est sauvegardé
grâce au mode USER (page 30).
Après sélection, appuyez sur la touche SET/SELECT
pour valider votre choix.
5 Lorsque vous avez terminé les réglages, appuyez
sur la touche MENU pour abandonner la page de
menu.
Remarque
Effectuez ces réglages pour chaque entrée (INPUT1 à INPUT4) et
chaque signal (vidéo ou ordinateur).
Paramètres qui peuvent être réglés
Ci-dessous se trouvent une brève description des
paramètres disponibles avec PICTURE et PICTURE
OTHER de la page PICTURE.
FRANÇAIS
1 Appuyez sur la touche MENU pour afficher la page
de menu.
La page de menu s’affiche.
2 Utilisez les touches 5/∞ pour choisir l’option
PICTURE puis appuyez sur la touche SET/SELECT.
PICTURE
MOD E : STD
CONTRAST
BLACK LVL .
COLOR
TINT
SHARP
OTHER
EX IT
Dans le cas où l’image est fournie par un ordinateur
personnel connecté à l’entrée INPUT3 ou INPUT4, la
page suivante est affichée.
PICTURE
MOD E : TDS
C
B
O
E
3 Utilisez les touches 5/∞ pour choisir le paramètre
à régler puis appuyez sur la touche SET/SELECT.
CONTRAST
USE:
A
ONT R ST
LACK LVL .
THE
R
USE:
XIT
USE:
END: MENU
END: MENU
END: MENU
Valeurs possibles pour PICTURE
CONTRAST ............. Réglez le contraste en fonction de
l’éclairage ambiant de manière que
l’image soit bien visible.
BLACK LVL. ............. Réglez la luminosité de manière que
les parties sombres de l’image
soient bien visibles.
COLOR.................... Réglez les couleurs pour obtenir une
certaine profondeur. (Une certaine
profondeur procure une sensation
de naturel.)
TINT......................... Réglez la teinte pour que la peau ait
une couleur naturelle.
SHARP .................... En principe, choisissez la valeur
centrale. Pour obtenir une image
douce, choisissez une valeur à
gauche; pour obtenir une image
nette, choisissez une valeur à droite.
Autres ajustements de l’image (PICTURE OTHER):
R LEVEL .................. Pour régler la quantité de rouge
dans l’image.
G LEVEL .................. Pour régler la quantité de vert dans
l’image.
B LEVEL .................. Pour régler la quantité de bleu dans
l’image.
Pour plus d’informations concernant un ajustement
particulier, référez-vous aux pages indiquées entre
parenthèses.
3D Y/C LEVEL ......... (page 32)
3D NR LEVEL .......... (page 33)
COLOR TEMP ......... (page 34)
FILM MODE............ (page 35)
HUGH CONTRAST .. (page 36)
ABL ......................... (page 37)
Remarque
Des images d’ajustement séparées peuvent être mémorisées
quand HIGH CONTRAST est réglé sur “ON” et sur “OFF”.
<ARE1349> Fr
31
ANNEAU D’AFFICHAGE
AJUSTEMENT DU P
Page 96

AJUSTEMENT DU PANNEAU D’AFFICHAGE
○○○○○○○○○○○○○○○○○○○○○○○○○○○○○○○○○○○○○○○○○○○○○○○○○○○○○○○○○○○○○○
○○○○○○○○○○○○○○○○○○○○○○○○○○○○○○○○○○○○○○○○○○○○○○○○○○○○○○○○○○○○○○○○○○○○○○○○○○○○○○○○○○○
○○○○○○○○○○○○○○○○○○○
Visualisation d’une image animée
3 Utilisez les touches 5/∞ pour choisir l’option
OTHER puis appuyez sur la touche SET/SELECT.
(3D Y/C MODE)
FRANÇAIS
Lorsque vous regardez un sujet en déplacement rapide,
comme ce peut être le cas au cours d’une émission
sportive, le choix d’une valeur convenable en fonction de
la source vidéo, permet le plus souvent de réduire le flou
et le bruit numérique, et partant d’obtenir une image plus
claire.
÷ Ce paramètre peut prendre 5 valeurs; la valeur “1” est
conseillée lorsque la source donnent des images très
animées, la valeur “5” lorsque les images sont fixes.
4 Utilisez les touches 5/∞ pour choisir l’option 3D
Y/C LEVEL puis appuyez sur la touche
SET/SELECT.
PICTURE
OTHER
3D Y/C
3D NR
COLOR
FILM
HIGH
EX IT
LEVEL : 3
LEVEL : 1
T
EMP : S T D
M
DE : O
O
NTRAST
C
O
USE:
:
FF
OF
F
END: MENU
1,6
2,3,4,5
CH
EDIT/
LEARN
SOURCE SAT/DTV
POWER
%
DVD
TOP MENU
MENU
1 7 3 ¡
84
CU-PDP008
PLASMA DISPLAY REMOTE CONTROL UNIT
MUTING
RECEIVER
TV/SAT/DTV/DVD
MENU
%
SET/
SELECT
%
FAVORITES
VCR REC
%
VOL
GUIDE
(SAT)/DTV
INFO
¢
Î
1 Appuyez sur la touche MENU pour afficher la page
ANNEAU D’AFFICHAGE
de menu.
La page de menu s’affiche.
2 Utilisez les touches 5/∞ pour choisir l’option
AJUSTEMENT DU P
PICTURE puis appuyez sur la touche SET/SELECT.
PICTURE
MOD E : STD
CONTRAST
BLACK LVL .
COLOR
TINT
SHARP
OTHER
EX IT
USE:
END: MENU
2,3,4,5
3D Y/C LVL.:3
USE:
END: MENU
5 Utilisez les touches 2/3 pour choisir une valeur
comprise entre 1 et 5, selon le cas.
Si une valeur est adoptée en lieu et place de “3”, elle
est sauvegardée grâce au mode USER (page 30).
Après sélection, appuyez sur la touche SET/SELECT
pour valider votre choix.
6 Appuyez sur la touche MENU pour abandonner la
page de menu lorsque la mise en oeuvre est
terminée.
Remarques
÷ La valeur “3” est choisie lors des réglages effectués en usine.
÷ Modifier la valeur de 3D Y/C LEVEL n’est possible que si
l’entrée INPUT1 est utilisée et reçoit un signal vidéo
composite.
32
<ARE1349> Fr
Page 97

○○○○○○○○○○○○○○○○○○○○○○○○○○○○○○○○○○○○○○○○○○○○○○○○○○○○○○○○○○○○○○
○○○○○○○○○○○○○○○○○○○○○○○○○○○○○○○○○○○○○○○○○○○○○○○○○○○○○○○○○○○○○○○○○○○○○○○○○○○○○○○○○○○
○○○○○○○○○○○○○○○○○○○
Réduction du bruit numérique dans
3 Utilisez les touches 5/∞ pour choisir l’option
OTHER puis appuyez sur la touche SET/SELECT.
l’image vidéo (3D NR LEVEL)
AJUSTEMENT DU PANNEAU D’AFFICHAGE
Vous pouvez réduire le bruit vidéo présent dans les
signaux S-vidéo de luminance et de chrominance de
l’image provenant de la prise INPUT1 S-VIDEO.
÷ Ce paramètre peut prendre 5 valeurs; la valeur “1”
correspond à une faible réduction du bruit, la valeur “5”
à une forte réduction.
PICTURE
OTHER
3D Y/C
3D NR
COLOR
FILM
HIGH
EX IT
LEVEL : 3
LEVEL :1
T
EMP : S T D
M
DE : O
O
NTRAST
C
O
USE:
:
FF
OF
F
END: MENU
FRANÇAIS
1,6
2,3,4,5
CH
TV/SAT/DTV/DVD
EDIT/
LEARN
SOURCE SAT/DTV
POWER
%
DVD
TOP MENU
MENU
1 7 3 ¡
84
CU-PDP008
PLASMA DISPLAY REMOTE CONTROL UNIT
MUTING
RECEIVER
MENU
%
SET/
SELECT
%
FAVORITES
VCR REC
%
VOL
GUIDE
(SAT)/DTV
INFO
¢
Î
2,3,4,5
1 Appuyez sur la touche MENU pour afficher la page
de menu.
La page de menu s’affiche.
2 Utilisez les touches 5/∞ pour choisir l’option
PICTURE puis appuyez sur la touche SET/SELECT.
PICTURE
MOD E : STD
CONTRAST
BLACK LVL .
COLOR
TINT
SHARP
OTHER
EX IT
USE:
END: MENU
4 Utilisez les touches 5/∞ pour choisir l’option 3D
NR LEVEL puis appuyez sur la touche
SET/SELECT.
3D NR LEVEL : 1
USE:
END: MENU
5 Utilisez les touches 2/3 pour choisir une valeur
comprise entre 1 et 5, selon le cas.
Si une valeur est adoptée en lieu et place de “1”, elle
est sauvegardée grâce au mode USER (page 30).
Après sélection, appuyez sur la touche SET/SELECT
pour valider votre choix.
6 Lorsque vous avez terminé les réglages, appuyez
sur la touche MENU pour abandonner la page de
menu.
Remarques
÷ La valeur “1” est choisie lors des réglages effectués en usine.
÷ Modifier la valeur de 3D NR LEVEL n’est possible que si
l’entrée INPUT1 est utilisée et reçoit un signal vidéo
composite.
ANNEAU D’AFFICHAGE
AJUSTEMENT DU P
<ARE1349> Fr
33
Page 98

AJUSTEMENT DU PANNEAU D’AFFICHAGE
○○○○○○○○○○○○○○○○○○○○○○○○○○○○○○○○○○○○○○○○○○○○○○○○○○○○○○○○○○○○○○
○○○○○○○○○○○○○○○○○○○○○○○○○○○○○○○○○○○○○○○○○○○○○○○○○○○○○○○○○○○○○○○○○○○○○○○○○○○○○○○○○○○
○○○○○○○○○○○○○○○○○○○
Réglage de la température de
3 Utilisez les touches 5/∞ pour choisir l’option
OTHER puis appuyez sur la touche SET/SELECT.
couleur de l’image (COLOR TEMP)
FRANÇAIS
Grâce à cette option, vous pouvez choisir une des 5
valeurs de tonalités.
1,6
2,3,4,5
CH
EDIT/
LEARN
SOURCE SAT/DTV
POWER
%
DVD
TOP MENU
MENU
1 7 3 ¡
84
MUTING
RECEIVER
TV/SAT/DTV/DVD
MENU
%
SET/
SELECT
%
FAVORITES
VCR REC
%
VOL
GUIDE
(SAT)/DTV
INFO
¢
2,3,4,5
4 Utilisez les touches 5/∞ pour choisir l’option
COLOR TEMP puis appuyez sur la touche
SET/SELECT.
PICTURE
OTHER
3D Y/C
3D NR
COLOR
FILM
HIGH
EX IT
LEVEL : 3
LEVEL : 1
T
EMP : S T D
M
DE : O
O
NTRAST
C
O
USE:
:
FF
OF
F
END: MENU
CU-PDP008
PLASMA DISPLAY REMOTE CONTROL UNIT
Î
1 Appuyez sur la touche MENU pour afficher la page
de menu.
La page de menu s’affiche.
2 Utilisez les touches 5/∞ pour choisir l’option
PICTURE puis appuyez sur la touche SET/SELECT.
PICTURE
MOD E : STD
ANNEAU D’AFFICHAGE
AJUSTEMENT DU P
CONTRAST
BLACK LVL .
COLOR
TINT
SHARP
OTHER
EX IT
USE:
END: MENU
STDPC.TEM
:
USE:
END: MENU
5 Utilisez les touches 2/3 pour choisir la valeur de
COLOR TEMP.
Choisissez la température de couleur qui vous plaît et
qui convient compte tenu de l’environnement.
÷ NEWS: Les couleurs sont plus froides qu’avec LIVE.
÷ LIVE: Les couleurs sont froides.
÷ STD: Les couleurs sont normales.
÷ FILM: Causes the colors displayed to appear in
warmer hues.
÷ B&W: Les couleurs sont plus chaudes qu’avec
FILM.
Si une valeur est adoptée en lieu et place de “STD”,
elle est sauvegardée grâce au mode USER (page 30).
Après sélection, appuyez sur la touche SET/SELECT
pour valider votre choix.
6 Lorsque vous avez terminé les réglages, appuyez
sur la touche MENU pour abandonner la page de
menu.
34
Remarque
La valeur “3” est choisie lors des réglages effectués en usine.
<ARE1349> Fr
Page 99

○○○○○○○○○○○○○○○○○○○○○○○○○○○○○○○○○○○○○○○○○○○○○○○○○○○○○○○○○○○○○○
AJUSTEMENT DU PANNEAU D’AFFICHAGE
○○○○○○○○○○○○○○○○○○○○○○○○○○○○○○○○○○○○○○○○○○○○○○○○○○○○○○○○○○○○○○○○○○○○○○○○○○○○○○○○○○○
○○○○○○○○○○○○○○○○○○○
Utilisation de FILM MODE
3 Utilisez les touches 5/∞ pour choisir l’option
OTHER puis appuyez sur la touche SET/SELECT.
La fonction FILM MODE détecte automatiquement les
films tournés à raison de 24 images par seconde et
convertit ces images en signaux vidéo de haute qualité
qui permettent de reproduire les images à la même
cadence que celle du film.
÷ En principe, la valeur doit être “HQ” (Haute Qualité);
toutefois, ce réglage peut provoquer quelques écarts
de synchronisation avec la piste son. Dans ce cas,
utilisez la valeur “STD” (Standard). Avec la valeur
“OFF”, le traitement progressif du signal a lieu.
1,6
2,3,4,5
CH
TV/SAT/DTV/DVD
EDIT/
LEARN
SOURCE SAT/DTV
POWER
%
DVD
TOP MENU
MENU
FAVORITES
1 7 3 ¡
84
CU-PDP008
PLASMA DISPLAY REMOTE CONTROL UNIT
MUTING
RECEIVER
MENU
%
SET/
SELECT
%
VCR REC
%
VOL
GUIDE
(SAT)/DTV
INFO
¢
Î
2,3,4,5
PICTURE
OTHER
3D Y/C
3D NR
COLOR
FILM
HIGH
EX IT
LEVEL : 3
LEVEL : 1
T
EMP : S T D
M
DE : O
O
NTRAST
C
O
USE:
:
FF
OF
F
END: MENU
4 Utilisez les touches 5/∞ pour choisir l’option FILM
MODE puis appuyez sur la touche SET/SELECT.
F.MODE:HQ S TD OF F
USE:
END: MENU
5 Utilisez les touches 2/3 pour choisir la valeur de
FILM MODE.
Si une valeur est adoptée en lieu et place de “OFF”,
elle est sauvegardée grâce au mode USER (page 30).
Après sélection, appuyez sur la touche SET/SELECT
pour valider votre choix.
FRANÇAIS
1 Appuyez sur la touche MENU pour afficher la page
de menu.
La page de menu s’affiche.
2 Utilisez les touches 5/∞ pour choisir l’option
PICTURE puis appuyez sur la touche SET/SELECT.
PICTURE
MOD E : STD
CONTRAST
BLACK LVL .
COLOR
TINT
SHARP
OTHER
EX IT
USE:
END: MENU
6 Lorsque vous avez terminé les réglages, appuyez
sur la touche MENU pour abandonner la page de
menu.
Remarques
÷ La valeur “OFF” est choisie lors des réglages effectués en
usine.
÷ La fonction FILM MODE n’agit qu’avec un signal NTSC, 480i.
ANNEAU D’AFFICHAGE
AJUSTEMENT DU P
<ARE1349> Fr
35
Page 100

AJUSTEMENT DU PANNEAU D’AFFICHAGE
○○○○○○○○○○○○○○○○○○○○○○○○○○○○○○○○○○○○○○○○○○○○○○○○○○○○○○○○○○○○○○
○○○○○○○○○○○○○○○○○○○○○○○○○○○○○○○○○○○○○○○○○○○○○○○○○○○○○○○○○○○○○○○○○○○○○○○○○○○○○○○○○○○
○○○○○○○○○○○○○○○○○○○
Utilisation en ambiance lumineuse
3 Utilisez les touches 5/∞ pour choisir l’option
OTHER puis appuyez sur la touche SET/SELECT.
(HIGH CONTRAST)
FRANÇAIS
Pour obtenir une image vidéo très claire, choisissez la
valeur “ON” pour cette option quand l’écran est placé
dans une ambiance très lumineuse.
÷ Choisissez la valeur “OFF” si l’écran n’est pas placé
dans une salle brillamment éclairée.
1,6
2,3,4,5
CH
TV/SAT/DTV/DVD
EDIT/
LEARN
SOURCE SAT/DTV
POWER
%
DVD
TOP MENU
MENU
FAVORITES
1 7 3 ¡
84
MUTING
RECEIVER
MENU
%
SET/
SELECT
%
VCR REC
%
VOL
GUIDE
(SAT)/DTV
INFO
¢
4 Utilisez les touches 5/∞ pour choisir l’option
HIGH CONTRAST puis appuyez sur la touche
SET/SELECT.
2,3,4,5
PICTURE
OTHER
3D Y/C
3D NR
COLOR
FILM
HIGH
EX IT
HIGH CONT.:ON OFF
LEVEL : 3
LEVEL : 1
T
EMP : S T D
M
DE : O
O
NTRAST
C
O
USE:
USE:
:
FF
OF
F
END: MENU
END: MENU
CU-PDP008
PLASMA DISPLAY REMOTE CONTROL UNIT
Î
1 Appuyez sur la touche MENU pour afficher la page
de menu.
La page de menu s’affiche.
2 Utilisez les touches 5/∞ pour choisir l’option
PICTURE puis appuyez sur la touche SET/SELECT.
ANNEAU D’AFFICHAGE
AJUSTEMENT DU P
PICTURE
MOD E : STD
CONTRAST
BLACK LVL .
COLOR
TINT
SHARP
OTHER
EX IT
USE:
END: MENU
5 Utilisez les touches 2/3 pour choisir la valeur de
HIGH CONTRAST.
Des images d’ajustement séparées peuvent être
mémorisées quand “HIGH CONTRAST” est réglé sur
“ON” et sur “OFF”.
Après sélection, appuyez sur la touche SET/SELECT
pour valider votre choix.
6 Lorsque vous avez terminé les réglages, appuyez
sur la touche MENU pour abandonner la page de
menu.
Remarques
÷ La valeur “OFF” est choisie lors des réglages effectués en
usine.
÷ MOVIE et GAME sont indisponibles quand la valeur de HIGH
CONTRAST est “ON”.
36
<ARE1349> Fr
 Loading...