


PLASMA DISPLAY SYSTEM
SYSTEME D’ÉCRAN PLASMA
SISTEMA DE PANTALLA DE PLASMA
PDP-5050HD
PDP-4350HD
PDP-5045HD
PDP-4345HD
Register Your Product on
www.pioneerelectronics.com
Operating Instructions
Mode d’emploi
Manual de instrucciones

11)
1)
Read these instructions.
2)
Keep these instructions.
3)
Heed all warnings.
4)
Follow all instructions.
5)
Do not use this apparatus near water.
6)
Clean only with dry cloth.
7)
Do not block any ventilation openings. Install in
accordance with the manufacturer’s instructions.
8)
Do not install near any heat sources such as
radiators, heat registers, stoves, or other apparatus
(including amplifiers) that produce heat.
9)
Do not defeat the safety purpose of the polarized or
grounding-type plug. A polarized plug has two
blades with one wider than the other. A grounding
type plug has two blades and a third grounding
prong. The wide blade or the third prong are
provided for your safety. If the provided plug does
not fit into your outlet, consult an electrician for
replacement of the obsolete outlet.
10)
Protect the power cord from being walked on or
pinched particularly at plugs, convenience
receptacles, and the point where they exit from the
apparatus.
Only use attachments/accessories specified by the
manufacturer.
12)
Use only with the cart, stand, tripod, bracket, or
table specified by the manufacturer, or sold with the
apparatus. When a cart is used, use caution when
moving the cart/apparatus combination to avoid
injury from tip-over.
13)
Unplug this apparatus during lightning storms or
when unused for long periods of time.
14)
Refer all servicing to qualified service personnel.
Servicing is required when the apparatus has been
damaged in any way, such as power-supply cord or
plug is damaged, liquid has been spilled or objects
have fallen into the apparatus, the apparatus has
been exposed to rain or moisture, does not operate
normally, or has been dropped.
Note to CATV system installer.
This reminder is provided to call the CATV system installer’s attention to Article 820-40 of the NEC that provides
guidelines for proper grounding and, in particular, specifies that the cable ground–shall be connected to the
grounding system of the building, as close to the point of cable entry as practical.

WARNING: THE APPARATUS IS NOT WATER-
PROOFS, TO PREVENT FIRE OR SHOCK HAZARD, DO
NOT EXPOSE THIS APPLIANCE TO RAIN OR MOISTURE
AND DO NOT PUT ANY WATER SOURCE NEAR THIS
APPARATUS, SUCH AS VASE, FLOWER POT, COSMETICS CONTAINER AND MEDICINE BOTTLE ETC.
WARNING: Handling the cord on this product or
cords associated with accessories sold with the product will expose you to lead, a chemical known to the
State of California and other governmental entities to
cause cancer and birth defects or other reproductive
harm. Wash hands after handling.
NOTE: This equipment has been tested and found to
comply with the limits for a class B digital device, pursuant to Part 15 of the FCC Rules. These limits are designed to provide reasonable protection against harmful
interference in a residential installation. This equipment
generates, uses, and can radiate radio frequency energy
and, if not installed and used in accordance with the
instructions, may cause harmful interference to radio
communications. However, there is no guarantee that
interference will not occur in a particular installation. If
this equipment does cause harmful interference to radio
or television reception, which can be determined by turning the equipment off and on, the user is encouraged to
try to correct the interference by one or more of the following measures:
— Reorient or relocate the receiving antenna.
— Increase the separation between the equipment and
receiver.
— Connect the equipment into an outlet on a circuit
different from that to which the receiver is connected.
— Consult the dealer or an experienced radio/TV tech-
nician for help.
CAUTION:
This product satisfies FCC regulations when shielded
cables and connectors are used to connect the unit to
other equipment. To prevent electromagnetic interference with electric appliances such as radios and televisions, use shielded cables and connectors for connections.
FEDERAL COMMUNICATIONS COMMISSION
DECLARATION OF CONFORMITY
This device complies with part 15 of the FCC Rules. Operation is subject to the following two conditions: (1) This
device may not cause harmful interference, and (2) this
device must accept any interference received, including
interference that may cause undesired operation.
Product Name: Plasma Display System
(Plasma Display)
(Media Receiver)
Model Number: PDP-5050HD PDP-4350HD
(PDP-505PU) (PDP-435PU)
(PDP-AR05U) (PDP-AR05U)
PDP-5045HD PDP-4345HD
(PDP-504PU) (PDP-434PU)
(PDP-R05U) (PDP-R05U)
Product Category: Class B Personal Computers & Peripherals
Responsible Party Name: PIONEER ELECTRONICS
(USA), INC., Customer Support Div.
Address: P.O. BOX 1760, LONG BEACH, CA., 90801-1760
U.S.A.
Phone: (800) 421-1625
For Business Customer URL
http://www.PioneerUSA.com
English
Information to User
Alteration or modifications carried out without appropriate authorization may invalidate the user’s right to
operate the equipment.
[For Canadian model]
This Class B digital apparatus complies with Canadian
ICES-003.
IMPORTANT NOTICE: The serial number for this
equipment is located on the rear panel. Please write this
serial number on your enclosed warranty card and keep
it in a secure area. This is for your security.
WARNING: Be sure to plug this equipment into a
grounding-type AC outlet.

Contents
Thank you for buying this Pioneer product.
Please read through these operating instructions so you will know how to operate your model properly. After you have finished
reading the instructions, put them away in a safe place for future reference.
In some countries or regions, the shape of the power plug and power outlet may sometimes differ from that shown in the explanatory drawings. However the method of connecting and operating the unit is the same.
01 Important User Guidance Information
02 Safety Precautions
03 Operational Precautions
04 Supplied Accessories
Plasma Display ................................................................... 11
Media Receiver .................................................................... 11
05 Part Names
Plasma Display ................................................................... 12
Media Receiver .................................................................... 12
Remote control unit ............................................................ 14
06 Preparation
Installing the Plasma Display ............................................ 15
Installing the Media Receiver ............................................ 16
Installing the Media Receiver vertically ...................... 16
Connecting the system cable ............................................ 18
Routing cables .................................................................... 19
Preparing the remote control unit ..................................... 20
Inserting batteries ......................................................... 20
Cautions regarding batteries ....................................... 20
Allowed operation range of the remote
control unit .................................................................... 20
Cautions regarding the remote control unit .............. 20
Cable connections for watching digital and/or
conventional TV channels .................................................. 21
Connecting VHF/UHF antennas and a Cable
Converter ....................................................................... 21
Cable connections for watching digital
TV channels over air (VHF/UHF) ........................................ 21
Connecting VHF/UHF antennas .................................. 21
Switching between antenna A and B ............................... 22
Inserting the cable card ..................................................... 22
Connecting the power cord ............................................... 23
07 Basic Operations
Turning on the power (Standby) ........................................ 24
Turning off the power (Standby) ........................................ 24
Watching TV channels........................................................ 25
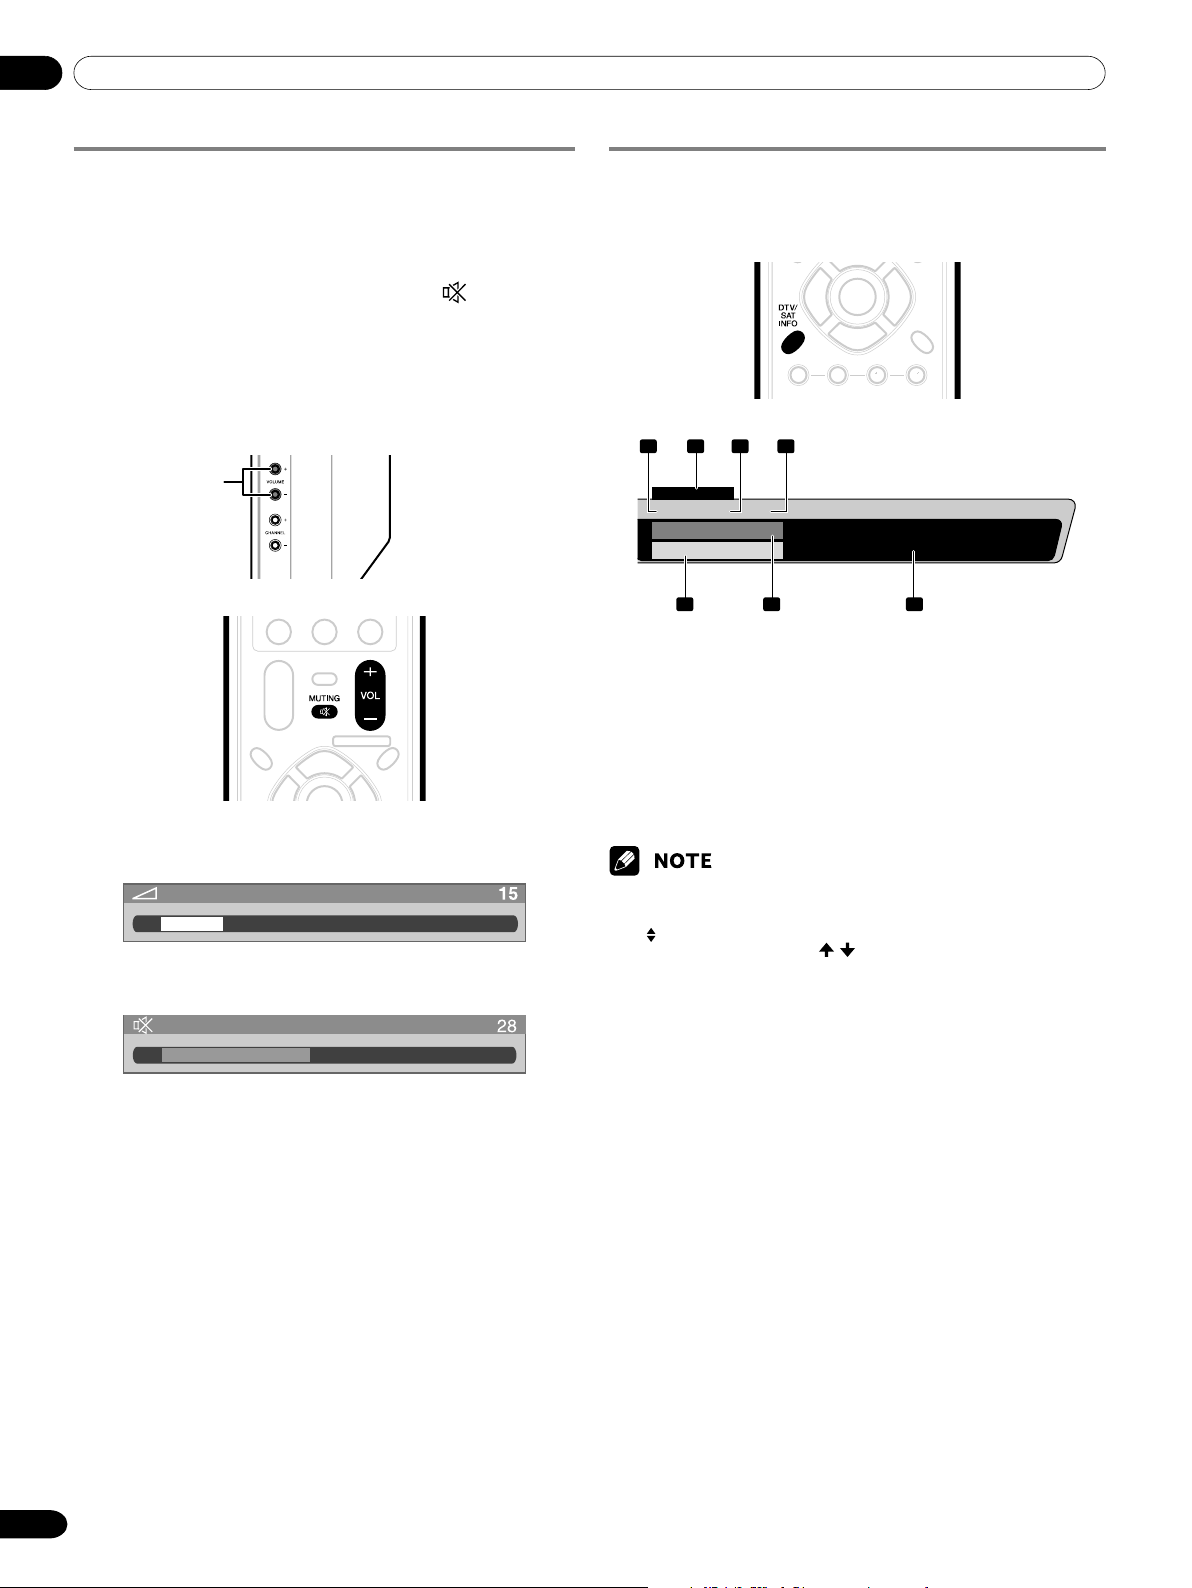
Selecting the antenna .................................................. 25
Changing channels ...................................................... 25
Changing the volume and sound ................................ 26
Viewing a channel banner ........................................... 26
Using the POD service ................................................. 27
Changing the language................................................ 27
Setting MTS/SAP mode ............................................... 27
Using the multiscreen functions ....................................... 28
Splitting the screen ...................................................... 28
Freezing images ............................................................ 29
08 Menu Setup
Menu configuration ............................................................ 30
AV mode menus ............................................................ 30
PC mode menus ........................................................... 30
Menu operations .................................................................30
09 Tuner Setup
Setting up TV channels ...................................................... 31
Using Auto Channel Preset ......................................... 31
Setting for skipping unwanted channels.................... 31
Setting up TV channels manually ............................... 31
Naming TV channels .................................................... 32
Checking signal strength ............................................. 32
Checking the Cable Card ID ........................................ 32
Enabling data acquisition ............................................ 32
Parental Control .................................................................. 33
Changing the password ............................................... 33
Clearing the password ................................................. 34
Activating the Parental Control ................................... 34
Setting the voluntary movie rating system
(MPAA) .......................................................................... 34
Setting the TV ratings ................................................... 35
Setting the TV Parental Guidelines (TV Guidelines) ... 35
Blocking Not Rated TV programs ................................ 35
Canadian rating systems ............................................. 36
Setting Canadian English ratings ............................... 36
Setting Canadian French ratings ................................ 37
Temporarily deactivating the Parental Control ........... 37
Setting your favorite channels ........................................... 37
Setting up closed captions ................................................ 37
Activating the closed caption ...................................... 38
Selecting the type of conventional closed captions .. 38
Selecting digital closed captions ................................ 38
Selecting digital closed caption parameters ............. 38
Clock Setting ....................................................................... 39
4
En

Contents
10 Adjustments and Settings
Sleep Timer .......................................................................... 40
AV Selection ........................................................................ 40
Picture adjustments ........................................................... 41
Pro Adjust ...................................................................... 41
Sound adjustments ............................................................ 42
FOCUS ........................................................................... 43
Front Surround .............................................................. 43
Power Control ...................................................................... 43
Energy Save ................................................................... 43
No Signal off (AV mode only) ....................................... 43
No Operation off (AV mode only)................................. 44
Power Management (PC mode only) .......................... 44
Adjusting image positions (AV mode only) ...................... 44
Adjusting image positions and clock automatically
(PC mode only) .................................................................... 45
Adjusting image positions and clock manually
(PC mode only) .................................................................... 45
Selecting a screen size ....................................................... 46
Changing the brightness at both sides of the screen
(Side Mask) .......................................................................... 47
Language setting ................................................................ 47
11 Timer Presetting
Presetting TV programs using the timer ........................... 48
Priority rules for overlapped presettings ........................... 49
12 Enjoying through External Equipment
Watching a DVD image ...................................................... 50
Connecting a DVD player ............................................. 50
Displaying a DVD image .............................................. 50
Watching a VCR image ...................................................... 50
Connecting a VCR ........................................................ 50
Displaying a VCR image ............................................... 50
Using HDMI Input ............................................................... 51
Connecting HDMI equipment ..................................... 51
Enjoying a game console or watching camcorder
images ................................................................................. 52
Connecting a game console or camcorder ................ 52
Displaying an image of the game console or
camcorder ..................................................................... 52
Recording digital TV programs using a VCR or
DVD recorder ....................................................................... 52
Avoiding unwanted feedback ...................................... 52
Connecting a recorder ................................................. 53
Connecting other audio equipment .................................. 53
Connecting an AV receiver .......................................... 53
Watching a D-VHS image ................................................... 54
What is i.LINK? .............................................................. 54
Which i.LINK devices are connectable? ..................... 54
What can be recorded through i.LINK? ...................... 54
Connecting D-VHS recorders ...................................... 54
When connecting a single D-VHS recorder ............... 54
When connecting two D-VHS recorders..................... 54
Displaying a D-VHS image ................................................. 55
Useful and important notification ............................... 55
Setting up for controlling a D-VHS recorder .............. 56
Editing the i.LINK list .................................................... 56
Setting up for i.LINK standby....................................... 57
Operating the control panel screen ............................ 57
Watching an image from a personal computer ............... 58
Connecting a personal computer ............................... 58
Displaying an image from a personal computer ....... 58
Computer compatibility chart ............................................ 58
Connecting the VCR controller .......................................... 59
The lists of controllable recording
equipment manufactures ............................................ 60
Connecting control cords .................................................. 61
About SR+ .................................................................... 61
13 Useful Remote Control Features
Learning function of the remote control unit ................... 62
Using the learning function ......................................... 62
Presetting manufacture codes .................................... 62
Manufacture codes ...................................................... 63
Using the remote control unit to control other
devices ................................................................................. 64
Receiver control buttons .............................................. 64
Cable control buttons ................................................... 65
SAT control buttons ...................................................... 66
VCR control buttons ..................................................... 67
DVD/DVR control buttons ............................................ 68
14 Appendix
Troubleshooting .................................................................. 69
Specifications ...................................................................... 79
English
En
5

01 Important User Guidance Information
In order to obtain maximum enjoyment from this Pioneer
PureVision PDP-5050HD/PDP-4350HD/PDP-5045HD/PDP4345HD Plasma Display System, please first read this
information carefully.
With the Pioneer PureVision PDP-5050HD/PDP-4350HD/PDP5045HD/PDP-4345HD, you can be assured of a high quality
Plasma Display System with long-life and high reliability. To
achieve images of exceptional quality, this Pioneer Plasma
Display System incorporates state-of-the-art design and
construction, as well as very precise and highly advanced
technology.
Over the course of its lifetime, the luminosity of the Pioneer
PDP-5050HD/PDP-4350HD/PDP-5045HD/PDP-4345HD Plasma
Display System will diminish very slowly, such as with all
phosphor-based screens (for example, a traditional tube-type
television). To enjoy beautiful and bright images on your
Pioneer Plasma Display System for many years to come, please
carefully read and follow the usage guidelines below.
Usage guidelines
All phosphor-based screens (including conventional tube-type
televisions) can be affected by displaying static images for a
prolonged period. Plasma Display Systems are no exception to
this rule. After-image and permanent effects on the screen can
be avoided by taking some basic precautions. By following the
recommendations listed below, you can ensure longer and
satisfactory results from your plasma:
• Whenever possible, avoid frequently displaying the same
image or virtually still moving pictures (e.g. closed-captioned
images or video game images which have static portions).
• Avoid viewing the On Screen Display for extended periods,
from a DVD player, VCR, and all other components.
• Do not leave the same picture freeze-framed or paused
continuously over a long period of time, when using the still
picture mode from a TV, VCR, DVD player or any other
component.
• Images which have both very bright areas and very dark
areas side by side should not be displayed for a prolonged
period of time.
• When playing a game, the “GAME” mode setting within “AV
Selection” is strongly recommended. However, please limit its
use to less than 2 hours at a time.
•After playing a game, or displaying a PC image or any still
image, it is best to view a normal moving picture in the
“WIDE” or “FULL” screen setting for over 3 times longer than
the previous still/moving image.
•After using the Plasma Display System, always switch the
display to “STANDBY” mode.
Installation guidelines
The Pioneer PureVision PDP-5050HD/PDP-4350HD/PDP5045HD/PDP-4345HD Plasma Display System incorporates a
very thin design. To ensure safety, please take the proper
measures to mount or install the Plasma Display, in order to
prevent the unit from tipping over in the event of vibration or
accidental movement.
This product should be installed by using only parts and
accessories designed by PIONEER. Use of accessories other
than the PIONEER stand or installation bracket may result in
instability, and could cause injury. For custom installation,
please consult the dealer where the unit was purchased. To
ensure correct installation, experienced and qualified experts
must install the unit. PIONEER will not be held responsible for
accident or damage caused by the use of parts and accessories
manufactured by other companies.
To avoid malfunction and overheating when installing, make
sure that the vents on the main unit are not blocked. To ensure
proper heat emission:
• Distance the unit slightly from other equipment, walls, etc.
For the minimum space required around the unit, see pages
15 to 16.
• Do not fit the unit inside narrow spaces where ventilation is
poor.
• Do not cover with a cloth, etc.
• Clean the vents on the sides and rear of the unit to remove
dust build-up by using a vacuum cleaner set to its lowest
suction setting.
• Do not place the product on a carpet or blanket.
• Do not leave the product tilted over except the case of vertical
installation of the Media Receiver.
• Do not reverse the product.
Using the unit without proper ventilation may cause the
internal temperature to rise, and could result in possible
malfunction. When the surrounding or internal temperature
exceeds a certain degree, the display will automatically power
off in order to cool the internal electronics and prevent a
hazardous occurrence.
Malfunction can be caused by many factors: inappropriate
installation site, improper assembly/installation/mounting,
improper operation of or modifications made to this product.
However, PIONEER cannot be held responsible for accidents or
malfunction caused by the above.
Typical effects and characteristics of a phosphor-based matrix
display such as permanent residual images upon the
phosphors of the panel and the existence of a minute number
of inactive light cells in the screen are not covered by local
warranties.
6
En
Panel sticking and after-image lag
• Displaying the same images such as still images for a long
time may cause after-image lagging. This may occur in the
following two cases.
1. After-image lagging due to remaining electric
load
When image patterns with very high peak luminance are
displayed more than 1 minute, after-image lagging may occur
due to the remaining electric load. The after-images remaining
on the screen will disappear when moving images are
displayed. The time for the after-images to disappear depends
on the luminance of the still images and the time they had
been displayed.
2. After-image (lag image) due to burning
Avoid displaying the same image on the Plasma Display
continuously over a long period of time. If the same image is
displayed continuously for several hours, or for shorter periods
of time over several days, a permanent after-image may remain
on the screen due to burning of the fluorescent materials. Such
images may become less noticeable if moving images are later
displayed, but they will not disappear completely.
• The Energy save function can be set to help prevent damage
from screen burning (see page 43).
01Important User Guidance Information
English
About operations through i.LINK
PIONEER shall not always assure normal video/audio recording
or playback when a D-VHS is operated through i.LINK.
DO NOT PLACE THIS PRODUCT ON AN UNSTABLE CART,
STAND, TRIPOD, BRACKET, OR TABLE. THE PRODUCT MAY
FALL, CAUSING SERIOUS PERSONAL INJURY AND SERIOUS
DAMAGE TO THE PRODUCT. USE ONLY WITH A CART, STAND,
TRIPOD, BRACKET, OR TABLE RECOMMENDED BY THE
MANUFACTURER, OR SOLD WITH THE PRODUCT. FOLLOW
THE MANUFACTURE’S INSTRUCTIONS WHEN INSTALLING
THE PRODUCT AND USE MOUNTING ACCESSORIES
RECOMMENDED BY THE MANUFACTURER.
A PRODUCT AND CART COMBINATION SHOULD BE MOVED
WITH THE CARE. QUICK STOPS, EXCESSIVE FORCE, AND
UNEVEN SURFACES MAY CAUSE THE PRODUCT AND CART
COMBINATION TO OVERTURN.
En
7

02
Safety Precautions
Electricity is used to perform many useful functions, but it can
also cause personal injuries and property damage if improperly
handled. This product has been engineered and manufactured
with the highest priority on safety. However, improper use can
result in electric shock and/or fire. In order to prevent potential
danger, please observe the following instructions when installing, operating and cleaning the product. To ensure your safety
and prolong the service life of your product, please read the
following precautions carefully before using the product.
1. Read instructions—All operating instructions must be read
and understood before the product is operated.
2. Keep this manual in a safe place—These safety and
operating instructions must be kept in a safe place for
future reference.
3. Observe warnings—All warnings on the product and in the
instructions must be observed closely.
4. Follow instructions—All operating instructions must be
followed.
5. Cleaning—Unplug the power cord from the AC outlet before
cleaning the product. Use a damp cloth to clean the
product. Do not use liquid cleaners or aerosol cleaners.
6. Attachments—Do not use attachments not recommended
by the manufacturer. Use of inadequate attachments can
result in accidents.
7. Water and moisture—Do not use the product near water,
such as bathtub, washbasin, kitchen sink and laundry tub,
swimming pool and in a wet basement.
8. Stand—Do not place the product on an unstable cart,
stand, tripod or table. Placing the product on an unstable
base can cause the product to fall, resulting in serious
personal injuries as well as damage to the product. Use
only a cart, stand, tripod, bracket or table recommended by
the manufacturer or sold with the product. When mounting
the product on a wall, be sure to follow the manufacturer’s
instructions. Use only the mounting hardware
recommended by the manufacturer.
9. When relocating the product placed on a cart, it must be
moved with utmost care. Sudden stops, excessive force and
uneven floor surface can cause the product to fall from the
cart.
10. Ventilation—The vents and other openings in the cabinet
are designed for ventilation. Do not cover or block these
vents and openings since insufficient ventilation can cause
overheating and/or shorten the life of the product. Do not
place the product on a bed, sofa, rug or other similar
surface, since they can block ventilation openings. This
product is not designed for built-in installation; do not place
the product in an enclosed place such as a bookcase or
rack, unless proper ventilation is provided or the
manufacturer’s instructions are followed.
11. Power source—This product must operate on a power
source specified on the specification label. If you are not
sure of the type of power supply used in your home, consult
your dealer or local power company.
12. Power cord protection—The power cords must be routed
properly to prevent people from stepping on them or objects
from resting on them. Check the cords at the plugs and
product.
13. The plasma Display used in this product is made of glass.
Therefore, it can break when the product is dropped or
applied with impact. Be careful not to be injured by broken
glass pieces in case the plasma Display breaks.
14. Overloading—Do not overload AC outlets or extension
cords. Overloading can cause fire or electric shock.
15. Entering of objects and liquids—Never insert an object into
the product through vents or openings. High voltage flows
in the product, and inserting an object can cause electric
shock and/or short internal parts. For the same reason, do
not spill water or liquid on the product.
16. Servicing—Do not attempt to service the product yourself.
Removing covers can expose you to high voltage and other
dangerous conditions. Request a qualified service person to
perform servicing.
17. Repair—If any of the following conditions occurs, unplug
the power cord from the AC outlet, and request a qualified
service person to perform repairs.
a. When the power cord or plug is damaged.
b. When a liquid was spilled on the product or when
objects have fallen into the product.
c. When the product has been exposed to rain or water.
d. When the product does not operate properly as de-
scribed in the operating instructions.
Do not touch the controls other than those described in
the operating instructions. Improper adjustment of
controls not described in the instructions can cause
damage, which often requires extensive adjustment work
by a qualified technician.
e. When the product has been dropped or damaged.
f. When the product displays an abnormal condition. Any
noticeable abnormality in the product indicates that the
product needs servicing.
18. Replacement parts—In case the product needs replacement parts, make sure that the service person uses
replacement parts specified by the manufacturer, or those
with the same characteristics and performance as the
original parts. Use of unauthorized parts can result in fire,
electric shock and/or other danger.
19. Safety checks—Upon completion of service or repair work,
request the service technician to perform safety checks to
ensure that the product is in proper operating condition.
20. Wall or ceiling mounting—When mounting the product on
a wall or ceiling, be sure to install the product according to
the method recommended by the manufacturer.
21. Heat sources—Keep the product away from heat sources
such as radiators, heaters, stoves and other heat- generating products (including amplifiers).
22. Unplug the power cord from the AC outlet before installing
the speakers.
23. Never expose the screen of the Plasma Display to a strong
impact, for example, by hitting it. The screen may be
broken, resulting in fire or personal injury.
24. Do not expose the Plasma Display to direct sunlight for a
long period of time. The optical characteristics of the front
protection panel changes, resulting in discoloration or
warp.
25. The Plasma Display weighs about 32.8 kg (72.3 lbs.) for the
PDP-505PU, about 38 kg (83.8 lbs.) for the PDP-504PU,
about 26.8 kg (59.1 lbs.) for the PDP-435PU and about 30.5
kg (67.3 lbs.) for the PDP-434PU. Because it has small
depth and is unstable, unpack, carry, and install the
product with one more person at least and use the handles.
8
En

Safety Precautions
Installation Precautions
Observe the following precautions when installing with any items such as the optional stand.
When using the optional stand, brackets, or equivalent items
• Ask your dealer to perform the installation.
• Be sure to use the supplied bolts.
•For details, see the instruction manual that comes with the optional stand (or equivalent items).
When using other items
• Consult your dealer.
• The following six mounting holes can be used for the installation:
02
English
Rear view
Mounting hole Mounting hole
Median line
Illustration shows PDP-5045HD/4345HD.
• Be sure to use four or more mounting holes symmetrical to the vertical and horizontal median lines.
• Use M8 screws, which go 12 to 18 mm (0.5 to 0.7 inches) in depth from the mounting surface of the Plasma Display. See the side
view above.
• Be careful not to block the ventilation opening at the rear of the Plasma Display.
• Be sure to install the Plasma Display on a flat surface because it contains glass.
• The screw holes other than the above are to be used only for the specified products. Never use them for mounting non-specified
products.
• Do not mount or remove the Plasma Display to or from the stand, with speakers attached.
Median line
Side view
Plasma
Display
Mounting surface
Mounting
bracket (or
equivalent item)
M8 screw
12 to 18 mm
(0.5 to 0.7 inches)
• It is strongly recommended to use the optional PIONEER mounting products.
• PIONEER shall not be liable for any personal injury or product damage that results from the use of mounting items other than the
optional PIONEER products.
9
En

03
Operational Precautions
PIONEER bears no responsibility for any damages arising from
incorrect use of the product by you or other people,
malfunctions when in use, other product related problems, and
use of the product except in cases where the company must be
liable.
Plasma Display protection function
When still images (such as photos and computer images) stay
on the screen for an extended period of time, the screen will be
slightly dimmed. This is because the protection function of the
Plasma Display automatically adjusts the brightness to protect
the screen when detecting still images; so this does not
designate malfunction. The screen is dimmed when a still
image is detected for about three minutes.
Infrared rays
The Plasma Display releases infrared rays because of its
characteristics. Depending on how the Plasma Display is in
use, the remote controls of nearby equipment may be adversely
affected or wireless headphones using infrared rays are
interfered by noise. If this is the case, place that equipment at a
location where its remote control sensor is not affected.
Radio interference
While this product meets the required specifications, it emits a
small amount of noise. If you place such equipment as an AM
radio, personal computer, and VCR close to this product, that
equipment may be interfered. If this happens, place that
equipment far enough from this product.
Fan motor noise
When ambient temperature of the Media Receiver becomes
high, the rotation speed of the cooling fan motor increases.
This may make you feel that the fan motor is noisy at such an
occasion.
The fan motor keeps running until the power cord of the Media
Receiver is removed from a wall outlet.
Do not attach such items as labels and tape to the
product.
• This may result in the discoloration or scratch of the cabinet.
When not using the product for a long period of time
• If you do not use the product for a long period of time, the
functions of the product may be adversely affected. Switch on
and run the product occasionally.
Condensation
• Condensation may take place on the surface or inside of the
product when the product is rapidly moved from a cold place
to a warm place or just after a heater is switched on in winter
morning, for example. When condensation takes place, do
not switch on the product and wait until condensation
disappears. Using the product with condensation may result
in malfunction.
Cleaning the screen
• When cleaning the screen of this product, gently wipe it with
a soft dry cloth; the supplied cleaning cloth or other similar
cloths (e.g., cotton and flannel). If you use a hard cloth or rub
the screen hard, the surface of the screen will be scratched.
• If you clean the surface of the screen with a wet cloth, water
droplets on the surface may enter into the product, resulting
in malfunction.
Cleaning the cabinet
• When cleaning the cabinet of this product, gently wipe it with
a soft dry cloth; the supplied cleaning cloth or other similar
cloths (e.g., cotton and flannel). If you use a hard cloth or rub
the cabinet hard, the surface of the cabinet will be scratched.
• The cabinet of this product is mostly composed of plastic. Do
not use chemicals such as benzine or thinner to clean the
cabinet. Using these chemicals may result in quality
deterioration or coating removal.
• Do not expose the product to volatile gas or fluid such as
pesticide. Do not make the product contact with rubber or
vinyl products for a long period of time. The effect of
plasticizer in the plastic may result in quality deterioration or
coating removal.
• If you clean the surface of the cabinet with a wet cloth, water
droplets on the surface may enter into the product, resulting
in malfunction.
Handles at the rear of the Plasma Display
• Do not remove the handles from the rear of the Plasma
Display.
• When moving the Plasma Display, ask another person for
help and use the handles attached to the rear of the Plasma
Display. Do not move the Plasma Display by holding only a
single handle. Use the handles as shown.
• Do not use the handles to hang the product when installing
or carrying the product, for example. Do not use the handles
for the purpose of preventing the product from tilting over.
10
En
Supplied Accessories
04
Plasma Display
Power cord (2 m/6.6 feet)
Bead band × 3
Media Receiver
Cleaning cloth Speed clamp × 3
Speaker cushion × 3
Warranty card
(For PDP-5045HD/4345HD only)
(Use when installing the optional speakers at
the bottom of the Plasma Display.)
English
Power cord (2 m/6.6 feet)
AA size battery × 2
(Alkaline battery)
Screw hole cap × 4
• Always use the power cord supplied with the Plasma Display and the
one supplied with the Media Receiver for each respective unit.
VCR controller
(1.8 m/5.9 feet)
Remote control unit System cable (3 m/9.8 feet)
Stand
Operating Instructions
Screw × 4
(for stand)
Instruction guide
11
En
05 Part Names
Plasma Display
Illustrations show PDP-5045HD/4345HD.
Front view
Rear view
(right view)
4
1 POWER button
2 STANDBY indicator
5
3 POWER ON indicator
6
4 Remote control sensor
5STANDBY/ON button
7
6 INPUT button
7 VOLUME +/– buttons
8
8 CHANNEL +/– buttons
9 SYSTEM CABLE terminal (BLACK)
10 SYSTEM CABLE terminal (WHITE)
11 SPEAKER (right/left) terminals
12 AC INLET terminal
9
10
Media Receiver
Front view
POWER
1
ON STANDBY
2
REC
TIMER
ACQUISITION
3 4 5
DATA
The terminals have faced downward.
Pull this section to open the door.
PCINPUT 4
COMPONENT VIDEO
B/PBCR/PR
Y
6 7
-
VIDEO VIDEO AUDIO
S
AUDIO
ANALOG RGB
(
)
STEREO
LRC
8 9 10 11
11
12
1 POWER button
2 POWER ON indicator
3 STANDBY indicator
4 REC TIMER indicator
5 DATA ACQUISITION indicator
6 INPUT 4 terminals
(COMPONENT VIDEO: Y, C
B/PB, CR/PR)
7 INPUT 4 terminal (S-VIDEO)
8 INPUT 4 terminal (VIDEO)
9 INPUT 4 terminals (AUDIO)
10 PC INPUT terminal (AUDIO)
11 PC INPUT terminal (ANALOG RGB)
12
En
Rear view
1 2 3 4 5 6 7 9 10 11 13
IN OUT
CONTROL
SERVICE ONLY
ANTENNA B
VCR CONTROL
IN
OUT
MONITOR OUT
S-VIDEO
S-VIDEO
ANTENNA/
CABLE A IN
INPUT 2
VIDEO
VIDEO
INPUT 2
R-AUDIO-L
R-AUDIO-L
Cable
Cable
CARD
CARD
(TS)
VIDEO
S-VIDEO
S400
R-AUDIO-L
R-AUDIO-L
INPUT 1
INPUT 3
INPUT 3
DIGITAL OUT
OPTICAL
INPUT 1
COMPONENT VIDEO
CB/P
B
B/PB
YYC
CR/P
CR/P
R
R
128
INPUT 1 INPUT 3
HDMI
AC IN
BLACK
WHITE
SYSTEM CABLE
05Part Names
English
14
15 16 17 18 19 20 21 22 23
1 CONTROL IN terminal
2 CONTROL OUT terminal
3 VCR CONTROL terminal
4 ANTENNA B IN terminal
5 ANTENNA/CABLE A IN terminal
6 INPUT 2 terminal (VIDEO)
7 INPUT 2 terminals (AUDIO)
8 i.LINK terminals
9 Cable CARD slot
10 INPUT 1 terminals (AUDIO)
11 DIGITAL OUT terminal (OPTICAL)
12 INPUT 1 terminals
(COMPONENT VIDEO: Y, C
B/PB, CR/PR)
13 AC IN terminal
25 2624
14 RS-232C terminal (used for factory setup)
15 ANTENNA B OUT terminal
16 INPUT 2 terminal (S-VIDEO)
17 MONITOR OUT terminal (S-VIDEO)
18 MONITOR OUT terminal (VIDEO)
19 MONITOR OUT terminals (AUDIO)
20 INPUT 1 terminal (VIDEO)
21 INPUT 1 terminal (S-VIDEO)
22 INPUT 3 terminals (AUDIO)
23 INPUT 3 terminals
(COMPONENT VIDEO: Y, C
B/PB, CR/PR)
24 HDMI terminals (INPUT1/INPUT3)
25 SYSTEM CABLE terminal (WHITE)
26 SYSTEM CABLE terminal (BLACK)
13
En
05 Part Names
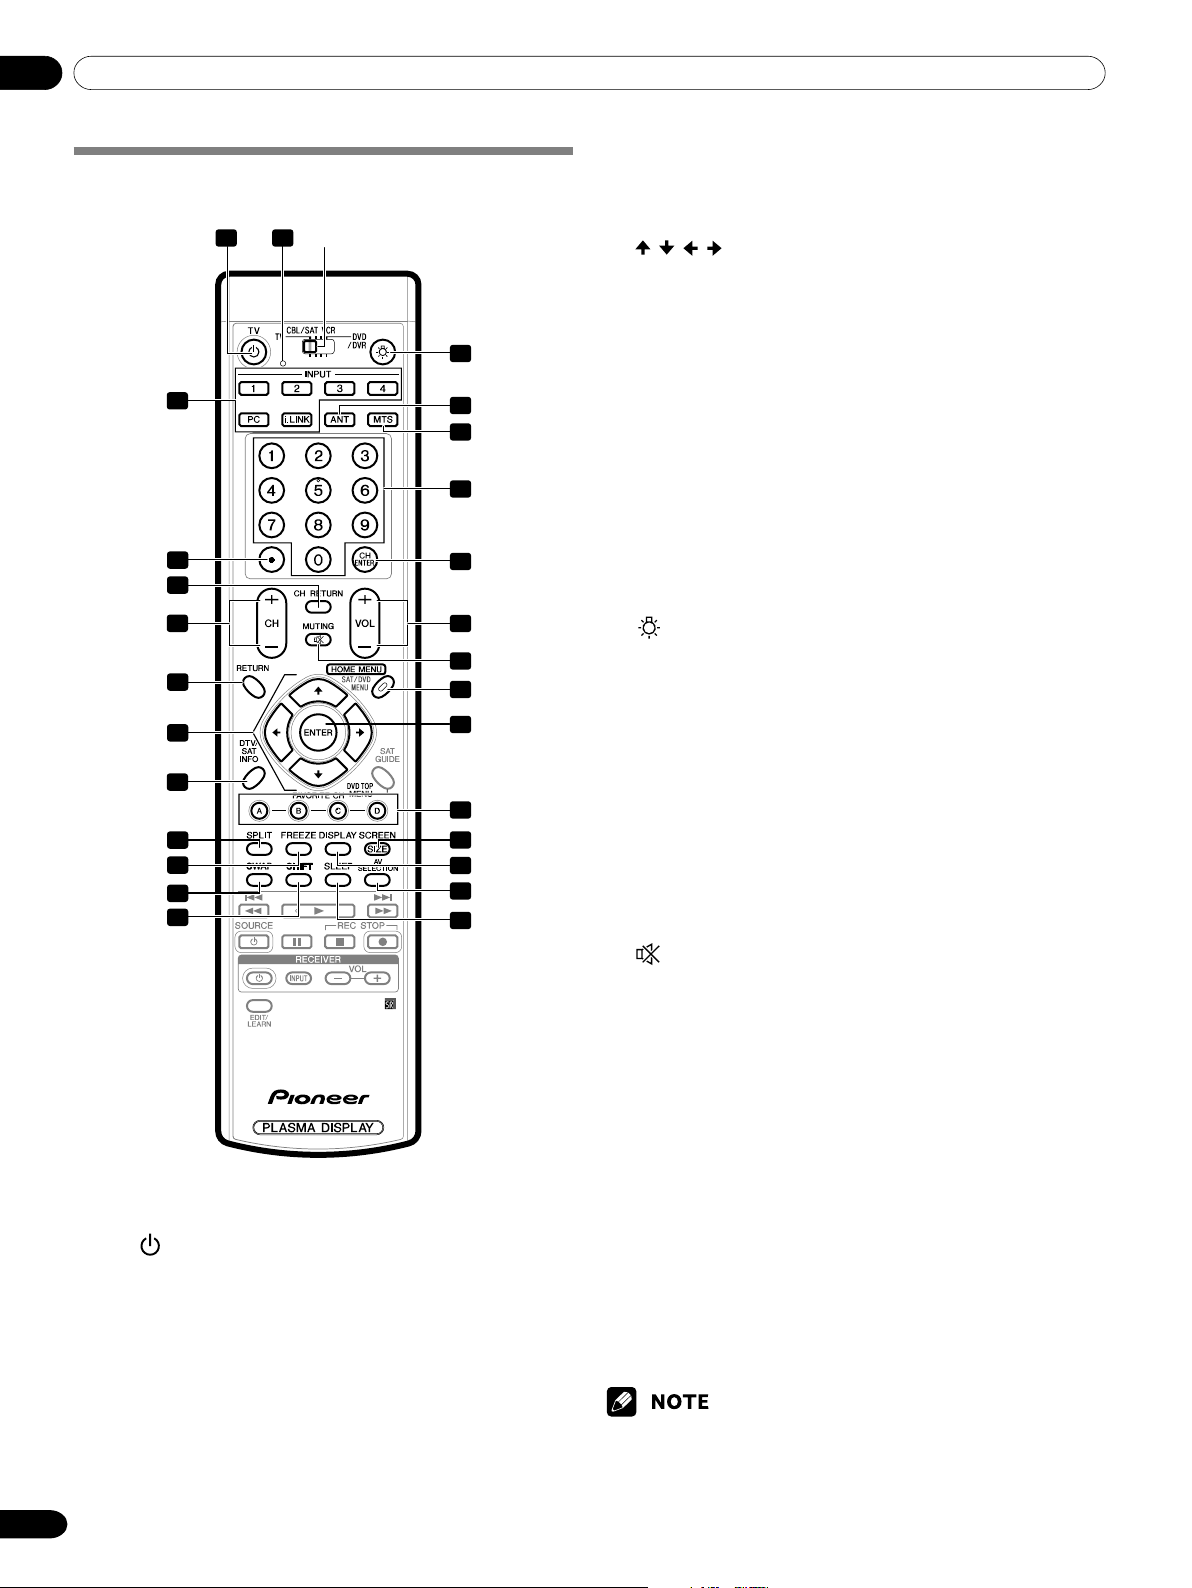
Remote control unit
Mode switch (with
1 2
3
4
5
6
7
8
9
10
11
12
13
With the mode switch set to TV
1 TV : Turns on the power to the Plasma
Display or places it into standby mode.
2 Transmission confirmation LED
3 INPUT: Selects an input source of the Plasma
Display. (INPUT 1, INPUT 2, INPUT 3, INPUT 4,
PC, i.LINK)
4 •(dot): Enters a dot.
5 CH RETURN: Returns to the previous chan-
nel.
“TV” selected)
14
15
16
17
18
19
20
21
22
23
24
25
26
27
6 CH +/–: Selects the channel.
7 RETURN: Returns to the previous menu
screen.
/ / / : Selects a desired item on the menu
8
screen.
9 DTV INFO: Shows more information on DTV
programs.
10 SPLIT: Switches the screen mode among 2-
screen, picture-in-picture, and single-screen.
11 FREEZE: Freezes a frame from a moving
image. Press again to cancel the function.
12 SWAP: Switches between the two screens
when in the 2-screen or picture-in-picture
mode.
13 SHIFT: Moves the location of the small screen
when in the picture-in-picture mode.
14
:When pressed, all buttons on the remote
control unit will light. The lighting will turn
off if no operations are performed within
about 5 seconds. This button is used for
performing operations in dark places.
15 ANT: Selects the antenna (A, B). See pages 21
and 22 for details.
16 MTS: Selects the MTS/SAP.
17 0 – 9: Selects the channel.
18 CH ENTER: Executes a channel number.
19 VOL
20
+/–: Sets the volume.
MUTING: Mutes the sound.
21 HOME MENU: Displays the menu screen.
22 ENTER: Executes a command.
23 FAVORITE CH (A, B, C, D):
Selects any of the four preset channels. See
page 37 for details to set the FAVORITE CH.
While watching, you can toggle the set channels by pressing A, B, C and D.
24 SCREEN SIZE: Selects the screen size.
25 DISPLAY: Displays the channel information.
26 AV SELECTION: Selects audio and video
settings. (AV mode: STANDARD, DYNAMIC,
MOVIE, GAME, USER. PC mode: STANDARD,
USER.)
27 SLEEP: Sets the sleep timer.
• When using the remote control unit, point it at the Plasma Display.
• See pages 62 to 68 for operating buttons not listed on this page.
14
En
06Preparation
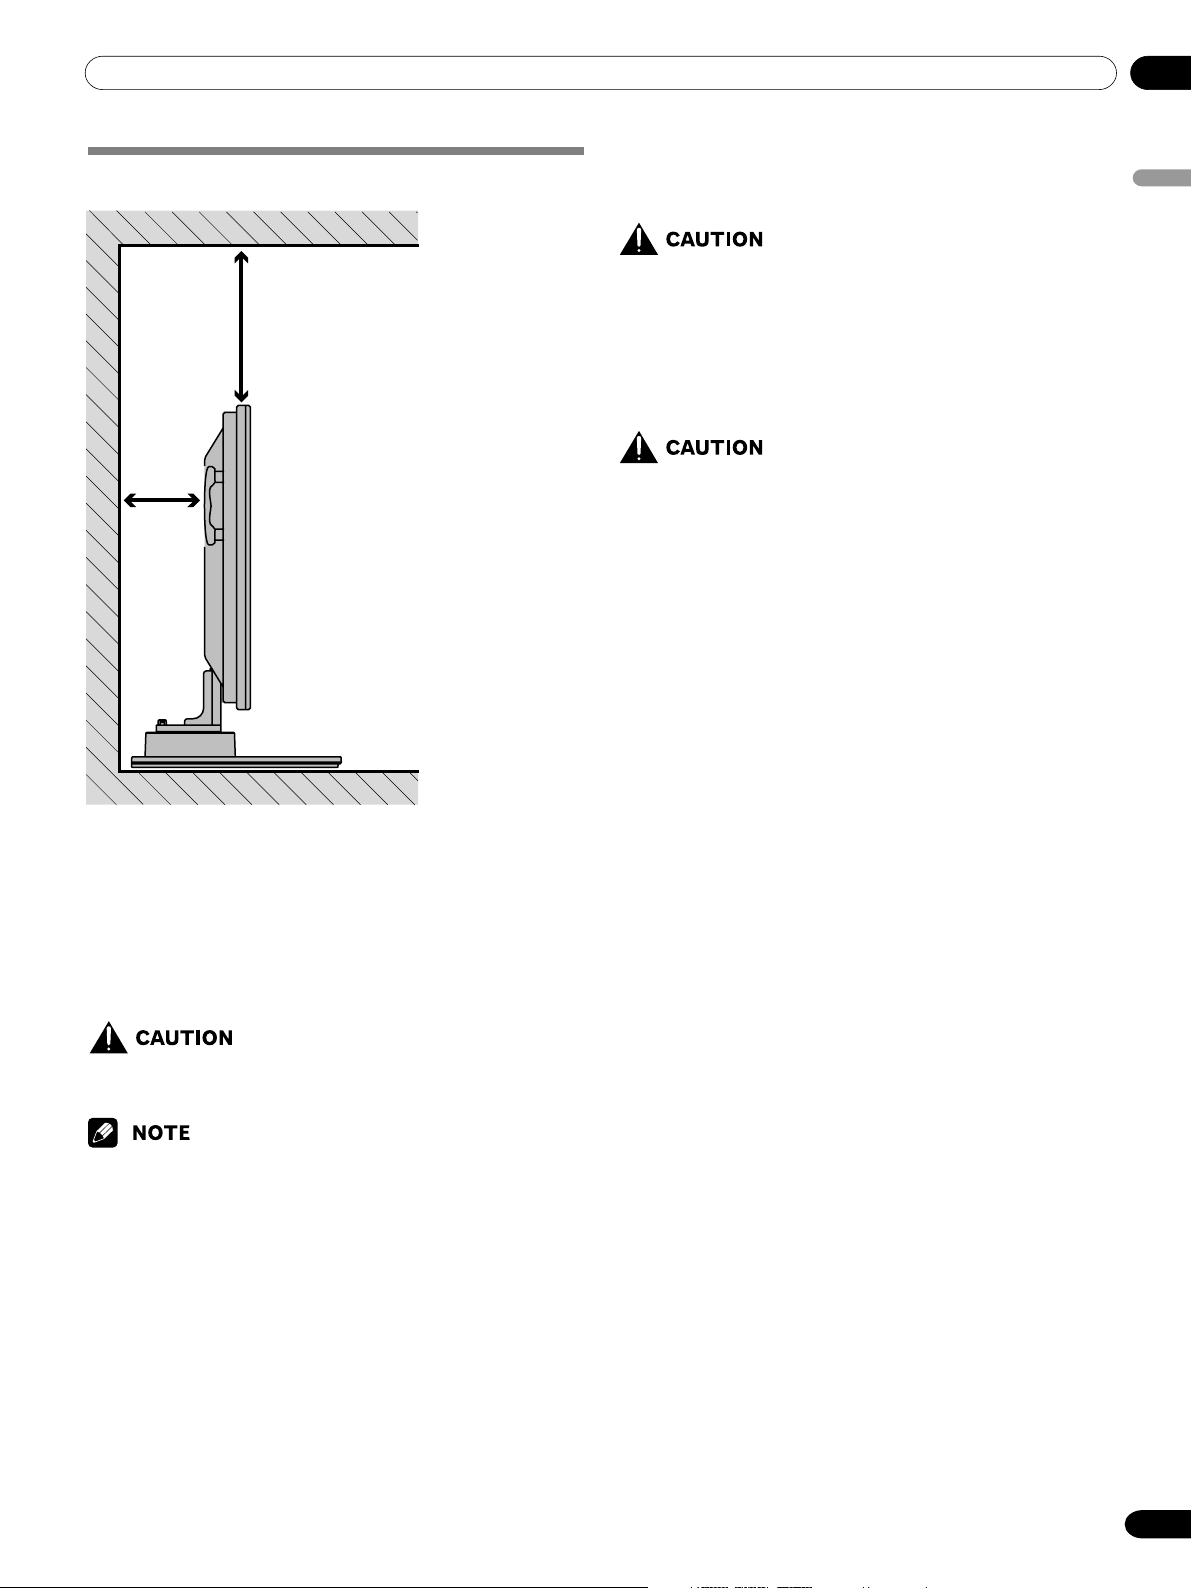
Installing the Plasma Display
Over 50 cm (19 11/16 inches)
Over 10
15
cm (3
/
16
inches )
Using the optional PIONEER stand
For details on installation, refer to the instruction manual
supplied with the stand.
• This product may be used only with model PDK-TS04 stand.
Use with other stands may result in instability causing
possible injury.
Using the optional PIONEER speakers
For details on installation, refer to the instruction manual
supplied with the speaker.
Operating Environment
Operating environment temperature and humidity: +0°C to
+40°C (+32°F to +104°F); less than 85% RH (cooling vents not
blocked)
Avoid installing at the following locations:
• Under direct exposure to sunlight
• Under strong artificial light
• In high humidity
•Poorly ventilated
English
Illustration shows PDP-5045HD/4345HD.
Locating
• Avoid direct sunlight. Maintain adequate ventilation.
• The length of the system cable used to connect the Plasma
Display and the Media Receiver is about 3 m (9.8 feet).
• Because the Plasma Display is heavy, be sure to have
someone help you when moving it.
• If you place anything on the top of the Media Receiver it will
not receive enough ventilation and will not operate properly.
• Allow enough space around the upper and back parts when
installing to ensure ventilation around the backside.
15
En
06 Preparation
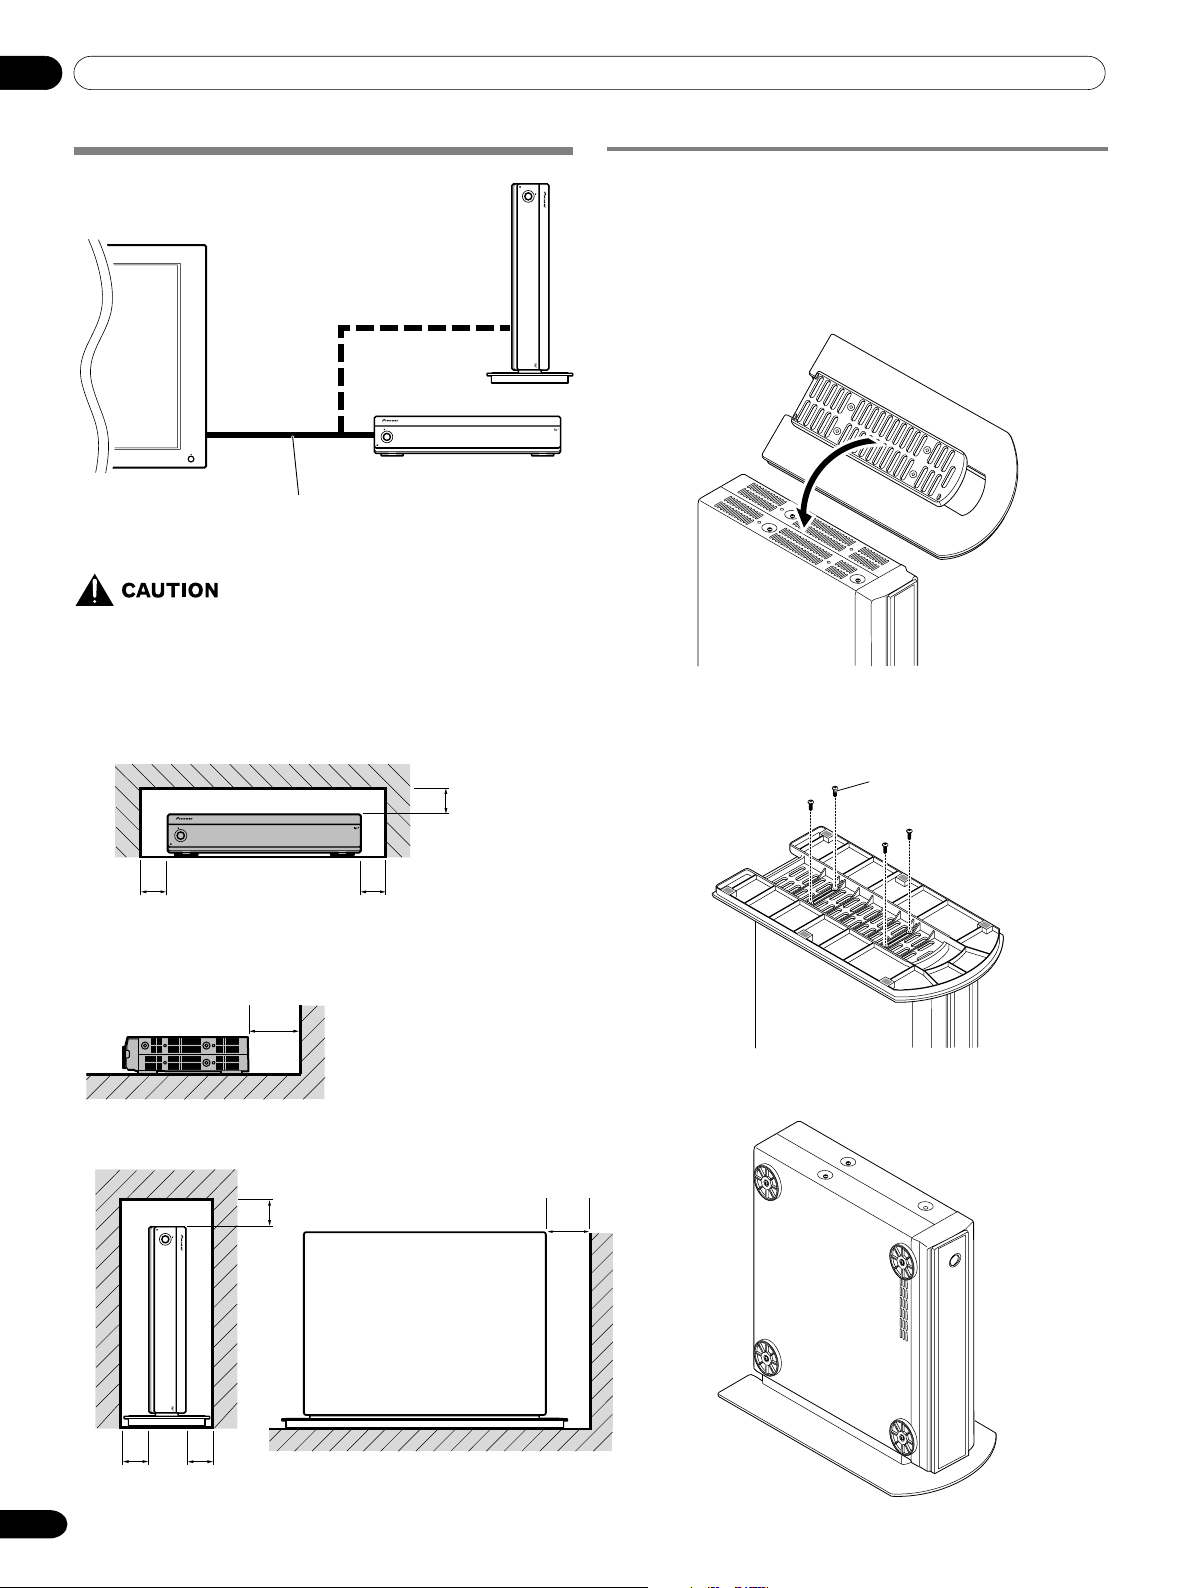
Installing the Media Receiver
Plasma Display
POWER
ON STANDBY
TIMER
REC
ACQUISITION
DATA
Media Receiver
(vertical installation)
(horizontal installation)
POWER
REC
DATA
ON STANDBY
TIMER
ACQUISITION
System cable (approx. 3 m/9.8
• Do not place a VCR or any other device on the top of the
Media Receiver.
• When installing, allow enough space on the sides and
above the Media Receiver.
• Do not block the side cooling vents or the rear ventilation fan opening of the Media Receiver.
feet)
Installing the Media Receiver vertically
You can use the supplied stand to install the Media Receiver
vertically.
1. Insert the stand into the side of the Media
Receiver.
Right side
2. Secure the stand with the supplied screws.
Over 5 cm
(2
inches)
POWER
POWER
ON STANDBY
TIMER
REC
ACQUISITION
DATA
REC
DATA
ON STANDBY
TIMER
ACQUISITION
Over 10 cm
(3
15
/16 inches)
Over 5 cm
(2
inches)
Over 5 cm
(2
inches)
Over 5 cm
inches)
(2
Over 10 cm
(3
15
/16 inches)
Screws
16
En
Over 5 cm
(2 inches)
Over 5 cm
(2
inches)
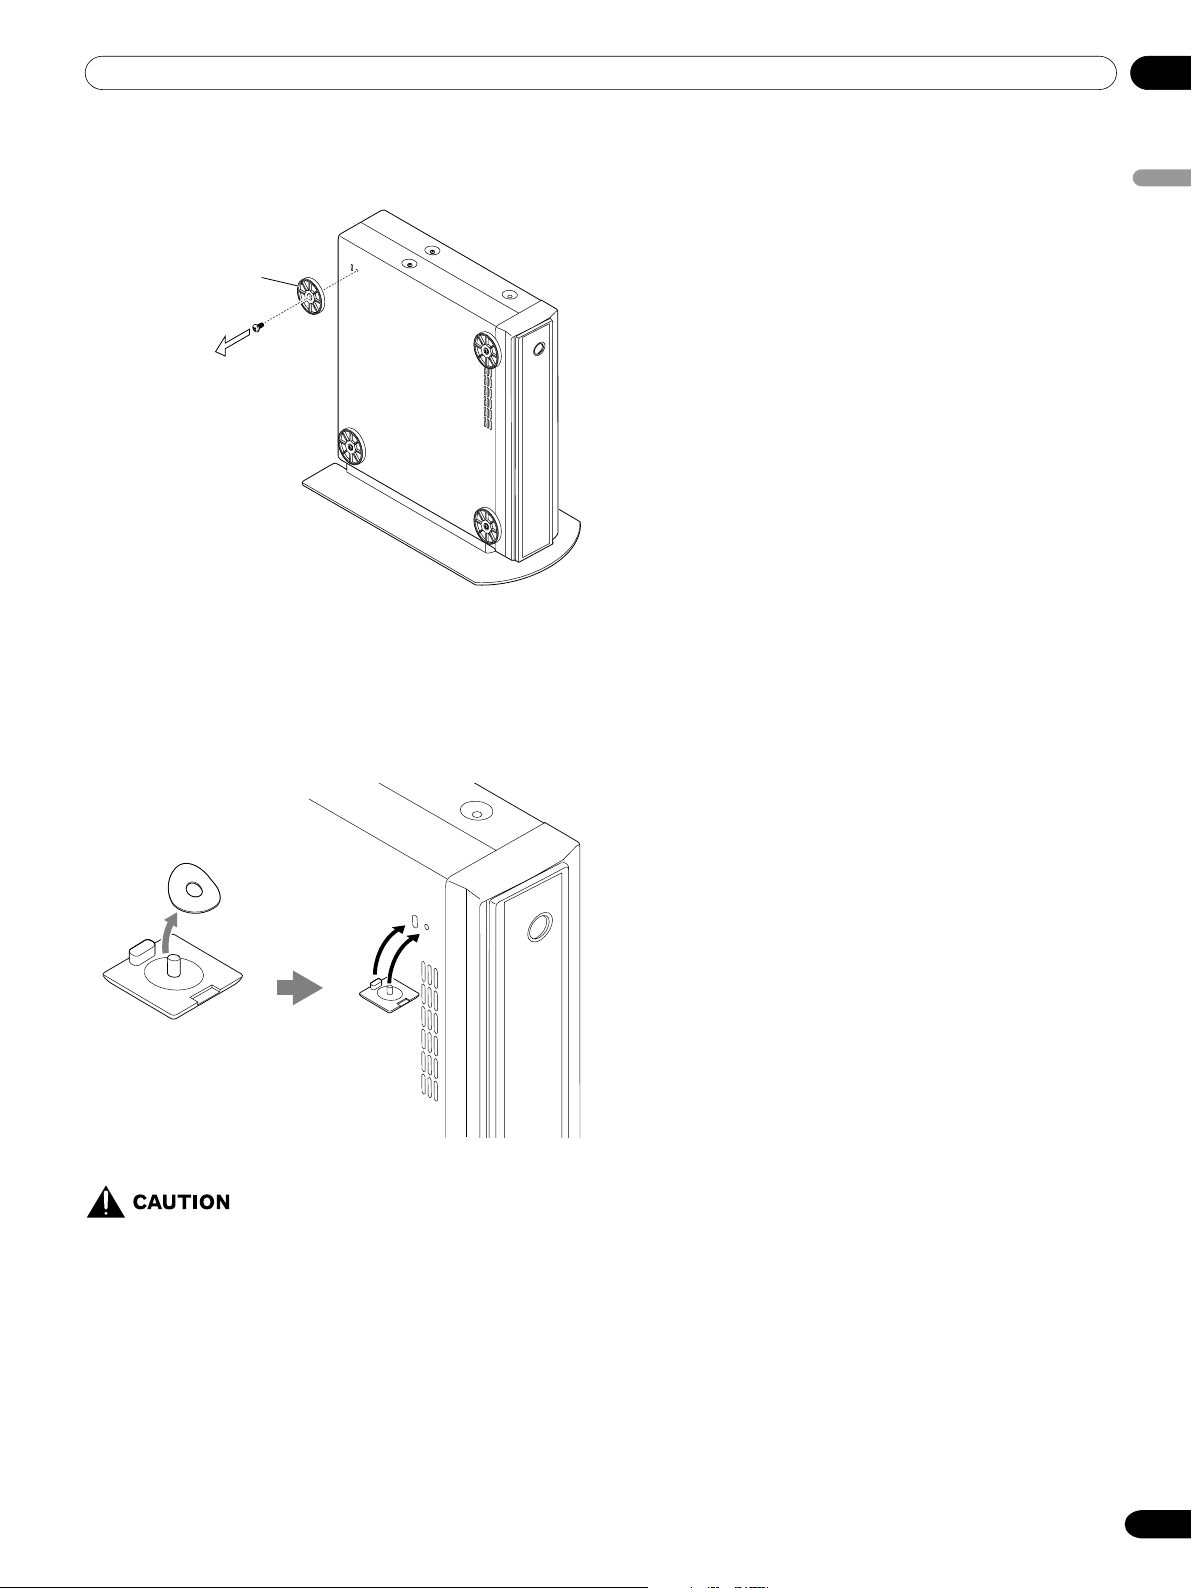
3. Remove the shock absorbing pads.
Shock absorbing pad
Keep the shock absorbing pads and screws. They are required
when you place the Media Receiver in the horizontal position.
06Preparation
English
4. Plug the screw holes using the supplied caps.
Remove the separation sheet.
Align with the
hole and attach.
Screw hole cap
• When you have installed the Media Receiver vertically,
be sure to use the supplied stand. If you place the unit
directly on the floor, the cooling vents will be blocked,
resulting in mechanical failure.
17
En
06 Preparation
Connecting the system cable
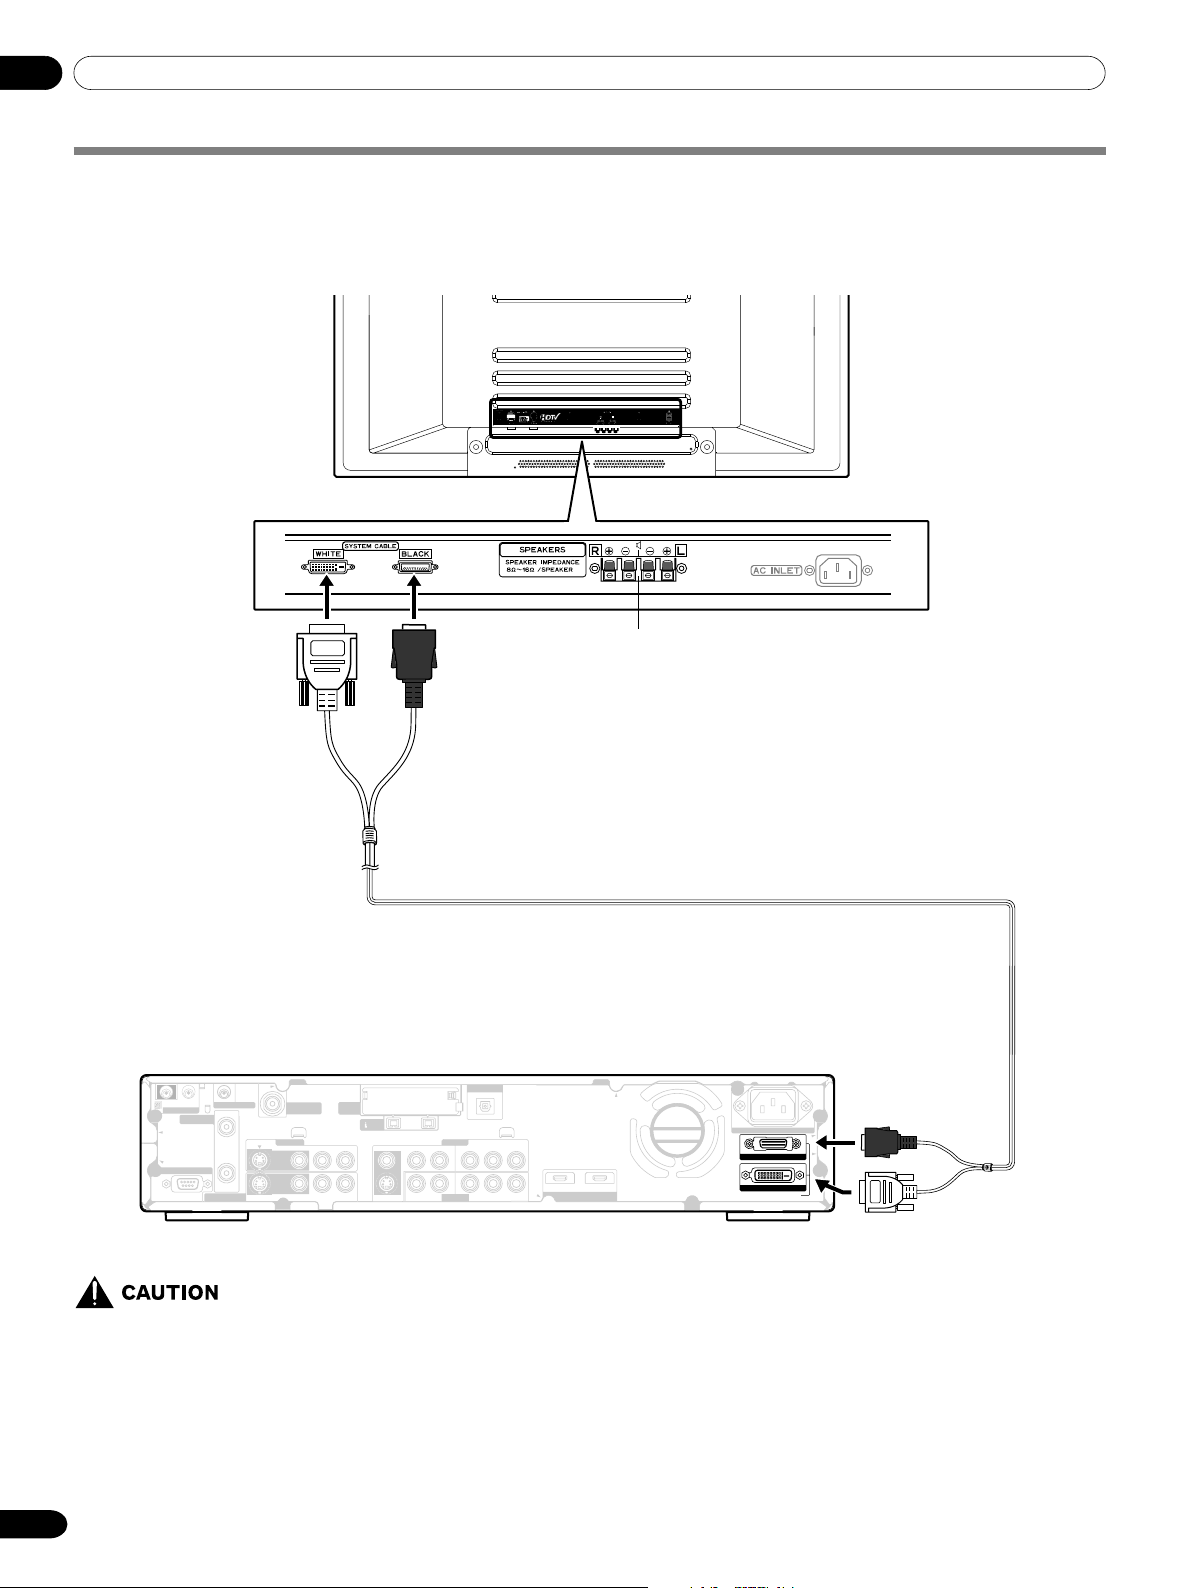
Connecting the system cable to the Plasma Display
Plasma Display (rear view)
(WHITE)
(BLACK)
Connecting the system cable to the Media Receiver
Media Receiver (rear view)
DIGITAL OUT
INPUT 1
INPUT 3
INPUT 3
OPTICAL
COMPONENT VIDEO
CB/P
B
B/PB
YYC
CR/P
R
CR/P
R
IN OUT
CONTROL
ANTENNA B
SERVICE ONLY
VCR CONTROL
IN
OUT
MONITOR OUT
S-VIDEO INPUT 2
S-VIDEO
ANTENNA/
CABLE A IN
VIDEO
VIDEO
R-AUDIO-L
R-AUDIO-L
Cable
Cable
CARD
CARD
(TS)
VIDEO
S-VIDEO
S400
R-AUDIO-L
R-AUDIO-L
For details on optional PIONEER speaker
installation, refer to the instruction manual
that came with the speaker.
System cable
AC IN
BLACK
INPUT 1 INPUT 3
HDMI
WHITE
SYSTEM CABLE
(BLACK)
(WHITE)
• THESE SPEAKER TERMINALS CAN BE APPLIED WITH HAZARDOUS VOLTAGE WHEN YOU CONNECT OR DIS-
CONNECT THE SPEAKER CABLES. TO PREVENT THE RISK OF ELECTRIC SHOCK, DO NOT TOUCH
UNINSULATED PARTS BEFORE DISCONNECTING THE POWER CORD.
18
En
06Preparation
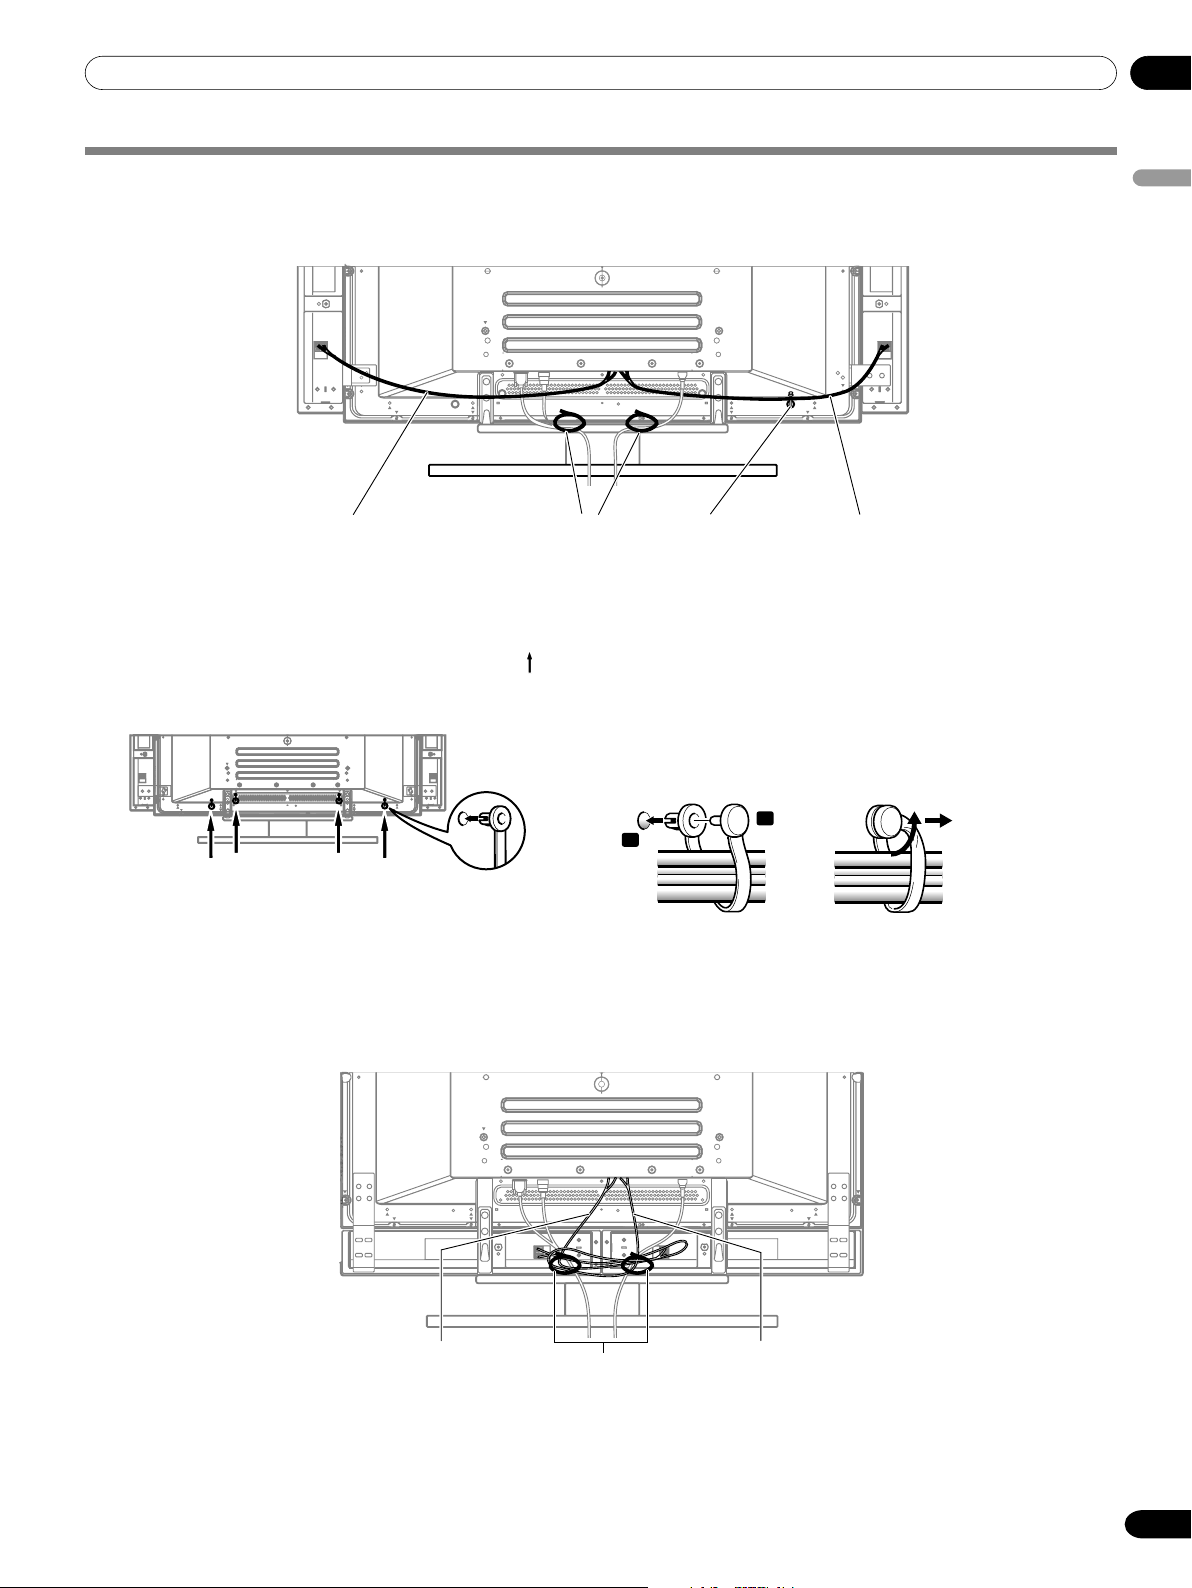
Routing cables
Speed clamps and bead bands are supplied for bunching cables. Once properly bunched, follow the steps below to route the
cables.
When the speakers are installed on the sides
Speaker cable Speed clamps
Cable binders (supplied
with the stand)*
Attaching speed clamps to the main unit
Attach the speed clamps using the 4 holes marked with
below, depending on your routing system.
Attaching and removing speed clamps
Insert [1] into an appropriate hole on the rear of the Plasma
Display and snap [2] into the back of [1] to lock the clamp.
Speed clamps are designed to be difficult to undo once in
place. Please attach them carefully.
Use pliers to twist the clamp 90°, pulling outward. The clamp
may deteriorate over time and become damaged if removed.
(rear view)
Speaker cable
English
When the speakers are installed at the bottom
(For PDP5045HD/4345HD only)
Speaker cable Speaker cable
2
1
Cable binders (supplied
with the stand)*
* Cable binder
Using the cable binders supplied with the stand, put the
speaker and system cables together so that the cables are
invisible from the front. At that time be careful not to apply
any force to the connection sections of the cables.
19
En
06 Preparation
Preparing the remote control unit
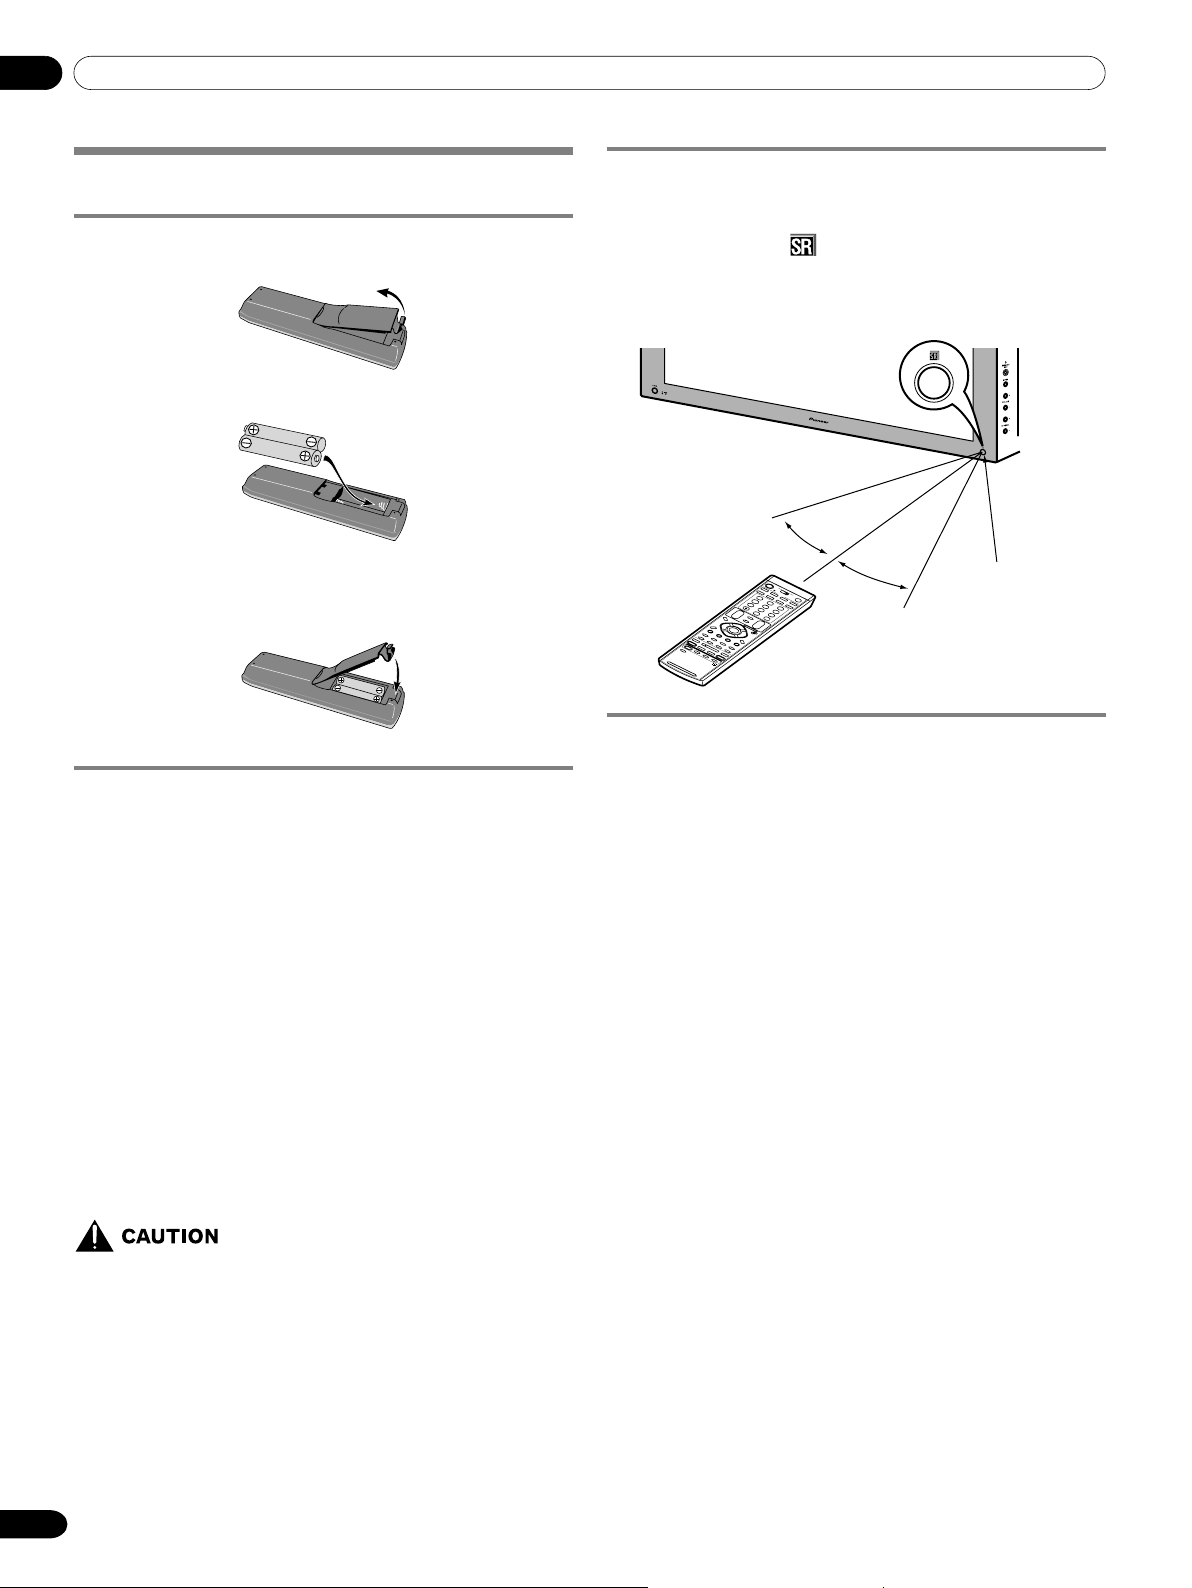
Inserting batteries
Open the battery cover.
1
Insert the supplied two AA size batteries.
2
• The battery polarities must correspond with the (+) and
(–) indicators in the battery compartment.
Close the battery cover.
3
Cautions regarding batteries
• The remote control unit cannot operate the system if the
batteries in the unit are empty. When this happens, replace
the batteries with new ones.
• Do not use manganese batteries. When you replace the
batteries, use alkaline ones.
• Do not mix batteries of different types. Different types of
batteries have different characteristics.
• Do not mix old and new batteries. Mixing old and new
batteries can shorten the life of new batteries or cause
chemical leakage in old batteries.
• Do not leave dead batteries in the remote control unit;
chemical leakage will occur. If you find any chemical leakage,
wipe thoroughly with a cloth.
• The batteries supplied with this product may have a shorter
life expectancy due to storage conditions.
• If you will not use the remote control unit for an extended
period of time, remove the batteries from it.
• WHEN DISPOSING OF USED BATTERIES, BE SURE
TO COMPLY WITH GOVERNMENT REGULATIONS
AND ENVIRONMENTAL PROTECTION GUIDELINES
THAT APPLY IN YOUR COUNTRY OR AREA.
Allowed operation range of the remote control
unit
Operate the remote control unit while pointing it toward the
remote control sensor (
front panel of the Plasma Display. The distance from the remote
control sensor must be within 7 m (23 feet) and the angle
relative to the sensor must be within 30 degrees in the right or
left direction.
) located at the bottom right of the
30°
7 m (23 feet)
30°
Remote control
sensor
Cautions regarding the remote control unit
• Do not expose the remote control unit to shock, liquid, or
high humidity.
• Do not place the remote control unit under direct sunlight;
the unit may deform.
• The remote control unit may not work properly if the remote
sensor window of the Plasma Display is under direct sunlight
or strong lighting. In such case, change the angle of the
lighting or Plasma Display, or operate the remote control unit
closer to the remote sensor window.
• When any obstacle exists between the remote control unit
and the remote control sensor, the remote control unit may
not function.
• As the batteries become empty, the remote control unit can
function within a shorter distance from the remote control
sensor. Replace the batteries with new ones if necessary.
• The Plasma Display emits very weak infrared rays from its
screen. If you place such equipment operated through
infrared remote control as a VCR nearby, that equipment may
not receive commands from its remote control unit properly
or entirely. If this is the case, place that equipment at a
location far enough from the Plasma Display.
• Depending on the installation environment, infrared rays
from the Plasma Display may not allow this system to
properly receive commands from the remote control unit or
may shorten allowable distances between the remote control
unit and the remote control sensor. The strength of infrared
rays emitted from the screen differs, depending on images
displayed on the screen.
20
En
06Preparation
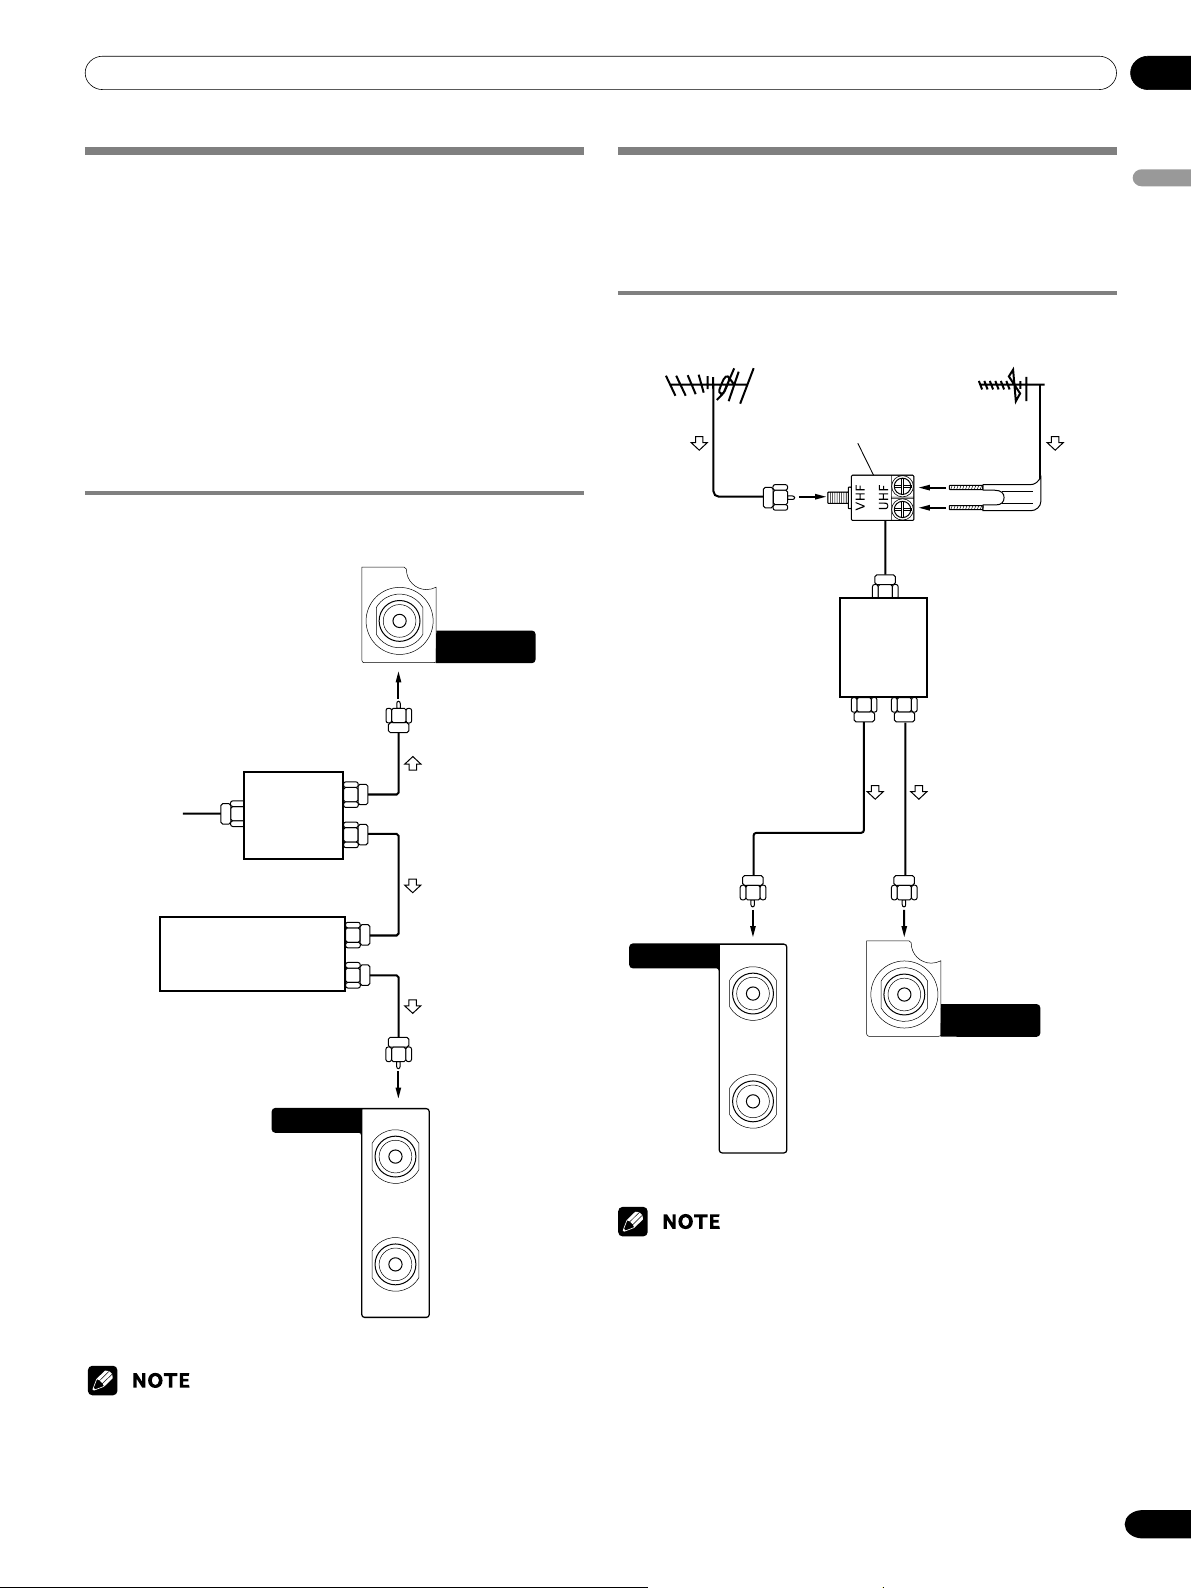
Cable connections for watching digital
and/or conventional TV channels
This system is equipped with two terminals for inputting TV
broadcasting signals: ANTENNA/CABLE A IN and ANTENNA B.
The ANTENNA/CABLE A IN terminal accepts both digital and
conventional TV broadcasting signals while the ANTENNA B
terminal accepts only conventional TV broadcasting signals.
When using a cable TV to watch digital and/or conventional TV
channels, connect to the ANTENNA/CABLE A IN terminal as
shown. In addition, you may connect an antenna to the
ANTENNA B terminal as shown; use an outdoor antenna to
enjoy clearer pictures. If your outdoor uses a 75-ohm coaxial
cable with an F-type connector, plug it into the antenna
terminal at the rear of the Media Receiver.
Connecting VHF/UHF antennas and a Cable
Converter
Media Receiver (rear)
ANTENNA/
CABLE A IN
Cable connections for watching digital
TV channels over air (VHF/UHF)
If using VHF and UHF antennas to watch digital TV channels,
connect the coaxial cables as shown.
Connecting VHF/UHF antennas
VHF antenna
U/V mixer
Splitter
UHF antenna
English
Cable TV
Cable Converter
Media Receiver (rear)
Splitter
ANTENNA B
IN
OUT
ANTENNA B
IN
ANTENNA/
CABLE A IN
Media Receiver
(rear)
OUT
• Be sure to connect coaxial cables as shown above. Signal reception
may fail if not properly connected.
• Be sure to connect coaxial cables as shown above. Signal reception
may fail if not properly connected.
21
En
06 Preparation
H
Switching between antenna A and B
To watch broadcasts via the two antennas, you can select it by
pressing ANT on the remote control unit.
• While watching a broadcast, press ANT to view the image
received from the other antenna.
•Pressing ANT while watching in the 2-screen mode (TV
image and video image) with TV selected will display the TV
image of the other antenna.
•Pressing ANT while watching in the 2-screen mode with two
TV images displayed will not have any effect.
•Pressing ANT while watching in the 2-screen mode with two
video images displayed will switch the selected screen to a
TV image.
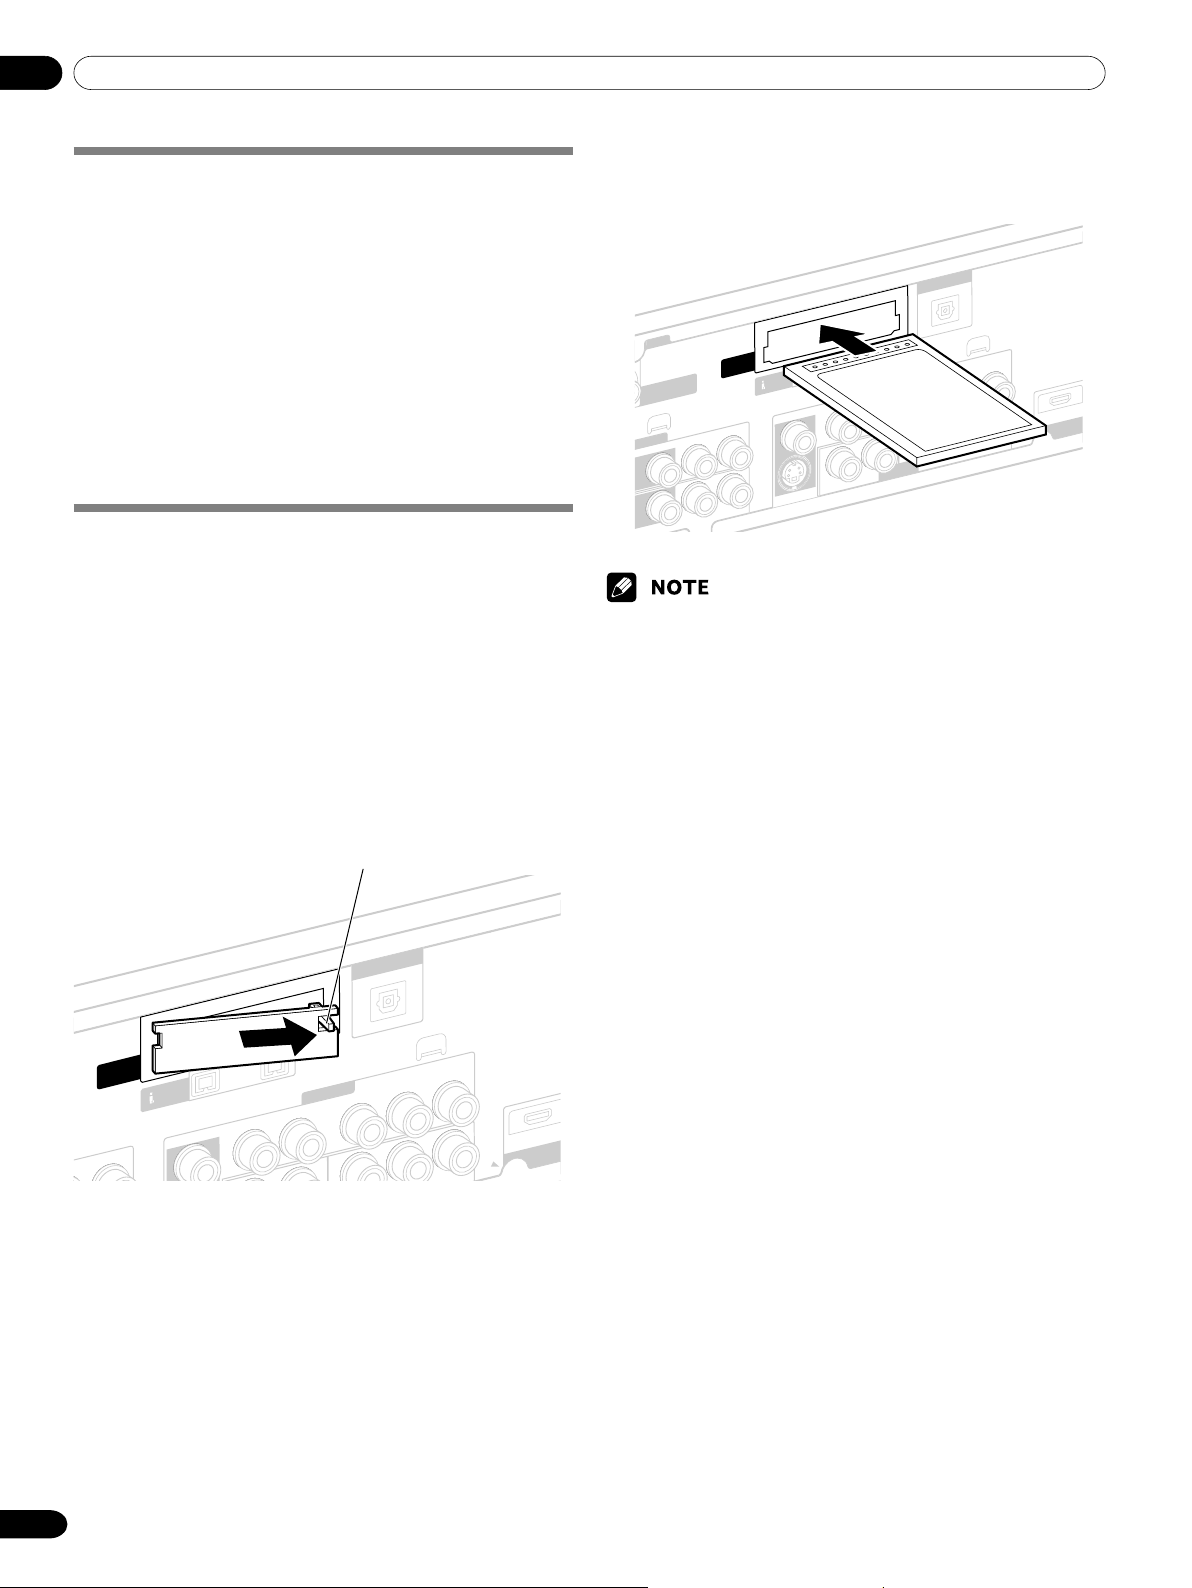
Inserting the cable card
The Media Receiver is equipped with a slot for inserting a cable
card. When you are watching digital and/or High Definition TV
channels over cable, the card allows you to use the POD
service provided by the cable TV company; the POD stands for
Point of Deployment. This service presents various types of
useful information, using HTML text.
Confirm that the ANTENNA/CABLE A IN terminal has
1
been connected with the coaxial cable from the Cable
Converter. See page 21.
Hold the tab of the slot cover on the rear of the Media
2
Receiver, and remove the cover while releasing the tab’s
latch.
Insert the specified cable card into the Cable CARD slot
3
as far as it goes.
DIGITAL OUT
OPTICAL
ANTENNA/
CABLE A IN
PUT 2
VIDEO
DEO
R-AUDIO-L
R-AUDIO-L
Cable
CARD
(TS)
VIDEO
S-VIDEO
S400
R-AUDIO-L
R-AUDIO-L
INPUT 3
COMPONENT VIDEO
Y
Y
• Be sure to insert only the specified cable card.
• Do not insert a PCMCIA card.
R
/P
R
C
B
/P
B
C
R
/P
R
C
B
/P
B
C
INPUT 1
Cable
CARD
UDIO-L
(TS)
VIDEO
S400
R-AUDIO-L
INPUT 1
Tab
DIGITAL OUT
OPTICAL
B
COMPONENT VIDEO
/P
B
C
Y
R
/P
R
C
INPUT 1
R
P
22
En
06Preparation
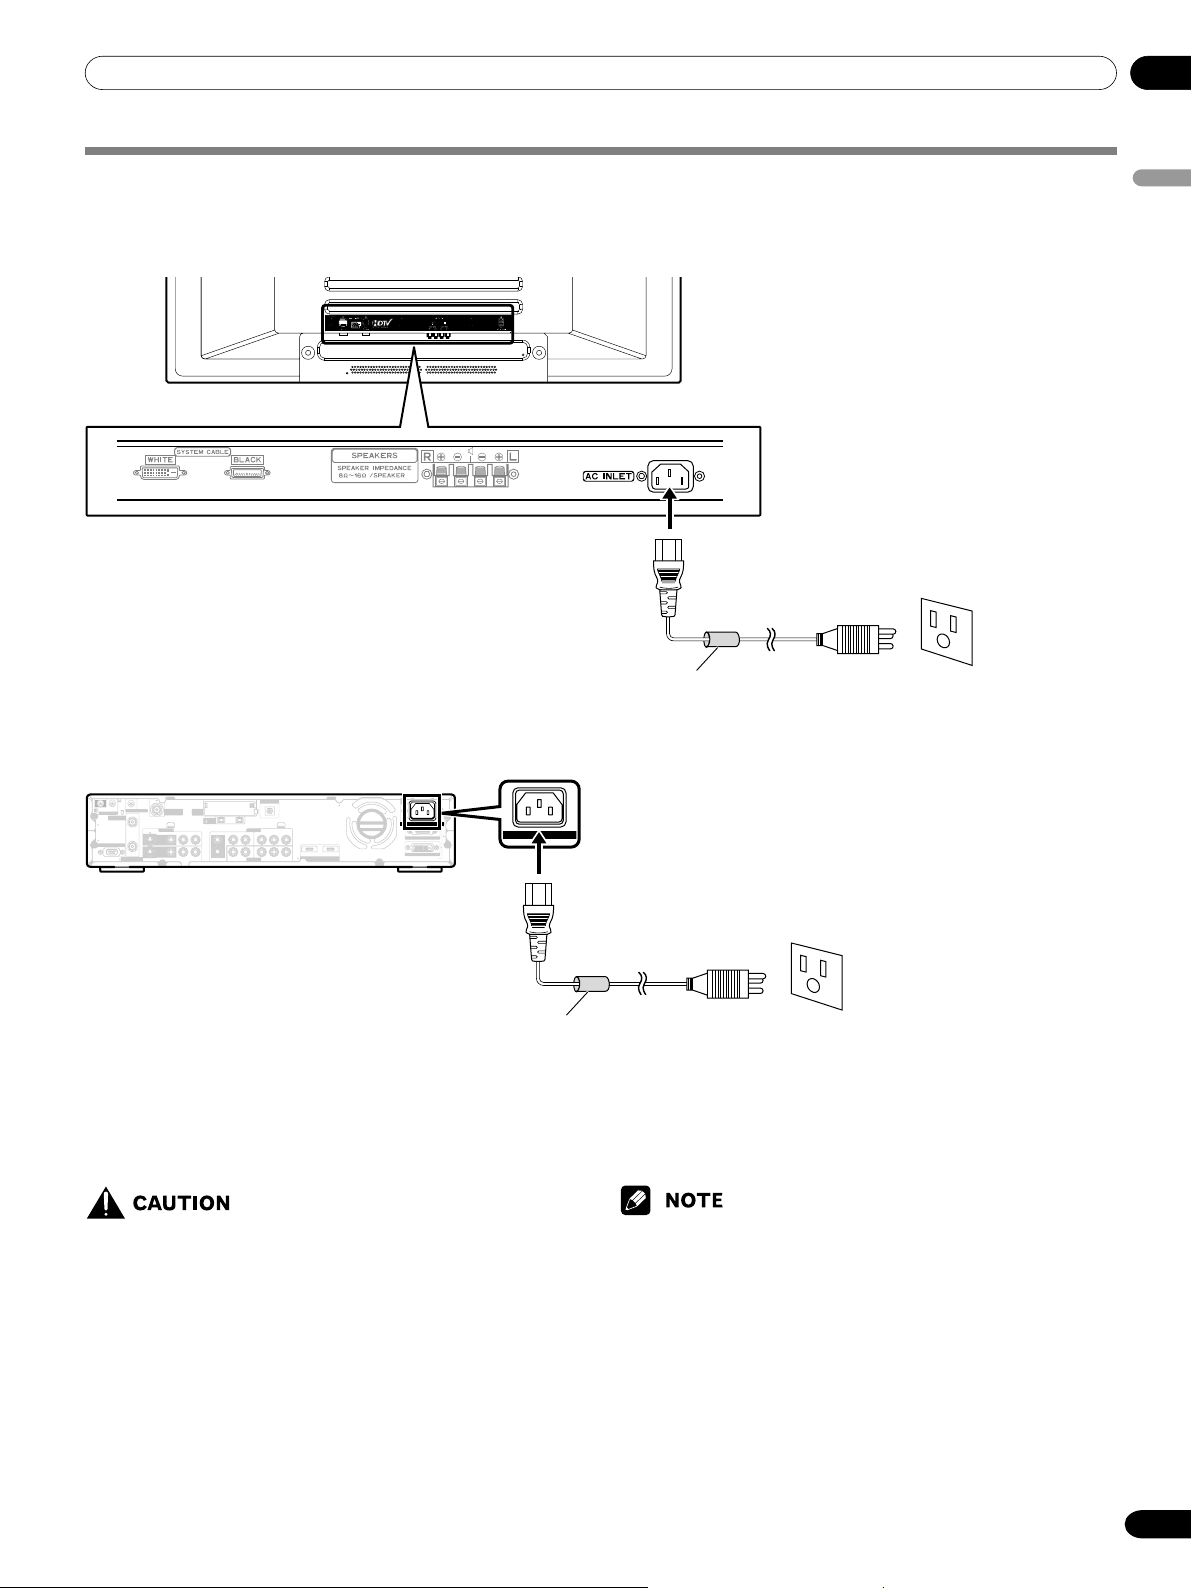
Connecting the power cord
Connect the power cord after all component connections have been completed.
Plasma Display (rear view)
Noise filter
Partially eliminates noise
caused by the power source.
English
Power cord
Media Receiver (rear view)
DIGITAL OUT
IN OUT
CONTROL
SERVICE ONLY
ANTENNA B
MONITOR OUT
VCR CONTROL
IN
OUT
ANTENNA/
Cable
Cable
CARD
CABLE A IN
CARD
INPUT 2
S-VIDEO
INPUT 2
VIDEO
R-AUDIO-L
R-AUDIO-L
VIDEO
S-VIDEO
• Use only the supplied power cord.
• Be sure to use the specified power supply voltage;
neglecting this can result in fire or electric shock.
•For the Plasma Display System, a three-core power cord
with a ground terminal is used for efficiency protection.
Always connect the power cord to a three-pronged
outlet and make sure that the cord is properly grounded.
OPTICAL
S400
(TS)
INPUT 1
COMPONENT VIDEO
VIDEO
R-AUDIO-L
CB/P
B
CR/P
R
INPUT 1 INPUT 3
R-AUDIO-L
INPUT 3
S-VIDEO
INPUT 3
INPUT 3
HDMI
YYC
B/PB
CR/P
R
AC INLET
AC IN
BLACK
WHITE
SYSTEM CABLE
AC IN
Noise filter
Partially eliminates noise
caused by the power source.
Power cord
• Always turn off the power of the Plasma Display and Media Receiver
when connecting the power cords.
• Disconnect the power cord from the power outlet when the Plasma
Display System is not going to be used for a long period of time.
23
En
07 Basic Operations
Turning on the power (Standby)
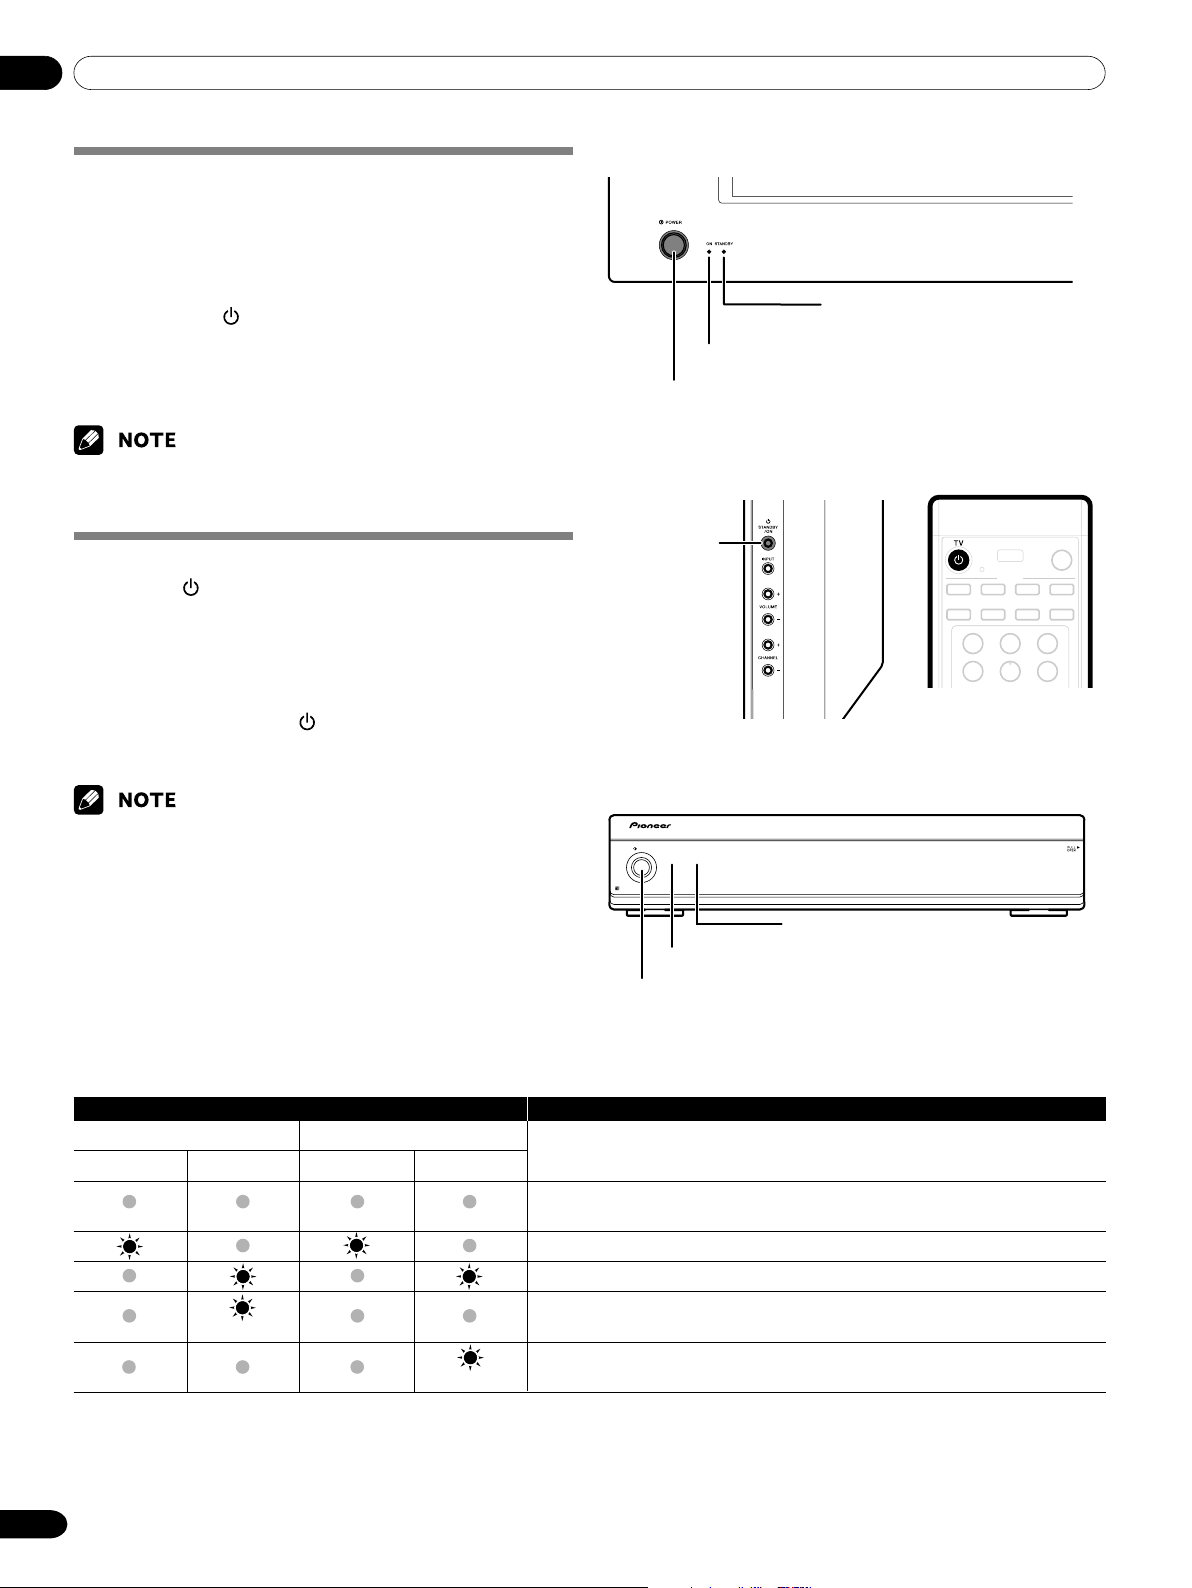
Press POWER on the Plasma Display if the STANDBY
1
indicator is off.
• The STANDBY indicator on the Plasma Display lights
up red.
Confirm that the STANDBY indicators light up red, and
2
then press TV on the remote control unit or
STANDBY/ON on the Plasma Display or POWER on the
Media Receiver to turn the system on.
• The POWER ON indicators on the Plasma Display and
Media Receiver light up green.
• In this manual, “system” means the Plasma Display Panel and Media
Receiver.
Turning off the power (Standby)
Press TV on the remote control unit or STANDBY/ON
1
on the Plasma Display or POWER on the Media Receiver.
• The system enters the standby mode and the image on
the screen disappears.
• Both STANDBY indicators light up red.
• It is recommended to place the system into the standby
mode by pressing TV on the remote control unit.
This allows the system to automatically receive digital
TV program information in the standby mode.
Plasma Display
STANDBY indicator
POWER ON indicator
POWER button
Illustration shows PDP-5045HD/4345HD.
(right view)
STANDBY/
ON button
Media Receiver
• If you are not going to use this system for a long period of time, press
POWER on the Plasma Display and remove the power cord from the
power outlet.
Plasma Display/Media Receiver status indicators
Indicator Status System Status
Plasma Display Media Receiver
POWER ON STANDBY POWER ON STANDBY
Power to the Plasma Display and Media Receiver is off. Or the power cords
have been disconnected.
Power to the system is on.
The system is in the standby mode.
The power cord has been disconnected from the Media Receiver.
Flashing
Power to the Plasma Display is off. Or the power cord has been disconnected
Flashing
from the Plasma Display.
POWER
ON STANDBY
REC
TIMER
POWER ON indicator
POWER button
DATA
ACQUISITION
STANDBY indicator
For other than the above, see “Troubleshooting” on page 69.
24
En
07Basic Operations
DTV 2 • 1002.102 A
XXXXXXXXXX
12:30pm — 2:00pm
12:33pm
Watching TV channels
Unless you set up TV channels that you can watch under the
current conditions, you cannot tune in those channels. For the
procedure, see “Setting up TV channels” on page 31.
• When watching a digital TV program, you may see emergency alert
messages scrolling at the top of the screen. Those messages are
broadcasted by TV stations as necessary when in emergency
situations.
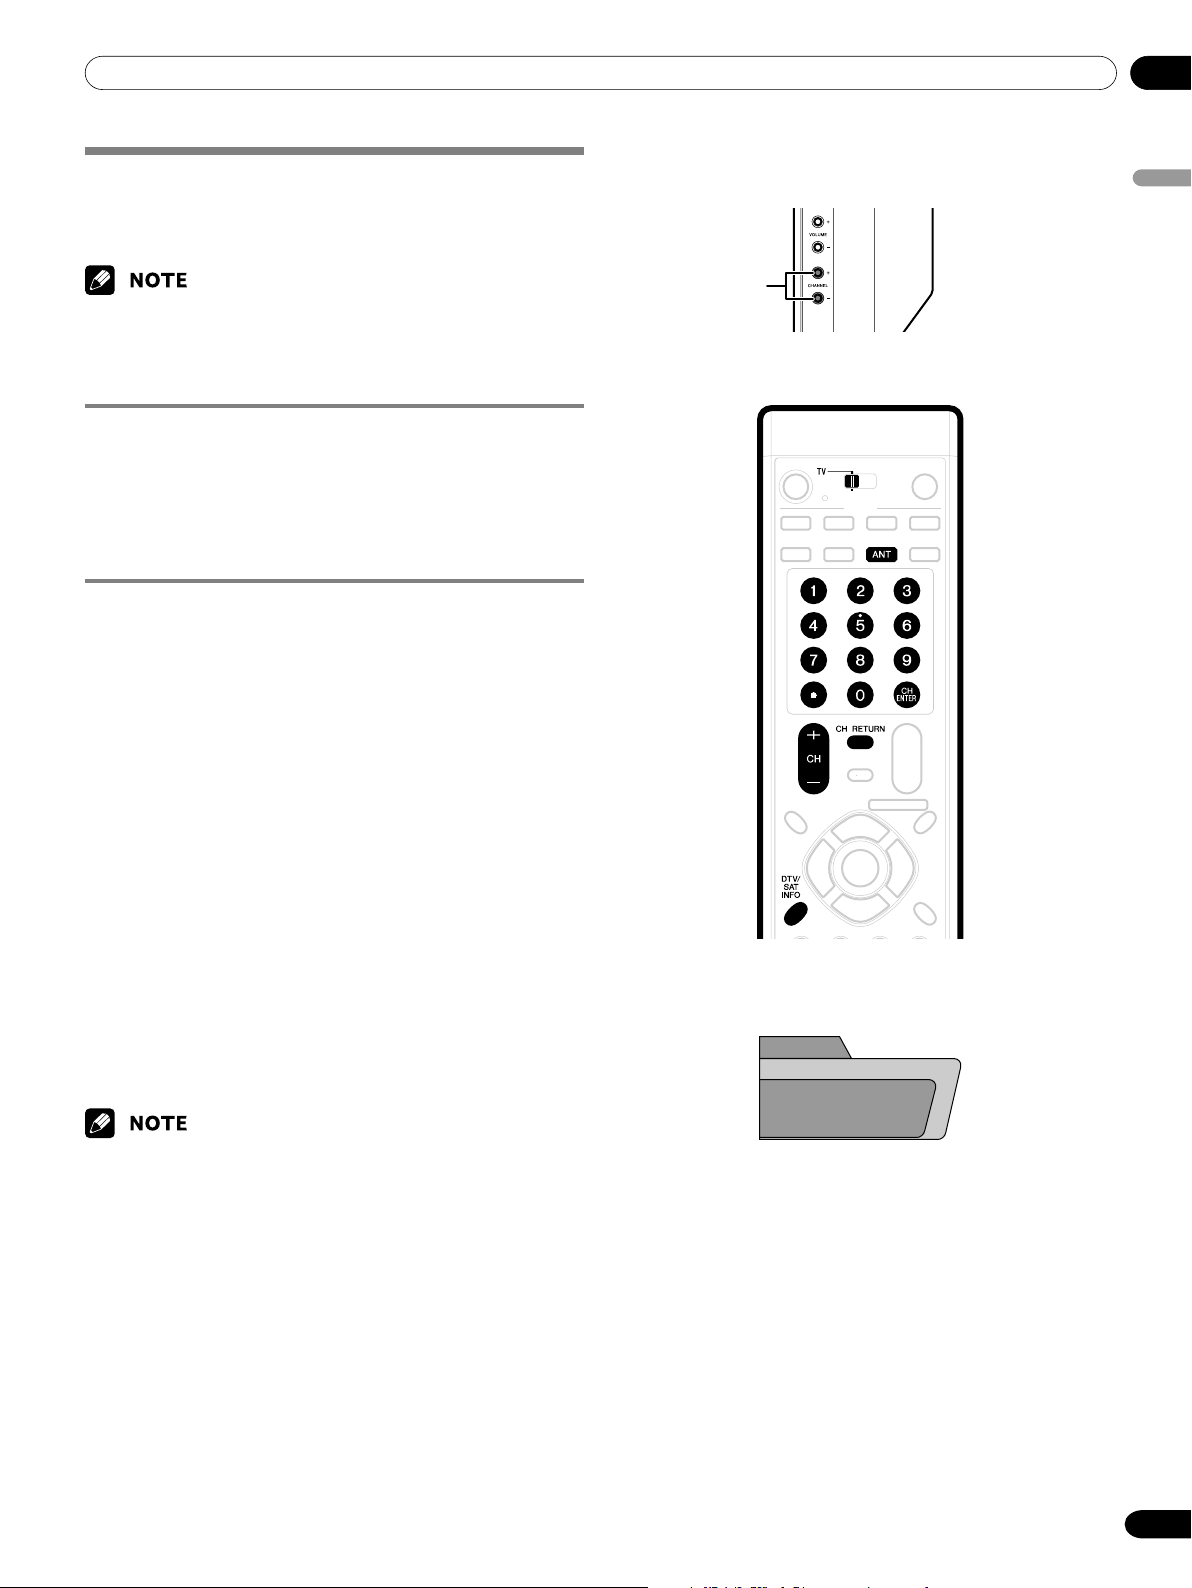
Selecting the antenna
After confirming that the Mode switch on the remote control
unit has been set to “TV”, press ANT on the remote control unit
to select antenna A or B.
• Make this selection depending on the connections to the
antenna input terminals on the Media Receiver (page 21).
Changing channels
To increase the channel number, press CH + on the remote
control unit. To decrease the channel number, press CH –.
• CHANNEL +/– on the Plasma Display operates the same as
CH +/– on the remote control unit.
•Press CH RETURN to switch the currently tuned channel to
the previously tuned channel.
Press CH RETURN again to restore the currently tuned
channel.
CHANNEL +/–
Plasma Display
(right view)
English
Using 0 – 9 and • (dot) on the remote control unit
Select channels directly by pressing buttons 0 to 9. To select
subchannels, also use the • (dot) button.
EXAMPLE
•To select channel 5 (1-digit channel), press 5.
•To select channel 25 (2-digit channel), press 2 then 5.
•To select channel 125 (3-digit channel), press 1, 2, then 5.
•To select subchannel 10.01, press 1, 0, • (dot), 0, then 1.
•To select subchannel 10.001 (for the cable TV), press 1, 0,
• (dot), 0, 0, then 1.
•After entering a channel or subchannel number, you may press
CH ENTER to tune in the channel more quickly.
• Each time you change a channel, such a channel banner appears
that shows information about the currently selected channel. To clear
the channel banner, press DTV INFO. For more information about
the channel banner, see “Viewing a channel banner” on page 26.
Channel banner
25
En
07 Basic Operations
Changing the volume and sound
To increase the volume, press VOL + on the remote control
unit. To decrease the volume, press VOL –.
• VOLUME +/– on the Plasma Display operates the same as
VOL +/– on the remote control unit.
•To mute the sound output, press MUTING. “ ” appears on
the screen. To quit muting, press MUTING again. Pressing
VOL + also quits muting.
Plasma Display
(right view)
VOLUME +/–
Viewing a channel banner
While watching a digital TV program, pressing DTV INFO
causes the following banner to appear. Pressing DTV INFO
again causes the banner to disappear.
1 2 3
12:33pm
WXCD • 1000 Ant. A
XXXXXXXXXX
12:30pm – 2:00pm
5 6 7
1 Station name
2 Current time
3 Channel number
4 Input (Ant. A or Ant. B)
5 Program time schedule
6 Program title
7 TV rating and program description (This may be unavailable
for some programs.)
4
********************************************************
*********************************************
******************************************
Volume adjustment
Muting
• The above information is not displayed if not included in broadcast
signals.
• If “ ” is shown at the bottom right of the channel banner containing
program description, press / to scroll the program description.
26
En
07Basic Operations
Using the POD service
If you have watched digital and/or High Definition TV channels
over cable, you can use the POD service provided by the cable
TV company. This service presents various types of useful
information, using HTML text.
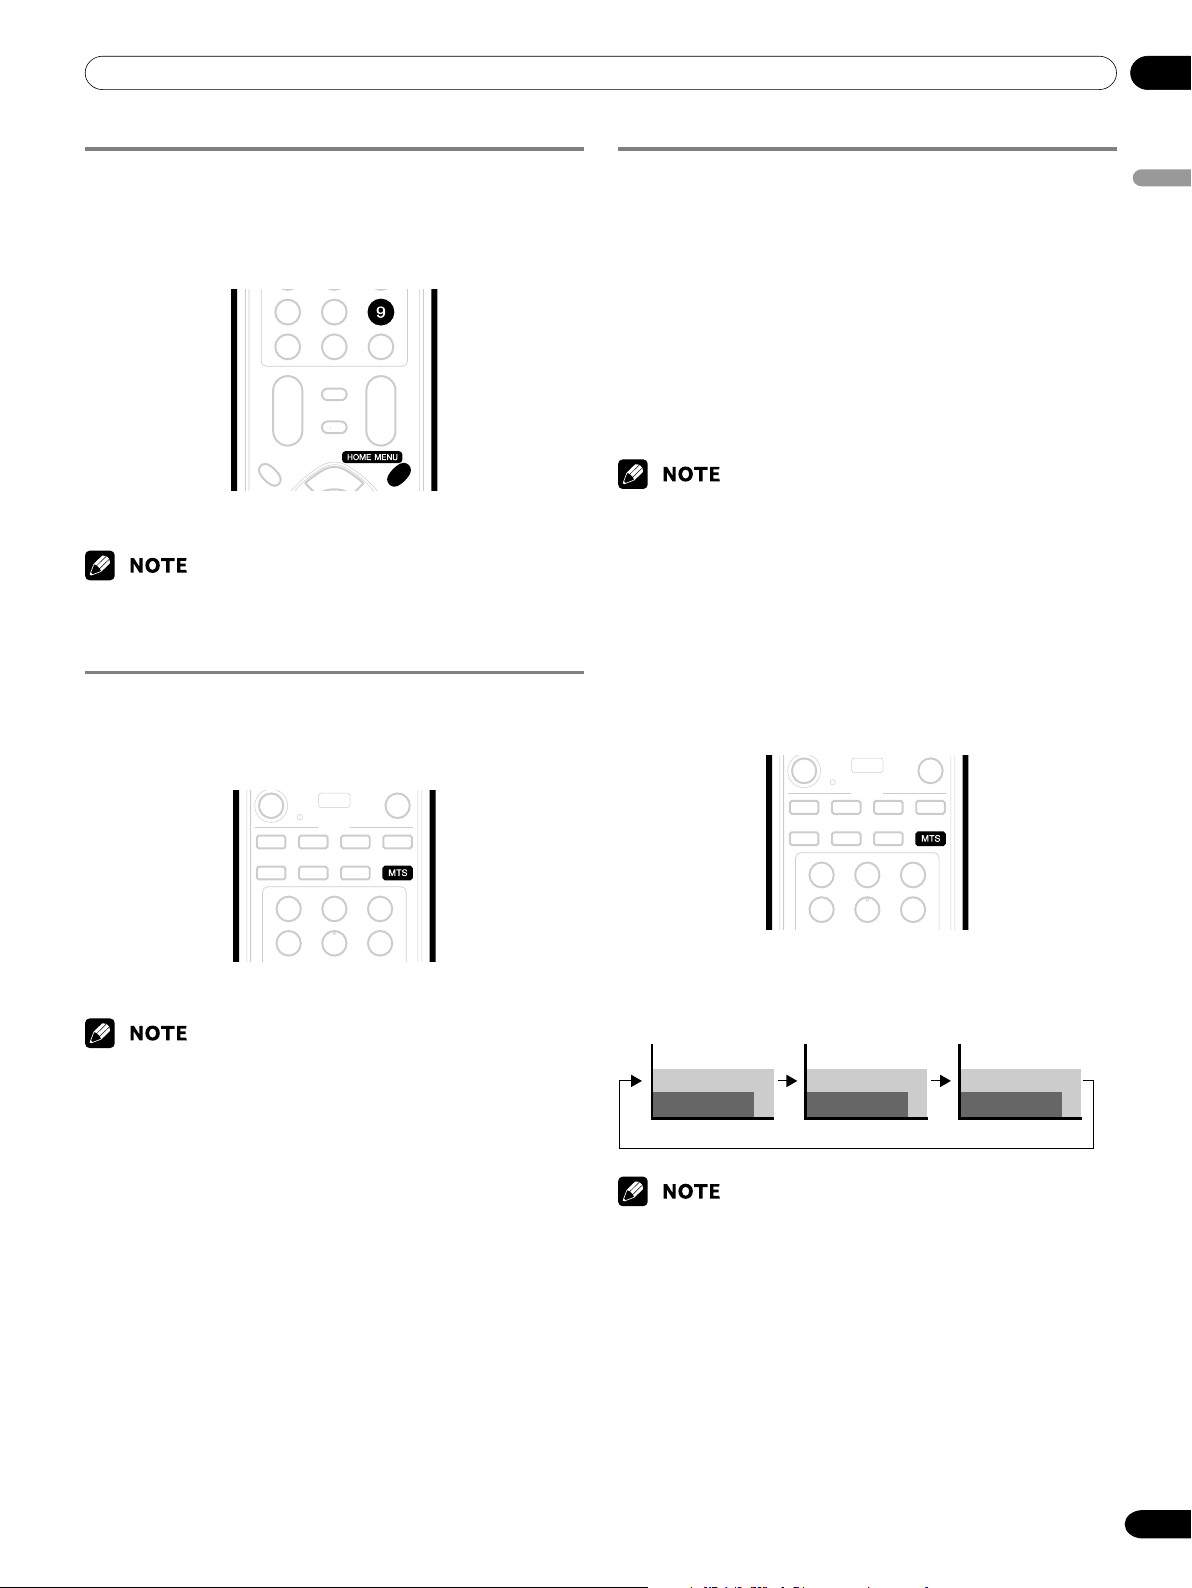
Press HOME MENU, 9, 9, then 9 to view the POD display.
• If you have enabled data acquisition using the menu, POD
information is automatically acquired even when the system is in the
standby mode. See page 32.
Changing the language
If you have selected a digital TV program that provides multilanguage services, you can switch among the languages by
pressing MTS on the remote control unit.
Setting MTS/SAP mode
When watching conventional TV programs, you may enjoy
stereo sound and/or Secondary Audio Programs (SAP), using
the Multi-channel Television Sound (MTS) function.
• Stereo broadcasts
You can enjoy, for example, sports, shows, and concerts in
dynamic stereo sound.
• SAP broadcasts
MAIN sound: The normal program soundtrack (either in
mono or stereo).
SAP sound: Listen to second language, supplementary
commentary and other information. (SAP is mono sound.)
• Conventional TV channels in this manual designate TV channels that
are received through the conventional VHF/UHF frequencies or
conventional cable TV channels.
• When stereo sound is difficult to hear, you may manually switch to
the MONO mode to obtain clearer sound.
• Once the MONO mode is selected, the Plasma Display System
sound remains mono even if the system receives a stereo broadcast.
You must reselect the STEREO mode if you want to hear stereo
sound again.
• Selecting MTS while the input source is INPUT 1 to 4 or PC does not
change the type of sound. In this case, sound is determined by the
video source.
English
Each time you press MTS, the language switches.
• Switchable languages differ depending on the current broadcast.
• If the language selected through language setting is available when
the channel or program is changed, you will hear that language.
Each time you press MTS, MTS toggles as shown below.
STEREO mode
STEREO
• In each of the MTS/SAP modes selected using the MTS button, the
display changes depending on broadcasting signals being received.
SAP mode
SAP
MONO mode
MONO
27
En
07 Basic Operations
When receiving STEREO sound signals
A 125
STEREO
A 125
STEREO
A 125
MONO
In STEREO mode
In SAP mode
In MONO mode
When receiving MAIN + SAP sound signals
A 125
MAIN (SAP)
A 125
SAP (MAIN)
A 125
MONO (SAP)
In STEREO mode
In SAP mode
In MONO mode
Using the multiscreen functions
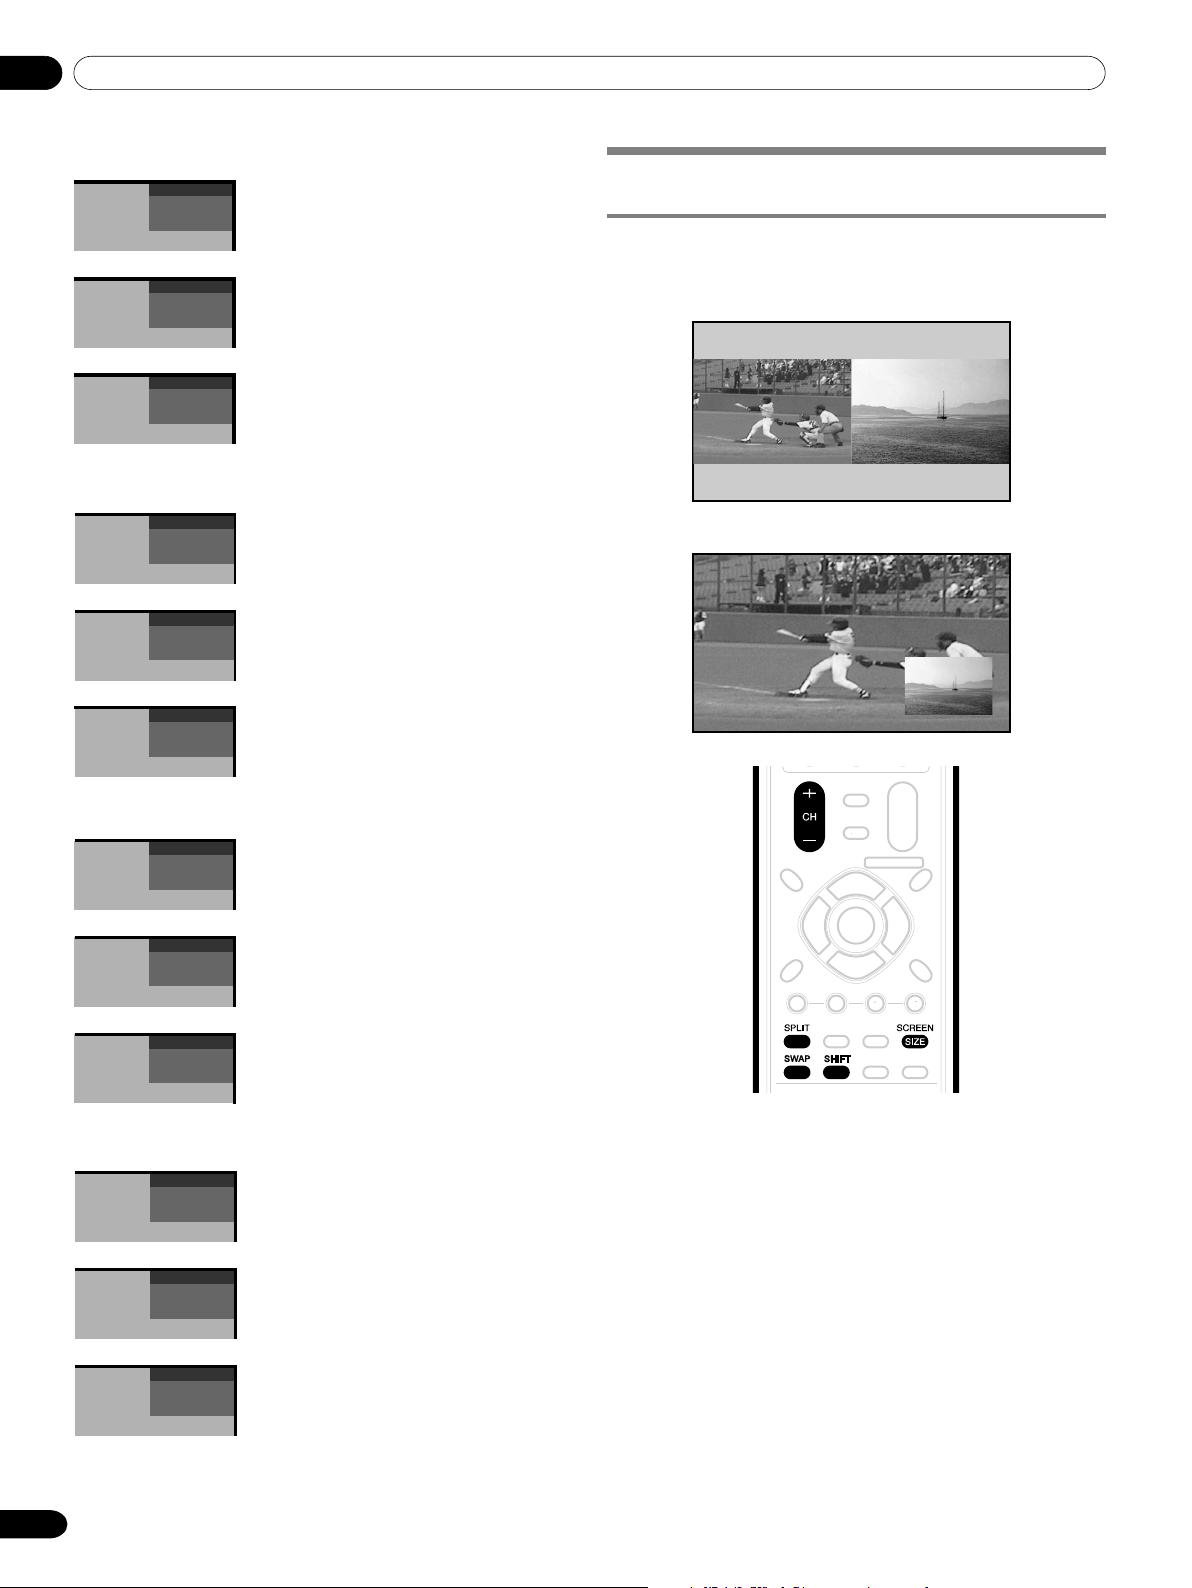
Splitting the screen
Use the following procedure to select the 2-screen or picture-inpicture mode.
2-screen
Picture-in-picture
When receiving STEREO + SAP sound signals
A 125
STEREO (SAP)
A 125
SAP (STEREO)
A 125
MONO (SAP)
In STEREO mode
In SAP mode
In MONO mode
When receiving MONO sound signals
A 125
MONO
A 125
MONO
A 125
MONO
In STEREO mode
In SAP mode
In MONO mode
Press SPLIT to select the display mode.
1
• Each time you press SPLIT, the display mode is
switched among 2-screen, picture-in-picture, and
single-screen.
28
En
07Basic Operations
•In 2-screen or picture-in-picture mode, press SWAP to
switch the position of the 2 screens shown.
Left screen is the active screen which will be indicated
by “ ”. The user is allowed to operate picture and
sound.
• In 2-screen mode, press SCREEN SIZE to change the
size of the left screen.
•In picture-in-picture mode, press SHIFT to move the
position of the small screen in anti-clockwise.
Freezing images
Use the following procedure to capture and freeze one frame
from a moving image that you are watching.
Normal image Still image
English
To select the desired input source, press the appropriate
2
input source button.
• If watching TV programs, press CH +/– to change the
channel.
• The multiscreen function cannot display images from the same input
source at the same time. If you make such an attempt, a warning
message appears.
• When you press HOME MENU or DTV INFO, the single-screen
mode is restored and the corresponding menu is displayed.
• When the two screens show the same analog broadcasting coming
through antenna A and B, the picture quality may differ between the
two screens.
Press FREEZE.
1
•A still image appears on the right screen while a
moving image is shown on the left screen.
Press FREEZE again to cancel the function.
2
•With the screen split, any image cannot be frozen.
• When this function is not available, a warning message appears.
29
En
08 Menu Setup
Menu configuration
AV mode menus
Home Menu Item Page
Picture AV Selection 40
Contrast 41
Brightness 41
Color 41
Tint 41
Sharpness 41
Pro Adjust 41
Reset 41
Sound Tr eble 42
Bass 42
Balance 42
Reset 42
FOCUS 43
Front Surround 43
Power Control Energy Save 43
No Signal off 43
No Operation off 44
PC mode menus
Home Menu Item Page
Picture AV Selection 40
Contrast 41
Brightness 41
Red 41
Green 41
Blue 41
Reset 41
Sound Tr eble 42
Bass 42
Balance 42
Reset 42
FOCUS 43
Front Surround 43
Power Control Energy Save 43
Power Management 44
Sleep Timer —40
Option Auto Setup 45
Manual Setup 45
Sleep Timer —40
Option Position 44
Side Mask 47
HDMI Input 51, 52
Monitor Out 52, 53
Digital Audio Out 54
Language 47
Tuner Setup Channel Setup 31, 32
Parental Control 33–37
Favorites 37
Closed Captions 37–39
Recorder Setup 56–57
Clock 39
Timers —48, 49
Menu operations
The following describes the typical procedure for setting up the
menus. For the actual procedures, see the appropriate pages
that describe individual functions.
Press HOME MENU.
1
2
Press / to select a menu item, and then press ENTER.
Repeat step 2 until you access the desired submenu item.
3
• The number of menu layers differs depending on menu
items.
• If you select “Tuner Setup” or “Timers” , a menu bar
appears at the bottom of the screen. To select a
submenu item on the bar, press
4
Press / to select an option (or parameter), and then
press ENTER.
•For some menu items, press
Press HOME MENU to exit the menu.
5
/ instead of / .
/ instead of / .
30
En
•You can return to the upper menu levels by pressing RETURN.

09Tuner Setup
Setting up TV channels
This section describes how to search and set up TV channels
that you can watch under the current conditions. Unless you set
up TV channels using Auto Channel Preset, you may not be able
to tune in those channels.
Using Auto Channel Preset
Auto Channel Preset automatically searches and sets up TV
channels.
Press HOME MENU.
1
2
Select “Tuner Setup”. ( / then ENTER)
3
Select “Channel Setup”. ( / then ENTER)
4
Select “Ant. A” or “Ant. B”. ( / then ENTER)
5
Select “Auto Channel Preset”. ( / then ENTER)
6
Select “Air” or “Cable”. ( / then ENTER)
Channel Setup
Ant. A
Ant. A Auto Channel Preset
Enter
Begin Preset
• Channel search automatically starts.
Channel Setup
Ant. A Auto Ch. Preset
Ant. A Auto Channel Preset
•To quit Auto Channel Preset halfway, press D.
After Auto Channel Preset has been finished, press
7
HOME MENU to exit the menu.
• When using the Cable Converter, you may need to manually add
Cable Converter output channels.
Auto Ch. Preset
Air
Cable
• Cable
D
Cancel
Cable
2.0
4.0
Cancel
6.0
D
Cable
One Moment Please …
xxxxxxxxxxxxxxxxxxxxx
xxxxxxxxxxxxxxxxxxxxx
xxxxxxxxxxxxxxxxxxxxx
Home Menu
Exit
xxxxxxxxxxxxxxxx
xxxxxxxxxxxxxxxx
xxxxxxxxxxxxxxxx
Home Menu
Exit
Setting for skipping unwanted channels
From among TV channels searched and set up using Auto
Channel Preset, you can select channels to be skipped when
CH +/– are operated.
Press HOME MENU.
1
2
Select “Tuner Setup”. ( / then ENTER)
3
Select “Channel Setup”. ( / then ENTER)
4
Select “Ant. A” or “Ant. B”. ( / then ENTER)
5
Select “Channel Keep/Skip”. ( / then ENTER)
6
Select a channel to be skipped. ( / then ENTER)
Channel Setup Ant. A
Ant. A Channel Keep/Skip
Channel Keep/Skip
2.0
4.0
6.0
xxxxxxxxxxxxxxxxxxxxx
xxxxxxxxxxxxxxxxxxxxx
xxxxxxxxxxxxxxxxxxxxx
Home Menu
Exit
•For the skipped channel, a check mark disappears.
Press HOME MENU to exit the menu.
7
•To restore skipped channels, use the above procedure except that you
select a skipped channel in step 6.
• When using the Cable Converter, you may need to manually add
Cable Converter output channels.
Setting up TV channels manually
This section describes how to manually set up TV channels that
have not been set up by Auto Channel Preset.
Press HOME MENU.
1
2
Select “Tuner Setup”. ( / then ENTER)
3
Select “Channel Setup”. ( / then ENTER)
4
Select “Ant. A” or “Ant. B”. ( / then ENTER)
5
Select “Add Channel”. ( / then ENTER)
6
Select a channel number to be added. ( / then ENTER)
•You can also use buttons 0 – 9 to enter a channel
number.
English
Channel Setup Ant. A
Ant. A Add Channel
Add Channel
0000.000
1
xxxxxxxxxxxxxxxxxxxxx
xxxxxxxxxxxxxxxxxxxxx
xxxxxxxxxxxxxxxxxxxxx
Home Menu
•After ENTER has been pressed, a confirmation screen
appears.
Press A to complete the setup processing.
7
Press HOME MENU to exit the menu.
8
Exit
31
En

09 Tuner Setup
Naming TV channels
You can name TV channels that you have set up for antenna B.
This may help you easily identify the channels during selections.
Press HOME MENU.
1
2
Select “Tuner Setup”. ( / then ENTER)
3
Select “Channel Setup”. ( / then ENTER)
4
Select “Ant. B”. ( / then ENTER)
5
Select “Name Channel”. ( / then ENTER)
6
Select a channel. ( / then ENTER)
•You can also use buttons 0 – 9 to enter a channel
number.
Channel Setup
Ant. B
Ant. B Name Channel
7
Enter up to 7 alphanumeric characters using / ,
/ , and ENTER.
•To clear the last character, press B.
Channel Setup
Ant. B
Ant. B Name Channel
Press A.
8
Press HOME MENU to exit the menu.
9
Name Channel
Name Channel
Name: DTV2
A BCDE FGH I J
KLMNOPQRST
UVWXYZ 12 34
567890 .@/ (
),–_:'&
ClearAccept
SPACE
DBA
Cancel
xxxxxxxxxxxxxxxxxxxxx
xxxxxxxxxxxxxxxxxxxxx
xxxxxxxxxxxxxxxxxxxxx
Home Menu
Exit
xxxxxxxxxxxxxxxxxxxxx
xxxxxxxxxxxxxxxxxxxxx
xxxxxxxxxxxxxxxxxxxxx
Home Menu
Exit
Checking the Cable Card ID
The Media Receiver has a slot for a cable card that is used for
managing your information by the cable TV company. The
following procedure allows you to check your Cable Card ID and
the Host ID.
Press HOME MENU.
1
2
Select “Tuner Setup”. ( / then ENTER)
3
Select “Channel Setup”. ( / then ENTER)
4
Select “POD ID”. ( / )
• The Host ID and Cable Card ID appear.
Press HOME MENU to exit the menu.
5
Enabling data acquisition
Use this function to enable the system to automatically acquire
information about digital TV programs even when in the standby
mode.
Press HOME MENU.
1
2
Select “Tuner Setup”. ( / then ENTER)
3
Select “Channel Setup”. ( / then ENTER)
4
Select “Data Acqu”. ( / then ENTER)
5
Select “Enabled”. ( / then ENTER)
Press HOME MENU to exit the menu.
6
• The DATA ACQUISITION indicator on the front of the Media
Receiver lights while data is being acquired.
Checking signal strength
When you have selected antenna A, you can check the current
channel’s signal strength. You may use this function when
receiving a channel through a VHF/UHF antenna.
Press HOME MENU.
1
2
Select “Tuner Setup”. ( / then ENTER)
3
Select “Channel Setup”. ( / then ENTER)
4
Select “Ant. A”. ( / then ENTER)
5
Select “Signal Strength”. ( / then ENTER)
Channel Setup
Ant. A
Ant. A
Signal Strength
• Adjust the direction of the antenna so that the current
signal strength reaches as close to the maximum signal
strength as possible.
Press HOME MENU to exit the menu.
6
Signal Strength
Maximum: 100
Current: 100
xxxxxxxxxxxxxxxxxxxxx
xxxxxxxxxxxxxxxxxxxxx
xxxxxxxxxxxxxxxxxxxxx
Home Menu
Exit
32
En

09Tuner Setup
Parental Control
With the Parental Control, parents can prevent their children
from watching inappropriate TV programs, VCR or DVD
contents. When an attempt is made to watch a program (or
content) blocked by parents, the Plasma Display shows nothing
but a message. The Parental Control functions for both
conventional and digital TV channels.
In the U.S. three rating systems have been provided: the TV
ratings, TV Parental Guidelines, and movie ratings. Movie
ratings are provided by the Motion Picture Association of
America (MPAA) and are used for original movies not edited for
television.
For the rating system in Canada, see pages 36 and 37.
Voluntary movie rating system (MPAA)
Rating Description
G General audiences. All ages admitted.
PG Parental guidance suggested. Some material
may not be suitable for children.
PG-13 Parents strongly cautioned. Some material
may be inappropriate for children under 13.
Age-Base R Restricted. Under 17 requires accompanying
NC-17 No one 17 and under admitted.
Adult A rating that has now been superseded by
NR Not rated.
• The voluntary movie rating system only uses an age-based rating.
TV ratings
Rating Description
TV-Y All children
TV-Y7 Children 7 and above
Age-Base
TV-G General audiences
TV-PG Parental guidance suggested
TV-14 Parents strongly cautioned
TV-MA Mature audiences only
parent or adult guardian (age varies in some
jurisdictions).
NC-17.
TV Parental Guidelines
Content
FV V S L D
Rating
TV-Y
(All children)
TV-Y7
(Directed to older children)
TV-G
Age-Base (General audience)
TV-PG
(Parental guidance suggested)
TV-14
(Parents strongly cautioned)
TV-MA
(Mature audience only) XXX
X: Content rating can be set.
(Fantasy (Violence) (Sexual (Adult (Sexually
violence) situations) language) suggestive
dialog)
X
X XXX
X XXX
Changing the password
Using a password prevents other persons from changing
Parental Control settings. A default password (1234) has been
set before shipment. Use the following procedure to change the
password.
Press HOME MENU.
1
2
Select “Tuner Setup”. ( / then ENTER)
3
Select “Parental Control”. ( / then ENTER)
4
Select “Password”. ( / then ENTER)
5
Select “Change Password”. ( / then ENTER)
Parental Control
Password
Enter the current 4-digit password, using buttons 0 – 9.
6
Enter a 4-digit password to be newly set, using buttons
7
0 – 9.
Enter the same password that you have entered in step 7.
8
•A confirmation screen appears.
Press A.
9
Press HOME MENU to exit the menu.
10
Password
Change Password
Clear Password
xxxxxxxxxxxxxxxxxxxxx
xxxxxxxxxxxxxxxxxxxxx
xxxxxxxxxxxxxxxxxxxxx
Home Menu
Exit
English
•Take a note of the newly set password and keep it handy.
33
En

09 Tuner Setup
Clearing the password
Use the following procedure to clear the password.
Press HOME MENU.
1
2
Select “Tuner Setup”. ( / then ENTER)
3
Select “Parental Control”. ( / then ENTER)
4
Select “Password”. ( / then ENTER)
5
Select “Clear Password”. ( / then ENTER)
Parental Control
Password
Enter the current 4-digit password, using buttons 0 – 9.
6
Password
Change Password
Clear Password
xxxxxxxxxxxxxxxxxxxxx
xxxxxxxxxxxxxxxxxxxxx
xxxxxxxxxxxxxxxxxxxxx
Home Menu
Exit
•A confirmation screen appears.
Press A.
7
Press HOME MENU to exit the menu.
8
• The above procedure will reset the password to the factory default
(1234).
Activating the Parental Control
Press HOME MENU.
1
2
Select “Tuner Setup”. ( / then ENTER)
3
Select “Parental Control”. ( / then ENTER)
4
Select “Status”. ( / then ENTER)
5
Select “On”. ( / then ENTER)
• The password entry screen appears. Enter your 4-digit
password using buttons 0 – 9.
Press HOME MENU to exit the menu.
6
Setting the voluntary movie rating system
(MPAA)
Press HOME MENU.
1
2
Select “Tuner Setup”. ( / then ENTER)
3
Select “Parental Control”. ( / then ENTER)
4
Select “MPAA Ratings”. ( / then ENTER)
5
Select the desired rating and change the setting. ( /
then ENTER)
Parental Control
MPAA Ratings
• The password entry screen appears. Enter your 4-digit
password using buttons 0 – 9.
• Each time you press ENTER, the setting is switched.
•A lock icon appears beside the blocked rating.
• All the ratings have been unblocked before shipment.
Press HOME MENU to exit the menu.
6
• Blocking a rating causes more severe ratings to be automatically
blocked as well. Likewise, unblocking a rating causes less severe
ratings to be automatically unblocked.
MPAA Ratings
G
PG
PG-13
Blocked MPAA Ratings
G, PG, PG-13, R, NC-17, Adult, NR
xxxxxxxxxxxxxxxxxxxxx
xxxxxxxxxxxxxxxxxxxxx
xxxxxxxxxxxxxxxxxxxxx
Home Menu
Exit
• If you select “Off” in step 5, then select “Reset on Startup” or “Don’t
Reset”. With “Reset on Startup” selected, the Parental Control is
automatically activated when the power to the system is turned off
and on. With “Don’t Reset” selected, the Parental Control remains off
when the power to the system is off and on.
We suggest you write down your password so you don’t forget it.
PDP-5045HD/PDP-4345HD
Your password No.:
34
En
If you forget the password
When the message “Enter your Password” is displayed in
step 6 under “Clearing the password”, press the ENTER
button on the remote control unit and hold it down for 3
seconds or longer.
The password reverts to “1234”.

09Tuner Setup
Setting the TV ratings
Press HOME MENU.
1
2
Select “Tuner Setup”. ( / then ENTER)
3
Select “Parental Control”. ( / then ENTER)
4
Select “TV Ratings”. ( / then ENTER)
5
Select the desired rating and change the setting. ( /
then ENTER)
Parental Control
TV Ratings
• The password entry screen appears. Enter your 4-digit
password using buttons 0 – 9.
• Each time you press ENTER, the setting is switched.
•A lock icon appears beside the blocked rating.
• All the ratings have been unblocked before shipment.
Press HOME MENU to exit the menu.
6
• Blocking a rating causes more severe ratings to be automatically
blocked as well. Likewise, unblocking a rating causes less severe
ratings to be automatically unblocked.
TV Ratings
TV-Y
TV-Y7
TV-G
TV-PG
Blocked TV Ratings
xxxxxxxxxxxxxxxxxxxxx
xxxxxxxxxxxxxxxxxxxxx
xxxxxxxxxxxxxxxxxxxxx
Home Menu
Exit
Blocking Not Rated TV programs
Use the following procedure to block TV programs whose rating
information is unavailable.
Press HOME MENU.
1
2
Select “Tuner Setup”. ( / then ENTER)
3
Select “Parental Control”. ( / then ENTER)
4
Select “Unavailable Ratings”. ( / then ENTER)
5
Select “Block” or “Don’t Block”. ( / then ENTER)
Parental Control
Unavailable Ratings
• The password entry screen appears. Enter your 4-digit
password using buttons 0 – 9.
The factory default is “Don’t Block”.
•
Press HOME MENU to exit the menu.
6
Unavailable Ratings
Block
Don’t Block
xxxxxxxxxxxxxxxxxxxxx
xxxxxxxxxxxxxxxxxxxxx
xxxxxxxxxxxxxxxxxxxxx
Home Menu
Exit
English
Setting the TV Parental Guidelines (TV
Guidelines)
Press HOME MENU.
1
2
Select “Tuner Setup”. ( / then ENTER)
3
Select “Parental Control”. ( / then ENTER)
4
Select “TV Parental Guidelines”. ( / then ENTER)
5
Select the desired rating and change the setting. ( /
then ENTER)
Parental Control
TV Parental Guidelines
• The password entry screen appears. Enter your 4-digit
password using buttons 0 – 9.
• Each time you press ENTER, the setting is switched.
•A lock icon appears beside the blocked rating.
• All the ratings have been unblocked before shipment.
Press HOME MENU to exit the menu.
6
• Blocking a rating causes more severe ratings to be automatically
blocked as well. Likewise, unblocking a rating causes less severe
ratings to be automatically unblocked.
TV Parental Guidelines
Fantasy Violence
Violence
Sexual Situations
Blocked TV Parental Guidelines
xxxxxxxxxxxxxxxxxxxxx
xxxxxxxxxxxxxxxxxxxxx
xxxxxxxxxxxxxxxxxxxxx
Home Menu
Exit
35
En

09 Tuner Setup
Canadian rating systems
In Canada you can choose the Canadian English ratings or the
Canadian French ratings. These ratings are based on the
Canadian Radio-Television and Telecommunications
Commission (CRTC) policy.
Canadian English ratings
Rating Description
Age-Base
E Exempt: Includes news, sports, documenta-
C Children: Intended for younger children
C8+ Children over 8 years old: Contains no
G General: Considered acceptable for all age
PG Parental Guidance: Intended for a general
14 + Over 14 Years: Could contain themes where
18 + Adults: Intended for viewers 18 years and
ries and other information programming; talk
shows, music videos, and variety
programming.
under the age of 8 years. Pays careful
attention to themes that could threaten their
sense of security and well-being.
portrayal of violence as the preferred,
acceptable, or only way to resolve conflict;
nor encourage children to imitate dangerous
acts which they may see on the screen.
groups. Appropriate viewing for the entire
family, contains very little violence, physical,
verbal or emotional.
audience, but may not be suitable for
younger children (under the age of 8)
because it could contain controversial
themes or issues.
violence is one of the dominant elements of
the storyline, but it must be integral to the
development of plot or character. Language
usage could be profane and nudity present
within the context of the theme.
older and might contain depictions of
violence, which while related to the development of plot, character or themes, are
intended for adult viewing. Could contain
graphic language and portrayals of sex and
nudity.
Canadian French ratings
Rating Description
E Exempt programming.
G General: All ages and children, contains
minimal direct violence, but may be
integrated into the plot in a humorous or
unrealistic manner.
8ans+ General but inadvisable for young children:
May be viewed by a wide public audience,
but could contain scenes disturbing to
children under eight who cannot distinguish
Age-Base
between imaginary and real situations.
Recommended for viewing with parent.
13ans+ Over 13 years: Could contain scenes of
frequent violent scenes and therefore
recommended for viewing with parent.
16ans+ Over 16 years: Could contain frequent
violent scenes and intense violence.
18ans+ Over 18 years: Only for adult viewing. Could
contain frequent violent scenes and extreme
violence.
Setting Canadian English ratings
Press HOME MENU.
1
2
Select “Tuner Setup”. ( / then ENTER)
3
Select “Parental Control”. ( / then ENTER)
4
Select “Canadian English Ratings”. ( / then ENTER)
5
Select the desired rating and change the setting. ( /
then ENTER)
Parental Control
Canadian English Ratings
• The password entry screen appears. Enter your 4-digit
password using buttons 0 – 9.
• Each time you press ENTER, the setting is switched.
•A lock icon appears beside the blocked rating.
• All the ratings have been unblocked before shipment.
Press HOME MENU to exit the menu.
6
Canadian English Ratings
E
C
C8+
Blocked Canadian English Ratings
xxxxxxxxxxxxxxxxxxxxx
xxxxxxxxxxxxxxxxxxxxx
xxxxxxxxxxxxxxxxxxxxx
Home Menu
Exit
36
En

09Tuner Setup
Setting Canadian French ratings
Press HOME MENU.
1
2
Select “Tuner Setup”. ( / then ENTER)
3
Select “Parental Control”. ( / then ENTER)
4
Select “Canadian French Ratings”. ( / then ENTER)
5
Select the desired rating and change the setting. ( /
then ENTER)
Parental Control
Canadian French Ratings
Canadian French Ratings
E
G
8 ans+
Blocked Canadian French Ratings
E, G, 8 ans+, 13 ans+, 16 ans+, 18
ans+
xxxxxxxxxxxxxxxxxxxxx
xxxxxxxxxxxxxxxxxxxxx
xxxxxxxxxxxxxxxxxxxxx
Home Menu
Exit
• The password entry screen appears. Enter your 4-digit
password using buttons 0 – 9.
• Each time you press ENTER, the setting is switched.
•A lock icon appears beside the blocked rating.
• All the ratings have been unblocked before shipment.
Press HOME MENU to exit the menu.
6
Temporarily deactivating the Parental Control
When the Parental Control is working and censors a blocked TV
program (or content), the Plasma Display shows nothing but a
message.
The method for temporarily deactivating the Parental Control
differs, depending on the currently selected input source.
Antenna A, antenna B, or i.LINK:
Press ENTER and then enter your 4-digit password.
Parental Control
WWWWWWW
1000.0000
(Ant. B)
xxxxxxxxxxxxxxxxxxxxx
xxxxxxxxxxxxxxxxxxxxx
xxxxxxxxxxxxxxxxxxxxx
Enter
Disable Parental Control
Setting your favorite channels
Set up to 10 TV channels to each of the four color buttons on
the remote control unit (40 channels in total). You can then
quickly select from only your favorite channels.
Press HOME MENU.
1
2
Select “Tuner Setup”. ( / then ENTER)
3
Select “Favorites”. ( / then ENTER)
4
Select a color button (A, B, C, D). ( / then ENTER)
5
Select a TV channel to be registered. ( / then ENTER)
A 2.0
A 4.0
A 6.0
A
Current Favorites A Line Up
A4.0 A6.0
xxxxxxxxxxxxxxxxxxxxx
xxxxxxxxxxxxxxxxxxxxx
xxxxxxxxxxxxxxxxxxxxx
Home Menu
Exit
Favorites Favorites
A
Favorites
•A star appears beside the favorite channels currently
selected.
•To register another TV channel under the same color
button, repeat step 5. To register another TV channel
under a different color button, repeat steps 4 and 5.
Press HOME MENU to exit the menu.
6
Setting up closed captions
Your Plasma Display System is equipped with an internal closed
caption decoder. Closed caption allows you to view
conversations, narration, and sound effects in TV programs and
home videos as subtitles on your Plasma Display screen.
You may enjoy digital closed captions when watching digital TV
programs. Digital closed captions allow you to change
parameters such as fonts and colors.
• Not all programs and videos offer closed caption. Please look
for the “
” symbol to ensure that captions will be shown.
English
• The password entry screen stays only for one minute. After
the screen disappears, pressing ENTER causes it to appear
again.
Input 1 – 4:
Enter your 4-digit password. You need not press ENTER first,
pressing ENTER causes the password entry screen to
disappear.
Please Input Your Password.
• The above password entry screen will also be shown during
2-screen mode, picture-in-picture, and while freezing an
image.
• The password entry screen stays only for one minute. After
the screen disappears, pressing ENTER causes it to appear
again.
37
En

09 Tuner Setup
Activating the closed caption
Press HOME MENU.
1
2
Select “Tuner Setup”. ( / then ENTER)
3
Select “Closed Captions”. ( / then ENTER)
4
Select “Status”. ( / then ENTER)
5
Select “On” or “On If Mute”. ( / then ENTER)
Closed Captions
Status
Status
Off
On
On If Mute
xxxxxxxxxxxxxxxxxxxxx
xxxxxxxxxxxxxxxxxxxxx
xxxxxxxxxxxxxxxxxxxxx
Home Menu
Exit
Item Description
Off Does not show closed captions.
(factory default)
On Always shows closed captions.
On If Mute Shows closed captions only while sound is
being muted.
Press HOME MENU to exit the menu.
6
•For MONITOR OUT, only conventional closed caption signals are
output; digital closed caption signals are not output.
Selecting the type of conventional closed
captions
Select the type of conventional closed captions that you will
watch after tuning to a conventional TV channel. This selection
also becomes effective when a selected digital TV program
provides only conventional closed captions.
• “CC1”, “CC2”, “CC3”, or “CC4” displays subtitles of TV dramas
and news programs while allowing a full view of the picture.
•“Text1”, “Text2”, “Text3”, or “Text4” superimposes on the
picture other information (e.g. TV guide, weather) that is
independent of the TV in progress.
Press HOME MENU.
1
2
Select “Tuner Setup”. ( / then ENTER)
3
Select “Closed Captions”. ( / then ENTER)
4
Select “Analog Settings”. ( / then ENTER)
5
Select the desired closed caption. ( / then ENTER)
Selecting digital closed captions
Use the following procedure to select digital closed captions.
Press HOME MENU.
1
2
Select “Tuner Setup”. ( / then ENTER)
3
Select “Closed Captions”. ( / then ENTER)
4
Select “Digital Settings”. ( / then ENTER)
5
Select “Digital Service”. ( / then ENTER)
6
Select the desired closed caption. ( / then ENTER)
Closed Captions
Digital Settings Digital Ser vice
Digital Settings
Digital Service
Service 1
Service 2
Service 3
Service 4
Service 5
xxxxxxxxxxxxxxxxxxxxx
xxxxxxxxxxxxxxxxxxxxx
xxxxxxxxxxxxxxxxxxxxx
Home Menu
Exit
• The factory default is “Service 1”.
Press HOME MENU to exit the menu.
7
• The Primary Caption Service is usually offered for Service 1,
and the Secondary Language Service is usually offered for
Service 2 if these services are available.
Selecting digital closed caption parameters
Use the following procedure to change such parameters of
digital closed captions as font size, font type, foreground and
background colors.
Press HOME MENU.
1
2
Select “Tuner Setup”. ( / then ENTER)
3
Select “Closed Captions”. ( / then ENTER)
4
Select “Digital Settings”. ( / then ENTER)
5
Select “Font Size”, “Font”, or any other item. ( / then
ENTER)
6
Select the desired parameter. ( / then ENTER)
Closed Captions
Digital Settings Font Size
7
Repeat steps 5 and 6 as necessary. ( , / )
Press HOME MENU to exit the menu.
8
Digital Settings
Font Size
Large
Standard
Small
xxxxxxxxxxxxxxxxxxxxx
xxxxxxxxxxxxxxxxxxxxx
xxxxxxxxxxxxxxxxxxxxx
Home Menu
Exit
38
En
Closed Captions
Analog Settings
Analog Settings
CC1
CC2
CC3
CC4
Text 1
• The factory default is “CC1”.
Press HOME MENU to exit the menu.
6
xxxxxxxxxxxxxxxxxxxxx
xxxxxxxxxxxxxxxxxxxxx
xxxxxxxxxxxxxxxxxxxxx
Home Menu
Exit

09Tuner Setup
The following table shows the parameters selectable for each
item.
Item Selection
Font Size Auto/ Large/ Standard/ Small
1
Font
Auto/ Font 1/ Font 2/ Font 3/ Font 4/
Font 5/ Font 6/ Font 7
Font
Color
Auto/ Black/ White/ Red/ Green/ Blue/
Yellow/ Magenta/ Cyan
Font
Opacity
Auto/ Solid/ Transparent/ Translucent/
Flashing
Background Color
Auto/ Black/ White/ Red/ Green/ Blue/
Yellow/ Magenta/ Cyan
Background Opacity
1
Font 1 (monospaced with serifs)/ Font 2 (proportionally spaced with
serifs)/ Font 3 (monospaced without serifs)/ Font 4 (proportionally
spaced without serifs)/ Font 5 (casual font)/ Font 6 (cursive font)/
Font 7 (small capitals font)
Auto/ Solid/ Transparent/ Translucent
With “Auto” selected, parameters specified by the provider are
used; if not specified by the provider, the bolded default
parameters are used. If you select parameters other than
“Auto”, the selected parameters are used regardless of
provider’s specifications.
Clock Setting
With “Auto Set” selected for Clock Setting, the system acquires
and sets time information automatically. You can also manually
set the correct time. If you disconnect the power cord from the
power outlet or power blackout occurs, the set time is cleared.
Press HOME MENU.
1
2
Select “Tuner Setup”. ( / then ENTER)
3
Select “Clock”. ( / then ENTER)
4
Select “Time Zone”. ( / then ENTER)
5
Select a time zone for your area. ( / then ENTER)
Clock
Time Zone
Time Zone
Atlantic
Eastern
Central
Mountain
Current Time:
9:55 pm EDT
Monday
05/17/04
xxxxxxxxxxxxxxxxxxxxx
xxxxxxxxxxxxxxxxxxxxx
xxxxxxxxxxxxxxxxxxxxx
Home Menu
Exit
7
Select “Applies” or “Does Not Apply”. ( / then ENTER)
• Make this selection, depending on whether summer
time is employed in your area.
Daylight Savings Time
Clock
Current Time:
D.S.T.
8
Select “Auto/Manual Set”. ( , / , then ENTER)
9
Select “Auto Set” or “Manual Set”. ( / then ENTER)
If you select “Auto Set”, select an antenna (A or B) and a
10
channel number using
Clock
Auto/Manual Set
Applies
Does Not Apply
/ and ENTER.
Auto/Manual Set
•Auto Set 2.0
Clock Set Channel
Ant. A
9:56 pm EDT
Monday
05/17/04
Current Time:
11:58 pm PDT
Monday
05/17/04
xxxxxxxxxxxxxxxxxxxxx
xxxxxxxxxxxxxxxxxxxxx
xxxxxxxxxxxxxxxxxxxxx
Home Menu
Exit
xxxxxxxxxxxxxxxxxxxxx
xxxxxxxxxxxxxxxxxxxxx
xxxxxxxxxxxxxxxxxxxxx
Home Menu
Exit
• The date and time will be automatically corrected using
data from the selected channel.
If you select “Manual Set”, manually set the date and
time using
Clock
Auto/Manual Set
Press HOME MENU to exit the menu.
11
• When the time has not been set, the REC TIMER indicator on the
front of the Media Receiver blinks.
• When the time has not yet been set, you cannot view channel banner
information, use auto channel select, and preset TV programs for
recording.
/ , / and ENTER.
Auto/Manual Set
•Manual Set
Date and Time
3
4
3 /17/04
5
6
11:58pm
Current Time:
11:58 pm PDT
Monday
05/17/04
xxxxxxxxxxxxxxxxxxxxx
xxxxxxxxxxxxxxxxxxxxx
xxxxxxxxxxxxxxxxxxxxx
Home Menu
Exit
English
6
Select “D.S.T.” ( , / , then ENTER)
39
En

10 Adjustments and Settings
Sleep Timer
When the selected time elapses, the Sleep Timer automatically
places the system into the standby mode.
Press SLEEP to select the desired time.
• The timer starts counting.
• Each time you press SLEEP, the selection is switched as
below:
You can also use the menu to change the options.
Press HOME MENU.
1
2
Select “Picture”. ( / then ENTER)
3
Select “AV Selection”. ( / then ENTER)
4
Select the desired option. ( / then ENTER)
AV Selection
30 60 90
(cancel)
• The factory default is “Off”.
•To cancel the Sleep Timer, select “Off” by pressing SLEEP.
•Five minutes before the selected time elapses, the remaining time
appears every minute.
You can also use the menu to set the Sleep Timer.
Press HOME MENU.
1
2
Select “Sleep Timer”. ( / then ENTER)
3
Select the desired time. ( / then ENTER)
Press HOME MENU to exit the menu.
4
Off
120
(minutes)
AV Selection
Select from the five viewing options, depending on the current
environment (e.g., room brightness), the type of the current TV
program, or the type of images input from external equipment.
Press AV SELECTION.
1
• The current AV Selection mode appears.
Press AV SELECTION again before the displayed mode
2
disappears.
•For AV source, the mode is switched in the order;
STANDARD, DYNAMIC, MOVIE, GAME, then USER.
•For PC source, the mode is switched between
STANDARD and USER.
STANDARD
DYNAMIC
MOVIE
GAME
USER
For AV source
Item Description
STANDARD For a highly defined image in a normally
DYNAMIC For a very sharp image with the maximum
MOVIE For a movie
GAME Lowers image brightness for easier viewing.
USER Allows the user to customize settings as
bright room
contrast
This mode does not allow manual image
quality adjustment.
desired. You can set the mode for each input
source.
For PC source
Item Description
STANDARD For a highly defined image in a normally
(factory default) bright room
USER Allows the user to customize settings as
desired. You can set the mode for each input
source.
Press HOME MENU to exit the menu.
5
40
En

10Adjustments and Settings
Picture adjustments
Adjust the picture to your preference for the chosen AV
Selection option (except DYNAMIC).
Press HOME MENU.
1
2
Select “Picture”. ( / then ENTER)
3
Select an item to be adjusted. ( / then ENTER)
Picture
AV Selection
Contrast
Brightness
Color
Tint
Sharpness
Pro Adjust
Reset
For PC source, the following screen appears:
Picture
AV Selection
Contrast
Brightness
Red
Green
Blue
Reset
STANDARD
40
0
0
0
0
STANDARD
40
0
0
0
0
For PC source
Item button button
Contrast For less contrast For more contrast
Brightness For less brightness For more brightness
Red For weaker red For stronger red
Green For weaker green For stronger green
Blue For weaker blue For stronger blue
•To make settings for “PureCinema”, “Color Temp”, “MPEG NR”,
“DNR”, “CTI”, and “DRE”, select “Pro Adjust” in step 3, and then press
ENTER. For the subsequent procedures, see “Pro Adjust”.
•To restore the factory defaults for all the items, press
“Reset” in step 3, and then press ENTER. A confirmation screen
appears. Press / to select “Yes”, and then press ENTER.
/ to select
Pro Adjust
This system provides various advanced functions for optimizing
the picture quality.
Press HOME MENU.
1
2
Select “Picture”. ( / then ENTER)
3
Select “Pro Adjust”. ( / then ENTER)
4
Select an item to be adjusted. ( / then ENTER)
•You can select “PureCinema”, “Color Temp”,
“MPEG NR”, “DNR”, “CTI”, or “DRE”.
5
Select the desired parameter. ( / then ENTER)
•For the selectable parameters, see the table.
English
4
Select the desired level. ( / then ENTER)
Contrast
• When an adjustment screen is in display, you can also
change an item to be adjusted, by pressing
Press HOME MENU to exit the menu.
5
/ .
For AV source
Item button button
Contrast For less contrast For more contrast
Brightness
Color For less color intensity For more color intensity
Tint
Sharpness
For less brightness For more brightness
Skin tones become Skin tones become
purplish greenish
For less sharpness For more sharpness
40
PureCinema
Automatically detects a film-based source (originally encoded at
24 frames/second), analyzes it, then recreates each still film
frame for high-definition picture quality.
Selections Off Deactivates the PureCinema.
Standard Produces smooth and vivid moving
images (film specific) by
automatically detecting recorded
image information when displaying
DVD or 1080i HDTV images (e.g.,
movies) having 24 frames per
second.
ADV Produces smooth and quality moving
images (as shown on theater
screens) by converting to 72 Hz
when displaying DVD images (e.g.,
movies) having 24 frames per
second.
Remark You cannot select “Standard” when 480p or 720p
signals are being input.
41
En

10 Adjustments and Settings
Color Temp
Adjusts the color temperature, resulting in a better white
balance.
Selections High White with bluish tone
Mid Natural tone
Low White with reddish tone
MPEG NR
Eliminates mosquito noise from video images when a digital TV
channel is watched or a DVD is played, resulting in noise-free
images.
Selections Off Deactivates the MPEG NR.
On Activates the MPEG NR.
DNR
Eliminates video noise for clean crisp images. The DNR stands
for Digital Noise Reduction.
Selections Off Deactivates the DNR.
High Enhanced DNR
Mid Standard DNR
Low Moderate DNR
CTI
Provides images with clearer color contours. The CTI stands for
Color Transient Improvement.
Sound adjustments
Adjust the sound to your preference for the chosen AV
Selection option. See page 40.
Press HOME MENU.
1
2
Select “Sound”. ( / then ENTER)
3
Select an item to be adjusted. ( / )
4
Select the desired level. ( / )
Sound STANDARD
Treble
Bass
Balance
Reset
FOCUS
Front Surround
Item button button
Tr eble For weaker treble For stronger treble
Bass For weaker bass For stronger bass
Balance Decreases audio from Decreases audio from
the right speaker the left speaker
Press HOME MENU to exit the menu.
5
2
0
0
Off
Off
Selections Off Deactivates the CTI.
On Activates the CTI.
DRE
Adjusts dark and bright portions on images so that the contrast
between brightness and darkness becomes clearer.
Selections Off Deactivates the DRE.
On Activates the DRE.
•To restore the factory defaults for all the items, press / to select
“Reset” in step 3, and then press ENTER. A confirmation screen
appears. Press / to select “Yes”, and then press ENTER.
42
En

10Adjustments and Settings
FOCUS
This shifts the sound coming direction (sound images) upward
and produces clear sound contours.
Press HOME MENU.
1
2
Select “Sound”. ( / then ENTER)
3
Select “FOCUS”. ( / )
4
Select the desired parameter. ( / )
Item Description
Off Deactivates the FOCUS.
(factory default)
On Activates the FOCUS.
Press HOME MENU to exit the menu.
5
Front Surround
This provides three-dimensional sound effects and/or deep, rich
bass.
Press HOME MENU.
1
2
Select “Sound”. ( / then ENTER)
3
Select “Front Surround”. ( / )
4
Select the desired parameter. ( / )
Item Description
Off Deactivates both the SRS and TruBass.
SRS Reproduces highly effective three-
dimensional sound.
TruBass Provides deep, rich bass using a new
(factory default) technology.
TruBass + SRS Provides both TruBass and SRS effects.
Press HOME MENU to exit the menu.
5
• (WOW) designates a status where the FOCUS is on and
TruBass + SRS has been selected for Front Surround.
• is a trademark of SRS Labs, Inc.
• WOW technology is incorporated under license from SRS Labs, Inc.
Power Control
Power Control provides convenient functions for power saving.
Energy Save
You can save power consumption by decreasing the picture
brightness. When you need not watch the screen and want to
enjoy only audio, you can also deactivate the screen.
Press HOME MENU.
1
2
Select “Power Control”. ( / then ENTER)
3
Select “Energy Save”. ( / then ENTER)
4
Select “Save” or “Picture Off”. ( / then ENTER)
Item Description
Standard Does not decrease picture brightness.
(factory default)
Save Decreases picture brightness to save power.
Picture Off Deactivates the screen to save power. To
restore the screen display, press any button
other than VOL +/– and MUTING.
This setting is not memorized by the system.
Press HOME MENU to exit the menu.
5
•You can also select this function using the Home menu when the
input source is a PC.
No Signal off (AV mode only)
The system will be automatically placed into the standby mode
if no signal is received for 15 minutes.
Press HOME MENU.
1
2
Select “Power Control”. ( / then ENTER)
3
Select “No Signal off”. ( / then ENTER)
4
Select “Enable”. ( / then ENTER)
Item Description
Disable Does not place the system into the
(factory default) standby mode.
Enable Places the system into the standby mode if
no signal is received for 15 minutes.
English
Press HOME MENU to exit the menu.
5
•Five minutes before the system is placed into the standby mode, a
message appears every minute.
• The system may not be placed into the standby mode when noise
signals are present at the Media Receiver after a TV program finishes.
43
En

10 Adjustments and Settings
No Operation off (AV mode only)
The system will be automatically placed into the standby mode
when no operation is performed for three hours.
Press HOME MENU.
1
2
Select “Power Control”. ( / then ENTER)
3
Select “No Operation off”. ( / then ENTER)
4
Select “Enable”. ( / then ENTER)
Item Description
Disable Does not place the system into the
(factory default) standby mode.
Enable Places the system into the standby mode if
Press HOME MENU to exit the menu.
5
•Five minutes before the system is placed into the standby mode, a
message appears every minute.
no operation is performed for three hours.
Power Management (PC mode only)
The system will be automatically placed into the standby mode
when no signal is received from the personal computer.
Press HOME MENU.
1
2
Select “Power Control”. ( / then ENTER)
3
Select “Power Management”. ( / then ENTER)
4
Select “Mode1” or “Mode2”. ( / then ENTER)
Item Description
Off No power management
(factory default)
Mode1 • Places the system into the standby mode
when no signal is received from the
personal computer for eight minutes.
• Even when you start using the computer
and a signal is received again, the system
stays off.
• The system is switched on again by
pressing STANDBY/ON on the Plasma
Display or TV
unit.
Mode2 • Places the system into the standby mode
when no signal is received for eight
seconds.
• When you start using the computer and a
signal is received again, the system is
switched on.
• The system is switched on again by
pressing STANDBY/ON on the Plasma
Display or TV
unit.
on the remote control
on the remote control
Adjusting image positions
(AV mode only)
Adjust the horizontal and vertical positions of images on the
Plasma Display.
Press HOME MENU.
1
2
Select “Option”. ( / then ENTER)
3
Select “Position”. ( / then ENTER)
4
Select “H/V Position Adjust”. ( / then ENTER)
Position
H/V Position Adjust
Reset
5
Adjust the vertical position ( / ) or horizontal position
(
/ ).
Press HOME MENU to exit the menu.
6
•To restore the factory defaults for all the items, press / to select
“Reset” in step 4, and then press ENTER. A confirmation screen
appears. Press / to select “Yes”, and then press ENTER.
• Adjustments are stored separately according to input source.
44
En
Press HOME MENU to exit the menu.
5

Adjusting image positions and clock
automatically (PC mode only)
Use Auto Setup to automatically adjust positions and clock of
images coming from a personal computer.
Press HOME MENU.
1
2
Select “Option”. ( / then ENTER)
3
Select “Auto Setup”. ( / then ENTER)
Option
Auto Setup
Manual Setup
• Auto Setup starts.
Press HOME MENU to exit the menu.
4
• When Auto Setup is finished, “Auto Setup completed.” appears.
• Even when “Auto Setup completed.” appears, Auto Setup may have
failed, depending on conditions.
• Auto Setup may fail with a PC image composed of similar patterns or
monochrome. If not successful, change the PC image and try again.
• Be sure to connect the computer to the Media Receiver and switch it
on before starting Auto Setup.
5
Perform adjustment. ( / and / )
• Use
Press HOME MENU to exit the menu.
6
•To restore the factory defaults for all the items, press / to select
“Reset” in step 4, and then press ENTER. A confirmation screen
appears. Press / to select “Yes”, and then press ENTER.
/ only when you adjust the vertical position
after selecting “H/V Position Adjust”.
10Adjustments and Settings
English
Adjusting image positions and clock
manually (PC mode only)
Usually you can easily adjust the positions and clock of images
using Auto Setup. Use Manual Setup to optimize the positions
and clock of images when necessary.
Press HOME MENU.
1
2
Select “Option”. ( / then ENTER)
3
Select “Manual Setup”. ( / then ENTER)
4
Select an item to be adjusted. ( / then ENTER)
Manual Setup
H/V Position Adjust
Clock
Phase
Reset
0
0
45
En

10 Adjustments and Settings
AV mode
4:3
WIDE FULL
CINEMA ZOOM
PC mode except for XGA signals
4:3
Dot by
Dot
FULL
Selecting a screen size
In single-screen mode, press SCREEN SIZE to change the size
of the screen from among the selectable options for the type of
video signals currently received.
• The selectable screen sizes differ depending on the types of
input signals.
AV mode
Item Description
4:3 For 4:3 “standard” pictures. A side bar appears on
each side.
FULL For 16:9 squeeze pictures.
ZOOM For 16:9 letterbox pictures. Bars may appear on the
top and bottom with some programs.
CINEMA For 14:9 letterbox pictures. Bars may appear on the
top and bottom on some programs.
WIDE In this mode pictures are progressively stretched
toward each side of the screen.
PC mode except for XGA signals
Item Description
4:3 Fills the screen without altering the input signal
aspect ratio.
FULL Full 16:9 screen display
Dot by Dot Matches input signal with same number of screen
pixels.
PC mode for XGA signals
FULL2 FULL1
4:3
PC mode for XGA signals
(Ex. 1024 × 768 input at PDP-5045HD)
Item Description
4:3 Matches input signal with the same number of
screen pixels.
Optimized for 1024 × 768 display
FULL1 Full 16:9 screen display
Optimized for 1024 × 768 display
FULL2 For wide signal display
Use when displaying 1280 × 768 signal resolution.
• In 2-screen mode, press SCREEN SIZE to change the size of left
screen.
• The PC mode above is for the PDP-5045HD. For the PDP-4345HD the
number of panel pixels is different, so signal processing and actual
viewing conditions will vary slightly.
• While watching High Definition TV broadcasting, pressing SCREEN
SIZE switches between FULL and WIDE.
• If you watch High Definition TV broadcasting with WIDE selected,
part of the screen (e.g., images, graphic interface) can be missed. If
this is the case, select FULL.
46
En

10Adjustments and Settings
Changing the brightness at both sides of
the screen (Side Mask)
With the 4:3 screen size selected for the AV mode, you can
change the brightness of the gray side masks that appear at
both sides of the screen.
Press HOME MENU.
1
2
Select “Option”. ( / then ENTER)
3
Select “Side Mask”. ( / then ENTER)
4
Select the desired parameter. ( / then ENTER)
Item Description
Fixed Always sets the same brightness for the
(factory default) gray side masks.
Auto Adjusts the brightness of the gray side masks
according to the brightness of images.
Press HOME MENU to exit the menu.
5
Language setting
You can select a language to be used for on-screen display such
as menus from among three languages: English, French, and
Spanish.
Press HOME MENU.
1
2
Select “Option”. ( / then ENTER)
3
Select “Language”. ( / then ENTER)
4
Select a language. ( / )
English
Language
Menu
Press HOME MENU to exit the menu.
5
English
47
En

11 Timer Presetting
Presetting TV programs using the timer
Using the menu, you can easily preset TV programs for
watching later (auto channel select), recording with a D-VHS
recorder, or recording via the supplied VCR controller.
With the power to the system left on, the Auto Channel Preset
automatically selects the preset TV program when its on-air
time comes. Then you will not miss an important TV program
when you are enjoying another TV program.
For the connections with a D-VHS recorder, see pages 54 and
55. For the connections with the supplied VCR controller, see
page 59.
7
Specify a channel number. ( / then ENTER for each
digit)
Day(s) Start/End Times
Timers
•1
Wed 5/19 3:58p - 10:58p A 2.0 None
8
Select a recording device. ( / then ENTER)
Channel
Recording Device
DBA
Clear TimerSuspend Timer New Timer
xxxxxxxxxxxxxxxxxxxxx
xxxxxxxxxxxxxxxxxxxxx
xxxxxxxxxxxxxxxxxxxxx
Home Menu
•To preset for auto channel select, select “None”.
Exit
•You can make up to 32 presettings in total.
• In steps 4 to 8, you can also press / to move the cursor.
Press HOME MENU.
1
2
Select “Timers”. ( / then ENTER)
3
Select a list number. ( / then ENTER)
Day(s) Start/End Times Channel
Timers
Timers
•1
Mon 5/17 9:58p - 10:58p A 2.0 None
4
Specify a date. ( / then ENTER)
Recording Device
DBA
Clear TimerSuspend Timer New Timer
xxxxxxxxxxxxxxxxxxxxx
xxxxxxxxxxxxxxxxxxxxx
xxxxxxxxxxxxxxxxxxxxx
Home Menu
• The selections include the days of the week (e.g.,
Mondays), “Weekdays”, “Weekends”, and “Everyday”.
Selecting one of these will cause the timer to activate
periodically.
Day(s)
Timers
•1
5
Specify the start and end times. ( / then ENTER for
Start/End Times Channel
Mon. 5/17
Tue. 5/18
Wed. 5/19 9:58p - 10:58p A 2.0 None
Thu. 5/20
Fri. 5/21
Recording Device
DBA
Clear TimerSuspend Timer New Timer
xxxxxxxxxxxxxxxxxxxxx
xxxxxxxxxxxxxxxxxxxxx
xxxxxxxxxxxxxxxxxxxxx
Home Menu
each field)
Day(s) Channel
Timers
•1
Start/End Times
1
2
Wed 5/19 3:58p - 10:58p A 2.0 None
4
5
Recording Device
DBA
Clear TimerSuspend Timer New Timer
xxxxxxxxxxxxxxxxxxxxx
xxxxxxxxxxxxxxxxxxxxx
xxxxxxxxxxxxxxxxxxxxx
Home Menu
Exit
Exit
Exit
Day(s) Start/End Times Channel
Timers
•1
Tue. 5/18 12:03a - 1:03a A 2.0 D-VHS
Press HOME MENU to exit the menu.
9
Recording Device
Name
Advantz
DBA
Clear TimerSuspend Timer New Timer
xxxxxxxxxxxxxxxxxxxxx
xxxxxxxxxxxxxxxxxxxxx
xxxxxxxxxxxxxxxxxxxxx
Home Menu
Exit
An alarm screen appears slightly before the preset timer is
activated. If watching a TV channel through antenna A or B in a
single-screen mode, the screen allows you to cancel the
presetting by pressing D.
Timer Alert
The Following timer is about to begin:
Sun. 1/0 12:00 am – 12:00 am
Ant. A 0.0
A
D
Cancel TimerAccept
The icons beside the list numbers have the following meanings.
Icon Meaning
REC
Preset for recording; no conflicts with other timers
exist.
Preset for auto channel select; no conflicts with
other timers exist.
REC
Preset for recording; conflicts with other timers exist.
Preset for auto channel select; conflicts with other
timers exist.
REC
Preset for recording; the timer start has been
delayed.
Preset for auto channel select; the timer start has
been delayed.
48
En
6
Select antenna A or B. ( / then ENTER)
Day(s) Start/End Times
Timers
•1
Wed 5/19 3:58p - 10:58p A 2.0 None
Channel
DBA
Recording Device
Clear TimerSuspend Timer New Timer
xxxxxxxxxxxxxxxxxxxxx
xxxxxxxxxxxxxxxxxxxxx
xxxxxxxxxxxxxxxxxxxxx
Home Menu
Exit

11Timer Presetting
• If you set a timer to record a future digital program on a VCR, you
must first turn off Parental Control. Otherwise, you will record only a
black screen. See “Temporarily deactivating the Parental Control” on
page 37.
•To change the TV program presetting, repeat the above procedure. To
cancel the presetting, press D after selecting a list number in step 4.
• Switch on the recording equipment at least 30 seconds before the
start of the preset program; otherwise recording will not be executed.
• When presetting for recording, finish the operations two minutes
(one minute for auto channel select) before the start of the program;
otherwise presetting may fail.
• Auto channel select is not executed when the system is in the
standby mode.
•Recording is not executed if recordable D-VHS tape is not present in
the D-VHS recorder when the preset program starts. This is also true
when a specified D-VHS recorder is not in connection.
•For recording with a VCR, confirm that the video output terminals on
the Media Receiver have been connected to the signal input
terminals on the VCR.
•Presettings become ineffective if the start time and the end time are
identical.
Priority rules for overlapped presettings
When preset TV programs are overlapped, the following three
rules are used to determine a higher priority. If more than one of
the three rules are met, the rules are applied in the order; 1, 2,
then 3.
Rule 1: Presetting for recording is given a higher priority over
presetting for auto channel select.
English
Presetting for recording
Presetting for auto
channel select
The shaded area is not executed.
Rule 2: If two presettings are overlapped, presetting with
earlier start time is given a higher priority. If two
presettings are sequential, the last portion of the first
program may not be recorded for 60 seconds (or
less) because recording of the second program is
started at the exact start time.
Program A
Program B
The shaded area is not executed.
Rule 3: If presettings at the same start time are overlapped,
presetting with a higher list number is given a higher
priority.
49
En

12 Enjoying through External Equipment
T
You can connect many types of external equipment to your
Plasma Display System, like a DVD player, VCR, personal
computer, game console, and camcorder.
To view images coming from external equipment, select the
input source using the INPUT buttons on the remote control
(page 14) or the INPUT button on the Plasma Display.
•To protect all equipment, always turn off the system before
connecting to a DVD player, VCR, personal computer, game
console, camcorder, or other external equipment.
•Refer to the relevant instruction manual (DVD player, personal
computer, etc.) carefully before making connections.
Watching a DVD image
Connecting a DVD player
Use the INPUT 1 terminals when connecting a DVD player and
other audiovisual equipment.
AV cable (commercially available)
Media
Receiver
(rear view)
ANTENNA/
Cable
Cable
CARD
CARD
CABLE A IN
NPUT 2
VIDEO
R-AUDIO-L
R-AUDIO-L
VIDEO
(TS)
VIDEO
S-VIDEO
S400
R-AUDIO-L
R-AUDIO-L
INPUT 1
INPUT 3
Component Video cable
(commercially available)
DIGITAL OUT
OPTICAL
COMPONENT VIDEO
CB/P
B
CR/P
R
INPUT 1
YYC
B/PB
CR/P
HDMI
R
Displaying a DVD image
To watch a DVD image, press INPUT 1 on the remote control
unit or press INPUT on the Plasma Display to select INPUT1.
•Refer to your DVD player instruction manual for the signal type.
• The INPUT 1 terminals are checked for cable connections in the
order where; 1) Component Video, 2) S-Video, 3) Video.
• Connect external equipment to only terminals that are to be actually
used.
•You can also use the INPUT 3 terminals when connecting only with
the Component Video output terminals on a DVD player.
Watching a VCR image
Connecting a VCR
Use the INPUT 2 terminals when connecting a VCR and other
audiovisual equipment.
Media Receiver (rear view)
DIGITAL OUT
INPUT 1
INPUT 3
INPUT 3
OPTICAL
COMPONENT VIDEO
CB/P
B
B/PB
YYC
CR/P
R
INPUT 1 INPU
CR/P
HDMI
R
IN OUT
CONTROL
ANTENNA B
SERVICE ONLY
VCR CONTROL
IN
OUT
MONITOR OUT
S-VIDEO INPUT 2
S-VIDEO
ANTENNA/
CABLE A IN
VIDEO
VIDEO
S-Video cable
(commercially available)
Cable
Cable
CARD
CARD
R-AUDIO-L
R-AUDIO-L
(TS)
S-VIDEO
VIDEO
S400
R-AUDIO-L
R-AUDIO-L
AV cable
(commercially available)
50
En
S-Video cable
(commercially available)
VCR
Displaying a VCR image
To watch a VCR image, press INPUT 2 on the remote control
unit or press INPUT on the Plasma Display to select INPUT2.
DVD player
• The INPUT 2 terminals are checked for cable connections in the
order where; 1) S-Video, 2) Video.
• Connect external equipment to only terminals that are to be actually
used.

12Enjoying through External Equipment
Using HDMI Input
The INPUT 1 and INPUT 3 terminals include HDMI terminals to
which digital video and audio signals can be input. To use the
HDMI terminal, activate the terminal and specify the types of
video and audio signals to be received from the connected
equipment. For the types of these signals, see the operation
manual that came with the connected equipment.
Before starting the menu, press INPUT 1 (or INPUT 3) on the
remote control unit or press INPUT on the Plasma Display to
select INPUT 1 (or INPUT 3).
Input signal correlation table
19 2 0∗1080i@59.94/60Hz
720∗480p@59.94/60Hz
12 8 0∗720p@59.94/60Hz
720(1440)∗480i@59.94/60Hz
• PC signals are not supported.
Connecting HDMI equipment
Media Receiver (rear view)
DIGITAL OUT
OPTICAL
S400
(TS)
VIDEO
R-AUDIO-L
R-AUDIO-L
S-VIDEO
Audio cable
(commercially available)
Make this connection
when inputting analog
audio signals.
INPUT 1
INPUT 3
INPUT 3
COMPONENT VIDEO
CB/P
B
B/PB
YYC
CR/P
CR/P
R
R
INPUT 1 INPUT 3
HDMI
HDMI cable
(commercially available)
To activate the HDMI terminal:
Press HOME MENU.
1
2
Select “Option”. ( / then ENTER)
3
Select “HDMI Input”. ( / then ENTER)
4
Select “Setting”. ( / then ENTER)
5
Select “Enable”. ( / then ENTER)
Item Description
Disable Deactivates the HDMI terminal.
(factory default)
Enable Activates the HDMI terminal.
Press HOME MENU to exit the menu.
6
To specify the type of digital video signals:
Press HOME MENU.
1
2
Select “Option”. ( / then ENTER)
3
Select “HDMI Input”. ( / then ENTER)
4
Select “Video”. ( / then ENTER)
5
Select the type of digital video signals. ( / then
ENTER)
• If you select “Auto”, an attempt will be made to identify
the type of digital video signals when digital video
signals are received.
Item Description
Auto Automatically identifies input digital video
(factory default) signals.
Color-1 Digital Component Video signals (4:2:2)
locked
Color-2 Digital Component Video signals (4:4:4)
locked
Color-3 Digital RGB signals locked
Press HOME MENU to exit the menu.
6
English
HDMI equipment
• If you select a parameter other than “Auto”, make such a setting that
results in natural color.
• If no image appears, specify another digital video signal type.
•For the digital video signal types to be specified, check the operation
manual that came with the connected equipment.
To specify the type of audio signals:
Press HOME MENU.
1
2
Select “Option”. ( / then ENTER)
3
Select “HDMI Input”. ( / then ENTER)
4
Select “Audio”. ( / then ENTER)
5
Select the type of audio signals. ( / then ENTER)
• If you select “Auto”, an attempt will be made to identify
the type of audio signals when audio signals are
received.
51
En

12 Enjoying through External Equipment
Item Description
Auto Automatically identifies input audio
(factory default) signals.
Digital Accepts digital audio signals.
Analog Accepts analog audio signals.
• The INPUT 4 terminals are checked for cable connections in the
order where; 1) Component Video, 2) S-Video, 3) Video.
• Connect external equipment to only terminals that are to be actually
used.
Press HOME MENU to exit the menu.
6
• If no sound is output, specify another audio signal type.
•For the audio signal types to be specified, check the operation
manual that came with the connected equipment.
• Depending on the equipment to be connected, you also need to
connect analog audio cables.
Enjoying a game console or watching
camcorder images
Connecting a game console or camcorder
Use the INPUT 4 terminals to connect a game console,
camcorder and other audiovisual equipment.
Media Receiver (front view)
PCINPUT 4
-
VIDEO VIDEO AUDIO
COMPONENT VIDEO
B/PBCR/PR
Y
S
S-Video cable
(commercially available)
AUDIO
ANALOG RGB
(
)
STEREO
LRC
AV cable
(commercially available)
Displaying an image of the game console or
camcorder
To watch an image coming from the game console or
camcorder, press INPUT 4 on the remote control unit or press
INPUT on the Plasma Display to select INPUT4.
Recording digital TV programs using a
VCR or DVD recorder
If you connect recording equipment such as a VCR or DVD
recorder to the MONITOR OUT terminals on the rear of the
Media Receiver, you can record, for example, digital TV
programs using the recording equipment.
You can also record digital TV programs more easily by using
the supplied VCR controller. Connect the VCR controller to the
VCR control terminal on the rear of the Media Receiver and
then position the controller so that its light emitting section
faces the remote control sensor on the recording equipment.
For more information, see page 59.
Avoiding unwanted feedback
You can prevent unwanted feedback from adversely affecting
the quality of images. Specify the output terminal whose output
is to be inhibited.
Press HOME MENU.
1
2
Select “Option”. ( / then ENTER)
3
Select “Monitor Out”. ( / then ENTER)
Select “INPUT1 Prohibit”, “INPUT2 Prohibit”, “INPUT3
4
Prohibit”, or “INPUT4 Prohibit”. (
Press HOME MENU to exit the menu.
5
/ then ENTER)
Component Video cable
(commercially available)
52
En
Game console/Camcorder

12Enjoying through External Equipment
M
Connecting a recorder
Media Receiver (rear view)
IN OUT
VCR CONTROL
CONTROL
IN
ANTENNA B
SERVICE ONLY
OUT
MONITOR OUT
VCR controller (for
presetting digital TV
programs for recording)
ANTENNA/
CABLE A IN
S-VIDEO INPUT 2
VIDEO
R-AUDIO-L
R-AUDIO-L
VIDEO
S-VIDEO
S-Video cable
(commercially available)
DIGITAL OUT
INPUT 1
INPUT 3
INPUT 3
OPTICAL
COMPONENT VIDEO
CB/P
B
B/PB
YYC
Cable
Cable
CARD
CARD
(TS)
S-VIDEO
VIDEO
S400
R-AUDIO-L
R-AUDIO-L
AV cable
(commercially available)
Connecting other audio equipment
INPUT 1
English
H
The digital audio output terminal (optical) on this system can
output Dolby Digital signals. Using an optical digital cable,
connect an AV receiver to the digital audio output terminal
(optical) on the rear of the Media Receiver. This allows audio
such as digital TV broadcasting to be played in high quality.
If your AV receiver does not have a digital audio input terminal
(optical), connect the MONITOR OUT terminals (AUDIO) on the
CR/P
R
INPUT 1
CR/P
R
rear of the Media Receiver to the audio input terminals on the
AV receiver.
HD
• When using the digital audio output terminal (optical), you need to
make settings depending on your AV receiver. For more information,
see the instruction manual that came with the AV receiver.
Connecting an AV receiver
Media Receiver (rear view)
DIGITAL OUT
INPUT 3
OPTICAL
COMPONENT VIDEO
CB/P
B
B/PB
YYC
CR/P
R
CR/P
R
IN OUT
CONTROL
SERVICE ONLY
ANTENNA B
VCR CONTROL
IN
OUT
MONITOR OUT
ANTENNA/
Cable
Cable
CARD
CARD
CABLE A IN
S-VIDEO INPUT 2 INPUT 1
VIDEO
VIDEO
S-VIDEO
(TS)
R-AUDIO-L
R-AUDIO-L
VIDEO
S-VIDEO
S400
R-AUDIO-L
R-AUDIO-L
VCR or DVD recorder
• About the MONITOR OUT terminals
The MONITOR OUT terminals cannot output the following signals:
1 Video signals input from the COMPONENT VIDEO terminal
2 Video signals from a personal computer
3 S-Video signals when a conventional TV channel is being received
4 S-Video signals when Video signals (INPUT 1, 2, and 4) are being
input
5 Digital video and audio signals from the HDMI terminals
• When watching images played back on a VCR or DVD recorder
connected to the MONITOR OUT terminals, select an input source
(e.g., TV channel reception) on the recording equipment other than
external input sources. Selecting an external input source may result
in distorted images or noise.
• Analog broadcasting signals are not sent to the MONITOR OUT
(S-VIDEO) terminal. This is also true of composite signals coming
from INPUT 1, 2, or 4.
Audio cable
(commercially available)
Optical digital cable
(commercially available)
AV receiver
53
En

12 Enjoying through External Equipment
I
Switching the optical audio signal type
Set up for the DIGITAL AUDIO output terminal (OPTICAL),
depending on your AV receiver.
Press HOME MENU.
1
2
Select “Option”. ( / then ENTER)
3
Select “Digital Audio Out”. ( / then ENTER)
4
Select “Dolby Digital” or “PCM”. ( / then ENTER)
Item Description
PCM Always outputs in the PCM format
(factory default)
regardless of the types of signals.
Dolby Digital For Dolby Digital encoded signals, outputs in
the Dolby Digital format. For PCM encoded
signals, outputs in the PCM format.
Press HOME MENU to exit the menu.
5
Watching a D-VHS image
What is i.LINK?
i.LINK is a digital serial interface for handling digital video,
digital audio, and other data in two directions. i.LINK is Sony’s
term for the IEEE 1394 data transport bus. Digital AV equipment
compatible with i.LINK can be connected using a single i.LINK
cable. The i.LINK interface allows this PDP system to control
one of up to two i.LINK compatible devices (in connection) that
can be identified.
When connecting a single D-VHS recorder
Media Receiver (rear view)
DIGITAL OUT
R CONTROL
IN
OUT
TOR OUT
S-VIDEO INPUT 2
S-VIDEO
ANTENNA/
Cable
Cable
CARD
CARD
CABLE A IN
VIDEO
VIDEO
R-AUDIO-L
R-AUDIO-L
(TS)
VIDEO
S-VIDEO
D-VHS recorder
S400
R-AUDIO-L
R-AUDIO-L
OPTICAL
COMPONENT VIDEO
INPUT 1
CB/P
B
CR/P
R
INPUT 1 IN
INPUT 3
YYC
B/PB
CR/P
HDMI
R
(The function and performance
are the same for both terminals.)
i.LINK cable
(commercially available)
To use i.LINK, you need to
connect only an i.LINK cable;
you need not connect cables to
the video and audio terminals.
Which i.LINK devices are connectable?
For i.LINK devices, this system supports only D-VHS recorders.
The i.LINK terminals on this system cannot be connected with
other equipment such as DVD recorders, digital video cameras,
personal computers, and PC peripheral devices because of
differences in the specifications.
What can be recorded through i.LINK?
With D-VHS recorders connected to this system through i.LINK,
you can record only digital TV programs. You cannot record
conventional TV channels nor contents coming from external
input sources and personal computers.
Connecting D-VHS recorders
Use the i.LINK terminals when connecting D-VHS recorders.
When connecting two D-VHS recorders
You can connect two D-VHS recorders directly to the i.LINK
terminals on the rear of the Media Receiver.
i.LINK cables
Media Receiver
POWER
REC
DATA
ON STANDBY
TIMER
ACQUISITION
D-VHS recorder
D-VHS recorder
54
En

Using i.LINK cables you can also connect up to two
D-VHS recorders in a daisy chain.
i.LINK cable
Displaying a D-VHS image
To watch a D-VHS image, press i.LINK on the remote control
unit or press INPUT on the Plasma Display to select i.LINK.
12Enjoying through External Equipment
English
Media Receiver
POWER
REC
DATA
ON STANDBY
TIMER
ACQUISITION
D-VHS recorder
D-VHS recorder
Precautions about i.LINK connections
• Use S400 i.LINK cables that have 4-pin plugs and are shorter
than 3.5 m (11.48 feet).
• Some i.LINK devices cannot relay data when their power is
off.
• Do not make the following loop connections:
Media Receiver
POWER
REC
DATA
ON STANDBY
TIMER
ACQUISITION
D-VHS recorder
D-VHS recorder
Media Receiver
POWER
REC
DATA
ON STANDBY
TIMER
ACQUISITION
D-VHS recorder
Useful and important notification
Useful information
•D-VHS recorders connected through i.LINK can play back
digital TV programs recorded using this system.
•D-VHS recorders connected through i.LINK can record only
digital TV programs. Using i.LINK, those recorders cannot
record conventional TV channels nor contents coming from
external input sources.
• This system can be simultaneously connected with up to two
D-VHS recorders that support i.LINK. You can control one of
these D-VHS recorders (basic functions only).
• Some D-VHS recorders connected through i.LINK may not
allow this system to control through the control panel screen
or to display images and output sound.
•To record digital TV programs using connected D-VHS
recorders, use D-VHS tape. You cannot use VHS tape nor
S-VHS tape.
• Some D-VHS recorders connected though i.LINK may not
allow this system to play back images and sound recorded on
VHS tape, S-VHS tape, or (if with analog signals) D-VHS tape.
If this is the case, connect the analog output terminals on the
D-VHS recorder to INPUT 1, 2, 3, or 4 terminals on this
system. See page 50.
• This system supports the Digital Transmission Content
Protection (DTCP) technology. The DTCP is a copy protection
technology that presents data coding and device
authentication.
• i.LINK may not allow copy-restricted video, audio, and other
data to be copied from one i.LINK device to another. It also
may not allow video, audio, and other data to be transferred
with equipment that does not support the DTCP.
Precautions
• While one D-VHS recorder connected through i.LINK is
recording or playing back, do not switch on or off the other
connected D-VHS recorder (not in use) or do not connect or
disconnect the i.LINK cable from that D-VHS recorder. Doing
so can result in image and sound interruption.
• Some D-VHS recorders that support i.LINK cannot relay data
when their power is off. Check the instruction manual that
came with your D-VHS recorder. This system allows you to
change the setting for data relay in the standby mode. See
“Setting up for i.LINK standby” on page 57.
55
En

12 Enjoying through External Equipment
Setting up for controlling a D-VHS recorder
You can operate the connected D-VHS recorder from the
Plasma Display that shows the control panel screen. After
making the connections, use the menu to specify the model of
the D-VHS recorder to be operated. You can operate only a
single D-VHS recorder from the Plasma Display.
Press HOME MENU.
1
2
Select “Tuner Setup”. ( / then ENTER)
3
Select “Recorder Setup”. ( / then ENTER)
4
Select “i.LINK Setup”. ( / then ENTER)
5
Select “i.LINK List”. ( / then ENTER)
Select the D-VHS recorder model to be operated.
6
/ then ENTER)
(
Recorder Setup i.LINK Setup
i.LINK Setup i.LINK List D-VHS XXXX XXXX Control
Press A to select “Connect”.
7
Press HOME MENU to exit the menu.
8
• The following information appears at the right end of the i.LINK list to
indicate the connection status of the D-VHS recorders:
Control: Data connection with the D-VHS recorder has been
Link: The D-VHS recorder has been physically con-
—: Currently not physically connected
• When connected to any device other than a D-VHS, the device is not
listed in the i.LINK List.
established and the recorder is ready for control.
nected, and can be controlled if it is selected for
control.
i.LINK List
Move DeleteRenameConnect
---
---
DCBA
xxxxxxxxxxxxxxxxxxxxx
xxxxxxxxxxxxxxxxxxxxx
xxxxxxxxxxxxxxxxxxxxx
Home Menu
Exit
Editing the i.LINK list
The i.LINK list shows all devices connected through i.LINK
interfaces. In this list, you can change the name or order of
devices or delete device information.
Press HOME MENU.
1
2
Select “Tuner Setup”. ( / then ENTER)
3
Select “Recorder Setup”. ( / then ENTER)
4
Select “i.LINK Setup”. ( / then ENTER)
5
Select “i.LINK List”. ( / then ENTER)
6
Select the desired device. ( / )
Recorder Setup i.LINK Setup
i.LINK Setup i.LINK List
The following procedure differs depending on what you want to
perform.
To change the name of a device:
Press B to select “Rename”.
7
8
Enter up to 7 characters using / , / and ENTER.
Recorder Setup i.LINK Setup
i.LINK Setup i.LINK List
Press A.
9
Press HOME MENU to exit the menu.
10
To change the order of devices:
Press C to select “Move”.
7
8
Select the new desired position. ( / then ENTER)
• The selected device is moved to the selected position.
Press HOME MENU to exit the menu.
9
i.LINK List
D-VHS XXXX XXXX Control
Move DeleteRenameConnect
i.LINK List
New Name: D-VHS
A BCDE FGH I J
KLMNOPQRST
UVWXYZ 12 34
567890 .@/
),–_:'&
ClearAccept
DBA
---
---
DCBA
SPACE
Cancel
xxxxxxxxxxxxxxxxxxxxx
xxxxxxxxxxxxxxxxxxxxx
xxxxxxxxxxxxxxxxxxxxx
Home Menu
xxxxxxxxxxxxxxxxxxxxx
xxxxxxxxxxxxxxxxxxxxx
xxxxxxxxxxxxxxxxxxxxx
(
Home Menu
Exit
Exit
56
En
To delete information about a device:
Press D to select “Delete”.
7
•A confirmation message appears.
•A warning message appears if the selected device has
been preset for recording with the timer or if its power
is on. If this is the case, you cannot delete the device
that you have selected.
Press A to execute the deletion.
8
Press HOME MENU to exit the menu.
9

12Enjoying through External Equipment
Setting up for i.LINK standby
Use the following procedure to enable data transfer between
multiple i.LINK devices even when the system is in the standby
mode.
Press HOME MENU.
1
2
Select “Tuner Setup”. ( / then ENTER)
3
Select “Recorder Setup”. ( / then ENTER)
4
Select “i.LINK Setup”. ( / then ENTER)
5
Select “i.LINK Standby”. ( / then ENTER)
6
Select “Enable”. ( / then ENTER)
Press HOME MENU to exit the menu.
7
•With “Enable” selected, the system relays data between multiple
i.LINK devices even when in the standby mode; the i.LINK circuits
are energized in that mode.
In standby mode
i.LINK device Media Receiver i.LINK device
POWER
REC
DATA
ON STANDBY
TIMER
ACQUISITION
No data relay
Operating the control panel screen
The control panel screen appears when you press i.LINK. It
disappears when you press i.LINK again. To select a button on
the control panel screen, press
ENTER on the remote control.
1 202
3 4 5 6 97 8
D-VHS4 XXXXXXX XXX
No1394 00:00:00
ON/OFF
REC
10 11 1312 14 15 16 17 18 19
1 Shows the current status of the D-VHS recorder.
2 Shows the name of the currently selected device.
3 Shows counter time output by the D-VHS recorder.
4 Shows the manufacture name of the D-VHS recorder to be
operated.
5 Shows the model name of the D-VHS recorder to be
operated.
6 Shows the type of inserted video tape; D for D-VHS, S for
S-VHS, and no display for VHS.
7 Appears when any tape has been inserted.
8 Appears when the inserted tape has been write protected.
The inserted tape cannot be used for recording when this
indicator appears.
9 Appears when the D-VHS recorder has been preset for
recording and is in the standby mode.
10 Switches on and off the D-VHS recorder.
11 Starts recording.
12 Rewinds to the start of the current program.
13 Rewinds the tape.
14 Pauses the tape.
15 Stops the current tape motion.
16 Starts playing back.
17 Forwards to the start of the next program.
18 Forwards the tape.
19 Exits the control panel screen and displays the i.LINK Setup
menu.
20 Allows you to change the D-VHS recorder to be operated.
After pressing this button, press
model from the list, and then press ENTER.
/ or / , and then press
D
Device List
• D-VHS4
A
i.LINK Setup
/ to select the desired
English
• If no i.LINK device has been connected, “No i.LINK devices are
connected.” appears. If this is the case, connect i.LINK devices.
• If none of the connected equipment has been supported for control,
you cannot execute control.
57
En

12 Enjoying through External Equipment
15
141312
9
11
10
8
7
6
5
4 321
Watching an image from a personal
computer
Connecting a personal computer
Use the PC terminals to connect a personal computer.
• The PC input terminals are DDC2B-compatible.
• Plug & Play may not correctly function, depending on personal
computers in use.
Media Receiver (front view)
PCINPUT 4
CERDATA
ACQUISITION
ø 3.5 mm stereo miniplug cable
(commercially available)
COMPONENT VIDEO
B/PBCR/PR
Y
-
VIDEO VIDEO AUDIO
S
AUDIO
ANALOG RGB
(
)
STEREO
LRC
RGB cable
(commercially available)
Signal names for 15-pin mini D-sub connecter
(front view)
Pin No. Signal name
1 R
2 G
3 B
4 Not connected
5 Not connected
6 GND (ground)
7 GND (ground)
8 GND (ground)
9 +5V
10 GND (ground)
11 Not connected
12 SDA
13 HD
14 VD
15 SCL
Personal computer
Displaying an image from a personal computer
When connecting to a personal computer, the input signal type
is automatically identified. If the personal computer image does
not come in clearly, you may need to use Auto Setup in the
menu. See page 45.
To watch an image coming from the personal computer, press
PC on the remote control unit or press INPUT on the Plasma
Display to select “PC”.
• The PC terminals cannot be used for audiovisual equipment.
•A Macintosh adaptor may be required for use with some Macintosh
computers.
Computer compatibility chart
Resolution Frequency Remarks
720 × 400 70 Hz
640 × 480 60 Hz
65 Hz Macintosh 13" (67 Hz)
72 Hz
75 Hz
800 × 600 56 Hz
60 Hz
72 Hz
75 Hz
832 × 624 74.5 Hz Macintosh 16"
10 2 4 × 768 60 Hz
70 Hz
75 Hz Macintosh 19"
12 8 0 × 768 56 Hz
60 Hz
70 Hz
58
En

Connecting the VCR controller
N
/
/
O
A
Connect the supplied VCR controller to the Media Receiver. This
allows you to preset digital TV programs for recording; see page
48. When the specified time comes, the system in the standby
mode is automatically switched on and the specified TV
program is recorded using the connected VCR or DVD recorder.
• Make sure to leave the VCR power on when presetting TV programs
for recording with the VCR controller.
• Be sure to firmly connect the VCR controller to the VCR control
terminal on the rear of the Media Receiver. If you have mistakenly
connected it to the CONTROL IN or CONTROL OUT terminal, remote
control or other operations may be disabled.
Use the following procedure to set the manufacture of the
recording equipment:
Press HOME MENU.
1
2
Select “Tuner Setup”. ( / then ENTER)
3
Select “Recorder Setup”. ( / then ENTER)
4
Select “VCR Setup”. ( / then ENTER)
Select the manufacture of the recording equipment.
5
/ then ENTER)
(
Recorder Setup
VCR Setup
VCR Setup
• XXXXX
XXXXX
XXXXX
xxxxxxxxxxxxxxxxxxxxx
xxxxxxxxxxxxxxxxxxxxx
xxxxxxxxxxxxxxxxxxxxx
Home Menu
12Enjoying through External Equipment
English
Exit
Media Receiver (rear view)
IN OUT
VCR CONTROL
CONTROL
IN
ANTENNA B
SERVICE ONLY
OUT
MONITOR OUT
VCR CONTROL
Position the light
emitting section
on the VCR
controller cable
so that it faces
the VCR.
ANTENNA/
Cable
Cable
CARD
CARD
CABLE A IN
S-VIDEO INPUT 2
VIDEO
R-AUDIO-L
R-AUDIO-L
VIDEO
S-VIDEO
(Once you have positioned the
VCR controller, secure with the
supplied tape.)
Remote control sensor
(TS)
S-VIDEO
VIDEO
S400
R-AUDIO-L
R-AUDIO-L
DIGITAL
OPTIC
COMPO
INPUT 1
C
B
YYC
B
INPUT 3
INPUT 3
VCR or DVD
recorder
• The screen for recording test appears.
Check that the power to the recording equipment is on,
6
and insert tape into the slot.
• Insert tape you think it all right to erase its contents.
The contents will be erased because Rec and Stop
codes are output in the test.
• Check that the light emitting section on the VCR
controller cable faces the recording equipment.
Press A to execute recording test.
7
• If the recording equipment fails to start and stop
recording, check and change the specified recording
equipment manufacture.
Press A to select “Yes, Store Setting”.
8
Press HOME MENU to exit the menu.
9
.
• Even if you correctly specify the manufacture of the recording
equipment, control of some models may be disabled.
•Perform the recording test when the recording equipment is not in
recording standby or is not recording.
• The recording test takes approximately 10 seconds.
• The PIONEER has been set as the factory default.
59
En

12 Enjoying through External Equipment
The lists of controllable recording
equipment manufactures
Manufacture
Admiral
Advantz
Adventura
Aiko
Aiwa
Akai
American High
Asha
Audiovox
Beaumark
Bell & Howell
Broksonic
CCE
Calix
Canon
Capehart
Carver
Cineral
Citizen
Colt
Craig
Curtis Mathes
Cybernex
Daewoo
Daytron
Denon
Dynatech
Electrohome
Electrophonic
Emerex
Emerson
Fisher
Fuji
Funai
GE
Garrard
Go Video
GoldStar
Gradiente
Grundig
HI-Q
Manufacture
Harley Davidson
Harman/Kardon
Harwood
Headquarter
Hitachi
JVC
Jensen
KEC
KLH
Kenwood
Kodak
LXI
Lloyd's
Logik
MEI
MGA
MGN Technology
MTC
Magnasonic
Magnavox
Magnin
Marantz
Marta
Matsushita
Memorex
Minolta
Mitsubishi
Motorola
Multitech
NAD
NEC
Nikko
Nikon
Noblex
Olympus
Optimus
Optonica
Orion
Panasonic
Penney
Pentax
Manufacture
Philco
Philips
Pilot
Pioneer
Por tland
Profitronic
Proscan
Protec
Pulsar
Quarter
Quartz
Quasar
RCA
Radio Shack
Radix
Randex
Realistic
Ricoh
Runco
STS
Salora
Samsung
Sanky
Sansui
Sanyo
Scott
Sears
Semp
Sharp
Shintom
Shogun
Singer
Sony
Sylvania
Symphonic
TMK
Ta tung
Teac
Technics
Teknika
Thomas
Manufacture
Toshiba
To tevision
Unitech
Vector
Vector Research
Video Concepts
Videosonic
Wa rd s
White Westinghouse
XR-1000
Yamaha
Zenith
Some modes of the listed
manufactures may not allow
control through the VCR
controller.
60
En

12Enjoying through External Equipment
Connecting control cords
Connect control cords between the Media Receiver and other
PIONEER equipment having the
the connected equipment by sending commands from its
remote control unit to the remote control sensor on the Media
Receiver.
After the CONTROL IN terminals have been connected, the
remote control sensors on the connected equipment do not
accept commands from the remote control units. Face the
remote control units to the remote control sensor on the
Plasma Display when operating the connected equipment.
• Make sure that the power is turned off when making connections.
• Complete all component connections before making control cord
connections.
About SR+
The CONTROL OUT terminal on the rear of the Media Receiver
supports SR+ that allows linked operations with a PIONEER
AV receiver. SR+ presents functions such as the input switch
linkage operation function and the DSP surround mode display
function. For more information, see the instruction manual that
came with the PIONEER AV receiver supporting SR+.
logo. You can then operate
Media Receiver (rear view)
IN OUT
CONTROL
ANTENNA B
SERVICE ONLY
IN OUT
CONTROL
VCR CONTROL
IN
OUT
MONITOR OUT
S-VIDEO INPUT 2
S-VIDEO
ANTENNA/
CABLE A IN
VIDEO
VIDEO
R-AUDIO-L
R-AUDIO-L
Cable
Cable
CARD
CARD
(TS)
S-VIDEO
VIDEO
S400
R-AUDIO-L
R-AUDIO-L
INPUT 1
INPUT 3
INPUT 3
DIGITAL OUT
OPTICAL
COMPONENT VIDEO
CB/P
YYC
B/PB
CONTROL
IN
OUT
CONTROL
IN
OUT
English
B
CR/P
R
INPUT 1 INPUT 3
HDMI
CR/P
R
• While in connection through SR+, the volume on this system is
temporarily minimized.
CONTROL
IN
OUT
The control cables (commercially available) are mono sound
cables with mini plugs (no resistance).
61
En

13 Useful Remote Control Features
Learning function of the remote control
unit
You can operate the connected AV products (AV Receiver, Cable
Box, SAT tuner, VCR, DVD, DVD recorder, LD) using the learning
function of your remote control unit. This remote control unit
has a function that can memorize each remote control code.
2 to 5 cm (0.8 to 2.0 inches)
Remote control Remote control of
(Supplied accessory) AV product
Using the learning function
Slide the Mode switch to match the device whose remote
1
control signal you want to be learned.
Press EDIT/LEARN and 2 at the same time.
2
•The LED flashes.
Press a button to be learned.
3
• The LED lights up.
•For the functions that can be learned, see pages 64 to
68.
• When learning is finished, the LED starts flashing
again.
Press EDIT/LEARN again to exit the Learn mode.
4
Presetting manufacture codes
Slide the Mode switch to match the device to which you
1
want to preset the remote control signal.
Press EDIT/LEARN and 1 at the same time.
2
• The LED flashes.
Press 0 – 9 to enter the manufacture code. See page 63.
3
•Preset mode is finished once the LED no longer lights
up.
•To exit the Edit mode halfway, press EDIT/LEARN again.
• If the Mode switch selection is changed when in the Edit mode, the
Edit mode is cancelled.
• If no operation is performed for more than one minute, the Edit mode
is cancelled.
• When you enter a code not listed, the LED flashes quickly.
• If the table on page 63 does not include your desired manufacturer or
the remote control does not work, you can make the memory learn
its signal by the Learn mode.
• The initial mode is “000” (PIONEER).
•To exit the Learn mode halfway, press EDIT/LEARN again.
• If the Mode switch selection is changed when in the Learn mode,
the Learn mode is cancelled.
• If no operation is performed for more than one minute, the Learn
mode is cancelled.
• It takes about 2 seconds to finish code transmission. Do not interrupt
it halfway. Wait until the LED flashes again.
•You can reset all learned codes to the factory defaults. When not in
the Learn mode, press and hold TV , and then press and
VOL + (RECEIVER section) at the same time.
62
En

Manufacture codes
CABLE/SAT
000 PIONEER1(CABLE) PIONEER PIONEER(DVD)
001 PIONEER2(CABLE) FISHER PANASONIC(DVD)
002 JERROLD1(CABLE) FISHER2 SAMSUNG(DVD)
003 JERROLD2(CABLE) FISHER3 SONY(DVD)
004 JERROLD3(CABLE) GOLDSTAR TOSHIBA(DVD)
005 JERROLD4(CABLE) HITACHI JVC(DVD)
006 JERROLD5(CABLE) HITACHI2 PIONEER(DVD-RECORDER)
007 JERROLD6(CABLE) HITACHI3 PIONEER2(DVD-RECORDER)
008 JERROLD7(CABLE) MAGNAVOX2 PIONEER3(DVD-RECORDER)
009 JERROLD8(CABLE) MITSUBISHI PANASONIC(DVD-RECORDER)
010 JERROLD9(CABLE) MITSUBISHI2 PANASONIC2(DVD-RECORDER)
01 1 JERROLD10(CABLE) MITSUBISHI3 PANASONIC3(DVD-RECORDER)
012 S.A.1(CABLE) MITSUBISHI4 PHILIPS(DVD-RECORDER)
013 S.A.2(CABLE) MITSUBISHI5 SHARP(DVD-RECORDER)
014 S.A.3(CABLE) MITSUBISHI6 SHARP2(DVD-RECORDER)
015 S.A.4(CABLE) PANASONIC TOSHIBA(DVD-RECORDER)
016 ZENITH1(CABLE) PANASONIC2 TOSHIBA2(DVD-RECORDER)
017 ZENITH2(CABLE) PANASONIC3
018 ZENITH3(CABLE) RCA
019 R CA2
020 PIONEER(SAT) RCA3 PIONEER(LD)
02 1RCA1(SAT) SANYO KENWOOD(LD)
022RCA2(SAT) SANYO2 PANASONIC1(LD)
023 SONY(SAT) SANYO3 PANASONIC2(LD)
024 SHARP PHILIPS(LD)
025 SHARP2 RCA(LD)
026 SHARP3 SONY(MDP)
027 SONY(BETA) SONY(LD)
028 SONY(VHS)
029 SONY(8mm)
030TOSHIBA
03 1 JVC
032 JVC2
033 JVC3
034 JVC4
035 JVC5
036 ZENITH
037 MITSUBISHI(J-3)
038 SHARP(J-2)
039PANASONIC(J-3)
040TOSHIBA(J-3)
04 1GRANDIENTE
042 AKAI
043 PIONEER2
044 SANYO4
045MATSUI
046 AIWA
047 ALBA81
048 BUSH
049 THOMSON
050BAIRD
05 1 TELEFUNKEN
052 ALBA
VCR DVD/DVR
CABLE/SAT
053 Grundig1
054 Grundig2
055 Grundig3
056 SONY2
057 SONY3
058 SONY4
059 RCA4
060 PHILIPS
061 PHILIPS2
062 PHILIPS3
063 PHILIPS4
064 PHILIPS5
065 PHILIPS6
066 SAMSUNG
067SAMSUNG2
068SAMSUNG3
069SAMSUNG4
070SAMSUNG5
071SAMSUNG6
072 MARANTZ
073 MARANTZ2
074 GE
075 GE2
076 GE3
077 YAMAHA
078YAMAHA2
079 YAMAHA3
080YAMAHA4
08 1 CURTIS_MATHIS
082 CURTIS_MATHIS2
083 CURTIS_MATHIS3
084 FUNAI
085 ADMIRAL
086 KENWOOD
087 KENWOOD2
088 KENWOOD3
089 NEC
090 NEC2
091 NEC3
092 NEC4
093WARDS
094WARDS2
095WARDS3
096WARDS4
097 MEMOREX
098 MEMOREX2
099 JC_PENNY
10 0 JC_PENNY2
101 JC_PENNY3
102 JC_PENNY4
103 JC_PENNY5
10 4 JC_PENNY6
VCR DVD/DVR
13Useful Remote Control Features
English
63
En

13 Useful Remote Control Features
Using the remote control unit to control
other devices
Mode switch
(with “TV”
selected)
Receiver control buttons
When a Pioneer receiver is connected to the display, the
receiver can be operated using buttons 1 to 3.
When a non-Pioneer receiver is connected to the display, the
signals for 1 to 3 must first be learned before operating. See
page 62.
1 RECEIVER (STANDBY/ON)
Turns the receiver power on and off.
2 RECEIVER INPUT
Selects the input source connected to the receiver.
3 RECEIVER VOL +/–
Adjusts the receiver volume level. Press VOL + to
increase the volume and VOL – to decrease it.
• (RECEIVER) MUTING
Allows the remote control unit to learn receiver’s mute signal. Use
this button when the mode switch is set to a position other than TV.
• The color-highlighted buttons on the remote control can learn the
control signal from another device’s remote control.
64
En
1
2
3

13Useful Remote Control Features
Cable control buttons
When the Mode switch is set to CBL/SAT, the cable converter
Mode switch
(with “CBL/SAT”
selected)
connected to the display can be operated using 1 to 5.
Cable converters made by other manufacturers and not preset
can also be operated using the remote control unit if 1 to 5
have learned the functions. See page 62.
10 – 9
Press a button (or buttons) that corresponds to the
1
4
5
2
channel that you want to watch.
2 CH +/–
Press CH + or CH – to tune in a higher or lower channel.
3 SOURCE
Turns the cable converter power on and off.
4 CH ENTER *
Fix the selected channel with the direct channel selection
buttons.
5 CH RETURN *
Press to switch between the current channel and the
channel you were watching immediately before.
* Some manufacturers do not preset CH ENTER and
CH RETURN. Use these buttons to learn if necessary.
English
• CABLE and SAT cannot be selected at the same time.
• The color-highlighted buttons on the remote control can learn the
control signal from another device’s remote control.
3
65
En

13 Useful Remote Control Features
Mode switch
(with “CBL/SAT”
selected)
1
6
2
7
3
4
5
8
SAT control buttons
When the SAT is preset by the learning function of the remote
control, the remote control unit buttons will function as shown
below.
• When the Mode switch is set to CBL/SAT, satellite broadcast
tuners made by other manufacturers and not preset can also
be operated with the remote control unit if 1 to 8 have
learned the functions. See page 62.
10 – 9
Press a button (or buttons) that corresponds to the
channel that you wish to watch.
2 CH +/–
Press CH + or CH – to tune in a higher or lower channel.
3 ENTER, / / /
ENTER: Press to activate the selected function.
/ / / : Press the button to select items on the SAT
GUIDE screen or SAT MENU screen.
4SAT INFO
When this button is pressed, information on satellite
broadcasting will appear.
• Use this button to learn if necessary.
5 SOURCE
Turns the Satellite broadcast tuner power on and off.
6 CH ENTER
Fix the selected channel with the direct channel selection
buttons.
• Use this button to learn if necessary.
7SAT MENU
When this button is pressed, the satellite broadcasting
menu screen will appear.
8SAT GUIDE
When this button is pressed, the satellite broadcasting
guide screen will appear.
66
En
• CABLE and SAT cannot be selected at the same time.
• The color-highlighted buttons on the remote control can learn the
control signal from another device’s remote control.

13Useful Remote Control Features
VCR control buttons
When the VCR is preset by the learning function of the remote
Mode switch
(with “VCR”
selected)
control, the remote control unit buttons will function as follows
when the Mode switch of the remote control unit is set to
VCR.
• When the input selector button having the same number as
the input terminal connecting the VCR is pressed, the VCR
can be operated using 1 to 8.
• VCR made by other manufacturers and not preset can also
be operated using the remote control unit if 1 to 8 have
learned the functions. See page 62.
1 CH +/–
Press to select the channel of the TV tuner on the VCR.
2 (PLAY)
1
Selects playback.
3 (REW)
Rewinds the tape and allows picture search.
4 SOURCE
Turns the power of the VCR on and off.
5 (PAUSE/STILL)
Sets pauses and still pictures.
6 (FF)
Rapidly advances the tape and allows picture search.
7 (REC)
2
3
4
5
6
7
8
Starts recording.
8 (STOP)
Stop tape transport.
• The color-highlighted buttons on the remote control can learn the
control signal from another device’s remote control.
English
67
En

13 Useful Remote Control Features
Mode switch
(with “DVD/
DVR” selected)
1
2
3
4
5
6
DVD/DVR control buttons
When the DVD/DVR is preset by the learning function of the
remote control, the remote control unit buttons will function as
follows when the Mode switch of the remote control unit is set
to DVD/DVR.
• When the input selector button having the same number as
the input terminal connecting a DVD player or DVD recorder
is pressed, these players can be operated using 1 to 12.
• DVD players or DVD recorders made by other manufacturers
and not preset can also be operated using the remote control
unit if 1 to 12 have learned the functions. See page 62.
7
8
9
10
11
12
1 CH +/– (DVD recorder only)
Press to change the channel of the tuner built in the DVD
recorder.
2 RETURN
When the DVD menu is in display, press to restore the
immediately previous screen.
3 (PLAY)
Selects playback.
4 (SCAN)/ (CHAPTER SEARCH)
Continue pressing to go backward.
Pressing quickly once takes you to the start of the chapter
currently playing. Each time you press it, you move back
to the start of the previous chapter.
5 SOURCE
Turns the power of the DVD player or DVD recorder on
and off.
6 (PAUSE/STILL)
Sets pauses and still pictures.
7SAT/DVD MENU (DVD, DVD recorder)
When this button is pressed, the DVD menu will appear.
8 ENTER, / / / (DVD, DVD recorder)
ENTER:Press to activate the selected function.
/ / / :Press the button to select items on the DVD
MENU screen.
9 DVD TOP MENU (DVD, DVD recorder)
When this button is pressed, the DVD top menu will
appear.
10 (SCAN)/ (CHAPTER SEARCH)
Continue pressing for fast forward.
Pressing quickly once takes you to the start of the next
chapter. Each time you press it, you move ahead to the
start of the next chapter.
11 (REC)
Starts recording.
12 (STOP)
Playback stops when pressing once.
With some DVD players or DVD recorders, pressing the
button twice may open the disc tray.
11, 12 REC STOP
Press and hold , and then press this button to stop
recording. This operation is true of only Pioneer DVD
recorders.
• The DVD player or DVD recorder cannot be selected at the same
time.
• The color-highlighted buttons on the remote control can learn the
control signal from another device’s remote control.
68
En

14Appendix
Troubleshooting
Problem Possible Solution
• No power.
•Green and red rectangles appear on
the screen alternately.
• The system cannot be operated.
•Remote control unit does not
operate.
• No image and audio is presented.
• No picture.
• Audio is output but no image is
presented.
• Images are presented but no audio
is output.
• Sound is reversed between the right
and left.
• Sound is output from only a single
speaker.
• Picture is cut off.
• Strange color, light color, dark or
color misalignment.
•Power is suddenly turned off.
• Make sure the Plasma Display and the Media Receiver are connected correctly. (See page 18.)
• Is the power cord disconnected? (See page 23.)
•Has the main power been turned on? (See page 24.)
• Check if you pressed TV
If the indicator on the system lights up red, press TV
• Check if the system cable has been disconnected or almost disconnected? (See page 18.)
• External influences such as lightning, static electricity, etc., may cause improper operation.
In this case, operate the system after first turning the power of the Plasma Display and the Media
Receiver, or unplugging the power cord and re-plugging it in after 1or 2 minutes.
• Is the Mode switch set correctly? Slide it to the TV setting position. (See page 14.)
•Are batteries inserted with polarity (+, –) aligned? (See page 20.)
•Are batteries worn out? (Replace with new batteries.) (See page 20.)
• Operate the remote control unit while pointing it toward the remote control sensor on the Plasma
Display. (See page 20.)
•Are you using it under strong or fluorescent lighting?
• Is a fluorescent light illuminated near the remote control sensor?
• Check if the input source for video or PC has been unintentionally selected although you want to
watch a TV channel. (See page 25.)
• Check if you have activated the Parental Control function. (See page 33.)
Enter a password to temporarily cancel the Parental Control function. (See page 37.)
• Is connection to other components correct? (See pages 50 to 58.)
• Is a non-compatible PC signal being input? (See page 58.)
• Is picture adjustment correct? (See page 41.)
• Check if you have selected “Picture Off” for Energy Save. With this option selected, the screen is
deactivated; only audio is output. To restore the screen display, press any button other than
VOL +/– and MUTING. (See page 43.)
• Check if you have selected the minimum volume. (See page 26.)
• Check if you have muted sound. (See page 26.)
• When using a video or PC input source, check that the audio terminal is also in connection.
(See pages 50 to 54 and 58.)
• Check if the speaker cable connections have been reversed between the right and left or if the
speaker cable from either speaker has been disconnected. (See pages 12 and 18.)
•Has the balance been correctly adjusted? (See pages 42 and 43.)
• Is the image position correct? (See pages 44 and 45.)
• Has the correct screen size been selected? (See page 46.)
•Adjust the picture tone. (See page 41.)
• Is the room too bright? The picture may look dark in a room that is too bright.
• Is the sleep timer set? (See page 40.)
• Check the power control setting. (See pages 43 and 44.)
• The system’s internal temperature has increased. Remove any objects blocking vent or clean.
(See pages 15 and 16.)
English
on the remote control unit. (See page 24.)
.
Code Message Check
SD04 Powering off. Internal temperature too high. Check if the ambient temperature of the Plasma Display is high.
Check temperature around PDP.
SD05 Powering off. Internal protection circuits activated, Check the speaker cable connections between the Plasma Display
Is there a short in speaker cable?and the speakers.
SD11 Powering off. Internal temperature too high. Check if the ambient temperature of the Media Receiver is high.
Check temperature around media receiver.
69
En

14 Appendix
The video program that you watch may be high definition (HD) or standard definition (SD). This Plasma Display is designed to scale
to each type of definition properly. If the video program’s definition type changes while a menu window is displayed on the screen
(for example: HD→SD or SD→HD), the menu size may temporarily shrink or enlarge until the scaling is completed. This may
happen, for example, when you switch between television and an external digital video recorder (D-VHS), or when your recorded
program switches between different definition types, while the on-screen menu is being shown.
If this happens, the menu will return to its normal size after two to three seconds. This action is normal, and does not indicate a
problem with your Plasma Display system.
70
En

This product in part uses “OpenSSL” software.
To the extent the OpenSSL software is being used, the following notification applies:
Copyright (c) 1998-2004 The OpenSSL Project. All rights reserved.
Redistribution and use in source and binary forms, with or without modification, are permitted provided that the following conditions
are met:
1. Redistributions of source code must retain the above copyright notice, this list of conditions and the following disclaimer.
2. Redistributions in binary form must reproduce the above copyright notice, this list of conditions and the following disclaimer in the
documentation and/or other materials provided with the distribution.
3. All advertising materials mentioning features or use of this software must display the following acknowledgment: “This product
includes software developed by the OpenSSL Project for use in the OpenSSL Toolkit. (http://www.openssl.org/)”
4. The names “OpenSSL Toolkit” and “OpenSSL Project” must not be used to endorse or promote products derived from this software
without prior written permission. For written permission, please contact openssl-core@openssl.org.
5. Products derived from this software may not be called “OpenSSL” nor may “OpenSSL” appear in their names without prior written
permission of the OpenSSL Project.
6. Redistributions of any form whatsoever must retain the following acknowledgment: “This product includes software developed by
the OpenSSL Project for use in the OpenSSL Toolkit (http://www.openssl.org/)”
THIS SOFTWARE IS PROVIDED BY THE OpenSSL PROJECT “AS IS” AND ANY EXPRESSED OR IMPLIED WARRANTIES, INCLUDING,
BUT NOT LIMITED TO, THE IMPLIED WARRANTIES OF MERCHANTABILITY AND FITNESS FOR A PARTICULAR PURPOSE ARE
DISCLAIMED. IN NO EVENT SHALL THE OpenSSL PROJECT OR ITS CONTRIBUTORS BE LIABLE FOR ANY DIRECT, INDIRECT,
INCIDENTAL, SPECIAL, EXEMPLARY, OR CONSEQUENTIAL DAMAGES (INCLUDING, BUT NOT LIMITED TO, PROCUREMENT OF
SUBSTITUTE GOODS OR SERVICES; LOSS OF USE, DATA, OR PROFITS; OR BUSINESS INTERRUPTION) HOWEVER CAUSED AND
ON ANY THEORY OF LIABILITY, WHETHER IN CONTRACT, STRICT LIABILITY, OR TORT (INCLUDING NEGLIGENCE OR OTHERWISE)
ARISING IN ANY WAY OUT OF THE USE OF THIS SOFTWARE, EVEN IF ADVISED OF THE POSSIBILITY OF SUCH DAMAGE.
14Appendix
English
This product includes cryptographic software written by Eric Young (eay@cryptsoft.com). This product includes software written by
Tim Hudson (tjh@cryptsoft.com).
Original SSLeay License
Copyright (C) 1995-1998 Eric Young (eay@cryptsoft.com)
All rights reserved.
This package is an SSL implementation written by Eric Young (eay@cryptsoft.com). The implementation was written so as to conform
with Netscapes SSL.
This library is free for commercial and non-commercial use as long as the following conditions are aheared to. The following conditions
apply to all code found in this distribution, be it the RC4, RSA, lhash, DES, etc., code; not just the SSL code. The SSL documentation
included with this distribution is covered by the same copyright terms except that the holder is Tim Hudson (tjh@cryptsoft.com).
Copyright remains Eric Young’s, and as such any Copyright notices in the code are not to be removed. If this package is used in a
product, Eric Young should be given attribution as the author of the parts of the library used. This can be in the form of a textual
message at program startup or in documentation (online or textual) provided with the package.
Redistribution and use in source and binary forms, with or without modification, are permitted provided that the following conditions
are met:
1. Redistributions of source code must retain the copyright notice, this list of conditions and the following disclaimer.
2. Redistributions in binary form must reproduce the above copyright notice, this list of conditions and the following disclaimer in the
documentation and/or other materials provided with the distribution.
3. All advertising materials mentioning features or use of this software must display the following acknowledgement: “This product
includes cryptographic software written by Eric Young (eay@cryptsoft.com)” The word ‘cryptographic’ can be left out if the rouines
from the library being used are not cryptographic related :-).
4. If you include any Windows specific code (or a derivative thereof) from the apps directory (application code) you must include an
acknowledgement: “This product includes software written by Tim Hudson (tjh@cryptsoft.com)”
THIS SOFTWARE IS PROVIDED BY ERIC YOUNG “AS IS” AND ANY EXPRESS OR IMPLIED WARRANTIES, INCLUDING, BUT NOT
LIMITED TO, THE IMPLIED WARRANTIES OF MERCHANTABILITY AND FITNESS FOR A PARTICULAR PURPOSE ARE DISCLAIMED. IN
NO EVENT SHALL THE AUTHOR OR CONTRIBUTORS BE LIABLE FOR ANY DIRECT, INDIRECT, INCIDENTAL, SPECIAL, EXEMPLARY,
OR CONSEQUENTIAL DAMAGES (INCLUDING, BUT NOT LIMITED TO, PROCUREMENT OF SUBSTITUTE GOODS OR SERVICES; LOSS
OF USE, DATA, OR PROFITS; OR BUSINESS INTERRUPTION) HOWEVER CAUSED AND ON ANY THEORY OF LIABILITY, WHETHER IN
CONTRACT, STRICT LIABILITY, OR TORT (INCLUDING NEGLIGENCE OR OTHERWISE) ARISING IN ANY WAY OUT OF THE USE OF THIS
SOFTWARE, EVEN IF ADVISED OF THE POSSIBILITY OF SUCH DAMAGE.
The licence and distribution terms for any publically available version or derivative of this code cannot be changed. i.e. this code
cannot simply be copied and put under another distribution licence [including the GNU Public Licence.]
71
En

14 Appendix
Linux Source Notice
The Pioneer Plasma Television integrated with the Media Receiver in part is powered by utilizes the Linux operation system. The
machine readable copy of the corresponding source code is available for the cost of distribution. To obtain a copy, please visit
http://www.pioneerelectronics.com/ for more information.
GNU General Public License
Version 2, June 1991
Copyright (C) 1989, 1991 Free Software Foundation, Inc.
59 Temple Place - Suite 330, Boston, MA 02111-1307, USA
Everyone is permitted to copy and distribute verbatim copies of this license document, but changing it is not allowed.
Preamble
The licenses for most software are designed to take away your freedom to share and change it. By contrast, the GNU General Public
License is intended to guarantee your freedom to share and change free software—to make sure the software is free for all its users.
This General Public License applies to most of the Free Software Foundation’s software and to any other program whose authors
commit to using it. (Some other Free Software Foundation software is covered by the GNU Library General Public License instead.) You
can apply it to your programs, too.
When we speak of free software, we are referring to freedom, not price. Our General Public Licenses are designed to make sure that
you have the freedom to distribute copies of free software (and charge for this service if you wish), that you receive source code or can
get it if you want it, that you can change the software or use pieces of it in new free programs; and that you know you can do these
things.
To protect your rights, we need to make restrictions that forbid anyone to deny you these rights or to ask you to surrender the rights.
These restrictions translate to certain responsibilities for you if you distribute copies of the software, or if you modify it.
For example, if you distribute copies of such a program, whether gratis or for a fee, you must give the recipients all the rights that you
have. You must make sure that they, too, receive or can get the source code. And you must show them these terms so they know their
rights.
We protect your rights with two steps: (1) copyright the software, and (2) offer you this license which gives you legal permission to copy,
distribute and/or modify the software.
Also, for each author’s protection and ours, we want to make certain that everyone understands that there is no warranty for this free
software. If the software is modified by someone else and passed on, we want its recipients to know that what they have is not the
original, so that any problems introduced by others will not reflect on the original authors’ reputations.
Finally, any free program is threatened constantly by software patents. We wish to avoid the danger that redistributors of a free program
will individually obtain patent licenses, in effect making the program proprietary. To prevent this, we have made it clear that any patent
must be licensed for everyone’s free use or not licensed at all.
The precise terms and conditions for copying, distribution and modification follow.
GNU General Public License
TERMS AND CONDITIONS FOR COPYING, DISTRIBUTION AND MODIFICATION
0. This License applies to any program or other work which contains a notice placed by the copyright holder saying it may be distributed
under the terms of this General Public License. The “Program”, below, refers to any such program or work, and a “work based on
the Program” means either the Program or any derivative work under copyright law: that is to say, a work containing the Program
or a portion of it, either verbatim or with modifications and/or translated into another language. (Hereinafter, translation is included
without limitation in the term “modification”.) Each licensee is addressed as “you”.
Activities other than copying, distribution and modification are not covered by this License; they are outside its scope. The act of
running the Program is not restricted, and the output from the Program is covered only if its contents constitute a work based on
the Program (independent of having been made by running the Program). Whether that is true depends on what the Program does.
1. You may copy and distribute verbatim copies of the Program’s source code as you receive it, in any medium, provided that you
conspicuously and appropriately publish on each copy an appropriate copyright notice and disclaimer of warranty; keep intact all
the notices that refer to this License and to the absence of any warranty; and give any other recipients of the Program a copy of this
License along with the Program.
You may charge a fee for the physical act of transferring a copy, and you may at your option offer warranty protection in exchange
for a fee.
2. You may modify your copy or copies of the Program or any portion of it, thus forming a work based on the Program, and copy and
distribute such modifications or work under the terms of Section 1 above, provided that you also meet all of these conditions:
a) You must cause the modified files to carry prominent notices stating that you changed the files and the date of any change.
b) You must cause any work that you distribute or publish, that in whole or in part contains or is derived from the Program or any
part thereof, to be licensed as a whole at no charge to all third parties under the terms of this License.
c) If the modified program normally reads commands interactively when run, you must cause it, when started running for such
interactive use in the most ordinary way, to print or display an announcement including an appropriate copyright notice and a
notice that there is no warranty (or else, saying that you provide a warranty) and that users may redistribute the program under
these conditions, and telling the user how to view a copy of this License.
72
En

(Exception: if the Program itself is interactive but does not normally print such an announcement, your work based on the Program
is not required to print an announcement.)
These requirements apply to the modified work as a whole. If identifiable sections of that work are not derived from the Program,
and can be reasonably considered independent and separate works in themselves, then this License, and its terms, do not apply to
those sections when you distribute them as separate works. But when you distribute the same sections as part of a whole which is
a work based on the Program, the distribution of the whole must be on the terms of this License, whose permissions for other
licensees extend to the entire whole, and thus to each and every part regardless of who wrote it.
Thus, it is not the intent of this section to claim rights or contest your rights to work written entirely by you; rather, the intent is to
exercise the right to control the distribution of derivative or collective works based on the Program.
In addition, mere aggregation of another work not based on the Program with the Program (or with a work based on the Program)
on a volume of a storage or distribution medium does not bring the other work under the scope of this License.
3. You may copy and distribute the Program (or a work based on it, under Section 2) in object code or executable form under the terms
of Sections 1 and 2 above provided that you also do one of the following:
a) Accompany it with the complete corresponding machine-readable source code, which must be distributed under the terms of
Sections 1 and 2 above on a medium customarily used for software interchange; or,
b) Accompany it with a written offer, valid for at least three years, to give any third party, for a charge no more than your cost of
physically performing source distribution, a complete machine-readable copy of the corresponding source code, to be distributed
under the terms of Sections 1 and 2 above on a medium customarily used for software interchange; or,
c) Accompany it with the information you received as to the offer to distribute corresponding source code. (This alternative is
allowed only for noncommercial distribution and only if you received the program in object code or executable form with such
an offer, in accord with Subsection b above.)
The source code for a work means the preferred form of the work for making modifications to it. For an executable work, complete
source code means all the source code for all modules it contains, plus any associated interface definition files, plus the scripts
used to control compilation and installation of the executable. However, as a special exception, the source code distributed need
not include anything that is normally distributed (in either source or binary form) with the major components (compiler, kernel, and
so on) of the operating system on which the executable runs, unless that component itself accompanies the executable.
If distribution of executable or object code is made by offering access to copy from a designated place, then offering equivalent
access to copy the source code from the same place counts as distribution of the source code, even though third parties are not
compelled to copy the source along with the object code.
4. You may not copy, modify, sublicense, or distribute the Program except as expressly provided under this License. Any attempt
otherwise to copy, modify, sublicense or distribute the Program is void, and will automatically terminate your rights under this
License.
However, parties who have received copies, or rights, from you under this License will not have their licenses terminated so long as
such parties remain in full compliance.
5. You are not required to accept this License, since you have not signed it. However, nothing else grants you permission to modify or
distribute the Program or its derivative works. These actions are prohibited by law if you do not accept this License. Therefore, by
modifying or distributing the Program (or any work based on the Program), you indicate your acceptance of this License to do so,
and all its terms and conditions for copying, distributing or modifying the Program or works based on it.
6. Each time you redistribute the Program (or any work based on the Program), the recipient automatically receives a license from the
original licensor to copy, distribute or modify the Program subject to these terms and conditions. You may not impose any further
restrictions on the recipients’ exercise of the rights granted herein. You are not responsible for enforcing compliance by third
parties to this License.
7. If, as a consequence of a court judgment or allegation of patent infringement or for any other reason (not limited to patent issues),
conditions are imposed on you (whether by court order, agreement or otherwise) that contradict the conditions of this License, they
do not excuse you from the conditions of this License. If you cannot distribute so as to satisfy simultaneously your obligations
under this License and any other pertinent obligations, then as a consequence you may not distribute the Program at all. For
example, if a patent license would not permit royalty-free redistribution of the Program by all those who receive copies directly or
indirectly through you, then the only way you could satisfy both it and this License would be to refrain entirely from distribution of
the Program.
If any portion of this section is held invalid or unenforceable under any particular circumstance, the balance of the section is
intended to apply and the section as a whole is intended to apply in other circumstances.
It is not the purpose of this section to induce you to infringe any patents or other property right claims or to contest validity of any
such claims; this section has the sole purpose of protecting the integrity of the free software distribution system, which is implemented
by public license practices. Many people have made generous contributions to the wide range of software distributed through that
system in reliance on consistent application of that system; it is up to the author/donor to decide if he or she is willing to distribute
software through any other system and a licensee cannot impose that choice.
This section is intended to make thoroughly clear what is believed to be a consequence of the rest of this License.
8. If the distribution and/or use of the Program is restricted in certain countries either by patents or by copyrighted interfaces, the
original copyright holder who places the Program under this License may add an explicit geographical distribution limitation
excluding those countries, so that distribution is permitted only in or among countries not thus excluded. In such case, this
License incorporates the limitation as if written in the body of this License.
14Appendix
English
73
En

14 Appendix
9. The Free Software Foundation may publish revised and/or new versions of the General Public License from time to time. Such new
versions will be similar in spirit to the present version, but may differ in detail to address new problems or concerns.
Each version is given a distinguishing version number. If the Program specifies a version number of this License which applies to
it and “any later version”, you have the option of following the terms and conditions either of that version or of any later version
published by the Free Software Foundation. If the Program does not specify a version number of this License, you may choose any
version ever published by the Free Software Foundation.
10. If you wish to incorporate parts of the Program into other free programs whose distribution conditions are different, write to the
author to ask for permission. For software which is copyrighted by the Free Software Foundation, write to the Free Software Foundation;
we sometimes make exceptions for this. Our decision will be guided by the two goals of preserving the free status of all derivatives
of our free software and of promoting the sharing and reuse of software generally.
NO WARRANTY
11. BECAUSE THE PROGRAM IS LICENSED FREE OF CHARGE, THERE IS NO WARRANTY FOR THE PROGRAM, TO THE EXTENT
PERMITTED BY APPLICABLE LAW. EXCEPT WHEN OTHERWISE STATED IN WRITING THE COPYRIGHT HOLDERS AND/OR OTHER
PARTIES PROVIDE THE PROGRAM “AS IS” WITHOUT WARRANTY OF ANY KIND, EITHER EXPRESSED OR IMPLIED, INCLUDING,
BUT NOT LIMITED TO, THE IMPLIED WARRANTIES OF MERCHANTABILITY AND FITNESS FOR A PARTICULAR PURPOSE. THE
ENTIRE RISK AS TO THE QUALITY AND PERFORMANCE OF THE PROGRAM IS WITH YOU. SHOULD THE PROGRAM PROVE
DEFECTIVE, YOU ASSUME THE COST OF ALL NECESSARY SERVICING, REPAIR OR CORRECTION.
12. IN NO EVENT UNLESS REQUIRED BY APPLICABLE LAW OR AGREED TO IN WRITING WILL ANY COPYRIGHT HOLDER, OR ANY
OTHER PARTY WHO MAY MODIFY AND/OR REDISTRIBUTE THE PROGRAM AS PERMITTED ABOVE, BE LIABLE TO YOU FOR
DAMAGES, INCLUDING ANY GENERAL, SPECIAL, INCIDENTAL OR CONSEQUENTIAL DAMAGES ARISING OUT OF THE USE OR
INABILITY TO USE THE PROGRAM (INCLUDING BUT NOT LIMITED TO LOSS OF DATA OR DATA BEING RENDERED INACCURATE
OR LOSSES SUSTAINED BY YOU OR THIRD PARTIES OR A FAILURE OF THE PROGRAM TO OPERATE WITH ANY OTHER
PROGRAMS), EVEN IF SUCH HOLDER OR OTHER PARTY HAS BEEN ADVISED OF THE POSSIBILITY OF SUCH DAMAGES.
END OF TERMS AND CONDITIONS
How to Apply These Terms to Your New Programs
If you develop a new program, and you want it to be of the greatest possible use to the public, the best way to achieve this is to make
it free software which everyone can redistribute and change under these terms.
To do so, attach the following notices to the program. It is safest to attach them to the start of each source file to most effectively convey
the exclusion of warranty; and each file should have at least the “copyright” line and a pointer to where the full notice is found.
<one line to give the program’s name and an idea of what it does.>
Copyright (C) yyyy name of author
This program is free software; you can redistribute it and/or modify it under the terms of the GNU General Public License as published
by the Free Software Foundation; either version 2 of the License, or (at your option) any later version.
This program is distributed in the hope that it will be useful, but WITHOUT ANY WARRANTY; without even the implied warranty of
MERCHANTABILITY or FITNESS FOR A PARTICULAR PURPOSE. See the GNU General Public License for more details.
You should have received a copy of the GNU General Public License along with this program; if not, write to the Free Software Foundation,
Inc., 59 Temple Place - Suite 330, Boston, MA 02111-1307, USA.
Also add information on how to contact you by electronic and paper mail.
If the program is interactive, make it output a short notice like this when it starts in an interactive mode:
Gnomovision version 69, Copyright (C) year name of author
Gnomovision comes with ABSOLUTELY NO WARRANTY; for details type ‘show w’. This is free software, and you are welcome to
redistribute it under certain conditions; type ‘show c’ for details.
The hypothetical commands ‘show w’ and ‘show c’ should show the appropriate parts of the General Public License. Of course, the
commands you use may be called something other than ‘show w’ and ‘show c’; they could even be mouse-clicks or menu items—
whatever suits your program.
You should also get your employer (if you work as a programmer) or your school, if any, to sign a “copyright disclaimer” for the
program, if necessary. Here is a sample; alter the names:
Yoyodyne, Inc., hereby disclaims all copyright interest in the program ‘Gnomovision’ (which makes passes at compilers) written by
James Hacker.
signature of Ty Coon, 1 April 1989
Ty Coon, President of Vice
This General Public License does not permit incorporating your program into proprietary programs. If your program is a subroutine
library, you may consider it more useful to permit linking proprietary applications with the library. If this is what you want to do, use the
GNU Lesser General Public License instead of this License.
74
En

GNU Lesser General Public License
Version 2.1, February 1999
Copyright (C) 1991, 1999 Free Software Foundation, Inc.
59 Temple Place, Suite 330, Boston, MA 02111-1307, USA
Everyone is permitted to copy and distribute verbatim copies of this license document, but changing it is not allowed.
[This is the first released version of the Lesser GPL. It also counts as the successor of the GNU Library Public License, version 2, hence
the version number 2.1.]
Preamble
The licenses for most software are designed to take away your freedom to share and change it. By contrast, the GNU General Public
Licenses are intended to guarantee your freedom to share and change free software—to make sure the software is free for all its users.
This license, the Lesser General Public License, applies to some specially designated software packages—typically libraries—of the
Free Software Foundation and other authors who decide to use it. You can use it too, but we suggest you first think carefully about
whether this license or the ordinary General Public License is the better strategy to use in any particular case, based on the explanations
below.
When we speak of free software, we are referring to freedom of use, not price. Our General Public Licenses are designed to make sure
that you have the freedom to distribute copies of free software (and charge for this service if you wish); that you receive source code or
can get it if you want it; that you can change the software and use pieces of it in new free programs; and that you are informed that you
can do these things.
To protect your rights, we need to make restrictions that forbid distributors to deny you these rights or to ask you to surrender these
rights. These restrictions translate to certain responsibilities for you if you distribute copies of the library or if you modify it.
For example, if you distribute copies of the library, whether gratis or for a fee, you must give the recipients all the rights that we gave
you. You must make sure that they, too, receive or can get the source code. If you link other code with the library, you must provide
complete object files to the recipients, so that they can relink them with the library after making changes to the library and recompiling
it. And you must show them these terms so they know their rights.
We protect your rights with a two-step method: (1) we copyright the library, and (2) we offer you this license, which gives you legal
permission to copy, distribute and/or modify the library.
To protect each distributor, we want to make it very clear that there is no warranty for the free library. Also, if the library is modified by
someone else and passed on, the recipients should know that what they have is not the original version, so that the original author’s
reputation will not be affected by problems that might be introduced by others.
Finally, software patents pose a constant threat to the existence of any free program. We wish to make sure that a company cannot
effectively restrict the users of a free program by obtaining a restrictive license from a patent holder.
Therefore, we insist that any patent license obtained for a version of the library must be consistent with the full freedom of use
specified in this license.
Most GNU software, including some libraries, is covered by the ordinary GNU General Public License. This license, the GNU Lesser
General Public License, applies to certain designated libraries, and is quite different from the ordinary General Public License. We use
this license for certain libraries in order to permit linking those libraries into non-free programs.
When a program is linked with a library, whether statically or using a shared library, the combination of the two is legally speaking a
combined work, a derivative of the original library. The ordinary General Public License therefore permits such linking only if the entire
combination fits its criteria of freedom. The Lesser General Public License permits more lax criteria for linking other code with the
library.
We call this license the “Lesser” General Public License because it does Less to protect the user’s freedom than the ordinary General
Public License. It also provides other free software developers Less of an advantage over competing non-free programs. These
disadvantages are the reason we use the ordinary General Public License for many libraries. However, the Lesser license provides
advantages in certain special circumstances.
For example, on rare occasions, there may be a special need to encourage the widest possible use of a certain library, so that it
becomes a de-facto standard. To achieve this, non-free programs must be allowed to use the library.
A more frequent case is that a free library does the same job as widely used non-free libraries. In this case, there is little to gain by
limiting the free library to free software only, so we use the Lesser General Public License.
In other cases, permission to use a particular library in non-free programs enables a greater number of people to use a large body of
free software. For example, permission to use the GNU C Library in non-free programs enables many more people to use the whole
GNU operating system, as well as its variant, the GNU/Linux operating system.
Although the Lesser General Public License is Less protective of the users’ freedom, it does ensure that the user of a program that is
linked with the Library has the freedom and the wherewithal to run that program using a modified version of the Library.
The precise terms and conditions for copying, distribution and modification follow. Pay close attention to the difference between a
“work based on the library” and a “work that uses the library”. The former contains code derived from the library, whereas the latter
must be combined with the library in order to run.
14Appendix
English
75
En

14 Appendix
GNU Lesser General Public License
TERMS AND CONDITIONS FOR COPYING, DISTRIBUTION AND MODIFICATION
0. This License Agreement applies to any software library or other program which contains a notice placed by the copyright holder or
other authorized party saying it may be distributed under the terms of this Lesser General Public License (also called “this License”).
Each licensee is addressed as “you”.
A “library” means a collection of software functions and/or data prepared so as to be conveniently linked with application programs
(which use some of those functions and data) to form executables.
The “Library”, below, refers to any such software library or work which has been distributed under these terms. A “work based on
the Library” means either the Library or any derivative work under copyright law: that is to say, a work containing the Library or a
portion of it, either verbatim or with modifications and/or translated straightforwardly into another language. (Hereinafter, translation
is included without limitation in the term “modification”.)
“Source code” for a work means the preferred form of the work for making modifications to it. For a library, complete source code
means all the source code for all modules it contains, plus any associated interface definition files, plus the scripts used to control
compilation and installation of the library.
Activities other than copying, distribution and modification are not covered by this License; they are outside its scope. The act of
running a program using the Library is not restricted, and output from such a program is covered only if its contents constitute a
work based on the Library (independent of the use of the Library in a tool for writing it). Whether that is true depends on what the
Library does and what the program that uses the Library does.
1. You may copy and distribute verbatim copies of the Library’s complete source code as you receive it, in any medium, provided that
you conspicuously and appropriately publish on each copy an appropriate copyright notice and disclaimer of warranty; keep intact
all the notices that refer to this License and to the absence of any warranty; and distribute a copy of this License along with the
Library.
You may charge a fee for the physical act of transferring a copy, and you may at your option offer warranty protection in exchange
for a fee.
2. You may modify your copy or copies of the Library or any portion of it, thus forming a work based on the Library, and copy and
distribute such modifications or work under the terms of Section 1 above, provided that you also meet all of these conditions:
a) The modified work must itself be a software library.
b) You must cause the files modified to carry prominent notices stating that you changed the files and the date of any change.
c) You must cause the whole of the work to be licensed at no charge to all third parties under the terms of this License.
d) If a facility in the modified Library refers to a function or a table of data to be supplied by an application program that uses the
facility, other than as an argument passed when the facility is invoked, then you must make a good faith effort to ensure that, in
the event an application does not supply such function or table, the facility still operates, and performs whatever part of its
purpose remains meaningful.
(For example, a function in a library to compute square roots has a purpose that is entirely well-defined independent of the application.
Therefore, Subsection 2d requires that any application-supplied function or table used by this function must be optional: if the
application does not supply it, the square root function must still compute square roots.) These requirements apply to the modified
work as a whole. If identifiable sections of that work are not derived from the Library, and can be reasonably considered independent
and separate works in themselves, then this License, and its terms, do not apply to those sections when you distribute them as
separate works. But when you distribute the same sections as part of a whole which is a work based on the Library, the distribution
of the whole must be on the terms of this License, whose permissions for other licensees extend to the entire whole, and thus to
each and every part regardless of who wrote it.
Thus, it is not the intent of this section to claim rights or contest your rights to work written entirely by you; rather, the intent is to
exercise the right to control the distribution of derivative or collective works based on the Library.
In addition, mere aggregation of another work not based on the Library with the Library (or with a work based on the Library) on a
volume of a storage or distribution medium does not bring the other work under the scope of this License.
3. You may opt to apply the terms of the ordinary GNU General Public License instead of this License to a given copy of the Library. To
do this, you must alter all the notices that refer to this License, so that they refer to the ordinary GNU General Public License,
version 2, instead of to this License. (If a newer version than version 2 of the ordinary GNU General Public License has appeared,
then you can specify that version instead if you wish.) Do not make any other change in these notices.
Once this change is made in a given copy, it is irreversible for that copy, so the ordinary GNU General Public License applies to all
subsequent copies and derivative works made from that copy. This option is useful when you wish to copy part of the code of the
Library into a program that is not a library.
4. You may copy and distribute the Library (or a portion or derivative of it, under Section 2) in object code or executable form under the
terms of Sections 1 and 2 above provided that you accompany it with the complete corresponding machine-readable source code,
which must be distributed under the terms of Sections 1 and 2 above on a medium customarily used for software interchange.
If distribution of object code is made by offering access to copy from a designated place, then offering equivalent access to copy
the source code from the same place satisfies the requirement to distribute the source code, even though third parties are not
compelled to copy the source along with the object code.
5. A program that contains no derivative of any portion of the Library, but is designed to work with the Library by being compiled or
linked with it, is called a “work that uses the Library”. Such a work, in isolation, is not a derivative work of the Library, and therefore
falls outside the scope of this License. However, linking a “work that uses the Library” with the Library creates an executable that is
a derivative of the Library (because it contains portions of the Library), rather than a “work that uses the library”. The executable is
therefore covered by this License. Section 6 states terms for distribution of such executables.
76
En

When a “work that uses the Library” uses material from a header file that is part of the Library, the object code for the work may be
a derivative work of the Library even though the source code is not. Whether this is true is especially significant if the work can be
linked without the Library, or if the work is itself a library. The threshold for this to be true is not precisely defined by law.
If such an object file uses only numerical parameters, data structure layouts and accessors, and small macros and small inline
functions (ten lines or less in length), then the use of the object file is unrestricted, regardless of whether it is legally a derivative
work. (Executables containing this object code plus portions of the Library will still fall under Section 6.)
Otherwise, if the work is a derivative of the Library, you may distribute the object code for the work under the terms of Section 6. Any
executables containing that work also fall under Section 6, whether or not they are linked directly with the Library itself.
6. As an exception to the Sections above, you may also combine or link a “work that uses the Library” with the Library to produce a
work containing portions of the Library, and distribute that work under terms of your choice, provided that the terms permit
modification of the work for the customer’s own use and reverse engineering for debugging such modifications.
You must give prominent notice with each copy of the work that the Library is used in it and that the Library and its use are covered
by this License. You must supply a copy of this License. If the work during execution displays copyright notices, you must include
the copyright notice for the Library among them, as well as a reference directing the user to the copy of this License.
Also, you must do one of these things:
a) Accompany the work with the complete corresponding machine-readable source code for the Library including whatever changes
were used in the work (which must be distributed under Sections 1 and 2 above); and, if the work is an executable linked with
the Library, with the complete machine-readable “work that uses the Library”, as object code and/or source code, so that the
user can modify the Library and then relink to produce a modified executable containing the modified Library. (It is understood
that the user who changes the contents of definitions files in the Library will not necessarily be able to recompile the application
to use the modified definitions.)
b) Use a suitable shared library mechanism for linking with the Library. A suitable mechanism is one that (1) uses at run time a
copy of the library already present on the user’s computer system, rather than copying library functions into the executable,
and (2) will operate properly with a modified version of the library, if the user installs one, as long as the modified version is
interface-compatible with the version that the work was made with.
c) Accompany the work with a written offer, valid for at least three years, to give the same user the materials specified in Subsection
6a, above, for a charge no more than the cost of performing this distribution.
d) If distribution of the work is made by offering access to copy from a designated place, offer equivalent access to copy the above
specified materials from the same place.
e) Verify that the user has already received a copy of these materials or that you have already sent this user a copy.
For an executable, the required form of the “work that uses the Library” must include any data and utility programs needed for
reproducing the executable from it. However, as a special exception, the materials to be distributed need not include anything that
is normally distributed (in either source or binary form) with the major components (compiler, kernel, and so on) of the operating
system on which the executable runs, unless that component itself accompanies the executable.
It may happen that this requirement contradicts the license restrictions of other proprietary libraries that do not normally accompany
the operating system. Such a contradiction means you cannot use both them and the Library together in an executable that you
distribute.
7. You may place library facilities that are a work based on the Library side-by-side in a single library together with other library
facilities not covered by this License, and distribute such a combined library, provided that the separate distribution of the work
based on the Library and of the other library facilities is otherwise permitted, and provided that you do these two things:
a) Accompany the combined library with a copy of the same work based on the Library, uncombined with any other library
facilities. This must be distributed under the terms of the Sections above.
b) Give prominent notice with the combined library of the fact that part of it is a work based on the Library, and explaining where
to find the accompanying uncombined form of the same work.
8. You may not copy, modify, sublicense, link with, or distribute the Library except as expressly provided under this License. Any
attempt otherwise to copy, modify, sublicense, link with, or distribute the Library is void, and will automatically terminate your
rights under this License. However, parties who have received copies, or rights, from you under this License will not have their
licenses terminated so long as such parties remain in full compliance.
9. You are not required to accept this License, since you have not signed it. However, nothing else grants you permission to modify or
distribute the Library or its derivative works. These actions are prohibited by law if you do not accept this License. Therefore, by
modifying or distributing the Library (or any work based on the Library), you indicate your acceptance of this License to do so, and
all its terms and conditions for copying, distributing or modifying the Library or works based on it.
10. Each time you redistribute the Library (or any work based on the Library), the recipient automatically receives a license from the
original licensor to copy, distribute, link with or modify the Library subject to these terms and conditions. You may not impose any
further restrictions on the recipients’ exercise of the rights granted herein. You are not responsible for enforcing compliance by
third parties with this License.
11. If, as a consequence of a court judgment or allegation of patent infringement or for any other reason (not limited to patent issues),
conditions are imposed on you (whether by court order, agreement or otherwise) that contradict the conditions of this License, they
do not excuse you from the conditions of this License. If you cannot distribute so as to satisfy simultaneously your obligations
under this License and any other pertinent obligations, then as a consequence you may not distribute the Library at all.
For example, if a patent license would not permit royalty-free redistribution of the Library by all those who receive copies directly or
indirectly through you, then the only way you could satisfy both it and this License would be to refrain entirely from distribution of
the Library.
14Appendix
English
77
En

14 Appendix
If any portion of this section is held invalid or unenforceable under any particular circumstance, the balance of the section is
intended to apply, and the section as a whole is intended to apply in other circumstances.
It is not the purpose of this section to induce you to infringe any patents or other property right claims or to contest validity of any
such claims; this section has the sole purpose of protecting the integrity of the free software distribution system which is implemented
by public license practices. Many people have made generous contributions to the wide range of software distributed through that
system in reliance on consistent application of that system; it is up to the author/donor to decide if he or she is willing to distribute
software through any other system and a licensee cannot impose that choice.
This section is intended to make thoroughly clear what is believed to be a consequence of the rest of this License.
12. If the distribution and/or use of the Library is restricted in certain countries either by patents or by copyrighted interfaces, the
original copyright holder who places the Library under this License may add an explicit geographical distribution limitation excluding
those countries, so that distribution is permitted only in or among countries not thus excluded. In such case, this License incorporates
the limitation as if written in the body of this License.
13. The Free Software Foundation may publish revised and/or new versions of the Lesser General Public License from time to time.
Such new versions will be similar in spirit to the present version, but may differ in detail to address new problems or concerns.
Each version is given a distinguishing version number. If the Library specifies a version number of this License which applies to it
and “any later version”, you have the option of following the terms and conditions either of that version or of any later version
published by the Free Software Foundation. If the Library does not specify a license version number, you may choose any version
ever published by the Free Software Foundation.
14. If you wish to incorporate parts of the Library into other free programs whose distribution conditions are incompatible with these,
write to the author to ask for permission. For software which is copyrighted by the Free Software Foundation, write to the Free
Software Foundation; we sometimes make exceptions for this. Our decision will be guided by the two goals of preserving the free
status of all derivatives of our free software and of promoting the sharing and reuse of software generally.
NO WARRANTY
15. BECAUSE THE LIBRARY IS LICENSED FREE OF CHARGE, THERE IS NO WARRANTY FOR THE LIBRARY, TO THE EXTENT PERMITTED
BY APPLICABLE LAW. EXCEPT WHEN OTHERWISE STATED IN WRITING THE COPYRIGHT HOLDERS AND/OR OTHER PARTIES
PROVIDE THE LIBRARY “AS IS” WITHOUT WARRANTY OF ANY KIND, EITHER EXPRESSED OR IMPLIED, INCLUDING, BUT NOT
LIMITED TO, THE IMPLIED WARRANTIES OF MERCHANTABILITY AND FITNESS FOR A PARTICULAR PURPOSE. THE ENTIRE
RISK AS TO THE QUALITY AND PERFORMANCE OF THE LIBRARY IS WITH YOU. SHOULD THE LIBRARY PROVE DEFECTIVE, YOU
ASSUME THE COST OF ALL NECESSARY SERVICING, REPAIR OR CORRECTION.
16. IN NO EVENT UNLESS REQUIRED BY APPLICABLE LAW OR AGREED TO IN WRITING WILL ANY COPYRIGHT HOLDER, OR ANY
OTHER PARTY WHO MAY MODIFY AND/OR REDISTRIBUTE THE LIBRARY AS PERMITTED ABOVE, BE LIABLE TO YOU FOR
DAMAGES, INCLUDING ANY GENERAL, SPECIAL, INCIDENTAL OR CONSEQUENTIAL DAMAGES ARISING OUT OF THE USE OR
INABILITY TO USE THE LIBRARY (INCLUDING BUT NOT LIMITED TO LOSS OF DATA OR DATA BEING RENDERED INACCURATE
OR LOSSES SUSTAINED BY YOU OR THIRD PARTIES OR A FAILURE OF THE LIBRARY TO OPERATE WITH ANY OTHER SOFTWARE),
EVEN IF SUCH HOLDER OR OTHER PARTY HAS BEEN ADVISED OF THE POSSIBILITY OF SUCH DAMAGES.
END OF TERMS AND CONDITIONS
How to Apply These Terms to Your New Libraries
If you develop a new library, and you want it to be of the greatest possible use to the public, we recommend making it free software that
everyone can redistribute and change. You can do so by permitting redistribution under these terms (or, alternatively, under the terms
of the ordinary General Public License).
To apply these terms, attach the following notices to the library. It is safest to attach them to the start of each source file to most
effectively convey the exclusion of warranty; and each file should have at least the “copyright” line and a pointer to where the full notice
is found.
<one line to give the library’s name and an idea of what it does.>
Copyright (C) year name of author
This library is free software; you can redistribute it and/or modify it under the terms of the GNU Lesser General Public License as
published by the Free Software Foundation; either version 2.1 of the License, or (at your option) any later version.
This library is distributed in the hope that it will be useful, but WITHOUT ANY WARRANTY; without even the implied warranty of
MERCHANTABILITY or FITNESS FOR A PARTICULAR PURPOSE. See the GNU Lesser General Public License for more details.
You should have received a copy of the GNU Lesser General Public License along with this library; if not, write to the Free Software
Foundation, Inc., 59 Temple Place, Suite 330, Boston, MA 02111-1307, USA
Also add information on how to contact you by electronic and paper mail.
You should also get your employer (if you work as a programmer) or your school, if any, to sign a “copyright disclaimer” for the library,
if necessary. Here is a sample; alter the names:
Yoyodyne, Inc., hereby disclaims all copyright interest in the library ‘Frob’ (a library for tweaking knobs) written by James Random
Hacker.
signature of Ty Coon, 1 April 1990
Ty Coon, President of Vice
That’s all there is to it!
78
En

14Appendix
Specifications
Item 50"Plasma Display, Model: PDP-505PU/PDP-504PU 43" Plasma Display, Model: PDP-435PU/PDP-434PU
Number of Pixels 1280 × 768 pixels 1024 × 768 pixels
Audio Amplifier 13 W + 13 W (1 kHz, 10 %, 8 Ω)13 W + 13 W (1 kHz, 10 %, 8 Ω)
Surround System SRS/FOCUS/TruBass SRS/FOCUS/TruBass
Power Requirement PDP–505PU: 120 V AC, 60 Hz, 363 W PDP–435PU: 120 V AC, 60 Hz, 298 W
(0.2 W Standby) (0.2 W Standby)
PDP–504PU: 110–240 V AC, 50/60 Hz, 363 W PDP–434PU: 110–240 V AC, 50/60 Hz, 298 W
(0.3 W Standby, 120 V) (0.3 W Standby, 120 V)
Dimensions PDP–505PU: 1270 (W) × 737 (H) × 93 (D) mm PDP–435PU: 1120 (W) × 652 (H) × 93 (D) mm
(50 (W) × 29 (H) × 3
PDP–504PU: 1270 (W) × 737 (H) × 98 (D) mm PDP–434PU: 1120 (W) × 652 (H) × 98 (D) mm
(50 (W) × 29 (H) × 3
Weight PDP–505PU: 32.8 kg (72.3 lbs.) PDP–435PU: 26.8 kg (59.1 lbs.)
PDP–504PU: 38 kg (83.8 lbs.) PDP–434PU: 30.5 kg (67.3 lbs.)
Item Media Receiver, Model: PDP-AR05U/PDP-R05U
Reception System (Digital) ATSC Digital TV system
Circuit type 8VSB/64QAM/256QAM/QPSK demodulation
Tuner VHF/UHF VHF 2–13ch, UHF 14–69ch
CATV 2–135ch
Audio format Dolby Digital
Reception System (Analog) American TV standard NTSC system
Circuit type Video signal detection PLL full synchronous detection, PLL digital synthesizer
Tuner VHF/UHF VHF 2–13ch, UHF 14–69ch
CATV ANTENNA/CABLE A IN: 1–135ch Cable: 1–125ch
Audio multiplex BTSC system
Terminals Rear ANTENNA/CABLE A IN 75 Ω UNBAL, F Type for DTV/VHF/UHF/CATV in
ANTENNA B 75 Ω UNBAL, F Type for VHF/UHF/CATV in
i.LINK (TS) S400 (2)
INPUT 1 COMPONENT VIDEO in, S-VIDEO in, VIDEO in, AUDIO in, HDMI in
INPUT 2 S-VIDEO in, VIDEO in, AUDIO in
INPUT 3 COMPONENT VIDEO in, AUDIO in, HDMI in
Monitor Out S-VIDEO out, VIDEO out, AUDIO out
Digital Audio Output Optical (1)
VCR Control Output 1
CONTROL IN 1
CONTROL OUT 1
Cable CARD Point of Deployment
Front INPUT 4 COMPONENT VIDEO in, S-VIDEO in, VIDEO in, AUDIO in
PC Analog RGB in, AUDIO in
OSD English/French/Spanish
Power Requirement 120 V AC, 60 Hz, 43.3 W (31 W Standby, 120 V)
Dimensions 420 (W) × 90 (H) × 295 (D) mm
Weight 5.8 kg (12.8 lbs.)
11
/16 (D) inches) (44 1/8 (W) × 25 11/16 (H) × 3 11/16 (D) inches)
7
/8 (D) inches) (44 1/8 (W) × 25 11/16 (H) × 3 7/8 (D) inches)
system
Loop out
9
(16
/16 (W) × 3 9/16 (H) × 1110/16 (D) inches)
English
• Design and specifications are subject to change without notice.
79
En

14 Appendix
Trademarks
• FOCUS, WOW, SRS and symbol are trademarks of SRS Labs, Inc.
FOCUS and WOW technologies are incorporated under license from SRS Labs, Inc.
• Manufactured under license from Dolby Laboratories. “Dolby” and the double-D symbol are trademarks of Dolby Laboratories.
• HDMI, the HDMI logo and High-Definition Multimedia Interface are trademarks or registered trademarks of HDMI Licensing LLC.
• This product includes FontAvenue
• “i.LINK” and the “i.LINK” logo are trademarks.
• DDC is a registered trademark of Video Electronics Standards Association.
• CableCARD is a trademark of Cable Television Laboratories, Inc.
• The names of the companies or institutions are trademarks or registered trademarks of the respective companies or institutions.
Copyright protection
• This product incorporates copyright protection technology that is protected by U.S. patents and other intellectual property rights.
Use of this copyright protection technology must be authorized by Macrovision Corporation, and is intended for home and other
limited consumer uses only unless otherwise authorized by Macrovision. Reverse engineering or disassembly is prohibited.
®
fonts licensed by NEC Corporation. FontAvenue is a registered trademark of NEC Corporation.
80
En
Published by Pioneer Corporation.
Copyright © 2004 Pioneer Corporation.
All rights reserved.


Note à l’attention de l’installateur du système de câblodistribution.
Cette note a pour objet d’appeler l’attention de l’installateur du système de câblodistribution sur l’Article 820-40 du
NEC qui fournit des conseils pour le raccordement convenable à la terre et signale, en particulier, que le câble de
masse doit être relié au dispositif de mise à la terre du bâtiment, aussi près que possible du point d’entrée du
câble.

AVERTISSEMENT: CET APPAREIL N’EST PAS
ÉTANCHE. POUR ÉVITER TOUT RISQUE D’INCENDIE
OU TOUTE SECOUSSE ÉLECTRIQUE, NE L’EXPOSEZ
PAS À LA PLUIE NI À L’HUMIDITÉ, NE LE PLACEZ PAS
À PROXIMITÉ D’UN POINT D’EAU NI D’UN VASE, D’UN
FLACON DE COSMÉTIQUE OU DE MÉDICAMENT, ETC.
AVERTISSEMENT: Manipuler le cordon
d’alimentation de cet appareil ou les cordons des
accessoires prévus, vous expose au plomb, corps
chimique que l’État de Californie et d’autres entités
gouvernementales savent capable provoquer des cancers, des défauts de naissance et d’autres anomalies
de la reproduction. Lavez vos mains après toute ma-
nipulation de ces cordons.
REMARQUE: Cet appareil est conforme aux
spécifications de la 15e partie des Règles de la Commission Fédérale des Communications (FCC). Ces
limites ont été définies pour assurer une protection
suffisante contre des brouillages nuisibles dans une zone
résidentielle. Cet appareil génère, utilise et émet des
signaux radioélectriques et s’il n’est pas installé et
employé conformément aux prescriptions de son mode
d’emploi, il peut provoquer des brouillages des communications radio. Toutefois, il n’y a pas de garantie que
les brouillages n’auront pas lieu dans une installation
particulière. Si cet appareil provoque effectivement des
brouillages de la réception de la radio et de la télévision,
ce qui peut être déterminé en arrêtant l’appareil puis en
le remettant en marche, il est conseillé à l’utilisateur
d’essayer d’y remédier, au moyen de l’une ou de
plusieurs des mesures suivantes:
— Réorienter ou déplacer l’antenne réceptrice.
— Augmenter la distance entre l’appareil et le récepteur.
— Connecter l’appareil à une prise secteur d’un circuit
différent de celui auquel est connecté le récepteur.
— Consulter le revendeur ou un technicien compétent
de radio ou de télévision.
PRÉCAUTION:
Cet appareil est conforme aux spécifications de la FCC
si des câbles et des connecteurs blindés sont utilisés
pour son raccordement à d’autres appareils. Pour limiter les risques de brouillage électromagnétique
d’appareils électriques tels que récepteurs de radio ou
de télévision, effectuez les raccordements au moyen de
câbles et de connecteurs blindés.
DÉCLARATION DE CONFORMITÉ AUX
RÈGLES DE LA FCC
Cet appareil est conforme à la 15e partie des Règles de
la FCC. Son fonctionnement est soumis aux 2 conditions
suivantes: (1) Cet appareil ne doit pas produire des
brouillages sérieux, et (2) il doit accepter les brouillages
qu’il reçoit, y compris ceux qui peuvent provoquer un
fonctionnement indésirable.
Nom de l’appareil: Système d’écran à plasma
(Écran plasma)
(Récepteur Média)
Numéro de modèle: PDP-5050HD PDP-4350HD
(PDP-505PU) (PDP-435PU)
(PDP-AR05U) (PDP-AR05U)
PDP-5045HD PDP-4345HD
(PDP-504PU) (PDP-434PU)
(PDP-R05U) (PDP-R05U)
Catégorie d’appareil: Ordinateurs personnels et
phériphériques de la classe B
Nom du tiers responsable: PIONEER ELECTRONICS
(USA), INC., Division d’assistance à la clientèle.
Adresse: P.O. BOX 1760, LONG BEACH, CA., 90801-1760
États-Unis
Téléphone: (800) 421-1625
URL pour la clientèle professionnelle
http://www.PioneerUSA.com
Français
Informations destinées à l’utilisateur
Les altérations ou modifications réalisées sans
autorisation écrite convenable peuvent entraîner la
déchéance de vos droits d’utilisateur.
[Pour le modèle destiné au Canada]
Cet appareil numérique de la classe B est conforme à la
norme NMB-003 du Canada.
REMARQUE IMPORTANTE: Le numéro de série de
cet appareil se trouve sur le panneau arrière. Veuillez
noter ce numéro sur la carte de garantie fournie que
vous placerez ensuite en lieu sûr. Cela, pour des raisons
de sécurité.
AVERTISSEMENT: Veillez à alimenter cet appareil à
partir d’une prise secteur munie d’une borne de masse.

Table des matières
Nous vous remercions d’avoir acquis cet appareil Pioneer.
Veuillez lire attentivement ce mode d’emploi pour être en mesure d’utiliser l’appareil convenablement. La lecture de ce mode
d’emploi terminée, conservez-le dans un endroit sûr pour référence.
Dans certains pays ou régions, la forme de la prise secteur et celle de la fiche du cordon d’alimentation peuvent différer des
illustrations de ce document. Toutefois, la manière de brancher le cordon et d’utiliser l’appareil est la même.
01 Informations importantes pour l’utilisateur
02 Précautions de sécurité
03 Précautions d’emploi
04 Accessoires fournis
Écran plasma ...................................................................... 11
Récepteur Média................................................................. 11
05 Nomenclature
Écran plasma ...................................................................... 12
Récepteur Média................................................................. 12
Boîtier de télécommande ................................................... 14
06 Préparation
Installation de l’écran à plasma ........................................ 15
Installation du Récepteur Média ....................................... 16
Montage vertical du Récepteur Média ....................... 16
Raccordement du câble système ...................................... 18
Cheminement des câbles .................................................. 19
Préparation du boîtier de télécommande ......................... 20
Mise en place des piles ................................................20
Précautions relatives aux piles .................................... 20
Portée du boîtier de télécommande............................ 20
Précautions relatives au boîtier de télécommande ... 20
Raccordement des câbles pour la télévision ordinaire
ou numérique ......................................................................21
Raccordement d’une antenne THF/UHF et d’un
convertisseur de câble ................................................. 21
Raccordement des câbles pour la télévision numérique
diffusée par voie hertzienne (THF/UHF) ............................ 21
Raccordement des antennes THF/UHF ...................... 21
Sélection de l’antenne A ou B ........................................... 22
Introduction de la carte pour câble ................................... 22
Raccordement du cordon d’alimentation ........................ 23
07 Opérations de base
Mise en service (en veille) .................................................. 24
Mise hors service (en veille) ............................................... 24
Pour regarder une émission de télévision ........................ 25
Sélection de l’antenne.................................................. 25
Sélection des canaux ................................................... 25
Modification du niveau sonore ....................................26
Affichage de la fiche d’identification du canal .......... 26
Utilisation des services POD ....................................... 27
Sélection de la langue .................................................. 27
Sélection du canal audio (MTS et SAP)...................... 27
Utilisation des fonctions d’affichage ................................ 28
Partage d’écran.............................................................28
Gel d’une image ............................................................ 29
4
Fr
08 Réglages par menus
Structure des menus ..........................................................30
Menus des modes AV................................................... 30
Menus des modes PC .................................................. 30
Utilisation des menus......................................................... 30
09 Réglages du syntoniseur
Réglage des canaux de télévision ..................................... 31
Utilisation de la pré-sélection automatique
de canal ......................................................................... 31
Réglage pour que soient ignorés certains canaux .... 31
Réglage des canaux de télévision ............................... 31
Nommer les canaux de télévision ............................... 32
Vérification de la puissance du signal ........................ 32
Vérification de l’identité de la carte pour le câble ..... 32
Autorisation de l’acquisition de données ................... 32
Restriction parentale .......................................................... 33
Changement de mot de passe .................................... 33
Effacement du mot de passe ....................................... 34
Mise en service de la restriction parentale ................ 34
Utilisation du classement volontaire des films
(MPAA) .......................................................................... 34
Utilisation du classement des
émissions de télévision ................................................ 35
Utilisation du classement parental des émissions
de télévision (Lignes directrices pour la télévision)... 35
Interdiction des émissions de
télévision non classées ................................................ 35
Systèmes de classement en vigueur au Canada ....... 36
Utilisation du classement pour les Canadiens
anglophones ................................................................. 36
Utilisation du classement pour les
Canadiens français....................................................... 37
Mise hors service temporaire
de la restriction parentale ............................................37
Sélection des canaux favoris ............................................. 37
Utilisation des sous-titres................................................... 37
Mise en service du sous-titrage codé ......................... 38
Sélection du type de sous-titrage codé ordinaire ...... 38
Sélection du sous-titrage codé numérique ................ 38
Sélection des paramètres du sous-titrage codé
numérique .....................................................................38
Réglage de l’horloge ........................................................... 39

Table des matières
10 Réglages et mises au point
Minuterie de mise en veille ................................................ 40
Sélection AV ........................................................................ 40
Réglages de l’image ........................................................... 41
Réglage Pro ................................................................... 41
Réglages du son ................................................................. 42
FOCUS ........................................................................... 43
Surround avant ............................................................. 43
Gestion de l’alimentation ................................................... 43
Économie d’énergie...................................................... 43
Mise en veille en l’absence de signal
(mode AV uniquement) ................................................ 43
Mise en veille en l’absence de commande
(mode AV uniquement) ................................................ 44
Gestion de l’alimentation (mode PC uniquement) .... 44
Réglage de la position de l’image
(mode AV uniquement) ...................................................... 44
Réglage automatique de la position de l’image et de
l’horloge (mode PC uniquement) ...................................... 45
Réglage manuel de la position de l’image et
de l’horloge (mode PC uniquement) ................................. 45
Sélection d’un format d’image .......................................... 46
Modification de la luminosité de chaque côté de l’écran
(Cache latéral) .....................................................................47
Choix de la langue .............................................................. 47
11 Sélection préalable à l’aide du
programmateur
Sélection préalable des émissions de
télévision à l’aide du programmateur ............................... 48
Traitement des sélections préalables se chevauchant .... 49
12 Emploi d’un appareil extérieur
Affichage des images d’un lecteur de DVD ..................... 50
Raccordement d’un lecteur de DVD ........................... 50
Affichage des images provenant d’un lecteur
de DVD ........................................................................... 50
Affichage des images d’un magnétoscope ...................... 50
Raccordement d’un magnétoscope ........................... 50
Affichage des images provenant
d’un magnétoscope...................................................... 50
Utilisation de l’entrée HDMI .............................................. 51
Raccordement d’un appareil HDMI ............................ 51
Utilisation d’une console de jeu ou d’un caméscope ..... 52
Raccordement d’une console de jeu
ou d’un caméscope ...................................................... 52
Affichage des images d’une console de jeu
ou d’un caméscope ...................................................... 52
Enregistrement d’une émission de télévision numérique
sur un magnétoscope ou un graveur de DVD.................. 52
Suppression des bouclages indésirables................... 52
Raccordement d’un appareil d’enregistrement......... 53
Raccordement d’autres appareils audio .......................... 53
Raccordement d’un récepteur audiovisuel ................ 53
Affichage d’une image numérique VHS ........................... 54
Qu’est-ce que i.LINK? ...................................................54
Quels appareils i.LINK peuvent être reliés?................ 54
Quels signaux peuvent être enregistrés
via i.LINK? ......................................................................54
Raccordement d’un magnétoscope
numérique VHS ............................................................ 54
Raccordement d’un seul magnétoscope
numérique VHS ............................................................ 54
Raccordement de deux magnétoscopes
numériques VHS........................................................... 54
Affichage d’une image numérique VHS ........................... 55
Informations intéressantes et importantes ................ 55
Réglage pour la commande d’un magnétoscope
numérique VHS ............................................................ 56
Modification de la liste i.LINK...................................... 56
Configuration de l’interface i.LINK
pour le système en veille .............................................. 57
Utilisation de la page de commande .......................... 57
Affichage des images d’un ordinateur personnel ........... 58
Raccordement d’un ordinateur personnel ................. 58
Affichage des images d’un ordinateur personnel ..... 58
Tableau de compatibilité ordinateur ................................. 58
Raccordement du contrôleur de magnétoscope .............59
Liste des fabricants d’appareils d’enregistrement
qui peuvent être commandés à distance ................... 60
Raccordement des câbles de commande ........................ 61
Quelques mots sur SR+ ..............................................61
13 Particularités du boîtier de télécommande
Fonction d’apprentissage du boîtier
de télécommande ............................................................... 62
Utilisation de la fonction d’apprentissage ................. 62
Utilisation des codes des fabricants ........................... 62
Codes des fabricants .................................................... 63
Utilisation du boîtier de télécommande pour agir sur
d’autres appareils ............................................................... 64
Touches de commande de récepteur ......................... 64
Touches de commande pour le câble ......................... 65
Touches de commande du syntoniseur
pour satellite ................................................................. 66
Touches de commande du magnétoscope ................ 67
Touches de commande du lecteur de DVD,
graveur de DVD ............................................................. 68
14 Annexe
Guide de dépannage .......................................................... 69
Caractéristiques techniques .............................................. 71
Français
5
Fr

01 Informations importantes pour l’utilisateur
Veuillez lire attentivement ces informations de manière à
profiter au mieux du système d’écran à plasma Pioneer
PureVision PDP-5050HD/PDP-4350HD/PDP-5045HD/PDP4345HD.
Avec le système d’écran à plasma Pioneer PureVision PDP5050HD/PDP-4350HD/PDP-5045HD/PDP-4345HD, vous
disposez d’un ensemble de qualité qui assurera un service
fiable et de longue durée. Afin de vous offrir des images de
qualité exceptionnelle, le système d’écran à plasma Pioneer
bénéficie d’une conception et d’une fabrication de très haut
niveau, et incorpore les dernières avancées technologiques.
Avec le temps, la luminosité de l’écran à plasma Pioneer PDP5050HD/PDP-4350HD/PDP-5045HD/PDP-4345HD diminuera
légèrement, tout comme dans le cas des écrans à tube
cathodoluminescents (écran des téléviseurs habituels). Pour
profiter longtemps des belles images lumineuses que produit le
système d’écran à plasma Pioneer, lisez ce qui suit et respectez
les consignes qui vous sont données:
Instructions d’usage
Tous les écrans cathodoluminescents (y compris ceux des
téléviseurs habituels) sont détériorés par l’affichage prolongé
d’images fixes. Les systèmes d’écran à plasma ne font pas
exception à cette règle. Les images rémanentes et les effets
permanents peuvent être évités en prenant quelques
précautions simples. En suivant les consignes qui vous sont
données ci-dessous, vous vous assurez d’obtenir des résultats
satisfaisants de l’écran à plasma:
• Dans toute la mesure du possible, évitez l’affichage de la
même image, ou d’une image pratiquement fixe (par
exemple, les images sous-titrées et les images statiques des
jeux vidéo).
• Évitez de faire apparaître, pendant une période prolongée,
l’affichage sur écran produit par un lecteur de DVD, un
magnétoscope ou d’autres appareils similaires.
• Ne conservez pas longtemps une image fixe consécutive à
une pause ou un arrêt sur image que le magnétoscope, le
lecteur de DVD et tout autre appareil similaire sont capables
de produire.
• Les images comportant côte à côte des zones très
lumineuses et des zones très sombres ne doivent pas, non
plus, demeurer sur l’écran pendant de longues périodes.
• Lorsque vous jouez, nous vous conseillons vivement
d’employer le mode “JEU” de “Sélection AV”. Veillez
également à ce que les sessions de jeu ne dépassent pas 2
heures.
• Après un jeu, ou bien après l’affichage d’une image fixe
provenant d’un ordinateur, il est souhaitable de passer des
images animées avec les réglages “LARGE” ou “PLEIN”
pendant une période supérieure à 3 fois la durée de l’image
fixe précédemment affichée.
• Lorsque vous n’utilisez plus le système d’écran à plasma,
n’oubliez pas de repasser en veille “STANDBY”.
Instructions d’installation
Le système d’écran à plasma Pioneer PureVision PDP-5050HD/
PDP-4350HD/PDP-5045HD/PDP-4345HD, présente une très
faible épaisseur. Pour des raisons de sécurité et pour éviter que
l’appareil ne puisse se renverser en cas de vibration ou contact
accidentel, veillez à fixer ou à installer le système d’écran à
plasma de la manière convenable.
Cet appareil doit être installé en faisant usage des pièces et des
accessoires conçus par PIONEER, à l’exclusion de tous autres.
L’emploi d’accessoires autres que le support et l’applique
PIONEER peut se traduire par une instabilité de l’appareil qui
peut être la cause d’une blessure. Dans le cas où vous désirez
une installation spéciale, consultez le magasin où vous avez
acheté l’appareil. Pour vous garantir une installation correcte et
sûre, il est préférable de vous adresser à un technicien
expérimenté et qualifié. PIONEER ne saurait être tenue
responsable ni des accidents ni des dommages provoqués par
l’utilisation de pièces ou d’accessoires provenant d’autres
fabricants.
Pour éviter toute anomalie et toute surchauffe, veillez à ce que
les ouïes de l’appareil ne soient pas obstruées de manière que
la chaleur puisse s’évacuer: Pour garantir la dissipation
convenable de la chaleur:
• Éloignez légèrement l’appareil des autres équipements, des
murs, etc. L’espace minimum requis est indiqué aux pages
15 et 16.
• N’introduisez pas l’appareil dans un espace exigu où la
ventilation est médiocre.
• Ne recouvrez pas l’appareil d’un linge, etc.
• Au moyen d’un aspirateur réglé à la puissance minimale,
nettoyez périodiquement les ouïes latérales et arrière pour
supprimer les poussières qui pourraient s’y accumuler.
• Ne posez l’appareil ni sur un tapis ni sur une couverture.
• Ne conservez pas l’appareil incliné, sauf dans le cas du
récepteur média s’il doit être monté en position verticale.
• Ne renversez pas l’appareil.
L’utilisation de l’appareil sans ventilation convenable, peut
provoquer une élévation de la température intérieure qui peut
se traduire par une anomalie de fonctionnement. Lorsque la
température ambiante ou interne excède une certaine valeur,
l’écran se met de lui-même hors tension pour que les circuits
électroniques puissent se refroidir et que tous les risques
soient ainsi écartés.
Une anomalie de fonctionnement peut être provoquée par de
multiples facteurs: choix d’un emplacement d’installation qui
ne convient pas, assemblage, installation et montage non
conformes, utilisation anormale de l’appareil, modifications de
l’appareil n’ayant pas reçues l’aval du fabricant. Toutefois,
PIONEER ne saurait être tenue responsable de ces anomalies.
Les caractéristiques et effets habituellement rencontrés avec
les écrans matriciels à revêtement cathodoluminescent, par
exemple, la rémanence d’image, et l’existence d’un nombre
négligeable de cellules lumineuses inactives, ne sont pas
couverts par les garanties locales.
6
Fr

Rémanence d’image sur le panneau
• L’affichage de la même image pendant une longue période
peut provoquer une rémanence de cette image. Cela peut
spécialement se produire dans les circonstances suivantes.
01Informations importantes pour l’utilisateur
1. Image rémanente due à la charge électrique
Si une image présentant des zones très lumineuses est
affichée pendant plus d’une minute, une image rémanente
produite par la charge électrique importante peut en résulter.
Cette image rémanente s’estompe peu à peu dès qu’une image
animée la remplace. Le temps requis pour la disparition de
l’image dépend de la luminosité de l’image fixe qui lui a donné
naissance et du temps d’exposition de cette image.
2. Image rémanente due au brûlage
Évitez d’afficher sur l’écran à plasma la même image pendant
longtemps. Si la même image demeure sur l’écran pendant
plusieurs heures, ou encore apparaît tous les jours au cours
d’une période plus courte mais répétée, une image rémanente
peut être produite par brûlage de la couche fluorescente de
l’écran. Cette image rémanente devient moins visible après
l’affichage d’images animées mais elle ne disparaît jamais
complètement.
• La fonction d’économie d’énergie peut être employée pour
éviter ce genre de phénomène dommageable (reportez-vous
à la page 43).
Quelques mots sur la liaison i.LINK
PIONEER ne garantit pas que l’enregistrement ou la lecture
réalisés à l’aide d’un magnétoscope VHS numérique (D-VHS) et
par le truchement de la liaison i.LINK soient parfaits dans tous
les cas.
Français
NE DÉPOSEZ PAS L’APPAREIL SUR UNE TABLE, UN CHARIOT,
UN SUPPORT, UN TRÉPIED, UNE CONSOLE INSTABLES. CET
APPAREIL POURRAIT TOMBER, PROVOQUANT DES
BLESSURES GRAVES OU DES DOMMAGES PHYSIQUES
IMPORTANTS. UTILISEZ UNIQUEMENT UN CHARIOT, UN
SUPPORT, UN TRÉPIED, UNE CONSOLE OU UNE TABLE
CONSEILLÉS PAR LE FABRICANT OU VENDUS AVEC
L’APPAREIL. RESPECTEZ LES INSTRUCTIONS DU FABRICANT
POUR TOUT CE QUI CONCERNE L’INSTALLATION DE
L’APPAREIL ET L’EMPLOI DES ACCESSOIRES DE MONTAGE
QU’IL CONSEILLE.
L’ENSEMBLE QUE FORME UN APPAREIL ET LE CHARIOT À
L’AIDE DUQUEL ON LE DÉPLACE, DOIT ÊTRE MANŒUVRÉ
AVEC PRÉCAUTION. LES ARRÊTS BRUSQUES, LES
POUSSÉES EXCESSIVES ET LES IRRÉGULARITÉS DU
PLANCHER, PEUVENT PROVOQUER LE BASCULEMENT DU
CHARIOT ET LA CHUTE DE L’APPAREIL.
7
Fr

02 Précautions de sécurité
L’électricité permet de disposer d’un grand nombre de fonctions
utiles mais elle peut être la source de blessures et de dommages
matériels si certaines précautions ne sont pas respectées. Cet
appareil a été conçu et fabriqué en tenant le plus grand compte de
la sécurité. Toutefois, son utilisation incorrecte peut conduire à
ressentir une secousse électrique, ou à provoquer un incendie.
Pour éviter tout risque potentiel, observez les instructions qui
suivent lorsque vous installez, utilisez ou nettoyez l’appareil. Pour
votre sécurité et pour prolonger la durée de service de l’appareil,
lisez soigneusement ce qui suit avant de l’utiliser.
1. Prenez connaissance du mode d’emploi—Vous devez lire
toutes les instructions relatives à la sécurité et au
fonctionnement avant de faire usage de l’appareil.
2. Conservez le mode d’emploi—De manière à pouvoir vous y
reporter ultérieurement, conservez soigneusement les
instructions relatives à la sécurité et au fonctionnement.
3. Observez les mises en garde—Toutes les mises en garde
apposées sur l’appareil ou mentionnées dans le mode d’emploi
doivent être observées.
4. Respectez les instructions—Toutes les instructions de
fonctionnement et d’entretien doivent être respectées.
5. Nettoyage—Débranchez la fiche du câble d’alimentation avant
de nettoyer cet appareil. Essuyez l’appareil à l’aide d’un chiffon
doux et propre. N’utilisez aucun liquide de nettoyage ni aucun
aérosol.
6. Accessoires—N’utilisez aucun accessoire qui ne soit pas
conseillé par le fabricant. Tout accessoire non conseillé peut
entraîner un accident.
7. Eau et humidité—N’utilisez pas l’appareil près d ‘un point
d’eau tel que baignoire, lavabo, évier, machine à laver, piscine,
ni dans un sous-sol humide.
8. Support—Ne déposez pas l’appareil sur une table, un chariot,
un support, un trépied, une console instables. L’appareil
pourrait tomber, être gravement endommagé ou sérieusement
blesser quelqu’un. Utilisez uniquement un chariot, un support,
un trépied, une console ou une table conseillés par le fabricant
ou vendus avec l’appareil. Si l’appareil doit être fixé sur un mur,
respectez scrupuleusement les instructions de montage du
fabricant. N’utilisez que les accessoires de montage conseillés
par le fabricant.
9. Si vous déplacez l’appareil en le posant sur un chariot,
manœuvrez celui-ci avec précaution. Des arrêts brusques, une
poussée excessive, des irrégularités à la surface du sol peuvent
provoquer la chute de l’appareil.
10. Ventilation—Les évents et autres ouvertures de la carrosserie
sont destinés à la ventilation. Ne les couvrez pas, ne les
obstruez pas car une réduction de la ventilation peut entraîner
une augmentation de la température interne de l’appareil et
par voie de conséquence une diminution de sa durée de vie. Ne
posez pas l’appareil sur un lit, un canapé, un tapis ou une
surface similaire car cela pourrait conduire à l’obstruction des
ouvertures de ventilation. Cet appareil n’a pas été conçu pour
être encastré; ne l’installez pas dans un endroit clos tel qu’une
bibliothèque fermée ou une baie, à moins que la ventilation
convenable puisse être assurée conformément aux instructions
fournies par le fabricant.
11. Alimentation—Cet appareil ne doit être alimenté qu’à partir
d’une source conforme à l’indication que porte la plaquette
signalétique. Si vous ne connaissez pas la nature de la source,
prenez conseil du distributeur ou de la compagnie d’électricité.
12. Protection du cordon d’alimentation—Le câble d’alimentation
doit cheminer de manière qu’on ne puisse pas le piétiner, ni
qu’il soit écrasé par un meuble ou un objet lourd. Examinez
8
Fr
soigneusement le cheminement du câble d’alimentation près
de la prise secteur et au point de sortie de l’appareil.
13. Le panneau de l’écran à plasma est en verre. Il peut donc être
brisé par la chute de l’appareil, ou par un choc. En cas de
casse du panneau, veillez à ne pas être blessé par les débris.
14. Surcharge—Ne surchargez pas les prises secteur ou les
rallonges. Cela peut entraîner un incendie, ou encore vous
exposer à une secousse électrique.
15. Introduction d’objets étrangers ou de liquide—N’introduisez
aucun objet dans les ouvertures de l’appareil. Des tensions
élevées existent à l’intérieur de l’appareil, en sorte que le
contact d’un objet avec les points portés à haute tension peut
entraîner un incendie, ou encore vous exposer à une secousse
électrique. Pour les mêmes raisons, ne renversez ni eau ni
autre liquide sur l’appareil.
16. Entretien—Ne tentez pas de réparer cet appareil par vousmême. La dépose des capots peut vous exposer à des tensions
dangereuses ou à d’autres risques. Faites entretenir l’appareil
par du personnel qualifié pour cela.
17. Réparations—Dans l’un des cas ci-dessous, débranchez la
fiche du câble d’alimentation et faites vérifier ou réparer
l’appareil par du personnel qualifié pour cela.
a. Le câble ou la fiche d’alimentation sont endommagés.
b. Un liquide a été renversé sur l’appareil, ou encore un objet
étranger a été introduit dans l’appareil par une de ses
ouvertures.
c. L’appareil a été exposé à la pluie ou à l’eau.
d. L’appareil ne fonctionne pas normalement bien que vous
respectiez les instructions du mode d’emploi.
N’agissez que sur les commandes mentionnées dans ce
mode d’emploi. En effet, toute action sur les commandes
autres que celles dont il est question dans ce document,
entraîne, le plus souvent, l’intervention coûteuse d’un
technicien qualifié à fin de rétablir les conditions normales
de fonctionnement.
e. L’appareil est tombé, ou sa carrosserie a été endommagée.
f. Le fonctionnement anormal de l’appareil est évident. Toute
anomalie de fonctionnement visible justifie que l’appareil
soit apporté à un service après-vente.
18. Pièces de rechange—Si une pièce doit être remplacée,
assurez-vous auprès du service de réparation qu’elle le sera par
la pièce prescrite par le fabricant ou une pièce ayant des
caractéristiques et des performances identiques. L’utilisation
d’une pièce non conforme à l’original peut entraîner un
incendie, ou vous exposer à une secousse électrique ou à
d’autres dangers.
19. Contrôle de sécurité—Après toute intervention sur cet appareil,
exigez du service de réparation qu’il effectue un contrôle de
sécurité afin de s’assurer que l’appareil peut être utilisé sans
danger.
20. Montage sur un mur ou en plafond—Si l’appareil doit être
monté sur un mur ou en plafond, assurez-vous que cela sera
exécuté conformément à la méthode conseillée par le
fabricant.
21. Sources de chaleur—Conservez l’appareil loin des appareils de
chauffage (radiateurs, poêles) et des appareils qui dégagent de
la chaleur (y compris les amplificateurs).
22. Débranchez la fiche du cordon d’alimentation avant d’effectuer
le raccordement des enceintes.
23. Veillez à ce que le système d’écran à plasma ne soit pas heurté.
Un choc ou un impact pourraient provoquer la rupture du
panneau, ce qui pourrait entraîner un incendie ou causer des
blessures.
24. N’exposez pas le système d’écran à plasma à la lumière directe
du soleil pendant une longue période. Les caractéristiques
optiques du panneau avant protecteur seraient modifiées, ce
qui se traduirait pas des décolorations et des déformations.
25.
Le système d’écran à plasma pèse environ 32,8 kg (72,3
lbs.) dans le cas du modèle PDP-505PU, environ 38 kg (83,8
lbs.) dans le cas du modèle PDP-504PU, environ 26,8 kg
(59,1 lbs.) dans le cas du modèle PDP-435PU et environ 30,5
kg (67,3 lbs.) dans le cas du modèle PDP-434PU.
de sa faible profondeur, cet appareil est instable et doit être
déballé, transporté et installé par au moins deux personnes et
en faisant usage des poignées prévues à cet effet.
En raison

Précautions d’installation
Observez les précautions suivantes si vous effectuez une installation mettant en œuvre des accessoires tels que le support en
option.
Si vous utilisez le support, les équerres ou les accessoires en option
• Demandez au revendeur d’effectuer l’installation.
• Servez-vous des boulons fournis.
•Pour de plus amples détails concernant cette question, reportez-vous au mode d’emploi qui accompagne le support en option
(ou les accessoires équivalents).
Si vous utilisez d’autres accessoires
• Consultez le revendeur.
• Les 6 perçages de fixation suivants peuvent être utilisés pour l’installation:
02Précautions de sécurité
Français
Vue de dos
Perçage de
fixation
Ligne centrale
L’illustration montre PDP-5045HD/4345HD.
•Veillez à utiliser au moins 4 perçages de fixation symétriquement par rapport aux lignes centrales verticale et horizontale.
• Utilisez des vis M8 qui pénètrent de 12 à 18 mm (0,5 à 0,7 pouces) dans la surface de pose de l’écran à plasma. Consultez la vue
de côté ci-dessus.
•Veillez à ne pas obstruer les évents d’aération qui se trouvent à l’arrière de l’écran à plasma.
•L’écran à plasma doit être installé sur une surface plane car il comporte un verre.
• Les perçages autres que ceux mentionnés ci-dessus sont uniquement destinés à des produits spécifiques. Ne les utilisez pas
pour effectuer le montage d’appareils non spécifiés.
• Ne montez pas l’écran à plasma sur le support quand les enceintes sont fixées à l’écran; cette consigne vaut pareillement pour
la dépose.
Perçage de
fixation
Ligne
centrale
Vue de côté
Écran
plasma
Surface de pose
Équerre de
fixation (ou
accessoire
équivalent)
Vis M8
12 à 18 mm
(0,5 à 0,7 pouces)
• Nous ne saurions trop vous conseiller d’utiliser les accessoires PIONEER de fixation.
• PIONEER ne saurait être tenue responsable des blessures ou dommages matériels qui résulteraient de l’utilisation d’accessoires
de fixation autres que ceux conçus et fabriqués par PIONEER.
9
Fr

03 Précautions d’emploi
PIONEER ne saurait être tenue responsable des dommages
survenant à la suite d’un usage incorrect de l’appareil, par
vous-même ou d’autres personnes, des anomalies de
fonctionnement, des perturbations que l’appareil peut causer à
d’autres équipements à moins que sa responsabilité soit
clairement engagée.
Fonction de protection de l’écran à plasma
Lorsque vous affichez des images fixes (photos ou images
fournies par un ordinateur) pendant une longue période, la
luminosité de l’écran est légèrement réduite. Cette disposition
automatique résulte de l’action d’une fonction de protection de
l’écran qui atténue sa luminosité dès que la présence d’une
image fixe est détectée; il ne s’agit donc pas d’une anomalie de
fonctionnement. La baisse de luminosité survient après qu’une
image fixe a été détectée pendant 3 minutes.
Rayonnement infrarouge
En raison de ses caractéristiques mêmes, l’écran à plasma
émet un rayonnement infrarouge. Selon la manière dont l’écran
à plasma est utilisé, le fonctionnement des boîtiers de
télécommande des appareils à proximité de l’écran peut être
profondément perturbé; pareillement des combinés
téléphoniques sans cordon qui sont alors brouillés. Dans une
telle situation, changez l’emplacement de l’appareil pour que
son capteur de télécommande soit hors de la zone de
perturbation.
Brouillage radioélectrique
Bien que cet appareil réponde aux caractéristiques exigées, il
faut savoir qu’il génère un brouillage. Si vous placez un
récepteur de radio AM, un ordinateur personnel ou un
magnétoscope dans le voisinage de cet appareil, leur
fonctionnement peut être perturbé par le brouillage. En ce cas,
éloignez l’appareil concerné.
Bruit du ventilateur
Lorsque la température intérieure du récepteur média s’élève,
la vitesse de rotation du moteur du ventilateur de
refroidissement augmente. Vous pouvez alors avoir
l’impression que le moteur du ventilateur est bruyant.
Le moteur du ventilateur tourne aussi longtemps que la fiche
du cordon d’alimentation du récepteur média n’est pas
débranchée de la prise secteur.
Ne collez aucune étiquette ni aucun ruban sur
l’appareil
• Cela peut décolorer ou rayer la carrosserie.
Si vous n’utilisez pas l’appareil pendant une longue
période
• Si vous conservez l’appareil non utilisé pendant longtemps,
son fonctionnement peut en souffrir profondément. Mettez
l’appareil en service et faites-le fonctionner régulièrement.
Condensation
• De la condensation peut se former à la surface ou à
l’intérieur de l’appareil si vous le transportez rapidement
d’une pièce froide dans une pièce chaude, ou bien, lorsque,
le matin, en hiver, vous allumez un appareil de chauffage. Si
de la condensation se forme, ne mettez pas l’appareil en
service et attendez qu’elle ait disparu. Mettre l’appareil en
service alors que de la condensation s’est formée, peut
provoquer une anomalie de fonctionnement.
Nettoyage de l’écran
•Pour nettoyer l’écran de l’appareil, utilisez un chiffon doux et
sec; le chiffon de nettoyage fourni convient, de même que
d’autres chiffons similaires (par exemple, en coton ou
flanelle). Sachez que la surface de l’écran peut être rayée si
vous utilisez un chiffon dur, ou la frottez fort.
• Si vous utilisez un chiffon humide pour le nettoyage de
l’écran, des gouttelettes d’eau peuvent pénétrer dans
l’appareil et provoquer une anomalie de fonctionnement.
Nettoyage de la carrosserie
•Pour nettoyer la carrosserie de l’appareil, utilisez un chiffon
doux et sec; le chiffon de nettoyage fourni convient, de même
que d’autres chiffons similaires (par exemple, en coton ou
flanelle). Sachez que la surface de la carrosserie peut être
rayée si vous utilisez un chiffon dur, ou la frottez fort.
• La carrosserie de cet appareil est essentiellement composée
de matières plastiques. N’utilisez aucun produit chimique
(essence, diluant, etc.) pour la nettoyer. Ces produits
chimiques peuvent endommager la finition ou la faire peler.
• N’exposez pas l’appareil à des gaz ni à des liquides vaporisés
tels que les insecticides. Ne conservez pas l’appareil en
contact prolongé avec des matériaux en caoutchouc ou en
vinyle. Le plastifiant de la matière plastique peut
endommager la finition ou la faire peler.
• Si vous utilisez un chiffon humide pour le nettoyage de
l’écran, des gouttelettes d’eau peuvent pénétrer dans
l’appareil et provoquer une anomalie de fonctionnement.
Poignées placées à l’arrière de l’écran à plasma
• Ne déposez pas les poignées que porte l’écran à plasma, à
l’arrière.
•Pour déplacer l’écran à plasma, faites-vous aider par une
autre personne et utilisez les poignées fixées à l’arrière de
l’écran à plasma. Ne déplacez pas l’écran à plasma en ne
vous aidant que d’une seule poignée. Utilisez les poignées de
la manière illustrée.
• N’utilisez pas les poignées pour suspendre l’appareil au
cours de son installation ou de son transport. N’utilisez les
pas les poignées pour empêcher la chute de l’appareil.
10
Fr

Écran plasma
04Accessoires fournis
Cordon d’alimentation
(2 m/6,6 pieds)
Collier à œil × 3
Récepteur Média
Chiffon de nettoyage Collier rapide × 3
Carte de garantie
Garniture pour enceinte × 3
(Pour PDP-5045HD/4345HD seulement)
(À utiliser si les enceintes en option sont
montées à la partie inférieure de l’écran à
plasma.)
Français
Cordon d’alimentation
(2 m/6,6 pieds)
Pile AA × 2
(pile alcaline)
Capuchon pour perçage de
vis × 4
• Utilisez respectivement le cordon d’alimentation fourni avec l’écran
plasma et celui fourni avec le récepteur média.
Télécommande de
magnétoscope
(1,8 m/5,9 pieds)
Boîtier de
télécommande
Support
Mode d’emploi
Câble système
(3 m/9,8 pieds)
Vis × 4
(pour le support)
Guide d’emploi
11
Fr

05 Nomenclature
Écran plasma
Les illustrations montrent PDP-5045HD/4345HD.
Vue de face
Vue de dos
(vue de droite)
4
1 Touche POWER
2 Témoin STANDBY
5
3 Témoin POWER ON
6
4 Capteur de télécommande
5 Touche STANDBY/ON
7
6 Touche INPUT
7 Touches VOLUME +/–
8
8 Touches CHANNEL +/–
9 Prise SYSTEM CABLE (NOIR)
10 Prise SYSTEM CABLE (BLANC)
11 Prises pour les enceintes (gauche/droite)
12 Prise AC INLET
9
10
Récepteur Média
Vue de face
POWER
1
ON STANDBY
2
REC
TIMER
ACQUISITION
3 4 5
DATA
Les prises sont tournées vers le bas.
Tirez ici pour ouvrir ce volet.
PCINPUT 4
COMPONENT VIDEO
B/PBCR/PR
Y
6 7
-
VIDEO VIDEO AUDIO
S
AUDIO
ANALOG RGB
(
)
STEREO
LRC
8 9 10 11
11
12
1 Touche POWER
2 Témoin POWER ON
3 Témoin STANDBY
4 Témoin REC TIMER
5 Témoin DATA ACQUISITION
6 Prises INPUT 4
(COMPONENT VIDEO: Y, C
7 Prise INPUT 4 (S-VIDEO)
8 Prise INPUT 4 (VIDEO)
9 Prises INPUT 4 (AUDIO)
10 Prise PC INPUT (AUDIO)
11 Prise PC INPUT (ANALOG RGB)
B/PB, CR/PR)
12
Fr

Vue de dos
05Nomenclature
1 2 3 4 5 6 7 9 10 11 13
DIGITAL OUT
INPUT 1
INPUT 3
INPUT 3
OPTICAL
INPUT 1
COMPONENT VIDEO
CB/P
B
B/PB
YYC
IN OUT
CONTROL
ANTENNA B
SERVICE ONLY
14
VCR CONTROL
IN
OUT
MONITOR OUT
S-VIDEO
S-VIDEO
ANTENNA/
CABLE A IN
INPUT 2
VIDEO
VIDEO
INPUT 2
R-AUDIO-L
R-AUDIO-L
Cable
Cable
CARD
CARD
(TS)
VIDEO
S-VIDEO
S400
R-AUDIO-L
R-AUDIO-L
15 16 17 18 19 20 21 22 23
1 Prise CONTROL IN
2 Prise CONTROL OUT
3 Prise VCR CONTROL
4 Prise ANTENNA B IN
5 Prise ANTENNA/CABLE A IN
6 Prise INPUT 2 (VIDEO)
7 Prises INPUT 2 (AUDIO)
8 Prises i.LINK
9 Fente Cable CARD
10 Prises INPUT 1 (AUDIO)
11 Prise DIGITAL OUT (OPTICAL)
12 Prises INPUT 1
(COMPONENT VIDEO: Y, C
B/PB, CR/PR)
13 Prise AC IN
128
CR/P
R
INPUT 1 INPUT 3
CR/P
R
HDMI
14 Prise RS-232C (utilisée pour la mise au
point usine)
15 Prise ANTENNA B OUT
16 Prise INPUT 2 (S-VIDEO)
17 Prise MONITOR OUT (S-VIDEO)
18 Prise MONITOR OUT (VIDEO)
19 Prises MONITOR OUT (AUDIO)
20 Prise INPUT 1 (VIDEO)
21 Prise INPUT 1 (S-VIDEO)
22 Prises INPUT 3 (AUDIO)
23 Prises INPUT 3
(COMPONENT VIDEO: Y, C
24 Prises HDMI (INPUT1/INPUT3)
25 Prise SYSTEM CABLE (BLANC)
26 Prise SYSTEM CABLE (NOIR)
AC IN
BLACK
WHITE
SYSTEM CABLE
25 2624
B/PB, CR/PR)
Français
13
Fr

05 Nomenclature
Boîtier de télécommande
Sélecteur de mode
1 2
3
4
5
6
7
8
9
10
11
12
13
Lorsque le sélecteur de mode est sur la position TV
1 TV : L’écran plasma est mis en service ou en
veille à l’aide de cette touche.
2 Diode de confirmation de transmission
3 INPUT: Ces touches assurent la sélection de la
source pour l’écran plasma. (INPUT 1, INPUT 2,
INPUT 3, INPUT 4, PC, i.LINK)
4 •(point): Cette touche provoque la saisie d’un point.
5 CH RETURN: Cette touche rétablit le canal
précédent.
6 CH +/–: Ces touches sélectionnent un canal.
7 RETURN: Cette touche rétablit la page de menu
14
Fr
précédente.
(sur la position “TV”)
14
15
16
17
18
19
20
21
22
23
24
25
26
27
/ / / : Cette commande sélectionne un poste
8
d’un menu.
9 DTV INFO: Cette touche affiche d’autres informa-
tions sur les émissions de télévision numérique.
10 SPLIT: Cette touche permet d’afficher deux im-
ages, une image dans une image ou une seule
image.
11 FREEZE: Cette touche gèle une image animée.
Appuyez une nouvelle fois sur cette touche pour
annuler.
12 SWAP: Cette touche permet de passer d’une image
à l’autre lorsque 2 images ou une image dans une
image sont affichées.
13 SHIFT: Cette touche déplace la petite image dans
le cas d’une image dans une image.
14
:Lorsque vous appuyez sur cette touche, toutes
les touches du boîtier de télécommande
s’éclairent. L’éclairement cesse au bout de 5
secondes si aucune opération n’est réalisée.
Cette touche est utile pour éclairer le boîtier
lorsque la pièce est plongée dans l’obscurité.
15 ANT: Cette touche sélectionne l’antenne (A, B).
Pour de plus amples détails, reportez-vous aux
pages 21 à 22.
16 MTS: Cette touche sélectionne le signal audio
MTS/SAP.
17 0 – 9: Ces touches sélectionnent un canal.
18 CH ENTER: Cette touche valide un numéro de
canal.
19 VOL +/–: Ces touches règlent le niveau de sortie.
20 MUTING: Cette touche coupe les sons.
21 HOME MENU: Cette touche affiche la page de
menu.
22 ENTER: Cette touche exécute une commande.
23 FAVORITE CH (A, B, C, D):
Ces touches sélectionnent un canal préréglé parmi
quatre. Pour de plus amples détails concernant les
canaux favoris, reportez-vous à la page 37.
Tandis que vous regardez la télévision, vous pouvez
passer d’un canal à l’autre au moyen des touches
A, B, C et D.
24 SCREEN SIZE: Sélection d’un format d’image.
25 DISPLAY: Cette touche affiche les informations sur
le canal.
26 AV SELECTION: Cette touche sélectionne les
réglages audio et vidéo. (En mode AV: STANDARD,
DYNAMIQUE, CINÉMA, JEU, UTILISATEUR. En mode PC:
STANDARD, UTILISATEUR.)
27 SLEEP: Cette touche règle la minuterie de mise en
veille.
•Pour utiliser le boîtier de télécommande, dirigez-le vers l’écran
plasma.
•Pour de plus amples détails concernant les touches qui ne figurent
pas sur cette page, reportez-vous aux pages 62 à 68.

06Préparation
Installation de l’écran à plasma
Plus de 50 cm (19 11/16 pouces)
Plus de 10
15
cm (3
/
16
pouces)
Utilisation du support PIONEER en option
Pour de plus amples détails concernant son installation,
reportez-vous au mode d’emploi qui l’accompagne.
• Cet appareil ne doit être monté que sur le support PDK-TS04.
L’usage de tout autre support peut le rendre instable, et
indirectement, être à l’origine de blessures.
Utilisation des enceintes PIONEER en option
Pour de plus amples détails concernant leur installation,
reportez-vous au mode d’emploi qui les accompagne.
Conditions ambiantes de fonctionnement
Température et humidité ambiantes de fonctionnement: +0°C à
+40°C (+32°F à +104°F); humidité relative inférieure à 85% (les
ouïes d’aération sont dégagées)
Évitez les emplacements suivants:
• Exposition directe à la lumière du soleil
• Exposition à une lumière artificielle puissante
• Exposition à une forte humidité
•Ventilation médiocre
Français
L’illustration montre PDP-5045HD/4345HD.
Emplacement
• Évitez que l’écran ne soit exposé à la lumière directe du
soleil. Veillez à ce qu’il soit convenablement ventilé.
• La longueur du câble système assurant la connexion entre le
l’écran à plasma et le récepteur média est de l’ordre de 3 m
(9,8 pieds).
• Le poids de l’écran à plasma étant élevé, faites-vous aider si
vous devez le déplacer.
• Si vous déposez un objet quelconque sur le dessus du
récepteur média, il sera mal ventilé et ne fonctionnera pas
normalement.
• Ménagez un espace suffisant au-dessus et à l’arrière pour
être assuré que la ventilation puisse s’effectuer
convenablement.
15
Fr

06 Préparation
Installation du Récepteur Média
Écran plasma
POWER
ON STANDBY
TIMER
REC
ACQUISITION
DATA
Récepteur Média
(montage vertical)
(montage horizontal)
POWER
REC
DATA
ON STANDBY
TIMER
ACQUISITION
Câble système (environ 3 mètres/9,8 pieds)
• Ne posez aucun appareil, pas même un magnétoscope,
sur le dessus du récepteur média.
• Ménagez suffisamment d’espace sur les côtés et audessus du récepteur média.
• N’obstruez ni les ouïes latérales d’aération ni la sortie
du ventilateur de refroidissement qui se trouve à
l’arrière du récepteur média.
Montage vertical du Récepteur Média
Vous pouvez vous servir du support fourni pour monter le
récepteur média verticalement.
1. Engagez le support sur le côté du récepteur
média.
Côté droit
2. Assurez le maintien du support au moyen des vis
fournies.
POWER
Plus de 5 cm
(2 pouces)
POWER
ON STANDBY
TIMER
REC
ACQUISITION
DATA
REC
DATA
ON STANDBY
TIMER
ACQUISITION
Plus de 10 cm
15
/16 pouces)
(3
Plus de 5 cm
(2 pouces)
Plus de 5 cm
(2 pouces)
Plus de 5 cm
(2 pouces)
Plus de 10 cm
15
(3
/16 pouces)
Vis
16
Fr
Plus de 5 cm
(2 pouces)
Plus de 5 cm
(2 pouces)

3. Retirez les garnitures antichoc.
Garniture antichoc
Conservez les garnitures antichoc et les vis. Vous en aurez
besoin si vous décidez de monter le récepteur média dans la
position horizontale.
06Préparation
Français
4. Bouchez les perçages de vis au moyen des
caches fournis.
Retirez la feuille protectrice.
Placez le cache en
face du perçage et
insérez-le.
Cache pour perçage de vis
•Pour monter le récepteur média verticalement, ne faites
usage que du support fourni. Si vous posez le récepteur
directement sur le plancher, les évents d’aération se
trouveront obstrués, ce qui conduira à une panne
mécanique.
17
Fr

06 Préparation
Raccordement du câble système
Raccordement du câble système à l’écran à plasma
Écran plasma (vue de dos)
(BLANC)
(NOIR)
Raccordement du câble système au récepteur média
Récepteur Média (vue de dos)
DIGITAL OUT
INPUT 1
INPUT 3
INPUT 3
OPTICAL
COMPONENT VIDEO
CB/P
B
B/PB
YYC
CR/P
CR/P
R
R
INPUT 1 INPUT 3
IN OUT
CONTROL
ANTENNA B
SERVICE ONLY
VCR CONTROL
IN
OUT
MONITOR OUT
S-VIDEO INPUT 2
S-VIDEO
ANTENNA/
CABLE A IN
VIDEO
VIDEO
R-AUDIO-L
R-AUDIO-L
Cable
Cable
CARD
CARD
(TS)
S-VIDEO
VIDEO
S400
R-AUDIO-L
R-AUDIO-L
Pour de plus amples détails concernant
l’installation des enceintes PIONEER en
option, reportez-vous au mode d’emploi qui
accompagne les enceintes.
Câble système
AC IN
BLACK
WHITE
HDMI
SYSTEM CABLE
(NOIR)
(BLANC)
• LES BORNES D’ENCEINTE PEUVENT ÊTRE PORTÉES À DES TENSIONS DANGEREUSES ALORS QUE BRANCHEZ,
OU DÉBRANCHEZ, LES CÂBLES D’ENCEINTE. POUR ÉVITER UNE SECOUSSE ÉLECTRIQUE, NE TOUCHEZ PAS
LA PARTIE DÉNUDÉE DU CÂBLE AVANT DE DÉBRANCHER LA FICHE DU CORDON D’ALIMENTATION.
18
Fr

Cheminement des câbles
Des colliers rapides et des colliers à œil sont fournis avec le système pour permettre la mise en faisceau des câbles. Après avoir
constitué les faisceaux de câbles, procédez comme il est dit ci-dessous pour les faire cheminer.
Si les enceintes sont montées de chaque côté
(vue de dos)
06Préparation
Français
Câble d’enceinte Colliers rapides
Attaches pour les câbles
(fournies avec le support)*
Fixation des colliers rapides à l’appareil
Fixez les colliers rapides dans les 4 perçages repérés par la
flèche
cheminement prévu pour les câbles.
sur l’illustration ci-dessous; cela, en fonction du
Si les enceintes sont installées en partie basse
(Pour PDP-5045HD/4345HD seulement)
Câble d’enceinte
Pose et dépose des colliers rapides
Introduisez la partie [1] dans le perçage convenable, à l’arrière
de l’écran à plasma, puis engagez la partie [2] dans la partie
[1] pour assurer la fermeture du collier.
Les colliers rapides sont conçus pour être difficiles à déposer
une fois qu’ils sont en place et fermés. Effectuez leur pose avec
soin.
Utilisez une paire de pinces pour tourner le collier de 90° puis
tirez vers l’extérieur. Le collier peut se détériorer avec le temps,
et être endommagé au cours de sa dépose.
2
1
Câble d’enceinte Câble d’enceinte
Attaches pour les câbles
(fournies avec le support)*
*Attache pour les câbles
En vous servant des attaches pour les câbles fournies avec le
support, rassemblez les câbles du système et des enceintes
de manière qu’ils soient invisibles de l’avant. En procédant à
cette opération, veillez à n’appliquer aucune traction sur la
partie connectée des câbles.
19
Fr

06 Préparation
Préparation du boîtier de télécommande
Mise en place des piles
Ouvrez le couvercle du logement des piles.
1
Introduisez les 2 piles AA fournies.
2
•Respectez les polarités (+) et (–) indiquées dans le
logement des piles.
Fermez le couvercle du logement des piles.
3
Portée du boîtier de télécommande
Agissez sur le boîtier de télécommande en le dirigeant vers le
capteur (
l’écran plasma. La distance du boîtier au capteur doit être
inférieure à 7 mètres (23 pieds) et l’angle du faisceau avec la
face de l’écran doit être à 30 degrés, quelle que soit la position
du boîtier dans l’espace.
Précautions relatives au boîtier de
télécommande
• Ne heurtez pas le boîtier de télécommande, ne l’exposez ni à
Précautions relatives aux piles
• Le boîtier de télécommande ne peut pas agir sur l’appareil si
les piles qu’il contient sont épuisées. En ce cas, remplacez
les piles par des piles neuves.
• N’utilisez pas de pile au manganèse. Utilisez des piles
alcalines comme piles de remplacement.
• N’utilisez pas, en même temps, des piles de type différent. Si
les types diffèrent, il en est de même des caractéristiques.
• N’utilisez pas tout à la fois une pile neuve et une pile usagée.
Utiliser conjointement une pile neuve et une pile usagée peut
se traduire par une réduction de la durée de vie de la pile
neuve, ou une fuite de l’électrolyte de la pile usagée.
• Ne conservez pas des piles usagées dans le boîtier de
télécommande car une fuite de l’électrolyte pourrait en
résulter. En cas de fuite de l’électrolyte, nettoyez
soigneusement le logement des piles avec un chiffon.
• Les piles fournies avec cet appareil peuvent avoir une durée
de service plus courte que prévue du fait des conditions de
stockage.
•Retirez les piles si vous envisagez de ne pas faire usage du
boîtier de télécommande pendant longtemps.
• POUR LA MISE AU REBUT DES PILES, VEUILLEZ
VOUS CONFORMER AUX RÈGLEMENTS LOCAUX OU
AUX INSTRUCTIONS RELATIVES À
L’ENVIRONNEMENT APPLICABLES DANS VOTRE
PAYS OU VOTRE RÉGION.
• Ne conservez pas le boîtier de télécommande exposé à la
• Le boîtier de télécommande peut être sans effet si le capteur
• Si un obstacle se trouve placé entre le boîtier et le capteur de
• Lorsque les piles sont usagées, la portée du boîtier de
• Le panneau de l’écran plasma émet un très faible
• En fonction des caractéristiques de l’installation, les signaux
) qui est placé à la partie inférieure droite de
30°
des liquides ni à une forte humidité.
lumière directe du soleil car cela pourrait le déformer.
de télécommande de l’écran plasma est éclairé par le soleil
ou une vive lumière. Dans une telle situation, vous pouvez
soit changer l’emplacement de l’éclairage ou de l’écran
plasma, soit approcher le boîtier de télécommande du
capteur de télécommande.
télécommande, l’action à distance de la télécommande peut
être impossible.
télécommande peut être sensiblement réduite. En ce cas,
remplacez les piles du boîtier par des piles neuves.
rayonnement infrarouge. Si vous placez à proximité de
l’écran un appareil commandé à distance par des signaux
infrarouges, par exemple un magnétoscope, la réception des
signaux émis par le boîtier de télécommande de l’appareil
peut être perturbée. En ce cas, éloignez l’appareil de l’écran
plasma.
infrarouges rayonnés par le panneau de l’écran plasma
peuvent interdire la réception convenable des ordres émis
par le boîtier de télécommande, ou bien vous obliger à faire
usage du boîtier à plus courte distance du capteur de
télécommande. La puissance du rayonnement infrarouge
émis par le panneau dépend des caractéristiques de l’image
affichée.
7 m (23 pieds)
30°
Capteur de
télécommande
20
Fr
 Loading...