

Page 1

Operating Instructions | Manual de instrucciones |
Manual de instruções | |
PLASMA TELEVISION
TELEVISOR DE PLASMA
TELEVISOR DE PLASMA
PDP-
PDP-
508
428
XG
XG
Page 2
To use your plasma television for a long period of time
Cautions regarding screen burning
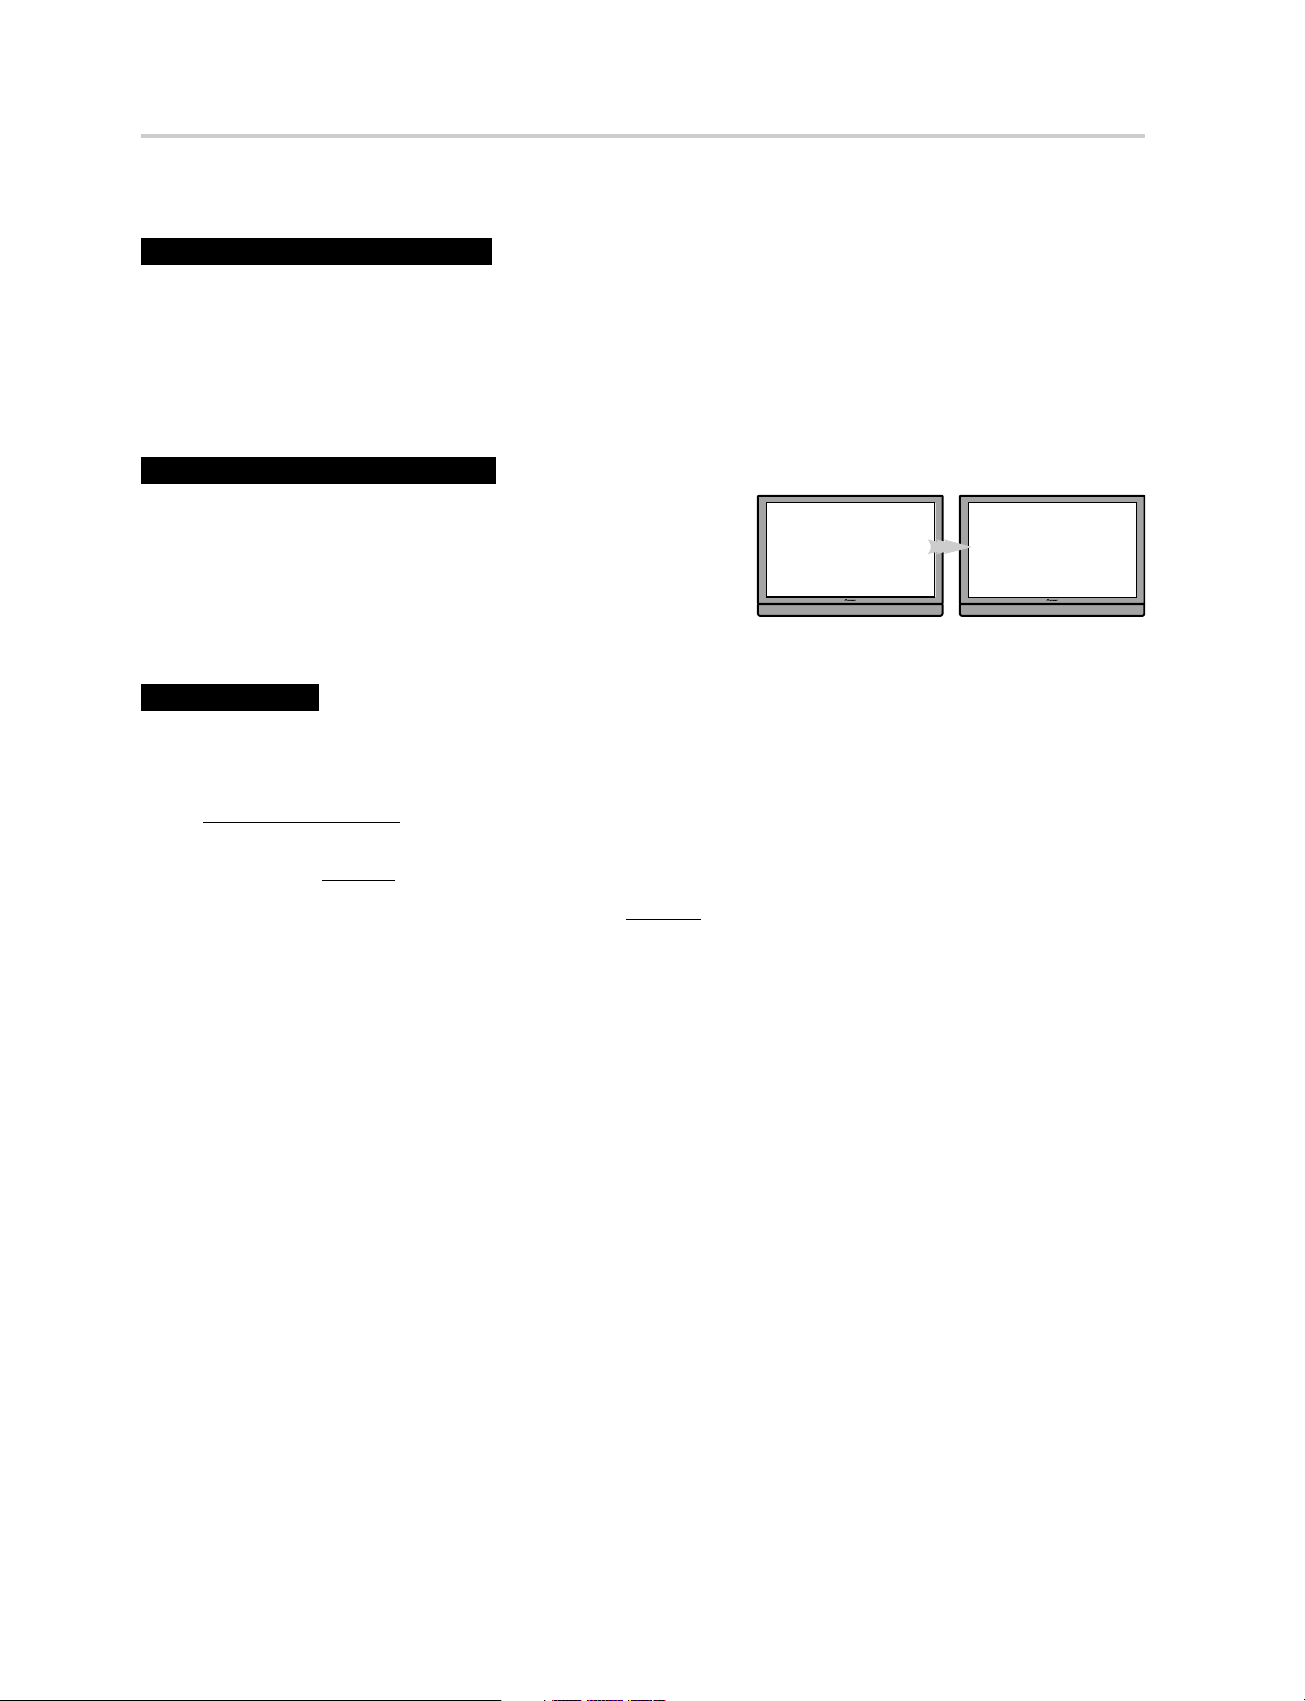
After-image lagging and screen burning
After-image lagging:
When characters, images or images of fixed patterns with very high luminance are displayed on a plasma television screen, even if displayed for a relatively
short period of time, the image may remain on the screen due to the residual electric load of the panel. However, this is not a malfunction. This after-image
lagging can be eliminated gradually by displaying moving images in full screen.
Burning:
When images like those described above are displayed continuously for a long period of time or repeatedly, a difference occurs between the luminance of
the continuously displayed image and that of other portions of the screen, resulting in the image remaining on the screen due to burning. Please note that
if this burning occurs, it may be difficult to completely restore the screen to the state prior to burning. It should also be noted that this phenomenon
tends to occur more easily soon after the product is purchased.
Display examples susceptible to burning
• If programs such as terrestrial digital broadcasts having a screen size of 4:3 are viewed
repeatedly, the normal display area other than the black bands on the left and right sides
of the screen becomes susceptible to burning.
• If cinema-size images are repeatedly viewed in their original size, the normal display area
other than the black bands at the top and bottom of the screen becomes susceptible to
burning.
• If programs containing a time display or station name displayed on the screen are viewed
for a long period of time (or viewed repeatedly), the displayed characters may be easily
burned onto the screen.
• If images of fixed patterns such as those of personal computer displays or game software are displayed for a long period of time, the patterns may be
easily burned onto the screen.
Preventing burning
It is recommended to use your plasma television while paying attention to the matters described below, particularly when using the product soon after it
has been purchased, to prevent screen burning.
• Avoid using the product while displaying images susceptible to burning as described above whenever possible.
• Use the product with the Orbiter function set to “On”
⇒ see Useful adjustment settings: “Orbiter”).
(
• When viewing programs broadcast in a 4:3 or cinema screen size, switch the screen size with the remote control unit to display the image in full screen.
(Change the screen size to “WIDE”, for example, with the screen size button on the remote control unit (
• Set the Side Mask detection function to “On” (
• Set the brightness of the side masks
⇒ see Useful adjustment settings: “Changing the brightness at both sides of the screen (Side Mask)”).
(
• It is recommended to lower the brightness when viewing by setting the Energy Sav
that appear on the left and right sides of the screen when viewing at a 4:3 screen size to “Auto” in “Brightness Sync.”
⇒ see Useful adjustment settings: “Detecting side masks”).
e function to “Mode 1” (⇒ see Setting up: “Power Control”).
15:00 PROTV
15:00 PROTV
⇒ see Part names: “Remote control unit”)).
15:00 PROTV
15:00 PROTV
Page 3
IMPORTANT
CAUTION
RISK OF ELECTRIC SHOCK
DO NOT OPEN
The lightning flash with arrowhead symbol,
within an equilateral triangle, is intended to
alert the user to the presence of uninsulated
“dangerous voltage” within the product’s
enclosure that may be of sufficient
magnitude to constitute a risk of electric
shock to persons.
CAUTION:
TO PREVENT THE RISK OF ELECTRIC
SHOCK, DO NOT REMOVE COVER (OR
BACK). NO USER-SERVICEABLE PARTS
INSIDE. REFER SERVICING TO QUALIFIED
SERVICE PERSONNEL.
CAUTION
The switch on this unit will not completely shut off all power
from the AC outlet. Since the power cord serves as the main
disconnect device for the unit, you will need to unplug it from
the AC outlet to shut down all power. Therefore, make sure the
unit has been installed so that the power cord can be easily
unplugged from the AC outlet in case of an accident. To avoid
fire hazard, the power cord should also be unplugged from the
AC outlet when left unused for a long period of time (for
example, when on vacation).
D3-4-2-2-2a_A_En
WARNING
This equipment is not waterproof. To prevent a fire or shock
hazard, do not place any container filed with liquid near this
equipment (such as a vase or flower pot) or expose it to
dripping, splashing, rain or moisture.
D3-4-2-1-3_A_En
WARNING
Before plugging in for the first time, read the following section
carefully.
The voltage of the available power supply differs according
to country or region. Be sure that the power supply voltage
of the area where this unit will be used meets the required
voltage (e.g., 230V or 120V) written on the rear panel.
D3-4-2-1-4_A_En
WARNING
This product equipped with a three-wire grounding
(earthed) plug - a plug that has a third (grounding) pin.
This plug only fits a grounding-type power outlet. If you are
unable to insert the plug into an outlet, contact a licensed
electrician to replace the outlet with a properly grounded
one. Do not defeat the safety purpose of the grounding
plug.
D3-4-2-1-6_A_En
The exclamation point within an equilateral
triangle is intended to alert the user to the
presence of important operating and
maintenance (servicing) instructions in the
literature accompanying the appliance.
D3-4-2-1-1_En-A
The following symbols are found on labels
attached to the product. They alert the operators
and service personnel of this equipment to any
potentially dangerous conditions.
WARNING
This symbol refers to a hazard or unsafe
practice which can result in personal injury
or property damage.
CAUTION
This symbol refers to a hazard or unsafe
practice which can result in severe personal
injury or death.
WARNING
To prevent a fire hazard, do not place any naked flame
sources (such as a lighted candle) on the equipment.
VENTILATION CAUTION
When installing this unit, make sure to leave space around
the unit for ventilation to improve heat radiation. For the
minimum space required, see page 15.
WARNING
Slots and openings in the cabinet are provided for
ventilation to ensure reliable operation of the product, and
to protect it from overheating. To prevent fire hazard, the
openings should never be blocked or covered with items
(such as newspapers, table-cloths, curtains) or by operating
the equipment on thick carpet or a bed.
D3-4-2-1-7a_A_En
English
Operating Environment
Operating environment temperature and humidity:
+0 °C to +40 °C (+32 °F to +104 °F); less than 85 %RH
(cooling vents not blocked)
Do not install this unit in a poorly ventilated area, or in
locations exposed to high humidity or direct sunlight (or
strong artificial light)
D3-4-2-1-7c_A_En
STANDBY/ON Button
STANDBY:
flow is cut and the unit is no longer fully operational.
When placed into the standby mode, the main power
STANDBY/ON Indicator: The indicator is lit red when the unit
is in the standby mode and is lit blue when it is in the power-on
mode.
Page 4

Contents
Thank you for buying this Pioneer product.
Please read through these operating instructions so you will know how to operate your model properly. After you have finished reading
the instructions, put them away in a safe place for future reference.
In some countries or regions, the shape of the power plug and power outlet may sometimes differ from that shown in the explanatory
drawings. However the method of connecting and operating the unit are the same.
Illustrations shown in this manual are for the PDP-508XG unless otherwise specified.
Contents
01 Important user information. . . . . . . . . . . . . . . . . 6
02 Safety precautions . . . . . . . . . . . . . . . . . . . . . . . . 9
Installation precautions. . . . . . . . . . . . . . . . . . . . . . . . . . . . . . . . . . 10
03 Supplied accessories . . . . . . . . . . . . . . . . . . . . . . 11
04 Part names . . . . . . . . . . . . . . . . . . . . . . . . . . . . . . 12
Plasma television. . . . . . . . . . . . . . . . . . . . . . . . . . . . . . . . . . . . . . . 12
Remote control unit. . . . . . . . . . . . . . . . . . . . . . . . . . . . . . . . . . . . . 14
05 Preparation . . . . . . . . . . . . . . . . . . . . . . . . . . . . . 15
Installing the plasma television . . . . . . . . . . . . . . . . . . . . . . . . . . . 15
Moving the plasma television . . . . . . . . . . . . . . . . . . . . . . . . . . . . . 15
Preventing the plasma television from falling over. . . . . . . . . . . . 16
Basic connections . . . . . . . . . . . . . . . . . . . . . . . . . . . . . . . . . . . . . . 16
Preparing the remote control unit . . . . . . . . . . . . . . . . . . . . . . . . . 18
Operating range of the remote control unit . . . . . . . . . . . . . . . . . 18
06 Watching TV. . . . . . . . . . . . . . . . . . . . . . . . . . . . . 19
Turning the power on . . . . . . . . . . . . . . . . . . . . . . . . . . . . . . . . . . . 19
Placing the system into standby . . . . . . . . . . . . . . . . . . . . . . . . . . 19
Changing channels . . . . . . . . . . . . . . . . . . . . . . . . . . . . . . . . . . . . . 20
Changing the volume and sound . . . . . . . . . . . . . . . . . . . . . . . . . . 20
Switching the broadcast audio channel . . . . . . . . . . . . . . . . . . . . 21
Using the multiscreen functions . . . . . . . . . . . . . . . . . . . . . . . . . . 21
Freezing images. . . . . . . . . . . . . . . . . . . . . . . . . . . . . . . . . . . . . . . . 22
07 The HOME MENU . . . . . . . . . . . . . . . . . . . . . . . . . 23
HOME MENU overview . . . . . . . . . . . . . . . . . . . . . . . . . . . . . . . . . . 23
Using the HOME MENU . . . . . . . . . . . . . . . . . . . . . . . . . . . . . . . . . 24
08 Setting up. . . . . . . . . . . . . . . . . . . . . . . . . . . . . . . 25
Setting up TV channels automatically . . . . . . . . . . . . . . . . . . . . . .25
Setting up TV channels manually . . . . . . . . . . . . . . . . . . . . . . . . . .25
Reducing video noise . . . . . . . . . . . . . . . . . . . . . . . . . . . . . . . . . . . .26
Setting Child Lock. . . . . . . . . . . . . . . . . . . . . . . . . . . . . . . . . . . . . . .26
Suppressing audio distortion. . . . . . . . . . . . . . . . . . . . . . . . . . . . . .26
Labeling TV channels . . . . . . . . . . . . . . . . . . . . . . . . . . . . . . . . . . . .27
Sorting preset TV channels . . . . . . . . . . . . . . . . . . . . . . . . . . . . . . .27
Language setting . . . . . . . . . . . . . . . . . . . . . . . . . . . . . . . . . . . . . . .27
AV Selection . . . . . . . . . . . . . . . . . . . . . . . . . . . . . . . . . . . . . . . . . . .28
Basic picture adjustments. . . . . . . . . . . . . . . . . . . . . . . . . . . . . . . .28
Advanced picture adjustments . . . . . . . . . . . . . . . . . . . . . . . . . . . .29
Comparing picture adjustments on the screen . . . . . . . . . . . . . . .32
Sound adjustments . . . . . . . . . . . . . . . . . . . . . . . . . . . . . . . . . . . . .33
Listening to audio from the sub screen using headphones . . . . .33
Power Control . . . . . . . . . . . . . . . . . . . . . . . . . . . . . . . . . . . . . . . . . .34
09 Useful adjustment settings . . . . . . . . . . . . . . . . 36
Switching the vertical drive mode
(AV source only) . . . . . . . . . . . . . . . . . . . . . . . . . . . . . . . . . . . . . . . .36
Adjusting image positions (AV source only) . . . . . . . . . . . . . . . . .36
Adjusting image positions and clock automatically
(PC source only) . . . . . . . . . . . . . . . . . . . . . . . . . . . . . . . . . . . . . . . .36
Adjusting image positions and clock manually
(PC source only) . . . . . . . . . . . . . . . . . . . . . . . . . . . . . . . . . . . . . . . .37
Color system setting . . . . . . . . . . . . . . . . . . . . . . . . . . . . . . . . . . . . .37
Selecting a game mode . . . . . . . . . . . . . . . . . . . . . . . . . . . . . . . . . .37
Selecting a screen size manually . . . . . . . . . . . . . . . . . . . . . . . . . .37
Selecting a screen size automatically. . . . . . . . . . . . . . . . . . . . . . .38
Detecting side masks . . . . . . . . . . . . . . . . . . . . . . . . . . . . . . . . . . . .38
Changing the brightness at both sides of the screen
(Side Mask) . . . . . . . . . . . . . . . . . . . . . . . . . . . . . . . . . . . . . . . . . . . .39
Room Light Sensor . . . . . . . . . . . . . . . . . . . . . . . . . . . . . . . . . . . . . .39
Blue LED Dimmer. . . . . . . . . . . . . . . . . . . . . . . . . . . . . . . . . . . . . . .39
Orbiter . . . . . . . . . . . . . . . . . . . . . . . . . . . . . . . . . . . . . . . . . . . . . . . .39
Video Pattern. . . . . . . . . . . . . . . . . . . . . . . . . . . . . . . . . . . . . . . . . . .40
Sleep Timer . . . . . . . . . . . . . . . . . . . . . . . . . . . . . . . . . . . . . . . . . . . .40
Using a password . . . . . . . . . . . . . . . . . . . . . . . . . . . . . . . . . . . . . . .40
4
En
Page 5

Contents
10 Using with other equipment. . . . . . . . . . . . . . . .42
Connecting a digital tuner . . . . . . . . . . . . . . . . . . . . . . . . . . . . . . . 42
Connecting a DVD player . . . . . . . . . . . . . . . . . . . . . . . . . . . . . . . . 42
Connecting a VCR . . . . . . . . . . . . . . . . . . . . . . . . . . . . . . . . . . . . . . 43
Connecting a game console or camcorder . . . . . . . . . . . . . . . . . . 43
Connecting a personal computer. . . . . . . . . . . . . . . . . . . . . . . . . . 44
Connecting an amplifier/AV receiver . . . . . . . . . . . . . . . . . . . . . . . 44
Avoiding unwanted feedback . . . . . . . . . . . . . . . . . . . . . . . . . . . . . 44
Using the HDMI Input . . . . . . . . . . . . . . . . . . . . . . . . . . . . . . . . . . . 45
Using control cords . . . . . . . . . . . . . . . . . . . . . . . . . . . . . . . . . . . . . 47
Enjoying through USB interface (Home Gallery function) . . . . . . 48
Controlling other equipment using the supplied remote
control unit . . . . . . . . . . . . . . . . . . . . . . . . . . . . . . . . . . . . . . . . . . . . 50
English
11 Using the HDMI Control. . . . . . . . . . . . . . . . . . . .56
Using the HDMI Control functions. . . . . . . . . . . . . . . . . . . . . . . . . 56
Making the HDMI Control connections . . . . . . . . . . . . . . . . . . . . . 57
Setting the HDMI Control . . . . . . . . . . . . . . . . . . . . . . . . . . . . . . . . 59
Using the HDMI Control menus . . . . . . . . . . . . . . . . . . . . . . . . . . . 60
12 Using Teletext. . . . . . . . . . . . . . . . . . . . . . . . . . . .61
Using the Teletext Functions. . . . . . . . . . . . . . . . . . . . . . . . . . . . . . 61
Operating the Teletext basics . . . . . . . . . . . . . . . . . . . . . . . . . . . . . 61
13 Additional information . . . . . . . . . . . . . . . . . . . .63
Troubleshooting . . . . . . . . . . . . . . . . . . . . . . . . . . . . . . . . . . . . . . . . 63
Signal assignments for 15-pin D-sub connector. . . . . . . . . . . . . . 65
Standard channel allocation selections for countries
and regions. . . . . . . . . . . . . . . . . . . . . . . . . . . . . . . . . . . . . . . . . . . . 65
Specifications. . . . . . . . . . . . . . . . . . . . . . . . . . . . . . . . . . . . . . . . . . 66
En
5
Page 6

01
Important user information
Chapter 1
Important user information
In order to obtain maximum enjoyment from this Pioneer PDP508XG/PDP-428XG plasma television, please first read this
information carefully.
With the Pioneer PDP-508XG/PDP-428XG, you can be assured of a
high quality plasma television with long-life and high reliability. To
achieve images of exceptional quality, this Pioneer plasma
television incorporates state-of-the-art design and construction, as
well as very precise and highly advanced technology.
The Pioneer PDP-508XG/PDP-428XG incorporates the latest in
color filter technology: Direct Color Filter. This improves the color/
picture reproduction of these models as compared to previous
models. It also eliminates the need for a physical glass panel to be
placed in front of the plasma panel, which furthers Pioneer’s
continued goal of reducing environmental waste in consumer
electronics, now during the manufacturing process and in the
future during the recycling process.
Over the course of its lifetime, the luminosity of the Pioneer PDP508XG/PDP-428XG plasma television will diminish very slowly,
such as with all phosphor-based screens (for example, a traditional
tube-type television). To enjoy beautiful and bright images on your
Pioneer plasma television for a long time, please carefully read and
follow the usage guidelines below:
Usage guidelines
All phosphor-based screens (including conventional tube-type
televisions) can be affected by displaying static images for a
prolonged period. Plasma televisions are no exception to this rule.
After-image and permanent effects on the screen can be avoided
by taking some basic precautions. By following the
recommendations listed below, you can ensure longer and
satisfactory results from your plasma television:
• Whenever possible, avoid frequently displaying the same
image or virtually still moving pictures (e.g. video game images
which have static portions).
• Do not display Teletext for a prolonged period of time.
• Avoid viewing the On Screen Display for extended periods,
from a digital tuner, DVD player, VCR and all other
components.
• Do not leave the same picture freeze-framed or paused
continuously over a long period of time, when using the still
picture mode from a TV, VCR, DVD player or any other
component.
• Images which have both very bright areas and very dark areas
side by side should not be displayed for a prolonged period of
time.
• When playing a game, the “GAME” mode setting within “AV
Selection” is strongly recommended. However, please do not
use this mode for long periods of time.
• After playing a game, displaying a PC image or any still image,
it is best to view a normal moving picture in the “WIDE” or
“FULL” screen setting for more than three times the length of
the previous still/moving image.
• After using the plasma television, always switch the display to
“STANDBY” mode.
Installation guidelines
The Pioneer PDP-508XG/PDP-428XG plasma television
incorporates a very thin design. To ensure safety, please take the
proper measures to mount or install the plasma television, in order
to prevent the unit from tipping over in the event of vibration or
accidental movement.
This product should be installed by using only parts and
accessories designed by Pioneer. Use of accessories other than
the Pioneer stand or installation bracket may result in instability,
and could cause injury. For custom installation, please consult the
dealer where the unit was purchased. To ensure correct
installation, experienced and qualified experts must install the unit.
Pioneer will not be held responsible for accident or damage caused
by the use of parts and accessories manufactured by other
companies.
To avoid malfunction and overheating, make sure that the vents on
the main unit are not blocked when installing to ensure proper heat
emission:
• Distance the unit slightly from other equipment, walls, etc. For
the minimum space required around the unit, see page 15.
• Do not fit the unit inside narrow spaces where ventilation is
poor.
• Do not cover with a cloth, etc.
• Clean the vents on the sides and rear of the unit to remove dust
build-up, by using a vacuum cleaner set to its lowest suction
setting.
• Do not place the product on a carpet or blanket.
• Do not leave the product tilted over.
• Do not turn the product upside down.
Using the unit without proper ventilation may cause the internal
temperature to rise, and could result in possible malfunction.
When the surrounding or internal temperature exceeds a certain
degree, the display will automatically power off in order to cool the
internal electronics and prevent hazardous occurrences.
Any malfunction may occur due to: an inappropriate installation
site, improper assembly, installation, mounting, or operation of
this product, modifications made to the product. However, Pioneer
cannot be held responsible for such accidents or malfunction.
Note
The following are typical effects and characteristics of a
phosphor-based matrix display and as such, are not covered by
the manufacturer’s limited warranties:
• Permanent residual images upon the phosphors of the panel.
• The existence of a minute number of inactive light cells.
• Panel generated sounds, examples: Fan motor noise, and
electrical circuit humming/glass panel buzzing
Caution
• Pioneer bears no responsibility for any damage arising from
incorrect use of the product by you or other people,
malfunctions when in use, other product related problems, and
use of the product except in cases where the company must be
liable.
6
En
Page 7

Important user information
01
Plasma television protection function
When still images (such as photos and computer images) stay on
the screen for an extended period of time, the screen will be slightly
dimmed. This is because the protection function of the plasma
television automatically adjusts the brightness to protect the
screen when detecting still images; so this does not designate
malfunction. The screen is dimmed when a still image is detected
for about three minutes.
Information of pixel defect
Plasma television displays information using pixels. Pioneer
plasma television panels contain a very large number of pixels.
(Depending on the panel size: over 2.3 million cells in case of a 42
inch display; over 3.1 million cells in the case of a 50 inch display).
All Pioneer display panels are manufactured using a very high level
of ultra-precision technology and undergo individual quality
control.
In rare cases, some pixels can be permanently switched off, or on,
resulting in either a black or colored pixel permanently fixed on the
screen.
This effect is common to all plasma television because it is a
consequence of the technology.
If the defective pixels are visible at a normal viewing distance of
between 2.5 meters and 3.5 meters while viewing a normal
broadcast (i.e. not a test card, still image or single color display)
please contact the supplying dealer.
If, however, they can only be seen close up or during single color
displays then this is considered normal for this technology.
Infrared rays
The plasma television releases infrared rays because of its
characteristics. Depending on how the plasma television is in use,
the remote controls of nearby equipment may be adversely affected
or wireless headphones using infrared rays are interfered by noise.
If this is the case, place that equipment at a location where its
remote control sensor is not affected.
Radio interference
While this product meets the required specifications, it emits a
small amount of noise. If you place such equipment as an AM
radio, personal computer, and VCR close to this product, that
equipment may be interfered. If this happens, place that
equipment far enough from this product.
Plasma television driving sound
The screen of the plasma television is composed of extremely fine
pixels and these pixels emit light according to received video
signals. This principle may make you hear buzz sound or electrical
circuit humming from the plasma television.
Do not attach such items as labels and tape to the product
This may result in the discoloration or scratch of the cabinet.
Condensation
Condensation may take place on the surface or inside of the
product when the product is rapidly moved from a cold place to a
warm place or just after a heater is switched on in winter morning,
for example. When condensation takes place, do not switch on the
product and wait until condensation disappears. Using the product
with condensation may result in malfunction.
Cleaning the surface of the screen and the glossy surface
of the front cabinet
When cleaning the surface of the screen or the glossy surface of
the front cabinet, gently wipe it with a dry soft cloth; the supplied
cleaning cloth or other similar cloths (e.g., cotton and flannel). If
you use a dusty or hard cloth or if you rub the screen hard, the
surface of the product will be scratched.
If you clean the surface of the screen with a wet cloth, water
droplets on the surface may enter into the product, resulting in
malfunction.
Cleaning the cabinet
When cleaning the cabinet of this product, gently wipe it with a
clean soft cloth (e.g., cotton and flannel). If you use a dusty or hard
cloth or if you rub the cabinet hard, the surface of the cabinet will
be scratched.
The cabinet of this product is mostly composed of plastic. Do not
use chemicals such as benzene or thinner to clean the cabinet.
Using these chemicals may result in quality deterioration or
coating removal.
Do not expose the product to volatile gas or fluid such as pesticide.
Do not make the product contact with rubber or vinyl products for
a long period of time. The effect of plasticizer in the plastic may
result in quality deterioration or coating removal.
If you clean the surface of the cabinet with a wet cloth, water
droplets on the surface may enter into the product, resulting in
malfunction.
Handles at the rear of the plasma television
Do not remove the handles from the rear of the plasma television.
When moving the plasma television, ask another person for help
and use the handles attached to the rear of the plasma television.
Do not move the plasma television by holding only a single handle.
Do not use the handles to hang the product when installing or
carrying the product, for example. Do not use the handles for the
purpose of preventing the product from tilting over.
Fan noise
The rotation speed of the cooling fan motor increases when the
ambient temperature of the plasma television becomes high. You
may hear the sound of the fan motor at that time.
English
When not using the product for a long period of time
If you do not use the product for a long period of time, the functions
of the product may be adversely affected. Switch on and run the
product occasionally.
7
En
Page 8

01
Important user information
To use this product for a long period of time
The Energy Save function can maintain efficiency of the screen for
a long period of time. Setting the Energy Save function to “Mode 1”
is recommended in order to maintain the efficiency of the screen
for a long period of time.
Caution
Panel sticking and after-image lag
Displaying the same images such as still images for a long time
may cause after-image lagging. This may occur in the following two
cases.
After-image lagging due to remaining electrical load
When image patterns with very high peak luminance are displayed
for more than one minute, after-image lagging may occur due to
the remaining electric load. The after-images remaining on the
screen will disappear when moving images are displayed. The time
for the after-images to disappear depends on the luminance of the
still images and the time they had been displayed.
After-image (lag image) due to burning
Avoid displaying the same image on the plasma television
continuously over a long period of time.
If the same image is displayed continuously for a long period, or for
shorter periods of time over several days, a permanent after-image
may remain on the screen due to burning of the fluorescent
materials. Such images may become less noticeable if moving
images are later displayed, but they will not disappear completely.
Note
• When a still image, such as a program menu, is displayed for
5 to 10 minutes, the system automatically turns the image off
to prevent damage from screen burning.
• To prevent screen burning, the display position is automatically
changed imperceptibly when watching plasma television (see
Orbiter on page 39).
Preventing damage from screen burning
• We recommend that you enjoy watching images displayed in
full screen, except when doing so may result in copyright
infringement (see page 37).
• Set the Side Mask detection function to “On”, the High
Definition 16:9 aspect ratio images containing side masks will
be detected and the side masks will be added automatically or
the image displayed in full screen, leading to more effective
countermeasures taken for the screen burning (see Detecting
side masks on page 38).
8
En
Page 9
Safety precautions
Chapter 2
02
Safety precautions
Electricity is used to perform many useful functions, but it can also
cause personal injuries and property damage if improperly
handled. This product has been engineered and manufactured
with the highest priority on safety. However, improper use can
result in electric shock and/or fire. In order to prevent potential
danger, please observe the following instructions when installing,
operating and cleaning the product. To ensure your safety and
prolong the service life of your product, please read the following
precautions carefully before using the product.
1. Read instructions - All operating instructions must be read and
understood before the product is operated.
2. Keep this manual in a safe place - These safety and operating
instructions must be kept in a safe place for future reference.
3. Observe warnings - All warnings on the product and in the
instructions must be observed closely.
4. Follow instructions - All operating instructions must be followed.
5. Cleaning - Unplug the power cord from the AC outlet before
cleaning the product. To clean the product, use the supplied
cleaning cloth or other soft clothes (e.g., cotton, flannel). Do not
use liquid cleaners or aerosol cleaners.
6. Attachments - Do not use attachments not recommended by the
manufacturer. Use of inadequate attachments can result in
accidents.
7. Water and moisture - Do not use the product near water, such as
bathtub, washbasin, kitchen sink and laundry tub, swimming pool
and in a wet basement.
8. Stand - Do not place the product on an unstable cart, stand, tripod
or table. Placing the product on an unstable base can cause the
product to fall, resulting in serious personal injuries as well as
damage to the product. Use only a cart, stand, tripod, bracket or
table recommended by the manufacturer or sold with the product.
When mounting the product on a wall, be sure to follow the
manufacturer’s instructions. Use only the mounting hardware
recommended by the manufacturer.
9. When relocating the product placed on a cart, it must be moved
with utmost care. Sudden stops, excessive force and uneven floor
surface can cause the product to fall from the cart.
10. Ventilation - The vents and other openings in the cabinet are
designed for ventilation. Do not cover or block these vents and
openings since insufficient ventilation can cause overheating and/
or shorten the life of the product. Do not place the product on a
bed, sofa, rug or other similar surface, since they can block
ventilation openings. This product is not designed for built-in
installation; do not place the product in an enclosed place such as
a bookcase or rack, unless proper ventilation is provided or the
manufacturer’s instructions are followed.
11. Power source - This product must operate on a power source
specified on the specification label. If you are not sure of the type
of power supply used in your home, consult your dealer or local
power company.
12. Power cord protection - The power cords must be routed properly
to prevent people from stepping on them or objects from resting on
them. Check the cords at the plugs and product.
English
13. The plasma television used in this product is made of glass.
Therefore, it can break when the product is dropped or applied with
impact. Be careful not to be injured by broken glass pieces in case
the plasma television breaks.
14. Overloading - Do not overload AC outlets or extension cords.
Overloading can cause fire or electric shock.
15. Entering of objects and liquids - Never insert an object into the
product through vents or openings. High voltage flows in the
product, and inserting an object can cause electric shock and/or
short internal parts. For the same reason, do not spill water or
liquid on the product.
16. Servicing - Do not attempt to service the product yourself.
Removing covers can expose you to high voltage and other
dangerous conditions. Request a qualified service person to
perform servicing.
17. Repair - If any of the following conditions occurs, unplug the power
cord from the AC outlet, and request a qualified service person to
perform repairs.
a. When the power cord or plug is damaged.
b. When a liquid was spilled on the product or when objects have
fallen into the product.
c. When the product has been exposed to rain or water.
d. When the product does not operate properly as described in
the operating instructions.
Do not touch the controls other than those described in the
operating instructions. Improper adjustment of controls not
described in the instructions can cause damage, which often
requires extensive adjustment work by a qualified technician.
e. When the product has been dropped or damaged.
f. When the product displays an abnormal condition. Any
noticeable abnormality in the product indicates that the
product needs servicing.
18. Replacement parts - In case the product needs replacement parts,
make sure that the service person uses replacement parts
specified by the manufacturer, or those with the same
characteristics and performance as the original parts. Use of
unauthorized parts can result in fire, electric shock and/or other
danger.
19. Safety checks - Upon completion of service or repair work, request
the service technician to perform safety checks to ensure that the
product is in proper operating condition.
20. Wall or ceiling mounting - When mounting the product on a wall or
ceiling, be sure to install the product according to the method
recommended by the manufacturer.
21. Heat sources - Keep the product away from heat sources such as
radiators, heaters, stoves and other heat- generating products
(including amplifiers).
22. Unplug the power cord from the AC outlet before installing the
speakers (for PDP-508XG only).
23. Never expose the screen of the plasma television to a strong
impact, for example, by hitting it. The screen may be broken,
resulting in fire or personal injury.
24. Do not expose the plasma television to direct sunlight for a long
period of time. The optical characteristics of the front protection
panel changes, resulting in discoloration or warp.
25. The plasma television weighs about 34.6 kg (76.3 lbs.) for the PDP508XG and about 29.6 kg (65.3 lbs.) for the PDP-428XG. Because it
has small depth and is unstable, unpack, carry, and install the
product with one more person at least and use the handles.
En
9
Page 10
02
Safety precautions
Installation precautions
Observe the following precautions when installing with any items
such as the optional stand.
When using the optional stand, brackets, or equivalent
items
Ask your dealer to perform the installation.
Be sure to use the supplied bolts.
For details, see the instruction manual that comes with the
optional stand (or equivalent items).
When using other items
Consult your dealer.
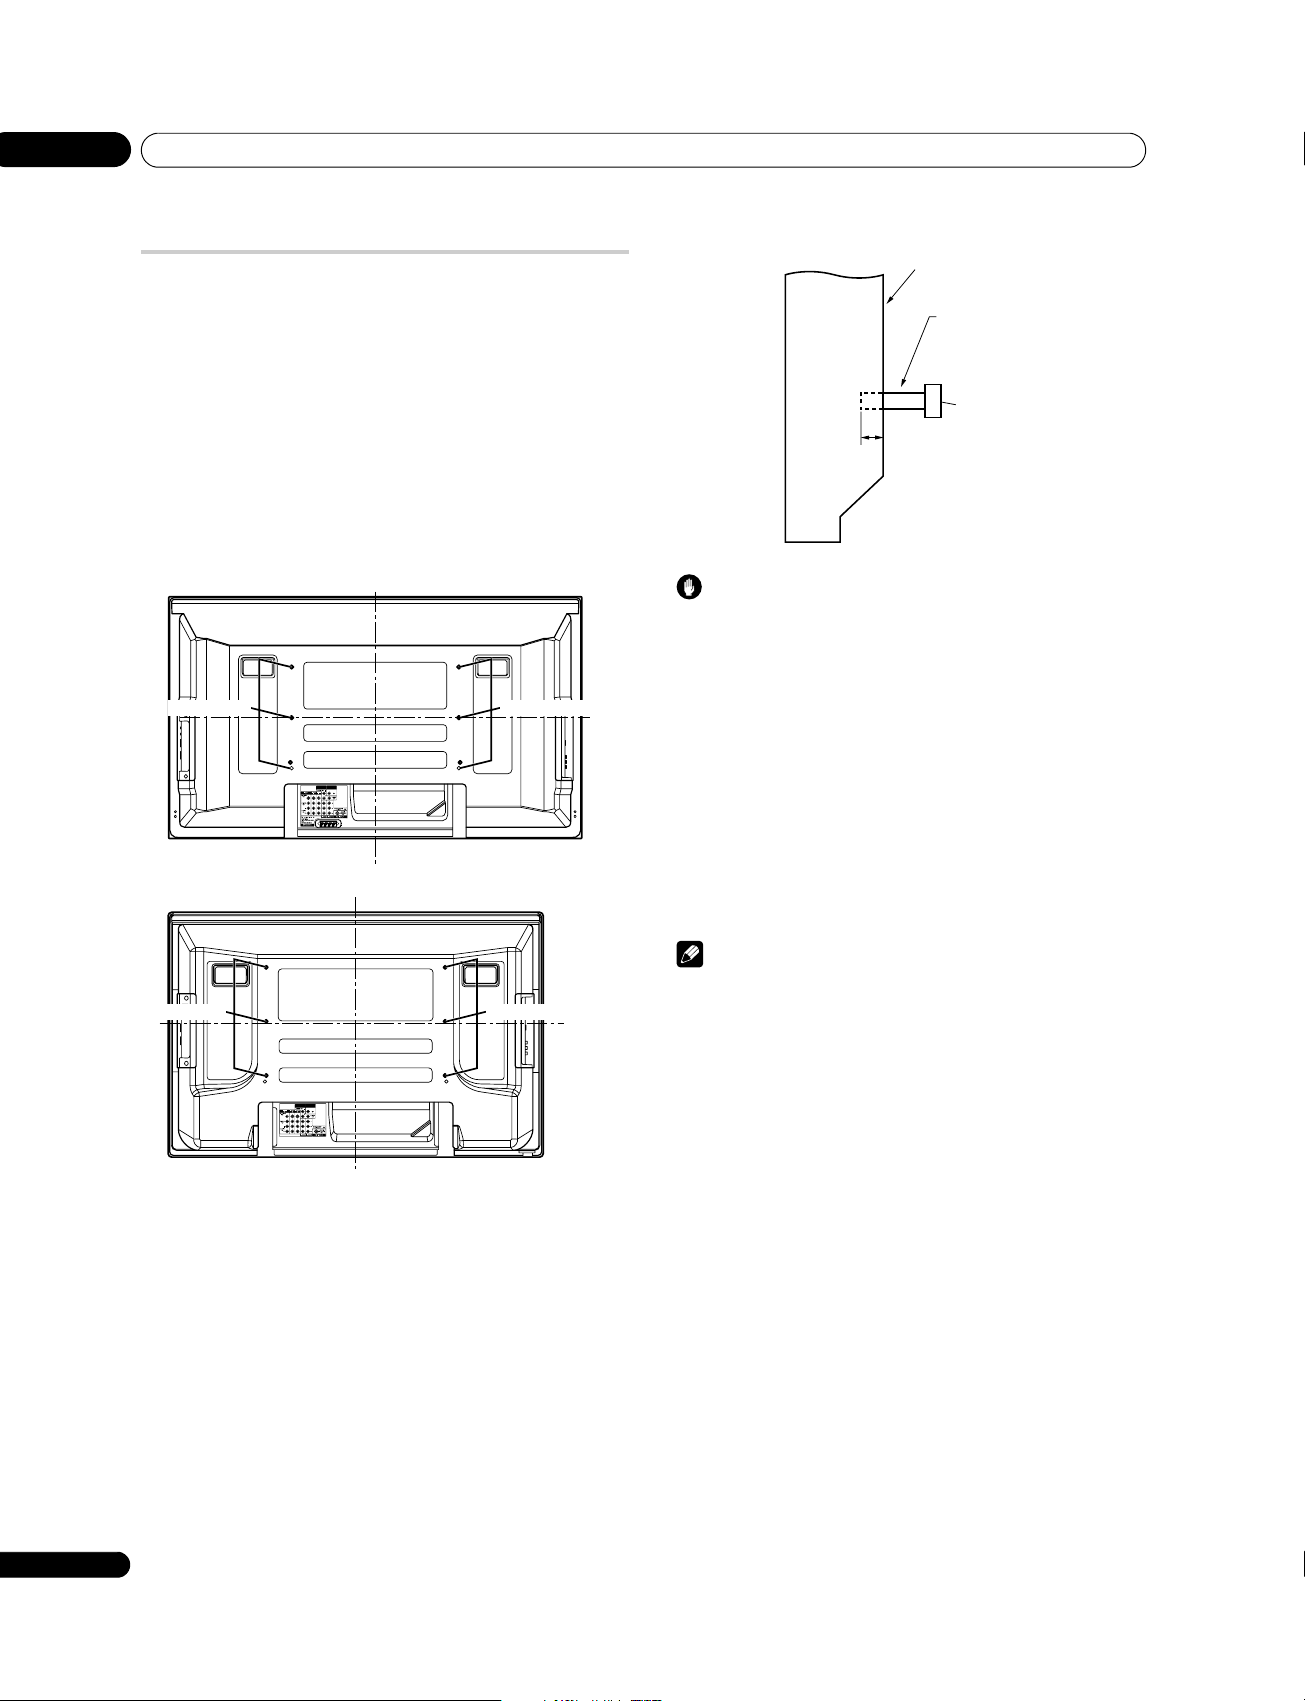
The following six mounting holes can be used for the installation:
Rear (PDP-508XG)
Mounting holes Mounting holes
MONITOR
SUB
OUT
WOOFER
Median line
Rear (PDP-428XG)
Median
line
Side view
Mounting surface
Mounting bracket
Plasma television
(or equivalent)
M8 screw
12 mm to 18 mm
Caution
• Be sure to use four or more mounting holes symmetrical to the
vertical and horizontal median lines.
• Use M8 screws, which go 12 mm to 18 mm in depth from the
mounting surface of the plasma television. See the side view
above.
• Be careful not to block the ventilation opening at the rear of the
plasma television.
• Be sure to install the plasma television on a flat surface
because it contains glass.
• The screw holes other than the illustrations on the left are to be
used only for the specified products. Never use them for
mounting non-specified products.
• Do not mount or remove the plasma television to or from the
stand, with speakers attached (for PDP-508XG only).
Mounting holes Mounting holes
MONITOR
SUB
OUT
WOOFER
Median line
Median
line
Note
• It is strongly recommended to use the optional Pioneer
mounting products.
• Pioneer shall not be liable for any personal injury or product
damage that results from the use of mounting items other than
the optional Pioneer products.
10
En
Page 11

Supplied accessories
Chapter 3
03
Supplied accessories
Check that all of the following accessories are supplied in the box.
Remote control unit
AA size battery x 2
(for remote control unit)
Ferrite core
Cable tie (for ferrite core)
Speed clamp x 3
English
Cleaning cloth
Warranty card
Operating instructions
Bead band x 3
Power cord *
Power cord
(with a ferrite core attached) *
*1 Either one of the power cords is supplied depending on the
country.
1
1
11
En
Page 12
04
Part names
Chapter 4
Part names
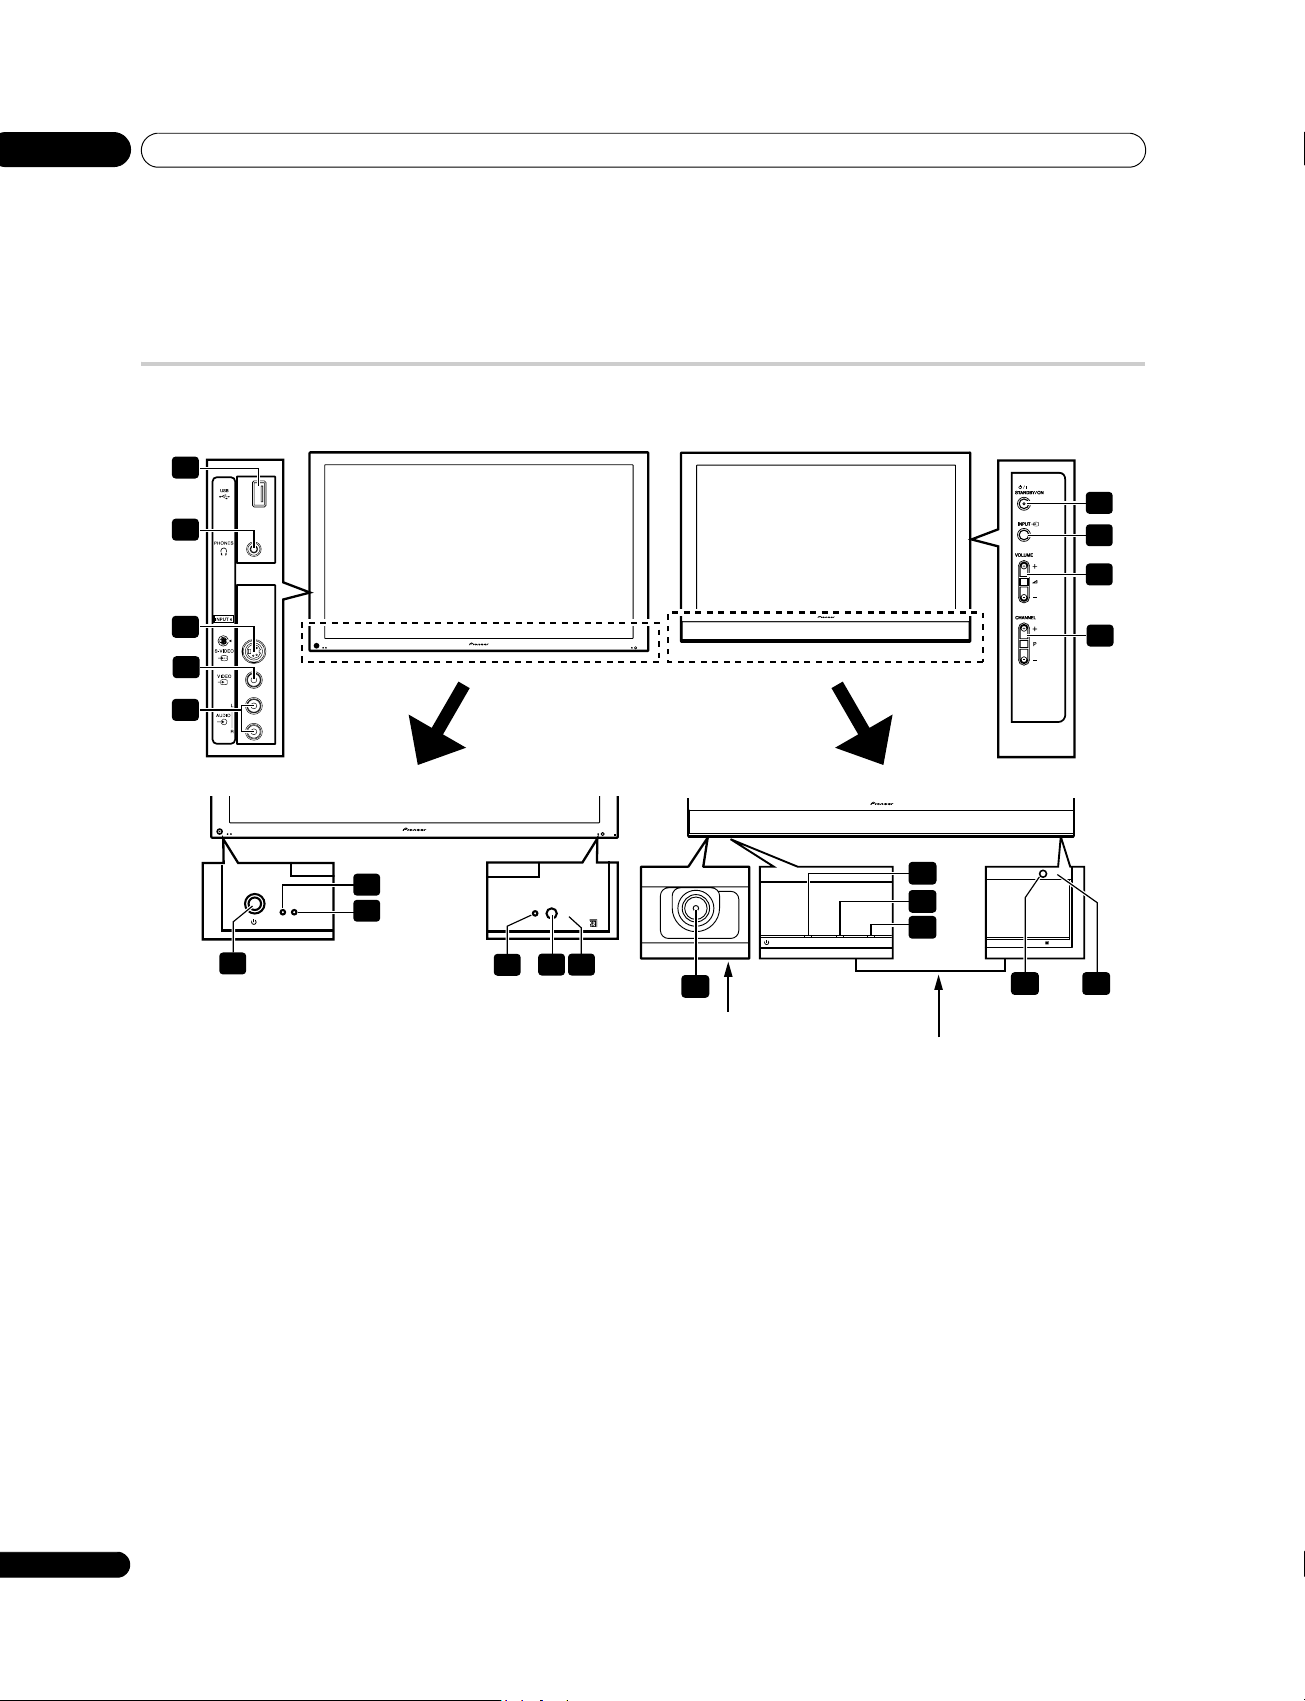
Plasma television
(Front)
Side PDP-508XG PDP-428XG Side
11
12
7
8
9
13
14
15
2
ON STANDBY
1
1 button (If the button is off, the power will not turn on even
when , 0 to 9 on the remote control unit or STANDBY/ON on
the plasma television is pressed.)
2 POWER ON indicator
3 STANDBY indicator
4 SLEEP indicator
5 Room Light Sensor
6 Remote control sensor
7STANDBY/ON button
3
SLEEP
5
4
6
Viewed from the underside of the display
The terminals on side panels are common to the PDP-508XG and PDP-428XG.
SLEEPON STANDBY
1
Viewed from the front of the display
8 INPUT button
9VOLUME +/– buttons
10 CHANNEL +/– buttons
11 USB port
12 PHONES output terminal
13 INPUT 6 terminal (S-VIDEO)
14 INPUT 6 terminal (VIDEO)
15 INPUT 6 terminals (AUDIO)
10
2
3
4
5 6
12
En
Page 13
Part names
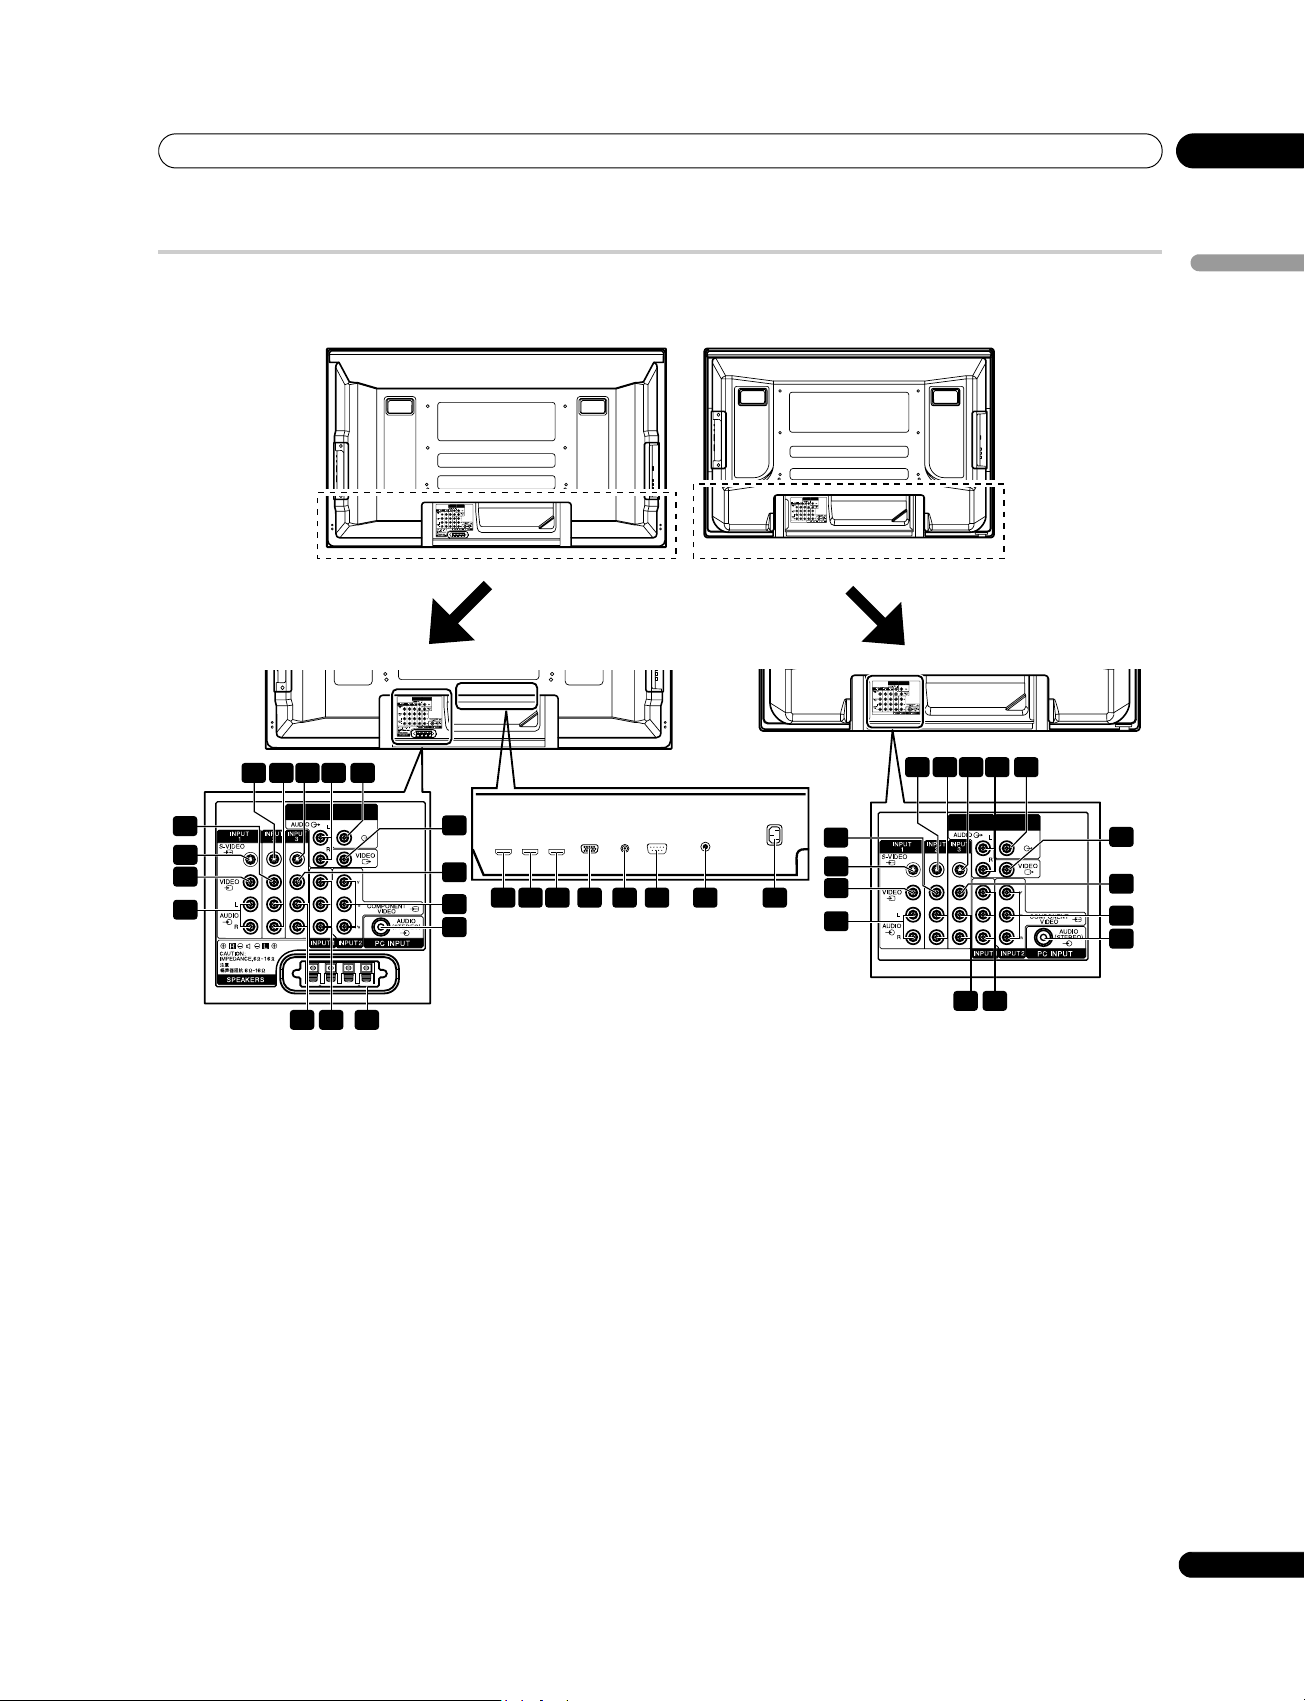
Plasma television
04
(Rear)
12
11
10
9
13 14 15 1716
MONITOR
OUT
PDP-508XG PDP-428XG
MONITOR
SUB
OUT
WOOFER
MONITOR
SUB
OUT
WOOFER
SUB
WOOFER
18
19
20
21
78 6 5 4 3 2 1
*For exact terminal positions, refer to the
terminal position sheet located near the
terminal compartment.
English
MONITOR
SUB
OUT
WOOFER
MONITOR
SUB
OUT
WOOFER
13 14 15 1716
MONITOR
SUB
OUT
12
WOOFER
18
11
10
9
19
20
21
23 22 24
1 AC IN terminal
2 ANT (antenna) input terminal
3 RS-232C terminal (used for factory setup)
4 CONTROL OUT terminal (supports SR+)
5 PC INPUT terminal (analog RGB)
6 INPUT 5 terminal (HDMI)
7 INPUT 4 terminal (HDMI)
8 INPUT 3 terminal (HDMI)
9 INPUT 1 terminals (AUDIO L, R)
10 INPUT 1 terminal (VIDEO)
11 INPUT 1 terminal (S-VIDEO)
12 INPUT 2 terminal (VIDEO)
23 22
The terminals from 1 to 8 are the same as the PDP-508XG.
13 INPUT 2 terminal (S-VIDEO)
14 INPUT 2 terminals (AUDIO L, R)
15 INPUT 3 terminal (S-VIDEO)
16 MONITOR OUT terminals (AUDIO L, R)
17 SUBWOOFER output terminal
18 MONITOR OUT terminal (VIDEO)
19 INPUT 3 terminal (VIDEO)
20 INPUT 2 terminals (COMPONENT VIDEO: Y, P
21 PC INPUT terminal (AUDIO (STEREO))
22 INPUT 1 terminals (COMPONENT VIDEO: Y, P
23 INPUT 3 terminals (AUDIO L, R)
24 SPEAKERS L, R terminals (PDP-508XG only)
B
B
, PR)
, PR)
13
En
Page 14
04
Part names
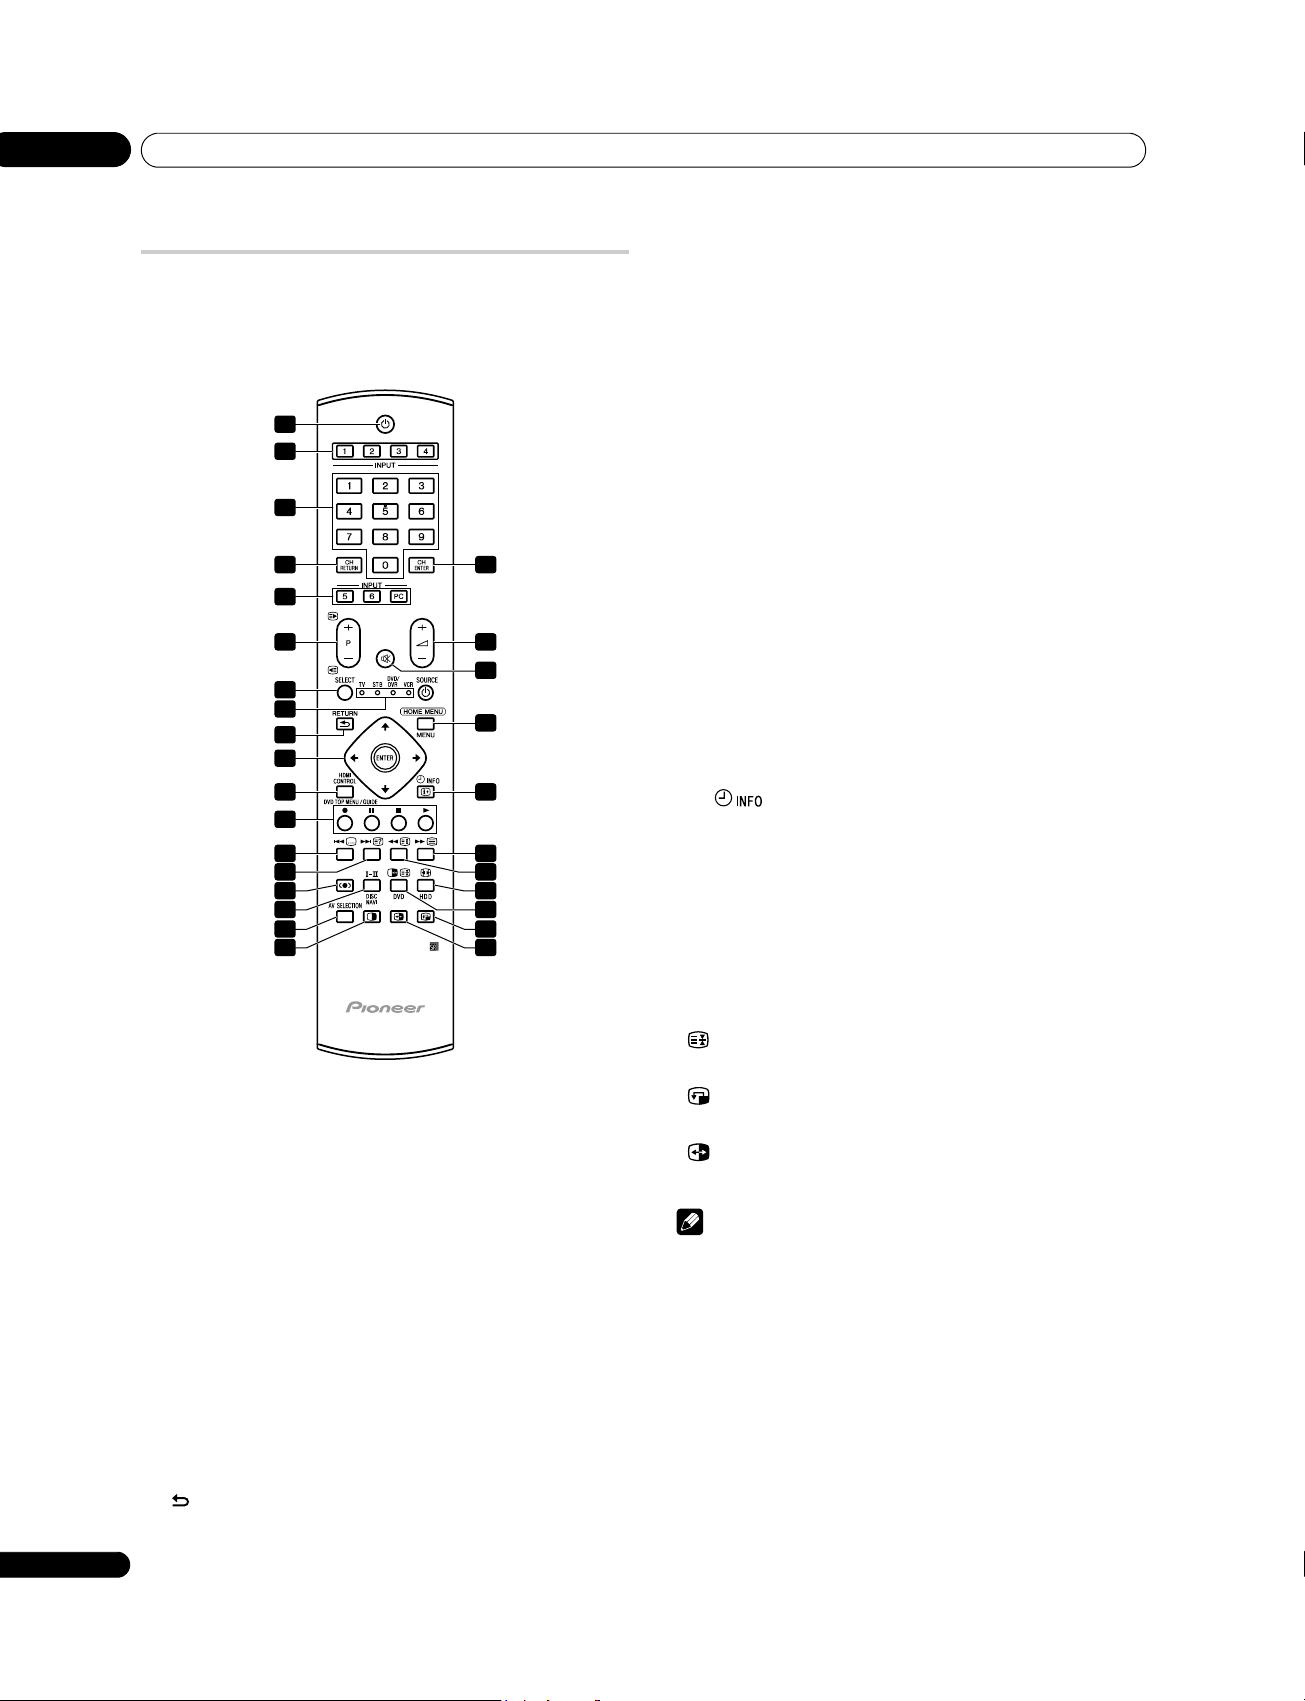
Remote control unit
This section describes the functions of the buttons available when
the TV mode has been selected by using the SELECT button. For the
buttons controlling other equipment, see Controlling other
equipment using the supplied remote control unit starting from
page 50.
1
2
3
4
2
5
6
7
8
9
10
11
12
13
14
15
16
17
18
19
20
21
22
23
24
25
26
27
28
9 ///: Selects a desired item on the setting screen.
ENTER: Executes a command.
10 HDMI CONTROL: Displays the HDMI Control menu.
11 Color (RED/GREEN/YELLOW/BLUE): Teletext mode: Selects a
page.
12
[: Jumps to the Teletext subtitle page.
13 k: Displays hidden characters.
14 h: Use to select a sound effect mode.
15 g: Sets the sound multiplex mode.
16 AV SELECTION: Selects audio and video settings. (AV source:
OPTIMUM, STANDARD, DYNAMIC, MOVIE, GAME, SPORT,
USER. PC source: STANDARD, USER.)
17 c: Press to select 2-screen, picture-in-picture or single screen
mode.
18 CH ENTER: Executes a channel selection by the number
buttons.
19 i +/i –: Sets the volume.
20 e: Mutes the sound.
21 HOME MENU: TV/External Input mode: Displays the HOME
MENU screen.
22 p : TV/External input mode: Displays the channel
information.
23 m: Selects the Teletext mode (all TV image, all TEXT image, TV/
TEXT image).
24 l: Teletext mode: Displays an Index page for the CEEFAX/
FLOF format.
25 f: TV/External input mode: Selects the screen size.
26 d: TV/External input mode: Freezes a frame from a moving
image. Press again to cancel the function.
1 : Turns on the power to the plasma television or places it into
the standby mode.
2 INPUT: Selects an input source (“INPUT 1”, “INPUT 2”, “INPUT
3”, “INPUT 4”, “INPUT 5”, “INPUT 6” or “PC”)
30 to 9: TV/External input mode: Selects a channel.
Teletext mode: Selects a page.
Turns the power on when the STANDBY indicator lights red.
4 CH RETURN: Returns to the previously selected channel.
5P+/P–: TV/External input mode: Selects a channel.
w/x: Teletext mode: Selects a page.
6 SELECT: Switches the selection among TV, STB, DVD/DVR, and
VCR, so that you can control other connected equipment,
using the supplied remote control unit.
7 TV, STB, DVD/DVR, VCR: These indicators show the current
selection and status when you control other connected
equipment, using the supplied remote control unit.
8 RETURN: Restores the previous menu screen.
14
En
: Teletext mode: Stops updating Teletext pages. Press again
to release the hold mode.
27 : Moves the position of the sub screen when in picture-in-
picture mode.
28 : Swaps the main and sub screens when in picture-in-
picture or 2-screen mode.
Note
• When using the remote control unit, point it at the plasma
television.
Page 15
Preparation
Chapter 5
05
Preparation
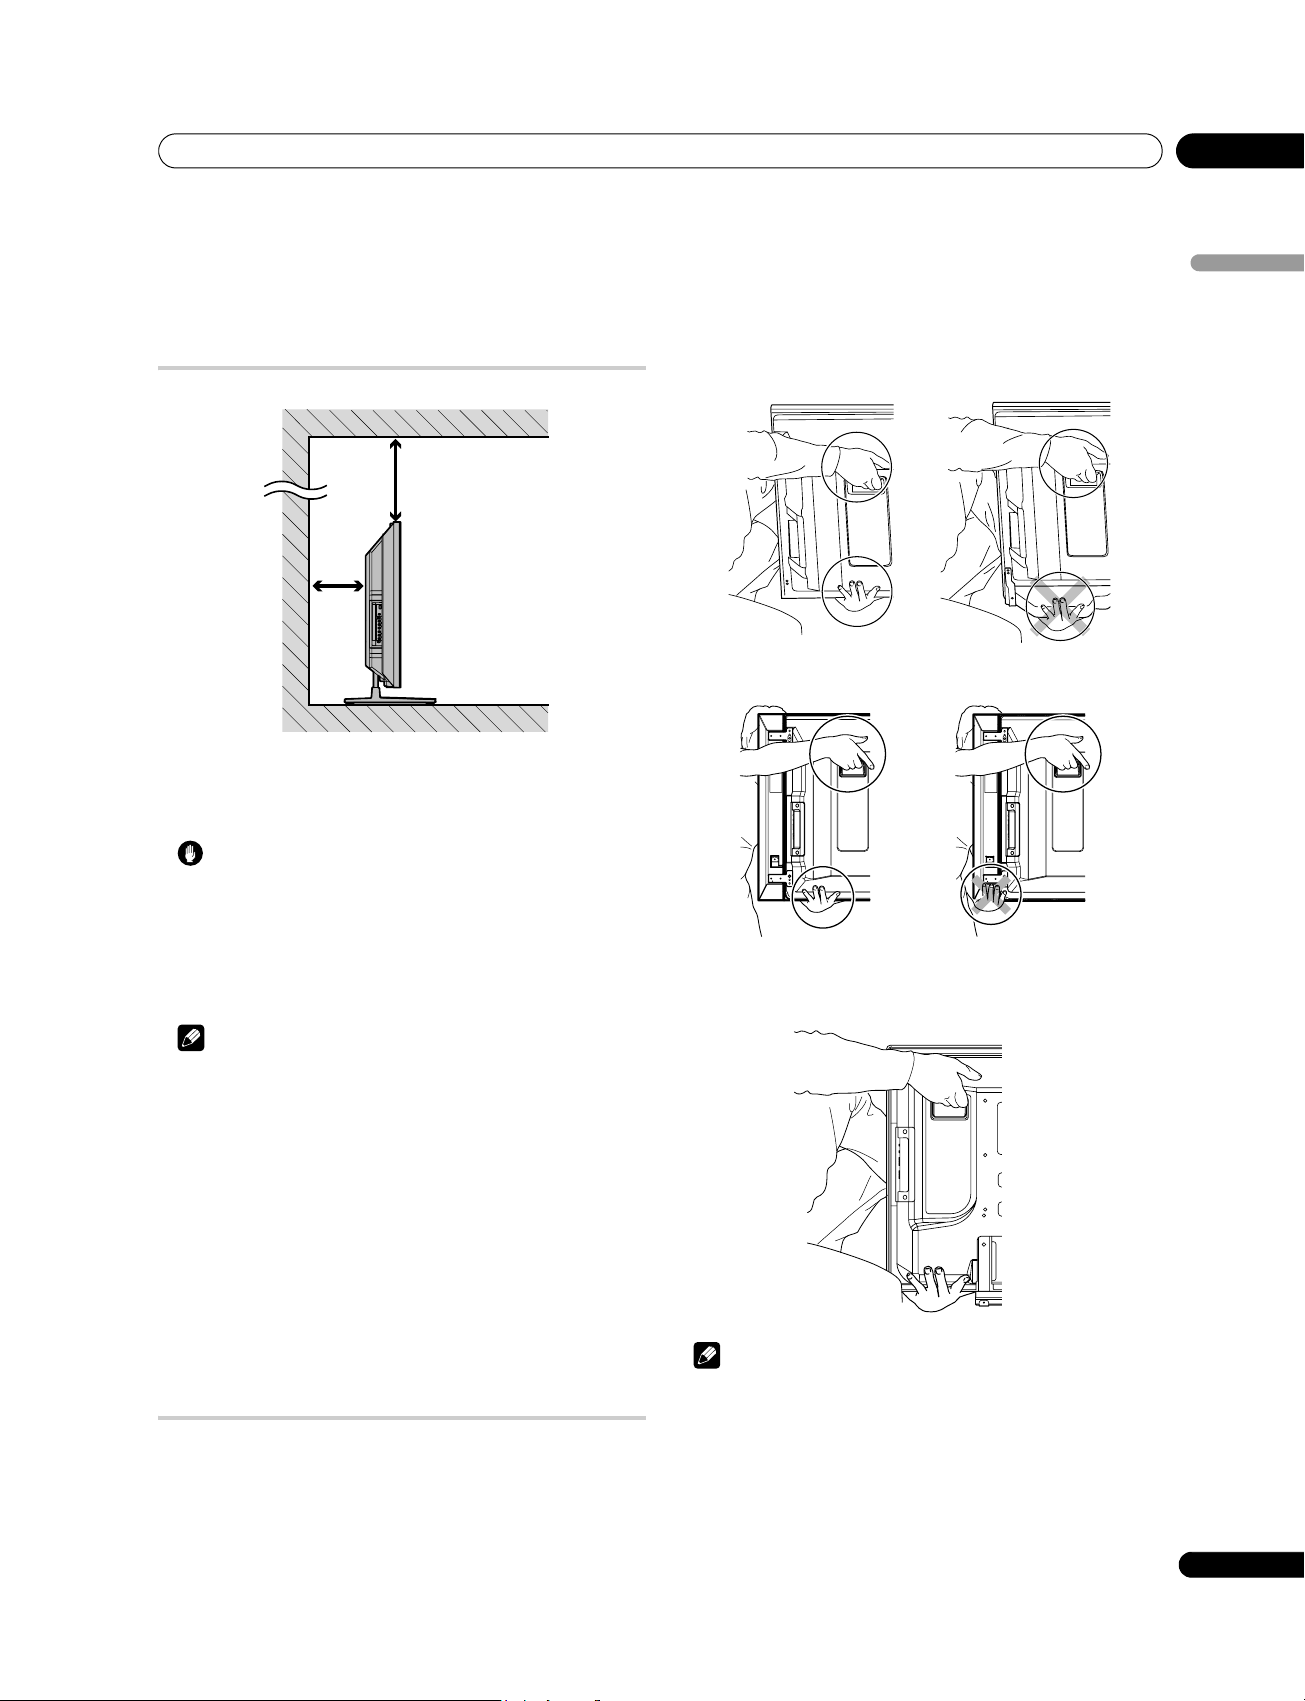
Installing the plasma television
Over 50 cm
Over
10 cm
Location
• Avoid direct sunlight. Maintain adequate ventilation.
Caution
• If you do not leave sufficient space above the plasma television,
it will not receive enough ventilation and will not operate
properly.
• Pioneer will not be responsible for accident or damage caused
by inadequate installation or stabilization, erroneous
operation, remodeling or natural disasters.
English
(For PDP-508XG)
Under speaker
Side speaker
(For PDP-428XG)
Note
• Allow enough space around the upper and back parts when
installing to ensure adequate ventilation of the rear of the unit.
• Be sure to install the plasma television in a flat, stable location.
Using the optional Pioneer stand
For details on installation, refer to the instruction manual supplied
with the stand.
Using the optional Pioneer speakers (for PDP-508XG
only)
For details on installation, refer to the instruction manual supplied
with the speaker.
Moving the plasma television
When installing on a rack, etc., hold the plasma television as
shown on the right. Because the plasma television is heavy, be
sure to have someone help you when moving it.
Note
• Do not use the speaker to support the weight of the plasma
television.
• When the plasma television has under-mounted speakers,
always remove the speakers before moving the plasma
television. Do not hold the plasma television by the speaker
mounting fittings.
15
En
Page 16
05
Wood screw
Screw
Preparation
Preventing the plasma television from
falling over
After installing the stand, be sure to take special care to ensure
that the plasma television will not fall over and is stabilized to both
the wall and rack.
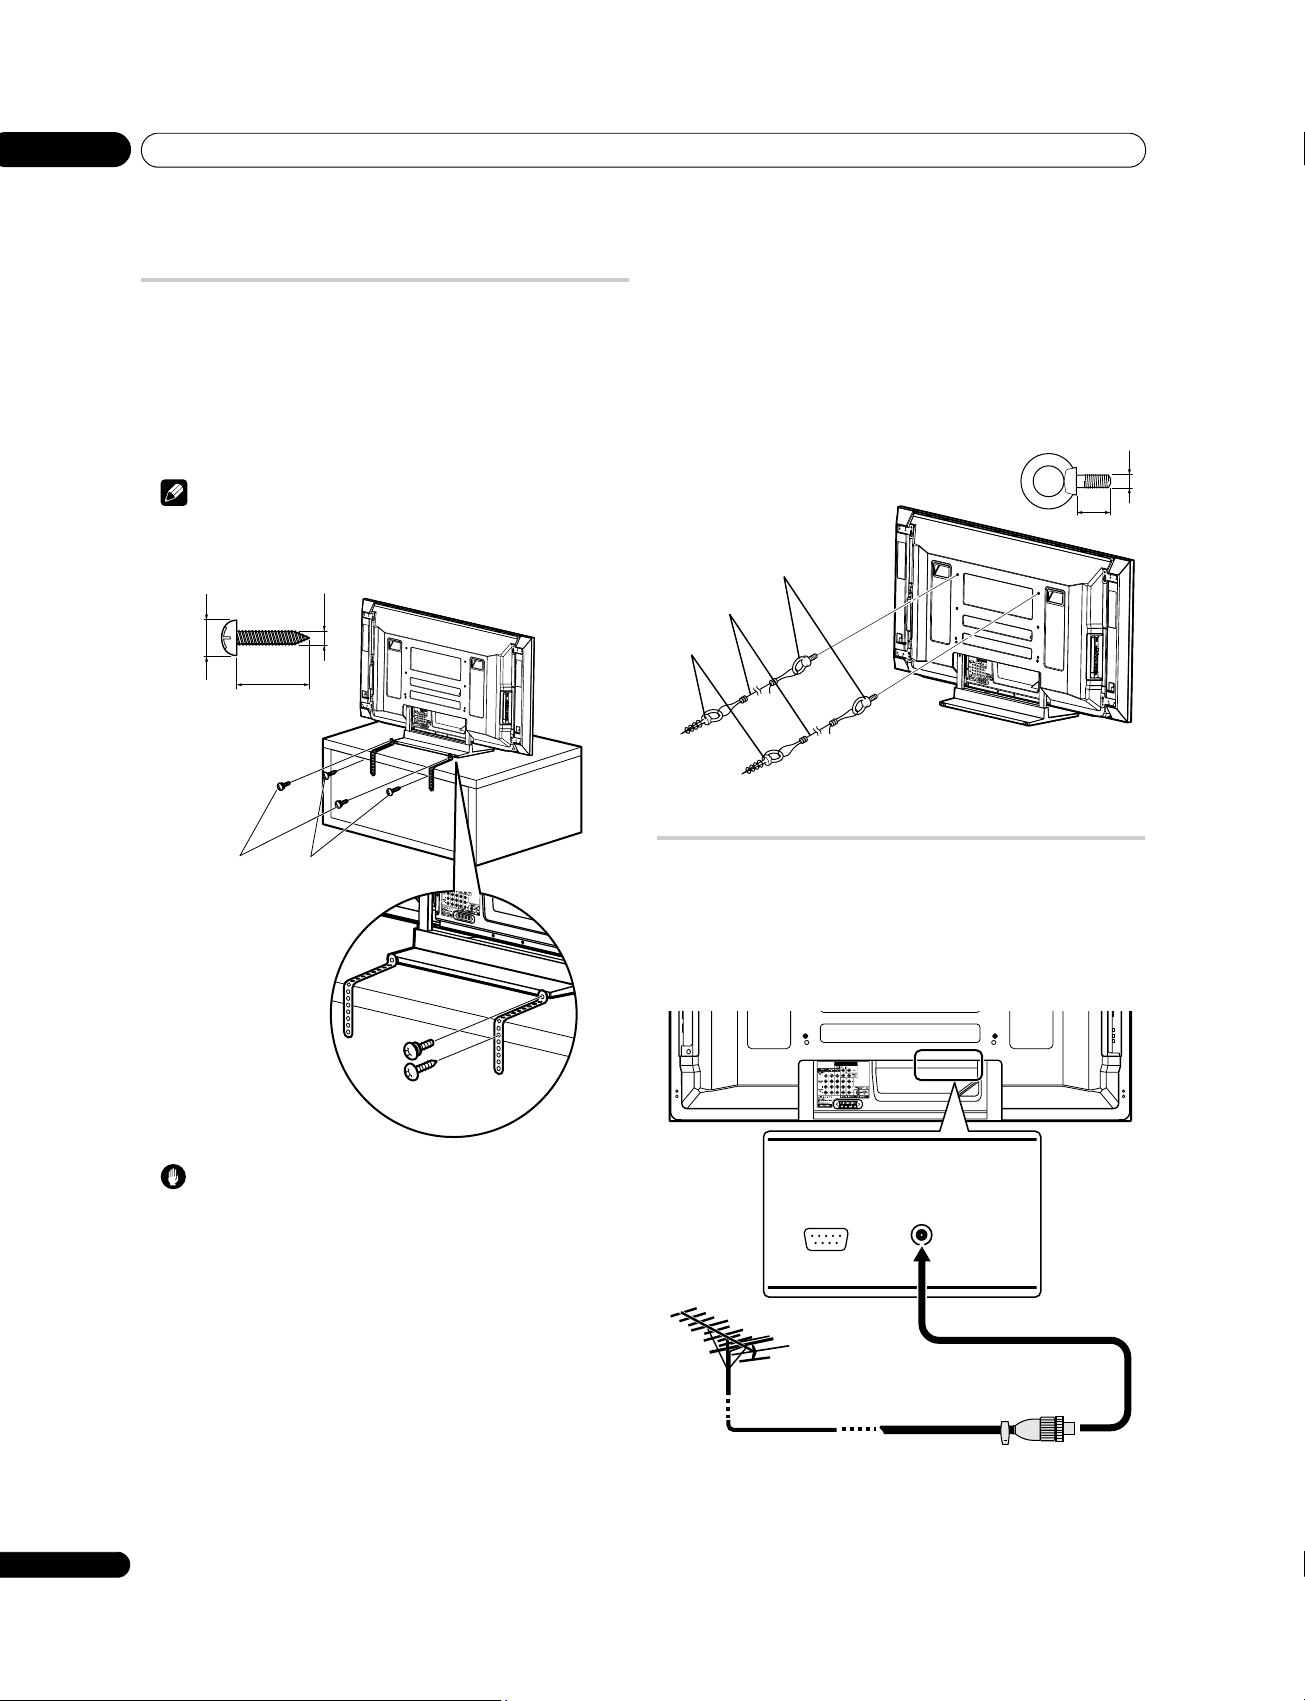
Stabilizing on a table or rack
Stabilize the plasma television as shown in the diagram using the
plastic bands and screws supplied with the optional stand.
Note
• To stabilize the plasma television on a table or rack, use screws
that have a nominal diameter of 4 mm and that are at least 20
mm long.
4 mm
8 mm to 15 mm
20 mm min.
MO
NITOR
OUT
SUB
WOOFE
R
Using a wall for stabilization
1 Attach falling prevention bolts (hooks) to the plasma
television.
2 Use strong cords to stabilize it appropriately and firmly to
a wall, pillar, or other sturdy element.
Perform this work in the same way on the left and right sides.
Use hooks, cords and fittings that are available on the market.
Recommended hook: Nominal diameter 8 mm Length 12 mm to
18 mm.
M8
12 mm to 18 mm
1. Hook
2. Cord
Fitting
MONITOR
OUT
S
U
B
W
OOFE
R
Screw
(M4 x 10 mm)
Wood screw
(commercially available,
4 mm x 20 mm min.)
Drill a hole in the
middle at the rear
of the tabletop
panel before using
a wood screw.
Perform this work
the same way on
the left and right
sides.
Caution
• A table or rack with adequate strength should always be used
to support the plasma television. Failure to do so could result
in personal injury and physical damage.
• When installing the plasma television, please take the
necessary safety measures to prevent it from falling or
overturning in case of emergencies, such as earthquakes, or of
accidents.
• If you do not take these precautions, the plasma television
could fall down and cause injury.
• The screws, hooks, cords and other fittings that you use to
secure the plasma television to prevent it from overturning will
vary according to the composition and thickness of the surface
to which it will be attached.
• Select the appropriate screws, hooks, cords, and other fittings
after first inspecting the surface carefully to determine its
thickness and composition and after consulting a professional
installer if necessary.
16
En
Basic connections
Connecting the antenna
To enjoy a clearer picture, use an outdoor antenna. The following is
a brief explanation of the types of connections that are used for a
coaxial cable.
(Rear view)
MONITOR
SUB
OUT
WOOFER
Standard DIN45325 plug (IEC169-2)
75-ohm coaxial cable (round cable)
(commercially available)
• Connect the 75-ohm coaxial cable (commercially available) to
the ANT IN (antenna input) terminal.
Page 17
Preparation
05
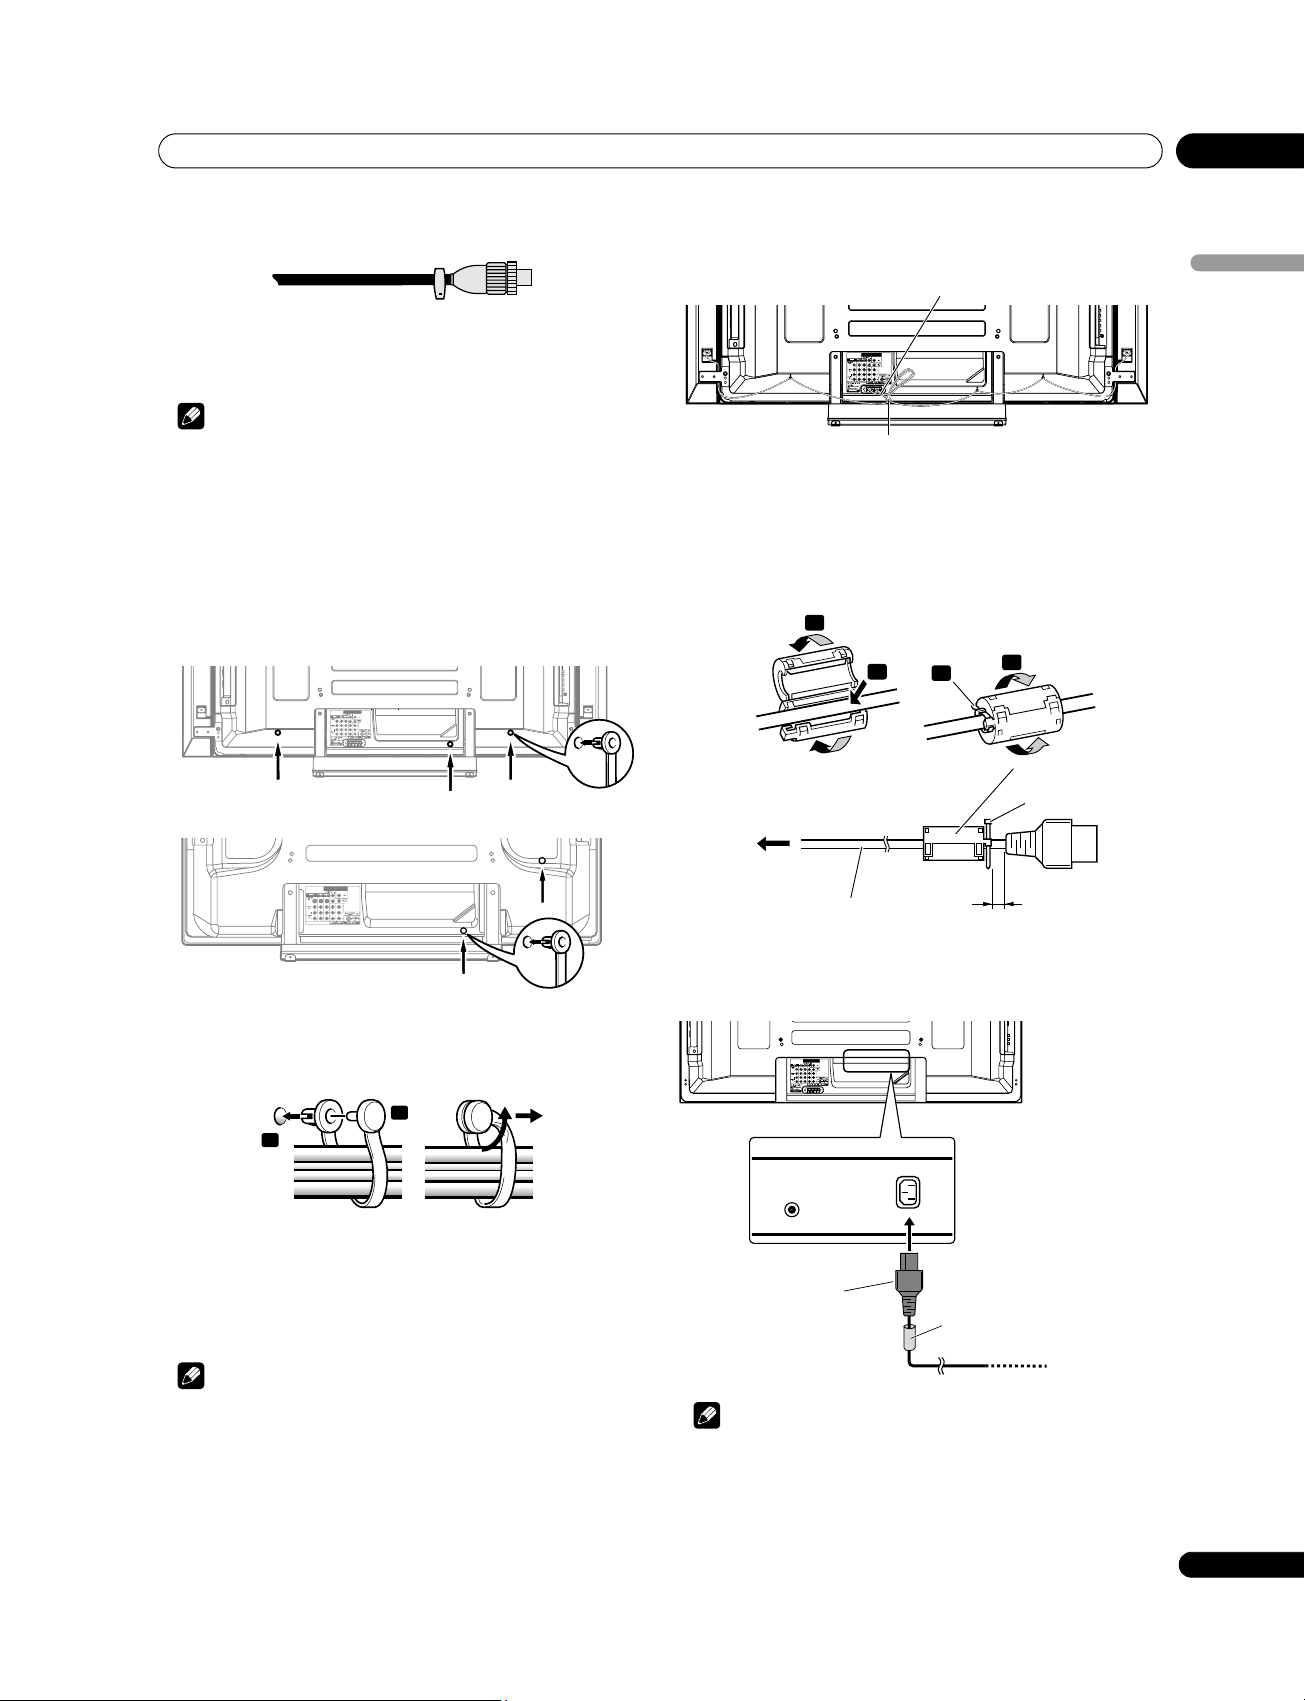
Antenna cable (commercially available)
If your outdoor antenna uses a 75-ohm coaxial cable with a
standard DIN45325 plug (IEC169-2), plug it into the antenna
terminal at the rear of the plasma television.
Note
• If the antenna is not connected correctly, the quality of
reception may be impaired. If images are not displaying
correctly, check whether the antenna connection is correct or
not.
Routing cables
Use the speed clamps as necessary to route the connecting
cables. The diagrams below show the location of the holes on the
rear of the display.
PDP-508XG (Rear view)
MONITOR
SUB
OUT
WOOFER
PDP-428XG (Rear view)
PDP-428XG (Rear view)
Tidying the speaker cables (PDP-508XG only)
Use the supplied bead bands as necessary to tidy the speaker cables.
MONITOR
OUT
WOOFER
Speaker cable
SUB
Rear view
Bead band
Attaching the ferrite core
(when a ferrite core is not attached)
To help prevent noise, attach the supplied ferrite core to the
connector end of the power cord as shown. Use the supplied cable
tie to prevent the ferrite core from slipping on the cable.
1
2
3
4
Ferrite core
Cable tie
English
MONITOR
SUB
MONITOR
SUB
OUT
WOOFER
OUT
WOOFER
Attaching and removing speed clamps
Insert [1] into an appropriate hole on the rear of the plasma
television and snap [2] into the back of [1] to lock the clamp.
2
1
• Speed clamps are designed to be difficult to undo once in
place. Please attach them carefully.
• Use pliers to twist the clamp 90º, pulling outward. The clamp
may deteriorate over time and become damaged if removed.
• Be careful not to subject any connecting cables to strain.
Note
• Use the speed clamps as necessary.
To power outlet
AC power cord
As close as possible
Connecting the power cord
Rear view
MONITOR
SUB
OUT
WOOFER
Power cord
Note
• Disconnect the power cord from the power outlet when the
plasma television is not going to be used for a long period of time.
• After all other components are connected, connect the power
plug to the AC outlet.
Ferrite core
Partially eliminates noise
caused by the power source.
To power outlet
17
En
Page 18
05
Preparation
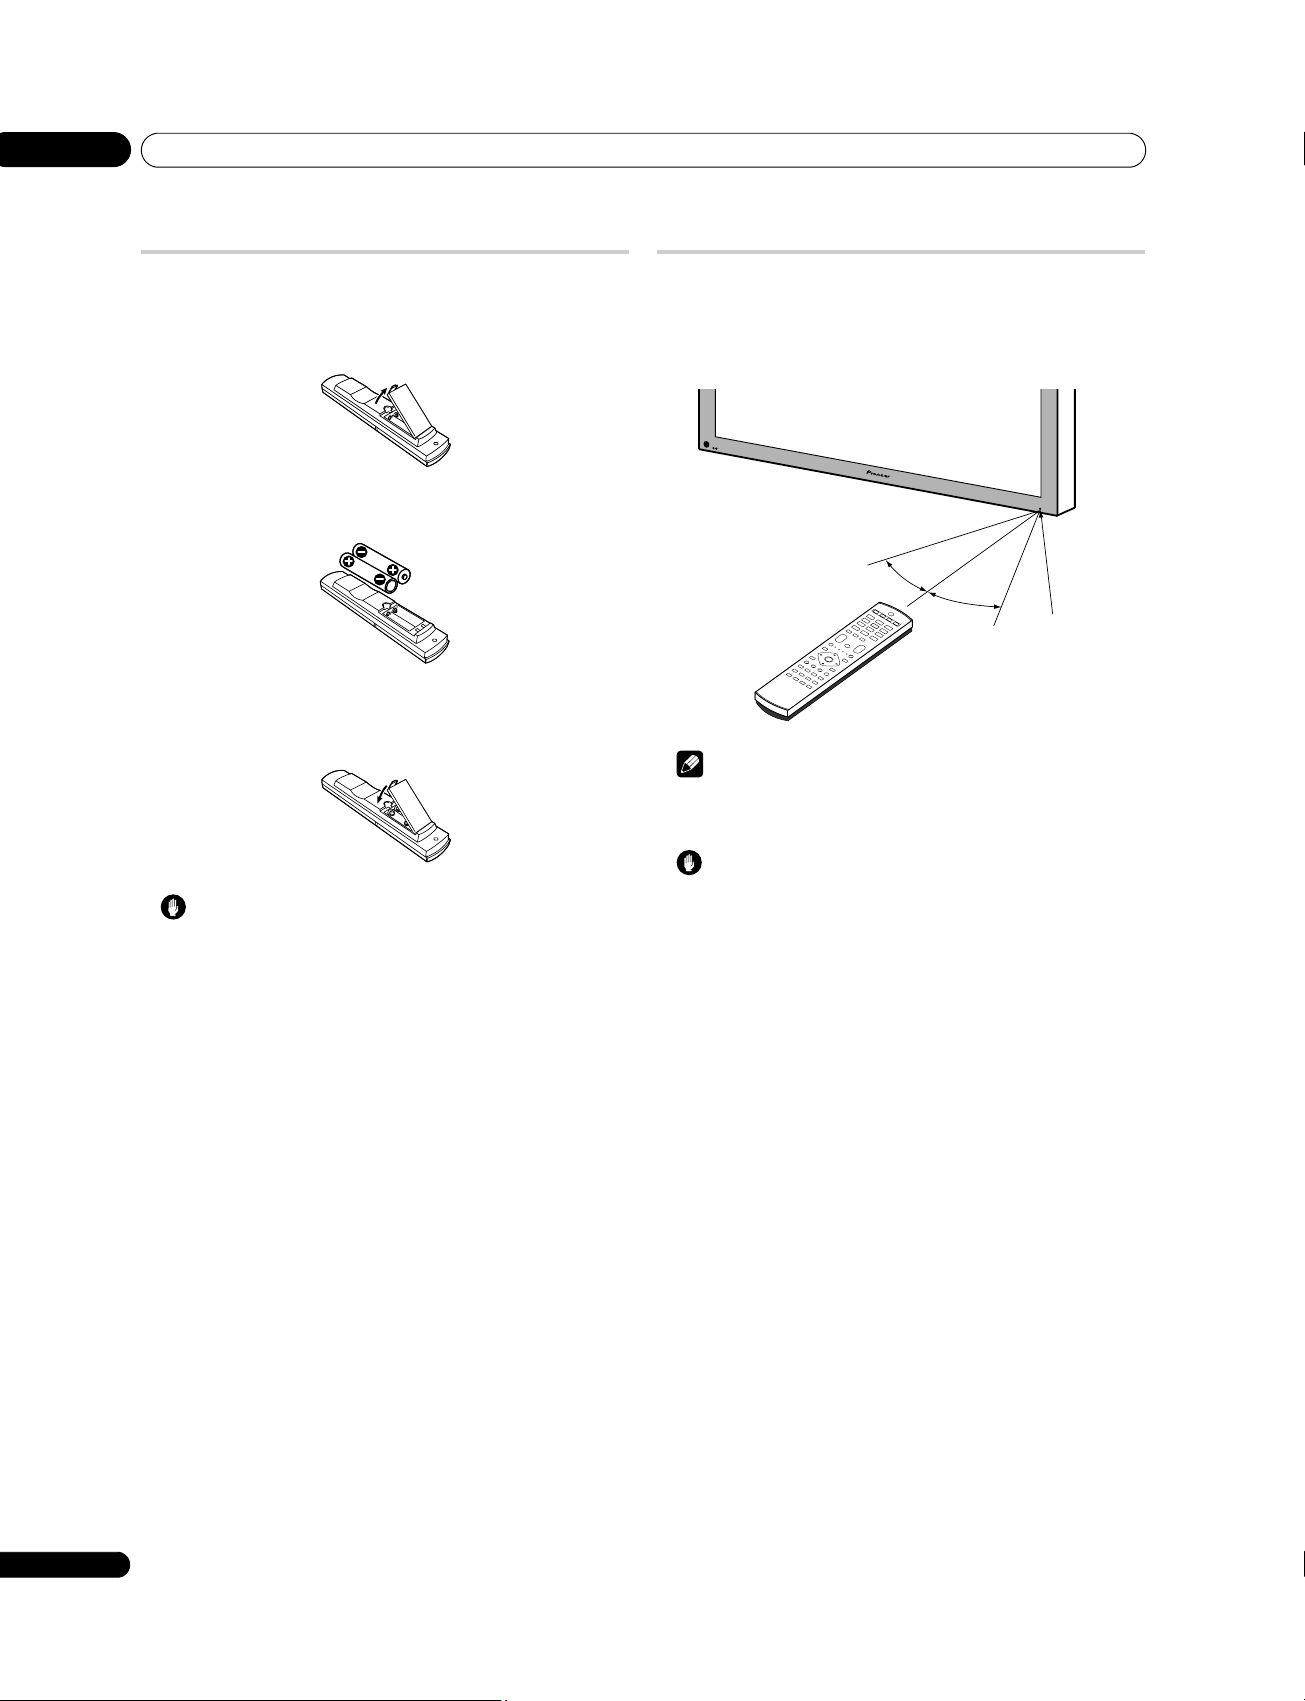
Preparing the remote control unit
Inserting batteries
1 Open the battery cover.
2 Load the supplied two AA size batteries while inserting
their respective negative polarity (–) ends first.
Place batteries with their terminals corresponding to the (+) and
(–) indicators in the battery compartment.
3 Close the battery cover.
Operating range of the remote control unit
Operate the remote control unit while pointing it toward the remote
control sensor located at the bottom right of the front panel of the
plasma television. The distance from the remote control sensor
must be within 7 m and the angle relative to the sensor must be
within 30 degrees in the right, left, upward, or downward direction.
30º
7 m
Remote
control
sensor
30º
Note
• For the remote control sensor located on the PDP-428XG, see
Part names on page 12.
Caution
Improper use of batteries can result in chemical leakage or an
explosion. Be sure to follow the instructions below.
• When you replace the batteries, use manganese or alkaline
ones.
• Place the batteries with their terminals corresponding to the
(+) and (–) indicators.
• Do not mix batteries of different types. Different types of
batteries have different characteristics.
• Do not mix old and new batteries. Mixing old and new batteries
can shorten the life of new batteries or cause chemical leakage
in old batteries.
• Remove batteries as soon as they have worn out. Chemicals
that leak from batteries can cause a rash. If you find any
chemical leakage, wipe thoroughly with a cloth.
• The batteries supplied with this product may have a shorter life
expectancy due to storage conditions.
• If you will not use the remote control unit for an extended
period of time, remove the batteries from it.
• WHEN DISPOSING OF USED BATTERIES, PLEASE COMPLY
WITH GOVERNMENTAL REGULATIONS OR
ENVIRONMENTAL PUBLIC INSTITUTION’S RULES THAT
APPLY IN YOUR COUNTRY/AREA.
Caution
• Do not expose the remote control unit to shock. In addition, do
not expose the remote control unit to liquids, and do not place
in an area with high humidity.
• Do not install or place the remote control unit under direct
sunlight. The heat may cause deformation of the unit.
• The remote control unit may not work properly if the remote
control sensor of the plasma television is under direct sunlight
or strong lighting. In such case, change the angle of the
lighting or plasma television, or operate the remote control unit
closer to the remote control sensor.
• When any obstacle exists between the remote control unit and
the remote control sensor, the remote control unit may not
function.
• As the batteries become empty, the remote control unit can
function within a shorter distance from the remote control
sensor. Replace the batteries with new ones early enough.
• The plasma television emits very weak infrared rays from its
screen. If you place such equipment operated through infrared
remote control as a VCR nearby, that equipment may not
receive commands from its remote control unit properly or
entirely. If this is the case, place that equipment at a location
far enough from the plasma television.
• Depending on the installation environment, infrared rays from
the plasma television may not allow this system to properly
receive commands from the remote control unit or may
shorten allowable distances between the remote control unit
and the remote control sensor. The strength of infrared rays
emitted from the screen differs, depending on images
displayed on the screen.
18
En
Page 19
Watching TV
Chapter 6
06
Watching TV
Important
• Before watching broadcast channels, the built-in TV tuner
must be set up. See Setting up TV channels automatically on
page 25 for how to do this.
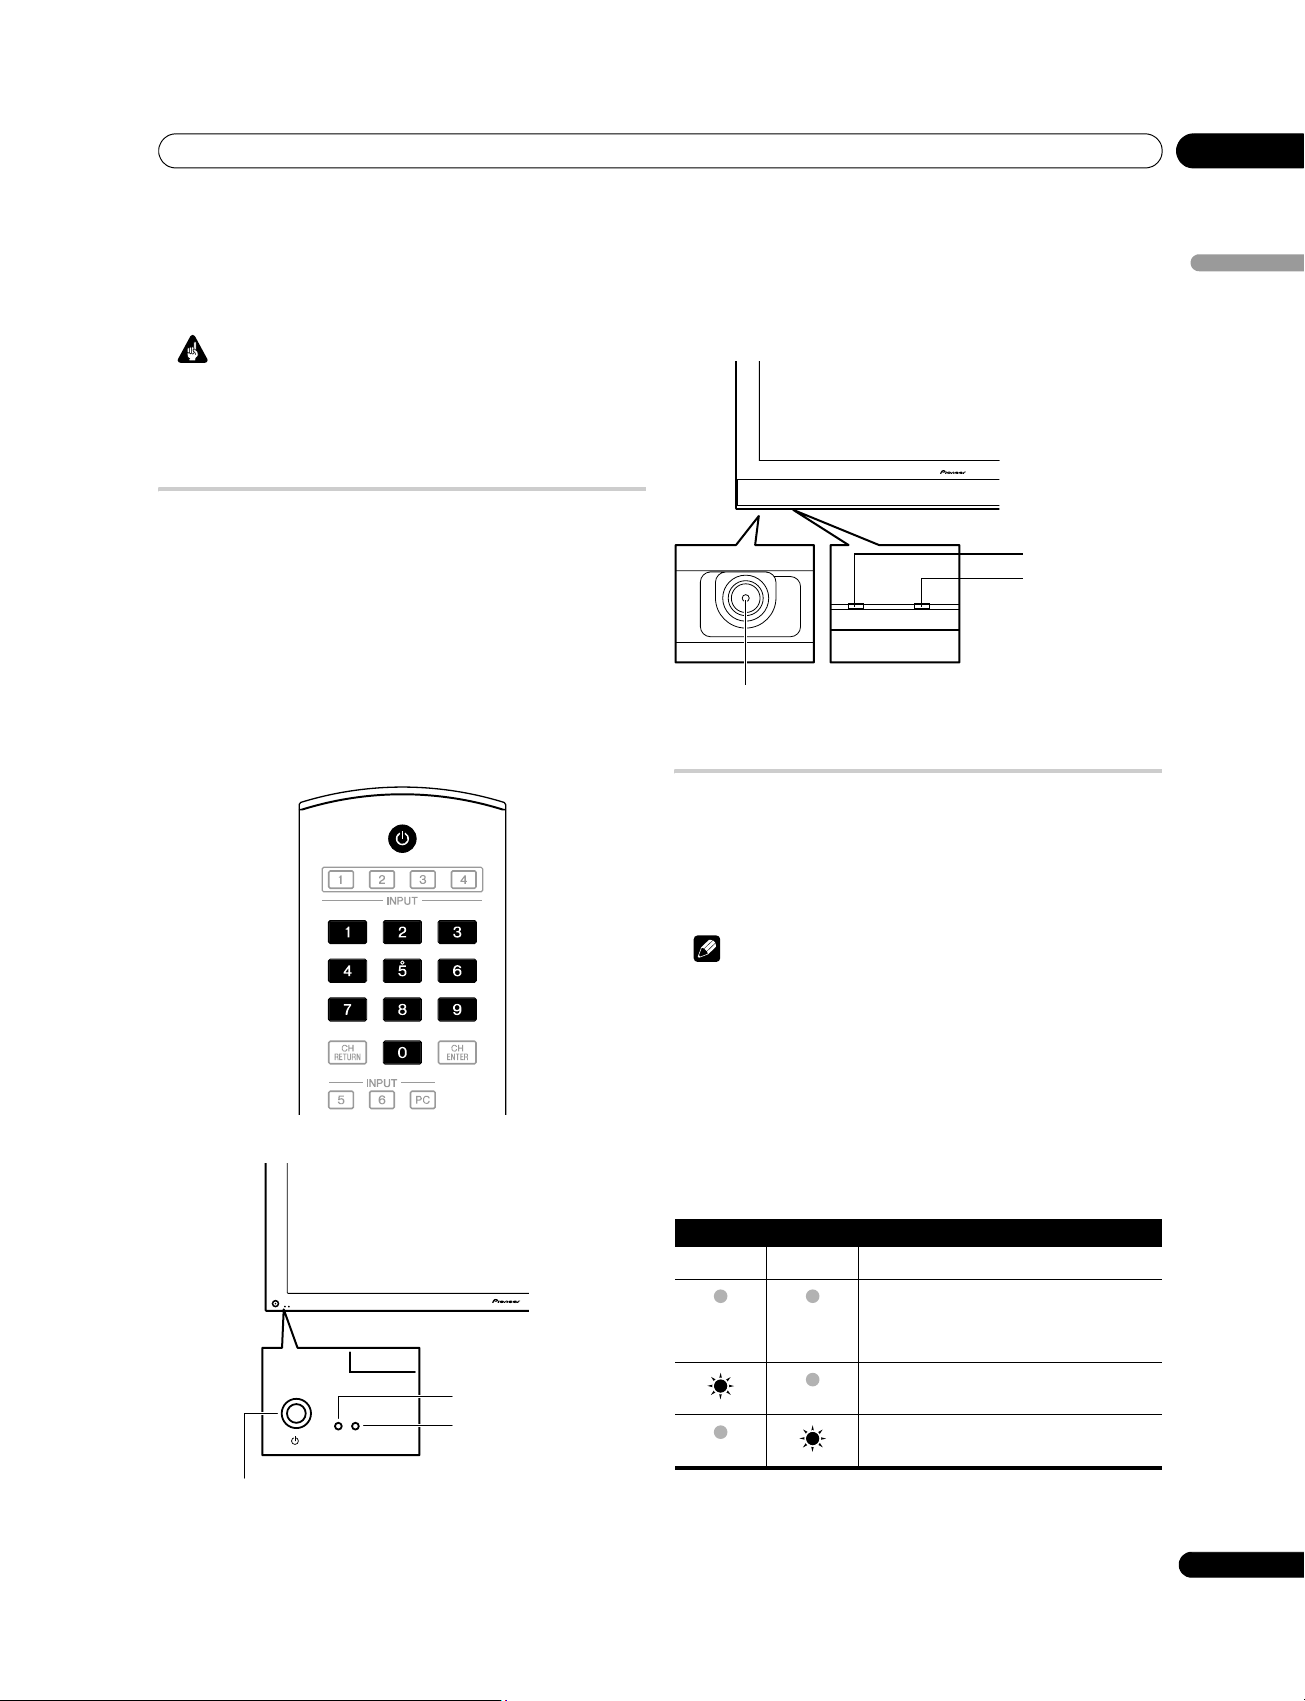
Turning the power on
• Press on the plasma television when the POWER ON and
STANDBY indicators are off.
•The system is on.
• The POWER ON indicator lights up blue.
• Press or 0 to 9 on the remote control unit or STANDBY/
ON on the plasma television if the STANDBY indicator lights
red.
• The POWER ON indicator lights up blue.
• If you press 0 on the remote control unit, images from “INPUT 1”
will be displayed.
•If you press 1 to 9, TV images will be displayed.
English
PDP-428XG
POWER ON indicator
STANDBY indicator
ON STANDBY
button
Placing the system into standby
Press on the remote control unit or STANDBY/ON on the
plasma television.
• The STANDBY indicator lights up red.
• The system enters the standby mode and the image on the
screen disappears.
PDP-508XG
button
ON STANDBY
POWER ON indicator
STANDBY indicator
Note
• When on the plasma television is off, you cannot turn the
power on by pressing or 0 to 9 on the remote control unit or
STANDBY/ON on the plasma television.
• If you are not going to use the plasma television for a long
period of time, be sure to remove the power cord from the
power outlet.
Plasma television status indicators
The table below shows the operational status of the plasma
television. You can check the current status of the system with the
indicators on the plasma television.
Indicator status System status
POWER ON STANDBY
The power cord of the plasma television has been
disconnected. Or, the power cord of the plasma
television has been connected but the
of the plasma television is off.
Power to the system is on.
The system is in the standby mode.
For other than the above, see Troubleshooting on page 63.
button
19
En
Page 20
06
Watching TV
Note
• You can select “Auto”, “High”, “Mid” or “Low” for the brightness
of the POWER ON indicator. When “Auto” is selected, the
brightness of the indicator changes to “High”, “Mid” or “Low”
to match the brightness level of the viewing area. For details,
see Blue LED Dimmer on page 39.
Changing channels
Use the remote control or the control panel on the right-hand side
of the plasma television to change channels.
• Before operating with the remote control unit, make sure to
select the TV mode using its SELECT button. See Controlling
other equipment using the supplied remote control unit on
page 50.
Using 0 to 9 on the remote control unit
• Select channels directly by pressing buttons 0 to 9.
For example:
Press 2 to select channel 2 (one-digit channel).
Press 1 then 2 to select channel 12 (two-digit channel).
Press 1, 2 then 3 to select channel 123 (three-digit channel).
When viewing Teletext information:
• View a page directly which is three-digit page number from 100
to 899 by pressing buttons 0 to 9. See also Operating the
Teletext basics on page 61.
Note
•Press CH RETURN to switch back to the previous channel.
Press again to return to the current channel.
• After entering a channel number you can press
CH ENTER to tune in the channel more quickly.
• In standby, when you press 0, the power turns on and images
come from the “INPUT 1” source. Or, when you press any
button from 1 to 9, TV images display.
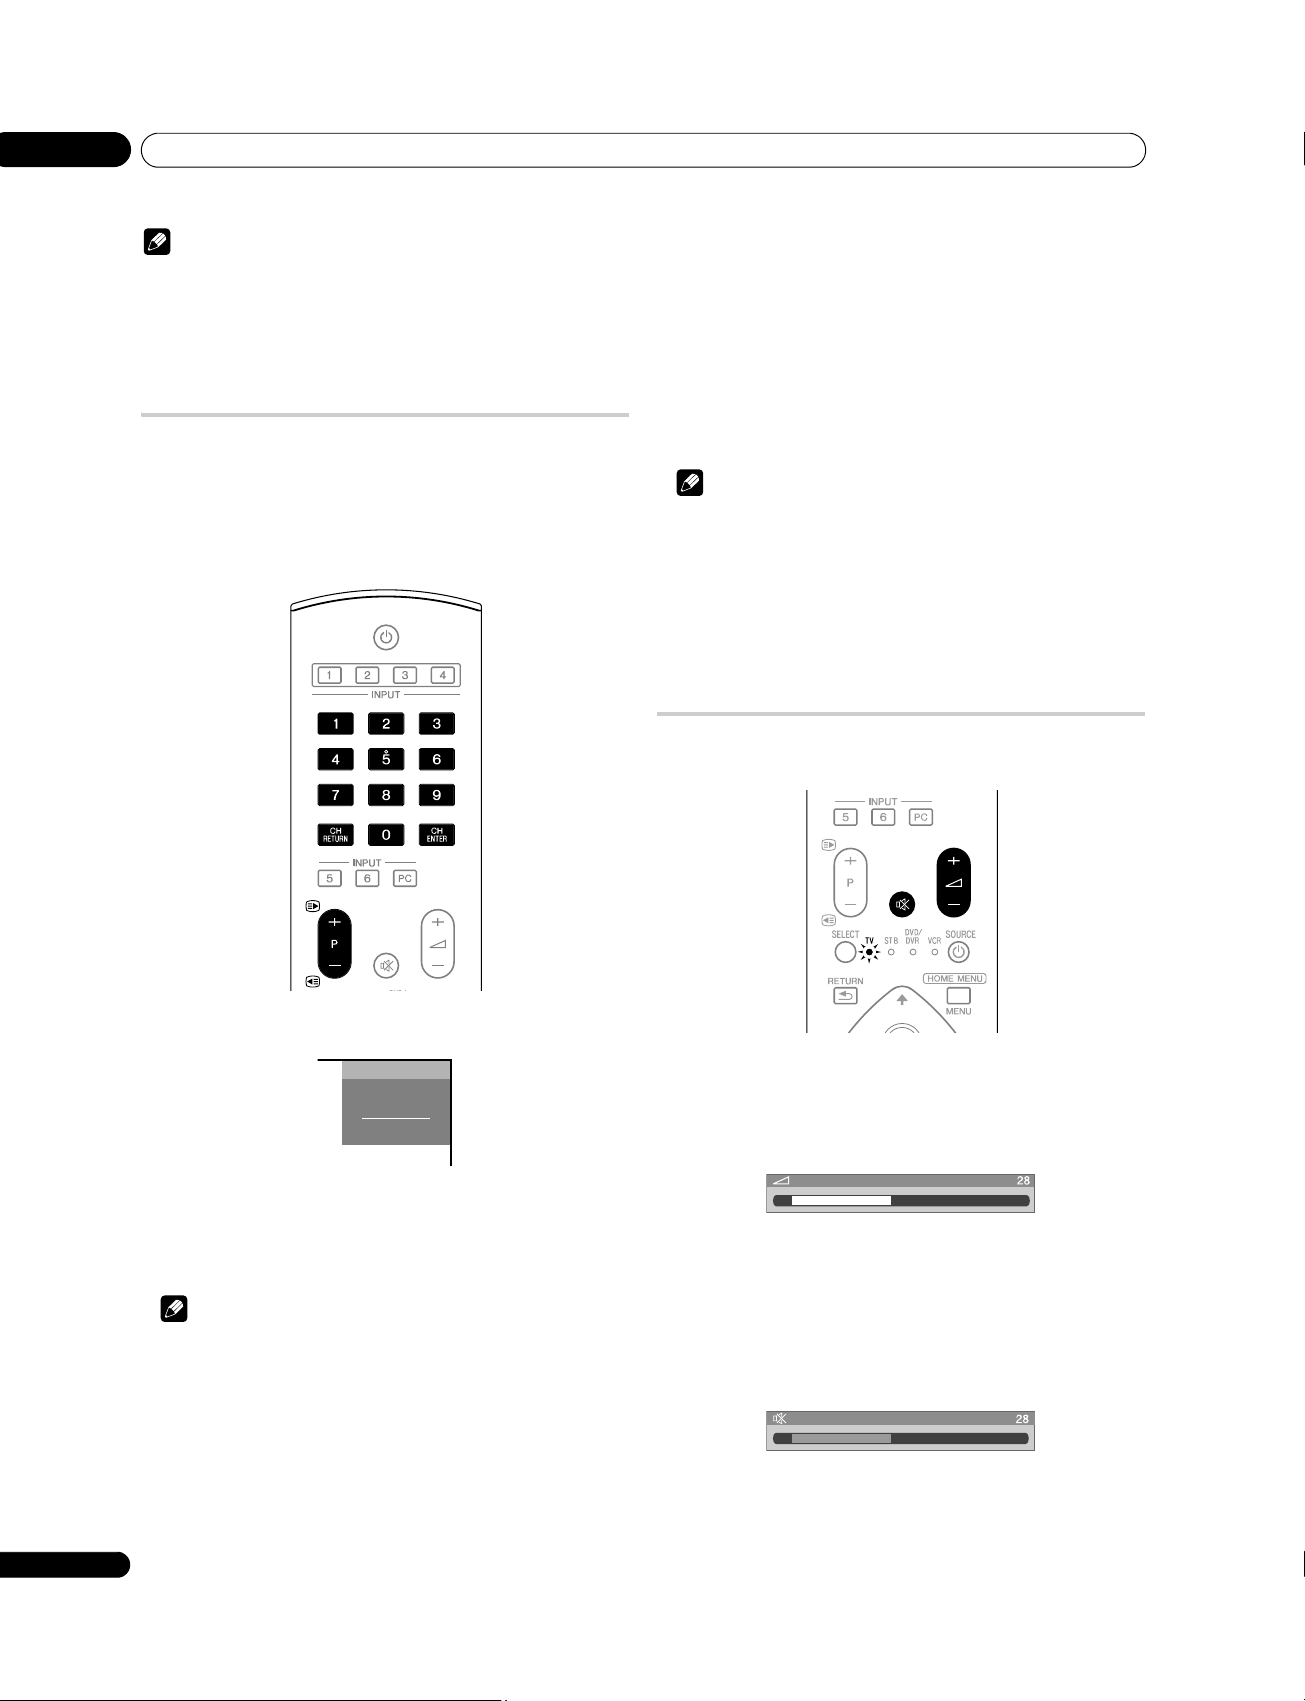
Changing the volume and sound
Use the remote control or the control panel on the right-hand side
of the plasma television to adjust the volume.
Channel display
8
AAA
STEREO
STANDARD
FULL
Using P+ / P– on the remote control unit
• Press P+ to increase the channel number.
• Press P– to decrease the channel number.
Note
• CHANNEL +/– on the plasma television operates the same as
P+/P–.
• Press CH RETURN to switch back to the previous channel.
Press again to return to the current channel.
• P+/P– cannot pick up channels that are set to skip. For Channel
Skip, see steps 13 and 14 under Setting up TV channels
manually on page 25.
20
En
Using
i
+ /
i
– on the remote control unit
•Press i + to increase the volume.
•Press i – to decrease the volume.
Volume adjustment
• VOLUME +/– on the plasma television operates the same as
i + /i –.
Using e on the remote control unit
•Press e to mute the sound.
e appears on the screen.
Muting
•Press e again or i + to restore the sound.
Page 21
Watching TV
06
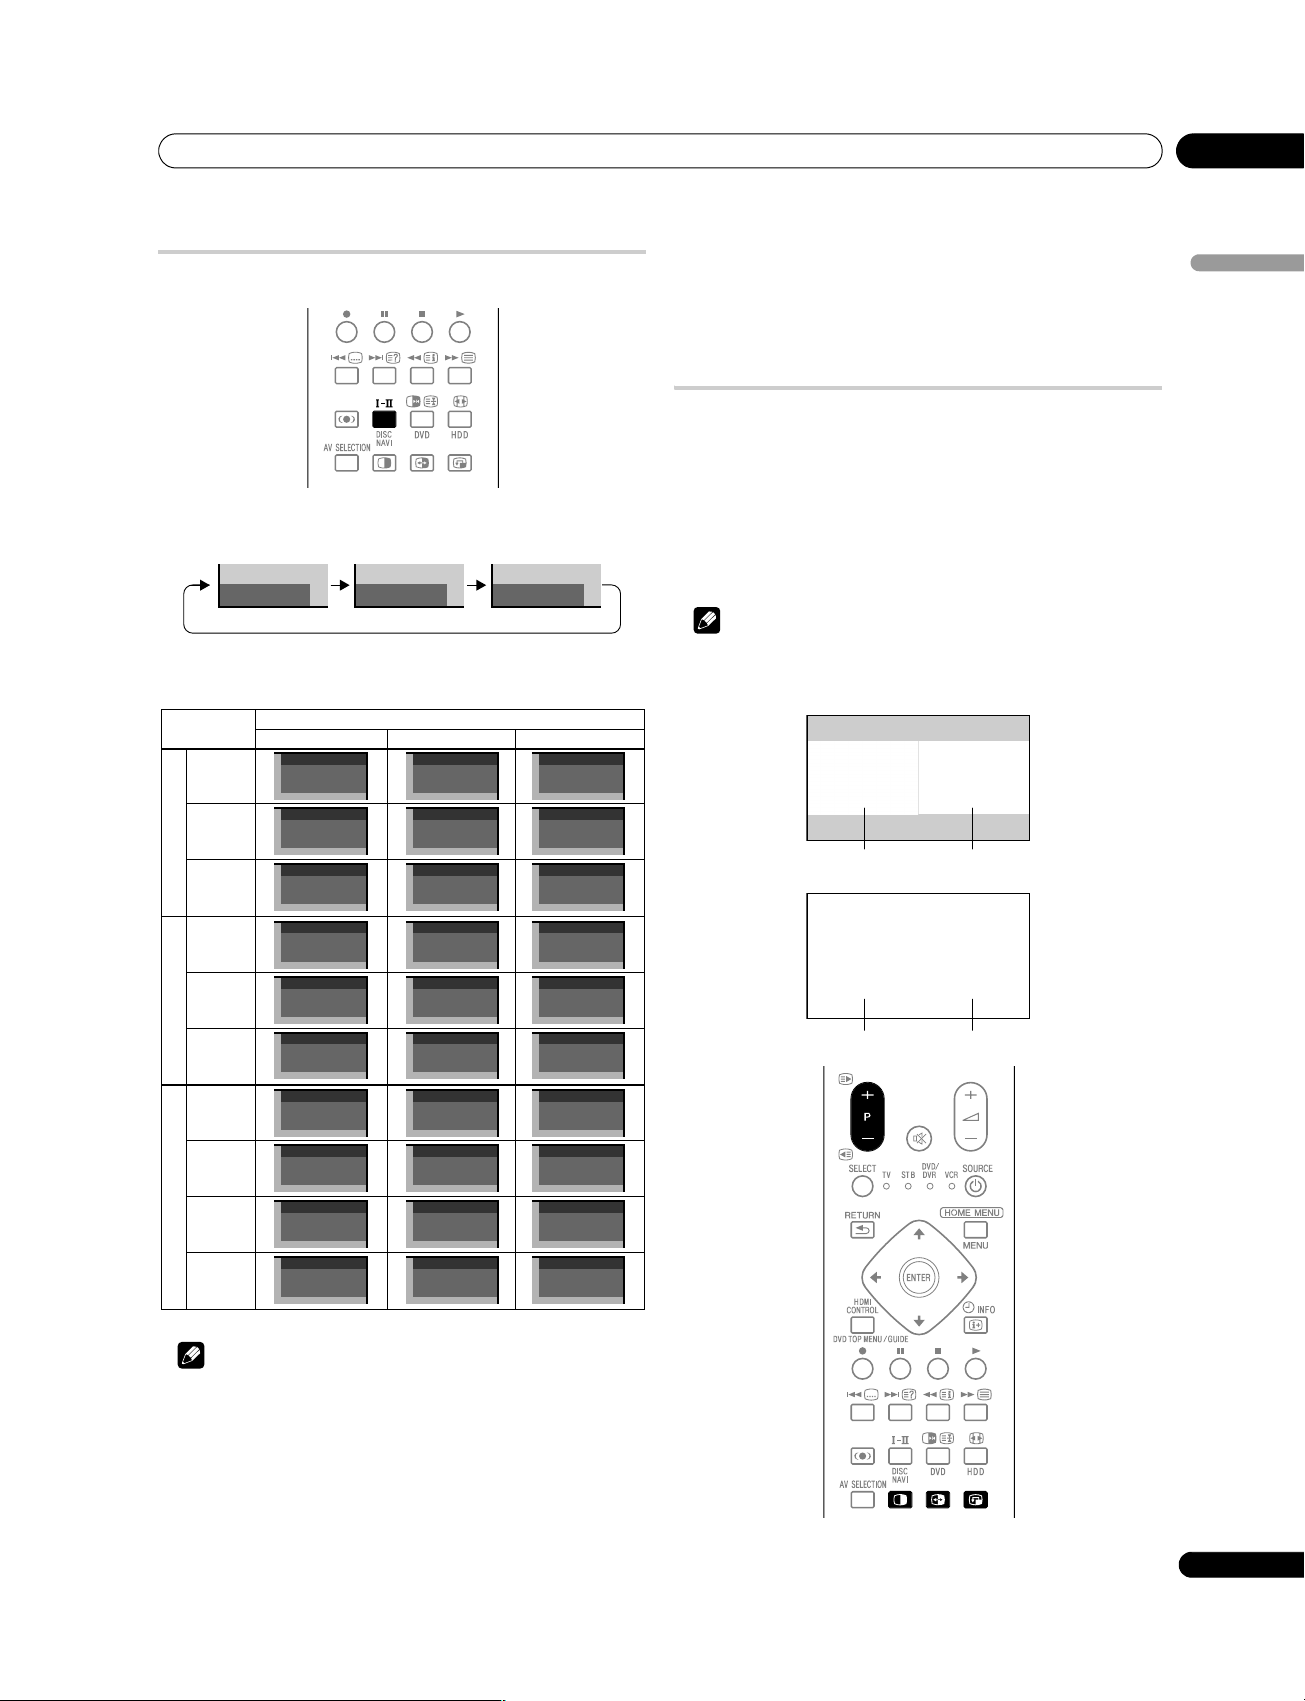
Switching the broadcast audio channel
Depending on the broadcast, you can switch the audio channel.
• Press - to change the audio channel.
mode mode MONO mode
I II MONO
The table below shows the available audio channels by broadcast
audio type.
NICAM BroadcastsA2 BroadcastsBTSC Broadcasts
Stereo
Bilingual
Monaural
1
AAA
NICAM STEREO
2
BBB
NICAM
3
CCC
NICAM MONO
Setting
1
AAA
NICAM STEREO
2
BBB
NICAM
3
CCC
NICAM MONO
MONO
1
AAA
MONO
2
BBB
MONO
3
CCC
MONO
• Selecting a sound multiplex mode while the input source is
“INPUT 1” to “INPUT 6” or “PC” does not change the type of
sound. In this case, sound is determined by the video source.
• While watching a TV channel with any High Deviation setting
(page 26), you cannot change the sound multiplex mode.
Using the multiscreen functions
• Before operating with the remote control unit, make sure to
select the TV mode using its SELECT button. See Controlling
other equipment using the supplied remote control unit on
page 50.
Splitting the screen
Use the following procedure to select the 2-screen or picture-inpicture mode.
Note
• Displaying a split screen for a long period of time, or for shorter
periods of time everyday, may result in image retention.
2-screen
Main screen Sub screen
Picture-in-picture
English
Stereo
Bilingual
Monaural
Stereo
MAIN+SAP
Stereo+SAP
Monaural
4
DDD
STEREO
5
EEE
DUAL
6
FFF
MONO
4
GGG
STEREO
5
HHH
MONO(SAP)
5
JJJ
STEREO(SAP)
6
KKK
MONO
4
DDD
STEREO
5
EEE
DUAL
6
FFF
MONO
4
GGG
STEREO
5
HHH
SAP(MAIN)
5
JJJ
SAP(STEREO)
6
KKK
MAIN
DDD
MONO
EEE
MONO
MONO
GGG
MONO
HHH
MONO
MONO
KKK
MONO
4
5
6
FFF
4
5
5
JJJ
6
Note
• In each of the sound multiplex mode selected using the -
button, the display changes depending on broadcasting
signals being received.
• Once the MONO mode is selected, the plasma television sound
remains mono even if the system receives a stereo broadcast.
You must switch the mode back to or mode if you want to
hear stereo sound again.
Main screen Sub screen
21
En
Page 22
06
Watching TV
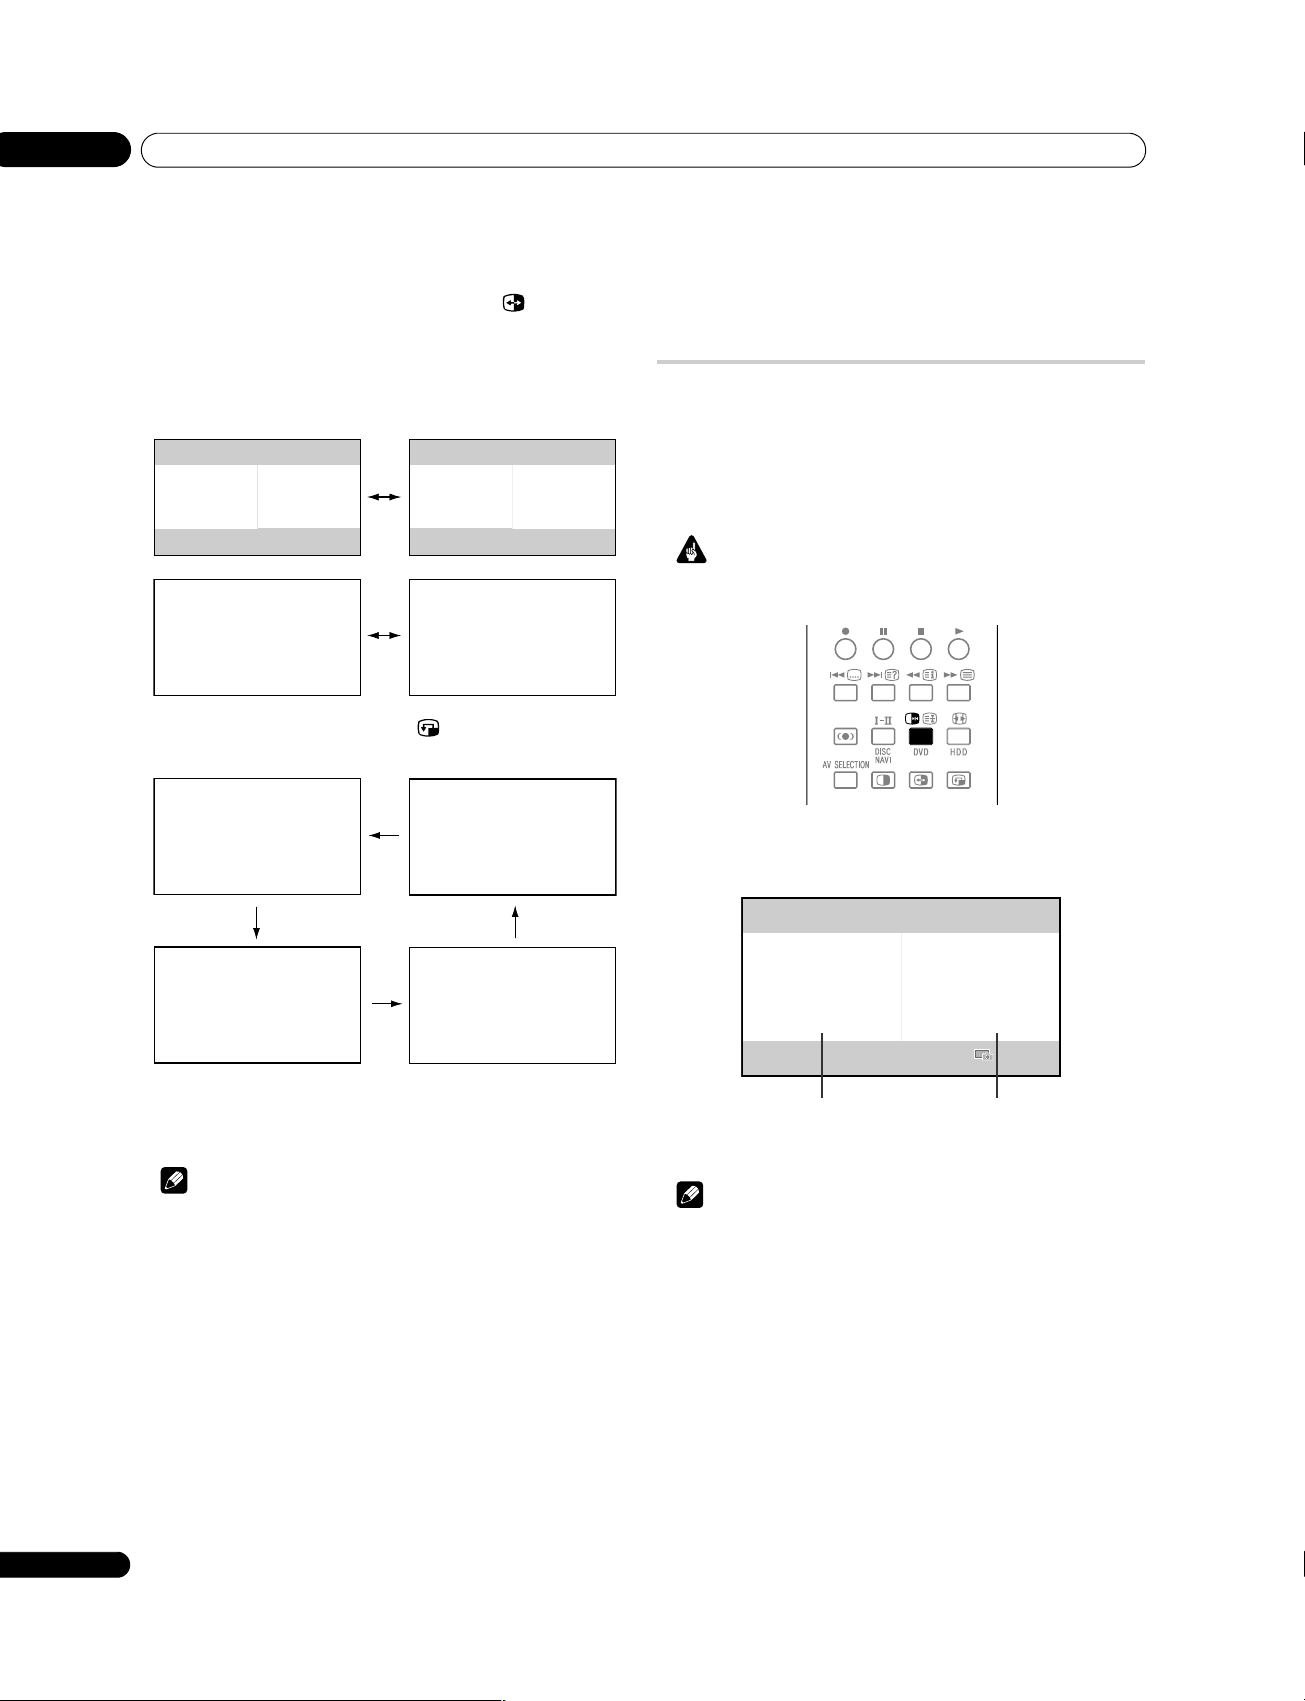
1 Press c to select the display mode.
Each time you press c, the display mode is switched between
2-screen, picture-in-picture, and single-screen modes.
• In 2-screen or picture-in-picture mode, press to switch the
position of the two screens shown.
• The left screen (in the 2-screen mode) or the larger screen (in
the picture-in-picture mode) is the active screen, indicated by a
“z” icon. You can use any of the normal functions to change
the picture and sound.
• In picture-in-picture mode, press to move the position of
the small screen anti-clockwise.
• With headphones connected, you can listen to audio coming
from the sub screen when in the 2-screen or picture-in-picture
mode. For more information, see Listening to audio from the
sub screen using headphones on page 33.
Freezing images
Use the following procedure to capture and freeze one frame from
a moving image that you are watching.
• Before operating with the remote control unit, make sure to
select the TV mode using its SELECT button. See Controlling
other equipment using the supplied remote control unit on
page 50.
Important
• Displaying a static image for a long period of time, or for
shorter periods of time everyday, may result in image retention.
2 To select the desired input source, press the appropriate
input source button.
• If watching TV programs, press P+/P– to change the channel.
Note
• The multiscreen function cannot display images from the same
input source at the same time. If you make such an attempt, a
warning message appears.
• The multiscreen function cannot display images from
combinations of two external input sources (“INPUT 1” to
“INPUT 6”, “PC”). It can display images from the following
combinations of inputs sources: built-in TV tuner and one
external source (“INPUT 1” to “INPUT 6”, “PC”).
• When you press HOME MENU, the single-screen mode is
restored and the corresponding menu is displayed.
• When in the 2-screen mode, images displayed on the right
screen may look less fine, depending on images.
•Press d.
A still image appears on the right screen while a moving image is
shown on the left screen.
Normal image Still image
•Press d again to cancel the function.
Note
• You cannot freeze the picture when using the 2-screen or
picture-in-picture mode.
• When this function is not available, a warning message
appears.
22
En
Page 23

The HOME MENU
Chapter 7
07
The HOME MENU
HOME MENU overview
For AV source
HOME MENU Item Page
Picture AV Selection 28
Contrast 28
Brightness 28
Color 28
Tint 28
Sharpness 28
Pro Adjust 29
Reset 28
Sound Treble 33
Bass 33
Balance 33
Reset 33
Sound Effect 33
Headphone Output 33
Sub Volume 33
Power Control Energy Save 34
No Signal off 34
No Operation off 34
Sleep Timer – 40
Option Position 36
Auto Size 38
Side Mask 39
HDMI Input 45
HDMI Control Setting 59
Blue LED Dimmer 39
Orbiter 39
Video Pattern 40
Drive Mode 36
Color System 37
Monitor Out 44
Game Control Pref 37
Room Light Sensor 39
English
HOME MENU Item Page
Setup Auto Installation 25
Analog TV Setup 25
Password 40
Language 27
Home Gallery –49
HDMI Control –56
For PC source
HOME MENU Item Page
Picture AV Selection 28
Contrast 28
Brightness 28
Red 28
Green 28
Blue 28
Reset 28
Sound Same as AV source menu 33
Power Control Energy Save 34
Power Management 35
Sleep Timer – 40
Option Auto Setup 36
Manual Setup 37
HDMI Input 45
HDMI Control Setting 59
Home Gallery – 49
HDMI Control – 56
23
En
Page 24
07
The HOME MENU
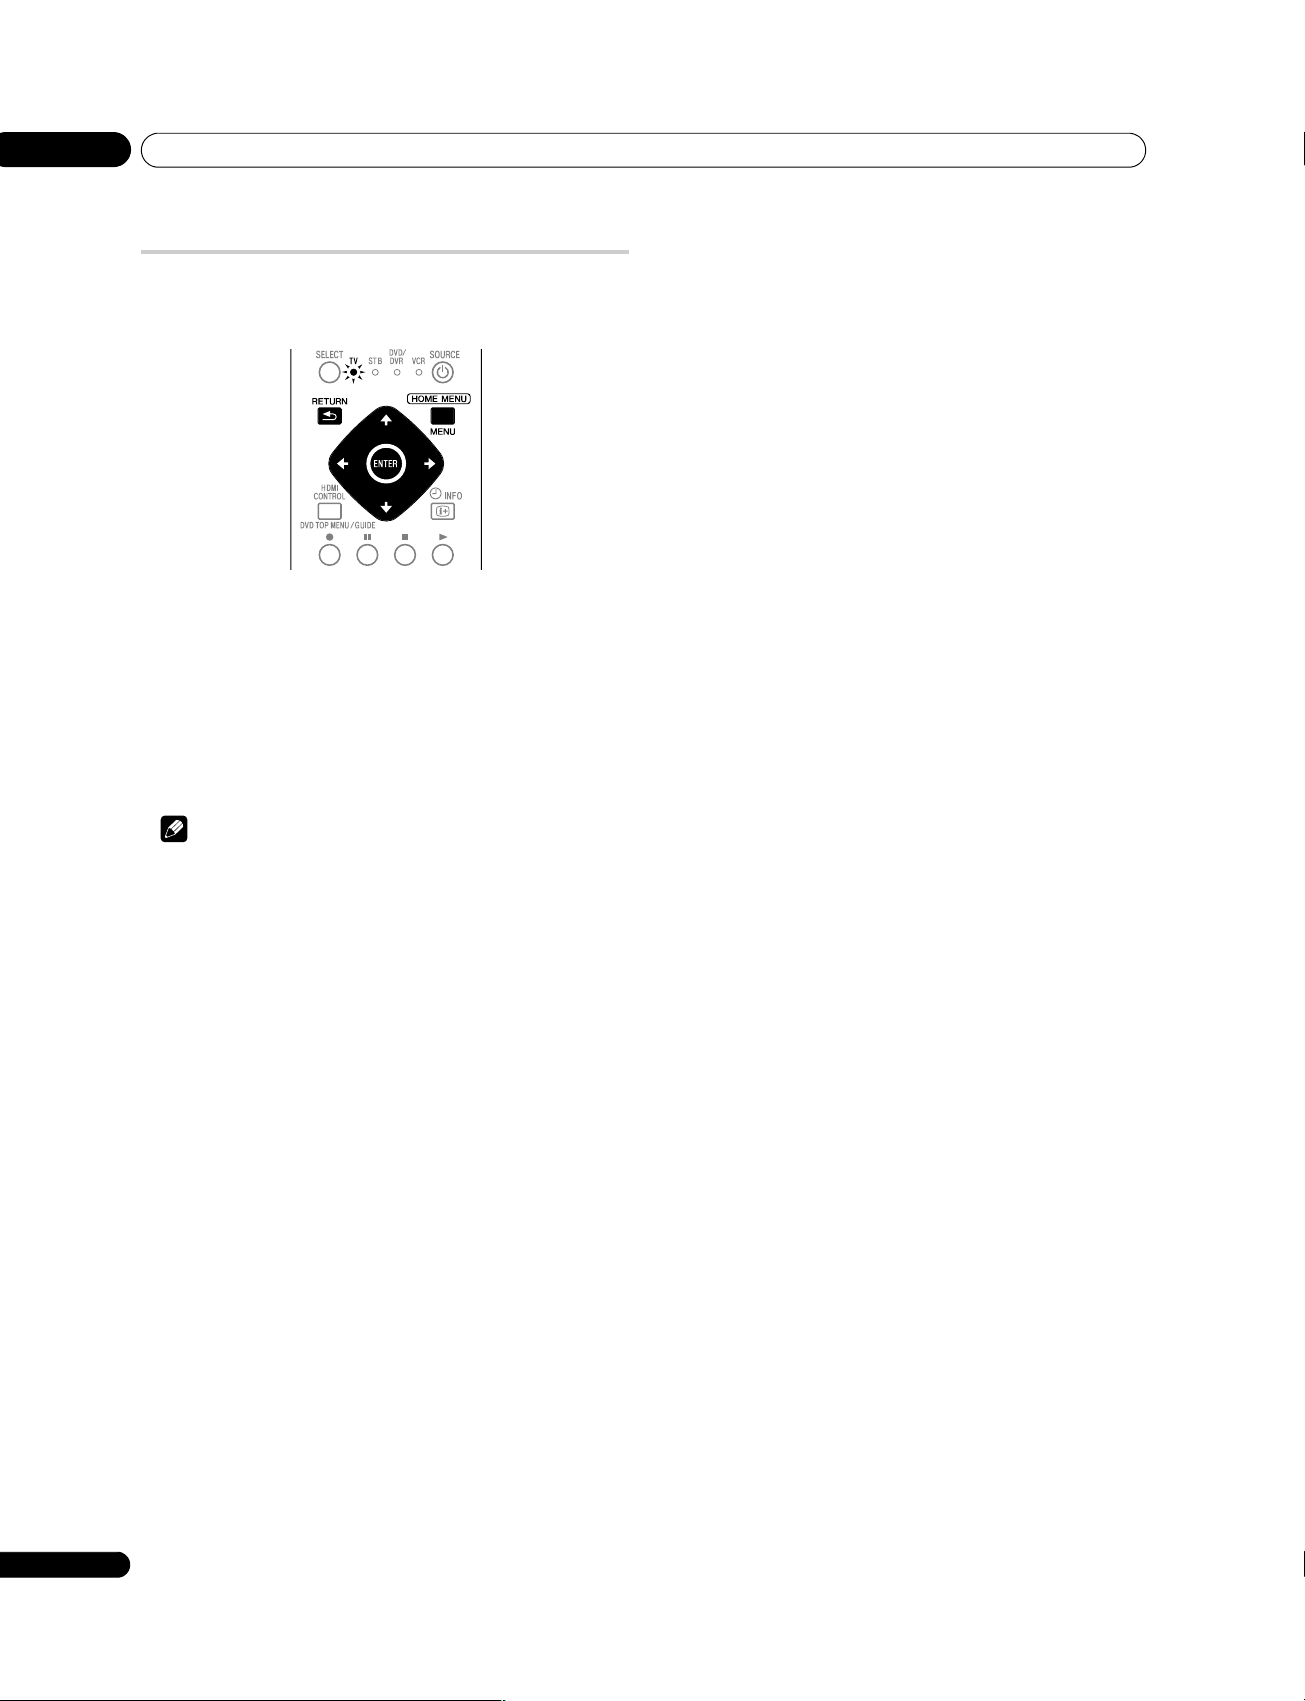
Using the HOME MENU
The following describes the typical procedure for setting up the
menus. For the actual procedures, see the appropriate pages that
describe individual functions.
1 Press HOME MENU.
2 Press / to select a menu item, and then press ENTER.
3 Repeat step 2 until you access the desired submenu item.
The number of menu layers differs depending on the menu items.
4 Press / to select an option (or parameter), and then
press ENTER.
For some menu items, press / instead of /.
5 Press HOME MENU to exit the menu.
Note
• You can return to the upper menu levels by pressing RETURN.
• Before operating with the remote control unit, make sure to
select the TV mode using its SELECT button. See Controlling
other equipment using the supplied remote control unit on
page 50.
24
En
Page 25
Setting up
Chapter 8
08
Setting up
Setting up TV channels automatically
This section describes how to automatically search for and set up
TV channels.
Using Auto Installation
When the plasma television is switched on for the first time after
purchase, the initial auto installation is initiated. You can set
language, region and channels in successive operations.
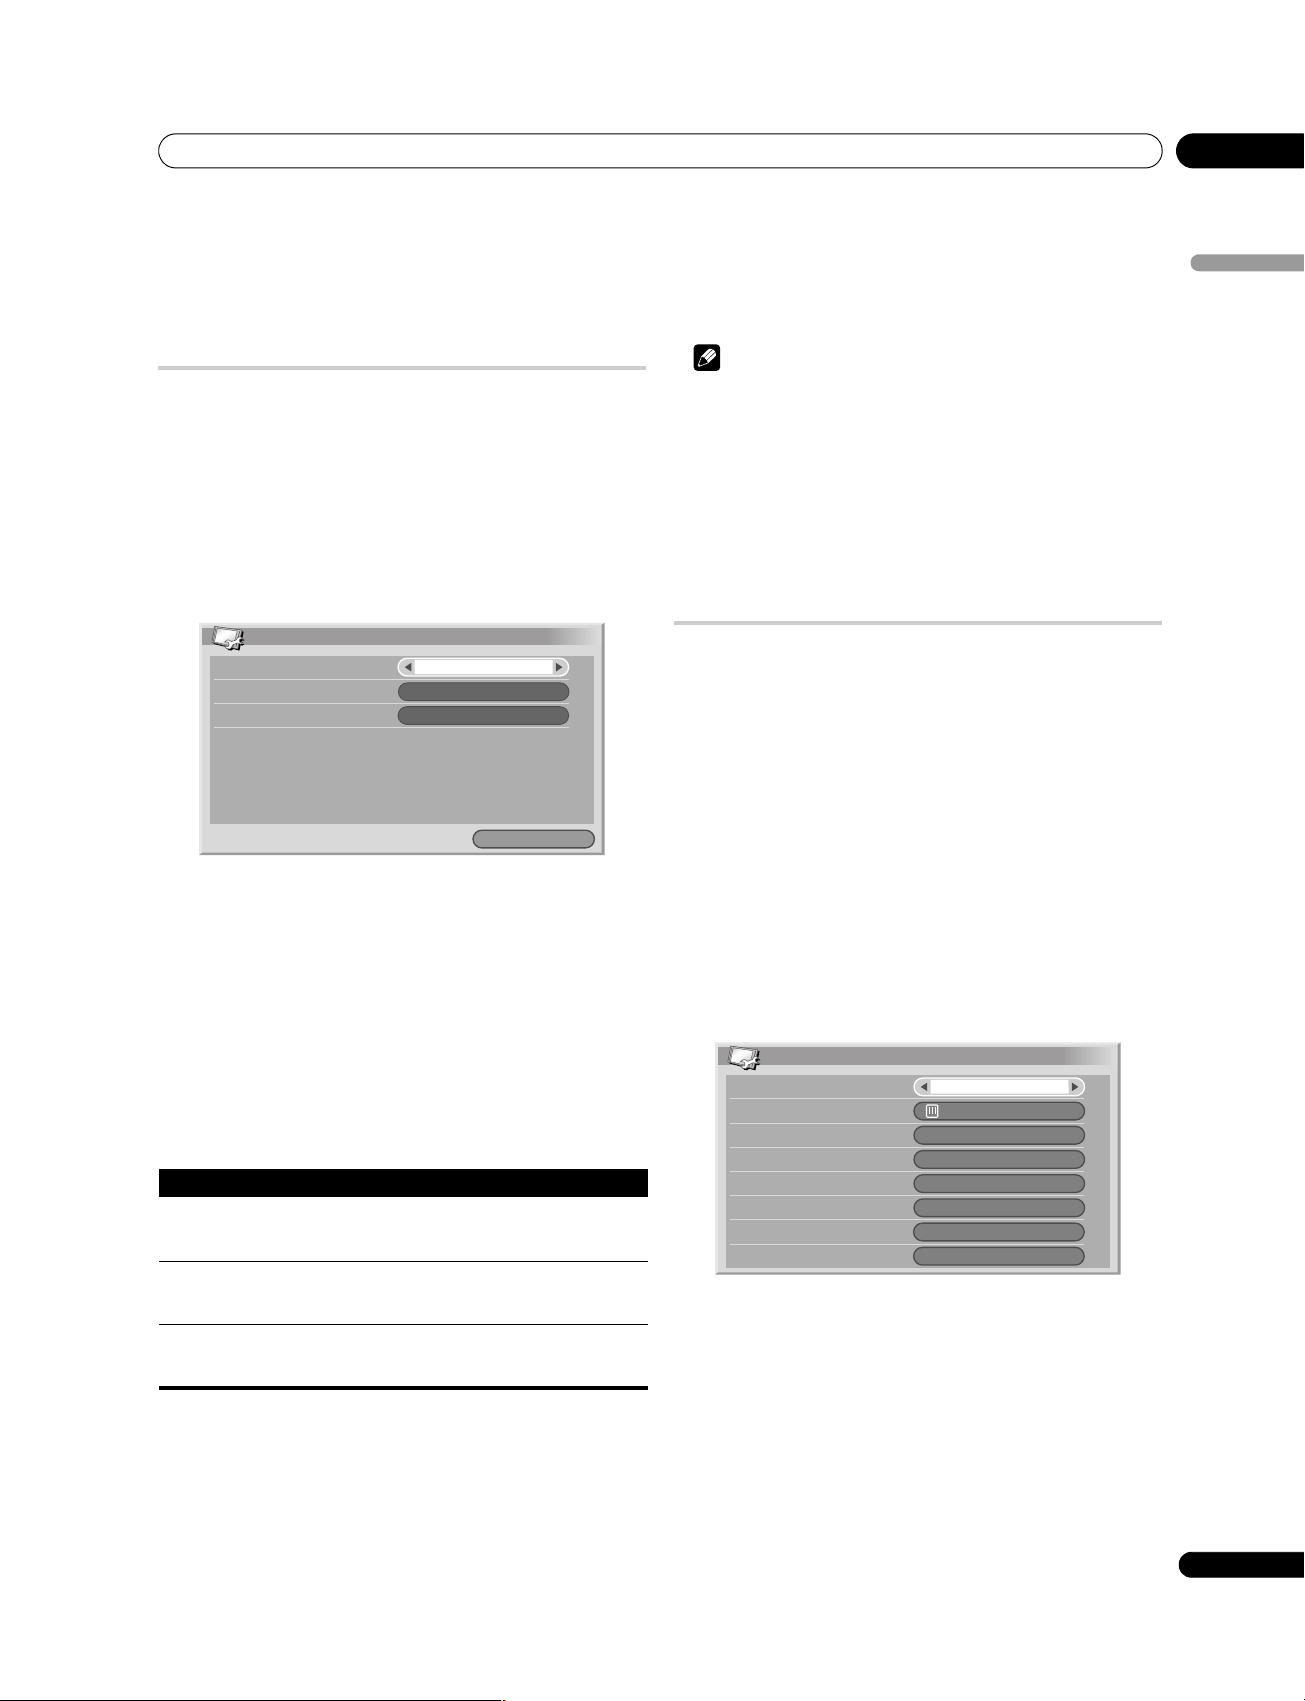
1 Select “Language“ (/).
2 Select a language (/).
Auto Installation
Language
Region
Channel Allocation
Installation
You can select from among five languages; English, Spanish,
Portuguese, traditional Chinese and simplified Chinese.
3 Select “Region“ (/).
4 Select your region (/).
Select the country or region in which you live. If it is not listed,
select “Other regions”.
5 Select “Channel Allocation“ (/).
6 Select “General”, “Air (US Type)“ or “Cable (US Type)” (/
).
The table on page 65 (Standard channel allocation selections for
countries and regions) shows which option you should usually
select in your country or region.
Item Description
General Scans to locate your regional broadcasting
frequencies. The earlier the frequencies identified, the
smaller the channel numbers used.
Air (US Type) Searches for the same broadcasting frequencies as for
receiving over air in the U.S. This selection is effective
when the system is receiving over air.
Cable (US Type) Searches for the same broadcasting frequencies as for
watching cable TV in the U.S. This selection is effective
when the system is receiving from a cable TV company.
7 Select “Start“ (/ then ENTER).
Auto Installation automatically starts.
• To quit Auto Installation in progress, press RETURN.
English
Australia
General
Start
Note
• You can start Auto Installation from the HOME MENU after
moving to another country, for example. Perform the following
steps before starting Auto Installation: Press HOME MENU,
select “Setup” (/ then ENTER), then “Auto Installation” (/
then ENTER). The password entry screen appears. Enter
your four-digit password using buttons 0 to 9. For the
password, see Using a password on page 40.
• If no channels are found, check the antenna connections, and
then retry Auto Installation.
Setting up TV channels manually
Use the Manual Adjust function to set up TV channels manually.
Steps 5 to 14 differ depending on your selection for Channel
Allocation.
1 Press HOME MENU.
2 Select “Setup“ (/ then ENTER).
3 Select “Analog TV Setup“ (/ then ENTER).
The password entry screen appears. Enter your four-digit password
using buttons 0 to 9. For the password, see Using a password on
page 40.
4 Select “Manual Adjust“ (/ then ENTER).
5 Select “Program Entry“ (/).
6 Select a program number (/).
• With “General” selected, you can select 1 through 99.
• With “Air (US Type)” selected, you can select 2 through 69.
• With “Cable (US Type)” selected, you can select 1 through 125.
Manual Adjust
Program Entry
Search
System
Color System
Store
Tun er NR
Child Lock
High Deviation
7 Select “Search“ (/).
8 Enter a frequency using buttons 0 to 9, then ENTER.
You can also press / to enter a frequency.
• With “Air (US Type)” or “Cable (US Type)” selected, you cannot
change the display frequency.
9 Select “System“ (/).
10 Select a sound system (/).
You can select from among “B/G”, “D/K”, “I” and “M/N”.
• With “Air (US Type)” or “Cable (US Type)” selected, you cannot
change the factory default (“M/N”).
1
44.25MHz
B/G
Auto
Yes
On
View
Off
English
25
En
Page 26

08
Setting up
11 Select “Color System“ (/).
12 Select a color system (/).
You can select from “Auto”, “PAL”, “NTSC”, “SECAM”, “PAL-M”,
“PAL-N”, and “4.43NTSC”.
• With “Air (US Type)” or “Cable (US Type)” selected, you cannot
change the factory default (“Auto”).
13 Select “Store“ (/).
14 Select “Yes“ (/).
• With “Air (US Type)” or “Cable (US Type)” selected, press /
to select “ADD/DEL”, then press / to select “ADD”.
• With “Yes” selected, you can select the channel using P+/P–.
With “No” selected, you cannot select the channel using
P+/P–.
15 Press HOME MENU to exit the menu.
• Alternatively, to set up for another channel, repeat steps 5 to 14.
Note
• Manual Adjust also allows you to make selections for “Tuner
NR”, “Child Lock”, and “High Deviation”. See Reducing video
noise, Setting Child Lock, and Suppressing audio distortion
respectively.
• This plasma television is equipped with the auto frequency
tuning function that automatically adjusts tuning frequencies
according to received signals. For this reason, the Manual
Adjust menu may show slightly different frequencies from your
entry when you access the menu next time. You cannot
deactivate the Auto Frequency Tuning function.
Reducing video noise
For the individual channels, you can specify whether the plasma
television should reduce video noise depending on the levels of
broadcasting signals.
1 Press HOME MENU.
2 Select “Setup” (/ then ENTER).
3 Select “Analog TV Setup” (/ then ENTER).
The password entry screen appears. Enter your four-digit password
using buttons 0 to 9. For the password, see Using a password on
page 40.
4 Select “Manual Adjust” (/ then ENTER).
5 Select “Program Entry” (/).
6 Select a program number (/).
• With “General” selected, you can select 1 through 99.
• With “Air (US Type)” selected, you can select 2 through 69.
• With “Cable (US Type)” selected, you can select 1 through 125.
7 Select “Tuner NR“ (/).
8Select “On“ (/).
9 Press HOME MENU to exit the menu.
Setting Child Lock
Child Lock inhibits selected TV channels from being tuned and
watched.
1 Repeat steps 1 to 6 provided for Reducing video noise.
After selecting a program number (using Program Entry), perform
the following steps:
2 Select “Child Lock“ (/).
3 Select “Block“ (/).
• The selection is switched between “View” (factory default) and
“Block”.
4 Press HOME MENU to exit the menu.
Suppressing audio distortion
You can suppress audio distortion that may be induced when too
strong audio signals are received in the selected channel.
Note
• High Deviation is selectable only when you have selected “D/K”
for “System” under Setting up TV channels manually on
page 25.
1 Repeat steps 1 to 6 provided for Reducing video noise.
After selecting a program number, perform the following steps:
2 Select “High Deviation“ (/).
3 Select “High”, “Mid” or “Low” (/).
Item Description
Off Deactivates the function
High Suppresses audio distortion slightly; however, the
audio volume is slightly lowered than when Off is
selected
Mid Suppresses audio distortion moderately
Low Suppresses audio distortion further; however, the
audio volume is further lowered
With “Air (US Type)” or “Cable (US Type)” selected, you cannot
change the factory default (“Off”).
4 Press HOME MENU to exit the menu.
Note
• While watching a TV channel with any High Deviation setting,
you cannot change the sound multiplex mode.
Note
• This function may not achieve a satisfactory result, depending
on the conditions of broadcasting signals.
• The factory default is “On”.
26
En
Page 27
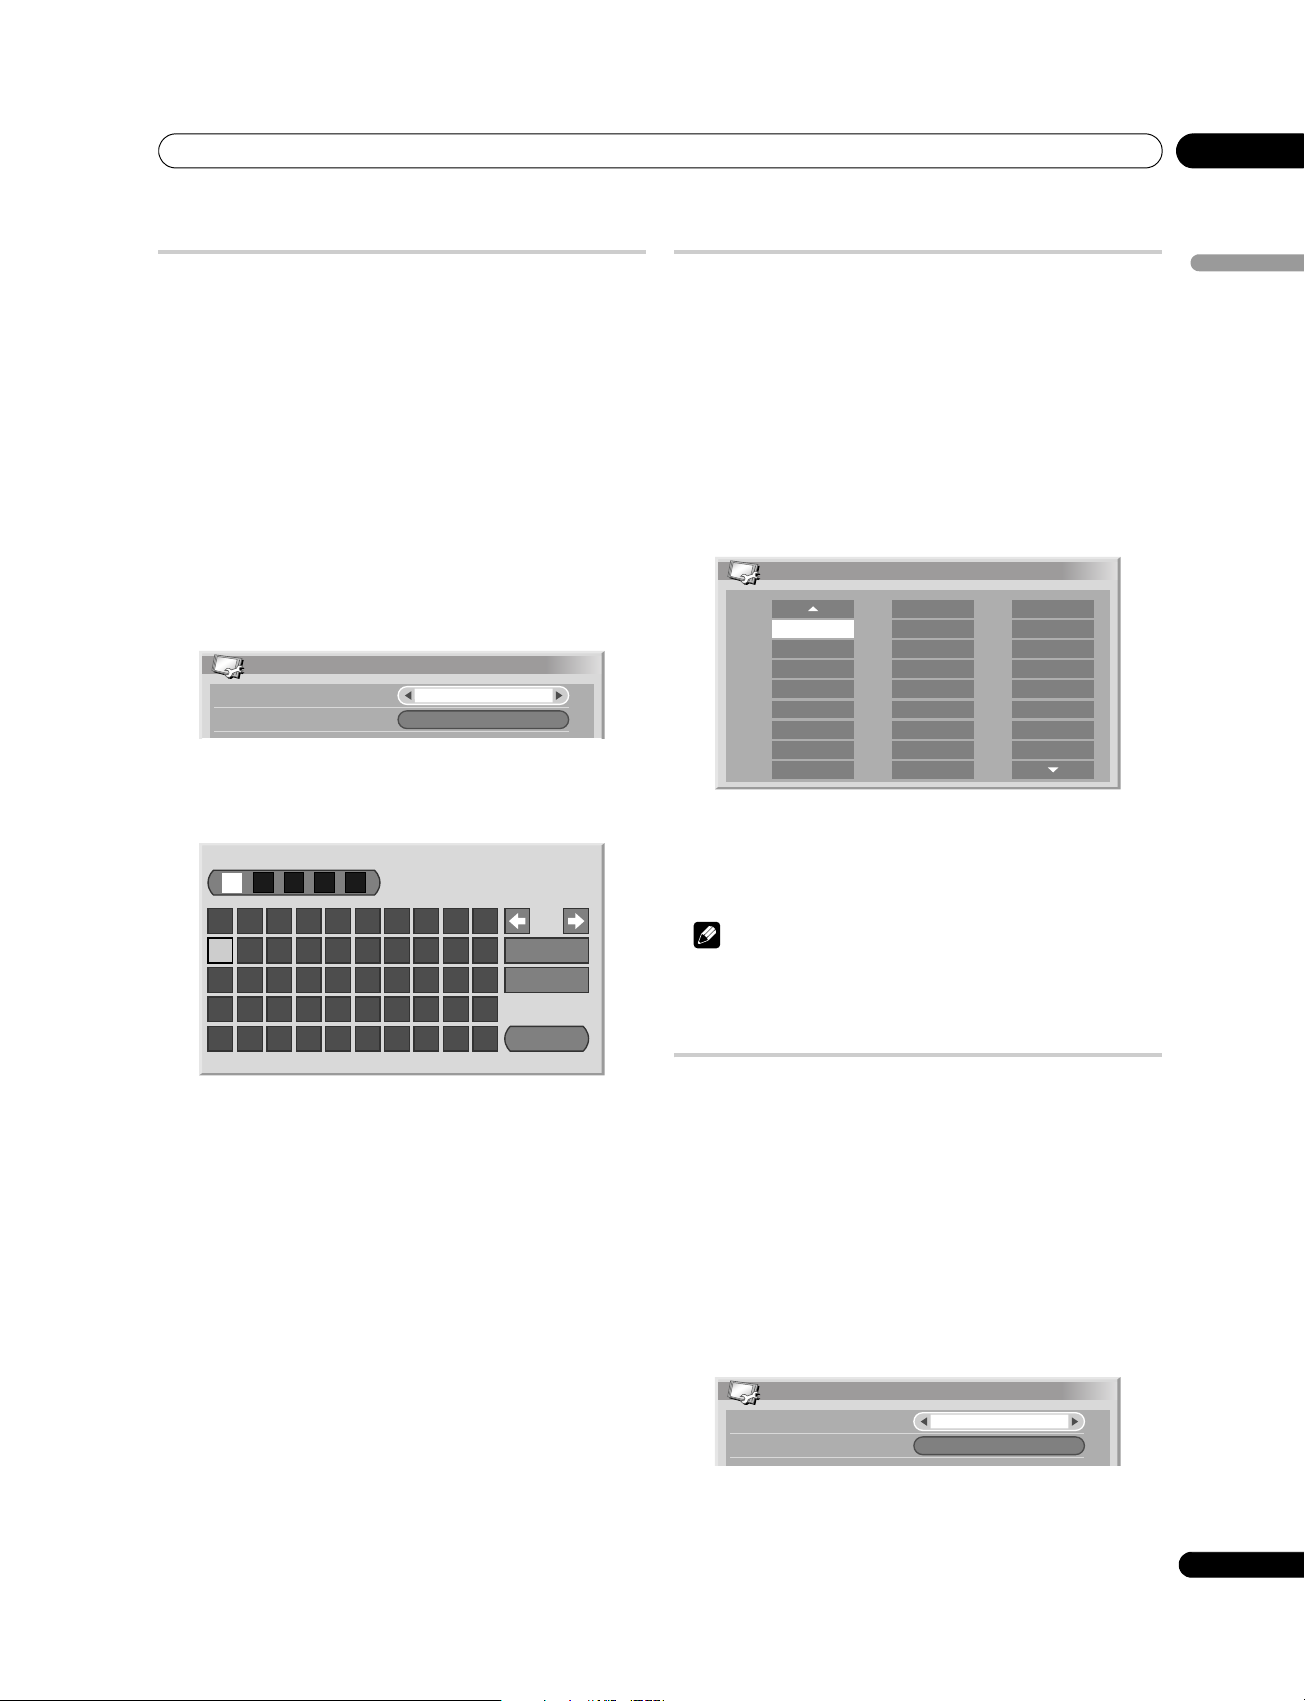
Setting up
08
Labeling TV channels
You can name TV channels that you have set up, using up to five
characters. This may help you easily identify the channels during
selections.
1 Press HOME MENU.
2 Select “Setup“ (/ then ENTER).
3 Select “Analog TV Setup“ (/ then ENTER).
Enter your four-digit password using buttons 0 to 9 when
prompted.
4 Select “Label“ (/ then ENTER).
5 Select “Program Entry“ (/).
6 Select a program number (/).
• With “General” selected, you can select 1 through 99.
• With “Air (US Type)” selected, you can select 2 through 69.
• With “Cable (US Type)” selected, you can select 1 through 125.
Label
Program Entry
Label
7 Select “Label“ (/ then ENTER).
The name entry screen appears.
8 Select the first character (///, then ENTER).
1234567890
BCDEFGH I J
A
KLMNOPQRST
UVWXYZ, . : ;
&' ( )+- * /_
1
Delete
Space
@
OK
Sorting preset TV channels
After performing a “General” channel search, you can use the
following procedure to change the sequence of the preset TV
programs. (Sorting preset TV channels is not possible if you used
“Air (US Type)” or “Cable (US Type)“ for your channel search.)
1 Press HOME MENU.
2 Select “Setup“ (/ then ENTER).
3 Select “Analog TV Setup“ (/ then ENTER).
Enter your four-digit password using buttons 0 to 9 when
prompted.
4 Select “Sort“ (/ then ENTER).
The sort screen appears.
Sort 1/4
19
20
21
22
23
24
25
RRRRR18
SSSSS
TTTTT
UUUUU
VVVVV
WWWWW
XXXXX
YYYYY
IIIII09
JJJJJ
AAAAA01
BBBBB02
CCCCC03
DDDDD04
EEEEE05
FFFFF06
GGGGG07
HHHHH08
10
KKKKK
11
LLLLL
12
MMMMM
13
NNNNN
14
OOOOO
15
PPPPP
16
17
QQQQQ
5 Select a channel to be shifted (/// then ENTER).
6 Select a new location (/// then ENTER).
Sorting is executed.
7 Press HOME MENU to exit the menu.
Note
• To change a page on the Sort screen in step 6, select / on
the screen with / to select a page, and then press ENTER.
Language setting
English
• The cursor moves to the second character.
9 Repeat step 8 to enter up to five characters.
• To correct entered characters, select [] or [] on the
screen, and then press ENTER. The cursor moves to the
preceding or subsequent character.
• To delete the current character, select [Delete] on the screen,
and then press ENTER.
• To put a space for the current character, select [Space] on the
screen, and then press ENTER.
10 To complete the name entry, press / or / to select
[OK] on the screen, and then press ENTER.
11 Press HOME MENU to exit the menu.
You can select the language to be used for on-screen display such
as menus and instructions, from among five languages; English,
Spanish, Portuguese, traditional Chinese and simplified Chinese.
For the language to be used in the Teletext mode, you can select
from among West Europe, East Europe, Greece/Turkey, Russia,
and Arabia.
1 Press HOME MENU.
2 Select “Setup“ (/ then ENTER).
3 Select “Language“ (/ then ENTER).
4 Select “Menu“ (/).
5 Select a language (/).
Language
Menu
Teletext
English
West Europe
6 Select “Teletext“ (/).
7 Select a language (/).
8 Press HOME MENU to exit the menu.
27
En
Page 28
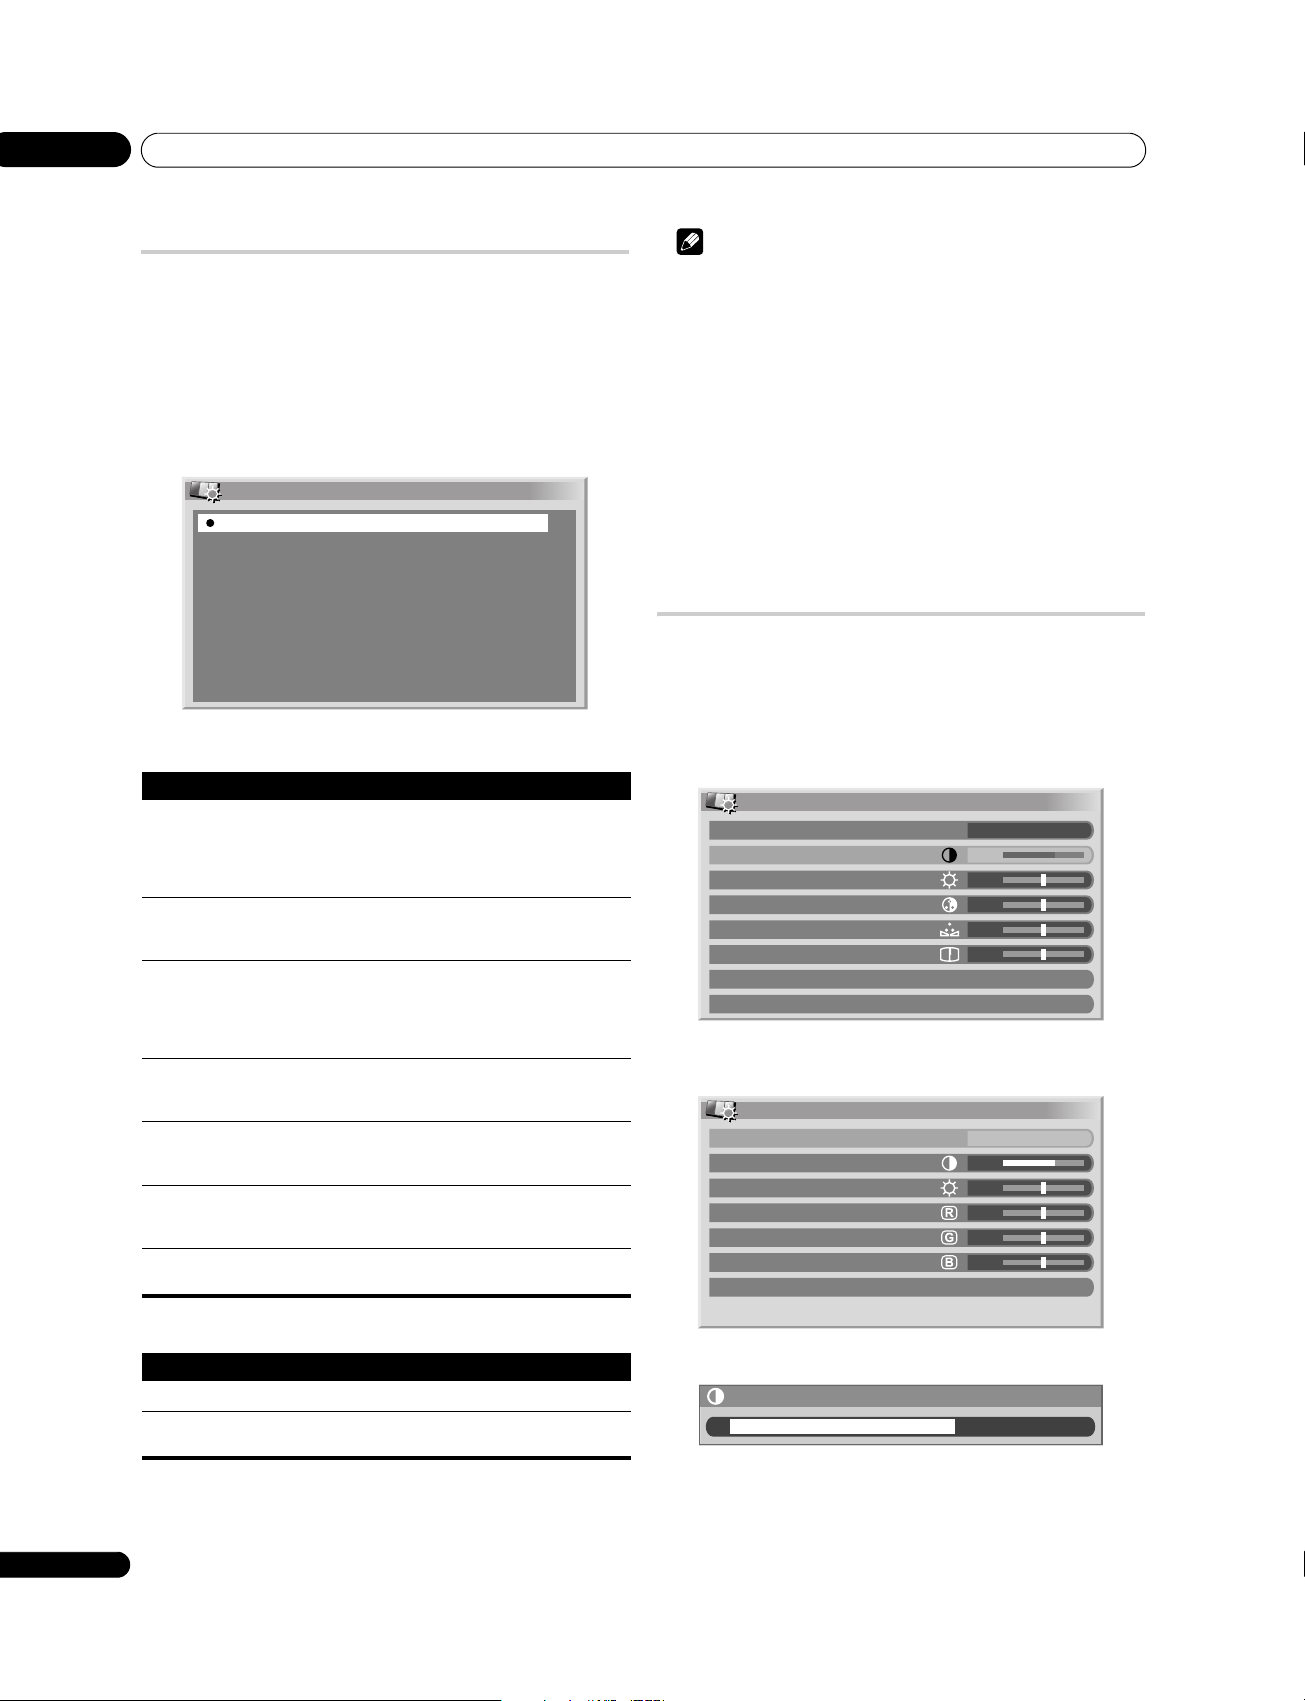
08
Setting up
AV Selection
Select from the seven viewing options, depending on the current
environment (e.g., room brightness), the type of the current TV
program, or the type of images input from external equipment.
1 Press HOME MENU.
2 Select “Picture“ (/ then ENTER).
3 Select “AV Selection“ (/ then ENTER).
4 Select the desired option (/ then ENTER).
AV Selection
OPTIMUM
STANDARD
DYNAMIC
MOVIE
SPORT
GAME
USER
For AV source
Item Description
OPTIMUM Automatically adjusts the brightness of the image to
the optimum level in accordance with the brightness
level of the viewing area.
This setting is shared by both the external and TV input
sources.
STANDARD For a highly defined image in a normally bright room.
This setting is shared by both the external and TV input
sources.
DYNAMIC Sharp imaging with the maximum contrast.
Note that this mode does not allow manual image
quality adjustment.
This setting is shared by both the external and TV input
sources.
MOVIE Optimized for movies.
This setting is shared by both the external and TV input
sources.
SPORT Optimized for sports programs.
This setting is shared by both the external and TV input
sources.
GAME Lowers image brightness for easier viewing.
This setting is shared by both the external and TV input
sources.
USER Allows the user to customize settings as desired. You
can set the mode for each input source.
Note
• You can also press AV SELECTION on the remote control to
change the viewing option.
• If you have selected “DYNAMIC”, you cannot select “Contrast”,
“Brightness”, “Color”, “Tint”, “Sharpness”, “Pro Adjust”, and
“Reset”; these menu items are dimmed.
• If you have selected “OPTIMUM”, you cannot select “Pro
Adjust”; menu items in “Pro Adjust” are dimmed.
• As “OPTIMUM” automatically optimizes image quality, the
process in which image settings such as brightness and tint
gradually change may be seen on the screen. This is not a
malfunction.
• When “OPTIMUM” is selected, images are reproduced based
on the information collected at the Room Light Sensor as well,
regardless of its setting (“On” or “Off”) for the “Option” menu.
Basic picture adjustments
Adjust the picture to your preference for the chosen AV Selection
option (except DYNAMIC).
1 Press HOME MENU.
2 Select “Picture“ (/ then ENTER).
3 Select an item to be adjusted (/ then ENTER).
Picture
AV Selection
Contrast
Brightness
Color
Tint
Sharpness
Pro Adjust
Reset
For a PC source or when the Home Gallery function is on, the
following screen appears:
Picture
AV Selection
Contrast
Brightness
Red
Green
Blue
Reset
OPTIMUM
40
0
0
0
0
STANDARD
40
0
0
0
0
For PC source
Item Description
STANDARD For a highly defined image in a normally bright room
USER Allows the user to customize settings as desired. You
can set the mode for each input source.
5 Press HOME MENU to exit the menu.
28
En
4 Select the desired level (/).
Contrast
40
When an adjustment screen is in display, you can also change the
item to be adjusted, by pressing /.
5 Press HOME MENU to exit the menu.
Page 29
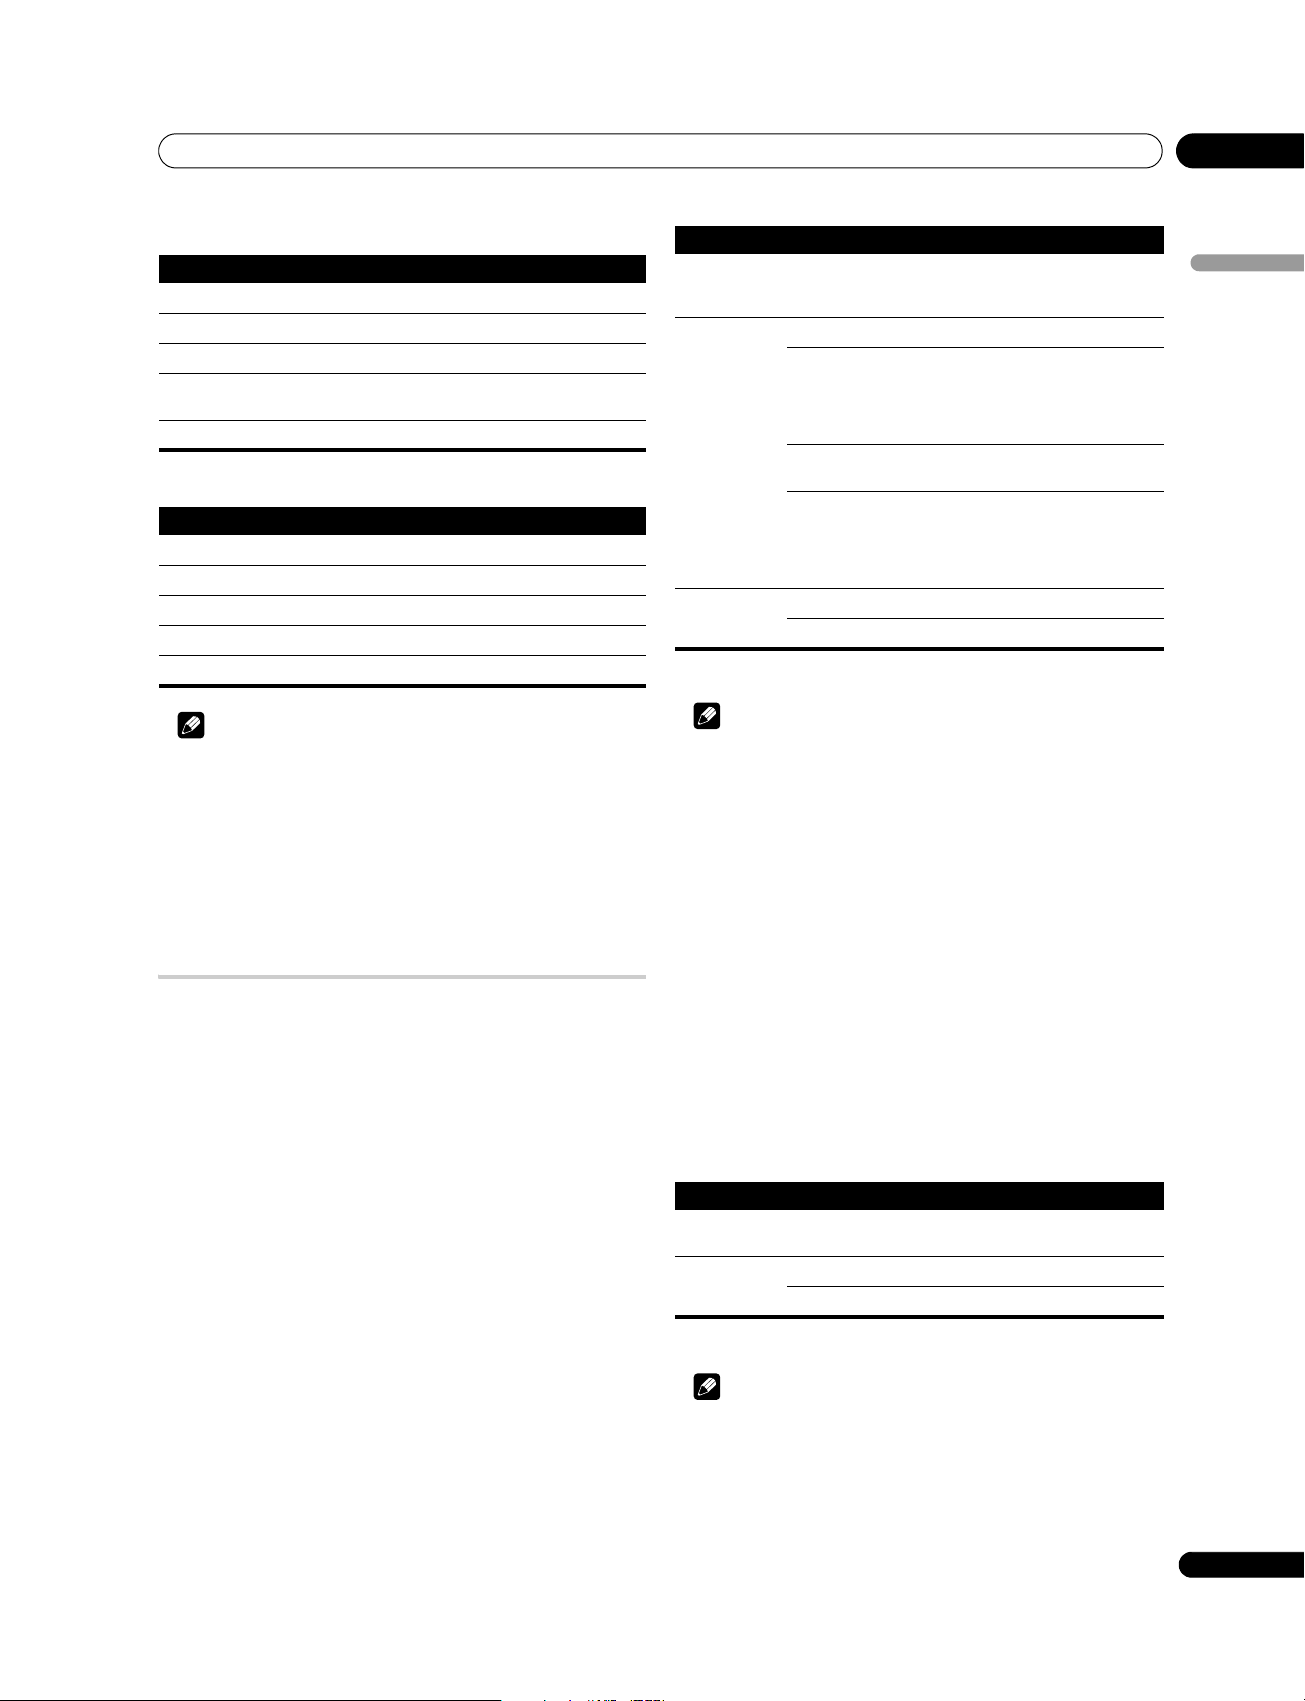
Setting up
08
For AV source
Item button button
Contrast For less contrast For more contrast
Brightness For less brightness For more brightness
Color For less color intensity For more color intensity
Tint Skin tones become
purplish
Sharpness For less sharpness For more sharpness
Skin tones become
greenish
For PC source
Item button button
Contrast For less contrast For more contrast
Brightness For less brightness For more brightness
Red For weaker red For stronger red
Green For weaker green For stronger green
Blue For weaker blue For stronger blue
Note
• To perform advanced picture adjustments, select “Pro Adjust”
in step 3 and then press ENTER. For the subsequent
procedures see Advanced picture adjustments.
• To restore the factory defaults for all items, press / to select
“Reset” in step 3, and then press ENTER. A confirmation screen
appears. Press / to select “Yes”, and then press ENTER.
• You may experience a sudden change in the image position
and screen brightness when you open the “Picture” menu.
Advanced picture adjustments
The plasma television provides various advanced functions for
optimizing the picture quality. For details on these functions, see
the tables.
Using PureCinema
1 Press HOME MENU.
2 Select “Picture“ (/ then ENTER).
3 Select “Pro Adjust“ (/ then ENTER).
4 Select “PureCinema“ (/ then ENTER).
5 Select “Film Mode” or “Text Optimization” (/ then
ENTER).
6 Select the desired parameter (/ then ENTER).
For the selectable parameters, see the table.
PureCinema
Automatically detects a film-based source (originally encoded at 24 frames/
second), analyzes it, then recreates each still film frame for high-definition
picture quality
Film Mode Off Deactivates the PureCinema
Te xt
Optimization
Standard Produces smooth and vivid moving images
Smooth Produces smoother and more vivid moving
Advance Produces smooth and quality moving
Off Deactivates Text Optimization
On Activates Text Optimization
(film specific) by automatically detecting
recorded image information when
displaying DVD or high-definition images
(e.g., movies) having 24 frames per second
images
images (as shown on theatre screens) by
converting to 72 Hz when displaying DVD
images (e.g., movies) having 24 frames per
second
7 Press HOME MENU to exit the menu.
Note
• “Standard” is not selectable for the following input signals:
480p, 576p, 720p@50 Hz, 720p@60 Hz, 1080p@50 Hz,
1080p@60 Hz.
• “Advance” is not selectable for the following input signals: PAL,
SECAM, 576i, 576p, 720p@50 Hz, 1080i@50 Hz, 1080p@50 Hz/
60 Hz.
• “Smooth” is not selectable for the following input signals:
1080p@50 Hz, 1080p@60 Hz.
• When you select “On” for “Game Control Pref” on the “Option”
menu, the “PureCinema” setting is disabled.
Using Intelligent Mode
1 Press HOME MENU.
2 Select “Picture” (/ then ENTER).
3 Select “Pro Adjust” (/ then ENTER).
4 Select “Intelligent Mode” (/ then ENTER).
5 Select the desired parameter (/ then ENTER).
Intelligent Mode
Performs such compensation that results in the optimum color tones and
brightness for images
Selections Off Deactivates Intelligent Mode
On Activates Intelligent Mode
6 Press HOME MENU to exit the menu.
English
Note
• As this function automatically optimizes image quality, the
process in which image settings such as brightness and tint
gradually change may be seen on the screen. This is not a
malfunction.
29
En
Page 30

08
Setting up
Using the Picture Detail
1 Press HOME MENU.
2 Select “Picture” (/ then ENTER).
3 Select “Pro Adjust” (/ then ENTER).
4 Select “Picture Detail” (/ then ENTER).
5 Select an item to be adjusted (/ then ENTER).
• You can select “DRE Picture”, “Black Level”, “ACL”, “Enhancer
Mode” or “Gamma”.
6 Select the desired parameter (/ then ENTER).
DRE Picture
Emphasizes the contrast on images so that the difference between brightness
and darkness becomes more distinct
Selections Off Deactivates DRE Picture
High Enhanced DRE Picture
Mid Standard DRE Picture
Low Moderate DRE Picture
Black Level
Emphasizes dark portion on images so that the difference between brightness
and darkness becomes more distinct
Selections Off Deactivates Black Level
On Activates Black Level
ACL
Performs such compensation that results in the optimum contrast
characteristics for images
Selections Off Deactivates ACL
On Activates ACL
Enhancer Mode
Selects processing of the image’s high frequency (detailed) areas
Selections 1 Selects Hard (SHARPNESS) image
2 Selects Natural (SHARPNESS) image
3 Selects Soft (SHARPNESS) image
Gamma
Adjusts the gamma characteristics (image gradation characteristics)
Selections 1 Selects gamma characteristics 1
2 Selects gamma characteristics 2
3 Selects gamma characteristics 3
Using Color Temp
1 Press HOME MENU.
2 Select “Picture“ (/ then ENTER).
3 Select “Pro Adjust“ (/ then ENTER).
4 Select “Color Detail“ (/ then ENTER).
5 Select “Color Temp“ (/ then ENTER).
6 Select the desired parameter (/ then ENTER).
Color Temp
Adjusts the color temperature, resulting in a better white balance
Selections High White with bluish tone
Mid-High Intermediate tone between High and Mid
Mid Natural tone
Mid-Low Intermediate tone between Mid and Low
Low White with reddish tone
Manual Color temperature adjusted to your
• You may rather want to perform fine adjustment. To do this,
select “Manual” first and then press and hold ENTER for more
than three seconds. The manual adjustment screen appears.
Then go to step 7.
7 Select an item to be adjusted (/ then ENTER).
8 Select the desired level (/).
Item button button
R High Fine adjustment for
G High For weaker green For stronger green
B High For weaker blue For stronger blue
R Low Fine adjustment for
G Low For weaker green For stronger green
B Low For weaker blue For stronger blue
bright portions
dark portions
• To perform adjustment for another item, press RETURN, and
then repeat steps 7 and 8.
• You may press / to immediately change an item to be
adjusted.
9 Press HOME MENU to exit the menu.
preference
For weaker red For stronger red
For weaker red For stronger red
7 Press HOME MENU to exit the menu.
30
En
Page 31

Setting up
08
Using CTI and Color Space
1 Press HOME MENU.
2 Select “Picture“ (/ then ENTER).
3 Select “Pro Adjust“ (/ then ENTER).
4 Select “Color Detail“ (/ then ENTER).
5 Select “CTI“ or “Color Space” (/ then ENTER).
6 Select the desired parameter (/ then ENTER).
CTI
Provides images with clearer color contours. CTI stands for Color Transient
Improvement.
Selections Off Deactivates CTI
On Activates CTI
Color Space
Changes the color reproduction space
Selections 1 Optimized for vivid, vibrant color
reproduction
2 Standard color reproduction
7 Press HOME MENU to exit the menu.
Using Color Management
1 Press HOME MENU.
2 Select “Picture“ (/ then ENTER).
3 Select “Pro Adjust“ (/ then ENTER).
4 Select “Color Detail“ (/ then ENTER).
5 Select “Color Management“ (/ then ENTER).
6 Select an item to be adjusted (/ then ENTER).
Item button button
R Closer to magenta Closer to yellow
Y Closer to red Closer to green
G Closer to yellow Closer to cyan
C Closer to green Closer to blue
B Closer to cyan Closer to magenta
M Closer to blue Closer to red
• To perform adjustment for another item, press RETURN, and
then repeat steps 6 and 7.
• You may press / to immediately change an item to be
adjusted.
8 Press HOME MENU to exit the menu.
Eliminating noise from images
1 Press HOME MENU.
2 Select “Picture” (/ then ENTER).
3 Select “Pro Adjust” (/ then ENTER).
4 Select “Noise Reduction” (/ then ENTER).
5 Select an item to be adjusted (/ then ENTER).
You can select “3DNR”, “Field NR”, “Block NR” or “Mosquito NR”.
6 Select the desired parameter (/ then ENTER).
3DNR
Eliminates video noise for clean crisp images. 3DNR stands for 3-dimensional
Noise Reduction.
Selections Off Deactivates 3DNR
High Enhanced 3DNR
Mid Standard 3DNR
Low Moderate 3DNR
English
Color Management
R
Y
G
C
B
M
7 Select the desired level (/).
Field NR
0
0
0
0
0
0
Removes glimmer for more natural images
Selections Off Deactivates Field NR
High Enhanced Field NR
Mid Standard Field NR
Low Moderate Field NR
Block NR
Helps reduce noise appearing in high-definition images
Selections Off Deactivates Block NR
On Activates Block NR
31
En
Page 32

08
Setting up
Mosquito NR
Reduces mosquito noise in DVD and high-definition images, resulting in noisefree images
Selections Off Deactivates Mosquito NR
On Activates Mosquito NR
7 Press HOME MENU to exit the menu.
Using the 3DYC and I-P Mode
1 Press HOME MENU.
2 Select “Picture“ (/ then ENTER).
3 Select “Pro Adjust“ (/ then ENTER).
4 Select “Others“ (/ then ENTER).
5 Select “3DYC” or “I-P Mode” (/ then ENTER).
6 Select the desired parameter (/ then ENTER).
3DYC
Optimizes characteristics for separating brightness signals and color signals.
This works for both video and still images.
Selections Off Deactivates 3DYC
High Enhanced 3DYC
Mid Standard 3DYC
Low Moderate 3DYC
I-P Mode
Performs optimum conversion from interlace signals to progressive signals.
This works for both video and still images.
Selections 1 Optimum for video images
2 Standard setting
3 Optimum for still images
7 Press HOME MENU to exit the menu.
Note
• The 3DYC setting is ineffective when SECAM, PAL-M, PAL-N or
4.43 NTSC signals are input.
• For the I-P Mode, the individual parameters are not selectable
for the following input signals: 480p, 576p, 720p, 1080p.
• The I-P Mode setting is disabled if you use an external input
source and select “On” for “Game Control Pref” on the “Option”
menu.
• For the 3DYC, the individual parameters are selectable only
when you have selected the analog tuner, or you have selected
“INPUT 1”, “INPUT 2”, “INPUT 3” or “INPUT 6” as the input
source and there is a video signal present.
Comparing picture adjustments on the
screen
During picture adjustments, you can quickly refer to the image
previously set in the same parameter, allowing you to easily
compare and select the preferred image quality.
1 Press HOME MENU.
2 Select “Picture” (/ then ENTER).
3 Select an item to be adjusted (/ then ENTER).
4 While performing adjustment, press BLUE on the remote
control unit.
“Before” displays and the image adjusted last time appears for
comparison.
Before
5 Press the button again to return to the newly adjusted
image.
Each press of the button toggles between “Before” and “After”.
6 Repeat steps 1 and 5 for other parameters.
7 Press HOME MENU to exit the menu.
Caution
• If you exit the menu by pressing HOME MENU or no operation
is performed for 60 seconds, all the parameter settings
displayed last are stored in memory.
• If you want to exit the menu without performing the
adjustments (or leaving the settings disabled) on the “After”
screen, switch to “Before” and then exit.
Note
• You cannot adjust any item while on the “Before” screen. A
warning message appears.
• When you switch to another parameter, make sure to change
the display from “Before” to “After” first, otherwise you cannot
select “Before”. A warning message appears if you don’t.
• If you exit the selection from the “Before” screen, the previous
entry is stored in the memory and the button no longer works.
• If you exit the selection from the “After” screen, the new entry
is stored in the memory and the button no longer works.
• If you move and change the “AV Selection” parameter, the new
entry in the current parameter is stored in the memory and the
button continues to work.
• You cannot compare images between different parameters on
the “AV Selection” menu (“STANDARD” and “MOVIE”, for
example).
• When you select this function, “Intelligent Mode” for “Pro
Adjust” on the “Picture” menu, “OPTIMUM” on the “AV
Selection” menu and “Room Light Sensor” on the “Option”
menu are all set to off and image quality returns to default
settings.
• This function is not selectable:
- when you select “AV Selection”,
- when you select “Yes” or “No” on the confirmation screen for
“Reset” from the “Picture” menu or
- when you select a menu from the PC source
32
En
Page 33

Setting up
08
Sound adjustments
You can adjust the sound quality to your preference with the
following settings.
Adjust the sound to your preference for the chosen AV Selection
option (see AV Selection on page 28).
1 Press HOME MENU.
2 Select “Sound“ (/ then ENTER).
3 Select an item to be adjusted (/).
4 Select the desired level (/).
Sound STANDARD
Treble
Bass
Balance
Reset
Sound Effect
Headphone Output
Sub Volume
Item button button
Treble For weaker treble For stronger treble
Bass For weaker bass For stronger bass
Balance Shifts the audio balance to
the left
5 Press HOME MENU to exit the menu.
Note
• You cannot adjust the sound for listening with headphones.
• If you perform sound adjustments with headphones
connected, the new settings will become effective as soon as
you disconnect the headphones.
• To restore the factory defaults for all items, press / to select
“Reset” in step 3, and then press ENTER. A confirmation screen
appears. Press / to select “Yes”, and then press ENTER.
Sound Effect
You can select from SRS FOCUS, SRS or SRS TruBass.
1 Press HOME MENU.
2 Select “Sound” (/ then ENTER).
3 Select “Sound Effect” (/ then ENTER).
4 Select “SRS FOCUS”, “SRS” or “SRS TruBass” (/).
5 Select the desired parameter (/).
2
0
0
Main
30
Shifts the audio balance to
the right
SRS FOCUS
Selections Off Deactivates SRS FOCUS
On Activates SRS FOCUS
Shifts the apparent direction of the sound
upward for more clearly defined sound
®
®
SRS
Selections Off Deactivates SRS
On
Activates SRS
Reproduces highly effective threedimensional sound
®
®
SRS TruBass
Selections Off Deactivates SRS TruBass
On Activates SRS TruBass
Provides deep, rich bass using a new
technology
®
®
6 Press HOME MENU to exit the menu.
Note
®
• (WOW) denotes a status where SRS FOCUS
®
and SRS TruBass® are on.
SRS
,
• Y ou c an a lso pre ss (S oun d Ef fect) o n th e re mot e to cha nge
the selection.
• You cannot adjust the sound effect for listening with
headphones.
• If you change the sound effect with headphones connected,
the new setting will become effective as soon as you
disconnect the headphones.
• The effect of this function differs depending on signals.
Listening to audio from the sub screen
using headphones
With headphones connected, you can listen to audio coming from
the sub screen when in the 2-screen or picture-in-picture mode;
audio coming from the main screen is output from the speakers.
1 Press HOME MENU.
2 Select “Sound“ (/ then ENTER).
3 Select “Headphone Output” (/).
4 Select the desired parameter (/).
Sound Effect
Headphone Output
Sub Volume
Main
30
English
Headphone Output
Selections Main
(default)
Sub When in the 2-screen or picture-in-picture
Audio coming from the main screen is
output from the PHONES output terminal
mode, audio coming from the sub screen is
output from the PHONES output terminal
33
En
Page 34

08
Setting up
5 Select “Sub Volume” (/).
6 Select the desired volume level (/).
7 Press HOME MENU to exit the menu.
Note
• To adjust the volume for headphones after selecting “Sub”,
always use “Sub Volume” from the menu, whether the screen
is in single, 2-picture or picture-in-picture mode. When the
screen is in single mode with “Sub” selected, audio coming
from the screen is output from the speakers even with
headphones connected.
Power Control
Power Control provides convenient functions for power saving.
Energy Save
You may use one of the three Energy Save modes to save power
consumption.
1 Press HOME MENU.
2 Select “Power Control“ (/ then ENTER).
3 Select “Energy Save“ (/ then ENTER).
4 Select “Mode 1“, “Mode 2“, or “Picture Off“ (/ then
ENTER).
Energy Save
Selections Off Does not decrease the picture brightness
Mode 1 Slightly lowers power consumption while slightly
Mode 2 Decreases the picture brightness and lowers
Picture Off
5 Press HOME MENU to exit the menu.
suppressing the brightness drop level
power consumption
Deactivates the screen to save power. To restore
the screen display, press any button other than
i
+ /i –, (Sound Effect) or e.
This setting is not memorized by the system.
No Signal off (AV source only)
The system will be automatically placed into the standby mode if no
signal is received for 15 minutes.
1 Press HOME MENU.
2 Select “Power Control“ (/ then ENTER).
3 Select “No Signal off“ (/ then ENTER).
4 Select “Enable“ (/ then ENTER).
No Signal off
Selections Disable
(default)
Enable Places the system into the standby mode if no
Does not place the system into the standby mode
signal is received for 15 minutes
5 Press HOME MENU to exit the menu.
Note
• Five minutes before the system is placed into the standby
mode, a message appears every minute.
• The system may not be placed into the standby mode when
noise signals are present at the plasma television after a TV
program finishes.
No Operation off (AV source only)
The system will be automatically placed into the standby mode
when no operation is performed for three hours.
1 Press HOME MENU.
2 Select “Power Control“ (/ then ENTER).
3 Select “No Operation off“ (/ then ENTER).
4 Select “Enable“ (/ then ENTER).
No Operation off
Selections Disable
(default)
Enable Places the system into the standby mode if no
Does not place the system into the standby mode
operation is performed for three hours
Note
• When you change the Energy Save mode, you may notice a
change in the panel sound. This is normal.
• The Energy Save function can maintain efficiency of the screen
for a long period of time. Setting the Energy Save function to
“Mode 1” is recommended in order to maintain efficiency of the
screen for a long period of time.
34
En
5 Press HOME MENU to exit the menu.
Note
• Five minutes before the system is placed into the standby
mode, a message appears every minute.
Page 35

Setting up
Power Management (PC source only)
The system will be automatically placed into the standby mode
when no signal is received from the personal computer.
1 Press HOME MENU.
2 Select “Power Control“ (/ then ENTER).
3 Select “Power Management“ (/ then ENTER).
4 Select “Mode 1“ or “Mode 2” (/ then ENTER).
Power Management
Selections Off (default) No power management
Mode 1 • Places the system into the standby mode when
no signal is received from the personal computer
for eight minutes.
• Even when you start using the computer and a
signal is received again, the system stays off.
• The system is switched on again by pressing
STANDBY/ON on the plasma television or on
the remote control unit.
Mode 2 • Places the system into the standby mode when
no signal is received from the personal computer
for eight seconds.
• When you start using the computer and a
signal is input again, the system is switched on.
• The system is switched on again by pressing
STANDBY/ON on the plasma television or on
the remote control unit.
08
English
5 Press HOME MENU to exit the menu.
Note
• This function is not selectable when the PC is connected to the
HDMI terminal.
35
En
Page 36

09
Useful adjustment settings
Chapter 9
Useful adjustment settings
About “Option” menus
The “Option” menu consists of two screens. To select the desired
menu, press repeatedly / to switch between Screen 1 and
Screen 2. The current screen number appears at the top right
corner on the screen.
Option
Position
Auto Size
Side Mask
HDMI Input
HDMI Control Setting
Blue LED Dimmer
Orbiter
Video Pattern
Option
Drive Mode
Color System
Monitor Out
Game Control Pref
Room Light Sensor
Off
Auto
On
1
Auto
Always Output
Off
On
1/2
2/2
Adjusting image positions (AV source only)
Adjust the horizontal and vertical positions of images on the
plasma television.
1 Press HOME MENU.
2 Select “Option“ (/ then ENTER).
3 Select “Position“ (/ then ENTER).
4 Select “H/V Position Adjust“ (/ then ENTER).
5 Adjust the vertical position (/) or the horizontal
position (/).
6 Press HOME MENU to exit the menu.
Note
• To restore the factory defaults for all items, press / to select
“Reset” in step 4, and then press ENTER. A confirmation screen
appears. Press / to select “Yes”, and then press ENTER.
• Adjustments are stored separately according to input source.
• Depending on the displayed video, the image position may not
change even after adjustment.
Adjusting image positions and clock
automatically (PC source only)
(For AV source)
Switching the vertical drive mode
(AV source only)
You can select the desired drive mode according to the program
you watch.
1 Press HOME MENU.
2Select “Option“ (/ then ENTER).
3 Select “Drive Mode“ (/ then ENTER).
4 Select “1“, “2“ or “3“ (/ then ENTER).
5 Press HOME MENU to exit the menu.
Note
• This setting can be made for each input source separately.
• Selections are effective only for the following input signals:
PAL/SECAM, 576i, 576p, 1080i@50 Hz, 720p@50 Hz.
• This setting cannot be made when 480i, 480p, 1080i@60 Hz,
720p@60 Hz, 1080p@24 Hz or 1080p@60 Hz signals are input.
• The Drive Mode does not operate when “On” is selected in
“Game Control Pref”.
Use Auto Setup to automatically adjust the positions and clock of
images coming from a personal computer.
1 Press HOME MENU.
2 Select “Option“ (/ then ENTER).
3 Select “Auto Setup“ (/ then ENTER).
• A message screen appears and Auto Setup starts.
4 Press HOME MENU to exit the menu.
Note
• When Auto Setup is finished, “Auto Setup completed.”
appears.
• Even when “Auto Setup completed.” appears, Auto Setup may
have failed, depending on conditions.
• Auto Setup may fail with a PC image composed of similar
patterns or monochrome. If not successful, change the PC
image and try again.
• Be sure to connect the computer to the plasma television and
switch it on before starting Auto Setup.
• This function is not selectable when the PC is connected to the
HDMI terminal.
• Depending on the displayed video, the image position may not
change even after adjustment.
36
En
Page 37

Useful adjustment settings
09
Adjusting image positions and clock
manually (PC source only)
Usually you can easily adjust the positions and clock of images
using Auto Setup. Use Manual Setup to optimize the positions and
clock of images when necessary.
1 Press HOME MENU.
2 Select “Option“ (/ then ENTER).
3 Select “Manual Setup“ (/ then ENTER).
4 Select the item to be adjusted (/ then ENTER).
5 Perform adjustment (/ and /).
• With “Clock” or “Phase” selected, you can change the
parameter using /.
6 Press HOME MENU to exit the menu.
Note
• To restore the factory defaults for all items, press / to select
“Reset” in step 4, and then press ENTER. A confirmation screen
appears. Press / to select “Yes”, and then press ENTER.
• This function is not selectable when the PC is connected to the
HDMI terminal.
• Depending on the displayed video, the image position may not
change even after adjustment.
Selecting a game mode
When playing a game, you can use this function to establish a
preference for image quality or operability.
1 Press HOME MENU.
2 Select “Option“ (/ then ENTER).
3 Select “Game Control Pref” (/ then ENTER).
4 Select “On” or “Off” (/then ENTER).
Item Description
On Establishes a preference for operability
Off Establishes a preference for image quality
5 Press HOME MENU to exit the menu.
Note
• The “Game Control Pref” is only available when using an
external input (except a PC source) and “GAME” is selected in
“AV Selection”.
• The “Game Control Pref” options are not effective when PC
signals are received (when a PC source menu is displayed on
the screen).
• The “On” setting is not effective when freezing images or in the
multiscreen mode.
English
Color system setting
If an image does not appear clearly, select another color system
(e.g., PAL, NTSC).
1 Press HOME MENU.
2 Select “Option“ (/ then ENTER).
3 Select “Color System“ (/ then ENTER).
4 Select a video signal system (/ then ENTER).
• You can select “Auto”, “PAL”, “SECAM”, “NTSC”, “4.43NTSC”,
“PAL-M” or “PAL-N”.
• With “Auto” selected, input signals are automatically
identified.
5 Press HOME MENU to exit the menu.
Note
• The factory default is “Auto”.
• You do not need to enter any setting if “HDMI Input” has been
selected.
• You need to perform color system setti ng f or e ach of “ INPUT 1 ”,
“INPUT 2”, “INPUT 3” and “INPUT 6”.
• For the color system setting, see steps 11 and 12 under Setting
up TV channels manually on page 25.
Selecting a screen size manually
Press f to switch among the screen size options selectable for
the type of video signals currently received.
Each time you press f, the selection is switched.
The selectable screen sizes differ depending on the types of input
signals.
Important
• If images with black bands on both sides or top and bottom of
the screen – when using the “4:3”, “FULL 14:9” or “CINEMA
14:9” modes, for example – are displayed continuously for long
periods or for shorter periods of time over several days, image
retention may result. It is recommended that you enjoy
watching images displayed in full screen, except when doing
so may result in copyright infringement.
37
En
Page 38

09
Useful adjustment settings
AV source
Item Description
4:3 For 4:3 “standard” pictures. A side mask appears on each
FULL 14:9 For 1 4:9 squeeze pictures. A thin side mask appears on each
CINEMA 14:9 For 14:9 letterbox pictures. A thin side mask appears on
WIDE In this mode the picture is progressively stretched toward
FULL For 16:9 squeeze pictures
ZOOM For 16:9 letterbox pictures. Bars may appear on the top and
CINEMA For 14:9 letterbox pictures. Bars may appear on the top and
side.
side.
each side, and you may also see bars on the top and bottom
with some programs.
each side of the screen
bottom with some programs.
bottom on some programs.
PC source
Item Description
4:3 Fills the screen without altering the input signal aspect ratio
FULL Full 16:9 screen display
AV source PC source
4:3
CINEMA FULL 14:9
4:3
FULL
Selecting a screen size automatically
The plasma television automatically selects an appropriate screen
size when the received video signals contain WSS (wide screen
signaling) information or when video signals are received from a
connected HDMI equipment (see Using the HDMI Input on
page 45). To activate this function, use the following procedure.
1 Press HOME MENU.
2 Select “Option“ (/ then ENTER).
3 Select “Auto Size“ (/ then ENTER).
4 Select “Natural” or “Wide-Zoom” (/ then ENTER).
Item Description
Off Deactivates the Auto Size function
Natural Naturally adjusts the image to the screen
Wide-Zoom Enlarges and displays only the 4:3 aspect ratio portion in full
and wide screen
5 Press HOME MENU to exit the menu.
Note
• Manually select an appropriate screen size if an image does
not automatically switch to a correct screen format.
• When the video signal contains no aspect ratio information,
the function will not work even with “Natural” or “Wide-Zoom”
selected.
Detecting side masks
ZOOM CINEMA 14:9
FULL WIDE
Note
• The specifications given for the PC source are for the PDP508XG. For the PDP-428XG, the number of panel pixels is
different, and thus signal processing and actual viewing
conditions will vary slightly.
• While receiving High Definition video signals, pressing f
switches among FULL, WIDE, 4:3, and ZOOM.
• Some HD broadcasts may display 4:3 content with side masks,
which may cause uneven wear. After viewing it is
recommended to view full-screen motion video (see Detecting
side masks).
Some HD broadcasts may display 4:3 content with side masks. The
plasma television automatically detects these side masks to
provide gray side masks when “Natural” has been selected for
“Auto Size”, or display the image full screen with the side masks
removed when “Wide-Zoom” has been selected. This function does
not operate when “Off” is selected for “Auto Size”.
1 Press HOME MENU.
2 Select “Option“ (/ then ENTER).
3 Select “Side Mask“ (/ then ENTER).
4 Select “Detection” (/).
5 Select “On” (/).
Item Description
Off Deactivates the Side Mask detection
On Activates the Side Mask detection
6 Press HOME MENU to exit the menu.
Important
• The “On” setting prevents uneven wear on 4:3 content and side
masks and can reduce the possibility of image retention.
38
En
Page 39

Useful adjustment settings
09
Note
• You cannot set the Side Mask detection to “On” or “Off” when
“Off” is selected in “Auto Size”.
• The Side Mask detection does not operate on 4:3 content
displayed in SD signals.
• “Auto” will appear on the channel display when this function is
on.
• Set the Side Mask detection function to “On”, the High
Definition 16:9 aspect ratio images containing side masks will
be detected and the side masks will be added automatically or
the image displayed in full screen, leading to more effective
countermeasures taken for the screen burning.
• Detection errors may occur depending on the HD contents. In
case a detection error occurs, manually change the screen size
to the desired size.
Changing the brightness at both sides of
the screen (Side Mask)
With the 4:3, FULL 14:9, or CINEMA 14:9 screen size selected, you
can change the brightness of the gray side masks that appear at
both sides of the screen.
1 Press HOME MENU.
2 Select “Option“ (/ then ENTER).
3 Select “Side Mask“ (/ then ENTER).
4 Select “Brightness Sync.” (/).
5 Select the desired parameter (/).
Item Description
Fixed (default) Always sets the same brightness for the gray side masks
Auto Adjusts the brightness of the gray side masks according to
the brightness of images
Important
• The “Auto” setting adjusts the brightness of the side masks
according to the brightness of the screen and can reduce the
possibility of image retention.
6 Press HOME MENU to exit the menu.
Room Light Sensor
This function automatically adjusts the brightness of the display
panel in accordance with the brightness level of the viewing area.
For details, use the following procedure.
1 Press HOME MENU.
2 Select “Option” (/ then ENTER).
3 Select “Room Light Sensor” (/ then ENTER).
4 Select “On” or “Off” (/ then ENTER).
Item Description
On Activates the Room Light Sensor function
Off Deactivates the Room Light Sensor function
5 Press HOME MENU to exit the menu.
Note
• This function is disabled when “OPTIMUM” is selected on the
“AV Selection” menu.
• This function is not available when PC signals are received.
• As this function automatically optimizes image quality, the
process in which image settings such as brightness and tint
gradually change may be seen on the screen. This is not a
malfunction.
Blue LED Dimmer
You can adjust the brightness of the POWER ON indicator
depending on the brightness level of the viewing area. When “Auto”
is selected, the brightness of the indicator changes to “High”, “Mid”
or “Low” to match the brightness level of the viewing area.
1 Press HOME MENU.
2 Select “Option” (/ then ENTER).
3 Select “Blue LED Dimmer” (/ then ENTER).
4 Select “Auto”, “High”, “Mid” or “Low” (/ then ENTER).
5 Press HOME MENU to exit the menu.
Orbiter
This function automatically shifts the image little by little to reduce
the occurrence of the burning.
1 Press HOME MENU.
2 Select “Option” (/ then ENTER).
3 Select “Orbiter” (/ then ENTER).
4 Select “On” (/ then ENTER).
5 Press HOME MENU to exit the menu.
To cancel this function, select “Off” in step 4.
English
Note
• When the Orbiter function is set to “On”, the image may appear
to drop slightly on the screen.
• This function does not operate when PC signals are received.
39
En
Page 40

09
Useful adjustment settings
Video Pattern
You can display the Video Pattern screen that also helps eliminate
after-image when it occurs.
1 Press HOME MENU.
2Select “Option” (/ then ENTER).
3 Select “Video Pattern” (/ then ENTER).
A confirmation screen appears.
4 Select “Start” (ENTER).
The Video Pattern screen displays.
Note
• The system is automatically placed into standby one hour after
the Video Pattern screen has started.
• While the Video Pattern screen is on, no buttons operate
except a on the remote control unit, STANDBY/ON and a on
the plasma television.
• To cancel the Video Pattern screen, press a on the remote
control unit, STANDBY/ON or a on the plasma television.
• The Video Pattern timer has priority over the sleep timer. When
the Video Pattern timer is on, the sleep timer becomes
ineffective.
Sleep Timer
When the selected time elapses, the Sleep Timer automatically
places the system into the standby mode.
1 Press HOME MENU.
2 Select “Sleep Timer“ (/ then ENTER).
3 Select the desired time (/ then ENTER).
Select “Off” (cancel), “30 min”, “60 min”, “90 min” or “120 min”.
4 Press HOME MENU to exit the menu.
Entering a password
In a case where you select a channel blocked with Child lock
function or if password entry is requested when attempting to open
the menu, enter a password correctly.
• Enter your four-digit password using buttons 0 to 9.
Please Input Your Password.
Note
• If you fail password entry three times, “Invalid password.”
appears, and the menu is closed. In order to display the
password entry screen again to unlock the password, select
the blocked channel or open the menu again.
• If the password entry screen disappears before entry, you may
recall it by pressing ENTER.
Changing the password
Use the following procedure to change the password.
1 Press HOME MENU.
2 Select “Setup“ (/ then ENTER).
3 Select “Password“ (/ then ENTER).
The password entry screen appears. Enter the current four-digit
password using buttons 0 to 9.
4 Select “Change Password“ (/ then ENTER).
5 Enter a four-digit password to be newly set, using the
buttons 0 to 9.
Change Password
Please Input New Password.
Note
• Five minutes before the selected time elapses, the remaining
time appears every minute.
• To check the remaining time, perform steps 1 and 2. After
checking the time, press HOME MENU to restore the previous
display.
• The SLEEP indicator on the front of the plasma television lights
up in orange when the Sleep Timer is set.
Using a password
The plasma television provides a Child lock function for preventing
children from watching inappropriate programs. You need to enter
a password when watching programs with “Block” specified.
Before the system is shipped, “1234” is preset as the factory-default
password. You can however, change the password as you want.
You will need to enter the password before using the “Auto
Installation”, “Analog TV Setup”, or “Password” functions from the
HOME MENU to prevent unauthorized changes to the settings.
40
En
Reconfirm New Password.
6 Enter the same password that you have entered in step 5.
• If a different password is entered, the operation goes back to
step 5 for reentry from the beginning.
• You can try up to three times to reconfirm the new password
before the Change Password screen is automatically exited.
7 Press HOME MENU to exit the menu.
Note
• Take a note of the newly set password and keep it handy.
Page 41

Useful adjustment settings
Resetting the password function
1 Press HOME MENU.
2 Select “Setup“ (/ then ENTER).
3 Select “Password“ (/ then ENTER).
The password entry screen appears. Enter your four-digit password
using buttons 0 to 9.
4 Select “Reset“ (/ then ENTER).
5 Select “Yes“ (/ then ENTER).
6 Press HOME MENU to exit the menu.
Note
• The above procedure will reset the password to the factory
default (1 2 3 4).
09
English
We suggest you write down your password so you don’t forget it.
PDP-508XG / PDP-428XG
Your password No.:
If you forget the password
When the message “Please Input Your Password” is displayed,
press the ENTER button on the remote control unit and hold it
down for three seconds or longer.
The password reverts to “1234”.
41
En
Page 42

10
Using with other equipment
Chapter 10
Using with other equipment
You can connect many types of external equipment to your plasma
television, like a digital tuner, VCR, DVD player, personal computer,
game console, and camcorder.
To view images coming from external equipment, select the input
source using INPUT 1 to INPUT 6 or PC on the remote control unit
(page 14) or INPUT on the plasma television.
Caution
• To protect all equipment, always unplug the plasma television
from the power outlet before connecting to a digital tuner, VCR,
DVD player, personal computer, game console, camcorder, or
other external equipment.
Note
• Unless stated otherwise, the connecting cables shown in the
illustrations are readily available commercially, but are not
supplied with this product.
• Refer to the relevant operation manual (DVD player, personal
computer, etc.) carefully before making connections.
Connecting a digital tuner
You can use the INPUT 1 terminal when connecting a digital tuner
and other audiovisual equipment.
Use either a component, S-Video or standard video cable for the
video signal. Use a stereo audio cable for the audio. (If you’re using
the standard video input, you can use a red/white/yellow audio/
video cable.)
Displaying broadcasts via a digital tuner
To watch a digital tuner image, press INPUT 1 on the remote
control unit or press INPUT on the plasma television to select
“INPUT 1”.
Note
• Signal priority for the INPUT 1 terminals is (1) Component
video, (2) S-Video, (3) Video.
• Connect only the type of video cable that will actually be used.
• Refer to your digital tuner operation manual for the signal types
available.
Connecting a DVD player
Use the INPUT 2 terminal when connecting to a DVD player and
other audiovisual equipment.
Use either a component, S-Video or standard video cable for the
video signal. Use a stereo audio cable for the audio. (If you’re using
the standard video input, you can use a red/white/yellow audio/
video cable.)
MONITOR
SUB
OUT
WOOFER
(Rear view)
MONITOR
SUB
OUT
S-Video cable
WOOFER
S-Video cable
Audio/Video
cable
Digital tuner
(Rear view)
MONITOR
SUB
OUT
WOOFER
MONITOR
SUB
OUT
WOOFER
Component video cable
Audio/Video
cable
Component video cable
DVD player
DVD playback
To watch a DVD, press INPUT 2 on the remote control unit or press
INPUT on the plasma television to select “INPUT 2”.
Note
• Signal priority for the INPUT 2 terminals is (1) Component
video, (2) S-Video, (3) Video.
• Connect only the type of video cable that will actually be used.
• Refer to your DVD player operation manual for the signal types
available.
42
En
Page 43

Using with other equipment
10
Connecting a VCR
Use the INPUT 3 terminals when connecting a VCR and other
audiovisual equipment.
Use either an S-Video or standard video cable for the video signal.
Use a stereo audio cable for the audio. (If you’re using the standard
video input, you can use a red/white/yellow audio/video cable.)
MONITOR
SUB
OUT
WOOFER
(Rear view)
MONITOR
SUB
OUT
WOOFER
VCR
VCR playback
To watch a VCR image, press INPUT 3 on the remote control unit
or press INPUT on the plasma television to select “INPUT 3”.
S-Video cable
Audio/Video cable
Connecting a game console or camcorder
Use the INPUT 6 terminals to connect a game console, camcorder
and other audiovisual equipment.
Use either an S-Video or standard video cable for the video signal.
Use a stereo audio cable for the audio. (If you’re using the standard
video input, you can use a red/white/yellow audio/video cable.)
S-Video cable
Audio/Video cable
Game console/camcorder
English
Note
• Signal priority for the INPUT 3 terminals is (1) S-Video, (2)
Video.
• Connect only the type of video cable that will actually be used.
• Refer to your VCR operation manual for the signal types
available.
Displaying an image from the game console or
camcorder
To watch an image coming from the game console or camcorder,
press INPUT 6 on the remote control unit or press INPUT on the
plasma television to select “INPUT 6”.
Note
• Signal priority for the INPUT 6 terminals is (1) S-Video, (2)
Video.
• Connect only the type of video cable that will actually be used.
43
En
Page 44

10
Using with other equipment
Connecting a personal computer
Use the PC terminals to connect a personal computer.
• The PC input terminal is DDC1/2B-compatible.
(Rear view)
MONITOR
SUB
OUT
WOOFER
MONITOR
SUB
OUT
WOOFER
RGB cable
Stereo
mini jack cable
Personal computer
Displaying an image from a personal computer
To watch an image coming from the personal computer, press PC
on the remote control unit or press INPUT on the plasma television
to select “PC”.
When connecting to a personal computer, the correct input signal
type is automatically detected. If the personal computer image
does not come in clearly, you may need to use Auto Setup menu.
See page 36.
Connecting an amplifier/AV receiver
You can enjoy more powerful sound by connecting an amplifier /AV
receiver and subwoofer to the plasma television.
MONITOR
SUB
OUT
WOOFER
(Rear view)
MONITOR
SUB
OUT
WOOFER
Stereo audio cable Audio cable
AV receiver
Subwoofer
Note
• For details, refer to the operation manual for the audio
equipment to be connected.
• If your amplifier/AV receiver has a subwoofer output, it is not
necessary to connect the subwoofer output on the plasma
television.
• Audio signals corresponding to the currently displayed images
are always output to the MONITOR OUT and SUBWOOFER
terminals.
Avoiding unwanted feedback
Note
• The PC terminals cannot be used for audiovisual equipment.
Computer compatibility chart
Resolution Frequency
720 x 400 70 Hz
640 x 480 (VGA) 60 Hz
800 x 600 (SVGA) 60 Hz
1280 x 720 60 Hz
1024 x 768 (XGA) 60 Hz
1360 x 768 (Wide-XGA) 60 Hz
1280 x 1024 (SXGA) 60 Hz
44
En
You can prevent unwanted feedback from adversely affecting the
quality of images. Specify the output terminal whose output is to be
inhibited.
1 Press HOME MENU.
2 Select “Option“ (/ then ENTER).
3 Select “Monitor Out“ (/ then ENTER).
4 Select the desired parameter (/ then ENTER).
Monitor Out
Always Output
INPUT 1 Prohibit
INPUT 2 Prohibit
INPUT 3 Prohibit
INPUT 4 Prohibit
INPUT 5 Prohibit
INPUT 6 Prohibit
Page 45

Using with other equipment
10
Item Description
Always Output Outputs composite video and audio signals no matter
which input source is selected
INPUT 1 Prohibit Does not output composite video and audio signals
when “INPUT 1” is selected
INPUT 2 Prohibit Does not output composite video and audio signals
when “INPUT 2” is selected
INPUT 3 Prohibit Does not output composite video and audio signals
when “INPUT 3” is selected
INPUT 4 Prohibit Does not output composite video and audio signals
when “INPUT 4” is selected
INPUT 5 Prohibit Does not output composite video and audio signals
when “INPUT 5” is selected
INPUT 6 Prohibit Does not output composite video and audio signals
when “INPUT 6” is selected
5 Press HOME MENU to exit the menu.
Note
• The INPUT 4 and INPUT 5 video signals are not output from the
MONITOR OUT jack regardless of this setting.
Using the HDMI Input
The INPUT 3, INPUT 4 and INPUT 5 terminals are HDMI terminals
to which digital video and audio signals can be input. To use the
HDMI terminals, activate the terminal and specify the types of
video and audio signals to be received from the connected
equipment. For the types of these signals, see the operation
manual that came with the connected equipment.
Before starting the menu, press INPUT 3, INPUT 4 or INPUT 5 on
the remote control unit or press INPUT on the plasma television to
select “INPUT 3”, “INPUT 4” or “INPUT 5”.
Video signals supported
720 (1440) x 576i@50 Hz
720 x 576p@50 Hz
1280 x 720p@50 Hz
1920 x 1080i@50 Hz
720 (1440) x 480i@59.94 Hz/60 Hz
720 x 480p@59.94 Hz/60 Hz
1280 x 720p@59.94 Hz/60 Hz
1920 x 1080i@59.94 Hz/60 Hz
1920 x 1080p@24 Hz
1920 x 1080p@50 Hz
1920 x 1080p@60 Hz
PC signals supported
640 x 480 (VGA) 60 Hz
800 x 600 (SVGA) 60 Hz
1024 x 768 (XGA) 60 Hz
1360 x 768 (Wide - XGA) 60 Hz
1280 x 1024 (SXGA) 60 Hz
For audio, the system supports the following:
•Linear PCM (STEREO 2ch)
• Sampling frequency: 32 kHz, 44.1 kHz, 48 kHz
HDMI Control supported
The plasma television supports the HDMI Control functions. By
connecting devices that support the HDMI Control functions to the
plasma television, you can control the connected device(s) from
the plasma television or remote control unit of the plasma
television. See Using the HDMI Control on Chapter 11.
Deep Color supported
Deep Color means the color depth that describes the number of
bits used to represent the color of a single pixel in a bitmapped
image. Besides the conventional RGB/YCbCr16 bit/20 bit/24 bit
signals, the plasma television also supports RGB/YCbCr30 bit/36
bit signals. This enables finer, minute color reproduction when a
device that supports Deep Color signals is connected to the
plasma television. When Deep Color signals are received, the color
depth appears on the channel display.
Note
• It may take a short while until the image is displayed,
depending on the equipment connected.
• Make sure to use an HDMI compliant cable.
• When inputting 1080p signals, we recommend you use an
HDMI cable that supports HDMI Category 2.
• When connecting a PC to the HDMI terminal, use the HDMI
compliant PC or video card.
• When connecting a PC to the HDMI terminal using a DVI
output terminal, the plasma television may not display
properly. If that is the case, consult with your PC manufacturer.
• PC picture and/or sound may not be displayed or heard
properly depending on the PC used.
English
45
En
Page 46

10
Using with other equipment
Connecting HDMI equipment
For INPUT 3, connect an HDMI cable for the video and (if
necessary) a stereo audio cable for analog audio. You can select
the audio and video format according to the device you’ve
connected – see below for more.
MONITOR
SUB
OUT
WOOFER
(Rear view)
MONITOR
SUB
OUT
WOOFER
Stereo audio
cable
HDMI device
For INPUT 4 and INPUT 5, connect just an HDMI cable – this
carries both the audio and video signals (the illustration below
shows the connection to INPUT 5).
MONITOR
SUB
OUT
WOOFER
HDMI compliant cable
(HDMI cable having the
HDMI mark)
Activating the INPUT 3 HDMI terminal
1 Press HOME MENU.
2 Select “Option“ (/ then ENTER).
3 Select “HDMI Input“ (/ then ENTER).
4 Select “Setting“ (/ then ENTER).
5 Select “Enable“ (/ then ENTER).
Item Description
Disable (default) Deactivates the INPUT 3 HDMI terminal
Enable Activates the INPUT 3 HDMI terminal
6 Press HOME MENU to exit the menu.
Note
• You need not manually activate the INPUT 4 and INPUT 5 HDMI
terminals.
Specifying the type of input signals
1 Repeat steps 1 to 3 provided for Activating the INPUT 3
HDMI terminal.
2 Select “Signal Type” (/ then ENTER).
3 Select “Video” or “PC” (/ then ENTER).
Item Description
Video (default) Select this option except when a PC is connected
PC Select this option when a PC is connected to the HDMI
input terminal
4 Press HOME MENU to exit the menu.
46
En
(Rear view)
HDMI device
HDMI compliant cable
(HDMI cable having the
HDMI mark)
Caution
• Make sure to select “PC” when a PC is connected to the HDMI
input terminal.
Note
• In the “Video” mode, the image is “over-scanned” (enlarged),
and the mode is automatically switched to “PC” when PC
signals are received.
• In the “PC” mode, the image is displayed in full size for
optimum image quality.
when “Video” is selected
(“overscan” size screen)
when “PC” is selected
(“underscan” size screen)
Page 47

Using with other equipment
10
Specifying the type of digital video signals
1 Press HOME MENU.
2 Select “Option” (/ then ENTER).
3 Select “HDMI Input” (/ then ENTER).
4 Select “Video“ (/ then ENTER).
5 Select the type of digital video signals (/ then ENTER).
• If you select “Auto”, an attempt will be made to identify the type
of digital video signals when digital video signals are received.
Item Description
Auto (default) Automatically identifies input digital video signals
Color-1 Digital Component Video signals (4:2:2) locked
Color-2 Digital Component Video signals (4:4:4) locked
Color-3 Digital RGB signals (16 to 235) locked
Color-4 Digital RGB signals (0 to 255) locked
6 Press HOME MENU to exit the menu.
Note
• If you select a parameter other than “Auto”, make such a
setting that results in natural color.
• If no image appears, or images appear in inappropriate colors,
specify another digital video signal type.
• For the digital video signal types to be specified, check the
operation manual that came with the connected equipment.
Specifying the type of audio signals
When using the INPUT 3 HDMI terminal, you need to specify the
type of audio signals.
1 Repeat steps 1 to 3 provided for Specifying the type of
digital video signals.
2 Select “Audio“ (/ then ENTER).
3 Select the type of audio signals (/ then ENTER).
• If you select “Auto”, an attempt will be made to identify the type
of audio signals when audio signals are received.
Using control cords
Connect control cords between the plasma television and other
Pioneer equipment having the t logo to be able to operate the
connected equipment via the remote control sensor on the plasma
television.
After the CONTROL IN terminals have been connected, the remote
control sensors on the connected equipment do not accept
commands from the remote control units. Face the remote control
units to the remote control sensor on the plasma television when
operating the connected equipment.
Note
• Make sure that the power cord is removed from the power
outlet when making connections.
• Complete all component connections before making control
cord connections.
About SR+
The CONTROL OUT terminal on the rear of the plasma television
supports SR+ that allows linked operations with a Pioneer AV
receiver. SR+ presents functions such as the input switch linkage
operation function and the DSP surround mode display function.
For more information, see the instruction manual that came with
the Pioneer AV receiver supporting SR+.
Note
• While in connection through SR+, the volume on this system is
temporarily minimized.
• When making control cord connections, use the SR+ cable.
• When making control cord connections with one or more
pieces of Pioneer equipment, directly connect the plasma
television and the Pioneer amplifier that supports SR+. Do not
connect other equipment between them.
MONITOR
SUB
OUT
WOOFER
(Rear view)
English
Item Description
Auto (default) Automatically identifies the input signals
Digital Accepts digital audio signals
Analog Accepts analog audio signals
4 Press HOME MENU to exit the menu.
Note
• The INPUT 4 and INPUT 5 HDMI terminals accept only digital
audio signals.
• If no sound is output, specify another audio signal type.
• For the audio signal types to be specified, check the operation
manual that came with the connected equipment.
• Depending on the equipment to be connected, you also need
to connect analog audio cables.
a
b
c
When SR+ is not used (a, b and c):
The control cables (commercially available) are mono sound cables with mini
plugs (no resistance).
When SR+ is used (a):
Use the SR+ cable (available as option).
CONTROL
CONTROL
CONTROL
IN
OUT
IN
OUT
IN
OUT
47
En
Page 48

10
Using with other equipment
Enjoying through USB interface (Home
Gallery function)
On this system, you can watch JPEG images that have been
captured and stored in memory cards using a digital still camera.
You can also connect your digital camera directly to the plasma
television using a USB connector cable.
Digital still
camera
Note
• A single USB device can only be connected at a time. No USB
hub can be connected.
• Such devices as a printer or keyboard cannot be connected
and used.
USB connector cable
USB flash drive
Multi-card reader
Readable memory cards
This system can read memory cards whose formats are FAT16,
FAT32, or VFAT.
Image data display
Connecting a USB device
Hold the USB device’s connector with its top side facing the front
pa nel , an d then i nse rt i t in to the U SB p ort on t he s ide of the p las ma
television.
• Insert the USB device’s connector as far as it goes.
• When using the USB connector of your device, connect it
directly to the USB port.
Side of the plasma television
USB flash drive or
multi-card reader
Removing a USB device
To remove a USB device’s connector, quit the Home Gallery screen
and then remove it.
Readable data files
This system can read only JPEG files that meet the following
conditions:
• Extensions are JPG or JPEG.
• JPEG 4:2:2 and 4:2:0 format
• The image resolution must be less than 3264 pixels in the
horizontal direction and 2448 pixels in the vertical direction.
• The image resolution must be higher than 160 pixels in the
horizontal direction and 120 pixels in the vertical direction.
Note
• This system may not be able to display images, depending on
the type of your memory card, or camera.
• This system may not be able to display images modified or
edited using a personal computer or other equipment.
• This system complies with the USB Mass Storage Class, SIC
(Still Image Capture) Class + PTP and Multiple LUN (Logical
Unit Number) Class.
Note
• Be sure to quit the Home Gallery screen before removing the
USB device. If you remove the USB device while the Home
Gallery screen is displayed, data inside the memory may be
damaged.
• Do not insert or remove the USB device immediately after the
system is switched on or off. This may cause data inside the
memory to be damaged.
• Do not turn the digital camera off while the Home Gallery
screen is displayed.
48
En
Page 49

Using with other equipment
10
Starting the initial Home Gallery screen
When you connect a USB device while the system is on, the initial
screen appears automatically. If the screen does not appear, use
the steps 1 and 2.
1 Press HOME MENU.
2 Select “Home Gallery” (/ then ENTER).
Home Gallery
Folder selection
HOME MENU
MEMORY_CARD
folder 1
folder 2
folder 3
folder 4
Exit
1 / 1
3 Select a folder (/ then ENTER).
Selecting a folder
The initial Home Gallery screen shows folders saved in the memory
card. Different types of icons appear depending on the contents of
folders.
—
Designates a folder that contains another
folder.
➂ File name
➃ Rotation angle
➄ Image selection cursor
➅ Appears for unreadable images and images that could not be
displayed on a single screen.
➆ Number of the selected file/total number of images in the folder
➇ Appears when the folder contains more than 16 images.
➈ Indicates that the picture has been rotated.
Press / to scroll the screen.
To highlight a desired image, press / and / to move the
cursor. Information about the highlighted image appears at the top
left of the screen.
Press HOME MENU to quit the Home Gallery function.
Starting a standard single-image screen
When the thumbnail screen is displayed, press / and / to
highlight a desired image, and then press ENTER. The thumbnail
screen disappears and only the selected image is displayed.
Home Gallery
Picture Information
File Neme
Winter. j
Picture Size
800*600
Date
2002/8/30
Angle
Full Screen
Rotation
English
—
Designates a folder that contains no
image file.
—
Designates a folder that contains one or
more image files.
—
Designates one or more image files saved
under the root directory.
To select a desired folder, press / and then ENTER. Images in
the selected folder are displayed in thumbnail format.
Starting a thumbnail screen
When a folder is selected on the initial Home Gallery screen,
images in the folder are displayed in thumbnail format.
1
32
Home Gallery
Picture Information
File Neme
DSCO1234
Picture Size
800*600
Date
2002/8/30
Angle
4
Slide Show
Start
Setup
Setup
HOME MENU
Exit
➀ Picture size
➁ Saved date
Thumbnail 1/444
957
6
8
HOME MENU
Exit
With the above screen displayed, you can use the following buttons
to perform various operations:
P–:
Displays the previous image in the normal or full screen.
P+:
Displays the next image in the normal or full screen.
RED:
Displays the image using the full screen. To quit the full-screen
display, press RETURN.
GREEN:
Rotates the displayed image clockwise. Each press rotates the
image in the sequence: 90°, 180°, and then 270°.
HOME MENU:
Quits the Home Gallery function.
Note
• Be careful not to display the same image for an extended
period of time. This may cause screen burning/image
retention.
• Images smaller than 1024 x 768 pixels are displayed with blank
surrounding.
Starting the Slide Show Setup screen
When the thumbnail screen is displayed, press GREEN to start the
screen for setting up for Slide Show that sequentially changes
images.
1 Select “Display Mode” (/).
2 Select “Normal” or “Full” (/).
• With “Full” selected, images are displayed using the full screen.
49
En
Page 50

10
Using with other equipment
3 Select “Playback Order” (/).
4 Select “Name Order” or “Random” (/).
5 Select “Repeat Mode” (/).
6 Select “Single Time” or “Loop” (/).
• With “Loop” selected, Slide Show is repeated until RETURN is
pressed.
7 Select “Playback Mode” (/).
8 Select “Auto” or “Manual” (/).
• With “Auto” selected, images automatically change at the
specified intervals.
• With “Manual” selected, images change each time you press
P+/P–.
Home Gallery
HOME MENU
Slide Show Setup
Display Mode
Playback Order
Repeat Mode
Playback Mode
Interval (sec)
Exit
Normal
Name Order
Single time
Auto
3
9 If you have selected “Auto” in step 8, press / to select
“Interval (sec.)”, and then press / to select the desired
display duration for individual images.
• You can select from among 3 seconds, 5 seconds, 10 seconds,
20 seconds, 30 seconds, 60 seconds, and 90 seconds.
10 To start the Slide Show screen, press RETURN to display
the thumbnail screen and then press RED.
• To quit the Home Gallery function, press HOME MENU.
Starting the Slide Show screen
After setting up for Slide Show, you can start Slide Show to
sequentially change images.
1 To start the Slide Show screen, press RED when a
thumbnail screen is displayed.
• With “Auto” selected for “Playback Mode”, images
automatically change at the specified intervals.
• With “Manual” selected for “Playback Mode”, press P+/P– to
change images.
• While images are automatically changing, you can stop and
hold automatic image change for approximately 90 seconds by
pressing RED. To resume, press RED again.
2 When quitting the Slide Show screen, press RETURN to
restore the thumbnail screen or HOME MENU to quit the
Home Gallery function.
Adjusting the picture quality
When a thumbnail screen is displayed, press YELLOW. The same
picture adjustment screen as the PC source is displayed. For the
subsequent procedure, see page 28.
Controlling other equipment using the
supplied remote control unit
Using the supplied remote control unit, you can control other
equipment in connection: a set-top box (STB), DVD player, DVD/
HDD recorder (DVR), BD player or VCR.
Before using this function, you need to preset the supplied remote
control unit with the manufacture code of the equipment to be
controlled. When you then want to control the equipment, press
SELECT on the remote control unit to select an appropriate mode
depending on the equipment; the selection is switched among TV,
STB, DVD/DVR, and VCR. The corresponding mode indicators on
the remote control unit show the currently selected mode.
• When you control a BD player, select the DVD/DVR mode.
Presetting manufacture codes
1 Press SELECT on the remote control unit to select the STB,
DVD/DVR, or VCR mode depending on the equipment.
2 After confirming that the indicator of the previously
selected mode goes off, press and hold SELECT, and then
press 1 on the remote control unit.
• The corresponding mode indicator flashes.
3 Press 0 to 9 to enter a three-digit manufacture code.
• See the manufacture code list to identify an appropriate code.
• The mode indicator lights up for approximately one second and
then goes off; presetting the manufacture code is completed.
Note
• When paused during a slideshow is played, the screen
automatically changes to the next image in five minutes.
• If no operation is continued for five minutes, the Home Gallery
function automatically finishes except when the slideshow is
played with “Loop” selected for the “Repeat Mode”.
50
En
Note
• If you perform no operation for approximately one minute while
a mode indicator is flashing, the code presetting procedure is
quitted.
Page 51

Using with other equipment
10
• If you enter a code not listed in the table, a mode indicator
flashes quickly for approximately one second and then flashes
as before.
• To quit the code presetting procedure halfway while a mode
indicator is flashing, you may press SELECT on the remote
control unit.
• The factory default manufacture codes for the STB, DVD/DVR,
and VCR modes are “000”, “100”, and “500” respectively.
Manufacture codes
• Some equipment listed in the table may not allow you to control
with the supplied remote control unit partially or entirely.
STB
000 PIONEER 1 (factory default)
001 PIONEER 2
002 AONVISION
003 ZINWELL
004 CANAL SATELLITE
005 HUMAX
006 PACE 1
007 PACE 2
008 QUALI-TV
009 SKY DIGITAL
DVD
100 PIONEER 1 (factory default)
101 PIONEER 2
102 AKAI
103 DENON
104 HITACHI
105 JVC
106 KENWOOD 1
107 KENWOOD 2
108 PANASONIC 1
109 PANASONIC 2
110 PHILIPS 1
111 PHILIPS 2
112 SAMSUNG
113 SHARP
114 SONY 1
115 SONY 2
116 SONY 3
117 THOMSON
118 TOSHIBA
119 YAMAHA
DVR
200 PIONEER 1
201 PIONEER 2
202 PIONEER 3
203 PANASONIC
204 PHILIPS 1
205 PHILIPS 2
206 SHARP
207 SONY
208 TOSHIBA
BD
300 PIONEER
VCR
500 PIONEER 1 (factory default)
501 PIONEER 2
502 AIWA 1
503 AIWA 2
504 AKAI 1
505 AKAI 2
506 AKAI 3
507 DAEWOO
508 GRUNDIG 1
509 GRUNDIG 2
510 GRUNDIG 3
511 GRUNDIG 4
512 HITACHI 1
513 HITACHI 2
514 HITACHI 3
515 JVC 1
516 JVC 2
517 JVC 3
518 JVC 4
519 JVC 5
520 LOEWE 1
521 LOEWE 2
522 MATSUI
523 ORION
524 PANASONIC 1
525 PANASONIC 2
526 PHILIPS 1
English
51
En
Page 52

10
Using with other equipment
VCR
527 PHILIPS 2
528 PHILIPS 3
529 SANYO
530 SAMSUNG 1
531 SAMSUNG 2
532 SAMSUNG 3
533 SAMSUNG 4
534 SHARP
535 SONY 1
536 SONY 2
537 SONY 3
538 SONY 4
539 SONY 5
540 SONY 6
541 SONY 7
542 THOMSON
543 TOSHIBA
52
En
Page 53

Using with other equipment
1
2
3
4
10
STB (set - top box) control buttons
When in the STB mode, the buttons on the remote control unit
function as below.
10 to 9
Function as the numeric buttons.
2P+/P–
Press to tune in a higher or lower channel.
3RETURN
When the broadcasting menu screen is in display, press to
restore the immediately previous screen.
4 ENTER
Press to activate the selected function.
///
Press to select items on the broadcasting menu screen or the
broadcasting guide screen.
5GUIDE
Press to display the broadcasting guide screen.
6SOURCE
Turns the set-top box on and off.
7MENU
6
7
Press to display the broadcasting menu screen.
8INFO
Press to display information on the current broadcasting.
9 Color (RED/GREEN/YELLOW/BLUE)
This operation is available for only AonVision and Zinwell
products.
English
5
8
9
53
En
Page 54

10
Using with other equipment
1
2
3
4
5
6
7
8
9
10
11
12
13
14
15
16
17
18
DVD/DVR control buttons
When in the DVD/DVR mode, the buttons on the remote control
unit function as below.
10 to 9
Function as the numeric buttons.
2P+/P– (DVD/HDD recorder (DVR) only)
Press to change the channel of the tuner built in the DVD/
HDD recorder (DVR).
3RETURN
When the DVD menu is in display, press to restore the
immediately previous screen.
4 ENTER
Press to activate the selected function.
///
Press to select items on the DVD MENU screen.
5 DVD TOP MENU
When this button is pressed, the DVD top menu will appear.
6 F (PAUSE/STILL)
Sets pauses and still pictures.
7 ● (REC) (DVD/HDD recorder (DVR) only)
Starts recording.
8 U (CHAPTER SEARCH)
Each time you press, you move ahead to the start of the next
chapter.
9 T (CHAPTER SEARCH)
Each time you press, you move back to the start of the previous
chapter.
10 DISC NAVI (DVD/HDD recorder (DVR) only)
Press to display the Disc Navigator screen for browsing the
contents of a disc.
11 SOURCE
Turns on and off the power of the DVD player or DVD/HDD
recorder (DVR).
12 MENU
Press to display the DVD menu.
13 ■ (STOP)
Press to stop playback or recording. With some DVD players
or DVD/HDD recorders (DVRs), pressing the button twice may
open the disc tray.
14 I (PLAY)
Starts playback.
15 V (SCAN)
Press for fast forward.
16 S (SCAN)
Press to go backward.
17 HDD (DVD/HDD recorder (DVR) only)
Press to select the hard disk (HDD) for playback or recording.
18 DVD (DVD/HDD recorder (DVR) only)
Press to select the DVD for playback or recording.
7, 13 REC STOP (DVD/HDD recorder (DVR) only)
Press ● and ■ at the same time to stop recording. This
operation is available for only Pioneer and Sony DVD/HDD
recorders (DVRs).
54
En
Note
• You can control a BD player in the DVD/DVR mode.
• The DVD player, DVD/HDD recorder (DVR) or BD player cannot
be selected at the same time.
Page 55

Using with other equipment
1
2
10
VCR control buttons
When in the VCR mode, the buttons on the remote control unit
function as below.
10 to 9
Function as the numeric buttons.
2P+/P–
Press to select channels of the TV tuner on the VCR.
3 F (PAUSE/STILL)
Sets pauses and still pictures.
4 ● (REC)
Starts recording.
5SOURCE
Turns the power of the VCR on and off.
6 ■ (STOP)
Stops tape transport.
7 I (PLAY)
Starts playback.
8 V (FF)
Rapidly advances the tape and allows picture search.
9 S (REW)
5
Rewinds the tape and allows picture search.
English
3
4
6
7
8
9
55
En
Page 56

11
Using the HDMI Control
Chapter 11
Using the HDMI Control
Using the HDMI Control functions
You can operate such Pioneer devices as a recorder, player or AV
system that support the HDMI Control functions using the remote
control of the plasma television.
The HDMI Control functions include playback of content using onscreen control panel on the plasma television, recording of a TV
program while watching, timer recording using a program list on
the connected recorder, and confirmation of timer recording
registered in the recorder. For details, see the table below.
Note
• Maximum number of devices that can be connected and
controlled using the remote control unit of the plasma
television is as follows: recorder x 2, player x 2, AV system x 1.
• Not all device operations may be available for HDMI Control
functions.
HDMI Control functions
Function Description
Playback of
content
On-screen
control
Recording of TV
program
Timer recording Timer recording using a program list on the
Confirmation of
recording
schedule
Display
Language
Setup
AV system
control
Power On The connected recorder can be turned On
Power Off The connected device(s) can be turned Off
The proper input source is automatically
selected and the content i s p la ye d b ac k o n t he
plasma television as you press PLAY on the
connected device
Recorder/player operation can be controlled
on-screen or with the remote control unit of
the plasma television (play, stop, fast forward/
reverse, etc.)
The program now watching can be recorded
using the remote control unit of the plasma
television
recorder connected
Recording schedule registered in the
recorder can be displayed and confirmed on
the screen using the remote control unit of
the plasma television
Information on the display menu language is
transferred to the recorder or player
connected to the plasma television. For
details, see the operation manual that came
with the recorder or player.
Receiver/amplifier operation can also be
controlled with the remote control unit of the
plasma television (volume, surround mode
and input selection of the HDMI terminal)
when the plasma television is turned On.
The plasma television can be turned On when
the connected recorder(s) or player(s) is
turned On and images are input to the plasma
television.
when the plasma television is turned Off
Usable
devices
Recorder/
player
Recorder/
player
Recorder
Recorder
Recorder
Recorder/
player
AV system
Recorder
Recorder/
player
Recorder/
player/AV
system
•Press i+/– or e to adjust volume for
the AV system.
•Press , , , , ENTER, RETURN
() or color (BLUE, RED, YELLOW,
GREEN) buttons to use functions such
as the disc navigator on the connected
recorder or player.
Note
• When using the HDMI Control functions, operate the remote
control unit while pointing it toward the remote control sensor
(
t) located at the bottom right of the front panel of the plasma
television.
• You cannot use two or more HDMI terminals at the rear of the
plasma television at the same time except “Power Off” and
“Display Language Setup” functions.
56
En
Page 57

Using the HDMI Control
11
On-screen control panel
For an AV system
1
HDMI Control
1
SURROUND+
2
INPUT- INPUT+
3
SURROUND-
4
HDMI CONTROLHDMI CONTROL
Exit
Press or on the remote control unit of the plasma television
to switch the surround mode in order or in reverse order, or
to switch the input source in order or in reverse order. Pressing
HDMI CONTROL turns the control panel screen off to return to the
HDMI Control menu.
Note
• You cannot operate the recorder/player when you press or
to switch the input source during operation. To resume the
operation, return to the HDMI Control menu and select the
desired function again.
For a recorder
HDMI Control
1
2
3
4
HDMI CONTROLHDMI CONTROL
Exit
Press or on the remote control unit of the plasma television
to select fast reverse or fast forward mode, to skip commercials
or to stop playback. Pressing ENTER starts playback and HDMI
CONTROL turns the control panel screen off to return to the HDMI
Control menu.
Switches the surround mode in
5
order
2
Switches the input source in
6
reverse order
7
3
Switches the surround mode in
reverse order
4
Closes the screen to return to the
HDMI Control menu
5
Displays the model number of the
connected device
6
Void
7
Switches the input source in order
1
Skips commercials
5
2
Fast reverse
3
Stops playback
6
4
Closes the screen to return to the
7
HDMI Control menu
5
Displays the model number of the
connected device
6
Starts playback
7
Fast forward
Making the HDMI Control connections
When you make changes in connections between the plasma
television and the device(s) that supports the HDMI Control
functions or settings for the “HDMI Control Setting”, perform the
following procedure:
1 Turn on the plasma television and all the connected devices.
2 Confirm that the setting in “Input Setting” for “HDMI Control
Setting” is properly entered according to the connected devices.
Also confirm the HDMI Control related settings in the connected
devices.
3 Switch to the HDMI input terminals to which the devices are
connected to check if audio and video images are properly output
and displayed.
4 Try turning off the plasma television, then turn the power back
on to the plasma television.
Connecting an AV amp/DVD recorder/BD player
MONITOR
SUB
OUT
WOOFER
(Rear view)
MONITOR
SUB
OUT
WOOFER
Stereo
audio cable
HDMI compliant cable
(HDMI cable having the
AV amp
HDMI mark)
English
For a player
1
Displays the DVD disc menu or
5
Blu-ray disc’s pop-up menu on the
player
6
2
Fast reverse
7
3
Stops playback
4
Closes the screen to return to the
HDMI Control menu
5
Displays the model number of the
connected device
6
Starts playback
7
Fast forward
1
2
3
4
HDMI CONTROLHDMI CONTROL
HDMI Control
MENU
Exit
Press or on the remote control unit of the plasma television to
select fast reverse or fast forward mode,
menu or Blu-ray disc’s pop-up menu on the player or
playback. Pressing
ENTER
starts playback and
to display the DVD disc
to stop
HDMI CONTROL
turns the control panel screen off to return to the HDMI Control
menu.
HDMI compliant cable
(HDMI cable having the
HDMI mark)
DVD recorder BD player
The PDP-508XG/PDP-428XG does not support S/PDIF. When
connecting the plasma television to an AV system, use the
MONITOR OUT terminal.
57
En
Page 58

11
Using the HDMI Control
Connecting a DVD recorder
(Rear view)
MONITOR
SUB
OUT
WOOFER
MONITOR
SUB
OUT
WOOFER
(Rear view)
MONITOR
SUB
OUT
WOOFER
HDMI compliant cable
(HDMI cable having the
HDMI mark)
DVD recorder
Note
• Maximum number of devices that can be connected and
controlled using the remote control unit of the plasma
television is as follows: recorder x 2, player x 2, AV system x 1.
• When connecting an AV system, be sure to place and connect
it between the plasma television and recorder or player.
• Do not connect an AV system that does not support the HDMI
Control functions between the plasma television and a
recorder/player, otherwise the HDMI Control functions may not
operate properly.
• When connecting an AV system that does not support the
HDMI Control functions and a player/recorder that supports
the HDMI Control functions to the plasma television, connect
the AV system to the MONITOR OUT terminal on the plasma
television using a stereo audio cable, and the recorder/player
to the HDMI terminal using an HDMI compliant cable (see the
illustration).
• HDMI Control may not operate properly if you do not use an
HDMI cable that supports the HDMI 1.3 Specification.
Stereo
audio cable
HDMI compliant cable
(HDMI cable having the
HDMI mark)
DVD recorderAV amp
• After making connections, enter the setting in “Input Setting”
for “HDMI Control Setting”. Be sure that the setting is entered
in each HDMI input terminal to which the device is connected.
• Settings in the connected device(s) are also required to use the
HDMI Control functions. For details, see the operation manual
that came with the connected device(s).
• When a recorder is connected, its power is automatically
switched on as the plasma television is turned On to help make
the recording smoother.
• For more information on the devices that support the HDMI
Control functions, check the Pioneer Web site (see back cover).
58
En
Page 59

Using the HDMI Control
11
Setting the HDMI Control
Selecting the input terminal
Select the HDMI terminal to which the external device is connected
in order to use the HDMI Control functions.
1 Press HOME MENU.
2 Select “Option” (/ then ENTER).
3 Select “HDMI Control Setting” (/ then ENTER).
HDMI Control Setting
Input Setting
Power Off Control
Power-On Ready
Hold Sound Status
4 Select “Input Setting” (/ then ENTER).
5 Select “INPUT 3” , “INPUT 4” or “INPUT 5” (/ then
ENTER).
Only the device that supports the HDMI Control and is connected
through the selected INPUT terminal is available for the HDMI
Control functions.
6 Press HOME MENU to exit the menu.
Note
• “INPUT 3” can only be selected when “Enable” has been
selected for the “HDMI Input” menu (see Activating the INPUT
3 HDMI terminal on page 46).
• If you have selected “Off” in step 5, a message “Operations
cannot be carried out. Confirm the HDMI control settings.”
appears when HDMI CONTROL is pressed on the remote
control unit.
• If you operate an HDMI supported device(s) using an HDMI
terminal other than the terminal selected in “Input Setting”, a
malfunction may occur. When connecting to any HDMI
terminals other than the terminal selected in “Input Setting”,
make sure to enter the settings of the external device(s) so that
the HDMI Control function does not operate.
INPUT 4
On
On
Off
Power On Test
Power Off Test
Selecting the Power-On Ready
You can select whether or not the plasma television is turned On
when the connected Pioneer recorder or player is turned On and
images are input to the plasma television.
(factory default is “On”)
1 Repeat steps 1 to 3 in Selecting the input terminal.
2 Select “Power-On Ready” (/ then ENTER).
3 Select “On” (/ then ENTER).
4 Press HOME MENU to exit the menu.
Selecting the Hold Sound Status
You can select whether or not the function is held for the
connected Pioneer AV system even if the system is placed into
standby during HDMI Control operations.
(factory default is “Off”)
1 Repeat steps 1 to 3 in Selecting the input terminal.
2 Select “Hold Sound Status” (/ then ENTER).
3 Select “On” (/ then ENTER).
4 Press HOME MENU to exit the menu.
Power On/Off Test
You can confirm if the Power On/Off control function is effective
between the plasma television and the connected device.
1 Repeat steps 1 to 3 in Selecting the input terminal.
2 Select “Power On Test” or “Power Off Test” (/ then
ENTER).
A list containing devices appears when multiple HDMI devices are
connected to the HDMI terminals.
3 Select the desired device (/ then ENTER).
4 Press HOME MENU to exit the menu.
Note
• Devices that can be checked for Power On/Off Test are those
connected to HDMI terminals as set in “Input Setting”.
• If the Power On/Off Test fails, check for the connection and
setting.
English
Selecting the Power Off Control
You can select whether or not the connected device is turned Off
when the plasma television is turned Off.
(factory default is “On”)
1 Repeat steps 1 to 3 in Selecting the input terminal.
2 Select “Power Off Control” (/ then ENTER).
3 Select “On” (/ then ENTER).
4 Press HOME MENU to exit the menu.
Note
• The “Power Off Control” function is valid for the devices
connected to any of HDMI terminals at the rear of the plasma
television.
59
En
Page 60

11
Using the HDMI Control
Using the HDMI Control menus
You can enjoy various functions with the connected Pioneer
recorder, player or AV system that supports the HDMI Control
functions by selecting and using the corresponding HDMI Control
menus.
1 Press HOME MENU.
2 Select “HDMI Control” (/ then ENTER).
The HDMI Control menu is displayed.
HDMI Control
Disc Navigator
Timer REC(DVR)
Timer REC List(DVR)
Pause Live TV
Stop REC(DVR)
CTRL Panel(AV-SYS)
Playback CTRL Panel
Switch to AV Sound
HDMI Control menu
Item Description
Disc Navigator Displays a title list of the connected recorder or
Timer REC (DVR) Displays a timer recording list of the connected
Timer REC List (DVR) Displays a timer recording list of the connected
Pause Live TV Starts recording of the current TV channel when a
Stop REC (DVR) Stops recording for the connected recorder
CTRL Panel
(AV-SYS)
Playback CTRL Panel Displays the control panel for the connected recorder
Switch to AV Sound
(Switch to PDP Sound)
player
recorder
recorder
recorder is connected, but with playback paused,
effectively pausing the broadcast
Displays the control panel for the connected AV
system on the plasma television
or player on the plasma television
Switches between the plasma television and the
connected AV system to which sound is output
Note
• To use the HDMI Control functions, a Pioneer recorder, player
or AV system that supports the HDMI Control functions is
required.
• Not all operations may be controlled for the connected devices.
• The HDMI Control menu is not selectable when “Off” is
selected in “Input Setting” for the “HDMI Control Setting”
menu.
• Even when the program being recorded is over, recording is not
automatically stopped on the Pause Live TV menu.
• The CTRL Panel (AV-SYS) menu is only available when the
sound is output from the AV system.
• The Playback CTRL Panel menu is selectable when the
connected recorder or player is ready to operate.
• You can also display the HDMI Control menu by pressing
HDMI CONTROL on the remote control unit of the plasma
television.
60
En
Page 61

Using Teletext
Chapter 12
12
Using Teletext
Using the Teletext Functions
What is Teletext?
Teletext broadcasts pages of information and entertainment to
specially equipped television sets. Your plasma television receives
Teletext signals broadcast by TV networks, and decodes them into
graphical format for viewing. News, weather and sports
information, stock exchange prices and program previews are
among many services available.
Important
• Displaying Teletext pages for a long period of time, or for
shorter periods of time everyday, may result in image retention.
Operating the Teletext basics
Turning on and off Teletext
1 Select a TV channel or external input source providing a
Teletext program.
2 Press
3 Press
and normal image on the left screen.
• Each time you press
• If you select a program with no Teletext signal, “Cannot display
Selecting and operating Teletext pages
Use the following remote control buttons to select and operate
Teletext pages.
Color (RED/GREEN/YELLOW/BLUE):
You can select a group or block of pages displayed in the colored
brackets at the bottom of the screen by pressing the corresponding
color (RED/GREEN/YELLOW/BLUE) on the remote control unit.
0 to 9:
Directly select any page from 100 to 899 by using 0 to 9.
w / x:
Press
Press
k:
To display hidden information such as an answer to a quiz, press
k.
Press
To stop updating Teletext pages, press .
Press again to release the hold mode.
l:
Displays an Index page for the CEEFAX/FLOF format. Displays a
TOP Over View page for the TOP format.
m to display the Teletext (full screen).
m again to display the Teletext on the right screen
m, the screen switches as shown to the
left.
Teletext.” appears.
w to increase the page number.
x to decrease the page number.
k again to hide the information.
:
English
Tele tex t
Note
• Before displaying the Teletext, return the screen to the singlescreen mode.
Teletext
61
En
Page 62

12
Using Teletext
Displaying subpages
You can display several subpages as they are transmitted.
203 203TEXT 01:44:37
P- P+ Life Promis
01 02 03 04
1 Press
m to display Teletext.
• If you open a page containing subpages, the subpages are
automatically displayed in sequence.
2 To quit automatic subpage change, press /.
• You can then manually change subpages by pressing /.
Note
• Pressing
w/x causes the page to be changed and the
subpage screen to disappear.
• Pressing stops automatic subpage change and performs its
respective button function.
Displaying TOP Over View
When receiving TOP Teletext, you can read a TOP text overview.
TOP Over View
BLOCK PAGES
TV PROGRAMS
COLOR BAR
WEATHER
NEWS
MOVIE
LOCAL
SPORTS
BLOCK 1
BLOCK 2
BLOCK 3
1 Press
m to display Teletext.
2 While receiving TOP Teletext, press
View.
3 Press / and / to select the desired block or group
pages, and then press ENTER.
GROUP PAGES
FOOT BALL
BASKETBALL
TENNIS
SKI
JUDO
SWIM
GROUP 1
GROUP 2
GROUP 3
GROUP 4
l to display TOP Over
Displaying subtitle pages
You can display several subtitles as they are transmitted.
1 Press
Subtitle is updated by the information sent by the broadcasting
station.
2 Press
62
En
[ to display the subtitle.
[ again to access next available subtitle screen.
Page 63

Additional information
Chapter 13
13
Additional information
Troubleshooting
Problem Possible solution
GENERAL
• No power.
• System cannot be switched on.
• Power is suddenly turned off. • The system’s internal temperature has increased. Remove any objects blocking vent or clean. (See page 15.)
• The system cannot be operated. • External influences such as voltage malfunction, static electricity, etc., may cause improper operation. In this
• Remote control unit does not operate. • Is the TV indicator on the remote control unit lighted? Press SELECT on the remote control unit to select the TV
• Panel sounds /noises. • Panel generated sounds—for example, fan motor noise, electrical circuit humming , glass panel buzzing—are
PICTURE/SOUND
• Screen appears dark • Check if any obstacles exist in front of the Room Light Sensor. (See pages 12 and 39.)
• No image and audio is presented. • Check if the input source for video or PC has been unintentionally selected although you want to watch a TV
• No picture. • Is connection to other components correct? (See pages 42 to 47.)
• Audio is output but no image is presented. • Check if you have selected “Picture Off” for Energy Save. With this option selected, the screen is deactivated: only
• Images are presented but no audio is
output.
• Sound is reversed between
the right and left speakers.
• Sound is output from only a single speaker.
• Picture is cut off. • Is the image position correct? (See page 36.)
• Strange color, light color, dark or color
misalignment.
• Is the power cord disconnected? (See page 17.)
•Has a on the plasma television been turned on? (See page 19.)
• Check if you pressed buttons 0 to 9 or on the remote control unit. (See page 19.)
• If the indicator on the system lights up red, press 0 to 9 or on the remote control unit or STANDBY/ON on the
plasma television.
• Check the power control setting. (See page 34.)
• Check the sleep timer setting. (See page 40.)
case, operate the system after unplugging the power cord and re-plugging it in after one or two minutes.
mode.
• Are batteries inserted with polarity (+, –) aligned? (See page 18.)
• Are batteries worn out? Replace with new batteries. (See page 18.)
• Operate the remote control unit while pointing it toward the remote control sensor on the plasma television. (See
page 18.)
• Are you using it under strong or fluorescent lighting?
• Is a fluorescent light illuminated to remote control sensor?
• Check if any obstacles exist between the remote control unit and the remote control sensor.
normal operation of a phosphor-based matrix display.
• When you change the Energy Save mode, you may notice a change in the panel sound. This is normal.
channel. (See page 20.)
• Check if you have selected a channel blocked with Child Lock. (See page 26.)
• Enter a password to temporarily cancel Child Lock. (See page 40.)
• Check the cable connection with the antenna. (See page 16.)
• Check the cable connection with the other equipment. (See pages 42 to 47.)
• Is a non-compatible PC signal being input? (See page 44.)
sound is output. To restore the screen display, press any button other than (Sound Effect), i +/i – or
e (See page 34).
• Check if you have selected the minimum volume. (See page 20.)
• Check that no headphones are connected.
• Check that the sound is not muted. (See page 20.)
• Check that the audio input is also connected. (See pages 42 to 44.)
• Check the sound system selected for a TV channel where problems have occurred (see page 21). Reselect the
correct sound system.
• Check if the speaker cable connections have been reversed between the right and left or if the speaker cable from
either speaker has been disconnected (for PDP-508XG only). (See page 13.)
• Has the balance been correctly adjusted? (See page 33.)
• Has the correct screen size been selected? (See page 37.)
• Adjust the picture tone. (See pages 28 to 31.)
• Is the room too bright? The picture may look dark in a room that is too bright.
• Check the color system setting. (See page 37.)
English
63
En
Page 64

13
Additional information
Problem Possible solution
• After-image lag. • After displaying a still image or a very bright image for a certain period of time, if the screen is then switched to a
• Brightness and color tone on both sides
differ from those in the center in 4:3 mode.
darker scene, the previous image may appear as an after-image.
• This can be rectified by playing a rather bright moving image for several minutes. However, displaying a still image
for excessively long periods of time may cause permanent display deterioration.
• To help eliminate after-image when it occurs, display the “Video Pattern” screen. (See page 40.)
• If images in 4:3 mode or letterbox images are displayed for long periods or for shorter periods over several days,
an after-image may remain due to burning. This is a characteristic of plasma televisions.
• We recommend that you enjoy watching images in a full screen mode as much as possible. (See page 37.)
• When watching images in 4:3 mode, we recommend you select “Auto” for the Side Mask setting. This adjusts the
brightness of the gray side masks according to the brightness of the main image. (See page 39.)
HDMI Control
• HDMI Control functions do not operate. • Check if the connections are properly made between the plasma television and the device that supports the HDMI
• No image and audio is presented. • Check if the connections are properly made between the plasma television and the device that supports the HDMI
• No picture • Check if the connections are properly made between the plasma television and the device that supports the HDMI
• No sound • Check if the connections are properly made between the plasma television and the device that supports the HDMI
•An error message “The device cannot be
operated. Please check the connection.”
appears.
Control functions. (See page 57.)
• HDMI Control may not operate properly if you do not use an HDMI cable that supports the HDMI 1.3 Specification.
• Check if you have entered the settings properly for “HDMI Control Setting”. (See page 59.)
• Check if the settings for the HDMI Control functions are effective on the connected device(s). For details, refer to
the operation manual that came with the device.
Control functions. (See page 57.)
• Check if you have entered the settings properly for the HDMI Control Setting. (See page 59.)
Control functions. (See page 57.)
• Check if you have entered the settings properly for “HDMI Control Setting”. (See page 59.)
Control functions. (See page 57.)
• Check if you have entered the settings properly for “HDMI Control Setting”. (See page 59.)
• Check if the connections are properly made between the plasma television and the device that supports the HDMI
Control functions. (See page 57.)
• Check if you have entered the settings properly for “HDMI Control Setting”. (See page 59.)
OTHER
• POWER ON indicator or STANDBY indicator
is quickly flashing.
• An external device connected to the USB
terminal does not operate.
• Photo data stored in digital still cameras
cannot be read through the USB interface.
• Internal protective circuits may have been activated. First turn off a on the plasma television, and then turn the
power on by pressing a again after waiting one minute or more. If the indicator is still flashing, unplug the plasma
television’s power cord from the power outlet. Wait one to two minutes then plug in the plasma television again.
If this does not solve the problem, contact a Pioneer Service Center or Pioneer Authorized Independent Service
company. These are listed on your warranty card for each country or region.
• Check if the device is connectable to the display. (See page 48.)
• Re-insert the USB cable. (See page 48.)
• For connection, use a USB cable shorter than 5 m. (See page 48.)
• Check if the USB cable is properly connected. (See page 48.)
• First turn off a on the plasma television and then turn it on again in order to check if the external device works
correctly.
• Check if the external device works correctly after the USB device was restarted.
• Check if the digital still camera is in the viewing mode.
• Refer to the instruction manual for the digital still camera.
• Check if the device is connectable to the display. (See page 48.)
• Check if the digital still camera turns on.
If the following error codes appear on the screen, check the corresponding items in the table.
Code Message Check
SD04 and SD11 Powering off. Internal temperature too high.
Check temperature around PDP.
SD05 (PDP-508XG)
Internal protection circuit turns power off.
Is there a short in the speaker cable?
(PDP-428XG)
Internal protection circuit turns power off.
Check if the ambient temperature of the plasma television is high.
Check the speaker cable connections between the plasma television
and the speakers.
Contact a Pioneer Service Center or Pioneer Authorized Independent
Service company. These are listed on your warranty card for each
country or region.
64
En
Page 65

Additional information
Signal assignments for 15-pin D-sub connector
Pin No. Signal assignment Pin No. Signal assignment
1 R 9 +5 V
2 G 10 GND (ground)
3 B 11 Not connected
4 Not connected 12 SDA
5 Not connected 13 HD
6 GND (ground) 14 VD
7 GND (ground) 15 SCL
8 GND (ground)
13
English
Standard channel allocation selections for countries and regions
Region Standard channel allocation Region Standard channel allocation
Taiwan Air (US Type)* Mexico Air (US Type)*
Hong Kong General Chile Air (US Type)*
Philippines Air (US Type)* Brazil Air (US Type)*
Thailand General Australia General
Malaysia General New Zealand General
Singapore General Egypt General
Indonesia General South Africa General
Saudi Arabia General Colombia Air (US Type)*
Israel General Peru Air (US Type)*
Lebanon General Venezuela Air (US Type)*
United Arab Emirates General
* When receiving signals from a cable TV company, select “Cable (US Type)” for “Channel Allocation”. See Setting up TV channels
automatically on page 25.
65
En
Page 66

13
Additional information
Specifications
Item 50” plasma television, model: PDP-508XG 42” plasma television, model: PDP-428XG
Number of pixels 1365 x 768 pixels 1024 x 768 pixels
Audio amplifier 17 W + 17 W (1 kHz, 10 %, 6 Ω)
Speakers – Woofer: 4.8 cm x 13 cm cone type
Sound Effect SRS FOCUS/SRS/SRS TruBass
Power Requirements 110 V to 240 V AC, 50 Hz/60 Hz, 366 W
Weight 34.6 kg (76.3 lbs.) 29.6 kg (65.3 lbs.)
Color System PAL/SECAM/NTSC/4.43 NTSC/PAL-M/PAL-N
TV Function Receiving System PAL: B/G, D/K, I SECAM: B/G, D/K NTSC: M/N
Tuner VHF/UHF 44.25 MHz to 863.25 MHz
CATV Hyper-band, S1 ch to S41ch
Auto Channel Preset 99 ch (General), 68 ch (Air, US Type), 125 ch (Cable, US Type), Auto Preset
Audio multiplex NICAM/A2/BTSC System
Terminals Rear INPUT 1 COMPONENT VIDEO in, S-VIDEO in, AV in
INPUT 2 COMPONENT VIDEO in, S-VIDEO in, AV in
INPUT 3
INPUT 4
INPUT 5
PC INPUT Analog RGB, Audio in
CONTROL OUT 1
MONITOR OUT AV out
SUBWOOFER Variable
SPEAKERS 6 Ω to 16 Ω –
Antenna 75 Ω Din Type for VHF/UHF in
Side INPUT 6 S-VIDEO, AV in
USB
PHONES 16 Ω to 32 Ω recommended
(0.2 W Standby/110 V AC)
S-VIDEO in, AV in, HDMI in
*1
HDMI in
*1
HDMI in
*2
USB in
*1
Tweeter: 2.5 cm semidome type
110 V to 240 V AC, 50 Hz/60 Hz, 298 W
(0.2 W Standby/110 V AC)
*1
This conforms to HDMI1.3 and HDCP1.1. HDMI (High-Definition Multimedia Interface) is a digital interface that handles both video and audio using a single cable.
HDCP (High-bandwidth Digital Content Protection) is a technology used to protect copyrighted digital contents that use the Digital Visual Interface (DVI).
*2
This conforms to USB1.1 and 2.0 specifications.
Design and specifications are subject to change without notice.
Trademarks
• is a trademark of SRS Labs, Inc.
• WOW technology is incorporated under license from SRS Labs, Inc.
• This product includes FontAvenue
FontAvenue is a registered trademark of NEC Corporation.
• DDC is a registered trademark of Video Electronics Standards Association.
• HDMI, the HDMI logo and High-Definition Multimedia Interface are trademarks or registered trademarks of HDMI Licensing LLC.
• The names of companies or institutions are trademarks or registered trademarks of the respective companies or institutions.
66
En
®
fonts licensed by NEC Corporation.
Page 67

Additional information
Dimensions
PDP-508XG
Unit: mm
13
English
717
PDP-428XG
Unit: mm
679
1040
1224
115
115
Published by Pioneer Corporation.
Copyright © 2007 Pioneer Corporation.
All rights reserved.
67
En
Page 68

Para utilizar su televisor de plasma por un largo período de tiempo
Precauciones contra el quemado de la pantalla
Imagen retenida y quemado de la pantalla
Imagen retenida:
Cuando se visualizan caracteres, imágenes o imágenes de patrones fijos con luminancia muy alta en una pantalla de plasma, aunque se visualicen
durante un período relativamente corto de tiempo, la imagen puede permanecer en la pantalla debido a la carga eléctrica residual del panel. Sin embargo,
esto no es un fallo de funcionamiento. Esta imagen remanente puede eliminarse gradualmente mediante la visualización de imágenes en movimiento en
la pantalla completa.
Quemado:
Cuando se visualizan imágenes como las que se han descrito anteriormente durante un largo período de tiempo continua o repetidamente, ocurre una
diferencia entre la luminancia de la imagen visualizada continuamente y la de las otras partes de la pantalla, resultando en una imagen retenida en la
pantalla debido al quemado. Tenga en cuenta que si este quemado ocurre, puede que sea difícil restaurar completamente la pantalla a su estado anterior
al quemado. También se debe tener en cuenta que este fenómeno tiende a ocurrir más fácilmente inmediatamente después de la compra del
producto.
Ejemplos de visualización susceptibles al quemado
• Si se visualizan programas digitales en un tamaño de pantalla de 4:3 repetidamente, el
área de visualización normal, además de las bandas negras laterales de la pantalla, queda
susceptible al quemado.
• Si se visualizan imágenes en tamaño de cine repetidamente en su tamaño original, el área
de visualización normal, además de las bandas negras en las partes superior e inferior de
la pantalla, queda susceptible al quemado.
• Si se visualizan programas con indicación de la hora o nombre de la estación en la
pantalla durante un largo período de tiempo (o repetidamente), puede que los caracteres
visualizados se quemen fácilmente en la pantalla.
• Si se visualizan imágenes de patrones fijos tales como las visualizaciones de computadoras o software de juegos durante un largo período de tiempo,
puede que los patrones se quemen fácilmente en la pantalla.
Prevención del quemado
Se recomienda utilizar el televisor de plasma prestándose atención a los asuntos que se describen a continuación, particularmente cuando se utiliza el
producto inmediatamente después de comprarlo, para evitar el quemado de la pantalla.
• Siempre que sea posible, evite utilizar el producto visualizando imágenes susceptibles al quemado como se ha descrito anteriormente.
• Utilice el producto con la función Orbiter configurada a “Encendido”
(⇒Consulte Ajustes útiles: “Orbiter”).
•Cuando visualice programas
en pantalla completa. (Cambie el tamaño de pantalla a “PANORÁMICA”, por ejemplo, con el botón de tamaño de pantalla en el mando a distancia
⇒Consulte Nombres de los componentes: “Mando a distancia”)).
(
• Configure la función de detección de máscara lateral a “Encendido” (
• Cuando contemple en un tamaño de pantalla de 4:3, ajuste el brillo de las máscaras laterales
a “Auto” en “Brillo sinc.”. (⇒Consulte Ajustes útiles: “Cambio del brillo en ambos lados de la pantalla (Máscara lateral)”).
• Se recomienda reducir el brillo cuando se contemple con la función Ahorro de energía ajustada a “Modo 1” (⇒ consulte Configuración: “Ahorro de
energía”).
en un tamaño de pantalla de 4:3 o de cine, cambie el tamaño de pantalla con el mando a distancia para visualizar la imagen
⇒Consulte Ajustes útiles: “Detección de máscaras laterales” ).
15:00 PROTV
15:00 PROTV
que aparecen en los lados izquierdo y derecho de la pantalla
15:00 PROTV
15:00 PROTV
Page 69

IMPORTANTE
T
CAUTION
RISK OF ELECTRIC SHOCK
DO NOT OPEN
La luz intermitente con el símbolo de punta
de flecha dentro un triángulo equilátero.
Está convenido para avisar el usuario de la
presencia de “voltaje peligrosa” no aislada
dentro el producto que podría constituir un
peligro de choque eléctrico para las
personas.
PRECAUCIÓN
El interruptor de la alimentación de este aparato no corta
por completo toda la alimentación de la toma de corriente de
CA. Puesto que el cable de alimentación hace las funciones
de dispositivo de desconexión de la corriente para el aparato,
para desconectar toda la alimentación del aparato deberá
desenchufar el cable de la toma de corriente de CA. Por lo
tanto, asegúrese de instalar el aparato de modo que el cable
de alimentación pueda desenchufarse con facilidad de la
toma de corriente de CA en caso de un accidente. Para evitar
correr el peligro de incendio, el cable de alimentación también
deberá desenchufarse de la toma de corriente de CA cuando
no se tenga la intención de utilizarlo durante mucho tiempo
seguido (por ejemplo, antes de irse de vacaciones).
ATENCIÓN:
PARA PREVENIR EL PELIGRO DE CHOQUE
ELÉCTRICO NO REMOVER LA TAPA NI LAS
PARTES DENTRO NO UTILIZADAS,
LLAMAR UNA PERSONA CUALIFICADA
D3-4-2-2-2a_A_Sp
ADVERTENCIA
Este aparato no es impermeable. Para evitar el riesgo de
incendio y de descargas eléctricas, no ponga ningún
recipiente lleno de líquido (como pueda ser un vaso o un
florero) cerca del aparato ni lo exponga a goteo,
salpicaduras, lluvia o humedad.
D3-4-2-1-3_A_Sp
El punto exclamativo dentro un triángulo
equilátero convenido para avisar el usuário
de la presencia de importantes
instrucciones sobre el funcionamiento y la
manutención en la libreta que acompaña el
aparato.
D3-4-2-1-1_Sp
Los símbolos siguientes se encuentran en
la etiquetas fijadas al producto. Estos
símbolos alertan a los usuarios y personal
de servicio de este equipo acerca de
cualquier condición potencialmente
peligrosa.
ADVERTENCIA
Este símbolo se refiere a un peligro o
actuación insegura que puede causar
lesiones personales o daños a la
propiedad.
PRECAUCIÓN
Este símbolo se refiere a un peligro o
situación insegura que puede causar
graves lesiones personales o la muerte.
Español
ADVERTENCIA
Antes de enchufar el aparato a la corriente, lea la
sección siguiente con mucha atención.
La tensión de la red eléctrica es distinta según el país o
región. Asegúrese de que la tensión de la alimentación de la
localidad donde se proponga utilizar este aparato
corresponda a la tensión necesaria (es decir, 230 V ó 120 V)
indicada en el panel posterior.
D3-4-2-1-4_A_Sp
ADVERTENCIA
Este producto está provisto de una clavija de tres
conductores con toma de tierra (puesta a tierra) cuya tercera
patilla es la de toma de tierra. Esta clavija sólo se adapta en
una toma de corriente del tipo de toma de tierra. Si no
puede insertar la clavija en la toma de corriente, llame a un
electricista profesional para que le reemplace la toma de
corriente por otra con toma de tierra que sea adecuada. No
elimine el dispositivo de seguridad de la clavija con toma de
tierra.
D3-4-2-1-6_A_Sp
Entorno de funcionamiento
emperatura y humedad del entorno de funcionamiento
+0 ˚C a +40 ˚C (+32 ˚F a +104 ˚F); menos del 85 % de
humedad relativa (rejillas de refrigeración no obstruidas)
No instale este aparato en un lugar mal ventilado, ni en lugares
expuestos a alta humedad o a la luz directa del sol (o de otra luz
artificial potente).
D3-4-2-1-7c_A_Sp
ADVERTENCIA
Para evitar el peligro de incendio, no ponga nada con fuego
encendido (como pueda ser una vela) encima del aparato.
D3-4-2-1-7a_A_Sp
PRECAUCIÓN PARA LA VENTILACIÓN
Cuando instale este aparato, asegúrese de dejar espacio en
torno al mismo para la ventilación con el fin de mejorar la
disipación de calor. Para el espacio mínimo requerido,
consulte la página 15.
ADVERTENCIA
Las ranuras y aberturas de la caja del aparato sirven para su
ventilación para poder asegurar un funcionamiento fiable
del aparato y para protegerlo contra sobrecalentamiento.
Para evitar el peligro de incendio, las aberturas nunca
deberán taparse ni cubrirse con nada (como por ejemplo,
periódicos, manteles, cortinas) ni ponerse en
funcionamiento el aparato sobre una alfombra gruesas o
una cama.
Botón STANDBY/ON
STANDBY:
En el modo de espera, el flujo de alimentación
principal se corta y la unidad no queda
totalmente operacional.
Indicador STANDBY/ON
El indicador se enciende en rojo cuando la unidad está en el
modo de espera y se enciende en azul cuando está en el modo
de encendido.
Page 70

Contenido
Gracias por la adquisición de este producto Pioneer.
Lea completamente este manual de instrucciones para aprender a operar correctamente el aparato. Después de haber terminado la
lectura de las instrucciones, guarde el manual en un lugar seguro para poderlo consultar en el futuro.
En algunos países o regiones, la forma de la clavija de alimentación y de la toma de corriente pueden ser diferentes de la mostrada en
las ilustraciones de explicación. Sin embargo, el método de conexión y la operación del aparato son iguales.
Las ilustraciones que aparecen en este manual son para el modelo PDP-508XG, a menos que se especifique de lo contrario.
Contenido
01 Información importante para el usuario. . . . . . . 6
02 Precauciones de seguridad. . . . . . . . . . . . . . . . . . 9
Precauciones relacionadas con la instalación . . . . . . . . . . . . . . . 10
03 Accesorios suministrados . . . . . . . . . . . . . . . . . . 11
04 Nombres de los componentes . . . . . . . . . . . . . . 12
Televisor de plasma . . . . . . . . . . . . . . . . . . . . . . . . . . . . . . . . . . . . . 12
Mando a distancia . . . . . . . . . . . . . . . . . . . . . . . . . . . . . . . . . . . . . . 14
05 Preparación . . . . . . . . . . . . . . . . . . . . . . . . . . . . . 15
Instalación del televisor de plasma . . . . . . . . . . . . . . . . . . . . . . . . 15
Traslado del televisor de plasma . . . . . . . . . . . . . . . . . . . . . . . . . . 15
Prevención de caída del televisor de plasma . . . . . . . . . . . . . . . . 16
Conexiones básicas . . . . . . . . . . . . . . . . . . . . . . . . . . . . . . . . . . . . . 16
Preparación del mando a distancia . . . . . . . . . . . . . . . . . . . . . . . . 18
Rango de operación del mando a distancia . . . . . . . . . . . . . . . . . 18
06 Contemplación de TV . . . . . . . . . . . . . . . . . . . . . 19
Encendido. . . . . . . . . . . . . . . . . . . . . . . . . . . . . . . . . . . . . . . . . . . . . 19
Colocación del sistema en el modo de espera . . . . . . . . . . . . . . . 19
Cambio de canales . . . . . . . . . . . . . . . . . . . . . . . . . . . . . . . . . . . . . 20
Cambio del volumen y sonido. . . . . . . . . . . . . . . . . . . . . . . . . . . . . 20
Cambio del canal de audio de emisión . . . . . . . . . . . . . . . . . . . . . 21
Utilización de las funciones de multipantalla . . . . . . . . . . . . . . . . 21
Congelamiento de imágenes . . . . . . . . . . . . . . . . . . . . . . . . . . . . . 22
07 El MENÚ PRINCIPAL . . . . . . . . . . . . . . . . . . . . . . . 23
Resumen del MENÚ PRINCIPAL . . . . . . . . . . . . . . . . . . . . . . . . . . 23
Utilización del MENÚ PRINCIPAL . . . . . . . . . . . . . . . . . . . . . . . . . 24
08 Configuración . . . . . . . . . . . . . . . . . . . . . . . . . . . 25
Configuración automática de los canales de TV . . . . . . . . . . . . . .25
Configuración manual de los canales de TV . . . . . . . . . . . . . . . . .25
Reducción de ruido de vídeo . . . . . . . . . . . . . . . . . . . . . . . . . . . . . .26
Configuración del bloqueo infantil . . . . . . . . . . . . . . . . . . . . . . . . .26
Supresión de la distorsión de audio . . . . . . . . . . . . . . . . . . . . . . . .26
Etiquetado de canales de TV . . . . . . . . . . . . . . . . . . . . . . . . . . . . . .27
Organización de los canales de TV predeterminados . . . . . . . . . .27
Configuración del idioma. . . . . . . . . . . . . . . . . . . . . . . . . . . . . . . . .27
Selección AV . . . . . . . . . . . . . . . . . . . . . . . . . . . . . . . . . . . . . . . . . . .28
Ajustes de imagen básicos . . . . . . . . . . . . . . . . . . . . . . . . . . . . . . .28
Ajustes de imagen avanzados . . . . . . . . . . . . . . . . . . . . . . . . . . . . .29
Comparación de los ajustes de imagen en la pantalla . . . . . . . . .32
Ajustes del sonido . . . . . . . . . . . . . . . . . . . . . . . . . . . . . . . . . . . . . .33
Escucha de audio de la pantalla secundaria con auriculares . . .33
Control de la alimentación. . . . . . . . . . . . . . . . . . . . . . . . . . . . . . . .34
09 Ajustes útiles . . . . . . . . . . . . . . . . . . . . . . . . . . . . 36
Cambio del modo de accionamiento vertical
(fuente de AV solamente). . . . . . . . . . . . . . . . . . . . . . . . . . . . . . . . .36
Ajuste de las posiciones de imagen
(fuente de AV solamente). . . . . . . . . . . . . . . . . . . . . . . . . . . . . . . . .36
Ajuste automático de las posiciones y reloj de las imágenes
(fuente de PC solamente). . . . . . . . . . . . . . . . . . . . . . . . . . . . . . . . .36
Ajuste manual de las posiciones y reloj de las imágenes
(fuente de PC solamente). . . . . . . . . . . . . . . . . . . . . . . . . . . . . . . . .37
Configuración del sistema de color . . . . . . . . . . . . . . . . . . . . . . . .37
Selección de un modo de juego . . . . . . . . . . . . . . . . . . . . . . . . . . .37
Selección manual de un tamaño de pantalla . . . . . . . . . . . . . . . .37
Selección automática de un tamaño de pantalla . . . . . . . . . . . . .38
Detección de máscaras laterales . . . . . . . . . . . . . . . . . . . . . . . . . .38
Cambio del brillo en ambos lados de la pantalla
(Máscara lateral). . . . . . . . . . . . . . . . . . . . . . . . . . . . . . . . . . . . . . . .39
Sensor de luz ambiental. . . . . . . . . . . . . . . . . . . . . . . . . . . . . . . . . .39
Regulación del LED azul . . . . . . . . . . . . . . . . . . . . . . . . . . . . . . . . .39
Orbiter . . . . . . . . . . . . . . . . . . . . . . . . . . . . . . . . . . . . . . . . . . . . . . . .39
Patrón de vídeo . . . . . . . . . . . . . . . . . . . . . . . . . . . . . . . . . . . . . . . . .40
Temporizador de apagado . . . . . . . . . . . . . . . . . . . . . . . . . . . . . . . .40
Utilización de una contraseña . . . . . . . . . . . . . . . . . . . . . . . . . . . . .40
4
Sp
Page 71

Contenido
10 Utilización con otros equipos . . . . . . . . . . . . . . .42
Conexión de un sintonizador digital. . . . . . . . . . . . . . . . . . . . . . . . 42
Conexión de un reproductor DVD . . . . . . . . . . . . . . . . . . . . . . . . . 42
Conexión de una videograbadora. . . . . . . . . . . . . . . . . . . . . . . . . . 43
Conexión de una consola de videojuegos o una
videocámara . . . . . . . . . . . . . . . . . . . . . . . . . . . . . . . . . . . . . . . . . . . 43
Conexión de una computadora . . . . . . . . . . . . . . . . . . . . . . . . . . . 44
Conexión de un amplificador/receptor de AV . . . . . . . . . . . . . . . . 44
Prevención de realimentación indeseable . . . . . . . . . . . . . . . . . . 44
Utilización de la entrada HDMI . . . . . . . . . . . . . . . . . . . . . . . . . . . 45
Utilización de cables de control . . . . . . . . . . . . . . . . . . . . . . . . . . . 47
Utilización de interfaz USB (función Home Gallery). . . . . . . . . . . 48
Control de otros equipos con el mando a distancia
suministrado . . . . . . . . . . . . . . . . . . . . . . . . . . . . . . . . . . . . . . . . . . 50
Español
11 Utilización del Control HDMI. . . . . . . . . . . . . . . .56
Utilización de las funciones del Control HDMI . . . . . . . . . . . . . . . 56
Conexiones de Control HDMI . . . . . . . . . . . . . . . . . . . . . . . . . . . . . 57
Configuración del Control HDMI . . . . . . . . . . . . . . . . . . . . . . . . . . 59
Utilización de los menús del Control HDMI . . . . . . . . . . . . . . . . . 60
12 Utilización del teletexto . . . . . . . . . . . . . . . . . . .61
Utilización de las funciones de teletexto . . . . . . . . . . . . . . . . . . . . 61
Operaciones básicas de teletexto. . . . . . . . . . . . . . . . . . . . . . . . . . 61
13 Información adicional . . . . . . . . . . . . . . . . . . . . .63
Solución de problemas . . . . . . . . . . . . . . . . . . . . . . . . . . . . . . . . . . 63
Asignaciones de señales para el conector mini D-sub de 15
contactos . . . . . . . . . . . . . . . . . . . . . . . . . . . . . . . . . . . . . . . . . . . . . 65
Selecciones de asignación de canal estándar para países y
regiones . . . . . . . . . . . . . . . . . . . . . . . . . . . . . . . . . . . . . . . . . . . . . . 65
Especificaciones . . . . . . . . . . . . . . . . . . . . . . . . . . . . . . . . . . . . . . . 66
Sp
5
Page 72

01
Información importante para el usuario
Capítulo 1
Información importante para el usuario
Para disfrutar al máximo con este televisor de plasma PDP-508XG/
PDP-428XG de Pioneer, lea primero cuidadosamente esta
información.
Con el PDP-508XG/PDP-428XG de Pioneer, usted puede estar
seguro de disponer de un televisor de plasma de alta calidad, larga
duración y alta fiabilidad. Para lograr imágenes de una calidad
excepcional, este televisor de plasma de Pioneer incorpora un
diseño y una construcción de vanguardia, así como también una
tecnología muy precisa y avanzada.
El PDP-508XG/PDP-428XG de Pioneer incorpora la más avanzada
tecnología de filtro de color: Direct Color Filter. Esto mejora la
reproducción de los colores y de la imagen de estos modelos en
comparación con los modelos anteriores. También elimina la
necesidad de poner un panel de vidrio físico en frente del panel de
plasma, lo que fomenta el objetivo continuado de Pioneer de
reducir la basura ambiental en los productos electrónicos de
consumo, ahora durante el procesamiento de fabricación y en el
futuro durante el procesamiento de reciclaje.
Durante el curso de su vida útil, la luminosidad del televisor de
plasma PDP-508XG/PDP-428XG de Pioneer se reducirá muy
lentamente, al igual que sucede con todas las pantallas basadas
en fósforo (la pantalla de un televisor de tubo tradicional, por
ejemplo). Para disfrutar de imágenes hermosas y brillantes en su
televisor de plasma de Pioneer durante mucho tiempo, lea y siga
cuidadosamente los consejos de utilización indicados a
continuación:
Consejos para la utilización
Todas las pantallas basadas en fósforo (incluyendo los televisores
de tubo convencional) pueden ser afectadas al mostrar imágenes
estáticas durante un largo período de tiempo. Los televisores de
plasma no son ninguna excepción. Los efectos de imagen residual
y permanente en la pantalla pueden evitarse tomando algunas
precauciones básicas. Siguiendo las recomendaciones listadas a
continuación, usted podrá asegurar que su televisor de plasma
dure más y ofrezca unos resultados más satisfactorios:
• Siempre que sea posible, evite visualizar frecuentemente la
misma imagen o imágenes en movimiento virtualmente fijas
(ej., imágenes de videojuegos con partes estáticas).
• No visualice teletexto durante un período de tiempo
prolongado.
• Evite ver durante largos periodos de tiempo la visualización en
pantalla correspondiente a un sintonizador digital, reproductor
DVD, videograbadora y todos los demás componentes.
• Cuando utilice el modo de imagen fija de un televisor,
videograbadora, reproductor DVD o cualquier otro
componente, no visualice la misma imagen ni haga una pausa
durante un largo período de tiempo.
• Las imágenes que tienen áreas muy brillantes y muy oscuras
unas junto a otras no deberán visualizarse durante largos
períodos de tiempo.
• Cuando visualice imágenes de juegos, se recomienda utilizar
el modo “JUEGO” dentro de “Selección AV”. Sin embargo, no
utilice este modo durante largos períodos de tiempo.
• Después de jugar con una consola de videojuegos, visualizar la
imagen de un PC o de visualizar cualquier imagen fija, lo mejor
es ver una imagen en movimiento normal en la pantalla
“PANORÁMICA” o “COMPLETA” durante un tiempo tres veces
superior al que dura la imagen fija/en movimiento anterior.
6
• Después de utilizar el televisor de plasma, ponga siempre la
Sp
pantalla en el modo “STANDBY”.
Consejos para la instalación
El diseño del televisor de plasma PDP-508XG/PDP-428XG de
Pioneer es muy delgado. Para garantizar la seguridad, tome las
medidas apropiadas para montar o instalar el televisor de plasma
de forma que no se caiga en el caso de producirse vibraciones o
algún movimiento accidental.
Este producto deberá instalarse utilizando solamente las piezas y
los accesorios diseñados por Pioneer. La utilización de accesorios
que no sean el soporte o la ménsula de instalación de Pioneer
puede ser la causa de que se produzcan inestabilidad y lesiones.
Para realizar una instalación personalizada, consulte el
concesionario a quien adquirió la unidad. Para garantizar una
instalación correcta de la unidad, ésta deberá ser llevada a cabo
por un experto con experiencia y bien cualificado. Pioneer no se
hará responsable de los accidentes o daños causados al utilizar las
piezas y los accesorios fabricados por otras compañías.
Para evitar fallos en el funcionamiento y recalentamientos,
asegúrese de que los orificios de ventilación de la unidad principal
no estén bloqueados al hacer la instalación, para asegurar así una
salida del calor apropiada:
• Separe ligeramente la unidad de otros equipos, paredes, etc.
Para el espacio mínimo requerido alrededor del aparato,
consulte la página 15.
• No instale la unidad en espacios angostos donde la ventilación
no sea apropiada.
• No tape la unidad con un paño, etc.
• Utilizando una aspiradora con su potencia de aspiración
ajustada al mínimo, limpie el polvo acumulado en los orificios
de ventilación de los lados y de la parte trasera de la unidad.
• No ponga el producto sobre una alfombra o manta.
• No deje el producto inclinado.
• No vuelva el producto al revés.
La utilización de la unidad sin la ventilación apropiada puede ser la
causa de que la temperatura interna aumente y de que se
produzca un fallo en el funcionamiento. Cuando la temperatura
ambiental o interna supere cierto valor, la pantalla se apagará
automáticamente para que se enfríen los componentes
electrónicos internos y se impidan situaciones peligrosas.
Puede que se produzca un fallo en el funcionamiento debido a: un
lugar de instalación inapropiado o a un ensamblaje, instalación,
montaje o funcionamiento incorrectos de este producto, o a que se
han hecho modificaciones en el mismo. Sin embargo, Pioneer no
se hace responsable de los accidentes o fallos en el
funcionamiento que se puedan producir.
Nota
A continuación se describen las características y efectos típicos
de una pantalla de matriz basada en fósforo y, por lo tanto, no
están cubiertos por las garantías limitadas del fabricante:
• Imágenes residuales permanentes en el fósforo del panel.
• La existencia de un número muy pequeño de celdas de luz
inactivas.
• Sonidos generados por el panel como, por ejemplo: Ruido del motor
del ventilador, y zumbido del circuito eléctrico/panel de vidrio.
Page 73

Información importante para el usuario
01
Precaución
• Pioneer no se hace responsable de los daños provenientes de la
utilización incorrecta del producto por el usuario u otras personas,
fallos de funcionamiento durante la utilización, problemas
relacionados con otros componentes, y utilización del producto,
excepto en los casos donde la compañía deba ser responsable.
Función de protección del televisor de plasma
Cuando imágenes fijas (como fotos e imágenes de computadoras)
permanecen en la pantalla durante un período de tiempo
prolongado, la pantalla se oscurece ligeramente. Esto ocurre
porque la función de protección del televisor de plasma ajusta
automáticamente el brillo para proteger la pantalla al detectar
imágenes fijas y, por lo tanto, no indica un fallo de funcionamiento.
La pantalla se oscurece cuando se detecta una imagen fija durante
aproximadamente tres minutos.
Información de defecto de píxel
El televisor de plasma visualizan información utilizando píxeles.
Los paneles de los televisores de plasma de Pioneer contienen un
número muy grande de píxeles. (Dependiendo del tamaño del
panel: más de 2,3 millones de celdas en el caso de una pantalla de
42 pulgadas; y más de 3,1 millones de celdas en el caso de una
pantalla de 50 pulgadas). Todos los paneles de visualización de
Pioneer se fabrican utilizando un nivel muy alto de tecnología de
ultra-precisión y pasan por un control de calidad individual.
En casos raros, puede que algunos píxeles queden
permanentemente apagados, o encendidos, resultando en un píxel
negro o de color permanentemente fijo en la pantalla.
Este efecto es común en todos los televisores de plasma, porque
es una consecuencia de la tecnología.
Si los píxeles defectuosos están visibles en una distancia de
visualización normal entre 2,5 metros y 3,5 metros mientras se ve
una transmisión normal (o sea, no en una tarjeta de prueba,
imagen fija o visualización en color simple), póngase en contacto
con el revendedor.
Si, entretanto, sólo se puede verlos muy cerca o durante
visualizaciones en color simples, esto se considera normal para
esta tecnología.
Rayos infrarrojos
El televisor de plasma radia rayos infrarrojos debido a sus
características. Dependiendo de cómo se está utilizando el
televisor de plasma, los mandos a distancia de equipos próximos
pueden afectarse adversamente, o teléfonos sin hilos que utilizan
rayos infrarrojos pueden sufrir interferencias. Si esto es el caso,
ponga el equipo en un lugar donde su sensor de mando a distancia
no sea afectado.
No fije ítems como etiquetas y cintas al producto
Esto puede causar la decoloración o arañazo de la caja.
Cuando no utilice el producto durante un largo período de
tiempo
Si no utiliza el producto durante un largo período de tiempo, puede
que las funciones del producto se afecten adversamente.
Encienda y opere el producto ocasionalmente.
Condensación
La condensación puede formarse en la superficie o dentro del
producto cuando se traslada el producto rápidamente de un lugar
frío a un lugar caliente, o inmediatamente después que se
encienda un calentador en una mañana de invierno, por ejemplo.
Si hay condensación, no encienda el producto. Espere hasta que
la condensación desaparezca. Utilizar el producto con
condensación puede causar un fallo de funcionamiento.
Limpieza de la superficie de la pantalla y de la superficie
lustrosa de la caja frontal
Al limpiar la superficie de la pantalla o la superficie lustrosa de la
caja frontal, límpiela suavemente con un paño blando y seco, con
el paño de limpieza suministrado, u otros paños similares (ej.,
algodón y franela). Si se utiliza un paño duro o polvoriento, o si se
frota la pantalla con mucha fuerza, la superficie de la pantalla
puede arañarse.
Si se limpia la superficie de la pantalla con un paño mojado, las
gotas de agua en la superficie pueden entrar en el producto, lo que
podría causar un fallo de funcionamiento.
Limpieza de la caja
Al limpiar la caja de este producto, límpiela suavemente con un
paño blanco y limpio (ej., algodón y franela). Si se utiliza un paño
duro o polvoriento, o si se frota la caja con mucha fuerza, la
superficie de la caja puede arañarse.
La caja de este producto está compuesta en su mayor parte de
plástico. No utilice substancias químicas como benzina o
diluyentes para limpiar la caja. La utilización de estas substancias
químicas puede causar el deterioro de la calidad o extracción del
revestimiento.
No exponga el producto a gases o fluidos volátiles como pesticida.
No deje el producto quedarse en contacto con productos de
caucho o vinilo durante un período de tiempo prolongado. El efecto
del plastificante en el plástico puede causar el deterioro de la
calidad o extracción del revestimiento.
Si se limpia la superficie de la caja con un paño mojado, las gotas
de agua en la superficie pueden entrar en el producto, lo que
podría causar un fallo de funcionamiento.
Español
Interferencia de radio
Aunque este producto satisfaga las especificaciones requeridas,
ello emite una pequeña cantidad de ruido. Al poner equipos como
radio AM, computadora o videograbadora cerca de este producto,
tales equipos pueden sufrir interferencias. Si esto ocurre, ponga el
equipo afectado lo más distante posible de este producto.
Sonido de accionamiento del televisor de plasma
La pantalla del televisor de plasma se compone de píxeles
extremamente finos y estos píxeles emiten luz de acuerdo con las
señales de vídeo recibidas. Este principio puede hacerle oír un
sonido de zumbido o zumbido del circuito eléctrico del televisor de
plasma.
Asideros en la parte trasera del televisor de plasma
No retire los asideros de la parte trasera del televisor de plasma.
Al trasladar el televisor de plasma, pida ayuda a otra persona y
utilice los asideros instalados en la parte trasera del televisor de
plasma. No traslade el televisor de plasma agarrando sólo un
asidero.
No utilice los asideros para colgar el producto cuando instale o
traslade el producto, por ejemplo. No utilice los asideros para el
propósito de evitar que el producto caiga.
7
Sp
Page 74

01
Información importante para el usuario
Ruido del ventilador
La velocidad de rotación del motor del ventilador de enfriamiento
aumenta cuando la temperatura ambiente del televisor de plasma
se pone alta. Puede que oiga el sonido del motor del ventilador en
este caso.
Para utilizar este producto por un largo período de tiempo
La función de ahorro de energía puede mantener la eficiencia de la
pantalla por un largo período de tiempo. Se recomienda ajustar la
función de ahorro de energía a “Modo 1” para mantener la
eficiencia de la pantalla por un largo período de tiempo.
Precaución
Imagen remanente del panel
La visualización de las mismas imágenes, imágenes fijas por
ejemplo, durante un largo período de tiempo puede causar el
efecto de imagen remanente. Esto puede ocurrir en los dos casos
siguientes.
Imagen remanente debida a carga eléctrica remanente
Cuando hay patrones de imagen en la pantalla con una luminancia
de pico muy alto que duran más de un minuto, puede que se
produzca imagen remanente debido a la carga eléctrica
remanente. Las imágenes remanentes que quedan en la pantalla
desaparecerán cuando se visualicen imágenes en movimiento. El
tiempo que tardan en desaparecer las imágenes remanentes
depende de la luminancia de las imágenes fijas y del tiempo que
éstas han sido visualizadas.
Imagen remanente (imagen retenida) debido al quemado
Evite visualizar continuamente la misma imagen en el televisor de
plasma durante largos períodos de tiempo.
Si se visualiza la misma imagen continuamente durante un largo
período de tiempo, o por períodos de tiempo más cortos durante
varios días, quedará una imagen remanente permanente en la
pantalla debido a que se han quemado materiales fluorescentes.
Es posible que tales imágenes se noten menos si luego se
visualizan imágenes en movimiento, pero no desaparecerán
continuamente.
Nota
• Cuando se visualiza una imagen fija, como un menú de
programa, durante 5 a 10 minutos, el sistema apaga la imagen
automáticamente para evitar daños del quemado de la
pantalla.
• Para evitar el quemado de la pantalla, la posición de
visualización cambia automáticamente de forma
imperceptible mientras se está viendo el televisor de plasma
(consulte Orbiter en la página 39).
Prevención de daños desde el quemado de la pantalla
• Se recomienda disfrutar de la visualización de imágenes en
pantalla completa, excepto cuando esto pueda resultar en
violación de los derechos de autor (consulte la página 37).
• Ajuste la función de detección de máscaras laterales a
“Encendido”, para detectar las imágenes de alta definición en
la relación de aspecto de 16:9 con máscaras laterales y añadir
las máscaras laterales o visualizar la imagen en pantalla
completa automáticamente, proporcionando así
contramedidas más efectivas para el quemado de la pantalla
(consulte Detección de máscaras laterales en la página 38).
8
Sp
Page 75

Precauciones de seguridad
Capítulo 2
Precauciones de seguridad
02
La electricidad se utiliza para realizar muchas funciones útiles, pero ésta
también puede causar lesiones a las personas y daños en las
propiedades si no se manipula correctamente. Este producto ha sido
diseñado y fabricado dando la máxima prioridad a la seguridad. Sin
embargo, si no se utiliza de la forma correcta puede producir descargas
eléctricas y/o un incendio. Para impedir posibles peligros, siga las
instrucciones siguientes cuando instale, utilice y limpie el producto.
Para garantizar su seguridad y prolongar la duración de su producto, lea
cuidadosamente las instrucciones siguientes antes de utilizarlo.
1
. Lea las instrucciones - Antes de utilizar el producto deberán leerse y
entenderse todas las instrucciones de funcionamiento.
2. Guarde este manual en un lugar seguro - Estas instrucciones de
seguridad y operación deben guardarse en un lugar seguro para
futuras consultas.
3. Observe las advertencias - Todas las advertencias del producto y de las
instrucciones deberán seguirse al pie de la letra.
4. Siga las instrucciones - Deberán seguirse todas las instrucciones de
operación.
5. Li mpi eza - Desenchu fe el cable de alimentación de l a toma de CA antes
de limpiar el producto. Para limpiar el producto, utilice el paño de
limpieza suministrado u otros paños blandos (ej., algodón, franela). No
utilice productos de limpieza líquidos ni en aerosol.
6. Accesorios - No utilice accesorios que no hayan sido recomendados
por el fabricante. La utilización de accesorios que no son adecuados
puede causar accidentes.
7. Agua y humedad - No utilice el producto cerca del agua como, por
ejemplo, una bañera, palangana, fregadero de cocina, lavadora, piscina
y sótano húmedo.
8. Soporte - No coloque el producto en un carrito, soporte, trípode o mesa
inestable. La colocación del producto en una base inestable puede ser
la causa de que el producto se caiga, lo que podría causar lesiones
graves a personas y también daños al producto. Utilice solamente un
carrito, soporte, trípode, ménsula o mesa recomendado por el
fabricante o vendido junto con el producto. Cuando coloque el
producto en una pared, asegúrese de seguir las instrucciones del
fabricante. Utilice solamente el hardware de montaje recomendado por
el fabricante.
9. Cuando traslade el producto colocado en un carrito, éste deberá
moverse con el máximo cuidado. Las paradas repentinas, la fuerza
excesiva y la superficie del suelo irregular pueden ser la causa de que
el producto caiga del carrito.
10. Ventilación - Los orificios de ventilación y otras aberturas de la caja han
sido diseñados para ventilar el producto. No cubra ni bloquee estos
orificios de ventilación y aberturas porque la falta de ventilación puede
causar recalentamiento y/o reducir la duración del producto. No
coloque el producto en una cama, sofá, alfombra u otra superficie
similar porque las aberturas de ventilación podrán quedar bloqueadas.
Este producto no ha sido diseñado para ser empotrado; no lo coloque
en un lugar cerrado como, por ejemplo, un mueble librería o estantería
a menos que disponga de la ventilación apropiada o se sigan las
instrucciones del fabricante.
11. Fuente de alimentación - Este producto deberá funcionar con la fuente
de alimentación especificada en la etiqueta de especificaciones. Si no
está seguro acerca del tipo de alimentación utilizado en su hogar,
consulte su concesionario o a la compañía abastecedora de
electricidad de su localidad.
12. Protección del cable de alimentación - Los cables de alimentación
deberán instalarse correctamente para evitar que los pisen las
personas o que puedan colocarse objetos pesados encima de ellos.
Compruebe los cables en las clavijas de alimentación y donde se
enchufan al producto.
13. El panel de plasma utilizado en este producto está hecho de cristal. Por
lo tanto, podrá romperse cuando el producto se caiga o reciba un
impacto fuerte. En el caso de que se rompa el televisor de plasma,
tenga cuidado para no herirse con las piezas de cristal rotas.
Sobrecarga - No sobrecargue las tomas de CA ni los cables de prolongación.
14.
La sobrecarga puede causar un incendio o una descarga eléctrica.
15.
Entrada de objetos y líquidos - No inserte nunca un objeto en el producto
a través de los orificios de ventilación o aberturas. Por el interior del
producto circula alta tensión, y la inserción de un objeto puede causar
una descarga eléctrica y/o un cortocircuito en las piezas internas. Por la
misma razón, no derrame agua o líquidos en el interior del producto.
16. Trabajo de servicio - No intente realizar usted mismo ningún trabajo de
servicio en el producto. Quitar las cubiertas puede exponerle a una
tensión alta y a otras condiciones peligrosas. Para realizar trabajos de
servicio, póngase en contacto con personal de servicio cualificado.
17. Reparaciones - Si se produce cualquiera de las condiciones indicadas
a continuación, desenchufe el cable de alimentación de la toma de CA
y solicite al personal de servicio cualificado que lleve a cabo las
reparaciones.
a. Cuando el cable de alimentación o su clavija estén estropeados.
b. Cuando se derrame líquidos en el producto o hayan caído objetos
en su interior.
c. Cuando el producto haya estado expuesto a la lluvia o al agua.
d. Cuando el producto no funcione correctamente como se describe
en las instrucciones de operación.
No toque otros controles que no sean los descritos en las instrucciones
de operación. El ajuste incorrecto de los controles que no se describen
en las instrucciones puede causar daños, que a menudo requieren el
trabajo exhaustivo de un técnico cualificado.
e. Cuando el producto se haya caído o estropeado.
f. Cuando el producto muestre una condición anormal. Cualquier
anormal idad que se n ote en e l produ cto ind icará q ue éste nece sita
ser reparado.
18. Piezas de reemplazo - En el caso de que el producto necesite piezas de
reemplazo, asegúrese de que el personal de servicio utilice las piezas
especificadas por el fabricante, o aquellas que tengan las mismas
características y rendimiento que las piezas originales. La utilización de
piezas no autorizadas puede causar un incendio, descarga eléctrica y/
o otros peligros.
19. Comprobaciones de seguridad - Al finalizar el trabajo de servicio o el
trabajo de reparación, pida al técnico de servicio que realice
comprobaciones de seguridad para asegurar que el producto se
encuentre en condiciones de funcionamiento apropiadas.
20. Montaje en pared o techo - Cuando monte el producto en una pared o
en el techo, asegúrese de instalarlo según el método recomendado por
el fabricante.
21. Fuentes de calor - Mantenga el producto alejado de las fuentes de calor
tales como radiadores, estufas y otros productos que generen calor
(incluyendo amplificadores).
22. Desenchufe el cable de alimentación de la toma de CA antes de instalar
los altavoces (para PDP-508XG solamente).
23. No exponga nunca el televisor de plasma a impactos fuertes como, por
ejemplo, chocándolo contra otros objetos. La pantalla puede romperse,
lo que podría causar un incendio o lesiones personales.
24. No exponga el televisor de plasma a la luz directa del sol por un largo
período de tiempo. Las características ópticas del panel de protección
frontal cambiarán, lo que causará la decoloración o alabeo del panel.
25. El televisor de plasma pesa aproximadamente 34,6 para el PDP-508XG
y aproximadamente 29,6 kg para el PDP-428XG. Como el producto tiene
una profundidad pequeña y es inestable, desempaque, traslade e
instale el producto con por lo menos una persona más y utilice los
asideros.
Español
9
Sp
Page 76

02
Precauciones de seguridad
Precauciones relacionadas con la
instalación
Observe las precauciones siguientes cuando instale con
cualesquiera ítems como el soporte opcional.
Cuando utilice el soporte opcional, ménsulas o
componentes equivalentes
Solicite la instalación a su revendedor.
Asegúrese de utilizar los pernos suministrados.
Para los detalles, consulte el manual de instrucciones que
acompaña el soporte opcional (o componentes equivalentes).
Cuando utilice otros componentes
Consulte su revendedor.
Los seis agujeros de montaje siguientes pueden utilizarse para la
instalación:
Vista trasera (PDP-508XG)
Agujero de montaje
Vista trasera (PDP-428XG)
MONITOR
SUB
OUT
WOOFER
Línea mediana
Agujero de montaje
Línea
mediana
Vista lateral
Superficie de montaje
Televisor de
plasma
Ménsula de
montaje (o
equivalente)
12 mm a 18 mm
Tornillo M8
Precaución
• Asegúrese de utilizar cuatro o más agujeros de montaje
simétricos a las líneas medianas vertical y horizontal.
• Utilice tornillos M8, de 12 mm a 18 mm de profundidad desde
la superficie de montaje del televisor de plasma. Vea la vista
lateral arriba.
• Tenga cuidado de no bloquear la abertura de ventilación en la
parte trasera del televisor de plasma.
• Asegúrese de instalar el televisor de plasma en una superficie
plana, porque contiene un cristal.
• Los agujeros de tornillo diferentes de los indicados en las
ilustraciones de la izquierda se utilizan solamente para los
productos especificados. No los utilice nunca para el montaje
de productos no especificados.
• No monte ni extraiga el televisor de plasma, en o desde el
soporte, con los altavoces instalados (para PDP-508XG
solamente).
10
Sp
MONITOR
SUB
OUT
WOOFER
Línea mediana
Nota
• Recomendamos fuertemente que utilice los productos de
Agujero de montajeAgujero de montaje
Línea
mediana
montaje opcionales de Pioneer.
• Pioneer no se hace responsable de cualesquier lesiones
personales o daños del producto resultantes de la utilización
de componentes de montaje diferentes de los productos
opcionales de Pioneer.
Page 77

Accesorios suministrados
Capítulo 3
Accesorios suministrados
Compruebe que todos los siguientes accesorios estén en la caja.
03
Paño de limpieza
Mando a distancia
Pilas de tamaño AA x 2
(para mando a distancia)
Núcleo de ferrita
Enlace de cable
(para núcleo de ferrita)
Abrazaderas rápidas x 3
Abrazaderas de cuentas x 3
Tarjeta de garantía
Español
Manual de instrucciones
Cable de alimentación *
Cable de alimentación
(con un núcleo de ferrita
1
instalado)*
1
*1 Se suministra uno de los cables de alimentación dependiendo
del país.
11
Sp
Page 78

04
Nombres de los componentes
Capítulo 4
Nombres de los componentes
Televisor de plasma
(Parte frontal)
11
12
13
14
15
Lado
1
PDP-508XG PDP-428XG
2
ON STANDBY
3
SLEEP
5
4
6
Lado
7
8
9
10
2
3
4
SLEEPON STANDBY
1
5 6
Los terminales en los paneles laterales son comunes a los modelos PDP-508XG y PDP-428XG.
1 Botón (Si el botón está desactivado, el sistema no se
encenderá aun cuando se pulse , 0 a 9 en el mando a
distancia o STANDBY/ON en el televisor de plasma.)
2 Indicador POWER ON
3 Indicador STANDBY
4 Indicador SLEEP
5 Sensor de luz ambiental
6 Sensor del mando a distancia
7 Botón STANDBY/ON
12
Sp
Visto del lado de abajo de la pantalla
Visto de la parte frontal de la pantalla
8 Botón INPUT
9 Botones VOLUME +/–
10 Botones CHANNEL +/–
11 Puerto USB
12 Terminal PHONES (auriculares)
13 Terminal INPUT 6 (S-VIDEO)
14 Terminal INPUT 6 (VIDEO)
15 Terminales INPUT 6 (AUDIO)
Page 79

Nombres de los componentes
Televisor de plasma
(Parte trasera)
PDP-508XG PDP-428XG
04
12
11
10
MONITOR
SUB
OUT
MONITOR
SUB
OUT
WOOFER
MONITOR
SUB
OUT
WOOFER
13 14 15 1716
MONITOR
SUB
OUT
WOOFER
18
19
9
20
21
78 6 5 4 3 2 1
*Para las posiciones exactas de los terminales,
refiérase a la hoja de posiciones de los terminales
que se encuentra en el compartimiento de los
terminales.
WOOFER
MONITOR
SUB
OUT
WOOFER
13 14 15 1716
MONITOR
SUB
OUT
12
WOOFER
18
11
10
9
19
20
21
Español
23 22
23 22 24
Los terminales de 1 a 8 son los mismos que los del PDP-508XG.
1 Terminal AC IN
2 Terminal de entrada ANT (antena)
3 Terminal RS-232C (se utiliza para la configuración de fábrica)
4 Terminal CONTROL OUT (soporta SR+)
5 Terminal PC INPUT (analog RGB)
6 Terminal INPUT 5 (HDMI)
7 Terminal INPUT 4 (HDMI)
8 Terminal INPUT 3 (HDMI)
9 Terimnales INPUT 1 (AUDIO L, R)
10 Terminal INPUT 1 (VIDEO)
11 Terminal INPUT 1 (S-VIDEO)
12 Terminal INPUT 2 (VIDEO)
13 Terminal INPUT 2 (S-VIDEO)
14 Terimnales INPUT 2 (AUDIO L, R)
15 Terminal INPUT 3 (S-VIDEO)
16 Terminales MONITOR OUT (AUDIO L, R)
17 Terminal SUBWOOFER
18 Terminal MONITOR OUT (VIDEO)
19 Terminal INPUT 3 (VIDEO)
20 Terminales INPUT 2 (COMPONENT VIDEO: Y, P
, PR)
B
21 Terminal PC INPUT (AUDIO (STEREO))
22 Terminales INPUT 1 (COMPONENT VIDEO: Y, P
, PR)
B
23 Terimnales INPUT 3 (AUDIO L, R)
24 Terminales SPEAKERS L, R (PDP-508XG solamente)
13
Sp
Page 80

04
Nombres de los componentes
Mando a distancia
En esta sección se describen las funciones de los botones que se
encuentran disponibles cuando el modo TV ha sido seleccionado
con el botón SELECT. Para los botones para controlar otros
equipos, consulte Control de otros equipos con el mando a distancia
suministrado a partir de la página 50.
1
2
3
4
2
5
6
7
8
9
10
11
12
13
14
15
16
17
1 : Conecta la alimentación del televisor de plasma o lo pone
en el modo de espera.
2 INPUT: Selecciona una fuente de entrada (“ENTRADA 1”,
“ENTRADA 2”, “ENTRADA 3”, “ENTRADA 4”, “ENTRADA 5”,
“ENTRADA 6” o “PC”)
3 0 a 9: Modo de entrada de TV/equipo externo: Selecciona un
canal.
Modo de teletexto: Selecciona una página.
Enciende el televisor cuando el indicador STANDBY está
encendido en rojo.
4 CH RETURN: Vuelve al canal seleccionado anteriormente.
5P+/P–: Modo de entrada de TV/equipo externo: Selecciona un
canal.
w/x: Modo de teletexto: Selecciona una página.
6 SELECT: Cambia la selección entre TV, STB, DVD/DVR y VCR,
de modo que pueda controlar otros equipos conectados,
utilizando el mando a distancia suministrado.
7 TV, STB, DVD/DVR, VCR: Estos indicadores muestran la
selección actual y el estado cuando se controla otro equipo
conectado con el mando a distancia suministrado.
14
Sp
18
19
20
21
22
23
24
25
26
27
28
8 RETURN: Restaura la pantalla del menú anterior.
9 ///: Selecciona un ítem deseado en la pantalla de
configuración.
ENTER: Ejecuta un comando.
10 HDMI CONTROL: VIsualiza el menú de control HDMI.
11 Color (ROJO/VERDE/AMARILLO/AZUL): Modo de teletexto:
Selecciona una página.
12
[: Salta a la página de subtítulos de teletexto.
13 k: Visualiza caracteres ocultos.
14 h: Utilice para seleccionar un modo de efecto de sonido.
15 g: Ajusta el modo múltiplex de sonido.
16 AV SELECTION: Selecciona las configuraciones de audio y
vídeo. (Fuente de AV: ÓPTIMO, ESTÁNDAR, DINÁMICO,
PELÍCULA, JUEGO, DEPORTE, USUARIO. Fuente de PC:
ESTÁNDAR, USUARIO.)
17 c: Pulse para seleccionar el modo de 2 pantallas, imagen-en-
imagen o pantalla simple.
18 CH ENTER: Ejecuta una selección de canal por los botones
numéricos.
19 i +/i –: Ajusta el volumen.
20 e: Silencia el sonido.
21 HOME MENU: Modo de entrada de TV/equipo externo:
Visualiza la pantalla del MENÚ PRINCIPAL.
22 p : Modo de entrada de TV/equipo externo: Visualiza la
información de canal.
23 m: Selecciona el modo de teletexto (Todas las imágenes de
TV, todas las imágenes de TEXTO, imágenes de TV/TEXTO).
24 l: Modo de teletexto: Visualiza una página de índice para el
formato CEEFAX/FLOF.
25 f: Modo de entrada de TV/equipo externo: Selecciona el
tamaño de la pantalla.
26 d: Modo de entrada de TV/equipo externo: Congela un
fotograma de una imagen en movimiento. Pulse de nuevo para
cancelar la función.
: Modo de teletexto: Detiene la actualización de páginas de
teletexto. Pulse de nuevo para cancelar el modo de retención.
27 : Desplaza la posición de la pantalla secundaria en el modo
de imagen-en-imagen.
28 : Intercambia entre las pantallas principal y secundaria en
el modo de imagen-en-imagen o de 2 pantallas.
Nota
• Cuando utilice el mando a distancia, apúntelo al televisor de
plasma.
Page 81

Preparación
Capítulo 5
Preparación
05
Instalación del televisor de plasma
Más de 50 cm
Más de
10 cm
Ubicación
• Evite la luz directa del sol. Mantenga la ventilación adecuada.
Precaución
• Si no deja espacio suficiente sobre el televisor de plasma, éste
no recibirá la ventilación adecuada y no funcionará
correctamente.
• Pioneer no se hará responsable por accidentes o dãnos
causados por una instalación o estabilización inadecuada,
operación incorrecta, modificación o desastres naturales.
(Para PDP-508XG)
Altavoz inferior
Español
Altavoz lateral
(Para PDP-428XG)
Nota
• Permita un espacio suficiente alrededor de las partes superior
y trasera al instalar, para asegurar la ventilación alrededor de
la parte trasera.
• Asegúrese de instalar el televisor de plasma en una ubicación
plana y estable.
Utilización del soporte Pioneer opcional
Para los detalles de la instalación, consulte el manual de
instrucciones suministrado con el soporte.
Utilización de los altavoces Pioneer opcionales (para
PDP-508XG solamente)
Para los detalles de la instalación, consulte el manual de
instrucciones suministrado con los altavoces.
Traslado del televisor de plasma
Cuando instale en una estantería, etc., sostenga el televisor de
plasma como se muestra a la derecha. Como el televisor de
plasma es pesado, asegúrese de pedir la ayuda a otra persona al
trasladarlo.
Nota
• No utilice el altavoz para soportar el peso del televisor de
plasma.
• Cuando el televisor de plasma tiene altavoces montados por
debajo, siempre saque los altavoces antes de mover el televisor
de plasma. No sostenga el televisor de plasma por los
accesorios de montaje de altavoz.
15
Sp
Page 82

05
Preparación
Prevención de caída del televisor de plasma
Después de instalar el soporte, asegúrese de tener especial
cuidado para asegurar que el televisor de plasma no caiga y se
estabilice en la pared y en la estantería.
Estabilización en una mesa o estantería
Estabilice el televisor de plasma como se muestra en el diagrama
utilizando las abrazaderas de plástico y tornillos suministrados con
el soporte opcional.
Nota
• Para estabilizar el televisor de plasma en una mesa o
estantería, utilice tornillos con un diámetro nominal de 4 mm y
con por lo menos 20 mm de largo.
4 mm
8 mm a 15 mm
20 mm mín.
M
ONITOR
OUT
SUB
WOOFER
Utilización de una pared para la estabilización
1 Instale los pernos (ganchos) de prevención de caída en el
televisor de plasma.
2 Utilice cuerdas fuertes para estabilizarlo apropiada y
firmemente en una pared, pilar u otro elemento robusto.
Realice este trabajo de la misma manera en los lados izquierdo y
derecho.
Utilice ganchos, cuerdas y accesorios que se encuentran
disponibles en el comercio. Gancho recomendado: Diámetro
nominal de 8 mm y largo de 12 a 18 mm.
12 mm a 18 mm
1. Gancho
2. Cable
Accesorio
MONITOR
OUT
SUB
WOOFER
M8
Tornillo
(M4 x 10 mm)
Tornillo de rosca para madera
(disponible comercialmente,
4 mm x 20 mm mín.)
Taladre un agujero
en el medio del lado
trasero del tablero
antes de utilizar un
tornillo de rosca
para madera.
Realice este trabajo
Tornillo
de la misma manera
en los lados
izquierdo y derecho.
Tornillo de rosca para madera
Precaución
• Siempre se debe utilizar una mesa o estantería con una
resistencia adecuada para soportar el televisor de plasma.
Dejar de hacer esto podría resultar en lesiones personales y
daños físicos.
• Al instalar el televisor de plasma, tome las medidas de
seguridad necesarias para evitar que el televisor caiga o se
vuelque en caso de emergencias, como en terremotos o
accidentes.
• Si no toma estas precauciones, el televisor de plasma podría
caer y causar lesiones.
• Los tornillos, ganchos, cuerdas y otros accesorios que se
utilicen para fijar el televisor de plasma para prevenir que se
vuelque varían de acuerdo con la composición y espesor de la
superficie donde se instala el televisor.
• Seleccione los tornillos, ganchos, cuerdas y otros accesorios
adecuados después de inspeccionar la superficie
cuidadosamente para determinar su espesor y composición, y
16
Sp
después de consultar un instalador profesional si fuese
necesario.
Conexiones básicas
Conexión de la antena
Para disfrutar de una imagen clara, utilice una antena exterior. A
continuación se explica brevemente los tipos de conexiones que se
utilizan para un cable coaxial.
(Vista trasera)
MONITOR
SUB
OUT
WOOFER
Clavija estándar DIN45325 (IEC169-2)
Cable coaxial de 75 ohmios (cable redondo)
(disponible comercialmente)
• Conecte el cable coaxial de 75 ohmios (disponible
comercialmente) al terminal ANT IN (entrada de antena).
Page 83

Preparación
05
Cable de antena (disponible comercialmente)
Si su antena exterior utiliza un cable coaxial de 75 ohmios con una
clavija estándar DIN45325 (IEC169-2), enchúfela al terminal de
antena en la parte trasera del televisor de plasma.
Nota
• Si la antena no está conectada correctamente, puede que la
calidad de recepción no sea buena. Si las imágenes no se
visualizan correctamente, verifique si la conexión de la antena
está correcta o no.
Encaminamiento de los cables
Utilice las abrazaderas rápidas como sea necesario para
encaminar los cables de conexión. Los diagramas a continuación
muestran la ubicación de los agujeros en la parte trasera de la
pantalla.
PDP-508XG (Vista trasera )
MONITOR
SUB
OUT
WOOFER
Ordenación de los cables de altavoz (PDP-508XG
solamente)
Utilice las abrazaderas de cuentas suministradas como sea necesario
para ordenar los cables de altavoz.
MONITOR
SUB
OUT
WOOFER
Cable de altavoz
Vista trasera
Abrazadera de cuentas
Fijación del núcleo de ferrita
(cuando un núcleo de ferrita no está instalado)
Para ayudar la prevención contra ruidos, fije el núcleo de ferrita
suministrado al extremo del conector del cable de alimentación
como se muestra. Utilice el enlace de cable suministrado para
prevenir que el núcleo de ferrita deslice en el cable.
1
2
3
4
Español
PDP-428XG (Vista trasera )
MONITOR
SUB
OUT
WOOFER
Fijación y extracción de las abrazaderas rápidas
Inserte [1] en el agujero apropiado en la parte trasera del televisor
de plasma, y meta [2] en la parte trasera de [1] para fijar la
abrazadera.
2
1
• Las abrazaderas rápidas están diseñadas para que no se
deshagan fácilmente una vez que estén en posición. Por lo
tanto, fíjelas cuidadosamente.
• Utilice alicates para girar la abrazadera 90º, tirándola hacia
fuera. La abrazadera puede deteriorarse con el paso del tiempo
y estropearse si se retira.
• Tenga cuidado en no sujetar ningún cabo de conexión a
esfuerzos.
Nota
• Utilice las abrazaderas rápidas como sea necesario.
Núcleo de ferrita
Enlace de cable
A la toma de
corriente
Cable de alimentació de CA
Lo más cerca posible
Conexión de cable de alimentación
Vista trasera
MONITOR
SUB
OUT
WOOFER
Cable de alimentación
Nota
• Desenchufe el cable de alimentación de la toma de corriente
cuando no planee utilizar el televisor de plasma durante un largo
período de tiempo.
• Después de haber conectado todos los demás componentes,
conecte el cable de alimentación a la toma de CA.
Núcleo de ferrita
Elimina parcialmente el ruido causado
por la fuente de energía.
A la toma de corriente
17
Sp
Page 84

05
Preparación
Preparación del mando a distancia
Instalación de las pilas
1 Abra la tapa del compartimiento de las pilas.
2 Instale las dos pilas de tamaño AA mientras inserta sus
extremos de polaridad negativa (–) primero.
Ponga las pilas con sus terminales correspondientes alineados
con los indicadores (+) y (–) en el compartimiento de las pilas.
3 Cierre la tapa del compartimiento de las pilas.
Rango de operación del mando a distancia
Opere el mando a distancia apuntándolo al sensor de mando a
distancia ubicado en la derecha inferior del panel frontal del
televisor de plasma. La distancia desde el sensor de mando a
distancia debe estar dentro de 7 m, y el ángulo relativo al sensor
debe estar dentro de 30 grados en la dirección derecha, izquierda,
hacia arriba, o hacia abajo.
30º
7 m
Sensor del
mando a
distancia
30º
Nota
• Para el sensor de mando a distancia ubicado en la pantalla
PDP-428XG, consulte Nombres de los componentes en la
página 12.
Precaución
La utilización incorrecta de las pilas puede causar fugas del
electrólito o una explosión. Asegúrese de seguir las instrucciones
a continuación.
• Cuando reemplace las pilas, utilice pilas de manganeso o
alcalinas.
• Ponga las pilas con sus terminales correspondientes
alineados con los indicadores (+) y (–).
• No mezcle pilas de tipos diferentes. Las pilas de tipos
diferentes tienen también características diferentes.
• No mezcle pilas usadas con nuevas. Mezclar pilas usadas con
nuevas puede reducir la vida útil de las pilas nuevas o causar
fugas del electrólito en las pilas viejas.
• Retire las pilas tan pronto como se agoten. La fuga de
electrólito de las pilas puede causar erupciones en la piel. Si
encuentra cualquier fuga de ácido, limpie completamente con
un paño.
• Las pilas suministradas con este producto pueden durar
menos de lo esperado debido a las condiciones de
almacenamiento.
• Si no va a utilizar el mando a distancia durante un largo
período de tiempo, retire las pilas del mando a distancia.
• AL DESCARTARSE DE PILAS USADAS, CUMPLA CON LOS
REGLAMENTOS GUBERNAMENTALES O CON LAS LEYES
PÚBLICAS RELACIONADAS CON EL MEDIO AMBIENTE
APLICABLES EN SU PAÍS/REGIÓN.
18
Sp
Precaución
• No exponga el mando a distancia a impactos. Además, no
exponga el mando a distancia a líquidos, y no lo ponga en un
área con alta humedad.
• No instale ni ponga el mando a distancia bajo la luz directa del
sol. El calor puede deformar la unidad.
• Puede que el mando a distancia no funcione correctamente si
el sensor del mando a distancia del televisor de plasma está
bajo la luz directa del sol o bajo una iluminación intensa. En
este caso, cambie el ángulo de la iluminación o del televisor de
plasma, u opere el mando a distancia más cerca del sensor de
mando a distancia.
•Cuando existe cualquier obstáculo entre el mando a distancia
y el sensor de mando a distancia, puede que el mando a
distancia no funcione.
• A medida que las pilas se agotan, el mando a distancia puede
funcionar dentro de una distancia más corta desde el sensor
de mando a distancia. Reemplace las pilas por un juego de
pilas nuevas lo más rápido posible.
• El televisor de plasma emite rayos infrarrojos muy débiles
desde su pantalla. Si hay un equipo operado por mando a
distancia de rayos infrarrojos, como una videograbadora, en
las proximidades, puede que tal equipo no reciba los
comandos de su mando a distancia correctamente o mismo
no reciba ningún comando. Si esto ocurre, coloque el equipo
en un lugar lo más distante posible del televisor de plasma.
• Dependiendo del entorno de instalación, los rayos infrarrojos
del televisor de plasma pueden no permitir que este sistema
reciba correctamente los comandos del mando a distancia, o
pueden acortar la distancia permisible entre el mando a
distancia y el sensor del mando a distancia. La intensidad de
los rayos infrarrojos emitidos de la pantalla difiere,
dependiendo de las imágenes visualizadas en la pantalla.
Page 85

Contemplación de TV
Capítulo 6
Contemplación de TV
06
Importante
• Antes que ver los canales de emisión, debe configurar el
sintonizador de TV incorporado. Consulte Configuración
automática de los canales de TV en la página 25 para saber
cómo hacer esto.
Encendido
•Pulse en el televisor de plasma si los indicadores POWER
ON y STANDBY están apagados.
• El sistema se enciende.
• El indicador POWER ON se enciende en azul.
•Pulse ó 0 a 9 en el mando a distancia o STANDBY/ON en
el televisor de plasma si el indicador STANDBY está encendido
en rojo.
• El indicador POWER ON se enciende en azul.
•Si pulsa 0 en el mando a distancia, se visualizarán las
imágenes de la fuente “ENTRADA 1”.
•Si pulsa 1 a 9, se visualizarán las imágenes de TV.
PDP-428XG
Español
Indicador POWER ON
Indicador STANDBY
ON STANDBY
Botón
Colocación del sistema en el modo de
espera
Pulse en el mando a distancia o STANDBY/ON en el
televisor de plasma.
• El indicador STANDBY se enciende en rojo.
• El sistema entra en el modo de espera y la imagen desaparece
de la pantalla.
Botón
PDP-508XG
ON STANDBY
Indicador POWER ON
Indicador STANDBY
Nota
•Cuando del televisor de plasma está apagado, no se puede
encender el sistema pulsando o 0 a 9 en el mando a
distancia o STANDBY/ON en el televisor de plasma.
• Si no planea utilizar el televisor de plasma durante un largo
período de tiempo, asegúrese de desenchufar el cable de
alimentación de la toma de corriente.
Indicadores de estado del televisor de plasma
La tabla a continuación muestra el estado de operación del
televisor de plasma. Puede verificar el estado actual del sistema
con los indicadores en el televisor de plasma.
Estado de los
indicadores
POWER ON STANDBY
El cable de alimentación del televisor de plasma
ha sido desenchufado. O, el cable de
alimentación del televisor de plasma ha sido
conectado, pero el botón
plasma está desactivado.
El sistema está encendido.
El sistema está en el modo de espera.
Para casos diferentes de los de arriba, consulte Solución de
problemas en la página 63.
Estado del sistema
del televisor de
19
Sp
Page 86

06
Contemplación de TV
Nota
• Puede seleccionar “Auto”, “Alto”, “Medio” o “Bajo” para el brillo
del indicador POWER ON. Cuando “Auto” está seleccionado, el
brillo del indicador cambia a “Alto”, “Medio” o “Bajo” de
acuerdo con el nivel del brillo del área de visualización. Para los
detalles, consulte Regulación del LED azul en la página 39.
Cambio de canales
Utilice el mando a distancia en el panel de control en el lado
derecho del televisor de plasma para cambiar los canales.
• Antes de operar con el mando a distancia, asegúrese de
seleccionar el modo TV con su botón SELECT. Consulte Control
de otros equipos con el mando a distancia suministrado en la
página 50.
Utilización de 0 a 9 en el mando a distancia
• Seleccione los canales directamente pulsando los botones 0 a
9.
Por ejemplo:
Pulse 2 para seleccionar el canal 2 (canal de un dígito).
Pulse 1 y, a continuación, 2 para seleccionar el canal 12 (canal de
dos dígitos).
Pulse 1, 2 y, a continuación 3 para seleccionar el canal 123 (canal
de tres dígitos).
Cuando esté viendo información de teletexto:
• Visualice una página directamente, que tenga un número de
página de tres dígitos de 100 a 899, pulsando los botones 0 a 9.
Consulte también Operaciones básicas de teletexto en la
página 61.
Nota
•Pulse CH RETURN para volver al canal anterior. Pulse
nuevamente para volver al canal actual.
• Después de introducir un número de canal, puede pulsar
CH ENTER para sintonizar el canal más rápidamente.
•Cuando pulse 0 en el modo de espera, el sistema se enciende
y se visualizan las imágenes de la fuente “ENTRADA 1”. O,
cuando pulse cualquier botón de 1 a 9, se visualizan las
imágenes de TV.
Cambio del volumen y sonido
Visualización del canal
8
AAA
ESTÉREO
ESTÁNDAR
COMPLETA
Utilización de P+/P– del mando a distancia
•Pulse P+ para aumentar el número del canal.
•Pulse P– para disminuir el número del canal.
Nota
• CHANNEL +/– en el televisor de plasma funciona de la misma
forma que P+/P–.
•Pulse CH RETURN para volver al canal anterior. Pulse
nuevamente para volver al canal actual.
•Los botones P+/P– no pueden captar los canales que han sido
configurados para omisión. Para la Omisión de Canales,
consulte los pasos 13 y 14 en Configuración manual de los
canales de TV en la página 25.
Utilice el mando a distancia en el panel de control en el lado
derecho del televisor de plasma para ajustar el volumen.
Utilización de
•Pulse i + para aumentar el volumen.
•Pulse i – para aumentar el volumen.
• VOLUME +/– en el televisor de plasma funciona de la misma
forma que i + /i –.
i
+/
i
Ajuste del volumen
– en el mando a distancia
Utilización de e en el mando a distancia
•Pulse e para silenciar el sonido.
e aparece en la pantalla.
Silenciamiento
20
Sp
•Pulse e de nuevo o i + para restaurar el sonido.
Page 87

Contemplación de TV
06
Cambio del canal de audio de emisión
Dependiendo de la emisión, puede cambiar el canal de audio.
•Pulse - para cambiar el canal de audio.
Modo Modo Modo MONO
I II MONO
En la tabla a continuación se muestran los canales de audio
disponibles por el tipo de audio de emisión.
Estéreo
Bilingüe
Emisiones NICAMEmisiones A2Emisiones BTSC
Monoaural
1
AAA
NICAM ESTÉREO
2
BBB
NICAM
3
CCC
NICAM MONO
Configuración
1
AAA
NICAM ESTÉREO
2
BBB
NICAM
3
CCC
NICAM MONO
MONO
1
AAA
MONO
2
BBB
MONO
3
CCC
MONO
• Seleccionar un modo múltiplex de sonido mientras la fuente de
entrada es “ENTRADA 1” a “ENTRADA 6” ó “PC” no cambia el
tipo de sonido. En este caso, el sonido se determina por la
fuente de vídeo.
• Mientras esté viendo un canal de TV con cualquier
configuración de Corr. sobremodul. (página 26), no puede
cambiar el modo múltiplex de sonido.
Utilización de las funciones de
multipantalla
• Antes de operar con el mando a distancia, asegúrese de
seleccionar el modo TV con su botón SELECT. Consulte Control
de otros equipos con el mando a distancia suministrado en la
página 50.
División de la pantalla
Utilice el procedimiento siguiente para seleccionar el modo de 2
pantallas o de imagen-en-imagen.
Nota
• Visualizar una pantalla dividida durante un largo período de
tiempo, o por períodos más cortos durante varios días, puede
resultar en la retención de imagen.
2 pantallas
Español
Estéreo
Bilingüe
Monoaural
Estéreo
MAIN+SAP
Estéreo+SAP
Monoaural
4
DDD
ESTÉREO
5
EEE
DUAL
6
FFF
MONO
4
GGG
ESTÉREO
5
HHH
MONO(SAP)
5
JJJ
ESTÉREO(SAP)
6
KKK
MONO
4
DDD
ESTÉREO
5
EEE
DUAL
6
FFF
MONO
4
GGG
ESTÉREO
5
HHH
SAP(PRINCIPAL)
5
JJJ
SAP(ESTÉREO)
6
KKK
PRINCIPAL
DDD
MONO
EEE
MONO
MONO
GGG
MONO
HHH
MONO
MONO
KKK
MONO
4
5
6
FFF
4
5
5
JJJ
6
Nota
• En cada modo múltiplex de sonido seleccionado, utilice el
botón - para cambiar la visualización dependiendo de las
señales de emisión que están siendo recibidas.
• Una vez que el modo MONO esté seleccionado, el sonido del
televisor de plasma permanece monofónico aun cuando el
sistema reciba una emisión en estéreo. Debe cambiar el modo
de vuelta al modo o si desea escuchar el sonido estéreo de
nuevo.
Pantalla principal Pantalla secundaria
Imagen-en-imagen
Pantalla principal Pantalla secundaria
21
Sp
Page 88

06
Contemplación de TV
1Pulse c para seleccionar el modo de visualización.
Cada vez que se pulsa c, el modo de visualización cambia entre
2 pantallas, imagen-en-imagen y pantalla simple.
• En el modo de 2 pantallas o imagen-en-imagen, pulse para
intercambiar la posición de las dos pantallas visualizadas.
• La pantalla izquierda (en el modo de 2 pantallas) o la pantalla
mayor (en el modo de imagen-en-imagen) es la pantalla activa,
que se indica por el icono “z”. Puede utilizar cualquier de las
funciones normales para cambiar la imagen y el sonido.
• En el modo de imagen-en-imagen, pulse para mover la
posición de la pantalla pequeña hacia la izquierda.
• Con los auriculares conectados, puede escuchar el audio de la
pantalla secundaria en el modo de 2 pantallas o de imagen-enimagen. Para más información, consulte Escucha de audio de
la pantalla secundaria con auriculares en la página 33.
Congelamiento de imágenes
Utilice el procedimiento siguiente para capturar y congelar un
fotograma de una imagen en movimiento que esté viendo.
• Antes de operar con el mando a distancia, asegúrese de
seleccionar el modo TV con su botón SELECT. Consulte Control
de otros equipos con el mando a distancia suministrado en la
página 50.
Importante
• Visualizar una imagen estática durante un largo período de
tiempo, o por períodos más cortos durante varios días, puede
resultar en la retención de imagen.
2 Para seleccionar la fuente de entrada deseada, pulse el
botón correspondiente a la fuente de entrada.
• Cuando esté viendo programas de TV, pulse P+/ P– para
cambiar el canal.
Nota
• La función de multipantalla no puede visualizar imágenes
desde la misma fuente de entrada al mismo tiempo. Si intenta
hacer eso, aparecerá un mensaje de advertencia.
• La función de multipantalla no puede visualizar imágenes de
combinaciones de dos fuentes de entrada externas
(“ENTRADA 1” a “ENTRADA 6”, “PC”). Sin embargo, puede
visualizar imágenes de las siguientes combinaciones de
fuentes de entrada: sintonizador de TV incorporado y una
fuente externa (“ENTRADA 1” a “ENTRADA 6”, “PC”).
• Cuando se pulsa HOME MENU, el modo de pantalla simple se
restaura, y se visualiza el menú correspondiente.
• En el modo de 2 pantallas, las imágenes visualizadas en la
pantalla derecha puede parecer menos nítidas, dependiendo
de las imágenes.
•Pulse d.
Una imagen fija aparece en la pantalla derecha mientras se
visualiza una imagen en movimiento en la pantalla izquierda.
Imagen normal Imagen fija
•Pulse d de nuevo para cancelar la función.
Nota
• No es posible congelar la imagen cuando se utiliza el modo de
2 pantallas o de imagen-en-imagen.
• Cuando esta función no está disponible, aparece un mensaje
de advertencia.
22
Sp
Page 89

El MENÚ PRINCIPAL
Capítulo 7
El MENÚ PRINCIPAL
07
Resumen del MENÚ PRINCIPAL
Para la fuente de AV
MENÚ PRINICIPAL Ítem Página
Imagen Selección AV 28
Contraste 28
Brillo 28
Color 28
Matiz 28
Nitidez 28
Ajuste profesional 29
Reponer 28
Sonido Agudos 33
Graves 33
Balance 33
Reponer 33
Efecto sonido 33
Salida auriculares 33
Subvolumen 33
Control de la
alimentación
Temporizador de
apagado
Opción Posición 36
Ahorro de energía 34
Apagado: sin señal 34
Apagado: sin operación 34
– 40
Tmño. Auto. 38
Máscara lateral 39
Entrada HDMI 45
Conf.Control HDMI 59
Regul. LED azul 39
Orbiter 39
Patrón de vídeo 40
Modo activo 36
Sistema de color 37
Salida monitor 44
Pref. cont. juego 37
Sensor luz amb. 39
MENÚ PRINICIPAL Ítem Página
Configuración Instalación auto. 25
Config. TV analógica 25
Contraseña 40
Idioma 27
Home Gallery –49
Control HDMI –56
Español
Para la fuente de PC
MENÚ PRINICIPAL Ítem Página
Imagen Selección AV 28
Contraste 28
Brillo 28
Rojo 28
Verde 28
Azul 28
Reponer 28
Sonido Igual que el menú de la
Control de la
alimentación
Temporizador de
apagado
Opción Autoconfiguración 36
Home Gallery – 49
Control HDMI – 56
fuente de AV
Ahorro de energía 34
Gestión de energía 35
– 40
Configuración manual 37
Entrada HDMI 45
Conf.Control HDMI 59
33
23
Sp
Page 90

07
El MENÚ PRINCIPAL
Utilización del MENÚ PRINCIPAL
A continuación se describe el procedimiento típico para configurar
los menús. Para los procedimientos reales, consulte las páginas
apropiadas que describen las funciones individuales.
1 Pulse HOME MENU.
2Pulse / para seleccionar un ítem de menú y, a
continuación, pulse ENTER.
3 Repita el paso 2 hasta que acceda al ítem de submenú
deseado.
El número de capas del menú diferirá dependiendo de los ítems del
menú.
4Pulse / para seleccionar una opción (o parámetro) y, a
continuación, pulse ENTER.
Para algunos ítems de menú, pulse / en lugar de /.
5 Pulse HOME MENU para salir del menú.
Nota
• Puede volver a los niveles de menú superiores pulsando
RETURN.
• Antes de operar con el mando a distancia, asegúrese de
seleccionar el modo TV con su botón SELECT. Consulte Control
de otros equipos con el mando a distancia suministrado en la
página 50.
24
Sp
Page 91

Configuración
Capítulo 8
Configuración
08
Configuración automática de los canales de TV
En esta sección se describe cómo buscar y configurar
automáticamente los canales de TV.
Utilización de la instalación automática
Cuando se enciende el televisor de plasma por primera vez tras la
compra, se inicia la autoconfiguración inicial. Puede configurar el
idioma, región y canales en operaciones sucesivas.
1 Seleccione “Idioma” (
2 Seleccione un idioma (
Instalación auto.
Idioma
Región
Asignación canales
Instalación
Puede seleccionar entre cinco idiomas: Inglés, español, portugués,
chino tradicional y chino simplificado.
3 Seleccione “Región” (
4 Seleccione su región (
Seleccione el país o región en que vive. Si su región no está en la lista,
seleccione “Otras regiones”.
5 Seleccione “Asignación canales” (
6 Seleccione “General”, “Aire (Tipo EE.UU.)” o “Cable (Tipo
EE.UU.)” (
En la tabla en la
/
).
página 65 (Selecciones de asignación de canal
estándares para países y regiones
seleccionar usualmente en su país o región.
Ítem Descripción
General Explora para localizar las frecuencias de emisión
Aire (Tipo EE.UU.) Busca las mismas frecuencias de emisión para la
Cable (Tipo EE.UU.) Busca las mismas frecuencias de emisión para ver TV
7 Seleccione “Iniciar” (
La instalación automática comienza automáticamente.
• Para salir de la instalación automática en progreso, pulse
RETURN
.
/
).
/
).
Español
Austria
General
Iniciar
/
).
/
).
/
).
) se muestra las opciones que debe
regionales. Cuanto más temprano se identifican las
frecuencias, menor serán los números de canales que
se utilizan.
recepción aérea en los Estados Unidos. Esta selección
está efectiva cuando el sistema está recibiendo por el
aire.
por cables en los Estados Unidos. Esta selección está
efectiva cuando el sistema está recibiendo de una
compañía de TV por cable.
/
y, a continuación, ENTER).
• Puede iniciar la instalación automática a partir del MENÚ
• Si no se encuentra ningún canal, compruebe las conexiones de la
Configuración manual de los canales de TV
Utilice la función Ajuste manual para configurar manualmente los
canales de TV. Los pasos 5 a 14 difieren dependiendo de su selección
para Asignación canales.
1 Pulse HOME MENU.
2 Seleccione “Configuración” (
3 Seleccione “Config. TV analógica” (
ENTER).
La pantalla de introducción de contraseña aparece. Introduzca la
contraseña de cuatro dígitos utilizando los botones
contraseña, consulte
4 Seleccione “Ajuste manual” (
5 Seleccione “Introducción programas” (
6 Seleccione un número de programa (
• Con “General” seleccionado, puede seleccionar de 1 a 99.
• Con “Aire (Tipo EE.UU.)” seleccionado, puede seleccionar de 2 a 69.
• Con “Cable (Tipo EE.UU.)” seleccionado, puede seleccionar de 1 a 125.
7 Seleccione “Búsqueda” (
8 Introduzca una frecuencia utilizando los botones 0 a 9 y, a
continuación, ENTER.
También puede pulsar
• Con “Aire (Tipo EE.UU.)” o “Cable (Tipo EE.UU.)” seleccionado, no
9 Seleccione “Sistema” (
10 Seleccione un sistema de sonido (
Puede seleccionar entre “B/G”, “D/K”, “I” y “M/N”.
• Con “Aire (Tipo EE.UU.)” o “Cable (Tipo EE.UU.)” seleccionado, no
Nota
PRINCIPAL después de trasladarse para otro país, por ejemplo.
Antes de iniciar la instalación automática, realice los pasos a
continuación: Pulse
(
/
y, a continuación,
auto.” (
/
HOME MENU
ENTER
y, a continuación,
, seleccione “Configuración”
) y, a continuación, “Instalación
ENTER
). La pantalla de
introducción de contraseña aparece. Introduzca la contraseña de
cuatro dígitos utilizando los botones
consulte
Utilización de una contraseña
0 a 9
. Para la contraseña,
en la página 40
antena y, a continuación, intente de nuevo la instalación
automática.
/
y, a continuación, ENTER).
/
y, a continuación,
0
a 9. Para la
Utilización de una contraseña
Ajuste manual
Introducción programas
Búsqueda
Sistema
Sistema de color
Memorizar
Sinton. RN
Bloqueo infantil
Corr. sobremodul.
/
/
y, a continuación, ENTER).
44.25MHz
Encendido
Apagado
/
).
para introducir una frecuencia.
/
/
1
B/G
Auto
Sí
Ver
en la página 40.
).
).
puede cambiar la frecuencia de visualización.
/
).
/
).
puede cambiar la selección predeterminada de fábrica (“M/N”).
Español
25
Sp
Page 92

08
Configuración
11 Seleccione “Sistema de color” (
12 Seleccione un sistema de color (
Puede seleccionar entre “Auto”, “PAL”, “NTSC”, “SECAM”, “PAL-M”,
“PAL-N” y “4.43NTSC”.
• Con “Aire (Tipo EE.UU.)” o “Cable (Tipo EE.UU.)” seleccionado, no
puede cambiar la selección predeterminada de fábrica (“Auto”).
13 Seleccione “Memorizar” (
/
14 Seleccione “Sí” (
• Con “Aire (Tipo EE.UU.)” o “Cable (Tipo EE.UU.)” seleccionado, pulse
/
para seleccionar “AÑADIR/BORRAR” y, a continuación, pulse
/
para seleccionar “AÑADIR”.
• Con “Sí” seleccionado, puede seleccionar el canal con
Con “No” seleccionado, no puede seleccionar el canal con
P+/P–
.
15 Pulse HOME MENU para salir del menú.
• Alternativamente, para configurar otro canal, repita los pasos de 5 a 14.
Nota
• El ajuste manual también le permite hacer selecciones para
“Sinton. RN”, “Bloqueo infantil” y “Corr. sobremodul.”. Consulte
Reducción de ruido de vídeo, Configuración del bloqueo infantil
Supresión de la distorsión de audio
• Este televisor de plasma está equipado con una función de
sintonización automática de las frecuencias que ajusta
automáticamente las frecuencias de acuerdo con las señales
recibidas. Por esta razón, puede que en el menú Ajuste manual se
muestren frecuencias ligeramente diferentes de su entrada
cuando acceda al menú la próxima vez. No es posible desactivar
la función de Sintonización automática de las frecuencias.
).
/
/
/
).
, respectivamente.
).
).
P+/P–
.
y
Reducción de ruido de vídeo
Para los canales individuales, puede especificar si el televisor de
plasma debe reducir el ruido de vídeo dependiendo de los niveles de
las señales de transmisión.
1 Pulse HOME MENU.
/
2 Seleccione “Configuración” (
3 Seleccione “Config. TV analógica” (
ENTER).
La pantalla de introducción de contraseña aparece. Introduzca la
contraseña de cuatro dígitos utilizando los botones
contraseña, consulte
4 Seleccione “Ajuste manual” (
5 Seleccione “Introducción programas” (
6 Seleccione un número de programa (
• Con “General” seleccionado, puede seleccionar de 1 a 99.
• Con “Aire (Tipo EE.UU.)” seleccionado, puede seleccionar de 2 a 69.
• Con “Cable (Tipo EE.UU.)” seleccionado, puede seleccionar de 1 a 125.
7 Seleccione “Sinton. RN” (
8 Seleccione “Encendido” (
9 Pulse HOME MENU para salir del menú.
Utilización de una contraseña
/
/
y, a continuación, ENTER).
/
y, a continuación,
0
a 9. Para la
en la página 40.
/
y, a continuación, ENTER).
/
).
/
).
).
).
Configuración del bloqueo infantil
El bloqueo infantil impide la sintonización y contemplación de canales
de TV seleccionados.
1 Repita los pasos de 1 a 6 en
Después de seleccionar un número de programa (utilizando
Introducción programas), realice los siguientes pasos:
2 Seleccione “Bloqueo infantil” (
3 Seleccione “Bloquear” (
• La selección cambia entre “Ver” (selección predeterminada) y
“Bloquear”.
4 Pulse HOME MENU para salir del menú.
Reducción de ruido de vídeo
/
).
/
).
.
Supresión de la distorsión de audio
Puede suprimir la distorsión de audio que puede ocurrir cuando se
reciben señales de audio muy fuertes en el canal seleccionado.
Nota
• La configuración Corr. sobremodul. sólo está seleccionado
cuando se ha seleccionado “D/K” para “Sistema” en
Configuración manual de los canales de TV
1 Repita los pasos de 1 a 6 en
Después de seleccionar un número de programa, realice los
siguientes pasos:
2 Seleccione “Corr. sobremodul.” (
3 Seleccione “Alta”, “Media” o “Baja” (
Ítem Descripción
Apagado Desactiva la función
Alta Suprime la distorsión de audio ligeramente; sin
embargo, se reduce el volumen de audio ligeramente
cuando se selecciona Apagado
Media Suprime la distorsión de audio moderadamente
Baja Suprime la distorsión de audio aún más; sin embargo,
se reduce el volumen de audio aún más
Con “Aire (Tipo EE.UU.)” o “Cable (Tipo EE.UU.)” seleccionado, no
puede cambiar la selección predeterminada de fábrica (“Apagado”).
4 Pulse HOME MENU para salir del menú.
Nota
• Mientras esté viendo un canal de TV con cualquier configuración
de Corr. sobremodul., no puede cambiar el modo múltiplex de
sonido.
Reducción de ruido de vídeo
/
en la página 25.
).
/
).
.
Nota
• Puede que esta función no obtenga un resultado satisfactorio,
dependiendo de las condiciones de las señales de transmisión.
• La selección predeterminada de fábrica es “Encendido”.
26
Sp
Page 93

Configuración
08
Etiquetado de canales de TV
Puede nombrar los canales de TV que ha configurado, utilizando
hasta cinco caracteres. Esto puede ayudarle a identificar
fácilmente los canales durante las selecciones.
1 Pulse HOME MENU.
2 Seleccione “Configuración” (/ y, a continuación,
ENTER).
3 Seleccione “Config. TV analógica” (/ y, a continuación,
ENTER).
Introduzca la contraseña de cuatro dígitos utilizando los botones 0
a 9 cuando se solicite.
4 Seleccione “Etiqueta” (/ y, a continuación, ENTER).
5 Seleccione “Introducción programas” (/).
6 Seleccione un número de programa (/).
• Con “General” seleccionado, puede seleccionar de 1 a 99.
• Con “Aire (Tipo EE.UU.)” seleccionado, puede seleccionar de 2
a 69.
• Con “Cable (Tipo EE.UU.)” seleccionado, puede seleccionar de
1 a 125.
Etiqueta
Introducción programas
Etiqueta
7 Seleccione “Etiqueta” (/ y, a continuación, ENTER).
El cursor se desplaza al segundo carácter.
8 Seleccione el primer carácter (/// y, a
continuación, ENTER).
1
Organización de los canales de TV
predeterminados
Después de realizar una búsqueda de canales “General”, puede
utilizar el siguiente procedimiento para cambiar la secuencia de los
programas de TV predeterminados. (La organización de los canales de
TV predeterminados no es posible si se ha utilizado “Aire (Tipo
EE.UU.)” o “Cable (Tipo EE.UU.)” para la búsqueda de canales.)
1 Pulse HOME MENU.
/
2 Seleccione “Configuración” (
3 Seleccione “Config. TV analógica” (
ENTER).
Introduzca la contraseña de cuatro dígitos utilizando los botones 0 a 9
cuando se solicite.
4 Seleccione “Organizar” (
/
La pantalla de organización aparece.
Organizar 1/4
AAAAA01
BBBBB02
CCCCC03
DDDDD04
EEEEE05
FFFFF06
GGGGG07
HHHHH08
10
11
12
13
14
15
16
17
5 Seleccione un canal para desplazar (
continuación, ENTER).
6 Seleccione una nueva ubicación (
continuación, ENTER).
La organización se ejecuta.
7 Pulse HOME MENU para salir del menú.
y, a continuación, ENTER).
/
y, a continuación,
y, a continuación, ENTER).
IIIII09
JJJJJ
KKKKK
LLLLL
MMMMM
NNNNN
OOOOO
PPPPP
QQQQQ
///
RRRRR18
SSSSS
19
TTTTT
20
UUUUU
21
VVVVV
22
WWWWW
23
XXXXX
24
YYYYY
25
///
y, a
y, a
Español
1234567890
BCDEFGH I J
A
KLMNOPQRST
Delete
Space
UVWXYZ, . : ;
&' ( )+- * /_
@
OK
• El cursor se desplaza al segundo carácter.
9 Repita el paso 8 para introducir hasta cinco caracteres.
• Para corregir los caracteres introducidos, seleccione [] o
[] en la pantalla y, a continuación, pulse ENTER. El cursor se
desplaza al carácter precedente o subsiguiente.
• Para corregir el carácter actual, seleccione [Delete] en la
pantalla y, a continuación, pulse ENTER.
• Para colocar un espacio para el carácter actual, seleccione
[Space] en la pantalla y, a continuación, pulse ENTER.
10 Para completar la introducción del nombre, pulse / o
/ para seleccionar [OK] en la pantalla y, a continuación,
pulse ENTER.
11 Pulse HOME MENU para salir del menú.
Nota
• Para cambiar una página en la pantalla de organización en el paso
6, seleccione
página y, a continuación, pulse
/
en la pantalla con
ENTER
/
para seleccionar una
.
Configuración del idioma
Puede seleccionar el idioma que se utilizará para la visualización en la
pantalla, como para los menús e instrucciones, entre cinco idiomas:
Inglés, español, portugués, chino tradicional y chino simplificado.
Para el idioma que se utilizará en el modo de teletexto, puede
seleccionar entre Europa Occid., Europa Oriental, Grecia/Turquía,
Rusia y Arabia.
1 Pulse HOME MENU.
/
2 Seleccione “Configuración” (
3 Seleccione “Idioma” (
4 Seleccione “Menú” (
5 Seleccione un idioma (
Idioma
Menú
Teletexto
6 Seleccione “Teletexto” (
7 Seleccione un idioma (
/
/
/
/
).
/
8 Pulse HOME MENU para salir del menú.
y, a continuación, ENTER).
y, a continuación ENTER).
).
Español
Europa Occid.
).
).
27
Sp
Page 94

08
Configuración
Selección AV
Seleccione entre las siete opciones de contemplación, dependiendo
del entorno actual (p. ej., brillo de la sala), el tipo de programa de TV
actual, o el tipo de entrada de imágenes del equipo externo.
1 Pulse HOME MENU.
2 Seleccione “Imagen” (/ y, a continuación, ENTER).
3 Seleccione “Selección AV” (/ y, a continuación, ENTER).
4 Seleccione la opción deseada (/ y, a continuación,
ENTER).
Selección AV
ÓPTIMO
ESTÁNDAR
DINÁMICO
PELÍCULA
DEPORTE
JUEGO
USUARIO
Para la fuente de AV
Ítem Descripción
ÓPTIMO Ajusta automáticamente el brillo de la imagen al nivel
óptimo de acuerdo con el nivel del brillo del área de
visualización.
Esta configuración se comparte por las fuentes de entrada
externa y de entrada de TV.
ESTÁNDAR Para una imagen altamente definida en una sala con brillo
normal.
Esta configuración se comparte por las fuentes de entrada
externa y de entrada de TV.
DINÁMICO Imágen nítida con contraste máximo.
Observe que este modo no permite el ajuste manual de la
calidad de la imagen.
Esta configuración se comparte por las fuentes de entrada
externa y de entrada de TV.
PELÍCULA Optimizado para películas.
Esta configuración se comparte por las fuentes de entrada
externa y de entrada de TV.
DEPORTE Optimizado para programas deportivos.
Esta configuración se comparte por las fuentes de entrada
externa y de entrada de TV.
JUEGO Reduce el brillo de la imagen para una visualización más
fácil.
Esta configuración se comparte por las fuentes de entrada
externa y de entrada de TV.
USUARIO Permite al usuario personalizar las configuraciones que
desee. Puede configurar el modo para cada fuente de
entrada.
Para la fuente de PC
Nota
• También puede pulsar AV SELECTION en el mando a distancia
para cambiar la opción de contemplación.
• Si ha seleccionado “DINÁMICO”, no puede seleccionar
“Contraste”, “Brillo”, “Color”, “Matiz”, “Nitidez”, “Ajuste
profesional” y “Reponer”; estos ítems de menú están
oscurecidos.
• Si ha seleccionado “ÓPTIMO”, no podrá seleccionar “Ajuste
profesional”; estos ítems de menú están oscurecidos.
• Como la configuración “ÓPTIMO” optimiza la calidad de la
imagen automáticamente, puede verse en la pantalla el
proceso en el cual las configuraciones de imagen cambian
gradualmente, tales como brillo y matiz. Esto no es un fallo de
funcionamiento.
• Cuando “ÓPTIMO” está seleccionado, las imágenes se
reproducen basadas en la información adquirida en el Sensor
de luz ambiental, independientemente de su configuración
(“Encendido” o “Apagado”) para el menú “Opción”.
Ajustes de imagen básicos
Ajuste la imagen según sus preferencias para la opción Selección
AV elegida (excepto DINÁMICO).
1 Pulse HOME MENU.
2 Seleccione “Imagen” (/ y, a continuación, ENTER).
3 Seleccione un ítem que desee ajustar (/ y, a
continuación, ENTER).
Imagen
Selección AV
Contraste
Brillo
Color
Matiz
Nitidez
Ajuste profesional
Reponer
Para la fuente de PC o cuando la función Home Gallery está
activada, la siguiente pantalla aparece:
Imagen
Selección AV
Contraste
Brillo
Rojo
Verde
Azul
Reponer
ÓPTIMO
40
0
0
0
0
ESTÁNDAR
40
0
0
0
0
Ítem Descripción
ESTÁNDAR Para una imagen altamente definida en una sala con brillo
USUARIO Permite al usuario personalizar las configuraciones que
28
5 Pulse HOME MENU para salir del menú.
Sp
normal
desee. Puede configurar el modo para cada fuente de
entrada.
4 Seleccione el nivel deseado (/).
Contraste
40
Cuando se visualice una pantalla de ajuste, también puede
cambiar un ítem pulsando /.
5 Pulse HOME MENU para salir del menú.
Page 95

Configuración
08
Para la fuente de AV
Ítem Botón Botón
Contraste Para menos contraste Para más contraste
Brillo Para menos brillo Para más brillo
Color Para menos intensidad de
color
Matiz Los tonos de la piel tiran a
morado
Nitidez Para menos nitidez Para más nitidez
Para más intensidad de
color
Los tonos de la piel tiran a
verde
Para la fuente de PC
Ítem Botón Botón
Contraste Para menos contraste Para más contraste
Brillo Para menos brillo Para más brillo
Rojo Para rojo más débil Para rojo más fuerte
Verde Para verde más débil Para verde más fuerte
Azul Para azul más débil Para azul más fuerte
Nota
• Para realizar los ajustes de imagen avanzados, seleccione
“Ajuste profesional” en el paso 3 y, a continuación, pulse
ENTER. Para los procedimientos subsiguientes, consulte
Ajustes de imagen avanzados.
• Para restaurar las selecciones predeterminadas de fábrica
para todos los ítems, pulse / para seleccionar “Reponer”
en el paso 3 y, a continuación, pulse ENTER. Aparecerá una
pantalla de confirmación. Pulse / para seleccionar “Sí” y,
a continuación, pulse ENTER.
• Puede que experimente un cambio brusco en la posición de la
imagen y en el brillo de la pantalla cuando abra el menú
“Imagen”.
Ajustes de imagen avanzados
El televisor de plasma provee varias funciones avanzadas para
optimizar la calidad de la imagen. Para los detalles sobre estas
funciones, consulte las tablas.
Utilización de PureCinema
1 Pulse HOME MENU.
2 Seleccione “Imagen” (/ y, a continuación, ENTER).
3 Seleccione “Ajuste profesional” (/ y, a continuación,
ENTER).
4 Seleccione “PureCinema” (/ y, a continuación, ENTER).
5 Seleccione “Modo película” o “Optimización” (/ y, a
continuación, ENTER).
6 Seleccione el parámetro deseado (/ y, a continuación,
ENTER).
Con respecto a los parámetros seleccionables, consulte la tabla.
PureCinema
Detecta automáticamente una fuente basada en película (codificada original en
24 fotogramas/segundo), la analiza y, a continuación, recrea cada fotograma fijo
para ofrecer una calidad de imagen de alta definición
Modo película Apagado Desactiva la función PureCinema
Optimización
Estándar Produce imágenes fluidas y vívidas
Suave Produce imágenes en movimiento más
Avanzar Produce imá genes en movimiento fluidas y
Apagado Desactiva la optimización de texto
Encendido Desactiva la optimización de texto
(específicas para película) detectando
automáticamente la información de
imagen grabada cuando se visualizan
imágenes de DVD o de alta definición (ej.,
películas) con 24 fotogramas por segundo
fluidas y vívidas
de calidad (como se ve en las pantallas de
cine) convirtiendo a 72 Hz cuando se
visualizan imágenes de DVD (ej., .películas)
con 24 fotogramas por segundo
7 Pulse HOME MENU para salir del menú.
Nota
• No se puede seleccionar “Estándar” para las siguientes
señales de entrada: 480p, 576p, 720p@50 Hz, 720p@60 Hz,
1080p@50 Hz, 1080p@60 Hz.
• No se puede seleccionar “Avanzar” para las siguientes señales
de entrada: PAL, SECAM, 576i, 576p, 720p@50 Hz, 1080i@50
Hz, 1080p@50 Hz/60 Hz.
• No se puede seleccionar “Suave” para las siguientes señales
de entrada: 1080p@50 Hz, 1080p@60 Hz.
• Al seleccionar “Encendido” para “Pref. cont. juego” en el menú
“Opción”, se desactiva la configuración “PureCinema”.
Utilización del modo inteligente
1 Pulse HOME MENU.
2 Seleccione “Imagen” (/ y, a continuación, ENTER).
3 Seleccione “Ajuste profesional” (/ y, a continuación,
ENTER).
4 Seleccione “Modo inteligente” (/ y, a continuación,
ENTER).
5 Seleccione el parámetro deseado (/ y, a continuación,
ENTER).
Modo inteligente
Realiza una compensación que resulta en los tonos de color y al brillo óptimos
para las imágenes
Selecciones Apagado Desactiva el modo inteligente
Encendido Activa el modo inteligente
6 Pulse HOME MENU para salir del menú.
Nota
• Como esta función optimiza la calidad de la imagen
automáticamente, puede verse en la pantalla el proceso en el
cual las configuraciones de imagen cambian gradualmente,
tales como brillo y matiz. Esto no es un fallo de
funcionamiento.
Español
29
Sp
Page 96

08
Configuración
Utilización del detalle de imagen
1 Pulse HOME MENU.
2 Seleccione “Imagen” (/ y, a continuación, ENTER).
3 Seleccione “Ajuste profesional” (/ y, a continuación,
ENTER).
4 Seleccione “Detalle imagen” (/ y, a continuación,
ENTER).
5 Seleccione un ítem que desee ajustar (/ y, a
continuación, ENTER).
• Puede seleccionar “Imagen DRE”, “Nivel negro”, “ACL”, “Modo
realzador” o “Gamma”.
6 Seleccione el parámetro deseado (/ y, a continuación,
ENTER).
Imagen DRE
Aumenta el contraste en las imágenes de modo que la diferencia entre el brillo
y oscuridad quede más distinta
Selecciones Apagado Desactiva la imagen DRE
Alta Imagen DRE realzada
Media Imagen DRE estándar
Baja Imagen DRE moderada
Nivel negro
Aumenta la parte oscura en las imágenes de modo que la diferencia entre el
brillo y oscuridad quede más distinta
Selecciones Apagado Desactiva el nivel de negro
Encendido Activa el nivel de negro
ACL
Realiza una compensación que resulta en las características de contraste
óptimas para las imágenes
Selecciones Apagado Desactiva la función ACL
Encendido Activa la función ACL
Modo realzador
Selecciona el proceso de las áreas de alta frecuencia (detalladas) de la imagen
Selecciones 1 Selecciona una imagen dura (NITIDEZ)
2 Selecciona una imagen natural (NITIDEZ)
3 Selecciona una imagen suave (NITIDEZ)
Gamma
Ajusta las características de gamma (características de degradación de
imagen)
Selecciones 1 Selecciona las características de gamma 1
2 Selecciona las características de gamma 2
3 Selecciona las características de gamma 3
Utilización de la temperatura de color
1 Pulse HOME MENU.
2 Seleccione “Imagen” (/ y, a continuación, ENTER).
3 Seleccione “Ajuste profesional” (/ y, a continuación,
ENTER).
4 Seleccione “Detalle color” (/ y, a continuación, ENTER).
5 Seleccione “Temperatura de color” (/ y, a
continuación, ENTER).
6 Seleccione el parámetro deseado (/ y, a continuación,
ENTER).
Temperatura
del color
Ajusta la temperatura de color, resultando en mejor equilibrio del blanco
Selecciones Alta Blanco con tono azulado
Media-Alta Tono intermedio entre Alta y Media
Media Tono natural
Media-Baja Tono intermedio entre Media y Baja
Baja Blanco con tono rojizo
Manual Temperatura del color ajustada según sus
• Puede preferir realizar un ajuste fino. Para hacer esto, primero
seleccione “Manual” y después pulse ENTER por más de tres
segundos. Se visualiza la pantalla de ajuste manual. Luego,
vaya al paso 7.
7 Seleccione un ítem que desee ajustar (/ y, a
continuación, ENTER).
8 Seleccione el nivel deseado (/).
Ítem Botón Botón
R Alta Ajuste fino para partes
G Alta Para verde más débil Para verde más
B Alta Para azul más débil Para azul más fuerte
R Baja Ajuste fino para partes
G Baja Para verde más débil Para verde más
B Baja Para azul más débil Para azul más fuerte
brillantes
oscuras
• Para realizar el ajuste para otro ítem, pulse RETURN y, a
continuación, repita los pasos 7 y 8.
•Puede pulsar / para cambiar inmediatamente un ítem que
desee ajustar.
9 Pulse HOME MENU para salir del menú.
preferencias
Para rojo más débil Para rojo más fuerte
fuerte
Para rojo más débil Para rojo más fuerte
fuerte
7 Pulse HOME MENU para salir del menú.
30
Sp
Page 97

Configuración
08
Utilización de CTI y espacio de color
1 Pulse HOME MENU.
2 Seleccione “Imagen” (/ y, a continuación, ENTER).
3 Seleccione “Ajuste profesional” (/ y, a continuación,
ENTER).
4 Seleccione “Detalle color” (/ y, a continuación, ENTER).
5 Seleccione “CTI” o “Espacio de color” (/ y, a
continuación, ENTER).
6 Seleccione el parámetro deseado (/ y, a continuación,
ENTER).
CTI
Proporciona imágenes con contornos de color más claros. CTI es la sigla de
Color Transient Improvement (Mejora transitoria de color).
Selecciones Apagado Desactiva la función CTI
Encendido Activa la función CTI
Espacio de color
Cambia el espacio de reproducción de color
Selecciones 1 Optimizado para reproducción de color vivo
2 Reproducción de color estándar
y vibrante
7 Pulse HOME MENU para salir del menú.
Utilización de la gestión del color
1 Pulse HOME MENU.
2 Seleccione “Imagen” (/ y, a continuación, ENTER).
3 Seleccione “Ajuste profesional” (/ y, a continuación,
ENTER).
4 Seleccione “Detalle color” (/ y, a continuación, ENTER).
5 Seleccione “Gestión de color” (/ y, a continuación,
ENTER).
6 Seleccione un ítem que desee ajustar (/ y, a
continuación, ENTER).
Gestión de color
R
Y
G
C
B
M
7 Seleccione el nivel deseado (/).
0
0
0
0
0
0
Ítem Botón Botón
R Más cerca del magenta Más cerca del amarillo
Y Más cerca del rojo Más cerca del verde
G Más cerca del amarillo Más cerca del azul verdoso
C Más cerca del verde Más cerca del azul
B Más cerca del azul verdoso Más cerca del magenta
M Más cerca del azul Más cerca del rojo
• Para realizar el ajuste para otro ítem, pulse RETURN y, a
continuación, repita los pasos 6 y 7.
•Puede pulsar / para cambiar inmediatamente un ítem que
desee ajustar.
8 Pulse HOME MENU para salir del menú.
Eliminación de ruido de las imágenes
1 Pulse HOME MENU.
2 Seleccione “Imagen” (/ y, a continuación, ENTER).
3 Seleccione “Ajuste profesional” (/ y, a continuación,
ENTER).
4 Seleccione “Reducción ruido” (/ y, a continuación,
ENTER).
5 Seleccione un ítem que desee ajustar (/ y, a
continuación, ENTER).
Puede seleccionar “3DNR”, “NR campo”, “NR bloque” o “NR
mosquito”.
6 Seleccione el parámetro deseado (/ y, a continuación,
ENTER).
3DNR
Elimina el ruido de vídeo para ofrecer imágenes nítidas. 3DNR es la sigla para
reducción de ruido tridimensional.
Selecciones Apagado Desactiva la función 3DNR
Alta 3DNR realzado
Media 3DNR estándar
Baja 3DNR moderado
NR campo
Elimina el centelleo para proporcionar imágenes más naturales
Selecciones Apagado Desactiva el NR campo
Alta NR campo realzado
Media NR campo estándar
Baja NR campo moderado
NR bloque
Ayuda a reducir el ruido que aparece en las imágenes de alta definición
Selecciones Apagado Desactiva el NR bloque
Encendido Activa el NR bloque
Español
31
Sp
Page 98

08
Configuración
NR mosquito
Reduce el ruido de mosquito en imágenes de DVD y de alta definición,
proporcionando imágenes libres de ruido
Selecciones Apagado Desactiva el NR mosquito
Encendido Activa el NR mosquito
7 Pulse HOME MENU para salir del menú.
Utilización de 3DYC y del I-P Modo
1 Pulse HOME MENU.
2 Seleccione “Imagen” (/ y, a continuación, ENTER).
3 Seleccione “Ajuste profesional” (/ y, a continuación,
ENTER).
4 Seleccione “Otros” (/ y, a continuación, ENTER).
5 Seleccione “3DYC” o “I-P Modo” (/ y, a continuacón,
ENTER).
6 Seleccione el parámetro deseado (/ y, a continuación,
ENTER).
3DYC
Optimiza las características para separar las señales de brillo y señale s de color.
Esto funciona tanto para imágenes de vídeo cuanto para imágenes fijas.
Selecciones Apagado Desactiva la función 3DYC
Alta 3DYC realzado
Media 3DYC estándar
Baja 3DYC moderado
I-P Modo
Realiza la conversión óptima de las señales entrelazadas a señales progresivas.
Esto funciona tanto para imágenes de vídeo cuanto para imágenes fijas.
Selecciones 1 Óptimo para imágenes de vídeo
2 Configuración estándar
3 Óptimo para imágenes fijas
7 Pulse HOME MENU para salir del menú.
Nota
• La configuración 3DYC no está efectiva cuando se introducen
señales SECAM, PAL-M, PAL-N ó 4.43 NTSC.
• Para el I-P Modo, no es posible seleccionar los parámetros
individuales para las siguientes señales de entrada: 480p,
576p, 720p, 1080p.
• La configuración I-P Modo se desactiva si se utiliza una fuente
de entrada externa y se selecciona “Encendido” para “Pref.
cont. juego” en el menú “Opción”.
• Para la configuración 3DYC, sólo se pueden seleccionar los
parámetros individuales cuando se ha seleccionado el
sintonizador analógicos, o cuando se ha seleccionada
“ENTRADA 1”, “ENTRADA 2”, “ENTRADA 3” o “ENTRADA 6”
como la fuente de entrada y no hay una señal de vídeo
presente.
32
Sp
Comparación de los ajustes de imagen en la
pantalla
Durante los ajustes de imagen, puede referirse rápidamente a la
imagen ajustada anteriormente con el mismo parámetro, lo que le
permite comparar fácilmente y seleccionar la calidad de imagen
preferida.
1 Pulse HOME MENU.
2 Seleccione “Imagen” (/ y, a continuación, ENTER).
3 Seleccione un ítem que desee ajustar (/ y, a
continuación, ENTER).
4 Mientras realiza el ajuste, pulse BLUE en el mando a
distancia.
Se visualiza “Antes” y la imagen ajustada anteriormente aparece
para comparación.
Antes
5 Pulse de nuevo el botón para volver a la imagen que está
ajustando actualmente.
Cada pulsación del botón cambia entre “Antes” y “Después”.
6 Repita los pasos 1 y 5 para otros parámetros.
7 Pulse HOME MENU para salir del menú.
Precaución
• Si sale el menú pulsando HOME MENU o no realiza ninguna
operación dentro de 60 segundos, las configuraciones
visualizadas por último de todos los parámetros se almacerán
en la memoria.
• Si desea salir del menú sin ejecutar los ajustes (o dejar las
configuraciones desactivadas) en la pantalla “Después”,
cambie a “Antes” y, a continuación, salga.
Nota
• No se puede ajustar ningún ítem en la pantalla “Antes”. Un
mensaje de advertencia aparece.
• Al cambiar a otro parámetro, asegúrese de cambiar la pantalla
de “Antes” a “Después” primero; de lo contrario, no podrá
seleccionar “Antes”. Un mensaje de advertencia aparece si no
lo hace.
• Si sale de la selección de la pantalla “Antes”, la entrada anterior
se almacena en la memoria y el botón no funciona más.
• Si sale de la selección de la pantalla “Después”, la nueva
entrada se almacena en la memoria y el botón no funciona más.
• Si selecciona y cambia el parámetro “Selección AV”, la nueva
entrada en el parámetro actual se almacena en la memoria y el
botón continúa funcionando.
• No puede comparar imágenes entre parámetros diferentes en
el menú “Selección AV” (“ESTÁNDAR” y “PELÍCULA”, por
ejemplo).
• Cuando selecciona esta función, “Modo inteligente” para
“Ajuste profesional” en el menú “Imagen”, “ÓPTIMO” en el
menú “Selección AV” y “Sensor luz amb.” en el menú “Opción”
se desactivan y la calidad de la imagen vuelve a las
configuraciones predeterminadas.
• No se puede seleccionar esta función:
- cuando se selecciona “Selección AV”,
- cuando se selecciona “Sí” o “No” en la pantalla de
confirmación para “Reponer” en el menú “Opción” o
- cuando se selecciona un menú de la fuente de PC
Page 99

Configuración
08
Ajustes del sonido
Puede ajustar la calidad del sonido según sus preferencias con las
configuraciones siguientes.
Ajuste el sonido según sus preferencias para la opción Selección
AV elegida (consulte Selección AV en la página 28).
1 Pulse HOME MENU.
2 Seleccione “Sonido” (/ y, a continuación, ENTER).
3 Seleccione el ítem que desee ajustar (/).
4 Seleccione el nivel deseado (/).
Sonido ESTÁNDAR
Agudos
Graves
Balance
Reponer
Efecto sonido
Salida auriculares
Subvolumen
Ítem Botón Botón
Agudos Para agudos más débiles Para agudos más fuertes
Graves Para graves más débiles Para graves más fuertes
Balance Desplaza el balance de
audio hacia la izquierda
5 Pulse HOME MENU para salir del menú.
Nota
• No es posible ajustar el sonido para la escucha con auriculares.
• Si realiza ajustes de sonido con los auriculares conectados, las
nuevas configuraciones entrarán en efecto tan pronto
desconecte los auriculares.
• Para restaurar las selecciones predeterminadas de fábrica
para todos los ítems, pulse / para seleccionar “Reponer”
en el paso 3 y, a continuación, pulse ENTER. Aparecerá una
pantalla de confirmación. Pulse / para seleccionar “Sí” y,
a continuación, pulse ENTER.
Efecto sonido
Puede seleccionar entre SRS FOCUS, SRS o SRS TruBass.
1 Pulse HOME MENU.
2 Seleccione “Sonido” (/ y, a continuación, ENTER).
3 Seleccione “Efecto sonido” (/ y, a continuación,
ENTER).
4 Seleccione “SRS FOCUS”, “SRS” o “SRS TruBass” (/)
5 Seleccione el párametro deseado (/).
2
0
0
Principal
30
Desplaza el balance de
audio hacia la derecha
SRS FOCUS
Selecciones Apagado Desactiva SRS FOCUS
Encendido Activa SRS FOCUS
Desplaza la dirección aparente del sonido
hacia arriba para un sonido definido más
claro
®
®
SRS
Selecciones Apagado Desactiva SRS
Encendido
Activa SRS
Reproduce un sonido tridimensional
altamente efectivo
®
®
SRS TruBass
Selecciones Apagado Desactiva SRS TruBass
Encendido Activa SRS TruBass
Proporciona graves profundos y ricos
utilizando una nueva tecnología
®
®
6 Pulse HOME MENU para salir del menú.
Nota
• (WOW) indica un estado donde SRS FOCUS
®
y SRS TruBass® están activados.
SRS
®
,
• También puede pulsar (Efecto sonido) en el mando a
distancia para cambiar la selección.
• No es posible ajustar el efecto de sonido para la escucha con
auriculares.
• Si cambia el efecto de sonido con los auriculares conectados,
las nuevas configuraciones entrarán en efecto tan pronto
desconecte los auriculares.
• El efecto de esta función difiere dependiendo de las señales.
Escucha de audio de la pantalla secundaria
con auriculares
Con los auriculares conectados, puede escuchar el audio de la
pantalla secundaria en el modo de 2 pantallas o de imagen-enimagen; el audio de la pantalla principal sale por los altavoces.
1 Pulse HOME MENU.
2 Seleccione “Sonido” (/ y, a continuación, ENTER).
3 Seleccione “Salida auriculares” (/).
4 Seleccione el párametro deseado (/).
Efecto sonido
Salida auriculares
Subvolumen
Salida auriculares
Selecciones Principal
(selección
predeterminada)
Sub En el modo de 2 pantallas o de imagen-en-
El audio de la pantalla principal se genera
por el terminal de salida PHONES.
imagen, el audio de la pantalla secundaria
sale por el terminal de salida PHONES.
Principal
30
Español
33
Sp
Page 100

08
Configuración
5 Seleccione “Subvolumen” (/).
6 Seleccione el nivel de volumen deseado (/).
7 Pulse HOME MENU para salir del menú.
Nota
• Para ajustar el volumen para los auriculares después de
seleccionar “Sub”, siempre utilice “Subvolumen” del menú,
independientemente si está en el modo de pantalla simple, de
2 pantallas o de imagen-en-imagen. Cuando la pantalla está en
el modo simple con “Sub” seleccionado, el audio de la pantalla
sale por los altavoces, aunque los auriculares estén
conectados.
Control de la alimentación
El control de la alimentación ofrece funciones convenientes para
el ahorro de energía.
Ahorro de energía
Puede utilizar uno de los modos de ahorro de energía para ahorrar
el consumo de energía.
1 Pulse HOME MENU.
2 Seleccione “Control de la alimentación” (/ y, a
continuación, ENTER).
3 Seleccione “Ahorro de energía” (/ y, a continuación,
ENTER).
4 Seleccione “Modo 1”, “Modo 2” o “Desactivar imagen” (/
y, a continuación, ENTER).
Ahorro de energía
Selecciones Apagado No reduce el brillo de la imagen
Modo 1 Baja ligeramente el consumo de energía
Modo 2 Reduce el brillo de la imagen y disminuye el
Desactivar
imagen
5 Pulse HOME MENU para salir del menú.
mientras suprime ligeramente el nivel de
reducción del brillo
consumo de energía
Desactiva la pantalla para ahorrar energía. Para
restaurar la visualización de la pantalla, pulse
cualquier botón diferente de
(Efecto sonido) o
Esta configuración no se memoriza por el
sistema.
e
i
.
+ /i – ,
Apagado: sin señal (fuente de AV solamente)
El sistema entra automáticamente en el modo de espera cuando
no se recibe ninguna señal durante 15 minutos.
1 Pulse HOME MENU.
2 Seleccione “Control de la alimentación” (/ y, a
continuación, ENTER).
3 Seleccione “Apagado: sin señal” (/ y, a continuación,
ENTER).
4 Seleccione “Activar” (/ y, a continuación, ENTER).
Apagado: sin señal
Selecciones Desactivar
(Selección
predeterminada)
Activar Coloca el sistema en el modo de espera cuando
No coloca el sistema en el modo de espera
no se recibe ninguna señal durante 15 minutos
5 Pulse HOME MENU para salir del menú.
Nota
• Cinco minutos antes que el sistema entre en el modo de
espera, un mensaje aparece cada minuto.
• Puede que el sistema no entre en el modo de espera cuando
hay señales de ruido en el televisor de plasma tras el fin de la
transmisión de TV.
Apagado: sin operación (fuente de AV solamente)
El sistema entra automáticamente en el modo de espera cuando
no se realiza ninguna operación durante tres horas.
1 Pulse HOME MENU.
2 Seleccione “Control de la alimentación” (/ y, a
continuación, ENTER).
3 Seleccione “Apagado: sin operación” (/ y, a
continuación, ENTER).
4 Seleccione “Activar” (/ y, a continuación, ENTER).
Apagado: sin operación
Selecciones Desactivar
(Selección
predeterminada)
Activar Coloca el sistema en el modo de espera
No coloca el sistema en el modo de espera
cuando no se realiza ninguna operación
durante tres horas
Nota
• Cuando cambie el modo de ahorro de energía, puede notar un
cambio en el sonido del panel. Esto es normal.
• La función de ahorro de energía puede mantener la eficiencia
de la pantalla por un largo período de tiempo. Se recomienda
ajustar la función de ahorro de energía a “Modo 1” para
mantener la eficiencia de la pantalla por un largo período de
tiempo.
34
Sp
5 Pulse HOME MENU para salir del menú.
Nota
• Cinco minutos antes que el sistema entre en el modo de
espera, un mensaje aparece cada minuto.
 Loading...