

Page 1

壁掛け型プラズマディスプレイ金具
HUNG ON WALL UNIT
ECRAN MURAL
WANDBEFESTIGUNGSEINHEIT
UNITA' DA PARETE
EENHEID VOOR WANDBEVESTIGING
UNIDAD PARA COLGAR DE LA PARED
PDK-WM02
「据付工事」について
本機は十分な技術・技能を有する専門業者が据え付けを
行うことを前提に販売されているものです。据え付け・取
り付けは必ず工事専門業者または販売店にご依頼くださ
い。
なお、据え付け、取り付けの不備、誤使用、改造、天災な
どによる事故損傷については、弊社は一切責任を負いま
せん。
取扱説明書
Operating instructions
Mode d’emploi
Bedienungsanleitung
Istruzioni per l’uso
Gebruiksaanwijzing
Manual de instrucciones
1
Ja
Page 2
このたびは、パイオニアの製品をお買い求めいただきまして
まことにありがとうございます。お使いになる前には取扱説
明書をよくお読みになり、安全に正しくご使用ください。ま
たお読みになった後も、この取扱説明書は大切に保管してく
ださい。
工事専門業者様へ
本製品の設置については、弊社発行のテクニカルマニュ
アルを熟読し、その内容を必ず守ってください。
指定外の組み立て、取り付け、使い方をされた場合、およ
び改造、天災などによる事故損傷については、弊社は一切
責任を負いません。
もくじ
取扱上の注意 ................................................................. 2
取り付けなどに不具合があると落下などの事故につ
ながり大変危険です。
注意
設置場所について
設置場所は金具とディスプレイの重量に十分耐えう
注意
禁止
禁止
禁止
注意
る強度をもつ場所を選定してください。
人が容易にぶら下がったり寄り掛かれる場所には設
置しないでください。
屋外や温泉、海辺の近くには設置しないでください。
振動や衝撃の加わるような場所には設置しないでく
ださい。
壁の構造強度により取り付けできない場合がありま
すので工事専門業者へご相談ください。
部品の確認 ..................................................................... 3
設置手順 ......................................................................... 3
外形寸法図 ..................................................................... 7
取扱上の注意
ご注意 安全上の絵表示について
取扱説明書および製品に記されている注意事項には、損害の
レベルや内容を示す絵表示が付けられていることがありま
す。それら絵表示の意味は以下のとおりです。
人が死亡または重傷を負うおそ
警告
注意
れがある内容を示します。
人がけがをしたり財産に損害を
受けるおそれがある内容を示し
ます。
その他の設置場所についてはプラズマディスプレイ
本体の取扱説明書を熟読し、その内容を必ず守って
注意
ください。
組み立て・設置について
組み立ての手順を守り、指定の箇所はすべて確実に
ネジ止めしてください。
注意
注意
注意
禁止
指定を守らないとプラズマディスプレイ取り付け後
に、破損や落下など思わぬ事故の原因となることが
あります。
プラズマディスプレイの取り付け作業は安全のため、
必ず 2 人以上で行ってください。
作業の際には、プラズマディスプレイと周辺機器の
電源を切り、電源プラグをコンセントから抜いてく
ださい。
各部のネジをゆるめたりすると落下などの事故に
つながりますので、絶対にゆるめないでください。
異常や不具合が発見されたならば速やかに修理を
工事専門業者へ依頼してください。
注意
警告・注意(気をつけること)
禁止(やってはいけないこと)
指示・強制(しなければならないこと)
本製品はプラズマディスプレイ専用です。
指定外のプラズマディスプレイの取り付けや改造お
禁止
よび他の用途への使用はしないでください。
2
Ja
ディスプレイ金具内部や壁取り付け部など、目に
つかないところが破損し、ディスプレイが落下す
注意
る危険を生じることがありますので、ディスプレ
イなどの点検修理時や、お店の内装工事の時など、
必ず工事専門業者に点検を依頼してください。で
きれば、定期的に工事専門業者に点検を依頼する
ことをお勧めします。
このディスプレイ金具を長期間使用されると、環
境によっては経年変化で強度が不足することがあ
注意
ります。5 年を目安として、工事専門業者に点検
を依頼し、使用して問題のないことをお確かめく
ださい。
Page 3
部品の確認
設置手順
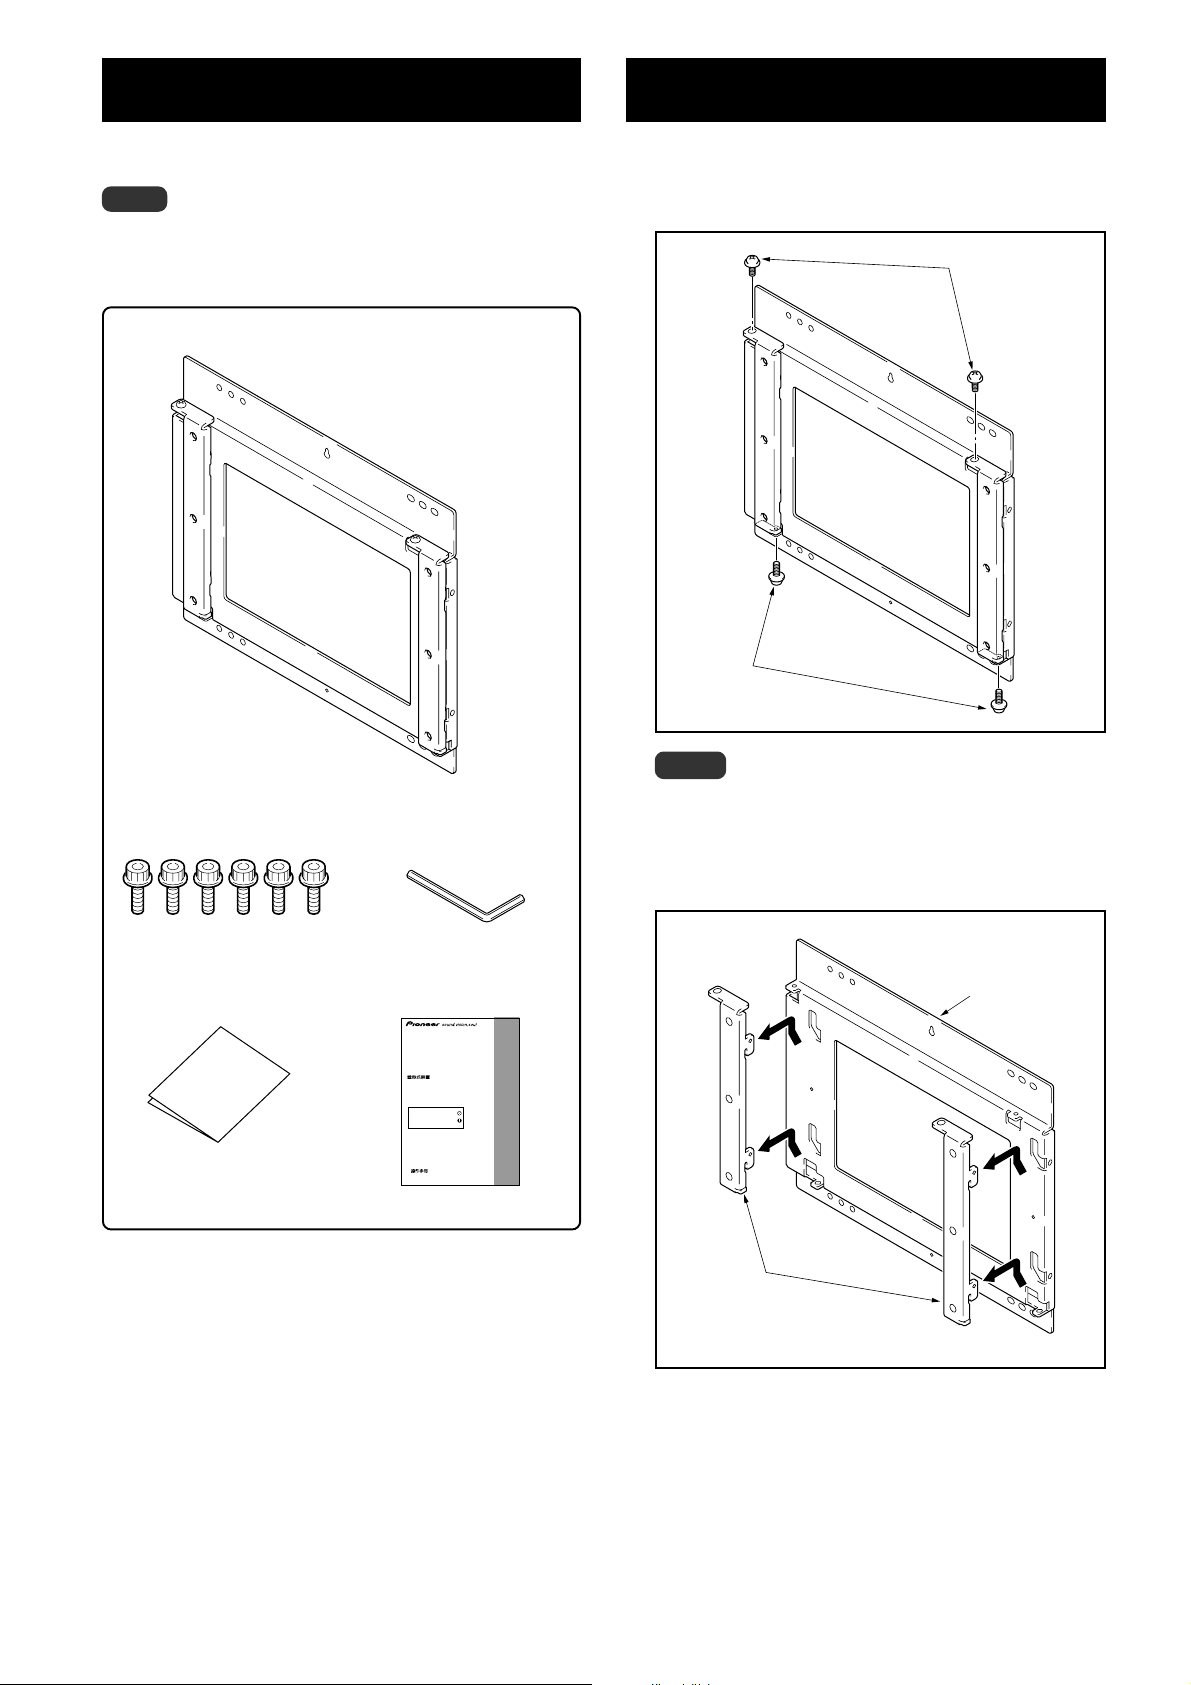
組み立ての前に部品を確認してください。
ご注意
壁掛け金具を壁面に固定するためのネジ類は付属していません。
別途ご用意ください。
プラスドライバーを別途ご用意ください。
壁掛け金具× 1
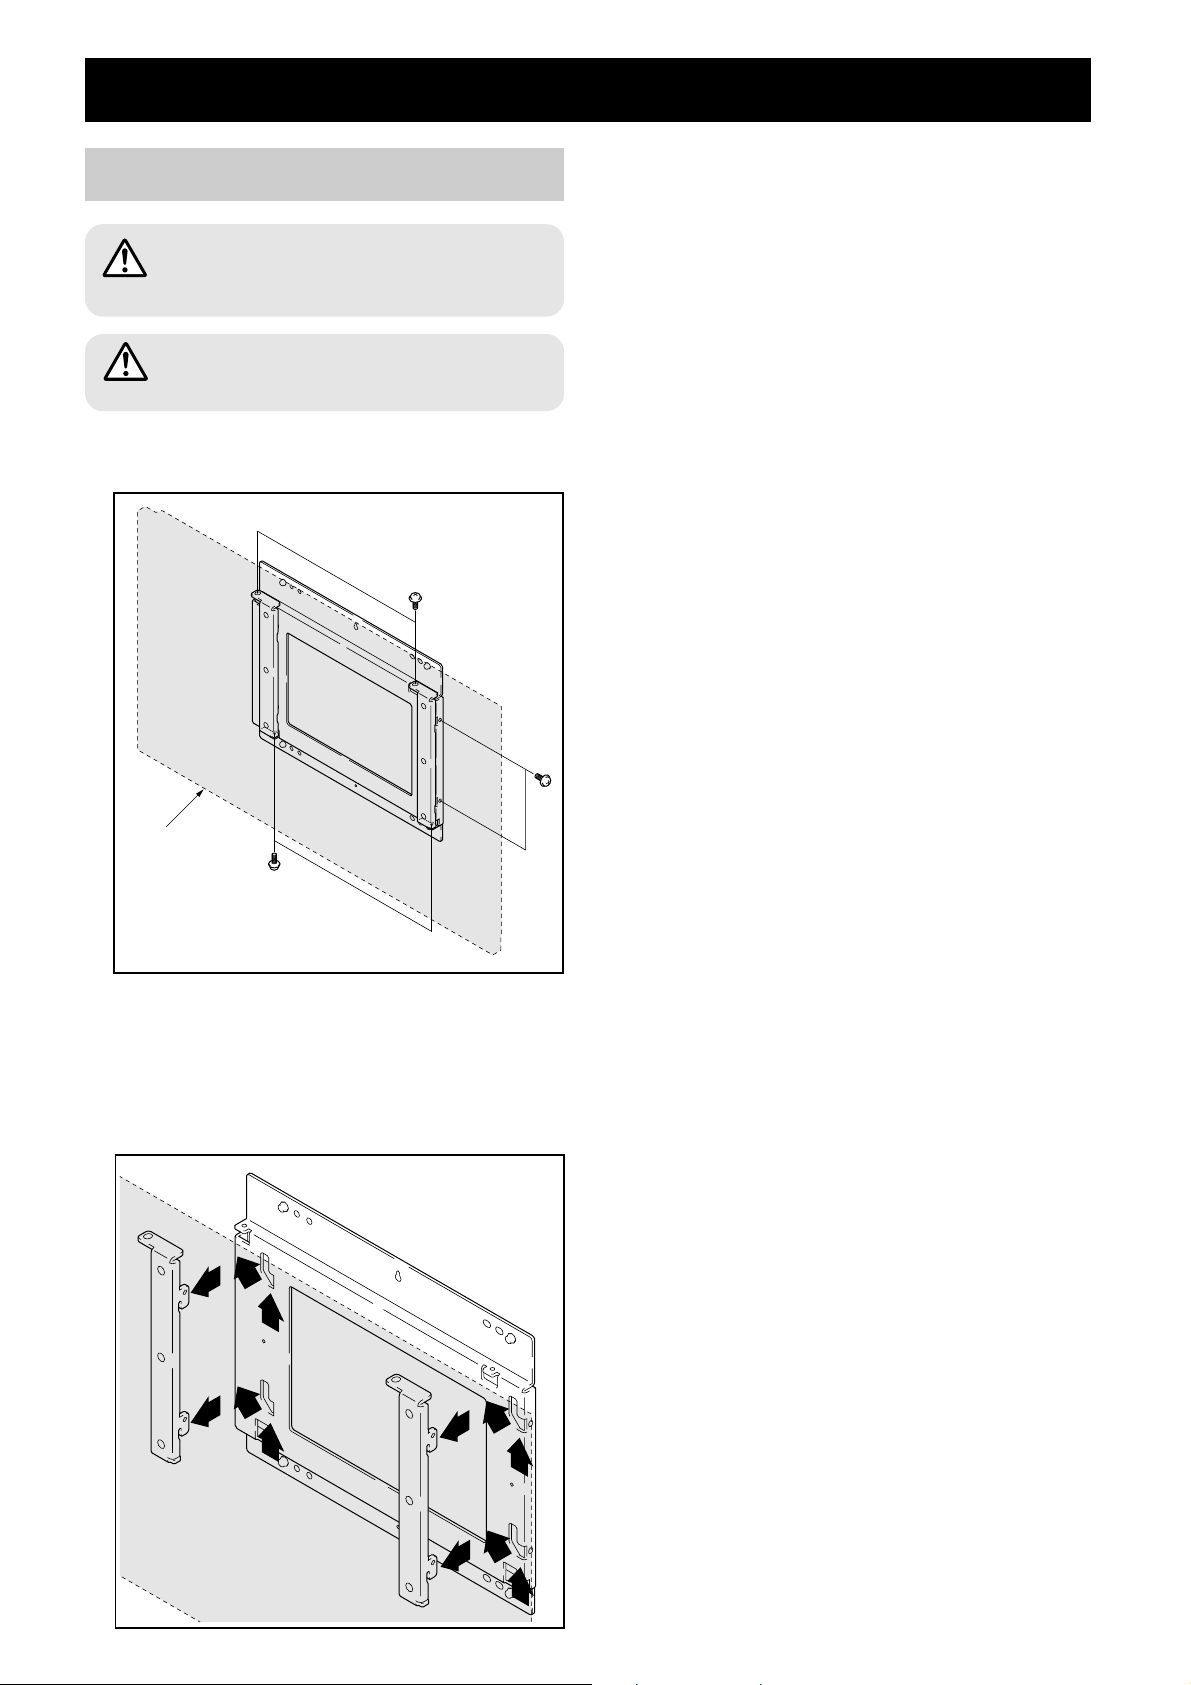
1 壁掛け金具の上下についているネジを外す。
(上下左右 4 カ所)
ネジを外す
ネジを外す
M8 ツバ付ボルト× 6
型紙× 1
六角レンチ× 1
(M8 用:対辺 6mm)
取扱説明書(本書)× 1
壁掛け型プラズマディスプレイ金具
HUNG ON WALL UNIT
ECRAN MURAL
WANDBEFESTIGUNGSEINHEIT
UNITA' DA PARETE
EENHEID VOOR WANDBEVESTIGING
UNIDAD PARA COLGAR DE LA PARED
PDK-WM02
「据付工事」について
本機は十分な技術・技能を有する専門業者が据え付けを
行うことを前提に販売されているものです。据え付け・取
り付けは必ず工事専門業者または販売店にご依頼くださ
い。
なお、据え付け、取り付けの不備、誤使用、改造、天災な
どによる事故損傷については、弊社は一切責任を負いま
せん。
取扱説明書
Operating instructions
Mode d’emploi
Bedienungsanleitung
Istruzioni per l’uso
Gebruiksaanwijzing
Manual de instrucciones
1
Ja
ご注意
固定ネジ(M5×10mm)2本をあとで使用しますので、紛失
しないようにしてください。
2 壁側金具と PDP 側金具を外す。
壁側金具
PDP 側金具
3
Ja
Page 4
設置手順
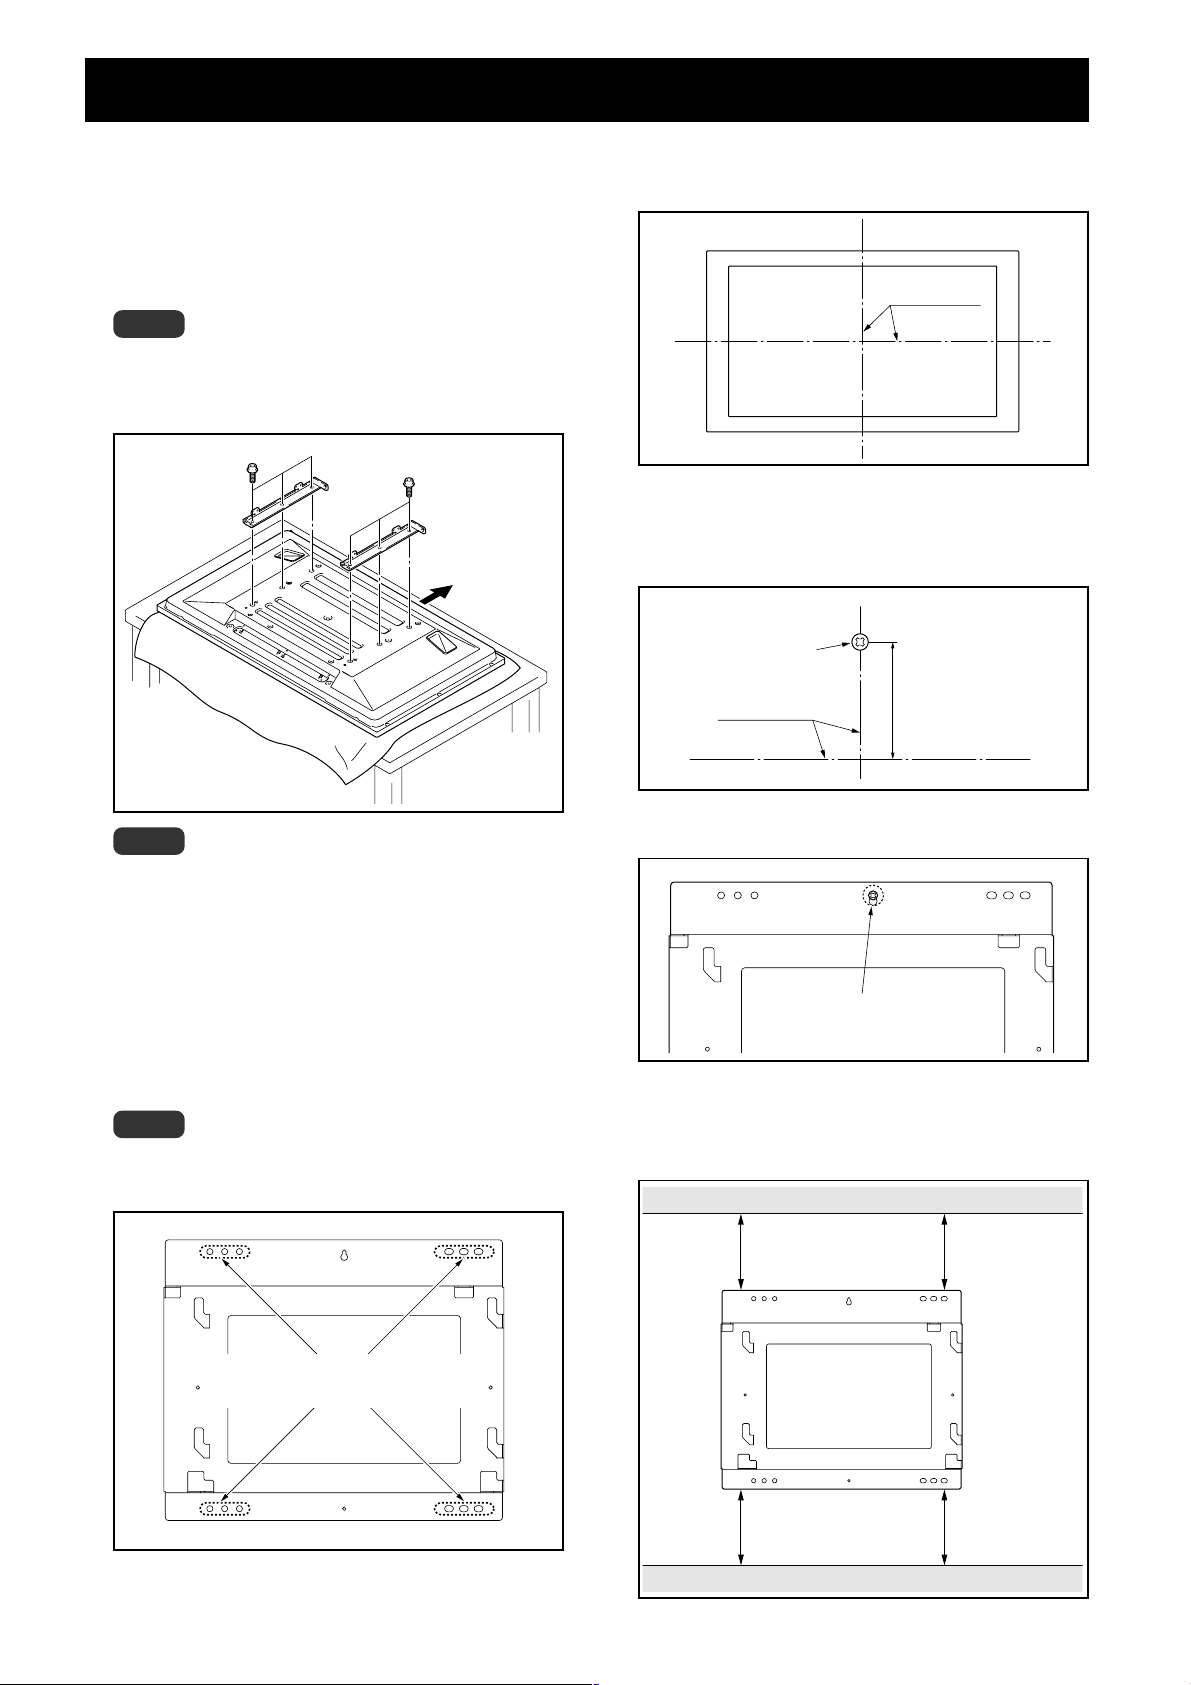
3 プラズマディスプレイにPDP 側金具を取り付
ける。
プラズマディスプレイとPDP側金具を、上下をまちがえ
ないように M8 ツバ付ボルトで固定してください(6 カ
所)。
ご注意
ディスプレイにキズおよび破損が生じないように、シートの
ようなものを敷いてください。
必ず安定したテーブルなどの上で取り付けてください。
こちらを上に
してください。
1 はじめに壁や梁の強度を確認しながらプラズマディスプレ
イを取り付ける位置を決め、画面センターの位置を出す。
画面センター
2 画面センターから上側230mmに位置出し用のネジを仮
止めする。仮止めしたネジは金具が固定された後、必要
ない場合は取り外してください。
ネジを仮止めする
画面センター
230mm
ご注意
スピーカーを取り付ける場合は、この段階で取り付けてくだ
さい。
取り付け方はプラズマディスプレイ本体の取扱説明書のス
ピーカー取付手順をご覧ください。
4 壁側金具を壁に取り付ける。
左右対称の位置に固定してください。(4 カ所以上)
このとき使用するネジ、ボルト類は壁の強度や材質によ
り異なりますので、別途ご用意ください。
ご注意
取り付けの際には、壁や梁の強度を確認してから作業を行ってく
ださい。
取り付け穴
(左右対称の位置に固定:4 カ所以上)
3 手順 2 のネジに壁側金具を引っ掛ける。
ネジに壁側金具を
引っ掛ける
4 天井から壁側金具までの距離(A1、A2)、または床から
金具までの距離(B
1、B 2)を測り、水平になるように調
整してから壁へボルトなどで固定する。
天井
A1
A2
A1 =A2
または
B
1 =B2
Ja
B1
床
B2
4
Page 5
設置手順
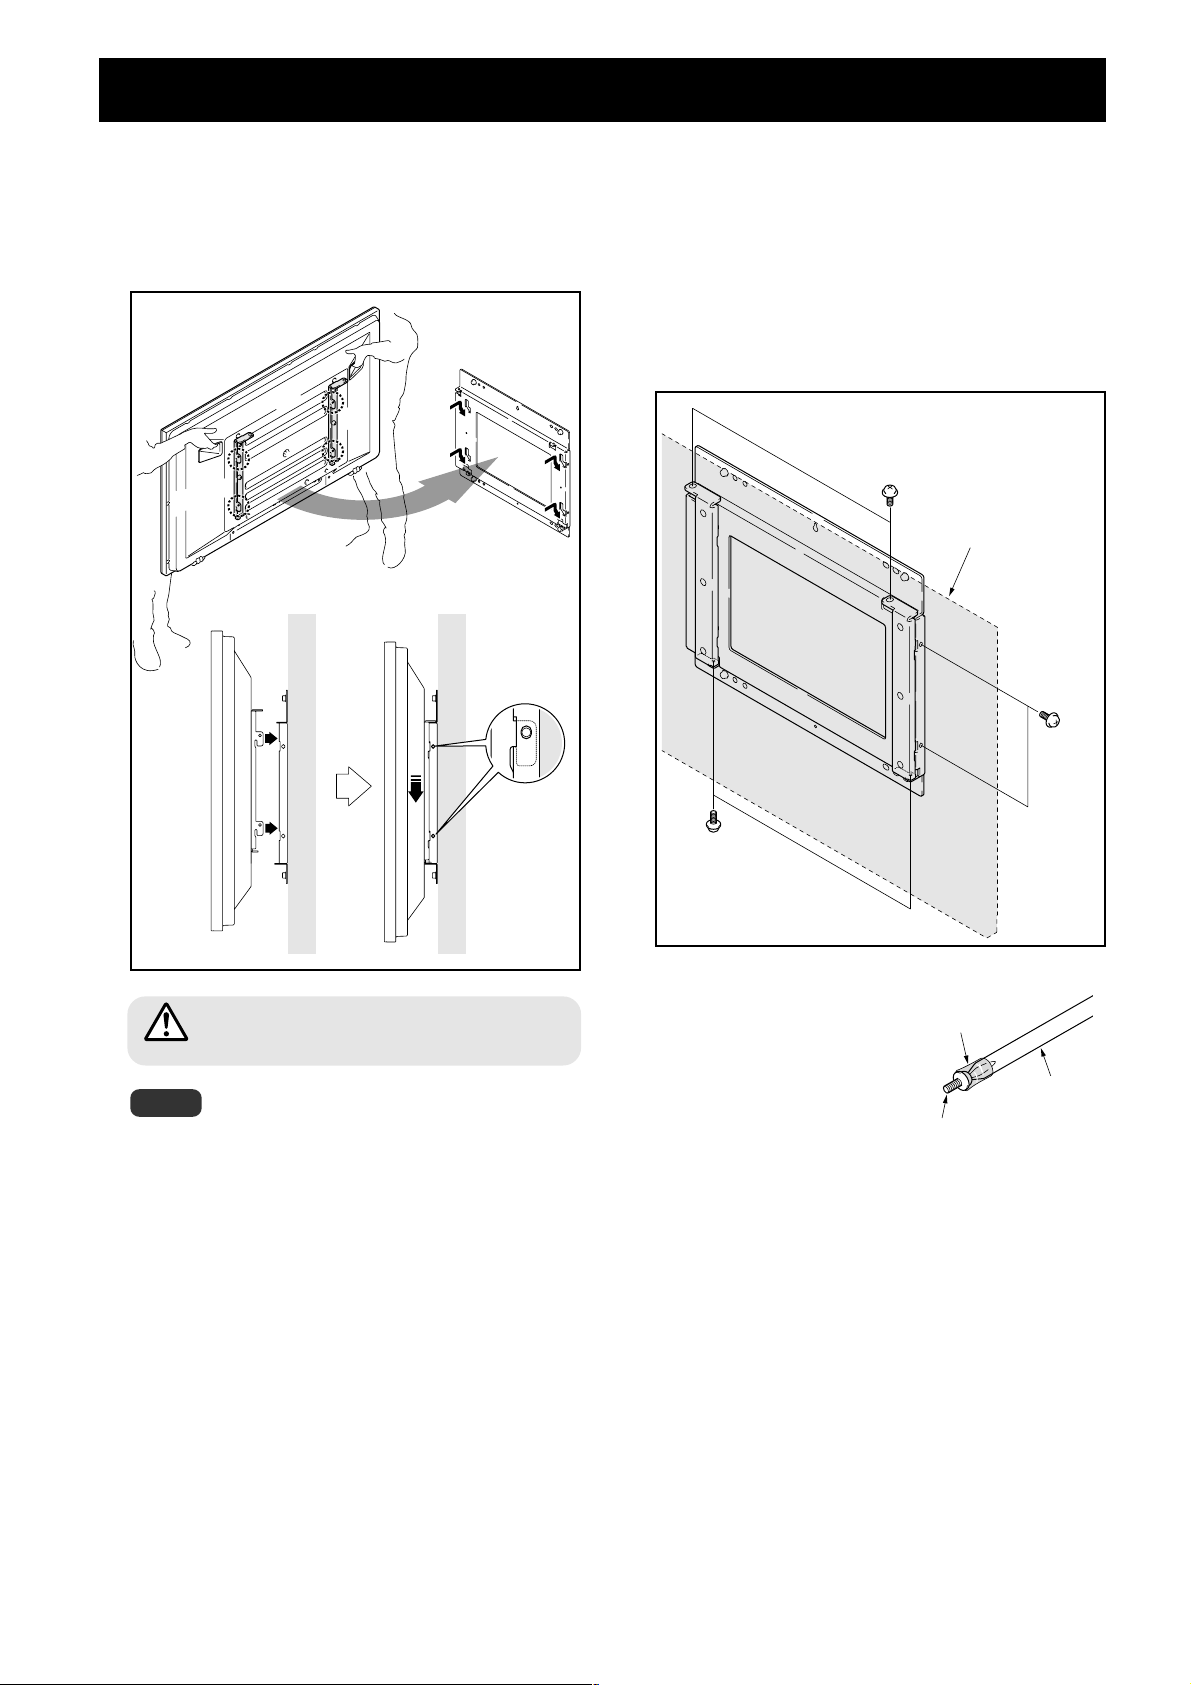
5 PDP 側金具のカギ手部分を壁側金具に引っ掛
ける。(4カ所)
カギ手部分がきちんと引っ掛かり、プラズマディスプレ
イが水平で正しい位置に取り付いたか確認してください。
PDP 側金具のカギ手部分を壁側金具に引っ掛ける
6 手順 1で外したネジで金具を固定する。(2カ
所)
ネジの取り付け位置は、上、下、右側のいずれかから選
択してください。
ネジは同じ面に 2 カ所固定します。
プラズマディスプレイの上側にスペースがない場合は、
スピーカーの取り付け位置により下側か右側のどちらか
を選択してください。
上側固定位置
プラズマディスプレイ
右側固定
位置
必ず 2 人以上で取り付けてください。
注意
ご注意
取り付けの際、スピーカーを付けた場合はスピーカー部分を
持たないでください。
配線などが金具やプラズマディスプレイに挟まれたりしない
ようにしてください。特に下側にスピーカーが取り付けられ
た場合は、壁とスピーカーに配線などが挟まれやすくなりま
すので十分注意してください。
下側固定位置
ネジを固定する場合、ドライ
バーの先端が磁化されている
ものを使用すると便利です。
お手元にない場合は、ネジが
落ちないようにネジの頭部と
ドライバーの先端をテープな
どで固定すると簡単に作業を
行えます。
テープなどで
固定する
ドライバー
ネジ
5
Ja
Page 6
設置手順
プラズマディスプレイを外す場合
作業を始める前にプラズマディスプレイと周辺機器の電
源プラグをコンセントから抜いてください。
注意
必要に応じて配線ケーブル類を外してください。
必ず 2 人以上で作業を行なってください。
注意
1 PDP 側金具を固定しているネジを外す。
プラズマ
ディスプレイ
2 プラズマディスプレイを一度少し持ち上げてか
11
ら(
1)、斜め左上方向に動かして(
11
向に突き当ててください。その位置から手前に
引き出すと(
33
3)外せます。
33
Ÿ
!
~
Ÿ
!
~
22
2)、上方
22
Ÿ
!
~
Ja
Ÿ
!
~
6
Page 7

外形寸法図
質量
・5.2kg(金具のみ)
・35.4kg(金具+プラズマディスプレイ< PDP-435HDS のディスプレイとスピーカー取付時>)
・36.6kg(金具+プラズマディスプレイ< PDP-435HDL のディスプレイとスピーカー取付時>)
・41.6kg(金具+プラズマディスプレイ< PDP-505HDS のディスプレイとスピーカー取付時>)
・42.9kg(金具+プラズマディスプレイ< PDP-505HDL のディスプレイとスピーカー取付時>)
・39.2kg(金具+プラズマディスプレイ< PDP-435SX 取付時>)
PDP-505HDS/PDP-435HDS取付時
257 (332)
230205
250225
150150
652 (737)
1120 (1270)
496
455
407
355
中心線
(画面センター)
292 (367)
(単位:mm)
( )寸法は 50 型の場合
98
取付時外寸]
[サイドスピーカー
76 (118.5)
475
93
[プラズマディスプレイ本体]
559 (634) [サイドスピーカー外寸]
96
PDP-505HDL/PDP-435HDL取付時
62
1312 (1462)[ダイレクト取付時] 1350 (1500) [ワイド取付時]
250
230
150
652 (737)
150
205
225
268303
1118 (1268) [下側スピーカー外寸]
1288 (1438)[サイドスピーカー外寸]
303
496
455
407
355
268
中心線
(画面センター)
101(143.5)
76 (118.5)
475
32[金具のみ]
98
257 (332)
571
1120 (1270)
292 (367)
101 (143.5)
93
32[金具のみ]
125
7
Ja
Page 8

外形寸法図
PDP-435SX取付時
303 268
496
455
407
355
230205
150150
225 250
753 (プラズマディスプレイ外寸)
427 326
281
中心線
(画面センター)
571
1168 (プラズマディスプレイ外寸)
316
475 76202
32 (金具のみ)
93
123.5
Ja
2004パイオニア株式会社 禁無断転載
8
Page 9

Thank you for buying Pioneer’s product.
Please read through the Operating Instructions to learn how
to operate your model safely and properly.
Please be advised to keep the Operating Instructions in
your place for future reference.
Installation
¶ Consult your dealer if you encounter any difficulties with
this installation.
¶ Pioneer is not liable for any damage resulting from
improper installation, improper use, modification, or
natural disasters.
Note to Construction Companies
Prior to installing this product, please read Pioneer's
technical manual thoroughly and heed its content.
Pioneer shall not be liable in any way for any accidents or
damage resulting from other than the specified assembly,
mounting and usage, from remodeling, or from natural
disasters or the like.
Cautions
This product is exclusively for use with the plasma display.
It should not be used for any other purpose, such as for
holding a plasma display, or remodeled in any way.
Improper installation is extremely dangerous because it
may result in it falling over or other accident.
Installation Location
• Select a location that is strong enough to support the
weight of the wall mount and the displays.
• Do not install it at a place where people can easily hang
from it or lean on it.
• Do not install it outdoors, at a hot spring, or near a beach.
• Do not install where vibration or shock may occur.
• There are cases where it cannot be installed because of
the structural strength of the wall, so consult with an
expert installer.
• Thoroughly read and always follow the plasma display
operating instructions for more information about the
installation location.
Contents
Cautions ................................................................... 9
Checking the Parts ............................................... 10
Installation Procedure .......................................... 10
External Dimension Diagram ............................. 14
CAUTION
This symbol refers to a hazard or unsafe practice which
can result in personal injury or property damage.
Assembling and Installation
• Assemble in accordance with the assembly
instructions and securely attach all screws at the
designated locations.
There have been cases where unforeseen accidents
such as the equipment breaking or falling over due to
incorrect installation have occurred.
• The display must always be installed by two or more
people to assure it is installed safely.
• Before installation, turn off the power for the display
and peripheral devices then remove the power cord
plug from the power outlet.
Make sure that the screws used to attach all parts never
become loose, because a loosened screw may result in it
falling over or other accident.
If you discover a fault or malfunction, immediately have an
expert installer perform repairs.
There is a danger of the interior of metal fittings of the
display, parts attached to the wall, or other places that
cannot be seen being damaged so that the display falls
over. Therefore, when inspecting or repairing the display, or
when performing interior finishing work in your shop, be
sure to ask an expert installer to inspect these places. We
recommend that if possible, you ask an expert installer to
perform inspections at regular intervals.
If the metal fittings of the display are used for a long time,
the environment may cause change over time, reducing
their strength. After five years, ask an expert installer to
inspect it to make sure that it can be used without any
problems.
9
En
Page 10

Checking the Parts
Installation Procedure
Check the parts before beginning assembly.
Note
Screws used to fix the wall-hanging metal fitting firmly to
the wall surface are not included. Purchase these separately.
Philips driver separately.
Hung on wall unit x1
1 Removing the screws from the top and
bottom of the Hung on wall unit (4 locations: top and bottom, left and right side).
Removing the
screws.
Removing
the screws.
Bolts M8 x 6
Stencil x 1
Hexagon wrench x 1
(Opposite side 6 mm for M8 use)
Operating instructions
(this document) x 1
壁掛け型プラズマディスプレイ金具
HUNG ON WALL UNIT
ECRAN MURAL
WANDBEFESTIGUNGSEINHEIT
UNITA' DA PARETE
EENHEID VOOR WANDBEVESTIGING
UNIDAD PARA COLGAR DE LA PARED
PDK-WM02
「据付工事」について
本機は十分な技術・技能を有する専門業者が据え付けを
行うことを前提に販売されているものです。据え付け・取
り付けは必ず工事専門業者または販売店にご依頼くださ
い。
なお、据え付け、取り付けの不備、誤使用、改造、天災な
どによる事故損傷については、弊社は一切責任を負いま
せん。
取扱説明書
Operating instructions
Mode d’emploi
Bedienungsanleitung
Istruzioni per l’uso
Gebruiksaanwijzing
Manual de instrucciones
1
Ja
Note
Be careful not to lose the 2 anchor screws (M5 x 10mm)
because they will be used later.
2 Removing the PDP side metal fitting from
the wall side metal fitting.
Wall side
metal fitting
PDP side
metal fitting
10
En
Page 11

Installation Procedure
3 Attaching the PDP side metal fitting to the
plasma display.
Attach the PDP side metal fitting to the plasma display
with bolts M8 carefully so the top and bottom are not
accidentally reversed (6 locations).
Note
Spread a sheet or similar material so that the display
will not be scratched or damaged.
Always install it on top of a stable table or similar
surface.
Place it so the
top is here.
1 First decide the position to install the plasma display as
you check the strength of the wall and beam, then set
the location at the center of the screen.
Center of
the screen
2 Temporarily attach the screw used for positioning about
230mm above the center of the screen. After the metal
fitting is fixed by the temporarily attached screw,
remove it if it is not necessary.
Temporarily
attaching the
screw
Center of the screen
230mm
Note
If you plan to install speakers, install them at this stage.
For the installation method, refer to the speaker
installation procedure in the operating instructions for
the plasma display.
4 Installing the wall side metal fitting on the
wall.
Fix it firmly in place symmetrically to the left and right (4
or more locations).
The screws and bolts used for this step vary according
to the strength and the materials of the wall, so prepare
these separately.
Note
Perform this installation work after confirming the
strength of the wall, columns, etc.
Attachment holes
(attached symmetrically on the left
and right: 4 or more locations)
3 Hang the wall side metal fitting on the screw referred to
in step 2.
Hanging the wall side
metal fitting on the screw.
4 Measure the distance from the ceiling to the wall side
metal fitting (A
the metal fitting (B
1, A2) and the distance from the floor to
1, B2), then after adjusting it so it is
horizontal, fasten it to the wall with bolts.
Ceiling
A1
A2
A1 =A2
or
B1 =B2
B1
B2
Floor
11
En
Page 12

Installation Procedure
5 Hanging the cant hooks of the PDP side
fitting on the wall side fitting (4 locations).
Make sure that the cant hooks are firmly hung and that
the plasma display is attached horizontally in its correct
position.
Hanging the cant hooks of the PDP side
metal fitting on the wall side metal fitting.
6 Fixing the metal fitting with the screws
removed in step 1 (2 locations).
Select the positions to attach the screws from the top,
bottom, or right side.
Attach the screws at two locations on the same plane.
If there is no space above the plasma display, select
locations either below or to the right of the speaker
installation location.
Top attachment
location
Plasma display
Right side
attachment
location
Always have at least two people do this task.
Caution
Note
If speakers are attached, do not hold the speakers to
perform this attachment.
Be careful that the wiring etc. is not caught in the metal
fitting or the plasma display. Be extremely careful if
there is a speaker attached to the bottom, because if
there is, wiring etc. is easily caught between the wall
and the speaker.
Bottom
attachment
location
It is convenient to attach the
screws using a screw driver
with a magnetized tip. If you
do not have one, you can do
the work easily by attaching
the head of the screw to the
tip of the screw driver with
tape so that the screw does
not fall.
Attached
with tape
Screw driver
Screw
12
En
Page 13

When removing the plasma display
Before beginning this procedure, remove the power
plugs of the plasma display and peripheral devices
Caution
Caution
from their outlets. As necessary also remove
connecting cables.
Always have at least two people do this task.
1 Removing screws fixing the PDP side
metal fitting.
Installation Procedure
Plasma display
2 After slightly raising the plasma display
once (
till you cannot raise it any higher. You can
remove it by pulling it towards yourself in
this position (
11
1), raise it upwards to the left (2)
11
33
3).
33
Ÿ
!
~
Ÿ
!
~
Ÿ
!
~
Ÿ
!
~
13
En
Page 14

External Dimension Diagram
Weight
• 5.2 kg (11.5 lbs) [only metal fittings]
• 35.4 kg (78.0 lbs) [When used with a PDP-435XDE/435HDE/435FDE/435HDG display with speakers (PDP-S22-LR) attached.]
• 36.6 kg (80.7 lbs) [When used with a PDP-435XDE/435HDE/435FDE/435HDG display with speakers (PDP-S26-LR) attached.]
• 41.6 kg (91.7 lbs) [When used with a PDP-505XDE/505HDE/505HDG display with speakers (PDP-S21-LR) attached.]
• 42.9 kg (94.6 lbs) [When used with a PDP-505XDE/505HDE/505HDG display with speakers (PDP-S25-LR) attached.]
PDP-435XDE/435HDE/435FDE/435HDG display with speakers (PDP-S22-LR) attached
PDP-505XDE/505HDE/505HDG display with speakers (PDP-S21-LR) attached
1120 (1270)
496
455
407
355
Center line
(Screen center)
292 (367)
652 (737)
250225
257 (332)
230205
150150
98
[External dimensions
76 (118.5)
475
Unit: mm
Dimensions in ( )
are the dimensions for
the 50 inch model
when side speakers
are installed]
93 [Plasma display]
559 (634) [External dimension of a side speaker]
96
1118 (1268) [External dimension of a bottom speaker]
1288 (1438) [External dimension of a side speaker]
268303
PDP-435XDE/435HDE/435FDE/435HDG display with speakers (PDP-S26-LR) attached
PDP-505XDE/505HDE/505HDG display with speakers (PDP-S25-LR) attached
62
1312 (1462)[When doing a flush installation] 1350 (1500) [When doing an air installation]
250
652 (737)
225
230
205
150
150
303
496
455
407
355
268
Center line
(Screen center)
101(143.5)
76 (118.5)
475
32 [Only metal fitting]
98
14
En
257 (332)
571
1120 (1270)
292 (367)
32[Only metal fittings]
93
125
101 (143.5)
Published by Pioneer Corporation.
Copyright © 2004 Pioneer Corporation.
All rights reserved.
Page 15

Nous vous remercions d’avoir choisi un produit Pioneer.
Veuillez lire attentivement ce mode d’emploi pour savoir
comment utiliser correctement et en toute sécurité votre
support. Nous vous conseillons de conserver
soigneusement ce mode d’emploi à proximité et dans un
endroit sûr afin de pouvoir vous y référer le cas échéant.
Installation
¶ En cas de difficultés, veuillez consulter votre revendeur.
¶ Pioneer ne saura être tenu responsable d’aucun
dommage résultant d’une installation ou d’une
utilisation incorrecte de ce produit, de sa modification
ou encore de catastrophes naturelles.
Remarque destinée aux entreprises de
construction
Lisez attentivement le manuel technique Pioneer avant
d'installer ce produit, et respectez les consignes qu’il
contient.
Pioneer décline toute responsabilité en cas d'accidents
ou de dégâts provoqués par un montage, une installation
ou une utilisation non conformes aux spécifications du
manuel, ou encore par une modification ou une
catastrophe naturelle.
Attention
Ce produit ne peut être utilisé qu'avec l'écran plasma.
Il doit être utilisé uniquement comme support d’un écran
plasma, à l’exclusion de tout autre usage, et ne doit pas
être modifié.
Toute installation incorrecte est extrêmement dangereuse
car elle risquerait de provoquer la chute du support ou autre
accident.
Montage et installation
• Montez le support conformément aux instructions et
fixez solidement toutes les vis aux endroits prévus à
cet effet.
Des accidents ont déjà été constatés (détérioration
du matériel, chute, etc.) en raison d’une installation
incorrecte.
• Pour plus de sécurité, l’écran doit toujours être
installé par au moins deux personnes à la fois.
• Avant de procéder à l’installation, mettez l’écran ainsi
que les périphériques hors tension, puis retirer la
prise du câble d’alimentation électrique de la prise
murale.
Assurez-vous que toutes les vis utilisées pour fixer les
différentes pièces ne se desserrent ou ne se dévissent pas,
car cela risquerait d’entraîner la chute du support ou
d’autres accidents.
Si vous constatez un défaut ou un dysfonctionnement,
veuillez faire intervenir immédiatement un installateur
spécialisé.
L’intérieur des pièces de fixation en métal de l’écran ou des
pièces fixées au mur ainsi que d’autres endroits qui ne sont
pas visibles risquent d’être endommagés, ce qui pourrait
provoquer la chute de l’écran. Par conséquent, lorsque vous
inspectez ou réparez l’écran ou lorsque vous procédez à
des travaux de finition en atelier, demandez à un installateur
spécialisé de procéder aux inspections ou vérifications
nécessaires. Nous vous recommandons dans la mesure du
possible de les faire contrôler régulièrement par un
installateur spécialisé.
Au fil du temps, les pièces de fixation en métal de l’écran
peuvent perdre de leur résistance. Faites-les contrôler au
bout de cinq ans par un installateur spécialisé afin de
vérifier qu’elles peuvent encore être utilisées sans
problème.
Lieu d’installation
• Sélectionnez un endroit assez solide pour supporter le
poids du support et de l’écran.
• N’installez pas le support à un endroit où il est possible
de s’y accrocher ou de prendre appui dessus.
• N’installez pas le support en extérieur, à proximité d’une
source de chaleur ou d’une plage.
• N’installez pas le support à un endroit où il pourrait être
soumis à des chocs ou à des vibrations.
• Dans certains cas, les qualités de résistance du mur ne
permettent pas l’installation du support. Veuillez consulter
dans ce cas un installateur spécialisé.
• Le mode d’emploi de l’écran plasma contient de plus
amples informations en ce qui concerne le lieu
d’installation. Consultez-le et suivez scrupuleusement ses
instructions.
Publication de Pioneer Corporation.
© 2004 Pioneer Corporation.
Tous droits de reproduction et de traduction réservés.
15
Fr
Page 16

Wir danken Ihnen, dass Sie sich für den Kauf eines Produkts
der Firma Pioneer entschieden haben.
Bitte lesen die Bedienungsanleitung aufmerksam, um sich
über die sichere und richtige Bedienung Ihres Modells zu
informieren.
Wir empfehlen Ihnen, die Bedienungsanleitung anschließend
sicher aufzubewahren, um Sie später im Bedarfsfalle zu Rate
ziehen zu können.
Installation
¶ Bitte setzen Sie sich mit Ihrem Händler in Verbindung,
wenn Sie auf Schwierigkeiten bei der Installation
stoßen.
Die Firma Pioneer haftet nicht für Schäden, die auf falsche
Installation, auf inkorrekte Verwendung, auf vorgenommene
Veränderungen oder auf Naturkatastrophen zurückzuführen
sind.
Hinweis an Montagebetriebe
Bitte lesen Sie vor der Installation die Montageanleitung
der Firma Pioneer für dieses Produkt aufmerksam und
beachten Sie die gegebenen Hinweise.
Die Firma Pioneer haftet nicht für Unfälle oder Schäden,
die auf eine andere Montage, eine andere Befestigung
oder einen anderen Gebrauch als angegeben oder auf
Änderungen oder auf Naturkatastrophen zurückzuführen
sind.
Sicherheitshinweise
Dieses Display darf nur zusammen mit dem Plasma-Display
verwendet werden.
Das Produkt darf nicht für andere Zwecke als das Halten
eines Plasma-Displays eingesetzt oder in irgendeiner Weise
umgebaut werden.
Eine falsche Installation ist sehr gefährlich, da sie zum
Umfallen des Displays oder zu einem anderen Unfall führen
kann.
Installationsort
• Wählen Sie für Installation einen Ort, der stabil genug ist,
das Gewicht der Wandhalterung und des Displays zu
tragen.
• Installieren Sie die Einheit nicht an einem Platz, an den
sich Personen leicht hängen oder sich anlehnen können.
• Installieren Sie die Einheit nicht im Freien, in der Nähe
einer heißen Quelle oder in Strandnähe.
• Installieren Sie die Einheit nicht an Orten, an denen sie
Vibrationen oder Stößen ausgesetzt sein kann.
• Konsultieren Sie, wenn die Einheit aufgrund der
gegebenen Festigkeitsverhältnisse der Wand nicht
installiert werden kann, einen Installationsfachmann.
• Informieren Sie sich zu weiteren Einzelheiten über den
Installationsort in der Bedienungsanleitung für das
Plasmadisplay, und beachten Sie stets die dort
gegebenen Anweisungen und Hinweise.
16
Ge
Montage und Installation
• Führen Sie die Montagearbeiten gemäß den
Montageanweisungen aus und befestigen Sie alle
Schrauben sicher an den jeweils vorgesehenen
Positionen.
Es hat Fälle gegeben, in denen es aufgrund einer
falschen Installation zu unvorhergesehenen Unfällen
wie beispielsweise einem Bruch oder zum Umfallen
der Einheit kam.
• Das Display muss stets von zwei oder mehr Personen
installiert werden, um zu sichern, dass es sicher
installiert wird.
• Schalten Sie das Display und periphere Geräte vor
der Installation aus und trennen Sie es bzw. sie durch
Herausziehen des Steckers aus der Steckdose vom
Netz.
Vergewissern Sie sich, dass die für die Befestigung der
einzelnen Teile verwendeten Schrauben nicht locker
werden, da eine gelockerte Schraube zu einem Umfallen
der Einheit oder zu anderen Unfällen führen kann.
Wenn Sie einen Fehler oder eine Fehlfunktion feststellen,
dann setzen Sie sich unverzüglich
mit einem Installationsfachmann in Verbindung, um
Reparaturen ausführen zu lassen.
Eine Gefahr des Inneren von Metall-Zubehörteilen des
Displays, der an die Wand montierten Teile oder anderen
zugehörigen Stellen besteht darin, dass eintretende
Schäden nicht gesehen werden können, so dass es
passieren kann, dass das Display unvermittelt umfällt.
Daher sollten Sie, wenn das Display einer Inspektion
unterzogen oder repariert wird oder wenn abschließende
Innenarbeiten in Ihren Räumlichkeiten ausgeführt werden,
nicht vergessen, einen Fachmann zu bitten, sich diese
Stellen anzusehen. Wir empfehlen Ihnen, in regelmäßigen
Abständen eine Inspektion durch einen Fachmann
vornehmen zu lassen.
Wenn die Metall-Zubehörteile des Displays lange im Einsatz
waren, kann es sein, dass sich ihre Festigkeit durch
Umwelteinflüsse vermindert hat. Bitten Sie deshalb nach
fünf Jahren einen Fachmann, die Einheit einer Inspektion zu
unterziehen, um sicherzugehen, dass sie weiterhin
problemlos verwendet werden kann.
Veröffentlicht von Pioneer Corporation.
Urheberrechtlich geschützt © 2004 Pioneer Corporation.
Alle Rechte vorbehalten.
Page 17

Vi ringraziamo per avere acquistato un prodotto Pioneer.
Vi preghiamo di leggere attentamente le Istruzioni per l’uso
per imparare il modo sicuro e corretto di operare sul vostro
modello. Vi consigliamo di tenere le Istruzioni per l’uso a
portata di mano per farvi riferimento in futuro.
Installazione
¶ In caso di difficoltà durante l’installazione, rivolgetevi al
vostro rivenditore.
¶ Pioneer non è responsabile per alcun danno causato
dall’installazione o dall’uso impropri, nonché da
modifiche o catastrofi naturali.
Nota per le società di costruzioni
Prima di installare questo prodotto, leggere attentamente
il manuale tecnico Pioneer e prestare attenzione al suo
contenuto.
Assemblaggio e installazione
• Assemblatelo in linea con le istruzioni e serrate fino
in fondo tutte le viti nella posizione prescelta.
Vi sono stati casi in cui l’apparecchio si è rotto o è
caduto a causa di un’installazione non effettuata in
modo corretto.
• Il display deve sempre essere installato da due o più
persone per assicurarsi di installarlo correttamente.
• Prima dell’installazione spegnete il display e gli
apparecchi periferici, quindi staccate la spina di
corrente del cavo dalla presa.
Assicuratevi che le viti utilizzate per applicare i diversi pezzi
non vadano mai perse, perché la perdita di una vite
potrebbe causare la sua caduta od altri incidenti.
Se vi accorgete di un difetto o un cattivo funzionamento,
fate immediatamente eseguire la relativa riparazione da un
installatore esperto.
La Pioneer non è responsabile in alcun modo per danni
o incidenti causati da assemblaggio, installazione, utilizzo
o modifiche diversi da quelli specificatamente indicati,
nonché da catastrofi naturali o simili.
Precauzioni
Questo prodotto deve essere usato esclusivamente con il
display a plasma.
Il supporto deve essere utilizzato solo ed esclusivamente
per il display a plasma e non deve essere modificato in
alcun modo.
L’installazione impropria è estremamente pericolosa in
quanto potrebbe provocare la caduta dell’apparecchio o altri
incidenti.
Posizionamento dell’installazione
• Scegliete una posizione sufficientemente forte da
sostenere il peso per il montaggio a parete dei display.
• Non installatelo in un posto dove le persone possono
facilmente appendersi o appoggiarsi su di esso.
• Non installatelo all’esterno, su una fonte di calore o vicino
ad una spiaggia.
• Non installatelo dove possano verificarsi vibrazioni o
possa essere soggetto a colpi.
• In alcuni casi, non è possibile installarlo a causa della
forza limitata della parete ed è meglio consultare un
installatore esperto.
• Leggete attentamente e seguite le istruzioni per l’uso del
display a plasma per ulteriori informazioni sulla posizione
dell’installazione.
Gli accessori metallici all’interno del display sono pericolosi,
come i pezzi applicati alla parete o in posizioni dove
eventuali danni non possano essere visti e il display
potrebbe cadere. Quindi, quando controllate o riparate il
display, o se state eseguendo lavori di ristrutturazione
all’interno del vostro negozio, assicuratevi che un
installatore esperto supervisioni tali posizioni.
Vi consigliamo, se possibile, di richiedere ad un installatore
esperto di effettuare controlli a intervalli regolari.
Se gli accessori metallici del display sono utilizzati per lungo
tempo, dove la situazione ambientale possa modificarli nel
tempo riducendo la loro forza. Dopo cinque anni, richiedete
ad un installatore esperto di ispezionarlo per assicurarsi che
possa essere usato senza problemi.
Pubblicato da Pioneer Corporation.
Copyright © 2004 Pioneer Corporation.
Tutti i diritti riservati.
17
It
Page 18

Hartelijk dank voor de aanschaf van dit Pioneer product.
Lees deze gebruiksaanwijzing aandachtig door voor een veilige
en juiste bediening van dit model.
Berg de gebruiksaanwijzing veilig op voor het geval u deze
later wilt raadplegen.
Installatie
¶ Raadpleeg uw verkoper indien u problemen met de
installatie ondervindt.
Pioneer is niet verantwoordelijk voor schade veroorzaakt
door onjuiste installatie, onjuist gebruik, wijzigingen of
natuurrampen.
Opmerking voor bouwbedrijven
Lees aandachtig de technische handleiding van Pioneer
voordat u met de installatie begint en respecteer de
gegeven richtlijnen.
Montage en installatie
• Monteer de wandmontage volgens de instructies
voor montage, en bevestig alle schroeven op de
daarvoor bestemde plaatsen.
Door onjuiste installatie kunnen zich onvoorziene
ongevallen voordoen, waarbij de apparatuur kan
breken of omvallen.
• De display dient altijd door twee of meer mensen te
worden geïnstalleerd om er zeker van te zijn dat hij
veilig wordt geplaatst.
• Koppel voorafgaande aan installatie de display en
randapparatuur los van de netspanning, en verwijder
vervolgens de netstekker uit het stopcontact.
Zorg ervoor dat de schroeven die alle onderdelen
bevestigen niet los komen te zitten; door een loszittende
schroef kan het apparaat omvallen of andere ongevallen
veroorzaken.
Pioneer kan in geen geval verantwoordelijk worden gesteld
voor ongelukken of schade die het gevolg zijn van een
assemblage, montage of gebruik die niet in de handleiding
wordt aangegeven, van een ombouw of van natuurrampen
en dergelijke.
Waarschuwingen
Dit product kan alleen gebruikt worden met het
plasmabeeldscherm.
Het mag niet worden gebruikt voor andere doeleinden,
zoals het monteren van een plasmascherm, of worden
gewijzigd.
Onjuiste installatie is zeer gevaarlijk omdat de staander kan
omvallen of een ander ongeval kan veroorzaken.
Plaats van installatie
• Kies een plaats die stevig genoeg is om het gewicht van
de wandmontage en de displays te kunnen dragen.
• Installeer het niet op een plaats waar iemand er aan kan
hangen of op kan leunen.
• Installeer de wandmontage niet op een plaats waar deze
aan trillingen en schokken onderhevig is.
• Installeer de staander niet waar hij blootstaat aan trillingen
of schokken.
• Het is mogelijk dat het niet kan worden geïnstalleerd
omdat de muur niet stevig genoeg is; het is in dat geval
aan te raden een vakmonteur te raadplegen.
• Lees de gebruiksaanwijzing voor de plasma-display goed
door voor meer gegevens over de plaats van installatie.
Waarschuw onmiddellijk een vakmonteur voor uitvoering
van herstelwerkzaamheden indien u een gebrek of storing
ontdekt.
Het gevaar bestaat dat schade aan de binnenzijde van de
metalen appendages van de display, onderdelen die aan de
muur zijn bevestigd of op andere plaatsen niet te zien is,
waardoor de display kan omvallen. Daarom dient u ervoor
te zorgen dat de vakmonteur of degene die het apparaat
onderzoekt deze onderdelen bekijkt tijdens controle of
reparatie van de display, of tijdens afwerking van de
binnenzijde. Indien mogelijk kunt u een vakmonteur vragen
regelmatig controle uit te voeren.
Indien de metalen appendages van de display gedurende
lange tijd worden gebruikt, is het mogelijk dat ze door
invloed van de omgeving slijtage gaan vertonen waardoor
de sterkte afneemt. Vraag een vakmonteur na een jaar of
vijf de appendages te controleren om er zeker van te zijn
dat ze zonder probleem kunnen worden gebruikt.
18
Du
Uitgegeven door Pioneer Corporation.
Copyright © 2004 Pioneer Corporation.
Alle rechten voorbehouden.
Page 19

Gracias por comprar un producto Pioneer.
Por favor, lea atentamente el Manual de instrucciones para
saber cómo utilizar este modelo de una forma segura y
correcta.
Le recomendamos que conserve el Manual de instrucciones
para consultarlo en el futuro.
Instalación
¶ Si encuentra dificultades para la instalación, consulte a
su distribuidor.
¶ Pioneer no es responsable de ningún daño que pueda
derivarse de una instalación o uso inapropiados,
modificaciones o desastres naturales.
Nota para empresas constructoras
Antes de la instalación, el manual técnico de Pioneer debe
leerse en su totalidad y su contenido debe seguirse
cuidadosamente.
Pioneer no será responsable en ningún caso de los posibles
accidentes o lesiones debidos a la instalación o el montaje
incorrectos, el uso indebido, el cambio de configuración,
desastres naturales o causas similares.
Precauciones
El producto está destinado sólo al uso con la pantalla de
plasma.
No deberá emplearse para ningún otro propósito -como, por
ejemplo, para utilizar una pantalla de plasma distinta-, ni
remodelarse en forma alguna.
Es muy peligroso realizar una instalación inadecuada, ya
que puede tener como resultado la caída de la pantalla o
accidentes de otro tipo.
Lugar de instalación
• Elija un lugar lo suficientemente resistente como para
aguantar el peso del soporte mural y la pantalla.
• No instale el producto en un lugar de fácil acceso.
De esta manera evitará que la gente pueda apoyarse en
él o colgarse del mismo.
• No lo instale en exteriores, en fuentes termales ni cerca
de una playa.
• No instale el producto donde pueda sufrir vibraciones o
golpes.
• En algunos casos, la resistencia estructural de la pared no
permite la instalación del producto, por lo que es
recomendable que un instalador experto le asesore al
respecto.
• Para más detalles acerca del lugar de instalación, lea y
siga detenidamente todas las instrucciones de
funcionamiento de la pantalla de plasma.
Montaje e instalación
• Monte el producto de acuerdo con las instrucciones
de montaje y atornille de forma segura todos los
tornillos en los lugares indicados.
Ha habido casos de accidentes imprevistos -como la
rotura o caída del equipo- debido a una instalación
incorrecta.
• Para garantizar una instalación segura de la pantalla,
es necesario que siempre lo hagan dos o más
personas.
• Antes de la instalación, apague la pantalla y los
dispositivos periféricos y desenchufe el cable de
alimentación de la toma eléctrica.
Asegúrese de que los tornillos utilizados para fijar las piezas
siempre están firmemente sujetos, ya que si se aflojan
podrían provocar la caída del producto o cualquier otro
accidente.
Si se detectara alguna irregularidad o un funcionamiento
defectuoso, póngase inmediatamente en contacto con un
instalador experto para que lleve a cabo las reparaciones
pertinentes.
Existe el peligro de que el interior de los dispositivos de
montaje metálicos de la pantalla, las piezas instaladas en la
pared u otras partes ocultas resulten dañadas, pudiendo
provocar la caída de la pantalla. Por lo tanto, cuando se
inspeccione o repare la pantalla, o cuando realicen obras
menores en el taller, asegúrese de que un instalador
experto inspecciona tales lugares. Le recomendamos que,
a ser posible, un instalador experto se encargue de llevar a
cabo revisiones periódicas.
Si los dispositivos de sujeción metálicos de la pantalla se
utilizan durante un largo período de tiempo, es posible que
el ambiente reduzca su resistencia. Cuando hayan
transcurrido cinco años desde la fecha de la instalación,
asegúrese de que un instalador experto inspecciona el
producto para tener la certeza de que se puede utilizar sin
problemas.
Publicado por Pioneer Corporation.
Copyright © 2004 Pioneer Corporation.
Todos los derechos reservados.
19
Sp
Page 20

感謝您購買本 Pioneer 產品。
為使您熟知本機安全和正確操作方式,務求詳閱本「操作手冊」。
在您閱讀完手冊的內容後,請妥為保存,以備日後參考之用。
注 意
本產品為電漿顯示器專用。
安裝
¶ 如果您在安裝時遇到任何問題,請與您的經銷商連絡。
¶ Pioneer對於因安裝錯誤、不當使用、修改或天災所造成
的任何意外或損害,恕概不負責。
製造商注意事項
在安裝本產品之前,請仔細閱讀Pioneer技術手冊並留意內
容說明。
Pioneer對於因非指定之組合、架設及使用、因改造、或因天
然災害等類似情形,致發生意外或損壞等情事,概不負責。
本產品不應從事其他用途,例如用來托住電漿顯示器,或從事
任何形式之改造。
安裝不當極度危險,因為可能會造成翻落或發生其他意外。
安裝地點
•選擇強度足以支撐壁掛裝置及顯示器重量的地點。
•請勿安裝在人們可以輕易吊掛或靠著的地點。
•請勿安裝於室外、溫泉或靠近沙灘的地點。
•請勿安裝於抖動或震動的地點。
•有些情況下不可安裝,例如牆壁強度不夠,因此請洽專業安
裝人員。
•請仔細閱讀並確實遵照電漿顯示器操作手冊中有關更多安裝
地點的資訊。
組合及安裝
•組合時請依照組合說明,將所有螺絲確實安裝於指定部位
上。
目前已發生幾起例如因安裝不當致造成設備損壞或翻落等屬
於非預期之意外。
•為顧及安裝上的安全,應始終由兩人以上負責安裝顯示器。
•安裝之前,請關閉顯示器及週邊裝置電源,再拔掉電源插座
上的電源線插頭。
•請確定用來安裝所有組件的螺絲上緊無鬆脫,若然鬆脫則可
能導致翻落或發生其他意外。
•如您發現有故障或者異常,請立即要求專業人員前來維修。
•顯示器內部金屬零件、壁掛配件或其他損壞無法看見的地方
仍有造成顯示器翻落的危險。因此,在檢查或維修顯示器,
或在店內進行內部加工工作時,請確實向專業安裝人員詢問
應檢查的地方。本公司建議如果可以,您可請專業安裝人員
來定期執行檢查作業。
•如果顯示器的金屬零件已長時間使用,環境會影響替換壽
命,降低使用能力的。使用五年後,請洽專業安裝人員前來
檢查,以確保其在使用上毫無問題。
先鋒公司發行。
版權 2004年先鋒公司所有。
保留所有權利。
Published by Pioneer Corporation.
Copyright © 2004 Pioneer Corporation.
A
ll rights reserved.
PIONEER CORPORATION 4-1, Meguro 1-Chome, Meguro-ku, Tokyo 153-8654, Japan
PIONEER ELECTRONICS (USA) INC.
PIONEER EUROPE NV MULTIMEDIA DIVISION
PIONEER ELECTRONICS AUSTRALIA PTY.LTD.
PIONEER ELECTRONICS ASIACENTRE PTE. LTD.
PIONEER HIGH FIDELITY TAIWAN CO., LTD.
PIONEER ELECTRONICS (CHINA) LTD.
PIONEER GULF FZE
PIONEER ELECTRONICS DE MEXICO S.A. DE C.V.
Lob 11-017, Jebel Ali Free Zone P.O. BOX 61226, Jebel Ali, Dubai, United Arab Emirates, TEL: 971- 4-8815756
P.O.BOX 1540, Long Beach, California 90801-1540, U.S.A., TEL: 1-310-952-2111
Pioneer House Hollybush Hill, Stoke Poges, Slough SL2 4QP, U.K., TEL: 44-1753-789-789
178-184 Boundary Road, Braeside, Victoria 3195, Australia, TEL: 61-39-586-6300
253 Alexandra Road #04-01, Singapore 159936, TEL: 65-6472-1111
13FL., No44 Chung Shan North Road, Sec.2. Taipei, Taiwan, TEL: 886-2-2521-3588
Room 1704-06, 17/F World Trade Centre, 280 Gloucester Rd. Causeway Bay, Hong Kong, TEL: 852-2848-6488
Blvd. Manuel Avila Camacho 138 10 piso Col.Lomas de Chapultepec, Mexico, D.F. 11000 TEL: 55-9178-4270
Printed in Japan / Imprimé au Japon <AZR1099-A>
 Loading...