

Page 1

MVH-Z5050BT
RDS AV RECEIVER
RADIO AV RDS
RECEPTOR RDS AV
English Español Português (B)
Owner's Manual
Manual de Instrucciones
Manual do proprietário
Page 2

Important
Contents
Thank you for buying this Pioneer
product.
Please read through these instructions
so you will know how to operate your
model properly. After you have finished
reading the instructions, keep this
document in a safe place for future
reference.
The screen shown in the examples may
differ from actual screens, which may be
changed without notice for
performance and function
improvements.
■Precaution ......................... 3
Important safet y information ............................ ...... 3
To ensure safe driving .................... ............................. 4
When using a display conne cted to V OUT......... 4
To avoid battery exhaustion ................. .................... 4
Rear view camer a.. ............................. .......................... 4
Handling the U SB connector............. ....................... 4
In case of trouble .................... ................................ ...... 4
Visit our website ............................ ............................. ... 4
Protecting the LCD panel and screen .................... 5
Notes on internal memor y................. ....................... 5
About this man ual........................ ............................. ... 5
■Parts and controls............. 6
Main unit....... ................................ ................................ ... 6
Remote Control .......................... ................................ ... 6
■Basic operation ................. 7
Resetting the micropro cessor................... ............... 7
Preparing the remote control ........... ....................... 7
Starting up the uni t... ................................ .................. 7
Using the touch panel ....... ................................ ......... 8
Top menu screen .................... ............................. ......... 9
■Bluetooth......................... 10
Bluetooth connec tion .................. ............................ 10
Bluetooth settings ........... ................................ .......... 10
Switching the connected Bluetooth device..... 10
Hands-free phoning ...................... ............................ 11
Bluetooth audio ........................... ............................... 13
■AppRadio Mode + ........... 14
Using AppRadio Mode + ................ ......................... 14
Starting procedu re. ............................. ...................... 14
Using the keyboard ....................... ............................ 15
Using the audio mix funct ion............. ................... 15
■AV source ......................... 16
Supported AV source ................................ ................ 16
Displaying the AV operation scre en............ ........ 16
Selecting a s ource................. ............................. ........ 17
Changing the displ ay order of source ................ 17
Adjusting the range of favourite source icons
area....... ............................... ................................ ..... 17
■iPod/iPhone or smartphone
connection for
AV source ......................... 18
iPod/iPhone with a L ightning connector .......... 18
iPhone with a 30-pin connec tor........... ................ 18
Smartphone (Androi d™ device)... ......................... 19
■Radio ................................ 20
Starting procedu re. ............................. ...................... 20
Basic operation ................. ................................ .......... 20
Searching by PTY info rmation.......................... ..... 20
Storing the strongest broadcast frequencies
(BSM).... ............................... ................................ ..... 20
Radio settings ............................ ................................ .. 21
■TV tuner ........................... 22
Starting procedu re. ............................. ...................... 22
Basic operation ................. ................................ .......... 22
■Compressed files ............. 22
Plugging/unplugging a USB storage device.... 22
Starting procedu re. ............................. ...................... 22
Basic operation .......................... ................................ . 23
■iPod.................................. 26
Connecting your iPod ................ .............................. 26
Basic operation .......................... ................................ . 26
■Spotify®............................ 28
Listening to Spotify .................. ................................ . 28
Basic operation .......................... ................................ . 28
■AUX .................................. 30
Starting procedu re................ ............................. ....... 30
Basic operation .......................... ................................ . 30
■AV input ........................... 31
Starting procedu re................ ............................. ....... 31
■MIXTRAX .......................... 32
MIXTRAX EZ operation .............................. ............... 32
Starting procedu re................ ............................. ....... 32
MIXTRAX settings .... ................................ .................. 32
■Settings............................ 33
Displaying the s etting screen........... ..................... 33
System settings ........... ................................ ............... 33
Theme settings ....................... ................................ .... 37
Audio settings ....................... ............................. ......... 37
Video settings .............. ................................ ............... 41
■Favourite menu ............... 42
Creating a shortcut .... ................................ ............... 42
Selecting a shor tcut................. ................................ . 42
Removing a shortcut ............ ................................ .... 42
■Other functions ............... 42
Setting the time and date ........................... ............ 42
Changing the wide screen mode ......................... 42
Restoring this product to the default
settings ....................... ................................ ............ 43
■Apple CarPlay .................. 43
Using Apple CarPlay ........... ............................... ....... 43
Setting the driving pos ition................. .................. 43
Starting procedu re................ ............................. ....... 44
Adjusting the volume ........ ............................... ....... 44
■Android Auto™ ................ 45
Using Android Auto .................... .............................. 45
Setting the driving pos ition................. .................. 45
Starting procedu re .......................... .......................... 45
Adjusting the volum e.......... ............................. ........ 45
Setting the au to-launch function..... .................... 46
■Appendix for Apple CarPlay
and Android Auto............ 46
Error messages ................. ............................. .............. 46
Detailed information regarding connected iPod
devices ............. ................................ ....................... 47
Using app-based connec ted content......... ........ 47
■Connection....................... 48
Precautions ........................... ................................ ........ 48
Important safeg uards............. ................................ .. 48
Precautions before connec ting the system.... .. 48
Before installing this prod uct .............................. .. 48
To prevent damage ...................... ............................. 48
Notice for the blue/wh ite lead. ............................. 49
This product ............. ............................. ....................... 49
Power cord........ ............................... ............................. 49
Speaker leads ................................ ............................... 49
Power amp (sold separately).............. .............................. . 50
iPod/iPhone and smartph one........ ....................... 50
iPod/iPhone with Lightning connector ................. ....... 50
iPhone with 30-pin connector ....................... .................. 50
Smartphone (Androi d device) ............................. .. 50
Camera ............................. ................................ .............. 50
External video component an d the display ..... 51
■Installation....................... 52
Precautions before instal lation .................. ........... 52
Before installing .................. ............................. ........... 52
Installation not es................ ............................. ........... 52
Installation using the screw holes on the side of
this product ................ ............................. .............. 52
Installing the microphone .................. .................... 52
Mounting on the sun visor ...... ............................... 53
Installation on the stee ring column... ................. 53
Adjusting the microp hone angle ......................... 53
■Appendix ......................... 54
Troubleshooting ....................... ................................ .. 54
Error messages ................. ............................. .............. 54
Detailed informati on for playable media .......... 56
Bluetooth .......... ............................... ............................. 57
WMA.............. ................................ ................................ .. 57
2En
Page 3

English
Contents
CAUTION
WAR NING
FLAC........ ................................ ................................ ........ 57
DivX......... ................................ ................................ ........ 58
AAC ..................... ................................ ............................ 58
Google™, Goog le Play, Android...... ...................... 58
MIXTRAX......... ................................ ............................... 58
Detailed in formation regarding conne cted iPod
devices ...................... ................................ .............. 5 8
Using app-based conne cted content................. 58
Spotify® ............................... ................................ ........... 59
Notice regarding vi deo viewing....... .................... 59
Notice regarding M P3 file usage .......................... 59
Using the LCD screen correctly ..................... ........ 59
Specifications ................ ................................ .............. 5 9
Precaution
This product is evaluated in moderate and tropical climate condition under the Audio, video and
similar electronic apparatus - Safety requirements, IEC 60065.
Important safety information
• Do not attempt to inst all or service t his product by yourse lf. Installation or s ervicing of this product by
persons without training and experience in electronic equipment and automotive accessories may
be dangerous and could expose you to the risk of electric shock, injury or other hazards.
• Do not allow this product to come into contact with liquids. Electrical shock could result. Also,
damage to the produ ct, smoke, and overheating co uld result from contact with li quids.
• If liquid or foreign matte r should get inside this produc t, park your vehicle in a safe pla ce, turn the
ignition switch of f (ACC OFF) immediate ly and consult your dealer or the nea rest authorised Pioneer
Service Station. Do not use this product in this condition because doing so may result in a fire, electric
shock, or other failure.
• If you notice smoke, a strange nois e or odour from this product, or any other ab normal signs on the
LCD screen, turn off the power immediately and consult your dealer or the nearest authorised Pioneer
Service Station. Using this product in this condition may result in permanent damage to the system.
• Do not disassemble or modify this product, as there are high-voltage components inside which may
cause an electric shock. Be sure to consult your dealer or the nearest authorised Pioneer Service
Station for internal inspection, adjustments or repairs.
Before using this product, be sure to read and fully understand the following safety
information:
• Do not operate this product, any applications, or the rear view camera option (if
purchased) if doing so will divert your attention in any way from the safe operation of
your vehicle. Always observe safe driving rules and follow all existing traffic
regulations. If you experience difficulty in operating this product or reading the
display, park your vehicle in a safe location and apply the handbrake before making
the necessary adjustments.
• Never set the volume of this produc t so high that you cannot hear outside traffic and
emergency vehicles.
• To promote safety, certain functions are disabled unless the vehicle is stopped and/or
the handbrake is applied.
• Keep this manual handy as a reference for operating procedures and safety
information .
• Do not install this product where it may (i) obstruct the driver’s vision, (ii) impair th e
performance of any of the vehicle’s operating systems or safety features, including air
bags or hazard lamp buttons or (iii) impair the driver ’s ability to safely operate the
vehicle.
3En
Page 4

• Please remember to fasten your seat belt at all times while operating your vehicle. If
WAR NIN G
WAR NIN G
WAR NIN G
WAR NING
CAUTION
CAUTION
you are ever in an accident, your injuries can be considerably more severe if your seat
belt is not properly buckled.
• Never use headphones while driving.
Rear view camera
With an optional rear view camera, you are able to use this product as an aid to keep an
eye on trailers, or backing into a tight parking spot.
To ensure safe driving
• LIGHT GREEN LEAD AT POWER CONNECTOR IS DESIGNED TO DETECT PARKED STATUS AND
MUST BE CONNECTED TO THE POWER SUPPLY SIDE OF THE HANDBRAKE SWITCH. IMPROPER
CONNECTION OR USE OF THIS LEAD MAY VIOLATE APPLICABLE LAW AND MAY RESULT IN
SERIOUS INJURY OR DAMAGE.
• Do not take any steps to tamper with or disable the handbrake interlock system which is in
place for your protecti on. Tampering with or dis abling the handbrake interlock system could
result in serious injury or death.
• To avoid the risk of damage and injury and the potential violation of applicable laws, this
product is not for use with a video image that is visib le to the driver.
• In some countries the viewing of video image on a display inside a vehicle even by persons other
than the driver may be illegal. Where such regulations apply, they must be obeyed.
If you attempt to watch video image while driving, the warning “Viewing of front seat
video source while driving is strictly prohibited.” will appear on the screen. To watch
video image on this display, stop the vehicle in a safe place and apply the handbrake.
Please keep the brake pedal pushed down before releasing the handbrake.
When using a display connected to V OUT
The video output terminal (V OUT) is for connection of a display to enable passengers in
the rear seats to watch video images.
NEVER install the rear display in a location that enables the driver to watch video images while driving.
To avoid battery exhaustion
Be sure to run the vehicle engine while using this product. Using this product without
running the engine can drain the battery.
Do not install this product in a vehicle that does not have an ACC wire or circuitry available.
• SCREEN IMAGE MAY APPEAR REVERSED.
• USE INPUT ONLY FOR REVERSE OR MIRROR IMAGE REAR VIEW CAMERA. OTHER USE MAY RESULT IN
INJURY OR DAMAGE.
The rear view mode is to use this product as an aid to keep an eye on the trailers, or while backing up.
Do not use thi s function for entertain ment purposes.
Handling the USB connector
• To prevent data loss and damage to the storage device, never remove it from this product while data
is being transferred.
• Pioneer cannot guarantee compatibility with all USB mass storage devices and assumes no
responsibility for any loss of data on media players, iPhone, smartphone, or other devices while using
this product.
In case of trouble
Should this product fail to operate properly, contact your dealer or nearest authorised
Pioneer Service Station.
Visit our website
Visit us at the following site:
In Mexico
http://www.pioneer-mexico.com/
In Singapore
http://www.pioneer.com.sg/
In Malaysia
http://www.pioneer.my/
In Thailand
http://www.pioneer-thailand.com/
In Philippines
http://www.pioneer.ph/
In Vietnam
http://www.pioneer.vn/
4En
Page 5
English
In Indonesia
http://www.pioneer.co.id/
In Australia
http://www.pioneer.com.au/
In Israel
http://www.pioneerisrael.co.il/
In Middle East/Africa
http://www.pioneer-mea.com/en/
In Latin
http://www.pioneer-latin.com/en/about-pioneer.html
In Hong Kong
http://www.pioneerhongkong.com.hk/ct/index.php
In Taiwan
http://www.pioneer-twn.com.tw/
In Korea
http://www.pioneer.co.kr/
• We offer the latest information about PIONEER CORPORATION on our website.
• Pioneer regularly provides software updates to further improve it’s products. Please
check the support section of the Pioneer website for all available software updates.
Protecting the LCD panel and screen
• Do not expose the LCD screen to direct sunlight when this product is not used. This
may result in LCD screen malfunction due to the resulting high temperatures.
• When using a mobile phone, keep the aerial of the mobile phone away from the LCD
screen to prevent disruption of the video in the form of spots, coloured stripes, etc.
• To protect the LCD screen from damage, be sure to touch the touch panel keys only
with your finger and do so gently.
Notes on internal memory
• The information will be erased by disconnecting the yellow lead from the battery (or
removing the battery itself ).
• Some of the settings and recorded contents will not be reset.
Meanings of symbols used in this manual
This indicates to touch the appropriate soft key on the touch screen.
This indicates to touch and hold the appropriate soft key on the touch screen.
About this manual
This manual uses diagrams of actual screens to describe operations. However, the
screens on some units may not match those shown in this manual depending on the
model used.
5En
Page 6
Parts and controls
NOTE
NOTE
Main unit
LCD screen
VOL (+/-)
RESET Press to reset the microprocessor (page 7).
Press to switch between the Application screen and the AV operation screen.
Press and hold to switch to the camera view mode.
To activate the camera view mode with this button, set [Back Camera Input] to
[On] (page 33).
Press to display the top menu screen.
Press and hold to power off. To power back on, press any button.
Press to display the menu bar (page 8).
Press and hold to mute or unmute.
Press to display the top menu screen or back to previous screen.
Press and hold to turn off the display.
Press to activate the voice recognition mode such as Siri when the iPhone is
connected to th e unit via Bluetooth or USB.
Remote Control
Volu me (+/ -)
MODE Press to switch between the Application screen and the AV operation screen.
SRC Press to cycle through all the available sources.
TOP MENU Not used.
MENU Not used.
Thumb pad Not used.
MUTE
AUDIO
SUBTITLE
ANGLE
BAND/ESC Press to select th e tuner band when tuner is selected as a source.
RETURN Press to return to t he specified poi nt and start playback from there.
or For audio: Press and hold to perform fast reverse or fast forwards.
or Press to return to the previ ous track (chapter) or go to the nex t track (chapter).
FOLDER/P.CH Press to select the next or previous title or folder.
Press and hold to switch to the camera view mode.
To activate the camera view mode with this button, set [Back Camera Input]
to [On] (page 33).
Press and hold to turn the source off.
Not used.
Press to cancel the control mode of functions.
Press to pause or resume playback.
For video: Press to perform fast reverse or fast forwards.
Press to answer or end a call.
Press to stop playback.
If you resume playback, playback will start from the point where you stopped.
Press the button again to stop playback completely.
Press to recall radio station frequencies assigned to preset channel keys.
Press to answer or end a call.
6En
Page 7
English
CAUTION
WAR NING
Basic operation
How to replace the battery
Insert the CR2025 (3 V) battery with the plus (+) and
minus (-) poles orientated properly.
CAUTION
NOTE
Important
NOTE
Resetting the microprocessor
• Pressing the RESET button resets settin gs and recorded conte nts to the factor y settings.
– Do not perform this operation when a device is conn ected to this product.
– Some of the settings and recorded contents will not be reset.
• The microprocessor must be reset under the following conditions:
– Prior to using this product for the first time after installation.
– If this produc t fails to operate properly.
– If there appears to be problems with the operation of the system.
1 Turn the ignition switch OFF.
2 Press RESET with a pen tip or other pointed tools.
Settings and recorded contents are reset to the factory settings.
Preparing the remote control
Remove the insulation sheet before use.
• Do not ingest the battery, Chemical Burn Hazard.
(The remote control supplied with) This product contains a coin/button cell battery. If the coin/
button cell battery is swallowed, it can cause severe internal burns in just 2 hours and can lead to
death.
Keep new and used batteries away from children.
If the battery compartment does no t close securely, stop using the product and keep it away from
children.
If you think batter ies might have been swallowed or place d inside any part of the body, seek
immediate medical attention.
• Batteries (battery pack or batteries installed) must not be exposed to excessive heat such as sunshine,
fire or the like.
• Remove the battery if the remote control is not used for a month or longer.
• There is a danger of explosion if the battery is incorrectly replaced. Replace o nly with the same or
equivalent type.
• Do not handle the battery with metallic tools.
• Do not store the battery with metallic objects.
• If the battery leaks, wipe the remote control completely clean and install a new battery.
• When disposing of used batteries, please comply with governmental regulations or environmental
public instit utions’ rules that apply in your country/area.
• “Perchlorate Material – special handling may apply. See www.dtsc.ca.gov/hazardouswaste/
perchlorate. (Applic able to California, U.S.A.)”
Using the remote control
Point the remote control in the direction of the front panel to operate.
The remote control may not function properly in direct sunlight.
• Do not store the remote control in high temperatures or direct sunlight.
• Do not let the remote control fall onto the floor, where it may become jammed under the brake or
accelerator.
Starting up the unit
1 Start the engine to boot up the system.
The [Select Program Language] screen appears.
From the second time on, the screen shown will differ depending on the previous conditions.
2 Touch the language.
3 Touch .
For Mexico onl y
The [Speaker Mode Settings] screen appears. Skip to step 6.
For countries other than Mexico
The [Location Settings] screen appears.
4 Touch the item to select the using location.
7En
Page 8
5 Tou ch .
WAR NIN G
NOTE
NOTE
NOTE
NOTE
The [Speaker Mode Settings] screen appears.
6 Touch the speaker modes.
[Standard Mode]
4-speaker system with front and rear speakers, or a 6-speaker system with front and
rear speakers and subwoofers.
[Network Mode]
3-way system with a high range speaker, middle range speaker and subwoofer (low
range speaker) for reproduction of high, middle and low frequencies (bands).
Do not use the unit in standard mode when a speaker system for 3-way network mode is
connected to th e unit. This may cause damage to the spe akers.
7 Tou ch [OK ].
Initial Legal Disclaimer screen appears.
8 Tou ch [OK ].
The top menu screen appears.
Once the speaker mode is set, the setting cannot be changed unless this product is restored to the
default settin gs. Restore the default settings to ch ange the speaker mode settin g (page 43).
Switching the speaker mode
To change the speaker mode, you need to restore this product to the default settings.
1 Restore the default setting (page 43).
Using the touch panel
You can operate this product by touching the keys on the screen directly with your
fingers.
To protect the LCD screen from damage, be sure to touch the screen only with your finger gently.
Common touch panel keys
: Returns to the previous screen.
: Close the screen.
Operating list screen s
Touching an item on the list allows you to narrow down the options and
proceed to the next operation.
Appears when all characters are not displayed on the display area.
If you touch the key, the rests are scrolled for display.
This function is available only when you stop your vehicle i n a safe place and apply
the handbrake.
Appears when items cannot be displayed on a single page.
Drag the side bar, the initial search bar or the list to view any hidden items.
Operating the time bar
You can change the playback point by dragging the key.
The playback tim e corresponding to the position of the key is displaye d while
dragging the key.
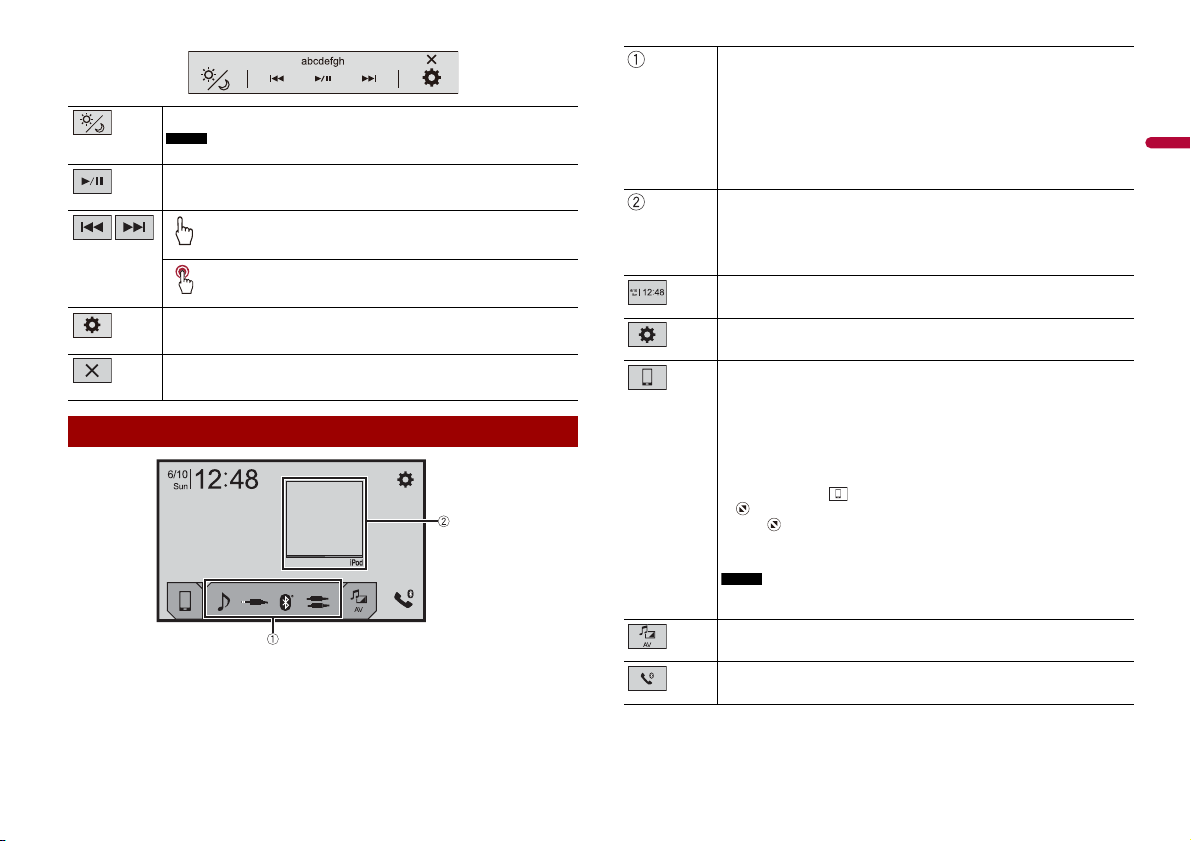
Operating the menu bar
1 Press .
The menu bar pops up on the screen.
The menu bar availability may vary depending on the activating source.
8En
Page 9
English
Switches the dimmer duration by day or night.
NOTE
TIPS
TIP
TIP
NOTE
When AppRadio Mode + is on, AppRadio Mode + SideControl Bar is displayed.
Switches between playback a nd pause.
Skips fi les forwards or b ackwards.
Performs fast reverse or fast forwards.
Displays setting menu screen (page 33).
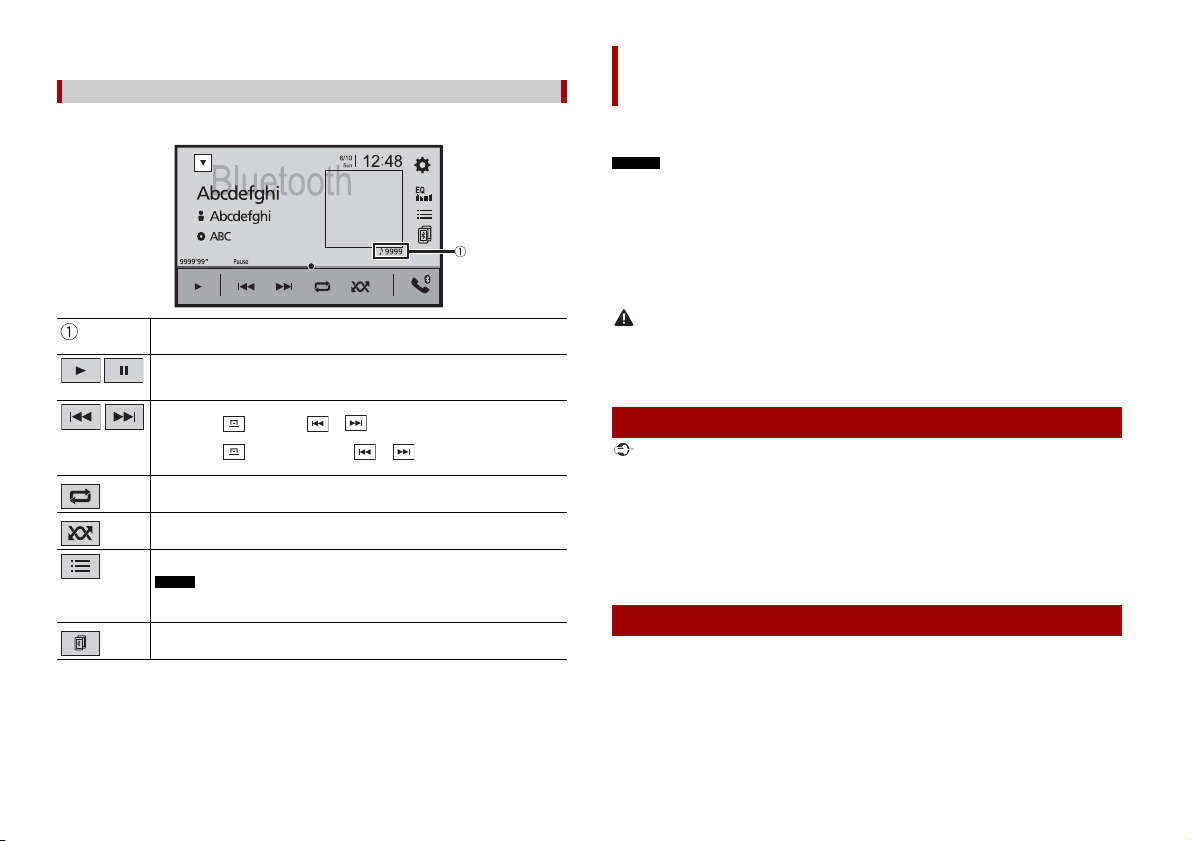
Favourite source icons
• When you connect the exte rnal navigation system to this unit, the navigation
mode key is displayed at the middle of the right side of the display.
• If you select [Power OFF], you can turn off al most all functions.
– An incoming call is received (only for hands-free phoning via Bluetooth).
– A rear view camera image is input when the vehicle is in reverse.
– A butto n on this unit is pressed.
– The ignition switch is turned off (ACC OFF), then turned on (ACC ON).
AV operation key
Displays the current source.
When the last source is displayed behind the key, you can switch the source by
touching the key.
Setting the time and date (page42)
Settings (page 33) and Favourite menu (page 42)
Closes the menu bar.
Connected device key
Displays connected device.
Switches the source or ap plication with connected devices such as AppRadio
Mode +, external navigation system, etc.
Top menu screen
When a device with a compatible application is connected, the favourite
application key appears. Once the key appears, you can adjust the range of the
favourite application key area with the following steps.
1 Touch and hold .
appears at the top right of the favourite application key.
2 Drag to the desired position.
To finish the adjusting, touch any place of the display except for the
favourite application key.
This function is available only when you stop your vehicle in a safe place and apply
the handbrake.
AV source (page 16)
Hands-free phoning (page 11)
9En
Page 10
NOTES
TIPS
Bluetooth
CAUTION
NOTE
NOTE
Bluetooth connection
1 Turn on the Bluetooth function on the device.
2 Press .
3 Tou ch t hen .
The Bluetooth screen appears.
4 Touch [Connection].
5 Tou ch .
The unit starts to search for available devices, then displays them in the device list.
6 Touch the Bluetooth device name.
After the device is successfully registered, a Bluetooth connection is established by
the system. Once the connection is established, the device name is displayed on the
list.
• If five devices are already paired, [Memory Full] is displayed. Delete a paired device first (page 10).
• If your device supports SSP (Secure Simple Pairing), a six-digit number appears on the display of this
product. Touch [Yes] to pa ir the device.
• If you try to connec t an unconnected mobile phon e while two mobile phones are alread y connected,
the first one of the two connected mobile phones will be disconnected and the unconnected mobile
phone will be connected instead.
• The Bluetooth connection can also be made by detecting this product from the Bluetooth device.
Before registration, make sure that [Visibility] in the [Bluetooth] menu is set to [On] (page 10). For
details on Bluetooth device operations, refer to the operating instructions supplied with the
Bluetooth device.
• Two mobile phones can be connected to th is product at the sa me time (page 10).
Bluetooth settings
1 Press .
2 Tou ch the n .
Never turn this product off and disconnect the device while the Bluetooth setting operation is being
processed.
Menu Item Description
[Connection] Connect, disconnect, or delete registered Bluetooth device
[Auto Connect]
[On] [Off]
[Visibility]
[On] [Off]
[PIN Code Input] Change the PIN code for Bluetooth connection.
[Device Inform ation] Displaying the device name and address of this product.
[Bluetooth Memory Clear] Touch [Clear] then [OK] to clear the Bluetooth memory.
manually.
Touch to delete registered device.
To connect a registered Bluetooth device manually, touch
the name of th e device.
To disconnect the device, touch the name of the connected
device in the list.
Connect the Bluetooth device manually in the following cases:
• Two or more Bluetooth devices are registered, and you want to
manually select the device to be used.
• You want to reconnect a disconnected Bluetooth device.
• Connection cannot be established automatically for some
reason.
Select [On] to connect the last connecte d Bluetooth device
automatically.
If two Bluetooth devices were connected the last time, the two
devices are connected to this product automatically in the order
that they are registered in the device list.
Select [On] to make this product visible to the other device.
The default PIN code is “0000”.
1 Touch [0] to [9] to input the pin code (up to 8 digits).
2 Tou c h .
Switching the connected Bluetooth device
After registering and connecting the Bluetooth devices to this product, you can switch
among the devices using the switch devices key in the phone function and some audio
sources.
• You can register up to five Bluetooth devices on this product (page 10).
• You can connect one of the registered devices to this product. In cases where the
registered device is equipped with a phone function, a total of two devices can be
connected at the same time when using the phone function. If two of the five
10En
Page 11
English
registered devices are already connected, you can connect the remaining third device
CAUTION
TIP
NOTE
TIPS
NOTES
to use the audio function only from the switch devices key on the audio source screen.
• The icon for the mobile phone currently being used is displayed on the Phone menu
screen. If you connect two mobile phones to this product at the same time, you can
switch between the mobile phones using the switch devices key. The contents of the
phone menu are memorised for each connected mobile phone (page 11).
• The switch devices key will appear for some audio sources. The audio source may
automatically switch to another source depending on the selected device.
Hands-free phoning
To use this function you need to connect your mobile phone to this product via
Bluetooth in advance (page 10).
For your safety, avoid talking on the phone as much as possible while driving.
The following items are d isplayed.
• Name of the current mobile phon e
• List number of t he current mobile ph one
• Reception status of the current mobi le phone
• Battery status of the current mobile phone
If you connect two mobile phones to th is product at the sa me time, you can switch
between the mobile phones using the switch devices key.
Switches the search language to English or system language.
It may not appear depending on the system language setting.
Synchronises the contacts on this product's phone book with the co ntacts on
your phone manually.
Using preset dial list (page 1 1)
Making a phone call
1 Press .
2 Touch .
The phone menu screen appears.
3 Touch one of the call icons on the phone menu screen.
Using phone book
Select a contact from the phone book. Touch the desired name on the list then
select the phone number.
• The contacts on your phon e will be automa tically transferred to this prod uct.
• Update the phone book manuall y.
• [Visibility] of the [Bluetooth] screen should be on (page 10).
• If two mobile phones are automatically connected to this product with the
Bluetooth device auto connect function, the phone book of the second phone is
displayed.
Using call history
Make a phone call from the received call , dialled call , or missed call .
Direct phone number input
Enter the num ber keys to enter th e phone number the n touch to make a call.
▶To end the call
1 Touch .
Using the preset dial lists
▶Registering a phone number
You can easily store up to six phone numbers per device as presets.
1 Press .
11En
Page 12
2 Touch .
TIPS
NOTE
NOTES
TIPS
TIP
NOTES
3 Touch or .
On the [Phone Book] screen, touch the desired name to display the contact’s phone
number.
4 Touch .
▶Dialling from the preset dial list
1 Touch .
2 Touch the desired entry on the list to make a call.
The dial screen appears and dialling starts.
▶Deleting a phone number
1 Press .
2 Touch .
3 Touch .
4 Touch .
5 Touch [Yes].
Receiving a phone call
1 Touch to answer the call.
Touch to end the call.
• Touch while getting a call waiting, switch to the talking person.
• Touch while getting a call waiting to reject the call.
When two phones are connected at the same time, if an incoming call is received on the second phone
while you are talking on the first phone, the dial confirmation screen for the second phone will be
displayed.
Voice recognition function (for iPhone)
By connecting your iPhone to this product, you can use the voice recognition function
(Siri Eyes Free Mode) on this product.
• When an iPhone is used, Siri Eyes Free Mode is available with this product.
• In this chapter, iPhone and iPod touch will be referred to as “iPhone”.
1 Press .
2 Touch .
3 Touch .
The voice recognition function launches and the voice control screen appears.
• You can also launch the voice recognit ion function by pressing .
• If two mobile phones are automat ically connected to this product with t he Bluetooth device auto
connect function, the voice recognition function (Siri Eyes Free Mode) will be set on the second
phone.
• If you want to use the voice recognition function (Siri Eyes Free Mode) on another connected iPhone,
touch with numbered to the other iPhone. The iPhone that you switch to will be set as the
current device.
Minimising the dial confirmation screen
1 Touch .
To display the dial confirmation screen, touch again.
• The dial confirmation screen cannot be minimised on the AV operation screen.
• AV sources cannot be selected even if the dial confirmation screen is minimised while talking on the
phone or receiving an incoming call.
Phone settings
1 Press .
2 Touch then .
Menu Item Description
[Auto Answer]
[On] [Off]
[Ring Tone]
[On] [Off]
[Invert Name] Select [Yes] to change the order of the first and last names
Setting the private mode
During a conversation, you can switch to private mode (talk directly on your mobile
phone).
Select [On] to answer an incoming call automatically.
Select [On] if the ring tone does not come out from the car
speakers.
in the phone book.
12En
Page 13
English
1 Touch or to turn private mode on or off.
NOTES
NOTES
• If two mobile phones are con nected to this product and th e first phone is set to private mo de, you
can receive incoming calls on the second phone while maintaining the call in progress on the first
phone.
• When two mobile phones are connected to this product and private mode of the first phone is turned
off, if an incoming cal l on the second phon e is answered while a call is in progress on the first phone
or while dialling or receiving a call on the first phone, the call, dialling, or receiving on the first phone
is ended.
Adjusting the other party’s listening volume
This product can be adjusted to the other party’s listening volume.
1 Touch to switch between the three volume levels.
Notes for hands-free phoning
▶General notes
• Connection to all mobile phones featuring Bluetooth wireless technology is not
guaranteed.
• The line-of-sight distance between this product and your mobile phone must be 10
metres or less when sending and receiving voice and data via Bluetooth technology.
• With some mobile phones, the ring sound may not be output from the speakers.
• If private mode is selected on the mobile phone, hands-free phoning may be disabled.
▶Registration and connection
• Mobile phone operations vary depending on the type of mobile phone. Refer to the
instruction manual that came with your mobile phone for detailed instructions.
• When phone book transfer does not work, disconnect your phone and then perform
pairing again from your phone to this product.
▶Making and receiving calls
• You may hear a noise in the following situations:
– When you answer the phone using the button on the pho ne.
– When the person on the other end of the line hangs up the phone.
• If the person on the other end of t he line cannot hear the conversation due to an echo,
decrease the volume level for hands-free phoning.
• With some mobile phones, even after you press the accept button on the mobile
phone when a call comes in, hands-free phoning may not be performed.
• The registered name will appear if the phone number is already registered in the
phone book. When the same phone number is registered under different names, only
the phone number will be displayed.
▶The received call and dialled number histories
• You cannot make a call to the entry of an unknown user (no phone number) in the
received call history.
• If calls are made by operating your mobile phone, no history data will be recorded in
this product.
▶Phone book transfers
• If there are more than 1 000 phone book entries on your mobile phone, not all entries
may download completely.
• Depending on the phone, this product may not display the phone book correctly.
• If the phone book in the phone contains image data, the phone book may not be
transferred correctly.
• Depending on the mobile phone, phone book transfer may not be available.
Bluetooth audio
Before using the Bluetooth audio player, register and connect the device to this product
(page 10).
• Depending on the Bluetooth audio player connected to this product, the available operations with
this product may be limited to the following two levels:
– A2DP (Advanced Audio Distribution Profile): Only playing back songs on your audio player is
possible.
– A2DP and AVRCP (Audio/Video Remote Control Profile): Playing back, pausing, selecting songs, etc.,
are possible.
• Depending on the Bluetooth device connected to this product, the available operations with this
product may be limited or differ from the descriptions in this manual.
• While you are listening to song s on your Bluetooth device, re frain from operating the phone function
as much as possible. If you try operating, the signal may cause noise for song playback.
• When you are talking on th e Bluetooth device connec ted to this product via Bluetoo th, it may pause
playback.
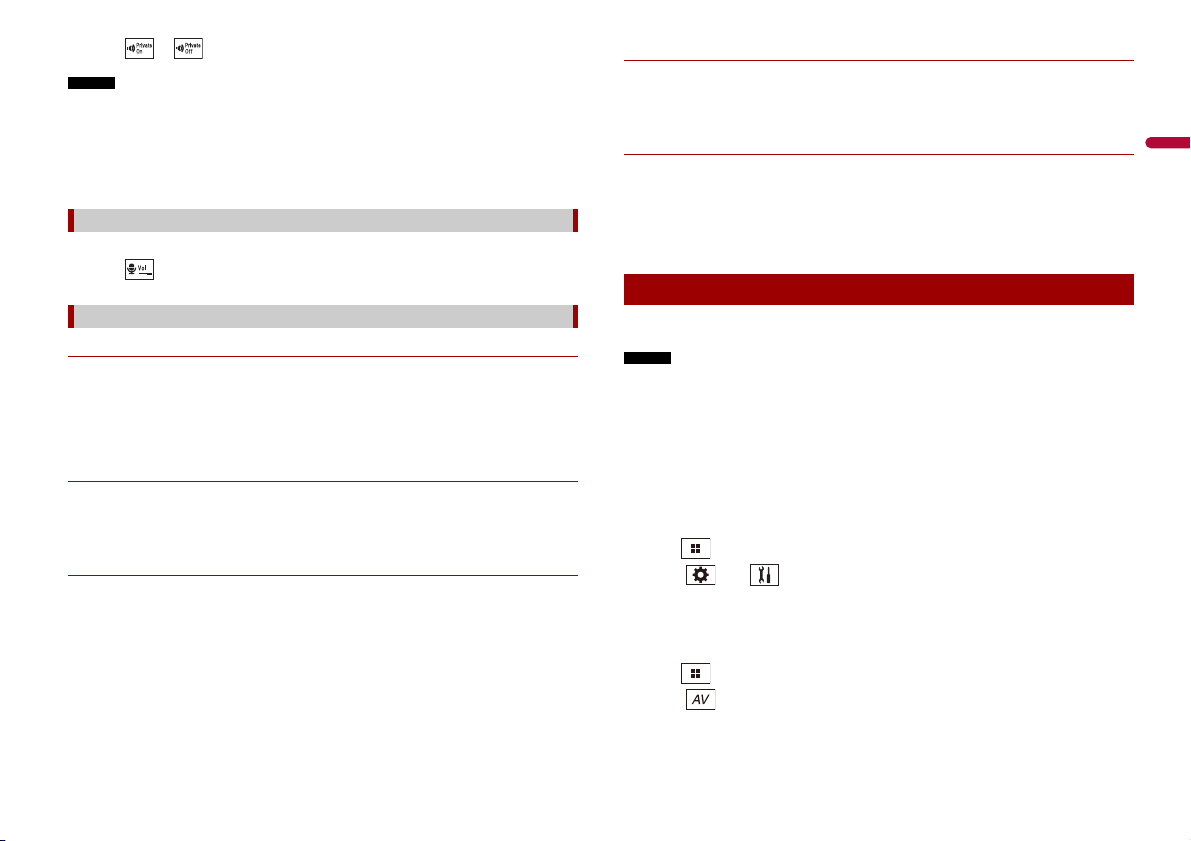
1 Press .
2 Touch then .
The system setting screen appears.
3 Touch [AV Source Settings].
4 Confirm that [Bluetooth Audio] is turned on.
5 Press .
6 Touch .
The AV source screen appears.
7 Touch [Bluetooth Audio].
13En
Page 14
The Bluetooth audio playback screen appears.
NOTE
Bluetooth audio playback screen
NOTES
WAR NING
Important
TIPS
Basic operation
AppRadio Mode +
You can operate iPhone or smartphone applications with finger gestures such as
tapping, dragging, scrolling, or flicking on the screen of this product.
• The compatible finger gestures vary depending on the application for an iPhone or a smartphone.
• Even though an application is not compatible with AppRadio Mode +, depending on the application
an image may be displayed. But you can not operate the application. To use AppRadio Mode +, install
the AppRadio app on the iPhone or smartphone in advance. For details about the AppRadio app, visit
the following site:
http://p ioneer-mexico.com.mx /
• Be sure to read Us ing app-based conne cted content (page 58) before you perform t his operation.
• Copyright protected files such as DRM cannot be played.
• AppRadio Mod e + may be referred t o as AppRadio M ode.
Track number indicator
Switches between playback and pause.
Skips files forwards or backwards.
• By pressing then touch or , you can also skip files forwards or
backwards.
• By pressing then touch and hold or , you can also perform fast
reverse or fast forwards.
Sets a repeat play range.
Plays files in random order.
Selects a file or folder from the list to playback.
This function is available only when the AVRCP version of the Bluetooth device is
1.4 or higher.
Switches among the Blueto oth devices when the devices are connec ted to
this product via Bluetooth (page 10).
14En
• Certain uses of the iPhone or smartphone may not be legal while driving in your jurisdiction, so you
must be aware of and obe y any such restrictions.
• If in doubt as to a particular function, only perform it while the car is parked.
• No feature should be u sed unless it is safe to do so under the driving co nditions you are experien cing.
Using AppRadio Mode +
• Pioneer is not liable for any issues that may arise from incorrect or flawed app-based content.
• The content and functionality of the supported applications are the responsibility of the A pp
providers.
• In AppRadio Mod e +, functionality through the product is l imited while driving, with ava ilable
functions de termined by the App provi ders.
• Availability of AppR adio Mode + functio nality is determined by t he App provider, and not
determined by Pioneer.
• AppRadio Mode + allows access to applications other than those listed (subject to limitations while
driving), but the extent to which content can be used is determined by the App providers.
Starting procedure
When connecting an iPhone or a smartphone to this product, the settings are
automatically configured according to the device to be connected. For details of the
available connection, refer to iPod/iPhone or smartphone connection for AV source
(page 18).
• Touch the desired application icon after the AppRadio app is launched.
Page 15
English
• If you connect your device to this product while an AppRadio Mode + compatible application is
AppRadio Mode +
NOTES
NOTE
CAUTION
TIP
NOTE
already running, the application operation screen will appear on this product.
• The desired application is launched, and the application operation screen appears.
• Press to go back to the top menu screen.
For smartphone (Android) users
• [USB MTP] is set to [Off] to use AppRadio Mode + (page 33).
• The video playback capability depe nds on the connected Android device.
1 Unlock your smartphone and connect it to this product via USB.
Refer to Smartphone (Android device) (page 50).
2 Press .
3 Touch .
4 Touch [AppRadio Mode].
5 Touch desired icon in the tab.
The AppRadio app is launched.
• Press then touch to hide the AppRadio Mode + SideControlBar.
• Press then touch again to display the AppRadio Mode + SideControlBar again.
• and are not available depending on the type of device.
For iPhone users
1 Connect your iPhone.
Refer to iPod/iPhone with Lightning connector (page 50).
2 Press .
3 Touch .
4 Touch [AppRadio Mode].
5 Touch desired icon in the tab.
The AppRadio app is launched.
Displays the current source.
Displays the launcher appl ication screen.
Displays the previous screen.
Displays the menu screen.
Using the keyboard
When you tap the text input area of an application for iPhone, a keyboard will be
displayed on the screen. You can input desired text directly from this product.
This function is only availabl e in AppRadio Mode + on the iPhone.
For your safety, the keyboard functionality is only available when the vehicle is stopped and the
handbrake is engaged.
1 Start up the AppRadio Mode +.
2 Touch the text input area on the application operation screen.
A keyboard for entering text appears.
You can select the keyboard language (page 35).
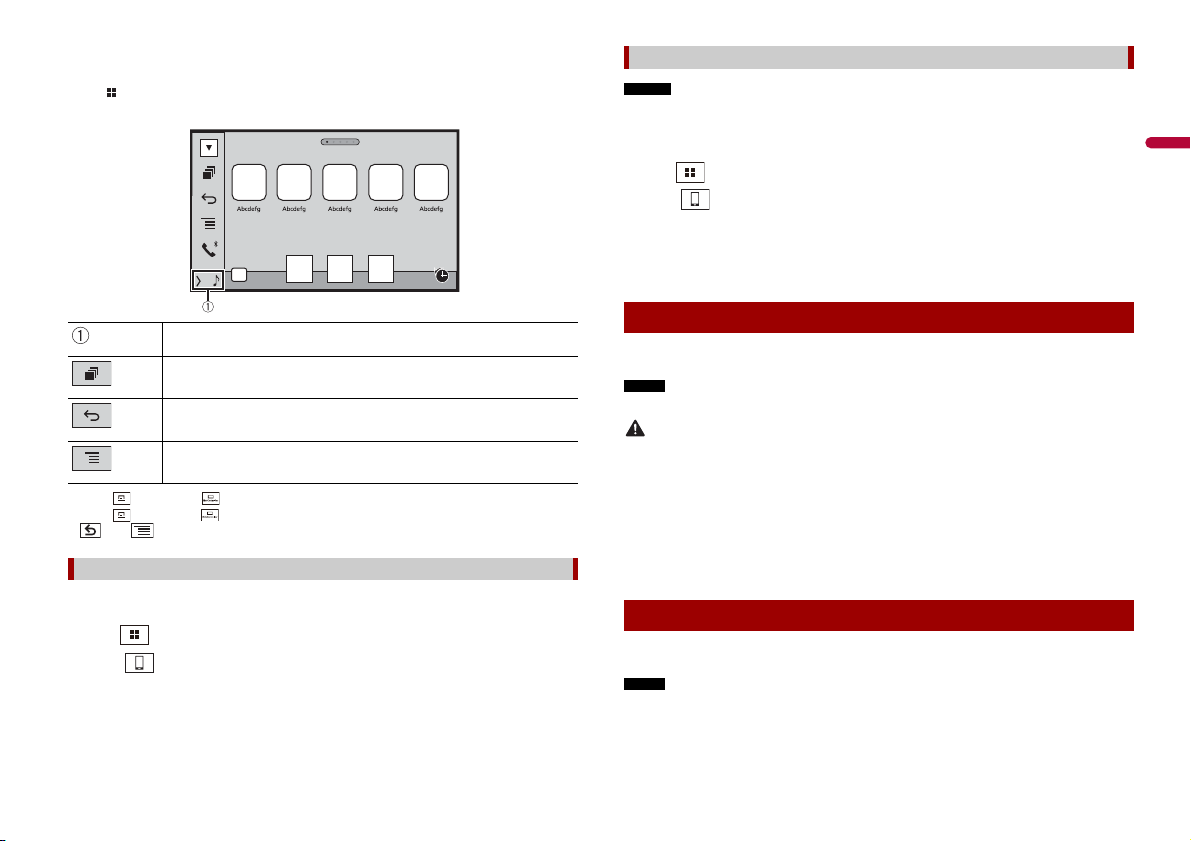
Using the audio mix function
You can output the audio mixing AV source and an application for iPhone or
smartphone when AppRadio Mode + is used.
Depending on the application or AV source, this function may not be available.
1 Start up the AppRadio Mode +.
2 Press VOL (+/-).
15En
Page 16
The audio mix menu will be displayed on the screen.
TIP
Touch to mute. Touch again to cancel mute.
Adjusts the audio volume.
AV source
Supported AV source
You can play or use the following sources with this product.
• Radio
• USB
The following sources can be played back or used by connecting an auxiliary device.
• iPod
• Spotify®
• Bluetooth® audio
• TV
• AV in put (AV)
• AUX
The AV operation screen and the Application screen can be switched by pressing .
16En
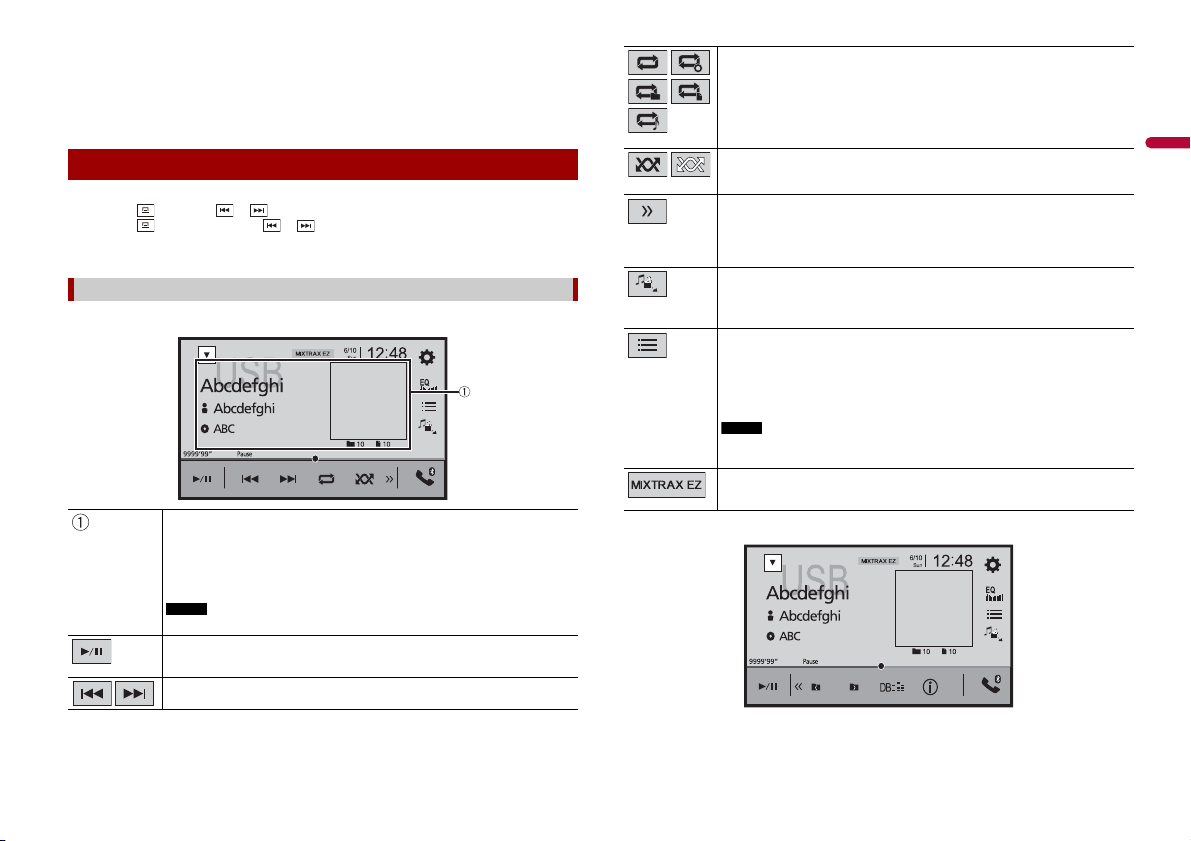
Displaying the AV operation screen
1 Press then touch the AV operation key.
The AV operation screen appears.
Displays the source list.
Page 17
English
NOTE
Selecting a source
NOTE
Adjusting the range of favourite source icons area
Source on the AV source selection screen
1 Press then touch .
2 Touch the source icon.
When you select [Source OFF], the AV source is turned off.
Source on the source list
1 Press then touch AV operation key.
2 Touch .
3 Touch the source key.
When you select [Source OFF], the AV source is turned off.
Changing the display order of source
This function is available onl y when you stop your vehicle in a safe place a nd apply the handbrake.
Changing the display order of source icons
1 Press then touch .
2 Touch and hold the source icon and drag the icon to the desired position.
Changing the display order of source keys
1 Press then touch AV operation key.
2 Touch .
3 Touch .
4 Drag the source key to the desired position.
This function is available only when you stop your vehicle in a safe place and apply the handbrake.
1 Press .
2 Touch and hold .
appears at the top left of the favourite source icons.
3 Drag to the desired position.
To finish the adjusting, touch any place of the display except for the favourite source
icons area.
17En
Page 18

NOTES
TIP
iPod/iPhone or
smartphone connection
for AV source
When using an iPod/iPhone or a smartphone with this product, the settings are
automatically configured according to the device to be connected. This section
describes source compatibility for each device with the connection.
• Operation methods may vary depending on the iPod/iPhone model or smartphone and its software
version.
• Depending on the sof tware version of iPod/iPhone or the versio n of smartphone OS, it may not be
compatible with this unit.
iPod/iPhone with a Lightning connector
These are the methods to connect an iPod/iPhone with a Lightning connector to this
product. The available sources vary depending on the connection method.
• Connecting via Bluetooth (page 18)
• Connecting via CD-IU52* (page 18)
* Sold separately
Compatible iPod/iPhone models
• iPhone 7, 7 Plus
• iPhone SE
• iPhone 6, 6 Plus, 6s, 6s Plus
• iPhone 5, 5c, 5s
• iPod touch 5th, 6th generation
• iPod nano 7th generation
Depending on the iPod models, it may not be compatible with some AV sources. For
details about iPod/iPhone compatibility with this product, refer to the information on
our website.
You can connect and control an iPod/ iPhone compatible with this prod uct by using separately sold
connector cables.
Connecting via Bluetooth
The following sources are available when an iPod/iPhone is connected to the unit via
Bluetooth.
• iPod
• Spotify
• Bluetooth audio
1 Connect an iPod/iPhone with this product via Bluetooth (page 10).
2 Press then touch .
3 Touch compatible desired source.
Connecting via CD-IU52
The following sources are available when an iPod/iPhone with a Lightning connector is
connected to the unit via CD-IU52 (sold separately).
• iPod
• Spotify
1 Connect an iPod/iPhone to USB port of this product by CD-IU52.
2 Press then touch .
3 Touch compatible desired source.
The unit automatically configures connection with connected device.
• AppRadio Mode +
1 Connect an iPod/iPhone to USB port of this product by CD-IU52.
2 Press then touch .
3 Touch [AppRadio Mode].
4 Touch desired icon in the tab.
iPhone with a 30-pin connector
These are the methods to connect an iPhone with a 30-pin connector to this product.
The available sources vary depending on the connection method.
• Connecting via Bluetooth (page 19)
• Connecting via CD-IU51* (page 19)
* Sold separately
Compatible iPhone model
• iPhone 4s
18En
Page 19

English
For details about iPhone compatibility with this product, refer to the information on our
TIP
website.
You can connect and control an iPhone compatible with this product by using separately sold
connector cable s.
Connecting via Bluetooth
The following sources are available when an iPhone is connected to the unit via
Bluetooth.
• iPod
• Spotify
• Bluetooth audio
1 Connect an iPhone with this product via Bluetooth (page 10).
2 Press then touch .
3 Touch compatible desired source.
Connecting via CD-IU51
The following sources are available when an iPhone with a 30-pin connector is
connected to the unit via CD-IU51 (sold separately).
• iPod
• Spotify
1 Connect an iPhone to USB port of this product by CD-IU51.
2 Press then touch .
3 Touch compatible desired source.
Smartphone (Android™ device)
These are the methods to connect a smartphone to this product. The available sources
vary depending on the connection method.
• Connecting via Bluetooth (page 19)
• Connecting via CD-MU200* (page 19)
* Sold separately
Compatible smartphones
Compatibility with all smartphones is not guaranteed. For details about smartphone
compatibility with this product, refer to the information on our website.
Connecting via Bluetooth
The following sources are available when a smartphone is connected to the unit via
Bluetooth.
• Spotify
• Bluetooth audio
1 Connect a smartphone with this product via Bluetooth (page 10).
2 Press then touch .
3 Touch compatible desired source.
Connecting via CD-MU200
The following sources are available when a smartphone is connected to the unit via CDMU200.
• AppRadio Mode +
1 Connect a smartphone to USB port of this product by CD-MU200.
2 Press then touch .
3 Touch [AppRadio Mode].
4 Touch desired icon in the tab.
19En
Page 20
Radio
Radio screen
TIPS
NOTE
TIP
NOTES
Starting procedure
1 Press then touch .
2 Tou ch [Ra dio ].
The Radio screen appears.
Manual tuning
Seek tuning or non stop seek tuning
Releasing the key in a few seconds skips to the nearest station from the
current frequency. Keep holding the key for long seconds to perform,
performs non stop seek tuning.
Searches for a broadc ast by PTY information (page 20).
• By pressing then touch or , you ca n also switch the preset chann els.
• By pressing then touch and hold or and releasing it, you can also perform seek tuning.
Basic operation
20En
Recalls the preset channel stored to a key from memory.
Stores the current broadcas t frequency to a key.
Displays the preset cha nnel list.
Select an item on the list ([1] to [6]) to switch to the preset channel.
Selects the FM1, FM2, FM3, or A M band.
Performs BSM (best stations memory) function (page 20).
Searching by PTY information
You can tune into a station using PTY (Programme Type Identification) information.
This function is available when the FM tuner is selected.
1 Tou c h .
2 Touch or to select the item.
3 Touch to star t searching.
If you touch [Cancel], the searching process is cancelled.
Storing the strongest broadcast frequencies (BSM)
The BSM (best stations memory) function automatically stores the six strongest
broadcast frequencies under the preset channel keys [1] to [6].
• Storing broadcast frequencies with BSM may replace those you have already saved.
• Previously stored broadcast frequencies may remain stored if the number of frequencies stored has
not reached the limit.
1 Touch to begin search.
While the message is displayed, the six strongest broadcast frequencies will be
stored under the preset channel keys in the order of their signal strength.
To cancel the storage process
1 Touch [Cancel].
Page 21
English
Radio settings
NOTE
NOTE
NOTE
NOTE
1 Press .
2 Touch then .
The system setting screen appears.
3 Touch [AV Source Settings].
4 Touch [Radio settings].
The menu items vary according to the source.
Menu Item Description
[Local]
[Off]
FM: [Level1] [Level2] [Level3] [Level4]
AM: [Level1] [Level2]
[FM Step]
[100kHz] [50kHz]
[AM Step]
[9kHz] [10kHz]
[Regional]
[On] [Off]
[Alternative FREQ]*1
[On] [Off]
[Auto PI]
[On] [Off]
Local seek tuning allows you to only tune into
radio stations with sufficiently strong signals.
The FM [Level4] (AM [Level2]) setting allows reception
of only stations with the strongest signals.
You can switch the seek tuning step for the FM
band, and the seek/manual tuning step for the
AM band.
For the FM band, the manu al tuning step is fixed to 50
kHz.
Switches whether the area code is checked
during the Auto PI search.
Allow the unit to retune to a different fre quency
providing the same station.
This menu is available only when [Location Settings] i s
[Australia] (page 35).
Searches for the same PI (Programme
Identification) code broadcast station from all
frequency bands automatically when the
broadcasting station contains RDS data.
Menu Item Description
[TA Interrupt]*2
[On] [Off]
[News Interrupt]*2
[On] [Off]
*1 For countr ies other than Mexico
*2 This function is available only when you receive the FM band.
Receives the traffic announcement from the last
selected frequency, interrupting the other
sources.
Interrupt the currently selected source with
news programmes.
[Alarm Interrupt]*2
[On] [Off]
Even if you set to [Off], the PI search is automatically
performed when the tuner cannot get a good
recept ion.
The alarm broadcast can be received from the
last selected frequency, interrupting the other
sources.
21En
Page 22
NOTE
TIP
TV tuner
TV screen (Example)
NOTES
NOTES
Compressed files
You can watch the TV by connecting the TV tuner such as GEX-1550DTV (sold separately)
to this product. For details of connection, refer to the TV tuner operation manual.
The following d escription is different fro m the TV tuner operatio n manual.
Starting procedure
1 Press then touch .
2 Tou ch [TV ].
The TV screen appears.
Basic operation
Switches the screen m ode (page 42).
[Full]—[Normal]
By pressing then touch or , you can also switch the preset channels.
Plugging/unplugging a USB storage device
You can play compressed audio, compressed video, or still image files stored in an
external storage device.
Plugging a USB storage device
1 Pull out the plug from the USB port of the USB cable.
2 Plug a USB storage dev ice into the USB cable.
• This product may not achieve optimum performance with some USB storage devices.
• Connection via a USB hub is not possible.
• A USB cable is required for connection.
USB cable
USB storage device
Unplugging a USB storage device
1 Pull out the USB storage device from the USB cable.
• Check that no data is being accessed before pulling out the USB storage device.
• Turn off (ACC OFF) the ignition switch before unplugging the USB storage device.
Starting procedure
1 Press then touch .
22En
Page 23
English
2 Plug the USB storage device into the USB cable (page 22).
TIPS
TIP
NOTE
Audio source screen 1 (Example: USB)
TIP
TIP
NOTE
Audio source screen 2 (Example: USB)
3 Touch [USB].
Playback is performed in order of folder numbers. Folders are skipped if they contain
no playable files.
Sets a repeat play rang e for all files/the current folder/ the current file.
Basic operation
• By pressing then touch or , you can also skip files/chapters forwards or backwards.
• By pressing then touch and hold or on the audio or video file, you can also perform fast
reverse or fast forwards.
• You can set the screen size for the video and image files (page 42).
Audio source
Displays the link search screen.
Touch the song to play back followed by touching the song i nformation, after
switching to Music Browse mode (page 24).
If you touch the ar twork, the list of songs in the album is displayed.
This function is available for the USB storage device only.
Switches between playback a nd pause.
Skips files forwards or backwards.
Plays files or does not pl ay in random order.
Displays the hidden function b ar.
You can also display the hidden fun ction bar by flicking the bar from th e right to
the left.
Switches the following media file types.
[Music]: Compressed audio files
[Video]: Compressed video files
[Photo]: Image files
Selects a file from the list.
Touch a file on the list to playback.
Touching a folder on the list shows its contents. You can play a file on the list by
touching it.
When you play compressed audio files stored in a USB storage device, you can
search for a file using Music Browse (page 24).
Displays the MIXTRAX screen (pa ge 32).
23En
Page 24
NOTES
TIP
CAUTION
Displays the hidden function bar.
TIP
TIP
Video source screen (Example: USB)
You can also display the hidden function bar by fl icking the bar from the lef t to the
right.
Selects the p revious folder or the next folder.
Constructs the database for using the Music Browse mode (page 24).
Switches the current music information display.
▶Selecting a file using Music Browse mode
You can select files to play back using the category list if the files contain tag
information.
• This function is available for the USB storage device only.
• Music Browse mode cannot be held once the power is turned off.
1 Touch to create a database.
Music Browse mode will be available after the database has been created.
2 Touch .
3 Touch the desired category to display the file list.
4 Touch the item.
Refine the item until the desired song title or file name is displayed on the list.
5 Touch the desired song title or file name to play back.
If the selection made with Music Browse has been cancelled, you can switch to Music
Browse mode again by touching the [Tag] tab on the file/folder list screen and
touching the desired track.
Once the database is created in the USB storage, there is no need to create the database again as long
as the same contents are saved. To enter the Music Browse mode directly, touch and then touch
[Tag] before selecting the song.
Video sou rce
For safety reasons, video images cannot be viewed while your vehicle is in motion. To view video
images, stop in a safe place and apply the handbrake.
24En
Hides the touch pane l keys.
To display the keys again , touch anywhere on the screen.
Switches between playback and pause.
Performs fast reverse or fast forwards.
Touch again to change the playback speed.
Stops playback.
Performs frame-by-frame playback.
Performs slow-motion playback.
Sets a repeat play range for all files/the current folder/the current file.
Switches the audio/subtitle language.
The icons vary according to the file.
Switches t he following media file types.
[Music]: Compressed audio files
[Video]: Compressed video files
[Photo]: Image files
Page 25
English
TIPS
Selects a file from the list.
TIP
Still image screen
NOTE
TIP
Touch a file on the list to playback.
Touching a folder on the list shows its contents. You can play a file on the list by
touching it.
Skips files forwards or backwards.
Still image source
• Image files are not displayed in the rear display.
• By pressing then touch and hold or on the still image file, you can search through 10
image files at a time. If the file currently being played is the first or last file in the folder, the search is
not perfor med.
Hides the touch pane l keys.
To display the keys again, to uch anywhere on the screen.
Switches between playback a nd pause.
Skips files forwards or backwards.
Saves the current images as the wallpaper.
Touch the following items then touch [Yes] to overwrite the image.
[As AV Screen ]: Saves the image as the wallpaper for the AV screen.
[As HomeScreen]: Saves the image as the wallpaper for the top menu screen.
[As Both]: Saves the image as the wallpaper for both the AV screen and top menu
screen.
If you save the new image, the current wallpaper is overwritten except for the
preset image.
Rotates the displayed picture 9 0° clockwise.
Sets a repeat play rang e for all files/the current folder.
Plays all files in the c urrent repeat play range or does not play the m in
random order.
Switches the following media file types.
[Music]: Compressed audio files
[Video]: Compressed video files
[Photo]: Image files
Selects a file from the list.
Touch a file on the list to playback.
Touching a folder on the list shows its contents. You can play a file on the list by
touching it.
Selects the previous folder or the next folder.
25En
Page 26
NOTES
TIPS
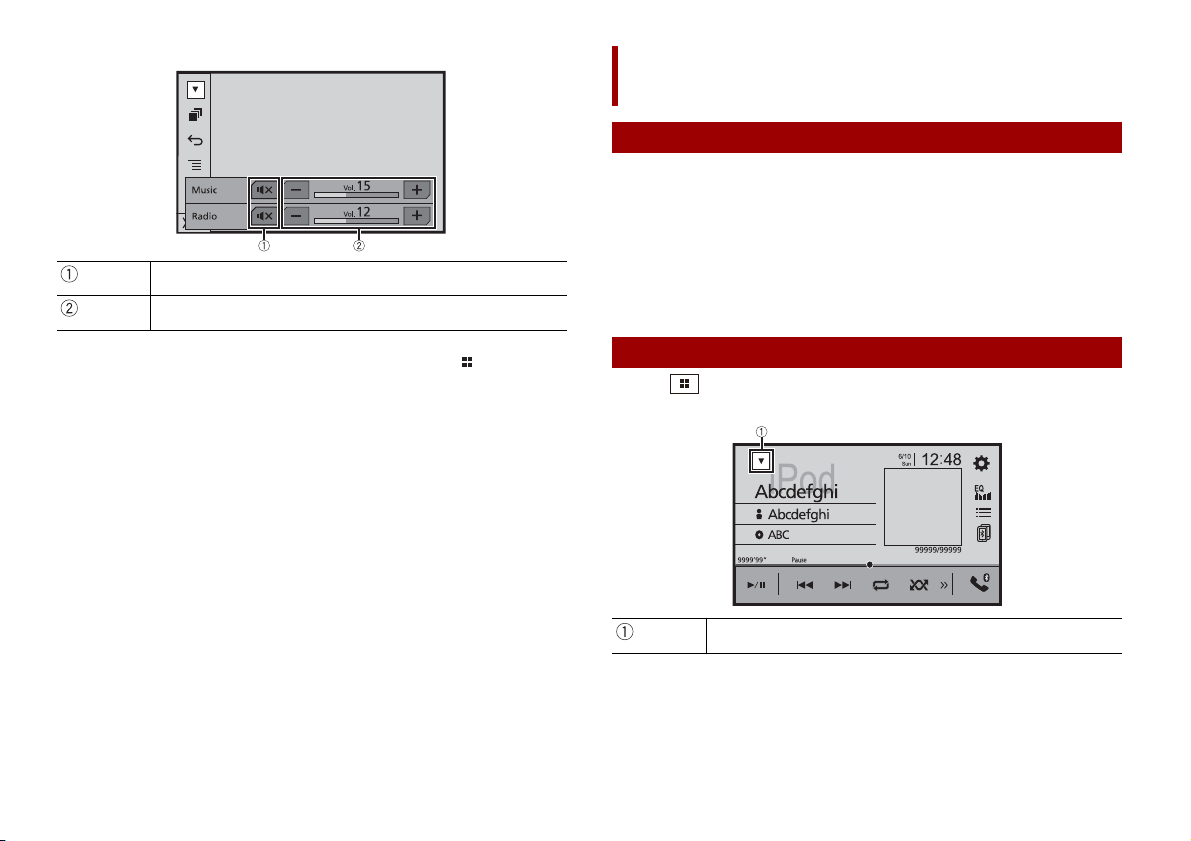
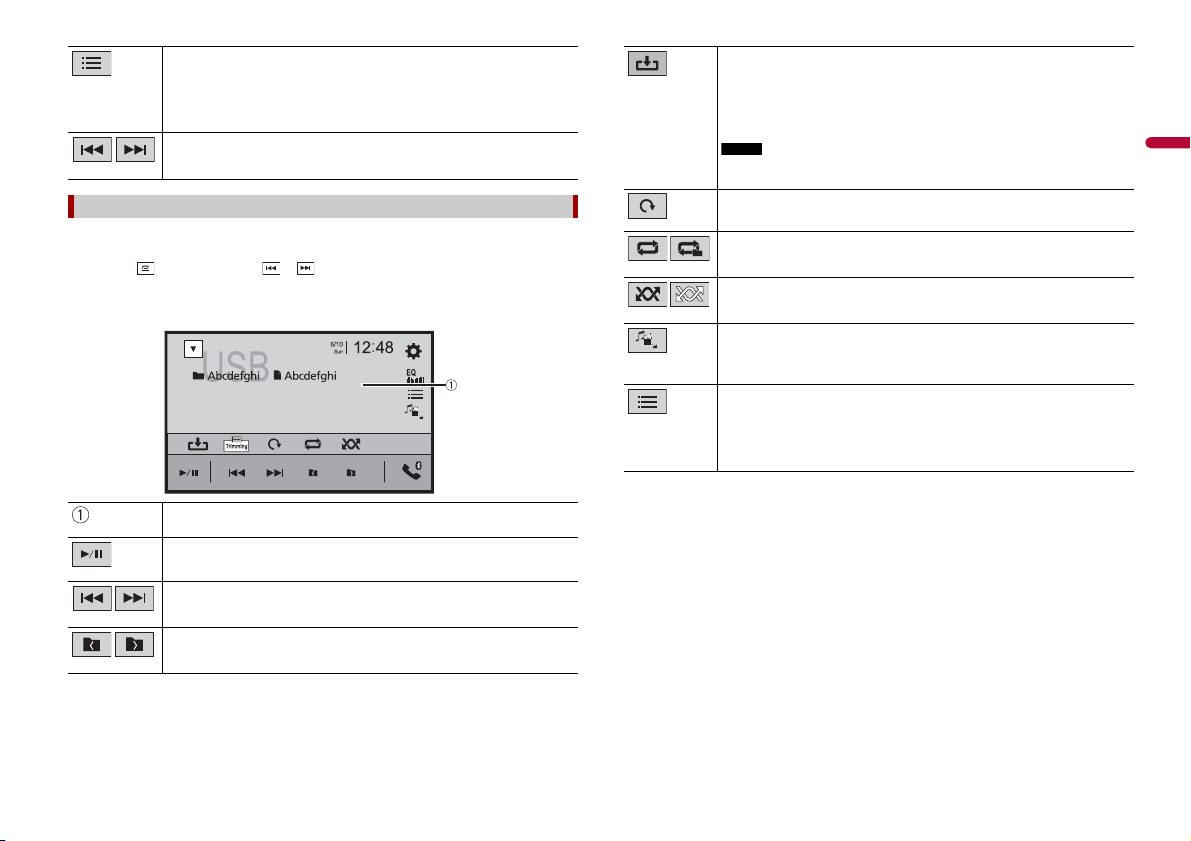
iPod
Audio source screen 1
TIP
NOTE
TIPS
NOTES
Connecting your iPod
When connecting an iPod to this product, the settings are automatically configured
according to the device to be connected. For details of the available connection, refer to
iPod/iPhone or smartphone connection for AV source (page 18).
• Depending on the ge neration or version of the iPod, so me functions may not be availa ble.
• Do not delete the Apple Music® app from your iPod, since some functions may not be available.
1 Connect your iPod.
2 Press then touch .
3 Tou ch [iPod ].
Basic operation
• By pressing then touch or , you can also skip files forwards or backwards.
• By pressing then touch and hold or , you can also perform fast reverse or fast forwards.
Audio source
Displays the link search screen.
Select a song from the list related to the song currently playing.
If you touch the artwork, the list of songs in the album is displayed.
This function is not available while playing Apple Music Radio.
Switches between playback and pause.
Skips files forwards or backwards.
Sets a repeat play range for all in the selected list/the current song.
Plays songs within the selected list/album randomly.
Displays the hidden function bar.
Switches among connected devices.
Selects a song from the list.
Touch the category then the title of the list to playback of the selected list.
• If you use English as the system language, the alphabet search function is
available. Touch the initia l search bar to use th is function.
• You can play playlists created with the MusicSphere application. The application
is available on our webs ite.
• When you touch Apple Music Radio station in the list screen, Apple Music Radio
screen appears (page 27).
• Depending on the generation or version of the iPod, some functions may not be
availa ble.
• Only 16 000 songs in the iPod are available in the list if the iPod has more than 16
000 songs. Available songs depend on the iPod.
26En
Page 27

English
Important
NOTE
Changes the audiobook sp eed.
Audio source screen 2
Apple Music Radio screen
NOTE
Normal—Fast—Slow
Displays the hidden func tion bar.
Apple Music® Radio source
Apple Music Radio may not be available in your country or region. For details about Apple Music Radio,
visit the following site: http://www.apple.com/music/
This functi on is only available when using the iPod funct ion with an iPhone 7, iPhone 7 Plus, iPhon e SE,
iPhone 6s, iPhone 6s Plus, iPhone 6, iPhone 6 Plus, iPhone 5s, iPhone 5, iPhone 5c, iPhone 4s or iPod
touch (5th, 6th generation).
Displays the pop-up menu for Apple Music Radio.
• Touch [Play More Like This] to play back songs similar to the current song.
• Touch [Play Less Like This] to set it not to play back the current song again.
• Touch [Add to iTunes Wish List] to add the current s ong to the iTunes wish list.
This function may not be used depending on your Apple Music account status.
Skips tracks forw ards.
Switches between playback a nd pause.
27En
Page 28
WAR NIN G
Important
Spotify®
NOTES
TIP
Playback screen 1 (Track)
To enjoy Spotify as you drive, first download the Spotify app to your iPhone or
smartphone. You can download it from the iTunes App Store or Google Play. Choose a
free account or a paid Premium account, either in the app or at spotify.com. A Premium
account gives you more features like offline listening. If you have Spotify already, please
update the app so you have the latest version then connect your phone to your car. Now
you can take your music on the road.
Certain uses of the iPhone or smartphone may not be legal while driving in your jurisdiction, so you
must be aware of and obey any such restrictions. If in doubt as to a particular function, only perform it
while the car is parked. No feature should be used unless it is safe to do so under the driving conditions
you are experiencing.
• Confirm the requirements to access Spotify using Pioneer car audio/video (page 18).
• To use Spotify, you need to connect to the Internet via 3G, EDGE, LTE (4G), or a Wi-Fi network. I f the
data plan for your iPhone or smartphone does not provide for unlimited data usage, additional
charges from yo ur carrier may apply.
• For information on the coun tries and regions where Spoti fy can be used, take a look at https://
www.spotify.com/us/select-your-country/.
Limitations:
• Depending on the availability of the Internet, you may not be able to receive the
Spotify service.
• The Spotify service is subject to change without notice. The ser vice could be affected
by any of the following: firmware version of the iPhone or smartphone, firmware
version of the Spotify application, changes to the Spotify music service.
• Certain functions of the Spotify service are not available when accessing the service
through Pioneer car audio/video products.
• Spotify is a music service not affiliated with Pioneer. More information is available at
https://support.spotify.com/.
• The Spotify application is available for most iPhone and smartphone, please visit
https://support.spotify.com/ for the latest compatibility information.
Listening to Spotify
Update the firmware of the Spotify application to the latest version before use.
1 Unlock the mobile device and connect it to this product.
• iPhone via USB or Bluetooth
• Smartphone via Bluetooth
2 Press .
3 Tou c h t h en .
4 Touch [AV Source Settings].
5 Confirm that [Spotify] is turned on.
6 Press then touch .
7 Tou ch [Sp oti fy ].
• For details on Bluetooth connection, see page 10.
• For details on USB connecti on for iPhone, refer to iPod/iPhone wi th Lightning connector (pag e 50) or
iPhone with 30-pin connector (page 50).
Basic operation
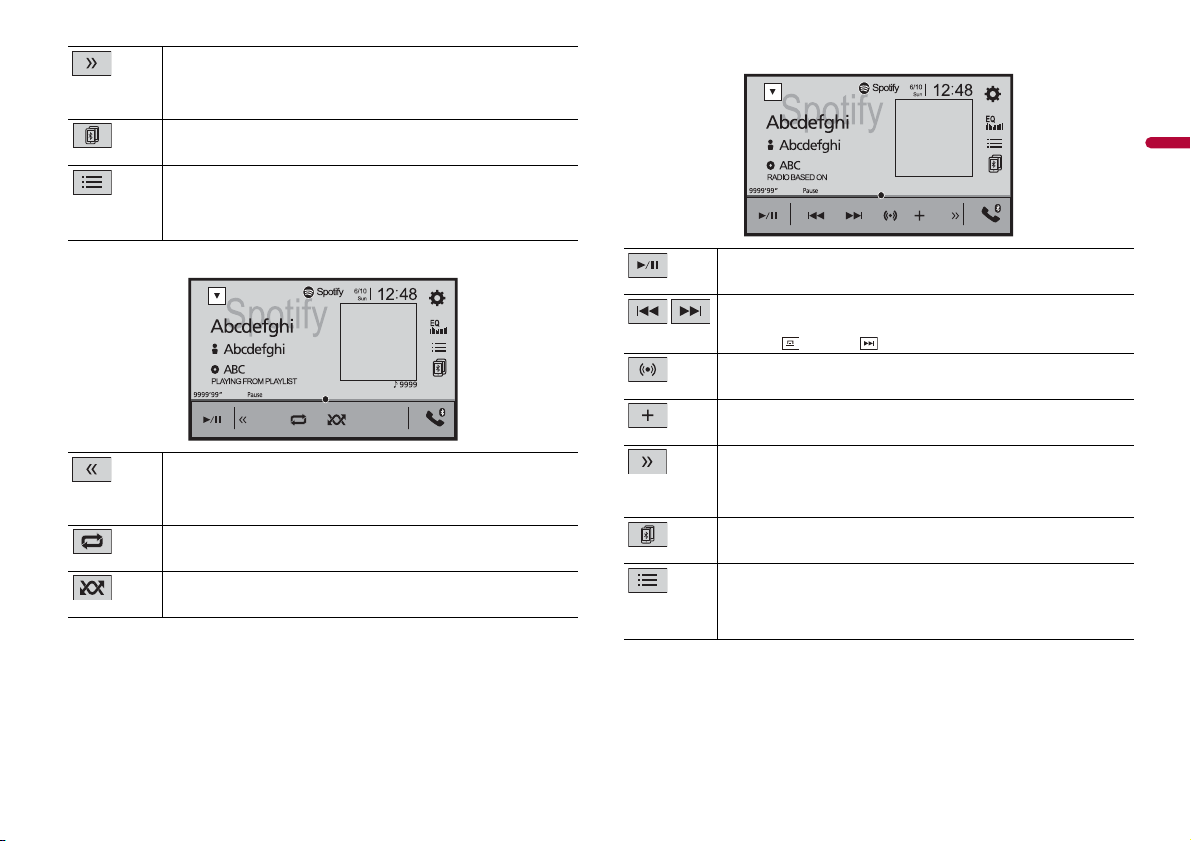
Switches between playback and pause.
Skips tracks forwards or backwards.
By pressing th en touch , you can skip trac ks forwards.
Switches to radio mode.
Saves or deletes the current s ong information to or from Your Music.
28En
Page 29
English
Displays the hidden func tion bar.
TIP
TIP
Playback screen 2 (Track)
TIP
TIP
Playback screen 1 (Radio mode)
You can also display th e hidden function bar by flicking the bar from the right to
the left.
Switches among connected devices.
Selects a track or s tation from the list.
Yo ur Mu s ic : Selects a track or station from the list of saved song information.
Browse: Selects a track from the category list.
Radio: Selects a station from the station list.
Recently Played: Selects a track from recently played.
Switches between playback and pause.
Skips tracks forwards or backwards.
By pressing then touch , you can skip songs forwards.
Starts new radio mo de.
Saves or deletes the current song information to or from Your Music.
Displays the hidden func tion bar.
You can also display the hidden function bar by flicking the bar from the left to the
right.
Sets a repeat play range.
Plays tracks in random order.
Displays the hidden function b ar.
You can also display the hidden fun ction bar by flicking the bar from th e right to
the left.
Switches among conn ected devices.
Selects a track or s tation from the list.
Yo ur Mu s ic : Selects a track or station from the list of saved song information.
Browse: Selects a track from the category list.
Radio: Selects a station from the station list.
Recently Played: Selects a track from recently played.
29En
Page 30
Displays the hidden function bar.
TIP
Playback screen 2 (Radio mode)
CAUTION
NOTE
AUX screen
You can also display the hidden function bar by fl icking the bar from the lef t to the
right.
Gives a Thumbs Up to the playing track.
Gives a Thumbs Down to the p laying track and skips to the next track.
AUX
You can display the video image output by the device connected to video input.
For safety reasons, video images cannot be viewed while your vehicle is in motion. To view video
images, stop in a safe place and apply the handbrake.
A Mini-jack AV cable (CD -RM10) (sold separately) is re quired for connection. For details, refer to External
video component and the display (page 51).
Starting procedure
1 Press .
2 Tou c h th e n .
3 Touch [Input/Output settings].
4 Confirm that [AUX Input] is turned on.
5 Press then touch .
6 Touch [AUX].
The AUX screen appears.
Basic operation
30En
Page 31
English
Hides the touch panel keys.
TIP
CAUTION
To display the keys again, touch anywhere on the screen.
You can set the screen size for the video image (page 42).
Switches between the video input and audio input.
AV input
You can display the video image output by the device connected to video input. For
details, refer to External video component and the display (page 51).
For safety reasons, video images cannot be viewed while your vehicle is in motion. To view video
images, stop in a safe place and apply the han dbrake.
Starting procedure
1 Press .
2 Touch then .
3 Touch [Input/Output settings].
4 Touch [AV Input].
5 Touch [On].
6 Press then touch .
7 Touch [AV].
The image is displayed on the screen.
31En
Page 32

NOTES
MIXTRAX
(Example: USB)
MIXTRAX is an original technology for creating non-stop mixes of selections from your
audio library, complete with DJ effects.
MIXTRAX EZ operation
You can use this unit to play USB audio files.
MIXTRAX EZ is used to add a variety of sound effects between songs for arranging the
pauses between songs.
It allows you to enjoy listening to music non-stop.
• This function is only available when a file on a USB storage device is being played.
• Depending on the file/song, sound effects may not be available.
• Depending on t he file/song, non-stop playback may not be ava ilable.
Starting procedure
1 Tou ch .
Activates the MIX TRAX mode.
Switches between playback and pause.
MIXTRAX settings
1 Press .
2 Tou c h t h en .
The system setting screen appears.
3 Touch [AV Source Settings].
4 Touch [MIXTRAX Settings].
Menu Item Description
[Short Playback Mode]
[Off] [60s] [90s] [120s]
[150s] [180s] [Random]
[Display Effect]
[On] [Off]
[Cut-In Effect]
[On] [Off]
[Effect Setting]
[Standard] [Simple]
[Custom]
[Flash Pattern] The flashing colour changes with the changes in the sound
[Sound1] to [Sound6] The flash pattern changes according to the sound level.
[L-Pass1] to [L-Pass6] The flash pattern changes according to the bass level.
[Random1] The flash pattern changes randomly according to the
[Random2] The flash pattern changes randomly according to the
[Random3] The flash pattern changes randomly according to the low
[Off] Set the flash pattern to off.
Specify the playback portion.
Set the effect display for MIXTRAX.
Set the effect tone that sounds when you skip tracks
forwards o r backward s.
Set and play back the MIXTRAX effect that you want.
and bass levels.
sound level mode and low pass mode.
sound level mode.
pass mode.
Selects a trac k.
32En
Page 33

English
Settings
NOTE
You can adjust various settings in the main menu.
[Auto Mix]
Menu Item Description
[Auto Mix]
[On] [Off]
Select whether to perform mixing the sound output from
AppRadio Mode + and AV source sound automatically.
Displaying the setting screen
1 Press .
2 Touch .
3 Touch one of the following categories, then select the options.
System settings (page 33)
Theme set tings (page 37)
Audio settings (page 37)
Video settings (page 41)
Bluetooth settings (page 10)
System settings
The menu items vary according to the source.
[AV Source Settings]
Menu Item Description
[MIXTRAX Settings] (page 32)
[Radio settings] (page 21)
[Bluetooth Audio]
[On] [Off]
[Spotify]
[On] [Off]
[Beep Tone]
Menu Item Description
[Beep Tone]
[On] [Off]
Setting Bluetooth audio source activation
Setting Spotify source activation.
Select [Off] to disable the beep sound when the button is
pressed or the screen is touched.
[Input/Output settings]
Menu Item Description
[USB MTP]
[On] [Off]
[AppRadio Mode Sound] Set where the sound for AppRadio Mode + is output when
[AVH] The sound is output from the speakers of this unit.
[Smartphone] The sound is output from the speakers of the smartphone.
[AV Input]
[On] [Off]
[AUX Input]
[On] [Off]
[Camera settings]
A separately sold rear view camera (e.g. ND-BC8) is required for utilizing the rear view
camera function. (For details, consult your dealer.)
▶Rear view camera
This product features a function that automatically switches to the full-screen image of
the rear view camera installed on your vehicle when the gear stick is in the REVERSE (R)
position.
▶Camera for Camera View mode
Camera View can be displayed at all times. Note that with this setting, the camera image
is not resized to fit, and that a portion of what is seen by the camera is not viewable.
To display the camera image, touch [Camera View] on the AV source selection screen
(page 17).
To close the camera view mode, touch on the camera view screen.
Select whe ther or not to activate USB MTP (Media Transfer
Protocol) connection.
it is used with a smartphone.
With an iPhone, the sound is always output from the speakers of
this unit.
Select AV input source (page 31).
Set to [On] for AUX source (page 30).
33En
Page 34

NOTE
To set the rear view camera as the camera for Camera View mode, set [Back Camera Inp ut] to [On]
CAUTION
NOTE
CAUTION
NOTES
2 m
Markings
Markings
50 cm
Rear bumper
25 cm
25 cm
(page 34).
Pioneer recommends the use of a camera which outputs mirror reversed images, otherwise the screen
image may appear reversed.
• Immediately verify whether the display changes to the rear view camera image when the gearstick is
moved to REVERSE (R) from another position.
• When the screen changes to full-screen rear view camera image during normal driving, switch to the
opposite se tting in [Camera Polarity].
• If you touch while the camera image is displayed, the displayed image tu rns off temporarily.
Menu Item Description
[Back Camera Input]
[On] [Off]
Setting rear view camera activation.
[Camera Polarity] Setting the polarit y of the rear view camera.
[Battery] The polarity of the connected lead is positive.
[Ground] The polarity of the connected lead is negative.
This function is available when [Back Camera Input] is set to [On].
[Parking Assist Guide]
[On] [Off]
You can set whether to display the parking assist
guidelines on the rear view camera images when backing
up your vehicle.
Menu Item Description
[Parking Assist Guide
Adjust]
Adjusting the guidelines by dragging or touching / /
/ / / on the screen.
Touch [Default] to reset the settings.
• When adjusting the guidelines, be sure to park the vehicle in a
safe place and apply the handbrake.
• Before getting out of the car to place the mark ings, be sure to
turn the ignition switch off (ACC OFF).
• The range projected by the rear view camera is limited. Also, the
vehicle width and distance guidelines displayed on the rear view
camera image may differ from the actual vehicle width and
distance. (The guidelines are straight lines.)
• The image quality may deteriorate depending on the usage
environment, such as at night or in d ark surroundings.
• This setting is ava ilable only when you st op your vehicle in a safe
place and apply the handbrake.
• Using packing tape or similar tape place markings as shown
below before setting up the guidelines so that the guidelines can
be overlaid to the markings.
34En
[Demo Mode]
Menu Item Description
[Demo Mode]
[On] [Off]
Setting the demo mode.
Page 35

English
[System Language]
NOTES
NOTES
NOTES
CAUTION
NOTES
NOTES
[Restore Settings]
Menu Item Description
[System Language] Select the system language.
• If the embedded language and the selected language setting are
not the sam e, the text informat ion may not displa y properly.
• Some characters may not be displayed properly.
[Location Setting]
For countries other than Mexico
Menu Item Description
[Location Setting]
[South America]
[Australia]
Select the using location.
[Steering Wheel Control]
Menu Item Description
[Steering W heel Control]
[With Adapter] [W/o
Adapter]
Select [With Adapter] or [W/o Adapter] according to your
wired remote control.
• This setting is available only when you stop your vehicle in a safe
place and apply the handbrake.
• Depending on your vehicl e, this function may not work properly.
In this case, contact your dealer or an au thorised PIONEER
Service Station.
• Please use a PIO NEER wiring harne ss for each car mode l when
[With Adapter] mode is engaged, otherwise select [W/o
Adapter].
Menu Item Description
[All Settings] Touch [Restore] to restore the settings to the default
settings.
Do not turn off the engine while restoring the settings.
• This setting is available only when you stop your vehicle in a safe
place and apply the handbrake.
• The source is turned off and the Bluetooth connection is
disconnected before the process starts.
[Keyboard]
Menu Item Description
[Keyboard] You can use the keyboard in AppRadio Mode + by setting
the language of the keyboard for iPhone.
• Set the same system language setting as the iPhone to operate
this function properly.
• This function is only avai lable in AppRadio Mode + on the
iPhone.
[Touch panel calibration]
If you feel that the touch panel keys on the screen deviate from the actual positions that
respond to your touch, adjust the response positions of the touch panel screen.
• Do not use sharp pointed tools such as ballpoint or mechanical pens. They may damage the screen.
• Do not turn off the engine while saving the adjusted position data.
• This setting is available only when you stop your vehicle in a sa fe place and apply the handbra ke.
35En
Page 36

NOTE
Menu Item Description
CAUTION
TIPS
NOTE
[Touch panel calibration] 1 Tou ch [Yes ].
2 Touch two corners of the screen along the arrows then
touch the centres of the two [+] marks at the same
time twice.
3 Press .
The adjustment results are saved.
4 Press once again.
Proceed to 16-point adjustment.
5 Gently touch the centre of the [+] mark displayed on
the screen.
The target indicates the order.
• When you press , the previous adjustment
position returns.
• When you press and hold , the adjustment is
cancelled.
6 Press and hold .
The adjustment results are saved.
Menu Item Description
[Dimmer Duration] Adjust the time that the dimmer is turned on or off by
dragging the cursors or touching or .
You can use this function when [Dimmer Trigger] is set to
[Time].
• Each touch of or moves the cursor backwards or
forwards in the 15 minute width.
• When the cursors are placed on the same point, the dimmer
available time is 0 hours.
• When the cursor for off time setting is placed on the left end and
the cursor for on time setting is placed on the right end, the
dimmer available time is 0 hours.
• When the cursor for on ti me setting is placed o n the left end and
the cursor for off time setting is placed on t he right end, the
dimmer available time is 24 hours.
The time display of the dimmer duration adjusting bar depends on
the clock display setting (page42).
[Dimmer S ettings]
This setting is available only when you stop your vehicle in a safe place and apply the handbrake.
Menu Item Description
[Dimmer Trigger] Setting the dimmer brightness.
[Auto] Switches the dimmer to on or off automatically according
to your vehicle’s headlight turning on or off.
[Manual] Switches the dimmer to on or off manually.
[Time] Switches the dimmer to on or off at the time you adjusted.
[Day/Night] Setting the dimmer duration by day or night.
You can use this function when [Dimmer Trigger] is set to
[Manual].
[Day] Turns the dimmer function to off.
[Night] Turns the dimmer function to on.
36En
[Picture Adjustment]
You can adjust the picture for each source and rear view camera.
For safety reasons, you cannot use some of these functions while your vehicle is in motion. To enable
these functions, you must stop in a safe place and apply the handbrake.
To adjust following menu, touch , , , to adjust.
Menu Item Description
[Brightness]
[-24] to [+24]
[Contrast]
[-24] to [+24]
[Colour]*
[-24] to [+24]
[Hue]*
[-24] to [+24]
[Dimmer]
[+1] to [+48]
[Temperature]
[-3] to [+3]
Adjust the black intensity.
Adjust the contrast.
Adjust the colour saturation.
Adjust the tone of colour (which colour is emphasised, red,
or green).
Adjust the brightness of the display.
Adjust the colour temperature, resulting in a better white
balance.
Page 37

English
* W ith some pictures, yo u cannot adjust [Hue] a nd [Colour].
NOTES
CAUTION
NOTES
TIP
• The adjustments of [Brightness], [Contrast], and [Dimmer] are stored separately when your vehicle's
headlights are off (daytime) and o n (nighttime).
• [Brightness] and [Contrast] are switched automatically depending on the setting of [Dimmer
Settings].
• [Dimmer] can be changed the setting or the time to switch it to on or off (page 36).
• The picture adjustment may not be available with some rear view cameras.
• The setting contents can be memorised separately.
[System Information]
Menu Item Description
[Firmware Information] Displaying the firmware version.
[Firmware Update]
• The USB storage device for updating must contain only the
correct upda te file.
• Never turn this product off, disconnect the USB storage device
while the firmware is being updated.
• You can only update the firmware when the vehicle is stopped
and the handbrake is engaged.
1 Download the firmware update files into your
computer.
2 Connect a blank (formatted) USB storage device to
your computer then locate the correct update file and
copy it onto the USB storage device.
3 Connect the USB storag e device to this product
(page 22).
4 Turn the source off (page17).
5 Display the [System] setting screen (page33).
6 Touch [System Information].
7 Touch [Firmware Update].
8 Touch [Continue].
Follow the on-screen instructions to finish updating the
firmware.
• This product will reset automatically after the
firmware update is completed if the update is
successful.
• If an error message appears on the screen, touch
the display and perform the above steps again.
[Licence] Displaying the open source licence.
Theme settings
The menu items vary according to the source.
Menu Item Description
[Background]
[Home] [AV]
Preset Display Select the desired preset background display.
(custom)*1 Displays the background display image imported from the
(off) Hides the background display.
[Illumination]*2 Selec t an illumination colour from the colour list or create a
Coloured Keys Select the desired preset colour.
(custom) Displays the screen to customise the illumination colour.
(rainbow) Shifts gradually between the preset colours in sequence.
[Theme]*2 Select the theme colour.
[Clock] Select the style of the clock from the preset image.
Preset Images Select the desired preset style for the clock.
(off) Hides the clock display.
*1 Refer to Still image source (page 25).
*2 You can preview the top menu screen or the AV operation screen by touc hing [Home] or [AV]
respectively.
Select the wall paper from the preset items in this product
or original pictures via the external device.
The wall paper can be set from selections for the top menu
screen and AV operation screen.
external storage device.
defined colour.
To customise the defined colour, touch then touch
or to adjust the brightness and the level of red, green
and blue to create favourite colour.
To store the customise d colour in the memory, touch and
hold [Memo], and the customised colour will be available
at the next illumination setting by pressing .
You can also adjust the colour tone by dragging the colour bar.
Audio settings
The menu items vary according to the source. Some of the menu items become
unavailable when the volume is set to mute or the source is off.
37En
Page 38

Menu Item Description
TIPS
TIP
NOTE
TIP
NOTES
NOTE
[Graphic EQ]
[Super Bass] [Powerful]
[Natural] [Vocal] [Flat]
[Custom1] [Custom2]
[Fader/Balance] Touch or to adjust the front/rear speaker balance.
[Mute Level] Select mute or attenuate the AV source volume and iPhone
Select or customise the equaliser curve.
Select a curve that you want to use as the basis of
customising then touch the frequency that you want to
adjust.
• If you make adjustments when a curve [Super Bass], [Powerful],
[Natural], [Vocal], or [Flat] is selected, the equaliser curve settings
will be changed to [Custom1] mandatorily.
• If you make adjustments when the [Custom2] curve is selected
for example, the [Cu stom2] curve will be updated .
• [Custom1] and [Custom2] curves can be created common to all
sources.
• If you trail a finger across the bars of multiple equaliser bands,
the equaliser curve settings will be set to the value of the
touched po int on each bar.
Set [Front] and [Rear] to [0] when using a dual speaker
system.
Touch or to adjust the left/right speaker balance.
You can also set the value by dragging the point on the displayed
table.
Only the balance can be adjusted when [Network Mode] is
selected as the speaker mode.
or smartphone application volume when the navigation
outputs the guidance voice.
[ATT] The volume becomes 20 dB lower than the current volume.
[Mute] The volume becomes 0.
[Off] The volume does not change.
Menu Item Description
[Source Level Adjuster]
[-4] to [+4]
[Subwoofer]
[On] [Off]
[Speaker Level]
Listening position*1*2
[Off] [Front-L] [Front-R]
[Front] [All]
Standard Mode*3
[Front Left] [Front Right]
[Rear Left] [Rear Rig ht]
[Subwoofer]
Network Mode*3
[High Left] [High Right]
[Mid Left] [Mid Right]
[Subwoofer]
Speaker output level
[-24] to [10]
[Crossover]*4 Select a s peaker unit (filter) to ad just the HPF or LPF c ut-off
Adjust the volume level of each source to prevent radical
changes in volume when switching between sources other
than FM.
Touch or to adjust the source volume after
comparing the FM tuner volume level with the level of the
source.
If you directly touch the area where th e cursor can be moved, the
SLA (source level adjustment) setting will be changed to the value
of the touched point.
• Settings are based on the FM tuner volume level, which remains
unchanged.
• This function is not available when the FM tuner is selected as
the AV source.
• This function is available only for the currently selected source.
Select enable or disable rear subwoofer output from this
product.
Adjust the speaker output level of the listening position.
1 Touch or to select the listening position then
select the output speaker.
2 Touch or to adjust the selected speaker output
level.
This function is available when [Subwoofer] is set to [On].
frequency and the slope for each speaker unit (page 40).
[Subwoofer Settings]*4 Select the subwoofer phase (page 40).
[Listening Position]*1
[Off] [Front Left] [Front
Right] [Front] [All]
Select a listening position that you want to make as the
centre of sound effects.
38En
Page 39
English
TIP
NOTE
TIP
NOTES
NOTE
Menu Item Description
WAR NING
CAUTION
NOTE
TIP
[Time Alignment]
[On] [Off]
Listening position*1*2
[Off] [Front-L] [Front-R]
[Front] [All]
Standard Mode*3*5
[Front Left] [Front Right]
[Rear Left] [Rear Right]
[Subwoofer]
Network Mode*3*5
[High Left] [High Right]
[Mid Left] [Mid Right]
[Subwoofer]
Distance
[0] to [350]
[Auto EQ]
[On] [Off]
[A-EQ&TA Measurement] Measures and adjusts the vehicles acoustics, equaliser, and
[Save Settings] Save to recall th e following cur rent sound settings by
[Load Settings]
[Initial Settings] [Sound
Setting] [Auto EQ&TA
Setting]
[Bass Boost]*1
[0] to [6]
[Rear Speaker Output]*1
[Rear] [Subwoofer]
Select or customise the time alignment settings to reflect
the distance between the listener’s position and each
speaker. You need to measure the distance between the
head of the listener and each speaker unit.
1 Touch or to select the listening position then
select the alignment speaker.
2 Touch or to input the distance between the
selected speaker and listening position.
If you touch [TA On], the tim e alignment is turned off man datorily.
This function is available only when the listening position setting
is set to [Front-L] or [Front-R].
Set the auto-adjusted equaliser to suit the vehicle’s
acoustics. To use this function, the Auto EQ measurement
must be done in advance (page 40).
time alignment automatically to suit th e vehicle interior
(page 40).
touching [OK]: bass boost, slope, subwoofer phase, speaker
level, Graphic EQ, HPF/LPF, listening position, crossover,
time alignment.
When you touch [Cancel], return to th e [Audio] setting screen .
Load the sound settings.
• [Sound Setting] is available only when you have already saved
the sound settings (page 39).
• [Auto EQ&TA Setting] i s available only wh en you have already
performe d Auto EQ measure ment (page 39).
Adjust the bass boost level.
Select the rear speaker output.
This function is available when [ Standard Mode] is selected as the
speaker mode.
Menu Item Description
[Loudness]*3
[Off] [Low] [Mid] [High]
[Automatic Level Control] Corrects automatically the audio level difference between
Compensates for deficiencies in the low-frequency and
high-frequency ranges at low volume.
This functi on is not availa ble while you make or receive a call us ing
the hands-free function.
the music files or the sources.
[Off] Turns the auto level control setting off.
[Mode1] Corrects a little the audio level difference between the
[Mode2] Corrects widely the audio level difference between the
[Sound Retrieve r]
[Off] [Mode1] [Mode2]
*1 [All] is not available when [Network Mode] is selected as the speaker mode.
*2 If you change the listening position setting, the output levels of all the speakers will change in
conjuncti on with the sett ing.
*3 To use this function, the vehicle’s acoustics must be measured in advance.
*4 This function is not available when adjusting the High speaker.
*5 This function is available only when the listening position setting is set to [Front Left] or [Front
Right].
music files or the sources (for the narrow dynamic range
audio signal).
music files or the sources (for the wide dynamic range
audio signal).
Enhances compressed audio and restores rich sound
automatically.
[Mode2] has a stronger effect than [Mode1].
Adjusting the equaliser curve automatically (Auto EQ)
By measuring the vehicle’s acoustics, the equaliser curve can be adjusted automatically
to suit the vehicle interior.
A loud tone (noise) may be emitted from the speakers when measuring t he vehicle’s acoustics. Never
perform Auto EQ measurement while driving.
• Thoroughly check the conditions before per forming Auto EQ as the speakers may be d amaged if this
is performed under the following conditions:
– When the speakers are incorrectly connected. (For example, when a rear speaker i s connected as a
subwoofer output.)
– When a speaker is connected to a power amp delivering output higher than the speaker’s
maximum inpu t power capability.
39En
Page 40

• If a microphone for acoustical measurement (sold separately) is not placed in the appropriate
CAUTION
NOTE
NOTE
NOTE
NOTE
NOTE
TIP
location, th e measurement tone may becom e loud and measurement may take a long time, resulti ng
in battery drainage. Be sure to place the microphone in the sp ecified location.
▶Before operating th e Auto EQ function
• Perform Auto EQ in a quiet place with the vehicle engine and air conditioning
switched off. Also, cut the power of car phones or mobile phones in the vehicle, or
remove them in advance. Surrounding sounds may prevent correct measurement of
the vehicle’s acoustics.
• Be sure to use the microphone for acoustical measurement (sold separately). Using
other microphones may prevent measurement, or result in incorrect measurement of
the vehicle’s acoustics.
• To perform Auto EQ, the front speakers must be connected.
• When this produc t is connected to a power amp with input level control, Auto EQ may
be impossible if the power amp’s input level is set below the standard level.
• When this product is connected to a power amp with an LPF (low pass filter), turn the
LPF off before performing Auto EQ. Also, set the cut-off frequency for the built-in LPF
of an active subwoofer to the highest frequency.
• The distance has been calculated by a computer to provide optimum delay to ensure
accurate results. Do not change this value.
– The reflected sound within the vehicle is strong and delay occurs.
– The LPF on active subwoofers or external amps delay the lower sounds.
• If an error occurs during measurement, check the following before measuring the
vehicle’s acoustics.
– Front speakers (left/r ight)
– Rear speakers (left/right)
–Noise
– Microphone for acous tical measurement (sold separately )
– Low battery
▶Performing Auto EQ
Do not turn off the engine while the measurement is in progress.
Auto EQ changes the audio settings as follow s:
• The fader/balance settings return to the centre position (page 38).
• Previous settings for Auto EQ will be overwritten.
1
Stop the vehicle in a quiet place, close all doors, windows, and sun roof, and then
turn the engine off.
If the engine is left running, engine noise may prevent correct Auto EQ.
The Auto EQ may differ depending on where you place the microphone. If desired,
place the microphone on the front passenger seat and perform Auto EQ.
3
Disconnect the iPhone or smartphone device.
4
Turn on the ignition switch (ACC ON).
If the vehicle’s air conditioner or heater is turned on, turn it off.
5
Switch the AV source to [Source OFF] (page 17).
6
Press .
7
Touch then .
8
Tou ch [A -EQ& TA M eas urem ent] .
9
Connect the microphone for acoustical measurement (sold separately) with this
product.
Plug the microphone into the AUX input jack on the back panel of this product.
Use an extension cable (sold separately) if the cord of the microphone (sold separately) is not long
enough.
10
Touch [Front Left] or [Front Right] to select the cu rrent listening position.
11
Tou ch [S ta rt] .
A 10-second countdown starts.
The Bluetooth connection is disconnected before the process starts.
12
Exit the vehicle and keep the doors closed until the countdown finishes.
When the countdown finishes, a measurement tone (noise) is emitted from the
speakers and Auto EQ measurement begins.
13
Wait until the measurement is completed.
When Auto EQ is completed, a message is displayed.
The measurement time varies depending on the type of vehicle.
To stop the measurement, touch [St op].
14
Store the microphone carefully in the glove box or another safe place.
If the microphone is subjected to direct sunlight for an extended period, high
temperatures may cause distortion, colour change, or malfunction.
40En
If driving restrictions are detected during measurement, the measurement is cancelled.
2
Fix the microphone for acoustical measurement (sold separately) in the centre of
the headrest of the driver’s seat, facing forwards.
Adjusting the cutoff frequency value
You can adjust the cutoff frequency value of each speaker.
Page 41

English
The following speakers can be adjusted:
NOTE
[Standard Mode]: Front, Rear, Subwoofer.
[Network Mode]: High, Mid, Subwoofer.
[Subwoofer Settings] is available only when [Subwoofer] is [On].
1 Press .
2 Touch then .
3 Touch [Crossover] or [Subwoofer Settings].
4 Touch or to switch the speaker.
5 Drag the graph line to set the c utoff position.
6 Drag the lowest point of the graph to set the cutoff slope.
The following items can also be set.
Switches the subwoofer phase between normal and reverse position.
Menu Item Description
[AUX]
[Auto] [PAL] [NTSC] [PAL-
M] [PAL-N] [SECAM]
[Camera]
[Auto] [PAL] [NTSC] [PAL-
M] [PAL-N] [SECAM]
[TV]
[Auto] [PAL] [NTSC] [PAL-
M] [PAL-N] [SECAM]
Select the suitable video signal setting when you connect
this product to an AUX equipment.
Select the suitable video signal setting when you connect
this product to a rear view camera.
Select the suitable video signal setting when you connect
this product to a TV tuner.
LPF/HPF
Switches the L PF/HPF setting to [On] or [O ff]. When it is turned off, the high-pass
filter or low-pass filter of each speaker can also be tu rned on by touching the
graph lines.
Video settings
The menu items vary according to the source.
[Time Per Photo Slide]
Menu Item Description
[Time Per Photo Slide]
[5sec] [10sec] [15sec]
[Manual]
[Video Signal Setting]
Menu Item Description
[AV]
[Auto] [PAL] [NTSC] [PALM] [PAL-N] [SECAM]
Select the interval of image file slideshows on this product.
Select the suitable video signal setting when you connect
this product to an AV equipment.
41En
Page 42

NOTE
TIP
TIP
Favourite menu
TIPS
NOTE
Other functions
Registering your favourite menu items in shortcuts allows you to quickly jump to the
registered menu screen by a simple touch on the [Favourites] screen.
Up to 12 menu items can be registered in the favourite menu.
Creating a shortcut
1 Press then touch .
2 Touch the star icon of the menu item.
The star icon for the selected menu is filled in.
To cancel the registration, touch the star icon in the menu column again.
Selecting a shortcut
1 Press then touch .
2 Tou ch .
3 Touch the menu item.
Removing a shortcut
1 Press then touch .
2 Tou ch .
3 Touch and hold the favourite menu column.
The selected menu item is removed from the [Favourites] screen.
You can also remove a shortcut by touching and holding the registered menu column.
Setting the time and date
1 Touch the current time on the screen.
2 Touch or to set the correct time and date.
You can operate the following items: Year, month, date, hour, minute.
• You can change the time display for mat to [12hour] or [24hour].
• You can change the order of date display format: Day-month, Month-day.
Changing the wide screen mode
You can set the screen mode for AV screen and image files.
1 Touch the screen display mode key.
Screen display mode key
2 Touch the desired mode.
[Full] Displays 16:9 images on the full screen without changing the ratio.
42En
Enlarges and displays images of USB sources keeping the ratio of the original
[Zoom] Displays the images enlarging them vertically.
source image.
Page 43
English
TIPS
NOTE
[Normal] Displays images without changing the 4:3 aspect ratio.
NOTES
NOTE
NOTE
WAR NING
Important
• For USB sources, 4:3 aspect ratio may not be displayed.
[Trimming] An image is displayed across the entire screen with the horizontal-to-vertical ratio
• Devices connected with USB MTP are not supported.
left as is. If the screen ratio differs from the image, the image may be displayed
partly cut off either at the t op/bottom or sides.
[Trimming] is for image files only.
Apple CarPlay
You can operate iPhone applications with finger gestures such as tapping, dragging,
scrolling, or flicking on the screen of this product.
Compatible iPhone models
iPhone 7, iPhone 7 Plus, iPhone SE, iPhone 6s, iPhone 6s Plus, iPhone 6, iPhone 6 Plus,
iPhone 5s, iPhone 5c, iPhone 5
• Different settings c an be stored for each v ideo source.
• When a video is viewed in wide screen mode that does not match its original aspect ratio, it may
appear different.
• The video image will appear coarser when viewed in [Zoom] mode.
Image files can be set to either [Normal] or [Trimming] in wide screen mode.
Restoring this product to the default settings
You can restore settings or recorded content to the default settings from [Restore
Settings] in the [System] menu (page 35).
The compatible finger gestures vary depending on the application for the iPhone.
• Certain uses of th e iPhone may not be legal while dri ving in your jurisd iction, so you must be aware of
and obey any such restriction s.
• If in doubt as to a particular function, only perform it while the car is parked.
• No feature should be use d unless it is safe to do so un der the driving condi tions you are experiencin g.
Using Apple CarPlay
Apple CarPl ay may not be availabl e in your country o r region.
For details about Apple CarPlay, visit the following site:
http://www.apple.com/ios/carplay
• The content and functionality of the supported applications are the responsibility of the App
providers.
• In Apple CarPlay, usage is limited while driving, with availability of functions and content determined
by the App provider s.
• Apple CarPlay allows access to applications other than those listed that are subject to limitations
while driving.
• PIONEER IS NOT RESPONSIB LE AND DISCLAIMS LIABILIT Y FOR THIRD PARTY (NON-PIONEER) APPS
AND CONTENT, INCLUDI NG WITHOUT LIMITATION ANY INACCURAC IES OR INCOMPLETE
INFORMATION.
Setting the driving position
To achieve optimum usability of Apple CarPlay, set the driving position setting correctly
according to the vehicle. The setting will be applied the next time an Apple CarPlay
compatible device is connected to this product.
1 Press .
2 Touch then .
The system setting screen appears.
43En
Page 44

3 Touch [Driving Position].
TIP
NOTES
NOTE
4 Touch the item.
[Left]
Select for a left-hand drive vehicle.
[Right]
Select for a right-hand drive vehicle.
Touch to mute. Touch again to cancel mute.
Starting procedure
1 Connect an Apple CarPlay compatible device to this product via USB.
2 Press .
3 Tou ch .
4 Touch [Apple CarPlay].
5 Touch Apple CarPlay icon in the tab.
The application screen appears.
You can use Siri function by pressing once App le CarPlay is activated.
• If an Apple CarPlay compatible device has been connected and another screen is displayed, touch
[Apple CarPlay] on the top menu screen to display the Application menu screen.
• The Bluetooth connection with the Apple CarPlay compatible device will be terminated automatically
if Apple CarPlay is turned on. While Apple C arPlay is turned on, onl y a Bluetooth audio connec tion will
be possible for devices other than the device connect ed via Apple CarPlay.
• Hands-free phoning via Bluetooth wireless technology is not available while Apple CarPlay is on. If
Apple CarPlay is turned on during a call on a mobile phone other than an Apple CarPlay compatible
device, the Bluetooth connection will be terminated after the c all ends.
• Refer to iPod/iPhone with Lightning connector (page 50) for details on connecting a device to this
product.
Adjusting the volume
You can adjust the guidance volume separately from the main sound volume when
Apple CarPlay is used.
1 While Apple CarPlay is activated, press VOL (+/-).
The volume menu will be displayed on the screen.
Touch [+]/[-] to adjust the guidance volume.
Displays the main sound volume. To adjust the main sound volume, press
VOL (+/-) on the unit or touch [+]/[-].
The volume menu is displayed for four seconds. If the menu disappears, press VOL (+/-) again. The
menu reappears.
44En
Page 45

English
NOTES
WAR NING
Important
Android Auto™
TIP
NOTES
You can operate Android applications with finger gestures such as tapping, dragging,
scrolling, or flicking on the screen of this product.
Compatible Android devices
Requires the Android Auto app on Google Play and an Android compatible smartphone
running Android 5.0 Lollipop or higher.
• [USB MTP] is set to [Off] to use Android Auto (page 33).
• The compatible finger gestures vary depending on the application for the smartphone.
• Certain uses o f the smartphon e may not be legal while driving in your jurisdict ion, so you must be
aware of and obey any such restrictions.
• If in doubt as to a particular function, only perform it while the car is parked.
• No feature should be use d unless it is safe to do so un der the driving condi tions you are experiencin g.
Using Android Auto
Android Auto may not be av ailable in your country or region.
For details about Android Aut o, please refer to the Google support site:
http://suppor t.google.com/androidauto
• The content and functionality of the supported applications are the responsibility of the App
providers.
• In Android Auto, us age is limited while driving, with availab ility of functio ns and content determin ed
by the App provider s.
• Android Auto allows access to applications other than those listed that are subject to limitations
while driving.
• PIONEER IS NOT RESPONSIBLE AND DISCLAIMS LIABILITY FOR THIRD PARTY (NON-PIONEER) APPS
AND CONTENT, INCLUDI NG WITHOUT LIMITATION ANY INACCURAC IES OR INCOMPLETE
INFORMATION.
Setting the driving position
To achieve optimum usability of Android Auto, set the driving position setting correctly
according to the vehicle. The setting will be applied the next time an Android Auto
compatible device is connected to this product.
1 Press .
2 Touch then .
The system setting screen appears.
3 Touch [Driving Position].
4 Touch the item.
[Left]
Select for a left-hand drive vehicle.
[Right]
Select for a right-hand drive vehicle.
Starting procedure
1 Connect an Android Auto™ compatible device to this product via USB.
2 Press .
3 Touch .
4 Touch [Android Auto].
5 Touch Android Auto icon in the tab.
The application screen appears.
You can use voice recognition fu nction by pressing once Android Auto is ac tivated.
• When the device for Android Auto is connected to this unit, the device is also connected via
Bluetooth at the same time. If five devices are already paired, the message confirming whether to
delete the registered device is displayed. If you want to delete the device, touch [Agree]. If you want
to delete other dev ice, touch [BT Settings] and del ete the devices manually (page 10).
• If Android Auto is turned on during a call on a mobile phone other than the Android Auto compatib le
device, the Bluetooth connection will switch to the Android Auto compatible device after the call.
• Refer to Smartph one (Android device) ( page 50) for detail s on connecting a device to this produc t.
Adjusting the volume
You can adjust the guidance volume separately from the main sound volume when
Android Auto is used.
1 While Android Auto is activated, press VOL (+/-).
The volume menu will be displayed on the screen.
45En
Page 46

NOTE
NOTE
Appendix for Apple
CarPlay and Android Auto
Touch to mute. Touch again to cancel mute.
Touch [+]/[-] to adjust the guidance volume.
Displays the main sound volume. To adjust the main sound volume, press
VOL (+/-) on the unit or touch [+]/[-].
The volume menu is displayed for four seconds. If the menu disappears, press VOL (+/-) again. The
menu reappears.
Setting the auto-launch function
If this function is set to on, Android Auto will launch automatically when a n Android
Auto compatible device is connected to this product.
Android Auto will launch automatically only when an Android Auto compatible device is correctly
connected to this product.
1 Press .
2 Tou ch then .
3 Touch [Android Auto Auto-launch] to switch [On] or [Off].
Error messages
When problems occur with this product, an
error message appears on the display.
Refer to the table below to identify the
problem, then take the suggested
corrective action. If the error persists,
record the error message and contact your
dealer or your nearest Pioneer service
centre.
Apple CarPlay
Attempting to connect to Apple CarPlay.
• Communication failed and the system is
trying to connect.
• Wait for a while. Then, per form the
actions below if the error message is still
displayed.
– Restart the iPhone.
– Disconnect the cable from the iPhone,
and then connect the iPhone again
after a few seconds.
– Turn the ignition switch to OFF and
then to ON.
If the error message is still displayed after
performing the above action, please
contact your dealer or an authorised
Pioneer Service Station.
Android Auto
Android Auto has stopped.
• The connected device is not compatible
with Android Auto .
– Check if the device is compatible with
Android Auto.
• The start up of Android Auto fai led for
some reasons.
– Disconnect the cable from the
smartphone, and then connect the
smartphone again after a few seconds.
– Restart the smar tphone.
– Turn the ignition switch to OFF and
then to ON.
If the error message is still displayed after
performing the above action, please
contact your dealer or an authorised
Pioneer Service Station.
• The time set in this product is not correct.
– Check if the time is correctly se t.
Bluetooth pairing failed. Please pair your
Android phone manually.
• The Bluetooth pairing failed for some
reaso ns.
– Pair this product with the device
manually.
To use Android Auto, please st op your car
and check your Android phone.
• The default settings are displayed on the
screen of the Android Auto-compatible
device or images are not output from the
Android Auto-compatible device.
– Park your vehicle in a safe place, and
follow the instructions displayed on the
screen. If the error mes sage is still
displayed after performing a on-screen
instructions, please reconnect the
device.
46En
Page 47

English
Important
Detailed information
regarding connected iPod
devices
• Pioneer accepts no responsibility for data
lost from an iPod, even if that data is lost
while using this product. Please back up
your iPod data regularly.
• Do not leave the iPod in direct sunlight
for extended amounts of time. Extended
exposure to direct sunlight can result in
iPod malfunction due to the resulting
high temperature.
• Do not leave the iPod in any location with
high temperatures.
• Firmly secure the iPod when driving. Do
not let the iPod fall onto the floor, where
it may become jammed under the brake
or accelerator.
• For details, refer to the iPod manuals.
iOS
iOS is a trademark on which Cisco holds
the trademark right in the US and certain
other countries.
iPhone and iPod
“Made for iPod” and “Made for iPhone” mean
that an electronic accessory has been designed
to connect sp ecifically to iPod or iPhone,
respectively, and has been certified by the
developer to meet Apple performance
standards.
Apple is not responsible for the operation of this
device or its complian ce with safety and
regulato ry standards.
Please note that the use of th is accessory with
iPod or iPhone may affect wireless performance.
iPhone, iPod, iPod classic, iPod nano, and iPod
touch are trademarks of Apple Inc., registered in
the U.S. and other countries.
Lightning
Lightning is a trademark of Apple Inc.
Apple CarPlay
Apple CarPlay is a trademark of Apple Inc.
Use of the Apple CarPlay logo means that a
vehicle user interface meets Apple performance
standards. Apple is not responsible for the
operation of this vehicle or its co mpliance with
safety and regulatory standards. Please note
that the us e of this product with iPhone or iPod
may affect wireless performance.
Using app-based
connected content
Requirements to access app -based
connected content services using this
product:
• Latest version of the Pioneer compatible
connected content application(s) for the
smartphone, available from the service
provider, downloaded to your
smartphone.
• A current account with the content
service provider.
• Smartphone Data Plan.
Note: if the Data Plan for your
smartphone does not provide for
unlimited data usage, additional charges
from your carrier may apply for accessing
app-based connected content via 3G,
EDGE and/or LTE (4G) networks.
• Connection to the Internet via 3G, EDGE,
LTE (4G) or Wi-Fi network.
• Optional Pioneer adapter cable
connecting your iPhone to this product.
Limitations:
• Access to app-based connected content
will depend on the availability of cellular
and/or Wi-Fi network coverage for the
purpose of allowing your smar tphone to
connect to the Internet.
• Service availability may be
geographically limited to the region.
Consult the connected content service
provider for additional information.
• Ability of this product to access
connected content is subject to change
without notice and could be affected by
any of the following: compatibility issues
with future firmware versions of
smartphone; compatibility issues with
future versions of the connected content
application(s) for the smartphone;
changes to or discontinuation of the
connected Content application(s) or
service by its provider.
• Pioneer is not liable for any issues that
may arise from incorrect or flawed appbased content.
• The content and functionality of the
supported applications are the
responsibility of the App providers.
• In Apple CarPlay and Android Auto,
functionality through the product is
limited while driving, with available
functions determined by the App
providers.
• Availability of Apple CarPlay and Android
Auto functionalities is determined by the
App provider, and not determined by
Pioneer.
• Apple CarPlay and Android Auto allow
access to applications other than those
listed (subject to limitations while
driving), but the extent to which content
can be used is determined by the App
providers.
47En
Page 48

WARNIN G
WARNIN G
CAUTION
Connection
WARNIN G
Earth wire
POWER AMP
Other devices
(Another electronic
device in the car)
Metal parts of car’s
body
*1 Non supplied for this unit
ACC position
No ACC position
Precautions
Your new product and this
manual
• Do not operate this product, any
applications, or the rear view camera
option (if purchased) if doing so will
divert your attention in any way from the
safe operation of your vehicle. Always
observe safe driving rules and follow all
existing traffic regulations. If you
experience difficulty in operating this
product or reading the display, park your
vehicle in a safe location and apply the
handbrake before making the necessary
adjustments.
• Do not install this product where it may
(i) obstruct the driver’s vision,
(ii) impair the performance of any of the
vehicle’s operating systems of safety
features, including airbags, hazard lamp
buttons, or
(iii) impair the driver’s ability to safely
operate the vehicle.
In some cases, it may not be possible to
install this product because of the vehicle
type or the shape of the vehicle interior.
Important safeguards
Pioneer does not recommend that you
install this product yourself. This product is
designed for professional installation only.
We recommend that only authorised
Pioneer service personnel, who have
special training and experience in mobile
48En
electronics, set up and install this product.
NEVER SERVICE THIS PRODUCT YOURSELF.
Installing or servicing this product and its
connecting cables may expose you to the
risk of electric shock or other hazards, and
can cause damage to this product that is
not covered by warranty.
Precautions before
connecting the system
Do not take any steps to tamper with or
disable the handbrake interlock system
which is in place for your protection.
Tampering with or disabling the
handbrake interlock system could result in
serious injury or death.
• Secure all wiring with cable clamps or
electrical tape. Do not allow any bare
wiring to remain exposed.
• Do not directly connect the yellow lead of
this product to the vehicl e battery. If the
lead is directly connected to the battery,
engine vibration may eventually cause
the insulation to fail at the point where
the wire passes from the passenger
compartment into the engine
compartment. If the yellow lead’s
insulation tears as a result of contact with
metal parts, short- circuiting can occur,
resulting in considerable danger.
• It is extremely dangerous to allow cables
to become wound around the steering
column or gearstick. Be sure to in stall this
product, its cables, and wiring away in
such so that they will not obstruct or
hinder driving.
• M ake sure that the cables and wires will
not inter fere with or become caught in
any of the vehicle’s moving parts,
especially the steering wheel, gearstick,
handbrake, sliding seat tracks, doors, or
any of the vehicle’s controls.
• Do not route wires where they will be
exposed to high temperatures. If the
insulation heats up, wires may become
damaged, resulting in a short circuit or
malfunction and permanent damage to
the product.
• Do not shorten any leads. If you do, the
protection circuit (fuse holder, fuse
resistor or filter, etc.) may fail to work
properly.
• Never feed power to other ele ctronic
products by cutting the insulation of the
power supply lead of this product and
tapping into the lead. The current
capacity of the lead will be exceeded,
causing overheating.
Before installing this
product
• Use this unit with a 12-volt battery and
negative earthing only. Failure to do so
may result in a fire or malfunction.
• To avoid shorts in the electrical system,
be sure to disconnect the (–) battery
cable before installation.
To prevent damage
• When speaker output is used by 4
channels , use speakers over 50 W
(Maximum input power) and between 4
to 8 (impedance value). Do not use 1
to 3 speakers for this unit.
• When rear speaker output is used by 2
of subwoofer, use speakers over 70 W
(Maximum input power).
*Please refer to connection for a
connection method.
• The black cable is earth. When installing
this unit or power amp (sold separately),
make sure to connect the ear th wire first.
Ensure that the earth wire is properly
connected to metal par ts of the car’s
body. The earth wire of the power amp
and the one of this unit or any other
device must be connected to the car
separately with different screws. If the
screw for the earth wire loosens or falls
out, it could result in fire generation of
smoke or malfunction.
• When replacing the fuse, be sure to only
use a fuse of the rating prescribed on this
product.
• This product c annot be installed in a
vehicle without ACC (accessory) position
on the ignition switch.
• To avoid short-circuiting, cover the
disconnected lead with insulating tape. I t
is especially important to insulate all
Page 49

English
unused speaker leads, which if left
NOTES
uncovered may cause a short circuit.
• For connecting a power amp or other
devices to this product, refer to the
manual for the product to be connected.
• The graphical symbol placed on
the product means direct current.
Notice for the blue/
white lead
• When the ignition switch is turned on
(ACC ON), a control signal is output
through the blue/white lead. Connect to
an external power amp’s system remote
control terminal, the auto-aerial relay
control terminal, or the aerial booster
power control terminal (max. 300 mA 12
V DC). The control signal is output
through the blue/white lead, even if the
audio source is switched off.
This product
Microphone 3 m
Wired remote input
Hard-wired remote cont rol adapter can
be connected (sold separately).
RGB cable (supplied with Hideaway TV
tuner)
This produ ct
Hideaway TV tuner
(GEX-1550DTV (sold separately))
Aerial jack
Subwoofer output (STD)/Low range
output (NW)
Rear output (STD)/Middle range output
(NW)
Front output (STD)/High range output
(NW)
Power supply
Fuse (10 A)
Power cord
To power supply
Power cord
Yel low
To terminal supplied with power
regardless of ignition switch position.
Red
To electric terminal controlled by
ignition switch (12 V DC) ON/OFF
Orange/white
To lighting switch terminal.
Black (earth)
To vehicle (metal) body.
Violet/white
Of the two lead wires connected to the
back lamp, connect the one in which
the voltage changes when th e gear shift
is in the REVERSE (R) position. This
connection enables the unit to sense
whether the car is moving forwards or
backwards.
Yellow/black
If you use an equipment with Mute
function, wire this lead to the Audio
Mute lead on that equipment. If not,
keep the Audio Mute lead free of any
connections.
Blue/white
Connect to system control terminal of
the power amp (max. 300 mA 12 V DC).
Light green
Used to dete ct the ON/OFF st atus of the
handbrake. This lead must be
connected to the power supply side of
the handbrake switch.
Power supply side
Handbrake sw itch
Earth side
Speaker leads
Perform these connections when using a
subwoofer without the optional amplifier.
To power supply
Power cord
Left
Right
Front speaker (STD) or high range
speaker (NW)
Rear speaker (STD) or middle range
speaker (NW)
White
White/black
Grey
Grey/black
Green
Green/black
Violet
Violet/black
Subwoofer (4 )
When using a subwoofer of 2 , be sure
to connect the subwoofer to the violet
and violet/black leads of this unit. Do
not connect anything to the green and
green/black leads.
Not used.
Subwoofer (4 ) × 2
• When a subwoofer is connected to this
product instead of a rear speaker, change
the rear output setting in the initial
setting. The subwoofer output of this
product is monaural.
For details, refer to [Rear S peaker Output]
(page 39).
• With a two-speaker system, do not
connect anything to the speaker leads
that are not conn ected to speakers.
49En
Page 50

Important
Important
NOTE
NOTES
Power amp (sold
NOTE
separately)
Without internal amp
The speaker leads are not used when this
connection is in use.
With internal amp
Front speaker and Rear speaker signals
(STD) or middle range speaker and high
range speaker signals (NW ) are output
from the speaker leads when this
connection is in use.
System remote control
Connect to Blue/white cable.
Power amp (sold separately)
Connect with RCA cable (sold
separately)
To Rear output (STD)
To middle range output (NW)
Rear speaker (STD)
Middle range speaker (NW)
To Front output (STD)
To high range output (NW)
Fron t speaker (S TD)
High range speaker (NW)
To subwoofer output (STD)
To l ow r ange o utp ut ( NW )
Subwoofer (STD)
Low range speaker (NW)
Select the appropriate speaker mode
between standard mode (STD) and
network mode (NW). For details, refer to
Starting up the unit (page 7).
iPod/iPhone and
smartphone
• For d etails on how to c onnect an exter nal
device using a separately so ld cable, refer
to the manual for the cable.
• For details concerning the connection,
operations and compatibility of iPhone,
refer to iPod/iPhone or smartphone
connection for AV source (page 18).
• For details concerning the connection
and operations of smartphone, refer to
iPod/iPhone or smartphone connection
for AV source (page 18).
iPod/iPhone with
Lightning connector
Connecting via the USB port
USB port
USB cable 1.5 m
USB interface cable for iPod/iPhone (CD-
IU52) (sold separately)
iPhone with Lightning connector
iPhone with 30-pin
connector
Connecting via the USB port
USB port
USB cable 1.5 m
USB interface cable for iPod/iPhone (CD-
IU51) (sold separately)
iPhone with 30-pin connector
Smartphone
(Android device)
Connecting via the USB port
USB port
USB cable 1.5 m
USB - micro USB cable (Type USB A -
micro USB B) (supplied with CD-MU200
(sold separately))
USB Type-C cable (Type USB A - USB C)
(supplied with CD-CU50 (sold
separately))
Smartphone
The length of Type USB A - micro USB B
cable cannot exceed 2 m and Type USB A USB C cannot exceed 4 m according to the
USB cable standard. When using a cable
other than the above conditions, the main
unit function may not operate properly.
Camera
About rear view camera
When you use the rear view camera, the
rear view image is automatically switched
from the video by moving the gearstick to
REVERSE (R). Camera View mode also
allows you to check what is behind you
while driving.
50En
Page 51
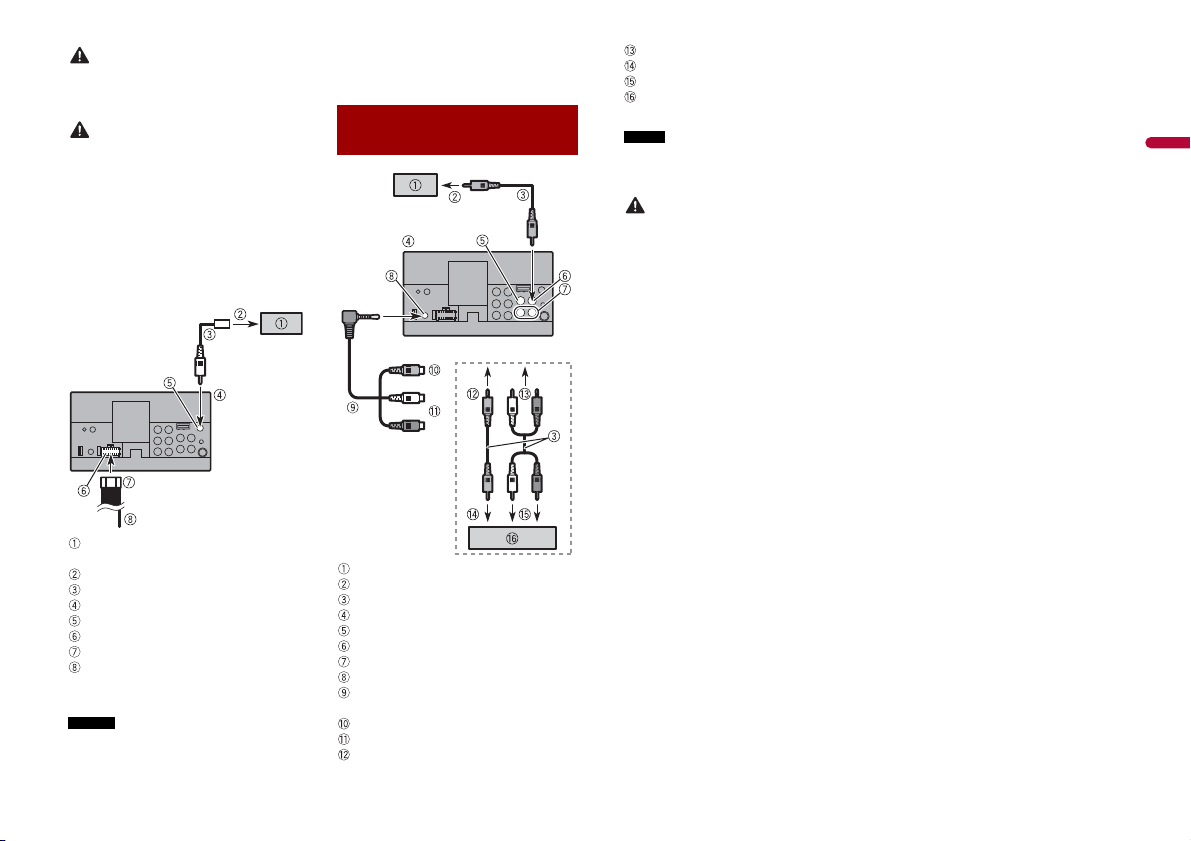
English
WARNIN G
USE INPUT ONLY FOR REVERSE OR MIRROR
CAUTION
NOTES
NOTE
WARNIN G
IMAGE REAR VIEW CAMERA. OTHER USE
MAY RESULT IN INJURY OR DAMAGE.
• The screen image may appear reversed.
• With the rear view camera you can keep
an eye on trailers, or back into a tight
parking spot. Do not use for
entertainment purposes.
• Object s in rear view may appear closer or
more distant than in reality.
• The image area of full-screen images
displayed while backing or checking the
rear of the vehicle may differ slightly.
Rear view camera (ND-BC8) (sold
separately)
To video output
RCA cable (supplied with ND-BC8)
This produ ct
Brown (R.C IN)
Power supply
Power cord
Violet/white (REVE RSE-GEAR SIGNAL
INPUT)
Refer to Power cord (page 49).
• Connec t only the rear view camera to R.C
IN. Do not connect any other equipment.
• Some appropriate settings are required
to use rear view came ras. For details, refer
to [Camera settings] (page 33).
External video component
and the display
Rear display with RCA input jacks
To v ide o in put
RCA cables (sold separately)
This product
Yel low (V IN)
Yel low (V OUT)
Red, white (R IN, L IN)
AUX input
Mini-jack AV cable (CD-RM10) (sold
separately)
Yel low
Red, white
To Yellow
To Red, white
To v ide o ou tpu t
To audio outputs
External video component (sold
separately)
The appropriate setting is required to use
the external video component. For details,
refer to AV input (page 31).
NEVER install the rear display in a
location that enables the driver to watch
the video so urce while driving.
This product’s rear video output is for
connection of a display to enable
passengers in the rear seats to watch the
video source.
51En
Page 52

CAUTION
Installation
Leave ample
space
5 cm
5 cm
you leave ample space behind the rear
panel and wrap any loose cables so they
are not blocking the vents.
Precautions before
installation
Never install this product in places where,
or in a manner that:
• Could injure the driver or passengers if
the vehicle stops suddenly.
• M ay interfere with the driver’s operation
of the vehicle, such as on the floor in front
of the driver’s seat, or close to the
steering wheel or gearstick.
• To ensure proper installation, be sure to
use the supplied parts in the manner
specified. If any parts are not supplied
with this product, use compatible parts in
the manner specified after you have the
part compatibility checked by your
dealer. If parts other than supplied or
compatible ones are used, they may
damage internal parts of this product or
they may work loose and the product
may become detached.
• Do not install this product where it may
(i) obstruct the driver’s vision,
(ii) impair the performance of any of the
vehicle’s operating systems or safety
features, including airbags, hazard lamp
buttons or
(iii) impair the driver’s ability to safely
operate the vehicle.
• Never install this product in front of or
next to the place in the dashboard, door,
or pillar from which one of your vehicle’s
airbags would de ploy. Please refer to your
vehicle’s owner’s manual for reference to
the deployment area of the frontal
airbags.
Before installing
• Consult with your nearest dealer if
installation requires drilling holes or
other modifications of the vehicle.
• Before making a final install ation of this
product, temporarily conn ect the wiring
to confirm that the connections are
correct and the system works properly.
Installation notes
• Do not install this product in places
subject to high temperatures or
humidity, such as:
– Places close to a heater, vent or air
conditioner.
– Places exposed to direct sunlight, such
as on top of the dashboard.
– Places that may be exposed to rain,
such as close to the door or on the
vehicle’s floor.
• Install this product horizontally on a
surface within 0 to 30 degrees tolerance
(within 5 degrees to the left or right).
Improper installation of the unit with the
surface tilted more than these tolerances
increases the potential for errors in the
vehicle’s location display, and might
otherwise cause reduced display
perfor mance.
• When installing, to ensure proper heat
dispersal when using this unit, make sure
Installation using the screw
holes on the side of this
product
1 Fastening this product to the factory
radio-m ounting bracket.
Position this product so that its screw
holes are aligned with the screw holes
of the brack et, and tighten the sc rews at
three locations on each side.
Fac tor y rad io- moun ting b rack et
If the pawl interferes with
installation, you may bend it down
out of the way.
Dashboard or console
Fram e
In some types of vehicles,
discrepancy may occur between the
unit and the dashboard. If this
happens, use the supplied frame to
fill the gap.
Trus s hea d scr ew
Be sure to use the screws supplied
with this product.
Installing the
microphone
• Install the microphone in a place where
its direction and distance from the driver
make it easiest to pick up the driver’s
voice.
• Be sure to turn off (ACC OFF) the product
before connecting the microphone.
• Depending on the vehicle model, the
microphone cable length may be too
short when you mount the microphone
on the sun visor. In such cases, install the
microphone on the steering column.
52En
Page 53
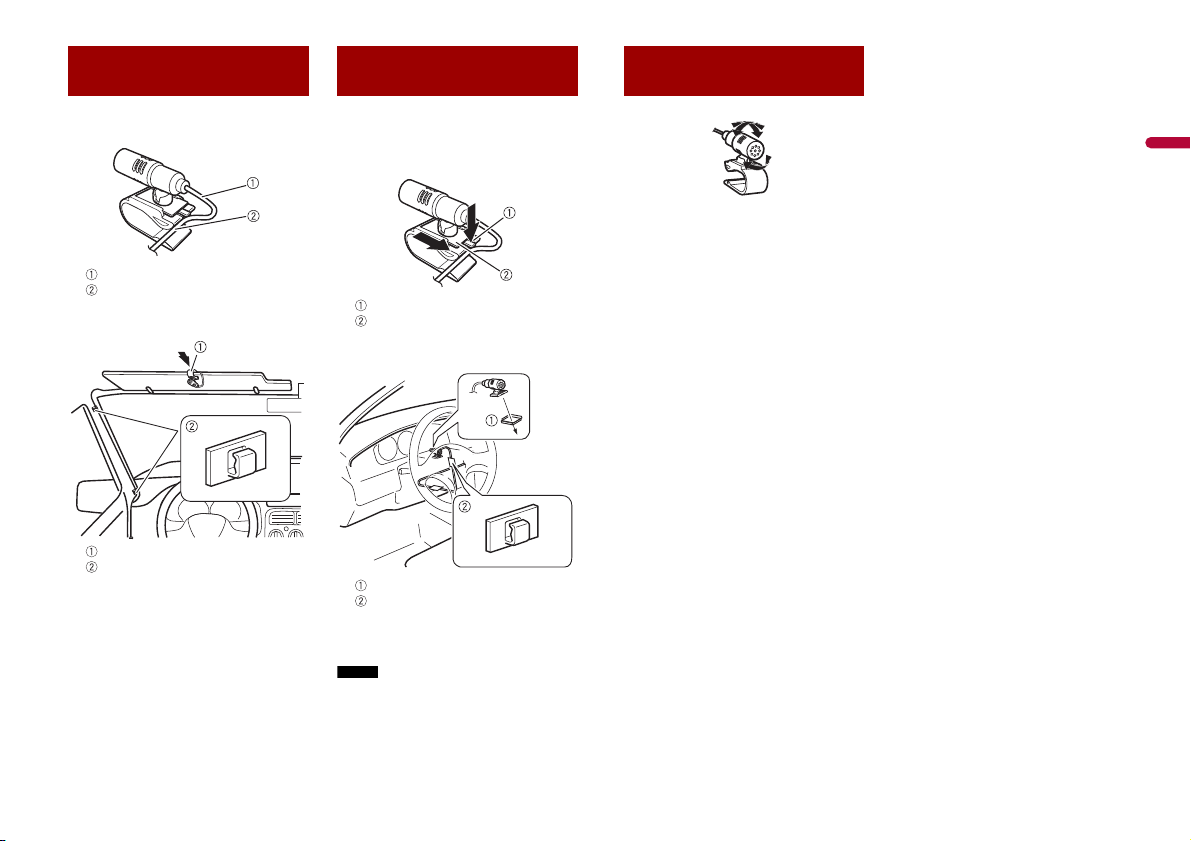
English
NOTE
Mounting on the sun
visor
1 Fit the microphone lead into the
groove.
Microphone lead
Groove
2 Attach the microphone clip to the sun
visor.
Microphone clip
Clamps
Use separately sold clamps to secure
the lead where necessary inside the
vehicle .
Install the microphone on the sun visor
when it is in the up position. It cannot
recognise the driver’s voice if the sun
visor is in the down position.
Installation on the
steering column
1 D etach the microphone base from the
microphone clip by sliding the
microphone base while pressing the
tab.
Tab
Microphone base
2 Mount the microphone on the
steering column.
Double-sided tape
Clamps
Use separately sold clamps to secure
the lead where necessary inside the
vehicle.
Keeping it away from the steering wheel.
Adjusting the microphone
angle
53En
Page 54

Appendix
Troubleshooting
If you have problems operating this
product, refer to this section. The most
common problems are listed below, along
with likely causes and solutions. If a
solution to your problem cannot be found
here, contact your dealer or the nearest
authorised Pioneer service facility.
Common problems
A black screen is displayed, and
operation is n ot possible using the touch
panel keys.
→ [Power OFF] mode is on.
– Press any button on this product to
release the mode.
Problems with the AV screen
The screen is covered by a caution
message and the video cannot be shown.
→ The handbrake lead is not connected or
the handbrake is not applied.
– Connect the handbrake lead correctly,
and apply the handbrake.
→ The handbrake interlock is activated.
– Park your vehicle in a safe place and
apply the handbrake.
No video output from the connected
equipment.
→ The [AV Input] or [AUX Input] setting is
incorrect.
– Correct the settings.
The audio or video skips.
→ This product is not firmly secured.
– Secure this product firmly.
No sounds are produced. The volume
level will not rise.
→ Cables are not connected correctly.
– Connect the cables correctly.
The icon is displayed, and ope ration is
impossible.
→ The operation is not compatible with
the video configuration.
Random playback in Music Browse mode
is released in the USB storage device.
→ Random playback in Music Browse
mode is cancelled after the ignition
switch is turned off (ACC OFF).
– Switch to Music Browse mode again
and turn on random playback.
The picture is stretched, with an incorrect
aspect ratio.
→ The aspect setting is incorrect for the
display.
– Select the appropriate setting for that
image.
iPod cannot be operated.
→ The iPod is frozen.
– Reconnect the iPod with the USB
interface cable for iPod/iPhone.
– Update the iPod software version.
→ An error has occurred.
– Reconnect the iPod with the USB
interface cable for iPod/iPhone.
– Park your vehicle in a safe place, and
then turn off the ignition switch (ACC
OFF). Subsequently, turn the ignition
switch to on (ACC ON) again.
– Update the iPod software version.
→ Cables are not connected correctly.
– Connect the cables correctly.
Sound from the iPod cannot be heard.
→ The audio output direction may switch
automatically when the Bluetooth and
USB connections a re used at the same
time.
– Use the iPod to change the audio
output direction.
Problems with the phone screen
Dialing is impossible because the touch
panel keys for dialing are inactive.
→ Your phone is out of range for service.
– Retry after re-entering the range for
service.
→ The connection between the mobile
phone and this product cannot be
established.
– Perform the connection process.
→ Of th e two mobile phones connected to
this product at the same time, if the first
phone is dialling, ringing or a call is in
progress, dialling cannot be performed
on the second phone.
– When the operation on the first of the
two mobile phones is completed, use
the switch devices key to switch to the
second phone and then dial.
Problems with Application
screen
A black screen is displayed.
→ While operating an application, the
application was ended on the
smartphone side.
– Press to display the top menu
screen.
→ The smartphone OS may be awaiting
screen operation.
– Stop the vehicle in a safe place and
check the screen on the smartphone.
The screen is displayed, but operation
does not work at all.
→ An error has occurred.
– Park your vehicle in a safe place, and
then turn off the ignition switch (ACC
OFF). Subsequently, turn the ignition
switch to on (ACC ON) again.
– When an Android device is connected,
disconnect the Bluetooth connection
from this product and then reconnect
it.
The smartphone was not charged.
→ Charging stopped because the
temperature of the smartphone rose
due to prolonged use of the
smartphone during charging.
– Disconnect the smartphone from the
cable, and wait until the smartphone
cools down.
→ More battery power was consumed
than was gained from charging.
– This problem may be resolved by
stopping any unnecessary services on
the smartphone.
Sound from AppRadio Mode + of the
Android dev ice cannot be heard fro m the
speakers of this unit.
→ Depending on the Android device, the
sound from AppRadio Mode + may not
be output from the speakers of this unit.
– Switch to [Smartphone] in the
[AppRadio Mode Sound] settings
(page 33).
Error messages
When problems occur with this product, an
error message appears on the display.
Refer to the table below to identify the
problem, the n take the suggested
corrective action. If the error persists,
record the error message and contact your
dealer or your nearest Pioneer service
centre.
54En
Page 55

English
Common
AMP Error
→ This product fails to operate or the
speaker connection is incorrect; the
protective circuit is activated.
– Check the speaker connection. If the
message fails to disappear even after
the engine is switched off/on, contact
your dealer or an authorised Pioneer
Service Station for assistance.
Spotify
Skip limit reached.
→ Skip limit reached.
– Do not exceed the skip limit.
– Spotify limits the total number of skips
per hour.
Check USB
→ The USB connec tor or USB cable has
short- circuited.
– Check that the USB connector or USB
cable is not caught in something or
damaged.
→ The connected USB storage device
consumes more than maximum
allowable current.
– Disconnect the USB storage device
and do not use it. Turn the ignition
switch to OFF, then to ACC or ON and
then connect a compliant USB storage
device.
No Spotify
→ The Spotify application is not installed
in the connected device.
– Install the Spotify application in your
mobile device.
Update App
→ The Spotify application is out of date.
– Update to the latest Spotify
application.
Please Log-in
→ You are not logged in to the Spotify
application.
– Please log in to the Spotify
application.
No Signal
→ The connected device is out of area.
– Connect the device to a network.
USB storage device
Error-02-9X/-DX
→ Communication failed.
– Turn the ignition switch OFF and back
ON.
– Disconnect the USB storage device.
– Change to a different source. Then,
return to the USB storage device.
Unplayable File
→ There is no playable file in the USB
storage device.
– Check that the files in the USB storage
device are compatible with this
product.
→ Sec urity for the connected USB storage
device is enabled.
– Follow the USB storage device
instructions to disable security.
Skipped
→ The connected USB storage device
contains DRM protected files.
– The protected files are skipped.
Protect
→ All the files on the connected USB
storage device are embedded with
DRM.
– Replace the USB storage device.
Incompatible USB
→ The connected USB storage device is
not supported by this product.
– Disconnect your device and replace it
with a compatible USB storage device.
Check USB
→ The USB connec tor or USB cable has
short-circuited.
– Check that the USB connector or USB
cable is not caught in something or
damaged.
→ The connected USB storage device
consumes more than maximum
allowable current.
– Disconnect the USB storage device
and do not use it. Turn the ignition
switch to OFF, then to ACC or ON and
then connect a compliant USB storage
device.
HUB Error
→ The connected USB hub is not
supported by this product.
– Directly connect the USB storage
device to this product.
No Response
→ This product cannot recognise the
connected USB storage device.
– Disconnect the device and replace it
with another USB storage device.
USB was disconnected for device
protection. Do not re-insert this USB
memory into the unit. Please restart the
unit.
→ The USB connec tor or USB cable has
short-circuited.
– Check that the USB connector or USB
cable is not caught in something or
damaged.
→ The connected USB storage device
consumes more than maximum
allowable current.
– Disconnect the USB storage device
and do not use it. Turn the ignition
switch to OFF, then to ACC or ON and
then connect a compliant USB storage
device.
→ The USB interf ace cable for iPod/iPhone
has short-circuited.
– Confirm that the USB interface cable
for iPod/iPhone or USB cable is not
caught in something or damaged.
Your device is not authorized to play this
DivX protected video.
→ This product’s DivX registration code
has not been authorised by the DivX
VOD contents provider.
Audio Format not supported
→ This type of file is not supported on this
product.
– Select a file that can be played.
iPod
Error-02-6X/-9X/-DX
→ iPod failure.
– Disconnect the cable from the iPod.
Once the iPod’s main menu is
displayed, reconnect the iPod and
reset it.
Error-02-67
→ The iPod firmware version is old.
– Update the iPod version.
Bluetooth
Error-10
→ The power failed for the Bluetooth
module of this product.
– Turn the ignition switch to OFF and
then to ON.
If the error message is still displayed after
performing the above action, please
contact your dealer or an authorised
Pioneer Service Station.
55En
Page 56

Detailed information
for playable media
Compatibility
Common notes about the USB storage
device
• Do not leave the USB storage device in
any location with high temperatures.
• Depending on the kind of the USB
storage device you use, this product may
not recognise the storage device or files
may not be played back properly.
• The text information of some audio and
video files may not be correctly
displayed.
• File extensions must be used properly.
• There m ay be a slight delay when starting
playback of files on an USB storage
device with complex folder hierarchies.
• Operations may vary depending on the
kind of an USB storage device.
• I t may not be possible to play some music
files from USB because of file
characteristics, file format, recorded
application, playback environment,
storage conditions, and so on.
USB storage device compatibility
• For details about USB storage device
compatibility with this product, refer to
Specifications (page 59).
• Protocol: bulk
• You cannot connect a USB storage device
to this product via a USB hub.
• Par titioned USB storage device is not
compatible with this product.
• Firmly secure the US B storage device
when driving. Do not let the USB storage
device fall onto the floor, where it may
become jammed under the brake or
accelerator.
• There may be a sli ght delay when starting
playback of audio files encoded with
image data.
• Some USB storage devices connected to
this product may generate noise on the
radio.
• Do not connect anything other than the
USB storage device.
The sequence of audio files on USB storage
device.
For USB storage device, the sequence is
different from that of USB storage device.
Handling guidelines and supplemental
information
• This product is not compatible with the
Multi Media Card (MMC).
• Copyright protected files cannot be
played back.
Common notes about DivX files
Notes specific to DivX files
• Only DivX files downloaded from DivX
partner sites are guaranteed for proper
operation. Unauthorised DivX files may
not operate properly.
• This product corresponds to a DivX file
display of up to 1 590 minutes 43
seconds. Search operations beyond this
time limit are prohibited.
• For details on the DivX video versions
that can be played on this product, refer
to Specifications (page 59).
• For more details about DivX, visit the
following site: http://www.divx.com/
DivX subtitle files
• Srt format subtitle files with the
extension “.srt” can be used.
• Only one subtitle file can be used for each
DivX file. Multiple subtitle file s cannot be
associated.
• Subtitle files that are named with the
same character string as the DivX file
before the extension are associated with
the DivX file. The character strings before
the extension must be exactly the same.
However, if there is only one DivX file and
one subtitle file in a single folder, the files
are associated even if the file names are
not the same.
• The subtitle file must be stored in the
same folder as the DivX file.
• Up to 255 subtitle files may be used. Any
more subtitle files will not be recognised.
• Up to 64 characters can be used for the
name of the subtitle file, including the
extension. If more than 64 characters are
used for the file name, the subtitle file
may not be recognised.
• The character code for the subtitle file
should comply with ISO -8859-1. Using
characters other than ISO-8859-1 may
cause the characters to be displayed
incorrectly.
• The subtitles may not be displayed
correctly if the displayed characters in the
subtitle file include control code.
• For materials that use a high transfer rate,
the subtitles and video may not be
completely synchronised.
• If multiple subtitles are programmed to
display within a very short time frame,
such as 0.1 seconds, the subtitles m ay not
be displayed at the correct time.
Media compatibility chart
General
• Maximum playback time of audio file
stored on an USB storage device: 7.5 h
(450 minutes)
USB storage device
Fi le s ys tem : FAT 16 /FAT3 2/ NTF S
Maximum number of directory: 8
Maximum number of folders: 1 500
Maximum number of files: 15 000
Playable file types: MP3, WMA, AAC, WAV,
FLAC, DivX, H.264, H.263, MPEG-2, MPEG-4,
WMV, FLV, MKV, JPEG, PNG, BMP
MP3 compatibility
• Ver. 2.x of ID3 tag is prioritised when both
Ver. 1 .x and Ver. 2 .x exi st.
• This product i s not compatible with the
following: MP3i (MP3 interactive), mp3
PRO, m3u playlist
USB storage device
File extension: .mp3
Bit rate: 8 kbps to 320 kbps (CBR), VBR
Sampling frequency: 16 kHz to 48 kHz
ID3 tag: ID3 tag Ver. 1.0, 1.1, 2.2, 2.3, 2.4
WMA compatibility
• This product i s not compatible with the
following: Windows Media™ Audio 9
Professional, Lossless, Voice
USB storage device
File extension: .wma
Bit rate: 48 kbps to 320 kbps (CBR), VBR
Sampling frequency: 32 kHz to 48 kHz
WAV compatibility
• The sampling frequency shown in the
display may be rounded.
USB storage device
File extension: .wav
Format: Linear PCM (LPCM)
Bit rate: Approx. 1.5 Mbps
Sampling frequency: 16 kHz to 48 kHz
AAC compatibility
• This product plays back AAC files
encoded by iTunes.
USB storage device
File extension: .aac, .adts, .mka, .m4a
Bit rate: 16 kbps to 320 kbps (CBR)
Sampling frequency: 11.025 kHz to 48 kHz
FLAC compatibility
USB storage device
File extension: .flac
Sampling frequency: 8 kHz to 192 kHz
56En
Page 57

English
DivX compatibility
NOTE
• This product is not compatible with the
following: DivX Ultra format, DivX files
without video data, DivX files encoded
with LPCM (Linear PCM) audio codec
• If a file contains more than 4 GB, playback
stops before the end.
• Some special operations may be
prohibited because of the composition of
DivX files.
Video files compatibility (USB)
• Files may not be played back properly
depending on the environment in which
the file was created or on the contents of
the file.
• This product is not compatible with
packet write data transfer.
• This product can recognise up to 32
characters, beginning with the first
character, including extension for the file
and folder name. Depending on the
display area, this product may try to
display them with a reduced font size.
However, the maximum number of the
characters that you can display varies
according to the width of each character,
and of the display area.
• Folder selection sequence or other
operations may be altered, depending on
the encoding or writing software.
.avi
Format: MPEG-4/DivX/H.264/H.263
Compatible video codec: MPEG-4 (Simple
Profile/Advanced Simple Profile)/DivX
(Home Theater Profile)/H.264 (Base Line
Profile/Main Profile/High Profile)/H.263
(Baseline Profile 0/3)
Maximum resolution: 1 920 pixels × 1 080
pixels
Maximum frame rate: 30 fps
• Files may not be able to be played back
depending on the bit rate.
.mp4
Format: MPEG-4/H.264/H.263
Compatible video codec: MPEG-4 (Simple
Profile/Advanced Simple Profile)/H.264
(Base Line Profile/Main Profile/High
Profile)/H.263 (Baseline Profile 0/3)
Maximum resolution: 1 920 pixels × 1 080
pixels
Maximum frame rate: 30 fps
• Files may not be able to be played back
depending on the bit rate.
.mkv
Format: MPEG-4/H.264
Compatible video codec: MPEG-4 (Simple
Profile/Advanced Simple Profile)/H.264
(Base Line Profile/Main Profile/High Profile)
Maximum resolution: 1 920 pixels × 1 080
pixels
Maximum frame rate: 30 fps
• Files may not be able to be played back
depending on the bit rate.
.mov
Format: MPEG-4/H.264/H.263
Compatible video codec: MPEG-4 (Simple
Profile/Advanced Simple Profile)/H.264
(Base Line Profile/Main Profile/High
Profile)/H.263 (Baseline Profile 0/3)
Maximum resolution: 1 920 pixels × 1 080
pixels
Maximum frame rate: 30 fps
• Files may not be able to be played back
depending on the bit rate.
.flv
Format : H.264
Compatible video codec: H.264 (Baseline
Profile/M ain Profile/High Profile)
Maximum resolution: 1 920 pixels × 1 080
pixels
Maximum frame rate: 30 fps
• Files may not be able to be played back
depending on the bit rate.
.m4v
Format: MPEG-4/H.264/H.263
Compatible video codec: MPEG-4 (Simple
Profile/Advanced Simple Profile)/H.264
(Base Line Profile/Main Profile/High
Profile)/H.263 (Baseline Profile 0/3)
Maximum resolution: 1 920 pixels × 1 080
pixels
Maximum frame rate: 30 fps
• Files may not be able to be played back
depending on the bit rate.
.asf
Format : WMV
Compatible video codec: WMV (Simple
Profile/M ain Profile/Advan ced Profile)
Maximum resolution: 1 920 pixels × 1 080
pixels
Maximum frame rate: 30 fps
• Files may not be able to be played back
depending on the bit rate.
.wmv
Format : WMV
Compatible video codec: WMV (Simple
Profile/M ain Profile/Advan ced Profile)
Maximum resolution: 1 920 pixels × 1 080
pixels
Maximum frame rate: 30 fps
• Files may not be able to be played back
depending on the bit rate.
.divx
Format : MPEG-4/DivX
Compatible video codec: MPEG-4 (Simple
Profile/Advanced Simple Profile)/DivX
(Home Theater Profile)
Maximum resolution: 1 920 pixels × 1 080
pixels
Maximum frame rate: 30 fps
• Files may not be able to be played back
depending on the bit rate.
Example of a hierarchy
This product assigns folder numbers. The
user cannot assign folder numbers.
Bluetooth
The Bluetooth® word mark and logos are
registered trademar ks owned by the Bluetooth
SIG, Inc. and any use of such marks by PION EER
CORPORATION is under license. Other
trademarks and trade names are those of their
respective owners.
WMA
Windows Media is either a registered trademark
or trademark of Mi crosoft Corporation in the
United States and/or other countries.
• This product includes technology owned
by Microsoft Corporation and cannot be
used or distributed without a license
from Microsoft Licensing, Inc.
FLAC
Copyright © 2000-2009 Josh Coalson
Copyright © 2011-2013 Xiph.Org
Found ation
Redistribution and use in source and
binary forms, with or without modification,
are permitted provided that the following
conditions are met:
– Redistributions of source code must
retain the above copyright no tice, this list
of conditions and the following
disclaimer.
– Redistributions in binary form must
reproduce the above copyright notice,
this list of conditions and the following
disclaimer in the documentation and/or
other materials provided with the
distribution.
57En
Page 58
– Neither the name of the Xiph.org
Important
Foundation nor the names of its
contributors may be used to endorse or
promote products derived from this
software without specific prior written
permission.
THIS SOFT WAR E IS PROVIDED BY THE
COPYRIGHT HOLDERS AND
CONTRIBUTORS “AS IS” AND ANY EXPRESS
OR IMPLIED WARRANTIES, INCLUDING, BUT
NOT LIMITED TO, THE IMPLIED
WARRANTIES OF MERCHANTABILITY AND
FITNESS FOR A PARTICULAR PURPOSE ARE
DISCLAIMED. IN NO EVENT SHALL THE
FOUNDATION OR CONTRIBUTORS BE
LIABLE FOR ANY DIREC T, INDIRECT,
INCIDENTAL, SPECIAL, EXEMPLARY, OR
CONSEQUENTIAL DAMAGES (INCLUDING,
BUT NOT LIMITED TO, PROCUREMENT OF
SUBSTITUTE GOODS OR SERVICES; LOSS OF
USE, DATA, OR PROFITS; OR BUSINESS
INTERRUPTION) HOWEVER CAUSED AND
ON ANY THEORY OF LIABILITY, WHETHER
IN CONTRACT, STRIC T LIABILITY, OR TORT
(INCLUDING NEGLIGENCE OR OTHERWISE)
ARISING IN ANY WAY OUT OF THE USE OF
THIS SOFTWARE, EVEN IF ADVISED OF THE
POSSIBILIT Y OF SUCH DAMAGE.
DivX
DivX® Home Theater Certified devices have been
tested for high-quality DivX Home Theater video
playback (including .avi, .divx). When you see
the DivX logo, you know you have the freedom
to play your favorite videos.
DivX®, DivX Certified® and associated logos are
trademarks of DivX, LLC and are used under
license.
This DivX Certified® device can play DivX® Home
Theater video files up to 576p (including .avi,
.divx).
Download free software at www.divx.com to
create, play and stream digital video.
AAC
AAC is short for Advanced Audio Coding
and refers to an audio compression
technology standard used w ith MPEG-2
and MPEG-4. Several applications can be
used to encode AAC files, but file formats
and extensions differ depending on the
application which is used to encode. This
unit plays back AAC files encoded by
iTunes.
Google™, Google Play,
Android
Google, Google Play, Android and Android
Auto are trademarks of Google Inc.
MIXTRAX
MIXTRAX is a trademark of the PIONEER
CORPO RATION.
Detailed information
regarding connected iPod
devices
• Pioneer accepts no responsibility for data
lost from an iPod, even if that data is lost
while using this product. Please back up
your iPod data regularly.
• Do not leave the iPod in direct sunlight
for extended amounts of time. Extended
exposure to direct sunlight can result in
iPod malfunction due to the resulting
high temperature.
• Do not leave the iPod in any location with
high temperatures.
• Firmly secure the iPod when driving. Do
not let the iPod fall onto the floor, where
it may become jammed under the brake
or accelerator.
• For details, refer to the iPod manuals.
iPhone and iPod
“Made for iPod” and “Made for iPhone” mean
that an electronic accessory has been designed
to connect specifically to iPod or iPhone,
respectively, and has been certified by the
developer to meet Apple performance
standards.
Apple is not responsible for the operation of this
device or its compliance with safety and
regulatory standards.
Please note that the use of this accessory with
iPod or iPhone may affect wireless performance.
iPhone, iPod, iPod classic, iPod nano, and iPod
touch are trademarks of Apple Inc., registered in
the U.S. and other countries.
Lightning
Lightning is a trademark of Apple Inc.
App Store
App Store is a service mark of Apple Inc.
iOS
iOS is a trademark on which Cisco holds
the trademark right in the US and certain
other countries.
iTunes
iTunes is a trademark of Apple Inc.,
registered in the U.S. and other countries.
Apple Music
Apple Music is a trademark of Apple Inc.,
registered in the U.S. and other countries.
Using app-based
connected content
Requirements to access app-based
connected content services using this
product:
• Latest version of the Pioneer compatible
connected content application(s) for the
smartphone, available from the service
provider, downloaded to your
smartphone.
• A current account with the content
service provider.
• Smar tphone Data Plan.
Note: if the Data Plan for your
smartphone does not provide for
unlimited data usage, additional charges
from your carrier may apply for accessing
app-based connected content via 3G,
EDGE and/or LTE (4G) networks.
• Con nection to the Intern et via 3G, EDGE,
LTE (4 G) or Wi -Fi ne tw or k.
• Optional Pioneer adapter cable
connecting your iPhone to this product.
Limitations:
• Access to app-based connected content
will depend on the availability of cellular
and/or Wi-Fi network coverage for the
purpose of allowing your smartphone to
connect to the Internet.
• Ser vice availability may be
geographically limited to the region.
Consult the connected content service
provider for additional information.
• Ability of this product to access
connected content is subject to change
without notice and could be affected by
any of the following: compatibility issues
58En
Page 59

English
with future firmware versions of
smartphone; compatibility issues with
future versions of the connected content
application(s) for the smartphone;
changes to or discontinuation of the
connected Content application(s) or
service by its provider.
Spotify®
SPOTIFY and the Spotify logo are among the
registered trademarks of Spotify AB. Compatible
mobile digital devices and premium
subscription required, where available, see
https://www.spotify.com.
Notice regarding video
viewing
Remember that use of this system for
commercial or public viewing purposes
may constitute an infringement on the
author’s rights as protected by the
Copyright Law.
Notice regarding MP3
file usage
Supply of this product only conveys a
license for private, non-commercial use
and does not convey a license nor imply
any right to use this product in any
commercial (i.e. revenue-generating) real
time broadcasting (terrestrial, satellite,
cable and/or any other media),
broadcasting/streaming via internet,
intranets and/or other networks or in other
electronic content distribution systems,
such as pay-audio or audio-on-demand
applications. An independent license for
such use is required. For details, please visit
http://www.mp3licensing.com.
Using the LCD screen
correctly
Handling the LCD screen
• When the LCD screen is subjected to
dire ct sun light for a l ong pe riod o f time , it
will become very hot, resulting in
possible damage to the LCD screen.
When not using this product, avoid
exposing it to direct sunlight as much as
possible.
• The LCD screen should be used within
the temperature ranges shown in
Specifications on page 59.
• Do not use the LCD screen at
temperatures higher or lower than the
operating temperature range, because
the LCD screen may not operate normally
and could be damaged.
• The LCD screen is exposed in order to
increase its visibility within the vehicle.
Please do not press strongly on it as this
may damage it.
• Do not push the LCD screen with
excessive force as this may scratch it.
• Never touch the LCD screen with
anything besides your finger when
operating the touch panel functions. The
LCD screen can scratch easily.
Liquid crystal display (LCD)
screen
• I f the LCD scree n is near the vent of an air
conditioner, make sure that air from the
air conditioner is not blowing on it. Heat
from the heater may break the LCD
screen, and cool air from the cooler may
cause moisture to form inside this
product, resulting in possible damage.
• Small black dots or white dots (bright
dots) may appear on the LCD screen.
These are due to the characteristics o f the
LCD screen and do not indicate a
malfunction.
• The LCD screen will be difficult to see if it
is exposed to direct sunlight.
• When using a mobile phone, keep the
aerial of the mobile phone away from the
LCD screen to prevent disruption of the
video in the form of disturbances such as
spots or coloured stripes.
Maintaining the LCD screen
• When removing dust from or cleaning
the LCD screen, first turn this product off
and then wipe the screen with a soft dry
cloth.
• When wiping the LCD screen, take care
not to scratch the surface. Do not use
harsh or abrasive chemical cleaners.
LED (light-emitting diode)
backlight
A light emitting diode is used inside the
display to illuminate the LCD screen.
• At low temperatures, using the LED
backlight may increase image lag and
degrade the image quality because of the
characteristics of the LCD screen. Image
quality will improve with an increase in
temperature.
• The product lifetime of the LED backlight
is more than 10 000 hours. However, it
may decrease if used in high
temperatures.
• If t he LED backlight reaches the end of its
product lifetime, the screen will become
dimmer and the image will no longer be
visible. In that case, please consult your
dealer or the nearest authorise d Pioneer
Service Station.
Specifications
General
Rated power source:
14.4 V DC (10.8 V to 15.1 V allowable)
Earthing system:
Negative type
Maximum current consumption:
10.0 A
Dimensions (W × H × D):
D
Chassis:
178 mm × 100 mm × 164 mm
Nose:
171 mm × 97 mm × 14 mm
Weigh t:
1.2 kg
Display
Screen size/aspect ratio:
6.94 inch wide/16:9 (effective display
area: 156.24 mm × 81.605 mm)
Pixels:
1 209 600 (2 520 × 480)
Display method:
TFT Active matrix driving
Colour system:
PAL/NTSC/PAL-M/PAL-N/SECAM
compat ible
Durable temperature range:
-10 ˚C to +60 ˚C (Power off)
Audio
Maximum power output:
• 50 W × 4 ch/4
• 50 W × 2 ch/4 + 70 W × 1 ch/2 (for
subwoofer)
Continuous power output:
22 W × 4 (50 H z to 15 kHz, 5 %THD, 4
LOAD, Both Channels Driven)
Load impedance:
4 (4 to 8 [2 for 1 ch] allowable)
Preout output level (max): 4.0 V
59En
Page 60

Equaliser (13-Band Graphic Equaliser):
NOTE
Freque ncy:
50 Hz/80 Hz/125 Hz/200 Hz/315 Hz/
500 Hz/800 Hz/1.25 kHz/2 kHz/3.15
kHz/5 kHz/8 kHz/12.5 kHz
Gain: ±12 dB (2 dB/step)
<Standard Mode>
HPF:
Freque ncy:
25 Hz/31.5 Hz/40 Hz/50 Hz/63 Hz/80
Hz/100 Hz/125 Hz/160 Hz/200 Hz/250
Hz
Slope:
-6 dB/oct, -12 dB/oct, -18 dB/oct, -24
dB/oct, OFF
Subwoofer/LPF:
Freque ncy:
25 Hz/31.5 Hz/40 Hz/50 Hz/63 Hz/80
Hz/100 Hz/125 Hz/160 Hz/200 Hz/250
Hz
Slope:
-6 dB/oct, -12 dB/oct, -18 dB/oct, -24
dB/oct, -30 dB/oct, -36 dB/oct, OFF
Gain:
+10 dB to -24 dB (1 dB/step)
Phase: Normal/Reverse
Time alignment:
0 to 140 step (2.5 cm/step)
Bass boost:
Gain: +12 dB to 0 dB
Speaker level:
+10 dB to -24 dB (1 dB/step)
<Network Mode>
HPF (High):
Freque ncy:
1.25 kHz/1.6 kHz/2 kHz/2.5 kHz/3.15
kHz/4 kHz/5 kHz/6.3 kHz/8 kHz/10 kHz/
12.5 kHz
Slope:
-6 dB/oct, -12 dB/oct, -18 dB/oct, -24
dB/oct
HPF (Mid):
Freque ncy:
25 Hz/31.5 Hz/40 Hz/50 Hz/63 Hz/80
Hz/100 Hz/125 Hz/160 Hz/200 Hz/250
Hz
Slope:
-6 dB/oct, -12 dB/oct, -18 dB/oct, -24
dB/oct, OFF
LPF (Mid):
Freque ncy:
1.25 kHz/1.6 kHz/2 kHz/2.5 kHz/3.15
kHz/4 kHz/5 kHz /6.3 kHz/8 kHz/10 kHz/
12.5 kHz
Slope:
-6 dB/oct, -12 dB/oct, -18 dB/oct, -24
dB/oct, -30 dB/oct, -36 dB/oct, OFF
Subwoofer:
Freque ncy:
25 Hz/31.5 Hz/40 Hz/50 Hz/63 Hz/80
Hz/100 Hz/125 Hz/160 Hz/200 Hz/250
Hz
Slope:
-12 dB/oct, -18 dB/oct, -24 dB/oct, -30
dB/oct, -36 dB/oct, OFF
Gain:
+10 dB to -24 dB (1 dB/step)
Phase: Normal/Reverse
Time al ignment:
0 to 140 step (2.5 cm/step)
Bass boost:
Gain: +12 dB to 0 dB
Speaker level:
+10 dB to -24 dB (1 dB/step)
USB
USB standard spec:
USB 1.1, USB 2.0 full speed, USB 2.0 high
speed
Max current supply: 1.5 A
USB Class:
MSC (Mass Storage Class), MTP (Media
Transfer Protocol)
Fi le s yst em: FAT1 6, FAT 32, NTF S
<USB audio>
MP3 decoding format:
MPEG-1 & 2 & 2.5 Audio Layer 3
WMA decoding format:
Ver. 7, 7.1, 8, 9, 10, 11, 12 (2 ch audio)
(Windows Media Player)
AAC decoding format:
MPEG-4 AAC (iTunes encoded only) (Ver.
12.5 and earlier)
FLAC decoding format:
Ver. 1.3.0 (Free Lossless Audio Codec)
WAV signal format (MSC Mode only):
Linear PCM
Sampling frequency:
Linear PCM:
16 kHz/22.05 kHz/24 kHz/32 kHz/44.1
kHz/48 kHz
<USB image>
JPEG decoding format (MSC Mode only):
.jpeg, .jpg, .jpe
Pixel Sampling: 4:2:2, 4:2:0
Decode Size:
MAX: 8 192 (H) × 7 680 (W)
MIN: 32 (H) × 32 (W)
PNG decoding format (MSC Mode only):
.png
Decode Size:
MAX: 720 (H) × 576 (W)
MIN: 32 (H) × 32 (W)
BMP decoding format (MSC Mode only):
.bmp
Decode Size:
MAX: 1 920 (H) × 936 (W)
MIN: 32 (H) × 32 (W)
<USB video>
H.264 video decoding format:
Base Line Profile, Main Profile, High
Profile
H.263 video decoding format:
Base Line Profile 0/3
VC-1 video decoding format:
Simple Profile, Main Profile, Advanced
Profile
DivX:
Home Theater
MPEG4 video decoding format:
Simple Profile, Advanced Simple Profile
MPEG2 video decoding format:
Main Profile
Bluetooth
Versio n:
Bluetooth 4.1 certified
Output power:
+4 dBm Max. (Power class 2)
Frequency band:
2 400 MHz to 2 483.5 MHz
FM tuner
Frequency range:
76 MHz to 108 MHz (South America)
87.5 MHz to 108 MHz (Australia) (For
countries other than Mexico)
Usable sensitivity:
12 dBf (1.1 V/75 , mono, S/N: 30 dB)
Signal-to-noise ratio: 72 dB (IEC-A network)
AM tuner
Frequency range:
530 kHz to 1 640 kHz (10 kHz)
Frequency range:
531 kHz to 1 602 kHz (9 kHz)
Usable sensitivity:
28 V (S/N: 20 dB)
Signal-to-noise ratio:
62 dB (IEC-A network)
Specifications and design are subject to possible
modification s without notice due to
improvements.
60En
Page 61

English
61En
Page 62

Importante
Índice
Gracias por comprar este producto
Pioneer.
Lea detenidamente estas instrucciones
para saber cómo utilizar
adecuadamente este modelo. Después
de leer las instrucciones, guarde este
documento en un lugar seguro para
consultarlo en el futuro.
Es posible que las pantallas mostradas
en los ejemplos sean distintas a las
pantallas reales, ya que podrían
modificarse sin previo aviso para
mejorar el desempeño y las funciones.
■Precauciones ..................... 3
Información impor tante sobre seguridad........ ... 3
Para garantizar una c onducción segura... ............ 4
Cuando utilice una pantalla conectada a
V OUT .................. ............................. .......................... 4
Para evitar la descarg a de la batería ...................... 4
Cámara de visión trasera ................................ ............ 4
Uso del conector USB..................... ............................. 4
En caso de problemas ............................. .................... 4
Visite nuestro sit io web.. ............................. ............... 4
Protección del pane l y la pantalla LCD .............. ... 5
Notas sobre la m emoria interna.......... .................... 5
Acerca de este manual ......... ................................ ...... 5
■Piezas y controles ............. 6
Unidad principal ......... ................................ .................. 6
Control remoto .............................. ................................ 6
■Funcionamiento básico .... 7
Restablecimiento del microprocesador ............... 7
Preparación del control remoto ............... ............... 7
Encendido de la unidad .......... ................................ ... 8
Uso del panel t áctil ............................ .......................... 8
Pantalla del menú superior ..................... ............... 10
■Bluetooth ......................... 11
Conexión Bluetooth ................ ............................. ..... 11
Ajustes de Bluetooth ...... ................................ .......... 11
Cambio del dispositivo Bluetooth
conectado ......................... ............................. ........ 11
Telefonía manos libres .............. ............................... 12
Audio Bluetooth .................... ................................ ..... 14
■AppRadio Mode + ........... 16
Uso de AppRadio Mode + ............................. .......... 16
Procedimiento de inicio........................................... 16
Uso del teclado .................... ............................... ........ 17
Uso de la función de mezcla de audi o.. ............. 17
■Origen AV......................... 18
Orígenes AV compatibles .............................. .......... 18
Visualización de la pantalla de operación
AV....... ............................. ............................. ............. 18
Selección de una fuente ................. ......................... 18
Cambio del orden de visualización del
origen ................... ............................. ...................... 18
Ajuste del alcance del área de iconos de
orígenes favoritos .......... ................................ ..... 19
■Conexión de iPod/iPhone o
teléfono inteligente para
origen AV ......................... 19
iPod/iPhone con un conector de Lightning ..... 19
iPhone con un co nector de 30 clavijas..... .......... 20
Teléfono inteligente (disposi tivo Android™).... 20
■Radio ................................ 21
Procedimiento de inicio........................................... 21
Funcionamiento básico .... ............................. .......... 21
Búsqueda por informació n de PTY.............. ........ 22
Almacenamiento de las frecuencias de
transmisión más potentes (BSM)... ................ 22
Ajustes de la radio...... ................................ ................ 22
■Sintonizador TV............... 23
Procedimiento de inicio........................................... 23
Funcionamiento básico .... ............................. .......... 23
■Archivos comprimidos.... 24
Conexión/desconexión de un dis positivo de
almacenamiento USB ...................... .................. 24
Procedimiento de in icio. ............................. ............ 24
Funcionamiento básico ................ ........................... 24
■iPod.................................. 27
Conexión del iPod ............... ............................... ....... 27
Funcionamiento básico ................ ........................... 27
■Spotify®............................ 29
Escuchar Spotif y................... ............................. ......... 29
Funcionamiento básico ................ ........................... 30
■AUX .................................. 32
Procedimiento de in icio. ............................. ............ 32
Funcionamiento básico ................ ........................... 32
■Entrada AV....................... 33
Procedimiento de in icio. ............................. ............ 33
■MIXTRAX .......................... 33
Operación de MIXTRAX EZ ............. ........................ 33
Procedimiento de in icio. ............................. ............ 33
Ajustes de MIXTRAX ................................ .................. 34
■Ajustes ............................. 34
Visualización de la p antalla de ajustes...... ......... 34
Ajustes del sistema ............................... ..................... 34
Ajustes del tema .............................. ........................... 39
Ajustes de audio. ................................ ........................ 39
Ajustes de video ........................ ................................ . 43
■Menú Favorito ................. 44
Creación de un ac ceso directo............ .................. 44
Selección de un acceso direc to. ........................... 44
Eliminación de un acceso dire cto............... ......... 44
■Otras funciones ............... 44
Ajuste de la hora y la fecha ............................ ......... 44
Cambio del modo de pantalla panorámica ..... 44
Restablecim iento de este producto a los ajust es
predeterminados ............... ................................ . 45
■Apple CarPlay .................. 45
Uso de Apple CarPlay ....................... ........................ 45
Ajuste de la posición de conducción... ............... 45
Procedimiento de in icio. ............................. ............ 46
Ajuste del volumen... ................................ ................. 46
■Android Auto™................. 47
Uso de Android Auto .............. ................................ .. 47
Ajuste de la p osición de conducción .......... ........ 47
Procedimiento de inicio........................................... 47
Ajuste del volumen... ................................ ................. 47
Ajuste de la función de inicio automático ........ 48
■Apéndice para
Apple CarPlay y
Android Auto ................... 48
Mensajes de error ................................ ....................... 48
Información detallada sobre los dispositivos
iPod conectados .......... ............................. ........... 49
Uso del contenido con conexión basado en
aplicaciones .............................. ............................. 49
■Conexión .......................... 50
Precauciones ........................... ................................ ..... 50
Precauciones impor tantes.... ............................. ..... 50
Precauciones antes de conectar el sistema...... 50
Antes de instalar este produc to.................... ........ 50
Para evitar daños ...................... ................................ .. 50
Aviso para el cable azul/blanco ............................. 51
Este producto ....... ............................. .......................... 51
Cable de alimentación... ................................ ........... 51
Cables de bocina s..... ............................. .................... 51
Amplificador de potencia (se vende por
separado)............ ............................... .............................. . 52
iPod/iPhone y teléfono intel igente.................... .. 52
iPod/iPhone con conector Lightning .............. .............. 52
iPhone con conector de 30 clavijas.... ............................ 52
Teléfono inteligente (dispositivo Android) ....... 53
Cámara .......................... ................................ ................. 53
Componente de vide o externo y la
visualización ..................... ............................. ........ 53
■Instalación ....................... 54
Precauciones antes de la instal ación .................. 54
Antes de la instalación ..... ................................ ........ 54
Notas acerca de la instalación ........ ....................... 54
Instalación mediante los orificios de tornillo del
lateral de este producto ......................... ........... 55
Instalación del micrófon o.. ................................ ..... 55
Montaje en el parasol ............. ................................ .. 55
2Es
Page 63

Español
Índice
PRECAUCIÓN
ADVERTENCIA
Precauciones
Instalación en l a columna de dirección ............. 55
Ajuste del ángulo del micrófo no........................ .. 56
■Apéndice .......................... 56
Solución de problemas ................... ......................... 56
Mensajes de error .............. ................................ ........ 57
Información detallada de los soportes que se
pueden reproducir ........ ................................ ..... 58
Bluetooth ..................... ................................ ................. 6 0
WMA ......................... ................................ ...................... 60
FLAC........ ................................ ................................ ........ 60
DivX......... ................................ ................................ ........ 61
AAC ..................... ................................ ............................ 61
Google™, Goog le Play, Android...... ...................... 61
MIXTRAX......... ................................ ............................... 61
Información detallada sobre los dispositivos
iPod conectados ................... ............................. .. 61
Uso del contenido con conexi ón basado en
aplicaciones ...... ................................ .................... 61
Spotify® ............................... ................................ ........... 62
Aviso acerca de la visualización de video.......... 62
Aviso acerca del u so de archivos MP3.. .............. 62
Uso correcto de la pantalla LCD........ .................... 62
Especificaciones ........ ................................ ................. 63
La operación de este equipo está sujeta a las siguientes dos condiciones: (1) es posible que este
equipo o dispositivo no cause interferencia perjudicial y (2) este equipo o dispositivo debe aceptar
cualquier interferencia, incluyendo la que pueda causar su operación no deseada.
Este producto es evaluado en condiciones de clima moderado y tropical en aparatos electrónicos de
audio, video y similares. Requisitos de seguridad, IEC 60065.
Información importante sobre seguridad
• No trate de instalar o reparar este producto usted mismo. La instalaci ón o la reparación de este
producto por parte de personas sin cualificación ni experiencia e n equipos electrónicos y accesorios
para automóviles puede ser peligrosa y puede exponerle al riesgo de sufrir una descarga eléctrica u
otros peligros.
• Evite que este producto entre en contacto con líquidos. Podrían producirse descargas eléctricas.
Además, el contacto con líquidos puede provocar daños al producto, humo y sobrecalentamiento.
• En caso de que ingresen al producto líquidos u objetos extraños, estacione su vehículo en un lugar
seguro, apáguelo (ACC OFF) de inmediato y comuníquese con su distribuidor o el centro de ser vicio
de Pioneer autorizado más cercano. No utilice este producto en dicha condici ón; de lo contrario,
podría producirse un incendio, una descarga eléctrica u otra falla.
• En caso de detectar humo, un ruido e xtraño o un olor que salga de este producto, o cua lquier otra
señal anormal en la pantalla LCD, apague el producto de inmediato y comuníquese con su
distribuidor o el centro de servicio de Pioneer autoriz ado más cercano. Si utiliza este producto en esta
condición, podrían producirse daños permanentes en el sistema.
• No desarme ni modifique este producto, ya que los componentes de alta tensión en el interior
podrían provocar una descarga eléctrica. Asegúrese de comunicarse con su distribuidor o el centro
de servicio de Pioneer autori zado más cercano para solicitar inspecciones internas, ajustes o
reparaciones.
Antes de utilizar este producto, asegúrese de leer y comprender completamente la
siguiente información de seguridad:
• No utilice este producto, ninguna aplicación, ni la opción de la cámara de visión
trasera (en caso de haberla adquirido) si al hacerlo se distraerá de alguna forma y no
podrá manejar su vehículo con seguridad. Siempre respete las reglas para conducir
con seguridad y el reglamento de tráfico vigente. Si enfrenta dificultades al usar este
producto o al leer la visualización, estacione su vehículo en un lugar seguro y accione
el freno de mano antes de realizar los ajustes necesarios.
• Nunca suba el volumen de este producto a un nivel tan alto que le impida escuchar el
tráfico exterior y los vehículos de los servicios de emergencia.
• En aras de fomentar la seguridad, algunas funciones están desactivadas hasta que el
vehículo se haya detenido y/o se haya accionado el freno de mano.
3Es
Page 64

• Conserve este manual en un lugar de fácil acceso para consultar los procedimientos de
ADVERTENCIA
ADVERTENCIA
ADVERTENCIA
ADVERTENCIA
PRECAUCIÓN
PRECAUCIÓN
funcionamiento y la información de seguridad.
• No instale este producto donde quizá (i) obstruya la visión del conductor, (ii) afecte el
funcionamiento de cualquiera de los sistemas de operación del vehículo relacionados
con la seguridad, como las bolsas de aire, los botones de luces de advertencia
(intermitentes), o (iii) afecte la capacidad del conductor de manejar el vehículo de
forma segura.
• No olvide usar el cinturón de seguridad en todo momento mientras conduce su
vehículo. En caso de un accidente, sus lesiones pueden ser mucho más graves si no
tiene el cinturón de seguridad bien puesto.
• Nunca utilice audífonos mientras conduce.
Para garantizar una conducción segura
Para evitar la descarga de la batería
Asegúrese de encender el motor del vehículo mientras utiliza este producto. La batería
podría descargarse si este producto se utiliza sin el motor encendido.
No instale este producto en un vehículo que no disponga de cables o circuitos ACC.
Cámara de visión trasera
Si dispone de una cámara opcional de visión trasera, puede utilizar este producto como
apoyo para observar vehículos de gran volumen o para dar marcha atrás y estacionarse
en un lugar estrecho.
• EL CABLE VERDE CLARO DEL CONECTOR DE ALIMENTACIÓN ESTÁ DISEÑADO PARA DETECTAR
EL ESTADO ESTACIONADO DEL VEHÍCULO Y DEBE CONECTARSE EN EL LADO DE LA FUENTE DE
ENERGÍA DEL INTERRUPTOR DEL FRENO DE MANO.LA CONEXIÓN O EL USO INCORRECTOS DE
ESTE CABLE PODRÍAN INFRINGIR LA LEY APLICA BLE Y PRODUCIR LESIONES O DAÑOS GRAVES.
• No intente alterar ni desactivar el sistema de bloqueo mediante el freno de mano, provisto
para su propia protección. La alteración o la desactivación del sistema de bloqueo del freno de
mano podrían produ cir lesiones graves o la muerte.
• Para evitar el riesgo de da ños y lesiones y la posible inf racción de las leyes aplicables, e ste
producto no debe utilizarse con una imagen de video que sea visible para el conductor.
• En algunos países, la visualización de imágenes de video en una pantalla dentro de un vehículo
incluso por pers onas distintas al conductor podría estar prohibida por l a ley. Deben obedecerse estas
disposiciones en los lugares donde estén vigentes.
Si intenta ver una imagen de video mientras conduce, aparecerá en la pantalla la
siguiente advertencia: “Está terminantemente prohibido visualizar una fuente de
video en el asiento delantero durante la conducción.”. Para ver una imagen de video
en esta pantalla, detenga el vehículo en un lugar seguro y accione el freno de mano. Pise
el pedal del freno sin soltarlo antes de quitar el freno de mano.
Cuando utilice una pantalla conectada a V OUT
El terminal de salida de video (V OUT) sirve para conectar una pantalla y permitir a los
pasajeros de los asientos traseros la visualización de imágenes de video.
NUNCA instale la pantalla trasera en un lugar que le permita al conductor ver imágenes de video
mientras conduce.
4Es
• LA IMAGEN DE LA PANTALLA PUEDE VERSE AL REVÉS.
• USE ESTA FUNCIÓN SOLO PARA DAR MARCHA ATRÁS O VER UN REFLEJO DE LA CÁMARA DE VISIÓN
TRASERA. CUALQUIER OTRO USO PODRÍA PRODUCIR LESIONES O DAÑOS.
El modo de visión tr asera sirve para utilizar este producto como apoyo para obser var vehículos de gran
volumen o para dar marcha atrás. No utilice esta función con fines de entretenimiento.
Uso del conector USB
• Para evitar la pérdida de datos y daños al dispositivo de almacenamiento, nunca lo extraiga de este
producto durante la transferencia de datos.
• Pioneer no puede garantizar la compatibilidad con todos los dispositivos de almacenamiento masivo
USB y no asume ninguna resp onsabilidad por ningún tipo de pérdida de dato s en reproductores
multimedia, iPhone, teléfono inteligente u otros dispositivos mientras se utiliza este producto.
En caso de problemas
Si este producto no funciona correctamente, comuníquese con su distribuidor o con el
centro de servicio de Pioneer autorizado más cercano.
Visite nuestro sitio web
Visite nuestro siguiente sitio:
En México
http://www.pioneer-mexico.com/
Page 65

Español
En Singapur
http://www.pioneer.com.sg/
En Malasia
http://www.pioneer.my/
En Tailandia
http://www.pioneer-thailand.com/
En Filipinas
http://www.pioneer.ph/
En Vietnam
http://www.pioneer.vn/
En Indonesia
http://www.pioneer.co.id/
En Australia
http://www.pioneer.com.au/
En Israel
http://www.pioneerisrael.co.il/
En Medio Oriente/África
http://www.pioneer-mea.com/en/
En Latinoamérica
http://www.pioneer-latin.com/en/about-pioneer.html
En Hong Kong
http://www.pioneerhongkong.com.hk/ct/index.php
En Taiwán
http://www.pioneer-twn.com.tw/
En Corea
http://www.pioneer.co.kr/
• Le brindamos la información más reciente acerca de PIONEER CORPORATION en
nuestro sitio web.
• Pioneer proporciona actualizaciones de software con regularidad con el fin de mejorar
sus productos. Consulte la sección de soporte del sitio web de Pioneer para conocer
todas las actualizaciones de software disponibles.
Protección del panel y la pantalla LCD
• No exponga la pantalla LCD a la luz solar directa cuando no se utilice este producto. Lo
anterior puede provocar una avería en la pantalla LCD debido a las altas temperaturas.
• Al utilizar un teléfono celular, mantenga la antena del teléfono celular alejada de la
pantalla LCD para evitar interrupciones en el video, por ejemplo: manchas, líneas de
color, etc.
• Para proteger la pantalla LCD contra daños, asegúrese de tocar las teclas del panel
táctil suavemente y solo con los dedos.
Notas sobre la memoria interna
• La información se eliminará si se desconecta el cable amarillo de la batería (o si se
extrae la batería).
• Algunos ajustes y contenido grabado no se restablecerán.
Acerca de este manual
Este manual utiliza diagramas de pantallas reales para describir las operaciones. No
obstante, las pantallas de algunas unidades quizá no coincidan con las mostradas en
este manual según el modelo utilizado.
Significado de los símbolos utilizad os en este manual
Esto indica que de be tocarse la tecla digital ade cuada en la pantalla tácti l.
Esto indica que debe mantener presionada la tecla digital adecuada en la pantalla
táctil.
5Es
Page 66

Piezas y controles
NOTA
NOTA
Unidad principal
Pantalla LCD
VOL (+/-)
RESET Pulse p ara restablecer el microprocesador (pági na 7).
Pulse para alternar entre la pantalla Aplicación y la pantalla de operación AV.
Mantenga pulsado el botón para cambiar al modo de visualización de la
cámara.
Para activar el modo de visualización de la cámara con este botón, ajuste
[Entrada cámara trasera] en [Act.] (página 35).
Pulse para visualizar la pantalla del Menú superior.
Mantenga pulsado para apagar. Para volver a encender, pulse cualquier botón.
Pulse para mostrar la barra de menús (página 9).
Mantenga pulsado para silenciar o activar el sonido.
Pulse para mostrar la pantalla del menú superior o volver a la pantalla anterior.
Mantenga pulsado para apagar la pantalla.
Pulse para activar el modo de reconocimiento de voz, por ejemplo: Siri cuando
iPhone se conecta a l a unidad mediante Bluetooth o USB.
Control remoto
Volu men (+ /-)
MODE Pulse para alternar entre la pantalla Aplicación y la pantalla de operación AV.
SRC Pulse para recorrer todos los orígenes disponibles.
TOP MENU Sin usar.
MENU Sin usar.
Almohadilla del
pulgar
MUTE
AUDIO
SUBTITLE
ANGLE
BAND/ESC Pulse para seleccionar la banda del sintonizador cuando este se selecciona
RETURN Pulse para volver al punto especificado y comenzar la reproducción a partir
o En el caso del audio: Mantenga presionado el botón para adelantar o retrasar
o Pulse para volver a la pista anterior (capítulo) o ir a la pista siguiente
Mantenga pulsado el botón para cambiar al modo de visualización de la
cámara.
Para activar el modo de visualización de la cámara con este botón, ajuste
[Entrada cámara trasera] en [Act.] (página 35).
Mantenga pulsado para desactivar el origen.
Sin usar.
Sin usar.
como origen.
Pulse para cancel ar el modo de control de funcione s.
de allí.
Pulse para pausar o rea nudar la reproducción.
rápidamente.
En el caso del video: Pulse el botón para adelantar o retrasar rápidamente.
(capítulo).
Pulse el botón para contestar o terminar una llamada.
Pulse para detener la reprodu cción.
Si reanuda la reproducción, esta comenzará a par tir del punto donde usted la
detuvo. Vuelva a pulsar el botón para detener la reproducción por completo.
6Es
Page 67

Español
FOLDER/P.CH Pulse para selecci onar el título o la carpeta siguiente o anterior.
PRECAUCIÓN
ADVERTENCIA
Cómo sustituir la batería
Inserte la batería CR2025 (3V) con los polos de más (+) y
menos (-) en la orientación correcta.
Pulse para recuperar las frecuencias de emisoras de radio asignadas a teclas
de canales preestablecidos.
Pulse el botón para contestar o terminar una llamada.
Funcionamiento básico
Restablecimiento del microprocesador
• Si pulsa el botón RESET, los ajustes y el contenido grabado se restablecen a los ajustes de fábrica.
– No realice esta operación cuando un dispositivo esté conectado a este producto.
– Algunos ajustes y contenido grabado no se restablecerán.
• El microprocesador debe restablecerse en las siguientes condiciones:
– Antes de utiliza r este producto por primera vez después de la ins talación.
– Si este producto no funciona correctamente.
– Si el funcio namiento del sistema pare ce tener problemas.
1 Gire la llave de encendido del vehículo a la posición de apagado (OFF).
2 Pulse RESET con la punta de un bolígrafo u otra herramienta puntiaguda.
Los ajustes y el contenido grabado se reinician a los ajustes de fábrica.
Preparación del control remoto
Quite la lámina de aislamiento antes de usarlo.
• No ingiera la batería; hay peligro de una quemadura química.
(El control remoto proporci onado) Este producto contiene una pil a de botón. Si la pila de botón es
tragada, puede causar severas quemaduras internas en solo dos horas y puede llevar a la muerte.
Mantenga las baterías nuevas y usadas lejos del alcance de los niños.
Si el compartimento de la batería no se cierra con seguridad, deje de utili zar el producto y
7Es
Page 68

manténgalo alejado de los niños.
PRECAUCIÓN
NOTA
Importante
NOTA
ADVERTENCIA
NOTA
NOTA
Si cree que la batería fue tragada o colocada dentro de cualquier parte del cuerpo, busque atención
médica inmediatamente.
• Las baterías (el paquete de baterías o las baterías instaladas) no deben exponerse al calor excesivo
como los rayos solares, incendios o fuentes de calor semejantes.
• Extraiga la baterí a si el control remoto no se utiliza durante un mes o un periodo más prolongado.
• Si la batería se sustituye de forma incorrecta, existe el riesgo de una explosión. Sustituya las baterías
solo con el mism o tipo de batería o uno equivalente.
• No manipule la batería con herramientas metálicas.
• No guarde la batería con objetos metálicos.
• En caso de filtración de líquido de la batería, limpie el control remoto completamente e instale una
batería nueva.
• Al desechar las baterías usadas, atienda las disposiciones gubernamentales o los reglamentos de las
instituciones públicas medioambientales vigentes en su país/área.
• “Material de perclorato, es posible que se apliquen procedimientos especiales de manipulación.
Consulte www.dtsc.ca.gov/hazardouswaste/perchlorate. (Vigentes en California, EE. UU.)”
Uso del control remoto
Dirija el control remoto en la dirección del panel frontal para que funcione.
Es posible que el control remoto no funcione correctamente en la luz solar directa.
4 Toque el elemento para seleccionar la ubicación en uso.
5 Toq u e .
Aparece la pantalla [Configuración del modo bocinas].
6 Toque los modos de las bocinas.
[Modo estándar]
Sistema de cuatro bocinas con bocinas frontales y traseras, o sistema de seis bocinas
con bocinas frontales y traseras y subwoofers.
[Modo red]
Sistema de tres vías con bocina de rango alto, bocina de rango medio y subwoofer
(bocina de bajo rango) para la reproducción de frecuencias altas, medias y bajas
(bandas).
No use la unidad en modo estándar cuando un sistema de bocinas del modo de red de tres vías
esté conectado a la unidad. Lo anterior podría provocar daños en las bocinas.
7 Toq ue [ OK].
Aparece la pantalla del aviso legal inicial.
8 Toq ue [ OK].
Aparece la pantalla del menú superior.
• No conserve el control remoto en altas temperaturas o la luz solar directa.
• No permita que el control remoto caiga al piso, donde podría quedar atrapado debajo del freno o el
acelerador.
Encendido de la unidad
1 Encienda el motor para iniciar el sistema.
Aparece la pantalla [Selecc. idioma programa].
A partir de la segunda vez, la pantalla mostrada será distinta en función de las condiciones
anteriores.
2 Toq ue e l idi oma .
3 Toque .
Solo para México
Aparece la pantalla [Configuración del modo bocinas]. Siga con el paso 6.
Para otros países fuera de México
Aparece la pantalla [Location Settings].
8Es
Una vez establecido el modo de las bocinas, no es posible cambiar los ajustes, a menos que este
producto se restablezca a los ajustes predeterminados. Restablezca los ajustes predeterminados para
cambiar los ajustes del modo de las bocinas (página 45).
Cambio del modo de las bocinas
Para cambiar el modo de las bocinas, es necesario restablecer este producto a los ajustes
predeterminados.
1 Restablezca los ajustes predeterminados (página 45).
Uso del panel táctil
Puede controlar este producto tocando las teclas de la pantalla directamente con los
dedos.
Para proteger la pantalla LCD contra daños, asegúrese de tocar la pantalla suavemente solo con los
dedos.
Page 69

Español
Teclas del panel táctil comunes
NOTA
NOTA
NOTA
: Vuelve a la pantalla anterior.
: Cierre la pantalla.
Uso de la barra de menú
1 Pulse .
La barra de menú aparece en la pantalla.
Uso de las pantallas con listas
Al tocar un elemento de la lista, puede reducir las opcio nes y pasar a la
siguiente operación.
Aparece cuando no se muestran todos los caracteres en el área de
visualizac ión.
Al tocar la tecla, el resto se desplaza para su visualización.
Esta función está disponible solo cuando detiene el vehículo en un lugar seguro y
acciona el freno de mano.
Aparece cuando los elementos no se pueden mostrar en una sola página.
Arrastre la barra de desplazamiento, la barra de búsqueda inicial o la lista para ver
los elementos ocultos.
La disponibilidad de la barra de menú puede variar según la fuente que la active.
Cambia la duración de la atenuación para el día o la noche.
Cuando AppRadio Mode + está activado, aparece AppRadio Mode +
SideControlBar.
Alterna entre reproducción y pausa.
Adelanta o atrasa archi vos.
Adelanta o retrasa rápidam ente.
Muestra la pantalla del m enú de configuración (página 34).
Cierra la barra de menú.
Uso de la barra del tiempo
Puede modificar el punto de reproducción arrastrando la tecla.
El tiempo de reproducción correspondiente a la posición de la tecla se muestra
mientras se arrastra la tecla.
9Es
Page 70

Pantalla del menú superior
SUGERENCIAS
SUGERENCIA
SUGERENCIA
NOTA
Tecla de dispositivo conectado
Muestra el dispositivo conectado.
Cambia el origen o aplicación con dispositivos conectados, por ejemplo: AppRadio
Mode +, sistema de navegación externo, etc.
Cuando se conecta un dispo sitivo con una aplicación compatible, aparece la tecla
de aplicación favorita. Una vez que aparece la tecla, puede ajustar el ran go del área
de la tecla de aplicación favorita con los pasos siguientes.
1 Mantener pulsado .
Aparece en la parte superior derecha de la tecla de aplicación
favorita.
2 Arrastre a la posición deseada.
Para terminar con el ajuste, toque cualquier lugar de la pantalla fuera
de la tecla de la aplicación favorita.
10Es
Iconos de orígenes favoritos
• Al conectar el sistema de navegación externa a esta unidad, se muestra la tecla
del modo de navegación en el medio del lado derecho de la pantal la.
• Al seleccionar [Power OFF] puede desactivar casi todas las funciones.
– Se recibe una llamada (únicamente para telefonía manos libres mediante
Bluetooth).
– Se recibe una imagen de la cámara de visión trasera cuando el vehículo da
marcha atrás.
– Se presiona un botón en esta unidad.
– Se apaga la llave de encendido (ACC OFF) y luego se enciende (ACC ON).
Tecla de operación AV
Muestra el origen actual.
Cuando aparece el último origen detrás de la tecla, p uede cambiar el origen al
tocar la tecla.
Ajuste de la hora y la fecha (página 44)
Menú Configuración (página 34) y Favorito (página44)
Esta función está disponible solo cuando detiene el vehículo en un lugar seguro y
acciona el freno de mano.
Fuente AV (página 18)
Telefonía manos libres (página 12)
Page 71

Español
NOTAS
SUGERENCIAS
Bluetooth
PRECAUCIÓN
NOTA
NOTA
Conexión Bluetooth
1 Active la función Bluetooth en el dispositivo.
2 Pulse .
3 Toque y luego .
Aparece la pantalla Bluetooth.
4 Toq ue [Co nex ió n].
5 Toq u e .
La unidad comienza a buscar los dispositivos disponibles y los muestra en la lista de
dispositivos.
6 Toque el nombre del dispositivo Bluetooth.
Después de que el dispositivo se haya registrado correctamente, el sistema
establece una conexión Bluetooth. Una vez establecida la conexión, el nombre del
dispositivo se muestra en la lista.
• Si ya hay emparejados cinco dispositivos, se muestra [Memoria llena]. Antes elimine un dispositivo
emparejado (página 11).
• En caso de que s u dispo sitiv o sea co mpatib le con e l Empa rejami ento Si mple Se guro ( SSP), a parece un
número de seis dígitos en la visualización de este producto. Toque [Sí] para emparejar el dispositivo.
• Si intenta conectar un teléfono celular desconectado cuando ya hay dos teléfonos celulares
conectados, el primero de los dos teléfonos conectados se desconectará y el teléfono desconectado
se conectará en su lugar.
• Para establecer la conexión Bluetooth, también puede detectar este producto desde el dispositivo
Bluetooth. Antes del registro, asegúrese de que [Visibilidad] en el menú [Bluetooth] esté en [Act.]
(página 11). Para obte ner información sobre las operac iones de un dispositivo Bluetooth , consulte las
instrucciones de funcionamiento que se entregan con el dispositivo Bluetooth.
• Pueden conectarse dos teléfonos celulares a este producto al mismo tiempo (página 11).
Nunca apag ue este producto ni d esconecte el dispos itivo mientras se e stá procesando la conf iguración
de Bluetooth.
Elemento d el menú Descripci ón
[Conexión] Conecte, desconecte o elimine el dispositivo Bluetooth
[Conexión autom.]
[Act.] [Des.]
[Visibilidad]
[Act.] [Des.]
[Entrada de códi go PIN] Cambie el código PIN para una conexión Bluetooth.
[Inform. dispositivo] Se muestran el nombre del dispositivo y la dirección del
[Borr. memo. Bluetooth] Toque [Claro] y luego [OK] para borrar la memoria
registrado de forma manual.
Toque para eliminar el dispositivo registrado.
Para conectar manualmente un dispositivo Bluetooth
registrado, toque el nombre del dispositivo.
Para desconectar el dispositivo, toque el nombre del
dispositivo conectado que aparece en la lista.
Conecte el dispositivo Bluetooth manualmente en los siguientes
casos:
• Hay registrados dos dispositivos Bluetooth o más y quiere
seleccionar manualmente el dispositivo que desea usar.
• Quiere volver a conectar un dispositivo Bluetooth desconectado.
• La conexión no se establece automáticamente por algún motivo.
Seleccione [Act.] para conectar automáticamente el último
dispositivo Bluetooth conectado.
Si la última vez se conectaron dos dispositivos Bluetooth, ambos
se conectarán automáticamente en este producto en el orden en
el que se registraron en la lista de dispositivos.
Seleccione [Act.] para permitir que este producto esté
visible par el otro dispositivo.
El código PIN predeterminado es “0000”.
1 Toque de [0] a [9] para ingresar el código PIN (hasta 8
dígitos).
2 Toq u e .
producto.
Bluetooth.
Ajustes de Bluetooth
1 Pulse .
2 Toque y luego .
Cambio del dispositivo Bluetooth conectado
Después de registrar y conectar los dispositivos Bluetooth a este producto, puede
alternar entre los dispositivos usando la tecla de cambio de dispositivos de la función
telefónica y algunas fuentes de audio.
• Puede registrar hasta cinco dispositivos Bluetooth en este producto (página 11).
11Es
Page 72

• Puede conectar uno de los dispositivos registrados a este producto. En los casos en
PRECAUCIÓN
SUGERENCIA
NOTA
SUGERENCIAS
NOTAS
que el disp ositivo registrado incluya una función telefónica, se pueden conec tar un
total de dos dispositivos al mismo tiempo al utilizar la función telefónica. Si dos de los
cinco dispositivos registrados ya están conectados, puede conectar el tercer
dispositivo para usar únicamente la función de audio con la tecla de cambio de
dispositivos de la pantalla de orígenes de audio.
• El icono del teléfono celular usando actualmente aparece en la pantalla del menú
telefónico. Si conecta dos teléfonos celulares a este producto al mismo tiempo, puede
alternar entre los teléfonos celulares usando la tecla de cambio de dispositivos. El
contenido del menú telefónico se conserva en la memoria en el caso de cada teléfono
celular conectado (página 12).
• La tecla de cambio de dispositivos aparecerá en el caso de algunas fuentes de audio.
Es posible que la fuente de audio se cambie automáticamente a la otra fuente según el
dispositivo seleccionado.
Telefonía manos libres
Para utilizar esta función, debe conectar en primer lugar su teléfono celular a este
producto mediante Bluetooth (página 11).
Se muestran los siguientes elementos.
• Nombre del teléfon o celular actual
• Número de lista del teléfono celular actual
• Estado de recepción del teléfono celular actual
• Estado de la batería del teléfono celular actual
Si conecta dos teléfonos celulares a este producto al mismo tiempo, puede
alternar entre los teléfonos celulares usando la tecla de cambio de dispositivos.
Cambia el idioma de búsqueda a inglés o al idioma del sistema.
Podría no aparecer en función del ajuste de idioma del sistema.
Sincroniza los contacto s de la agenda telefónica de este prod ucto con los
contactos de su telé fono de forma manual.
Uso de la lista de marcado preestablecido (página12)
Uso de la libreta telefónica
Seleccione un contacto de la libreta telefónica. Toque el nombre deseado en la
lista y luego seleccione el número telefónico.
Por su seguridad, evite hablar por te léfono mientras conduce.
Hacer una llamada telefónica
1 Pulse .
2 To que .
Aparece la pantalla del menú del teléfono.
3 Toque uno de los iconos de llamada en la pantalla del menú del teléfono.
12Es
• Los contactos del teléfono se transferirán automáticamente a es te producto.
• Actualizar manualmente el directorio.
• Debe activarse la opción [Visibilidad] de la pantalla [Bluetooth] (página 11).
• Si se conectaron automáticamente dos teléfonos celulares a este producto con la
función de conexión automática de un dispositivo Bluetooth, se visualiza la
agenda telefónica del segundo teléfono.
Uso del historial de llamada
Haga una llamada telefónica desde la llamada recibida , la llamada marcada
o la llamada perdida .
Entrada directa d el número telefónico
Pulse las teclas numéricas para escribir el número telefónico y luego toque
para llamar.
▶Para concluir una llamada
1 To que .
Uso de las listas de marcado preestablecido
▶Registro de un núm ero telefónico
Puede almacenar con facilidad hasta seis números telefónicos por dispositivo como
opciones preestablecidas.
Page 73

Español
1 Pulse .
SUGERENCIAS
NOTA
NOTAS
SUGERENCIAS
SUGERENCIA
NOTAS
2 Toque .
3 Toque o .
En la pantalla [Directorio de teléfonos], toque el nombre deseado para que se
muestre el número telefónico del contacto.
4 Toque .
▶Marcación desde la lista de marcado preestablecido
1 Toque .
2 Toque la entrada deseada del registro para hacer una llamada.
Aparece la pantalla de marcación y el dispositivo comienza a marcar.
▶Eliminación de un número telefónico
1 Pulse .
2 Toque .
3 Toque .
4 Toque .
5 To que [Sí] .
Recepción de una llamada telefónica
1 Toque para contestar una llamada.
Toque para concluir una llamada.
• Toque mien tras recibe una llamada en espera para cambiar de interlocutor.
• Toque mientras recibe u na llamada en espera para rechazar la llamada.
Cuando dos teléfonos están conectados al mismo tiempo y se recibe una llamada entrante en el
segundo teléfono cuando está hablando con el primer teléfono, se visualizará la pantalla de
confirmación de mercado del segundo teléfono.
Función de reconocimiento de voz (para iPhone)
Al conectar su iPhone a este producto, puede utilizar la función de reconocimiento de
voz (modo Eyes Free de Siri) en este producto.
• Cuando se utiliza un iPhone, el modo Eyes Free de Siri está disponible con este producto.
• En este capítulo, se hará referencia al iPhone y al i Pod touch con l a denomina ción “iPhone”.
1 Pulse .
2 Toque .
3 Toque .
Se inicia la función de reconocimiento de voz y aparece la pantalla de control de voz.
• También puede iniciar la función de reconocimiento de voz al pulsar .
• Si se conectan dos teléfonos celulares a utomáticamente a este producto con la función de conexió n
automática de un dispositivo Bluetooth, se configurará la función de reconocimiento de voz (modo
Eyes Free de Siri) en el segundo teléfono.
• Si desea usar la función de reconocimiento de voz (modo Eyes Free de Siri) en otro iPhone conectado,
toque con la numeración al otro iPhone. El iPhone al que cambió se configurará como el
dispositivo actual.
Minimizar la pantalla de confirmación de marcado
1 Toque .
Para mostrar l a pantalla de confirm ación de marcado, vuelva a tocar .
• La pantalla de confirmación de marcado no se puede mi nimizar en la pantalla de operación AV.
• Los orígenes AV no se pueden seleccionar, incluso si la pantalla de confirmación de marcado se
minimiza mientras habla por teléfono o recibe una llamada.
Ajustes del teléfono
1 Pulse .
2 Toque y luego .
Elemento d el menú Descripci ón
[Respuesta automática]
[Act.] [Des.]
[Timbre]
[Act.] [Des.]
[Invertir nombre] Seleccione [Sí] para cambiar el orden de los nombres y los
Seleccione [Act.] para responder una llamada entrante
automática mente.
Seleccione [Act.] si los altavoces del automóvil no emiten el
tono de llamada.
apellidos que aparecen en la agenda telefónica.
13Es
Page 74

NOTAS
Ajuste del modo privado
NOTAS
Durante una conversación, puede cambiar al modo privado (hablar directamente en su
teléfono celular).
1 Toque o para activar o desactivar el modo privado.
• Si dos teléfonos celu lares están conectados a est e producto y el pri mer teléfono está configurado en
modo privado, puede recibir llamadas en el segundo teléfono mientras mantiene la llamada en curso
en el primer teléfono.
• Cuando hay dos teléfonos celulares conectados a este producto y se desactiva el modo privado en el
primer teléfono, si se atiende una llamada en el segundo teléfono mientras hay una llamada en curso
en el primer te léfono o mientras marca o reci be una llamada en el prime r teléfono, finaliza la lla mada,
el marcado o la recepción del primer teléfono.
Ajuste del volumen de audio de la otra persona
Este producto se puede ajustar al volumen de audio de la otra persona.
1 Toque para alternar entre los tres niveles de volumen.
Notas sobre la telefonía manos libres
▶Notas generales
• No se garantiza la conexión a todos los teléfonos celulares con tecnología inalámbrica
Bluetooth.
• La distancia de línea visual entre este producto y su teléfono celular no debe ser mayor
a 10 metros al enviar y recibir voz y datos mediante la tecnología Bluetooth.
• Con algunos teléfonos celulares, es posible que el sonido del tono de llamada no se
emita desde las bocinas.
• Si se selecciona el modo privado en el teléfono celular, es posible que se desactive la
telefonía manos libres.
▶Registro y conexión
• Las operaciones de telefonía celular varían en función del tipo de teléfono celular.
Consulte instrucciones detalladas en el manual de instrucciones provisto con su
teléfono celular.
• Cuando una transferencia de agenda telefónica no funcione, desconecte su teléfono y
realice un emparejamiento nuevamente desde su teléfono a este producto.
▶Cómo hacer y recibir llamadas
• Es posible que escuche un ruido en las siguientes situaciones:
– Al contestar el teléfono mediante el botón del teléfono.
– Cuando el interlocutor cuelgue el teléfono.
• Si el interlocutor no puede escuchar la conversación debido a un eco, disminuya el
nivel de volumen de la telefonía manos libres.
• Con algunos teléfonos celulares, incluso después de pulsar el botón del teléfono
celular para aceptar una llamada entrante, es posible que no se lleve a cabo la
telefonía manos libres.
• El nombre registrado aparecerá si el número telefónico ya está registrado en la agenda
telefónica. Cuando un mismo número telefónico esté registrado con distintos
nombres, solo se mostrará el número telefónico.
▶Los historiales de llamadas recibidas y números marcados
• No puede realizar una llamada en la entrada de un usuario desconocido (sin número
telefónico) que aparezca en el historial de llamadas recibidas.
• Si se realizan llamadas mediante el uso de su teléfono celular, no se guardará en este
producto ningún dato del historial.
▶Transferencias de la agenda telefónica
• Si aparecen más de 1 000 entradas del agenda telefónica en su teléfono celular, es
posible que no se descarguen por completo todas las entradas.
• Según el teléfono, este producto quizá no muestre la agenda telefónica
correctamente.
• Si la agenda telefónica del teléfono contiene datos de imágenes, quizá no se transfiera
correctamente la agenda telefónica.
• La disponibilidad de la función de transferencia de la agenda telefónica depende del
teléfono celular.
Audio Bluetooth
Antes de utilizar el reproductor de audio Bluetooth, registre y conecte el dispositivo a
este producto (página 11).
• Según el reproducto r de audio Bluetooth conec tado a este producto, las f unciones disponibles con
este producto quizá estén limitadas a los siguientes dos niveles:
– A2DP (Perfil de distribución de audio avanzada): Solo es posib le reproducir canciones en su
reproductor de audio.
– A2DP y AVRCP (perfil de control rem oto de audio/video): Es posible reproducir, pausar, seleccio nar
canciones y realizar otras funcione s.
• Según el dispositivo Bluetooth conectado a este producto, las funciones disponibles con este
producto quizá estén limitadas o difieran de las que se describen en este manual.
• Al escuchar canciones en su dispositivo Bluetooth, evite utilizar la función telefónica en la medida de
lo posible. Si intent a utilizarla, la señal podría provoc ar ruido en la reproducción de canciones.
• Al hablar con el disposi tivo Bluetooth conectado a este pro ducto mediante Bluetooth, es posible que
la reproducción entre en pausa.
1 Pulse .
2 Toque y luego .
14Es
Page 75
Español
Aparece la pantalla de ajustes del sistema.
Pantalla de reproducción de audio Bluetooth
NOTA
3 Toque [Config. fuentes AV].
4 Confirme que [Bluetooth Audio] esté activado.
5 Pulse .
6 Toq u e .
Aparece la pantalla de origen AV.
7 Toque [Bluetooth Audio].
Aparece la pantalla de reproducción de audio Bluetooth.
Funcionamiento básico
Indicador de número de pista
Alterna entre reproducción y pausa.
Adelanta o atrasa archivos.
• Al pulsar y luego tocar o , tambié n puede adelant ar o retrasar
para saltar archivos.
• Al pulsar y, luego, mantener pulsado o , también puede atrasar o
adelantar rápidamente.
Ajusta un rango de repetición de reproducción.
Reproduce en orden aleatorio.
Selecciona un archivo o carpeta de la lista para su reproducción.
Esta función está disponible solo cuando la versión de AVRCP del dispositivo
Bluetooth es 1.4 o superior.
Cambia entre los dispositivos Bluetooth cuando los dispositivos están
conectados a este prod ucto a través de Bluetooth (página 11).
15Es
Page 76

NOTAS
ADVERTENCIA
Importante
AppRadio Mode +
SUGERENCIAS
AppRadio Mode +
Puede utilizar aplicaciones de iPhone o de teléfonos inteligentes con movimientos de
los dedos, como tocar, arrastrar, desplazar o palpar la pantalla de este producto.
• Los movimientos compatibles de los dedos varían en función de la aplicación correspondiente a un
iPhone o un teléfono inteligente.
• Incluso si una aplicación no es compatible con AppRadio Mode +, es posible que se muestre una
imagen en función de la aplicación. Sin embargo, no es posible utilizar la aplicación. Para utilizar
AppRadio Mode +, primero instale la aplicación AppRadio en el iPhone o el teléfono inteligente. Para
obtener información detallada sobre la aplicación AppRadio, visite el siguiente sitio:
http://p ioneer-mexico.com.mx /
• Asegúrese de leer Uso del contenido con conexión basado en aplicaciones (página 61) antes de
utilizar esta función.
• No se pueden reprodu cir los archivos protegidos por derechos de autor, como DRM.
• Es posible que se haga referencia a AppRadio Mode + como AppRadio Mode.
• Es posible que determ inados usos de un iPhone o un teléfono intel igente estén prohibidos mientras
conduce en su jurisdi cción; en consecuencia, debe conocer y respe tar dichas restricciones.
• Si tiene dudas acerca de una función en particular, solo utilícela mientras el vehículo está
estacionado.
• No debe utilizarse ninguna función, a menos que sea seguro utilizarla en las condiciones de
conducción actuales del vehículo.
información sobre la conexión disponible, consulte Conexión de iPod/iPhone o teléfono
inteligente para origen AV (página 19).
• Toque el icono de la aplicación deseada después de que se inicie la aplicación AppRadio.
• Si conecta el dispositivo a este producto mientras ya se está ejecutando una aplicación compatible
con AppRadio Mode +, aparecerá en este producto la pantalla de función de la aplicación.
• Se inicia la aplicación deseada, y aparece la pantalla de función de la aplicación.
• Pulse para volver a la pantalla de menú superior.
Muestra el origen ac tual.
Muestra la pantall a de la aplicación de inicio.
Uso de AppRadio Mode +
• Pioneer no se responsabiliza por ningún problema que pudiera presentarse debido al contenido
incorrecto o defectuoso basado en aplicaciones.
• El contenido y la funcionalidad de las aplicaciones compatibles son responsabilidad de los
proveedores de la App.
• En el AppRadio Mode +, la funcionalidad mediante el producto es limitada mientras conduce; las
funciones disponibles están definidas por los proveedores de la App.
• La disponibilidad de la funcionalidad AppRadio Mode + está definida por el proveedor de la App, no
por Pioneer.
• AppRadio Mode + permite el acceso a aplicaciones distintas a las enumeradas (supeditado a
restricciones mientras conduce); sin embargo, los proveedores de la App definen la medida en que el
contenido puede utilizarse.
Procedimiento de inicio
Al conectar un iPhone o un teléfono inteligente a este producto, los ajustes se
configuran automáticamente según el dispositivo que se conectará. Para obtener
16Es
Muestra la pantalla a nterior.
Muestra la pantalla del menú.
• Pulse y luego toque para ocultar el AppRadio Mode + SideControlBar.
• Pulse y luego toque nuevamente para volver a mostrar el AppRadio Mode +
SideControlBar.
• En función del tipo de dispositivo, y no están disponibles.
Para usuarios de iPhone
1 Conecte el iPhone.
Consulte iPod/iPhone con conector Lightning (página 52).
2 Pulse .
3 To que .
Page 77

Español
4 Toque [AppRadio Mode].
NOTAS
NOTA
PRECAUCIÓN
SUGERENCIA
NOTA
SUGERENCIA
5 Toque el icono deseado en la pestaña.
Se inicia la AppRadio app.
Para usuarios de teléfonos inteligentes (Android)
• [USB MTP] está [Des.] para usar AppRadio Mode + (página 35).
• La capacidad de reproducción del video depende del dispositivo Androi d conectado.
1 Desbloquee su teléfono inteligente y conéctelo a este producto mediante USB.
Consulte Teléfono inteligente (dispositivo Android) (página 53).
2 Pulse .
3 Toque .
4 Toque [AppRadio Mode].
5 Toque el icono deseado en la pestaña.
Se inicia la AppRadio app.
Esta función quizá no esté disponible en función de la aplicación o el origen AV.
1 Inicie el AppRadio Mode +.
2 Pulse VOL (+/-).
Se mostrará en la pantalla el menú de mezcla de audio.
Toque para suprimir el audio. Vuelva a tocar par a reactivar el audio.
Uso del teclado
Al tocar el área de escritura de texto de una aplicación para iPhone, se mostrará un
teclado en la pantalla. Puede ingresar el texto deseado directamente desde este
producto.
Esta función solo está disponible en el AppRadio Mode + del iPhone.
Por su seguridad, la funcionalidad del teclado está disponible solo cuando el vehículo está detenido y
el freno de mano accionado.
1 Inicie el AppRadio Mode +.
2 Toque el área de escritura de texto en la pantalla de función de la aplicación.
Aparece un teclado para la escritura de texto.
Puede seleccionar el idioma del teclado (página37).
Uso de la función de mezcla de audio
Puede reproducir audio mezclando el origen AV y una aplicación para iPhone o teléfono
inteligente cuando se utiliza AppRadio Mode +.
Ajusta el v olumen del audi o.
Es posible alternar entre la pantalla de operación AV y la pantalla de la Aplicación al pulsar .
17Es
Page 78
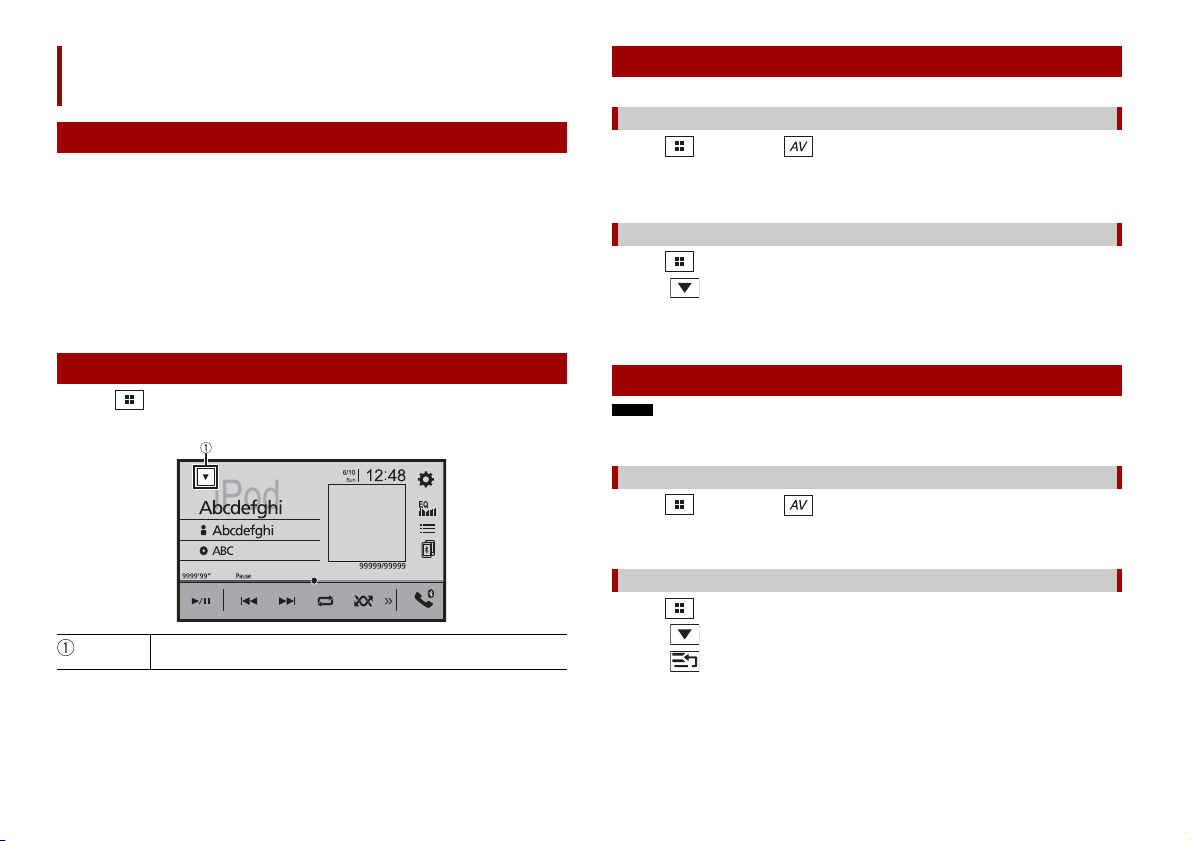
Origen AV
NOTA
Selección de una fuente
Orígenes AV compatibles
Puede reproducir o utilizar las siguientes fuentes con este producto.
• Radio
• USB
Las siguientes fuentes pueden reproducirse o utilizarse mediante la conexión de un
dispositivo auxiliar.
• iPod
• Spotify®
• Audio Bluetooth®
• TV
• Entrada AV (AV)
• AUX
Visualización de la pantalla de operación AV
1 Pulse y luego toque la tecla de operación AV.
Aparece la pantalla de operación AV.
Muestra la lista de f uentes.
Fuente en la pantalla de selección de orígenes AV
1 Pulse y luego toque .
2 Toque el icono de la fuente.
Al seleccionar [Source OFF], se desactiva el origen AV.
Fuente en la lista de fuentes
1 Pulse y luego toque la tecla de operación AV.
2 To que .
3 Toque la tecla de la fuente.
Al seleccionar [Source OFF], se desactiva el origen AV.
Cambio del orden de visualización del origen
Esta función está disponible solo cuando detiene el vehículo en un lugar seguro y acciona el freno de
mano.
Cambio del orden de visualización de los iconos de las fuentes
1 Pulse y luego toque .
2 Mantenga presionado el icono del origen y arrástrelo a la posición deseada.
Cambio del orden de visualización de las teclas de las fuentes
1 Pulse y luego toque la tecla de operación AV.
2 To que .
3 To que .
4 Arrastre la tecla de la fuente a la posición deseada.
18Es
Page 79

Español
NOTA
Ajuste del alcance del área de iconos de orígenes
NOTAS
SUGERENCIA
favoritos
Conexión de iPod/iPhone
Esta función está disponible solo cuando detiene el vehículo en un lugar seguro y acciona el freno de
mano.
1 Pulse .
2 Mantener pulsado .
Aparece en la parte superior izquierda del icono de origen favorito.
3 Arrastre a la posición deseada.
Para terminar con el ajuste, toque cualquier lugar de la pantalla fuera del icono de
origen favorito.
o teléfono inteligente
para origen AV
Al usar un iPod/iPhone o un teléfono inteligente con este producto, los ajustes se
configuran automáticamente según el dispositivo que se conectará. En esta sección se
describe la compatibilidad de orígenes para la conexión de cada dispositivo.
• Los métodos de operación pueden variar en función del modelo de iPod/iPhone o del teléfono
inteligente y la versión del software.
• La compatibilidad con esta unidad dependerá de la versión del iPod/iPhone o de la versión del SO del
teléfono inteli gente.
iPod/iPhone con un conector de Lightning
Estos son los métodos para conectar un iPod/iPhone con un conector Lightning a este
producto. Los orígenes disponibles varían en función del método de conexión.
• Conexión mediante Bluetooth (página 20)
• Conexión mediante CD-IU52* (página 20)
* Se vende por separado
Modelos de iPod/iPhone compatibles
• iPhone 7, 7 Plus
• iPhone SE
• iPhone 6, 6 Plus, 6s, 6s Plus
• iPhone 5, 5c, 5s
• iPod touch 5.ª, 6.ª generación
• iPod nano 7.ª generación
La compatibilidad con algunos orígenes AV dependerá de los modelos de iPod. Para
obtener información detallada acerca de la compatibilidad de este producto con un
iPod/iPhone, consulte la información que aparece en nuestro sitio web.
Puede conectar y controlar un iPod/iPhone compatible con este producto mediante cables del
conector que se venden por separado.
19Es
Page 80

Conexión mediante Bluetooth
SUGERENCIA
Los orígenes siguientes están disponibles cuando se conecta un iPod/iPhone a la unidad
mediante Bluetooth.
• iPod
• Spotify
• Audio Bluetooth
1 Conecte un iPod/iPhone a este producto mediante Bluetooth (página 11).
2 Pulse y luego toque .
3 Toque el origen compatible deseado.
Conexión mediante CD-IU52
Los orígenes siguientes están disponibles cuando se conecta un iPod/iPhone con un
conector Lightning a esta unidad mediante CD-IU52 (se vende por separado).
• iPod
• Spotify
1 Conecte un iPod/iPhone al puerto USB de este producto mediante CD-IU52.
2 Pulse y luego toque .
3 Toque el origen compatible deseado.
La unidad configura automáticamente la conexión con el dispositivo conectado.
• AppRadio Mode +
1 Conecte un iPod/iPhone al puerto USB de este producto mediante CD-IU52.
2 Pulse y luego toque .
3 Toque [AppRadio Mode].
4 Toque el icono deseado en la pestaña.
iPhone con un conector de 30 clavijas
Estos son los métodos para conectar un iPhone con un conector de 30 clavijas a este
producto. Los orígenes disponibles varían en función del método de conexión.
• Conexión mediante Bluetooth (página 20)
• Conexión mediante CD-IU51* (página 20)
* Se vende por separado
Modelos de iPhone compatibles
• iPhone 4s
Para obtener información detallada acerca de la compatibilidad de este producto con un
iPhone, consulte la información que aparece en nuestro sitio web.
Puede conectar y controlar un iPhone com patible con este producto mediante cables del conec tor que
se venden por separado.
Conexión mediante Bluetooth
Los orígenes siguientes están disponibles cuando se conecta un iPhone a la unidad
mediante Bluetooth.
• iPod
• Spotify
• Audio Bluetooth
1 Conecte un iPhone a este producto mediante Bluetooth (página 11).
2 Pulse y luego toque .
3 Toque el origen compatible deseado.
Conexión mediante CD-IU51
Los orígenes siguientes están disponibles cuand o se conecta un iPhone con conector de
30 clavijas a esta unidad mediante CD-IU51 (se vende por separado).
• iPod
• Spotify
1 Conecte un iPhone al puer to USB de este producto mediante CD-IU51.
2 Pulse y luego toque .
3 Toque el origen compatible deseado.
Teléfono inteligente (dispositivo Android™)
Estos son los métodos para conectar un teléfono inteligente a este producto. Los
orígenes disponibles varían en función del método de conexión.
• Conexión mediante Bluetooth (página 21)
• Conexión mediante CD-MU200* (página 21)
* Se vende por separado
Teléfono inteligentes compatibles
No se garantiza la compatibilidad con todos teléfono inteligentes. Para obtener
información detallada acerca de la compatibilidad de este producto con teléfono
inteligentes, consulte la información que aparece en nuestro sitio web.
20Es
Page 81

Español
Conexión mediante Bluetooth
Pantalla Radio
Los orígenes siguientes están disponibles cuando se conecta un teléfono inteligente a la
unidad mediante Bluetooth.
• Spotify
• Audio Bluetooth
1 Conecte un teléfono inteligente a este producto mediante Bluetooth (página 11).
2 Pulse y luego toque .
3 Toque el origen compatible deseado.
Radio
Procedimiento de inicio
1 Pulse y luego toque .
2 Toque [Radio].
Aparece la pantalla Radio.
Conexión mediante CD-MU200
Los orígenes siguientes están disponibles cuando se conecta un teléfono inteligente a la
unidad mediante CD-MU200.
• AppRadio Mode +
1 Conecte un teléfono inteligente al puerto USB de este producto mediante CD-
2 Pulse y luego toque .
3 Toque [AppRadio Mode].
4 Toque el icono deseado en la pestaña.
MU200.
Funcionamiento básico
Recupera la memoria el canal preestablecido almacenado en una
tecla.
Almacena en una tecla la frecuencia de transmisión actual .
Muestra la lista de c anales preestablecidos.
Seleccione un elemento de la lista ([1] a [6]) para cambiar al canal preestablecido.
Selecciona la banda FM1, FM2, FM3 o AM.
Realiza la funció n BSM (mejores estaciones en me moria) (página 22).
21Es
Page 82

SUGERENCIAS
NOTA
SUGERENCIA
NOTAS
Sintonización manual
NOTA
NOTA
Sintonización de búsqueda o sintonización de búsqueda
ininterrumpida
Soltar la tecla tras unos segundos salta a la siguiente estación más
cercana desde la frecuencia actual. Mantenga pulsada la tecla durante
más segundos para una sintonización de búsqueda ininterrumpida.
Busca una transmisión por información PTY (página 22).
Mientras se muestra el mensaje, las seis frecuencias de transmisión más potentes se
almacenarán en las teclas de canales preestablecidos en el orden de su fuerza de
señal.
Para cancelar el proceso de almacenamiento
1 To que [C anc elar ].
• Al pulsar y luego tocar o , también puede cambiar los canales preestablecidos.
• Al mantener pulsado y luego mantener en tacto o y soltarlo, también puede llevar a cabo
la sintonización de búsqueda.
Búsqueda por información de PTY
Puede sintonizar una estación con la información de PTY (Información de tipo de
programa).
Esta función está disponible cuando se selecciona el sintonizador FM.
1 Toque .
2 Toque o para seleccionar el elemento.
3 Toque para comenzar la búsqueda.
Si toca [Cancelar] se cance la el proceso de búsqueda.
Almacenamiento de las frecuencias de transmisión
más potentes (BSM)
La función BSM (memoria de mejores emisoras) almacena automáticamente las seis
frecuencias de transmisión más potentes en las teclas de canales preestablecidos [1] a
[6].
• Es posible que el almacenamiento de frecuencias de transmisión con BSM sustituya a las que ya tenga
guardadas.
• Es posible que las frecuencias de transmisión previamente almacenadas se mantengan así si el
número de f recuencias almacenad as no ha llegado al lím ite.
1 Toque para comenzar la búsqueda.
Ajustes de la radio
1 Pulse .
2 Toque y luego .
Aparece la pantalla de ajustes del sistema.
3 Toque [Config. fuentes AV].
4 Toque [Configuración de la radio].
Los elementos del menú varían según el origen.
Elemento de l menú Descripción
[Local]
[Des.]
FM: [Nivel1] [Nivel2] [Nivel3] [Nivel4]
AM: [Nivel1] [Nivel2]
[Paso FM]
[100kHz] [50kHz]
[Paso AM]
[9kHz] [10kHz]
[Regional]
[Act.] [Des.]
La sintonización de búsqueda local le permite
sintonizar solo las emisoras de radio con señales
suficientemente potentes.
El ajuste de FM [Nivel4] (AM [Nivel2]) permite la
recepción de las emisoras con las señales más
potentes úni camente.
Puede cambiar el paso de sintonización de
búsqueda para la banda FM y el paso de
sintonización de búsqueda/manual para la
banda AM.
Para la banda FM, el paso de sintonización ma nual
está fijado en 50 kHz.
Cambia si el código de área está verificado
durante la búsqueda Id. prog. auto..
22Es
Page 83

Español
NOTA
NOTA
Elemento d el menú Descripción
NOTA
SUGERENCIA
Pantalla de TV (ejemplo)
[FREC alternativa]*1
[Act.] [Des.]
[Id. prog. auto.]
[Act.] [Des.]
[Alarm Interrupt]*2
[Act.] [Des.]
[Interrupción AT]*2
[Act.] [Des.]
[Interrupción noticias]*2
[Act.] [Des.]
*1 Para otros países fuera de México
*2 Esta función está disponible solo cuando recibe la banda FM.
Permite que la unidad se sintonice a una
frecuencia diferente con la misma estación.
Este menú e stá disponible s olo cuando [Locat ion
Settings] es [Australia] (página 36).
Busca la estación emisora con el mismo código
de PI (Identificación de programa) en todas las
bandas de frecuencia automáticamente cuando
la estación emisora contiene datos RDS.
Aún si se configuró como [D es.], se realiza la
búsqueda de PI automáticamente cuando el
sintonizador no puede obtener una buena recepción.
La transmisión de alarma se puede recibir desde
la última frecuencia seleccionada y puede
interrumpir a las otras fuentes.
Recibe el anuncio de tráfico desde la última
frecuencia seleccionada y puede interrumpir a
las otras fuentes.
Interrumpe la fuente seleccionada actualmente
con programas de noticias.
Sintonizador TV
Para controlar el TV, puede conectar el sintonizador de TV, como GEX-1550DTV (se
vende por separado), a este producto. Para obtener información detallada sobre la
conexión, consulte el manual de operaciones del TV.
La siguiente descripción es diferente a la del manual de operación del sintonizador TV.
Procedimiento de inicio
1 Pulse y luego toque .
2 Toq ue [T V].
Aparece la pantalla de TV.
Funcionamiento básico
Cambia al modo de pantalla (página44).
[Full]—[Normal]
Al pulsar y luego tocar o , también puede cambiar los canales preestablecidos.
23Es
Page 84

NOTAS
NOTAS
Archivos comprimidos
SUGERENCIAS
SUGERENCIA
NOTA
Pantalla de origen de audio 1 (ejemplo: USB)
Conexión/desconexión de un dispositivo de
almacenamiento USB
Puede reproducir audio comprimido, video comprimido o archivos de imágenes
estáticas almacenados en un dispositivo de almacenamiento externo.
Conexión de un dispositivo de almacenamiento USB
1 Extraiga el conector del puerto USB del cable USB.
2 Conecte un dispositivo de almacenamiento USB al cable USB.
• Es posible que este producto no logre el desempeño óptimo con algunos dispositivos de
almacenamiento USB.
• No es posible la conexión mediante un concentrador USB.
• Para la conexión es nece sario un cable USB.
Cable USB
Dispositivo de almacenamiento USB
Procedimiento de inicio
1 Pulse y luego toque .
2 Conecte un dispositivo de almacenamiento USB al cable USB (página 24).
3 Toque [USB].
La reproducción se lleva a cabo según el orden de los números de carpetas. Se
omiten las carpetas que contengan archivos que no se pueden reproducir.
Funcionamiento básico
• Al pulsar y luego tocar o , también puede adelantar o retrasar para saltar archivos/
capítulos.
• Al pulsar y, luego, mantener pulsado o en el archivo de audio o video, también puede
atrasar o adelantar rápidamente.
• Puede ajustar el tamaño de la pantalla para archivos de video e imágenes (página 44).
Origen de audio
Desconexión de un dispositivo de almacenamiento USB
1 Extraiga el dispositivo de almacenamiento USB del cable USB.
• Revise que no haya acceso a ningún dato antes de extraer el dispositivo de almacenamiento USB.
• Apague (ACC OFF) la llave de encendido antes de desenchufar el dispositivo de almacenamiento USB.
24Es
Muestra la pantalla de búsqueda de vínculos.
Toque la canción para reproducirla y luego toque la información de la canción,
luego de cambiar al modo de exploración de música (página25).
Si toca el arte, se muestra la lista de canciones del álbum.
Esta función está disponible solo para el dispositivo de almacenamiento USB.
Alterna entre reproducci ón y pausa.
Page 85
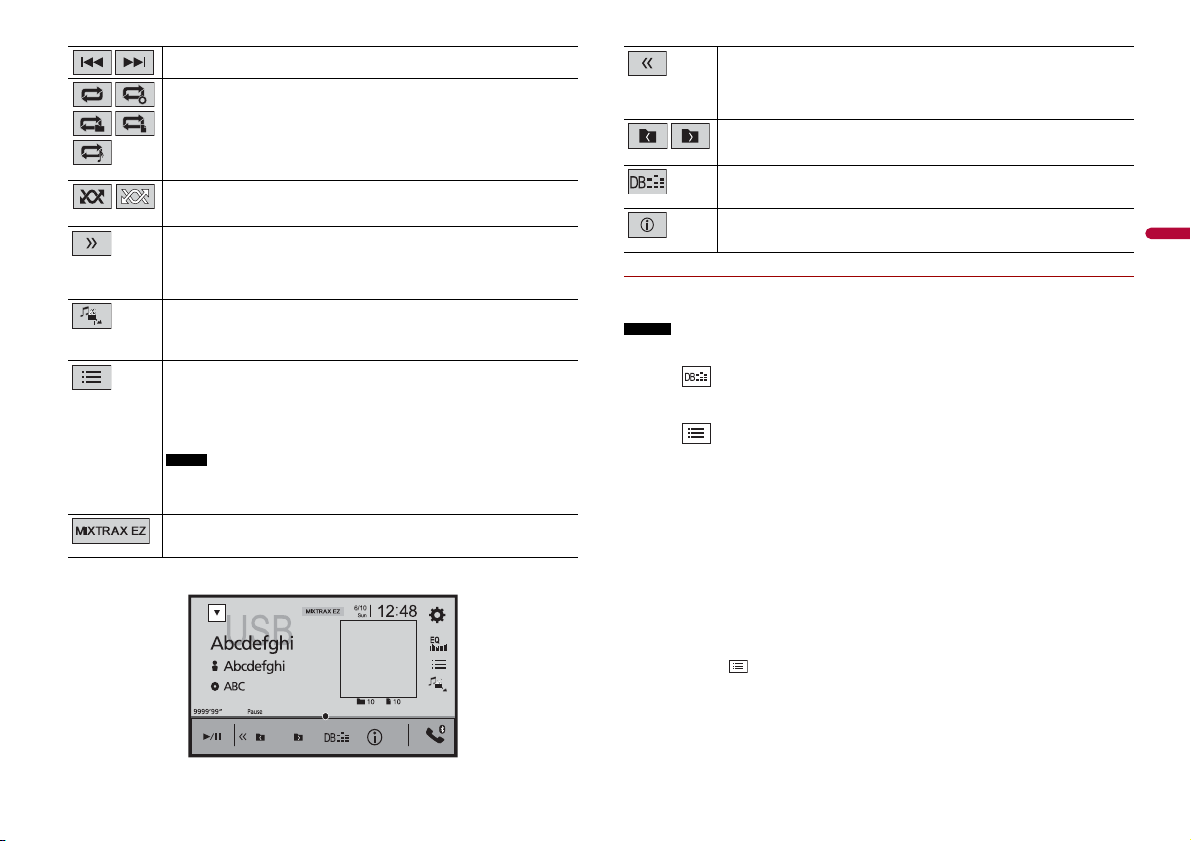
Español
Adelanta o atrasa archivos.
SUGERENCIA
SUGERENCIA
NOTA
Pantalla de origen de audio 2 (ejemplo: USB)
NOTAS
SUGERENCIA
SUGERENCIA
Ajusta un rango de repetición de reproducción para todos los archivos, la
carpeta actual o el archivo actual.
Muestra la barra de función o culta.
También puede mostrar la barra de función oculta al palpar l a barra de izquierda a
derecha.
Selecciona la carpeta siguiente o anterior.
Reproduce o no reproduce los archivos en orden aleatorio.
Muestra la barra de funci ón oculta.
También puede mostrar la barra de función oculta al palpar la barra de derecha a
izquierda.
Cambia los tipos de archivo multimedia siguientes.
[Music]: Archivos de audio comprimido
[Video]: Archivos de video comprimido
[Photo]: Archivos de imagen
Selecciona un archivo de la lista.
Toque un archivo de la lista para reproduc irlo.
Al tocar una carpeta de la lista, se muestra su contenido. Puede reproducir un
archivo de la lista con so lo tocarlo.
Al reproducir archivos de audio comprimidos que estén almacenados en un
dispositivo de almacenamiento USB, puede buscar un archivo en el modo de
exploración de música (página 25).
Muestra la pantalla MIXTRAX (página 33).
Construye la base de datos para usar con el modo de exploración de música
(página 2 5).
Alterna la visualización de la información actual de la música.
▶Selección de un archivo con el modo de exploración de música
Puede seleccionar archivos para su reproducción usando la lista de categorías si los
archivos contienen información de etiquetas.
• Esta función está disponible solo para el dispositivo de almacenamiento USB.
• No es posible mantener el modo de exploración de música una vez que se apaga la corriente.
1 Toque para crear una base de datos.
El modo de exploración de música estará disponible después de que se haya creado
la base de datos.
2 Toque .
3 Toque la categoría deseada para mostrar la lista de archivos.
4 Toque el elemento.
Refine el elemento hasta que aparezca en la lista el título de la canción o el nombre
del archivo deseados.
5 Toque el título de la canción o el nombre del archivo deseados para reproducirlo.
Si se canceló la selección hecha con el modo de exploración de música, puede tocar
la pestaña [Tag] en la pantalla de la lista de archivos o carpetas y tocar la pista
deseada para volver al modo de exploración de música.
Una vez que se crea la base de datos en el almacenamiento USB, no hay necesidad de crear de nuevo la
base de datos mientras se guarden los mismos contenidos. Para ingresar al modo Music Browse
directamente , toque y lue go [Tag] antes de selec cionar la canción.
25Es
Page 86

PRECAUCIÓN
Origen de video
SUGERENCIA
Pantalla de origen de video (ejemplo: USB)
SUGERENCIAS
SUGERENCIA
Pantalla de imágenes estáticas
Por razones de seguridad, no pueden verse las imágenes de video mientras el vehículo esté en
movimiento. Para ver imágenes de video, deténgase en un lugar seguro y accione el freno de mano.
Oculta las teclas del panel táctil.
Para volver a mostrar las teclas, toque en cualquie r lugar de la pantalla.
Alterna entre reproducci ón y pausa.
Adelanta o retrasa rápidamente.
Vuelve a tocar para cambiar la velocidad de reproducción.
Detiene la reproducción.
Reproduce fotograma por fotograma.
Cambia lo s tipos de archi vo multimedia sigu ientes.
[Music]: Archivos de audio comprimido
[Video]: Archivos de video comprimido
[Photo]: Archivos de imagen
Selecciona un archivo de la lista.
Toque un archivo de la lista para reproducirlo.
Al tocar una carpeta de la lista, se muestra su contenido. Puede reproducir un
archivo de la lista con solo tocarlo.
Adelanta o atrasa archivos.
Origen de imágenes estáticas
• Los archivos de imagen no se muestran en la pantalla trasera.
• Al pulsar y, luego, mantener pulsado o en el archivo de imagen estática, puede buscar en
10 archivos de imagen a la vez. Si el archivo en reproducción en ese momento es el primero o el
último de la carpeta, no se lleva a cabo la búsqueda.
Reproduce a cámara lenta.
Ajusta un rango de repetición de reproducción para todos los archivos, la
carpeta actual o el archivo actual.
Cambia el idioma del audio o de los subtítulos.
Los iconos varían según el archivo.
26Es
Oculta las teclas del panel táctil.
Para volver a mostrar las teclas, toque en cualquie r lugar de la pantalla.
Alterna entre reproducci ón y pausa.
Adelanta o atrasa archivos.
Selecciona la carpeta siguiente o anterior.
Page 87

Español
Guarda las imágenes a ctuales como el fondo de pantalla.
NOTA
SUGERENCIA
NOTAS
SUGERENCIAS
Pantalla de origen de audio 1
Toque los elementos siguientes y luego toque [Sí] para sobrescribir la imagen.
[Como PantallaAV]: Guarda la imagen como fondo de la pantalla para la pantalla
AV.
[Como PantHome]: Guarda la imagen como fondo de la pantalla de menú
superior.
[Como ambas]: Guarda la imagen como fondo de las pantallas AV y de menú
superior.
Al guardar la nueva imagen, el fondo de pantalla actual queda sobrescrito excepto
que sea la imagen preestablecida.
Gira la imagen mostrada 90° en sentido horario.
Ajusta un rango de repetición de reproducción para todos los archivos o la
carpeta actual.
Reproduce todos los a rchivos en el rango actual de repet ición de
reproducción o no los reproduce en orden aleatorio.
Cambia los tipos de archivo multimedia siguientes.
[Music]: Archivos de audio comprimido
[Video]: Archivos de video comprimido
[Photo]: Archivos de imagen
Selecciona un archivo de la lista.
Toque un archivo de la lista para reproduc irlo.
iPod
Conexión del iPod
Al conectar un iPod a este producto, los ajustes se configuran automáticamente según el
dispositivo que se conectará. Para obtener información sobre la conexión disponible,
consulte Conexión de iPod/iPhone o teléfono inteligente para origen AV (página 19).
• En función de la genera ción o la versión del iPod, algunas funciones quizá no estén disponibles.
• No elimine la Apple Music® app de su iPod, ya que algunas funciones pueden no estar disponibles.
1 Conecte el iPod.
2 Pulse y luego toque .
3 Toq ue [iP od] .
Funcionamiento básico
• Al pulsar y luego tocar o , también puede adelantar o retrasar para saltar archivos.
• Al pulsar y, luego, mantener pulsado o , también puede atrasar o adelantar rápidamente.
Al tocar una carpeta de la lista, se muestra su contenido. Puede reproducir un
archivo de la lista con so lo tocarlo.
Origen de audio
27Es
Page 88

Muestra la pantalla d e búsqueda de vínculos.
SUGERENCIA
NOTA
SUGERENCIAS
NOTAS
Importante
NOTA
Pantalla de origen de audio 2
Pantalla Apple Music Radio
Seleccione una canción a partir de la lista relacionada con la canción reproducida
en ese momento.
Si toca el arte, se muestra la lista de canciones del álbum.
Esta funci ón no está disponib le cuando se reprodu ce Apple Music Rad io.
Alterna entre reproducci ón y pausa.
Adelanta o atrasa archivos.
Ajusta un rango de repetición de reproducción para todos los elementos en la
lista seleccionada o en la canción actual.
Reproduce en orden aleato rio las canciones de la lista o e l álbum
seleccionados.
Muestra la barra de f unción oculta.
Cambia entre los dispositivos conectados.
Selecciona una canción de la lista.
Toque la categoría y luego el título de la lista para reproducir la lista seleccionada.
• Si utiliza el idioma inglés como el idioma del sistema, está disponible la función
de búsqueda alfabética. Toque la barra de búsqueda inicial para utilizar esta
función.
• Puede producir listas de re producción creadas con la a plicación MusicSphere. La
aplicación está disponible en nuestro sitio web.
• Cuando toque la estación Apple Music Radio en la lista, aparece al pantalla Apple
Music Radio (página 28).
• En función de la generación o la versión del iPod, algunas funciones quizá no
estén disponibles.
• En la lista solo hay disponibles 16 000 canciones del iPod si el iPod tiene más de
16 000 canciones. Las canciones disponibles dependen del iPod.
28Es
Cambia la velocidad del audiolibro.
Normal—Rápido—Lento
Muestra la barra de f unción oculta.
Origen Apple Music® Radio
Apple Music Radio puede no estar disponible en su país o región . Para obtener informació n detallada
sobre Apple Music Radio, visite el siguiente sitio: http://www.apple.com/music/
Esta función solo está disponible al usar la función iPod con un iPhone 7, iPhone 7 Plus, iPhone SE,
iPhone 6s, iPhone 6s Plus, iPhone 6, iPhone 6 Plus, iPhone 5s, iPhone 5, iPhone 5c, iPhone 4s o iPod
touch (5.ª, 6.ª generación).
Alterna entre reproducci ón y pausa.
Page 89

Español
Muestra el menú despleg able de Apple Music Radio.
NOTA
ADVERTENCIA
Importante
• Toque [Play More Like This] para reproducir canciones similares a la canción
actual.
• Toque [Play Less Like This] para ajustar no volver a reproducir la canción actual.
• Toque [Add to iTunes Wish List] para agregar la canción actual a la lista de deseos
de iTunes.
Es posible que esta función no esté disponible, según el estado de su cuenta de
Apple Music.
Adelanta las pistas.
Spotify®
Para disfrutar de Spotify mientras conduce, primero descargue la aplicación Spotify en
su iPhone o teléfono inteligente. Puede descargarla desde iTunes App Store o Google
Play. Seleccione una cuenta gratuita o una cuenta premium paga, desde la aplicación o
en spotify.com. Las cuentas premium le brindan más funciones como escuchar música
sin conexión. Si ya tiene Spotify, actualice la aplicación para obtener la última versión y,
luego, conecte su teléfono al vehículo. Ahora puede escuchar música en la carretera.
Es posible que determinados usos de un iPhone o un teléfono inteligente estén prohibidos mientras
conduce en su jurisdicción; en consecuencia, debe conocer y respetar dichas restricciones. Si tiene
dudas acerca de una función en particular, solo utilícela mientras el vehículo está estacionado. No debe
utilizarse ninguna función, a menos que sea seguro utilizarla en las condiciones de conducción
actuales del vehículo.
• Confirme los requisitos para acceder a Spotify mediante el audio/video para vehículos de Pioneer
(página 19).
• Para utilizar el servicio de Spotify, debe conectarse a Internet mediante una red 3G, EDGE, LTE (4G) o
Wi-Fi. Si el plan de datos del iPhone o teléfono inteligente no le permite hacer uso de los datos de
forma ilimitada, es posible que su compañía telefónica realice cobros adicionales.
• Para obtener información sobre los países y las regiones donde es posible usar los servicios de
Spotify, visite el sitio web https://www.spotify.com/us/select-your-country/.
Limitaciones:
• Es posible que no pueda recibir el servicio de Spotify en función de la disponibilidad
de Internet.
• El servicio de Spotify está supeditado a cambios sin previo aviso. El servicio podría
verse afectado por cualquiera de los siguientes factores: versión del firmware del
iPhone o teléfono inteligente, versión del firmware de la aplicación Spotify, cambios
realizados al servicio de música de Spotify.
• Determinadas funciones del servicio de Spotify no están disponibles al acceder al
servicio mediante los productos de audio/video para vehículos de Pioneer.
• Spotify es un servicio de música que no está afiliado a Pioneer. Puede obtener más
información en https://support.spotify.com/.
• La aplicación móvil Spotify está disponible para la mayoría de los dispositivos iPhone y
teléfonos inteligentes; visite https://support.spotify.com/ para conocer la última
información sobre la compatibilidad.
Escuchar Spotify
Actualice el firmware de la aplicación Spotify a la versión más reciente antes de usarla.
29Es
Page 90

1 Desbloquee el dispositivo móvil y conéctelo a este producto.
NOTAS
SUGERENCIA
Pantalla de reproducción 1 (Pista)
SUGERENCIA
SUGERENCIA
Pantalla de reproducción 2 (Pista)
• iPhone a través de USB o Bluetooth
• Teléfono inteligente a través de Bluetooth
2 Pulse .
3 Toque y luego .
4 Toque [Config. fuentes AV].
5 Confirme que [Spotify] esté activado.
6 Pulse y luego toque .
7 Toque [Spotify].
• Para obtener información sobre la conexión Blue tooth, consulte página 11.
• Para obtener información de tallada sobre la conexión USB para iPhone, cons ulte iPod/iPhone con
conector Lightning (página 52) o iPhone con conector de 30 clavijas (página 52).
Funcionamiento básico
Alterna entre reproducci ón y pausa.
Guarda o elimina l a información de la canción actual de Your M usic.
Muestra la barra de f unción oculta.
También puede mostrar la b arra de función oculta al pal par la barra de derecha a
izquierda.
Cambia entre los dispositivos conectados.
Selecciona una pista o una emisora de la lista.
Your Music: Selecciona una pista o una emisora a par tir de la lista de información
guardada de las canciones.
Browse: Selecciona una pista de la lista d e categorías.
Radio: Selecciona una emisora de la lista de emisoras.
Recently Played: Selecciona una pista reproducida recientemente.
Muestra la barra de f unción oculta.
También puede mostrar la barra de función oculta al pa lpar la barra de izquierda a
derecha.
Ajusta un rango de repetición de reproducción.
Adelanta o atrasa pistas.
Al pulsar y luego tocar , puede adelan tar pistas para omitirlas.
Cambia al modo radio.
30Es
Reproduce las pist as en orden aleatorio.
Page 91

Español
Alterna entre reproducción y pausa.
SUGERENCIA
SUGERENCIA
Pantalla de reproducción 1 (Modo radio)
SUGERENCIA
Pantalla de reproducción 2 (Modo radio)
Muestra la barra de función o culta.
Adelanta o atrasa pistas.
Al pulsar y luego tocar , puede adel antar canciones para omitir las.
Inicia un nuevo modo radio.
Guarda o elimina la in formación de la canción actual de Your Music.
Muestra la barra de funci ón oculta.
También puede mostrar la barra de función oculta al palpar la barra de derecha a
izquierda.
Cambia entre los dispositivos conectados.
Selecciona una pist a o una emisora de la lista.
Yo ur Mu s ic : Selecciona una pista o una emisora a partir de la lista de información
guardada de las canciones.
Browse: Selecciona una pista de la lista de categorías.
Radio: Selecciona una emisora de la lista de emisoras.
Recently Played: Selecciona una pista reproducida recientemente.
También puede mostrar la barra de función oculta al palpar l a barra de izquierda a
derecha.
Asigna un Pulgar arriba para la pista en reproducción.
Asigna un Pulgar abajo p ara la pista en reproducción y salta a la pista
siguiente.
31Es
Page 92

PRECAUCIÓN
NOTA
AUX
SUGERENCIA
Pantalla AUX
Puede visualizar la salida de imágenes de video mediante el dispositivo conectado a la
entrada de video.
Por razones de seguridad, no pueden verse las imágenes de video mientras el vehículo esté en
movimiento. Para ver imágenes de video, deténgase en un lugar seguro y accione el freno de mano.
Se necesita un cable AV con minienchufe (CD-RM10) (se vende por separado) para la conexión. Para
obtener detalles, consulte Componente de video externo y la visualizac ión (página 53).
Procedimiento de inicio
1 Pulse .
2 Toque y luego .
3 Toque [Config. entrada/salida].
4 Confirme qu e [Entrada AUX] esté activado.
5 Pulse y luego toque .
6 Toque [AUX].
Aparece la pantalla AUX.
Funcionamiento básico
Oculta las teclas del panel táctil.
Para volver a mostrar las teclas, toque en cualquier lugar de la pantalla.
Puede ajustar el tamaño de la pantalla para la i magen de video (página 44).
Cambia entra la entrada de video y la entrada de audio.
32Es
Page 93
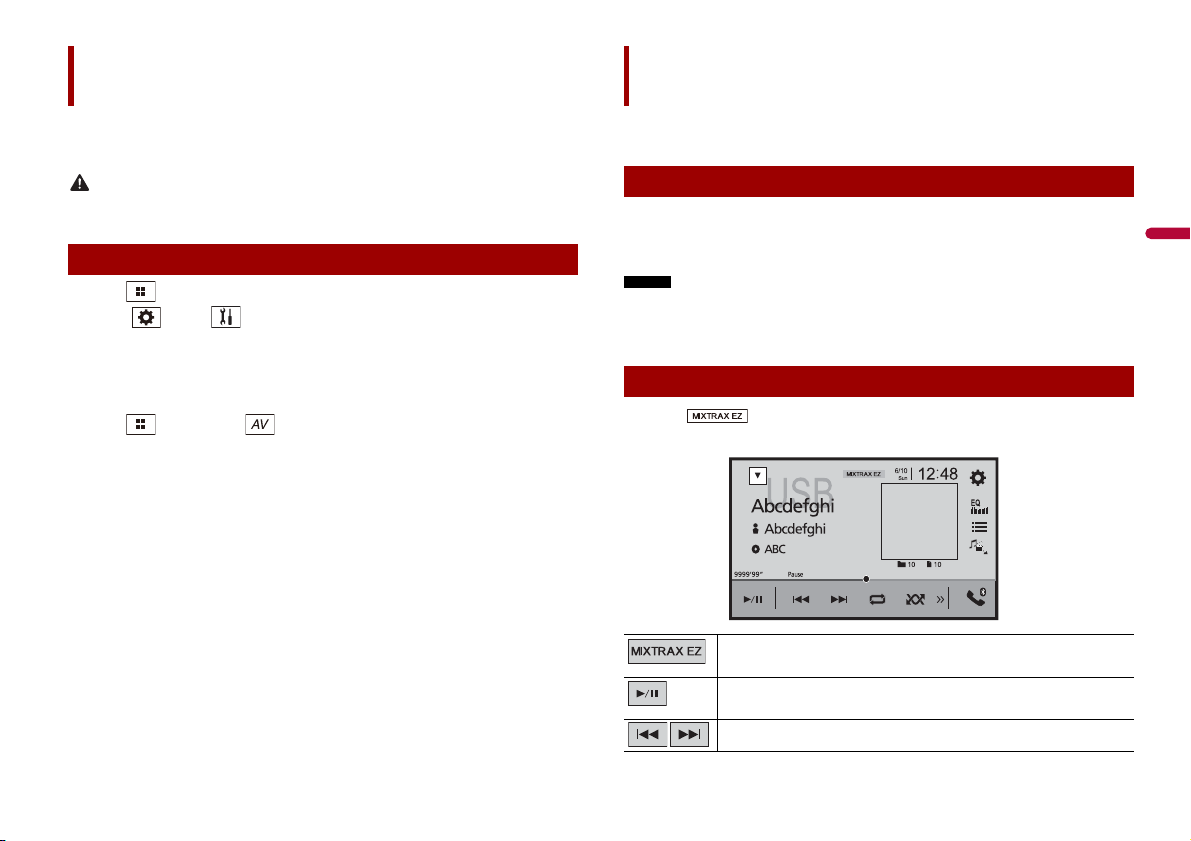
Español
PRECAUCIÓN
Entrada AV
NOTAS
(Ejemplo: USB)
MIXTRAX
Puede visualizar la salida de imágenes de video mediante el dispositivo conectado a la
entrada de video. Para obtener detalles, consulte Componente de video externo y la
visualización (página 53).
Por razones de seguridad, no pueden verse las imágenes de video mientras el vehículo esté en
movimiento. Para ver imágenes de video, deténgase en un lugar seguro y accione el freno de mano.
Procedimiento de inicio
1 Pulse .
2 Toque y luego .
3 Toque [Config. entra da/salida].
4 Toque [Entrada AV].
5 Toq ue [Ac t.] .
6 Pulse y luego toque .
7 Toq ue [AV] .
La imagen se muestra en la pantalla.
MIXTRAX es la tecnología original para crear mezclas ininterrumpidas de selecciones de
su biblioteca de audio, incluidos efectos de DJ.
Operación de MIXTRAX EZ
Puede usar esta unidad para reproducir archivos de audio USB.
MIXTRAX EZ se utiliza para agregar una variedad de efectos de sonido entre canciones a
fin de arreglar las pausas entre estas.
Permite disfrutar la música sin interrupciones.
• Esta función solo está disponible cuando se reproduce un archivo en un dispositivo de
almacenamiento USB.
• La disponibilidad de los efectos de sonido depende del archivo/la canción.
• La disponibilidad de la reproducción ininterrumpida depende del archivo/la canción.
Procedimiento de inicio
1 Toq u e .
Activa el modo MIXTRAX.
Alterna entre reproducción y pausa.
Selecciona una pist a.
33Es
Page 94
Ajustes de MIXTRAX
1 Pulse .
2 Toque y luego .
Aparece la pantalla de ajustes del sistema.
3 Toque [Config. fuentes AV].
4 Toque [Config. MIXTRAX].
Elemento de l menú Descripción
[Modo de reproducción
corta]
[Des.] [60s] [90s] [120s]
[150s] [180s] [Aleatorio]
[Efecto de p antalla]
[Act.] [Des.]
[Efecto corte limpio]
[Act.] [Des.]
[Ajuste de efectos]
[Estándar] [Simple]
[Personalizado]
[Patrón de flash] El color del parpadeo cambia con los cambios de los
De [Sonido1] a
[Sonido6 ]
De [Paso I1] a [Paso I6] El patrón de parpadeo cambia de acuerdo al nivel de
[Aleatorio1] El patrón de parpadeo cambia aleatoriamente según el
[Aleatorio2] El patrón de parpadeo cambia aleatoriamente de acuerdo
[Aleatorio3] El patrón de parpadeo cambia aleatoriamente de acuerdo
[Des.] Desactiva el patrón de parpadeo.
Especifica la parte de reproducción.
Ajusta la visualización de efectos para MIXTRAX.
Ajusta el tono del efecto sonoro al adelantar o retrasar para
omitir pistas.
Ajusta y reproduce el efecto MIXTRAX deseado.
niveles de sonido y graves.
El patrón de parpadeo cambia de acuerdo al nivel de
sonido.
graves.
modo del nivel de sonido y el modo de paso bajo.
al modo del nivel de sonido.
al modo de paso bajo.
Ajustes
Puede ajustar distintos valores de configuración en el menú principal.
Visualización de la pantalla de ajustes
1 Pulse .
2 Toq u e .
3 Toque una de las categorías siguientes y seleccione las opciones.
Ajustes del sistema (página 34)
Ajustes del tema (página 39)
Ajustes de audio (página 39)
Ajustes de video (página 43)
Ajustes de Bluetooth (página 11)
Ajustes del sistema
Los elementos del menú varían según el origen.
[Config. fuentes AV]
Elemento de l menú Descripción
[Config. MIXTRAX] (página 34)
[Configuración de la radio] (página 22)
[Bluetooth Audio]
[Act.] [Des.]
[Spotify]
[Act.] [Des.]
[Tono de pitido]
Elemento de l menú Descripción
[Tono de pitido]
[Act.] [Des.]
Ajuste de la activación del origen de audio Bluetooth
Ajuste de la activación del origen de Spotify.
Seleccione [Des.] para deshabilitar el sonido del pitido
cuando se pulsa un botón o se toca la pantalla.
34Es
Page 95
Español
[Mezcla autom.]
NOTA
NOTA
PRECAUCIÓN
NOTA
Elemento d el menú Descripci ón
[Mezcla autom.]
[Act.] [Des.]
Seleccione si desea hacer la mezcla de la salida de sonido
de AppRadio Mode + y AV automáticamente.
Para cerrar el modo de visualización de la cámara, toque en la pantalla de
visualización de la cámara.
Para configurar la cámara de visión trasera como la cámara para el modo Vista de cámara, ajuste
[Entrada cámara trasera] en [Act.] (página 35).
[Config. entrada/salida]
Elemento d el menú Descripci ón
[USB MTP]
[Act.] [Des.]
[AppRadio Mode Sound] Ajuste cuál es la salida del sonido para el AppRadio Mode +
Seleccione si desea activar la conexió n USB MTP (Protocolo
de transferencia de medios).
cuando se usa con un teléfono inteligente.
[AVH] El sonido sale por las bocinas de esta unidad.
[Smartphone] El sonido sale por las bocinas del teléfono inteligente.
Con un iPhone, el sonido siempre sale por las bocinas de esta
unidad.
[Entrada AV]
[Act.] [Des.]
[Entrada AUX]
[Act.] [Des.]
Selecciona un origen de entrada AV (página 33).
Ajuste en [Act.] para el origen AUX (página 32).
[Config. cámaras]
Se necesita una cámara de visión trasera de venta por separado (p. ej., ND-BC8) para
utilizar la función de cámara de visión trasera. (Comuníquese con su distribuidor para
obtener información detallada.)
▶Cámara de visión trasera
Este producto incluye una función que cambia automáticamente a la imagen de
pantalla completa de la cámara de visión trasera instalada en su vehículo, cuando la
palanca de cambios está en la posición de REVERSA (R).
▶Cámara para el modo Vista de cámara
Vista de cámara puede mostrarse en todo momento. Tenga en cuenta que con este
ajuste, la imagen de la cámara no se redimensiona, y que una parte de lo que la cámara
percibe no puede verse.
Para mostrar la imagen de la cámara, toque [Camera View] en la pantalla de selección del
origen AV (página 18).
Pioneer recomienda usar una cámara que emita imágenes especulares invertidas; de lo contrario es
posible que la imagen de la pantalla se vea invertida.
• Corrobore de inmediato si la visualización cambia a la imagen de cámara de visión trasera cuando la
palanca de cambios se pone en REVERSA (R) después de estar en otra posición.
• Cuando la pantalla cambie a la imagen de la cámara de visión trasera de pantalla completa durante la
conducción norm al del vehículo, cambie al ajuste opuesto en [Polaridad de la cámara ].
• Si toca mientras se muestra la imagen de la cámara, la imagen mostrada se apaga
temporalmen te.
Elemento d el menú Descripci ón
[Entrada cámara trasera]
[Act.] [Des.]
Ajuste de la activación de la cámara de visión trasera.
[Polaridad de la c ámara] Ajuste de la polaridad de la cámara de visión trasera.
[Batería] La polaridad del cable conectado es positiva.
[Con. tierra] La polaridad del cable conectado es negativa.
Esta función está disponible cuando [Entrada cámara trasera] está
en [Act.].
[Guía ayuda estacionam.]
[Act.] [Des.]
Puede ajustar si mostrar las indicaciones de asistencia para
estacionar en las imágenes de la cámara de visión trasera
mientras da marcha atrás.
35Es
Page 96

PRECAUCIÓN
NOTAS
Elemento de l menú Descripción
2 m
Marcas
Marcas
50 cm
Protector trasero
25 cm
25 cm
NOTAS
NOTAS
[Aj. guía ayuda estac.] Ajuste de las indicaciones al arrastrar o tocar / / / /
/ en la pantalla.
Toque [Pred.] para restablecer el ajuste.
[Idioma del sistema]
Elemento de l menú Descripción
[Idioma del sistema] Seleccione el idioma del sistema.
[Modo demo]
Elemento de l menú Descripción
[Modo demo]
[Act.] [Des.]
36Es
• Al ajustar las indicaciones, asegúrese de estacionar el vehículo en
un lugar seguro y colocar el freno de mano.
• Antes de salir del vehículo para colocar las marcas, asegúrese de
girar la llave de encendido a la posición de apagado (ACC OFF).
• El alcance proyectado por la cámara de visión trasera es limitado.
Además, las indicaciones del ancho del vehículo y de distancia
mostradas en la imagen de la cámara de visión trasera pueden
diferir del ancho del vehículo y la distancia reales. (Las
indicaciones son líneas rectas.)
• La calidad de la imagen puede deteriorarse en función del
entorno de uso, como de noche o en ambientes oscuros.
• Este ajuste está disponible solo cuando detiene el vehículo en un
lugar seguro y acciona el freno de mano.
• Con cinta de embalaje u otra cinta similar, coloque las marcas
como se mue stra a continuación a ntes de configurar la s
indicaciones, de modo que las indicaciones pueden
superponerse con las marcas.
Ajuste del modo de demostración.
• Si el idioma integrado y el ajuste del idioma seleccionado no
coinciden, es posible que la información de texto no se muestre
correctamente.
• Es posible que algunos caracteres no se muestren
correctamente.
[Ajuste de ubicación]
Para otros países fuera de México
Elemento de l menú Descripción
[Ajuste de ubic ación]
[Sudamérica] [Australia]
Seleccionar con la ubicación.
[Control tipo volante]
Elemento de l menú Descripción
[Control tipo volante]
[Con adap.] [Sin adap.]
Seleccione [Con adap.] o [Sin adap.] según el control
remoto cableado.
• Este ajuste está disponible solo cuando detiene el vehículo en un
lugar seguro y acciona el fren o de mano.
• En función de su vehículo, esta función podría no funcionar
correctamente. En ese caso, consulte a su distribuidor o el centro
de serv icio PIONEER autor izado.
• Use un soporte cableado PIONEER en cada modelo de veh ículo
cuando el modo [Con adap.] está a ctivado, de lo contrario
seleccione [Sin adap.].
Page 97
Español
NOTAS
[Restaurar configuración]
PRECAUCIÓN
NOTAS
NOTAS
NOTA
Elemento d el menú Descripci ón
[Todas las
configuraciones]
Toque [Restaurar] para restablecer la configuración a los
ajustes predeterminados.
No apague el motor mientras restablece los ajustes.
• Este ajuste está disponible solo cuando detiene el vehículo en un
lugar seguro y acciona el freno de mano.
• Se apaga el origen y la conexión Bluetooth se desconecta antes
del inicio del proceso.
[Teclado]
Elemento d el menú Descripci ón
[Teclado] Puede utilizar el teclado en AppRadio Mode + mediante el
ajuste del idioma del teclado para iPhone.
Elemento d el menú Descripci ón
[Calibración de panel
táctil]
1 Toq ue [S í].
2 Toque dos esquinas de la pantalla a lo largo de las
flechas y después toque los centros de las dos marcas
[+] al mismo tiempo dos veces.
3 Pulse .
De esta forma se guardan los resultados del ajuste.
4 Pulse una vez más.
Avance al ajuste de 16 puntos.
5 Toque suavemente el centro de la marca [+] mostrada
en la pantalla.
El objetivo indica el orden.
• Al pulsar , vuelve a aparecer la posición del
ajuste anterior.
• Al mantener pulsado , el ajuste se cancela.
6 Mantenga pulsado .
De esta forma se guardan los resultados del ajuste.
[Configuración del atenuador]
Si considera que las teclas del panel táctil de la pantalla se desvían de las posiciones
reales que responden al tacto, ajuste las posiciones de respuesta de la pantalla del panel
táctil.
• No utilice herramientas puntiagudas, como bolígrafos de punto fino o portaminas. Esto podría dañar
• No apague el motor mientras guarda los datos de la posición ajustada.
• Este ajuste está disponible solo cuando detiene el vehículo en un lugar seguro y acciona el freno de
[Calibración de panel táctil]
la pantal la.
mano.
• Ajuste el idioma del sistema al mismo que el del iPhone para que
funcione correctamente.
• Esta función solo está disponible en el AppRadio Mode + del
iPhone.
Este ajuste está disponible solo cuando detiene el vehículo en un lugar seguro y acciona el freno de
mano.
Elemento d el menú Descripci ón
[Activador del atenuador] Ajuste del brillo de la atenuación.
[Automático] Activa o desactiva la atenuación automáticamente si se
encienden o apagan los faros del vehículo.
[Manual] Activa o desactiva la atenuación manualmente.
[Hora] Activa o desactiva la atenuación a la hora que usted la haya
[Día/Noche] Ajuste de la duración de la atenuación para el día o la
ajustado.
noche.
Puede utilizar esta función cuando [Activador del
atenuador] está en [Manual].
[Día] Desactiva la función de atenuación.
[Noche] Activa la función de atenuación.
37Es
Page 98

PRECAUCIÓN
SUGERENCIAS
NOTA
Elemento de l menú Descripción
NOTAS
[Duración del atenuador] Para ajustar la hora en que la atenuación se activa o
desactiva, arrastre los cursores o toque o .
Puede utilizar esta función cuando [Activador del
atenuador] está en [Hora].
• Cada vez que toque o , el cursor se mueve hacia atrás o
hacia adelante en el ancho de 15 minutos.
• Cuando los cursores se colocan en el mismo punto, el tiempo de
atenuación disponible es 0 horas.
• Cuando el cursor del ajuste del tiempo de apagado se coloca en
el extremo izquierdo y el cursor del ajuste del tiempo de
encendido se coloca en el extremo derecho, el tiempo de
atenuación disponible es 0 horas.
• Cuando el cursor del ajuste del tiempo de encendido se coloca
en el extremo izquierdo y el cursor del ajuste del tiempo de
apagado se coloca en el extremo derecho, el tiempo de
atenuación disponible es 24 horas.
La visualización de la hora de la barra de ajuste de la duración de la
atenuación depende del ajuste de la visualización del reloj
(página44).
[Ajuste de imagen]
Puede ajustar la imagen de cada fuente y cámara de visión trasera.
Por razones de seguridad, no puede utilizar algunas de estas funciones mientras el vehículo esté en
movimiento. Para activar estas funciones, debe detenerse en un lugar seguro y accionar el freno de
mano.
Para ajustar el menú siguiente, toque , , , .
Elemento de l menú Descripción
[Brillo]
De [-24] a [+24]
[Contraste]
De [-24] a [+24]
[Color]*
De [-24] a [+24]
[Tonalidad]*
De [-24] a [+24]
Ajuste la intensidad del color negro.
Ajuste el contraste.
Ajuste la saturación del color.
Ajuste el tono del color (cuál color se destaca, rojo o verde).
Elemento de l menú Descripción
[Atenuador]
De [+1] a [+48]
[Temperatura]
De [-3] a [+3]
* Con algunas imágenes, no es posible ajustar [Tonalidad] y [Color].
• Los ajustes de [Brillo], [Contraste] y [Atenuador] se almacenan por separado cuando las luces de
posición del vehículo están apagadas (de día) y encendidas (de noche).
• En función del ajuste de [Configuración del atenuador], [Brillo] y [Con traste] cambian
automática mente.
• [Atenuador] permite modificar el ajuste o la hora en que se activará o desactivará (página 37).
• Es posible que el ajuste de imágenes no esté disponible en algunas cámaras de visión trasera.
• El contenido de los ajustes se puede guardar en la memoria de forma independiente.
Ajuste el brillo de la pantalla.
Ajuste la temperatura del color para producir un mejor
balance de blancos.
[Información del sistema]
Elemento de l menú Descripción
[Información de firmware] Visualización de la versión del firmware.
38Es
Page 99

Español
PRECAUCIÓN
NOTAS
Elemento d el menú Descripción
SUGERENCIA
[Actualización d e
firmware]
[Licencia] Visualización de la licencia de código abierto.
Ajustes del tema
Los elementos del menú varían según el origen.
Elemento d el menú Descripci ón
[Fondo]
[Home] [AV]
• El dispositivo de almacenamiento USB para la ac tualización
debe contener solo el archivo de actualización correcto.
• Nunca apague este producto, desconecte el dispositivo de
almacenamiento USB durante la actualización del firmware.
• Solo puede actualizar el firmware cuando el vehículo esté
detenido con el freno de mano accionado.
1 Descargue los archivos de actualización del firmware
en la computadora.
2 Conecte un dispositivo de almacenamiento USB en
blanco (formateado) a su computadora y busque el
archivo de actualización correcto para copiarlo al
dispositivo de almacenamiento USB.
3 Conecte el dispositivo de almacenamiento USB a este
producto (página 24).
4 Desactive la fuente (página 18).
5 Visualice la pantalla de ajustes [Sistema] (página 34).
6 Toque [Información del sistema].
7 Toque [Actualización de firmware].
8 Toque [Continuar].
Siga las instrucciones que aparecen en la pantalla para
terminar de actualizar el firmware.
• Este producto se reiniciará automáticamente
después de que concluya la actualización del
firmware, si la actualización es exitosa.
• Si aparece un mensaje de error en la pantalla,
toque la visualización y vuelva a realizar los pasos
mencionados.
Seleccione el papel tapiz a partir de los elementos
preestablecidos en este producto o las imágenes origin ales
mediante el dispositivo externo.
El papel tapiz puede ajustarse a partir de las selecciones de
la pantalla de menú superior y la pantalla de operación AV.
Elemento d el menú Descripci ón
Visualización
preestablecida
(personalizado)*1 Muestra la imagen de la visualización de fondo importada
(desactivado) Oculta la visualización de fondo.
[Iluminación]*2 Seleccione un color de iluminación a partir de la lista de
Teclas de colores Seleccione el color preestablecido deseado.
(personalizado) Muestra la pantalla para personalizar el color de
(arcoíris) Cambia gradualmente entre los colores preestablecidos en
[Tema]*2 Seleccione el color de tema.
[Reloj] Seleccione el estilo del reloj a par tir de la imagen
Imágenes
preestablecidas
(desactivado) Oculta la visualización del reloj.
*1 Consulte Origen de imágenes estáticas (página 26).
*2 Puede mostrarse una vista previa de la pantalla de menú superior o la pantalla de operación AV al
tocar [ Home] o [AV], respec tivamente.
Seleccione la visualización de fondo preestablecida
deseada.
del dispositivo de almacenamiento externo.
colores o cree un color definido.
iluminación.
Para personalizar el color definido, toque y luego o
para ajustar el brillo y el ni vel de rojo, verde y azul para
crear su color favorito.
Para almacenar el color personalizado en la memoria,
mantenga presionado [Memor.], y el color personalizado
estará disponible como el siguiente ajuste de iluminación
al pulsar .
También puede arrastrar la barra de color para ajustar el tono del
color.
secuencia.
preestablecida.
Seleccione el estilo preestablecido deseado para el reloj.
Ajustes de audio
Los elementos del menú varían según el origen. Algunos de los elementos del menú
dejan de estar disponibles cuando se suprime el volumen o la fuente está apagada.
39Es
Page 100
Elemento de l menú Descr ipción
SUGERENCIAS
SUGERENCIA
NOTA
SUGERENCIA
NOTAS
NOTA
[EQ gráfico]
[Superbajo] [Potente]
[Natural] [Vocal] [Plano]
[Pers.1] [Pers.2]
[Atenuado r/Balance] Toque o para ajustar el balance de bocinas
[Nivel de silenciar] Suprima el audio o atenúe el volumen del origen AV y el
Seleccione o personalice la curva del ecualizador.
Seleccione una curva que desee usar como base de la
personalización y luego toque la frecuencia que desee
ajustar.
• Si realiza ajustes cuando una curva [Superbajo], [Potente],
[Natural], [Vocal] o [Plano] esté seleccio nada, los ajustes de la
curva del ecualizador cambiarán a [Pers.1] obligatoriamente.
• Si realiza ajustes cuando la curva [Pers.2] esté seleccionada, por
ejemplo, se actualizará la cur va [Pers.2].
• Las curvas [Pers.1] y [Pers.2] pueden crearse como comunes para
todas las fuentes.
• Si pasa un dedo por las barras de varias bandas del ecualizador,
los ajustes de la curva del ecualizador se establecerán al valor del
punto tocado en cada barra .
delanteras/traseras. Ajuste [Fron.] y [Tras.] en [0] al utilizar
un sistema de bocinas doble.
Toque o para ajustar el balance de bocinas
izquierdas/derechas.
También puede ajustar el valor arrastrando el punto que aparece
en la tabla mostrada.
Solo se puede realizar el ajuste de bal ance cuando [Modo red] esté
seleccion ado como el modo de las b ocinas.
volumen de la aplicación del iPhone o teléfono inteligente
cuando funcione el sistema de orientación por voz de la
unidad de navegación.
[ATE] El volumen disminuye 20 dB abajo del volumen actual.
[Silenciar] El volumen es de 0.
[Des.] El volumen no cambia.
Elemento de l menú Descripción
[Regulador nivel fuente]
De [-4] a [+4]
[Subwoofer]
[Act.] [Des.]
[Nivel de la bocina]
Posición de escucha *1*2
[Des.] [Frontal-I] [FrontalD] [Fron.] [Todas]
Modo estándar*3
[Front. izq.] [Front. der.]
[Tras. izq.] [Tras. der.]
[Subwoofer]
Modo red*3
[Alto Izquierdo] [Alto
Derecho] [Medio
Izquierdo] [Medio
Derecho] [Subwoofer]
Nivel de salida de la
bocina
De [-24] a [10]
[Filtro de cruce]*4 Seleccione una unidad de bocina (filtro) para ajustar la
Ajuste el nivel de volumen de cada origen para evitar
cambios radicales del volumen al cambiar entre orígenes
distintos de FM.
Toque o para ajustar el volumen del origen
después de comparar el nivel del volumen del sintonizador
de FM con el nivel del origen.
Si toca directamente el área donde puede moverse el cursor, el
ajuste SLA (ajuste del nivel de la fuente) se cambiará al valor del
punto tocado.
• Los ajustes se basan en el nivel del volumen del sintonizador FM,
que permanece intacto.
• Esta función no está disponible cuando el sintonizador de FM se
selecciona com o origen AV.
• Esta función está disponible solo para la fuente seleccionada.
Seleccione para habilitar o deshabilitar la salida del
subwoofer trasero desde este producto.
Ajuste el nivel de salida de las bocinas de la posición de
escucha.
1 Toque o para seleccionar la posición de
escucha y luego seleccione la bocina de salida.
2 Toque o para ajustar el nivel de salida de las
bocinas seleccionadas.
Esta función está disponible cuando [Subwoofer] está en [Act.].
frecuencia de corte HPF o LPF y la pendiente de cada
unidad de bocina (página 43).
[Config. subwoofer]*4 Seleccione la fase del subwoofer (página 43).
[Posición de escucha]*1
[Des.] [Front. izq.] [Front.
der.] [Fron.] [Todas]
Seleccione una posición de escucha que desee convertir en
el centro de los efectos de sonido.
40Es
 Loading...