

Page 1
DIGITAL MEDIA RECEIVER
RÉCEPTEUR NUMÉRIQUE MULTIMÉDIA
RICEVITORE MULTIMEDIALE DIGITALE
RECEPTOR DE MEDIOS DIGITALES
DIGITALER MEDIA RECEIVER
DIGITALE MEDIA-RECEIVER
MVH-S520DAB
English Français Italiano Español Deutsch Nederlands
Operation Manual
Mode d’emploi
Manuale d’istruzioni
Manual de instrucciones
Bedienungsanleitung
Bedieningshandleiding
Page 2

English
About this manual:
Table of Contents
Getting Started........................................................................................ 3
Digital Audio Broadcasting (DAB)........................................................ 7
Radio.......................................................................................................... 9
USB/iPhone®/AUX................................................................................. 10
Bluetooth............................................................................................... 12
Spotify® .................................................................................................. 16
Using Pioneer Smart Sync/APP.......................................................... 18
Audio Adjustments .............................................................................. 22
Settings .................................................................................................. 23
FUNCTION settings ............................................................................... 23
AUDIO settings ...................................................................................... 26
SYSTEM settings.................................................................................... 28
ILLUMINATION settings........................................................................ 31
Additional Information ....................................................................... 33
• In the following instructions, a USB memory or USB audio player are referred to as
“USB device”.
- 2 -
Page 3
English
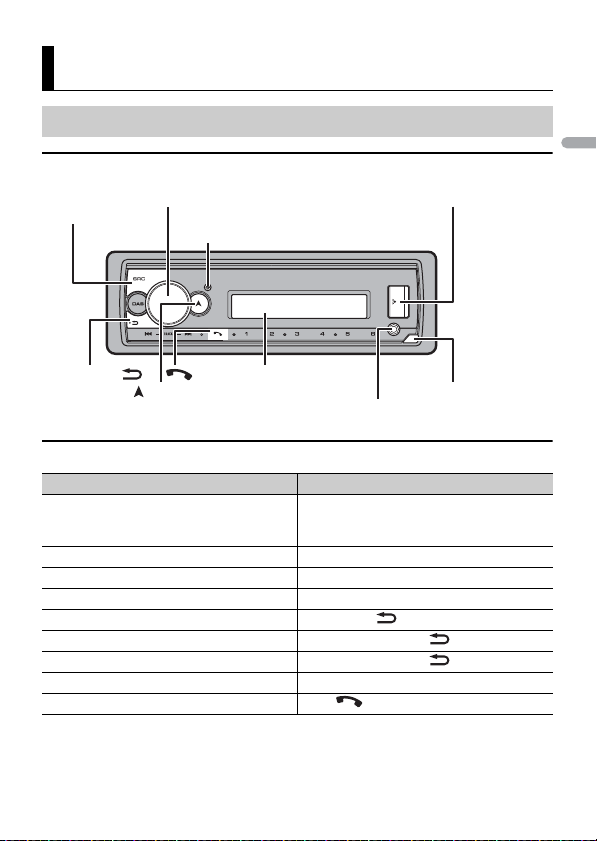
Getting Started
SRC (source)/OFF
Detach button
Display window
M.C. (multi-control) dial
BAND/
DISP (display)
(navigation)/LIST
USB port
AUX input jack (3.5 mm stereo jack)
Basic operation
MVH-S520DAB
Frequently used operations
Purpose Operation
Turn on the power* Press SRC/OFF to turn on the power.
Adjust the volume Turn the M.C. dial.
Select a source Press SRC/OFF repeatedly.
Change the display information Press DISP repeatedly.
Return to the previous display/list Press BAND/.
Return to the normal display from the menu Press and hold BAND/.
Change the display brightness Press and hold BAND/.
Answering a call Press any button.
Ending a call Press .
* When this unit ’s blue/white le ad is connected to the vehicle’s auto-an tenna relay control terminal,
the vehicle’s antenn a extends when this unit’s source is turned on. To retract the antenna , turn the
source off.
Press and hold SRC/OFF to turn off the
power.
- 3 -- 3 -
Page 4
English
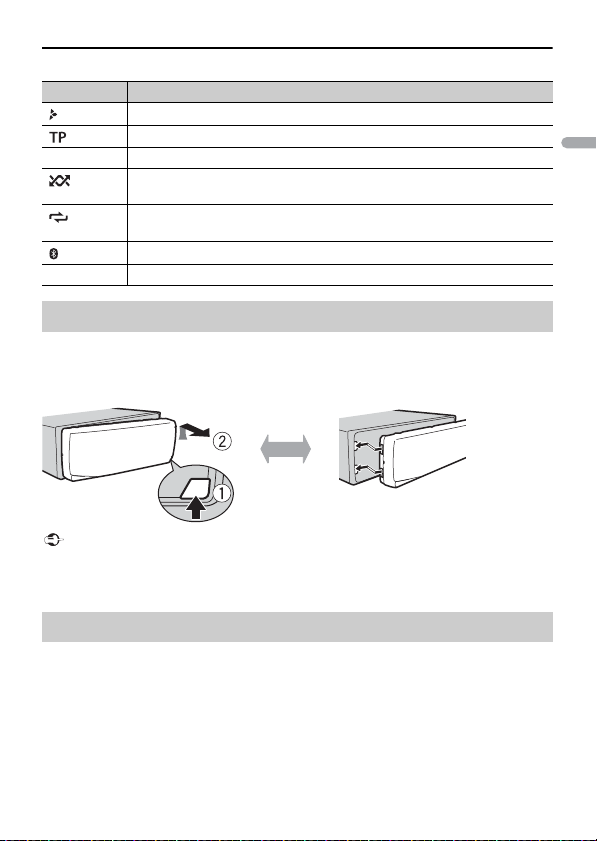
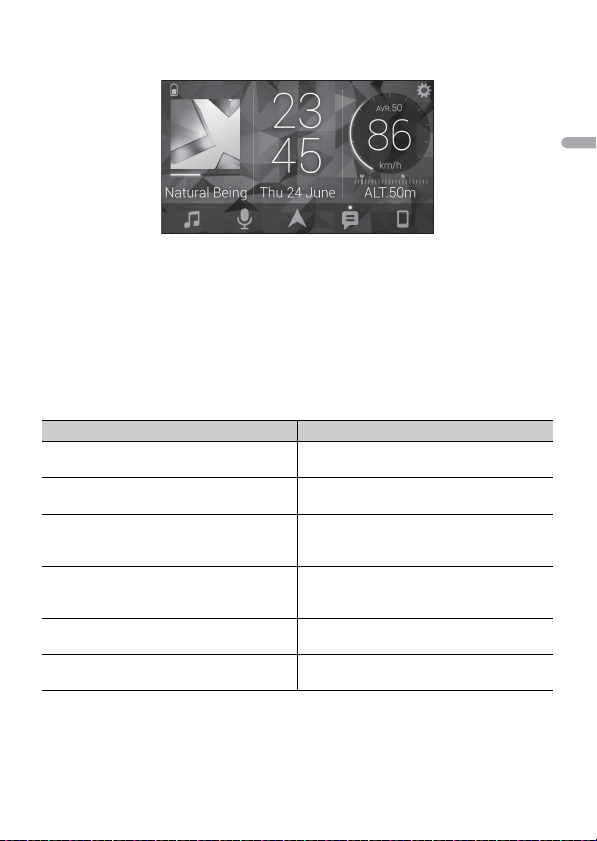
Display indication
Important
Detach Attach
Indication Description
Appears when a lower tier of the menu or folder exists.
Appears when a traffic program is received.
BASS Appears when the BASS function is activated.
Appears when random/shuffle play is set (except when BT AUDIO is
selected as the source).
Appears when repeat play is set (except when BT AUDIO is selected as the
source).
Appears when a Bluetooth connection is made (page 12).
APP Appears when a Pioneer Smart Sync connection is made (page 18).
Detaching the front panel
Detach the front panel to prevent thef t. Remove any cables and devices attached to the
front panel and turn off the unit before detaching it.
• Avoid subjecting the front panel to excessive shock.
• Keep the front pa nel out of direct sunlight a nd high temperatures.
• Always store the detached front panel in a protective case or bag.
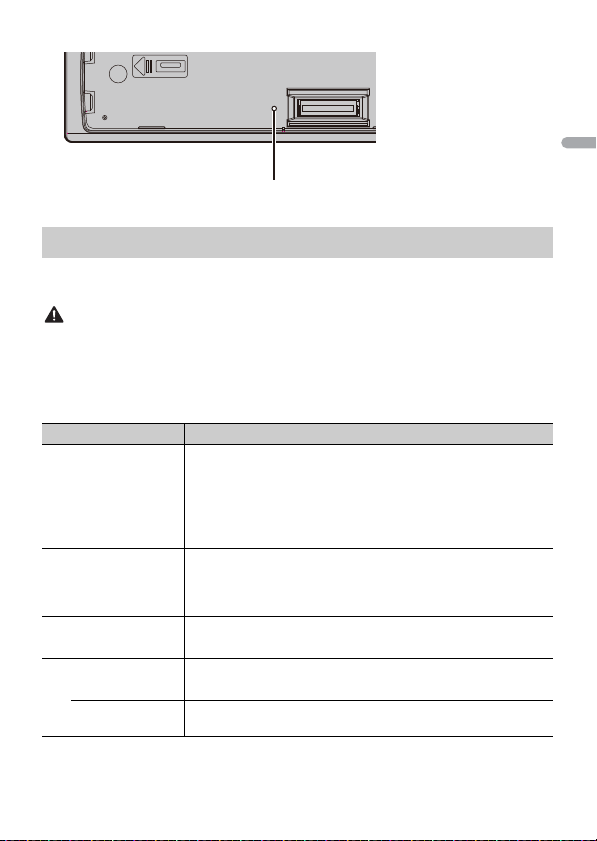
Resetting the microprocessor
The microprocessor must be reset in the following situations:
– Before using this unit for the first time after installation
– If the unit fails to operate properly
– When strange or incorrect messages appear on the display
1 Remove the front panel (page 4).
2 Press the RESET button with a pointed instrument longer than 8 mm.
- 4 -
Page 5
English
WAR NIN G
Setup menu
RESET button
When you turn the ignition switch to ON af ter installation, the setup menu appears in
the display.
Do not use the unit in standard mode when a speaker system for network mode is connected to the
unit. Do not use the unit in network mode when a speaker system for standard mode is connected to
the unit. Thi s may cause damage to the speakers.
1 Tu rn the M.C. dial to select the options, then press to confirm.
To proceed to the next menu option, you need to confirm your selection.
Menu Item Description
LANGUAGE Select the language to display the text information from a
[ENG](English),
[РУС](Russian),
[TUR](Turkish),
[FRA](French),
[DEU](German)
CLOCK SET Set the clock.
FM STEP Select the FM tuning step from 100 kHz or 50 kHz.
[100], [50]
DAB ANT PW Supply power to a DAB antenna. Select this when using the
[ON]
[OFF] No power is supplied to a DAB antenna. Select this w hen using a
compressed audio file.
1 Turn t he M.C. dial to adjust th e hour, then press to confirm.
The indicator moves to the minute setting automatically.
2 Turn t he M.C. dial to adjust the minute, then press to confirm.
optional DAB antenna (AN-DAB1, sold separately) with the unit.
passive antenna with no booster.
- 5 -- 5 -
Page 6

English
NOTE
Menu Item Description
SPEAKER MODE Switch between two operation modes: the 2-way network mo de
[STANDARD],
[NETWORK]
(NETWORK) and the standard mode (STANDARD) according to
the connections you have established. For details on operation
modes, see page 22.
After selecting the appropriate mode, turn the M.C. dial to
select [YES], then press to confirm.
• You cannot complete the setup menu without setting the
[SPEAKER MODE].
• Once the speaker mode is set, this setting cannot be changed
unless the default settings of this product are restored. Restore
the default settings to change the speaker mode setting (refer
to SYSTEM RESET on page 7).
• When [NETWORK] is selected, the beep tone function is not
availa ble.
2 [QUIT :YES] appears.
To return to the first item of the setup menu, turn the M.C. dial to select [QUIT :NO],
then press to confirm.
3 Press the M.C. dial to confirm the settings.
[UPDATING LIST] appears in the display and the service list will be updated.
These settings other than [SPEAKER MODE] can be made at any time from the SYSTEM settings
(page 28) and INITIAL settings (pa ge 6).
Canceling the demonstration display (DEMO OFF)
1 Press the M.C. dial to display the main menu.
2 Tu rn the M.C. dial to select [SYSTEM], then press to confirm.
3 Tu rn the M.C. dial to select [DEMO OFF], then press to confirm.
4 Tu rn the M.C. dial to select [YES], then press to confirm.
INITIAL settings
1 Press and hold SRC/OFF until the unit turns off.
2 Press and hold SRC/OFF to display the main menu.
3 Tu rn the M.C. dial to select [INITIAL], then press to confirm.
- 6 -
Page 7
English
4 Tu rn the M.C. dial to select an option, then press to confirm.
NOTE
Menu Item Description
FM STEP Select the FM tuning step from 100 kHz or 50 kHz.
[100], [50]
REAR-SP Select when there is a full-range speaker connected to the rear
[FUL]
[SW] Select when there is a subwoofer connected directly to the rear
SYSTEM UPDATE Select [SYSTEM INFO] to confirm the latest system information
[SYSTEM INFO], [S/
W UPDATE]
DAB ANT PW Supply power to a DAB antenna. Select this when using the
[ON]
[OFF] No power is supplied to a DAB antenna. Select this w hen using a
SYSTEM RESET Select [YES] to initialize the unit settings. The unit will be
[YES], [NO]
speaker output leads.
speaker output leads without any auxiliary amplifier.
on the unit.
Select [S/W UPDATE] to update the unit to the latest software
and initialize the unit settings. For details on the latest software
and updating, visit our website.
optional DAB antenna (AN-DAB1, sold separately) with the unit.
passive antenna with no booster.
restarted automatically.
Digital Audio Broadcasting (DAB)
To receive DAB signals, connect a DAB antenna (AN-DAB1) (sold separately) to the unit.
Seeking a service component/station
1 Pre ss SRC/OFF to select [DIGITAL RADIO].
2 Pre ss BAND/ to select the band from [D1], [D2] or [D3].
3 Press / to select a service component/station.
Press and hold / then release to seek an available service. Scanning stops when the unit
receives a service.
- 7 -- 7 -
Page 8

English
To select service component/station from service lists
NOTE
1
During DAB reception, press and hold .
Displays the list of all service components/stations. Press and hold again to search
for a service component/station alphabetically.
2 Select a service component/station from the list you selected, then press the M.C.
dial to confirm.
You can update the service list by pressing DAB. To cancel updating, press DAB again.
Presetting service components/stations
To store service components/stations
1
While receiving the service component/station you want to store, press and hold
one of the number buttons (1/ to 6/ ) until it stops flashing.
To retrieve stored service components/stations
1
Select the band, then press a number button (1/ to 6/).
Pause/Time shift functions
The unit stores recent broadcasts in the memory automatically. The memory capacity of
this unit varies depending on the bit rate of the service component used. The
approximate memory capacity is five minutes for 192 kbps.
To pause/resume
1
While receiving the service component, press and hold DISP.
To use the time shift function
1
While receiving the service component, press and hold DAB.
2 Press (skip back one minute)/ (skip forward one minute) to adjust the
playback point.
- 8 -
Page 9
English
TIP
NOTE
Radio
The tuner frequencies on this unit are allocated for use in Western Europe, Asia, the
Middle East, Africa and Oceania. Use in other areas may result in poor reception. The RDS
(radio data system) function only works in areas that broadcast RDS signals for FM
stations.
Receiving preset stations
1 Pre ss SRC/OFF to select [RADIO].
2 Pre ss BAND/ to select the band from [FM1], [FM2], [FM3], [MW] or [LW].
3 Press a number button (1/ to 6/).
The / buttons can be also used to select a preset station when [SEEK] is set to [PCH] in the
FUNCTION settings (page25).
Best stations memory (BSM)
The six strongest stations are stored on the number buttons (1/ to 6/).
1 After selecting the band, press the M.C. dial to display the main menu.
2 Tu rn the M.C. dial to select [FUNCTION], then press to confirm.
3 Tu rn the M.C. dial to select [BSM], then press to confirm.
To seek a station manually
1
After selecting the band, press / to select a station.
Press and hold / then release to seek an available station. Scanning stops
when the unit receives a station. To cancel seek tuning, press / .
[SEEK] needs to be set to [MAN] in the FUNCTION settings (page 25).
To store stations manually
1
While receiving the station you want to store, press and hold one of the number
buttons (1/ to 6/ ) until it stops flashing.
- 9 -- 9 -
Page 10

English
NOTES
NOTE
CAUTION
Using PTY functions
The unit searches for a station by PTY (program type) information.
1 Pre ss and hold during FM reception.
2 Tu rn the M.C. dial to select a program type from [NEWS/INFO], [POPULAR],
[CLASSICS] or [OTHERS].
3 Press the M.C. dial.
The unit begins to search for a station. When it is found, its program service name is
displayed.
• To cancel the search, press the M.C. dial.
• The program of some stations ma y differ from that in dicated by the trans mitted PTY.
• If no station is broadcasting the type of program you searched for, [NOT FOUND] is displayed for
about two seco nds and then the tuner returns to th e original station.
USB/iPhone®/AUX
(iPhone source is not available when [USB MTP] is set to [ON] in the SYSTEM settings
(page 29).)
Playing back
Disconnect headphones from the device before connecting it to the unit.
USB devices (including Android™)/iPhone
1
Open the USB port cover.
2 Plug in the USB device/iPhone using an appropriate cable.
To automatically switch to USB source when a USB device/i Phone is connected to the unit, s et [USB
AUTO] to [ON] in the SYSTEM settings (page30).
Use a USB cable (sold separately) to connect the USB device as any device connected directly to the
unit will protrud e out from the unit, which could be dan gerous.
Before removing the device, stop playback.
- 10 -
Page 11

English
AOA connections
NOTE
NOTE
NOTE
A device running Android OS 4.1 or later installed and also supports AOA (Android Open
Accessory) 2.0 can be connected to the unit via AOA, using the cable supplied with the
device.
If you use an AOA connection, [APP CONTROL] needs to be set to [WIRED] (page 29) and [USB MTP]
needs to be set to [OFF] (page 29) in the SYSTEM settings.
MTP connection
A device installed with Android OS 4.0 or most of later versions can be connected to the unit via MTP,
using the cable supplied with the device. However, depending on the connected device, OS version or
the numbers of the files in the device, audio files/songs may not be able to be played back via MTP.
Note that MT P connection is n ot compatible with WAV and FLAC f ile formats.
If you use an MTP connection, [USB MTP] needs to be set to [ON] in the SYSTEM settings (page29).
AUX
1
Insert the stereo mini plug into the AUX input jack.
2 Press SRC/OFF to select [AUX IN] as the source.
If [AUX] is set to [OFF] in the SYSTEM settings, [AUX IN] cannot be selected as a source (page 29).
Operations
You can make various adjustments in the FUNCTION settings (page 23) (except for AUX
IN/USB source).
Note that the following operations do not work for an AUX device. To operate an AUX
device, use the device itself.
Purpose Operation
Select a folder*1 Press 1/ or 2/.
Select a track/song (chapter) Press or .
Fast forward or reverse*2 Press and hold or .
Search for a file from a list (USB only) 1 Press and hold to display the list.
2 Tur n the M.C. dial to select the desired
file (folder) name or category, then press
to confirm.
3 Tur n the M.C. dial to select the desired
file, then press to confirm.
Playback starts.
- 11 -- 11 -
Page 12

English
Important
TIP
Purpose Operation
View a list of the files in the selected folder/
category*1
Play a song in the selected folder/
category*1
Repeat play Press 6/.
Random/shuffle play Press 5/.
Pause/resume playback Press 4/PAUS E.
Sound retriever*1 Press 3/S.Rtrv.
Return to root folder (USB only)*1 Press and hold 1/.
*1 Compressed a udio files only
*2 When you use the fast forward or reverse function while playing a VBR file, the playback time may
be not correct.
Press the M.C. dial when a folder/category
is selected.
Press and hold the M.C. dial when a folder/
category is selected.
[1]: Effective for low compression rates
[2]: Effective for high compression rates
Bluetooth
Bluetooth connection
If ten or more Bluetooth devices (e.g. a phone and separate audio player) are connected, they may not
work properly.
The next connection to the unit is performed automatically if the Bluetooth device has been connected
previously in the following steps.
1 Turn on the Bluetooth function of the device.
If you make a Bluetooth connection from the device, proceed to step 4.
2 Pre ss to display the [ADD DEVICE] setting.
The unit starts to search for available devices, then displays them in the device list.
• To cancel searching, press the M.C. dial.
• If the desired device is not in the list, select [RE-SEARCH].
• If there is no device available, [NOT FOUND] appears in the display.
• If there is already a connected device, the phone menu appears by pressing .
3 Tu rn the M.C. dial to select a device from the device list, then press to confirm.
- 12 -
Page 13
English
Press and hold the M.C. dial to switch the displayed de vice information between the
Important
TIP
Bluetooth device address and device name.
If you make a Bluetooth connection from the unit, proceed to step 5.
4 Select the unit name shown in the device display.
5 Make sure the same 6-digit number appears on this unit and the device, then
select [YES] if the 6-digit numbers displayed on this unit and the device are the
same.
Bluetooth telephone
First, make a Bluetooth connection with the Bluetooth telephone (page 12). Up to two
Bluetooth telephones can be connected simultaneously.
• Leaving the unit on standby to connect to your phone via Bluetooth while the engine is not running
can drain the vehicle’s battery.
• Be sure to p ark your vehicle in a safe place and apply the parking brake before operation.
To make a phone call
1
Press to display the phone menu.
When two phones are connected, a phone name appears first then a phone menu
will display. To switch to another phone, press again.
2 Tu rn the M.C. dial to select [RECENTS] or [PHONE BOOK], then press to confirm.
If you select [PHONE BOOK], proceed to step 4.
3 Tu rn the M.C. dial to select [MISSED], [DIALLED] or [RECEIVED], then press to
confir m.
4 Tu rn the M.C. dial to select a name or phone number, then press to confirm.
The phone call starts.
To answer an incoming call
1
Press any button when a call is received.
When two phones are connected to the unit via Bluetooth and there is an incoming call while one
phone is being used for a call, a message will appear in the display. To answer that incoming call, you
need to end the existing call.
- 13 -- 13 -
Page 14

English
Basic operations
NOTE
TIP
Purpose Operation
End a call Press .
Reject an incoming call Press and hold when a call is received.
Switch between the current caller
and a caller on hold
Cancel a caller on hold Press and hold .
Adjust the volume of the caller’s
voice (When private mode is on,
this function is not available.)
Turn the private mode on or off Press BAND/ during the call.
Press the M.C. dial.
Tur n the M.C. dial during the call.
To preset phone numbers
1
Select a phone number from a phone book or call history.
2 Press and hold one of the number buttons (1/ to 6/).
The contact is stored in the selected preset number.
To make a call using a preset number, press one of the number buttons (1/ to 6/),
then press the M.C. dial, while the phone menu is displayed.
Voice recognition
This function is only available when an iPhone/Android device equipped with voice
recognition is connecte d to the unit via Bluetooth.
1 Press and hold and then talk into the microphone to input voice commands.
To exit the voice recognition mode, press BAND/.
For details on the voice recognition features, refer to the manual supplied with your device.
When a Pioneer Smart Sync connection is made (page 18), you can also use the voice recognition
function from Pioneer Smart Sync installed on your iPhone/Android device by pressing and holding
. For details on the voice recognition features, see the application’s help section.
Phone menu
1
Press to display the phone menu.
- 14 -
Page 15
English
Important
Menu Item Description
RECENTS Display the missed call histor y.
[MISSED]
[DIALLED] Display the dialed call history.
[RECEIVED] Display the received call history.
PHONE BOOK Display the contacts in your phone.
PRESET 1-6 Recall the preset phone numbers. You can also recall the preset
phone numbers by pressing one of the number buttons (1/
to 6/).
A.ANSR* Select [ON] to answer an incoming call automatically.
[ON], [OFF]
PB INVT Invert the order of names in the phone book (name view).
DEVICELIST Display the list of paired Bluetooth devices. “*” appears on the
device name when the Bluetooth connection is established.
When no device is selected in the device list, this function is not
available.
DEL DEVICE Delete the device information.
[DELETE YES],
[DELETE NO]
ADD DEVICE Register a new device.
DEV. INFO Switch the device information on the display between the
* If two phones are connected, this function does not work on incoming calls that are received while
one of the phones is being used for a call.
device name and Bluetooth device address.
Bluetooth audio
• Depending on the B luetooth audio player connected to thi s unit, the available operations will be
limited to the following two levels:
– A2DP (Advanced Audio Dist ribution Profile) can only play back songs on you r audio player.
– AVRCP (Audio/Video Remote Control Profile) can perform functions such as playback, pause, select
song, etc.
• The sound of the Bluetooth audio player will be muted when the phone is in use.
• When the Bluetooth audio player is in use, you cannot connect to a Bluetooth telephone
automatically.
• Depending on the type of Bluetooth audio player you have connected to this unit, operation and
information displayed may vary based on availability and functionality.
- 15 -- 15 -
Page 16

English
1 Make a Bluetooth connection with the Bluetooth audio player.
NOTE
TIP
2 Pre ss SRC/OFF to select [BT AUDIO] as the source.
3 Pre ss BAND/ to start playback.
You must reconnect the Bluetooth connection when the source is switched or the unit is turned off.
When more than two and up to five devices are registered to the unit via Bluetooth, you can switch the
Bluetooth device by playing bac k songs on the device. By doing so, playing back a song from the
Bluetooth device of each passenger is easily available. However, depending on the usage conditions,
multiple connections may not be available and the audio files/songs may not be able to be played back
properly.
Basic operations
You can make various adjustments in the FUNCTION settings (page 23).
Purpose Operation
Fast forward or reverse Press and hold or .
Select a track Press or .
Repeat play* Press 6/.
Random play* Press 5/.
Pause/resume playback Press 4/PAUS E.
Search for a file from a list 1 Press and hold to display a list.
* Depending on the connected device, these operations may not be available.
2 Tur n the M.C. dial to select the desired
folder name, then press to confirm.
3 Tur n the M.C. dial to select the desired
file, then press to confirm.
Playback starts.
Spotify®
(Not available when [USB MTP] is set to [ON] in the SYSTEM settings (page 29).)
Spotify is a music streaming distribution service not affiliated with Pioneer. More
information is available at http://www.spotify.com.
The Spotify application is available for compatible smartphones, please visit https://
support.spotify.com/ for the latest compatibility information.
- 16 -
Page 17

English
To enjoy Spotify as you drive, first download the Spotify app to your iPhone or Android
Important
NOTE
NOTE
device. You can download it on the iTunes® App Store® or Google Play™. Choose a free
account or a paid Premium account, either in the app or at spotify.com. A Premium
account gives you more features, like offline listening.
• This product incorporates Spotify software which is subject to 3rd party licenses found here:
www.spotify.com/connect/third-party-licenses.
• For information on the countr ies and regions where Spotif y can be used, take a look at https:/ /
spotify.com/us/select-your-country/.
Listening to Spotify
Update the firmware of the Spotify application to the latest version before use.
1 Connec t this unit with the mobile device.
• iPhone via USB (page 10)
• iPhone/Android device via Bluetooth (page 12)
2 Pre ss SRC/OFF to select [SPOTIFY].
3 Press and hold 1/ to display [APP CONTROL].
4 Tu rn the M.C. dial to select one of the below.
• Select [WIRED] for the USB connection.
• Select [BLUETOOTH] for the Bluetooth connection.
5 Pre ss SRC/OFF to select [SPOTIFY].
6 Launch the Spotify application on the mobile device and start playback.
When you connect a mobile device other than an iPhone/Android device, it may not operate correctly
depending on your mobile device.
Basic operations
You can make various adjustments in the FUNCTION settings (page 23).
The available operations may vary according to the type of contents (track/album/artist/playlist/radio)
you want to play.
Purpose Operation
Skip a track Press or .
- 17 -- 17 -
Page 18
English
NOTE
NOTE
WAR NIN G
Purpose Operation
Search for a track from a list 1 Press and hold to display the list.
Pause/resume playback Press 4/PAUSE.
Thumbs Up (Only for radio) Press 1/.
Thumbs Down (Only for radio) Press 2/.
Random play (Only for track/album/artist/
playlist)
Repeat play (Only for track/album/artist/
playlist)
Start a radio channel based on the song
currently being played.
Some functions of Spotify may not be operated from the unit.
2 Tur n the M.C. dial to select the desired
category, then press to confirm.
3 Tur n the M.C. dial to select the desired
file, then press to confirm.
Playback starts.
Press 5/.
Press 6/.
1 Press and hold 5/ to start a radio.
2 Press the M.C. dial.
• This function may not be available
depending on the selected song.
Using Pioneer Smart Sync/APP
Pioneer Smart Sync is the application that intelligently brings your maps, messages, and
music together in the vehicle.
You can operate the unit from Pioneer Smart Sync installed on an iPhone/Android
device. In some cases, you can control aspects of the application, such as source
selection, pause, etc., by using the unit.
For details on what operations are available on the application , see the application’s help
section.
The APP source is not available when a Pioneer Smart Sync connection is not made or [USB MTP] is set
to [ON] in the SYSTEM settings (page 29).
• Functions operated with a smartphone are merely tools available to the driver. The driver shall
observe safe and sensible driving behavior under all circumstances.
• Do not attem pt to operate the app lication while driv ing. Make sure to pull off the road and park your
vehicle in a safe location befo re attempting to use the controls on the ap plication.
- 18 -
Page 19

English
For iPhone use rs
NOTE
This function is compatible with iOS 10.3 or later.
You can download Pioneer Smart Sync on iTunes App Store.
For Android device users
For Bluetooth connections, this function is compatible with devices that have Android
OS 5.0 or later installed.
For USB connections, this function is compatible with a phone that runs Android 5.0 or
later up to 7.1.2 and also supports AOA (Android Open Accessory) 2.0. However, the
compatibility depends on the smartphone.
You can download Pioneer Smart Sync on Google Play.
Some Android devices connected via AOA 2.0 may not work properly or emit sounds due to their own
software design , regardless of the OS version.
What kind of function does the application have?
Promoting the use of the unit
The interface of the unit can be evolved by using your iPhone/Android device.
- 19 -- 19 -
Page 20
English
Image (example):
NOTES
Examples:
– Selecting a source of the unit
– Listening to the music on your iPhone/Android device
– Controlling the sound field intuitively
– Setting the illumination colour
– Controlling your connected Bluetooth device
Extending the functions of the unit by using the application
The following functions, which are unavailable on the unit alone, are available by
making a Pioneer Smart Sync connection.
Menu Item (examp le) Description
Using a navigation application You can specify and start the navigation
Message reading You can read messages received from the
31 Band EQ setting You can select an equalizer band from the
Super "Todoroki" Sound You can boost the bass level more
Easy Sound Fit You can perform the time alignment setting
Theme setting You can set the wall paper and the theme
application installed on your device.
apps installed on your device.
31-band graphic equalizer (13-band for not
using the Pioneer Smart Sync connection).
dynamically than when not using the
Pioneer Smart Sync connection.
easily by selecting your vehicle type.
colour (display/keys/characters) at once.
• Some functions may be restricted depending on the connection conditions with the application.
• The 31 Band EQ setting is converted into 13 bands when a music source from this product is engaged.
- 20 -
Page 21

English
TIP
It is recommended to enter the search term "Pioneer Smart Sync" in the search field to search for the
NOTE
NOTES
application.
Making a connection with Pioneer Smart Sync
1 Press the M.C. dial to display the main menu.
2 Tu rn the M.C. dial to select [SYSTEM], then press to confirm.
3 Tu rn the M.C. dial to select [APP CONTROL], then press to confirm.
4 Tu rn the M.C. dial to select one of the below.
• Select [WIRED] for the USB connection.
• Select [BLUETOOTH] for the Bluetooth connection.
5 Tu rn the M.C. dial to select [AUTO APP CONN], then press to confirm.
6 Tu rn the M.C. dial to select [ON], then press to confirm.
7 Connec t this unit with the mobile device.
• iPhone/Android device via USB (page 10)
• iPhone/Android device via Bluetooth (page 12)
Pioneer Smart Sync on the device starts automatically.
Regardless of whether the [AUTO APP CONN] setting is set to [ON] or [OFF], you can
also perform the following to start Pioneer Smart Sync.
• For devices other than the USB-connecte d Android device, press SRC/OFF to select
any source and press and hold the M.C. dial.
• For iPhone, launch Pioneer Smart Sync on the mobile device.
• When you connect a mobile device other than an iPhone/Android device, it may not operate
correctly de pending on your mob ile device.
• If Pioneer Sm art Sync has not been ins talled on your iPhone/Androi d device yet, a message that
prompts you to install the application will appear on your iPhone/Android device (except for the
Android device connected via Bluetooth). Select [OFF] in [AUTO APP CONN] to clear the message
(page 30).
- 21 -- 21 -
Page 22

English
NOTE
Listening to music on your device
1 Pre ss SRC/OFF to select [APP].
Audio Adjustments
You can also make various adjustments in the AUDIO settings (page 26).
Operation modes
This unit features two operation modes: network mode and standard mode. You can
switch between modes as desired (page 6).
Network mode
You can create a 2-way + SW multi-amp and multi-speaker system with high range
speaker, middle range speaker and subwoofer for reproduction of high, middle and low
frequencies (bands).
Standard mode
You can create a 4-speaker system with front and rear speakers or front speakers and
subwoofers, or a 6-speaker system with front and rear speakers and subwoofers.
Adjusting the cut-off frequency value and the slope
value
You can adjust the cut-off frequency value and the slope value of each speaker.
The following speakers can be adjusted.
Network mode:
[HIGH] (high-range speaker HPF), [MID HPF] (middle-range speaker HPF), [MID LPF]
(middle-range speaker LPF), [SUBWOOFER]
Standard mode:
[FRONT], [REAR], [SUBWOOFER]
[SUBWOOFER] can only be selected when [ON] is selected in [SUBWOOFER] (page 26).
1 Press the M.C. dial to display the main menu.
2 Tu rn the M.C. dial to select [AUDIO], then press to confirm.
3 Tu rn the M.C. dial to select [CROSSOVER], then press to confirm.
- 22 -
Page 23

English
4 Tu rn the M.C. dial to select the speaker unit (filter) to be adjusted, then press to
confirm.
5 Tu rn the M.C. dial to select [HPF] or [LPF] according to the speaker unit (filter),
then press to confirm.
6 Tu rn the M.C. dial to select an appropriate cut-off frequency for the speaker unit
(filter) selected in step 4, then press to confirm.
Network mode:
[1.25K] to [12.5K] (if you choose [HIGH] or [MID LPF])
[25] to [250] (if you choose [MID HPF] or [SUBWOOFER])
Standard mode:
[25HZ] to [250HZ]
7 Tu rn the M.C. dial to select an appropriate slope for the speaker unit (filter)
selected in step 4.
Network mode:
[–6] to [–24] (if you choose [HIGH], [MID HPF] or [MID LPF])
[–12] to [–36] (if you choose [SUBWOOFER])
Standard mode:
[–6] to [–24] (if you choose [FRONT] or [REAR])
[–6] to [–36] (if you choose [SUBWOOFER])
Settings
You can adjust various settings in the main menu.
1 Press the M.C. dial to display the main menu.
2 Tu rn the M.C. dial to select one of the categories below, then press to confirm.
• FUNC TION settings (page 23)
• AUDIO settings (page 26)
• SYSTEM settings (page 28)
• ILLUMINATION settings (page 31)
3 Tu rn the M.C. dial to select the options, then press to confirm.
FUNCTION settings
The menu items vary according to the source.
- 23 -- 23 -
Page 24
English
Menu Item Description
S.FOLLOW
[ON], [OFF] Search for another ensemble that supports the
SOFT LINK*1*2
[ON], [OFF] If the reception of the service component/
PROGRAM TYPE
[NEWS/INFO], [POPULAR],
[CLASSICS], [OTHERS]
ENSEMBLE
FM SETTING
[TALK], [STANDARD], [MUSIC] Match the sound quality level with the broadcast
BSM
REGIONAL
[ON], [OFF] Limit the reception to the specific regional
LOC AL
FM: [OFF], [LV1], [LV2], [LV3], [LV4]
MW/LW: [OFF], [LV1], [LV2]
same service component/station with better
reception. If no alternative service component/
station can be found or reception remains poor,
the unit will automatically switch to an identical
FM bro adcast.
station being received becomes poor, the unit
will automatically switch to a station with a
similar broadcast.
Displays the program type information.
Displays the list of relevant ensembles.
signal conditions of the FM band signal.
(Available only when FM band is selected.)
Store the six strongest stations on the number
buttons (1/ to 6/ ) automatically.
programs when AF (alternative frequencies
search) is selected. (Available only when FM
band is selected.)
Restrict the tuning station according to the
signal strength.
- 24 -
Page 25
English
Menu Item Description
iPhone
TA SET TIN G
[DAB+RDS TA] Receive current traffic information for DAB and
[RDS TA ONLY] Receive current traffic inform ation for only RDS if
RDS (DAB has priority) if available.
available.
[TA OFF] Disables this function.
AF
[ON], [OFF] Allow the unit to retune to a different frequency
providing the same station. (Available only when
FM band is se lected.)
NEWS
[ON], [OFF] Interrupt the currently selected source with
news programs. (Available only when FM band is
selected.)
SEEK
[MAN], [PCH] Assign or buttons to seek the stations
one by one (manual tuning) or select a station
from the preset channels.
SAVE
Store the information about the song currently
being played to your music list on Spotify.
UNSAVE
Remove the song information stored in [SAVE].
SEL DEVICE
Connect a Bluetooth device in the list.
PLAY
Start playback.
STOP
Stop playback.
*1 Only available in areas where [SOFT LINK] function is supported.
*2 Not available when [S.FOLLOW] function is turned off.
- 25 -- 25 -
Page 26

English
NOTE
AUDIO settings
[CHK APP SETTG.] may be displayed when the setting is performed from Pioneer Smar t Sync.
Menu Item Description
EQ SETTING
[SUPER BASS], [POWERFUL],
[DYNAMIC], [NATURAL], [VOCAL],
[VIVID], [SET BY APP]*,
[CUSTOM1], [CUSTOM2], [FLAT]
* [SET BY APP] is displayed when
the preset equalizer curve that is
not available in the unit has bee n
set from Pioneer Smart Sync.
Select an equalizer band and
level for further customising.
Equalizer band: [50HZ] to
[12.5kHZ]
Equalizer level: [–6] to [+6]
FAD ER * (Only for standard mode)
BALANC E
SUBWOOFER
[ON], [OFF] Set to [ON] when using a subwoofer speaker.
SUBWOOFER
[NOR], [REV] Select the subwoofer phase.
SPEAKER LEVEL
Network mode: [HIGH L], [HIGH
R], [MID L], [MID R], [SUBWOOFER]
Standard mode: [FRONT L],
[FRONT R], [REAR L], [REAR R],
[SUBWOOFER]
Output level: [–24] to [10]
Select or customise the equalizer curve.
• When you select a setting other than
[CUSTOM1], [CUSTOM2] and [SET BY APP], you
can also customise the equalizer curve by
pressing and holding the M.C. dial, then store
the customised equalizer curve in [CUSTOM1].
Adjust the front and rear speaker balance.
Adjust the left and right speaker balance.
Select a speaker unit (filter) and adjust the
output level.
• Each value you have adjusted changes when
you change the [POSITION] setting (page 27).
- 26 -
Page 27

English
Menu Item Description
CROSSOVER
POSITION
[OFF], [FRONT LEFT] (front seat
left), [FRONT RIGHT] (front seat
right), [FRONT] (front seats), [ALL]*
* Only for standard mode
TIME ALGNMNT
[INITIAL], [OFF], [CUSTOM]
Select a type of speaker and
adjust the speaker distance for
further customising in [CUSTOM].
Network mode: [HIGH L], [HIGH
R], [MID L], [MID R], [SUBWOOFER]
Standard mode: [FRONT L],
[FRONT R], [REAR L], [REAR R],
[SUBWOOFER]
Speaker distance (cm): [350] to
[0.0]
SAVE SETTINGS
[YES], [NO] Save to later recall the following sound settings
LOAD SET TING S
D.BA SS
[OFF], [LOW], [HI] Boost the bass level dynamically to offer an
LOU DNES S
[OFF], [LOW], [MID], [HI] Compensate for clear sound at low volume.
Select a speaker unit (f ilter) to adjust the HPF or
LPF cut-off frequency and the slope for each
speaker unit.
For details on the [CROSSOVER] setting, see
page 22.
Select a listening posit ion to adjust the speakers'
output levels automatically and add a delay time
that corresponds to the number and locations of
occupied seats.
Select or customise the time alignment settings
to reflect the distance between the listener’s
position and each speaker.
• Select [INITIAL] to initialize the setting value.
• Select [OFF] to reset all setting values to 0.
• The [CUSTOM] setting is available when
[FRONT LEFT] or [FRONT RIGHT] is selected in
[POSITION] (page 27).
• The [CUSTOM] setting is not available when
[OFF] is selected in [SUBWOOFER] (page 26).
at their current values: [CROSSOVER], [SPEAKER
LEVEL], [EQ SETTING], [POSITION], [TIME
ALGNMNT], [D.BASS], [SUBWOOFER].
• The settings that can be saved differ when a
Pioneer Smart Sync connection is made.
Load the sound settings, when you have already
performed [SAVE SETTINGS].
effect as if a subwoofer was added to the system.
- 27 -- 27 -
Page 28

English
Menu Item Description
SLA
[+4] to [–4] Adjust the volume level for each source except
S.RTRV
[1] (effective for low compression
rates),
[2] (effective for high
compression rates),
[OFF]
* Not available when [SW] is selected in [REAR-SP] in the INITIAL settings (page 7).
FM.
Each of the below combinations are set to the
same setting automatically.
• When making a USB connection, set USB,
iPhone, APP, and SPOTIFY.
• When making a Bluetooth connecti on, set BT
AUDIO, iPhone, APP, and SPOTIFY.
Enhance compressed audio and restore rich
sound.
SYSTEM settings
You can also access to these menus when the unit is turned off.
Menu Item Description
LANGUAGE
[ENG](English), [РУС](Russian),
[TUR](Turkish), [FRA](French),
[DEU](German)
CLOCK SET
[12H], [24H] Set the clock (page 5).
SCROLL SET
[ONCE], [LOOP], [OFF] Select the way to scroll the text in the display
BEEP TONE (Only for standard mode)
[ON], [OFF] A beep can be heard when any button is pushed.
Select the language to display the text
information from a compressed audio file.
• This setting is not available when a Pioneer
Smart Sync connection is made.
window.
Select [OFF] to disable this function.
- 28 -
Page 29

English
Menu Item Description
INFO DISPLAY
[SOURCE/SPEANA], [CLOCK/
SPEANA], [SRC/LIVE FX], [CLOCK/
LIVE FX], [SOURCE], [SPEANA],
[OFF]
AUTO PI
[ON], [OFF] Search for a different station with the same
AUX
[ON], [OFF] Set to [ON] when using an auxiliary device
BT AUDIO
[ON], [OFF] Set the Bluetooth signal on/off.
SPOTIFY
[ON], [OFF] Set to [ON] when using the Spotify function.
PW SAVE*
[ON], [OFF] Reduce the battery power consumption.
BT MEM CLEAR
[YES], [NO] Clear the Bluetooth device data (device list, PIN
APP CONTROL
[WIRED], [BLUETOOTH] Select the appropriate connection method
USB MTP
[ON], [OFF] Set to [ON] when using the MTP connection.
Display the item on the sub information display.
• When [SOU RCE/SPEANA] or [CLOCK/SPEANA] is
selected, display the antenna instead of the
speana on the radio source.
programming, even if using a preset station.
connected to the unit.
Turning on the source is the only operation
allowed when this function is on.
code, call history, phone book, preset phone
numbers) stored in the unit.
[CLEARED] appears when data is successfully
deleted.
according to your device.
See page 30 for details on the connections for
each device.
The following sources are not available w hen the
setting is set to [ON].
• APP, SPOTIFY, iPhone, and USB (AOA)
- 29 -- 29 -
Page 30

English
Menu Item Description
AUTO APP CONN
[ON], [OFF] Select [ON] to automatically launch Pioneer
USB AUTO
[ON], [OFF] Select [ON] to automatically switch to USB
* [PW SAVE] is canceled if the vehicle battery is disconnected and will need to be turned back on once
the battery is reconnected. When [PW SAVE] is off, depending on connection methods, the unit may
continue to draw power from the battery if your vehicle’s ignition does not have an ACC (accessory)
position.
Smart Sync when the iPhone/Android device is
connected to the unit.
source when a USB device/iPhone is connected
to the unit.
Select [OFF] when a USB device/iPhone is being
connected to the unit just for charging.
Information on the connections for each device
The available sources differ depending on the setting value.
Please set [APP CONTROL] according to the table for the source you want to use.
For details on Pioneer Smart Sync connection, see page 18.
When Pioneer Smart Sync connection is NOT performed
Setting Value Device Availa ble so urce(s)
[WIRED] iPhone iPhone, SPOTIFY
Android USB (AOA)
[BLUETOOTH] iPhone iPhone, SPOTIFY
Android SPOTIFY
When Pioneer Smart Sync connection is performed
Setting Value Device Avai lable so urce(s)
[WIRED] iPhone APP, SPOTIFY
Android APP
[BLUETOOTH] iPhone APP, SPOTIFY
Android APP, SPOTIFY
- 30 -
Page 31

English
ILLUMINATION settings
Menu Item Description
COLOUR
[KEY COLOUR], [DISP COLOUR],
[BOTH COLOUR]
DIM SETTING
[SYNC ILLUMI], [SYNC CLOCK],
[MANUAL]
BRIGHTNESS
[KEY], [DISP] Select the brightness for the keys/display of the
PHONE COLOUR
[FLASHING] Applies the colour set by [KEY COLOUR].
[FLASH FX1] to [FLASH FX6] Cycle through a variety of colours automatically.
[OFF] No change in key colour made.
Select colour for the keys/display of the unit from
12 preset colours, [SCAN] or [CUSTOM]*.
• [SCAN]: Cycle through a variety of colours
automatically.
• [CUSTOM]*:
1 Press and hold the M.C. dial until the colour
setting display appears.
2 Set the primary colour (R (red)/G (green)/B
(blue)) and brightness level ([0] to [60]).
You cannot select a level below 10 for all three
of R (red), G (green), B (blue) at the same time.
You can also customise the preset colours. Select
one of the preset colours, then press and hold
the M.C. dial until the colour setting display
appears.
* The CUSTOM setting is only available for [KEY
COLOUR] and [DISP COLOUR].
Select the way to change the display brightness.
unit from [1] to [10].
The available setting ranges differ depending on
[DIM SETTING].
Select the key colour when a call is received.
• The illumination effect differs depending on
the selection of [ON] or [OFF] in [ILLUMI FX].
- 31 -- 31 -
Page 32

English
Menu Item Description
ILLUMI FX
[ON], [OFF] The illumination effect can be seen when:
– there is an incoming call when [FLASHING] is
selected in [PHONE COLOUR]
– you are on a phone call
– the message received on the device is being
read when a Pioneer Smart Sync connection is
made
– the front panel is attached.
The illumination effect will activate when the
ACC power is turned on/off regardless of this
setting.
- 32 -
Page 33

English
Additional Information
Troubleshooting
The display automatically return s to the
normal display.
→ No operations have been made for
about 30 seconds.
– Perform an operation.
The repeat play range changes
unexpectedly.
→ Depending on the repeat play range,
the selected range may change when
another folder or track is being selected
or during fast forwarding/reversing.
– Select the repeat play range again.
A subfolder is not played back.
→ Subfolders cannot be played when
[FLD] (folder repeat) is selected.
– Select another repeat play range.
The sound is intermittent.
→ You are using a device, such as a cellular
phone, that may cause audible
interference.
– Move electrical devices that may be
causing the interference away from
the unit.
The sound from the Bluetooth audio
source is not played back.
→ There is a call in progress on a
Bluetooth-connected cellular phone.
– The sound will be played back when
the call is terminated.
→ A Bluetooth-connected cellular phone
is currently being operated.
– Stop using the cellular phone.
→ The connection between the unit and
the cellular phone is not established
correctly after a call made by a
Bluetooth-connected cellular phone.
– Make a Bluetooth connection
between the unit and the cellular
phone again.
Error messages
Common
AMP ERROR
→ This unit fails to operate or the spe aker
connection is incorrect.
→ The protective circuit is activated.
– Check the speaker connection.
– Turn the ignition switch OFF and back
to ON again. If the message remains,
contact your dealer or an authorized
Pioneer Service Station for assistance.
NO XXXX (NO TITLE, for example)
→ There is no embedded text information.
– Switch the display or play another
track/file.
DAB tuner
ANTENNA ERROR
→ The antenna connection is incorrect.
– Check the antenna connection.
– Turn the ignition switch OFF and back
to ON again. If the message remains,
contact your dealer or an authorized
Pioneer Service Station for assistance.
USB device/iPhone
FORMAT READ
→ Sometime s there is a delay between the
start of playback and when you start to
hear any sound.
– Wait until the message disappears and
you hear sound.
- 33 -
Page 34

English
NO AUDIO
→ There are no songs.
– Transfer the audio files to the USB
device and connect.
→ The connected USB device has security
enabled.
– Follow the USB device instructions to
disable the security.
SKIPPED
→ The connected USB device contains
DRM protected files.
– The protected files are skipped.
PROTECT
→ All the files on the connected USB
device are embedded with DRM.
– Replace the USB device.
N/A USB
→ The connected USB device is not
supported by this unit.
– Disconnect your device and replace it
with a compatible USB device.
HUB ERROR
→ The USB device connected via a USB
hub is not supported by this unit.
– Connect the USB device directly to t his
unit using a USB cable.
CHECK USB
→ The USB connector or USB cable has
short-c ircuited.
– Check that the USB connector or USB
cable is not caught in something or
damaged.
→ The connected USB device consumes
more than maximum allowable current.
– Disconnect the USB dev ice and do not
use it. Turn the ignition switch OFF
and back to ACC or ON. Connec t only
compliant USB devices.
ERROR-19
→ Communication faile d.
– Perform one of the following
operations, then return to the USB
source.
• Disconnect the USB device.
• Change to a different source.
→ iPhone failure.
– Disconnect the cable from the iPhone.
Once the iPhone’s main menu is
displayed, reconnect the iPhone and
reset it.
ERROR-23
→ USB device was not formatted prope rly.
– Format the USB device with FAT12,
FAT1 6 or FAT 32.
ERROR-16
→ The iPhone firmware version is old.
– Update the iPhone version.
→ iPhone failure.
– Disconnect the cable from the iPhone.
Once the iPhone’s main menu is
displayed, reconnect the iPhone and
reset it.
STOP
→ There are no songs in the current list.
– Select a list that contains songs.
NO BT DEVICE GO TO BT MENU TO
REGISTER
→ No Bluetooth device found.
– Connect the unit and iPhone via
Bluetooth (page 12).
CONN. FAILED PRESS BAND KEY TO
RETRY
→ Bluetooth connection with iPhone
failed.
–Press BAND/ to make a
connection again.
DISCONNECTED PRESS BAND KEY TO
RETRY
→ Bluetooth connection lost.
–Press BAND/ to make a
connection again.
- 34 -
Page 35

English
Bluetooth device
ERROR-10
→ The power failed for the Bluetooth
module of the unit.
– Turn the ignition switch OFF and back
to ACC or ON.
APP
CONNECT APP
→ Pioneer Smart Sync connection is not
made.
– Make a connection with Pioneer Smart
Sync (page 18).
Spotify
NOT FOUND
→ The Spotify application has not started
running yet.
– Start up the Spotify application.
NO BT DEVICE GO TO BT MENU TO
REGISTER
→ No Bluetooth device found.
– Connect the unit and the device via
Bluetooth (page 12).
CONN. FAILED PRESS BAND KEY TO
RETRY
→ Bluetooth connection failed.
–Press BAND/ to make a
connection again.
CHECK APP PRESS BAND KEY TO RETRY
→ Connection to the Spotify application
failed.
–Press BAND/ to make a
connection again.
DISCONNECTED PRESS BAND KEY TO
RETRY
→ Bluetooth connection lost.
–Press BAND/ to make a
connection again.
CHECK APP
→ An unknown error (including
communication error) has occurred.
– Follow the instructions that appear on
the screen.
Handling guidelines
USB storage device
• Connec tions via USB hubs are not
supported.
• Firmly secure the USB storage device
before driving. Do not let the USB storage
device fall onto the floor, where it may
become jammed under the brake or
accelerator pedal.
• Depending on the USB storage device,
the following problems may occur.
–Operations may vary.
–The storage device may not be
recognized.
– Files may not be played back properly.
– The device may cause audible
interference when you are listening to
the radio.
iPhone
• Do not leave the iPhone in places with
high temperatures.
• Firmly secure the iPhone when driving.
Do not let the iPhone fall onto the floor,
where it may become jammed under the
brake or accelerator pedal.
• Incompatible text saved on the iPhon e
will not be displayed by the unit.
Compressed audio
compatibility
• Only the first 32 characters can be
displayed as a file name (including the file
extension) or a folder name.
- 35 -
Page 36

English
• The unit may not work properly
CAUTION
depending on the application used to
encode WMA files.
• There may be a slight delay at the start of
the playback of audio files embedded
with image data, or audio files stored on a
USB device with numerous folder
hierarchies.
• Russian text to be displayed on this unit
should be encoded in one of the
following character sets:
– Unicode (UTF-8, UTF-16)
– A character set other than Unicode that
is used in a Windows environment and
is set to Russian in the multi-language
setting
• Pioneer cannot guarantee compatibility
with all USB mass storage devices, and
assumes no responsibility for any loss of
data on media players, smartphones, or
other devices while using this product.
• Do not leave a USB device in any place
that is subject to high temperatures.
WMA files
File extension .wma
Bit rate 48 kbps to 320 kbps
Sampling frequency 32 kHz, 44.1 kHz, 48
Windows Media™
Audio Professional,
Lossless, Voice/DRM
Stream/Stream with
video
(CBR), 48 kbps to 384
kbps (VBR)
kHz
Not compatible
MP3 files
File extension .mp3
Bit rate 8 kbps to 320 kbps
(CBR) , VBR
Sampling frequency 8 kHz to 48 kHz (32
Compatible ID3 tag
versio n
M3u playlist Not compatible
MP3i (MP3
interactive), mp3 PRO
kHz, 44.1 kHz , 48 kHz
for emphasis)
1.0, 1.1, 2.2, 2.3, 2.4
(ID3 tag Version 2.x is
given priority over
Versi on 1.x .)
Not compatible
WAV files
• WAV file formats cannot be connected via
MTP.
File extension .wav
Quantization bits 8 and 16 (LPCM)
Sampling f requency 16 kHz to 48 kHz
(LPCM)
AAC files
Compatible for mat AAC en coded by
File extension .m4a
Sampling fre quency 11.025 kHz to 48 kHz
Stereo Bit Rate 16 kbps to 320 kbps,
Apple Lossless Not compatible
AAC file bou ght from
the iTunes Store (.m4p
file extension)
iTunes
VBR
Not compatible
FLAC files
• FLAC file formats cannot be connected
via MTP.
• FLAC files may not be playable,
depending on the encoder.
File extension .flac, .fla
Sampling frequency 8/11.025/12/16/22.05/
Quantization bi t rate 8/16/24 bit
Channel mode 1/2 ch
24/32/44.1 /48/96 kHz
- 36 -
Page 37

English
USB device
CAUTION
Folder
Compressed
audio file
to : Playback sequence
01 to 05: Folde r number
• There may be a slig ht delay when starting
playback of audio files on a USB storage
device with numerous folder hierarchies.
Playable folder
hierarchy
Playable folde rs Up to 1 50 0
Playable files Up to 15 000
Playback of copyright -
protected files
Partitioned USB
device
Up to eight tiers (A
practical hierarchy is
less than two ti ers.)
Not compatible
Only the first par tition
can be played.
iPhone compatibility
This unit supports only the following iPhone
models. Older versions may not be supported.
Made for
–iPhone XR
–iPhone XS Max
–iPhone XS
–iPhone X
–iPhone 8
–iPhone 8 Plus
–iPhone 7
–iPhone 7 Plus
–iPhone SE
–iPhone 6s
–iPhone 6s Plus
–iPhone 6
–iPhone 6 Plus
–iPhone 5s
• Operations may vary depending on the
generation and/or software version of
the iPhone.
• Users of iPhone with the Lightning®
Connector sh ould use the Lightning to
USB Cable (supplied with iPhone).
• Refer to the iPhone manuals for
information about the file/format
compatibility.
• Audiobook, Podcast: Compatible
Pioneer accepts no responsibility for data
lost on the iPhone, even if that data is lost
while this unit is used.
Sequence of audio files
The user cannot assign folder numbers and
specify playback sequences with this unit.
Sequence of audio file depends on the
connected device.
Note that the hidden files in a USB device
cannot be played back.
Example of a hierarchy
- 37 -
Page 38

English
Russian character chart
D: Display C: Character
Copyright and trademark
Bluetooth
The Bluetooth® word mark and logos are
registered trademarks owned by Bluetooth SIG,
Inc. and any use of su ch marks by PI ONEER
CORPORATION is under license. Other
trademarks and trade names are those of their
respective owners.
iTunes
Apple and iTunes are trademarks of Apple
Inc., registered in the U.S. and other
countries.
WMA
Windows Media is either a registered
trademark or trademark of Microsoft
Corporation in the United States and/or
other countries.
This product includes technology owned
by Microsoft Corporation and cannot be
used or distributed without a license from
Microsoft Licensing, Inc.
FLAC
Copyright © 2000-2009 Josh Coalson
Copyright © 2011-2014 Xiph.Org
Founda tion
Redistribution and use in source and
bina ry fo rms, w ith or witho ut mod ificat ion,
are permitted provided that the following
conditions are met:
– Redistributions of source code must
retain the above copyright notice, this list
of conditions and the following
disclaimer.
– Redistributions in binary form must
reproduce the above copyright notice,
this list of conditions and the following
disclaimer in the documentation and/or
other materials provided with the
distribution.
– Neither the name of the Xiph.org
Foundation n or the names of its
contributors may be used to endorse or
promote products derived from this
software without specific prior written
permission.
THIS SOFT WARE IS PROVID ED BY THE
COPYRIGHT HOLD ERS AND
CONTRIBUTORS “AS IS” AND ANY EXPRESS
OR IMPLIED WARRANTIES, IN CLUDING, BUT
NOT LIMITED TO, THE IMPLIED
WARRANTIES OF MERCHANTABILITY AND
FITNESS FOR A PARTICULAR PURPOSE ARE
DISCLAIMED. IN NO EVENT SHALL THE
FOUNDATION OR CONTRIBUTORS BE
LIABLE FOR ANY DIREC T, INDIRECT,
INCIDENTAL, SPECIAL, EXEMPLARY, OR
CONSEQUENTIAL DAMAGES (INCLUDING,
BUT NOT LIMITED TO, PROCUREMENT OF
SUBSTITUTE GOODS OR SERVICES; LOSS OF
USE, DATA, OR PROFITS; OR BUSINESS
INTERRUPTION) HOWEVER CAUSED AND
ON ANY THEORY OF LIABILITY, WHETHER
IN CONTRACT, STRIC T LIABILITY, OR TORT
- 38 -
Page 39

English
(INCLUDING NEGLIGENCE OR OTHERWISE)
ARISING IN ANY WAY OUT OF THE USE OF
THIS SOFTWARE, EVEN IF ADVISED OF THE
POSSIBILIT Y OF SUCH DAMAGE.
iPhone and Light ning
Use of the Made for Apple badge means
that an accessory has been designed to
connect specifically to the Apple
product(s) identified in the badge, and has
been certified by the developer to meet
Apple performance standards. Apple is not
responsible for the operation of this device
or its compliance with safety and
regulatory standards.
Please note that the use of this accessory
with an Apple product may affect wireless
performance.
iPhone and Lightning are trademarks of
Apple Inc., registered in the U.S. and other
countries.
Siri®
Works with Siri through the microphone.
Google™, Google Play, Android
Google, Google Play and Android are
trademarks of Google LLC.
Spotify®
SPOTIFY and the Spotify logo are among
the registered trademarks of Spotify AB.
Compatible mobile digital devices and
premium subscription required, where
available, see https://www.spotify.com.
T-Kernel 2.0
This product uses the source code of TKernel 2.0 under T-License 2.0 granted by
T-Engine Forum (www.tron.org).
MP3
Copyright (C) 1998-2009 PacketVideo
Licensed under the Apache License,
Version 2.0 (the "License"); you may not use
this file except in compliance with the
License.
You may obtain a copy of the License at
http://www.apache.org/licenses/LICENSE-
2.0
Unless required by applicable law or
agreed to in writing, software distributed
under the License is distributed on an "AS
IS" BASIS, WITHOUT WARRANTIES OR
CONDITIONS OF ANY KIND, either express
or implied.
See the License for the specific language
governing permissions and limitations
under the License.
Specifications
General
Power source: 14.4 V DC (10.8 V to 15.1 V
allowable)
Grounding system: Negative type
Maximum current consumption: 10.0 A
Dimensions (W × H × D):
DIN
Chassis: 178 mm × 50 mm × 165 mm
Nose: 188 mm × 58 mm × 17 mm
D
Chassis: 178 mm × 50 mm × 165 mm
Nose: 170 mm × 46 mm × 17 mm
Weight : 0.7 kg
Audio
Maximum power output:
• 50 W × 4 ch/4 Ω (for no subwoofer)
• 50 W × 2 ch/4 Ω + 70 W × 1 ch/2 Ω
(for subwoofer)
Continuous power output:
22 W × 4 (50 Hz to 15 000 Hz, 5 %
THD, 4 Ω load, both channels driven)
Load impedance: 4 Ω (4 Ω to 8 Ω (2 Ω for 1
ch) allowable)
Preout maximum output level: 2.0 V
Equalizer (13-Band Graphic Equalizer):
Frequency: 50 Hz/80 Hz/125 Hz/200
Hz/315 Hz/500 Hz/800 Hz/1.25 kHz/2
kHz/3.15 kHz/5 kHz/8 kHz/12.5 kHz
Gain: ±12 dB (2 dB step)
- 39 -
Page 40

English
High pass filter (Standard mode):
Frequency: 25 Hz/31.5 Hz/40 Hz/50
Hz/63 Hz/80 Hz/100 Hz/125 Hz/160
Hz/200 Hz/250 Hz
Slope: –6 dB/oct, –12 dB/oct, –18 dB/
oct, –24 dB/oct, OFF
Subwoofer/Low pass filter (Standard
mode):
Frequency: 25 Hz/31.5 Hz/40 Hz/50
Hz/63 Hz/80 Hz/100 Hz/125 Hz/160
Hz/200 Hz/250 Hz
Slope: –6 dB/oct, –12 dB/oct, –18 dB/
oct, –24 dB/oct, –30 dB/oct, –36 dB/
oct, OFF
Gain: +10 dB to –24 dB (1 dB step)
Phase: Normal/Reverse
Speaker level (Standard mode):
+10 dB to –24 dB (1 dB step)
Time alignment (Standard mode):
0 cm to 350 cm (2.5 cm/Step)
High pass filter (HIGH) (Network mode):
Frequency: 1.25 kHz/1.6 kHz/2 kHz/
2.5 kHz/3.15 kHz/4 kHz/5 kHz/6.3 kHz/
8 kHz/10 kHz/12.5 kHz
Slope: –6 dB/oct, –12 dB/oct, –18 dB/
oct, –24 dB/oct
High pass filter (MID) (Network mode):
Frequency: 25 Hz/31.5 Hz/40 Hz/50
Hz/63 Hz/80 Hz/100 Hz/125 Hz/160
Hz/200 Hz/250 Hz
Slope: –6 dB/oct, –12 dB/oct, –18 dB/
oct, –24 dB/oct, OFF
Low pass filter (MID) (Network mode):
Frequency: 1.25 kHz/1.6 kHz/2 kHz/
2.5 kHz/3.15 kHz/4 kHz/5 kHz/6.3 kHz/
8 kHz/10 kHz/12.5 kHz
Slope: –6 dB/oct, –12 dB/oct, –18 dB/
oct, –24 dB/oct, OFF
Subwoofer (Network mode):
Frequency: 25 Hz/31.5 Hz/40 Hz/50
Hz/63 Hz/80 Hz/100 Hz/125 Hz/160
Hz/200 Hz/250 Hz
Slope: –12 dB/oct, –18 dB/oct, –24 dB/
oct, –30 dB/oct, –36 dB/oct, OFF
Gain: +10 dB to –24 dB (1 dB step)
Phase: Normal/Reverse
Speaker level (Network mode):
+10 dB to –24 dB (1 dB step)
Time alignment (Network mode):
0 cm to 350 cm (2.5 cm/Step)
USB
USB standard specification: USB 2.0 full
speed
Maximum current supply: 1.5 A
USB Protocol:
MSC (Mass Storage Class)
MTP (Media Transfer Protocol)
AOA (Android Open Accessory) 2.0
Fi le s yst em: FAT1 2, FAT 16, FAT32
MP3 decoding format: MPEG-1 & 2 Audio
Layer 3
WMA decoding format: Ver. 7, 8, 9, 9.1, 9.2
(2 ch audio)
AAC decoding format: MPEG-4 AAC (iTunes
encoded only) (Ver. 10.6 and earlier)
FLAC decoding format: v1.2.1 (Free
Lossless Audio Codec)
WAV signal format: Linear PCM (Non-
compressed)
FM tuner
Frequency range: 87.5 MHz to 108.0 MHz
Usable sensitivity: 11 dBf (1.0 μV/75 Ω,
mono, S/N: 30 dB)
Signal-to-noise ratio: 65 dB (IEC-A network)
MW tuner
Frequency range: 531 kHz to 1 602 kHz
Usable sensitivity: 25 μV (S/N: 20 dB)
Signal-to-noise ratio: 60 dB (IEC-A network)
LW tuner
Frequency range: 153 kHz to 281 kHz
Usable sensitivity: 28 μV (S/N: 20 dB)
Signal-to-noise ratio: 60 dB (IEC-A network)
DAB tuner
Frequency range (Band III): 174.928 MHz to
239.200 MHz (5 A to 13 F)
Frequency range (L Band): 1 452.960 MHz
to 1 490.624 MHz (LA to LW)
- 40 -
Page 41

English
Usable sensitivity (Band III): –100 dBm
NOTE
Usable sensitivity (L Band): –100 dBm
Signal-to-noise ratio: 85 dB
Bluetooth
Version: Bluetooth 4.0 certified
Output power: +4 dBm Maximum (Power
class 2)
BLE (Bluetooth Low Energy) Version: 4.0
certified
BLE (Bluetooth Low Energy) Output power:
+3 dBm Maximum
Frequency band(s): 2 400 MHz to 2 483.5
MHz
Bluetooth profiles:
GAP (Generic Access Profile)
SDAP (Service Discovery Application
Profile)
HFP (Hands Free Profile) 1.6
PBAP (Phone Book Access Profile)
A2DP (Advanced Audio Distribution
Profile)
AVRCP (Audio/Video Remote Control
Profile) 1.5
SPP (Serial Port Profile) 1.1
Specifications and the design are subject
to modifications without notice.
- 41 -
Page 42

França is
À propos de ce mode d’emploi :
Table des matières
Mise en route............................................................................................ 3
Radiodiffusion numérique (Digital Audio Broadcasting – DAB) .... 8
Radio.......................................................................................................... 9
USB/iPhone®/AUX................................................................................. 11
Bluetooth............................................................................................... 13
Spotify® .................................................................................................. 18
Utiliser Pioneer Smart Sync/APP ....................................................... 20
Paramètres audio ................................................................................. 24
Réglages................................................................................................. 25
Réglages FUNCTION ............................................................................. 25
Réglages AUDIO .................................................................................... 28
Réglages SYSTEM.................................................................................. 31
Réglages ILLUMINATION...................................................................... 34
Informations complémentaires......................................................... 36
• Parmi les instructions suivantes, les clés USB ou les lecteurs audio USB sont
collectivement désignés sous le nom de « périphérique USB ».
- 2 -
Page 43

França is
Mise en route
SRC (source)/OFF
Touc he de re trai t
Fenêtre d’affichage
Molette M.C. (multi-contrôle)
BAND/
DISP (affichage)
(navigation)/LIST
Port U SB
Prise d’entrée AUX (prise stéréo 3,5 mm)
Fonctionnement de base
MVH-S520DAB
Opérations fréquemment utilisées
Objectif Opération
Mettre l’appareil sous tension* Appuyez sur SRC/OFF pour mettre
Régler le volume Tournez la molette M.C..
Sélectionner une source Appuyez plusieurs fois sur SRC/OFF.
Modifier les informations d’affichage Appuyez plusieurs fois sur DISP.
Revenir à l’affichage/la liste précédent(e) Appuyez sur BAND/.
Revenir à l’affichage normal à partir du
menu
Modifier la luminosité de l’affichage Appuyez longuement sur BAND/.
Répondre à un appel Appuyez sur un bouton.
Terminer un appel Appuyez sur .
l’appareil sous tension.
Appuyez longuement sur SRC/OFF pour
mettre l’appareil hors tension.
Appuyez longuement sur BAND/.
- 3 -- 3 -
Page 44

França is
* Si le fil bleu/blanc de l’appareil est relié à la borne de commande du relais d’antenne automatique du
Important
Retirer Fixer
véhicule, l’antenne se déploie lorsque la source de cet appareil est mise en service. Pour rétracter
l’antenne, mettez la source hors service.
Indication de l’affichage
Indication Description
Apparaît lorsqu’il existe un niveau inférieur de menu ou de dossier.
Apparaît lorsqu’un programme d’informations routières est capté.
BASS Apparaît lorsque la fonction BASS est activée.
Apparaît lorsque la lecture aléatoire est en service (sauf lorsque BT AUDIO
est sélectionné en tant que source).
Apparaît lorsque la lecture répétée est en service (sauf lorsque BT AUDIO
est sélectionné en tant que source).
Apparaît lorsqu’une connexion Bluetooth est établie (page 13).
APP Apparaît lorsqu’une connexion Pioneer Smart Sync est établie (page 20).
Retrait de la face avant
Retirez la face avant pour empêcher tout vol. Débranchez tous les câbles et les
périphériques branchés à la face avant et mettez l’appareil hors tension avant de le
retirer.
• Évitez de soumettre la face avant à des chocs excessifs.
• Tenez la face avant à l’abri du soleil et des températures élevées.
• Stockez toujours la face avant détachée, dans un étui de protection ou un sac.
Réinitialisation du microprocesseur
Le microprocesseur doit être réinitialisé dans les cas suivants :
– Avant la mise en service de cet appareil une fois celui-ci installé
- 4 -
Page 45

França is
– Si l’appareil ne fonctionne pas correctement
ATT ENT IO N
Bouton RESET
– Lorsque des messages inhabituels ou d’erreur s’affichent
1 R etrait de la face avant (page 4).
2 Appuyez sur le bouton RESET à l’aide d’un instrument pointu qui mesure plus de
8 mm.
Menu de configuration
Lorsque vous mettez le contact sur ON après avoir installé l’appareil, le menu de
configuration apparaît sur l’affichage.
Veuillez ne pas utiliser l’appareil en mode standard lorsqu’une enceinte en mode réseau est branchée à
l’appareil. Veuillez ne pas utilis er l’appareil en mode réseau lorsqu’une enceinte en mode standard est
branchée à l’appareil. Vous pourriez endommager les enceintes.
1 Tournez la molette M.C. pour sélectionner les options, puis appuyez pour valider.
Pour passer à l’option de menu suivante, vous devez valider votre sélection.
Élément de menu Description
LANGUAGE Sélectionnez la langue d’affichage des informations textuelles à
[ENG](anglais),
[РУС](russe),
[TUR](turc),
[FRA](français),
[DEU](allemand)
CLOCK SET Réglez l’horloge.
partir d’un fichier audio compressé.
1 Tournez la molette M.C. pour régler l’heure, puis appuyez
pour valider.
L’indicateur passe automatiquement au réglage des min utes.
2 Tournez la molette M.C. pour régler les minutes, puis appuyez
pour valider.
- 5 -- 5 -
Page 46

França is
REMARQUE
Élément de menu Description
FM STEP Sélectionnez l’incrément d’accord FM à partir de 100 kHz ou de
[100], [50]
DAB ANT PW Fournissez l’alimentation à une antenne DAB. À sélectionner
[ON]
[OFF] Aucune alimentation n’est fournie à une antenne DAB. À
SPEAKER MODE Commutez entre deux modes de fonctionnement : le mode
[STANDARD],
[NETWORK]
50 kHz.
lorsque vous utilisez l’antenne DAB en option (AN-DAB1,
vendue séparément) avec l’appareil.
sélectionner lorsque vous utilisez une antenne passive sans
amplificateur.
réseau bidirectionnel (NETWORK) et le mode standard
(STANDARD) en fonction des branchements que vous avez
établis. Pour obtenir de plus amples informations concer nant les
modes de fonctionnement, voir page 24.
Une fois le mode approprié sélectionné, tourn ez la molette M.C.
pour sélectionner [YES], puis appuyez pour valider.
• Vous ne pourrez pas finaliser le menu de configuration sans
régler le [SPEAKER MODE].
• Une fois le mode de sortie paramétré, vous ne pourrez pas
modifier cette option sauf si les réglages standard de ce
produit sont rétablis. Veuillez rétablir les réglages standard
pour changer l’option mode de sortie (reportez-vous au
SYSTEM RESET sur page 7).
• Lorsque [NET WORK] est sélectionné, la fonction de signal
sonore est indisponible.
2 [QUIT :YES] apparaît.
Pour revenir au premier éléme nt du menu de configuration, tournez la molet te M.C.
pour sélectionner [QUIT :NO], puis appuyez pour valider.
3 Ap puyez sur la molette M.C. pour valider les réglages.
[UPDATING LIST] s’affiche et la liste de services est mise à jour.
Ces paramètres autres que [SPEAKER MODE] peuvent être ajustés à tout moment à partir des réglages
du SYSTEM (page 31) et des réglages INITIAL (page 7).
Annulation de l’affichage de démonstration (DEMO
OFF)
1 Ap puyez sur la molette M.C. pour afficher le menu principal.
2 Tournez la molette M.C. pour sélectionner [SYSTEM], puis appuyez pour valider.
- 6 -
Page 47

França is
3 Tournez la molette M.C. pour sélectionner [DEMO OFF], puis appuyez pour
valider.
4 Tournez la molette M.C. pour sélectionner [YES], puis appuyez pour valider.
Réglages INITIAL
1 Appuyez longuement sur SRC/OFF jusqu’à ce que l’appareil se mette hors
tension.
2 Appuyez longuement sur SRC/OFF pour afficher le menu principal.
3 Tournez la molette M.C. pour sélectionner [INITIAL], puis appuyez pour valider.
4 Tournez la molette M.C. pour sélectionner une option, puis appuyez pour valider.
Élément de menu Description
FM STEP Sélectionnez l’incrément d’accord FM à partir de 100 kHz ou de
[100], [50]
REAR-SP À sélectionner lorsqu’un haut-parleur à gamme étendue est
[FUL]
[SW] À sélectionner lorsqu’un haut-parleur d’extrêmes graves est
SYSTEM UPDATE Sélectionnez [SYSTEM INFO] pour valider les dernières
[SYSTEM INFO], [S/
W UPDATE]
DAB ANT PW Fournissez l’alimentation à une antenne DAB. À sélectionner
[ON]
[OFF] Aucune alimentation n’est fournie à une antenne DAB. À
SYSTEM RESET Sélectionnez [YES] pour réinitialiser les réglages de l’appareil.
[YES], [NO]
50 kHz.
relié aux fils de sortie du haut-parleur arrière.
directement relié aux fils de sortie du haut-parleur arrière sans
amplificateur auxiliaire.
informations relatives au système de cet appareil.
Sélectionnez [S/W UPDATE] pour effectuer la dernière mise à
jour des logiciels de l’appareil et réinitialiser ses réglages. Pour
obtenir de plus amples informations sur les derniers logiciels et
mises à jour, veuillez vous rendre sur notre site Web.
lorsque vous utilisez l’antenne DAB en option (AN-DAB1,
vendue séparément) avec l’appareil.
sélectionner lorsque vous utilisez une antenne passive sans
amplificateur.
L’appareil redémarre automatiquement.
- 7 -- 7 -
Page 48

França is
REMARQUE
REMARQUE
Radiodiffusion numérique (Digital
Audio Broadcasting – DAB)
Pour capter des signaux DAB, branchez à l’appareil une antenne DAB (AN-DAB1)
(vendue séparément).
Recherche d’un composant de service ou d’une
station
1 Appuyez sur SRC/OFF pour sélectionner [DIGITAL RADIO].
2 Appuyez sur BAND/ pour sélectionner la bande [D1], [D2] ou [D3].
3 Appuyez sur / pour sélectionner un composant de service ou une
station.
Appuyez longuement sur / , puis relâchez pour rechercher un service disponible. Le
balayage s’arrête lorsque l’appareil capte u n service.
Pour sélectionner un composant de service ou une station dans
des listes de services
1 Pendant la réception DAB, appuyez longuement sur .
Affiche une liste de l’ensemble des composants de service/stations. Appuyez à
nouveau longuement sur pour rechercher un composant de service ou une station
par ordre alphabétique.
2 Sélectionnez un composant de service ou une station dans la liste que vous avez
sélectionnée, puis appuyez sur la molette M.C. pour valider.
Vous pouvez mettre à jour la liste de services en appuyant sur DAB. Pour annuler la mise à jour,
appuyez à nouveau s ur DAB.
- 8 -
Page 49
França is
Présélection de composants de service/stations
Pour mémoriser des composants de service/stations
1
Lorsque vous captez le composant de service ou la station que vous souhaitez
mémoriser, appuyez longuement sur l’une des touches numériques (1/ à 6/
) jusqu’à ce qu’elle cesse de clignoter.
Pour récupérer des composants de service/stations
1
Sélectionnez la bande, puis appuyez sur l’une des touches numériques (1/ à 6/
).
Fonctions de pause/décalage temporel
L’appareil mémorise automatiquement les émissions récentes. La capacité de mémoire
de cet appareil varie selon le débit binaire du composant de service utilisé. La capacité
de mémoire approximative est de cinq minutes pour 192 kbit/s.
Pour mettre sur pause/reprendre la lecture
1
Lorsque vous captez le composant de service, appuyez longuement sur DISP.
Pour utiliser la fonction de décalage temporel
1
Lorsque vous captez le composant de service, appuyez longuement sur DAB .
2 Appuyez sur (retour en arrière d’une minute)/ (saut en avant d’une
minute) pour ajuster le point de lecture.
Radio
Les fréquences du syntoniseur de cet ap pareil sont destinées à un e utilisation en Europe
de l’Ouest, Asie, Moyen-Orient, Afrique et Océanie. Son utilisation dans d’autres régions
peut se traduire par une réception de mauvaise qualité. La fonction RDS (Radio Data
System) n’est opérationnelle que dans les régions où des signaux RDS sont diffusés pour
les stations FM.
- 9 -- 9 -
Page 50

França is
CONSE IL
REMARQUE
Réception des stations présélectionnées
1 Appuyez sur SRC/OFF pour sélectionner [RADIO].
2 Appuyez sur BAND/ pour sélectionner la bande [FM1], [FM2], [FM3], [MW] ou
[LW].
3 Appuyez sur l’une des touches numériques (1/ à 6/).
Les touches / peuvent également servir à sélectionner une station préréglée lorsque [SEEK]
est réglé sur [PCH] dans les réglages FUNCTION (page 27).
Mémoire des meilleures stations (BSM)
Les six stations les plus puissantes sont mémorisées sur les touches numériques (1/ à
6/).
1 Après avoir sélectionné la bande, appuyez sur la molette M.C. pour afficher le
menu principal.
2 Tournez la molette M.C. pour sélectionner [FUNCTION], puis appuyez pour
valider.
3 Tournez la molette M.C. pour sélectionner [BSM], puis appuyez pour valider.
Pour rechercher une station manuellement
1
Après avoir sélectionné la bande, appuyez sur / pour sélectionner une
station.
Appuyez longuement sur / , puis relâchez pour rechercher une station
disponible. Le balayage s’arrête lorsque l’appareil capte une station. Pour annuler
l’accord par recherche, appuyez sur / .
[SEEK] doit être réglé sur [MAN] dans les réglages FUNCTION (page 27).
Pour mémoriser des stations manuellement
1
Lorsque vous captez la station que vous souhaitez mémoriser, appuyez
longuement sur l’une des touches numériques (1/ à 6/ ) jusqu’à ce qu’elle
cesse de clignoter.
- 10 -
Page 51

França is
REMARQUES
REMARQUE
PRÉCAUTION
Utilisation des fonctions PTY
L’appareil recherche une station diffusant des informations PT Y (type de programme).
1 Appuyez longuement sur pendant la réception FM.
2 Tournez la molette M.C. pour sélectionner le type de programme [NEWS/INFO],
[POPULAR], [CLASSICS] ou [OTHERS].
3 Ap puyez sur la molette M.C..
L’appareil continue à rechercher une station. Lorsqu’il en trouve une, son nom de
service de programme s’affiche.
• Pour annuler la recherche, appuyez sur la molette M.C..
• Le programme de certaines stations peut différer de celui qu’indique le PTY transmis.
• Si aucune station ne diffuse le type de programme que vous recherchez, [NOT FOUND] s’affiche
pendant environ deux secondes, puis le syntoniseur revient à la station de départ.
USB/iPhone®/AUX
(La source iPhone est indisponible lorsque [USB MTP] est réglé sur [ON] dans les SYSTEM
réglages (page 32).)
Lecture
Débranchez le casque ou les écouteurs du périphérique avant de raccorder ce dernier à
l’appareil.
Périphériques USB (y compris Android™)/iPhone
1
Ouvrez le cache du port USB.
2 Raccordez le périphérique USB/l’iPhone à l’aide d’un câble approprié.
Pour basculer au tomatiquement sur une source US B lorsqu’un périphérique USB/ iPhone est connecté
à l’appareil, réglez [USB AUTO] sur [ON] dans les paramètres SYSTEM (page 32).
Utilisez un câble USB (vendu séparément) pour raccorder le périphérique USB, car tout périphérique
raccordé directement à l’appareil dépas sant ce dernier pourrait être dangereux.
Avant de retirer le périphérique, arrêtez la lecture.
- 11 -- 11 -
Page 52

França is
Connexions AOA
REMARQUE
REMARQUE
REMARQUE
Il est possible de connecter à l’appareil un périphérique utilisant le système
d’exploitation Android 4.1 Android et prenant également en charge le système
d’exploitation 2.0 AOA (Android Open Accessory) via une connexion AOA à l’aide du
câble fourni avec le périphérique.
Si vous utilise z une connexion AOA, [APP CONTROL] doi t être réglé sur [WIRED] (page 3 2) et [USB MTP]
doit être réglé sur [OFF] (page 32) dans les paramètre s SYSTEM.
Connexion MTP
Il est possible de connecter un périphérique Android utilisant le système d’exploitation Android 4.0 ou
la plupart des versions supérieures via MTP, à l’aide du câble fourni avec le périphérique. Toutefois,
selon le périphérique connecté, la version du système d’exploitation et les numéros des fichiers qu’il
contient, il se peut que la lecture de fichiers audio / morceaux soit impossible via MTP. Notez que la
connexion MTP n’est pas compatib le avec les formats de fichiers WAV et FLAC.
Si vous utilisez une connexion MTP, vous devez régler [USB MTP] sur [ON] dans les paramètres SYSTEM
(page 32).
AUX
1
Insérez la mini-fiche stéréo dans la prise d’entrée AUX.
2 Appuyez sur SRC/OFF pour sélectionner la source [AUX IN].
Si [AUX] est réglé sur [ OFF] dans les réglages SYSTEM, i l est impossible de sélec tionner [AUX IN] en tant
que source (page 31).
Opérations
Vous pouvez procéder à différents ajustements dans les réglages FUNC TION (page 25)
(sauf pour la source AUX IN/USB).
Notez que les opérations suivantes ne fonctionnent pas pour un péri phérique AUX. Pour
utiliser un périphérique AUX, utilisez le périphérique proprement dit.
Objectif Opération
Sélectionner un dossier*1 Appuyez sur 1/ ou 2/.
Sélectionner une piste/un morceau
(chapitre)
Avance ou retour rapide*2 Appuyez longuement sur ou .
Appuyez sur ou .
- 12 -
Page 53

França is
Important
Objectif Opération
Rechercher un fichier dans une liste (USB
uniquement)
Afficher une liste de fichiers dans la
catégorie/le dossier sélectionné(e)*1
Lire un morceau de la catégorie/du dossier
sélectionné(e)*1
Lecture répétée Appuyez sur 6/.
Lecture aléatoire Appuyez sur 5/.
Pause/Reprise de la lecture Appuyez sur 4/PAUSE .
Sound retriever (correcteur de son
compressé)*1
Retour au dossier racine (USB
uniquement)*1
*1 Fichiers d’audio compressé uniquement
*2 Si vous utilis ez la fonction avan ce ou retour rapide au moment de la lec ture d’un fichier V BR, la
durée de lecture peut ne pas être correcte.
1 Appuyez longuement sur pour
afficher la liste.
2 Tournez la molette M.C. pour
sélectionner la catégorie ou le nom de
fichier (dossier) de votre choix, puis
appuyez pour valider.
3 Tournez la molette M.C. pour
sélectionner le fichier de votre choix, puis
appuyez pour valider.
La lecture commence.
Appuyez sur la molette M.C. lorsqu’une
catégorie/un dossier est sélectionné(e).
Appuyez longuement sur la molette M.C.
lorsqu’une catégorie/un dossier est
sélectionné(e).
Appuyez sur 3/S.Rtrv.
[1] : efficace pour les taux de compression
faibles
[2] : efficace pour les taux de compression
élevés
Appuyez longuement sur 1/.
Bluetooth
Connexion Bluetooth
Si au moins dix périphériques Bluetooth (ex. : un téléphone et un lecteur audio séparé) sont connectés,
il se peut qu’ils ne fonctionnent pas correctement.
- 13 -- 13 -
Page 54

França is
CONSE IL
L’appareil se connectera ensuite automatiquement si le périphérique Bluetooth a été connecté
Important
précédemment aux étapes suivantes.
1 Activez la fonction Bluetooth du périphérique.
Si vous établissez une connexion Bluetooth à partir du périphérique, passez à
l’étape4.
2 Appuyez sur pour afficher le paramètre [ADD DEVICE].
L’appareil commence à rechercher les périphériques disponibles, puis les affiche
dans la liste des périphériques.
• Pour annuler la recherche, appuyez sur la molette M.C..
• Si le périphérique de votre choix ne se trouve pas dans la liste, sélectionnez [RE-
SEARCH].
• Si aucun périphérique n’est disponible, [NOT FOUND] s’affiche.
• Si un périphérique est déjà connecté, le menu du téléphone apparaît en appuyant
sur .
3 Tournez la molette M.C. pour sélectionner un périphérique dans la liste des
périphériques, puis appuyez pour valider.
Appuyez longuement sur la molette M.C. pour commuter les informations de
périphérique affichées entre le nom du périphérique et l’adresse du périphérique
Bluetooth.
Si vous établissez une connexion Bluetooth à partir de l’appareil, passez à l’étape 5.
4 Sélectionnez le nom de l’appareil qui s’affiche sur le périphérique.
5 Assurez-vous que le même numéro à 6 chiffres ap paraît sur cet appareil et le
périphérique, puis sélectionnez [YES] si les numéros à 6 chiffres qui se sont
affichés sur cet appareil et le périphérique sont les mêmes.
Téléphone Bluetooth
Établissez d’abord une connexion Bluetooth avec le téléphone Bluetooth (page 13). Il est
possible de connecter simultanément jusqu’à deux téléphones Bluetooth.
• Si vous laissez l’appareil en veille pour vous connecter à votre téléphone via Bluetooth lorsque le
moteur ne tourne pas, vous risquez d’épuiser la batterie du véhicule.
• Assurez-vous de garer votre véhicule en lieu sûr et de serrer le frein à main avant utilisation.
Pour passer un appel téléphonique
1
Appuyez sur pour afficher le menu de téléphone.
- 14 -
Page 55

França is
Lorsque deux téléphones sont connectés, un nom de té léphone apparaît en premier,
CONSE IL
suivi d’un menu de téléphone. Pour commuter sur un autre téléphone, appuyez à
nouveau sur .
2 Tournez la molette M.C. pour sélectionner [RECENTS] ou [PHONE BOOK], puis
appuyez pour valider.
Si vous sélectionnez [PHONE BOOK], passez à l’étape 4.
3 Tournez la molette M.C. pour sélectionner [MISSED], [DIALLED] ou [RECEIVED],
puis appuyez pour valider.
4 Tournez la molette M.C. pour sélectionner un nom ou un numéro de téléphone,
puis appuyez pour valider.
L’appel téléphonique commence.
Pour répondre à un appel entrant
1
Appuyez sur un bouton lorsque vous recevez un appel.
Lorsque deux téléphones sont connectés à l’appareil via Bluetooth et qu’il y a un appel entrant alors
qu’un téléphone est déjà en cours d’appel, un message s’aff iche. Pour répondre à cet a ppel entrant,
vous devez mettre fin à l’appel existant.
Opérations de base
Objectif Opération
Terminer un appel Appuyez sur .
Refuser un appel entrant Appuyez longuement sur lorsque vous recevez
Commuter entre l’appel en cours
et un appel en attente
Annuler un appel en attente Appuyez longuement sur .
Régler le volume de la voix de
l’appelant (cette fonction est
indisponible lorsque le mode privé
est activé.)
Activer ou désactiver le mode
privé
un appel.
Appuyez sur la molette M.C..
Tournez la molette M.C. pendant l’appel.
Appuyez sur BAND/ pendant l’appel.
Pour présélectionner des numéros de téléphone
1
Sélectionnez un numéro dans un annuaire téléphonique ou un historique des
appels.
- 15 -- 15 -
Page 56

França is
2 Appuyez longuement sur l’une des touches numériques (1/ à 6/).
REMARQUE
CONSE IL
Le contact est mémorisé sous le numéro de présélection choisi.
Pour passer un appel à l’aide d’un numéro de présélection, appuyez sur l’une des
touches numériques (1/ à 6/ ), puis appuyez sur la molette M.C., pendant
l’affichage du menu du téléphone.
Reconnaissance vocale
Cette fonction n’est disponible que si un périphérique iPhone/Android équipé de la
reconnaissance vocale est connecté à l’appareil via Bluetooth.
1 Appuyez longuement sur , puis parlez dans le microphone pour entrer les
commandes vo cales.
Pour quitter le mode de reconnaissance vocale, appuyez sur BAND/.
Pour plus de détails sur les fonctions de reconnaissance vocale, consultez le mode d’e mploi de votre
périphérique.
Lorsqu’une connexion Pioneer Smart Sync est établie (page 20), vous pouvez également utiliser la
fonction de reconnaissance vocale depuis Pioneer Smart Sync installé sur votre périphérique iPhone/
Android en appuyant longuement sur . Pour obtenir plus de détails sur les fonctions de
reconnaissance vocale, reportez-vous à la section d’aide de l’application.
Menu de téléphone
1
Appuyez sur pour afficher le menu de téléphone.
Élément de menu Description
RECENTS Affichez l’historique des appels manqués.
[MISSED]
[DIALLED] Affichez l’historique des appels effectués.
[RECEIVED] Affichez l’historique des appels reçus.
PHONE BOOK Afficher les contacts sur votre téléphone.
PRESET 1-6 Rappelez les numéros de téléphone présélectionnés. Vous
A.ANSR* Sélectionnez [ON] pour répondre automatiquement à un ap pel
[ON], [OFF]
pouvez également rappeler un numéro de téléphone
présélectionné en appuyant sur l’une des touches de
présélection (1/ à 6/).
entrant.
- 16 -
Page 57

França is
Important
REMARQUE
CONSE IL
Élément de menu Description
PB INVT Inversez l’ordre des noms dans l’annuaire téléphonique (vue des
DEVICELIST Affichez la liste des périphériques Bluetooth appairés. « * »
DEL DEVICE Supprimez les informations de périphérique.
[DELETE YES],
[DELETE NO]
ADD DEVICE Enregistrez un nouveau périphérique.
DEV. INFO Commutez les informations de périphérique sur l’affichage
* Si deux téléphones sont connectés, cette fonction est inopérante sur les appels entrants qui sont
reçus lorsque l’un des téléphones est en cours d’appel.
noms).
apparaît sur le nom de périphérique lorsque la connexion
Bluetooth est établie.
Si aucun périphérique ne se trouve dans la liste des
périphériques, c’est que cette fonction est indisponible.
entre le nom du périphérique et l’adresse du périphérique
Bluetooth.
Audio Bluetooth
• Selon le lecteur audio Bluetooth connecté à cet appareil, les opérations disponibles sont limitées aux
deux nivea ux suivants :
– Profil A2DP (Advanced Audio Distribution Profile) : vous ne pouvez écouter que des morceaux sur
votre lecteur audio.
– AVRCP (Audio/Video Remote Control Profile) : vous pouvez écouter, mettre sur pause, sélectionner
un morceau, etc.
• Le son du lecteur audio Bluetooth est coupé lorsque le téléphone est utilisé.
• Lors de l’utili sation du lecteur audio Blue tooth, vous ne pouvez pas vous con necter
automatiquement à un téléphone Bluetooth.
• Selon le type de lec teur audio Bluetooth connecté à cet appareil, l’affichage des opérations et
informations de certaines fonctions peut ne pas être disponible.
1 Établissez une connexion Bluetooth avec le lecteur audio Bluetooth.
2 Appuyez sur SRC/OFF pour sélectionner la source [BT AUDIO].
3 Appuyez sur BAND/ pour lancer la lecture.
Vous devez reconnecte r la connexi on Bluetooth quand la source ou l ’appareil est éteint.
Lorsque plus de deux jusqu’à cinq périphériques sont enregistrés sur l’appareil via Bluetooth, vous
pouvez commuter le périphérique Bluetooth en enregistrant des morceaux sur le périphérique. En
procédant ainsi, il est facile d’enregistrer un morceau à partir du périphérique Bluetooth de chaque
- 17 -- 17 -
Page 58

França is
passager. Toutefois, selon les conditions d’utilisation, il se peut que des connexions multiples ne soient
Important
pas possibles et que les fichiers audio/morceaux ne soient pas enregistrés correctement.
Opérations de base
Vous pouvez procéder à différents ajustements dans les réglages FUNC TION (page 25).
Objectif Opération
Avance ou retour rapide Appuyez longuement sur ou .
Sélectionner une piste Appuyez sur ou .
Lecture répétée* Appuyez sur 6/.
Lecture aléatoire* Appuyez sur 5/.
Pause/Reprise de la lecture Appuyez sur 4/PAUSE .
Rechercher un fichier dans une liste 1 Appuyez longuement sur pour
* Selon le périphé rique connecté, il se peut que ces op érations soient indisponib les.
afficher une liste.
2 Tournez la molette M.C. pour
sélectionner le nom de dossier de votre
choix, puis appuyez pour valider.
3 Tournez la molette M.C. pour
sélectionner le fichier de votre choix, puis
appuyez pour valider.
La lecture démarre.
Spotify®
(Indisponible lorsque [USB MTP] est réglé sur [ON] dans les SYSTEM réglages (page 32).)
Spotify est un service de diffusion de musique en continu non affilié à Pioneer. Des
informations complémentaires sont disponibles sur http://www.spotify.com.
L’application Spotify est disponible pour les smartphones compatibles ; veuillez
consulter https://support.spotify.com/ afin d’obtenir les dernières informations sur la
compatibilité.
Pour profiter de Spotify pendant que vous conduisez, téléchargez d’abord l’application
Spotify sur votre iPhone ou votre périphérique Android. Vous pouvez la télécharger sur
le iTunes® App Store® ou Google Play™. Optez pour un compte gratuit ou payant
Premium, sur l’application ou sur spotify.com. Un compte Premium vous permet
d’accéder à davantage de fonctionnalités, comme l’écoute hors-ligne.
• Ce produit contient le logiciel Spotify qui fait l’objet de licences tierces que vous trouverez ici :
www.spotify.com/connect/third-party-licenses.
- 18 -
Page 59

França is
• Pour obtenir de plus ampl es informations sur les pays et les région s où Spotify peut être utilisé,
REMARQUE
REMARQUE
consultez https ://spotify.com/us/select-you r-country/.
Écoute de Spotify
Mettez à jour le microprogramme de l’application Spotify à sa dernière version avant de
l’utiliser.
1 Connectez cet appareil au périphérique mobile.
• iPhone via USB (page 11)
• iPhone/périphérique Android via Bluetooth (page 13)
2 Appuyez sur SRC/OFF pour sélectionner [SPOTIFY].
3 Appuyez longuement sur 1/ pour afficher [APP CONTROL].
4 Tournez la molette M.C. pour sélectionner l’un des éléments suivants.
• Sélectionnez [WIRED] pour la connexion USB.
• Sélectionnez [BLUETOOTH] pour la connexion Bluetooth.
5 Appuyez sur SRC/OFF pour sélectionner [SPOTIFY].
6 Lancez l’application Spotify sur le périphérique mobile, puis lancez la lecture.
Lorsque vous connectez un périphérique portable autre qu’un périphérique iPhone/Android, il peut ne
pas fonctionner correctement selon son modèle.
Opérations de base
Vous pouvez procéder à différents ajustements dans les réglages FUNC TION (page 25).
Les opérations disponibles peuvent varier selon le type de contenus (titres/albums/artistes/listes de
lecture/radios) que vous souhaitez lire.
Objectif Opération
Sauter une piste Appuyez sur ou .
Rechercher un titre dans une liste 1 Appuyez longuement sur pour
Pause/Reprise de la lecture Appuyez sur 4/PAUSE.
afficher la liste.
2 Tournez la molette M.C. pour
sélectionner la catégorie de votre choix,
puis appuyez pour valider.
3 Tournez la molette M.C. pour
sélectionner le fichier de votre choix, puis
appuyez pour valider.
La lecture commence.
- 19 -- 19 -
Page 60

França is
REMARQUE
REMARQUE
ATT ENT IO N
Objectif Opération
Pouces levés (uniquement pour la radio) Appuyez sur 1/.
Pouces baissés (uniquement pour la radio) Appuyez sur 2/.
Lecture aléatoire (uniquement pour les
titres/albums/artiste s/listes de lecture)
Lecture répétée (uniquement pour les
titres/albums/artiste s/listes de lecture)
Lancez une station de radio en fonction de
la chanson en cours de lecture.
Certaines fonctions de Spotify ne peuvent pas être activées à part ir de cet appareil.
Appuyez sur 5/.
Appuyez sur 6/.
1 Appuyez longuement sur 5/ pour
lancer une radio.
2 Appuyez sur la molette M.C..
• Cette fonction peut ne pas être disponible
selon la chanson sélectionnée.
Utiliser Pioneer Smart Sync/APP
Pioneer Smart Sync est l’application qui réunit intelligemment vos cartes, vos messages
et votre musique dans le véhicule.
Vous pouvez faire fonctionner l’appareil à partir de Pioneer Smart Sync installé sur un
périphérique iPhone/Android. Dans certains cas, vous pouvez commander des aspects
de l’application, par exemple, la sélection de la source, la mise en pause, etc. à l’aide de
l’appareil.
Pour plus de détails sur les opérations disponibles sur l’application, consultez la section
d’aide de l’application.
La source APP est indisponible lorsqu’une connexion Pioneer Smart Sync n’est pas établie ou que [USB
MTP] est réglé sur [ON] dans les SYSTEM réglages (page 32).
• Les fonctions utilisées à l’aide d’un sm artphone sont des instruments facilement accessibles pour le
conducteur. Le conducteur devra adopter un comportement au volant sécurisé et être attentionné en
toutes circonstances.
• N’essayez pas d’utilise r l’application tout en conduisan t. Veillez à quitter la route et à garer votre
véhicule en lieu sûr avant d’essayer d’utiliser les commandes de l’application.
Pour les utilisateurs d’iPhone
Cette fonction est compatible avec la version iOS 10.3 ou une version ultérieure.
Vous pouvez télécharger Pioneer Smart Sync sur iTunes App Store.
- 20 -
Page 61

França is
Pour les utilisateurs de périphérique Android
REMARQUE
Pour les connexions Bluetooth, cette fonction est compatible avec les périphériques sur
lesquels est installée la version OS 5.0 Android ou une version ultérieure.
Pour les connexions USB, cette fonc tion est compatible avec un téléphone sur lequel est
installée la version 5.0 Android ou une version ultérieure jusqu’à 7.1.2 et qui prend en
charge le système d’exploitation 2.0 AOA (Android Open Accessory). Toutefois, la
compatibilité dépend du smartphone.
Vous pouvez télécharger Pioneer Smart Sync sur Google Play.
Certains périphériques Android connectés via AOA2.0 risquent de ne pas fonctionner correctement ou
d’émettre des sons en raison de leur conception logicielle propre, indépendamment de la version du
système d’exploitation.
Quel type de fonction possède l’application ?
Promouvoir l’utilisation de l’appareil
L’interface de l’appareil peut être améliorée à l’aide de votre dispositif iPhone/Android.
Image (exemple) :
- 21 -- 21 -
Page 62

França is
Exemples :
REMARQUES
CONSE IL
– Sélectionner une source de l’appareil
– Écouter de la musique sur votre périphérique iPhone/Android
– Contrôler le champ acoustique de manière intuitive
– Paramétrer l’éclairage
– Contrôler votre dispositif Bluetooth connecté
Optimiser les fonctions de l’appareil par le biais de l’application
Les fonctions suivantes, qui sont uniquement indisponibles sur l’appareil, sont
disponibles si vous établissez une Pioneer Smart Sync connexion.
Options du menu (exemple) Description
Utiliser une application de navigation Vous pouvez spécifier et lancer l’application
Lire les messages Vous pouvez lire les messages reçus des
Paramétrer 31 bandes EQ Vous pouvez sélectionner une bande de
Son de haute qualité « Todoroki » Vous pouvez augmenter le niveau des
Ajuster facilement le son Vous pouvez exécuter facilement le
Paramétrer les fonds d’écran Vous pouvez immédiatement paramétrer
• L’accès à certaines fonctions peut être limité selon les conditions de connexion à l’application.
• Le réglage sur 31 bandes EQ devient 13 bandes lorsqu’une source musicale de ce produit est activée.
de navigation qui est installée sur votre
périphérique.
applications qui ont été installées sur votre
périphérique.
l’égaliseur à partir de l’égaliseur graphique à
31 bandes (13 bandes si vous n’utilisez pas
la connexion Pioneer Smart Sync).
basses de manière plus dynamique que
lorsque vous n’utilisez pas la connexion
Pioneer Smart Sync.
paramètre d’alignement dans le temps en
sélectionnant votre type de véhicule.
les fonds d’écran (affichage/touches/
caractères).
Il vous est recommandé d’entrer le terme recherché « Pioneer Smart Sync » dans le champ de recherche
pour trouver l’application.
- 22 -
Page 63

França is
REMARQUE
REMARQUES
Connectez-vous à Pioneer Smart Sync
1 Ap puyez sur la molette M.C. pour afficher le menu principal.
2 Tournez la molette M.C. pour sélectionner [SYSTEM], puis appuyez pour valider.
3 Tournez la molette M.C. pour sélectionner [APP CONTROL], puis appuyez à
nouveau pour valider.
4 Tournez la molette M.C. pour sélectionner l’un des éléments suivants.
• Sélectionnez [WIRED] pour la connexion USB.
• Sélectionnez [BLUETOOTH] pour la connexion Bluetooth.
5 Tournez la molette M.C. pour sélectionner [AUTO APP CONN], puis appuyez à
nouveau pour valider.
6 Tournez la molette M.C. pour sélectionner [ON], puis appuyez pour valider.
7 Connectez cet appareil au périphérique mobile.
• Périphérique iPhone/Android via USB (page 11)
• Périphérique iPhone/Android via Bluetooth (page 13)
Pioneer Smart Sync sur le périphérique démarre automatiquement.
Indépendamment du fait de savoir si le paramètre [AUTO APP CONN] est réglé sur
[ON] ou [OFF], vous pouvez également exécuter la fonction suivante pour démarrer
Pioneer Smart Sync.
• Pour les périphériq ues autres sur le périphérique Android connecté à USB, appuyez
sur SRC/OFF pour sélectionner une source et appuyez longuement sur la molette
M.C..
• Pour iPhone, lancez Pioneer Smart Sync sur le périphérique mobile.
• Lorsque vous connectez un périphérique port able autre qu’un périphérique iPhone/Android, il peut
ne pas fonctionner correctement selon son modèle.
• Si Pioneer Smart Sync n’a pas encore été installée sur votre périphériqueiPhone/Android, un message
vous invitant à installer l’application apparaîtra sur votre périphérique iPhone/Android (sauf pour le
périphérique Android connecté via Bluetooth). Sélect ionnez [OFF] dans [AUTO APP CONN] pour
effacer le message (page 32).
Écouter de la musique sur votre périphérique
1 Appuyez sur SRC/OFF pour sélectionner [APP].
- 23 -- 23 -
Page 64

França is
REMARQUE
Paramètres audio
Vous pouvez également procéder à différents ajustements dans les réglages AUDIO
(page 28).
Modes de fonctionnement
Cet appareil dispose de deux modes de fonctionnement : le mode réseau et le mode
standard. Vous pouvez commuter entre les modes à votre guise (page 6).
Mode réseau
Vous pouvez créer un système doté de plusieurs haut-parleurs et amplificateurs SW +
bidirectionnels comprenant des enceintes d’aigus, des enceintes de médiums et un
caisson de graves afin de reproduire les fréquences des aigus, des médiums et des
graves (bandes).
Mode standard
Vous pouvez créer un système de 4 enceintes avec des haut-parleurs avant et arrière ou
des enceintes avant et des caissons de graves, ou bien un système de 6 enceintes avec
des haut-parleurs avant et arrière et des caissons de graves.
Réglage de la valeur de la fréquence de coupure et
de la valeur de la pente
Vous pouvez régler la valeur de la fréquence de coupure et la valeur de la pente pour
chaque enceinte.
Vous pouvez régler les enceintes suivantes.
Mode réseau :
[HIGH] (enceinte des aigus HPF), [MID HPF] (enceinte des médiums HPF), [MID LPF]
(enceinte des médiums LPF), [SUBWOOFER]
Mode standard :
[FRONT], [REAR], [SUBWOOFER]
Vous pouvez sélectionner [SUBWOOFER] uniquement si [ON] est sélectionné dans [SUBWOOF ER]
(page 28).
1 Ap puyez sur la molette M.C. pour afficher le menu principal.
2 Tournez la molette M.C. pour sélectionner [AUDIO], puis appuyez pour valider.
3 Tournez la molette M.C. pour sélectionner [CROSSOVER], puis appuyez pour
valider.
- 24 -
Page 65

França is
4 Tournez la molette M.C. pour sélectionner l’enceinte (filtre) à régler, puis appuyez
pour valider.
5 Tournez la molette M.C. pour sélectionner [HPF] ou [LPF] selon l’enceinte (filtre),
puis appuyez pour valider.
6 Tournez la molette M.C. pour sélectionner une fréquence de coupure appropriée
à l’enceinte (filtre) sélectionnée à l’étape 4, puis appuyez pour valider.
Mode réseau :
[1.25K] à [12.5K] (si vous sélectionnez [HIGH] ou [MID LPF])
[25] à [250] (si vous sélectionnez [MID HPF] ou [SUBWOOFER])
Mode standard :
[25HZ] à [250HZ]
7 Tournez la molette M.C. pour sélectionner une pente appropriée à l’enceinte
(filtre) sélectionnée à l’étape 4.
Mode réseau :
[–6] à [–24] (si vous sélectionnez [HIGH], [MID HPF] ou [MID LPF])
[–12] à [–36] (si vous sélectionnez [SUBWOOFER])
Mode standard :
[–6] à [–24] (si vous sélectionnez [FRONT] ou [REAR])
[–6] à [–36] (si vous sélectionnez [SUBWOOFER])
Réglages
Vous pouvez régler divers paramètres dans le menu principal.
1 Ap puyez sur la molette M.C. pour afficher le menu principal.
2 Tournez la molette M.C. pour sélectionner l’une des catégories suivantes, puis
appuyez pour valider.
• Réglages FUNCTION (page 25)
• Réglages AUDIO (page 28)
• Réglages SYSTEM (page 31)
• Réglages ILLUMINATION (page 34)
3 Tournez la molette M.C. pour sélectionner les options, puis appuyez pour valider.
Réglages FUNCTION
Les éléments de menu varient selon la source.
- 25 -- 25 -
Page 66

França is
Élément de menu Description
S.FOLLOW
[ON], [OFF] Recherchez un autre ensemble prenant en
SOFT LINK*1*2
[ON], [OFF] Si la réception en cours du composant de service
PROGRAM TYPE
[NEWS/INFO], [POPULAR],
[CLASSICS], [OTHERS]
ENSEMBLE
FM SETTING
[TALK], [STANDARD], [MUSIC] Adaptez le niveau de qualité sonore aux
BSM
REGIONAL
[ON], [OFF] Limitez la réception des programmes régionaux
charge le même composant de service ou la
même station avec une meilleure réception. Si
aucun autre composant de service ou aucune
autre station n’est trouvée ou si la réception reste
médiocre, l’appareil passe automatiquement à
une diffusion FM identique.
ou de la station empire, l’appareil commute
automatiquement sur une station dont la
diffusion est similaire.
Affiche des informations sur le type de
programme.
Affiche une liste de tous les ensembles
pertinents.
conditions de signal de radiodiffusion du signal
de la bande FM. (Disponible uniquement lorsque
la bande FM est sélectionnée.)
Mémorisez automatiquement les six stations les
plus puissantes sur les touches numériques (1/
à 6/).
spécifiques lorsque AF (recherche des autres
fréquences) est sélectionné. (Disponible
uniquement lorsque la bande FM est
sélectionnée.)
- 26 -
Page 67

França is
Élément de menu Description
iPhone
LOC AL
FM : [OFF], [LV1], [LV2], [LV3],
[LV4]
MW/LW : [OFF], [LV1], [LV2]
Restreignez la station d’accord suivant la
puissance du signal.
TA SET TIN G
[DAB+RDS TA] Recevez les bulletins d’informations routières
[RDS TA ONLY] Recevez les bulletins d’informations routières
pour DAB et RDS (DAB est prioritaire) selon les
disponibilités.
pour RDS uniquement, selon les disponibilités.
[TA OFF] Désactive cette fonction.
AF
[ON], [OFF] Laissez l’appareil s’accorder sur une autre
fréquence fournissant la même station.
(Disponible uniquement lorsque la bande FM est
sélectionnée.)
NEWS
[ON], [OFF] Interrom pez la source actuellement sélectionnée
avec des bulletins d’informations. (Disponible
uniquement lorsque la bande FM est
sélectionnée.)
SEEK
[MAN], [PCH] Attribuez aux touches ou la
recherche de stations une par une (accord
manuel) ou sélectionnez une station à partir des
canaux préréglés.
SAVE
Enregistrez les informations concernant la
chanson en cours de lecture sur votre liste de
lecture sur Spotify.
UNSAVE
Supprimez les informations relatives à la
chanson enregistrées dans [SAVE].
SEL DEVICE
Connectez un périphérique Bluetooth de la liste.
- 27 -- 27 -
Page 68

França is
REMARQUE
Élément de menu Description
PLAY
Lancez la lecture.
STOP
Arrêtez la lecture.
*1 Uniquement disponible dans les zones où la fonction [SOFT LINK] est prise en charge.
*2 Indisponible lorsque la fonction [S.FOLLOW] est désactivée.
Réglages AUDIO
[CHK APP SETTG.] peut s’afficher lorsque le réglage est exécuté à partir de Pioneer Smart Sync.
Élément de menu Description
EQ SETTING
[SUPER BASS], [POWERFUL],
[DYNAMIC], [NATURAL], [VOCAL],
[VIVID], [SET BY APP]*,
[CUSTOM1], [CUSTOM2], [FLAT]
* [SET BY APP] s’affiche lorsque la
courbe préréglée de l’égaliseur
qui n’est pas disponible sur
l’appareil a été paramétrée à
partir de Pioneer Smart Sync.
Sélectionnez la bande et le
niveau de l’égaliseur pour une
personnalisation approfondie.
Bande de l’égaliseur : [50HZ] à
[12.5kHZ]
Niveau de l’égaliseur : [–6] à [+6]
FAD ER * (Uniquement pour le mode standard)
BALANC E
SUBWOOFER
[ON], [OFF] Réglez sur [ON] lorsque vous utilisez un caisson
Sélectionnez ou personnalisez la courbe de
l’égaliseur.
• Lorsque vous sélectionnez un paramètre autre
que [CUSTOM1], [CUSTOM2] et [SET BY APP],
vous pouvez également personnaliser la
courbe de l’égaliseur en appuyant longuement
sur la molette M.C., puis enregistrer la courbe
de l’égaliseur personnalisé dans [CUSTOM1].
Réglez l’équilibre sonore entre les haut-parleurs
avant et arrière.
Réglez l’équilibre sonore entre les haut-parleurs
gauche et droite.
de graves.
- 28 -
Page 69

França is
Élément de menu Description
SUBWOOFER
[NOR], [REV] Sélectionnez la phase du haut-parleur
SPEAKER LEVEL
Mode réseau: [HIGH L], [HIGH R],
[MID L], [MID R], [SUBWOOFER]
Mode standard : [FRONT L],
[FRONT R], [REAR L], [REAR R],
[SUBWOOFER]
Niveau de sortie : [–24] à [10]
CROSSOVER
POSITION
[OFF], [FRONT LEFT] (siège
conducteur), [FRONT RIGHT]
(siège passager), [FRONT] (sièges
arrière), [ALL]*
* Uniquement pour le mode
standard
TIME ALGNMNT
[INITIAL], [OFF], [CUSTOM]
Sélectionnez un type d’enceinte
et réglez la distance des
enceintes pour plus de
personnalisation dans [CUSTOM].
Mode réseau: [HIGH L], [HIGH R],
[MID L], [MID R], [SUBWOOFER]
Mode standard : [FRONT L],
[FRONT R], [REAR L], [REAR R],
[SUBWOOFER]
Distance des e nceintes (cm) :
[350] à [0.0]
d’extrêmes graves.
Sélectionnez une enceinte (filtre) et réglez le
niveau de sortie.
• Toutes les valeurs que vous avez réglées seront
modifiées si vous changez le paramètre
[POSITION] (page 29).
Sélectionnez une enceinte (filtre) pour régler la
pente et la fréquence de coupure HPF ou LPF
pour chaque enceinte.
Pour plus de détails sur les réglages de
[CROSSOVER], voir page 24.
Sélectionnez une position d’écoute afin de régler
automatiquement les niveaux de sor tie des
enceintes et ajoutez un délai qui corresponde au
nombre et aux emplacements des sièges
occupés.
Sélectionnez ou personnalisez les paramètres
d’alignement dans le temps pour refléter la
distance entre la position de l’auditeur/trice et
de chaque enceinte.
• Sélectionnez [INITIAL] pour réinitialiser la
valeur de réglage.
• Sé lectionnez [OFF] pour remettre à zéro toutes
les valeurs de réglage.
• Les paramètres [CUSTOM] sont disponibles si
[FRONT LEFT] ou si [FRONT RIGHT] sont
sélectionnés dans [POSITION] (page 29).
• Les paramètres [CUSTOM] sont disponibles si
[OFF] est sélectionné dans [SUBWOOFER]
(page 28).
- 29 -- 29 -
Page 70

França is
Élément de menu Description
SAVE SETTINGS
[YES], [NO] Sauvegardez pour un rappel ultérieur les
LOAD SET TING S
D.BA SS
[OFF], [LOW], [HI] Augmentez de manière dynamique le niveau des
LOU DNES S
[OFF], [LOW], [MID], [HI] Compensez pour obtenir un son net à faible
SLA
[+4] à [–4] Réglez le niveau de volume de chaque source,
S.RTRV
[1] (efficace pour les taux de
compression faibles),
[2] (efficace pour les taux de
compression élevés),
[OFF]
* Indisponible lorsque [SW] est sélectionné sous [REAR-SP] dans les réglages INITIAL (page 7).
paramètres audio suivants à leurs valeurs
actuelles : [CROSSOVER], [SPEAKER LEVEL], [EQ
SETTING], [POSITION], [TIME ALGNMNT],
[D.BASS], [SUBWOOFER].
• Les réglages qui peuvent être sauvegardés
diffèrent lorsqu’une connexion Pioneer Smart
Sync est établie.
Téléchargez les paramètres audio, si vous avez
déjà exécuté [SAVE SETTINGS].
basses afin d’offrir un effet semblable à l’ajout
d’un haut-parleur d’extrêmes-graves au système.
volume.
sauf celui de la FM.
Chacune des combinaisons ci-dessous est
définie automatiquement sur le même réglage.
• Lorsque vous branchez une connexion USB,
réglez USB, iPhone, APP et SPOTIFY.
• Lorsque vous branchez une connexion
Bluetooth, réglez BT AUDIO, iPhone, APP et
SPOTIFY.
Améliorez l’audio compressé et restaurez un son
riche.
- 30 -
Page 71

França is
Réglages SYSTEM
Vous pouvez également accéder à ces menus lorsque l’appareil est hors tension.
Élément de menu Description
LANGUAGE
[ENG](anglais), [РУС](russe),
[TUR](turc), [FRA](français),
[DEU](allemand)
CLOCK SET
[12H], [24H] Réglez l’horloge (page 5).
SCROLL SET
[ONCE], [LOOP], [OFF] Sélectionnez la manière de dérouler le texte
BEEP TONE (Uniquement pour le mode standard)
[ON], [OFF] Un signal sonore retentit si vous appuyez sur un
INFO DISPLAY
[SOURCE/SPEANA], [CLOCK/
SPEANA], [SRC/LIVE FX], [CLOCK/
LIVE FX], [SOURCE], [SPEANA],
[OFF]
AUTO PI
[ON], [OFF] Recherchez une autre station avec la même
AUX
[ON], [OFF] Sélectionnez [ON] lors de l’utilisation d’un
BT AUDIO
[ON], [OFF] Activez/désactivez le signal Bluetooth.
SPOTIFY
[ON], [OFF] Sélectionnez [ON] lorsque vous utilisez la
Sélectionnez la langue d’affichage des
informations textuelles à part ir d’un fichier audio
compressé.
• Ce paramètre est indisponible si une connexion
Pioneer Smart Sync est établie.
dans la fenêtre d’affichage.
bouton. Sélectionnez [OFF] pour désactiver cette
fonction.
Affichez l’élément sur l’affichage d’information
secondaire.
• Lorsque [SOURCE/SPEANA] ou [CLOCK/
SPEANA] sont sélectionnés, affichez l’antenne
au lieu du Speana sur la source radio.
programmation, même si vous utilisez une
station présélectionnée.
périphérique auxiliaire connecté à l’appareil.
fonction Spotify.
- 31 -- 31 -
Page 72

França is
Élément de menu Description
PW SAVE*
[ON], [OFF] Réduisez la consommation d’énergie de la
batterie.
L’activation de la source est la seule opération
autorisée lorsque cette fonction est activée.
BT MEM CLEAR
[YES], [NO] Effacez les données du périphérique Bluetooth
(liste des périphériques, co de PIN, histori que des
appels, annuaire téléphonique, numéros de
téléphone présélectionnés) mémorisés dans
l’appareil.
[CLEARED] apparaît lorsque des données sont
supprimées avec succès.
APP CONTROL
[WIRED], [BLUETOOTH] Sélectionnez la méthode de connexion adaptée
à votre périphérique.
Pour plus de détails, voir page 33 concernant les
connexions de chaque périphérique.
USB MTP
[ON], [OFF] Réglez sur [ON] lorsque vous utilisez la
connexion MTP.
Les sources suivantes sont indisponibles si le
réglage est paramétré sur [ON].
• APP, SPOTIFY, iPhone et USB (AOA)
AUTO APP CONN
[ON], [OFF] Sélectionnez [ON] pour lancer automatiquement
Pioneer Smart Sync lorsque le périphérique
iPhone/Android est connecté à l’appareil.
USB AUTO
[ON], [OFF] Sélectionnez [ON] pour basculer
* [PW SAVE] s’annule si la batterie du véhicule est débranchée, et il doit être réactivé une fois la batterie
rebranchée. Lorsque [PW SAVE] est désactivé, selon les méthodes de connexion, l’appareil peut
continuer à consommer l’énergie de la batterie s’il n’y a pas de position ACC (accessoire) sur le
contact de votre véh icule.
automatiquement sur la source USB lorsqu’un
périphérique USB/iPhone est connecté à
l’appareil.
Sélectionnez [OFF] lorsqu’un périphérique USB/
iPhone est connecté à l’appareil uniquement à
des fins de charge.
- 32 -
Page 73

França is
Informations concernant les connexions de chaque
périphérique
Les sources disponibles varient selon la valeur de réglage.
Veuillez utiliser [APP CONTROL] selon le tableau destiné à la source que vous souhaitez
utiliser.
Pour plus de détails sur la connexion Pioneer Smart Sync, voir page 20.
Lorsque la connexion Pioneer Smart Sync n’est PAS établie
Vale ur de régl age Périphér ique Source(s) disponible(s)
[WIRED] iPhone iPhone, SPOTIFY
Android USB (AOA)
[BLUETOOTH] iPhone iPhone, SPOTIFY
Android SPOTIFY
Lorsque la connexion Pioneer Smart Sync est établie
Vale ur de régl age Péri phériq ue Source(s) disponible(s)
[WIRED] iPhone APP, SPOTIFY
Android APP
[BLUETOOTH] iPhone APP, SPOTIFY
Android APP, SPOTIFY
- 33 -- 33 -
Page 74

França is
Réglages ILLUMINATION
Élément de menu Description
COLOUR
[KEY COLOUR], [DISP COLOUR],
[BOTH COLOUR]
DIM SETTING
[SYNC ILLUMI], [SYNC CLOCK],
[MANUAL]
BRIGHTNESS
[KEY], [DISP] Sélectionnez la luminosité des touches ou de
Sélectionnez la couleur des touch es ou de
l’affichage de l’appareil parmi 12 couleurs
présélectionnées, [SCAN] ou [CUSTOM]*.
• [SCAN] : parcourez automatiquement une
variété de couleurs.
• [CUSTOM]* :
1 Appuyez longuement sur la molette M.C.
jusqu’à ce que l’affichage de réglage des
couleurs apparaisse.
2 Réglez la couleur primaire (R (rouge)/G (vert)/
B (bleu)) et le niveau de luminosité ([0] à [60]).
Vous ne pouvez pas sélectionner un niveau
inférieur à 10 pour les trois couleurs R (rouge),
G (vert), B (bleu) à la fois.
Vous pouvez également personnaliser les
couleurs présélectionnées. Sélectionnez l’une
des couleurs présélectionnées, puis appuyez
longuement sur la molette M.C. jusqu’à ce que
l’affichage de réglage des couleurs apparaisse.
* Le réglage CUSTOM est uniquement disponible pour
[KEY COLOUR] et [DISP COLOUR].
Sélectionnez le mode pour modifier la
luminosité de l’affichage.
l’affichage de l’appareil de [1] à [10].
Les plages de réglage disponibles vari ent selon
le paramètre [DIM SETTING].
- 34 -
Page 75

França is
Élément de menu Description
PHONE COLOUR
Sélectionnez la couleur des touch es lors de la
réception d’un appel.
[FLASHING] Applique la couleur définie par [KEY COLOUR].
[FLASH FX1] à [FLASH FX6] Parcourez automatiquement une variété de
[OFF] Pas de changement de couleur des touches.
ILLUMI FX
[ON], [OFF] Il est possible d’afficher un effet d’éclairage :
• L’effet d’éclairage varie si [ON] ou [OFF] dans
[ILLUMI FX] sont sélectionnés.
couleurs.
– dans le cas d’un appel entrant lorsque
[FLASHING] est sélectionné dans [PHONE
COLOUR]
– lorsqu’un appel est déjà en cours ;
– quand le message reçu sur le périphérique est
en cours de lecture lorsqu’une connexion
Pioneer Smart Sync est établie
– lorsque la face avant est fixée.
L’effet d’éclairage s’active lorsque l’alimentation
ACC est activée/désactivée, indépendamment
de ce réglage.
- 35 -- 35 -
Page 76

França is
Informations complémentaires
Dépannage
L’affichage redevient automatiquement
ordinaire.
→ Vous n’avez exécuté aucune opération
pendant environ 30 secondes.
– Exécutez une opération.
L’étendue de lecture répétée change de
manière inattendue.
→ En fonction de l’étendue de lecture
répétée, l’étendue sélectionnée peut
changer lors de la sélection d’un autre
dossier ou d’une autre piste ou pendant
l’avance ou le retour rapide.
– Sélectionnez à nouveau l’étendue de
lecture répétée.
Un sous-dossier n’est pas lu.
→ Il est impossi ble de lire les sous-dossi ers
lorsque [FLD] (répétition du dossier) est
sélectionné.
– Sélectionnez une autre étendue de
lecture répétée.
Le son est intermittent.
→ Vous utilisez un périphérique, un
téléphone portable par exemple, qui
peut générer des interférences sonores.
– Éloignez de l’appareil tous les
périphériques électriques susceptibles
de provoquer des interférences.
Le son de la source audio Bluetooth n’est
pas lu.
→ Un appel est en cours sur un téléphone
portable Bluetooth connecté.
– Le son sera lu une fois l’appel terminé.
→ Un téléphone portable connecté à
Bluetooth est en cours d’utilisation.
– Cessez d’utiliser le téléphone portable
pour l’instant.
→ La connexion entre cet appareil et le
téléphone portable n’a pas été établie
correctement après un appel passé avec
un téléphone portable connecté à
Bluetooth.
– Établissez à nouveau la connexion
Bluetooth entre cet appareil et le
téléphone portable.
Messages d’erreur
Commun
AMP ERROR
→ Un dysfonctionnement de l’appareil
s’est produit ou le raccordement des
haut-parleurs est incorrect.
→ Le circuit de protection est activé.
– Vérifiez le raccordement des haut-
parleurs.
– Tournez la clé de contac t sur OFF, puis
de nouveau sur ON. Si le message ne
disparaît pas, demandez de l’aide à
votre revendeur ou à un centre
d’entretien agréé par Pioneer.
NO XXXX (ex. : NO TITLE)
→ Aucune information textuelle n’est
intégrée.
– Commutez l’affichage ou la lecture sur
une autre piste ou un autre fichier.
Syntoniseur DAB
ANTENNA ERROR
→ Le raccordement de l’antenne est
incorrect.
– Vérifiez le raccordement de l’antenne.
– Tournez la clé de contact sur OFF, puis
de nouveau sur ON. Si le message ne
disparaît pas, demandez de l’aide à
votre revendeur ou à un centre
d’entretien agréé par Pioneer.
- 36 -
Page 77

França is
Périphérique USB/iPhone
FORMAT READ
→ Le début de la lecture et le début de
l’émission des sons sont parfois décalés.
– Attendez que le message disparaisse
pour entendre les sons.
NO AUDIO
→ Il n’y a aucun morceau.
– Transférez les fichiers audio vers le
périphérique USB et procédez à la
connexion.
→ La sécurité est ac tivée sur le
périphérique USB connecté.
– Suivez les instructions du
périphérique USB pour désactiver la
sécurité.
SKIPPED
→ Le périphérique USB connecté contient
des fichiers protégés par DRM.
– Les fichiers protégés sont sautés.
PROTECT
→ Tous les fichiers sur le périphérique USB
connecté intègrent la protection par
DRM.
– Utilisez un autre périphérique USB.
N/A USB
→ Le périphérique USB connecté n’est pas
pris en charge par cet appareil.
–Déconnectez votre périphérique et
remplacez-le par un périphérique USB
compatible.
HUB ERROR
→ Le périphérique USB connecté via un
concentrateur USB n’est pas pris en
charge par cet appareil.
– Connectez le périphérique USB
directement à cet appareil à l’aide
d’un câble USB.
CHECK USB
→ Le connecteur USB ou le câble USB est
en court-circuit.
– Vérifiez que le connecteur USB ou le
câble USB n’est pas coincé ou
endommagé.
→ Le périphérique USB connecté
consomme plus que le courant maximal
autorisé.
– Déconnectez le périphérique USB et
ne l’utilisez pas. Mettez le contact sur
OFF, puis de nouveau sur ACC ou ON.
Ne connectez que des périphériques
USB conformes.
ERROR-19
→ Panne de communication.
– Effectuez l’une des opérations
suivantes, puis revenez à la source
USB.
• Déconnectez le périphérique USB.
• Changez de source.
→ Panne de l’iPhone.
– Débranchez le câble de l’iPhone. Une
fois le menu principal de l’iPhone
affiché, reconnectez et réinitialisez
l’iPhone.
ERROR-23
→ Le périphérique US B n’a pas été formaté
correctement.
– Formatez le périphérique USB avec
FAT1 2, FAT1 6 ou FAT3 2.
ERROR-16
→ La version du microprogramme de
l’iPhone est désuète.
– Mettez à jour la version de l’iPhone.
→ Panne de l’iPhone.
– Débranchez le câble de l’iPhone. Une
fois le menu principal de l’iPhone
affiché, reconnectez et réinitialisez
l’iPhone.
STOP
→ La liste en cours ne comporte aucun
morceau.
– Sélectionnez une liste contenant des
morceaux.
- 37 -
Page 78

França is
NO BT DEVICE GO TO BT MENU TO
REGISTER
→ Aucun périphérique Bluetooth trouvé.
– Connectez cet appareil et iPhone via
Bluetooth (page 13).
CONN. FAILED PRESS BAND KEY TO
RETRY
→ Échec de la connexion Bluetooth avec
iPhone.
–Appuyez sur BAND/ pour établir
une nouvelle connexion.
DISCONNECTED PRESS BAND KEY TO
RETRY
→ Perte de la connexion Bluetooth.
–Appuyez sur BAND/ pour établir
une nouvelle connexion.
Périphérique Bluetooth
ERROR-10
→ Coupure de courant au niveau du
module Bluetooth de cet appareil.
– Mettez le contact sur OFF, puis de
nouveau sur ACC ou ON.
APP
CONNECT APP
→ La connexion Pioneer Smar t Sync n’est
pas établie.
– Connectez-vous à Pioneer Smart Sync
(page 20).
Spotify
NOT FOUND
→ L’application Spotify n’a pas encore
démarré.
– Lancez l’application Spotify.
NO BT DEVICE GO TO BT MENU TO
REGISTER
→ Aucun périphérique Bluetooth trouvé.
– Connectez cet appareil et le
périphérique via Bluetooth (page 13).
CONN. FAILED PRESS BAND KEY TO
RETRY
→ Échec de la connexion Bluetooth.
– Appuyez sur BAND/ pour établir
une nouvelle connexion.
CHECK APP PRESS BAND KEY TO RETRY
→ Échec de la connexion à l’application
Spotify.
– Appuyez sur BAND/ pour établir
une nouvelle connexion.
DISCONNECTED PRESS BAND KEY TO
RETRY
→ Perte de la connexion Bluetooth.
– Appuyez sur BAND/ pour établir
une nouvelle connexion.
CHECK APP
→ Une erreur inconnue (notamment une
erreur de communication) est survenue.
– Suivez les instructions qui s’affichent à
l’écran.
Conseils sur la
manipulation
Périphérique de stockage USB
• Les connexio ns via un concentrateur USB
ne sont pas prises en charge.
• Attachez fermement le périphérique de
stockage USB avant de conduire. Ne
laissez pas le périphérique de stockage
USB tomber au sol, où il pourrait rester
coincé sous la pédale de frein ou
d’accélérateur.
• Selon le périphérique de stock age USB,
les problèmes suivants peuvent sur venir.
– Le fonctionnement peut varier.
– Le périphérique de stockage peut ne
pas être reconnu.
– Les fichiers peuvent ne pas être lus
correctement.
- 38 -
Page 79

França is
– Le périphérique peut générer des
PRÉCAUTION
interférences sonores lorsque vous
écoutez la radio.
iPhone
• Ne laissez pas l’iPhone dans un endroit
soumis à une température élevée.
• Attachez fermement l’iPhone pendant
que vous conduisez. Ne laissez pas
l’iPhone tomber au sol, où il pourrait
gêner le bon fonctionnement de la
pédale de frein ou d’accélérateur.
• Aucun texte incompatible enregistré sur
l’iPhone ne sera affiché par cet appareil.
Compatibilité avec
l’audio compressé
• Seuls les 32 premiers caractères peuvent
s’afficher en tant que nom de fichier
(extension de fichier comprise) ou nom
de dossier.
• L’appareil risque de ne pas fonctionner
correctement selon l’application utilisée
pour encoder les fichiers WMA.
• Il peut se produire un léger retard au
début de la lecture de fichiers audio
intégrés avec des données d’image, ou de
fichiers audio stockés sur u n périphérique
USB avec de nombreuses hiérarchies de
dossiers.
• Les textes russes à afficher sur cet
appareil doivent être codés avec l’un des
jeux de caractères suivants :
– Unicode (UTF-8, UTF-16)
– Jeu de caractères autre que l’Unicode
qui est utilisé dans un environnement
Windows et est paramétré sur Russe
dans le réglage multilingue
• Pioneer ne garantit pas la compatibilité
avec tous les périphériques de stockage
de masse USB et décline toute
responsabilité en cas de perte de
données sur des lecteurs multimédia,
smartphones ou autres périphériques
lors de l’utilisation de ce produit.
• Ne laissez pas un périphérique USB dans
un lieu soumis à de hautes températures.
Fichiers WMA
Extension de fichier .wma
Débit binaire 48 kbps à 320 kbps
Fréquence
d’échantillonn age
Windows Media™
Audio Profession al,
Lossless, Voice/DRM
Stream/Stream avec
vidéo
(CBR) , 48 kbps à
384 kbps (VBR)
32 kHz, 44,1 kHz,
48 kHz
Incompatible
Fichiers MP3
Extension de fichier .mp3
Débit binaire 8 kbps à 320 kbps
Fréquence
d’échantillonn age
Version étiquette ID3
compatible
Liste de lecture M3u Incompatible
MP3i (MP3 interactif ),
mp3 PRO
(CBR) , VBR
8 kHz à 48 kHz
(32 kHz, 44,1 kHz,
48 kHz pour
accentuation)
1.0, 1.1, 2.2, 2.3, 2.4 (la
versio n 2.x de
l’étiquette ID3 a
priorité sur la
version1.x.)
Incompatible
Fichiers WAV
• Il est impossible de connecter les formats
de fichier WAV via MTP.
Extension de fichier .wav
Bits de quantification 8 et 16 (LPCM)
Fréquence
d’échantillonn age
16 kHz à 48 kHz
(LPCM)
- 39 -
Page 80

França is
Fichiers AAC
PRÉCAUTION
Format compatible AAC encodé par
Extension de fichier .m4a
Fréque nce
d’échantillonn age
Débit binaire en
stéréo
Apple Lossless Incompatible
Fichier AAC acheté
dans la boutique
iTunes Store
(extension de fichier
.m4p)
iTunes
11,025 kHz à 48 kHz
16 kbps à 320 kbps,
VBR
Incompatible
Fichiers FLAC
• Il est impossible de connecter les formats
de fichier FLAC via MTP.
• Selon l’encodeur, les fichiers FLAC
risquent d’être illisibles.
Extension de fichier .flac, .fla
Fréque nce
d’échantillonn age
Débit binaire de
quantification
Mode de canal 1/2 canaux
8/11,025/1 2/16/22,05/
24/32/44,1 /48/96 kHz
8/16/24 bi ts
Périphérique USB
• Il peut se produire un léger retard au
début de la lecture de fichiers audio
stockés sur un périphérique de stockage
USB avec de nombreuses hiérarchies de
dossiers.
Hiérarchie des
dossiers lisibles
Dossiers lisibles Jusqu’à 1 500
Fichiers lisibles Jusqu’à 15 000
Lect ure des fichie rs
protégés par des
droits d’auteur
Jusqu’à huitniveaux
(dans la pratique, la
hiérarchie compte
moins de
deux niveaux)
Incompatible
Périp hérique USB
partitio nné
Seule la première
partitio n est lisible.
Compatibilité avec un
iPhone
Cet appareil prend en charge uniquement les
modèles d’iPhone suivants. Les versions
antérieures ne sont pas prises en charge.
Made for (Conçu pour)
–iPhone XR
–iPhone XS Max
–iPhone XS
–iPhone X
–iPhone 8
–iPhone 8 Plus
–iPhone 7
–iPhone 7 Plus
–iPhone SE
–iPhone 6s
– iPhone 6s Plus
–iPhone 6
–iPhone 6 Plus
–iPhone 5s
• Les opérations peuvent varier selon la
génération et/ou la version de l’iPhone.
• Les utilisateurs de iPhone avec le
connecteur Lightning® doivent utiliser le
câble Lightning vers USB (fourni avec
iPhone).
• Pour en savoir plus sur la compatibilité
fichier/format, repor tez-vous aux
manuels de l’iPhone.
• Livre audio, podcast : compatible
Pioneer n’accepte aucune responsabilité
en cas de perte de données sur l’iPhone,
même si la perte de données se produit
pendant l’utilisation de cet appareil.
- 40 -
Page 81

França is
Séquence des fichiers
Dossier
Fichier d’au dio
compressé
à : séquence de lecture
01 à 05 : numéro de dossier
D : Affichage C : Caractère
audio
Sur cet appareil, l’utilisateur ne peut pas
affecter de numéros de dossier ni spécifier
les séquences de lecture. La séquence de
fichier audio dépend du périphérique
raccordé.
Notez que la lecture des fichiers masqués
d’un périphérique USB est impossible.
Exemple de hiérarchie
Tableau des caractères
cyrilliques
Droits d’auteur et
marques commerciales
Bluetooth
La marque de mot et les logos Bluetooth® sont
des marques déposées appartenant à Bluetooth
SIG, Inc. et toute uti lisation de ces marques par
PIONEER CORPORATION est faite sous licence.
Les autres marques de commerce ou noms
commerciaux sont la propriété de leur
propriétaire respect if.
iTunes
Apple et iTunes sont des marques
commerciales d’Apple Inc., enregistrées
aux États-Unis et dans d’autres pays.
- 41 -
Page 82

França is
WMA
Windows Media est une marque déposée
ou une marque commerciale de Microsoft
Corporation aux États-Unis et/ou dans
d’autres pays.
Ce produit intègre une technologie
détenue par Microsoft Corporation, qui ne
peut être utilisée et distribuée que sous
licence de Microsoft Licensing, Inc.
FLAC
Copyright © 2000-2009 Josh Coalson
Copyright © 2011-2014 Xiph.Org
Founda tion
La redistribution et l’utilisation sous la
forme de source et sous forme binaire, avec
ou sans modification, sont autorisées pour
autant que les conditions suivantes soient
remplies :
– Les redistributions de code source
doivent mentionner l’avis de droit
d’auteur ci-dessus, la présente liste de
conditions et l’avis de non-responsabilité
suivant.
– Les redistributions sous forme binaire
doivent mentionner l’avis de droit
d’auteur ci-dessus, la présente liste de
conditions et l’avis de non-responsabilité
suivant dans la documentation et/ou les
autres éléments fournis avec la
distribution.
– Ni le nom de la Xiph.org Foundation, ni
les noms de ses contributeurs ne peuvent
être utilisés en vue d’approuver ou de
promouvoir des produits dérivés de ce
logiciel sans autorisation écrite préalable.
LE PRÉSENT LOGICI EL EST FOURNI PAR LES
TITULAIRES DE DROIT D’AUTEUR ET LES
CONTRIBUTEURS « EN L’ÉTAT », ET AUCUNE
GARANTIE, EXPLICITE OU IMPLICITE, N’EST
OFFERTE, Y COMPRIS ET SANS S’Y LIMITER,
LES GARANTIES IMPLICITES DE QUALITÉ
MARCHANDE ET D’ADÉQUATION À UNE
UTILISATION PARTICULIÈRE. EN AUCUN
CAS, LA FONDATION OU SES
CONTRIBUTEURS NE POURRONT ÊTRE
TENUS POUR RESPONSABLES DES
DOMMAGES DIRECTS, IND IRECTS,
ACCESSOIRES, SPÉCIAUX, DES DOMMAGES
ET INTÉRÊTS PUNITIFS OU DES DOMMAGES
CONSÉCUTIFS (NOTAMMENT, MAIS SANS
S’Y LIMITER, LE REMPLACEMENT DE
PRODUITS OU DE SERVICES, LA PERTE DE
JOUISSANCE, DE DONNÉES OU DE
BÉNÉFICES O U ENCORE L’INTERRUP TION
D’UNE ACTIVITÉ COMMERCIALE) QUELLES
QU’EN SOIENT LES CAUSES ET QUEL QUE
SOIT LE TYPE DE RESPONSABILITÉ,
CONTRACTUELLE, STRICTE OU FONDÉE
SUR UN DÉLIT CIVIL (Y COMPRIS PAR
NÉGLIGENCE OU POUR UNE AUTRE CAUSE)
RÉSULTANT D’UNE MANIÈRE OU D’UNE
AUTRE DE L’UTILISATION DE CE LOGICIEL,
MÊME SI MENTION A ÉTÉ FAITE DE LA
POSSIBILITÉ DE TELS DOMMAGES.
iPhone et Lightning
L’usage du badge Made for Apple signifie
qu’un accessoire a été conçu pour se
connecter spécialement au(x) produit(s)
Apple identifié(s) sur le badge, et qu’il a été
certifié conforme aux normes de
performance Apple par son concepteur.
Apple n’est pas responsable du
fonctionnement de cet appareil ou de sa
conformité avec les normes de sécurité et
de réglementation.
Veuillez noter que l’utilisation de cet
accessoire avec un produit Apple peut
affecter les performances de
communication sans fil.
iPhone et Lightning sont des marques
commerciales de Apple Inc., déposées aux
États-Unis et dans d’autres pays.
Siri®
Fonctionne avec Siri via le microphone.
Google™, Google Play, Android
Google, Google Play et Android sont des
marques de commerce de Google LLC.
Spotify®
SPOTIFY et le logo Spotify font partie des
marques déposées de Spotify AB. Des
appareils numériques mobiles compatibles
- 42 -
Page 83

França is
et un abonnement premium sont
nécessaires, le cas échéant, consultez le
site https://www.spotify.com.
T-Kernel 2.0
Ce produit utilise le code source de TKernel 2.0 sous la T-License 2.0 accordée
par le Forum T-Engine (www.tron.org).
MP3
Copyright (C) 1998-2009 PacketVideo
Autorisé sous la licence Apache, version 2.0
(la « Licence ») ; il vous est interdit d’utiliser
ce fichier sauf en conformité avec la
Licence.
Vous pourrez obtenir un exemplaire de la
Licence sur le site :
http://www.apache.org/licenses/LICENSE-
2.0
Sauf si la loi applicable l’exige ou en cas
d’accord écrit, le logiciel vendu sous la
Licence est distribué « EN L’ÉTAT », SANS
AUCUNE GARANTIE NI CONDITION,
expresse ou implicite.
Voir la Licence pour les limites et les
autorisations régissant les langues
spécifiques conformément à la Licence.
Caractéristiques
techniques
Généralités
Tension d’alimentation : 14,4 V CC (10,8 V à
15,1 V admissible)
Mise à la masse : pôle négatif
Consommation maximale : 10,0A
Dimensions (L × H × P) :
DIN
Châssis : 178 mm × 50 mm × 165 mm
Panneau avant : 188 mm × 58 mm ×
17 mm
D
Châssis : 178 mm × 50 mm × 165 mm
Panneau avant : 170 mm × 46 mm ×
17 mm
Poids : 0,7 kg
Audio
Puissance de sortie maximale :
• 50 W × 4 canaux/4 Ω (sans hautparleur d’extrêmes graves)
• 50 W × 2 canaux/4 Ω + 70 W ×
1 canal/2 Ω (pour haut-parleur
d’extrêmes graves)
Puissance de sortie continue :
22 W × 4 (50 Hz à 15 000 Hz, THD 5 %,
impédance de charge 4 Ω, avec les
deux canaux entraînés)
Impédance de charge: 4 Ω (4 Ω à 8 Ω (2 Ω
pour 1 station) admissible)
Niveau de sortie maximum de la sortie
préamp. : 2,0 V
Égaliseur (égaliseur graphique à
13 bandes) :
Fréquence : 50 Hz/80 Hz/125 Hz/
200 Hz/315 Hz/500 Hz/800 Hz/
1,25kHz/2kHz/3,15kHz/5kHz/8kHz/
12,5 kHz
Gain : ±12 dB (par pas de 2 dB)
Filtre passe-haut (mode standard) :
Fréquence : 25 Hz/31,5 Hz/40 Hz/
50 Hz/63 Hz/80 Hz/100 Hz/125 Hz/
160 Hz/200 Hz/250 Hz
Pente : -6 dB/oct, -12 dB/oct, -18 dB/
oct, -24 dB/oct, DÉSACTIVÉE
Caisson de graves/filtre passe-bas (mode
standard) :
Fréquence : 25 Hz/31,5 Hz/40 Hz/
50 Hz/63 Hz/80 Hz/100 Hz/125 Hz/
160 Hz/200 Hz/250 Hz
Pente : -6 dB/oct, -12 dB/oct, -18 dB/
oct, -24 dB/oct, -30 dB/oct, -36 dB/oct,
DÉSACTIVÉE
Gain : +10dB à -24dB (par pas de
1dB)
Phase : normale/inverse
Niveau des enceintes (mode standard) :
+10 dB à -24 dB (par pas de 1 dB)
- 43 -
Page 84

França is
Alignement en temps (mode standard) :
0cm à 350cm (2,5cm/pas)
Filtre passe-haut (HAUT) (mode réseau) :
Fréquence : 1,25 kHz/1,6 kHz/2 kHz/
2,5 kHz/3,15 kHz/4 kHz/5 kHz/
6,3 kHz/8 kHz/10 kHz/12,5 kHz
Pente : -6 dB/oct, -12 dB/oct, -18 dB/
oct, -24 dB/oct
Filtre passe-haut (MOYEN) (mode réseau) :
Fréquence : 25 Hz/31,5 Hz/40 Hz/
50 Hz/63 Hz/80 Hz/100 Hz/125 Hz/
160 Hz/200 Hz/250 Hz
Pente : -6 dB/oct, -12 dB/oct, -18 dB/
oct, -24 dB/oct, DÉSACTIVÉE
Filtre passe-bas (MOYEN) (mode réseau) :
Fréquence : 1,25 kHz/1,6 kHz/2 kHz/
2,5 kHz/3,15 kHz/4 kHz/5 kHz/
6,3 kHz/8 kHz/10 kHz/12,5 kHz
Pente : -6 dB/oct, -12 dB/oct, -18 dB/
oct, -24 dB/oct, DÉSACTIVÉE
Caisson de graves (mode réseau) :
Fréquence : 25 Hz/31,5 Hz/40 Hz/
50 Hz/63 Hz/80 Hz/100 Hz/125 Hz/
160 Hz/200 Hz/250 Hz
Pente : -12 dB/oct, -18 dB/oct, -24 dB/
oct, -30 dB/oct, -36 dB/oct,
DÉSACTIVÉE
Gain : +10dB à -24dB (par pas de
1dB)
Phase : normale/inverse
Niveau des enceintes (mode réseau) :
+10dB à -24dB (par pas de 1dB)
Alignement en temps (mode réseau) :
0cm à 350cm (2,5cm/pas)
USB
Spécification standard USB : USB 2. 0 vitesse
pleine
Alimentation maximale : 1,5 A
Protocole USB :
MSC (Mass Storage Class)
MTP (Media Transfer Protocol)
AOA (Android Open Accessory) 2.0
Sy stè me d e fic hier s : FAT 12 , FAT1 6, FAT 32
Format de décodage MP3 : MPEG-1 et 2
Couche Audio 3
Format de décodage WMA: Ver. 7, 8, 9, 9.1,
9.2 (2 canaux audio)
Format de décodage AAC : MPEG-4 AAC
(iTunes encodé uniquement)
(Ver. 10.6 et versions antérieures)
Format de décodage FLAC : v1.2.1 (Free
Lossless Audio Codec)
Format de signal WAV : PCM linéaire (non
compressé)
Syntoniseur FM
Gamme de fréquences : 87,5 MHz à
108,0 MHz
Sensibilité utile : 11 dBf (1,0 μV/75 Ω,
mono, S/B : 30 dB)
Rapport signal sur bruit : 65 dB (réseau IEC-
A)
Syntoniseur MW
Gamme de fréquences : 531 kHz à
1 602 kHz
Sensibilité utile : 25 μV (S/B : 20 dB)
Rapport signal sur bruit : 60 dB (réseau IEC-
A)
Syntoniseur LW
Gamme de fréquences : 153 kHz à 281 kHz
Sensibilité utile : 28 μV (S/B : 20 dB)
Rapport signal sur bruit : 60 dB (réseau IEC-
A)
Syntoniseur DAB
Gamme de fréquences (Bande III) :
174,928 MHz à 239,200 MHz (5 A à
13 F)
Gamme de fréquences (Bande L) :
1 452,960 MHz à 1 490,624 MHz (LA à
LW)
Sensibilité utile (bande III) : –100 dBm
Sensibilité utile (bande L) : –100 dBm
Rapport signal/bruit : 85 dB
Bluetooth
Version : Bluetooth 4.0 certifiée
Puissance de sortie : +4 dBm maximum
(Classe de puissance 2)
- 44 -
Page 85

França is
BLE (basse énergie Bluetooth) Version : 4.0
REMARQUE
certifiée
BLE (basse énergie Bluetooth) Puissance de
sortie : +3 dBm maximum
Bande(s) de fréquences : 2 400 MHz à
2 483,5 MHz
Profils Bluetooth :
GAP (Generic Access Profile)
SDAP (Service Discovery Application
Profile)
HFP (Hands Free Profile) 1.6
PBAP (Phone Book Access Profile)
A2DP (Advanced Audio Distribution
Profile)
AVRCP (Audio/Video Remote Control
Profile) 1.5
SPP (Serial Port Profile) 1.1
Les caractéristiques et la présentation
peuvent être modifiées sans avis préalable.
- 45 -
Page 86

Italiano
Informazioni sul manuale:
Sommario
Operazioni preliminari ........................................................................... 3
Digital Audio Broadcasting (DAB)........................................................ 8
Radio.......................................................................................................... 9
USB/iPhone®/AUX................................................................................. 11
Bluetooth............................................................................................... 13
Spotify® .................................................................................................. 18
Utilizzare Pioneer Smart Sync/APP................................................... 20
Regolazioni audio................................................................................. 23
Impostazioni.......................................................................................... 25
Impostazioni FUNCTION...................................................................... 25
Impostazioni AUDIO............................................................................. 27
Impostazioni SYSTEM........................................................................... 30
Impostazioni ILLUMINATION .............................................................. 33
Informazioni aggiuntive ..................................................................... 35
• Nelle seguenti istruzioni, una memoria USB o un lettore audio USB viene denominato
“dispositivo USB”.
- 2 -
Page 87

Italiano
Operazioni preliminari
SRC (sorgente)/OFF
Pulsante di sgancio
Finestra di visualizzazione
Ghiera M.C. (multi-controllo)
BAND/
DISP (display)
(navigazione)/LIST
Porta USB
Jack di ingresso AUX (jack stereo da 3,5 mm)
Funzionamento di base
MVH-S520DAB
Operazioni frequenti
Scopo Operazione
Accendere l’alimentazione* Premere SRC/OFF per accendere
Regolare il volume Ruotare la ghiera M.C. .
Selezionare una sorgente Premere ripetutamente SRC/OFF.
Cambiare la visualizzazione delle
informazioni
Tornare alla precedente visualizzazione/
elenco
Tornare alla visualizzazione normale dal
menu
Modifica della luminosità del display Tenere premuto BAND/.
Rispondere a una chiamata Premere qualsiasi pulsante.
l’alimentazione.
Ten ere premu to SRC/O FF per spegnere
l’alimentazione.
Premere ripetutamente DISP.
Premere BAND/.
Ten ere premu to BAND/.
- 3 -- 3 -
Page 88

Italiano
Importante
Scopo Operazione
Stacca Attacca
Terminare una chiamata Premere .
* Quando l’interlinea blu/bianca dell’unità è collegata al terminale di controllo relè dell’antenna
automatica del veicolo, l’antenna del veicolo si estende quando la sorgente dell’unità è attivata. Per
ritirare l’antenna, disattivare la sorgente.
Indicazione del display
Indicazione
Viene visualizzata quando esiste un livello inferiore del menu o della
Viene visualizzata quando viene ricevuto un programma sul traffico.
BASS Viene visualizzata quando è attivata la funzione BASS.
APP Viene visualizzata in presenza di una connessione Pioneer Smar t Sync
Descrizione
cartella.
Viene visualizzato quando è impostata la riproduzione casuale/shuffle
(fatta eccezione per quando è selezionato BT AUDIO come sorgente).
Viene visualizzato quando è impostata la funzione di riproduzione ripetuta
(fatta eccezione per quando è selezionato BT AUDIO come sorgente).
Viene visualizzata in presenza di una connessione Bluetooth (pagina 13).
(pagina 20).
Rimozione del frontalino
Staccare il frontalino per evitarne il fur to. Rimuovere tutti i cavi e i dispositivi collegati al
frontalino e spegnere l’unità prima di staccarla.
• Evitare di sottoporre il frontali no a forti urt i.
• Mantenere il frontalino lontano da luce diretta del sole e alte temperature.
• Conservare semp re il frontalino staccato in una custodia protettiva o in borsa.
- 4 -
Page 89

Italiano
AVV ERTE NZA
Reimpostazione del microprocessore
Pulsant e RESET
Il microprocessore deve essere reimpostato nei seguenti casi:
– Prima di utilizzare l’unità per la prima volta dopo l’installazione
– Se l’unità non funziona correttamente
– Se sul display vengono visualizzati messaggi anomali o errati
1 Rimuovere il pannello anteriore (pagina 4).
2 Premere il pulsante RESET con uno strumento appuntito più lungo di 8 mm.
Menu di configurazione
Quando, dopo l’installazione, l’interruttore di accensione viene impostato su ON, sul
display viene visualizzato il menu di configurazione.
Non utilizza re l’uni tà in modalità standard quand o un sistema di altoparlanti pe r la modalità di rete è
collegato all’unità. Non utilizzare l’unità in modalità di rete quando un sistema di altoparlanti per la
modalità standard è collegato all’unità. Questa operazione può danneggiare gli altoparlanti.
1 Ruotare la ghiera M.C. per selezionare le opzioni, quindi premere per confermare.
Per passare all’opzione di menu successiva, confermare la selezione.
Voce del menu Descrizione
LANGUAGE Selezionare la lingua per visualizzare le informazioni di testo di
[ENG](Inglese),
[РУС](Russo),
[TUR](Turco),
[FRA](Francese),
[DEU](Tedesco)
un file audio compresso.
- 5 -- 5 -
Page 90

Italiano
NOTA
Voce del menu Descrizione
CLOCK SET Impostare l’orologio.
FM STEP Selezionare il passo di frequenza FM tra 100 kHz o 50 kHz.
[100], [50]
DAB ANT PW Alimentare un’antenna DAB. Selezionare questa voce quando
[ON]
[OFF] All’antenna DAB non viene fornita alcuna alimentazione.
SPEAKER MODE Passare tra due modalità di funzionamento: la modalità di rete a
[STANDARD],
[NETWORK]
1 Ruotare la ghiera M.C. per regolare l’ora, quindi premere per
confermare.
L’indicatore passa automaticamente all’impostazione dei
minuti.
2 Ruotare la ghiera M.C. per regolare i minuti, quindi premere
per confermare.
con l’unità si utilizza un’antenna DAB opzionale (AN-DAB1,
venduta separatamente).
Selezionare questa voce quando si utilizza un’antenna passiva
senza booster.
2 vie (NETWORK) e la modalità standard (STANDARD), in base
alle connessioni stabilite. Per dettagli sulle modalità di
funzionamento, consultare pagina 23.
Dopo aver selezionato la modalità appropriata, ruotare la ghiera
M.C. per selezionare [YES], quindi premere per confermare.
• Non è possibile completare il menu di configurazione senza
aver impostato [SPEAKER MODE].
• Una volta impostata la modalità dell’altoparlante, non è
possibile modificare l’impostazione senza aver ripristinato le
impostazioni predefinite del prodotto. Ripristinare le
impostazioni predefinite per modificare l’impostazione della
modalità altoparlante (fare riferimento a SYSTEM RESET a
pagina 8).
• Quando è selezionato [NETWORK], la funzione del segnale
acustico non è disponibile.
2 Viene visualizzato [QUIT :YES].
Per tornare alla prima voce del menu di configurazione, ruotare la ghiera M.C. per
selezionare [QUIT :NO], quindi premere per confermare.
3 Premere la ghiera M.C. per confermare le impostazioni.
[UPDATING LIST] viene visualizzato sul display e l’elenco del servizio viene
aggiornato.
Tali impostazioni diverse da [SPEAKER MODE], possono essere effettuate in qualsiasi momento dalle
impostazioni SYSTEM (pagina 30) e dalle impostazioni INITIAL (pagina 7).
- 6 -
Page 91

Italiano
Annullamento della visualizzazione di
dimostrazione (DEMO OFF)
1 Premere la ghiera M.C. per visualizzare il menu principale.
2 Ruotare la ghiera M.C. per selezionare [SYSTEM], quindi premere per confermare.
3 Ruotare la ghiera M.C. per selezionare [DEMO OFF], quindi premere per
confermare.
4 Ruotare la ghiera M.C. per selezionare [YES], quindi premere per confermare.
Impostazioni INITIAL
1 Tenere premuto SRC/OFF finché l’unità si spegne.
2 Tenere premuto SRC/OFF per visualizzare il menu principale.
3 Ruotare la ghiera M.C. per selezionare [INITIAL], quindi premere per confermare.
4 Ruotare la ghiera M.C. per selezionare un’opzione, quindi premere per
confermare.
Voce del menu Descrizione
FM STEP Selezionare il passo di frequenza FM tra 100 kHz o 50 kHz.
[100], [50]
REAR-SP Selezionare in presenza di un altoparlante full-range collegato
[FUL]
[SW] Selezionare in presenza di un subwoofer collegato direttamente
SYSTEM UPDATE Selezionare [SYSTEM INFO] per confermare le più recenti
[SYSTEM INFO], [S/
W UPDATE]
alle interlinee di uscita dell’altoparlante posteriore.
alle interlinee di uscita dell’altoparlante posteriore senza
amplificatore ausiliario.
informazioni di sistema sull’unità.
Selezionare [S/W UPDATE] per aggiornare l’unità al software più
recente e avviare le impostazioni dell’unità. Per dettagli sul
software più recente e sull’aggiornamento, visitare il nostro sito
Web.
- 7 -- 7 -
Page 92

Italiano
NOTA
NOTA
Voce del menu Descrizione
DAB ANT PW Alimentare un’antenna DAB. Selezionare questa voce quando
[ON]
[OFF] All’antenna DAB non viene fornita alcuna alimentazione.
SYSTEM RESET Selezionare [YES] per avviare le impostazioni dell’unità. L’unità
[YES], [NO]
con l’unità si utilizza un’antenna DAB opzionale (AN-DAB1,
venduta separatamente).
Selezionare questa voce quando si utilizza un’antenna passiva
senza booster.
verrà riavviata automaticamente.
Digital Audio Broadcasting (DAB)
Per ricevere i segnali DAB, collegare un’antenna DAB (AN-DAB1) (venduta
separatamente) all’unità.
Ricerca di un componente di servizio/stazione
1 Premere SRC/OFF per selezionare [DIGITAL RADIO].
2 Premere BAND/ per selezionare la banda [D1], [D2] o [D3].
3 Premere / per selezionare un componente di servizio/stazione.
Tenere premuto / , quin di rilasciarlo per cercare un se rvizio disponib ile. La scansio ne
termina quando l’unità riceve un servizio.
Per selezionare un componente di servizio/stazione dagli
elenchi di servizio
1 Durante la ricezione DAB, tenere premuto .
Consente di visualizzare un elenco di tutti i componenti di servizi/stazioni. Tenere
premuto nuovamente per cercare un componente di servizio/stazione in ordine
alfabetico.
2 Selezionare un componente di servizio/stazione dall’elenco selezionato, quindi
premere la ghiera M.C. per confermare.
È possibile aggiornare l’elenco dei servizi premendo DAB. Per annullare l’aggiornamento, premere
nuovamente DAB.
- 8 -
Page 93

Italiano
Preimpostazione dei componenti di servizio/
stazioni
Per memorizzare i componenti di servizio/stazioni
1
Durante la ricezione del componente di servizio/stazione che si desidera
memorizzare, tenere premuto uno dei pulsanti numerici (da 1/ a 6/) fino a
quando non smette di lampeggiare.
Per recuperare i componenti di servizio/stazioni memorizzati
1
Selezionare la banda, quindi premere un pulsante numerico (da 1/ a 6/).
Funzioni di pausa/differita
L’unità memorizza automaticamente nella memoria le trasmissioni recenti. La capacità
della memoria dell’unità varia in base alla velocità di trasmissione del componente di
servizio utilizzato. La capacità approssimativa della memoria è pari a cinque minuti per
192 kbps.
Per sospendere/riprendere
1
Durante la ricezione di un componente di servizio, tenere premuto DISP.
Per utilizzare la funzione di differita
1
Durante la ricezione di un componente di servizio, tenere premuto DAB.
2 Premere (torna indietro di un minuto)/ (avanza di un minuto) per
regolare il punto di riproduzione.
Radio
Le frequenze del tuner sull’unità sono distribuite per l’utilizzo in Europa occidentale,
Asia, Medio oriente, Africa e Oceania. L’utilizzo in altre aree può provocare una scarsa
ricezione. La funzione RDS (radio data system) funziona solo nelle aree di trasmissione
dei segnali RDS per le stazioni FM.
- 9 -- 9 -
Page 94

Italiano
TIP
NOTA
Ricezione delle stazioni preimpostate
1 Premere SRC/OFF per selezionare [RADIO].
2 Premere BAND/ per selezionare la banda [FM1], [FM2], [FM3], [MW] o [LW].
3 Premere un pulsante numerico (da 1/ a 6/).
I pulsanti / possono anche essere utilizzati per selezionare una stazione preimpostata
quando [SEEK] è impostato su [PCH] nelle impostazioni FUNCTION (pagin a27 ).
Best stations memory (BSM)
Le sei stazioni più forti vengono memorizzate sui pulsanti numerici (da 1/ a 6/).
1 Una volta selezionata la banda, premere la ghiera M.C. per visualizzare il menu
principale.
2 Ruotare la ghiera M.C. per selezionare [FUNCTION], quindi premere per
confermare.
3 Ruotare la ghiera M.C. per selezionare [BSM], quindi premere per confermare.
Per cercare manualmente una stazione
1
Una volta selezionata la banda, premere / per selezionare una stazione.
Tenere premuto / , quindi rilasciarlo per cercare una stazione disponibile. La
scansione termina quando l’unità riceve una stazione. Per annullare la
sintonizzazione, premere / .
[SEEK] deve essere impostato su [MAN] nelle impostazioni FUNCTION (pagina 27).
Per memorizzare manualmente le stazioni
1
Durante la ricezione della stazione che si desidera memorizzare, tenere premuto
uno dei pulsanti numerici (da 1/ a 6/ ) fino a quando non smette di
lampeggiare.
Utilizzo delle funzioni PTY
L’unità cerca una stazione per informazione PTY (tipo di programma).
1 Tenere premuto durante la ricezione FM.
- 10 -
Page 95

Italiano
2 Ruotare la ghiera M.C. per selezionare un tipo di programma da [NEWS/INFO],
NOTE
NOTA
ATTENZIONE
[POPULAR], [CLASSICS] o [OTHERS].
3 Premere la ghiera M.C..
L’unità inizia a cercare una stazione. Una volta trovata, viene visualizzato il relativo
nome di servizio del programma.
• Per annullare la ricerca, premere la ghiera M.C..
• Il programma di alcune stazi oni può differire da quanto indicato dal PTY trasmess o.
• Se non viene trasmessa alcuna stazione per il tipo di programma che si sta cercando, viene
visualizzato [NOT FOUND] per circa due secondi, quindi il tuner torna alla stazione originale.
USB/iPhone®/AUX
(La sorgente iPhone non è disponibile quando [USB MTP] è impostato su [ON] nelle
impostazioni SYSTEM (pagina 32).)
Riproduzione
Scollegare le cuffie dal dispositivo prima di collegarlo all’unità.
Dispositivi USB (incluso Android™)/iPhone
1
Aprire il coperchio della porta USB.
2 Collegare il dispositivo USB/iPhone utilizzando un cavo idoneo.
Per passare automaticamente alla sorgente USB quando un dispositivo USB/iPhone è collegato
all’unità, impostare [USB AUTO] su [ON] nelle impostazioni SYSTEM (pagina 32).
Utilizzare un cavo USB (venduto sepa ratamente) per collegare il dispositivo USB in quanto og ni
dispositivo collegato direttamente all’unità sporge e può risultare pericoloso.
Prima di rimuovere il dispositivo, interrompere la riproduzione.
Connessioni AOA
Un dispositivo che esegue Android OS 4.1 o versioni successive e che supporta anche
AOA (Android Open Accessory) 2.0 può essere collegato all’unità via AOA, utilizzando il
cavo in dotazione con il dispositivo.
- 11 -- 11 -
Page 96

Italiano
NOTA
Se si utilizza una connessione AOA, impostare [APP CONTROL] su [WIRED] (pagina 32) e impostare [USB
NOTA
NOTA
MTP] su [OFF] (pagina 32) nelle impo stazioni SYSTEM.
Connessione MTP
Un dispositivo installato con Android OS 4.0 o la maggior parte delle versioni successive, può essere
collegato all’unità via MTP, utilizzando il cavo in dotazione con il dispositivo. Tuttavia, in base al
dispositivo collegato, alla versione OS o al numero di file nel dispositivo, i brani/file audio potrebbero
non essere riprodotti via MTP. Si prega di notare che il collegamento MTP non è compatibile con i
formati file WAV e FLAC.
Se si utilizza una connessione MTP, impostare [USB MTP] su [ON] nelle impostazioni SYSTEM
(pagina 32).
AUX
1
Inserire la spina mini stereo nel jack di ingresso AUX.
2 Premere SRC/OFF per selezionare [AUX IN] come sorgente.
Se [AUX] è impostato su [OFF] nelle impostazioni SYSTEM, non è possibile selezionare [AUX IN] come
sorgente (pagina 31).
Operazioni
È possibile effettuare diverse regolazioni nelle impostazioni FUNCTION (pagina 25) (fatta
eccezione per la sorgente AUX IN/USB).
Si prega di notare che le seguenti operazioni non funzionano su un dispositivo AUX. Per
utilizzare un dispositivo AUX, utilizzare il dispositivo stes so.
Scopo Operazione
Selezionare una cartella*1 Premere 1/ o 2/.
Selezionare una traccia/brano (capitolo) Premere o .
Avanzamento o avvolgimento rapido*2 Tenere premuto o .
Cercare un file da un elenco (solo USB) 1 Tenere premuto per visualizzare
l’elenco.
2 Ruotare la ghiera M.C. per selezionare il
nome file desiderato (car tella) o la
categoria, quindi premere per
confermare.
3 Ruotare la ghiera M.C. per selezionare il
file desiderato, quindi premere per
confermare.
La riproduzione si avvia.
- 12 -
Page 97

Italiano
Importante
TIP
Scopo Operazione
Visualizzare un elenco di file nella cartella/
categoria selezionata*1
Riprodurre un brano nella cartella/categoria
selezionata*1
Ripetere la riproduzione Premere 6/.
Riproduzione casuale/shuffle Premere 5/.
Sospendere/riprendere la riproduzione Premere 4/PAU SE .
Sound retriever*1 Premere 3/S.Rtrv.
Tornare alla cartella principale (solo USB)*1 Tenere premuto 1/.
*1 Solo file audio compressi
*2 Quando si utilizz a la funzione di avanz amento o avvolgimento rapi do durante la riproduzion e di un
file VBR, la durata della riproduzione indicata potrebbe non essere corretta.
Premere la ghiera M.C. quando viene
selezionata una cartella/categoria.
Tenere premuto la ghiera M.C. quando
viene selezionata una cartella/categoria.
[1]: efficace per velocità di compressione
basse
[2]: efficace per velocità di compressione
alte
Bluetooth
Connessione Bluetooth
Se sono con nessi dieci o più dis positivi Bluetooth (e s. un telefono e un lettore audio sep arato), questi
potrebbero non f unzionare correttamente.
La connessione successiva all’unità viene eseguita automaticamente se il dispositivo Bluetooth è stato
collegato in precedenza nei seguenti punti.
1 Attivare la funzione Bluetooth del dispositivo.
Se si effettua una connessione Bluetooth dal dispositivo, passare al punto 4.
2 Premere per visualizzare l’impostazione [ADD DEVICE].
L’unità inizia a cercare i dispositivi disponibili, quindi li visualizza nell’elenco dei
dispositivi.
• Per annullare la ricerca, premere la ghiera M.C..
• Se il dispositivo desiderato non è presente nell’elenco, selezionare [RE-SEARCH].
• Nel caso in cui non sia disponibile alcun dispositivo, sul display viene visualizzato
[NOT FOUND].
- 13 -- 13 -
Page 98

Italiano
• Se è già presente un dispositivo collegato, il menu del telefono viene visualizzato
Importante
premendo .
3 Ruotare la ghiera M.C. per selezionare il dispositivo desiderato, quindi premere
per confermare.
Tenere premuta la ghiera M.C. per cambiare le informazioni dispositivo visualizzate
tra indirizzo dispositivo Bluetooth e nome dispositivo.
Se si effettua una connessione Bluetooth dall’unità, passare al punto 5.
4 Selezionare il nome dell’unità visualizzato sul display del dispositivo.
5 Verificare che il numero a 6 cifre venga visualizzato sull’unità e sul dispositivo,
quindi selezionare [YES] se i numeri a 6 cifre visualizzati sull’unità e sul dispositivo
coincidono.
Telefono Bluetooth
Per prima cosa, effettuare una connessione Bluetooth con il telefono Bluetooth
(pagina 13). È possibile collegare simultaneamente fino a due telefoni Bluetooth.
• Lasciare l’unità in standby per la connessione al telefono via Bluetooth mentre il motore è spento può
causare l’esaurimento della batteria del veicolo.
• Assicurarsi di aver parcheggiato il veicolo in un luogo sicuro e inserire il freno di stazionamento prima
di eseguire l’operazione.
Per effettuare una telefonata
1
Premere per visualizzare il menu del telefono.
Quando si collegano due telefoni, il nome di un telefono può essere visualizzato
prima del menu del telefono. Per passare a un altro telefono, premere nuovamente
.
2 Ruota re la ghiera M.C. per selezionare [RECENTS] o [PHONE BOOK], quindi
premere per confermare.
Se si seleziona [PHONE BOOK], passare al punto 4.
3 Ruota re la ghiera M.C. per selezionare [MISSED], [DIALLED] o [RECEIVED], quindi
premere per confermare.
4 Ruota re la ghiera M.C. per selezionare un nome o un numero di telefono, quindi
premere per confermare.
Viene avviata la telefonata.
Per risponde a una chiamata in entrata
1
Tenere premuto qualsiasi pulsante quando si riceve una chiamata.
- 14 -
Page 99

Italiano
TIP
Quando all’unità vengono collegati due telefoni via Bluetooth e si verifica una chiamata in entrata
NOTA
mentre un telefono viene utilizzato per una chiamata, sul display viene visualizzato un messaggio. Per
rispondere alla chiamata in arrivo, è necessario terminare la chiamata in corso.
Operazioni di base
Scopo Operazione
Terminare una chiamata Premere .
Rifiutare una chiamata in entrata Tenere premuto quando si riceve una
Passare tra il chiamante corrente e
un chiamante in attesa
Annullare un chiamante in attesa Tenere premuto .
Regolare il volume della voce del
chiamante (quando la modalità
privata è attiva, questa funzione
non è disponibile).
Attivare o disattivare la modalità
privata
chiamata.
Premere la ghiera M.C..
Ruotare la ghiera M.C. durante la chiamata.
Premere BAND/ durante la chiamata.
Per preimpostare i numeri di telefono
1
Selezionare un numero di telefono dalla rubrica o dalla cronologia delle chiamate.
2 Tenere premuto uno dei pulsanti numerici (da 1/ a 6/).
Il contatto viene memorizzato sul numero preimpostato selezionato.
Per effettuare una chiamata utilizzando un numero preimpostato, premere uno dei
pulsanti numerici (da 1/ a 6/ ), quindi premere la ghiera M.C. mentre viene
visualizzato il menu del telefono.
Riconoscimento vocale
Questa funzione è disponibile solo quando un dispositivo iPhone/Android dotato di
riconoscimento vocale viene collegato all’unità via Bluetooth.
1 Tenere premuto , quindi parlare nel microfono per inserire i comandi vocali.
Per uscire dalla modalità di riconoscimento vocale, premere BAND/.
Per dettagli sulle funzioni di riconoscimento vocale, fare riferimento al manuale in dotazione con il
dispositivo.
- 15 -- 15 -
Page 100

Italiano
TIP
Quando viene effettuata una connessione Pioneer Smart Sync (pagina 20), è anche possibile utilizzare
la funzione di riconoscimento vocale da Pioneer Smart Sync installato sul dispositivo iPhone/Android
tenendo premuto . Per dettagli sulle funzioni del riconoscimento vocale, consultare la sezione di
guida dell’applicazione.
Menu del telefono
1
Premere per visualizzare il menu del telefono.
Voce del menu Descrizione
RECENTS Visualizzare la cronologia delle chiamate perse.
[MISSED]
[DIALLED] Visualizzare la cronologia delle chiamate effettuate.
[RECEIVED] Visualizzare la cronologia delle chiamate ricevute.
PHONE BOOK Visualizzare i contatti presenti nel telefono.
PRESET 1-6 Richiamare i numeri di telefono preimpostati. È inoltre possibile
A.ANSR* Selezionare [ON] per risponde automaticamente a una chi amata
[ON], [OFF]
PB INVT Invertire l’ordine dei nomi nella rubrica (vista nome).
DEVICELIST Visualizzare l’elenco dei dispositivi Bluetooth abbinati. Sul nome
DEL DEVICE Eliminare le informazioni del dispositivo.
[DELETE YES],
[DELETE NO]
ADD DEVICE Registrare un nuovo dispositivo.
DEV. INFO Cambiare le informazioni dispositivo sul display tra nome
* Nel caso in cui siano collegati due telefoni, questa funzione non è attiva con le chiamate in entrata
ricevute ment re uno dei tel efoni viene utilizzato per una chiam ata.
richiamare i numeri di telefono preimpostati premendo uno dei
tasti numerici (da 1/ a 6/).
in entrata.
del dispositivo viene visualizzato “*” quando viene stabilita la
connessione Bluetooth.
Quando non viene selezionato alcun dispositivo presente
nell’elenco dispositivo, questa funzione non è disponibile.
dispositivo e indirizzo dispositivo Bluetooth.
- 16 -
 Loading...