

Pioneer MVH-S100UBG User Manual [ru]

DIGITAL MEDIA RECEIVER
RECEPTEUR NUMERIQUE MULTIMEDIA
RICEVITORE MULTIMEDIALE DIGITALE
RECEPTOR DIGITAL DE MEDIOS
DIGITALER MEDIA RECEIVER
DIGITALE MEDIA-RECEIVER
ЦИФРОВОЙ МЕДИАРЕСИВЕР
MVH-S100UI
English Français Italiano Español Deutsch Nederlands Русский
MVH-S100UB
MVH-S100UBG
MVH-S100UBA
MVH-S100UBW
MVH-S010UB
Owner’s Manual
Mode d’emploi
Manuale d’istruzioni
Manual de instrucciones
Bedienungsanleitung
Handleiding
Руководство пользователя

About this manual:
Table of Contents
Manufacturer:
Pioneer Corporation
28-8, Honkomagome 2-chome,
Bunkyo-ku, Tokyo 113-0021, Japan
EU Representative’s & Importer:
Pioneer Europe NV
Haven 1087, Keetberglaan 1, 9120 Melsele,Belgium
http://www.pioneer-car.eu
Before You Start ......................................................................... 3
Getting Started .......................................................................... 4
Radio ............................................................................................ 6
USB/iPod/AUX ............................................................................ 7
App Mode.................................................................................... 9
Spotify®........................................................................................ 9
Using Pioneer ARC APP........................................................... 10
Settings...................................................................................... 11
FUNCTION settings ............................................................... 11
AUDIO settings....................................................................... 12
SYSTEM settings .................................................................... 13
ILLUMINATION settings........................................................ 14
Connections/Installation........................................................ 15
Additional Information........................................................... 18
• In the following instructions, a USB memory or USB audio player are referred
to as “USB device”.
• In this manual, iPod and iPhone are referred to as “iPod”.
2
En
Declaration of Conformity with regard to the Radio Equipment Directive 2014/53/EU
[*] MVH-S100UI, MVH-S100UB, MVH-S100UBG, MVH-S100UBA, MVH-S100UBW, MVH-S010UB
English:
Hereby, Pioneer declares that the radio
uipment type [*] is in compliance with Directive
eq
2014/53/EU.
The full text of the EU declaration of conformity is
availab
le at the following internet address: http://
www.pioneer-car.eu/compliance
Suomi:
Pioneer vakuuttaa, että radiolaitetyyppi [*] on
d
irektiivin 2014/53/ EU mukainen.
EU-vaatimustenmukaisuusvakuutuksen
täy
simittainen teksti on saatavilla seuraavassa
internetosoitteessa: http://www.pioneer-car.eu/
compliance
Nederlands:
Hierbij verklaar ik, Pioneer, dat het type
r
adioapparatuur [*] conform is met Richtlijn 2014/
53/EU.
De volledige tekst van de EUc
onformit eitsverklar ing kan worden
geraadpleegd op het volgende internetadres:
http://www.pioneer-car.eu/compliance
França is:
Le soussigné, Pioneer, déclare que l’équipement
ra
dioélectrique du type [*] est conforme à la
directive 2014/53/U E.
Le texte complet de la déclaration UE de
conf
ormité est disponible à l’adresse internet
suivante: http://www.pioneer-car.eu/compliance
Svenska:
Härmed fö rsäkrar Pionee r att denna typ av
ra
dioutrustning [*] överensstämmer med direktiv
2014/53/EU.
Den fullständiga texten till EU-försäkran om
ö
verensstämmelse finns på följande webbadress:
http://www.pioneer-car.eu/compliance
Dansk:
Hermed erklærer Pioneer, at radioudstyrstypen [*]
er i
overensstemmelse med direktiv 2014/53/EU.
EU-overensstemmelseserklæringens fulde tekst
k
an findes på følgende internetadresse: http://
www.pioneer-car.eu/compliance
Deutsch:
Hiermit erklärt Pioneer, dass der Funkanlagentyp
[
*] der Richtlinie 2014/5 3/EU entspricht.
Der vollständige Text der EUK
onformitätserklärung ist unter der folgenden
Internetadresse verfügbar: http://www.pioneercar.eu/complian ce
Ελληνικά:
Με την παρούσα ο/η Pioneer, δηλώνει ότι ο
ρ
αδιοεξοπλισμός [*] πληροί την οδηγία 2014/53/
ΕΕ.
Το πλήρες κείμενο της δήλωσης συμμόρφωσης ΕΕ
δ
ιατίθεται στην ακόλουθη ιστοσελίδα στο
διαδίκτυο: http://www.pioneer-car.eu/
compliance
Italiano:
Il fabbri cante, Pioneer, dic hiara che il tip o di
ap
parecchiatura radio [*] è conforme alla direttiva
2014/53/UE.
Il testo completo della dichiarazione di conformità
UE
è disponibile al seguente indirizzo Internet:
http://w ww.pioneer- car.eu/complian ce
Español:
Por la presente, Pioneer declara que el tipo de
eq
uipo radioe léctrico [*] es co nforme con la
Directiva 2014/53/U E.
El texto completo de la declaración UE de
c
onformidad está d isponible en la dirección
Internet siguiente: http://www.pioneer-car.eu/
compliance
Português:
O(a) abaixo assinado(a) Pioneer declara que o
p
resente ti po de equipam ento de rádio [* ] está
em conformidade com a D iretiva 2014/53/UE.
O texto integral da declaração de conformidade
e
stá disponível no seguinte endereço de Internet:
http://w ww.pioneer- car.eu/complian ce
Čeština:
Tímto Pioneer prohlašuje, že typ rádiového
z
ařízení [*] je v souladu s e směrnicí 2014/53/EU.

English
Úplné znění EU prohlášení o shodě je k dispozici
WARNING
CAUTION
na této internetové adrese: http://www.pioneercar.eu/compliance
Eesti:
Käesolevaga deklareerib Pioneer, et käesolev
aadioseadme tüüp [*] vastab direktiivi 2014/53/
r
EL nõuetele.
ELi vastavusdeklaratsiooni täielik tekst on
k
ättesaadav järgmisel internetiaadressil: http://
www.pioneer-car.eu/compliance
Magyar:
Pioneer igazolja, hogy a [*] típusú
r
ádióberen dezés megfel el a 2014/53/E U
irányelvnek.
Az EU-megfelelőségi nyilatkozat teljes szövege
elérhet
ő a következő internetes címen: http://
www.pioneer-car.eu/compliance
Latviešu valoda:
Ar šo Pioneer deklarē, ka radioiekārta [*] atbilst
D
irektīvai 2014/53/ES .
Pilns ES atbilstības deklarācijas teksts ir pieejams
š
ādā interneta vietnē: http://www.pioneer-car.eu/
compliance
Lietuvių kalba:
Aš, Pioneer, patvirtinu, kad radijo įrenginių tipas
[
*] atitinka Direkty vą 2014/53/ES.
Visas ES atitikties deklaracijos tekstas prieinamas
šiuo
interneto adresu: http://www.pioneer-car.eu/
compliance
Malti:
B’dan, Pioneer, niddikjara li dan it-tip ta’ tagħmir
tar-
radju [*] huwa konformi mad-Direttiva 2014/
53/UE.
It-test kollu tad-dikjarazzjoni ta’ konformità tal-UE
huw
a disponibbli f’dan l-indirizz tal-Internet li ġej:
http:// www.pioneer- car.eu/compli ance
Slovenčina:
Pioneer týmto vyhlasuje, že rádiové zariadenie
t
ypu [*] je v súlade so smer nicou 2014/53/EÚ.
Úplné EÚ vyhlásenie o zhode je k dispozícii na
tej
to internetovej adrese: http://www.pioneer-
car.eu/compliance
Slovenščina:
Pioneer potrjuje, da je tip radijske opreme [*]
s
kladen z Direktivo 2014 /53/EU.
Celotno besedilo izjave EU o skladnosti je na voljo
na
naslednjem spletnem naslovu: http://
www.pioneer-car.eu/compliance
Română:
Prin prez enta, Pion eer declară că tipul de
e
chipamente radio [*] este în conformitate cu
Directiva 2014/53/U E.
Textul integral al declarației UE de conformitate
es
te dispon ibil la următoa rea adresă inte rnet:
http://w ww.pioneer-c ar.eu/complian ce
български:
С настоящото Pioneer декларира, че този тип
ра
диосъоръж ение [*] е в съотве тствие с
Директива 2014/53/ЕС.
Цялостният текст на ЕС декларацията за
с
ъответствие може да се намери на следния
интернет адрес: http://www.pioneer-car.eu/
compliance
Polsk i:
Pioneer niniejszym oświadcza, że typ urządzenia
r
adiowego [*] jest zgodny z dyrektywą 2014/53/
UE.
Pełny tekst deklaracji zgodności UE jest dostępny
p
od następującym adresem internetowym: http://
www.pioneer-car.eu/compliance
Norsk:
Herved Pioneer erklærer at radioutstyr type [*] er i
s
amsvar med direktiv 2014/53/EU.
Den fullstendige teksten i EUs
amsvarserklæringen er tilgjengelig på følgende
internettadresse: http://www.pioneer-car.eu/
compliance
Íslenska:
Hér með Pioneer lýsir yfir að tegund þráðlausan
b
únað [*] er í samræmi við tilskipun 2014/53/ESB.
The fullur texti af ESB-samræmisyfirlýsingu er í
b
oði á eftirfarandi veffangi: http://www.pioneercar.eu/compl iance
Hrvatski:
Pioneer ovime izjavljuje da je radijska oprema t ipa
[*
] u skla du s Direktivo m 2014/53/E U.
Cjeloviti tekst EU izjave o sukladnosti dostupan je
n
a sljedećoj inter netskoj adresi: http:/ /
www.pioneer-car.eu/compliance
Türk :
Burada. Pione er radyo ekipma ni turunun [*] 20 14/
5
3/EU direktiflerine uyumlu oldugunu beyan eder.
Avrupa uyumluluk beyaninin tam metni belirtilen
i
nternet sitesinde mevcuttur: http://
www.pioneer-car.eu/compliance
Before You Start
Thank you for purchasing this PIONEER product
To ensure proper use, please read through this manual before using this product. It is
especially important that you read and observe WARN INGs a nd CAUTIONs in this manual.
Please keep the manual in a safe and accessible place for future reference.
If you want to dispose this product, do not mix it with general household waste. There is a
separate collection system for used electronic products in accordance with legislation
that requires proper treatment, recovery and recycling.
Private households in the member states of the EU, in Switzerland and Norway may return
their used electronic products free of charge to designated collection facilities or to a
retailer (if you purchase a similar new one).
For countries not mentioned above, please contact your local authorities for the correct
method of disposal.
By doing so yo u will ensure that your d isposed product und ergoes the necessar y treatment,
recovery and recycling and thus prevent potential negative effects on the environment and
human health.
• Do not attempt to install or service this product by yourself. Installation or servicing
of this product by p ersons without training and experie nce in electronic equipment
and automotive accessor ies may be dangerous and could expose you to th e risk of
electric shock, injury or other hazards.
• Do not attempt to operate the un it while driving. Make sure to pull off the road and park
your vehicle in a safe location before attempting to use the controls on the device.
• Do not allow this unit to come into contact with moisture and/or liquids. Electrical shock
could result. Also, damage to this unit, smoke, and overheating could result from contact
with liquids.
• Always keep the volume low enough to hear outside sounds.
• The Pioneer CarStereo-Pass is for use on ly in Germany.
3
En
• This product is evaluated in moderate and tropical climate condition under the Audio,
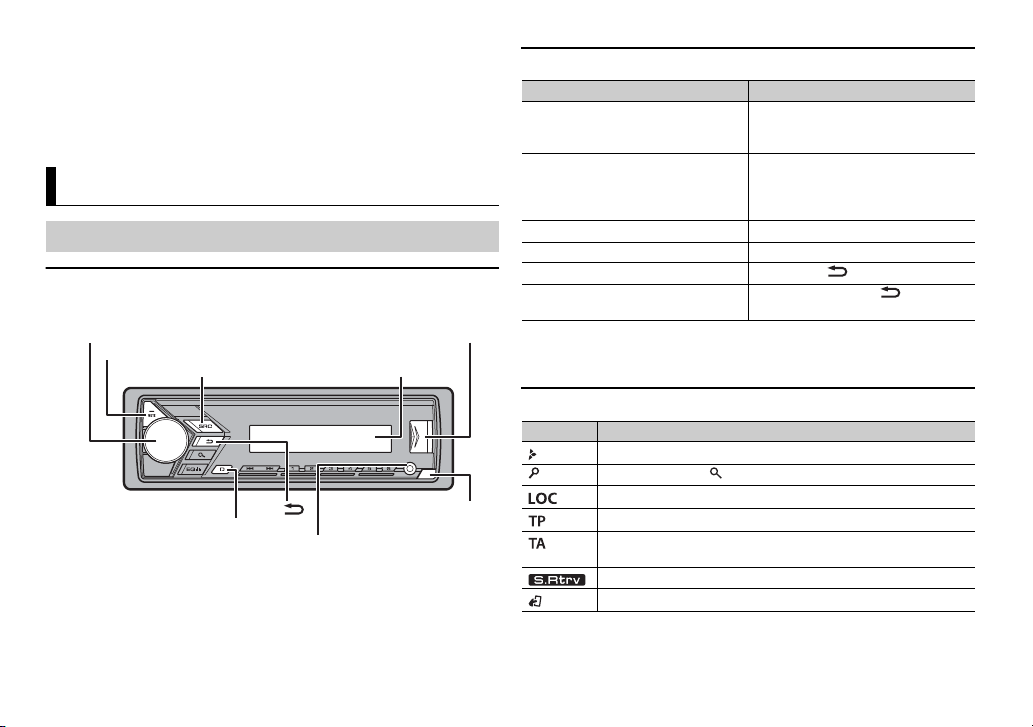
M.C. (multi-control) dial
BAND/
USB port
Display window
SRC (source)/OFF
DISP (display)
Detach button
AUX input jack (3.5 mm stereo jack)
MUTE
video and similar electronic apparatus - Safety requirements, IEC 60065.
If you experience problems
Should thi s unit fail to work p roperly, please contac t your dealer or ne arest authorized
PIONEER Se rvice Station .
Getting Started
Basic operation
MVH-S100UI/S100UB/S100UBG/S100UBA/S100UBW/
S010UB
Frequently used operations
Purpose Operation
Turn on the power* Press SR
Adjust the volume Tur n the M.
Select a source Press SRC/OFF repeatedly.
Change the display information Pres s DIS
Return to the previous display/list Press BAND/ .
Return to the normal display from the
menu
* When this unit’s blue/white lead is connected to the vehicle’s auto-antenna relay control
terminal, the vehicle’s antenna extends when this unit’s source is turned on. To retract the
antenna, turn th e source off.
C/OFF to turn on the power.
Press and hold SRC
power.
Press MU
MUTE again or turn the M.C. dial to
unmute.
Press and hold BAND/ .
/OFF to turn off the
C. dial.
TE to mute the unit . Press
P repeatedly.
Display indication
Indication Description
Appears when a lower tier of the menu or folder exists.
Appears when the button is pressed.
Appears when the local seek tuning function is set (pag e 12).
Appears when a traffic program is received.
Appears when the TA (traffic announcements) function is set
(page 12).
Appears when the sound retriever function is set (page 12).
Appears when the iPod control function is set (page 8).
4
En
English
Important
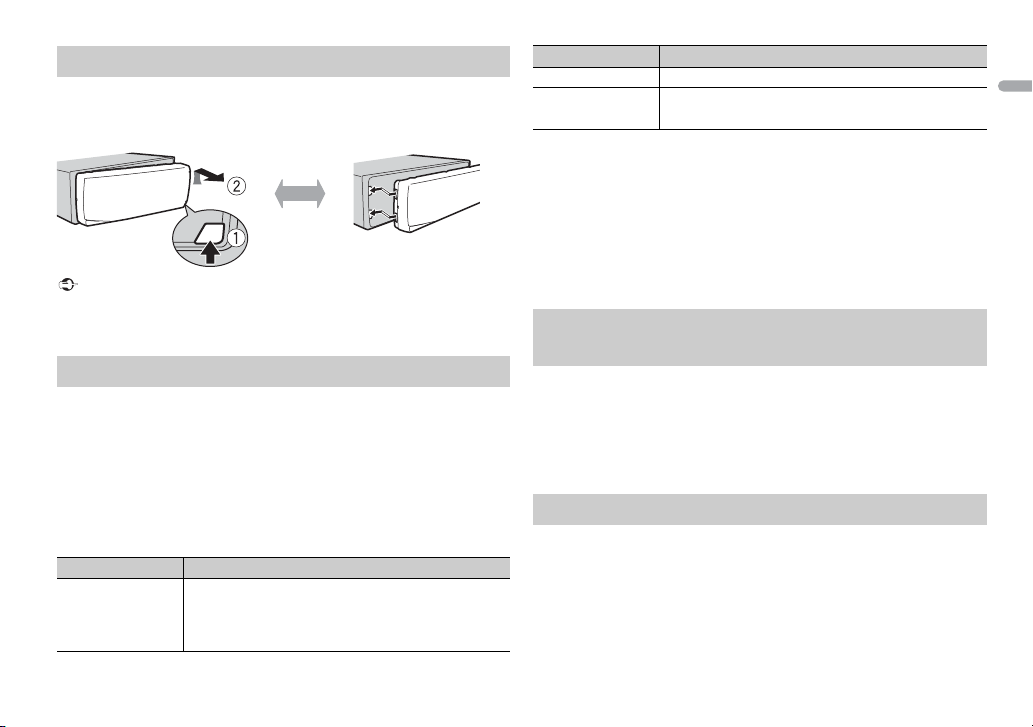
Detaching the front panel
Detach Attach
NOTES
Detach the front panel to prevent theft. Remove any cables and devices
attached to the front panel and turn off the unit before detaching it.
• Avoid subjecting the front panel to excessive shock.
• Keep the front pa nel out of direct sunlight and high temperatures.
• Always store the detached front panel in a protective case or bag.
Setup menu
When you turn the ignition switch to ON after installation, [SET UP :YES]
appears in the display.
1 Press the M.C. dial.
The setup menu disappears after 30 seconds of no operation. If you prefer
n
ot to set at this time, turn the M.C. dial to select [NO], then press to
confirm.
2 Turn the M.C. dial to select the options, then press to confirm.
To proceed to the next menu option, you need to confirm your selection.
Menu Item Description
LANGUAGE Select the language to display the text information from
[ENG](English),
](Russian),
[РУС
[TUR](Turkish)
mpressed audio file.
a co
Menu Item Description
CLOCK SET Set the clock.
FM STEP Select the FM tuning step from 100 kHz or 50 kHz.
[100], [50]
3 [QUIT :YES] appears when all the settings have been made.
To return to the first item of the setup menu, turn the M.
[QUIT :NO], then press to confirm.
C. dial to select
4 Press the M.C. dial to confirm the settings.
• You can cancel the menu setting by pressing SRC/OFF.
• These settings can be made at any time from the SYSTEM settings (page 13) and INITIAL
settings (page 5).
Canceling the demonstration display (DEMO
OFF)
1 Press the M.C. dial to display the main menu.
2 Tur n the M.C. dial to select [SYSTEM], then press to confirm.
3 Tur n the M.C. dial to select [DEMO OFF], then press to confirm.
4 Tur n the M.C. dial to select [YES], then press to confirm.
INITIAL settings
1 Press and hold SRC/OFF until the unit turns off.
2 Press and hold SRC/OFF to display the main menu.
3 Tur n the M.C. dial to select [INITIAL], then press to confirm.
4 Tur n the M.C. dial to select an option, then press to confirm.
5
En

NOTE
The options vary depending on the unit .
TIP
NOTE
Menu Item Description
FM STE P Select the FM tuning step from 100 kHz or 50 kHz.
[100], [50]
SP-P/O MODE Select when there is a full-range speaker connected to
[REAR/SUB.W]
[SUB.W/SUB.W] Select when there is a passive subwoofer connected
[REAR/REAR] Select when there are full-range speakers connected to
S/W UPDATE Select to confirm the latest system information on the
[SYSTEM INFO]
[SYSTEM
DATE]
UP
SYSTEM RESET Select [YES] to initialize the unit settings. The unit will be
[YES], [NO]
he rear speaker output leads and there is a subwoofer
t
connected to the RCA output.
irectly to the rear speaker output leads and there is a
d
subwoofer connected to the RCA output.
he rear speaker output leads and RCA output. If there is
t
a full-range speaker connected to the rear speaker
output leads, and the RCA output is not used, you may
select either [REAR/SUB.W] or [REAR/REAR].
it.
un
Select to update the unit to the latest software and
initialize the unit settings. For details on the latest
software and updating, visit our website.
restarted automatically.
(Some of the settings may be retained even after
setting the unit.)
re
Receiving preset stations
1 Press SRC/OFF to select [RADIO].
2 Press BAND/ to select the band from [FM1], [FM2], [FM3], [MW] or
[LW].
3 Press a number button (1/ to 6/ ).
The / buttons can be also used to select a preset station when [SEEK] is set to
[PCH] in the FUNCTION settings (page 12).
Best stations memory (BSM)
The six strongest stations are stored on the number buttons (1/ to 6/ ).
1 After selecting the band, press the M.C. dial to display the main menu.
2 Tur n the M.C. dial to select [FUNCTION], then press to confirm.
3 Tur n the M.C. dial to select [BSM], then press to confirm.
To seek a station manually
1 After selecting the band, press / to select a station.
Press and hold / then release to seek an available station.
Scanning stops when the unit receives a station. To cancel seek tuning,
press / .
Radio
The tuner frequencies on this unit are allocated for use in Western Europe,
Asia, the Middle East, Africa and Oceania. Use in other areas may result in poor
reception. The RDS (radio data system) function only works in areas that
broadcast RDS signals for FM stations.
6
En
[SEEK] needs to be set to [MAN] in the FUNCTION settings (page 12).
To store stations manually
1 While receiving the station you want to store, press and hold one of the
number buttons (1/ to 6/ ) until it stops flashing.

English
NOTES
NOTE
NOTE
Using PTY functions
CAUTION
NOTE
NOTE
The unit searches for a station by PTY (program type) information.
1 Press during FM reception.
2 Turn the M.C. dial to select a program type from [NEWS/INFO],
[POPULAR], [CLASSICS] or [OTHERS].
3 Press the M.C. dial.
The unit begins to search for a station. When it is found, its program service
na
me is displayed.
• To cancel the search, press the M.C. dial.
• The program o f some stations ma y differ from that in dicated by the trans mitted PTY.
• If no station is broadcasting the type of program you searched for, [NOT FOUND] is
displayed for ab out two seconds and then the tuner retu rns to the original station.
USB/iPod/AUX
Use an optional Pioneer USB cable (CD-U50E) to connect the USB device as any device
connected direc tly to the unit will protrude out fro m the unit, which could be dangerous .
Before removing the device, stop playback.
AOA connections
For details on AOA connection, see page 10.
MTP connection
A device installed with Android OS 4.0 or later can be connected to the unit via MTP, using
the cable supplied with the device. However, depending on the connected device and the
numbers of the files in the device, audio files/songs may not be able to be played back via
MTP. Note that M TP connecti on is not compatible wit h WAV and FLAC file formats.
If you use an MTP connection, [ANDROID WIRED] needs to be set to [MEMORY] in the
SYSTEM settings (page 14).
AUX
1 Insert the stereo mini plug into the AUX input jack.
2 Press SR C/OFF to select [AUX] as the source.
iPod function is not available for MVH-S100UB/S100UBG/S100UBA/S100UBW/S010UB.
Playing back
Disconnect headphones from the device before connecting it to the unit.
USB devices (including Android™)/iPod
1 Open the USB port cover.
2 Plug in the USB device/iPod using an appropriate cable.
To automatically switch to [USB] source when a USB device/iPod is connected to the unit,
set [USB AUTO] to [O N] in the SYSTE M setting s (page 14).
If [AUX] is s et to [OFF] in the S YSTEM settings, [AUX] cannot be selected as a source
(page 14).
Operations
You can make various adjustments in the FUNCTION settings (page 11).
Note that the following operations do not work for an AUX device. To operate
an
AUX device, use the device itself.
Purpose Operation
Select a folder/album*1 Press 1/ or 2/ .
Select a track/song (chapter) Press or .
Fast forward or reverse*2 Press and hold or .
En
7

Purpose Operation
NOTE
NOTES
Search for a file from a list 1 Press to display the list.
View a list of the files in the selected
folder/category*1
Play a song in the selected folder/
egory*1
cat
Alphabetical search (iPod only) 1 P
Repeat play Press 6/ .
Random/shuffle play Press 5/ .
Shuffle all play (iPod only) Press and hold 5/ .
Pause/resume playback Press 4/PA
Sound retriever Press 3/S.
Return to root folder (USB only)*1 Press and hold
rn the M.C. dial to select the
2 Tu
desired file (folder) name or
category, then press to confirm.
rn the M.C. dial to select the
3 Tu
desired file, then press to confirm.
Playback starts.
Press the M.C. dial when a folder/
category is selected.
Press and hold the M.C. dial when a
folder/category is selected.
ress to display the list.
rn the M.C. dial to select the
2 Tu
desired categor y list, then press
to enter the alphabetical search
de.
mo
(Turning the M.
enters the alphabetical search
mode.)
rn the M.C. dial to select a letter,
3 Tu
then press to display the
alphabetical list.
To cancel alphabetical search, press
BAND/ .
[1]: Effective for low compression rates
[2]: Effective for high compression
tes
ra
C. dial twice also
USE .
Rtrv.
.
Purpose Operation
Change drives in USB device
(Devices that support the USB mass
torage device class protocol only)
s
*1 Compressed audio files only
*2 When you use the fast forward or reverse function while playing a VBR file, the playback
time may be not correct.
Press BAND/ .
Useful functions for iPod
Link play mode
You can access songs based on the artist, album, or genre currently playing.
1 While listening to a song, press and hold to enter the link play mode.
2 Turn t he M.C. dial to select the mode ([ARTIST], [ALBUM], [GENRE]), then
press to confirm.
The selected song/album will be played after the currently playing song.
The selected song/album may be canceled if you use functions other than those from the
link play mod e (e.g. fast forward a nd reverse).
iPod control
You can control the unit via a connected iPod.
The following iPod models are not compatible with this function.
–iPod nano 1st generation, iPod with video
1 Press BAND/ during playback, then select the control mode.
[CO
NTROL iPod]: The unit’s iPod function can be operated from the
connected iPod.
[CO
NTROL AUDI O]: The unit’s iPod function can only be operated by the
buttons on the unit or suppl ied remote control. In this mode, the connected
iPod cannot be turned on or off.
• Pressing iPod can also switch the control mode (only for MVH-S100UI).
8
En
English
• Switching the control mode to [CONTROL iPod] pauses song playback. Use the connected
Important
NOTE
Important
iPod to resume playback.
• The following operations are still accessible from the unit, even if the control mode is set
to [CONTROL iPod].
– Pause, fast forward/reverse, song/chapter selection
• The volume can only be adjusted from the unit.
App Mode
(APP mode is not available for MVH-S100UB/S100UBG/S100UBA/S100UBW/
S010UB.)
You can enjoy listening to an application on an iPhone via the unit. In some
cases, y
ou can control an application by using the unit.
For details on compatible devices, visit our website.
Use of third part y apps may involve or require the provision of pers onally identifiable
information, whether through the c reation of a user acco unt or otherwise, an d for certain
applications , the provision of geo location data.
ALL THIRD PARTY APPS ARE THE SOLE RESPONSIBILIT Y OF THE PROVIDERS, INCLUDING
WITHOUT LIMITATION COLLECTION AND SECURITY OF USER DATA AND PRIVACY
PRACTICES. BY ACCESSING THIRD PARTY APPS, YOU AGREE TO REVIEW THE TERMS OF
SERVICE AND PRIVACY POLICIES OF THE PROVIDER S. IF YOU DO NOT AGREE WITH THE
TERMS OR POLICI ES OF ANY PROVIDER OR DO NOT CONSENT TO TH E USE OF
GEOLOCATION DATA WHERE APPLICABLE, DO NOT USE THAT THIRD PARTY APP.
For iPhone use rs
This function is compatible with iPhones and iPod touches installed with iOS 5.0 or later.
PIONEER IS NOT LIABLE FOR ANY THIRD PARTY APPS OR CONTENT, INCLUDING WITHOUT
LIMITATION THEIR ACCURACY OR COMPLETENESS. THE CONTENT AND FUNCTIONALITY OF
SUCH APPS ARE THE SOLE RESPONSIBILITY OF THE APP PROVIDER.
2 Press SRC/OFF to select [APP].
3 Operate the mobile device to start up the application.
Basic operations
You can make various adjustments in the FUNCTION settings (page 11).
Purpose Operation
Select a track Press or .
Fast forward or reverse Press and hold or .
Pause/resume playback Press BAND/ .
Spotify®
(MVH-S100UI is only compatible with Spotify installed on iPhone.)
Spotify is a music streaming distribution service not affiliated with Pioneer.
M
ore information is available at http://www.spotify.com.
The Spotify application is available for compatible smartphones, please visit
ht
tps://support.spotify.com/ for the latest compatibility information.
To enjoy Spotify as you drive, first download the Spotify app to your iPhone.
Y
ou can download it on the iTunes App Store. Choose a free account or a paid
Premium account, either in the app or at spotify.com. A Premium account
gives you more features, like offline listening.
• This product in corporates Spotify software whic h is subject to 3rd party license s found
here: www.spotify.com/connect/third-party-licenses.
• For information on the countries and regions where Spotify can be used, take a look at
https://www.spotify.com/us/select-your-country/.
Playback of an application via the unit
1 Connect this unit with the mobile device.
hone via USB (page 7)
• iP
Listening to Spotify
Update the firmware of the Spotify application to the latest version before use.
1 Connect this unit with the mobile device.
En
9

• iP
NOTE
NOTE
WAR NIN G
NOTE
hone via USB (page 7)
2 Press SRC/OFF to select [SPOTIFY].
3 Launch the Spotify application on the mobile device and start playback.
Purpose Operation
Store the information about the song
currently being played.
Remove the song information stored.
1 Press and hold 3/S.Rtrv.
[SAVE]/[UNSAVE] appears.
ress the M.C. dial.
2 P
Basic operations
You can make various adjustments in the FUNCTION settings (page 11).
The available operations may vary according to the type of contents (track/album/artist/
playlist/rad io) you want to pl ay.
Purpose Operation
Skip a track Press or .
Search for a track from a list 1 Press (list) to display the list.
Pause/resume playback Press 4/
Thumbs Up (Only for radio) Press 1/ .
Thumbs Down (Only for radio) Press 2/ .
Random play (Only for track/album/
a
rtist/playlist)
Repeat play (Only for track/album/
a
rtist/playlist)
Start a radio channel based on the
s
ong currently being played.
10
En
rn the M.C. dial to select the
2 Tu
desired categor y, then press to
confir m.
rn the M.C. dial to select the
3 Tu
desired file, then press to confirm.
Playback starts.
PAUSE.
Press 5/ .
Press 6/ .
1 Press and hold (list) to start a
radio.
ress the M.C. dial.
2 P
his function may not be available
• T
depending on the s elected song.
Some functions of Spotify may not be operated from the unit.
Using Pioneer ARC APP
(Pioneer ARC APP for iPhone is not available for MVH-S100UB/S100UBG/
S100UBA/S100UBW/S010UB.)
You can operate the unit from Pioneer ARC APP installed on an iPhone/
A
ndroid device. In some cases, you can control aspects of the application, such
as source selection, pause, etc., by using the unit.
For details on what operations are available on the application, see the
ap
plication’s help section.
Do not attempt to operate the application whi le driving. Make sure to pull off th e road and
park your vehic le in a safe location before atte mpting to use the controls o n the application.
For iPhone users
This function is compatible with iPhones (iPhone 5 or later) and iPod touches
in
stalled with iOS 8.0 or later.
You can download Pioneer ARC APP on iTunes App Store.
For Android device users
This function is compatible with devic
installed and also support AOA (Android Open Accessory) 2.0.
You can download Pioneer ARC APP on Google Play™.
Some Android devices connected via AOA 2.0 may not work properly or emit sounds due to
their own software design , regardless of the OS version.
es that have Android OS 4.1 or later

English
NOTE
NOTE
Making a connection with Pioneer ARC APP
NOTES
1 Connect this unit with the mobile device.
• i
Phone/Android device via USB (page 7)
Proceed to step 6 if you select the USB connection for iPhone.
2 Press the M.C. dial to display the main menu.
3 Turn the M.C. dial to select [SYSTEM], then press to confirm.
4 Turn the M.C. dial to select [ANDROID WIRED], then press to confirm.
5 Turn the M.C. dial to select [APP CONTROL] for an Android device
connected via USB.
If [ON] is selec ted in [P.APP AUTO ON] (page 14), Pioneer ARC APP on the
Android device starts automatically, and all the steps are finished.
If Pioneer ARC APP has not been installed on your Android device yet, a message that
prompts you to install the application will appear on your Android device. Select [OFF]
in [P.APP AUTO ON] to clear the message (page 14).
6 Press SRC/OFF to select any source.
7 Launch Pioneer ARC APP on the mobile device.
You can also launch the application by pressing and holding the M.C. dial for iPhone.
Listening to music on Android
1 Press SRC/OFF to select [ANDROID].
Basic operations
Purpose Operation
Select a track Press or .
Fast forwa rd or re verse Press and hold or .
Purpose Operation
Pause/resume playback Press 4/PA US E.
Sound retriever Press 3/S.
Rtrv.
[1]: Effective for low compression rates
[2]: Effective for high compression
tes
ra
Settings
You can adjust various settings in the main menu.
1 Press the M.C. dial to display the main menu.
2 Tur n the M.C. dial to select one of the categories below, then press to
confir m.
• FUNCTION settings (page 11)
• AUDIO setti ngs (page 12)
• SYSTEM settings (page 13)
• ILLUMINATION settings (page 14)
3 Tur n the M.C. dial to select the options, then press to confirm.
• iPod-related menu items in the following tables are not available for MVH-S100UB/
S100UBG/S100UBA/S100UBW/S010UB.
• APP mode-related menu items in the following tables are not available for MVH-S100UB/
S100UBG/S100UBA/S100UBW/S010UB.
FUNCTION settings
The menu items vary according to the source.
11
En
Menu Item Description
USB
iPod
iPod
FM SE TTING
[TALK], [STANDARD], [MUSIC] Match the sound quality le vel with the
BSM
REGIONAL
[ON], [OFF] Limit the reception to the specific regional
LOC AL
OFF], [LV1], [LV2], [LV3],
FM: [
[LV4]
MW/LW: [O
TA
[ON], [OFF] Receive current traffic information if
AF
[ON], [OFF] Allow the unit to retune to a different
NEWS
[ON], [OFF] Interrupt the currently sele cted source with
FF], [LV1], [LV2]
br
oadcast signal conditions of the FM band
signal. (Available only when FM band is
selected.)
Store the six strongest stations on the
ber buttons (1/ to 6/ )
num
automatica lly.
grams when AF (alternative frequencies
pro
search) is selected. (Available only when
FM band is selecte d.)
Restrict the tuning station accordin g to the
signa
l strength.
vailable. (Available only when FM band is
a
selected.)
uency providing the same station.
freq
(Available only when FM band is selected.)
rograms. (Available only when FM
news p
band is selected.)
Menu Item Description
SEEK
[MAN], [PCH] Assign or buttons to seek the
SAVE
UNSAVE
S.RTRV
[1] (effective for low
mpression rates),
co
[2] (effective for high
mpression rates),
co
[OFF]
AUDIO BOOK
[FASTER], [NORMAL],
LOWER]
[S
PAUS E
stations one by one (manual tuning) or
lect a station from the preset channels.
se
Store the information about the song
currently being played to your music list on
Spotify.
Remove the song information stored in
AVE].
[S
Enhance compressed audio and restore
ch sound.
ri
Not available when the FLAC file is played
.
back
Change the playback speed. (Not available
when [CONTROL iPod] is selected in the
control mode.)
Pause or resume playback.
AUDIO settings
Menu Item Description
FAD ER *1
Adjust the front and rear speaker balance.
12
En
English
Menu Item Description
BALANCE
Adjust the left and right speaker balance.
EQ SETTING
[SUPER BASS], [POWERFUL],
[NATURAL], [VOCAL],
[CUSTOM1], [CUSTOM2],
[FLAT]
Select an equalizer band and
r further customising.
level fo
Equalizer band: [80H
[250HZ], [800HZ], [2.5KHZ],
[8KHZ]
Equalizer level: [+
LOU DNES S
[OFF], [LOW], [MID], [HI] Compensate for clear sound at low volume.
SUB.W*2
[NOR], [REV], [OFF] Select the subwoofer phase.
SUB.W CTRL*2
Cut-off frequency: [5
[63HZ], [80HZ], [100HZ],
[125HZ], [160HZ], [200HZ]
Output level: [–2
Slope level: [–12],
BASS BOOST
[0] to [+6]
6] to [–6]
*3
4] to [+6]
[–24]
Select or customise the equalizer curve.
[CUSTOM1] can be set separately for each
source. However, each of the below
combinations are set to the same setting
automatically.
SB, iPod, ANDROID, SPOTIFY, and APP
• U
Z],
0HZ],
(iPhone)
[CUSTOM2] is a shared setting used for all
urces.
so
You can also switch the equalizer by
ressing repeatedly (Only for
p
MVH-S100UB/S100UBG/S100UBA/
0UBW/S010UB).
S10
Only frequencies lower than those in the
ected range are output from the
sel
subwoofer.
Select the bass boost level.
Menu Item Description
HPF SETTING
OFF],
Cut- off frequ ency: [
[50HZ], [63HZ], [80HZ],
[100HZ], [125HZ], [160HZ],
[200HZ]
Slope level: [
SLA
[+4] to [–4] Adjust the volume level for each source
*1 Not available when [SUB.W/SUB.W] is selected in [SP-P/O MODE] in the INITIAL settings
(page 6).
*2 Not available when [REAR/REAR] is selected in [ SP-P/O MODE] in the INITIAL settings
(page 6).
*3 Not available when [OFF] is selected in [SUB.W].
–12], [–24]
Only frequencies higher than the high-pass
filter (HPF) cutoff are output from the
speakers.
except FM.
Each of the below combinations are set to
e same setting automatically.
th
B, iPod, ANDROID, SPOTIFY, and APP
• US
(iPhone)
SYSTEM settings
You can also access to these menus when the unit is turned off.
Menu Item Description
LANGUAGE
[ENG](English),
[РУС](Russian), [TUR](Turkish)
CLOCK SET
12H/24H
[12H], [24H] Select the time notation.
Select the language to display the text
information from a compressed audio file.
Set the clock (page 5).
13
En

Menu Item Description
AUTO PI
[ON], [OFF] Search for a different statio n with the same
AUX
[ON], [OFF] Set to [ON] when using an auxiliary device
SPOTIFY
[ON], [OFF] Set to [ON] when using the Spotify
MUTE MODE (O
[MUTE], [20dB ATT], [10dB
AT
PW SAVE*
[ON], [OFF] Reduce the battery power consumption.
ANDROID WIRED
[MEMORY], [APP CONTROL] Select the appropriate connec tion method
P. A PP A U TO O N
[ON], [OFF]
nly for MVH-S100UI)
T]
ogramming, even if using a preset
pr
station.
onnected to the unit.
c
nction.
fu
Mute or attenuate sound automatically
when a signal from equipment with a mute
function is received.
Turning on the source is the only operation
wed when this function is on.
allo
or an Android device.
f
Select [ON] to automatically launch Pioneer
ARC APP when an Android device is
connected to the unit via AOA. (Not available
when [MEMORY] is sel ected in [ANDROID
WIRED].)
Menu Item Description
USB AUTO
[ON], [OFF] Select [ON] to automatically switch to
* [PW SAVE] is canceled if the vehicle battery is disconnected and will need to be turned
back on once the battery is reconnected. When [PW SAVE] is off, depending on
connection methods, the unit may continue to draw power from the batter y if your
vehicle’s ignition does not have an ACC (accessory) position.
SB] source when a USB device/iPod is
[U
connected to the unit.
Select [OFF] when a USB device/iPod is
connected to the unit just for
being
charging.
ILLUMINATION settings
Menu Item Description
DIM SETTING
[SYNC CLOCK], [MANUAL] Change the display brightness.
BRIGHTNESS
[1] to [10] Change the display brightness.
The available setting ranges differ
epending on [DIM SETTING].
d
14
En

English
Important
Connections/Installation
ACC posi tion No ACC p osition
Connections
• When installing this unit in a vehicle
without an ACC (accessory) position
on the ignition switch, failure to
connect the red cable t o the terminal
that detects operation of the ignition
key may result in batter y drain.
• Use of this unit in conditions other
than the following could result in fire
or malfunction.
– Vehicles with a 12-volt battery and
ative grounding.
neg
– When speaker output is used by 4
nels, use speakers over 50 W
chan
(maximum input power) and
between 4 Ω to 8 Ω (impedance
value). Do not use 1 Ω to 3 Ω
speakers for this unit.
– When rear speaker output is used
y 2 Ω of subwoofer, use speakers
b
over 70 W (maximum input power).
* Please refer to connections for a
nnection method.
co
o prevent a short-circuit,
• T
overheating or malfunction, be sure
to follow the directions below.
– Disconnect the negative terminal
f the battery before installation.
o
– Secure the wiring with cable
amps or adhesive tape. Wrap
cl
adhesive tape around wiring that
comes into contact with metal
parts to protect the wiring.
– Place all cables away from moving
arts, such as the shift lever and
p
seat rails.
– Place all cables away from hot
such as near the heater
places,
outlet.
– Do not connect the yellow cable to
he battery by passing it through
t
the hole to the engine
compartment.
– Cover any disconnected cable
nnectors with insulating tape.
co
– Do not shorten any cables.
– Never cut the insulation of the
wer cable of this unit in order to
po
share the power with other devices.
The current capacity of the cable is
limited.
– Use a fuse of the rating prescribed.
– Never wire the negative speaker
e directly to ground.
cabl
– Never band together negative
les of multiple speakers.
cab
his unit is on, control signals
• When t
are sent through the blue/white
cable. Connect this cable to the
system remote control of an external
power amp or the vehicle’s autoantenna relay control terminal (max.
300mA 12 V DC). If the vehicle is
equipped with a glass antenna,
connect it to the antenna booster
power supply terminal.
• Never connect the blue/white cable
to the power terminal of an external
power amp. Also, never connect it to
the power terminal of the auto
antenna. Doing so may result in
battery drain or a malfunction.
he black cable is ground. Ground
• T
cables for this unit and other
equipment (especially, high-current
products such as power amps) must
be wired separately. If they are not,
an accidental detachment may result
in a fire or malfunction.
e graphical symbol placed
• Th
on the produc t means direct current.
This unit
Power cord input
Rear output or subwoofer output
Front output (Only for MVHS100UI)
Antenna input
Fuse (10 A)
Wired remote input (Only for MVHS100UI)
Hard-wired remote control ad apter
an be connected (sold separately).
c
Power cord
To power cord input
Depending on the kind of vehicle,
the function of and may be
different. In this case, be sure to
nnect to and to .
co
Yellow
Back-up (or accessory)
Yellow
Connect to the constant 12 V
upply terminal.
s
Red
Accessory (or back-up)
Red
Connect to terminal controlled by
he ignition switch (12 V DC).
t
Connect le ads of the same colour
to each other.
Black (chassis ground)
15
En

NOTES
Important
Leave ample
space
5 cm
5 cm
16
Blue/white
The pin position of the ISO
onnector will differ depending on
c
the type of vehicle. Connect and
when Pin 5 is an antenna
control type. In another type of
ehicle, never connect and .
v
Blue/white
Connect to the system control
erminal of the power amp (max.
t
300 mA 12 V DC).
Blue/white
Connect to the auto-antenna relay
ontrol terminal (max. 300 mA 12 V
c
DC).
Yellow/black (Only for MVHS100UI)
If you use equipment with a Mute
nction, wire this lead to the
fu
Audio Mute lead on that
equipment. If not, keep the Audio
Mute lead free of any connections.
Speaker leads
White: Front left
White/black: Front left
Gray: Front right
Gray/black: Front right
Green: Rear left or subwoofer
Green/black: Rear left or
subwoofer
Violet : Rear right or subwoofer
Violet /black: Rear right or
subwoofer
ISO connector
In some vehicles, the ISO co nnector
y be divided into two. I n this
ma
case, be sure to connect to both
connec tors.
En
• Change the initial menu of this unit.
Refer to [SP-P/O MODE]
subwoofer output of this unit is
aural.
mon
hen using a subwoofer of 2 Ω, be
• W
sure to connec t the subwoofer to the
violet and violet/black leads of this
unit. Do not connect anything to the
green and green/black leads.
(page 6). The
Power amp (sold separately)
Perform these connections when
using the optional amplifier.
System remote control
Connect to blue/white cable.
Power amp (sold separately)
Connect with RCA cables (sold
separately)
To front output*
Front sp eaker*
To rear output or subwoofer output
Rear speaker or subwoofer
* Only for MVH-S100UI
Installation
• Check all connections and systems
before final installation.
• Do not use unauthorized parts as
this may cause malfunctions.
onsult your dealer if installation
• C
requires drilling of holes or other
modifications to the vehi cle.
ot install this unit where:
• Do n
– it may interfere with operation of
he vehicle.
t
– it may cause injury to a passenger
esult of a sudden stop.
as a r
he semiconductor laser will be
• T
damaged if it overheats. Install this
unit away from hot places such as
near the heater outlet.
mum
• Opti
performance is
obtained when the
unit is installed at an
angle of less than 60°.
hen installing, to ensure proper
• W
heat dispersal when using this unit,
make sure you leave ample space
behind the rear panel and wrap any
loose cables so they are not blocking
the vents.
DIN mount installation
1 Insert the supplied mounting
sleeve into the dashboard.
2 Secure the mounting sleeve by
using a screwdriver to bend the
metal tabs (90°) into place.
Dashboard
Mounting sleeve
ake sure that th e unit is
• M
installed securely in place. An
unstable installation may cause
skipping or other malfunctions.
When not using the supplied
mounting sleeve
1 Line up the holes on the
mounting bracket with the holes
on the sides of the unit to attach
the bracket.
2 S crew in one screw on each side to
hold the unit in place.

English
Tapping screw (5 mm × 9 mm,
Screw
Bracket
not supplied with product)
Mounting bracket
Dashboard or console
Using the included bracket
Check to make sure that the included
bracket matches your particular
model of vehicle and then attach it to
the unit as shown below.
Removing the unit (installed
with the supplied mounting
sleeve)
1 Remove the trim ring.
Trim rin g
Notched tab
eleasing the front panel allows
• R
easier access to the trim ring.
hen reattaching the trim ring,
• W
point the side with the notched
tab down.
2 Inser t the supplied extraction
keys into both sides of the unit
until they click into place.
3 Pull the unit out of the dashboard.
17
En

Additional Information
Troubleshooting Error messages
The display automatically returns to
the normal display.
→ No operations have been made for
about 30 seconds.
– Perform an operation.
The repeat pl ay range changes
unexpectedly.
→ Depending on the repeat play
range, the selected range may
change when another folder or
track is being selected or during
fast forwarding/reversing.
– Select the repeat play range
ain.
ag
A subfolder is not played back.
→ Subfolders cannot be played when
[FLD] (folder repeat) is selected.
– Select another repeat play range.
The sound is intermittent.
→ You are using a device, such as a
cellular phone, that may cause
audible interference.
– Move electrical devices that may
ing the interference away
be caus
from the unit.
Common
AMP ERROR
→ This unit fails to operate or the
speaker connection is incorrect.
he protective circuit is activated.
→ T
– Check the speaker connection.
– Turn the ignition switch OFF and
to ON again. If the message
back
remains, contact your dealer or an
authorized Pioneer Service
Station for assistance.
NO XXXX (NO TITLE, for example)
→ There is no embedded text
information.
– Switch the display or play another
ack/file.
tr
USB device/iPod
FORMAT READ
→ Sometimes there is a delay
between the start of playback and
when you start to hear any sound.
– Wait until the message
isappears and you hear sound.
d
NO AUDIO
→ There are no songs.
– Transfer the audio files to the USB
vice and connect.
de
he connected USB device has
→ T
security enabled.
– Follow the USB device
instructions to disable the
security.
SKIPPED
→ The connected USB d evice contains
DRM protected files.
– The protected files are skipped.
PROTECT
→ All the files on the connected USB
device are embedded with DRM.
– Replace the USB device.
N/A USB
→ The connected USB device is not
supported by this unit.
– Disconnect your device and
eplace it with a compatible USB
r
device.
HUB ERROR
→ The USB device connected via a
USB hub is not supported by this
unit.
–Connect the USB device directly
o this unit using a USB cable.
t
CHECK USB
→ The USB connector or USB cable
has short-circuited.
– Check that the USB connector or
SB cable is not caught in
U
something or damaged.
he connected USB device
→ T
consumes more than maximum
allowable current.
– Disconnect the USB device and
o not use it. Turn the ignition
d
switch OFF and back to ACC or
ON. Connect only compliant USB
devices.
od operates correctly but
→ The iP
does not charge.
– Make sure the connection cable
or the iPod has not shorted out
f
(e.g., not caught in metal objects).
After checkin g, turn the ignition
switch OFF and back to ON, or
disconnect the iPod and
reconn ect.
ERROR-19
→ Communication failed.
– Perform one of the following
erations, then return to the
op
USB source.
urn the ignition switch OFF and
• T
back to ON.
sconnect the USB device.
• Di
hange to a different source.
• C
od failure.
→ iP
– Disconnect the cable from the
od. Once the iPod’s main menu
iP
is displayed, reconnect the iPod
and reset it.
ERROR-23
→ USB device was not formatted
properly.
– Format the USB device with
12 , FAT1 6 or FAT 32.
FAT
ERROR-16
→ The iPod firmware version is old.
– Update the iPod version.
od failure.
→ iP
– Disconnect the cable from the
od. Once the iPod’s main menu
iP
18
En
English
is displayed, reconnect the iPod
CAUTION
and reset it.
STOP
→ There are no songs in the current
list.
– Select a list that contains songs.
NOT FOUND
→ No related songs.
– Transfer songs to the iPod.
APP
START UP APP
→ The application has not started
running yet.
– Operate the mobile device to
tart up the application.
s
Spotify
CHECK APP
→ Connection to the Spotify
application failed.
– Follow the instructions that
pear on the screen.
ap
Handling guidelines
USB storage device
• Connections via USB hubs are not
supported.
irmly secure the USB storage device
• F
before driving. Do not let the USB
storage device fall onto the floor,
where it may become jammed under
the brake or accelerator pedal.
epending on the USB storage
• D
device, the following problems may
occur.
–Operations may vary.
– The storage device may not be
gnized.
reco
– Files may not be played back
operly.
pr
– The device may cause audible
erference when you are listening
int
to the radio.
iPod
• Do not leave the iPod in places with
high temperatures.
irmly secure the iPod when driving.
• F
Do not let t he iPod fall onto the floor,
where it may become jammed under
the brake or accelerator pedal.
he settings of the iPod such as the
• T
equalizer and repeat play are
changed automatically when the
iPod is connected to the unit. Once
the iPod is disconnected, those
settings will return to the original
settings.
compatible text saved on the iPod
• In
will not be displayed by the unit.
Compressed audio
compatibility
• O
nly the first 32 characters can be
displayed as a file name (including
the file extension) or a folder name.
• The unit may not work properly
depending on the application used
to encode WMA files.
here may be a slight delay at the
• T
start of the playback of audio files
embedded with image data, or audio
files stored on a USB device with
numerous folder hierarchies.
ussian text to be displayed on this
• R
unit should be encoded in one of the
following character sets:
–Unicode (UTF-8, UTF-16)
– A character set other than Unicode
hat is used in a Windows
t
environment and is set to Russian
in the multi-language setting
• Pioneer cannot guarantee
compatibility with all USB mass
storage devices, and assumes no
responsibility for any loss of data on
media players, smartphones, or
other devices while using this
product.
• Do not leave discs or a USB storage
device in any place that is subject to
high temperatures.
WMA files
File e xtensio n .wma
Bit rate 48 kbps to 320 kbps
Sampling
frequency
(CBR), 48 kbps to
384 kbps (VBR)
32 kHz, 44.1 kH z, 48
kHz
Windows Media™
Audio Professional,
Lossless, Voice/
DRM Stream/
Stream with video
Not compatible
MP3 files
File e xtensio n .mp3
Bit rate 8 kbps to 320 kbps
Sampling
frequency
Compatible ID3 tag
version
M3u playlist Not compatible
MP3i (MP3
interactive), mp3
PRO
(CBR), VBR
8 kHz to 48 kHz (32
kHz, 44.1 kHz , 48
kHz for emphasis)
1.0, 1.1, 2.2, 2.3, 2.4
(ID3 tag Version 2.x
is given priority
over Version 1.x.)
Not compatible
WAV files
• WAV file formats cannot be
connected via MTP.
File e xtensio n .wav
Quantization bits 8 and 16 (LPCM), 4
Sampling
frequency
(MSADPCM)
16 kHz to 48 kHz
(LPCM), 22.05 kHz
and 44.1 kHz (MS
ADPCM)
FLAC files
• FLAC file formats cannot be
connected via MTP.
19
En
• FLAC files may not be playable,
CAUTION
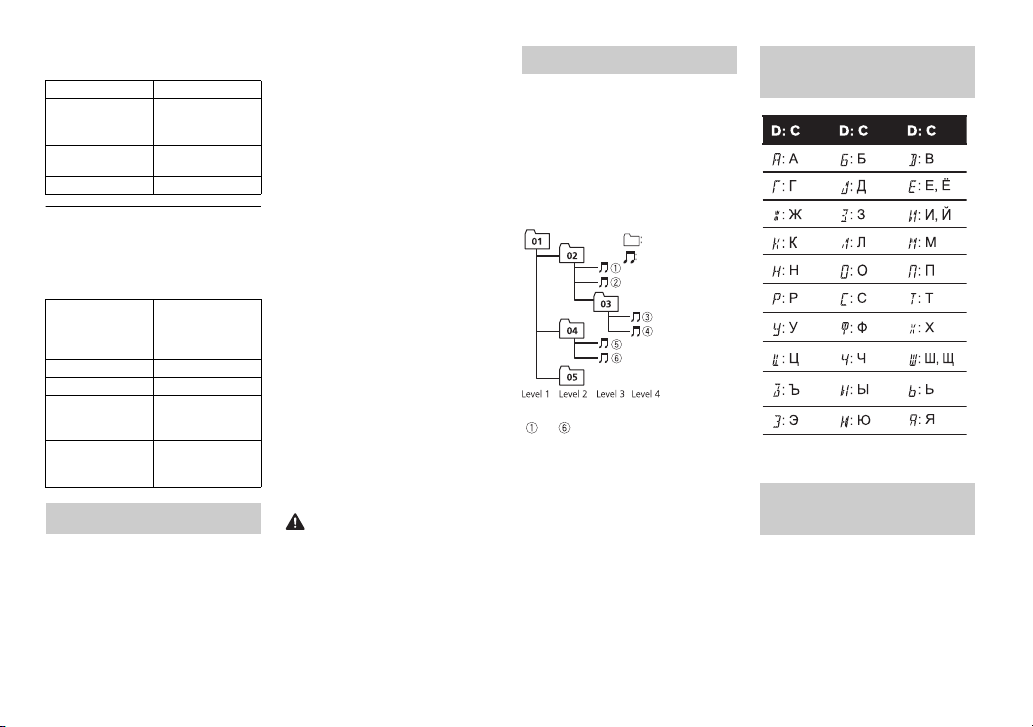
Folder
Compressed
audio file
to : Playback sequence
01 to 05: Folde r number
D: Display C: Character
depending on the encoder.
File ex tension .flac
Sampling
frequency
Quantization bit
rate
Channel mode 1/2 ch
8/11.025/12/16/
22.05/24/32/44.1/
48 kHz
16 bit
USB device
• There may be a slight delay when
starting playback of audio files on a
USB storage device with numerous
folder hierarchies.
Playable folder
hierarchy
Playable folders Up to 500
Playable files Up to 15 000
Playback of
copyrightprotected files
Partitioned USB
device
iPod compatibility
This unit supports only the following iPod
models. Supported iPod software versions
are shown below. Older versio ns may not
be supported.
Made for
–iPod touch (1st through 6th
generation)
Up to eight tiers (A
practical hierarchy
is less than two
tiers.)
Not compatible
Only the first
partition can be
played.
–iPod classic
– iPod with video
–iPod nano (1st through 7th
neration)
ge
–iPhone 6s
– iPhone 6s Plus
–iPhone 6
– iPhone 6 Plus
–iPhone 5s
–iPhone 5c
–iPhone 5
–iPhone 4s
–iPhone 4
–iPhone 3GS
–iPhone 3G
–iPhone
rations may vary depending on
• Ope
the generation and/or software
version of the iPod.
sers of iPod with the Lightning
• U
Connector should use the Lightning
to USB Cable (supplied with iPod).
sers of iPod with the Dock
• U
Connector should use the C D-IU51.
For details, consult your dealer.
fer to the iPod manuals for
• Re
information about the file/format
compatibility.
udiobook, Podcast: Compatible
• A
Pioneer accepts no responsibility for
data lost on the iPod, even if that data
is lost while this unit is used.
Sequence of audio files
The user cannot assign folder
numbers and specify playback
sequences with this unit. Sequence of
audio file depends on the connected
device.
Note that the hidden files in a USB
device cann
Example of a hierarchy
ot be played back.
Russian character
chart
Copyright and
trademark
iTunes
Apple and iTunes are trademarks of
ple Inc., registered in the U.S. and
Ap
other countries.
20
En

English
WMA
Windows Media is either a registered
trademark or trademark of Microsoft
Corporation in the United States and/
or other countries.
This product includes technology
wned by Microsoft Corporation and
o
cannot be used or distributed without
a license from Microsoft Licensing, Inc.
FLAC
Copyright © 2000-2009 Josh Coalson
Copyright © 2011-2013 Xiph.Org
undat ion
Fo
Redistribution and use in source and
y forms, with or without
binar
modification, are permitted provided
that the following conditions are met:
– Redistributions of source code must
etain the above copyright notice,
r
this list of conditions and the
following disclaimer.
– Redistributions in binary form must
duce the above copyright
repro
notice, this list of conditions and the
following disclaimer in the
documentation and/or other
materials provided with the
distribution.
– Neither the name of the Xiph.org
oundation n or the names of its
F
contributors may be used to end orse
or promote products derived from
this software without specific prior
written permission.
THIS SOFT WARE IS PROVIDED BY THE
PYRIG HT HOLDERS AND
CO
CONTRIBUTORS “AS IS” AND ANY
EXPRESS OR IMPLIED WARRANTIES,
INCLUDING, BUT NOT LIMITED TO, THE
IMPLIED WARRANTIES OF
MERCHANTABILITY AND FITNESS FOR
A PARTICULAR PURPOSE ARE
DISCLAIMED. IN NO EVENT SHALL THE
FOUNDATION OR CONTRIBUTORS BE
LIABLE FOR ANY DIRECT, INDIRECT,
INCIDENTAL, SPECIA L, EXEMPLARY, OR
CONSEQUENTIAL DAMAGES
(INCLUDING, BUT NOT LIMITED TO,
PROCUREMENT OF SUBSTITUTE
GOODS OR SERVICES; LOSS OF USE,
DATA, OR PROFITS; OR BUSINESS
INTERRUPTION) HOWEVER CAUSED
AND ON ANY THEORY OF LIABILITY,
WHETHER IN CONTRACT, STRICT
LIABILITY, OR TORT (INCLUDING
NEGLIGENCE OR OTHERW ISE) ARISING
IN ANY WAY OUT OF THE USE OF THIS
SOFTWARE, EVEN IF ADVISED OF THE
POSSIBILITY OF SUCH DAMAGE.
iPod & iPhone
iPhone, iPod, iPod classic, iPod nano,
iPod touch are trademarks of
and
ple Inc., registered in the U.S. and
Ap
other countries.
Lightning is a trademark of Apple Inc.
“Made for iPod” and “Made for iPhone”
ean that an electronic accessory has
m
been designed to connect specifically
to iPod or iPhone, respectively, and
has been certified by the developer to
meet Apple performance standards.
Apple is not responsible for the
operation of this device or its
compliance with safety and regulatory
standards. Please note that the use of
this accessory with iPod or iPhone
may affect wireless performance.
Android & Google Play
Android, Google Play, and the Google
logo are trademarks of Google
Play
Inc.
Spotify®
SPOTIFY and the Spotify logo are
ong the registered trademarks of
am
Spotify AB. Compatible mobile digital
devices and premium subscription
required, where available, see https://
www.spotify.com .
Specifications
General
Power source: 14.4 V DC (10.8 V to 15.1
V allowable)
Grounding system: Negative type
Maximum current consumption: 10.0
A
Dimensions ( W × H × D):
DIN
Chassis: 178 mm × 50 mm × 97
mm
Nose: 188 mm × 58 mm × 17 mm
D
Chassis: 178 mm × 50 mm × 97
mm
Nose: 170 mm × 46 mm × 17 mm
Weight: 0.5 kg
Audio
Maximum power output:
• 50 W × 4 ch/4 Ω (for no
ubwoofer)
s
• 50 W × 2 ch/4 Ω + 70 W × 1 ch/2
Ω (for subwoofer)
Continuous power output:
22 W × 4 (50 Hz to 15 000 Hz, 5 %
D, 4 Ω load, both channels
TH
iven)
dr
Load impedance: 4 Ω (4 Ω to 8 Ω
wable)
allo
Preout maximum output level: 2.0 V
Loudness contour: +10 dB (100 Hz),
6.5 dB (10 kHz) (volume: –30 dB)
+
Equalizer (5-Band Graphic Equalizer):
Frequency: 80 Hz/250 Hz/800 Hz/
.5 kHz/8 kHz
2
Equalization range: ±12 dB (2 dB
ep)
st
Subwoofer (mono):
Frequency: 50 Hz/63 Hz/80 Hz/
00 Hz/125 Hz/160 Hz/200 Hz
1
Slope: –12 dB/oct, –24 dB/oct
Gain: +6 dB to –24 dB
Phase: Normal/Reverse
USB
USB standard specification: USB 2.0
full speed
Maximum current supply: 1 A
USB Protocol:
MSC (Mass Storage Class)
MTP (Media Transfer Protocol)
AOA (Android Open Accessory)
0
2.
Fi le s yst em: FAT 12, FAT16, FAT3 2
MP3 decoding format: MPEG-1 & 2
dio La yer 3
Au
WMA decoding format: Ver. 7, 8, 9, 9.1,
2 (2 ch audio)
9.
FLAC decoding format: v1.3.0 (Free
ossless Audio Codec)
L
21
En

WAV signal format: Linear PCM & MS
NOTE
ADPCM (Non-compressed)
FM tuner
Frequency range: 87.5 MHz to 108.0
MHz
Usable sensitivity: 11 dBf (1.0 μV/75 Ω,
o, S/N: 30 dB)
mon
Signal-to-noise ratio: 72 dB (IEC-A
work)
net
MW tuner
Frequency range: 531 kHz to 1 602 kHz
Usable sensitivity: 25 μV (S/N: 20 dB)
Signal-to-noise ratio: 62 dB (IEC-A
work)
net
LW tu ner
Frequency range: 153 kHz to 281 kHz
Usable sensitivity: 28 μV (S/N: 20 dB)
Signal-to-noise ratio: 62 dB (IEC-A
work)
net
Specifications and the design are
subject to modifications without
notice.
22
En

English
23
En
À propos de ce mode d’emploi :
Table des matières
ATTENT ION
PRÉCAUTION
Avant de commencer................................................................ 2
Mise en route.............................................................................. 3
Radio ............................................................................................ 5
USB/iPod/AUX ............................................................................ 6
Mode d’application ................................................................... 9
Spotify®........................................................................................ 9
Utilisation de Pioneer ARC APP............................................. 11
Réglages.................................................................................... 12
Réglages FUNCTION ............................................................. 12
Réglages AUDIO..................................................................... 13
Réglages SYSTEM .................................................................. 14
Réglages ILLUMINATION...................................................... 15
Raccordements/Installation .................................................. 16
Informations complémentaires ............................................ 19
• Parmi les instructions suivantes, les clés USB ou les lecteurs audio USB sont
collectivement désignés sous le nom de « périphérique USB ».
• Dans ce mode d’emploi, les iPod et les iPhone sont collectivement désignés
sous le nom d’« iPod ».
Avant de commencer
Nous vous remercions d’avoir acheté cet appareil PIONEER
Pour garantir une utilisation correcte, lisez bien ce mode d’emploi avant d’utiliser cet
appareil. Il est particulièrement important que vous lisiez et respec tiez les indications
ATTENTION et PRÉCAUTION de ce mode d’emploi. Conservez-le dans un endroit sûr et
facilement acces sible pour toute consultation ul térieure.
Si vous souhaitez vous débarrasser de cet appareil, ne le mettez pas à la poubelle avec
vos ordures ménagères. Il existe un système de collecte séparé pour les appareils
électroniques usagés, qui doivent être récupérés, traités et recyclés conformément à la
législation.
Dans les états membres de l’UE, en Suisse et en Norvège, les foyers domestiques peuvent
rapporter le urs produits électroniques u sagés gratuitement à des points de col lecte
spécifiés ou à un revendeur (sous réserve d’achat d’un produit similaire).
Dans les pays qui ne sont pas mentionnés ci-dessus, veuillez contacter les autorités locales
pour vous informer de la méthode correcte de mise au rebut.
En agissant ainsi vous assurerez que le produit que vous mettez au rebut est soumis au
processus de traitement, de récupération et de recyclage nécessaire et éviterez ainsi les
effets négatifs potentiels sur l’environnement et la santé publique.
• N’essayez pas d’installer cet ap pareil ou d’en faire l’entretien vous-même.
L’installa tion ou l’entretien de cet a ppareil par des personnes sans fo rmation et sans
expérience en équipem ent électronique et en accessoires auto mobiles peut être
dangereux et vous exposer à des risques d’électrocution ou à d’autres dangers.
• N’essayez pas de démonter ou de modifier cet appareil. Veillez à quitter la route et garer
votre véhicule en lieu sûr avant d’essayer d’utiliser les commandes de l’appareil.
• Ne laissez pas cet appareil entrer en contact avec de l’humidité et/ou des liquides. Cela
pourrait provoquer une décharge électrique. Tout contact avec des liquides pour rait
également provoquer des dommages, de la fumée et une surchauffe de l’appareil.
2
Fr

França is
• Maintenez le niveau d ’écoute à une valeur te lle que vous puissiez enten dre les sons
Molette M.C. (multi-contrôle)
BAND/
Port USB
Fenêtre d’affichage
SRC (source)/OFF
DISP (affichage)
Tou che de ret rait
Prise d’entrée AUX (prise stéréo 3,5 mm)
MUTE
provenant de l’extérieur.
• Le Pioneer CarStereo-Pass est utilisable seulement en Allemagne.
• Ce produit est évalué sous des conditions climatiques modérées et tropicales
conformément à la norme C EI 60065 sur les Appareils audio, vidéo et appare ils
électroniques analogues - Exigences de sécur ité.
Si vous rencontrez des problèmes
En cas d’anomalie, veuillez contac ter votre revendeur ou le centre d’entretien agréé par
PIONEER le plus proc he.
Mise en route
Fonctionnement de base
MVH-S100UI/S100UB/S100UBG/S100UBA/S100UBW/
S010UB
Opérations fréquemment utilisées
Objectif Opération
Mettre l’appareil sous tension* Appuyez sur SR
Régler le volume Tou rne z la mol ett e M.
Sélectionner une source Appuyez plusieurs fois sur SR
Modifier les informations d’affichage Appuyez plusieurs fois sur DIS
Revenir à l’affichage/la liste
précéd
ent(e)
Revenir à l’affichage normal à partir du
me
nu
* Si le fil bleu/blanc de l’appareil est relié à la borne de commande du relais d’antenne
automatique du véhicule, l’antenne se déploie lorsque la source de cet appareil est m ise
en service. Pour rétracter l’antenne, mettez la source hors service.
l’appareil sous tension.
Appuyez longuement sur SRC/
pour mettre l’appareil hors tension.
Appuyez sur MU
de l’appareil. Appuyez à nouveau sur
MUTE ou tournez la molette M.C. pour
rétablir le son.
Appuyez sur BAND/ .
Appuyez longuement sur BAND / .
C/OFF pour mettre
OFF
C..
TE pour couper le son
C/OFF.
P.
Indication de l’affichage
Indication Description
Apparaît lorsqu’il existe un niveau inféri eur de menu ou de
Apparaît lorsque la fonction d’accord sur une station locale est en
Apparaît lorsqu’un programme d’informations routières est capté.
Apparaît lorsque la fonction TA (informations routières) est
sier.
dos
Apparaît lorsque vous appuyez sur la touche .
rvice (page 12).
se
activée (page 12).
3
Fr

Important
Indication Description
Retirer Fixer
REMARQUES
Apparaît lorsque le sound retriever (correcteur de son compressé)
est en service (page 13).
Apparaît lorsque la fonction de commande d’iPod est en ser vice
(page 8).
Retrait de la face avant
Retirez la face avant pour empêcher tout v
périphériques branchés à la face avant et mettez l’appareil hors tension avant
de le retirer.
• Évitez de soumettre la face avant à des chocs excessifs.
• Tenez la face avant à l’abri du soleil et des températures élevées.
• Stockez touj ours la face avant détac hée, dans un étui de protection ou un s ac.
ol. Débranchez tous les câbles et les
Menu de configuration
Lorsque vous mettez le contact sur ON après avoir installé l’appareil, [SET UP
:YES] s’affiche.
1 Appuyez sur la molette M.C..
Si vous n’utilisez pas l’appareil dans les 30 secondes qui suivent, le menu
de
configuration disparaît. Si vous préférez ne pas effectuer la
configuration pour l’instant, tournez la molette M.C. pour sélectionner
[NO], puis appuyez pour valider.
2 Tournez la molette M.C. pour sélectionner les options, puis appuyez
pour valider.
Pour passer à l’option de men u suivante, vous devez valider votre
sélec
tion.
Élément de m enu Description
LANGUAGE Sélectionnez la langue d’affichage des informations
[ENG] (anglais),
] (russe),
[РУС
R] (turc)
[TU
CLOCK SET Réglez l’horloge.
FM STEP Sélectionnez l’incrément d’accord FM à partir de 100 kHz
[100], [50]
t
extuelles à partir d’un fichier audio compressé.
50 kHz.
ou de
3 [QUIT :YES] apparaît lorsque tous les réglages sont terminés.
Pour revenir au premier élément du menu de configuration, tournez la
mo
lette M.C. pour sélectionner [QUIT :NO], puis appuyez pour valider.
4 Appuyez sur la molette M.C. pour valider les réglages.
• Vous pouvez annuler le réglage du menu en appuyant sur SRC/OFF.
• Ces paramètres peuvent être ajustés à tout moment à partir des réglages SYSTEM
(page 14) et des réglages INITIAL (page 5).
Annulation de l’affichage de démonstration
(DEMO OFF)
1 Appuyez sur la molette M.C. pour afficher le menu principal.
2 Tournez la molette M.C. pour sélectionner [SYSTEM], puis appuyez pour
valider.
3 Tournez la molette M.C. pour sélectionner [DEMO OFF], puis appuyez
pour valider.
4
Fr

França is
4 Tournez la molette M.C. pour sélectionner [YES], puis appuyez pour
REMARQUE
CONSE IL
valider.
Réglages INITIAL
1 Appuyez longuement sur SRC/OFF jusqu’à ce que l’appareil se m ette
hors tension.
2 Appuyez longuement sur SRC/OFF pour afficher le menu principal.
3 Tournez la molette M.C. pour sélectionner [INITIAL], puis appuyez pour
valider.
4 Tournez la molette M.C. pour sélectionner une option, puis appuyez
pour valider.
Les options varient selon les appareils.
Élément de menu Description
FM STEP Sélectionnez l’incrément d’accord FM à partir de 100 kHz
[100], [50]
SP-P/O MODE À sélectionner lorsqu’un haut-parleur à gamme étendue
[REAR/SUB.W]
[SUB.W/SUB.W] À sélectionner lorsqu’un haut-parleur d’extrêmes graves
[REAR/REAR] À sélectionner lorsque des haut-parleurs à gamme
de 50 kHz.
ou
relié aux fils de sortie du haut-pa rleur arrière et qu’un
est
haut-parleur d’extrêmes graves est branché à la sortie
RCA.
est directement relié aux fils de sortie du haut-
passif
parleur arrière et qu’un haut-parleur d’extrêmes graves
est branché à la sortie RCA.
endue sont reliés aux fils de sortie du haut-parleur
ét
arrière et à la sortie RCA. Si un haut-parleur à gamme
étendue est relié aux fils de sortie du haut-parleur arr ière
et que la sortie RCA n’est pas utilisée, vous pouvez
sélectionner [REAR/SUB.W] ou [REAR/REAR].
Élément de menu Description
S/W UPDATE À sélectionner pour valider les dernières informations
[SYSTEM INFO]
[SYSTEM
UPDATE]
SYSTEM RESET Sélectionnez [YES] pour réinitialiser les réglages de
[YES], [NO]
relatives au système de l’appareil.
À sélectionner pour effectuer la dernière mise à jour des
logiciels de l’appareil et réinitialiser ses réglages. Pour
obtenir de plus amples informations sur les derniers
logiciels et mises à jour, veuillez vous rendre sur notre
site Web.
’appareil. L’appareil redémarre automatiquement.
l
(Certains réglages sont conservés même après la
ialisation de l’appareil.)
réinit
Radio
Les fréquences du syntoniseur de cet appareil sont destinées à une utilisation
en Europe de l’Ouest, Asie, Moyen-Orient, Afrique et Océanie. Son utilisation
dans d’autres régions peut se traduire par une réception de mauvaise qualité.
La fonction RDS (Radio Data System) n’est opérationnelle que dans les régions
où des signaux RDS sont diffusés pour les stations FM.
Réception des stations présélectionnées
1 Appuyez sur SRC/OFF pour sélectionner [RADIO].
2 Appuyez sur BAND/ pour sélectionner la bande [FM1], [FM2], [FM3],
[MW] ou [LW].
3 Appuyez sur l’une des touches numériques (1/ à 6/ ).
Les touches / peuvent également servir à sélectionner une station préréglée
lorsque [SEEK] est réglé sur [PCH] dans les réglages FUNCTION (page 13).
5
Fr
REMARQUE
Mémoire des meilleures stations (BSM)
REMARQUES
REMARQUE
REMARQUE
Les six stations les plus puissantes sont mémorisées sur les touches
num
ériques (1/ à 6/ ).
1 Après avoir sélectionné la bande, appuyez sur la molette M.C. pour
afficher le menu principal.
2 Tournez la molette M.C. pour sélectionner [FUNCTION], puis appuyez
pour valider.
3 Tournez la molette M.C. pour sélectionner [BSM], puis appuyez pour
valider.
2 Tournez la molette M.C. pour sélectionner le type de programme
[NEWS/INFO], [POPULAR], [CLASSIC S] ou [OTHERS].
3 Appuyez sur la molette M.C..
L’appareil continue à rechercher une sta
nom de service de programme s’affiche.
• Pour annuler la recherch e, appuyez sur la m olette M.C..
• Le programme de certaines stations peut différer de celui qu’indique le PTY transmis.
• Si aucune station ne diffuse le type de programme que vous recherchez, [NOT FOUND]
s’affiche pendant environ deux secondes, puis le syntoniseur revient à la station de
départ.
tion. Lorsqu’il en trouve une, son
Pour rechercher une station manuellement
1 Après avoir sélectionné la bande, appuyez sur / pour
sélectionner une station.
Appuyez longuement sur / , puis relâchez pour rechercher une
station disponible. Le balayage s’arrête lorsque l’appareil capte une station.
P
our annuler l’accord par recherche, appuyez sur / .
[SEEK] doit être réglé sur [MAN] dans les réglages FUNCTION (page 13).
Pour mémoriser des stations manuellement
1 Lorsque vous captez la station que vous souhaitez mémoriser, appuyez
longuement sur l’une des touches numériques (1/ à 6/ ) jusqu’à ce
qu’elle cesse de clignoter.
Utilisation des fonctions PTY
L’appareil recherche une station diffusant
programme).
des informations PTY (type de
1 Appuyez sur pendant la réception FM.
6
Fr
USB/iPod/AUX
La fonction iPod n’est pas disponible pour le MVH-S100UB/S100UBG/S100UBA/S100UBW/
S010UB.
Lecture
Débranchez le casque ou les écouteurs du périphérique avant de raccorder ce
dernier à l’appareil.
Périphériques USB (y compris Android™)/iPod
1 Ouvrez le cache du port USB.
2 Raccordez le périphérique USB/l’iPod à l’aide d’un câble approprié.
Pour basculer automatiquement sur une source [USB] lorsqu’un périphérique USB/iPod est
connecté à l’appareil, réglez [USB AUTO] sur [ON] dans les paramètres SYSTEM (page 15).
França is
PRÉCAUTION
Utilisez un câble USB Pioneer en option (CD-U50E) pour raccorder le périphérique USB, car
REMARQUE
REMARQUE
tout périphériq ue raccordé directement à l’apparei l dépasse de ce dernier, ce qui pe ut être
dangereux.
Avant de retirer le périphérique, arrêtez la lecture.
Connexions AOA
Pour plus de détails sur la connexion AOA, voir page 11.
Connexion MTP
Il est possible de connecter un périphérique Android (utilisant le système d’exploitation
Android 4.0 ou une version supérieure) via une connexion MTP à l’aide du câble fourni avec
le périphérique. Toutefois, selon le périphérique connecté et les numéros des fichiers qu’il
contient, il se peut que la lecture de fichiers audio/morce aux soit impossible vi a MTP. Notez
que la connexion MTP est incompati ble avec les formats de fichier WAV et FLAC.
Si vous utilisez une connexion MTP, vous devez régler [ANDROID WIRED] sur [MEMORY]
dans les paramètres SYSTEM (page 15).
AUX
1 Insérez la mini-fiche stéréo dans la prise d’entrée AUX.
2 Appuyez sur SRC/OFF pour sélectionner la source [AUX].
Si [AUX] est réglé sur [OFF ] dans les réglages SYSTEM, il est impos sible de sélectionner [AUX]
en tant que source (page 14).
Opérations
Vous pouvez procéder à différents ajustements dans les réglages FUNCTION
(page 12).
Notez que les opérations suivantes ne fonctionnent pas pour un périphérique
A
UX. Pour utiliser un périphérique AUX, utilisez le périphérique proprement
dit.
Objectif Opération
Sélectionner un dossier/album*1 Appuyez sur 1/ ou 2/ .
Objectif Opération
Sélectionner une piste/un morceau
(chapitre)
Avance ou retour rapide*2 Appuyez longuement sur ou
Rechercher un fichier dans une liste 1 Ap
Afficher une liste de fichiers dans la
égorie/le dossi er sélectionné(e)*1
cat
Lire un morceau de la catégorie/du
dossier sélectionné(e)*1
Appuyez sur ou .
.
puyez sur pour afficher la liste.
ournez la molette M.C. pour
2 T
sélectionner la catégorie ou le nom
de fichier (dossier) de votre choix,
puis appuyez pour valider.
ournez la molette M.C. pour
3 T
sélectionner le fichier de votre
choix, puis appuyez pour valider.
La lecture démarre.
Appuyez sur la molette M.C.
lorsqu’une catégorie/un dossier est
sélectionné(e).
Appuyez longuement sur la molette
M.C. lorsqu’une catégorie/un dossier
est sélectionné(e).
7
Fr
Objectif Opération
REMARQUE
Recherche alphabétique (iPod
uniquement)
Lecture ré pétée Appuyez sur 6/ .
Lecture aléatoire Appuyez sur 5/ .
Lecture aléatoire de toutes les pistes
(iPod uniquement)
Pause/Reprise de la lecture Appuyez sur 4/PA
Sound retriever (correcteur de son
mpress é)
co
Retour au dossier racine (USB
uement)*1
uniq
1 Appuyez sur po ur afficher l a liste.
ournez la molette M.C. pour
2 T
sélectionner la liste de catégories de
votre choix, puis appuyez sur
pour accéder au mode de recherche
ique.
alphabét
(Pour accéder au mode de
echerche alphabétique, vous
r
pouvez également tourner
deux fois la molette M.
ournez la molette M.C. pour
3 T
sélectionner une lettre, puis
appuyez pour afficher la liste
alphabétique.
Pour annuler la recherche
lphabétique, appuyez sur BAND/
a
.
Appuyez longuement sur 5/ .
Appuyez sur 3/S.Rtrv.
[1]: efficace pour les taux de
mpression faibles
co
[2]: efficace pour les taux de
mpression élevés
co
Appuyez longuement sur .
US E.
C..)
Objectif Opération
Changer de lec teur sur le périphérique
USB
(périphériques prenant en charge le
otocole de classe de périphérique
pr
de stockage de masse USB
uniquement)
*1 Fichiers d’audio compressé uniquement
*2 Si vous utilisez la fo nction avance ou retour rapide au moment de la le cture d’un fichier
VBR, la durée de lecture peut ne pas être correcte.
Appuyez sur BA
ND/ .
Fonctions utiles pour iPod
Mode de lecture en lien
Vous pouvez accéder à des morceaux en vous basant sur l’artiste, l’album ou le
genre en cours de lecture.
1 Pendant l’écoute d’un morceau, appuyez longuement sur pour entrer
en mode de lecture en lien.
2 Tournez la molette M.C. pour sélectionner le mode ([ARTIST], [ALBUM],
[GENRE]), puis appuyez pour valider.
Le morceau/l’album sélectionné est lu après le morceau en cours de lecture.
Le morceau/l’album sélectionné peut être annulé si vous utilisez d’autres fonctions que le
mode de lecture en lien (ex. : avance et retour rapides).
Commande d’un iPod
Vous pouvez commander l’appareil via un iPod raccordé.
Les modèles d’iPod suivants ne sont pas compatibles avec cette fonction.
–iPod nano 1e génération, iPod avec vidéo
1 Appuyez sur BAND/ en cours de lecture, puis sélectionnez le mode
de commande.
8
Fr
 Loading...