

Page 1

Operation Manual
Mode d’emploi
RDS MEDIA CENTER RECEIVER
RECEPTOR CENTRAL MULTIMEDIA RDS
AUTORADIO MULTIMEDIA RDS
MVH-P8300BT
MVH-P7300
English EspañolFrançais
Page 2

Contents
Thank you for purchasing this PIONEER product.
To ensure proper use, please read through this manual before using this product. It
is especially important that you read and obser ve WARNINGs and CAUTIONsin
this manual. Please keep the manual in a safe and accessible place for future refer-
ence.
Precautions
IMPORTANT SAFEGUARDS 4
To ensure safe driving 4
– Parking brake interlock 5
To avoid battery exhaustion 5
Before you start
Information to User 6
For Canadian model 6
The Safety of Your Ears is in Your Hands 6
About this unit 6
Operating environment 7
After-sales service for Pioneer products 7
In case of trouble 7
Visit our website 7
Resetting the microprocessor 8
Demo mode 8
About this manual 8
Operating this unit
Head unit 9
Remote control 9
Basic operations 10
Use and care of the remote control 11
Basic menu operations 12
– Menu operations identical for function
settings/audio adjustments/initial
settings/lists 12
Customizing menus 13
– Canceling a Registered Menu 13
About guide information 13
Using Bluetooth telephone 13
– Setting up for hands-free phoning 14
– Basic operations 14
Radio 15
– Basic operations 15
– Storing and recalling stations for each
band 15
– Using iTunes tagging 15
– Function settings 16
Playing moving images 17
– Basic operations 17
– Selecting and playing files from the
name list 18
– Browsing for a video on the iPod 18
– Playing DivXâ VOD content 18
– Function settings 19
Playing audio 21
– Basic operations 21
– Selecting and playing files/tracks from
the name list 22
– Browsing for a song on the iPod 22
– Function settings 22
Using Pandoraâ 24
– Basic operations 25
– Displaying text information 25
– Selecting and playing the station
list 25
– Function settings 25
Playing still images 26
– Basic operations
– Selecting and playing files from the
name list 27
– Function settings 27
– Introduction of operations for playback
of still images as a slideshow 28
Bluetooth Telephone 29
– Connection menu operation 29
– Phone menu operation 30
– Function and operation 31
Audio Adjustments 32
System settings 33
Entertainment settings 34
– Customizing the illumination color 35
Initial Settings 35
– Auto EQ (auto-equalizing) 36
Other functions 38
– Using an AUX source 38
– Using an external unit 39
26
2
En
Page 3

Contents
English
– Switching the display indication 39
Detailed instructions
Changing the wide screen mode 40
Setting the DivX subtitle file 40
Setting the aspect ratio 40
Displaying the DivXâ VOD registration
code 40
Displaying the deregistration code 41
Changing the picture adjustment 41
Available accessories
HD Radioä tuner 42
– Basic operations 42
– Storing and recalling stations 42
– Using iTunes tagging 42
– Function settings 42
XM tuner 43
– Basic operations 43
– Storing and recalling stations 43
– Selecting an XM channel directly 43
– Function settings 43
– Selecting a channel from a channel
category 44
– Displaying the Radio ID 44
SIRIUS Satellite Radio tuner 44
– Basic operations 44
– Storing and recalling stations 45
– Selecting a SIRIUS channel
directly 45
– Function settings 45
– Selecting a channel from a channel
category 46
– Using the Instant Replay function 46
Handling guidelines 52
Compressed audio/video compatibility (USB,
SD) 53
iPod compatibility 54
Sequence of audio files 55
Using the display correctly 55
– Handling the display 55
– Liquid crystal display (LCD) screen 55
– LED (light-emitting diode)
backlight 56
Copyright and trademark 56
Specifications 58
Additional information
Troubleshooting 47
Error messages 47
Understanding auto EQ error messages 50
Indicator list 50
En
3
Page 4
Section
01
Precautions
IMPORTANT SAFEGUARDS
Please read all of these instructions regarding
your display and retain them for future reference.
1 Read this manual fully and carefully be-
fore operating your display.
2 Keep this manual handy as a reference for
operating procedures and safety information.
3 Pay close attention to all warnings in this
manual and follow the instructions carefully.
4 Do not allow other persons to use this sys-
tem until they have read and understood
the operating instructions.
5 Do not install the display where it may (i)
obstruct the driver’s vision, (ii) impair the
performance of any of the vehicle’s operating systems or safety features, including air bags, hazard lamp buttons or (iii)
impair the driver’s ability to safely operate the vehicle.
6 Do not operate this display if doing so in
any way will divert your attention from
the safe operation of your vehicle. Always
observe safe driving rules and follow all
existing traffic regulations. If you experience difficulty in operating the system or
reading the display, park your vehicle in a
safe location and make necessary adjustments.
7 Please remember to wear your seat belt at
all times while operating your vehicle. If
you are ever in an accident, your injuries
can be considerably more severe if your
seat belt is not properly buckled.
8 Never use headphones while driving.
9 To promote safety, certain functions are
disabled unless the parking brake is on,
and the vehicle is not in motion.
10 Never set the volume of your display so
high that you cannot hear outside traffic
and emergency vehicles.
WARNING
Do not attempt to install or service your display by yourself. Installation or servicing of
the display by persons without training and
experience in electronic equipment and automotive accessories may be dangerous and
could expose you to the risk of electric shock
or other hazards.
To ensure safe driving
WARNING
! LIGHT GREEN LEAD AT POWER CON-
NECTOR IS DESIGNED TO DETECT
PARKED STATUS AND MUST BE CONNECTED TO THE POWER SUPPLY SIDE
OF THE PARKING BRAKE SWITCH. IMPROPER CONNECTION OR USE OF
THIS LEAD MAY VIOLATE APPLICABLE
LAW AND MAY RESULT IN SERIOUS INJURY OR DAMAGE.
! To avoid the risk of damage and injury and the
potential violation of applicable laws, this unit
is not for use with video that is visible to the
driver.
! To avoid the risk of accident and the potential
violation of applicable laws, no viewing of
front seat video should ever occur while the
vehicle is being driven.
! In some countries or states the viewing of
images on a display inside a vehicle even by
persons other than the driver may be illegal.
Where such regulations apply, they must be
obeyed.
When you attempt to watch a video image
while driving, the warning Viewing of front
seat video source while driving is strictly
prohibited. will appear on the front display.
To watch a video image on the front display,
park your vehicle in a safe place and apply the
parking brake.
4
En
Page 5
Section
Precautions
Parking brake interlock
Certain functions (video viewing and certain
operations) offered by this unit could be dangerous and/or unlawful if used while driving.
To prevent such functions from being used
while the vehicle is in motion, there is an interlock system that senses when the parking
brake is set. If you attempt to use the functions
described above while driving, they will become disabled until you stop the vehicle in a
safe place, and (1) apply the parking brake, (2)
release the parking brake, and then (3) apply
the parking brake again. Please keep the
brake pedal pushed down before releasing the
parking brake.
Operation
01
English
1 Press M.C. to display the next page.
2 Press M.C. to select OK.
To avoid battery exhaustion
Keep the vehicle engine running when using
this unit to avoid draining the battery power.
! When no power is supplied to this unit,
such as when the vehicle battery is being
replaced, the microcomputer of this unit returns to its initial condition. We recommend that you transcribe the audio
adjustment data.
WARNING
Do not use with vehicles that do not feature an
ACC position.
En
5
Page 6
Section
02
Before you start
FCC ID: AJDK029
MODEL NO.: MVH-P8300BT
IC: 775E-K029
This equipment complies with FCC/IC radiation
exposure limits set forth for an uncontrolled
environment and meets the FCC radio frequency (RF) Exposure Guidelines in Supplement C to OET65 and RSS-102 of the IC radio
frequency (RF) Exposure rules. This equipment
has very low levels of RF energy that it deemed
to comply without maximum permissive exposure evaluation (MPE). But it is desirable that
it should be installed and operated keeping the
radiator at least 20 cm or more away from person’s body (excluding extremities: hands,
wrists, feet and ankles).
This transmitter must not be co-located or operated in conjunction with any other antenna or
transmitter.
For Canadian model
This Class B digital apparatus complies with
Canadian ICES-003.
The Safety of Your Ears is in
Your Hands
Get the most out of your equipment by playing
it at a safe level—a level that lets the sound
come through clearly without annoying blaring or distortion and, most importantly, without affecting your sensitive hearing. Sound
can be deceiving. Over time, your hearing
“comfort level” adapts to higher volumes of
sound, so what sounds “normal” can actually
be loud and harmful to your hearing. Guard
against this by setting your equipment at a
safe level BEFORE your hearing adapts.
! MVH-P7300
! This device complies with part 15 of the
FCC Rules. Operation is subject to the following two conditions:
(1) This device may not cause harmful interference, and (2) this device must accept
any interference received, including interference that may cause undesired operation.
Information to User
Alteration or modifications carried out without
appropriate authorization may invalidate the
user’s right to operate the equipment.
ESTABLISH A SAFE LEVEL:
! Set your volume control at a low setting.
! Slowly increase the sound until you can
hear it comfortably and clearly, without distortion.
! Once you have established a comfortable
sound level, set the dial and leave it there.
BE SURE TO OBSERVE THE FOLLOWING
GUIDELINES:
! Do not turn up the volume so high that you
can’t hear what’s around you.
! Use caution or temporarily discontinue use
in potentially hazardous situations.
! Do not use headphones while operating a
motorized vehicle; the use of headphones
may create a traffic hazard and is illegal in
many areas.
About this unit
The tuner frequencies on this unit are allocated for use in North America. Use in other
areas may result in poor reception.
6
En
Page 7

Section
Before you start
WARNING
Handling the cord on this product or cords associated with accessories sold with the product
may expose you to chemicals listed on proposition 65 known to the State of California and other
governmental entities to cause cancer and birth
defect or other reproductive harm. Wash hands
after handling.
CAUTION
! Do not allow this unit to come into contact
with liquids. Electrical shock could result.
Also, damage to this unit, smoke, and overheating could result from contact with liquids.
! Keep this manual handy for future reference.
! Always keep the volume low enough to hear
outside sounds.
! Avoid exposure to moisture.
! If the battery is disconnected or discharged,
any preset memory will be erased.
Important (Serial number)
The serial number is located on the bottom of
this unit. For your own security and convenience,
be sure to record this number on the enclosed
warranty card.
02
English
After-sales service for
Pioneer products
Please contact the dealer or distributor from
where you purchased this unit for after-sales
service (including warranty conditions) or any
other information. In case the necessary information is not available, please contact the
companies listed below:
Please do not ship your unit to the companies
at the addresses listed below for repair without
advance contact.
U.S.A.
Pioneer Electronics (USA) Inc.
CUSTOMER SUPPORT DIVISION
P.O. Box 1760
Long Beach, CA 90801-1760
800-421-1404
CANADA
Pioneer Electronics of Canada, Inc.
CUSTOMER SATISFACTION DEPARTMENT
300 Allstate Parkway
Markham, Ontario L3R 0P2
1-877-283-5901
905-479-4411
Note
Function setting operations are completed even if
the menu is cancelled before the operations are
confirmed.
Operating environment
This unit should be used within the temperature ranges shown below.
Operating temperature range: –10 °C to +60 °C
(14 °F to 140 °F)
EN300328 ETC test temperature: –20 °C and
+55 °C (–4 °F and 131 °F)
For warranty information please see the Limited Warranty sheet included with this unit.
In case of trouble
Should this product fail to operate properly,
please contact your dealer or nearest authorized Pioneer Service Station.
Visit our website
Visit us at the following site:
http://www.pioneerelectronics.com
in Canada
En
7
Page 8
Section
02
Before you start
http://www.pioneerelectronics.ca
1 Register your product. We will keep the details
of your purchase on file to help you refer to
this information in the event of an insurance
claim such as loss or theft.
2 Receive updates on the latest products and
technologies.
3 Download owner’s manuals, order product
catalogues, research new products, and
much more.
Resetting the microprocessor
The microprocessor must be reset in the following situations:
! Before using this unit for the first time after
installation
! If the unit fails to operate properly
! When strange or incorrect messages ap-
pear on the display
Operating the demo while the ignition switch
is set to ACC may drain battery power.
Refer to Demonstration (demo display set-
ting) on page 35.
About this manual
This manual describes operations of both
MVH-P8300BT and MVH-P7300. Only MVHP8300BT features Bluetooth functions, so the
explanations for those functions do not apply
to MVH-P7300.
In the following instructions, USB memories,
USB portable audio players, and SD memory
cards are collectively referred to as “external
storage devices (USB, SD)”. If only USB memories and USB portable audio players are indicated, they are collectively referred to as “USB
storage devices”.
In this manual, iPod and iPhone will be referred to as “iPod”.
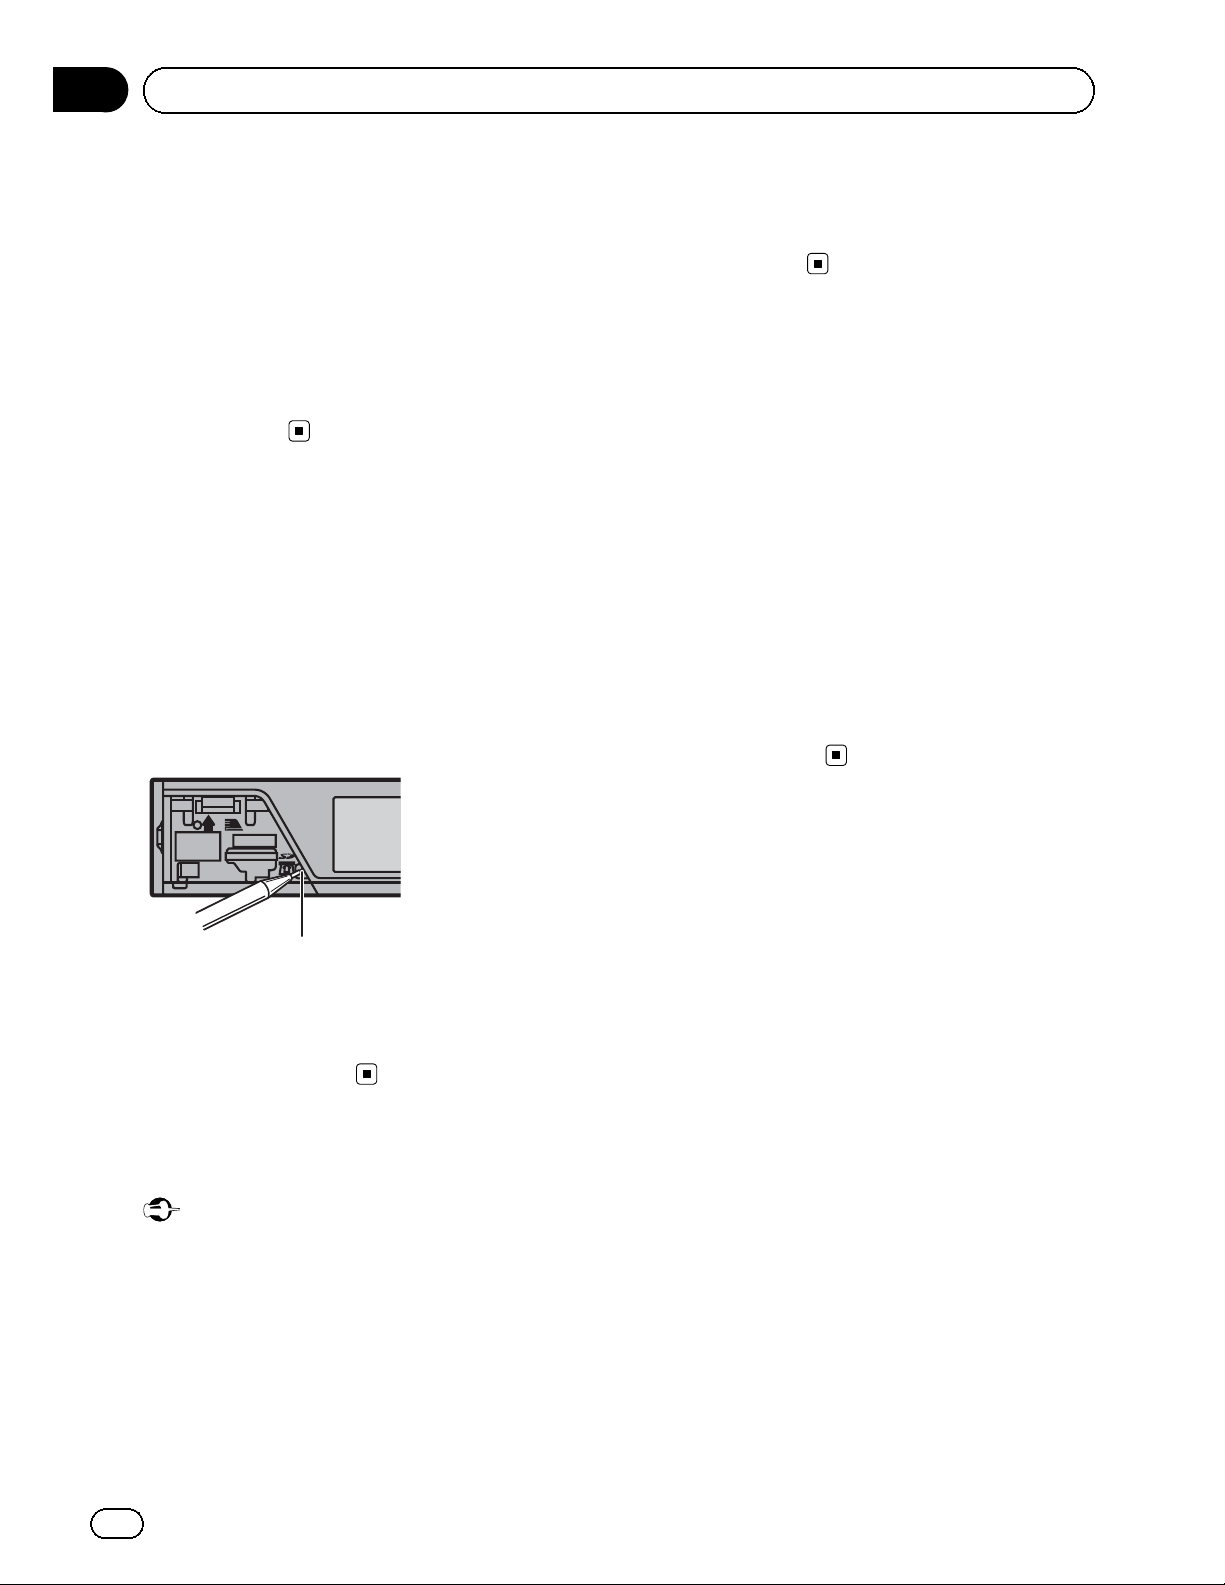
RESET button
1 Remove the front panel.
2 Press RESET with a pen tip or other
pointed instrument.
Demo mode
Important
Failure to connect the red lead (ACC) of this unit
to a terminal coupled with ignition switch on/off
operations may lead to battery drain.
The demo automatically starts when the ignition switch is set to ACC or ON while the unit
is turned off. Turning off the unit does not cancel demo mode. To cancel the demo mode, operate the function in the initial setting menu.
8
En
Page 9
8
Section
Operating this unit
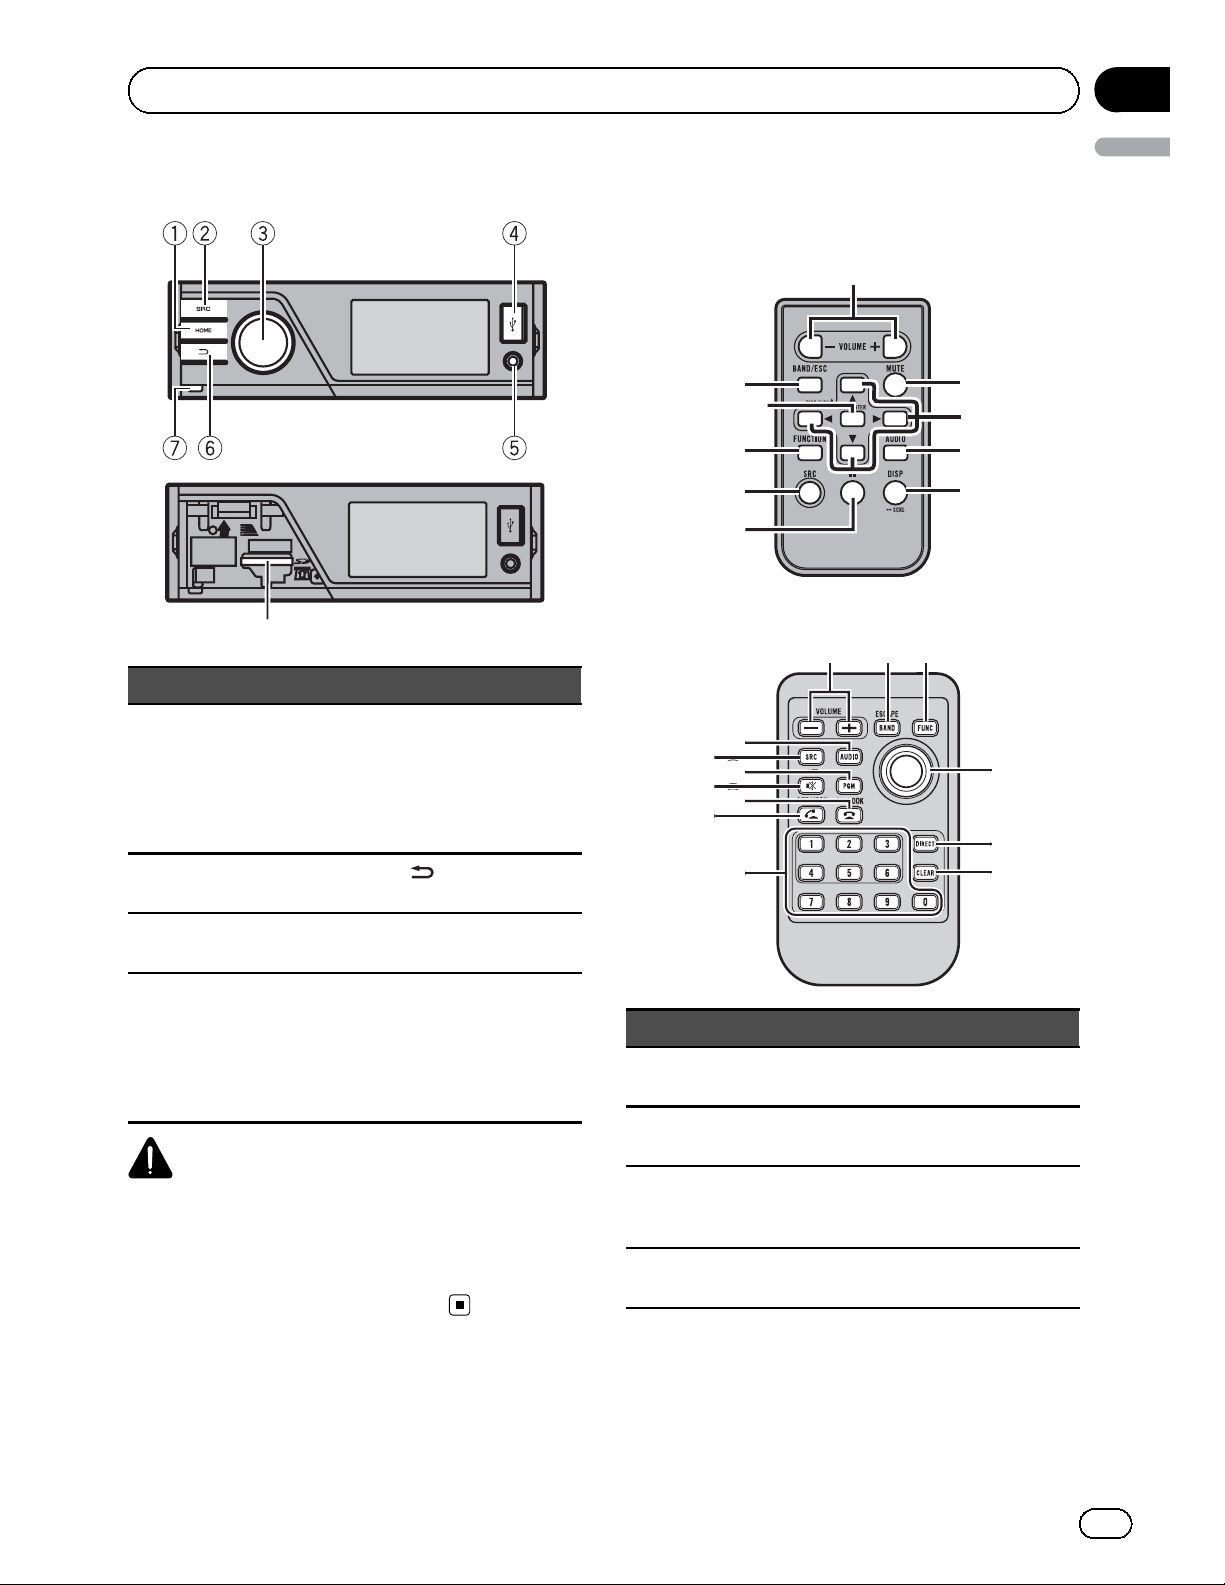
Head unit
Part Part
Remote control
Only for MVH-P7300
Only for MVH-P8300BT
03
English
AUX input jack
(3.5 mm stereo/
1 HOME 5
2 SRC/OFF 6
MULTI-CONTROL
3
(M.C.)
4 USB port 8
video jack)
Microphone input
jack for auto EQ
measurement
(back/display
off)
7 Detach button
SD memory card
slot
Remove the front
panel to access the
SD memory card
slot.
CAUTION
Use an optional Pioneer USB cable (CD-IU50) to
connect the USB audio player/USB memory as
any device connected directly to the unit will protrude out from the unit and may be dangerous.
Do not use unauthorized products.
Part Operation
+/– (VO-
9
LUME)
a MUTE
b a/b/c/d
c AUDIO
Press to increase or decrease volume.
Press to mute. Press again to unmute.
Press to perform manual seek
tuning, fast forward, reverse and
track search controls.
Press to display an audio function.
En
9
Page 10
Section
03
Operating this unit
Part Operation
Press to select different displ ays
for the audio source.
Press to select the basic screen or
image screen for the video
d DISP/SCRL
e e
f FUNCTION Press to display functions.
LIST/
g
ENTER
source.
! If the background setting on
the entertainment menu is
turned off, you can switch between the basic screen and
image screen.
Press to pause or resume playback.
Press to display the list depending
on the source.
While in the operating menu,
press to control functions.
Part Operation
m
n
o PGM Not used.
(OFF
HOOK)
(ON
HOOK)
Press to start talking on the
phone while operating a phone.
While operating the phone
source, press to end a call or reject an incoming call.
Note
You cannot operate function settings, audio adjustments, list menus, etc. by pressing a/b/c/d
and thumb pad of the remote control. Use multicontrol of the head unit instead.
Basic operations
BAND/ES-
h
CAPE
i Thumb pad
j DIRECT
k CLEAR
Press to select among three FM
bands and one AM band.
When playing external storage devices containing a mixture of various media file types, press to
switch between media file types
to play.
Music (compressed audio)—
Video (DivX video files)—Photo
(JPEG picture files)
Press to return to the ordinary display from the list/function menu.
Press to cancel the initial setting
menu.
Move to perform manual seek
tuning, fast forward, reverse and
track search controls.
Press to display the folder list, file
list or preset channel list depending on the source.
Press to directly select the desired
channel for XM/SIRIUS tuner.
Press to cancel the input number
when 0 to 9 are used.
Important
! Handle gently when removing or attaching
the front panel.
! Avoid subjecting the front panel to excessive
shock.
! Keep the front panel out of direct sunlight and
high temperatures.
! To avoid damaging the device or vehicle inter-
ior, remove any cables and devices attached
to the front panel before detaching it.
10
l
En
0 to 9 buttons
Press to directly select the desired
channel or preset tuning. Buttons
1 to 6 can operate the preset tuning.
Press and hold one of the buttons
1 to 6 to preset the desired station.
Page 11
Section
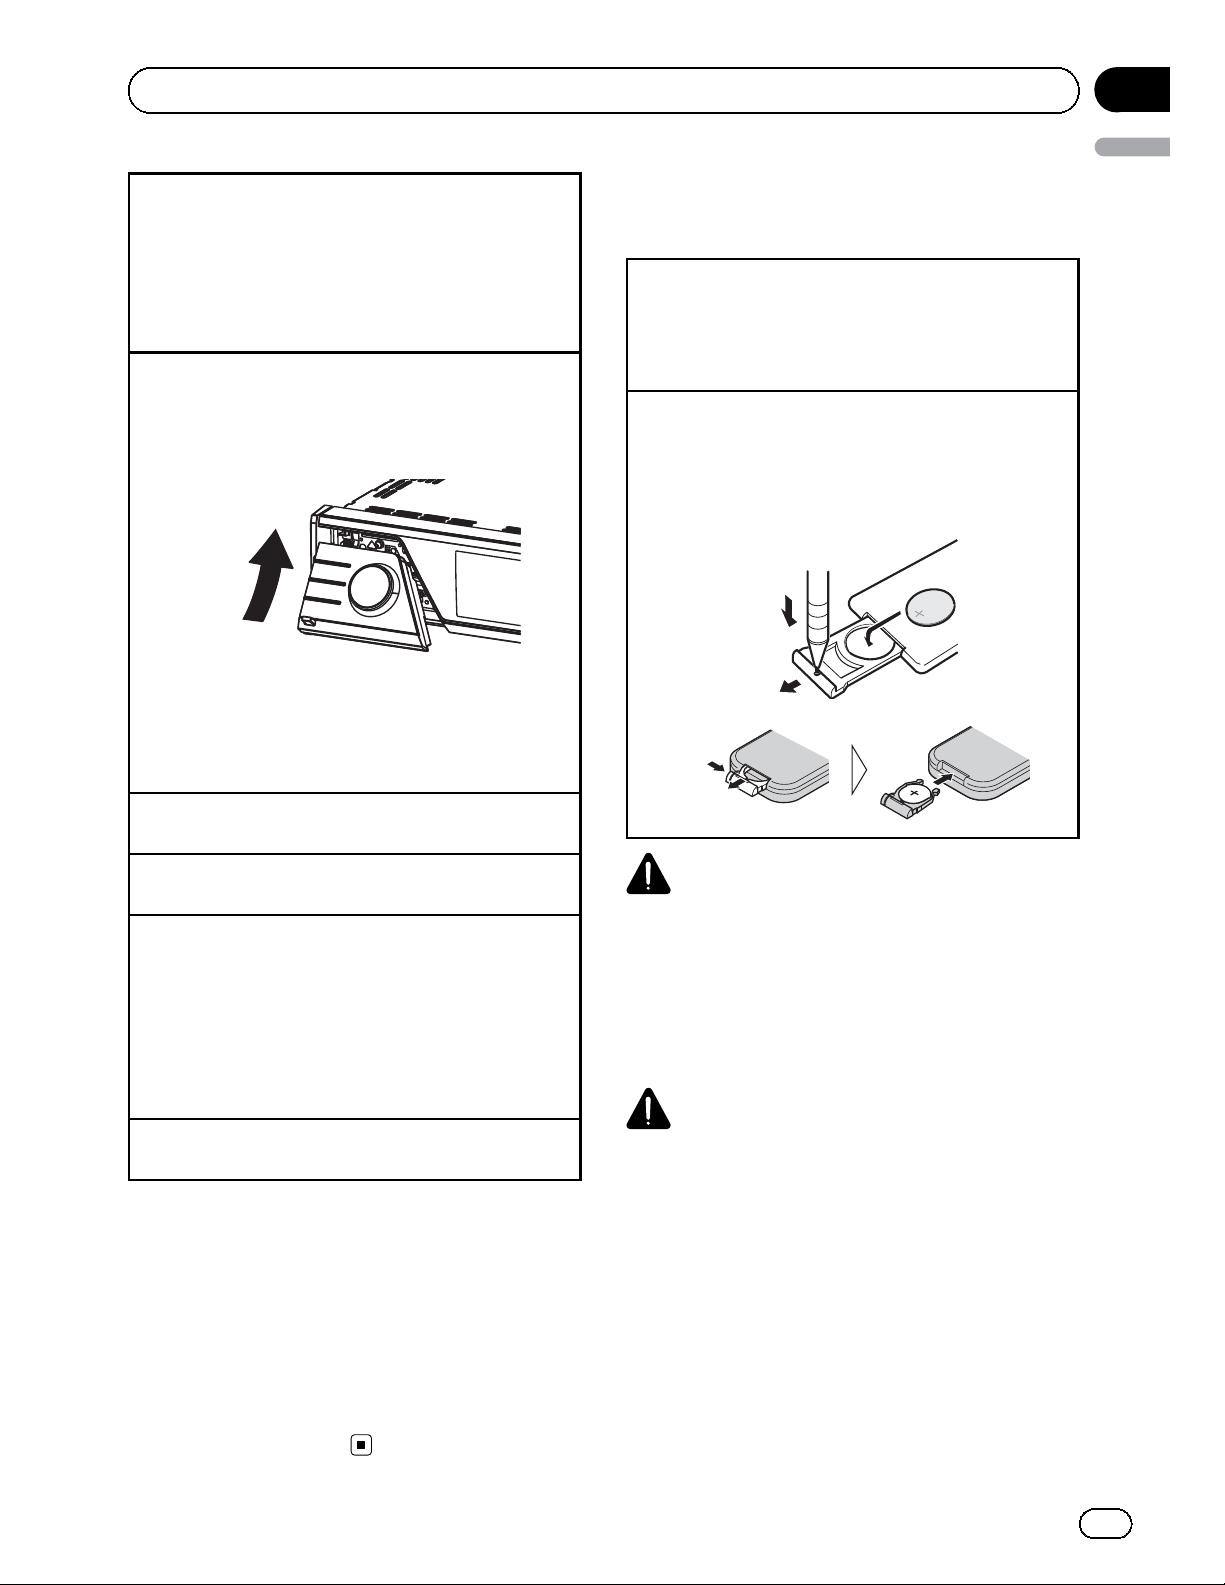
Operating this unit
Removing the front panel to protect your unit from
theft
1 Press the detach button to release the front
panel.
2 Grab the front panel and remove.
3 Always keep the detached fron t panel in a protec-
tion device such as a protection case.
Re-attaching the front panel
1 Slide the front panel up until it clicks.
The front panel and the head unit are connected
on the upper side. Make sure that the front panel
has been properly connected to the head unit.
03
English
Use and care of the remote
control
Using the remote control
1 Point the remote control in the direction of the
front panel to operate.
When using for the first time, pull out the film
protruding from the tray.
Replacing the battery
1 Slide the tray out on the back of the remote con-
trol.
2 Insert the battery with the plus (+) and minus (–)
poles aligned properly.
Only for MVH-P7300
2 Press the lower side of the front panel until it is
firmly seated.
If you can’t attach the front panel to the head unit
successfully, try again. Forcing the front panel
into place may result in damage.
Turning the unit on
1 Press SRC/OFF to turn the unit on.
Turning the unit off
1 Press and hold SRC/OFF until the unit turns off.
Selecting a source
1 Press SRC/OFF to cycle between:
XM (XM tuner)—SIRIUS (SIRIUS tuner)—Digital
Radio (HD Radio tuner)/Radio (tuner)—USB
(USB storage device)/iPod (iPod connected using
USB input)—Pandora (Pandora)—SD (SD memory card)—EXT1 (external unit 1)—EXT2 (external
unit 2)—AUX (AUX)
Adjusting the volume
1 Turn M.C. to adjust the volume.
Notes
! When this unit’s blue/white lead is connected
to the vehicle’s auto-antenna relay control
terminal, the vehicle’s antenna extends when
this unit’s source is turned on. To retract the
antenna, turn the source off.
! When iPod source is selected, the source will
switch to Pandora source when you turn on
Pandora application.
Only for MVH-P8300BT
WARNING
! Keep the battery out of the reach of children.
Should the battery be swallowed, consult a
doctor immediately.
! Batteries (battery pack or batteries installed)
must not be exposed to excessive heat such
as sunshine, fire or the like.
CAUTION
! Use one CR2025 (3 V) lithium battery.
! Remove the battery if the remote control is not
used for a month or longer.
! There is a danger of explosion if the battery is
incorrectly replaced. Replace only with the
same or equivalent type.
! Do not handle the battery with metallic tools.
! Do not store the battery with metallic objects.
! If the battery leaks, wipe the remote control
completely clean and install a new battery.
En
11
Page 12
Section
03
Operating this unit
! When disposing of used batteries, comply
with governmental regulations or environmental public institutions’ rules that apply in your
country/area.
! “Perchlorate Material – special handling may
apply.
www.dtsc.ca.gov/hazardouswaste/
See
perchlorate. (Applicable to California, U.S.A.)”
Important
! Do not store the remote control in high tem-
peratures or direct sunlight.
! The remote control may not function properly
in direct sunlight.
! Do not let the remote control fall onto the
floor, where it may become jammed under the
brake or accelerator pedal.
Basic menu operations
You can operate source selection, list function,
audio adjustment, etc., using HOME.
1 Press HOME.
2 Push M.C. up or down to change the
menu option.
Home (home menu)—Custom (custom
menu)—Phone (phone menu)
# The phone menu is available only for MVHP8300BT.
3 Turn M.C. to select the menu option.
After selecting, perform the following procedures.
Home (home menu)
Source (selecting a source)
1 Press M.C. to display the list.
Press to display the folder list, file list or preset
channel list depending on the source.
Audio (setting an audio menu)
1 Press M.C. to display the audio menu.
Refer to Audio Adjustments on page 32.
System (setting a system menu)
1 Press M.C. to display the system menu.
Refer to System settings on page 33.
Entertainment (setting an entertainment menu)
1 Press M.C. to display the entertainment menu.
Refer to Entertainment settings on page 34.
Custom (custom menu)
You can choose menus within each menu
(Audio function menu, etc.) and register them
to this custom menu.
Refer to Customizing menus on the next page.
Displaying the custom menu
1 Press M.C. to display the setting mode.
Phone (phone menu)
Displaying the phone menu
! Refer to Phone menu operation on page 30.
Menu operations identical for
function settings/audio
adjustments/initial settings/lis ts
Returning to the previous display
Returning to the previous list/category (the folder/category one level higher.)
1 Press
.
1 Press M.C. to display the setting mode.
2 Use M.C. to select the desired source name.
Turn to change the source. Press to select.
For the sources you can choose, refer to Selecting
a source on the previous page.
List (operating a list menu)
12
En
Returning to the ordinary display
Canceling the initial setting menu
1 Press HOME.
Page 13

Section
Operating this unit
Customizing menus
You can register frequently used menu items
to a custom menu.
! The menu columns you can register are
displayed in circular indicators.
1 Display menu columns to register.
Refer to Basic menu operations on the previous page.
You may display the menu column in Home
(home menu).
2 Push and hold M.C. right to register the
menu column.
The menu columns you have registered are
displayed in large, circular indicators.
3 Display the custom menu and choose a
registered menu.
Refer to Basic menu operations on the previous page.
Note
You can register up to 12 columns.
03
English
Guide information is displayed.
Operation
Turn M.C.
Push M.C. up or down.
Push M.C. left or right.
Press M.C.
Press and hold M.C.
Push M.C. up.
Push M.C. down.
Push and hold M.C. up.
Canceling a Registered Menu
1 Display the custom menu and choose a
registered menu.
Refer to Basic menu operations on the previous page.
2 Push and hold M.C. right to cancel the
registered menu.
About guide information
This unit displays guide information on how to
use M.C. for each function.
1 Display the system menu.
Refer to Basic menu operations on the previous page.
2 Use M.C. to select the Guide Info.
Turn to change the menu option. Press to select.
# Press M.C. to display the next page.
Using Bluetooth telephone
This function is available only for MVH-P8300BT.
Important
! Since this unit is on standby to connect with
your cellular phone via Bluetooth wireless
technology, using it without the engine running can drain the battery power.
! Operations may vary depending on the kind of
cellular phone.
! Advanced operations that require attention
such as dialing numbers on the monitor,
using the phone book, etc., are prohibited
while driving. Park your vehicle in a safe place
when using these advanced operations.
En
13
Page 14
Section
03
Operating this unit
Setting up for hands-free phoning
Before you can use the hands-free phoning
function you must set up the unit for use with
your cellular phone.
1 Connection
Operate the Bluetooth telephone connection
menu. Refer to Connection menu operation on
page 29.
2 Function settings
Operate the Bluetooth telephone function menu.
Refer to Phone menu operation on page 30.
Basic operations
Making a phone call
1 Refer to Phone menu operation on page 30.
! The estimated call time appears in the display
(this may differ slightly from the actual call
time).
Answering an incoming call
1 When a call is received, press M.C.
! You can also perform this operation by push-
ing M.C. up.
Ending a call
1 Press M.C.
Rejecting an incoming call
1 When a call is received, push M.C. down.
Answering a call waiting
1 When a call is received, press M.C.
! You can also perform this operation by push-
ing M.C. up.
Switching between callers on hold
1 Push M.C. up.
Canceling call waiting
1 Push M.C. down.
Adjusting the other party’s listening volume
1 Push M.C. left or right while talking on the
phone.
Turning private mode on or off
1 Push and hold M.C. up while talking on the
phone.
Notes
! If private mode is selected on the cellular
phone, hands-free phoning may not be available.
14
En
Page 15
t
ext
ext
9
CH
Q
1
2
3
Section
Operating this unit
Radio
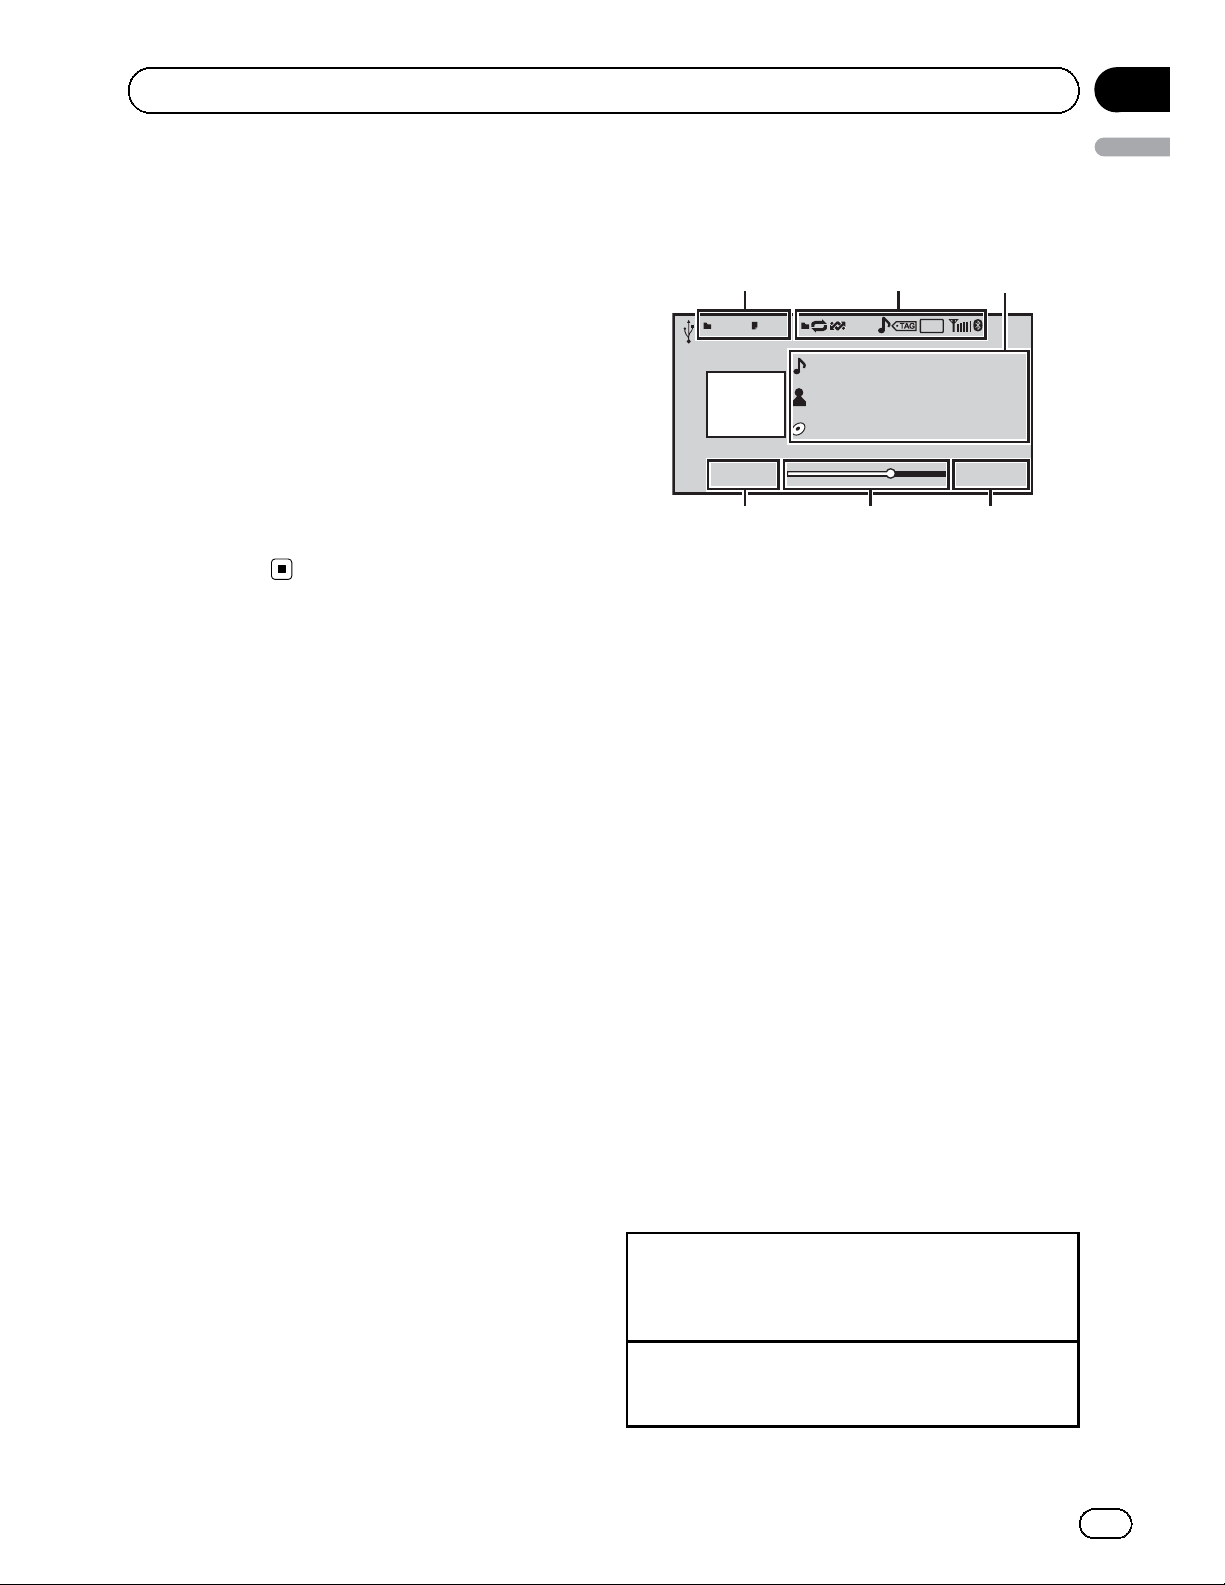
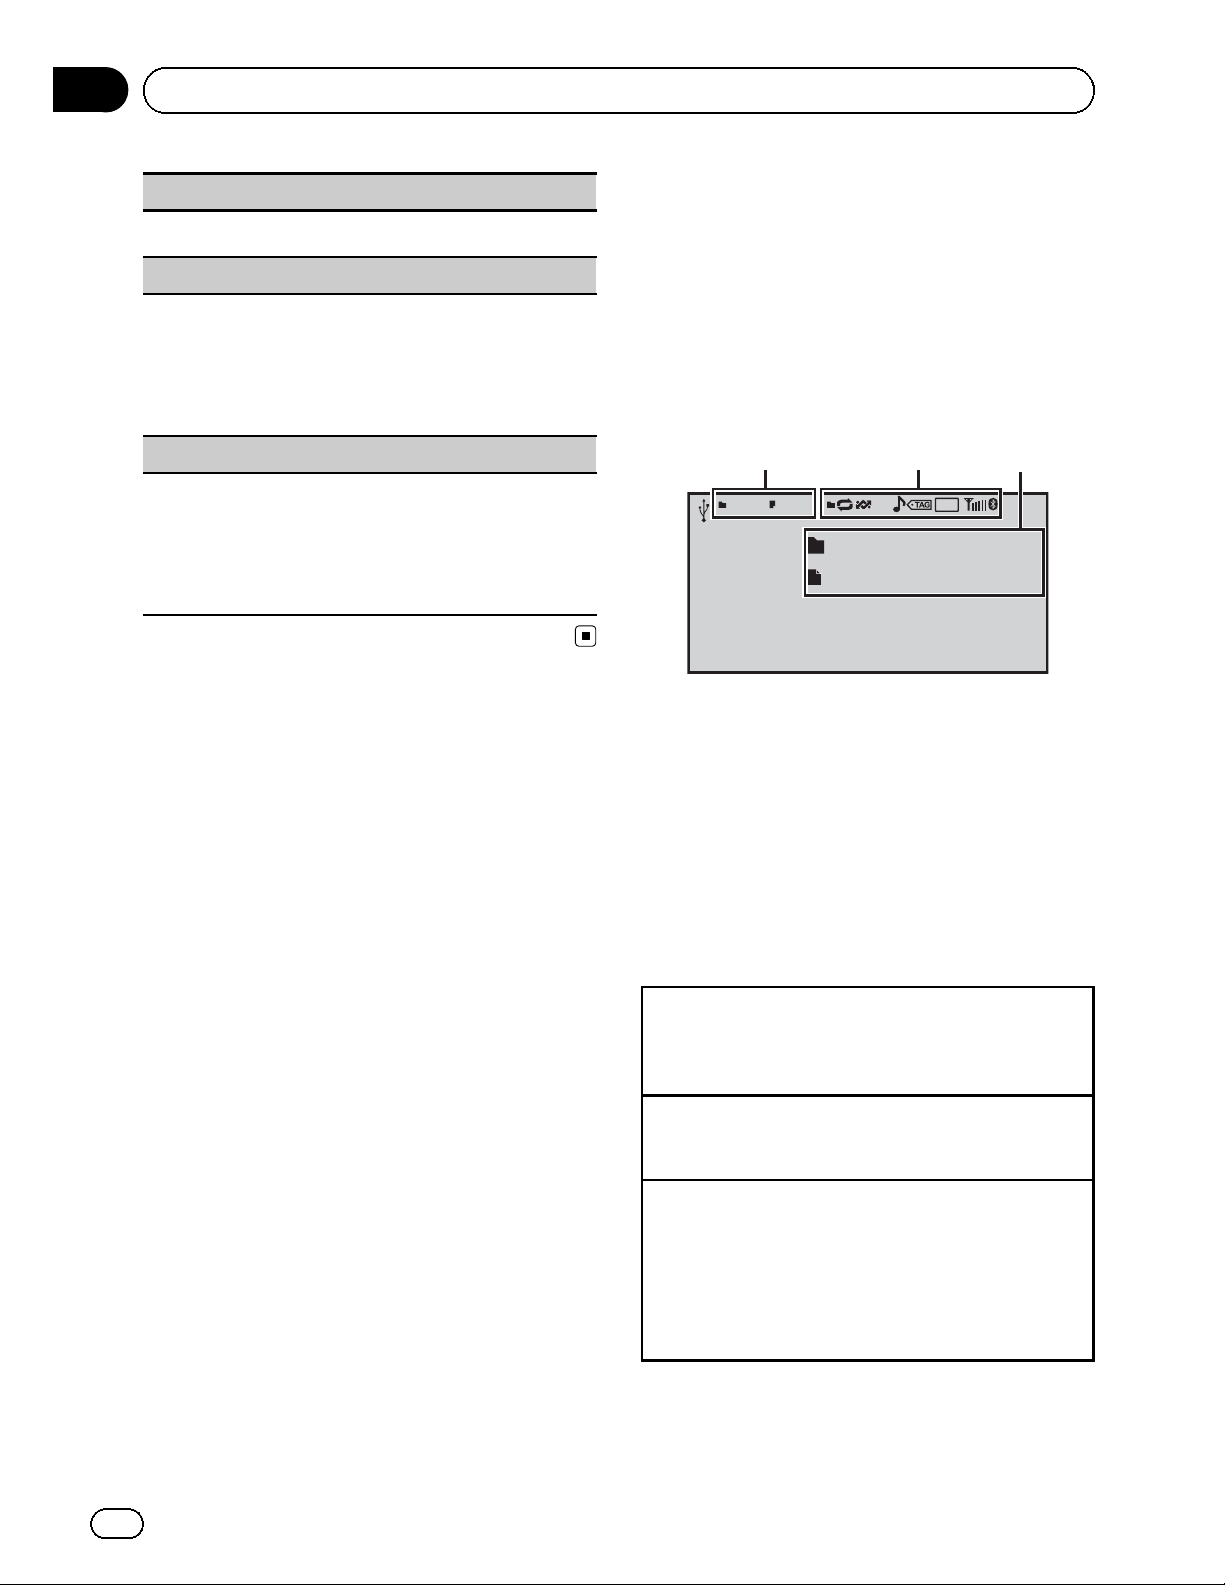
Basic operations
Radio
Local
Tex
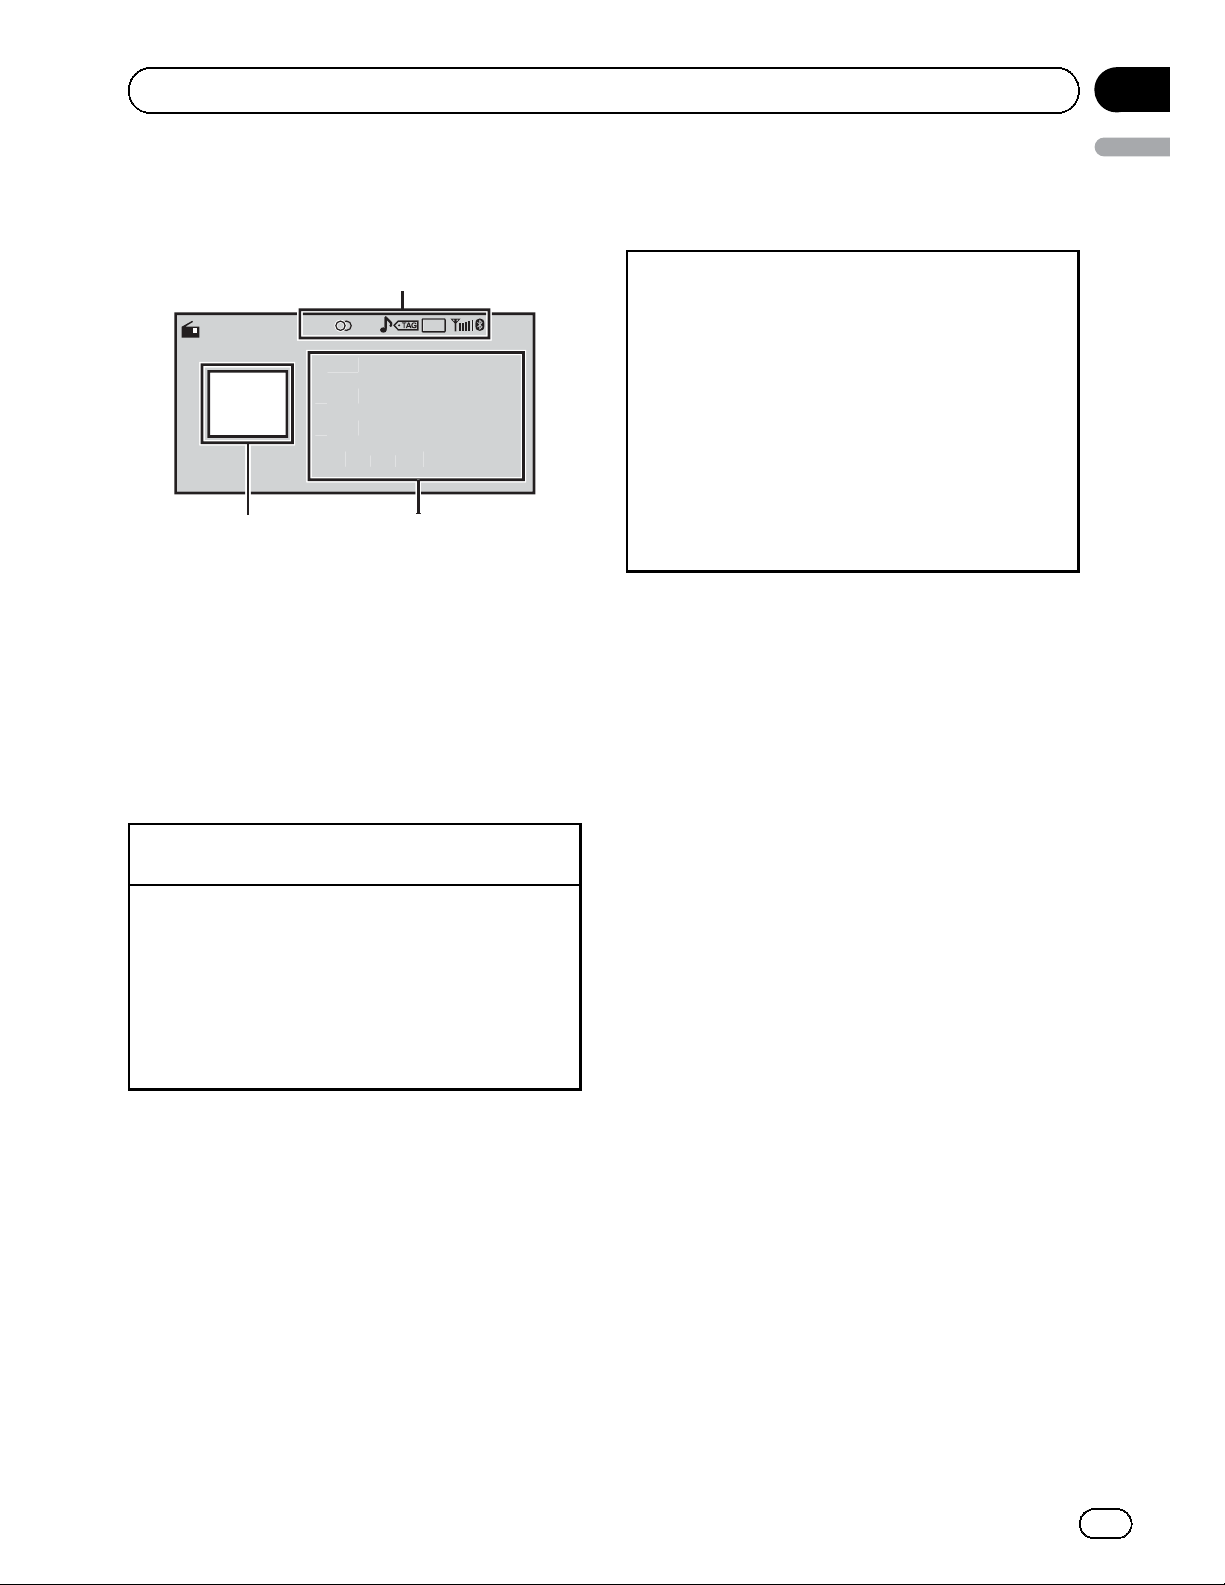
1 Indicator display area
Refer to Indicator list on page 50.
2 Text information area
A-E
87.
.
! Song title
! Artist name
! Program service name
! Band/Preset number/Frequency indica-
tor
3 Source image display
Manual tuning (step by step)
1 Push M.C. left or right.
Seeking
1 Push and hold M.C. left or right, and then re-
lease.
You can cancel seek tuning by pushing M.C. left
or right.
While pushing and holding M.C. left or right, you
can skip stations. Seek tuning starts as soon as
you release M.C.
16:54
MHz
03
English
Storing and recalling stations
for each band
Using the preset screen
1 Push M.C. up or down to display the preset
screen.
2 Push M.C. up or down until the desired band
(FM1, FM2, FM3 for FM or AM) is displayed.
3 Use M.C. to store the selected frequency in the
memory.
Turn to change the preset number. Press and
hold to store.
4 Use M.C. to select the desired station.
Turn to change the station. Press to select.
You can also display the preset screen by pressing
HOME. Refer to Basic menu operations on page 12.
Using iTunes tagging
This function can be operated with the following
iPod models.
— iPod 5th generation
— iPod nano 3rd generation
— iPod nano 4th generation
— iPod nano 5th generation
— iPod nano 6th generation
— iPod classic
— iPod classic 120GB
— iPod touch 1st generation
— iPod touch 2nd generation
— iPod touch 3rd generation
— iPod touch 4th generation
— iPhone
— iPhone 3G
— iPhone 3GS
— iPhone 4
However, tag information can be stored in this
unit even while other iPod models are used.
The song information (tag) can be saved from
the broadcasting station to your iPod. The
songs will show up in a playlist called “Tagged
playlist” in iTunes the next time you sync your
iPod. Then you can directly buy the songs you
want from the iTunes Store.
15
En
Page 16
Section
03
Operating this unit
Storing the tag information to this unit
1 Tune in to the broadcast station.
2 Press and hold M.C. if
while the desired song is broadcasting.
Storing the tagged information to your iPod
1 Connect the iPod to this unit and transfer this
unit’s tag information to the iPod.
! The tagged songs and the song that you can
buy from the iTunes Store may be different.
Make sure to confirm the song before you
make the purchase.
! If you cannot use this function normally, up-
date your iPod firmware.
! The tag information for up to 50 songs can be
stored on this unit.
Depending on the timing of when the tag information is stored, the tag information for the
song played before or after the currently playing song may also be stored.
! If an SD is selected as the source while tag in-
formation is being stored to this unit, the tag
information will not be transferred to the iPod.
! Tag information cannot be transferred to the
iPod when a file on an SD device is being
viewed as a slideshow.
! While transferring the tag, you cannot select
the SD source.
appears in the display
Local (local seek tuning)
Local seek tuning lets you tune in to only those radio
stations with sufficiently strong signals for good reception.
1 Press M.C. to display the setting mode.
2 Turn M.C. to select the desired setting.
FM: Off—Level1—Level2—Level3—Level4
AM: Off—Level1—Level2
The highest level setting allows reception of only
the strongest stations, while lower levels allow the
reception of weaker stations.
3 Press M.C. to confirm the selection.
Function settings
1 Press M.C. to display the function
menu.
2 Turn M.C. to select the function.
After selecting, perform the following procedures to set the function.
BSM (best stations memory)
BSM (best stations memory) automat ically stores the
six strongest stations in the order of their signal
strength.
1 Press M.C. to turn BSM on.
To cancel, press M.C. again.
16
En
Page 17
Section
Operating this unit
Playing moving images
Basic operations
If an iPod with video capabilities is connected
to this unit using an interface cable such as
the CD-IU50V (sold separately), you can enjoy
the video contents of the iPod as an iPod
source. You need not change the AUX setting.
1
Video
Text
Text
8888'88" -8888'88"
456
You can switch to the basic screen or the
image screen.
Refer to Display (display setting) on page 19.
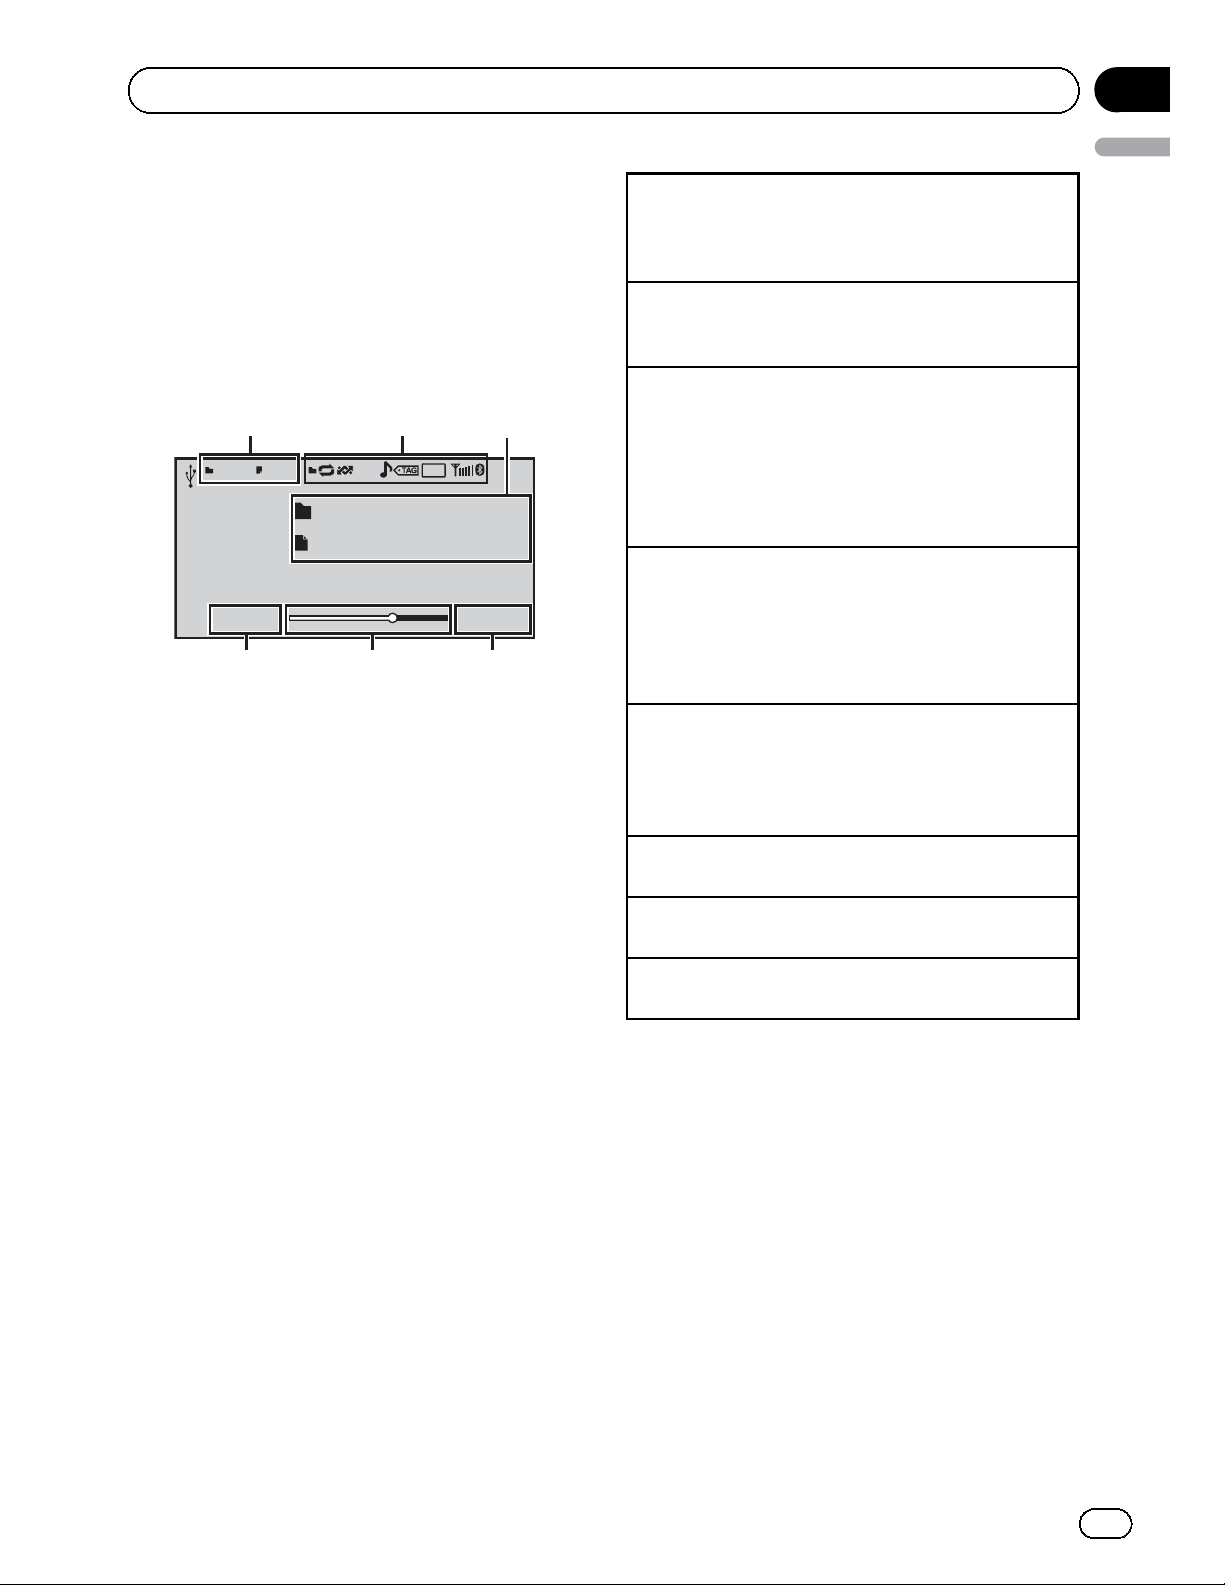
1 File information area for the currently playing
file
External storage device (USB, SD)
! Folder/file number indicator
iPod
! Song number indicator
2 Indicator display area
Refer to Indicator list on page 50.
3 Text information area
External storage device (USB, SD)
! Folder name
! File name
iPod
! Song title
! Artist name
! Album title
4 Play time indicator
5 Scrubber bar
6 Remaining time indicator
2
A-EQ
3
16:542345 7890
03
English
Playing files on a USB storage device
1 Open the USB port cover.
2 Plug in the USB storage device using a USB
cable.
Stopping playback of files on a USB storage device
1 You may disconnect the USB storage device at
any time.
Playing files on an SD memory card
1 Remove the front panel.
2 Insert an SD memory card into the SD card slot.
Insert it with the contact surface facing down,
and press on the card until it clicks and completely locks into place.
3 Re-attach the front panel.
Stopping playback of files on an SD memory card
1 Remove the front panel.
2 Press on the SD memory card until it clicks.
The SD memory card is ejected.
3 Pull out the SD memory card.
4 Re-attach the front panel.
Playing videos on an iPod
1 Open the USB port cover.
2 With an interface cable (e.g., CD-IU50V), connect
the iPod to a USB cable and AUX input using the
iPod Dock Connector.
Selecting a folder
1 Push M.C. up or down.
Selecting a file (chapter)
1 Push M.C. left or right.
Fast forwarding or reversing
1 Push and hold M.C. left or right.
Notes
! Disconnect USB storage devices from the unit
when not in use.
! Incompatible text stored with the video image
file may not be displayed or may be displayed
incorrectly.
! Incompatible text saved on the iPod will not
be displayed by the unit.
! Disconnect headphones from the iPod before
connecting it to this unit.
! The iPod cannot be turned on or off unless the
control mode is set to App.
! The iPod will turn off about two minutes after
the ignition switch is set to OFF.
En
17
Page 18
Section
03
Operating this unit
! When playing external storage devices that
contain a mixture of various media file types,
switch between media file types when playing
different files.
Refer to A/V Format (switching media file
types) on the next page.
Selecting and playing files
from the name list
1 Display the list menu.
Refer to Basic menu operations on page 12.
2 Use M.C. to select the desired file name
(or folder name).
Changing the file or folder name
1 Turn M.C.
Playing
1 When a file is selected, press M.C.
Viewing a list of the files (or folders) in the selected
folder
1 When a folder is selected, press M.C.
Changing the file or folder name (skip 100 items at
once)
1 Push M.C. up or down.
Changing the file or folder name (automatically skip
100 items each time)
1 Push and hold M.C. up or down.
Browsing for a video on the iPod
Searching the list by alphabet
1 When a list for the selected category is displayed,
push and hold M.C. left or right to switch to alphabet search mode.
2 Turn M.C. to select a letter.
3 Press M.C. to display the alphabetical list.
Changing the name of the video (skip 100 items at
once)
1 Push M.C. up or down.
Changing the name of the video (automatically skip
100 items each time)
1 Push and hold M.C. up or down.
Playing DivXâVOD content
Some DivX VOD (video on demand) content
may only be playable a fixed number of times.
When you attempt to play back this type of
content saved on an external storage device,
the remaining number of times it can be
played is shown on-screen. You can then decide whether or not to play back the contents
of the external storage device.
! If there is no limit to the number of times
the DivX VOD content can be viewed, then
you may insert the external storage device
into your player and play the content as
often as you like, and no message will be
displayed.
! You can confirm the number of times that
the content can be played by checking the
number displayed after Remaining Views:.
1 Display the list menu.
Refer to Basic menu operations on page 12.
2 Use M.C. to select a category/video.
Changing the name of the video or category
1 Turn M.C.
Playing
1 When a video is selected, press M.C.
Viewing a list of the files (or folders) in the selected
folder
1 When a category is selected, press M.C.
18
En
Important
! In order to play DivX VOD contents on this
unit, you first need to register the unit with
your DivX VOD contents provider. For details
on your registration code, refer to Displaying
â
the DivX
VOD registration code on page 40.
! DivX VOD content is protected by a DRM (Di-
gital Rights Management) system. This restricts playback of content to specific,
registered devices.
Page 19

Section
Operating this unit
% If a message is displayed after inserting
the external storage device containing
DivX VOD content, use M.C. to select a desired mode.
Turn to change the mode. Press to select.
! Play – Playback of the DivX VOD content
! Next Play – Skip to the next file
! Stop – If you do not want to play the DivX
VOD content
Function settings
1 Press M.C. to display the function
menu.
2 Turn M.C. to select the function.
After selecting, perform the following procedures to set the function.
External storage device (USB, SD)
Play/Pause (play/pause)
1 Press M.C. to display the setting mode.
2 Turn M.C. to select the desired setting.
Play—Pause
3 Press M.C. to confirm the selection.
Play Mode (repeat play)
1 Press M.C. to display the setting mode.
2 Turn M.C. to select a repeat play range.
! All – Repeat all files
! File – Repeat the current file
! Folder – Repeat the current folder
3 Press M.C. to confirm the selection.
Stop (stopping playback)
1 Press M.C. to stop playback.
Time Search (time search)
1 Press M.C. to display the setting mode.
2 Turn M.C. to find the part you want to play.
3 Press M.C. to confirm the selection.
Wide Mode (switching the wide mode)
1 Press M.C. to display the setting mode.
2 Turn M.C. to select the desired setting.
Full (full)—Just (just)—Cinema (cinema)—Zoom
(zoom)—Normal (normal)
For details about the settings, refer to Changing
the wide screen mode on page 40.
3 Press M.C. to confirm the selection.
Display (display setting)
You can switch to the basic screen or the image
screen.
1 Press
2 Press M.C. to select the desired setting.
A/V Format (switching media file types)
1 Press M.C. to display the setting mode.
2 Turn M.C. to select the desired setting.
3 Press M.C. to confirm the selection.
DivX® Subtitle (DivX subtitle file settings)
1 Press M.C. to display the setting mode.
2 Turn M.C. to select the desired setting.
3 Press M.C. to confirm the selection.
TV Aspect (aspect ratio settings)
1 Press M.C. to display the setting mode.
2 Turn M.C. to select the desired setting.
3 Press M.C. to confirm the selection.
DivX® VOD (DivX
1 Press M.C. to display the setting mode.
2 Use M.C. to display the desired code.
M.C. to display the setting mode.
Music (compressed audio)—Video (DivX video
files)—Photo (JPEG picture files)
Original (DivX subtitles) — Custom (DivX exter-
nal subtitles)
For details about the settings, refer to Setting the
DivX subtitle file on page 40.
16 : 9 — Letter Box — Pan Scan
For details about the settings, refer to Setting the
aspect ratio on page 40.
â
VOD registration code)
Turn to change the menu option. Press to select.
Registration – Refer to Displaying the DivX
registration code on page 40.
Deregistration – Refer to Displaying the deregis-
tration code on page 41.
â
03
English
VOD
Audio Lang. (audio language settings)
En
19
Page 20
Section
03
Operating this unit
You can switch the audio language during playback
when playing a file recorded with dialog in two or
more languages.
1 Press M.C. to display the setting mode.
2 Turn M.C. to select the desired setting.
3 Press M.C. to confirm the selection.
Subtitle Lang. (subtitle language settings)
You can switch subtitle language during playback
when playing file recorded with subtitles in one or
more languages.
1 Press M.C. to display the setting mode.
2 Turn M.C. to select the desired setting.
3 Press M.C. to confirm the selection.
iPod
Play/Pause (pause)
1 Press M.C. to pause or resume.
Shuffle Mode (shuffle)
1 Press M.C. to display the setting mode.
2 Turn M.C. to select your favorite setting.
! Songs – Play back songs in the selected list in
random order.
! Albums – Play back songs from a randomly
selected album in order.
! Off – Cancel random play.
3 Press M.C. to confirm the selection.
Play Mode (repeat play)
1 Press M.C. to display the setting mode.
2 Turn M.C. to select a repeat play range.
! One – Repeat the current song
! All – Repeat all songs in the selected list
3 Press M.C. to confirm the selection.
1 Press M.C. to display the setting mode.
2 Turn M.C. to find the part you want to play.
3 Press M.C. to confirm the selection.
Wide Mode (switching the wide mode)
1 Press M.C.
2 Turn M.C. to select the desired setting.
Full (full)—Just (just)—Cinema (cinema)—Zoom
(zoom)—Normal (normal)
For details about the settings, refer to Changing
the wide screen mode on page 40.
3 Press M.C. to confirm the selection.
Display (display setting)
You can switch to the basic screen or the image
screen.
1 Press M.C. to display the setting mode.
2 Press M.C. to select the desired setting.
ABC Search (alphabet search mode setting)
When this setting is on, you can switch to alphabet
search mode by turning M.C. twice while using the
browse function of the iPod. Refer to Searching the list
by alphabet on page 18.
1 Press M.C. to turn the setting for when M.C. is
turned twice on or off.
Sound Retriever (sound retriever)
Automatically enhances compressed audio and restores rich sound.
1 Press M.C. to display the setting mode.
2 Turn M.C. to select the desired setting.
Off (off)—1—2
1 is effective for low compression rates, and 2 is
effective for high compression rates.
3 Press M.C. to confirm the selection.
to display the setting mode.
Control Mode (control mode)
This function is not compatible with the following
iPod models.
! iPod nano 1st generation
! iPod 5th generation
1 Press M.C. to select your favorite setting.
! App – This unit’s iPod function can be oper-
ated from the connected iPod.
! Audio – This unit’s iPod function can be oper-
ated from this unit.
Time Search (time search)
20
En
Notes
! Switching the control mode to App pauses
song playback. Operate the iPod to resume
playback.
! The following functions are still accessible
from the unit even if the control mode is set to
App.
— Volume, fast forward/reverse, track up/
down, pausing
! When the control mode is set to App, opera-
tions are limited as follows:
Page 21
Section
Operating this unit
— Only Play/Pause (pause), Control Mode
(control mode), Wide Mode (switching
the wide mode) and Display (display setting) functions are available.
— The browse function cannot be operated
from this unit.
! You can select the following functions if the
background setting on the entertainment
menu is off.
— Wide Mode (switching the wide mode)
— Display (display setting)
— DivX® Subtitle (DivX subtitle file settings)
— TV Aspect (aspect ratio settings)
— Subtitle Lang. (subtitle language
settings)
Playing audio
Basic operations
S.Rtrv
2
A-EQ
3
16:54
67
1
234 789
Music
Text
4
8888'88" -8888'88"
Text
Text
5
1 File information area for the currently playing
file
External storage device (USB, SD)
! Folder/file number indicator
iPod
! Song number indicator
2 Indicator display area
Refer to Indicator list on page 50.
3 Text information area
External storage device (USB, SD)
! Song title/artist name/album title—
folder/file name
iPod
! Song title
! Artist name
! Album title
4 Artwork/Source image display area
iPod
! Artwork display or Source image display
External storage device (USB, SD)
! Source image display
5 Play time indicator
6 Scrubber bar
7 Remaining time indicator
03
English
Playing songs on a USB storage device
1 Open the USB port cover.
2 Plug in the USB storage device using a USB
cable.
Stopping playback of songs on a USB storage device
1 You may disconnect the USB storage device at
any time.
En
21
Page 22
Section
03
Operating this unit
Playing songs on an SD memory card
1 Remove the front panel.
2 Insert an SD memory card into the SD card slot.
Insert it with the contact surface facing down,
and press on the card until it clicks and completely locks into place.
3 Re-attach the front panel.
Stopping playback of songs on an SD memory card
1 Remove the front panel.
2 Press on the SD memory card until it clicks.
The SD memory card is ejected.
3 Pull out the SD memory card.
4 Re-attach the front panel.
Playing songs on an iPod
1 Open the USB port cover.
2 Connect an iPod to the USB cable usi ng an iPod
Dock Connector.
Selecting a folder
1 Push M.C. up or down.
Selecting a track (chapter)
1 Push M.C. left or right.
Fast forwarding or reversing
1 Push and hold M.C. left or right.
Notes
! Disconnect USB storage devices from the unit
when not in use.
! Depending on the version of iTunes used to
write MP3 files to a disc or media file types, incompatible text stored within an audio file
may be displayed incorrectly.
! Disconnect headphones from the iPod before
connecting it to this unit.
! The iPod cannot be turned on or off unless the
control mode is set to App.
! The iPod will turn off about two minutes after
the ignition switch is set to OFF.
Playing a song in the selected folder
1 When a folder is selected, press and hold M.C.
Browsing for a song on the iPod
Operations are the same as those for moving
images. (Refer to Browsing for a video on the
iPod on page 18.)
The following operation is available.
Playing a song in the selected category
1 When a category is selected, press and hold M.C.
However, the categories in the top tier are different from those for moving images.
! Video (video)
! Playlists (playlists)
! Artists (artists)
! Albums (albums)
! Songs (songs)
! Podcasts (podcasts)
! Genres (genres)
! Composers (composers)
! Audiobooks (audiobooks)
Function settings
1 Press M.C. to display the function
menu.
2 Turn M.C. to select the function.
After selecting, perform the following procedures to set the function.
External storage device (USB, SD)
Play/Pause (pause)
1 Press M.C. to pause or resume.
Selecting and playing files/
tracks from the name list
Operations are the same as those for moving
images. (Refer to Selecting and playing files
from the name list on page 18.)
The following operation is available.
22
En
Random (random play)
1 Press M.C. to turn random play on or off.
Play Mode (repeat play)
1 Press M.C. to display the setting mode.
2 Turn M.C. to select a repeat play range.
! For details about the settings, refer to
Play Mode (repeat play) on page 19.
3 Press M.C. to confirm the selection.
Page 23

Section
Operating this unit
Sound Retriever (sound retriever)
Automatically enhances compressed audio and restores rich sound.
1 Press M.C. to display the setting mode.
2 Turn M.C. to select the desired setting.
Off (off)—1—2
1 is effective for low compression rates, and 2 is
effective for high compression rates.
3 Press M.C. to confirm the selection.
Time Search (time search)
1 Press M.C. to display the setting mode.
2 Turn M.C. to find the part you want to play.
3 Press M.C. to confirm the selection.
Display (display setting)
You can switch to the desired text information.
1 Press M.C. to display the setting mode.
2 Press M.C. to select the desired setting.
A/V Format (switching media file types)
1 Press M.C. to display the setting mode.
2 Turn M.C. to select the desired setting.
Music (compressed audio)—Video (DivX video
files)—Photo (JPEG picture files)
3 Press M.C. to confirm the selection.
iPod
03
English
Link Search (link search)
You can play songs from the following lists.
• Album list of the currently playing artist
• Song list of the currently playing album
• Album list of the currently playing genre
1 Press M.C. to display the setting mode.
2 Turn M.C. to change the mode; press to select.
! Artists – Displays the album list of currently
playing artist.
! Albums – Displays a song list from the album
currently being played.
! Genres – Displays an album list from the
genre currently being played.
3 Use M.C. to select an album or song from the list.
For more details about the selection operation,
refer to Browsing for a video on the iPod on page
18.
Control Mode (control mode)
This function is not compatible with the following
iPod models.
! iPod nano 1st generation
! iPod 5th generation
1 Press M.C. to select your favorite setting.
! App – This unit’s iPod function can be oper-
ated from the connected iPod.
! Audio – This unit’s iPod function can be oper-
ated from this unit.
Audiobooks (changing of audiobook speed)
Play/Pause (pause)
1 Press M.C. to pause or resume.
Shuffle All (shuffle all)
1 Press M.C. to turn shuffle all on.
To turn off, set Shuffle Mode in the Function
menu to off.
Shuffle Mode (shuffle)
1 Press M.C. to display the setting mode.
2 Turn M.C. to select your favorite setting.
! For details about the settings, refer to
Shuffle Mode (shuffle) on page 20.
3 Press M.C. to confirm the selection.
Play Mode (repeat play)
1 Press M.C. to display the setting mode.
2 Turn M.C. to select a repeat play range.
! One – Repeat the current song
! All – Repeat all songs in the selected list
3 Press M.C. to confirm the selection.
1 Press M.C. to display the setting mode.
2 Turn M.C. to select your favorite setting.
! Faster – Playback at a speed faster than nor-
mal
! Normal – Playback at normal speed
! Slower – Playback at a speed slower than nor-
mal
3 Press M.C. to confirm the selection.
Sound Retriever (sound retriever)
Automatically enhances compressed audio and restores rich sound.
1 Press M.C. to display the setting mode.
2 Turn M.C. to select the desired setting.
Off (off)—1—2
1 is effective for low compression rates, and 2 is
effective for high compression rates.
3 Press M.C. to confirm the selection.
Time Search (time search)
En
23
Page 24

Section
03
Operating this unit
1 Press M.C. to display the setting mode.
2 Turn M.C. to find the part you want to play.
3 Press M.C. to confirm the selection.
ABC Search (alphabet search mode setting)
When this setting is on, you can switch to alphabet
search mode by turning M.C. twice while using the
browse function of the iPod. Refer to Searching the list
by alphabet on page 18.
1 Press M.C. to turn the setting for when M.C. is
turned twice on or off.
Notes
! Switching the control mode to App pauses
song playback. Operate the iPod to resume
playback.
! The following functions are still accessible
from the unit even if the control mode is set to
App.
— Volume, fast forward/reverse, track up/
down, pausing
! When the control mode is set to App, opera-
tions are limited as follows:
— Only Play/Pause (pause), Control Mode
(control mode), Wide Mode (switching
the wide mode) and Display (display setting) functions are available.
— The browse function cannot be operated
from this unit.
Using Pandora
IMPORTANT:
Requirements to access the Pandora music service using the Pioneer car audio/video products:
! Apple iPhone (first generation), iPhone 3G,
iPhone 3GS or iPhone 4 with firmware version
3.0 or later.
! Latest version of the Pandora application for
the iPhone, downloaded to your device.
(Search Apple iTunes App Store for
“Pandora”).
! Current Pandora account (Free account and
paid accounts available from Pandora; create
a free account online at
â
http://www.pandora.com/register or through
the Pandora application for the iPhone).
! iPhone Data Plan.
Note: if the Data Plan for your iPhone does
not provide for unlimited data usage, addi-
tional charges from AT&T may apply for accessing the Pandora service via AT&T’s 3G and/or
EDGE networks.
! Connection to the Internet via 3G, EDGE or Wi-
Fi network.
! Optional Pioneer adapter cable connecting
your iPhone to the Pioneer car audio/video
products.
Limitations:
! Access to the Pandora service will depend on
the availability of a cellular and/or Wi-Fi network for purposes of allowing your iPhone to
connect to the Internet.
! Pandora’s service is currently only available in
the U.S.
! Ability of the Pioneer car audio/video products
to access the Pandora service is subject to
change without notice and could be affected
by any of the following: compatibility issues
with future firmware versions of iPhones;
compatibility issues with future firmware versions of the Pandora application for the
iPhone; changes to the Pandora music service
by Pandora; discontinuation of the Pandora
music service by Pandora.
! Certain functionality of the Pandora service is
not available when accessing the service
through the Pioneer car audio/video products,
including, but not limited to, creating new stations, deleting stations, emailing current stations, buying songs from iTunes, viewing
additional text information, logging in to
Pandora, and adjusting Cell Network Audio
Quality.
Pandora Internet radio is a music service not affiliated with Pioneer. More information is available at http://www.pandora.com.
You can play the Pandora by connecting your
iPod which was installed the Pandora application.
24
En
Page 25

Section
Operating this unit
Basic operations
1
S.Rtrv
Pandora
Text
Text
3
88'88" -88'88"
Text
Text
4
1 Indicator display area
Refer to Indicator list on page 50.
2 Text information area
! Station title
! Song title
! Artist name
! Album title
3 Source image display
4 Play time indicator
5 Scrubber bar
6 Remaining time indicator
Playing songs
1 Open the USB port cover.
2 Connect an iPod to the USB cable usi ng an iPod
Dock Connector.
3 Start up the Pandora application installed on the
iPod.
Giving a Thumbs Up
1 Push M.C. up to give a “Thumbs Up” for song cur-
rently playing.
Giving a Thumbs Down
1 Push M.C. down to give a “Thumbs Down” for the
song currently playing and to skip to the next
song.
A-EQ
56
2
16:54
Displaying text information
Hiding text information
1 Press and hold
To display text information, press
Storing song information (Bookmark)
1 Press and hold M.C. to display the setting mode.
2 Turn M.C. to select the desired setting.
! Song – to add information for the song cur-
rently playing to bookmarks
! Artist – to add artist information for the song
currently playing to bookmarks
! Cancel – to cancel and return to the previous
display
3 Press M.C. to confirm the selection.
.
.
Selecting and playing the
station list
1 Press HOME to switch to menu list
mode.
2 Push M.C. up or down to select Home.
3 Turn M.C. to change the menu option
and press it to select List.
Changing stations
1 Turn M.C.
Playing
1 When the station is selected, press M.C.
Changing the sort order
1 Press and hold M.C.
You can sort the items in the list alphabetically or
in order of the dates on which the items were created.
03
English
Skipping tracks
1 Push M.C. right.
Function settings
1 Press M.C. to display the function
menu.
2 Turn M.C. to change the menu option
and press to select Function.
3 Turn M.C. to select the function.
After selecting, perform the following procedures to set the function.
En
25
Page 26
Section
03
Operating this unit
Play/Pause (pause)
1 Press M.C. to pause or resume.
Bookmark (bookmark)
1 Press M.C. to display the setting mode.
2 Turn M.C. to select the desired setting.
For details, refer to Storing song information (Bookmark) on the previous page.
3 Press M.C. to confirm the selection.
Sound Retriever (sound retriever)
1 Press M.C. to display the setting mode.
2 Turn M.C. to select the desired setting.
For details, refer to Sound Retriever (sound retrie-
ver) on page 23.
3 Press M.C. to confirm the selection.
Playing still images
When a USB/SD device that contains JPEG
picture files is connected, this unit starts a slideshow from the first folder/picture on the device. The player displays the pictures in each
folder in alphabetical order.
Basic operations
1
Photo
Text
Text
2
A-EQ
3
16:542345 7890
You can switch to the basic screen or the
image screen.
Refer to Display (display setting) on the next
page.
1 Folder/file number indicator
2 Indicator display area
Refer to Indicator list on page 50.
3 Text information area
! Folder name
! File name
Playing files on a USB storage device
1 Open the USB port cover.
2 Plug in the USB storage device using a USB
cable.
Stopping playback of files on a USB storage device
1 You may disconnect the USB storage device at
any time.
Playing files on an SD memory card
1 Remove the front panel.
2 Insert an SD memory card into the SD card slot.
Insert it with the contact surface facing down,
and press on the card until it clicks and completely locks into place.
3 Re-attach the front panel.
26
En
Page 27
Section
Operating this unit
Stopping playback of files on an SD memory card
1 Remove the front panel.
2 Press on the SD memory card until it clicks.
The SD memory card is ejected.
3 Pull out the SD memory card.
4 Re-attach the front panel.
Selecting a folder
1 Push M.C. up or down.
Selecting a file
1 Push M.C. left or right.
Searching every 10 files
1 Push and hold M.C. left or right.
Notes
! Disconnect USB storage devices from the unit
when not in use.
! Incompatible text stored with the video image
file may not be displayed or may be displayed
incorrectly.
! When playing external storage devices that
contain a mixture of various media file types,
switch between media file types when playing
different files.
Refer to A/V Format (switching media file
types) on page 19.
Selecting and playing files
from the name list
Operations are the same as those for moving
images. (Refer to Selecting and playing files
from the name list on page 18.)
Function settings
1 Press M.C. to display the function
menu.
2 Turn M.C. to select the function.
After selecting, perform the following procedures to set the function.
Play/Pause (pause)
1 Press M.C. to pause or resume.
1 Press M.C. to turn random play on or off.
Play Mode (repeat play)
1 Press M.C. to display the setting mode.
2 Turn M.C. to select a repeat play range.
! Folder – Repeat the current folder
! All – Repeat all files
3 Press M.C. to confirm the selection.
Capture (capturing an image in JPEG files)
You can capture image data and use it as wallpaper.
Images can be stored and recalled easily in this unit.
! Only one image can be stored on this unit. Old
images are overwritten with the new ones.
1 Press M.C. to display the setting mode.
2 Turn M.C. to select the desired setting.
3 Press M.C. to confirm the selection.
Rotate (picture rotation)
1 Press M.C. to display the setting mode.
2 Press M.C. to rotate the displayed picture 90°
clockwise.
Wide Mode (switching the wide mode)
1 Press M.C. to display the setting mode.
2 Turn M.C. to select the desired setting.
Full (full)—Just (just)—Cinema (cinema)—Zoom
(zoom)—Normal (normal)
For details about the settings, refer to Changing
the wide screen mode on page 40.
3 Press M.C. to confirm the selection.
Time Per Slide (slideshow interval time setting)
JPEG files can be viewed as a slide show on this unit.
In this setting, the interval between each image can
be set.
1
Press M.C. to display the setting mode.
2 Turn M.C. to select the desired setting.
! 5sec – JPEG images switch at inter vals of 5
seconds
! 10sec – JPEG images switch at inter vals of 10
seconds
! 15sec – JPEG images switch at inter vals of 15
seconds
! Manual – JPEG images can be switched
manually
3 Press M.C. to confirm the selection.
Display (display setting)
03
English
Random (random play)
En
27
Page 28

Section
03
Operating this unit
You can switch to the basic screen or the image
screen.
1 Press M.C. to display the setting mode.
2 Press M.C. to select the desired setting.
A/V Format (switching media file types)
1 Press M.C. to display the setting mode.
2 Turn M.C. to select the desired setting.
For details about the settings, refer to
A/V Format (switching media file types) on page
19.
3 Press M.C. to confirm the selection.
Note
You can select the following functions if the background setting on the entertainment menu is off.
! Capture (capturing an image in JPEG files)
! Rotate (picture rotation)
! Wide Mode (switching the wide mode)
! Display (display setting)
1 Press M.C. to display the setting mode.
2 Select a file.
The following operations are available. The operating method is the same as that for the basic operations. Refer to Basic operations on page 26.
! Selecting a folder
! Selecting a file
! Searching every 10 files
Play/Pause (pause)
1 Press M.C. to pause or resume.
Random (random play)
1 Press M.C. to turn random play on or off.
Play Mode (repeat play)
1 Press M.C. to display the setting mode.
2 Turn M.C. to select a repeat play range.
! All – Repeat all files
! Folder – Repeat the current folder
3 Press M.C. to confirm the selection.
Introduction of operations for
playback of still images as a
slideshow
You can view still images saved to a USB/SD
as a slideshow while listening to audio from
another source.
For details about the settings, refer to
Slide Show (slide show viewing) on page 34.
Function settings
1 Press M.C. to display the function
menu.
2 Turn M.C. to select the function.
After selecting, perform the following procedures to set the function.
Return (ending slideshow)
1 Press M.C. to end the slideshow.
Photo Selection (selecting photos)
Capture (capturing an image in JPEG files)
For details about the settings, refer to Capture (cap-
turing an image in JPEG files) on the previous page.
1 Press M.C. to display the setting mode.
2 Turn M.C. to select the desired setting.
3 Press M.C. to confirm the selection.
Rotate (picture rotation)
1 Press M.C. to display the setting mode.
2 Press M.C. to rotate the displayed picture 90°
clockwise.
Wide Mode (switching the wide mode)
1 Press M.C. to display the setting mode.
2 Turn M.C. to select the desired setting.
Full (full)—Just
(zoom)—Normal (normal)
For details about the settings, refer to Changing
the wide screen mode on page 40.
3 Press M.C. to confirm the selection.
Time Per Slide (slideshow interval time setting)
For details about the settings, refer to Time Per Slide
(slideshow interval time setting) on the previous page.
1 Press M.C. to display the setting mode.
2 Turn M.C. to select the desired setting.
3 Press M.C. to confirm the selection.
(just)—Cinema (cinema)—Zoom
28
En
Page 29

Section
Operating this unit
Note
When the USB or SD source is selected, this unit
cannot view still images on USB/SD as a
slideshow.
03
English
Bluetooth Telephone
This function is available only for MVHP8300BT.
For details on basic operations after connecting to a cellular phone, refer to Using Blue-
tooth telephone on page 13.
! PIN code is set to 0000 as the default. You
can change this code. Refer to PIN Code
(PIN code input) on the next page.
Connection menu operation
Important
Be sure to park your vehicle in a safe place and
apply the parking brake when performing this operation.
1 Display the phone menu.
Refer to Basic menu operations on page 12.
2 Use M.C. to select Connection.
Turn to change the menu option. Press to select.
3 Turn M.C. to select the function.
After selecting, perform the following procedures to set the function.
Device List (connecting or disconnecting a cellular
phone from the device list)
1 Press M.C. to display the setting mode.
2 Turn M.C. to select the name of a dev ice you want
to connect.
3 Press and hold M.C. to switch the Bluetooth de-
vice address and device name.
4 Press M.C. to connect the selected cellular
phone.
While connecting, the circular indicator flashes.
To complete the connection, check the device
name (MVH-P8300BT) and enter the PIN code on
your cellular phone. If the connection is established, a circular indicator appears next to the device name.
Delete Device (deleting a cellular phone from the device list)
En
29
Page 30
Section
03
Operating this unit
1 Press M.C. to display the setting mode.
2 Turn M.C. to select the name of a dev ice you want
to delete.
3 Press M.C. to select the device you want to delete.
Press and hold M.C. to switch the Bluetooth device address and device name.
4 Use M.C. to select Ye s .
Turn to change the menu option. Press to select.
To cancel, select No.
! While this function is in use, do not turn off the
engine.
Add Device (connecting a new cellular phone)
1 Press M.C. to start searching.
! To cancel, press M.C. while searching.
2 Turn M.C. to select a device from the device list.
! If the desired device is not displayed, select
Search Again.
! If five devices are already paired, Memory
Full is displayed and it is not possible to per-
form this operation. In this case, delete a
paired device first.
3 Press and hold M.C. to switch the Bluetooth de-
vice address and device name.
4 Press M.C. to connect the selected cellular
phone.
While connecting, Pairing flashes. To complete
the connection, check the device name (MVH-
P8300BT) and enter the PIN code on your cellular
phone. If the connection is established, Paired is
displayed and the phone menu appears.
Special Device (setting a special device)
Bluetooth devices that are difficult to establish a connection with are called special devices. If your Bluetooth device is listed as a special device, select the
appropriate one.
1 Press M.C. to display the setting mode.
2 Use M.C. to select a special device.
Turn to change the menu option. Press to select.
3 Use a cellular phone to connect to this unit.
To complete the connection, check the device
name (MVH-P8300BT) and enter the PIN code on
your cellular phone. If the connection is established, a circular indicator appears next to the device name.
! If five devices are already paired,
Full is displayed and it is not possible to perform this operation. In this case, delete a
paired device first.
Auto Connect (connecting to a Bluetooth device
automatically)
Memory
1 Press M.C. to turn automatic connection on or
off.
Visibility (setting the visibili ty of this unit)
To check the availability of this unit from other devices, Bluetooth visibility of this unit can be turned
on.
1 Press M.C. to turn the visibility of this unit on or
off.
! While setting Special Device, Bluetooth visibi-
lity of this unit is turned on temporarily.
Device Information (Bluetooth device address display)
1 Press M.C. to display the Bluetooth device ad-
dress and device name.
PIN Code (PIN code input)
To connect your cellular phone to this unit via Bluetooth wireless technology, you need to enter a PIN
code on your phone to verify the connection. The default code is 0000, but you can change it with this
function.
1 Press M.C. to display the setting mode.
2 Turn M.C. to select a number.
3 Press M.C. to move the cursor to the next posi-
tion.
4 After inputting the PIN code (up to 8 digits), press
M.C.
The PIN code can be stored in the memory.
! When you press and hold M.C. in the same
display, the PIN code you entered is stored in
this unit.
! Pressing M.C. in the confirmation display re-
turns you to the PIN code input display, and
you can change the PIN code.
Phone menu operation
Important
Be sure to park your vehicle in a safe place and
apply the parking brake when performing this operation.
1 Display the phone menu.
Refer to Basic menu operations on page 12.
2 Turn M.C. to select the function.
After selecting, perform the following procedures to set the function.
30
En
Page 31
Section
Operating this unit
Recent (recent call history)
You can make a phone call by selecting from dialed
calls, received calls, and missed calls in this menu.
1 Press M.C. to display Missed Calls (missed call
history), Dialed Calls (dialed call history) or Re-
ceived Calls (received call history).
2 Use M.C. to select the desired list.
Turn to change the menu option. Press to select.
3 Press M.C. to make a call.
4 When you find a phone number that you want to
store in the memory, press and hold M.C. right.
Phone Book (phone book)
! The phone book in your cellular phone will be
transferred automatically when the phone is connected to this unit.
! Depending on the cellular phone, the phone book
may not be transferred automatically. In this case,
operate your cellular phone to transfer the phone
book. The visibility of this unit should be on. Refer
to Visibility (setting the visibility of this unit) on
the previous page.
1 Press M.C. to display the alphabetical list.
2 Turn M.C. to select the first letter of the name you
are looking for.
! Press and hold M.C. to select the desired
character type.
alphabet–Cyrillic alphabet
3 Press M.C. to display a registered name list.
4 Turn M.C. to select the name you are looking for.
5 Press M.C. to display the phone number list.
6 Use M.C. to select the phone number you want to
call.
Turn to change the phone number. Press to select.
7 Press M.C. to make a call.
8 When you find a phone number that you want to
store in the memory, press and hold M.C. right.
03
English
Connection (phone connection)
! Operate the Bluetooth telephone connection
menu. Refer to Connection menu operation on
page 29.
Function and operation
1 Display Phone Function.
Refer to Phone Function (phone function) on
this page.
2 Press M.C. to display the function
menu.
3 Turn M.C. to select the function.
After selecting, perform the following procedures to set the function.
Auto Answer (automatic answering)
1 Press M.C. to turn automatic answering on or off.
Ring Tone (ring tone select)
1 Press M.C. to turn the ring tone on or off.
Preset Dial (preset phone numbers)
1 Press M.C. to display the setting mode.
2 Use M.C. to select the desired preset number.
Turn to change the menu option. Press to select.
M.C. to make a call.
Press
3
Phone Function (phone function)
You can set Auto Answer and Ring Tone from this
menu. For details, refer to Function and operation on
this page.
En
31
Page 32

Section
03
Operating this unit
Audio Adjustments
1 Display the audio menu.
Refer to Basic menu operations on page 12.
2 Turn M.C. to select the audio function.
After selecting, perform the following procedures to set the audio function.
Fader/Balance (fader/balance adjustment)
1 Press M.C. to display the setting mode.
2 Push M.C. up or down to adjust the front/rear
speaker balance.
Adjustment range (front/rear): Front 15 to Rear
15
3 Push M.C. left or right to adjust the left/right
speaker balance.
Adjustment range (left/right): Left 15 to Right 15
! Select F/R 0 when only using two speakers.
! When the rear output setting and preout setting
are Subwoofer, you cannot adjust front/rear
speaker balance.
Sonic Center Control (sonic center control)
Sound that is suited for the listening position can easily be created with this function.
1 Press M.C. to display the setting mode.
2 Push M.C. left or right to select a listening posi-
tion.
Adjustment range: Left:7 to Right:7
Auto EQ (auto-equalizer on/off)
The auto-equalizer is an equalizer curve created by
auto EQ (refer to Auto EQ (auto-equalizing) on page
36).
You can turn the auto-equalizer on or off.
1 Press M.C. to turn the auto-equalizer on or off.
You cannot use this function if auto EQ has not been
carried out.
Graphic EQ (equalizer adjustme nt)
You can adjust the currently selected equalizer curve
setting as desired. Adjusted equalizer curve settings
are stored in Custom1 or Custom2.
! A separate Custom1 curve can be created for
each source. If you make adjustments when a
curve other than Custom2 is selected, the equalizer curve settings will be stored in Custom1.
! A Custom2 curve that is common for all sources
can be created. If you make adjustments when
the Custom2 curve is selected, the Custom2
curve will be updated.
1 Press M.C. to display the setting mode.
M.C. to select an equalizer curve.
Turn
2
Powerful—Natural—Vocal—Custom1—Custom2—Flat—Super Bass
3 Push M.C. left or right to select the equalizer
band to adjust.
40Hz—80Hz—200Hz—400Hz—1kHz—2.5kHz
—8kHz—10kHz
4 Push M.C. up or down to adjust the level of the
equalizer band.
Adjustment range: +12dB to –12dB
Loudness (loudness)
Loudness compensates for deficiencies in the lowand high-frequency ranges at low volume.
1 Press M.C. to display the setting mode.
2 Turn M.C. to select the desired setting.
Off (off)—Low (low)—Mid (mid)—High (high)
3 Press M.C. to confirm the selection.
Subwoofer1 (subwoofer on/off setting)
This unit is equipped with a subwoofer output which
can be turned on or off.
1 Press M.C. to turn subwoofer output on or off.
Subwoofer2 (subwoofer adjustment)
The cut-off frequency and output level can be adjusted when the subwoofer output is on.
Only frequencies lower than those in the selected
range are outputted from the subwoofer.
1 Press M.C. to display the setting mode.
2 Turn M.C. to select the phase of subwoofer out-
put.
Normal (normal phase)—Reverse (reverse
phase)
3 Push M.C. up or down to adjust the output level
of the subwoofer.
Adjustment range: +6 to –24
4 Push M.C. left or right to select the cut-off fre-
quency.
50Hz—63Hz—80Hz—100Hz—125Hz
32
Bass Booster (bass boost)
En
Page 33

Section
Operating this unit
1 Press M.C. to display the setting mode.
2 Turn M.C. to adjust the level.
Adjustment range: 0 to +6
3 Press M.C. to confirm the selection.
High Pass Filter (high pass filter adjustment)
When you do not want low sounds from the subwoofer output frequency range to play from the front or
rear speakers, turn on the HPF (high pass filter). Only
frequencies higher than those in the selected range
are output from the front or rear speakers.
1 Press M.C. to display the setting mode.
2 Turn M.C. to select the cut-off frequency.
Off (off)—50Hz—63Hz—80Hz—100Hz—125Hz
3 Press M.C. to confirm the selection.
SLA (source level adjustment)
SLA (Source level adjustment) lets you adjust the vo-
lume level of each source to prevent radical changes
in volume when switching between sources.
! When selecting FM as the source, you cannot
switch to SLA.
! Settings are based on the FM volume level, which
remains unchanged.
! The AM volume level can also be adjusted with
this function.
1 Press M.C. to display the setting mode.
2 Push M.C. up or down to adjust the source vo-
lume.
Adjustment range: +4 to –4
Note
You cannot select Custom1 and Custom2 when
using the auto-equalizer.
03
English
System settings
1 Display the system menu.
Refer to Basic menu operations on page 12.
2 Turn M.C. to select the system function.
After selecting, perform the following procedures to set the system function.
Guide Info (guide information)
1 Press M.C. to display the guide information.
Refer to About guide information on page 13.
Clock ADJ (date and clock)
1 Press M.C. to display the setting mode.
2 Press M.C. to select the segment of the clock dis-
play you wish to set.
Day—Month—Year—Hour—Minute—AM/PM
3 Turn M.C. to set the date and time.
Picture ADJ (picture adjustment)
1 Press M.C. to display the setting mode.
2 Turn M.C. to select the function to be adjusted.
Press to select.
Brightness—Contrast—Color—Hue—Dimmer
—Temperature—Black Level
For details about the settings, refer to Changing
the picture adjustment on page 41.
When you select Black Level, press M.C. to turn
the setting on or off.
3 Turn M.C. to increase or decrease the level of the
selected item.
Adjustment range: +24 to –24
! Dimmer can be adjusted from +48 to +1.
! Temperature can be adjusted from +3 to –3.
Caution Lang. (caution language settings)
You can switch the display language for the warning
message of the parking brake interlock.
1 Press M.C. to display the setting mode.
2 Turn M.C. to select the desired setting.
English—Français—Español
3 Press M.C. to confirm the selection.
System Lang. (menu language settings)
En
33
Page 34
Section
03
Operating this unit
! The language can be changed for the following:
! Function menus
! System menu
! Initial menu
! On-screen display
! Multi language setting for DivX
! If the embedded language and the selected lan-
guage setting are not the same, text information
may not display properly.
! Some characters may not be displayed properly.
! To complete this operation, switch the ignition key
off and on after you set this setting.
1 Press M.C. to display the setting mode.
2 Turn M.C. to select the desired language.
English (English)—Español (Spanish)—Português (Portuguese)—РУССКИЙ (Russian)
3 Press M.C. to confirm the selection.
Detach Warning (warning tone setting)
If the front panel is not detached from the head unit
within four seconds of turning off the ignition, a warning tone sounds. You can turn off the warning tone.
1 Press M.C. to turn warning tone on or off.
AUX Input (auxiliary input)
Activate this setting when using an auxiliary device
connected to this unit.
1 Press M.C. to turn AUX Input on or off.
Entertainment settings
1 Display the entertainment menu.
Refer to Basic menu operations on page 12.
2 Turn M.C. to select the entertainment
function.
After selecting, perform the following procedures to set the entertainment function.
Background (background display setting)
1 Press M.C. to display the setting mode.
2 Turn M.C. to select the desired setting.
BGP1 (background picture 1)—BGP2 (background picture 2)—BGP3 (background picture 3)
—BGV (background visual)—Photo (photo)—
SPEANA (spectrum analyzer)—Off (display off)
3 Press M.C. to confirm the selection.
Clock (entertainment clock)
1 Press M.C. to turn entertainment clock display on
or off.
If the setting is on, it is automatically switched to
entertainment clock display.
Slide Show (slide show viewing)
1 Press M.C. to display the setting mode.
2 Turn M.C. to select the external storage device.
USB (USB storage device)—SD (SD memory card)
Slideshow will start.
34
Appearance (screen/illuminati on color)
1 Press M.C. to display the setting mode.
2 Turn M.C. to change the desired scree n/illumina-
tion color. Press to select.
Screen (screen color)—Illumi (Illumination color)
—Color Setting (customizing color)
For details on Color Setti ng (customizing color),
refer to Customizing the illumination color on the
next page.
3 Turn M.C. to change the desired illumination
color. Press to select.
The illumination color changes at a
regular interval.
The customized color is set as the illumination color.
En
Page 35

Section
Operating this unit
Notes
! If SPEANA (spectrum analyzer) is selected,
the spectrum analyzer will be displayed instead of Source image display or Artwork display.
! If you select USB, SD as the source, you can-
not select Slide Show.
Customizing the illumination color
1 Use M.C. to select Color Setting in the
Appearance (Illumination color).
Refer to Appearance (screen/illumination
color) on the previous page.
2 Use M.C. to customize the color.
Turn for fine tuning. Push left or right to adjust
the next color.
3 Press M.C. to store the customized color
in the memory.
The illumination color will be switched to the
customized color.
03
English
Initial Settings
1 Press and hold SRC/OFF until the unit
turns off.
2 Press M.C. to display the initial setting
menu.
3 Turn M.C. to select the initial setting.
After selecting, perform the following procedures to set the initial setting.
A-EQ Measurement (auto-equalizing)
The auto-equalizer is an equalizer curve created by
auto EQ (refer to Auto EQ (auto-equalizing) on the next
page).
You can turn the auto-equalizer on or off.
Rear Speaker (rear output and subwoofer setting)
This unit’s rear output (rear speaker leads output and
RCA rear output) can be used for full-range speaker
(Full) or subwoofer (Subwoofer) connection. If you
switch the rear output setting to Subwoofer, you can
connect a rear speaker lead directly to a subwoofer
without using an auxiliary amp.
Initially, the unit is set for rear full-range speaker connection (Full).
1 Press M.C. to display the setting mode.
2 Turn M.C. to change the setting.
Subwoofer (subwoofer)—Full (full-range speaker)
! Even if you change this setting, there will be
no output unless you turn the subwoofer output on (refer to Subwoofer1 (subwoofer on/off
setting) on page 32).
! If you change this setting, subwoofer output
in the audio menu will return to the factory
settings.
3 Press M.C. to confirm the selection.
Demonstration (demo display setting)
1 Press M.C. to turn the demo display on or off.
BT Memory Clear (resetting the Bluetooth wireless
technology module)
En
35
Page 36

Section
03
Operating this unit
This function is available only for MVH-P8300BT.
Bluetooth telephone data can be deleted. To protect
personal information, we recommend deleting this
data before transferring the unit to other persons. The
following settings will be deleted.
! phone book entries on the Bluetooth telephone
! preset numbers on the Bluetooth telephone
! registration assignment of the Bluetooth tele-
phone
! call history of the Bluetooth telephone
! information of the connected Bluetooth telephone
! PIN code
1 Press M.C. to display the setting mode.
2 Use M.C. to select Ye s .
Turn to change the mode. Press to select.
Cleared is displayed and the settings are deleted.
To cancel, select No.
! While this function is in use, do not turn off
the engine.
BT Ver. Info. (Bluetooth version display)
This function is available only for MVH-P8300BT.
1 Press M.C. to display the Bluetooth (microproces-
sor) version of this unit.
Software Update (updating the software)
WARNING
As a loud tone (noise) may be emitted from the
speakers when measuring the car's interior
acoustic characteristics, never perform auto EQ
while driving.
CAUTION
! Thoroughly check the conditions before per-
forming auto EQ as the speakers may be da-
maged if these functions are performed when:
— The speakers are incorrectly connected.
(For example, when a rear speaker is connected as a subwoofer output.)
— A speaker is connected to a power amp de-
livering output higher than the speaker’s
maximum input power capability.
! If the microphone is placed in an unsuitable
position the measurement tone may become
loud and measurement may take a long time,
resulting in battery drainage. Be sure to place
the microphone in the specified location.
This function is available only for MVH-P8300BT.
This function is used to update this unit with the latest software. For information on the software and updating, refer to our website.
1 Press M.C. to display the setting mode.
2 Use M.C. to select Yes to show a confirmation dis-
play.
Turn to change the mode. Press to select.
To cancel, select No.
Follow the on-screen instructions to finish updating the software.
Ever Scroll (scroll mode setting)
When ever scroll is set to On, recorded text information scrolls continuously in the display. Set to off if
you prefer the information to scroll just once.
1 Press M.C. to turn the ever scroll on or off.
Auto EQ (auto-equalizing)
The auto-equalizer automatically measures
the car’s interior acoustic characteristics, and
then creates an auto-equalizer curve based on
that information.
! To perform this function, dedicated micro-
phone (e.g. CD-MC20) is required.
Before operating the auto EQ function
! Carry out auto EQ in as quiet a place as
possible, with the car engine and air condi-
tioning switched off. Also cut power to car
phones or portable telephones in the car, or
remove them from the car before carrying
out auto EQ. Sounds other than the mea-
surement tone (surrounding sounds, en-
gine sound, telephones ringing etc.) may
prevent correct measurement of the car in-
terior acoustic characteristics.
! Be sure to carry out auto EQ using the op-
tional microphone. Using another micro-
phone may prevent measurement, or result
in incorrect measurement of the car inter-
ior acoustic characteristics.
! In order to perform auto EQ, the front
speaker must be connected.
! When this unit is connected to a power
amp with input level control, auto EQ may
not be possible if the power amp’s input
level is set below the standard level.
36
En
Page 37
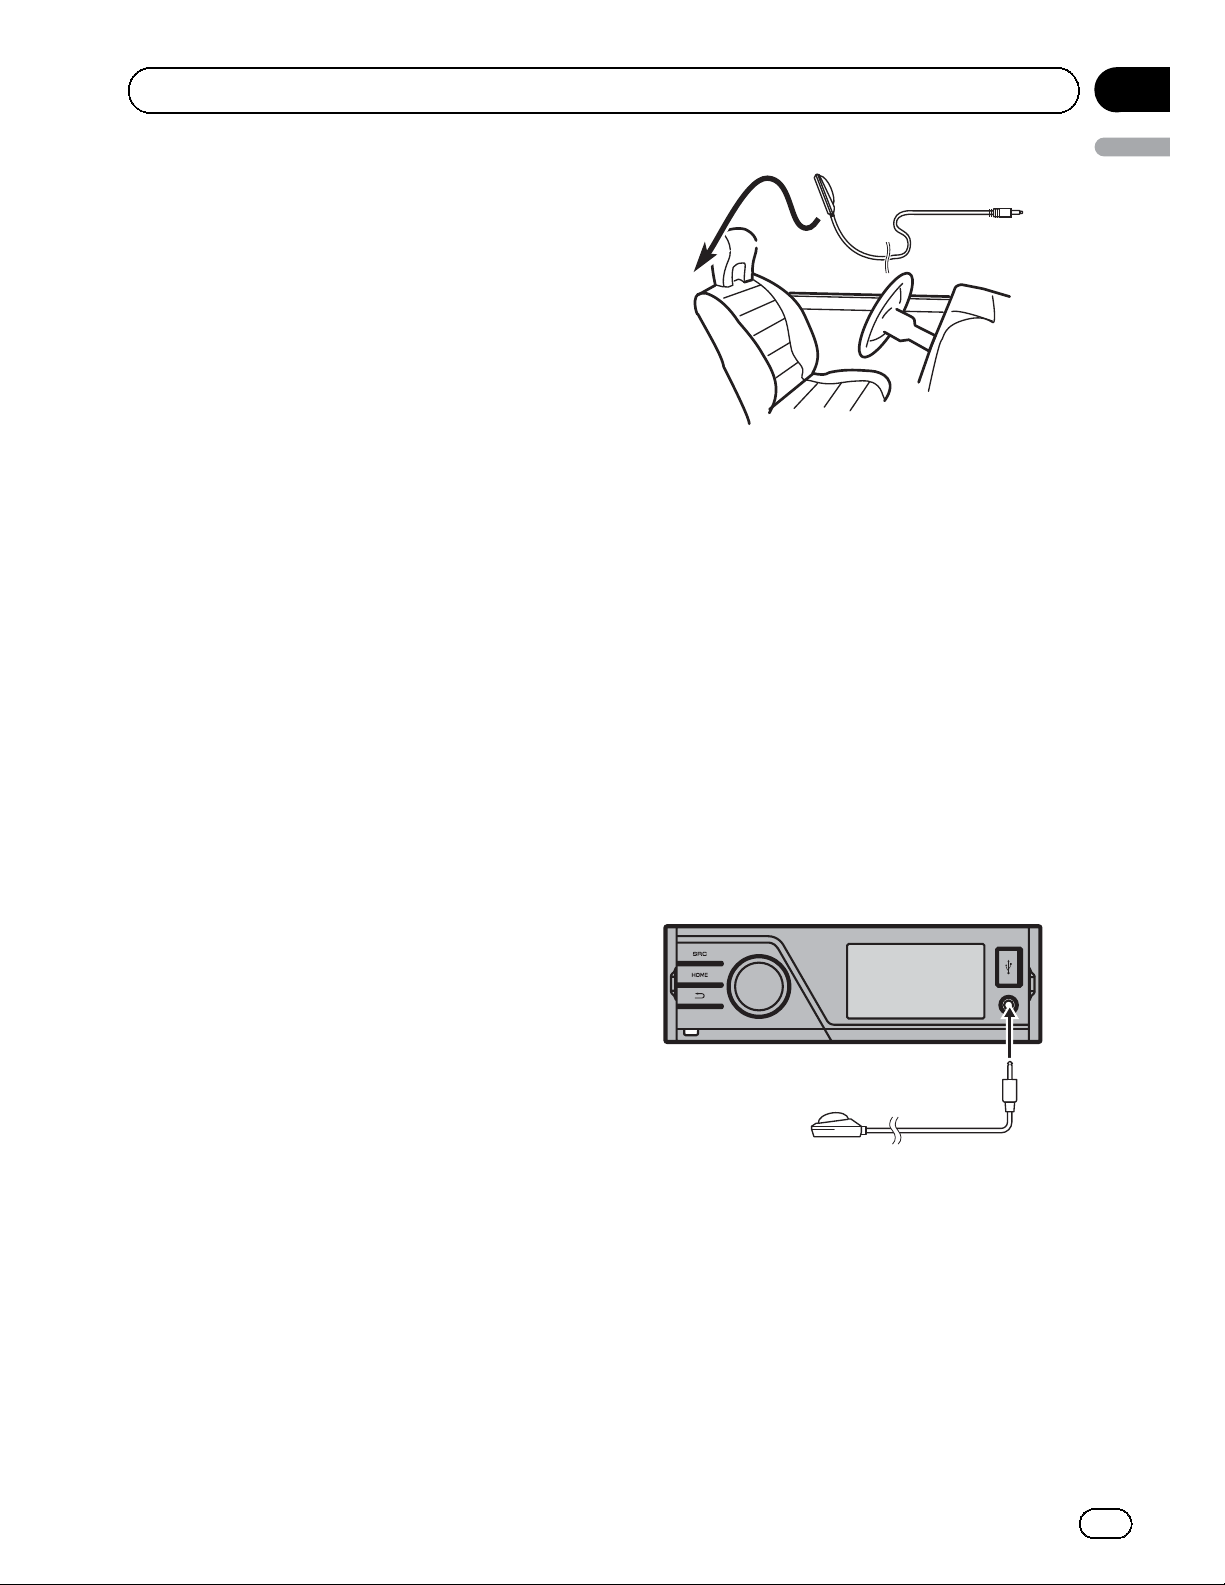
Section
Operating this unit
! When this unit is connected to a power
amp with an LPF, turn this LPF off before
performing auto EQ. Also set the cut-off frequency for the built-in LPF of an active subwoofer to the highest frequency.
! The distance has been calculated by com-
puter to be the optimum delay to give accurate results for the circumstances, so
please continue to use this value.
— The reflected sound within the car is
strong and delays occur.
— The LPF on active subwoofers or exter-
nal amps delay the lower sounds.
! Auto EQ changes the audio settings as fol-
lows:
— The fader/balance settings return to the
center position. (Refer to Fader/Balance
(fader/balance adjustment) on page 32.)
— The equalizer curve switches to Flat.
(Refer to Graphic EQ (equalizer adjust-
ment) on page 32.)
— The front, center and rear speakers will
automatically be adjusted to a high
pass filter setting.
! Previous settings for auto EQ will be over-
written.
Performing auto EQ
03
English
3 Turn the ignition switch to ON or ACC.
If the car’s air conditioner or heater is turned
on, turn it off. Noise from the fan in the air
conditioner or heater may prevent correct auto
EQ.
# If this unit is turned off, press SRC/OFF to turn
the source on.
4 Display the initial setting menu.
Refer to Initial Settings on page 35.
5 Use M.C. to enter the auto EQ measurement mode.
Turn to change the menu option. Press to select.
6 Plug the microphone into the microphone input jack on this unit.
1 Stop the car in a place that is quiet,
close all the doors, windows and sun roof,
and then turn the engine off.
If the engine is left running, engine noise may
prevent correct auto EQ.
2 Fix the optional microphone in the center of the headrest of the driver’s seat, fa-
cing forward.
The auto EQ may differ depending on where
you place the microphone. If desired, place
the microphone on the front passenger seat to
carry out auto EQ.
7 Press M.C. to start auto EQ.
8 When the 10-second countdown starts,
get out of the car and close the door within
10 seconds.
A measurement tone (noise) is emitted from
the speakers, and auto EQ measurement begins.
# It takes about nine minutes for auto EQ measurement to be completed when all the speakers
are connected.
En
37
Page 38

Section
03
Operating this unit
# To stop auto EQ, press M.C.
9 When auto EQ is completed, Complete
is displayed.
When the car’s interior acoustic characteristics cannot be measured correctly, an error
message will be displayed. (Refer to Under-
standing auto EQ error messages on page 50.)
10 Store the microphone carefully in the
glove compartment or another safe place.
If the microphone is subjected to direct sunlight for an extended period, high temperatures may cause distortion, color change or
malfunction.
Other functions
Using an AUX source
When connecting auxiliary device using the
front AUX input.
! You need to activate the AUX setting in the
initial setting menu. Refer to AUX Input
(auxiliary input) on page 34.
! If an iPod with video capabilities is con-
nected to this unit via 3.5 mm plug (4 pole)
cable (such as the CD-V150M), you can
enjoy the video contents of the connected
iPod.
! A portable audio/video player can be con-
nected by using a 3.5 mm plug (4 pole) with
an RCA cable (sold separately). However,
depending on the cable, a reverse connec-
tion between the red (right side audio)
cable and yellow (video) cable may be re-
quired in order for the sound and video
image to be reproduced correctly.
% Insert the mini plug into the AUX input
jack on this unit.
For more details, refer to Head unit on page 9.
This auxiliary device is automatically set to
AUX.
Function settings
1 Press M.C. to display the function
menu.
2 Turn M.C. to select the function.
After selecting, perform the following procedures to set the function.
A/V Change (auxiliary device signal setting)
1 Press M.C. to display the setting mode.
2 Turn M.C. to select the desired setting.
! Audio – auxiliary device connected with a
stereo mini plug cable
! Video – auxiliary video device connected with
4-pole mini plug cable (e.g., CD-V150M)
3 Press M.C. to confirm the selection.
38
Display (display setting)
En
Page 39

Section
Operating this unit
You can switch to the basic screen or the image
screen.
1 Press M.C. to display the setting mode.
2 Press M.C. to select the desired setting.
Wide Mode (switching the wide mode)
1 Press M.C. to display the setting mode.
2 Turn M.C. to select the desired setting.
Full (full)—Just (just)—Cinema (cinema)—Zoom
(zoom)—Normal (normal)
For details about the settings, refer to Changing
the wide screen mode on the next page.
3 Press M.C. to confirm the selection.
Notes
! You can select Display and Wide Mode,
when Video has been selected.
! You can select the following functions if the
background setting on the entertainment
menu is off.
— Wide Mode (switching the wide mode)
— Display (display setting)
03
English
external unit. For details concerning these
functions, refer to the owner’s manual for the
connected external unit.
% Press BAND/ESCAPE on the remote control.
% Press and hold BAND/ESCAPE on the remote control.
% Push M.C. left or right.
% Push and hold M.C. left or right.
% Push M.C. up or down.
% Press any number key from 1 to 6 on
the remote control (MVH-P8300BT only).
Using the functions allocated to 1 to
6 keys
1 Displaying the list menu.
Refer to Basic menu operations on page 12.
Using an external unit
An external unit refers to a Pioneer product,
such as those which will be available in the future. Although incompatible as a source, the
basic functions of up to two external units can
be controlled with this unit. When two external
units are connected, the external units are
automatically allocated to external unit 1 or external unit 2.
The basic operations of the external unit are
explained below. The allocated functions will
differ depending on the connected external
unit. For details concerning these functions,
refer to the owner’s manual for the external
unit.
Selecting the external unit as the source
% Press SRC/OFF to select External as the
source.
2 Use M.C. to select 1 KEY to 6 KEY.
Turn to change 1 KEY to 6 KEY and press.
Function settings
1 Press M.C. to display the function
menu.
2 Turn M.C. to select the function.
Turn to change the menu option. Press to select.
Function 1 (function 1)—Function 2 (function
2)—Function 3 (function 3)—Function 4
(function 4)—Auto/Manual (auto/manual)
Switching the display indication
Display indication can be switched on or off.
% Press and hold
# Pressing one of the buttons will turn on dis-
play indication.
.
Basic operations
The functions allocated to the following operations will differ depending on the connected
En
39
Page 40

Section
04
Detailed instructions
Changing the wide screen mode
You can select a desired mode for enlarging a
4:3 picture to a 16:9 picture.
% Display the screen mode.
Refer to Wide Mode (switching the wide
mode) on page 19.
Full (full screen)
The 4:3 picture is enlarged in the horizontal direction only, giving you a 4:3 TV picture (normal picture) without any omissions.
Just (just)
The picture is enlarged slightly at the center and
the amount of enlargement increases horizontally
toward the edges of the screen, enabling you to
enjoy a 4:3 picture without sensing any disparity
even when viewing on a wide screen.
Cinema (cinema)
The picture is enlarged by the same proportion as
Full or Zoom in the horizontal direction and by
an intermediate proportion between Full and
Zoom in the vertical direction; ideal for a cinemasized picture (wide screen picture) where captions lie outside the picture.
Zoom (zoom)
The 4:3 picture is enlarged in the same proportion
both vertically and horizontally; ideal for a cinema
sized picture (wide screen picture).
Normal (normal)
The 4:3 picture is displayed as it is, giving you no
sense of disparity since its proportions are the
same as that of the normal picture.
Notes
! Different settings can be stored for each video
source.
! When a video is viewed in a wide screen mode
that does not match its original aspect ratio, it
may appear different.
! Remember that using the wide mode feature
of this system for commercial or public viewing purposes may constitute an infringement
on the author’s rights protected by the Copyright Law.
! The video image will appear coarser when
viewed in Cinema or Zoom mode.
Setting the DivX subtitle file
You can select whether or not to display DivX
external subtitles.
! The DivX subtitles will be displayed even
when Custom is selected if no DivX exter-
nal subtitle files exist.
! You can select the following functions if the
background setting on the entertainment
menu is off.
% Display the DivX subtitle file setting
mode.
Refer to DivX® Subtitle (DivX subtitle file set-
tings) on page 19.
! Original – Display the DivX subtitles
! Custom – Display the DivX external subti-
tles
Notes
! Up to 42 characters can be displayed on one
line. If more than 42 characters are set, the
line breaks and the characters are displayed
on the next line.
! Up to 126 characters can be displayed on one
screen. If more than 126 characters are set,
the excess characters will not be displayed.
Setting the aspect ratio
% Display the aspect ratio setting mode.
Refer to TV Aspect (aspect ratio settings) on
page 19.
! 16 : 9 – Wide screen picture (16:9) is dis-
played as is (initial setting)
! Letter Box – The picture is the shape of a
letterbox with black bands on the top and
bottom of the screen
! Pan Scan – The picture is cut short on the
right and left sides of the screen
Displaying the DivXâVOD
registration code
In order to play DivX VOD (video on demand)
contents on this unit, the unit must first be registered with a DivX VOD contents provider.
For registration, generate a DivX VOD registration code and submit it to your provider.
40
En
Page 41

Section
Detailed instructions
! Keep a record of the code as you will need
it when you register your unit to the DivX
VOD provider.
% Select Registration.
Refer to DivX® VOD (DivX
code) on page 19.
Your registration code is displayed.
â
VOD registration
Displaying the
deregistration code
If your device is already registered, deregister
it by entering the deregistration code.
1 Select Deregistration.
Refer to DivX® VOD (DivX
code) on page 19.
2 Use M.C. to select Yes.
Turn to change the menu option. Press to select.
The deregistration is completed.
# To cancel deregistration, select No.
â
VOD registration
04
English
! Black Level – Emphasizes the dark portions
of images making the difference between
bright and dark more distinct
Changing the picture adjustment
You can adjust the Brightness (brightness),
Contrast (contrast), Color (color) ,Hue (hue),
Dimmer (dimmer), Temperature (tempera-
ture) and Black Level (black level) for each
source.
! You cannot adjust Color, Hue and
Black Level for the audio source.
! If the color system is not NTSC, you cannot
adjust Hue.
% Display the picture adjustment mode.
Refer to Picture ADJ (picture adjustment) on
page 33.
! Brightness – Adjusts the black intensity
! Contrast – Adjusts the contrast
! Color – Adjusts the color saturation
! Hue – Adjusts the tone of color (red or
green is emphasized)
! Dimmer – Adjusts the brightness of the dis-
play
! Temperature – Adjusts the color tempera-
ture, resulting in a better white balance
En
41
Page 42

ext
9
CH
Q
Seek
Section
05
Available accessories
HD Radioä tuner
This HD Radio Ready receiver is ready to receive
HD Radio broadcasts when connected to the
HD Radio tuner (e.g. GEX-P20HD), sold separately.
For details concerning operation, refer to the HD
Radio tuner’s operation manual.
Basic operations
D/Aauto
Radio
HD
A-E
87.
.
16:54
MHz
Using iTunes tagging
The operation is the same as that of the tuner.
(Refer to Using iTunes tagging on page 15.)
Function settings
1 Press M.C. to display the function
menu.
2 Turn M.C. to select the function.
After selecting, perform the following procedures to set the function.
BSM (best stations memory)
1 Press M.C. to turn BSM on.
To cancel, press M.C. again.
Local (local seek tuning)
1 Indicator display area
Refer to Indicator list on page 50.
2 Text information area
! Call sign—artist name—song title—pro-
gram type
! Band/Preset number/Frequency indica-
tor
3 Source image display
Operations are the same as those of the tuner.
(Refer to Basic operations on page 15.)
Storing and recalling stations
Operations are basically the same as those of
the tuner. (Refer to Storing and recalling sta-
tions for each band on page 15.)
However, the band selection method is different from that of the tuner.
Selecting a band
1 Push M.C. down.
1 Press M.C. to display the setting mode.
2 Turn M.C. to select Local.
3 Press M.C. to turn Local on or off.
4 Turn M.C. and press to select Level.
5 Turn M.C. to select the desired setting.
FM: Off—Level1—Level2—Level3—Level4
AM: Off—Level1—Level2
The highest level setting allows reception of only
the strongest stations, while lower levels allow the
reception of weaker stations.
Seek Mode (seek mode)
Seek tuning setting can be changed between digital
station seek (Seek HD) and analog station seek (Seek
All) depending on the reception status.
1 Press M.C. to select your favorite setting.
Seek All—Seek HD
Blending (reception mode)
If the reception for a digital broadcast becomes poor,
this unit automatically switches to the analog broadcast of the same frequency. If this function is set to
D/A Auto, the tuner switches between digital broadcast and analog broadcast automatically. If this function is set to Analog, the tuner will only receive
analog broadcasts.
1 Press M.C. to display the setting mode.
2 Turn M.C. to select a desired mode.
D/A Auto—Analog
42
En
Page 43
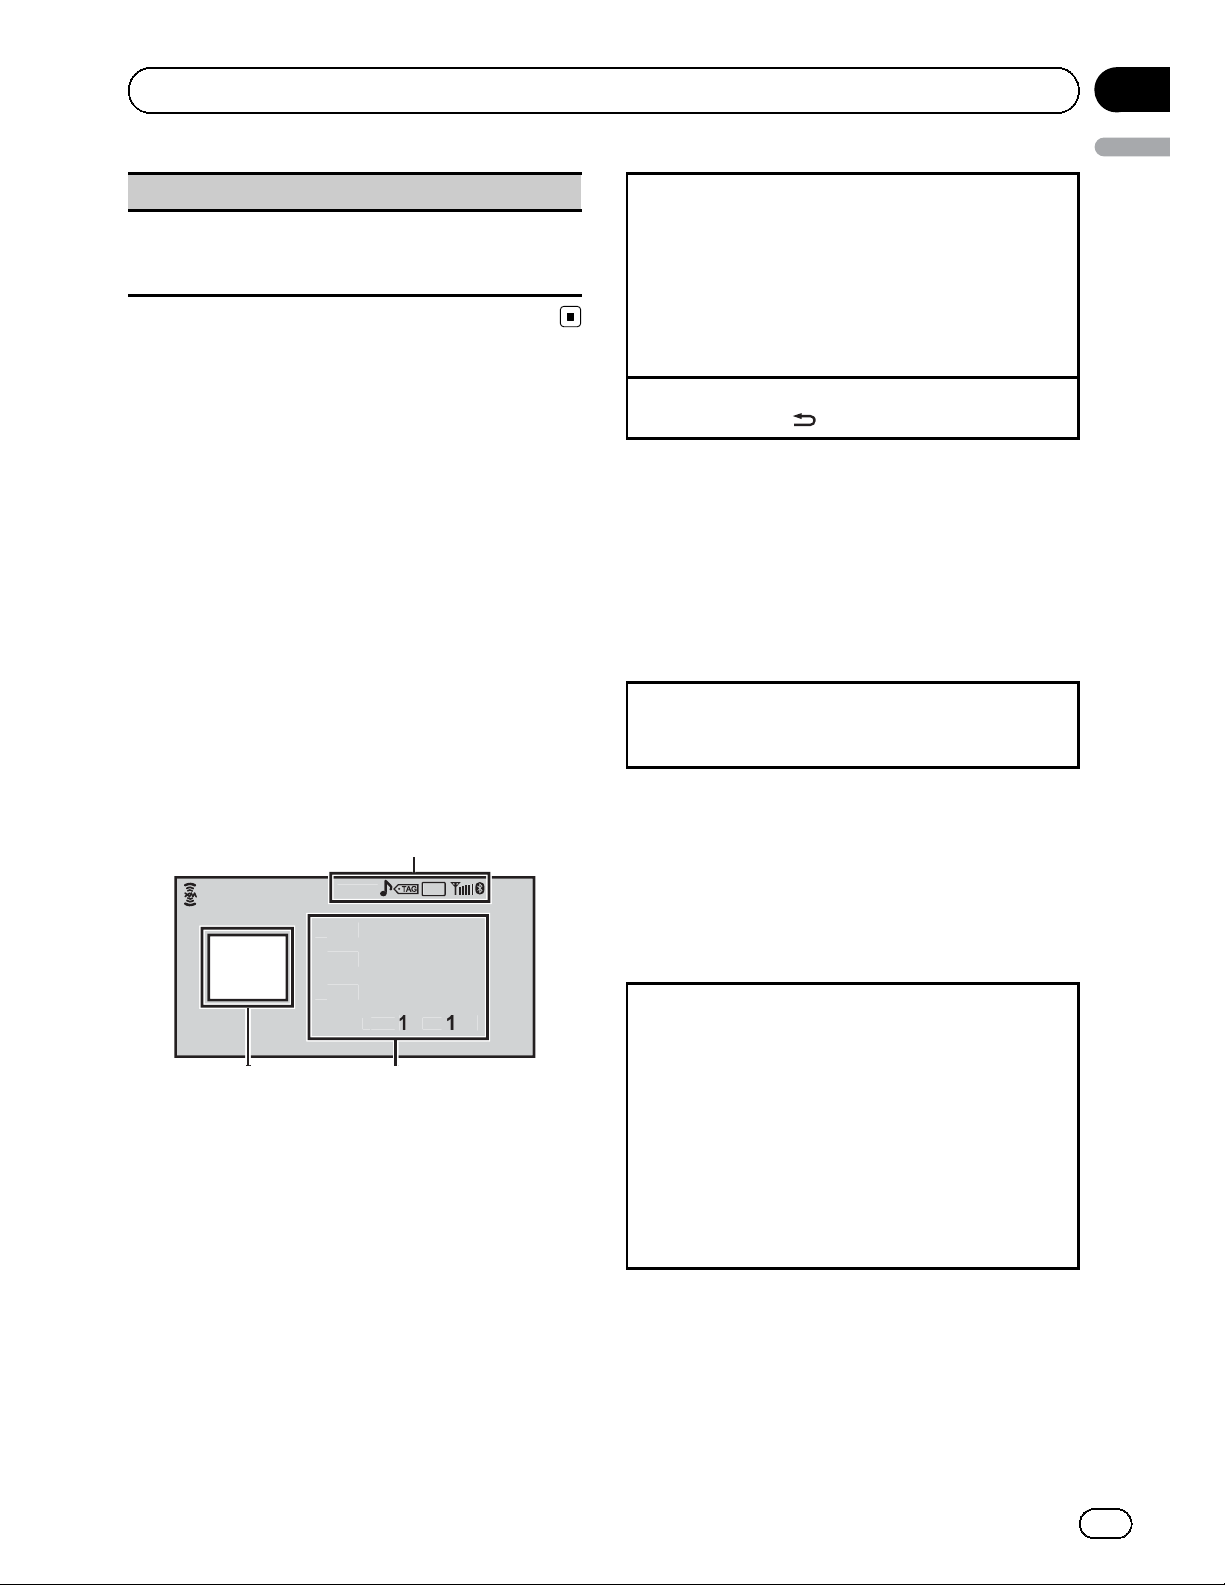
t
t
t
y
112
CH
Q
Section
Available accessories
Display (display setting)
You can switch to the desired text information.
1 Press M.C. to display the setting mode.
2 Press M.C. to select the desired setting.
XM tuner
You can use this unit to control an XM satellite
digital tuner (GEX-P920XM), which is sold separately.
For details concerning operation, refer to the
XM tuner’s operation manuals. This section
provides information on XM operations with
this unit which differs from that described in
the XM tuner’s operation manual.
! With this unit, you can operate two addi-
tional functions: XM channel direct selection and preset channel list.
Selecting a channel (step by step)
1 Push M.C. left or right.
! If you push and hold M.C. left or right, you
can increase or decrease the channel number
continuously.
! You can also perform tuning from a desired
channel category. (Refer to Selecting a chan-
nel from a channel category on the next page.)
Switching the display off
1 Press and hold
.
Storing and recalling stations
Operations are basically the same as those of
the tuner. (Refer to Storing and recalling sta-
tions for each band on page 15.)
However, the band selection method is different from that of the tuner.
Selecting a band
1 Push M.C. down.
Band can be selected from XM1, XM2 or XM3.
05
English
Basic operations
XM
Categor
x
x
x
XM
1 Indicator display area
Refer to Indicator list on page 50.
2 Text information area
! Channel name
! Artist name
! Song title
! Band/Preset number/Frequency indica-
tor
3 Source image display
A-E
.
16:54
Selecting an XM channel directly
This function is available only for MVH-P8300BT.
When using the remote control, you can select
the channel directly by entering the desired
channel number.
1 Press DIRECT.
The channel number input display appears.
2 Press 0 to 9 to enter the desired channel number.
! You can cancel the input number by pressing
CLEAR.
3 Press DIRECT.
The channel of the entered number is selected.
! After entering the number input mode, if you
do not perform an operation within about
eight seconds, the mode is automatically canceled.
Function settings
1 Press M.C. to display the function
menu.
43
En
Page 44
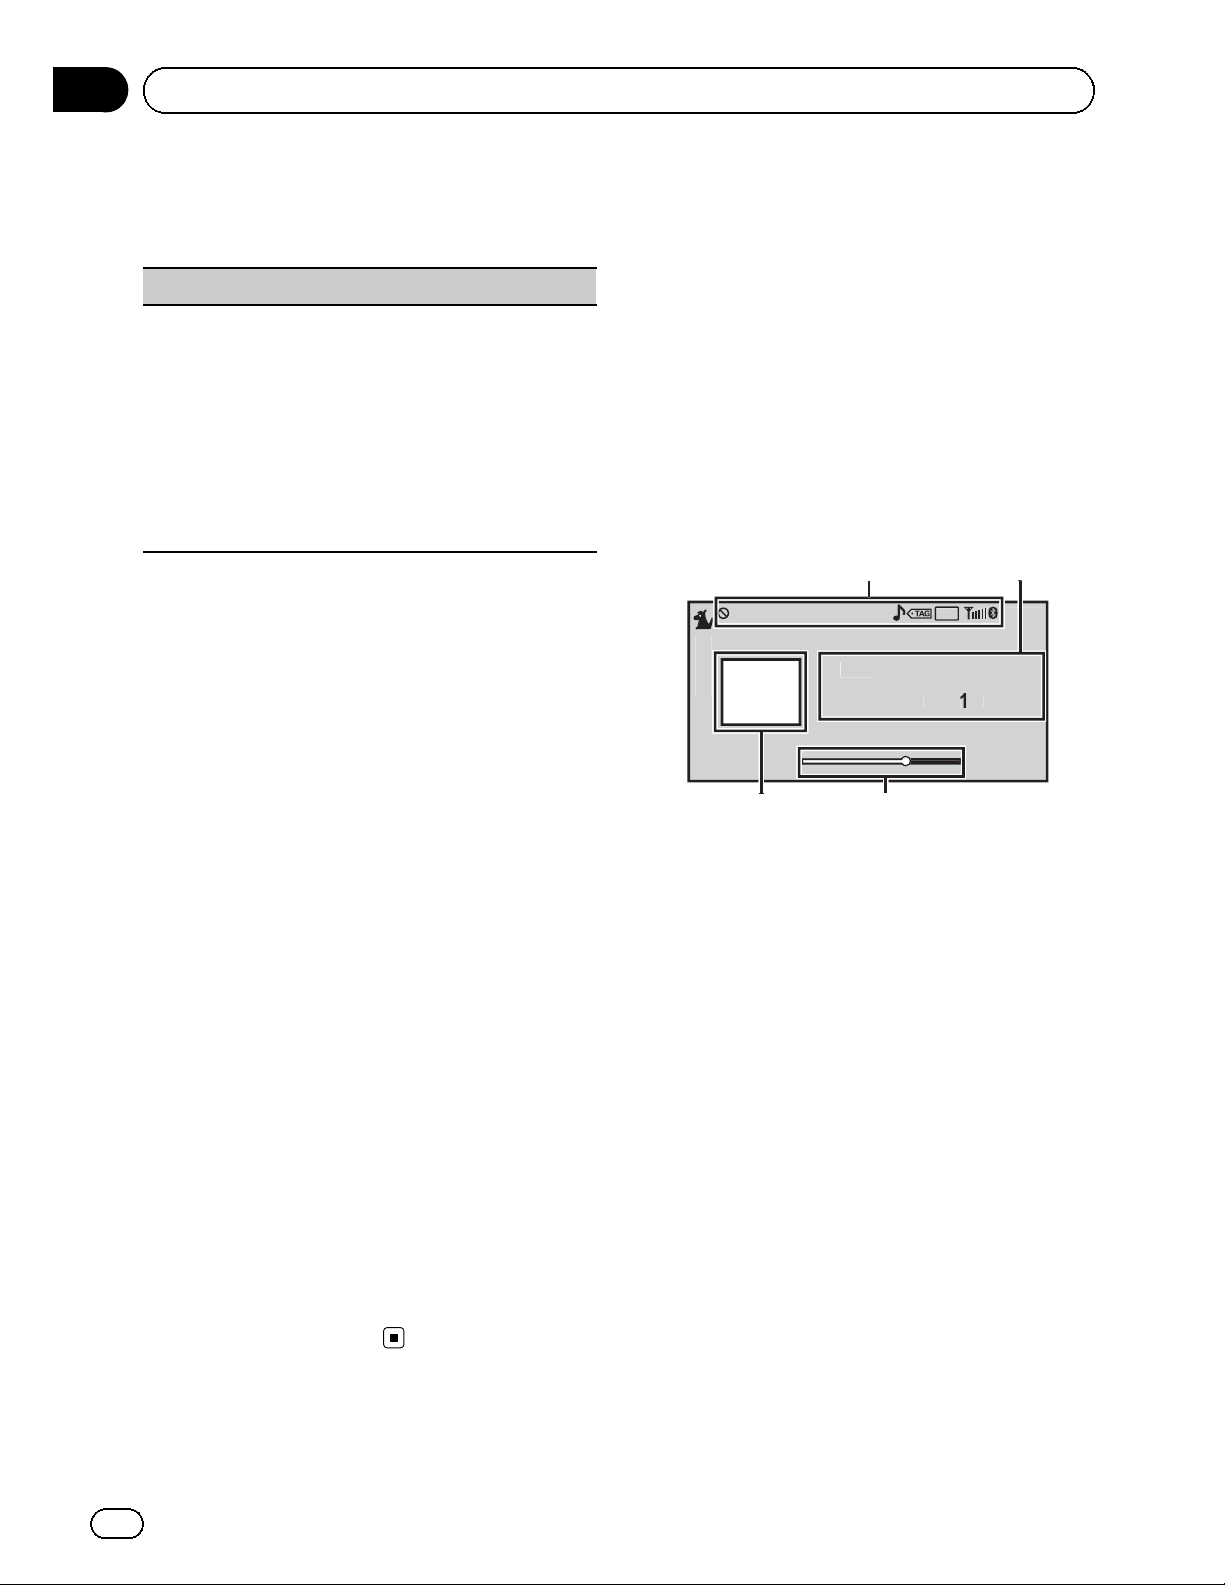
t
y
US1
CH
S
Q
Section
05
Available accessories
2 Turn M.C. to select the function.
After selecting, perform the following procedures to set the function.
Channel Mode (channel select mode setting)
You have two methods for selecting a channel: by
number and by category. When selecting by number,
channels in any category can be selected. Select by
category to narrow your search down to only channels in a particular category.
1 Press M.C. to display the setting mode.
2 Turn M.C. to select the desired setting.
All CH (channel number select setting)—Category (channel category select setting)
3 Press M.C. to confirm the selection.
Selecting a channel from a
channel category
1 Switch the channel select settings to
Category.
Refer to Channel Mode (channel select mode
setting) on this page.
SIRIUS Satellite Radio tuner
You can use this unit to control a SIRIUS Satellite Radio tuner, which is sold separately.
When the SIRIUS tuner is used together with
this unit, some operations differ slightly from
those described in the SIRIUS operation manual. This manual provides information on
these points. For all other information on
using the SIRIUS tuner, please refer to the SIRIUS operation manual.
Basic operations
Game
SIRIU
Categor
x
IRI
A-E
.
110
2 Push M.C. up or down to select the desired channel category.
3 Push M.C. left or right to select the desired channel in the selected channel category.
Displaying the Radio ID
1 Select the channel select settings to
All CH.
Refer to Channel Mode (channel select mode
setting) on this page.
2 Push M.C. left or right to select
RADIO ID.
# If you select another channel, display of the ID
code is canceled.
# RADIO ID and the ID codes are repeatedly dis-
played one aft er the other.
1 Indicator display area
Refer to Indicator list on page 50.
2 Text information area
! Play time—Channel number—Channel
name—Category name—Artist name—
Song title/program title—Composer
name
! Band/Preset number/Frequency indica-
tor
3 Scrubber bar
4 Source image display
44
En
Page 45
Section
Available accessories
Selecting a channel (step by step)
1 Push M.C. left or right.
! If you push and hold M.C. left or right, you
can increase or decrease the channel number
continuously.
! You can also perform tuning from a desired
channel category. (Refer to Selecting a chan-
nel from a channel category on the next page.)
Displaying the Radio ID
1 Push M.C. left or right to select CH 000.
! To select CH 000, set the channel select setting to
All CH. About the channel select setting, refer to
Channel Mode (channel select mode setting) on
this page.
Notes
! Play time and scrubber bar are displayed dur-
ing the Instant Replay mode. Refer to Using
the Instant Replay function on the next page.
! Play time display indicates the time inverted
from the live broadcast. The play time is displayed as a negative number.
! It may take a few seconds before you can hear
anything while this unit acquires and processes the satellite signal when you change
the source to a SIRIUS tuner or select a channel.
Storing and recalling stations
Operations are basically the same as those of
the tuner. (Refer to Storing and recalling sta-
tions for each band on page 15.)
However, the band selection method is different from that of the tuner.
Selecting a band
1 Push M.C. down.
Band can be selected from SIRIUS1, SIRIUS2 or
SIRIUS3.
05
English
Function settings
1 Press M.C. to display the main menu.
2 Turn M.C. to change the menu option
and press to select Function.
3 Turn M.C. to select the function.
After selecting, perform the following procedures to set the function.
Channel Mode (channel select mode setting)
You have two methods for selecting a channel: by
number and by category. When selecting by number,
channels in any category can be selected. Select by
category to narrow your search down to only channels in a particular category.
Refer to Channel Mode (channel select mode setting)
on the previous page.
Game Alert (game alert setting)
This system can alert you when games involving your
favorite teams are about to start. To use this function
you need to set up a game alert for the teams in advance.
! To use this function, a Pioneer SIRIUS bus inter-
face (e.g. CD-SB10) is required.
! To use this function, a SIRIUS plug-and-play unit
with a Game Alert Function is required.
! For details, refer to the SIRIUS plug-and-play
unit’s manuals.
! You can also operate this function when a SIR-
PNR2 is connected to this unit.
! The Game Alert function is on at the default set-
ting.
! Once you select the teams, you need to turn the
Game Alert function on.
1 Press M.C. to turn the Game Alert on or off.
! When a game of the selected team is about to
start (or is currently playing) on a different station,
a game alert is displayed.
Use M.C. to select Jump and switch to the other
station to listen to the game.
Turn to change the menu option. Press to select.
If you select Stay, the station will not be switched.
Selecting a SIRIUS channel directly
Operations are the same as those of the XM
tuner. (Refer to Selecting an XM channel directly
on page 43.)
Team Setting (team setting)
En
45
Page 46
Section
05
Available accessories
1 Press M.C. to display the setting mode.
2 Press M.C. to select a desired league.
3 Turn M.C. to select a desired team.
4 Press and hold M.C. to store the selected team in
the memory.
The game alert function is activated for that team.
5 Repeat these steps to select other teams.
Up to 12 teams can be selected.
! When you have already selected 12 teams,
FULL is displayed and additional teams cannot be selected. In this case, first delete a selected team and then try again.
Live Game Info (game information)
If any games of the selected teams are currently playing, you can display information on the games and
tune in to the broadcast channel.
You can display information on the games while enjoying the sound from the station you are currently
tuned in to. You can also tune in to the broadcast
channel when you wish to.
1 Press M.C. to display the setting mode.
2 Turn M.C. to select a game.
! The game score will be updated automatically.
3 Press M.C. to switch to the other station and lis-
ten to the game.
! If you have not selected any teams, NOT SET is
displayed.
! When games involving your favorite teams are not
currently playing, NO GAME is displayed.
Using the Instant Replay
function
The following functions can be operated in Instant Replay mode.
! To use this function, a Pioneer SIRIUS bus
interface (e.g. CD-SB10) is required.
! To use this function, a SIRIUS plug-and-
play unit with an Instant Replay Function is
required.
! For details, refer to the SIRIUS plug-and-
play unit’s manuals.
Using Instant Replay mode
1 Refer to Instant Replay (Instant Replay mode set-
ting) on this page.
! When another source is selected, instant re-
play mode is canceled.
Select a track
1 Push M.C. left or right.
Fast forward or reverse
1 Push and hold M.C. left or right, and then re-
lease.
Display (display setting)
You can switch to the desired text information.
1 Press M.C. to display the setting mode.
2 Press M.C. to select the desired setting.
Instant Replay (Instant Replay mode setting)
1 Press M.C. to turn Instant Replay mode on or off.
Play/Pause (pause)
1 Press M.C. to pause or resume.
Selecting a channel from a
channel category
Operations are the same as those of the XM
tuner. (Refer to Selecting a channel from a
channel category on page 44.)
46
En
Page 47
Additional information
Troubleshooting
Common
Symptom Cause Action
The power will
not turn on.
The unit will
not operate.
Operation with
the remote
control is not
possible.
The unit does
not operate
correctly even
when the appropriate remote control
buttons are
pressed.
There is no
sound.
The volume
level will not
rise.
The aspect
ratio is incorrect and the
image is
stretched.
There is no
image displayed.
The image displayed stops
(pauses) and
the unit cannot
be operated.
Leads and connectors are incorrectly connected.
The fuse is
blown.
Noise and/or
other factors are
causing the builtin microprocessor to operate incorrectly.
Battery power is
low.
Cables are not
connected correctly.
The aspect ratio
setting is incorrect for the display.
The parking
brake cable is
not connected.
The parking
brake is not applied.
The data could
no longer be
read during playback.
Confirm once more
that all connections are correct.
Rectify the cause
and then replace
the fuse. Be sure to
install a fuse with
the same rating.
Press RESET.
Load a new battery.
Connect the cables
correctly.
Select the appropriate setting for
your display.
Connect the parking brake cable,
and apply the parking brake.
Connect the parking brake cable,
and apply the parking brake.
Stop playback
once, and start
playback again.
Symptom Cause Action
There is no
sound.
The volume
level is low.
The sound and
video skip.
NO XXXX appears when a
display is changed (NO TITLE,
for example).
Sub-folders
cannot be
played back.
The repeat
range changes
automatically.
The volume level
is low.
The attenuator is
on.
The unit is not
firmly secured.
There is no embedded text information.
Folder repeat
play has been selected.
Another folder
was selected during repeat play.
Track search or
fast forward/reverse was performed during
file repeat play.
Adjust the volume
level.
Turn the attenuator
off.
Firmly secure the
unit.
Switch the display
or play another
track/file.
Select the repeat
range again.
Select the repeat
range again.
Select the repeat
range again.
Problems during iPod playback
Symptom Cause Action
The iPod does
not operate
correctly.
The cables are incorrectly connected.
The iPod version
is old.
Disconnect the
cable from the
iPod. Once the
iPod’s main menu
is displayed, reconnect the iPod and
reset it.
Update the iPod
version.
Error messages
When you contact your dealer or your nearest
Pioneer Service Center, be sure to note the
error message.
External storage device (USB, SD)
Message Cause Action
No Device The USB storage
device is not connected.
Connect a compatible USB storage
device.
Appendix
English
En
47
Page 48

Appendix
Additional information
Message Cause Action
Unplayable
File
Format Read Sometimes there
Skipped The external sto-
Protect All the files in the
Incompatible
USB
IncompatibleSDNon-compatible
This type of file
cannot be played
on this unit.
There are no
songs.
The connected
USB storage device has security
enabled.
is a delay between the start of
playback and
when you start to
hear any sound.
rage device in
use contains
WMA files embedded with
Windows
Mediaä
DRM 9/10.
external storage
device are embedded with
Windows Media
DRM 9/10.
The USB device
connected to is
not supported by
this unit.
The USB device
is not formatted
with FAT16 or
FAT32.
SD storage device
Select a file that
can be played.
Transfer the audio
files to the external
storage device and
connect.
Follow the USB
memory instructions to disable security.
Wait until the message disappears
and you hear
sound.
Play an audio file
not embedded with
Windows Media
DRM 9/10.
Transfer audio files
not embedded with
Windows Media
DRM 9/10 to the
external storage
device and connect.
Connect a USB
Mass Storage
Class compliant
device.
The connected
USB device should
be formatted with
FAT16 or FAT32.
Remove your device and replace it
with a compatible
SD storage device.
Message Cause Action
Check USB The USB connec-
tor or USB cable
has shortcircuited.
The connected
USB portable
audio player/
USB memory
consumes more
than maximum
allowable current.
Error-02-9X/-DXCommunication
failed.
Rental expired.
File Not Playable-High Definition
It is not possible to write it
in the flash.
Authorization
Error
The connected
external storage
device contains
expired DivX
VOD content.
The connected
external storage
device contains a
high definition
DivX file.
This unit’s flash
memory used as
the temporary
storage area is
full.
This unit’s DivX
registration code
has not been
authorized by the
DivX VOD contents provider.
Check that the
USB connector or
USB cable is not
caught in something or damaged.
Disconnect the
USB storage device and do not
use it. Turn the
ignition switch to
OFF, then to ACC
or ON and then
connect only compliant USB storage
devices.
Perform one of the
following operations.
–Turn the ignition
switch OFF and
back ON.
–Disconnect or
eject the external
storage device.
–Change to a different source.
Then, return to the
USB or SD source.
! Replace the external storage device.
! Select a file that
can be played.
! This unit cannot
play DivX HD files.
Replace the external storage device
with one this unit
can play.
! Select a file that
can be played.
Select a file that
can be played.
Register this unit
to the DivX VOD
contents provider.
48
En
Page 49

Additional information
Message Cause Action
Video frame
rate not supported
Audio Format
not supported
Not Found No related
The external storage device’s
frame rate is
more than 30 fps.
This type of file is
not supported on
this unit.
songs.
iPod
Message Cause Action
No Device USB storage de-
vice or iPod is
not connected.
Incompatible
USB
Check USB The iPod oper-
Format Read/
Ready
Error-02-6X/9X/-DX
Non-compatible
iPod
ates correctly but
does not charge.
Sometimes there
is a delay between the start of
playback and
when you start to
hear any sound.
Communication
failed.
iPod failure. Disconnect the
Replace the external storage device.
Select a file that
can be played.
Transfer a file that
can be played.
Connect a compatible iPod.
Disconnect your
device and replace
it with a compatible iPod.
Make sure the connection cable for
the iPod has not
shorted out (e.g.,
not caught in
metal objects).
After checking,
turn the ignition
switch OFF and
back ON, or disconnect the iPod
and reconnect.
Wait until the message disappears
and you hear
sound.
Disconnect the
cable from the
iPod. Once the
iPod’s main menu
is displayed, reconnect the iPod and
reset it.
cable from the
iPod. Once the
iPod’s main menu
is displayed, reconnect the iPod and
reset it.
Message Cause Action
Error-02-67 The iPod firm-
ware version is
old.
Stop There are no
songs.
There are no
songs in the current list.
No xxxx There is no infor-
mation.
Not Found No related
songs.
Update the iPod
version.
Transfer songs to
the iPod.
Select a list that
contains songs.
Record information
on the iPod.
Transfer songs to
the iPod.
Pandora
Message Cause Action
Start up the
Pandora application from
your Device.
Pandora system maintenance. Try
again later.
Skip limit
reached.
This version
of the
Pandora Application is
not supported.
Pandora is unable to play
music. Please
see your Device.
Create Station
within the
Pandora Application on
Device.
Unable to
save Bookmark. Try
again later.
The Pandora application has not
started running
yet.
Unable to save
thumb rating.
Unable to save
BookMark.
Pandora system
is undergoing
maintenance.
Skip limit
reached.
This version of
the Pandora application is not
supported.
Device error message displayed in
Pandora Application.
Unable to play
music from
Pandora.
No station found. Create a station in
Unable to save
Bookmark.
Start up the
Pandora application from your
iPod/iPhone.
Try again later.
Do not exceed the
skip limit.
Connect an iPod/
iPhone that has a
compatible version
of the Pandora application installed.
Please check your
iPod/iPhone.
the Pandora application on your
iPod/iPhone.
Try again later.
Appendix
English
En
49
Page 50

Appendix
Additional information
iTunes tagging
Message Cause Action
iPod full. Tags
not transferred.
Memory full.
Tags not
stored.
Tag transfer
failed. Reconnect your
iPod.
Tag store
failed.
SD source cannot be selected during
tag transfer.
Memory used for
tag information
on the iPod is
full.
This unit’s flash
memory used as
the temporary
storage area is
full.
This unit’s tag information cannot
transfer to the
iPod.
Tag information
cannot be stored
in this unit.
Tag information
is being transferred to the
iPod.
Sync the iPod with
iTunes and clean
up the tagged playlist.
Connect the iPod
to this unit and
transfer this unit’s
tag information to
the iPod.
Check the iPod
and try again.
Try again.
Wait until tag
transfer is complete.
Bluetooth Telephone
Message Cause Action
Error-10 The power failed
for the Bluetooth
module of this
unit.
Turn the ignition
switch OFF and
then to ACC or ON.
If the error message is still displayed after
performing the
above action,
please contact
your dealer or an
authorized Pioneer
Service Station.
Message Cause Action
Error. Please
check MIC.
Error. Please
check xxxx
speaker.
Error. Please
check noise.
Error. Please
check battery.
The microphone
is not connected.
The microphone
cannot pick up
the measuring
tone of a speaker.
The surrounding
noise level is too
high.
Power is not
being supplied
from the battery
to this unit.
Plug the optional
microphone securely into the
jack.
! Confirm that the
speakers are connected correctly.
! Correct the input
level setting of the
power amp connected to the
speakers.
! Set the microphone correctly.
! Stop your car in
a place that is
quiet, and switch
off the engine, air
conditioner and
heater.
! Set the microphone correctly.
! Stop your car in
a place that is
quiet, and switch
off the engine, air
conditioner and
heater.
! Connect the battery correctly.
Indicator list
Common
(MVH-P8300BT only)
Indicates that a Bluetooth telephone is connected.
Understanding auto EQ
error messages
When correct measurement of the car’s interior acoustic characteristics is not possible
using auto EQ, an error message may appear
on the display. In such cases, refer to the table
below to see what the problem is and how it
may be corrected. After checking, try again.
50
En
(MVH-P8300BT only)
Indicates the signal strength of the
cellular phone.
Shows when tag information is
stored in this unit.
Flashes when the tag is being
transferred to an iPod.
Page 51

Additional information
Indicates that Auto EQ is on.
Appendix
English
Tuner
Shows when song information
(tag) is being saved to your iPod.
iPod
1
S.Rtrv
Shows when repeat play is set to
One or All.
Shows when shuffle function is on.
Shows when the sound retriever
function is on.
External storage device (USB, SD)
Shows when the repeat range is
selected for the current file.
Local
Shows when local seek tuning is
on.
Indicates that the selected frequency is being broadcast in
stereo.
Shows when song information
(tag) from a radio station is received.
HD Radioä Technology
All Seek
Shows the seek mode status.
HD Seek
D/Aauto
Analog
Shows the setup value of reception
mode.
Shows when digital audio of HD
Radio signal is received.
S.Rtrv
Shows when the repeat range is
selected for the current folder.
Shows when random play is on.
Shows when the sound retriever
function is on.
Shows when analog audio of HD
Radio signal is received.
Shows the radio field strength.
Shows when the tuner is tuned to
HD Radio station.
Shows when you can receive song
information (tag) from a radio station.
XM/SIRIUS tuner
Shows when automatically switch-
Game
All CH
Category
ing to the game alert function is
not possible.
Shows when the channel number
select setting is selected.
Shows when the channel category
select setting is selected.
En
51
Page 52

Appendix
Additional information
Pandora
Shows when a song with a
"Thumbs Up" rating is playing.
Shows when a song with a
"Thumbs Down" rating is playing.
S.Rtrv
Shows when the sound retriever
function is on.
Handling guidelines
External storage device (USB, SD)
Address any questions you have about your external
storage device (USB, SD) to the manufacturer of the
device.
Do not leave the external storage device (USB, SD) in
places with high temperatures.
Depending on the external storage device (USB, SD),
the following problems may occur.
! Operations may vary.
! The storage device may not be recognized.
! Files may not be played back properly.
Partitioned USB memory is not compatible with this
unit.
Depending on the kind of USB portable audio player/
USB memory you use, the device may not be recognized or audio files may not be played back properly.
Do not leave the USB portable audio player/USB
memory in direct sunlight for extended amounts of
time. Doing so may cause the device to malfunction
from the extreme rise in temperature.
SD memory card
This unit supports only the following types of SD
memory cards.
! SD
! SDHC
Keep the SD memory card out of the reach of children. Should the SD memory card be swallowed, consult a doctor immediately.
Do not touch the connectors of the SD memory card
directly with your fingers or with any metal device.
Do not insert anything other than an SD memory card
into the SD card slot. If a metal object (such as a
coin) is inserted into the slot, the internal circuits may
break and cause malfunctions.
Do not insert a damaged SD memory card (e.g.
warped, label peeled off) as it may not be ejected
from the slot.
USB storage device
Connections via USB hub are not supported.
Do not connect anything other than a USB storage
device.
Firmly secure the USB storage device when driving.
Do not let the USB storage device fall onto the floor,
where it may become jammed under the brake or accelerator pedal.
Depending on the USB storage device, the device
may cause noise to occur in the radio.
! The device may genera te noise in the radio.
This unit can play back files in the USB portable
audio player/USB memory that is USB Mass Storage
Class. However, copyright protected files that are
stored in the USB devices cannot be played back.
You cannot connect a USB portable audio player/USB
memory to this unit via USB hub.
Do not try to force an SD memory card into the SD
card slot as the card or this unit may be damaged.
When ejecting an SD memory card, press it and hold
it until it clicks. It is dangerous for you to release your
finger immediately after you press on the card as the
card may shoot out of the slot and hit you in the face,
etc. If the card shoots out of the slot, it may become
lost.
iPod
Do not leave the iPod in direct sunlight for extended
amounts of time. Doing so may cause the iPod to
malfunction due to an extreme rise in temperature.
Do not leave the iPod in places with high temperatures.
To ensure proper operation, connect the dock connector cable from the iPod directly to this unit.
52
En
Page 53

Additional information
Firmly secure the iPod when driving. Do not let the
iPod fall onto the floor, where it may become jammed
under the brake or accelerator pedal.
For details, refer to the manuals for the iPod.
About iPod settings
! When an iPod is connected, this unit changes the
EQ (equalizer) setting of the iPod to off in order to
optimize the acoustics. When you disconnect the
iPod, the EQ returns to the original setting.
! You cannot set Repeat to off on the iPod when
using this unit. Repeat is automatically changed
to All when the iPod is connected to this unit.
Appendix
English
Important
! When naming a JPEG image file, add the cor-
responding filename extension (.jpg, .jpeg,
.jpe or .jfif).
! This unit plays back files with these filename
extensions (.jpg, .jpeg, .jpe or .jfif) as a JPEG
image file. To prevent malfunctions, do not
use these extensions for files other than JPEG
image files.
Compressed audio/video
JPEG picture files
JPEG is short for Joint Photographic Experts Group
and refers to a still image compression technology
standard.
Files are compatible with Baseline JPEG and EXIF 2.1
still images up to a resolution of 8 192 × 7 680. (EXIF
format is used most commonly with digital still cameras.)
Playback of EXIF format files that were processed by a
personal computer may not be possible.
There is no progressive JPEG compatibility.
DivX video files
Depending on the composition of the file information,
such as the number of audio streams or file size,
there may be a slight delay in playback if data is
being played back from an external storage device.
Some special operations may be prohibited due to
the composition of the DivX files.
Only DivX files downloaded from a DivX partner site
are guarantee for proper operation. Unauthorized
DivX files may not operate properly.
DRM rental files cannot be operated until playback is
started.
compatibility (USB, SD)
WMA
File extension: .wma
Bit rate: 5 kbps to 320 kbps (CBR), VBR
Sampling frequency: 8 kHz to 48 kHz
Windows Media Audio Professional, Lossless, Voice/
DRM Stream/Stream with video: Not compatible
MP3
File extension: .mp3
Bit rate: 8 kbps to 320 kbps (CBR), VBR
Sampling frequency: 8 kHz to 48 kHz (32 kHz, 44.1 kHz,
48 kHz for emphasis)
Compatible ID3 tag version: 1.0, 1.1, 2.2, 2.3 (ID3 tag
Version 2.x is given priority than Version 1.x.)
M3u playlist: Not compatible
MP3i (MP3 interactive), mp3 PRO: Not compatible
AAC
Compatible format: AAC encoded by iTunes
Recommended file size: 2 Mbps or less with a transmission rate of 2 GB or less.
The ID code of this unit must be registered to a DivX
VOD provider in order to playback DivX VOD files. For
information on ID codes, refer to Displaying the DivX
VOD registration code on page 40.
For more details about DivX, visit the following site:
http://www.divx.com/
File extension: .m4a
Bit rate: 8 kbps to 320 kbps
Sampling frequency: 8 kHz to 44.1 kHz
â
Apple Lossless: Not compatible
AAC file bought from the iTunes Store (.m4p file extension): Not compatible
En
53
Page 54

Appendix
Additional information
DivX compatibility
Compatible format: DivX video format implemented in
relation to DivX standards
File extensions: .avi or .divx
DivX Ultra format: Not compatible
DivX HD format: Not compatible
DivX files without video data: Not compatible
Compatible audio codec: MP2, MP3, Dolby Digital
LPCM: Not compatible
Bit rate: 8 kbps to 320 kbps (CBR), VBR
Sampling frequency: 32 kHz, 44.1 kHz, 48 kHz
Compatible external subtitle file extension: .srt
Supplemental information
Only the first 32 characters can be displayed as a file
name (including the file extension) or a folder name.
This unit may not operate correctly depending on the
application used to encode WMA files.
There may be a slight delay when starting playback of
audio files embedded with image data.
External storage device (USB, SD)
Playable folder hierarchy: up to eight tiers (A practical
hierarchy is less than two tiers).
Playable folders: up to 6 000
Playable files: up to 65 535
Playback of copyright-protected files: Not compatible
Partitioned external storage device (USB, SD): Only
the first playable partition can be played.
There may be a slight delay when starting playback of
audio files on an external storage device (USB, SD)
with numerous folder hierarchies.
SD memory card
CAUTION
Pioneer accepts no responsibility for data lost on
the USB memory/USB portable audio player/SD
memory card even if that data is lost while using
this unit.
iPod compatibility
This unit supports only the following iPod models.
Supported iPod software versions are shown below.
Older versions may not be supported.
! iPhone 4 (software version 4.1)
! iPhone 3GS (software version 4.1)
! iPhone 3G (software version 4.1)
! iPhone (software version 3.1.3)
! iPod nano 6th generation (software version 1.0)
! iPod nano 5th generation (software version 1.0.2)
! iPod nano 4th generation (software version 1.0.4)
! iPod nano 3rd generation (software version 1.1.3)
! iPod nano 2nd generation (software version 1.1.3)
! iPod nano 1st generation (software version 1.3.1)
! iPod touch 4th generation (software version 4.1)
! iPod touch 3rd generation (software version 4.0)
! iPod touch 2nd generation (software version 4.0)
! iPod touch 1st generation (software version 3.1.3)
! iPod classic 160GB (software version 2.0.4)
! iPod classic 120GB (software version 2.0.1)
! iPod classic (software version 1.1.2)
! iPod 5th generation (software version 1.3)
Depending on the generation or version of the iPod,
some functions may not be available.
Operations may vary depending on the software version of iPod.
When using an iPod, an iPod Dock Connector to USB
Cable is required.
A Pioneer CD-IU50 interface cable is also available.
For details, consult your dealer.
About the file/format compatibil ity, refer to the iPod
manuals.
Audio Book, Podcast: Compatible
There is no compatibility for Multi Media Cards
(MMC).
Compatibility with all SD memory cards is not guaranteed.
This unit is not compatible with SD-Audio/SD-Video.
54
En
CAUTION
Pioneer accepts no responsibility for data lost on
the iPod, even if that data is lost while this unit is
used.
Page 55

Additional information
Sequence of audio files
The user cannot assign folder numbers and
specify playback sequences with this unit.
Example of a hierarchy
01
02
03
04
05
Level 1 Level 2 Level 3 Level 4
: Folder
: Compressed
audio file
01 to 05: Folder
number
1 to 6: Playback
sequence
External storage device (USB, SD)
The playback sequence is the same as the recorded sequence in the external storage device (USB, SD).
To specify the playback sequence, the following method is recommended.
1 Create a file name that includes numbers that
specify the playback sequence (e.g., 01xxx.
mp3 and 099yyy.mp3).
2 Put those files into a folder.
3 Save the folder that contains the files to the
external storage device (USB, SD).
However, depending on the system environment, you may not be able to specify the playback sequence.
For USB portable audio players, the sequence
is different and depends on the player.
Using the display correctly
CAUTION
! If liquid or foreign matter should get inside
this unit, turn off the power immediately and
consult your dealer or the nearest authorized
PIONEER Service Station. Do not use the unit
in this condition because doing so may result
in fire, electric shock, or other failure.
! If you notice smoke, a strange noise or smell,
or any other abnormal signs from the display,
Appendix
English
turn off the power immediately and consult
your dealer or the nearest authorized
PIONEER Service Station. Using this unit in
this condition may result in permanent damage to the system.
! Do not disassemble or modify this unit, as
there are high-voltage components inside
which may cause electric shock. Be sure to
consult your dealer or the nearest authorized
PIONEER Service Station for internal inspection, adjustments, or repairs.
Handling the display
! When the display is subjected to direct sun-
light for a long period of time, it will become very hot resulting in possible
damage to the LCD screen. You should
avoid exposing the display unit to direct
sunlight as much as possible.
! The display should be used within the tem-
perature range of –10 °C to +60 °C (14 °F to
140 °F).
At temperatures higher or lower than this
operating temperature range, the display
may not operate normally.
Liquid crystal display (LCD) screen
! Heat from the heater may damage the LCD
screen, and cool air from the cooler may
cause moisture to form inside the display
resulting in possible damage. Also, if the
display is cooled down by the cooler, the
screen may become dark, or the life span
of the small fluorescent tube used inside
the display may be shortened.
! Small black dots or white dots (bright dots)
may appear on the LCD screen. These are
due to the characteristics of the LCD
screen and do not indicate a malfunction.
! When using a cellular phone, keep the an-
tenna away from the display to prevent disruption of the video image by the
appearance of spots, colored stripes, etc.
En
55
Page 56

Appendix
Additional information
LED (light-emitting diode)
backlight
! At low temperatures, using the LED back-
light may increase image lag and degrade
the image quality due to the characteristics
of the LCD screen. Image quality will improve with an increase in temperature.
! To protect the LED backlight, the display
will darken in the following environments:
— In the direct sunlight
— Near the heater vent
! The product lifetime of the LED backlight is
more than 10 000 hours. However, it may
decrease if used in high temperatures.
! If the LED backlight reaches the end of its
product lifetime, the screen will become
dark and the image will no longer be projected. In such cases, please consult your
dealer or the nearest authorized PIONEER
Service Station.
this product in any commercial (i.e. revenuegenerating) real time broadcasting (terrestrial,
satellite, cable and/or any other media), broadcasting/streaming via internet, intranets and/
or other networks or in other electronic content distribution systems, such as pay-audio or
audio-on-demand applications. An independent license for such use is required. For details, please visit
http://www.mp3licensing.com.
WMA
Windows Media is either a registered trademark or trademark of Microsoft Corporation in
the United States and/or other countries.
This product includes technology owned by
Microsoft Corporation and cannot be used or
distributed without a license from Microsoft
Licensing, Inc.
SD memory card
SD Logo is a trademark of SD-3C, LLC.
SDHC Logo is a trademark of SD-3C, LLC.
Copyright and trademark
This item incorporates copy protection technology that is protected by U.S. patents and
other intellectual property rights of Rovi
Corporation. Reverse engineering and disassembly are prohibited.
Bluetooth
The Bluetooth
tered trademarks owned by Bluetooth SIG, Inc.
and any use of such marks by Pioneer
Corporation is under license. Other trademarks and trade names are those of their respective owners.
iTunes
Apple and iTunes are trademarks of Apple
Inc., registered in the U.S. and other countries.
MP3
Supply of this product only conveys a license
for private, non-commercial use and does not
convey a license nor imply any right to use
â
word mark and logos are regis-
iPod & iPhone
iPhone, iPod, iPod classic, iPod nano, and
iPod touch are trademarks of Apple Inc., registered in the U.S. and other countries.
“Made for iPod” and “Made for iPhone ” mean
that an electronic accessory has been designed to connect specifically to iPod or
iPhone, respectively, and has been certified by
the developer to meet Apple performance
standards.
Apple is not responsible for the operation of
this device or its compliance with safety and
regulatory standards.
Please note that the use of this accessory with
iPod or iPhone may affect wireless performance.
DivX
â
DivX
and is used under license.
is a registered trademark of DivX, Inc.,
56
En
Page 57

Additional information
ABOUT DIVX VIDEO: DivXâis a digital
video format created by DivX, Inc. This is an official DivX Certified
video. Visit divx.com for more information and
software tools to convert your files into DivX
video.
ABOUT DIVX VIDEO-ON-DEMAND: This
DivX Certified
order to play purchased DivX Video-on-Demand (VOD) movies. To obtain your registration code, locate the DivX VOD section in
Playing moving images. Go to vod.divx.com for
more information on how to complete your registration.
SAT Radio
The SAT RADIO READY mark indicates that
the Satellite Radio Tuner for Pioneer (i.e., XM
tuner and Sirius satellite tuner which are sold
separately) can be controlled by this unit.
Please inquire to your dealer or nearest
authorized Pioneer service station regarding
the satellite radio tuner that can be connected
to this unit. For satellite radio tuner operation,
please refer to the satellite radio tuner owner’s
manual.
! The system will use direct satellite-to-recei-
ver broadcasting technology to provide listeners in their cars and at home with
crystal-clear sound seamlessly from coast
to coast. Satellite radio will create and
package over 100 channels of digital-quality
music, news, sports, talk and children’s
programming.
! “SAT Radio”, the SAT Radio logo and all re-
lated marks are trademarks of Sirius Satellite Radio Inc., and XM Satellite Radio Inc.
â
device that plays DivX
â
device must be registered in
Appendix
English
Dolby Digital
Manufactured under license from Dolby
Laboratories. “Dolby” and the double-D symbol
are trademarks of Dolby Laboratories.
Pandora
Pandora is a registered trademark of Pandora
Media, Inc.
HD Radioä Technology
! HD Radioä, HD Radio Readyä, and the
HD Radio Ready logo are proprietary trademarks of iBiquity Digital Corporation.
! This HD Radio Ready receiver is ready to re-
ceive HD Radio broadcasts when connected to the HD Radio tuner (e.g. GEXP20HD), sold separately.
En
57
Page 58

Appendix
Additional information
Specifications
General
Power source ............................. 14.4 V DC (10.8 V to 15.1 V
allowable)
Grounding system ................... Negative type
Maximum current consumption
..................................................... 10.0 A
Dimensions (W × H × D):
DIN
Chassis ..................... 178 mm × 50 mm ×
162 mm
(7 in. × 2 in. × 6-3/8 in.)
Nose ........................... 188 mm × 58 mm × 17 mm
(7-3/8 in.× 2-1/4 in.× 5/8 in.)
Weight .......................................... 1.1 kg (2.4 lbs)
(MVH-P8300BT)
Weight .......................................... 1.0 kg (2.2 lbs)
(MVH-P7300)
Display
Screen size/aspect ratio ....... 3.0 inch wide/16:9
(effective display area:
66.8 mm × 36.7 mm)
Pixels ............................................. 345 600 (1 440 × 240)
Display method ........................ TFT active matrix
Color system .............................. NTSC compatible
Durable temperature range (power off)
..................................................... –4 °F to +176 °F
Audio
Maximum power output ....... 50 W × 4
70 W × 1/2 W (for subwoofer)
Continuous power output ... 22 W × 4 (1 kHz, 5 % THD, 4
W load, both channels driven)
Load impedance ...................... 4 W (4 W to 8 W (2 W for 1 ch)
allowable)
Preout maximum output level
..................................................... 4.0 V
Equalizer (8-Band Graphic Equalizer):
Frequency .......................... 40 Hz/80Hz/200 Hz/400 Hz/
1 kHz/2.5 kHz/8 kHz/10 kHz
Gain ...................................... ±12 dB
HPF:
Frequency .......................... 50 Hz/63Hz/80 Hz/100 Hz/
125 Hz
Slope .................................... –12 dB/oct
Subwoofer (mono):
Frequency .......................... 50 Hz/63Hz/80 Hz/100 Hz/
125 Hz
Slope .................................... –18 dB/oct
Gain ...................................... +6 dB to –24 dB
Phase .................................. Normal/Reverse
Bass boost:
Gain ...................................... +12 dB to 0 dB
USB
USB standard specification
..................................................... USB 1.1, USB 2.0 full speed
Maximum current supply .... 500 mA
USB Class ................................... MSC (Mass Storage Class)
File system .................................. FAT16, FAT32
MP3 decoding format ........... MPEG-1 & 2 Audio Layer 3
WMA decoding format ......... Ver. 7, 7.1, 8, 9, 10, 11, 12
(2 ch audio)
(Windows Media Player)
AAC decoding format ............ MPEG-4 AAC (iTunes en-
coded only)
(Ver. 9.0.3 and earlier)
DivX decoding format ............ Home Theater Ver. 3, 4, 5.2,
6 (.avi, .divx)
SD
Compatible physical format
..................................................... Version 1.10
File system .................................. FAT12, FAT16, FAT32
MP3 decoding format ........... MPEG-1 & 2 Audio Layer 3
WMA decoding format ......... Ver. 7, 7.1, 8, 9, 10, 11, 12
(2 ch audio)
(Windows Media Player)
AAC decoding format ............ MPEG-4 AAC (iTunes en-
coded only)
(Ver. 9.0.3 and earlier)
DivX decoding format ............ Home Theater Ver. 3, 4, 5.2,
6 (.avi, .divx)
FM tuner
Frequency range ...................... 87.9 MHz to 107.9 MHz
Usable sensitivity ..................... 9 dBf (0.8 μV/75 W, mono,
S/N: 30 dB)
Signal-to-noise ratio ............... 72 dB (IHF-A network)
AM tuner
Frequency range ...................... 530 kHz to 1 710 kHz
(10 kHz)
Usable sensitivity ..................... 25 μV (S/N: 20 dB)
Signal-to-noise ratio ............... 62 dB (analog broadcasting)
(IHF-A network)
Bluetooth
(MVH-P8300BT)
Version .......................................... Bluetooth 2.0 certified
Output power ............................ +4 dBm Maximum
(Power class 2)
58
En
Page 59

Additional information
CEA2006 Specifications
Power output ............................. 14 W RMS × 4 Channels
(4 W and ≦ 1 % THD+N)
S/N ratio ....................................... 91 dBA (reference: 1 W into
4 W)
Note
Specifications and the design are subject to modifications without notice.
Appendix
English
En
59
Page 60
PIONEER CORPORATION
1-1, Shin-ogura, Saiwai-ku, Kawasaki-shi,
Kanagawa 212-0031, JAPAN
PIONEER ELECTRONICS (USA) INC.
P.O. Box 1540, Long Beach, California 90801-1540, U.S.A.
TEL: (800) 421-1404
PIONEER EUROPE NV
Haven 1087, Keetberglaan 1, B-9120 Melsele, Belgium/Belgique
TEL: (0) 3/570.05.11
PIONEER ELECTRONICS ASIACENTRE PTE. LTD.
253 Alexandra Road, #04-01, Singapore 159936
TEL: 65-6472-7555
PIONEER ELECTRONICS AUSTRALIA PTY. LTD.
5 Arco Lane, Heatherton, Victoria, 3202 Australia
TEL: (03) 9586-6300
PIONEER ELECTRONICS OF CANADA, INC.
300 Allstate Parkway, Markham, Ontario L3R 0P2, Canada
TEL: 1-877-283-5901
TEL: 905-479-4411
PIONEER ELECTRONICS DE MEXICO, S.A. de C.V.
Blvd.Manuel Avila Camacho 138 10 piso
Col.Lomas de Chapultepec, Mexico, D.F. 11000
TEL: 55-9178-4270
先鋒股份有限公司
台北市內湖區瑞光路407號8樓
電話: (02) 2657-3588
先鋒電子(香港)有限公司
香港九龍尖沙咀海港城世界商業中心
9樓901-6室
電話: (0852) 2848-6488
Published by Pioneer Corporation.
Copyright ã 2010 by Pioneer Corporation.
All rights reserved.
Publié par Pioneer Corporation. Copyright
ã 2010 par Pioneer Corporation. Tous
droits réservés.
<KKMZX> <10K00000>
Printed in Thailand
Imprimé en Thaïlande
<YRD5339-A/N> UC
Page 61
RDS MEDIA CENTER RECEIVER
AUTORADIO MULTIMEDIA RDS
RECEPTORY CENTRO DE COMUNICACIONES RDS
MVH-P8300BT
MVH-P7300
Printed in Thailand
Imprime en Tha'ilande
<YRD5343-A/N>
Installation
Manuel
Manual
UC
Manual
d'installation
de
instalaci6n
<KKMZX>
<10KOOOOO>
Page 62

C_C_o_"_"_e_ct_i_"
g=--t
h_e_u_"
_it
__
)
C~
E------="g=-I_is~h
)
AWARNING
•Toavoid the risk of accident and the potential
violation of applicable laws, no viewing of front
seat video should ever occur while the vehicle
being driven.
•Insome countries or states the viewing of images
on a display inside a vehicle evenbypersons
otherthan the driver maybeillegal. Where such
regulations apply, they mustbeobeyed.
is
ACAUTION
• PIONEER does
installorservice
Installingorservicing the product
expose youtoriskofelectric
hazards. Refer
of
your
displaytoauthorized Pioneer service
personnel.
• Secure
electrical tape. Do
to
• Do
compartmenttoconnect the
of
vibration
to
the
compartment. Take extra care in securing the
wireatthis
• Make sure
moving
gear shift,
mechanism.
• Do
protection
all
remain exposed.
not
drill
the
unittothe
failatthe
passenger
partsofthe
not
shorten
not
all
wiring
a hole
may
eventually
point
compartment
point.
that
wires
parking
any
circuit
recommend
your
display
installation
with
cable
not
allow
into
the
vehicle battery. Engine
cause
where
may
the
will
not interfere
vehicle, such as the
brake or seat
leads.Ifyou do, the
failtowork
that
yourself.
may
shock
and servicing
clamps
any
bare
engine
yellow
the
wire
passes from
into
the
sliding
properly.
you
or other
or
wiring
lead
insulation
engine
with
AWARNING
• Use speakers over50W (output value) and
between 4 n to 8 n (impedance value),
1n to 3 n speakers
•
The
black cable is ground. When installing this
unit or power
to connect the ground wire first. Ensure that
the ground wire is properly connected to metal
parts of the
power amp and the one of this
device mustbeconnected to the car separately
with different screws.Ifthe screw for the ground
wire loosens or falls out, it could resultinfire,
generation of smoke or malfunction.
Ground wire
car's
~
for
this unit.
amp
(sold separately), make sure
body. The ground wire of the
unit
POWER
ff
Do
or any other
AMP
I.
~~t!
L
Other
(Another electronic
deviceinthe
1-6
devices
Qlmportant
• When this
ACC
red
cable
detect the operation of the ignition
battery drain may result.
unit
(accessory) positiononthe ignition switch,
must
6
\_
Metal
partsofcar's
car)
is installed in avehicle without
be wired to the terminal that can
key.
Otherwise,
body
not use
AWARNING
LIGHT
GREEN
IS
DESIGNEDTODETECT
AND MUSTBECONNECTEDTOTHE
SUPPLY
IMPROPER CONNECTION
LEAD MAY
RESULTINSERIOUS INJURY
LEADATPOWER CONNECTOR
PARKED
SIDEOFTHE
VIOLATE
PARKING BRAKE SWITCH.
OR
APPLICABLE LAW
OR
STATUS
POWER
USEOFTHIS
AND
DAMAGE.
MAY
No
ACC
ACC
position
• Use this unit with a 12-volt battery and negative
grounding only. Failure to dosomay resultina
fire or malfunction.
•
To
prevent short-circuit, overheating or
malfunction,besure to follow the directions
below.
-Disconnect
battery before installation.
-Secure
adhesive tape.Toprotect the wiring, wrap
adhesive tape around them where they lie
against metal parts.
the negative terminal of the
the wiring with cable clamps or
position
Page 63
(Connecting the unit
)
(~
E----"ng=-I
i_s~h
)
-Place
-Place
-
-Cover
-Do
-Never
-Use
- Never wire the speaker negative cable directly
-Never
• When this unit is on, control signals are sent
through the blue/white cable. Connect this cable
to the system remote control ofanexternal power
amp or the vehicle's auto·antenna relay control
terminal (max.
If the vehicleisequipped with a glass antenna,
connect it to the antenna booster power supply
terminal.
• Never connect the blue/white cable to the power
terminal ofanexternal power amp.
Also, never connect it to the power terminalofthe
auto antenna. Doingsomay resultinbattery drain
or a malfunction.
• IP-BUS connectors are color-coded,Besure to
connect connectorsofthe same color.
all cables away from moving parts, such
as gear shift and seat rails.
all cables away from hot places, such
near the heater outlet.
Do
not connect the yellow cable to the battery
by
passing it through the hole to the engine
compartment.
any disconnected cable connectors with
insulating tape.
not shorten any cables.
cut
the insulation of the powercable of
this unitinorder to share the power to other
equipment. Current capacityofthe cable
limited.
a fuse of the rating prescribed.
to ground,
band together multiple speaker's
negative cables,
300
mA12V
DC).
is
as
Page 64

( Connecting the
unit)
( English)
(Connecting the
unit-nUl
C---
- English)
Connecting the power cord
Yellow
Connect to the constant 12 V supply terminal.
Orange/white
Connect to lighting switch terminal.
Red
Connecttoterminal controlledbyignition switch (12 V
Black (chassis ground)
Connect to a clean, paint-free metal location.
Front speaker
f'n!J
l/GL
Antenna input
DC)_
Fuse
Fuse
----___._-----------_._---_
~
~
resistor
resistor
_-_._---------
I~
'\
IP-BUS cable
_-_
Front speaker
Right
~
_._----_
:
,
i
i~
i Light green '
i Used to detect the ON/OFF status of the parking
! brake. This lead must
I supply side
!I...
....
_--------------
{'
! Blue/white
;J
: Connect to system control termmal of the power amp or
Microphone input
(MVH-P8300BT only)
-
-U
Wired remote input
Hard-wired remote control adaptor can
(sold separately).
-A--MicroPhone
4 m
(13
ft. 1 in.) (MVH-P8300BT only)
be
of
the parking brake switch.
connected to the power
be
connected
Gd
Power supply side
Ground side
connect anything to
,,::~'::f::~f::f~'::'f::::::"=:':OI:f:::~'''::::.,:::':ff:':O:'::::~
Green
and Green/black
leads_
:,::
:::::::::::,':'::'::':::::::
that are not connected to speakers.
,::,~,:
::
:,::"."
I"d,
Page 65

C~C_o_n_n_ec_t_i
n.......::::g~t_h_e_u_n_it_~)
(
When connecting to separately sold power amp
English)
Rear output
Subwoofer output
.-----------------------------------------------------
I I
I.
:
II(
I
:Torear output
I
I
I
I
Tosubwoofer
output
I
Blue/white
Connect to system control terminal of the
or
power amp
terminal (max. 300
auto-antenna relay control
mA12V
DC)
--------------------
Connect with
(sold separately)
----
System remote control
-------------------
• I
RCA
cables
I
I
I
I
I
I
I
I
I
I
I
1
----~
:
Perform these connections when
using the optional amplifier.
Front speaker
Rear speaker
...----:
Left
Subwoofer
Right
Subwoofer
Front speaker
Rear speaker
Page 66

(~I
"_s_t_a_1I
a_t_i
0_" )
(~
E--="g=--r_ls_h
)
Notes
• Check all connections and systems before final
installation.
•
Do
not use unauthorized parts
unauthorized parts may cause malfunctions.
• Consult with your dealer if installation requires
drilling of holes or other modifications of the
vehicle.
•
Do
not install this unit where:
-it
may interfere with operation of the vehicle.
- it may cause injury to a passenger
a sudden stop.
• Install this unit away from hot places such
the heater outlet.
• Optimum performance
is
installed atanangle of less than
is
The
use of
as
a resuItof
as
obtained when the unit
60°.
near
Installation with the mounting
sleeve
1.
Insert the mounting sleeve into the
dashboard.
• When installing in a shallow space, use a
supplied mounting sleeve. If there
space behind the unit, use factory supplied
mounting sleeve.
2.
Secure the mounting sleeve by
using a screwdriver to bend the
metal tabs
(90°)
into place.
Dashboard
is
enough
Mounting sleeve
Page 67

(--=--1
"_s_t_al_1
3.
Install the unit
•
Use
installing.
a_t_i
0_" )
as
illustrated.
commercially available parts when
..---Nut
Firewall
or
:x--metal support
• Make sure that the unitisinstalled securely
in
place. Unstable installation may cause this
unit to malfunction, suchassound skip.
C~
E------:,!"g~l_is_h
Removing the Unit
1.
Press the detach button to release
the front panel.
• Refer to the Operation Manual about how to
release the front panel.
2.
Insert the supplied extraction keys
into both sides of the unit until
they click into place.
3.
Pull the unit out of the dashboard.
Fastening the front panel
If you do
the
screw.
front
not
plantodetach
panel
can
the
be fastened
front
with
)
panel,
supplied
~
Screw
Page 68

(_I
"_s_t_a_1I
a_t_i
0_" )
Installing the microphone
(MVH-P8300BT only)
Installation notes
Install
orientation
voice of
4CAUTION
It is extremely dangerous to allowthe microphone
lead to become wound around the steering
columnorgear shift. Be sure to install the unit
such a way that it will not obstruct driving,
When installing the microphone
on
1.
the
microphone
that
the
person
will
in a
position
enableitto
operating
the sun visor
Install the microphone
microphone clip.
and
pickupthe
the
system.
on
the
C
2.
Install the microphone clip
sun visor.
• With the sun visor up, install the microphone
clip. (Lowering the sun visor reduces the voice
recognition rate.)
~
L Microphone clip
~=e~~
in
Clamp
Use separately sold
clamps
lead where necessary
inside the vehicle.
to secure the
E----.::"9=---I_i
on
s_h
the
ll~
)
Microphone
clip
""
When installing the microphone
on
the steering column
1.
Install the microphone
microphone clip.
• Microphone canbeinstalled without using
microphone clip,Inthis case, detach the
microphone base from the microphone
clip.Todetach the microphone base from
microphone clip, slide the microphone base.
on
the
Page 69

(_I
n_s_t_a_lIa_t_io_n
2.
Install the microphone clip on the
steering column.
Double-sided tape
~~
4~(,
/fr~\
Install the microphone cliponthe
rear side of the steering column.
Clamp
Use separately sold
clamps to secure
the lead where
necessary inside the
vehicle.
~)
(~
E--:ng=-I_is~h
)
Adjusting the microphone
angle
The microphone angle can
be
adjusted.
Page 70

P'C>I»C5tC5tr
PIONEER ELECTRONICS (USA) INC. PIONEER ELECTRONIQUESDUCANADA, INC.
GARANTIE
VAl/DE
SEULEMENT
GARANTIE
Pioneer
Electronics (USA)Inc. (PUSA)etPioneer Eleclronique duCanada, Inc. (POC) garantissenl
avoir ete instalies
vice
de
fabrication, seront repares ouremplaces par uneunite de valeurcomparable, au choix de
Les
unitesoupieces de rechange fournies en vertu de la presente garantie peuvent etre
LA
PRESENTE
A
CONDITION
OU
UNE
LA
PREMIERE
PAYS
oil
PUSAOUPOC,LECAS
et
utilises conformement au manueldeI'utilisateur
GARANTIE
QUELEPRODUIT
AUTRE
LOCATION.SIJAMAISUNSERVICEDEREPARATION
L'ACHAT A
L1MITI~E
S'APPLIQUEAUPROPRIETAIRE
PREUVE
ETE
AIT ETe
D'ACHAT VALIDE INDlQUANT LA
EFFECTUE
ECHEANT,
PAIERA
ACHETE
SEULEMENT,
POUR
CHEZUND1STRIBUTEUROUMARCHAND
TEL
VOUS
indus
INITIALAINSI QU'A
DATEDEL'ACHAT INITIAL
EST
QU'IL
EST
RETOURNERLEPRODUIT
REQUIS,LEPRODUIT
EXPLIQUE
PERIODE DE GAR ANTlE DES PRODUITS Pieces Main-d'ceuvre
Produits stereo pour I'auto 1
La
periode
de
garantie
pour
les
clients
qui
louentIeproduit
ELEMENTS
UN PRODUIT ACHETE CHEZ UN DISTRIBUTEUR NON AUTORISE N'EST COUVERT PAR AUCUNE
IMPLICITE DE
" AVEC TOUS SES DEFAUTS EVENTUELS ".
PIONEER N'EST
PIONEER NE
DE TOUTE
LA
PRESENTE
DOCUMENTS S'Y APPLIQUANT.
LA
PRESENTE GARANTIE NE COUVRE PAS LES TELEVISEURS OU LES ECRANS ENDOMMAGESENRAISON DE
PENDANT DE LONGUES PERIODES (IMAGES REMANENTES).
LA
PRESENTE GARANTIE NE COUVRE PAS LE COFFRAGE OU LES ELEMENTS ESTHETIQUES, LES ANTENNES INSTALLEES PAR L'UTILISATEUR, LES DOMM AGES AUX
DISQUES
PAR ECRIT PAR PIONEER, D'UN ACCIDENT, D'UN USAGE INAPPROPRIEOUD'UN USAGE ABUSIF, LES DOMMAGES PRODUITS PARLAFOUDREOULA
LES
DOMMAGES
CONFORMES A
LA
PRESENTE GARANTIE NE COUVRE PAS LE COOT DES PIECESOUDE LA MAIN-D'CEUVRE QUI SERAIENT AUTREMENT OFFERTES
PRESENTE
PIONEER.LAPRESENTE GARANTIE NE COUVRE PAS LES DEFECTUOSITES OU LES DOMMAGES CAUSES PAR L'UTILISATION D'UNE MAIN-D'CEUVRE OU DE PIECES
NON AUTORISEES,
LES NUMEROS
INVAlIDITEDETOUTE AUTRE GARANTIE
AUX ETATS-UNIS - PIONEER LIMITE SES OBLIGATIONSENVERTUDETOUTE GARANTIE IMPLICITE QUE CE SOIT, Y COMPRIS ENTRE AUTRES LES
DE QUALITE MARCHANDEOUD'ADAPTATION AUNUSAGE PARTICULlER, A UNE PERIODE N'EXCEDANT PAS LA PERIODEDEGARANTIE. AUCUNE GARANTIENES'APPLIQUE
APRES
L'EXCLUSIONOULA
S'APPLIQUER A VOUS.LAPRESENTE GARANTIE VOUS DONNE DES DROITS LEGAUX SPECIFIQUES.
ETAT
AL'AUTRE.
CANADA
AU
QU'ELLE
NON COUVERTS PARLAGARANTIE
QUA
LITE MARCHANDE OU
PAS
RESPONSABLE DE QUELQUE DOMMAGE CONSECUTIF ET(OU) INDIRECT QUE CE SOIT.
GARANTIT
APPLICATION
GARANTIE
OU
AUX
GARANTlE,SIELLES
DE
LA
PERIODEDEGARANTIE. CERTAINS ETATSNEPERMETTENT PAS LA LIMITATIONDELA
- SOUS RESERVE DE CE QUI EST EXPRESSEMENT
SOIT IMPLICITE,
PAS LES PRODUITS ENUMERES CI-DESSUS
INDUSTRIELLE OU COMMERCIALE QUE CE SOIT.
NE S'APPLIQUE PAS SI LE PRODUIT A ETE SOUMIS AUNE PUISSANCE NOMINALE EXCEDANT CELLE QUI A ETE
RUBANSOUDISQUES D'ENREGISTREMENT, LES DOMMAGES AU PRODUIT
SUBSEQUENTS
CELLES
QUI SONT SPECIFIEES DANS LE
NI
D'UN ENTRETIEN INADEQUAT.
SERlE MODIFIES, OBLITERES OU ENLEVES ANNULENT LA PRESENTE GARANTIE DANS SA TOTALITE.
LIMITATION
DECOULANT
SONT OBTENUES AUPRES D'UNE SOURCE AUTRE QU'UNE SOCIETE DE SERVICEOUAUTRE AUTORISEEOUDESIGNEE
DES DOMMAGES CONSECUTIFSOUINDIRECTS. LES
OBLIGATOIRE
commenceIejour
D'ADAPTATIONAUN
DE FUITES, LES DOMMAGES
OU AUTRE, NE
oilIeproduit
MANUEL
S'APPLIQUE
USAGE PARTICULIER QUE CE SOIT. DE PLUS, CE PRODUIT EST STRICTEMENT VENDU "
SERVICE
Pour
profiterduservice
indiquant
AUX
Votre
de
Votre
Veuiliez
de
Pioneer
ci-dessous
AU
Communiquez
ExpeditiondeYotre
en
pendantIetransport.
Pour
Satisfactiondela
PourIeraccordement
I'endroiletla
fTATS-UNIS-Communiquez
marchand
caisse
devrait
societedeservice
accederausite
service
Pioneerlaplus
Electronics Service -Ceservice peut vous aviser
pour
CANADA-POCadesign$uncertain
port
prepayeetselon
toutes
les
en vertu de la
datedela
Pioneer
autorise
enumerer
communiquer
avec
plaintesetproblemes
clienteleau1-877-283-5901.
ses
autorisee
WebdePioneerawww.pioneerelectronics.com.cliquer
proche.
Pioneer
ElectroniqueduCanada
unite
aux
une
Incluez
ou Ie
fonctionnementdevotre
PIONEER
garantie
aux
transaction
avecundes
-
Votre
marchand
coordonnees
- Celie-ci
avec
Pioneer
nombredesocietesdeservice
finsdeservice.Sivous
methodedetransport
votre
nom,
votre
aux
Etats-Unis,
AUX
ELECTRONICS
LONG
http://www.pioneerelectronics.com1-877-283-5901
P.O.
BEACH,
1-800-421-1404
Etats-Unisetau
parIepremier
partenaires
Pioneer
(numerosdetelephoneetde
peut
reparerlaplupart
par
ETATS-UNIS
CALIFORNIA
des
telephone,
(Ies
pouvant
adresseetun
communiquez
unite,oupour
SERVICE,
BOX
1760
proprietaire.
Pioneer
peul
reparerouremplacer
options de service optimales
par
courrieroupar
coordonneessetrouvent
expediez
etre
suivieetassuree.
numerodetelephoneounous
INC.
90801 300
REGLEMENTDES CONFLITS
AUX
ETATS-UNIS
recoursauProgrammederesolution
de
resolution
Improvement
Pour
avolr
probleme
distributeurImarchand
resolution
par
a
AU
NO.du modele : NO
Dale
auquel
ecrit
pour
votre
plalnte
CANADA-Communiquez
d'achat:
• Siunconflitseprodult
des
plaintes
vous
faites
communique.
aviser
ecrlt
avantdevous
autorise
des
pour
Act,15U.S.C. 2301ets.s.
recoursauProgrammederesolution
yous
sera
vous
par
des
plalntesdePioneer
prevalolrdevos
faceetles
demarches
vous
avecIedirecteurdela
aupn!s
Pioneer
indiquer
demarches
duquel
etudleraIecontllt
qu'elle
entre
vousetPioneer
des
que
vous vous
entreprendra
les
raisons
ENREGISTREZ LELIEU ETLADATE D'ACHAT POUR REFERENCE ULTERIEURE
pour
droitsoude
plaintes,
Satisfactiondela
vous
pour
appelezau1
avez
etes
el,
lesquelles
PRENEZSOINDEGARDERCETTE
GARANTIE
DANSLEPAYSOULE
avec
I'unite, ne fonctionnent pasdefa90n appropriee dans des conditions d'utilisation normales en raison d'un
TOUT
OU,SIVOUS
DANSLEPRESENT
REPAREOUREMPLACE, AL'INTERIEURDUPAYS
est
utilise
pourlapremiere
LORSQU'ILS
DE L'UTILISATEUR.
STiPULE
Canada,
suivanls
des
I'unite,
avecIeservicedeSoutien
trouver
apreslareponseIIune
resoudreIeconflit.Ceprogramme
entreprises
procureIeprodult
dansundelaidequarante
pour
DECOULANT
DANS LES PRESENTES, AUCUNE REPRESENTATION, GARANTIE,
ACE PRODUIT.
vous
pourIeservice:
telecopieur,
produits
electroniques
sur
Ie biaisdeson site
autorisees
vous
une
societedeservice
chercher
800421-1404etexpliquezaurepresentantduservice
resoudreIeconf/ll,etindiquera
elle
clienteleau(905)
Achete
INFORMATlO'JETVOTRE
lIMITEE
que
les produits dislribues par
PUSA
neuves
PROPRIETAIRE
PIONEER
DOlT
SONT UTILISES A DES FINS COMMERCIALESOUPROFESSIONNELLES, OU AU SEIN
devez
votre
I'onglel"
partoutauCanadasijamais
ci-dessous)
devez
I'emballer
EmballezIeproduitaumoyendemateriaux
reparationenvertuduTitreIde
pour
Pioneer.
n'entreprendra
deserie
ou de POC, sans que vousdeviez payer pour les pieces ou les travaux dereparation.
ou remises aneuf, au choix
SUBSEQUENTDUPRESENT
AUTORISE
LOUEZLEPRODUIT,
ETRE
DOCUMENT.
presenter
courriel, etc.).
pour
faire
AUX
EXPEDIE
VOUS
lois
(a)
pendantIaperiodedelocation
GARANTIE
DECOULANT
DE PILES DEFECTUEUSESOUDE
DUREE D'UNE GARANTIE IMPLICITE,ETCERTAINSNEPERMETTENT PAS
LIMITATIONS
votre
unite, ou
bien
pour
I'autoetvous
Service
and
votre modeleetvotre emplacement geographique. Veuiliezconsulter les
Web.
pour
soigneusementetI'envoyer
pouvons
vous
ala
clienteleau1-800-421-1404.AuCanada,
autorisee,
demande
reparerIeproduit
Une
(40)
aucune
946·7446
: _
de:
RE<;U
PRODUIT
ETATS-UNISOUAU
PENDANTLAPERIODEDEGARANTIE,ENPORT
ETES
A
ETI~:
ACHETE
PUSA
aux Etals-Unisetpar POC au Canada qui, apres
de
PUSAoude
PRODUIT
VOTRE
RESPONSABLEDUDEMONTAGEETDE
CANADA.
CONTRATDELOCATION INDIQUANT L'ENDROIT
oilL'ACHAT A
POCo
PIONEER
PENDANTLAPERIODEDEGARANTIE,
VOUS
DEVREZ
ETE
EFFECTUE.
FOURNIRUNRELEVEDECAISSE
PREPAYE,
L'INSTALLATIONDUPRODUIT.
an
ou
(b)
apreslaventeaudetail.
EXPRESSE OU IMPLICITE, Y COMPRIS
L'APPLICATION
D'UNE RETOUCHE, D'UNE MODIFICATION NON
ET EXCLUSIONS
vouS
POUVEZ JOUIR D'AUTRES DROITS, QUI PEUVENT VARIER D'UN
relevedecaisse
vous
diriger
aviser
Support"etchoisir"
trouver
fois
iours
vous
une
joindre
appelezouecrivez
GROUPEDESATISFACTIONDELA
PIONEER
initiale
faiteauservicedeSoutlen
vous
est
que
votre
apreslareceptiondevotre
combiendetemps
demarche.
pour
discuterdevotre
ou, si
vers
une
des
avez
societedeservice
pendant
hltp:/lwww.pioneerelectronics.ca
pendantlaperi
besoindeservicesdereparation
les
AU
ELECTRONIQUESDUCANADA,
ALLSTATE
MARKHAM,ONL3R
(905) 479-4411
offert
sans
la
101
Magnuson-Moss
plainteaete
D'IMAGES STATIQUES ET1MMOBILES
L'UTILISATION
ETABLIES
vous
louezIeproduit,
societedeservice
options
supplementaires
Authorized
autorisee.
aune
societedeservice
coussines
heuresdebureau.
a:
CANADA
PARKWAY
frals.
Vous
odedegarantle,
expllqueeaurepresentant,unnumero
ces
demarches
plainteetresoudre
.
D'ACHATDANS
UN
ENDROlTSUR
seloncequiseproduilenpremier.
QUELQUE
ETABLIE
SANS
FRAISENVERTUDELA
CI-DESSUS PEUVENT DONC NE PAS
OBLIGATION
Service
Locator"
adequats
communiquez
CLIENTELE
OP2
ala
devez
Warranty-Federal
a la
clientele
plainte,
DANS
DE PILES NON
GARANTIES
votre
Pioneer
autorisee.
qui
pourraient
pour
autorisee
pour
eviter
INC.
clientele,
avoir
recoursauProgramme
qui
puis
donnez-IuiIenom
(1)
repondraavotre
prendront;ou
rapidementIeprobleme.
ETLADATE
A L'INTERIEUR
1
an
GARANTIE
TEL
QUEL
" ET
LES
AUTORISEE
SURTENSION,
PAR
IMPLICITES
OU CONDITION,
contratdelocation
Votre
re9u
s'appliquer.
trouverlasociete
coordonnees
pour
votre
produit.
ouaPioneer,
les
dommages
avecIegroupe
vous
pouvez
avoir
Trade
Commission
vous
repondra
plainte
(2)
repondra
< CRY1276·A1N >
ImprimeenThailande
DE
DU
de
Ie
du
de
Page 71

PIONEER
ELECTRONICS
(USA)
INC.
PIONEER
ELECTRONICS
OF
CANADA,
INC.
LIMITED WARRANTY
WARRANTY
WARRANTY
Pioneer Electronics (USA) Inc. (PUSA), and Pioneer ElectronicsOfCanada, Inc. (paC), warrant that products distributed by
prope~y
function
of
comparable value, at the optionofPUSA
unit
or
new
THIS
LIMITED
PRODUCT
RECEIPTOROTHER
AND
DATEOFFIRST
ONLY
FROM
PRODUCT.
PRODUCT
Car
Stereo
The warranty periOd for retail customers who rentthe product commences upon thedate product is first put into use(a) during the rental periodor(b) retail sale, whichever occurs first.
WHATISNOT
IFTHIS PRODUCT
OF MERCHANTABILITY
PIONEER
PIONEER DOESNOT
WARRANTY
THIS
WARRANTY
THIS
THISWARRANTY DOESNOTCOVERTHE CABINET OR ANYAPPEARANCE ITEM,USER ATTACHEDANTENNA,
DAMAGE
UGHTNINGORTOPOWERSURGES,SUBSEQUENTDAMAGEFROMLEAKlNG,DAMAGE
SPECIAED
THISWARRANTYDOESNOTCOVERTHECOSTOFPARTSORLABORWHICHWOULDBEOTHERWiSEPROVlDEDWITHOUTCHARGE
ANYSOURCEOTHERTHANA~ONEERAUTHORIZEDSERVlCECOMPANYOROTHERD~NATEDLOCATlO~~SWARRANTYDOESNOTCOVERDEFECTSORDAMAGECAUSED
BY
THEUSEOFUNAUTHORIZED
ALTERED,DEFACED, ORREMOVEDSERIAL NUMBERSVOID THIS ENTIRE
NO
OTHER
IN
THE
MERCHANTABILITY
WARRANTY
LIMITATIONSOFINCIDENTALORCONSEQUENTIAL
OR
YOU
SPECIFIC
IN
CANADA-
OR
OTHERWISE,
TO
OBTAIN
In
the
~
-
Your
Authorized
list
the
Your
Authorized
Pioneer
Pioneer
emailoraccess
~
Shipping
Use
adequate
under normal usedue to a manufacturing defect when installed and operated according to the owner's manual erclosed with the unit will be repairedorreplaced with a
rebuilt at the optionofPUSA
WARRANTY
WAS
PURCHASED
VALID
RENTAL.
WITHIN
THE
PUSA
OR POC,ASAPPROPRIATE,
WARRANTY
Products
COVERED
WAS
PURCHASEDFROMANUNAUTHORIZED DISTRIBUTOR, THERE
AND
SHALL
NOTBELIABLE
WARRANT
DOESNOT
DOES
NOT
TOTHE
PRODUCT RESULTING FROMALTERATIONS,
INTHE
OWNER'S
WARRANTIES
U.S.A.-PIONEER
U.S.A.orCanadatoreceive
Please
contact
websiteatwww.pioneerelectronics.com
Electronics
-
pac
Your
AND
PERIOD.
SOME
LEGAL
EXCEPTASEXPRESSLY
RIGHTS
APPLICABLETOTHIS
SERVICE
contact
oneofthe
Pioneer
information
Pioneer
Service-Can
the
Pioneer
has a
numberofAuthorized Service Companies should
Unit
for
padding
Service-Please
materialtoprevent
or
APPLIESTOTHE
FROMANAUTHORIZED
PROOFOFPURCHASE
INTHE
COUNTRYOFPURCHASEASEXPLAINEDINTHIS
PERIOD
THEIMPLIED WARRANTY OFFITNESS FORA PARTICULARPURPOSE
FOR
ANY
APPLY
COVER DISPLAYSCREENS
MANUAL.
PARTSORLABOR
LIMITS
FITNESS FOR A
STATESDONOT
AND
following
Dealer-Your
(phone
Service
Company-Can
advise
websitetocontact
or
pac.
EVENT SERVICEISREQUIRED, THE
ANY
PRODUCTLISTED
IFTHE PRODUCT
ITS
YOU
warranty
number,
pac,
ORIGINALORANY
WILL
CONSEQUENTIAL AND/OR INCIDENTALDAMAGES.
OBLIGATIONS
PARTICULAR
ALLOW
MA'f
HAVE
PROVIDED
PRODUCT.
service
Pioneer
Pioneer
Dealer
fax,
email,
the
optimal
Pioneer.
package it carefully
damage
On all complaints and concerns in the U.S.A. call Customer Support at 1-800-421-1404, or, in Canada, call Customer Satisfaction at 1-877-283-5901.
IN
THE U.S.A.
For hook-up and operationofyour unitorto locate an For additional information on this warranty, please call or write:
Authorized Service Company, please call
PIONEERELECTRONICSSERVICE,
P.O BOX 1760 300 ALLSTATE
LONG BEACH, CALIFORNIA 90801 MARKHAM, ON L3R
1-800-421-1404
DISPUTE
IN
THE
U.S.A.-Following
Resolution
before
you
To
use
the
to
have
the
has
been
(1)
informing
IN
explained
respondtoyour
you
CANADA
http://www
RESOLUTION
Programtoresolve the dispute.
exercise
Complaint
product
why
- Call the
our
any
rights
Resolution
repaired
during
to the representative, a
complaint
it will
not
take
Customer
.pioneereIectronics.com
responsetoany
under,orseek
Program
the
in writing informing you
any
action.
Satisfaction
The
call
warranty
resolution
initial
Complaint
any
1-800-421-1404
period and the
Manager
VALID ONLYINCOUNTRYOFPRODUCT
without chargetoyou for partsoractual repair work.
SUBSEQUENT
PIONEER
SHOWING
PAYTORETURN
ABOVE
HAS
DAMAGEDBYSTATIC,NON-MOVING,
OR FROMIMPROPER MAINTENANCE.
UNDER
PURPOSE,TOA PERIOD
LIMITATIONS ON
OTHER
HEREIN,
you
partnerstoobtain
may
etc.)
perform
and
clickonService
service
in transit.
DISTRIBUTORIDEALERINTHE
THE
DATEOFORIGINAL
WHENITIS USED INA
BEENSUBJECTEDTOPOWERIN EXCESS
MODlRCATlONS
ANY
DAMAGES,SOTHE
l'liGHTS
THERE
needtopresent
repairorreplace
repairs
WHiCH
ARENOREPRESENTATIONS,
for
your
Dealer.
for
most
option
for
your
and
send it, transportation prepaidbya traceable, insured method, toanAuthorized Service
Include
your
or
write: CUSTOMERSATISFACTIONGROUP
OWNEROFTHIS
PRODUCT
DOCUMENT.
THE
REPAIREDORREPLACEMENT
NOT
WARRANTY
IMPLIED
HOW
LONGANIMPLIED
ABOVE
MAY
your
sales
service:
your
Car
and
Support
your
model
product requireservice.
name,
PURCHASE
MUSTBEDELIVEREDWITHIN
YOU
ARENOWARRANTIES, EXPRESSORIMPLIED, INCLUDING THE
TRADE
OR BUSINESSOR INANY INDUSTRIALOR COMMERCIALAPPLICATION.
AUTHORIZEDIN
FROM
INOPERATIVEBATTERIES,ORTHEUSEOFBATTERIESNOTCONFORMINGTOTHOSE
WARRANTIES
NOTTO
EXCEED
LIMITATIONSOREXCLUSIONS
VARY
FROM
receiptoryour
unit,orrefer
Electronics
address
and
and
products
select
geographic
and
INC.
requesttoCustonmr
Resolution
remedies,
createdbyTitle Iofthe
and
nameofthe
number
willbeissued.
what
action
at
(905)
946-7446
Support,
Programisavailabletoyou
explaintothe
Pioneer
will
to
shouldadispute
Magnuson-fvIossWarranty-Federal Trade Commission Improvement
customer
authorized
Within40daysofreceiving
take,
andinwhat
discuss
your
service
Distributor/Dealer
complaint
PURCHASE
PUSAinthe U.S.A., and by POCinCanada that fail to
Replacement
PIONEER
WILLBERESPONSIBLE
AND
IMAGES
INCLUDING,
WARRANTY
STATETOSTATE.
you
Contact
telephone
PRODUCT
U.S.A.ORCANADA.
OR,IFRENTED,
THISPRODUCTIS
OF
ITS
PUBLISHED POWERRATING.
APPLIED
ANYDAMAGETO
WRmNGBYPIONEER,ACCIDENT, MISUSEOR ABUSE,
THE
WARRANTY
WARRANTIES,
rental
contract
to an
Authorized
and
can
Authorized
location.
PioneerofCanadaaslisted
number
units
and/or
parts supplied under this warranty
DURING
THE
YOU
YOUR
THE
WARRANTY
PRODUCTTOYOU
SOLD
FOR LENGTHY PERIODS(BURN-IN).
RECORDSORRECORDING TAPESORDlSC5,ANY
BUT
NOT
LIMITED
PERIOD.NOWARRANTIES
LASTS
AND
SOME
MAY
OBLIGATIONS
showing
Pioneer
advise
other
Service
Locator
Please
reference
where
you
IN
WARRANTY
WILLBEREQUIREDTOPROVIDEA
RENTAL
FOR
NOT
place and
Service
optionsasapplicable.
canbereached
CONTRACT
PERIOD,TRANSPORTATION PREPAID,
REMOVAL
WITHIN
STRICTLY
UNDERTHISWARRANTY OBTAINEDFROM
TO,
THE
STATESDONOT
APPLYTOYOU.
OR CONDITIONS, IMPLIED,
dateoforiginal
Company.
to find
the
information
belowtoobtain
CANApA
THE
"AS
the
AND
PIONEERELECTRONICSOFCANADA,INC.
PARKWAY
OP2
(905) 479-4411 1-877-283-5901
http://www.pioneerelectronics.ca
arise
between
you
and
Pioneer,
you
product
will
or
are
Pioneer
the
Complaint
experiencing,
was
purchased.
investigate
(2)
respondtoyour
without
charge. You
representative
from
whom
time
your
period,toresolve
andtoobtainaprompt
are
the
the
complaint,
the
requiredtouse
problem
Pioneer
Pioneer
dispute;
resolution.
may
PERIOD
PROVIDED
SHOWING
INSTALLATIONOFTHE
COUNTRYOFPURCHASE.
~
1
Year
IMPUEDWARRANTY
IS"
AND
'WITH
DAMAGE
IMPLIED
nearest
during
makes
WARRANTIES
SHALLAPPLYAFTER
ALLOW
THE
THIS
WARRANTY
owner's
Your
sales
Please
Pioneer
listed
below
a local
CompanyorPioneer.
business
available
Resolution
Act,
15U.S.C.
steps
After
the
dispute
complaint
SALES
THEPLACE
Labor
1
Year
ALL
FAULTS".
DUETO
EXCLUSIONS
GIVES
STATUTORY
transaction.
receipt
access
the
servicer.
and
phone,
service
location.
hours.
its
Complaint
Program
2301
you
have
the
complaint
and
will either:
in writing
be
THE
OF
THE
should
et
seq.
taken
RECORDTHE PLACE
Model No. Serial No. Purchase Date _
Purchased From
KEEP THIS INFORMATION
AND
DATEOFPURCHASEFOR FUTURE REFERENCE
AND
YOUR
SALES
RECEIPT
IN A
SAFE
PLACE
< CRY1276-A/N >
PrintedinThailand
 Loading...