

Page 1

Operation Manual
Mode d’emploi
RDS MEDIA CENTER RECEIVER
RECEPTOR CENTRAL MULTIMEDIA RDS
AUTORADIO MULTIMEDIA RDS
MVH-P8300BT
MVH-P7300
English EspañolFrançais
Page 2

Contents
Thank you for purchasing this PIONEER product.
To ensure proper use, please read through this manual before using this product. It
is especially important that you read and observe WARNINGs and CAUTIONsin
this manual. Please keep the manual in a safe and accessible place for future refer-
ence.
Precautions
IMPORTANT SAFEGUARDS 4
To ensure safe driving 4
– Parking brake interlock 5
To avoid battery exhaustion 5
Before you start
Information to User 6
For Canadian model 6
The Safety of Your Ears is in Your Hands 6
About this unit 6
Operating environment 7
After-sales service for Pioneer products 7
In case of trouble 7
Visit our website 7
Resetting the microprocessor 8
Demo mode 8
About this manual 8
Operating this unit
Head unit 9
Remote control 9
Basic operations 10
Use and care of the remote control 11
Basic menu operations 12
– Menu operations identical for function
settings/audio adjustments/initial
settings/lists 12
Customizing menus 13
– Canceling a Registered Menu 13
About guide information 13
Using Bluetooth telephone 13
– Setting up for hands-free phoning 14
– Basic operations 14
Radio 15
– Basic operations 15
– Storing and recalling stations for each
band 15
– Using iTunes tagging 15
– Function settings 16
2
En
Playing moving images 17
– Basic operations 17
– Selecting and playing files from the
name list 18
– Browsing for a video on the iPod 18
– Playing DivXâ VOD content 18
– Function settings 19
Playing audio 21
– Basic operations 21
– Selecting and playing files/tracks from
the name list 22
– Browsing for a song on the iPod 22
– Function settings 22
Using Pandoraâ 24
– Basic operations 25
– Displaying text information 25
– Selecting and playing the station
list 25
– Function settings 25
Playing still images 26
– Basic operations 26
– Selecting and playing files from the
name list 27
– Function settings 27
– Introduction of operations for playback
of still images as a slideshow 28
Bluetooth Telephone 29
– Connection menu operation 29
– Phone menu operation 30
– Function and operation 31
Audio Adjustments 32
System settings 33
Entertainment settings 34
– Customizing the illumination color 35
Initial Settings 35
– Auto EQ (auto-equalizing) 36
Other functions 38
– Using an AUX source 38
– Using an external unit 39
Page 3

Contents
English
– Switching the display indication 39
Detailed instructions
Changing the wide screen mode 40
Setting the DivX subtitle file 40
Setting the aspect ratio 40
Displaying the DivXâ VOD registration
code 40
Displaying the deregistration code 41
Changing the picture adjustment 41
Available accessories
HD Radioä tuner 42
– Basic operations 42
– Storing and recalling stations 42
– Using iTunes tagging 42
– Function settings 42
XM tuner 43
– Basic operations 43
– Storing and recalling stations 43
– Selecting an XM channel directly 43
– Function settings 43
– Selecting a channel from a channel
category 44
– Displaying the Radio ID 44
SIRIUS Satellite Radio tuner 44
– Basic operations 44
– Storing and recalling stations 45
– Selecting a SIRIUS channel
directly 45
– Function settings 45
– Selecting a channel from a channel
category 46
– Using the Instant Replay function 46
Handling guidelines 52
Compressed audio/video compatibility (USB,
SD) 53
iPod compatibility 54
Sequence of audio files 55
Using the display correctly 55
– Handling the display 55
– Liquid crystal display (LCD) screen 55
– LED (light-emitting diode)
backlight 56
Copyright and trademark 56
Specifications 58
Additional information
Troubleshooting 47
Error messages 47
Understanding auto EQ error messages 50
Indicator list 50
En
3
Page 4

Section
01
Precautions
IMPORTANT SAFEGUARDS
Please read all of these instructions regarding
your display and retain them for future reference.
1 Read this manual fully and carefully be-
fore operating your display.
2 Keep this manual handy as a reference for
operating procedures and safety information.
3 Pay close attention to all warnings in this
manual and follow the instructions carefully.
4 Do not allow other persons to use this sys-
tem until they have read and understood
the operating instructions.
5 Do not install the display where it may (i)
obstruct the driver’s vision, (ii) impair the
performance of any of the vehicle’s operating systems or safety features, including air bags, hazard lamp buttons or (iii)
impair the driver’s ability to safely operate the vehicle.
6 Do not operate this display if doing so in
any way will divert your attention from
the safe operation of your vehicle. Always
observe safe driving rules and follow all
existing traffic regulations. If you experience difficulty in operating the system or
reading the display, park your vehicle in a
safe location and make necessary adjustments.
7 Please remember to wear your seat belt at
all times while operating your vehicle. If
you are ever in an accident, your injuries
can be considerably more severe if your
seat belt is not properly buckled.
8 Never use headphones while driving.
9 To promote safety, certain functions are
disabled unless the parking brake is on,
and the vehicle is not in motion.
10 Never set the volume of your display so
high that you cannot hear outside traffic
and emergency vehicles.
WARNING
Do not attempt to install or service your display by yourself. Installation or servicing of
the display by persons without training and
experience in electronic equipment and automotive accessories may be dangerous and
could expose you to the risk of electric shock
or other hazards.
To ensure safe driving
WARNING
! LIGHT GREEN LEAD AT POWER CON-
NECTOR IS DESIGNED TO DETECT
PARKED STATUS AND MUST BE CONNECTED TO THE POWER SUPPLY SIDE
OF THE PARKING BRAKE SWITCH. IMPROPER CONNECTION OR USE OF
THIS LEAD MAY VIOLATE APPLICABLE
LAW AND MAY RESULT IN SERIOUS INJURY OR DAMAGE.
! To avoid the risk of damage and injury and the
potential violation of applicable laws, this unit
is not for use with video that is visible to the
driver.
! To avoid the risk of accident and the potential
violation of applicable laws, no viewing of
front seat video should ever occur while the
vehicle is being driven.
! In some countries or states the viewing of
images on a display inside a vehicle even by
persons other than the driver may be illegal.
Where such regulations apply, they must be
obeyed.
When you attempt to watch a video image
while driving, the warning Viewing of front
seat video source while driving is strictly
prohibited. will appear on the front display.
To watch a video image on the front display,
park your vehicle in a safe place and apply the
parking brake.
4
En
Page 5

Precautions
Parking brake interlock
Certain functions (video viewing and certain
operations) offered by this unit could be dangerous and/or unlawful if used while driving.
To prevent such functions from being used
while the vehicle is in motion, there is an interlock system that senses when the parking
brake is set. If you attempt to use the functions
described above while driving, they will become disabled until you stop the vehicle in a
safe place, and (1) apply the parking brake, (2)
release the parking brake, and then (3) apply
the parking brake again. Please keep the
brake pedal pushed down before releasing the
parking brake.
Operation
1 Press M.C. to display the next page.
2 Press M.C. to select OK.
Section
01
English
To avoid battery exhaustion
Keep the vehicle engine running when using
this unit to avoid draining the battery power.
! When no power is supplied to this unit,
such as when the vehicle battery is being
replaced, the microcomputer of this unit returns to its initial condition. We recommend that you transcribe the audio
adjustment data.
WARNING
Do not use with vehicles that do not feature an
ACC position.
En
5
Page 6
Section
02
Before you start
FCC ID: AJDK029
MODEL NO.: MVH-P8300BT
IC: 775E-K029
This equipment complies with FCC/IC radiation
exposure limits set forth for an uncontrolled
environment and meets the FCC radio frequency (RF) Exposure Guidelines in Supplement C to OET65 and RSS-102 of the IC radio
frequency (RF) Exposure rules. This equipment
has very low levels of RF energy that it deemed
to comply without maximum permissive exposure evaluation (MPE). But it is desirable that
it should be installed and operated keeping the
radiator at least 20 cm or more away from person’s body (excluding extremities: hands,
wrists, feet and ankles).
This transmitter must not be co-located or operated in conjunction with any other antenna or
transmitter.
! MVH-P7300
! This device complies with part 15 of the
FCC Rules. Operation is subject to the following two conditions:
(1) This device may not cause harmful interference, and (2) this device must accept
any interference received, including interference that may cause undesired operation.
Information to User
Alteration or modifications carried out without
appropriate authorization may invalidate the
user’s right to operate the equipment.
For Canadian model
This Class B digital apparatus complies with
Canadian ICES-003.
The Safety of Your Ears is in
Your Hands
Get the most out of your equipment by playing
it at a safe level—a level that lets the sound
come through clearly without annoying blaring or distortion and, most importantly, without affecting your sensitive hearing. Sound
can be deceiving. Over time, your hearing
“comfort level” adapts to higher volumes of
sound, so what sounds “normal” can actually
be loud and harmful to your hearing. Guard
against this by setting your equipment at a
safe level BEFORE your hearing adapts.
ESTABLISH A SAFE LEVEL:
! Set your volume control at a low setting.
! Slowly increase the sound until you can
hear it comfortably and clearly, without distortion.
! Once you have established a comfortable
sound level, set the dial and leave it there.
BE SURE TO OBSERVE THE FOLLOWING
GUIDELINES:
! Do not turn up the volume so high that you
can’t hear what’s around you.
! Use caution or temporarily discontinue use
in potentially hazardous situations.
! Do not use headphones while operating a
motorized vehicle; the use of headphones
may create a traffic hazard and is illegal in
many areas.
About this unit
The tuner frequencies on this unit are allocated for use in North America. Use in other
areas may result in poor reception.
6
En
Page 7

Before you start
WARNING
Handling the cord on this product or cords associated with accessories sold with the product
may expose you to chemicals listed on proposition 65 known to the State of California and other
governmental entities to cause cancer and birth
defect or other reproductive harm. Wash hands
after handling.
CAUTION
! Do not allow this unit to come into contact
with liquids. Electrical shock could result.
Also, damage to this unit, smoke, and overheating could result from contact with liquids.
! Keep this manual handy for future reference.
! Always keep the volume low enough to hear
outside sounds.
! Avoid exposure to moisture.
! If the battery is disconnected or discharged,
any preset memory will be erased.
Important (Serial number)
The serial number is located on the bottom of
this unit. For your own security and convenience,
be sure to record this number on the enclosed
warranty card.
Note
Function setting operations are completed even if
the menu is cancelled before the operations are
confirmed.
Operating environment
This unit should be used within the temperature ranges shown below.
Operating temperature range: –10 °C to +60 °C
(14 °F to 140 °F)
EN300328 ETC test temperature: –20 °C and
+55 °C (–4 °F and 131 °F)
Section
02
English
After-sales service for
Pioneer products
Please contact the dealer or distributor from
where you purchased this unit for after-sales
service (including warranty conditions) or any
other information. In case the necessary information is not available, please contact the
companies listed below:
Please do not ship your unit to the companies
at the addresses listed below for repair without
advance contact.
U.S.A.
Pioneer Electronics (USA) Inc.
CUSTOMER SUPPORT DIVISION
P.O. Box 1760
Long Beach, CA 90801-1760
800-421-1404
CANADA
Pioneer Electronics of Canada, Inc.
CUSTOMER SATISFACTION DEPARTMENT
300 Allstate Parkway
Markham, Ontario L3R 0P2
1-877-283-5901
905-479-4411
For warranty information please see the Limited Warranty sheet included with this unit.
In case of trouble
Should this product fail to operate properly,
please contact your dealer or nearest authorized Pioneer Service Station.
Visit our website
Visit us at the following site:
http://www.pioneerelectronics.com
in Canada
En
7
Page 8
Section
02
Before you start
http://www.pioneerelectronics.ca
1 Register your product. We will keep the details
of your purchase on file to help you refer to
this information in the event of an insurance
claim such as loss or theft.
2 Receive updates on the latest products and
technologies.
3 Download owner’s manuals, order product
catalogues, research new products, and
much more.
Resetting the microprocessor
The microprocessor must be reset in the following situations:
! Before using this unit for the first time after
installation
! If the unit fails to operate properly
! When strange or incorrect messages ap-
pear on the display
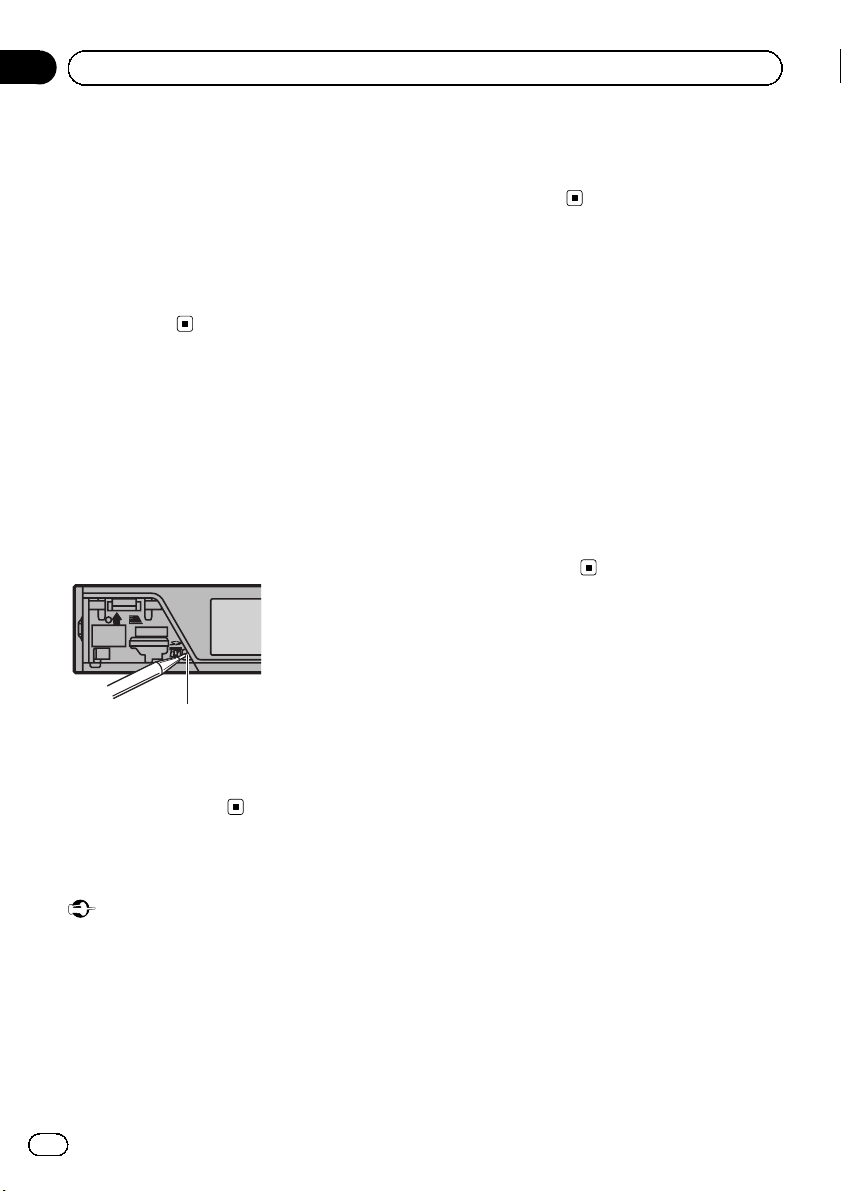
RESET button
Operating the demo while the ignition switch
is set to ACC may drain battery power.
Refer to Demonstration (demo display set-
ting) on page 35.
About this manual
This manual describes operations of both
MVH-P8300BT and MVH-P7300. Only MVHP8300BT features Bluetooth functions, so the
explanations for those functions do not apply
to MVH-P7300.
In the following instructions, USB memories,
USB portable audio players, and SD memory
cards are collectively referred to as “external
storage devices (USB, SD)”. If only USB memories and USB portable audio players are indicated, they are collectively referred to as “USB
storage devices”.
In this manual, iPod and iPhone will be referred to as “iPod”.
1 Remove the front panel.
2 Press RESET with a pen tip or other
pointed instrument.
Demo mode
Important
Failure to connect the red lead (ACC) of this unit
to a terminal coupled with ignition switch on/off
operations may lead to battery drain.
The demo automatically starts when the ignition switch is set to ACC or ON while the unit
is turned off. Turning off the unit does not cancel demo mode. To cancel the demo mode, operate the function in the initial setting menu.
8
En
Page 9
8
Operating this unit
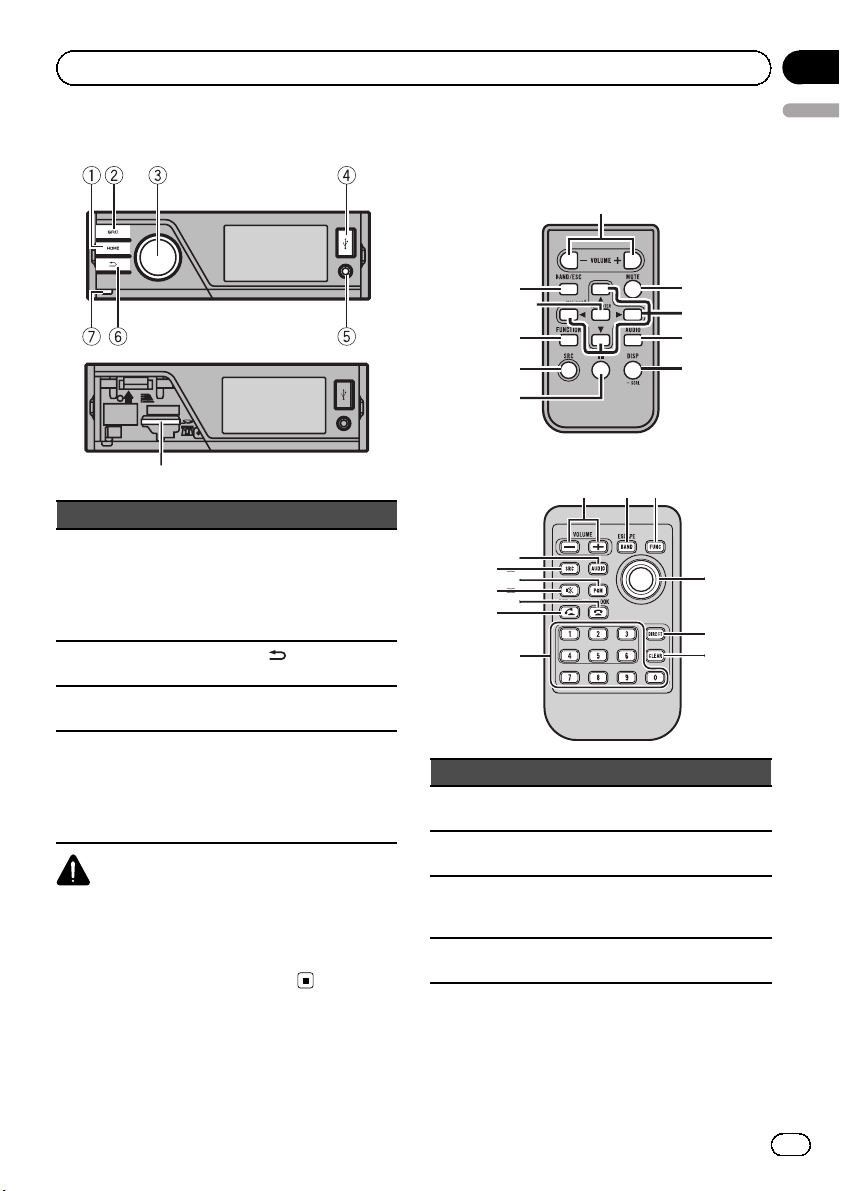
Head unit
Section
03
English
Remote control
Only for MVH-P7300
Part Part
AUX input jack
(3.5 mm stereo/
1 HOME 5
2 SRC/OFF 6
MULTI-CONTROL
3
(M.C.)
4 USB port 8
video jack)
Microphone input
jack for auto EQ
measurement
(back/display
off)
7 Detach button
SD memory card
slot
Remove the front
panel to access the
SD memory card
slot.
CAUTION
Use an optional Pioneer USB cable (CD-IU50) to
connect the USB audio player/USB memory as
any device connected directly to the unit will protrude out from the unit and may be dangerous.
Do not use unauthorized products.
Only for MVH-P8300BT
Part Operation
+/– (VO-
9
LUME)
a MUTE
b a/b/c/d
c AUDIO
Press to increase or decrease volume.
Press to mute. Press again to unmute.
Press to perform manual seek
tuning, fast forward, reverse and
track search controls.
Press to display an audio function.
En
9
Page 10

Section
03
Operating this unit
Part Operation
Press to select different displays
for the audio source.
Press to select the basic screen or
image screen for the video
d DISP/SCRL
e e
f FUNCTION Press to display functions.
LIST/
g
ENTER
BAND/ES-
h
CAPE
i Thumb pad
j DIRECT
k CLEAR
0 to 9 but-
l
tons
source.
! If the background setting on
the entertainment menu is
turned off, you can switch between the basic screen and
image screen.
Press to pause or resume playback.
Press to display the list depending
on the source.
While in the operating menu,
press to control functions.
Press to select among three FM
bands and one AM band.
When playing exte rnal storage devices containing a mixture of various media file types, press to
switch between media file types
to play.
Music (compressed audio)—
Video (DivX video files)—Photo
(JPEG picture files)
Press to return to the ordinary display from the list/function menu.
Press to cancel the initial setting
menu.
Move to perform manual seek
tuning, fast forward, reverse and
track search controls.
Press to display the folder list, file
list or preset channel list depending on the source.
Press to directly select the desired
channel for XM/SIRIUS tuner.
Press to cancel the input number
when 0 to 9 are used.
Press to directly select the desired
channel or preset tuning. Buttons
1 to 6 can operate the preset tuning.
Press and hold one of the buttons
1 to 6 to preset the desired station.
Part Operation
(OFF
m
HOOK)
(ON
n
HOOK)
o PGM Not used.
Press to start talking on the
phone while operating a phone.
While operating the phone
source, press to end a call or reject an incoming call.
Note
You cannot operate function settings, audio adjustments, list menus, etc. by pressing a/b/c/d
and thumb pad of the remote control. Use multicontrol of the head unit instead.
Basic operations
Important
! Handle gently when removing or attaching
the front panel.
! Avoid subjecting the front panel to excessive
shock.
! Keep the front panel out of direct sunlight and
high temperatures.
! To avoid damaging the device or vehicle inter-
ior, remove any cables and devices attached
to the front panel before detaching it.
10
En
Page 11

Operating this unit
Removing the front panel to protect your unit from
theft
1 Press the detach button to release the front
panel.
2 Grab the front panel and remove.
3 Always keep the detached front panel in a protec-
tion device such as a protection case.
Re-attaching the front panel
1 Slide the front panel up until it clicks.
The front panel and the head unit are connected
on the upper side. Make sure that the front panel
has been properly connected to the head unit.
2 Press the lower side of the front panel until it is
firmly seated.
If you can’t attach the front panel to the head unit
successfully, try again. Forcing the front panel
into place may result in damage.
Turning the unit on
1 Press SRC/OFF to turn the unit on.
Turning the unit off
1 Press and hold SRC/OFF until the unit turns off.
Selecting a sour ce
1 Press SRC/OFF to cycle between:
XM (XM tuner)—SIRIUS (SIRIUS tuner)—Digital
Radio (HD Radio tuner)/Radio (tuner)—USB
(USB storage device)/iPod (iPod connected using
USB input)—Pandora (Pandora)—SD (SD memory card)—EXT1 (external unit 1)—EXT2 (external
unit 2)—AUX (AUX)
Adjusting the volume
1 Turn M.C. to adjust the volume.
Notes
! When this unit’s blue/white lead is connected
to the vehicle’s auto-antenna relay control
terminal, the vehicle’s antenna extends when
this unit’s source is turned on. To retract the
antenna, turn the source off.
! When iPod source is selected, the source will
switch to Pandora source when you turn on
Pandora application.
Section
03
English
Use and care of the remote
control
Using the remote control
1 Point the remote control in the direction of the
front panel to operate.
When using for the first time, pull out the film
protruding from the tray.
Replacing the battery
1 Slide the tray out on the back of the remote con-
trol.
2 Insert the battery with the plus (+) and minus (–)
poles aligned prope rly.
Only for MVH-P7300
Only for MVH-P8300BT
WARNING
! Keep the battery out of the reach of children.
Should the battery be swallowed, consult a
doctor immediately.
! Batteries (battery pack or batteries installed)
must not be exposed to excessive heat such
as sunshine, fire or the like.
CAUTION
! Use one CR2025 (3 V) lithium battery.
! Remove the battery if the remote control is not
used for a month or longer.
! There is a danger of explosion if the battery is
incorrectly replaced. Replace only with the
same or equivalent type.
! Do not handle the battery with metallic tools.
! Do not store the battery with metallic objects.
! If the battery leaks, wipe the remote control
completely clean and install a new battery.
En
11
Page 12

Section
03
Operating this unit
! When disposing of used batteries, comply
with governmental regulations or environmental public institutions’ rules that apply in your
country/area.
! “Perchlorate Material – special handling may
apply.
www.dtsc.ca.gov/hazardouswaste/
See
perchlorate. (Applicable to California, U.S.A.)”
Important
! Do not store the remote control in high tem-
peratures or direct sunlight.
! The remote control may not function properly
in direct sunlight.
! Do not let the remote control fall onto the
floor, where it may become jammed under the
brake or accelerator pedal.
Basic menu operations
You can operate source selection, list function,
audio adjustment, etc., using HOME.
1 Press HOME.
2 Push M.C. up or down to change the
menu option.
Home (home menu)—Custom (custom
menu)—Phone (phone menu)
# The phone menu is available only for MVHP8300BT.
3 Turn M.C. to select the menu option.
After selecting, perform the following procedures.
Home (home menu)
Source (selecting a source)
1 Press M.C. to display the setting mode.
2 Use M.C. to select the desired source name.
Turn to change the source. Press to select.
For the sources you can choose, refer to Selecting
a source on the previous page.
List (operating a list menu)
1 Press M.C. to display the list.
Press to display the folder list, file list or preset
channel list depending on the source.
Audio (setting an audio menu)
1 Press M.C. to display the audio menu.
Refer to Audio Adjustments on page 32.
System (setting a system menu)
1 Press M.C. to display the system menu.
Refer to System settings on page 33.
Entertainment (setting an entertainment menu)
1 Press M.C. to display the entertainment menu.
Refer to Entertainment settings on page 34.
Custom (custom menu)
You can choose menus within each menu
(Audio function menu, etc.) and register them
to this custom menu.
Refer to Customizing menus on the next page.
Displaying the custom menu
1 Press M.C. to display the setting mode.
Phone (phone menu)
Displaying the phone menu
! Refer to Phone menu operation on page 30.
Menu operations identical for
function settings/audio
adjustments/initial settings/lists
Returning to the previous display
Returning to the previous list/category (the folder/category one level higher.)
1 Press
Returning to the ordinary display
Canceling the initial setting menu
1 Press HOME.
.
12
En
Page 13
Operating this unit
Section
03
Customizing menus
You can register frequently used menu items
to a custom menu.
! The menu columns you can register are
displayed in circular indicators.
1 Display menu columns to register.
Refer to Basic menu operations on the previous page.
You may display the menu column in Home
(home menu).
2 Push and hold M.C. right to register the
menu column.
The menu columns you have registered are
displayed in large, circular indicators.
3 Display the custom menu and choose a
registered menu.
Refer to Basic menu operations on the previous page.
Note
You can register up to 12 columns.
Canceling a Registered Menu
1 Display the custom menu and choose a
registered menu.
Refer to Basic menu operations on the previous page.
2 Push and hold M.C. right to cancel the
registered menu.
About guide information
This unit displays guide information on how to
use M.C. for each function.
1 Display the system menu.
Refer to Basic menu operations on the previous page.
2 Use M.C. to select the Guide Info.
Turn to change the menu option. Press to select.
Guide information is displayed.
English
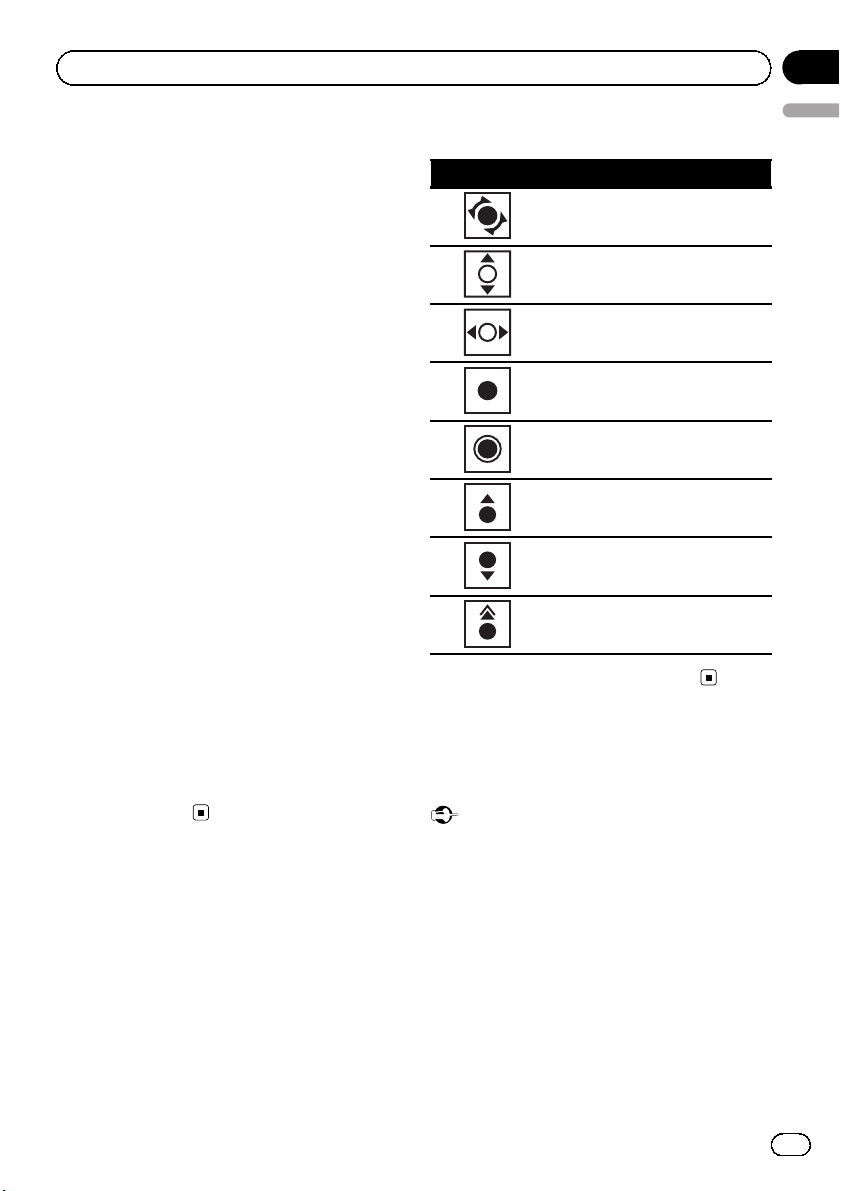
Operation
Turn M.C.
Push M.C. up or down.
Push M.C. left or right.
Press M.C.
Press and hold M.C.
Push M.C. up.
Push M.C. down.
Push and hold M.C. up.
# Press M.C. to display the next page.
Using Bluetooth telephone
This function is available only for MVH-P8300BT.
Important
! Since this unit is on standby to connect with
your cellular phone via Bluetooth wireless
technology, using it without the engine running can drain the battery power.
! Operations may vary depending on the kind of
cellular phone.
! Advanced operations that require attention
such as dialing numbers on the monitor,
using the phone book, etc., are prohibited
while driving. Park your vehicle in a safe place
when using these advanced operations.
En
13
Page 14
Section
03
Operating this unit
Setting up for hands-free phoning
Before you can use the hands-free phoning
function you must set up the unit for use with
your cellular phone.
1 Connection
Operate the Blueto oth telephone connection
menu. Refer to Connection menu operation on
page 29.
2 Function settings
Operate the Blueto oth telephone function menu.
Refer to Phone menu operation on page 30.
Basic operations
Making a phone call
1 Refer to Phone menu operation on page 30.
Answering an incoming call
1 When a call is received, press M.C.
! You can also perform this operation by push-
ing M.C. up.
Ending a call
1 Press M.C.
Rejecting an incoming call
1 When a call is received, push M.C. down.
Answering a call waiting
1 When a call is received, press M.C.
! You can also perform this operation by push-
ing M.C. up.
Switching between callers on hold
1 Push M.C. up.
Canceling call waiting
1 Push M.C. down.
Adjusting the other party’s listening volume
1 Push M.C. left or right while talking on the
phone.
Turning private mode on or off
1 Push and hold M.C. up while talking on the
phone.
Notes
! If private mode is selected on the cellular
phone, hands-free phoning may not be available.
! The estimated call time appears in the display
(this may differ slightly from the actual call
time).
14
En
Page 15
t
ext
ext
9
CH
Q
1
2
3
Operating this unit
Radio
Basic operations
A-E
87.
16:54
MHz
Radio
1 Indicator display area
Refer to Indicator list on page 50.
2 Text information area
Local
Tex
.
! Song title
! Artist name
! Program service name
! Band/Preset number/Frequency indica-
tor
3 Source image display
Manual tuning (step by step)
1 Push M.C. left or right.
Seeking
1 Push and hold M.C. left or right, and then re-
lease.
You can cancel seek tuning by pushing M.C. left
or right.
While pushing and holding M.C. left or right, you
can skip stations. Seek tuning starts as soon as
you release M.C.
Section
03
English
Storing and recalling stations
for each band
Using the preset screen
1 Push M.C. up or down to display the preset
screen.
2 Push M.C. up or down until the desired band
(FM1, FM2, FM3 for FM or AM ) is displayed.
3 Use M.C. to store the selected frequency in the
memory.
Turn to change the preset number. Press and
hold to store.
4 Use M.C. to select the desired station.
Turn to change the station. Press to select.
You can also display the preset screen by pressing
HOME. Refer to Basic menu operations on page 12.
Using iTunes tagging
This function can be operated with the following
iPod models.
— iPod 5th generation
— iPod nano 3rd generation
— iPod nano 4th generation
— iPod nano 5th generation
— iPod nano 6th generation
— iPod classic
— iPod classic 120GB
— iPod touch 1st generation
— iPod touch 2nd generation
— iPod touch 3rd generation
— iPod touch 4th generation
— iPhone
— iPhone 3G
— iPhone 3GS
— iPhone 4
However, tag information can be stored in this
unit even while other iPod models are used.
The song information (tag) can be saved from
the broadcasting station to your iPod. The
songs will show up in a playlist called “Tagged
playlist” in iTunes the next time you sync your
iPod. Then you can directly buy the songs you
want from the iTunes Store.
15
En
Page 16
Section
03
Operating this unit
Storing the tag information to this unit
1 Tune in to the broadcast station.
2 Press and hold M.C. if
while the desired song is broadcasting.
Storing the tagged information to your iPod
1 Connect the iPod to this unit and transfer this
unit’s tag information to the iPod.
appears in the display
! The tagged songs and the song that you can
buy from the iTunes Store may be different.
Make sure to confirm the song before you
make the purchase.
! If you cannot use this function normally, up-
date your iPod firmware.
! The tag information for up to 50 songs can be
stored on this unit.
Depending on the timing of when the tag information is stored, the tag information for the
song played before or after the currently playing song may also be stored.
! If an SD is selected as the source while tag in-
formation is being stored to this unit, the tag
information will not be transferred to the iPod.
! Tag information cannot be transferred to the
iPod when a file on an SD device is being
viewed as a slideshow.
! While transferring the tag, you cannot select
the SD source.
Local (local seek tuning)
Local seek tuning lets you tune in to only those radio
stations with sufficiently strong signals for good reception.
1 Press M.C. to display the setting mode.
2 Turn M.C. to select the desired setting.
FM: Off—Level1—Level2—Level3—Level4
AM: Off—Level1—Level2
The highest level setting allows reception of only
the strongest stations, while lower levels allow the
reception of weaker stations.
3 Press M.C. to confirm the selection.
Function settings
1 Press M.C. to display the function
menu.
2 Turn M.C. to select the function.
After selecting, perform the following procedures to set the function.
BSM (best stations memory)
BSM (best stations memory) automatically stores the
six strongest stations in the order of their signal
strength.
1 Press M.C. to turn BSM on.
To cancel, press M.C. again.
16
En
Page 17

Operating this unit
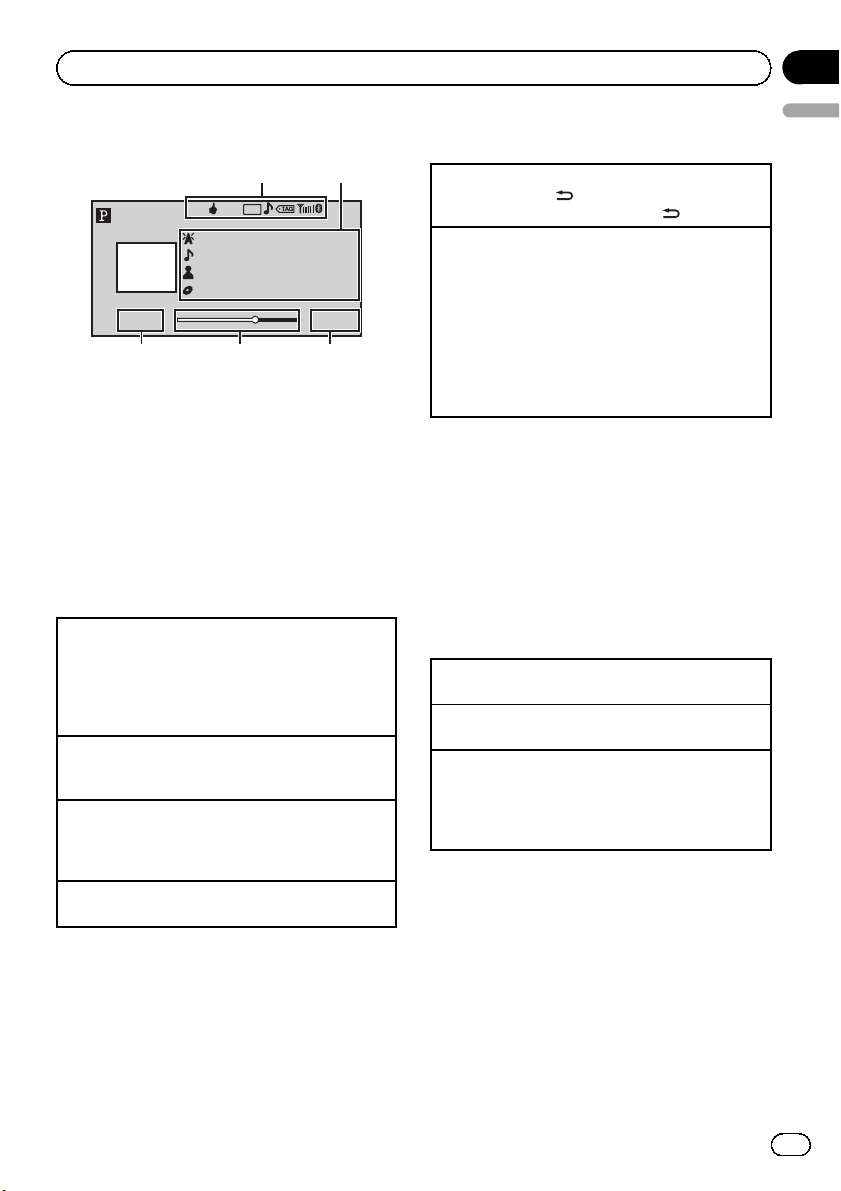
Playing moving images
Basic operations
If an iPod with video capabilities is connected
to this unit using an interface cable such as
the CD-IU50V (sold separately), you can enjoy
the video contents of the iPod as an iPod
source. You need not change the AUX setting.
Text
Text
2
A-EQ
3
16:542345 7890
1
Video
8888'88" -8888'88"
456
You can switch to the basic screen or the
image screen.
Refer to Display (display setting) on page 19.
1 File information area for the currently playing
file
External storage device (USB, SD)
! Folder/file number indicator
iPod
! Song number indicator
2 Indicator display area
Refer to Indicator list on page 50.
3 Text information area
External storage device (USB, SD)
! Folder name
! File name
iPod
! Song title
! Artist name
! Album title
4 Play time indicator
5 Scrubber bar
6 Remaining time indicator
Section
03
English
Playing files on a USB storage device
1 Open the USB port cover.
2 Plug in the USB storage device using a USB
cable.
Stopping playback of files on a USB storage device
1 You may disconnect the USB storage device at
any time.
Playing files on an SD memory card
1 Remove the front panel.
2 Insert an SD memory card into the SD card slot.
Insert it with the contact surface facing down,
and press on the card until it clicks and comple-
tely locks into place.
3 Re-attach the front panel.
Stopping playback of files on an SD memory card
1 Remove the front panel.
2 Press on the SD memory card until it clicks.
The SD memory card is ejected.
3 Pull out the SD memory card.
4 Re-attach the front panel.
Playing videos on an iPod
1 Open the USB port cover.
2 With an interface cable (e.g., CD-IU50V), connect
the iPod to a USB cable and AUX input using the
iPod Dock Connector.
Selecting a folder
1 Push M.C. up or down.
Selecting a file (chapter)
1 Push M.C. left or right.
Fast forwarding or reversing
1 Push and hold M.C. left or right.
Notes
! Disconnect USB storage devices from the unit
when not in use.
! Incompatible text stored with the video image
file may not be displayed or may be displayed
incorrectly.
! Incompatible text saved on the iPod will not
be displayed by the unit.
! Disconnect headphones from the iPod before
connecting it to this unit.
! The iPod cannot be turned on or off unless the
control mode is set to App.
! The iPod will turn off about two minutes after
the ignition switch is set to OFF.
En
17
Page 18

Section
03
Operating this unit
! When playing external storage devices that
contain a mixture of various media file types,
switch between media file types when playing
different files.
Refer to A/V Format (switching media file
types) on the next page.
Selecting and playing files
from the name list
1 Display the list menu.
Refer to Basic menu operations on page 12.
2 Use M.C. to select the desired file name
(or folder name).
Changing the file or folder name
1 Turn M.C.
Playing
1 When a file is selected, press M.C.
Viewing a list of the files (or folders) in the selected
folder
1 When a folder is selected, press M.C.
Changing the file or folder name (skip 100 items at
once)
1 Push M.C. up or down.
Changing the file or folder name (automatically skip
100 items each time)
1 Push and hold M.C. up or down.
Browsing for a video on the iPod
1 Display the list menu.
Refer to Basic menu operations on page 12.
2 Use M.C. to select a category/video.
Changing the name of the video or category
1 Turn M.C.
Playing
1 When a video is selected, press M.C.
Viewing a list of the files (or folders) in the selected
folder
1 When a category is selected, press M.C.
Searching the list by alphabet
1 When a list for the selected category is displayed,
push and hold M.C. left or right to switch to alphabet search mode.
2 Turn M.C. to select a letter.
3 Press M.C. to display the alphabetical list.
Changing the name of the video (skip 100 items at
once)
1 Push M.C. up or down.
Changing the name of the video (automatically skip
100 items each time)
1 Push and hold M.C. up or down.
Playing DivXâVOD content
Some DivX VOD (video on demand) content
may only be playable a fixed number of times.
When you attempt to play back this type of
content saved on an external storage device,
the remaining number of times it can be
played is shown on-screen. You can then decide whether or not to play back the contents
of the external storage device.
! If there is no limit to the number of times
the DivX VOD content can be viewed, then
you may insert the external storage device
into your player and play the content as
often as you like, and no message will be
displayed.
! You can confirm the number of times that
the content can be played by checking the
number displayed after Remaining Views:.
Important
! In order to play DivX VOD contents on this
unit, you first need to register the unit with
your DivX VOD contents provider. For details
on your registration code, refer to Displaying
â
the DivX
! DivX VOD content is protected by a DRM (Di-
gital Rights Management) system. This restricts playback of content to specific,
registered devices.
VOD registration code on page 40.
18
En
Page 19

Operating this unit
Section
03
% If a message is displayed after inserting
the external storage device containing
DivX VOD content, use M.C. to select a desired mode.
Turn to change the mode. Press to select.
! Play – Playback of the DivX VOD content
! Next Play – Skip to the next file
! Stop – If you do not want to play the DivX
VOD content
Function settings
1 Press M.C. to display the function
menu.
2 Turn M.C. to select the function.
After selecting, perform the following procedures to set the function.
External storage device (USB, SD)
Play/Pause (play/pause)
1 Press M.C. to display the setting mode.
2 Turn M.C. to select the desired setting.
Play—Pause
3 Press M.C. to confirm the selection.
Play Mode (repeat play)
1 Press M.C. to display the setting mode.
2 Turn M.C. to select a repeat play range.
! All – Repeat all files
! File – Repeat the current file
! Folder – Repeat the current folder
3 Press M.C. to confirm the selection.
Stop (stopping playback)
1 Press M.C. to stop playback.
Time Search (time search)
1 Press M.C. to display the setting mode.
2 Turn M.C. to find the part you want to play.
3 Press M.C. to confirm the selection.
Wide Mode (switching the wide mode)
1 Press M.C. to display the setting mode.
2 Turn M.C. to select the desired setting.
Full (full)—Just (just)— Cinema (cinema)—Zoom
(zoom)—Normal (normal)
For details about the settings, refer to Changing
the wide screen mode on page 40.
3 Press M.C. to confirm the selection.
Display (display setting)
You can switch to the basic screen or the image
screen.
1 Press M.C. to display the setting mode.
2 Press M.C. to select the desired setting.
A/V Format (switching media file types)
1 Press M.C. to display the setting mode.
2 Turn M.C. to select the desired setting.
Music (compressed audio)—Video (DivX video
files)—Photo (JPEG picture files)
3 Press M.C. to confirm the selection.
DivX® Subtitle (DivX subtitle file settings)
1 Press M.C. to display the setting mode.
2 Turn M.C. to select the desired setting.
Original (DivX subtitles) — Custom (DivX exter-
nal subtitles)
For details about the settings, refer to Setting the
DivX subtitle file on page 40.
3 Press M.C. to confirm the selection.
TV Aspect (aspect ratio settings)
1 Press M.C. to display the setting mode.
2 Turn M.C. to select the desired setting.
16 : 9 — Letter Box — Pan Scan
For details about the settings, refer to Setting the
aspect ratio on page 40.
3 Press M.C. to confirm the selection.
DivX® VOD (DivX
1 Press M.C. to display the setting mode.
2 Use M.C. to display the desired code.
Turn to change the menu option. Press to select.
Registration – Refer to Displaying the DivX
registration code on page 40.
Deregistration – Refer to Displaying the deregis-
tration code on page 41.
Audio Lang. (audio language settings)
â
VOD registration code)
English
â
VOD
En
19
Page 20

Section
03
Operating this unit
You can switch the audio language during playback
when playing a file recorded with dialog in two or
more languages.
1 Press M.C. to display the setting mode.
2 Turn M.C. to select the desired setting.
3 Press M.C. to confirm the selection.
Subtitle Lang. (subtitle language settings)
You can switch subtitle language during playback
when playing file recorded with subtitles in one or
more languages.
1 Press M.C. to display the setting mode.
2 Turn M.C. to select the desired setting.
3 Press M.C. to confirm the selection.
iPod
Play/Pause (pause)
1 Press M.C. to pause or resume.
Shuffle Mode (shuffle)
1 Press M.C. to display the setting mode.
2 Turn M.C. to select your favorite setting.
! Songs – Play back songs in the selected list in
random order.
! Albums – Play back songs from a randomly
selected album in order.
! Off – Cancel random play.
3 Press M.C. to confirm the selection.
Play Mode (repeat play)
1 Press M.C. to display the setting mode.
2 Turn M.C. to select a repeat play range.
! One – Repeat the current song
! All – Repeat all songs in the selected list
3 Press M.C. to confirm the selection.
Control Mode (control mode)
This function is not compatible with the following
iPod models.
! iPod nano 1st generation
! iPod 5th generation
1 Press M.C. to select your favorite setting.
! App – This unit’s iPod function can be oper-
ated from the connected iPod.
! Audio – This unit’s iPod function can be oper-
ated from this unit.
Time Search (time search)
1 Press M.C. to display the setting mode.
2 Turn M.C. to find the part you want to play.
3 Press M.C. to confirm the selection.
Wide Mode (switching the wide mode)
1 Press M.C. to display the setting mode.
2 Turn M.C. to select the desired setting.
Full (full)—Just (just)— Cinema (cinema)—Zoom
(zoom)—Normal (normal)
For details about the settings, refer to Changing
the wide screen mode on page 40.
3 Press M.C. to confirm the selection.
Display (display setting)
You can switch to the basic screen or the image
screen.
1 Press M.C. to display the setting mode.
2 Press M.C. to select the desired setting.
ABC Search (alphabet search mode setting)
When this setting is on, you can switch to alphabet
search mode by turning M.C. twice while using the
browse function of the iPod. Refer to Searching the list
by alphabet on page 18.
1 Press M.C. to turn the setting for when M.C. is
turned twice on or off.
Sound Retriever (sound retriever)
Automatically enhances compressed audio and restores rich sound.
1 Press M.C. to display the setting mode.
2 Turn M.C. to select the desired setting.
Off (off)—1—2
1 is effective for low compression rates, and 2 is
effective for high compression rates.
3 Press M.C. to confirm the selection.
Notes
! Switching the control mode to App pauses
song playback. Operate the iPod to resume
playback.
! The following functions are still accessible
from the unit even if the control mode is set to
App.
— Volume, fast forward/reverse, track up/
down, pausing
! When the control mode is set to App, opera-
tions are limited as follows:
20
En
Page 21
Operating this unit
Section
03
— Only Play/Pause (pause), Control Mode
(control mode), Wide Mode (switching
the wide mode) and Display (display setting) functions are available.
— The browse function cannot be operated
from this unit.
! You can select the following functions if the
background setting on the entertainment
menu is off.
— Wide Mode (switching the wide mode)
— Display (display setting)
— DivX® Subtitle (DivX subtitle file settings)
— TV Aspect (aspect ratio settings)
— Subtitle Lang. (subtitle language
settings)
Playing audio
Basic operations
1
234 789
Music
4
8888'88" -8888'88"
5
1 File information area for the currently playing
file
External storage device (USB, SD)
! Folder/file number indicator
iPod
! Song number indicator
2 Indicator display area
Refer to Indicator list on page 50.
3 Text information area
External storage device (USB, SD)
! Song title/artist name/album title—
folder/file name
iPod
! Song title
! Artist name
! Album title
4 Artwork/Source image display area
iPod
! Artwork display or Source image display
External storage device (USB, SD)
! Source image display
5 Play time indicator
6 Scrubber bar
7 Remaining time indicator
2
A-EQ
S.Rtrv
Text
Text
Text
16:54
67
3
English
Playing songs on a USB storage device
1 Open the USB port cover.
2 Plug in the USB storage device using a USB
cable.
Stopping playback of songs on a USB storage device
1 You may disconnect the USB storage device at
any time.
En
21
Page 22
Section
03
Operating this unit
Playing songs on an SD memory card
1 Remove the front panel.
2 Insert an SD memory card into the SD card slot.
Insert it with the contact surface facing down,
and press on the card until it clicks and completely locks into place.
3 Re-attach the front panel.
Stopping playback of songs on an SD memory card
1 Remove the front panel.
2 Press on the SD memory card until it clicks.
The SD memory card is ejected.
3 Pull out the SD memory card.
4 Re-attach the front panel.
Playing songs on an iPod
1 Open the USB port cover.
2 Connect an iPod to the USB cable using an iPod
Dock Connector.
Selecting a folder
1 Push M.C. up or down.
Selecting a track (chapter)
1 Push M.C. left or right.
Fast forwarding or reversing
1 Push and hold M.C. left or right.
Notes
! Disconnect USB storage devices from the unit
when not in use.
! Depending on the version of iTunes used to
write MP3 files to a disc or media file types, incompatible text stored within an audio file
may be displayed incorrectly.
! Disconnect headphones from the iPod before
connecting it to this unit.
! The iPod cannot be turned on or off unless the
control mode is set to App.
! The iPod will turn off about two minutes after
the ignition switch is set to OFF.
Selecting and playing files/
tracks from the name list
Operations are the same as those for moving
images. (Refer to Selecting and playing files
from the name list on page 18.)
The following operation is available.
Playing a song in the selected folder
1 When a folder is selected, press and hold M.C.
Browsing for a song on the iPod
Operations are the same as those for moving
images. (Refer to Browsing for a video on the
iPod on page 18.)
The following operation is available.
Playing a song in the selected category
1 When a category is selected, press and hold M.C.
However, the categories in the top tier are different from those for moving images.
! Video (video)
! Playlists (playlists)
! Artists (artists)
! Albums (albums)
! Songs (songs)
! Podcasts (podcasts)
! Genres (genres)
! Composers (composers)
! Audiobooks (audiobooks)
Function settings
1 Press M.C. to display the function
menu.
2 Turn M.C. to select the function.
After selecting, perform the following procedures to set the function.
External storage device (USB, SD)
Play/Pause (pause)
1 Press M.C. to pause or resume.
Random (random play)
1 Press M.C. to turn random play on or off.
Play Mode (repeat play)
1 Press M.C. to display the setting mode.
2 Turn M.C. to select a repeat play range.
! For details about the settings, refer to
Play Mode (repeat play) on page 19.
3 Press M.C. to confirm the selection.
22
En
Page 23

Operating this unit
Sound Retriever (sound retriever)
Automatically enhances compressed audio and restores rich sound.
1 Press M.C. to display the setting mode.
2 Turn M.C. to select the desired setting.
Off (off)—1—2
1 is effective for low compression rates, and 2 is
effective for high compression rates.
3 Press M.C. to confirm the selection.
Time Search (time search)
1 Press M.C. to display the setting mode.
2 Turn M.C. to find the part you want to play.
3 Press M.C. to confirm the selection.
Display (display setting)
You can switch to the desired text information.
1 Press M.C. to display the setting mode.
2 Press M.C. to select the desired setting.
A/V Format (switching media file types)
1 Press M.C. to display the setting mode.
2 Turn M.C. to select the desired setting.
Music (compressed audio)—Video (DivX video
files)—Photo (JPEG picture files)
3 Press M.C. to confirm the selection.
iPod
Play/Pause (pause)
1 Press M.C. to pause or resume.
Shuffle All (shuffle all)
1 Press M.C. to turn shuffle all on.
To turn off, set Shuffle Mode in the Function
menu to off.
Shuffle Mode (shuffle)
1 Press M.C. to display the setting mode.
2 Turn M.C. to select your favorite setting.
! For details about the settings, refer to
Shuffle Mode (shuffle) on page 20.
3 Press M.C. to confirm the selection.
Play Mode (repeat play)
1 Press M.C. to display the setting mode.
2 Turn M.C. to select a repeat play range.
! One – Repeat the current song
! All – Repeat all songs in the selected list
3 Press M.C. to confirm the selection.
Section
03
English
Link Search (link search)
You can play songs from the following lists.
• Album list of the currently playing artist
• Song list of the currently playing album
• Album list of the currently playing genre
1 Press M.C. to display the setting mode.
2 Turn M.C. to change the mode; press to select.
! Artist s – Displays the album list of currently
playing artist.
! Albums – Displays a song list from the album
currently being played.
! Genres – Displays an album list from the
genre currently being played.
3 Use M.C. to select an album or song from the list.
For more details about the selection operation,
refer to Browsing for a video on the iPod on page
18.
Control Mode (control mode)
This function is not compatible with the following
iPod models.
! iPod nano 1st generation
! iPod 5th generation
1 Press M.C. to select your favorite setting.
! App – This unit’s iPod function can be oper-
ated from the connected iPod.
! Audio – This unit’s iPod function can be oper-
ated from this unit.
Audiobooks (changing of audiobook speed)
1 Press M.C. to display the setting mode.
2 Turn M.C. to select your favorite setting.
! Faster – Playback at a speed faster than nor-
mal
! Normal – Playback at normal speed
! Slower – Playback at a speed slower than nor-
mal
3 Press M.C. to confirm the selection.
Sound Retriever (sound retriever)
Automatically enhances compressed audio and restores rich sound.
1 Press M.C. to display the setting mode.
2 Turn M.C. to select the desired setting.
Off (off)—1—2
1 is effective for low compression rates, and 2 is
effective for high compression rates.
3 Press M.C. to confirm the selection.
Time Search (time search)
En
23
Page 24

Section
03
Operating this unit
1 Press M.C. to display the setting mode.
2 Turn M.C. to find the part you want to play.
3 Press M.C. to confirm the selection.
ABC Search (alphabet search mode setting)
When this setting is on, you can switch to alphabet
search mode by turning M.C. twice while using the
browse function of the iPod. Refer to Searching the list
by alphabet on page 18.
1 Press M.C. to turn the setting for when M.C. is
turned twice on or off.
Notes
! Switching the control mode to App pauses
song playback. Operate the iPod to resume
playback.
! The following functions are still accessible
from the unit even if the control mode is set to
App.
— Volume, fast forward/reverse, track up/
down, pausing
! When the control mode is set to App, opera-
tions are limited as follows:
— Only Play/Pause (pause), Control Mode
(control mode), Wide Mode (switching
the wide mode) and Display (display setting) functions are available.
— The browse function cannot be operated
from this unit.
Using Pandora
â
IMPORTANT:
Requirements to access the Pandora music service using the Pioneer car audio/video products:
! Apple iPhone (first generation), iPhone 3G,
iPhone 3GS or iPhone 4 with firmware version
3.0 or later.
! Latest version of the Pandora application for
the iPhone, downloaded to your device.
(Search Apple iTunes App Store for
“Pandora”).
! Current Pandora account (Free account and
paid accounts available from Pandora; create
a free account online at
http://www.pandora.com/register or through
the Pandora application for the iPhone).
! iPhone Data Plan.
Note: if the Data Plan for your iPhone does
not provide for unlimited data usage, addi-
tional charges from AT&T may apply for accessing the Pandora service via AT&T’s 3G and/or
EDGE networks.
! Connection to the Internet via 3G, EDGE or Wi-
Fi network.
! Optional Pioneer adapter cable connecting
your iPhone to the Pioneer car audio/video
products.
Limitations:
! Access to the Pandora service will depend on
the availability of a cellular and/or Wi-Fi network for purposes of allowing your iPhone to
connect to the Internet.
! Pandora’s service is currently only available in
the U.S.
! Ability of the Pioneer car audio/video products
to access the Pandora ser vice is subject to
change without notice and could be affected
by any of the following: compatibility issues
with future firmware versions of iPhones;
compatibility issues with future firmware versions of the Pandora application for the
iPhone; changes to the Pandora music service
by Pandora; discontinuation of the Pandora
music service by Pandora.
! Certain functionality of the Pandora service is
not available when accessing the service
through the Pioneer car audio/video products,
including, but not limited to, creating new stations, deleting stations, emailing current stations, buying songs from iTunes, viewing
additional text information, logging in to
Pandora, and adjusting Cell Network Audio
Quality.
Pandora Internet radio is a music service not affiliated with Pioneer. More information is available at http://www.pandora.com.
You can play the Pandora by connecting your
iPod which was installed the Pandora application.
24
En
Page 25
Operating this unit
Basic operations
Section
03
English
Displaying text information
1
S.Rtrv
Pandora
3
88'88" -88'88"
4
A-EQ
Text
Text
Text
Text
56
2
16:54
1 Indicator display area
Refer to Indicator list on page 50.
2 Text information area
! Station title
! Song title
! Artist name
! Album title
3 Source image display
4 Play time indicator
5 Scrubber bar
6 Remaining time indicator
Playing songs
1 Open the USB port cover.
2 Connect an iPod to the USB cable using an iPod
Dock Connector.
3 Start up the Pandora application installed on the
iPod.
Giving a Thumbs Up
1 Push M.C. up to give a “ Thumbs Up” for song cur-
rently playing.
Giving a Thumbs Down
1 Push M.C. down to give a “Thumbs Down” for the
song currently playing and to skip to the next
song.
Skipping tracks
1 Push M.C. right.
Hiding text information
1 Press and hold
To display text information, press
Storing song information (Bookmark)
1 Press and hold M.C. to display the setting mode.
2 Turn M.C. to select the desired setting.
! Song – to add information for the song cur-
rently playing to bookmarks
! Artist – to add artist information for the song
currently playing to bookmarks
! Cancel – to cancel and return to the previous
display
3 Press M.C. to confirm the selection.
.
.
Selecting and playing the
station list
1 Press HOME to switch to menu list
mode.
2 Push M.C. up or down to select Home.
3 Turn M.C. to change the menu option
and press it to select List.
Changing stations
1 Turn M.C.
Playing
1 When the station is selected, press M.C.
Changing the sort order
1 Press and hold M.C.
You can sort the items in the list alphabetically or
in order of the dates on which the items were created.
Function settings
1 Press M.C. to display the function
menu.
2 Turn M.C. to change the menu option
and press to select Function.
3 Turn M.C. to select the function.
After selecting, perform the following procedures to set the function.
En
25
Page 26

Section
03
Operating this unit
Play/Pause (pause)
1 Press M.C. to pause or resume.
Bookmark (bookmark)
1 Press M.C. to display the setting mode.
2 Turn M.C. to select the desired setting.
For details, refer to Storing song information (Bookmark) on the previous page.
3 Press M.C. to confirm the selection.
Sound Retriever (sound retriever)
1 Press M.C. to display the setting mode.
2 Turn M.C. to select the desired setting.
For details, refer to Sound Retriever (sound retrie-
ver) on page 23.
3 Press M.C. to confirm the selection.
Playing still images
When a USB/SD device that contains JPEG
picture files is connected, this unit starts a slideshow from the first folder/picture on the device. The player displays the pictures in each
folder in alphabetical order.
Basic operations
Text
Text
2
A-EQ
3
16:542345 7890
1
Photo
You can switch to the basic screen or the
image screen.
Refer to Display (display setting) on the next
page.
1 Folder/file number indicator
2 Indicator display area
Refer to Indicator list on page 50.
3 Text information area
! Folder name
! File name
26
Playing files on a USB storage device
1 Open the USB port cover.
2 Plug in the USB storage device using a USB
cable.
Stopping playback of files on a USB storage device
1 You may disconnect the USB storage device at
any time.
Playing files on an SD memory card
1 Remove the front panel.
2 Insert an SD memory card into the SD card slot.
Insert it with the contact surface facing down,
and press on the card until it clicks and completely locks into place.
3 Re-attach the front panel.
En
Page 27

Operating this unit
Stopping playback of files on an SD memory card
1 Remove the front panel.
2 Press on the SD memory card until it clicks.
The SD memory card is ejected.
3 Pull out the SD memory card.
4 Re-attach the front panel.
Selecting a folder
1 Push M.C. up or down.
Selecting a file
1 Push M.C. left or right.
Searching every 10 files
1 Push and hold M.C. left or right.
Notes
! Disconnect USB storage devices from the unit
when not in use.
! Incompatible text stored with the video image
file may not be displayed or may be displayed
incorrectly.
! When playing external storage devices that
contain a mixture of various media file types,
switch between media file types when playing
different files.
Refer to A/V Format (switching media file
types) on page 19.
Selecting and playing files
from the name list
Operations are the same as those for moving
images. (Refer to Selecting and playing files
from the name list on page 18.)
Function settings
1 Press M.C. to display the function
menu.
2 Turn M.C. to select the function.
After selecting, perform the following procedures to set the function.
Play/Pause (pause)
1 Press M.C. to pause or resume.
Random (random play)
Section
03
English
1 Press M.C. to turn random play on or off.
Play Mode (repeat play)
1 Press M.C. to display the setting mode.
2 Turn M.C. to select a repeat play range.
! Folder – Repeat the current folder
! All – Repeat all files
3 Press M.C. to confirm the selection.
Capture (capturing an image in JPEG files)
You can capture image data and use it as wallpaper.
Images can be stored and recalled easily in this unit.
! Only one image can be stored on this unit. Old
images are overwritten with the new ones.
1 Press M.C. to display the setting mode.
2 Turn M.C. to select the desired setting.
3 Press M.C. to confirm the selection.
Rotate (picture rotation)
1 Press M.C. to display the setting mode.
2 Press M.C. to rotate the displayed picture 90°
clockwise.
Wide Mode (switching the wide mode)
1 Press M.C. to display the setting mode.
2 Turn M.C. to select the desired setting.
Full (full)—Just (just)— Cinema (cinema)—Zoom
(zoom)—Normal (normal)
For details about the settings, refer to Changing
the wide screen mode on page 40.
3 Press M.C. to confirm the selection.
Time Per Slide (slideshow interval time setting)
JPEG files can be viewed as a slide show on this unit.
In this setting, the interval between each image can
be set.
1 Press M.C. to display the setting mode.
2 Turn M.C. to select the desired setting.
! 5sec – JPEG images switch at intervals of 5
seconds
! 10sec – JPEG images switch at intervals of 10
seconds
! 15sec – JPEG images switch at intervals of 15
seconds
! Manual – JPEG images can be switched
manually
3 Press M.C. to confirm the selection.
Display (display setting)
En
27
Page 28
Section
03
Operating this unit
You can switch to the basic screen or the image
screen.
1 Press M.C. to display the setting mode.
2 Press M.C. to select the desired setting.
A/V Format (switching media file types)
1 Press M.C. to display the setting mode.
2 Turn M.C. to select the desired setting.
For details about the settings, refer to
A/V Format (switching media file types) on page
19.
3 Press M.C. to confirm the selection.
Note
You can select the following functions if the background setting on the entertainment menu is off.
! Capture (capturing an image in JPEG files)
! Rotate (picture rotation)
! Wide Mode (switching the wide mode)
! Display (display setting)
Introduction of operations for
playback of still images as a
slideshow
You can view still images saved to a USB/SD
as a slideshow while listening to audio from
another source.
For details about the settings, refer to
Slide Show (slide show viewing) on page 34.
Function settings
1 Press M.C. to display the function
menu.
2 Turn M.C. to select the function.
After selecting, perform the following procedures to set the function.
Return (ending slideshow)
1 Press M.C. to end the slideshow.
Photo Selection (selecting photos)
1 Press M.C. to display the setting mode.
2 Select a file.
The following operations are available. The operating method is the same as that for the basic operations. Refer to Basic operations on page 26.
! Selecting a folder
! Selecting a file
! Searching every 10 files
Play/Pause (pause)
1 Press M.C. to pause or resume.
Random (random play)
1 Press M.C. to turn random play on or off.
Play Mode (repeat play)
1 Press M.C. to display the setting mode.
2 Turn M.C. to select a repeat play range.
! All – Repeat all files
! Folder – Repeat the current folder
3 Press M.C. to confirm the selection.
Capture (capturing an image in JPEG files)
For details about the settings, refer to Capture (cap-
turing an image in JPEG files) on the previous page.
1 Press M.C. to display the setting mode.
2 Turn M.C. to select the desired setting.
3 Press M.C. to confirm the selection.
Rotate (picture rotation)
1 Press M.C. to display the setting mode.
2 Press M.C. to rotate the displayed picture 90°
clockwise.
Wide Mode (switching the wide mode)
1 Press M.C. to display the setting mode.
2 Turn M.C. to select the desired setting.
Full (full)—Just (just)— Cinema (cinema)—Zoom
(zoom)—Normal (normal)
For details about the settings, refer to Changing
the wide screen mode on page 40.
3 Press M.C. to confirm the selection.
Time Per Slide (slideshow interval time setting)
For details about the settings, refer to Time Per Slide
(slideshow interval time setting) on the previous page.
1 Press M.C. to display the setting mode.
2 Turn M.C. to select the desired setting.
3 Press M.C. to confirm the selection.
28
En
Page 29

Operating this unit
Section
03
Note
When the USB or SD source is selected, this unit
cannot view still images on USB/SD as a
slideshow.
English
Bluetooth Telephone
This function is available only for MVHP8300BT.
For details on basic operations after connecting to a cellular phone, refer to Using Blue-
tooth telephone on page 13.
! PIN code is set to 0000 as the default. You
can change this code. Refer to PIN Code
(PIN code input) on the next page.
Connection menu operation
Important
Be sure to park your vehicle in a safe place and
apply the parking brake when performing this operation.
1 Display the phone menu.
Refer to Basic menu operations on page 12.
2 Use M.C. to select Connection.
Turn to change the menu option. Press to select.
3 Turn M.C. to select the function.
After selecting, perform the following procedures to set the function.
Device List (connecting or disconnecting a cellular
phone from the device list)
1 Press M.C. to display the setting mode.
2 Turn M.C. to select the name of a device you want
to connect.
3 Press and hold M.C. to switch the Bluetooth de-
vice address and device name.
4 Press M.C. to connect the selected cellular
phone.
While connecting, the circular indicator flashes.
To complete the connection, check the device
name (MVH-P8300BT) and enter the PIN code on
your cellular phone. If the connection is established, a circular indicator appears next to the device name.
Delete Device (deleting a cellular phone from the device list)
En
29
Page 30

Section
03
Operating this unit
1 Press M.C. to display the setting mode.
2 Turn M.C. to select the name of a device you want
to delete.
3 Press M.C. to select the device you want to delete.
Press and hold M.C. to switch the Bluetooth device address and device name.
4 Use M.C. to select Yes.
Turn to change the menu option. Press to select.
To cancel, select No.
! While this function is in use, do not turn off the
engine.
Add Device (connecting a new cellular phone)
1 Press M.C. to start searching.
! To cancel, press M.C. while searching.
2 Turn M.C. to select a device from the device list.
! If the desired device is not displayed, select
Search Again.
! If five devices are already paired, Memory
Full is displayed and it is not possible to per-
form this operation. In this case, delete a
paired device first.
3 Press and hold M.C. to switch the Bluetooth de-
vice address and device name.
4 Press M.C. to connect the selected cellular
phone.
While connecting, Pairing flashes. To complete
the connection, check the device name (MVH-
P8300BT) and enter the PIN code on your cellular
phone. If the connection is established, Paired is
displayed and the phone menu appears.
Special Device (setting a special device)
Bluetooth devices that are difficult to establish a connection with are called special devices. If your Bluetooth device is listed as a special device, select the
appropriate one.
1 Press M.C. to display the setting mode.
2 Use M.C. to select a special device.
Turn to change the menu option. Press to select.
3 Use a cellular phone to connect to this unit.
To complete the connection, check the device
name (MVH-P8300BT) and enter the PIN code on
your cellular phone. If the connection is established, a circular indicator appears next to the device name.
! If five devices are already paired, Memory
Full is displayed and it is not possible to per-
form this operation. In this case, delete a
paired device first.
Auto Connect (connecting to a Bluetooth device
automatically)
1 Press M.C. to turn automatic connection on or
off.
Visibility (setting the visibility of this unit)
To check the availability of this unit from other devices, Bluetooth visibility of this unit can be turned
on.
1 Press M.C. to turn the visibility of this unit on or
off.
! While setting Special Device, Bluetooth visibi-
lity of this unit is turned on temporarily.
Device Information (Bluetooth device address display)
1 Press M.C. to display the Bluetooth device ad-
dress and device name.
PIN Code (PIN code input)
To connect your cellular phone to this unit via Bluetooth wireless technology, you need to enter a PIN
code on your phone to verify the connection. The default code is 0000, but you can change it with this
function.
1 Press M.C. to display the setting mode.
2 Turn M.C. to select a number.
3 Press M.C. to move the cursor to the next posi-
tion.
4 After inputting the PIN code (up to 8 digits), press
M.C.
The PIN code can be stored in the memory.
! When you press and hold M.C. in the same
display, the PIN code you entered is stored in
this unit.
! Pressing M.C. in the confirmation display re-
turns you to the PIN code input display, and
you can change the PIN code.
Phone menu operation
Important
Be sure to park your vehicle in a safe place and
apply the parking brake when performing this operation.
1 Display the phone menu.
Refer to Basic menu operations on page 12.
2 Turn M.C. to select the function.
After selecting, perform the following procedures to set the function.
30
En
Page 31

Operating this unit
Recent (recent call history)
You can make a phone call by selecting from dialed
calls, received calls, and missed calls in this menu.
1 Press M.C. to display Missed Calls (missed call
history), Dialed Calls (dialed call history) or Re-
ceived Calls (received call history).
2 Use M.C. to select the desired list.
Turn to change the menu option. Press to select.
3 Press M.C. to make a call.
4 When you find a phone number that you want to
store in the memory, press and hold M.C. right.
Phone Book (phone book)
! The phone book in your cellular phone will be
transferred automatically when the phone is connected to this unit.
! Dependin g on the cellular phone, the phone book
may not be transferred automatically. In this case,
operate your cellular phone to transfer the phone
book. The visibility of this unit should be on. Refer
to Visibility (setting the visibility of this unit) on
the previous page.
1 Press M.C. to display the alphabetical list.
2 Turn M.C. to select the first letter of the name you
are looking for.
! Press and hold M.C. to select the desired
character type.
alphabet–Cyrillic alphabet
3 Press M.C. to display a registered name list.
4 Turn M.C. to select the name you are looking for.
5 Press M.C. to display the phone number list.
6 Use M.C. to select the phone number you want to
call.
Turn to change the phone number. Press to select.
7 Press M.C. to make a call.
8 When you find a phone number that you want to
store in the memory, press and hold M.C. right.
Preset Dial (preset phone numbers)
Section
03
English
Connection (phone connection)
! Operate the Bluetooth telephone connection
menu. Refer to Connection menu operation on
page 29.
Function and operation
1 Display Phone Function.
Refer to Phone Function (phone function) on
this page.
2 Press M.C. to display the function
menu.
3 Turn M.C. to select the function.
After selecting, perform the following procedures to set the function.
Auto Answer (automatic answering)
1 Press M.C. to turn automatic answering on or off.
Ring Tone (ring tone select)
1 Press M.C. to turn the ring tone on or off.
1 Press M.C. to display the setting mode.
2 Use M.C. to select the desired preset number.
Turn to change the menu option. Press to select.
3 Press M.C. to make a call.
Phone Function (phone function)
You can set Auto Answer and Ring Tone from this
menu. For details, refer to Function and operation on
this page.
En
31
Page 32

Section
03
Operating this unit
Audio Adjustments
1 Display the audio menu.
Refer to Basic menu operations on page 12.
2 Turn M.C. to select the audio function.
After selecting, perform the following procedures to set the audio function.
Fader/Balance (fader/balance adjustment)
1 Press M.C. to display the setting mode.
2 Push M.C. up or down to adjust the front/rear
speaker balance.
Adjustment range (front/rear): Front 15 to Rear
15
3 Push M.C. left or right to adjust the left/right
speaker balance.
Adjustment range (left/right): Left 15 to Right 15
! Select F/R 0 when only using two speakers.
! When the rear output setting and preout setting
are Subwoofer, you cannot adjust front/rear
speaker balance.
Sonic Center Control (sonic center control)
Sound that is suited for the listening position can easily be created with this function.
1 Press M.C. to display the setting mode.
2 Push M.C. left or right to select a listening posi-
tion.
Adjustment range: Left:7 to Right:7
Auto EQ (auto-equalizer on/off)
The auto-equalizer is an equalizer curve created by
auto EQ (refer to Auto EQ (auto-equalizing) on page
36).
You can turn the auto-equalizer on or off.
1 Press M.C. to turn the auto-equalizer on or off.
You cannot use this function if auto EQ has not been
carried out.
Graphic EQ (equalizer adjustment)
You can adjust the currently selected equalizer curve
setting as desired. Adjusted equalizer curve settings
are stored in Custom1 or Custom2.
! A separate Custom1 curve can be created for
each source. If you make adjustments when a
curve other than Custom2 is selected, the equalizer curve settings will be stored in Custom1.
! A Custom2 curve that is common for all sources
can be created. If you make adjustments when
the Custom2 curve is selected, the Custom2
curve will be updated.
1 Press M.C. to display the setting mode.
2 Turn M.C. to select an equalizer curve.
Powerful—Natural—Vocal—Custom1—Custom2—Flat—Super Bass
3 Push M.C. left or right to select the equalizer
band to adjust.
40Hz—80Hz—200Hz—400Hz—1kHz—2.5kHz
—8kHz—10kHz
4 Push M.C. up or down to adjust the level of the
equalizer band.
Adjustment range: +12dB to –12dB
Loudness (loudness)
Loudness compensates for deficiencies in the lowand high-frequency ranges at low volume.
1 Press M.C. to display the setting mode.
2 Turn M.C. to select the desired setting.
Off (off)—Low (low)—Mid (mid)—High (high)
3 Press M.C. to confirm the selection.
Subwoofer1 (subwoofer on/off setting)
This unit is equipped with a subwoofer output which
can be turned on or off.
1 Press M.C. to turn subwoofer output on or off.
Subwoofer2 (subwoofer adjustment)
The cut-off frequency and output level can be adjusted when the subwoofer output is on.
Only frequencies lower than those in the selected
range are outputted from the subwoofer.
1 Press M.C. to display the setting mode.
2 Turn M.C. to select the phase of subwoofer out-
put.
Normal (normal phase)—Reverse (reverse
phase)
3 Push M.C. up or down to adjust the output level
of the subwoofer.
Adjustment range: +6 to –24
4 Push M.C. left or right to select the cut-off fre-
quency.
50Hz—63Hz—80Hz—100Hz—125Hz
Bass Booster (bass boost)
32
En
Page 33

Operating this unit
1 Press M.C. to display the setting mode.
2 Turn M.C. to adjust the level.
Adjustment range: 0 to +6
3 Press M.C. to confirm the selection.
High Pass Filter (high pass filter adjustment)
When you do not want low sounds from the subwoofer output frequency range to play from the front or
rear speakers, turn on the HPF (high pass filter). Only
frequencies higher than those in the selected range
are output from the front or rear speakers.
1 Press M.C. to display the setting mode.
2 Turn M.C. to select the cut-off frequency.
Off (off)—50Hz—63Hz—80Hz—100Hz—125Hz
3 Press M.C. to confirm the selection.
SLA (source level adjustment)
SLA (Source level adjustment) lets you adjust the vo-
lume level of each source to prevent radical changes
in volume when switching between sources.
! When selecting FM as the source, you cannot
switch to SLA.
! Settings are based on the FM volume level, which
remains unchanged.
! The AM volume level can also be adjusted with
this function.
1 Press M.C. to display the setting mode.
2 Push M.C. up or down to adjust the source vo-
lume.
Adjustment range: +4 to –4
Note
You cannot select Custom1 and Custom2 when
using the auto-equalizer.
Section
03
English
System settings
1 Display the system menu.
Refer to Basic menu operations on page 12.
2 Turn M.C. to select the system function.
After selecting, perform the following procedures to set the system function.
Guide Info (guide information)
1 Press M.C. to display the guide information.
Refer to About guide information on page 13.
Clock ADJ (date and clock)
1 Press M.C. to display the setting mode.
2 Press M.C. to select the segment of the clock dis-
play you wish to set.
Day—Month—Year—Hour—Minute—AM/PM
3 Turn M.C. to set the date and time.
Picture ADJ (picture adjustment)
1 Press M.C. to display the setting mode.
2 Turn M.C. to select the function to be adjusted.
Press to select.
Brightness—Contrast—Color—Hue—Dimmer
—Temperature—Black Level
For details about the settings, refer to Changing
the picture adjustment on page 41.
When you select Black Level, press M.C. to turn
the setting on or off.
3 Turn M.C. to increase or decrease the level of the
selected item.
Adjustment range: +24 to –24
! Dimmer can be adjusted from +48 to +1.
! Temperature can be adjusted from +3 to –3.
Caution Lang. (caution language settings)
You can switch the display language for the warning
message of the parking brake interlock.
1 Press M.C. to display the setting mode.
2 Turn M.C. to select the desired setting.
English—Français—Español
3 Press M.C. to confirm the selection.
System Lang. (menu language settings)
En
33
Page 34

Section
03
Operating this unit
! The language can be changed for the following:
! Function menus
! System menu
! Initial menu
! On-screen display
! Multi language setting for DivX
! If the embedded language and the selected lan-
guage setting are not the same, text information
may not display properly.
! Some characters may not be displayed properly.
! To complete this operation, switch the ignition key
off and on after you set this setting.
1 Press M.C. to display the setting mode.
2 Turn M.C. to select the desired language.
English (English)—Español (Spanish)—Português (Portuguese)—РУССКИЙ (Russian)
3 Press M.C. to confirm the selection.
Detach Warning (warning tone setting)
If the front panel is not detached from the head unit
within four sec onds of turning off the ignition, a warning tone sounds. You can turn off the warning tone.
1 Press M.C. to turn warning tone on or off.
AUX Input (auxiliary input)
Activate this settin g when using an auxiliary device
connected to this unit.
1 Press M.C. to turn AUX Input on or off.
Entertainment settings
1 Display the entertainment menu.
Refer to Basic menu operations on page 12.
2 Turn M.C. to select the entertainment
function.
After selecting, perform the following procedures to set the entertainment function.
Background (background display setting)
1 Press M.C. to display the setting mode.
2 Turn M.C. to select the desired setting.
BGP1 (background picture 1)—BGP2 (background picture 2)—BGP3 (background picture 3)
—BGV (background visual)—Photo (photo)—
SPEANA (spectrum analyzer)—Off (display off)
3 Press M.C. to confirm the selection.
Clock (entertainment clock)
1 Press M.C. to turn entertainment clock display on
or off.
If the setting is on, it is automatically switch ed to
entertainment clock display.
Slide Show (slide show viewing)
1 Press M.C. to display the setting mode.
2 Turn M.C. to select the external storage device.
USB (USB storage device)—SD (SD memory card)
Slideshow will start.
Appearance (screen/illumination color)
34
1 Press M.C. to display the setting mode.
2 Turn M.C. to change the desired screen/illumina-
tion color. Press to select.
Screen (screen color)—Illumi (Illumination color)
—Color Setting (customizing color)
For details on Color Setting (customizing color),
refer to Customizing the illumination color on the
next page.
3 Turn M.C. to change the desired illumination
color. Press to select.
The illumination color changes at a
regular interval.
The customized color is set as the illumination color.
En
Page 35

Operating this unit
Section
03
Notes
! If SPEANA (spectrum analyzer) is selected,
the spectrum analyzer will be displayed instead of Source image display or Artwork display.
! If you select USB, SD as the source, you can-
not select Slide Show.
Customizing the illumination color
1 Use M.C. to select Color Setting in the
Appearance (Illumination color).
Refer to Appearance (screen/illumination
color) on the previous page.
2 Use M.C. to customize the color.
Turn for fine tuning. Push left or right to adjust
the next color.
3 Press M.C. to store the customized color
in the memory.
The illumination color will be switched to the
customized color.
English
Initial Settings
1 Press and hold SRC/OFF until the unit
turns off.
2 Press M.C. to display the initial setting
menu.
3 Turn M.C. to select the initial setting.
After selecting, perform the following procedures to set the initial setting.
A-EQ Measurement (auto-equalizing)
The auto-equalizer is an equalizer curve created by
auto EQ (refer to Auto EQ (auto-equalizing) on the next
page).
You can turn the auto-equalizer on or off.
Rear Speaker (rear output and subwoofer setting)
This unit’s rea r output (rear speaker leads output and
RCA rear output) can be used for full-range speaker
(Full) or subwoofer (Subwoofer) connection. If you
switch the rear output setting to Subwoofer, you can
connect a rear speaker lead directly to a subwoofer
without using an auxiliary amp.
Initially, the unit is set for rear full-range speaker connection (Full).
1 Press M.C. to display the setting mode.
2 Turn M.C. to change the setting.
Subwoofer (subwoofer)—Full (full-range speaker)
! Even if you change this setting, there will be
no output unless you turn the subwoofer output on (refer to Subwoofer1 (subwoofer on/off
setting) on page 32).
! If you change this setting, subwoofer output
in the audio menu will return to the factory
settings.
3 Press M.C. to confirm the selection.
Demonstration (demo display setting)
1 Press M.C. to turn the demo display on or off.
BT Memory Clear (resetting the Bluetooth wireless
technology module)
En
35
Page 36

Section
03
Operating this unit
This function is available only for MVH-P8300BT.
Bluetooth telephone data can be deleted. To protect
personal information, we recommend deleting this
data before tran sferring the unit to other persons. The
following settings will be deleted.
! phone book entries on the Bluetooth telephone
! preset numbers on the Bluetooth telephone
! registration assignment of the Bluetooth tele-
phone
! call history of the Bluetooth telephone
! information of the connected Bluetooth telephone
! PIN code
1 Press M.C. to display the setting mode.
2 Use M.C. to select Yes.
Turn to change the mode. Press to select.
Cleared is displayed and the settings are deleted.
To cancel, select No.
! While this function is in use, do not turn off
the engine.
BT Ver. Info. (Bluetooth version display)
This function is available only for MVH-P8300BT.
1 Press M.C. to display the Bluetooth (microproces-
sor) version of this unit.
Software Update (updating the software)
This function is available only for MVH-P8300BT.
This function is used to update this unit with the latest software. For information on the software and updating, refer to our website.
1 Press M.C. to display the setting mode.
2 Use M.C. to select Yes to show a confirmation dis-
play.
Turn to change the mode. Press to select.
To cancel, select No.
Follow the on-screen instructions to finish updating the software.
Ever Scroll (scroll mode setting)
When ever scroll is set to On, recorded text information scrolls continuously in the display. Set to off if
you prefer the information to scroll just once.
1 Press M.C. to turn the ever scroll on or off.
Auto EQ (auto-equalizing)
The auto-equalizer automatically measures
the car’s interior acoustic characteristics, and
then creates an auto-equalizer curve based on
that information.
! To perform this function, dedicated micro-
phone (e.g. CD-MC20) is required.
WARNING
As a loud tone (noise) may be emitted from the
speakers when measuring the car's interior
acoustic characteristics, never perform auto EQ
while driving.
CAUTION
! Thoroughly check the conditions before per-
forming auto EQ as the speakers may be da-
maged if these functions are performed when:
— The speakers are incorrectly connected.
(For example, when a rear speaker is connected as a subwoofer output.)
— A speaker is connected to a power amp de-
livering output higher than the speaker’s
maximum input power capability.
! If the microphone is placed in an unsuitable
position the measurement tone may become
loud and measurement may take a long time,
resulting in battery drainage. Be sure to place
the microphone in the specified location.
Before operating the auto EQ function
! Carry out auto EQ in as quiet a place as
possible, with the car engine and air condi-
tioning switched off. Also cut power to car
phones or portable telephones in the car, or
remove them from the car before carrying
out auto EQ. Sounds other than the mea-
surement tone (surrounding sounds, en-
gine sound, telephones ringing etc.) may
prevent correct measurement of the car in-
terior acoustic characteristics.
! Be sure to carry out auto EQ using the op-
tional microphone. Using another micro-
phone may prevent measurement, or result
in incorrect measurement of the car inter-
ior acoustic characteristics.
! In order to perform auto EQ, the front
speaker must be connected.
! When this unit is connected to a power
amp with input level control, auto EQ may
not be possible if the power amp’s input
level is set below the standard level.
36
En
Page 37

Operating this unit
Section
03
! When this unit is connected to a power
amp with an LPF, turn this LPF off before
performing auto EQ. Also set the cut-off frequency for the built-in LPF of an active subwoofer to the highest frequency.
! The distance has been calculated by com-
puter to be the optimum delay to give accurate results for the circumstances, so
please continue to use this value.
— The reflected sound within the car is
strong and delays occur.
— The LPF on active subwoofers or exter-
nal amps delay the lower sounds.
! Auto EQ changes the audio settings as fol-
lows:
— The fader/balance settings return to the
center position. (Refer to Fader/Balance
(fader/balance adjustment) on page 32.)
— The equalizer curve switches to Flat.
(Refer to Graphic EQ (equalizer adjust-
ment) on page 32.)
— The front, center and rear speakers will
automatically be adjusted to a high
pass filter setting.
! Previous settings for auto EQ will be over-
written.
Performing auto EQ
1 Stop the car in a place that is quiet,
close all the doors, windows and sun roof,
and then turn the engine off.
If the engine is left running, engine noise may
prevent correct auto EQ.
2 Fix the optional microphone in the center of the headrest of the driver’s seat, facing forward.
The auto EQ may differ depending on where
you place the microphone. If desired, place
the microphone on the front passenger seat to
carry out auto EQ.
English
3 Turn the ignition switch to ON or ACC.
If the car’s air conditioner or heater is turned
on, turn it off. Noise from the fan in the air
conditioner or heater may prevent correct auto
EQ.
# If this unit is turned off, press SRC/OFF to turn
the source on.
4 Display the initial setting menu.
Refer to Initial Settings on page 35.
5 Use M.C. to enter the auto EQ measurement mode.
Turn to change the menu option. Press to select.
6 Plug the microphone into the microphone input jack on this unit.
7 Press M.C. to start auto EQ.
8 When the 10-second countdown starts,
get out of the car and close the door within
10 seconds.
A measurement tone (noise) is emitted from
the speakers, and auto EQ measurement begins.
# It takes about nine minutes for auto EQ measurement to be completed when all the speakers
are connected.
En
37
Page 38

Section
03
Operating this unit
# To stop auto EQ, press M.C.
9 When auto EQ is completed, Complete
is displayed.
When the car’s interior acoustic characteristics cannot be measured correctly, an error
message will be displayed. (Refer to Under-
standing auto EQ error messages on page 50.)
10 Store the microphone carefully in the
glove compartment or another safe place.
If the microphone is subjected to direct sunlight for an extended period, high temperatures may cause distortion, color change or
malfunction.
Other functions
Using an AUX source
When connecting auxiliary device using the
front AUX input.
! You need to activate the AUX setting in the
initial setting menu. Refer to AUX Input
(auxiliary input) on page 34.
! If an iPod with video capabilities is con-
nected to this unit via 3.5 mm plug (4 pole)
cable (such as the CD-V150M), you can
enjoy the video contents of the connected
iPod.
! A portable audio/video player can be con-
nected by using a 3.5 mm plug (4 pole) with
an RCA cable (sold separately). However,
depending on the cable, a reverse connec-
tion between the red (right side audio)
cable and yellow (video) cable may be re-
quired in order for the sound and video
image to be reproduced correctly.
% Insert the mini plug into the AUX input
jack on this unit.
For more details, refer to Head unit on page 9.
This auxiliary device is automatically set to
AUX.
Function settings
1 Press M.C. to display the function
menu.
2 Turn M.C. to select the function.
After selecting, perform the following procedures to set the function.
38
A/V Change (auxiliary device signal setting)
1 Press M.C. to display the setting mode.
2 Turn M.C. to select the desired setting.
! Audio – auxiliary device connected with a
stereo mini plug cable
! Video – auxiliary video device connected with
4-pole mini plug cable (e.g., CD-V150M)
3 Press M.C. to confirm the selection.
Display (display setting)
En
Page 39

Operating this unit
Section
03
You can switch to the basic screen or the image
screen.
1 Press M.C. to display the setting mode.
2 Press M.C. to select the desired setting.
Wide Mode (switching the wide mode)
1 Press M.C. to display the setting mode.
2 Turn M.C. to select the desired setting.
Full (full)—Just (just)— Cinema (cinema)—Zoom
(zoom)—Normal (normal)
For details about the settings, refer to Changing
the wide screen mode on the next page.
3 Press M.C. to confirm the selection.
Notes
! You can select Display and Wide Mode,
when Video has been selected.
! You can select the following functions if the
background setting on the entertainment
menu is off.
— Wide Mode (switching the wide mode)
— Display (display setting)
Using an external unit
An external unit refers to a Pioneer product,
such as those which will be available in the future. Although incompatible as a source, the
basic functions of up to two external units can
be controlled with this unit. When two external
units are connected, the external units are
automatically allocated to external unit 1 or external unit 2.
The basic operations of the external unit are
explained below. The allocated functions will
differ depending on the connected external
unit. For details concerning these functions,
refer to the owner’s manual for the external
unit.
Selecting the external unit as the source
% Press SRC/OFF to select External as the
source.
external unit. For details concerning these
functions, refer to the owner’s manual for the
connected external unit.
% Press BAND/ESCAPE on the remote control.
% Press and hold BAND/ESCAPE on the remote control.
% Push M.C. left or right.
% Push and hold M.C. left or right.
% Push M.C. up or down.
% Press any number key from 1 to 6 on
the remote control (MVH-P8300BTonly).
Using the functions allocated to 1 to
6 keys
1 Displaying the list menu.
Refer to Basic menu operations on page 12.
2 Use M.C. to select 1 KEY to 6 KEY.
Turn to change 1 KEY to 6 KEY and press.
Function settings
1 Press M.C. to display the function
menu.
2 Turn M.C. to select the function.
Turn to change the menu option. Press to select.
Function 1 (function 1)—Function 2 (function
2)—Function 3 (function 3)—Function 4
(function 4)—Auto/Manual (auto/manual)
Switching the display indication
Display indication can be switched on or off.
% Press and hold
# Pressing one of the buttons will turn on dis-
play indication.
.
English
Basic operations
The functions allocated to the following operations will differ depending on the connected
En
39
Page 40

Section
04
Detailed instructions
Changing the wide screen
mode
You can select a desired mode for enlarging a
4:3 picture to a 16:9 picture.
% Display the screen mode.
Refer to Wide Mode (switching the wide
mode) on page 19.
Full (full screen)
The 4:3 picture is enlarged in the horizontal direction only, giving you a 4:3 TV picture (normal picture) without any omissions.
Just (just)
The picture is enlarged slightly at the center and
the amount of enlargement increases horizontally
toward the edges of the screen, enabling you to
enjoy a 4:3 picture without sensing any disparity
even when viewing on a wide screen.
Cinema (cinema)
The picture is enlarged by the same proportion as
Full or Zoom in the horizontal direction and by
an intermediate proportion between Full and
Zoom in the vertical direction; ideal for a cinemasized picture (wide screen picture) where captions lie outside the picture.
Zoom (zoom)
The 4:3 picture is enlarged in the same proportion
both vertically and horizontally; ideal for a cinema
sized picture (wide screen picture).
Normal (normal)
The 4:3 picture is displayed as it is, giving you no
sense of disparity since its proportions are the
same as that of the normal picture.
Notes
! Different settings can be stored for each video
source.
! When a video is viewed in a wide screen mode
that does not match its original aspect ratio, it
may appear different.
! Remember that using the wide mode feature
of this system for commercial or public viewing purposes may constitute an infringement
on the author’s rights protected by the Copyright Law.
! The video image will appear coarser when
viewed in Cinema or Zoom mode.
Setting the DivX subtitle file
You can select whether or not to display DivX
external subtitles.
! The DivX subtitles will be displayed even
when Custom is selected if no DivX exter-
nal subtitle files exist.
! You can select the following functions if the
background setting on the entertainment
menu is off.
% Display the DivX subtitle file setting
mode.
Refer to DivX® Subtitle (DivX subtitle file set-
tings) on page 19.
! Original – Display the DivX subtitles
! Custom – Display the DivX external subti-
tles
Notes
! Up to 42 characters can be displayed on one
line. If more than 42 characters are set, the
line breaks and the characters are displayed
on the next line.
! Up to 126 characters can be displayed on one
screen. If more than 126 characters are set,
the excess characters will not be displayed.
Setting the aspect ratio
% Display the aspect ratio setting mode.
Refer to TV Aspect (aspect ratio settings) on
page 19.
! 16 : 9 – Wide screen picture (16:9) is dis-
played as is (initial setting)
! Letter Box – The picture is the shape of a
letterbox with black bands on the top and
bottom of the screen
! Pan Scan – The picture is cut short on the
right and left sides of the screen
Displaying the DivXâVOD
registration code
In order to play DivX VOD (video on demand)
contents on this unit, the unit must first be registered with a DivX VOD contents provider.
For registration, generate a DivX VOD registration code and submit it to your provider.
40
En
Page 41

Detailed instructions
Section
04
! Keep a record of the code as you will need
it when you register your unit to the DivX
VOD provider.
% Select Registration.
Refer to DivX® VOD (DivX
code) on page 19.
Your registration code is displayed.
â
VOD registration
Displaying the
deregistration code
If your device is already registered, deregister
it by entering the deregistration code.
1 Select Deregistration.
Refer to DivX® VOD (DivX
code) on page 19.
2 Use M.C. to select Yes.
Turn to change the menu option. Press to select.
The deregistration is completed.
# To cancel deregistration, select No.
â
VOD registration
Changing the picture
adjustment
You can adjust the Brightness (brightness),
Contrast (contrast), Color (color) ,Hue (hue),
Dimmer (dimmer), Temperature (tempera-
ture) and Black Level (black level) for each
source.
! You cannot adjust Color, Hue and
Black Level for the audio source.
! If the color system is not NTSC, you cannot
adjust Hue.
% Display the picture adjustment mode.
Refer to Picture ADJ (picture adjustment) on
page 33.
! Brightness – Adjusts the black intensity
! Contrast – Adjusts the contrast
! Color – Adjusts the color saturation
! Hue – Adjusts the tone of color (red or
green is emphasized)
! Dimmer – Adjusts the brightness of the dis-
play
! Temperature – Adjusts the color tempera-
ture, resulting in a better white balance
! Black Level – Emphasizes the dark portions
English
of images making the difference between
bright and dark more distinct
En
41
Page 42

ext
9
CH
Q
Seek
1
2
3
Section
05
Available accessories
HD Radioä tuner
This HD Radio Ready receiver is ready to receive
HD Radio broadcasts when connected to the
HD Radio tuner (e.g. GEX-P20HD), sold separately.
For details concerning operation, refer to the HD
Radio tuner’s operation manual.
Basic operations
D/Aauto
Radio
1 Indicator display area
Refer to Indicator list on page 50.
2 Text information area
! Call sign—artist name—song title—pro-
gram type
! Band/Preset number/Frequency indica-
tor
3 Source image display
Operations are the same as those of the tuner.
(Refer to Basic operations on page 15.)
Storing and recalling stations
Operations are basically the same as those of
the tuner. (Refer to Storing and recalling sta-
tions for each band on page 15.)
However, the band selection method is different from that of the tuner.
Selecting a band
1 Push M.C. down.
HD
A-E
16:54
87.
.
MHz
Using iTunes tagging
The operation is the same as that of the tuner.
(Refer to Using iTunes tagging on page 15.)
Function settings
1 Press M.C. to display the function
menu.
2 Turn M.C. to select the function.
After selecting, perform the following procedures to set the function.
BSM (best stations memory)
1 Press M.C. to turn BSM on.
To cancel, press M.C. again.
Local (local seek tuning)
1 Press M.C. to display the setting mode.
2 Turn M.C. to select Local.
3 Press M.C. to turn Local on or off.
4 Turn M.C. and press to select Level.
5 Turn M.C. to select the desired setting.
FM: Off—Level1—Level2—Level3—Level4
AM: Off—Level1—Level2
The highest level setting allows reception of only
the strongest stations, while lower levels allow the
reception of weaker stations.
Seek Mode (seek mode)
Seek tuning setting can be changed between digital
station seek (Seek HD) and analog station seek (Seek
All) depending on the reception status.
1 Press M.C. to select your favorite setting.
Seek All—Seek HD
Blending (reception mode)
If the reception for a digital broadcast becomes poor,
this unit automatically switches to the analog broadcast of the same frequency. If this function is set to
D/A Auto, the tuner switches between digital broadcast and analog broadcast automatically. If this function is set to Analog, the tuner will only receive
analog broadcasts.
1 Press M.C. to display the setting mode.
2 Turn M.C. to select a desired mode.
D/A Auto—Analog
42
En
Page 43

ext
ext
ext
y
111
12
CH
CH
Q
1
3
2
Available accessories
Display (display setting)
You can switch to the desired text information.
1 Press M.C. to display the setting mode.
2 Press M.C. to select the desired setting.
XM tuner
You can use this unit to control an XM satellite
digital tuner (GEX-P920XM), which is sold separately.
For details concerning operation, refer to the
XM tuner’s operation manuals. This section
provides information on XM operations with
this unit which differs from that described in
the XM tuner’s operation manual.
! With this unit, you can operate two addi-
tional functions: XM channel direct selection and preset channel list.
Basic operations
XM
Categor
A-E
16:54
Selecting a chan nel (step by step)
1 Push M.C. left or right.
! If you push and hold M.C. left or right, you
can increase or decrease the channel number
continuously.
! You can also perform tuning from a desired
channel category. (Refer to Selecting a chan-
nel from a channel category on the next page.)
Switching the displ ay off
1 Press and hold
.
Storing and recalling stations
Operations are basically the same as those of
the tuner. (Refer to Storing and recalling sta-
tions for each band on page 15.)
However, the band selection method is different from that of the tuner.
Selecting a band
1 Push M.C. down.
Band can be selected from XM1, XM2 or XM3.
Selecting an XM channel directly
This function is available only for MVH-P8300BT.
When using the remote control, you can select
the channel directly by entering the desired
channel number.
Section
05
English
1 Indicator display area
Refer to Indicator list on page 50.
2 Text information area
! Channel name
! Artist name
! Song title
! Band/Preset number/Frequency indica-
3 Source image display
tor
XM
.
1 Press DIRECT.
The channel number input display appears.
2 Press 0 to 9 to enter the desired channel number.
! You can cancel the input number by pressing
CLEAR.
3 Press DIRECT.
The channel of the entered number is selected.
! After entering the number input mode, if you
do not perform an operation within about
eight seconds, the mode is automatically canceled.
Function settings
1 Press M.C. to display the function
menu.
43
En
Page 44

ext
y
S
US1
CH
CH
S
S
Q
132
4
Section
05
Available accessories
2 Turn M.C. to select the function.
After selecting, perform the following procedures to set the function.
Channel Mode (channel select mode setting)
You have two methods for selecting a channel: by
number and by category. When selecting by number,
channels in any category can be selected. Select by
category to narrow your search down to only channels in a particular category.
1 Press M.C. to display the setting mode.
2 Turn M.C. to select the desired setting.
All CH (channel number select setting)—Category (channel category select setting)
3 Press M.C. to confirm the selection.
Selecting a channel from a
channel category
1 Switch the channel select settings to
Category.
Refer to Channel Mode (channel select mode
setting) on this page.
2 Push M.C. up or down to select the desired channel category.
3 Push M.C. left or right to select the desired channel in the selected channel category.
Displaying the Radio ID
1 Select the channel select settings to
All CH.
Refer to Channel Mode (channel select mode
setting) on this page.
SIRIUS Satellite Radio tuner
You can use this unit to control a SIRIUS Satellite Radio tuner, which is sold separately.
When the SIRIUS tuner is used together with
this unit, some operations differ slightly from
those described in the SIRIUS operation manual. This manual provides information on
these points. For all other information on
using the SIRIUS tuner, please refer to the SIRIUS operation manual.
Basic operations
Game
IRIU
1 Indicator display area
Refer to Indicator list on page 50.
2 Text information area
Categor
IRI
! Play time—Channel number—Channel
name—Category name—Artist name—
Song title/program title—Composer
name
! Band/Preset number/Frequency indica-
tor
3 Scrubber bar
4 Source image display
A-E
.
110
2 Push M.C. left or right to select
RADIO ID.
# If you select another channel, display of the ID
code is canceled.
# RADIO ID and the ID codes are repeatedly dis-
played one after the other.
44
En
Page 45

Available accessories
Selecting a chan nel (step by step)
1 Push M.C. left or right.
! If you push and hold M.C. left or right, you
can increase or decrease the channel number
continuously.
! You can also perform tuning from a desired
channel category. (Refer to Selecting a chan-
nel from a channel category on the next page.)
Displaying the Radio ID
1 Push M.C. left or right to select CH 000.
! To select CH 000, set the channel select setting to
All CH. About the channel select setting, refer to
Channel Mode (channel select mode setting) on
this page.
Notes
! Play time and scrubber bar are displayed dur-
ing the Instant Replay mode. Refer to Using
the Instant Replay function on the next page.
! Play time display indicates the time inverted
from the live broadcast. The play time is displayed as a negative number.
! It may take a few seconds before you can hear
anything while this unit acquires and processes the satellite signal when you change
the source to a SIRIUS tuner or select a channel.
Storing and recalling stations
Operations are basically the same as those of
the tuner. (Refer to Storing and recalling sta-
tions for each band on page 15.)
However, the band selection method is different from that of the tuner.
Selecting a band
1 Push M.C. down.
Band can be selected from SIRIUS1, SIRIUS2 or
SIRIUS3.
Selecting a SIRIUS channel directly
Operations are the same as those of the XM
tuner. (Refer to Selecting an XM channel directly
on page 43.)
Section
05
English
Function settings
1 Press M.C. to display the main menu.
2 Turn M.C. to change the menu option
and press to select Function.
3 Turn M.C. to select the function.
After selecting, perform the following procedures to set the function.
Channel Mode (channel select mode setting)
You have two methods for selecting a channel: by
number and by category. When selecting by number,
channels in any category can be selected. Select by
category to narrow your search down to only channels in a particular category.
Refer to Channel Mode (channel select mode setting)
on the previous page.
Game Alert (game alert setting)
This system can alert you when games involving your
favorite teams are about to start. To use this function
you need to set up a game alert for the teams in advance.
! To use this function, a Pioneer SIRIUS bus inter-
face (e.g. CD-SB10) is required.
! To use this function, a SIRIUS plug-and-play unit
with a Game Alert Function is required.
! For details, refer to the SIRIUS plug-and-play
unit’s manuals.
! You can also operate this function when a SIR-
PNR2 is connect ed to this unit.
! The Game Alert function is on at the default set-
ting.
! Once you select the teams, you need to turn the
Game Alert function on.
1 Press M.C. to turn the Game Alert on or off.
! When a game of the selected team is about to
start (or is currently playing) on a different station,
a game alert is displayed.
Use M.C. to select Jump and switch to the other
station to listen to the game.
Turn to change the menu option. Press to select.
If you select Stay, the station will not be switched.
Team Setting (team setting)
En
45
Page 46

Section
05
Available accessories
1 Press M.C. to display the setting mode.
2 Press M.C. to select a desired league.
3 Turn M.C. to select a desired team.
4 Press and hold M.C. to store the selected team in
the memory.
The game alert function is activated for that team.
5 Repeat these steps to select other teams.
Up to 12 teams can be selected.
! When you have already selected 12 teams,
FULL is displayed and additional teams cannot be selected. In this case, first delete a selected team and then try again.
Live Game Info (game information)
If any games of the selected teams are currently playing, you can display information on the games and
tune in to the broadcast channel.
You can display information on the games while enjoying the sound from the station you are currently
tuned in to. You can also tune in to the broadcast
channel when you wish to.
1 Press M.C. to display the setting mode.
2 Turn M.C. to select a game.
! The game score will be updated automatically.
3 Press M.C. to switch to the other station and lis-
ten to the game.
! If you have not selected any teams, NOT SET is
displayed.
! When games involving your favorite teams are not
currently playing, NO GAME is displayed.
Display (display setting)
You can switch to the desired text information.
1 Press M.C. to display the setting mode.
2 Press M.C. to select the desired setting.
Instant Replay (Instant Replay mode setting)
Using the Instant Replay
function
The following functions can be operated in Instant Replay mode.
! To use this function, a Pioneer SIRIUS bus
interface (e.g. CD-SB10) is required.
! To use this function, a SIRIUS plug-and-
play unit with an Instant Replay Function is
required.
! For details, refer to the SIRIUS plug-and-
play unit’ s manuals.
Using Instant Replay mode
1 Refer to Instant Replay (Instant Replay mode set-
ting) on this page.
! When another source is selected, instant re-
play mode is canceled.
Select a track
1 Push M.C. left or right.
Fast forward or reverse
1 Push and hold M.C. left or right, and then re-
lease.
1 Press M.C. to turn Instant Replay mode on or off.
Play/Pause (pause)
1 Press M.C. to pause or resume.
Selecting a channel from a
channel category
Operations are the same as those of the XM
tuner. (Refer to Selecting a channel from a
channel category on page 44.)
46
En
Page 47

Additional information
Troubleshooting
Common
Symptom Cause Action
The power will
not turn on.
The unit will
not operate.
Operation with
the remote
control is not
possible.
The unit does
not operate
correctly even
when the appropriate remote control
buttons are
pressed.
There is no
sound.
The volume
level will not
rise.
The aspect
ratio is incorrect and the
image is
stretched.
There is no
image displayed.
The image displayed stops
(pauses) and
the unit cannot
be operated.
Leads and connectors are incorrectly connected.
The fuse is
blown.
Noise and/or
other factors are
causing the builtin microprocessor to operate incorrectly.
Battery power is
low.
Cables are not
connected correctly.
The aspect ratio
setting is incorrect for the display.
The parking
brake cable is
not connected.
The parking
brake is not applied.
The data could
no longer be
read during playback.
Confirm once more
that all connections are correct.
Rectify the cause
and then replace
the fuse. Be sure to
install a fuse with
the same rating.
Press RESET.
Load a new battery.
Connect the cables
correctly.
Select the appro priate setting for
your display.
Connect the parking brake cable,
and apply the parking brake.
Connect the parking brake cable,
and apply the parking brake.
Stop playback
once, and start
playback again.
Symptom Cause Action
There is no
sound.
The volume
level is low.
The sound and
video skip.
NO XXXX appears when a
display is changed (NO TITLE,
for example).
Sub-folders
cannot be
played back.
The repeat
range changes
automatically.
The volume level
is low.
The attenuator is
on.
The unit is not
firmly secured.
There is no embedded text information.
Folder repeat
play has been selected.
Another folder
was selected during repeat play.
Track search or
fast forward/reverse was performed during
file repeat play.
Adjust the volume
level.
Turn the attenuator
off.
Firmly secure the
unit.
Switch the display
or play another
track/file.
Select the repeat
range again.
Select the repeat
range again.
Select the repeat
range again.
Problems during iPod playback
Symptom Cause Action
The iPod does
not operate
correctly.
The cables are incorrectly connected.
The iPod version
is old.
Disconnect the
cable from the
iPod. Once the
iPod’s main menu
is displayed, reconnect the iPod and
reset it.
Update the iPod
version.
Error messages
When you contact your dealer or your nearest
Pioneer Service Center, be sure to note the
error message.
External storage device (USB, SD)
Message Cause Action
No Device The USB storage
device is not connected.
Connect a compatible USB storage
device.
Appendix
English
En
47
Page 48

Appendix
Additional information
Message Cause Action
Unplayable
File
Format Read Sometimes there
Skipped The external sto-
Protect All the files in the
Incompatible
USB
IncompatibleSDNon-compatible
This type of file
cannot be played
on this unit.
There are no
songs.
The connected
USB storage device has security
enabled.
is a delay between the start of
playback and
when you start to
hear any sound.
rage device in
use contains
WMA files embedded with
Windows
Mediaä
DRM 9/10.
external storage
device are embedded with
Windows Media
DRM 9/10.
The USB device
connected to is
not supported by
this unit.
The USB device
is not formatted
with FAT16 or
FAT32.
SD storage device
Select a file that
can be played.
Transfer the audio
files to the external
storage device and
connect.
Follow the USB
memory instructions to disable security.
Wait until the message disappears
and you hear
sound.
Play an audio file
not embedded with
Windows Media
DRM 9/10.
Transfer audio files
not embedded with
Windows Media
DRM 9/10 to the
external storage
device and connect.
Connect a USB
Mass Storage
Class compliant
device.
The connected
USB device should
be formatted with
FAT16 or FAT32.
Remove your device and replace it
with a compatible
SD storage device.
Message Cause Action
Check USB The USB connec-
Error-02-9X/-DXCommunication
Rental expired.
File Not Playable-High Definition
It is not possible to write it
in the flash.
Authorization
Error
tor or USB cable
has shortcircuited.
The connected
USB portable
audio player/
USB memory
consumes more
than maximum
allowable current.
failed.
The connected
external storage
device contains
expired DivX
VOD content.
The connected
external storage
device contains a
high definition
DivX file.
This unit’s flash
memory used as
the temporary
storage area is
full.
This unit’s DivX
registration code
has not been
authorized by the
DivX VOD contents provider.
Check that the
USB connector or
USB cable is not
caught in something or damaged.
Disconnect the
USB storage device and do not
use it. Turn the
ignition switch to
OFF, then to ACC
or ON and then
connect only compliant USB storage
devices.
Perform one of the
following operations.
–Turn the ignition
switch OFF and
back ON.
–Disconnect or
eject the external
storage device.
–Change to a different source.
Then, return to the
USB or SD source.
! Replace the external storage device.
! Select a file that
can be played.
! This unit cannot
play DivX HD files.
Replace the external storage device
with one this unit
can play.
! Select a file that
can be played.
Select a file that
can be played.
Register this unit
to the DivX VOD
contents provider.
48
En
Page 49

Additional information
Message Cause Action
Video frame
rate not supported
Audio Format
not supported
Not Found No related
The external storage device’s
frame rate is
more than 30 fps.
This type of file is
not supported on
this unit.
songs.
iPod
Message Cause Action
No Device USB storage de-
Incompatible
USB
Check USB The iPod oper-
Format Read/
Ready
Error-02-6X/9X/-DX
vice or iPod is
not connected.
Non-compatible
iPod
ates correctly but
does not charge.
Sometimes there
is a delay between the start of
playback and
when you start to
hear any sound.
Communication
failed.
iPod failure. Disconnect the
Replace the external storage device.
Select a file that
can be played.
Transfer a file that
can be played.
Connect a compatible iPod.
Disconnect your
device and replace
it with a compatible iPod.
Make sure the connection cable for
the iPod has not
shorted out (e.g.,
not caught in
metal objects).
After checking,
turn the ignition
switch OFF and
back ON, or disconnect the iPod
and reconnect.
Wait until the message disappears
and you hear
sound.
Disconnect the
cable from the
iPod. Once the
iPod’s main menu
is displayed, reconnect the iPod and
reset it.
cable from the
iPod. Once the
iPod’s main menu
is displayed, reconnect the iPod and
reset it.
Message Cause Action
Error-02-67 The iPod firm-
ware version is
old.
Stop There are no
songs.
There are no
songs in the current list.
No xxxx There is no infor-
mation.
Not Found No related
songs.
Update the iPod
version.
Transfer songs to
the iPod.
Select a list that
contains songs.
Record information
on the iPod.
Transfer songs to
the iPod.
Pandora
Message Cause Action
Start up the
Pandora application from
your Device.
Pandora system maintenance. Try
again later.
Skip limit
reached.
This version
of the
Pandora Application is
not supported.
Pandora is unable to play
music. Please
see your Device.
Create Station
within the
Pandora Application on
Device.
Unable to
save Bookmark. Try
again later.
The Pandora application has not
started running
yet.
Unable to save
thumb rating.
Unable to save
BookMark.
Pandora system
is undergoing
maintenance.
Skip limit
reached.
This version of
the Pandora application is not
supported.
Device error message displayed in
Pandora Application.
Unable to play
music from
Pandora.
No station found. Create a station in
Unable to save
Bookmark.
Start up the
Pandora application from your
iPod/iPhone.
Try again later.
Do not exceed the
skip limit.
Connect an iPod/
iPhone that has a
compatible version
of the Pandora application installed.
Please check your
iPod/iPhone.
the Pandora application on your
iPod/iPhone.
Try again later.
Appendix
English
En
49
Page 50

Appendix
Additional information
iTunes tagging
Message Cause Action
iPod full. Tags
not transferred.
Memory full.
Tags not
stored.
Tag trans fer
failed. Reconnect your
iPod.
Tag store
failed.
SD source cannot be selected during
tag transfer.
Memory used for
tag information
on the iPod is
full.
This unit’s flash
memory used as
the temporary
storage area is
full.
This unit’s tag information cannot
transfer to the
iPod.
Tag information
cannot be stored
in this unit.
Tag information
is being transferred to the
iPod.
Sync the iPod with
iTunes and clean
up the tagged playlist.
Connect the iPod
to this unit and
transfer this unit’ s
tag information to
the iPod.
Check the iPod
and try again.
Try again.
Wait until tag
transfer is complete.
Bluetooth Telephone
Message Cause Action
Error-10 The power failed
for the Bluetooth
module of this
unit.
Turn the ignition
switch OFF and
then to ACC or ON.
If the error message is still displayed after
performing the
above action,
please contact
your dealer or an
authorized Pioneer
Service Station.
Understanding auto EQ
error messages
When correct measurement of the car’s interior acoustic characteristics is not possible
using auto EQ, an error message may appear
on the display. In such cases, refer to the table
below to see what the problem is and how it
may be corrected. After checking, try again.
Message Cause Action
Error. Please
check MIC.
Error. Please
check xxxx
speaker.
Error. Please
check noise.
Error. Please
check battery.
The microphone
is not connected.
The microphone
cannot pick up
the measuring
tone of a speaker.
The surrounding
noise level is too
high.
Power is not
being supplied
from the battery
to this unit.
Plug the optional
microphone securely into the
jack.
! Confirm that the
speakers are connected correctly.
! Correct the input
level setting of the
power amp connected to the
speakers.
! Set the microphone correctly.
! Stop your car in
a place that is
quiet, and switch
off the engine, air
conditioner and
heater.
! Set the microphone correctly.
! Stop your car in
a place that is
quiet, and switch
off the engine, air
conditioner and
heater.
! Connect the battery correctly.
Indicator list
Common
(MVH-P8300BT only)
Indicates that a Bluetooth telephone is connected.
(MVH-P8300BT only)
Indicates the signal strength of the
cellular phone.
Shows when tag information is
stored in this unit.
Flashes when the tag is being
transferred to an iPod.
50
En
Page 51

Additional information
Appendix
Indicates that Auto EQ is on.
Shows when song information
(tag) is being saved to your iPod.
iPod
1
S.Rtrv
Shows when repeat play is set to
One or All.
Shows when shuffle function is on.
Shows when the sound retriever
function is on.
External storage device (USB, SD)
Shows when the repeat range is
selected for the current file.
Shows when the repeat range is
selected for the current folder.
Tuner
Local
Shows when local seek tuning is
on.
Indicates that the selected frequency is being broadcast in
stereo.
Shows when song information
(tag) from a radio station is received.
HD Radioä Technology
All Seek
Shows the seek mode status.
HD Seek
D/Aauto
Analog
Shows the setup value of reception
mode.
Shows when digital audio of HD
Radio signal is received.
Shows when analog audio of HD
Radio signal is received.
Shows the radio field strength.
English
S.Rtrv
Shows when random play is on.
Shows when the sound retriever
function is on.
Shows when the tuner is tuned to
HD Radio station.
Shows when you can receive song
information (tag) from a radio station.
XM/SIRIUS tuner
Shows when automatically switch-
Game
All CH
Category
ing to the game alert function is
not possible.
Shows when the channel number
select setting is selected.
Shows when the channel category
select setting is selected.
En
51
Page 52

Appendix
Additional information
Pandora
Shows when a song with a
"Thumbs Up" rating is playing.
Shows when a song with a
"Thumbs Down" rating is playing.
S.Rtrv
Shows when the sound retriever
function is on.
Handling guidelines
External storage device (USB, SD)
Address any questions you have about your external
storage device (USB, SD) to the manufacturer of the
device.
Do not leave the external storage device (USB, SD) in
places with high temperatures.
Depending on the external storage device (USB, SD),
the following problems may occur.
! Operation s may vary.
! The storage device may not be recognized.
! Files may not be played back properly.
USB storage device
Connections via USB hub are not supported.
Do not connect anything other than a USB storage
device.
Firmly secure the USB storage device when driving.
Do not let the USB storage device fall onto the floor,
where it may become jammed under the brake or accelerator pedal.
Depending on the USB storage device, the device
may cause noise to occur in the radio.
! The device may generate noise in the radio.
This unit can play back files in the USB portable
audio player/USB memory that is USB Mass Storage
Class. However, copyright protected files that are
stored in the USB devices cannot be played back.
You cannot connect a USB portable audio player/USB
memory to this unit via USB hub.
Partitioned USB memory is not compatible with this
unit.
Depending on the kind of USB portable audio player/
USB memory you use, the device may not be recognized or audio files may not be played back properly.
Do not leave the USB portable audio player/USB
memory in direct sunlight for extended amounts of
time. Doing so may cause the device to malfunction
from the extreme rise in temperature.
SD memory card
This unit supports only the following types of SD
memory cards.
! SD
! SDHC
Keep the SD memory card out of the reach of children. Should the SD memory card be swallowed, consult a doctor immediately.
Do not touch the connectors of the SD memory card
directly with your fingers or with any metal device.
Do not insert anything other than an SD memory card
into the SD card slot. If a metal object (such as a
coin) is inserted into the slot, the internal circuits may
break and cause malfunctions.
Do not insert a damaged SD memory card (e.g.
warped, label peeled off) as it may not be ejected
from the slot.
Do not try to force an SD memory card into the SD
card slot as the card or this unit may be damaged.
When ejecting an SD memory card, press it and hold
it until it clicks. It is dangerous for you to release your
finger immediately after you press on the card as the
card may shoot out of the slot and hit you in the face,
etc. If the card shoots out of the slot, it may become
lost.
iPod
Do not leave the iPod in direct sunlight for extended
amounts of time. Doing so may cause the iPod to
malfunction due to an extreme rise in temperature.
Do not leave the iPod in places with high temperatures.
To ensure proper operation, connect the dock connector cable from the iPod directly to this unit.
52
En
Page 53

Additional information
Appendix
Firmly secure the iPod when driving. Do not let the
iPod fall onto the floor, where it may become jammed
under the brake or accelerator pedal.
For details, refer to the manuals for the iPod.
About iPod settings
! When an iPod is connected, this unit changes the
EQ (equalizer) setting of the iPod to off in order to
optimize the acoustics. When you disconnect the
iPod, the EQ returns to the original setting.
! You cannot set Repeat to off on the iPod when
using this unit. Repeat is automatically changed
to All when the iPod is connected to this unit.
JPEG picture files
JPEG is short for Joint Photographic Experts Group
and refers to a still image compression technology
standard.
Files are compatible with Baseline JPEG and EXIF 2.1
still images up to a resolution of 8 192 × 7 680. (EXIF
format is used most commonly with digital still cameras.)
Playback of EXIF format files that were processed by a
personal computer may not be possible.
There is no progressive JPEG compatibility.
DivX video files
Depending on the composition of the file information,
such as the number of audio streams or file size,
there may be a slight delay in playback if data is
being played back from an external storage device.
Some special operations may be prohibited due to
the composition of the DivX files.
Only DivX files downloaded from a DivX partner site
are guarantee for proper operation. Unauthorized
DivX files may not operate properly.
DRM rental files cannot be operated until playback is
started.
Recommended file size: 2 Mbps or less with a transmission rate of 2 GB or less.
The ID code of this unit must be registered to a DivX
VOD provider in order to playback DivX VOD files. For
information on ID codes, refer to Displaying the DivX
VOD registration code on page 40.
For more details about DivX, visit the following site:
http://www.divx.com/
Important
! When naming a JPEG image file, add the cor-
responding filename extension (.jpg, .jpeg,
.jpe or .jfif).
! This unit plays back files with these filename
extensions (.jpg, .jpeg, .jpe or.jfif) as a JPEG
image file. To prevent malfunctions, do not
use these extensions for files other than JPEG
image files.
Compressed audio/video
compatibility (USB, SD)
WMA
File extension: .wma
Bit rate: 5 kbps to 320 kbps (CBR), VBR
Sampling frequency: 8 kHz to 48 kHz
Windows Media Audio Professional, Lossless, Voice/
DRM Stream/Stream with video: Not compatible
MP3
File extension: .mp3
Bit rate: 8 kbps to 320 kbps (CBR), VBR
Sampling frequency: 8 kHz to 48kHz (32 kHz, 44.1 kHz,
48 kHz for emphasis)
Compatible ID3 tag version: 1.0, 1.1, 2.2, 2.3 (ID3 tag
Version 2.x is given priority than Version 1.x.)
M3u playlist: Not compatible
MP3i (MP3 interactive), mp3 PRO: Not compatible
AAC
Compatible format: AAC encoded by iTunes
File extension: .m4a
Bit rate: 8 kbps to 320 kbps
â
Sampling frequency: 8 kHz to 44.1 kHz
Apple Lossless: Not compatible
AAC file bought from the iTunes Store (.m4p file extension): Not compatible
English
En
53
Page 54

Appendix
Additional information
DivX compatibility
Compatible format: DivX video format implemented in
relation to DivX standards
File extensions: .avi or.divx
DivX Ultra format: Not compatible
DivX HD format: Not compatible
DivX files without video data: Not compatible
Compatible audio codec: MP2, MP3, Dolby Digital
LPCM: Not compatible
Bit rate: 8 kbps to 320 kbps (CBR), VBR
Sampling frequency: 32 kHz, 44.1 kHz, 48 kHz
Compatible external subtitle file extension: .srt
Supplemental information
Only the first 32 characters can be displayed as a file
name (including the file extension) or a folder name.
This unit may not operate correctly depending on the
application used to encode WMA files.
There may be a slight delay when starting playback of
audio files embedded with image data.
External storage device (USB, SD)
Playable folder hierarchy: up to eight tiers (A practical
hierarchy is less than two tiers).
Playable folders: up to 6 000
Playable files: up to 65 535
Playback of copyright-protected files: Not compatible
Partitioned external storage device (USB, SD): Only
the first playable partition can be played.
There may be a slight delay when starting playback of
audio files on an external storage device (USB, SD)
with numerous folder hierarchies.
SD memory card
There is no compatibility for Multi Media Cards
(MMC).
Compatibility with all SD memory cards is not guaranteed.
This unit is not compatible with SD-Audio/SD-Video.
CAUTION
Pioneer accepts no responsibility for data lost on
the USB memory/USB portable audio player/SD
memory card even if that data is lost while using
this unit.
iPod compatibility
This unit supports only the following iPod models.
Supported iPod software versions are shown below.
Older versions may not be supported.
! iPhone 4 (software version 4.1)
! iPhone 3GS (software version 4.1)
! iPhone 3G (software version 4.1)
! iPhone (software version 3.1.3)
! iPod nano 6th generation (software version 1.0)
! iPod nano 5th generation (software version 1.0.2)
! iPod nano 4th generation (software version 1.0.4)
! iPod nano 3rd generation (software version 1.1.3)
! iPod nano 2nd generation (software version 1.1.3)
! iPod nano 1st generation (software version 1.3.1)
! iPod touch 4th generation (software version 4.1)
! iPod touch 3rd generation (software version 4.0)
! iPod touch 2nd generation (software version 4.0)
! iPod touch 1st generation (software version 3.1.3)
! iPod classic 160GB (software version 2.0.4)
! iPod classic 120GB (software version 2.0.1)
! iPod classic (software version 1.1.2)
! iPod 5th generation (software version 1.3)
Depending on the generation or version of the iPod,
some functions may not be available.
Operations may vary depending on the software version of iPod.
When using an iPod, an iPod Dock Connector to USB
Cable is required.
A Pioneer CD-IU50 interface cable is also available.
For details, consult your dealer.
About the file/format compatibility, refer to the iPod
manuals.
Audio Book, Podcast: Compatible
CAUTION
Pioneer accepts no responsibility for data lost on
the iPod, even if that data is lost while this unit is
used.
54
En
Page 55

Additional information
Appendix
Sequence of audio files
The user cannot assign folder numbers and
specify playback sequences with this unit.
Example of a hierarchy
01
02
03
04
05
Level 1 Level 2 Level 3 Level 4
: Folder
: Compressed
audio file
01 to 05: Folder
number
1 to 6: Playback
sequence
External storage device (USB, SD)
The playback sequence is the same as the recorded sequence in the external storage device (USB, SD).
To specify the playback sequence, the following method is recommended.
1 Create a file name that includes numbers that
specify the playback sequence (e.g., 01xxx.
mp3 and 099yyy.mp3).
2 Put those files into a folder.
3 Save the folder that contains the files to the
external storage device (USB, SD).
However, depending on the system environment, you may not be able to specify the playback sequence.
For USB portable audio players, the sequence
is different and depends on the player.
Using the display correctly
CAUTION
! If liquid or foreign matter should get inside
this unit, turn off the power immediately and
consult your dealer or the nearest authorized
PIONEER Service Station. Do not use the unit
in this condition because doing so may result
in fire, electric shock, or other failure.
! If you notice smoke, a strange noise or smell,
or any other abnormal signs from the display,
turn off the power immediately and consult
English
your dealer or the nearest authorized
PIONEER Service Station. Using this unit in
this condition may result in permanent damage to the system.
! Do not disassemble or modify this unit, as
there are high-voltage components inside
which may cause electric shock. Be sure to
consult your dealer or the nearest authorized
PIONEER Service Station for internal inspection, adjustments, or repairs.
Handling the display
! When the display is subjected to direct sun-
light for a long period of time, it will become very hot resulting in possible
damage to the LCD screen. You should
avoid exposing the display unit to direct
sunlight as much as possible.
! The display should be used within the tem-
perature range of –10 °C to +60 °C (14°F to
140 °F).
At temperatures higher or lower than this
operating temperature range, the display
may not operate normally.
Liquid crystal display (LCD) screen
! Heat from the heater may damage the LCD
screen, and cool air from the cooler may
cause moisture to form inside the display
resulting in possible damage. Also, if the
display is cooled down by the cooler, the
screen may become dark, or the life span
of the small fluorescent tube used inside
the display may be shortened.
! Small black dots or white dots (bright dots)
may appear on the LCD screen. These are
due to the characteristics of the LCD
screen and do not indicate a malfunction.
! When using a cellular phone, keep the an-
tenna away from the display to prevent disruption of the video image by the
appearance of spots, colored stripes, etc.
En
55
Page 56

Appendix
Additional information
LED (light-emitting diode)
backlight
! At low temperatures, using the LED back-
light may increase image lag and degrade
the image quality due to the characteristics
of the LCD screen. Image quality will improve with an increase in temperature.
! To protect the LED backlight, the display
will darken in the following environments:
— In the direct sunlight
— Near the heater vent
! The product lifetime of the LED backlight is
more than 10 000 hours. However, it may
decrease if used in high temperatures.
! If the LED backlight reaches the end of its
product lifetime, the screen will become
dark and the image will no longer be projected. In such cases, please consult your
dealer or the nearest authorized PIONEER
Service Station.
Copyright and trademark
This item incorporates copy protection technology that is protected by U.S. patents and
other intellectual property rights of Rovi
Corporation. Reverse engineering and disassembly are prohibited.
Bluetooth
The Bluetooth
tered trademarks owned by Bluetooth SIG, Inc.
and any use of such marks by Pioneer
Corporation is under license. Other trademarks and trade names are those of their respective owners.
iTunes
Apple and iTunes are trademarks of Apple
Inc., registered in the U.S. and other countries.
MP3
Supply of this product only conveys a license
for private, non-commercial use and does not
convey a license nor imply any right to use
â
word mark and logos are regis-
this product in any commercial (i.e. revenuegenerating) real time broadcasting (terrestrial,
satellite, cable and/or any other media), broadcasting/streaming via internet, intranets and/
or other networks or in other electronic content distribution systems, such as pay-audio or
audio-on-demand applications. An independent license for such use is required. For details, please visit
http://www.mp3licensing.com.
WMA
Windows Media is either a registered trademark or trademark of Microsoft Corporation in
the United States and/or other countries.
This product includes technology owned by
Microsoft Corporation and cannot be used or
distributed without a license from Microsoft
Licensing, Inc.
SD memory card
SD Logo is a trademark of SD-3C, LLC.
SDHC Logo is a trademark of SD-3C, LLC.
iPod & iPhone
iPhone, iPod, iPod classic, iPod nano, and
iPod touch are trademarks of Apple Inc., registered in the U.S. and other countries.
“Made for iPod” and “Made for iPhone” mean
that an electronic accessory has been designed to connect specifically to iPod or
iPhone, respectively, and has been certified by
the developer to meet Apple performance
standards.
Apple is not responsible for the operation of
this device or its compliance with safety and
regulatory standards.
Please note that the use of this accessory with
iPod or iPhone may affect wireless performance.
DivX
â
DivX
is a registered trademark of DivX, Inc.,
and is used under license.
56
En
Page 57

Additional information
Appendix
ABOUT DIVX VIDEO: DivXâis a digital
video format created by DivX, Inc. This is an official DivX Certified
â
device that plays DivX
video. Visit divx.com for more information and
software tools to convert your files into DivX
video.
ABOUT DIVX VIDEO-ON-DEMAND: This
DivX Certified
â
device must be registered in
order to play purchased DivX Video-on-Demand (VOD) movies. To obtain your registration code, locate the DivX VOD section in
Playing moving images. Go to vod.divx.com for
more information on how to complete your registration.
SAT Radio
The SAT RADIO READY mark indicates that
the Satellite Radio Tuner for Pioneer (i.e., XM
tuner and Sirius satellite tuner which are sold
separately) can be controlled by this unit.
Please inquire to your dealer or nearest
authorized Pioneer service station regarding
the satellite radio tuner that can be connected
to this unit. For satellite radio tuner operation,
please refer to the satellite radio tuner owner’s
manual.
! The system will use direct satellite-to-recei-
ver broadcasting technology to provide listeners in their cars and at home with
crystal-clear sound seamlessly from coast
to coast. Satellite radio will create and
package over 100 channels of digital-quality
music, news, sports, talk and children’s
programming.
! “SAT Radio”, the SAT Radio logo and all re-
lated marks are trademarks of Sirius Satellite Radio Inc., and XM Satellite Radio Inc.
Dolby Digital
English
Manufactured under license from Dolby
Laboratories. “Dolby” and the double-D symbol
are trademarks of Dolby Laboratories.
Pandora
Pandora is a registered trademark of Pandora
Media, Inc.
HD Radioä Technology
! HD Radioä, HD Radio Readyä, and the
HD Radio Ready logo are proprietary trademarks of iBiquity Digital Corporation.
! This HD Radio Ready receiver is ready to re-
ceive HD Radio broadcasts when connected to the HD Radio tuner (e.g. GEXP20HD), sold separately.
En
57
Page 58

Appendix
Additional information
Specifications
General
Power source ............................. 14.4 V DC (10.8 V to 15.1 V
allowable)
Grounding system ................... Negative type
Maximum current consumption
..................................................... 10.0 A
Dimensions (W × H × D):
DIN
Chassis ..................... 178 mm × 50 mm ×
162 mm
(7 in. × 2 in. × 6-3/8in.)
Nose ........................... 188 mm × 58 mm × 17 mm
(7-3/8 in.× 2-1/4 in.× 5/8 in.)
Weight .......................................... 1.1 kg (2.4 lbs)
(MVH-P8300BT)
Weight .......................................... 1.0 kg (2.2 lbs)
(MVH-P7300)
Display
Screen size/aspect ratio ....... 3.0 inch wide/16:9
(effective display area:
66.8 mm × 36.7 mm)
Pixels ............................................. 345 600 (1 440 × 240)
Display method ........................ TFT active matrix
Color system .............................. NTSC compatible
Durable temperature range (power off)
..................................................... –4 °F to +176 °F
Audio
Maximum power output ....... 50 W × 4
70 W × 1/2 W (for subwoofer)
Continuous power output ... 22 W × 4 (1 kHz, 5 % THD, 4
W load, both channels driven)
Load impedance ...................... 4 W (4 W to 8 W (2 W for 1ch)
allowable)
Preout maximum output level
..................................................... 4.0 V
Equalizer (8-Band Graphic Equalizer):
Frequency .......................... 40 Hz/80 Hz/200 Hz/400 Hz/
1 kHz/2.5 kHz/8 kHz/10 kHz
Gain ...................................... ±12 dB
HPF:
Frequency .......................... 50 Hz/63 Hz/80 Hz/100 Hz/
125 Hz
Slope .................................... –12 dB/oct
Subwoofer (mono):
Frequency .......................... 50 Hz/63 Hz/80 Hz/100 Hz/
125 Hz
Slope .................................... –18 dB/oct
Gain ...................................... +6 dB to –24 dB
Phase .................................. Normal/Reverse
Bass boost:
Gain ...................................... +12 dB to 0 dB
USB
USB standard specification
..................................................... USB 1.1, USB 2.0 full speed
Maximum current supply .... 500 mA
USB Class ................................... MSC (Mass Storage Class)
File system .................................. FAT16, FAT32
MP3 decoding format ........... MPEG-1 & 2 Audio Layer 3
WMA decoding format ......... Ver. 7, 7.1, 8, 9, 10, 11, 12
(2 ch audio)
(Windows Media Player)
AAC decoding format ............ MPEG-4 AAC (iTunes en-
coded only)
(Ver. 9.0.3 and earlier)
DivX decoding format ............ Home Theater Ver. 3, 4, 5.2,
6 (.avi, .divx)
SD
Compatible physical format
..................................................... Version 1.10
File system .................................. FAT12, FAT16, FAT32
MP3 decoding format ........... MPEG-1 & 2 Audio Layer 3
WMA decoding format ......... Ver. 7, 7.1, 8, 9, 10, 11, 12
(2 ch audio)
(Windows Media Player)
AAC decoding format ............ MPEG-4 AAC (iTunes en-
coded only)
(Ver. 9.0.3 and earlier)
DivX decoding format ............ Home Theater Ver. 3, 4, 5.2,
6 (.avi, .divx)
FM tuner
Frequency range ...................... 87.9 MHz to 107.9 MHz
Usable sensitivity ..................... 9 dBf (0.8 µV/75 W, mono,
S/N: 30 dB)
Signal-to-noise ratio ............... 72 dB (IHF-A network)
AM tuner
Frequency range ...................... 530 kHz to 1710 kHz
(10 kHz)
Usable sensitivity ..................... 25 µV (S/N: 20dB)
Signal-to-noise ratio ............... 62 dB (analog broadcasting)
(IHF-A network)
Bluetooth
(MVH-P8300BT)
Version .......................................... Bluetooth 2.0 certified
Output power ............................ +4 dBm Maximum
(Power class 2)
58
En
Page 59

Additional information
Appendix
CEA2006 Specifications
Power output ............................. 14 W RMS × 4 Channels
(4 W and ≦ 1 % THD+N)
S/N ratio ....................................... 91 dBA (reference: 1 W into
4 W)
Note
Specifications and the design are subject to modifications without notice.
English
En
59
Page 60

Table des matières
Nous vous remercions d’avoir acheté cet appareil PIONEER.
Pour garantir une utilisation correcte, lisez bien ce mode d’emploi avant d’utiliser cet appareil. Il est particulièrement important que vous lisiez et respectiez les indications ATTEN-
TION et PRÉCAUTION de ce mode d’emploi. Conservez-le dans un endroit sûr et
facilement accessible pour toute consultation ultérieure.
Précautions
RÈGLES DE PROTECTION
IMPORTANTES 62
Pour une conduite en toute sécurité 62
– Verrouillage par le frein de parking 63
Pour éviter l’épuisement de la batterie 63
Avant de commencer
Pour le modèle canadien 64
La protection de votre ouïe est entre vos
mains 64
Quelques mots sur cet appareil 64
Environnement d’utilisation 65
Service après-vente des produits Pioneer 65
En cas d’anomalie 65
Visitez notre site Web 65
Réinitialisation du microprocesseur 65
Mode de démonstration 66
Quelques mots sur ce mode d’emploi 66
Utilisation de l’appareil
Appareil central 67
Télécommande 67
Opérations de base 68
Utilisation et entretien de la
télécommande 69
Opérations des menus de base 70
– Opérations communes des menus
pour les réglages des fonctions/
réglages audio/réglages initiaux/
listes 71
Personnalisation des menus 71
– Annulation d’un menu enregistré 71
Quelques mots sur les informations de
guidage 71
Utilisation du téléphone Bluetooth 72
– Réglage pour la téléphonie mains
libres 72
– Opérations de base 72
Radio 73
– Opérations de base 73
– Enregistrement et rappel des stations
pour chaque gamme 73
– Utilisation de l’étiquetage iTunes 73
60
Fr
– Réglages des fonctions 74
Lecture de vidéos 75
– Opérations de base 75
– Sélection et lecture de fichiers à partir
de la liste des noms de fichiers 76
– Recherche d’une vidéo sur l’iPod 76
– Lecture du contenu VOD d’un
DivXâ 76
– Réglages des fonctions 77
Lecture audio 80
– Opérations de base 80
– Sélection et lecture des fichiers/plages
à partir de la liste des noms 81
– Recherche d’une plage musicale sur
l’iPod 81
– Réglages des fonctions 81
Utilisation de Pandoraâ 83
– Opérations de base 84
– Affichage des informations
textuelles 84
– Sélection et lecture de la liste de
stations 85
– Réglages des fonctions 85
Lecture d’images fixes 86
– Opérations de base 86
– Sélection et lecture de fichiers à partir
de la liste des noms de fichiers 87
– Réglages des fonctions 87
– Introduction aux opérations de lecture
d’images fixes sous forme de
diaporama 88
Téléphone Bluetooth 89
– Utilisation du menu de connexion 89
– Utilisation du menu du téléphone 91
– Fonction et utilisation 92
Réglages sonores 92
Réglages système 94
Réglages de divertissement 95
– Personnalisation de la couleur
d’éclairage 96
Réglages initiaux 96
– EQ auto (égalisation automatique) 97
Autres fonctions 100
Page 61

Table des matières
Français
– Utilisation d’une source AUX 100
– Utilisation comme source
extérieure 101
– Mise en service ou hors service de
l’indication de l’affichage 101
Instructions détaillées
Changer le mode écran large 102
Paramétrage du fichier de sous-titres
DivX 102
Définition du ratio d’aspect 103
Affichage de votre code d’enregistrement
VOD DivXâ 103
Affichage du code de
désenregistrement 103
Modification des réglages de l’image 103
Accessoires disponibles
Syntoniseur HD Radioä 104
– Opérations de base 104
– Mise en mémoire et rappel des
stations 104
– Utilisation de l’étiquetage iTunes 104
– Réglages des fonctions 104
Syntoniseur XM 105
– Opérations de base 105
– Mise en mémoire et rappel des
stations 105
– Sélection directe d’un canal XM 106
– Réglages des fonctions 106
– Sélection d’un canal dans une
catégorie de canal 106
– Affichage du code d’identification de la
radio 106
Syntoniseur radio satellite SIRIUS 107
– Opérations de base 107
– Mise en mémoire et rappel des
stations 107
– Sélection directe d’un canal
SIRIUS 108
– Réglages des fonctions 108
– Sélection d’un canal dans une
catégorie de canal 109
– Utilisation de la fonction Relecture
instantanée 109
Informations complémentaires
Dépannage 110
Messages d’erreur 111
Signification des messages d’erreur du
réglage EQ auto 114
Liste des indicateurs 115
Conseils sur la manipulation 116
Formats audio/vidéo compressés
compatibles (USB, SD) 118
Compatibilité iPod 119
Séquence des fichiers audio 120
Utilisation correcte de l’afficheur 120
– Soin à apporter à l’afficheur 120
– Écran à cristaux liquides (LCD) 121
– Rétroéclairage à DEL (diode
électroluminescente) 121
Droits d’auteur et marques
commerciales 121
Caractéristiques techniques 123
61
Fr
Page 62

Section
01
Précautions
RÈGLES DE PROTECTION
IMPORTANTES
Veuillez lire toutes les instructions concernant
votre écran et les conserver pour référence ultérieure.
1 Lisez soigneusement la totalité de ce
mode d’emploi avant d’utiliser votre
écran.
2 Conservez ce mode d’emploi à portée de
main afin de vous y référer concernant les
procédures d’utilisation et les informations de sécurité.
3 Observez attentivement tous les avertis-
sements contenus dans ce manuel et suivez soigneusement les instructions.
4 Ne laissez pas d’autres personnes utiliser
ce système avant qu’elles aient lu et
compris les instructions d’utilisation.
5 N’installez pas l’écran là où il peut (i)
gêner la vision du conducteur, (ii) dégrader le fonctionnement de systèmes d’utilisation ou les dispositifs de sécurité du
véhicule, incluant les airbags, les
commandes du signal de détresse, ou (iii)
dégrader la capacité du conducteur à utiliser le véhicule en sécurité.
6 N’utilisez pas cet écran si cela peut dé-
tourner votre attention de la conduite du
véhicule en toute sécurité. Observez toujours des règles de conduite sûre et respectez toutes les régulations existantes
du code de la route. Si l’utilisation du système ou la lecture de l’écran vous posent
des difficultés, garez votre véhicule dans
un endroit sûr et effectuez les réglages nécessaires.
7 N’oubliez pas de toujours mettre votre
ceinture de sécurité lorsque vous conduisez votre véhicule. Si vous avez un accident, vos blessures peuvent être
considérablement plus graves si votre
ceinture n’est pas bouclée correctement.
8 N’utilisez jamais des écouteurs en condui-
sant.
9 Pour renforcer la sécurité, certaines fonc-
tions sont désactivées si le frein de park-
ing n’est pas serré et si le véhicule n’est
pas à l’arrêt.
10 Ne réglez jamais le volume de votre écran
à un niveau tel que vous ne puissiez pas
entendre la circulation extérieure et les
véhicules de secours.
ATTENTION
N’essayez pas d’installer votre écran ou d’en
faire l’entretien vous-même. L’installation ou
l’entretien de l’écran par des personnes sans
formation et sans expérience en équipement
électronique et en accessoires automobiles
peut être dangereux et vous exposer à des
risques d’électrocution ou à d’autres
dangers.
Pour une conduite en toute
sécurité
ATTENTION
! LE FIL VERT CLAIR DU CONNECTEUR
D’ALIMENTATION EST PRÉVU POUR
DÉTECTER L’ÉTAT STATIONNÉ ET DOIT
ÊTRE CONNECTÉ À L’ALIMENTATION
DU COMMUTATEUR DU FREIN DE
PARKING. UNE MAUVAISE CONNEXION
OU UNE UTILISATION INCORRECTE DU
FIL PEUT VIOLER LA LOI APPLICABLE
ET SE TRADUIRE PAR DES DOMMAGES
CORPORELS OU MATÉRIELS GRAVES.
! Pour éviter les risques de dommages maté-
riels ou corporels et une violation éventuelle
des lois applicables, cet appareil ne doit pas
être utilisé avec un écran vidéo visible par le
conducteur.
! Pour éviter le risque d’accident et une viola-
tion potentielle des lois applicables, l’écran du
siège avant ne doit en aucun cas être regardé
pendant la conduite du véhicule.
62
Fr
Page 63

Précautions
Section
01
! Dans certains états ou pays, il peut être illégal
même pour des personnes autres que le
conducteur de regarder des images sur un
écran à l’intérieur d’un véhicule. Lorsque ces
réglementations s’appliquent, elles doivent
être respectées.
Si vous essayez de regarder une image vidéo
pendant que vous conduisez, l’avertissement
Viewing of front seat video source while
driving is strictly prohibited. s’affiche sur l’é-
cran avant.
Pour regarder une image vidéo sur l’écran
avant, garez votre voiture dans un endroit sûr
et serrez le frein à main.
Verrouillage par le frein de parking
L’utilisation pendant la conduite de certaines
des fonctions offertes par cet appareil (visualisation d’une vidéo ou certaines opérations)
peut être dangereuse et/ou illégale. Pour empêcher l ’utilisation de ces fonctions quand le
véhicule est en mouvement, il existe un système de blocage qui détecte la position serrée
du frein de parking. Si vous essayez d’utiliser
les fonctions mentionnées ci-dessus pendant
que vous conduisez, elles seront désactivées
jusqu’à ce que vous arrêtiez le véhicule dans
un endroit sûr, et (1) serriez le frein de parking,
(2) le desserriez, puis (3) le serriez à nouveau.
Maintenez la pédale de frein enfoncée avant
de relâcher le frein de parking.
! Quand cet appareil n’est plus alimenté, no-
tamment lors d’un remplacement de la batterie de la voiture, le microprocesseur de
l’appareil revient à sa condition initiale.
Nous vous recommandons de noter les
données de réglage audio.
Français
ATTENTION
N’utilisez pas cet appareil avec des véhicules qui
ne possèdent pas de position ACC.
Utilisation
1 Appuyez sur M.C. pour afficher la page
suivante.
2 Appuyez sur M.C. pour choisir OK.
Pour éviter l’épuisement de
la batterie
Laissez tourner le moteur du véhicule lorsque
vous utilisez cet appareil pour éviter de décharger la batterie.
63
Fr
Page 64

Section
02
Avant de commencer
ID FCC: AJDK029
NO DE MODÈLE: MVH-P8300BT
IC: 775E-K029
Cet équipement est conforme aux limites d’exposition aux radiations FCC/IC définies pour
les équipements non contrôlés et respecte les
Règles d’Exposition aux fréquences radio (RF)
FCC définies dans le Supplément C de OET65
et RSS-102 des règles IC d’exposition aux fréquences radio (RF). Cet équipement a des niveaux d’énergie RF très faibles qui sont
estimés être conformes sans évaluation de
l’exposition maximale autorisée (MPE). Mais il
est souhaitable que l’équipement soit installé
et utilisé en laissant le radiateur à au moins 20
cm de la personne (à l’exclusion des extrémités : mains, poignets, pieds et chevilles).
Pour le modèle canadien
Cet appareil numérique de la classe B est
conforme à la norme NMB-003 du Canada.
La protection de votre ouïe
est entre vos mains
Pour assurer le rendement optimal de votre
matériel et – plus important encore – la protection de votre ouïe, réglez le volume à un niveau
raisonnable. Pour ne pas altérer votre sens de
la perception, le son doit être clair mais ne
produire aucun vacarme et être exempt de
toute distorsion. Votre ouïe peut vous jouer
des tours. Avec le temps, votre système auditif
peut en effet s’adapter à des volumes supérieurs, et ce qui vous semble un « niveau de
confort normal » pourrait au contraire être excessif et contribuer à endommager votre ouïe
de façon permanente. Le réglage de votre matériel à un volume sécuritaire AVANT que votre
ouïe s’ adapte vous permettra de mieux vous
protéger.
CHOISISSEZ UN VOLUME SÉCURITAIRE :
! Réglez d’abord le volume à un niveau infé-
rieur.
! Montez progressivement le volume jusqu’à
un niveau d’écoute confortable ; le son doit
être clair et exempt de distorsions.
! Une fois que le son est à un niveau confor-
table, ne touchez plus au bouton du volume.
N’OUBLIEZ PAS DE RESPECTER LES
DIRECTIVES SUIVANTES :
! Lorsque vous montez le volume, assurez-
vous de pouvoir quand même entendre ce
qui se passe autour de vous.
! Faites très attention ou cessez temporaire-
ment l’ utilisation dans les situations pouvant s’avérer dangereuses.
! N’utilisez pas des écouteurs ou un casque
d’écoute lorsque vous opérez un véhicule
motorisé ; une telle utilisation peut créer
des dangers sur la route et est illégale à de
nombreux endroits.
Quelques mots sur cet appareil
Les fréquences du syntoniseur de cet appareil
sont attribuées pour une utilisation en Amérique du Nord. Son utilisation dans d’autres
régions peut se traduire par une réception de
mauvaise qualité.
PRÉCAUTION
! Ne laissez pas cet appareil entrer en contact
avec des liquides. Cela pourrait provoquer une
électrocution. Tout contact avec des liquides
pourrait aussi provoquer des dommages, de
la fumée et une surchauffe de l’appareil.
! Conservez ce mode d’emploi à portée de main
pour référence ultérieure.
! Maintenez le niveau d’écoute à une valeur
telle que vous puissiez entendre les sons provenant de l’extérieur.
! Évitez tout contact avec l’humidité.
! Si la batterie est débranchée ou déchargée, le
contenu de la mémoire sera effacé.
64
Fr
Page 65

Avant de commencer
Section
02
Remarque
Les opérations de réglage des fonctions sont validées même si le menu est annulé avant la confirmation des opérations.
Environnement d’utilisation
Cet appareil doit être utilisé dans les plages de
température ci-dessous.
Plage de température de fonctionnement :
–10 °C à +60 °C (14°F à 140 °F)
Température de test ETC EN300328: –20 °C et
+55 °C (–4 °F et 131 °F)
Service après-vente des
produits Pioneer
Veuillez contacter le revendeur ou le distributeur auprès duquel vous avez acheté cet appareil pour le service après vente (y compris les
conditions de garantie) ou pour toute autre information. Dans le cas où les informations nécessaires ne sont pas disponibles, veuillez
contacter les sociétés indiquées ci-dessous :
N’expédiez pas l’appareil pour réparation à
l’une des adresses figurant ci-dessous sans
avoir pris contact au préalable.
Pour connaître les conditions de garantie, reportez-vous au document Garantie limitée qui
accompagne cet appareil.
En cas d’anomalie
En cas d’anomalie, consultez le distributeur
ou le service d’entretien agréé par Pioneer le
plus proche.
Visitez notre site Web
Rendez-nous visite sur le site suivant :
http://www.pioneerelectronics.com
au Canada
http://www.pioneerelectronics.ca
1 Enregistrez votre produit. Nous conserverons
les détails de votre achat dans nos fichiers
pour vous aider à faire référence à ces informations pour une déclaration d’assurance en
cas de perte ou de vol.
2 Recevez les mises à jour sur les derniers pro-
duits et les technologies les plus récentes.
3 Téléchargez les modes d’emploi, commandez
les catalogues des produits, recherchez de
nouveaux produits, et bien plus.
Français
États-Unis
Pioneer Electronics (USA) Inc.
CUSTOMER SUPPORT DIVISION
P.O. Box 1760
Long Beach, CA 90801-1760
800-421-1404
CANADA
Pioneer Électroniques du Canada, Inc.
Département de service aux consommateurs
300 Allstate Parkway
Markham, Ontario L3R 0P2
1-877-283-5901
905-479-4411
Réinitialisation du
microprocesseur
Le microprocesseur doit être réinitialisé dans
les situations suivantes :
! Avant d’utiliser cet appareil après son in-
stallation
! En cas d’anomalie de fonctionnement de
l’appareil
! Quand des messages étranges ou incor-
rects s’affichent sur l’écran
Fr
65
Page 66

Section
02
Avant de commencer
Touche RESET
1 Retirez la face avant.
2 Appuyez sur RESET avec la pointe d’un
stylo ou un autre instrument pointu.
Mode de démonstration
Important
La non-connexion du fil rouge (ACC) de cet appareil à une borne couplée avec les opérations de
mise en/hors service du contact d’allumage peut
conduire au déchargement de la batterie.
La démonstration démarre automatiquement
quand le contact d’allumage est en position
ACC ou ON lorsque l’alimentation de cet appareil est coupée. Mettre l’appareil hors tension n’annule pas le mode de démonstration.
Pour annuler le mode démonstration, paramétrez la fonction dans le menu des réglages initiaux. Utiliser la démonstration lorsque le
contact d’allumage est en position ACC peut
décharger la batterie.
Reportez-vous à la page 96, Demonstration
(réglage de l’affichage de démonstration).
mémoire SD sont collectivement appelés “périphériques de stockage externes (USB, SD)”.
Si uniquement les mémoires USB et les lecteurs portables USB sont concernés, ils sont
appelés “périphériques de stockage USB”.
Dans ce manuel, iPod et iPhone sont désignés
par le terme “iPod”.
Quelques mots sur ce mode
d’emploi
Ce mode d’emploi décrit à la fois l’utilisation
de l’appareil MVH-P8300BT et celle du MVHP7300. Seul MVH-P8300BT dispose des fonctions Bluetooth, les explications relatives à ces
fonctions ne concernent donc pas MVHP7300.
Dans les instructions suivantes, les mémoires
USB, lecteurs audio portables USB et cartes
66
Fr
Page 67

8
Utilisation de l’appareil
Section
03
Appareil central
Partie Partie
Jack d’entrée AUX
(jack stéréo/vidéo
1 HOME 5
2 SRC/OFF 6
MULTI-CONTROL
3
(M.C.)
4 Port USB 8
PRÉCAUTION
Utilisez un câble USB Pioneer optionnel (CDIU50) pour connecter le lecteur audio USB/la mémoire USB, étant donné que n’importe quel périphérique relié directement à l’appareil dépassera
de l’appareil et peut s’avérer dangereux.
N’utilisez pas de produits non autorisés.
3,5 mm)
Jack d’entrée microphone pour mesure EQ auto
(retour/affi-
chage hors service)
Touche de retrait de
7
la face avant
Logement de la
carte mémoire SD
Retirez la face
avant pour accéder
au logement de la
carte mémoire SD.
Télécommande
Seulement pour le MVH-P7300
Seulement pour le MVH-P8300BT
Partie Utilisation
+/– (VO-
9
LUME)
a MUTE
b a/b/c/d
c AUDIO
Appuyez sur ces touches pour
augmenter ou diminuer le niveau
sonore.
Appuyez sur cette touche pour
couper le son. Appuyez à nouveau
pour réactiver le son.
Appuyez sur ces touches pour
exécuter les commandes d’accord manuel, avance rapide, retour rapide et recherche de plage.
Appuyez sur cette touche pour afficher une fonction audio.
Français
67
Fr
Page 68

Section
03
Utilisation de l’appareil
Partie Utilisation
d DISP/SCRL
e e
f FUNCTION
LIST/
g
ENTER
BAND/ES-
h
CAPE
Sélecteur
i
multidirectionnel
Appuyez sur cette touche pour
choisir un affichage différent pour
la source audio.
Appuyez sur cette touche pour
choisir l’écran de base ou l’image
pour la source vidéo.
! Si le réglage de l’arrière-plan
du menu de divertissement
est désactivé, vous pouvez
basculer entre l’écran de base
et l’image.
Appuyez sur cette touche pour
mettre en pause ou reprendre la
lecture.
Appuyez sur cette touche pour afficher les fonctions.
Appuyez sur cette touche pour afficher la liste en fonction de la
source.
Appuyez sur cette touche pour
contrôler les fonctions lorsque
vous utilisez le menu.
Appuyez sur cette touche pour
choisir une des trois gammes FM
ou la gamme AM.
Quand vous lisez des fichiers sur
un périphérique de stockage externe contenant un mélange de
divers types de fichiers média, appuyez sur cette touche pour basculer entre les types de fichiers
média à lire.
Music (audio compressé)—Video
(fichiers vidéo DivX)—Photo (fichiers d’images JPEG)
Appuyez sur cette touche pour revenir à l’affichage standard à partir du menu des listes/fonctions.
Appuyez pour annuler le menu
des réglages initiaux.
Déplacez ce bouton pour exécuter
les commandes d’accord manuel,
d’avance rapide, de retour rapide
et de recherche de plage musicale.
Appuyez sur cette touche pour afficher la liste des dossiers, la liste
des fichiers ou la liste des canaux
présélectionnés selon la source.
Partie Utilisation
j DIRECT
k CLEAR
Touches 0
l
à 9
(OFF
m
HOOK)
(ON
n
HOOK)
o PGM Non utilisée.
Appuyez sur cette touche pour
choisir le canal désiré pour le syntoniseur XM/SIRIUS.
Appuyez pour annuler les chiffres
entrés quand vous utilisez les touches 0 à 9.
Appuyez sur un e de ces touches
pour choisir le canal ou la présélection que vous désirez. Les touches 1 à 6 permettent d’effectuer
la présélection.
Appuyez de façon prolongée sur
une des touches 1 à 6 pour présélectionner la station souhaitée.
Appuyez pour commencer à parler dans le téléphone lors de l’utilisation d’un télé phone.
Lors de l’utilisation de la source
téléphone, appuyez pour terminer
un appel ou rejeter un appel entrant.
Remarque
Vous ne pouvez pas effectuer de réglage des
fonctions ou réglage audio, utiliser les menus
des listes, etc. en appuyant sur a/b/c/d ou sur
le sélecteur multidirectionnel de la télécommande. Utilisez le bouton Multi-control de l’appareil central.
Opérations de base
Important
! Lorsque vous enlevez ou remontez la face
avant, manipulez-la doucement.
! Évitez de heurter la face avant.
! Conservez la face avant à l’abri des tempéra-
tures élevées et de la lumière directe du soleil.
! Pour éviter d’endommager le périphérique ou
l’intérieur du véhicule, retirez tous les câbles
et périphériques connectés à la face avant,
avant d’enlever cette dernière.
68
Fr
Page 69

Utilisation de l’appareil
Section
03
Retrait de la face avant pour protéger l’appareil
contre le vol
1 Appuyez sur la touche de retrait pour libérer la
face avant.
2 Saisissez la face avant et retirez-la.
3 Conservez toujours la face avant dans un boîtier
de protection lorsqu ’ elle est détachée.
Remontage de la face avant
1 Faites glisser la face avant vers le haut jusqu’àce
qu’un déclic soit émis.
La face avant et l’appareil central sont connectés
par le haut. Assurez-vous que la face avant soit
correctement connectée à l’appareil central.
2 Appuyez en bas de la face avant jusqu’àce
qu’elle soit bien en place.
Si vous ne pouvez pas monter la face avant sur
l’appareil central, réessayez. Forcer la face avant
en position risque de l’endommager.
Mise en service de l’appareil
1 Appuyez sur SRC/OFF pour mettre en service l’ap-
pareil.
Mise hors service de l’appareil
1 Maintenez la pression sur SRC/OFF jusqu’àce
que l’appareil soit mis hors tension.
Choix d’une source
1 Appuyez sur SRC/OFF pour parcourir les options
disponibles :
XM (syntoniseur XM) —SIRIUS (syntoniseur SIRIUS)—Digital Radio (syntoniseur HD Radio)/
Radio (syntoniseur)—USB (périphérique de stockage USB)/iPod (iPod connecté via l’entrée USB)
—Pandora (Pandora)—SD (carte mémoire SD)—
EXT1 (source extérieure 1)—EXT2 (source exté-
rieure 2)—AUX (AUX)
Réglage du volume
1 Tournez M.C. pour régler le volume.
tracter l’antenne, mettez la source hors service.
! Lorsque la source iPod est sélectionnée, la
source passe à Pandora lorsque vous mettez
l’application Pandora en service.
Français
Utilisation et entretien de
la télécommande
Utilisation de la télécommande
1 Pointez la télécommande dans la direction de la
face avant de l’appareil à télécommander.
Lors de la première utilisation, retirez le film qui
dépasse du porte-pile.
Remplacement de la pile
1 Sortez le porte-pile de l’arrière de la télécom-
mande en le faisant glisser.
2 Insérez la pile en respectant les polarités (+) et
(–).
Seulement pour le MVH-P7300
Seulement pour le MVH-P8300BT
ATTENTION
! Conservez la pile hors de portée des enfants.
Au cas où la pile serait avalée, consultez immédiatement un médecin.
! Les piles ne doivent pas être exposées à des
températures élevées telles que la lumière directe du soleil, des flammes ou toute autre
source de chaleur similaire.
Remarques
! Si le fil bleu/blanc de l’appareil est relié à la
prise de commande du relais de l’antenne
motorisée du véhicule, celle-ci se déploie
lorsque la source est mise en service. Pour ré-
PRÉCAUTION
! Utilisez une pile au lithium CR2025 (3V).
! Retirez la pile si la télécommande n’est pas
utilisée pendant un mois ou plus.
69
Fr
Page 70

Section
03
Utilisation de l’appareil
! Remplacer la pile de manière incorrecte peut
créer un risque d’explosion. Remplacez la pile
uniquement par une pile identique ou de type
équivalent.
! Ne manipulez pas la pile avec un outil métal-
lique.
! Ne conservez pas la pile avec des objets mé-
talliques.
! Si la pile fuit, nettoyez soigneusement la télé-
commande, puis insérez une pile neuve.
! Lors de la mise au rebut des piles usagées,
respectez les règlements nationaux ou les instructions locales en vigueur dans le pays ou la
région en matière de conservation ou de protection de l’environnement.
Important
! Ne laissez pas la télécommande exposée à
des températures élevées ou à la lumière directe du soleil.
! La télécommande peut ne pas fonctionner
correctement à la lumière directe du soleil.
! Ne laissez pas la télécommande tomber sur le
plancher, où elle pourrait gêner le bon fonctionnement de la pédale de frein ou
d’accélérateur.
Opérations des menus de base
Vous pouvez activer la sélection de la source,
la fonction liste, le réglage audio, etc., à l’aide
de HOME.
1 Appuyez sur HOME.
2 Poussez M.C. vers le haut ou vers le bas
pour modifier l’option de menu.
Home (menu accueil)—Custom (menu per-
sonnalisé)—Phone (menu téléphone)
# Le menu téléphone est disponible pour le
MVH-P8300BTseulement.
3 Tournez M.C. pour sélectionner l’option
de menu.
Après la sélection, effectuez les procédures
suivantes.
Home (menu accueil)
Source (choix d’une source)
1 Appuyez sur M.C. pour afficher le mode de para-
métrage.
2 Utilisez M.C. pour choisir le nom de la source dé-
sirée.
Tournez pour changer la source. Appuyez pour sélectionner.
Pour connaître les sources que vous pouvez choisir, reportez-vous à la page précédente, Choix
d’une source.
List (utilisation du menu liste)
1 Appuyez sur M.C. pour afficher la liste.
Appuyez sur cette touche pour afficher la liste des
dossiers, la liste des fichiers ou la liste des canaux
présélectionnés selon la source.
Audio (réglage d’ un menu audio)
1 Appuyez sur M.C. pour afficher le menu audio.
Reportez-vous à la page 92, Réglages sonores.
System (réglage d’un menu système)
1 Appuyez sur M.C. pour afficher le menu système.
Reportez-vous à la page 94, Réglages système.
Entertainment (réglage d’un menu de divertisse-
ment)
1 Appuyez sur M.C. pour afficher le menu de diver-
tissement.
Reportez-vous à la page 95, Réglages de divertisse-
ment.
Custom (menu personnalisé)
Vous pouvez choisir les menus dans chaque
menu (menu des fonctions audio, etc.) et les
enregistrer dans ce menu personnalisé.
Reportez-vous à la page suivante, Personnali-
sation des menus.
Affichage du menu personnalisé
1 Appuyez sur M.C. pour afficher le mode de para-
métrage.
Phone (menu téléphone)
Affichage du menu du téléphone
! Reportez-vous à la page 91, Utilisation du menu
du téléphone.
70
Fr
Page 71

Utilisation de l’appareil
Section
03
Opérations communes des
menus pour les réglages des
fonctions/réglages audio/
réglages initiaux/listes
Retour à l’affichage précédent
Retour à la liste/catégorie précédente (dossier/catégorie de niveau immédiatement supérieur)
1 Appuyez sur
Retour à l’affichage ordinaire
Annulation du menu des réglages initiaux
1 Appuyez sur HOME.
.
Personnalisation des menus
Vous pouvez enregistrer les éléments de menu
fréquemment utilisés dans un menu personnalisé.
! Les colonnes de menus que vous pouvez
enregistrer sont affichées dans des indicateurs circulaires.
1 Affichez les colonnes de menu à enregistrer.
Reportez-vous à la page précédente, Opérations des menus de base.
Vous pouvez afficher la colonne du menu
dans Home (menu accueil).
Annulation d’un menu enregistré
1 Affichez le menu personnalisé et sélectionnez un menu enregistré.
Reportez-vous à la page précédente, Opérations des menus de base.
2 Poussez et maintenez M.C. vers la
droite pour annuler le menu enregistré.
Quelques mots sur les
informations de guidage
Cet appareil affiche les informations de guidage sur la manière d’utiliser M.C. pour
chaque fonction.
1 Affichez le menu système.
Reportez-vous à la page précédente, Opérations des menus de base.
2 Utilisez M.C. pour sélectionner
Guide Info.
Tournez pour changer l’option de menu. Appuyez pour sélectionner.
Les informations de guidage s’affichent.
Utilisation
Tournez M.C.
Français
2 Poussez et maintenez M.C. vers la
droite pour enregistrer la colonne de
menus.
Les colonnes de menus que vous avez enregistrées sont affichées dans de grands indicateurs circulaires.
3 Affichez le menu personnalisé et sélectionnez un menu enregistré.
Reportez-vous à la page précédente, Opérations des menus de base.
Remarque
Vous pouvez enregistrer jusqu’à 12 colonnes.
Poussez M.C. vers le haut ou vers
le bas.
Poussez M.C. vers la gauche ou
vers la droite.
Appuyez sur M.C .
Appuyez sur M.C . de façon prolongée.
Poussez M.C. vers le haut.
Fr
71
Page 72

Section
03
Utilisation de l’appareil
Utilisation
Poussez M.C. vers le bas.
Poussez et maintenez M.C. vers le
haut.
# Appuyez sur M.C. pour afficher la page sui-
vante.
Utilisation du téléphone
Bluetooth
Cette fonction est disponible pour le MVHP8300BT seulement.
Important
! Comme cet appareil est en attente d’une
connexion avec votre téléphone cellulaire via
la technologie sans fil Bluetooth, son utilisation avec le moteur arrêté peut décharger la
batterie.
! Les opérations peuvent différer selon le type
de téléphone cellulaire.
! Les opérations avancées qui requièrent votre
attention, telles que composer des numéros
sur le moniteur, utiliser l’annuaire, etc. sont
interdites pendant que vous conduisez. Garez
correctement votre voiture lorsque vous utilisez ces opérations avancées.
Réglage pour la téléphonie
mains libres
Avant de pouvoir utiliser la fonction téléphonie
mains libres, vous devez préparer l’appareil
pour une utilisation avec votre téléphone cellulaire.
1 Connexion
Utilisez le menu de connexion du téléphone Bluetooth. Reportez-vous à la page 89, Utilisation du
menu de connexion.
2 Réglages des fonctions
Utilisez le menu des fonctions du téléphone Bluetooth. Reportez-vous à la page 91, Utilisation du
menu du téléphone.
Opérations de base
Exécution d’un appel
1 Reportez-vous à la page 91, Utili sation du menu
du téléphone.
Réponse à un appel entrant
1 Lors de la réception d’un appel, appuyez sur M.C.
! Vous pouvez aussi effectuer cette opération
en poussant M.C. vers le haut.
Fin d’un appel
1 Appuyez sur M.C.
Rejet d’un appel entrant
1 Lors de la réception d’un appel, poussez M.C.
vers le bas.
Réponse à un appel en attente
1 Lors de la réception d’un appel, appuyez sur M.C.
! Vous pouvez aussi effectuer cette opération
en poussant M.C. vers le haut.
Commutation entre les appelants en attente
1 Poussez M.C. vers le haut.
Annulation des appels en attente
1 Poussez M.C. vers le bas.
Réglage du volume d’écoute du destinataire
1 Poussez M.C. vers la gauche ou vers la droite
pendant que vous parlez au téléphone.
Mise en ou hors service du mode privé
1 Poussez et maintenez M.C. vers le haut pendant
que vous parlez au téléphone.
Remarques
! Si le mode privé est sélectionné sur le télé-
phone cellulaire, la téléphonie mains libres
peut ne pas être disponible.
! La durée estimée de l’appel est affichée (elle
peut différer légèrement de la durée réelle de
l’appel).
72
Fr
Page 73

t
ext
ext
9
CH
Q
1
2
3
Utilisation de l’appareil
Section
03
Radio
Opérations de base
A-E
87.
16:54
MHz
Radio
Local
Tex
.
1 Zone d’affichage des indicateurs
Reportez-vous à la page 115, Liste des indica-
teurs.
2 Zone d’information textuelle
! Titre de la plage musicale
! Nom de l’interprète
! Nom du service de programme
! Indicateur de gamme/numéro de présé-
lection/fréquence
3 Affichage des images sources
Accord manuel (pas à pas)
1 Poussez M.C. vers la gauche ou vers la droite.
Recherche
1 Poussez et maintenez M.C. vers la gauche ou
vers la droite, puis relâchez.
Vous pouvez annuler l’accord automatique en
poussant M.C. vers la gauche ou vers la droite.
Lorsque vous poussez et maintenez M.C. vers la
gauche ou vers la droite, vous pouvez sauter des
stations. L’accord automatique démarre dès que
vous relâchez M.C.
Enregistrement et rappel des
stations pour chaque gamme
Utilisation de l’écran de présélection
1 Poussez M.C. vers le haut ou vers le bas pour affi-
cher l’écran de présélection.
2 Poussez M.C. vers le haut ou vers le bas jusqu’à
ce que la gamme désirée, FM1, FM2, FM3 en FM
ou AM , soit affichée.
3 Utilisez M.C. pour enregistrer la fréquence sélec-
tionnée.
Tournez pour changer le numéro de présélection.
Appuyez de façon prolongée pour enregistrer.
4 Utilisez M.C. pour choisir la station désirée.
Tournez pour changer de station. Appuyez pour
sélectionner.
Vous pouvez aussi afficher l’écran de présélection en
appuyant sur HOME. Reportez-vous à la page 70,
Opérations des menus de base.
Utilisation de l’étiquetage iTunes
Cette fonction ne peut pas être utilisée avec les
modèles d’iPods suivants.
— iPod 5ème génération
— iPod nano 3ème génération
— iPod nano 4ème génération
— iPod nano 5ème génération
— iPod nano 6ème génération
— iPod classic
— iPod classic 120 Go
— iPod touch 1ère génération
— iPod touch 2ème génération
— iPod touch 3ème génération
— iPod touch 4ème génération
— iPhone
— iPhone 3G
— iPhone 3GS
— iPhone 4
Cependant, les informations d’étiquette peuvent être enregistrées dans cet appareil lorsque
d’autres modèles d’iPod sont utilisés.
Français
73
Fr
Page 74

Section
03
Utilisation de l’appareil
Les informations (étiquette) sur la plage musicale peuvent être enregistrées à partir de la
station en cours de diffusion sur votre iPod.
Les plages musicales se présenteront sous
forme de liste de lecture appelée “Liste de lecture étiquetée” dans iTunes lors de la synchronisation suivante de votre iPod. Vous pouvez
ensuite acheter directement les plages musicales qui vous intéressent dans le iTunes
Store.
Enregistrement des informations d’étiquette sur cet
appareil
1 Réglez la station de diffusion.
2 Appuyez de manière prolongée sur M.C. si
est affiché à l’écran lorsque la plage musicale qui
vous intéresse est diffusée.
Enregistrement des informations étiquetées sur votre
iPod
1 Connectez l’iPod à cet appareil et transférez les
informations d’étiquette de cet appareil vers
l’iPod.
! Il se peut que les plages musicales étiquetées
et celles que vous pouvez achetées dans le
iTunes Store soient différentes. Vérifiez que la
plage musicale est bien celle que vous souhaitez avant de l’acheter.
! Si vous ne pouvez pas utiliser normalement
cette fonction, mettez à jour le firmware de
votre iPod.
! Il est possible d'enregistrer sur cet appareil
des informations d'étiquettes pour 50 plages
musicales.
En fonction du moment de l'enregistrement
des informations d'étiquettes, les informations
d'étiquettes de la plage musicale lue avant ou
après la plage musicale en cours de lecture
peuvent également être enregistrées.
! Si une carte mémoire SD est sélectionnée
pour la source alors que les informations d'étiquettes sont en cours d'enregistrement sur
cet appareil, les informations d'étiquette ne
seront pas transférées vers l'iPod.
! Les informations d'étiquettes ne peuvent pas
être transférées vers l'iPod lorsqu'un fichier
sur un périphérique SD est visualisé sous
forme de diaporama.
! Lors du transfert de l’étiquette, il est impos-
sible de sélectionner la source SD.
Réglages des fonctions
1 Appuyez sur M.C. pour afficher le menu
des fonctions.
2 Tournez M.C. pour sélectionner la fonction.
Après avoir sélectionné la fonction, effectuez
les procédures de paramétrage suivantes.
BSM (mémoire des meilleures stations)
La fonction BSM (mémoire des meilleures stations)
mémorise automatiquement les six stations les plus
fortes dans l’ordre de la force du signal.
1 Appuyez sur M.C. pour mettre la fonction BSM en
service.
Pour annuler, appuyez de nouveau sur M.C.
Local (accord automatique sur une station locale)
L’accord automatique sur une station locale ne s’inté-
resse qu’aux stations de radio dont le signal reçu est
suffisamment puissant pour garantir une réception
de bonne qualité.
1 Appuyez sur M.C. pour afficher le mode de para-
métrage.
2 Tournez M.C. pour choisir le réglage désiré.
FM : Off—Level1—Level2—Level3—Level4
AM : Off—Level1—Level2
La valeur la plus élevée permet la réception des
seules stations très puissantes ; les autres valeurs
autorisent la récep tion de stations moins puissantes.
3 Appuyez sur M.C. pour confirmer la sélection.
74
Fr
Page 75

Utilisation de l’appareil
Section
03
Lecture de vidéos
Opérations de base
Si un iPod disposant de fonctions vidéo est
connecté à cet appareil à l’aide d’un câble
d’interface de type CD-IU50V (vendu séparément), vous pouvez profiter du contenu vidéo
de l’iPod en tant que source iPod. Vous n’avez
pas besoin de modifier le réglage de AUX.
Text
Text
2
A-EQ
3
16:542345 7890
1
Video
8888'88" -8888'88"
456
Vous pouvez basculer sur l’écran de base ou
sur l’image.
Reportez-vous à la page 77, Display (réglage
de l’affichage).
1 Zone d’information du fichier pour le fichier
en cours de lecture
Périphérique de stockage externe (USB,
SD)
! Indicateur du numéro de dossier/fichier
iPod
! Indicateur du numéro de plage musi-
cale
2 Zone d’affichage des indicateurs
Reportez-vous à la page 115, Liste des indica-
teurs.
3 Zone d’information textuelle
Périphérique de stockage externe (USB,
SD)
! Nom du dossier
! Nom du fichier
iPod
! Titre de la plage musicale
! Nom de l’interprète
! Titre de l’album
4 Indicateur du temps de lecture
5 Barre de lecture
6 Indicateur du temps restant
Lecture de fichiers sur un périphérique de stockage
USB
1 Ouvrez le capot du port USB.
2 Branchez le périphérique de stockage USB en uti-
lisant un câble USB.
Arrêt de la lecture de fichiers sur un périphérique de
stockage USB
1 Vous pouvez débrancher le périphérique de stoc-
kage USB à tout moment.
Lecture de fichiers sur une carte mémoire SD
1 Retirez la face avant.
2 Insérez une carte mémoire SD dans le logement
prévu à cet effet.
Insérez-la en orientant la surface de contact vers
le bas et en appuyant sur la carte jusqu’àce
qu’un déclic soit émis et que la carte soit verrouil-
lée en place.
3 Remontez la face avant.
Arrêt de la lecture de fichiers sur une carte mémoire
SD
1 Retirez la face avant.
2 Appuyez sur la carte mémoire SD jusqu’àce
qu’un déclic soit émis.
La carte mémoir e SD est éjectée.
3 Retirez la carte mémoire SD.
4 Remontez la face avant.
Lecture de vidéos sur un iPod
1 Ouvrez le capot du port USB.
2 Àl’aide d’un câble d’interface (par exemple, CD-
IU50V), connectez l’iPod à un câble USB et à une
entrée AUX à l’aide d’un connecteur Dock iPod.
Sélection d’un dossier
1 Poussez M.C. vers le haut ou vers le bas.
Sélection d’un fichier (chapitre)
1 Poussez M.C. vers la gauche ou vers la droite.
Avance ou retour rapide
1 Poussez et maintenez M.C. vers la gauche ou
vers la droite.
Remarques
! Débranchez les périphériques de stockage
USB de l’appareil lorsque vous ne l’utilisez
pas.
! Tout texte incompatible mémorisé avec le fi-
chier image vidéo risque de ne pas s’afficher
ou de s’afficher de manière incorrecte.
! Tout texte incompatible enregistré sur l’iPod
ne sera pas affiché par cet appareil.
Français
75
Fr
Page 76

Section
03
Utilisation de l’appareil
! Débranchez les écouteurs de l’iPod avant de
le connecter à cet appareil.
! L’iPod ne peut pas être mis en service ou hors
service sauf si le mode de commande est
réglé sur App.
! L’iPod sera mis hors service environ deux mi-
nutes après que le contact d’allumage est mis
en position OFF (coupé).
! Quand vous lisez des fichiers sur un périphé-
rique de stockage externe contenant un mélange de divers types de fichiers média,
basculez entre les types de fichiers média à
lire.
Reportez-vous à la page suivante, A/V Format
(commutation entre les types de fichiers
média).
Sélection et lecture de fichiers
à partir de la liste des noms de
fichiers
1 Affichez le menu des listes.
Reportez-vous à la page 70, Opérations des
menus de base.
2 Utilisez M.C. pour sélectionner le nom
de fichier (ou nom de dossier) désiré.
Modification du nom de fichier ou de dossier
1 Tournez M.C.
Lecture
1 Quand un fichier est sélectionné, appuyez sur M.
C.
Affichage d’une liste des fichiers (ou des dossiers)
dans le dossier sélectionné
1 Quand un dossier est sélectionné, appuyez sur
M.C.
Changement de fichier ou de dossier (sauter 100 éléments)
1 Poussez M.C. vers le haut ou vers le bas.
Changement de fichier ou de dossier (sauter automatiquement 100 éléments à chaque fois)
1 Poussez et maintenez M.C. vers le haut ou vers le
bas.
Recherche d’une vidéo sur l’iPod
1 Affichez le menu des listes.
Reportez-vous à la page 70, Opérations des
menus de base.
2 Utilisez M.C. pour sélectionner une catégorie/vidéo.
Modification du nom de la vidéo ou catégorie
1 Tournez M.C.
Lecture
1 Quand une vidéo est sélectionnée, appuyez sur
M.C.
Affichage d’une liste des fichiers (ou des dossiers)
dans le dossier sélectionné
1 Quand une catégorie est sélectionnée, appuyez
sur M.C.
Recherche par ordre alphabétique dans la liste
1 Lorsque la liste de la catégorie sélectionnée s’affi-
che, poussez et maintenez M.C. vers la gauche
ou vers la droite pour activer le mode de recherche par ordre alphabétique.
2 Tournez M.C. pour sélectionner une lettre.
3 Appuyez sur M.C. pour afficher la liste alphabé-
tique.
Changement de vidéo (sauter 100 éléments)
1 Poussez M.C. vers le haut ou vers le bas.
Changement de vidéo (sauter automatiquement 100
éléments à chaqu e fois)
1 Poussez et maintenez M.C. vers le haut ou vers le
bas.
Lecture du contenu VOD d’un DivX
Certains contenus VOD (vidéo à la demande)
DivX peuvent être joués seulement un nombre
de fois fixé. Si vous essayez de lire ce type de
contenu enregistré sur un périphérique de
stockage externe, le nombre de lectures possibles restantes s’affiche à l’écran. Vous pouvez
ensuite décider de lire ou non le contenu du
périphérique de stockage externe.
â
76
Fr
Page 77

Utilisation de l’appareil
Section
03
! Si votre contenu VOD DivX peut être utilisé
àl’infini, vous pouvez insérer le périphé-
rique de stockage externe dans votre lecteur et en jouer le contenu aussi souvent
que vous le voulez, et aucun message n’est
affiché.
! Vous pouvez contrôler le nombre d’utilisa-
tion restante du contenu en vérifiant le numéro qui s’affiche après Remaining
Views:.
Important
! Pour pouvoir jouer un contenu VOD DivX sur
cet appareil, vous devez d’abord enregistrer
l’appareil auprès de votre fournisseur de
contenu VOD DivX. Pour les détails sur votre
code d’enregistrement, reportez-vous à la
page 103, Affichage de votre code d’enregistre-
ment VOD DivX
â
.
! Le contenu VOD DivX est protégé par un sys-
tème DRM (Digital Rights Management). Ceci
restreint la lecture du contenu à des appareils
spécifiques, enregistrés.
% Si un message s’affiche après l’insertion
du périphérique de stockage externe
contenant un contenu VOD DivX, utilisez
M.C. pour sélectionner un mode désiré.
Tournez pour changer de mode. Appuyez pour
sélectionner.
! Play – Lecture du contenu VOD DivX
! Next Play – Passer au fichier suivant
! Stop – Si vous ne voulez pas jouer le conte-
nu VOD DivX
Réglages des fonctions
1 Appuyez sur M.C. pour afficher le menu
des fonctions.
2 Tournez M.C. pour sélectionner la fonction.
Après avoir sélectionné la fonction, effectuez
les procédures de paramétrage suivantes.
Périphérique de stockage externe (USB,
SD)
Play/Pause (lecture/pause)
1 Appuyez sur M.C. pour afficher le mode de para-
métrage.
2 Tournez M.C. pour choisir le réglage désiré.
Play—Pause
3 Appuyez sur M.C. pour confirmer la sélection.
Play Mode (répétition de la lecture)
1 Appuyez sur M.C. pour afficher le mode de para-
métrage.
2 Tournez M.C. pour sélectionner une étendue de
répétition de lecture.
! All – Répétition de tous les fichiers
! File – Répétition du fichier en cours de lecture
! Folder – Répétition du dossier en cours de
lecture
3 Appuyez sur M.C. pour confirmer la sélection.
Stop (arrêt de la lecture)
1 Appuyez sur M.C. pour arrêter la lecture.
Time Search (recherche temporelle)
1 Appuyez sur M.C. pour afficher le mode de para-
métrage.
2 Tournez M.C. pour trouver la partie que vous vou-
lez lire.
3 Appuyez sur M.C. pour confirmer la sélection.
Wide Mode (passage en mode écran large)
1 Appuyez sur M.C. pour afficher le mode de para-
métrage.
2 Tournez M.C. pour choisir le réglage désiré.
Full (plein)—Just (ajusté)—Cinema (cinéma)—
Zoom (zoom)—Normal (normal)
Pour des détails sur les réglages, reportez-vous à
la page 102, Changer le mode écran large.
3 Appuyez sur M.C. pour confirmer la sélection.
Display (réglage de l’affichage)
Vous pouvez basculer sur l’écran de base ou sur l’image.
1 Appuyez sur M.C. pour afficher le mode de para-
métrage.
2 Appuyez sur M.C. pour choisir le mode désiré.
A/V Format (commutation entre les types de fichiers
média)
Français
77
Fr
Page 78

Section
03
Utilisation de l’appareil
1 Appuyez sur M.C. pour afficher le mode de para-
métrage.
2 Tournez M.C. pour choisir le réglage désiré.
Music (audio compressé)—Video (fichiers vidéo
DivX)—Photo (fichiers d’images JPEG)
3 Appuyez sur M.C. pour confirmer la sélection.
DivX® Subtitle (réglages du fichier de sous-titres
DivX)
1 Appuyez sur M.C. pour afficher le mode de para-
métrage.
2 Tournez M.C. pour choisir le réglage désiré.
Original (sous-titres DivX) — Custom (sous-titres
externes DivX)
Pour des détails sur les réglages, reportez-vous à
la page 102, Paramétrage du fichier de sous-titres
DivX.
3 Appuyez sur M.C. pour confirmer la sélection.
TV Aspect (réglages du ratio d’aspect)
1 Appuyez sur M.C. pour afficher le mode de para-
métrage.
2 Tournez M.C. pour choisir le réglage désiré.
16 : 9 — Letter Box — Pan Scan
Pour des détails sur les réglages, reportez-vous à
la page 103, Définition du ratio d’aspect.
3 Appuyez sur M.C. pour confirmer la sélection.
DivX® VOD (code d’enregistrement VOD DivX
1 Appuyez sur M.C. pour afficher le mode de para-
métrage.
2 Utilisez M.C. pour afficher le code désiré.
Tournez pour changer l’option de menu. Appuyez
pour sélectionner.
Registration – Reportez-vous à la page 103, Affi-
chage de votre code d’enregistrement VOD DivX
Deregistration – Reportez-vous à la page 103, Af-
fichage du code de désenregistrement.
Audio Lang. (réglages de la langue audio)
Lorsque vous lisez un fichier enregistré avec des dialogues en plusieurs langues, vous pouvez changer de
langue audio pendant la lecture.
1 Appuyez sur M.C. pour afficher le mode de para-
métrage.
2 Tournez M.C. pour choisir le réglage désiré.
3 Appuyez sur M.C. pour confirmer la sélection.
â
)
â
Subtitle Lang. (réglages de la langue des sous-titres)
Lorsque vous lisez un fichier enregistré avec des
sous-titres en plusieurs langues, vous pouvez changer de langue des sous-titres pendant la lecture.
1 Appuyez sur M.C. pour afficher le mode de para-
métrage.
2 Tournez M.C. pour choisir le réglage désiré.
3 Appuyez sur M.C. pour confirmer la sélection.
iPod
Play/Pause (pause)
1 Appuyez sur M.C. pour mettre en pause ou re-
prendre la lectur e.
Shuffle Mode (lecture aléatoire)
1 Appuyez sur M.C. pour afficher le mode de para-
métrage.
2 Tournez M.C. pour choisir le réglage désiré.
! Songs – Lecture des plages musicales dans
un ordre aléatoire à l’intérieur de la liste sélectionnée.
! Albums – Lecture dans l’ordre de plages mu-
sicales à partir d’un album sélectionné au hasard.
! Off – Annulation de la lecture aléatoire.
3 Appuyez sur M.C. pour confirmer la sélection.
Play Mode (répétition de la lecture)
1 Appuyez sur M.C. pour afficher le mode de para-
métrage.
2 Tournez M.C. pour sélectionner une étendue de
répétition de lecture.
! One – Répétition de la plage musicale en
.
cours de lecture
! All – Répétition de toutes les plages musica-
les de la liste sélectionnée
3 Appuyez sur M.C. pour confirmer la sélection.
Control Mode (mode de commande)
Cette fonction n’est pas compatible avec les modèles
d’iPod suivants.
! iPod nano 1ère génération
! iPod 5ème génération
1 Appuyez sur M.C. pour choisir votre réglage favo-
ri.
! App – La fonction iPod de cet appareil peut
être utilisée à partir de l’iPod connecté.
! Audio – La fonction iPod de cet appareil peut
être utilisée à partir de cet appareil.
Time Search (recherche temporelle)
78
Fr
Page 79

Utilisation de l’appareil
Section
03
1 Appuyez sur M.C. pour afficher le mode de para-
métrage.
2 Tournez M.C. pour trouver la partie que vous vou-
lez lire.
3 Appuyez sur M.C. pour confirmer la sélection.
Wide Mode (passage en mode écran large)
1 Appuyez sur M.C. pour afficher le mode de para-
métrage.
2 Tournez M.C. pour choisir le réglage désiré.
Full (plein)—Just (ajusté)—Cinema (cinéma)—
Zoom (zoom)—Normal (normal)
Pour des détails sur les réglages, reportez-vous à
la page 102, Changer le mode écran large.
3 Appuyez sur M.C. pour confirmer la sélection.
Display (réglage de l’affichage)
Vous pouvez basculer sur l’écran de base ou sur l’image.
1 Appuyez sur M.C. pour afficher le mode de para-
métrage.
2 Appuyez sur M.C. pour choisir le mode désiré.
ABC Search (réglage du mode de recherche par ordre
alphabétique)
Quand ce réglage est activé, vous pouvez passer en
mode de recherche par ordre alphabétique en tournant M.C. deux fois lorsque vous utilisez la fonction
de recherche de l’iPod. Reportez-vous à la page 76,
Recherche par ordre alphabétique dans la liste.
1 Appuyez sur M.C. pour activer ou désactiver le ré-
glage pour quand M.C. est tourné deux fois.
Sound Retriever (sound retriever)
Améliore automatiquement l’audio compressé et restaure un son riche.
1 Appuyez sur M.C. pour afficher le mode de para-
métrage.
2 Tournez M.C. pour choisir le réglage désiré.
Off (hors service)—1—2
1 est efficace pour les faibles taux de compres-
sion et 2 est efficace pour les taux de compression élevés.
3 Appuyez sur M.C. pour confirmer la sélection.
! Les fonctions suivantes sont toujours accessi-
bles à partir de l’appareil même si le mode de
commande est réglé sur App.
— Volume, avance/retour rapide, avance/re-
tour d’une plage, pause
! Lorsque le mode de commande est réglé sur
App, les opérations sont limitées comme
suit :
— Seules les fonctions Play/Pause (pause),
Control Mode (mode commande),
Wide Mode (passage en mode écran
large) et Display (réglage de l’affichage)
sont disponibles.
— La fonction de recherche ne peut pas être
utilisée à partir de cet appareil.
! Vous pouvez sélectionner les fonctions suivan-
tes si le réglage de l’arrière-plan du menu de
divertissement est désactivé.
— Wide Mode (passage en mode écran
large)
— Display (réglage de l’affichage)
— DivX® Subtitle (réglages du fichier de
sous-titres DivX)
— TV Aspect (réglages du ratio d’aspect)
— Subtitle Lang. (réglages de la langue des
sous-titres)
Français
Remarques
! Régler le mode de commande sur App met
en pause la lecture d’une plage musicale. Utilisez l’iPod pour reprendre la lecture.
79
Fr
Page 80

Section
03
Utilisation de l’appareil
Lecture audio
Opérations de base
1
234 789
Music
4
8888'88" -8888'88"
5
1 Zone d’information du fichier pour le fichier
en cours de lecture
Périphérique de stockage externe (USB,
SD)
! Indicateur du numéro de dossier/fichier
iPod
! Indicateur du numéro de plage musi-
cale
2 Zone d’affichage des indicateurs
Reportez-vous à la page 115, Liste des indica-
teurs.
3 Zone d’information textuelle
Périphérique de stockage externe (USB,
SD)
! Titre de la plage musicale/nom de l’in-
terprète/titre de l’album—nom de dossier/fichier
iPod
! Titre de la plage musicale
! Nom de l’interprète
! Titre de l’album
4 Zone d’affichage des pochettes d’album/ima-
ges sources
iPod
! Affichage des pochettes d’album ou des
images sources
Périphérique de stockage externe (USB,
SD)
! Affichage des images sources
5 Indicateur du temps de lecture
6 Barre de lecture
7 Indicateur du temps restant
2
A-EQ
S.Rtrv
16:54
Text
Text
Text
67
3
Lecture de plages musicales sur un périphérique de
stockage USB
1 Ouvrez le capot du port USB.
2 Branchez le périphérique de stockage USB en uti-
lisant un câble USB.
Arrêt de la lecture de plages musicales sur un périphérique de stockage USB
1 Vous pouvez débrancher le périphérique de stoc-
kage USB à tout moment.
Lecture de plages musicales sur une carte mémoire
SD
1 Retirez la face avant.
2 Insérez une carte mémoire SD dans le logement
prévu à cet effet.
Insérez-la en orientant la surface de contact vers
le bas et en appuyant sur la carte jusqu’àce
qu’un déclic soit émis et que la carte soit verrouillée en place.
3 Remontez la face avant.
Arrêt de la lecture de plages musicales sur une carte
mémoire SD
1 Retirez la face avant.
2 Appuyez sur la carte mémoire SD jusqu’àce
qu’un déclic soit émis.
La carte mémoir e SD est éjectée.
3 Retirez la carte mémoire SD.
4 Remontez la face avant.
Lecture de plages musicales sur un iPod
1 Ouvrez le capot du port USB.
2 Connecter un iPod au câble USB à l’aide d’un
connecteur Dock iPod.
Sélection d’un dossier
1 Poussez M.C. vers le haut ou vers le bas.
Sélection d’une plage (chapitre)
1 Poussez M.C. vers la gauche ou vers la droite.
Avance ou retour rapide
1 Poussez et maintenez M.C. vers la gauche ou
vers la droite.
Remarques
! Débranchez les périphériques de stockage
USB de l’appareil lorsque vous ne l’utilisez
pas.
80
Fr
Page 81

Utilisation de l’appareil
Section
03
! Selon la version de iTunes utilisée pour enre-
gistrer les fichiers MP3 sur un disque ou les
types de fichiers média, des informations textuelles incompatibles enregistrées dans le fichier audio peuvent ne pas s’afficher
correctement.
! Débranchez les écouteurs de l’iPod avant de
le connecter à cet appareil.
! L’iPod ne peut pas être mis en service ou hors
service sauf si le mode de commande est
réglé sur App.
! L’iPod sera mis hors service environ deux mi-
nutes après que le contact d’allumage est mis
en position OFF (coupé).
Sélection et lecture des fichiers/
plages à partir de la liste des noms
Les opérations sont identiques à celles des vidéos. (Reportez-vous à la page 76, Sélection et
lecture de fichiers à partir de la liste des noms
de fichiers.)
L’opération suivante est disponible.
Lecture d’une plage musicale dans le dossier sélectionné
1 Quand un dossier est sélectionné, appuyez sur
M.C. de façon prolongée.
Recherche d’une plage
musicale sur l’iPod
Les opérations sont identiques à celles des vidéos. (Reportez-vous à la page 76, Recherche
d’une vidéo sur l’iPod.)
L’opération suivante est disponible.
Lecture d’une plage musicale dans la catégorie sélectionnée
1 Quand une catégorie est sélectionnée, appuyez
sur M.C. de façon prolongée.
Cependant, les catégories du niveau le plus
haut sont différentes de celles des vidéos.
! Video (vidéo)
! Playlists (listes de lecture)
! Artists (interprètes)
! Albums (albums)
! Songs (plages musicales)
! Podcasts (podcasts)
! Genres (genres)
! Composers (compositeurs)
! Audiobooks (livres audio)
Réglages des fonctions
1 Appuyez sur M.C. pour afficher le menu
des fonctions.
2 Tournez M.C. pour sélectionner la fonction.
Après avoir sélectionné la fonction, effectuez
les procédures de paramétrage suivantes.
Périphérique de stockage externe (USB,
SD)
Play/Pause (pause)
1 Appuyez sur M.C. pour mettre en pause ou re-
prendre la lectur e.
Random (lecture aléatoire)
1 Appuyez sur M.C. pour mettre en service ou hors
service la lecture aléatoire.
Play Mode (répétition de la lecture)
1 Appuyez sur M.C. pour afficher le mode de para-
métrage.
2 Tournez M.C. pour sélectionner une étendue de
répétition de lecture.
! Pour des détails sur les réglages, reportez-
vous à la page 77, Play Mode (répétition de la
lecture).
3 Appuyez sur M.C. pour confirmer la sélection.
Sound Retriever (sound retriever)
Améliore automatiquement l’audio compressé et restaure un son riche.
1 Appuyez sur M.C. pour afficher le mode de para-
métrage.
2 Tournez M.C. pour choisir le réglage désiré.
Off (hors service)—1—2
1 est efficace pour les faibles taux de compres-
sion et 2 est efficace pour les taux de compres-
sion élevés.
3 Appuyez sur M.C. pour confirmer la sélection.
Time Search (recherche temporelle)
Français
81
Fr
Page 82

Section
03
Utilisation de l’appareil
1 Appuyez sur M.C. pour afficher le mode de para-
métrage.
2 Tournez M.C. pour trouver la partie que vous vou-
lez lire.
3 Appuyez sur M.C. pour confirmer la sélection.
Display (réglage de l’affichage)
Vous pouvez basculer sur les informations textuelles
désirées.
1 Appuyez sur M.C. pour afficher le mode de para-
métrage.
2 Appuyez sur M.C. pour choisir le mode désiré.
A/V Format (commutation entre les types de fichiers
média)
1 Appuyez sur M.C. pour afficher le mode de para-
métrage.
2 Tournez M.C. pour choisir le réglage désiré.
Music (audio compressé)—Video (fichiers vidéo
DivX)—Photo (fichiers d’images JPEG)
3 Appuyez sur M.C. pour confirmer la sélection.
iPod
Play/Pause (pause)
1 Appuyez sur M.C. pour mettre en pause ou re-
prendre la lectur e.
Shuffle All (lecture aléatoire de toutes les plages)
1 Appuyez sur M.C. pour mettre en service la lec-
ture aléatoire de toutes les plages.
Pour mettre hors service, mettez Shuffle Mode
hors service dans le menu Function.
Shuffle Mode (lecture aléatoire)
1 Appuyez sur M.C. pour afficher le mode de para-
métrage.
2 Tournez M.C. pour choisir le réglage désiré.
! Pour des détails sur les réglages, reportez-
vous à la page 78, Shuffle Mode (lecture aléa-
toire).
3 Appuyez sur M.C. pour confirmer la sélection.
Play Mode (répétition de la lecture)
1 Appuyez sur M.C. pour afficher le mode de para-
métrage.
2 Tournez M.C. pour sélectionner une étendue de
répétition de lecture.
! One – Répétition de la plage musicale en
cours de lecture
! All – Répétition de toutes les plages musica-
les de la liste sélectionnée
3 Appuyez sur M.C. pour confirmer la sélection.
Link Search (recherche de liaison)
Vous pouvez lire des plages musicales dans les listes
suivantes.
• Liste d’albums de l’interprète en cours de lecture
• Liste de plages musicales de l’album en cours de
lecture
• Liste d’albums du genre en cours de lecture
1 Appuyez sur M.C. pour afficher le mode de para-
métrage.
2 Tournez M.C. pour changer le mode, appuyez
pour sélectionner.
! Artist s – Affiche la liste d’albums de l’inter-
prète en cours de lecture.
! Albums – Affiche une liste de plages musica-
les de l’album en cours de lecture.
! Genres – Affiche une liste des albums du
genre en cours de lecture.
3 Utilisez M.C. pour sélectionner un album ou une
plage musicale dans la liste.
Pour plus de détails sur l’opération de sélection,
reportez-vous à la page 76, Recherche d’une vidéo
sur l’iPod.
Control Mode (mode de commande)
Cette fonction n’est pas compatible avec les modèles
d’iPod suivants.
! iPod nano 1ère génération
! iPod 5ème génération
1 Appuyez sur M.C. pour choisir votre réglage favo-
ri.
! App – La fonction iPod de cet appareil peut
être utilisée à partir de l’iPod connecté.
! Audio – La fonction iPod de cet appareil peut
être utilisée à partir de cet appareil.
Audiobooks (changement de la vitesse du livre
audio)
82
Fr
Page 83

Utilisation de l’appareil
Section
03
1 Appuyez sur M.C. pour afficher le mode de para-
métrage.
2 Tournez M.C. pour choisir le réglage désiré.
! Faster – Lecture plus rapide que la vitesse
normale
! Normal – Lecture à la vitesse normale
! Slower – Lecture plus lente que la vitesse nor-
male
3 Appuyez sur M.C. pour confirmer la sélection.
Sound Retriever (sound retriever)
Améliore automatiquement l’audio compressé et restaure un son riche.
1 Appuyez sur M.C. pour afficher le mode de para-
métrage.
2 Tournez M.C. pour choisir le réglage désiré.
Off (hors service)—1—2
1 est efficace pour les faibles taux de compres-
sion et 2 est efficace pour les taux de compression élevés.
3 Appuyez sur M.C. pour confirmer la sélection.
Time Search (recherche temporelle)
1 Appuyez sur M.C. pour afficher le mode de para-
métrage.
2 Tournez M.C. pour trouver la partie que vous vou-
lez lire.
3 Appuyez sur M.C. pour confirmer la sélection.
ABC Search (réglage du mode de recherche par ordre
alphabétique)
Quand ce réglage est activé, vous pouvez passer en
mode de recherche par ordre alphabétique en tournant M.C. deux fois lorsque vous utilisez la fonction
de recherche de l’iPod. Reportez-vous à la page 76,
Recherche par ordre alphabétique dans la liste.
1 Appuyez sur M.C. pour activer ou désactiver le ré-
glage pour quand M.C. est tourné deux fois.
Remarques
! Régler le mode de commande sur App met
en pause la lecture d’une plage musicale. Utilisez l’iPod pour reprendre la lecture.
! Les fonctions suivantes sont toujours accessi-
bles à partir de l’appareil même si le mode de
commande est réglé sur App.
— Volume, avance/retour rapide, avance/re-
tour d’une plage, pause
! Lorsque le mode de commande est réglé sur
App, les opérations sont limitées comme
suit :
— Seules les fonctions Play/Pause (pause),
Control Mode (mode commande),
Wide Mode (passage en mode écran
large) et Display (réglage de l’affichage)
sont disponibles.
— La fonction de recherche ne peut pas être
utilisée à partir de cet appareil.
Utilisation de Pandora
â
IMPORTANT:
Conditions requises pour l’accès au service de
musique Pandora à l’aide d’appareils audio/vidéo
pour véhicule Pioneer:
! Apple iPhone (première génération), iPhone
3G, iPhone 3GS ou iPhone 4 avec version de
firmware 3.0 ou ultérieure.
! Dernière version de l’application Pandora
pour iPhone téléchargée sur votre appareil.
(Recherchez “Pandora” dans Apple iTunes
App Store.)
! Compte Pandora actuel (compte gratuit ou
payant disponible sur Pandora; création d’un
compte gratuit en ligne à l’adresse
http://www.pandora.com/register ou via l’application Pandora de l’iPhone).
! Forfait “Data Plan” pour iPhone.
Remarque: si le forfait “Data Plan” de votre
iPhone ne fournit pas une utilisation de données illimitée, AT&T peut appliquer des frais
supplémentaires pour l’accès au service
Pandora via les réseaux AT&T’s 3G et/ou
EDGE.
! Connexion à l’Internet via un réseau 3G, EDGE
ou Wi-Fi.
! Câble adaptateur Pioneer en option pour la
connexion de votre iPhone aux appareils
audio/vidéo pour véhicule Pioneer.
Restrictions:
! L’accès au service Pandora dépend de la dis-
ponibilité du réseau de téléphonie mobile et/
ou Wi-Fi dans le but d’autoriser la connexion
de votre iPhone à Internet.
! Le service Pandora n’est actuellement dispo-
nible qu’aux États-Unis.
Français
83
Fr
Page 84

Section
03
Utilisation de l’appareil
! La capacité d’accès au service Pandora des
appareils audio/vidéo pour véhicule Pioneer
peut être modifiée sans avis préalable et peut
être affectée par une des conditions suivantes : problèmes de compatibilité avec les versions futures de firmware iPhone, problèmes
de compatibilité avec les versions futures de
l’application Pandora pour iPhone, modifications du service de musique Pandora par
Pandora, interruption du service de musique
Pandora par Pandora.
! Certaines fonctions du service Pandora ne
sont pas disponibles lors de l’accès au service
via les appareils audio/vidéo pour véhicule
Pioneer, telles que par exemple la création de
nouvelles stations, la suppression de stations,
l’envoi de messages électroniques des stations actuelles, l’achat de plages musicales
sur iTunes, l’affichage d’informations textuelles additionnelles, la connexion à Pandora et
le réglage de la qualité sonore du réseau de
téléphonie mobile.
La radio Pandora sur Internet est un service de
musique non affilié à Pioneer. Plus d’informations sont disponibles à l’adresse
http://www.pandora.com.
Vous pouvez écouter Pandora en connectant
un iPod sur lequel est installée l’application
Pandora.
Opérations de base
1
S.Rtrv
Pandora
3
88'88" -88'88"
4
1 Zone d’affichage des indicateurs
Reportez-vous à la page 115, Liste des indica-
teurs.
A-EQ
Text
Text
Text
Text
56
2
16:54
2 Zone d’information textuelle
! Titre de la station
! Titre de la plage musicale
! Nom de l’interprète
! Titre de l’album
3 Affichage des images sources
4 Indicateur du temps de lecture
5 Barre de lecture
6 Indicateur du temps restant
Lecture de plages musicales
1 Ouvrez le capot du port USB.
2 Connecter un iPod au câble USB à l’aide d’un
connecteur Dock iPod.
3 Démarrez l’application Pandora installée sur
l’iPod.
Fonction “Thumbs Up” (pouce tourné vers le haut)
1 Poussez M.C. vers le haut pour donner un avis fa-
vorable à la plage musicale en cours de lecture.
Fonction “Thumbs Down” (pouce tourné vers le bas)
1 Poussez M.C. vers le bas pour donner un avis dé-
favorable à la plage musicale en cours de lecture
et passer à la plage musicale suivante.
Saut de plage
1 Poussez M.C. vers la droite.
Affichage des informations
textuelles
Masquage des informations textuelles
1 Appuyez sur
Pour afficher les informations textuelles, appuyez
sur
.
Mise en mémoire des informations sur la plage musicale (signet)
1 Appuyez de façon prolongée sur M.C. pour affi-
cher le mode de paramétrage.
2 Tournez M.C. pour choisir le réglage désiré.
! Song – pour ajouter des informations sur la
plage musicale en cours de lecture aux signets
! Artist – pour ajouter des informations sur l’in-
terprète en cours de lecture aux signets
! Cancel – pour annuler et revenir à l’affichage
précédent
3 Appuyez sur M.C. pour confirmer la sélection.
de façon prolongée.
84
Fr
Page 85

Utilisation de l’appareil
Section
03
Sélection et lecture de la liste
de stations
1 Appuyez sur HOME pour passer en
mode liste des menus.
2 Poussez M.C. vers le haut ou vers le bas
pour sélectionner Home.
3 Tournez M.C. pour changer l’option de
menu et appuyez pour sélectionner List.
Changement des stations
1 Tournez M.C.
Lecture
1 Quand la station est sélectionnée, appuyez sur
M.C.
Modification de l’ordre de tri
1 Appuyez sur M.C. de façon prolongée.
Vous pouvez trier les éléments de la liste par
ordre alphabétique ou de date de création.
Réglages des fonctions
1 Appuyez sur M.C. pour afficher le menu
des fonctions.
2 Tournez M.C. pour changer l’option de
menu et appuyez pour sélectionner
Function.
Sound Retriever (sound retriever)
1 Appuyez sur M.C. pour afficher le mode de para-
métrage.
2 Tournez M.C. pour choisir le réglage désiré.
Pour les détails, reportez-vous à la page 83,
Sound Retriever (sound retriever).
3 Appuyez sur M.C. pour confirmer la sélection.
Français
3 Tournez M.C. pour sélectionner la fonction.
Après avoir sélectionné la fonction, effectuez
les procédures de paramétrage suivantes.
Play/Pause (pause)
1 Appuyez sur M.C. pour mettre en pause ou re-
prendre la lectur e.
Bookmark (signet)
1 Appuyez sur M.C. pour afficher le mode de para-
métrage.
2 Tournez M.C. pour choisir le réglage désiré.
Pour les détails, reportez-vous à la page précédente, Mise en mémoire des informations sur la
plage musicale (signet).
3 Appuyez sur M.C. pour confirmer la sélection.
85
Fr
Page 86

Section
03
Utilisation de l’appareil
Lecture d’images fixes
Lorsqu’un périphérique USB/SD contenant
des fichiers d’image JPEG est connecté, cet
appareil lance un diaporama à partir du premier dossier/de la première image du périphérique. Le lecteur affiche les images de chaque
dossier dans l’ordre alphabétique.
Opérations de base
Text
Text
2
A-EQ
3
16:542345 7890
1
Photo
Vous pouvez basculer sur l’écran de base ou
sur l’image.
Reportez-vous à la page suivante, Display (ré-
glage de l’affichage).
1 Indicateur du numéro de dossier/fichier
2 Zone d’affichage des indicateurs
Reportez-vous à la page 115, Liste des indica-
teurs.
3 Zone d’information textuelle
! Nom du dossier
! Nom du fichier
Lecture de fichiers sur un périphérique de stockage
USB
1 Ouvrez le capot du port USB.
2 Branchez le périphérique de stockage USB en uti-
lisant un câble USB.
Arrêt de la lecture de fichiers sur un périphérique de
stockage USB
1 Vous pouvez débrancher le périphérique de stoc-
kage USB à tout moment.
Lecture de fichiers sur une carte mémoire SD
1 Retirez la face avant.
2 Insérez une carte mémoire SD dans le logement
prévu à cet effet.
Insérez-la en orientant la surface de contact vers
le bas et en appuyant sur la carte jusqu’àce
qu’un déclic soit émis et que la carte soit verrouillée en place.
3 Remontez la face avant.
Arrêt de la lecture de fichiers sur une carte mémoire
SD
1 Retirez la face avant.
2 Appuyez sur la carte mémoire SD jusqu’àce
qu’un déclic soit émis.
La carte mémoir e SD est éjectée.
3 Retirez la carte mémoire SD.
4 Remontez la face avant.
Sélection d’un dossier
1 Poussez M.C. vers le haut ou vers le bas.
Sélection d’un fichier
1 Poussez M.C. vers la gauche ou vers la droite.
Recherche tous les 10 fichiers
1 Poussez et maintenez M.C. vers la gauche ou
vers la droite.
Remarques
! Débranchez les périphériques de stockage
USB de l’appareil lorsque vous ne l’utilisez
pas.
! Tout texte incompatible mémorisé avec le fi-
chier image vidéo risque de ne pas s’afficher
ou de s’afficher de manière incorrecte.
! Quand vous lisez des fichiers sur un périphé-
rique de stockage externe contenant un mélange de divers types de fichiers média,
basculez entre les types de fichiers média à
lire.
Reportez-vous à la page 77, A/V Format
(commutation entre les types de fichiers
média).
86
Fr
Page 87

Utilisation de l’appareil
Section
03
Sélection et lecture de fichiers
à partir de la liste des noms de
fichiers
Les opérations sont identiques à celles des vidéos. (Reportez-vous à la page 76, Sélection et
lecture de fichiers à partir de la liste des noms
de fichiers.)
Réglages des fonctions
1 Appuyez sur M.C. pour afficher le menu
des fonctions.
2 Tournez M.C. pour sélectionner la fonction.
Après avoir sélectionné la fonction, effectuez
les procédures de paramétrage suivantes.
Play/Pause (pause)
1 Appuyez sur M.C. pour mettre en pause ou re-
prendre la lectur e.
Random (lecture aléatoire)
1 Appuyez sur M.C. pour mettre en service ou hors
service la lecture aléatoire.
Play Mode (répétition de la lecture)
1 Appuyez sur M.C. pour afficher le mode de para-
métrage.
2 Tournez M.C. pour sélectionner une étendue de
répétition de lecture.
! Folder – Répétition du dossier en cours de
lecture
! All – Répétition de tous les fichiers
3 Appuyez sur M.C. pour confirmer la sélection.
Capture (capture d’une image dans des fichiers
JPEG)
Vous pouvez capturer des données image et les utiliser en papier peint. Ces images peuvent être stockées
dans cet appareil, et rappelées facilement.
! Seule une image peut être enregistrée sur cet ap-
pareil. Les anciennes images sont écrasées par
les nouvelles.
1 Appuyez sur M.C. pour afficher le mode de para-
métrage.
2 Tournez M.C. pour choisir le réglage désiré.
3 Appuyez sur M.C. pour confirmer la sélection.
Rotate (rotation d’image)
1 Appuyez sur M.C. pour afficher le mode de para-
métrage.
2 Appuyez sur M.C. pour faire tourner l’image affi-
chée de 90° dans le sens des aiguilles d’une montre.
Wide Mode (passage en mode écran large)
1 Appuyez sur M.C. pour afficher le mode de para-
métrage.
2 Tournez M.C. pour choisir le réglage désiré.
Full (plein)—Just (ajusté)—Cinema (cinéma)—
Zoom (zoom)—Normal (normal)
Pour des détails sur les réglages, reportez-vous à
la page 102, Changer le mode écran large.
3 Appuyez sur M.C. pour confirmer la sélection.
Time Per Slide (réglage de l’intervalle de temps du
diaporama)
Il est possible de consulter les fichiers JPEG sous
forme de diaporama sur cet appareil. Dans ce réglage, l’intervalle entre chaque image peut être défini.
1 Appuyez sur M.C. pour afficher le mode de para-
métrage.
2 Tournez M.C. pour choisir le réglage désiré.
! 5sec – Les images JPEG changent avec un in-
tervalle de 5 secondes
! 10sec – Les images JPEG changent avec un
intervalle de 10 secondes
! 15sec – Les images JPEG changent avec un
intervalle de 15 secondes
! Manual – Vous pouvez changer d’image
JPEG manuellement
3 Appuyez sur M.C. pour confirmer la sélection.
Display (réglage de l’affichage)
Vous pouvez basculer sur l’écran de base ou sur l’image.
1 Appuyez sur M.C. pour afficher le mode de para-
métrage.
2 Appuyez sur M.C. pour choisir le mode désiré.
A/V Format (commutation entre les types de fichiers
média)
1 Appuyez sur M.C. pour afficher le mode de para-
métrage.
2 Tournez M.C. pour choisir le réglage désiré.
Pour des détails sur les réglages, reportez-vous à
la page 77, A/V Format (commutation entre les
types de fichiers média).
3 Appuyez sur M.C. pour confirmer la sélection.
Français
87
Fr
Page 88

Section
03
Utilisation de l’appareil
Remarque
Vous pouvez sélectionner les fonctions suivantes
si le réglage de l’arrière-plan du menu de divertissement est désactivé.
! Capture (capture d’une image dans des fi-
chiers JPEG)
! Rotate (rotation d’image)
! Wide Mode (passage en mode écran large)
! Display (réglage de l’affichage)
Introduction aux opérations de
lecture d’images fixes sous
forme de diaporama
Vous pouvez visualiser des images fixes enregistrées sur un périphérique USB/SD sous
forme de diaporama tout en écoutant de l’audio provenant d’une autre source.
Pour des détails sur les réglages, reportezvous à la page 95, Slide Show (visualisation
du diaporama).
Réglages des fonctions
1 Appuyez sur M.C. pour afficher le menu
des fonctions.
2 Tournez M.C. pour sélectionner la fonction.
Après avoir sélectionné la fonction, effectuez
les procédures de paramétrage suivantes.
Return (arrêt du diaporama)
1 Appuyez sur M.C. pour arrêter le diaporama.
Photo Selection (sélection de photos)
1 Appuyez sur M.C. pour afficher le mode de para-
métrage.
2 Sélectionnez un fichier.
Les opérations suivantes sont disponibles. La méthode d’utilisation est la même que celle des opérations de base. Reportez-vous à la page 86,
Opérations de base.
! Sélection d’un dossier
! Sélection d’un fichier
! Recherche tous les 10 fichiers
Play/Pause (pause)
1 Appuyez sur M.C. pour mettre en pause ou re-
prendre la lectur e.
Random (lecture aléatoire)
1 Appuyez sur M.C. pour mettre en service ou hors
service la lecture aléatoire.
Play Mode (répétition de la lecture)
1 Appuyez sur M.C. pour afficher le mode de para-
métrage.
2 Tournez M.C. pour sélectionner une étendue de
répétition de lecture.
! All – Répétition de tous les fichiers
! Folder – Répétition du dossier en cours
de lecture
3 Appuyez sur M.C. pour confirmer la sélection.
Capture (capture d’une image dans des fichiers
JPEG)
Pour des détails sur les réglages, reportez-vous à la
page précédente, Capture (capture d’une image dans
des fichiers JPEG).
1 Appuyez sur M.C. pour afficher le mode de para-
métrage.
2 Tournez M.C. pour choisir le réglage désiré.
3 Appuyez sur M.C. pour confirmer la sélection.
Rotate (rotation d’image)
1 Appuyez sur M.C. pour afficher le mode de para-
métrage.
2 Appuyez sur M.C. pour faire tourner l’image affi-
chée de 90° dans le sens des aiguilles d’une montre.
Wide Mode (passage en mode écran large)
1 Appuyez sur M.C. pour afficher le mode de para-
métrage.
2 Tournez M.C. pour choisir le réglage désiré.
Full (plein)—Just (ajusté)—Cinema (cinéma)—
Zoom (zoom)—Normal (normal)
Pour des détails sur les réglages, reportez-vous à
la page 102, Changer le mode écran large.
3 Appuyez sur M.C. pour confirmer la sélection.
88
Fr
Page 89

Utilisation de l’appareil
Section
03
Time Per Slide (réglage de l’intervalle de temps du
diaporama)
Pour des détails sur les réglages, reportez-vous à la
page 87, Time Per Slide (réglage de l’intervalle de
temps du diaporama).
1 Appuyez sur M.C. pour afficher le mode de para-
métrage.
2 Tournez M.C. pour choisir le réglage désiré.
3 Appuyez sur M.C. pour confirmer la sélection.
Remarque
Lorsque la source USB ou SD est sélectionnée,
cet appareil ne peut pas afficher des images fixes
enregistrées sur USB/SD sous forme de
diaporama.
Téléphone Bluetooth
Cette fonction est disponible pour le MVHP8300BT seulement.
Pour les détails sur les opérations de base une
fois la connexion à un téléphone cellulaire effectuée, reportez-vous à la page 72, Utilisation
du téléphone Bluetooth.
! Par défaut, le code PIN est fixé à 0000.
Vous pouvez changer ce code. Reportezvous à la page 91, PIN Code (saisie du code
PIN).
Utilisation du menu de connexion
Important
Lorsque vous effectuez cette opération, assurezvous de garer votre véhicule dans un endroit sûr
et de mettre le frein à main.
1 Affichez le menu du téléphone.
Reportez-vous à la page 70, Opérations des
menus de base.
2 Utilisez M.C. pour choisir Connection.
Tournez pour changer l’option de menu. Appuyez pour sélectionner.
3 Tournez M.C. pour sélectionner la fonction.
Après avoir sélectionné la fonction, effectuez
les procédures de paramétrage suivantes.
Français
Device List (connexion ou déconnexion d’un télé-
phone cellulaire de la liste)
1 Appuyez sur M.C. pour afficher le mode de para-
métrage.
2 Tournez M.C. pour sélectionner le nom de l ’ appa-
reil que vous voulez connecter.
3 Appuyez de façon prolongée sur M.C. pour chan-
ger l’adresse de périphérique Bluetooth et le nom
d’appareil.
4 Appuyez sur M.C. pour connecter le téléphone
cellulaire sélectionné.
Pendant la connexion, l’ indicateur circulaire clignote. Pour terminer la connexion, vérifiez le nom
de l’appareil (MVH-P8300BT) et entrez le code
PIN sur votre téléphone cellulaire. Si la connexion
est établie, un indicateur circulaire s’affiche à
côté du nom d’appareil.
Fr
89
Page 90

Section
03
Utilisation de l’appareil
Delete Device (suppression d’un téléphone cellulaire
de la liste)
1 Appuyez sur M.C. pour afficher le mode de para-
métrage.
2 Tournez M.C. pour sélectionner le nom de l ’ appa-
reil que vous voulez supprimer.
3 Appuyez sur M.C. pour sélectionner le téléphone
que vous voulez supprimer.
Appuyez de façon prolongée sur M.C. pour changer l’adresse de périphérique Bluetooth et le nom
d’appareil.
4 Utilisez M.C. pour choisir Ye s .
Tournez pour changer l’option de menu. Appuyez
pour sélectionner.
Pour annuler, sélectionnez No.
! Ne coupez pas le moteur pendant l’utilisation de
cette fonction.
Add Device (connexion d’un nouveau téléphone cel-
lulaire)
1 Appuyez sur M.C. pour commencer la recherche.
! Pour annuler, appuyez sur M.C. pendant la re-
cherche.
2 Tournez M.C. pour sélectionner un téléphone de
la liste.
! Si le téléphone souhaité n’est pas affiché, sé-
lectionnez Search Again.
! Si cinq appareils sont déjà appairés, Memory
Full s’affiche et il est impossible de réaliser
cette opération. Dans ce cas, supprimez d’abord un appareil appairé.
3 Appuyez de façon prolongée sur M.C. pour chan-
ger l’adresse de périphérique Bluetooth et le nom
d’appareil.
4 Appuyez sur M.C. pour connecter le téléphone
cellulaire sélectionné.
Pendant la connexion, Pairing clignote. Pour terminer la connexion, vérifiez le nom de l’appareil
(MVH-P8300BT) et entrez le code PIN sur votre téléphone cellulaire. Si la connexion est établie, Pai-
red s’affiche et le menu du téléphone apparaît.
Special Device (réglage d’un appareil spécial)
Les périphériques Bluetooth avec lesquels il est difficile d’établir une connexion sont appelés des périphériques spéciaux. Si votre périphérique Bluetooth
figure dans la liste des périphériques spéciaux, sélectionnez-le.
1 Appuyez sur M.C. pour afficher le mode de para-
métrage.
2 Utilisez M.C. pour sélectionner un appareil spé-
cial.
Tournez pour changer l’option de menu. Appuyez
pour sélectionner.
3 Utilisez un téléphone cellulaire pour vous connec-
ter à cet appareil.
Pour terminer la connexion, vérifiez le nom de
l’appareil (MVH-P8300BT) et entrez le code PIN
sur votre téléphone cellulaire. Si la connexion est
établie, un indicateur circulaire s’affiche à côté
du nom d’appareil.
! Si cinq appareils sont déjà appairés, Memory
Full s’affiche et il est impossible de réaliser
cette opération. Dans ce cas, supprimez d’abord un appareil appairé.
Auto Connect (connexion automatique à un appareil
Bluetooth)
1 Appuyez sur M.C. pour activer ou désactiver la
connexion automatique.
Visibility (réglage de la visibilité de cet appareil)
Pour vérifier la disponibilité de cet appareil à partir
d’autres appareils, la visibilité Bluetooth de cet appareil peut être activée.
1 Appuyez M.C. pour activer ou désactiver la visibi-
lité de cet appareil.
! Lors du réglage Special Device, la visibilité
Bluetooth de cet appareil est temporairement
activée.
Device Information (affichage de l’adresse de péri-
phérique Bluetooth)
1 Appuyez sur M.C. pour afficher l’adresse de péri-
phérique Bluetooth et le nom d’appareil.
90
Fr
Page 91

Utilisation de l’appareil
Section
03
PIN Code (saisie du code PIN)
Pour connecter votre téléphone cellulaire à cet appareil via la technologie sans fil Bluetooth, vous devez
entrer un code PIN sur votre téléphone pour vérifier la
connexion. Le code par défaut est 0000, mais vous
pouvez le modifier en utilisant cette fonction.
1 Appuyez sur M.C. pour afficher le mode de para-
métrage.
2 Tournez M.C. pour sélectionner un numéro.
3 Appuyez sur M.C. pour placer le curseur sur la po-
sition suivante.
4 Après avoir entré le code PIN (jusqu’à 8 chiffres),
appuyez sur M.C.
Le code PIN peut être enregistré en mémoire.
! Quand vous appuyez de manière prolongée
sur M.C. dans le même écran, le code PIN
que vous avez saisi est stocké dans cet appareil.
! Appuyer sur M.C. dans l’écran de confirma-
tion vous ramène à l’écran de saisie du code
PIN, et vous pouvez changer le code PIN.
Utilisation du menu du téléphone
Important
Lorsque vous effectuez cette opération, assurezvous de garer votre véhicule dans un endroit sûr
et de mettre le frein à main.
1 Affichez le menu du téléphone.
Reportez-vous à la page 70, Opérations des
menus de base.
2 Tournez M.C. pour sélectionner la fonction.
Après avoir sélectionné la fonction, effectuez
les procédures de paramétrage suivantes.
Recent (historique des appels récents)
Vous pouvez effectuer un appel en sélectionnant
parmi les appels composés, les appels reçus et les
appels manqués dans ce menu.
1 Appuyez sur M.C. pour afficher Missed Calls (his-
torique des appels manqués), Dialed Calls (historique des appels composés) ou Received Calls
(historique des appels reçus).
2 Utilisez M.C. pour choisir la liste désirée.
Tournez pour changer l’option de menu. Appuyez
pour sélectionner.
3 Appuyez sur M.C. pour effectuer un appel.
4 Lorsque vous trouvez un numéro de téléphone
que vous voulez enregistrer en mémoire, poussez
et maintenez M.C. vers la droite.
Phone Book (annuaire)
! L’annuaire de votre téléphone cellulaire sera
transféré automatiquement lorsque le téléphone
est connecté à cet appareil.
! En fonction du téléphone cellulaire, l’annuaire
risque de ne pas être transféré automatiquement.
Dans ce cas, utilisez votre téléphone cellulaire
pour transférer l ’ annuaire. La visibilité de cet appareil doit être activée. Reportez-vous à la page
précédente, Visibility (réglage de la visibilité de cet
appareil).
1 Appuyez sur M.C. pour afficher la liste alphabé-
tique.
2 Poussez M.C. pour sélectionner la première lettre
du nom que vous recherchez.
! Appuyez sur M.C. de façon prolongée pour
choisir le type des caractères à utiliser.
alphabet–alphabet cyrillique
3 Appuyez sur M.C. pour afficher une liste de noms
enregistré.
4 Tournez M.C. pour sélectionner le nom que vous
recherchez.
5 Appuyez sur M.C. pour afficher la liste des numé-
ros de téléphone.
6 Utilisez M.C. pour sélectionner le numéro de télé-
phone à appeler.
Tournez pour changer de numéro de téléphone.
Appuyez pour sélectionner.
7 Appuyez sur M.C. pour effectuer un appel.
8 Lorsque vous trouvez un numéro de téléphone
que vous voulez enregistrer en mémoire, poussez
et maintenez M.C. vers la droite.
Preset Dial (numéros de téléphone présélectionnés)
Français
91
Fr
Page 92

Section
03
Utilisation de l’appareil
1 Appuyez sur M.C. pour afficher le mode de para-
métrage.
2 Utilisez M.C. pour choisir le numéro de présélec-
tion désiré.
Tournez pour changer l’option de menu. Appuyez
pour sélectionner.
3 Appuyez sur M.C. pour effectuer un appel.
Phone Function (fonction téléphone)
Vous pouvez régler Auto Answer et Ring Tone àpar-
tir de ce menu. Pour les détails, reportez-vous à cette
page, Fonction et utilisation.
Connection (connexion du téléphone)
! Utilisez le menu de connexion du téléphone Blue-
tooth. Reportez-vous à la page 89, Utilisation du
menu de connexion.
Fonction et utilisation
1 Affichez Phone Function.
Reportez-vous à cette page, Phone Function
(fonction téléphone).
2 Appuyez sur M.C. pour afficher le menu
des fonctions.
3 Tournez M.C. pour sélectionner la fonction.
Après avoir sélectionné la fonction, effectuez
les procédures de paramétrage suivantes.
Auto Answer (réponse automatique)
1 Appuyez sur M.C. pour activer ou désactiver la ré-
ponse automatique.
Ring Tone (sélection de la sonnerie)
1 Appuyez sur M.C. pour activer ou désactiver la
sonnerie.
Réglages sonores
1 Affichez le menu audio.
Reportez-vous à la page 70, Opérations des
menus de base.
2 Tournez M.C. pour sélectionner la fonction audio.
Après avoir sélectionné la fonction audio, effectuez les procédures de paramétrage suivantes.
Fader/Balance (réglage de l’équilibre avant-arrière/
droite-gauche)
1 Appuyez sur M.C. pour afficher le mode de para-
métrage.
2 Poussez M.C. vers le haut ou vers le bas pour ré-
gler l’équilibre sonore entre les haut-parleurs
avant et arrière.
Plage de réglage (avant/arrière) : Front 15 à Rear
15
3 Poussez M.C. vers la gauche ou vers la droite
pour ajuster l’équilibre des haut-parleurs gauchedroite.
Plage de réglage (gauche/droite) : Left 15 à Right
15
! Sélectionnez F/R 0 lorsque deux haut-parleurs
seulement sont utilisés.
! Si le réglage pour la sortie arrière et le réglage du
préamp sont Subwoofer, vous ne pouvez pas régler l’équilibre des haut-parleurs avant-arrière.
Sonic Center Control (sonic center control)
Le son adapté à la position d’écoute peut être facilement créé avec cette fonction.
1 Appuyez sur M.C. pour afficher le mode de para-
métrage.
2 Poussez M.C. vers la gauche ou vers la droite
pour sélectionner une position d’écoute.
Plage de réglage : Left:7 à Right:7
Auto EQ (égalisation automatique en service/hors
service)
L’égalisation automatique est une courbe d’égalisa-
tion créée par EQ auto (reportez-vous à la page 97, EQ
auto (égalisation automatique)).
Vous pouvez mettre l’égalisation automatique en service ou hors service.
1 Appuyez sur M.C. pour mettre l’égalisation auto-
matique en service ou hors service.
Vous ne pouvez pas utiliser cette fonction si les réglages EQ auto n’ont pas été effectués.
92
Fr
Page 93

Utilisation de l’appareil
Section
03
Graphic EQ (réglage de l’égaliseur)
Vous pouvez ajuster comme vous le désirez la courbe
d’égalisation actuellement sélectionnée. Les réglages
de la courbe d’égalisation ajustée sont mémorisés
dans Custom1 ou Custom2.
! Une courbe Custom1 distincte peut être créée
pour chaque source. Si vous effectuez des réglages quand une courbe d’égalisation autre que
Custom2 est sélectionnée, les paramètres de la
courbe d’égalisation seront enregistrés dans Cus-
tom1.
! Il est possible de créer une courbe Custom2
commune à toutes les sources. Si vous effectuez
des ajustements quand la courbe Custom2 est
sélectionnée, la courbe Custom2 est mise à jour.
1 Appuyez sur M.C. pour afficher le mode de para-
métrage.
2 Tournez M.C. pour sélectionner une courbe d’éga-
lisation.
Powerful—Natural—Vocal—Custom1—Custom2—Flat—Super Bass
3 Poussez M.C. vers la gauche ou vers la droite
pour choisir la bande de l’égaliseur à ajuster.
40Hz—80Hz—200Hz—400Hz—1kHz—2.5kHz
—8kHz—10kHz
4 Poussez M.C. vers le haut ou vers le bas pour ré-
gler le niveau de la bande d ’ égalisation.
Plage de réglage : +12dB à –12dB
Loudness (correction physiologique)
La correction physiologique a pour objet d’accentuer
les hautes et les basses fréquences à bas niveaux d’écoute.
1 Appuyez sur M.C. pour afficher le mode de para-
métrage.
2 Tournez M.C. pour choisir le réglage désiré.
Off (hors service)—Low (faible)—Mid (moyen)—
High (élevé)
3 Appuyez sur M.C. pour confirmer la sélection.
Subwoofer1 (réglage en service/hors ser vice du
haut-parleur d’extrêmes graves)
Cet appareil est équipé d’une sortie haut-parleur d’extrêmes graves qui peut être mise en service ou hors
service.
1 Appuyez sur M.C. pour mettre la sortie haut-par-
leur d’extrêmes graves en service ou hors service.
Subwoofer2 (réglage du haut-parleur d’extrêmes
graves)
La fréquence de coupure et le niveau de sortie peuvent être réglés lorsque la sortie haut-parleur d’extrêmes graves est activée.
Seules les fréquences inférieures à celles de la plage
sélectionnée sont produites par le haut-parleur d’extrêmes graves.
1 Appuyez sur M.C. pour afficher le mode de para-
métrage.
2 Tournez M.C. pour choisir la phase de la sortie
haut-parleur d’extrêmes graves.
Normal (phase normale)—Reverse (phase inversée)
3 Poussez M.C. vers le haut ou vers le bas pour ré-
gler le niveau de sortie du haut-parleur d’extrêmes
graves.
Plage de réglage : +6 à –24
4 Poussez M.C. vers la gauche ou vers la droite
pour choisir la fréquence de coupure.
50Hz—63Hz—80Hz—100Hz—125Hz
Bass Booster (accentuation des graves)
1 Appuyez sur M.C. pour afficher le mode de para-
métrage.
2 Tournez M.C. pour régler le niveau.
Plage de réglage : 0 à +6
3 Appuyez sur M.C. pour confirmer la sélection.
High Pass Filter (réglage du filtre passe-haut)
Quand vous ne voulez pas que les sons graves de la
gamme de fréquence de la sortie haut-parleur d’extrêmes graves soient émis par les haut-parleurs avant
ou arrière, mettez le filtre passe-haut (HPF) en service.
Seules les fréquences supérieures à celles de la plage
sélectionnée sont émises par les haut-parleurs avant
ou arrière.
1 Appuyez sur M.C. pour afficher le mode de para-
métrage.
2 Tournez M.C. pour choisir la fréquence de cou-
pure.
Off (hors service)—50Hz—63Hz—80Hz—100Hz
—125Hz
3 Appuyez sur M.C. pour confirmer la sélection.
Français
93
Fr
Page 94

Section
03
Utilisation de l’appareil
SLA (réglage du niveau de la source)
La fonction SLA (réglage du niveau de la source) permet d’ajuster les niveaux sonores de chaque source
afin d’éviter que ne se produisent de fortes variations
d’amplitude sonore lorsque vous passez d’une source
àl’autre.
! Si FM a été choisie comme source, vous ne pou-
vez pas afficher la fonction SLA.
! Les réglages sont basés sur le niveau du volume
FM qui lui, demeure inchangé.
! Le niveau du volume AM peut également être
réglé avec cette fonction.
1 Appuyez sur M.C. pour afficher le mode de para-
métrage.
2 Poussez M.C. vers le haut ou vers le bas pour
ajuster le volume de la source.
Plage de réglage : +4 à –4
Remarque
Vous ne pouvez pas sélectionner Custom1 et
Custom2 lors de l’utilisation de l’égalisation au-
tomatique.
Réglages système
1 Affichez le menu système.
Reportez-vous à la page 70, Opérations des
menus de base.
2 Tournez M.C. pour sélectionner la fonction système.
Après avoir sélectionné la fonction système,
effectuez les procédures de paramétrage suivantes.
Guide Info (informations de guidage)
1 Appuyez sur M.C. pour afficher les informations
de guidage.
Reportez-vous à la page 71, Quelques mots sur les
informations de guidage.
Clock ADJ (date et horloge)
1 Appuyez sur M.C. pour afficher le mode de para-
métrage.
2 Appuyez sur M.C. pour sélectionner le segment
de l’affichage de l’horloge que vous voulez régler.
Jour—Mois—Année—Heure—Minute—AM/PM
3 Tournez M.C. pour régler la date et l’heure.
Picture ADJ (réglage de l’image)
1 Appuyez sur M.C. pour afficher le mode de para-
métrage.
2 Tournez M.C. pour choisir la fonction à régler. Ap-
puyez pour sélection ner.
Brightness—Contrast—Color—Hue—Dimmer
—Temperature—Black Level
Pour des détails sur les réglages, reportez-vous à
la page 103, Modification des réglages de l’image.
Lorsque vous sélectionnez Black Level, appuyez
sur M.C. pour activer ou désactiver le réglage.
3 Tournez M.C. pour augmenter ou diminuer le ni-
veau de l’élément sélectionné.
Plage de réglage : +24 à –24
! Dimmer peut être réglé de +48 à +1.
! Temperature peut être réglé de +3 à –3.
Caution Lang. (réglages de la langue des avertissements)
94
Fr
Page 95

Utilisation de l’appareil
Section
03
Vous pouvez changer la langue d’affichage des avertissements concernant le système de blocage du
frein de parking.
1 Appuyez sur M.C. pour afficher le mode de para-
métrage.
2 Tournez M.C. pour choisir le réglage désiré.
English—Français—Español
3 Appuyez sur M.C. pour confirmer la sélection.
System Lang. (réglages de la langue des menus)
! La langue peut être changée pour les menus sui-
vants :
! Menus de fonctions
! Menu système
! Menu initial
! Affichage à l’écran
! Réglage multilingue pour DivX
! Si la langue incorporée et la langue sélectionnée
sont différentes, les informations textuelles peuvent ne pas s’afficher correctement.
! Certains caractères peuvent ne pas s’afficher cor-
rectement.
! Coupe z et remettez le contact d’allumage après
avoir effectué le réglage afin de terminer cette
opération.
1 Appuyez sur M.C. pour afficher le mode de para-
métrage.
2 Tournez M.C. pour choisir la langue désirée.
English (Anglais)—Español (Espagnol)—Português (Portugais)—РУССКИЙ (Russe)
3 Appuyez sur M.C. pour confirmer la sélection.
Detach Warning (réglage du signal sonore d’avertis-
sement)
Si vous ne retirez pas la face avant de l’appareil central dans les quatre secondes qui suivent la coupure
du contact, un signal sonore d’avertissement retentit.
Vous pouvez mettre hors service ce signal sonore d’avertissement.
1 Appuyez sur M.C. pour mettre le signal sonore
d’avertissement en service ou hors service.
AUX Input (entrée auxiliaire)
Activez ce réglage lorsque vous utilisez un appareil
auxiliaire connecté à cet appareil.
1 Appuyez sur M.C. pour mettre AUX Input en ser-
vice ou hors service.
Réglages de divertissement
1 Affichez le menu de divertissement.
Reportez-vous à la page 70, Opérations des
menus de base.
2 Tournez M.C. pour sélectionner la fonction de divertissement.
Après avoir sélectionné la fonction de divertissement, effectuez les procédures de paramétrage suivantes.
Background (réglage de l’affichage d’arrière-plan)
1 Appuyez sur M.C. pour afficher le mode de para-
métrage.
2 Tournez M.C. pour choisir le réglage désiré.
BGP1 (image d’arrière-plan 1)—BGP2 (image d’ar-
rière-plan 2)—BGP3 (image d’arrière-plan 3)—
BGV (arrière-plan)—Photo (photo)—SPEANA
(analyseur de spectre)—Off (affichage hors service)
3 Appuyez sur M.C. pour confirmer la sélection.
Clock (horloge diver tissante)
1 Appuyez sur M.C. pour mettre l’affichage de l’hor-
loge divertissante en service ou hors service.
Si le réglage est en service, il est basculé automatiquement sur l’affichage de l’horloge divertissante.
Slide Show (visualisation du diaporama)
1 Appuyez sur M.C. pour afficher le mode de para-
métrage.
2 Tournez M.C. pour sélectionner le périphérique de
stockage externe.
USB (périphérique de stockage USB)—SD (carte
mémoire SD)
Le diaporama commence.
Appearance (couleur de l’écran/d’éclairage)
1 Appuyez sur M.C. pour afficher le mode de para-
métrage.
2 Tournez M.C. pour changer la couleur de l’écran/
d’éclairage désirée. Appuyez pour sélectionner.
Screen (couleur de l’écran)—Illumi (couleur d’é-
clairage)—Color Setting (couleur personnalisée)
Pour les détails sur Color Setting (couleur personnalisée), reportez-vous à la page suivante, Per-
sonnalisation de la couleur d’éclairage.
3 Tournez M.C. pour changer la couleur d’éclairage
désirée. Appuyez pour sélectionner.
Français
95
Fr
Page 96

Section
03
Utilisation de l’appareil
La couleur d’éclairage change à intervalles réguliers.
La couleur personnalisée est réglée
en tant que couleur d’éclairage.
Remarques
! Lorsque SPEANA (analyseur de spectre) est
sélectionné, l’analyseur de spectre est affiché
au lieu de l’image source ou de la pochette
d’album.
! Si vous sélectionnez USB ou SD comme
source, vous ne pouvez pas sélectionner
Slide Show.
Personnalisation de la couleur
d’éclairage
1 Utilisez M.C. pour sélectionner
Color Setting dans Appearance (couleur
d’éclairage).
Reportez-vous à la page précédente,
Appearance (couleur de l’écran/d’éclairage).
2 Utilisez M.C. pour personnaliser la couleur.
Tournez pour un ajustement fin. Poussez vers
la gauche ou vers la droite pour régler la couleur suivante.
3 Appuyez sur M.C. pour mémoriser la
couleur personnalisée.
La couleur d’éclairage basculera sur la couleur personnalisée.
Réglages initiaux
1 Maintenez la pression sur SRC/OFF jusqu’à ce que l’appareil soit mis hors tension.
2 Appuyez sur M.C. pour afficher le menu
des réglages initiaux.
3 Tournez M.C. pour sélectionner le réglage initial.
Après avoir sélectionné le réglage initial, effectuez les procédures de paramétrage suivantes.
A-EQ Measurement (égalisation automatique)
L’égalisation automatique est une courbe d’égalisa-
tion créée par EQ auto (reportez-vous à la page suivante, EQ auto (égalisation automatique)).
Vous pouvez mettre l’égalisation automatique en service ou hors service.
Rear Speaker (réglage de la sortie arrière et du hautparleur d’extrêmes graves)
La sortie arrière de cet appareil (sortie de connexion
des haut-parleurs arrière et sortie arrière RCA) peut
être utilisée pour la connexion d’un haut-parleur
pleine gamme (Full)oud’un haut-parleur d’extrêmes
graves (Subwoofer). Si vous basculez le réglage de
la sortie arrière sur Subwoofer, vous pouvez connecter une borne de haut-parleur arrière à un haut-parleur d’extrêmes graves directement, sans utiliser un
amplificateur auxiliaire.
Initialement, cet appareil est réglé pour la connexion
d’un haut-parleur pleine gamme (Full).
1 Appuyez sur M.C. pour afficher le mode de para-
métrage.
2 Tournez M.C. pour changer de réglage.
Subwoofer (haut-parleur d’extrêmes graves)—
Full (haut-parleur pleine gamme)
! Même si vous modifiez ce réglage, aucun si-
gnal ne sera émis aussi longtemps que la sortie vers le haut-parleur d’extrêmes graves
n’est pas en service (reportez-vous à la page
93, Subwoofer1 (réglage en service/hors ser-
vice du haut-parleur d’extrêmes graves)).
! Si vous modifiez ce réglage, la sortie haut-par-
leur d’extrêmes graves est repositionnée sur
les réglages d’usine dans le menu audio.
3 Appuyez sur M.C. pour confirmer la sélection.
Demonstration (réglage de l’affichage de démons-
tration)
96
1 Appuyez sur M.C. pour mettre l’affichage de dé-
monstration en service ou hors service.
Fr
Page 97

Utilisation de l’appareil
Section
03
BT Memory Clear (réinitialisation du module technologie sans fil Bluetooth)
Cette fonction est disponible pour le MVH-P8300BT
seulement.
Les données du téléphone Bluetooth peuvent être
supprimées. Pour protéger vos informations personnelles, nous vous recommandons de supprimer ces
données avant de transmettre l’appareil à d’autres
personnes. Les réglages suivants seront supprimés.
! entrées d’annuaire sur le téléphone Bluetooth
! numéros de présélection sur le téléphone Blue-
tooth
! affectation d’enregistrement du téléphone Blue-
tooth
! historiqu e des appels du téléphone Bluetooth
! informations sur le téléphone Bluetooth connecté
! code PIN
1 Appuyez sur M.C. pour afficher le mode de para-
métrage.
2 Utilisez M.C. pour choisir Ye s .
Tournez pour changer de mode. Appuyez pour sélectionner.
Cleared s’affiche et les réglages sont supprimés.
Pour annuler, sélectionnez No.
! Ne coupez pas le moteur pendant l’utilisation
de cette fonction.
BT Ver. Info. (affichage de la version Bluetooth)
Cette fonction est disponible pour le MVH-P8300BT
seulement.
1 Appuyez sur M.C. pour afficher la version Blue-
tooth (microprocesseur) de cet appareil.
Software Update (mise à jour du logiciel)
Cette fonction est disponible pour le MVH-P8300BT
seulement.
Cette fonction est utilisée pour effectuer une mise à
jour de cet appareil avec le logiciel le plus récent.
Pour plus d’informations sur le logiciel et la mise à
jour, consultez notre site Web.
1 Appuyez sur M.C. pour afficher le mode de para-
métrage.
2 Utilisez M.C. pour sélectionner Ye s afin d’afficher
un écran de confirmation.
Tournez pour changer de mode. Appuyez pour sélectionner.
Pour annuler, sélectionnez No.
Suivez les instructions à l’écran pour finir la mise
à jour du logiciel.
Ever Scroll (réglage du mode de défilement)
Quand la fonction Ever Scroll est réglée sur On, les informations textuelles enregistrées défilent en permanence. Mettez la fonction hors service si vous
préférez que l’information défile une fois seulement.
1 Appuyez sur M.C. pour mettre la fonction de défi-
lement permanent en service ou hors service.
EQ auto (égalisation automatique)
L’égalisation automatique mesure automati-
quement les caractéristiques acoustiques de
l’habitacle de la voiture puis crée une courbe
d’égalisation automatique en fonction de ces
informations.
! Pour réaliser cette fonction, un microphone
dédié (par exemple, CD-MC20) est requis.
ATTENTION
Comme une forte tonalité (bruit) peut être émise
à partir des haut-parleurs lors de la mesure des
caractéristiques acoustiques de l’habitacle, n’effectuez jamais le réglage EQ auto lorsque vous
conduisez.
PRÉCAUTION
! Vérifiez soigneusement les conditions avant
d’exécuter le réglage EQ auto car vous pourriez endommager les haut-parleurs si ces
fonctions sont exécutées lorsque :
— Les haut-parleurs sont connectés de ma-
nière incorrecte. (Par exemple, un hautparleur arrière est connecté à la sortie
haut-parleur d’extrêmes graves.)
— Un haut-parleur est connecté à un amplifi-
cateur de puissance délivrant une puissance de sortie supérieure à la puissance
d’entrée maximum admissible par le hautparleur.
! Si le microphone est placé dans une position
inadéquate, la tonalité de mesure peut devenir
forte et la mesure peut prendre longtemps, ce
qui entraîne une décharge de la batterie. Assurez-vous de placer le microphone à l’emplacement spécifié.
Français
97
Fr
Page 98

Section
03
Utilisation de l’appareil
Avant d’utiliser la fonction EQ auto
! Effectuez le réglage EQ auto dans un en-
droit aussi calme que possible, avec le moteur et la climatisation coupés. Mettez
également hors tension les téléphones de
voiture ou les téléphones portables qui se
trouvent dans la voiture, ou sortez-les de la
voiture avant d’effectuer le réglage EQ
auto. Les sons autres que la tonalité de mesure (sons environnants, son du moteur,
sonneries de téléphones, etc.) peuvent empêcher une mesure correcte des caractéristiques acoustiques de l’habitacle de la
voiture.
! Assurez-vous d’effectuer le réglage EQ auto
en utilisant le microphone en option. L’utili-
sation d’un autre microphone peut empêcher la mesure, ou conduire à une mesure
incorrecte des caractéristiques acoustiques de l’habitacle de la voiture.
! Pour exécuter la fonction EQ auto, vous
devez connecter le haut-parleur avant.
! Quand cet appareil est connecté à un am-
plificateur de puissance disposant d’un
contrôle du niveau d’entrée, le réglage EQ
auto peut ne pas être possible si le niveau
d’entrée de l’amplificateur de puissance
est inférieur au niveau standard.
! Quand cet appareil est connecté à un am-
plificateur de puissance équipé d’un filtre
passe-bas, mettez le filtre passe-bas hors
service avant d’effectuer le réglage EQ
auto. Définissez également la fréquence de
coupure pour le filtre passe-bas intégré
d’un haut-parleur d’extrêmes graves actif
sur la fréquence la plus haute.
! La distance a été calculée par ordinateur
comme étant le retard optimum pour donner des résultats précis pour les circonstances considérés, veuillez donc continuer
à utiliser cette valeur.
— Le son réfléchi à l’intérieur du véhicule
est fort et que des retards se produisent.
— Le filtre passe bas sur les haut-parleurs
d’extrêmes graves ou les amplis externes retardent les sont inférieurs.
! Le réglage EQ auto modifie les réglages
audio comme suit :
— Les réglages équilibre avant-arrière/
droite-gauche reviennent à la position
centrale. (Reportez-vous à la page 92,
Fader/Balance (réglage de l’équilibre
avant-arrière/droite-gauche).)
— La courbe d’égalisation bascule sur
Flat. (Reportez-vous à la page 93,
Graphic EQ (réglage de l’égaliseur).)
— Les haut-parleurs avant, central et ar-
rière seront automatiquement réglés au
moyen d’ un réglage de filtre passe-haut.
! Le réglage EQ auto précédent sera écrasé.
Exécution de la fonction EQ auto
1 Arrêtez la voiture dans un endroit
calme, fermez toutes les portières, les vitres et le toit ouvrant, puis coupez le moteur.
Si vous laissez tourner le moteur, son bruit
peut empêcher un réglage EQ auto correct.
2 Attachez le microphone fourni au centre du repose-tête du conducteur, en l’orientant vers l’avant.
Le résultat du réglage EQ auto peut différer
selon l ’endroit où vous placez le microphone.
Si vous le désirez, placez le microphone sur le
siège du passager avant pour effectuer le réglage EQ auto.
98
Fr
Page 99

Utilisation de l’appareil
Section
03
3 Placez le contact d’allumage sur ON ou
ACC.
Si la climatisation ou le chauffage de la voiture
sont en service, coupez-les. Le bruit du ventilateur de la climatisation ou du chauffage peut
empêcher une exécution correcte du réglage
EQ auto.
# Appuyez sur SRC/OFF pour mettre la source
en service si l’appareil est hors service.
4 Affichez le menu des réglages initiaux.
Reportez-vous à la page 96, Réglages initiaux.
5 Utilisez M.C. pour passer en mode de
mesure EQ auto.
Tournez pour changer l’option de menu. Appuyez pour sélectionner.
6 Branchez le microphone dans le jack
d’entrée microphone sur cet appareil.
possible, un message d’erreur s’affiche. (Reportez-vous à la page 114, Signification des
messages d ’ erreur du réglage EQ auto.)
10 Conservez le microphone dans la boîte
à gants ou un autre endroit sûr.
Si le microphone est exposé à la lumière directe du soleil pendant une période prolongée,
les températures élevées peuvent provoquer
une distorsion, une modification de la couleur
ou un dysfonctionnement.
Français
7 Appuyez sur M.C. pour exécuter la
fonction EQ auto.
8 À partir du début du décomptage de 10
secondes, sortez de la voiture et fermez la
porte dans les 10 secondes.
La tonalité de mesure (bruit) est émise par les
haut-parleurs, et la mesure EQ auto
commence.
# Il faut environ neuf minutes pour terminer la
mesure EQ auto lorsque tous les haut-parleurs
sont connectés.
# Pour arrêter la fonction EQ auto, appuyez sur
M.C.
9 Quand la fonction EQ auto est terminée, Complete s’affiche.
Si une mesure correcte des caractéristiques
acoustiques de l’habitacle de la voiture est im-
99
Fr
Page 100

Section
03
Utilisation de l’appareil
Autres fonctions
Utilisation d’une source AUX
Lors de la connexion d’un appareil auxiliaire à
l’aide d’une entrée AUX avant.
! Vous devez activer le réglage AUX dans le
menu des réglages initiaux. Reportez-vous
à la page 95, AUX Input (entrée auxiliaire).
! Si un iPod disposant de fonctions vidéo est
connecté à cet appareil avec un câble à
prise 3,5 mm (4 pôles) (par exemple CDV150M), vous pouvez profiter du contenu
vidéo de l’iPod connecté.
! Vous pouvez connecter un lecteur audio/
vidéo portable à l’aide d’un câble à prise
3,5 mm (4 pôles) vers RCA (vendu séparément). Toutefois, selon le câble, une connexion inverse entre le câble rouge (audio
côté droit) et le câble jaune (vidéo) peut
être requise pour reproduire correctement
le son et l’image vidéo.
% Insérez la mini prise dans le jack d’en-
trée AUX de cet appareil.
Pour plus de détails, reportez-vous à la page
67, Appareil central.
Ce dispositif auxiliaire est automatiquement
réglé sur AUX.
Réglages des fonctions
1 Appuyez sur M.C. pour afficher le menu
des fonctions.
2 Tournez M.C. pour sélectionner la fonction.
Après avoir sélectionné la fonction, effectuez
les procédures de paramétrage suivantes.
A/V Change (réglage du signal de l’appareil auxi-
liaire)
1 Appuyez sur M.C. pour afficher le mode de para-
métrage.
2 Tournez M.C. pour choisir le réglage désiré.
! Audio – appareil auxiliaire connecté avec un
câble mini prise stéréo
! Video – un appareil vidéo auxiliaire connecté
avec un câble mini prise 4 pôles (par exemple
CD-V150M)
3 Appuyez sur M.C. pour confirmer la sélection.
Display (réglage de l’affichage)
Vous pouvez basculer sur l’écran de base ou sur l’image.
1 Appuyez sur M.C. pour afficher le mode de para-
métrage.
2 Appuyez sur M.C. pour choisir le mode désiré.
Wide Mode (passage en mode écran large)
1 Appuyez sur M.C. pour afficher le mode de para-
métrage.
2 Tournez M.C. pour choisir le réglage désiré.
Full (plein)—Just (ajusté)—Cinema (cinéma)—
Zoom (zoom)—Normal (normal)
Pour des détails sur les réglages, reportez-vous à
la page 102, Changer le mode écran large.
3 Appuyez sur M.C. pour confirmer la sélection.
Remarques
! Vous pouvez sélectionner Display ou
Wide Mode quand Video a été sélectionné.
! Vous pouvez sélectionner les fonctions suivan-
tes si le réglage de l’arrière-plan du menu de
divertissement est désactivé.
— Wide Mode (passage en mode écran
large)
— Display (réglage de l’affichage)
100
Fr
 Loading...