

Page 1

MINIDISC RECORDER
MJ-d508
Operating Instructions
D
DDann
DIE
Page 2

IMPORTANT
RISK OF ELECTRIC SHOCK
The lightning flash with arrowhead symbol, within an
equilateral triangle, is intended to alert the user to the
presence of uninsulated "dangerous voltage" within the
product's enclosure that may be of sufficient magnitude to
constitute a risk of electric shock to persons.
[FOR EUROPEAN MODEL]
CAUTION
This product contains a laser diode of higher class
than 1. To ensure continued safety, do not remove any
covers or attempt to gain access to the inside of the
product.
Refer all servicing to qualified personnel.
The following caution label appears on your unit.
CAUTION:
TO PREVENT THE RISK OF ELECTRIC SHOCK, DO NOT
REMOVE COVER (OR BACK). NO USER-SERVICEABLE
PARTS INSIDE. REFER SERVICING TO QUALIFIED SER
VICE PERSONNEL.
CAUTION
DO NOT OPEN
A
The exclamation point within an equilateral triangle is intended
to alert the user to the presence of important operating and
maintenance (servicing) instructions in the literature
accompanying the appliance.
CLASS 1
LASER PRODUCT
The cut-off plug should be disposed of and must not be
IMPORTANT
FOR USE IN THE UNITED
KINGDOM
The wires in this mains lead are coloured in
accordance with the following code :
If the plug provided is unsuitable for your socket
outlets, the plug must be cut off and a suitable plug
fitted.
Blue : Neutral
Brown : Live
This product is for general household purposes. Any failure due
to use for other than household purposes (such as longterm use
for buisiness purposes in a restaurant or use in a car or ship) and
which requires repair will be charged for even during warranty
period.
inserted into any 13 amp socket as this can result in electric
shock. The plug or adaptor or the distribution panel should
be provided with 5 amp fuse. As the colours of the wires in
the mains lead of this appliance may not correspond with
coloured markings identifying the terminals in your plug,
proceed as follows :
The wire which is coloured blue must be connected to the
terminal which is marked with the letter N or coloured black.
The wire which is coloured brown must be connected
to the terminal which is marked with the letter L or coloured
red.
U.S. and foreign patents licenced from
Dolby Laborotories Licencing Corporation.
CAUTION:This product satisfies FCC regulations when
shielded cables and connectors are used to connectthe unit to
other equipment. To prevent electromagnetic interference
with electric appliances such as radios and televisions, use
shielded cables and connectors for connections.
Do not connect either wire to the earth terminal of a
three pin plug.
NOTE
After replacing or changing a fuse, the fuse cover in the
plug must be replaced with a fuse cover which corre
sponds to the colour of the insert in the base of the plug
or the word that is embossed on the base of the plug, and
the appliance must not be used without a fuse cover. If
lost replacement fuse covers can be obtained from:
your dealer.
Only 5 A fuses approved by B.S.I. or A.S.T.A to B.S.
1362 should be used.
WARNING : TO PREVENT FIRE OR SHOCK HAZARD, DO
NOT EXPOSE THIS APPLIANCE TO RAIN OR MOISTURE.
IMPORTANT NOTICE
[For U.S. model]
The serial number forthis equipment is located on the rear panel.
Please write this serial number on your enclosed warranty card
and keep it in a secure area. This is for your security.
This product complies with the Low Voltage Directive (73/
23/EEC), EMC Directives (89/336/EEC, 92/31/EEC) and CE
Marking Directive (93/68/EEC).
<PRB1285>
CAUTION
• Use of controls or adjustnnents or perfornnance of procedures other than those specified herein may result in hazardous
radiation exposure.
• The use of optical instruments with this product will increase eye hazard.
Information to User
Alteration or modifications carried out without appropriate authorization may invalidate the user's right to operate the equipment.
INFRINGEMENT OF COPYRIGHT [For U.K. model]
Recording and playback of copyrighted material may require consent. See the Copyright Act 1956 and the Performers'
Protection Acts 1958 and 1972.
Page 3
IMPORTANT SAFETY INSTRUCTIONS
READ INSTRUCTIONS — Ali the safety and operating
instructions should be read before the product is
operated.
RETAIN INSTRUCTIONS — The safety and operating
instructions should be retained for future reference.
HEED WARNINGS — All warnings on the product and
in the operating instructions should be adhered to.
FOLLOW INSTRUCTIONS — All operating and use
instructions should be followed.
CLEANING — Unplug this product from the wall outlet
before cleaning. The product should be cleaned only
with a polishing cloth ora soft dry cloth. Never clean
with furniture wax, benzine, insecticides or other
volatile liquids since they may corrode the cabinet.
ATTACHMENTS — Do not use attachments not
recommended by the product manufactureras they
may cause hazards.
WATER AND MOISTURE — Do not use this product
near water — for example, near a bathtub, wash
bowl, kitchensink, or laundry tub; in a wet basement;
or near a swimming pool; and the like.
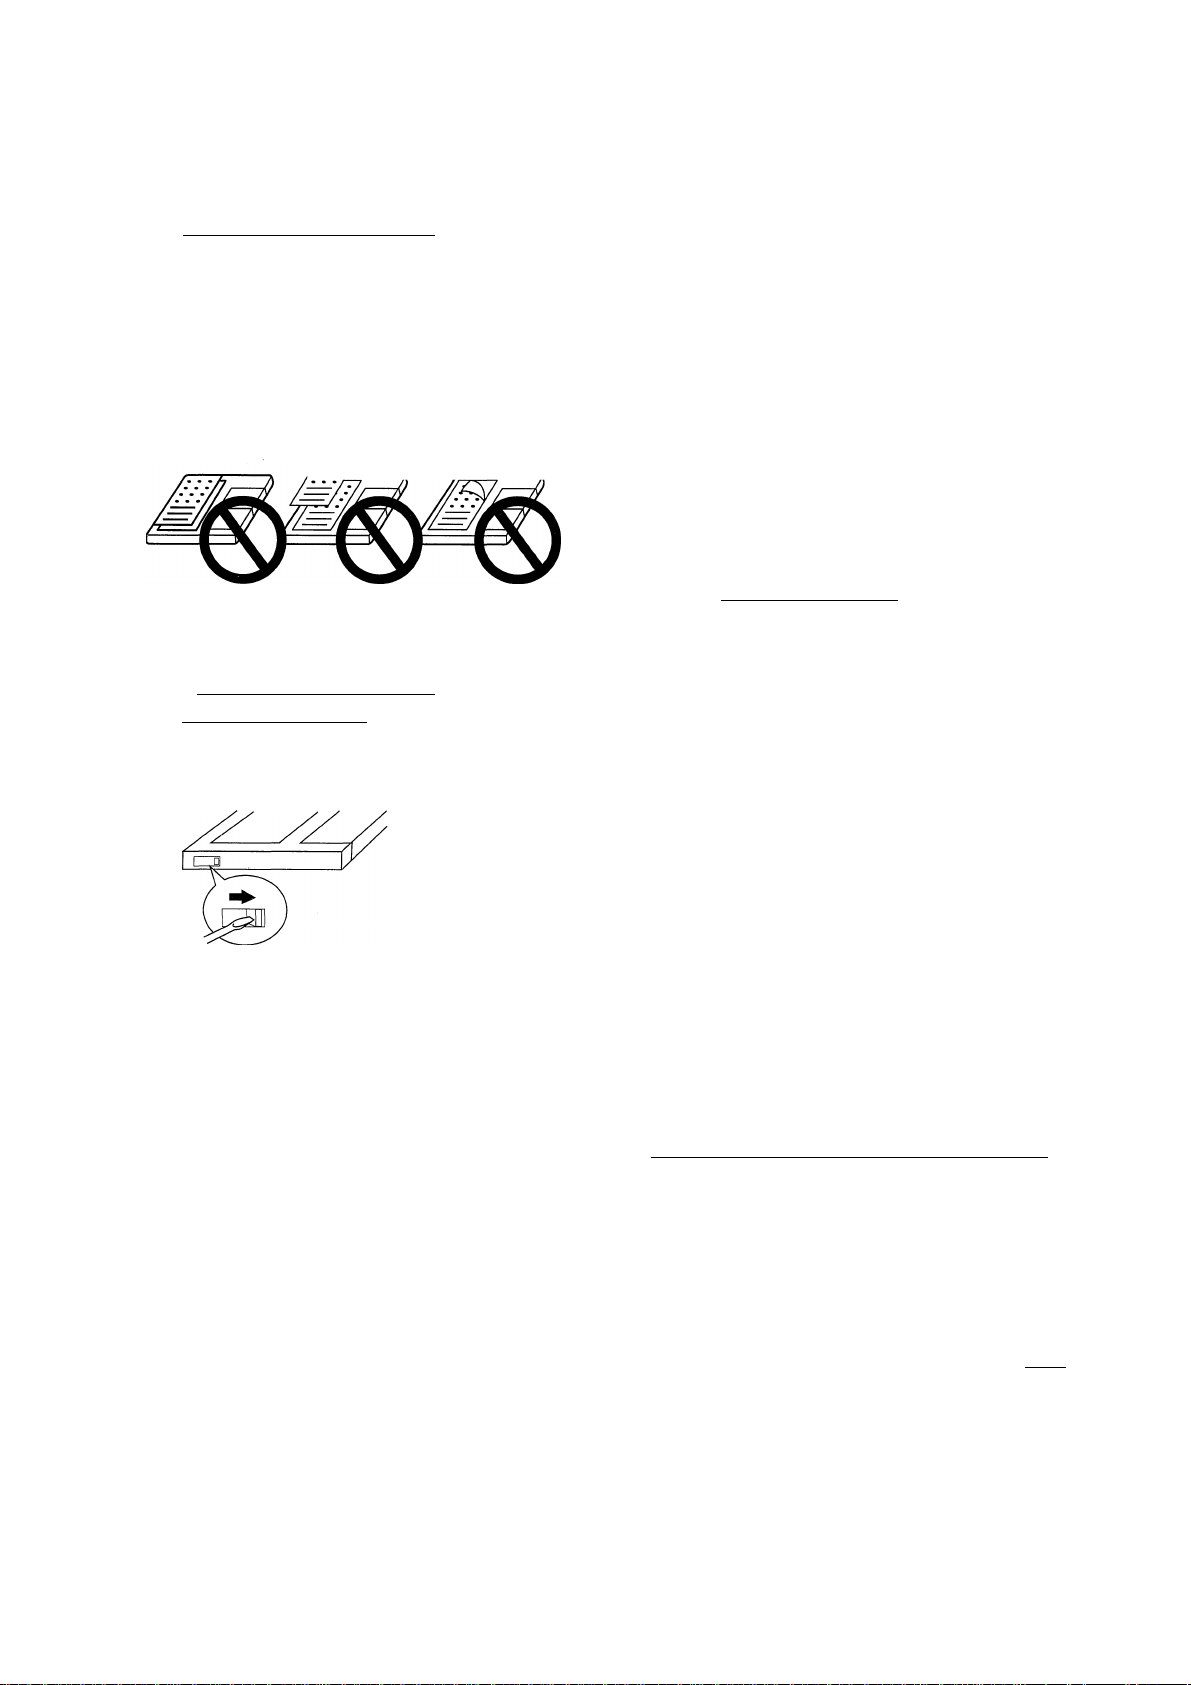
ACCESSORIES — Do not place this product on an
unstable cart, stand, tripod, bracket, or table. The
product may fall, causing serious injury to a child or
adult, and serious damage to the product. Use only
with a cart, stand, tripod, bracket, or table
recommended by the manufacturer, or sold with
the product. Any mounting of the product should
follow the manufacturer's instructions, and should
use a mounting accessory recommended by the
manufacturer.
CART — A product and cart combination should be
moved with care. Quick stops, excessive force, and
uneven surfaces may cause the product and cart
combination to overturn.
VENTILATION — Slots and openings in the cabinet are
provided for ventilation and to ensure reliable
operation of the product and to protect it from
overheating, and these openings must not be
blocked or covered. The openings should never be
blocked by placing the product on a bed, sofa, rug,
or other similar surface. This product should not be
placed in a built-in installation such as a bookcase or
rack unless proper ventilation is provided or the
manufacturer's instructions have been adhered to.
POWER SOURCES — This product should be operated
only from the type of power source indicated on the
marking label. If you are not sure of the type of
power supply to your home, consult your product
dealer or local power company.
LOCATION - The appliance should be installed in
a stable location.
NONUSE PERIODS - The power cord of the ap
pliance should be unplugged from the outlet
when left un-used for a long period of time.
GROUNDING OR POLARIZATION
• If this product is equipped with a polarized alternating
current line plug (a plug having one blade wider than
the other), it will fit into the outlet only one way. This
is a safety feature. If you are unable to insert the plug
fully into the outlet, try reversing the plug. If the plug
should still fail to fit, contact your electrician to
replace your obsolete outlet. Do not defeat the
safety purpose of the polarized plug.
• If this product is equipped with a three-wire
grounding type plug, a plug having a third (grounding)
pin, it will onlyfit into a grounding type power outlet.
This is a safety feature. If you are unable to insert the
plug into the outlet, contact your electrician to
replace your obsolete outlet. Do not defeat the
safety purpose of the grounding type plug.
POWER-CORD PROTECTION — Power-supply cords
should be routed, so that they are not likely to be
walked on or pinched by items placed upon or
against them, paying particular attention to cords at
plugs, convenience receptacles, and the point where
they exit from the product.
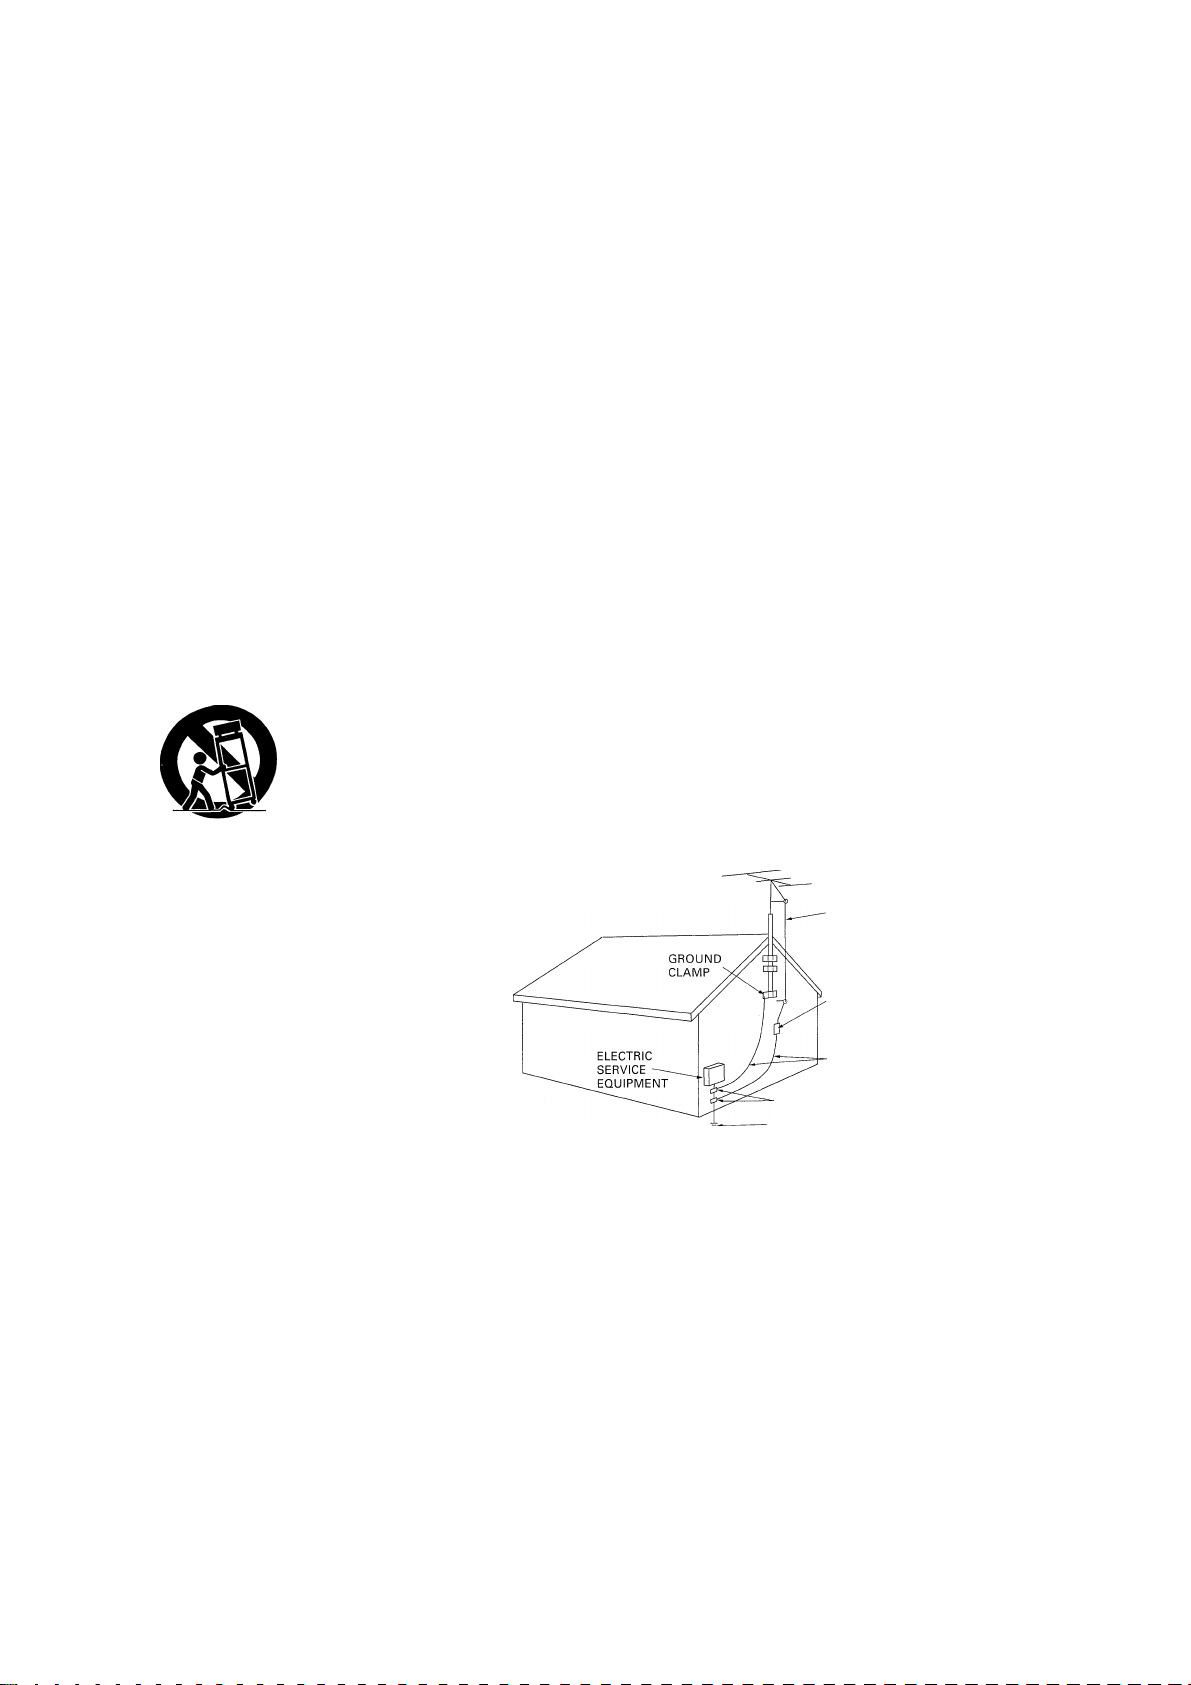
OUTDOOR ANTENNA GROUNDING — If an outside
antenna or cable system is connected to the product,
be sure the antenna or cable system is grounded so
as to provide some protection against voltage surges
andbuilt-upstaticcharges. Article 81 Oof the National
Electrical Code, ANSI/NFPA70, provides information
with regard to proper grounding of the mast and
supporting structure, grounding of the lead-in wire
to an antenna discharge unit, size of grounding
conductors, location of antenna-discharge unit,
connection to grounding electrodes, and
requirements for the grounding electrode. See Figure
A.
LIGHTNING — For added protection for this product
during a lightning storm, or when it is left unattended
and unused for long periods of time, unplug it from
the wall outlet and disconnect the antenna or cable
system. This will prevent damage to the product
due to lightning and power-line surges.
POWER LINES — An outside antenna system should
not be located in the vicinity of overhead power lines
or other electric light or power circuits, or where it
can fall into such power lines or circuits. When
installing an outside antenna system, extreme care
should be taken to keep from touching such power
lines or circuits as contact with them might be fatal.
OVERLOADING — Do not overload wall outlets,
extension cords, or integral convenience receptacles
as this can result in a risk of fire or electric shock.
Fig. A
OBJECT AND LIQUID ENTRY — Never push objects of
any kind into this product through openings as they
may touch dangerous voltage points or short-out
parts that could result in a fire or electric shock.
Never spill liquid of any kind on the product.
SERVICING — Do not attempt to service this product
yourself as opening or removing covers may expose
you to dangerous voltage or other hazards. Refer all
servicing to qualified service personnel.
DAMAGE REQUIRING SERVICE — Unplug this product
from the wall outlet and refer servicing to qualified
service personnel under the following conditions:
• When the power-supply cord or plug is damaged.
• If liquid has been spilled, or objects have fallen into
the product.
• If the product has been exposed to rain or water.
• If the product does not operate normally by following
the operating instructions. Adjust only those controls
that are covered by the operating instructions as an
improper adjustment of other controls may result in
damage and will often require extensive work by a
qualified technician to restore the product to its
normal operation.
• If the product has been dropped or damaged in any
way.
• When the product exhibits a distinct change in
performance — this indicates a need for service.
REPLACEMENT PARTS — When replacement parts
are required, be sure the service technician has used
replacement parts specified by the manufacturer or
have the same characteristics as the original part.
Unauthorized substitutions may result in fire, electric
shock, or other hazards.
SAFETY CHECK — Upon completion of any service or
repairs to this product, ask the service technician to
perform safety checks to determine that the product
is in proper operating condition.
WALL OR CEILING MOUNTING — The product should
not be mounted to a wall or ceiling.
HEAT — The product should be situated away from heat
sources such as radiators, heat registers, stoves, or
other products (including amplifiers) that produce
heat.
ANTENNA
DISCHARGE UNIT
(NEC SECTION 810-20)
GROUNDING CONDUCTORS
(NEC SECTION 810-21)
GROUND CLAMPS
POWER SERVICE GROUNDING
ELECTRODE SYSTEM
(NEC ART 250, PART H)
NEC — NATIONAL ELECTRICAL CODE
This equipment has been tested and found to comply with the limits for a Class B digital device, pursuant to Part 15 of the
FCC Rules. These limits are designed to provide reasonable protection against harmful interference in a residential installa
tion. This equipment generates, uses, and can radiate radio frequency energy and, if not installed and used in accordance
with the instructions, may cause harmful interference to radio communications. However, there is no guarantee that interfer
ence will not occur in a particular installation. If this equipment does cause harmful interference to radio or television recep
tion, which can be determined by turning the equipment off and on, the user is encouraged to try to correct the interference
by one or more of the following measures:
- Reorient or relocate the receiving antenna.
- Increase the separation between the equipment and receiver.
- Connect the equipment into an outlet on a circuit different from that to which the receiver is connected.
- Consult the dealer or an experienced radio/TV technician for help.
<PRB1285>
Page 4

Features of the MJ-D508 MD Recorder
Sound quality and flexibility
Minidisc technology delivers sound quality connparable to that of compact disc,
and adds recording and editing capabilities that make it far more flexible and easy
to use than either CD-R (compact disc recordable) or DAT (digital audio tape).
Because the discs themselves are small and are housed in a protective cartridge,
MD is also an ideal format for music on the move. Use the MJ-D508 to make high
quality digital recordings from other components in your stereo system which you
can then use with your portable or-car MD player wherever you go.
_____
_____
_____
_____
Advanced Parameter Processing
To fit over an hour of high quality stereo audio on such a small disc, MD uses a
much more compact digital coding system than CD—there's around 80% less
digital data on an MD than on a CD. The basic technology that makes this possible
is called Adaptive Transform Acoustic Coding (ATRAC for short), and is present in
all MD players and recorders. Advanced Parameter Processing is a Pioneer
technology that further improves the sound quality of MD by providing extremely
precise control over the ATRAC process.
Digital recording levels control
The MJ-D508 gives you more control over digital recording levels than most other
digital recorders, allowing you to raise or lower the level as appropriate. This can
be especially useful for equalizing the average recording levels when making 'mix
discs' compiled from various sources.
Digital Noise Reduction
Pioneer's Digital Noise Reduction (dnr) technology reduces audible noise both on
playback and recording. This means that you can use it to make better sounding
recordings from sources such as analog cassette tapes, and use it on existing
MDs that were recorded from noisy sources.
РАС function
You can use the high quality digital/analog converter (DAC) in the MJ-D508 to
improve the sound quality of other components in your audio system—analog
and digital. Use it together with the Digital Noise Reduction feature for cleaner
playback of records and analog cassette tapes, or use it to improve the sound of
other digital components by taking advantage of the latest in DAC technology.
<PRB1285>
_____
_____
Advanced editing
The MJ-D508's editing features are quick and intuitive to use, yet extraordinarily
powerful with precise control. Moving individual tracks, re-ordering the whole
disc, combining and dividing tracks into new tracks, erasing tracks or sections of
tracks, naming and copying disc and track names can all be achieved with just a
few button presses. And if you make a mistake, you can always undo last edit
operation—even if you just accidently erased the whole disc.
Recovery recording
If you've ever just missed the beginning of something because you didn't get to
the record start button in time, you'll appreciate the recovery recording feature.
This lets you start recording from six seconds before you hit the record start
button. When recording, or in record-standby mode, the recorder stores the last
six seconds of audio passing through the unit, so when you choose recovery
recording, the recorder simply records those last six seconds to the disc in
addition to the material coming afterwards.
Page 5

Before You Start
Connecting Up
What's What
Playing Discs (the basics)
Making a Recording (the basics)
Playing Discs (beyond the basics)
Making a Recording (beyond the basics)
Editing a Disc
Using the DAC
Checking What's in the Box
Hints on Installation..........................
About Minidiscs.................................
Connecting Up for Digital Playback and Recording .
Connecting Up for Analog Playback and Recording
Front Panel
Display
Remote Control
Switching On for the First Time..
Choosing a Track to Play
Skipping Tracks..........................................
Skipping Time
Fast-Forwarding/Reversing
Displaying Disc Information
Reducing Noise during Playback
Recording Using a Digital Input
Recording Using the Analog Inputs .
Reducing Noise during Recording ...
Starting a Recording Automatically .
Playing Things Again ....................................
Playing Tracks at Random
Programming the Track Order
Playing Non-Stop Music................................
Fading Out and Fading In
Searching for a Track
Scanning a Long-play Disc
Using a Timer for Future Playback.
Fading in Using a Timer................................
Setting the Digital Recording Level
Recording Over Unwanted Material
Recovering Lost Time.............................................................
Automatically Numbering Tracks
Manually Numbering Tracks during Recording .
Recording Extra-Long Material..............................................
Recording Fade Ins and Fade Outs
Using a Timer for Future Recording .....................................
Introduction.............................................................
Naming a Disc........................................................
Naming a Track......................................................
Copying Track Names to Other Tracks
Dividing a Track into Two......................................
Combining Two Tracks into One..........................
Moving Tracks on a Disc.......................................
Reordering Tracks on a Disc
Erasing a Whole Disc
Erasing individual Tracks
Erasing a Section of a Track
Undoing a Mistake
Writing the UTOC...................................................
Using the DAC.
..............
.....................
......
..........................
...................................
......................
......................
......................
...........................
.....................
............................
....................................
...........................
.......................................
......................................
...........................................
......................................
................................
...........................................
......................................
................................
...............................................
. 7
. 7
10
11
12
13 3
14
15
16
16
17
17
18
18
19
20
21
21
mmt
22
22
23
24
24
25
25
26
26
27
28
28
29
29
30
30
31
32
32
33
34
35
36
37
38
38
39
39
40
41
42
•a
*3
■s
■0
(D
a)
0
D
&)
o"
O
(P
0
3
(/)
Additional Information
Understanding Error Messages.
Troubleshooting
Specifications............................................
........................................
44
45
46
<PRB1285>
Page 6

Thank you for buying this Pioneer product. Before starting to set up your new minidisc
recorder, please check that you've received the following supplied
accessories in the box:
® Two sets of stereo audio cords for connecting the recorder to your amplifier.
@ An optical digital cord for connection to another digital component. (Not supplied
in the U.S.)
@ Remote Control unit.
® Two 'AA size lEC R6P batteries for use with the remote control (see below for
how to load them).
® AC power cord (multi-voltage models only).
® Plug adaptor (multi-voltage models only).
Also included in the box is your warranty card (European and US models only).
Using this manual
This manual is for the MJ-D508 Minidisc Recorder. It is split into two broad sections,
the first covering set up, and the second, operation. Set up, which starts here, covers
all aspects of getting your new minidisc recorder up and running with the rest of your
stereo system. If this is the first time you've used minidiscs, we recommend reading
the About Minidiscs section starting on the following page before using the recorder for
the first time.
In the second section of the manual, starting on page 12, you'll learn how to use every
feature of the MJ-D508, from basic playback to advanced disc editing. The final part of
the manual provides reference information on error messages you might encounter
during use, a troubleshooting page, and technical specifications.
Line voltage selector
dial set to 240V
____
Putting the batteries in the remote control
Turn over the remote control, then press and slide the battery compartment cover off.
Put in the batteries supplied, taking care to match the plus and minus ends of
each battery with the markings inside the compartment.
Slide the cover back on, and your remote is ready for use.
CAUTION!
Incorrect use of batteries can result in hazards such as leakage and bursting. Please
observe the following:
❖ Don't mix new and old batteries together
❖ Don't use different kinds of battery together—although they may look similar,
different batteries may have different voltages.
❖ Make sure that the plus and minus ends of each battery match the indications in
the battery compartment.
❖ Remove batteries from equipment that isn't to be used for a month or more.
Rear panel line voltage selector dial
Multi-voltage models are provided with a dial to match the unit to the local voltage.
Always check that this selector is set properly before plugging the power cord into the
wall outlet. To set the voltage dial:
® Disconnect the power cord.
@ Use a small-sized screwdriver.
@ Insert a screwdriver into the groove on the voltage selector, and adjust so that the
voltage marking on the dial aligns with the volts marking on the rear panel.
Note: U.S. and European models are not provided with this dial.
Mains voltages in Saudi Arabia are 127V and 220V only.
<PRB1285>
Page 7

Hints on Installation
We want you to enjoy using the MJ-D508 for years to conne, so please bear in nnind the following points when choosing a
suitable location for it:
DO..
Use in a wejhventilated room.
Place on a solid, flat, level surface, such as a table, shelf
or stereo rack.
Avoiding condensation
problems
Condensation may form inside the recorder
if it is brought into a warm room from
outside, or if the temperature of the room
rises quickly. Although the condensation
won't damage the recorder, it may tempo
rarily impair its performance. For this reason
you should leave it to adjust to the warmer
temperature for about an hour before
switching on and using.
PONT.
❖ Use in a place exposed to high temperatures or
humidity, including near radiators and other heat
generating appliances.
❖ Place on a window sill or other place where the
recorder will be exposed to direct sunlight.
❖ Use in an excessively dusty or damp environment.
❖ Place directly on top of an amplifier, or other component
in your stereo system that becomes hot in use.
❖ Use near a television or monitor as you may experience
interference—especially if the television uses an indoor
antenna.
❖ Use in a kitchen or.other room where the recorder may
be exposed to smoke or steam.
❖ Place on an unstable surface, or one that is not large
enough to support all four of the unit's feet.
About Minidiscs
Minidisc, or MD as it's usually called, is an extremely flexible and convenient format on which you can both playback and record
high-quality digital audio. Because it's a disc, MD has many of the advantages of compact disc—you can jump directly to any
track on the disc, program the playing order, instantly skip over tracks you don't want to play or back to tracks you want to play
again, and so on. The really great thing about MD though is the flexibility it offers when recording. Things that were impossible
using analog cassette tape, such as reordering tracks, programming track names, and deleting sections or tracks without
leaving any gaps are all easily achieved if you're using MD. Minidiscs have other advantages over cassette tape; the recorder
automatically finds the next blank space to record on, and can tell you how much room there is left on a disc before you start
recording. When you delete something fromothe disc, the time available for recording is automatically updated.
If this is the first time you've used MD, please take a few minutes to read through this section of the manual. It gives
information on how to handle the discs properly, the different kinds of disc available, and some basic MD characteristics.
____
Different kinds of MD available
All MDs carry this mark:
Do not use any disc which
does not have this mark.
There are both recordable and non-recordable (playbackonly) MDs. Commercially available music on MD generally
comes on discs which are playback only. The diagrams
below show the differences between the two types.
Playback-only MD
Disc has
shutter
, on one
side only.
□□□□□
OiE
□
Recordable MD
Disc
label
Disc has
^ shutters
on both
sides.
Handling MDs
The actual disc that contains the audio is quite delicate
and so is protected against dust, fingerprints and so on
by an outer cartridge. Don't force open the disc shutters
to expose the disc, and never touch the disc itself. Also,
do not attempt to disassemble the disc cartridge,
if the disc cartridge becomes dirty or stained, wipe clean
with a soft, dry cloth.
Shutter
Disc
Cartridge
<PRB1285>
Page 8
____
Storing and labeling MDs
When you're not playing a nninidisc, put the disc cartridge
back in the case for storage. Avoid storing or leaving discs
in very hot or humid areas, such as in a car in summer.
Also avoid leaving discs in direct sunlight, or in places
where sand or grit might get into the disc cartridge.
Recordable MDs come with self-adhesive labels to stick on
the disc cartridge to tell you what's recorded on the disc.
Always stick the label in the area provided, avoiding the
disc shutter and the edges of the disc.
If the disc label starts to peel off at the corners, remove
the label and replace it with a fresh one—don't simply
stick another label on top of the old one.
Protecting an MD against
____
accidental erasure
Once you've recorded a disc, it's a good idea to protect
it against accidental erasure by sliding the tab on the
side of the disc to the open position.
Compact discs have a sampling frequency of 44.1 kHz,
which happens to be the same as MDs. This means you
shouldn't run into problems making digital recordings of
CDs or other MDs (although see Copying restrictions
below for exceptions to this).
Other digital sources you may come across (DAT, digital
satellite and dvd) often use different sampling rates—
specifically, 32kHz and 48kHz. The MJ-D508 can handle
these too, and, at the time of writing, these are by far the
most common sampling rates around. There is, however,
a trend towards higher sampling rates. Some DVD discs
and DAT tapes are recorded at 96kHz. The MJ-D508
cannot handle this rate, and you'll have to record via the
analog terminals of the DVD or DAT recorder to the analog
inputs of the MJ-D508.
____
Copying restrictions
You may run into problems making digital copies of some
sources, even when the sampling rate is compatible.
Some DVD discs disable the DVD player's digital output to
prevent illegal digital copying (you can still record via the
analog outputs though).
Another restriction on digital copying comes from some
thing called SCMS, which stands for Serial Copy Manage
ment System. This stops you making multiple-generation
digital recordings and is aimed at preventing illegal digital
copying of copyright material. The number of generations
that SCMS will let you make depends on the source.
If you want to erase or re-record the disc, simply slide
the tab back to the closed position before loading the
disc into the recorder.
Analog and digital recording
Whatever you record onto an MD is stored on the disc as
digital data (in other words, numbers). This is what we
mean when we say that MD is a digital format. However,
what you feed into the MJ-D508 to record can be either
analog (such as the output from a turntable or a tuner), or
digital (such as the direct digital output from a CD player,
or another MD recorder).
If you record an analog signal, the recorder has to first
change it into a digital form before writing it onto the disc.
If you're recording from another digital format, like a CD, it
makes sense to just record the digital data directly. This is
usually not a problem, but there are a couple of points to
bear in mind.
All digital audio has something called a 'sampling rate',
which is measured in kHz (kilohertz). The quality of the
final sound depends to a large extent on this: the higher
the better.
CD MD
Digital connection Digital connection
MD
Digital audio from CD, DVD or DAT can be copied
digitally for one generation only.
\ \ I / \ \ /
I Satellite 1I md md | md |
Digital connection Digital connection Digital connection
Audio from digital satellite can usually be copied
digitally for two generations. (Sometimes just one
generation is possible.)
]
Any source[==j> | MD
Analog
connection
Digital connection Digital connection
MD
J MD ~|
A recording made from any source via analog inputs can be digitally copied once only.
<PRB1285>
Page 9

____
About the Table of Contents
When you load any kind of nninidisc into the recorder, the
first thing it does is read a section of the disc called the
Table of Contents, or
book tells the reader what each chapter is about and
where to find it in the book, the TOC tells the recorder
where the tracks are on the disc, the name and length of
each track, the name of the disc, and so on. in the couple
of seconds it takes to read all this, the recorder's display
shows the message TOC Reading.
Since you can change what's on a recordable MD, the
Table of Contents is rewritable, and so is called the User
Table of Contents, or UTOC for short. If you have a
recordable disc loaded in the recorder and hit eject, the
recorder automatically updates the UTOC before giving you
____
About MD System Limitations
The sophisticated playback, editing and recording features
available to you with MD are possible because of the way
in which the sound data is stored on the disc together
with the system of TOCs and UTOCs described above.
There are times however when you might encounter odd
TOC. Just as the contents page of a
the disc back. Alternatively, you can have the recorder
update the UTOC at any time using the UTOC write
function. In both cases, the message UTOC Writing
appears in the display during the UTOC updating process.
The UTOC is vital for the recorder to be able to play a disc
correctly. Until you hit eject or perform a UTOC write
command, the recorder stores all the current session's
recording and editing information in its memory. If there's a
power failure or you accidently switch the recorder off
before it's had a chance to write the UTOC there's a danger
that all that disc information will be lost. To prevent this,
switch the recorder back on as soon as possible and eject
the disc, if you leave the unit off for a week or more, the
information stored in the memory will be permanently lost
and the recordings/edits on that disc lost.
side-effects of the way the system works. These are not
malfunctions, but limitations of the system. Below is a list
of symptoms you may run across depending on the way
you record or edit discs.
Symptom
The recorder shows the message
TOC full even though there are fewer
than 255 tracks on the disc (the
maximum possible).
The recorder shows the message Disc
full before you've reached the maxi
mum recording time of the disc.
The amount of recording time available
doesn't increase after erasing some
short tracks.
The total recorded time, plus the
recording time remaining, appears to be
less than the length of the disc.
The recorder won't allow you to
combine two tracks into one during
editing.
The sound is interrupted during fast
forward or reverse.
MD System Limitation
Although when you listen to a disc it appears that each track sits end to end in an
unbroken sequence, the actual audio information may be scattered all over the disc in
different places. The more times you record and edit things on a disc, the more
scattered the information becomes. Usually, this doesn't affect the user; the recorder
keeps track of everything using the UTOC. However, because the recorder needs to
know where every little gap is on the disc (and counts each one as a track, although
you don't see it), the UTOC eventually fills up, and the recorder won't let you record
anything else on that disc. Erasing a complete track, or the entire disc cures the
problem.
If a disc is scratched or damaged in some way, that part of the disc becomes auto
matically unavailable for recording. In this case, the recorder shows the reduced
recording time available.
If you erase a track which is less than 12 seconds long, the recorder can't add that
time to the available recording time.
Recording time on a disc is divided into two second blocks—^the smallest 'unit' of a
minidisc. Although a piece of audio data may be shorter than this, it still takes up two
seconds on the disc, and the remainder is 'lost' (until the whole block is erased). As
the number of these partially used blocks builds up, you might notice that the total
disc length appears to shorten. (See also the note about damaged discs above.)
There are two situations where you can't use the combine edit feature:
❖ When one of the tracks was recorded using the digital input, and the other using
the analog input.
❖ When one track was recorded in long-play mono mode, and the other in normal
stereo mode.
As we mentioned above, the more re-recording and editing you do on a disc, the
more scattered the audio information on the disc becomes. During fast forward or
reverse this may show up as interrupted sound.
<PRB1285>
Page 10

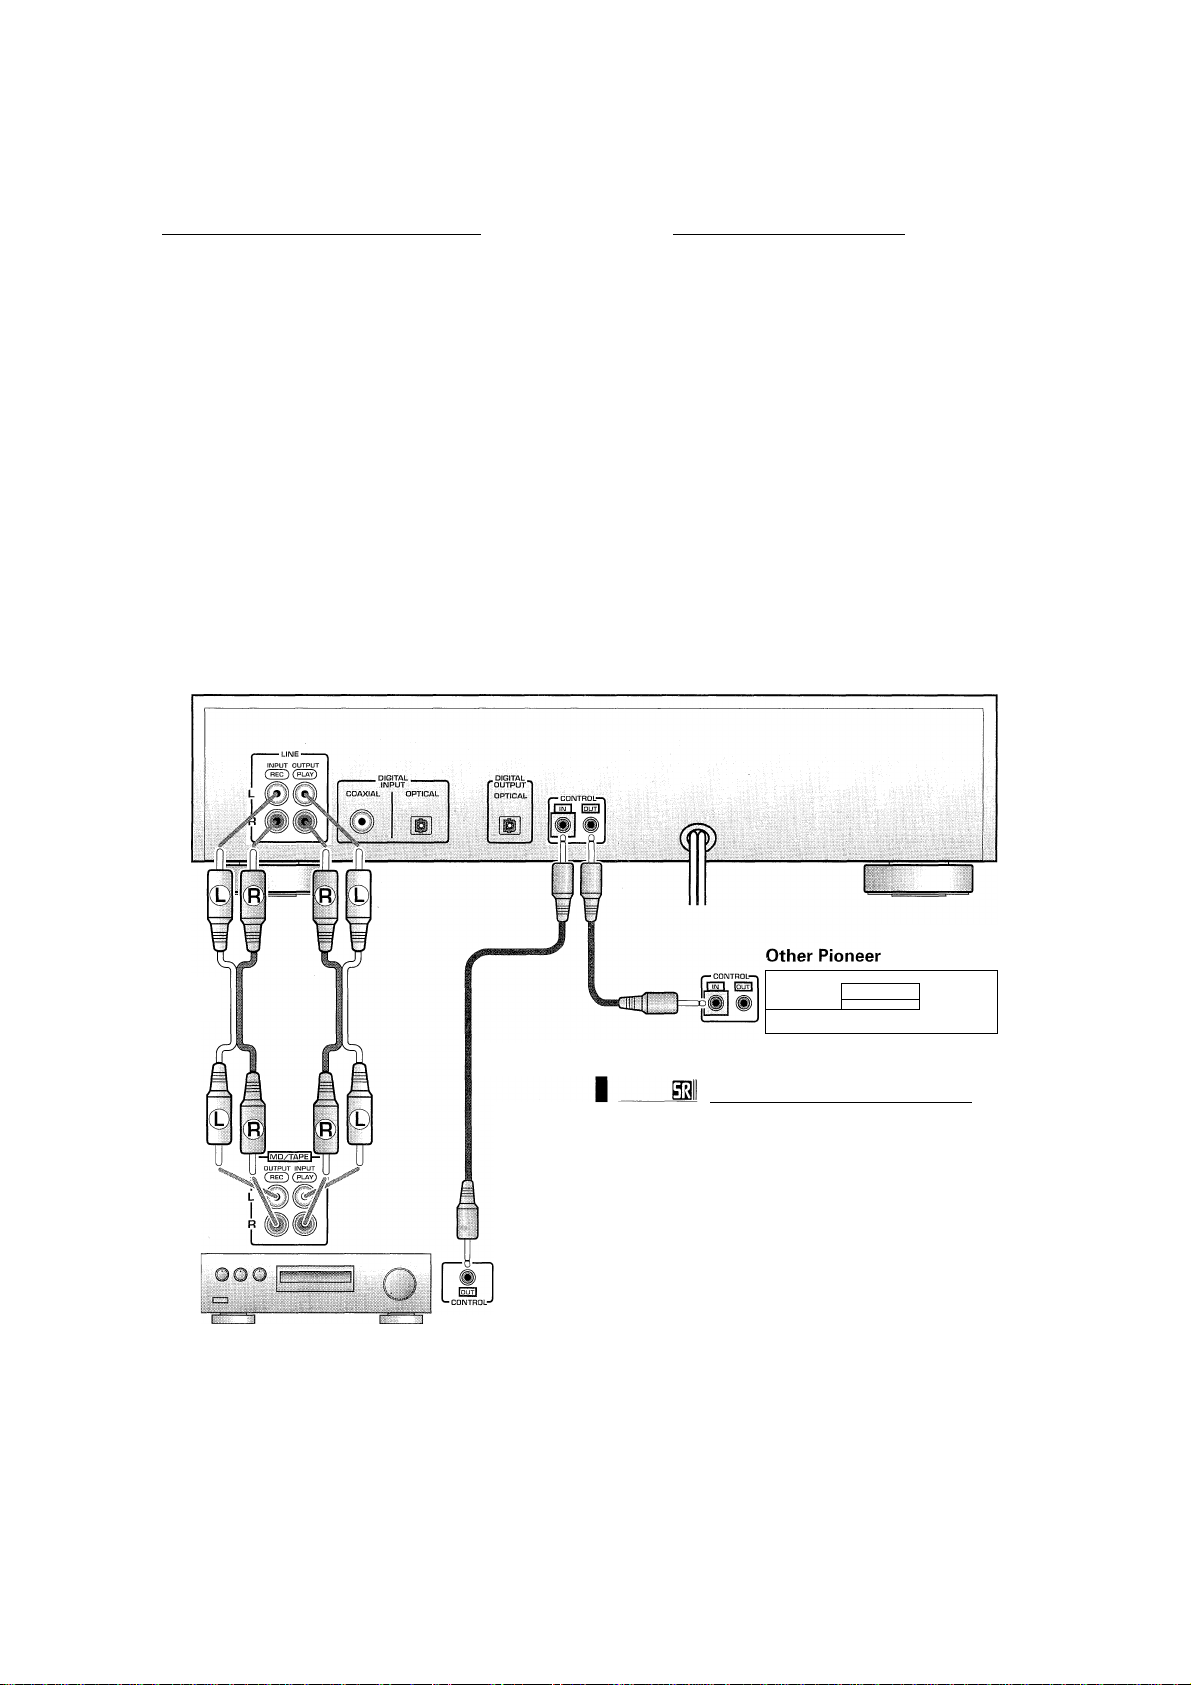
Connecting Up for Digital Playback & Recording
Jf you want to use the DAC function please make the connections on this page and the following page as well (for an
explanation of the DAC function see p. 42).
<PRB1285>
____
Before you start...
There are various ways to integrate the MJ-D508 into
your stereo system, depending on what other equipment
you have and what you want to do. The diagrams on this
and the following page show possible connections with
various other components. Before you start connecting
your system, make sure that all the components are
switched off and disconnected from the wall outlet.
____
About optical and coaxial jacks
The MJ-D508 has both optical and coaxial jacks for digital
input (from a CD player or another MD recorder, for
example). This is for convenience only; there's no differ
ence at all in the sound quality, but since some equipment
has only one type of connector—and you can only
connect like with like—having both on this recorder can
be an advantage. If your other component also has both,
connect whichever is more convenient.
If you're using the coaxial-type digital input you'll need a
lead with an RCA/phono plug at each end (the same type
of connector as the audio cables supplied).
To use the optical jack, first pull out
the dust cap. Keep it for futur^use.
The optical lead (supplied, except in
the US) will only go in one way, so
match up the jack and the plug
before inserting.
Take care not to bend optical cable
around sharp corners when installing
as this can damage the cable. When storing optical cable,
coil loosely.
Connecting to an amplifier
____
with a digital input
The most basic connection is an output to your amplifier
or receiver so that you can hear the disc your playing. If
you own an amplifier/receiver with a PCM-compatible
optical digital input (check your amplifier/receiver's
instruction manual if you're unsure about this), you can
connect it to the digital output of this unit., However,
there may be no advantage in doing this over using the
analog connections shown opposite—use your ears to
judge which sounds better.
Page 11
____
Other uses for the digital output
If you have another digital recorder, such as a CD-R or DAT
deck, you might want to use this unit as a digital source. In
this case, connect the optical digital output of the MJ-
D508 to an optical digital input of your other digital
recorder.
i^P
____
Using the digital inputs
To make direct digital recordings on the MJ-D508 you'll
need to connect the digital output of a source (like a CD
player or another MD recorder) to a digital input on this
unit. To make recordings from analog sources (like a
turntable or analog cassette deck) it's usually easiest to
connect this recorder to your amplifier/receiver's tape
inputs and outputs—see below for more on this.
Connecting Up.
Before you start, make sure that all the components are
switched off and disconnected from the wall outlet.
Next, connect this unit to your amplifier/receiver using the
two sets of supplied audio leads—one set for playback,
the other for recording. On the rear panel of your amp find
an unused set of inputs/outputs for a tape/MD recorder
(check the instruction manual that came with your amp if
you're unsure about which terminals to use).
Supplied
audio leads
& Recording
Using this set up you can make recordings from any other
component connected to the amplifier, via the analog
inputs of this unit.
Even if you connected this unit to your amplifier/receiver
using the optical digital out (see previous page), it may be
convenient to also connect it using the analog terminals.
This will allow you to make recordings from MD to analog
cassette tape, for example.
component
Amplifier
Pioneer S out
Note: Rear panel shown is that of US model; others may
look slightly different. In particular, models for some other
regions do not have Pioneer^ connectors.
Connecting Other Pioneer
Components (except Europe)
If you are using a Pioneer amplifier or receiver that has this
feature, you can control this unit with the multi-remote
controller that came with your amplifier/receiver. The
advantage of this is that you can use a single remote control
to operate several components. Check the instruction
manual that came with your amplifier or receiver for more
information on using its remote as a multi-controller.
Use a commercially available cord with a mono mini-plug
at either end to connect the CONTROL out terminal of the
amplifier/receiver to the CONTROL in terminal of this unit. If
you have more components using the same system you
can just daisy chain them together, making sure the
CONTROL OUT
the CONTROL IN of another.
Make sure that at least one set of analog terminals is
connected to the amplifier when using H control cords.
of one component is always connected to
<PRB1285>
Page 12
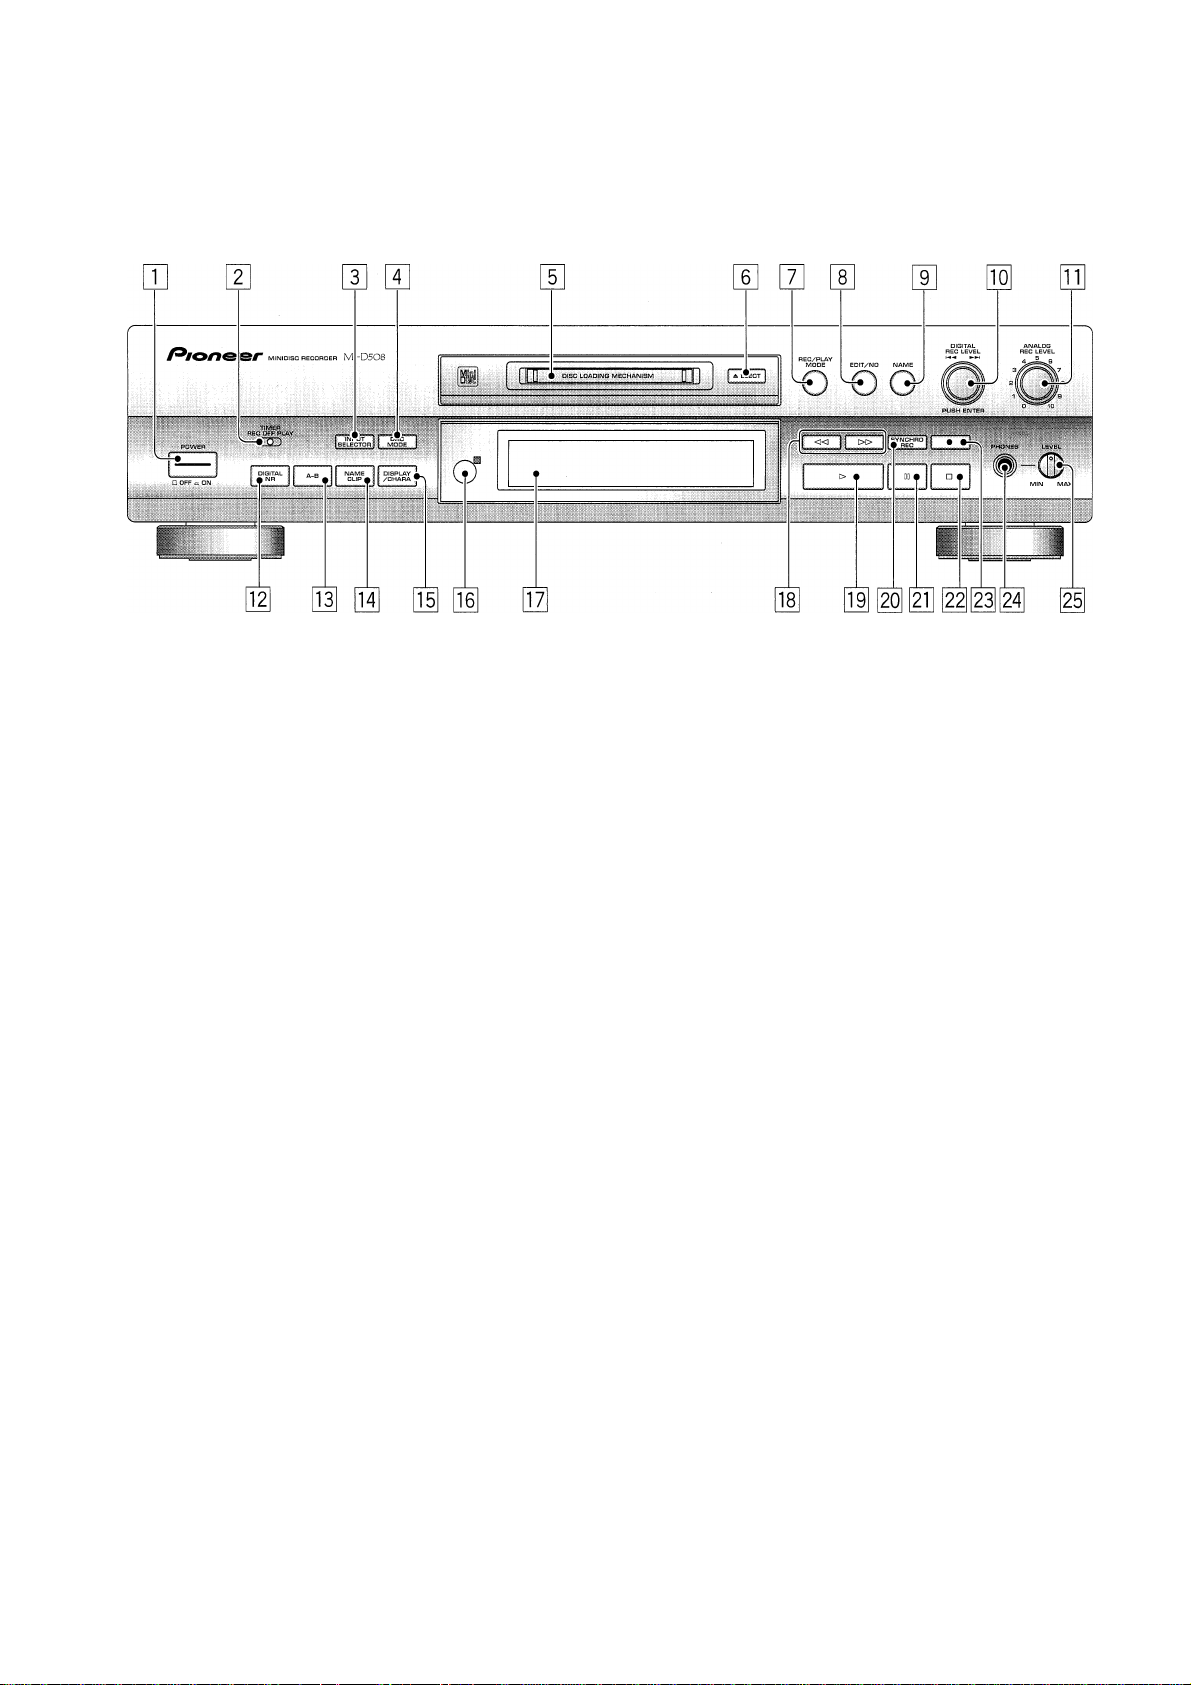
Front Panel
m POWER ON/OFF
Switches power to the unit on and off.
[2] TIMER (REC/OFF/PLAY) (p.26,31)
Switches the timer mode between timer-controlled
recording, timer-controlled playback, and timer off.
a INPUT SELECTOR (p.19,20,42)
Switches between the analog, optical digital and
coaxial digital inputs.
H] DACMODE (pp.42-43)
Press to switch on/off the DAC function.
[5] MD loading slot
[3 EJECTS
Press to eject a disc from the recorder.
[7] REC/PLAY MODE (p.24, 25, 26, 27, 29, 30)
Press to access various record and playback options.
3 EDIT/NO.
Press to access various editing features.
3 NAME (pp.32-33)
Press to enter and exit the disc/track naming process.
3 DIGITAL REC LEVEL /
Multifunction control used to set the digital recording
level (p.27), skip time/tracks (pp.16-17), choose
between different menu options, and select charac
ters in disc/track naming mode (pp.32-33). Push to
confirm selections.
[1 ANALOG REC LEVEL (p.20)
Use to set the recording level when the analog inputs
are used.
3 DIGITAL NR (p.18, 21, 42)
Press to switch digital noise reduction on/off during
playback or recording.
01 A-B(p.22,39)
Use to set a start point and an end point to mark a
section of the disc for editing or repeat play.
0 NAME CLIP (p.34)
Press to copy the current disc or track name to the
recorder's memory.
0 DISPLAY/CHARA
Press to switch between display modes (elapsed
time, time remaining, etc.) (p.l8), and between upper
and lower-case characters in disc/track naming mode
(pp.32-33).
01 Remote control sensor
Picks up the infrared signals from the remote control
unit.
0 Display (p.13)
01 ◄◄ and ►► (p.17)
Press and hold for fast-reverse and fast-forward
playback.
0 ► (p.15)
Press to start playback, (or recording)
a SYNCHRO REC (p.21)
Press to enter synchronous recording mode: recording
starts when the recorder senses an input signal.
3 II
Press to pause playback or recording.
Press to stop playback or recording.
• (pp.19-20)
Press to put the recorder into record-pause mode.
PHONES jack
Phones LEVEL
Use to raise or lower the headphone volume level.
<PRB1285>
Page 13
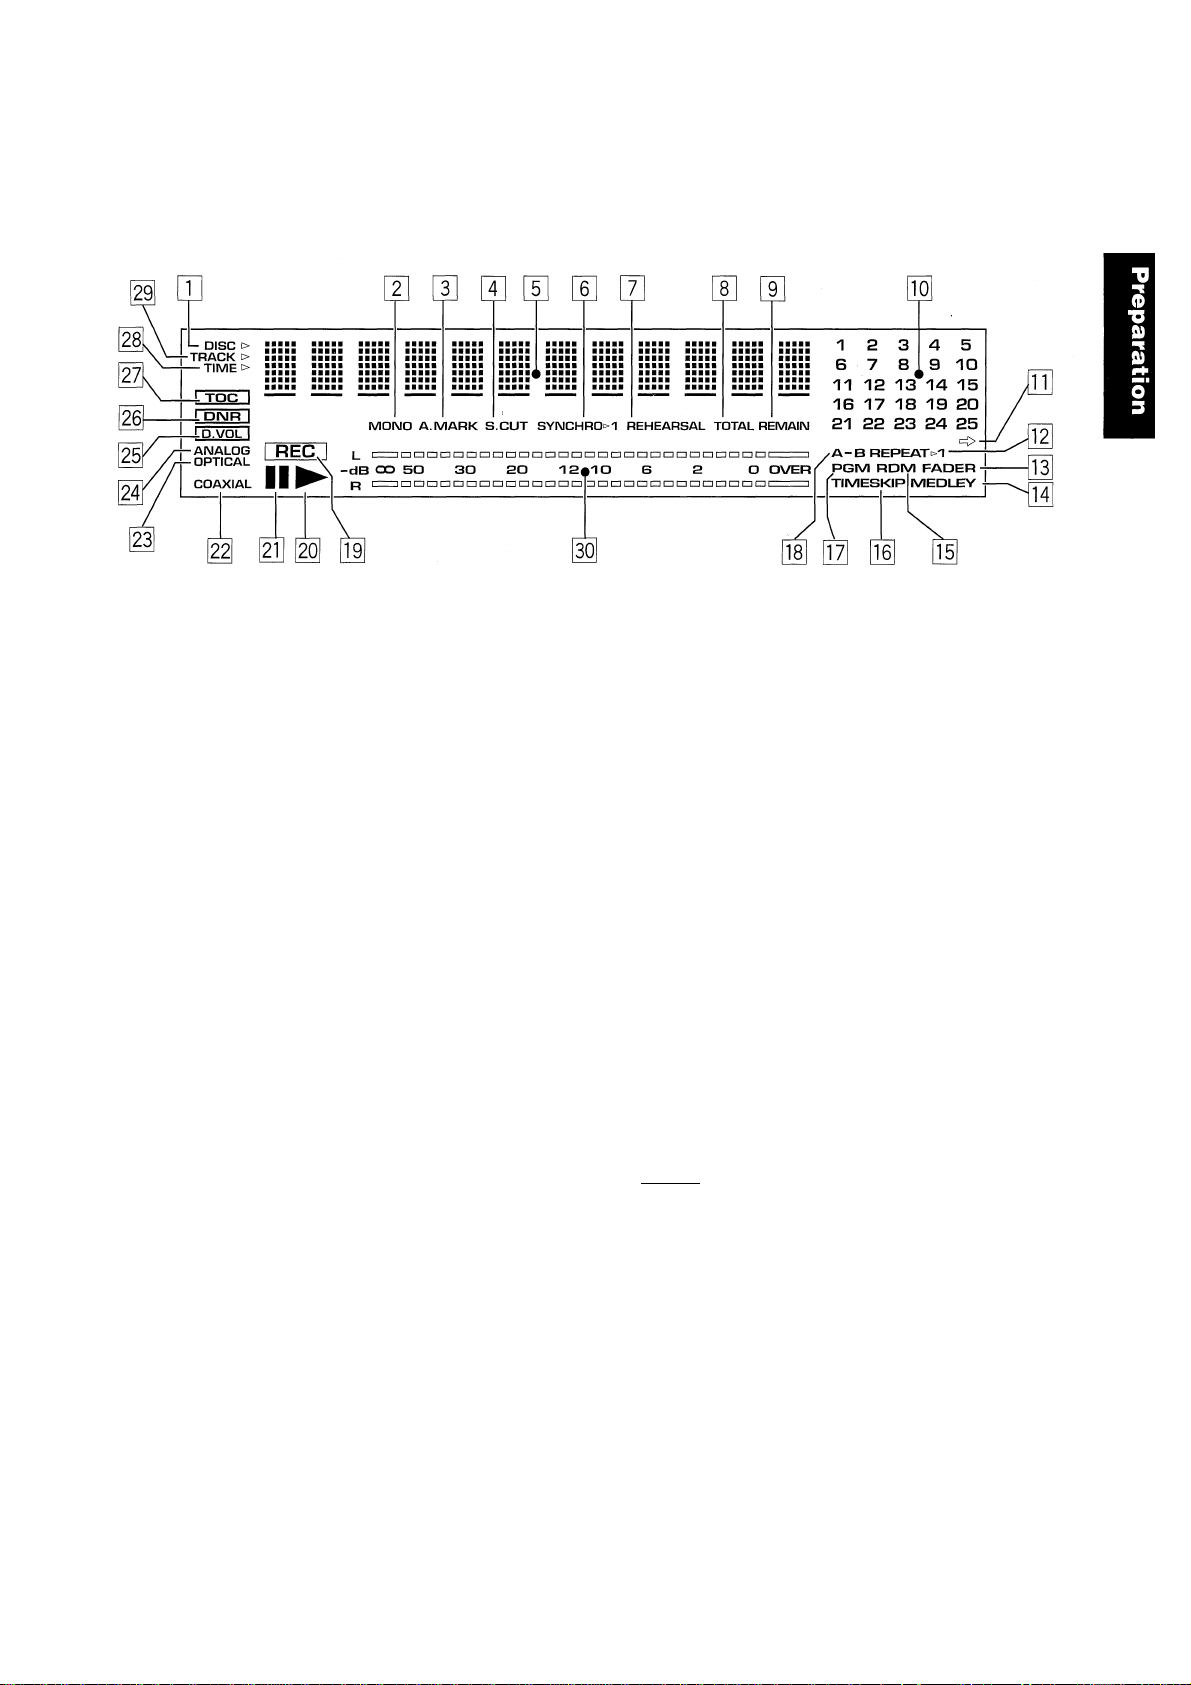
Display
DISC>
Indicates that the character display ([E) is showing
disc information (e.g. disc name).
[2] MONO (p.30)
Lights in long-play recording/playback mode,
d] A.MARK (p.29)
Lights when automatic track numbering is on.
H S.CUT (p.28)
Indicates that the space cut function is active,
d Character display
Displays recorder functions, disc/track names or disc
times, depending on the mode of the recorder.
d SYNCHRO {p.2D
Lights when sync recording mode is on.
d REHEARSAL (p.35,39)
Lights when auditioning the effects of an edit.
d TOTAL (p.18)
Lights to show that the current time displayed is how
far the recorder is into the disc,
d REMAIN (p.18)
Lights to show that the current time displayed is how
much time is left on the disc.
01 Track number display
Track numbers light to show how many tracks are on
the disc.
Indicates that the disc has more than 25 tracks.
OH REPEAT >1 (p.22)
Lights when the recorder is in repeat play mode.
01 FADER (p.24,30)
Lights when the recorder is in fade play mode.
0 MEDLEY (p.24)
Lights when the recorder is in medley play mode.
[d RDM (p.22)
Lights when the recorder is in random play mode.
TIMESKIP (p.17)
Lights when the recorder is in time-skip mode.
PGM (p.23)
Lights when the recorder is in program play mode.
A-B (p.22, 39)
Indicates that a section of disc has been marked.
REC (p.19-21)
Lights during record mode.
►
Lights during playback.
II
Lights when playback/recording is paused.
COAXIAL (p.19)
Lights when recording from the coaxial digital input.
OPTICAL (p.19)
Lights when recording from the optical digital input.
ANALOG (p.20)
Lights when recording from the analog inputs.
(p.27)D.VOL
Lights when the digital volume control is active.
DNR
(p.18, 21,42)
Indicates that Digital Noise Reduction is on.
I TOC I (p.9,19)
Indicates that there is TOC information in the
recorder's memory that hasn't been written to the
disc yet. When this display is lit don't turn the power
of the unit off or this information will be lost.
TIME >
Indicates that the character display (E) is showing
time information (e.g. elapsed time of track).
TRACK>
Indicates that the character display {E) is showing
track information (e.g. track name).
RECORDING LEVEL
Shows the recording level of a disc.
<PRB1285>
Page 14
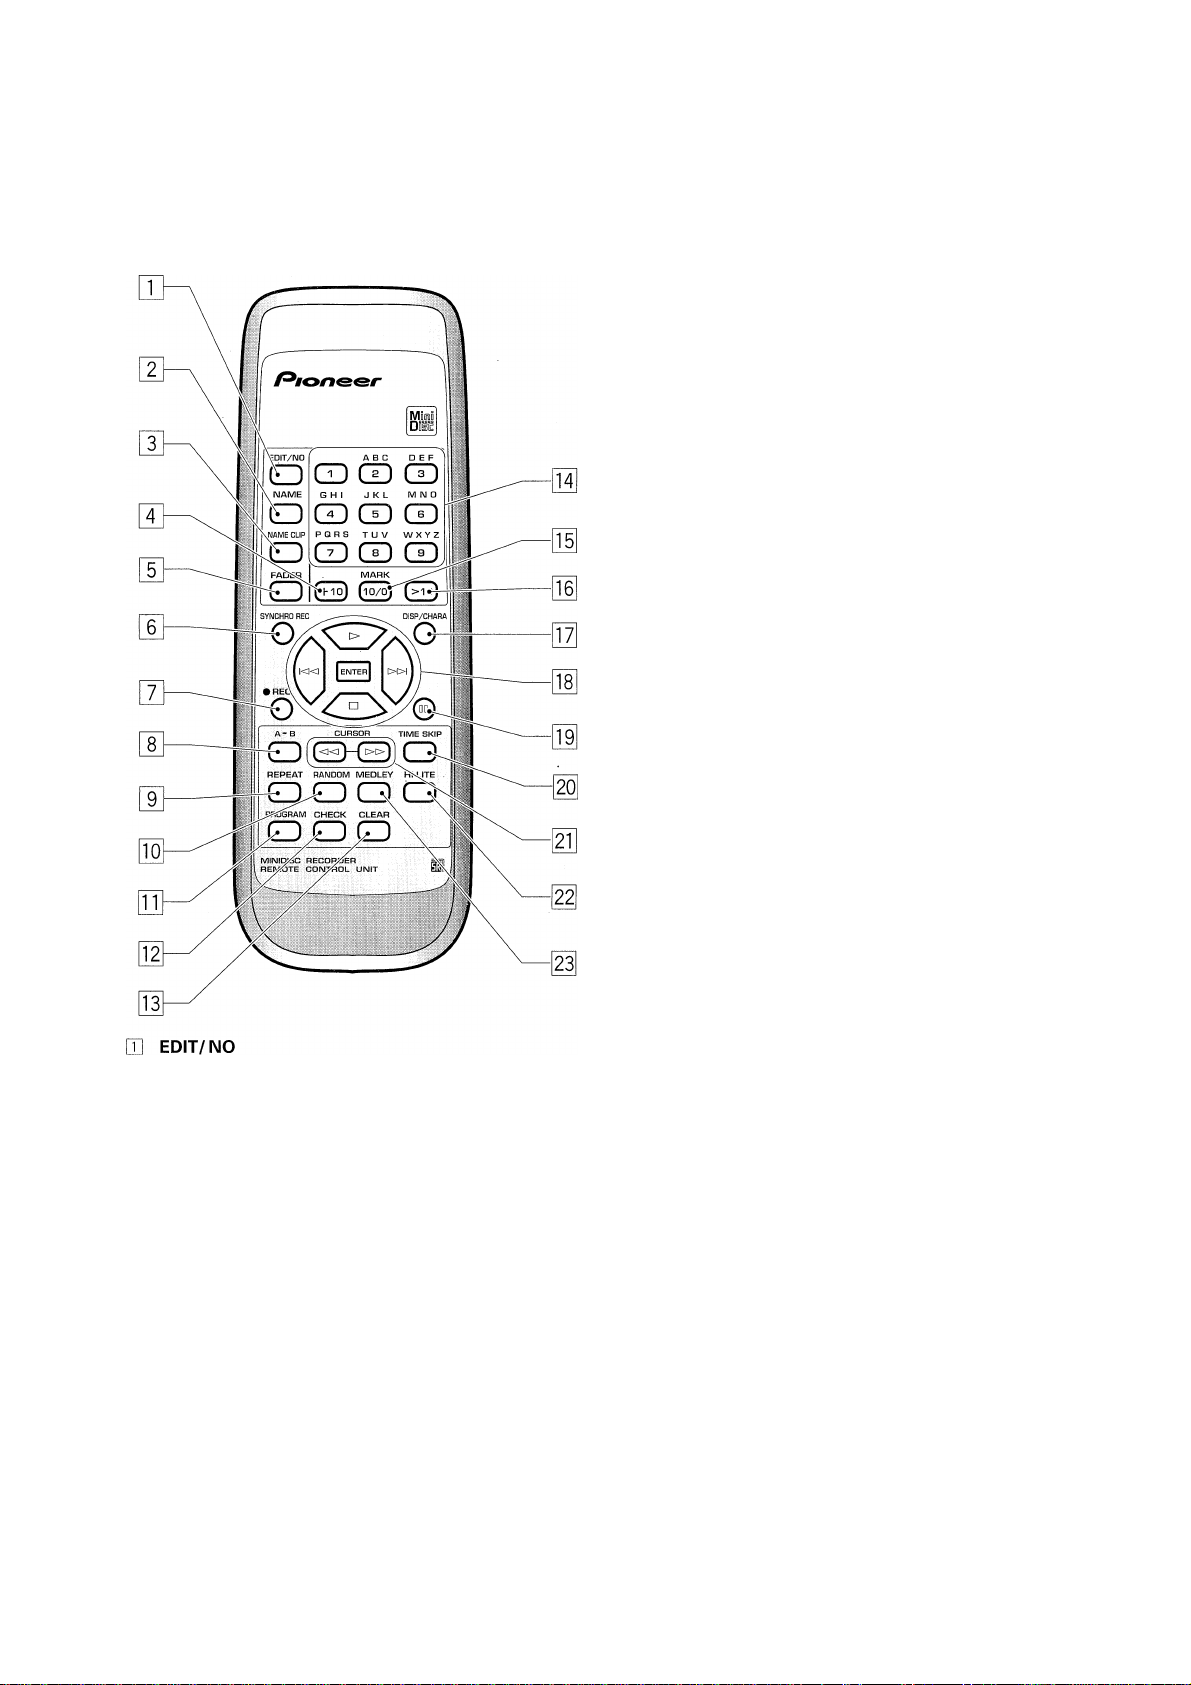
Press to access various editing features.
[2] NAME (p.32,33)
Press to enter and exit the disc/track naming process,
a NAME CLIP (p.34)
Press to copy the current disc or track name to the
recorder's memory.
S +10 (p.16,23)
Use to select track numbers greater than 10.
0 FADER (p.24,30)
Press to fade in or out during playback, or to record a
fade in or out during recording.
[6] SYNCHRO REC (p.21)
Press to enter synchronous recording mode: recording
starts when the recorder senses an input signal.
0 «REC (p.19,20)
Press to put the recorder into record-pause mode.
E A-B (p.22,39)
Use to set a start point and an end point to mark a
section of the disc for editing or repeat play.
E REPEAT (p.22)
Press to set the repeat mode (repeat disc, track, or
segment).
M RANDOM (p.22)
Press to play tracks in a random order.
E PROGRAM (p.23)
Press to start programming the track playback order.
E CHECK (p.23)
Press to check the programmed track order.
E CLEAR (p.23)
Press to clear the last programmed track number.
E Number / letter buttons (p.16, 32, 33)
Use to jump directly to track numbers in playback
mode, select track numbers in edit mode, and select
letters in disc/track naming mode.
E MARK, 10/0 (p.16,23)
Use for 0 or 10 when selecting track numbers.
E >10 (p.16,23)
Press to select track numbers over 10.
E DISP/CHARA
Press to switch between display modes (elapsed
time, time remaining, etc.) (p.18), and between upper
and lower-case characters in disc/track naming mode
(p.32, 33).
B Playback control (p.15-16) / ENTER
► Play
■ Stop
Skip back to last track
►►I Skip forward to next track
Confirm playback, recording and editing
ENTER
options.
E II
Press to pause playback or recording,
a TIME SKIP (p.17)
Press to change the skip track buttons to skip time.
a CURSOR, ◄◄ / ►► (p.17, 32, 33)
Press to move cursor in disc or track naming mode, or
fast forward/reverse through a disc in playback mode.
a HI-LITE (p.25)
Press to search for a track based on a short sample of
each track.
a MEDLEY (p.24)
Press to switch medley mode on/off. Tracks play end-toend with each track fading out before the next one starts.
<PRB1285>
Page 15
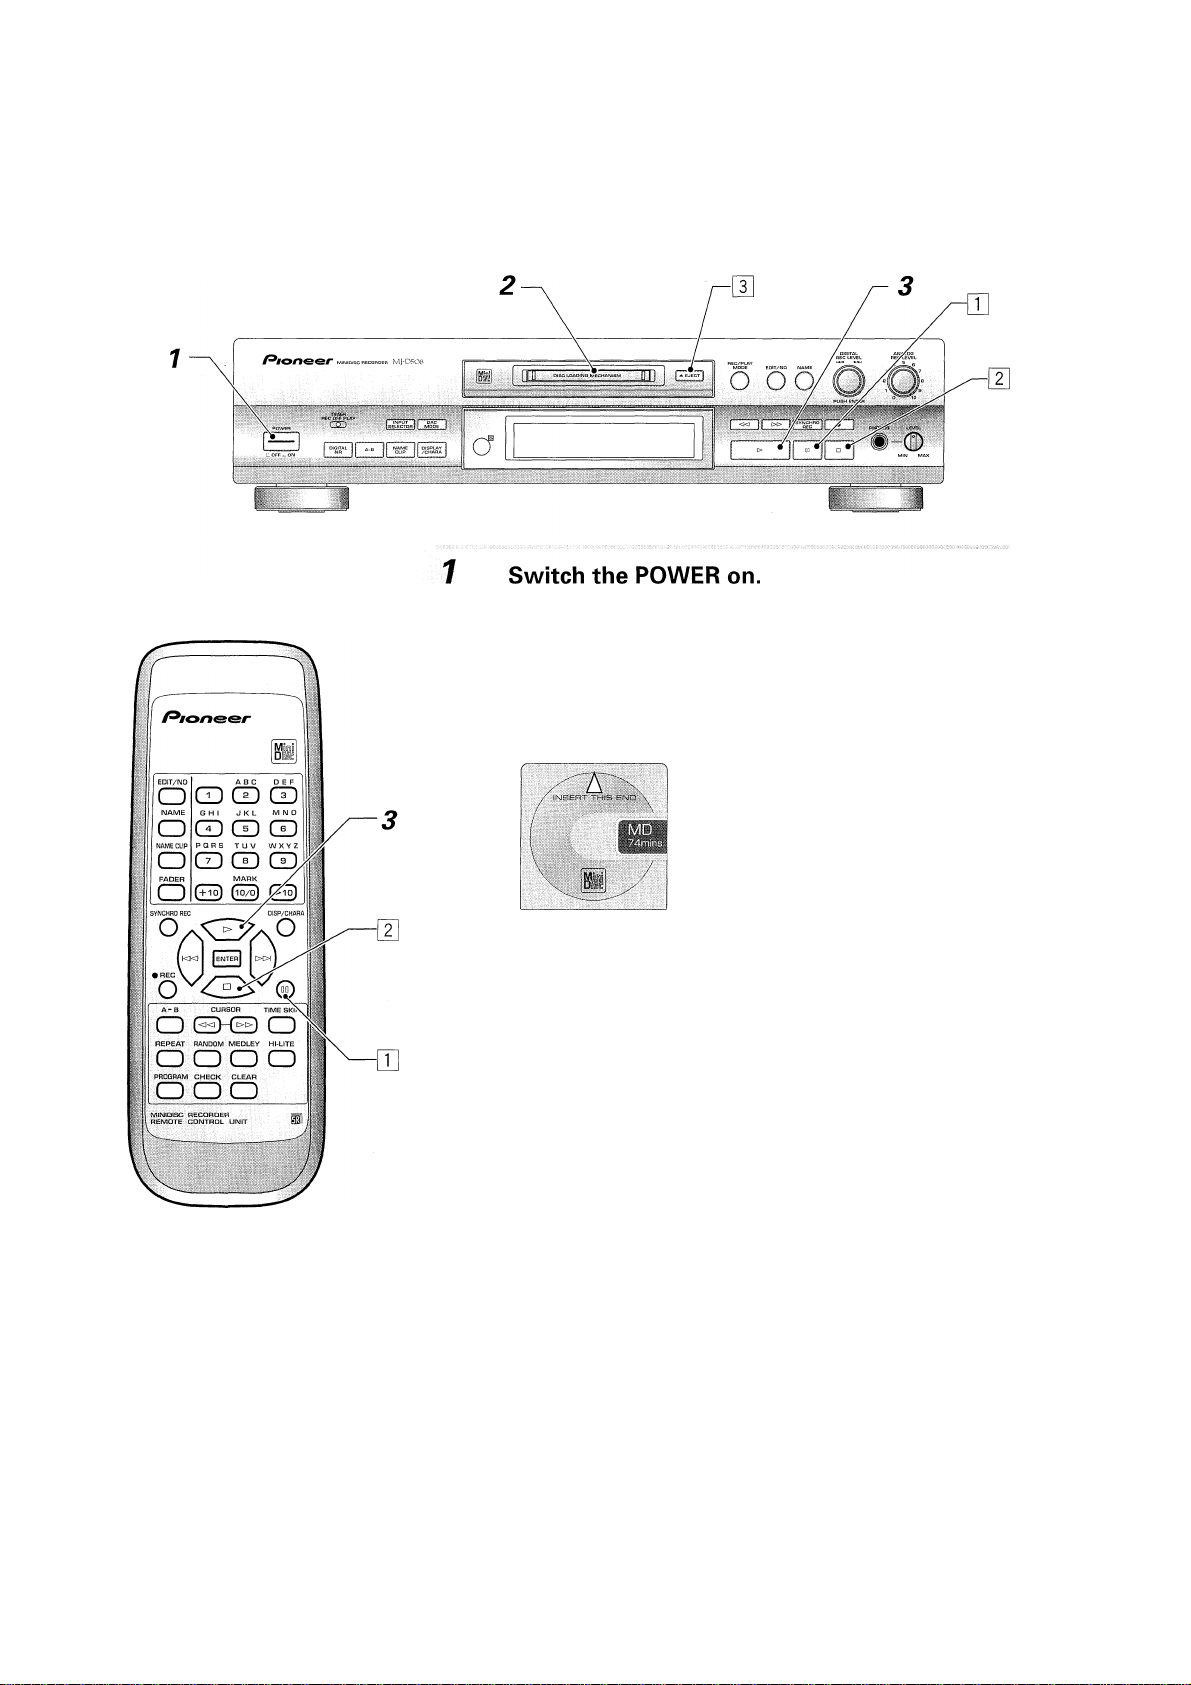
After a short time the recorder shows the message No Disc to tell you
it's waiting for you to insert a disc—don't try and load a disc until you
see this message.
Load an MD.
Gently push the MD into the slot in the direction indicated on the disc
cartridge. The recorder pulls the md into the
recorder automatically.
The first thing the recorder does is read the table
of contents (TOC) to see what's on the disc. If
you've just loaded a blank MD, the recorder
displays the message Blank disc; press ^ EJECT
to eject the disc.
If the MD has a disc name recorded on it, the recorder displays the
name.
Press ► (play button) to start playback.
The recorder finds the first track on the disc and starts playing.
If you've loaded a prerecorded disc, the recorder displays the track name
of each track as it plays. Track names longer than 12 characters scroll
across the display.
If you're playing a home-recorded disc, the recorder will display the track
names if they're there, otherwise it simply says No Name.
Use these controls for other basic operation;
Q] Press
II
(pause button) to stop playback temporarily.
(Press ► (play button) or ll again to resume playback.)
[2] Press ■ (stop button) to halt playback completely. (If you press ►
now, playback starts again from the beginning of the disc.)
@] Press ^ EJECT to get the disc out of the recorder.
<PRB1285>
Page 16

Pressing the ► (play) button starts the disc playing from track one. If you want to start from a different track just enter the
number of the track using the remote control's number buttons. If you do the same thing during playback, the recorder
immediately jumps to that track on the disc.
Enter track number you want to play from.
For track numbers 1 through 10, just press the appropriate number
button (use the 10/0 button for track 10).
For track numbers over 10, there are two ways to enter the track
number you want:
□ Use the +10 button.
For example, to jump to track 16, press:
MNO
C22) => dD
® Use the >10 button.
For example, to select track 36, press:
MNO
0°) ■=> QD ■=> CD
For three-digit track numbers, press >10 twice. For example, to select
track 168 press:
____
_
___ ______
___
MNO TUV
V .
EOfT/NO
SYNCHRO fl£C
PROGRAM
/^ to n ee r
CD CD
9
CD CD
2
0 03 CD
(+^ §
0
T
c
JESr
0 ^
TeT
0
0 00
00
0
gl'
S]:|
g 1
■ o"!
^ 1
©\
o
0
ED ■=> ED ■=> ED ■=> CD CD
Skipping Tracks
You can skip forwards or back to the start of other tracks on the disc without having to worry about the track numbers.
Press or on the remote, or turn the jog dial on the recorder to skip a track.
❖ If the disc is already playing, skipping forward always takes you to the
start of the next track. Skipping backwards takes you first to the
beginning of the current track, then to the beginning of previous tracks.
When you get to the end or beginning of the disc, the track numbers
'wrap around' as you continue skipping tracks, in other words,
skipping forward a track when you're already on the last track takes
O (EHEE) O
00 0 o
oo o
you back to the first track on the disc.
❖ If the disc is stopped, you can 'select' tracks using the track skip
controls. Press the jog dial, or enter on the remote, to start the
selected track playing.
V—V
If the TIMESKIP indicator is showing in the display, then the
controls will jump blocks of time rather than tracks. See Skipping
pusH
1
Time on the following page for more on this.
eN-reP
<PRB1285>
Page 17

Skipping Time
You can skip through a disc in blocks of tinne too. If you're playing a track and want to skip a couple of minutes forward or
back, it's much quicker to use this feature than the usual fast-forward/reverse playback described below.
Press TIME SKIP on the remote, or ENTER on the front panel during playback or while the disc is paused.
Pressing repeatedly changes the time skip mode between 15 sec,
60 sec and Hme skip off (in which case, the and controls skip
tracks rather than time).
Press or on the remote, or turn the jog dial on the recorder to skip time.
❖ Each press skips a block of time. If you want to switch to the other
block length, press time skip or enter to select it.
❖ When you get to the end (or beginning) of a track, the recorder
proceeds to skip time in the following (or previous) tracks.
Fast-Forwarding/ReversSng
Use the fast-forward and fast-reverse play functions to search for a particular point within a track while it's playing.
Press and hold « or for high-speed reverse
and forward playback.
CDCD S
I o
I 5
o
o
SepS ,
Q CD S
ED® GD
If you reach the end (or beginning) of the current track while holding
down the ◄◄ or ►► button, the recorder will go straight through into
the next (or previous) track on the disc.
!(
0(E)^’’0
REPEAT RANDOM MEDLEY Hi-UTE
o o o o
I,-0‘OO
,
_____ 1
<PRB1285>
Page 18

Displaying Disc Information
You can have the recorder display various kinds of disc information, like how much material is recorded on a disc, how much
time is left on the disc for you to record on, the elapsed playback time, and so on. When a disc is playing, you have access
to four different display screens; when the disc is stopped you can switch between three. These are shown below.
Press DISPLAY/CHARA to switch the kind of disc information displayed.
You can have the recorder display various disc information, both when
the disc is stopped, and when it's playing. The display changes in the
following sequence:
In PLAY or PAUSE mode:
__.cm.
❖ Track name. ^
iuM' iu./:; .1. b =
❖ Elapsed time of current 1
track. T
, _..cz
❖ Remaining playback I
time of current track. ’
❖ Remaining playback
time of disc.
! 2
i 5
o
o
•g\
o
PROGRAM
O
gdS o
ScD
qdS
00)©
]e3[
(“
OO 5
So
In STOP mode:
❖ Disc name. ^
©
©
©
1
❖ Total recorded time 1
on disc. T
’)
❖ Remaining recording
time available.
Reducing Noise during Playback
Minidisc captures very accurately on disc any source that you feed into the inputs, without adding extra noise or hiss.
However, if what you record is noisy (such as an old vinyl record or analog cassette tape), then that noise will end up on the
minidisc too. Using the Digital Noise Reduction (dnr) feature can reduce the level of rumble or hiss in such recordings.
........
..........
^ o
J
<PRB1285>
Press DIGITAL NR to switch Digital Noise Reduction on.
The DNR indicator lights in the display to tell you that Digital Noise
Reduction is on (press again to switch it off).
Digital noise reduction may not be effective in the following cases:
❖ If the recording contains transient noises, such as pops and clicks.
❖ If the level of noise is extreme.
❖ If the frequency range is narrow, (an am radio broadcast, for example).
Page 19

»igital Input
Recording through the optical or coaxial digital input fronn another digital component, such as a CD player, has a couple of
advantages over analog recording.
❖ Copying digital information directly doesn't affect the sound quality at all, whereas you may be able to tell the
difference between the original and the recording if you use the analog inputs.
❖ You don't have to set any recording levels, so you don't have to worry about a loud peak in the sound over
loading the recorder resulting in a distorted recording.
Insert a recordable MD.
Make sure the disc is not a playback only disc, and that the erase-protect
tab is closed (see page 8 if you're unsure about these points).
If there's already material recorded on the disc, the recorder automati
cally records new material after what's already there—there's no need
to search for blank space to record on.
You can find out how much blank space you have left on the disc by
switching the display mode at this point. See the previous page for how
to do this.
Z Use the INPUT SELECTOR to choose one of the
digital inputs.
Pressing input selector switches the inputs in the following order:
Optical - Analog - Coaxial
The recorder's display indicates the current input.
The [rod indicator
Whenever you record something, the
red TOC indicator lights to show the
disc's Table of Contents needs updat
ing. Never switch off the recorder
while the TOC indicator is lit or you risk
losing your recording (see p.9 for
more information on this). When you
eject a newly recorded disc, always
wait until the UTOC Writing message
has stopped flashing and the red TOC
indicator disappears before switching
the recorder off.
4
3 Prepare the source you're going to record.
If you're recording from a CD. load the CD into the player, etc.
4 Press • REC.
The recorder is ready to record something (record-pause mode), but is
not actually recording yet.
Press ► (play) or ii (pause) to start recording.
Start playing the source.
To pause recording press ii (pause); to end
recording, press ■ (stop).
Pressing ii (pause) causes the recorder to start a new track.
I' ®Even if you've loaded a recordable MD and checked that the
erase protect tab is closed, the recorder won't allow you to record If: there is
very little time remaining on the disc; the UTOC is full; the recorder can't read
the UTOC (because it is damaged, or out of standard).
<PRB1285>
Page 20

Recording Using the Analog Inputs
Recording through the analog inputs follows much the same procedure as recording via a digital input. The only difference is
that you'll have to set the recording level. This determines how loud the recording will be when you play it back. If you're
used to recording on analog cassette, the idea is exactly the same, but with MD you have to be much more careful not to
overload the signal. Compared to analog tape, the distortion that you get from overloading an MD is much less tolerable, and
something you'll definitely want to avoid. On the other hand, recording the signal very quietly will result in lower sound
quality than MD is capable of, so that's not very good either—although it is better to under-record an MD than to over-record it.
What you want to aim for is a level where the loudest sound from your source material is recorded onto the MD at a level
just below the point where it overloads (producing an unpleasant, buzzy distortion).
Insert a recordable MD.
Make sure the disc is not a playback only disc, and that the eraseprotect tab is closed (see page 8 if you're unsure about these points).
If there's already material recorded on the disc, the recorder automati
cally records new material after what's already there.
You can find out how much blank space you have left on the disc by switch
ing the display mode at this point. See the page 18 for how to do this.
Use the INPUT SELECTOR to choose analog input.
Pressing INPUT selector switches the inputs in the following order:
Optical - Analog - Coaxial
The display indicates the current input.
Prepare the source you're going to record.
If you're recording from a turntable, for example, put a record on and set
it playing.
Press • REC.
The recorder is ready to record something (record-pause mode), but is
not actually recording yet.
5 CD(ÍD
o ss
\o
A"
1 /
CD EEHE) CD
oooo
loop
s
s
(á^\
<PRB1285>
ANALOG I REC I L ■
DD >
Adjust so that the maximum level is
in this area, without going into the
red OVER area.
See note about the
TOC indicator on the previous page.
Turn the ANALOG REC LEVEL dial to adjust the recording level.
Try to set the recording level against the loudest part of the source
material you're recording. Adjust so that the loudest signals reach just
below the red OVER area in the display.
Once you've found the best level, stop the source.
6 Press ► (play) or ll (pause) to start recording.
7 Start playing the source again from the beginning.
To pause recording press ll (pause); to end
recording, press ■ (stop).
Pressing ll (pause) causes the recorder to start a new track.
Page 21

Reducing Noise during Recording
If you're recording from a noisy source, such as analog tape or a vinyl record, you can use the Digital NR (Noise Reduction)
feature to clean up the signal and reduce the noise that ends up on the recording. Digital NR doesn't work well if; the noise
is transient (like pops and on a vinyl record); the level of noise is very high; the source has a limited frequency range (like an
AM radio broadcast).
Press DIGITAL NR before recording.
The DNR indicator lights in the display (press again to switch off
Digital NR).
Record in the normal way.
You can use any of the recording modes with Digital NR.
Starting a Recording Automatically
The MJ-D508 has a handy feature that makes the starting and stopping of recording completely automatic. Once set to this
mode (called synchro recording), the recorder monitors the input and remains in record-pause mode all the while there is
silence. As soon as the recorder detects some audio, recording starts.
There are two synchro recording modes; 1-track sync and all-track sync. In 1-track sync mode, the recorder stops recording
after it detects three seconds of silence after the track. In all-track sync mode, the recorder goes into record-pause mode
after it detects three seconds of silence after a track, then starts recording again as soon as it senses the start of the next
track. If the space between tracks on the source material is less than three seconds, that space gets recorded. Any gap
longer than three seconds is automatically reduced to three seconds. If this happens the S.CUT indicator lights in the display.
Prepare for analog- or digital-input recording.
Load a recordable md and set the input selector (see pages 19 and 20 for
more detailed instructions), and prepare the source material. Set the
analog input level or the digital volume level as required (see pages 20
and 26 for more detailed instructions).
Press SYNCHRO REC.
Press once for 1-track sync mode; twice for all-track sync mode. Further
presses switches between the two modes.
The display indicates the current mode;
.
...............
• ■»••• • 1 2 3 4 5
■" ' ' ‘'
......................
L —
' ■■■' ■ ' '■■■'
.o S = O.VH«
j 1/ . i...| I-": e 7 a g io
ESQ ' '
rREc~; L —
i.„j j i a 7 a a io
..........
1 2 3 4 5
.......
■ ‘ ■■■■■
Start playing the source material.
Recording starts automatically.
❖ If the recorder detects no input signal for 30 minutes, synchro
recording mode is cancelled.
❖ In 1-track sync mode, recording automatically stops after the track has
finished. In all-track sync mode, the recorder goes into record-pause
mode after each track; press ■ (stop) to cancel synchro recording mode.
menw
mode is cancelled after the fade out (see page 30 for more on recording fades).
If you record a fade out during all-track sync mode, the synchro
<PRB1285>
Page 22

Playing Things Again
A number of repeat play features are available from the remote control: you can repeat a whole disc, the current track, or any
segment of the disc by setting a start and end point. Having set the repeat mode, the recorder continues to repeat until you
stop the disc or cancel the repeat mode.
To repeat a track or all tracks: Press REPEAT to
select a repeat mode.
Each press changes the repeat mode in the following sequence:
Repeat the current track (repeat >1 lights)
Repeat the whole disc (repeat lights)
Repeat mode off
To loop a segment of the disc:
U] Press A-B once where you want the loop to start. (A- lights)
[2] Press A”B again where you want the loop to end. (A-B lights)
0 Press REPEAT. (A-B REPEAT lights)
❖ Cancel the loop by pressing repeat again. The recorder jumps to the
start of the current track and playback continues as normal.
*> If you press m (stop) while the loop is playing, playback halts and the
loop points are lost.
<PRB1285>
Playing Tracks at Random
Selecting the random play mode leaves the track order of the disc up to the recorder. Each track on the disc is played just
once, but in a random order.
IW
i^ioneer
gdS
1 2
II 5
SCD
GDCD
1 0
1 a
\vE^/
] s [~
: f
TzT
\o^
So
D;
00
:0
ii® .i.
m
oh
s
0
0
T
1
0
o" :
O (
j
Press RANDOM during playback or when the disc is stopped.
The RDM indicator lights in the display and random playback starts.
❖ Pressing m (stop) cancels the random play mode.
❖ You can still use repeat mode during random play.
❖ You can't use random mode together with medley mode (see page 24
for more on medley mode). Switching to medley mode cancels
random play.
Page 23

Programming the Track Order
Using the random play feature, you can have the recorder surprise you with the track order. Programming the track order
means telling the recorder precisely which tracks, and in what order, you want played.
The sequence you program applies only to the disc in the recorder at the time. As soon as you eject that disc the program
memory is lost. However, all the while the disc is in the recorder the programmed order will be remembered—even if you
turn the recorder off.
Make sure the recorder is stopped, then press PROGRAM.
Track number
programmed
-2m
3
2m
2m
Enter the track numbers in the order you want
them played.
You can program a sequence of up to 30 tracks. The message PGM Full
is displayed when you reach the limit.
There are several ways to select the track numbers to play.
[T] Use the number keys on the remote:
For track numbers 1 to 10 use the individual number buttons.
For track numbers over 10, use either the +10 button or the >10
button:
For example, to select track 16, press:
___
MNO
GH) CD
Alternatively, press:
____ IVIIMO
CD 1=^ CD '=^ CD
For three-digit track numbers, press >10 twice. For example, to select
track 168 press:
/-w-v MlMCp TUV
(ED ^ (EB ■=!> (jD ^ CED O
® Use the track skip buttons on the remote:
Use the and track skip buttons to step through the track
numbers, which show up in the display. To add a track to the program
press ENTER or PROGRAM.
0 Use the jog dial on the front panel:
Use the jog dial to step through the track numbers, which show up in
the display. Push the jog dial (enter) to add a track to the program.
ТПДСК i 'i о 'I 'I :: ■"/. p
Program step
number
20 -12 10 Б 2 О D\/ER PGM
Press ► (play) to start playback.
The recorder starts with the first track you programmed.
You can use the repeat feature to repeat the whole program.
❖ To cancel the programmed order, first stop the disc, then press
Ш (stop) once more. Ejecting a disc also cancels the program.
❖ To delete the last track in the current program, press CLEAR on the
remote control.
❖ To check the program order, press CHECK on the remote while the
disc is stopped. Step through the tracks by repeatedly pressing CHECK.
<PRB1285>
Page 24

Playing Non-Stop Music
You can use the MJ-D508 as a kind of electronic DJ, fading out one track on a disc and imnnediately starting the next to
form an unbroken chain of tracks. Because some music is already recorded with a fade out at the end of the track, the fadeout each track about 12 seconds before its end. After a fade-out of about two seconds, the next track starts without a pause
(you miss the last 10 seconds of each track). This feature is called 'medley playback.'
During playback, or in stop mode, press REC/PLAY MODE.
❖ On the remote control, just press medley during either playback or
pause mode to switch the medley feature on or off.
Turn the jog dial until the display reads Medley Off.
О (HKEE) CD
REPEAT : RANDOM MEDLEY
оосзго
ООО
a Press the jog dial (ENTER) to switch to Medley On.
Further presses switches between Medley On and Medley Off. (If you
eject the disc, the medley mode is reset to off.)
4 Press ► (play) to start playback (if necessary).
Fading Out and Fading In
Pausing a disc during playback cuts the sound off abruptly. You can achieve a softer effect by using the fader feature to fade
the track out over a few seconds before pausing. Likewise, when you resume playback, instead of a sudden attack of sound,
you can have the recorder fade in the volume gradually.
Press FADER during playback to pause the disc.
The FADER indicator in the display blinks and the volume fades to zero
over about five seconds. The recorder then pauses playback.
Press FADER again to resume playback.
The FADER indicator in the display blinks and the volume starts to fade in.
<PRB1285>
Page 25

Track
Suppose you want to listen to a specific track, but don't know where it is on the disc. You could use the track skip controls
and listen to the beginning of each track until you find the one you're looking for. But there's a better way: the highlight scan.
This feature autonnatically plays 10 seconds of each track on the disc in turn, nnissing out the first nninute of each track. You
can use this feature while a disc is playing, or when it's stopped.
Press HI-LITE.
The HI-LITE indicator in the display lights and highlight scan starts.
❖ If a track is shorter than a nninute, then the first 10 seconds of the
track is played.
❖ If you're playing the disc in random or program play mode and press
HI-LITE, those modes are cancelled and highlight scan starts.
When you recognize the track you want to play in full, press ► (play).
Highlight scan mode is cancelled, the recorder finds the beginning of the
current track and normal playback starts.
Scanning a Long-Play Disc
There may be times when you'd like to be able to record continuously for longer than the usual 74 minutes that MD provides
for. The MJ-D508 has a long-play mode that doubles the available recording time on a disc at the cost of stereo recording.
However, if you're recording a speech or an interview, for example, this is unlikely to be a great loss.
As an added bonus, recordings made in long-play mode (see page 30 for how to do this) can be scanned at double speed to
find a certain place on the disc. Again, this is probably most useful when listening back to speech, which can usually still be
understood at double speed.
23
During playback, press REC/PLAY MODE.
Turn the jog dial until the display reads Mono Normal.
You'll only see this option if the track currently playing is recorded in
mono long-play mode.
Press the jog dial (ENTER) to switch to Mono Fast.
Further presses switches between Mono Normal and Mono Fast.
If the recorder runs into a stereo recording on the disc, the scanning
mode is immediately canceled.
❖ You can't use the scanning mode in random, highlight, repeat or
medley modes.
<PRB1285>
Page 26

Using a Timer for Future Playback
To schedule playback or recording in advance, use a commercially available audio timer unit. These have one or more
switched power outlets which you plug other components into (in this case, your amplifier and the MJ-D508). You can then
set the timer to switch the components on at any time. Read the instruction manual that came with your timer for more
detailed instructions.
1 Switch on the timer and amplifier.
tmi
2
3
4
wall outlet
Switch on the MJ-D508.
Set the TIMER switch to PLAY.
Load an MD into the recorder.
❖ At this point you can program the play order of the disc (see page 22
for how to do this).
❖ See also Fading In Using a Timer below.
Set the timer.
After you've made the setting, the timer will shut off power to the
amplifier and the MJ-D508.
Fading In Using a Timer
If you like to wake up in the morning to your MD recorder set to play using a timer (see above for how to use with an audio
timer), you might prefer to have the music fade in rather than start abruptly. The fader mode lets you do just this.
Load a disc and press REC/PLAY MODE.
❖ Using the remote control, just press FADER and proceed to step 4.
<PRB1285>
,TWe°
Turn the jog dial until you see Fader Off in the display.
Press the Jog dial (ENTER) to switch to Fader On.
Further presses switches between Fader On and Fader Off.
4
Set the TIMER switch to PLAY.
4
5
Set your audio timer.
Page 27

Setting the Digital Recording Level
One of the advantages of digital-to-digital recording is that you don't have to set recording levels—and risk distortion by
overloading the disc. If you're recording comnnercial nnaterial from CDs or other MDs, the digital level has already been
optimized and you don't need to change it. If you're making a digital copy of a CD, DAT or MD that was not commercially
produced and that was consistently under-recorded, you can boost the overall level by up to -r12dB. Remember though, that
any peaks in the original recording run the risk of distorting the copy.
If you record digital satellite broadcasts, you may also have cause to boost the digital recording volume since the digital
volume of some broadcasts is relatively low. Again, remember that if there are any peaks in the broadcast, you run the risk
of momentary distortion.
It's also possible to reduce the digital recording volume so that you end up with a recording that is quieter than the original.
In most cases, this is not desirable since the recording quality will suffer very slightly. However, if you're putting together a
mix MD (various tracks compiled from different sources), and there is a track which stands out as generally louder than the
others (peak volumes are usually very similar, but the average level might be higher in some recordings than others so they
sound louder), then you might want to reduce the level of that track.
Note that this feature won't get rid of distortion on the source material.
You can adjust the digital recording volume while the unit is in stop mode, record-pause mode or while it is actually record
ing. Once changed, the new digital recording level remains until you change it again, or reset it. Each digital input has it's
own level which can be set independently.
After selecting one of the digital inputs, press REC/PLAY MODE.
❖ Use the INPUT SELECTOR button on the front panel to change inputs-
see page 19 for more information.
The display shows the option Digital Vol.
Digital volume level
adjusted down 3dB.
Press the jog dial (ENTER).
The display changes to D.vol OdB (OdB is the default and means the
recording volume is the same as the original).
Turn the jog dial to adjust the recording level up or down.
❖ The maximum adjustment possible is between -48dB and -h12dB.
❖ Between -12dB and -f12dB, adjustment is in steps of 0.1 dB. Down to
-42dB, adjustment is in steps of 0.5dB. Below this, adjustment is in
steps of 1 .OdB.
❖ To reset the current digital input back to its default setting, press
EDIT/NO here.
Press the jog dial (ENTER) again to input the level.
❖ If you set the level at anything other than OdB, the D.VOL indicator in
the display lights to remind you of the fact.
You can now record as usual.
<PRB1285>
Page 28

Recording Over Unwanted Material
One of the convenient features of recording on MD is that the recorder automatically records on the next available section of
the disc. Sometimes though, you'll want to record over something that's already on the disc. Unlike a cassette tape, all the
material after the point at which you start recording is lost. So, if you just want to erase a track (or part of a track) in the
middle of a disc, use the edit features instead (see pages 32-41 for more on this), then simply record as usual.
If you decide that you do want to record from midway through a disc, here's how to do it:
Find the place in the disc you want to record from
and pause playback.
Press • (REC).
The display reminds you that you are about to overwrite the disc.
If you change your mind here, press ■ (stop) to cancel overwrite.
Press ^ (play) or ii (pause) to start recording.
Recovering Lost Time
If you've ever just missed the beginning of a song you were trying to record off the radio because you didn't quite get to the
record button in time, you'll wish you'd had the recovery feature of the MJ-D508. This let's you start recording from six
seconds before you hit the button to start recording! In other words, you can 'miss' the beginning of something by up to six
seconds, yet still record it.
Recovery recording works because all audio signals that go into the recorder while it's in record or record-pause mode pass
through a six second 'reservoir' of memory. In other words, the recorder always has the last six seconds of audio in its memory.
When you start recovery recording, the recorder uses that audio instead of what's actually going into the recorder at the moment
you press the record button.
With the recorder already in record-pause mode, press • REC to switch on recovery recording.
The display indicates that recovery recording mode is on; the recorder
remains in record-pause mode.
REPEAT RANDOM MEDLEY
❖ Pressing 9 REC again switches recovery recording mode off again.
Press ► (play) or il (pause) to start recording.
❖ To stop recording and cancel recovery recording, press ■ (stop).
❖ To pause recording, but remain in recovery mode, press ll (pause).
<PRB1285>
Page 29

Automatically Numbering Tracks
If you'f^ recording directly fronn a CD or another MD using a digital input, track numbers are automatically copied along with
the audio. When recording other digital or analog sources, if the recorder detects more than 1.5 seconds of silence, it
regards that as the space between tracks and starts a new track. Although this usually works fine, you may run into prob
lems if you're recording a noisy vinyl record or analog tape and the recorder doesn't recognize the gap between tracks. For
this reason you can adjust the level of sound that the recorder regards as "silence.”
With the recorder in stop mode, press
2,5
REC/PLAY MODE.
The display shows the current "silence" threshold for automatic track
numbering.
Turn the jog dial until you see A.mark -50dB displayed.
Press the jog dial (ENTER) to change the level.
Press repeatedly to choose between the following levels:
-50dB ^ -60dB ^ OFF ^ -40dB
-50dB (Initial level.) A 'mid' level suitable for most recordings.
-60dB Use this setting if you find the recorder is putting new track
numbers in during very quiet sections of classical music, for
example.
"40dB Use this setting if you find the recorder is not putting in new
track numbers because the original source is too noisy.
OFF This turns off automatic track numbering: everything is recorded
as a single track. (Digital copies of CDs and MDs will still have
track numbers.)
Manually Numbering Tracks during Recording
You can increse the track number incrementally wherever you want during a recording, so if there are two tracks on the
original that run into each other without a pause, for example, you can still separate them Into separate tracks on the MD.
Also, if you switched off the auto track numbering (see above), you can number each track using this method.
Wherever you want a new track to begin, press
• REC to increase the track number in increments
of one.
Recording continues unbroken.
<PRB1285>
Page 30

....
Recording Extra-Long Material
There may be times when you'd like to be able to record continuously for longer than the usual 74 minutes that MD
provides for. The MJ-D508 has a long-play mode that doubles the available recording time on a disc at the cost of stereo
recording. However, if you're recording a speech or an interview, for example, this is unlikely to be a great loss. You can
freely mix long-play mono recordings and normal stereo recordings on the same disc—the recorder automatically detects
the mode on playback.
T Prepare for analog- or digital-input recording.
Load a recordable MD and set the input selector (see pages 19 and 20
for more detailed instructions), and prepare the source material. Set the
analog input level or the digital volume level as required (see pages 20
and 27 for more detailed instructions).
Press REC/PLAY MODE.
Turn the jog dial until you see Stereo displayed.
Regular stereo recording mode
Long-play mono recording mode
Press the jog dial (ENTER) to switch to Mono recording mode.
Further presses switch between Stereo and Mono recording modes.
❖ The recorder will stay in the mode you set now (even after ejecting
the disc or switching the power off) until you change it again.
Press • REC, then ► (play) or ii (pause) to start recording.
❖ You can't switch the record mode during recording. To switch, first
pause the recording.
Recording Fade Ins and Fade Outs
Sometimes, for example if you're recording just an excerpt from something, it may be better to fade in the recording, then
fade out again at the end, rather than start and end abruptly. Note that you can't record fade ins when in synchro or recovery
recording mode (although you can record a fade out).
Press FADER during record-pause to fade in.
If in normal record mode, the recording starts immediately with a five
second fade in.
<PRB1285>
Press FADER during recording to fade out.
After recording a five second fade out, the recorder goes into recordpause mode. This happens in either normal or synchro record mode.
❖ You can also just press ■ (stop) if you don't need a fade out.
memo
is cancelled after the fade out (see page 21 for more on synchro recording).
If you record a fade out during sync recording, the synchro mode
Page 31

Using a Timer for Future Recording
If you're using your MJ-D508 with an audio timer (see page 26 for how to connect this up), you can set it to record at a
preset time and date, making it useful for recording a radio or satellite program when you're away, for example.
7 Switch on the timer, amplifier and the source
component.
2
3
4
Switch on the MJ-D508.
Set the timer switch to REC.
Prepare for recording.
Load a recordable MD, select the correct input, set recording levels/
volume as appropriate, set for mono or stereo recording, etc.
Set the timer.
After you've made the setting, the timer shuts off power to the compo
nents connected to it.
❖ It takes about a minute from when the timer switches everything on
to when the recorder actually starts recording, so bear this in mind
when setting the timer.
Make sure the recorder writes the disc's UTOC within a week of timer recording.
The UTOC is not written until you eject the disc or do a UTOC write (see
page 41). Until then, the UTOC information is stored in the recorder's
memory. This is fine for at least a week, but may be lost after that.
Generally, switch on the recorder and eject the disc or use the UTOC
write command as soon as possible after timer recording.
<PRB1285>
Page 32
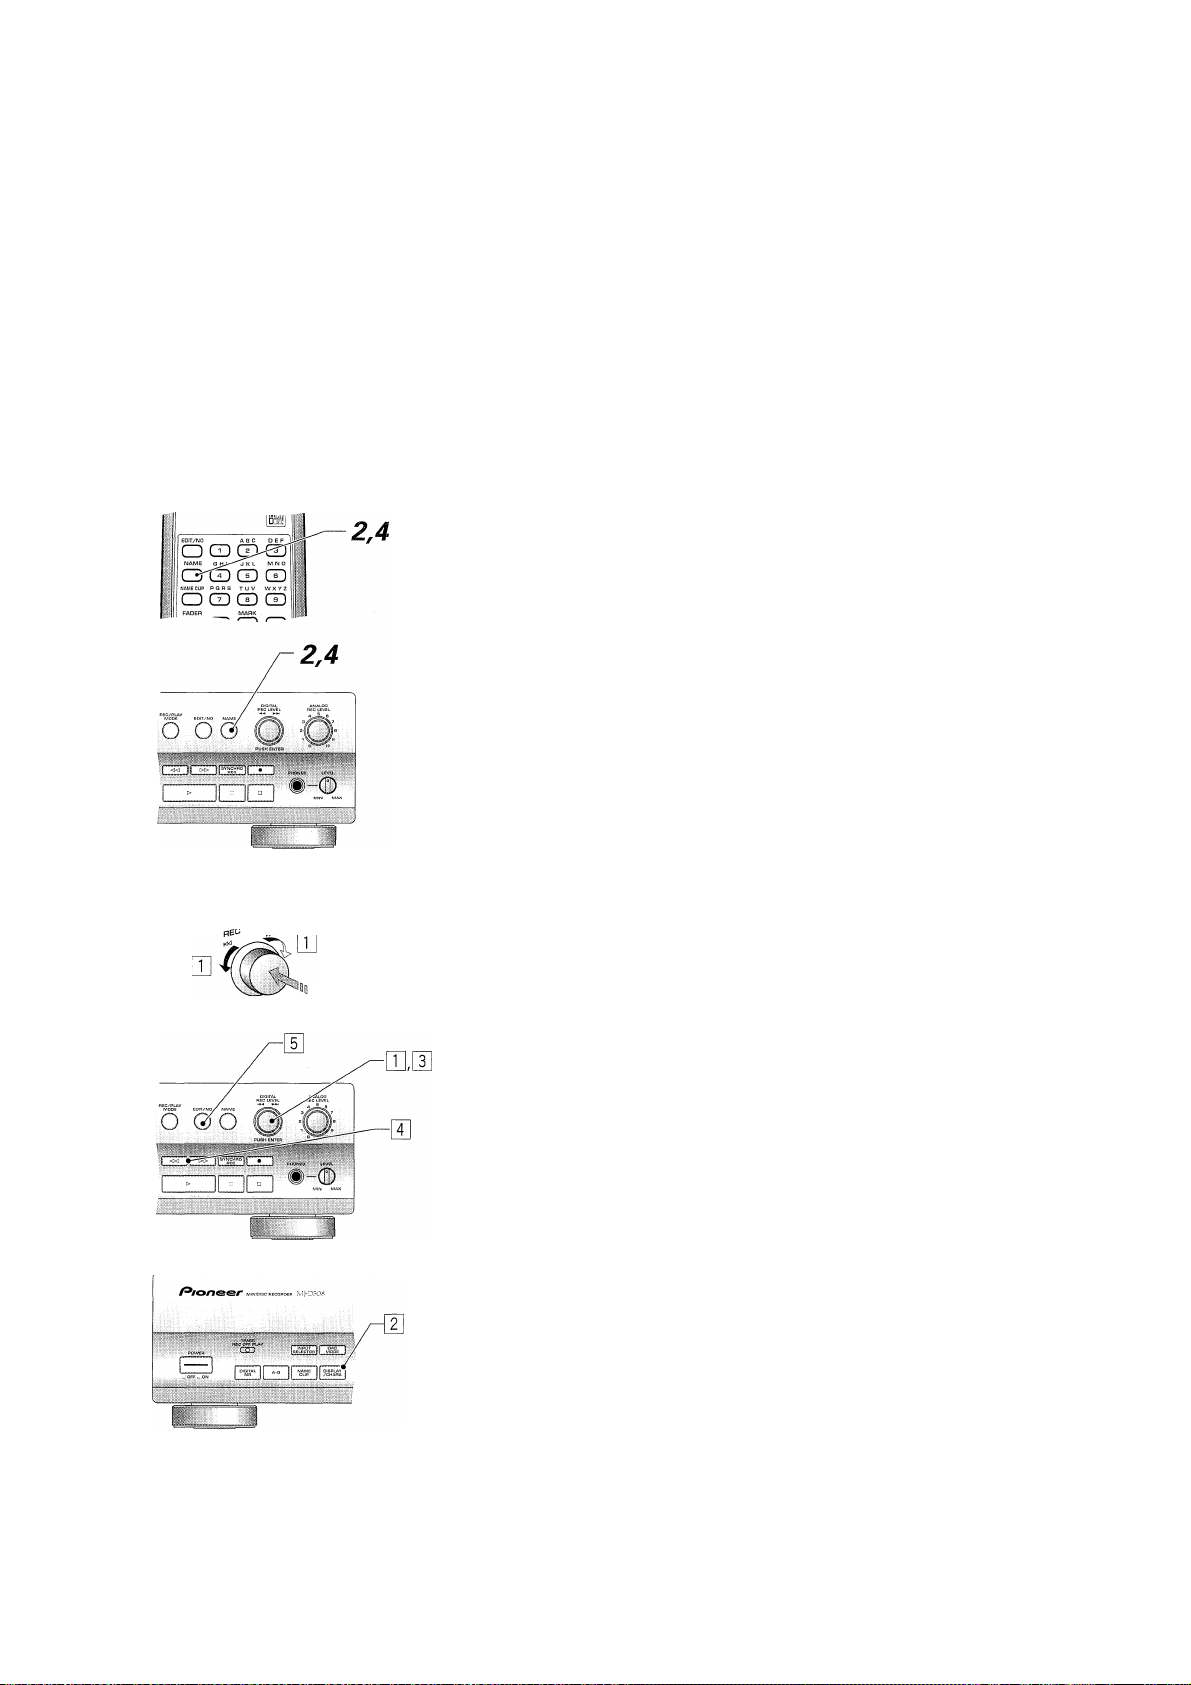
Introduction
The MD system allows for very flexible editing of discs. Using the editing features described on the following pages you can
easily: create names for discs and for individual tracks; combine two tracks into one long one, or divide a track into two short
ones; move single tracks, or reorder a whole disc; erase tracks or parts of tracks on a disc.
Naming a Disc
You can name a recordable MD so that when you load the disc into the recorder, the disc's name appears in the recorder's
display. The name can be up to 100 characters long, including spaces. You can also edit the existing disc name (if you've
recorded something else on the disc, for example), but you can't change the name of a playback-only disc.
Make sure the disc you want to name/edit is
loaded into the recorder and is stopped.
Press NAME.
If the disc doesn't already have a name, the character display is blank
with a blinking cursor on the first character. If the disc is already named,
the character display shows the name (or the first 12 characters if it is
too long to be displayed completely), with a blinking cursor under the
first character.
g^iTEP [?]
pUSH
Enter/edit the name for the disc.
You can do this from either the front panel or the remote control.
Front panel controls:
[E Select/change the character at the current cursor position by turning
the jog dial. See below for the complete list of letters, numbers and
symbols available.
[E Change between uppercase and lowercase by pressing
DISPLAY/CHARA. The case of the character at the current cursor
position changes between upper- and lowercase with each press.
E] Confirm the character and move the cursor to the next character
position by pressing the jog dial (or by pressing
H Move the cursor backwards or forwards along the display using the
◄◄ and buttons. Although you can't move backwards beyond the
beginning of the name, you can move forwards as far as you like.
[5] Erase the character at the current cursor position by pressing
EDIT/NO. The characters either side of the current cursor position
close up to fill the gap.
Characters available for disc and track names;
ABCDEFGHIJKLMNOPQRSTUVWXYZ
abcdefghljklmnopqrstuvwxyz
1234567890
+ <space>
<PRB1285>
Page 33

Remote control:
[T] Select/change the character at the current cursor position using the
remote buttons as shown:
: )
: 5
i 5
1 3ER
GD CD CD
(ZD CD GD
CD CD CD
Use number keys 1-9 for numbers and
1
the letters shown above each key. Press
a key repeatedly to cycle through the
1
letters and numbers on that key.
GD GD GD
^0! ■■#$%&■() * + ■/:;< = >?(§)_■ <space>
[I] Change between uppercase and lowercase by pressing
DISP/CHARA. The case of the character at the current cursor position
changes between upper- and lowercase with each press.
E] Input the character and move the cursor to the next character position
by pressing ENTER (or by pressing ►►).
0] Move the cursor backwards or forwards along the display using the
◄◄ and ►► buttons. You can't move backwards beyond the begin
ning of the name, or past the next blank position after the end of the
name.
E] Erase the character at the current cursor position by pressing
EDIT/NO. The characters either side of the current cursor position
close up to fill the gap.
Press NAME again to input the disc name and exit
the disc naming mode.
Naming.a Track
In addition to naming the disc, you can name each track on a disc too. Again, the names can be up to 100 characters long.
Select the track on the disc you want to name.
You can name tracks in any mode, but if the disc is stopped, the track
must still be selected—use the jog dial or and buttons to select
tracks in stop mode.
If the disc is playing, you must finish entering the name before the track
finishes—pausing playback is a good idea.
2
3
Press NAME.
Input the track name
Use exactly the same procedure as naming a disc to name a track.
Press NAME again to input the track name and
exit the track naming mode.
<PRB1285>
Page 34

Copying Track Tracks
If you need to name several tracks with similar names—several parts of one suite, for example—^you can name the first one using
the procedure detailed above, then simply copy that name to the other tracks and edit them as required. This can save you a lot of
time over naming each track individually. The recorder stores the last three names you've copied using the name clip function in
its memory (up to 40 characters each). When you copy another track name, the oldest one is deleted from memory.
7 Go to the track with the name you want to copy.
❖ Use one of the usual methods—track skip, direct selection, etc.
Press NAME CLIP to copy the currently displayed name into memory.
The display should confirm that the track name has been copied.
❖ You cannot copy the track names of playback-only discs.
Go to the track that you want to copy the name to.
❖ Use one of the usual methods—track skip, direct selection, etc.
^
__
J
4
Press NAME to start editing the current track name.
2,6
5
Move the cursor to the position you want to insert the copied name.
Use the ◄◄ and ►► buttons to move the cursor around the character
display.
Press NAME CLIP again.
The display flashes Name Insert briefly and the most recently clipped
name appears.
Use the jog dial to select one of the previous three names stored, then press the jog dial (ENTER).
On the remote, use the and buttons to select a name, then
press ENTER.
The selected name is inserted at the point you chose.
Ctss3
......................
❖ Edit the name further if necessary.
8 Press NAME to leave the track name mode.
:PRB1285>
Page 35

Dividing a Track into Two
If you recorded two pieces of music that run into each other without a break through the analog inputs, the recorder
wouldn't have automatically given them their own track numbers. After the recording is complete, you might want to assign
the two tracks different track numbers. Use the divide function to do this. The recorder inserts the new track number and
shunts all the subsequent tracks up one automatically.
You can split any track into two at anytime using the divide function, so you can, for example, divide up a long track into
several parts for easy searching, and so on.
1 Start playing the track you want to divide.
________
C/Riorteer
O CD CD S I I
k O Q CD Q 1
CD CD CD GD1 1 ^
^
m: i J
^^|d1e| I
15^ CD m i
—3
— 4
2 Press II (pause) at the point where you want to
divide it.
3
Press EDIT/NO.
The edit menu appears in the display.
¡:«i
Pi- REPEAT RANCX)M M^aLEY HI-UTE\JfeM
PROGRAM CHECK CLEAR \ |
i::;: ..... .; ..... .j.
Ijas
...................................
This shows how much you've
adjusted the original dividing point
[ CD 111
[ oaaofl
V.
____________
’ 1
^
~2
^5,7
^6
h B 7 8 0 no
4
5
Turn the jog dial and select Divide.
On the remote control use the and buttons.
Press the jog dial (ENTER) to input the division.
On the remote control press enter.
The four-seconds either side of where you pressed pause start playing
alternately and repeatedly.
Use the and buttons to adjust the dividing point backwards or forwards.
The display indicates how far you've moved the dividing point, and the
segments continue to play giving you aural feedback.
❖ You can move the break point about 2.5 seconds either direction from
your original point.
❖ Each step indicated in the display corresponds to about 1/100th sec.
❖ To abort the divide function here, press ■ (stop) or edit/no.
Press the jog dial (ENTER) to confirm the divide point.
On the remote control press enter.
❖ If the track you just divided has a name, the recorder gives that name
to both parts automatically. If the disc's User Table of Contents
(UTOC) is full, however, the new track won't be given any name.
❖ You can keep dividing the track (or other tracks on the disc) until you
reach the maximum allowed of 255 tracks.
<PRB1285>
Page 36

Combining Two Tracks into One
If there are two consecutive tracks on a disc that you'd rather were a single track, you can 'glue' them together using the
Combine function. All the tracks following the newly combined tracks are automatically renumbered.
There are a few limitations when using this feature; it will not work if one or both tracks are less than 12 seconds long; you
cannot combine two tracks if one of them is recorded in long-play mode while the other is in stereo; and you can't combine
tracks if one was recorded using a digital input and the other using the analog inputs.
If both the tracks are named, then the new single track takes the name of the first track. If only one track is named then the
new track takes that name.
During playback of the later track of the two, press II (PAUSE).
Combine only works with two consecutive tracks, so if you wanted to
combine tracks 3 and 4, pause during playback of track 4.
❖ If you want to combine two tracks which are not consecutive, you'll
have to first move them next to each other—see page 37 for how to
do this.
Press EDIT/NO.
The edit menu appears in the display.
TRACKS.
1 TOC 1 '■■■'
OPT.CA.
Turn the jog dial and until you see Combine.
On the remote control use the and buttons.
Press the jog dial (ENTER) to select it.
On the remote control press ENTER.
❖ To abort at this point, press ■ (stop) or EDiT/NO.
Press the jog dial (ENTER) once more to input the combination.
On the remote control, press enter.
The two tracks are combined to form a single, long track.
.■■■. :v. I.". ( i/i ■"!'
. OOVHR
Tracks to be
combined.
<PRB1285>
Page 37

Moving Tracks on a Disc
Although you can use the progrann playback feature to play a disc out of the 'regular' track order, you can also edit the track
order itself so that the disc pernnanently plays in a different order (unless, of course, you edit the track order again). If you
just want to move a track or two to a different position on the disc, it's probably quickest to use this feature; if you want to
seriously change the order of the whole disc, use the Reorder feature described on the next page in Reordering Tracks on a Disc.
Press EDIT/NO while the disc is stopped.
The edit menu appears in the display.
Turn the jog dial until you see Move.
On the remote control use the and buttons.
2A6
3,7
5
Press the jog dial (ENTER) to select it.
On the remote control press enter.
You now have to specify which track you want to move, and where you
want to move it to.
❖ To abort at this point, press ■ (stop) or edit/no.
Use the jog dial or and buttons to select
the track number you want to move.
Press ►► to move the cursor to the destination
track number.
Use the jog dial or and »-i buttons to select a new track number.
For example, if you want track 4 to be the second track on the disc:
❖ if you made a mistake with either track number, you can still change
them. Use the ◄◄ and ►► buttons to move between the two track
numbers.
Track number
to be moved
Track number
after moving
Press the jog dial (ENTER) to move the track.
On the remote control press enter.
All the tracks are renumbered automatically.
<PRB1285>
Page 38

Reordering Tracks on a Disc
The track reorder feature takes the play order you've programmed for the disc using the program play feature (see page 23),
and reorders the tracks on the disc accordingly. If you want to change the position of more than a couple of tracks on the
disc, it's probably quicker to do it this way than use the move track function described on the previous page.
EDfT/NO
SYNCHRO REC
s CD CD S
CZD CD CD
o
ED (i°D Q
o
L
See page 22 for more on how to do this.
Press EDIT/NO while the disc is stopped.
Program Move appears in the display.
Press the jog dial (ENTER) to select it.
Program the track playback order.
On the remote control press ENTER.
❖ To abort at this point, press ■ (stop) or edit/no.
4
Press the jog dial again to reorder.
All the tracks on the disc are automatically renumbered to reflect the
new order.
Erasing a Whole Disc.
The MJ-D508 offers several erase options, from the whole disc, to just a segment of a single track. Erasing the whole disc
erases not only all the tracks on the disc, but also the disc name (if you've entered one).
<PRB1285>
T Press EDIT/NO while the disc is stopped.
The edit menu appears in the display.
Turn the jog dial until you see All Erase in the display.
On the remote control use the and buttons.
Press the jog dial (ENTER) to select it.
On the remote control press ENTER.
❖ To abort at this point, press ■ (stop) or EDIT/NO.
Press the jog dial again to erase.
The recorder erases the disc and displays the message Blank Disc.
Page 39

Erasing Individual Tracks
Erasing unwanted tracks on a disc frees up disc space for further recording. When you erase a track, all the tracks following
it are automatically renumbered.
7 Press EDIT/NO while the disc is stopped.
The edit menu appears in the display.
Turn the jog dial until you see Erase in the
display.
On the remote control use the and buttons.
o Press the jog dial (ENTER) to select it.
On the remote control press ENTER.
❖ To abort at this point, press ■ (stop) or EDiT/NO.
4 Use the jog dial or the and buttons to
select the track you want to erase.
Press the jog dial (ENTER) again to erase.
Erasing a Section of a Track
When you erase a section of a track, you can either have the recorder create separate tracks from the parts before and after
the erased section, or you can have the recorder combine the parts either side of the erased section into one track.
Set the start and end points of the section you want to erase.
[U Play the disc and press A-B at the start point. (A- lights)
[2] Press A-B again when you reach the end point. (A-B lights)
[H Press II (pause).
3
4,5
A
4
1
2
3
Press EDIT/NO.
Turn the jog dial until you see A-B Erase or A-B Combine in the display.
On the remote control use the and buttons.
Choose A-B Erase to create separate tracks before and after the erase
points. Choose A-B Combine to create a single track from the parts
either side of the erase points.
<PRB1285>
Page 40

3-5
4
1
Press the jog dial (ENTER) to select the function.
On the rennote control press enter.
You'll now hear a few seconds of the track before and after the A and B
erase points. The recorder repeats these alternately. To change either
the A or B points:
E Press the A-B button to select one of the points. Each press switches
between the A and B erase points.
® Move the currently selected point backwards or forwards using the
◄◄ and ►► buttons. Each step corresponds to about 1/100th sec.
Each erase point can be adjusted 176 steps either way (almost 2
seconds backwards or forwards from the original point).
❖ The recorder will not allow you to move point A beyond point B.
❖ If the display shows the message Point err while adjusting either
point, move the point in the other direction until the error message
disappears.
[U Repeat steps 1 and 2 until you have the erase points you want.
❖ To abort at this point, press ■ (stop) or EDIT/NO.
Push the jog dial or press ENTER on the remote to
finalize the edit.
The track numbers are automatically updated to reflect the edit.
Undoing a Mistake
Although the MJ-D508 gives you several opportunities to abort an edit if you make a mistake, there will probably still be
times when you complete an edit operation only to find that it wasn't what you had intended. As long as you haven't
updated the UTOC by ejecting the disc or performing a UTOC write command, or recorded anything else on the disc, you can
still undo the last edit operation.
Press EDIT/NO when the disc is stopped.
Turn the jog dial until you see UNDO in the
display.
On the remote control use the and buttons.
❖ If no undo is possible, then the recorder won't give you this option.
Push the jog dial or press ENTER bn the remote.
❖ Cancel the undo operation by pressing ■ (stop) or EDIT/NO.
Input by pushing the jog dial or pressing ENTER
on the remote again.
<PRB1285>
Page 41

Writing the UTOC
Every time you record or edit anything on a recordable MD, the recorder needs to update the User Table of Contents (UTOC)
so that it can playback the disc properly next time (see page 9 for more detailed information on what the UTOC is and what it
does). Generally, the recorder keeps track of all the records and edits you make on a disc during a session then, when you
eject the disc, it writes the updated
in addition to this automatic update, you can have the recorder write an updated UTOC to the disc anytime using the UTOC
write command. This can be a good thing to do occasionally to safeguard the contents of a disc after a series of recording or
editing operations. For example, if there is a power outage or you accidently switch off the recorder, there's a danger that
the recorder will lose the recording and editing information and so won't be able to update the UTOC correctly when you
eject the disc. Flere's how to use the UTOC write function:
UTOC to the disc all in one go.
T Press EDIT/NO when the disc is stopped.
2. Turn the jog dial until you see UTOC Write in the
display.
On the remote, use the and buttons.
Press the jog dial (ENTER).
On the remote, press ENTER.
The recorder prompts you to write with the message UTOC Write?
❖ To abort at this point, press ■ (stop) or EDiT/NO.
Press the jog dial (ENTER) again to write.
On the remote, press enter.
<PRB1285>
Page 42

The DAC (short for Digital/Analog Converter) is one of the
nnost important parts of the MJ-D508. That's because it
acts as the interpreter between the language of digital
audio spoken by
that we hear and understand. Just as two people who
speak different languages need an interpreter who can
speak and understand both languages, the
busy converting analog signals to digital, and digital signals
back to analog.
MD , and the language of analog sound
DAC keeps
In normal use, the DAC works in the background: you play
a disc; you hear the sound—you don't need to worry about
what happens in between. However, with the MJ-D508
it's possible to use just the DAC part on its own to convert
any analog signal to digital, or digital signal to analog. In
fact, any source you feed into one of the recorder's inputs
appears at all of the recorder's outputs. This, combined
with the option of applying Digital NR to any of the inputs,
creates several uses for the stand-alone DAC.
do with it?
❖ Improve the sound of your CD player, or other digital component, by using MJ-D508's DAC
The sound quality of digital audio is largely dependent on the quality of the DAC, so taking advantage of the latest
design DAC in the MJ-D508 may improve the digital-to-analog conversion and therefore the overall sound quality.
❖ Use Digital NR to clean up noisy sources
Connect your cassette tape deck, or any other component, to your amplifier via the MJ-D508 and switch on the
Digital NR for improved playback sound quality.
❖ Improve the audio performance of your PC
Because the inside of a computer is less-than-ideal for high quality analog audio, sound quality can be improved
dramatically if an external DAC is used to get audio in and out of your PC. (Note that you'll need a soundcard with
suitable digital inputs and outputs—see the instructions that came with your PC soundcard for more information.)
Example set up:
Cassette deck,
turntable, etc.
Analog in with
Digital NR on
Amplifier/receiver
:i.B,
EE3
Analog out for analog cassette deck and digital player (above)
o o o
i . - ii . irnni II } ■ :
ooo
Digital player (CD
player, etc.)
Digital In using the DAC
of the IVIJ-D508
O OO Q
I
<PRB1285>
Page 43

Make sure that if there's a disc in the recorder that it's stopped.
B---. 3
4
2 3
3
Press INPUT SELECTOR to select a DAC input.
Each press switches between optical, analog and coaxial—the display
shows the current selection.
Optical — The DAC will convert from the optical digital input to analog,
as well as sending the digital signal to both the optical and coaxial outs.
Analog
coaxial), and can also process the signal using the Digital NR.
— The DAC will convert from analog to digital (optical and
Coaxial — The DAC will convert from the coaxial digital input to analog
as well as sending the digital signal to both the optical and coaxial outs.
Press DAC MODE to switch the DAC function on/off.
The display indicates the current DAC mode.
If in either Optical or Coaxial mode, the display shows the sampling
frequency of the input signal (32, 44.1 or 48kHz), or DAC Unlock if there
is no signal present. In Analog mode, the sampling frequency is always
44.1kHz.
4 If you are converting from analog to digital, adjust
the level using the ANALOG INPUT LEVEL control.
Set so that the maximum signal level is just below the red over area
indicator. If you set the level so that the red level indicators light, you'll
end up with a distorted digital signal.
Switch DIGITAL NR on/off as required.
<PRB1285>
Page 44

Error Messages
Message
No Disc
Disc ERR ❖ The disc is damaged.
?Disc
Disc Full
Blank Disc
Playback MD
Protected
TOC Full
Can't REC
Temp Over
Can't Edit
Name Full ❖ There is no space left for registering a disc/track
Defect
MECHAERR^
Can't Copy
Not Audio
Description
❖ MD is not loaded.
❖ The MD data cannot be read.
❖ The MD does not contain the TOC or the data is
corrupted.
❖ The data is corrupted or the MD is out of standard.
❖ The MD has no space available for recording.
❖ The MD does not contain any recorded information
(including disc name information).
❖ An attempt is made to record or edit a playback-only
MD.
❖ The MD is protected against accidental erasure.
❖ The disc does not have the space for recording the
track number and character data (including disc/
track names).
❖ Recording cannot be completed successfully due to
shock or disc damage.
❖ The temperature is too high.
❖ Editing is not possible.
name.
❖ Recording interrupted due to disc damage.
❖ The MD recorder is not tunctioning properly.
❖ An attempt is made to record copy-prohibited
material.
❖ The disc contains non-audio data.
Action
❖ Load an MD.
❖ Reload the MD.
❖ Reload the MD.
❖ Use another MD.
❖ Use another MD.
❖ Use another recordable MD.
❖ The disc is ready to be recorded on.
❖ Use a recordable MD.
❖ Release the accidental erasure protection.
❖ Use another recordable MD.
❖ Restart recording or use another MD.
❖ Turn power off and leave to cool.
❖ Retry at another position on the disc.
❖ Shorten the disc/track name.
❖ Use another recordable MD.
❖ Turn power off then on again..
❖ Use a copy-permitted source (an ordinary
CD, etc.).
❖ Record the analog input from the source.
❖ Use another track.
❖ Use another MD.
<PRB1285>
UTOC WERR ❖ The UTOC data cannot be written properly due to
physical shock or disc damage.
UTOC ERR^
Din Unlock
TOC ERR^
SIO Error
Note: Error messages marked with an asterisk are followed by a number or other symbol.
❖ The recorded UTOC data is not conforming to the
MD standard or is otherwise illegible.
❖ The signal at the digital input is not recognized by
the recorder.
❖ The disc is scratched or otherwise damaged.
❖ The TOC data cannot be read.
❖ The MD is out of standard.
❖ Internal communication in the unit has broken
down.
❖ Turn power off and on again, then retry
UTOC writing. Do not to expose the unit to
any physical shock during UTOC writing.
❖ Use another MD.
❖ Use the all erase function and record the
MD from the beginning.
❖ Check the connections, and the output
mode of the source component.
❖ Use another MD.
❖ Turn power off then on again.
Page 45

Troubleshooting
It's often easy to mistake incorrect operation for trouble and malfunction of the unit. If you think there is something
wrong with the component, check the points below first. If the problems persists, contact your nearest Pioneerauthoriorized service center and have them check over the unit.
Symptom
No sound.
Can't record.
Can't record in stereo.
No Disc is displayed when
an MD is loaded.
Sound is intermittent.
The remaining recording
time doesn't increase even
after erasing some short
tracks.
The total of the recorded
time and remaining
recording time ofan MD
doesn't match the
maximum recording time
of the MD.
Tracks cannot be
combined.
Possible Causes
❖ The power cord is unplugged.
❖ Connection cords aren't connected
properly.
❖ The MD is protected against accidental erasure.
❖ A playback-only MD is in use.
❖ The TOC is full (this may occur after repeated
recording and editing operations).
❖ The MD recorder is in long-play mono recording
mode.
❖ Damaged disc.
❖ Condensation inside the MD recorder.
❖ Tracks shorter than 12 seconds are sometimes
not counted in the recording time information.
All tracks consist of a number of two-second
blocks. Often, the end of a track will not fall right
at the end of one of these blocks. As a result, the
actual available recording time may be slightly
shorter than the value calculated based on the
displayed time information.
The disc contains a damaged section, making
that part unusable.
The MD has been repeatedly re-recorded and
edited
One of the tracks was recorded using the digital
input, while the other was recorded using the
analog input.
Remedy-
Connect to an AC power outlet.
Connect the cords correctly; see
Connecting Up starting on page
10.
Close the accidental erasure
protect tab (see page 8.)
Use a recordable MD.
Execute the all-track erase
command and record the disc
from the beginning.
Use the stereo recording mode
(see page 30).
Use another MD.
Leave the MD recorder for about
an hour before retrying playback.
This is not a malfunction.
This is not a malfunction.
Use another MD.
This is not a malfunction.
This is not a malfunction: a track
recorded using the digital input
cannot be combined with a track
recorded using the analog input.
It is possible that this unit will cause interference on nearby television sets, especially if you're using the TV with an
indoor antenna. If you experience this problem, either use an outdoor television antenna, or move the MD player away
from the television.
Static electricity and other external interference can cause the unit to temporarily malfunction. Try swtiching the power
off and unplugging from the wall outlet, then plugging in and switching on again.
<PRB1285>
Page 46

Specifications
Type..............................................................................Minidisc digital audio system
Recording system..............................................Field modulation overwrite system
Reproduction system......................................................Non-contact optical readout
Sampling frequency.............................................................................................44.1 kHz
Frequency response
S/N ratio.................................................................................................................. lOOdB
Wow & flutter...........................................................................Below measurable limit
Power requirements
U.S. model........................................................................................AC 120V, 60 Hz
U.K. model.....................................................................................AC230V, 50/60Hz
European model (except U.K.)
Multi-voltage model
Power consumption
U.S. model ...........................................................................................................15W
European model...................................................................................................15W
Multi-voltage model
Dimensions...................................................................420(W) x 105(H) x 294(D) mm
Main unit weight
.................................................................................
..............................................
......
.................................................................................
............................................
AC110,120-127V, 220-230V, 240V
......................................................................................
AC 220~230V, 50/60Hz
(19-9/16X 4-Vsx 11-9/16 in.)
8 Hz to 20 kHz
50/60Hz (switchable)
15W
3.5 kg (7 lb 12oz.)
Audio input:
Line input jacks..................................... RCA PIN x2 ; reference input level 500mV
(input impedance 50 kQ.)
Audio output:
Line output jacks
Headphone output jack.......................................................................................... I.OmW
................................ RCA PIN x2 ; reference output level 500mV
(input impedancel ki^)
(volume max., load impedance 32 Q.)
Other jacks :
Coaxial digital Input jack
Optical digital input jack............................................................................................... x1
Optical digital output jack............................................................................................. x1
Control IN jack (Except European model).........................................................x1
Control OUT jack (Except European model).................................................................x1
..................................................................RCA PIN ; 0.5 Vp-p
(input impedance 75 Q.)
<PRB1285>
Accessories
Warranty card (U.S. and European models only)........................................................ x 1
Operating Instructions (this manual).............................................................................x 1
Audio cord.....................................................................................................................
Optical cord (Except U.S. model)
Remote control unit.......................................................................................................x 1
batteries (AA/R6P)
AC power cord (multi-voltage model only)....................................................................x 1
Plug adaptor (multi-voltage model only)
........................................................................................................x 2
........
...........................
.......................................................................
....................................... x 1
X 2
x 1
NOTE:
Specifications and design subject to possible modification without notice, due
to improvements.
U.S. and foreign patents licenced from Dolby Laboratories Licencing Corporation.
Page 47

POWER-CORD CAUTION
Handle the power cord by the plug. Do not pull out the plug by tugging the
cord and never touch the power cord when your hands are wet as this could
cause a short circuit or electric shock. Do not place the unit, a piece of
furniture, etc., on the power cord, or pinch the cord. Never make a knot in the
cord or tie it with other cords. The power cords should be routed such that
they are not likely to be stepped on. A damaged power cord can cause a fire
or give you an electrical shock. Check the power cord once in a while. When
you find it damaged, ask your nearest Pioneer authorized service center or
your dealer for a replacement.
This unit stores the following information in its memory:
• Digital input volume level setting
• Program play order
• Timer playback with fade in
• Digital NR setting
• Auto mark operation level setting
• Stereo/mono recording setting
• DAC mode setting
• Input selector setting
To return stored settings to their initial values (factory settings), hold down
the STOP (■) button and press the DNR button.
MAINTENANCE OF EXTERNAL SURFACES
• Use a polishing cloth or dry cloth to wipe off dust and dirt.
e When the surfaces are very dirty, wipe with a soft cloth dipped in some
neutral cleanser diluted five or six times with water, and wrung out well,
and then wipe again with a dry cloth. Do not use furniture wax or
cleaners.
9 Never use thinners, benzine, insecticide sprays and other chemicals on or
near this unit, since these will corrode the surfaces.
When storing optical cable, coil loosly as shown right.
The cable may be damaged if bent around sharp corners,
<PRB1285>
Page 48

^cc4to*H€%:
Selecting fine audio equipment such as the unit you’ve just purchased
is only the start of your musical enjoyment. Now it’s time to consider how
you can maximize the fun and excitement your equipment offers. This
manufacturer and the Electronic Industries Association’s Consumer
Electronics Group want you to get the most out of your equipment by
playing it at a safe level. One that lets the sound come through loud and
clear without annoying blaring or distortion-and, most importantly, without
affecting your sensitive hearing.
Sound can be deceiving. Over time your hearing “comfort level” adapts
to higher volumes of sound. So what sounds “normal” can actually be
loud and harmful to your hearing. Guard against this by setting your
equipment at a safe level BEFORE your hearing adapts.
To establish a safe level:
• Start your volume control at a low setting.
• Slowly increase the sound until you can hear it comfortably and clearly,
and without distortion.
Once you have established a comfortable sound level:
• Set the dial and leave it there.
Taking a minute to do this now will help to prevent hearing damage or
loss in the future. After all, we want you listening for a lifetime.
We Want You Listening For A Lifetime
Used wisely, your new sound equipment will provide a lifetime of fun
and enjoyment. Since hearing damage from loud noise is often undetectable
until it is too late, this manufacturer and the Electronic Industries
Association’s Consumer Electronics Group recommend you avoid
prolonged exposure to excessive noise. This list of sound levels is included
for your protection.
Decibel
Level Example
30 Quiet library, soft whispers
40 Living room, refrigerator, bedroom away from traffic
50 Light traffic, normal conversation, quiet office
60 Air conditioner at 20 feet, sewing machine
70 Vacuum cleaner, hair dryer, noisy restaurant
80 Average city traffic, garbage disposals, alarm clock
at two feet.
THE FOLLOWING NOISES CAN BE DANGEROUS
UNDER CONSTANT EXPOSURE
90 Subway, motorcycle, truck traffic, lawn mower
100 Garbage truck, chain saw, pneumatic drill
120 Rock band concert in front of speakers, thunderclap
140 Gunshot blast, jet plane
180 Rocket launching pad
Information courtesy of the Deafness Research Foundation.
Published by Pioneer Electronic Corporation.
Copyright© 1999 Pioneer Electronic Corporation.
All rights reserved.
PIONEER ELECTRONIC CORPORATION 4-1, Meguro 1-Chome, Meguro-ku, Tokyo 153-8654, Japan
PIONEER ELECTRONICS [USA] INC. P.O. BOX 1540, Long Beach, California 90801-1540, USA
PIONEER ELECTRONICS OF CANADA, INC. 300 Allstate Parkway Markham, Ontario L3R OP2, Canada
PIONEER ELECTRONIC [EUROPE] N.V. Haven 1087 Keetberglaan 1, 9120 Melsele, Belgium, TEL: 03/570.05.11
PIONEER ELECTRONICS AUSTRALIA PTY. LTD. 178-184 Boundary Road, Braeside, Victoria 3195, Australia, TEL: [03] 9586-6300
PIONEER ELECTRONICS DE MEXICO S.A. DE C.V. San Lorenzo Num 1009 3er piso Desp. 302 Col. Del Valle, Mexico D.F. C.P. 03100 TEL5-688-52-90
<99C00ZF0N01>
Printed in Belgium
<PRB1285-B>
 Loading...