

Page 1
REPRODUCTOR MUlTIMEDIA
MULTI ENTERTAINMENT PLAYER
MEP-4000
http://pioneerdj.com/support/
El sitio Web de Pioneer indicado más arriba tiene una sección con las preguntas más frecuentes, y además
ofrece información del software y varios tipos de información y servicios para que usted pueda usar su
producto con la mayor comodidad.
The Pioneer website shown above offers FAQs, information on software and various other types of information
and services to allow you to use your product in greater comfort.
http://www.prodjnet.com/rekordbox/support/
Para obtener información acerca del rekordbox, vea el sitio de asistencia indicado más arriba.
For inquiries on rekordbox, please see the support site shown above.
Manual de instrucciones
Operating Instructions
Page 2
Le damos las gracias por la adquisición de este producto Pioneer. Lea a fondo estas instrucciones de utilización para que aprenda a utilizar correctamente su modelo. Después de haber terminado de leer estas instrucciones, guárdelas en un lugar seguro para, en caso de ser necesario, consultarlas
en el futuro.
En algunos países o regiones, la forma de la clavija de alimentación y de la toma de corriente pueden ser algunas veces diferentes de la mostrada en
las ilustraciones explicativas. Sin embargo, el método de conexión y funcionamiento de la unidad es el mismo.
IMPORTANTE
CAUTION
RISK OF ELECTRIC SHOCK
DO NOT OPEN
La luz intermitente con el símbolo de punta
de flecha dentro un triángulo equilátero.
Está convenido para avisar el usuario de la
presencia de “voltaje peligrosa” no aislada
dentro el producto que podría constituir un
peligro de choque eléctrico para las
personas.
ATENCIÓN:
PARA PREVENIR EL PELIGRO DE CHOQUE
ELÉCTRICO NO REMOVER LA TAPA NI LAS
PARTES DENTRO NO UTILIZADAS,
LLAMAR UNA PERSONA CUALIFICADA.
ADVERTENCIA
Este aparato no es impermeable. Para evitar el riesgo
de incendio y de descargas eléctricas, no ponga ningún
recipiente lleno de líquido (como pueda ser un vaso o
un florero) cerca del aparato ni lo exponga a goteo,
salpicaduras, lluvia o humedad.
D3-4-2-1-3_A1_Es
ADVERTENCIA
Antes de enchufar el aparato a la corriente, lea la sección
siguiente con mucha atención.
La tensión de la red eléctrica es distinta según el
país o región. Asegúrese de que la tensión de la
alimentación de la localidad donde se proponga
utilizar este aparato corresponda a la tensión
necesaria (es decir, 230 V ó 120 V) indicada en el
panel posterior.
D3-4-2-1-4*_A1_Es
ADVERTENCIA
Este producto está provisto de una clavija de tres
conductores con toma de tierra (puesta a tierra) cuya
tercera patilla es la de toma de tierra. Esta clavija sólo
se adapta en una toma de corriente del tipo de toma de
tierra. Si no puede insertar la clavija en la toma de
corriente, llame a un electricista profesional para que le
reemplace la toma de corriente por otra con toma de
tierra que sea adecuada. No elimine el dispositivo de
seguridad de la clavija con toma de tierra.
ADVERTENCIA
D3-4-2-1-6_A1_Es
Para evitar el peligro de incendio, no ponga nada con
fuego encendido (como pueda ser una vela) encima del
aparato.
D3-4-2-1-7a_A1_Es
PRECAUCIÓN PARA LA VENTILACIÓN
Cuando instale este aparato, asegúrese de dejar
espacio en torno al mismo para la ventilación con el fin
de mejorar la disipación de calor (por lo menos 5 cm
encima, 5 cm detrás, y 5 cm en cada lado).
ADVERTENCIA
Las ranuras y aberturas de la caja del aparato sirven
para su ventilación para poder asegurar un
funcionamiento fiable del aparato y para protegerlo
contra sobrecalentamiento. Para evitar el peligro de
incendio, las aberturas nunca deberán taparse ni
cubrirse con nada (como por ejemplo, periódicos,
manteles, cortinas) ni ponerse en funcionamiento el
aparato sobre una alfombra gruesas o una cama.
D3-4-2-1-7b*_A1_Es
Entorno de funcionamiento
Temperatura y humedad del entorno de funcionamiento
+5 °C a +35 °C; menos del 85 % de humedad relativa
(rejillas de refrigeración no obstruidas)
No instale este aparato en un lugar mal ventilado, ni en
lugares expuestos a alta humedad o a la luz directa del
sol (o de otra luz artificial potente).
Si la clavija del cable de alimentación de CA de este
aparato no se adapta a la toma de corriente de CA
que usted desea utilizar, deberá cambiar la clavija por
otra que se adapte apropiadamente. El reemplazo y
montaje de una clavija del cable de alimentación de
CA sólo deberá realizarlos personal de servicio
técnico cualificado. Si se enchufa la clavija cortada a
una toma de corriente de CA, puede causar fuertes
descargas eléctricas. Asegúrese de que se tira de la
forma apropiada después de haberla extraído.
El aparato deberá desconectarse desenchufando la
clavija de la alimentación de la toma de corriente
cuando no se proponga utilizarlo durante mucho
tiempo (por ejemplo, antes de irse de vacaciones).
PRECAUCIÓN
El interruptor de la alimentación POWER de este
aparato no corta por completo toda la alimentación
de la toma de corriente de CA. Puesto que el cable de
alimentación hace las funciones de dispositivo de
desconexión de la corriente para el aparato, para
desconectar toda la alimentación del aparato deberá
desenchufar el cable de la toma de corriente de CA.
Por lo tanto, asegúrese de instalar el aparato de
modo que el cable de alimentación pueda
desenchufarse con facilidad de la toma de corriente
de CA en caso de un accidente. Para evitar correr el
peligro de incendio, el cable de alimentación también
deberá desenchufarse de la toma de corriente de CA
cuando no se tenga la intención de utilizarlo durante
mucho tiempo seguido (por ejemplo, antes de irse de
vacaciones).
El punto exclamativo dentro un triángulo
equilátero convenido para avisar el usuário
de la presencia de importantes
instrucciones sobre el funcionamiento y la
manutención en la libreta que acompaña el
aparato.
D3-4-2-1-1_A1_Es
D3-4-2-1-7c*_A1_Es
D3-4-2-2-1a_A1_Es
D3-4-2-2-2a*_A1_Es
Es
2
Page 3

PRECAUCIÓN
Este aparato es un producto de láser de clase 1
clasificado como tal en Seguridad de productos de
láser, IEC 60825-1:2007.
PRODUCTO LASER CLASE 1
D58-5-2-2a_A1_Es
PRECAUCIONES CONCERNIENTES A LA
MANIPULACIÓN DEL CABLE DE
ALIMENTACIÓN
Tome el cable de alimentación por la clavija. No
extraiga la clavija tirando del cable. Nunca toque el
cable de alimentación cuando sus manos estén
mojadas, ya que esto podría causar cortocircuitos o
descargas eléctricas. No coloque la unidad, algún
mueble, etc., sobre el cable de alimentación.
Asegúrese de no hacer nudos en el cable ni de unirlo a
otros cables. Los cables de alimentación deberán ser
dispuestos de tal forma que la probabilidad de que
sean pisados sea mínima. Una cable de alimentación
dañado podrá causar incendios o descargas eléctricas.
Revise el cable de alimentación está dañado, solicite el
reemplazo del mismo al centro de servicio autorizado
PIONEER más cercano, o a su distribuidor.
S002*_A1_Es
Condensación
Si el reproductor se traslada de repente de un lugar frío
al interior de una habitación caliente (en invierno, por
ejemplo) o si la temperatura de la habitación donde
está instalado el reproductor aumenta de repente
debido al uso de una calefacción, etc., en el interior del
reproductor (en los componentes de operación y en la
lente) puede que se formen gotas de agua
(condensación). Cuando se forme condensación, el
reproductor no funcionará correctamente y será
imposible reproducir. Deje sin funcionar el reproductor
a la temperatura de la habitación durante 1 o 2 horas
con la alimentación conectada (el tiempo dependerá
del grado de condensación). Las gotas de agua se
disiparán y entonces será posible realizar la
reproducción.
La condensación también se puede producir en el
verano si el reproductor se expone al aire frío que
procede directamente de un acondicionador de aire. Si
ocurre esto, traslade el reproductor a un lugar
diferente.
S005_A1_Es
Es
3
Page 4

Contenido
Cómo leer este manual
En este manual, los nombres de canales y botones indicados en el
producto, los nombres de menús del software, etc., se indican dentro de
corchetes ([ ]). (p. ej.: Canal [MASTER], [ON/OFF], menú [File])
! Después de instalar el rekordbox, su Manual de instrucciones se
podrá ver desde el menú [Ayuda] del rekordbox.
Antes de empezar a usar la unidad
Características ............................................................................................ 5
Ejemplo de configuración del sistema ..................................................... 5
Contenido de la caja ................................................................................... 5
Antes de comenzar
Discos y aparatos USB que se pueden usar ............................................ 6
Formatos de archivos de música reproducibles ..................................... 7
Funciones que se pueden usar en combinación con un ordenador ..... 7
Instalación rekordbox ................................................................................. 8
Conexiones
Nombres de los terminales ...................................................................... 10
Ejemplo de conexiones ............................................................................ 11
Directrices para la instalación ................................................................ 12
Operación
Panel de control ........................................................................................ 13
Pantalla de la unidad principal................................................................ 14
Selección de la fuente que se va a reproducir (sección de selección
de fuentes) ................................................................................................. 14
Operaciones básicas (secciones del reproductor, selección de
fuentes y navegador) ................................................................................ 15
Operación del dial jog .............................................................................. 16
Establezca el bucle ................................................................................... 17
Visualización de información de pistas (sección de navegación) ....... 17
Búsqueda rápida de pistas usando la información de librería ............ 18
Ajuste de la velocidad de reproducción (sección de control de
tempo) ........................................................................................................ 18
Para guardar puntos cue o puntos de bucle ......................................... 18
Cambio de los ajustes .............................................................................. 19
Información adicional
Solución de problemas ............................................................................ 21
Mensaje de error ....................................................................................... 22
Cuidados para el uso ................................................................................ 22
Manejo de los discos ................................................................................ 22
Acerca de las marcas de fábrica y marcas registradas ........................ 23
Cuidados para los derechos de autor ..................................................... 23
Uso del sitio de asistencia ....................................................................... 23
Especificaciones ....................................................................................... 23
Es
4
Page 5
Antes de empezar a usar la unidad
Tipo 1 (Chile, India, Perú)
Características
Esta unidad es un reproductor multimedia del tipo montado en estantería diseñado para DJ móviles y clubs, y en él se puede usar una amplia variedad
de fuentes de música para actuaciones de DJ.
Español
MULTIMEDIA, MULTIFORMATO
Esta unidad no sólo puede reproducir CD de música (CD-DA), sino también archivos de música (MP3 y WAV) grabados en aparatos USB de la
Unidad de introducción por ranura
No es necesario abrir y cerrar una bandeja, así que los discos se pueden
cambiar rápidamente.
clase de almacenamiento en masa (aparatos de memoria flash y discos
duros) y discos CD-R/-RW.
Cue de memoria
rekordbox
™
Esta unidad es compatible con rekordbox, el software de administración
de música exclusivo de los reproductores DJ de Pioneer. Los archivos
de música administrados con rekordbox se pueden transferir a aparatos
USB y éstos se pueden conectar a esta unidad para seleccionar pistas y
realizar otras operaciones fácilmente.
Esta unidad es compatible con la función de cue de memoria para esta-
blecer y guardar puntos cue de antemano. Los puntos cue se pueden
recuperar instantáneamente durante las actuaciones de DJ.
Ejemplo de configuración del sistema
Combinando esta unidad con un mezclador DJ y equipos periféricos se puede establecer un sistema DJ como el mostrado en el diagrama de abajo.
Music management
Software de administración
software
de música
Aparato USB Aparato USB
DISC 1 DISC 2
SOURCE
EJECT
TIME MODE
SELECT
CD
USB
AUTO CUE
1
12
FOLDER TRACK REMAIN
DISPLAY
REPEAT
A.CUE
RELAY
UTILITY
REV
FWD
RELOOP
HOT LOOP OUT ADJUST
OUT
IN/CUE
CDJ
VINYL
JOG MODE
CUE
Ordenador
EJECT
OFF
ON
POWER
USB 1
USB STOP
TEMPO
M
SF
SELECT PUSH
MASTER TEMPO
/EXIT
TEMPO RANGE
BACK
MEMORY
CUE
SEARCH
PITCH BEND
USB 2
EJECT
TEMPO
WIDE
±16
±10
±6
%
BPM
REV
0
MT MT
rekordbox
EJECT
CD
USB
1
12
SOURCE
SELECT
JOG MODE
TIME MODE
AUTO CUE
DISPLAY
UTILITY
FWD
VINYL
USB STOP
HOT LOOP OUT ADJUST
IN/CUE
CDJ
FOLDER TRACK REMAIN
A.CUE
CUE
MULTI ENTERTAINMENT PLAYER MEP-4000
MULTI ENTERTAINMENT PLAYER MEP-4000
TEMPO
M
SF
REPEAT
RELAY
SELECT PUSH
RELOOP
MASTER TEMPO
/EXIT
OUT
TEMPO RANGE
BACK
MEMORY
CUE
SEARCH
PITCH BEND
TEMPO
WIDE
±16
±10
±6
%
BPM
0
MEP-4000
Disco Disco
DJ mesa de mezclas
Para verificar la entrada/
salida de audio
Para salida de audio
Amplificador,
altavoz con amplificador, etc.
PHONO
CD CD CDCD
/ LINE
99
10
55
9
22
8
00
7
--22
6
--44
5
--77
4
3
--1100
2
--1155
1
0
MIXING
MONO
SPLIT CUE
CUE
MASTER
HEADPHONES
Auriculares
PHONO
MASTER LEVEL
99
55
22
00
--22
--44
--77
--1100
--1155
CUE CUECUECUECUE
CROSS FADER
/ LINELINEUSB
SUBWOOFER LEVEL
9
OUTPUT MODE
5
FREQUENCY
2
50
0
-2
36
-4
-7
-10
2
-15
11
R
ZONE LEVEL
BOOTH MONITOR
BALANCE
R
L
PROFESSIONAL MIXER
NORMAL CROSSOVER
100
164
30 210
Hz
SEND/RTN
44
33
MASTER MASTER
2
MICMIC 1
OFF
LEVEL
MIN
ON/OFF
DJM-4000
MAX
10
9
8
7
6
5
4
3
2
1
0
LINE
99
55
22
00
--22
--44
--77
--1100
--1155
99
10
9
8
7
6
5
4
3
2
1
0
----
10
55
9
22
8
00
7
--22
6
--44
5
--77
4
3
--1100
2
--1155
1
0
OFF
ON
MIC 2
MIC 1+2
Contenido de la caja
! Cable(s) de alimentación
! Cable de audio
! Manual de Instrucciones (este manual)
Cable(s) de alimentación
Con esta unidad se incluyen los cables de alimentación siguientes. Use el cable de alimentación apropiado para su país o región.
Tipo 2 (Colombia, Guatemala, Panamá, Venezuela)
! Cable de control remoto dedicado
! Sello de la clave de licencia del rekordbox
Es
5
Page 6
Antes de comenzar
Discos y aparatos USB que se pueden usar
Acerca de los discos
Esta unidad puede reproducir los discos mostrados más abajo.
Tipo Marca
CD
CD-R
CD-RW
2
CD-TEXT
1 Se pueden reproducir los discos que tienen las marcas de esta tabla en la
etiqueta, envoltura o carátula del disco.
2 Los títulos y los nombres de álbumes y artistas grabados en los datos del
CD-Text se visualizan. Cuando se graban datos de texto múltiple en el disco se
visualiza información para los datos del primer texto.
Discos que no se pueden reproducir
! DTS-CD
! Photo CD
! Video CD
! Discos CD Graphics (CD-G)
! CD sin finalizar
! DVD
Acerca de los discos CD-R/-RW
Los archivos de música (MP3/WAV) grabados en discos CD-R/-RW se
pueden reproducir.
Capas de carpetas
Máximo número de
carpetas
Máximo número de
archivos
Cuando haya muchas carpetas o archivos se necesitará algo de tiempo
para hacer la carga.
Acerca de los discos creados en ordenadores
Dependiendo de la configuración de la aplicación y del ambiente del
ordenador, puede que no sea posible reproducir ciertos discos. Grabe
los discos en un formato compatible con esta unidad. Para conocer
detalles, contacte con el vendedor de la aplicación.
1
Capas 8 máximas (los archivos en carpetas más allá de
la capa 8 no se pueden reproducir)
Carpetas 999
Archivos 999
Formatos compatibles
! Music CD (CD-DA)
! Music CD (CD-DA)
! MP3
! WAV
Music CD (CD-DA)
Si la calidad de la grabación es mala debido a las propiedades del disco,
a las rayas o suciedad del disco o a la suciedad de la lente de grabación,
puede que no sea posible reproducir el disco.
Creación de discos con copias de seguridad
Cuando los discos CD-R/-RW hacen una pausa o se dejan en el modo
de pausa durante mucho tiempo en puntos cue, puede que sea difícil
reproducir el disco en esos puntos, debido a las propiedades del mismo.
Además, cuando se haga un bucle en un punto específico, repetidamente y durante muchas veces, puede que sea difícil reproducir ese
punto.
Cuando se reproduzcan discos valiosos recomendamos hacer copias de
seguridad.
Acerca de Copy Control CDs y DualDiscs
Esta unidad ha sido diseñada conforme a las normas de CD. El uso y
rendimiento de los discos de otras normas que no sean las de CD no
está garantizado.
Acerca de los CD sencillos de 8 cm
Los CD sencillos de 8 cm no se pueden reproducir en el MEP-4000. No
ponga adaptadores de 8 cm en los CD y reproduzca estos discos en el
MEP-4000. El adaptador podría caerse al girar el disco y dañar el disco o
el reproductor.
Acerca de los aparatos USB
Esta unidad es compatible con aparatos USB de almacenamiento en
masa USB (discos duros externos, aparatos de memoria flash portátiles,
aparatos de audio digitales, etc.).
Capas de carpetas Máximo de 8 capas
Máximo número de carpetas dentro de una
1
carpeta
Máximo número de archivos dentro de una carpeta
Máximo número de archivos
Sistemas de archivo compatibles FAT16, FAT32
1 Cuando no se administran con rekordbox
2 Cuando se administran con rekordbox
2
Cuando haya muchas carpetas o archivos se necesitará algo de tiempo
para hacer la carga.
Las carpetas y archivos que sobrepasan el límite no se pueden
visualizar.
Aparatos USB que no se pueden usar
! Los aparatos de disco óptico, como las unidades DVD/CD externas,
etc., no son compatibles.
! No se pueden usar concentradores USB.
Cuidados al usar aparatos USB
! Cuando se usan aparatos USB tenga cuidado de no aplicar
fuerzas intensas a la sección de la clavija. Si lo hace puede que
la clavija se desconecte por error y se dañe el puerto o el aparato USB.
! Algunos aparatos USB pueden no funcionar bien en esta unidad.
Note que Pioneer no aceptará ninguna responsabilidad por ninguna
pérdida de datos grabados en aparatos USB causada por la conexión
a esta unidad.
Carpetas 999
1
Archivos 999
Archivos 20 000
Es
6
Page 7
! Si el aparato USB se divide en múltiples particiones, sólo se podrá
usar la primera partición.
! Los aparatos USB equipados con lectores de tarjetas flash pueden
no funcionar.
! Dependiendo del aparato USB que esté usando puede que no se
logre el rendimiento deseado.
! Los aparatos USB cuya corriente nominal excede 500 mA no se
pueden usar. Use aparatos USB que funcionen con una fuente de
alimentación externa (adaptador de CA, etc.).
Formatos de archivos de música
reproducibles
Esta unidad es compatible con archivos de música de los formatos
mostrados abajo.
Tipo MP3 WAV
Extensión de archivo .mp3 .wav
Formatos compatibles MPEG-1 WAV
Profundidad de bits 16 bits 16 bits
Velocidad de bits 32 kbps a 320 kbps —
Frecuencia de
muestreo
Método de
codificación
32 kHz, 44,1 kHz, 48 kHz 44,1 kHz
CBR, VBR PCM sin comprimir
Acerca de los archivos MP3
Los archivos MP3 pueden tener una velocidad de bits constante (CBR)
o variable (VBR). En esta unidad se pueden reproducir ambos tipos
de archivos, pero las funciones de búsqueda y búsqueda superrápida
son más lentas con los archivos VBR. Si su prioridad es la operabilidad
recomendamos grabar archivos MP3 con CBR.
Funciones que se pueden usar en
combinación con un ordenador
Software de administración de música
rekordbox
rekordbox es un programa de software para que los propietarios del
MEP-4000 o de otro reproductor DJ de Pioneer puedan administrar los
archivos de música que usan en la reproducción DJ.
— El rekordbox se puede usar para clasificar y buscar archivos de
música guardados en su ordenador y también para crear listas
de reproducción, todo lo cual puede ayudar a mejorar sus actuaciones de DJ.
! Para usar el rekordbox, descárguelo del sitio Web de Pioneer indi-
cado más abajo.
http://www.prodjnet.com/rekordbox/support/
Contrato de Licencia del Software
El presente Contrato de Licencia del Software (en lo sucesivo “Contrato”)
se formaliza entre usted (tanto la persona que instala el Programa como
cualquier entidad legal para la cual actúe dicha persona) (en lo sucesivo
“Usted” o “Su”) y PIONEER CORPORATION (en lo sucesivo “Pioneer”).
LA REALIZACIÓN DE CUALQUIER PASO PARA CONFIGURAR O
INSTALAR EL PROGRAMA IMPLICA QUE USTED ACEPTA LAS
CONDICIONES DEL PRESENTE CONTRATO DE LICENCIA. EL
PERMISO PARA DESCARGAR Y/O UTILIZAR EL PROGRAMA ESTÁ
EXPRESAMENTE CONDICIONADO A LOS SIGUIENTES TÉRMINOS.
NO SE REQUIERE LA AUTORIZACIÓN ESCRITA O POR MEDIOS
ELECTRÓNICOS PARA QUE EL PRESENTE CONTRATO TENGA VALIDEZ
LEGAL Y FUERZA EJECUTORIA. EN CASO DE NO ACEPTAR LAS
CONDICIONES DEL PRESENTE CONTRATO, NO ESTARÁ AUTORIZADO
A UTILIZAR EL PROGRAMA Y DEBERÁ INTERRUMPIR LA INSTALACIÓN
O DESINSTALACIÓN, SEGÚN CORRESPONDA.
1 Definiciones
1 “Documentación” significa la documentación, especificaciones y
contenido de ayuda por escrito que Pioneer normalmente facilita
para ayudar en la instalación y utilización del programa.
2 “Programa” significa todas y cada una de las partes del software
con licencia de Pioneer para su uso según lo estipulado en el
presente Contrato.
2 Licencia de programa
1 Licencia limitada. Sujeto a las limitaciones del presente
Contrato, Pioneer le otorga una licencia limitada, no exclusiva e
intransferible (sin derecho a sublicenciar):
a Instalar una única copia del programa en la unidad de disco
duro de su ordenador, utilizar el programa exclusivamente
para fines personales en cumplimiento de lo establecido
en el presente Contrato y en la Documentación (“Uso
autorizado”);
b Utilizar la Documentación en beneficio de su Uso autorizado;
y
c Realizar una copia del programa exclusivamente a efectos
de copia de seguridad, siempre y cuando todos los títulos y
marcas registradas, derechos de autor y avisos de derechos
limitados sean reproducidos en la copia.
2 Limitaciones. Usted no podrá copiar ni utilizar el Programa o
Documentación salvo en la medida que esté expresamente
permitido por el presente Contrato. No podrá ceder, sublicenciar,
alquilar, arrendar ni prestar el Programa, ni utilizarlo para formar
a terceros, para multipropiedad comercial u oficina de servicios.
Usted no podrá modificar, aplicar ingeniería inversa, descompilar o desensamblar el Programa, ni a través de terceros, salvo
en la medida en que lo permita de forma expresa la legislación
vigente, y sólo tras haber notificado a Pioneer por escrito de sus
actividades previstas. No podrá utilizar el Programa en múltiples procesadores son el previo consentimiento por escrito de
Pioneer.
3 Propiedad. Pioneer o su otorgante de licencia se reserva cual-
quier derecho, título o interés en todas las patentes, derechos
de autor, marcas registradas, secretos comerciales y otros derechos de propiedad intelectual del Programa y Documentación, y
cualquier obra derivada de los mismos. No podrá adquirir otros
derechos, expresa o implícitamente, fuera del alcance de la
licencia limitada estipulada en el presente Contrato.
4 Soporte excluido. Pioneer no está obligado a ofrecer soporte,
mantenimiento, actualizaciones, modificaciones o nuevas
publicaciones del Programa o Documentación estipulados en el
presente Contrato.
3 Exclusión de garantías
EL PROGRAMA Y LA DOCUMENTACIÓN SE OFRECEN “TAL CUAL” SIN
REPRESENTACIONES NI GARANTÍAS, Y USTED ACEPTA UTILIZARLOS
BAJO SU PROPIO RIESGO. HASTA EL MÁXIMO GRADO PERMITIDO
POR LA LEY, PIONEER RENUNCIA DE FORMA EXPRESA A TODA
GARANTÍA DE CUALQUIER CLASE EN RELACIÓN AL PROGRAMA Y
DOCUMENTACIÓN, YA SEA DE FORMA EXPRESA, IMPLÍCITA, POR
LEY O QUE SURJAN COMO CONSECUENCIA DEL RENDIMIENTO,
TRANSACCIÓN O USO COMERCIAL, INCLUYENDO SIN LIMITACIÓN
LAS GARANTÍAS DE COMERCIABILIDAD O IDONEIDAD PARA UN FIN
DETERMINADO, PROPÓSITO, CALIDAD SATISFACTORIA, PRECISIÓN,
TITULARIDAD O DE NO VIOLACIÓN.
4 Indemnizaciones y recursos ante incumplimiento
contractual
Usted acepta que cualquier incumplimiento de las limitaciones del pre-
sente Contrato originarán daños irreparables a Pioneer que no podrán
verse compensados únicamente con una indemnización por daños y
perjuicios. Además de indemnizaciones y otros recursos a los cuales
Pioneer pueda tener derecho, usted acepta que Pioneer pueda tomar
medidas cautelares para impedir el incumplimiento real, inminente o
continuado del presente Contrato.
Español
Es
7
Page 8
5 Terminación
Pioneer puede dar por finalizado el presente Contrato en cualquier
momento por incumplimiento de una cláusula. Si el presente Contrato
queda rescindido, usted dejará de utilizar el Programa, lo eliminará
permanentemente del equipo donde esté instalado y destruirá todas las
copias del Programa y Documentación que estén en su posesión, y lo
confirmará a Pioneer por escrito. Los apartados 2.2, 2.3, 2.4, 3, 4, 5 y 6
seguirán vigentes tras la rescisión del presente Contrato.
6 Términos generales
1 Limitaciones de responsabilidad. En ningún caso Pioneer o
alguna de sus filiales será responsable en relación al presente
Contrato o en cuanto a su contenido, bajo ninguna teoría de
responsabilidad, por los daños indirectos, cuantificables,
accesorios, consecuentes o punitivos, o daños por pérdida de
beneficios, ingresos, negocios, ahorros, datos, uso o gastos de
adquisición sustitutiva, incluso si se advirtió de la posibilidad de
tales daños o éstos estaban previstos. En ningún caso Pioneer
será responsable de aquellos daños que superen los importes
abonados por usted a Pioneer o a sus filiales para el Programa.
Las partes reconocen que los límites de responsabilidad y la
asignación de riesgos del presente Contrato se reflejan en el precio del Programa y constituyen elementos esenciales de la venta
entre ambas partes, sin los cuales Pioneer no hubiera ofrecido el
Programa ni formalizado el presente Contrato.
2 Las limitaciones o exclusiones de la garantía y responsabilidad
que se incluyen en el presente Contrato no perjudican ni afectan
a sus derechos legales como consumidor y le serán de aplicación sólo en la medida en que dichas limitaciones o exclusiones
estén permitidas por la legislación vigente de su territorio.
3 Divisibilidad y renuncia. Si se determina que cualquier cláu-
sula del presente Contrato es ilegal, inválida o inaplicable, esa
cláusula se aplicará en la medida que sea posible o, en caso de
que sea incapaz de ser aplicada, se considerará anulada y eliminada del presente Contrato, y las cláusulas restantes seguirán
vigentes y válidas. La renuncia de cualquiera de las partes a los
derechos que les correspondieren en virtud del incumplimiento
del presente Contrato no se interpretará como una renuncia a
ningún otro derecho que les pudiere corresponder en virtud de
incumplimientos futuros.
4 Sin asignación. Usted no debe asignar, vender, ceder, delegar o
hacer un uso distinto del presente Contrato o cualesquiera derechos u obligaciones en relación al mismo, voluntaria o involuntariamente, por efecto de la ley u otra forma, sin el previo consentimiento por escrito de Pioneer. Cualquier supuesta asignación,
transferencia o delegación por su parte quedará sin efecto.
Sujeto a lo precedente, el presente Contrato será vinculante y
redundará en beneficio de las partes y sus respectivos sucesores
y designados.
5 Indivisibilidad del contrato. El presente Contrato constituye el
contrato íntegro entre las partes y reemplaza todos los acuerdos
o representaciones anteriores o actuales, orales o escritos, en
cuanto al contenido del mismo. El presente Contrato no debe
modificarse sin el previo consentimiento por escrito de Pioneer,
y ningún documento, uso, costumbre o ley tendrán capacidad
para modificar el presente Contrato.
6 Usted está de acuerdo con que este Contrato se regulará y cons-
tituirá por las leyes de Japón.
Cuidados para la instalación del
rekordbox
Lea cuidadosamente “Contrato de Licencia del Software” antes de instalar
el rekordbox.
! El archivo de instalación descargado incluye el programa de instala-
ción en los 12 idiomas siguientes:
Inglés, francés, alemán, italiano, holandés, español, portugués, ruso,
chino (caracteres simplificados), chino (caracteres tradicionales),
coreano y japonés.
! Cuando se use un sistema operativo en cualquier idioma que no sea
uno de los enumerados más arriba, elija [English (Inglés)] durante
el proceso de instalación.
Sistemas operativos compatibles rekordbox
Mac OS X (10.5.8 o posterior)
®
7 Home Premium/Professional/
Windows
Ultimate (SP1 o posterior)
®
Windows Vista
Business/Ultimate (SP2 o posterior)
Windows
Professional Edition (SP3 o posterior)
Home Basic/Home Premium/
®
XP Home Edition/
versión de 32 bits
versión de 64 bits
versión de 32 bits
versión de 64 bits
versión de 32 bits
1
1
1
1
1
1
Ambiente de funcionamiento mínimo para
rekordbox
! Unidad central de procesamiento:
— Para Mac OS X, ordenador Macintosh equipado con un procesa-
dor Intel® Dual-Core a 1,6 GHz o más
— Para un ordenador compatible con PC/AT con Windows® 7,
Windows Vista® y Windows® XP equipado con un procesador
Intel® Dual Core a 2,0 GHz o más
! Memoria necesaria: RAM de 1 GB o más
! Disco duro: Espacio libre de 250 MB o más (sin incluir espacio para
guardar archivos de música, etc.)
! Sonido: Salida de audio a altavoces, auriculares, etc. (aparato de
audio interno o externo)
! Conexión a Internet: Para el registro del usuario y obtener informa-
ción, use un navegador Web compatible con SSL de 128 bits (Safari
2.0 o posterior, Internet Explorer® 6.0 o posterior, etc.).
! Puerto USB: Para transferir archivos de música a un aparato USB se
necesita un puerto USB para conectar en él dicho aparato (memoria
flash, disco duro, etc.).
! La funcionalidad total no está garantizada en todos los ordenado-
res, ni en los que cumplen con los requerimientos ambientales
descritos anteriormente.
! Incluso disponiendo de la capacidad de memoria para el ambiente
de operación indicado anteriormente, en los casos descritos a
continuación, el software puede que no provea una funcionalidad
y un rendimiento completos debido a la falta de memoria. En este
caso, tome las medidas necesarias para asegurar que dispone de
memoria libre suficiente. Recomendamos añadir memoria extra
para lograr un rendimiento estable.
— Cuando haya muchas pistas que están siendo administradas
en la librería rekordbox
— Cuando se están ejecutando programas residentes y servicios
! Dependiendo de la configuración de la alimentación del ordena-
dor, etc., la capacidad de procesamiento de la CPU y el disco duro
pueden no ser suficientes. Cuando use ordenadores portátiles
en particular, mantenga siempre conectada la alimentación de
CA y ponga el ordenador en condiciones de máximo rendimiento
cuando use el rekordbox.
! Note que se pueden producir problemas en la operación del rekor-
dbox debido a otro software que esté usándose con él.
Instalación rekordbox
Para usar el rekordbox en el MEP-4000, use la Ver. 1.5.4 u otra posterior.
Lea cuidadosamente Cuidados para la instalación del rekordbox antes de
instalar el rekordbox.
! Para instalar y desinstalar rekordbox se necesita autorización del
administrador del ordenador.
Inicie la sesión como el usuario que fue establecido como adminis-
trador del ordenador antes de hacer la instalación.
Es
8
Page 9
Acerca del procedimiento de instalación
(Mac OS X)
1 Haga doble clic en el archivo descargado [Install_
rekordbox_1.x.x.x.pkg.zip] y luego haga doble clic en el
archivo sin comprimir [Install_rekordbox_1.x.x.x.pkg].
2 Instale rekordbox siguiendo las instrucciones de la
pantalla.
Acerca del procedimiento de instalación
(Windows)
1 Haga doble clic en el archivo descargado [Install_
rekordbox_1.x.x.x.zip] y luego haga doble clic en el
archivo sin comprimir [Install_rekordbox_1.x.x.x.exe].
2 Instale rekordbox siguiendo las instrucciones de la
pantalla.
! Haga clic en [Cancelar] para cancelar la instalación después de
iniciarse ésta.
Inicio de rekordbox
Inicie la sesión como el usuario que fue establecido como administrador
del ordenador antes de hacer la instalación del rekordbox.
! Cuando se inicia el rekordbox por primera vez se le pedirá que intro-
duzca la clave de licencia. La clave de licencia se indica en el sello
de dicha clave incluido en la misma bolsa de plástico que el manual
de instrucciones.
! Cuando se inicia el rekordbox, el manual de instrucciones se puede
ver desde el menú rekordbox [Ayuda].
Para Mac OS X
Abra la carpeta [Aplicación] con Finder y luego haga
doble clic en [rekordbox 1.x.x.app].
! El 1.x.x indica la versión del rekordbox.
2 En la pantalla de configuración de preferencias,
marque el elemento [Crear la biblioteca para MEP-4000
cuando desconecte el dispositivo USB].
Crear la biblioteca para MEP-4000 cuando
desconecte el dispositivo USB :
Transferencia de listas de reproducción
y otros datos de administración a un
aparato USB
Los datos se transfieren cuando se realiza la operación para desconec-
tar el aparato USB.
1 En el rekordbox, haga clic en .
Español
Para Windows® 7, Windows Vista® y Windows®
XP
Haga clic en el botón del menú [Iniciar] de Windows, y
luego en [Todos los programas] > [Pioneer] > [rekordbox
1.x.x] > [rekordbox 1.x.x].
! El 1.x.x indica la versión del rekordbox.
Configuración del rekordbox
El rekordbox deberá configurarse antes de ser usado en esta unidad.
1 Después de iniciar el rekordbox, haga clic en [Archivo]
> [Preferencias].
2 Haga clic en
a la derecha del que quiera
transferir.
3 Aparece una barra indicando el progreso de la
transferencia de datos. Espere hasta que la barra llegue
al extremo derecho.
Cuando la barra se apaga, los datos habrán sido transferidos
completamente.
4 Desconexión de los aparatos USB.
! Asegúrese de desconectar el aparato USB mediante la operación en
el rekordbox. Si se desconecta de cualquier otra forma, los datos de
administración no se transferirán al aparato USB.
! No desfragmente el aparato USB después de transferir a él los datos
de administración.
Cuidados para usar el rekordbox
Si ha sido usada la función [Organización de la lista de reproducción
usando una carpeta] del rekordbox, cuando se navega por la categoría
[PLAYLIST] de esta unidad, la carpeta no se visualiza; y en su lugar se
visualiza una lista de todas las listas de reproducción.
Es
9
Page 10

Conexiones
Asegúrese de desconectar la alimentación y desenchufar el cable de alimentación de la toma de corriente siempre que haga o cambie conexiones.
Consulte el manual de instrucciones del componente que va a ser conectado.
Conecte el cable de alimentación después de terminar las conexiones entre los aparatos.
Asegúrese de usar el cable de alimentación incluido.
Nombres de los terminales
Panel trasero
1 32
AUDIO OUT
12
L
L
R
R
Unidad reproductora
AC IN
REMOTE
CONTROL
REMOTE
CONTROL
Unidad de control
1 AC IN
Conecte esto a una toma de corriente.
Conecte el cable de alimentación después de terminar las conexiones entre los aparatos.
Asegúrese de usar el cable de alimentación incluido.
2 REMOTE CONTROL (la página 11)
Conecte la unidad reproductora y la unidad de control usando el cable de control remoto dedicado (incluido).
3 AUDIO OUT (la página 11)
Conecte los cables de audio (incluidos) aquí.
2
10
Es
Page 11
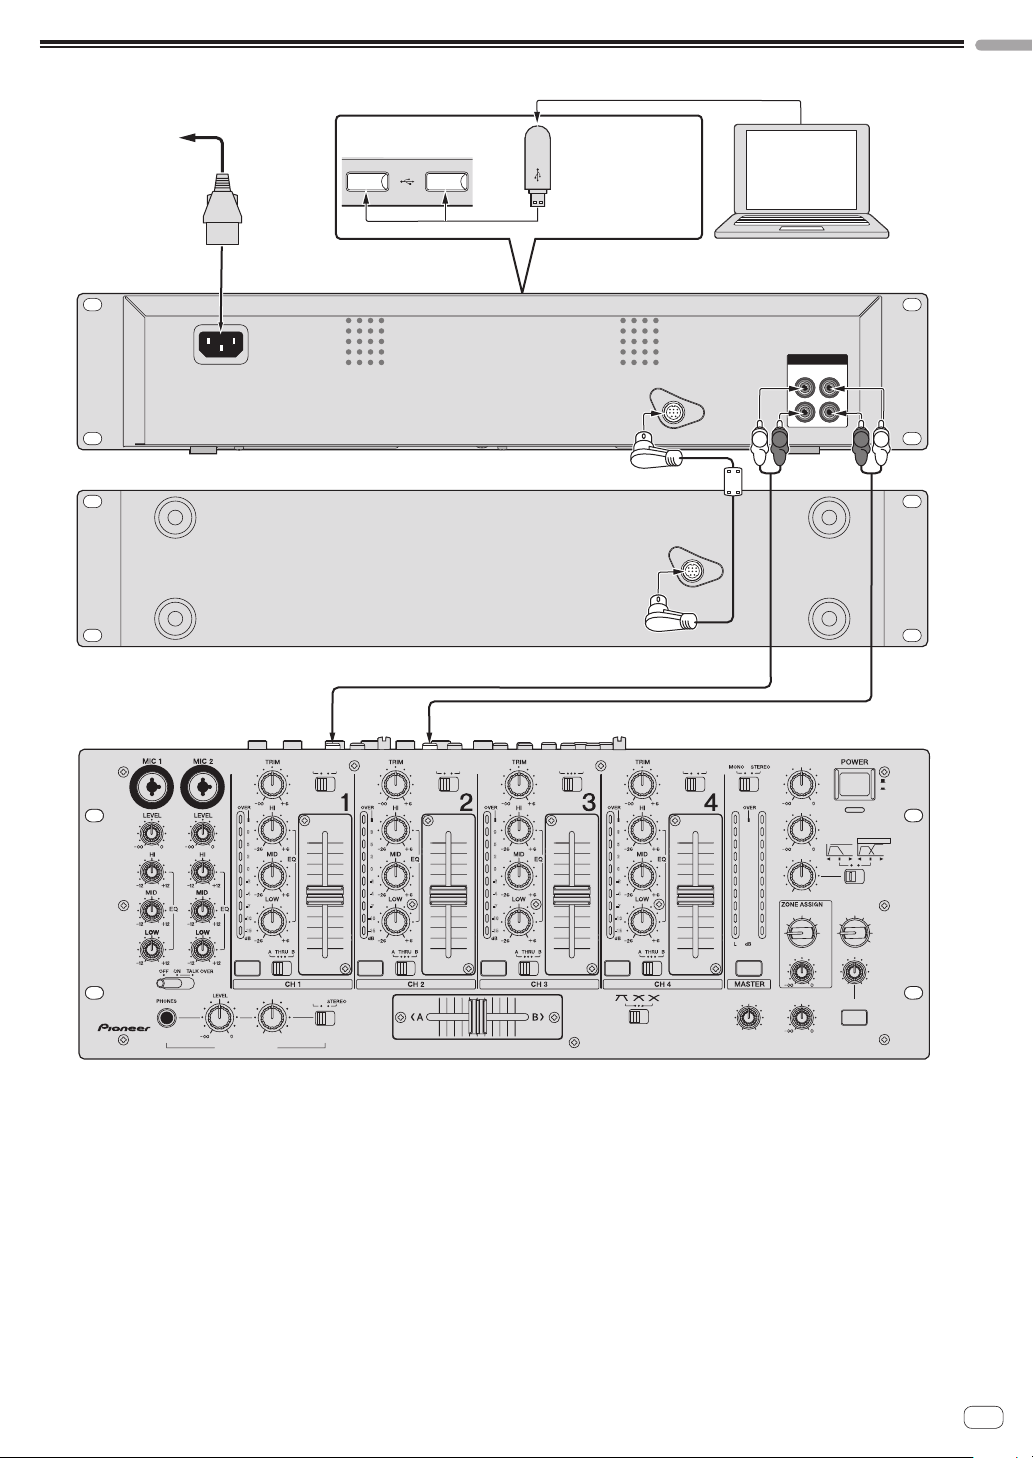
Ejemplo de conexiones
USB 1
DC5V 500mA
USB 2
DC5V 500mA
Español
A una toma de CA
Cable de alimentación
AC IN
Panel trasero de la unidad reproductora
Panel trasero de la unidad de control
Panel frontal de
la unidad reproductora
Aparato USB en el que
están grabados los
datos del rekordbox
Cable de control remoto dedicado (incluido)
rekordbox
Ordenador
AUDIO OUT
12
L
L
R
REMOTE
CONTROL
1
REMOTE
CONTROL
R
R
L
R
L
PHONO
CD CD CDCD
/ LINE
99
55
22
00
--22
--44
--77
--1100
--1155
CUE
HEADPHONES
10
9
8
7
6
5
4
3
2
1
0
----
MIXING
MONO
SPLIT CUE
MASTER
99
55
22
00
--22
--44
--77
--1100
--1155
DJ mesa de mezclas
Use solamente el cable de control remoto suministrado.
1
Cable de audio (incluido)
PHONO
LINE
99
10
9
8
7
6
5
4
3
2
1
0
10
55
9
22
8
00
7
--22
6
--44
5
--77
4
3
--1100
2
--1155
1
0
99
55
22
00
--22
--44
--77
--1100
--1155
CUE CUECUECUECUE
CROSS FADER
/ LINELINEUSB
10
9
8
7
6
5
4
3
2
1
0
MASTER LEVEL
SUBWOOFER LEVEL
9
5
FREQUENCY
2
50
0
-2
36
-4
30 210
Hz
-7
44
33
-10
2
-15
11
R
ZONE LEVEL
BOOTH MONITOR
BALANCE
R
L
PROFESSIONAL MIXER
OUTPUT MODE
NORMAL CROSSOVER
100
164
SEND/RTN
MASTER MASTER
2
MICMIC 1
OFF
MIC 1+2
LEVEL
MAX
MIN
ON/OFF
DJM-4000
OFF
ON
MIC 2
Es
11
Page 12
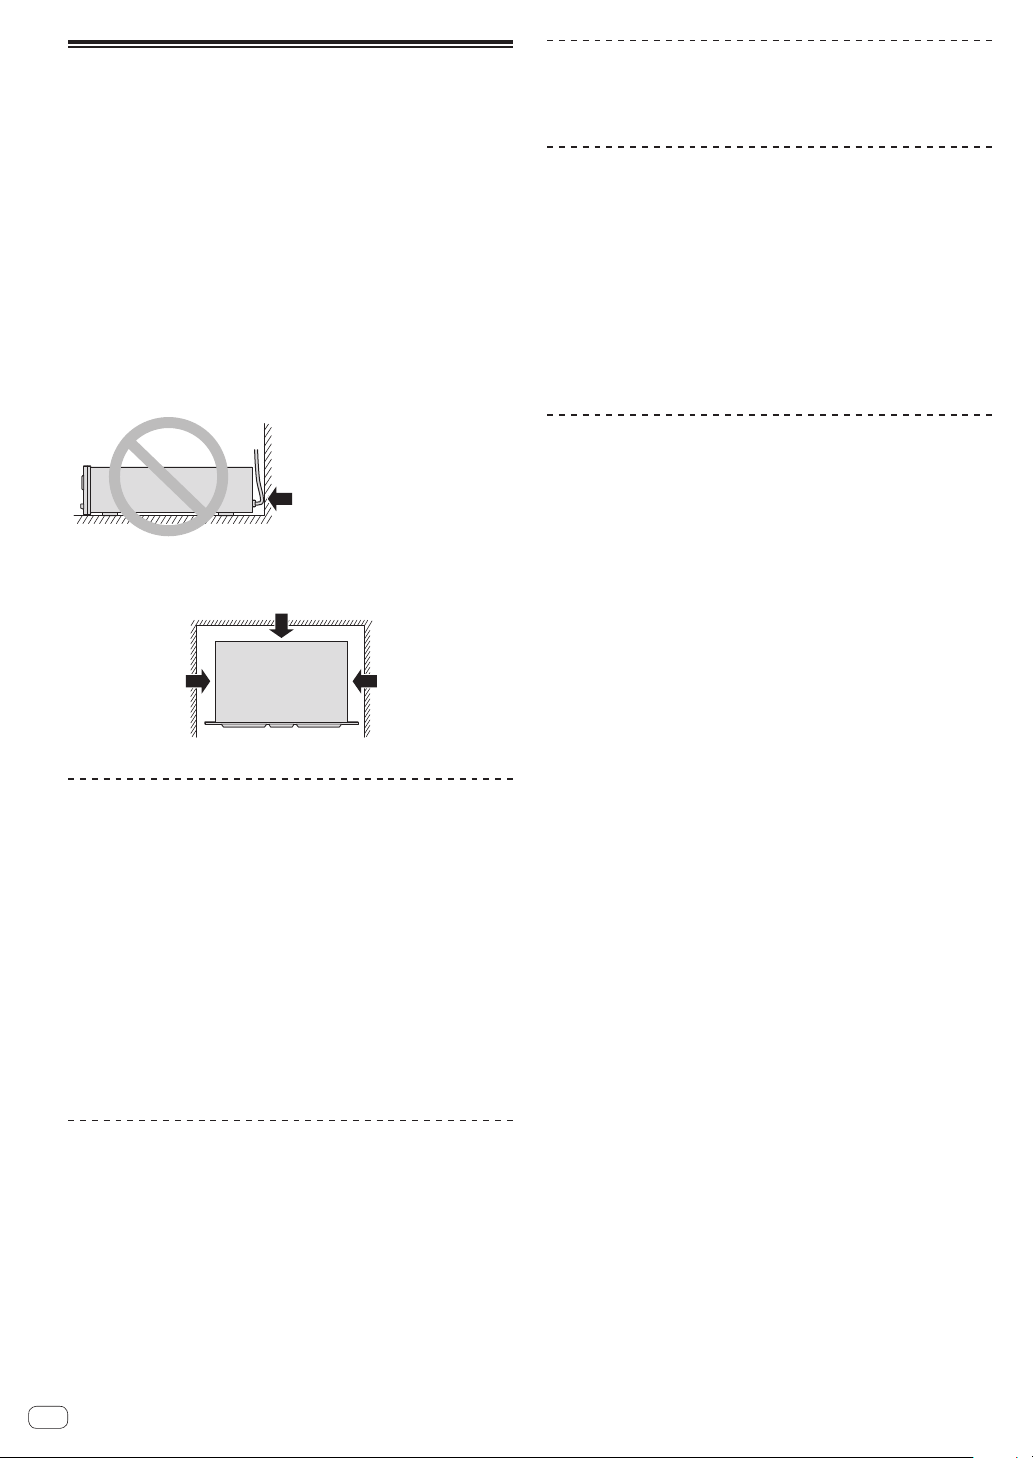
Directrices para la instalación
! No ponga esta unidad encima de objetos que produzcan calor, tales
como un amplificador, ni la exponga a luz de un foco durante mucho
tiempo, porque podría dañarse.
! Instale esta unidad alejada de un sintonizador o un TV. De lo con-
trario, la imagen se distorsionará o puede que se produzca ruido.
Además, si se usa una antena interior, se puede producir fácilmente
distorsión o ruido. En tales casos, use una antena exterior o apague
esta unidad.
! Cuando esta unidad se usa en un entorno de sonido alto como, por
ejemplo, cerca de un altavoz, el sonido puede que salte. Instale esta
unidad alejada del altavoz o reduzca en volumen de escucha.
! Ponga esta unidad en una superficie nivelada y en una base estable.
! No ponga objetos pesados encima de esta unidad.
Asegúrese de que el reproductor, incluyendo sus cables de audio y de
alimentación, no toquen materiales que vibren. Cualquier otra causa
de vibración que no sea los aisladores puede causar saltos del sonido.
Tome un cuidado especial cuando use el reproductor instalado en una
caja de transporte.
No permita el contacto con superficies
que vibran.
Para asegurar la disipación térmica
apropiada, asegúrese de mantener este
espacio abierto.
Acerca de las cajas de transporte
Si pone esta unidad en una caja de transporte, tenga cuidado para
impedir presionar la superficie del dial jog.
Limpieza del producto
Bajo circunstancias normales, limpie la unidad con un paño seco. Para
quitar las manchas difíciles, empape un paño blando en detergente neutro diluido con 5 ó 6 partes de agua, escúrralo bien, limpie las manchas
y luego pase de nuevo un paño seco por la superficie. No use alcohol,
diluyente, bencina o insecticida porque pueden despegar la etiqueta
impresa o descolorar la unidad. Evite dejar productos de goma o vinilo
en contacto durante mucho tiempo porque la superficie de la unidad
también podrá dañarse. Cuando use paños impregnados en productos
químicos, etc., lea las instrucciones cuidadosamente.
Desenchufe la clavija de alimentación de la toma de CA cuando limpie
esta unidad.
Limpieza del dial jog
Para limpiar el dial jog, pase por él un paño de sacar brillo o uno que
sea blando y esté seco. Para eliminar la suciedad rebelde, moje un paño
blando en una solución suave de detergente neutro (diluido en 5 o 6 partes de agua), escurra bien el paño y páselo por la suciedad para eliminarla. Use un paño seco para secar la superficie. Usar alcohol, diluyente
de pintura, bencina, insecticidas u otras substancias fuertes en el dial
jog puede ser causa de que las marcas o el acabado del dial se pelen o
pierdan su color, por lo tanto, el uso de tales sustancias deberá evitarse.
Para asegurar la
disipación térmica
apropiada, asegúrese de mantener
este espacio
abierto.
Para asegurar la
disipación térmica
apropiada, asegúrese de mantener
este espacio
abierto.
Montaje en una estantería según las
normas EIA
Los agujeros de montaje a derecha e izquierda del panel de operaciones de esta unidad son para el tamaño 2U (unidad reproductora) + 2U
(unidad de control) de las estanterías del estándar EIA de 19 pulgadas.
Esta unidad tiene una profundidad máxima de 267,6 mm.
! Asegure esta unidad con tornillos (no suministrados) aptos para la
estantería.
! No instale directamente esta unidad encima de un amplificador
de potencia. La radiación de calor de un amplificador de potencia
puede dañar esta unidad. Además se puede producir ruido (de zumbido, etc.).
! Cuando transporte esta unidad, retírela de la estantería. Esta unidad
puede dañarse si se transporta sin quitarla de la estantería.
! Si transporta esta unidad sin quitarla de la estantería, asegúrese de
que no la sacude ni la golpea.
Transporte de esta unidad
No mueva nunca esta unidad durante la
reproducción
Los discos giran a alta velocidad durante la reproducción; no levante ni
mueva nunca esta unidad durante la reproducción para evitar rayar o
dañar de otra forma los discos.
Cuando se mueva esta unidad
Cuando mueva esta unidad, retire siempre cualquier disco que se haya
cargado, y desconecte la alimentación. Mover esta unidad con un disco
cargado puede dañar el disco o la unidad.
Es
12
Page 13
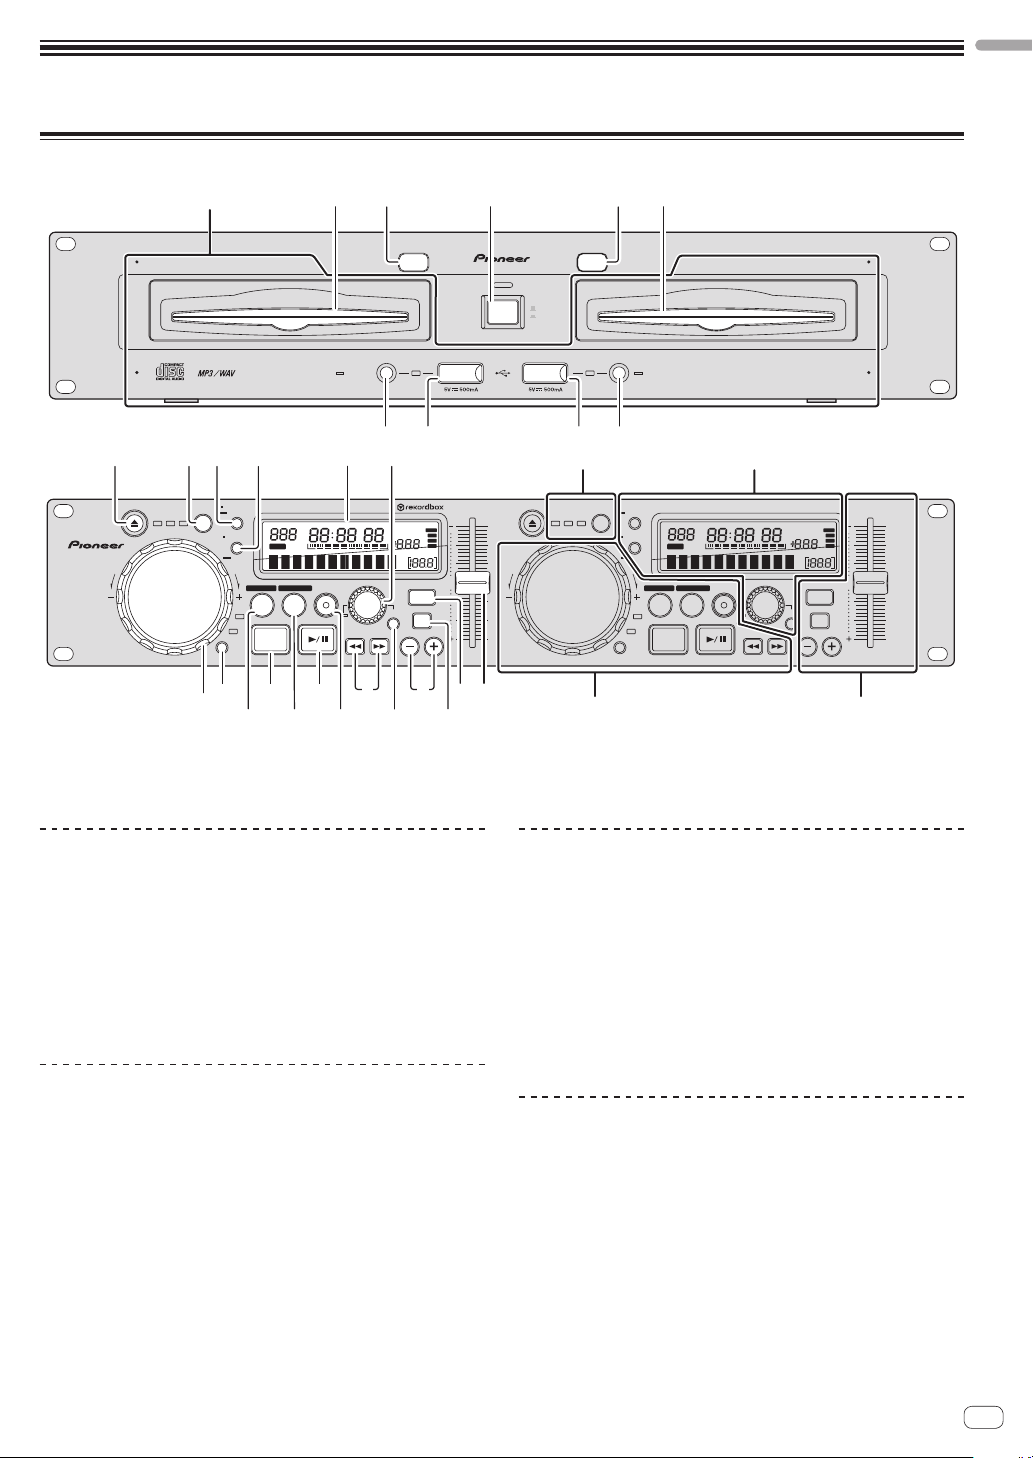
Operación
Panel de control
Español
Sección de selección de fuentes
DISC 1 DISC 2
Unidad reproductora
2 6 f
EJECT
REV
Unidad de control
SOURCE
TIME MODE
SELECT
CD
USB
12
b
DISPLAY
JOG MODE
a
AUTO CUE
UTILITY
FWD
HOT LOOP OUT ADJUST
IN/CUE
CDJ
VINYL
c
FOLDER TRACK REMAIN
REPEAT
A.CUE
RELAY
OUT
CUE
9
d
1
1 POWER wON vOFF (la página 15)
2 EJECT h (la página 15)
8
RELOOP
/EXIT
M
MEMORY
h ig
CUE
USB STOP
SF
SELECT PUSH
SEARCH
USB 1
1
POWER
OFF
ON
USB 2
EJECT
2 3
MULTI ENTERTAINMENT PLAY ER MEP-40 00
USB STOP
4 5
Sección de selección de fuentes
EJECT
TEMPO
WIDE
±16
±10
±6
REV
0
k
l
m
Sección del reproductor
SOURCE
TIME MODE
SELECT
CD
USB
12
AUTO CUE
DISPLAY
UTILITY
FWD
VINYL
JOG MODE
1
Sección de navegación
FOLDER TRACKREMAIN
REPEAT
A.CUE
RELAY
HOT LOOP OUT ADJUST
OUT
IN/CUE
CDJ
CUE
MULTI ENTERTAINMENT PLAYER MEP-4000
M
RELOOP
/EXIT
MEMORY
23
EJECT
45
TEMPO
%
BPM
MASTER TEMPO
MT MT
TEMPO RANGE
BACK
PITCH BEND
n7
je
d LOOP OUT (OUT ADJUST)
e RELOOP/EXIT
WIDE
±16
TEMPO
MASTER TEMPO
TEMPO RANGE
BACK
%
BPM
PITCH BEND
±10
±6
CUE
SF
SELECT PUSH
SEARCH
Sección de control de tempo
TEMPO
0
Sección de selección de fuentes
Seleccione la fuente que va a reproducir con esta unidad aquí (la página
14).
3 Ranura de inserción del disco
4 Ranura de inserción de aparato USB
5 USB STOP
6 SOURCE SELECT
Sección del reproductor
Estos controles se puede usar para hacer operaciones básicas del reproductor DJ, tales como reproducir discos, poner puntos de cue/bucle y
manipular el dial jog (la página 15).
7 SEARCH m, n
8 PLAY/PAUSE f
9 CUE
a JOG MODE
b Dial jog
c LOOP IN/CUE (HOT LOOP)
Sección de navegación
La información del aparato cargado en esta unidad, las pistas cargadas,
etc., se visualiza aquí (la página 17).
f TIME MODE, AUTO CUE
g DISPLAY, UTILITY
h Pantalla de la unidad principal
i SELECT PUSH, MEMORY CUE (selector giratorio)
j BACK
Sección de control de tempo
Ajuste la velocidad de reproducción de pistas aquí (la página 18).
k TEMPO
l MASTER TEMPO
m TEMPO RANGE
n PITCH BEND –, +
Es
13
Page 14
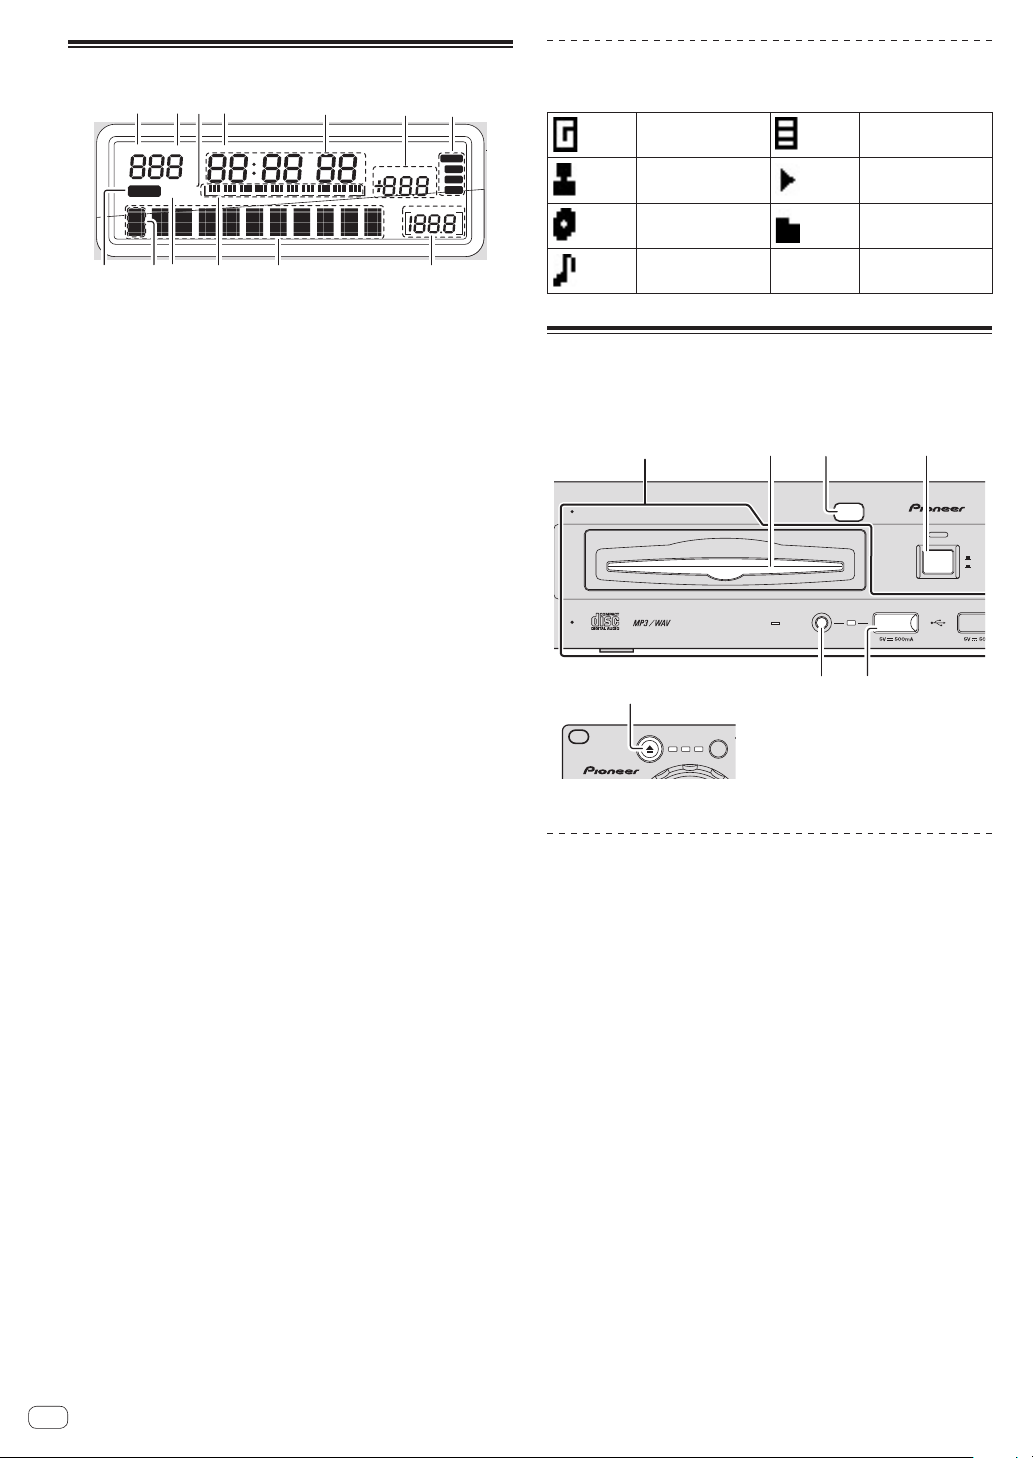
Pantalla de la unidad principal
1
2 4
3
FOLDER TRACK REMAIN
REPEAT
A.CUE
RELAY
M
5
SF
6
TEMPO
Lista de iconos visualizados en la sección
de la pantalla de la unida principal
7
Género Lista de reproducción
WIDE
±16
±10
±6
%
BPM
Artista Reproducción
Álbum Carpeta
8
9 a b c
d
1 FOLDER
El número de carpeta se visualiza aquí.
2 TRACK
Esto visualiza el número de pista.
No es posible visualizar más de 1 000 pistas.
3 REPEAT
Se enciende en el modo de repetición de reproducción.
4 REMAIN
La visualización se puede cambiar entre el tiempo transcurrido y el
tiempo restante pulsando [TIME MODE (AUTO CUE)] f.
[REMAIN] se enciende cuando la visualización se establece para el
tiempo restante.
5 M, S, F (visualización de tiempo)
“M” indica minutos, “S” segundos y “F” cuadros.
Hay 75 cuadros en un segundo.
6 TEMPO %
Esto indica el porcentaje mediante el que cambia la velocidad de
reproducción.
7 WIDE, ±16, ±10, ±6
Esto indica el margen mediante el cual se puede ajustar la velocidad
de reproducción.
8 A. CUE (la página 16)
Esto se enciende cuando se establece cue automático.
9 Visualización de iconos
El icono de la categoría actualmente seleccionada se visualiza aquí.
Para conocer los iconos que se visualizan, vea Lista de iconos visuali-
zados en la sección de la pantalla de la unida principal en la página 14.
a RELAY
Esto se enciende durante la reproducción con relevo.
b Visualización de la dirección de reproducción
La pista se visualiza como una gráfico de barras.
Se apaga desde el lado izquierdo cuando se visualiza el tiempo
restante. Todo el gráfico parpadea lentamente cuando el tiempo de
pista restante es inferior a 30 segundos, y luego parpadea rápidamente cuando el tiempo restante es inferior a 15 segundos.
c Sección de visualización de información
La información de pistas se visualiza con la visualización [BROWSE]
o [INFO].
Se pueden visualizar hasta 11 caracteres. Los caracteres que se
pueden visualizar son las letras A a Z, ciertos caracteres latinos, los
números 0 a 9 y ciertos símbolos. Para otros caracteres se visualiza
“?”.
Para conocer detalles de cómo visualizar la información de pistas,
consulte Visualización de información de pistas (sección de navega-
ción) en la página 17.
d BPM
Visualiza BPM (pulsaciones por minuto) de la pista que está siendo
reproducida.
Nombre de pista/
archivo
— —
Selección de la fuente que se va a
reproducir (sección de selección de
fuentes)
Sección de selección de fuentes
Unidad reproductora
2
EJECT
CD1USB
12
Unidad de control
Carga de discos
! Meta el disco con la cara impresa hacia arriba.
! Inserte el disco horizontalmente en la ranura de inserción de discos
del panel frontal de la unidad principal.
! No cargue más de 1 disco.
! No meta los discos a la fuerza en la ranura de inserción de discos
cuando esta unidad está apagada. Hacerlo podría dañar el disco y
causar fallos en el funcionamiento de esta unidad.
! Cuando se introduce o expulsa un disco, no aplique ninguna fuerza
al disco en el sentido opuesto a su movimiento. Hacerlo podría
dañar el disco o esta unidad.
1 Pulse [POWER] 1.
Conecte la alimentación de esta unidad.
2 Inserte el disco en la ranura de inserción de discos 3.
La reproducción empieza.
! Cuando se activa cue automático, la reproducción empieza cuando
se pulsa [PLAY/PAUSEf] 8. Para conocer detalles de la función
cue automático, vea Configuración de cue automático en la página
16.
! Cuando se carga un disco que contiene archivos de música graba-
dos con una estructura jerárquica, la reproducción empieza desde la
pistas de la capa más alta.
DISC 1
SOURCE
SELECT
3 12
EJECT
POWER
USB 1
USB STOP
45
OFF
ON
USB
14
Es
Page 15
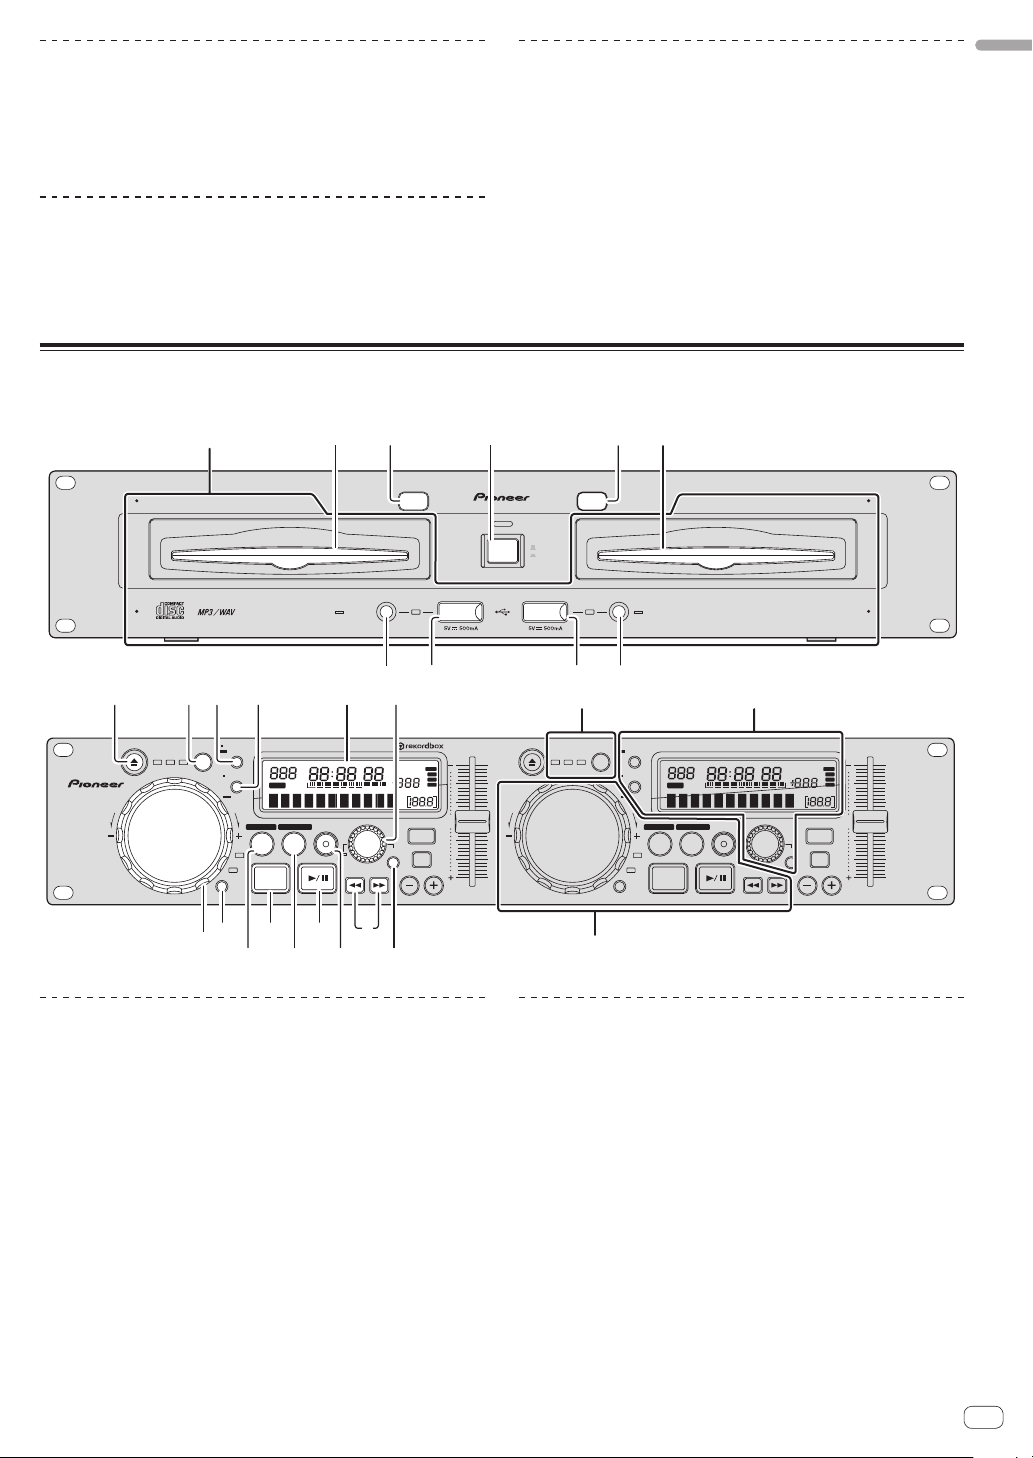
Expulsión de discos
Extracción de aparatos USB de esta
unidad
Pulse [EJECT/h] 2.
El disco se expulsa por la ranura de inserción de discos.
! Este botón sólo funciona en el modo de pausa o cuando se hace una
pausa en un punto cue.
Carga de aparatos USB
Conecte el aparato USB en la ranura de inserción del
mismo 4.
El indicador [USB STOP] se enciende.
! Asegúrese de seguir el procedimiento de abajo cuando quite apara-
tos USB de esta unidad. La extracción de un aparato USB sin seguir
este procedimiento podría borrar los datos de administración de esta
unidad y hacer imposible leer el aparato USB.
! Cuando desconecte la alimentación de esta unidad, asegúrese de
quitar primero el aparato USB.
1 Pulse [USB STOP] 5 durante un mínimo de 2
segundos.
El indicador [USB STOP] se apaga.
2 Desconecte el aparato USB.
Operaciones básicas (secciones del reproductor, selección de fuentes y
navegador)
Español
Sección de selección de fuentes
Unidad reproductora
2 6 f hg
EJECT
REV
Unidad de control
USB 1
1
POWER
OFF
ON
USB 2
EJECT
2 3
MULTI ENTERTAINMENT PLAY ER MEP-40 00
USB STOP
4 5
Sección de selección de fuentes
EJECT
TEMPO
WIDE
±16
±10
±6
REV
0
SOURCE
TIME MODE
SELECT
CD
USB
12
AUTO CUE
DISPLAY
UTILITY
FWD
VINYL
JOG MODE
1
Sección del reproductor
Sección de navegación
FOLDER TRACK REMAIN
REPEAT
A.CUE
RELAY
HOT LOOP OUT ADJUST
OUT
IN/CUE
CDJ
CUE
MULTI ENTERTAINMENT PLAYER MEP-4000
SF
M
SELECT PUSH
RELOOP
/EXIT
BACK
MEMORY
CUE
SEARCH
TEMPO
%
BPM
MASTER TEMPO
TEMPO RANGE
PITCH BEND
TEMPO
WIDE
±16
±10
±6
0
23
EJECT
DISC 1 DISC 2
USB STOP
4
5
i
SOURCE
TIME MODE
SELECT
CD
USB
12
b
DISPLAY
JOG MODE
a
AUTO CUE
UTILITY
FWD
HOT LOOP OUT ADJUST
IN/CUE
CDJ
VINYL
c
FOLDER TRACK REMAIN
REPEAT
A.CUE
RELAY
OUT
CUE
9
d
8
RELOOP
/EXIT
M
MEMORY
CUE
S
SELECT PUSH
SEARCH
7
TEMPO
F
%
BPM
MASTER TEMPO
MT MT
TEMPO RANGE
BACK
PITCH BEND
je
1
Acerca del interruptor de alimentación
de esta unidad
Para conectar la alimentación
Pulse [POWER] 1.
Conecte la alimentación de esta unidad.
El indicador [POWER] se enciende en verde.
Para desconectar la alimentación
Pulse [POWER] 1.
Desconecte la alimentación de esta unidad.
El indicador [POWER] se apaga.
Reproducción
1 Cargue la fuente en esta unidad.
2 Pulse [SOURCE SELECT] 6 y establezca la fuente.
! Esto sólo funciona en el modo de pausa o cuando se hace una pausa
en un punto cue.
3 Gire el selector giratorio i.
Seleccione la pista.
! Cuando hay múltiples capas de carpetas
— Para ir a capas más bajas de una carpeta, seleccione la carpeta y
luego pulse el selector giratorio.
— Para volver a capas más altas, pulse [BACK] j.
— Pulse [BACK] durante más de 1 segundos para ir a la capa
superior.
4 Pulse el selector giratorio i.
La pista se carga y empieza la reproducción.
Es
15
Page 16

Pausa
Durante la reproducción, pulse [PLAY/PAUSEf] 8.
! La reproducción se reanuda cuando se vuelve a pulsar
[PLAY/PAUSEf].
Reanudación de la reproducción desde la
posición que se reproducía antes de expulsar el
disco (Reanudación)
Después de expulsar el disco, vuelva a cargarlo
inmediatamente en esta unidad.
! La función de reanudación sólo funciona cuando el mismo disco se
expulsa y luego se carga antes de cargar otro disco.
! La función de reanudación no funciona para aparatos USB.
Exploración hacia adelante o hacia atrás
Pulse [SEARCH m, n] 7.
Pulse [n] para explorar hacia adelante.
Pulse [m] para explorar hacia atrás.
Configuración de cue
1 Durante la reproducción, pulse [PLAY/PAUSEf] 8.
La reproducción hace una pausa.
2 Pulse [CUE] 9.
El punto en el que se hace la pausa en la pista se establece como punto
cue.
El indicador [PLAY/PAUSEf] parpadea y el indicador [CUE] se
enciende. En este momento no sale sonido.
! Cuando se establece un punto cue nuevo, el punto cue establecido
previamente se cancela.
Ajuste de la posición del punto cue
1 Mientras hace una pausa en el punto cue, pulse
[SEARCH m, n] 7.
Los indicadores [PLAY/PAUSEf] y [CUE] parpadean.
2 Pulse [SEARCH m, n] 7.
El punto cue se puede ajustar con precisión en unidades de un cuadro.
! Es posible hacer la misma operación con el dial jog.
3 Pulse [CUE] 9.
La posición donde se pulsó el botón se establece como punto cue nuevo.
! Cuando se establece un punto cue nuevo, el punto cue establecido
previamente se cancela.
Vuelta al punto cue (Vuelta cue)
Durante la reproducción, pulse [CUE] 9.
El aparato vuelve inmediatamente al punto cue actualmente establecido
y hace una pausa.
! Cuando se pulsa [PLAY/PAUSEf] 8, la reproducción empieza
desde el punto cue.
Configuración del punto cue durante la
reproducción (Cue de tiempo real)
Durante la reproducción, pulse [LOOP IN/CUE
(HOT LOOP)] c.
El punto en el que se pulsó el botón se establece como punto cue.
Configuración de cue automático
Cuando se carga una pista o se hace cue en ella hasta el comienzo, la
sección en silencio al comienzo de la pista se omite y se pone automáticamente un punto cue en el punto directamente anterior al comienzo
del sonido.
Pulse [TIME MODE (AUTO CUE)] f durante más de 1
segundos.
Cue automático se activa.
[A. CUE] se enciende en la pantalla de la unidad principal.
! Cue automático se desactiva cuando se pulsa de nuevo
[TIME MODE (AUTO CUE)] durante un mínimo de 1 segundo.
Cambio de nivel de cue automático
El nivel de presión acústica identificado como sección en silencio con la
función de cue automático se puede seleccionar de entre ocho niveles.
–36 dB, –42 dB, –48 dB, –54 dB, –60 dB, –66 dB, –72 dB y –78 dB
! La configuración del nivel de cue automático permanece en la
memoria aunque se desconecte la alimentación.
! El nivel de cue automático se puede cambiar usando uno de los
procedimientos descritos más abajo.
1 Pulse [DISPLAY (UTILITY)] g durante más de 1
segundo.
Se visualiza la pantalla [UTILITY].
2 Gire el selector giratorio i y luego púlselo.
Seleccione [A. CUE LEVEL].
3 Gire el selector giratorio i y luego púlselo.
El ajuste de cue automático cambia.
Operación del dial jog
! No ponga objetos encima del dial jog ni lo aplique fuerzas intensas.
No permita tampoco que entren bebidas u otros líquidos en el producto. Estas acciones pueden causar fallos en el funcionamiento.
Cambio del modo del dial jog
Pulse [JOG MODE] a.
El modo cambia entre VINYL y CDJ cada vez que se pulsa el botón.
Cuando se selecciona el modo VINYL o CDJ se enciende el indicador
respectivo.
— Modo VINYL: Cuando se pulsa la parte superior del dial jog
durante la reproducción, ésta se para, y cuando se gira ahora el
dial jog, el sonido se reproduce según el sentido en que se gira el
dial jog.
— Modo CDJ: La reproducción no para a pesar de pulsar la parte
superior del dial jog. Las operaciones tales como scratching no
se pueden realizar.
Verificación del punto cue (Muestreador
de punto cue)
Mantenga pulsado [CUE] 9 después de volver al punto
cue.
La reproducción empieza desde el punto cue establecido. La reproducción continúa mientras se pulsa el botón.
Es
16
Page 17

Scratch
SF
K
1 Pulse [JOG MODE] a.
Ponga el modo de jog en VINYL.
2 Durante la reproducción, pulse la parte superior del
dial jog b.
La reproducción se para.
3 Gire el dial jog b en el sentido que quiera reproducir
y a la velocidad deseada.
El sonido se reproduce según el sentido y la velocidad a la que se gira el
dial jog, girando la parte superior del dial jog mientras ésta se pulsa.
4 Retire su mano de la parte superior del dial jog b.
La reproducción normal se reanuda.
Pitch bend
Durante la reproducción, gire la sección exterior del dial
jog sin tocar su parte superior b.
La velocidad de reproducción aumenta cuando se gira a la derecha, y
disminuye cuando se gira a la izquierda. La reproducción vuelve a la
velocidad normal cuando se deja de girar.
! Cuando el modo jog se pone en el modo CDJ, la misma operación se
puede hacer girando la parte superior del dial jog.
2 Pulse [LOOP OUT (OUT ADJUST)] d.
El punto de salida de bucle se establece y empieza la reproducción de
bucle.
Ajuste preciso del punto de salida de
bucle (ajuste de salida de bucle)
1 Durante la reproducción de bucle, pulse [LOOP OUT
(OUT ADJUST)] d.
[LOOP OUT (OUT ADJUST)] empieza a parpadear rápidamente.
El tiempo de la salida de bucle se visualiza en la pantalla de la unidad
principal.
2 Pulse [SEARCH m, n] 7.
El punto de salida de bucle se puede ajustar en unidades de un cuadro.
! Es posible hacer la misma operación con el dial jog.
! El margen de ajuste del punto de salida de bucle está en cualquier
lugar posterior al punto de entrada de bucle.
3 Pulse [LOOP OUT (OUT ADJUST)] d.
La reproducción de bucle se reanuda.
! La reproducción de bucle también se reanuda si no se realiza nin-
guna operación durante más de 10 segundos.
Cancelación de la reproducción de bucle
(Salida de bucle)
Español
Búsqueda de cuadros
Gire el dial jog b durante el modo de pausa.
La posición de pausa se puede mover en unidades de un cuadro.
! La posición se mueve en el sentido de la reproducción cuando el dial
jog se gira a la derecha, y en el sentido inverso cuando se gira a la
izquierda.
Búsqueda superrápida
Gire el dial jog b mientras pulsa [SEARCH m, n] 7.
La pista avanza/retrocede rápidamente en el sentido en que se gira el
dial jog.
! Esta función se cancela cuando se suelta [SEARCH m, n].
! Cuando deja de girar el dial jog, la reproducción normal se reanuda.
! La velocidad de avance/retroceso rápido se puede ajustar según la
velocidad a la que se gira el dial jog.
Establezca el bucle
Sección del reproductor
EJECT
REV
Unidad de control
1 Durante la reproducción, pulse [LOOP IN/CUE
(HOT LOOP)] c.
El punto de entrada de bucle queda establecido.
! Esta operación no es necesaria si ya ha establecido un punto cue
como un punto de entrada de bucle .
SOURCE
TIME MODE
SELECT
CD
USB
12
b
AUTO CUE
DISPLAY
UTILITY
FWD
VINYL
JOG MODE
CDJ
FOLDER TRACK REMAIN
REPEAT
A.CUE
RELAY
HOT LOOP OUT ADJUST
OUT
IN/CUE
CUE
RELOOP
89a
M
SELECT PUSH
/EXIT
BAC
MEMORY
CUE
SEARCH
7
edc
1
Durante la reproducción de bucle, pulse [RELOOP/EXIT]
e.
La reproducción continúa más allá del punto de salida de bucle sin
volver al punto de entrada de bucle.
Vuelva a la reproducción de bucle
(Rebucle)
Después de cancelar la reproducción de bucle, pulse
[RELOOP/EXIT] e durante la reproducción.
La pista vuelve al punto de entrada de bucle previamente establecido y la
reproducción de bucle empieza.
Retorno al punto de entrada de bucle
(Hot Loop)
Durante la reproducción de bucle, pulse [LOOP IN/CUE
(HOT LOOP)] c.
La pista vuelve al punto de entrada de bucle previamente establecido y la
reproducción de bucle empieza.
Visualización de información de
pistas (sección de navegación)
Sección de navegación
M
MEMORY
CUE
SF
SELECT PUSH
SEARCH
i
BACK
j
WIDE
TEMPO
%
BPM
MASTER TEMPO
MT
TEMPO RANGE
PITCH BEND
T
±16
±10
±6
0
Es
f g
URCE
TIME MODE
LECT
AUTO CUE
FOLDER TRACK REMAIN
DISPLAY
A.CUE
UTILITY
FWD
HOT LOOP OUT ADJUST
IN/CUE
CDJ
VINYL
JOG MODE
Unidad de control
CUE
h
REPEAT
RELAY
RELOOP
/EXIT
OUT
17
Page 18

Acerca de las visualizaciones [BROWSE] y
Sección de control de tempo
[INFO]
Visualización [BROWSE]
Use el selector giratorio i para clasificar y visualizar las pistas cargadas
con una categoría o estructura de árbol.
La visualización de la sección de visualización de información cambia
dependiendo de si la información de librería está grabada o no en el
aparato USB.
— Cuando hay información de librería d Examen de librería: Los archi-
vos de música se visualizan en las categorías [ARTIST], [ALBUM],
[TRACK], [PLAYLIST], [FOLDER] y [GENRE].
— Sin información de librería d examen de librería: Las carpetas/pis-
tas del medio se visualizan con una estructura de árbol.
Visualización [INFO]
Esto visualiza información detallada de las pistas cargadas.
La visualización cambia entre el título, nombre de artista y nombre de
álbum cada vez que se pulsa [DISPLAY (UTILITY)] g.
Búsqueda rápida de pistas usando la
información de librería
Cuando la información de librería creada usando rekordbox se graba
en el aparato USB, esa información se puede usar para buscar pistas
rápidamente.
1 Gire el selector giratorio i y seleccione la categoría.
Seleccione la categoría.
— Cuando hay información de librería en el aparato USB,
seleccione en las categorías [ARTIST], [ALBUM], [TRACK],
[PLAYLIST], [FOLDER] y [GENRE].
— Cuando no hay información de librería en el aparato USB, selec-
cione en la categoría [FOLDER].
— Para los discos CD-DA, seleccione en la categoría [TITLE] o
[TRACK].
2 Pulse el selector giratorio i.
La visualización cambia al elemento seleccionado en el paso1.
Ajuste de la velocidad de
reproducción (sección de control de
tempo)
N
M SF
SELECT PUSH
LOOP
XIT
BACK
MEMORY
CUE
SEARCH
Unidad de control
1 Mueva [TEMPO] k hacia delante o hacia atrás.
La velocidad de reproducción aumenta cuando la barra deslizante se
mueve al lado [+] (hacia usted) y disminuye cuando la barra deslizante
se mueve hacia el lado [–] (lejos de usted).
El porcentaje de cambio de la velocidad de reproducción se visualiza en
[TEMPO %] en la pantalla de la unidad principal.
TEMPO
%
BPM
MASTER TEMPO
MT
TEMPO RANGE
PITCH BEND
n
TEMPO
WIDE
±16
±10
±6
0
kl
m
2 Pulse [PITCH BEND] n.
Cuando se pulsa durante la reproducción, la función de pitch bend se
activa. Pulse el botón [+] para ir más rápido y el botón [–] para ir más
lento.
! La rapidez con que cambia la velocidad se puede cambiar girando el
dial jog mientras se pulsa el botón.
Selección del margen de ajuste de la
velocidad de reproducción
Pulse [TEMPO RANGE] m.
El margen de ajuste de la velocidad de reproducción cambia cada vez
que se pulsa el botón.
[WIDE, ±16, ±10, ±6] se enciende en la pantalla de la unidad principal.
! Los ajustes son posibles en unidades de 0,05 % cuando se establece
[±6] %, [±10] % o [±16] %, y en unidades de 0,1 % cuando se establece [WIDE].
! En [±16] %, los ajustes es posible hacerlos en unidades de 0,05 %,
pero los ajustes superiores a 10 % se hacen en unidades de 0,1 %.
! El margen de ajuste de [WIDE] es de ±100 %. Cuando se pone en
–100 % para la reproducción.
! [WIDE] sólo se puede seleccionar cuando se reproducen CD de
música (CD-DA).
Ajuste de la velocidad de reproducción
sin cambiar el tono (Master Tempo)
Pulse [MASTER TEMPO] l.
El indicador [MASTER TEMPO] se enciende. El tono no cambia aunque se cambie la velocidad de reproducción con la barra deslizante
[TEMPO].
! El sonido se procesa digitalmente, por lo que su calidad cambia.
Para guardar puntos cue o puntos
de bucle
Use este procedimiento para guardar en aparatos USB el punto cue o de
bucle de la fuente actualmente seleccionada.
1 Conecte el aparato USB a esta unidad.
! Cuando use un solo aparato USB, conéctelo al puerto USB1.
2 Establezca el punto cue.
! Para guardar el punto de bucle, establézcalo y luego reproduzca el
bucle.
3 Pulse el selector giratorio i durante más de 1
segundo.
[CUE CALL] se visualiza.
! Pulse [BACK] j para volver a la pantalla anterior.
4 Gire el selector giratorio i para visualizar [CUE
MEMORY].
5 Pulse el selector giratorio i.
El punto cue o de bucle se guarda.
[CUE MEMORY] parpadea rápidamente mientras se guarda el punto
cue. [LOOP MEMORY] parpadea rápidamente mientras se guarda el
punto de bucle.
Cuando se termina de guardar puntos, la visualización de información
parpadea lentamente.
! No desconecte nunca el aparato USB mientras están guardándose
los datos.
! Cuando la fuente es un aparato USB se pueden guardar hasta 10
puntos por pista.
! Cuando la fuente es un disco se pueden guardar hasta 100 puntos
por disco.
! Pulse [BACK] j para volver a la pantalla anterior.
18
Es
Page 19

Llamada a puntos cue o de bucle
guardados
1 Conecte el aparato USB a esta unidad.
! Cuando use un solo aparato USB, conéctelo al puerto USB1.
2 Pulse el selector giratorio i durante más de 1
segundo.
[CUE CALL] se visualiza.
! Pulse [BACK] j para volver a la pantalla anterior.
3 Pulse el selector giratorio i.
[POINT 01] se visualiza.
! Pulse [BACK] j para volver a la pantalla anterior.
4 Gire el selector giratorio i para visualizar el número
del punto al que quiere llamar.
5 Pulse el selector giratorio i.
Se llama al punto cue o de bucle guardado.
Eliminación individual de puntos cue o de
bucle guardados
1 Conecte el aparato USB a esta unidad.
! Cuando use un solo aparato USB, conéctelo al puerto USB1.
2 Pulse el selector giratorio i durante más de 1
segundo.
[CUE CALL] se visualiza.
! Pulse [BACK] j para volver a la pantalla anterior.
3 Gire el selector giratorio i para visualizar [CUE
DELETE].
4 Pulse el selector giratorio i.
[DELETE 01] se visualiza.
! Pulse [BACK] j para volver a la pantalla anterior.
5 Gire el selector giratorio i para visualizar el número
del punto que quiere eliminar.
6 Pulse el selector giratorio i.
[DELETE XX?] se visualiza.
! Pulse [BACK] j para volver a la pantalla anterior.
7 Pulse el selector giratorio i.
El punto cue o de bucle guardado se elimina.
2 Use el selector giratorio i para cambiar la
configuración.
! Pulse [BACK] j para volver a la pantalla anterior.
3 Pulse el selector giratorio i.
Las configuraciones cambiadas se guardan.
! Para cerrar la pantalla [UTILITY], pulse [DISPLAY (UTILITY)] g o
seleccione [EXIT] en los elementos de selección y pulse el selector
giratorio i.
Configuración de preferencias
Los elementos de selección se puede establecer por separado para las
capas respectivas.
! No apague esta unidad mientras se visualiza [Saving] en la sección
de visualización de información.
Ajustes
opcionales
A. CUE LEVEL
RELAY
REPEAT
SENSITIVITY
SLEEP TIME
SCROLL START
TIME
SCROLL SPEED
BIT RATE
VERSION
LOAD DEFAULT
EXIT
*: Ajuste al hacerse la compra
Elementos de
selección
-36 dB, -42 dB,
-48 dB, -54 dB,
-60 dB*, -66 dB,
-72 dB, -78 dB
ON/OFF*
ON/OFF*
-20 – 0* – +20
No sleep, 5 – 15*
– 120 min
0.5 – 2.0* – 30.0 sec
50 – 400* –
2 000 msec
Display ON/OFF*
—
— Restablece los ajustes.
—
Descripciones
Establece el nivel de cue automático.
Para conocer detalles del procedimiento de ajuste, vea Cambio de nivel de
cue automático en la página 16.
Establece la función de reproducción
con relevo. Para conocer detalles del
procedimiento de ajuste, vea Acerca de
la función de relevo en la página 19.
Establece la función de repetición de
reproducción. Para conocer detalles del
procedimiento de ajuste, vea Acerca de
la función de repetición en la página 19.
Ajusta la sensibilidad cuando se pulsa
la parte superior del dial jog.
Fija el tiempo que va a pasar hasta que
se establece el modo de espera.
Establece el tiempo tras el cual los
caracteres de la sección de visualización de información empiezan a
desplazarse.
Establece la velocidad a la que los
caracteres de la sección de visualización de información empiezan a
desplazarse.
Establece la visualización de la velocidad de bits.
Visualiza la versión del software de la
unidad.
Los ajustes cambiados se guardan y
reaparece la pantalla anterior.
Español
Cambio de los ajustes
Sección de navegación
FOLDER TRACK REMAIN
REPEAT
A.CUE
RELAY
HOT LOOP OUT ADJUST
OUT
IN/CUE
CUE
h
RELOOP
/EXIT
f g
URCE
TIME MODE
LECT
AUTO CUE
DISPLAY
UTILITY
FWD
CDJ
VINYL
JOG MODE
Unidad de control
1 Pulse [DISPLAY (UTILITY)] g durante un mínimo de 3
segundos.
Se visualiza la pantalla [UTILITY].
M
MEMORY
CUE
SF
SELECT PUSH
SEARCH
i
BACK
j
WIDE
TEMPO
%
BPM
MASTER TEMPO
MT
TEMPO RANGE
PITCH BEND
T
±16
±10
±6
0
Acerca de la función de relevo
Cuando se activa la función de reproducción con relevo para uno de los
reproductores, las pistas se reproducen alternativamente en cada uno
de los reproductores. La reproducción puede continuar sin parar hasta
que se desactiva la función de reproducción con relevo preparando la
fuente la fuente en un reproductor mientras se reproduce una pista en el
otro reproductor.
Para activar la función de reproducción con relevo deberá hacerse el
ajuste siguiente.
— Ponga [AUTO CUE] en [ON].
Acerca de la función de repetición
Esta función reproduce repetidamente la pista que está reproducién-
dose o las pistas de la carpeta actual.
El ajuste de abajo deberá hacerse para permitir la función de repetición.
— Ponga [RELAY] en [OFF].
Es
19
Page 20

! Cuando hay múltiples capas de carpetas, la función de repetición
de reproducción cambia según el ajuste de [AUTO CUE], como se
describe a continuación.
— Cuando [AUTO CUE] se pone en [ON]: La pista que está reprodu-
ciéndose se reproduce repetidamente.
— Cuando [AUTO CUE] se pone en [OFF]: Las pistas de la carpeta
que está reproduciéndose se reproducen repetidamente.
Acerca de la función de descanso
Cuando se alcanza el tiempo de descanso establecido mientras un CD
está en el modo de pausa o mientras se hace una pausa en un punto
cue, la operación del CD se detiene y [SLEEP] se visualiza en la sección
de visualización de información.
El modo de descanso se cancela pulsando uno de los botones
siguientes:
— Botón [PLAY/PAUSE f]
— Botón [CUE]
! El tiempo tras el cual se establece el modo de descanso se puede
cambiar en Cambio de los ajustes.
20
Es
Page 21

Información adicional
Solución de problemas
! La operación incorrecta se confunde a menudo con un problema o un fallo de funcionamiento. Si piensa que algo funciona mal con este com-
ponente, compruebe los puntos de abajo. Algunas veces, el problema puede estar en otro componente. Inspeccione los otros componentes y los
aparatos eléctricos que esté utilizando. Si no se puede corregir el problema después de comprobar los elementos de abajo, pida al servicio de
Pioneer autorizado más cercano o a su concesionario que realice el trabajo de reparación.
! Esta unidad puede no funcionar bien debido a la electricidad estática o a otras influencias externas. En este caso, el funcionamiento apropiado se
puede restaurar desconectando la alimentación, esperando 1 minuto y volviendo a conectar la alimentación.
! Los CD-R/-RW no finalizados (discos parciales) no se pueden reproducir en el MEP-4000.
! Los discos de formas irregulares que no sean los discos de 12 cm estándar no se pueden reproducir en esta unidad (intentar reproducirlos causará
daños o accidentes).
! Los BPM medidos por esta unidad pueden ser diferentes de los BPM indicados en el disco o los indicados por un mezclador DJ de Pioneer, etc.
Esto se debe a los diferentes métodos usados para medir los BPM, y no es ningún fallo de funcionamiento.
Problema Verificación Remedio
No se puede expulsar el disco. ¿Está reproduciéndose una pista?
— Póngase en contacto con su centro de servicio Pioneer más cercano.
La reproducción no empieza cuando
se carga el disco.
No se puede reproducir un archivo. ¿Está protegido el archivo por derechos de autor
No se produce sonido, o éste está
distorsionado o tiene ruido.
Se produce un ruido alto o se detiene
la reproducción con cierto disco.
El cue de la pista no termina. ¿Está activada la función cue automático? Si la sección en silencio entre pistas es larga, el cue puede que tarde cierto
La función de retroceso de cue no
funciona.
La función de reproducción de bucle
no funciona.
La configuración no se guarda en la
memoria.
No se reconoce el aparato USB. ¿Está bien conectado el aparato USB? Conecte el aparato firmemente (hasta el fondo).
La visualización de la dirección de
reproducción no se visualiza en el
modo de tiempo restante.
Se necesita tiempo para leer los
aparatos USB (unidades de memoria
flash y discos duros).
¿Se puede reproducir el disco o archivo? Vea Acerca de los discos en la página 6 o Formatos de archivos de música repro-
¿Está activada la función cue automático? Pulse [TIME MODE (AUTO CUE)] durante un mínimo de 1 segundo para cance-
(por DRM)?
¿Está utilizando bien el mezclador DJ conectado? Verifique el funcionamiento del mezclador DJ.
¿Está esta unidad cerca de un TV? Apague el TV o instale esta unidad y el TV alejados el uno del otro.
¿Está rayado el disco? Los discos rayados no se pueden reproducir.
¿Está sucio el disco? Quite la suciedad del disco. (la página 22)
¿Está establecido el punto cue? Establezca un punto cue. (página 16)
¿Está establecido el punto cue? Establezca un punto cue. (página 16)
¿Se ha desconectado la alimentación directamente después de cambiar la configuración?
¿Está el aparato USB conectado a través de un
concentrador USB?
¿Es el aparato USB compatible con esta unidad? Este reproductor sólo soporta aparatos de la clase de almacenamiento en masa
¿Es el formato de archivo compatible con esta
unidad?
¿Está usando un aparato USB (por ejemplo, un
disco duro activado por alimentación de bus) cuya
corriente es superior a la corriente nominal de
esta unidad (500 mA)?
— Desconecte la alimentación, espere 1 minuto y vuelva a conectar la
— Cuando se reproducen archivos grabados en VBR, puede que el aparato no
¿Hay un número grande de carpetas o archivos
grabado en el aparato USB?
¿Hay otros archivos que no son de música grabados en el aparato USB?
Haga una pausa en la reproducción o en un punto cue y luego pulse [EJECT h].
ducibles en la página 7.
lar la función cue automático. (la página 16)
Los archivos protegidos por derechos de autor no se pueden reproducir.
tiempo.
No apague esta unidad mientras se visualiza [Saving] en la sección de visualización de información.
No se pueden usar concentradores USB.
USB.
Este reproductor soporta memorias flash portátiles y aparatos de reproducción
de audio digital.
Verifique el formato de archivo del aparato USB conectado. Para los formatos
de archivo compatibles con esta unidad, vea Acerca de los aparatos USB en la
página 6.
Use un aparato USB que funcione con la corriente nominal de esta unidad (un
disco duro accionado por un adaptador de CA u otro suministro de alimentación
externo).
alimentación.
detecte inmediatamente la duración de la pista y que se necesite algo de tiempo
para que aparezca la visualización de la dirección de reproducción.
Cuando haya muchas carpetas o archivos se necesitará algo de tiempo para
hacer la carga.
Cuando se graban en carpetas archivos que no son de música también se
necesita tiempo para leerlos. No guarde archivos o carpetas que no sean de
música en el aparato USB.
Español
Es
21
Page 22

Problema Verificación Remedio
La categoría no se visualiza. ¿Está reproduciendo un CD de música? La categoría no se visualiza para los CD de música.
¿Se graba la información de la librería en el
aparato USB?
¿Está protegido contra escritura el aparato USB? Prepare el aparato USB para poder escribir archivos en él.
Las pistas exportadas usando el
rekordbox no se visualizan en ninguna
categoría.
Las teclas no funcionan. ¿Está activada la función de descanso? Cancele la función de descanso. (la página 20)
No se pueden cambiar las fuentes. ¿Está reproduciéndose una pista? Haga una pausa en la reproducción o en un punto cue y luego cambie la fuente.
¿Está usando AAC u otro archivo de música no
compatible en esta unidad?
Use rekordbox para crear información de librería.
Verifique que el elemento [Crear la biblioteca para MEP-4000 cuando desconecte
el dispositivo USB] en la pantalla de configuración de preferencias rekordbox
esté marcado.
Transfiera la información de librería rekordbox al aparato USB. (la página 9)
Ponga el interruptor de protección contra escritura del aparato USB en la
posición de desactivado.
Use archivos WAV o MP3.
Mensaje de error
Cuando esta unidad no funciona normalmente aparece un código de error en la pantalla. Consulte la tabla de abajo y tome las medidas indicadas. Si
se visualiza un código de error que no se muestra en la tabla de abajo, o si el mismo código de error se visualiza después de tomar la medida indicada,
póngase en contacto con la tienda donde compró el aparato o con el centro de servicio de Pioneer más cercano.
Código de
error
E-7201 TOC READ ERROR No se pueden leer los datos del TOC.
E-8301
E-8302
E-8303
E-8304 DECODE ERROR Se cargan archivos de música que no se puede reproduE-8305 DATA FORMAT ERROR
E-8306 NO FILE La pista grabada en la librería, la lista de reproducción,
E-9101 MECHANICAL TIME OUT El funcionamiento mecánico no se ha detenido dentro
Tipo de error Descripción del error Causa y medidas a tomar
! El disco está agrietado.dReemplace el disco.
PLAYER ERROR Se carga un disco que no se puede reproducir
normalmente.
cir normalmente.
etc., ha sido eliminada del aparato USB y no se puede
reproducir.
del tiempo especificado.
! El disco está sucio.dLimpie el disco.
! Si la operación en normal con otros discos, el problema
está en el disco.
El formato está equivocado.dEmplee archivos de música que
estén en el formato correcto.
No elimine esa pista de la tarjeta del aparato USB.
Hay un objeto extraño en la ranura de inserción del disco.
dRetire el objecto extraño.
Cuidados para el uso
Limpieza de la lente
La lente del reproductor no debería ensuciarse en el uso normal, pero
si por alguna razón hay un fallo en su funcionamiento debido a polvo o
suciedad, contacte con el centro de servicio autorizado por Pioneer más
cercano. Aunque se encuentran a la venta limpiadores de lentes para
reproductores, no recomendamos utilizarlos porque podrían dañar la
lente.
Manejo de los discos
Conservación
! Ponga siempre los discos en sus cajas y guárdelos verticalmente,
evitando el calor, los lugares húmedos, los lugares expuestos a la luz
solar directa y los lugares sumamente fríos.
! Asegúrese de leer los avisos incluidos con el disco.
Limpieza de discos
! Los discos pueden no reproducirse si tienen huellas dactilares o
polvo. En este caso, use un paño de limpieza, etc., para pasarlo
suavemente por el disco, desde el interior hacia el exterior. No use
paños de limpieza sucios.
! No use bencina, diluyente u otros productos químicos voláti-
les. No use tampoco aerosoles de discos de vinilo ni productos
antiestáticos.
! Para la suciedad difícil de quitar, ponga un poco de agua en un paño
blando, escúrralo bien, páselo por el reproductor para limpiarlo y
finalmente pase un paño seco para quitar la humedad.
! No use discos dañados (agrietados o deformados).
! No deje que la superficie de las señales del disco se raye o ensucie.
! No ponga dos discos juntos en la bandeja del disco, uno sobre el
otro.
! No pegue trozos de papel pegatinas en los discos. Si lo hace podrían
deformarse los discos siendo imposible reproducirlos. Note también
que los discos de alquiler tienen a menudo etiquetas pegadas, y que
la cola de las etiquetas puede salir al exterior. Verifique que no haya
cola alrededor de los bordes de tales etiquetas antes de usar discos
de alquiler.
Acerca de los discos de formas especiales
Los discos de formas especiales (en forma de corazón, hexagonales,
etc.) no se pueden reproducir en esta unidad. No intente reproducir
tales discos porque podrían dañar la unidad.
22
Es
Page 23

Acerca de la condensación en los discos
En la superficie de los discos, si éstos se pasan de un lugar frío (especialmente en invierno) a una habitación caliente, pueden formarse gotas
de agua (condensación). Los discos puede que no se reproduzcan normalmente si tienen condensación. Quite cuidadosamente las gotas de
agua de la superficie del disco antes de cargarlo.
Acerca de las marcas de fábrica y
marcas registradas
! Pioneer y rekordbox son marcas de fábrica o marcas registradas de
PIONEER CORPORATION.
®
! Microsoft
marcas registradas o marcas de fábrica de Microsoft Corporation en
los Estados Unidos y/o en otros países.
! Apple, Macintosh, Mac OS, Safari, iTunes y Finder son marcas regis-
tradas de Apple Inc. en los Estados Unidos y en otros países.
! Pentium es una marca registrada de Intel Corporation.
! Adobe y Reader son marcas registradas o marcas de fábrica de
Adobe Systems Incorporated en los Estados Unidos y/o en otros
países.
! ASIO es una marca de fábrica de Steinberg Media Technologies
GmbH.
Los nombres de compañías y productos mencionados aquí son marcas
de fábrica de sus respectivos propietarios.
Este producto cuenta con licencia para se usado sin fines de lucro.
Este producto no tiene licencia para ser usado con fines comerciales
(con fines de lucro) como, por ejemplo, en emisiones (terrestres, por
satélite, por cable u otros tipos de emisiones), streaming en Internet,
Intranet (un red corporativa) u otros tipos de redes, ni para distribuir
información electrónica (servicio de distribución de música digital en
línea). Para tales usos necesita adquirir las licencias correspondientes. Para conocer detalles, visite http://www.mp3licensing.com.
, Windows Vista®, Windows® e Internet Explorer® son
Cuidados para los derechos de autor
rekordbox restringe la reproducción y duplicación del contenido de
música protegido por derechos de autor.
! Cuando hay datos codificados, etc. para proteger los derechos de
autor embebidos en el contenido de música, puede no ser posible
utilizar el programa normalmente.
! Cuando el rekordbox detecta datos codificados, etc. para proteger
los derechos de autor embebidos en el contenido de música, el
proceso (reproducción, lectura, etc.) puede parar.
Las grabaciones que usted ha hecho son para su uso personal y, según
las leyes de los derechos de autor, no se pueden usar sin el consentimiento del propietario de tales derechos.
! La música grabada de CD, etc., está protegida por las leyes de los
derechos de autor de países individuales, y también por tratados
internacionales. La persona que ha grabado la música es la respon-
sable de asegurar que ésta se use legalmente.
! Cuando maneje música descargada de Internet, etc., la persona que
la haya descargado será la responsable de asegurar que ésta se use
según el contrato concluido con el sitio de la descarga.
Uso del sitio de asistencia
Antes de preguntar acerca de las operaciones y la asistencia técnica
del rekordbox, consulte el manual de instrucciones del rekordbox y lea
atentamente las preguntas más frecuentes publicadas en el sitio de
asistencia del rekordbox.
! Durante el registro del usuario necesitará introducir su clave de
licencia, así que téngala a mano. Además, no se olvide del nombre
para el inicio de sesión (su dirección de correo electrónico) y la contraseña especificada para su registro de usuario, así como también
la clave de la licencia.
! PIONEER CORPORATION recoge su información personal con los
propósitos siguientes:
1 Proveer asistencia al cliente relacionada con su producto
adquirido
2 Informarle por correo electrónico de asuntos relacionados con el
producto y enviarle información de acontecimientos
3 Para obtener información recogida por sondeos con fines de
planificar productos
— Su información personal se mantendrá estrictamente confiden-
cial, cumpliendo así la política de privacidad establecida por
nuestra compañía.
— Puede informarse de nuestra política de privacidad en el sitio de
asistencia para el rekordbox.
! Cuando haga preguntas relacionadas con el rekordbox, asegúrese
de dar a conocer el tipo de su ordenador y sus especificaciones
(CPU, memoria instalada, otros periféricos conectados, etc.), el
sistema operativo y la versión usada, así como también información
concreta del problema pertinente.
— Para preguntar cómo configurar su ordenador con periféricos
que no son de Pioneer y para obtener la correspondiente asistencia técnica, contacte con el fabricante o vendedor específico.
! Se prevén actualizaciones para mejorar la funcionalidad y el rendi-
miento del rekordbox. Los programas actualizados estarán disponibles en los sitios de asistencia de rekordbox. Le recomendamos
encarecidamente que actualice su software con frecuencia para que
su sistema disponga siempre de las actualizaciones más recientes.
Especificaciones
Requisitos de potencia ................................. CA 110 V a 240 V, 50 Hz/60 Hz
Consumo de energía.............................................................................. 18 W
Peso de la unidad principal
Unidad reproductora ...................................................................... 5,0 kg
Unidad de control ........................................................................... 1,7 kg
Dimensiones máximas
Unidad reproductora
..482,6 mm (anchura) × 91,0 mm (altura) × 267,6 mm (profundidad)
Unidad de control
....482,6 mm (anchura) × 89,0 mm (altura) × 95,0 mm (profundidad)
Temperatura de funcionamiento tolerable .......................... +5 °C a +35 °C
Humedad de funcionamiento tolerable .....5 % a 85 % (sin condensación)
Salida de audio analógico (AUDIO OUT)
Terminal de salida ....................................................................Terminal RCA
Nivel de salida ......................................................................2,0 Vrms (1 kHz)
Respuesta de frecuencia ....................................................... 17 Hz a 20 kHz
Relación señal/ruido ........................................................................... 114 dB
Distorsión armónica total ..................................................................0,005 %
Sección descendente de USB (USB)
Puerto ................................................................................................... Tipo A
Alimentación ................................................................ 5 V/500 mA o menos
Otros terminales
Unidad reproductora
Terminal de control remoto ............................. Mini DIN de 8 contactos
Unidad de control
Terminal de control remoto ............................. Mini DIN de 8 contactos
— Las especificaciones y diseño de este producto están sujetos a
cambios sin previo aviso.
! © 2012 PIONEER CORPORATION. Todos los derechos reservados.
Español
Sitio de asistencia rekordbox
http://www.prodjnet.com/rekordbox/support/
! Antes de registrarse el usuario en el sitio de apoyo rekordbox será
necesario que usted busque información acerca del rekordbox.
Es
23
Page 24

Thank you for buying this Pioneer product. Please read through these operating instructions so you will know how to operate your model properly. After
you have finished reading the instructions, put them away in a safe place for future reference.
In some countries or regions, the shape of the power plug and power outlet may sometimes differ from that shown in the explanatory drawings.
However the method of connecting and operating the unit is the same.
IMPORTANT
CAUTION
RISK OF ELECTRIC SHOCK
DO NOT OPEN
The lightning flash with arrowhead symbol,
within an equilateral triangle, is intended to
alert the user to the presence of uninsulated
“dangerous voltage” within the product’s
enclosure that may be of sufficient
magnitude to constitute a risk of electric
shock to persons.
CAUTION:
TO PREVENT THE RISK OF ELECTRIC
SHOCK, DO NOT REMOVE COVER (OR
BACK). NO USER-SERVICEABLE PARTS
INSIDE. REFER SERVICING TO QUALIFIED
SERVICE PERSONNEL.
WARNING
This equipment is not waterproof. To prevent a fire or
shock hazard, do not place any container filled with
liquid near this equipment (such as a vase or flower
pot) or expose it to dripping, splashing, rain or
moisture.
D3-4-2-1-3_A1_En
WARNING
Before plugging in for the first time, read the following
section carefully.
The voltage of the available power supply differs
according to country or region. Be sure that the
power supply voltage of the area where this unit
will be used meets the required voltage (e.g., 230 V
or 120 V) written on the rear panel.
D3-4-2-1-4*_A1_En
WARNING
This product equipped with a three-wire grounding
(earthed) plug - a plug that has a third (grounding) pin.
This plug only fits a grounding-type power outlet. If you
are unable to insert the plug into an outlet, contact a
licensed electrician to replace the outlet with a properly
grounded one. Do not defeat the safety purpose of the
grounding plug.
D3-4-2-1-6_A1_En
WARNING
To prevent a fire hazard, do not place any naked flame
sources (such as a lighted candle) on the equipment.
D3-4-2-1-7a_A1_En
VENTILATION CAUTION
When installing this unit, make sure to leave space
around the unit for ventilation to improve heat radiation
(at least 5 cm at top, 5 cm at rear, and 5 cm at each
side).
WARNING
Slots and openings in the cabinet are provided for
ventilation to ensure reliable operation of the product,
and to protect it from overheating. To prevent fire
hazard, the openings should never be blocked or
covered with items (such as newspapers, table-cloths,
curtains) or by operating the equipment on thick carpet
or a bed.
D3-4-2-1-7b*_A1_En
Operating Environment
Operating environment temperature and humidity:
+5 °C to +35 °C (+41 °F to +95 °F); less than 85 %RH
(cooling vents not blocked)
Do not install this unit in a poorly ventilated area, or in
locations exposed to high humidity or direct sunlight (or
strong artificial light)
If the AC plug of this unit does not match the AC
outlet you want to use, the plug must be removed
and appropriate one fitted. Replacement and
mounting of an AC plug on the power supply cord of
this unit should be performed only by qualified
service personnel. If connected to an AC outlet, the
cut-off plug can cause severe electrical shock. Make
sure it is properly disposed of after removal.
The equipment should be disconnected by removing
the mains plug from the wall socket when left unused
for a long period of time (for example, when on
vacation).
CAUTION
The POWER switch on this unit will not completely
shut off all power from the AC outlet. Since the power
cord serves as the main disconnect device for the
unit, you will need to unplug it from the AC outlet to
shut down all power. Therefore, make sure the unit
has been installed so that the power cord can be
easily unplugged from the AC outlet in case of an
accident. To avoid fire hazard, the power cord should
also be unplugged from the AC outlet when left
unused for a long period of time (for example, when
on vacation).
CAUTION
This product is a class 1 laser product classified
under the Safety of laser products, IEC 60825-1:2007.
The exclamation point within an equilateral
triangle is intended to alert the user to the
presence of important operating and
maintenance (servicing) instructions in the
literature accompanying the appliance.
D3-4-2-1-1_A1_En
D3-4-2-1-7c*_A1_En
D3-4-2-2-1a_A1_En
D3-4-2-2-2a*_A1_En
CLASS 1 LASER PRODUCT
D58-5-2-2a_A1_En
En
2
Page 25

POWER-CORD CAUTION
Condensation
Handle the power cord by the plug. Do not pull out the
plug by tugging the cord and never touch the power
cord when your hands are wet as this could cause a
short circuit or electric shock. Do not place the unit, a
piece of furniture, etc., on the power cord, or pinch the
cord. Never make a knot in the cord or tie it with other
cords. The power cords should be routed such that they
are not likely to be stepped on. A damaged power cord
can cause a fire or give you an electrical shock. Check
the power cord once in a while. When you find it
damaged, ask your nearest PIONEER authorized
service center or your dealer for a replacement.
S002*_A1_En
If the player is moved suddenly from a cold place into a
warm room (in winter, for example) or if the
temperature in the room in which the player is installed
rises suddenly due to a heater, etc., water droplets
(condensation) may form inside (on operating parts and
the lens). When condensation is present, the player will
not operate properly and playback is not possible. Let
the player stand at room temperature for 1 or 2 hours
with the power turned on (the time depends on the
extent of condensation). The water droplets will
dissipate and playback will become possible.
Condensation can also occur in the summer if the
player is exposed to the direct wind from an
air-conditioner. If this happens, move the player to a
different place.
S005_A1_En
En
3
Page 26

Contents
How to read this manual
In this manual, names of channels and buttons indicated on the product, names of menus in the software, etc., are indicated within square
brackets ([ ]). (e.g. [MASTER] channel, [ON/OFF], [File] menu)
! The Operating Instructions of rekordbox can be viewed from the
rekordbox [Help] menu after installing rekordbox.
Before start
Features ....................................................................................................... 5
System setup example ............................................................................... 5
What’s in the box ........................................................................................ 5
Before you start
Usable discs and USB devices .................................................................. 6
Playable music file formats ....................................................................... 7
Functions usable in combination with a computer................................. 7
Installing rekordbox .................................................................................... 8
Connections
Names of terminals .................................................................................. 10
Example of connections ........................................................................... 11
Installation guidelines .............................................................................. 12
Operation
Control panel ............................................................................................. 13
Main unit display ...................................................................................... 14
Setting the source to be played (source select section) ....................... 14
Basic Operations (player, source select and browse sections) ........... 15
Operating the jog dial ............................................................................... 16
Set the loop ................................................................................................ 17
Displaying track information (browse section) ...................................... 17
Searching for tracks quickly using the library information .................. 18
Adjusting the playing speed (tempo control section) ........................... 18
Storing cue or loop points ........................................................................ 18
Changing the settings .............................................................................. 19
Additional information
Troubleshooting ........................................................................................ 20
Error messages ......................................................................................... 21
Cautions on use ........................................................................................ 21
Handling discs .......................................................................................... 21
About trademarks and registered trademarks ...................................... 21
Cautions on copyrights ............................................................................ 22
Using the support site .............................................................................. 22
Specifications............................................................................................ 22
En
4
Page 27

Before start
Type 1 (Chile, India, Peru)
Features
This unit is a rack-mount type multi-entertainment player for mobile DJs and clubs on which a wide variety of music sources can be used for DJ
performances.
English
MULTI MEDIA, MULTI FORMAT
This unit can play not only music CDs (CD-DA), but also music files
(MP3 and WAV) recorded on mass storage class USB devices (flash
Slot-in Drive
There is no need to open and close a tray, so discs can be changed
quickly.
memory devices and hard discs) and CD-R/-RW discs.
rekordbox
™
This unit supports rekordbox, the music management software exclusively for Pioneer DJ players. Music files managed with rekordbox can be
Memory Cue
This unit supports the memory cue function for setting and storing cue
points ahead of time. Cue points can be called out instantaneously during DJ performances.
transferred to USB devices and connected to this unit for simple track
selection and other operations.
System setup example
A DJ system like the one shown on the diagram below can be set up by combining this unit with a DJ mixer and peripheral devices.
Music management
Music management
software
software
USB device USB device
DISC 1 DISC 2
SOURCE
EJECT
TIME MODE
SELECT
CD
USB
AUTO CUE
1
12
FOLDER TRACK REMAIN
DISPLAY
REPEAT
A.CUE
RELAY
UTILITY
REV
FWD
RELOOP
HOT LOOP OUT ADJUST
OUT
IN/CUE
CDJ
VINYL
JOG MODE
CUE
Computer
EJECT
OFF
ON
POWER
USB 1
USB STOP
TEMPO
M
SF
SELECT PUSH
MASTER TEMPO
/EXIT
TEMPO RANGE
BACK
MEMORY
CUE
SEARCH
PITCH BEND
USB 2
EJECT
TEMPO
WIDE
±16
±10
±6
%
BPM
REV
0
MT MT
rekordbox
EJECT
CD
USB
1
12
SOURCE
SELECT
JOG MODE
TIME MODE
AUTO CUE
DISPLAY
UTILITY
FWD
VINYL
USB STOP
HOT LOOP OUT ADJUST
IN/CUE
CDJ
FOLDER TRACK REMAIN
A.CUE
CUE
MULTI ENTERTAINMENT PLAYER MEP-4000
MULTI ENTERTAINMENT PLAYER MEP-4000
TEMPO
M
SF
REPEAT
RELAY
SELECT PUSH
RELOOP
MASTER TEMPO
/EXIT
OUT
TEMPO RANGE
BACK
MEMORY
CUE
SEARCH
PITCH BEND
TEMPO
WIDE
±16
±10
±6
%
BPM
0
MEP-4000
Disc Disc
DJ mixer
For checking the
audio input/output
Headphones
For audio output
Amplifier,
powered speaker, etc.
PHONO
CD CD CDCD
/ LINE
99
10
55
9
22
8
00
7
--22
6
--44
5
--77
4
3
--1100
2
--1155
1
0
MIXING
MONO
SPLIT CUE
CUE
MASTER
HEADPHONES
LINE
99
55
22
00
--22
--44
--77
--1100
--1155
99
10
55
9
22
8
00
7
--22
6
--44
5
--77
4
3
--1100
2
--1155
1
0
----
99
10
55
9
22
8
00
7
--22
6
--44
5
--77
4
3
--1100
2
--1155
1
0
CUE CUECUECUECUE
CROSS FADER
PHONO
MASTER LEVEL
/ LINELINEUSB
9
10
5
9
2
8
0
7
-2
6
-4
5
-7
4
3
-10
2
-15
1
R
0
BALANCE
R
L
PROFESSIONAL MIXER
SUBWOOFER LEVEL
OUTPUT MODE
NORMAL CROSSOVER
FREQUENCY
50
100
164
36
30 210
Hz
SEND/RTN
44
33
MASTER MASTER
2
2
MICMIC 1
11
OFF
ZONE LEVEL
LEVEL
MIN
BOOTH MONITOR
ON/OFF
DJM-4000
OFF
ON
MIC 2
MIC 1+2
MAX
What’s in the box
! Power cord(s)
! Audio cable
! Operating instructions (this document)
Power cord(s)
The power cords below are included with this unit. Use the power cord suitable for your country or region.
Type 2 (Columbia, Guatemala, Panama, Venezuela)
! Dedicated remote control cable
! rekordbox license key seal
En
5
Page 28

Before you start
Usable discs and USB devices
About discs
This unit can play the discs shown below.
Type Mark
CD
CD-R
CD-RW
2
CD-TEXT
1 Discs on which the marks on this table are indicated on the disc label, package
or jacket can be played.
2 Titles, album names and artist names recorded in the CD-Text data are dis-
played. When multiple text data are recorded on the disc, the information for the
first text data is displayed.
Discs that cannot be played
! DTS-CD
! Photo CDs
! Video CDs
! CD Graphics (CD-G) discs
! Unfinalized CDs
! DVD
About CD-R/-RW discs
Music files (MP3/WAV) recorded on CD-R/-RW discs can be played.
Folder layers
Max. number of folders 999 folders
Max. number of files 999 files
When there are many folders or files, some time may be required for
loading.
About discs created on computers
Depending on the application settings and the computer’s environmental settings, it may not be possible to play certain discs. Record the disc
in a format supported on this unit. For details, contact your application’s
retailer.
If the recording quality is poor due to the disc’s properties, scratches or
dirt on the disc or dirt on the recording lens, it may not be possible to
play the disc.
1
Max. 8 layers (files in folders beyond the 8th layer cannot
be played)
Compatible formats
! Music CD (CD-DA)
! Music CD (CD-DA)
! MP3
! WAV
Music CD (CD-DA)
Creating backup discs
When CD-R/-RW discs are paused or left in the pause mode at cue
points for long periods of time, it may become difficult to play the disc at
that point, due to the properties of the disc. Also, when a specific point
is looped repeatedly an extremely large number of times, it may become
difficult to play that point.
When playing valuable discs, we recommend making backup discs.
About Copy Control CDs and DualDiscs
This unit is designed to CD standards. Operation and performance of
discs with standards other than CD standards is not guaranteed.
About 8 cm single CDs
8 cm single CDs cannot be played on the MEP-4000. Do not mount 8 cm
adapters on CDs and play them on the MEP-4000. The adapter could fall
off as the disc spins, damaging the disc or the player.
About USB devices
This unit supports USB mass storage class USB devices (external hard
disks, portable flash memory devices, digital audio players, etc.).
Folder layers Max. 8 layers
Max. number of folders within a folder
Max. number of files within a folder
Max. number of files
Supported file systems FAT16, FAT32
1 When not managed with rekordbox
2 When managed with rekordbox
When there are many folders or files, some time may be required for
loading.
Folders and files exceeding the limits cannot be displayed.
2
USB devices that cannot be used
! Optical disc type devices such as external DVD/CD drives, etc., are
not supported.
! USB hubs cannot be used.
Cautions on using USB devices
! When using USB devices, be careful not to apply strong forces
to the plug section. Doing so could cause it to disconnect unintentionally and could damage the port or USB device.
! Some USB devices may not operate properly on this unit. Note that
Pioneer will accept no responsibility whatsoever for any loss of data
recorded on USB devices resulting from connection to this unit.
! If the USB device is split into multiple partitions, only the first parti-
tion can be used.
! USB devices equipped with flash card readers may not operate.
! Depending on the USB device you are using, the desired perfor-
mance may not be achieved.
! USB devices whose rated current exceeds 500 mA cannot be used.
Use USB devices that run on an external power supply (AC adapter,
etc.).
1
1
999 folders
999 files
20 000 files
En
6
Page 29

Playable music file formats
This unit supports music files in the formats shown below.
Type MP3 WAV
File extension .mp3 .wav
Compatible formats MPEG-1 WAV
Bit depth 16 bit 16 bit
Bit rate 32 kbps to 320 kbps —
Sampling frequency 32 kHz, 44.1 kHz, 48 kHz 44.1 kHz
Encoding method CBR, VBR Uncompressed PCM
About MP3 files
MP3 files can have a constant bit rate (CBR) or a variable bit rate (VBR).
Both types of files can be played on this unit, but the search and super
fast search functions are slower with VBR files. If your priority is operability, we recommend recording MP3 files in CBR.
Functions usable in combination
with a computer
rekordbox music management software
rekordbox is a software program for purchasers of the MEP-4000 or other
Pioneer DJ players to manage the music files they use for DJ play.
— rekordbox may be used for classifying and searching for music
files stored on your computer as well as creating playlists, all of
which can help improve your DJ performance.
! To use rekordbox, please download it from the Pioneer website
below.
http://www.prodjnet.com/rekordbox/support/
Software end user license agreement
This Software End User License Agreement (“Agreement”) is between
you (both the individual installing the Program and any single legal
entity for which the individual is acting) (“You” or “Your”) and PIONEER
CORPORATION (“Pioneer”).
TAKING ANY STEP TO SET UP OR INSTALL THE PROGRAM MEANS
THAT YOU ACCEPT ALL OF THE TERMS OF THIS LICENSE AGREEMENT.
PERMISSION TO DOWNLOAD AND/OR USE THE PROGRAM IS
EXPRESSLY CONDITIONED ON YOUR FOLLOWING THESE TERMS.
WRITTEN OR ELECTRONIC APPROVAL IS NOT REQUIRED TO MAKE
THIS AGREEMENT VALID AND ENFORCEABLE. IF YOU DO NOT
AGREE TO ALL OF THE TERMS OF THIS AGREEMENT, YOU ARE NOT
AUTHORIZED TO USE THE PROGRAM AND MUST STOP INSTALLING IT
OR UNINSTALL IT, AS APPLICABLE.
1 Definitions
1 “Documentation” means written documentation, specifications
and help content made generally available by Pioneer to aid in
installing and using the Program.
2 “Program” means all or any part of Pioneer’s software licensed to
You by Pioneer under this Agreement.
2 Program license
1 Limited License. Subject to this Agreement’s restrictions,
Pioneer grants to You a limited, non-exclusive, nontransferable,
license (without the right to sublicense):
a To install a single copy of the Program on the hard disk
drive of Your computer, to use the Program only for Your
personal purpose complying with this Agreement and the
Documentation (“Authorized Use”);
b To use the Documentation in support of Your Authorized Use;
and
c To make one copy of the Program solely for backup pur-
poses, provided that all titles and trademark, copyright and
restricted rights notices are reproduced on the copy.
2 Restrictions. You will not copy or use the Program or
Documentation except as expressly permitted by this Agreement.
You will not transfer, sublicense, rent, lease or lend the Program,
or use it for third-party training, commercial time-sharing or
service bureau use. You will not Yourself or through any third
party modify, reverse engineer, disassemble or decompile the
Program, except to the extent expressly permitted by applicable
law, and then only after You have notified Pioneer in writing of
Your intended activities. You will not use the Program on multiple
processors without Pioneer’s prior written consent.
3 Ownership. Pioneer or its licensor retains all right, title and
interest in and to all patent, copyright, trademark, trade secret
and other intellectual property rights in the Program and
Documentation, and any derivative works thereof. You do not
acquire any other rights, express or implied, beyond the limited
license set forth in this Agreement.
4 No Support. Pioneer has no obligation to provide support,
maintenance, upgrades, modifications or new releases for the
Program or Documentation under this Agreement.
3 Warranty disclaimer
THE PROGRAM AND DOCUMENTATION ARE PROVIDED “AS IS”
WITHOUT ANY REPRESENTATIONS OR WARRANTIES, AND YOU
AGREE TO USE THEM AT YOUR SOLE RISK. TO THE FULLEST EXTENT
PERMISSIBLE BY LAW, PIONEER EXPRESSLY DISCLAIMS ALL
WARRANTIES OF ANY KIND WITH RESPECT TO THE PROGRAM AND
DOCUMENTATION, WHETHER EXPRESS, IMPLIED, STATUTORY,
OR ARISING OUT OF COURSE OF PERFORMANCE, COURSE OF
DEALING OR USAGE OF TRADE, INCLUDING ANY WARRANTIES
OF MERCHANTABILITY, FITNESS FOR A PARTICULAR PURPOSE,
SATISFACTORY QUALITY, ACCURACY, TITLE OR NON-INFRINGEMENT.
4 Damages and remedies for breach
You agree that any breach of this Agreement’s restrictions would cause
Pioneer irreparable harm for which money damages alone would be
inadequate. In addition to damages and any other remedies to which
Pioneer may be entitled, You agree that Pioneer may seek injunctive
relief to prevent the actual, threatened or continued breach of this
Agreement.
5 Termination
Pioneer may terminate this Agreement at any time upon Your breach of
any provision. If this Agreement is terminated, You will stop using the
Program, permanently delete it from the computer where it resides, and
destroy all copies of the Program and Documentation in Your possession, confirming to Pioneer in writing that You have done so. Sections
2.2, 2.3, 2.4, 3, 4, 5 and 6 will continue in effect after this Agreement’s
termination.
6 General terms
1 Limitation of Liability. In no event will Pioneer or its subsidiaries
be liable in connection with this Agreement or its subject matter,
under any theory of liability, for any indirect, incidental, special,
consequential or punitive damages, or damages for lost profits,
revenue, business, savings, data, use, or cost of substitute procurement, even if advised of the possibility of such damages or if
such damages are foreseeable. In no event will Pioneer’s liability
for all damages exceed the amounts actually paid by You to
Pioneer or its subsidiaries for the Program. The parties acknowledge that the liability limits and risk allocation in this Agreement
are reflected in the Program price and are essential elements of
the bargain between the parties, without which Pioneer would
not have provided the Program or entered into this Agreement.
2 The limitations or exclusions of warranties and liability contained
in this Agreement do not affect or prejudice Your statutory rights
as consumer and shall apply to You only to the extent such limitations or exclusions are permitted under the laws of the jurisdiction where You are located.
3 Severability and Waiver. If any provision of this Agreement is held
to be illegal, invalid or otherwise unenforceable, that provision
will be enforced to the extent possible or, if incapable of enforcement, deemed to be severed and deleted from this Agreement,
and the remainder will continue in full force and effect. The
waiver by either party of any default or breach of this Agreement
will not waive any other or subsequent default or breach.
En
English
7
Page 30

4 No Assignment. You may not assign, sell, transfer, delegate or
otherwise dispose of this Agreement or any rights or obligations
under it, whether voluntarily or involuntarily, by operation of law
or otherwise, without Pioneer’s prior written consent. Any purported assignment, transfer or delegation by You will be null and
void. Subject to the foregoing, this Agreement will be binding
upon and will inure to the benefit of the parties and their respective successors and assigns.
5 Entire Agreement. This Agreement constitutes the entire agree-
ment between the parties and supersedes all prior or contemporaneous agreements or representations, whether written or
oral, concerning its subject matter. This Agreement may not be
modified or amended without Pioneer’s prior and express written
consent, and no other act, document, usage or custom will be
deemed to amend or modify this Agreement.
6 You agree that this Agreement shall be governed and construed
by and under the laws of Japan.
Cautions on installing rekordbox
Read the “Software end user license agreement” carefully before installing rekordbox.
! The downloaded installation file includes the installation program in
the following 12 languages:
English, French, German, Italian, Dutch, Spanish, Portuguese,
Russian, Chinese (simplified characters), Chinese (traditional characters), Korean, Japanese.
! When using an operating system in any language besides the ones
listed above, select [English] during the installation procedure.
Supported operating systems rekordbox
Mac OS X (10.5.8 or later)
®
7 Home Premium/Professional/
Windows
Ultimate (SP1 or later)
®
Windows Vista
Business/Ultimate (SP2 or later)
Windows
or later)
Home Basic/Home Premium/
®
XP Home Edition/Professional (SP3
32-bit version
64-bit version
32-bit version
64-bit version
32-bit version
Minimum operating environment for rekordbox
! CPU:
— For Mac OS X, Macintosh computer with a dual-core 1.6 GHz or
greater Intel® processor
— For Windows® 7, Windows Vista® and Windows® XP, a PC/
AT-compatible computer with a dual-core 2.0 GHz or greater
Intel® processor
! Required memory: 1 GB or more of RAM
! Hard disc: 250 MB or more of free space (not including space for
storing music files, etc.)
! Sound: Audio output to speakers, headphones, etc. (internal or
external audio device)
! Internet connection: For user registration and inquiries, use a
web browser supporting 128-bit SSL (Safari 2.0 or greater, Internet
Explorer® 6.0 or greater, etc.).
! USB port: A USB port for connection of a USB device (flash memory,
hard disc, etc.) is required to transfer music files to the USB device.
! Full functionality is not guaranteed on all computers, even those
meeting the operating environment requirements described above.
! Even with the required memory capacity indicated for the operat-
ing environment above, in the cases described below the software
may not provide full functionality and performance due to lack of
memory. In this case, take the necessary measures to ensure sufficient free memory. We recommend adding extra memory in order
to achieve stable performance.
— When there are many tracks being managed in the rekordbox
library
— When resident programs and services are running
! Depending on the computer’s power settings, etc., the CPU and
hard disc processing capacity may be insufficient. When using laptop computers in particular, always keep the AC power connected
and set the computer to maximum performance conditions when
using rekordbox.
! Note that problems may arise in the operation of rekordbox due to
other software being used together with it.
1
1
1
1
1
1
Installing rekordbox
To use rekordbox on the MEP-4000, use Ver. 1.5.4 or later.
Read Cautions on installing rekordbox carefully before installing
rekordbox.
! Authorization of the computer’s administrator is required to install
and uninstall rekordbox.
Log on as the user which was set as the computer’s administrator
before installing.
About the installation procedure (Mac OS X)
1 Double-click on the downloaded file [Install_
rekordbox_1.x.x.x.pkg.zip], then double-click on the
unzipped file [Install_rekordbox_1.x.x.x.pkg].
2 Install rekordbox following the instructions on the
screen.
About the installation procedure
(Windows)
1 Double-click on the downloaded file [Install_
rekordbox_1.x.x.x.zip], then double-click on the
unzipped file [Install_rekordbox_1.x.x.x.exe].
2 Install rekordbox following the instructions on the
screen.
! Click [Cancel] to cancel installation after it has started.
Launching rekordbox
Log on as the user which was set as the computer’s administrator before
using rekordbox.
! When rekordbox is launched the first time, you are asked to input
the license key. The license key is indicated on the license key seal
included in the same plastic pouch as the operating instructions.
! When rekordbox is started up, the operating instructions can be
viewed from the rekordbox [Help] menu.
For Mac OS X
Open the [Application] folder with Finder, then doubleclick [rekordbox 1.x.x.app].
! The 1.x.x indicates the rekordbox version.
For Windows® 7, Windows Vista® and Windows®
XP
Click on the Windows [Start] menu button, then [All
Programs] > [Pioneer] > [rekordbox 1.x.x] > [rekordbox
1.x.x].
! The 1.x.x indicates the rekordbox version.
En
8
Page 31

Setting rekordbox
rekordbox must be set before using it on this unit.
1 After launching rekordbox, click [File] > [Preferences].
2 At the preferences settings screen, check the item
[Create library for MEP-4000 right before USB device is
disconnected].
Create library for MEP-4000 right before USB device is disconnected :
English
Transferring playlists and other
management data to a USB device
The data is transferred when the operation for disconnecting the USB
device is performed.
1 In rekordbox, click .
2 Click
on the right of the you want to
transfer.
3 A bar indicating the progress of data transfer
appears. Wait until the bar reaches the right edge.
When the bar turns off, data transfer is completed.
4 Disconnecting USB devices.
! Be sure to disconnect the USB device through the operation in
rekordbox. If it is disconnected in any other way, the management
data will not be transferred to the USB device.
! Do not defrag the USB device after management data is transferred
to it.
Cautions on using rekordbox
If the rekordbox [Organizing Playlist by using a folder] function has
been used, when this unit’s [PLAYLIST] category is browsed, the folder
is not displayed; instead, a list of all the playlists is displayed.
En
9
Page 32
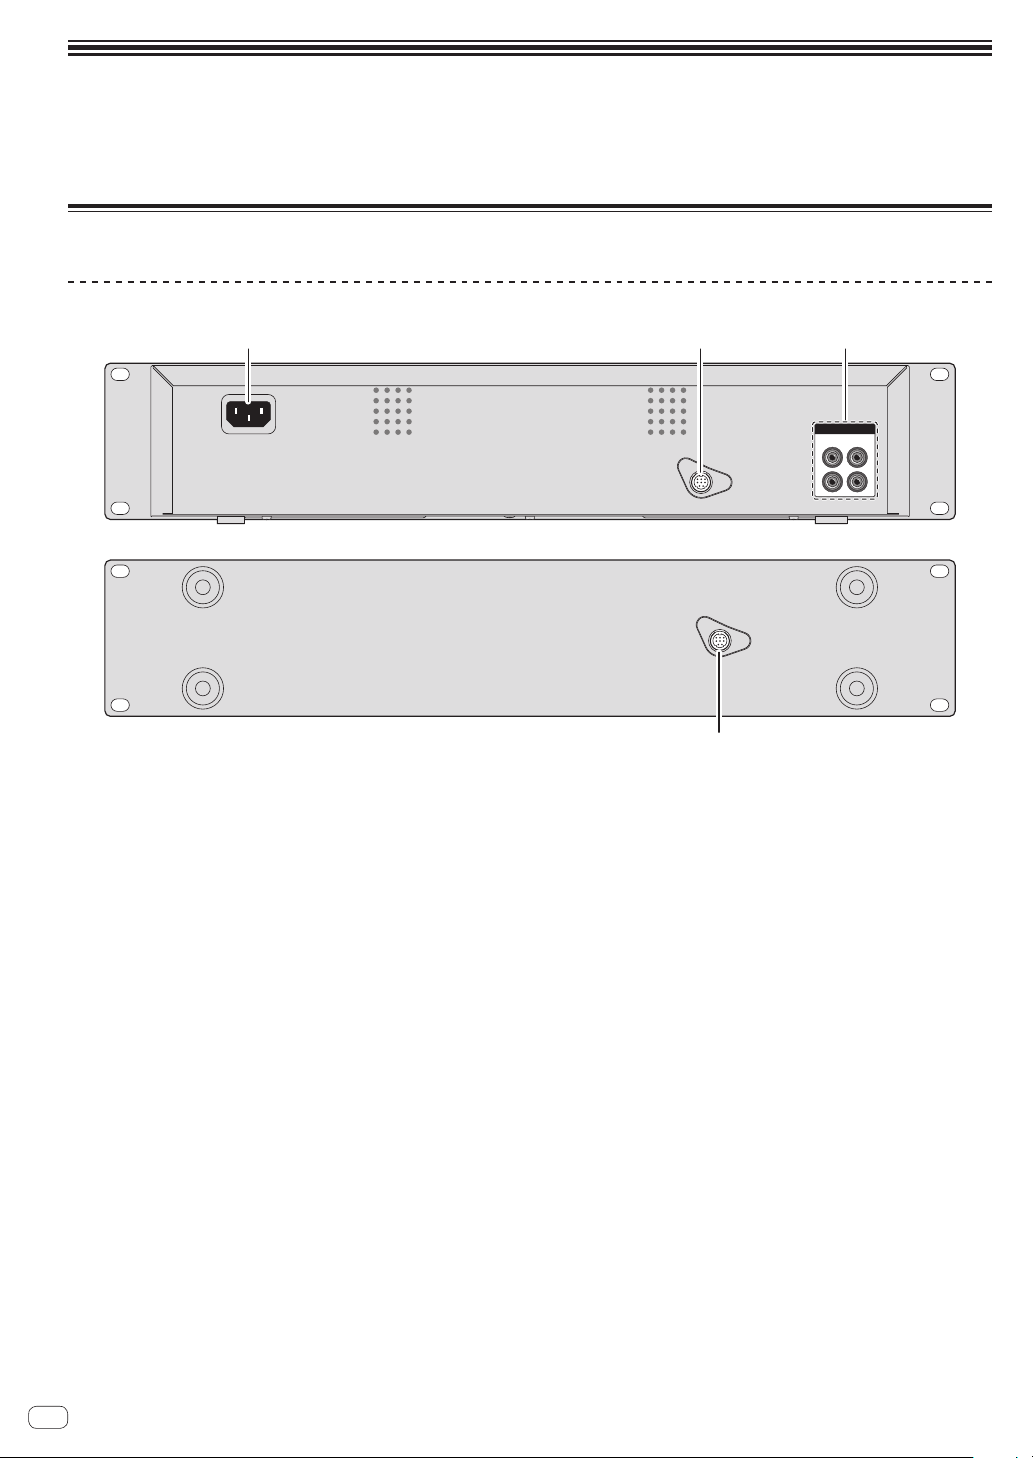
Connections
Be sure to turn off the power and unplug the power cord from the power outlet whenever making or changing connections.
Refer to the operating instructions for the component to be connected.
Connect the power cord after all the connections between devices have been completed.
Be sure to use the included power cord.
Names of terminals
Rear panel
1 32
AC IN
REMOTE
CONTROL
Drive unit
REMOTE
CONTROL
AUDIO OUT
L
R
12
L
R
Control unit
1 AC IN
Connect this to a power outlet.
Connect the power cord after all the connections between devices have been completed.
Be sure to use the included power cord.
2 REMOTE CONTROL (page 11)
Connect the drive unit and control unit using the dedicated remote control cable (included).
3 AUDIO OUT (page 11)
Connect the audio cables (included) here.
2
10
En
Page 33

Example of connections
USB 1
DC5V 500mA
USB 2
DC5V 500mA
To an AC outlet
Power cord
Drive unit’s rear panel
Control unit’s rear panel
AC IN
Drive unit’s front panel
Dedicated remote control cable (included)
USB device on which
rekordbox data is
recorded.
REMOTE
CONTROL
1
Audio cable (included)
REMOTE
CONTROL
Computer
rekordbox
AUDIO OUT
L
R
R
L
English
12
L
R
R
L
CD CD CDCD
99
10
55
9
22
8
00
7
--22
6
--44
5
--77
4
3
--1100
2
--1155
1
0
----
MIXING
MONO
SPLIT CUE
CUE
MASTER
HEADPHONES
DJ mixer
Use only the furnished remote control cable.
1
PHONO
/ LINE
PHONO
LINE
99
10
55
9
22
8
00
7
--22
6
--44
5
--77
4
3
--1100
2
--1155
1
0
99
10
55
9
22
8
00
7
--22
6
--44
5
--77
4
3
--1100
2
--1155
1
0
99
55
22
00
--22
--44
--77
--1100
--1155
CUE CUECUECUECUE
CROSS FADER
/ LINELINE USB
10
9
8
7
6
5
4
3
2
1
0
MASTER LEVEL
SUBWOOFER LEVEL
9
5
FREQUENCY
2
50
0
-2
36
-4
30 210
-7
33
-10
2
-15
11
R
ZONE LEVEL
BOOTH MONITOR
BALANCE
R
L
PROFESSIONAL MIXER
OFF
ON
OUTPUT MODE
NORMAL CROSSOVER
100
164
Hz
SEND/RTN
44
MASTER MASTER
2
MICMIC 1
OFF
MIC 2
MIC 1+2
LEVEL
MAX
MIN
ON/OFF
DJM-4000
En
11
Page 34

Installation guidelines
! Do not place this unit on objects radiating heat, such as an amplifier,
or expose it to a spotlight for an extended period of time, as this may
damage this unit.
! Install this unit away from a tuner or a TV. Otherwise, image distor-
tion or noise may result. Also, image distortion or noise can easily
occur if an indoor antenna is used. In such cases, use an outdoor
antenna or turn off the power of this unit.
! When this unit is used in a loud-sound environment, e.g., near
a speaker, sound skip may occur. Install this unit away from the
speaker or reduce the listening volume.
! Place this unit on a level surface and a stable platform.
! Do not place heavy objects on top of this unit.
Be sure the player, including its audio and power supply cords, does not
touch vibrating materials. Any cause of vibration other than the insulators may cause sound skip. Take special care when using the player
while it is installed in a carrying case.
Do not allow contact with vibrating
surfaces.
To assure proper heatdissipation, be
sure to maintain this open space.
Cleaning the product
Under normal circumstances, wipe it with a dry cloth. For hard-toremove stains, soak a soft cloth in a neutral detergent diluted with 5 to
6 times of water, wring it thoroughly, wipe off the stains, and wipe the
surface with a dry cloth again. Do not use alcohol, thinner, benzene, or
insecticide, as these may peel off the printed label or the coated film.
Avoid leaving rubber or vinyl products in contact for an extended period
of time, as this may also damage the surface of the cabinet. When using
chemical-impregnated wipes, etc., read the cautions carefully.
Unplug the power plug from the AC outlet when cleaning this unit.
Cleaning the Jog Dial
To clean the jog dial, wipe with a polishing or a soft, dry cloth. For stubborn dirt, moisten a soft cloth with a weak solution of neutral detergent
(diluted in 5 to 6 parts water), wring the cloth well, and wipe away the
dirt. Use a dry cloth to wipe the surface dry. Applying alcohol, paint
thinner, benzene, insecticides, or other stringent substances to the jog
dial may cause the markings or finishing of the dial to peel or become
discolored, and the use of any such substances should accordingly be
avoided.
To assure proper
heatdissipation, be
sure to maintain
this open space.
To assure proper
heatdissipation, be
sure to maintain
this open space.
Mounting on a rack conforming to EIA
standards
The mount holes on the left and right of this unit’s operation panel are
for the 2U (drive unit) + 2U (control unit) size of 19-inch EIA standard
racks. This unit has a maximum depth of 267.6 mm.
! Secure this unit with screws (not supplied) matching the rack.
! Do not install this unit directly above a power amplifier. Heat radiat-
ing from the power amplifier may damage this unit. Also, noise (hum
noise, etc.) may be generated.
! When transporting this unit, remove it from the rack. Transporting
this unit without removing it from the rack may damage this unit.
! If you transport this unit without removing it from the rack, make
sure vibration or shock is not applied to this unit.
Transporting this unit
Never move this unit during playback
During playback, discs rotate at very high speeds; never lift or move this
unit during this time to prevent scratches or other damage to discs.
When moving this unit
When moving this unit, always remove any discs that have been loaded,
and turn off the power. Moving this unit with a disc loaded could result
in damage to the disc or unit.
About carrying cases
If this unit is placed in a carrying case, take precautions to prevent any
pressure from being exerted on the surface of the jog dial.
En
12
Page 35

Operation
Control panel
Source select section
23
1
2 3
English
EJECT
DISC 1 DISC 2
USB STOP
USB 1
Drive unit
45
Control unit
2 6 f
EJECT
REV
SOURCE
SELECT
CD
USB
1
12
b
TIME MODE
DISPLAY
JOG MODE
a
AUTO CUE
UTILITY
FWD
HOT LOOP OUT ADJUST
IN/CUE
CDJ
VINYL
c
FOLDER TRACK REMAIN
A.CUE
CUE
9
d
h ig
WIDE
±16
TEMPO
SF
M
REPEAT
RELAY
SELECT PUSH
RELOOP
/EXIT
OUT
MEMORY
CUE
SEARCH
8
±10
±6
%
BPM
0
MASTER TEMPO
MT MT
TEMPO RANGE
BACK
PITCH BEND
l
n7
je
m
1 POWER wON vOFF (page 15)
2 EJECT h (page 15)
Source select section
Select the source to be played with this unit here (page 14).
3 Disc insertion slot
4 USB device insertion slot
5 USB STOP
6 SOURCE SELECT
Player section
These controls can be used for such basic DJ player operations as playing discs, setting cue/loop points and operating the jog dial (page 15).
7 SEARCH m, n
8 PLAY/PAUSE f
9 CUE
a JOG MODE
b Jog dial
c LOOP IN/CUE (HOT LOOP)
d LOOP OUT (OUT ADJUST)
e RELOOP/EXIT
POWER
USB 2
EJECT
OFF
ON
USB STOP
MULTI ENTERTAINMENT PLAY ER MEP-4000
4 5
TEMPO
k
Source select section
EJECT
CD
USB
1
12
REV
Player section
SOURCE
SELECT
TIME MODE
AUTO CUE
DISPLAY
UTILITY
FWD
VINYL
JOG MODE
FOLDER TRACKREMAIN
A.CUE
HOT LOOP OUT ADJUST
IN/CUE
CDJ
CUE
Browse section
MULTI ENTERTAINMENT PLAYER MEP-4000
M
REPEAT
RELAY
SELECT PUSH
RELOOP
/EXIT
OUT
MEMORY
CUE
TEMPO
SF
MASTER TEMPO
TEMPO RANGE
BACK
SEARCH
Tempo control section
Browse section
Information on the device loaded on this unit, loaded tracks, etc., is
displayed here (page 17).
f TIME MODE, AUTO CUE
g DISPLAY, UTILITY
h Main unit display
i SELECT PUSH, MEMORY CUE (rotary selector)
j BACK
Tempo control section
Adjust the track playing speed here (page 18).
k TEMPO
l MASTER TEMPO
m TEMPO RANGE
n PITCH BEND –, +
%
BPM
PITCH BEND
TEMPO
WIDE
±16
±10
±6
0
En
13
Page 36

Main unit display
Source select section
1
2 4
3
FOLDER TRACK REMAIN
A.CUE
REPEAT
RELAY
M
5
SF
TEMPO
6
List of icons displayed on the main unit
display section
7
Genre Playlist
WIDE
±16
±10
±6
%
BPM
Artist Playing
Album Folder
8
9 a b c
1 FOLDER
The folder number is displayed here.
2 TRACK
This displays the track number.
It is not possible to display more than 1 000 tracks.
3 REPEAT
Lights when in the Repeat Play mode.
4 REMAIN
The display can be switched between the elapsed time and the
remaining time by pressing [TIME MODE (AUTO CUE)] f.
[REMAIN] lights when the display is set to the remaining time.
5 M, S, F (time display)
“M” indicates minutes, “S” seconds, “F” frames.
There are 75 frames to a second.
6 TEMPO %
This indicates the percentage by which the playing speed is
changed.
7 WIDE, ±16, ±10, ±6
This indicates the range by which the playing speed can be adjusted.
8 A. CUE (page 16)
This lights when auto cue is set.
9 Display icons
The icon of the currently selected category is displayed here. For the
icons that are displayed, see List of icons displayed on the main unit
display section on page 14.
a RELAY
This lights during relay play.
b Playing address display
The track is displayed as a bar graph.
Turns off from the left side when the remaining time is displayed. The
entire graph flashes slowly when the remaining track time is under
30 seconds, then flashes quickly when the remaining track time is
under 15 seconds.
c Information display section
The track information is displayed with the [BROWSE] display or
[INFO] display.
Up to 11 characters can be displayed. The displayable characters are
letters (A to Z), certain Latin characters, numbers 0 to 9 and certain
symbols. For other characters, “?” is displayed.
For details on how to display the track information, see Displaying
track information (browse section) on page 17.
d BPM
Displays BPM (Beats Per Minute) of the track currently being played.
d
Track/file name — —
Setting the source to be played
(source select section)
3 12
EJECT
DISC 1
POWER
USB STOP
Drive unit
2
CD1USB
12
SOURCE
SELECT
EJECT
Control unit
Loading discs
! Set the disc with the printed side facing up.
! Insert the disc horizontally into the disc insertion slot in the main
unit’s front panel.
! Do not load more than 1 disc.
! Do not force discs into the disc insertion slot when this unit’s power
is off. Doing so could damage the disc and lead to malfunction of
this unit.
! When the disc is being drawn in or ejected, do not apply any force
to the disc in the direction opposite its movement. Doing so could
damage the disc or this unit.
1 Press [POWER] 1.
Turn on the power of this unit.
2 Insert the disc into the disc insertion slot 3.
Playback starts.
! When auto cue is turned on, playback starts when
[PLAY/PAUSEf] 8 is pressed. For details on the auto cue function, see Setting auto cue on page 16.
! When a disc containing music files recorded with a hierarchical
structure is loaded, playback starts from the tracks in the uppermost
layer.
USB 1
45
OFF
ON
USB
14
En
Page 37

Ejecting discs
Press [EJECT h]2.
The disc is ejected from the disc insertion slot.
! This button only functions when in the pause mode or when pausing
at a cue point.
Removing USB devices from this unit
! Be sure to follow the procedure below when removing USB devices
from this unit. Removing a USB device without following this proce-
dure could erase this unit’s management data and make it impos-
sible to read the USB device.
! When turning this unit’s power off, be sure to remove the USB device
first.
Loading USB devices
Connect the USB device to the USB device insertion slot
1 Press [USB STOP] 5 for at least 2 seconds.
The [USB STOP] indicator turns off.
2 Disconnect the USB device.
4.
The [USB STOP] indicator lights.
Basic Operations (player, source select and browse sections)
Source select section
23
1
2 3
English
EJECT
DISC 1 DISC 2
USB STOP
Drive unit
5
Control unit
2 6 f hg
EJECT
REV
SOURCE
TIME MODE
SELECT
USB
CD
1
12
b
DISPLAY
JOG MODE
a
AUTO CUE
UTILITY
FWD
HOT LOOP OUT ADJUST
CDJ
VINYL
c
FOLDER TRACK REMAIN
A.CUE
IN/CUE
CUE
9
OUT
d
REPEAT
RELAY
RELOOP
/EXIT
8
M
MEMORY
CUE
S
SELECT PUSH
SEARCH
7
i
F
BACK
je
TEMPO
MASTER TEMPO
TEMPO RANGE
PITCH BEND
About the power switch of this unit
EJECT
OFF
ON
POWER
USB 1
4
USB 2
USB STOP
4 5
Source select section
EJECT
TEMPO
WIDE
±16
±10
±6
%
BPM
MT MT
REV
0
SOURCE
TIME MODE
SELECT
USB
CD
1
12
AUTO CUE
DISPLAY
UTILITY
FWD
VINYL
JOG MODE
CDJ
HOT LOOP OUT ADJUST
IN/CUE
MULTI ENTERTAINMENT PLAY ER MEP-40 00
Browse section
FOLDER TRACK REMAIN
A.CUE
CUE
MULTI ENTERTAINMENT PLAYER MEP-4000
M
REPEAT
RELAY
RELOOP
/EXIT
OUT
MEMORY
CUE
SF
SELECT PUSH
SEARCH
BACK
TEMPO
MASTER TEMPO
TEMPO RANGE
PITCH BEND
Player section
Playback
TEMPO
WIDE
±16
±10
±6
%
BPM
0
To turn the power on
Press [POWER] 1.
Turn on the power of this unit.
The [POWER] indicator lights green.
To turn the power off
Press [POWER] 1.
Turn off the power of this unit.
The [POWER] indicator turns off.
1 Load the source onto this unit.
2 Press [SOURCE SELECT] 6 and set the source.
! This only functions when in the pause mode or when pausing at a
cue point.
3 Turn the rotary selector i.
Select the track.
! When there are multiple folder layers
— To move to lower layers in a folder, select the folder then press
the rotary selector.
— To return to higher layers, press [BACK] j.
— Press [BACK] for more than 1 second to move to the top layer.
4 Press the rotary selector i.
The track is loaded and playback begins.
En
15
Page 38

Pausing
During playback, press [PLAY/PAUSEf] 8.
! Playback resumes when [PLAY/PAUSEf] is pressed again.
Resuming playback from the position playing
just before the disc was ejected (Resume)
After ejecting the disc, immediately reload that same
disc into this unit.
! The resume function only works when the same disc is ejected then
reloaded before loading another disc.
! The resume function does not work for USB devices.
Forward and reverse scanning
Press [SEARCH m, n] 7.
Press [n] to scan in the forward direction.
Press [m] to scan in the reverse direction.
Setting Cue
1 During playback, press [PLAY/PAUSEf] 8.
Playback is paused.
2 Press [CUE] 9.
The point at which the track is paused is set as the cue point.
The [PLAY/PAUSEf] indicator flashes and the [CUE] indicator lights.
No sound is output at this time.
! When a new cue point is set, the previously set cue point is canceled.
Adjusting the cue point position
Setting Cue Point during playback (Real
Time Cue)
During playback, press [LOOP IN/CUE (HOT LOOP)] c.
The point at which the button was pressed is set as the cue point.
Setting auto cue
When a track is loaded or cued to the beginning, the silent section at the
beginning of the track is skipped and the cue point is automatically set
to the point directly before the sound starts.
Press [TIME MODE (AUTO CUE)] f for over 1 seconds.
Auto cue is set to on.
[A. CUE] lights on the main unit display.
! When [TIME MODE (AUTO CUE)] is pressed again for at least 1
second, auto cue is set to off.
Changing the auto cue level
The acoustic pressure level identified as a silent section with the auto
cue function can be selected from eight levels.
–36 dB, –42 dB, –48 dB, –54 dB, –60 dB, –66 dB, –72 dB and –78 dB
! The auto cue level setting remains in the memory, even when the
power is turned off.
! The auto cue level can be changed using one of the procedures
described below.
1 Press [DISPLAY (UTILITY)] g for over 1 second.
The [UTILITY] screen is displayed.
2 Turn rotary selector i then press it.
Select [A. CUE LEVEL].
3 Turn rotary selector i then press it.
The auto cue level setting changes.
1 While paused at the cue point, press [SEARCH m,
n] 7.
The [PLAY/PAUSEf] and [CUE] indicators flash.
2 Press [SEARCH m, n] 7.
The cue point can be fine-adjusted in units of single frames.
! The same operation is possible using the jog dial.
3 Press [CUE] 9.
The position at which the button was pressed is set as the new cue point.
! When a new cue point is set, the previously set cue point is canceled.
Returning to Cue Point (Back Cue)
During playback, press [CUE] 9.
The set immediately returns to the currently set cue point and pauses.
! When [PLAY/PAUSEf] 8 is pressed, playback starts from the
cue point.
Checking Cue Point (Cue Point Sampler)
After returning to the cue point, press and hold in [CUE] 9.
Playback starts from the set cue point. Playback continues while the
button is held in.
Operating the jog dial
! Do not place objects on the top of the jog dial or apply strong forces
to it. Also do not let drinks or other liquids get inside the product.
These actions may result in malfunction.
Switching the jog dial mode
Press [JOG MODE] a.
The mode switches between VINYL and CDJ each time the button is
pressed.
When the VINYL or CDJ mode is selected, the respective indicator lights.
— VINYL mode: When the top of the jog dial is pressed during play-
back, playback stops, and when the jog dial is spun at this time
sound is produced according to the direction in which the jog
dial is spun.
— CDJ mode: Playback does not stop even when the top of the
jog dial is pressed. Such operations as scratching cannot be
performed.
Scratch
1 Press [JOG MODE] a.
Set the jog mode to VINYL.
2 During playback, press the top of the jog dial b.
Playback stops.
16
En
Page 39

3 Spin the jog dial b in the direction you want to play
SF
K
and at the desired speed.
The sound is played according to the direction and speed at which the
jog dial is spun by spinning the top of the jog dial while pressing it.
4 Release your hand from the top of the jog dial b.
Normal playback resumes.
Pitch bend
During playback, spin the outer section without
touching the top of the jog dial b.
The playing speed increases when spun clockwise, decreases when
spun counterclockwise. When spinning is stopped, playback returns to
the normal speed.
! When the jog mode is set to the CDJ mode, the same operation can
be performed by spinning the top of the jog dial.
Fine-adjusting the loop out point (loop
out adjust)
1 During loop playback, press [LOOP OUT
(OUT ADJUST)] d.
[LOOP OUT (OUT ADJUST)] starts flashing quickly.
The loop out point’s time is displayed on the main unit display.
2 Press [SEARCH m, n] 7.
The loop out point can be adjusted in units of single frames.
! The same operation is possible using the jog dial.
! The loop out point adjustment range is anywhere after the loop in
point.
3 Press [LOOP OUT (OUT ADJUST)] d.
Loop playback resumes.
! Loop playback also resumes if no operation is performed for over 10
seconds.
English
Frame search
Spin the jog dial b while in the pause mode.
The pause position can be moved in units of single frames.
! The position is moved in the direction of playback when the jog
dial is spun clockwise, in the reverse direction when it is spun
counterclockwise.
Super fast search
Spin the jog dial b while pressing [SEARCH m, n] 7.
The track is fast-forwarded/fast-reversed in the direction in which the jog
dial is spun.
! This function is canceled when [SEARCH m, n] is released.
! When you stop the jog dial from spinning, normal playback resumes.
! The fast-forward/fast-reverse speed can be adjusted according to the
speed at which the jog dial is spun.
Set the loop
Player section
EJECT
REV
Control unit
1 During playback, press [LOOP IN/CUE (HOT LOOP)] c.
Loop In Point is set.
! This operation is not necessary if you have already set a Cue Point as
a Loop In Point.
2 Press [LOOP OUT (OUT ADJUST)] d.
The loop out point is set, and loop playback begins.
SOURCE
TIME MODE
SELECT
CD
USB
12
b
AUTO CUE
DISPLAY
UTILITY
FWD
VINYL
JOG MODE
CDJ
FOLDER TRACK REMAIN
REPEAT
A.CUE
RELAY
HOT LOOP OUT ADJUST
OUT
IN/CUE
CUE
RELOOP
89a
M
SELECT PUSH
/EXIT
BAC
MEMORY
CUE
SEARCH
7
1
edc
Canceling Loop playback (Loop Exit)
Duriung loop playback, press [RELOOP/EXIT] e.
Playback continues beyond the Loop Out Point without returning to the
Loop In Point.
Returning to Loop playback (Reloop)
After canceling loop playback, press [RELOOP/EXIT] e
during playback.
The track returns to the previously set loop in point and loop playback
begins.
Returning to the loop in point (Hot Loop)
During loop playback, press [LOOP IN/CUE (HOT LOOP)] c.
The track instantaneously returns to the set loop in point and loop playback starts.
Displaying track information
(browse section)
Browse section
FOLDER TRACK REMAIN
REPEAT
A.CUE
RELAY
HOT LOOP OUT ADJUST
OUT
IN/CUE
CUE
h
RELOOP
/EXIT
f g
URCE
TIME MODE
LECT
AUTO CUE
DISPLAY
UTILITY
FWD
VINYL
JOG MODE
CDJ
Control unit
About the [BROWSE] and [INFO] displays
[BROWSE] display
Use the rotary selector i to sort and display the loaded tracks with a
category or tree structure.
The display on the information display section differs according to
whether or not library information is recorded on the USB device.
M
MEMORY
CUE
SF
SELECT PUSH
SEARCH
i
BACK
j
WIDE
TEMPO
%
BPM
MASTER TEMPO
MT
TEMPO RANGE
PITCH BEND
T
±16
±10
±6
0
En
17
Page 40

— When library information is present d Library browsing: The music
files are displayed in the [ARTIST], [ALBUM], [TRACK], [PLAYLIST],
[FOLDER] and [GENRE] categories.
— Without library information d Folder browsing: The folders/tracks on
the medium are displayed with a tree structure.
[INFO] display
This displays detailed information on the loaded tracks.
The display switches between the title, artist name and album name
each time [DISPLAY (UTILITY)] g is pressed.
! Adjustments are possible in units of 0.05 % when set to [±6] %,
[±10] % or [±16] %, in units of 0.1 % when set to [WIDE].
! At [±16] %, adjustments are possible in units of 0.05 %, but over 10 %
adjustments are made in units of 0.1 %.
! The [WIDE] adjustment range is ±100 %. When set to –100 %, play-
back stops.
! [WIDE] can only be selected when playing music CDs (CD-DA).
Adjusting the playing speed without
changing the pitch (Master Tempo)
Searching for tracks quickly using
the library information
When library information created using rekordbox is recorded on the
USB device, the library information can be used to quickly search for
tracks.
1 Turn the rotary selector i and select the category.
Select the category.
— When there is library information on the USB device, select from
the [ARTIST], [ALBUM], [TRACK], [PLAYLIST], [FOLDER] and
[GENRE] categories.
— When there is no library information on the USB device, select
from the [FOLDER] category.
— For CD-DA discs, select from the [TITLE] or [TRACK] category.
2 Press the rotary selector i.
The display switches to the item selected in step 1.
Adjusting the playing speed (tempo
control section)
Tempo control section
TEMPO
WIDE
±16
TEMPO
MASTER TEMPO
BACK
%
BPM
MT
TEMPO RANGE
PITCH BEND
±10
±6
0
MSF
SELECT PUSH
OOP
XIT
MEMORY
CUE
SEARCH
Press [MASTER TEMPO] l.
The [MASTER TEMPO] indicator lights. The pitch does not change even
when the playing speed is changed with the [TEMPO] slider.
! The sound is digitally processed, so the sound quality changes.
Storing cue or loop points
Use this procedure to store the cue or the loop point of the currently
selected source on USB devices.
1 Connect the USB device to this unit.
! When using a single USB device, connect it to the USB1 port.
2 Setting the cue point.
! To store the loop point, set the loop point then play the loop.
3 Press the rotary selector i for over 1 second.
[CUE CALL] is displayed.
! Press [BACK] j to return to the previous screen.
4 Turn the rotary selector i to display [CUE MEMORY].
5 Press the rotary selector i.
The cue or the loop point is stored.
[CUE MEMORY] flashes quickly while the cue point is being stored.
[LOOP MEMORY] flashes quickly while the loop point is being stored.
When storing is completed, the information display switches to a slow
flashing.
! Never disconnect the USB device while the data is being stored.
! When the source is a USB device, up to 10 points can be stored per
track.
! When the source is a disc, up to 100 points can be stored per disc.
! Press [BACK] j to return to the previous screen.
Control unit
n
kl
m
1 Move [TEMPO] k forward and backward.
The playing speed increases when the slider is moved to the [+] side
(towards you), decreases when the slider is moved to the [–] side (away
from you).
The percentage by which the playing speed is changed is displayed at
[TEMPO %] on the main unit display.
2 Press [PITCH BEND] n.
When pressed during playback, the pitch bend function is activated.
Press the [+] button to speed up, the [–] button to slow down.
! The rate at which the speed changes can be changed by turning the
jog dial while pressing the button.
Selecting the playing speed adjustment
range
Press [TEMPO RANGE] m.
The playing speed adjustment range switches each time the button is
pressed.
[WIDE, ±16, ±10, ±6] lights on the main unit display.
En
18
Calling out stored cue or loop points
1 Connect the USB device to this unit.
! When using a single USB device, connect it to the USB1 port.
2 Press the rotary selector i for over 1 second.
[CUE CALL] is displayed.
! Press [BACK] j to return to the previous screen.
3 Press the rotary selector i.
[POINT 01] is displayed.
! Press [BACK] j to return to the previous screen.
4 Turn the rotary selector i to display the number of
the point you want to call out.
5 Press the rotary selector i.
The stored cue or loop point is called out.
Page 41

Deleting stored cue or loop points
individually
1 Connect the USB device to this unit.
! When using a single USB device, connect it to the USB1 port.
2 Press the rotary selector i for over 1 second.
[CUE CALL] is displayed.
! Press [BACK] j to return to the previous screen.
3 Turn the rotary selector i to display [CUE DELETE].
4 Press the rotary selector i.
[DELETE 01] is displayed.
! Press [BACK] j to return to the previous screen.
5 Turn the rotary selector i to display the number of
the point you want to delete.
6 Press the rotary selector i.
[DELETE XX?] is displayed.
! Press [BACK] j to return to the previous screen.
7 Press the rotary selector i.
The stored cue or loop point is deleted.
Changing the settings
Browse section
FOLDER TRACK REMAIN
REPEAT
A.CUE
RELAY
HOT LOOP OUT ADJUST
OUT
IN/CUE
CUE
h
RELOOP
/EXIT
f g
URCE
TIME MODE
LECT
AUTO CUE
DISPLAY
UTILITY
FWD
VINYL
JOG MODE
CDJ
Control unit
1 Press [DISPLAY (UTILITY)] g for at least 3 seconds.
The [UTILITY] screen is displayed.
2 Use the rotary selector i to change the setting.
! Press [BACK] j to return to the previous screen.
3 Press the rotary selector i.
The changed settings are stored.
! To close the [UTILITY] screen, either press [DISPLAY (UTILITY)] g or
select [EXIT] from the setting items and press the rotary selector i.
M
MEMORY
CUE
SF
SELECT PUSH
SEARCH
i
BACK
j
WIDE
TEMPO
%
BPM
MASTER TEMPO
MT
TEMPO RANGE
PITCH BEND
T
±16
±10
±6
0
Setting preferences
The setting items can be set separately for the respective players.
! Do not turn off this unit’s power while [Saving] is displayed on the
information display section.
Options
settings
A. CUE LEVEL
RELAY
REPEAT
SENSITIVITY
SLEEP TIME
SCROLL START
TIME
SCROLL SPEED
BIT RATE
VERSION
LOAD DEFAULT
EXIT
Selection
items
-36 dB, -42 dB,
-48 dB, -54 dB,
-60 dB*, -66 dB,
-72 dB, -78 dB
ON/OFF*
ON/OFF*
-20 – 0* – +20
No sleep, 5 – 15*
– 120 min
0.5 – 2.0* – 30.0 sec
50 – 400* –
2 000 msec
Descriptions
Sets the auto cue level. For details on
the setting procedure, see Changing the
auto cue level on page 16.
Sets the relay play function. For details
on the setting procedure, see About the
relay function on page 19.
Sets the repeat play function. For details
on the setting procedure, see About the
repeat function on page 19.
Adjusts the sensitivity when the top of
the jog dial is pressed.
Sets the time until the sleep mode
is set.
Sets the time after which the characters
on the information display section start
scrolling.
Sets the speed at which the characters
on the information display section
scroll.
Display ON/OFF* Sets the bit rate display.
— Displays this unit’s software version.
— Resets the settings.
—
The changed settings are saved and the
previous screen reappears.
*: Setting upon purchase
About the relay function
When the relay play function is turned on for one of the players, tracks
are played alternately on each of the players. Playback can be continued
endlessly until the relay play function is turned off by preparing the
source on one player while a track is playing on the other player.
The setting below must be made to enable the relay function.
— Set [AUTO CUE] to [ON].
About the repeat function
This function plays the currently playing track or the tracks in the current
folder repeatedly.
The setting below must be made in order to enable the repeat function.
— Set [RELAY] to [OFF].
! When there are multiple folder layers, the repeat play function differs
according to the [AUTO CUE] setting, as described below.
— When [AUTO CUE] is set to [ON]: The currently playing track is
played repeatedly.
— When [AUTO CUE] is set to [OFF]: The tracks in the currently
playing folder are played repeatedly.
English
About the sleep function
When the set sleep time is reached while a CD is in the pause mode
or paused at a cue point, operation of the CD stops and [SLEEP] is displayed on the information display section.
The sleep mode is canceled by pressing one of the following buttons:
— [PLAY/PAUSE f] button
— [CUE] button
! The time after which the sleep mode is set can be changed at
Changing the settings.
En
19
Page 42

Additional information
Troubleshooting
! Incorrect operation is often mistaken for trouble or malfunction. If you think that there is something wrong with this component, check the points
below. Sometimes the trouble may lie in another component. Inspect the other components and electrical appliances being used. If the trouble
cannot be rectified after checking the items below, ask your nearest Pioneer authorized service center or your dealer to carry out repair work.
! This unit may not operate properly due to static electricity or other external influences. In this case, proper operation may be restored by turning the
power off, waiting 1 minute, then turning the power back on.
! Non-finalized (partial discs) CD-R/-RW cannot be played on the MEP-4000.
! Irregularly shaped discs other than standard 12 cm discs cannot be played on this unit (doing so will lead to damage or accidents).
! The BPM measured by this unit may differ from the BPM indicated on the disc or that of a Pioneer DJ mixer, etc. This is due to the different meth-
ods used for measuring the BPM, and is not a malfunction.
Problem Check Remedy
Disc cannot be ejected. Is a track playing?
— Contact your nearest Pioneer service center.
Playback does not start when disc
is loaded.
File cannot be played. Is the file copyright-protected (by DRM)? Copyright-protected files cannot be played.
No sound is produced, or sound is
distorted or noisy.
Loud noise is produced or playback
stops when a certain disc is played.
Track cueing does not finish. Is the auto cue function activated? If the silent section between tracks is long, some time may be required for
Back cue function does not work. Is a cue point set? Set a cue point. (page 16)
Loop play function does not work. Is a cue point set? Set a cue point. (page 16)
Settings are not stored in the memory. Has the power been turned off directly after
USB device is not recognized. Is the USB device properly connected? Connect the device securely (all the way in).
The playing address display is not
displayed in the remaining time mode.
Time is required to read USB devices
(flash memory drives and hard discs).
The category is not displayed. Are you playing a music CD? The category is not displayed for music CDs.
Tracks exported using rekordbox are
not displayed in any category.
Keys do not work. Is the sleep function activated? Cancel the sleep function. (page 19)
Sources cannot be switched. Is a track playing? Pause playback or pause at a cue point, then switch the source.
Is the disc or file playable? See About discs on page 6 or Playable music file formats on page 7.
Is the auto cue function activated? Press [TIME MODE (AUTO CUE)] for at least 1 second to cancel the auto cue
Are you operating the connected DJ mixer
properly?
Is this unit placed near a TV? Turn the TV’s power off or install this unit and TV away from each other.
Is the disc scratched? Scratched discs may not play.
Is the disc dirty? Wipe the dirt off the disc. (page 21)
changing the setting?
Is the USB device connected via a USB hub? USB hubs cannot be used.
Is the USB device supported by this unit? This player only supports USB mass storage class devices.
Is the file format supported by this unit? Check the file format of the connected USB device. For the file formats sup-
Are you using a USB device (such as a bus powerdriven hard disk) whose current is higher than this
unit’s rated current (500 mA)?
— Turn the power off, wait 1 minute, then turn the power back on.
— When playing files recorded in VBR, it may happen that the set cannot detect the
Is there a large number of folders or files recorded
on the USB device?
Are files other than music files stored on the USB
device?
Is the library information recorded on the USB
device?
Is the USB device write-protected? Set the USB device so that files can be written on it.
Are you using AAC or other music files not supported on this unit?
Pause playback or pause at a cue point, then press [EJECT h].
function. (page 16)
Check the operation of the DJ mixer.
cueing.
Do not turn off this unit’s power while [Saving] is displayed on the information
display section.
This player supports portable flash memory and digital audio playback devices.
ported by this unit, see About USB devices on page 6.
Use a USB device within this unit’s rated current (such as a hard disk driven by
an AC adapter or other external power supply).
length of the track immediately and that some time is required for the playing
address display to appear.
When there are many folders or files, some time may be required for loading.
When files other than music files are stored in folders, time is required to read
them as well. Do not store files or folders other than music files on the USB
device.
Use rekordbox to create the library information.
Check that the [Create library for MEP-4000 right before USB device is discon-
nected] item on the rekordbox preferences settings screen is checked.
Transfer the rekordbox library information to the USB device. (page 9)
Set the USB device’s write-protect switch to the off position.
Use WAV or MP3 files.
20
En
Page 43

Error messages
When this unit cannot operate normally, an error code appears on the display. Check the table below and take the measures indicated. If an error code
not shown on the table below is displayed, or if the same error code is displayed again after taking the indicated action, contact your store of purchase
or a nearby Pioneer service station.
Error code Error type Description of error Cause and action
E-7201 TOC READ ERROR TOC data cannot be read.
E-8301
E-8302
E-8303
E-8304 DECODE ERROR Music files that cannot be played normally are loaded.
E-8305 DATA FORMAT ERROR
E-8306 NO FILE Track recorded in the library, playlist, etc., has been
E-9101 MECHANICAL TIME OUT Mechanical operation has not stopped within specified
PLAYER ERROR Disc that cannot be played normally is loaded.
deleted from the USB device and cannot be played.
time.
! Disc is cracked.dReplace the disc.
! Disc is dirty.dClean the disc.
! If operation is normal with other discs, the problem is with
that disc.
Format is wrong.dReplace with music files in the proper
format.
Do not delete that track from the USB device.
There is a foreign object in the disc insertion slot.dRemove
the foreign object.
English
Cautions on use
Cleaning the lens
The player’s lens should not become dirty in normal use, but if for some
reason it should malfunction due to dust or dirt, consult your nearest
Pioneer authorized service center. Although lens cleaners for players are
commercially available, we advise against using them since some may
damage the lens.
Handling discs
Storing
! Always place discs in their cases and store them vertically, avoiding
hot, humid places, places exposed to direct sunlight and extremely
cold places.
! Be sure to read the cautions included with the disc.
Cleaning discs
! Discs may not play if there are fingerprints or dust on them. In this
case, use a cleaning cloth, etc., to gently wipe the disc from the
inside towards the outside. Do not use dirty cleaning cloths.
! Do not use benzene, thinner or other volatile chemicals. Also do not
use record spray or antistatic agents.
! For tough dirt, apply some water to a soft cloth, wring out thoroughly,
wipe off the dirt, then wipe off the moisture with a dry cloth.
! Do not use damaged (cracked or warped) discs.
! Do not let the signal surface of discs get scratched or dirty.
! Do not place two discs in the disc tray, one on top of the other.
! Do not attach pieces of paper or stickers to discs. Doing so could
warp discs, making it impossible to play them. Also note that rental
discs often have labels attached to them, and the label’s glue may
have oozed out. Check that there is no glue around the edges of such
labels before using rented discs.
About specially shaped discs
Specially shaped discs (heart-shaped, hexagonal, etc.) cannot be played
on this unit. Do not attempt to play such discs, as they could damage
the unit.
About condensation on discs
Water droplets (condensation) may form on the surface of discs if they
are moved from a cold place (particularly in winter) into a warm room.
Discs may not play normally if there is condensation on them. Carefully
wipe the water droplets off the surface of the disc before loading it.
About trademarks and registered
trademarks
! Pioneer and rekordbox are trademarks or registered trademarks of
the PIONEER CORPORATION.
! Microsoft®, Windows Vista®, Windows® and Internet Explorer® are
either registered trademarks or trademarks of Microsoft Corporation
in the United States and/or other countries.
! Apple, Macintosh, Mac OS, Safari, iTunes, and Finder are trade-
marks of Apple Inc., registered in the U.S. and other countries.
! Pentium is a registered trademark of Intel Corporation.
! Adobe and Reader are either registered trademarks or trademarks
of Adobe Systems Incorporated in the United States and/or other
countries.
! ASIO is a trademark of Steinberg Media Technologies GmbH.
The names of companies and products mentioned herein are the trademarks of their respective owners.
This product has been licensed for nonprofit use. This product has not
been licensed for commercial purposes (for profit-making use), such
as broadcasting (terrestrial, satellite, cable or other types of broadcasting), streaming on the Internet, Intranet (a corporate network) or other
types of networks or distributing of electronic information (online digital music distribution service). You need to acquire the corresponding
licenses for such uses. For details, see http://www.mp3licensing.com.
En
21
Page 44

Cautions on copyrights
rekordbox restricts playback and duplication of copyright-protected
music contents.
! When coded data, etc., for protecting the copyright is embedded in
the music contents, it may not be possible to operate the program
normally.
! When rekordbox detects that coded data, etc., for protecting the
copyright is embedded in the music contents, processing (playback,
reading, etc.) may stop.
Recordings you have made are for your personal enjoyment and according to copyright laws may not be used without the consent of the copyright holder.
! Music recorded from CDs, etc., is protected by the copyright laws of
individual countries and by international treaties. It is the full respon-
sibility of the person who has recorded the music to ensure that it is
used legally.
! When handling music downloaded from the Internet, etc., it is the
full responsibility of the person who has downloaded the music to
ensure that it is used in accordance with the contract concluded
with the download site.
Using the support site
Before making an inquiry about rekordbox operations and technical
support, refer to the operating instructions for rekordbox and check the
FAQs published on the support site for rekordbox.
rekordbox support site
http://www.prodjnet.com/rekordbox/support/
! Prior user registration on the rekordbox support site is required for
you to make inquires concerning rekordbox.
! You will need to enter your license key during user registration, so
please have it handy. Also, be sure not to forget the login name (your
e-mail address) and the password specified for your user registra-
tion, as well as the license key.
! PIONEER CORPORATION collects your personal information for the
following purposes:
1 To provide customer support for your purchased product
2 To inform you of product or event information by e-mail
3 To obtain feedback collected by survey for product planning
purposes
— Your personal information is kept confidential corresponding to
the privacy policy set forth by our company.
— You can check our privacy policy on the rekordbox support site.
! When making inquiries regarding rekordbox, please be sure to fur-
nish your computer type and specifications (CPU, installed memory,
other connected peripherals, etc.), the operating system and version
used, as well as concrete information regarding the issue at hand.
— To inquire about configuring your computer with non-Pioneer
peripheral devices and to obtain the corresponding technical
support, contact the specific manufacturer or retailer.
! Further version updates are anticipated for improved functionality
and performance of rekordbox. Update programs will be available
from the rekordbox support site. We strongly recommend you
upgrade your software on a regular basis to keep the latest updates
on your system.
Analog audio output (AUDIO OUT)
Output terminals ...................................................................... RCA terminal
Output Level .........................................................................2.0 Vrms (1 kHz)
Frequency response.............................................................. 17 Hz to 20 kHz
S/N ratio ............................................................................................... 114 dB
Total harmonic distortion ..................................................................0.005 %
USB downstream section (USB)
Port .......................................................................................................Type A
Power supply ....................................................................5 V/500 mA or less
Other terminals
Drive unit
Remote control terminal ................................................. Mini DIN 8-pin
Control unit
Remote control terminal ................................................. Mini DIN 8-pin
— The specifications and design of this product are subject to
change without notice.
! © 2012 PIONEER CORPORATION. All rights reserved.
Specifications
Power requirements .................................... AC 110 V to 240 V, 50 Hz/60 Hz
Power consumption ............................................................................... 18 W
Main unit weight
Drive unit ......................................................................................... 5.0 kg
Control unit .....................................................................................1.7 kg
Max. external dimensions
Drive unit ... 482.6 mm (width) × 91.0 mm (height) × 267.6 mm (depth)
Control unit .. 482.6 mm (width) × 89.0 mm (height) × 95.0 mm (depth)
Tolerable operating temperature ........................................ +5 °C to +35 °C
Tolerable operating humidity ...................... 5 % to 85 % (no condensation)
En
22
Page 45

Page 46

Page 47

Page 48

© 2012 PIONEER CORPORATION.
PIONEER CORPORATION
1-1, Shin-ogura, Saiwai-ku, Kawasaki-shi, Kanagawa 212-0031, Japan
PIONEER ELECTRONICS ASIACENTRE PTE. LT D.
253 Alexandra Road, #04-01, Singapore 159936 TEL: 65-6472-7555
PIONEER ELECTRONICS AUSTRALIA PTY. LTD.
5 Arco Lane, Heatherton, Victoria, 3202, Australia, TEL: (03) 9586-6300
PIONEER ELECTRONICS (THAILAND) CO., LT D.
17th Fl., KPN Tower, 719 Rama 9 Road, Bangkapi, Huaykwang, Bangkok 10310 TEL: 66-2-717-0777
PIONEER TECHNOLOGY (MALAYSIA) SDN. BHD
16th Floor, Menara Uni. Asia 1008 Jalan Sultan Ismail 50250 Kuala Lumpur TEL: 60-3-2697-2920
ӒᎣӌԥϵѨ
ѯᢋѯіҀϲୣ࿆ӏ ĵıĸ ဵĹዃ
ӒᎣႬφȞ෬ȟԥϵѨ
෬Οᓹߞؔᢋၿ ĺıĺġဵĶġዃ
PIONEER GULF FZE
Lob 11-017, Jebel Ali Free Zone P. O. Box 61226, Jebel Ali Dubai TEL: 971-4-8815756
PIONEER ELECTRONICS DE MEXICO S.A. DE C.V.
Blvd.Manuel Avila Camacho 138 10 piso Col.Lomas de Chapultepec, Mexico, D.F. 11000 TEL: 55-9178-4270
PIONEER INTERNATIONAL LATIN AMERICA S.A.
Plaza Credicorp Bank, 14th Floor, Calle 50, No.120 Panama City 0816-01361 Republic of Panama TEL: 507-300-3900
K002_PSV_L
TEL: 886-(0)2-2657-3588
TEL: 852-2848-6488
Printed in China
<502-M4000A-3202>
All rights reserved.
<DRB1632-A>
 Loading...