

Owner’s Manual
Mode d’emploi
Bluetooth adapter
Adaptateur Bluetooth
Black plate (1,1)
English
Français
CD-BTB100
Português (B)
<CRD4105-A/N>1
Black plate (2,1)
Contents
Thank you for buying this Pioneer product.
Please read through these operating instructions so you will know how to operate
your model properly. After you have finished reading the instructions, keep this man-
ual in a safe place for future reference.
Before You Start
Information to User 4
For Canadian model 4
About this unit 5
Operating environment 5
About this manual 5
In case of trouble 5
About Bluetooth 6
Resetting this unit 6
– Resetting this unit without erasing the
data about phone 6
– Resetting this unit with clearing all
memory 6
Bluetooth Telephone
Hands-free phoning with cellular phones
featuring Bluetooth wireless
technology 8
About the telephone source 9
– Standby mode 9
Setting up for hands-free phoning 9
Basic operation of hands-free phoning 10
– Making a phone call 10
– Taking a phone call 10
Introduction of advanced hands-free phoning
operation 11
Connecting a cellular phone 12
– Searching for available cellular
phones 12
– Using a cellular phone to initiate a
connection 12
Disconnecting a cellular phone 13
Registering connected cellular phone 13
Deleting a registered phone 13
Connecting to a registered cellular
phone 14
– Connecting to a registered phone
manually 14
– Connecting to a registered phone
automatically 14
Using the Phone Book 14
– Transferring entries to the Phone
Book 15
– Changing the Phone Book display
order 15
– Calling a number in the Phone
Book 15
– Searching a number in the Phone
Book 16
– Editing the name of a Phone Book
entry 16
– Editing phone numbers 17
– Clearing a Phone Book entry 17
Clearing memory 17
Using the Call History 18
– Displaying the Call History 18
– Calling a number from the Call
History 18
Using preset numbers 18
– Assigning preset numbers 18
– Recalling preset numbers 19
Making a call by entering phone number 19
Echo canceling and noise reduction 19
Switching the ring tone 19
Setting the automatic rejecting 20
Setting the automatic answering 20
Displaying BD (Bluetooth Device)
address 20
Bluetooth Audio
Listening to songs on BT Audio (Bluetooth
audio player) 21
Connecting a Bluetooth audio player 22
Playing songs on Bluetooth audio player 22
Disconnecting a Bluetooth audio player 23
Displaying BD (Bluetooth Device)
address 23
2
En
<CRD4105-A/N>2
Contents
Black plate (3,1)
English
Initial Settings
Entering PIN code for Bluetooth wireless
connection 24
Operating with different head units
Using as an external unit 25
Function compatibility charts 26
– Head unit group 1 26
– Head unit group 2 28
– Head unit group 3 29
– Head unit group 4 30
Connecting a cellular phone 31
– Using a cellular phone to initiate a
connection 32
Registering connected cellular phone 32
Disconnecting a cellular phone 32
Voice recognition 33
Setting the automatic answering 33
Connecting to a registered phone
automatically 33
Setting the ring tone 33
Displaying the device information of this
unit 34
Connecting a Bluetooth audio player 34
Disconnecting a Bluetooth audio player 34
Connections
Connecting the units 36
Additional Information
Error messages 40
Specifications 40
Installation
Installing this unit 37
– Mounting with Velcro fasteners 37
Installing the microphone 37
– When installing the microphone on the
sun visor 38
– When installing the microphone on the
steering column 38
Adjusting the microphone angle 39
<CRD4105-A/N>3
En
3
Section
01
Black plate (4,1)
Before You Start
Information to User
FCC ID: AJDK013
MODEL NO.: CD-BTB100
IC: 775E-K013
This device complies with Part 15 of FCC Rules
and RSS-Gen of IC Rules. Operation is subject
to the following two conditions: (1) this device
may not cause interference, and (2) this device
must accept any interference, including interference that may cause undesired operation of
this device.
MADE IN THAILAND
This equipment has been tested and found to
comply with the limits for a class B digital device, pursuant to Part 15 of the FCC Rules.
These limits are designed to provide reasonable protection against harmful interference in
a residential installation.
This equipment generates, uses and can radiate radio frequency energy and, if not installed
and used in accordance with the instructions,
may cause harmful interference to radio communications. However, there is no guarantee
that interference will not occur in a particular
installation.
If this equipment dose cause harmful interference to radio or television reception, which
can be determined by turning the equipment
off and on, the user is encouraged to try to correct the interference by one or more of the following measures:
! Reorient or relocate the receiving antenna.
! Increase the separation between the equip-
ment and receiver.
! Connect the equipment into an outlet on a
circuit different from that to which the receiver is connected.
! Consult the dealer or an experienced radio/
TV technician for help.
Alteration or modifications carried out without
appropriate authorization may invalidate the
user’s right to operate the equipment.
This transmitter must not be co-located or operated in conjunction with any other antenna
or transmitter.
This equipment complies with FCC/IC radiation
exposure limits set forth for uncontrolled
equipment and meets the FCC/IC radio frequency (RF) Exposure Guidelines in Supplement C to OET65 and RSS-102 of the IC radio
frequency (RF) exposure rules. This equipment
has very low levels of RF energy that it is
deemed to comply without testing of specific
absorption ratio (SAR).
For Canadian model
Operation is subject to the following two conditions:
(1) This device may not cause harmful interference, and (2) this device must accept any interference received, including interference that
may cause undesired operation.
This Class B digital apparatus complies with
Canadian ICES-003.
4
En
<CRD4105-A/N>4
Before You Start
Black plate (5,1)
Section
01
English
About this unit
This unit is the adapter for a Pioneer head unit
to connect cellular phone featuring Bluetooth
wireless technology for hands-free and listen
to songs on Bluetooth audio player.
! This unit is designed to use only in a vehi-
cle.
WARNING: For U.S. models
Handling the cord on this product or cords associated with accessories sold with the product
may expose you to chemicals listed on proposition 65 known to the State of California and other
governmental entities to cause cancer and birth
defects or other reproductive harm. Wash hands
after handling.
CAUTION
! Do not allow this unit to come into contact
with liquids. Electrical shock could result.
Also, this unit damage, smoke, and overheat
could result from contact with liquids.
! Keep this manual handy as a reference for op-
erating procedures and precautions.
! Always keep the volume low enough so that
you can hear sounds from outside the vehicle.
! Protect this unit from moisture.
! Should this product fail to operate properly,
contact your dealer or nearest authorized Pioneer Service Station.
Important (Serial number)
The serial number is located on the bottom of
this unit. For your own security and convenience,
be sure to record this number on the enclosed
warranty card.
Operating environment
This unit should be used within the temperature ranges shown below.
Operating temperature range: -10 °C to +60 °C
(14 °F to 140 °F)
EN300328 ETC test temperature: -20 °C and
+55 °C (-4 °F and 131 °F)
About this manual
Operate this unit with the connected head
unit. Instructions in this manual use AVHP7850DVD and AVH-P7800DVD as an example
of head unit.
! When using with AVH-P6850DVD and AVH-
P6800DVD, refer to the operation manual
supplied with it for operating instructions.
! When using the head units other than
AVH-P7850DVD, AVH-P7800DVD, AVHP6850DVD and AVH-P6800DVD, refer to
Using as an external unit on page 25.
We recommend that you familiarize yourself
with the functions and their operation by reading through the manual before you begin
using this unit. It is especially important that
you read and observe WARNINGs and CAU-
TIONs in this manual.
In case of trouble
Should this product fail to operate properly,
contact your dealer or nearest authorized Pioneer Service Station.
<CRD4105-A/N>5
En
5
Section
01
Black plate (6,1)
Before You Start
About Bluetooth
Bluetooth is a short-range wireless radio connectivity technology that is developed as a
cable replacement for mobile phones, handheld PCs and other devices. Bluetooth operates in 2.4 GHz frequency range and transmits
voice and data at speeds up to 1 megabit per
second. Bluetooth was launched by a special
interest group (SIG) that comprises of Ericsson
Inc., Intel Corp., Nokia Corp., Toshiba and IBM
in 1998, and it is currently developed by nearly
2 000 companies worldwide.
! The Bluetooth word mark and logos are
owned by the Bluetooth SIG, Inc. and any
use of such marks by Pioneer Corporation
is under license. Other trademarks and
trade names are those of their respective
owners.
! AUTO ANSWER
! REFUSE ALL CALLS
! RING TONE
! AUTO CONNECT
! ECHO CANCEL
When using as an external unit, the value of
the following settings are cleared:
! automatic answering
! automatic connection
! ring tone
This unit must be reset under the following
conditions:
! Prior to using this unit for the first time
after installation
! When this unit and the head unit are re-
connected
! If the unit fails to operate properly
! When strange or incorrect messages ap-
pear on the display
! If there appear to be problems with the op-
eration of the Hands-free Phoning function
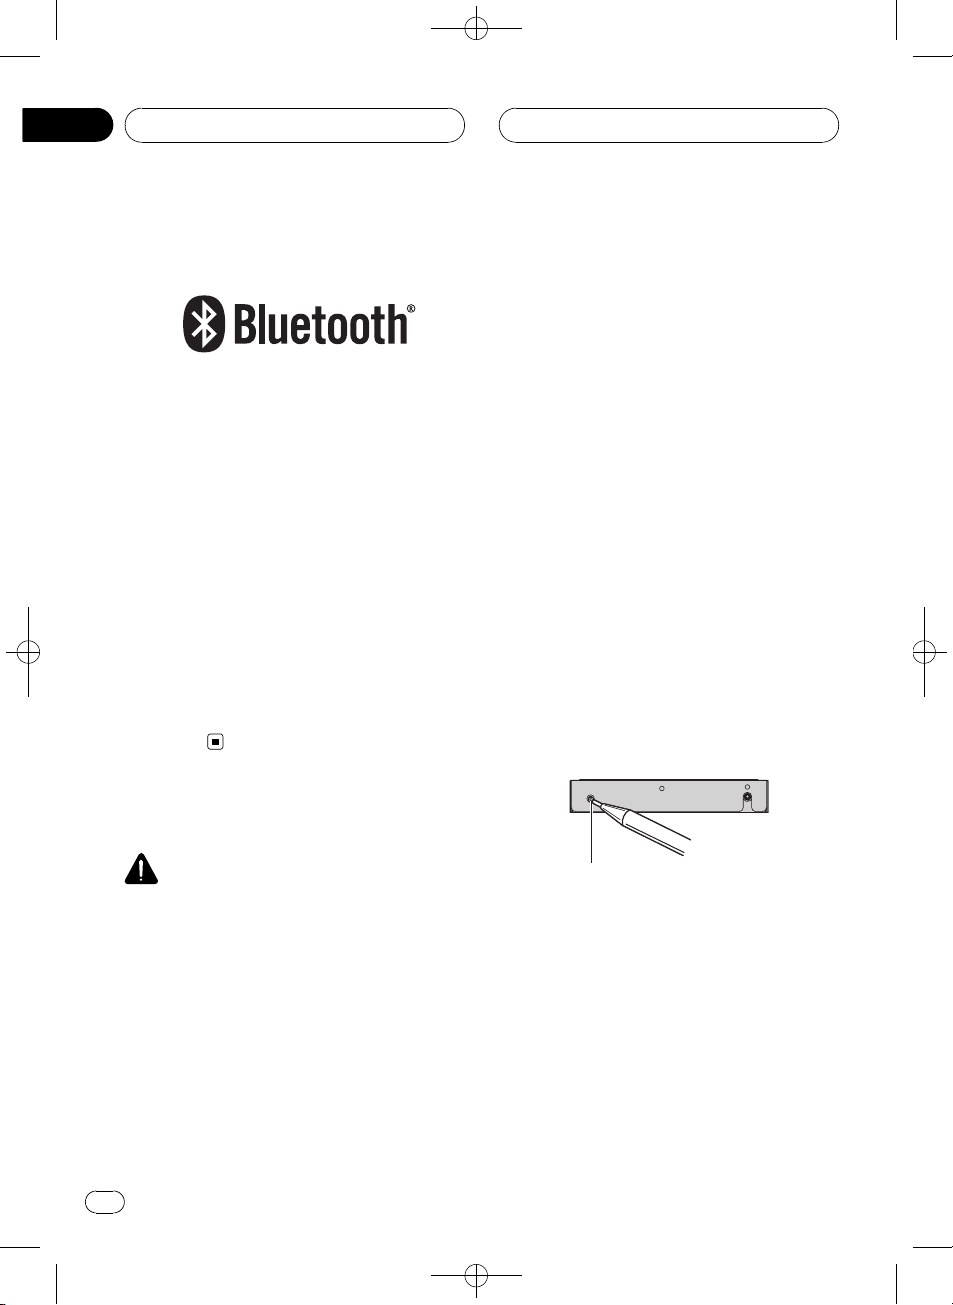
1 Turn the ignition switch OFF.
2 Press RESET with a pen tip or other
pointed instrument.
Resetting this unit
CAUTION
Pressing RESET button of this unit with the ignition switch ON (ACC ON) erasing the contents of
the unit’s memory.
Resetting this unit without
erasing the data about phone
Pressing RESET button of this unit lets you
reset the unit to its initial settings without
erasing the data about phone. However the
value of the following settings are cleared:
! PHONEBOOK NAME VIEW
6
En
RESET button
Resetting this unit with
clearing all memory
To protect personal and private information,
data about the phone stored in this unit can
be deleted.
1 Turn the ignition switch to ACC or ON
position.
<CRD4105-A/N>6
Before You Start
2 Press RESET with a pen tip or other
pointed instrument.
All memory is now completely cleared.
# It takes about 10 seconds to delete the data.
To make it sure, leave the ignition switch ACC or
ON position for 10 seconds after you operate the
deletion.
# Please confirm if all data have been completely cleared. For confirmation of the data status,
refer to Registering connected cellular phone on
page 13. If all phone’s statuses are blank, data
has been completely cleared.
Black plate (7,1)
Section
01
English
<CRD4105-A/N>7
En
7
987643215ab
Section
02
Black plate (8,1)
Bluetooth Telephone
Hands-free phoning with
cellular phones featuring
Bluetooth wireless technology
If your cellular phone features Bluetooth wireless technology, you can use this adapter to
connect to a Pioneer head unit for hands-free,
wireless calls, even while driving.
Important
Since this unit is on standby to connect with your
cellular phones via Bluetooth wireless technology, using this unit without running the engine
can result in battery drainage.
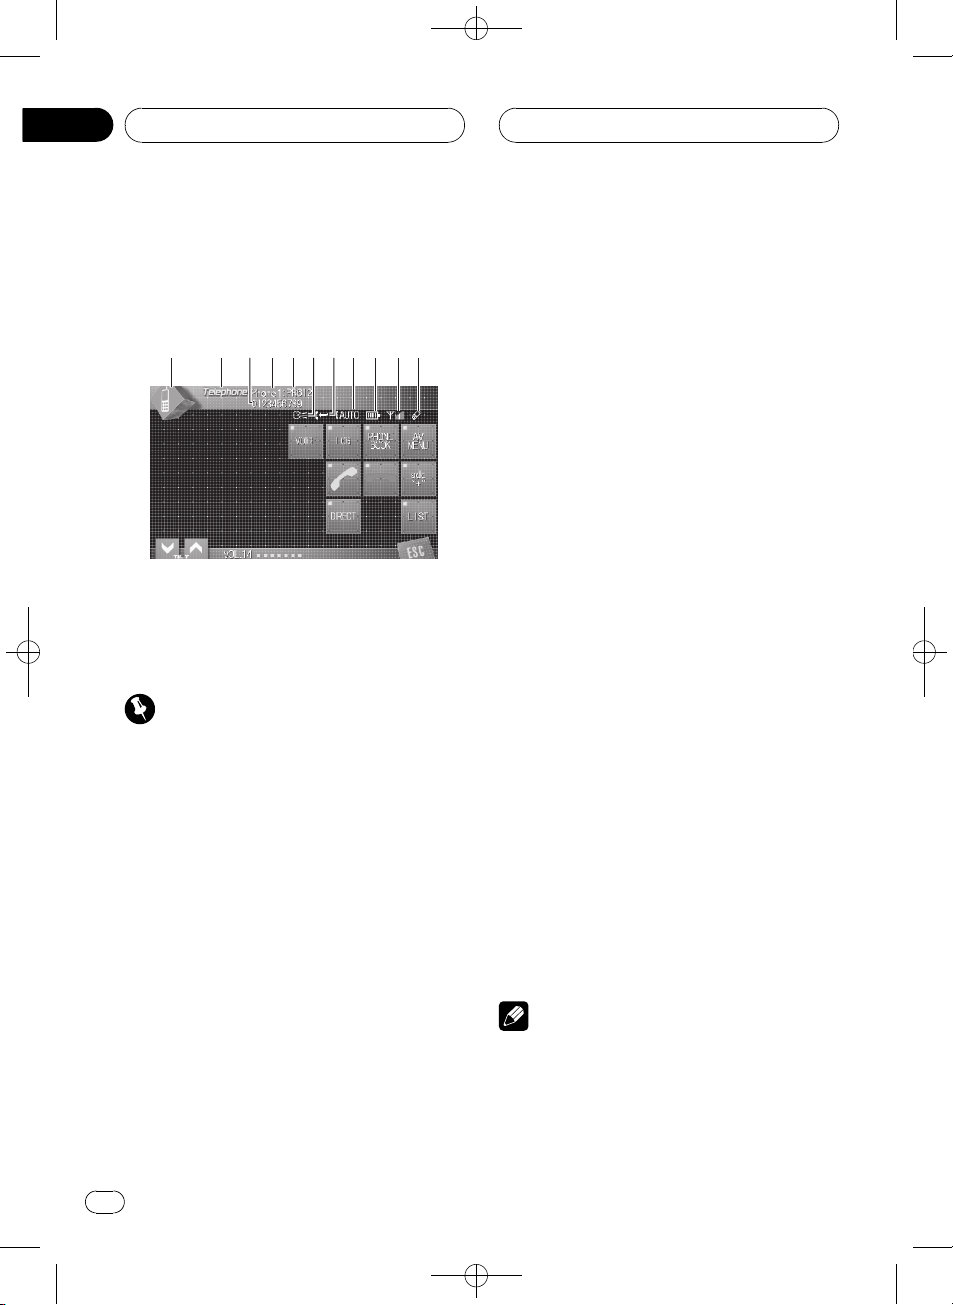
1 Source icon
Shows which source has been selected.
2 Source name
Shows the selected source name.
3 Phone number
Shows the phone number you selected.
4 User number indicator
Shows the registration number of the cellular phone.
6 Voice recognition indicator
Shows when the voice recognition function
is on (for more details, refer to Voice recogni-
tion on page 10).
7 Incoming call notice indication
Shows when an incoming call has been received and not checked yet.
8 Automatic answering indicator
Shows when the automatic answering function is on (for more details, refer to Setting
the automatic answering on page 20).
9 Battery strength indicator
Shows the battery strength of cellular
phone.
! Battery strength indicator may differ
from the actual battery strength.
! If the battery strength is not available,
nothing is displayed in the battery
strength indicator area.
a Signal level indicator
Shows the signal strength of cellular phone.
! Signal level indicator may differ from the
actual signal level.
! Depending on the cellular phones featur-
ing Bluetooth wireless technology, radio
field intensity is not available.
b Telephone indicator
Shows when a phone connection using
Bluetooth wireless technology is established (for more details, refer to Connecting
a cellular phone on page 12).
Notes
! This unit’s phone call reception is on standby
when ignition switch is set to ACC or ON.
5 Device name
Shows the device name of the cellular
phone.
8
En
<CRD4105-A/N>8

Bluetooth Telephone
Black plate (9,1)
Section
02
English
! The line-of-sight distance between this unit
and your cellular phone must be 10 meters or
less for sending and receiving voice and data
via Bluetooth wireless technology. However,
the transmission distance may become shorter than the estimated distance, depending on
the environment in use.
! In order to use Bluetooth wireless technology,
devices must be able to interpret certain profiles. This unit is compatible with the following
profiles.
— GAP (Generic Access Profile)
— SDP (Service Discovery Protocol)
— OPP (Object Push Profile)
— HSP (Head Set Profile)
— HFP (Hands Free Profile)
— A2DP (Advanced Audio Distribution Pro-
file)
— AVRCP (Audio/Video Remote Control Pro-
file)
! When phone is selected as a source, volume
and equalizer curve are automatically changed to suitable settings for the phone source.
When the source is returned to another
source, volume and equalizer settings automatically return to the original setting.
! Equalizer curve for the phone source is
fixed.
About the telephone source
Standby mode
Once connected via Bluetooth wireless technology, the head unit will remain on telephone
source standby in the background all the
while the connection is sustained. This means
you can freely use the other functions of the
head unit, but still be ready to receive a call.
% Touch the source icon and then touch
Telephone to select the telephone.
# When the source icon is not displayed, you
can display it by touching the screen.
Setting up for hands-free
phoning
Before you can use the hands-free phoning
function you will need to set up the unit for
use with your cellular phone. This entails establishing a Bluetooth wireless connection between this unit and your phone, registering
your phone with this unit, and adjusting the
volume level.
1 Connection
For detailed instructions on connecting your
phone to this unit via Bluetooth wireless technology, refer to Connecting a cellular phone on
page 12.
# Your phone should now be temporarily connected; however, to make best use of the technology, we recommend you register the phone to
this unit.
2 Registration
Refer to Registering connected cellular phone
on page 13 for instructions on how to register
your temporarily connected phone.
3 Volume adjustment
Adjust the earpiece volume on your cellular
phone for comfort. When adjusted, the volume
level is memorized in this unit as the default
setting.
# Caller’s voice volume and ring volume may
vary depending on the type of cellular phones.
# If the difference between the ring volume and
caller’s voice volume is big, overall volume level
may become unstable.
# Before disconnecting cellular phone from this
unit, make sure to adjust the volume to proper
level. If the volume has been muted (zero level)
on your cellular phone, the volume level of your
cellular phone remains muted even after the cellular phone is disconnected from this unit.
<CRD4105-A/N>9
En
9
Section
02
Black plate (10,1)
Bluetooth Telephone
Basic operation of handsfree phoning
These are the basic operations to use handsfree phoning via Bluetooth wireless technology. More advanced hands-free phoning operations are explained starting on Introduction
of advanced hands-free phoning operation on
the next page.
Important
Advanced operations that require your attention
such as dialing numbers on the monitor, using
phone book, etc., are prohibited while you are
driving. When you need to use these advanced
operations, stop your vehicle in a safe place and
operate.
Making a phone call
Voice recognition
If your cellular phone features voice recognition technology, you can make a call by voice
commands.
! Operation varies depending on the type of
your cellular phone. Refer to the instruction
manual that came with your cellular phone
for detailed instructions.
! This function can be operated only when
the connection is established with HFP
(Hands Free Profile).
1 Touch VOICE to turn the voice recognition function on.
Voice dial icon appears on the information bar.
Voice recognition function is now ready.
# If your cellular phone does not feature voice
recognition function, you can not touch VOICE.
Taking a phone call
Answering an incoming call
Even when a source other than Telephone is
selected or when this unit itself is turned off,
you can still answer incoming calls. If you set
this unit to automatically answering incoming
calls, refer to Setting the automatic answering
on page 20.
1 When a call comes in, touch
# If the private mode is selected on the cellular
phone, hands-free phoning may not be performed.
2 To end the call, touch .
The estimated call time appears in the display
(this may differ slightly from the actual call
time).
# You may hear a noise when you disconnect
the phone.
Rejecting an incoming call
You can reject an incoming call. If you want to
set this unit to automatically rejecting all incoming calls, refer to Setting the automatic re-
jecting on page 20.
% When a call comes in, touch
The call is rejected.
Note
The manually rejected call is recorded in missed
call history list. About the missed call history list,
refer to Using the Call History on page 18.
.
.
2 Pronounce the name of your contact.
10
En
<CRD4105-A/N>10
1
Bluetooth Telephone
Black plate (11,1)
Section
02
English
Answering a call waiting
If while you are talking on the phone another
call comes in, the number (or name if it is in
your phone book) of the new caller appears on
the display to signal that you have a call waiting. You can put the first caller on hold while
you answer the call waiting, or you can choose
to reject the call.
1 Touch
2 Touch
# The caller you have been talking to is now on
hold. To end the call, both you and your caller
need to hang up the phone.
# While your callers hold the line, touching
switches between callers.
to answer a call waiting.
to end the call.
Rejecting a call waiting
If you would rather not interrupt your current
call to answer a call waiting, you can reject it.
% Touch
# The number you have rejected is not added to
the call history list.
to reject a call waiting.
Introduction of advanced
hands-free phoning operation
Important
You are required to park your vehicle and set the
parking brake in order to perform this operation.
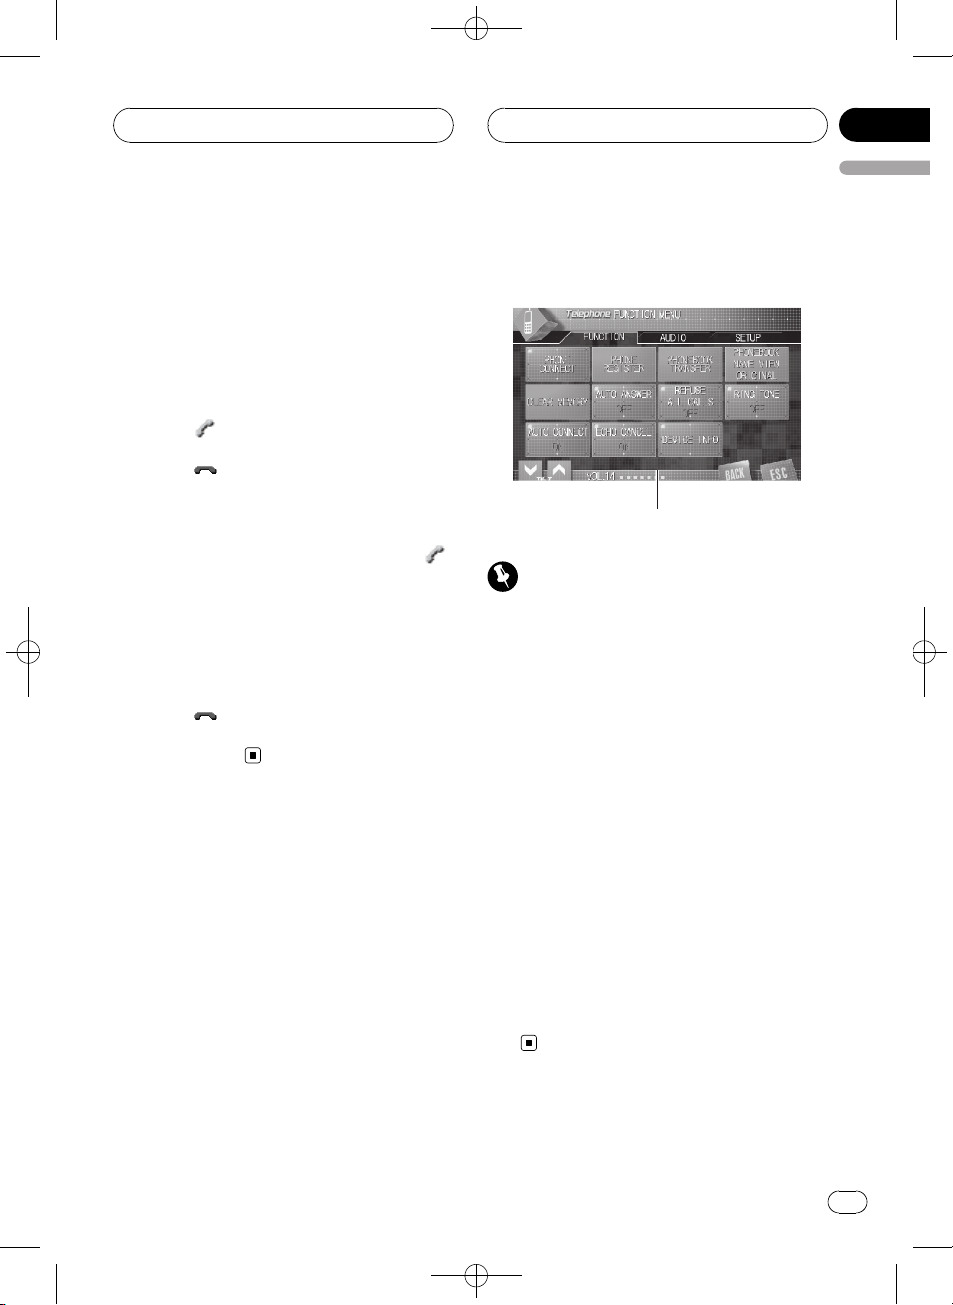
1 Function display
Shows the function names.
1 Select Telephone as a source.
2 Touch AV MENU to display MENU.
MENU appears on the display.
# When AV MENU is not displayed, you can dis-
play it by touching the screen.
# You can also display MENU by clicking the
joystick.
3 Touch FUNCTION to display the function names.
The function names are displayed and operable ones are highlighted.
# To return to the previous display, touch BACK.
# To return to the playback display, touch
ESC.
En
<CRD4105-A/N>11
11
Section
02
Black plate (12,1)
Bluetooth Telephone
Connecting a cellular phone
To use a phone wirelessly with this unit, it is
necessary first to establish a connection using
Bluetooth wireless technology. There are several ways you can do this.
! Connection is normally established by HFP,
which gives you a full control of functions
available on the telephone source. However, in some cases when you make connection from your cellular phone, the
connection may be made by HSP and several functions may not be available.
! A phone may be connected via Bluetooth
wireless technology but not yet registered
with this unit. In this case it is said to be
temporarily connected, and the available
features are limited. To take full advantage
of all the features available, we recommend
you register your phone with this unit.
Refer to Registering connected cellular
phone on the next page for more on this.
Searching for available cellular
phones
You can have this unit search for any available
phones in the area that have Bluetooth wireless technology, then select which you want to
connect to from a list displayed on-screen.
1 Touch PHONE CONNECT on the function
menu.
2 Touch Search to search for available cellular phones.
While searching, SEARCHING is displayed.
When available cellular phones featuring
Bluetooth wireless technology are found, device names or Name Not Found (if names
cannot be obtained) are displayed.
# If this unit fails to find any available cellular
phones, NOT FOUND is displayed.
3 Touch the device name you want to
connect.
While connecting, CONNECTING is displayed.
To complete the connection, please check the
device name (Pioneer BT unit) and enter the
link code on your cellular phone. If the connection is established, CONNECTED is displayed.
# The link code is set to 0000 as default. You
can change this code in the initial setting. Refer
to Entering PIN code for Bluetooth wireless con-
nection on page 24.
Using a cellular phone to
initiate a connection
Putting the unit in Connection open mode allows you to establish a Bluetooth wireless connection from your phone. You may need to
refer to the operation manual that came with
your phone if you are unsure how to initiate a
connection from your phone.
1 Touch PHONE CONNECT on the function
menu.
2 Touch CONNECTION OPEN.
The unit is now on standby for connection
from cellular phone.
3 Use cellular phone to connect to this
unit.
# Operation varies depending on the type of
your cellular phone. Refer to the instruction manual that came with your cellular phone for detailed instructions.
# You may need to enter the link code on your
cellular phone to complete the connection.
# The link code is set to 0000 as default. You
can change this code in the initial setting. Refer
to Entering PIN code for Bluetooth wireless con-
nection on page 24.
12
En
<CRD4105-A/N>12
Bluetooth Telephone
Black plate (13,1)
Section
02
English
Disconnecting a cellular phone
When you are done using your phone with this
unit, you can close the Bluetooth wireless connection.
1 Touch PHONE CONNECT on the function
menu.
2 Touch DISCONNECT to disconnect the
currently connected cellular phone from
this unit.
After the disconnection is completed,
NO CONNECTION is displayed.
Registering connected
cellular phone
You can register a phone that is temporarily
connected to this unit in order to take full advantage of the features available with Bluetooth wireless technology. A total of five
phones can be registered: three user cellular
phones and two guest phones. When registered as a user phone, all the possible functions are available for use. When registered as
a guest phone, some functions are limited.
1 Touch PHONE REGISTER on the function
menu.
2 Touch and hold one of the registration
assignments to register the currenctly connected phone.
Select from the following:
1 (user 1)—2 (user 2)—3 (user 3)—G (guest 1)
— G (guest 2)
If the registration is succeeded, the device
name of the connected phone is displayed in
the selected assignment.
# If the assignment is empty, the device name is
not displayed. If the assignment is already taken,
the device name appears. To replace an assign-
ment with a new phone, first delete the current
assignment. For more detailed instructions, see
Deleting a registered phone on this page.
# If the registration failed, device name of the
connected phone is not displayed in the selected
assignment. In this case, return to step 1 and try
again.
Note
Audio adjustment can be set independently for
each user.
Deleting a registered phone
If you no longer need to use a registered
phone with this unit, you can delete it from the
registration assignment for another phone.
1 Touch PHONE REGISTER on the function
menu.
2 Touch DELETE next to the device name
you want to delete.
A confirmation display appears. Touch YES to
delete the phone.
# It takes about 10 seconds to delete the data.
To make it sure, leave the ignition switch ACC or
ON position for 10 seconds after you operate the
deletion.
# To cancel deleting a registered phone, touch
NO.
<CRD4105-A/N>13
En
13

Section
02
Black plate (14,1)
Bluetooth Telephone
Connecting to a registered
cellular phone
Once your phone is registered with this unit it
is a simple matter to establish a Bluetooth
wireless connection, either manually by selecting a registration assignment, or automatically
when a registered phone is within range.
Connecting to a registered
phone manually
Select a phone from the registration assignments to connect to the phone manually.
1 Touch PHONE CONNECT on the function
menu.
2 Touch DIRECT CONNECT.
3 Touch the device name you want to
connect.
While connecting, CONNECTING is flashing.
If the connection is established, CONNECTED
is displayed.
Connecting to a registered
phone automatically
When Automatic Connection is active the unit
will automatically establish a connection with
a registered phone when it comes into range.
! This feature may not work with all phones.
If your registered phone fails to connect
with Automatic Connection, use the manual connection method explained in Con-
necting to a registered phone manually on
this page.
! With some cellular phones, you may be re-
quired to make a confirmation on the cellular phone in connecting to this unit. In
such case, the connection may not be
made until you confirm it on the phone
even if the Automatic Connection of this
unit is set to on. If possible, set your cellular phone to not seeking a confirmation for
the Bluetooth connection. For details,
please refer to the operation manual that
came with your cellular phone.
! This feature is not possible if you are play-
ing back songs on your Bluetooth audio
player via Bluetooth wireless technology. In
such case, stop the playback and switch to
another source for your cellular phone to
connect to this unit through this function.
! While you are operating in the function
menu of Telephone source or BT AUDIO
source, this unit does not initiate an automatic connection to your registered phone.
! This feature cannot be set for each different
user phone.
% Touch AUTO CONNECT on the function
menu to turn the Automatic Connection
function on.
If your cellular phone is set ready for Bluetooth
wireless connection, the connection to this
unit will be automatically established.
# To turn automatic connection off, touch
AUTO CONNECT again.
Using the Phone Book
The Phone Book can store up to 500 names
and numbers. Use the Phone Book to browse
for numbers on the unit’s display and select
numbers to call. Names and phone numbers
stored in a registered user phone’s address
book can be transferred to the Phone Book, allowing you to fill the Phone Book quickly and
easily with your contacts.
! The maximum number of characters which
can be displayed is different depending on
your cellular phone. This unit can display
up to 24 to 48 letters.
14
En
<CRD4105-A/N>14
Bluetooth Telephone
Black plate (15,1)
Section
02
English
Transferring entries to the
Phone Book
To populate the Phone Book you can transfer
the numbers in a registered user phone’s address book.
The Phone Book can hold a total of 500 entries; 300 from User 1, 150 from User 2, and 50
from User 3.
! Once the transferring Phone Book function
starts, the Bluetooth connection is disconnected and the hands-free phoning is not
possible. In order to restart the hands-free
phoning, connect your cellular phone to
this unit again. If the automatic connection
of this unit is turned on, however, the connection will be automatically established
several tens of seconds after the phone is
disconnected for the transferring.
! Some symbols used in the phone number
of the phone book entries cannot be transferred to this unit. Only +, # and * can be
correctly recognized by this unit.
! With some cellular phones, it may not be
possible to transfer whole phone book at a
time. In this case, transfer phone book entries one by one from your phone by using
your cellular phone.
! Depending on the cellular phone con-
nected via Bluetooth wireless technology,
this unit cannot display the Phone Book
correctly. (Some characters may be
garbled.)
! If the phone book in the cellular phone con-
tains image data, phone book may not be
correctly transferred.
1 Touch PHONEBOOK TRANSFER on the
function menu.
2 Touch START to turn the Phone Book
Transfer function on.
The Phone Book Transfer is now on standby.
3 Use cellular phone to perform phone
book transfer.
Perform phone book transfer using the cellular phone. For detailed instruction on this,
refer to the instruction manual that came with
your cellular phone.
# While transferring the phone book, hourglass
icon is displayed.
# The display indicates how many entries have
been transferred and the total number to be
transferred.
# To cancel the transferring process, touch
STOP.
4 Completed is displayed and phone
book transfer is completed.
Changing the Phone Book
display order
You can choose to display the Phone Book
sorted alphabetically by first name or last
name.
! With some cellular phones, this feature
may not be possible.
% Touch PHONEBOOK NAME VIEW on the
function menu to turn Phone Book Name
View function on.
Display order for the Phone Book is changed.
# To change to the other display order, touch
PHONEBOOK NAME VIEW again.
Calling a number in the Phone
Book
You can select the entry in the Phone Book
and make the call.
1 Touch PHONE BOOK to display the
Phone Book.
<CRD4105-A/N>15
En
15

Section
02
Black plate (16,1)
Bluetooth Telephone
2 Touch a Phone Book entry you want to
call.
The display is switched to the Phone Book edit
display.
# Touch PREV or NEXT to display other phone
book entries.
3 Touch phone number of the Phone
Book entry you want to call.
If several phone numbers are entered to an
entry, touch one you want to call.
The display returns to the normal display and
the Phone Book entry you selected is displayed on the information bar.
4 Touch
The estimated call time appears in the display
(this may differ slightly from the actual call
time).
# For an international call, touch add "+" to add
+ to the phone number.
5 To end the call, touch .
The estimated call time appears in the display
(this may differ slightly from the actual call
time).
to make a call.
Searching a number in the
Phone Book
After finding the number in the Phone Book
you want to call, you can select the entry and
make the call.
1 Touch PHONE BOOK to display the
Phone Book.
2 Touch SEARCH to display the Phone
Book search display.
3 Touch an alphabet letter to select the
first letter of the name you are looking for.
4 Touch ENTER to show entries starting
with the letter you chose.
The display shows the first six Phone Book entries starting with that letter (e.g. “Ben”,
“Brian” and “Burt” when “ B” is selected).
# Touch PREV or NEXT to display other phone
book entries.
# To refine the search with a different letter,
touch CLEAR.
5 Touch a Phone Book entry and make a
call.
See step two to five on Calling a number in the
Phone Book on the previous page for how to
do this.
Editing the name of a Phone
Book entry
You can edit the names of Phone Book entries.
Each name can be up to 16 characters long.
1 Touch PHONE BOOK to display the
Phone Book.
2 Select a Phone Book entry you want to
edit.
See step two to three on Calling a number in
the Phone Book on the previous page for how
to do this.
3 Touch EDIT next to the Phone Book
entry name.
The display is changed to the Phone Book edit
display.
4 Touch 123 or ABC to select the desired
character type.
Touching ABC switches the character types in
the following order.
Alphabet (upper case), numbers and symbols
—Alphabet (lower case)
16
En
<CRD4105-A/N>16
Bluetooth Telephone
Black plate (17,1)
Section
02
English
5 Touch a letter to enter.
# To delete a character and leave a space, touch
.
6 Touch MEMORY to store the new
name.
Editing phone numbers
You can edit the phone numbers of Phone
Book entries.
1 Touch PHONE BOOK to display the
Phone Book.
2 Select a Phone Book entry you want to
edit.
See step two to three on Calling a number in
the Phone Book on page 15 for how to do this.
3 Touch EDIT next to the phone number
you want to edit.
The display is changed to the Phone Book dial
edit display.
4 Touch 0—9 to input numbers.
# For an international call, touch add "+" to add
+ to the phone number.
# Touch CLEAR to delete the number.
5 Touch c or d to move the cursor and
edit the number.
Repeat these steps until you have finished
changing.
6 Touch ENTER to store the new number.
Clearing a Phone Book entry
You can delete Phone Book entries in the
Phone Book one by one.
To clear all of your entries in the Phone Book,
refer to Clearing memor y on this page.
1 Touch PHONE BOOK to display the
Phone Book.
2 Select a Phone Book entry you want to
delete.
See step two to three on Calling a number in
the Phone Book on page 15 for how to do this.
3 Touch DELETE to delete the Phone Book
entry.
A confirmation display appears. Touch YES to
delete the entry.
# It takes about 10 seconds to delete the data.
To make it sure, leave the ignition switch ACC or
ON position for 10 seconds after you operate the
deletion.
# If you do not want to clear a Phone Book entry
that you have selected, touch NO.
Clearing memory
You can clear memory of each item; Phone
Book, dialed/received/missed call history list
and preset phone number.
1 Touch CLEAR MEMORY on the function
menu.
2 Touch CLEAR next to the item you want
to delete from the memory.
Select from the following:
PHONE BOOK (phone book)—DIALED CALLS
(dialed call histor y) — RECEIVED CALLS (received call histor y)— MISSED CALLS (missed
call history)—PRESET DIALS (preset phone
numbers)
After selecting a desired item, a confirmation
display appears. Touch OK to delete the memory.
# If you want to clear all the Phone Book, dialed/received/missed call history list and preset
phone number, touch CLEAR ALL.
<CRD4105-A/N>17
En
17
Section
02
Black plate (18,1)
Bluetooth Telephone
# It takes about 10 seconds to delete the data.
To make it sure, leave the ignition switch ACC or
ON position for 10 seconds after you operate the
deletion.
# If you do not want to clear memory that you
have selected, touch CANCEL.
Using the Call History
The 12 most recent calls made (dialed), received and missed are stored in the Call History. You can browse the Call History and call
numbers from it.
Displaying the Call History
The Call History is divided into three groups:
Missed calls, Dialed calls, and Received calls.
You can see the number (and name if the
number is in the Phone Book).
% Touch LOG to display the Call History.
Touching LOG repeatedly switches between
the following call histories:
Missed call — Dialed call — Received call
# If no phone numbers have been stored in the
selected list, nothing is displayed.
# You can switch between phone number and
name (if entered) by pressing ABC/123.
Calling a number from the Call
History
1 Display the list and select a phone number.
Display the phone number you want to make a
call.
2 Touch a phone number or name (if entered) you want to call.
The display returns to the normal display and
the phone number you selected is displayed
on the information bar.
# Touch PREV or NEXT to display other phone
number or name (if entered).
3 Touch to make a call.
The estimated call time appears in the display
(this may differ slightly from the actual call
time).
# For an international call, touch add "+" to add
+ to the phone number.
4 To end the call, touch .
Using preset numbers
Assigning preset numbers
Numbers that you dial frequently can be assigned to presets for quick recall.
You can assign up to six frequently called
phone numbers to number presets (P 1-P 6).
1 Select a desired phone number from
the Phone Book or the Call History.
See the instructions explained in previous
pages for how to select a desired phone number from the Phone Book or the Call History.
The display should now be the normal display
and the selected phone number is displayed
on the information bar.
2 Touch LIST to display preset numbers
P 1-P 6.
3 Keep touching one of P 1-P 6 to preset
the phone number.
The phone number you selected is stored in
presets.
18
En
<CRD4105-A/N>18
Bluetooth Telephone
Black plate (19,1)
Section
02
English
# Up to 30 phone numbers (six phone numbers
for each of the three registered phones and two
guest phones) can be stored in memory.
Recalling preset numbers
You can easily recall the preset phone numbers.
1 Touch LIST to display preset numbers
P 1-P 6.
Preset numbers P 1-P 6 appear in the display.
2 Touch one of preset numbers P 1-P 6.
The selected phone number should now be
displayed on the information bar.
3 Touch
4 To end the call, touch
The estimated call time appears in the display
(this may differ slightly from the actual call
time).
to make a call.
.
Making a call by entering
phone number
You can make a call by directly entering phone
numbers on this unit.
1 Touch DIRECT to display the direct dial
display.
4 To end the call, touch
The estimated call time appears in the display
(this may differ slightly from the actual call
time).
.
Echo canceling and noise
reduction
When you are operating hands-free phoning
in the vehicle, you may hear undesired echo.
This function reduces the echo and noise and
keeps a certain sound quality.
! This feature cannot be set for each different
user phone.
% Touch ECHO CANCEL on the function
menu to turn Echo Cancel function on.
# To turn echo canceling off, touch
ECHO CANCEL again.
Switching the ring tone
The unit offers you to turn the ring tone for incoming calls on or off.
! The ring tone you select for this unit has no
effect on the ring tone used by your phone.
If you do not want your phone and this unit
to ring at the same time, we recommend
you turn the ring tone of one or the other
off.
2 Touch 0—9 to input numbers.
# For an international call, touch add "+" to add
+ to the phone number.
# Touch CLEAR to delete the number.
# Up to 24 digits can be entered.
3 When you completed entering the
number, touch
to make a call.
% Touch RING TONE on the function menu
to turn the ring tone on.
# To turn the ring tone off, touch RING TONE
again.
En
<CRD4105-A/N>19
19
Section
02
Black plate (20,1)
Bluetooth Telephone
Setting the automatic
rejecting
If this function is on, this unit automatically rejects all incoming calls.
! This feature cannot be set for each different
user phone.
! The rejected call is not memorized in re-
ceived or missed call history list.
% Touch REFUSE ALL CALLS on the function menu to turn the automatic call rejection on.
ON appears in the display.
# To turn the automatic call rejection off, touch
REFUSE ALL CALLS again.
Setting the automatic
answering
If this function is on, this unit automatically
answers all incoming calls.
! This feature cannot be set for each different
user phone.
% Touch AUTO ANSWER on the function
menu to turn the automatic answer on.
ON appears in the display.
# To turn the automatic answer off, touch
AUTO ANSWER again.
Displaying BD (Bluetooth
Device) address
Each device featuring Bluetooth wireless technology is allocated a unique 48-bit device address. Each device address consists of a 12digit of hexadecimal string.
You can display the BD address of your cellular phone and this unit.
Should this unit fails to operate properly and
you consult with dealer for repair, you may be
asked to indicate the system versions of this
unit and of Bluetooth module. You can display
the versions and confirm them.
% Touch DEVICE INFO on the function
menu to display the BD address.
Various information regarding the bluetooth
wireless technology are displayed.
! BD ADDRESS (system address)
! SYSTEM NAME (system name)
! SYSTEM VER. (version)
! BT MODULE VER. (Bluetooth module
version)
Note
If both the automatic reject and automatic answer functions are set to ON, the automatic reject
is prioritized and all incoming calls are automatically rejected.
20
En
<CRD4105-A/N>20
Bluetooth Audio
Black plate (21,1)
Section
03
English
Listening to songs on BT Audio
(Bluetooth audio player)
123 4
If you connect this adapter to a Pioneer head
unit, you can control a Bluetooth audio player
via Bluetooth wireless technology.
Important
! This unit can control a Bluetooth audio player
via A2DP or AVRCP profile. Bluetooth audio
players (or Bluetooth adapters) compatible
with those profiles can be connected to this
unit.
— A2DP profile (Advanced Audio Distribution
Profile): Only playing back songs on your
audio player is possible.
— AVRCP profile (Audio/Video Remote Con-
trol Profile): Playing back, pausing, selecting songs, etc., are possible.
! Since there are a number of Bluetooth audio
players available on the market, operations
with your Bluetooth audio player using this
unit vary in great range. Please refer to the instruction manual that came with your Bluetooth audio player as well as this manual
while operating your player on this unit.
! Information about songs (e.g. the elapsed
playing time, song title, song index, etc.) cannot be displayed on this unit.
! While you are listening to songs on your Blue-
tooth audio player, please refrain from operat-
ing on your cellular phone as much as
possible. If you try operating on your cellular
phone, the signal from your cellular phone
may cause a noise on the song playback.
! When you are talking on the cellular phone
connected to this unit via Bluetooth wireless
technology, the song playback from your Blue-
tooth audio player connected to this unit is
muted.
! Even if while you are listening to song on your
Bluetooth audio player you switch to another
source, the playback of song continues to
elapse.
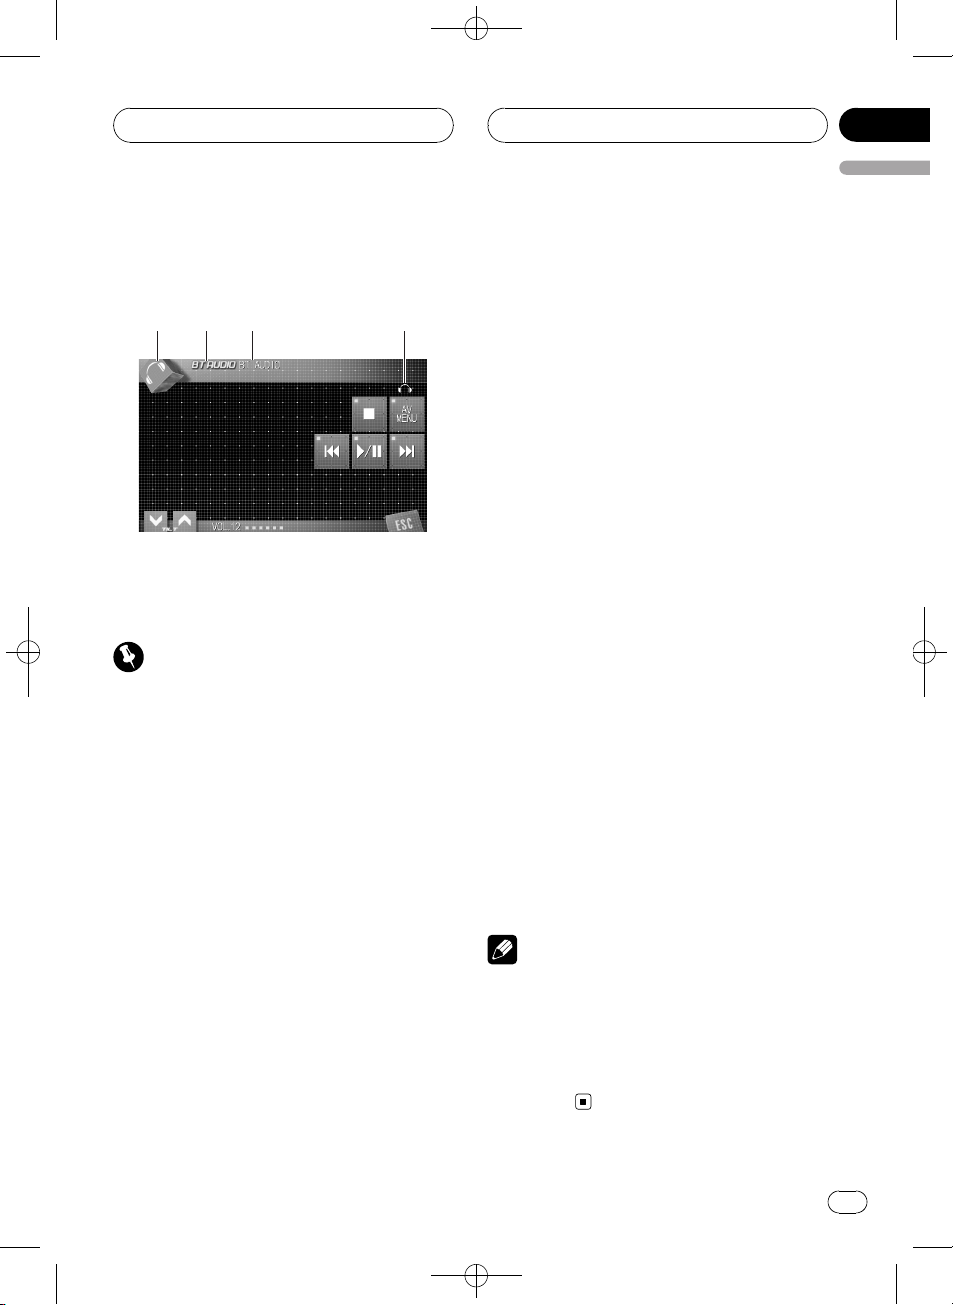
1 Source icon
Shows which source has been selected.
2 Source name
Shows the selected source name.
3 Device name
Shows the device name of the connected
Bluetooth audio player (or Bluetooth adapter).
4 Bluetooth audio indicator
Shows when a Bluetooth audio player connection is established (for more details,
refer to Connecting a Bluetooth audio player
on the next page).
% Touch the source icon and then touch
BT AUDIO to select the Bluetooth audio
source.
Note
The line-of-sight distance between this unit and
your cellular phone must be 10 meters or less for
sending and receiving voice and data via Bluetooth wireless technology. However, the transmission distance may become shorter than the
estimated distance, depending on the environment in use.
<CRD4105-A/N>21
En
21
1
Section
03
Bluetooth Audio
Connecting a Bluetooth
audio player
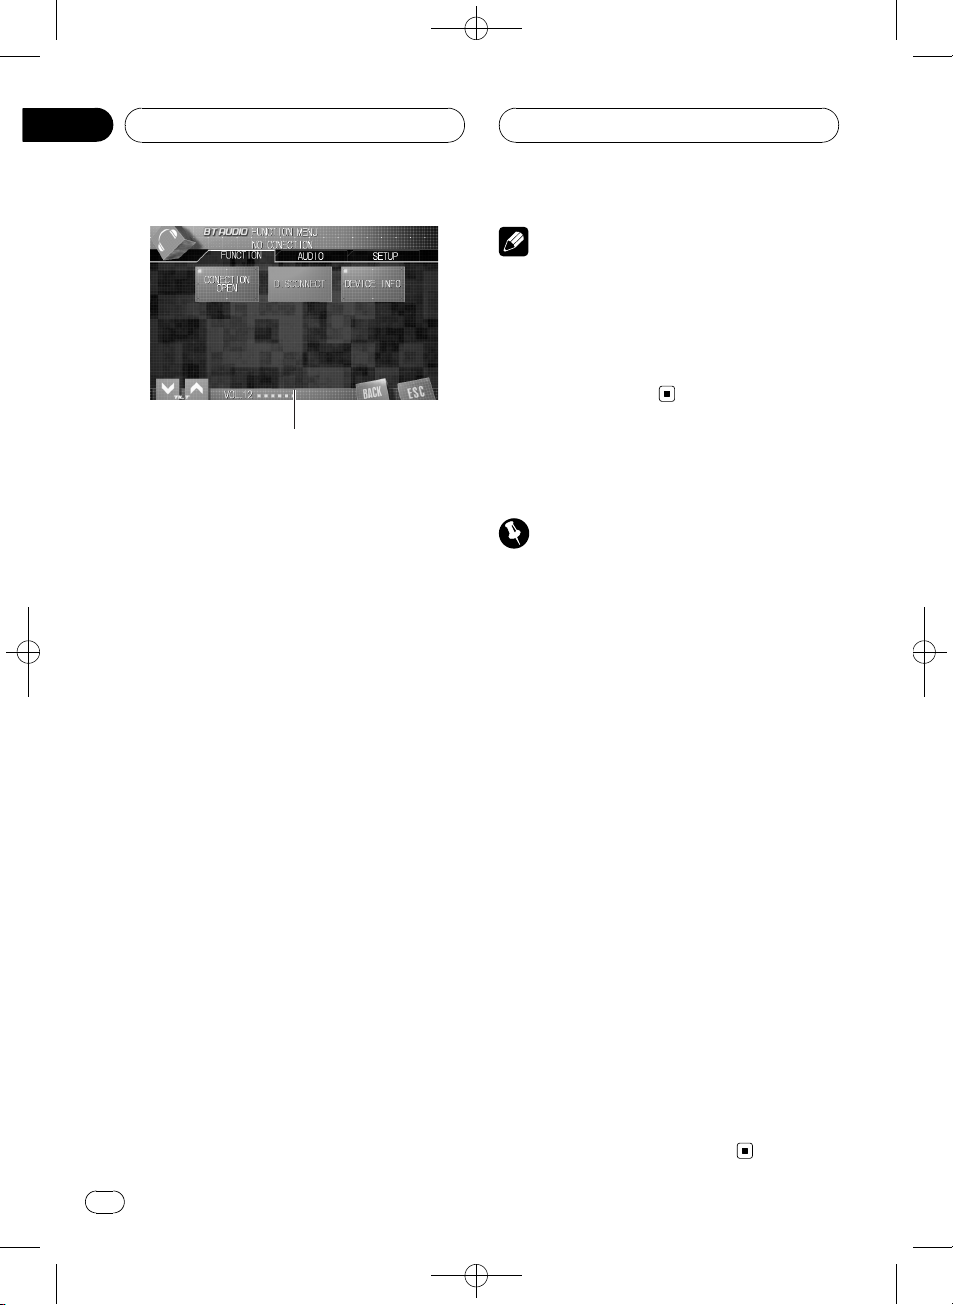
1 Function display
Shows the function names.
For this unit to control your Bluetooth audio
player it needs to establish a Bluetooth wireless connection.
This function initiates the connection via Bluetooth wireless technology.
1 Touch AV MENU to display MENU.
MENU appears on the display.
# When AV MENU is not displayed, you can dis-
play it by touching the screen.
# You can also display MENU by clicking the
joystick.
2 Touch FUNCTION to display the function names.
The function names are displayed and operable ones are highlighted.
# To return to the previous display, touch BACK.
# To return to the playback display, touch ESC.
3 Touch CONNECTION OPEN.
ON is displayed. This unit is now on standby
for connection from Bluetooth audio player.
If your Bluetooth audio player is set ready for
Bluetooth wireless connection, the connection
to this unit will be automatically established.
Black plate (22,1)
Note
Before you can use audio players you may need
to enter the PIN code into this unit. If your player
requires a PIN code to establish a connection,
look for the code on the player or in its accompanying documentation. Enter the PIN code referring to Entering PIN code for Bluetooth wireless
connection on page 24.
Playing songs on Bluetooth
audio player
Important
Operation varies depending on the type of your
Bluetooth audio player. Refer to the instruction
manual that came with your Bluetooth audio
player for detailed instructions.
1 Touch f.
Playback starts.
# When you want to pause a song, touch f
again.
2 To skip back or forward to another
track, touch o or p.
Touching p skips to the start of the next
track. Touching o once skips to the start of
the current track. Touching it again will skip to
the previous track.
# You can also skip back or forward to another
track by pressing c or d button or moving the
joystick left or right.
3 To perform fast forward or reverse,
keep touching o or p.
# You can also perform fast reverse/fast forward
by pressing and holding c or d button or holding
the joystick left or right.
# When you perform fast forward or reverse,
there is a sound or not. This difference depends
on the Bluetooth audio player which you use.
4 To stop playback, touch g.
22
En
<CRD4105-A/N>22
Bluetooth Audio
Black plate (23,1)
Section
03
English
Disconnecting a Bluetooth
audio player
When you are done using your Bluetooth
audio player with this unit, you can close the
Bluetooth wireless connection.
1 Touch AV MENU to display MENU.
MENU appears on the display.
# When AV MENU is not displayed, you can dis-
play it by touching the screen.
# You can also display MENU by clicking the
joystick.
2 Touch FUNCTION to display the function names.
The function names are displayed and operable ones are highlighted.
# To return to the previous display, touch BACK.
# To return to the playback display, touch ESC.
3 Touch DISCONNECT.
After the disconnection is completed,
Disconnected is displayed.
Displaying BD (Bluetooth
Device) address
Each device featuring Bluetooth wireless technology is allocated a unique 48-bit device address. Each device address consists of a 12digit of hexadecimal string.
You can display the BD address of this unit.
Should this unit fails to operate properly and
you consult with dealer for repair, you may be
asked to indicate the system versions of this
unit and of Bluetooth module. You can display
the versions and confirm them.
# You can also display MENU by clicking the
joystick.
2 Touch FUNCTION to display the function names.
The function names are displayed and operable ones are highlighted.
# To return to the previous display, touch BACK.
# To return to the playback display, touch ESC.
3 Touch DEVICE INFO to display the BD
address.
Various information regarding the bluetooth
wireless technology are displayed.
! BD ADDRESS (system address)
! SYSTEM NAME (system name)
! SYSTEM VER. (version)
! BT MODULE VER. (Bluetooth module
version)
1 Touch AV MENU to display MENU.
MENU appears on the display.
# When AV MENU is not displayed, you can dis-
play it by touching the screen.
<CRD4105-A/N>23
En
23
Section
04
Initial Settings
Entering PIN code for
Bluetooth wireless connection
With some Bluetooth audio players, you may
be required to enter to this unit in advance
PIN code of your Bluetooth audio player, in
order to set this unit ready for a connection
from your Bluetooth audio player.
1 Touch the source icon and then touch
OFF to turn this unit off.
# When the source icon is not displayed, you
can display it by touching the screen.
2 Touch AV MENU and then touch INITIAL
to display the function names.
The function names are displayed and operable ones are highlighted.
# When AV MENU is not displayed, you can dis-
play it by touching the screen.
# You can also display MENU by clicking the
joystick.
# To go to the next group of function names,
touch NEXT.
# To return to the previous group of function
names, touch PREV.
# To return to the previous display, touch BACK.
# To return to the display of each source, touch
ESC.
Black plate (24,1)
3 Touch PINCODE INPUT.
PIN code input display appears.
4 Touch 0—9 to input the PIN code of
your Bluetooth audio player.
# Touch C to delete the number.
5 After inputting PIN code (up to 16 digits), touch ENTER.
The PIN code you entered is stored in this
unit.
24
En
<CRD4105-A/N>24
Operating with different
head units
Black plate (25,1)
Section
05
English
Using as an external unit
The following head units operate this unit as
an external unit. For more details about the external unit, refer to the head unit’s manual.
! 1–6KEY doesn’t be used to operate this
unit.
! When selecting TEL as a source,
AUTO/MANUAL (A/M) doesn’t be used to
operate this unit.
! When selecting BT AUDIO as a source,
FUNC3 (F3)/FUNCTION3 and FUNC4 (F4)/
FUNCTION4 doesn’t be used to operate
this unit.
Head unit group 1
The following head units featuring FUNCTION
button operation or SOFT KEY operation.
DEH-P9650MP, DEH-P9600MP, DEH-P7700MP,
DEH-P7650MP, DEH-P7600MP, DEH-P6800MP,
DEH-P6750MP, DEH-P6700MP, DEH-P6600,
DEH-P5850MPH, DEH-P5850MP, DEHP5800MP, DEH-P580MP, DEH-P5750MP, DEHP5650MP, DEH-P5600MP, DEH-P4850MPH,
DEH-P4850MP, DEH-P4800MP, DEH-P480MP,
DEH-P4750MP, DEH-P4700MP, DEH-P4650,
DEH-P4600, DEH-P3800MP, DEH-P3700MP,
DEH-P3600MP, DEH-P2650, DEH-P2600, DEHP960MP, DEH-P760MP, DEH-P670MP, DEHP660, DEH-P560MP, DEH-P470MP, DEHP460MP, DEH-P360, DEH-P26, DVH-P5850MP,
DVH-P580MP, DVH-P5650MP, FH-P5000MP,
FH-P4200MP, KEH-P7035, KEH-P6025
Head unit group 2
The following head units featuring
MULTI-CONTROL operation.
DEH-P8850MP, DEH-P8650MP, DEH-P8600MP,
DEH-P7800MP, DEH-P7750MP, DEH-P6850MP,
DEH-P6800MP, DEH-P880PRS, DEH-P860MP,
DEH-P780MP, DEH-P680MP, DEH-P80MP,
DEH-P80RS, DEH-P8MP, DEH-P1Y
Head unit group 3
The following head units featuring touch
panel key operation.
AVH-P7650DVD, AVH-P7600DVD, AVHP6650DVD, AVH-P6600DVD, AVH-P5750DVD,
AVH-P5700DVD
Head unit group 4
The following head units are navigation units
featuring touch panel key operation.
AVIC-D2, AVIC-N1, AVIC-N2, AVIC-N3, AVIC-Z1
Important
! Since this unit is on standby to connect with
your cellular phones via Bluetooth wireless
technology, using this unit without running
the engine can result in battery drainage.
! In order to use Bluetooth wireless technology,
devices must be able to interpret certain pro-
files. When using as an external unit, this unit
is compatible with the following profiles.
— GAP (Generic Access Profile)
— SDP (Service Discovery Protocol)
— HSP (Head Set Profile)
— HFP (Hands Free Profile)
— A2DP (Advanced Audio Distribution Pro-
file)
— AVRCP (Audio/Video Remote Control Pro-
file)
! This unit can control a Bluetooth audio player
via A2DP or AVRCP profile. Bluetooth audio
players (or Bluetooth adapters) compatible
with those profiles can be connected to this
unit.
— A2DP profile (Advanced Audio Distribution
Profile): Only playing back songs on your
audio player is possible.
— AVRCP profile (Audio/Video Remote Con-
trol Profile): Playing back, pausing, selecting songs, etc., are possible.
<CRD4105-A/N>25
En
25
Section
05
Black plate (26,1)
Operating with different
head units
! When using this unit as an external unit, the
PIN code is set to 0000. You can not change
the PIN code. This unit can connect only the
Bluetooth audio player which request 0000 as
the PIN code or does not request any PIN
code.
! Since there are a number of Bluetooth audio
players available on the market, operations
with your Bluetooth audio player using this
unit vary in great range. Please refer to the instruction manual that came with your Bluetooth audio player as well as this manual
while operating your player on this unit.
! Information about songs (e.g. the elapsed
playing time, song title, song index, etc.) cannot be displayed on this unit.
! While you are listening to songs on your Blue-
tooth audio player, please refrain from operating on your cellular phone as much as
possible. If you try operating on your cellular
phone, the signal from your cellular phone
may cause a noise on the song playback.
! When you are talking on the cellular phone
connected to this unit via Bluetooth wireless
technology, the song playback from your Bluetooth audio player connected to this unit is
muted.
! Even if while you are listening to song on your
Bluetooth audio player you switch to another
source, the playback of song continues to
elapse.
! Operation varies depending on the type of
your cellular phone and Bluetooth audio
player. Refer to the instruction manual that
came with them for detailed instructions.
Notes
! This unit’s phone call reception is on standby
when ignition switch is set to ACC or ON.
! The line-of-sight distance between this unit
and your cellular phone must be 10 meters or
less for sending and receiving voice and data
via Bluetooth wireless technology. However,
the transmission distance may become shorter than the estimated distance, depending on
the environment in use.
! TEL and BT AUDIO are set to the same vo-
lume and the same SLA (Source Level Adjustment) volume. Change the volume value for
TEL or BT AUDIO each time, if needed.
! If the remote control have PGM button, you
can perform following operations with it:
— When selecting TEL as a source, you can
scroll a phone number in the call history.
— When selecting BT AUDIO as a source,
you can pause a song.
Function compatibility charts
Head unit group 1
Controls of Bluetooth telephone
Select TEL/BT AUDIO
as a source
Switch between TEL
and BT AUDIO
Put the unit in VOICE
*
ON mode
Take a phone call
End a call Press b.
Display the received/
missed call history
Display the dialed
call history
Press SOURCE.
When selecting TEL/BT
AUDIO as a source, press
BAND.
When selecting TEL as a
source, press and hold
BAND.
When a call comes in, press
a.
Press c.
Press d.
* You can use this function if your cellular phone features voice recognition technology.
26
En
<CRD4105-A/N>26
Operating with different
head units
Black plate (27,1)
Section
05
English
Controls of Bluetooth telephone
Select a phone number from the dialed or
received/missed call
history
Make a call
Select a function
Scroll a phone number in the call history
Put the unit in
C.OPEN mode
Put the unit in RE-
GIST mode
Put the unit in DIS-
CONN. mode
Turn the automatic
answering on or off
Turn the automatic
connection on or off
Turn the ring tone on
or off
Display and switch
the device information
When displaying the dialed
or received/missed call history, press c or d.
If you want to return to the
telephone standby display,
press b.
When selecting a phone
number from the dialed and
received call history, press a.
When selecting TEL as a
source, press FUNCTION
(FUNC).
When selecting TEL as a
source, press a or b in
FUNC1 (F1).
When selecting TEL as a
source, press and hold a or
b in FUNC1 (F1).
When selecting TEL as a
source, press a or b in
FUNC2 (F2).
When selecting TEL as a
source, press and hold a or
b in FUNC2 (F2).
When selecting TEL as a
source, press a or b in
FUNC3 (F3).
When selecting TEL as a
source, press and hold a or
b in FUNC3 (F3).
When selecting TEL as a
source, press a or b in
FUNC4 (F4).
When selecting TEL as a
source, press and hold a or
b in FUNC4 (F4).
Controls of Bluetooth audio
Select TEL/BT AUDIO
as a source
Switch between TEL
and BT AUDIO
Skip back or forward
to another song
Fast forward/re-
*2
verse
Select a function
Pause a song
Put the unit in
C.OPEN mode
Play songs
Put the unit in DIS-
CONN. mode
Switch between
AUTO and MANUAL
Press SOURCE.
When selecting TEL/BT
AUDIO as a source, press
BAND.
When selecting BT AUDIO
*1
as a source, press c or d.
When selecting BT AUDIO
as a source, press and hold
c or d.
When selecting BT AUDIO
as a source, press FUNC-
TION (FUNC).
When selecting BT AUDIO
as a source, press a or b in
FUNC1 (F1).
When selecting BT AUDIO
as a source, press and hold
a or b in FUNC1 (F1).
When selecting BT AUDIO
as a source, press a or b in
FUNC2 (F2).
When selecting BT AUDIO
as a source, press and hold
a or b in FUNC2 (F2).
When selecting BT AUDIO
as a source, press c or d in
AUTO/MANUAL (A/M).
Note
When using as an external unit, this unit doesn't
automatically return to the original source after a
phone call. Select a desired source manually
after a phone call.
*1You can use this function when you select AUTO in AUTO/MANUAL (A/M).
2
*
You can use this function when you select MANUAL in AUTO/MANUAL (A/M).
<CRD4105-A/N>27
En
27
Section
05
Black plate (28,1)
Operating with different
head units
Head unit group 2
Controls of Bluetooth telephone
Select TEL/BT AUDIO
as a source
Switch between TEL
and BT AUDIO
Put the unit in VOICE
*1
ON mode
Take a phone call
End a call
Display the received/
missed call history
Display the dialed
call history
Select a phone number from the dialed or
received/missed call
history
Make a call
Select a function
Scroll a phone number in the call history
Put the unit in
C.OPEN mode
Press SOURCE.
When selecting TEL/BT
AUDIO as a source, press
BAND.
When selecting TEL as a
source, press and hold
BAND.
When a call comes in, push
MULTI-CONTROL up.
Push MULTI-CONTROL
down.
Push MULTI-CONTROL left.
Push MULTI-CONTROL
right.
When displaying the dialed
or received/missed call history, push MULTI-CONTROL
left or right.
If you want to return to the
telephone standby display,
push MULTI-CONTROL
down.
When selecting a phone
number from the dialled and
received call history, push
MULTI-CONTROL up.
When selecting TEL as a
source, use MULTI-CON-
TROL.
When selecting TEL as a
source, press MULTI-CON-
TROL in FUNC1 (F1).
When selecting TEL as a
source, press and hold
MULTI-CONTROL in FUNC1
(F1).
Controls of Bluetooth telephone
Put the unit in REGIST mode
Put the unit in DISCONN. mode
Turn the automatic
answering on or off
Turn the automatic
connection on or off
Turn the ring tone on
or off
Display and switch
the device information
Controls of Bluetooth audio
Select TEL/BT AUDIO
as a source
Switch between TEL
and BT AUDIO
Skip back or forward
to another song
Fast forward/re-
*3
verse
Select a function
When selecting TEL as a
source, press MULTI-CON-
TROL in FUNC2 (F2).
When selecting TEL as a
source, press and hold
MULTI-CONTROL in FUNC2
(F2).
When selecting TEL as a
source, press MULTI-CON-
TROL in FUNC3 (F3).
When selecting TEL as a
source, press and hold
MULTI-CONTROL in FUNC3
(F3).
When selecting TEL as a
source, press MULTI-CON-
TROL in FUNC4 (F4).
When selecting TEL as a
source, press and hold
MULTI-CONTROL in FUNC4
(F4).
Press SOURCE.
When selecting TEL/BT
AUDIO as a source, press
BAND.
When selecting BT AUDIO
as a source, push MULTI-
*2
CONTROL left or right.
When selecting BT AUDIO
as a source, push and hold
MULTI-CONTROL left or
right.
When selecting BT AUDIO
as a source, use MULTI-
CONTROL.
*1You can use this function if your cellular phone features voice recognition technology.
2
*
You can use this function when you select AUTO in AUTO/MANUAL (A/M).
3
*
You can use this function when you select MANUAL in AUTO/MANUAL (A/M).
28
En
<CRD4105-A/N>28
Operating with different
head units
Black plate (29,1)
Section
05
English
Controls of Bluetooth audio
Pause a song
Put the unit in
C.OPEN mode
Play songs
Put the unit in DIS-
CONN. mode
Switch between
AUTO and MANUAL
When selecting BT AUDIO
as a source, press MULTI-
CONTROL in FUNC1 (F1).
When selecting BT AUDIO
as a source, press and hold
MULTI-CONTROL in FUNC1
(F1).
When selecting BT AUDIO
as a source, press MULTI-
CONTROL in FUNC2 (F2).
When selecting BT AUDIO
as a source, press and hold
MULTI-CONTROL in FUNC2
(F2).
When selecting BT AUDIO
as a source, press MULTI-
CONTROL in AUTO/MANUAL (A/M).
Note
When using as an external unit, this unit doesn't
automatically return to the original source after a
phone call. Select a desired source manually
after a phone call.
Head unit group 3
Controls of Bluetooth telephone
Select TEL/BT AUDIO
as a source
Switch between TEL
and BT AUDIO
Put the unit in VOICE
*
ON mode
Take a phone call
End a call Touch b.
Press SOURCE.
When selecting TEL/BT
AUDIO as a source, touch
BAND.
When selecting TEL as a
source, keep touching
BAND.
When a call comes in, toucha.
Controls of Bluetooth telephone
Display the received/
missed call history
Display the dialed
call history
Select a phone number from the dialed or
received/missed call
history
Make a call
Select a function
Scroll a phone number in the call history
Put the unit in
C.OPEN mode
Put the unit in RE-
GIST mode
Put the unit in DIS-
CONN. mode
Turn the automatic
answering on or off
Turn the automatic
connection on or off
Turn the ring tone on
or off
Display and switch
the device information
Tou c h c.
Tou c h d.
When displaying the dialed
or received/missed call history, touch c or d.
If you want to return to the
telephone standby display,
touch b.
When selecting a phone
number from the dialed and
received call history, touch
a.
When selecting TEL as a
source, touch AV MENU and
then touch FUNCTION.
When selecting TEL as a
source, touch ab in FUNC-
TION1.
When selecting TEL as a
source, keep touching ab in
FUNCTION1.
When selecting TEL as a
source, touch ab in FUNC-
TION2.
When selecting TEL as a
source, keep touching ab in
FUNCTION2.
When selecting TEL as a
source, touch ab in FUNC-
TION3.
When selecting TEL as a
source, keep touching ab in
FUNCTION3.
When selecting TEL as a
source, touch ab in FUNC-
TION4.
When selecting TEL as a
source, keep touching ab in
FUNCTION4.
* You can use this function if your cellular phone features voice recognition technology.
<CRD4105-A/N>29
En
29
Section
05
Black plate (30,1)
Operating with different
head units
Controls of Bluetooth audio
Select TEL/BT AUDIO
as a source
Switch between TEL
and BT AUDIO
Skip back or forward
to another song
Fast forward/re-
*2
verse
Select a function
Pause a song
Put the unit in
C.OPEN mode
Play songs
Put the unit in DIS-
CONN. mode
Switch between
AUTO and MANUAL
Press SOURCE.
When selecting TEL/BT
AUDIO as a source, press
BAND.
When selecting BT AUDIO
*1
as a source, touch c or d.
When selecting BT AUDIO
as a source, keep touching c
or d.
When selecting BT AUDIO
as a source, touch AV
MENU and then touch
FUNCTION.
When selecting BT AUDIO
as a source, touch ab in
FUNCTION1.
When selecting BT AUDIO
as a source, keep touching
ab in FUNCTION1.
When selecting BT AUDIO
as a source, touch ab in
FUNCTION2.
When selecting BT AUDIO
as a source, keep touching
ab in FUNCTION2.
When selecting BT AUDIO
as a source, touch c or d in
AUTO/MANUAL (A/M).
Note
When using as an external unit, this unit doesn't
automatically return to the original source after a
phone call. Select a desired source manually
after a phone call.
Head unit group 4
Controls of Bluetooth telephone
Select TEL/BT AUDIO
as a source
Switch between TEL
and BT AUDIO
Put the unit in VOICE
*3
ON mode
Take a phone call
End a call Touch b.
Display the received/
missed call history
Display the dialed
call history
Select a phone number from the dialed or
received/missed call
history
Make a call
Select a function
Scroll a phone number in the call history
Put the unit in
C.OPEN mode
Press SOURCE.
When selecting TEL/BT
AUDIO as a source, touch
BAND.
When selecting TEL as a
source, keep touching
BAND.
When a call comes in, toucha.
Tou c h c.
Tou c h d.
When displaying the dialed
or received/missed call history, touch c or d.
If you want to return to the
telephone standby display,
touch b.
When selecting a phone
number from the dialed and
received call history, touch
a.
When selecting TEL as a
source, touch AV MENU or
press the joystick and then
touch FUNCTION
When selecting TEL as a
source, touch SEND in
FUNCTION1.
When selecting TEL as a
source, keep touching SEND
in FUNCTION1.
*4
.
*1You can use this function when you select AUTO in AUTO/MANUAL (A/M).
2
*
You can use this function when you select MANUAL in AUTO/MANUAL (A/M).
3
*
You can use this function if your cellular phone features voice recognition technology.
4
*
In case of AVIC-D2, you can not use AV MENU.
30
En
<CRD4105-A/N>30
 Loading...