

Page 1

DVD SURROUND SYSTEM
HTZ-55DV
Operating Instructions
Page 2
IMPORTANT
CAUTION
RISK OF ELECTRIC SHOCK
DO NOT OPEN
The lightning flash with arrowhead symbol, within an
equilateral triangle, is intended to alert the user to the
presence of uninsulated "dangerous voltage" within the
product's enclosure that may be of sufficient magnitude
to constitute a risk of electric shock to persons.
CAUTION:
TO PREVENT THE RISK OF ELECTRIC SHOCK, DO
NOT REMOVE COVER (OR BACK). NO USERSERVICEABLE PARTS INSIDE. REFER SERVICING TO
QUALIFIED SERVICE PERSONNEL.
These labels can be found on the unit’s bottom panel. Ces étiquettes se trouvent sur le fond de l’appareil.
CAUTION
RISK OF ELECTRIC SHOCK
DO NOT OPEN
Note: This equipment has been tested and found to comply with the limits for a Class B digital device, pursuant to Part 15 of the FCC Rules. These
limits are designed to provide reasonable protection against harmful interference in a residential installation. This equipment generates, uses, and
can radiate radio frequency energy and, if not installed and used in accordance with the instructions, may cause harmful interference to radio
communications. However, there is no guarantee that interference will not occur in a particular installation. If this equipment does cause harmful
interference to radio or television reception, which can be determined by turning the equipment off and on, the user is encouraged to try to correct
the interference by one or more of the following measures:
– Reorient or relocate the receiving antenna.
– Increase the separation between the equipment and receiver.
– Connect the equipment into an outlet on a circuit different from that to which the receiver is connected.
– Consult the dealer or an experienced radio/TV technician for help.
CAUTION
This product satisfies FCC regulations when shielded cables and connectors are used to connect the unit to other equipment. To prevent electromagnetic
interference with electric appliances such as radios and televisions, use shielded cables and connectors for connections.
The exclamation point within an equilateral triangle is
intended to alert the user to the presence of important
operating and maintenance (servicing) instructions in
the literature accompanying the appliance.
ATTENTION
DANGER D'ELECTROCUTION
NE PAS OUVRIR
CAUTION
• Use of controls or adjustments or performance of procedures other than those specified herein may result in hazardous radiation exposure.
• The use of optical instruments with this product will increase eye hazard.
Information to User
Alteration or modifications carried out without appropriate authorization
may invalidate the user’s right to operate the equipment.
WARNING: TO PREVENT FIRE OR SHOCK HAZARD,
DO NOT EXPOSE THIS APPLIANCE TO RAIN OR MOISTURE.
CAUTION
This product contains a laser diode of higher class than 1. To
ensure continued safety, do not remove any covers or attempt
to gain access to the inside of the product.
Refer all servicing to qualified personnel.
The following caution appears on your unit.
Location: bottom of the unit
THE STANDBY/ON BUTTON IS SECONDARY CONNECTED AND
THEREFORE DOES NOT SEPARATE THE UNIT FROM MAINS POWER
IN STANDBY POSITION.
POWER-CORD CAUTION
CLASS 1
LASER PRODUCT
Handle the power cord by the plug. Do not pull out the plug by tugging the
cord and never touch the power cord when your hands are wet as this could
cause a short circuit or electric shock. Do not place the unit, a piece of
furniture, etc., on the power cord, or pinch the cord. Never make a knot in
the cord or tie it with other cords. The power cords should be routed such
that they are not likely to be stepped on. A damaged power cord can cause a
fire or give you an electrical shock. Check the power cord once in a while.
When you find it damaged, ask your nearest PIONEER authorized service
center or your dealer for a replacement.
CAUTION :
VORSICHT :
ADVARSEL :
VARNING :
VARO! :
LASER RADIATION WHEN OPEN.
AVOID EXPOSURE TO BEAM.
LASERSTRAHLUNG, WENN ABDECKUNG GEÖFFNET
NICHT DEM STRAHL AUSSETZEN!
LASERSTRÅLING VED ÅBNING UNDGÅ
UDSÆTTELSE FOR STRÅLING.
LASERSTRÅLNING NÄR DENNA DEL ÄR
ÖPPNAD BETRAKTA EJ STRÅLEN.
AVATTAESSA ALTISTUT LASERSÄTEIL YLLE.
ÄLÄ KATSO SÄTEESEN.
VRW1697
2
En
Page 3
Thank you for buying this Pioneer product.
110V
-127V
220V
-230V
240V
VOLTAGE SELECTOR
CAUTION
DISCONNECT POWER
SUPPLY CORD,
BEFORE CHANGING
THE VOL T AGE
Please read through these operating instructions so you will know
how to operate your model properly. After you have finished
reading the instructions, put them away in a safe place for future
reference.
In some countries or regions, the shape of the power plug and
power outlet may sometimes differ from that shown in the
explanatory drawings. However, the method of connecting and
operating the unit is the same.
Line Voltage Selector Switch
Only multi-voltage models are provided with this switch.
There is a Voltage Selector. Australian model is not provided
with this switch. Be sure this is set correctly.
Mains voltages in Saudi Arabia are 127 V and 220 V only.
Always check that this selector is set properly before
plugging the power cord into the wall outlet.
1. Disconnect the power cord.
2. Use a small-sized screwdriver (flat blade).
3. Insert the screwdriver into the groove on the
voltage selector, and adjust the voltage
selector.
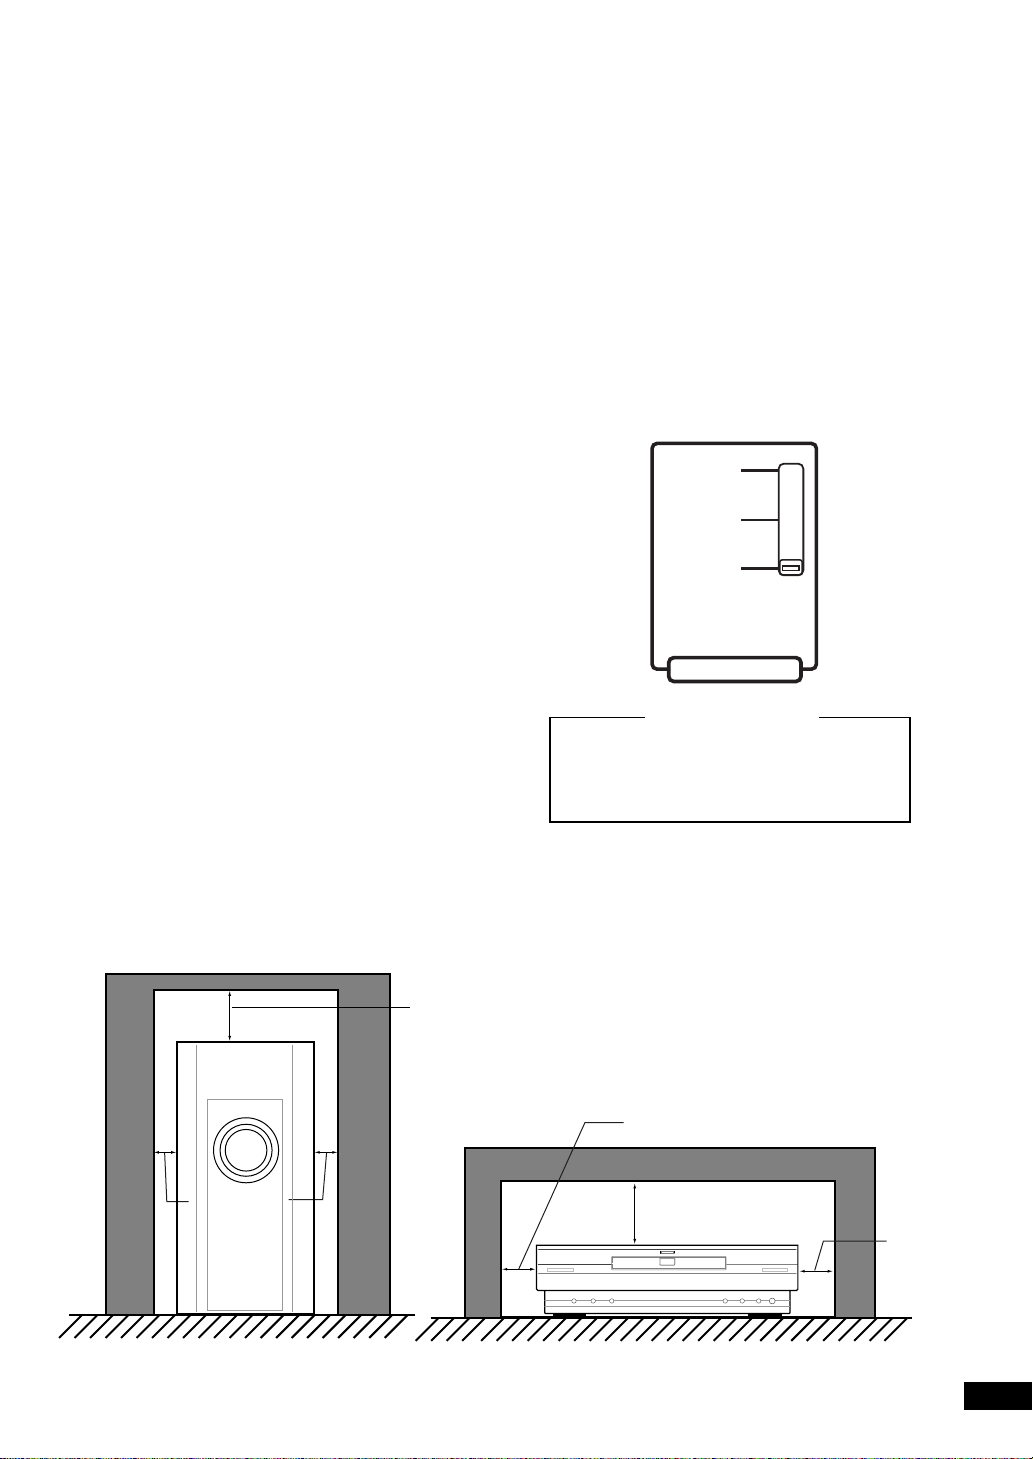
Installation Precautions
• Install components so that there are no obstructions above
or either side of them, or by ventilation holes. Also install
10cm away from the wall as shown in the figures.
Components feature ventilation holes on the bottom so do
not install on thick pile carpets or other surfaces that may
block them.
• Use a vacuum cleaner periodically to clean the port of the
subwoofer to keep it free of dust.
Powered subwoofer unit (S-DV55SW)
25 cm (10 in.) or more
10 cm (4 in.)
or more
CAUTION 240V
Power source voltage is factory adjusted
240 volts. If your area is different, change
voltage selector setting.
DVD Tuner system (XV-DV55)
10 cm (4 in.) or more
25 cm (10 in.) or more
10 c m
(4 in.)
or more
Rear: 10 cm (4 in.) or more
Rear: 10 cm (4 in.) or more
3
En
Page 4

Contents
1 Before You Start
Features ................................................................................ 5
Using this manual ................................................................ 5
Hints on installation ............................................................ 6
Avoiding problems with condensation ............................... 6
Moving the system ............................................................... 6
Discs compatible with this system ...................................... 6
DVD Video regions .............................................................. 6
2 Controls and Displays
Front panel .......................................................................... 7
Display ................................................................................. 7
Remote control .................................................................... 8
3 Getting Started
Introduction........................................................................10
Switching on and setting the clock.................................... 10
Switching the time format ................................................ 10
Setting up for surround sound .......................................... 11
Setting the speaker distances ............................................ 11
Balancing the surround sound ........................................... 12
Using the setup navigator .................................................. 13
Playing DVD Video discs..................................................... 14
Playing CDs ......................................................................... 16
Playing Video CDs .............................................................. 17
Listening to the radio ......................................................... 18
Improving FM stereo sound ............................................... 18
Listening to other components .........................................19
Switching between digital and analog sources ................. 19
4 Shaping the Sound
Adjusting the bass and treble ........................................... 20
Using P.Bass ....................................................................... 20
Using sound modes ........................................................... 21
Listening to surround-sound sources
with room effects .............................................................. 21
Listening to other sources with room effects .................. 22
Listening at low volume ..................................................... 22
Adjusting channel volume levels ....................................... 22
5 Using the DVD Player
Introduction....................................................................... 23
Finding what you want on a disc....................................... 23
Switching camera angles (DVD only) ............................... 24
Switching subtitles (DVD only)......................................... 24
Switching audio language (DVD only) ............................. 24
Programming playlists ....................................................... 24
Programming a DVD playlist ............................................. 25
Programming a CD/Video CD playlist .............................. 26
More programming options .............................................. 26
Using repeat play .............................................................. 27
Using random play ............................................................ 27
DVD .................................................................................... 27
CD/Video CD .................................................................... 27
Bookmarking a place in a disc (DVD/Video CD) ............. 28
Memorizing disc settings (DVD only) ............................... 28
Displaying disc information .............................................. 29
7 Using the Timer
Using the wake up timer ................................................... 31
Activating/deactivating the wake up timer ...................... 31
Checking the timer settings .............................................. 32
Using the sleep timer ........................................................ 32
8 Making a Recording
Making an audio or a video recording ............................. 33
Making a digital recording ................................................ 33
9 DVD Settings
Using the Setup menu ....................................................... 34
OSD settings...................................................................... 34
Setup Menu Mode ............................................................. 34
OSD language .................................................................... 34
On Screen Display (Expert) .............................................. 34
Video settings .................................................................... 35
TV Screen Size ................................................................... 35
Adjusting the video quality ............................................... 35
Still Picture (Expert) ......................................................... 35
Angle Indicator (Expert) ................................................... 35
Audio settings.................................................................... 36
Dolby Digital Out .............................................................. 36
Linear PCM Out ................................................................. 36
Language settings .............................................................. 36
Audio Language ................................................................. 36
Subtitle Language .............................................................. 37
Auto Language ................................................................... 37
DVD Language (Expert) .................................................... 38
Subtitle Off (Expert) ......................................................... 38
Subtitle Display (Expert) .................................................. 38
Miscellaneous settings ...................................................... 39
Parental Lock ..................................................................... 39
Changing the parental lock level ...................................... 39
Changing your password ................................................... 40
Background Color (Expert) .............................................. 40
10 Advanced Sound Settings
Advanced sound settings .................................................. 41
LFE attenuator ................................................................... 41
Dynamic Range Control .................................................... 41
Dual-mono setting............................................................. 42
11 Controlling Other Equipment
Setting up the remote control .......................................... 43
Setting up using component presets ................................ 43
Reassigning a MULTI CONTROL button ........................... 44
Learning directly from other remote controls ................. 45
Deleting a single command ............................................... 46
Deleting all commands for a component ......................... 46
Controlling a component while playing another ............. 46
Clearing all remote control settings ................................. 47
Checking preset codes ...................................................... 47
CD/MD/CD-R/VCR/LD player controls .......................... 48
Cassette deck controls ...................................................... 49
DVD/DVR player controls ................................................. 50
DTV controls ...................................................................... 51
Cable TV/satellite TV/TV controls ................................... 52
6 Using the Tuner
Saving station presets ....................................................... 30
Listening to station presets .............................................. 30
4
En
Page 5

Features
1 Before You Start
12 Connecting Up
Connecting to a TV with the supplied video cord ........... 53
Connecting to a TV with an S-Video cord........................ 53
Playing your TV through this system ................................ 53
Watching TV ...................................................................... 53
Connecting Other Components ....................................... 54
Connecting an audio recorder.......................................... 54
Connecting Outdoor Antennas ........................................ 55
Connecting an Outdoor AM Antenna .............................. 55
Connecting an Outdoor FM Antenna .............................. 55
13 Additional Information
Setting the display brightness .......................................... 56
Switching the TV system output ....................................... 56
Taking care of your system ................................................ 57
Disc lens cleaner ................................................................ 57
Taking care of your discs ................................................... 57
Storing discs ...................................................................... 57
Discs to avoid .................................................................... 57
Glossary ............................................................................. 58
DVD language code list ..................................................... 59
Preset Code List ................................................................ 60
Troubleshooting ................................................................ 64
Resetting the player .......................................................... 66
Screen sizes and disc formats ........................................... 66
Component features & functions..................................... 67
DVD tuner system .............................................................. 67
Powered subwoofer unit .................................................... 67
Display unit ........................................................................ 67
Specifications .................................................................... 68
÷ Superlative audio performance with Dolby
Digital* and DTS** software
The HTZ–55DV delivers breathtaking sound quality with
Dolby Digital and DTS discs, and is also compatible with
96kHz/24-bit PCM sources.
÷ New graphical Setup Navigator
Setting up your home theater is easy using the graphical
Setup Navigator. Answer the questions that appear on-screen
and the Setup Navigator makes the necessary audio, video and
language settings for you.
• This product incorporates copyright protection
technology that is protected by method claims of certain
U. S. patents and other intellectual property rights
owned by Macrovision Corporation and other rights
owners. Use of this copyright protection technology
must be authorized by Macrovision Corporation, and is
intended for home and other limited viewing uses only
unless otherwise authorized by Macrovision
Corporation. Reverse engineering or disassembly is
prohibited.
* Manufactured under license from Dolby Laboratories.
“Dolby”, “Pro Logic” and the double-D symbol are
trademarks of Dolby Laboratories. Confidential
unpublished works. © 1992-1997 Dolby Laboratories.
All rights reserved.
** “DTS” and “DTS Digital Surround” are trademarks of
Digital Theater Systems, Inc. Manufactured under
license from Digital Theater Systems, Inc.
Using this manual
This manual is for the HTZ–55DV DVD Surround System. It is
divided into several sections: information for before you start
using the system (chapters 1–2); getting started using the
system (chapters 3–4); more advanced features (chapters 5–
8); system settings and preferences (chapters 9–10); using
this remote control with other components (chapter 11);
connecting up the system and using this system with external
components (chapter 12). Chapter 13 provides additional
information, including a glossary of terms used in this
manual, and a troubleshooting section.
5
En
Page 6
1 Before You Start
Hints on installation
We want you to enjoy using this unit for years to come, so
please bear in mind the following points when choosing a
suitable location for it:
Do...
✓ Use in a well-ventilated room.
✓ Place on a solid, flat, level surface, such as a table, shelf or
stereo rack.
Don’t...
✗ Use in a place exposed to high temperatures or humidity,
including near radiators and other heat-generating
appliances.
✗ Place on a window sill or other place where the system will be
exposed to direct sunlight.
✗ Use in an excessively dusty or damp environment.
✗ Place directly on top of an amplifier, or other component in
your stereo system that becomes hot in use.
✗ Use near a television or monitor as you may experience
interference—especially if the television uses an indoor
antenna.
✗ Use in a kitchen or other room where the system may be
exposed to smoke or steam.
✗ Use on a thick rug or carpet, or cover with cloth—this may
prevent proper cooling of the unit.
✗ Place on an unstable surface, or one that is not large enough
to support all four of the unit’s feet.
Discs compatible with this
system
Any disc that displays one of the following logos should play
in this system. Other formats, including DVD-RAM, DVDROM, DVD-Audio, CD-ROM, SACD and Photo CD will not play.
Single or double sided / Single or double layer.
Dolby Digital, DTS, MPEG or Linear PCM digital audio.
MPEG-2 digital video.
Discs are generally divided into one or more ‘titles’. Titles are
further subdivided into ‘chapters’.
Single sided / Single layer. 12 cm or 8cm (5" or 3") discs.
Linear PCM digital audio. (Also compatible with finalized CDRecordable discs.)
Discs are divided into ‘tracks’.
This system can play CD-R and CD-RW discs recorded with
audio. However, depending on the quality of the initial
recording, and the condition of the disc, you may find that not
all discs will play successfully. (For example, if the disc is
scratched or dirty, or if the player’s pickup lens is dirty.) Some
CD-R and CD-RW discs may need to be finalized* before
playing successfully.
* Check with the instruction manual of the recording
component used to make the CD-R or CD-RW disc for
finalization procedures.
Avoiding problems with
condensation
Condensation may form inside the system if it is brought into
a warm room from outside, or if the temperature of the room
rises quickly. Although the condensation won’t damage the
system, it may temporarily impair its performance. For this
reason you should leave it to adjust to the warmer
temperature for about an hour before switching on and using.
Single sided / Single layer. 12 cm or 8cm (5" or 3") discs.
MPEG-1 digital audio. MPEG-1 digital video. Discs are divided
into ‘tracks’.
DVD Video regions
ALL
2
Moving the system
If you need to move the system, first switch it off and unplug
from the wall outlet. Never lift or move the unit during
playback—discs rotate at a high speed and may be damaged.
6
En
All DVD Video discs carry a region mark on the case
somewhere that indicates which region(s) of the world the
disc is compatible with. Your DVD system also has a region
mark, which you can find on the rear panel. Discs from
incompatible regions will not play in this system. Discs
marked ALL will play in any player.
Page 7

2 Controls and Displays
Front panel
1 STANDBY / ON – Press to switch the system on or into
standby.
2 Standby/timer indicator – Lights red when the
system is in standby; lights in green if the timer has been set.
3 Disc tray
4 DVD function indicator – Lights when the system is
set to the DVD function.
5 0 OPEN/CLOSE – Press to open or close the disc tray.
6 PHONES – Plug in a pair of headphones for private
listening.
Display
12345678 91011 1213
2134 5
11 1 0
6789
7 3 – Press to start or resume playback.
8 8 – Press to pause a disc that’s playing, or restart a paused
disc.
9 7 – Press to stop the disc.
10 VOLUME controls – Use to adjust the overall system
volume.
11 FUNCTION – Press to select the input source (DVD, tuner,
etc.)
1 CONDITION – Indicates playback settings (condition)
are memorized.
2 TITLE – Indicates a title playback.
3 TOTAL – Indicates total playback time of disc side currently
playing.
4 LAST MEMO – Indicates that the location on a disc where
you last stopped watching is memorized.
5 REMAIN – Indicates remaining playback time.
6 CHP/TRK – Indicates playback of a chapter or track.
7 ANGLE – Indicates multi-angle playback.
8 LFE – Lights if the current Dolby Digital or DTS source has a
Low Frequency Effects (LFE) channel.
9 Channel indicators – Shows which channels are
recorded on the disc loaded.
10 2 DIGITAL – Indicates Dolby Digital playback.
11 2 PRO LOGIC – Indicates Dolby Pro Logic playback.
14151617181920
12 DSP – Lights when a DSP mode or Advanced Theater effect
is on.
13 DTS – Indicates DTS playback.
14 Mono – Lights when the mono FM reception mode is
selected.
15 Stereo Station Reception – Lights during stereo
broadcast station reception.
16 Station Reception – Lights during broadcast station
reception.
17 Sleep Timer – Lights when the sleep timer is ON and
during sleep timer operation.
18 Wake-up Timer – Lights when the wake-up timer is ON,
and flashes during wake-up timer operation.
19 Timer ON – Lights when the wake-up timer is ON, and
flashes during wake-up timer operation.
20 96 kHz – Lights during playback of a source with a
sampling frequency of 96kHz.
7
En
Page 8
2 Controls and Displays
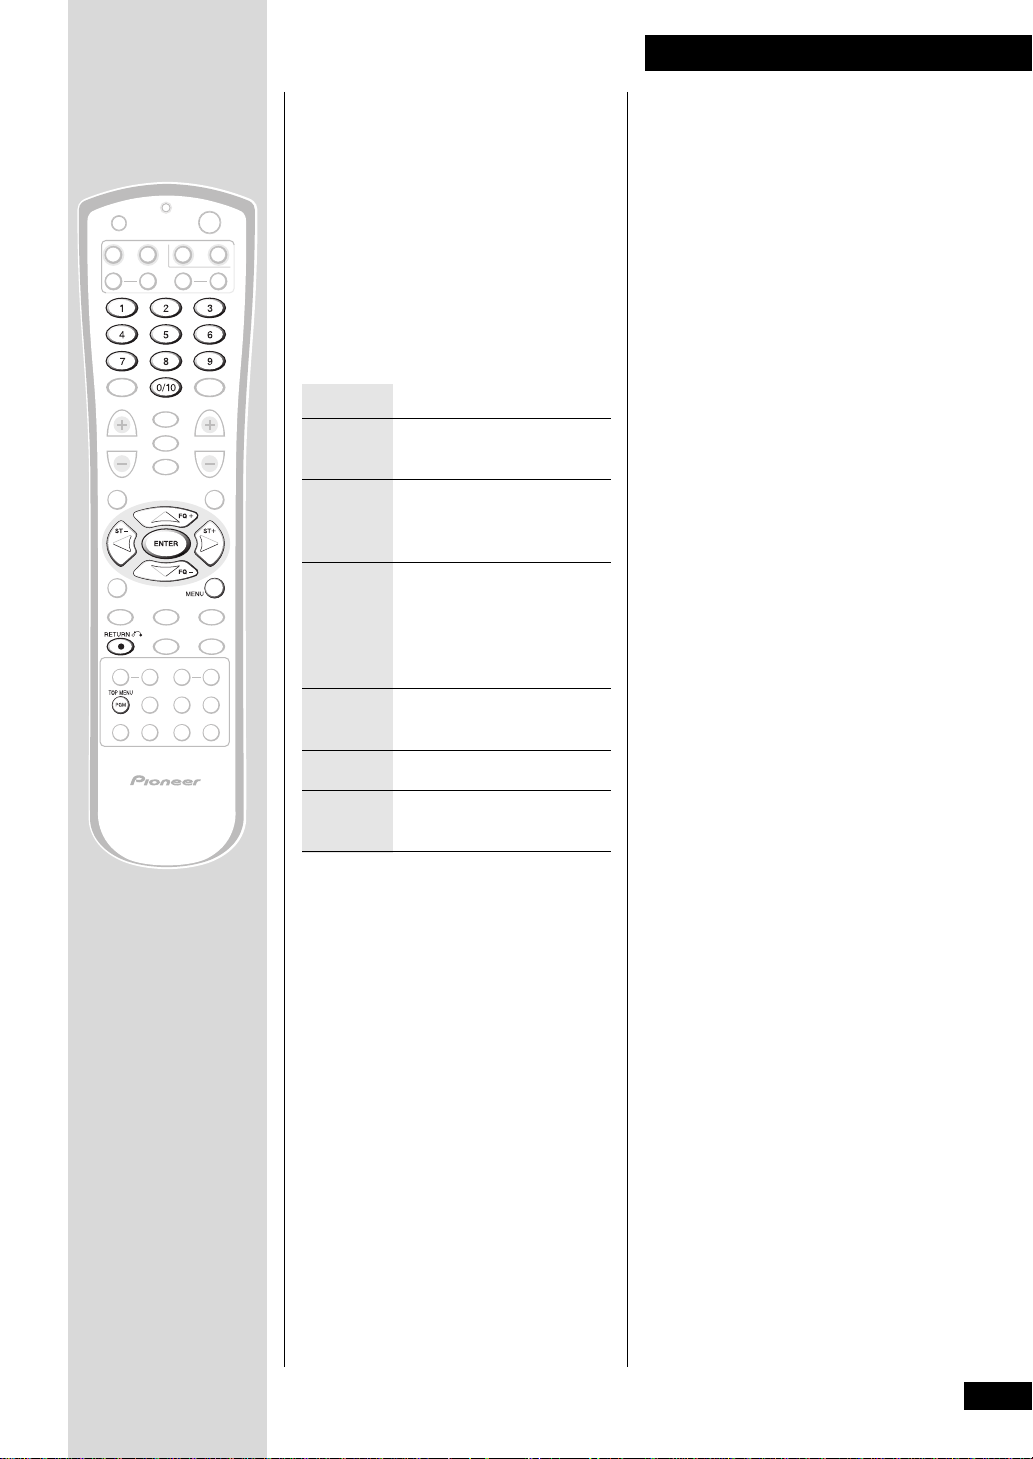
Remote control
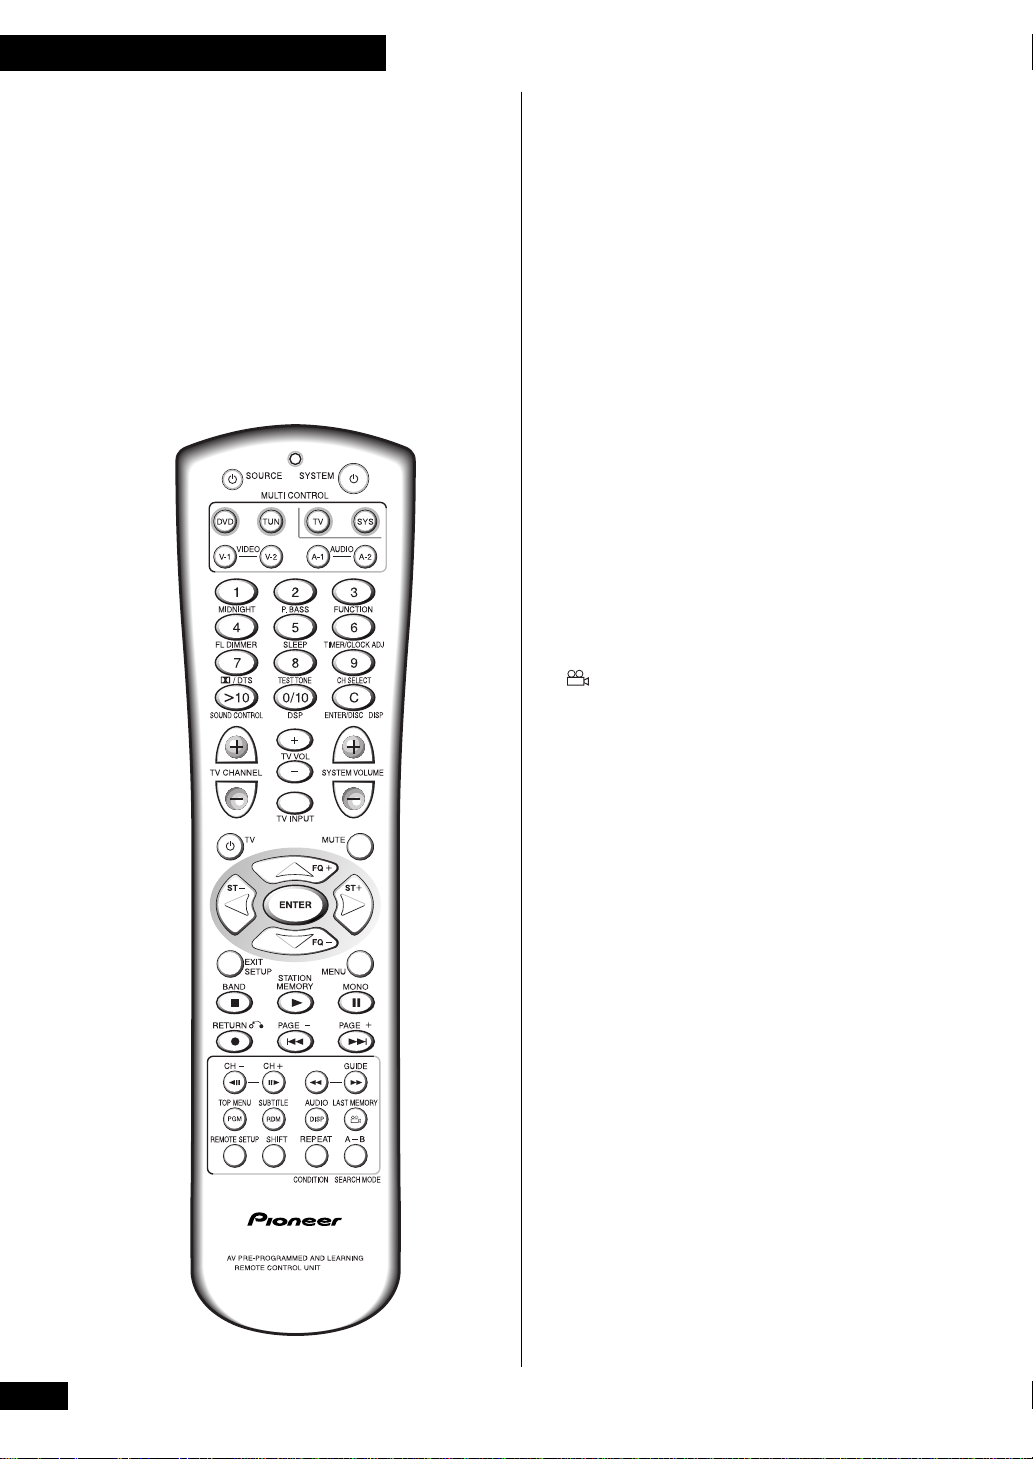
Many of the remote control’s buttons have more than one
function. To make things easier, the button names are colorcoded:
• Sky blue – DVD and Video CD functions
• Yellow – tuner functions
• Pale purple – TV functions
• Green – sound and other system settings
• Orange – DVD and CD functions (press SHIFT first to
access)
• Pink – Cable TV functions
To learn how a particular button on the remote works, look
up the function name in the alphabetical list below. Buttons
labeled only with symbols appear first.
2/DTS – Press to switch the Theater mode when listening
to Dolby Digital or DTS DVD discs. For other discs, press to
switch on Dolby Pro Logic.
7 – Press to stop a disc playing.
3 – Press to start or restart a disc playing.
8 – Press to pause or restart a disc.
¶ – Press twice within 10 seconds to start recording on a
recorder connected to the AUDIO 1 or VIDEO 1 outputs.
4 – Press to skip back tracks/chapters/titles on a disc.
¢ – Press to skip forward tracks/chapters/titles on a disc.
e – Use for slow motion reverse playback and frame
reverse with a DVD or Video CD.
E – Use for slow motion forward playback and frame
advance with a DVD or Video CD.
1 – Press and hold to reverse scan through a disc.
¡ – Press and hold to forward scan through a disc.
– Press to switch the camera angle during a multi-angle
scene on a DVD disc.
0/10 – Use as zero, or 10 when selecting tracks/chapters/
titles from a DVD, Video CD or CD, or radio station presets.
1–9 (number buttons) – Use to select tracks/chapters/titles
from a DVD, Video CD or CD, or radio station presets.
>10 – Use when entering a track/chapter/title or radio
station preset number greater than 10. After pressing, input
the required number (>10, 2, 4 for 24, and so on).
A A-1 – Press to switch to an audio component connected to
the AUDIO 1 inputs/outputs.
A-2 – Press to switch to an audio component connected to
the AUDIO 2 inputs.
A-B – Use to set the start and end points of a repeating loop.
AUDIO (sky blue) – Press to switch to another audio
channel or language on the disc playing.
B BAND – Press to switch between AM and FM bands when
listening to the radio.
C C – Press to clear settings or entries.
CH+ / CH– – Press to change channels on a satellite
tuner, cable box, VCR, etc.
CH SELECT – Press to select the speaker channel when
setting up your system for surround sound.
8
En
Page 9

2 Controls and Displays
CONDITION – Press to save the current settings for the
DVD disc playing. Next time you load the disc, the player will
automatically revert to these settings.
D DISP (orange) – Press to switch the displayed informa-
tion for the DVD or CD loaded.
DISP (green) – Press to display the time.
DSP – Use to select a DSP room effect mode.
DVD – Press when you want to play a DVD, Video CD or CD.
E ENTER – Use to confirm menu choices, setups and so on.
ENTER/DISC – Used for controlling external components
only. Function varies with the external component.
EXIT – Press to exit the guide feature of cable TV.
F FL DIMMER – Use to adjust the brightness of the
fluorescent display.
FQ+/– – Use to manually tune to radio stations.
FUNCTION – Press to switch the system function (DVD,
tuner, Video 1, etc.), without changing the remote control
mode.
G GUIDE – Press to access the guide feature on cable TV.
L LAST MEMORY – Use to bookmark the current place on
a DVD or Video CD disc, and to start playing from a previously
bookmarked place on a disc.
M MENU – Press to display a DVD or Video CD disc menu for
navigating the contents of a disc.
MIDNIGHT – Press to switch the Midnight listening mode
on or off. This mode aids listening at low volume.
MONO – Press to listen to a stereo FM radio broadcast in
mono (this can improve the sound quality). Press again to
switch back to stereo.
MUTE – Press to mute the speakers. Press again to cancel
the mute.
P P.BASS – Press to switch P.BASS on or off. Switch on for
extended bass.
PAGE +/– – Press to display the next/previous page of a
cable TV guide.
PGM – Use to program a playlist for a DVD, Video CD or CD.
R RDM – Use to set the random play mode when playing a
DVD, Video CD or CD.
REMOTE SETUP – Press to put the remote into setup
mode. Use to setup the remote to control other components in
your system.
REPEAT – Use to set the repeat mode for a DVD, Video CD
or CD.
RETURN – Use to return to the previous level of a DVD disc
menu, or to display the menu of a Video CD playing in PBC
mode.
S SEARCH MODE – Use to select a search mode (title,
chapter, track, time) for a DVD, Video CD or CD.
SETUP – Press to show the on-screen display for making
audio, video and other settings for DVD playback.
SHIFT – Press to access the remote functions printed in
orange on the remote. After pressing, the shift mode remains
in effect for up to 10 seconds.
SLEEP – Use to select a preset time until the system switches
into standby.
SOUND CONTROL – Press to adjust the bass or treble.
SOURCE – Press to switch on/off a source component
(tape or MD deck, for example) connected to this system. (You
need to set up the remote first for this to work).
ST +/– – Press to switch the station preset when listening to
the radio.
STATION MEMORY – Use to save the current frequency
as a station preset.
SUBTITLE – Press to switch the subtitle language on a
multilingual DVD disc.
SYS – Press to switch the remote from TV control to system
control without changing the source function of the system.
SYSTEM – Press to switch the system on or into standby.
SYSTEM VOLUME – Use to adjust the overall system
volume.
T TEST TONE – While setting up the channel levels of the
speakers, press to start or stop the test tone.
TIMER/CLOCK ADJ – Use to set the timer or clock.
TOP MENU – Press to display the top level menu of a DVD
disc.
TUN – Press to switch to tuner for listening to the radio.
TV – Press to switch the remote from system, DVD, tuner, etc.
control to TV control.
TV – Press to switch your TV on/off. (You need to set up
the remote first for this to work).
TV CHANNEL – Use to change the TV channel.
TV INPUT – Press to switch the TV input (from internal
tuner, to VCR1, and so on).
TV VOL – Use to adjust the TV volume.
V V-1 – Press to switch to a video component connected to the
VIDEO 1 inputs/outputs.
V-2 – Press to switch to a video component connected to the
VIDEO 2 inputs.
9
En
Page 10
3 Getting Started
Introduction
This chapter covers switching on and setting the clock, using the Setup Navigator to set
some basic preferences, using all the basic controls for playing discs, and using the
tuner.
Switching on and setting the clock
This system has a built in clock, which needs to be set to be able to use the timer
features.
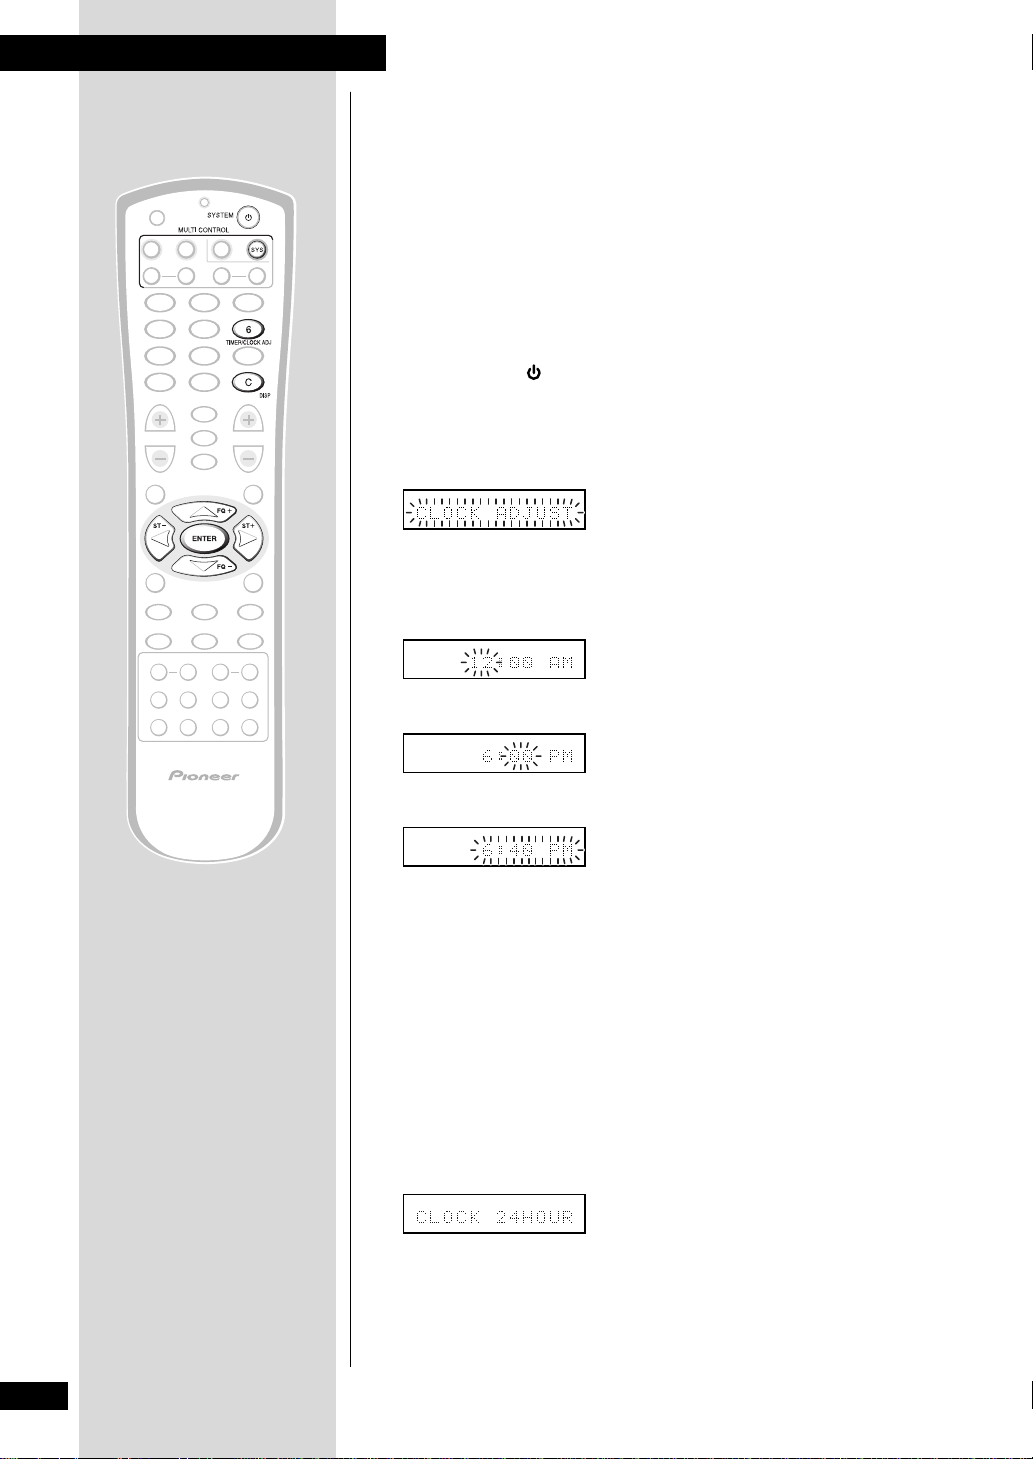
1 Press SYSTEM to switch on.
2 Press SYS then TIMER/CLOCK ADJ.
3 Press the @ or # button until you see CLOCK ADJUST in the
display.
4 Press ENTER.
If you've just connected the power, the display shows 12:00 AM, with the hour
blinking.
5 Use the % and fi buttons to set the hour, then press ENTER.
6 Use the % and fi buttons to set the minute, then press ENTER.
The display blinks for 2 seconds to indicate that the time has been set.
Tip
Press SYS then DISP anytime to see the clock when the system is on or in standby.
Switching the time format
You can display the clock in either 12 or 24-hour format.
1 Switch the system into standby.
2 Press SYS then TIMER/CLOCK ADJ.
3 Press the @ or # button until you see CLOCK 12 HOUR or
CLOCK 24 HOUR in the display.
4 Use the % and fi buttons to select 12 or 24.
10
En
5 Press ENTER.
Page 11

3 Getting Started
Setting up for surround sound
You can use this system right out of the box for surround sound with just the default settings.
However, for really great surround sound, we recommend that you spend a few minutes making
some settings that match this system to your listening room. These include setting the distances
from your listening position to your speakers, and balancing the speaker volumes. Unless you
change the layout of your speakers or main listening position, you only need to make these
settings once.
Setting the speaker distances
1 Press SYS, then SETUP.
This puts the remote into surround setup
mode.
2 Press the @ or # button until
you see FRONT in the display.
3 Use the % and fi buttons to set
the distance from your main
listening position to the front
speakers.
Ideally, your listening position should be
equidistant from the two front speakers.
The default setting is 3m. You can adjust
the range from 0.3m to 9.0m in steps of
0.3m.
4 Press # to move on to the
CENTER speaker setting.
5 Use the % and fi buttons to set
the distance from your main
listening position to the center
speaker.
The default setting is 3m. You can adjust
the range from 0.3m to 9.0m in steps of
0.3m.
7 Use the % and fi buttons to set
the distance from your main
listening position to the
surround speakers.
Ideally, your listening position should be
equidistant from the surround speakers.
The default setting is 3m. You can adjust
the range from 0.3m to 9.0m in steps of
0.3m.
8 Press ENTER to make the last
setting and exit.
• The setting mode is automatically
exited if no operation is performed
within 20 seconds.
• There are several other settings that
you can make from the System Setup
menu to further tailor your surround
sound. See chapter 10 for more on this.
• The speaker distance settings have no
effect when the Dolby/DTS mode is set
to VIRTUAL SURR1 or
VIRTUAL SURR2. See page 21 for
more on Dolby/DTS modes.
6 Press # to move on to the
SURROUND speakers setting.
11
En
Page 12
3 Getting Started
Balancing the surround sound
You can further improve surround sound performance by balancing the levels from the
subwoofer, center and surround speakers relative to the front left/right speakers. To help
you judge the sound level of each speaker a test tone is played through each speaker in
turn (make sure that there are no headphones connected). Adjust the levels until they
all sound equal.
The levels you set here will apply to all Dolby/DTS modes. However, you can set levels
independently for each DSP mode.
Note: it may not be possible to accurately adjust the subwoofer level using this
method. You may prefer to leave it on its default setting and adjust it to your liking later
when playing surround-sound sources.
1 Press SYS then 2/DTS.
The Dolby/DTS mode can be set to any-thing except SURROUND OFF. (No test tone is
output if the Dolby/DTS mode is set to SURROUND OFF.)
2 Set the volume to a moderate level.
3 Press TEST TONE to start the test tone then adjust the master
volume to a suitable level.
The test tone plays through each speaker in turn:
• Front left
• Center
• Front right
• Surround right
• Surround left
• Subwoofer
4 Use the % and fi buttons to adjust the level of a speaker as the
test tone plays.
For best results, sit in your main listening position when doing this. You can adjust each
speaker in the range of +/-10dB.
5 When you're done, press TEST TONE to turn off the test tone.
12
En
Page 13
3 Getting Started
Using the setup navigator
Before playing any discs, we strongly recommend using the Setup Navigator. This makes all the
basic system settings for you.
1 Press SYSTEM to switch on.
Also turn on your TV and make sure that it
is set to the correct video input.
• If a disc already loaded starts playing,
press 7 to stop it.
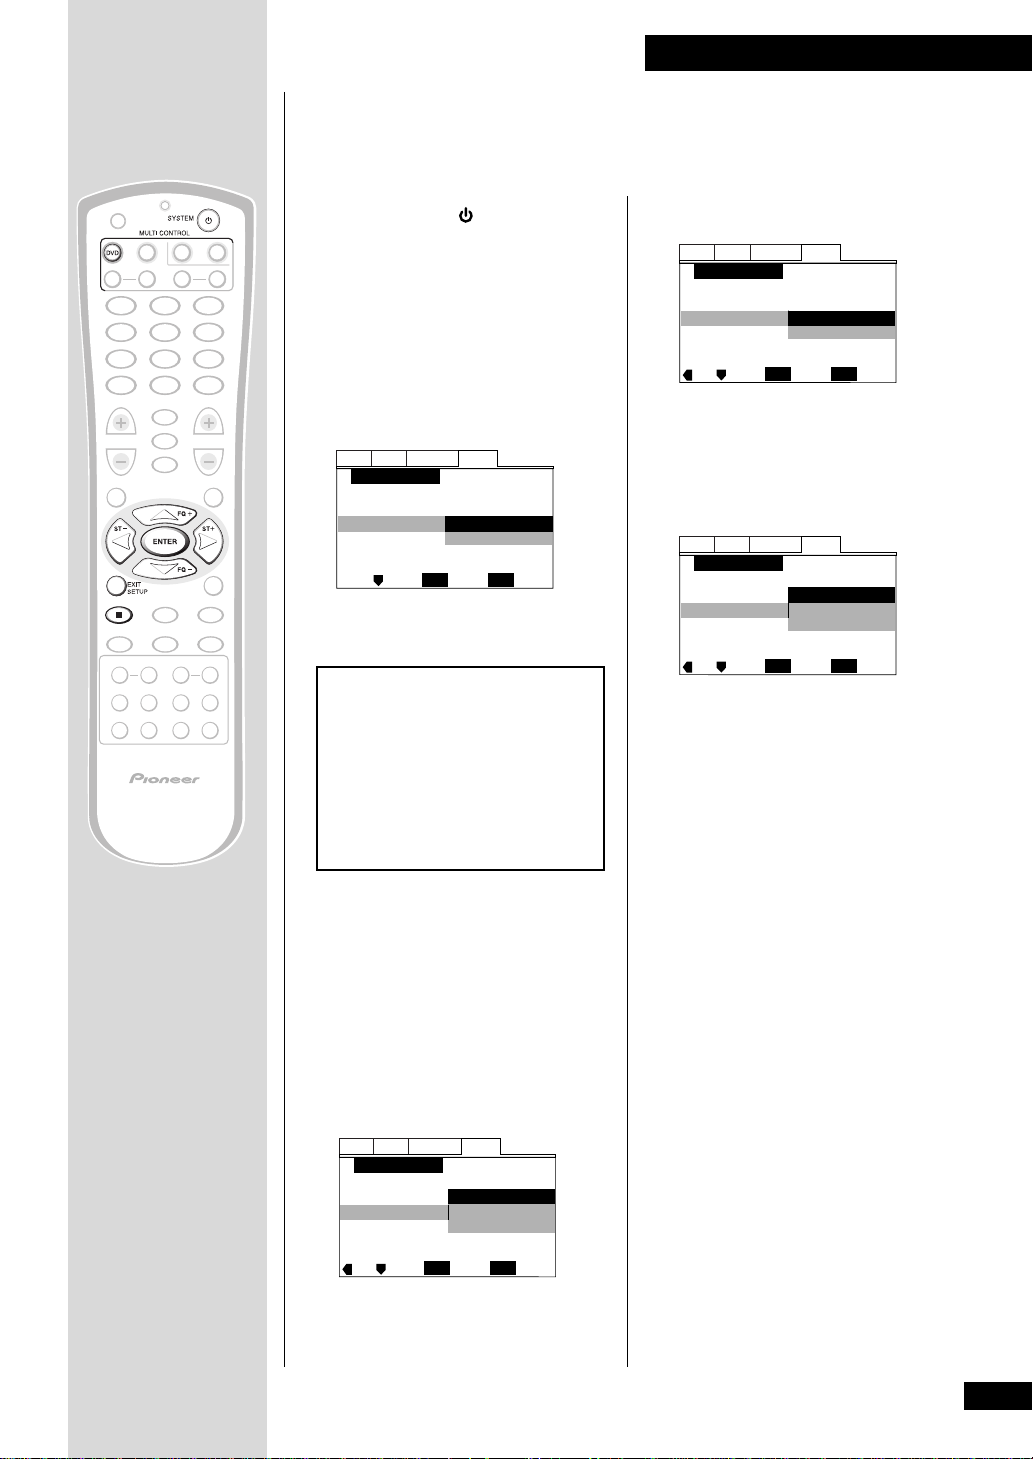
2 Press DVD then SETUP.
The Setup Navigator on-screen
display (OSD) appears:
Audio GeneralLanguageVideo
Setup Navigator
Setup Navigator
Move
Start
Auto Start Off
ENTER
Select
SETUP
Exit
Navigate all of the following OSDs using
these controls:
%, fi – cursor up/down
ENTER – select the highlighted menu
option
@ – go back to the previous question
The control possibilities for the current
OSD are shown at the bottom of each
screen.
3 Select START.
Remember: Press ENTER to select an
option.
• If you decide you don’t want to use the
Setup Navigator, select Auto Start
Off here instead.
5 Select the type of TV you have.
Audio GeneralLanguageVideo
Setup Navigator
TV Connection
TV Type
Widescreen (16:9)
Standard (4:3)
Move
ENTER
Select
SETUP
Exit
• See Aspect ratio in the glossary on page
58 if you’re unsure of the difference
between widescreen and standard TVs.
6 Confirm all the settings.
Audio GeneralLanguageVideo
Setup Navigator
Exit Setup Navigator
Move
Save Changes
Delete Changes
Start Again
ENTER
Select
SETUP
Exit
7 Press SETUP to exit.
Congratulations, you’ve set up your
system!
If you want to use the Setup Navigator
again at any time, it is available from the
General menu. Also, each individual
setting can be changed using the
appropriate menu option—chapter 9
explains all menu options in detail.
4 Choose an OSD menu
language.
Audio GeneralLanguageVideo
Setup Navigator
Language
OSD Language
Move
ENTER
English
français
Español
Select
SETUP
Exit
13
En
Page 14
3 Getting Started
Playing DVD Video discs
Only the basic controls for playback of DVD discs are covered here. Further functions are detailed
in the next chapter.
1 Press DVD.
Alternatively, press FUNCTION on the
front panel to select DVD.
2 Load a DVD disc.
• Press 0 OPEN/CLOSE to eject the
disc tray.
• Place a disc in the tray, label side face
up, making sure it is seated properly in
the disc guide.
• Press 0 OPEN/CLOSE to close the
disc tray. Many DVD-Video discs start
playing automatically.
3 Basic playback controls*
Button What it does
3 Starts/resumes playback
8 Pauses a disc that’s playing or
restarts a paused disc
7 Stops playback. Display shows
RESUME (press 3 to start
playback again from the last place
stopped).
1 Press & hold for fast reverse
scanning. (After 5 seconds,
scanning continues even after
releasing the button: press 3 to
resume normal playback.)
¡ Press & hold for fast forward
scanning. (After 5 seconds,
scanning continues even after
releasing the button: press 3 to
resume normal playback.)
Button What it does
Numbers
>10 Selects titles/chapters 11 and over.
e Press & hold for about 2 seconds to
E Press & hold for about 2 seconds to
If the disc is stopped, playback starts
from the selected title number. If
the disc is playing, playback jumps
to the start of the selected chapter
number.
(For example, for 24, press >10 , 2,
4
.)
start slow-motion reverse scanning.
Change the speed using the e
and E buttons.
When playing, press once to pause;
reverse a single frame with each
subsequent press.
start slow-motion forward scanning.
Change the speed using the e
and E buttons.
When playing, press once to pause;
advance a single frame with each
subsequent press.
* While using the DVD, you may see the
or mark displayed on-screen.
means that the operation is not
allowed by the system.
means that the operation is not
allowed by the disc.
14
En
4 Skips to the start of the current
chapter, then to previous chapters.
¢ Skips to the next chapter.
Page 15
4 Basic disc menu controls
Some DVD discs contain menus.
Sometimes these are displayed
automatically when you start playback;
others only appear when you press MENU
or TOP MENU.
Control What it does
3 Getting Started
TOP MENU
MENU Displays a DVD disc menu—this
RETURN
Cursor
buttons
ENTER Selects the current menu option
Numbers
Displays the ‘top menu’ of a DVD
disc—this varies with the disc.
varies with the disc and may be the
same as the ‘top menu’.
Returns to the previously displayed
menu screen.
On some DVD-Audio discs featuring
browsable pictures, press to display
the browser screen.
Moves the cursor around the screen
Selects a numbered menu option
(some discs only)
5 Eject and remove the disc
before switching off.
15
En
Page 16
3 Getting Started
Playing CDs
Only the basic controls for playback of CDs are covered here. Further functions are
detailed in the next chapter.
1 Press DVD.
Alternatively, press FUNCTION on the front panel to select DVD.
2 Load a CD.
• Press 0 OPEN/CLOSE to eject the disc tray.
• Place a disc in the tray, label side face up, making sure it is seated properly in the
disc guide.
• Press 0 OPEN/CLOSE to close the disc tray.
3 Basic playback controls:
Button What it does
3 Starts/restarts playback
8 Pauses a disc that’s playing or restarts a paused disc
7 Stops playback
1 Press & hold for fast reverse scanning.
¡ Press & hold for fast forward scanning.
4 Skips to the start of the current track, then to previous tracks.
¢ Skips to the next track.
Numbers
>10 Selects tracks 11 and over. (For example, to select track 24, press >10, 2, 4.)
4 Eject and remove the disc before switching off.
Starts playback from the selected track number.
16
En
Page 17

3 Getting Started
Playing Video CDs
Only the basic controls for playback of Video CDs are covered here. Further functions are detailed
in the next chapter.
1 Press DVD.
Alternatively, press FUNCTION on the
front panel to select DVD.
2 Load a Video CD.
• Press 0 OPEN/CLOSE to eject the
disc tray.
• Place a disc in the tray, label side face
up, making sure it is seated properly in
the disc guide.
• Press 0 OPEN/CLOSE to close the
disc tray.
3 Basic playback controls
Many Video CDs contain menus, from
which you control playback. This is called
PlayBack Control, or PBC, and if the disc
features it, the PBC menu will be the first
thing you see when you start playback (see
Basic PBC menu controls on the right
for how to navigate these).
Button What it does
3 Starts/resumes playback
8 Pauses a disc that’s playing or
restarts a paused disc
7 Stops playback. Display shows
RESUME (press 3 to start
playback again from the last place
stopped).
1 Press & hold for fast reverse
scanning. (After 5 seconds,
scanning continues even after
releasing the button: press 3 to
resume normal playback.)
Button What it does
Numbers
>10 Selects tracks 11 and over. (For
E Press & hold for about 2 seconds to
Starts playback from the selected
track number.
example, to select track 24, press
>10, 2, 4.)
start slow-motion forward scanning.
Change the speed using the e
and E buttons.
When playing, press once to pause;
advance a single frame with each
subsequent press.
4 Basic PBC menu controls
If the Video CD features PBC menus,
navigate them using the following
controls. To switch off PBC, press 7 then
restart playback using a number button to
select a track directly.
Button What it does
RETURN
Numbers
4 Displays the previous menu page (if
¢ Displays the next menu page (if
3 Press to select an item from a PBC
Displays the PBC menu.
Selects a numbered menu option.
there is one).
there is one).
menu.
5 Eject and remove the disc
before switching off.
¡ Press & hold for fast forward
scanning (After 5 seconds, scanning
continues even after releasing the
button: press 3 to resume normal
playback.)
4 Skips to the start of the current
track, then to previous tracks.
¢ Skips to the next track.
17
En
Page 18

3 Getting Started
Listening to the radio
The following steps show you how to tune in to FM and AM radio broadcasts using the
automatic (search) and manual (step) tuning functions. Once you are tuned to a
station you can memorize the frequency for recall later—see Saving station presets on
page 30 for more on how to do this.
1 Press TUN.
Alternatively, press FUNCTION on the front panel to select Tuner.
2 Press BAND to select the FM or AM band.
Each press switches the band between FM and AM.
3 Tune to a station.
There are three ways to do this:
• Automatic tuning
To search for stations in the currently selected band, press and hold either the FQ + or
FQ – button for about a second. The system will start searching for the next station,
stopping when it has found one. Repeat this step to search for other stations.
• Manual tuning
To change the frequency one step at a time, press the FQ + / FQ– buttons.
• High speed tuning
Press and hold the FQ+ or FQ– button for high speed tuning, releasing the button
once you reach the frequency you want.
Improving FM stereo sound
If you’re listening to a stereo FM broadcast, but find that there is a lot of noise because
of a weak signal, try switching to mono.
• Press MONO to switch between mono and stereo.
When listening in mono, the indicator lights in the display.
18
En
Page 19
3 Getting Started
Listening to other components
This system has several audio/video inputs for you to connect other components, such
as a VCR, MD deck, and so on. See chapter 12 for more on connecting up other
components.
1 Switch to the source you want to watch/listen to.
There are four external inputs you can connect components to. Select them using the
multi-control buttons:
• V-1 (Video 1)
• V-2 (Video 2)
• A-1 (Audio 1)
• A-2 (Audio 2)
Alternatively, you can use the FUNCTION button on the front panel, or press SYS then
FUNCTION on the remote.
2 Start playing the source component.
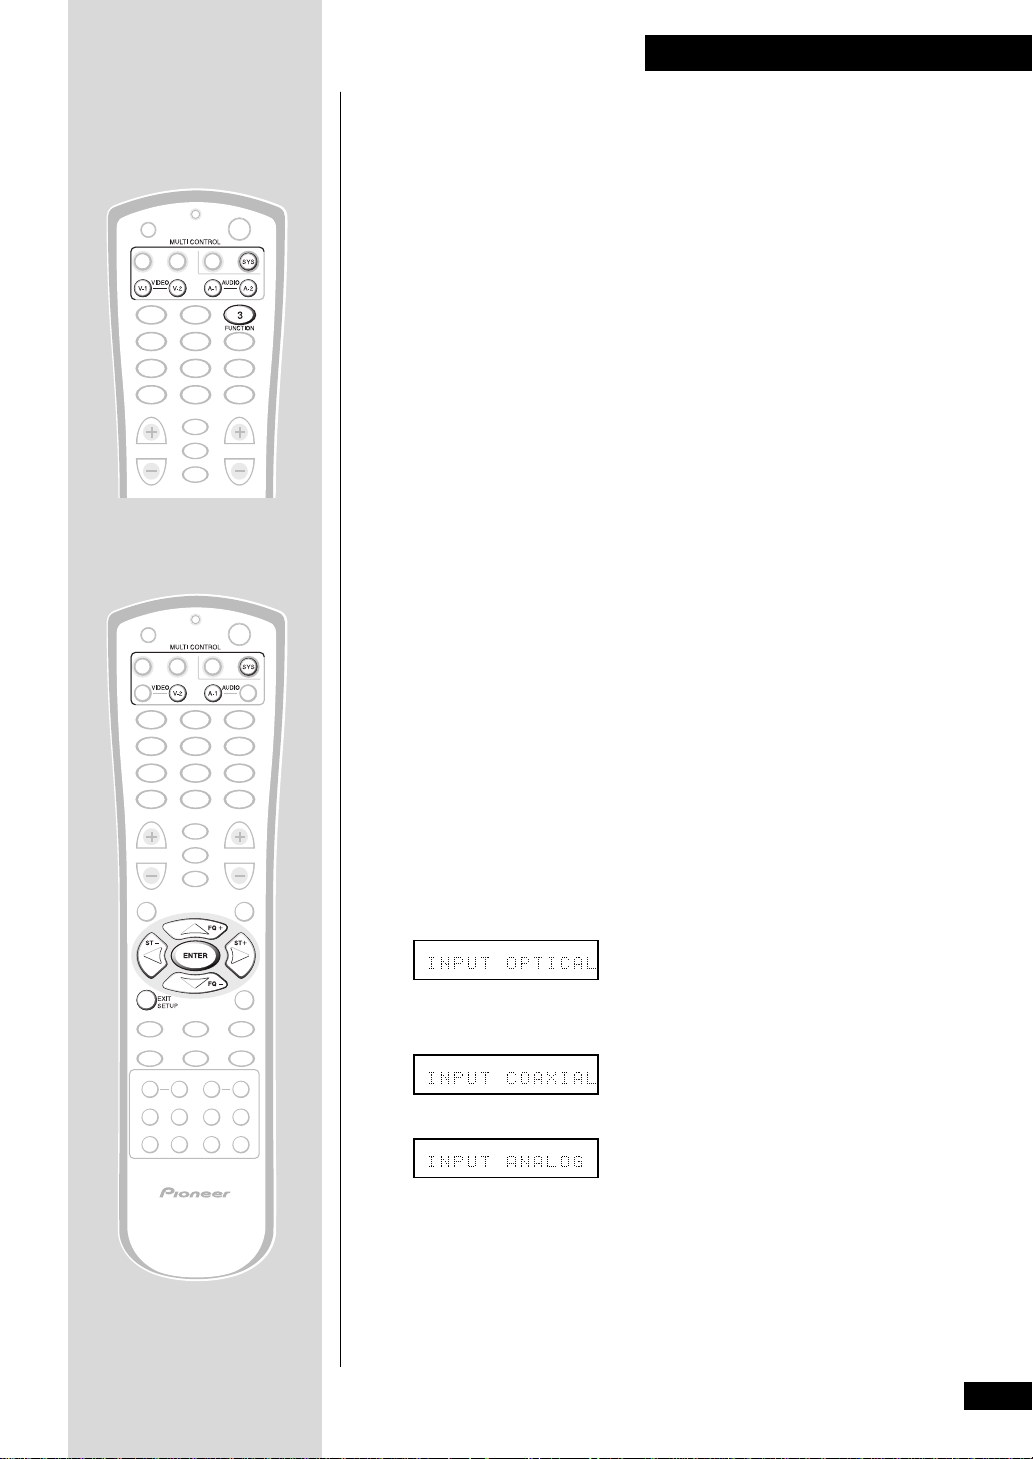
Switching between digital and analog sources
Both digital and analog inputs are available when Audio 1 or Video 2 is selected as the
source. The Input Select setting tells the system which input it should use.
See page 54 for more on connecting other components to this system.
Note: This system can only play Dolby Digital, PCM (32, 44.1, and 48kHz) and DTS
digital audio formats. For digital sources using other formats, use analog connections
and select INPUT ANALOG.
1 Press AUDIO A-1 or VIDEO V-2 (for the input you want to set).
The settings for the Audio 1 and Video 2 inputs are completely independent.
2 Press SYS then SETUP.
3 Press the @ or # button until you see INPUT in the display.
4 Use the % and fi buttons to select the input to use.
• INPUT OPTICAL – the optical digital input is used as the source
• INPUT COAXIAL – the coaxial digital input is used as the source (this setting is
only available for VIDEO 2)
• INPUT ANALOG – (default setting) the analog inputs are used as the source
5 Press ENTER to make the setting.
19
En
Page 20

4 Shaping the Sound
Adjusting the bass and treble
The simplest way to shape the sound is by adjusting the amount of bass and treble.
Note: The bass and treble controls have no effect when using the DSP modes, or when
the Dolby/DTS mode is set to anything other than AUTO, STANDARD or SURROUND
.
OFF
1 Press SYS then SOUND
CONTROL.
2 Use the @ or # buttons to select BASS or TREBLE.
3 Use the % and fi buttons to adjust the sound.
You can see the current level in the display.
4 Press ENTER to set the level.
Using P.Bass
In addition to the standard controls for adjusting bass and treble, this system has a
P.Bass feature. Switch this on to further extend the bass.
Note: P.Bass has no effect when listening through headphones.
• Press SYS then P.BASS to switch P.BASS on or off.
20
En
Page 21

Using sound modes
The sound modes allow you to add various
room-type sound effects to your DVDs, CDs
and other sources. These effects process the
sound in various ways to simulate different
spaces such as a theater, or concert hall.
For Dolby Surround, Dolby Digital or DTS
surround sources, such as DVDs, use the
Advanced Theater effects to add room
effects to the sound; for stereo-only
sources, such as audio CDs, use the DSP
modes. As well as choosing between effects,
you can also adjust how strong the effect
sounds. Often, a more subtle effect level
enhances the sound better than turning it
right up. Experiment to see what works
best for you.
Listening to surroundsound sources with
room effects
Effects modes
Switch on the Dolby/DTS mode when you
play a Dolby Surround, Dolby Digital or
DTS encoded source.
• Auto – For digital sources, decoding
is automatically selected according to
the source: Dolby Digital, DTS, Dolby
Pro Logic, 2-channel stereo, etc. No
extra effects are added to the source.
Analog sources are played in the same
way as the Surround Off setting.
• Standard – As Auto, except that 2channel (analog or digital) sources
are processed using Dolby Pro Logic for
surround-sound effects.
• Musical – Concert hall sound.
• Drama – Classic, mid-size movie
theater sound.
• Action – Large, modern movie
theater sound.
• Virtual Surround 1 – Virtual
surround sound from just the main
front stereo speakers and a subwoofer.
Use this mode if you can't use the
surround speakers.
4 Shaping the Sound
• Virtual Surround 2 – Virtual
surround sound if you have connected
the surround speakers, but are using
them in front of the listening position.
• Rear Wide – Widens the rear
channel soundstage.
• Surround Off – All sources are
played through only the front left and
right speakers, and the subwoofer. No
effects are added.
Note: The Dolby/DTS mode cannnot be
used with 96kHz/24-bit sources, or in
combination with DSP effects.
1 Press SYS then 2/DTS to
select a sound mode.
Each press changes the mode as follows:
• AUTO
• STANDARD (surround on, with no
Advanced Theater effect)
• MUSICAL
• DRAMA
• ACTION
• VIRTUAL SURR.1
• VIRTUAL SURR.2
• REAR WIDE
• SURROUND OFF (surround off)
To adjust the effect level when
using one of the Advanced
Theater effects:
1 Press SYS then SOUND CON-
TROL.
2 Use the % and fi buttons to
adjust the effect level.
You can adjust the effect level in the range
of 10 to 90.
21
En
Page 22

4 Shaping the Sound
Listening to other
sources with room
effects
You can add room effects to audio CDs and
other stereo sources using the DSP modes.
Different effects work better with different
kinds of music, so don’t be afraid to
experiment a little.
There are seven DSP effects to choose from:
• Hall 1 – Large, wood-paneled
concert hall sound.
• Hall 2 – Large, stone-walled concert
hall sound.
• Jazz – Live jazz club sound.
• Dance – Nightclub sound.
• Theater 1 – Classic, mid-size movie
theater sound.
• Theater 2 – Large, modern movie
theater sound.
• Simulated Stereo – Virtual stereo
for mono sources.
Notes
• The DSP effects cannnot be used with
96kHz/24-bit sources, or in combination with the Dolby/DTS mode.
• When playing stereo sources with DSP
effects switched off, there is no sound
from the surround and center speakers.
1 Press SYS then DSP to select a
sound mode.
Each press changes the mode as follows:
• HALL 1
• HALL 2
• JAZZ
• DANCE
• THEATER 1
• THEATER 2
• SIMULATED STEREO
• DSP OFF (no effects added)
Listening at low volume
When the volume is low, surround effects
tend to become less than satisfactory. Turn
the Midnight listening mode on to enjoy
quality surround sound even at low
volumes.
• Press SYS then MIDNIGHT to
switch Midnight listening mode
on/off.
Adjusting channel
volume levels
Depending on your room and where you’re
sitting, you may want to adjust the relative
volumes of one or more speakers for a
more balanced sound. You can do this in
any mode, including the Dolby Digital/
DTS, DSP, and stereo modes. Settings that
you make in any sound mode are
completely independent and don’t affect
any other mode.
Notes
• Each DSP effect has its own set of
channel level settings.
• The channel levels you set for the
Dolby/DTS mode apply to all Advanced
Theater effects.
• The headphone level is not affected by
the channel level settings.
1 Press SYS then CH SELECT.
Adjustments to the channel volume levels
will affect only the current sound mode.
2 Use the @ and # buttons to
select a channel to adjust.
The display shows the channel and its
current setting.
• Remember that not all channels are
available in all sound modes.
22
En
To adjust the effect level when
using one of the DSP effects:
1 Press SYS then SOUND CON-
TROL.
2 Use the % and fi buttons to
adjust the effect level.
You can adjust the effect level in the range
of 10 to 90.
3 Use the % and fi buttons to
adjust the volume of the
current channel.
For best results, sit in your main listening
position when doing this. You can adjust
each speaker in the range of +/-10 dB.
4 When you're done, press
ENTER.
Page 23

5 Using the DVD Player
Introduction
• Most of the functions covered in this chapter apply to DVD discs, Video CDs and CDs,
although the exact operation of some varies slightly with the kind of disc loaded.
• When playing DVD discs, if the or icon appears on-screen when you try and
use a particular function, either the player or the disc doesn’t allow the use of that
function.
• When playing Video CDs, some of the functions are not available in PBC mode. If
you want to use them, stop the disc first and restart by inputting a track number on
the remote control.
Finding what you want on a disc
You can directly access any point on a disc using one of the search modes. Use these
search modes while a disc is playing, or when it’s stopped— playback immediately
starts from the point specified.
1 Press SHIFT, then SEARCH MODE repeadedly to choose between:
• Title search (DVD only)
• Chapter/Track search
• Time search (DVD and Video CD only)
• Off
2 Enter the title/chapter/track number or time (minutes &
seconds).
For example, for title 4, press 4.
For chapter/track 12, press 1 , 2.
For 45 minutes into the disc,
press 4 , 5 , 0 , 0.
3 Press 3 to start/restart playback.
23
En
Page 24

5 Using the DVD Player
Switching camera angles (DVD only)
Some DVD discs feature scenes shot from two or more angles—check the box for
details: it should be marked with a icon if it contains multi-angle scenes. When
these scenes are playing, a camera icon appears on-screen and the ANGLE indicator
lights in the display.
• To switch the camera angle, press SHIFT then .
• To hide the TV angle indicator, choose Angle Indicator > Off from
the Video menu (see page 35).
Switching subtitles
(DVD only)
Many DVD discs have subtitles in one or more languages—the box will usually tell you
which subtitle languages are available. You can switch subtitle language anytime
during playback.
• To display/switch the subtitle language, press SUBTITLE
repeatedly.
• To switch off subtitles, press SUBTITLE then C (Clear).
• To set subtitle preferences, see page 37.
Switching audio language (DVD only)
When playing a DVD disc recorded with dialog in two or more languages, you can
switch audio language anytime during playback.
Note: With some discs, you can select the audio language from the DVD disc menu.
Press menu then follow the on-screen menus to make your selection.
• To display the current audio language, press AUDIO.
• To switch the audio language, press AUDIO repeatedly.
• To set audio language preferences, see page 36.
Programming playlists
Programming a playlist means telling the player which tracks, and in what order, you
want played. You can program a sequence of up to 24 tracks, playing tracks more than
once if you like.
Input the playlist via an on-screen display, using the cursor buttons and number
buttons to navigate the screen and enter title/chapter numbers.
24
En
Page 25

Programming a DVD playlist
Program Chapter Program Title
Current:
Title
Title
1
(Chapter 1 ~ 49)
Program Memory
PROGRAM
ExitMove
09
–––––– –– –– –– –– –– ––
07 18 –– –– –– –– ––
–– –– –– –– –– –– ––
On
Off
7
Chapter
1
5 Using the DVD Player
1 Press SHIFT then PGM.
2 Use the @ and # buttons to
select Program Chapter or
Program Title.
If you select Program Chapter, move
the cursor down (fi) to highlight Title,
then enter a title number (all the chapters
you program will be from this title).
Program Chapter Program Title
Current: Title
Title
–– –– –– –– –– –– ––
––
–– –– –– –– –– –– ––
––
–– –– –– –– –– –– ––
––
Program Memory – Off
Program Chapter
Current: Title
––
–– –– ––––––––––––––––––
––––––––
––
Program Memory – Off
7 Chapter 1
(Chapter 1~ 18)
1
PROGRAM
ENTER
PlayMove
Program Title
2(/20)
–– –– –– –– –– ––
ENTER
PROGRAM
PlayMove
Exit
––
Exit
3 Move the cursor down to the
playlist window and start
entering chapter/title numbers.
For titles/chapters 1 to 10, use the
corresponding number button. For 11 and
over, use the >10 button (>10, 2, 4 for
24, etc.)
4 If you want to memorize the
playlist, move the cursor down
to Program Memory and set it
to ON.
The player can memorize playlists for up
to 24 DVD discs.
5 Press ENTER to start playback
immediately, or SHIFT then
PGM to exit if you want to start
playback later.
Program Chapter Program Title
Current: Title
Title
09
07 18 –– –– –– –– ––
–––––– –– –– –– –– –– ––
–– –– –– –– –– –– ––
Program Memory – Off
Program Chapter
Current: Title
09
07 18
––––––––
––
Program Memory – Off
7 Chapter 1
1
(Chapter 1~ 18)
PROGRAM
ENTER
PlayMove
Program Title
2(/20)
––––––––––––––––––
–– –– –– –– –– ––
ENTER
PROGRAM
PlayMove
Exit
––
Exit
25
En
Page 26

5 Using the DVD Player
Programming a CD/Video CD playlist
1 Press SHIFT then PGM.
Program Track
Current: Track
Total Time
––
––––––––
1(/10)
–– –– ––––––––––––––––––
––
0.00
–– –– –– –– –– ––
ENTER
PROGRAM
PlayMove
––
Exit
2 Start entering track numbers.
For tracks 1 to 10, use the corresponding number button. For 11 and over, use the >10
button (>10, 2, 4 for 24, etc.)
3 Press ENTER to start playback immediately, or SHIFT then PGM to
exit if you want to start playback later*
* You can’t start program playback later with a PBC Video CD: press ENTER to start.
More programming options
There are several other options available when programming/using playlists.
• To view the playlist, press SHIFT then PGM.
• To put a pause in the playlist, press 8 instead of a number.
• You can’t program two pauses in succession, or start/end a playlist with a pause.
• To delete an entry from the playlist, position the cursor on the
title/chapter/track number and press C (Clear).
• To insert an entry into the playlist, position the cursor where you
want the title/chapter/track to appear, then enter its number.
All the following entries move up one.
• To add an entry to the end of the playlist, press SHIFT then PGM,
enter the title/chapter/track number, then press SHIFT and PGM
again.
• To add the currently playing title/chapter/track to the playlist,
press SHIFT then hold PGM for about 2 seconds.
• If there is no current playlist, a new one is created. (For DVD: if the last playlist
programmed was for titles, then a title playlist is created; otherwise a chapter playlist
is created.)
• To delete the playlist, press 7 to stop playback, then press C
(Clear).
• To delete a memorized DVD playlist, load the DVD disc, press
SHIFT then PGM, then change the Program Memory option to
Off. Press ENTER to confirm.
26
En
Page 27

5 Using the DVD Player
Using repeat play
Use the repeat function to repeat the
current track/chapter/title, the whole disc,
or loop between two points anywhere on
the disc. You can set the repeat mode in
normal or program play modes. Set or
change the repeat mode while the disc is
already playing.
Note: you can’t use repeat and random
play at the same time.
• To set or change the repeat
mode, press REPEAT.
The repeat mode is shown on-screen. Just
stop on the one you want.
• To cancel repeat play, press C
(Clear), or set the repeat mode
to OFF.
• To loop a section of a disc,
press A–B to mark the start
point, then again to mark the
end point and start looping.
• To cancel looping, press A–B
again.
• To repeat a section of a disc
once, press A–B to mark the
start point, then press 3 to
mark the end point and loop.
Using random play
To play titles/chapters/tracks in a different
order each time you play a disc, use the
random play mode. Each title/chapter/
track plays just once, but in a random
order. Set the random play mode while the
disc is playing or stopped.
Note: you can’t use random play
together with program or repeat play.
DVD
• To start playing chapters at
random, press SHIFT then
RDM, then ENTER.
• To start playing titles at random, press SHIFT, then RDM
twice, then ENTER.
CD/Video CD
• To start playing tracks at
random, press SHIFT then
RDM.
Button What it does
RDM
CD/Video CD: Starts random
playback of tracks.
DVD: Sets random mode (chapter
or title). Press
ENTER
to start.
Button What it does
REPEAT Sets the repeat mode. For DVD the
repeat modes are title or chapter;
for CDs or Video CDs, track or all
tracks.
A–B Sets the start point of a loop to
repeat. Press again to mark the end
point and start the loop repeating.
• To play the loop just once, mark
the end point by pressing 3
C Cancels repeat mode (playback
continues).
7 Cancels repeat mode (playback
stops).
ENTER DVD only: Starts random
playback.
¢ Starts a new random title/chapter/
track.
4 Returns to the start of the current
title/chapter/track (you can’t go
further back than this).
C Cancels random mode (playback
continues normally).
7 Cancels random mode (playback
stops).
27
En
Page 28

5 Using the DVD Player
Bookmarking a place in a disc
(DVD/Video CD)
If you watch only part of a DVD disc with the intention of picking up later where you left
off, you can bookmark the place then resume playback at a later date without having to
manually search for the right place.
You can use this feature for up to five discs (after that the oldest bookmark is deleted to
make space for a new one).
• At the point from which you want to resume playback next time,
press LAST MEMORY, then stop the disc (7).
• To resume playback, load the disc and press LAST MEMORY. (If
the disc started auto playback, stop it first.)
• To clear the last memo position of the disc loaded, press LAST
MEMORY then C (Clear) while Last Memory is displayed onscreen.
Note: Bookmarking also works with Video CD, but for one disc only, and you must
leave the disc in the system—opening the disc tray erases the memory. Last Memory
may not work reliably with some PBC Video CDs.
Memorizing disc settings (DVD only)
If you have a particular set of preferences for a disc, you can memorize them using the
Condition Memory function. Once memorized, your settings will be recalled
automatically whenever you load that disc. The system can store settings for 15 discs;
after this, memorizing another replaces the oldest one stored.
The settings memorized are:
• On Screen Display (page 34)
• Subtitle language (page 37)
• Audio language (page 36)
• Video quality (page 35)
• Angle indicator (page 35)
• Parental lock level (page 39)
• To memorize settings for the current disc, press SHIFT then
CONDITION during playback.
• To recall memorized settings, just load the disc.
The display shows COND_MEMORY and Condition Memory appears
on-screen.
• To clear memorized settings, load the disc and press C (Clear)
while Condition Memory is displayed on-screen.
28
En
Page 29

5 Using the DVD Player
Displaying disc information
Various track, chapter and title information, as well as the video transmission rate for
DVD discs, can be displayed on-screen while a disc is playing, or while it’s stopped.
• To show/switch the information displayed, press DVD then DISP.
• When a disc is playing, the informa-tion appears at the top of the screen. Keep
pressing DISP to change the displayed information.
Play
Tr. Rate :
3
9.2
DVD display showing the
video transmission rate
• When a disc is stopped, all title/chapter, or track information for the disc loaded
appears on-screen. Press DISP again to exit the screen.
Information: DVD
Title Chapter Title Chapter
1~ 30
01
1~ 21
02
1~ 46
03
1~ 12
04
1~ 8
05
1/1
1~ 10
06
1~ 13
07
1~ 5
08
1~ 4
09
DISPLAY
Exit
DVD-Video
Information: Compact Disc
1/1
3.32
2.58
6.30
DISPLAY
Exit
Total Time
Track Time
01
02
CD/Video CD
• To display the time remaining on the DVD disc playing, press and
hold DISP.
The time remaining is displayed for as long as you hold down the DISP button. Release
to revert to the previous display.
29
En
Page 30

6 Using the Tuner
Saving station presets
If you often listen to a particular radio station, it's convenient to have the receiver store
the frequency for easy recall whenever you want to listen to that station. This saves the
effort of manually tuning in each time. This system can save up to 30 station presets.
When saving FM frequencies, the receiver also saves the mono setting (see page 18).
1 Tune to a station you want to memorize.
See Listening to the radio on page 18 for more on how to do this.
2 Press STATION MEMORY.
3 Press ST+ or ST– to select a station preset number.
Alternatively, use the number buttons (use the >10 button for numbers over 10).
If you use the number buttons, you can skip step 4.
4 Press STATION MEMORY again to save the station preset.
Repeat these steps to save up to 30 station presets.
Listening to station presets
Having saved up to 30 station presets (see above for how to do this), you can be listening
to a station with a couple of button presses.
1 Press TUN to switch to the tuner.
2 Use ST+ or ST– to select the station preset you want to listen to.
Alternatively, use the number buttons (use the >10 button for numbers over 10).
• If the system is left disconnected from the AC power outlet for a lengthy period, the
station presets will be lost and will have to be re-programed.
30
En
Page 31

7 Using the Timer
Using the wake up timer
You can use the timer as an alarm clock to
wake up to the sound of a disc loaded or
the radio. If you have an external
component operated by a separate timer,
you can also set the source function to
that.
Once the timer is active, it will switch the
system on everyday at the set time.
Unlike an ordinary alarm clock, you need
to set a system switch off time as well as a
switch on time.
1 Select the source that you’d
like to wake up to.
For a disc, press DVD; for the radio press
TUNER. For an external component, press
the corresponding button.
2 Load a disc or tune to a radio
station, then set the volume.
If you selected an external component,
make the appropriate timer settings for it.
When setting the volume, remember
things sound louder first thing in the
morning!
7 Set the switch off time.
Set in the same way as the switch on time,
pressing ENTER to finish.
• If you make a mistake, press
TIMER/CLOCK ADJ and start again
from step 3.
8 Check the settings you just
made.
The display should indicate that you set
the wake up timer, then show the on time,
the off time, the function (DVD, etc.), and
the volume.
• There is no direct way to edit the timer
settings. If you see that some timer
setting is not what you’d intended,
you’ll need to start the process again
from the top.
9 Switch the system into standby.
The timer will not work if the system is left
on!
The standby light on the front panel lights
green to indicate that the timer has been
set.
3 Press SYS then TIMER/CLOCK
ADJ.
4 Press the @ or # button until
you see WAKE-UP SET in the
display.
5 Press ENTER.
The display shows a switch on time with
the hour blinking.
6 Set the switch on time.
Use % and fi to set the hour then press
ENTER. Set the minute in the same way,
pressing ENTER to finish.
• If you make a mistake, press
TIMER/CLOCK ADJ and start again
from step 3.
Activating/deactivating
the wake up timer
To activate the wake up timer, set the timer
to ON. To deactivate it, set the timer to
OFF.
1 Press SYS then TIMER/CLOCK
ADJ.
2 Press the @ or # button until
you see TIMER ON or TIMER
OFF in the display.
3 Press ENTER.
31
En
Page 32

7 Using the Timer
Checking the timer
settings
If you’ve set the wake-up timer, you can
check the settings anytime. Here’s how to
do it.
1 Press SYS then TIMER CLOCK/
ADJ.
2 Press the @ or # button until
you see TIMER CHECK in the
display.
3 Press ENTER.
The display shows the timer settings:
• On time
• Off time
• Function (DVD, etc.)
• Volume
Using the sleep
timer
The sleep timer switches the system into
standby after a specified amount of time so
that you can fall asleep without worrying
about the stereo being left on all night. If
you've also set the wake up timer this is
important since the wake up timer will
only work if the system is in standby.
1 Press SYS.
2 Press SLEEP to set the time
until the system goes into
standby.
Press repeatedly to switch between:
• SLEEP AUTO – this setting is only
available when the system is playing a
CD *
• SLEEP 90 (minutes)
• SLEEP 60 (minutes)
• SLEEP 30 (minutes)
• SLEEP OFF (cancels the sleep timer)
The sleep timer indicator ( ) lights
when the sleep timer is active.
* not available when a Video CD is in PBC
mode, or if you're playing a CD or Video
CD in repeat mode. If you set a disc
playing in repeat mode after setting the
sleep timer to AUTO, it automatically
switches to the 90 minute setting.
• Once the sleep timer is set, you can
check the time left by pressing SLEEP.
•TO cancel the sleep timer, switch the
system into standby, or select SLEEP
(as described above)
OFF
• If you switch to a different source when
SLEEP AUTO is set, the system will
automatically go into standby a
minute later.
32
En
Page 33

8 Making Recordings
Making an audio or a video recording
The following steps show you how to make
an audio or a video recording from the
built in tuner, DVD, CD or from an audio
or video source connected to the system
(CD player, satellite tuner, etc.). Recordings
can be made to a recorder connected to the
AUDIO 1 or VIDEO 1 inputs/outputs.
The system's volume, balance, bass, treble,
Midnight and surround sound settings
have no effect on the recording.
Notes
• You can't record a source connected to
the digital inputs from the analog
outputs.
• You can't record DTS encoded discs
from the analog outputs.
1 Select a source to record.
Use the MULTI CONTROL buttons on the
remote, or the FUNCTION button
(remote or front panel) to select the
source.
2 Prepare the program source.
Tune to the radio station, load the CD, etc.
For a video recording load the video, etc.
3 Insert a blank tape, MD, etc.
into the recorder connected to
either AUDIO 1 or VIDEO 1 and
set the recording levels.
Refer to the instructions that came with
the recorder if you are unsure how to do
this. Most video recorders set the audio
recording level automatically—check
your video's instruction manual if you are
unsure whether yours has manual
controls.
Making a digital
recording
The system has one optical digital audio
output (for AUDIO 1). If you want to
make a digital recording from this system
hook up this optical output to the optical
input of your digital recorder. The source
(CD, DVD, etc.) must be digital also; this
system doesn’t convert analog inputs to
digital. If you’re recording from an
external digital component, also make
sure that you’ve selected the digital input
for that component (see page 19).
Note: If you want to record DVD disc,
check that the digital output settings
correct. See page 36 for detailed
instructions.
1 Select DVD or VIDEO V-2 as the
digital source to record.
Use the MULTI CONTROL buttons on the
remote, or the FUNCTION button
(remote or front panel) to select the
source.
2 Prepare the program source.
Load the CD, MD, etc.
3 Insert a blank MD, CD-R, etc.
into the recorder connected to
the optical output of AUDIO 1.
4 Start recording, then start
playback of the source
component.
See the instructions that came with your
recorder for detailed instructions on
recording.
4 Start recording, then start
playback of the source
component.
33
En
Page 34

9 DVD Settings
Using the Setup
menu
The Setup menu gives you access to all the
DVD system settings. When in DVD mode,
press SETUP to display/leave the menu
and the cursor buttons and ENTER to
navigate and select options. The controls
for each menu are shown at the bottom of
the screen.
If an option is greyed out it means that it
cannot be changed at the current time.
This is usually because a disc is playing.
Stop the disc, then change the setting.
The current setting for any option is
marked with a colored box. The color of
the box indicates what kind of disc the
setting is applicable to: blue for DVD only;
yellow for DVD and Video CD; green for any
type of disc.
OSD settings
Setup Menu Mode
• Default setting: Basic
The Basic setup menu gives you access to
the more commonly used settings. It also
features an information bar which tells
you more about what the currently
highlighted option means.
Set to Expert for access to all settings.
OSD language
• Set in Setup Navigator (default:
English)
Choose between OSD menus in the
languages offered.
Audio General
Audio Language - English
Subtitle Language - Japanese
Select the On Screen Language
Language
Video
OSD Language English
Auto Language – On
Move
English
français
Español
SETUP
Exit
On Screen Display
(Expert)
• Default setting: Position - Normal
When watching DVD discs recorded in 4:3
format (‘regular’ TV size) on a widescreen
TV, it can be difficult to see the operation
displays (Play, Stop, Resume, etc.) at
the top of the screen. If you find them hard
to read, set the On Screen Display to
Position - Wide.
If you prefer not to have the operation
displays (Play, Stop, Resume, etc.)
shown on-screen, change the On
Screen Display setting to Off.
34
En
Audio Language
Video
Setup Menu Mode
Setup Navigator
Parental Lock – Level 8
Change menu mode
Move
General
Expert
Basic
SETUP
Exit
Audio Language General
Video
TV Screen
Picture Quality
Still Picture
On Screen Display
Angle Indicator
Move
16:9(Wide)
Standard
Field
Position – Wide
On
Position – Normal
Off
Setup
Exit
Page 35

9 DVD Settings
Video settings
TV Screen Size
• Set in Setup Navigator (Default: 16:9 (Wide))
If you have a widescreen TV, select the 16:9 (Wide)
setting—widescreen DVD software is then shown using the
full screen area. When playing software recorded in
conventional (4:3) format, the settings on your TV will
determine how the material is presented—see the manual
that came with your TV for details on what options are
available.
If you have a conventional TV, choose either 4:3 (Letter
Box) or 4:3 (Pan & Scan). In Letter Box mode,
widescreen software is shown with black bars at the top and
bottom of the screen. Pan & Scan chops the sides off
widescreen material to make it fit the 4:3 screen (so even
though the picture looks larger on the screen, you’re actually
seeing less of the movie). See Aspect ratio in the Glossary on
page 58 for more information.
Audio Language General
Video
TV Screen
Picture Quality –
4:3(Letter Box)
4:3(Pan&Scan)
16:9(Wide)
Still Picture (Expert)
• Default setting: Auto
This system uses one of two processes when displaying a still
frame from a DVD disc. The default Auto setting lets the
system decide which to use.
Field – produces a stable, generally shake-free image.
Frame – produces a sharper image, but more prone to shake
than field stills.
Audio Language General
Video
TV Screen
Picture Quality
Still Picture
On Screen Display
Angle Indicator
Move
16:9(Wide)
Standard
Field
Frame
On
Auto
Setup
Exit
Angle Indicator (Expert)
• Default setting: On
If you prefer not to see the camera icon on-screen during
multi-angle scenes on DVD discs, change the Angle
Indicator setting to Off.
Select your display preference
Move
SETUP
Exit
Adjusting the video quality
There are several preset picture quality settings that suit
various program types. Alternatively, set up your own and save
them for later recall.
Audio Language General
Video
TV Screen – 16:9(Wide)
Picture Quality
Adjust picture quality
Move
Cinema
Animation
Standard
SETUP
Exit
Audio Language General
Video
TV Screen
Picture Quality
Still Picture
On Screen Display
Angle Indicator
Move
16:9(Wide)
Standard
Field
Position – Normal
On
Off
Setup
Exit
35
En
Page 36

9 DVD Settings
Audio settings
Dolby Digital Out
• Set in Setup Navigator (Default: Dolby Digital)
You only need to make this setting if you connected this
system to another component (MD recorder, etc.) using
one of the digital outs.
When recording a Dolby Digital disc to an MD or CD recorder,
set this to Dolby Digital 3 PCM. When you're done
recording, set it back to Dolby Digital for proper playback
of Dolby Digital discs.
Language
Video
Dolby Digital Out
96kHz PCM Out –
Change Dolby Digital output mode
Move
Linear PCM Out
• Set in Setup Navigator (Default: 96kHz)
You only need to make this setting if you connected this
system to another component (MD recorder, etc.) using
one of the digital outs.
When recording a 96kHz/24-bit disc to an MD or CD recorder,
set this to 96kHz 3 48kHz. When you're done recording,
set it back to 96kHz for proper playback of 96kHz/24-bit
discs.
GeneralAudio
Dolby Digital
Dolby Digital 3 PCM
SETUP
Exit
Language settings
Audio Language
• Default Setting: English
This setting is your preferred audio language for DVD discs. If
the language you specify here is recorded on a disc, the system
automatically plays the disc in that language (although this
depends on the Auto Language setting—see Auto Language
on page 37).
Audio General
Audio Language - English
Subtitle Language - Japanese
Setup audio language
The DVD format recognizes 136 different languages. Choose
Other if you want to specify a language other than those
listed, then follow the on-screen display to select a language.
You may also want to refer to the DVD language code list on
page 59.
Audio General
Audio Language
List of Languages
ja: Japanese
Setup audio language
Language
Video
OSD Language – English
Auto Language - Japanese
Move
Video
Move
+/–
Language
ENTER
English
French
Spanish
Other
Code (0~2)
1001
Select
SETUP
RETURN
SETUP
Exit
Return
Exit
36
En
Language
Video
Dolby Digital Out –
DTS Out
96kHz PCM Out
Chenge 96 kHz output mode
Move
GeneralAudio
Dolby Digital
96kHz 3 48kHz
96kHz
SETUP
Remember: You can switch between the languages
recorded on a DVD disc any time during playback using the
AUDIO button. (This does not affect this setting.)
Exit
Page 37

9 DVD Settings
Subtitle Language
• Default Setting: English
This setting is your preferred subtitle language for DVD discs.
If the language you specify here is recorded on a disc, the
system automatically plays the disc with those subtitles
(although this depends on the Auto Language setting—see
Auto Language on the right).
Audio General
Audio Language – English
Subtitle Language Japanese
Setup disc's subtitle language
The DVD format recognizes 136 different languages. Choose
Other if you want to specify a language other than those
listed, then follow the on-screen display to select a language.
You may also want to refer to the DVD language code list on
page 59.
Language
Video
OSD Language – English
Auto Language - English
Move
English
French
Spanish
Other
SETUP
Exit
Auto Language
• Default Setting: On
When set to On, the system always selects the default audio
language on a DVD disc (French dialog for a French movie,
for example), and displays subtitles in your preferred subtitle
language only if that is set to something different. In other
words, movies in your native language won’t have any
subtitles, while foreign language movies will be shown with
subtitles.
Set to Off to have the system play discs strictly according to
your Audio Language and Subtitle Language settings.
For Auto Language to work, the Audio Language and Subtitle
Language settings must be the same—see pages 36–37.
Audio General
Audio Language – English
Subtitle Language – Spanish
Play dialog, etc. in original language
Subtitles ON with foreign audio
Language
Video
OSD Language – English
Auto Language
Move
On
On
Off
SETUP
Exit
Audio General
Subtitle Language
ja: Japanese
Setup disc's subtitle language
Language
Video
List of Languages
Move
+/–
ENTER
Code (0~2)
1001
RETURN
SETUP
Select
Return
Exit
Remember: You can change or switch off the subtitles on
a DVD disc any time during playback using the SUBTITLE
button. (This does not affect this setting.)
Remember: You can still switch audio and subtitle
languages on playback using the AUDIO and SUBTITLE
buttons.
37
En
Page 38

9 DVD Settings
DVD Language (Expert)
• Default Setting: w/Subtitle Language
Some multi-lingual discs have disc menus in several
languages. This setting specifies in which language the disc
menus should appear. Leave on the default setting for menus
to appear in the same langauge as your subtitle preference—
see page 37.
Audio General
Audio Language – English
Subtitle Language Japanese
The DVD format recognizes 136 different languages. Choose
Other if you want to specify a language other than those
listed, then follow the on-screen display to select a language.
You may also want to refer to the DVD language code list on
page 59.
Audio General
DVD Language
ja: Japanese
Language
Video
OSD Language – English
Auto Language
DVD Language
Subtitle Display
Subtitle Off
Move
Video
List of Languages
Move
+/–
w/ Subtitle Language
- On
English
English
French
- On
Spanish
- Selected Subtitle
Other
Language
ENTER
Select
SETUP
Exit
Code (0~2)
1001
RETURN
Return
SETUP
Exit
Subtitle Off (Expert)
• Default Setting: Selected Subtitle
Some discs display subtitles even if the Subtitle Display
setting (below) is set to off. In this case, you can either have
the subtitles displayed in the same language as your preferred
audio language (With Audio), or in your preferred subtitle
language (Selected Subtitle). If the Audio Langage
and Subtitle Language settings are the same then both of
these choices will give the same result.
Audio General
Audio Language – English
Subtitle Language – Spanish
Language
Video
OSD Language – English
Auto Language
DVD Language –
Subtitle Display
Subtitle Off
Move
– On
English
With Audio
- On
Selected Subtitle
Selected Subtitle
SETUP
Exit
Subtitle Display (Expert)
• Default Setting: On
Set to On, the system displays subtitles according to the
Subtitle Language and Auto Language settings above. Set to
Off to switch subtitles off altogether (although see Subtitle
Off above). Set to Assist Subtitle to have the system
display the extra assistive subtitles recorded on to some DVD
discs.
Audio General
Audio Language – English
Subtitle Language – Spanish
Language
Video
OSD Language – English
Auto Language –
DVD Language -
Subtitle Display
Subtitle Off -
Move
On
English
On
Off
On
Assist Subtitle
Selected Subtitle
SETUP
Exit
38
En
Page 39

9 DVD Settings
Miscellaneous settings
Parental Lock
• Default level: 8
• Default password: none
You can restrict access to certain discs using this feature. Once
set, you will be asked for a four-digit password when a
restricted disc is loaded, giving you a degree of control over
what your children watch.
You can set the restriction to one of eight levels. Setting the
level at 1 means that any disc that has any level of restriction
will need the password in order to watch it, while setting it at
level 8 gives unlimited access.
DVD discs are also rated from 1 to 8. Discs rated 1 (or with no
rating) generally contain little or no offensive material; discs
rated 2, may contain material that some parents may feel is
unsuitable for children. Discs rated 8 will almost certainly be
unsuitable for children.
Since a disc’s rating is up to the manufacturer, it is not
possible to give a definitive guide to each level—check the
disc box for parental lock details.
Be careful: not all discs that you may consider inappropriate for your children are rated. Unrated discs will always play
without requiring the password first.
Changing the parental lock level
1 Select Level Change.
Audio GeneralLanguageVideo
Parental Lock: Register Code Number
Enter 4–Digit Code
Move
2 Use the number buttons to register a new
password or confirm your existing password,
then press ENTER.
The first time you set the parental lock level, you have to
register a password. Anything you input becomes your
password.
Audio Language
Parental Lock: Register Code Number
Enter 4–Digit Code
Move
+/–
Video
RETURN
General
1019
RETURN
Return
SETUP
ENTER
SETUP
ExitReturn
Exit
Audio Language
Video
Setup Menu Mode
Setup Navigator
Parental Lock
Setup viewing restrictions
Move
– Basic
Level Change
Password Change
General
SETUP
Exit
3 Select a new level.
Move leftward to lock more levels (more discs will require the
password); rightward to unlock levels. You can’t lock level 1.
Audio GeneralLanguageVideo
Parental Lock: Level Change
1
Level
234 6785
Set Parental Lock
Move
ENTER
RETURN
SETUP
Return
ExitSelect
4 Press ENTER to set the new level.
The screen returns to the General menu display.
39
En
Page 40

9 DVD Settings
Changing your password
1 Select Password Change.
Audio Language
Video
Parental Lock: Confirm Code Number
Enter 4–Digit Code
Move
2 Input your existing password, then press
ENTER.
Audio Language
Video
Parental Lock: Confirm Code Number
Enter 4–Digit Code
Move
+/–
RETURN
RETURN
General
General
SETUP
ENTER
SETUP
ExitReturn
ExitReturn
Background Color (Expert)
• Default setting: Blue
This specifies the color of the screen when there’s no video.
Audio Language
Video
Setup Menu Mode — Expert
Setup Navigator
Parental Lock — Level 8
Background Color
Move
General
Black
Blue
Other
SETUP
Exit
3 Input a new password, then press ENTER.
The new password is set and the screen returns to the General
menu display.
Audio Language
Video
Parental Lock: Password Change
Enter 4–Digit Code
Move
+/–
General
6271
RETURN
Return
ENTER
SETUP
Exit
If you forget your password, resetting the system will clear the
password. See page 66 for more on this.
40
En
Page 41

10 Advanced Sound Setup
Advanced sound settings
This chapter covers advanced settings to further optimize the sound of your system.
LFE attenuator
The LFE (low frequency effects) channel carries ultra low bass sound to add weight to
effects in Dolby Digital and DTS soundtracks. This channel can overload the sub-woofer
resulting in distortion. Use the LFE attenuator setting to reduce the signal fed to the subwoofer.
Note: The LFE attenuator only works with sources that contain an LFE channel. It is
not a general level control for the sub-woofer.
1 Press SYS then SETUP.
2 Press the @ or # button until you see LFE ATT in the display.
3 Use the % and fi buttons to set the amount of signal reduction.
There are three settings:
• ATT 0 – default setting (no signal reduction)
• ATT 10 – the LFE channel signal level is reduced to avoid distortion
• OFF – the LFE channel is switched off completely. This may be useful late at night,
for example.
4 Press ENTER to make the setting.
Dynamic Range Control
The dynamic range of a source is the difference between the quietest and the loudest
sounds. The dynamic range of Dolby Digital soundtracks can be very great. This makes
them exciting, but it also means that when you turn the volume down you can easily
lose quiet dialog. Switch on Dynamic Range Control to even out the soundtrack volume.
1 Press SYS then SETUP.
2 Press the @ or # button until you see D.R.C. in the display.
3 Use the % and fi buttons to sselect a dynamic range setting.
• D.R.C. OFF – default setting (no change to the dynamics)
• D.R.C. LOW – the dynamic range is reduced by a small amount.
• D.R.C. MEDIUM – mid setting
• D.R.C. HIGH – the dynamic range is reduced by a large amount (good for
listening at very low volume).
4 Press ENTER to make the setting.
41
En
Page 42

10 Advanced Sound Setup
1 Press SYS then SETUP.
2 Press the @ or # button until you see STEREO or DUAL MONO
3 Use the % and fi buttons to select a dual-mono setting.
Dual-mono setting
The dual-mono setting applies only to Dolby Digital discs that feature dual-mono
material—see the disc box for details.
Dual-mono discs are recorded with two independent channels that may be played
together or separately depending on the situation. For example, a guitar tuition disc
might have the guitar recorded on one channel and all the other instruments on the
other. Use the dual-mono setting to play just the guitar part on its own; just the backing,
or everything together (through separate speakers, or mixed).
in the display.
• STEREO – default setting (Ch1 is played through the left speaker; Ch2 through
the right)
• DualMono Ch1 – Ch1 is played through the center speaker (or through the left
and right speakers if Surround Off is selected); Ch2 is muted.
• DualMono Ch2 – Ch2 is played through the center speaker (or through the left
and right speakers if Surround Off is selected); Ch1 is muted.
• DualMono MIX – Ch1 and Ch2 are mixed together and played through the
center speaker (or through both left and right speakers if Surround Off is selected).
4 Press ENTER to make the setting.
42
En
Page 43

11 Controlling Other Equipment
Setting up the remote control
In addition to controlling this system, you can set up the remote to operate other audio/
visual components, such as your TV, VCR, MD recorder, and so on.
To set up the remote, often all you need to do is to tell it what component(s) you have
(see Setting up using component presets below). If you have a component that the
remote doesn’t know how to control already, you can ‘teach’ it using that component’s
remote control (see Learning directly from other remote controls on page 45).
Setting up using component presets
This method of setting up the remote requires only that you tell it the manufacturer of
each component. You do this by looking up the type of component (TV, MD deck, etc.),
and the manufacturer in the Preset code list starting on page 60.
After setting up, see pages 48 – 52 for how to actually control your other components
using this remote.
Note: The correct preset code may not cover all the remote control commands for
your particular components. Use the learning function to program extra commands
(see Learning directly from other remote controls on page 45).
1 Switch on the component you are setting up this remote for.
After you’ve entered the correct code in the steps below, the remote should switch off the
component.
2 Press and hold REMOTE SETUP for three seconds.
The red LED at the top of the remote blinks twice.
• To cancel, press REMOTE SETUP again.
3 Press the MULTI CONTROL button for the component you want
to control.
For example, if you want to set up the remote to control your TV, press TV.
The MULTI CONTROL buttons have different types of components assigned to them by
default:
• V-1 – analog or digital VCR, DVD,
DVD-R, LD, DVD/LD player (default: Pioneer VCR, 0058).
• V-2 – Satellite, cable or DTV tuner (default: Pioneer cable TV tuner, 0533).
• A-1 and A-2 – CD player, CD-R recorder, tape deck, MD deck (A-1 default:
Pioneer CD-R recorder, 1087. A-2 default: Pioneer CD player, 0032).
• TV – television (default: Pioneer TV, 0679).
You can change these assignments if you need to. For example, if you connected an
audio component to one of the video inputs/outputs. See page 44 for how to do this.
4 Look up the preset code for your component.
You can find this in Preset code list starting on page 60. First find the type of
component (TV, etc.), then find the manufacturer. Next to each manufacturer is one or
more 4-digit codes.
• If you can’t find the manufacturer of your component in the code list, press
REMOTE SETUP to exit, then see Learning directly from other remote controls
on page 45 for how to set up the remote using an alternative method.
• If no button is pressed for more than 10 seconds, remote setup is exited.
43
En
Page 44

11 Controlling Other Equipment
5 Point the remote at the component to control and enter the
4-digit code.
If there’s more than one code, enter the first one.
The LED blinks after each button press, and twice to confirm a valid code has been
input. If it doesn’t blink twice, you have entered an invalid code: check the code and
input it again.
If all went well, the remote should have just switched off the other component. If it
didn’t, and the manufacturer has more than one code in the list, start again from step 1
using another code.
Reassigning a MULTI CONTROL button
You can only assign preset codes for certain kinds of components to each MULTI
CONTROL
button to a different kind of component. You would need to do this if you connected an
MD recorder to the Video 1 inputs/outputs, for example.
1 Press and hold REMOTE SETUP for three seconds.
The LED at the top of the remote will blink twice.
2 Press the MULTI CONTROL button which you want to change.
You can reassign these buttons:
• V- 1
• V- 2
• A-1
• A-2
• TV
In the above example, press V-1.
button. However, if necessary, you can reassign a MULTI CONTROL
44
En
3 Use the number buttons to enter 992.
4 Press the MULTI CONTROL button which you want duplicated.
In the above example, press A-1.
Page 45

11 Controlling Other Equipment
Learning directly from other remote controls
If preset codes are not available for your component(s), or the available preset codes do
not work, you can use this method to teach the remote each command separately.
You can also use this operation to program additional commands for a component not
covered in the preset codes.
1 Press and hold REMOTE SETUP for three seconds.
The LED at the top of the remote blinks twice.
2 Press the MULTI CONTROL button for the component you want
to control.
For example, press VIDEO V-1 to program a command from a VCR connected to the
Video 1 inputs/outputs.
3 Using the number buttons, enter 975.
The LED flashes rapidly to indicate that the remote is in Learning Setup mode and ready
to learn new commands from another remote.
• The remote will exit Learning Setup after 10 seconds if no commands are entered.
• To cancel Learning Setup here, press REMOTE SETUP.
4 Press the MULTI CONTROL button again for the component you
want to control.
5 Press the button on this system’s remote that you want to learn a
new command.
For example, press 3.
The illustration left shows the buttons that can be used to learn commands.
6 Point the remotes towards each other, about 2-5 cm (1-2 inches)
apart.
7 Press the button on the other component’s remote for the
command you want to program.
The LED on this system’s remote will go out and then blink twice when the command
has been learned.
• If the LED doesn’t start blinking, try varying the distance between the remotes, then
press the button again.
• Some commands from other remote controls cannot be learned, but in most cases
the remotes just need to be moved closer together or farther apart.
• If the LED starts to blink slowly, it may mean that no more commands can be learnt.
If it is necessary to learn another command, first delete another learnt command—
see the following page.
8 Program additional commands for the same component as
required.
Repeat steps 5 through 7.
9 Program commands for other components as required.
Repeat steps 4 through 7.
10 When you’re done, press REMOTE SETUP to exit Learning Setup
mode.
45
En
Page 46

11 Controlling Other Equipment
Deleting a single command
1 Press and hold REMOTE SETUP for three seconds.
2 Press the MULTI CONTROL button related to the command you
want to delete.
For example, press VIDEO V-1 if the command you want to delete is one for a VCR
connected to the Video 1 inputs.
3 Use the number buttons to enter 976.
4 Press the same MULTI CONTROL button again.
In the above example, press VIDEO V-1 again.
5 Press twice the command button you want to delete.
Deleting all commands for a component
1 Press and hold REMOTE SETUP for three seconds.
2 Press the MULTI CONTROL button related to the commands you
want to delete.
For example, press VIDEO V-1 if the commands you want to delete are for a VCR
connected to the Video 1 inputs.
3 Use the number buttons to enter 976.
4 Press the same MULTI CONTROL button twice more.
In the above example, press VIDEO V-1 twice.
Controlling a component while playing
another
This feature allows you to keep the system in one function (for example, CD) while
putting the remote control in a different one (Video 1, for example). This may be useful
if you were listening to a CD and wanted to rewind a video tape, for example.
1 Press SHIFT, then press the MULTI CONTROL button for the
component you want to
control.
The system remains in the same function, but the remote is in a different one.
2 To switch back to the original function, press the MULTI
CONTROL for the current system function.
It’s also possible to set up the remote so that a particular multi control button always
only switches the remote control mode and not the system function.
1 Press and hold REMOTE SETUP for three seconds.
The LED at the top of the remote blinks twice.
46
En
2 Press the MULTI CONTROL button you want to set up.
3 Use the number buttons to enter 983.
The LED on the top of the remote blinks twice. Now, when you press that MULTI
CONTROL
• To change the button back, repeat the above, entering 982 in step 3.
button, only the remote mode changes.
Page 47

11 Controlling Other Equipment
Clearing all remote control settings
This clears all presets, all learnt functions and restores the factory presets.
1 Press and hold REMOTE SETUP for three seconds.
The LED at top of the remote blinks twice.
2 Press any MULTI CONTROL button.
3 Use the number buttons to enter 981.
The LED blinks a total of four times to indicate the button has been cleared.
Checking preset codes
To check which preset code is associated with a MULTI CONTROL button:
1 Press and hold REMOTE SETUP for three seconds.
The LED at top of the remote will blink twice.
2 Press the MULTI CONTROL button you want to check the preset
code for.
3 Use the number buttons to enter 990.
Each preset code consists of four digits, for example 1329. Each digit will be represented
by a series of blinks on the remote’s LED—3 blinks to represent the digit “3”, etc.
4 Press 1.
The blinking LED indicates the left-most digit of the preset code (“1” in the example
above).
5 Press 2.
The blinking LED indicates the next digit of the preset code (“3” in the example above).
6 Press 3.
The blinking LED indicates the next digit of the preset code (“2” in the example above).
7 Press 4.
The blinking LED indicates the right-most digit of the preset code (“9” in the example
above).
47
En
Page 48

11 Controlling Other Equipment
CD/MD/CD-R/VCR/LD player controls
These controls are available after you set up the remote to control. See Setting up the remote
control on page 43 for how to do this.
10
23
22
9
1
19
16
12
78
2
20
15
13
17
18
21
14
5
11
1 SOURCE
Press to switch between standby and on.
2 4
Press to return to the start of the current
track. Repeated presses skips to the start of
previous tracks.
3 ¢
Press to advance to the start of the next
track. Repeated presses skips to the start of
following tracks.
4 8
Press to pause playback.
5 ¡
Hold down for fast playback.
4
3
6
6 1
Hold down for fast reverse playback.
7 3
Press to start playback.
8 7
Press to stop playback.
9 
Press twice within 10 seconds to start
recording or pause recording.
10 2
Press to rewind or reverse program source.
11 3
Press to fast forward program source.
12 5
Press to pause program source.
13 ∞
Press to stop program source.
14 ENTER
to play program source.
15 Number buttons
Used to directly access tracks on a program
source.
16 > 10
Use to select track numbers over 10.
17 ENTER/DISC, C
Function varies with the component:
CD changer : selects a disc
CD-R, MD, LD : clear function
VCR : enter function
18 DISP
Press to switch the display.
19 PGM
Press to start program play.
20 RDM
Press to start random play.
21 REPEAT
Press to start repeat play.
22 CH –
Press to change the TV channel on the
VCR.
23 CH +
Press to change the TV channel on the
VCR.
48
En
Page 49

11 Controlling Other Equipment
Cassette deck controls
These controls are available after you set up the remote to control. See Setting up the remote
control on page 43 for how to do this.
10
1
12
14
11
13
78
2
9
4
3
56
1 SOURCE
Press to switch between standby and on
(not possible on all models).
2 4
Use to play the reverse side of the tape on a
reversible deck.
3 ¢
Use to play the forward side of the tape on
a reversible deck.
4 8
Press to pause playback or recording.
5 ¡
Press to fast forward the tape. Pressing
during playback starts forward search.
6 1
Press to rewind the tape. Pressing during
playback starts reverse search.
7 3
Press to start playback.
8 7
Press to stop playback.
For deck two or any tape deck
that can record:
9 
Press twice within 10 seconds to start
recording or pause recording.
For deck one of a dual tape
deck:
10 2
Press to rewind the tape.
11 3
Press to fast forward the tape.
12 5
Press to pause the tape.
13 ∞
Press to stop the tape.
14 ENTER
Press to start playback.
49
En
Page 50

11 Controlling Other Equipment
DVD/DVR player controls
These controls are available after you set up the remote to control. See Setting up the remote
control on page 43 for how to do this.
11
13
12
1
2
4
3
5
7
6
9
8
10
14
15
19
17
16
202221
18
1 SOURCE
Press to switch the DVD or DVR between
standby and on.
2 Number buttons
Press to directly access tracks.
3>10
Use to select track numbers over 10.
4C
Use to clear function.
5 5/∞/2/3/ENTER
Use to navigate items on the menu screen.
6 7
Press to stop playback or recording.
7 3
Press to start playback.
8 8
Press to pause playback or recording.
9 4
Press to return to the start of the current
track. Repeated presses skip to the start of
previous tracks.
10 ¢
Press to advance to the start of the next
track. Repeated presses skip to the start of
following tracks.
11 RETURN / 
DVD : Use to go back one menu.
DVR : Press twice within 10 seconds to start
recording.
12 e/CH–
Press during playback for reverse slow
motion. When paused, press to go back
frame-by-frame. For DVR, use to change
channels.
13 E/CH+
Press during playback for slow motion.
When paused, press to advance frame-byframe. For DVR, use to change channels.
14 1
Press and hold for fast reverse scanning.
15 ¡
Press and hold for fast forward scanning.
16 TOP MENU/PGM
Press to display the top menu of a DVD
disc. Press with SHIFT to program a
playlist of tracks.
17 SUBTITLE/RDM
Press to display/switch subtitles. Press with
SHIFT to start random playback.
18 AUDIO/DISPLAY
Press to select the audio language. Press
with SHIFT to display/switch disc
information.
19 LAST MEMORY/
Press to set a bookmark, or start playback
from a bookmarked disc. Press with SHIFT
to switch camera angles.
20 REPEAT/CONDITION
Press once to repeat playback of the
current track, or twice to repeat playback
of the current title. Press with SHIFT to
save the player settings for the currently
loaded disc.
21 A-B /SEARCH MODE
Press once to mark the start of a loop; press
again to mark the end and start looping.
Press with SHIFT to select the disc search
mode.
22 SETUP
Press to access the Setup menu.
50
En
Page 51

11 Controlling Other Equipment
DTV controls
These controls are available after you set up the remote to control. See Setting up the remote
control on page 43 for how to do this.
1
3
16
14
24
23
22
18 19 2 0
1 SOURCE
Press to switch the TV on or off.
2
4
17
15
5
13
76
8
9
10
12
11
21
2 Number buttons
Use to select a specific TV channel.
3 >10 ( • )
Use to add a decimal point when selecting
a specific TV channel.
4 ENTER/DISC
Use to enter a channel.
5 5˜∞˜2˜3˜ENTER
Press to select or adjust and navigate items
on the menu screen.
ENTER
Use to bring up the DTV menus.
6 7 (CLOSED CAPTION)
Press to display closed captions
7 3 (AUDIO)
Press to select audio channels
8 8 (SCREEN MODE)
Press to select the screen mode.
9 4 (DTV)
Press to switch the DTV on/off
10 ¢ (MENU)
Use to display the menu.
11 ¡ (GUIDE)
Use as the Guide button for navigation.
12 1 (CLEAR)
Press to clear the DTV menu.
These four buttons are dedicated TV control buttons.
14 TV
Press to switch the TV between standby and
on.
15 TV INPUT
Press to switch the TV input (not possible
with some models).
16 TV CHANNEL +/–
Use to select channels.
17 TV VOL +/–
Use to adjust the TV volume.
18 TOP MENU (BLUE)
Use to choose the blue commands on a
DTV menu.
19 SUBTITLE (GREEN)
Use to choose the green commands on a
DTV menu.
20 AUDIO (RED)
Use to choose the red commands on a DTV
menu.
21 LAST MEMORY (YELLOW)
Use to choose the yellow commands on a
DTV menu.
22 CH –
Press to change the DTV channel.
23 CH +
Press to change the DTV channel.
24 RETURN / ¶ (Information)
Press to get INFO on the DTV program.
13 MENU
Use to select different menus from the DTV
functions.
51
En
Page 52

11 Controlling Other Equipment
Cable TV/satellite TV/TV controls
These controls are available after you set up the remote to control. See Setting up the remote
control on page 43 for how to do this.
3
11
9
1
12
The first four buttons are
dedicated TV control buttons.
8
4
2
7
10
5
6
13
1 TV
Press to switch the TV between standby and
on.
2 TV INPUT
Press to switch the TV input (not possible
with some models).
3 TV CHANNEL +/–
Use to select channels.
4 TV VOL +/–
Use to adjust the TV volume.
5 PAGE –
Press to display the previous menu page on
cable TV.
6 PAGE +
Press to display the next menu page on
cable TV.
7 5˜∞˜2˜3˜ENTER
Press to select or adjust and navigate items
on the menu screen.
8 Number buttons
Use to select a specific TV channel.
52
En
9 SOURCE
Press to switch the TV or CATV between
standby and on.
10 MENU
Press to display or close the TV or CATV
menu.
11 RETURN (INFO)
Press to display information on cable TV.
12 EXIT
Press to exit.
13 GUIDE
Press to switch the program information
screen for cable TV on/off.
Page 53

12 Connecting Up
Connecting to a TV with the
supplied video cord
Important: Before making or changing any rear panel
connections, switch off the power and disconnect the power
cord from the AC outlet.
You can connect this system to any TV using this output jack
with the supplied video cord. However, if your TV has an
S-Video input, we recommend also using that since you
should get a better picture.
Refer to the TV’s instruction manual for more detailed
connection instructions.
Yellow
Yellow
TV
Playing your TV through this
system
When watching cable or satellite TV, it’s best to connect the
cable/satellite box directly to this system, rather than going
via the TV. However, if you’re watching TV via an antenna
plugged directly into the back of the TV, then connect your
TV’s audio outputs to the AUDIO 1 or AUDIO 2 inputs of
this system to play the TV’s audio through the speakers of this
system. Use a standard stereo audio cord (not supplied),
matching up the colors both ends for best results.
Connect to AUDIO 1 IN or AUDIO 2 IN
TV
White
White
Red
Red
Connecting to a TV with an
S-Video cord
Many TVs also have an S-Video input which you can use to
connect to this system using an S-Video cord (not supplied).
Refer to the TV’s instruction manual for more detailed
connection instructions.
TV
Watching TV
With the above connections made, your TV becomes another
source component for this system.
To play your TV through this system, press the
AUDIO A-1 or A-2 button (depending on
which one the TV is connected to).
If the TV is connected to AUDIO 1, memorize its remote
control codes in the AUDIO A–1 multi control button. If it
is connected to AUDIO 2, memorize its remote control codes
in the AUDIO A–2 multi control button. See chapter 11 for
more on this.
53
En
Page 54

12 Connecting Up
Connecting Other
Components
• Connect an audio/visual player or recorder, such as a
video recorder or satellite decoder to the VIDEO 1 inputs/
outputs.
• Connect an audio/visual player, such as a video deck or
satellite decoder to the VIDEO 2 inputs. If the player has
a digital audio output, connect to the VIDEO 2 DIGITAL
IN
or OPTICAL IN jacks.
See Switching between digital and analog sources on
page 19 for more on this.
• Connect an audio player/recorder, such as an MD deck, to
the AUDIO 1 analog inputs/outputs. If the player/
recorder has optical digital jacks, connect to the AUDIO 1
OPTICAL IN to the player/recorder’s optical output, and
AUDIO 1 OPTICAL OUT to the player/recorder’s optical
input.
See Switching between digital and analog sources on
page 19 for more on this.
• Connect an audio player to the AUDIO 2 analog inputs.
LD player, video deck, etc.
(Components with audio/
video capability)
Tape deck, etc.
(Audio only
components)
Important: if you connect a video component with a
standard video cord, your TV must also be connected to this
system with a standard video cord.
From an auxiliary
To the TV’s
video input
component’s video
output jacks
To an auxiliary component’s
video input jacks
Connecting an audio recorder
Analog inputs are only output from the analog outputs. (You
can’t record an analog input via the digital output.) Likewise,
you can’t record a digital input via the analog outputs.
For digital connection
Important: if you connect a video component with an SVideo cord, your TV must also be connected to this unit with
an S-Video cord.
From an auxiliary
To the TV’s
S-Video
input
component’s S-Video
output jacks
To an auxiliary component’s
S-Video input jacks
To an auxiliary
component’s audio
input jacks
No output No output
From an auxiliary component’s
audio output jacks
No output
From an auxiliary
component’s audio
output jacks
54
En
Page 55

12 Connecting Up
Connecting outdoor antennas
If reception is poor with the supplied antenna, connect a commercially available outdoor AM and/or FM antenna.
Connecting an outdoor AM Antenna
Connect as shown in the figure below. Do not disconnect the AM loop antenna even if you connect an outdoor AM antenna.
Outdoor AM antenna
Indoor AM antenna
Vinyl insulated wire (5 to 6m)(15–18ft.)
The system’s antenna terminal
Connecting an outdoor FM Antenna
Connect as shown in the figure below.
75Ω coaxial cable (3C-2V)
Unit: mm
Tooled(–)
Insulated(+)
The system’s antenna terminal
AM loop antenna
FM antenna
Note: The ground mark ( ) on the antenna terminal
refers to measures to reduce reception noise when an antenna
is connected. It does not refer to a safety ground.
55
En
Page 56

13 Additional Information
• Press SYS then FL DIMMER.
1 With the system in standby, press SYS then SETUP.
2 Press the @ or # button until you see
3 Use the % and fi buttons to select a video out setting.
Setting the display brightness
You can adjust the brightness of the display to suit the lighting conditions of the room.
For example, in a brightly lit room you'd probably want the display brighter than in a
room with low lighting.
Press FL DIMMER repeatedly to set the display brightness. There are five levels.
Switching the TV system output
DVD and Video CD discs are recorded in either PAL or NTSC format. This setting
determines which TV signal format is output to your TV.
DVD VIDEO in the display.
• DVD VIDEO AUTO – default setting (video is output according to the disc loaded:
PAL if it's a PAL disc; NTSC if it's an NTSC disc). If you have a multi-system TV, leave
this setting as AUTO.
• DVD VIDEO PA L – output is always PAL, even when an NTSC disc is loaded. Use
this setting if your TV is PAL-compatible only.
• DVD VIDEO NTSC – PAL Video CDs are output as NTSC; PAL DVD discs cannot be
played on this setting. Use this setting if your TV is NTSC-compatible only.
56
En
4 Press ENTER to make the setting.
Page 57

Taking care of your system
To clean this unit, wipe with a soft, dry cloth. For stubborn
dirt, wet a soft cloth with a mild detergent solution made by
diluting one part detergent to 5 or 6 parts water, wring well,
then wipe off the dirt. Use a dry cloth to wipe the surface dry.
Do not use volatile liquids such as benzene and thinner which
may damage the surfaces.
13 Additional Information
• Wipe lightly from the center of the disc using
straight strokes.
Disc lens cleaner
The disc pickup lens should not become dirty in normal use,
but if for some reason it should malfunction due to dirt or
dust, consult your nearest Pioneer authorized service center.
Although lens cleaners for CD players are commercially
available, we do not recommend using them since some may
damage the lens.
Taking care of your discs
When holding discs, take care not to leave fingerprints, dirt or
scratches on the disc surface. Hold the disc by its edge or by
the center hole and edge. Damaged or dirty discs can affect
playback performance. Take care also not to scratch the label
side of the disc. Although not as fragile as the recorded side,
scratches can still result in a disc becoming unusable.
Should a disc become marked with fingerprints, dust, etc.,
clean using a soft, dry cloth, wiping the disc lightly from the
center to the outside edge as shown on the right. If necessary,
use a cloth soaked in alcohol, or a commercially available CD
or DVD cleaning kit to clean a disc more thoroughly. Never
use benzine, thinner or other cleaning agents, including
products designed for cleaning vinyl records.
• Don’t wipe the disc surface using circular
strokes.
Storing discs
Although CDs and DVDs are more durable than vinyl records,
you should still take care to handle and store discs correctly.
When you're not using a disc, return it to its case and store
upright. Avoid leaving discs in excessively cold, humid, or hot
environments (including under direct sunlight).
Don't glue paper or put stickers on discs, or write on them
using a pencil, ball-point pen or other sharp-tipped writing
instrument.
Discs to avoid
Discs spin at high speed during playback. If you can see that a
disc is cracked, chipped, warped, or otherwise damaged, don't
risk using it—you could end up damaging the system.
This system is designed for use with conventional, fully
circular discs only. Use of shaped discs is not recommended.
Pioneer disclaims all liability arising in connection with the
use of shaped CDs and DVDs.
57
En
Page 58

13 Additional Information
Glossary
Analog audio
An electrical signal that directly represents sound. Compare
this to digital audio which can be an electrical signal, but is
an indirect representation of sound. See also Digital audio.
Aspect ratio
The width of a TV screen relative to its height. Conventional
TVs are 4:3 (in other words, the screen is almost square);
widescreen models are 16:9 (the screen is almost twice as wide
as it is high).
Chapter (DVD only)
Just as a book is split up into several chapters, a title on a DVD
disc is usually divided into chapters. See also Title.
Digital audio
An indirect representation of sound by numbers. During
recording, the sound is measured at discrete intervals (44,100
times a second for CD audio) by an analog-to-digital
converter, generating a stream of numbers. On playback, a
digital-to-analog converter generates an analog signal based
on these numbers. See also Sampling frequency and Analog
audio.
Dolby Digital
A surround sound system developed by Dolby Laboratories
containing up to six channels of digital audio (front left and
right, surround left and right, center and low-frequency
channels). See also DTS.
DTS
A surround sound system developed by Digital Theater
Systems as an alternative to Dolby Digital. DTS discs contain
up to eight channels of digital audio. See also Dolby Digital.
Optical digital output
A jack that outputs digital audio in the form of light pulses.
Connect components with optical digital jacks using a special
optical cord, available from good audio dealers.
PCM (Pulse Code Modulation)
The most common system of encoding digital audio, found
on CDs and DAT. Excellent quality, but requires a lot of data
compared to formats such as Dolby Digital and MPEG audio.
For compatibility with digital audio recorders (CD, MD and
DAT) and AV amplifiers with digital inputs, this unit can
convert Dolby Digital and MPEG audio to PCM. See also
Digital audio.
PBC (PlayBack Control) (Video CD only)
A system of navigating a Video CD through on-screen menus
recorded onto the disc. Especially good for discs that you
would normally not watch from beginning to end all at
once—karaoke discs, for example.
Regions (DVD only)
These associate discs and players with particular areas of the
world. This unit will only play discs that have compatible
region codes. You can find the region code of your unit by
looking on the rear panel. Some discs are compatible with
more than one region (or all regions).
Sampling frequency
The rate at which sound is measured to be turned into digital
audio data. The higher the rate, the better the sound quality,
but the more digital information is generated. Standard CD
audio has a sampling frequency of 44.1kHz, which means
44,100 samples (measurements) per second. See also Digital
audio.
58
En
Dynamic range
The difference between the quietest and loudest sounds
possible in an audio signal (without distorting or getting lost
in noise). Dolby Digital and DTS soundtracks are capable of a
very wide dynamic range, delivering dramatic cinema-like
effects.
MPEG video
The video format used for Video CDs and DVDs. Video CD uses
the older MPEG-1 standard, while DVD uses the newer and
much better quality MPEG-2 standard.
Title (DVD only)
A collection of chapters on a DVD disc. See also Chapter.
Page 59

13 Additional Information
DVD language code list
The table below lists all the languages and codes that are recognized by the DVD standard.
Language Code Language Code Language Code
Japanese/japonais ( ja ) 1001
English/anglais ( en ) 0514
French ( fr) 0618
German ( de ) 0405
Italian ( it ) 0920
Spanish ( es ) 0519
Dutch ( nl ) 1412
Russian ( ru ) 1821
Chinese ( zh ) 2608
Korean ( ko ) 1115
Greek ( el ) 0512
Afar ( aa ) 0101
Abkhazian ( ab ) 0102
Afrikaans ( af ) 0106
Amharic ( am ) 0113
Arabic ( ar ) 0118
Assamese ( as ) 0119
Aymara ( ay ) 0125
Azerbaijani ( az ) 0126
Bashkir ( ba ) 0201
Byelorussian ( be ) 0205
Bulgarian ( bg ) 0207
Bihari ( bh ) 0208
Bislama ( bi ) 0209
Bengali ( bn ) 0214
Tibetan ( bo ) 0215
Breton ( br ) 0218
Catalan ( ca ) 0301
Corsican ( co ) 0315
Czech ( cs ) 0319
Welsh ( cy ) 0325
Danish ( da ) 0401
Bhutani ( dz ) 0426
Esperanto ( eo ) 0515
Estonian ( et ) 0520
Basque ( eu ) 0521
Persian ( fa ) 0601
Finnish ( fi ) 0609
Fiji ( fj ) 0610
Faroese ( fo ) 0615
Frisian ( fy ) 0625
Irish ( ga ) 0701
Scots-Gaelic ( gd ) 0704
Galician ( gl ) 0712
Guarani ( gn ) 0714
Gujarati ( gu ) 0721
Hausa ( ha ) 0801
Hindi ( hi ) 0809
Croatian (hr ) 0818
Hungarian ( hu ) 0821
Armenian ( hy ) 0825
Interlingua ( ia ) 0901
Interlingue ( ie ) 0905
Inupiak ( ik ) 0911
Indonesian ( in ) 0914
Icelandic ( is ) 0919
Hebrew ( iw ) 0923
Yiddish ( ji ) 1009
Javanese ( jw ) 1023
Georgian ( ka ) 1101
Kazakh ( kk ) 1111
Greenlandic ( kl ) 1112
Cambodian ( km ) 1113
Kannada ( kn ) 1114
Kashmiri ( ks ) 1119
Kurdish ( ku ) 1121
Kirghiz ( ky ) 1125
Latin ( la ) 1201
Lingala (ln ) 1214
Laothian ( lo ) 1215
Lithuanian ( lt ) 1220
Latvian ( lv ) 1222
Malagasy ( mg ) 1307
Maori ( mi ) 1309
Macedonian ( mk ) 1311
Malayalam ( ml ) 1312
Mongolian ( mn ) 1314
Moldavian ( mo ) 1315
Marathi ( mr ) 1318
Malay ( ms ) 1319
Maltese ( mt ) 1320
Burmese ( my ) 1325
Nauru ( na ) 1401
Nepali ( ne ) 1405
Norwegian ( no ) 1415
Occitan ( oc ) 1503
Oromo ( om ) 1513
Oriya ( or ) 1518
Panjabi ( pa ) 1601
Polish ( pl ) 1612
Pashto, Pushto ( ps ) 1619
Portuguese ( pt ) 1620
Quechua ( qu ) 1721
Rhaeto-Romanc
Kirundi ( rn ) 1814
Romanian ( ro ) 1815
Kinyarwanda ( rw ) 1823
Sanskrit ( sa ) 1901
Sindhi ( sd ) 1904
Sangho ( sg ) 1907
Serbo-Croatian ( sh ) 1908
Singhalese ( si ) 1909
Slovak ( sk ) 1911
Slovenian ( sl ) 1912
Samoan ( sm ) 1913
Shona ( sn ) 1914
Somali ( so ) 1915
Albanian ( sq ) 1917
Serbian ( sr ) 1918
Siswati ( ss ) 1919
Sesotho ( st ) 1920
Sundanese ( su ) 1921
Swedish ( sv ) 1922
Swahili ( sw ) 1923
Tamil ( ta ) 2001
Telugu ( te ) 2005
Tajik ( tg ) 2007
Thai ( th ) 2008
Tigrinya ( ti ) 2009
Turkmen ( tk ) 2011
Tagalog ( tl ) 2012
Setswana ( tn ) 2014
Tonga ( to ) 2015
Turkish ( tr ) 2018
Tsonga ( ts ) 2019
Tatar ( tt ) 2020
Twi ( tw ) 2023
Ukrainian ( uk ) 2111
Urdu ( ur ) 2118
Uzbek ( uz ) 2126
Vietnamese ( vi ) 2209
Volapük ( vo ) 2215
Wolof ( wo ) 2315
Xhosa ( xh ) 2408
Yoruba ( yo ) 2515
Zulu ( zu ) 2621
e ( rm ) 1813
59
En
Page 60

13 Additional Information
Preset Code List
DVD PLAYER/RECORDER
Manufacturer Code
Denon 0490, 0634
GE 0522
Harman/Kardon 0582
JVC 0558, 0623
Kenwood 0534
Magnavox 0503
Marantz 0539
Mitsubishi 0521
Onkyo 0503, 0627
Optimus 0571
Panasonic 0490, 0632
Philips 0503, 0539
Pioneer 0525, 0571, 0632,
0631(DVD-R)
Proscan 0522
RCA 0522
Samsung 0573
Sharp 0630
Sherwood 0633
Sony 0533
Technics 0490
Theta Digital 0571
Toshiba 0503
Yamaha 0490, 0545
Zenith 0503, 0591
LASERDISC PLAYER
Manufacturer Code
Aiwa 0203
Akai 0598
Denon 0059, 0172
Disco Vision 0023
Funai 0203, 0584
GoldStar 0172
Hitachi 0023
Hong Deng 0542
Idall 0595
Kebao 0581
Mitsubishi 0059
NAD 0059
Optimus 0059
Panasonic 0204, 0496
Pioneer 0023, 0059, 0463,
0572, 0548
Quasar 0204
Realistic 0203
Rowa 0541
SMC 0596
Sega 0023
Sharp 0597
Shinco 0540
Sony 0193, 0201, 0583,
0589
Super 0581
Technics 0204
Toshiba 0599
TELEVISION (1/4)
Manufacturer Code
A-Mark 0003
AOC 0003, 0019, 0030
Admiral 0093, 0418, 0463,
1096
Aiko 0092
Akai 0030, 0035
Alaron 0179, 0216
Ambassador 0177
America Action 0180
Ampro 0751
Amstrad 0412
Anam 0003, 0004, 0009,
0068, 0161, 0180,
0250, 0425, 1253
Anam National 0161, 0250, 0425,
0650, 1253
Archer 0003
Audiovox 0003, 0092, 0180,
0451
Baysonic 0180
Belcor 0019
Bell & Howell 0016, 0154
Bradford 0180
Brockwood 0019
Broksonic 0003, 0236, 0463
CCE 0037
CXC 0180
Candle 0030, 0056, 0186
Carnivale 0030
Carver 0054, 0170
Celebrity 0000, 1003
Cineral 0092, 0451
Citizen 0030, 0039, 0056,
0060, 0092, 0186,
1063
Concerto 0056
Contec 0180
Craig 0161, 0180
Crosley 0054
Crown 0039, 0180, 0418
Curtis Mathes 0016, 0030, 0039,
0047, 0051, 0054,
0056, 0060, 0093,
0145, 0154, 0451,
0466, 1063, 1096,
1147, 1148, 1166,
1347
Daewoo 0019, 0039, 0066,
0092, 0154, 0451
Daytron 0019
Denon 0145, 1148
Dumont 0017, 0019
Dwin 0720, 0774
ECE 0037
Electroband 0000, 1003
Emerson 0019, 0038, 0039,
0154, 0177, 0178,
0179, 0180, 0236,
0282, 0463, 1181
Envision 0030
Etron 0009, 0646
Fisher 0154
Fortress 0093, 1096
TELEVISION (2/4)
Manufacturer Code
Fujitsu 0179, 0683
Funai 0171, 0179, 0180,
0264, 1174
Futuretech 0180
GE 0021, 0047, 0051,
0093, 0135, 0178,
0282, 0451, 1096,
1147, 1181, 1347
General 0186
Gibralter 0017, 0019, 0030
GoldStar 0001, 0002, 0019,
0030, 0037, 0039,
0056, 0178, 1181
Gradiente 0053, 0056, 0170,
1056
Grundig 0037
Grunpy 0179, 0180
Hallmark 0178, 1181
Harley Davidson 0179
Harman/Kardon 0054
Harvard 0068, 0180
HCM 0412
Hitachi 0016, 0038, 0056,
0145, 0151, 1148
Infinity 0054
Innova 0037
Inteq 0017
JBL 0054
JCB 0000, 1003
JVC 0036, 0053, 0069,
0094, 0160, 0653,
1056
KEC 0180
KTV 0030, 0039, 0180
Kamp 0216
Kawasho 0216
Kenwood 0019, 0030
LG 0056
LXI 0047, 0054, 0154,
0156, 0178, 1159,
1181
Logik 0016
Luxman 0056
MGA 0019, 0030, 0150,
0178, 1153, 1181
MTC 0019, 0030, 0056,
0060, 0216, 1063
Magnavox 0030, 0036, 0054,
0179, 0186, 1254
Majestic 0016
Marantz 0030, 0037, 0054
Matsushita 0250, 0650, 1253
Megatron 0003, 0145, 0178,
1148, 1181
Memorex 0016, 0056, 0150,
0154, 0178, 0250,
0463, 1181, 1153,
1253
Midland 0017, 0039, 0047,
0051, 0135
Minoka 0412
Minutz 0021
60
En
Page 61

13 Additional Information
TELEVISION (3/4)
Manufacturer Code
Mitsubishi 0019, 0093, 0150,
0178, 1096, 1153,
1181, 0108, 0512
Motorola 0093, 1096
Multitech 0180
NAD 0156, 0178, 1159,
1166, 1181
NEC 0019, 0030, 0036,
0056, 0170
NTC 0092
Netsat 0037
Nicamagic 0216
Nikko 0030, 0092, 0178,
1181
Onwa 0180
Optimus 0154, 0250, 0650,
1166, 1253
Optonica 0093, 0165, 1096
Orion 0179, 0236, 0463
Osaki 0412
Panasonic 0051, 0126, 0161,
0250, 0650, 1253
Penney 0002, 0003, 0019,
0021, 0030, 0039,
0047, 0051, 0056,
0060, 0135, 0156,
0178, 1063, 1159,
1181, 1347
Philco 0019, 0030, 0054,
0145, 0418, 0463,
1148
Philips 0037, 0054
Pilot 0019, 0030, 0039
Pioneer 0038, 0172, 1166
Portland 0019, 0039, 0092
Prism 0051
Proscan 0047
Proton 0003, 0178, 0466,
1181
Pulsar 0017, 0019
Quasar 0051, 0165, 0250,
0650, 1253
RCA 0019, 0038, 0047,
0051, 0090, 0093,
0135, 1047, 1096,
1147, 1247, 1347,
1447
Radio Shack 0019, 0030, 0039,
0047, 0056, 0154,
0165, 0178, 0180,
1181
Realistic 0019, 0030, 0039,
0056, 0154, 0165,
0178, 0180, 1181
Rhapsody 0216
Royal 0412
Runco 0017, 0030
SKY 0037
SSS 0019, 0180
Sampo 0030, 0039
Samsung 0019, 0030, 0037,
0056, 0060, 0090,
0178, 1063, 1181
Samsux 0039
Sansei 0451
Sansui 0463
TELEVISION (4/4)
Manufacturer Code
Sanyo 0154, 0208, 0339
Scimitsu 0019
Scotch 0178, 1181
Scott 0019, 0178, 0179,
0180, 0236, 1181
Sears 0047, 0054, 0056,
0154, 0156, 0171,
0178, 0179, 1159,
1174, 1181
Semivox 0180
Semp 0156, 1159
Sharp 0039, 0093, 0165,
1096
Shogun 0019
Signature 0016
Simpson 0186
Sky-Worth 0037
Sony 0000, 0650, 1003,
0010
Soundesign 0178, 0179, 0180,
0186, 1181
Spectricon 0003
Squareview 0171, 1174
Starlite 0180
SuperTech 0216
Supreme 0000, 1003
Sylvania 0030, 0054
Symphonic 0171, 1174
TMK 0056, 0177, 0178,
1181
Tandy 0093, 1096
Tatung 0003
Technics 0051, 0250, 1253
Technol Ace 0179
Techwood 0003, 0051, 0056
Teknika 0016, 0019, 0039,
0054, 0056, 0060,
0092, 0150, 0179,
0180, 0186, 1063,
1153
Telefunken 0056
Toshiba 0036, 0060, 0154,
0156, 1063, 1159,
1256, 0035
Totevision 0039
Vector Research 0030
Victor 0036, 0053, 0160,
0250, 0650, 1056,
1253
Vidikron 0054
Vidtech 0019, 0036, 0178,
1181
Wards 0016, 0019, 0021,
0030, 0054, 0056,
0165, 0178, 0179,
1181
White Westinghouse 0463
Yamaha 0019, 0030
Zenith 0016, 0017, 0092,
0463
Zonda 0003
CABLE TV/DTV
Manufacturer Code
ABC 0003, 0007, 0008,
0011, 0014, 0017
Americast 0899
Bell & Howell 0014
Bell South 0899
Contec 0019
Daehan 0778
Daeryung 0008
Everquest 0015
Gemini 0015
General Instrument 0011, 0276, 0476,
0810
GoldStar 0144, 0838
Hamlin 0020
Hitachi 0011
Hytex 0007
Jasco 0015
Jerrold 0003, 0011, 0012,
0014, 0015, 0276,
0476, 0810
LG Alps 0779
Memorex 0000, 1003
Now 0776
Oak 0007, 0019
Pacific 0678
Panasonic 0000, 0107, 1003
Paragon 0000, 1003
Pioneer 0144, 0260, 0533,
0877, 1010(DTV),
1021
Pulsar 0000
Quasar 0000
Radio Shack 0015
Regal 0020
Rembrandt 0011
Runco 0000
Samsung 0144, 0702
Scientific Atlanta 0008, 0017, 0477,
0877
Seawoo 0780
Sharp 0313, 1010(DTV)
Signal 0015
Signature 0011
Starcom 0003, 0015
Stargate 0015
Starquest 0015
Taihan 0778
Tocom 0012
TongKook 0777, 0840
Toshiba 0000
Tusa 0015
United Artists 0007
Zenith 0000, 0525, 0899
61
En
Page 62

13 Additional Information
SATELLITE TUNER
Manufacturer Code
AlphaStar 0772
DX Antenna 0752
Dae Young 0735
Daeryung 0396
Echostar 0396, 0775, 1005
Expressvu 0775
General Instrument 0361, 0627, 0869
HTS 0775
Hitachi 0489, 0819
Hughes Network Systems 0749
Hung Chang 0732
Hyundai 0758
JVC 0492, 0505, 0506,
0775
Jerrold 0361, 0627
JiWon 0364
Kabil 0737
Magnavox 0722, 0724
Marantz 0200
Memorex 0724
Mitsubishi 0491
NEC 0496, 0499, 0507,
0508
Next Level 0869
Now 0757
Panasonic 0340, 0500, 0701,
0739
Pantech 0747
Philips 0200, 0722, 0724
Pioneer 0662
Primestar 0361, 0627
RCA 0143, 0392, 0566,
0855
Radio Shack 0869
Samsung 0773
Sanyo 0493
Sharp 0494,
Sony 0275, 0639, 0661
Star Choice 0869
Tae Kwang 0733
Toshiba 0486, 0790
Uniden 0722, 0724
VTech 0321
Victor 0492, 0505, 0506
Zenith 0856
CD PLAYER (1/2)
Manufacturer Code
ADC 0018
Adcom 0155
Aiwa 0124, 0157
Anam 0362
Audio-Technica 0170
Burmester 0420
California Audio Labs 0029, 0303
Carver 0157, 0179, 0437
DKK 0000
Denon 0003, 0358, 0873
Dynamic Bass 0179
Emerson 0155, 0164, 0305,
0469
Eroica 0562, 0563
Fantasia 0525
Fisher 0174, 0179, 0342
GE 0009
Garrard 0280, 0393, 0420
Genexxa 0032, 0164, 0305
CD PLAYER (2/2)
Manufacturer Code
GoldStar 0383, 0525
Harman/Kardon 0157, 0173, 0426
Hitachi 0032, 0155
Inkel 0065, 0114, 0180,
0203, 0437
JVC 0072
Kenwood 0028, 0037, 0190,
0626, 0681, 0826
Krell 0157
Kyocera 0018
LXI 0305
Linn 0157
Lotte 0505
Luxman 0266
MCS 0029
MTC 0420
Magnavox 0157, 0305
Marantz 0029, 0157, 0180
Mission 0157
NSM 0157
Nikko 0164, 0170, 0174,
0362, 0525
Onkyo 0101, 0381, 0868
Optimus 0000, 0032, 0037,
0087, 0145, 0179,
0280, 0305, 0342,
0420, 0426, 0437,
0468, 1063
Panasonic 0029, 0303, 0367,
0752
Parasound 0420
Philips 0157, 0626
Pioneer 0032, 0244, 0305,
0468, 0551, 1062,
1063, 1087
Proton 0157
QED 0157
Quasar 0029
RCA 0009, 0053, 0155,
0179, 0305, 0764
Realistic 0155, 0164, 0179,
0180, 0420
Rotel 0157, 0420
SAE 0157
STS 0018
Sansui 0157, 0305
Sanyo 0087, 0179, 0349
Scott 0155, 0164, 0305
Sears 0305
Sharp 0037, 0180, 0261,
0861
Sherwood 0065, 0114, 0180,
0426
Sony 0000, 0185, 0490,
0604, 0605
Soundesign 0145
Tandberg 0203
Tascam 0420
Teac 0174, 0180, 0393,
0420
Technics 0029, 0303
Toshiba 0481
Victor 0072
Wards 0053, 0157
Yamaha 0036, 0170, 0187,
0261
Yorx 0461
CASSETTE DECK
Manufacture Code
ADC 1171
Aiwa 1029, 1197, 1223
Akai 1189
Anam 1364
Carver 1029, 1261
Denon 1076
Dual 1383
Dynamic Bass 1261
Eroica 1418
Fisher 1261
Garrard 1375
GoldStar 1375
Harman/Kardon 1029, 1182
Inkel 1070, 1337
JVC 1244, 1273
Kenwood 1070
Kyocera 1171
Lotte 1339
Luxman 1266
Magnavox 1029
Marantz 1029
Nakamichi 1218
Nikko 1364
Olympus 1266
Onkyo 1135, 1282
Optimus 1027, 1220, 1337
Panasonic 1229
Philips 1029
Pioneer 1027, 1099, 1101,
1220
RCA 1261
Renaissance 1413
Samsung 1391
Sansui 1029
Sanyo 1261
Sherwood 1337
Sonic 1375
Sony 1170, 1243, 1291
Teac 1391
Technics 1229
Victor 1244, 1273
Wards 1027
Yamaha 1094, 1097
VCR (1/4)
Manufacturer Code
Admiral 0048, 0209
Adventura 0000
Aiko 0278
Aiwa 0000, 0037
Akai 0041, 0315
America Action 0278
American High 0035
Anam 0037, 0162, 0240,
0278, 0553, 0579
Anam National 0162, 1162
Asha 0240
Audiovox 0037
Beaumark 0240
Bell & Howell 0104
Broksonic 0002, 0121, 0184,
0209
CCE 0072, 0278
Calix 0037
Canon 0035
Capehart 0020
Carver 0081
62
En
Page 63

13 Additional Information
VCR (2/4)
Manufacturer Code
Cineral 0278
Citizen 0037, 0278
Colt 0072
Craig 0037, 0047, 0072,
0240
Curtis Mathes 0035, 0041, 0060,
0162
Cybernex 0240
Daewoo 0020, 0045, 0046,
0278
Daytron 0020
Denon 0042
Dynatech 0000
Electrohome 0037
Electrophonic 0037
Emerex 0032
Emerson 0000, 0002, 0037,
0043, 0121, 0184,
0209, 0278
Fisher 0047, 0104
Fuji 0033, 0035
Funai 0000
GE 0035, 0048, 0060,
0240
Garrard 0000
General 0052
Go Video 0432
GoldStar 0037, 0038, 0225,
0480
Gradiente 0000, 0008
HI-Q 0047
Harley Davidson 0000
Harman/Kardon 0038, 0081
Harwood 0072
Headquarter 0046
Hitachi 0000, 0041, 0042,
0235
Hughes Network Systems 0042
JVC 0008, 0041, 0067
Jensen 0041
KEC 0037, 0278
KLH 0072
Kenwood 0038, 0041, 0067
Kodak 0035, 0037
LG 0480
LXI 0037
Lloyd's 0000
Logik 0072
MEI 0035
MGA 0043, 0240
MGN Technology 0240
MTC 0000, 0240
Magnasonic 0278
Magnavox 0000, 0035, 0039,
0081, 0149
Magnin 0240
Marantz 0035, 0081
Marta 0037
Matsushita 0035, 0162
Memorex 0000, 0035, 0037,
0039, 0046, 0047,
0048, 0104, 0209,
0240, 1037, 1162,
1262
Minolta 0042
Mitsubishi 0043, 0048, 0067
Motorola 0035, 0048
Multitech 0000, 0072
VCR (3/4)
Manufacturer Code
NAD 0058
NEC 0038, 0040, 0041,
0067, 0104
Nikko 0037
Nikon 0034
Noblex 0240
Olympus 0035
Optimus 0037, 0048, 0058,
0104, 0162, 0432,
1048, 1062, 1162,
1262
Orion 0002, 0184, 0209
Panasonic 0035, 0162, 0225,
0616, 1062, 1162,
1262
Penney 0035, 0037, 0038,
0040, 0042, 0240
Pentax 0042
Philco 0035, 0209
Philips 0035, 0081, 0618
Pilot 0037
Pioneer 0058, 0067, 0168
Portland 0020
Profitronic 0240
Proscan 0060,
Protec 0072
Pulsar 0039
Quarter 0046
Quartz 0046
Quasar 0035, 0162, 1162
RCA 0035, 0042, 0048,
0060, 0149, 0240,
Radio Shack 0000, 1037
Radix 0037
Randex 0037
Realistic 0000, 0035, 0037,
0046, 0047, 0048,
0104
ReplayTV 0614, 0616
Ricoh 0034
Runco 0039
STS 0042
Samsung 0045, 0240, 0426,
0432
Sanky 0039, 0048
Sansui 0000, 0041, 0067,
0209
Sanyo 0046, 0047, 0104,
0240
Scott 0043, 0045, 0121,
0184
Sears 0000, 0035, 0037,
0042, 0046, 0047,
0104
Semp 0045
Sharp 0048, 0363
Shintom 0072
Shogun 0240
Singer 0072
Sony 0000, 0032, 0033,
0034, 0035
Sylvania 0000, 0035, 0043,
0081
Symphonic 0000
TMK 0240
Tatung 0041
Teac 0000, 0041
Technics 0035, 0162
VCR (4/4)
Manufacturer Code
Teknika 0000, 0035, 0037,
0052
Thomas 0000
Tivo 0618
Toshiba 0043, 0045
Totevision 0037, 0240
Unitech 0240
Vector 0045
Vector Research 0038, 0040
Victor 0008, 0041, 0067
Video Concepts 0040, 0045
Videosonic 0240
Wards 0000, 0035, 0042,
0047, 0048, 0060,
0072, 0081, 0149,
0240
White Westinghouse 0209, 0278
XR-1000 0000, 0035, 0072
Yamaha 0038
Zenith 0000, 0033, 0034,
0039, 0209
MD RECORDER AND CD RECORDER
Manufacturer Code
Denon 0873
Kenwood 0626, 0681, 0826
Onkyo 0868
Optimus 1063
Philips 0626
Pioneer 1062, 1063,
1087(CD-R)
Sharp 0861
Sony 0490
63
En
Page 64

13 Additional Information
Troubleshooting
Incorrect operation is often mistaken for trouble or malfunction. If you think that there is something wrong with this component,
check the points below. Sometimes the trouble may lie in another component. Inspect the other components and electrical appliances
being used. If the trouble cannot be rectified after checking the items below, ask your nearest Pioneer authorized service center or
your dealer to carry out repair work.
The disc is ejected automatically after loading.
• Dirty or damaged disc.
See page 57 for disc care information.
• Disc not seated properly in the disc guide.
Align the disc properly.
• Incompatible region number.
If the region number on a DVD-video disc does not
match the number on the DVD tuner, the disc cannot
be used (page 6).
• Condensation inside the unit.
Allow time for condensation to evaporate. Avoid using
the player near an air-conditioning unit.
Playback is not possible.
• Disc is loaded upside down.
Reload the disc with the label side face up.
• In the case of CD-R and CD-RW discs, make sure that the
recording has been finalized following the procedures in
the manual supplied with the recording component.
New settings made in the Setup screen menus
while a disc is playing are ineffective.
• Some settings can be changed while a disc is playing, but
are not effective until the disc is stopped then restarted.
This is not a malfunction.
Make the same setting when the disc is stopped.
Press 7, then restart playback (3). Note that making
settings in the Setup screen menus may cancel the
RESUME function.
Settings are canceled.
• When the power is cut due to power failure or by
unplugging the power cord, settings will be canceled.
No picture/No color.
DVD/CD/Video CD
• Incorrect video connections.
Check that connections are correct and that plugs are
inserted fully.
• TV/monitor settings are incorrect.
Check the instruction manual of the TV/monitor.
64
En
mark appears on screen.
• The operation is prohibited by the system.
DVD/CD/Video CD
mark appears on screen.
• The selected function does not operate for that disc.
When making changes in the Setup OSD
menus, is displayed.
• There is a CD or Video CD loaded and the setting that was
changed applies only to DVD discs.
The settings will take effect next time a DVD is loaded.
Picture playback stops and the operation
buttons cannot be used.
Press 7, then start playback again (3). Switch the
power off once, then on again using the front panel
STANDBY/ON switch.
Screen is stretched or aspect does not change.
• The TV Screen setting in the Setup menu is incorrect.
Set the TV Screen option to match the TV/monitor
you're using (page 35).
Page 65

13 Additional Information
Picture disturbance during playback or dark.
• This player is compatible with Macro-Vision System copy
guard. Some discs include a copy prevention signal, and
when this type of disc is played back, stripes etc., may
appear on some sections of the picture depending on the
TV.
This is not a malfunction.
• Different discs respond in different ways to some
functions.This may result in the screen becoming black
for a brief instant or shaking slightly when the function is
executed.
These problems are largely due to differences between
discs and disc content and are not malfunctions of this
system.
When recorded on a VCR or passed through an
AV selector, there is disturbance in the playback picture.
• Due to copy protection, connection of this system through
a VCR or an AV selector may prevent recording or cause
picture problems.
This is not a malfunction.
DVD/CD/Video CD
The remote control doesn't seem to work.
• The remote control is too far from the system, or the angle
with the remote sensor is too wide.
Use the remote within its operating range (See the
separate Setting Up guide).
• The batteries are exhausted.
Put in new batteries (See the separate Setting Up
guide).
No audio, or audio is distorted.
• Dirt, dust, etc. on the disc.
Clean the disc (page 57).
• Interconnects are not fully inserted into the terminals (or
are not connected).
Check that all interconnects are firmly inserted.
• Dirty or oxidized plugs/terminals.
Clean the plugs/terminals.
• Incorrect audio cable connection.
Check the audio connections (See the separate Setting
Up guide).
• The disc is paused.
Press 3 or 8 to exit the pause mode.
• Incorrect settings.
DVD/CD/Video CD
Check that the volume is turned up, that the speakers
are on, the input function set correctly, etc.
• Mute is on.
Press mute (remote control only) to switch mute off.
Noticeable difference in DVD and CD volume.
• DVDs and CDs use different recording methods.
This is not a malfunction.
No 96kHz signal from the digital audio output
• Linear PCM Out is set to 96kHz348kHz.
Set to 96kHz.
• As a copy-protection measure, some DVDs do not output
96kHz audio.
In this case, even if 96kHz is selected, the player
automatically outputs the audio at 48 kHz. This is not
a malfunction.
65
En
Page 66

13 Additional Information
Noisy radio reception
• Antennas are not connected properly.
Check the connections. For FM, make sure that the
antenna is fully extended and positioned to give the
best reception (See the separate Setting Up guide).
For AM, make sure that the loop antenna is pointing in
the best direction (See the separate Setting Up guide).
• The frequency is incorrect.
Check the radio frequency.
• The radio signal is weak.
If the radio signal is weak, an outdoor antenna will
usually give better results than the supplied indoor
Tuner
types.
• Other electrical equipment is causing interference.
Other electrical equipment, such as TVs, fluorescent
lamps and motors can cause interference. Try
switching off or moving the equipment, or moving the
antenna(s).
Auto tuning does not pick up some stations.
• The radio signal is weak.
Auto tuning will only detect radio stations with a good
signal. For more sensitive tuning, connect an outdoor
antenna.
Note: Static electricity or other external influences may
cause malfunctioning of this unit. In this case, unplug the
power cord and then plug back in. This will usually reset the
unit for proper operation. If this does not correct the problem,
please consult your nearest Pioneer service center.
Screen sizes and disc
formats
The table below shows the effect of various TV Screen settings
on the different kinds of disc available.
When viewing a wide screen TV or monitor
Setting and Appearance Screen format of disc
Widescreen (movies, etc.)
Note that some extra-wide formats
(such as CinemaScope) will appear
with black bars at the top and
bottom of the screen.
16:9 (Wide)
Standard (TV programs,
etc.)
Your TV will determine how the
picture is presented—check the
manual that came with the TV for
details. Typical options are black
bars either side, some form of
stretched or zoomed presentation.
16:9 (Wide)
When viewing a standard size TV or monitor
Setting and Appearance Screen format of disc
Standard (TV programs,
etc.)
The program is presented correctly,
regardless of the setting.
Any setting
Widescreen (movies, etc.)
The program is shown in
widescreen with black bars at the
top and bottom of the screen.
66
En
Resetting the system
Resetting the system returns all menu, picture and password
settings to their factory defaults.
Switch the system into standby using the front panel
STANDBY/ON switch. Next, hold down the front panel 7
button and switch back on. All settings will have been cleared.
4:3 (Letter Box)
Widescreen (movies, etc.)
The sides of the program are
cropped so that the picture fills the
whole screen.
4:3 (Pan & Scan)
Widescreen (movies, etc.)
The program appears squashed: set
to either 4:3 (Letter Box) or 4:3
(Pan & Scan).
16:9 (Wide)
Page 67

Component features & functions
13 Additional Information
DVD Tuner System
STANDBY/ON
button
STANDBY
indicator
FUNCTION
button
FM antenna
terminals
VOLUME
up button
VOLUME
down button
Control cable jack (blue) A
DVD indicator
OPEN/CLOSE
Disc table
button
Stop button
Analog jacks for
auxiliary components
button
Pause
PHONES
jack
Play button
Powered Subwoofer Unit
Power cord
connector
Control cable
jack (black) B
Speaker
Control cable jack (blue) A
terminals
AM antenna
terminals
Display cable jack
Display Unit
Digital jacks for
auxiliary components
Control cable jack (black) B
Display
Remote control sensor
Display cable jack
67
En
Page 68

Specifications
Amplifier Section
Continuous power output (RMS)
Front, Center, Rear ........................... 40W, per channel
(1kHz, 10% T.H.D., 8 Ω)
Subwoofer ................... 65W (100Hz 10% T.H.D., 8 Ω)
Power Supply Section
Power requirements
Australian model ......................... AC 240 V, 50/60 Hz
Multi voltage model ....... AC 110-127/220-230/240 V
(Switchable), 50/60 Hz
Power consumption
Australian model ................................................ 160 W
Multi voltage model .............................................418 W
Power consumption in standby mode ............................ 1 W
Speakers Section
Front, Rear, Center speakers
Type Sealed, antimagnetic (EIAJ)*
Speaker .............................. 8.7cm (3-7/16 in.) (cone type)
Nominal impedance ........................................................ 8 Ω
Frequency range ...................................... 100 to 20,000 Hz
Max. input ........................................................... 40 W (EIAJ)
Powered subwoofer
Type ................. Bass reflex floor type, antimagnetic (EIAJ)*
Speaker ........................................ 16 cm (6 in.) (cone type)
Nominal impedance ........................................................ 8 Ω
Frequency range ........................................ 25 Hz to 300 Hz
Max. input ........................................................... 65 W (EIAJ)
* Antimagnetic design (EIAJ) speaker system conforms to
the basic EIAJ standards.
DVD Player (Audio)Section
S/N ratio ........................................................... 115 dB (EIAJ)
Dynamic range ................................................. 100 dB (EIAJ)
Distortion ................................................................. 0.004%
Frequency response
48 kHz sampling .................................. 4 Hz to 22 kHz
96 kHz sampling .................................. 4 Hz to 44 kHz
Wow & flutter ................................. Below measurable levels
(±0.001% W.PEAK)
DVD Player (Video) Section
Output level ................................................... 1 Vp-p (75 Ω)
Video Y output level ...................................... 1 Vp-p (75 Ω)
Video C output level............................... 286 mVp-p (75 Ω)
DVD (Other jacks) Section
Digital optical output (PCM/2/DTS) ... Optical connector
Digital optical input (PCM/2/DTS)...... Optical connector
Digital coaxial input (PCM/2/DTS)...... Coaxial connector
Tuner Section
FM tuner
Frequency range .................... 87.5 MHz to 108.0 MHz
Antenna ............................................. 75 Ω unbalanced
AM tuner
Frequency range ....................... 531 kHz to 1,602 kHz
(9 kHz step)
Antenna ................................. loop antenna (supplied)
Miscellaneous
DVD tuner system
Dimensions .............. 280 (W) x 240 (D) x 82 (H) mm
Weight ................................................. 3.1 kg (6.8 lbs)
Powered subwoofer unit
Dimensions ............ 190 (W) x 425 (D) x 430 (H) mm
Weight .......................................... 13.8 kg (30.15 lbs)
Front, Rear speakers
Dimensions ................ 110 (W) x 75 (D) x 154 (H) mm
Weight ............................................... 0.76 kg (1.7 lbs)
Center speaker
Dimensions ................ 210 (W) x 75 (D) x 110 (H) mm
Weight ............................................... 0.83 kg (1.8 lbs)
Display unit
Dimensions ................. 210 (W) x 62 (D) x 86 (H) mm
Weight ................................................. 0.23 kg (.51 lb)
Operating conditions:
Temperature .............. +5°C to +35°C (+41°F to 95°F)
Humidity ............. 5% to 85% (without condensation)
(11(W) x 9-7/16 (D) x 3-1/4 (H) in.)
(7-1/2 (W) x 16-3/4 (D) x 17 (H) in.)
(4-5/16 (W) x 2-15/16 (D) x 6 (H) in.)
(8-1/2 (W) x 2-15/16 (D) x 4-5/16 (H) in.)
(8-1/2 (W) x 2-7/16 (D) x 3-3/8 (H) in.)
Supplied Items
Remote control .................................................................... 1
Alkaline Batteries (AA/LR6) ............................................... 2
Display unit .......................................................................... 1
AM loop antenna ................................................................. 1
FM antenna .......................................................................... 1
Video cable .......................................................................... 1
Power cord ........................................................................... 1
Display cable ....................................................................... 1
Control cable A (Blue) ....................................................... 1
Control cable B (Black) ..................................................... 1
Speaker cords (5 m/16 ft. 3 in.) ........................................ 3
Speaker cords (10 m/32 ft. 6 in.)...................................... 2
Cord labels........................................................................... 1
Non-skid pads ..................................................................... 1
Operating instructions (Setting up) ................................... 1
Operating instructions (Basic/Detailed) ........................... 1
Warranty .............................................................................. 1
Note: Specifications and design subject to possible modification
without notice, due improvements.
Published by Pioneer Corporation.
Copyright © 2000 Pioneer Corporation.
All rights reserved.
PIONEER CORPORATION
PIONEER ELECTRONICS [USA] INC.
PIONEER ELECTRONICS OF CANADA, INC.
PIONEER EUROPE NV
PIONEER ELECTRONICS AUSTRALIA PTY. LTD.
PIONEER ELECTRONICS DE MEXICO S.A. DE C.V.
<00F00ZF0H00>
4-1, Meguro 1-Chome, Meguro-ku, Tokyo 153-8654, Japan
P.O. BOX 1540, Long Beach, California 90801-1540, U.S.A.
300 Allstate Parkway, Markham, Ontario L3R OP2, Canada
Haven 1087, Keetberglaan 1, B-9120 Melsele, Belgium TEL: 03/570.05.11
178-184 Boundary Road, Braeside, Victoria 3195, Australia, TEL: [03] 9586-6300
San Lorenzo 1009 3er Piso Desp. 302 Col. Del Valle Mexico D.F. C.P. 03100
TEL: 5-688-52-90
Printed in <ARB7228-A>
 Loading...