


(this page intentionally left blank)
1
En
IMPORTANT
CAUTION
RISK OF ELECTRICAL SHOCK
DO NOT OPEN
The lightening flash with arrowhead symbol within an equilateral triangle is intended to alert the user to the presence of un-insulated “dangerous voltage” with the product’s enclosure that may be of sufficient magnitude to constitute a risk of electrical shock to individuals.
CAUTION:
TO PREVENT THE POSSIBLE RISK OF ELECTRICAL SHOCK OR INJURY, DO NOT REMOVE THE COVER (FRONT, BACK, OR TOP). NO USER-SERVICABLE PARTS ARE INSIDE. REFER SERVICING TO QUALIFIED SERVICE PERSONNEL.
The exclamation mark within an equilateral triangle is intended to alert the user to the presence of important operating and maintenance (servicing) instructions in the literature accompanying the product.
Note: This equipment has been tested and found to comply with the limits for a Class B digital device, pursuant to Part 15 of the FCC Rules. These limits are designed to provide reasonable protection against harmful interference in a residential installation. This equipment generates, uses, and can radiate radio frequency energy and, if not installed and used in accordance with instructions, may cause harmful interference to radio communications. However, there is no guarantee that interference will not occur in a particular installation. If this equipment does cause harmful interference to radio or television reception, which can be determined by turning the equipment OFF and ON, the user is encouraged to try to correct the interference by one or more of the following measures:
Reorient or relocate the receiver or receiving antenna.
Increase the separation between the equipment and the receiver.
Plug the equipment into an outlet on a circuit different from the receiver. Consult the dealer or an experienced radio/TV technician for assistance.
Information to User:
Alteration or modifications carried out without appropriate authorization may invalidate the user’s right to warranty service or other assistance.
[For Canadian Model]
This Class B apparatus complies with Canadian ICES-003.
[Pour le modèle Canadien]
Cet appareil numérique de le Classe B est conforme à la norme NMB-003 du Canada.
DANGER – VISIBLE AND INVISIBLE LASER RADIATION WHEN OPEN. AVOID
DIRECT EXPOSURE TO BEAM.
CAUTION: Use of controls or adjustments or performance of procedures other than those specified herein may result in hazardous radiation exposure.
CAUTION: The use of optical instruments with this product will increase eye hazard.
2
En

This product complies with the EMC Directives (89/336/EEC, amended by 92/31/EEC and 93/68/ECC).
Cet produit est conforme aux Directives relatives à la Compatibilité Électromagnétique (89/336/CEE, amendements 92/31/CEE et 93/68/CEE).
Este producto cumple con las Directivas EMC (89/336/CE, correcto por la 92/31/CE y la 93/68/CE).
Federal Communications Commission Declaration or Conformity
This device complies with part 15 of the FCC Rules. Operation is subject to the following two (2) conditions:
( 1 ) This device may not cause harmful interference
( 2 ) This device must accept any interference received, including interference that may cause undesired operation.
Product Name: DVD / CD Writer
Model Numbers: DVR-R100 and DVR-610
Responsible Party Name: PIONEER ELECTRONICS (USA) INC.
Customer Support Division
Address: 1925 E. Dominguez Street, Long Beach, CA 90810 U.S.A. Phone: (800) 872 – 4159
3
En
Thank you for buying this Pioneer product.
Please read through these operating instructions so you will know how to operate your model properly. After you have finished reading the instructions, put them away in a safe place for future reference.
WARNING:
This product is not waterproof. To prevent a fire or shock hazard, do not place a container filled with liquid near this unit or expose it to other sources of moisture.
WARNING: Handling the product’s cord or cords associated with accessories sold with the unit will expose you to lead, a chemical known by California and other governmental entities to cause cancer and birth defects or other reproductive harm. Wash Hands After Handling.
The generation of acoustical noise is less than 70dB (ISO7779/DIN45635)
CAUTION
This product is a Class 1 laser product but this product contains a laser diode higher than Class 1. To ensure continued safety, do not remove any covers or attempt to gain access to the inside of this product. Refer all servicing to qualified personnel. The caution label shown to the right appears on your unit (top of cover).
IMPORTANT NOTICE – RECORD THE MODEL NUMBER AND SERIAL NUMBER OF THIS UNIT BELOW. THE NUMBERS ARE ON THE REAR PANEL.
MODEL #: DVR-R100 - OR - DVR-610
SERIAL #:
KEEP THESE NUMBERS FOR FUTURE REFERENCE.
 is a trademark of the DVD Format / Logo Licensing Corporation.
4
En
SAFETY INSTRUCTIONS
To ensure your personal safety and to maximize the full operating potential of your unit, read and follow these safety instructions.
Environment – Avoid installing this drive in a location with exposure to large quantities of dust, high temperatures, high humidity, or subject to excessive vibrations or shocks.
Power – Turn OFF the system before installing this or any other hardware device.
Read & Retain Instructions – Read all operating and user information provided with this drive.
Cleaning – Use a damp cloth to clean the exterior housing. Avoid using any fluids including liquid, aerosol or alcohol-based cleaning products.
Water or Moisture – Avoid operating or locating this drive near water or other sources of fluid.
Power Sources – Operate this drive only from the recommended power sources. If you are unsure of the power source, consult an authorized Pioneer representative.
Overloading – Avoid connecting too many devices to a single wall socket or power source as this can cause fires or short circuits.
Object & Liquid Entry – Never push inappropriate objects in to the device. Avoid spilling any liquids in to or on the outside of the drive.
Condensation – Moisture can form in the operating section of the product if the drive is taken from cool surroundings to a room with a warmer temperature. Let the drive stand for one to two hours in the new location before turning it ON.
Servicing – Opening or removing the cover exposes you to possible electrical shock or other danger. Contact a Pioneer authorized service representative for repairing this drive (refer to the enclosed Service & Support Card).
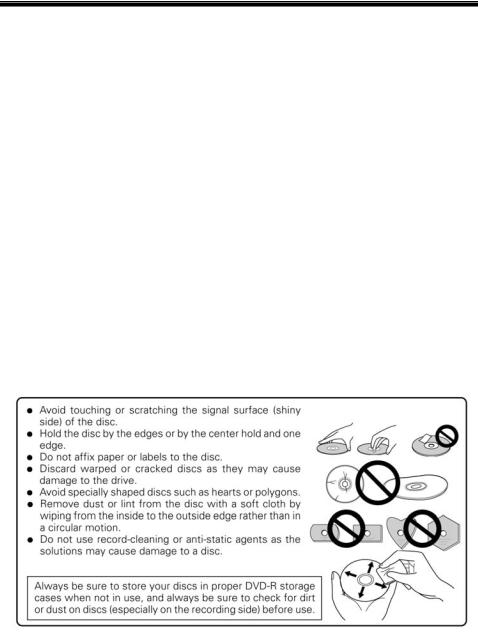
About DualDisc Playback – DualDisc is a new two-sided disc with one side containing DVD video / audio / etc. content and the opposite side containing non-DVD content such as digital audio material. The non-DVD audio side is not compliant with the CD Audio Specification; therefore, may not play. The DVD side of DualDisc media plays in this unit. For more details about the DualDisc specification, please refer t to the disc manufacturer or your retailer.
Note: Some discs may not be playable due to different recording formats or the physical condition of the disc at the time of recording or playback.
5
En

FEATURES
Write Speed (*CAV, **ZCLV, *** This specification describes the maximum speed in one zone.)
DVD-R |
1X, 2X, 6X, 8X**, 12X**, 16X* |
|
|
DVD-R (DL) |
2X, 4X, 6X, 8X*** |
|
|
DVD-RW |
1X, 2X, 4X, 6X |
|
|
DVD+R |
2.4X, 4X, 6X, 8X**, 12X**, 16X* |
|
|
DVD+R (DL) |
2.4X, 4X, 6X, 8X*** |
|
|
DVD+RW |
2.4X, 3.3X, 4X, 6X, 8X** |
|
|
CD-R |
4X, 10X, 16X, 24X**, 32X**, 40X* |
|
|
CD-RW |
4X, 10X, 16X, 20X**, 24X**, 32X** |
|
|
Maximum Read Speed |
|
|
|
DVD-ROM (single) |
16X |
DVD-ROM (DL) |
12X |
DVD-R, DVD+R |
12X |
DVD-R (DL) |
8X |
DVD-RW, DVD+RW |
8X |
DVD+R (DL) |
8X |
CD-ROM, CD-R |
40X |
CD-RW |
32X |
DVD-RAM |
2X** |
|
|
DualDisc |
(please refer to the previous page in this document) |
||
IDE Data Transfer Mode |
PIO Mode 4 / Multi-Word DMA Mode 2 / Ultra DMA Mode 4 |
Buffer Size |
2 MBytes (Read/Write) |
5.25” Half-Height built-in type |
|
Stereo Audio Output |
|
LCD Tilt-Servo Mechanism |
|
Horizontal / Vertical orientation
Low vibration mechanism by DRA System
Disc Format (Read/Write)
DVD single layer/dual layer / 120mm / 80mm disc
DVD-R (when writing, use only 650nm – for General use – media)
DVD-R (4X, 8X, 16X write speed)
Dual Layer DVD-R
DVD-RW (1X, 2X, 4X, 6X write speed)
DVD+R (2.4X, 4X, 8X, 16X write speed)
Double Layer DVD+R
DVD+RW (2.4X, 4X, 8X write speed)
DVD-RAM (non-cartridge, Version 2.0, Version 2.1) (Read only)
CD-ROM Mode 1
CD-R XA Mode 2 (form 1, form 2)
Photo CD (single and multiple sessions)
CD-DA
CD-Extra (CD PLUS)
Video-CD
CD Text
CD-R
CD-RW / High Speed CD-RW / Ultra Speed CD-RW
Note:
A specific application program is necessary to write the formats listed above. Supported media required for specific DVD and CD writing speeds.
When writing to DVD at 12X and 16X, use Pioneer-tested media. For media brand information, refer to the Pioneer website: www.pioneerelectronics.com
6
En

Interface
1)Forced Ejection Hole
If the tray fails to eject when the Eject button is pressed, insert a stiff rod into the hole and push to eject the tray.
During normal operation, the eject button should be used to unload the tray. Turn the power to the drive OFF then wait approximately one minute until the disc stops spinning before trying to eject the tray using the Forced Ejection Hole.
2)BUSY Indicator
Operation status is indicated as follows:
During reading |
Lights |
During writing |
Lights |
3)Eject Button
Press the button to unload / load the disc.
4)Disc Tray
Press the Eject button to open the loading tray then place a CD or DVD disc onto the tray with the label facing up. Press the Eject button again or gently push the tray to close and load.
Do not attempt to pull out the disc tray forcibly – use the Forced Ejection Hole (1).
Precautions When Playing 8cm (3.15”) Discs
An 8cm (3.15”) disc cannot be played when the drive is mounted vertically even with an adapter.
ABOUT REGION CODES
The region code can only be changed five (5) times, including the initial setting. Please be aware that the fifth change becomes PERMANENT. Therefore, avoid changing the region code unless absolutely necessary.
Region codes are part of the DVD Standard. However, region codes on DVD discs are optional. DVD discs with no specified region code can be played on all compliant players.
7
En
INTERFACE
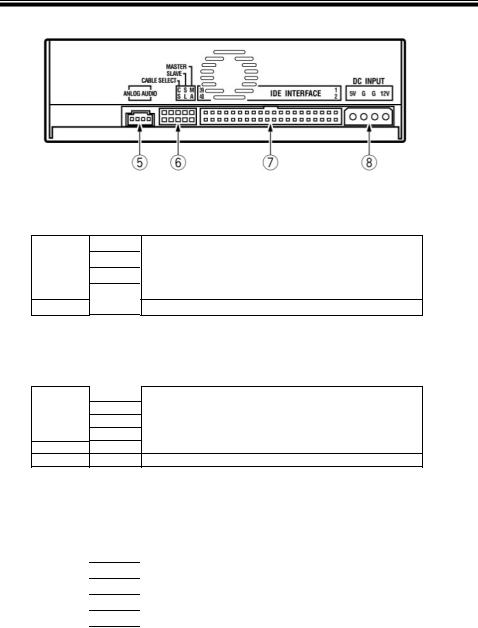
5)Audio Output
This connector outputs analog audio.
This connector is compatible with ‘Molex 70553’ choose a suitable connection cable.
Pin |
Name |
Function |
1 |
L |
(Left channel audio output |
2 |
G |
Ground |
3 |
G |
Ground |
4R Right channel audio output
6)Device Configuration Jumper
(switch turns ON when a jumper is added)
Power OFF the drive before changing the jumper setting.
Pin #1 is ON when shipped from the factory
Pin |
Name |
Function |
|
|
1 |
MA |
ON |
|
Drive set to Master mode |
2 |
SL |
ON |
|
Drive set to Slave mode |
3 |
CS |
ON |
|
Drive set to Cable-Select |
4 Reserved
5 Reserved
7)Host IDE Interface
This is a 40-pin I/O connector in accordance with the ATA specifications.
8)DC Input
Pin |
Name |
Function |
1 |
+12 |
Power Supply input for DC +12 V |
2 |
G |
Ground |
3 |
G |
Ground |
4 |
+5 |
Power Supply input fo +5 V |
8
En

INSTALLATION
1)Turn OFF the computer’s power and remove the power cord from the wall outlet before removing the front cover.
2)Remove the blank panel from the front of the empty 5.25” bay slot.
3)Install the slide rails on the drive if necessary.
(Please contact the store where the drive was purchase to obtain slide rails.)
4)Insert the drive into the slot.
5)When anchoring is required, refer to the computer’s instruction manual.
•Please use screws measuring 5mm (3/16”) or less for mounting. Using longer screws may damage the drive.
•When the mounting screws are loose, the vibrations from a spinning disc may generate a ripping noise. To prevent this noise, tighten the screws.
9
En
 Loading...