

DVD / CD WRITER
LECTEUR DE DVD / CD
DVD- / CD-WRITER
REGISTRATORE PER DISCHI DVD O CD
GRABADORA DE DISCOS DVD Y CD
DVD / CD WRITER
XLA
DVR-A08
XLB
XLC
Operating instructions
Mode d’emploi
Bedienungsanleitung
Istruzioni per l’uso
Manual de instrucciones
Gebruiksaanwijzing
IMPORTANT
CAUTION
RISK OF ELECTRIC SHOCK
DO NOT OPEN
The lightning flash with arrowhead, within
an equilateral triangle, is intended to alert
the user to the presence of uninsulated
"dangerous voltage" within the product's
enclosure that may be of sufficient
magnitude to constitute a risk of electric
shock to persons.
CAUTION:
TO PREVENT THE RISK OF ELECTRIC
SHOCK, DO NOT REMOVE COVER (OR
BACK). NO USER-SERVICEABLE PARTS
INSIDE. REFER SERVICING TO QUALIFIED
SERVICE PERSONNEL.
NOTE: This equipment has been tested and found to comply with the limits for a Class B digital device, pursuant to
Part 15 of the FCC Rules. These limits are designed to provide reasonable protection against harmful interference in
a residential installation. This equipment generates, uses, and can radiate radio frequency energy and, if not
installed and used in accordance with the instructions, may cause harmful interference to radio communications.
However, there is no guarantee that inter ference will not occur in a particular installation. If this equipment does
cause harmful interference to radio or television reception, which can be determined by turning the equipment off
and on, the user is encouraged to try to correct the interference by one or more of the following measures:
– Reorient or relocate the receiving antenna.
– Increase the separation between the equipment and receiver.
– Connect the equipment into an outlet on a circuit different from that to which the receiver is connected.
– Consult the dealer or an experienced radio/TV technician for help.
Information to User
Alteration or modifications carried out without appropriate authorization may invalidate the user’s right to operate
the equipment.
This Class B digital apparatus complies with Canadian ICES-003.
Cet appareil numérique de la Classe B est conforme à la norme NMB-003 du Canada.
The exclamation point within an equilateral
triangle is intended to alert the user to the
presence of important operating and
maintenance (servicing) instructions in the
literature accompanying the appliance.
D3-4-2-1-1_En
D8-10-1-2_En
D8-10-2_En
D8-10-1-3_EF
DANGER –
VISIBLE AND INVISIBLE LASER RADIATION WHEN OPEN. AVOID DIRECT
EXPOSURE TO BEAM.
CAUTION : USE OF CONTROLS OR ADJUSTMENTS OR PERFORMANCE OF PROCEDURES OTHER THAN THOSE
CAUTION : THE USE OF OPTICAL INSTRUMENTS WITH THIS PRODUCT WILL INCREASE EYE HAZARD.
SPECIFIED HEREIN MAY RESULT IN HAZARDOUS RADIATION EXPOSURE.
D6-8-2-1_En
2
This product complies with the EMC Directives
(89/336/EEC, amended by 92/31/EEC and
93/68/EEC).
Ce produit est conforme aux directives relatives à la
compatibilité électromagnétique (89/336/CEE,
amendements 92/31/CEE et 93/68/CEE).
Dieses Produkt entspricht den EMV-Richtlinien
(89/336/EEC, geändert durch 92/31/EEC und
93/68/EEC).
Questo prodotto è conforme alle direttive EMC
(89/336/CEE, emendate 92/31/CEE e 93/68/CEE).
Este producto cumple con las Directivas EMC
(89/336/CE, correcto por la 92/31/CE y la 93/68/CE).
Dit product voldoet aan de EMC-richtlijnen
(89/336/EEG, gewijzigd bij 92/31/EEG en 93/68/EEG).
D3-4-2-1-9b_En
D3-4-2-1-9b_Fr
D3-4-2-1-9b_Ge
D3-4-2-1-9b_It
D3-4-2-1-9b_Sp
D3-4-2-1-9b_Du
Denna produkt överensstämmer med föreskrifterna i
EMC-direktiven (89/336/EEC, uppdaterat med
92/31/EEC och 93/68/EEC).
Este produto cumpre com as Directivas EMC
(89/336/CE, corregida por a 92/31/CE e a 93/68/CE).
Dette produkt er i overensstemmelse med direktivet
vedrørende elektromagnetisk kompatibilitet
89/336/EØF, ændret ved direktiverne 92/31/EØF og
93/68/EØF.
Tämä tuote on EMC -Direktiivin (89/336/EEC,
muutettu 92/31/EEC ja 93/68/EEC) mukainen.
D3-4-2-1-9b_Sw
D3-4-2-1-9b_Po
D3-4-2-1-9b_Da
D3-4-2-1-9b_Fi
English
Français
Deutsch
FEDERAL COMMUNICATIONS COMMISSION
DECLARATION OF CONFORMITY
This device complies with part 15 of the FCC Rules. Operation is
subject to the following two conditions: (1) This device may not
cause harmful interference, and (2) this device must accept any
interference received, including interference that may cause undesired operation.
Product Name: DVD / CD WRITER
Model Numbers: DVR-A08XLA, DVR-A08XLB, DVR-A08XLC
Responsible Party Name: PIONEER ELECTRONICS (USA) INC.
Address: 1925 E. DOMINGUEZ ST. LONG BEACH, CA 90810 U.S.A.
Phone: 800-872-4159
Custormer Support Division
Italiano
Español
Nederlands
3
Thank you for buying this Pioneer product.
Please read through these operating instructions so you will know how to operate your model
properly. After you have finished reading the instructions, put them away in a safe place for
future reference. K015 En
WARNING
This equipment is not waterproof. To prevent a fire
or shock hazard, do not place any container filed
with liquid near this equipment (such as a vase or
flower pot) or expose it to dripping, splashing, rain
or moisture.
D3-4-2-1-3_A_En
WARNING: Handling the cord on this product or
cords associated with accessories sold with the
product will expose you to lead, a chemical known to
the State of California and other governmental
entities to cause cancer and birth defects or other
reproductive harm.
Wash hands after handling
D36-P4_En
The Generation of Acoustical Noise Is Less Than 70dB.
(ISO7779/DIN45635)
CAUTION
This product is a class 1 laser product, but this
product contains a laser diode higher than Class 1.
To ensure continued safety, do not remove any covers
or attempt to gain access to the inside of the product.
Refer all servicing to qualified personnel.
The following caution label appears on your unit.
Location: on top of the cover
IMPORTANT NOTICE – RECORD THE MODEL NUMBER AND SERIAL NUMBERS OF THIS EQUIPMENT BELOW.
THE NUMBERS ARE ON THE REAR.
MODEL NO.
SERIAL NO.
KEEP THESE NUMBERS FOR FUTURE USE.
DVR-A08XLA, D VR-A08XLB, DVR-A08XLC
CLASS 1 LASER PRODUCT
LASER KLASSE 1
D3-4-2-1-8_A_En
D1-4-2-6-2_En
4
En
is a trademark of DVD Format/Logo Licensing Corporation.
SAFETY INSTRUCTIONS
To ensure your personal safety and to maximize the full operating potential of your Drive, read and follow
these safety precautions:
ENVIRONMENT - Please do not use the unit at places with much dust, high temperature, or high humidity.
Please use the unit at a place where it is not subjected to vibrations or shocks.
POWER - Turn off your system and attached hardware devices before installation.
READ INSTRUCTIONS - Read all safety and operating instructions before the Drive is operated.
RETAIN INSTRUCTIONS - Retain the safety and operating instructions for future reference.
FOLLOW INSTRUCTIONS - Follow all operating and use instructions.
HEED WARNINGS - All warnings must be adhered to.
CLEANING - DO NOT use liquid, aerosol cleaners, or alcohol. Use only a damp cloth to clean the exterior
housing.
WATER AND MOISTURE - DO NOT use this product near water.
POWER SOURCES - Operate this product from the type of power source indicated on the marking label. If you
are not sure of the type of power available, consult Authorized Pioneer Dealer.
OVERLOADING - DO NOT overload wall outlets and extension cords. Doing so can result in fire or electric
shock.
OBJECT AND LIQUID ENTRY - Never push objects of any kind into this product. Touching dangerous voltage
points may cause a short resulting in fire or electric shock. Do not spill liquid of any kind on this product.
CONDENSATION - Moisture will form in the operating section of the product causing performance to be
impaired if it is brought from cool surroundings into a warmer environment. If you are moving the unit to a
location with a warmer temperature, let the product stand for 1-2 hours in the new location before turning it
back on.
SERVICING - Do not attempt to repair this product yourself. Opening or removing covers may expose you to
dangerous voltage or other hazards. Refer all servicing to qualified service personnel. (Refer to the enclosed
Service and Support Card.)
English
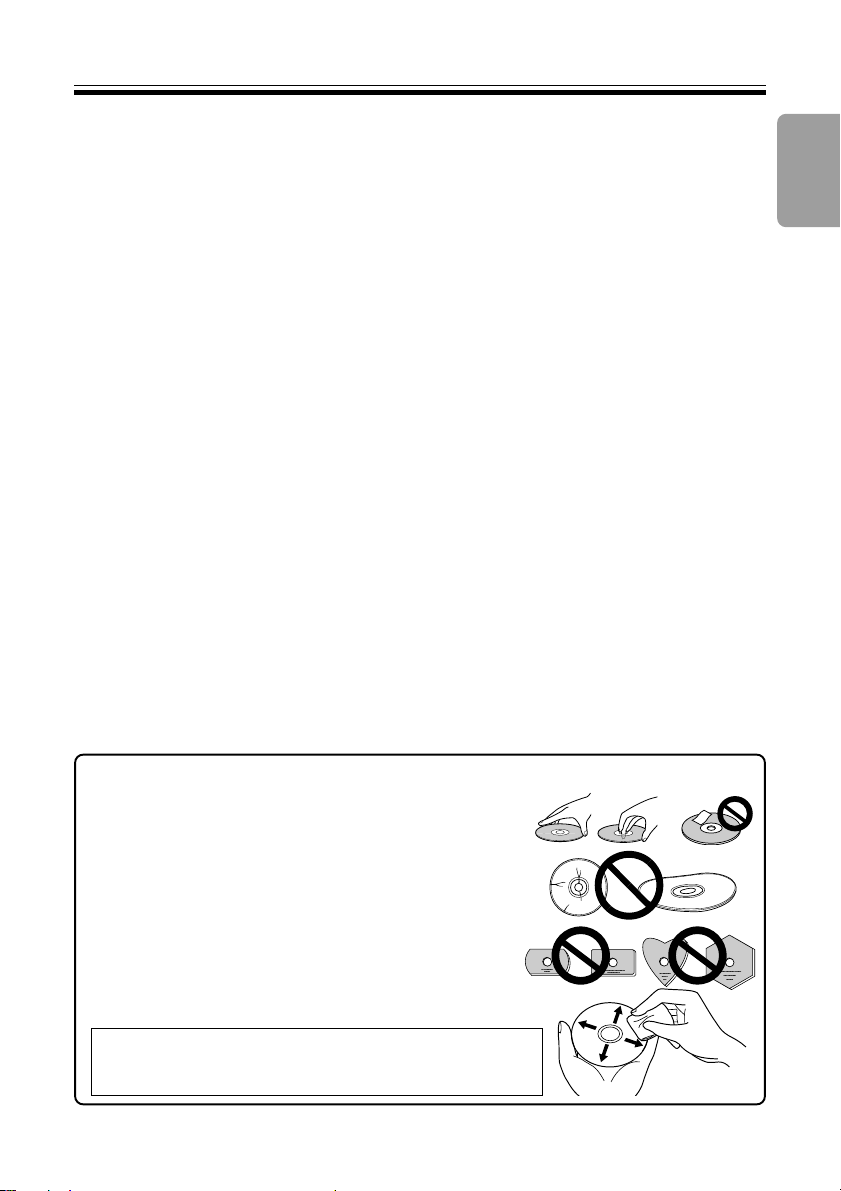
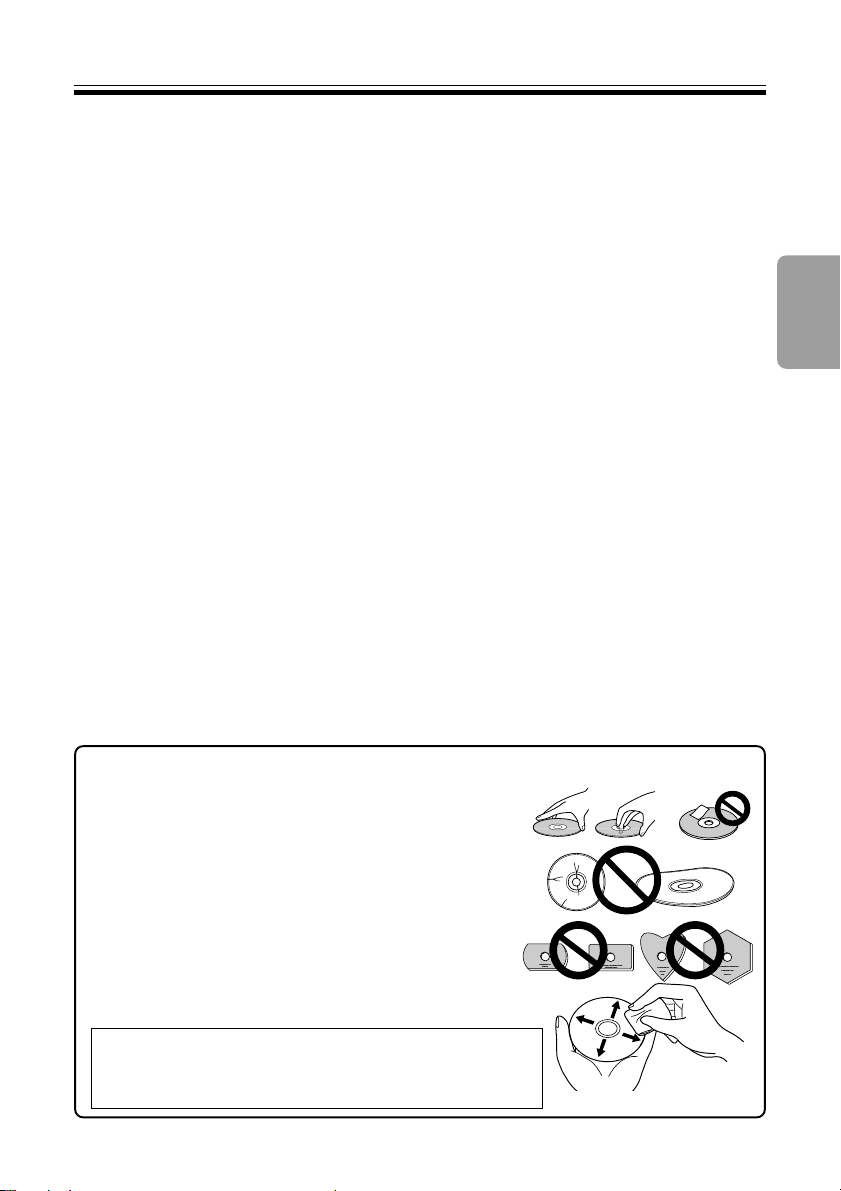
÷ Avoid touching or scratching the signal surface (shiny
side) of the disc.
÷ Hold the disc by the edges or by the center hold and one
edge.
÷ Do not affix paper or labels to the disc.
÷ Discard warped or cracked discs as they may cause
damage to the drive.
÷ Avoid specially shaped discs such as hearts or polygons.
÷ Remove dust or lint from the disc with a soft cloth by
wiping from the inside to the outside edge rather than in
a circular motion.
÷ Do not use record-cleaning or anti-static agents as the
solutions may cause damage to a disc.
Always be sure to store your discs in proper DVD-R storage
cases when not in use, and always be sure to check for dirt
or dust on discs (especially on the recording side) before use.
5
En

FEATURES
• Write Speed ( ✻ : ZCLV )
DVD-R 1X, 2X, 4X, 6X, 8X✻, 12X✻, 16X
DVD-RW 1X, 2X, 4X
DVD+R 2.4X, 4X, 6X, 8X✻, 12X✻, 16X
Double layered DVD+R 2.4X, 4X
DVD+RW 2.4X, 4X
CD-R 4X, 10X, 16X, 24X✻, 32X
CD-RW 4X, 10X, 16X, 20X✻, 24X
• Maximum Read Speed
DVD-ROM (single) 16X
DVD-ROM (dual) 12X
DVD-R, DVD+R 12X
Double layered DVD+R 8X
DVD-RW, DVD+RW 8X
DVD-RAM 2X
CD-ROM, CD-R 40X
CD-RW 32X
• Buffer Memory Size : 2 MBytes (Write, Read)
• IDE Data Transfer Mode : PIO Mode 4/Multi Word DMA Mode 2/Ultra DMA Mode 4
• 5.25inch Half-Height built in type
• Stereo Audio Output
• LCD Tilt Servo Mechanism
• Horizontal/Vertical orientation available
• Low vibration Mechanism by DRA system
Disc Format (Read/Write)
• DVD single layer/dual layer /120 mm disc /80 mm disc
• DVD-R (In case of write, 650nm disc for General only.)
• 4X-SPEED DVD-R • 8X-SPEED DVD-R
• DVD-RW • 2X-SPEED DVD-RW
• 4X-SPEED DVD-RW
• DVD+R • 4X-SPEED DVD+R
• 8X-SPEED DVD+R • Double layered DVD+R
• DVD+RW • 4X-SPEED DVD+RW
• DVD-RAM (Version 2.0, Version 2.1) (Read only)
• CD-ROM Mode 1
• CD-ROM XA Mode2 (form 1, form2)
• Photo CD (single and multiple session)
• CD-DA • CD-Extra (CD PLUS)
• Video CD • CD Text
• CD-R
• CD-RW, High-Speed CD-RW, Ultra-Speed CD-RW
✻
✻
✻
✻
Note:
• Specific application program that support above format is needed to write.
• Supported media required for specific DVD & CD writing speeds.
• When performing DVD writing at 12x or 16x speeds, use Pioneer-designate disc media. For
details, consult information available on Pioneer’s website.
6
En
INTERFACE
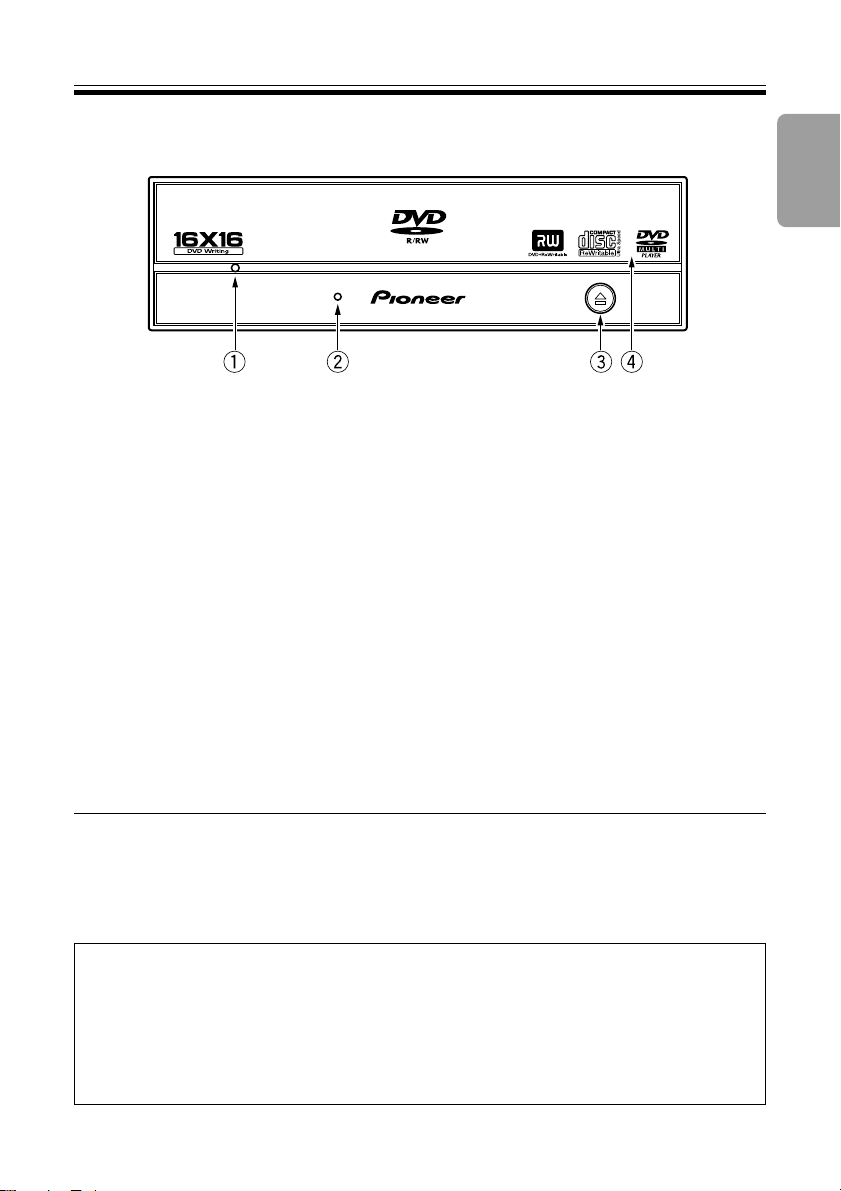
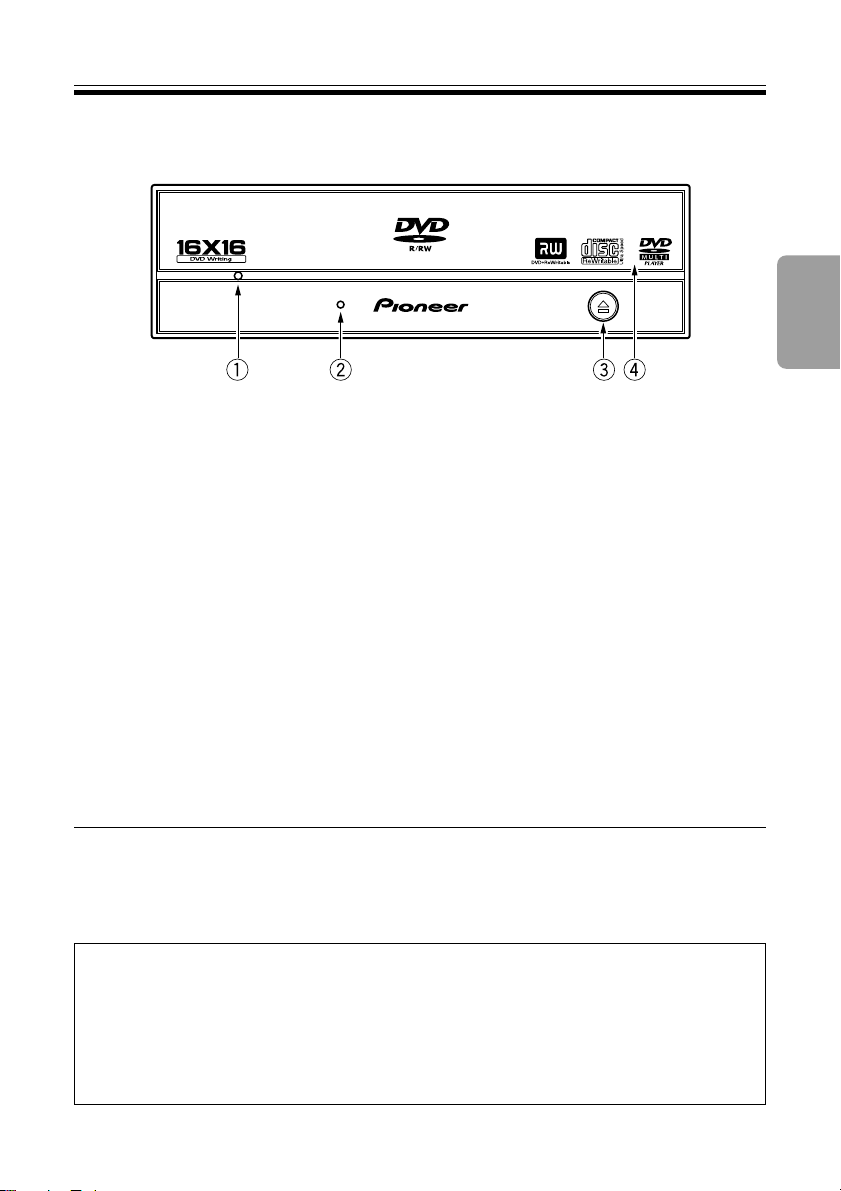
FRONT VIEW
1 Forced Ejection Hole
Insert a stiff rod into the hole and push to eject the tray when the tray doesn’t unload by
pressing the Eject button. In the normal operation, the eject button should be used to unload
the tray. Make sure the power of the drive is turned off and wait more than one minute till the
disc rotation is stopped when access the eject hole.
2 BUSY Indicator
Operation status is indicated as follows.
During reading Lights
During writing Lights
3 Eject Button (0)
To unload /load the disc, press the button.
4 Disc Tray
Open the loading tray by pressing the eject button, then place a CD or DVD disc into the slit
with the label facing up.
Press the eject button or push the front part of tray to load the tray with the disc.
Do not attempt to pull out the disc tray forcibly.
English
Precautions on playing 8 cm (3.15") Discs
An 8 cm (3.15") disc cannot be played even an adapter is attached to the disc when the drive is
upright condition.
ABOUT REGION CODES
The region code can be changed ONLY 5 times, including the 1st setting. Please be
aware the 5th change will be PERMANENT, therefore, please pay attention when
changing region codes.
÷ Region codes are part of the DVD Standard. However, Region codes on DVD
discs are optional. DVD discs with no specified Region code can be played on all
players.
7
En
INTERFACE
5 6 7
8
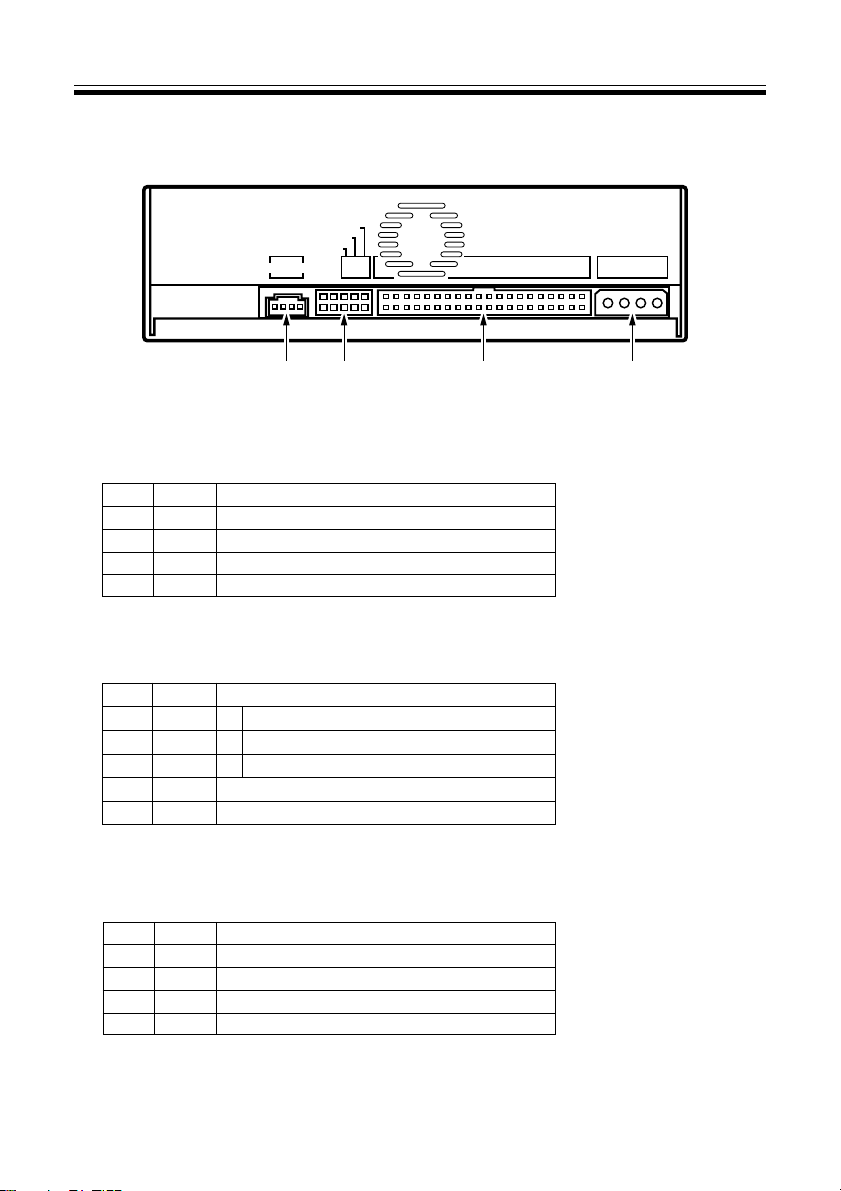
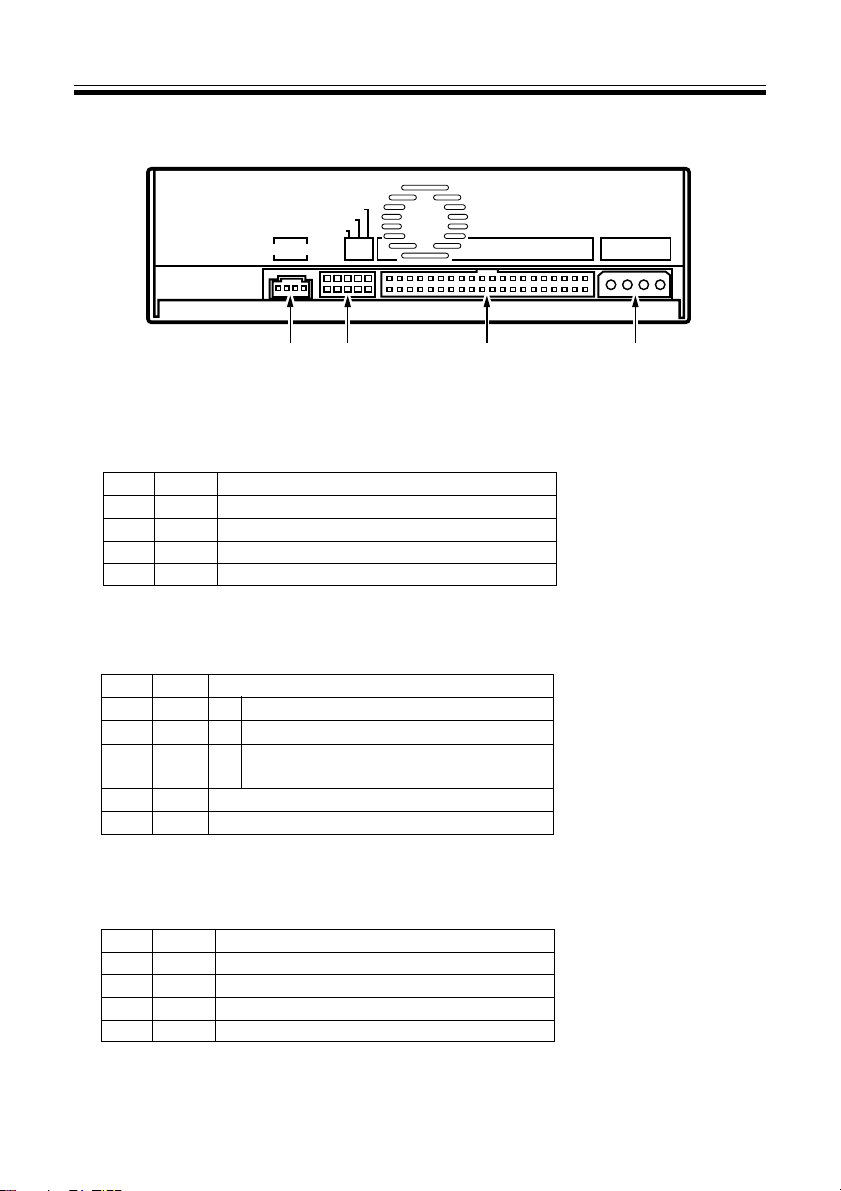
REAR VIEW
MASTER
SLAVE
CABLE SELECT
ANLOG AUDIO
SC
39
M
40
ALS
IDE INTERFACE
5 Audio Output
This is a connector for output of analog audio.
This connector is compatible with `Molex 70553`, choose a suitable connection cable.
Pin Name Function
1 L Left channel audio output.
2 G Ground.
3 G Ground.
4 R Right channel audio output.
6 Device Configuration Jumper
Switch becomes ON when short socket is put.
Make sure the power of the drive is off before changing jumper setting.
Pin # 1 is ON at the time of shipping from the plant.
Pin Name Function
1 MA on The drive is used in master mode.
2 SL on The drive is used in slave mode.
3 CS on Using Cable Select function.
4 Reserved.
5 Reserved.
1
2
DC INPUT
5V G G 12V
7 Host IDE Interface
This is a 40 pin I/O connector according to the ATA specifications.
8 DC Input
Pin Name Function
1 +12 Power supply input for DC +12 V.
2 G Ground.
3 G Ground.
4 +5 Power supply input for DC +5 V.
8
En

INSTALLATION
1 Turn off the power of the personal computer and remove the power cord from the
AC outlet, then remove the cover or the front panel.
2 Remove the blank panel installed on the front of the 5.25 inch slot.
3 Install the fixing slide rails on the drive. (When slide rails are required, please contact
your shop or the computer manufacturer.)
4 Insert the drive into the slot.
5 When fixing is required, please refer to the instruction manual for the computer.
÷ Please use screws with a length of 5 mm (3/16 in.) or less for mounting. Using
longer screws may cause damage on the drive.
÷ When the mounting screws are loose etc., the vibrations from disc rotation may
generate ripping noise. To prevent it the screws should be tightened securely.
English
En
9
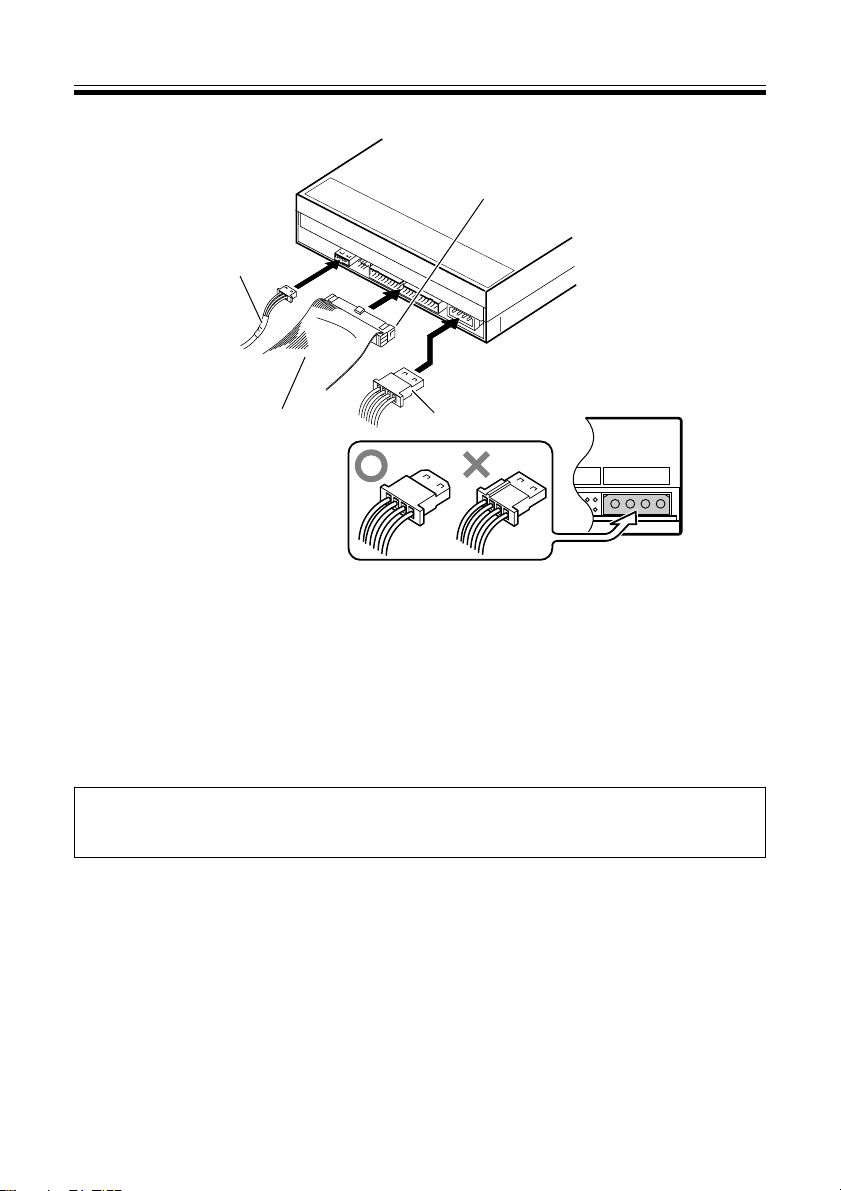
CONNECTIONS
Audio Cable
Pin 1
IDE Interface cable
Power cable
1
5V G G 12V
2
DC INPUT
÷ Turn off the power supply of the personal computer.
÷ Connect the power cable from the personal computer. At the time of connection,
pay attention to the polarity of the cable.
÷ Connect the IDE interface cable. At this time, confirm that pin 1 of the IDE connector
of the drive is connected correctly to pin 1 of the cable.
÷ When a sound card is being used, connect the audio output with an audio cable to
the sound card.
Be sure to supply electrical power for this product from the personal computer
which is connected to it. Do not use any other power supply than the internal one
of the personal computer.
10
En

SPECIFICATIONS
[Setting]
This drive is Horizontal and Vertical Use.
[Disc Size]
• 12 cm (4.72”) / 8 cm (3.15”)*
* 8 cm (3.15") discs cannot be used at upright position.
[Data Transfer Rate]
Data Read (Sustained)
DVD Max. 22.16 MBytes/sec.
CD Max. 6.14 MBytes/sec.
Data Write (Sustained)
DVD Ave. 22.16 MBytes/sec. (16X DVD-R)
CD Ave. 4.92 MBytes/sec. (32X CD-R)
Host Interface specification
PIO Mode 4, Multi word DMA Mode 2 16.6 MBytes/sec.
Ultra DMA Mode 4 66.6 MBytes/sec.
• The data transfer rate may not be output due to disc conditions (scratches, etc.).
[Access Time/ Seek Time]
Access time (Random average)
Seek time (Random average)
[Audio Characteristic]
Line Out 0.75 ± 0.1 Vrms (at 10 kΩ load)
[Others]
Power Supply DC +12 V, 0.9 A
Dimensions 148 (W) x 42.3 (H) x 198 (D) mm
(including front panel)
Weight 1.1 kg (2.43 lb)
Operation temperature +5°C to +45°C (41°F to 113°F)
Operation humidity 5% to 85% (no condensation)
Storage temperature – 40°C to +60°C (– 40°F to 140°F)
Storage humidity 5% to 90% (no condensation)
[Accessories]
Short-circuit socket x 2
Mounting screw x 4
Operating instructions x 1
NOTE:
• Specifications and design subject to possible modifications without notice, due to improvements.
(17.1 – 40X CAV Mode over 16 block transfer)
DVD-ROM 140 ms CD-ROM 130 ms
DVD-ROM 120 ms CD-ROM 100 ms
DC +5 V, 1.4 A
5-27/32 (W) x 1-11/16 (H) x 7-25/32 (D) in.
English
Published by Pioneer Corporation.
Copyright C 2004 Pioneer Corporation.
All rights reserved.
11
En
Nous vous remercions pour cet achat d’un produit Pioneer.
Nous vous demandons de lire soigneusement ce mode d’emploi ; vous serez ainsi à même de
faire fonctionner l’appareil correctement. Après avoir bien lu le mode d’emploi, le ranger dans un
endroit sûr pour pouvoir s’y référer ultérieurement. K015 Fr
AVERTISSEMENT
Cet appareil n’est pas étanche. Pour éviter les
risques d’incendie et de décharge électrique, ne
placez près de lui un récipient rempli d’eau, tel
qu’un vase ou un pot de fleurs, et ne l’exposez pas
à des gouttes d’eau, des éclaboussures, de la pluie
ou de l’humidité.
D3-4-2-1-3_A_Fr
La production de bruits acoustiques est inférieure à 70 dB.
(ISO7779/DIN45635)
IMPORTANT
ATTENTION
DANGER D´ELECTROCUTION
NE PAS OUVRIR
Ce symbole de l’éclair, placé dans un
triangle équilatéral, a pour but d’attirer
l’attention de l’utilisateur sur la présence, à
l’intérieur du coffret de l’appareil, de
“tensions dangereuses” non isolées d’une
grandeur suffisante pour représenter un
risque d’électrocution pour les êtres
humains.
ATTENTION
Cet appareil est un produit laser de Classe 1, mais la
diode laser qu’il renferme est supérieure à la Classe 1.
Pour garantir une sécurité constante, ne retirez
aucun des couvercles et n’essayez pas d’avoir accès à
l’intérieur de l’appareil.
Confiez toute réparation à un personnel qualifié.
L’étiquette suivante se trouve sur votre appareil.
Emplacement : sur le dessus du couvercle
ATTENTION:
POUR ÉVITER TOUT RISQUE
D’ÉLECTROCUTION, NE PAS ENLEVER LE
COUVERCLE (NI LE PANNEAU ARRIÈRE).
AUCUNE PIÈCE RÉPARA BLE PA R
L’UTILISATEUR NE SE TROUVE À
L’INTÉRIEUR. CONFIER TOUT ENTRETIEN À
UN PERSONNEL QUALIFIÉ UNIQUEMENT.
Ce point d’exclamation, placé dans un
triangle équilatéral, a pour but d’attirer
l’attention de l’utilisateur sur la présence,
dans les documents qui accompagnent
l’appareil, d’explications importantes du
point de vue de l’exploitation ou de
l’entretien.
CLASS 1 LASER PRODUCT
LASER KLASSE 1
D3-4-2-1-1_Fr
D3-4-2-1-8_A_Fr
12
Fr
est une marque de fabrique de DVD Format/Logo Licensing Corporation.
INSTRUCTIONS DE SECURITE
Pour garantir votre sécurité personnelle et obtenir le maximum de votre lecteur, lire et suivre ces consignes de
sécurité:
ENVIRONNEMENT - Ne pas utiliser cet appareil dans des endroits avec beaucoup de poussière, une
température ou une humidité élevée. Utiliser l’appareil à un endroit où il n’est pas soumis à des vibrations ou
des chocs.
PUISSANCE - Couper l’alimentation du système et des dispositifs joints avant l’installation.
LIRE LES INSTRUCTIONS - Lire toutes les instructions de sécurité et d’utilisation avant d’actionner le lecteur.
CONSERVER LES INSTRUCTIONS - Garder les instructions de sécurité et d’utilisation pour une future
référence.
SUIVRE LES INSTRUCTIONS - Suivre toutes les instructions de fonctionnement et d’utilisation.
ATTENTION AUX AVERTISSEMENTS - Observer tous les avertissements.
NETTOYAGE - NE PAS utiliser de liquides, de détachants en aérosol ou de l’alcool. N’utiliser qu’un chiffon
humide pour nettoyer les surfaces extérieures du boîtier.
EAU ET HUMIDITE - NE PAS utiliser ce produit à proximité d’eau.
SOURCES D’ALIMENTATION - Utiliser ce produit avec le type d’alimentation indiqué sur l’étiquette de
fabrication. En cas de doute à propos du type d’alimentation disponible, consulter un revendeur Pioneer agréé.
SURCHARGE - NE PAS surcharger les prises murales et les rallonges pour ne pas entraîner d’incendie ou de
secousse électrique.
PENETRATION D’OBJETS ET DE LIQUIDES - Ne jamais enfoncer d’objet d’aucune sorte dans ce produit. Le
contact avec des points de tension dangereux peut provoquer un court-circuit, entraînant un incendie ou une
secousse électrique. Ne pas verser de liquide d’aucune sorte sur ce produit.
CONDENSATION - De l’humidité se forme sur la section de fonctionnement du produit entraînant une baisse
de performances s’il est amené d’un endroit frais vers un environnement plus chaud. En cas de déplacement
de l’appareil vers un endroit ayant une température plus chaude, laisser le produit pendant 1 à 2 heures dans
le nouvel endroit avant de le remettre sous tension.
ENTRETIEN - Ne pas essayer de réparer soi-même ce produit. L’ouverture ou le retrait des capots peut vous
exposer à une tension dangereuse ou d’autres dangers. Pour tout entretien, demander à un personnel d’entretien
qualifié. (Se reporter à la carte d’entretien et de support jointe.)
Français
÷ Evitez de toucher ou de griffer la surface du disque sur
laquelle sont enregistrés les signaux (surface brillante).
÷ Saisissez le disque par les bords ou par le centre et un
bord.
÷ Ne collez pas de papier ou d’étiquette sur le disque.
÷ Jetez les disques fissurés ou voilés, car ils peuvent
endommager le lecteur.
÷ Evitez les disques de forme spéciale, notamment ceux
en forme de coeur ou de polygone.
÷ Eliminez la poussière ou les peluches du disque à l’aide
d’un linge doux en frottant de l’intérieur vers l’extérieur
et non en effectuant un mouvement circulaire.
÷ N’utilisez jamais de produit de nettoyage pour disque ou
d’ agent antistatique, car ces solutions peuvent
endommager le disque.
Rangez toujours vos disques dans les boîtes de rangement
de DVD-R prévues à cet effet lorsque nous ne les utilisez pas
et vérifiez s’ils ne sont pas couverts de saletés ou de
poussières (surtout sur la face enregistrée) avant de les utiliser.
13
Fr

CARACTERISTIQUES
• Vitesse d’écriture ( ✻ : ZCLV )
DVD-R 1X, 2X, 4X, 6X, 8X✻, 12X✻, 16X
DVD-RW 1X, 2X, 4X
DVD+R 2,4X, 4X, 6X, 8X✻, 12X✻, 16X
DVD+R double couche 2,4X, 4X
DVD+RW 2,4X, 4X
CD-R 4X, 10X, 16X, 24X✻, 32X
CD-RW 4X, 10X, 16X, 20X✻, 24X
• Vitesse de lecture maximale
DVD-ROM (simple) 16X
DVD-ROM (dual) 12X
DVD-R, DVD+R 12X
DVD+R double couche 8X
DVD-RW, DVD+RW 8X
DVD-RAM 2X
CD-ROM, CD-R 40X
CD-RW 32X
• Taille de la mémoire tampon : 2 Mo (écriture, lecture)
• Mode de transfert de données IDE :PIO mode 4 / DMA multi-mot mode 2/Ultra DMA mode 4
• Type intégré 5,25 pouces demi-hauteur
• Sortie audio stéréo
• Servomécanisme de bascule d’écran à cristaux liquides
• Orientation horizontale / verticale au choix
• Mécanisme à faible vibration par système DRA
Format du disque (lecture/écriture)
• DVD simple couche/double couche /disque de 120 mm/disque de 80 mm
•
DVD-R (En cas d’écriture, disque 650 nm pour usage général seul)
• DVD-R VITESSE 4X • DVD-R VITESSE 8X
• DVD-RW • DVD-RW VITESSE 2X
• DVD-RW VITESSE 4X
• DVD+R • DVD+R VITESSE 4X
• DVD+R VITESSE 8X • DVD+R double couche
• DVD+RW • DVD+RW VITESSE 4X
• DVD-RAM (Version 2.0, Version 2.1) (lecture seul)
• CD-ROM Mode 1
• CD-ROM XA Mode 2 (forme 1, forme 2)
• CD Photo (une session ou plusieurs sessions)
• CD-DA • CD-Extra (CD PLUS)
• CD vidéo • CD text
• CD-R
• CD-RW, CD-RW haute vitesse, CD-RW Ultra rapide
✻
✻
✻
✻
Remarque :
•
Un programme d’application prenant en charge le format ci-dessus est nécessaire pour l’écriture.
•
Médias supportés requis pour les vitesses d’écriture DVD et CD spécifiques.
•
Pour effectuer une écriture sur DVD aux vitesses 12x ou 16x, utilisez des disques désignés par
Pioneer. Pour plus de détails, consultez les informations disponibles sur le site web de Pioneer.
14
Fr
INTERFACE
VUE AVANT
1 Orifice d’éjection forcée
Insérer une tige rigide dans l’orifice et pousser pour éjecter le tiroir lorsque celui-ci ne s’ouvre
pas lors d’un appui sur la touche d’éjection. En fonctionnement, utiliser uniquement la touche
d’éjection pour ouvrir le tiroir. Veiller à ce que l’alimentation du lecteur soit coupée et attendre
l’arrêt de la rotation du disque pendant plus d’une minute avant de tenter d’éjecter le tiroir au
moyen de l’orifice d’éjection.
2 Voyant BUSY (occupé)
L'état de fonctionnement est signalé comme suit:
Pendant la lecture S'allume
Pendant l'écriture S'allume
3 Touche d’éjection (0)
Pour décharger / charger le disque, appuyer sur la touche.
4 Tiroir du disque
Ouvrir le tiroir de chargement en appuyant sur la touche d’éjection, puis placez un CD ou un
DVD dans l’emplacement prévu avec l’étiquette tournée vers le haut. Appuyer sur la touche
d’éjection ou sur la partie avant du tiroir pour charger le disque.
N'essayez pas de retirer de force le plateau du disque.
Français
Précautions à prendre lors de la lecture de disques de 8 cm
Les disques de 8 cm ne peuvent pas être lus par le lecteur même en utilisant un adaptateur intermédiaire
au disque lorsque le lecteur est placé en position verticale.
A PROPOS DES CODES REGIONAUX
Le code régional peut être modifié 5 fois SEULEMENT (premier réglage compris).
Comme la cinquième modification sera DÉFINITIVE, soyez particulièrement prudent
lorsque vous décidez de modifier les codes régionaux.
÷ Les codes régionaux sont couverts par la norme DVD. Toutefois, les codes régionaux
des disques DVD sont facultatifs. Les disques DVD qui ne possèdent pas de code
régional peuvent être reproduits sur tous les lecteurs.
15
Fr
INTERFACE
5 6 7
8
VUE DE LA FACE ARRIERE
MASTER
SLAVE
CABLE SELECT
ANLOG AUDIO
39
M
SC
40
ALS
IDE INTERFACE
5 Sortie audio
Connecteur pour sortie analogique audio.
Ce connecteur est compatible avec la norme « Molex 70553 ».
Choisir un câble de connexion
approprié.
Broche
Nom Fonction
1
L
Sortie audio voie de droite (Left)
2GTerre
3GTerre
4 R Sortie audio voie de gauche (Right)
6 Cavalier de configuration
ON signifie que le cavalier réunit les deux broches de cette position.
Veiller à ce que l’alimentation du lecteur soit coupée avant de changer la configuration du cavalier.
La broche n° 1 est configurée sur ON en usine.
Broche
Nom Fonction
1MAon
2SLon
3 CS on Utilisation de la fonction de sélection par
4Réservé.
5Réservé.
Le lecteur est utilisé en mode maître (Master).
Le lecteur est utilisé en mode esclave (Slave).
câble (Cable Select).
1
2
DC INPUT
5V G G 12V
7 Interface IDE avec l’hôte
Connecteur d’E/S 40 broches conforme aux spécifications ATA.
8 Entrée cc (DC)
Broche
Nom Fonction
1 +12 Entrée cc +12 V
2GTerre
3GTerre
4 +5 Entrée cc +5 V
16
Fr
 Loading...