

Page 1
DVD Recorder
DVR-230-
S
4.74.7
Operating Instructions
®
Page 2
IMPORTANT
CAUTION
RISK OF ELECTRIC SHOCK
DO NOT OPEN
The lightning flash with arrowhead symbol,
within an equilateral triangle, is intended to
alert the user to the presence of uninsulated
"dangerous voltage" within the product's
enclosure that may be of sufficient
magnitude to constitute a risk of electric
shock to persons.
CAUTION:
TO PREVENT THE RISK OF ELECTRIC
SHOCK, DO NOT REMOVE COVER (OR
BACK). NO USER-SERVICEABLE PARTS
INSIDE. REFER SERVICING TO QUALIFIED
SERVICE PERSONNEL.
WARNING
This equipment is not waterproof. To prevent a fire
or shock hazard, do not place any container filed
with liquid near this equipment (such as a vase or
flower pot) or expose it to dripping, splashing, rain
or moisture.
D3-4-2-1-3_A_En
Operating Environment
Operating environment temperature and humidity:
+5 ºC – +35 ºC (+41 ºF – +95 ºF); less than 85 %RH
(cooling vents not blocked)
Do not install this unit in a poorly ventilated area, or in
locations exposed to high humidity or direct sunlight (or
strong artificial light)
D3-4-2-1-7c_A_En
The exclamation point within an equilateral
triangle is intended to alert the user to the
presence of important operating and
maintenance (servicing) instructions in the
literature accompanying the appliance.
D3-4-2-1-1_En-A
WARNING
Before plugging in for the first time, read the following
section carefully.
The voltage of the available power supply differs
according to country or region. Be sure that the
power supply voltage of the area where this unit
will be used meets the required voltage (e.g., 230V
or 120V) written on the rear panel.
D3-4-2-1-4_A_En
WARNING
To prevent a fire hazard, do not place any naked
flame sources (such as a lighted candle) on the
equipment.
D3-4-2-1-7a_A_En
CAUTION
This product is a class 1 laser product, but this
product contains a laser diode higher than Class 1.
To ensure continued safety, do not remove any covers
or attempt to gain access to the inside of the product.
Refer all servicing to qualified personnel.
The following caution label appears on your unit.
Location: inside of the unit
CLASS 3B VISIBLE AND INVISIBLE LASER RADIATION
CAUTION
WHEN OPEN, AVOID EXPOSURE TO THE BEAM.
RADIATIONS LASER VISIBLES ET INVISIBLES DE CLASSE 3B
ATTENTION
QUAND OUVERT. ÉVITEZ TOUT EXPOSITION AU FAISCEAU.
KLASSE 3B SYNLIG OG USYNLIG LASERSTRÅLING VED ÅBNING.
ADVARSEL
UNDGÅ UDSÆTTELSE FOR STRÅLING.
KLASS 3B SYNLIG OCH OSYNLIG LASERSTRÅLNING NÄR DENNA
VARNING
DEL ÄR ÖPPNAD. UNDVIK ATT UTSÄTTA DIG FÖR STRÅLEN.
BEI GEÖFFNETER ABDECKUNG IST SICHTBARE UND UNSICHTBARE
VORSICHT
LASERSTRAHLUNG DER KLASSE 3B IM GERÄTEINNEREN
VORHANDEN. AUGEN NICHT DEM LASERSTRAHLAUSSETZEN!
PRECAUCIAÓN
VARO!
CUANDO SE ABRE HAY RADIACIÓN LÁSER DE CLASE 3B VISIBLE
E INVISIBLE. EVITE LA EXPOSICIÓN A LOS RAYOS LÁSER.
AVATTAESSA OLET ALTTIINA NÄKYVÄLLE JA
NÄKYMÄTTÖMÄLLE LUOKAN 3B LASERSÄTEILYLLE.
ÄLÄ KATSO SÄTEESEEN.
DRW2247 - A
D3-4-2-1-8_A_En
Page 3

VENTILATION CAUTION
When installing this unit, make sure to leave space
around the unit for ventilation to improve heat
radiation (at least 10 cm at top, 10 cm at rear, and
10 cm at each side).
WARNING
Slots and openings in the cabinet are provided for
ventilation to ensure reliable operation of the
product, and to protect it from overheating. To
prevent fire hazard, the openings should never be
blocked or covered with items (such as newspapers,
table-cloths, curtains) or by operating the
equipment on thick carpet or a bed.
If the AC plug of this unit does not match the AC
outlet you want to use, the plug must be removed
and appropriate one fitted. Replacement and
mounting of an AC plug on the power supply cord of
this unit should be performed only by qualified
service personnel. If connected to an AC outlet, the
cut-off plug can cause severe electrical shock. Make
sure it is properly disposed of after removal.
The equipment should be disconnected by removing
the mains plug from the wall socket when left
unused for a long period of time (for example, when
on vacation).
CAUTION
The STANDBY/ON switch on this unit will not
completely shut off all power from the AC outlet.
Since the power cord serves as the main disconnect
device for the unit, you will need to unplug it from
the AC outlet to shut down all power. Therefore,
make sure the unit has been installed so that the
power cord can be easily unplugged from the AC
outlet in case of an accident. To avoid fire hazard,
the power cord should also be unplugged from the
AC outlet when left unused for a long period of time
(for example, when on vacation).
D3-4-2-1-7b_A_En
D3-4-2-2-1a_A_En
This product is for general household purposes. Any failure
due to use for other than household purposes (such as longterm use for business purposes in a restaurant or use in a
car or ship) and which requires repair will be charged for
even during the warranty period. K041_En
This product includes FontAvenue® fonts licenced by NEC
corporation. FontAvenue is a registered trademark of NEC
Corporation.
This product incorporates copyright protection technology
that is protected by method claims of certain U.S. patents
and other intellectual property rights owned by
Macrovision Corporation and other rights owners. Use of
this copyright protection technology must be authorized
by Macrovision Corporation, and is intended for home and
other limited viewing uses only unless otherwise
authorized by Macrovision Corporation. Reverse
engineering or disassembly is prohibited.
POWER-CORD CAUTION
Handle the power cord by the plug. Do not pull out the
plug by tugging the cord and never touch the power
cord when your hands are wet as this could cause a
short circuit or electric shock. Do not place the unit, a
piece of furniture, etc., on the power cord, or pinch the
cord. Never make a knot in the cord or tie it with other
cords. The power cords should be routed such that they
are not likely to be stepped on. A damaged power cord
can cause a fire or give you an electrical shock. Check
the power cord once in a while. When you find it
damaged, ask your nearest PIONEER authorized
service center or your dealer for a replacement.
This product complies with the Low Voltage Directive
(73/23/EEC, amended by 93/68/EEC), EMC Directives
(89/336/EEC, amended by 92/31/EEC and
93/68/EEC).
S002_En
D3-4-2-1-9a_En
Replacement and mounting of an AC plug on the power supply cord of this unit should be performed only by qualified
service personnel.
Do not connect either wire to the earth terminal of a
three pin plug.
NOTE
After replacing or changing a fuse, the fuse cover in
the plug must be replaced with a fuse cover which
corresponds to the colour of the insert in the base
of the plug or the word that is embossed on the
base of the plug, and the appliance must not be
used without a fuse cover. If lost replacement fuse
covers can be obtained from your dealer.
Only 5 A fuses approved by B.S.I or A.S.T.A to
B.S.1362 should be used.
D3-4-2-1-2-2_En
IMPORTANT
FOR USE IN THE UNITED
KINGDOM
The wires in this mains lead are coloured in
accordance with the following code:
Blue : Neutral
Brown : Live
If the plug provided is unsuitable for your socket
outlets, the plug must be cut off and a suitable plug
fitted.
The cut-off plug should be disposed of and must
not be inserted into any 13 amp socket as this can
result in electric shock. The plug or adaptor or the
distribution panel should be provided with 5 A fuse.
As the colours of the wires in the mains lead of this
appliance may not correspond with coloured
markings identifying the terminals in your plug,
proceed as follows ;
The wire which is coloured blue must be connected
to the terminal which is marked with the letter N or
coloured black.
The wire which is coloured brown must be
connected to the terminal which is marked with the
letter L or coloured red.
Page 4

01
Contents
Contents
01 Before you start
Features
What’s in the box
Putting the batteries in the remote control
Using the remote control
Disc / content format playback compatibility
. . . . . . . . . . . . . . . . . . . . . . . . . . . . . . . . . . .5
. . . . . . . . . . . . . . . . . . . . . . . . . . . .5
. . . . . . . . .6
. . . . . . . . . . . . . . . . . . . . . . .6
02 Connecting up
Rear panel connections
Front panel connections
Extra features for use with compatible TVs
Easy connections
Using other types of audio/video output
Connecting to a cable box or satellite receiver
Connecting an external decoder box (1)
Connecting an external decoder box (2)
Connecting to an AV amplifier/receiver
Connecting other AV sources
Plugging in
. . . . . . . . . . . . . . . . . . . . . . . . . . . . . . . .17
. . . . . . . . . . . . . . . . . . . . . . . .9
. . . . . . . . . . . . . . . . . . . . . . .9
. . . . . . . .10
. . . . . . . . . . . . . . . . . . . . . . . . . . .11
. . . . . . . . . .12
. . . . . . . . . .14
. . . . . . . . . .15
. . . . . . . . . . .16
. . . . . . . . . . . . . . . . . .17
03 Controls and displays
Front panel
Display
Remote control
. . . . . . . . . . . . . . . . . . . . . . . . . . . . . . . .18
. . . . . . . . . . . . . . . . . . . . . . . . . . . . . . . . . . .18
. . . . . . . . . . . . . . . . . . . . . . . . . . . . .19
. . . . . . . .7
. . . . . .13
06 Recording
About DVD recording
Recording time and picture quality
Restrictions on video recording
Setting the picture quality/recording time
Basic recording from the TV
Setting a timer recording
Timer recording FAQ
Recording from an external component
Playing your recordings on other DVD players
Initializing a DVD-RW disc
. . . . . . . . . . . . . . . . . . . . . . . .35
. . . . . . . . . . . . . .35
. . . . . . . . . . . . . . . . .36
. . . . . . . . .36
. . . . . . . . . . . . . . . . . . .37
. . . . . . . . . . . . . . . . . . . . . .38
. . . . . . . . . . . . . . . . . . . . . . . . .41
. . . . . . . . . .41
. . . . . . . . . . . . . . . . . . . . .43
07 Editing
Editing Titles (Title Edit)
Editing chapters (Chapter Edit)
. . . . . . . . . . . . . . . . . . . . . . .44
. . . . . . . . . . . . . . . . .46
08 The Initial Setup menu
Using the Initial Setup menu
Basic settings
Disc settings
Video settings
Audio settings
Recording settings
Playback settings
. . . . . . . . . . . . . . . . . . . . . . . . . . . . . .48
. . . . . . . . . . . . . . . . . . . . . . . . . . . . . . .53
. . . . . . . . . . . . . . . . . . . . . . . . . . . . . .54
. . . . . . . . . . . . . . . . . . . . . . . . . . . . . .56
. . . . . . . . . . . . . . . . . . . . . . . . . .57
. . . . . . . . . . . . . . . . . . . . . . . . . . .58
. . . . . . . . . . . . . . . . . . .48
. . . . .42
04 Getting started
Switching on and setting up
Making your first recording
Using the built-in TV tuner
Basic playback
Displaying disc information on-screen
. . . . . . . . . . . . . . . . . . . . . . . . . . . . .24
. . . . . . . . . . . . . . . . . . .20
. . . . . . . . . . . . . . . . . . . .22
. . . . . . . . . . . . . . . . . . . . .23
05 Playback
Introduction
Using the Disc Navigator to browse the contents
of a disc
Navigating discs
Scanning discs
Playing in slow motion
Frame advance/frame reverse
The Play Mode menu
Displaying and switching subtitles
Switching DVD soundtracks
Switching audio channels
Switching camera angles
4
En
. . . . . . . . . . . . . . . . . . . . . . . . . . . . . . .28
. . . . . . . . . . . . . . . . . . . . . . . . . . . . . . . . . . .28
. . . . . . . . . . . . . . . . . . . . . . . . . . . .29
. . . . . . . . . . . . . . . . . . . . . . . . . . . . .30
. . . . . . . . . . . . . . . . . . . . . . .30
. . . . . . . . . . . . . . . . . .31
. . . . . . . . . . . . . . . . . . . . . . . . .31
. . . . . . . . . . . . . . . . . . .33
. . . . . . . . . . . . . . . . . . . . .34
. . . . . . . . . . . . . . . . . . . . .34
. . . . . . . . . . .26
. . . . . . . . . . . . . .33
09 Additional information
Screen sizes and disc formats
Troubleshooting
Frequently asked questions
Time Zone list
Language code list
Country/Area code list
On-screen displays and recorder displays . . . . . . . . .68
Handling discs . . . . . . . . . . . . . . . . . . . . . . . . . . . . .69
Storing discs . . . . . . . . . . . . . . . . . . . . . . . . . . . . . . .69
Damaged discs . . . . . . . . . . . . . . . . . . . . . . . . . . . . .69
Cleaning the pickup lens . . . . . . . . . . . . . . . . . . . . . .69
Condensation . . . . . . . . . . . . . . . . . . . . . . . . . . . . . .69
Hints on installation . . . . . . . . . . . . . . . . . . . . . . . . .70
Moving the recorder . . . . . . . . . . . . . . . . . . . . . . . . .70
Resetting the recorder. . . . . . . . . . . . . . . . . . . . . . . .70
Glossary . . . . . . . . . . . . . . . . . . . . . . . . . . . . . . . . . .70
Specifications . . . . . . . . . . . . . . . . . . . . . . . . . . . . . .72
. . . . . . . . . . . . . . . . . . . . . . . . . . . .63
. . . . . . . . . . . . . . . . . . . . . . . . . . . . . .66
. . . . . . . . . . . . . . . . . . . . . . . . . .67
. . . . . . . . . . . . . . . . . .62
. . . . . . . . . . . . . . . . . . . .65
. . . . . . . . . . . . . . . . . . . . . . . .67
Page 5
Before you start
Chapter 1
Before you start
Features
• Progressive scan-compatible
Compared to standard interlaced video, progressive scan
effectively doubles the amount of video information fed to
your TV or monitor. (Check your TV/monitor for
compatibility with this feature.)
• Cinema surround sound in your home
Connect this recorder to a Dolby Digital and/or DTScompatible AV amp/receiver to enjoy full surround sound
effects from Dolby Digital and DTS DVD discs.
• Program up to 32 timer recordings
You can program the recorder to record up to 32
programs, up to a month in advance, using the VIDEO
®
Plus+
system*1 for easy programming if you want. As
well as single programs, you can specify daily or weekly
recordings, too.
*1
and PlusCode are registered trademark
of Gemstar Development Corporation.
The VIDEO Plus+ system is manufactured under
license from Gemstar Development Corporation.
• One Touch Recording
Use One Touch Recording to start recording immediately
in 30 minute blocks. Each time you press the
button, the recording time is extended by another 30
minutes.
• Optimized recording
Optimized recording adjusts the recording quality
automatically if a timer recording will not fit onto a disc
with the settings that you made. Note that the quality of
recordings may be reduced if a longer recording time is
used.
• High quality 16-bit Linear PCM audio
When recording using the high quality setting (XP), the
audio is recorded in uncompressed 16-bit Linear PCM
format. This delivers great sounding audio to accompany
the high picture quality.
• Find what you want to watch quickly and easily
Unlike video tape that needs to be wound to the correct
place, you can jump right to the part of a DVD disc that
you want to watch. Search for a point on a disc by title,
chapter or time.
®
REC
• Play Video mode recordings on a regular DVD
Video mode
player
Discs recorded using the Video mode can be played back
on regular DVD players, including computer DVD drives
compatible with DVD-Video playback
*2 ‘DVD-Video format’ recording: The use of the DVDVideo format for recording on DVD-R and DVD-RW discs
is referred to as recording in ‘Video mode’ on Pioneer’s
DVD recorders. Supporting playback of DVD-R / DVDRW discs is optional for manufacturers of DVD
playback equipment, and there is DVD playback
equipment that does not play DVD-R or DVD-RW discs
recorded in the DVD-Video format.
Note: ‘Finalization’ is required.
• MP3 file playback
This recorder can play MP3 audio files on CD-R, CD-RW
or CD-ROM discs (see
compatibility
on page 7).
Disc / content format playback
*2
.
What’s in the box
Please confirm that the following accessories are in the
box when you open it.
• Remote control
• AA/R6P dry cell batteries x2
• Audio/video cable (red/white/yellow)
• RF antenna cable
• Power cable
• These operating instructions
• Warranty card
01
En
5
Page 6
01
Before you start
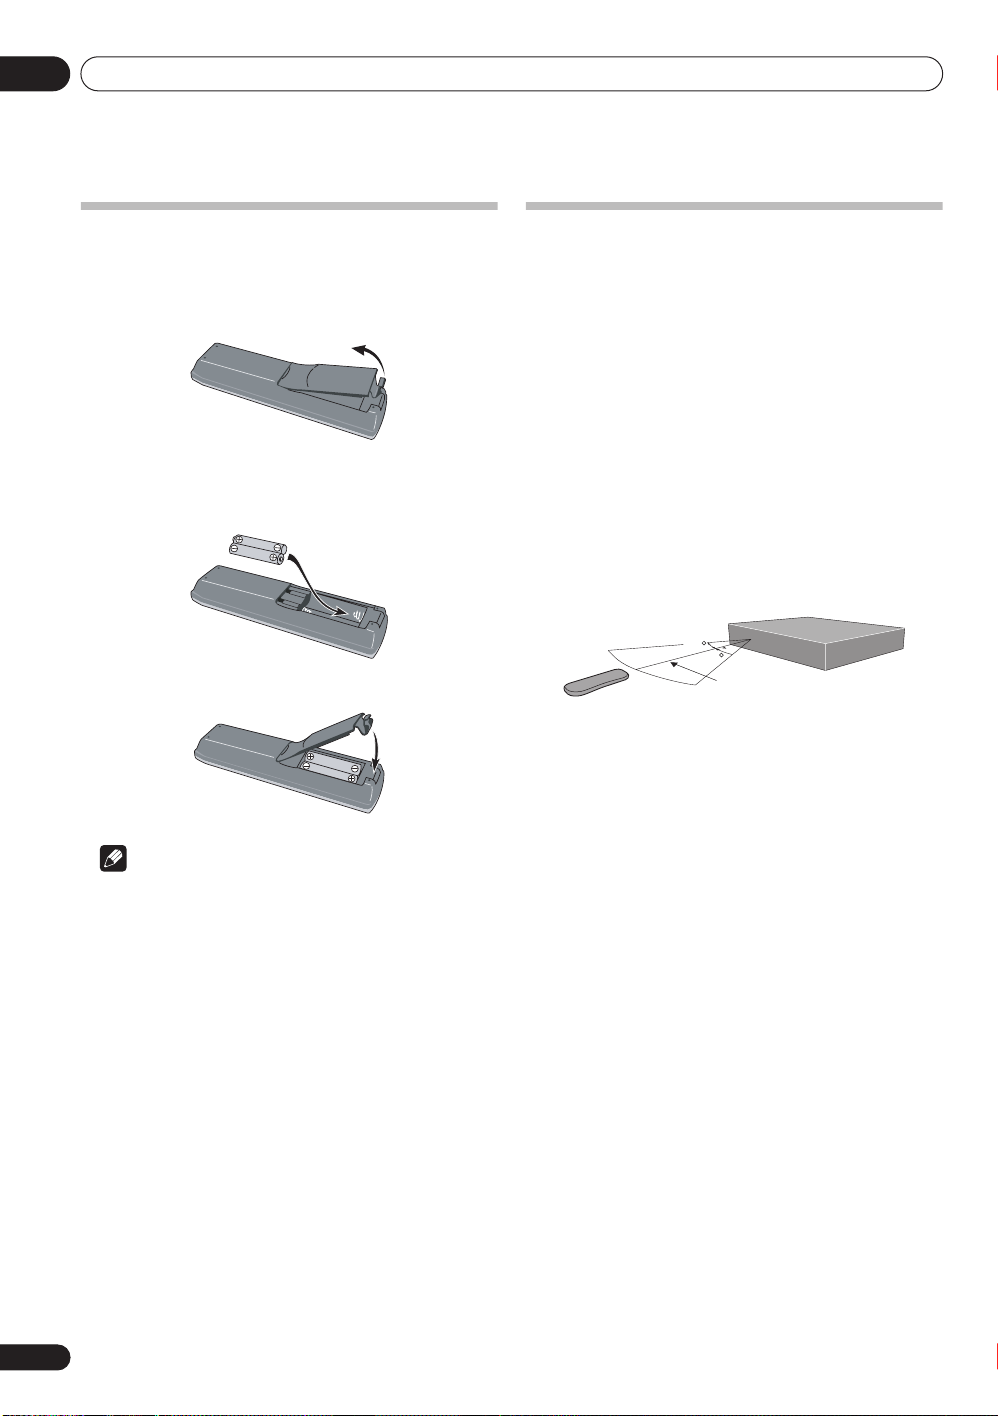
Putting the batteries in the remote
control
1 Open the battery compartment cover on the
back of the remote control.
2 Insert two AA/R6P batteries into the battery
compartment following the indications (
the compartment.
3 Close the cover.
,
) inside
Using the remote control
Keep in mind the following when using the remote
control:
• Make sure that there are no obstacles between the
remote and the remote sensor on the unit.
• Remote operation may become unreliable if strong
sunlight or fluorescent light is shining on the unit’s
remote sensor.
• Remote controllers for different devices can interfere
with each other. Avoid using remotes for other
equipment located close to this unit.
• Replace the batteries when you notice a fall off in the
operating range of the remote.
• When the batteries run down or you change the
batteries, the remote control mode is automatically
reset. See
• Use within the operating range and angle, as shown.
Remote Control
30
30
7 m
on page 52 to reset it.
Note
Incorrect use of batteries can result in hazards such as
leakage and bursting. Please observe the following:
• Don’t mix new and old batteries together.
• Don’t use different kinds of battery together—
although they may look similar, different batteries
may have different voltages.
• Make sure that the plus and minus ends of each
battery match the indications in the battery
compartment.
• Remove batteries from equipment that isn’t going to
be used for a month or more.
• When disposing of used batteries, please comply
with governmental regulations or environmental
public instruction’s rules that apply in your country or
area.
6
En
Page 7
Before you start
Disc / content format playback
compatibility
General disc compatibility
This recorder is compatible with a wide range of disc
types (media) and formats. Playable discs will generally
feature one of the following logos on the disc and/or disc
packaging. Note however that some disc types, such as
recordable CD and DVD, may be in an unplayable
format—see below for further compatibility information.
DVD-Video DVD-R DVD-RW
Video CDAudio CD CD-R
•
is a trademark of DVD Format/Logo Licensing
Corporation.
• About DualDisc playback
A DualDisc is a new two-sided disc, one side of which
contains DVD content video, audio, etc. while the
other side contains non-DVD content such as digital
audio material.
The non-DVD, audio side of the disc is not compliant
with the CD Audio specification and therefore may
not play.
It is possible that when loading or ejecting a
DualDisc, the opposite side to that being played will
be scratched. Scratched discs may not be playable.
The DVD side of a DualDisc plays in this product.
DVD-Audio content will not play.
For more detailed information on the DualDisc
specification, please refer to the disc manufacturer
or disc retailer.
DVD-R/RW compatibility
This recorder will play and record DVD-R/RW discs.
Compatible media:
• DVD-RW Ver. 1.1, Ver. 1.1 / 2x and Ver. 1.2 / 4x
• DVD-R Ver. 2.0, Ver. 2.0 / 4x / 8x and Ver. 2.1 / 16x
Recording formats:
• DVD-R: DVD-Video format (Video mode)
• DVD-RW: Video Recording (VR) format and DVDVideo format (Video mode)
CD-RW
This recorder cannot record onto DVD-R DL Ver. 3.0 (Dual
Layer) discs. Dual Layer discs recorded and finalized on
other recorders, however, can be played on this recorder.
Older models of DVD recorders and DVD writers may
reject DVD-RW Ver. 1.2 / 4x discs. If you want to share
DVD-RW discs between this recorder and an older
recorder/writer, we recommend using Ver. 1.1 discs.
The following table shows older Pioneer DVD recorders’
limited compatibility with DVD-RW Ver. 1.2 / 4x discs.
Model
DVR-7000
DVR-3100/ DVR-5100H
1
Discs should be finalized in this recorder before playing. Unfinalized
VR mode and Video mode discs may not play.
2
Cannot read the CPRM information
you load a disc. However, this will not affect playback.
3
Copy-once protected disc titles will not play.
Playable Recordable
1,2,3
Yes
1
Yes
will show in the display when
No
No
CD-R/RW compatibility
This recorder cannot record CD-R or CD-RW discs.
• Compatible formats: CD-Audio, Video CD, ISO 9660
CD-ROM* containing MP3 files
*
ISO 9660 Level 1 or 2 compliant. Joliet file system is
compatible with this recorder.
• Multi-session playback: No
• Unfinalized disc playback: No
Compressed audio compatibility
• Compatible media: CD-ROM, CD-R, CD-RW
• Compatible formats: MPEG-1 Audio Layer 3 (MP3)
• Sampling rates: 44.1 or 48kHz
• Bit-rates: 32 to 320Kbps (128Kbps or higher
recommended)
• Variable bit-rate (VBR) MP3 playback: Yes
• File extension: .mp3 (this must be used for the
recorder to recognize MP3 files – do not use for other
file types)
• File structure: Up to 50 folders / 300 files (if these
limits are exceeded, only files and folders up to these
limits are playable)
01
7
En
Page 8

01
Before you start
PC-created disc compatibility
Discs recorded using a personal computer may not be
playable in this unit due to the setting of the application
software used to create the disc. In these particular
instances, check with the software publisher for more
detailed information.
Discs recorded in packet write mode (UDF format) are
not compatible with this recorder.
Check the DVD-R/RW or CD-R/RW software disc boxes
for additional compatibility information.
Frequently asked questions
• What’s the difference between DVD-R and DVD-RW?
The most important difference between DVD-R and
DVD-RW is that DVD-R is a record-once medium,
while DVD-RW is a re-recordable/erasable medium.
You can re-record/erase a DVD-RW disc
approximately 1,000 times.
For more information, see
page 35.
• What’s VR mode?
VR (Video Recording) mode is a special mode
designed for home DVD recording. It allows flexible
editing of recorded material compared to ‘Video
mode’. On the other hand, Video mode discs are
more compatible with other DVD players.
• Can I play my recordable discs in a regular DVD player?
Generally, DVD-R discs and DVD-RW discs recorded
in Video mode
but they must be ‘finalized’ first. This process fixes
the contents of the disc to make them readable to
other DVD players as DVD-Video discs.
DVD-RW discs recorded in VR mode are playable in
some players.
This label indicates playback compatibility with
DVD-RW discs recorded in VR mode (Video
Recording format). However, for discs recorded with
a record-only-once encrypted program, playback can
only be achieved using a CPRM compatible device.
Note that Pioneer cannot guarantee that discs
recorded using this recorder will play on other players.
* ‘DVD-Video format’ recording: The use of the DVDVideo format for recording on DVD-R and DVD-RW discs
is referred to as recording in ‘Video mode’ on Pioneer’s
DVD recorders. Supporting playback of DVD-R / DVDRW discs is optional for manufacturers of DVD
playback equipment, and there is DVD playback
equipment that does not play DVD-R or DVD-RW discs
recorded in the DVD-Video format.
Note: ‘Finalization’ is required.
*
are playable in a regular DVD player,
About DVD recording
on
This recorder supports the recording of ‘copy-once’
broadcast programs using the CPRM copy protection
system (see CPRM on page 36) on CPRM-compliant
DVD-RW discs in VR mode. CPRM recordings can only
be played on players that are specifically compatible
with CPRM.
8
En
Page 9
Connecting up
Chapter 2
Connecting up
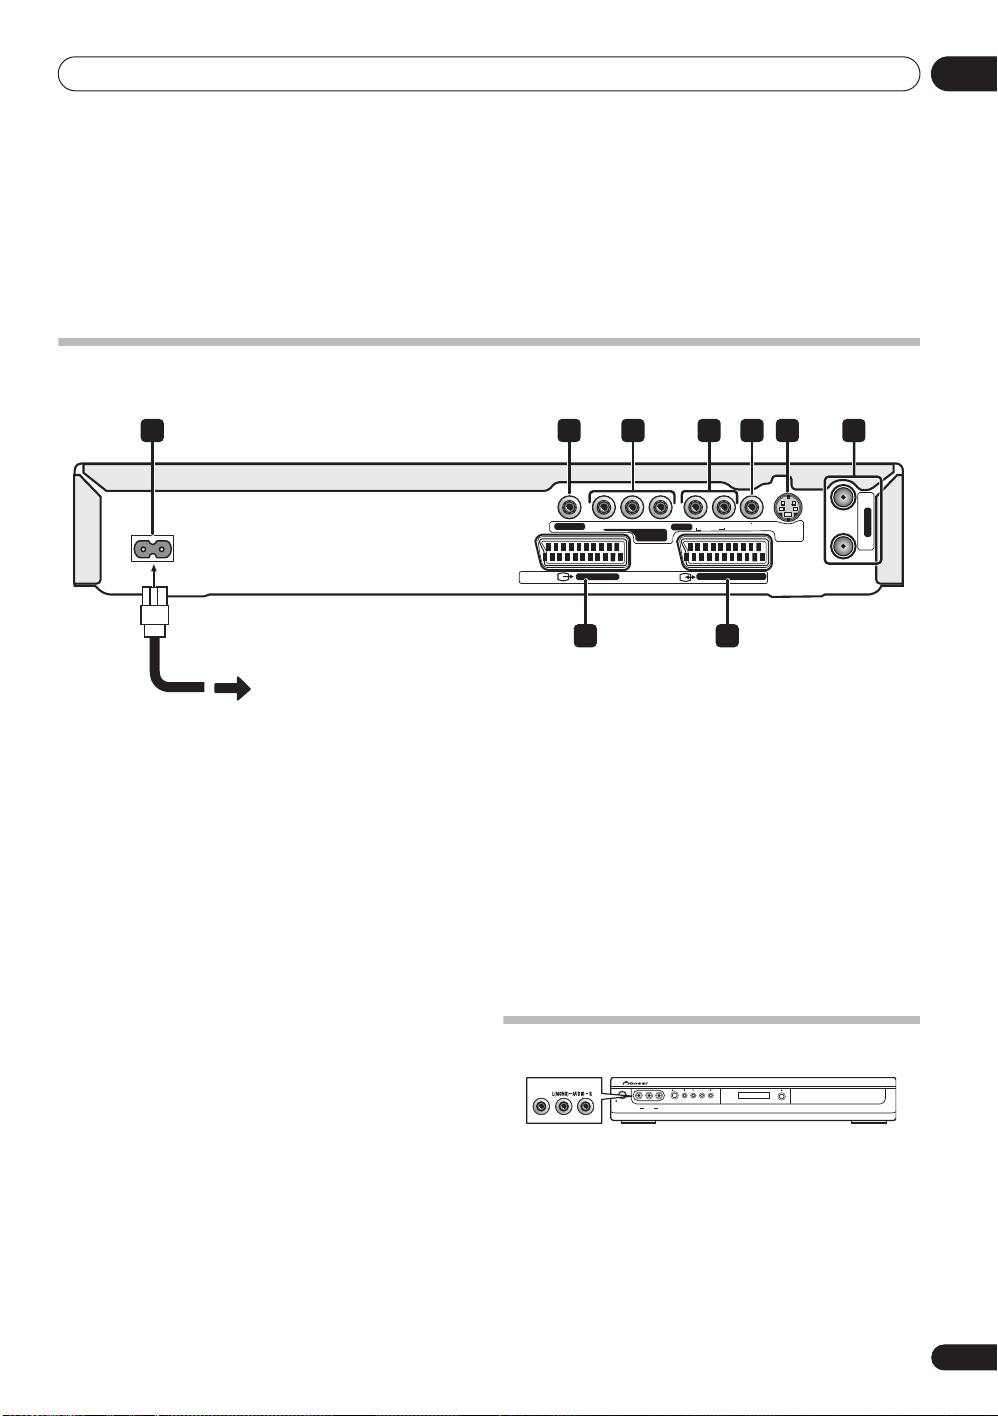
Rear panel connections
1 2 3 4 5 6 7
AC IN
DIGITAL OUT
AV 1 ・RGB - TV
COMPONENT
VIDEO OUT
R
OUTPUT
RYPBP
L
AUDIO VIDEO
AV 2 (INPUT 1 DECODER)
89
S-VIDEO
IN
OUT
02
ANTENNA
1 AC IN
Connect to a power outlet using the supplied power cable
only.
2 COAXIAL DIGITAL OUT
A digital audio output for connecting to an AV amp/
receiver, Dolby Digital/DTS decoder or other equipment
with a coaxial digital input.
3 COMPONENT VIDEO OUT
A high-quality video output for connecting to a TV or
monitor with a component video input.
4 Analog audio output (AUDIO OUTPUT)
Stereo analog audio output for connection to your TV or
AV receiver.
5 Composite video output (VIDEO OUTPUT)
Standard video output for connection to your TV or AV
receiver.
6 S-video output (S-VIDEO OUTPUT)
S-video video output for connection to your TV or AV
receiver.
7 ANTENNA IN/OUT
Connect your TV antenna to the
signal is passed through to the
ANTENNA IN
ANTENNA OUT
jack. The
jack for
connection to your TV.
8 AV2 (INPUT 1/DECODER) AV connector
Audio/video input/output SCART-type AV connector for
connecting to a VCR, or other equipment with a SCART
connector. The input accepts video and S-video. See
L1 In
on page 54 for how to set this up.
AV2/
9 AV1•RGB-TV AV connector
Audio/video output SCART-type AV connector for
connecting to a TV or other equipment with a SCART
connector. The video output is switchable between video,
S-video and RGB. See
AV1 Out
on page 54 for how to set
this up.
Front panel connections
VIDEO
On the left side of the front panel there is a second audio/
video input, consisting of a standard (composite) video
jack, and stereo analog audio jacks.
REC
STANDBY/ON
VIDEO
L(MONO) AUDIO R
INPUT 2
En
9
Page 10

02
Connecting up
Extra features for use with
compatible TVs
When this recorder is connected to a TV that features i/o
Link.A, AV Link, T-V Link, EasyLink, MegaLogic,
SMARTLINK, Q-Link, DATA LOGIC or NexTView Link
using a fully-wired 21-pin SCART cable (not supplied), the
following functions are available:
• Direct TV recording
• Channel preset download
• NexTView timer programming download
• TV auto power on
• System configuration
For further details and compatibility information, see also
the manual that came with your TV.
Direct TV recording
Direct TV recording allows you to record the TV program
that you’re watching, without having to worry about
whether this recorder is set to the same channel. See
Direct recording from TV
feature.
Channel preset download
This feature allows you to set up the channel presets of
this recorder very simply using the channel presets and
preset names already in your TV. See
setting up
TV
on page 20 and
on page 50 for more on this feature.
on page 38 for more on this
Switching on and
Auto CH Setup : Download from
Note
• For further details and compatibility information, see
also the manual that came with your TV.
NexTView timer programming download
NexTView timer programming download allows you to
program a timer recording directly from the electronic
program guide displayed on your TV.
See the manual that came with your TV for more
information on how to use this feature. Note that the
and
LP
options displayed on your TV correspond to the SP
and
LP
recording modes on this recorder.
TV auto power on
When you play a disc in this recorder, the TV
automatically turns on and switches to the correct video
input. See the manual that came with your TV for how to
use this feature.
System configuration
Basic settings, including language, country and TV
screen size (aspect ratio), can be downloaded from your
TV to help set up this recorder for use.
10
En
SP
Page 11
Connecting up
IN
OUT
RYPBPRL
AUDIO VIDEO
S-VIDEO
OUTPUT
DIGITAL OUT
COMPONENT
VIDEO OUT
AV 1 ・RGB - TV
AV 2 (INPUT 1 DECODER)
ANTENNA
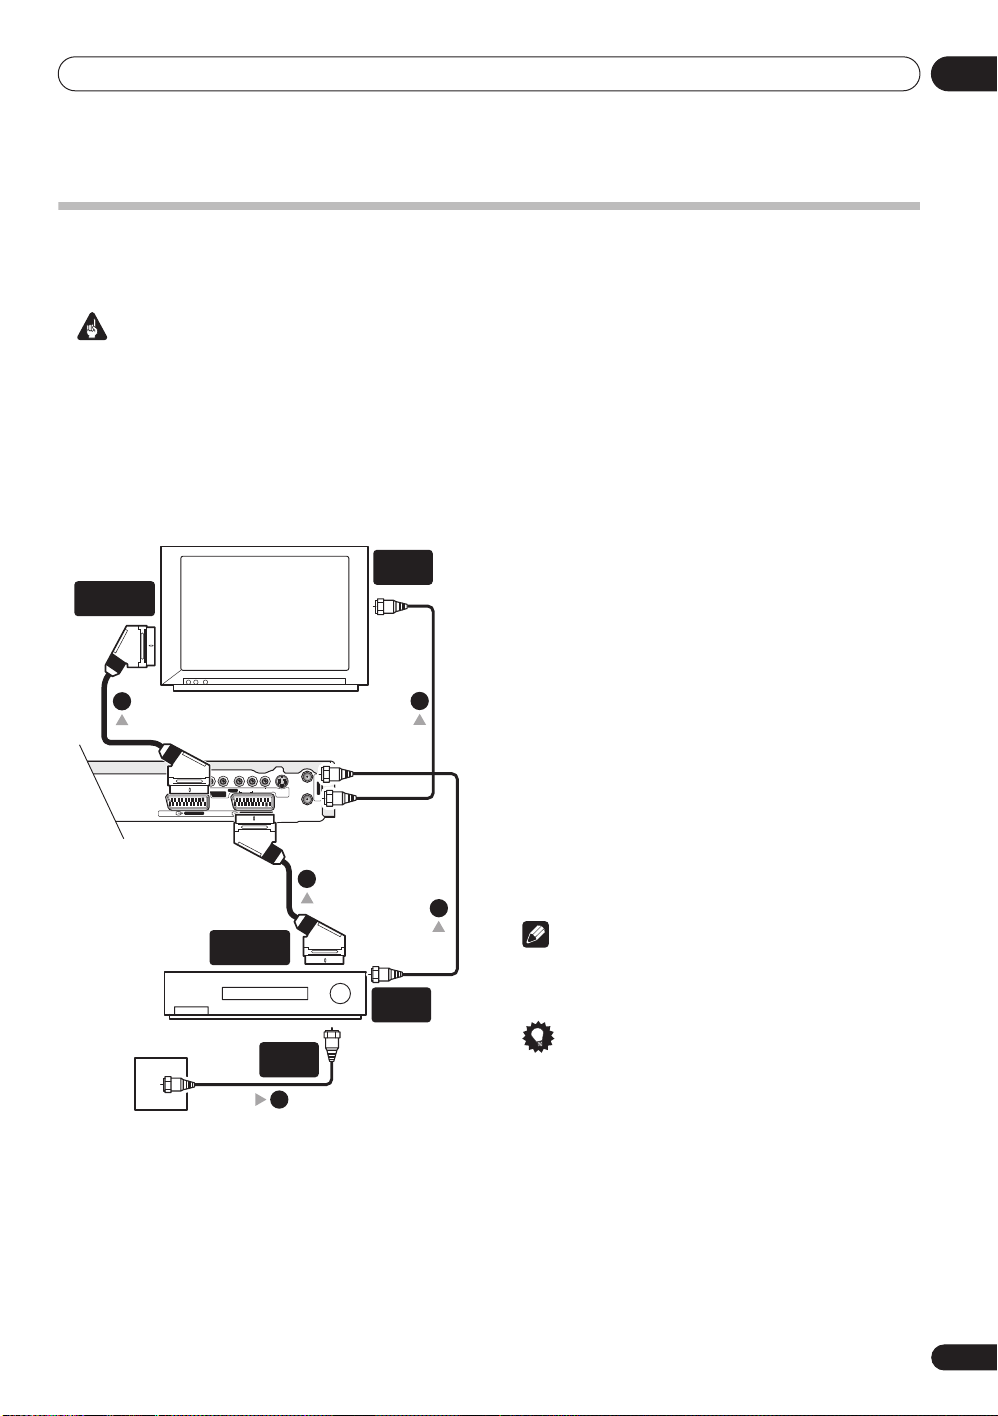
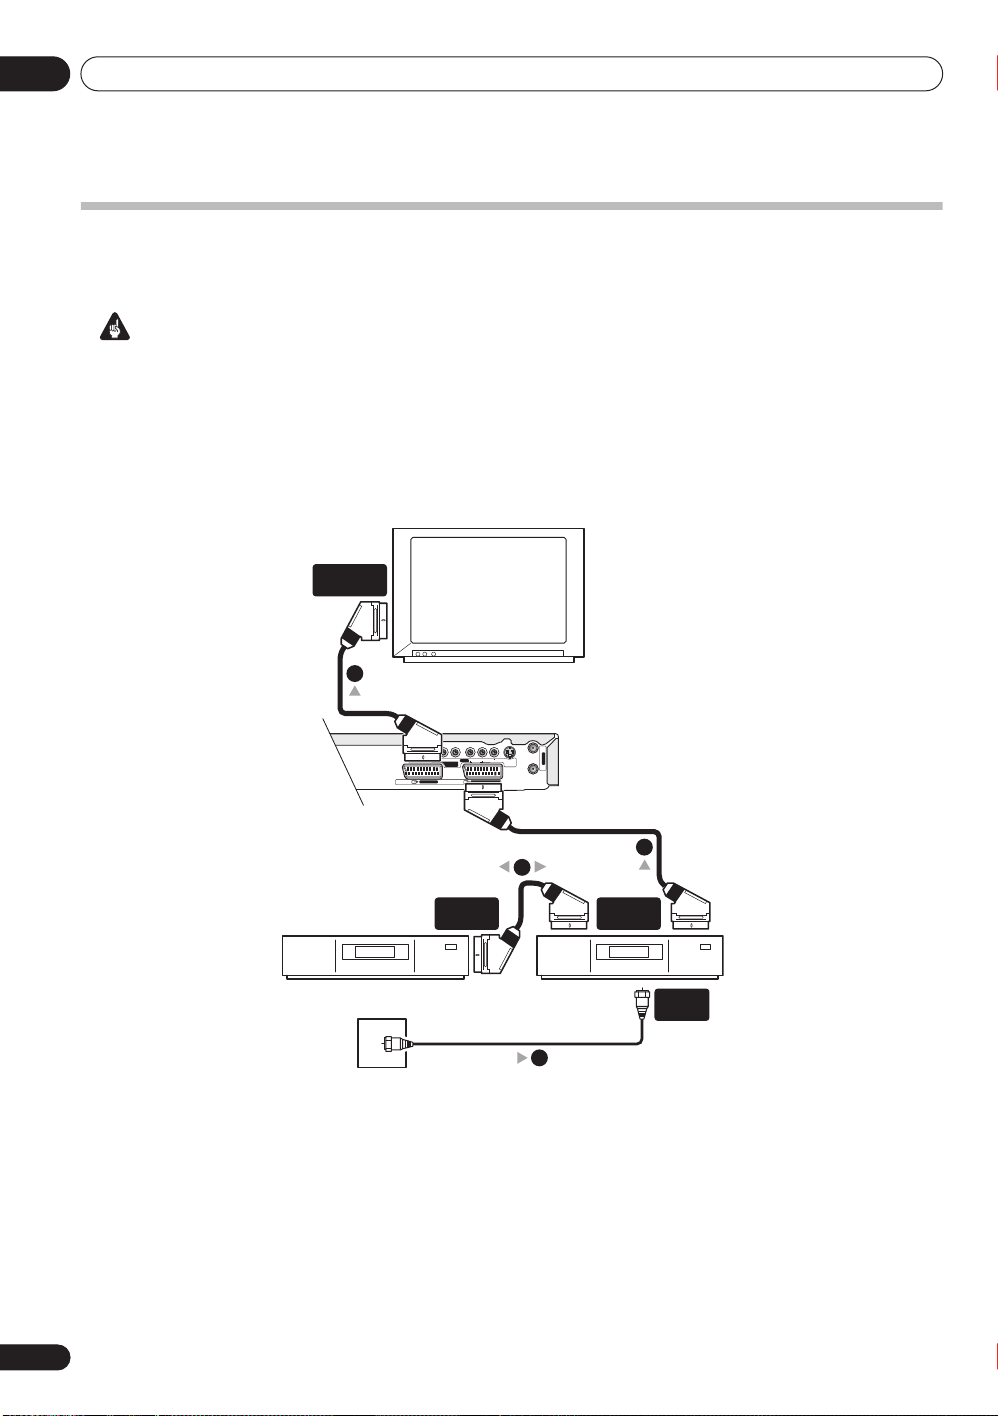
Easy connections
The setup described below is a basic setup that allows you to watch and record TV programs, and play discs. Other
types of connections are explained starting on the following page.
Important
• These connections use SCART cables (not supplied). If your TV (or VCR) does not have a SCART connection, see
the following page for connecting up using the supplied audio/video cable.
• The
AV1•RGB-TV
The
AV2 (INPUT 1/DECODER)
See
AV1 Out
• Before making or changing any rear panel connections, make sure that all components are switched off and
unplugged from the wall outlet.
SCART AV
CONNECTOR
4
Antenna/cable TV
wall outlet
AV connector can output ordinary (composite) video, S-video or RGB, plus stereo analog audio.
connector accepts ordinary video or S-video input, as well as stereo analog audio.
on page 54 and
AV2/L1 In
on page 54 for how to set them up.
1 Connect the cable from the antenna/cable TV
wall outlet to the antenna input on your VCR.
ANTENNA
IN
• If you are not connecting a VCR in the chain, connect
it to the
ANTENNA IN
jack on this recorder and skip
the next step.
2 Use an RF antenna cable (one is supplied) to
connect the antenna output of your VCR to the
ANTENNA IN of this recorder.
TV
3
3 Use another RF antenna cable to connect the
ANTENNA OUT of this recorder to the antenna input
on your TV.
4 Use a SCART cable (not supplied) to connect the
AV1•RGB-TV AV connector on this recorder to the
SCART AV connector on your TV.
5 Use another SCART cable to connect the AV2
5
(INPUT 1/DECODER) AV connector to a SCART AV
connector on your VCR.
2
Note
• See the following page if you want to use one of the
other kinds of audio/video connection.
Tip
• This recorder has a ‘through’ function which allows
you to record a TV program from the built-in TV tuner
in this recorder while watching a video playing on
VCR
SCART AV
CONNECTOR
ANTENNA
OUT
ANTENNA
IN
1
your VCR. (To use this feature when the recorder is in
standby,
Save
Power Save
on page 53).
must be set to
Off
—see
Power
02
11
En
Page 12

02
Connecting up
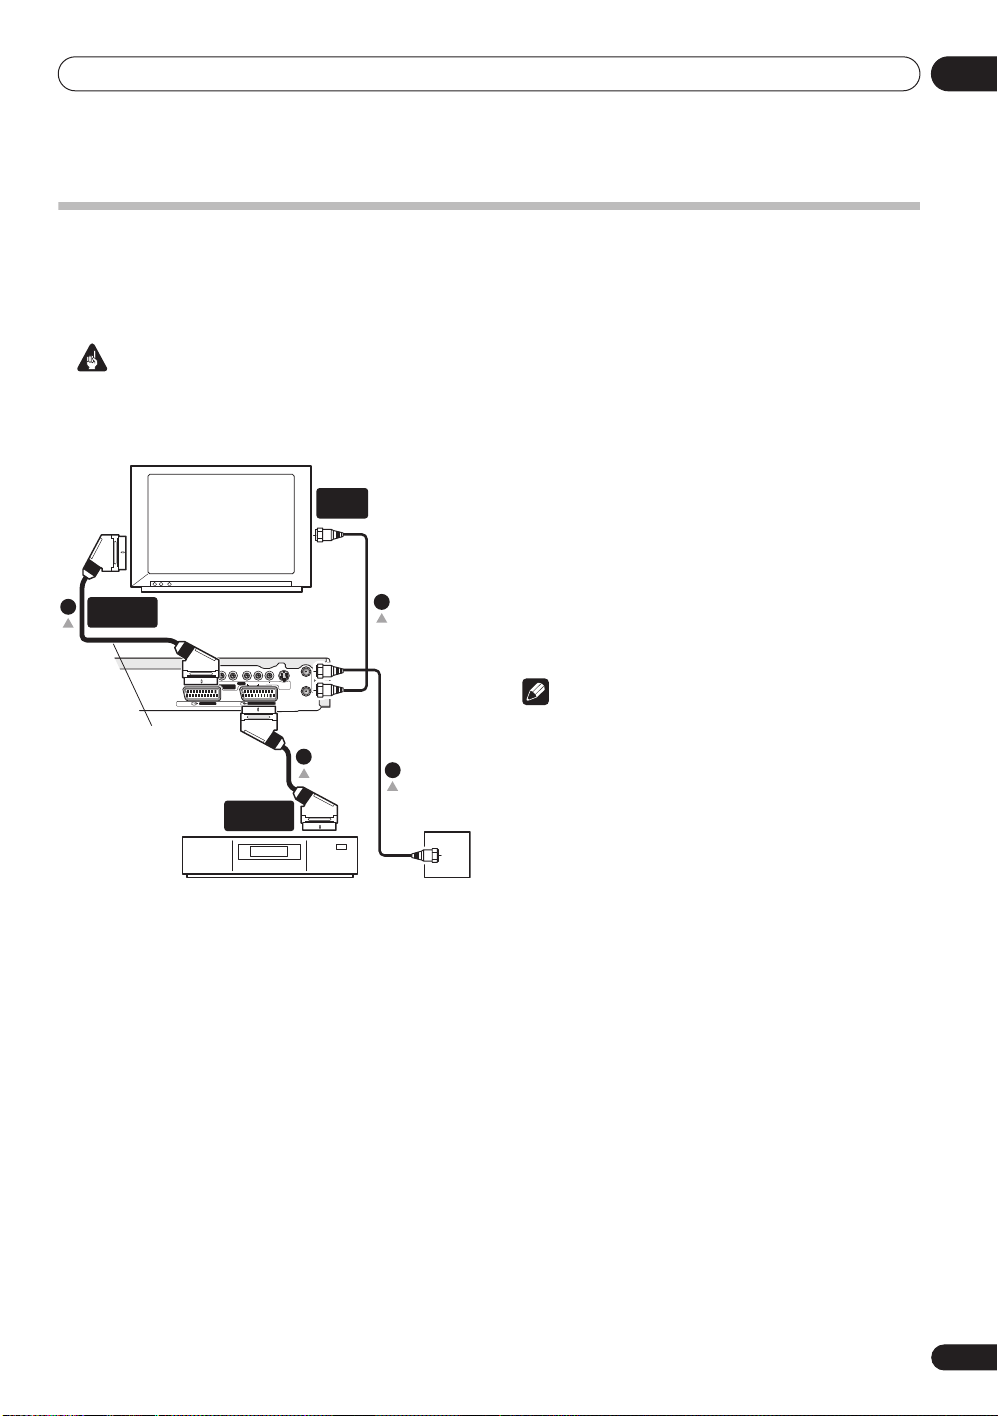
Using other types of audio/video output
If you can’t use the SCART AV connector to connect your TV to this recorder, there are standard audio/video output
jacks, as well as an S-video output.
Using the supplied audio/video cable
AUDIO
INPUT
VIDEO
INPUT
TV
12
IN
ANTENNA
S-VIDEO
OUT
AV 1 ・RGB - TV
RYPBPRL
OUTPUT
AUDIO VIDEO
COMPONENT
VIDEO OUT
AV 2 (INPUT 1 DECODER)
AC IN
DIGITAL OUT
1 Connect the VIDEO OUTPUT jack to a video input
on your TV.
Use the yellow jack of the supplied audio/video cable for
the video connection.
2 Connect the AUDIO OUTPUT jacks to the
corresponding audio inputs on your TV.
Use the red and white jacks of the supplied audio/video
cable for the audio connection. Make sure you match up
the left and right outputs with their corresponding inputs
for correct stereo sound.
Using the S-video or component video
output
S-VIDEO
AV 1 ・RGB - TV
INPUT
AUDIO
INPUT
RYPBPRL
OUTPUT
AUDIO VIDEO
COMPONENT
VIDEO OUT
AV 2 (INPUT 1 DECODER)
jack to an S-
COMPONENT
1
2
IN
ANTENNA
S-VIDEO
OUT
COMPONENT
VIDEO INPUT
1
TV
AC IN
DIGITAL OUT
1 Connect the S-video or component video output
to a similar input on your TV.
For an S-video connection, use an S-video cable (not
supplied) to connect the
S-VIDEO OUTPUT
video input on your TV.
For a component video connection, use a component
video cable (not supplied) to connect the
VIDEO OUT
See also
jacks to a component video input on your TV.
Component Video
on page 55 for how to set up
the component video output for use with a progressive
scan-compatible TV.
2 Connect the AUDIO OUTPUT jacks to the
corresponding audio inputs on your TV.
You can use the supplied audio/video cable, leaving the
yellow video plug disconnected. Make sure you match up
the left and right outputs with their corresponding inputs
for correct stereo sound.
12
En
Page 13
Connecting up
IN
OUT
RYPBPRL
AUDIO VIDEO
S-VIDEO
OUTPUT
DIGITAL OUT
COMPONENT
VIDEO OUT
AV 1 ・RGB - TV
AV 2 (INPUT 1 DECODER)
ANTENNA
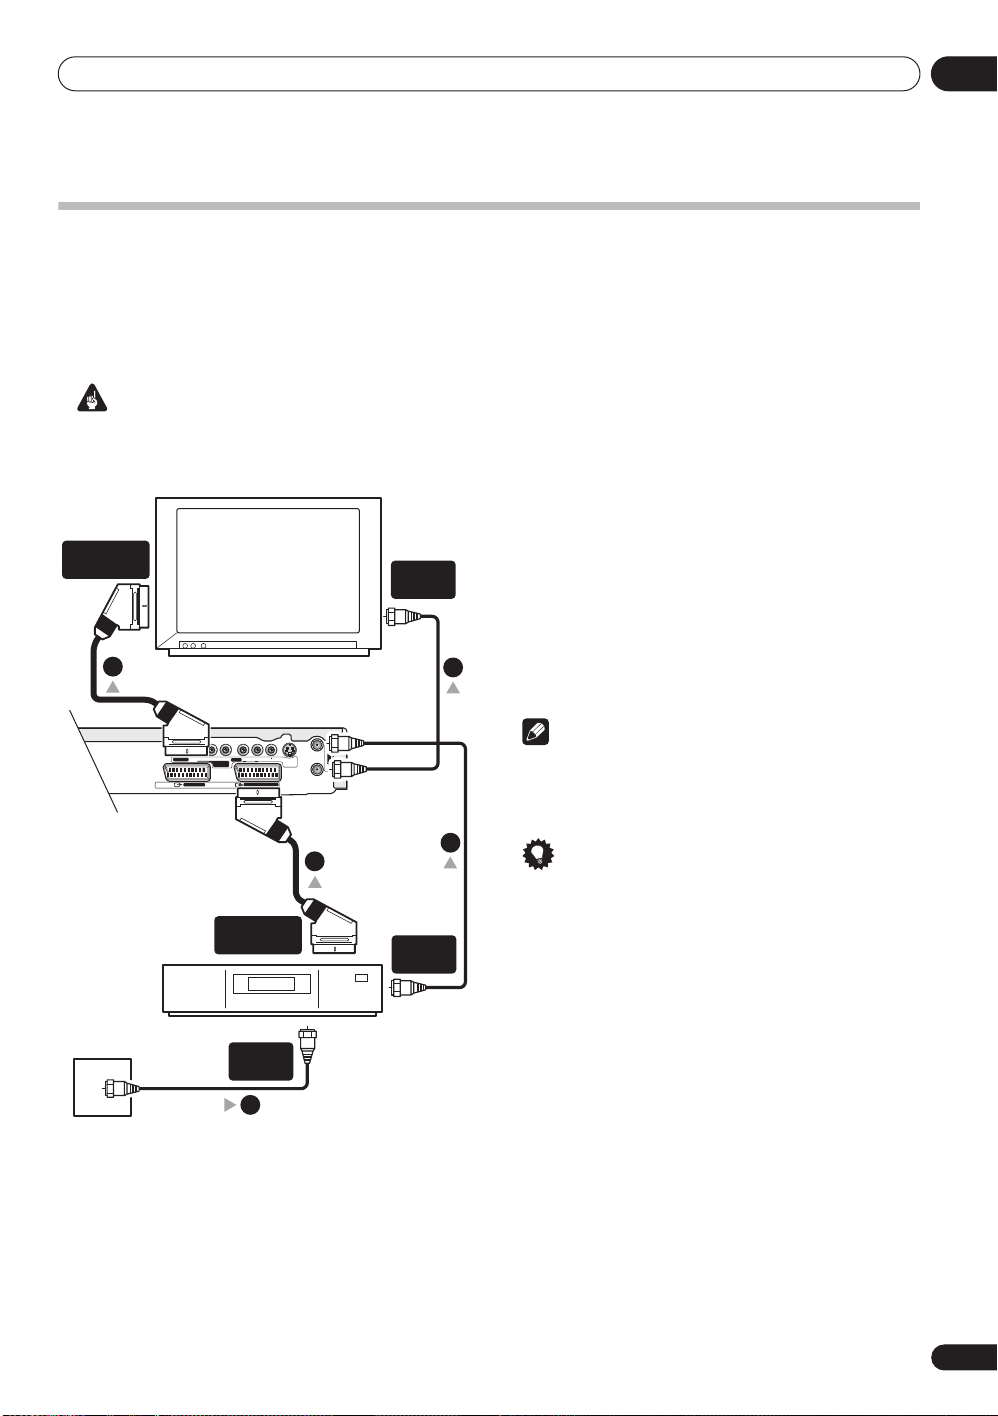
Connecting to a cable box or satellite receiver
If you have a cable or satellite receiver with a built-in decoder, connect it to this recorder and your TV as shown on this
page. If you are using a separate decoder box for your cable/satellite TV, set up following the instructions on the next
page.
Using the setup on this page you can:
• Record any channel by selecting it on the cable box/satellite tuner.
Important
• Do not connect this recorder ‘through’ your VCR, satellite receiver or cable box. Always connect each component
directly to your TV or AV amplifier/receiver.
1 Connect RF antenna cables as shown.
This enables you to watch and record TV channels.
SCART AV
CONNECTOR
2
ANTENNA
IN
TV
2 Use a SCART cable (not supplied) to connect the
AV1•RGB-TV AV connector to a SCART AV connector
on your TV.
This enables you to watch discs.
3 Use another SCART cable to connect the AV2
(INPUT 1/DECODER) AV connector to a SCART AV
connector on your satellite/cable box.
1
This enables you to record scrambled TV channels.
02
Cable/Satellite box
Antenna/cable TV
wall outlet
SCART AV
CONNECTOR
ANTENNA
IN
1
Note
• The diagram shows SCART video connections, but
you can alternatively use any of the other audio/video
connections.
3
1
Tip
• This recorder has a ‘through’ function which allows
you to record a TV program from the built-in TV tuner
in this recorder while watching a video playing on
ANTENNA
OUT
your VCR. (To use this feature when the recorder is in
standby,
Save
Power Save
on page 53).
must be set to
Off
—see
Power
13
En
Page 14
02
IN
OUT
RYPBPRL
AUDIO VIDEO
S-VIDEO
OUTPUT
DIGITAL OUT
COMPONENT
VIDEO OUT
AV 1 ・RGB - TV
AV 2 (INPUT 1 DECODER)
ANTENNA
Connecting up
Connecting an external decoder box (1)
If you have an external, dedicated decoder box for your satellite or cable TV system, use the setup described on this
page.
Important
• Do not connect your decoder box directly to this recorder.
• Information from the decoder (for example, relating to pay TV services), is only viewable when this recorder is off
(in standby).
• For timer recording to work properly on this recorder, the VCR/satellite receiver/cable box must also be switched
on during recording.
• It is not possible to watch one TV program and record another using this setup.
SCART AV
CONNECTOR
4
TV
SCART AV
CONNECTOR
Decoder
Antenna/cable TV
wall outlet
1 Connect the cable from the antenna/cable TV
wall outlet to the antenna input on your VCR/
satellite receiver/cable box.
2 Use a SCART cable (not supplied) to connect your
decoder to your VCR/satellite receiver/cable box.
See the manual for your decoder box for more detailed
instructions.
3
2
SCART AV
CONNECTOR
VCR/Satellite receiver
/Cable box
ANTENNA
IN
1
3 Use a SCART cable to connect your VCR/satellite
receiver/cable box to the AV2 (INPUT 1/DECODER)
AV connector on this recorder.
4 Use a SCART cable to connect the AV1•RGB-TV
AV connector to your TV.
14
En
Page 15
Connecting up
IN
OUT
RYPBPRL
AUDIO VIDEO
S-VIDEO
OUTPUT
DIGITAL OUT
COMPONENT
VIDEO OUT
AV 1 ・RGB - TV
AV 2 (INPUT 1 DECODER)
ANTENNA
Connecting an external decoder box (2)
If you only have a decoder, connect it to this recorder and your TV as shown on this page.
Using the setup on this page you can:
• Record scrambled channels received using the recorder’s built-in TV tuner.
Important
• Do not connect this recorder ‘through’ your VCR, satellite receiver or cable box. Always connect each component
directly to your TV or AV amplifier/receiver.
1 Connect RF antenna cables as shown.
This enables you to watch and record TV channels.
2 Use a SCART cable (not supplied) to connect the
AV1•RGB-TV AV connector to a SCART AV connector
on your TV.
This enables you to watch discs.
3 Use another SCART cable to connect the AV2
(INPUT 1/DECODER) AV connector to a SCART AV
connector on your decoder box.
This enables you to record scrambled TV channels.
2
SCART AV
CONNECTOR
TV
ANTENNA
IN
1
02
Decoder
SCART AV
CONNECTOR
Note
• In order to use this setup, you will need to make the
3
1
Antenna/cable TV
wall outlet
following settings from the Initial Setup menu:
– Set the
Initial Setup menu (see
– From the
Decoder
(see
AV2/L1 In
Manual CH Setting
setting to
AV2/L1 In
Decoder
from the
on page 54).
screen, set the
setting for the scrambled channels to On
Manual CH Setup
on page 50).
15
En
Page 16
02
IN
OUT
RYPBPRL
AUDIO VIDEO
S-VIDEO
OUTPUT
DIGITAL OUT
COMPONENT
VIDEO OUT
AV 1 ・RGB - TV
AV 2 (INPUT 1 DECODER)
ANTENNA
Connecting up
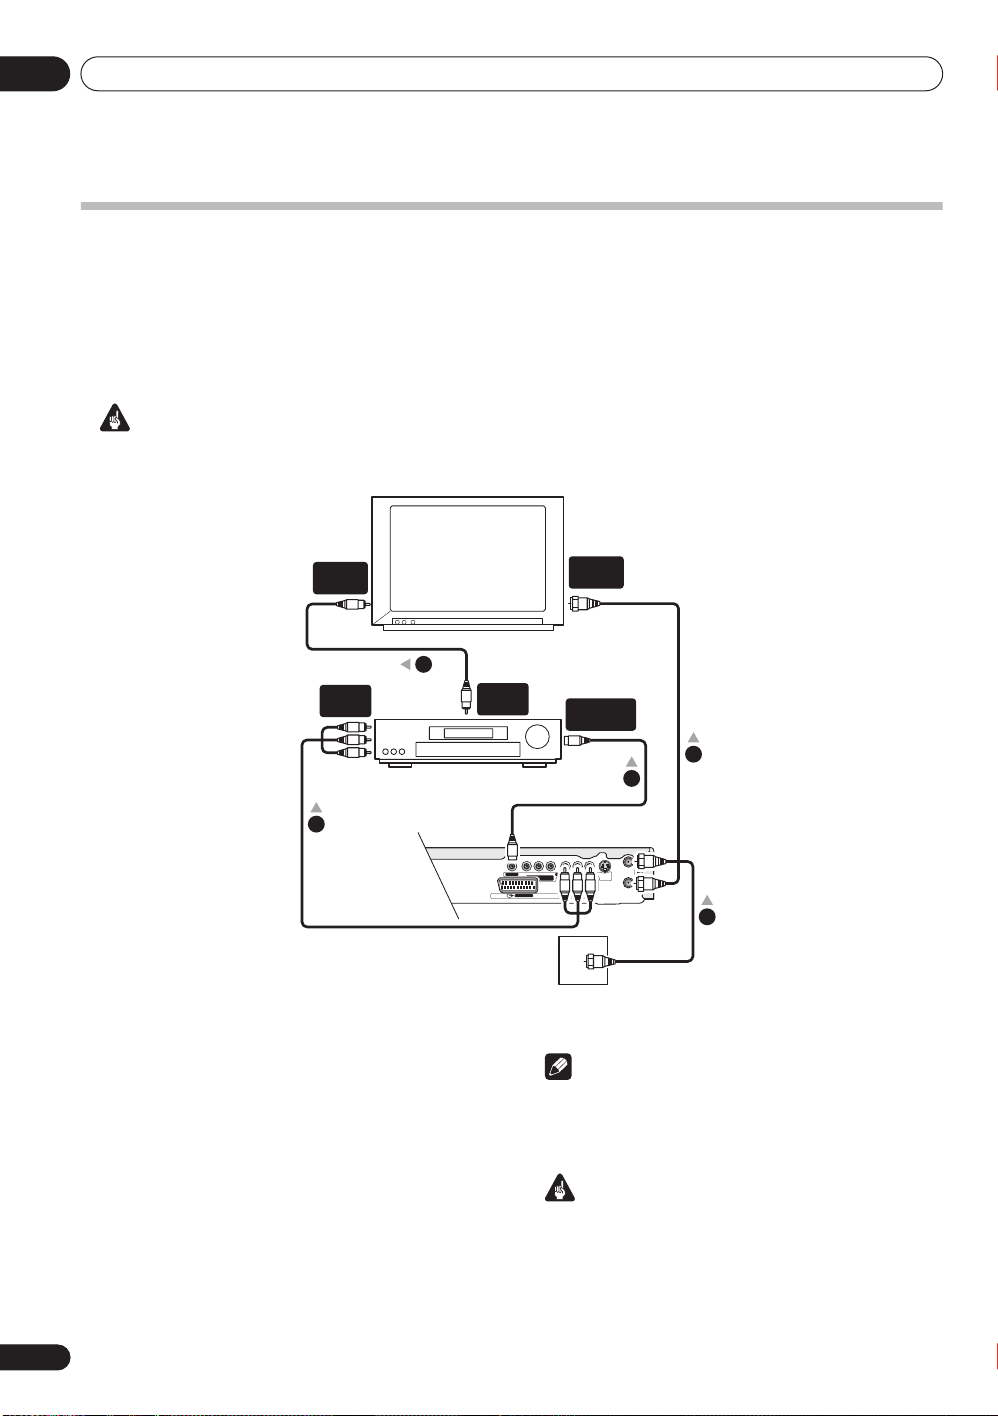
Connecting to an AV amplifier/receiver
To enjoy multichannel surround sound you need to connect this recorder to an AV amplifier/receiver using the digital
coaxial output.
In addition to a digital connection, we recommend also connecting using the stereo analog connection for
compatibility with all discs and sources.
You’ll probably also want to connect a video output to your AV amplifier/receiver. Use the ordinary video output (as
shown here), or the S-video output.
Important
• Noise may be output from your speakers if the recorder is not set up to work with your AV amplifier/receiver
properly (see
Audio Out
on page 57).
VIDEO
IN
A/V
IN 1
AV amp/
receiver
3
1 Connect RF antenna cables as shown.
This enables you to watch and record TV channels.
2 Connect one of the DIGITAL OUT COAXIAL jack
on this recorder to an coaxial digital input on your
AV amplifier/receiver.
This enables you to listen to multichannel surround
sound.
3 Connect the analog AUDIO OUTPUT and VIDEO
OUTPUT jacks on this recorder to an analog audio
and video input on your AV amplifier/receiver.
4 Connect the AV amplifier/receiver’s video output
to a video input on your TV.
16
En
ANTENNA
IN
TV
4
VIDEO
OUT
DIGITAL IN
COAXIAL
1
2
1
Antenna/cable TV
wall outlet
Note
• The diagram shows ordinary video connections,
but you can alternatively use an AV connector or
S-video connections, if they’re available.
Important
• Do not connect this recorder to your TV ‘through’
your VCR using A/V cables. Always connect it directly
to your TV.
Page 17
Connecting up
02
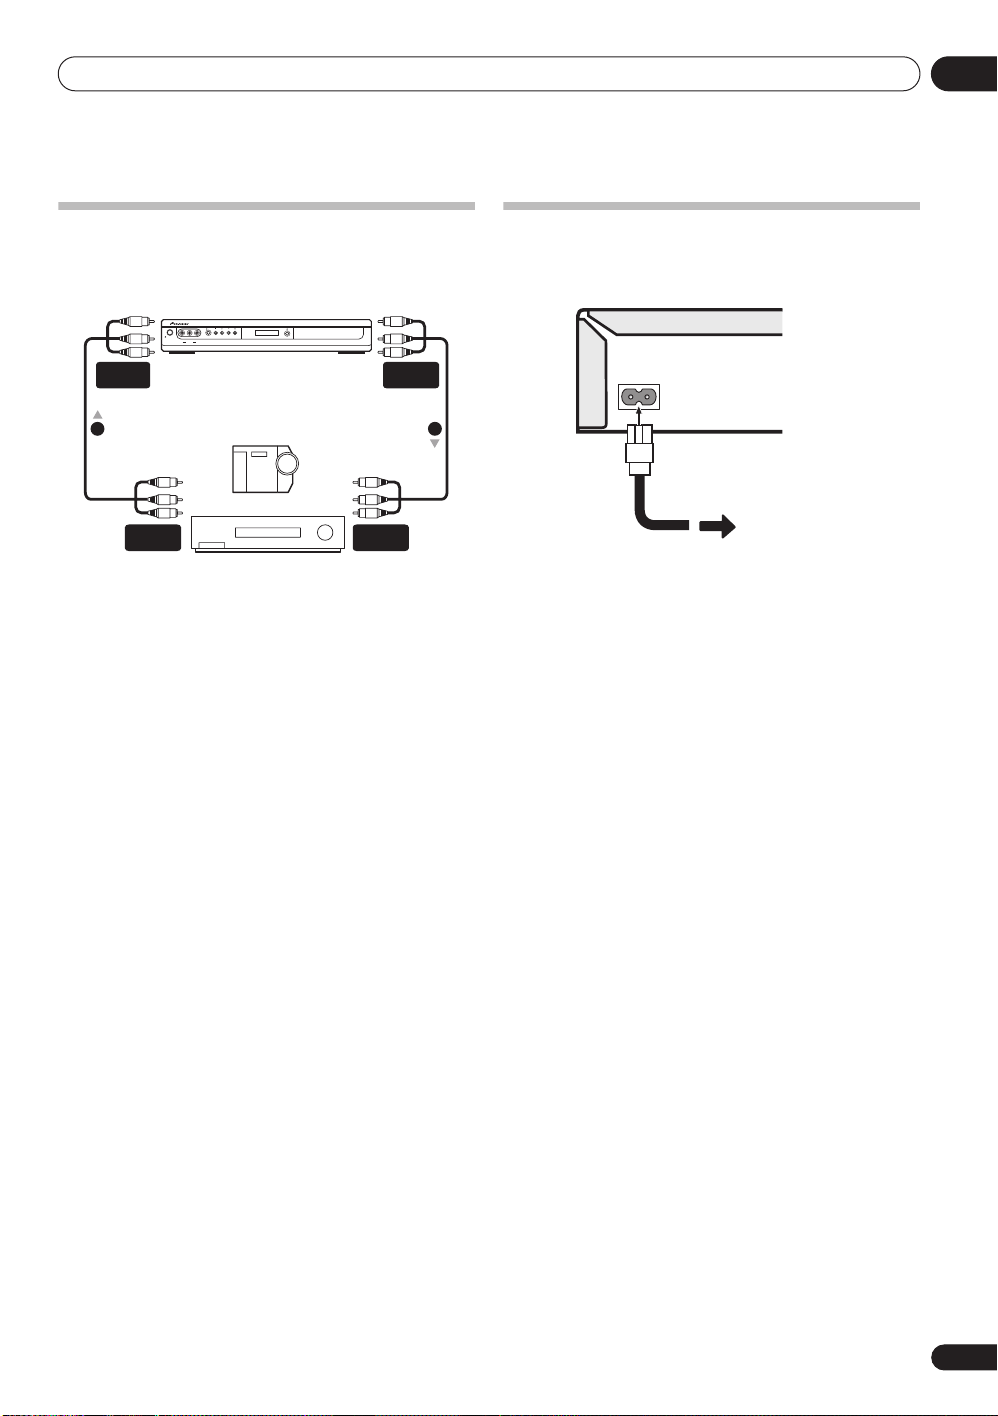
Connecting other AV sources
Connecting a VCR or analog camcorder
REC
STANDBY/ON
VIDEO
L(MONO) AUDIO R
INPUT 2
AUDIO/VIDEO
INPUT
1 2
Analog camcorder
AUDIO/VIDEO
OUTPUT
VCR
1 Connect a set of audio and video outputs of your
VCR or camcorder to a set of inputs on this recorder.
This enables you to record tapes from your VCR or
camcorder.
• The front panel connections make convenient
connections for a camcorder input (standard video
connection only).
2 Connect a set of audio and video inputs of your
VCR or camcorder to the outputs on the rear panel of
this recorder.
This enables you to record from this recorder to your VCR
or camcorder.
• You can use standard video or S-video cables for the
video connection.
AUDIO/VIDEO
INPUT
AUDIO/VIDEO
OUTPUT
Plugging in
Before plugging in for the first time, make sure that
everything is connected properly.
AC IN
1 Plug the supplied AC power cable into the AC IN
inlet and the other end into a standard household
power outlet.
17
En
Page 18
03
Controls and displays
Chapter 3
Controls and displays
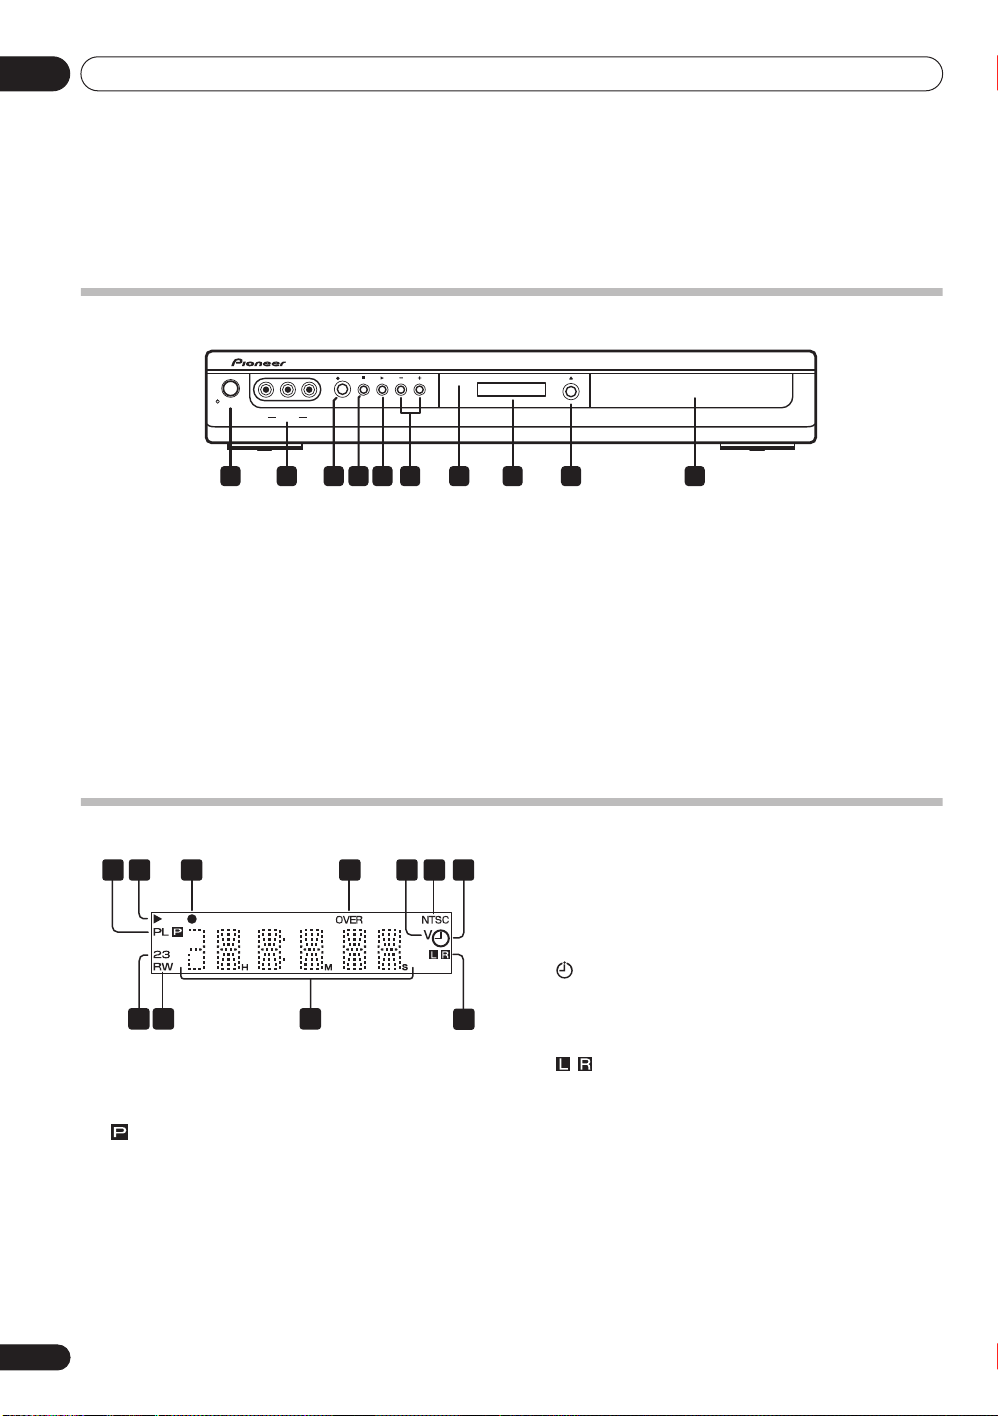
Front panel
REC
STANDBY/ON
VIDEO
L(MONO) AUDIO R
INPUT 2
1 2 3 4 5 876 9 10
1 STANDBY/ON
Press to switch the recorder on/into standby.
2 Front panel inputs
Audio/video inputs, convenient for connecting a video
camera.
3 REC
Press to start recording.
4
Press to stop playback or recording.
(page 9)
Display
21
3 4 6
11
10
1PL
Lights when a PlayList is playing (only applicable to
some VR mode discs recorded on other recorders).
(page 55)
Lights when the component video output is set to
progressive scan.
2
Lights during playback; blinks when paused.
3
Lights during recording; blinks when recording is
paused.
4 OVER
Lights when the analog audio input level is too high.
18
En
9
5
Press to start or restart playback (press while playing to
pause playback).
6 +/–
(page 23, 25)
Use to change TV channels, skip chapters/tracks, etc.
7 IR remote sensor
8 Front panel display
See below for details.
9 OPEN/CLOSE
Press to open/close the disc tray.
10 Disc tray
75
8
5V
Lights when an unfinalized Video mode disc is loaded.
6 NTSC
Lights when playing an NTSC disc.
7
(page 38)
Lights when a timer recording has been set. (Indicator
blinks if the timer has been set but there isn’t a
recordable disc loaded.)
8
Indicates which channels of a bilingual broadcast are
recorded.
9 Character display
Shows disc time information, channel number,
messages, and so on.
10 R / RW
Indicates the type of recordable DVD loaded: DVD-R or
DVD-RW.
11 2 3
Shows the remote control mode (if nothing is displayed,
the remote control mode is 1).
(page 56)
(page 52)
(page 6)
Page 19
Controls and displays
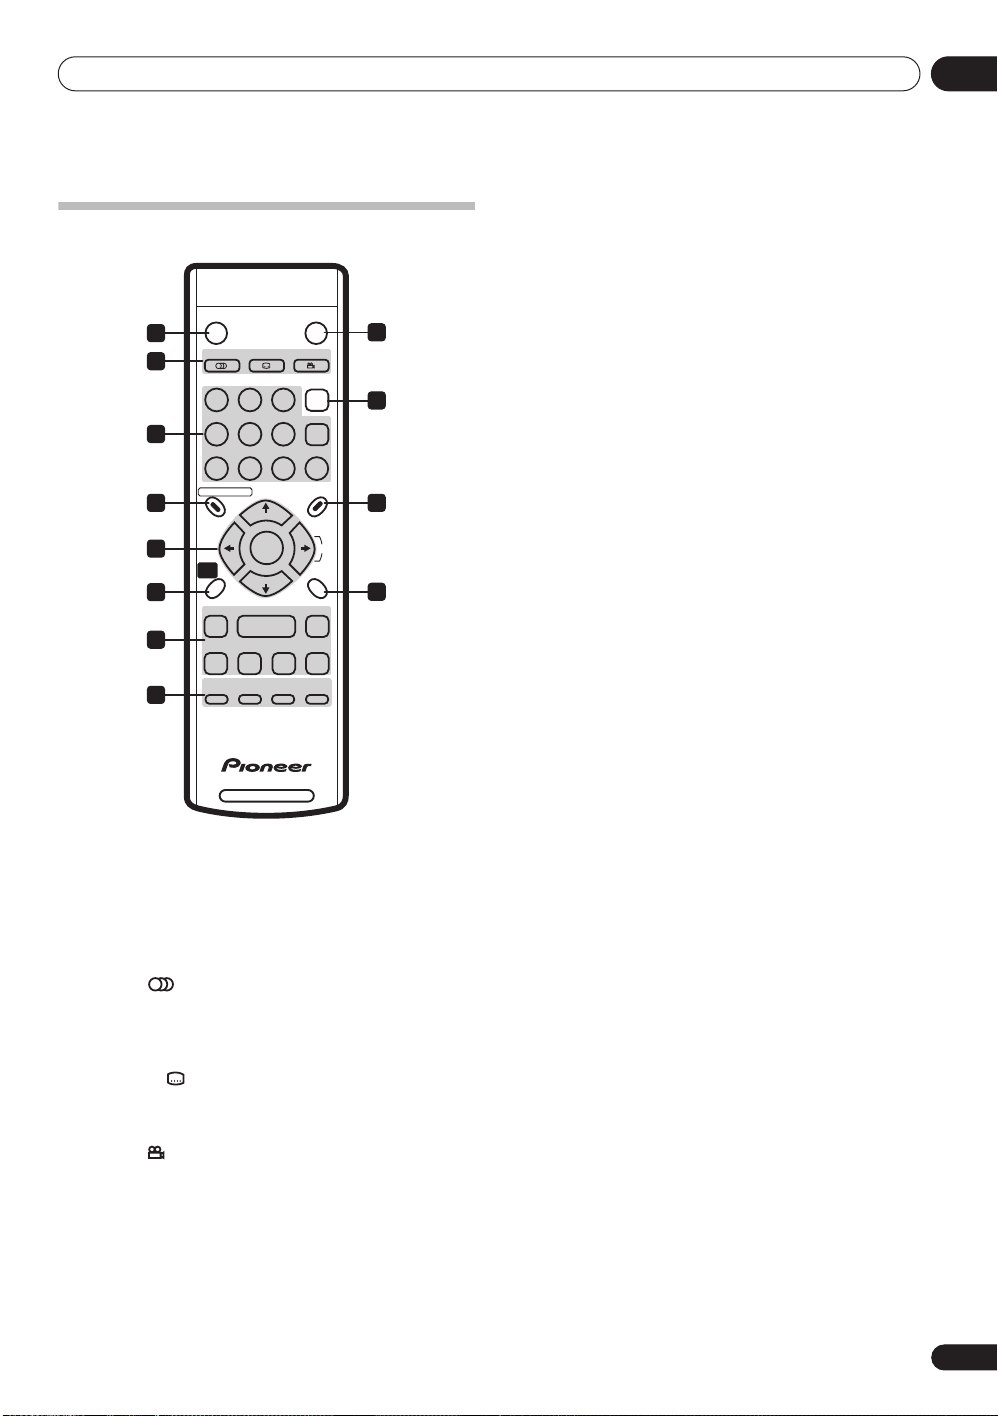
Remote control
STANDBY/ON DISPLAY
1
3
5
6 7
8
9
11
12
AUDIO SUBTITLE ANGLE
123
456
7890
DISC NAVIGATOR
TOP
MENU
HOME
MENU
CH+
ENTER
CH–
/ /
REC CM SKIP
TV DIRECT
REC
REC MODE
DVD RECORDER
/DVD
CLEAR
RETURN
1 STANDBY/ON
Press to switch the recorder on/into standby.
2 DISPLAY
Displays/changes the on-screen information displays.
3 DVD playback functions
AUDIO
(page 23, 33, 34)
Changes the audio language or channel. (When the
recorder is stopped, press to change the tuner
audio.)
SUBTITLE
(page 33)
Displays/changes the subtitles included in
multilingual DVD-Video discs.
ANGLE
(page 34)
Switches camera angles on discs with multi-angle
scenes.
4 TV/DVD
(page 24)
Press to switch between ‘TV mode’, in which you get the
picture and sound from the TV’s tuner, and ‘DVD mode’,
in which you get picture and sound from the recorder’s
tuner (or an external input).
TV
MENU
2
4
INPUT
10
5 Number buttons, CLEAR
Use the number buttons for track/chapter/title selection;
channel selection, and so on.
Use
CLEAR
to clear an entry and start again.
6 DISC NAVIGATOR, TOP MENU
Press to display the Disc Navigator, or the ‘top menu’
when a DVD-Video disc is loaded.
7 MENU
(page 25)
Press to display the menu of a DVD-Video disc.
8
///
Used to navigate all on-screen displays. Press
select the currently highlighted option. The
(cursor buttons), CH +/–, ENTER
ENTER
(cursor
to
right) button is also used to change the recording input.
Use the
CH +/–
buttons to change the channel of the
built-in TV tuner.
9 HOME MENU
Press to display the Home Menu, from which you can
navigate all the functions of the recorder.
10 RETURN
Press to go back one level in the on-screen menu or
display.
11 Playback and recording controls
/
(page 30)
(page 24)
Press to start reverse or forward scanning. Press
again to change the speed.
Press to start playback.
Press to pause playback or recording.
Press to stop playback or recording.
/
Press to skip to the previous or next title/chapter/
track; or to display the previous or next menu page.
/
(page 30)
While paused, press to show the previous or next
video frame; press and hold to start slow-motion
playback.
12 REC
(page 22)
Press to start recording. Press repeatedly to set the
recording time in blocks of 30 mins.
REC MODE
Press repeatedly to change the recording mode
(picture quality).
TV DIRECT REC
(page 38)
Press to start recording whatever channel your TV is
set to.
CM SKIP
Press repeatedly to skip progressively forward
through the audio or video playing.
03
19
En
Page 20
04
Getting started
Chapter 4
Getting started
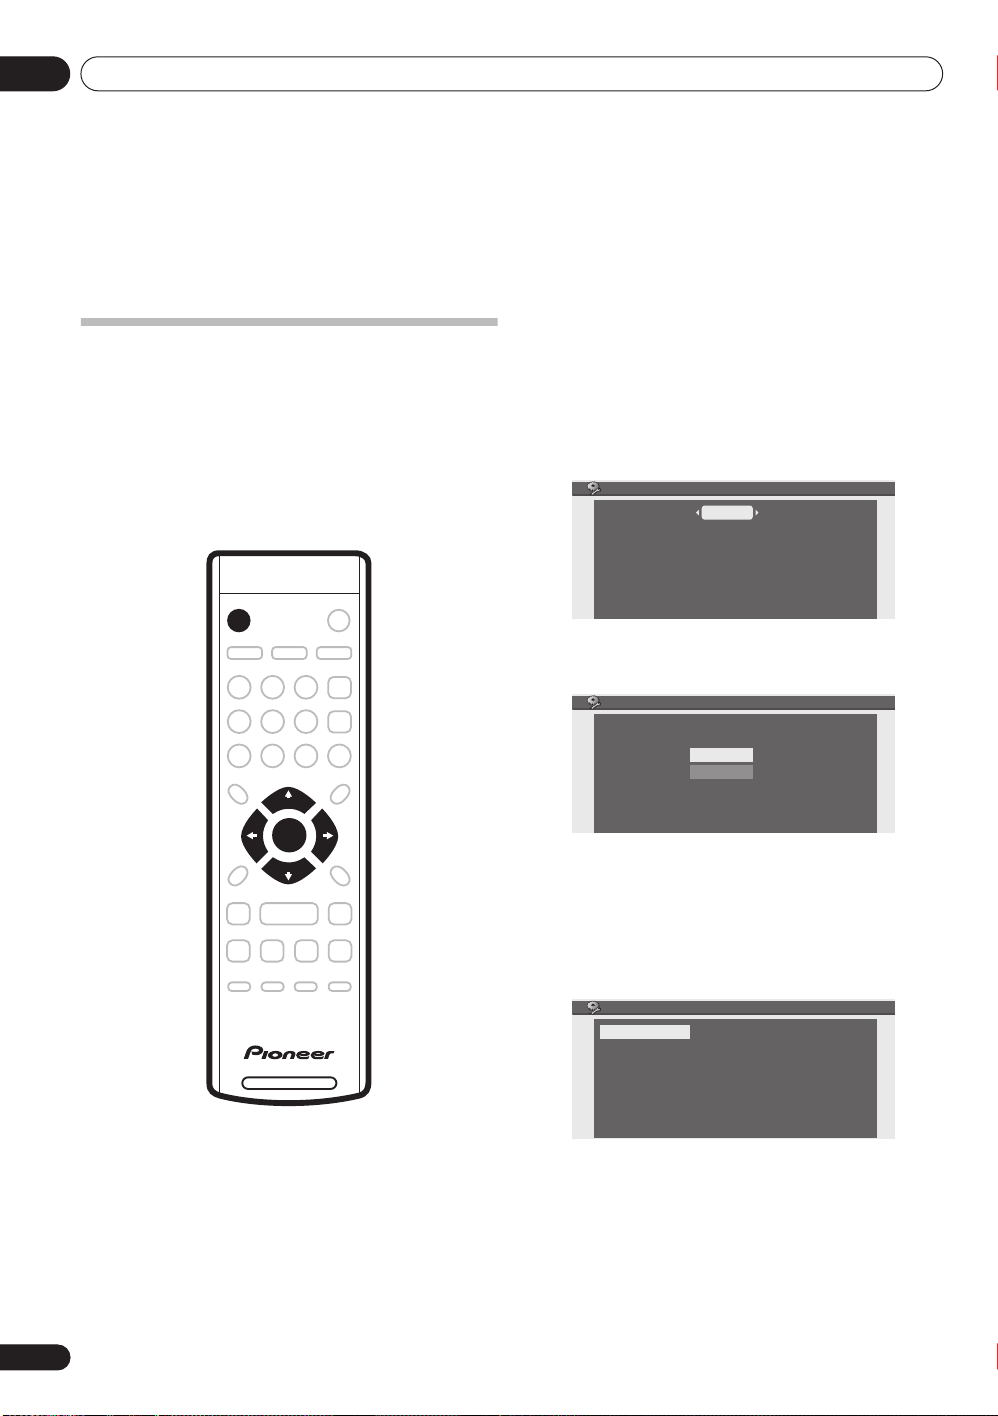
Switching on and setting up
When you switch the recorder on for the first time, you
can make several basic settings using the Setup
Navigator. This takes you through setting the clock and
the internal TV tuner settings.
If you’re using the recorder for the first time, we strongly
recommend you use the Setup Navigator before starting
to use the recorder.
STANDBY/ON
• If this recorder is connected to a compatible TV using
a fully-wired 21-pin SCART cable, the recorder will
take a few seconds to download country, TV screen
size and language information. (Check the manual
that came with your TV for compatibility information.)
3 Use the
/
(cursor left/right) buttons to
choose a language, then press ENTER.
OSD Language
OSD Language
English
4 Press ENTER to start setting up using the Setup
Navigator.
ENTER
DVD RECORDER
1 Switch on your TV and set the video input to this
recorder.
2 Press the
STANDBY/ON button on the remote
control or the front panel to switch on.
• When you switch on for the first time, your TV should
display the Setup Navigator screen. (If the Setup
Navigator doesn’t appear, you can also access it from
the Initial Setup menu; see page 48).
20
En
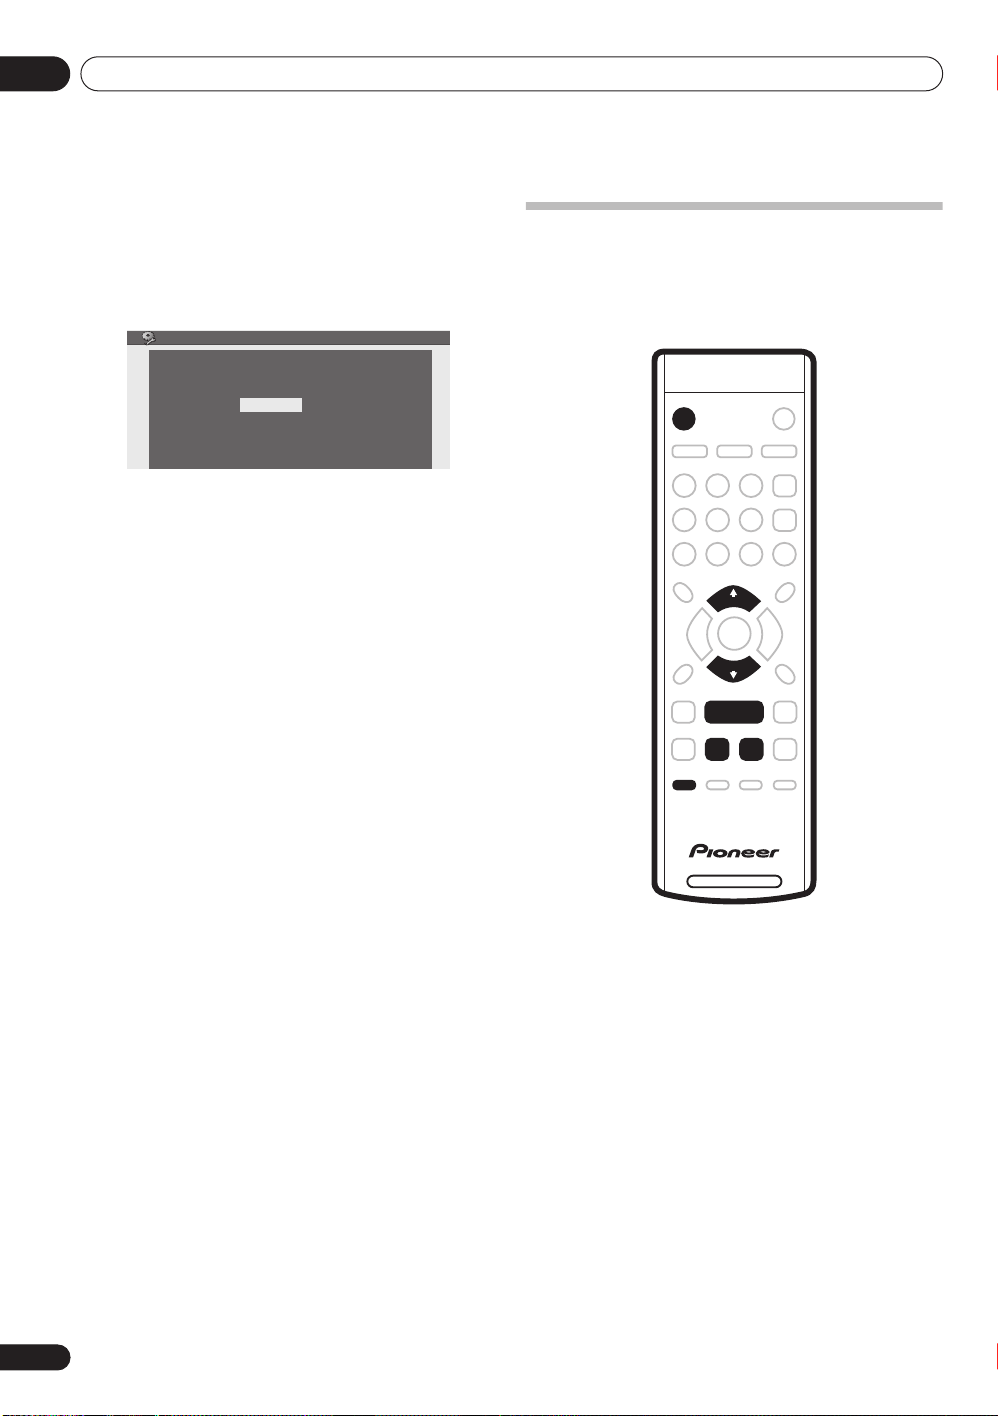
Setup Navigator
Complete this setup before you start using your recorder.
Start
Cancel
Please use the Initial Setup if you want to make more
detailed settings.
• If you don’t want to use the Setup Navigator, press
(cursor down) to select
Cancel
, then press
ENTER
exit the Setup Navigator.
5 Select the Auto Channel Setup (‘Auto Scan’ or
‘Download from TV’), or ‘Do not set’, then press
ENTER.
Tuner
Auto Scan
Download from TV
Do not set
• Select
Do not set
if you want to skip setting up the
channels (because they have already been set up, for
example).
• You can only use the
Download from TV
feature if
you connected this recorder to your TV using a
fully-wired 21-pin SCART cable connected to the
AV1•RGB-TV
AV connector, and if your TV supports
this function (check your TV’s instruction manual for
more details).
to
Page 21
Getting started
04
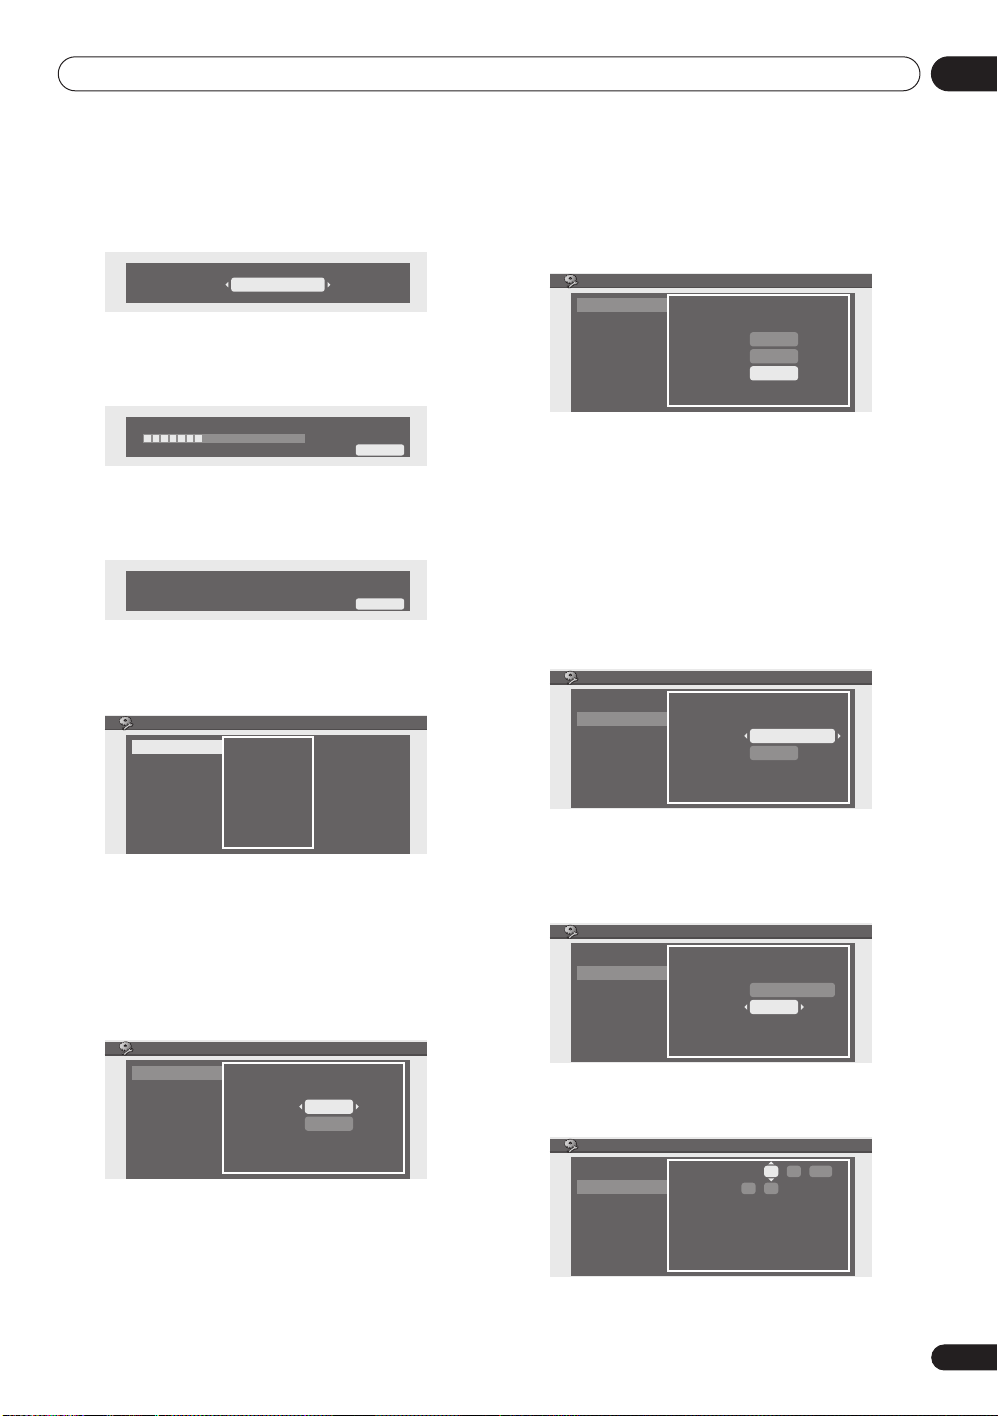
• Use the
/
(cursor left/right) buttons to
choose your country, then press ENTER.
Country England
• Auto-tuning channels
The
Auto Scan
option automatically scans and sets the
channel presets.
Tuning
Please wait a moment.
20/107
Cancel
• Downloading channels from your TV
Use the
Download from TV
option to download all the
channels that your TV is tuned to.
Downloading
Please wait a moment.
Cancel
6 Select ‘Auto’ for automatic time setting, or
‘Manual’ to set the clock manually, then press
ENTER.
Clock
Auto
Manual
Date
Time
Clock Set CH
The recorder takes a short while to set the time. After
you see that the time has been set, select
Next
proceed.
Auto
Auto TUE 01 / 02 / 2005
Manual
Date
Time
Clock Set CH
12 : 00
Pr01
Start
Next
If the time could not be set automatically, press
RETURN
Manual
to go back to the previous screen and select
.
• Manual clock setting
If no stations in your area are broadcasting time
signals, you can set the clock manually.
Use the
/
(cursor left/right) buttons to set
your time zone.
Set the time relative to GMT (see
Time Zone list
page 66 for a list of the possible time zones).
Clock
Auto
Manual
Date
Time
Time Zone
Summer Time
SAT 01 / 01 / 2005
12 : 00
GMT
Off
to
on
• Auto clock setting
Some TV channels broadcast time signals together
with the program. This recorder can use these
signals to set the clock automatically.
Set ‘Clock Set CH‘ to the channel preset number
that broadcasts a time signal, then move the
cursor down to ‘Start’ and press ENTER.
Auto
Auto
Manual
Date
Time
Clock Set CH
SAT 01 / 01 / 2005
00 : 00
Pr01
Start
Press (cursor down) then use the
/
(cursor
left/right) buttons to select ‘On’ or ‘Off’ for
summer time, then press ENTER.
Select On if you are currently using summer time.
Clock
Auto
Manual
Date
Time
Time Zone
Summer Time
SAT 01 / 01 / 2005
12 : 00
GMT
On
Set the date (day/month/year) and time, then
press ENTER to make all the settings.
Clock
Use the
Auto
Manual
/
Date
Time
Time Zone
Summer Time
(cursor up/down) buttons to change
01 01
:
0012
GMT
On
/
/SAT
2005
the value in the highlighted field.
21
En
Page 22
04
Getting started
Use the
/
(cursor left/right) buttons to move
from one field to another.
• You can go back to the previous screen at anytime in
the Setup Navigator by pressing
RETURN
.
7 That’s it! Press ENTER to finish setting up.
Setup Navigator
Setup is complete!
Enjoy using your DVD recorder!
Finish Setup
Other settings you can make
After setting up using the Setup Navigator, you should be
ready to start enjoying your DVD recorder. It’s possible,
however, that you may want to make a couple of
additional settings, depending on how the recorder is set
up for terrestrial TV broadcasts.
• Manual channel setting – This setting lets you skip
channels where there is no station, as well as
manually tune to stations. See
page 50.
• Set Guide Preset – This setting lets you assign guide
channels to ensure that the VIDEO Plus+
programming system works correctly. See
Preset
on page 51.
Manual CH Setup
Set Guide
on
Making your first recording
This quick guide shows you how to make a basic
recording of a TV program to a recordable DVD.
Recording is covered in much more detail in chapter 6
(
Recording
).
STANDBY/ON
CH+
CH–
REC
22
En
DVD RECORDER
1 If they aren’t already on, switch on your TV and
this recorder.
Press STANDBY/ON
to switch on.
• Make sure that the video input on your TV is set to this
recorder.
2 Press OPEN/CLOSE (front panel only) to open
the disc tray.
3 Load a blank DVD-R or DVD-RW disc with the
label side face-up, using the disc tray guide to align
the disc.
• When you load a new, blank DVD-RW disc, the
recorder will take a moment to initialize it for
recording.
4 Use the CH +/– buttons to select the TV channel
you want to record from.
• You can also use the
+/–
buttons on the front panel if
the recorder is stopped.
Page 23

Getting started
AUDIO
04
• Channel presets are numbered 1–99.
• If the recorder is connected to your TV using a SCART
cable and your TV supports Direct Recording, it’s
possible to quickly start recording whatever channel
your TV is tuned to. See
Direct recording from TV
on
page 38 for detailed instructions.
5 Press REC to start recording.
• By default, the recording will be in SP (standard play)
mode, which will give you around two hours of
recording from a blank DVD disc. The different
recording mode and their recommended uses are
covered in mode detail in Chapter 6.
• You can pause recording by pressing
REC
Press
or again to restart recording.
.
6 When you want to stop recording, press .
Playing back your recording
The TV program you just recorded should be on the DVD
disc as a single title with one or more chapters.
• Press to start playback.
If you want to stop playback before the end of the
recording, press
.
Using the built-in TV tuner
Changing TV channels
There are three different ways to select TV channels. Note
that you can’t change the TV channel during playback,
recording or during recording standby.
123
456
7890
CH+
ENTER
CH–
•
CH +/–
buttons on the remote
•
Number buttons
select channel 4, press
press
3, 4, ENTER
channel changes after a few seconds.)
•
+/–
buttons on the front panel
on the remote – For example, to
4
then
ENTER
; for channel 34,
. (If you don’t press
ENTER
, the
Note
• Channel presets are numbered 1–99.
Changing audio channels
You can change the audio channel of the broadcast or
external input signal.
• Press AUDIO to change the audio.
The current audio channel is displayed on-screen.
• If the NICAM audio setting (see
is set to
NICAM
and you are watching a NICAM
broadcast, you can switch between
Regular
(non-NICAM) audio.
NICAM
Regular
• If the NICAM broadcast is bilingual, you can also
select the language.
NICAM A NICAM B
Regular
• You can also select the language for a non-NICAM
bilingual broadcast.
A (L) B (R)
A + B (L+R)
• When watching a recording made from an external
input with
Bilingual
recording selected (see
on page 56), you can switch the audio channel
between left (
L
), right (R) or both (
LR
L+R
Note
• When recording in Video mode, or in VR mode using
the
XP
setting, only one channel of a bilingual
broadcast is recorded. In this case, decide which
language you want to record before recording by
setting the Bilingual Recording setting (see
on page 56).
NICAM A+B
Audio In
NICAM
L+R
on page 56)
and
Audio In
).
Audio In
23
En
Page 24

04
STANDBY/ON
ENTER
CH+
CH–
Getting started
Switching between TV and DVD
When the recorder is stopped or recording you can
choose whether to have the audio/video from the built-in
TV tuner (or external input) play on your TV (‘DVD mode’),
or watch the channel that the TV is currently set to (‘TV
mode’).
During playback or when a menu is being displayed onscreen, the sound and video is always routed to your TV
and is unaffected by the
Note that the recorder must be connected to your TV
using a SCART cable to be able to use this feature.
• Press TV/DVD to switch between TV mode and
DVD mode.
TV/DVD
mode setting.
TV
/DVD
24
En
Basic playback
This section shows you how to use your recorder for
playback of discs (DVD, CD, etc.). More playback
features, such as repeat play, are covered in the next
chapter.
Important
• Throughout this manual, the term ‘DVD’ means
playback-only DVD-Video discs and DVD-R/RW. If a
function is specific to a particular kind of DVD disc, it
is specified.
• Some DVD-Video discs don’t allow certain playback
controls to operate at certain points in the disc. This
is not a malfunction.
• VR mode discs recorded on another DVD recorder
may contain a PlayList of titles. These can be found
after the Original titles on the disc. See also
Disc Navigator to browse the contents of a disc
page 28.
Using the
on
1 Press STANDBY/ON to switch on.
Also turn on your TV and make sure that it is set to the
correct video input.
2 Press OPEN/CLOSE (front panel only) to open
the disc tray.
3 Load a disc.
Load a disc with the label side facing up, using the disc
tray guide to align the disc (if you’re loading a doublesided DVD-Video disc, load it with the side you want to
play face down).
• If you want to play a DTS audio CD, please first read
the note on page 25.
• Please see
compatibility
(DVD/CD hybrid disc)
Disc / content format playback
on page 7 if you want to play a Dual Disc
.
4 Press to start playback.
• If you’re playing a DVD-Video or Video CD, a disc
menu may appear when you start playback. Use the
///
(cursor buttons) and
ENTER
to navigate
DVD disc menus, and the number buttons and
ENTER
for Video CD menus.
• See the following sections for more details on playing
specific kinds of discs.
5 To stop playback, press .
6 When you’ve finished using the recorder, eject
the disc and switch the recorder back into standby.
• To open/close the disc tray, press OPEN/CLOSE
Remove the disc before putting the recorder into
standby.
.
Page 25

Getting started
04
• Press STANDBY/ON
to switch the recorder into
standby.
Playing DVD discs
The table below shows the basic playback controls for
DVD-Video, and recordable DVD discs.
Press to start or restart playback.
Press to pause playback; press again to
restart playback.
Press to stop playback.
You can resume playback from the same
/ /
CM SKIP
123
456
7890
ENTER
TOP MENU MENU
ENTER
RETURN
point by pressing
cancel the resume function.)
• During playback, press to start scanning. Press repeatedly to increase the
scanning speed.
• Press and hold while paused to start
slow-motion playback. Press repeatedly to
change the playback speed.
• While paused, press to advance a single
frame in either direction.
Press to skip to previous/next chapter/title.
(You can also use the front panel
tons to do this during playback.)
(Commercial skip). Each press skips forward progressively up to a maximum of
ten minutes.
• Except VR mode:
chapter number then press
directly to that chapter within the currently
playing title.
On some discs, you can also use the number buttons to select numbered items in
the disc menu.
• VR mode only:
title number then press
• All:
Press
entry and start again.
Press to display the ‘top’ menu or menu of
a DVD-Video disc (these are often the
same).
Use the cursor buttons to navigate DVDVideo disc menus; press
items.
Press to return to the previous level of a
DVD-Video disc menu.
. (Press again to
during playback, enter a
d
uring playback, enter a
ENTER
CLEAR
to clear a number
ENTER
ENTER
.
to select
+/–
to skip
but-
Playing audio CDs and MP3s
The table below shows the basic playback controls for
audio CDs and MP3 files.
Press to start playback.
Press to pause playback; press again to
restart playback.
Press to stop playback.
/ /
Audio CD only:
Press again to increase the scanning
spee
d
. (There are two scan speeds; the
Press to start scanning.
current scan speed is shown on-screen.)
Press to skip to previous/next track (or
folder for MP3 disc). (You can also use the
d
front panel +/– buttons to
o this during
playback.)
D
123
456
7890
uring playback, enter a track (or folder)
number then press
ENTER
to that track.
Press
CLEAR
to clear a number entry and
start again.
ENTER
to skip directly
Note
• If you want to play a DTS audio CD, make sure the
recorder is connected to a DTS-compatible amp/
receiver with a digital connection. Noise will be
output through the analog outputs. Also make sure
that
STEREO
(see
Switching audio channels
is selected using the
on page 34).
AUDIO
button
• You can’t use scanning when playing MP3 files.
Playing Video CDs
The table below shows the basic playback controls for
Video CDs.
Some discs feature Playback Control (PBC for short)
menus. These discs show PBC in the display when you
load them and display a menu on-screen from where you
can select what to watch.
Press to start or restart playback.
Press to pause playback; press again to
restart playback.
Press to stop playback.
You can resume playback from the same
point by pressing
cancel the resume function.)
. (Press again to
25
En
Page 26

04
Getting started
/ /
• During playback, press to start scan-
ning. Press repeatedly to increase the
scanning speed.
• Press and hold while paused to start
slow-motion playback. Press repeatedly to
change the playback speed (forward direction only).
• While paused, press to advance a single
frame (forward direction only).
Press to skip to previous/next track. (You
can also use the front panel +/– buttons to
d
o this during playback.)
When a PBC menu is displayed, press to
d
isplay the previous/next page.
(Commercial skip). Each press skips for-
CM SKIP
ward progressively up to a maximum of
ten minutes.
D
123
456
7890
uring playback, enter a track number
then press
ENTER
to skip directly to that
track.
Press
CLEAR
to clear a number entry and
start again.
ENTER
While a PBC menu screen is displayed,
use to select numbered menu items.
RETURN
Press to display the disc menu of a Video
CD playing in PBC mode.
Note
• When playing in PBC mode, some playback features,
such as search and repeat play are not available.
2 To hide the information display, press DISPLAY
repeatedly until it disappears.
The example displays below are a guide only; actual
displays vary according to the disc loaded, etc.
Stop display 1
1 2
Stop
DVD-RW VR
Original
10:10 SAT 12/12/2005 Stereo
43
5
Pr 01
1 Original or PlayList
VR mode DVD-RW discs edited on other DVD recorders
may contain Original and PlayList content. (See also the
note on page 27 about PlayLists.)
2 Disc type and mode
Shows the disc type (
MP3, NO DISC
DVD, if applicable (
R/RW Video mode discs are shown as
PBC
Shows
, if Video CD playback control is on.
DVD-VIDEO, DVD-R, DVD-RW, CD
, etc.), and the disc mode for recordable
VR
or
Video
). Note that finalized DVD-
DVD-VIDEO
.
3 Current date and time
4 Preset name or number
Shows the preset name (if set) or preset number for the
currently selected channel.
5 Audio mode
Shows the broadcast audio mode for the current channel
preset (
Mono, Stereo
, etc.).
Stop display 2
,
Displaying disc information onscreen
You can display various on-screen information about the
disc loaded.
DISPLAY
1 Press DISPLAY repeatedly to display/change the
on-screen information.
• The on-screen display automatically disappears after
20 minutes.
26
En
2 3
Stop
DVD-RW VR
Original
Titles : Original 99
Lock Disc : On
Resume
Remain 00h35m (SP)
, Play List 15
Pr01
Stereo
Copy Once
DVD Mode
4 516
1 Resume
Shows
Resume
if playback can be resumed from the last
place stopped.
2 Recording mode and Recording time available
Shows the current recording mode (XP, SP, LP, etc.), and
the total recording time available on the disc.
Finalized Video mode DVD-R/RW discs are shown as
DVD-R Finalized
or
DVD-RW Finalized
.
3 Copy control information
Shows recording restrictions.
Page 27

Getting started
04
4 Lock Disc On or Off
5 Number of titles/tracks/folders on the disc
6 Shows the current mode of the recorder (see
Switching between TV and DVD
on page 24)
Play display 1
Play
DVD-R Video 01 - 002
Original
1 2 3
00:03:30
1 Disc type and mode
Shows the disc type (
DISC
, etc.), and the disc mode for recordable DVD, if
applicable (
VR
DVD-R, DVD-RW, CD, MP3, NO
or
Video
). Shows
PBC
if a Video CD is in
playback control (PBC) mode.
2 Current title and chapter number
(For CD/Video CD, shows current track; for MP3, shows
current folder and track.)
3 Elapsed title time
(For CD, MP3, shows elapsed track time; for Video CD,
shows elapsed disc time.)
Play display 2
1 2
Play
DVD-VIDEO 01 - 002 00:03:30
Title Name : 11/11 soccer game
Title Total : 01h30m00s
Chapters : 007
5 4 3
! #
DVD Mode
1 Angle indicator
Lights during multi-angle scenes.
2 Copy protected material (!)/ PureCinema
indicator (#)
Shows ‘!’ if the playback material is copy-once protected.
Shows ‘#’ if the video output is 24 fps, progressive scan.
3 Current title name
4 Total running time of title
5 Total number of chapters in title
Recording display
1
Rec
DVD-RW VR
One-Touch Rec
05 - 001
Remain 00h20m (SP)
00h19m
00:03:30
432
Pr01
Stereo
Copy Once
1 Timer recording start and stop time or remaining
time of one-touch recording
Shows the start and stop times if the current recording is
a timer recording. Shows the remaining recording time if
the current recording is the one-touch recording.
2 Current title and chapter number
3 Elapsed recording time
4 Recording mode and Recording time available
Shows the current recording mode (XP, SP, LP, etc.), and
the available recording time on the disc.
Note
• The Video mode disc displays become the same as a
DVD-Video disc once the disc is finalized.
• The total recording time figure is calculated based on
a 12cm/4.7GB disc at the displayed record setting.
• Recording and playback times for TV recordings are
approximately 0.1% shorter than the actual time. This
is because of the slightly different frame rates of TV
broadcasts versus DVD.
• This recorder can play PlayLists on discs recorded
using other recorders. However, these PlayLists
cannot be edited.
•
Copy Once
or
Can’t Record
messages may appear
in the stop or recording displays. These indicate that
the broadcast TV program contains copy control
information.
27
En
Page 28

05
DISC NAVIGATOR
ENTER
HOME
MENU
Playback
Chapter 5
Playback
Introduction
Most of the features described in this chapter make use
of on-screen displays. Navigate these using the
(cursor buttons) and
from any screen, use the
also that the button guide at the bottom of every screen
shows which buttons do what.
Many of the functions covered in this chapter apply to
DVD discs, Video CDs, CDs, and MP3 discs, although the
exact operation of some varies slightly with the kind of
disc loaded. The following icons are provided to help you
quickly identify which instructions you need for which
kind of disc.
DVD
Any kind of DVD, DVD-R or DVD-RW
ENTER
. To go back one level
RETURN
button. Remember
///
The DVD side of a DualDisc plays in this product.
DVD-Audio content will not play.
For more detailed information on the DualDisc
specification, please refer to the disc manufacturer
or disc retailer.
Using the Disc Navigator to browse
the contents of a disc
Use the Disc Navigator to browse the contents of a
recordable disc and start playback.
28
En
DVD-Video
Commercially produced DVD or finalized
Video mode DVD-R/RW
Video mode
VR mode
Video CD
Video mode DVD-R/RW (unfinalized)
VR mode DVD-RW
CD
Audio CD
Video CD
MP3
MP3 files
• Some DVD-Video discs don’t allow certain playback
controls to operate at certain points in the disc. This
is not a malfunction.
•When playing Video CDs, some functions are not
available in PBC mode.
• When playing an NTSC disc, the video output will be
PAL.
• About DualDisc playback
A DualDisc is a new two-sided disc, one side of which
contains DVD content video, audio, etc. while the
other side contains non-DVD content such as digital
audio material.
The non-DVD, audio side of the disc is not compliant
with the CD Audio specification and therefore may
not play.
It is possible that when loading or ejecting a
DualDisc, the opposite side to that being played will
be scratched. Scratched discs may not be playable.
Using the Disc Navigator with recordable
discs
VR mode
1 Press HOME MENU and select ‘Disc Navigator’
from the on-screen display.
Alternatively, you can press
straight to the Disc Navigator screen.
Video mode
HOME MENU
Disc Navigator
Editing
Timer Recording
Initial Setup
Play Mode
ENTER
Confirm
DISC NAVIGATOR
HOME MENU
Exit
to go
Page 29

Playback
123
456
7890
CLEAR
ENTER
05
2 Use the
/
(cursor left/right) buttons to select
a title to play.
• You can also use the front panel + / – buttons.
Disc Navigator
DVD-VR Titles ORG 03, PL 02 Remain 00h20m (XP)
01 02 03 PL01
TUE 29/06
11:00
Title 01 Original
The lively big tree
Recording Time 00h30m00s
WED 30/06
11:00
THU 01/07
11:00
FRI 02/07
11:00
• Some VR mode DVDs recorded on other recorders
may have a PlayList of virtual content. PlayList titles
appear in the Disc Navigator after the ‘Original’ titles.
3 Press ENTER to start playback.
Using the Disc Navigator with MP3 discs
MP3
1 Press HOME MENU and select ‘Disc Navigator’
from the on-screen display.
Alternatively, you can press
takes you straight to the Disc Navigator screen.
Disc Navigator
MP3
Folder (1-03) Track (1-004)
01. Rock
02. Pop
03. Dance
DISC NAVIGATOR
Folder : 01 Track : 001Current
001. Intro
002. Escape
003. Everything You Say
004. What I Do
, which
Navigating discs
ALL
During playback you can easily jump to another title,
chapter or track on a disc using the number buttons on
the remote.
DVD-Video Video mode
1 During playback use the number buttons to
enter a chapter number within the current title.
For example, for chapter 6, press 6; for chapter 24, press
2
, then 4.
• To clear and start again, press
2 Optionally: Press ENTER.
Otherwise, just wait a few seconds and playback will
jump to the new chapter.
CLEAR
.
Folder Name : Rock
2 Select what you want to play.
Use the
///
items and press
(cursor buttons) buttons to highlight
ENTER
to select.
Note
• The Disc Navigator is only accessible when there is a
disc loaded.
• Another way to find a particular place on a disc is to
use the time search mode. See
Search Mode
page 32.
on
VR mode
1 During playback, use the number buttons to
input a title number.
For example, for title 6, press 6; for title 24, press 2, then
4
.
• To clear and start again, press
CLEAR
.
2 Optionally: Press ENTER.
Otherwise, just wait a few seconds and playback will
jump to the new title.
CD Video CD
1 During playback, use the number buttons to
input a track number.
For example, for track 6, press 6; for track 24, press 2,
then
4
.
CLEAR
• To clear and start again, press
.
2 Optionally: Press ENTER.
Otherwise, just wait a few seconds and playback will
jump to the new track.
29
En
Page 30

05
//
Playback
MP3
1 During playback, use the number buttons to
input a track/folder number.
For example, for folder 6, press 6; for track 24, press 2,
then
4
.
• To clear and start again, press
2Use the
/
(cursor up/down) buttons to select
CLEAR
.
either ‘Track’ or ‘Folder’.
Input Number 001/010 Track
3 Optionally: Press ENTER.
Otherwise, just wait a few seconds and playback will
jump to the new track.
Scanning discs
You can fast scan discs at various speeds, forwards or
backward.
3 To resume normal playback, press
.
Note
• Depending on the disc, reverse playback may not be
smooth.
• Sound can be heard while scanning audio CDs
(analog output only).
• No subtitles are displayed while scanning DVD-Video
discs.
• It is not possible to scan MP3 files.
• Sound is output when scanning DVDs only in forward
Scan1
. However, when connected using the coaxial
digital output, some receivers may not be able to
reproduce the scanned audio. No sound is output
when using other scan speeds.
• Depending on the recording mode and whether the
disc is recorded in Video or VR mode, scanning
speeds will vary.
• Depending on the disc, normal playback may
automatically resume when a new chapter is reached
on a DVD disc.
Playing in slow motion
DVD Video CD
You can play video at various slow motion speeds. DVDs
can be played in slow motion in either direction, while
Video CDs can only be played forwards in slow motion.
1 During playback, press or to start
reverse or forward scanning.
• The scanning speed is shown on-screen.
2 Press the same button repeatedly to increase the
scanning speed.
DVD
•
Forward:
Scan1
•
Reverse:
Reverse
CD
•
Forward/Reverse:
30
En
Scan1
Scan2 Scan3 Scan4
Scan1 Scan2 Scan3 Scan4
Video CD
Scan2
1 During playback, press .
2 Press and hold
or until slow motion
reverse or forward playback starts.
3 Press the same button repeatedly to change the
slow motion speed.
Slow 1/16 Slow 1/8
Slow 1/2
4 To resume normal playback, press
.
Page 31

Playback
123
456
7890
CLEAR
ENTER
HOME
MENU
05
Note
• Reverse slow-motion playback may not be as smooth
as forward and may be better with some discs than
others.
• Depending on the disc, normal playback may
automatically resume when a new chapter is reached
on a DVD disc.
• No sound is output during slow-motion playback.
Frame advance/frame reverse
DVD Video CD
You can step forwards or backwards a frame at a time
through a DVD. With Video CDs, you can only use frame
advance.
/ /
The Play Mode menu
ALL
The Play Mode menu gives you access to search and
repeat play functions.
Important
• You can’t use the Play Mode features with Video CDs
playing in PBC mode, or while a DVD disc menu is
being displayed. For other restrictions, see the
following sections.
1 During playback, press .
2 Press
or to go backwards or forwards one
frame.
3 To resume normal playback, press
Note
• Depending on the disc, normal playback may
automatically resume when a new chapter is reached
on a DVD disc.
1 Press HOME MENU and select ‘Play Mode’.
.
2 Use the
HOME MENU
Disc Navigator
Editing
Timer Recording
Initial Setup
Play Mode
ENTER
Confirm
/
(cursor up/down) buttons and
HOME MENU
Exit
ENTER to navigate.
• To exit the Play Mode menu, press
HOME MENU
.
31
En
Page 32

05
Playback
Search Mode
ALL
The Search Mode feature lets you start playback from a
specified point in a disc by time or by title/chapter/folder/
track number.
1 Select ‘Search Mode’ from the Play Mode menu.
2 Select one of the search options.
3 Use the number buttons to enter a title/chapter/
folder/track number or the search time (in hours,
minutes & seconds).
Search Mode
Search Mode
Repeat
Time Search (
DVD
current title, press
and 20 seconds into the title, press
Time Search (Video CD):
the disc, press
4, 5, 0, 0
• You can also use the
and
ENTER
to input a time.
Time Search
Title Search
Chapter Search
):
For example, for 25 minutes into the
2, 5, 0, 0
. For 1 hour and 15 minutes
1, 1, 5, 2, 0
.
For example, for 45 minutes into
.
/
(cursor up/down) buttons
Input Time 00 : 25 : 00
Tip
• You can often select what you want to watch on a
DVD disc from the disc menu. Press
MENU
to display the disc menu.
MENU
or
TOP
Note
• When using time search, playback may occasionally
start slightly before or after the time you input.
Repeat play
ALL
There are various repeat play options, depending on the
kind of disc loaded.
1 Select ‘Repeat’ from the Play Mode menu.
Play Mode
Search Mode
Repeat
2 Use the
a repeat play mode.
/
(cursor up/down) buttons to select
Repeat
Repeat
Off
Title/Folder/Chapter/Track Search:
press
6
.
• You can also use the
and
ENTER
to input a title/folder/chapter/track
number.
4 Press ENTER.
32
En
/
(cursor up/down) buttons
Input Track 01/12
For example, for track 6,
VR mode
• For VR mode DVD discs, select
(or
Off
).
DVD-Video Video mode
Disc, Title
or
Chapter
• For DVD-Video and Video mode DVD discs, select
Title
or
Chapter
CD
• For CDs and Video CDs, select
MP3
• For MP3 discs, select
Video CD
(or
Off
Disc, Folder
).
Disc
or
Track
(or
Off
or
Track
(or
Off
3 To resume normal playback, select ‘Off’ from the
Repeat Play menu.
).
).
Page 33

Playback
05
Displaying and switching subtitles
DVD-Video
Some DVD discs have subtitles in one or more
languages, which you can switch during playback.
Check the disc packaging for details of the subtitle
options.
SUBTITLE
CLEAR
1 Press SUBTITLE repeatedly to select a subtitle
option.
The current subtitle language is shown on-screen.
Subtitle: 1/2 English
The toucan lives in tropical forests
2 To switch off subtitles, press SUBTITLE
repeatedly until ‘Off’ is displayed.
Note
• Some discs only allow you to change subtitle
language from the disc menu. Press
access.
• To set subtitle preferences, see
TOP MENU
Language
to
on page 60.
Switching DVD soundtracks
DVD-Video
When playing a DVD disc recorded with two or more
soundtracks (often in different languages), you can
switch the soundtrack during playback.
Check the disc packaging for details of the soundtrack
options.
AUDIO
• Press AUDIO repeatedly to select an audio
soundtrack.
Audio 1/2 English
Dolby Digital 3/2CH
Note
• The sound may drop out momentarily when
switching soundtracks.
• Some discs only allow you to change audio language
from the disc menu. Press
• To set audio language preferences, see
page 60.
• Some discs feature both Dolby Digital and DTS
soundtracks. There is no analog audio output when
DTS is selected. To listen to the DTS soundtrack,
connect this recorder to a DTS decoder or AV amp/
receiver with built-in DTS decoder via the digital
output. See
Connecting to an AV amplifier/receiver
page 16 for connection details.
TOP MENU
to access.
Language
on
on
33
En
Page 34

05
Playback
Switching audio channels
VR mode CD Video CD MP3
For VR mode content recorded with bilingual audio, you
can switch between left (
both (
L+R
).
When playing Video CDs and audio CDs you can switch
between stereo, just the left channel or just the right
channel.
1 To display/switch the audio channel, press
AUDIO repeatedly.
The audio channel(s) currently playing are indicated onscreen.
VR mode
L+R
– Both channels (default)
•
•
L
– Left channel only
R
– Right channel only
•
CD Video CD MP3
•
Stereo
– Stereo (default)
•
1/L
– Left channel only
2/R
– Right channel only
•
L
) channel, right (R) channel, or
AUDIO
Switching camera angles
DVD-Video
Some DVD-Video discs feature scenes shot from two or
more angles—check the disc box for details: it should be
marked with a icon if it contains multi-angle scenes.
When a multi-angle scene is playing, the same icon
appears on screen to let you know that other angles are
available.
ANGLE
• To switch the camera angle, press ANGLE.
• The angle number is displayed on-screen.
• If the disc was paused, playback starts again with the
new angle.
Note
• You can also change the angle from some DVD-Video
disc menus. Press
TOP MENU
to access.
34
En
Note
• When playing a Bilingual recording on a VR mode
disc, if you are listening to the Dolby Digital
soundtrack via the digital output, you cannot switch
the audio channel. Set
Digital -> PCM
(see
Dolby Digital
Audio Out
to
Dolby
on page 57) or listen
via the analog outputs if you need to switch the audio
channel.
Page 35

Recording
Chapter 6
Recording
About DVD recording
This recorder can record on both DVD-R and DVD-RW
media. The main difference between the two is that DVDR discs can only be recorded once, while DVD-RW can be
recorded, erased and re-recorded many times.
A further difference between the two disc types is that
only DVD-RW can be initialized for
which offers much more comprehensive editing
functions compared to
The big advantage, however, of Video mode is its
compatibility with standard DVD players, most of which
will not play VR mode DVD-RW discs (see also the notes
below).
While DVD-R discs can only be recorded using the Video
mode, you can initialize a DVD-RW disc for Video or VR
mode recordings. Once initialized (any previous content
is erased in this operation), all recordings on that disc
will be in the chosen recording mode.
Important
• You cannot play, edit or record on unfinalized DVD-R/
RW discs recorded in Video mode on other DVD
recorders. (Likewise, unfinalized Video mode discs
recorded on this recorder are not playable on other
players/recorders.)
• This recorder cannot record onto DVD-R DL Ver. 3.0
(Dual Layer) discs.
• This recorder cannot record onto CD-R or CD-RW
discs.
• Pioneer takes no responsibility for recording failure
due to power cuts, defective discs, or damage to the
recorder.
• Fingerprints, dirt and small scratches on a disc can
affect playback and/or recording performance.
Please take proper care of your discs.
• This recorder can record both PAL and SECAM only.
• This recorder cannot record NTSC signals. NTSC
discs are playable, although the video output will be
PAL.
Note
• Some DVD players, such as some Pioneer models,
are compatible with VR mode DVD-RW discs. Check
the operating instructions for your player for VR
mode compatibility information.
Video mode
VR mode
recording.
recording,
• The maximum number of titles that can be recorded
on a DVD-R/RW disc is 99.
• The maximum number of chapters recordable on a
DVD-R/RW disc is 999.
Recording time and picture quality
There are six preset recording quality modes:
XP
– Highest quality setting, gives about one hour of
•
recording time.
•
SP
(Standard Play) – Default quality, used for most
applications, gives about two hours of recording
time.
•
LP
(Long Play) – Lower video quality than SP, but
doubles the recording time to about four hours.
•
EP
(Extended Play) – Lower video quality than LP, but
this gives about six hours of recording time.
•
SLP
(Super Long Play) – Lower video quality than EP,
but this gives about eight hours of recording time.
•
SEP
(Super Extended Play) – Lowest video quality, but
gives about ten hours of recording time in VR mode
or twelve hours in Video mode.
Please note that there is a trade-off between recording
time and quality. The longer the possible recording time,
the lower the recorded picture quality. You may wish to
try recording different kinds of program in different
modes to determine the combination of picture quality
and recording time that suits your needs.
We recommend that the
fast moving or action programs.
In all except the
channel Dolby Digital format. When set to
recorded in high quality, uncompressed Linear PCM
format.
If the broadcast audio is bilingual and you are recording
in Video mode, or in VR mode on the
Bilingual Recording setting (page 57) to select the
B/R
audio channel to record before recording starts.
Note
• Note that all recording times (both here and those
shown by the recorder) are only approximate. This is
because of the way that the video is recorded; you
may get slightly more or slightly less, depending on
what you’re recording.
XP
XP
mode be used for recording
mode, sound is recorded in two
XP
, sound is
XP
setting, use the
A/L
or
06
35
En
Page 36

06
REC MODE
Recording
• Except when a recordable Video mode disc is loaded,
changing the recording mode will display the
recording time for a VR mode disc.
Restrictions on video recording
• You cannot record copy-protected video using this
recorder. Copy-protected video includes DVD-Video
discs and some satellite broadcasts. If copyprotected material is encountered during a
recording, recording will pause automatically and an
error message will be displayed on-screen.
• Video that is ‘copy-once only’ can only be recorded on
a DVD-RW disc in VR mode (see below).
• When recording a TV broadcast or through an
external input, you can display copy control
information on screen. (see
information on-screen
CPRM
CPRM is a copy protection system with scramble system
regarding the recording of ‘copy once’ broadcast
programs. CPRM stands for
Recordable Media
This recorder is CPRM compatible, which means that
you can record copy-once broadcast programs, but you
cannot then make a copy of those recordings. CPRM
recordings can only be made on CPRM-compatible DVDRW (ver. 1.1 or higher) discs formatted in VR mode.
DVD CPRM recordings can only be played on players that
are specifically compatible with CPRM.
.
Recording equipment and copyright
Recording equipment should be used only for lawful
copying and you are advised to check carefully what is
lawful copying in the country in which you are making a
copy. Copying of copyright material such as films or
music is unlawful unless permitted by a legal exception
or consented to by the rightowners.
• This product incorporates copyright protection
technology that is protected by method claims of
certain U. S. patents and other intellectual property
rights owned by Macrovision Corporation and other
rights owners. Use of this copyright protection
technology must be authorized by Macrovision
Corporation, and is intended for home and other
limited viewing uses only unless otherwise
authorized by Macrovision Corporation. Reverse
engineering or disassembly is prohibited.
Displaying disc
on page 26).
Content Protection for
Setting the picture quality/recording
time
VR mode Video mode
Before starting a recording, you will usually want to set
the picture quality/recording time. There are six standard
settings available, which allow you to choose a balance
between picture quality and recording time.
• Press REC MODE repeatedly to select a recording
setting.
•XP – Fine picture quality
•
SP
– Standard play
LP
– Long play
•
•
EP
– Extended play
•
SLP
– Super Long Play
SEP
– Super Extended Play
•
The setting is indicated in the front panel display, and
shown on-screen together with the recording time for a
blank recordable disc.
Note
• Except when a recordable Video mode disc is loaded,
changing the recording mode will display the
recording time for a VR mode disc.
36
En
Page 37

Recording
Basic recording from the TV
VR mode Video mode
Follow the instructions below to record a TV program.
Recording starts immediately and continues until the
disc is full or you stop the recording.
AUDIO
123
456
7890
CH+
ENTER
CH–
REC REC MODE
DVD RECORDER
1 Load a recordable disc.
• If you load a new blank DVD-RW disc, the recorder
takes a short while to initialize the disc.
2 Use the CH +/– buttons to select the TV channel
to record.
The front panel display shows the channel number:
P R 0 7
Channel number
3 Use the REC MODE button to set the picture
quality/recording time.
• See
Setting the picture quality/recording time
above
for detailed instructions.
4 Use the AUDIO button to select the audio
channel to record.
See
Changing audio channels
on page 23 for more on
this.
• When recording in VR mode, if a broadcast is
bilingual, both audio channels are recorded, allowing
you to switch the audio channel on playback. The
only exception to this is when the picture quality is set
to
XP
, in which case you do need to select the audio
channel before recording.
5 Press REC to start recording.
If you want to set a recording end time, press the REC
button repeatedly. The recording time increases in 30
minute increments, up to a maximum of twelve hours.
The remaining recording time is shown on-screen and in
the front panel display. When the recording ends, the
recorder automatically switches into standby.
• To cancel the set recording time, press
REC
.
• If you want to pause recording at any time, press
. Press again to restart the recording. (If recording
in VR mode, a new chapter is started after recording
restarts)
6 To stop the recording, press .
• If you set the recording time in the previous step, you
can still stop the recording anytime by pressing
.
• Recording will stop automatically when there is no
more space on the DVD.
Tip
• During recording you can turn on/off the SCART loop
through function. During recording, press the front
panel
+
button to switch to
through on), or
–
to switch to
SCART THRU
SCART NORM
(loop
(loop
though off). Note that you can’t switch loop through
on if recording from the
AV1•RGB-TV
AV connectors. Also, loop through is
AV2(INPUT 1/DECODER)
or
automatically reset to off after recording has
finished.
06
• While the recorder is stopped, you can also use the
number buttons on the remote to select the channel.
(For channel 6, press
press
2, 4
then
• If the recorder is stopped, you can also use the
ENTER
6
then
)
ENTER
; for channel 24,
+/–
buttons on the front panel to select the channel
number.
37
En
Page 38

06
CLEAR
ENTER
HOME
MENU
Recording
Direct recording from TV
If you connected this recorder to your TV using a SCART
cable, and your TV supports Direct Recording, you can
record whatever is currently being shown on the TV
without having to worry about what channel preset the
recorder is on. Check the instructions that came with
your TV if you’re not sure whether your TV supports this
feature.
TV DIRECT
REC REC MODE
1 If necessary, load a recordable disc.
2 Set the picture quality/recording time using the
REC MODE button.
3 Press TV DIRECT REC to start recording.
If you want to set a recording time, press the REC
button repeatedly. The recording time increases in 30
minute increments, up to a maximum of twelve hours.
You can see the recording time on-screen and in the front
panel display. When the recording ends, the recorder
automatically switches into standby if no other operation
is being performed.
• To cancel the set recording time, press
• If you want to pause recording at any time, press
. Press again to restart the recording. (If recording
in VR mode, a new chapter is started after recording
restarts)
4 To stop the recording, press .
• If you set the recording time in step 3, you can still
stop the recording anytime by pressing
• Recording will stop automatically when there is no
more space on the DVD.
REC
DVD RECORDER
REC
.
Setting a timer recording
VR mode Video mode
Using the timer recording features you can program up
to 32 timer recordings up to a month in advance. Timer
recording programs can be set to record just once, every
day, or every week.
You can set the recorder so that it will adjust the
recording quality to try and fit the recording on to the disc
if it would not otherwise fit at the recording quality you set
(see
Optimized Rec
Important
•A timer recording can’t be set if there are already 32
timer programs waiting to be recorded.
• Timer recording will not start if:
– The recorder is already recording.
– A disc is being initialized, finalized or unfinalized.
• Except when finalizing Video mode discs, timer
recording will start when the operation preventing
timer recording has finished.
• If a disc is playing when a timer recording is due to
start, playback will automatically stop to allow the
recording to start.
• The timer indicator lights in the front panel display
when the timer is active. If the indicator is blinking it
means that there is no disc loaded, or the disc loaded
is not recordable.
• Approximately two minutes before a timer recording
.
is set to start, the recorder will go into timer recording
standby (assuming that a recordable disc is loaded).
In timer recording standby you cannot use some
functions.
on page 57 for more on this).
Tip
• You can press
in standby to switch on and immediately start
recording.
• Please note that you can’t record from another
component (VCR, etc.) that is connected by a SCART
cable to the
using the TV Direct Recording feature.
38
En
TV DIRECT REC
while the recorder is
AV2(INPUT 1/DECODER)
AV connector
Page 39

Recording
VCR
Plus+
123
456
7890
CLEAR
ENTER
HOME
MENU
06
1 Press HOME MENU, select Timer Recording, then
Timer Rec (View).
Timer Recording
VIDEO Plus+ system
Timer Rec (View)
The Timer Rec (View) screen appears, from which you
can see timer recordings already set and set new ones.
Timer Rec (View)
Date
Remain 01h20m(SP)
Start
SUN 12/12 07:00
Stop
08:00 SPPr01
New Input
Free space on the
loaded disc
CH
Rec Mode
1/1
Page number
Timer program
already set
Select here to
input a new
timer program
•If there are more than eight timer programs already
set, press
to switch page (go back using the
button).
• You can also clear a timer program before it’s started
by highlighting it and pressing
CLEAR
.
2 Select ‘New Input’ to set a new timer program,
then press ENTER.
•
RecMode
Recording time and picture quality
– Select XP, SP, LP, EP,
SLP
or
SEP
on page 35).
(See
4 After entering all the timer recording
information, highlight ‘Program Set’ and press
ENTER.
The timer recording list screen is displayed again. The
timer program you just input appears in the list.
5 To exit the timer recording screen, press HOME
MENU.
Timer recording using the VIDEO Plus+®
programming system
This system makes programming timer recordings very
simple. Most TV guides publish PlusCode programming
numbers with their program details. If you want to make
a timer recording of a program, you just input the
corresponding code. The date, start, stop and channel
settings are made automatically. All you have to do is tell
the recorder the recording mode, and whether it’s a
once-only recording or a regular recording.
Timer Rec (View)
Date Start
Program Set
:SUN 12/12 07 00
3 Enter the timer recording settings.
Use the
/
buttons to select a field; use the
buttons to change the value.
•
Date
– Choose a date up to one month in advance, or
select a daily or weekly program.
•
Start
– Set the recording start time.
Stop
– Set the recording end time (maximum length
•
of a timer recording is 12 hours).
•
CH
– Choose a channel (1–99, excluding skip
channels), or one of the external inputs from which to
record.
Stop CH
:08 00 Pr01
Rec Mode
SP
/
1 Press HOME MENU, select Timer Recording, then
VIDEO Plus+ system.
2 Use the number buttons to enter a PlusCode
programming number, then press ENTER.
To clear the last digit entered, press
VIDEO Plus+ system
VIDEO Plus+# 3 9 9 2 4
(0) - (9) to input
CLEAR
.
39
En
Page 40

06
Recording
3 If you want to change the recording quality, use
the
/
the
•See also
buttons to highlight Rec Mode, then use
/
buttons to change.
Timer Rec (View)
Date Start
Program Set
:SUN 12/12 07 00
Stop CH
:08 00 Pr01
Recording time and picture quality
page 35 and
Setting the picture quality/recording time
Rec Mode
SP
on
on page 36.
4 After making the settings, press ENTER.
• If you haven’t set up the guide channels (or at least
the guide channel for the PlusCode programming
number that you entered), the recorder will prompt
you to enter the channel number that the TV program
is showing on.
Tip
• You can check the timer program settings by
displaying the timer recording screen.
Programming a new end time
1 During timer recording, press HOME MENU,
select Timer Recording, then Timer Rec (View).
Timer Rec (View)
2 Use the
Date
Remain 01h20m(SP)
Start
SUN 12/12 07:00
button to highlight the current timer
Stop
08:00 SPPr01
New Input
CH
Rec Mode
1/1
recording, then press ENTER.
A screen showing details of the timer recording appears.
From this screen, only the recording stop time can be
changed.
Timer Rec (View)
Date Start
Program Set
:SUN 12/12 07 00
Stop CH
: 00 Pr01
08
Rec Mode
SP
Extending a timer recording in progress
You can extend a timer recording beyond the
programmed end time in two different ways. This can be
useful if a broadcast program overruns, for example.
ENTER
HOME
MENU
REC
Moving the end time by 30-minute blocks
1 During timer recording, press and hold REC for
three seconds.
The timer indicator disappears from the front panel
display.
2 Press REC repeatedly to extend recording in 30
minute increments.
40
En
3 Set a new Stop time for the timer recording.
Use the
then use the
/
buttons to select the hour or minute field,
/
buttons to change the time.
4 Press ENTER to set the new time and exit the
screen.
Recording will continue until the new stop time is
reached.
Canceling and stopping a timer recording in
progress
After a timer recording has started, you can cancel the
program (but continue recording), or stop recording
completely if you need to.
REC
Page 41

Recording
REC
REC MODE
INPUT
1 During timer recording, press and hold REC for
three seconds.
Only the program is canceled (the timer indicator
disappears); recording continues so that you can
manually stop recording whenever you like.
2 When you want to stop recording completely,
press
.
Preventing use of the recorder before a
timer recording (child lock)
You can make all the front panel and remote control
buttons inoperative using the child lock feature. This is
useful when you set a timer recording and want to make
sure that the timer settings are not changed before
recording has finished.
1 If the recorder is on, switch it into standby.
2 Press and hold
seconds to lock the controls.
The front panel display briefly shows
are pressed on the remote or front panel,
displayed again.
• To unlock the recorder, press and hold
panel for three seconds until the display shows
• To cancel a timer recording when the recorder is
locked, first unlock the recorder (see above), then
press and hold
on the front panel for three
LOCK
. If any buttons
LOCK
on the front
REC
for three seconds.
is briefly
OK
Timer recording FAQ
Frequently Asked Questions
• Even though the timer is set, the recorder doesn’t start
recording!
Check that the disc loaded is recordable, not locked
(see
Lock Disc
than 99 titles already on the DVD.
• The recorder won’t let me enter a timer program! Why
not?
You can’t enter a timer program if the clock isn’t set.
• What happens when two or more timer programs
overlap?
Basically, the program with the earlier recording start
time has priority. However, the recorder will start
recording the program with the later start time after
the earlier program is finished. If two programs have
the same times (but different channels, for example),
the program displayed higher up in the list in the
timer recording screen has priority.
on page 53), and that there are fewer
Recording from an external
component
VR mode Video mode
You can record from an external component, such as a
camcorder or VCR, connected to one of the recorder’s
external inputs.
1 Make sure that the component you want to
record from is connected properly to the DVD
recorder.
.
See Chapter 2 (
2 Press INPUT repeatedly to select one of the
external inputs to record from.
There are two analog inputs. The current input is shown
on-screen and in the front panel display:
• On-screen :
•
L2
– Input 2 (front panel)
Check that the
Bilingual Rec
page 56).
• If the aspect ratio is distorted (squashed or
stretched), adjust on the source component or your
TV before recording.
3 Set up the recorder.
• Use
Setting the picture quality/recording time
for detailed information.
4 Press REC when you’re ready to start
recording.
Note
• If your source is copy-protected using CopyGuard,
you will not be able to record it. See
video recording
Connecting up
AV2/L1
(front panel disply: L1) – Input 1
Audio In
are as you want them (see
REC MODE
settings for
to set the recording quality. See
on page 36 for more details.
) for connection options.
External Audio
Audio In
Restrictions on
06
and
on
on page 36
41
En
Page 42

06
Recording
Playing your recordings on other DVD
players
VR mode Video mode
Most regular DVD players can play finalized discs
recorded in Video mode. A number of players (including
many Pioneer models) can also play DVD-RW discs
recorded in VR mode, finalized or not. Check the manual
that came with the player to check what kinds of discs it
will play.
When you finalize a Video mode disc, a title menu is
created from which you can select titles when you play
the disc. These menus are navigated in the usual way,
pressing
using the
ENTER
Finalizing a disc
Finalizing ‘fixes’ the recordings in place so that the disc
can be played on a regular DVD player or computer
equipped with a suitable DVD-ROM drive.
1 Load the disc you want to finalize.
Make sure that the recorder is stopped before
proceeding.
2 Press HOME MENU and select ‘Initial Setup’.
3 Press
MENU
or
TOP MENU
///
(cursor buttons) followed by
to display the menu, then
to select titles and start playback.
VR mode Video mode
Important
• Once you’ve finalized a disc recorded in Video mode,
you can’t edit or record anything else on that disc.
However, the finalization on a DVD-RW disc maybe
‘undone’; see
Undo Finalize
on page 54 for how to do
this.
•A VR mode disc can still be recorded and edited on
this recorder even after finalizing.
to select ‘Disc’.
Initial Setup
Basic
Disc
Video
Audio
Recording
Playback
Lock Disc
Initialize
Finalize
4 Select ‘Finalize’.
Disc
Basic
Disc
Video
Audio
Recording
Playback
Lock Disc Finalize
Initialize
Finalize
Undo Finalize
5 Select Finalize ‘Start’.
Finalize
Finalize
Undo Finalize
6
Video mode only:
Start
Start
All the titles on the disc are
displayed.
Title Menu 01/02
01 02 03
TUE 29/06
11:00
04
FRI 02/07
11:00
WED 30/06
11:00
05 06
SAT 03/07
11:00
THU 01/07
11:00
SUN 04/07
11:00
7 The recorder will now start finalizing the disc.
during finalization:
Finalizing
Please wait a moment.
1 min left
• How long finalization takes depends on the type of
disc, how much is recorded on the disc and the
number of titles on the disc. A disc recorded in VR
mode can take up to one hour to finalize. A disc
recorded in Video mode can take up to 20 minutes.
42
En
Page 43

Recording
06
Initializing a DVD-RW disc
DVD-RW
When you first load a blank disc, the recorder will
initialize it automatically for recording. You can also
manually initialize DVD-RW discs.
You can initialize a disc for either Video mode recording
or VR mode recording.
Important
• Initializing a disc will erase everything recorded on it.
Make sure there is nothing on the disc that you want
to keep!
• You may not be able to re-initialize a disc in a different
format if it was originally initialized on an older DVD
recorder.
1 Press HOME MENU and select ‘Initial Setup’.
2 Press
to select ‘Disc’.
Initial Setup
Basic
Disc
Video
Audio
Recording
Playback
Lock Disc
Initialize
Finalize
Note
• By default, the recorder initializes blank DVD-RW
discs for VR mode recording. See
DVD-RW Auto Init.
on page 58 if you want to change the default to Video
mode.
• If a disc was previously finalized on an older DVD
recorder, you may not be able to re-initialize and/or
initialize it for Video mode recording.
3 Select ‘Initialize’
Disc
Basic
Disc
Video
Audio
Recording
Playback
Lock Disc VR Mode
Video ModeInitialize
Finalize
4 Select ‘Video Mode’ or ‘VR Mode’ from the
initialize options.
Initialize
VR Mode
Video Mode
Start
Start
5 Select ‘Start’.
It takes about 30 seconds to initialize the disc.
Initializing disc
Please wait a moment.
1 min left
43
En
Page 44

07
Editing
Chapter 7
Editing
Using this recorder you can edit video content on
unfinalized Video mode and VR mode DVD discs. More
detailed editing is possible on VR mode discs, which can
be edited at the chapter level. Video mode discs can only
be edited at the title level.
Once a Video mode disc has been finalized, further
editing is not possible.
1 Press HOME MENU and select ‘Editing’ from the
on-screen display.
HOME MENU
Disc Navigator
Editing
Timer Recording
Initial Setup
Play Mode
ENTER
Confirm
2Use the
/
buttons to select ‘Title Edit’ or
‘Chapter Edit’ from the Editing menu.
Editing
Title Edit
Chapter Edit
Erase
Title Name
Navi Mark
Lock
Erase All
The following title editing functions are available:
Erase
•
•
•
– Erase a title (page 44)
Title Name
Navi Mark
– Name or rename a title (page 45)
(VR mode only) – Change the thumbnail
image of a title (page 45)
•
Lock
(VR mode only) – Lock or unlock a title to
prevent accidental changes being made (page 46)
•
Erase All
– Erase all titles (page 46)
HOME MENU
Exit
Editing Titles (Title Edit)
Erase
VR mode Video mode
Use this command to erase individual titles from a disc.
When erasing Original content from a VR mode DVDRW, the available recording time will increase as titles
are erased. Erasing a title from a Video mode DVD-RW
disc increases the available recording time only if it is the
last title on the disc.
Since DVD-R is not erasable/rewritable, erased titles do
not free up space on the disc, even though they are not
visible anymore.
1Select ‘Erase’ from the Title Edit menu options.
/
2 Use the
to erase, then press ENTER.
Disc recording
mode
Erase
DVD-VR Titles 04 Remain 00h20m (XP)
01 02 03 04
TUE 29/06
11:00
Currently
selected title
buttons to select the title you want
Recording time
available in the displayed
THU 01/07
11:00
recording mode
FRI 02/07
11:00
Edit mode
Title 01 Original
The lively big tree
Recording Time 00h30m00s
WED 30/06
11:00
Locked title
indicator
Information for
selected title
The following chapter editing functions are available for
VR mode discs only:
•
Erase
– Erase a chapter (page 46)
•
Divide
– Divide a chapter into two new chapters
(page 47)
•
Combine
– Combine two chapters into one (page 47)
44
En
3 Highlight ‘Yes’ to confirm, or ‘No’ to cancel, then
press ENTER.
When the last title is erased, you will automatically be
taken back to the Home Menu.
4 Press RETURN to go back to the Title Edit menu
options, or select another title to erase.
Page 45

Editing
07
Title Name
VR mode Video mode
You can give titles names up to 64 characters long for VR
mode recordings and 32 characters for Video mode
recordings.
1 Select ‘Title Name’ from the Title Edit menu
options.
2 Use the
to name, then press ENTER to go to the name input
screen.
3 Input a name for the selected title.
Input area
•A name generated automatically by the recorder will
already be in the name input section of the screen.
• Use the
select characters.
• Select
case.
• Select
the
characters directly (press and hold for two seconds
to delete the whole name).
• For discs formatted on a different DVD recorder, you
will see only a limited character set.
4 Highlight ‘OK’ then press ENTER to enter the
name and return to the title selection screen.
• To return to the title selection screen without saving
changes to the title name, press
5 Press RETURN to go back to the Title Edit menu
options, or select another title to name.
/
buttons to select the title you want
Cursor to select character
Title Name
The lively big tree
CAPS
A B C D E F G H I J K L M . , ? !
O
P Q R S T U V W X Y Z ( ) : ;
N
small
A A A A A A Æ
D
N O O O O O ø U U U U Y ß $
0 1 2 3 4 5 6 7 8 9 < = > _ &
c
2
OK Clear Space
ç
E E E E I I I I #
+ – / @ [ ¥ ] ˆ ÷ x ± { | }
£ \ § ¨ © ¬ – ®
3
µ ¶ ·
´
a
<<
–
o
1
¸
–
<<
1/41/23
Cursor to
select input
position
///
CAPS
Clear
CLEAR
button on the remote control to delete
(cursor buttons) and
or
small
to change to upper or lower-
to delete characters. Alternatively, use
RETURN
%
~
¡
_
˚
¿
`
/4
Area to select
character
ENTER
.
to
Navigation Mark (Navi Mark)
VR mode
Use this function to select a frame from a title to use as
that title’s thumbnail image in the Disc Navigator. Note
that the exact frame used may be slightly different to the
one you choose.
1 Select ‘Navi Mark’ from the Title Edit menu
options.
2 Use the
press ENTER.
3 Use the playback controls (
find the frame you want to use for the thumbnail
picture.
Currently selected title number
Currently selected chapter number
4 When the frame you want to use is displayed,
select ‘Change’ then press ENTER.
5 To return to the title selection screen, press
RETURN, or select ‘Back’ then press ENTER.
6 Press RETURN to go back to the Title Edit menu
options, or select another title to change.
/
buttons to select the title then
Sum total of the chapter
in the selected title
Edit mode
Navi Mark
Title 01 Chapters 007 Recording Time 00h20m
Chapter 001
Playback
indicator
Playback point
The lively big tree
Chapter Time 00h05m02s
Chapter point
, , ,
Information for
selected chapter
Recording time
of the selected title
H
MS
00 : 03 30:
Change
Back
Playback time
, etc.) to
45
En
Page 46

07
Editing
Lock
VR mode
You can lock a title so that it can’t be edited or erased
accidentally. If you do need to edit it, you can always
unlock it later.
1 Select ‘Lock’ from the Title Edit menu options.
/
2 Use the
buttons to select the title you want
to lock (or unlock), then press ENTER.
Lock
DVD-VR Titles 04 Remain 00h20m (XP)
01 02 03 04
TUE 29/06
11:00
Title 01 Original
The lively big tree
Recording Time 00h30m00s
WED 30/06
11:00
THU 01/07
11:00
FRI 02/07
11:00
An unlocked title will become locked; a locked title will be
unlocked. Locked titles are displayed with a padlock icon.
3 Press RETURN to go back to the Title Edit menu
options, or select another title to lock/unlock.
Erase All
VR mode Video mode
This command erases all unlocked titles from the disc
(see also
When editing a DVD-RW, the available recording time
will increase when titles are erased. Since DVD-R is not
erasable/rewritable, the erased titles do not free up space
on the disc, even though they are not visible anymore.
1 Select ‘Erase All’ from the Title Edit menu
options.
2 Select ‘Yes’ to confirm, or ‘No’ to cancel, then
press ENTER.
When all titles are erased, you will automatically be taken
back to the Home Menu.
Lock
on page 46).
Title Edit
Title Edit
Chapter Edit
Erase all titles?
Erase
Title Name
Navi Mark
Lock
Erase All
Editing chapters (Chapter Edit)
VR mode
When editing VR mode DVDs you can edit individual
chapters within a title, with commands for erasing,
combining and dividing.
Erase
VR mode
Use this command to erase individual chapters from a
title.
1 Select ‘Erase’ from the Chapter Edit menu
options.
2 Use the
containing the chapters you want to erase, then
press ENTER.
3 Use the
chapter you want to erase, then press ENTER.
4 Highlight ‘Yes’ to confirm, or ‘No’ to cancel, then
press ENTER.
NoYes
5 To return to the title selection screen, press
RETURN.
6 Press RETURN to go back to the Chapter Edit
menu options, or select another title to edit.
/
buttons to select the title
Erase
DVD-VR Titles 04 Remain 00h20m (XP)
01 02 03 04
TUE 29/06
11:00
///
Erase
Title 01 Chapters 011 Recording Time 00h20m
001 002 003 004
005 006 007 008
Title 01 Original
The lively big tree
Recording Time 00h30m00s
WED 30/06
11:00
THU 01/07
11:00
FRI 02/07
11:00
(cursor buttons) to select the
Chapter 001
The lively big tree
Chapter Time 00h05m02s
46
En
Page 47

Editing
07
Divide
VR mode
Use this command to divide a chapter into two new ones.
Note that the exact divide point used may be slightly
different to the one you choose.
1 Select ‘Divide’ from the Chapter Edit menu
options.
2 Use the
containing the chapter you want to divide, then
press ENTER.
3 Use the
chapter, then press ENTER.
Currently selected title number
Currently selected
chapter
4 Use the playback controls (
find the place you want to divide the chapter.
5 Select ‘Divide’ and press ENTER to divide the
chapter.
6 To return to the chapter selection screen, press
RETURN, or select ‘Back’ then press ENTER.
7 Press RETURN to go back to the Chapter Edit
menu options, or select another title to edit.
• When divided, both of the new chapters must be
longer than three seconds.
/
buttons to select the title
///
(cursor buttons) to select the
Sum total of the chapter
Edit mode
in the selected title
Divide
Title 01 Chapters 011 Recording Time 00h20m
001 002 003 004
005 006 007 008
Chapter 001
The lively big tree
Chapter Time 00h05m02s
Information for
selected chapter
, , ,
Divide
Title 01 Chapters 007 Recording Time 00h20m
Chapter 001
The lively big tree
Chapter Time 00h05m02s
H
00 : 03 30:
MS
Divide
Note
Recording time
of the selected title
Currently selected
chapter number
, etc.) to
Back
Combine
VR mode
Use this function to combine two adjacent chapters into
one.
1 Select ‘Combine’ from the Chapter Edit menu
options.
/
2 Use the
containing the chapters you want to combine, then
press ENTER.
Edit mode
Title
number
Movie before and behind
a selected boundary line
3 Highlight the bar divider between the two
chapters you want to combine, then press ENTER.
4 To return to the title selection screen, press
RETURN.
5 Press RETURN to go back to the Chapter Edit
menu options, or select another title to edit.
Note
• It may not always be possible to combine two
chapters, even though they are adjacent. If a chapter
has been divided into three, then the middle chapter
erased, it is not possible to combine the two
remaining chapters into one.
buttons to select the title
Selected chapter number
Sum total of the chapter
in the selected title
Recording time
of the selected title
Combine
Title 01 Chapters 011 Recording Time 00h20m
001 002 003 004
005 006 007 008
Selected boundary line
Combine
Title 01 Chapters 011 Recording Time 00h20m
001 002 003 004
005 006 007 008
Chapter 001
The lively big tree
Chapter Time 00h05m02s
Chapter 001
The lively big tree
Chapter Time 00h05m02s
Information for
selected chapter
47
En
Page 48

08
The Initial Setup menu
Chapter 8
The Initial Setup menu
1 Select ‘Auto’.
Using the Initial Setup menu
The Initial Setup menu is where you can set various
recorder options for sound, picture, language and so on.
• Press HOME MENU and select ‘Initial Setup’.
HOME MENU
Disc Navigator
Editing
Timer Recording
Initial Setup
Play Mode
ENTER
Confirm
HOME MENU
Exit
• Some settings can only be changed when the
recorder is stopped. during playback these settings
are grayed out in the Initial Setup menu.
• Except for the Setup Navigator, menu screens are
exited automatically after 20 minutes of inactivity.
Basic settings
Clock
The date (day, month, year) and time must be set before
you can use any of the timer recording features.
The clock can be set automatically if there is a broadcast
station transmitting clock signals, or manually. Select
Auto
to set the clock automatically or
the clock setting screen.
Initial Setup
Initial Setup
Basic
Disc
Basic
Tuner
Video
Video Out
Audio
Audio In
Recording
Audio Out
Language
Playback
Recording
Playback
Clock
Tuner
Clock Setting
On Screen Display
OSD Language
Front Panel Display
Display
Remote Control Set
Control
Setup Navigator
Setup Navigator
Power Save
• Auto clock setting
Some TV channels broadcast time signals together
with the program. This recorder can use these
signals to set the clock automatically.
Auto
Manual
Manual
to display
2 Set ‘Clock Set CH‘ to the channel preset number
that broadcasts a clock signal.
3 Move the cursor down to ‘Start’ and press
ENTER.
The time and date is displayed when the recorder has
successfully set the clock.
Clock
Auto
Manual
Auto
Auto
Manual
Auto
Auto
Manual
Auto
Auto TUE 01 / 02 / 2005
Manual
Date
Time
Clock Set CH
Date
Time
Clock Set CH
Date
Time
Clock Set CH
Date
Time
Clock Set CH
SAT 01 / 01 / 2005
00 : 00
SAT 01 / 01 / 2005
00 : 00
12 : 00
• If the time could not be set, press
to the previous screen and select
Pr01
Start
Pr01
Start
Pr01
Start
Next
RETURN
Manual
to go back
.
48
En
Page 49

The Initial Setup menu
08
• Manual clock setting
If no stations in your area are broadcasting time
signals, you can set the clock manually:
1 Set your time zone.
Set this by selecting a time relative to GMT (see
Zone list
on page 66 for the possible time zones).
Clock
Auto
Manual
Date
Time
Time Zone
Summer Time
SAT 01 / 01 / 2005
12 : 00
GMT
Off
Time
2 Move the cursor down and select ‘On’ for
summer time if you are currently on summer time,
then press ENTER.
Clock
Auto
Manual
Date
Time
Time Zone
Summer Time
SAT 01 / 01 / 2005
12 : 00
GMT
On
3 Set the date (day/month/year) and time, then
press ENTER to make all the settings.
Clock
Use the
Auto
Manual
/
Date
Time
Time Zone
Summer Time
buttons to change the value in the
01 01
:
0012
GMT
On
/
/SAT
2005
highlighted field.
Use the
/
buttons to move from one field to
another.
Tuner
Basic
Basic
Disc
Video
Audio
Recording
Playback
Clock
Tuner
OSD Language
Display
Control
Setup Navigator
Power Save
Auto CH Setup
Manual CH Setup
Channel Swapping
Set Guide Preset
Auto CH Setup : Auto Scan
This recorder has a built-in TV tuner for recording PAL B/
G, PAL I, SECAM L and SECAM D/K TV programs off the
air or from analog cable TV. We recommend that you first
use the Auto Channel Setup described here to tune into
the channels in your area, then if there are any unwanted
channels, you can disable them using Channel Skip
(described below).
1 Choose ‘Tuner’ from the Initial Setup menu, then
‘Auto Channel Setup’, then ‘Auto Scan’.
Tuner
Auto CH Setup
Manual CH Setup
Channel Swapping
Set Guide Preset
Auto Scan
Download from TV
2 Select your country.
Country England
3 Press ENTER to start tuning.
Tuning
Please wait a moment.
20/107
Cancel
• You can cancel before auto tuning has finished by
pressing
ENTER
again.
After auto scanning has finished, the channel mapping
screen appears showing which channels have been
assigned to which program numbers.
Use the
Auto CH Setup
Pr System
01
02
03
04
05
06
07
08
/
CH Name
1
I
2
I
3
I
4
I
5
I
6
I
7
I
8
I
buttons to display the previous/next
Pr System CH Name
09
10
11
12
13
14
15
16
9
I
10
I
I
11
12
I
13
I
14
I
I
15
16
I
1/7
page.
4 Press HOME MENU to exit this screen.
Note
• You can fine-tune individual stations using the
Manual CH Setting
feature. See
Manual CH Setup
below for how to use this.
49
En
Page 50

08
The Initial Setup menu
Auto CH Setup : Download from TV
If you connected this recorder to your TV using the
AV1•RGB-TV
AV connector, and if your TV supports this
function, you can download all the channels that your TV
is tuned to. Check your TV’s instruction manual for more
details.
1 Choose ‘Download from TV’.
Auto CH Setup
Auto CH Setup
Manual CH Setup
Channel Swapping
Set Guide Preset
Auto Scan
Download from TV
2 Select your country.
Country England
3 Press ENTER to start downloading.
Downloading
Please wait a moment.
Cancel
After downloading has finished, the channel mapping
screen appears showing which channels have been
assigned to which program numbers.
Tip
• If the channel tuning information is updated in the
TV, the recorder will automatically download the new
information.
Manual CH Setup
The channel skip function lets you skip channels where
there is no station so that as you change channels, you
only see channels that have a station.
The manual tuning function allows you to manually tune
to stations, should you need to.
1 Select ‘Manual CH Setup’.
2 Select your country.
Country England
3 Press ENTER to go to the manual channel setup
screen.
Manual CH Setup
Preset
Skip
CH System
Channel
AFT Off
Level +32
Pr01
Off
EEURO
1
Sound System
Name
A B C 1 2
Decoder
B/G
On
From this screen there are nine parameters you can set:
Preset
•
•
– Change the preset number.
Skip
– If you want to skip the displayed channel
(because there is no station assigned to that
channel), change the
•
CH System
– Set the channel system used in your
Skip
setting to On.
area or region.
•
Channel
– Change the channel number assigned to
the current preset.
•
AFT
(Auto Fine Tune) – When set to On, the station is
automatically tuned; set to
Off
to manually fine tune
(see below).
•
Level
– Set the AFT level (see above).
•
Sound System
– Set the sound system used for the
current channel.
•
Name
– Move the cursor right then input a name for
the current station, (up to five characters) then press
ENTER
.
Decoder
•
requiring a decoder connected to the
DECODER)
AV2/L1 In
– If the current channel is scrambled,
AV2 (INPUT 1/
AV connector, set this to On. See also
on page 54.
50
En
Press
Tuner
Auto CH Setup
Manual CH Setup
Channel Swapping
Set Guide Preset
ENTER
to go to the country setting screen.
Skip
CH System
Channel
AFT
Sound System
Name
Decoder
Page 51

The Initial Setup menu
08
Channel Swapping
The preset swap feature lets you swap the channel
assignments of different programs. This is so that you
can group together station presets which naturally go
together.
1 Select ‘Channel Swapping’.
Tuner
Auto CH Setup
Manual CH Setup
Channel Swapping
Set Guide Preset
2 Press ENTER to go to the swap presets screen.
3 Use the
/
buttons to select a preset station to
swap.
• Use the
/
buttons to display the previous/
next page.
Channel Swapping
[1] 1/17
Pr System CH Name
01 I 1
02 I 2 ABC12
03 I 3
04 I 4
05 I 5
06 I 6
Swap Preset
[2] 1/17
Pr System CH Name
01 I 1
02 I 2
03 I 3
04 I 4
05 I 5
06 I 6
05 01
ABC12
4 Press , then select a preset station to swap
with the first preset.
Channel Swapping
[1] 1/17
Pr System CH Name
01 I 1
02 I 2 ABC12
03 I 3
04 I 4
05 I 5
06 I 6
Swap Preset
[2] 1/17
Pr System CH Name
01 I 1
02 I 2
03 I 3
04 I 4
05 I 5
06 I 6
05 03
ABC12
5 Press ENTER to swap the presets.
6 If you want to swap more presets, press
, then
repeats steps 3 to 5.
7 Press HOME MENU to finish and exit.
Set Guide Preset
• Default setting:
n/a
Guide channels are used by the VIDEO Plus+ system so
that the channel number specified in the VIDEO Plus+
programming numbers can be guaranteed to
correspond to the correct station.
1 Select ‘Set Guide Preset’, then press ENTER.
Tuner
Manual CH Setup
Channel Swapping
Set Guide Preset
Guide - PresetAuto CH Setup
2 Assign channel numbers to the guide channels as
necessary.
Look in your TV guide to see which channel numbers
should be assigned to which guide channels.
Set Guide Preset
• Use the
Auto CH Setup
Manual CH Setup
Channel Swapping
Set Guide Preset
/
Guide - Preset 1/26
Pr01 6
1
2
Pr02
3
- - - -
- - - -
4 9
- - - -
5 10
- - - -
7
- - - -
- - - -
8
- - - -
- - - -
buttons to change the guide channel
for setting.
• Use the
/
buttons to change the channel
number.
• Use the
/
button to display the previous/next
10 guide channels.
3 To return to the previous screen, press ENTER or
RETURN.
OSD Language
• Default setting:
Basic
Basic
Disc
Video
Audio
Recording
Playback
English
Clock
Tuner
OSD Language
Display
Control
Setup Navigator
Power Save
This sets the language of the on-screen menus and
displays.
51
En
Page 52

08
The Initial Setup menu
• Select ‘OSD Language’ then use the
/
buttons to select a language option.
OSD Language
OSD Language
English
Display
• Default setting:
Basic
Basic
Disc
Video
Audio
Recording
Playback
You can have the recorder show or hide on-screen
operation displays (for Play, Stop, etc.), and choose
whether to switch the front panel display on or off when
the recorder is in standby.
Display
OSD Screen
Front Panel
On
Clock
Tuner
OSD Language
Display
Control
Setup Navigator
Power Save
OSD Screen
Front Panel
On
On
There are three different recorder IDs. When set to
Recorder2
or
Recorder3
, the remote control mode is
shown in the front panel display.
Control
Remote Control
AV Link Setup
Recorder1
This recorder only
After selecting a new recorder ID, you have to confirm the
change by selecting
then pressing
Control
Remote Control
AV Link Setup
After changing this setting, the remote
control mode must be changed.
OK to Continue ?
ENTER
Yes
or No (use the
.
Recorder2
This recorder only
/
buttons),
NoYes
Note that as soon as you change the recorder ID, the
remote becomes inoperative until you change the remote
to the same ID.
To set the remote, press and hold
button (
1, 2
or 3) for five seconds.
RETURN
and a number
AV Link Setup
• Default setting:
This recorder only
Control
Remote Control
• Default setting:
You only need to set this if you are using more than one
Pioneer DVD recorder in the same room.
Basic
Basic
Disc
Video
Audio
Recording
Playback
So that each remote control operates only its own
recorder, make this setting different for each recorder
and remote in the room.
52
En
Recorder1
Clock
Tuner
OSD Language
Display
Control
Setup Navigator
Power Save
Remote Control
AV Link Setup
Control
Remote Control
AV Link Setup
Recorder1
This recorder only
This setting determines how AV Link signals are handled
when the recorder is in standby. Choose the
Recorder Only
this recorder. Choose
setting for AV Link signals to affect only
Pass Through
This
to have this
recorder pass on AV Link signals to other connected
devices without affecting this recorder.
Note
• When set to Pass Through, make sure to set
Save
(page 53) to
Off
.
Power
Page 53

The Initial Setup menu
Setup Navigator
• Default setting:
Basic
Basic
Disc
Video
Audio
Recording
Playback
The Setup Navigator appears automatically when you
switch on the recorder for the first time (or after resetting
the recorder). It is also available from the Initial Settings
menu should you need it at any other time.
See also
Switching on and setting up
Power Save
• Default setting:
Basic
Basic
Disc
Video
Audio
Recording
Playback
n/a
Clock
Tuner
OSD Language
Display
Control
Setup Navigator
Power Save
Off
Clock
Tuner
OSD Language
Display
Control
Setup Navigator
Power Save
OSD Language
Tuner
Clock
on page 20.
Disc settings
Lock Disc
VR mode
• Default setting:
Disc
Basic
Disc
Video
Audio
Recording
Playback
Set to On to prevent accidental recording, editing or
erasing of the disc loaded. If you need to unlock the disc
to make edits, select
Lock Disc
Lock Disc
Off
Off
Lock Disc
Initialize
Finalize
.
Off
08
Power Save
Power Save
When set to
Off
, signals arriving at the
terminal and at the
connector are passed through to the
terminal and to the
Off
ANTENNA IN
AV2 (INPUT 1/DECODER)
ANTENNA OUT
AV1•RGB-TV
AV connector,
AV
respectively, when the recorder is in standby.
You can cut the standby power consumption of the
recorder by turning off the through function for one or
both terminals:
•
Mode1
– Through function only for the antenna
terminal
•
Mode2
– No through function
•
Off
– Through function for both antenna terminal
and AV connector
Important
•A locked disc can still be initialized (which will
completely erase the disc).
Initialize
DVD-RW
See
instructions on this option.
Finalize
DVD-RW DVD-R
Finalizing ‘fixes’ the recordings in place so that the disc
can be played on a regular DVD player or computer
equipped with a suitable DVD-ROM drive.
Initializing a DVD-RW disc
See
Playing your recordings on other DVD players
page 42 for detailed instructions.
on page 43 for detailed
on
53
En
Page 54

08
The Initial Setup menu
Undo Finalize
DVD-RW
You can undo the finalization on Video mode DVD-RW
discs recorded and finalized on this recorder. You need to
do this if you want to record more material or edit
material already on the disc.
If when you load a disc the message
recorded. Undo the finalization
This disc cannot be
is displayed, use this
command to be able to record on the disc using this
recorder.
Select
Finalize
, then
Undo Finalize Start
from the
finalize options screen.
Pioneer cannot guarantee that undoing the finalization will
work with discs that were finalized on another recorder.
Video settings
Video In
Color System
• Default setting:
Video
Basic
Disc
Video
Audio
Recording
Playback
On the default setting, the recorder automatically detects
whether the video signal from the built-in tuner or from
one of the external inputs is
however, occasionally need to set it manually if the
picture is not displayed properly.
1 Select ‘Color System’, then press ENTER.
Color System
Color System
AV2/L1 In
Auto
Video In
Video Out
Input Adjust
Playback Adjust
Preset
Color System
PAL
or
Color System
AV2/L1 In
SECAM
Pr01
PAL
. You may,
2 Use the
preset then press
3 Use the
/
buttons to change the channel
.
/
buttons to change the color system
for the current input or built-in tuner.
Video In
Color System
AV2/L1 In
Preset
Color System
Pr01
PAL
AV2/L1 In
• Default setting:
You only need to make this setting if you connected this
recorder to another component using the
DECODER)
The
AV connector.
AV2/L1 In
Color System
AV2/L1 In
AV2 (INPUT 1/DECODER)
be set to one of the following settings:
•
Video
– Sets the input signal type to composite
video.
•
S-Video
Decoder
•
connected to the
(For scrambled channels, make sure that the manual
channel
CH Setup
Video
AV2 (INPUT 1/
AV2/L1 In
Video
AV connector input can
– Sets the input signal type to S-video.
– Use this setting if you are using a decoder
Decoder
AV2 (INPUT 1/DECODER)
setting is set to On—see
input.
Manual
on page 50)
Video Out
AV1 Out
• Default setting:
You only need to make this setting if you connected this
recorder to your TV using the
connector.
Video
AV1•RGB-TV
SCART AV
54
En
Video
Basic
Disc
Video
Audio
Recording
Playback
Video In
Video Out
Input Adjust
Playback Adjust
AV1 Out
Component Video
Page 55

The Initial Setup menu
08
Important
• If you make a setting here that is incompatible with
your TV, the TV may not display any picture at all. If
this happens either switch everything off and
reconnect to the TV using either the supplied video
cable, or an S-video cable (see
component video output
or reset the recorder (see
Using the S-video or
on page 12 for more on this),
Resetting the recorder
on
page 70 for how to do this).
Video Out
•
AV1 Out
Component Video
Video
– Compatible with all TVs, but lowest quality of
Video
Interlace
the three AV settings.
•
S-Video
– Almost the same quality as RGB, but can
give better results if you are using a long SCART
cable.
•
RGB
– If your TV is compatible, this setting gives the
best picture quality.
Note
• When set to RGB, the
Component Video
setting has
no effect.
Important
If you switch to
Progressive
when using a TV that is not
compatible with progressive-scan video, you will not be
able to see anything displayed on your TV. If this happens,
press and hold the
STANDBY/ON
output back to
+
button on the front panel, then press
. This will set the recorder’s video
Interlace
.
Input Adjust
Video
Basic
Disc
Video
Audio
Recording
Playback
Use this setting to adjust the amount of noise reduction
(NR) applied to the video signal.
From the Input Adjust screen, use the
adjust the
NR
setting from
Input Adjust
NR
Video In
Video Out
Input Adjust
Playback Adjust
Off
to
Max
Off Max
/
.
buttons to
Component Video
• Default setting:
You only need to make this setting if you connected this
recorder to your TV using the component video jacks.
If your TV is compatible with progressive-scan
component video, set this
quality picture. If your TV is not compatible with
progressive-scan video, leave it set to
Video Out
AV1 Out
Component Video
• See also
page 71.
Interlace
Progressive
Video
Interlace
Progressive scan video
for the highest
Interlace
.
in the glossary on
Press
ENTER
to confirm and exit the screen.
Playback Adjust
Video
Video
Basic
Basic
Disc
Disc
Video
Video
Audio
Audio
Recording
Recording
Playback
Playback
Use the various Playback Adjust settings to adjust the
picture quality of the video output.
Video In
Video In
Video Out
Video Out
Input Adjust
Input Adjust
Playback Adjust
Playback Adjust
Pure Cinema
Block NR
Mosquito NR
White Level
Chroma Level
55
En
Page 56

08
The Initial Setup menu
From the Playback Adjust screen, use the
to select a setting, then use the
/
/
buttons to adjust
it.
Playback Adjust
•
Pure Cinema
Pure Cinema
Block NR
Mosquito NR
White Level
Chroma Level
Off On
Off Max
Off Max
Min Max
Min Max
– This setting optimizes the picture for
film material when the video output is set to
progressive scan. Usually it is best set to
switching it
Block NR
•
Off
if the picture appears unnatural.
– Adjusts the amount of noise reduction
On
applied to the block noise (artifacts visible in areas of
flat color, caused by MPEG compression).
•
Mosquito NR
– Adjusts the amount of noise
reduction applied to the mosquito noise (artifacts
visible around the edge of an image, caused by
MPEG compression).
•
White Level
•
Chroma Level
ENTER
Press
– Adjusts the intensity of white.
– Adjusts how rich colors appear.
to exit the screen.
buttons
, but try
Audio settings
Audio Adjust setting
Audio
Basic
Disc
Video
Audio
Recording
Playback
Use the Audio Adjust setting to adjust the dynamic range
of the audio output when playing DVDs with Dolby Digital
sound.
From the Audio Adjust screen, use the
adjust the
Audio DRC
dynamic range untouched;
range, making it good for lower-level listening.)
Audio Adjust
Audio DRC
Audio Adjust
Audio In
Audio Out
setting On or
On
‘squashes’ the dynamic
Off
Off
/
. (
Off
buttons to
leaves the
56
En
Press
ENTER
to confirm and exit the screen.
Audio In
Audio
Basic
Disc
Video
Audio
Recording
Playback
Use the Audio In settings to specify which channel(s) of
a dual mono source to record.
From the Audio In screen, use the
a setting, then use the
Audio In
NICAM Select
Tuner Level
External Audio
Bilingual Rec
Audio Adjust
Audio In
Audio Out
/
/
buttons to adjust it.
NICAM
Normal
Stereo
A/L
NICAM Select
Tuner Level
External Audio
Bilingual Rec
buttons to select
Page 57

The Initial Setup menu
08
•
NICAM Select
audio in a TV broadcast, select
otherwise set to
can still select
button. See
•
Tuner Level
– If you want to record the non-NICAM
Regular Audio
NICAM
. (When set to
Regular Audio
using the
Changing audio channels
– Set to
Compression
NICAM
AUDIO
on page 23.)
if the audio level
,
, you
from the built-in tuner is excessively high causing
distortion.
•
External Audio
input is regular stereo, or
– Select
Stereo
if the external audio
Bilingual
if each channel
carries a separate soundtrack.
•
Bilingual Rec –
When recording a bilingual source
from an external input in Video mode or VR mode set
to
XP
, you can choose to record either the
or the
B/R
(right) audio channel.
A/L
(left),
Note
• Except in XP recording mode, if you’re recording in
VR mode, both channels will be recorded and you
can switch them as you like on playback.
Audio Out
Audio
Basic
Disc
Video
Audio
Recording
Playback
Use the various Audio Out settings to make sure that the
digital audio output is compatible with your AV receiver
(or other connected component). You may need to check
the operating instructions that came with your AV
receiver to see which digital formats it’s compatible with.
From the Audio Out screen, use the
select a setting, then use the
Audio Out
Dolby Digital
96kHz PCM
DTS
MPEG
•
Dolby Digital
Digital compatible, set to
set to
Dolby Digital -> PCM
•
96kHz PCM
with high sampling rate audio (88.2 / 96 kHz), set to
96kHz
, otherwise set to
Audio Adjust
Audio In
Audio Out
Dolby Digital
96kHz -> 48kHz
MPEG -> PCM
Dolby Digital
96kHz PCM
DTS
MPEG
/
/
buttons to adjust it.
On
buttons to
– If your AV receiver, etc. is Dolby
Dolby Digital
, otherwise
.
– If your AV receiver, etc. is compatible
96kHz -> 48kHz
.
•
DTS
– If your AV receiver, etc. has a built-in DTS
decoder, set to
Important
•
MPEG
– If your AV receiver, etc. is MPEG audio
compatible, set to
PCM
.
below.)
On
, otherwise set to
MPEG
, otherwise set to
Off
. (See also
MPEG ->
Important
• If you set
DTS
to On with a non-DTS compatible
amplifier, noise will be output when you play a DTS
disc.
• When set to
On
, there is no analog audio output
when playing a DTS DVD-Video disc.
• When playing a DTS audio CD (even when
Off
), noise is output from the analog outputs.
DTS
is
Do not
play this through your amplifier and speakers.
• When playing a DTS audio CD, make sure that
Stereo
is selected using the
Switching DVD soundtracks
AUDIO
button. See
on page 33.
Recording settings
Optimized Rec
• Default setting:
Recording
Basic
Disc
Video
Audio
Recording
Playback
On the default setting, if a timer program (Standard or
VIDEO Plus+ programming system) is set but there isn’t
enough space on the disc at the recording quality set, the
recording will start, but it will be cut off when the disc is
full.
Set
Optimized Rec
automatically adjust the recording quality to fit the
available disc space.
Optimized Rec
Optimized Rec
Off
Optimized Rec
Auto Chapter
DVD-RW Auto Init
to On to have the recorder
Off
57
En
Page 58

08
The Initial Setup menu
Note
• The quality of recordings may be reduced if a longer
recording time is used.
• If, even on recording level
SEP
, there is insufficient
space available on the disc, the recording is made on
SEP
but recording will stop once the disc is full.
• Optimized Recording only compensates for the first
(earliest starting) timer program if more than one has
been set.
• Unlike other recordings made using this recorder,
the title name of an optimized recording does not
contain the recording mode.
Auto Chapter
• Default setting:
Recording
Basic
Disc
Video
Audio
Recording
Playback
On the default setting, a new chapter is started
approximately every 15 minutes.
Auto Chapter
Auto Chapter
On
Optimized Rec
Auto Chapter
DVD-RW Auto Init
On
When you load a new, blank DVD-RW disc the recorder
automatically initializes it for recording. You can set it to
initialize the disc for
DVD-RW Auto Init
DVD-RW Auto Init
VR mode
VR Mode
or
Video mode
recording.
Playback settings
Parental Lock
Some DVD-Video discs feature a Parental Lock level. If
the recorder is set to a lower level than the disc, it will
require you to enter a password before the disc will play.
This gives you some control about what your children
watch on your DVD recorder.
Some discs also support the Country/Area code feature.
The recorder does not play certain scenes on these discs
depending on the Country/Area code you set.
Before you can set the Parental Lock level or the Country/
Area code you must set a password. As the password
owner you can change the Parental Lock level or Country/
Area code whenever you like. You can also change the
password.
DVD-RW Auto Init.
• Default setting:
Recording
Basic
Disc
Video
Audio
Recording
Playback
58
En
VR Mode
Optimized Rec
Auto Chapter
DVD-RW Auto Init
Note
• Not all discs that you may consider inappropriate for
your children use the Parental Lock feature. These
discs will always play without requiring the password
first.
• If you forget the password, you can reset the recorder
to its factory settings (see
Resetting the recorder
on
page 70), then set a new password.
Set Password
• Default password:
none
The password you set will enable you to change the
Parental Lock level and Country/Area code setting. It is
also the password that you will need to enter if you want
to play a disc with a parental lock level higher than the
recorder.
Page 59

The Initial Setup menu
08
1 Select ‘Set Password’.
Parental Look
Set Password Set Password
Change Level
Country / Area
2 Use the number buttons to input a four-digit
password.
Set Password
Set Password
Change Level
Country / Area
Set Password
1 2 3 4
3 Press ENTER to set the password.
Change Password
To change your password, confirm your existing
password then enter a new one.
1 Select ‘Change Password’.
Parental Look
Change Password
Change Level
Country / Area
Current Password
New Password
Change Level
• Default level:
Off
1 Select ‘Change Level’.
Parental Look
Change Password
Change Level
Country / Area
Password
Level
2 Use number buttons to enter your password,
then press ENTER.
Change Level
3 Use the
Change Password
Change Level
Country / Area
/
Password
Level
buttons to select a new parental
1 2 3 4
Off
lock level.
Change Level
Change Password
Change Level
Country / Area
Password
Level
1 2 3 4
Off
2 Use the number buttons to enter your existing
password.
Change Password
Change Password
Change Level
Country / Area
Current Password
New Password
1 2 3 4
- - - -
3 Press ENTER.
4 Enter a new password.
Change Password
Change Password
Change Level
Country / Area
Current Password
New Password
1 2 3 4
5 6 7 8
5 Press ENTER.
4 Press ENTER to set the new Parental Lock level.
Country/Area
• Default Country/Area code:
us (2119)
1 Select ‘Country / Area’.
Parental Look
Change Password
Change Level
Country / Area
Password
Code
Number
2 Use number buttons to enter your password,
then press ENTER.
Country / Area
Initial Setup
Change Password
Basic
Change Level
Tuner
Video Out
Country / Area
Audio In
Audio Out
Language
Recording
Playback
Password
Parental Lock: Country Code
TV Screen Size
Code
Still Picture
Password
Seamless Playback
Number
Parental Lock
Parental Lock
Angle Indicator
Code
Number
1
2
2 3 4
us
1 1 9
1 2 3 4
us
2 1 1 9
59
En
Page 60

08
The Initial Setup menu
3 Select a Country/Area code.
• You may also want to refer to the
list
on page 67.
Country/Area code
There are two ways you can set the Country/Area code:.
• Select by code letter: Use the
/
buttons to
change the code.
Country / Area
Change Password
Change Level
Country / Area
Password
Code
Number
• Select by code number: Press
1 2 3 4
us
2 1 1 9
then use the
number buttons to enter the four-digit Country/Area
code (you can find the
Country/Area code list
on
page 67.)
Country / Area
Change Password
Change Level
Country / Area
Password
Code
Number
1 2 3 4
us
2 1 1 9
4 Press ENTER to set the new Country/Area code.
Note
• Changing the Country/Area code does not take effect
until the next disc is loaded (or the current disc is
reloaded).
Language
Playback
Basic
Disc
Video
Audio
Recording
Playback
Parental Look
Language
Visual
Use the various Language settings to set the default
audio, subtitle and menu languages for DVD discs, as
well as subtitle display behavior.
From the Language screen, use the
select a setting, then use the
If you want to choose a language other than those listed
for audio, subtitles and menus, select
another language (see
Selecting ‘Other’ languages
below).
Language
English
English
English
•
Audio
Subtitle
DVD Menu
Subtitle Display
Audio
– This setting is your preferred audio language
for DVD discs. If the language you specify here is
recorded on a disc, the recorder automatically plays
the disc in that language.
•
Subtitle
– This setting is your preferred subtitle
language for DVD discs. If the language you specify
here is recorded on a disc, the recorder automatically
plays the disc with those subtitles.
•
DVD Menu
– Some multilingual discs have disc
menus in several languages. This setting specifies in
which language the disc menus should appear.
Leave on the default setting (
for menus to appear in the same language as your
Subtitle
•
Subtitle Display
language.
– When set to On, the recorder
displays subtitles according to the
Set to
Off
to switch subtitles off altogether (although
you may find that some discs override this setting).
Audio
Subtitle
DVD Menu
Subtitle DisplayAction
/
buttons to
/
buttons to adjust it.
Other
On
w/Subtitle Language
Subtitle
then select
setting.
)
60
En
Tip
• You can switch between the audio and subtitle
languages recorded on a DVD disc any time during
playback using the
AUDIO
and
SUBTITLE
buttons.
(This does not affect these settings.)
Page 61

The Initial Setup menu
08
Selecting ‘Other’ languages
1 Select ‘Other’ from the language list.
This option appears in the settings for DVD Menu
Language, Audio Language, and Subtitle Language.
2 Select the language you want.
Language
Audio
Subtitle
DVD Menu
Subtitle Display
Language
Number
• Select by language name: Use the
English
English
Other
On
English
0 5 1 4
/
buttons to
change the language.
• Select by code number: Press
then use the
number buttons to enter the four-digit language
code.
See
Language code list
on page 67 for a list of available
languages and corresponding codes.
3 Press ENTER to confirm and exit the screen.
Visual settings
Playback
Basic
Disc
Video
Audio
Recording
Playback
Parental Look
Language
Visual
Action
Use the Visual settings to specify the kind of TV you have
and how still frames should appear when you pause
playback of a disc.
From the Visual screen, use the
setting, then use the
Visual
TV Screen Size
Still Picture
/
buttons to adjust it.
4:3 (Letter Box)
Auto
TV Screen Size
Still Picture
/
buttons to select a
If you have a conventional TV, choose either
(Letter Box)
or
4:3 (Pan & Scan)
. In Letter Box mode,
4:3
widescreen software is shown with black bars at the
top and bottom of the screen. Pan & Scan chops the
sides off widescreen material to make it fit the 4:3
screen (so even though the picture looks larger on
the screen, you’re actually seeing less of the movie).
See
Screen sizes and disc formats
on page 62 for
more information.
•
Still Picture
– The recorder uses one of two
processes when displaying a still frame from a DVD
disc. The default
Auto
setting automatically chooses
the best setting each time.
The
Frame
setting produces a sharper image, but
more prone to shake than field stills.
Action settings
Playback
Basic
Disc
Video
Audio
Recording
Playback
Parental Look
Language
Visual
Action
Use the Action settings to specify Video CD playback and
DVD title playback behavior.
From the Action screen, use the
setting, then use the
Action
PBC Mode
Title Continue
•
PBC Mode
/
buttons to adjust it.
On
On
– Set to On to have the recorder
automatically start playing Video CDs in playback
control (PBC) mode, if possible. Set to
prefer to use ‘manual’ playback.
•
Title Continue
– (VR mode only) Set to On to have
the recorder start playing the following title
immediately after the previous one ends. When set to
Off
, playback stops at the end of a title.
PBC Mode
Title Continue
/
buttons to select a
Off
if you
•
TV Screen Size
the
16:9
– If you have a widescreen TV, select
setting—widescreen DVD software is then
shown using the full screen area. When playing
software recorded in conventional (4:3) format, the
settings on your TV will determine how the material is
presented—see the manual that came with your TV
for details on what options are available.
61
En
Page 62

09
Additional information
Chapter 9
Additional information
Screen sizes and disc formats
When viewing on a standard TV or monitor
Screen format of disc Setting Appearance
16:9 4:3 (Letter Box)
The program is shown in
wi
d
escreen with black bars at
the top and bottom of the
screen.
4:3 (Pan & Scan)
4:3 16:9
4:3 (Letter Box)
4:3 (Pan & Scan)
When viewing on a widescreen TV or monitor
Screen format of disc Setting Appearance
16:9 16:9
4:3 16:9
The sides of the program are
cropped so that the picture
fills the whole screen.
The program appears
squashed. Set to either
(Letter Box)
Scan)
.
The program is presented
correctly on either setting.
The program is presente
widescreen.
Your TV will determine how the
picture is presented—check
the manual that came with the
TV for details.
or
4:3 (Pan &
4:3
d
in
62
En
Page 63

Additional information
Troubleshooting
Incorrect operation is often mistaken for trouble and malfunction. If you think there is something wrong with this
component, please check the points below. Sometimes the trouble may lie in another component. Investigate the
other components and electrical appliances being used. If the trouble cannot be rectified even after checking the
points below, ask your nearest Pioneer authorized service center or your dealer to carry out repair work.
General
Problem Remedy
The disc is automatically ejected
after closing the disc tray
No picture
Can’t play a disc
All settings are reset
Screen goes blank and controls are
inoperative
Remote control does not work
No sound or sound is distorted
The picture from the external input
is distorted
• Check that the disc is not a DVD-RAM, DVD+R/RW, DualDisc or other
incompatible format disc (page 7).
• Check that the disc is loaded properly (aligned in disc tray and label-side up).
• Take out the disc and clean it (page 69).
• Check that the disc has a region code compatible with the recorder (page 71).
• Check that everything is connected properly (page 9).
• Check that the connected TV and/or the AV amp/receiver is set to the correct
input.
• The recorder may be set to progressive-scan with an incompatible TV. Reset to
interlace by pressing and holding the + button (front panel) then pressing
STANDBY/ON
• Check that the disc is not a DVD-RAM, DVD+R/RW, DualDisc or other
incompatible format disc (page 7).
• Take out the disc and clean it (page 69).
• Check that the disc is loaded properly (aligned in disc tray and label-side up).
• There may be condensation in the recorder. Leave the recorder for an hour or so
for the condensation to evaporate.
• If the recorder is unplugged (or there is a power failure) while the recorder is on,
all the settings will be lost.
• Make sure that you switch the recorder into standby before unplugging the
power cord.
• Press then restart playback.
• Set the remote control to the same ID number as the recorder (page 52). (When
the batteries run down, the remote mode is automatically reset to 1.)
• Use the remote within its operating range (page 6).
• Replace the batteries (page 6).
• Make sure that the amp/receiver or TV is set to the correct input and the volume
turned up.
• There is no sound when the picture is paused, or during scanning (even forwards
at regular play speed) or slow motion play. Press to resume regular playback.
• DTS discs can only be played if this recorder is connected to a DTS decoder or
DTS compatible amp/receiver. If you have connected a suitable decoder, also
make sure that the
• Some 96kHz discs do not output audio through the digital jack. In this case,
switch the input of your amp/receiver to analog.
• Check the audio cable connections (page 9).
• If the sound is distorted, try cleaning the cable plugs.
• If the video signal from the external component is copy-protected, you cannot
connect via this recorder. Connect the component directly to your TV.
(front panel).
Initial Setup
>
Audio
>
Audio Out
>
DTS
setting is On.
09
63
En
Page 64

09
Additional information
Problem
Screen is stretched vertically or horizontally
Can’t play a disc recorded using this
recorder on another player
During playback the picture is dark
or distorted
Can’t record or does not record successfully
Timer program doesn’t record successfully
After briefly unplugging or after a
power failure the front panel display shows ‘--:--’
Front panel display shows ‘LOCK’
when a button is pressed
The picture freezes and the front
panel and remote control buttons
stop working
Remedy
• Make sure that the
you have (see also page 62).
• If you have a widescreen TV, check its aspect ratio settings.
• This recorder’s input switches into wide mode automatically according to the
input signal. When the unit connected is not compatible with ID-1, set the
connected component to output 4:3 aspect ratio (standard) video.
• If the disc was recorded in Video mode, make sure that it’s finalized (page 42).
• Some players will not play recordable DVD discs, even when recorded in Video
mode and finalized.
• If the disc was recorded in VR mode, the other player must be specifically RW
compatible in order to play it (page 7).
• discs recorded with copy-once material cannot be played on non-CPRM
compatible players (page 36).
• When a copy-protected disc is played via a VCR, the picture will not display
correctly. Connect the recorder directly to your TV.
• Check that there is some remaining blank space on the DVD.
• Check that the disc isn’t already finalized.
• A DVD disc may contain up to 99 (Original) titles and 999 chapters. Check that
these limits have not been reached.
• Check that the source you are trying to record is not copy protected.
• For a VR formatted disc, check that the disc isn’t locked (page 53).
• This recorder cannot record NTSC signals.
• The power may have failed during recording.
• When setting the recording channel, make sure you set the recorder’s built-in TV
tuner, not the TV’s built-in tuner.
• When recording to a Video mode disc, programs that are copy-once protected
cannot be recorded. Use a VR mode formatted disc for copy-once material
(page 36).
• Two timer programs may have overlapped, in which case only the earlier one will
record completely.
• The power may have failed during recording.
• Reset the clock and other recorder settings to use the recorder again.
• The Child Lock is on; turn off in order to use the recorder (page 41).
• Press the front panel
switch back on and restart playback. If the power fails to switch off, press and hold
STANDBY/ON
TV Screen Size
STANDBY/ON
for 10 seconds until the power switches off.
setting (page 61) is correct for the kind of TV
button to switch the power off, then
64
En
• If the unit does not operate normally due to external effects such as static electricity, disconnect the power plug
from the outlet and insert again to return to normal operating conditions.
• If power to the recorder is cut (due to a power outage, the plug being pulled from the power outlet, etc.) during
recording, editing, initializing, finalizing, or other operation, some recorded material on the disc, or the disc itself,
may become unusable. In this case, try re-initializing the disc (DVD-RW only), or use a new disc. Pioneer is not
responsible for lost recordings, damaged discs or other losses in these cases.
Page 65

Additional information
Frequently asked questions
In this section you can find answers to frequently asked
questions on how to use your DVD recorder and what it
can do.
• What kind of discs can I use for recording?
You can use DVD-R and DVD-RW discs for recording.
DVD-RAM, CD-R and CD-RW discs are not
recordable using this recorder.
See
General disc compatibility
details.
• Can I watch recordings made using this recorder on
other DVD players?
Yes. Use a DVD-R disc for you recordings (these are
always recorded in Video mode). After recording,
finalize the disc to make it playable on other DVD
players (note that you cannot make further
recordings on the disc after finalizing it).
If you want to use a DVD-RW disc, make sure that it’s
initialized for recording in Video mode. As with a
DVD-R, finalize the disc after recording to make it
playable in other players.
See also
on page 42.
Playing your recordings on other DVD players
on page 7 for more
•I changed the batteries in the remote control and now
it doesn’t work!
Most likely the remote control ID does not match the
recorder. After changing the batteries, the remote ID
is reset to 1; if the recorder is set to something else,
the remote will not work with it.
See
Remote Control
of the recorder and the remote.
on page 52 for how to set the ID
09
• Can I edit recordings, or erase parts of recordings from
a disc?
Yes. Recording to a VR mode DVD-RW disc gives you
the most flexibility when editing. By default, when you
load a new DVD-RW disc into the recorder it is
initialized for recording in VR mode.
See also
• Can I play a VR mode DVD-RW disc in another DVD
player?
Look for the ‘RW Compatible’ mark on the other DVD
player to see if it will play VR mode DVD-RW discs. If
the player does not recognize the disc when you load
it, try finalizing it in the recorder, then try again.
See also
on page 42.
• Can I record a copy-once protected program from a
subscription satellite or cable channel?
Yes, but you’ll need to use a CPRM-compatible DVDRW disc initialized for VR mode recording. (Look on
the disc package to see if it is CPRM compatible.)
See also
Editing
on page 44.
Playing your recordings on other DVD players
CPRM
on page 36.
65
En
Page 66

09
Additional information
Time Zone list
Country / City
England / London GMT
Iceland / Reykjavik GMT
Ireland / Dublin GMT
Portugal / Lisbon GMT
Scotland / Glasgow GMT
Spain / Canary Islands GMT
Wales / Cardiff GMT
Austria / Vienna GMT +1:00
Belgium / Brussels GMT +1:00
Bosnia - Herzegovina / Sarajevo GMT +1:00
Croatia / Split GMT +1:00
Czech Republic / Prague GMT +1:00
Denmark / Copenhagen GMT +1:00
France / Paris GMT +1:00
Germany / Berlin GMT +1:00
Hungary / Budapest GMT +1:00
Italy / Rome GMT +1:00
Luxembourg / Luxembourg GMT +1:00
Macedonia / Skopje GMT +1:00
Malta / Valletta GMT +1:00
Netherlands / Amsterdam GMT +1:00
Norway / Oslo GMT +1:00
Poland / Warsaw GMT +1:00
Serbia and Montenegro / Belgrade GMT +1:00
Slovakia / Bratislava GMT +1:00
Slovenia / Ljubljana GMT +1:00
Spain / Madrid GMT +1:00
Sweden / Stockholm GMT +1:00
Switzerland / Geneva GMT +1:00
Belarus/Minsk GMT +2:00
Bulgaria / Sofia GMT +2:00
Cyprus / Nicosia GMT +2:00
Estonia / Tallinn GMT +2:00
Finland / Helsinki GMT +2:00
Greece / Athens GMT +2:00
Latvia / Riga GMT +2:00
Lithuania / Vilnius GMT +2:00
Time Zone
Country / City
Romania / Bucharest GMT +2:00
Russia / Kaliningrad GMT +2:00
South Africa / Johannesburg GMT +2:00
Turkey / Istanbul GMT +2:00
Ukraine / Kiev GMT +2:00
Georgia / Tbilisi GMT +3:00
Russia / Moscow GMT +3:00
Armenia / Jerevan GMT +4:00
Azerbaijan / Baku GMT +4:00
Russia / Samara GMT +4:00
Russia / Yekaterinburg GMT +5:00
Russia / Novosibirsk GMT +6:00
Russia / Omsk GMT +6:00
Russia / Krasnoyarsk GMT +7:00
Australia / Perth GMT +8:00
Russia / Irkutsk GMT +8:00
Russia / Yakutsk GMT +9:00
Australia / Adelaide GMT +9:30
Australia / Darwin GMT +9:30
Australia / Brisbane GMT +10:00
Australia / Hobart GMT +10:00
Australia / Melbourne GMT +10:00
Australia / Sydney GMT +10:00
Australia / Victoria GMT +10:00
Russia / Vladivostok GMT +10:00
New Caledonia / Noumea GMT +11:00
Russia / Magadan GMT +11:00
Fiji / Suva GMT +12:00
New Zealand / Wellington GMT +12:00
Russia / Kamchatka GMT +12:00
Marshall Islands / Eniwetok Atoll GMT +12:00
Marshall Islands / Kwajalein Atoll GMT +12:00
Samoa / Apia GMT –11:00
Time Zone
66
En
Page 67

Additional information
Language code list
Language (Language code letter),
Japanese (ja),
English (en),
French (fr),
German (de),
Italian (it),
Spanish (es),
Chinese (zh),
Dutch (nl),
Portuguese (pt),
Swedish (sv),
Russian (ru),
Korean (ko),
Greek (el),
Afar (aa),
Abkhazian (ab),
Afrikaans (af),
Amharic (am),
Arabic (ar),
Assamese (as),
Aymara (ay),
Azerbaijani (az),
Bashkir (ba),
Byelorussian (be),
Bulgarian (bg),
Bihari (bh),
Bislama (bi),
Bengali (bn),
Tibetan (bo),
Breton (br),
Catalan (ca),
Corsican (co),
Czech (cs),
Welsh (cy),
Danish (da),
1001
0514
0618
0405
0920
0519
2608
1412
1620
1922
1821
1115
0512
0101
0102
0106
0113
0118
0119
0125
0126
0201
0205
0207
0208
0209
0214
0215
0218
0301
0315
0319
0325
0401
Language code
Bhutani (dz),
Esperanto (eo),
Estonian (et),
Basque (eu),
Persian (fa),
Finnish (fi),
Fiji (fj),
Faroese (fo),
Frisian (fy),
Irish (ga),
Scots-Gaelic (gd),
Galician (gl),
Guarani (gn),
Gujarati (gu),
Hausa (ha),
Hindi (hi),
Croatian (hr),
Hungarian (hu),
Armenian (hy),
Interlingua (ia),
Interlingue (ie),
Inupiak (ik),
Indonesian (in),
Icelandic (is),
Hebrew (iw),
Yiddish (ji),
Javanese (jw),
Georgian (ka),
Kazakh (kk),
Greenlandic (kl),
Cambodian (km),
Kannada (kn),
Kashmiri (ks),
Kurdish (ku),
0610
0609
0625
0701
0801
0809
0911
1009
0426
0520
0521
0601
0615
0712
0714
0721
0818
0919
0923
1023
1101
1111
1114
1119
1121
0515
0821
0825
0901
0905
0914
1112
1113
0704
Kirghiz (ky),
Latin (la),
Lingala (ln),
Laothian (lo),
Lithuanian (lt),
Latvian (lv),
Malagasy (mg),
Maori (mi),
Macedonian (mk),
Malayalam (ml), 1312
Mongolian (mn), 1314
Moldavian (mo), 1315
Marathi (mr), 1318
Malay (ms), 1319
Maltese (mt), 1320
Burmese (my), 1325
Nauru (na), 1401
Nepali (ne), 1405
Norwegian (no), 1415
Occitan (oc), 1503
Oromo (om), 1513
Oriya (or), 1518
Panjabi (pa), 1601
Polish (pl), 1612
Pashto, Pushto (ps), 1619
Quechua (qu), 1721
Rhaeto-Romance (rm), 1813
Kirundi (rn), 1814
Romanian (ro), 1815
Kinyarwanda (rw), 1823
Sanskrit (sa), 1901
Sindhi (sd), 1904
Sangho (sg), 1907
Serbo-Croatian (sh), 1908
1125
1201
1214
1215
1220
1222
1307
1309
1311
09
Sinhalese (si), 1909
Slovak (sk), 1911
Slovenian (sl), 1912
Samoan (sm), 1913
Shona (sn), 1914
Somali (so), 1915
Albanian (sq), 1917
Serbian (sr), 1918
Siswati (ss), 1919
Sesotho (st), 1920
Sundanese (su), 1921
Swahili (sw), 1923
Tamil (ta), 2001
Telugu (te), 2005
Tajik (tg), 2007
Thai (th), 2008
Tigrinya (ti), 2009
Turkmen (tk), 2011
Tagalog (tl), 2012
Setswana (tn), 2014
Tonga (to), 2015
Turkish (tr), 2018
Tsonga (ts), 2019
Tatar (tt), 2020
Twi (tw), 2023
Ukrainian (uk), 2111
Urdu (ur), 2118
Uzbek (uz), 2126
Vietnamese (vi), 2209
Volapük (vo), 2215
Wolof (wo), 2315
Xhosa (xh), 2408
Yoruba (yo), 2515
Zulu (zu), 2621
Country/Area code list
Country/Area,
Argentina, 0118, ar
Australia, 0121, au
Austria, 0120, at
Belgium, 0205, be
Brazil, 0218, br
Canada, 0301, ca
Chile, 0312, cl
China, 0314, cn
Denmark, 0411, dk
Country/Area code, Country/Area code letter
Finland, 0609, fi
France, 0618, fr
Germany, 0405, de
Hong Kong, 0811, hk
India, 0914, in
Indonesia, 0904, id
Italy, 0920, it
Japan, 1016, jp
Korea, Republic of, 1118, kr
Malaysia, 1325, my
Mexico, 1324, mx
Netherlands, 1412, nl
New Zealand, 1426, nz
Norway, 1415, no
Pakistan, 1611, pk
Philippines, 1608, ph
Portugal, 1620, pt
Russian Federation, 1821, ru
Singapore, 1907, sg
Spain, 0519, es
Sweden, 1905, se
Switzerland, 0308, ch
Taiwan, 2023, tw
Thailand, 2008, th
United Kingdom, 0702, gb
USA, 2119, us
67
En
Page 68

09
Additional information
On-screen displays and recorder displays
The table below shows a list of error messages that you may encounter when using the recorder and an explanation
of their meaning.
Message
• Initializing disc. Please wait a moment.
• Incompatible region number.
• Cannot record any more titles.
• No more space for file management data.
• Cannot add any more chapter marks.
• This disc cannot be recorded. Undo the finalization.
• Cannot play this disc.
• This disc cannot be recorded.
• Cannot read the CPRM information.
• Could not record the information to the disc.
• Cannot edit.
• Could not initialize disc.
• Could not complete finalization successfully.
• Could not undo finalization successfully.
• Could not successfully unlock the disc.
• Incompatible or unreadable disc.
• Cannot record to a disc that is not CPRM compatible.
• Cannot record this content using Video mode
recording.
• This content is copy protected.
• Incorrect CPRM information.
• The audio will conform to the [Bilingual
Recording] setting.
• Operation stopped due to power failure.
• Repairing disc.
• Could not repair the disc.
• Overheating has stopped operation.
Press DISPLAY to clear this message.
Explanation/Action
When you load a blank DVD-RW disc, the recorder automatically
initializes it.
The disc loaded has an incompatible region number for the
recorder and so will not play.
The disc control data limit has been reached, or the maximum
number of chapters and/or titles has been reached. Erase titles/
chapters or combine chapters.
The disc was finalized on a non-Pioneer DVD recorder. Undo the
finalization in order to recording/editing.
The disc may be dirty or damaged. Take out the disc, clean it and
retry. If the error persists, use a new disc. If the error appears even
with a new disc, please consult a Pioneer Service Center.
The disc loaded is a DVD-RAM, DVD+R/RW or some other
incompatible disc type. This display may also appear if the disc is
dirty or damaged.
The video source is copy-once protected. Use a VR mode DVD-RW
disc with CPRM for recording.
The video source is copy-protected and cannot be recorded.
The recorder could not read the CPRM information. The recorder
may be damaged—please consult a Pioneer Service Center.
When recording from an external input in Video mode, or in VR
mode set to
both.
If during recording the power plug is disconnected from the power
outlet, this message will be displayed the next time the recorder is
switched on. In this case, the recording will not be recoverable.
This message is displayed when, due to damage or recording
conditions, the recorder attempts to repair a disc.
The recorder was unable to repair the disc.
The internal temperature of the recorder has exceeded the
operating limit. If this message reappears, please contact a
Pioneer authorized service center.
XP
, you can only record the left or right channel; not
68
En
Page 69

Additional information
09
Handling discs
When holding discs of any type, take care not to leave
fingerprints, dirt or scratches on the disc surface. Hold
the disc by its edge or by the center hole and edge.
Damaged or dirty discs can affect playback and
recording performance. Take care also not to scratch the
label side of the disc. Although not as fragile as the
recorded side, scratches can still result in a disc
becoming unusable.
Should a disc become marked with fingerprints, dust,
etc., clean using a soft, dry cloth, wiping the disc lightly
from the center to the outside edge as shown in the
diagram below.
If necessary, use a cloth soaked in alcohol, or a
commercially available CD/DVD cleaning kit to clean a
disc more thoroughly. Never use benzine, thinner or
other cleaning agents, including products designed for
cleaning vinyl records.
Storing discs
Although CDs and DVD discs are more durable than vinyl
records, you should still take care to handle and store
discs correctly. When you're not using a disc, return it to
its case and store upright. Avoid leaving discs in
excessively cold, humid, or hot environments (including
under direct sunlight).
Don't glue paper or put stickers onto the disc, or use a
pencil, ball-point pen or other sharp-tipped writing
instrument. These could all damage the disc.
For more detailed care information see the instructions
that come with discs.
Do not load more than one disc into the recorder.
Damaged discs
Discs spin at high speed inside the recorder. If you can
see that a disc is cracked, chipped, warped, or otherwise
damaged, don't risk using it; you could end up damaging
the recorder.
This recorder is designed for use with conventional, fully
circular discs only. Use of shaped discs is not
recommended for this product. Pioneer disclaims all
liability arising in connection with the use of shaped
discs.
Cleaning the pickup lens
The DVD recorder’s lens should not become dirty in
normal use, but if for some reason it should malfunction
due to dust or dirt, consult your nearest Pioneerauthorized service center. Although lens cleaners for CD
players are commercially available, we do not
recommend using them since some may damage the
lens.
Condensation
Condensation may form inside the recorder if it is
brought into a warm room from outside, or if the
temperature of the room rises quickly. Although the
condensation won’t damage the recorder, it may
temporarily impair its performance. For this reason you
should leave it to adjust to the warmer temperature for
about an hour before switching on and using.
69
En
Page 70

09
Additional information
Hints on installation
We want you to enjoy using this unit for years to come, so
please bear in mind the following points when choosing
a suitable location for it:
do...
Use in a well-ventilated room.
Place on a solid, flat, level surface, such as a table,
shelf or stereo rack.
don’t...
Use in a place exposed to high temperatures or
humidity, including near radiators and other heatgenerating appliances.
Place on a window sill or other place where the
recorder will be exposed to direct sunlight.
Use in a dusty or damp environment or in a room
where it will be exposed to excessive cigarette smoke.
Place directly on top of an amplifier, or other
component in your stereo system that becomes hot in
use.
Use near a television or monitor as you may
experience interference—especially if the television uses
an indoor antenna.
Use in a kitchen or other room where the recorder
may be exposed to smoke or steam.
Use on a thick rug or carpet, or cover with cloth—this
may prevent proper cooling of the unit.
Place on an unstable surface, or one that is not large
enough to support all four of the unit’s feet.
Glossary
Analog audio
An electrical signal that directly represents sound.
Compare this to digital audio which can be an electrical
signal, but is an indirect representation of sound. See
also
digital audio
Aspect ratio
The width of a TV screen relative to its height.
Conventional TVs are 4:3 (in other words, the screen is
almost square); widescreen models are 16:9 (the screen
is almost twice as wide as it is high).
Chapter
Just as a book is split up into several chapters, a title on
a DVD disc is usually divided into chapters. See also
Digital audio
An indirect representation of sound by numbers. during
recording, the sound is measured at discrete intervals
(44,100 times a second for CD audio) by an analog-todigital converter, generating a stream of numbers. On
playback, a digital-to-analog converter generates an
analog signal based on these numbers. See also
Sampling frequency
Dolby Digital
.
and
Analog audio
Title
.
.
Moving the recorder
If you need to move the recorder, first remove the disc, if
there’s one loaded, and close the disc tray. Next, press
STANDBY/ON
that the
disconnect the power cord. Never lift or move the unit
during playback or recording—discs rotate at a high
speed and may be damaged.
to switch the power to standby, checking
OFF
indication in the display goes off. Lastly,
Resetting the recorder
If you need to, you can reset the recorder to all its factory
settings.
1 Make sure that the recorder is on.
2 Press and hold
The recorder turns off with all settings reset.
70
En
and press STANDBY/ON.
Dolby® Digital Recording enables consumers to record
high-quality video with stereo sound on recordable DVD
discs. The technology, when utilized instead of PCM
recording, also saves recordable disc space, allowing for
higher video resolution or extended recording time on
each DVD. DVDs created using Dolby Digital Recording
will play back on all DVD-Video players.
Manufactured under license from Dolby Laboratories.
“Dolby” and the double-D symbol are trademarks of Dolby
Laboratories.
DTS
DTS stands for Digital Theater System. DTS is a surround
system different from Dolby Digital that has become a
popular surround sound format for movies.
“DTS” and “DTS Digital Out” are registered trademarks of
digital Theater Systems, Inc.
Page 71

Additional information
09
Dynamic range
The difference between the quietest and loudest sounds
possible in an audio signal (without distorting or getting
lost in noise). Dolby Digital and DTS soundtracks are
capable of a wide dynamic range, delivering dramatic
cinema-like effects.
File extension
A tag added to the end of a filename to indicate the type
of file. For example, “.mp3” indicates an MP3 file.
ISO 9660 format
International standard for the volume and file structure of
CD-ROM discs.
MP3
MP3 (MPEG1 audio layer 3) is a compressed audio file
format. Files are recognized by their file extension “.mp3”
or “.MP3”.
MPEG audio
An audio format used on Video CDs and some DVD
discs. This unit can convert MPEG audio to PCM format
for wider compatibility with digital recorders and AV
amp/receivers. See also
PCM
.
MPEG video
The video format used for Video CDs and DVDs. Video CD
uses the older MPEG-1 standard, while DVD uses the
newer and much better quality MPEG-2 standard.
PureCinema
DVD-Video may be either video material (originally shot
on video) or film material (originally shot film). Video
material has a frame rate of 30 frames per second (fps)
(NTSC) or 25 fps (PAL), compared with film’s 24 fps. This
recorder converts film material to 50 fps (in progressive
scan mode) for 625 progressive scan output.
Regions (DVD only)
ALL
2
(example region code marks)
Regions associate discs and players with particular
areas of the world. This unit will only play discs that have
compatible region codes. You can find the region code of
your unit by looking on the rear panel. Some discs are
compatible with more than one region (or all regions).
Sampling frequency
The rate at which sound is measured to be turned into
digital audio data. The higher the rate, the better the
sound quality, but the more digital information is
generated. Standard CD audio has a sampling frequency
of 44.1kHz, which means 44,100 samples
(measurements) per second. See also
Digital audio
.
Title
A collection of chapters on a DVD disc. See also
Chapter
Track
Audio CDs and Video CDs use tracks to divide up the
content of a disc. The DVD equivalent is called a chapter.
See also
Chapter
.
.
PCM (Pulse Code Modulation)
The most common system of encoding digital audio,
found on CDs and DAT. Excellent quality, but requires a
lot of data compared to formats such as Dolby Digital
and MPEG audio. For compatibility with digital audio
recorders (CD, MD and DAT) and AV amp/receivers with
digital inputs, this unit can convert Dolby Digital and
MPEG audio to PCM. See also
Digital audio
.
PBC (PlayBack Control) (Video CD only)
A system of navigating a Video CD through on-screen
menus recorded onto the disc. Especially good for discs
that you would normally not watch from beginning to end
all at once—karaoke discs, for example.
Progressive scan video
Also called non-interlaced video, this method of
displaying a picture updates all the lines in one pass,
resulting in a more stable, flicker-free image than
interlaced video (for a given scanning rate).
71
En
Page 72

09
Additional information
Specifications
General
System . . . . . . . . . . . . . . . . . . . . . . .DVD-Video, DVD-R/RW,
Power requirements . . . . . . . . . . . . . . .220–240 V, 50/60 Hz
Power Consumption . . . . . . . . . . . . . . . . . . . . . . . . . . . 25 W
Power consumption in standby mode . . . . . . . . . . . . . 0.6 W
Weight. . . . . . . . . . . . . . . . . . . . . . . . . . . . . . . . . . . . . . 3.3 kg
Dimensions . . . . . . . . . . . . . 420 (W) x 69 (H) x 333 (D) mm
Operating temperature . . . . . . . . . . . . . . . . . +5°C to +35°C
Operating humidity . . . . . . . . . . . . . . . . . . . . . . . . 5% to 85%
TV system . . . . . . . . . . . . . . . . . . . . . . . . . . . . . . PAL/SECAM
Video-CD, CD, CD-R/RW (MP3, CD-DA)
(Front panel display: off, Power Save: Mode 2)
(no condensation)
Tuner
Receivable channels
PAL B/G PAL I
VHF (low)
VHF (high)
Hyper
UHF
VHF (low)
VHF (high)
Frequency
47 - 89 MHz
104 - 300 MHz
302 - 470 MHz
470 - 862 MHz
SECAM L SECAM D/K
Frequency
49 - 65 MHz
104 - 300 MHz
Channel
E2 - E4
X - Z
E5 - E12
S1 - S20
M1 - M10
U1 - U10
S21 - S41
E21 - E69
Channel
2 - 4
5 - 10
B - Q
Frequency
44 - 89 MHz
104 - 300 MHz
302 - 470 MHz
470 - 862 MHz
Frequency
49 - 94 MHz
104 - 300 MHz
Channel
A - C
X - Z
D - J
11, 13
S1 - S20
S21 - S41
E21 - E69
Channel
R1 - R5
R6 - R12
S1 - S20
Recording
Recording format . . . . . . . . . . . . . . . . DVD Video Recording
Recordable discs
DVD-RW (DVD Re-recordable disc)
DVD-R (DVD Recordable disc)
Video recording format
Sampling frequency. . . . . . . . . . . . . . . . . . . . . . . . . 13.5MHz
Compression format . . . . . . . . . . . . . . . . . . . . . . . . . . MPEG
Audio recording format
Sampling frequency. . . . . . . . . . . . . . . . . . . . . . . . . . . .48kHz
Compression format . . . . . . . . Dolby Digital or Linear PCM
Recording time
XP (XP) . . . . . . . . . . . . . . . . . . . . . . . . . . . . . . Approx. 1 hour
Standard Play (SP). . . . . . . . . . . . . . . . . . . . Approx. 2 hours
Long Play (LP). . . . . . . . . . . . . . . . . . . . . . . . Approx. 4 hours
Extended Play (EP). . . . . . . . . . . . . . . . . . . . Approx. 6 hours
Super Long Play (SLP). . . . . . . . . . . . . . . . . Approx. 8 hours
Super Extended Play (SEP) . . . Approx. 10 hours (VR mode)
Aprrox. 12 hours (Video mode)
72
En
DVD-VIDEO
(uncompressed)
Hyper
UHF
STEREO
B/G - A2
I - NICAM
L - NICAM
B/G - NICAM
D/K - NICAM
300 - 470 MHz
470 - 862 MHz
S21 - S41
21 - 69
302 - 470 MHz
470 - 862 MHz
S21 - S41
E21 - E69
Timer
Programs . . . . . . . . . . . . . . . . . . . . . . . 1 month/32 programs
Clock . . . . . . . Quartz lock (24-hour/24-hour digital display)
Input/Output
VHF/UHF antenna input/output terminal . . . . VHF/UHF set
Video input. . . . . . . . . . . . . . . . . . . . . Input 1 (rear), 2 (front)
Input level . . . . . . . . . . . . . . . . . . . . . . . . . . . . . 1 Vp-p (75 Ω)
Jacks . . . . . . . . . . . . . . . . . . . . . . . .AV connector 2 (input 1)
Video output . . . . . . . . . . . . . . . . . . . . . . . . . . . . AV1/Output
Output level . . . . . . . . . . . . . . . . . . . . . . . . . . . 1 Vp-p (75 Ω)
Jacks . . . . . . . . . . . . . . . . . . . . . . . . . . AV connector 1 (AV1)
S-Video input . . . . . . . . . . . . . . . . . . . . . . . . . . . . . . . . Input 1
Y (luminance) - Input level. . . . . . . . . . . . . . . . 1 Vp-p (75 Ω)
C (color) - Input level . . . . . . . . . . . . . . . . .286 mVp-p (75 Ω)
Jacks . . . . . . . . . . . . . . . . . . . . . . . . . . . . . . AV connector 2
S-Video output. . . . . . . . . . . . . . . . . . . . . . . . . . AV1 / Output
Y (luminance) - Output level . . . . . . . . . . . . . . 1 Vp-p (75 Ω)
C (color) - Output level. . . . . . . . . . . . . . . .286 mVp-p (75 Ω)
Jacks . . . . . . . . . . . .AV connector 1 (AV1), 4 pin mini DIN
Component video output
Output level . . . . . . . . . . . . . . . . . . . . . . . . Y: 1.0 Vp-p (75 Ω)
Jacks . . . . . . . . . . . . . . . . . . . . . . . . . . . . . . . . . . .RCA jacks
Audio input . . . . . . . . . . . . . . . . . Input 1 (rear), 2 (front) L/R
Input level
During audio input. . . . . . . . . . . . . . . . . . . . . . . . . . . 2V rms
(Input impedance: more than 22 kΩ)
Jacks . . . . . . . . . . . . . . . . . . . . AV connector 2, RCA jacks
75 Ω (IEC connector)
RCA jack (input 2)
RCA jack (Output)
PB, PR: 0.7 Vp-p (75 Ω)
Page 73

Additional information
RGB output
Output level . . . . . . . . . . . . . . . . . . . . . . . . . . 0.7 Vp-p (75 Ω)
Jacks . . . . . . . . . . . . . . . . . . . . . . . . . . AV connector 1 (AV1)
Audio output . . . . . . . . . . . . . . . . . . . . . . . . . . . . AV1 Output
During audio output. . . . . . . . . . . . . . . . . . . . . . . . . . 2V rms
(Output impedance: less than 1.5 kΩ)
Jacks . . . . . . . . . . . . . . . . AV connector 1 (AV1), RCA jacks
Digital Audio output . . . . . . . . . . . . Coaxial digital output 1
Jacks . . . . . . . . . . . . . . . . . . . . . . . . . . . . . . . . . . . RCA jacks
AV Connectors (21-pin connector assignment)
AV connector input/output . . . . . . . . . . . . .21-pin connector
This connector provides the video and audio signals for
connection to a compatible color TV or monitor.
PIN no. AV1(RGB)-TV / AV2(INPUT 1)
1. . . . . . . . . . . . . . . . . . . . . . . . Audio 2/R out / Audio 2/R out
2. . . . . . . . . . . . . . . . . . . . . . . . . . . . . . . . . . . – / Audio 2/R in
11 . . . . . . . . . . . . . . . . . . . . . . . . . . . . . . . . . . . . . . . G out / –
3. . . . . . . . . . . . . . . . . . . . . . . . .Audio 1/L out / Audio 1/L out
6. . . . . . . . . . . . . . . . . . . . . . . . . . . . . . . . . . . – / Audio 1/L in
15 . . . . . . . . . . . . . . . . . . . . . . . . . . . . . . . . . R or C out / C in
4. . . . . . . . . . . . . . . . . . . . . . . . . . . . . . . . . . . . . . . . . . . . . GND
17. . . . . . . . . . . . . . . . . . . . . . . . . . . . . . . . . . . . . . . . . . . . GND
7 . . . . . . . . . . . . . . . . . . . . . . . . . . . . . . . . . . . . . . . . B out / –
19. . . . . . . . . . . . . . . . . . . . . . . Video out or Y out / Video out
20. . . . . . . . . . . . . . . . . . . . . . . . . . . . . . . . . – / Video in or Y in
8. . . . . . . . . . . . . . . . . . . . . . . . . . . . . . . . . . . . . . . . . . . Status
21. . . . . . . . . . . . . . . . . . . . . . . . . . . . . . . . . . . . . . . . . . . . GND
09
Supplied accessories
Remote control . . . . . . . . . . . . . . . . . . . . . . . . . . . . . . . . . . . 1
dry cell batteries (AA/R6P) . . . . . . . . . . . . . . . . . . . . . . . . . . 2
Audio / Video cable (red/white/yellow) . . . . . . . . . . . . . . . . 1
RF antenna cable. . . . . . . . . . . . . . . . . . . . . . . . . . . . . . . . . . 1
Power cable . . . . . . . . . . . . . . . . . . . . . . . . . . . . . . . . . . . . . . 1
Warranty card . . . . . . . . . . . . . . . . . . . . . . . . . . . . . . . . . . . . 1
Operating Instructions
Note: The specifications and design of this product are subject
to change without notice, due to improvement.
Published by Pioneer Corporation.
Copyright © 2005 Pioneer Corporation.
All rights reserved.
73
En
Page 74

Index
Index
A
Audio
digital output settings
input settings
setting preferences for audio language
switching on playback
Auto Scan - see Automatic channel setup
Automatic channel setup
AV amplifier (connecting to)
AV connector
56
9, 11 – 15, 50, 53, 54,
57
33,
20,
34
49
16
73
B
Bilingual audio
18, 23, 34, 35, 37,
57
C
CD Audio
compatibility
playback controls for
Component video
7
12
25, 28 –
34
D
Dolby Digital
34
25,
58
46
57
56
adjusting the dynamic range
dual mono sources and
explained
output setting
Downloading channel presets from the TV
DTS
CD audio encoded with
explained
output setting
DVD
aspect ratios
compatibility
DVD-R vs. DVD-RW
finalizing
initializing a DVD-RW
playback controls for
Video mode vs. VR mode 8, 35, 44
70
70
61,
7, 42,
8, 42,
57
57
62
64
7, 35,
53
43,
25, 28 – 34
E
Editing 44 – 47
Video mode vs. VR mode 44
60
10, 20,
L
Language
audio
33, 60
code list 67
DVD menu 60
setting for menus and displays (OSD) 20, 51
settings for DVD playback 60
subtitle 33, 60
M
Manual channel setup 21, 50
MP3 audio 7, 71
N
NICAM audio 23
P
PAL 35, 49
Picture quality
recording time vs.
setting for playback 55
setting for recording 36
Playback 24 – 34
on-screen displays 27
parental lock for DVD-Video 58
picture quality settings for 55
50
settings 58
R
Recording 35 – 43
automatic chapter marking 58
copy-protection and 36
copyright and 36
on-screen displays 27
optimized 57
settings 57
timer programs 38 – 41
TV programs 22, 37, 38, 39
using an external input 41, 56
Video mode vs. VR mode 35
Remote control
buttons explained
changing the batteries 6
operating range 6
35
19
74
En
Page 75

Index
S
SCART - see AV connector
SECAM
35, 49
Subtitles
setting preferences for
switching
33
T
Timer recording
TV audio channel
TV channels
changing
manual setting
recording
10,
14
37,
23
50
22, 37, 38,
57
39
V
Video CD
compatibility
playback control (PBC)
playback controls for
VIDEO Plus+ system
VR mode
7
25, 28 –
39
5,
37
60
25,
61
34
75
En
Page 76

If you want to dispose this product, do not mix it with general household waste. There is a separate collection system for used
electronic products in accordance with legislation that requires proper treatment, recovery and recycling.
Private households in the 25 member states of the EU, in Switzerland and Norway may return their used electronic products free of charge to
designated collection facilities or to a retailer (if you purchase a similar new one).
For countries not mentioned above, please contact your local authorities for the correct method of disposal.
By doing so you will ensure that your disposed product undergoes the necessary treatment, recovery and recycling and thus prevent potential
negative effects on the environment and human health.
Published by Pioneer Corporation.
Copyright © 2005 Pioneer Corporation.
All rights reserved.
PIONEER CORPORATION
4-1, Meguro 1-Chome, Meguro-ku, Tokyo 153-8654, Japan
PIONEER ELECTRONICS (USA) INC.
P.O. BOX 1540, Long Beach, California 90810-1540, U.S.A. TEL: (800) 421-1404
PIONEER ELECTRONICS OF CANADA, INC.
300 Allstate Parkway, Markham, Ontario L3R OP2, Canada TEL: 1-877-283-5901
PIONEER EUROPE NV
Haven 1087, Keetberglaan 1, B-9120 Melsele, Belgium TEL: 03/570.05.11
PIONEER ELECTRONICS ASIACENTRE PTE. LTD.
253 Alexandra Road, #04-01, Singapore 159936 TEL: 65-6472-7555
PIONEER ELECTRONICS AUSTRALIA PTY. LTD.
178-184 Boundary Road, Braeside, Victoria 3195, Australia, TEL: (03) 9586-6300
PIONEER ELECTRONICS DE MEXICO S.A. DE C.V.
Blvd.Manuel Avila Camacho 138 10 piso Col.Lomas de Chapultepec, Mexico,D.F. 11000 TEL: 55-9178-4270
K002_A_En
-
 Loading...