

DVD Player
Lettore per DVD
DV-454
DV-350
Operating Instructions
Istruzioni per l’uso
IMPORTANT
The lightning flash with arrowhead
symbol, within an equilateral triangle, is
intended to alert the user to the presence
of uninsulated “dangerous voltage”
within the product’s enclosure that may
be of sufficient magnitude to constitute
a risk of electric shock to persons.
CAUTION
RISK OF ELECTRIC SHOCK
DO NOT OPEN
CAUTION:
TO PREVENT THE RISK OF ELECTRIC
SHOCK, DO NOT REMOVE COVER (OR
BACK). NO USER-SERVICEABLE PARTS
INSIDE. REFER SERVICING TO QUALIFIED
SERVICE PERSONNEL.
The exclamation point within an
equilateral triangle is intended to alert
the user to the presence of important
operating and maintenance (servicing)
instructions in the literature
accompanying the appliance.
H002_En
CAUTION
This product contains a laser diode of higher class
than 1. To ensure continued safety, do not remove
any covers or attempt to gain access to the inside of
the product.
Refer all servicing to qualified personnel.
The following caution label appears on your unit.
Location: rear of the unit
CLASS 1
LASER PRODUCT
H018A_En
WARNING: THE APPARATUS IS NOT WATER-
PROOFS, TO PREVENT FIRE OR SHOCK HAZARD, DO
NOT EXPOSE THIS APPARATUS TO RAIN OR MOISTURE AND DO NOT PUT ANY WATER SOURCE NEAR
THIS APPARATUS, SUCH AS VASE, FLOWER POT, COSMETICS CONTAINER AND MEDICINE BOTTLE ETC.
On the top of the player
H001A_En
This product complies with the Low Voltage Directive
(73/23/EEC, amended by 93/68/EEC), EMC Directives
(89/336/EEC, amended by 92/31/EEC and 93/68/EEC).
CAUTION: THE STANDBY/ON BUTTON IS
SECONDARY CONNECTED AND THEREFORE DOES
NOT SEPARATE THE UNIT FROM MAINS POWER IN
STANDBY POSITION. THEREFORE INSTALL THE
UNIT SUITABLE PLACES EASY TO DISCONNECT
THE MAINS PLUG IN CASE OF THE ACCIDENT. THE
MAINS PLUG OF UNIT SHOULD BE UNPLUGGED
FROM THE WALL SOCKET WHEN LEFT UNUSED
FOR A LONG PERIOD OF TIME. H017B_En
H015A_En
WARNING: Slot and openings in the cabinet
are provided for ventilation and to ensure reliable operation of the product and to protect it from overheating, to prevent fire hazard, the openings should never
be blocked and covered with items, such as newspapers, table-cloths, curtains, etc. Also do not put the apparatus on the thick carpet, bed, sofa, or fabric having a
thick pile.
H040_En

WARNING: BEFORE PLUGGING IN THE UNIT
FOR THE FIRST TIME, READ THE FOLLOWING SECTION
CAREFULLY. THE VOLTAGE OF THE AVAILABLE POWER
SUPPLY DIFFERS ACCORDING TO COUNTRY OR REGION. BE SURE THAT THE POWER SUPPLY VOLTAGE
OF THE AREA WHERE THIS UNIT WILL BE USED MEETS
THE REQUIRED VOLTAGE (E.G., 230V OR 120V) WRITTEN ON THE REAR PANEL.
WARNING: NO NAKED FLAME SOURCES,
SUCH AS LIGHTED CANDLE, SHOULD BE PLACED ON
THE APPARATUS. IF NAKED FLAME SOURCES ACCIDENTALLY FALL DOWN, FIRE SPREAD OVER THE APPARATUS THEN MAY CAUSE FIRE.
H041A_En
H044_En
OPERATING ENVIRONMENT
Operating environment temperature and humidity:
+5°C – +35°C (+41°F – +95°F); less than 85%RH (cooling
vents not blocked)
Do not install in the following locations
÷ Location exposed to direct sunlight or strong artificial light
÷ Location exposed to high humidity, or poorly ventilated
location
When disposing of used batteries, please comply with
governmental regulations or environmental public
instruction’s rules that apply in your country or area.
H045_En
H048_En
This product is for general household purposes. Any
failure due to use for other than household purposes
(such as long-term use for business purposes in a restaurant or use in a car or ship) and which requires repair
will be charged for even during the warranty period.
This product incorporates copyright protection
technology that is protected by method claims of
certain U.S. patents and other intellectual property
rights owned by Macrovision Corporation and other
rights owners. Use of this copyright protection
technology must be authorized by Macrovision
Corporation, and is intended for home and other
limited viewing uses only unless otherwise
authorized by Macrovision Corporation. Reverse
engineering or disassembly is prohibited.
K041_En
This product includes FontAvenue® fonts
licenced by NEC corporation. FontAvenue is a
registered trademark of NEC Corporation.

Contents
Thank you for buying this Pioneer product.
Please read through these operating instructions so you will know how to
operate your model properly. After you have finished reading the instructions, put
them away in a safe place for future reference.
01 Before You Start
Features .............................................................. 6
What’s in the box ............................................... 7
Putting the batteries in the remote control ..... 7
Using the remote control .................................. 7
Discs compatible with this player ....................8
CD-R/RW compatibility ................................8
DVD-R/RW compatibility ............................. 8
MP3 compatibility ......................................... 8
Titles, chapters and tracks ........................... 9
DVD-Video regions........................................ 9
02 Connecting Up
Rear panel connections ................................. 10
Easy connections ............................................ 11
Connecting using the S-Video output ........... 12
Connecting using the AV connector output ......
Connecting to an AV receiver ........................ 13
12
03 Controls and Displays
Front panel ........................................................ 15
Display ............................................................. 16
Remote control ................................................ 17
04 Getting Started
Switching on .................................................... 19
Let’s Get Started ......................................... 19
Using the on-screen displays ......................... 20
Setting up with the Setup Navigator .............. 21
Playing discs ................................................... 23
Basic playback controls ............................ 24
Front panel controls .................................. 25
DVD-Video disc menus ............................. 25
Video CD PBC menus ................................ 26
05 Playing Discs
Introduction ..................................................... 27
Using the Disc Navigator to browse
the contents of a disc ..................................... 27
Scanning discs ................................................ 28
Playing in slow motion .................................... 28
Frame advance/frame reverse ....................... 28
Looping a section of a disc ............................ 29
Using repeat play ............................................ 29
Using random play .......................................... 30
Creating a program list .................................... 31
Editing a program list ................................. 33
Other functions available
from the program menu ............................ 33
Searching a disc .............................................. 34
Switching subtitles ..........................................34
Switching DVD audio language ...................... 34
Switching audio channel when
playing a Video CD .......................................... 35
Zooming the screen .........................................35
Switching camera angles ................................ 35
Displaying disc information ............................36
4
En

Contents
English
06 The Audio Settings Menu
Audio DRC ........................................................37
Virtual Surround ...............................................37
07 The Initial Settings Menu
Using the Initial Settings menu ......................39
Digital Audio Out settings .............................. 39
Digital Out ...................................................39
Dolby Digital Out ....................................... 39
DTS Out ....................................................... 40
96kHz PCM Out ..........................................40
MPEG Out ................................................... 40
Video Output settings ..................................... 41
TV Screen ................................................... 41
AV Connector Out ...................................... 41
S-Video Out................................................. 41
Language settings .......................................... 42
Audio Language ......................................... 42
Subtitle Language ..................................... 42
DVD Menu Language .................................43
Subtitle Display .......................................... 43
Display settings ............................................... 43
OSD Language ........................................... 43
On Screen Display ..................................... 43
Angle Indicator .......................................... 44
Options ............................................................. 44
Parental Lock ..............................................44
Registering a new password ............... 44
Changing your password .................... 45
Setting/changing the
Parental Lock level ................................45
Setting/changing the Country Code ... 46
08 Additional Information
Taking care of your player and discs .............. 47
Handling discs ........................................... 47
Storing discs ...............................................47
Discs to avoid .............................................. 47
Cleaning the pickup lens ........................... 48
Problems with condensation .................... 48
Hints on installation .................................. 48
Moving the player ...................................... 48
Power cord caution .................................... 48
Screen sizes and disc formats ....................... 49
Widescreen TV users ................................. 49
Standard TV users ..................................... 49
Resetting the player .........................................49
Language code list .......................................... 50
Country code list .............................................. 50
Selecting languages using the
language code list ........................................... 51
Glossary ............................................................ 51
Setting the TV system ..................................... 53
Watching NTSC on a PAL TV
(MOD. PAL) ................................................ 53
Specifications ...................................................54
5
En
Before You Start01
Features
24-bit/192kHz compatible DAC
This player is fully compatible with high
sampling-rate discs, capable of delivering
better-than-CD sound quality in terms of
dynamic range, low-level resolution and
high-frequency detail.
Excellent audio performance with
Dolby*1 Digital and DTS*2 software
Logos: 1
When connected to a suitable AV amplifier
or receiver, this player gives great surround
sound with Dolby Digital and DTS discs.
TruSurround*3 and Virtual Dolby
Digital
Logo:
TruSurround/Virtual Dolby Digital creates a
realistic surround-sound effect from any
Dolby Digital source using just two speakers
(see page 37).
Picture zoom
While a DVD or Video CD is playing, you can
zoom in on any part of the picture at up to 4x
magnification for a closer look (see page
35).
MP3 compatibility
This player is compatible with CD-R, CD-RW
and CD-ROM discs that contain MP3 audio
tracks (see page 8).
Graphical on-screen displays
Setting up and using your DVD player is
made very easy using the graphical onscreen displays.
Energy saving design
This player features an auto power-off
function. If the player is not used for over 30
minutes, it automatically switches itself into
standby.
This unit is designed to use 0.3 W of power
when in standby mode.
*1 Manufactured under license from Dolby
Laboratories. “Dolby” and the double-D
symbol are trademarks of Dolby Laboratories.
*2 “DTS” is a registered trademark of Digital
Theater Systems, Inc.
*3 TruSurround and the
trademarks of SRS Labs, Inc. TruSurround
technology is incorporated under license from
SRS Labs, Inc.
® symbol are
6
En
Before You Start
01
What’s in the box
Please confirm that the following accessories are in the box when you open it.
• Remote control
• AA/R6P dry cell batteries x2
• Audio/video cable (red/white/yellow
plugs)
• Power cable
• These operating instructions
• Warranty card
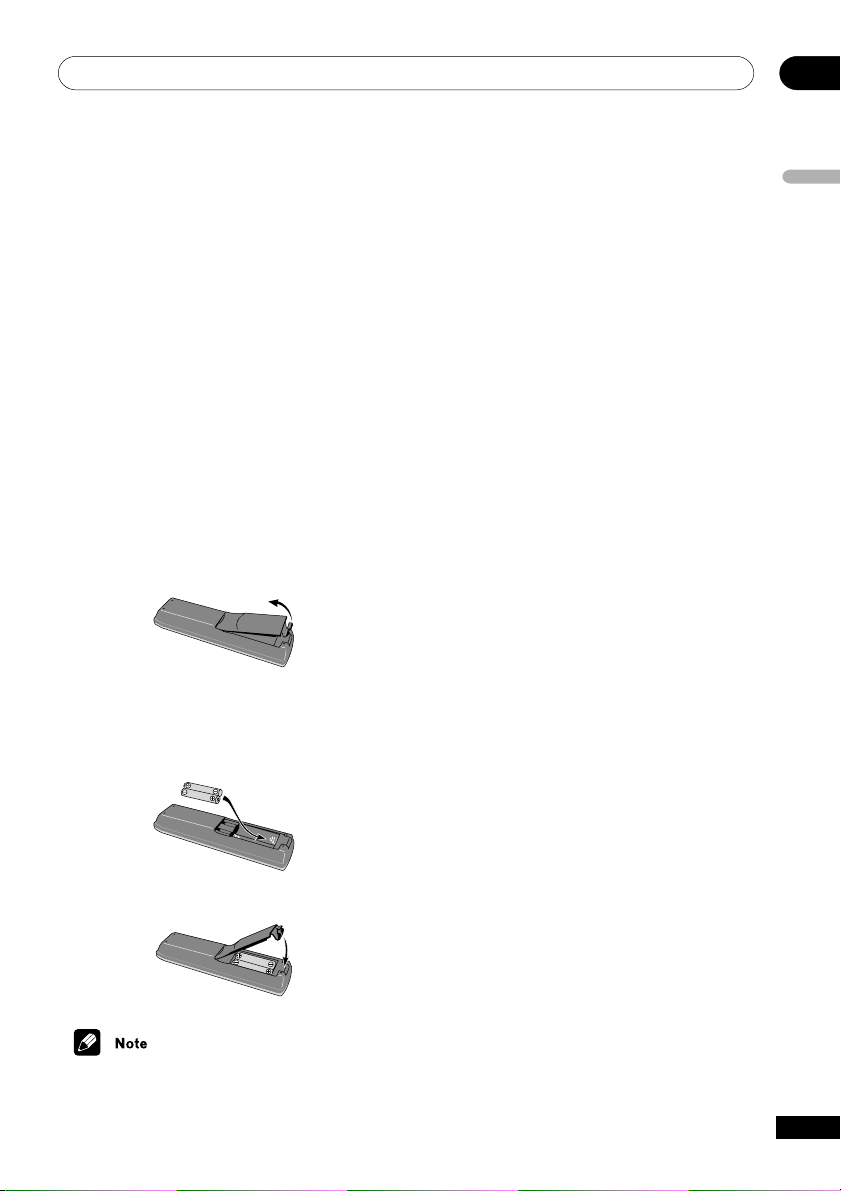
Putting the batteries in the
remote control
1 Open the battery compartment cover
on the back of the remote control.
2 Insert two AA/R6P batteries into the
battery compartment following the
indications (ª, ·) inside the compartment.
3 Close the cover.
• Don’t mix new and old batteries
English
together.
• Don’t use different kinds of battery
together—although they may look
similar, different batteries may have
different voltages.
• Make sure that the plus and minus ends
of each battery match the indications in
the battery compartment.
• Remove batteries from equipment that
isn’t going to be used for a month or
more.
• When disposing of used batteries,
please comply with governmental
regulations or environmental public
instruction’s rules that apply in your
country or area.
H048 En
Using the remote control
Keep in mind the following when using the
remote control:
• Make sure that there are no obstacles
between the remote and the remote
sensor on the unit.
• The remote has a range of about 7
meters.
• Remote operation may become unreliable if strong sunlight or fluorescent
light is shining on the unit’s remote
sensor.
• Remote controllers for different devices
can interfere with each other. Avoid
using remotes for other equipment
located close to this unit.
• Replace the batteries when you notice a
fall off in the operating range of the
remote.
Incorrect use of batteries can result in
hazards such as leakage and bursting.
Please observe the following:
7
En
Before You Start01
Discs compatible with this
player
Any disc that displays one of the following
logos should play in this player. Other
formats, including DVD-Audio, DVD-RAM,
DVD-ROM, CD-ROM (except those that
contain MP3 files), SACD and Photo CD will
not play.
DVD-Video
Video CDAudio CD CD-R CD-RW
• DVD-R/RW and CD-R/RW (audio and
Video CDs) discs recorded using a
personal computer or a DVD or CD
recorder may not play if the disc is
damaged or dirty, or if there is dirt or
condensation on the player’s lens.
• If you record a disc using a personal
computer, even if it is recorded in a
compatible format, there are cases in
which it may not play because of the
settings of the application software used
to create the disc. (Check with the
software publisher for more detailed
information.)
• See also the DVD-R/RW or CD-R/RW
disc box for other information.
8
En
CD-R/RW compatibility
• This unit can play CD-R and CD-RW
discs recorded in CD Audio or Video CD
format, or with MP3 audio files. It
cannot record CD-R or CD-RW discs.
• Unfinalized audio CD format CD-R/RW
discs can be played, but not all time
information (playing time, etc.) will be
displayed.
• Unfinalized CD-R/RW discs recorded in
any format other than audio CD cannot
be played. (Noise may be output in this
case.)
DVD-R/RW compatibility
• This unit can play DVD-R/RW discs
recorded as DVD-Video format. It will not
play DVD-RW discs recorded in video
recording (VR) format.
• This unit cannot record DVD-R/RW
discs.
• Unfinalized DVD-R/RW discs cannot be
played.
MP3 compatibility
• The CD-ROM must be ISO 9660
compatible.
• Files should be MPEG-1 Audio Layer 3
format, 32, 44.1 or 48kHz, fixed bit-rate.
Incompatible files will not play and
Can’t play this format will be
displayed.
• Variable bit-rate (VBR) files are playable,
but playing times may not be shown
correctly.
• This player only plays tracks that are
named with the file extension “.mp3” or
“.MP3”.
• This player is not compatible with multi-
session discs. If you try and play a multisession disc, only the first session will
be played.

Before You Start
01
• Use CD-R or CD-RW media for recording your MP3 files. The disc must be
finalized in order to play.
• Audio encoded at 128Kbps should
sound close to regular audio CD quality.
Although this player will play lower bitrate MP3 tracks, the sound quality
becomes noticeably worse at lower bitrates.
• Folder and track names (excluding the
“.mp3” extension) are displayed.
• This player can recognize a maximum of
250 folders and 250 tracks. Discs
containing more than 250 folders or
tracks will play, but only the first 250
folders/tracks.
Titles, chapters and tracks
DVD discs are generally divided into one or
more titles. Titles may be further subdivided
into chapters.
Title 1 Title 2 Title 3
Chapter 1 Chapter 2 Chapter 3 Chapter 1 Chapter 1 Chapter 2
CDs and Video CDs are divided into tracks.
DVD-Video regions
All DVD-Video discs carry a region mark on
the case somewhere that indicates which
region(s) of the world the disc is compatible
with. Your DVD player also has a region
mark, which you can find on the rear panel.
Discs from incompatible regions will not play
in this player. Discs marked ALL will play in
any player.
The diagram below shows the various DVD
regions of the world.
1
2
4
2
5
1
6
2
3
5
4
English
Track 1 Track 2 Track 3 Track 4 Track 5 Track 6
CD-ROMs containing MP3 files are divided
into folders and tracks. Folders may also
contain further subfolders.
mp3
mp3
mp3
mp3
mp3
Folder A Folder B Folder C
Track 1 Track 2 Track 3 Track 1 Track 1
Track 2
mp3
9
En

Connecting Up02
Rear panel connections
1 2 3 4
DIGITAL AUDIO OUT
COAXIAL
OPTICAL
S
VIDEO OUT
AUDIO OUT
L
R
567
When connecting this player up to your
TV, AV receiver or other components,
make sure that all components are
switched off and unplugged.
1 DIGITAL AUDIO OUT – COAXIAL
This is a digital audio output for connection
to a PCM, Dolby Digital, DTS and/or MPEGcompatible AV receiver that has a coaxial
digital input.
Connect using a commercially available
coaxial digital audio cable.
2 AUDIO OUT L / R
This pair of analog audio outputs connects to
your TV, AV receiver or stereo system. Even if
you are connecting up one of the digital
outputs, we still recommend you connect
these jacks.
Use the supplied audio/video cable when
connecting these jacks. Match the colors of
the jacks and cables for correct stereo
sound.
AV CONNECTOR (RGB)-TV
4 AC IN
Connect the supplied power cord here, then
plug into a power outlet.
5 VIDEO OUT
This is a standard video output that you can
connect to your TV or AV receiver using the
supplied audio/video cable.
6 S (S-Video output)
This is an S-video output that you can use
instead of the video output described in 5
above.
7 DIGITAL AUDIO OUT – OPTICAL
(DV-454 only)
This is a digital audio output for connection
to a PCM, Dolby Digital, DTS and/or MPEGcompatible AV receiver that has an optical
digital input.
Connect using a commercially available
optical digital audio cable.
3 AV CONNECTOR (RGB) - TV
This is a combined audio and video output
for connection to a TV that has a SCART
input. Connect using a SCART cable. The
type of video output can be switched to suit
your TV. See page 12 and 41.
10
En
• You may find it useful to have the
manuals supplied with your other
components handy when connecting
this player.
• If you come across any unfamiliar terms
in this section of the manual, take a look
at the Glossary starting on page 51.
Connecting Up
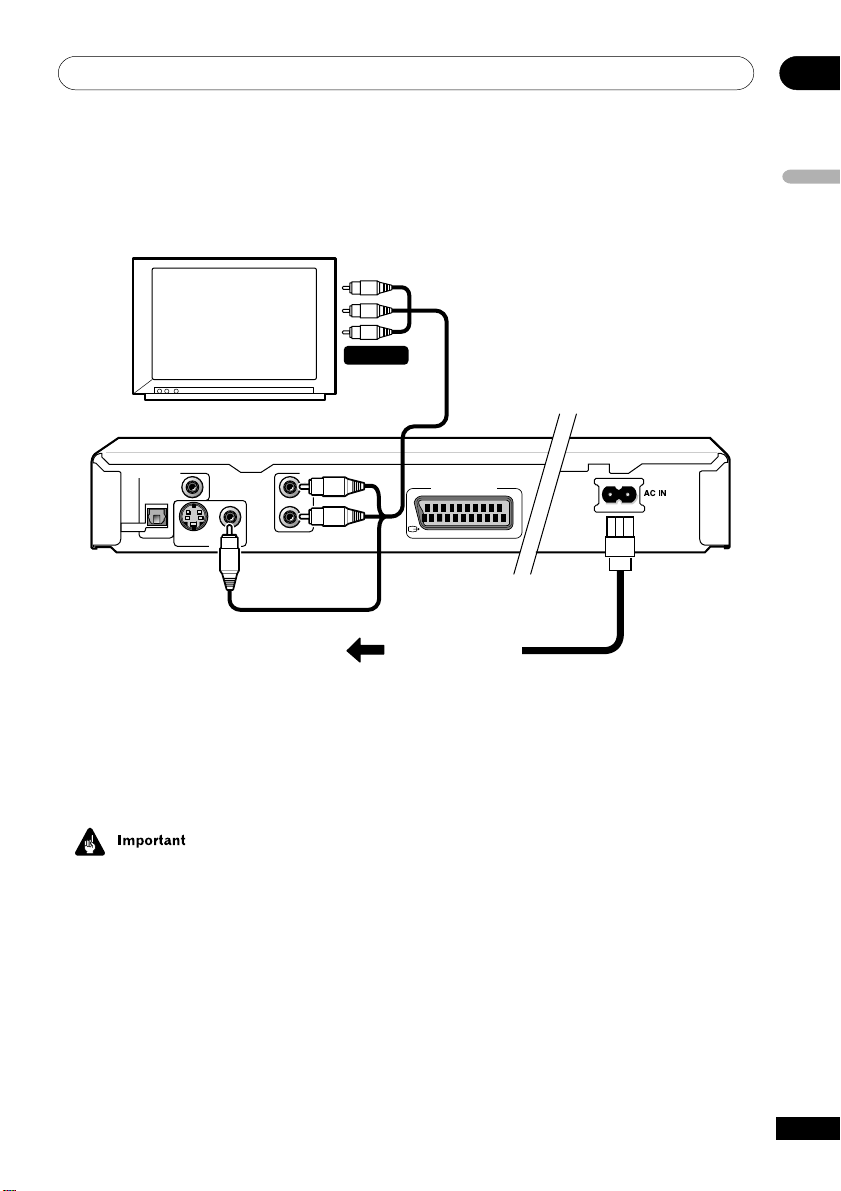
Easy connections
TV
02
English
A/V IN
DIGITAL AUDIO OUT
COAXIAL
OPTICAL
S
VIDEO OUT
AUDIO OUT
L
R
The setup described here is a basic setup
that allows you to play discs using just the
cables supplied with the player. In this setup,
stereo audio is played through the speakers
in your TV.
• This player is equipped with copy
protection technology. Do not connect
this player to your TV via a VCR (or your
VCR via this player) using AV cables, as
the picture from this player will not
appear properly on your TV. (This player
may also not be compatible with some
combination TV/VCRs for the same
reason; refer to the manufacturer for
more information.)
AV CONNECTOR (RGB)-TV
To power outlet
1 Connect the VIDEO OUT and AUDIO
OUT jacks to a set of A/V inputs on your
TV.
Use the supplied audio/video cable, connecting the red and white plugs to the audio
outputs and the yellow plug to the video
output. Make sure you match up the left and
right audio outputs with their corresponding
inputs for correct stereo sound.
See below if you want to use a SCART cable
for the audio/video connection, or an S-Video
cable for the video connection.
2 Connect the supplied AC power cord
to the AC IN inlet, then plug into a power
outlet.
11
En
Connecting Up02
• Before unplugging the player from the
power outlet, make sure you first switch
it into standby using either the front
panel
STANDBY/ON button, or the
remote control, and wait of the -OFF-
message to disappear from the player’s
display.
• For the above reasns, do not plug this
player into a switched power supply
found on some amplifiers and AV
receivers.
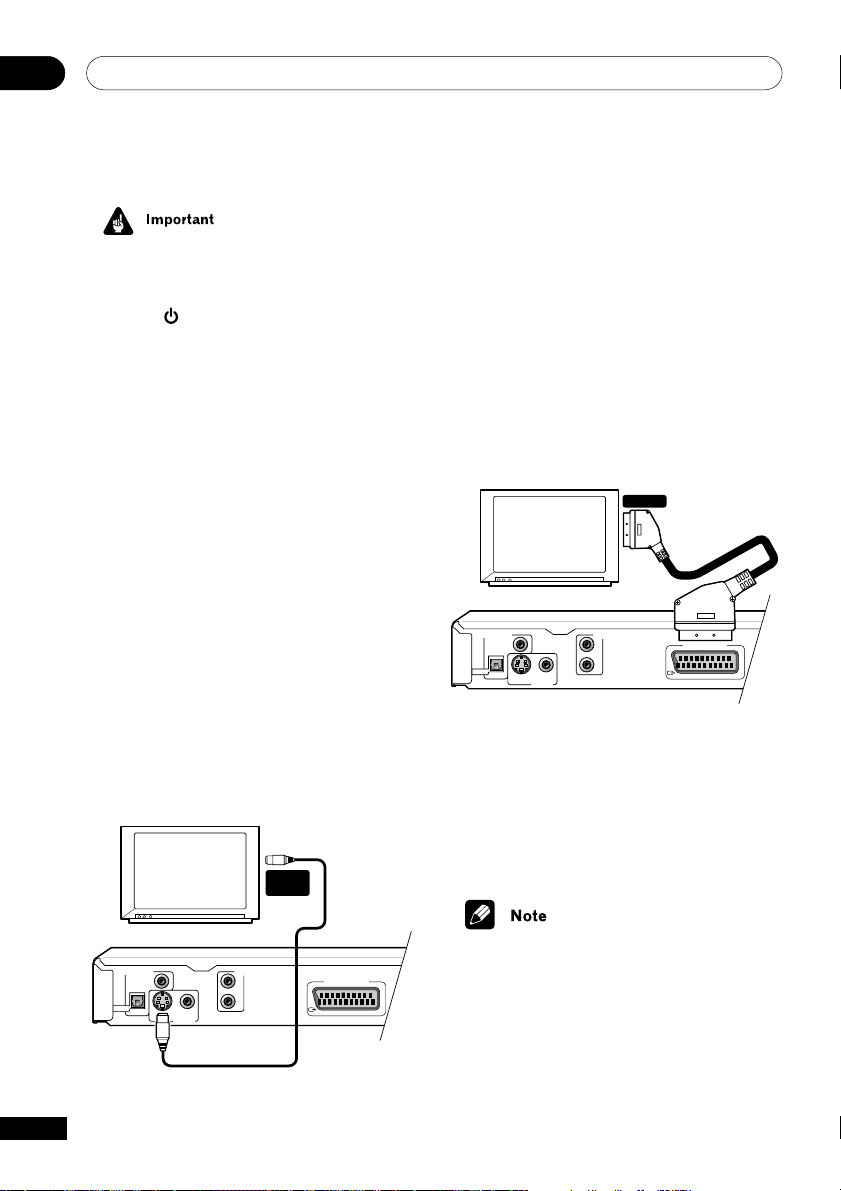
Connecting using the S-Video
output
If your TV has an S-Video input, you can use
this instead of the standard (composite)
output for a better quality picture.
1 Use an S-Video cable (not supplied)
to connect the S-VIDEO OUT to an
S-Video input on your TV (or monitor or
AV receiver).
Line up the small triangle above the jack
with the same mark on the plug before
plugging in.
S-VIDEO
INPUT
Connecting using the AV
connector output
If your TV has a SCART-type AV input, you
can use a SCART cable to connect this
player to your TV. This type of connection
carries both the sound and the picture, so
there’s no need to connect up the AUDIO
OUT L/R and VIDEO OUT jacks.
1 Use a SCART cable (not supplied) to
connect the AV CONNECTOR (RGB)-TV to
an AV input on your TV.
SCART
TV
DIGITAL AUDIO OUT
COAXIAL
OPTICAL
S
VIDEO OUT
This connector can output standard (composite), S-Video or RGB component video.
The default setting is standard, which should
work with all TVs. Consult the manual that
came with your TV to see if you can use one
of the higher quality settings. See page 41
for how to change the video output.
AUDIO OUT
L
R
AV CONNECTOR (RGB)-TV
12
En
TV
DIGITAL AUDIO OUT
OPTICAL
• SCART cables are available in several
AUDIO OUT
COAXIAL
S
VIDEO OUT
L
R
AV CONNECTOR (RGB)-TV
configurations. Make sure that the one
you get will work with this player and
your TV/monitor. You can find the pin
assignments on page 54.
Connecting Up
02
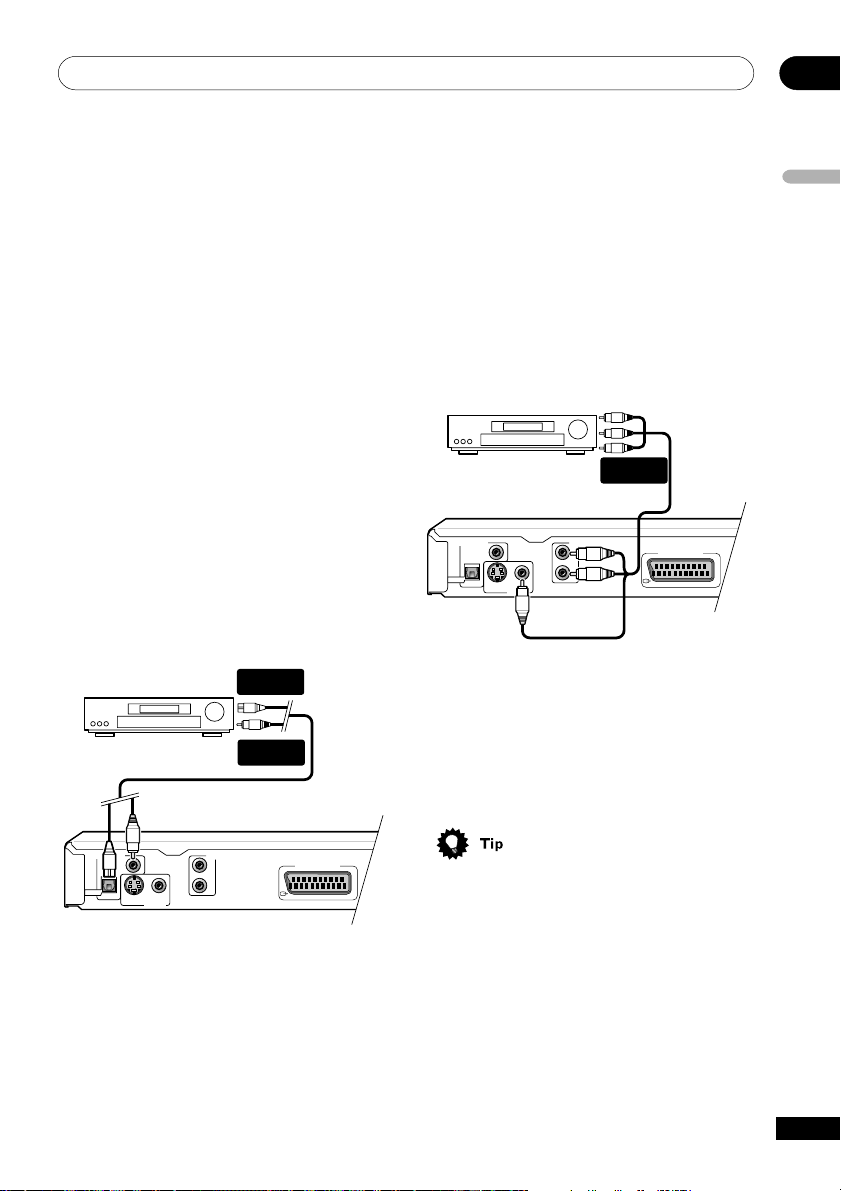
Connecting to an AV
receiver
To enjoy multichannel surround sound you
need to connect this player to an AV receiver
using a digital output. The DV-454 has both
coaxial and optical digital jacks; use whichever is convenient. The DV-350 has only a
coaxial jack.
In addition to a digital connection, we
recommend also connecting using the
stereo analog connection.
You’ll probably also want to connect a video
output to your AV receiver. You can use any
of the video outputs available on this player
(the illustration shows a standard (composite) connection).
1 Connect one of DIGITAL OUT jacks on
this player to a digital input on your AV
receiver.
DIGITAL IN
OPTICAL
AV receiver
DIGITAL IN
COAXIAL
For a coaxial connection, use a coaxial cable
(similar to the supplied video cable) to
connect the COAXIAL DIGITAL OUT jack to a
coaxial input on your AV receiver.
2 Connect the analog AUDIO OUT L/R
and VIDEO OUT jacks on this player to a
set of analog audio and video inputs on
your AV receiver.
AV receiver
DIGITAL AUDIO OUT
COAXIAL
OPTICAL
S
VIDEO OUT
AUDIO OUT
L
R
AUDIO/
VIDEO INPUT
AV CONNECTOR (RGB)-TV
The diagram shows standard video connections, but you can alternatively use the SVideo or SCART cable connections if they’re
available.
3 Connect the AV receiver’s video
output to a video input on your TV.
English
DIGITAL AUDIO OUT
OPTICAL
COAXIAL
S
VIDEO OUT
AUDIO OUT
L
R
AV CONNECTOR (RGB)-TV
This enables you to listen to multichannel
surround sound.
For an optical connection, use an optical
cable (not supplied) to connect the OPTICAL
DIGITAL OUT jack to an optical input on your
AV receiver.
• You usually have to connect the same
kind of video cable between your DVD
player and AV receiver, and between
your AV receiver and TV.
13
En

Connecting Up02
• My TV doesn’t have any inputs to
connect the DVD player. How can I watch
DVDs?
Unfortunately, if your TV has no inputs
you can’t use this player with it.
• My VCR is already connected to my TV, so
there aren’t any spare inputs. What
should I do?
If all your TV’s inputs are already in use,
you can buy a video input selector from
an electronics store, which effectively
gives you more inputs.
• My TV only has one input for the sound.
What should I plug it into?
If you don’t mind mono sound, you can
buy a stereo RCA-to-mono RCA cable
from an electronics store. Connect the
stereo end to this player and the mono
end to your TV.
If you want stereo sound, connect this
player to your amplifier or stereo system
using a stereo audio cable.
14
En
• I connected the DVD player to my AV
receiver, and although the sound is fine,
there’s no picture. What did I do wrong?
Make sure that the type of video
connection from the DVD player to your
AV receiver is the same as that from the
receiver to your TV. Most AV receivers
won’t convert from one kind of connection to another.
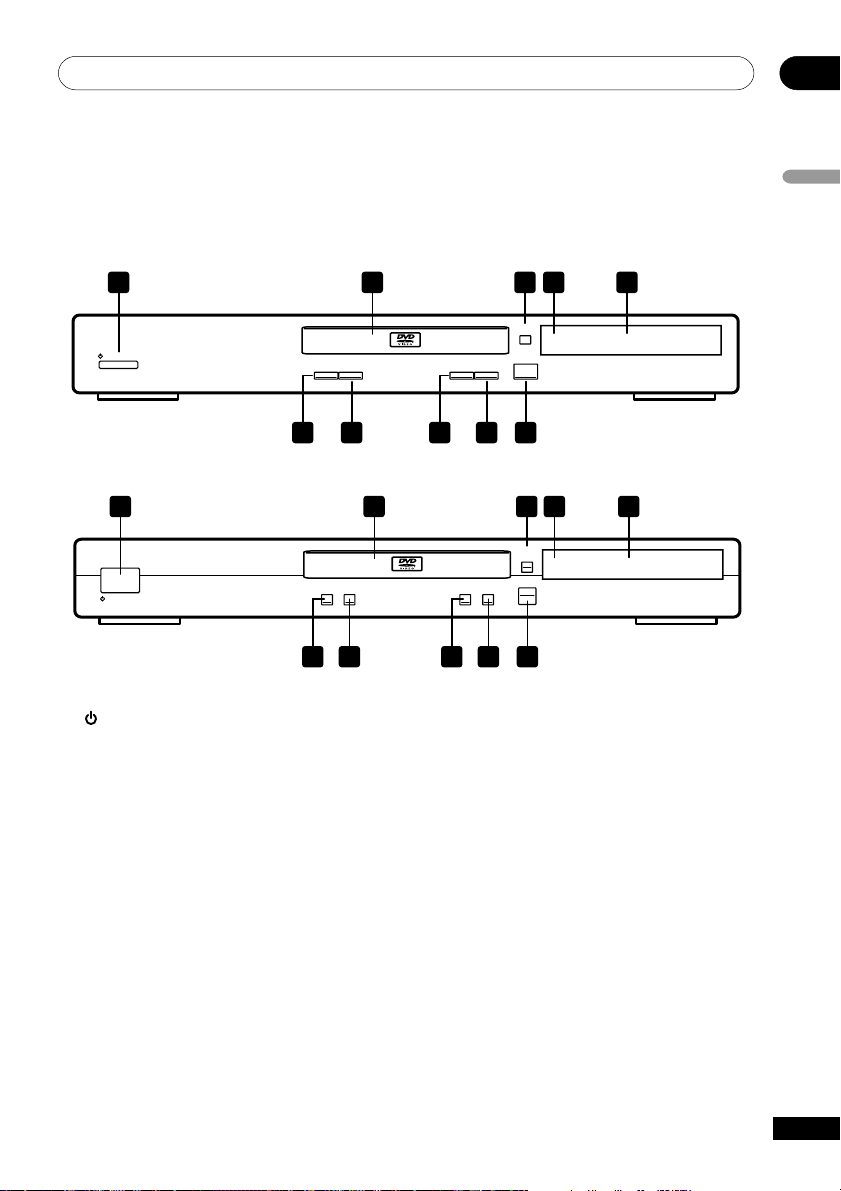
Controls and Displays
Front panel
STANDBY/ON
03
English
2 3 541
OPEN/CLOSE
0
Î
3
8741 ¡¢
DV-350
STANDBY/ON
DV-454
STANDBY/ON
1
10 9 8 7 6
¡
1
¢
4
10 9 8 7 6
Press to switch the player on or into standby
2 Disc tray
3 0 OPEN/CLOSE
Press to open or close the disc tray
4 Remote control sensor
The remote control has a range of up to
about 7m
5 Display
See page 16 for a description of the display
6 3
Press to start or resume playback
2 3 541
OPEN/
CLOSE
0
Î
3
8
7
7 8
Press to pause playback. Press again to
restart
8 7
Press to stop the disc (you can resume
playback by pressing 3 (play))
9 ¡ ¢
• Press and hold for fast forward scanning
• Press to jump to the next chapter or track
10 4 1
• Press and hold for fast reverse scanning
• Press to jump back to the beginning of the
current chapter or track, then to previous
chapters/tracks
15
En
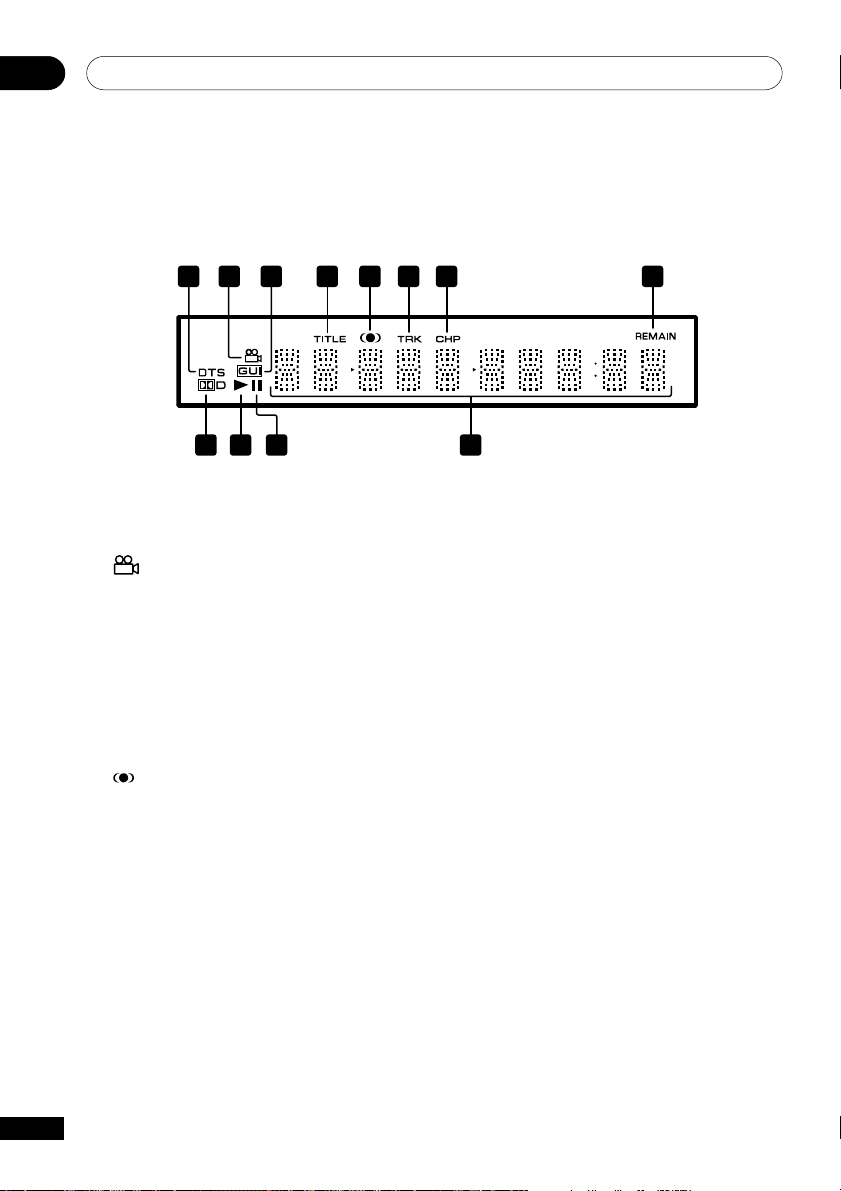
Controls and Displays03
Display
1
2 3 4 5 6 7 8
12 911 10
1 DTS
Lights when a DTS soundtrack is playing
2
Lights during multi-angle scenes on a DVD
disc
3 GUI (Graphical User Interface)
Lights when a menu is displayed on-screen
4 TITLE
Indicates that the character display is
showing a DVD title number
5
Lights when 2V/TruSurround is selected
6 TRK
Indicates that the character display is
showing a CD or Video CD track number
7CHP
Indicates that the character display is
showing a DVD chapter number
8 REMAIN
Lights when the character display is showing
the time or number of tracks/titles/chapters
remaining
9 Character display
10 8
Lights when a disc is paused
11 3
Lights when a disc is playing
12 2D
Lights when a Dolby Digital soundtrack is
playing
16
En
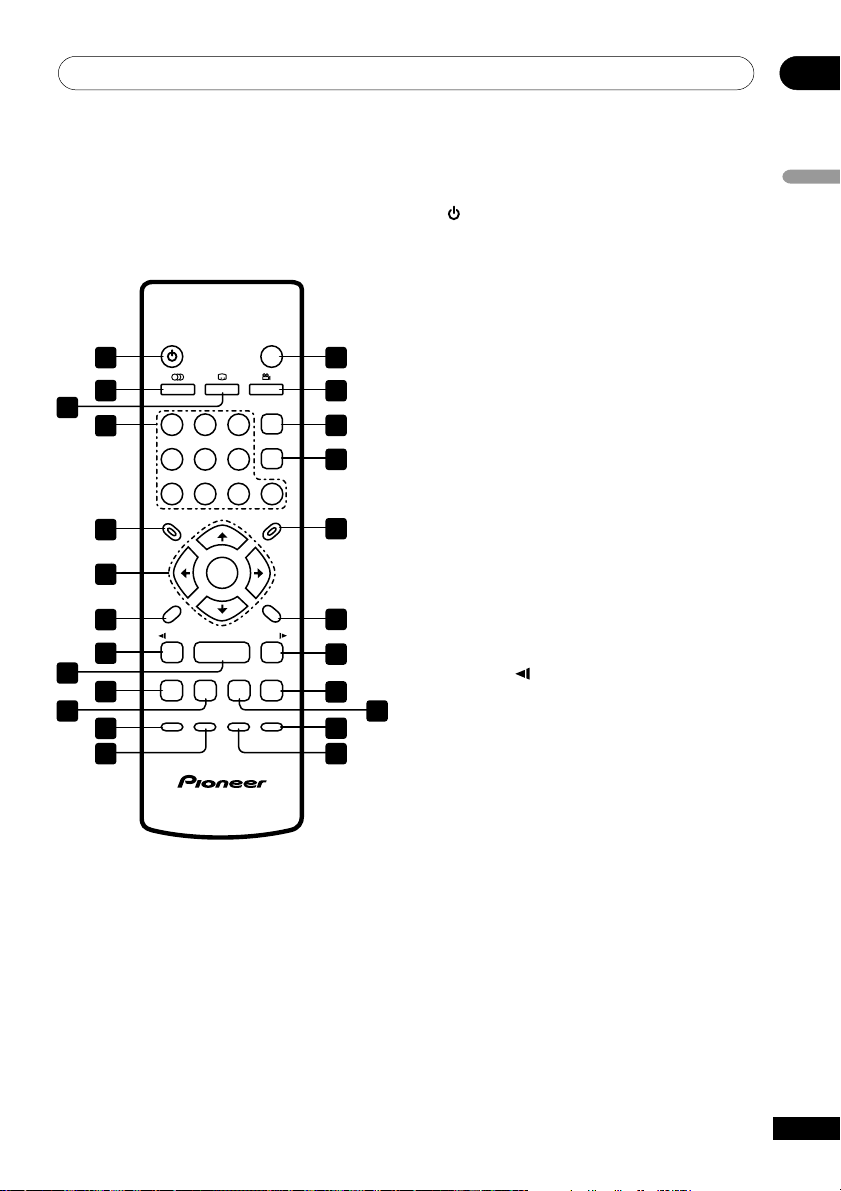
Controls and Displays
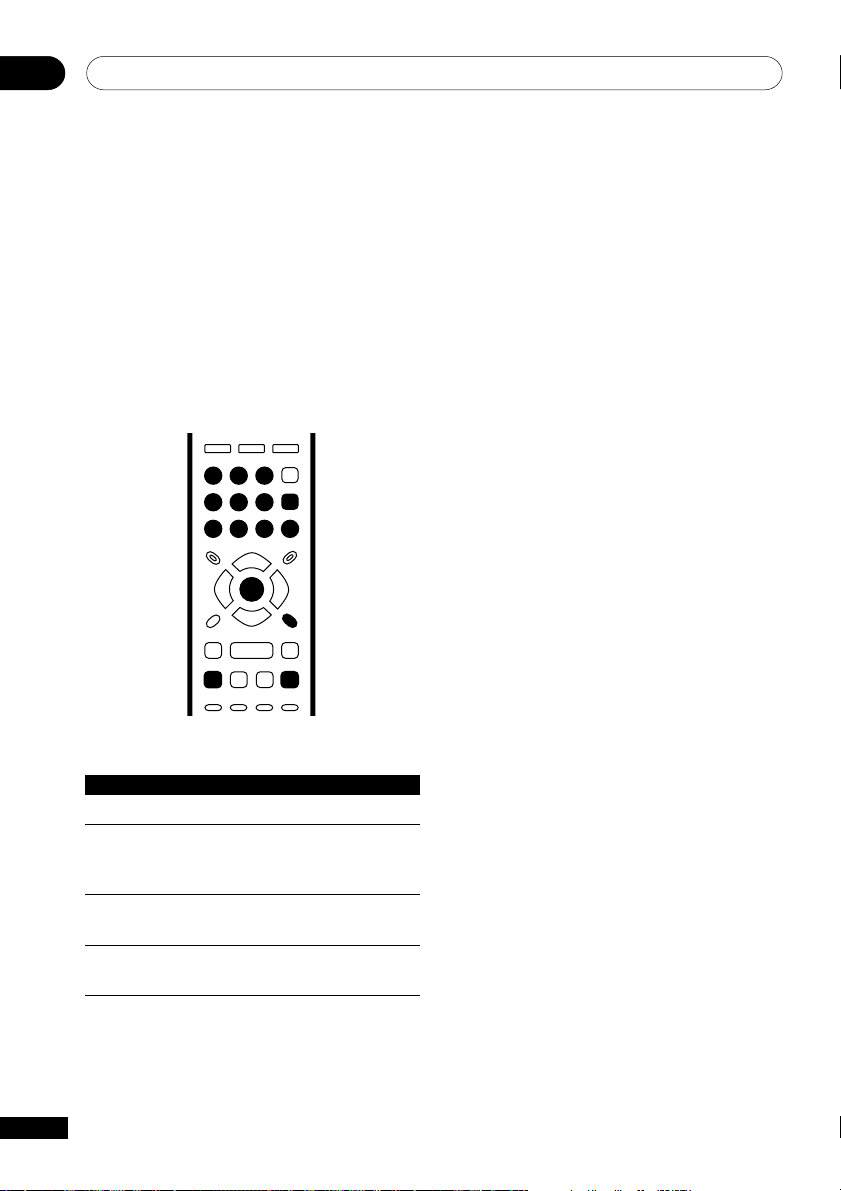
Remote control
SUBTITLE
23
6
5
ENTER
3
8
7
ZOOM DISPLAY
OPEN/CLOSE
0
ANGLEAUDIO
CLEAR
ENTER
0
MENU
RETURN
E/
¡
¢
15
16
17
18
19
20
21
23
24
STANDBY/ON
1 14
2
3
4
1
4
789
TOP MENU
5
6
SETUP
7
8
9
10
11 22
12
/e
1
4
PLAY MODE SURROUND
13
1 STANDBY/ON
Press to switch the player on or into standby
2 AUDIO
Press to select the audio channel or
language (pages 34–35)
3 SUBTITLE
Press to select a subtitle display (page 34)
4 Number buttons
5 TOP MENU
Press to display the top menu of a DVD disc
6 ENTER & cursor control buttons
Use to navigate on-screen displays and
menus. Press ENTER to select an option or
execute a command
7 SETUP
Press to display (or exit) the on-screen
display
8 1 and
/e
Use for reverse slow motion playback, frame
reverse and reverse scanning. See page 28
9 3
Press to start or resume playback
03
English
10 4
Press to jump to the beginning of the current
chapter or track, then to previous chapters/
tracks
11 8
Press to pause playback; press again to
restart
17
En

Controls and Displays03
12 PLAY MODE
Press to display the Play Mode menu
(pages 29–34) (You can also get to the Play
Mode menu by pressing SETUP and selecting Play Mode)
13 SURROUND
Press to activate/switch off 2V/TruSurround
14 0 OPEN/CLOSE
Press to open or close the disc tray
15 ANGLE
Press to change the camera angle during
DVD multi-angle scene playback (page 35)
16 CLEAR
Press to clear a numeric entry
17 ENTER
Use to select menu options, etc. (works
exactly the same as the ENTER button in 6
above)
18 MENU
Press to display a DVD disc menu, or the
Disc Navigator if a CD, Video CD or MP3 disc
is loaded
19 RETURN
Press to return to a previous menu screen
20 ¡ and
Use for forward slow motion playback, frame
advance and forward scanning. (page 28)
21 ¢
Press to jump to the next chapter or track
22 7
Press to stop the disc (you can resume
playback by pressing 3 (play))
23 DISPLAY
Press to display information about the disc
playing (page 36)
24 ZOOM
Press to change the zoom level (page 35)
E/
18
En
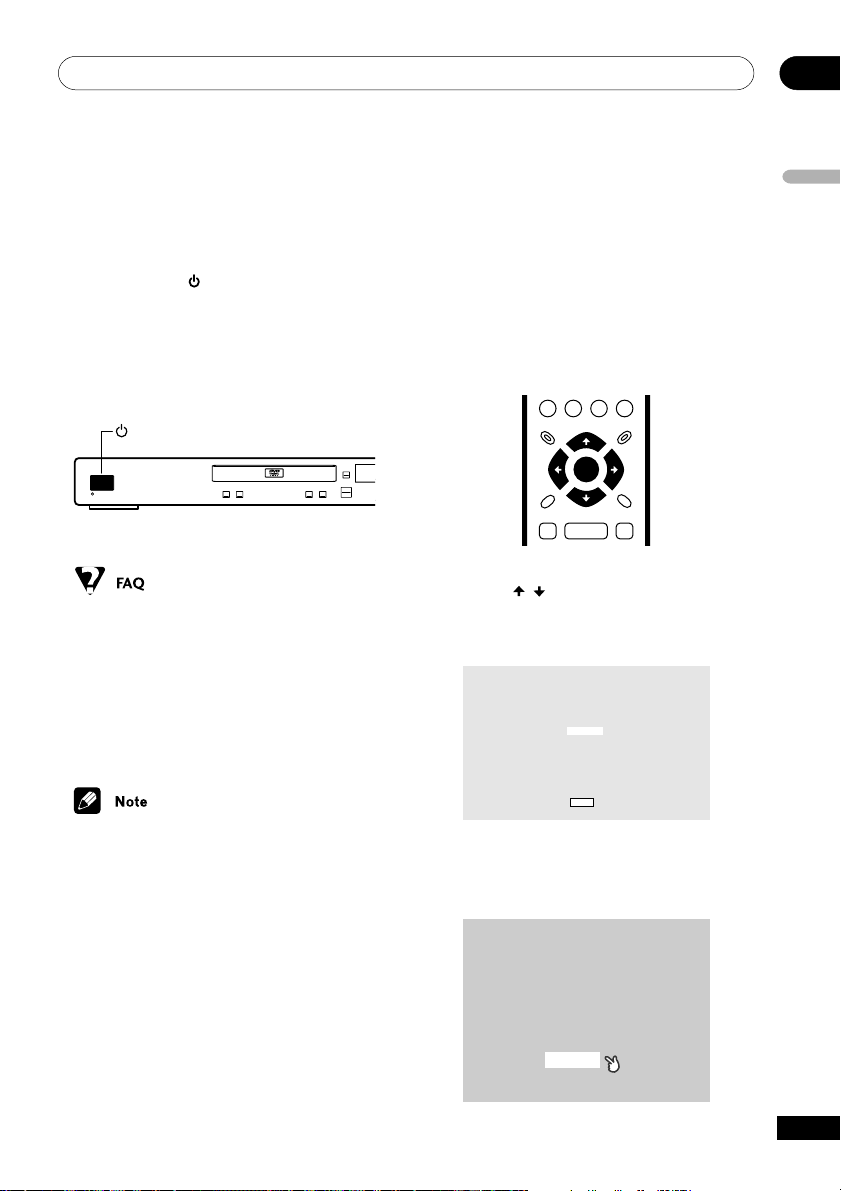
Getting Started
GUIDE
RETURN
ENTER
Switching on
After making sure that everything is connected properly and that the player is
plugged in, press
front panel, or on the remote control to
switch the player on.
Also, switch on your TV and make sure that it
is set to the input you connected the DVD
player to.
STANDBY/ON
STANDBY/ON
DV-454
• My DVD player switches on but there is
nothing displayed on my TV.
Make sure that the TV is set to the
correct video input (not a TV channel).
For example, if you connected this
player to the VIDEO 1 inputs on your TV,
switch your TV to VIDEO 1.
STANDBY/ON on the
OPEN/
CLOSE
0
¡
1
¢
4
3
8
7
Î
Let’s Get Started
When you switch on the player for the first
time, you should see a welcome screen
displayed on your TV. From here you can set
up the language and the kind of TV you have,
then either use the Setup Navigator to make
more settings, or jump right in and start
playing some discs.
1 Use the / (cursor up/down)
buttons to choose a language, then press
ENTER.
Hello!
Select the display language
using the cursor keys on the remote
English
Français
Deutsch
Italiano
Español
04
English
• This player features a screen saver and
an auto power off function. If the player
is stopped and no button is pressed for
five minutes, the screen saver starts. If
the disc tray is closed but no disc is
playing and no control is pressed for 30
minutes, the player automatically goes
into standby.
Choose one then press
Enter
2 Press ENTER to move on to the next
screen.
Welcome to Pioneer DVD!
Thank you for purchasing this Pioneer DVD player.
Before using, please take a little time
to setup your DVD player
Put the batteries into the remote control
Next, press the [ENTER] button on the remote control
and start the Let's Get Started Menu
Next
19
En
Getting Started04
ENTER
GUIDE
RETURN
ENTER
SETUP
RETURN
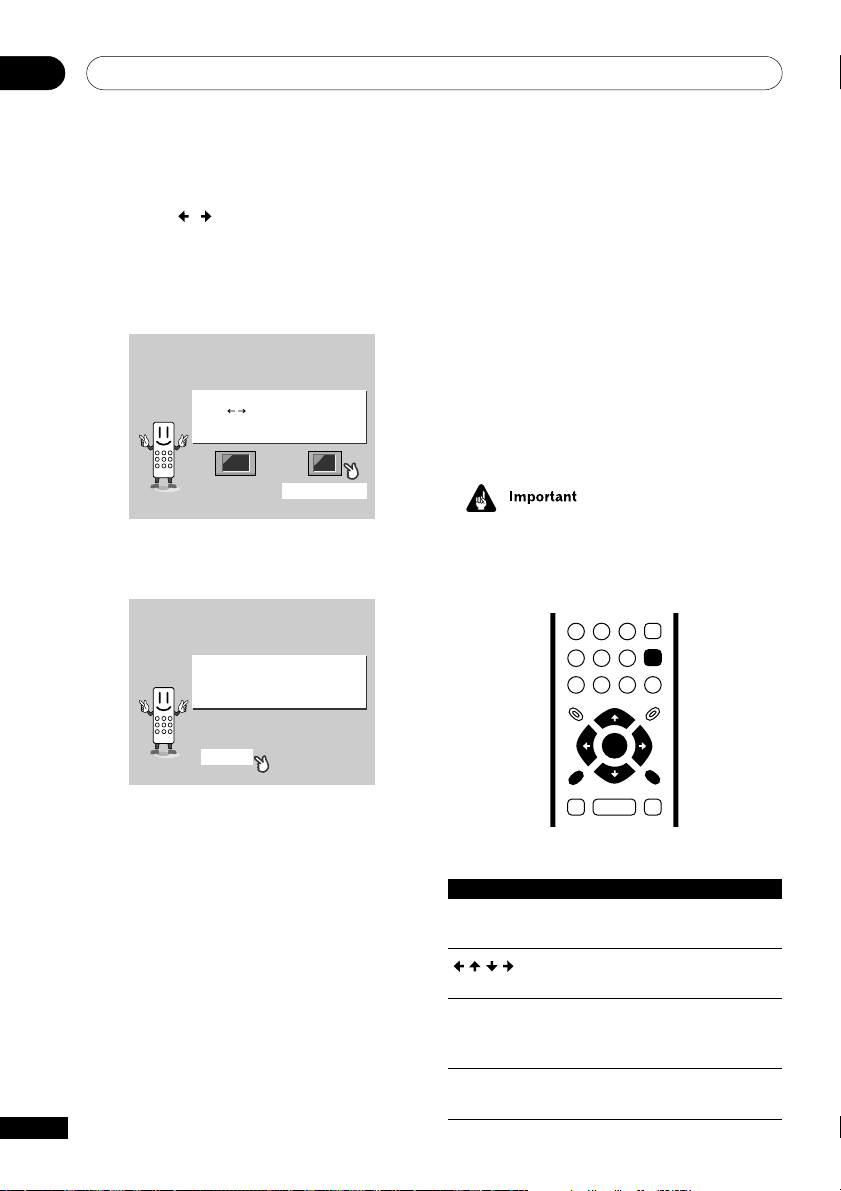
3 Use the / (cursor left/right)
buttons to select either ‘Wide screen
(16:9)’ or ‘Standard size screen (4:3)’
according to the kind of TV you have,
then press ENTER.
Let's Get Started Menu
What kind of TV do you have?
Use the / cursor buttons
to choose, then press [ENTER]
Wide screen (16:9) Standard size screen (4:3)
4 Press ENTER again to finish setting up.
Let's Get Started Menu
Setup complete
If you're finished setting up,
choose [Complete],
to start again choose [Back]
Complete Back
Using the on-screen displays
For ease of use, this player makes extensive
use of graphical on-screen displays (OSDs).
You should get used to the way these work as
you’ll need to use them when setting up the
player, using some of the playback features,
such as program play, and when making
more advanced settings for audio and video.
All the screens are navigated in basically the
same way, using the cursor buttons to
change the highlighted item and pressing
ENTER to select it.
• Throughout this manual, ‘Select’ means
use the cursor buttons to highlight an
item on-screen, then press ENTER.
• Select Back then press ENTER if you
want to go back and change the setting
you just made.
Button What it does
SETUP Display/exit the on-screen
display
Changes the highlighted
menu item
ENTER Selects the highlighted menu
item (both ENTER buttons
work in exactly the same way)
RETURN Returns to the main menu
20
without saving changes
En
Getting Started
04
• The button guide at the bottom of every
OSD screen shows you which buttons
you’ll need to use for that screen.
Setting up with the Setup
Navigator
Using the Setup Navigator you can make a
number of other initial settings for this
player. We recommend using the Setup
Navigator, especially if you connected this
player to an AV receiver for playing surround
sound. To answer some of the questions
about digital audio formats you may need to
look at the instructions that came with your
AV receiver.
1 If a disc is playing, press 7 (stop).
Also turn on your TV and make sure that it is
set to the correct video input.
2 Press SETUP.
The on-screen display (OSD) appears.
Audio Settings
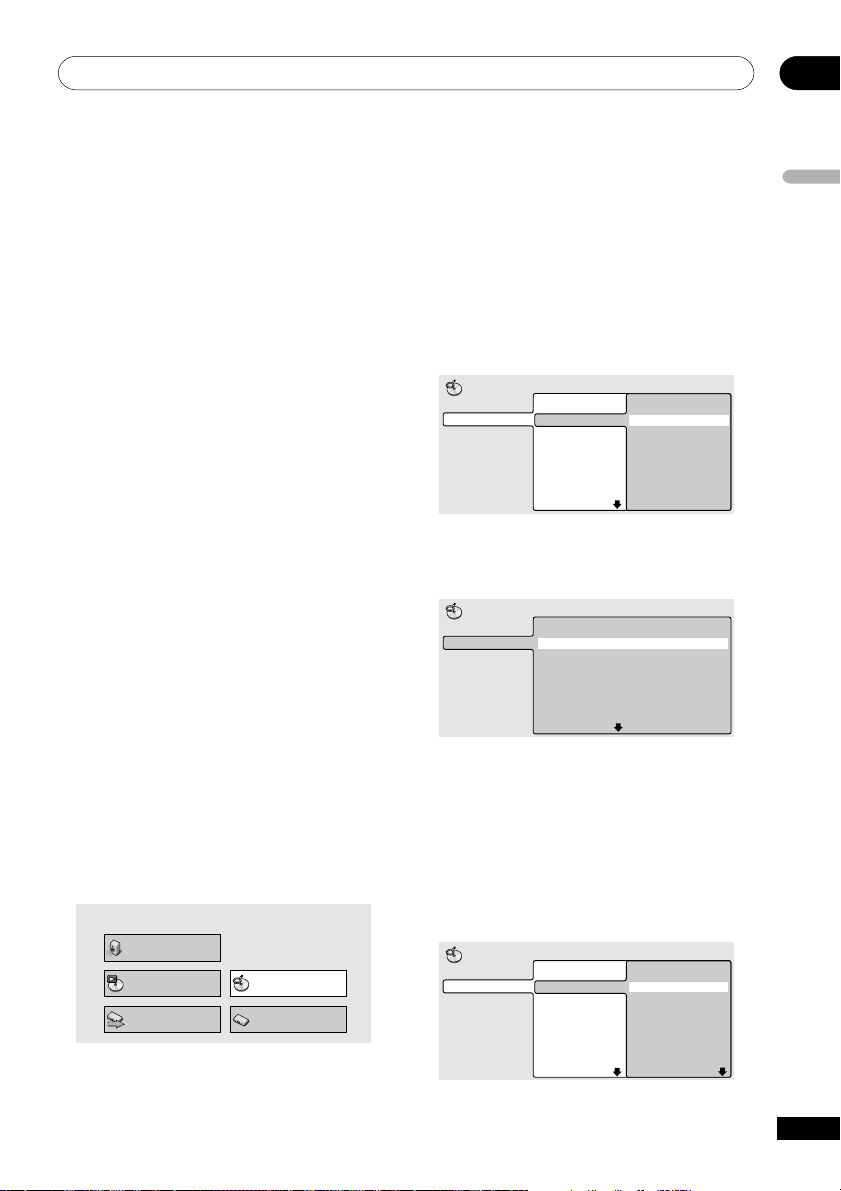
4 Select a DVD language.
Some DVD discs feature on-screen menus,
soundtracks and subtitles in several languages. Set your preferred language here.
Setup Navigator
Audio Out Settings
AV Receiver Func.
DVD LanguageLanguage Settings
English
French
German
Italian
Spanish
Other Language
• Note that the language you choose here
may not be available on all discs.
• If you want to select a language other
than those listed, select Other
Language. See Selecting languages
using the language code list on page 51
for detailed information.
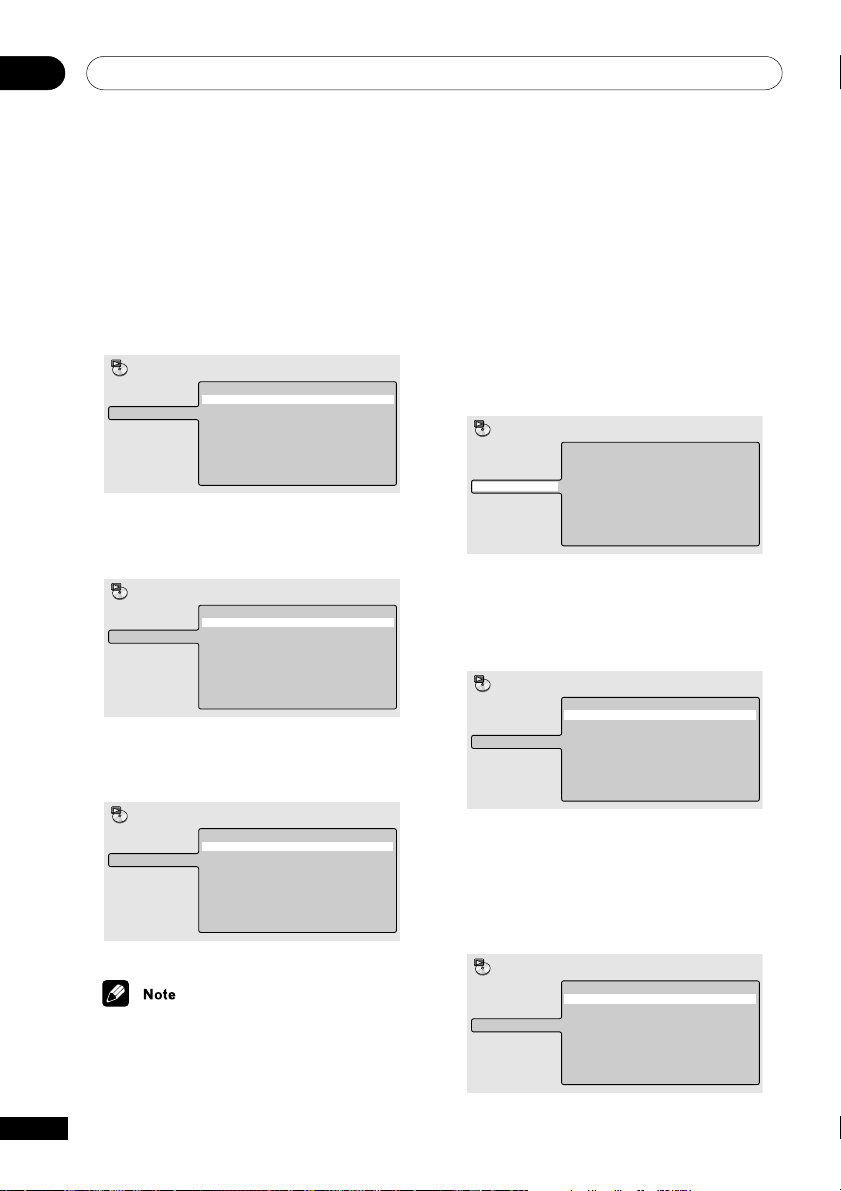
5 Did you connect this player to an
amplifier or AV receiver?
Select Connected or Not Connected.
Setup Navigator
Language Settings
Audio Out Settings
AV Receiver Func.
AV Receiver
Connected
Not Connected
English
Play Mode
Initial Settings
Disc Navigator
Setup Navigator
3 Select ‘Setup Navigator’.
Audio Settings
Play Mode
Initial Settings
Disc Navigator
Setup Navigator
• If you selected Not Connected here,
that completes setup using the Setup
Navigator. Press ENTER to exit.
21
En

Getting Started04
6 Did you connect this player to an AV
receiver using a digital output?
Select Connected or Not Connected.
Setup Navigator
Language Settings
Audio Out Settings
AV Receiver Func.
AV Receiver
Digital Audio Out
Connected
Not Connected
• If you selected Not Connected here,
that completes setup using the Setup
Navigator. Press ENTER to exit.
7 Is your AV receiver Dolby Digital
compatible?
Select Compatible, Not Compatible or
Don’t Know.
Setup Navigator
Language Settings
Audio Out Settings
AV Receiver Func.
Dolby Digital
Compatible
Not Compatible
Don't Know
8 Is your AV receiver DTS compatible?
Select Compatible, Not Compatible or
Don’t Know.
Setup Navigator
Language Settings
Audio Out Sttings
AV Receiver Func.
Dolby Digital
DTS
Compatible
Not Compatible
Don't Know
9 Is your AV receiver MPEG compatible?
Select Compatible, Not Compatible or
Don’t Know.
Setup Navigator
Language Settings
Audio Out Settings
AV Receiver Func.
Dolby Digital
DTS
MPEG
Compatible
Not Compatible
Don't Know
10 Is your AV receiver compatible with
96kHz Linear PCM audio?
Select Compatible, Not Compatible or
Don’t Know.
Setup Navigator
Language Settings
Audio Out Settings
AV Receiver Func.
Dolby Digital
DTS
MPEG
96kHz Linear PCM
Compatible
Not Compatible
Don't Know
11 Press ENTER to complete the setup, or
press SETUP to quit the Setup Navigator
without making any changes.
Setup Navigator
Language Settings
Audio Out Settings
AV Receiver Func.
Dolby Digital
DTS
Settings complete
MPEG
Press ENTER to exit
96kHz Linear PCM
Compatible
Not Compatible
Unknown
ENTER
Congratulations, setup is complete!
22
En
Getting Started
04
Playing discs
The basic playback controls for playing DVD,
CD, Video CD and MP3 discs are covered
here. Further functions are detailed in the
next chapter.
23
56
ENTER
3
8
7
OPEN/CLOSE
0
ENTER
0
¡
¢
STANDBY/ON
1
4
789
1
4
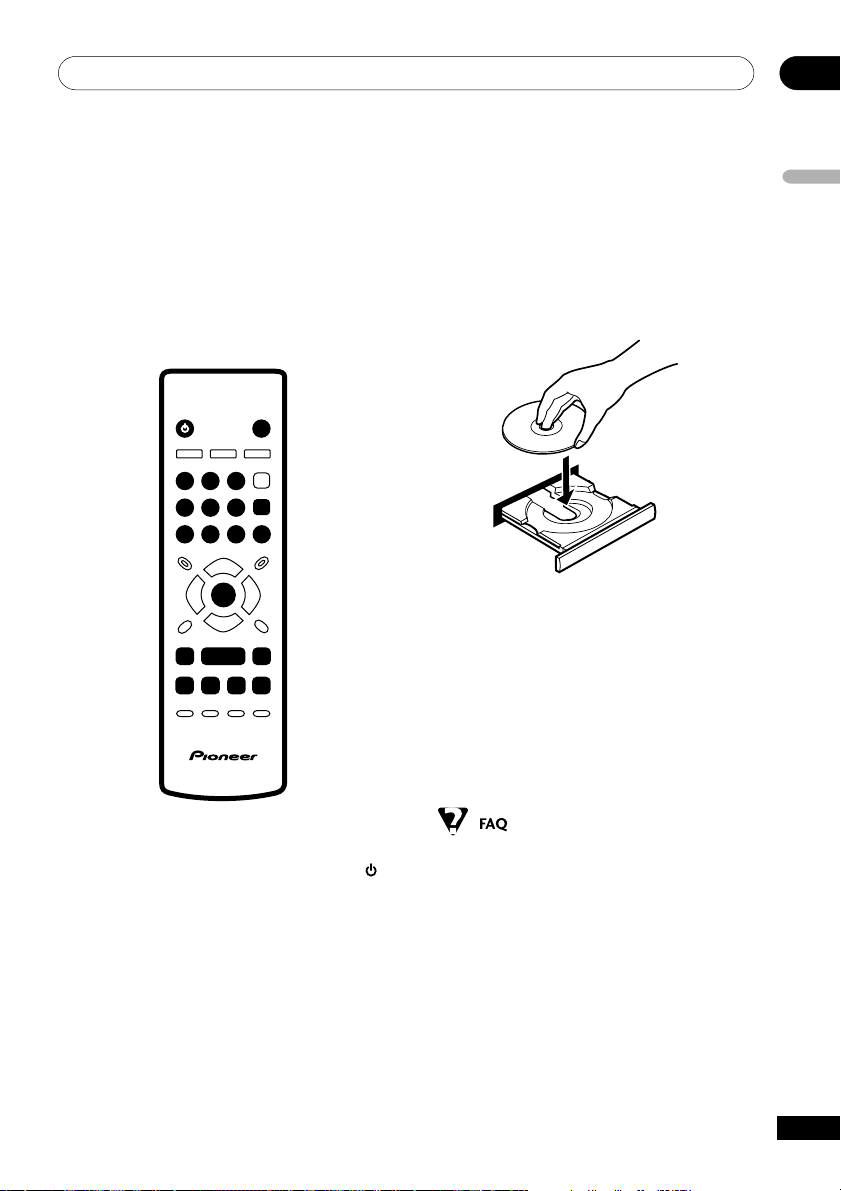
3 Load a disc.
English
Load a disc with the label side facing up,
using the disc tray guide to align the disc (if
you’re loading a double-sided DVD disc, load
it with the side you want to play face down).
4 Press 3 (play) to start playback.
If you’re playing a DVD or Video CD, a menu
may appear. See pages 25, 26 for how to
navigate these.
If you’re playing an MP3 disc, it may take a
few seconds before playback starts, depending on the complexity of the file structure on
the disc.
1 If the player isn’t already on, press
STANDBY/ON to switch it on.
If you’re playing a DVD or Video CD, also turn
on your TV and make sure that it is set to the
correct video input.
2 Press 0 OPEN/CLOSE to open the disc
tray.
• After I load a DVD disc, it ejects automatically after a few seconds!
Most likely, the disc is the wrong region
for your player. The region number
should be printed on the disc; check it
against the region number of the player
(which you can find on the rear panel).
See also page 9.
If the region number is OK, it may be
that the disc is damaged or dirty. Clean
the disc and look for signs of damage.
See also page 47.
23
En

Getting Started04
• Why won’t the disc I loaded play?
First check that you loaded the disc the
right way up (label side up), and that it’s
clean and not damaged. See page 47
for information on cleaning discs.
If a disc loaded correctly won’t play, it’s
probably an incompatible format or disc
type, such as DVD-Audio or DVD-ROM.
See page 8 for more on disc
compatibility.
• I have a widescreen TV so why are there
black bars at the top and bottom of the
screen when I play some discs?
Some movie formats are such that even
when played on a widescreen TV, black
bars are necessary at the top and
bottom of the screen. This is not a
malfunction.
• I have a standard (4:3) TV and set the
player to show widescreen DVDs in pan &
scan format, so why do I still get black
bars top and bottom with some discs?
Some discs override the display
preferences of the player, so even if you
have 4:3 (Pan & Scan) selected, those
discs will still be shown in letterbox
format. This is not a malfunction.
• My AV receiver is definitely compatible
with 96kHz Linear PCM audio, but it
doesn’t seem to work with this player.
What’s wrong?
For digital copy-protection purposes,
some 96kHz DVD discs are
automatically downsampled to 48kHz.
This is not a malfunction. With these
kinds of discs, if you want to enjoy highquality analog audio, set Digital Out to
Off (page 39), and 96kHz PCM Out to
96kHz (page 40).
Basic playback controls
The table below shows the basic controls on
the remote for playing discs. The folllowing
chapter covers more playback features in
more detail.
Button What it does
3 Starts playback.
DVD and Video CD: if the
display shows RESUME,
playback starts from the
resume point.
8 Pauses a disc that’s playing,
or restarts a paused disc.
7 Stops playback.
DVD and Video CD: Display
shows RESUME. Press 7
(stop) again to cancel the
resume function.
1 Press to start fast reverse
scanning. Press 3 (play) to
resume normal playback.
¡ Press to start fast forward
scanning. Press 3 (play) to
resume normal playback.
4 Skips to the start of the
current track or chapter, then
to previous tracks/chapters.
¢ Skips to the next track or
chapter.
Numbers Use to enter a title/track
number. Press ENTER to select
(or wait a few seconds).
• If the disc is stopped, playback starts from the selected
title (for DVD) or track number
(for CD/Video CD/MP3 ).
• If the disc is playing,
playback jumps to the start of
the selected chapter or track.
24
En
Getting Started
TOP MENU MENU
RETURN
ENTER
0
1
23
4
56
789
ENTER
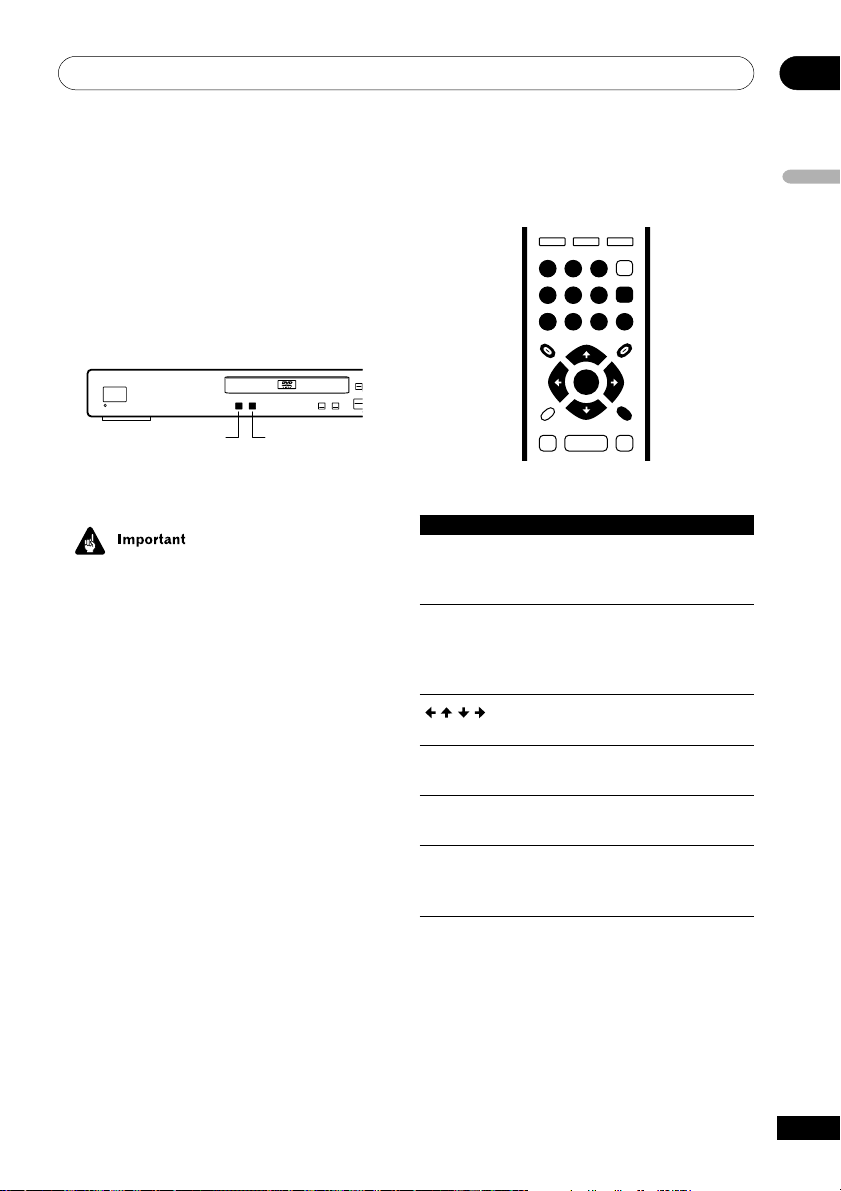
Front panel controls
The 3 (play), 7 (stop), and 8 (pause) buttons
on the front panel work in exactly the same
way as their remote control equivalents. The
combined scan/skip buttons on the front
panel (4 1 and ¡ ¢) work slightly
differently from the remote buttons.
¡
1
¢
STANDBY/ON
DV-454
41 ¡¢
Press and hold for fast scan; press for track/
chapter skip.
• You may find with some DVD discs that
some playback controls don’t work in
certain parts of the disc. This is not a
malfunction.
• Track skip and number buttons for track
selection do not work with unfinalized
CD-R/RW discs.
DVD-Video disc menus
Many DVD-Video discs contain menus from
which you can select what you want to
watch. They may give access to additional
features, such as subtitle and audio language selection, or special features such as
slideshows. See the disc packaging for
details.
Sometimes DVD-Video menus are displayed
automatically when you start playback;
others only appear when you press MENU or
TOP MENU.
4
04
English
OPEN/
CLOSE
0
3
8
7
Button What it does
TOP MENU Displays the ‘top menu’ of a
DVD disc—this varies with the
disc.
MENU Displays a DVD disc menu—
ENTER Selects the current menu
RETURN Returns to the previously
Numbers Highlights a numbered menu
this varies with the disc and
may be the same as the ‘top
menu’.
Moves the cursor around the
screen.
option.
displayed menu screen.
option (some discs only).
Press ENTER to select.
25
En
Getting Started04
Video CD PBC menus
Some Video CDs have menus from which
you can choose what you want to watch.
These are called PBC (Playback control)
menus.
You can play a PBC Video CD without having
to navigate the PBC menu by starting
playback using a number button to select a
track, rather than the 3 (play) button.
23
1
ENTER
56
4
789
0
ENTER
RETURN
26
En
4
¢
Button What it does
RETURN Displays the PBC menu.
Numbers Use to enter a numbered
menu option. Press ENTER to
select.
4 Displays the previous menu
page (if there is one).
¢ Displays the next menu page
(if there is one).
Playing Discs
05
Introduction
Most of the features described in this
chapter make use of on-screen displays. For
an explanation of how to navigate these, see
Using the on-screen displays on page 20.
Many of the functions covered in this chapter
apply to DVD discs, Video CDs, CDs and
MP3 discs, although the exact operation of
some varies slightly with the kind of disc
loaded.
Some DVD discs restrict the use of some
functions (random or repeat, for example).
This is not a malfunction.
When playing Video CDs, some of the
functions are not available during PBC
playback. If you want to use them, start the
disc playing using a number button to select
a track.
Using the Disc Navigator to
browse the contents of a disc
Use the Disc Navigator to browse through
the contents of a disc to find the part you
want to play. You can use the Disc Navigator
when a disc is playing or stopped.
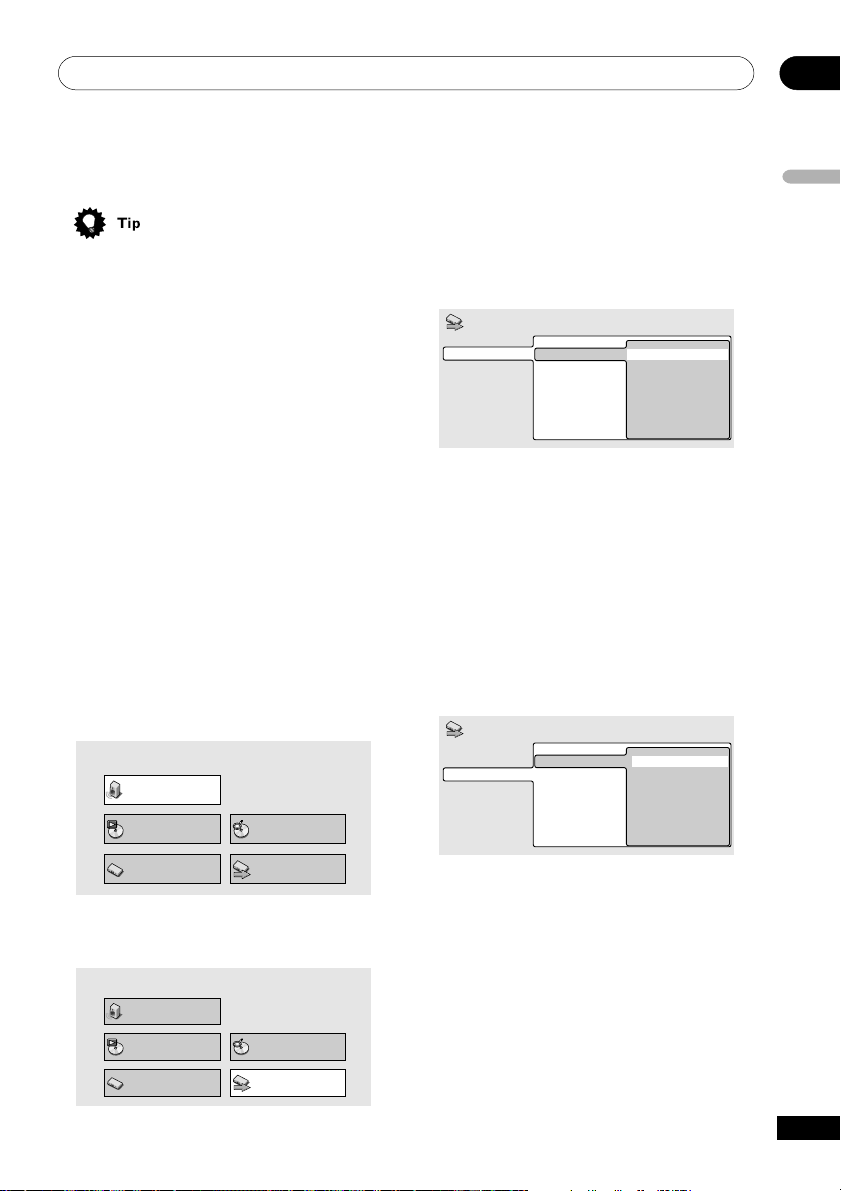
1 Press SETUP and select ‘Disc Navigator’ from the on-screen display.
Alternatively, if a CD, Video CD or MP3 disc
is loaded, you can press MENU, which takes
you straight to the Disc Navigator screen.
2 Select what you want to play.
Depending on the type of disc you have
loaded, the Disc Navigator looks slightly
different.
The screen for DVD discs shows the titles on
the left and the chapters on the right. Select
a title, or a chapter within a title.
Disc Navigator
DVD
Title 1-10
Title 01
Title 02
Title 03
Title 04
Title 05
Title 06
Title 07
Title 08
Chapter 1-3
Chapter 001
Chapter 002
Chapter 003
The screen for CDs and Video CDs shows a
list of tracks.
Disc Navigator
CD
Track 1-10
Track 01
Track 02
Track 03
Track 04
Track 05
Track 06
Track 07
Track 08
The screen for an MP3 disc shows the folder
names on the left and the track names on
the right (note that if there are more than 16
folders or names that contain accented or
non-roman characters, tracks and folders
may show up with generic names – F_033,
T_035, etc.).
Select a folder, or a track within a folder.
English
Audio Settings
Play Mode
Setup Navigator
Disc Navigator
Initial Settings
Disc Navigator
MP3
Folder 1-17
001. ACP
002. Nth Degree
003. Pfeuti
004. Live
005. Glitch music
006. CodHead
007. Thermo
008. Missing Man
Track 1-10
001. Gravity deluxe
002. Tesla's patent
003. Border dispute
004. Delayed by rain
005. Accident incident
006. Pigeon post
007. Outernational
008. Vacuum tube
Playback starts after you press ENTER.
27
En
Playing Discs05
• The Disc Navigator is not available
unless there is a disc loaded.
• It’s not possible to use the Disc Navigator when playing a Video CD in PBC
mode, or an unfinalized CD-R/RW disc.
• Another way to find a particular place on
a disc is to use one of the search modes.
See Searching a disc on page 34.
Scanning discs
You can fast-scan discs forward or backward
at various different speeds.
1 During playback, press 1 or ¡ to
start scanning.
2 Press repeatedly to increase the
scanning speed.
• MP3s can only be scanned at one speed.
• The scanning speed is shown on-screen.
3 To resume normal playback, press 3
(play).
• Sound can be heard while scanning
audio CDs and MP3 discs.
• When scanning a Video CD or MP3
track, playback automatically resumes
at the end or beginning of the track.
• There is no sound while scanning DVDs
and Video CDs, and no subtitles while
scanning DVDs.
• Depending on the disc, normal playback
may automatically resume when a new
chapter is reached on a DVD disc.
28
En
Playing in slow motion
You can play DVDs and Video CDs at four
different forward slow motion speeds, and
DVDs also at two reverse speeds.
1 During playback, press 8 (pause).
/e
E/
2 Press and hold
slow motion playback starts.
• The slow motion speed is shown onscreen.
• There is no sound during slow motion
playback.
3 Press repeatedly to change the slow
motion speed.
• The slow motion speed is displayed onscreen.
4 To resume normal playback, press 3
(play).
• Video CD only supports forward slow
motion playback.
• The picture quality during slow motion
playback is not as good as during
normal playback.
• Depending on the disc, normal playback
may automatically resume when a new
chapter is reached.
or
until
Frame advance/frame reverse
You can advance or back up a DVD disc
frame-by-frame. With Video CDs, you can
only use frame advance.
1 During playback, press 8 (pause).
/e
E/
2 Press
advance a frame at a time.
3 To resume normal playback, press 3
(play).
or
to reverse or
Playing Discs
05
• The picture quality when using frame
reverse is not as good as frame advance.
• Depending on the disc, normal playback
may automatically resume when a new
chapter is reached.
• When changing direction with a DVD
disc, the picture may ‘move’ in an
unexpected way. This is not a
malfunction.
Looping a section of a disc
The A-B Repeat function allows you to
specify two points (A and B) within a track
(CD and Video CD) or title (DVD) that form a
loop which is played over and over.
A-B Repeat is not available with MP3 discs,
Video CDs in PBC mode, or unfinalized
CD-R/RW discs.
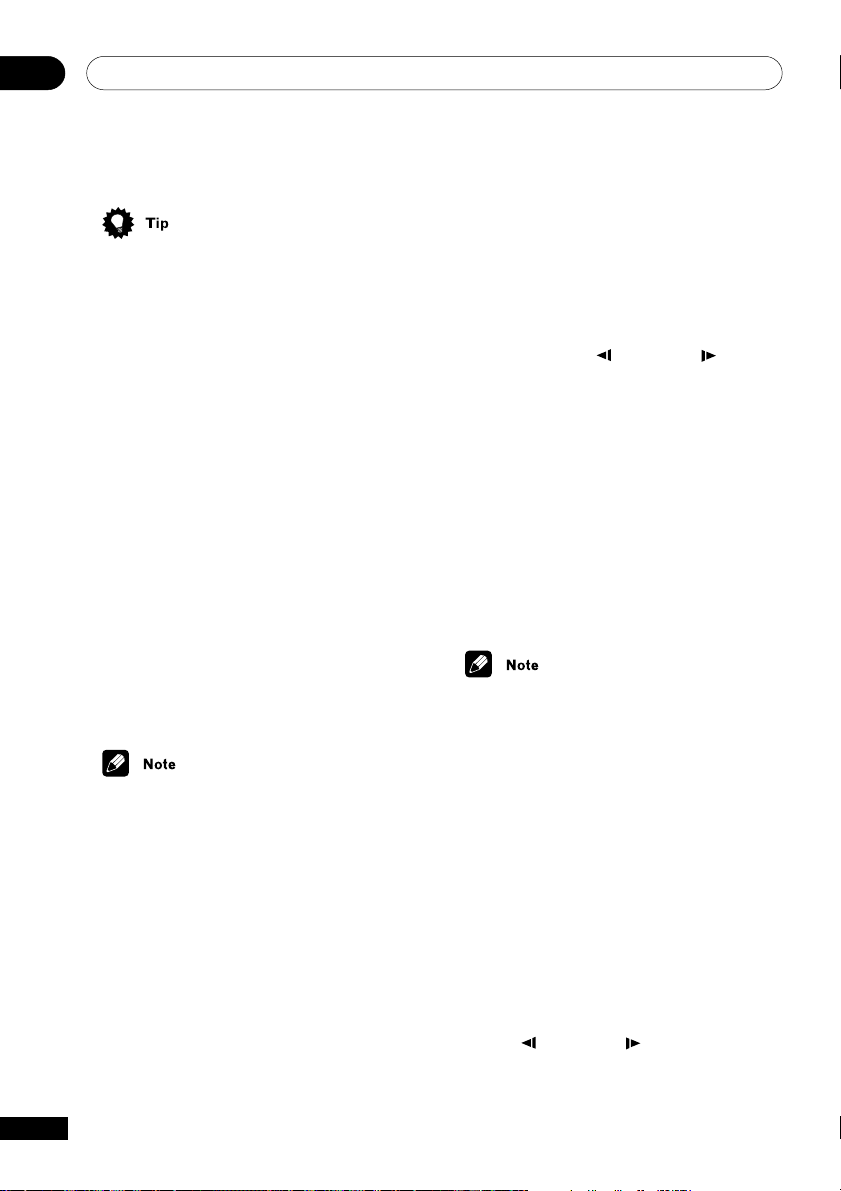
1 During playback, press PLAY MODE
and select ‘A-B Repeat’ from the list of
functions on the left.
Play Mode
A-B Repeat
Repeat
Random
Program
Search Mode
2 Press ENTER on ‘A(Start Point)’ to set
the loop start point.
A(Start Point)
B(End Point)
Off
3 Press ENTER on ‘B(End Point)’ to set
the loop end point.
Play Mode
A-B Repeat
Repeat
Random
Program
Search Mode
A(Start Point)
B(End Point)
Off
After pressing ENTER, playback jumps back
to the start point and plays the loop.
• The minimum loop time is 2 seconds.
4 To resume normal playback, select
‘Off’ from the menu.
Using repeat play
There are various repeat play options,
depending on the kind of disc loaded. It’s
also possible to use repeat play together with
program play to repeat the tracks/chapters in
the program list (see Creating a program list
on page 31).
Repeat play is not available with Video CDs
in PBC mode, or unfinalized CD-R/RW discs.
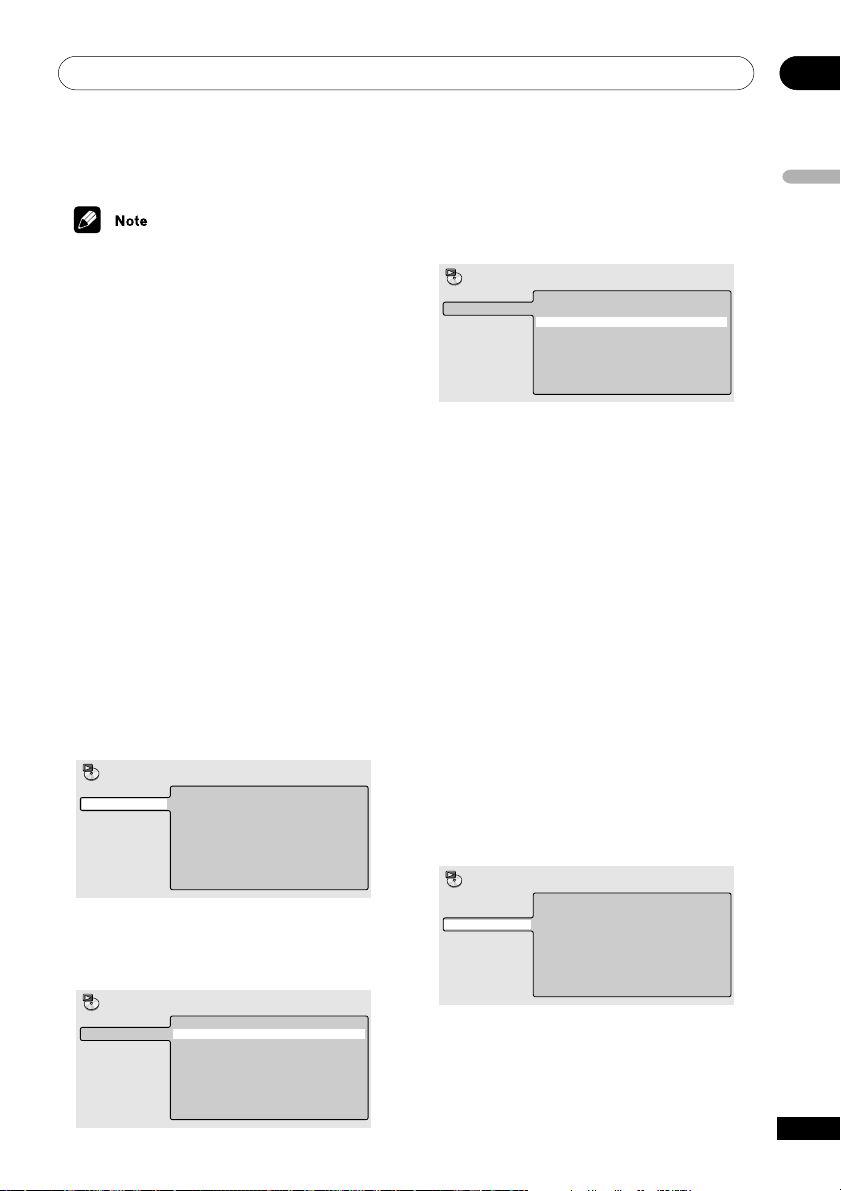
1 During playback, press PLAY MODE
and select ‘Repeat’ from the list of
functions on the left.
Play Mode
A-B Repeat
Repeat
Random
Program
Search Mode
Title Repeat
Chapter Repeat
Repeat Off
English
Play Mode
A-B Repeat
Repeat
Random
Program
Search Mode
A(Start Point)
B(End Point)
Off
29
En
Playing Discs05
2 Select a repeat play option.
If program play is active, select Program
Repeat to repeat the program list, or Repeat
Off to cancel.
For DVD discs, select Title Repeat or
Chapter Repeat (or Repeat Off).
Play Mode
A-B Repeat
Repeat
Random
Program
Search Mode
Title Repeat
Chapter Repeat
Repeat Off
For CDs and Video CDs, select Disc Repeat
or Track Repeat (or Repeat Off).
Play Mode
A-B Repeat
Repeat
Random
Program
Search Mode
Disc Repeat
Track Repeat
Repeat Off
For MP3 discs, select Disc Repeat, Folder
Repeat or Track Repeat (or Repeat Off).
Using random play
Use the random play function to play titles or
chapters (DVD) or tracks (CD, Video CD and
MP3 discs) in a random order.
You can set the random play option when a
disc is playing or stopped.
1 Press PLAY MODE and select ‘Random’
from the list of functions on the left.
Play Mode
A-B Repeat
Repeat
Random
Program
Search Mode
2 Select a random play option.
For DVD discs, select Random Title or
Random Chapter (or Random Off)
Play Mode
A-B Repeat
Repeat
Random
Program
Search Mode
Random Title
Random Chapter
Random Off
Random Title
Random Chapter
Random Off
30
En
Play Mode
A-B Repeat
Repeat
Random
Program
Search Mode
Disc Repeat
Folder Repeat
Track Repeat
Repeat Off
• You can’t use repeat and random play at
the same time.
• If you switch camera angle during
repeat play, repeat play is canceled.
For CDs, Video CDs and MP3 discs, select
On or Off to switch random play on or off.
(Note that when used with MP3 discs, only
tracks from within the current folder are
played.)
Play Mode
A-B Repeat
Repeat
Random
Program
Search Mode
On
Off

Playing Discs
05
• To stop the disc and cancel random
playback, press 7 (stop).
• To cancel random playback without
stopping playback, press CLEAR. The
disc will play to the end, then stop.
• During random play, the 4 and ¢
buttons function a little differently to
normal: 4 returns to the beginning of
the current track/chapter. You can't go
back further than this. ¢ selects
another track/chapter at random from
those remaining.
• You can't use random play together with
program or repeat play.
• You can’t use random play with Video
CDs playing in PBC mode, or unfinalized
CD-R/RW discs.
Creating a program list
This feature lets you program the play order
of titles/chapters/folders/tracks on a disc.
Program play is not available with Video CDs
playing in PBC mode, or unfinalized
CD-R/RW discs.
1 Press PLAY MODE and select ‘Pro-
gram’ from the list of functions on the
left.
2 Select ‘Create/Edit’ from the list of
program options.
Play Mode
A-B Repeat
Repeat
Random
Program
Search Mode
Create/Edit
Playback Start
Playback Stop
Program Delete
Program Memory ‰ Off
The Program edit screen that appears
depends on the kind of disc loaded.
On the left side is the program list, then to
the right is a list of titles (if a DVD disc is
loaded), tracks (for CDs and Video CDs), or
folder names (for MP3 discs). On the far
right is a list of chapters (for DVD) or track
names (for MP3).
3 Select a title, chapter, folder or track
for the current step in the program list.
For a DVD disc, you can add a whole title, or
a chapter within a title to the program list.
• To add a title, select the title.
Program
Program Step
01. 01
02.
03.
04.
05.
06.
07.
08.
Title 1~38
Title 01
Title 02
Title 03
Title 04
Title 05
Title 06
Title 07
Title 08
Chapter 1~4
Chapter 001
Chapter 002
Chapter 003
Chapter 004
English
Play Mode
A-B Repeat
Repeat
Random
Program
Search Mode
Create/Edit
Playback Start
Playback Stop
Program Delete
Program Memory ‰ Off
31
En

Playing Discs05
• To add a chapter, first highlight the title,
then press
(cursor right) and select a
chapter from the list.
Program
Program Step
01. 01-003
02.
03.
04.
05.
06.
07.
08.
Title 1-38
Title 01
Title 02
Title 03
Title 04
Title 05
Title 06
Title 07
Title 08
Chapter 1-4
Chapter 001
Chapter 002
Chapter 003
Chapter 004
For a CD or Video CD, select a track to add to
the program list.
Program
Program Step
01. 04
02.
03.
04.
05.
06.
07.
08.
Track 1~12
Track 01
Track 02
Track 03
Track 04
Track 05
Track 06
Track 07
Track 08
For an MP3 disc, you can add a whole folder,
or a track within a folder to the program list.
• To add a folder, select the folder.
• To add a track, first find the folder, then
(cursor right) and select a track
press
name from the list.
Program
Program Step
01. 001-003
02.
03.
04.
05.
06.
07.
08.
Folder 1-6
001. ACP
002. Nth Degree
003. Pfeuti
004. Live
005. Glitch music
006. CodHead
Track 1-10
001. Gravity deluxe
002. Tesla's patent
003. Border dispute
004. Delayed by rain
005. Accident incident
006. Pigeon post
007. Outernational
008. Vacuum tube
After pressing ENTER to select the title/
chapter/folder/track, the step number
automatically moves down one.
4 Repeat step 3 to build up a program
list.
A program list can contain up to 24 titles/
chapters/folders/tracks.
5 To play the program list, press 3
(play).
Program play remains active until you turn
off program play (see below), erase the
program list (see below), eject the disc or
switch off the player.
32
En
Program
Program Step
01. 001
02.
03.
04.
05.
06.
07.
08.
Folder 1-6
001. ACP
002. Nth Degree
003. Pfeuti
004. Live
005. Glitch music
006. CodHead
Track 1-10
001. Gravity deluxe
002. Tesla's patent
003. Border dispute
004. Delayed by rain
005. Accident incident
006. Pigeon post
007. Outernational
008. Vacuum tube
• To save your program list and exit the
program edit screen without starting
playback, press PLAY MODE or SETUP.
(Don’t press RETURN – your program
list won’t be saved.)
• During program play, press ¢ to skip
to the next program step.
• Press CLEAR during playback to switch
off program play. Press while stopped to
erase the program list.

Playing Discs
Editing a program list
After creating a program list, you can add,
delete and change steps.
1 Press PLAY MODE and select ‘Pro-
gram’ from the list of functions on the
left.
2 Select ‘Create/Edit’ from the list of
program options.
3 To clear a step, highlight the step
number and press CLEAR.
4 To insert a step in the middle of the
program list, highlight the step where
you want the new step to appear, then
select a title/chapter/folder/track to add.
After pressing ENTER, the new step is
inserted into the list.
5 To add a step to the end of the
program list, highlight the next free step
then select a title/chapter/folder/track to
add.
• To save your program list and exit the
program edit screen without starting
playback, press PLAY MODE or SETUP.
• If you want to exit the program edit
screen without saving the changes you
made, press RETURN.
Other functions available from
the program menu
As well as creating and editing a program
list, you can start program play, cancel
program play, erase the program list, and
memorize a program list from the Play Mode
menu.
1 Press PLAY MODE and select ‘Pro-
gram’ from the list of functions on the
left.
Play Mode
A-B Repeat
Repeat
Random
Program
Search Mode
2 Select a program play function.
• Create/Edit – See above
• Playback Start – Starts playback of a
saved program list
• Playback Stop – Turns off program play,
but does not erase the program list
• Program Delete – Erases the program
list and turns off program play
• Program Memory (DVD only) – Select
On to save the program list for the disc
loaded. (Select Off to cancel the
program memory for the disc loaded)
Create/Edit
Playback Start
Playback Stop
Program Delete
Program Memory ‰ Off
05
English
• Program lists are saved for the disc
loaded. When you load a disc with a
saved program list, program play is
automatically turned on.
• You can save program lists for up to 24
discs. After that, the oldest one is
replaced with the new one saved.
33
En

Playing Discs05
Searching a disc
You can search DVD discs by title or chapter
number, or by time. CDs can be searched by
track number, and Video CDs by track
number or time. MP3 discs can be searched
by folder or track number.
1 Press PLAY MODE and select ‘Search
Mode’ from the list of functions on the
left.
The search options that appear depend on
the kind of disc loaded. The screen below
shows the DVD search options.
Play Mode
A-B Repeat
Repeat
Random
Program
Search Mode
2 Select a search mode.
3 Use the number buttons to enter a
title, chapter, folder or track number, or a
time.
Play Mode
A-B Repeat
Repeat
Random
Program
Search Mode
• For a time search, enter the number of
minutes and seconds into the currently
playing title (DVD) or track (Video CD)
you want playback to resume from. For
example, press 4, 5, 0, 0 to have
playback start from 45 minutes into the
disc. For 1 hour, 20 minutes and 30
seconds, press 8, 0, 3, 0.
Title Search
Chapter Search
Time Search
Title Search
Chapter Search
Time Search
Chapter Input
0 0 1
4 Press ENTER to start playback.
• The disc must be playing in order to use
time search.
• Search functions are not available with
Video CDs in PBC mode, or unfinalized
CD-R/RW discs.
Switching subtitles
Some DVD discs have subtitles in one or
more languages; the disc box will usually tell
you which subtitle languages are available.
You can switch subtitle language anytime
during playback.
1 Press SUBTITLE repeatedly to select a
subtitle option.
Current / Total
Subtitle English1/2
• To set subtitle preferences, see Subtitle
Language on page 42.
Switching DVD audio
language
When playing a DVD disc recorded with
dialog in two or more languages, you can
switch audio language anytime during
playback.
1 Press AUDIO repeatedly to select an
audio language option.
Current /Total
Audio French Dolby Digital 3/2.1CH1/2
• To set audio language preferences, see
Audio Language on page 42.
34
En

Playing Discs
05
Switching audio channel
when playing a Video CD
When playing a Video CD, you can switch
between stereo, just the left channel or just
the right channel.
1 Press AUDIO repeatly to select an
audio channel option.
Audio Stereo
Zooming the screen
Using the zoom feature you can magnify a
part of the screen by a factor of 2 or 4, while
watching a DVD or Video CD.
1 During playback, use the ZOOM
button to select the zoom factor.
• Normal
• 2x
• 4x
Normal
2 Use the cursor buttons to change the
English
zoomed area.
You can change the zoom factor and the
zoomed area freely during playback.
• If the navigation square at the top of the
screen disappears, press ZOOM again
to display it.
• We do not recommend using DVD disc
menus when the screen is zoomed as
menu options will not be highlighted.
• If you are displaying subtitles, these will
disappear when the screen is zoomed.
They will reappear when you return the
screen to normal,
Switching camera angles
Some DVD discs feature scenes shot from
two or more angles—check the disc box for
details.
When a multi-angle scene is playing, a
icon appears on screen to let you know that
other angles are available (this can be
switched off if you prefer—see page 44).
Zoom 2
Zoom 4
• Since DVD and Video CD has a fixed
resolution, picture quality will deteriorate, especially at 4x zoom. This is not a
malfunction.
Zoom 2
Zoom 4
1 During playback (or when paused),
press ANGLE to switch angle.
If the disc was paused, playback starts again
with the new angle.
35
En

Playing Discs05
Displaying disc information
Various track, chapter and title information,
as well as the video transmission rate for
DVD discs, can be displayed on-screen while
a disc is playing.
1 To show/switch the information
displayed, press DISPLAY.
When a disc is playing, the information
appears at the top of the screen. Keep
pressing DISPLAY to change the displayed
information.
• DVD displays
Play DVD
3
Current / Total Elapsed
Title
French
Audio
Dolby Digital 3/2.1CH AngleSubtitle
Play DVD
3
Current / Total Elapsed
Chapter
Tr. Rate 8.6Mbps
Remain
2.0511/38
4.57
English 1
Remain
2.0511/38
4.57
Total
Tota l
7.02
7.02
• You can see disc information (number of
titles/chapters, tracks, folders and so
on) from the Disc Navigator screen. See
Using the Disc Navigator to browse the
contents of a disc on page 27.
36
En
• CD and Video CD displays
Play CD
3
Current / Total Elapsed
Trac k
Play CD
3
Disc
1.072/16
Elapsed
28.00
Remain
4.40
Remain
30.20
• MP3 disc displays
Play MP3
3
Current / Total Elapsed
Track
Track Name Outernational
Play MP3
3
Current / Total
Folder
2/7
Folder Name ACP
Remain
0.181/17
12.42
Tota l
Tota l
Tota l
5.47
58.20
13.00

The Audio Settings Menu
Audio DRC
• Default setting: Off
When watching Dolby Digital DVDs at low
volume, it’s easy to lose the quieter sounds
completely—including some of the dialog.
Switching Audio DRC (Dynamic Range
Control) to On can help by bringing up the
quieter sounds, while controlling loud peaks.
How much of a difference you hear depends
on the material you’re listening to. If the
material doesn’t have wide variations in
volume, you may not notice much change.
1 Press SETUP and select ‘Audio Settings’ from the on-screen display.
Audio Settings
Play Mode
Initial Settings
Disc Navigator
Setup Navigator
06
English
• Audio DRC is only effective with Dolby
Digital audio sources.
• Audio DRC is only effective through the
digital output when Digital Out is set to
On, and Dolby Digital Out is set to
Dolby Digital > PCM. See page 39.
• The effect of Audio DRC depends on
your speakers and AV receiver settings.
Virtual Surround
• Default setting: Off
Switch on Virtual Surround to enjoy surround
sound effects from just two speakers.
When you play a Dolby Digital soundtrack,
Virtual Dolby Digital, which uses
TruSurround technology from SRS, produces
a deep, realistic 3D soundspace from a pair
of stereo speakers.
2 Highlight Audio DRC, then use the
buttons (cursor left/right) to change
/
to ‘On’ or ‘Off’, as required.
Audio Settings
Audio DRC
Virtual Surround
Off
Off
3 Press ENTER to make the setting and
exit the Audio Settings screen.
37
En

06
The Audio Settings Menu
1 Press SETUP and select ‘Audio Settings’ from the on-screen display.
Audio Settings
Play Mode
Initial Settings
2 Highlight Virtual Surround, then use
/
the
buttons (cursor left/right) to
change to ‘2V/TruSurround’ or ‘Off’, as
required.
Audio Settings
Audio DRC
Virtual Surround
3 Press ENTER to make the setting and
exit the Audio Settings screen.
Disc Navigator
Setup Navigator
Off
Off
• Virtual Surround doesn’t work with DTS
or 96kHz linear PCM audio, or during
MP3 playback, through either the
analog or digital outputs.
• If the player is outputting Dolby Digital
or MPEG bitstream audio (in other
words, no conversion to PCM), Virtual
Surround has no effect on the audio
from the digital output. See pages 39–
40 for how to set up the digital output
formats.
• How good the surround effect is varies
with the disc.
38
En
• You can also use the SURROUND
button on the remote control to switch
Virtual Surround on (2V/
TruSurround)/Off.

The Initial Settings Menu
Using the Initial Settings
menu
The Initial Settings menu gives you complete
control in setting up your DVD player,
including audio, and video output settings,
audience limitation settings, among others.
If an option is grayed out it means that it
cannot be changed at the current time. This
is usually because a disc is playing. Stop the
disc, then change the setting.
1 Press SETUP and select ‘Initial Settings’ from the on-screen display.
Audio Settings
Digital Audio Out settings
Digital Out
• Default setting: On
You only need to make this setting if you
connected this system to an AV receiver (or
other component) using one of the digital
outputs.
Initial Settings
Digital Audio Out
Video Output
Language
Display
Options
Digital Out
Dolby Digital Out
DTS Out
96 kHz PCM Out
MPEG Out
On
Off
07
English
Play Mode
Initial Settings
Disc Navigator
Setup Navigator
2 Select the setup category from the list
on the left, then select an item from the
menu list to the right.
3 Make the setting you want.
• The language options shown in the onscreen display illustrations on the
following pages may not correspond to
those available in your country or
region.
If at any time you need to switch off the
digital audio output, set this to Off, otherwise leave it On.
Note that you can’t switch on/off the optical
and coaxial outputs individually.
Dolby Digital Out
• Default setting: Dolby Digital
You only need to make this setting if you
connected this system to an AV receiver (or
other component) using one of the digital
outputs.
Initial Settings
Digital Audio Out
Video Output
Language
Display
Options
If your AV receiver (or other connected
component) is Dolby Digital compatible, set
to Dolby Digital, otherwise set to Dolby
Digital > PCM.
Digital Out
Dolby Digital Out
DTS Out
96 kHz PCM Out
MPEG Out
Dolby Digital
Dolby Digital > PCM
39
En

The Initial Settings Menu07
DTS Out
• Default setting: Off
You only need to make this setting if you
connected this system to an AV receiver (or
other component) using one of the digital
outputs.
Initial Settings
Digital Audio Out
Video Output
Language
Display
Options
Digital Out
Dolby Digital Out
DTS Out
96 kHz PCM Out
MPEG Out
DTS
Off
If your AV receiver (or other connected
component) has a built-in DTS decoder, set
this to DTS, otherwise set to Off. Check the
manual that came with the other component
if you’re unsure whether it is DTS compatible.
• If you set to DTS with a non-DTS
compatible amplifier, noise will be
output when you play a DTS disc.
96kHz PCM Out
• Default setting: 96kHz > 48kHz
You only need to make this setting if you
connected this system to an AV receiver (or
other component) using one of the digital
outputs.
If your AV receiver (or other connected
component) is compatible with high
sampling rates (96 kHz), set this to 96kHz,
otherwise set it to 96kHz > 48kHz (96 kHz
audio is converted to a more compatible 48
kHz). Check the manual that came with the
other component if you’re unsure whether it
is 96 kHz compatible.
MPEG Out
• Default setting: MPEG > PCM
You only need to make this setting if you
connected this system to an AV receiver (or
other component) using one of the digital
outputs.
Initial Settings
Digital Audio Out
Video Output
Language
Display
Options
If your AV receiver (or other connected
component) is compatible with MPEG audio,
set this to MPEG, otherwise set it to MPEG >
PCM (MPEG audio is converted to more
compatible PCM audio). Check the manual
that came with the other component if you’re
unsure whether it is MPEG audio compatible.
Digital Out
Dolby Digital Out
DTS Out
96 kHz PCM Out
MPEG Out
MPEG
MPEG > PCM
40
En
Initial Settings
Digital Audio Out
Video Output
Language
Display
Options
Digital Out
Dolby Digital Out
DTS Out
96 kHz PCM Out
MPEG Out
96 kHz > 48kHz
96 kHz

The Initial Settings Menu
07
Video Output settings
TV Screen
• Default setting: 4:3 (Letter Box)
Initial Settings
Digital Audio Out
Video Output
Language
Display
Options
TV Screen
AV Connector Out
S-Video Out
If you have a widescreen TV, select the 16:9
(Wide) setting—widescreen DVD software is
then shown using the full screen area. When
playing software recorded in conventional
(4:3) format, the settings on your TV will
determine how the material is presented—
see the manual that came with your TV for
details on what options are available.
If you have a conventional TV, select either
4:3 (Letter Box) or 4:3 (Pan & Scan). In
Letter Box mode, widescreen software is
shown with black bars at the top and bottom
of the screen. Pan & Scan chops the sides off
widescreen material to make it fit the 4:3
screen (so even though the image looks
larger on the screen, you’re actually seeing
less of the picture). See also page 49.
4:3 (Letter Box)
4:3 (Pan&Scan)
16:9 (Wide)
and reconnect to the TV using either the
supplied audio/video cable, or an SVideo cable (see pages 11 and 12 for
more on this).
• SCART cables come in various configurations. Make sure you use the correct
one for your TV/monitor. See page 54 for
the SCART pin assignment diagram.
Initial Settings
Digital Audio Out
Video Output
Language
Display
Options
TV Screen
AV Connector Out
S-Video Out
Video
S-Video
RGB
• Video – Standard video, compatible
with all TVs.
• S-Video – Higher quality, but check your
TV for compatibility.
• RGB – Best quality, but check your TV
for compatibility.
S-Video Out
• Default setting: S2
You only need to make this setting if you
connected this player to your TV using an SVideo cord.
English
AV Connector Out
• Default setting: Video
You only need to make this setting if you
connected this player to your TV using the AV
SCART-type connector.
• If you make a setting here that is
incompatible with your TV, the TV may
not display any picture at all. If this
happens either switch everything off
Initial Settings
Digital Audio Out
Video Output
Language
Display
Options
TV Screen
AV Connector Out
S-Video Out
S1
S2
If you find that the picture is stretched or
distorted on the default S2 setting, try
changing it to S1.
41
En

The Initial Settings Menu07
Language settings
Audio Language
• Default setting: English
Initial Settings
Digital Audio Out
Video Output
Language
Display
Options
This setting is your preferred audio language
for DVD discs. If the language you specify
here is recorded on a disc, the system
automatically plays the disc in that language.
The DVD format recognizes 136 different
languages. Select Other Language if you
want to specify a language other than those
listed. See also Selecting languages using the
language code list on page 51.
• You can switch between the languages
recorded on a DVD disc any time during
playback using the AUDIO button. (This
does not affect this setting.) See page
34.
Audio Language
Subtitle Language
DVD Menu Lang.
Subtitle Display
English
French
German
Italian
Spanish
Other Language
Subtitle Language
• Default setting: English
Initial Settings
Digital Audio Out
Video Output
Language
Display
Options
This setting is your preferred subtitle
language for DVD discs. If the language you
specify here is recorded on a disc, the
system automatically plays the disc with
those subtitles.
The DVD format recognizes 136 different
languages. Select Other Language if you
want to specify a language other than those
listed. See also Selecting languages using the
language code list on page 51.
• You can change or switch off the
subtitles on a DVD disc any time during
playback using the SUBTITLE button.
(This does not affect this setting.) See
page 34.
Audio Language
Subtitle Language
DVD Menu Lang.
Subtitle Display
English
French
German
Italian
Spanish
Other Language
42
En

The Initial Settings Menu
DVD Menu Language
• Default setting: w/Subtitle Lang.
07
English
Display settings
Initial Settings
Digital Audio Out
Video Output
Language
Display
Options
Audio Language
Subtitle Language
DVD Menu Lang.
Subtitle Display
w/Subtitle Lang.
English
French
German
Italian
Spanish
Other Language
Some multilingual discs have disc menus in
several languages. This setting specifies in
which language the disc menus should
appear. Leave on the default setting for
menus to appear in the same language as
your Subtitle Language—see page 42.
The DVD format recognizes 136 different
languages. Select Other Language if you
want to specify a language other than those
listed. See also Selecting languages using the
language code list on page 51.
Subtitle Display
• Default setting: On
Initial Settings
Digital Audio Out
Video Output
Language
Display
Options
Audio Language
Subtitle Language
DVD Menu Lang.
Subtitle Display
On
Off
OSD Language
• Default setting: English
Initial Settings
Digital Audio Out
Video Output
Language
Display
Options
OSD Language
On Screen Display
Angle Indicator
English
Français
Deutsch
Italiano
Español
This sets the language of this player’s onscreen displays.
On Screen Display
• Default setting: On
Initial Settings
Digital Audio Out
Video Output
Language
Display
Options
This sets whether operation displays are
shown on-screen (Play, Resume, Scan and
so on.)
OSD Language
On Screen Display
Angle Indicator
On
Off
When set to On, the player displays subtitles
according to the Subtitle Language setting.
Set to Off to switch subtitles off altogether.
43
En

The Initial Settings Menu07
Angle Indicator
• Default setting: On
Initial Settings
Digital Audio Out
Video Output
Language
Display
Options
If you prefer not to see the camera icon onscreen during multi-angle scenes on DVD
discs, change this setting to Off.
OSD Language
On Screen Display
Angle Indicator
On
Off
Options
• Not all discs that you may consider
inappropriate for your children use the
Parental Lock feature. These discs will
always play without requiring the
password first.
• If you forget your password, you’ll need
to reset the player to it’s factory settings
(page 49), then register a new password.
Registering a new password
You must register a password before you can
change the Parental Lock level or enter a
Country Code.
1 Select ‘Password’.
Parental Lock
• Default level: Off
• Default password: none
• Default country code: us (2119)
Some DVD Video discs feature a Parental
Lock level. If your player is set to a lower level
than the disc, the disc won’t play. This gives
you some control about what your children
watch on your DVD player.
Some discs also support the Country Code
feature. The player does not play certain
scenes on these discs, depending on the
country code you set.
Before you can set the Parental Lock level or
the Country Code you must register a
password. As the password owner, you can
change the Parental Lock level or Country
Code whenever you like. You can also change
the password.
44
En
Initial Settings
Digital Audio Out
Video Output
Language
Display
Options
Parental Lock Password
Level Change
Country Code
2 Use the number buttons to enter a 4digit password.
Initial Settings
Digital Audio Out
Video Output
Language
Display
Options
Register Code Number
****
The numbers you enter show up as asterisks
(*) on-screen.

The Initial Settings Menu
07
3 Press ENTER to register the password
and return to the Options menu screen.
If you forget your password, you can reset
the system then register a new one. See
page 49 for how to reset the player.
Changing your password
To change your password, confirm your
existing password then enter a new one.
1 Select ‘Password Change’.
Initial Settings
Digital Audio Out
Video Output
Language
Display
Options
Parental Lock Password Change
Level Change
Country Code
2 Use the number buttons to enter your
existing password, then press ENTER.
• The numbers appear as asterisks as you
enter them.
Initial Settings
Digital Audio Out
Video Output
Language
Display
Options
Password Change
Password
New Password
****
3 Enter a new password.
Initial Settings
Digital Audio Out
Video Output
Language
Display
Options
Password Change
Password
New Password
****
****
4 Press ENTER to register the new
password and return to the Options
menu screen.
Setting/changing the Parental Lock
level
1 Select ‘Level Change’.
Initial Settings
Digital Audio Out
Video Output
Language
Display
Options
Parental Lock Password Change
Level Change
Country Code
2 Use number buttons to enter your
password, then press ENTER.
Initial Settings
Digital Audio Out
Video Output
Language
Display
Options
Parental Lock : Level Change
Password
1 2 3 4 5 6 7 8 off
****
English
45
En

The Initial Settings Menu07
3 Select a new level.
Initial Settings
Digital Audio Out
Video Output
Language
Display
Options
Parental Lock : Level Change
Password
1 2 3 4 5 6 7 8 off
****
Press (cursor left) repeatedly to lock more
levels (more discs will require the password);
(cursor right) to unlock levels. You
press
can’t lock level 1.
4 Press ENTER to set the new level and
return to the Options menu screen.
Setting/changing the Country Code
You may also want to refer to the Country
code list on page 50.
1 Select ‘Country Code’.
Initial Settings
Digital Audio Out
Video Output
Language
Display
Options
Parental Lock Password Change
Level Change
Country Code
3 Select a country code.
There are two ways you can do this.
• Select by code letter: Use
(cursor
/
up/down) to change the country code.
Initial Settings
Digital Audio Out
Video Output
Language
Display
Options
Parental Lock: Country Code
Password
Country Code List Code
us
****
2 1 1 9
• Select by code number: Press (cursor
right) then use the number buttons to
enter the 4-digit country code (you can
find the Country code list on page 50.)
Initial Settings
Digital Audio Out
Video Output
Language
Display
Options
Parental Lock: Country Code
Password
Country Code List Code
us
****
2 1 1 9
4 Press ENTER to set the new Country
Code and return to the Options menu
screen.
2 Use number buttons to enter your
password, then press ENTER.
Initial Settings
Digital Audio Out
Video Output
Language
Display
Options
Parental Lock: Country Code
Password
Country Code List Code
us
46
En
• Changing the country code does not
take effect until the next disc is loaded
(or the current disc is reloaded).
****
2 1 1 9

Additional Information
Taking care of your player
and discs
Handling discs
When holding discs of any type, take care
not to leave fingerprints, dirt or scratches on
the disc surface. Hold the disc by its edge or
by the center hole and edge.
Damaged or dirty discs can affect playback
performance. Take care also not to scratch
the label side of the disc. Although not as
fragile as the recorded side, scratches can
still result in a disc becoming unusable.
Should a disc become marked with fingerprints, dust, etc., clean using a soft, dry
cloth, wiping the disc lightly from the center
to the outside edge as shown in the diagram
below.
08
English
Storing discs
Although CDs and DVD discs are more
durable than vinyl records, you should still
take care to handle and store discs correctly.
When you're not using a disc, return it to its
case and store upright. Avoid leaving discs
in excessively cold, humid, or hot environments (including under direct sunlight).
Don't glue paper or put stickers onto the
disc, or use a pencil, ball-point pen or other
sharp-tipped writing instrument. These could
all damage the disc.
For more detailed care information see the
instructions that come with discs.
Do not load more than one disc into the
player at a time.
Wipe lightly from the center of the
disc using straight strokes.
Don’t wipe the disc surface using
circular strokes.
If necessary, use a cloth soaked in alcohol,
or a commercially available CD/DVD
cleaning kit to clean a disc more thoroughly.
Never use benzine, thinner or other cleaning
agents, including products designed for
cleaning vinyl records.
Discs to avoid
Discs spin at high speed inside the player. If
you can see that a disc is cracked, chipped,
warped, or otherwise damaged, don't risk
using it in your player—you could end up
damaging the unit.
This unit is designed for use with conventional, fully circular discs only. Use of shaped
discs is not recommended for this product.
Pioneer disclaims all liability arising in
connection with the use of shaped discs.
47
En

Additional Information08
Cleaning the pickup lens
The DVD player’s lens should not become
dirty in normal use, but if for some reason it
should malfunction due to dust or dirt,
consult your nearest Pioneer-authorized
service center. Although lens cleaners for CD
players are commercially available, we do
not recommend using them since some may
damage the lens.
Problems with condensation
Condensation may form inside the player if it
is brought into a warm room from outside, or
if the temperature of the room rises quickly.
Although the condensation won’t damage
the player, it may temporarily impair its
performance. For this reason you should
leave it to adjust to the warmer temperature
for about an hour before switching on and
using.
Hints on installation
We want you to enjoy using this unit for
years to come, so please bear in mind the
following points when choosing a suitable
location for it:
Do...
✓ Use in a well-ventilated room.
✓ Place on a solid, flat, level surface, such
as a table, shelf or stereo rack.
Don’t...
✗ Use in a place exposed to high tempera-
tures or humidity, including near
radiators and other heat-generating
appliances.
✗ Place on a window sill or other place
where the player will be exposed to
direct sunlight.
✗ Use in an excessively dusty or damp
environment.
✗ Place directly on top of an amplifier, or
other component in your stereo system
that becomes hot in use.
✗ Use near a television or monitor as you
may experience interference—especially
if the television uses an indoor antenna.
✗ Use in a kitchen or other room where
the player may be exposed to smoke or
steam.
✗ Use on a thick rug or carpet, or cover
with cloth—this may prevent proper
cooling of the unit.
✗ Place on an unstable surface, or one
that is not large enough to support all
four of the unit’s feet.
Moving the player
If you need to move the player, first press
STANDBY/ON on the front panel to turn
the player off. Wait for -OFF- to disappear
from the display, then unplug the power
cord. Never lift or move the unit during
playback—discs rotate at a high speed and
may be damaged.
Power cord caution
Handle the power cord by the plug part. Do
not pull out the plug by tugging the cord,
and never touch the power cord when your
hands are wet, as this could cause a short
circuit or electric shock. Do not place the
unit, a piece of furniture, or other object on
the power cord or pinch the cord in any other
way. Never make a knot in the cord or tie it
with other cords. The power cords should be
routed so that they are not likely to be
stepped on. A damaged power cord can
cause a fire or give you an electric shock.
Check the power cord once in a while. If you
find it damaged, ask your nearest Pioneer
authorized service center or your dealer for a
replacement.
48
En

Additional Information
08
Screen sizes and disc formats
DVD-Video discs come in several different
screen aspect ratios, ranging from TV
programs, which are generally 4:3, to
CinemaScope widescreen movies, with an
aspect ratio of up to about 7:3.
Televisions, too, come in different aspect
ratios; ‘standard’ 4:3 and widescreen 16:9.
Widescreen TV users
If you have a widescreen TV, the TV Screen
setting (page 41) of this player should be set
to 16:9 (Wide).
When you watch discs recorded in 4:3
format, you can use the TV controls to select
how the picture is presented. Your TV may
offer various zoom and stretch options; see
the instructions that came with your TV for
details.
Please note that some movie aspect ratios
are wider than 16:9, so even though you have
a widescreen TV, these discs will still play in
a ‘letterbox’ style with black bars at the top
and bottom of the screen.
Standard TV users
If you have a standard TV, the TV Screen
setting (page 41) of this player should be set
to 4:3 (Letter Box) or 4:3 (Pan&Scan),
depending on which you prefer.
Set to 4:3 (Letter Box), widescreen discs are
shown with black bars top and bottom.
Set to 4:3(Pan&Scan), widescreen discs are
English
shown with the left and right sides cropped.
Although the picture looks larger, you don’t
actually see the whole picture.
Please note that many widescreen discs
override the player’s settings so that the disc
is shown in letterbox format regardless of the
setting.
• Using the 16:9 (Wide) setting with a
standard 4:3 TV, or either of the 4:3
settings with a widescreen TV, will result
in a distorted picture.
Resetting the player
Use this procedure to reset all the player’s
settings to the factory default.
1 Switch the player into standby.
2 Using the front panel buttons, hold
down the 7 (stop) button and press
STANDBY/ON to switch the player
back on.
All the player’s settings are now reset, and
you should see the ‘Let’s Get Started’ screen.
49
En

Additional Information08
Language code list
Language (Laguage code letter), Language code
Japanese (ja), 1001
English (en), 0514
French (fr), 0618
German (de), 0405
Italian (it), 0920
Spanish (es), 0519
Chinese (zh), 2608
Dutch (nl), 1412
Portuguese (pt), 1620
Swedish (sv), 1922
Russian (ru), 1821
Korean (ko), 1115
Greek (el), 0512
Afar (aa), 0101
Abkhazian (ab), 0102
Afrikaans (af), 0106
Amharic (am), 0113
Arabic (ar), 0118
Assamese (as), 0119
Aymara (ay), 0125
Azerbaijani (az), 0126
Bashkir (ba), 0201
Byelorussian (be), 0205
Bulgarian (bg), 0207
Bihari (bh), 0208
Bislama (bi), 0209
Bengali (bn), 0214
Tibetan (bo), 0215
Breton (br), 0218
Catalan (ca), 0301
Corsican (co), 0315
Czech (cs), 0319
Welsh (cy), 0325
Danish (da), 0401
Bhutani (dz), 0426
Esperanto (eo), 0515
Estonian (et), 0520
Basque (eu), 0521
Persian (fa), 0601
Finnish (fi), 0609
Fiji (fj), 0610
Faroese (fo), 0615
Frisian (fy), 0625
Irish (ga), 0701
Scots-Gaelic (gd), 0704
Galician (gl), 0712
Guarani (gn), 0714
Gujarati (gu), 0721
Hausa (ha), 0801
Hindi (hi), 0809
Croatian (hr), 0818
Hungarian (hu), 0821
Armenian (hy), 0825
Interlingua (ia), 0901
Interlingue (ie), 0905
Inupiak (ik), 0911
Indonesian (in), 0914
Icelandic (is), 0919
Hebrew (iw), 0923
Yiddish (ji), 1009
Javanese (jw), 1023
Georgian (ka), 1101
Kazakh (kk), 1111
Greenlandic (kl), 1112
Cambodian (km), 1113
Kannada (kn), 1114
Kashmiri (ks), 1119
Kurdish (ku), 1121
Kirghiz (ky), 1125
Latin (la), 1201
Lingala (ln), 1214
Laothian (lo), 1215
Lithuanian (lt), 1220
Latvian (lv), 1222
Malagasy (mg), 1307
Maori (mi), 1309
Macedonian (mk), 1311
Malayalam (ml), 1312
Mongolian (mn), 1314
Moldavian (mo), 1315
Marathi (mr), 1318
Malay (ms), 1319
Maltese (mt), 1320
Burmese (my), 1325
Nauru (na), 1401
Nepali (ne), 1405
Norwegian (no), 1415
Occitan (oc), 1503
Oromo (om), 1513
Oriya (or), 1518
Panjabi (pa), 1601
Polish (pl), 1612
Pashto, Pushto (ps), 1619
Quechua (qu), 1721
Rhaeto-Romance (rm), 1813
Kirundi (rn), 1814
Romanian (ro), 1815
Kinyarwanda (rw), 1823
Sanskrit (sa), 1901
Sindhi (sd), 1904
Sangho (sg), 1907
Serbo-Croatian (sh), 1908
Sinhalese (si), 1909
Slovak (sk), 1911
Slovenian (sl), 1912
Samoan (sm), 1913
Shona (sn), 1914
Somali (so), 1915
Albanian (sq), 1917
Serbian (sr), 1918
Siswati (ss), 1919
Sesotho (st), 1920
Sundanese (su), 1921
Swahili (sw), 1923
Tamil (ta), 2001
Telugu (te), 2005
Tajik (tg), 2007
Thai (th), 2008
Tigrinya (ti), 2009
Turkmen (tk), 2011
Tagalog (tl), 2012
Setswana (tn), 2014
Tonga (to), 2015
Turkish (tr), 2018
Tsonga (ts), 2019
Tatar (tt), 2020
Twi (tw), 2023
Ukrainian (uk), 2111
Urdu (ur), 2118
Uzbek (uz), 2126
Vietnamese (vi), 2209
Volapük (vo), 2215
Wolof (wo), 2315
Xhosa (xh), 2408
Yoruba (yo), 2515
Zulu (zu), 2621
Country code list
Country, Country code, Country code letter
Argentina, 0118, ar
Australia, 0121, au
Austria, 0120, at
Belgium, 0205, be
Brazil, 0218, br
Canada, 0301, ca
Chile, 0312, cl
China, 0314, cn
Denmark, 0411, dk
Finland, 0609, fi
France, 0618, fr
Germany, 0405, de
50
En
Hong Kong, 0811, hk
India, 0914, in
Indonesia, 0904, id
Italy, 0920, it
Japan, 1016, jp
Korea, Republic of, 1118, kr
Malaysia, 1325, my
Mexico, 1324, mx
Netherlands, 1412, nl
New Zealand, 1426, nz
Norway, 1415, no
Pakistan, 1611, pk
Philippines, 1608, ph
Portugal, 1620, pt
Russian Federation, 1821, ru
Singapore, 1907, sg
Spain, 0519, es
Sweden, 1905, se
Switzerland, 0308, ch
Taiwan, Province of China, 2023, tw
Thailand, 2008, th
United Kingdom, 0702, gb
United States of America, 2119, us

Additional Information
Selecting languages using
the language code list
Some of the language options (such as ‘DVD
Language’ in the Setup Navigator) allow you
to set your prefered language from any of the
136 languages listed in the language code
list on the previous page.
08
English
Glossary
Analog audio
An electrical signal that directly represents
sound. Compare this to digital audio which
can be an electrical signal, but is an indirect
representation of sound. See also Digital
audio.
1 Select ‘Other Language’.
2 Use the
buttons to select either a code letter or a
code number.
3 Use the
buttons to select a code letter or a code
number.
See the language code list on the previous
page for a complete list of langauges and
codes.
(cursor left/right)
/
(cursor up/down)
/
Aspect ratio
The width of a TV screen relative to its height.
Conventional TVs are 4:3 (in other words, the
screen is almost square); widescreen models
are 16:9 (the screen is almost twice as wide
as it is high).
Digital audio
An indirect representation of sound by
numbers. During recording, the sound is
measured at discrete intervals (44,100 times
a second for CD audio) by an analog-todigital converter, generating a stream of
numbers. On playback, a digital-to-analog
converter generates an analog signal based
on these numbers. See also Sampling
frequency and Analog audio.
Dolby Digital
1
Using a maximum of 5.1 channels of audio,
this high quality surround system is used in
many of the finer movie theaters around the
world.
The on-screen display shows which channels
are active, for example showing 3/2.1. The 3
being the two front channels and the center
channel; the 2 being the surround channels,
and the .1 being the LFE channel.
51
En

Additional Information08
DTS
DTS stands for Digital Theater System. DTS
is a surround system different from Dolby
Digital that has become a popular surround
sound format for movies.
Dynamic range
The difference between the quietest and
loudest sounds possible in an audio signal
(without distorting or getting lost in noise).
Dolby Digital and DTS soundtracks are
capable of a very wide dynamic range,
delivering dramatic cinema-like effects.
File extension
A tag added to the end of a filename to
indicate the type of file. For example, “.mp3”
indicates an MP3 file.
MP3
MP3 (MPEG1 audio layer 3) is a compressed
audio file format. Files are recognized by
their file extension “.mp3” or “.MP3”.
MPEG audio
An audio format used on Video CDs and
some DVD discs. This unit can convert
MPEG audio to PCM format for wider
compatibility with digital recorders and AV
amplifiers. See also PCM.
MPEG video
The video format used for Video CDs and
DVDs. Video CD uses the older MPEG-1
standard, while DVD uses the newer and
much better quality MPEG-2 standard.
PCM (Pulse Code Modulation)
The most common system of encoding
digital audio, found on CDs and DAT.
Excellent quality, but requires a lot of data
compared to formats such as Dolby Digital
and MPEG audio. For compatibility with
digital audio recorders (CD, MD and DAT)
and AV amplifiers with digital inputs, this
unit can convert Dolby Digital, DTS and
MPEG audio to PCM. See also Digital audio.
PBC (PlayBack Control) (Video CD only)
A system of navigating a Video CD through
on-screen menus recorded onto the disc.
Especially good for discs that you would
normally not watch from beginning to end all
at once—karaoke discs, for example.
Regions (DVD-Video only)
These associate discs and players with
particular areas of the world. This unit will
only play discs that have compatible region
codes. You can find the region code of your
unit by looking on the rear panel. Some discs
are compatible with more than one region
(or all regions).
Sampling frequency
The rate at which sound is measured to be
turned into digital audio data. The higher the
rate, the better the sound quality, but the
more digital information is generated.
Standard CD audio has a sampling frequency of 44.1kHz, which means 44,100
samples (measurements) per second. See
also Digital audio.
52
En

Additional Information
Setting the TV System
The default setting of this player is AUTO,
and unless you notice that the picture is
distorted when playing some discs, you
should leave it set to AUTO. If you experience
picture distortion with some discs, set the TV
system to match your country or region’s
system. Doing this, however, may restrict the
kinds of disc you can watch. The table below
shows what kinds of disc are compatible
with each setting (AUTO, PAL and NTSC).
1 If the player is on, press
ON to switch it to standby.
2 Using the front panel controls, hold
down ¡ ¢ then press
to switch the TV system.
The TV system changes as follows:
AUTO = NTSC
NTSC = PAL
PAL = AUTO
The player’s display shows “Welcome
Pioneer”, then indicates the new setting.
STANDBY/
STANDBY/ON
08
English
Watching NTSC on a PAL TV (MOD.
PAL)
Most models of the newly developed
countdown PAL TV system detect 50 Hz
(PAL)/60 Hz (NTSC) and automatically switch
vertical amplitude, resulting in a display
without vertical shrinkage.
If your PAL TV does not have a V-Hold
control, you may not be able to watch NTSC
discs because of picture roll. If the TV has a
V-Hold control, adjust it until the picture
stops rolling.
On some TVs, the picture may shrink
vertically, leaving black bands at the top and
bottom of the screen. This is not a malfunction; it is caused by the NTSC to PAL
conversion.
• You have to switch the player into
standby (press
each change.
STANDBY/ON) before
D i s c P l a y e r s e t t i n g
Type
DVD
Video CD
no disc
CD /
Format
NTSC
PAL
NTSC
PAL
––
NTSC
NTSC
––
NTSC
NTSC
NTSC
PAL
MOD.PAL
PAL
MOD.PAL
PAL
PAL
AUTO
NTSC
PAL
NTSC
PAL
NTSC or PAL
53
En

Additional Information08
Specifications
General
System ............................. DVD-Video, Video CD,
Power requirements .... AC 220–240 V, 50/60 Hz
Power consumption .................................... 14 W
Power consumption (standby)
Weight .........................................................2.5 kg
Dimensions
DV-454 .............. 420 (W) x 55 (H) x 278 (D) mm
DV-350 .............. 420 (W) x 55 (H) x 276 (D) mm
Operating temperature .............. +5°C to +35°C
Operating humidity ............................ 5% to 85%
S-Video output
Y (luminance) - Output level ..........1 Vp-p (75 Ω)
C (color) - Output level ........... 286 mVp-p (75 Ω)
Jack .................................................. S-Video jack
Video output
Output level .................................... 1 Vp-p (75 Ω)
Jack ....................................................... RCA jack
AV connector output
AV Connector (21-pin connector assignment)
AV connector output ............... 21-pin connector
This connector provides the video and audio
signals for connection to a compatible colour
TV or monitor.
CD and MP3 files
....................... 0.3 W
(no condensation)
Audio output (1 stereo pair)
Output level ....................... During audio output
200 mVrms (1 kHz, –20 dB)
Number of channels .......................................... 2
Jacks ..................................................... RCA jack
Digital audio characteristics
Frequency response ..................... 4 Hz to 44 kHz
(DVD fs: 96 kHz)
S/N ratio .................................................... 118 dB
Dynamic range ......................................... 101 dB
Total harmonic distortion ..................... 0.0016 %
Wow and flutter .............. Limit of measurement
(±0.001% W. PEAK) or lower
Digital output
Optical digital output (DV-454 only)
............................................... Optical digital jack
Coaxial digital output ........................... RCA jack
Accessories
Audio/video cable .............................................. 1
Power cable ........................................................ 1
Remote control ................................................... 1
AA/R6P dry cell batteries .................................. 2
Operating Instructions ...................................... 1
Warranty card ..................................................... 1
• The specifications and design of this
product are subject to change without
notice, due to improvement.
PIN no.
1 ................ Audio 2/R out
3 ................. Audio 1/L out
4 ............................... GND
7 .............................. B out
8 ............................. Status
54
En
11 ............................. G out
15 ..................... R or C out
17 ............................. GND
19 ........ Video out or Y out
21 ............................. GND
Published by Pioneer Corporation.
Copyright © 2002 Pioneer Corporation.
All rights reserved.

English
55
En

IMPORTANTE
Il simbolo del lampo con terminale a
forma di freccia situato all’interno di un
triangolo equilatere serve ad avvisare
l’utilizzatore della presenza di un
“voltaggio pericoloso” non isolato nella
struttura del prodotto che potrebbe
essere di un’intensità tale da provocare
scosse elettriche all’utilizzatore.
CAUTION
RISK OF ELECTRIC SHOCK
DO NOT OPEN
ATTENZIONE:
PER EVITARE IL RISCHIO DI SCOSSE
ELETTRICHE, NON RIMUOVERE IL
COPERCHIO (O IL RETRO). NON CI SONO
PARTI INTERNE ACCESSIBILI
ALL’UTILIZZATORE. IN CASO DI
NECESSITÀ, RIVOLGERSI
ESCLUSIVAMENTE A PERSONALE DI
SERVIZIO QUALIFICATO.
Il punto esclamativo in un triangolo
equilatere serve ad avvisare l’utilizzatore
della presenza di importanti istruzioni di
funzionamento e manutenzione riportate
nel libretto allegato al prodotto.
H002A_It
PRECAUZIONE
Questo prodotto contiene un diodo al laser di classe
superiore alla classe 1. Per motivi di sicurezza, non
smontare i coperchi e non procedere ad interventi
sulle parti interne.
Per qualsiasi riparazione rivolgersi a personale
qualificato.
La nota seguente si trova sul pannello posteriore
dell’apparecchio.
CLASS 1
LASER PRODUCT
H018_It
AVVERTENZA: QUESTO APPARECCCHIO
NON E’ IMPERMEABILE. NON SISTEMARE VICINO AD
ESSO NESSUN OGGETTO CONTENENTE ACQUA,
COME VASI, CONTENITORI DI PRODOTTI DI BELLEZzA
O FLACONI DI MEDICINALI.
Sul coperchio dell'apparecchio
H001A_It
Questo prodotto è conforme alla direttiva sul basso
voltaggio (73/23/CEE emendata 93/68/CEE), direttive
EMC 89/338/CEE, emendata 92/31/CEE e 93/68/CEE.
ATTENZIONE: L’INTERRUTTORE STANDBY/
ON E’COLLEGATO AD UN CIRCUITO SECONDARIO
E QUINDI, NELLA POSIZIONE DI
ATTESA(STANDBY), NON SCOLLEGA L’UNITÀ
DALLA PRESA DI CORRENTE. INSTALLARE L’UNITÀ
IN UN POSTO ADEGUATO IN MODO CHE SIA FACILE SCOLLEGARE LA SPINA DI ALIMENTAZIONE IN
CASE DI INCIDENTE. LA SPINA DI ALIMENTAZIONE
DELL’UNITÀ DOVREBBE ESSERE SCOLLEGATA
DALLA PRESA A MURO QUANDO L’APPARECCHIO
RIMANE INUTILIZZATO PER UN CERTO PERIODO
DI TEMPO.
H015A_It
H017B_It
AVVERTENZA: Feritoie ed aperture nella
struttura sono previste solo per la ventilazione e, in
modo da assicurare il buon funzionamento del prodotto,
proteggerlo dal surriscaldamento, dai rischi d’incendio,
le aperture non devono mai essere ostruite o ricoperte
da oggetti come giornali, tovaglie, tende, ecc… Inoltre,
non posizionare l’apparecchio su tappetti spessi, letti,
divani o mobili aventi una spessa imbottitura.
H040_It

AVVERTENZA: PRIMA DI COLLEGARE
L’UNITÀ PER LA PRIMA VOLTA, LEGGERE LA SEZIONE
SEGUENTE CON ATTENZIONE. IL VOLTAGGIO PER
L’ALIMENTAZIONE È DIVERSO A SECONDO DEI PAESI
E DELLE REGIONI, QUINDI ASSICURATEVI CHE
L’ALIMENTAZIONE ELETTRICA DEL POSTO DOVE
L’UNITÀ SARÀ UTILIZZATA POSSIEDE IL VOLTAGGIO
RICHIESTO (E.G., 230 V O 120 V) INDICATO SUL
PANNELLO ANTERIORE.
H041_It
AVVERTENZA: NON SISTEMATE NESSUN
OGGETTO CON FIAMMA VIVA, COME CANDELE
ACCESE, VICINO ALL’APPARECCHIO. SE UN TALE
OGGETTO DOVESSE CADERE ACCIDENTALMENTE
SULL’APPARECCHIO, IL FUOCO POTREBBE
ESPANDERSI SULL’APPARECCHIO CON PERICOLO
D’INCENDIO.
CONDIZIONI AMBIENTALI DI
FUNZIONAMENTO
Umidità e temperatura di funzionamento:
+5ºC – +35ºC (+41ºF – +95ºF); inferiore a 85%RH (feritoie
di raffreddamento non ostruite)
Non posizionare nei seguenti luoghi:
÷ luoghi esposti alla luce diretta del sole o a forti sorgenti di
luce artificiale
÷ luoghi esposti a condizioni di alta umidità o scarsa
ventilazione
H044_It
H045_It
Questo prodotto è destinato esclusivamente all’uso
domestico. Eventuali disfunzioni dovute ad usi diversi
(quali uso prolungato a scopi commerciali, in ristoranti,
o uso in auto o su navi) e che richiedano particolari
riparazioni, saranno a carico dell’utente, anche se nel
corso del periodo di garanzia.
Questo prodotto contiene una tecnologia di
protezione dei diritti di autore, che è a sua volta
protetta dal contenuto di certi brevetti americani e da
altri diritti sulla proprietà intellettuale, posseduti dalla
Macrovision Corporation e da altri possessori di diritti.
L'uso di questa tecnologia di protezione dei diritti
d'autore deve essere autorizzato dalla Macrovision
Corporation, ed è inteso solamente per uso
domestico, o per altri scopi limitati, ove non altrimenti
autorizzato dalla Macrovision Corporation. L'uso di
tecniche di inversione e lo smontaggio sono proibiti.
Questo prodotto include caratteri
FontAvenue
®
concessi in licenza da NEC
K041_It
Corporation. FontAvenue è un marchio
registrato di NEC Corporation.
Italiano
Quando recuperate le pile / batterie usate, fate riferimento
alle norme di legge in vigore nel vs. paese in tema di
protezione dell’ambiente.
H048_It

Sommario
Grazie per avere acquistato questo prodotto
Pioneer.
Per utilizzare correttamente il modello acquistato leggere attentamente le
istruzioni per l’uso. Una volta lette, conservare le istruzioni in un luogo sicuro.
01 Prima di iniziare
Caratteristiche ................................................... 6
Contenuto della confezione ..............................7
Inserimento delle batterie nel telecomando ....7
Utilizzo del telecomando ...................................7
Dischi compatibili con il lettore ........................ 8
Compatibilità CD-R/RW ...............................8
Compatibilità DVD-R/RW ............................. 8
Compatibilità MP3 ........................................8
Titoli, capitoli e tracce ..................................9
Regioni dei DVD-Video .................................9
02 Collegamento
Collegamenti del pannello posteriore ........... 10
Collegamenti facili .......................................... 11
Collegamento a un’uscita S-Video ..................12
Collegamento mediante l’uscita del
connettore AV ................................................... 12
Collegamento a un ricevitore AV ................... 13
03 Controlli e display
Pannello anteriore........................................... 15
Display ............................................................. 16
Telecomando ................................................... 17
04 Come iniziare
Accensione .......................................................19
Come iniziare ..............................................19
Utilizzo dei display su schermo ...................... 20
Impostazioni tramite Setup Navigator
(Instal. Guidata) ............................................... 21
Riproduzione di dischi .....................................23
Controlli di riproduzione basilari .............. 24
Controlli sul pannello anteriore ................. 25
Menu del disco per DVD-Video.................. 25
Menu PBC dei Video CD ............................26
05 Riproduzione di dischi
Introduzione ..................................................... 27
Utilizzo di Disc Navigator (Disc Navigator) per
visualizzare i contenuti di un disco ............... 27
Scansione dei dischi....................................... 28
Riproduzione lenta .......................................... 28
Avanzamento di un fotogramma alla volta
in avanti/indietro ..............................................28
Ripetizione in loop di una sezione
del disco ............................................................29
Utilizzo della riproduzione ripetuta .................29
Utilizzo della riproduzione casuale .................30
Creazione della lista programmi .................... 31
Modifica della lista programmi .................33
Altre funzioni disponibili dal menu di
programmazione ....................................... 33
Ricerche sul disco .......................................... 34
Cambio di sottotitoli ......................................... 34
Cambio di lingua per l’audio dei DVD ........... 34
Cambio di canale audio durante la
riproduzione di un Video CD ...........................35
Zoom dello schermo ....................................... 35
Cambio dell’angolo di visuale ........................ 35
Visualizzazione delle informazioni del
disco ..................................................................36
4
It

Sommario
06 Menu delle impostazioni audio
Audio DRC (Audio DRC) .................................37
Virtual Surround (Virtual Surround) .............. 37
07 Menu delle impostazioni iniziali
Utilizzo del menu Initial Settings
(Impost. iniziali) ............................................... 39
Impostazioni Digital Audio Out
(Uscita audio dig.) ........................................... 39
Digital Out (Uscita Digitale) ......................39
Dolby Digital Out (Uscita Dolby Dig.) ...... 39
DTS Out (Uscita DTS) ................................. 40
96kHz PCM Out (Uscita PCM 96kHz ) ..... 40
MPEG Out (Uscita MPEG) ........................ 40
Impostazioni Video Output (Uscita video) .... 41
TV Screen (Schermo TV) ............................ 41
AV Connector Out (Uscita AV).................. 41
S-Video Out (Uscita S-Video)...................... 41
Impostazioni Language (Lingua) ................... 42
Audio Language (Lingua Audio) .............. 42
Subtitle Language (Lingua Sottotitoli) ..... 42
DVD Menu Language
(Lingua menu DVD) .................................... 43
Subtitle Display (Vedi Sottotitoli).............. 43
Impostazioni Display (Display)....................... 43
OSD Language (Lingua OSD) .................. 43
On Screen Display
(Display su TV-OSD) .................................. 43
Angle Indicator (Indicatore angolo) ......... 44
Options (Opzioni) ............................................ 44
Parental Lock (Blocco Genitori) ............... 44
Registrazione di una nuova
password............................................... 44
Modifica della password ......................45
Impostazione/modifica del livello
Parental Lock (Blocco Genitori) .......... 45
Impostazione/modifica Country Code
(Codice paese) ...................................... 46
08 Informazioni aggiuntive
Manutenzione del lettore e dei dischi ........... 47
Come avere cura dei dischi .......................47
Come conservare i dischi ......................... 47
Dischi da evitare .........................................47
Pulitura della lente del lettore .................. 48
Problemi di condensa ................................48
Suggerimenti per l’installazione .............. 48
Spostamento del lettore ............................ 48
Avvertimento riguardante il filo di
alimentazione..............................................48
Dimensioni dello schermo e formati
dei dischi.......................................................... 49
Televisore widescreen ................................49
Televisore standard .....................................49
Reimpostazione del lettore............................. 49
Lista di codici delle lingue .............................. 50
Lista codici paesi..............................................50
Selezione della lingua tramite la lista
dei codici delle lingue ..................................... 51
Glossario .......................................................... 51
Impostazione del sistema televisivo .............. 53
Utilizzo del formato NTSC nei televisori PAL
(MOD. PAL) ................................................ 53
Specifiche ........................................................ 54
Italiano
5
It

Prima di iniziare01
Caratteristiche
DAC a 24 bit/192 kHz compatibile
Questo lettore è totalmente compatibile con
dischi ad alta frequenza di campionamento e
fornisce una qualità sonora superiore ai
lettori CD per quanto riguarda gamma audio,
risoluzione dei bassi e i dettagli delle alte
frequenze.
Prestazioni audio eccezionali grazie
al Dolby*1 Digital e al software
2
DTS*
Logo: 1
Quando viene collegato a un amplificatore o
ricevitore AV, questo lettore produce un
suono surround digitale di ottima qualità con
dischi Dolby Digital e DTS.
TruSurround*3 e Virtual Dolby
Digital
Logo:
TruSurround/Virtual Dolby Digital crea un
effetto surround realistico con qualsiasi
sorgente Dolby Digital utilizzando soltanto
due altoparlanti (vedere pagina 37).
Compatibilità MP3
Questo lettore è compatibile con dischi CDR, CD-RW e CD-ROM che contengono tracce
audio MP3 (vedere pagina 8).
Display su schermo grafici
I display su schermo grafici consentono di
semplificare l’installazione e l’utilizzo di
questo lettore DVD.
Risparmio energetico
Il lettore è dotato di una funzione di
spegnimento automatico. Se rimane
inutilizzato per oltre 30 minuti, viene
automaticamente attivata la modalità
standby.
L’alimentazione dell’unità in modalità
standby è di 0,3 W.
*1 Prodotto sotto licenza dalla Dolby
Laboratories. “Dolby” ed il simbolo doppia D
sono marchi registrati della Dolby Laboratories.
*2 “DTS” è un marchio di fabbrica di Digital
Theater Systems, Inc.
*3 TruSurround e il simbolo
marchi di fabbrica di SRS Labs, Inc. La
tecnologia TruSurround è stata incorporata
con l’autorizzazione di SRS Labs, Inc.
®
sono
Ingrandimento dell’immagine
Durante la riproduzione di un DVD o un
Video CD è possibile ingrandire qualsiasi
parte dell’immagine con un livello di
ingrandimento massimo di 4x, per una
visualizzazione più dettagliata (vedere
pagina 35).
6
It

Prima di iniziare
01
Contenuto della confezione
Verificare che i seguenti accessori siano
inclusi nella confezione.
• Telecomando
• Batterie a secco AA/R6P x2
• Cavo audio/video (spine rosse/bianche/
gialle)
• Cavo di alimentazione
• Istruzioni per l’uso
• Documento di garanzia
Inserimento delle batterie
nel telecomando
1 Aprire il coperchio del vano
portabatterie sul retro del telecomando.
2 Inserire due batterie AA/R6P nel vano
portabatterie seguendo le indicazioni
(ª , ·) riportate all’interno del vano.
3 Chiudere il coperchio.
Nota
Un utilizzo errato delle batterie può
causare danni, quali perdita di liquido ed
esplosione. Si consiglia di seguire le
seguenti precauzioni:
• Non utilizzare contemporaneamente
batterie vecchie e nuove.
• Non utilizzare contemporaneamente tipi
diversi di batterie. Anche se possono
sembrare simili, batterie diverse
potrebbero essere di tensione diversa.
• Verificare che i poli positivo e negativo di
ciascuna batteria corrispondano alle
indicazioni del vano portabatterie.
• Rimuovere le batterie
dall’apparecchiatura, se non viene
utilizzata per un mese o più.
• Quando recuperate le pile / batterie
usate, fate riferimento alle norme di
legge in vigore nel vs. paese in tema di
protezione dell’ambiente.
Utilizzo del telecomando
Quando si utilizza il telecomando tenere
presente quanto segue:
• Verificare che tra il telecomando e il
sensore per il controllo a distanza
dell’unità non siano presenti ostacoli.
• Il telecomando ha un raggio di azione di
circa 7 metri
• Il corretto funzionamento del controllo a
distanza può venire compromesso se il
sensore dell’unità è illuminato dalla luce
diretta del sole o da una luce
fluorescente.
• Telecomandi di dispositivi diversi
possono interferire reciprocamente.
Evitare l’utilizzo del telecomando per
un’altra apparecchiatura posizionata
vicino a quest’unità.
• Sostituire le batterie quando si nota una
diminuzione del raggio di azione del
telecomando.
Italiano
H048 It
7
It

Prima di iniziare01
Dischi compatibili con il
lettore
Questo lettore può essere utilizzato per
riprodurre i dischi che presentano uno dei
logo seguenti. Non è possibile riprodurre
dischi di altri formati, compresi DVD-Audio,
DVD-RAM, DVD-ROM, CD-ROM (escluso
quelli che contengono file MP3), SACD e
Photo CD.
DVD-Video
Video CDAudio CD CD-R CD-RW
Nota
• La riproduzione di dischi DVD-R/RW e
CD-R/RW (audio e Video CD) registrati
utilizzando un pc o un registratore DVD
o CD può non funzionare se il disco è
danneggiato o sporco oppure se la lente
del lettore è ricoperta di condensa.
• Se si registra un disco mediante un pc,
anche se il formato di registrazione è
compatibile, è possibile che il lettore
non lo riproduca a causa delle
impostazioni dell’applicazione software
utilizzata per creare il disco. (Per
ulteriori informazioni rivolgersi al
produttore del software.)
• Per ulteriori informazioni vedere anche
la confezione del disco DVD-R/RW o CDR/RW.
8
It
Compatibilità CD-R/RW
• Questa unità può riprodurre dischi CD-R
e CD-RW registrati in un formato di CD
audio o Video CD oppure con file audio
MP3. È impossibile registrare dischi CDR o CD-RW.
•È possibile riprodurre dischi CD-R/RW
registrati in formato CD non finalizzati,
ma non verranno visualizzate tutte le
informazioni di durata (tempo di
riproduzione, ecc.).
• Non è possibile riprodurre dischi CD-R/
RW non finalizzati registrati in un
formato che non sia CD audio. (In
questo caso verrebbe emesso solo
rumore)
Compatibilità DVD-R/RW
•È possibile riprodurre dischi DVD-R/RW
registrati in formato DVD-Video. Non è
possibile riprodurre dischi DVD-RW
registrati in formato di registrazione
video (VR).
• Non è possibile registrare dischi DVD-R/
RW.
• Non è possibile riprodurre dischi DVDR/RW non finalizzati.
Compatibilità MP3
• Il CD-ROM deve essere compatibile con
lo standard ISO 9660.
• Il formato dei file dovrebbe essere
MPEG-1 Audio Layer 3 a 32, 44,1 o 48
kHz e frequenza bit fissa. I file
incompatibili non verranno riprodotti e
verrà visualizzata la scritta Can’t play
this format (Impossibile riprodurre
questo formato).
•È possibile riprodurre file a frequenza bit
variabile (VBR), ma i tempi di
riproduzione non verranno visualizzati
correttamente.
• Possono essere riprodotte solo tracce
con estensione di file “.mp3” o “.MP3”.
• Il lettore non è compatibile con dischi a
sessione multipla. Se si cerca di
riprodurre un disco a sessione multipla,
verrà riprodotta solo la prima sessione.

Prima di iniziare
01
• Utilizzare il supporto CD-R o CD-RW per
registrare file MP3. Per la riproduzione è
necessario che il disco sia finalizzato.
• L’audio codificato a 128 Kbps dovrebbe
avere una qualità sonora simile a quella
dell’audio normale dei CD. Sebbene sia
possibile riprodurre tracce MP3 a una
frequenza bit più bassa, la qualità del
suono risulta notevolmente inferiore.
• Vengono visualizzati i nomi della cartella
e della traccia (senza l’estensione
“.mp3”).
• Il lettore può riconoscere fino a 250
cartelle e 250 tracce. In dischi che
contengono più di 250 cartelle o tracce
verranno riprodotti, ma solo le prime 250
cartelle o tracce.
Titoli, capitoli e tracce
In genere i dischi DVD sono divisi in uno o
più titoli. Questi vengono suddivisi
ulteriormente in capitoli.
Titolo 1 Titolo 2 Titolo 3
Chapitolo 1 Chapitolo 2 Chapitolo 3 Chapitolo 1 Chapitolo 1 Chapitolo 2
I CD e i Video CD sono divisi in tracce.
Regioni dei DVD-Video
Tutti i dischi DVD-Video presentano sulla
custodia un contrassegno che indica la
regione del mondo con cui il disco è
compatibile. Anche il lettore DVD presenta
un contrassegno della regione, sul pannello
posteriore. Con questo lettore non è
possibile riprodurre dischi di regioni
incompatibili. I dischi contrassegnati con
ALL possono essere riprodotti su qualsiasi
lettore.
Nell’immagine seguente sono mostrate le
varie regioni DVD del mondo.
1
2
4
2
5
1
6
2
3
5
4
Italiano
Traccia 1 Traccia 2 Traccia 3 Traccia 4 Traccia 5 Traccia 6
I CD-ROM che contengono file MP3 sono
divisi in cartelle e tracce. Le cartelle possono
contenere sottocartelle.
mp3
mp3
mp3
mp3
mp3
mp3
Cartella A Cartella B Cartella C
Traccia 1 Traccia 2 Traccia 3 Traccia 1 Traccia 1
Traccia 2
9
It

Collegamento02
Collegamenti del pannello posteriore
1 2 3 4
DIGITAL AUDIO OUT
COAXIAL
OPTICAL
S
VIDEO OUT
AUDIO OUT
L
R
567
Quando si collega il lettore a un
televisore, a un ricevitore AV o ad altri
componenti, assicurarsi che tali
componenti siano spenti e che
l’alimentazione sia staccata.
1 DIGITAL AUDIO OUT – COAXIAL
Si tratta di un’uscita audio digitale per il
collegamento a un ricevitore AV compatibile
con le tecnologie PCM, Dolby Digital, DTS e/
o MPEG con ingresso digitale coassiale.
Per il collegamento utilizzare un cavo audio
digitale coassiale disponibile in commercio.
2 AUDIO OUT L/R
Questa coppia di uscite audio analogiche
consente di eseguire il collegamento al
televisore, al ricevitore AV o all’impianto
stereo. Anche se si sta eseguendo il
collegamento a una delle uscite digitali, è
preferibile utilizzare queste prese.
Collegare a queste prese il cavo audio/video
fornito in dotazione. Per una corretta
riproduzione del suono stereo, collegare i
cavi alle prese di colore corrispondente.
AV CONNECTOR (RGB)-TV
4 AC IN
Collegare a questa presa il cavo di
alimentazione fornito, quindi inserire l’altra
estremità del cavo nella presa di corrente.
5 VIDEO OUT
Si tratta di una semplice uscita video che è
possibile collegare al televisore o al ricevitore
AV mediante il cavo audio/video fornito.
6 S (Uscita S-Video)
Si tratta di una uscita S-Video che è possibile
utilizzare in alternativa all’uscita descritta al
precedente punto 5.
7 DIGITAL AUDIO OUT – OPTICAL
(soltanto DV-454)
Si tratta di un’uscita audio digitale per il
collegamento a un ricevitore AV compatibile
con le tecnologie PCM, Dolby Digital, DTS e/
o MPEG con ingresso digitale ottico.
Per il collegamento utilizzare un cavo audio
digitale ottico disponibile in commercio.
3 AV CONNECTOR (RGB)-TV
Si tratta di un’uscita audio e video
combinata per il collegamento a un
televisore con presa SCART. Effettuare il
collegamento tramite il cavo SCART. È
possibile cambiare il tipo di uscita video in
base al tipo di televisore. Vedere pagine 12 e
41.
10
It
• Può risultare utile consultare i manuali
forniti con i componenti quando si
esegue il collegamento del lettore.
• Se alcuni termini di questa sezione
risultano poco chiari, fare riferimento al
glossario riportato a pagina 51.

Collegamento
Collegamenti facili
Televisore
DIGITAL AUDIO OUT
COAXIAL
OPTICAL
S
VIDEO OUT
AUDIO OUT
L
R
02
A/V IN
Italiano
AV CONNECTOR (RGB)-TV
Alla presa di
corrente
La seguente installazione è un’installazione
di base che consente di riprodurre dei dischi
utilizzando soltanto i cavi forniti con il lettore.
In questa installazione l’audio stereo viene
riprodotto attraverso gli altoparlanti del
televisore.
• Il lettore è dotato di una tecnologia di
protezione contro le copie illegali . Non
collegare il lettore al televisore
attraverso il videoregistratore (o il
videoregistratore attraverso il lettore)
mediante cavi AV poiché la
visualizzazione delle immagini sullo
schermo televisivo non risulterà nitida.
(Il lettore potrebbe risultare non
compatibile con alcune combinazioni di
televisori e videoregistratori per la
stessa ragione. Per ulteriori informazioni
rivolgersi al produttore.)
1 Collegare le prese VIDEO OUT e
AUDIO OUT alla serie di ingressi A/V del
televisore.
Utilizzare il cavo audio/video in dotazione,
collegando le spine rossa e bianca alle
uscite audio e la spina gialla all’uscita video.
Assicurarsi di collegare le uscite audio
sinistra e destra ai corrispondenti ingressi
per ottenere una riproduzione stereo
ottimale.
Se si desidera utilizzare un cavo SCART per il
collegamento audio/video o un cavo S-Video
per il collegamento video, vedere di seguito.
2 Collegare il cavo di alimentazione a
corrente alternata fornito alla presa AC
IN, quindi inserire l’altra estremità del
cavo nella presa di corrente.
11
It

Collegamento02
• Prima si scollegare il lettore dalla presa
di corrente, assicurarsi di attivare la
modalità standby del lettore, premendo
il tasto
STANDBY/ON sul pannello
anteriore oppure sul telecomando, e
attendere che la scritta -OFF- scompaia
dal display del lettore.
• Per tali ragioni non collegare il lettore
alla presa per cavo di alimentazione di
alcuni amplificatori e ricevitori AV.
Collegamento a un’uscita SVideo
Se il televisore dispone di uscita S-Video, è
possibile utilizzare tale uscita invece
dell’uscita standard (composite) per ottenere
una migliore qualità dell’immagine.
Collegamento mediante
l’uscita del connettore AV
Se il televisore è dotato di ingresso di tipo
SCART, è possibile utilizzare un cavo SCART
per collegare il lettore al televisore. Questo
tipo di collegamento consente la
trasmissione sia dell’audio che delle
immagini e pertanto non è necessario
collegare le prese AUDIO OUT L/R e VIDEO
OUT.
1 Utilizzare un cavo SCART (non
fornito) per collegare il CONNECTOR AV
(RGB)-TV a un ingresso AV del televisore.
SCART
1 Per collegare l’uscita S-VIDEO OUT
all’ingresso S-Video del televisore (o del
monitor o del ricevitore AV), utilizzare un
cavo S-Video (non fornito).
Allineare il triangolino riportato sopra la
presa con lo stesso simbolo riportato rulla
spina prima di inserire la spina.
S-VIDEO
INPUT
Televisore
DIGITAL AUDIO OUT
OPTICAL
COAXIAL
S
VIDEO OUT
AUDIO OUT
L
R
12
It
AV CONNECTOR (RGB)-TV
Televisore
DIGITAL AUDIO OUT
OPTICAL
COAXIAL
S
VIDEO OUT
AUDIO OUT
L
R
AV CONNECTOR (RGB)-TV
Il connettore consente di trasmettere video
standard (composite), S-Video o RGB
component. L’impostazione predefinita è
standard e dovrebbe funzionare con tutti i
televisori. Per verificare se è possibile
utilizzare una delle impostazioni per ottenere
una qualità superiore, consultare il manuale
fornito con il televisore. Per informazioni
sulla modifica dell’uscita video, vedere
pagina 41.
Nota
• I cavi SCART sono disponibili in diverse
configurazioni. Verificare che il cavo
utilizzato funzioni con il lettore e il
televisore/monitor. Per l’assegnazione
dei pin, vedere pagina 54.

Collegamento
02
Collegamento a un ricevitore
AV
Per ottenere un suono surround multicanale,
è necessario collegare il lettore a un
ricevitore AV con uscita digitale. Utilizzare
una delle due prese digitali di DV-454,
coassiale o ottica, a seconda delle esigenze.
DV-350 dispone soltanto di una presa
coassiale.
Oltre al collegamento digitale, si
raccomanda di utilizzare anche il
collegamento stereo analogico.
Se si desidera collegare un’uscita video al
ricevitore AV, È possibile utilizzare una
qualsiasi delle uscite video disponibili sul
lettore (l’illustrazione mostra un
collegamento standard (composito).
1 Collegare un’uscita DIGITAL OUT del
lettore a un ingresso digitale del
ricevitore AV.
DIGITAL IN
OPTICAL
Ricevitore AV
DIGITAL IN
COAXIAL
Per stabilire un collegamento coassiale,
utilizzare un cavo coassiale (simile al cavo
video fornito) per collegare l’uscita COAXIAL
DIGITAL OUT a un ingresso coassiale del
ricevitore AV.
2 Collegare le prese analogiche AUDIO
OUT L/R e VIDEO OUT del lettore alla
serie di ingressi audio e video analogici
del ricevitore AV.
Ricevitore AV
DIGITAL AUDIO OUT
COAXIAL
OPTICAL
S
VIDEO OUT
AUDIO OUT
L
R
AUDIO/
VIDEO INPUT
AV CONNECTOR (RGB)-TV
L’immagine mostra collegamenti video
standard; in alternativa è possibile utilizzare i
collegamenti S-Video o cavo SCART se
disponibili.
3 Collegare l’uscita video del ricevitore
AV a un ingresso video del televisore.
Italiano
DIGITAL AUDIO OUT
OPTICAL
COAXIAL
S
VIDEO OUT
AUDIO OUT
L
R
AV CONNECTOR (RGB)-TV
Questa operazione consente di riprodurre un
suono surround multicanale.
Per stabilire un collegamento ottico,
utilizzare un cavo ottico (non fornito) per
collegare l’uscita OPTICAL DIGITAL OUT
all’ingresso ottico del ricevitore AV.
• Solitamente occorre utilizzare lo stesso
tipo di cavo video per collegare il lettore
DVD al ricevitore AV e il ricevitore AV al
televisore.
13
It

Collegamento02
• Il televisore non dispone di ingressi per il
collegamento del lettore DVD. Come è
possibile vedere comunque i DVD?
Purtroppo, se il televisore in uso non
dispone degli appositi ingressi non è
possibile utilizzare il lettore DVD.
• Al televisore è già collegato il
videoregistratore, pertanto non vi sono
ingressi disponibili. Che fare?
Se tutti gli ingressi del televisore sono
occupati, è possibile acquistare presso
un rivenditore di apparecchiature
elettroniche un selettore di ingressi
video per aumentare il numero di
ingressi.
• Il televisore dispone soltanto di un
ingresso per l’audio. Quale cavo conviene
inserire?
Se ci si accontenta dell’audio mono, è
possibile acquistare da un rivenditore di
apparecchiature elettroniche un cavo
stereo RCA-to-mono RCA. Collegare
l’estremità stereo del cavo al lettore e
l’estremità mono al televisore.
Per riprodurre un suono stereo,
collegare il lettore all’amplificatore o
all’impianto stereo mediante un cavo
audio stereo.
14
It
• Collegando il lettore DVD al ricevitore AV
viene emesso un suono chiaro ma non
viene riprodotta alcuna immagine. È stata
eseguita qualche operazione errata?
Assicurarsi che il tipo di collegamento
video tra il lettore DVD e il ricevitore AV
corrisponda a quello tra il ricevitore e il
televisore. La maggior parte dei ricevitori
AV non sono in grado di eseguire la
conversione da un tipo di collegamento
a un altro.

Controlli e display
Pannello anteriore
STANDBY/ON
03
2 3 541
OPEN/CLOSE
0
Î
3
8741 ¡¢
DV-350
STANDBY/ON
DV-454
STANDBY/ON
1
10 9 8 7 6
¡
1
¢
4
10 9 8 7 6
Premere questo pulsante per accendere il
lettore o attivare il modo standby
2 Cassetto del disco
3 0 OPEN/CLOSE
Premere questo pulsante per aprire o
chiudere il cassetto del disco
4 Sensore del telecomando
Il telecomando funziona fino a circa 7 metri
di distanza
5 Display
Vedere pagina 16 per una descrizione del
display
6 3
Premere questo pulsante per avviare o
riprendere la riproduzione
2 3 541
OPEN/
CLOSE
0
Î
3
8
7
7 8
Premere questo pulsante per sospendere la
riproduzione. Premerlo di nuovo per
riavviarla
8 7
Premere questo pulsante per fermare il disco
(per riavviare la riproduzione, premendo 3
(play))
9 ¡ ¢
• Tenere premuto questo pulsante per
eseguire la scansione rapida in avanti
• Premere questo pulsante per spostarsi al
capitolo o alla traccia successiva
10 4 1
• Tenere premuto questo pulsante per
eseguire la scansione rapida indietro
• Premere questo pulsante per spostarsi
all’inizio del capitolo o della traccia corrente,
quindi ai capitoli o alle tracce precedenti
Italiano
15
It

Controlli e display03
Display
1
2 3 4 5 6 7 8
12 911 10
1DTS
Si illumina durante la riproduzione di una
traccia DTS
2
Si illumina durante la visualizzazione di
scene multi-angolo con il DVD
3 GUI (Graphical User Interface)
Si illumina durante la visualizzazione di un
menu sullo schermo
4 TITLE
Indica che sul display a caratteri è
visualizzato un numero di titolo del DVD
5
Si illumina quando è selezionato il suono
2V/TruSurround
6 TRK
Indica che sul display a caratteri è
visualizzato il numero di traccia del CD
musicale o del Video CD
7CHP
Indica che sul display a caratteri è
visualizzato il numero del capitolo del DVD
8 REMAIN
Si illumina quando nel display a caratteri
viene visualizzata la durata o il numero di
tracce/titoli/capitoli rimanenti nel disco
9 Display a caratteri
10 8
Si illumina quando la riproduzione del disco
è stata sospesa
11 3
Si illumina durante al riproduzione del disco
12 2D
Si illumina durante la riproduzione di una
traccia Dolby Digital
16
It

Controlli e display
03
Telecomando
SUBTITLE
23
6
5
ENTER
3
8
7
ZOOM DISPLAY
OPEN/CLOSE
0
ANGLEAUDIO
CLEAR
ENTER
0
MENU
RETURN
E/
¡
¢
15
16
17
18
19
20
21
23
24
STANDBY/ON
1 14
2
3
4
1
4
789
TOP MENU
5
6
SETUP
7
8
9
10
11 22
12
/e
1
4
PLAY MODE SURROUND
13
1 STANDBY/ON
Premere questo pulsante per accendere il
lettore o attivare il modo standby
2 AUDIO
Premere questo pulsante per selezionare il
canale audio o la lingua (pagine 34-35)
3 SUBTITLE
Premere questo pulsante per selezionare la
visualizzazione dei sottotitoli (pagina 34)
4 Pulsanti numerati
5 TOP MENU
Premere questo pulsante per visualizzare il
menu principale di un disco DVD
6 Pulsante ENTER e pulsanti cursore
Da utilizzare per navigare tra i display su
schermo e i menu. Premere ENTER per
selezionare un’opzione o per eseguire un
comando
7 SETUP
Premere questo pulsante per visualizzare (o
chiudere) il display su schermo
8 1 e
/e
Utilizzare questo pulsante per riproduzione
lenta all’indietro, scorrimento all’indietro dei
fotogrammi e riavvolgimento. Vedere pagina
28.
Italiano
9 3
Premere questo pulsante per avviare o
riprendere la riproduzione
10 4
Premere questo pulsante per spostarsi
all’inizio del capitolo o della traccia corrente,
quindi ai capitoli o alle tracce precedenti
11 8
Premere questo pulsante per sospendere la
riproduzione; premerlo di nuovo per riavviarla
17
It

Controlli e display03
12 PLAY MODE
Premere questo pulsante per visualizzare il
menu Play Mode (Modo Riproduzione)
(pagine 29-34) (È anche possibile
visualizzare il menu Play Mode (Modo
Riproduzione) premendo SETUP e
selezionando Play Mode (Modo
Riproduzione))
13 SURROUND
Premere questo pulsante per attivare o
disattivare il suono 2V/TruSurround
14 0 OPEN/CLOSE
Premere questo pulsante per aprire o
chiudere il cassetto del disco
15 ANGLE
Premere questo pulsante per modificare
l’angolo di visuale durante la riproduzione di
scene multi-angolo (pagina 35)
16 CLEAR
Premere questo pulsante per cancellare un
numero immesso
17 ENTER
Utilizzare questo pulsante per la selezione di
voci di menu e così via (ha le stesse funzioni
del pulsante ENTER descritto al precedente
punto 6)
18 MENU
Premere per visualizzare il menu di un disco
DVD oppure Disc Navigator (Disc Navigator)
se è stato caricato un CD, Video CD o MP3.
19 RETURN
Premere questo pulsante per ritornare alla
schermata precedente del menu
20 ¡ e
Utilizzare questo pulsante per riproduzione
lenta in avanti, avanzamento di un
fotogramma alla volta, scansione in avanti.
Vedere pagina 28.
21 ¢
Premere questo pulsante per spostarsi al
capitolo o alla traccia successiva
22 7
Premere questo pulsante per fermare il disco
(per riavviare la riproduzione, premendo
3 (play))
23 DISPLAY
Premere questo pulsante per visualizzare le
informazioni relative alla riproduzione del
disco (pagina 36)
24 ZOOM
Premere per modificare l’ingrandimento
dell’immagine (pagina 35)
E/
18
It

Come iniziare
04
Accensione
Dopo aver verificato che tutti i cavi siano
collegati correttamente e che il lettore sia
inserito nel circuito elettrico, premere
STANDBY/ON sul pannello anteriore
oppure sul telecomando per accendere il
lettore.
Inoltre, accendere il televisore e verificare
che sia impostato sull’ingresso a cui è stato
collegato il lettore DVD.
STANDBY/ON
OPEN/
CLOSE
0
Î
¡
1
¢
STANDBY/ON
DV-454
4
• Il lettore DVD si accende, ma sul
televisore non viene visualizzata nessuna
immagine.
Verificare che il televisore sia impostato
sull’ingresso video corretto, non su un
canale televisivo. Ad esempio, se il
lettore è stato collegato agli ingressi
VIDEO 1 del televisore, commutare
quest’ultimo su VIDEO 1.
3
8
7
Come iniziare
Quando si accende il lettore per la prima
volta, viene visualizzata sul televisore una
schermata di benvenuto. È possibile
impostare la lingua e il tipo di televisore
utilizzato., quindi utilizzare Setup Navigator
(Instal. Guidata) per eseguire ulteriori
impostazioni oppure accedere direttamente
al lettore e avviare la riproduzione.
ENTER
GUIDE
1 Utilizzare i tasti / (cursore su/giù)
per selezionare la lingua desiderata,
quindi premere ENTER.
Hello!
Select the display language
using the cursor keys on the remote
Choose one then press
English
Français
Deutsch
Italiano
Español
Enter
RETURN
Italiano
Nota
• Il lettore è dotato di screen saver e della
funzione di spegnimento automatico. Se
il funzionamento del lettore viene
interrotto e non viene premuto alcun
pulsante per cinque minuti, viene
visualizzato lo screen saver. Se il
cassetto del disco è chiuso, ma non
viene riprodotto alcun disco e non viene
selezionato alcun controllo per 30
minuti, il lettore entra automaticamente
in standby.
2 Premere ENTER per visualizzare la
schermata successiva.
Welcome to Pioneer DVD!
Thank you for purchasing this Pioneer DVD player.
Before using, please take a little time
to setup your DVD player
Put the batteries into the remote control
Next, press the [ENTER] button on the remote control
and start the Let's Get Started Menu
Next
19
It

Come iniziare04
3 Utilizzare i pulsanti / (cursore
destra/sinistra) per selezionare ‘Wide
screen (16:9)’ (Widescreen (16:9)) o
‘Standard size screen (4:3)’ (Schermo
standard (4:3)) in base al televisore
utilizzato, quindi premere ENTER.
Let's Get Started Menu
What kind of TV do you have?
Use the / cursor buttons
to choose, then press [ENTER]
Wide screen (16:9) Standard size screen (4:3)
4 Premere ENTER di nuovo per
concludere l’installazione.
Let's Get Started Menu
Setup complete
If you're finished setting up,
choose [Complete],
to start again choose [Back]
Complete Back
Utilizzo dei display su
schermo
Per maggiore facilità con questo lettore
vengono utilizzati display su schermo (OSD)
grafici. È necessario apprendere il
funzionamento dei display OSD per poterli
utilizzare durante l’impostazione del lettore,
tramite alcune delle funzioni di riproduzione
come la riproduzione di programma, e per
eseguire impostazioni audio e video
avanzate.
Tutte le schermate vengono richiamate nello
stesso modo, utilizzando i tasti cursore per
modificare le voci evidenziate e premendo
ENTER per selezionare la voce desiderata.
• Nel presente manuale il termine
“selezionare” indica l’utilizzo dei tasti
cursore per evidenziare una voce su
schermo e la successiva pressione di
ENTER.
ENTER
20
It
• Selezionare Back (Indietro), quindi
premere ENTER se si desidera tornare
indietro e modificare le impostazioni
appena selezionate.
ENTER
GUIDE
SETUP
RETURN
RETURN
Pulsante A cosa serve?
SETUP Visualizza/Chiude il display su
schermo
Modifica la voce di menu
evidenziata
ENTER Seleziona la voce di menu
evidenziata (entrambi i
pulsanti ENTER funzionano
allo stesso modo)
RETURN Torna al menu principale
senza salvare le modifiche

Come iniziare
• La guida dei pulsanti nella parte
inferiore di ogni display OSD mostra
quali pulsanti è necessario utilizzare per
ciascuna schermata.
Impostazioni tramite Setup
Navigator (Instal. Guidata)
Tramite Setup Navigator (Instal. Guidata) è
possibile eseguire numerose impostazioni
iniziali del lettore. Si consiglia di utilizzare
Setup Navigator (Instal. Guidata) soprattutto
quando si collega il lettore a un ricevitore AV
per la riproduzione surround. In caso di
dubbi sui formati audio digitali, consultare le
istruzioni fornite con il ricevitore AV.
1 Durante la riproduzione di un disco,
premere 7 (stop).
Accendere il televisore e verificare che sia
impostato sull’ingresso video corretto.
2 Premere SETUP.
Viene visualizzato il display su schermo
(OSD).
4 Selezionare una lingua DVD.
Alcuni dischi DVD presentano menu,
colonne sonore e sottotitoli in numerose
lingue. Impostare la lingua desiderata.
Setup Navigator
Language Settings
Audio Out Settings
AV Receiver Func.
DVD Language
English
French
German
Italian
Spanish
Other Language
• Notare che la lingua selezionata con
questa operazione potrebbe non essere
disponibile su tutti i dischi.
• Se si desidera selezionare una lingua
non inclusa nell’elenco, selezionare
Other Language (Altra lingua). Per
ulteriori informazioni vedere Selezione
della lingua tramite la lista dei codici delle
lingue a pagina 51.
5 Il lettore è collegato a un
amplificatore o a un ricevitore AV?
Selezionare Connected (Collegata) oppure
Not Connected (Non collegata).
04
Italiano
Audio Settings
Play Mode
Initial Settings
Disc Navigator
Setup Navigator
3 Selezionare ‘Setup Navigator’ (Instal.
Guidata).
Audio Settings
Play Mode
Initial Settings
Disc Navigator
Setup Navigator
Setup Navigator
Audio Out Settings
AV Receiver Func.
AV ReceiverLanguage Settings
Connected
Not Connected
• Se è stau selezionato Not Connected
(Non collegata), l’installazione tramite
Setup Navigator (Instal. Guidata) viene
terminata. Premere ENTER per chiudere
la schermata.
21
It

Come iniziare04
6 Il lettore è stato collegato a un
ricevitore AV tramite un’uscita digitale?
Selezionare Connected (Collegata) oppure
Not Connected (Non collegata).
Setup Navigator
Language Settings
Audio Out Settings
AV Receiver Func.
AV Receiver
Digital Audio Out
Connected
Not Connected
• Se è stato selezionato Not Connected
(Non collegata), l’installazione tramite
Setup Navigator (Instal. Guidata) viene
terminata. Premere ENTER per chiudere
la schermata.
7 Il ricevitore AV è Dolby Digital
compatibile?
Selezionare Compatible (Compatibile), Not
Compatible (Non compatibile) oppure
Don’t Know (Non so).
Setup Navigator
Language Settings
Audio Out Settings
AV Receiver Func.
Dolby Digital
Compatible
Not Compatible
Don't Know
8 Il ricevitore AV è DTS compatibile?
Selezionare Compatible (Compatibile), Not
Compatible (Non compatibile) oppure
Don’t Know (Non so).
Setup Navigator
Language Settings
Audio Out Sttings
AV Receiver Func.
Dolby Digital
DTS
Compatible
Not Compatible
Don't Know
9 Il ricevitore AV è MPEG compatibile?
Selezionare Compatible (Compatibile), Not
Compatible (Non compatibile) oppure
Don’t Know (Non so).
Setup Navigator
Language Settings
Audio Out Settings
AV Receiver Func.
Dolby Digital
DTS
MPEG
Compatible
Not Compatible
Don't Know
10 Il ricevitore AV è compatibile con
l’audio 96kHz Linear PCM (Usc. PCM lin.96
kHz)?
Selezionare Compatible (Compatibile), Not
Compatible (Non compatibile) oppure
Don’t Know (Non so).
Setup Navigator
Language Settings
Audio Out Settings
AV Receiver Func.
Dolby Digital
DTS
MPEG
96kHz Linear PCM
Compatible
Not Compatible
Don't Know
11 Premere ENTER per completare
l’installazione o premere SETUP per uscire
da Setup Navigator (Instal. Guidata)
senza apportare modifiche.
Setup Navigator
Language Settings
Audio Out Settings
AV Receiver Func.
Dolby Digital
DTS
Settings complete
MPEG
Press ENTER to exit
96kHz Linear PCM
Compatible
Not Compatible
Unknown
ENTER
Congratulazioni. L’installazione è terminata.
22
It

Come iniziare
04
Riproduzione di dischi
Vengono qui spiegati i controlli basilari per la
riproduzione di dischi DVD, CD, Video CD ed
MP3. Nel capitolo successivo vengono
spiegate ulteriori funzioni.
23
56
ENTER
3
8
7
OPEN/CLOSE
0
ENTER
0
¡
¢
STANDBY/ON
1
4
789
1
4
3 Caricare un disco.
Caricare il disco con l’etichetta rivolta verso
l’alto, utilizzando la guida del cassetto del
disco per allineare il disco (se il disco è un
DVD a doppio lato, inserirlo con il lato che si
desidera riprodurre rivolto verso il basso).
Italiano
4 Premere 3 (play) per avviare la
riproduzione.
Se si riproduce un DVD o un Video CD,
potrebbe venire visualizzato un menu. Per
informazioni sulla navigazione dei menu,
vedere le pagine 25 e 26.
Se si riproduce un disco MP3, potrebbero
trascorrere dei secondi prima che la
riproduzione venga avviata, a seconda della
complessità della struttura del file sul disco.
1 Se il lettore non è già acceso, premere
STANDBY/ON.
Se si riproduce un DVD o un Video CD,
accendere anche il televisore e verificare che
sia impostato sull’ingresso video corretto.
2 Premere 0 OPEN/CLOSE per aprire il
cassetto del disco.
• Quando si carica un disco DVD, questo
viene espulso automaticamente dopo
pochi secondi.
È molto probabile che il disco sia di una
regione diversa a quella del lettore. Il
numero della regione dovrebbe essere
riportato sul disco; verificare che sia lo
stesso del lettore (riportato sul pannello
posteriore). Vedere anche a pagina 9.
Se il numero della regione è corretto, il
disco potrebbe essere danneggiato o
sporco. Pulire il disco e verificare che
non sia danneggiato. Vedere anche a
pagina 47.
23
It

Come iniziare04
24
It
• Pe rch é il disco caricato non viene
riprodotto?
In primo luogo verificare che il disco
caricato sia stato caricato correttamente
(con l’etichetta rivolta verso l’alto) e che
non sia sporco o danneggiato. Per
informazioni sulla pulizia dei dischi,
vedere pagina 47.
Se il disco caricato correttamente non
viene riprodotto, è probabile che sia di
formato o tipo incompatibile, quale
DVD-Audio o DVD-ROM. Per ulteriori
informazioni sulla compatibilità di
dischi, vedere a pagina 8.
• Possiedo un televisore widescreen, ma
perché, riproducendo alcuni dischi,
vengono visualizzate delle barre nere
nella parte superiore e inferiore dello
schermo?
Alcuni formati cinematografici
richiedono la visualizzazione di barre
nere anche quando vengono riprodotti
su un televisore widescreen. Non si
tratta di un malfunzionamento.
• Possiedo un televisore standard (4:3) e ho
impostato il lettore sulla visualizzazione
di DVD widescreen in formato Pan &
Scan. Perché riporducendo alcuni dischi
vengono visualizzate delle barre nere
nella parte superiore e inferiore dello
schermo?
Alcuni dischi ignorano le preferenze di
visualizzazione impostate, quindi anche
se si utilizza un formato 4:3 (Pan &
Scan) (4:3 (Pan & Scan)), la
visualizzazione è in formato letterbox.
Non si tratta di un malfunzionamento.
• Il ricevitore AV è compatibile con l’audio
PCM lineare a 96 kHz, ma non funziona
con il lettore. Come si spiega?
Come misura di protezione contro le
copie digitali, su alcuni dischi DVD a 96
kHz viene effettuato automaticamente
un downsampling a 48 kHz. Non si tratta
di un malfunzionamento. Con questo
genere di dischi, se si vuole fruire di un
audio analogico di qualità elevata,
occorre impostare Digital Out (Uscita
Digitale) su Off (Spent) (pagina 39), e
96kHz PCM Out (Uscita PCM 96kHz)
su 96kHz (pagina 40).
Controlli di riproduzione basilari
Nella seguente tabella vengono spiegati i
controlli basilari per la riproduzione di dischi
tramite telecomando. Nel capitolo
successivo vengono spiegate ulteriori
funzioni di riproduzione.
Pulsante A cosa serve?
3 Avvia la riproduzione.
DVD e Video CD: se nel display
viene visualizzato RESUME, la
riproduzione viene avviata dal
punto in cui è stata interrotta.
8 Sospende la riproduzione di
un disco o riavvia la
riproduzione sospesa.
7 Interrompe la riproduzione.
DVD e Video CD: nel display
viene visualizzato RESUME.
Premere di nuovo 7 (stop) per
annullare la funzione di
ripresa.
1 Premere per avviare la
scansione indietro veloce.
Premere 3 (play) per avviare la
normale riproduzione.
¡ Premere per avviare la
scansione in avanti veloce.
Premere 3 (play) per avviare la
normale riproduzione.
4 Passa all’inizio della traccia o
del capitolo corrente, quindi
alle tracce o capitoli
precedenti.
¢ Passa alla traccia o al capitolo
successivo.
Numeri Utilizzati per immettere un
numero di traccia o di titolo.
Premere ENTER per
selezionare (oppure attendere
alcuni secondi).
• Se la riproduzione era stata
interrotta, riprende dal titolo
selezionato (per DVD) o dalla
traccia selezionata (per CD/
Video CD/MP3).
• Durante la riproduzione, la
riproduzione passa all’inizio
del capitolo o traccia
selezionati.

Come iniziare
Controlli sul pannello anteriore
I pulsanti 3 (play), 7 (stop) e 8 (pause) sul
pannello anteriore funzionano esattamente
come i pulsanti riportati sul telecomando. I
pulsanti combinati di ricerca/passaggio sul
pannello anteriore (4 1 e ¡ ¢)
funzionano in maniera leggermente diversa
dai pulsanti del telecomando.
OPEN
CLOS
0
¡
1
¢
4
DV-454
STANDBY/ON
41 ¡¢
Tenere premuto per la scansione veloce;
premere per passare a un’altra traccia o un
altro capitolo.
• Con alcuni dischi DVD, in determinate
sezioni del disco i controlli di
riproduzione potrebbero non funzionare.
Non si tratta di un malfunzionamento.
• I pulsanti per passare da una traccia
all’altra e i pulsanti numerati per la
selezione delle tracce non funzionano
con dischi CD-R/RW non finalizzati.
Menu del disco per DVD-Video
Numerosi dischi DVD-Video presentano
menu dai quali è possibile selezionare il
programma. Tali menu danno accesso a
funzioni aggiuntive, quali la selezione della
lingua dell’audio e dei sottotitoli, oppure a
funzioni speciali, quali l’anteprima delle
sezioni. Per ulteriori informazioni vedere la
custodia del disco.
Alle volte i menu dei DVD-Video vengono
visualizzati automaticamente quando si avvia
la riproduzione; in altri casi i menu vengono
visualizzati soltanto quando si preme MENU
o TOP MENU.
3
8
7
23
1
ENTER
56
4
789
TOP MENU MENU
0
ENTER
RETURN
Pulsante A cosa serve?
TOP MENU Visualizza il ‘menu principale’
di un disco DVD e dipende dal
disco utilizzato.
MENU Visualizza un menu di disco
DVD e dipende dal disco
utilizzato. Potrebbe essere
uguale al ‘menu principale’.
Sposta il cursore all’interno
dello schermo.
ENTER Seleziona l’opzione di menu
corrente.
RETURN Ritorna alla schermata del
menu precedentemente
visualizzato.
Numeri Evidenzia un’opzione di menu
numerata (soltanto per alcuni
dischi). Premere ENTER per
selezionare.
04
Italiano
25
It

Come iniziare04
Menu PBC dei Video CD
Alcuni Video CD presentano menu che
consentono di scegliere il programma
desiderato. Questi menu sono chiamati
menu PBC (Playback Control).
È possibile riprodurre un Video CD PBC
senza dovere aprire il menu PBC, avviando la
riproduzione tramite il pulsante numerato
per selezionare la traccia, piuttosto che
utilizzando il pulsante 3 (play).
23
1
ENTER
56
4
789
0
ENTER
RETURN
26
It
4
¢
Pulsante Funzione
RETURN Visualizza il menu PBC.
Numeri Utilizzati per immettere
un’opzione di menu numerata.
Premere ENTER per
selezionare.
4 Visualizza la pagina di menu
precedente (se disponibile).
¢ Visualizza la pagina di menu
successiva (se disponibile).

Riproduzione di dischi
05
Introduzione
Per la maggior parte delle funzioni descritte
in questo capitolo vengono utilizzati i display
su schermo. Per ulteriori informazioni sulla
navigazione dei menu, vedere Utilizzo dei
display su schermo a pagina 20.
Molte delle funzioni trattate nel presente
capitolo riguardano i dischi DVD, i Video CD,
CD ed MP3, sebbene il corretto
funzionamento di alcune di queste funzioni
varia leggermente a seconda del disco
caricato.
Per alcuni dischi DVD viene utilizzato un
numero inferiore di funzioni (riproduzione
casuale o ripetuta, ad esempio). Non si tratta
di un malfunzionamento.
Quando si riproducono i Video CD, alcune
funzioni non sono disponibili durante la
riproduzione PBC. Se si desidera utilizzare
tali funzioni, avviare la riproduzione con un
pulsante numerato per selezionare una
traccia.
Utilizzo di Disc Navigator
(Disc Navigator) per
visualizzare i contenuti di un
disco
Utilizzare Disc Navigator (Disc Navigator) per
visualizzare i contenuti di un disco e trovare
la sezione che si desidera riprodurre. È
possibile utilizzare Disc Navigator (Disc
Navigator) durante la riproduzione di un
disco o quando questa viene interrotta.
1 Premere SETUP e selezionare ‘Disc
Navigator’ (Disc Navigator) dal display su
schermo.
In alternativa, se è stato caricato un disco
CD, Video CD o MP3, è possibile premere
MENU e visualizzare la schermata Disc
Navigator (Disc Navigator).
Audio Settings
Play Mode
Setup Navigator
Disc Navigator
Initial Settings
2 Selezionare la parte che di desidera
riprodurre.
A seconda del tipo di disco caricato, Disc
Navigator (Disc Navigator) viene visualizzato
in maniera leggermente diversa.
Nella schermata per i dischi DVD vengono
visualizzati i titoli sulla sinistra e i capitoli
sulla destra. Selezionare un titolo oppure un
capitolo all’interno del titolo.
Disc Navigator
DVD
Title 1-10
Title 01
Title 02
Title 03
Title 04
Title 05
Title 06
Title 07
Title 08
Chapter 1-3
Chapter 001
Chapter 002
Chapter 003
Nella schermata per CD e Video CD viene
visualizzato un elenco di tracce.
Disc Navigator
CD
Track 1-10
Track 01
Track 02
Track 03
Track 04
Track 05
Track 06
Track 07
Track 08
Nella schermata per i dischi MP3 vengono
visualizzati i nomi delle cartelle sulla sinistra
e i nomi delle tracce sulla destra (da notare
che se vi sono più di 16 cartelle o nomi che
contengono caratteri accentati o non
romani, le tracce e le cartelle possono
comparire con nomi generici, ad es. F_033,
T_035, ecc.).
Selezionare una cartella o una traccia
all’interno della cartella.
Disc Navigator
MP3
Folder 1-17
001. ACP
002. Nth Degree
003. Pfeuti
004. Live
005. Glitch music
006. CodHead
007. Thermo
008. Missing Man
Track 1-10
001. Gravity deluxe
002. Tesla's patent
003. Border dispute
004. Delayed by rain
005. Accident incident
006. Pigeon post
007. Outernational
008. Vacuum tube
La riproduzione viene avviata quando si
preme ENTER.
Italiano
27
It

Riproduzione di dischi05
• Disc Navigator (Disc Navigator) è
disponibile soltanto quando è stato
caricato un disco.
• Non è possibile utilizzare Disc Navigator
(Disc Navigator) durante la riproduzione
di un Video CD in modalità PBC o di un
disco CD-R/RW non finalizzato.
• Per trovare una particolare sezione del
disco è anche possibile utilizzare i modi
di ricerca. Vedere Ricerche sul disco a
pagina 34.
Scansione dei dischi
È possibile eseguire la scansione veloce del
disco in avanti e indietro a diverse velocità.
1 Durante la riproduzione premere 1
o ¡ per avviare la scansione.
2 Premere ripetutamente per
aumentare la velocità di scansione.
• La scansione di MP3s viene eseguita
soltanto a una velocità.
• La velocità di scansione viene
visualizzata su schermo.
3 Per riprendere la normale
riproduzione, premere 3 (play).
Nota
• Durante la scansione audio dei dischi
CD ed MP3 è possibile sentire l’audio.
• Durante la scansione di una traccia di
Video CD o MP3, la riproduzione
riprende automaticamente all’inizio o
alla fine della traccia.
• Durante la scansione di DVD e Video CD
non viene emesso alcun suono e
durante la scansione di DVD non
vengono visualizzati i sottotitoli.
• A seconda del tipo disco, quando si
raggiunge un nuovo capitolo su un
disco DVD, la normale riproduzione
potrebbe riprendere automaticamente.
28
It
Riproduzione lenta
Per i DVD e i Video CD sono disponibili
quattro diverse velocità di riproduzione lenta
in avanti, mentre per i DVD sono disponibili
due velocità di riproduzione lenta indietro.
1 Durante la riproduzione premere 8
(pause).
/e
2 Tenere premuto
quando non viene avviata la
riproduzione lenta.
• La velocità di riproduzione lenta viene
visualizzata su schermo.
• Durante la riproduzione lenta non viene
emesso alcun suono.
3 Premere ripetutamente per modificare
la velocità di riproduzione lenta.
• La velocità di riproduzione lenta viene
visualizzata su schermo.
4 Per riprendere la normale
riproduzione, premere 3 (play).
Nota
• I Video CD supportano soltanto la
riproduzione lenta indietro.
• La qualità dell’immagine durante la
riproduzione lenta è inferiore a quella
della riproduzione normale.
• A seconda del tipo disco, quando si
raggiunge un nuovo capitolo, la normale
riproduzione potrebbe riprendere
automaticamente.
o
E/
fino a
Avanzamento di un
fotogramma alla volta in
avanti/indietro
Con i dischi DVD è possibile avanzare di un
fotogramma alla volta in avanti e indietro.
Con i Video CD è possibile utilizzare soltanto
l’avanzamento per fotogrammi in avanti.
1 Durante la riproduzione premere 8
(pause).
/e
2 Premere
di un fotogramma alla volta in avanti e
indietro.
3 Per riprendere la normale
riproduzione, premere 3 (play).
o
E/
per avanzare

Riproduzione di dischi
05
Nota
• La qualità dell’immagine durante
l’avanzamento di un fotogramma alla
volta indietro non è pari a quella
dell’avanzamento di un fotogramma alla
volta in avanti.
• A seconda del tipo disco, quando si
raggiunge un nuovo capitolo, la normale
riproduzione potrebbe riprendere
automaticamente.
• Quando si cambia direzione con un
disco DVD l’immagine può “spostarsi”
in modo inaspettato, e ciò non è dovuto
ad un guasto.
Ripetizione in loop di una
sezione del disco
La funzione A-B Repeat (Ripetizione A-B)
consente di specificare due punti (A e B)
all’interno di una traccia (CD e Video CD) o
di un titolo (DVD) che compongono un loop
riprodotto ripetutamente.
La funzione A-B Repeat (Ripetizione A-B) non
è disponibile con dischi MP3, Video CD in
modalità PBC o dischi CD-R/RW non
finalizzati.
1 Durante la riproduzione premere
PLAY MODE e selezionare ‘A-B Repeat’
(Ripetizione A-B) dall’elenco di funzioni
sulla sinistra.
Play Mode
A-B Repeat
Repeat
Random
Program
Search Mode
2 Premere ENTER su ‘A(Start Point)’
(Punto iniziale) per impostare il punto
iniziale del loop.
A(Start Point)
B(End Point)
Off
3 Premere ENTER su ‘B(End Point)’
(Punto finale) per impostare il punto
finale del loop.
Play Mode
A-B Repeat
Repeat
Random
Program
Search Mode
A(Start Point)
B(End Point)
Off
Dopo aver premuto ENTER, la riproduzione
ritorna al punto iniziale del loop e questo
viene riprodotto.
• Il tempo minimo di loop è 2 secondi.
4 Per riprendere la normale
riproduzione, selezionare ‘Off’ (Spento)
dal menu.
Utilizzo della riproduzione
ripetuta
Esistono numerose opzioni di riproduzione
ripetuta, a seconda del tipo di disco caricato.
È anche possibile utilizzare la riproduzione
ripetuta assieme alla riproduzione programmata per ripetere le tracce/i capitoli nella
lista programmi (vedere Creazione della lista
programmi a pagina 31).
La funzione di riproduzione ripetuta non è
disponibile con dischi Video CD in modalità
PBC o dischi CD-R/RW non finalizzati.
1 Durante la riproduzione premere
PLAY MODE e selezionare ‘Repeat’
(Ripetiz.) dall’elenco di funzioni sulla
sinistra.
Play Mode
A-B Repeat
Repeat
Random
Program
Search Mode
Title Repeat
Chapter Repeat
Repeat Off
Italiano
Play Mode
A-B Repeat
Repeat
Random
Program
Search Mode
A(Start Point)
B(End Point)
Off
29
It

Riproduzione di dischi05
2 Selezionare un’opzione di ripetizione.
Se la riproduzione programmata è attiva,
selezionare Program Repeat (Ripet.
Programma) per ripetere la lista programmi
oppure Repeat Off (Ripet. Spenta) per
annullare.
Per i dischi DVD selezionare Title Repeat
(Ripet. Titolo) o Chapter Repeat (Ripet.
Capitolo) (oppure Repeat Off (Ripet. Spenta)).
Play Mode
A-B Repeat
Repeat
Random
Program
Search Mode
Title Repeat
Chapter Repeat
Repeat Off
Per i CD e i Video CD, selezionare Disc Repeat
(Rip. disco singolo) o Track Repeat (Ripet.
Traccia) (oppure Repeat Off (Ripet. Spenta)).
Play Mode
A-B Repeat
Repeat
Random
Program
Search Mode
Disc Repeat
Track Repeat
Repeat Off
Utilizzo della riproduzione
casuale
Utilizzare la funzione di riproduzione casuale
per visualizzare titoli o capitoli (DVD) o tracce
(CD, Video CD e dischi MP3) in ordine
casuale.
È possibile impostare l’opzione di
riproduzione casuale quando si riproduce un
disco o la riproduzione viene interrotta.
1 Premere PLAY MODE e selezionare
‘Random’ (Casuale) dall’elenco di funzioni
sulla sinistra.
Play Mode
A-B Repeat
Repeat
Random
Program
Search Mode
2 Selezionare un’opzione di
riproduzione casuale.
Per i dischi DVD selezionare Random Title
(Titolo casuale) o Random Chapter
(Capitolo casuale) (oppure Random Off
(Casuale spenta)).
Random Title
Random Chapter
Random Off
Per i dischi MP3 selezionare Disc Repeat
(Rip. disco simgolo), Folder Repeat (Ripet.
Cartella) o Track Repeat (Ripet. Traccia)
(oppure Repeat Off (Ripet. Spenta)).
Play Mode
A-B Repeat
Repeat
Random
Program
Search Mode
Disc Repeat
Folder Repeat
Track Repeat
Repeat Off
Nota
• Non è possibile utilizzare
contemporaneamente la ripetizione e la
riproduzione casuale.
• Se si cambia l’angolo di visuale durante
la riproduzione, la riproduzione ripetuta
viene annullata.
30
It
Play Mode
A-B Repeat
Repeat
Random
Program
Search Mode
Random Title
Random Chapter
Random Off
Per dischi CD, Video CD ed MP3, selezionare
On (Acceso) oppure Off (Spento) per
attivare e disattivare la riproduzione casuale.
(Notare che quando si utilizza tale comando
con dischi MP3, vengono riprodotte soltanto
le tracce della cartella corrente.)
Play Mode
A-B Repeat
Repeat
Random
Program
Search Mode
On
Off

Riproduzione di dischi
• Per interrompere il disco e annullare la
riproduzione casuale, premere 7 (stop).
• Per annullare la riproduzione casuale
senza interrompere la riproduzione,
premere CLEAR. Il disco viene riprodotto
fino alla fine, quindi la riproduzione si
interrompe.
• Durante la riproduzione casuale, i
pulsanti 4 e ¢ hanno un
funzionamento leggermente differente
dal normale: 4 consente di tornare
all’inizio della traccia o del capitolo
correnti. Non è possibile tornare più
indietro di questo punto. ¢ consente
di selezionare un’altra traccia o un altro
capitolo a caso tra i rimanenti.
• Non è possibile utilizzare la riproduzione
casuale assieme alla riproduzione
programmata o ripetuta.
Nota
• Non è possibile utilizzare la riproduzione
casuale con dischi Video CD in modalità
PBC o dischi CD-R/RW non finalizzati.
Creazione della lista
programmi
La funzione di riproduzione programmata
non è disponibile con dischi Video CD in
modalità PBC o dischi CD-R/RW non
finalizzati.
1 Premere PLAY MODE e selezionare
‘Program’ (Programm) dall’elenco di
funzioni sulla sinistra.
2 Selezionare ‘Create/Edit’ (Crea/mod.
prog.) della lista dalle opzioni di programma.
Play Mode
A-B Repeat
Repeat
Random
Program
Search Mode
Create/Edit
Playback Start
Playback Stop
Program Delete
Program Memory ‰ Off
La schermata di modifica Program
dell’elenco di riproduzione visualizzata
dipende dal tipo di disco caricato.
Sulla sinistra viene riportata la lista
programmi, mentre sulla destra viene
riportato l’elenco dei titoli (se è stato caricato
un disco DVD), le tracce (per CD e Video CD)
o i nomi delle cartelle (per dischi MP3).
Sull’estrema destra viene riportato l’elenco
dei capitoli (per i DVD) o i nomi delle tracce
(per gli MP3).
3 Selezionare un titolo, un capitolo, una
cartella o una traccia per il passaggio
corrente nella lista programmi.
Per i dischi DVD, è possibile aggiungere alla
lista programmi un titolo intero o un capitolo
all’interno del titolo.
• Per aggiungere un titolo, selezionare il
titolo desiderato.
Program
Program Step
01. 01
02.
03.
04.
05.
06.
07.
08.
Title 1~38
Title 01
Title 02
Title 03
Title 04
Title 05
Title 06
Title 07
Title 08
Chapter 1~4
Chapter 001
Chapter 002
Chapter 003
Chapter 004
05
Italiano
Play Mode
A-B Repeat
Repeat
Random
Program
Search Mode
Create/Edit
Playback Start
Playback Stop
Program Delete
Program Memory ‰ Off
31
It

Riproduzione di dischi05
• Per aggiungere un capitolo, evidenziare
il titolo, quindi premere
(cursore
destro) e selezionare il capitolo
dall’elenco.
Program
Program Step
01. 01-003
02.
03.
04.
05.
06.
07.
08.
Title 1-38
Title 01
Title 02
Title 03
Title 04
Title 05
Title 06
Title 07
Title 08
Chapter 1-4
Chapter 001
Chapter 002
Chapter 003
Chapter 004
Per un CD o un Video CD, selezionare una
traccia da aggiungere alla lista programmi.
Program
Program Step
01. 04
02.
03.
04.
05.
06.
07.
08.
Track 1~12
Track 01
Track 02
Track 03
Track 04
Track 05
Track 06
Track 07
Track 08
Per i dischi MP3, è possibile aggiungere alla
lista programmi una intera cartella o una
traccia all’interno della cartella.
• Per aggiungere una cartella, selezionare
la cartella desiderata.
• Per aggiungere una traccia, individuare
la cartella, quindi premere
(cursore
destro) e selezionare il nome della
traccia dall’elenco.
Program
Program Step
01. 001-003
02.
03.
04.
05.
06.
07.
08.
Folder 1-6
001. ACP
002. Nth Degree
003. Pfeuti
004. Live
005. Glitch music
006. CodHead
Track 1-10
001. Gravity deluxe
002. Tesla's patent
003. Border dispute
004. Delayed by rain
005. Accident incident
006. Pigeon post
007. Outernational
008. Vacuum tube
Quando si preme ENTER per selezionare
titolo/capitolo/cartella/traccia, si passa
automaticamente al numero di passaggio
successivo, più in basso di una posizione.
4 Ripetere il passaggio 3 per creare una
lista programmi.
La lista programmi può contenere fino a 24
titoli/capitoli/cartelle/tracce.
5 Per riprodurre la lista programmi,
premere 3 (play).
La riproduzione programmata rimane
attivata fino a quando non viene disattivata
(vedere di seguito), non si cancella la lista
programmi (vedere di seguito), non si estrae
il disco o non si spegne il lettore.
32
It
Program
Program Step
01. 001
02.
03.
04.
05.
06.
07.
08.
Folder 1-6
001. ACP
002. Nth Degree
003. Pfeuti
004. Live
005. Glitch music
006. CodHead
Track 1-10
001. Gravity deluxe
002. Tesla's patent
003. Border dispute
004. Delayed by rain
005. Accident incident
006. Pigeon post
007. Outernational
008. Vacuum tube
• Per salvare la lista programmi e
chiudere schermata di modifica del
programma senza avviare la
riproduzione, premere PLAY MODE o
SETUP. (Non premere RETURN,
altrimenti la lista programma non verrà
salvata.)
• Durante la riproduzione programmata,
premere ¢ per passare al successivo
passaggio del programma.
• Premere CLEAR durante la riproduzione
per disattivare la riproduzione programmata. Premere mentre la riproduzione è
interrotta per cancellare la lista
programmi.

Riproduzione di dischi
05
Modifica della lista programmi
Dopo aver creato una lista programmi, è
possibile aggiungere, eliminare e modificare
i passaggi.
1 Premere PLAY MODE e selezionare
‘Program’ (Programm) dall’elenco di
funzioni sulla sinistra.
2 Selezionare ‘Create/Edit’ (Crea/mod.
prog.) dalle opzioni della lista
programmi.
3 Per eliminare il passaggio, evidenziare
il numero di passaggio e premere CLEAR.
4 Per inserire un passaggio all’interno
della lista programmi, evidenziare il
passaggio dove si desidera che venga
visualizzato il nuovo passaggio, quindi
selezionare titolo/capitolo/cartella/traccia
da aggiungere.
Quando si preme ENTER, il nuovo passaggio
viene inserito nell’elenco.
5 Per aggiungere un passaggio alla fine
della lista programmi, evidenziare il
successivo passaggio libero, quindi
selezionare titolo/capitolo/cartella/traccia
da aggiungere.
• Per salvare la lista programmi e
chiudere schermata di modifica del
programma senza avviare la
riproduzione, premere PLAY MODE o
SETUP.
• Se si desidera chiudere schermata di
modifica del programma senza salvare
le modifiche apportate, premere
RETURN.
Altre funzioni disponibili dal
menu di programmazione
Oltre a creare e modificare la lista
programmi, è possibile riprodurla,
annullarla, eliminarla e memorizzarla dal
menu Play Mode (Modo Riproduzione).
1 Premere PLAY MODE e selezionare
‘Program’ (Programm) dall’elenco di
funzioni sulla sinistra.
Play Mode
A-B Repeat
Repeat
Random
Program
Search Mode
2 Selezionare una funzione di
riproduzione programmata.
• Create/Edit (Crea/mod. prog.) –
Vedere sopra
• Playback Start (Inizio ripr. prog.) –
Avvia la riproduzione della lista
programmi salvata.
• Playback Stop (Fine ripr. prog.) –
Disattiva la riproduzione programmata,
ma non cancella la lista programmi
• Program Delete (Cancella prog.) –
Cancella la lista programmi e disattiva
la riproduzione programmata
• Program Memory (Memoria Programma) (soltanto DVD) – Selezionare
On (Acceso) per salvare la lista
programmi per il disco caricato.
(Selezionare Off (Spento) per annullare
la memoria di programma per il disco
caricato)
Create/Edit
Playback Start
Playback Stop
Program Delete
Program Memory ‰ Off
Italiano
• Le liste programmi vengono salvate per
il disco caricato. Quando viene caricato
un disco con una lista programmi
salvata, viene automaticamente attivata
la riproduzione programmata.
•È possibile salvare le liste programmi
per un numero massimo di 24 dischi.
Dopodiché la lista più vecchia viene
sostituita da quella appena salvata.
33
It

Riproduzione di dischi05
Ricerche sul disco
Sui dischi DVD è possibile eseguire ricerche
per numero di titolo o capitolo oppure per
tempo. È possibile eseguire ricerche sui CD
per numero di traccia e sui Video CD per
numero di traccia o per tempo. È possibile
eseguire ricerche sui dischi MP3 per numero
di cartella o di traccia.
1 Premere PLAY MODE e selezionare
‘Search Mode’ (Modo di ricerca)
dall’elenco di funzioni sulla sinistra.
Le opzioni di ricerca visualizzate dipendono
dal tipo di disco caricato. Nella schermata
sottostante vengono mostrate le opzioni di
ricerca sui DVD.
Play Mode
A-B Repeat
Repeat
Random
Program
Search Mode
2 Selezionare un modo di ricerca.
3 Utilizzare i pulsanti numerati per
immettere un titolo, un capitolo, una
cartella, un numero di traccia oppure un
tempo.
Play Mode
A-B Repeat
Repeat
Random
Program
Search Mode
Title Search
Chapter Search
Time Search
Title Search
Chapter Search
Time Search
Chapter Input
0 0 1
4 Premere ENTER per avviare la
riproduzione.
Nota
• La ricerca basata sul tempo può essere
utilizzata unicamente durante la
riproduzione di un disco.
• Le funzioni di ricerca non sono
disponibili con dischi Video CD in
modalità PBC o dischi CD-R/RW non
finalizzati.
Cambio di sottotitoli
Alcuni dischi DVD dispongono di sottotitoli
in una o più lingue; sulla confezione del
disco in genere vengono riportate le lingue
disponibili nei sottotitoli. Durante la
riproduzione è possibile cambiare la lingua
dei sottotitoli in qualsiasi momento.
1 Premere ripetutamente SUBTITLE per
selezionare un’opzione per i sottotitoli.
Current / Total
Subtitle English1/2
• Per impostare le preferenze dei
sottotitoli, vedere Subtitle Language
(Lingua Sottotitoli) a pagina 42.
Cambio di lingua per l’audio
dei DVD
Durante la riproduzione di un disco DVD
registrato con dialoghi in due o più lingue, è
possibile cambiare la lingua dell’audio in
qualsiasi momento.
34
It
• Per una ricerca basata sul tempo,
immettere il numero di minuti e secondi
del titolo correntemente riprodotto
(DVD) o della traccia (Video CD) in
corrispondenza dei quali si desidera
riprendere la riproduzione. Per esempio,
premere 4, 5, 0, 0 perché la riproduzione
venga avvita dal 45mo minuto del disco.
Per 1 ora, 20 minuti e 30 secondi,
premere 8, 0, 3, 0.
1 Premere ripetutamente AUDIO per
selezionare un’opzione tra le lingue per
l’audio.
Current /Total
Audio French Dolby Digital 3/2.1CH1/2
• Per impostare le preferenze della lingua
audio, vedere Audio Language (Lingua
Audio) a pagina 42.

Riproduzione di dischi
05
Cambio di canale audio durante la riproduzione di un
Video CD
Durante la riproduzione di un Video CD è
possibile cambiare canale da stereo a
soltanto canale sinistro o soltanto canale
destro.
1 Premere ripetutamente AUDIO per
selezionare un’opzione dei audio.
Audio Stereo
Zoom dello schermo
Durante la riproduzione di un DVD o Video
CD, è possibile ingrandire una parte dello
schermo per un fattore 2 o 4 tramite la
funzione di zoom.
1 Durante la riproduzione, utilizzare il
pulsante ZOOM per selezionare il fattore
di zoom.
• Normale
• 2x
• 4x
Normale
Zoom 2
Zoom 2
• La risoluzione di DVD e Video CD è fissa,
pertanto la qualità dell’immagine viene
deteriorata, in particolare con uno zoom
4x. Non si tratta di un
malfunzionamento.
2 Utilizzare i tasti cursore per
modificare l’area ingrandita.
Durante la riproduzione è sempre possibile
modificare il fattore di zoom e l’area
ingrandita.
• Se il riquadro di navigazione non è più
visibile nella parte superiore dello
schermo, premere di nuovo ZOOM per
visualizzarlo.
Nota
• Si consiglia di non utilizzare i menu di
un disco DVD se l’immagine è
ingrandita, in quanto le opzioni del
menu non appaiono evidenziate.
• Quando s’ingrandisce l’immagine, non
è possibile visualizzare i sottotitoli, che
saranno nuovamente visibili quando si
torna alla visualizzazione normale.
Cambio dell’angolo di visuale
Alcuni dischi DVD dispongono di scene
riprese da due o più angolazioni. Per ulteriori
informazioni, verificare sulla confezione del
disco.
Quando viene riprodotta una scena multiangolo, per indicare che sono disponibili
ulteriori angolazioni sullo schermo viene
visualizzata l’icona
essere disattivata, qualora lo si preferisca,
vedere a pagina 44).
(che può anche
Italiano
Zoom 4
Zoom 4
1 Durante la riproduzione (o quando
questa è stata interrotta), premere
ANGLE per cambiare angolazione.
Se la riproduzione era stata interrotta, viene
riavviata da una nuova angolazione.
35
It

Riproduzione di dischi05
Visualizzazione delle
informazioni del disco
Durante la riproduzione di un disco è
possibile visualizzare su schermo numerose
informazioni su tracce, capitoli e titoli,
nonché la velocità di trasmissione del video
per i dischi DVD.
1 Per visualizzare o alternare le
informazioni visualizzate, premere
DISPLAY.
Quando viene riprodotto un disco, le
informazioni vengono visualizzate nella parte
superiore dello schermo. Continuare a
premere DISPLAY per cambiare le
informazioni visualizzabili.
• Display dei DVD
Play DVD
3
Current / Total Elapsed
Title
French
Audio
Dolby Digital 3/2.1CH AngleSubtitle
Play DVD
3
Current / Total Elapsed
Chapter
Tr. Rate 8.6Mbps
Remain
2.0511/38
4.57
English 1
Remain
2.0511/38
4.57
Total
Tota l
7.02
7.02
•È possibile visualizzare le informazioni
del disco (numero di titolo/capitolo,
traccia, cartella e così via) dalla
schermata Disc Navigator (Disc
Navigator). Vedere Utilizzo di Disc
Navigator (Disc Navigator) per
visualizzare i contenuti di un disco a
pagina 27.
36
It
• Display dei CD e Video CD
Play CD
3
Current / Total Elapsed
Trac k
Play CD
3
Disc
1.072/16
Elapsed
28.00
Remain
4.40
Remain
30.20
• Display dei dischi MP3
Play MP3
3
Current / Total Elapsed
Track
Track Name Outernational
Play MP3
3
Current / Total
Folder
2/7
Folder Name ACP
Remain
0.181/17
12.42
Tota l
Tota l
Tota l
5.47
58.20
13.00

Menu delle impostazioni audio
06
Audio DRC (Audio DRC)
• Impostazione predefinita: Off (Spento)
Quando si riproducono DVD Dolby Digital a
basso volume, spesso non è possibile sentire
le frequenze più basse, compreso il dialogo.
Se si imposta Audio DRC (Audio DRC)
(Dynamic Range Control) su On (Acceso) è
possibile alzare il volume dei bassi, pur
controllando i picchi.
La differenza che si avverte nel suono
riprodotto dipende dal tipo di materiale
utilizzato. Se il materiale non è caratterizzato
da ampie variazioni in volume, si potrebbe
non percepire alcun cambiamento.
1 Premere SETUP e selezionare ‘Audio
Settings’ (Impost. Audio) dal display su
schermo.
Audio Settings
Play Mode
Initial Settings
2 Evidenziare Audio DRC (Audio DRC),
quindi utilizzare i tasti / (cursore
destro/sinistro) per selezionare ‘On’
(Acceso) o ‘Off’ (Spento), in base alle
esigenze.
Disc Navigator
Setup Navigator
Nota
• L’audio DRC (Audio DRC) funziona
soltanto con sorgenti audio Dolby
Digital.
• L’audio DRC (Audio DRC) funziona
soltanto tramite l’uscita digitale, se
Digital Out è impostato su On (Acceso)
e Dolby Digital Out è impostato su
Dolby Digital > PCM. Vedere a pagina
39.
• L’effetto di Audio DRC (Audio DRC)
dipende dagli altoparlanti e dalle
impostazioni del ricevitore AV.
Virtual Surround (Virtual
Surround)
• Impostazione predefinita: Off (Spento)
Attivare Virtual surround per ascoltare effetti
surround soltanto da due altoparlanti.
Quando viene riprodotta una colonna sonora
Dolby Digital, Virtual Dolby Digital, che
utilizza la tecnologia TruSurround da SRS,
ricrea un ambiente sonore 3D realistico e
profondo tramite una coppia di altoparlanti
stereo.
Italiano
Audio Settings
Audio DRC
Virtual Surround
Off
Off
3 Premere ENTER per eseguire
l’impostazione e uscire dalla schermata
Audio Settings (Impost. Audio).
37
It

Menu delle impostazioni audio06
1 Premere SETUP e selezionare ‘Audio
Settings’ (Impost. Audio) dal display su
schermo.
Audio Settings
Play Mode
Initial Settings
Disc Navigator
Setup Navigator
2 Evidenziare Virtual Surround, quindi
utilizzare i tasti
/
(cursore destro/
sinistro) per selezionare
‘2V/TruSurround’ oppure ‘Off’ (Spento),
in base alle esigenze.
Audio Settings
Audio DRC
Virtual Surround
Off
Off
3 Premere ENTER per eseguire
l’impostazione e uscire dalla schermata
Audio Settings (Impost. Audio).
Nota
• Virtual Surround non funziona con DTS
o con l’audio PCM lineare a 96 kHz,
oppure durante la riproduzione MP3,
tramite l’uscita analogica o digitale.
• Se il lettore produce audio bit stream
Dolby Digital o MPEG (ovvero l’audio
non viene convertito in formato PCM),
l’audio proveniente dall’uscita digitale
non verrà modificato da Virtual Surround. Per le modalità di impostazione
dei formati delle uscite digitali, vedere le
pagine 39-40.
• L’effetto surround varia a seconda del
disco riprodotto.
38
It
• Per attivare (2V/TruSurround) o
disattivare (Off (Spento)) Virtual
Surround è possibile utilizzare anche il
pulsante SURROUND sul telecomando.

Menu delle impostazioni iniziali
07
Utilizzo del menu Initial
Settings (Impost. iniziali)
Il menu Initial Settings (Impost. iniziali)
consente di controllare le impostazioni del
lettore DVD, incluse quelle relative alle uscite
audio e video e quelle del controllo genitori.
Se un’opzione non è disponibile significa che
in quel determinato momento non può
essere modificata. In genere ciò si verifica
durante la riproduzione del disco.
Interrompere la riproduzione, quindi
modificare l’impostazione.
1 Premere SETUP e selezionare ‘Initial
Settings’ (Impost. iniziali) dal display su
schermo.
Audio Settings
Play Mode
Initial Settings
2 Selezionare la categoria di
installazione dall’elenco sulla sinistra,
quindi selezionare una voce dall’elenco
sulla destra.
3 Selezionare le impostazioni
desiderate.
Nota
• Le opzioni relative alla lingua
visualizzate su schermo e riportate nelle
seguenti pagine potrebbero non
corrispondere alle immagini disponibili
su schermo nel proprio paese o nella
propria regione.
Disc Navigator
Setup Navigator
Impostazioni Digital Audio
Out (Uscita audio dig.)
Digital Out (Uscita Digitale)
• Impostazione predefinita: On (Acceso)
È necessario eseguire queste impostazioni se
il sistema è collegato a un ricevitore AV (o a un
altro componente) tramite una delle uscite
digitali.
Initial Settings
Digital Audio Out
Video Output
Language
Display
Options
Se in qualsiasi momento è necessario
disattivare l’uscita audio digitale, impostare
questa opzione su Off (Spento), altrimenti
lasciarla su On (Acceso).
Notare che è possibile attivare/disattivare
indipendentemente le uscite ottica e
coassiale.
Dolby Digital Out (Uscita Dolby
Dig.)
• Impostazione predefinita: Dolby Digital
È necessario eseguire queste impostazioni se
il sistema è collegato a un ricevitore AV (o a un
altro componente) tramite una delle uscite
digitali.
Initial Settings
Digital Audio Out
Video Output
Language
Display
Options
Digital Out
Dolby Digital Out
DTS Out
96 kHz PCM Out
MPEG Out
Digital Out
Dolby Digital Out
DTS Out
96 kHz PCM Out
MPEG Out
On
Off
Dolby Digital
Dolby Digital > PCM
Italiano
Se il ricevitore AV (o un altro componente
collegato) è Dolby Digital compatibile,
selezionare Dolby Digital, altrimenti
impostare l’opzione su Dolby Digital >
PCM.
39
It

Menu delle impostazioni iniziali07
DTS Out (Uscita DTS)
• Impostazione predefinita: Off (Spento)
È necessario eseguire queste impostazioni se
il sistema è collegato a un ricevitore AV (o a un
altro componente) tramite una delle uscite
digitali.
Initial Settings
Digital Audio Out
Video Output
Language
Display
Options
Digital Out
Dolby Digital Out
DTS Out
96 kHz PCM Out
MPEG Out
DTS
Off
Se il ricevitore AV (o un altro componente
collegato) dispone di un decoder DTS
integrato, impostare su DTS, altrimenti
impostare su Off (Spento). In caso di dubbi
sulla compatibilità DTS, consultare il
manuale fornito con l’altro componente.
Nota
• Se si seleziona l’impostazione DTS con
un amplificatore non DTS compatibile,
quando viene riprodotto un disco DTS
verrà emesso un rumore.
96kHz PCM Out (Uscita PCM
96kHz)
• Impostazione predefinita: 96 kHz > 48
kHz
È necessario eseguire queste impostazioni se
il sistema è collegato a un ricevitore AV (o a un
altro componente) tramite una delle uscite
digitali.
Se il ricevitore AV (o un altro componente
collegato) è compatibile con elevate
frequenze di campionamento (96 kHz),
impostare l’uscita a 96 kHz, altrimenti
selezionare 96 kHz > 48 kHz (l’audio a 96
kHz viene convertito nel formato più
compatibile a 48 kHz). In caso di dubbi sulla
compatibilità con la frequenza a 96 kHz,
consultare il manuale fornito con l’altro
componente.
MPEG Out (Uscita MPEG)
• Impostazione predefinita: MPEG > PCM
È necessario eseguire queste impostazioni se
il sistema è collegato a un ricevitore AV (o a un
altro componente) tramite una delle uscite
digitali.
Initial Settings
Digital Audio Out
Video Output
Language
Display
Options
Se il ricevitore AV (o un altro componente
collegato) è compatibile con l’audio MPEG,
impostare l’uscita su MPEG, altrimenti
selezionare MPEG > PCM (l’audio MPEG
viene convertito in audio PCM). In caso di
dubbi sulla compatibilità con l’audio MPEG,
consultare il manuale fornito con l’altro
componente.
Digital Out
Dolby Digital Out
DTS Out
96 kHz PCM Out
MPEG Out
MPEG
MPEG > PCM
40
It
Initial Settings
Digital Audio Out
Video Output
Language
Display
Options
Digital Out
Dolby Digital Out
DTS Out
96 kHz PCM Out
MPEG Out
96 kHz > 48kHz
96 kHz

Menu delle impostazioni iniziali
07
Impostazioni Video Output
(Uscita video)
TV Screen (Schermo TV)
• Impostazione predefinita: 4:3
(Letterbox) (4:3 (Letter Box))
Initial Settings
Digital Audio Out
Video Output
Language
Display
Options
TV Screen
AV Connector Out
S-Video Out
Se si possiede un televisore widescreen,
selezionare l’impostazione 16:9 (Wide) (16:9
(Wide)). Il software DVD widescreen viene
visualizzato su un’area a schermo intero.
Quando si riproduce software registrato in
formato convenzionale (4:3), le impostazioni
sul televisore determinano le modalità di
presentazione del materiale. Per informazioni
sulle opzioni disponibili, vedere il manuale
fornito con il televisore.
Se si possiede un televisore tradizionale,
selezionare 4:3 (Letter Box) (4:3 (Letter
Box)) o 4:3 (Pan & Scan) (4:3 (Pan&Scan)).
In modo Letter Box il software widescreen
viene visualizzato con due barre nere nella
parte superiore e inferiore dello schermo.
L’impostazione Pan & Scan taglia i lati
dell’immagine widescreen riprodotta su uno
schermo 4:3 (quindi, anche se l’immagine
sembra più grande su schermo, in realtà
viene visualizzata una porzione inferiore di
pellicola). Vedere anche a pagina 49.
AV Connector Out (Uscita AV)
• Impostazione predefinita: Video (Video)
Questa impostazione è necessaria soltanto se
il lettore è collegato a un televisore tramite un
connettore AV di tipo SCART.
• Se si esegue un’impostazione
incompatibile con il televisore utilizzato,
4:3 (Letter Box)
4:3 (Pan&Scan)
16:9 (Wide)
sul televisore potrebbe non venire
visualizzata alcuna immagine. In tal
caso spegnere il televisore e il lettore e
ricollegare il lettore al televisore tramite
il cavo video/audio fornito o il cavo SVideo (per ulteriori informazioni vedere
pagine 11 e 12).
• I cavi SCART sono disponibili in diverse
configurazioni. Verificare di utilizzare il
cavo corretto per il televisore/monitor.
Per lo schema SCART vedere pagina
54.
Initial Settings
Digital Audio Out
Video Output
Language
Display
Options
TV Screen
AV Connector Out
S-Video Out
Video
S-Video
RGB
• Video (Video) – standard video
compatibile con tutti i televisori.
• S-Video (S-Video) – qualità superiore,
ma occorre verificare che il televisore
sia compatibile.
• RGB (RGB) – qualità ottimale, ma
occorre verificare che il televisore sia
compatibile.
S-Video Out (Uscita S-Video)
• Impostazione predefinita: S2
Questa impostazione è necessaria soltanto se
il lettore è collegato a un televisore tramite un
cavo S-Video.
Initial Settings
Digital Audio Out
Video Output
Language
Display
Options
Se l’immagine appare allungata o distorta
con l’impostazione predefinita S2, modificare
l’impostazione su S1.
TV Screen
AV Connector Out
S-Video Out
S1
S2
Italiano
41
It

Menu delle impostazioni iniziali07
Impostazioni Language (Lingua)
Audio Language (Lingua Audio)
• Impostazione predefinita: English
(Inglese)
Initial Settings
Digital Audio Out
Video Output
Language
Display
Options
L’impostazione indica la lingua audio
preferita per i dischi DVD. Se la lingua
specificata è presente sul disco, il disco
viene automaticamente riprodotto in tale
lingua.
Il formato DVD riconosce 136 lingue diverse.
Se si desidera selezionare una lingua diversa
da quelle elencate, selezionare Other
Language (Altra lingua). Vedere anche
Selezione della lingua tramite la lista dei codici
delle lingue a pagina 51.
• In qualsiasi momento durante la
riproduzione è possibile passare da una
lingua all’altra tra quelle presenti su un
disco DVD utilizando AUDIO. (La
presente impostazione non viene
modificata da questo cambiamento.)
Vedere a pagina 34.
Audio Language
Subtitle Language
DVD Menu Lang.
Subtitle Display
English
French
German
Italian
Spanish
Other Language
Subtitle Language (Lingua
Sottotitoli)
• Impostazione predefinita: English
(Inglese)
Initial Settings
Digital Audio Out
Video Output
Language
Display
Options
L’impostazione indica la lingua dei sottotitoli
desiderata per i dischi DVD. Se la lingua
specificata è presente sul disco, il disco
viene automaticamente riprodotto con i
sottotitoli in tale lingua.
Il formato DVD riconosce 136 lingue diverse.
Se si desidera selezionare una lingua diversa
da quelle elencate, selezionare Other
Language (Altra lingua). Vedere anche
Selezione della lingua tramite la lista dei codici
delle lingue a pagina 51.
• In qualsiasi momento durante la
riproduzione è possibile modificare o
disattivare i SUBTITLE di un disco DVD.
(La presente impostazione non viene
modificata da questo cambiamento.)
Vedere a pagina 34.
Audio Language
Subtitle Language
DVD Menu Lang.
Subtitle Display
English
French
German
Italian
Spanish
Other Language
42
It

Menu delle impostazioni iniziali
07
DVD Menu Language (Lingua
menu DVD)
• Impostazione predefinita: w/Subtitle
Lang. (Con Sottotitoli)
Initial Settings
Digital Audio Out
Video Output
Language
Display
Options
Audio Language
Subtitle Language
DVD Menu Lang.
Subtitle Display
w/Subtitle Lang.
English
French
German
Italian
Spanish
Other Language
In alcuni dischi in più lingue è possibile
visualizzare i menu del disco in varie lingue.
Tramite questa impostazione viene
specificata la lingua in cui vengono
visualizzati i menu. Se si desidera
visualizzare i menu nella stessa Subtitle
Language (Lingua Sottotitoli), mantenere le
impostazioni predefinite. Vedere a pagina
42.
Il formato DVD riconosce 136 lingue diverse.
Se si desidera selezionare una lingua diversa
da quelle elencate, selezionare Other
Language (Altra lingua). Vedere anche
Selezione della lingua tramite la lista dei codici
delle lingue a pagina 51.
Subtitle Display (Vedi Sottotitoli)
• Impostazione predefinita: On (Acceso)
Initial Settings
Digital Audio Out
Video Output
Language
Display
Options
Audio Language
Subtitle Language
DVD Menu Lang.
Subtitle Display
On
Off
Impostazioni Display (Display)
OSD Language (Lingua OSD)
• Impostazione predefinita: English
(Inglese)
Initial Settings
Digital Audio Out
Video Output
Language
Display
Options
Consente di impostare la lingua delle
schermate visualizzate.
On Screen Display (Display su TVOSD)
• Impostazione predefinita: On (Acceso)
Initial Settings
Digital Audio Out
Video Output
Language
Display
Options
Consente di selezionare se si desidera
visualizzare su schermo i display delle
operazioni (Play (Riprod.), Resume
(Riprendi), Scan (Scan) e così via).
OSD Language
On Screen Display
Angle Indicator
OSD Language
On Screen Display
Angle Indicator
English
Français
Deutsch
Italiano
Español
On
Off
Italiano
Quando è impostata su On (Acceso), i
sottotitoli vengono visualizzati nella lingua
impostata per Subtitle Language (Lingua
Sottotitoli). Importare su Off (Spento) per
disattivare completamente i sottotitoli.
43
It

Menu delle impostazioni iniziali07
Angle Indicator (Indicatore
angolo)
• Impostazione predefinita: On (Acceso)
Initial Settings
Digital Audio Out
Video Output
Language
Display
Options
OSD Language
On Screen Display
Angle Indicator
On
Off
Se, durante le scene multi-angolo di dischi
DVD si desidera non visualizzare l’icona della
telecamera, impostare su Off (Spento).
Options (Opzioni)
Parental Lock (Blocco Genitori)
• Livello predefinito: Off (Spento)
• Password predefinita: nessuna
• Codice paese predefinito: us (2119)
Alcuni dischi DVD-Video presentano un
livello di Parental Lock (Blocco Genitori). Se il
lettore è impostato su un livello inferiore
rispetto a quello del disco, il disco non viene
riprodotto. Tale funzione consente di avere
un certo controllo sui dischi che i bambini
possono guardare.
Alcuni dischi supportano anche la funzione
di Country Code (Codice paese). A seconda
del codice Paese impostato, alcune scene
non vengono riprodotte.
Prima di potere impostare un livello Parental
Lock (Blocco Genitori) o un Country Code
(Codice paese), è necessario memorizzare
una password. Il titolare della password
potrà sempre modificare il livello Parental
Lock (Blocco Genitori) o il Country Code
(Codice paese). È anche possibile modificare
la password.
Nota
• Su alcuni dischi che potrebbero essere
considerati non adatti a bambini la
funzione Parental Lock (Blocco Genitori)
potrebbe tuttavia non essere disponibile.
La riproduzione di questi dischi sarà
sempre possibile senza dover inserire la
password.
• Se si dimentica la password, è
necessario ripristinare le impostazioni
originali di fabbrica del lettore (pagina
49), quindi registrare una nuova
password.
Registrazione di una nuova password
È necessario registrare una password prima
di modificare il livello Parental Lock (Blocco
Genitori) o immettere un Country Code
(Codice paese).
1 Selezionare ‘Password’ (Password).
Initial Settings
Digital Audio Out
Video Output
Language
Display
Options
Parental Lock Password
Level Change
Country Code
2 Utilizzare i pulsanti numerati per
immettere una password a 4 cifre.
Initial Settings
Digital Audio Out
Video Output
Language
Display
Options
Register Code Number
****
I numeri immessi vengono visualizzati su
schermo come asterischi (*).
44
It

Menu delle impostazioni iniziali
07
3 Premere ENTER per registrare la
password e tornare alla schermata del
menu Options (Opzioni).
Se si dimentica la password, è possibile
reimpostare il sistema e registrare una
nuova password. Per informazioni sulla
reimpostazione del lettore, vedere a pagina
49.
Modifica della password
Per modificare la password, confermare
quella esistente, quindi immetterne una
nuova.
1 Selezionare ‘Password Change’
(Cambio Password).
Initial Settings
Digital Audio Out
Video Output
Language
Display
Options
Parental Lock Password Change
Level Change
Country Code
2 Utilizzare i pulsanti numerati per
immettere la password esistente, quindi
premere ENTER.
• I numeri vengono visualizzati come
asterischi al momento dell’immissione.
Initial Settings
Digital Audio Out
Video Output
Language
Display
Options
Password Change
Password
New Password
****
3 Immettere una nuova password.
Initial Settings
Digital Audio Out
Video Output
Language
Display
Options
Password Change
Password
New Password
****
****
4 Premere ENTER per registrare la
nuova password e tornare alla schermata
del menu Options (Opzioni).
Impostazione/modifica del livello
Parental Lock (Blocco Genitori)
1 Selezionare ‘Level Change’ (Cambio
Livello).
Initial Settings
Digital Audio Out
Video Output
Language
Display
Options
Parental Lock Password Change
Level Change
Country Code
2 Utilizzare i pulsanti numerati per
immettere la password, quindi premere
ENTER.
Initial Settings
Digital Audio Out
Video Output
Language
Display
Options
Parental Lock : Level Change
Password
1 2 3 4 5 6 7 8 off
****
Italiano
45
It

Menu delle impostazioni iniziali07
3 Selezionare un nuovo livello.
Initial Settings
Digital Audio Out
Video Output
Language
Display
Options
Parental Lock : Level Change
Password
1 2 3 4 5 6 7 8 off
****
Premere ripetutamente (cursore sinistro)
per bloccare più livelli (per bloccare più
dischi viene richiesta la password); premere
(cursore destro) per sbloccare il livelli. Non
è possibile bloccare il livello 1.
4 Premere ENTER per impostare un
nuovo livello e tornare alla schermata del
menu Options (Opzioni).
Impostazione/modifica Country Code
(Codice paese)
È possibile consultare anche la lista codici
paesi a pagina 50.
1 Selezionare ‘Country Code’ (Codice
paese).
Initial Settings
Digital Audio Out
Video Output
Language
Display
Options
Parental Lock Password Change
Level Change
Country Code
3 Selezionare un codice paese.
È possibile eseguire l’operazione in due
modi.
• Selezione di una lettera del codice:
utilizzare
(cursore su/giù) per
/
modificare il codice paese.
Initial Settings
Digital Audio Out
Video Output
Language
Display
Options
Parental Lock: Country Code
Password
Country Code List Code
us
****
2 1 1 9
• Selezione di un numero del codice:
premere
(cursore destro), quindi
utilizzare i pulsanti numerati per
immettere un codice paese a 4 cifre. (È
possibile trovare la lista di codici paese
a pagina 50.)
Initial Settings
Digital Audio Out
Video Output
Language
Display
Options
Parental Lock: Country Code
Password
Country Code List Code
us
****
2 1 1 9
4 Premere ENTER per impostare un
nuovo Country Code (Codice paese) e
tornare alla schermata del menu Options
(Opzioni).
2 Utilizzare i pulsanti numerati per
immettere la password, quindi premere
ENTER.
Initial Settings
Digital Audio Out
Video Output
Language
Display
Options
Parental Lock: Country Code
Password
Country Code List Code
us
46
It
Nota
• La modifica del Country Code (Codice
paese) avrà effetto a partire dal
caricamento del disco successivo (o del
disco attuale).
****
2 1 1 9
 Loading...