

Page 1
Active Monitor Speaker
Haut-parleur de Moniteur Actif
Aktiver Monitorlautsprecher
Diffusore Monitor Attivo
DM-40BT
Actieve Monitorluidspreker
Altavoz Monitor Activo
DM-40BT-W
Coluna de Monitor Ativa
Активная Акустическая Система
ᆀ઼ԥྜඵᖑᏣ
アクティブモニタースピーカー
pioneerdj.com/support/
The Pioneer DJ support site shown above offers FAQs, information on software and various other types of
information and services to allow you to use your product in greater comfort.
Le site de support DJ de Pioneer indiqué ci-dessus propose une FAQ, des informations sur le logiciel et divers
types d’informations et de services qui permettent une utilisation plus confortable de ce produit.
Die oben gezeigte Pioneer DJ-Support-Website enthält häufig gestellte Fragen, Informationen über Software
und andere wichtige Informationen und Dienste, die Ihnen helfen, Ihr Produkt optimal zu verwenden.
Il sito di supporto DJ Pioneer indicato qui sopra offre una sezione FAQ, informazioni sul software ed
informazioni e servizi di vario tipo, per permettere un uso più confortevole dei nostri prodotti.
De bovengenoemde Pioneer DJ ondersteuningswebsite biedt een overzicht van de vaak gestelde vragen,
informatie over software en allerlei andere soorten informatie en diensten die u in staat stellen dit product met
meer gemak te gebruiken.
El sitio de asistencia Pioneer DJ mostrado arriba ofrece las preguntas frecuentes, información del software y
varios otros tipos de información y servicios que le permitirán usar su producto con mayor confort.
O site de suporte da Pioneer DJ mostrado acima oferece FAQs, informações sobre o software e outros tipos
de informações e serviços para permitir utilizar o produto com um maior conforto.
На указанном выше сайте поддержки Pioneer DJ содержатся раздел часто задаваемых вопросов,
информация по программному обеспечению, а также различные другие типы информации и услуг,
позволяющие использовать ваше изделие более лучшим образом.
αРᡘұޠӒᎣEKМනᆪયණٽGBRȃᡞၦଊІөԓڐуޠၦଊᇅ݉ଡ଼ȂѠᡲ்Р߰ޠٻңࠣȄ
上記のPioneerDJサポート サイトでは、困ったときのよくある質問やソフトウェア の情報など、より快適に製品をお使い
いただくための各種情報やサービスを提供しております。
English
Nederlands Español
Português Русский
商品相談・修理受付・付属品購入窓口のご案内
お取り扱いにお困りのとき、本書の巻末をご覧ください。
Operating Instructions
Mode d’emploi
Bedienungsanleitung
Istruzioni per l’uso
Handleiding
Manual de instrucciones
Manual de instruções
Инструкции по эксплуатации
ᐈձКь
取扱説明書
保証書付き
ϜН
日本語Français Deutsch Italiano
Page 2
Thank you for buying this Pioneer DJ product.
Please read through these operating instructions so you will know how to operate your model properly.
After you have finished reading the instructions, put them away in a safe place for future reference.
[For American Users and Canadian Users]
IMPORTANT
The lightning flash with arrowhead symbol,
within an equilateral triangle, is intended to
alert the user to the presence of uninsulated
“dangerous voltage” within the product’s
enclosure that may be of sufficient
magnitude to constitute a risk of electric
shock to persons.
The Safety of Your Ears is in Your Hands
Get the most out of your equipment by playing it at a safe level – a level that lets the sound come through clearly without
annoying blaring or distortion and, most importantly, without affecting your sensitive hearing. Sound can be deceiving.
Over time, your hearing “comfort level” adapts to higher volumes of sound, so what sounds “normal” can actually be
loud and harmful to your hearing. Guard against this by setting your equipment at a safe level BEFORE your hearing
adapts.
ESTABLISH A SAFE LEVEL:
• Set your volume control at a low setting.
• Slowly increase the sound until you can hear it comfortably and clearly, without distortion.
• Once you have established a comfortable sound level, set the dial and leave it there.
BE SURE TO OBSERVE THE FOLLOWING GUIDELINES:
• Do not turn up the volume so high that you can’t hear what’s around you.
• Use caution or temporarily discontinue use in potentially hazardous situations.
• Do not use headphones while operating a motorized vehicle; the use of headphones may create a traffic hazard and is
illegal in many areas.
CAUTION
RISK OF ELECTRIC SHOCK
DO NOT OPEN
CAUTION:
TO PREVENT THE RISK OF ELECTRIC
SHOCK, DO NOT REMOVE COVER (OR
BACK). NO USER-SERVICEABLE PARTS
INSIDE. REFER SERVICING TO QUALIFIED
SERVICE PERSONNEL.
The exclamation point within an equilateral
triangle is intended to alert the user to the
presence of important operating and
maintenance (servicing) instructions in the
literature accompanying the appliance.
D3-4-2-1-1b_A1_En
S001a_A1_En
[For American Users]
Read these instructions.
1)
Keep these instructions.
2)
Heed all warnings.
3)
Follow all instructions.
4)
Do not use this apparatus near water.
5)
Clean only with dry cloth.
6)
Do not block any ventilation openings. Install in
7)
accordance with the manufacturer’s
instructions.
Do not install near any heat sources such as
8)
radiators, heat registers, stoves, or other
apparatus (including amplifiers) that produce
heat.
Do not defeat the safety purpose of the polarized
9)
or grounding-type plug. A polarized plug has two
blades with one wider than the other. A
grounding type plug has two blades and a third
grounding prong. The wide blade or the third
prong are provided for your safety. If the provided
plug does not fit into your outlet, consult an
electrician for replacement of the obsolete outlet.
Protect the power cord from being walked on or
10)
pinched particularly at plugs, convenience
receptacles, and the point where they exit from
the apparatus.
11)
Only use attachments/accessories specified by
the manufacturer.
12)
Use only with the cart, stand, tripod, bracket, or
table specified by the manufacturer, or sold with
the apparatus. When a cart is used, use caution
when moving the cart/apparatus combination to
avoid injury from tip-over.
13)
Unplug this apparatus during lightning storms
or when unused for long periods of time.
14)
Refer all servicing to qualified service personnel.
Servicing is required when the apparatus has
been damaged in any way, such as power-supply
cord or plug is damaged, liquid has been spilled
or objects have fallen into the apparatus, the
apparatus has been exposed to rain or moisture,
does not operate normally, or has been dropped.
D3-7-13-69_En
En
2
Page 3
Caution
To prevent fire hazard, the Class 2 Wiring Cable
should be used for connection with speaker, and
should be routed away from hazards to avoid damage
to the insulation of the cable.
D3-7-13-67*_A1_En
IMPORTANT NOTICE
THE MODEL NUMBER AND SERIAL NUMBER OF THIS EQUIPMENT ARE ON THE REAR OR BOTTOM.
RECORD THESE NUMBERS ON PAGE 11 FOR FUTURE REFERENCE.
D36-AP9-3*_A1_En
[For European Users]
CAUTION
TO PREVENT THE RISK OF ELECTRIC SHOCK, DO NOT
REMOVE COVER (OR BACK). NO USER-SERVICEABLE
PARTS INSIDE. REFER SERVICING TO QUALIFIED
SERVICE PERSONNEL.
If you want to dispose this product, do not mix it with general household waste. There is a separate collection system for used
electronic products in accordance with legislation that requires proper treatment, recovery and recycling.
Private households in the member states of the EU, in Switzerland and Norway may return their used electronic products free of charge to
designated collection facilities or to a retailer (if you purchase a similar new one).
For countries not mentioned above, please contact your local authorities for the correct method of disposal.
By doing so you will ensure that your disposed product undergoes the necessary treatment, recovery and recycling and thus prevent potential
negative effects on the environment and human health.
D3-4-2-1-1_B1_En
K058b_A1_En
English
[For American Users and Others]
NOTE:
This equipment has been tested and found to comply with the limits for a Class B digital device, pursuant to Part 15
of the FCC Rules. These limits are designed to provide reasonable protection against harmful interference in a
residential installation. This equipment generates, uses, and can radiate radio frequency energy and, if not installed
and used in accordance with the instructions, may cause harmful interference to radio communications. However,
there is no guarantee that interference will not occur in a particular installation. If this equipment does cause
harmful interference to radio or television reception, which can be determined by turning the equipment off and on,
the user is encouraged to try to correct the interference by one or more of the following measures:
— Reorient or relocate the receiving antenna.
— Increase the separation between the equipment and receiver.
— Connect the equipment into an outlet on a circuit different from that to which the receiver is connected.
— Consult the dealer or an experienced radio/TV technician for help.
Information to User
Alterations or modifications carried out without appropriate authorization may invalidate the user’s right to operate
the equipment.
The graphical symbol placed on the product
means alternating current.
The graphical symbol placed on the product
CAUTION
This product is evaluated in moderate climate
condition.
means direct current.
The graphical symbol placed on the product
means Class II equipment.
D3-8-2-4_A1_En
D8-10-1-2_A1_En
D8-10-2_A1_En
D3-8-2-1-7b_A1_En
En
3
Page 4
WARNING
POWER-CORD CAUTION
Handle the power cord by the plug. Do not pull out the
plug by tugging the cord and never touch the power
cord when your hands are wet as this could cause a
short circuit or electric shock. Do not place the unit, a
piece of furniture, etc., on the power cord, or pinch the
cord. Never make a knot in the cord or tie it with other
cords. The power cords should be routed such that they
are not likely to be stepped on
can cause a fire or give you an electrical shock. Check
the power cord once in a while. When you find it
damaged, ask your nearest se
dealer for a replacement.
This equipment is not waterproof. To prevent a fire or
shock hazard, do not place any container filled with
liquid near this equipment (such as a vase or flower
pot) or expose it to dripping, splashing, rain or
moisture.
WARNING
To prevent a fire hazard, do not place any naked flame
sources (such as a lighted candle) on the equipment.
Operating Environment
Operating environment temperature and humidity:
+5 °C to +35 °C (+41 °F to +95 °F); less than 85 %RH
(cooling vents not blocked)
Do not install this unit in a poorly ventilated area, or in
locations exposed to high humidity or direct sunlight (or
strong artificial light).
VENTILATION CAUTION
When installing this unit, make sure to leave space
around the unit for ventilation to improve heat radiation
(at least 15 cm at top, 15 cm at rear, and 15 cm at each
side).
. A damaged power cord
rvice center or your
Precaution for the DM-40BT/DM-40BT-W
Do not connect this speaker to any amplifier other
than the one supplied with this system. Connection
to any other amplifier may result in a malfunction or
a fire.
Do not attach these speakers to the wall or ceiling, as
they may cause injury in the event of a fall.
D3-4-2-1-3_A1_En
D3-4-2-1-7a_A1_En
D3-4-2-1-7c*_A2_En
D3-4-2-1-7d*_A1_En
S002*_A1_En
SGK006_A1_En
SGK007_A1_En
This product is for general household purposes. Any
failure due to use for other than household purposes
(such as long-term use for business purposes in a
restaurant or use in a car or ship) and which requires
repair will be charged for even during the warranty
period.
K041_A1_En
WARNING
Slots and openings in the cabinet are provided for
ventilation to ensure reliable operation of the product,
and to protect it from overheating. To prevent fire
hazard, the openings should never be blocked or
covered with items (such as newspapers, table-cloths,
curtains) or by operating the equipment on thick carpet
or a bed.
D3-4-2-1-7b*_A1_En
This transmitter must not be co-located or operated
in conjunction with any other antenna or transmitter.
D8-9-2-5_A1_En
This equipment complies with FCC radiation
exposure limits set forth for an uncontrolled
environment and meets the FCC radio frequency (RF)
Exposure Guidelines. This equipment has very low
levels of RF energy that it deemed to comply without
maximum permissive exposure evaluation (MPE). But
it is desirable that it should be installed and operated
keeping the radiator at least 20 cm or more away
from person’s body (excluding extremities: hands,
wrists, feet and ankles).
D8-9-2-7-1_A2_En
This equipment complies with IC radiation exposure
limits set forth for an uncontrolled environment and
meets RSS-102 of the IC radio frequency (RF)
Exposure rules. This equipment has very low levels of
RF energy that it deemed to comply without
maximum permissive exposure evaluation (MPE). But
it is desirable that it should be installed and operated
keeping the radiator at least 20 cm or more away
from person’s body (excluding extremities: hands,
wrists, feet and ankles).
D8-9-2-7-3_A1_En
This device complies with Industry Canada
licence-exempt RSS standard(s). Operation is subject
to the following two conditions: (1) this device may
not cause interference, and (2) this device must
accept any interference, including interference that
may cause undesired operation of the device.
D8-9-10-1_A1_En
En
4
Page 5
Read Before Use (Important)
a
Before start
Features
! A bass reflex duct at the front and the Groove technology produce a powerful kick sound.
! A convex diffuser on a new shape waveguide improves the sound directivity of high frequencies and provides spacious sound.
! Rich bass sound and clearer sound quality achieved despite its compact desktop size.
! Compatible with AAC and Qualcomm
! A pairing button on the front panel enables pairing with one touch.
®
aptX™ for higher quality sound playback over Bluetooth.
Checking the accessories
! Power cord x1
! Operating instructions (this document)
! Audio converter cable (3.5 mm stereo mini plug to RCA) x1
! Speaker cord x1
! Bottom cushion x8
Names and functions of parts
English
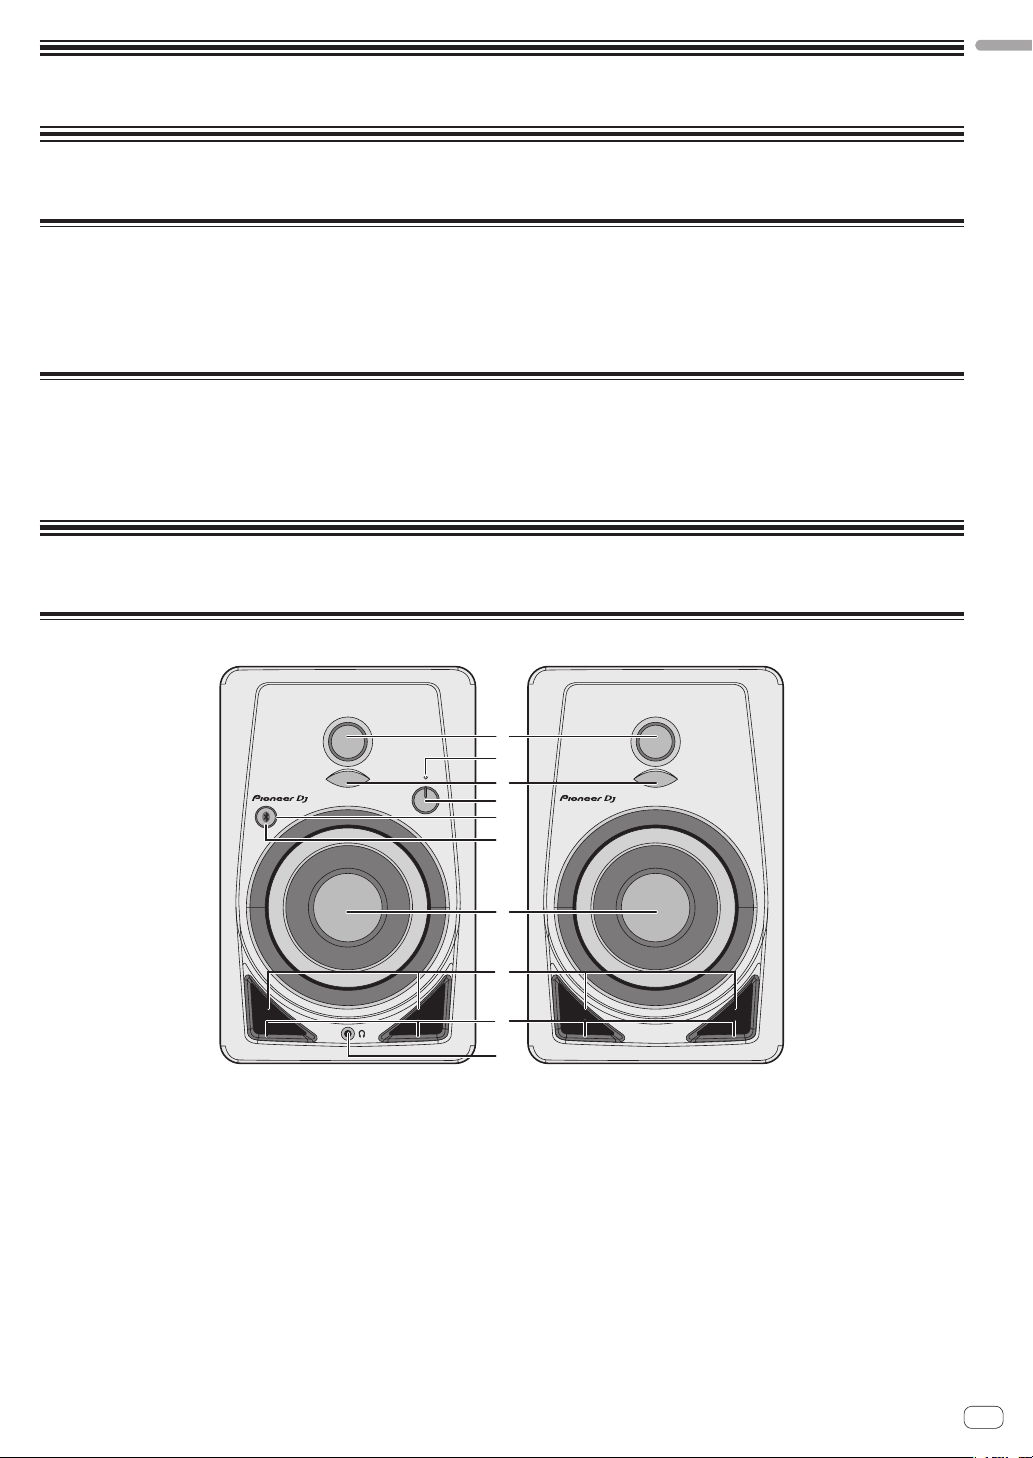
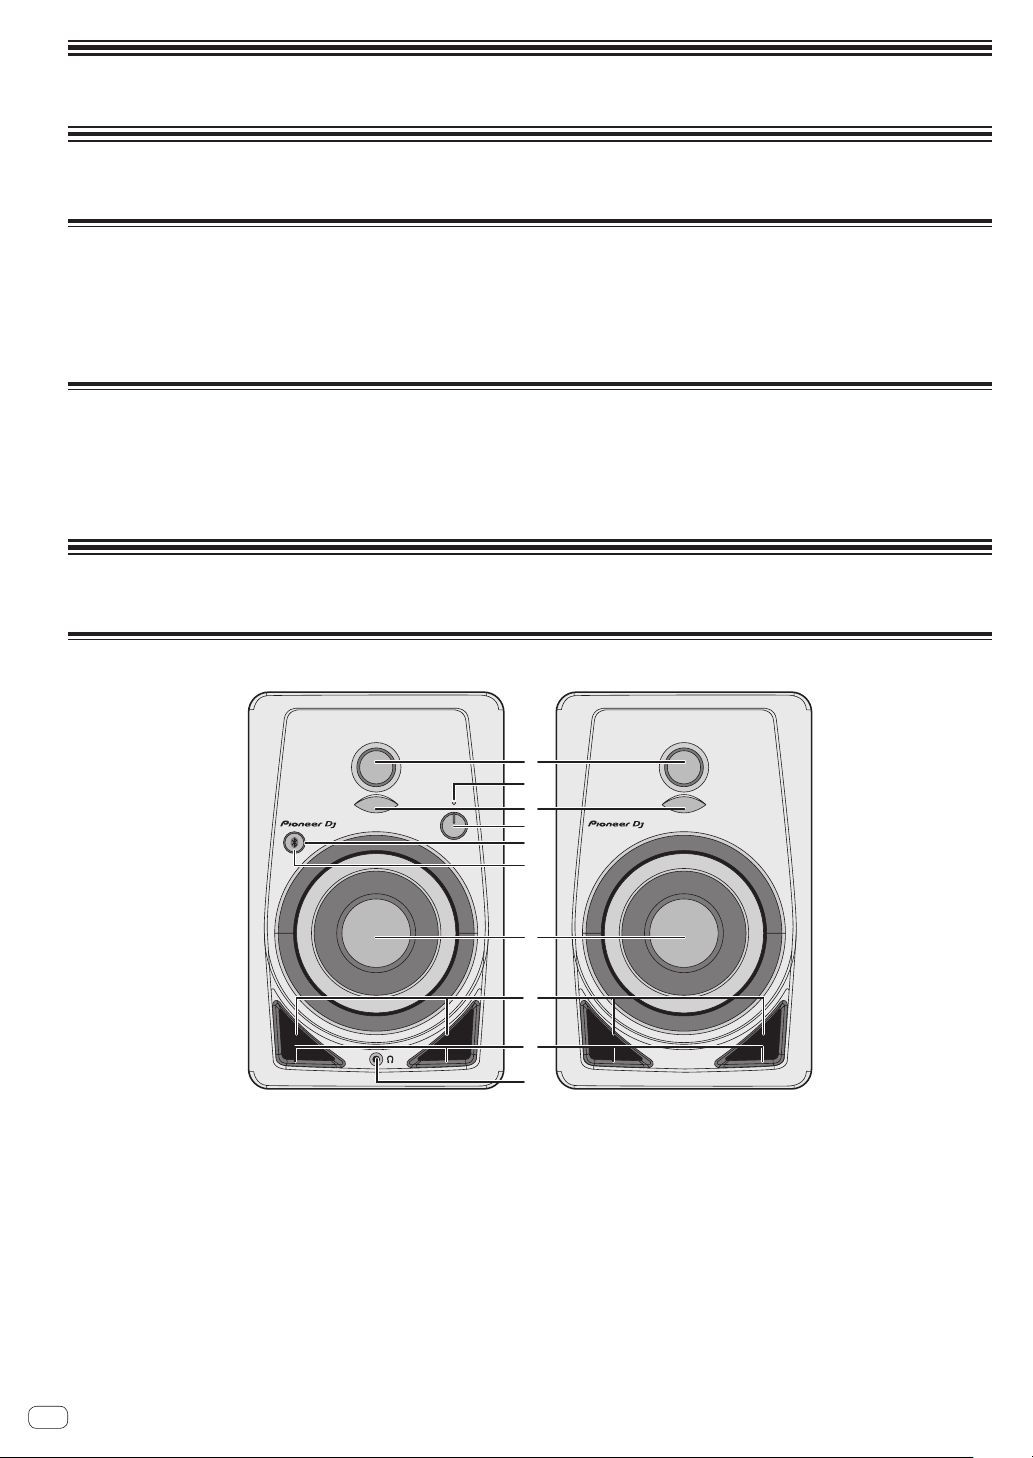
Front panel
1 3/4 inch soft dome tweeters
2 POWER indicator
Lighting is linked to turning on/off the power. The indicator is off in
standby.
3 Diffusers
Improve the sound directivity of high frequencies and provide spacious sound.
4 LEVEL control
Adjusts the volume.
5 Pairing button
Performs pairing with a Bluetooth device.
The button also performs the pause and play operations during
music playback via Bluetooth.
For details, refer to “Listening to the Music of a Bluetooth Device”
(page 8).
1
2
3
4
5
6
7
8
9
6 Pairing indicator ( page 8)
When flashing: Pairing operation is performed or waiting to connect
When lit: Connected with Bluetooth device
7 4 inch glass fiber woofers
8 Bass reflex ducts
9 Grooves
Adjust the airflow of the bass reflex ducts to radiate low frequencies
smoothly.
a Headphone terminal
This is a 3.5 mm stereo mini plug type output terminal.
Connecting headphones mutes the sound output from the speakers
and outputs sound only from the headphones.
En
5
Page 6
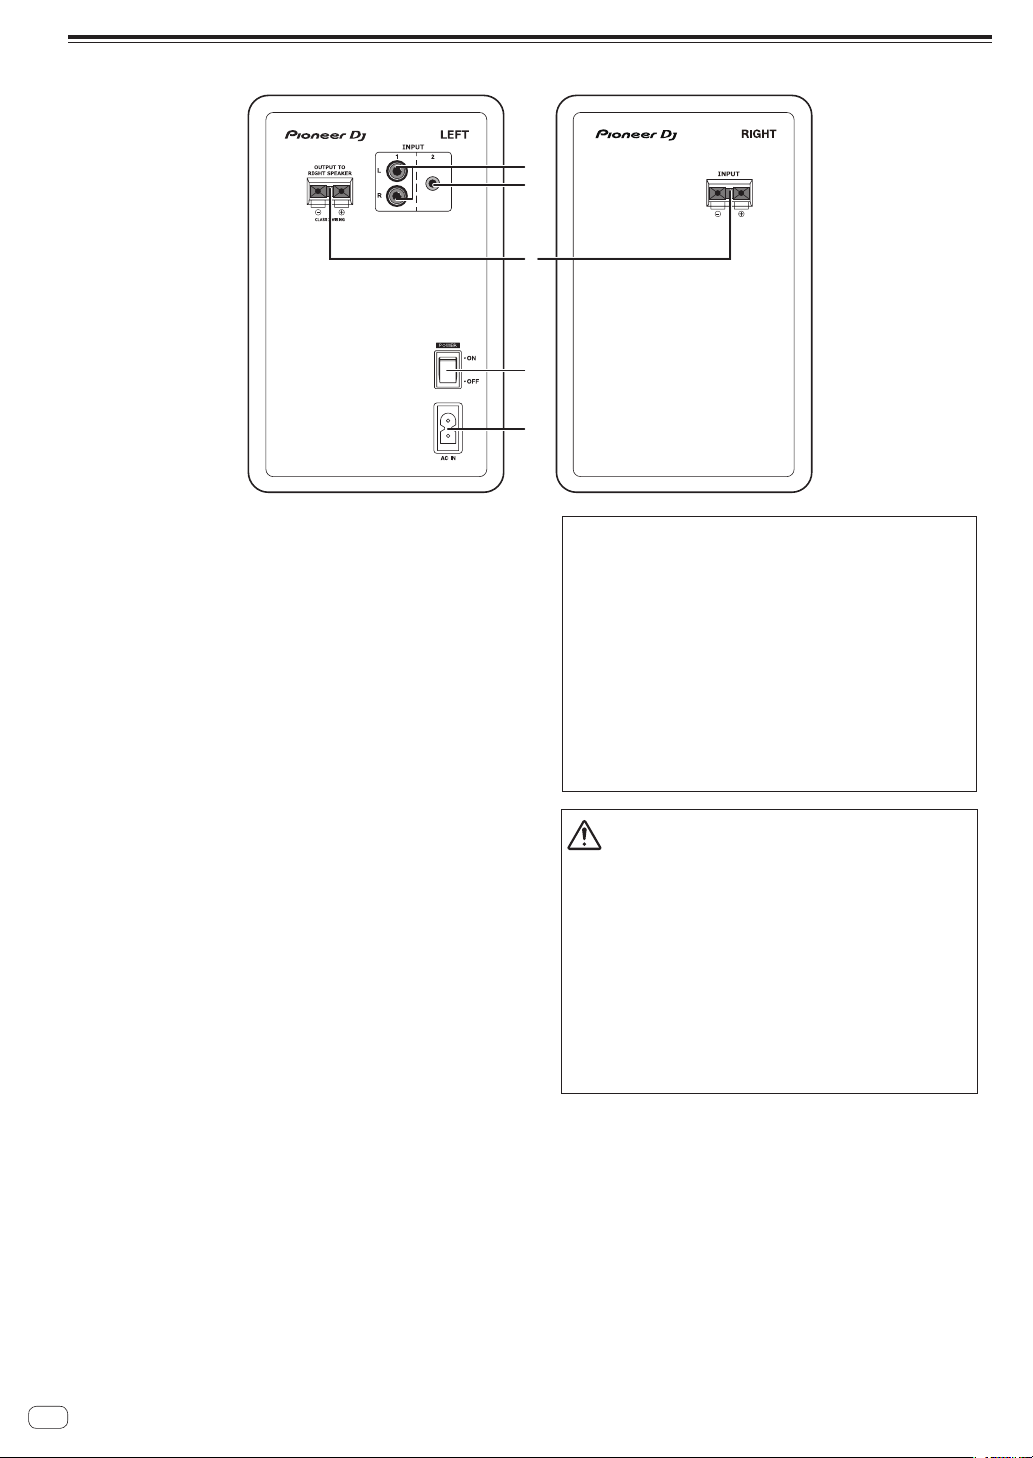
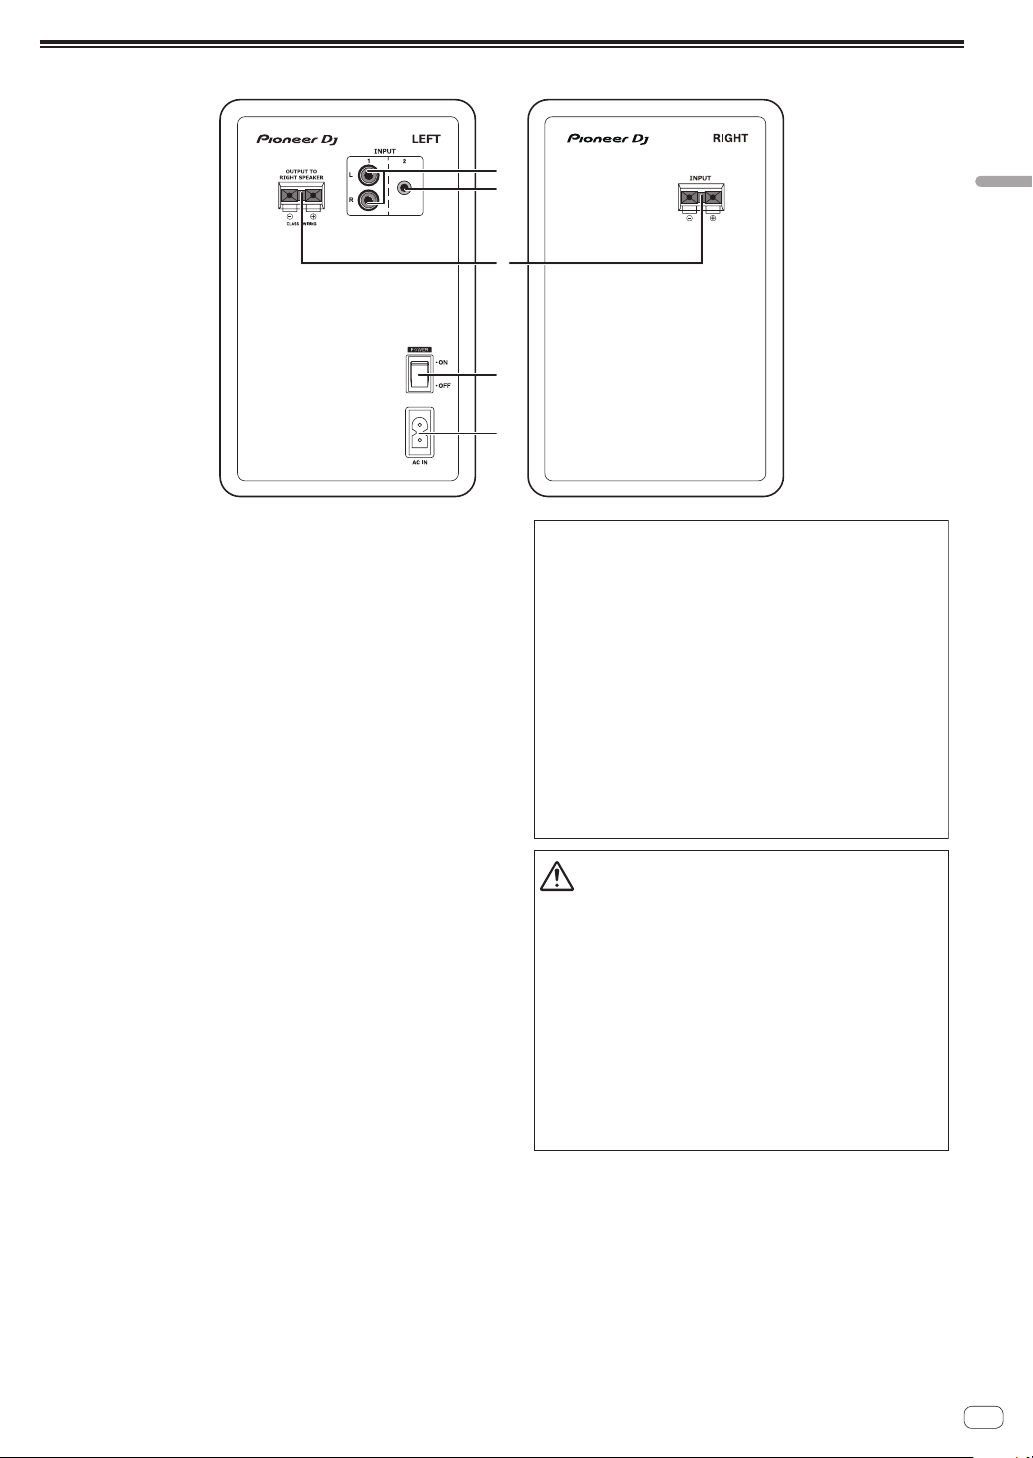
Rear panel
1
2
3
4
5
1 INPUT 1 terminals (stereo)
These are RCA pin type unbalanced input terminals.
2 INPUT 2 terminals (stereo)
This is a 3.5 mm stereo mini plug type unbalanced input terminal.
3 Speaker connection connectors
Connect the left and right speakers using the included cord.
Do not connect these speakers to an amplifier other than that of this
system. Doing so may cause a damage or fire.
4 POWER switch
Turns this unit’s power on and off.
5 AC IN
Connect the power cord to AC IN and then to the power outlet.
Connect the power cord after all the connections between devices
have been completed.
Be sure to use the included power cord.
CAUTION
The POWER switch on this unit will not completely
shut off all power from the AC outlet. Since the power
cord serves as the main disconnect device for the
unit, you will need to unplug it from the AC outlet to
shut down all power. Therefore, make sure the unit
has been installed so that the power cord can be
easily unplugged from the AC outlet in case of an
accident. To avoid fire hazard, the power cord should
also be unplugged from the AC outlet when left
unused for a long period of time (for example, when
on vacation).
D3-4-2-2-2a*_A1_En
CAUTION
! This product is provided with an auto standby function. If a
state of no sound continues for a set time (approximately 30
minutes) during use, the product automatically turns off the
POWER indicator and enters a standby state with low power
consumption regardless of whether there is a Bluetooth
connection.
! If the product enters the standby state when there is
a Bluetooth connection, the Bluetooth connection is
disconnected and the Bluetooth indicator also turns off.
! When an audio signal is input from the input terminals in the
standby state, the product automatically enters the power-on
state. Furthermore, the product also enters the power-on state
if the Bluetooth pairing button is pressed while in standby.
! This auto standby function cannot be disabled.
En
6
Page 7
Installation and Connections
WARNING
Store small parts out of the reach of children and
infants. If accidentally swallowed, contact a doctor
immediatel
D41-6-4_A1_En
Red+
Black
With the red line
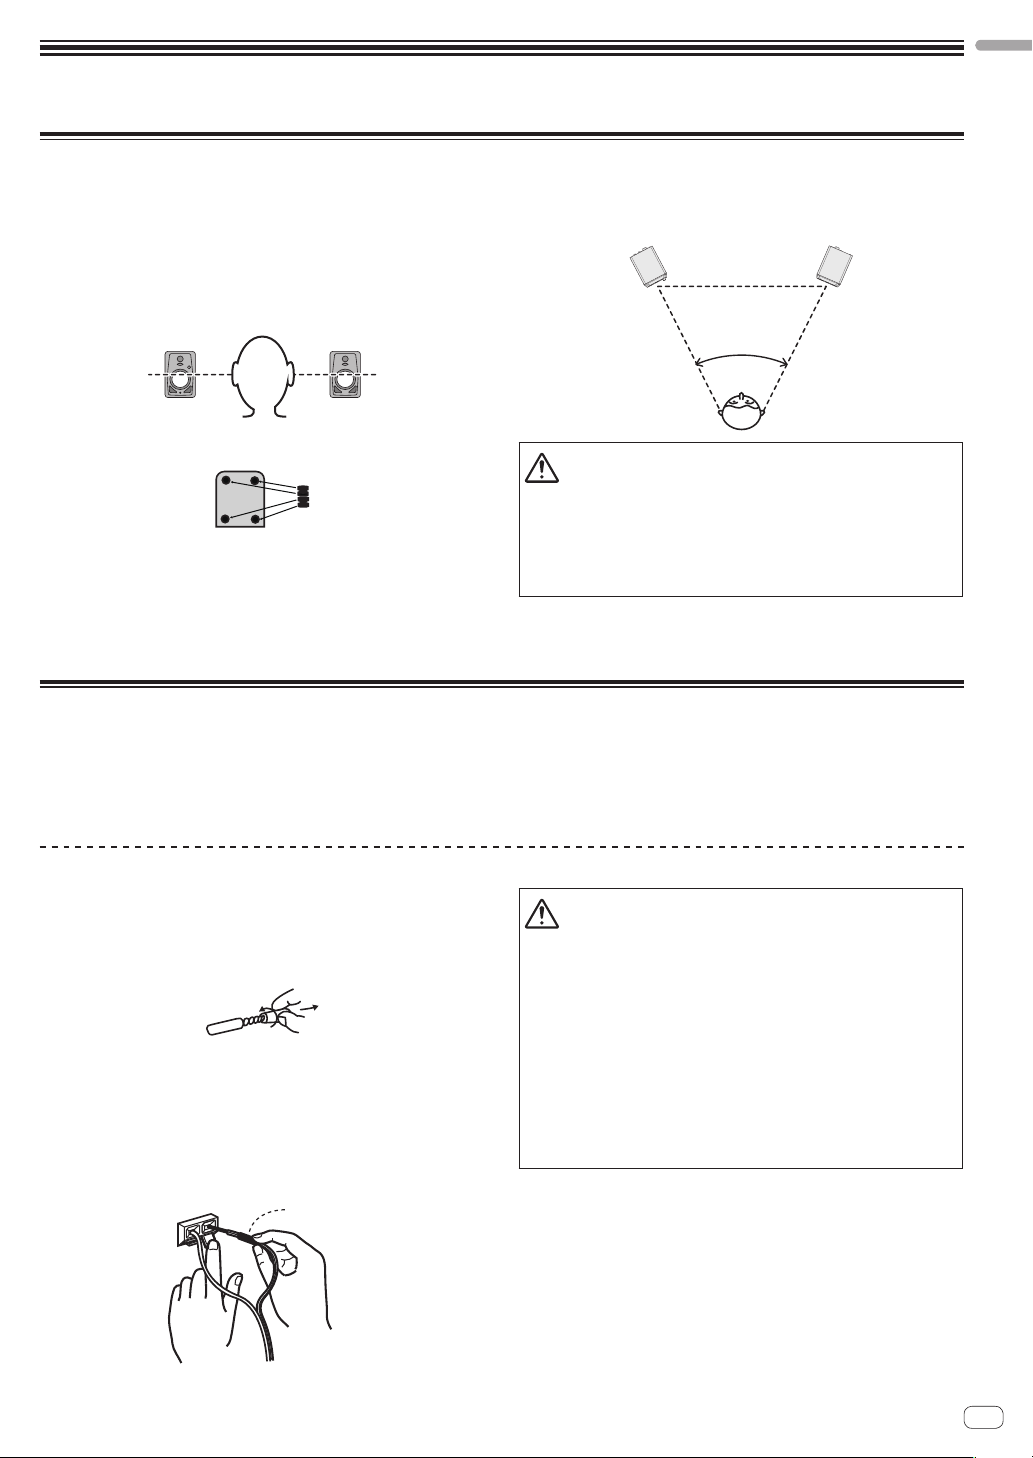
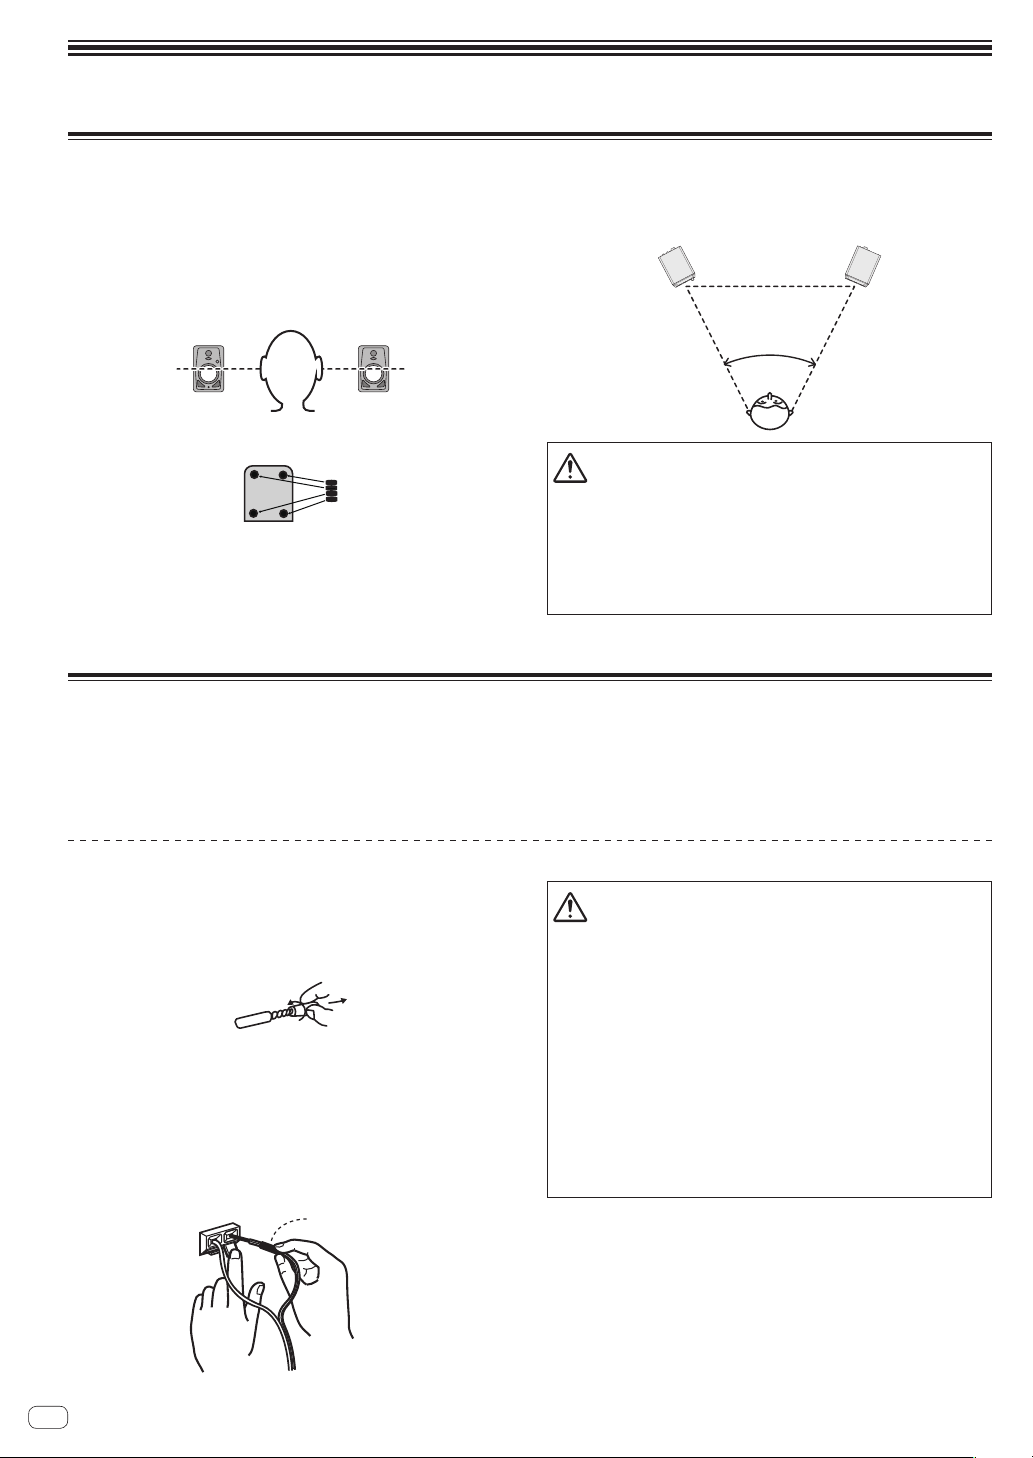
Installation Procedure
A speaker’s playback sound is delicately influenced by conditions in
the listening room. To produce optimum listening conditions, take due
consideration of the conditions of your installation location before beginning actual installation.
! Place the speakers at ear level.
! For a natural stereo effect, the right and left speakers should be
installed in symmetrical and equidistant positions from the listening
position.
! Affix the supplied cushions to the bottom of the unit to prevent
slipping.
y.
! Install the speakers facing inward with a total angle of 60 degrees
from the listening position, 30 degrees for each of the left and right
speakers.
CAUTION
To promote proper cooling, please assure that sufficient spaceis preserved between the speakers and nearby walls or othercomponents
(minimum 15 cm or more above, behind, and toright and left sides of
each speaker). Leaving insufficient spacebetween the speaker and
walls or other components may lead torising interior temperatures,
leading to malfunction or damage.
English
50 ° to 60 °
Connections
! Be sure to turn off the power and unplug the power cord from the
power outlet whenever making or changing connections.
! Refer to the operating instructions for the component to be
connected.
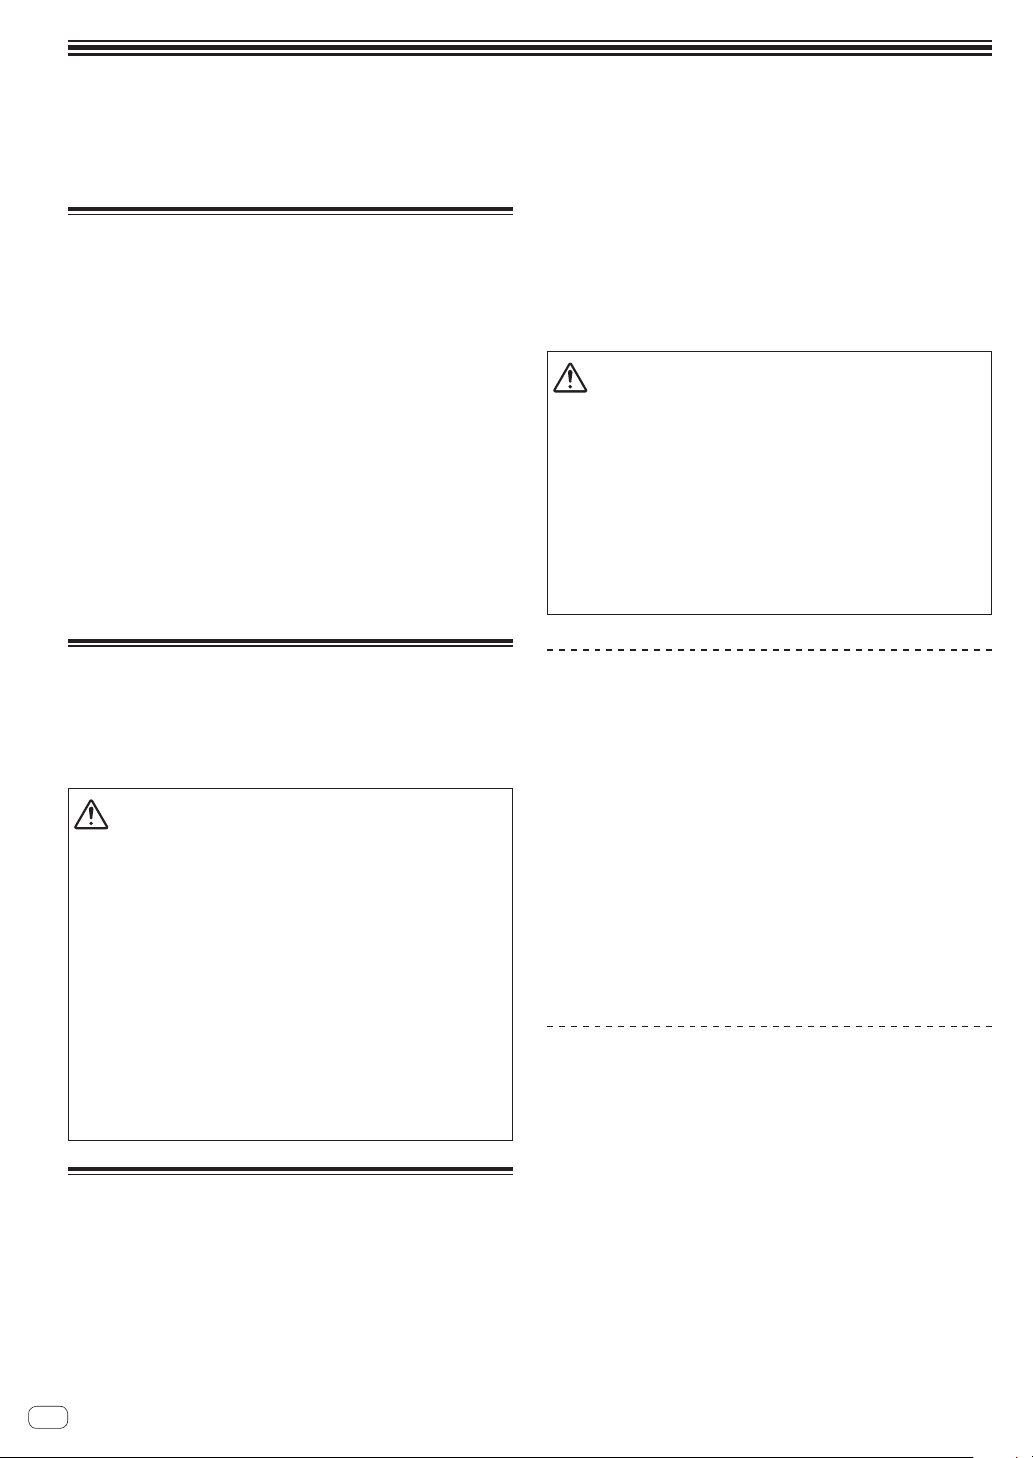
Connecting cords
Connect the included speaker cord to the speakers.
1 Strip about 1 cm of the head of the included speaker
cord and twist and remove the exposed insulator.
After removing the insulator, thoroughly twist the core wires.
2 Connect the included speaker cord to the speaker
terminals on the LEFT and RIGHT sides.
3 Insert the core wires into the terminals while pressing
the claw on the speaker terminal.
Connect the speaker cord with the red line into the + terminal side (red)
and the speaker cord without the red line into the – terminal side (black).
−
! Connect the power cord after all the connections between devices
have been completed.
! Be sure to use the included power cord.
! Be careful with regard to the volume because the signals input from
the [INPUT 1] terminal, [INPUT 2] terminal, and Bluetooth are mixed.
CAUTION
! After connecting to the terminals, lightly pull the speaker cord to
make sure that heads of the speaker cord are securely connected
to the terminals. A loose connection might cause audio output to
be interrupted or noise to be output.
! When connecting the speaker cord, thoroughly twist the core
wires, and make sure that the core wires are not protruding out of
the speaker terminals. Core wires protruding out of the speaker
terminals may come into contact with the rear panel or with each
other. This may cause an excessive load to be placed on the amplifier which results in operation stopping or a malfunction.
! If a mistake is made with the polarities (+, –) on the LEFT and
RIGHT sides when connecting the LEFT and RIGHT speaker cord,
normal stereo effect can no longer be obtained.
En
7
Page 8
Listening to the Music of a Bluetooth Device
These speakers allow you to wirelessly enjoy tracks saved to a Bluetooth device.
When using the speakers for the first time or when connecting a new Bluetooth device to the speakers, you need to pair the speakers and Bluetooth
device.
Pairing (device mutual registration) is the operation required to connect a Bluetooth device and the speakers.
! Microwave-based health aids
Pairing and Connection Procedure
1 Turn on the [POWER] switch to power on the
speakers.
! The Bluetooth indicator flashes for approximately 30 seconds and the
speakers enter the pairing state.
! If the Bluetooth indicator is off, press the pairing button for at least 2
seconds to switch to the pairing state again.
2 Perform the pairing operation on the Bluetooth
device.
Perform the operation while the speakers are in the pairing state. For
details, see the operating instructions of your Bluetooth device.
3 When the Bluetooth indicator changes from the
flashing to lit state, pairing (connecting) is complete.
If pairing could not be performed within 30 seconds, the Bluetooth indicator changes from the flashing to off state.
! A Bluetooth device that has already been paired can be connected by
performing the connection operation on the Bluetooth device side if
the speakers are powered on.
! Some baby monitors
Other, less common, equipment that may operate on the same
frequency:
! Anti-theft systems
! Amateur radio stations (HAM)
! Warehouse logistic management systems
! Discrimination systems for train or emergency vehicles
CAUTION
! In the event noise appears in your television image, there is the
possibility that a Bluetooth
supported by this unit) are causing signal interference with the
antenna input connector of your television, video, satellite tuner,
etc. In this event, increase the distance between the antenna input
connector and the Bluetooth device or this unit (including products supported by this unit).
! If there is something obstructing the path between this unit
(including devices supported by this unit) and the device equipped
with Bluetooth wireless technology (such as a metal door, concrete
wall, or insulation containing tinfoil), you may need to change the
location of your system to prevent signal noise and interruptions.
device or this unit (including products
Playback
When you play music on a connected Bluetooth device, the music playing on the Bluetooth device is output from the speakers.
! Pressing the pairing button during music playback on the Bluetooth
device allows you to perform the pause/play operation (same function as the pause/play button of the Bluetooth device).
CAUTION
! When pairing (connecting), move the Bluetooth device close to the
speakers.
! Loud sound may be output when the playback operation is per-
formed for the first time after connecting completes so we recommend lowering the volume before playback.
! The pause/play operation may not be possible with the pairing but-
ton depending on the application used.
! Connecting with the speakers may not be possible depending on
the Bluetooth device.
! If you wish to pair the speakers with a different Bluetooth device,
turn off the Bluetooth function of the currently connected
Bluetooth device or disconnect the connection before performing
the pairing operation.
! The speakers store the pairing information of up to eight Bluetooth
devices, and attempt to connect to the last paired device if the pairing button is pressed in the state of no connection with a Bluetooth
device.
Radio wave caution
Radio wave caution
This unit uses a 2.4 GHz radio wave frequency, which is a band used by
other wireless systems (see list below). To prevent noise or interrupted
communication, do not use this unit nearby such devices, or make sure
these devices are switched off during use.
! Cordless phones
! Cordless facsimiles
! Microwave ovens
! Wireless LAN devices (IEEE802.11b/g)
! Wireless AV equipment
! Wireless controllers for game systems
En
8
Scope of operation
Use of this unit is limited to home use. (Transmission distances may be
reduced depending on communication environment).
In the following locations, poor condition or inability to receive radio
waves may cause the audio to be interrupted or stopped:
! In reinforced concrete buildings or steelframed or ironframed
buildings.
! Near large metallic furniture.
! In a crowd of people or near a building or obstacle.
! In a location exposed to the magnetic field, static electricity or radio
wave interference from radio communication equipment using the
same frequency band (2.4 GHz) as this unit, such as a 2.4 GHz wireless LAN device or microwave oven.
! If you live in a heavily populated residential area (apartment, town-
house, etc.) and if your neighbor’s microwave is placed near your
system, you may experience radio wave interference. If this occurs,
move your unit to a different place. When the microwave is not in
use, there will be no radio wave interference.
Radio wave reflections
The radio waves received by this unit include the radio wave coming
directly from the device equipped with Bluetooth wireless technology
(direct wave) and waves coming from various directions due to reflections by walls, furniture and building (reflected waves). The reflected
waves (due to obstacles and reflecting objects) further produce a variety
of reflected waves as well as variation in reception condition depending
on locations. If the audio cannot be received properly due to this phenomenon, try moving the location of the device equipped with Bluetooth
wireless technology a little. Also note that audio may be interrupted
due to the reflected waves when a person crosses or approaches the
space between this unit and the device equipped with Bluetooth wireless
technology.
Page 9
Additional information
Troubleshooting
! Sometimes the problem may lie in another component. Inspect the other components and electrical appliances being used. If the problem cannot
be rectified, ask your nearest Pioneer authorized service center or your dealer to carry out repair work.
! This unit may not operate properly due to static electricity or other external factors. In this case, normal operation may be restored by unplugging
the power cord, waiting about 5 seconds or more, then plugging the power cord back in.
Common
Problem Check Remedy
The power is not turned on. Is the power cord properly connected? Plug in the power cord to an AC outlet.
Is the connected device set properly? Set the device external input and volume properly.
No sound is output from the connected
device or the sound is low.
The POWER indicator (white) does not
light.
This unit does not recover (power-on)
from the standby state.
Distorted sound.
Oscillates (loud sound is output
continuously).
Sound is only output from the left
speaker.
The power turns off (standby state)
automatically.
Is the volume set to the proper position?
Is the power turned on? Turn on the [POWER] switch on the rear panel of this unit.
Is the power turned on? Turn on the [POWER] switch on the rear panel of this unit.
Are the speakers in the standby state?
Is the input signal level low? Increase the input signal level.
Is the volume set to the proper position?
Is the level for input from the connected device
appropriate?
Is the volume set to the proper position?
Is the speaker cord connected properly? Connect the left and right speakers properly.
Did a state of no sound continue for a set time
(approximately 30 minutes) or longer?
Is the input signal level low? Increase the input signal level.
Turn the [LEVEL] control on the front panel of this unit clockwise to increase
the volume.
Turn off the [POWER] switch on the rear panel of this unit once and then turn
it back on after a few seconds. Or press the pairing button on the front panel
of this unit.
Turn the [LEVEL] control on the front panel of this unit counterclockwise to
reduce the volume.
Adjust the output level of the connected device properly.
Turn the [LEVEL] control on the front panel of this unit counterclockwise to
reduce the volume.
Input a signal from the RCA or stereo mini plug input terminal.
Or press the pairing button on the front panel of this unit.
English
When connected to INPUT 1 or INPUT 2 terminals
Problem Check Remedy
No sound is output from the connected
device or the sound is low.
Sound is only output from one speaker. Is the device connected properly? Connect the device to both the left and right input terminals.
Sound is interrupted or noise can be
heard.
Are the connection cables properly connected? Connect the connection cables properly.
Are the terminals and plugs dirty? Clean the terminals and plugs before making connections.
Is there a contact problem with the connection cables? Reconnect the connection cables.
When connected via Bluetooth
Problem Check Remedy
Cannot connect or sound is interrupted
or noise can be heard.
Is there a device producing electromagnetic waves
in the 2.4 GHz band (microwave oven, wireless
LAN device, other Bluetooth device, etc.) nearby?
Is the distance from the Bluetooth device too far?
Or is there a wall or obstacle blocking the signal in
the space between?
Is an application other than a music playback
application running on the Bluetooth device?
Does the Bluetooth device you wish to connect
support A2DP?
Has pairing with the Bluetooth device been performed properly?
Either install the unit away from this device or stop using the other device
producing electromagnetic waves.
Move this unit and the connected Bluetooth device close to each other. Or
change the position of the Bluetooth device or this unit.
Exit any application on the Bluetooth device other than the music playback
application.
Use a Bluetooth device that supports A2DP.
Turn the power of this unit and Bluetooth device off and back on, and then
perform pairing again.
En
9
Page 10
About trademarks and registered trademarks
! "Pioneer DJ" is a trademark of PIONEER CORPORATION, and is used under license.
! The names of companies and products mentioned herein are trademarks or registered trademarks of their respective owners.
! The Bluetooth
Corporation is under license. Other trademarks and trade names are those of their respective owners.
®
word mark and logos are registered trademarks owned by Bluetooth SIG, Inc. and any use of such marks by PIONEER DJ
! Qualcomm aptX is a product of Qualcomm Technologies International, Ltd. Qualcomm is a trademark of Qualcomm Incorporated, registered in
the United States and other countries, used with permission. aptX is a trademark of Qualcomm Technologies International, Ltd., registered in the
United States and other countries, used with permission.
Specifications
DM-40BT/DM-40BT-W
Model 2-Way Active Speaker
Amplifier section
Amplifier output
Input terminals RCA × 1, 3.5 mm stereo mini plug × 1
Input impedance
Output terminals Headphone × 1
Speaker section
Enclosure Bass reflex type/vinyl-laminated MDF
Woofer (LF driver) 4 inch (102 mm) cone
Tweeter (HF driver) 3/4 inch (19 mm) soft dome
Bluetooth section
Version Bluetooth Specification Ver. 4.2
Output Bluetooth Specification Class 2
Frequency used 2.4 GHz
Modulation FH-SS (Frequency Hopping Spread Spectrum)
Supported Bluetooth profiles A2DP, AVRCP
Supported Codec
Power supply section / other
Supported voltages AC 110 V to 240 V, 50 Hz/60 Hz
Power consumption 35 W
Power consumption when waiting (standby status) 0.3 W
External dimensions W × H × D
Weight
! The specifications and design of this product are subject to change without notice.
! © 2017 Pioneer DJ Corporation. All rights reserved.
Lch: 21 W/4 W, Class AB
Rch: 21 W/4 W, Class AB
10 kW
SBC, AAC, Qualcomm
Lch: 146 mm × 227 mm × 223 mm
Rch: 146 mm × 227 mm × 210 mm
Lch: 2.7 kg
Rch: 2.2 kg
®
aptX™, Qualcomm® aptX™ Low Latency
10
En
Page 11
UCP0516
Pioneer DJ Americas, Inc.
WARRANTY VALID ONLY IN THE U.S.A. AND CANADA
WARRANTY
Pioneer DJ Americas, Inc. (PDJA) warrants that products distributed by PDJA in the U.S.A. and Canada that fail to function properly under normal use due to a manufacturing
defect when installed and operated according to the owner ’s manual enclosed with the unit will be repaired or replaced with a unit of comparable value, at the option of PDJA,
without charge to you for parts or actual repair work. Parts supplied under this warranty may be new or rebuilt at the option of PDJA.
THIS LIMITED WARRANTY APPLIES TO THE ORIGINAL OR ANY SUBSEQUENT OWNER OF THIS PIONEER DJ PRODUCT DURING THE WARRANTY PERIOD PROVIDED THE
PRODUCT WAS PURCHASED FROM AN AUTHORIZED PIONEER DJ DISTRIBUTOR/DEALER IN THE U.S.A. OR CANADA. YOU WILL BE REQUIRED TO PROVIDE A SALES
RECEIPT OR OTHER VALID PROOF OF PURCHASE SHOWING THE DATE OF ORIGINAL PURCHASE OR, IF RENTED, YOUR RENTAL CONTRACT SHOW ING THE PLACE AND
DATE OF FIRST RENTAL. IN THE EVENT SERVICE IS REQUIRED, THE PRODUCT MUST BE DELIVERED WITHIN THE WARRANTY PERIOD, TRANSPORTATION PREPAID,
ONLY FROM WITHIN THE U.S.A. AS EXPLAINED IN THIS DOCUMENT. YOU WILL BE RESPONSIBLE FOR REMOVAL AND INSTALLATION OF THE PRODUCT. PDJA WILL PAY
TO RETURN THE REPAIRED OR REPLACEMENT PRODUCT TO YO U WITHIN THE U.S.A.
PRODUCT WARRANTY PERIOD
Audio and Video .............................................................................................................................................................................................. 1 Year 1 Year
The warranty period for retail customers who rent the product commences upon the date product is first put into use (a) during the rental period or (b) retail sale, whichever occurs first.
WHAT IS NOT COVERED
IF THIS PRODUCT WAS PURCHASED FROM AN UNAUTHORIZED DISTRIBUTOR, THERE ARE NO WARRANTIES, EXPRESS OR IMPLIED, INCLUDING THE IMPLIED WARRANTY
OF MERCHANTABILITY AND THE IMPLIED WARRANTY OF FITNESS FOR A PARTICULAR PURPOSE AND THIS PRODUCT IS SOLD STRICTLY “AS IS” AND “WITH ALL FAULTS".
PIONEER DJ SHALL NOT BE LIABLE FOR ANY CONSEQUENTIAL AND/OR INCIDENTAL DAMAGES.
THIS WARRANTY DOES NOT APPLY IF THE PRODUCT HAS BEEN SUBJECTED TO POWER IN EXCESS OF ITS PUBLISHED POWER RATING.
THIS WARRANTY DOES NOT COVER THE CABINET OR ANY APPEARANCE ITEM, USER ATTACHED ANTENNA
DAMAGE TO THE PRODUCT RESULTING FROM ALTERATIONS, MODIFICATIONS NOT AUTHORIZED IN WRITING BY PIONEER DJ, ACCIDENT, MISUSE OR ABUSE, DAMAGE DUE TO
LIGHTNING OR TO POWER SURGES, SUBSEQUENT DAMAGE FROM LEAKING, DAMAGE FROM INOPERATIVE BATTERIES, OR THE USE OF BATTERIES NOT CONFORMING TO THOSE
SPECIFIED IN THE OWNER’S MANUAL.
THIS WARRANTY DOES NOT COVER THE COST OF PARTS OR LABOR WHICH WOULD BE OTHERWISE PROVIDED WITHOUT CHARGE UNDER THIS WARRANTY OBTAINED FROM
ANY SOURCE OTHER THAN A PIONEER DJ AUTHORIZED SERVICE COMPA NY OR OTHER DESIGNATED LOCATION. THIS WARRANTY DOES NOT COVER DEFECTS OR DAMAGE CAUSED
BY THE USE OF UNAUTHORIZED PARTS OR LABOR OR FROM IMPROPER MAINTENANCE.
ALTERED, DEFACED, OR REMOVED SERIAL NUMBERS VOID THIS ENTIRE WARRANTY
NO OTHER WARRANTIES
PIONEER DJ LIMITS ITS OBLIGATIONS UNDER ANY IMPLIED WARRANTIES INCLUDING, BUT NOT LIMITED TO, THE IMPLIED WARRANTIES OF MERCHANTABILITY AND
FITNESS FOR A PARTICULAR PURPOSE, TO A PERIOD NOT TO EXCEED THE WARRANTY PERIOD. NO WARRANTIES SHALL APPLY AFTER THE WA RRANTY PERIOD.
SOME STATES DO NOT ALLOW LIMITATIONS ON HOW LONG AN IMPLIED WARRANTY LASTS AND SOME STAT ES DO NOT ALLOW THE EXCLUSIONS OR LIMITATIONS
OF INCIDENTAL OR CONSEQUENTIAL DAMAGES, SO THE ABOVE LIMITATIONS OR EXCLUSIONS MAY NOT APPLY TO YOU. THIS WA RRANTY GIVES YOU SPECIFIC LEGAL
RIGHTS AND YOU MAY HAVE OTHER RIGHTS WHICH MAY VARY FROM STATE TO STATE.
TO OBTAIN SERVICE
PDJA has appointed a number of Authorized Service Companies throughout the U.S.A. and Canada should your product require service. To receive warranty service you
need to present your sales receipt or, if rented, your rental contract showing place and date of original owner’s transaction. If shipping the unit you will need to package it
carefully and send it, transportation prepaid by a traceable, insured method, to an Authorized Service Company. Package the product using adequate padding material to
prevent damage in transit. The original container is ideal for this purpose. Include your name, address and telephone number where you can be reached during business
hours.
On all complaints and concerns in the U.S.A. and Canada call Customer Support at 1-800-872-4159.
LIMITED WARRANTY
Parts Labor
, ANY DA MAGE TO RECORDS OR RECORDING TA PES OR DISCS, ANY
English
For hook-up and operation of your unit or to locate an
Authorized Service Company, please call or write:
DISPUTE RESOLUTION
Following our response to any initial request to Customer Support, should a dispute arise between you and Pioneer DJ, Pioneer DJ makes available its Complaint Resolution
Program to resolve the dispute. The Complaint Resolution Program is available to you without charge. Yo u are required to use the Complaint Resolution Program before you exercise
any rights under, or seek any remedies, created by Title I of the Magnuson-Moss Warranty-Federal Trade Commission Improvement Act, 15 U.S.C. 2301 et seq.
To use the Complaint Resolution Program call 1-800-872-4159 and explain to the customer service representative the problem you are experiencing, steps you have taken
to have the product repaired during the warranty period and the name of the authorized Distributor/Dealer from whom the Pioneer DJ product was purchased. After the
complaint has been explained to the representative, a resolution number will be issued. Within 40 days of receiving your complaint, Pioneer DJ will investigate the dispute
and will either: (1) respond to your complaint in writing informing you what action Pioneer DJ will take, and in what time period, to resolve the dispute; or (2) respond to your
complaint in writing informing you why it will not take any action.
CUSTOMER SUPPORT
PIONEER ELECTRONICS (USA) INC.
LONG BEACH, CALIFORNIA 90801
P. O. BOX 1720
1-800-872-4159
http://www.pioneerelectronics.com
RECORD THE PLACE AND DATE OF PURCHASE FOR FUTURE REFERENCE
Model No. ____________________________________________ Serial No. _________________________________________ Purchase Date ______________________
Purchased From ____________________________________________________________________________________________________________________________
KEEP THIS INFORMATION AND YOUR SALES RECEIPT IN A SAFE PLACE
_
En
11
Page 12
Nous vous remercions d’avoir acheté ce produit Pioneer DJ.
Veuillez lire attentivement ce mode d’emploi de manière à pouvoir utiliser votre modèle correctement. Après avoir lu ces
explications,conservez-les en lieu sûr pour éventuellement les consulter plus tard.
[Pour les utilisateurs aux États-Unis et au Canada]
IMPORTANT
Ce symbole de l’éclair, placé dans un
triangle équilatéral, a pour but d’attirer
l’attention de l’utilisateur sur la présence, à
l’intérieur du coffret de l’appareil, de
“tensions dangereuses” non isolées d’une
grandeur suffisante pour représenter un
risque d’électrocution pour les êtres
humains.
La protection de votre ouïe est entre vos mains
Pour assurer le rendement optimal de votre matériel
et – plus important encore – la protection de votre ouïe, réglez le volume à un niveau raisonnable. Pour ne pas altérer
votre sens de la perception, le son doit être clair mais ne produire aucun vacarme et être exempt de toute distorsion.
Votre ouïe peut vous jouer des tours. Avec le temps, votre système auditif peut en effet s’adapter à des volumes
supérieurs, et ce qui vous semble un « niveau de confort normal » pourrait au contraire être excessif et contribuer à
endommager votre ouïe de façon permanente. Le réglage de votre matériel à un volume sécuritaire AVANT que votre
ouïe s’adapte vous permettra de mieux vous protéger.
CHOISISSEZ UN VOLUME SÉCURITAIRE:
• Réglez d’abord le volume à un niveau inférieur.
• Montez progressivement le volume jusqu’à un niveau d’écoute confortable ; le son doit être clair et exempt de
distorsions.
• Une fois que le son est à un niveau confortable, ne touchez plus au bouton du volume.
N’OUBLIEZ PAS DE RESPECTER LES DIRECTIVES SUIVANTES:
• Lorsque vous montez le volume, assurez-vous de pouvoir quand même entendre ce qui se passe autour de vous.
• Faites très attention ou cessez temporairement l’utilisation dans les situations pouvant s’avérer dangereuses.
• N’utilisez pas des écouteurs ou un casque d’écoute lorsque vous opérez un véhicule motorisé ; une telle utilisation
peut créer des dangers sur la route et est illégale à de nombreux endroits.
ATTENTION :
POUR ÉVITER TOUT RISQUE
D’ÉLECTROCUTION, NE PAS ENLEVER LE
COUVERCLE (NI LE PANNEAU ARRIÈRE).
AUCUNE PIÈCE RÉPARABLE PAR
L’UTILISATEUR NE SE TROUVE À
L’INTÉRIEUR. CONFIER TOUT ENTRETIEN À
UN PERSONNEL QUALIFIÉ UNIQUEMENT.
ATTENTION
DANGER D´ELECTROCUTION
NE PAS OUVRIR
Ce point d’exclamation, placé dans un
triangle équilatéral, a pour but d’attirer
l’attention de l’utilisateur sur la présence,
dans les documents qui accompagnent
l’appareil, d’explications importantes du
point de vue de l’exploitation ou de
l’entretien.
D3-4-2-1-1b_A1_Fr
S001a_A1_Fr
[Pour les utilisateurs aux États-Unis]
Attention
Pour éviter les risques d’incendie, des fils de câblage
de Classe 2 doivent être utilisés pour le branchement
de haut-parleurs et ils doivent être acheminés à
l’écart de dangers potentiels afin d’éviter
d’endommager leur isolant.
D3-7-13-67*_A1_Fr
REMARQUE IMPORTANTE
LE NUMÉRO DE MODÈLE ET LE NUMÉRO DE SÉRIE
SE TROUVENT À L’ARRIÈRE OU SUR LE FOND DE
CET APPAREIL. NOTEZ CES NUMÉROS À LA PAGE
11 POUR VOUS Y RÉFÉRER ULTÉRIEUREMENT.
D36-AP9-3*_A1_Fr
[Pour les utilisateurs en Europe]
ATTENTION
POUR ÉVITER TOUT RISQUE D’ÉLECTROCUTION, NE
PAS ENLEVER LE COUVERCLE (NI LE PANNEAU
ARRIÈRE). AUCUNE PIÈCE RÉPARABLE PAR
L’UTILISATEUR NE SE TROUVE À L’ INTÉRIEUR.
CONFIER TOUT ENTRETIEN À UN PERSONNEL
QUALIFIÉ UNIQUEMENT.
Si vous souhaitez vous débarrasser de cet appareil, ne le mettez pas à la poubelle avec vos ordures ménagères. Il existe un système de
collecte séparé pour les appareils électroniques usagés, qui doivent être récupérés, traités et recyclés conformément à la législation.
Les habitants des états membres de l’UE, de Suisse et de Norvège peuvent retourner gratuitement leurs appareils électroniques usagés aux
centres de collecte agréés ou à un détaillant (si vous rachetez un appareil similaire neuf).
Dans les pays qui ne sont pas mentionnés ci-dessus, veuillez contacter les autorités locales pour savoir comment vous pouvez vous débarrasser
de vos appareils.
Vous garantirez ainsi que les appareils dont vous vous débarrassez sont correctement récupérés, traités et recyclés et préviendrez de cette façon
les impacts néfastes possibles sur l’environnement et la santé humaine.
D3-4-2-1-1_B1_Fr
K058b_A1_Fr
Fr
2
Page 13
PRÉCAUTION DE VENTILATION
Lors de l’installation de l’appareil, veillez à laisser un
espace suffisant autour de ses parois de manière à
améliorer la dissipation de chaleur (au moins 15 cm sur
le dessus, 15 cm à l’arrière et 15 cm de chaque côté).
Milieu de fonctionnement
Te
De +5 °C à +35 °C (de +41 °F à +95 °F) ; Humidité
relative inférieure à 85 % (orifices de ventilation non
obstrués
N’installez pas l’appareil dans un endroit mal ventilé ou
un lieu soumis à une forte humidité ou en plein soleil
(ou à une forte lumière artificielle).
AVER
P
flamme nue (telle qu’une bougie allumée) sur
l’appareil.
AVERTISSEMENT
Cet appareil
n’est pas étanche. Pour éviter les risques
d’incendie et de décharge électrique, ne placez près de
lui un récipient rempli d’eau, tel qu’un vase ou un pot
de fleurs, et ne l’exposez pas à des gouttes d’eau, des
éclaboussures, de la pluie ou de l’humidité.
NOTE IMPORTANTE SUR LE CABLE
ne les recouvrez pas d’objets, tels que journaux, nappes
D3-4-2-1-3_A1_Fr
TISSEMENT
our éviter les risques d’incendie, ne placez aucune
D3-4-2-1-7a_A1_Fr
mpérature et humidité du milieu de fonctionnement :
)
D3-4-2-1-7c*_A1_Fr
Le symbole graphique indiqué sur le produit
représente le courant alternatif.
Le symbole graphique indiqué sur le produit
représente le courant continu.
Le symbole graphique indiqué sur le produit
représente un équipement de Classe II.
ATTENTION
Ce produit a été testé dans des conditions de climat
tempéré.
D3-4-2-1-7d*_A1_Fr
D3-8-2-4_A1_Fr
D3-8-2-1-7b_A1_Fr
Tenir le câble d’alimentation par la fiche. Ne pas
débrancher la prise en tirant sur le câble et ne pas
toucher le câble avec les mains mouillées. Cela risque
de provoquer un court-circuit ou un choc électrique. Ne
pas poser l’appareil ou un meuble sur le câble. Ne pas
pincer le câble. Ne pas faire de noeud avec le câble ou
l’attacher à d’autres câbles. Les câbles d’alimentation
doivent être posés de façon à ne pas être écrasés. Un
câble abîmé peut provoquer un risque d’incendie ou un
choc électrique. Vérifier le câble d’alimentation de
temps en temps. Contacter le service après-vente le
plus proche ou le revendeur pour un remplacement.
Précautions concernant les enceintes
DM-40BT/DM-40BT-W
Ne reliez pas cette enceinte à un amplificateur autre
que celui fourni avec l’ensemble, faute de quoi vous
pouvez provoquer une anomalie de fonctionnement,
voire un incendie.
N’attachez pas ces enceintes sur un mur ou au
plafond car, en tombant, elles pourraient causer des
blessures.
Ce produit est destiné à une utilisation domestique
générale. Toute panne due à une utilisation autre qu'à
des fins privées (comme une utilisation à des fins
commerciales dans un restaurant, dans un autocar
ou sur un bateau) et qui nécessite une réparation
sera aux frais du client, même pendant la période de
garantie.
AVERTISSEMENT
Les fentes et ouvertures du coffret sont prévues pour la
ventilation, pour assurer un fonctionnement stable de
l’appareil et pour éviter sa surchauffe. Pour éviter les
risques d’incendie, ne bouchez jamais les ouvertures et
D’ALIMENTATION
Français
S002*_A1_Fr
SGK006*_A1_Fr
SGK007_A1_Fr
K041_A1_Fr
Cet équipement est conforme aux limites
d’exposition aux rayonnements énoncées pour un
environnement non contrôlé et respecte les règles
d’exposition aux fréquences radioélectriques (RF)
CNR-102 de l’IC. Cet équipement émet une énergie
RF très faible qui est considérée conforme sans
évaluation de l’exposition maximale autorisée.
Cependant, cet équipement doit être installé et utilisé
en gardant une distance de 20 cm ou plus entre le
dispositif rayonnant et le corps (à l’exception des
extrémités : mains, poignets, pieds et chevilles).
D8-9-2-7-3_A1_Fr
ou rideaux, et n’utilisez pas l’appareil posé sur un tapis
épais ou un lit.
D3-4-2-1-7b*_A1_Fr
Le présent appareil est conforme aux CNR d’Industrie
Canada applicables aux appareils radio exempts de
licence. L’exploitation est autorisée aux deux
conditions suivantes : (1) l’appareil ne doit pas
produire de brouillage, et (2) l’utilisateur de l’appareil
doit accepter tout brouillage radioélectrique subi,
même si le brouillage est susceptible d’en
compromettre le fonctionnement.
D8-9-10-1_A1_Fr
Fr
3
Page 14
A lire avant l’utilisation (Important)
a
Informations préliminaires
Caractéristiques
! Reproduction d'un son de grosse caisse puissant grâce à un canal bass-reflex à l'avant et à la technologie Groove.
! Diffuseur convexe doté d'un guide d'ondes d'une forme nouvelle optimisant la directivité des hautes fréquences et la spatialité du son.
! Obtention d'un son riche en basses et d'une qualité sonore plus claire malgré son format de bureau compact.
! Compatible avec AAC et Qualcomm® aptX™ pour une lecture audio de qualité supérieure via Bluetooth.
! Bouton d’appairage sur la face avant permettant d’appairer d’une simple pression.
Vérification des accessoires
! Cordon d’alimentation x1
! Mode d’emploi (ce document)
! Câble de conversion audio (mini-jack stéréo de 3,5 mm vers RCA) x1
! Cordon de haut-parleur x1
! Coussinets antidérapants x8
Noms et fonctions des organes
Face avant
1 Tweeters à dôme souple de 3/4 pouces
2 Indicateur POWER
L’éclairage est lié à la mise sous/hors tension. Le voyant est éteint en veille.
3 Diffuseurs
Améliorez la directivité sonore des hautes fréquences et offrez un
son ample.
4 Commande LEVEL
Ajuste le volume.
5 Bouton d’appairage
Permet d’appairer avec un appareil Bluetooth.
Le bouton permet également de mettre en pause et de lire pendant la
lecture de musique via Bluetooth.
Pour plus de détails, reportez-vous à “Écoute de la musique d’un
appareil Bluetooth” (page 7).
Fr
4
1
2
3
4
5
6
7
8
9
6 Indicateur d’appairage (page 7)
Clignotant : Opération d’appairage en cours d’exécution ou en
attente de connexion
Allumé : Connecté à l’appareil Bluetooth
7 Caissons en fibre de verre de 4 pouces
8 Canaux basse réflex
9 Rainures
Ajustez la circulation de l’air des canaux basse réflex pour émettre
en douceur les basses fréquences.
a Prise de casque
Il s’agit d’une prise de sortie de type mini-jack stéréo de 3,5 mm.
Le raccordement d’un casque coupe le son provenant des hautparleurs, et le son provient uniquement du casque.
Page 15
Panneau arrière
1 Prises INPUT 1 (stéréo)
Il s’agit de prises d’entrée asymétriques de type prise RCA.
2 Prises INPUT 2 (stéréo)
Il s’agit d’une prise d’entrée asymétrique de type mini-jack stéréo
de 3,5 mm.
3 Connecteurs de raccordement de haut-parleur
Raccordez les haut-parleurs gauche et droit à l’aide du cordon
fourni.
Ne raccordez pas ces haut-parleurs à un amplificateur autre que
celui de ce système. Ceci pourrait endommager le produit ou provoquer un incendie.
4 Commutateur POWER
Pour allumer et éteindre cet appareil.
5 AC IN
Branchez le cordon d’alimentation à AC IN et à la prise électrique.
Lorsque tous les appareils ont été raccordés, vous pouvez brancher
le cordon d’alimentation.
Veillez à utiliser le cordon d’alimentation fourni.
1
2
3
4
5
ATTENTION
L’interrupteur POWER de cet appareil ne coupe pas
complètement celui-ci de sa prise secteur. Comme le
cordon d’alimentation fait office de dispositif de
déconnexion du secteur, il devra être débranché au
niveau de la prise secteur pour que l’appareil soit
complètement hors tension. Par conséquent, veillez à
installer l’appareil de telle manière que son cordon
d’alimentation puisse être facilement débranché de
la prise secteur en cas d’accident. Pour éviter tout
risque d’incendie, le cordon d’alimentation sera
débranché au niveau de la prise secteur si vous
prévoyez une période prolongée de non utilisation
(par exemple avant un départ en vacances).
ATTENTION
! Ce produit inclut une fonction de veille automatique.
En cas d’absence de son pendant une durée définie
(30 minutes environ) pendant l’utilisation, le produit éteint
automatiquement l’indicateur POWER et passe à l’état de
veille et de faible consommation d’énergie qu’une connexion
Bluetooth soit établie ou non.
! Si le produit passe à l’état de veille alors qu’une connexion
Bluetooth est établie, la connexion Bluetooth est déconnectée
et l’indicateur Bluetooth s’éteint également.
! Lorsqu’un signal audio provient des prises d’entrée à l’état
de veille, le produit passe automatiquement à l’état activé. Le
produit passe également à l’état activé si vous appuyez sur le
bouton d’appairage Bluetooth alors qu’il est en veille.
! Cette fonction de veille automatique ne peut pas être
désactivée.
Français
D3-4-2-2-2a*_A1_Fr
Fr
5
Page 16
Installation et connexions
AVERTISSEMENT
Gardez les pièces de petite taille hors de la portée des
bébés et des enfants. En cas d’ingestion accidentelle,
veuillez contacter immédiatement un médecin
D41-6-4_A1_Fr
Rouge+
Noire
Avec la ligne rouge
Installation
Les sons reproduits par les enceintes sont influencés délicatement
par les conditions du local d’écoute. Pour bénéficier d’un environnement d’écoute optimal, réfléchissez bien aux conditions de l’emplacement avant de commencer l’installation proprement dite.
! Installez les haut-parleurs à hauteur des oreilles.
! Pour obtenir un effet stéréo naturel, les enceintes gauche et droite
doivent être installées à des points symétriques et équidistants de la
position d’écoute.
! Fixez les coussinets fournis sur la surface inférieure de l’appareil
pour éviter tout risque de glissement.
.
! Installez les haut-parleurs orientés vers l’intérieur à un angle de
60 degrés par rapport à la position d’écoute, 30 degrés pour chacun
des haut-parleurs gauche et droit.
ATTENTION
Pour permettre un meilleur refroidissement, veillez à ce qu’un espace
suffisant soit laissé entre les haut-parleurs et les murs ou autres
composants à proximité (15 cm minimum au-dessus, derrière et sur
les côtés droit et gauche de chaque haut-parleur). Le fait de ne pas
laisser d’espace suffisant entre le haut-parleur et les murs ou autres
composants peut entraîner une augmentation des températures intérieures, et provoquer un dysfonctionnement ou un endommagement.
50 ° à 60 °
Raccordements
! Veillez à toujours éteindre les appareils et à débrancher le cor-
don d’alimentation de la prise secteur avant de raccorder un appareil
ou de changer les liaisons.
! Reportez-vous au mode d’emploi de l’appareil devant être raccordé.
Cordons de raccordement
Branchez le cordon de haut-parleur fourni aux haut-parleurs.
1 Dénudez sur 1 cm environ de la tête du cordon de
haut-parleur fourni, tordez et retirez l’isolant exposé.
Une fois l’isolant retiré, tordez bien les fils centraux.
2 Branchez le cordon de haut-parleur fourni aux prises
de haut-parleurs à GAUCHE et à DROITE.
3 Introduisez les fils centraux dans les prises tout en
appuyant sur la griffe de la prise de haut-parleur.
Branchez le cordon de haut-parleur avec la ligne rouge sur le côté de la
prise + (rouge) et le cordon de haut-parleur sans la ligne rouge sur le
côté de la prise – (noire).
−
! Lorsque tous les appareils ont été raccordés, vous pouvez brancher
le cordon d’alimentation.
! Veillez à utiliser le cordon d’alimentation fourni.
! Faites attention au volume car les signaux provenant de la prise
[INPUT 1], de la prise [INPUT 2] et de Bluetooth sont combinés.
ATTENTION
! Une fois les prises raccordées, tirez légèrement sur le cordon de
haut-parleur pour vous assurer que les têtes de cordon de hautparleur sont bien raccordées aux prises. Un raccordement lâche
peut entraîner une interruption de la sortie audio ou l’émission de
bruit.
! Lors du branchement du cordon de haut-parleur, tordez bien les
fils centraux, et assurez-vous que les fils centraux ne dépassent
pas des prises de haut-parleur. Les fils centraux qui dépassent
des prises de haut-parleur peuvent entrer en contact avec le
panneau arrière ou entre eux. Ceci peut entraîner une charge
excessive sur l’amplificateur, provoquant ainsi un arrêt ou un
dysfonctionnement.
! Si les polarités sont inversées (+, –) sur les côtés GAUCHE et
DROIT lors du branchement du cordon de haut-parleur GAUCHE
et DROIT, l’effet stéréo normal ne peut plus être obtenu.
Fr
6
Page 17
Écoute de la musique d’un appareil
Bluetooth
Ces haut-parleurs vous permettent d’écouter des morceaux enregistrés sur un appareil Bluetooth.
Lorsque vous utilisez les haut-parleurs pour la première fois ou lorsque vous connectez un nouvel appareil Bluetooth aux haut-parleurs, vous devez
appairer les haut-parleurs et l’appareil Bluetooth.
L’appairage (enregistrement mutuel d’appareils) est l’opération nécessaire pour connecter un appareil Bluetooth et les haut-parleurs.
Français
Procédure d’appairage et de
connexion
1 Tournez le commutateur [POWER] pour mettre les
haut-parleurs sous tension.
! L’indicateur Bluetooth clignote pendant 30 secondes environ et les
haut-parleurs passent à l’état d’appairage.
! Si l’indicateur Bluetooth est éteint, appuyez sur le bou-
ton d’appairage pendant au moins 2 secondes pour revenir
à l’état d’appairage.
2 Effectuez l’opération d’appairage sur l’appareil
Bluetooth.
Effectuez l’opération lorsque les haut-parleurs sont à l’état d’appairage.
Pour plus de détails, consultez le mode d’emploi de votre appareil
Bluetooth.
3 Lorsque l’indicateur Bluetooth passe de l’état
clignotant à l’état allumé, l’appairage (la connexion) est
terminé.
Si l’appairage n’a pas pu être effectué dans les 30 secondes, l’indicateur
Bluetooth passe de l’état clignotant à l’état éteint.
! Un appareil Bluetooth déjà appairé peut être connecté en effectu-
ant l’opération de connexion sur l’appareil Bluetooth si les hautparleurs sont sous tension.
Lecture
Lorsque vous lisez de la musique sur un appareil Bluetooth connecté, la
musique lue sur l’appareil Bluetooth est émise par les haut-parleurs.
! Appuyez sur le bouton d’appairage pendant la lecture de musique
sur l’appareil Bluetooth pour effectuer une opération de mise en
pause/lecture (même fonction que le bouton de pause/lecture
de l’appareil Bluetooth).
ATTENTION
! Pendant l’appairage (la connexion), rapprochez l’appareil
Bluetooth des haut-parleurs.
! Un son fort peut être émis lorsque l’opération de lecture est effec-
tuée pour la première fois après l’établissement de la connexion.
Nous vous recommandons donc de baisser le volume avant la
lecture.
! L’opération de mise en pause/lecture peut ne pas être possible
avec le bouton d’appairage en fonction de l’application utilisée.
! La connexion aux haut-parleurs peut ne pas être possible en fonc-
tion de l’appareil Bluetooth.
! Si vous souhaitez appairer les haut-parleurs à un autre appa-
reil Bluetooth, désactivez la fonction Bluetooth de l’appareil
Bluetooth actuellement connecté ou arrêtez la connexion
avant d’effectuer l’opération d’appairage.
! Les haut-parleurs stockent les informations d’appairage
de huit appareils Bluetooth maximum et tentent de se connecter au dernier appareil appairé lorsque vous appuyez sur le
bouton d’appairage en l’absence de connexion à un appareil
Bluetooth.
Précautions relatives aux ondes
radio
Cet appareil utilise une fréquence d’onde radioélectrique de 2,4 GHz,
une bande utilisée aussi par d’autres systèmes sans fil (cf. la liste cidessous). Pour éviter des parasites ou une interruption des communications, n’utilisez pas cet appareil près de ces dispositifs ou faites en sorte
que ceux-ci soient mis hors tension pendant son utilisation.
! Téléphones sans fil
! Télécopieurs sans fil
! Fours à micro-ondes
! Périphériques LAN sans fil (IEEE802.11b/g)
! Équipement audiovisuel sans fil
! Commandes sans fil pour consoles de jeu
! Instruments médicaux à micro-ondes
! Certains interphones de surveillance
Il se peut que d’autres équipements, moins courants, fonctionnent sur la
même fréquence:
! Systèmes antivol
! Stations de radio amateur (HAM)
! Systèmes de gestion logistique d’entrepôt
! Systèmes de mobilité pour trains et véhicules d’urgence
ATTENTION
! Si du bruit apparaît sur l’image de votre téléviseur, il est possible
qu’un appareil Bluetooth® ou cette unité (y compris les produits
pris en charge par cette unité) génère des interférences de signal
avec le connecteur d’entrée d’antenne de votre téléviseur, lecteur
vidéo, syntoniseur satellite, etc. Dans ce cas, éloignez le connecteur d’entrée d’antenne et l’appareil Bluetooth ou cette unité
(y compris les produits pris en charge par cette unité).
! Si un objet fait obstacle sur le parcours entre cet appareil (y com-
pris les produits supportés par cet appareil) et l’appareil adapté
à la technologie sans fil Bluetooth (tel qu’une porte métallique,
un mur de béton ou un isolant contenant une feuille d’étain), il se
peut que vous deviez changer l’emplacement de votre système
pour éviter les parasites et les interruptions.
Fr
7
Page 18

Portée du fonctionnement
L’emploi de cet appareil est limité à un usage domestique.
(Selon l’environnement des communications, il se peut que les distances de transmission soient réduites). Dans les endroits suivants, de
mauvaises conditions ou l’incapacité à recevoir les ondes radio peuvent
entraîner une interruption momentanée ou une coupure des sons :
! Dans des immeubles en béton armé, des constructions à charpente
métallique ou en acier.
! Près de grands meubles métalliques.
! Dans une foule de personnes ou près d’un bâtaiment ou d’un
obstacle.
! Dans un endroit exposé à un champ magnétique, à de l’électricité
statique ou aux interférences d’ondes radioélectriques, provenant d’équipements de communication radio utilisant la même
gamme de fréquences (2,4 GHz) que cet appareil, tel qu’un périphérique LAN sans fil de 2,4 GHz ou un four à microondes.
! Si vous vivez dans un quartier densément peuplé (immeu-
ble d’appartements, etc.) et que le four à micro-ondes d’un de vos
voisins se trouve près de votre système, il se peut que des interférences d’ondes radio se produisent. Dans ce cas, déplacez votre
appareil vers un endroit différent. Quand le four à micro-ondes ne
fonctionne pas, aucune interférence ne se produira sur les ondes
radio.
Réflexions des ondes radio
Parmi les ondes radio captées par cet appareil se trouvent celles, provenant directement de l’appareil adapté à la technologie Bluetooth (ondes
directes) et celles qui proviennent de directions diverses par suite de
leur réflexion sur des murs, mobilier et structure (ondes réfléchies).
Les ondes réfléchies (du fait des obstacles et objets réfléchissants)
produisent à leur tour d’autres ondes réfléchies, provoquant des conditions de réception variables selon les endroits. Si les sons ne peuvent
pas être captés correctement en raison de ce phénomène, essayez de
changer légèrement l’emplacement du dispositif adapté à la technologie Bluetooth. De plus, sachez que les sons peuvent être interrompus
du fait des ondes réfléchies quand une personne s’approche ou traverse l’espace entre cet appareil et le dispositif, adapté à la technologie
Bluetooth.
Fr
8
Page 19
Informations supplémentaires
En cas de panne
! Parfois, le problème peut provenir d’un autre composant. Examinez les autres composants et les appareils électriques utilisés. Si le problème ne
peut pas être résolu, contactez votre service après-vente agréé Pioneer ou votre revendeur pour une réparation.
! De l’électricité statique ou des facteurs externes ont peut être déréglé cet appareil. Dans ce cas, le fonctionnement normal de l’appareil peut éven-
tuellement être rétabli en débranchant le cordon d’alimentation, attendant 5 secondes ou plus, puis rebranchant le cordon d’alimentation.
Problèmes courants
Problème Vérification Solution
L’appareil ne s’allume pas.
Aucun son ne provient de l’appareil
connecté ou le son est faible.
Le voyant POWER (blanc) ne s’allume
pas.
Cette unité ne ressort pas de l’état de
veille (mise en veille).
Distorsion du son.
Oscillations (un son faible est émis en
continu).
Le son est restitué uniquement par le
haut-parleur gauche.
L’alimentation est coupée automatiquement (état de veille).
Est-ce que le cordon d’alimentation est correctement raccordé ?
L’appareil connecté est-il correctement défini ? Définissez l’entrée externe et le volume de l’appareil correctement.
Le réglage du volume est-il dans la position
appropriée ?
L’alimentation est-elle activée? Tournez le commutateur [POWER] sur le panneau arrière de cette unité.
L’alimentation est-elle activée? Tournez le commutateur [POWER] sur le panneau arrière de cette unité.
Les haut-parleurs sont-ils à l’état de veille ?
Le niveau du signal d’entrée est-il faible ? Augmentez le niveau du signal d’entrée.
Le réglage du volume est-il dans la position
appropriée ?
Le niveau d’entrée de l’appareil connecté est-il
approprié ?
Le réglage du volume est-il dans la position
appropriée ?
Le cordon de haut-parleur est-il branché
correctement ?
Est-ce qu’aucun son n’a été émis pendant une
durée définie (30 minutes environ) ou plus ?
Le niveau du signal d’entrée est-il faible ? Augmentez le niveau du signal d’entrée.
Branchez le cordon d’alimentation sur une prise secteur.
Tournez la commande [LEVEL] sur le panneau avant de cette unité dans le
sens horaire pour augmenter le volume.
Désactivez une fois le commutateur [POWER] sur le panneau arrière de cette
unité, puis réactivez-le après quelques secondes.
Tournez la commande [LEVEL] sur le panneau avant de cette unité dans le
sens antihoraire pour réduire le volume.
Ajustez correctement le niveau de sortie de l’appareil raccordé.
Tournez la commande [LEVEL] sur le panneau avant de cette unité dans le
sens antihoraire pour réduire le volume.
Branchez les haut-parleurs gauche et droit correctement.
Émettez un signal à partir d’une prise d’entrée RCA ou mini-jack stéréo.
Ou appuyez sur le bouton d’appairage sur la face avant de cette unité.
Français
Lors de la connexion aux prises INPUT 1 ou à la prise INPUT 2
Problème Vérification Solution
Aucun son ne provient de l’appareil
connecté ou le son est faible.
Le son est restitué uniquement par un
haut-parleur.
Le son est interrompu ou aucun
bruit n’est entendu.
Est-ce que les câbles de liaison sont correctement
raccordés ?
Est-ce que les prises et fiches sont sales ? Nettoyez les prises et les fiches avant d’effectuer les raccordements.
L’appareil est-il connecté correctement ? Connectez l’appareil sur les prises d’entrée gauche et droite.
Y-a-t-il un problème de contact avec les câbles de
raccordement ?
Raccordez correctement les câbles de liaison.
Rebranchez les câbles de raccordement.
Lors de la connexion via Bluetooth
Problème Vérification Solution
Un appareil produisant des ondes électromagné-
Impossible de se connecter ou le son est
interrompu ou aucun bruit n’est entendu.
tiques dans la bande 2,4 GHz (four à micro-ondes,
appareil LAN sans fil, autre appareil Bluetooth,
etc.) se trouve-t-il à proximité ?
La distance de l’appareil Bluetooth est-elle trop
importante ? Ou un mur ou un obstacle bloquant
le signal est-il présent entre eux ?
Une application autre qu’une application de
lecture de musique est-elle exécutée sur l’appareil
Bluetooth ?
L’appareil Bluetooth que vous voulez connecter
prend-il en charge A2DP ?
L’appairage à l’appareil Bluetooth a-t-il était effectué correctement ?
Éloignez l’unité de cet appareil ou cessez d’utiliser l’autre appareil produisant des ondes électromagnétiques.
Rapprochez cette unité et l’appareil Bluetooth connecté. Ou déplacez l’appareil Bluetooth ou cette unité.
Quittez toute application sur l’appareil Bluetooth autre que l’application de
lecture de musique.
Utilisez un appareil Bluetooth prenant en charge A2DP.
Mettez cette unité et l’appareil Bluetooth hors tension puis de nouveau sous
tension, puis effectuez de nouveau l’appairage.
Fr
9
Page 20
À propos des marques commerciales et des marques déposées
! « Pioneer DJ » est une marque déposée de PIONEER CORPORATION qui est utilisée sous licence.
! Les noms de sociétés et de produits mentionnés ici sont des marques commerciales ou des marques déposées de leurs détenteurs respectifs.
! La marque et les logos Bluetooth® sont des marques déposées appartenant à Bluetooth SIG, Inc. et toute utilisation de ces marques par PIONEER
DJ Corporation est concédée sous licence. Les autres marques commerciales et noms commerciaux appartiennent à leurs détenteurs respectifs.
! Qualcomm aptX est un produit de Qualcomm Technologies International, Ltd. Qualcomm est une marque commerciale de Qualcomm
Incorporated, déposée aux États-Unis et dans d’autres pays, utilisée avec autorisation. aptX est une marque commerciale de Qualcomm
Technologies International, Ltd., déposée aux États-Unis et dans d’autres pays, utilisée avec autorisation.
Spécifications
DM-40BT/DM-40BT-W
Modèle Haut-parleur actif 2 voies
Section d’amplificateur
Sortie d’amplification
Prises d’entrée RCA ×1, mini-jack stéréo de 3,5 mm ×1
Impédance d’entrée
Prises de sortie Casque ×1
Section de haut-parleur
Coffret Type basse réflex/MDF avec finition vinyle
Caisson (circuit LF) Cône de 4 pouces (102 mm)
Tweeter (circuit HF) Dôme souple de 3/4 pouces (19 mm)
Section Bluetooth
Version Bluetooth Specification de Ver. 4.2
Genere Bluetooth Specification Classe 2
Fréquence utilisée 2,4 GHz
Modulation FH-SS (Spectre de Diffusion de Frequence)
Profiles Bluetooth Supportes A2DP, AVRCP
Codec Supporte
Section d’alimentation / Autre
Tensions acceptées CA 110 V à 240 V, 50 Hz/60 Hz
Consommation électrique 35 W
Consommation électrique en attente (état de veille) 0,3 W
Dimensions extérieures (l × H × P)
Poids
! Les caractéristiques et la présentation peuvent être modifiées, sans avis préalable, dans un souci d’amélioration.
! © 2017 Pioneer DJ Corporation. Tous droits de reproduction et de traduction réservés.
Lch : 21 W/4 W, Classe AB
Rch : 21 W/4 W, Classe AB
10 kW
SBC, AAC, Qualcomm
Lch : 146 mm × 227 mm × 223 mm
Rch : 146 mm × 227 mm × 210 mm
Lch : 2,7 kg
Rch : 2,2 kg
®
aptX™, Qualcomm® aptX™ Latence Basse
10
Fr
Page 21
UCP0516
Pioneer DJ Americas, Inc.
GARANTIE
Pioneer DJ Americas, Inc.(PDJA) garantie que les produits distribués par PDJA aux États-Unis ou au Canada qui, bien qu’étant installés et utilisés conformément au Manuel de
l’utilisateur fourni avec le produit, ne fonctionneraient pas correctement dans le cadre d’une utilisation normale en raison d’un défaut de fabrication seront réparés ou remplacés
par un produit de valeur équivalente, au choix de PDJA, sans frais à votre charge pour les pièces et/ou la main d’œuvre de réparation. Les pièces incluses en vertu de la présente
garantie peuvent être neuves ou remises à neuf, au choix de PDJA.
LA PRÉSENTE GARANTIE LIMITÉE S’APPLIQUE AU PROPRIÉTAIRE ORIGINAL AINSI QU’À TOUT PROPRIÉTAIRE SUCCESSIF DE CE PRODUIT PIONEER DJ PENDANT LA
PÉRIODE DE GARANTIE À CONDITION QUE LE PRODUIT AIT ÉTÉ ACHETÉ AUPRÈS D’UN DISTRIBUTEUR/DÉTAILLANT PIONEER DJ AGRÉÉ AUX ÉTATS-UNIS OU AU CANADA.
VOUS DEVREZ FOURNIR UN RELEVÉ DE CAISSE OU UNE AUTRE PREUVE D’ACHAT VALIDE INDIQUANT LA DATE DE L’ ACHAT INITIAL OU, SI VOUS LOUEZ LE PRODUIT,
VOTRE CONTRAT DE LOCATION INDIQUANT L’ENDROIT ET LA DATE DE LA PREMIÈRE LOCATION. EN CAS DE BESOIN DE RÉPARATION, LE PRODUIT DOIT ÊTRE RENVOYÉ
ET LIVRÉ AU COURS DE LA PÉRIODE DE GARANTIE, FRAIS DE PORT PAYÉS ET UNIQUEMENT DEPUIS L’ INTÉRIEUR DES ÉTAT S-UNIS. COMME EXPLIQUÉ DANS LE PRÉSENT
DOCUMENT. VOUS ÊTES RESPONSABLE DU DÉMONTAGE ET DE L’INSTALLATION DU PRODUIT. PDJA PREND À SA CHARGE LES FRAIS D’EXPÉDITION DU PRODUIT RÉPA RÉ
OU REMPLACÉ JUSQU’À VOT RE ADRESSE À L’INTÉRIEUR DES ÉTATS-UNIS.
PÉRIODE DE GARANTIE DES PRODUITS
Audio et Vidéo ............................................................................................................................................................................................1 an 1 an
La période de garantie pour les clients qui louent le produit commence le jour où le produit est utilisé pour la première fois (a) pendant la période de location ou (b) après la
vente au détail, selon ce qui se produit en premier.
ÉLÉMENTS NON COUVERTS PAR LA GARANTIE
UN PRODUIT ACHETÉ CHEZ UN DISTRIBUTEUR NON AUTORISÉ N’EST COUVERT PAR AUCUNE GARANTIE EXPRESSE OU IMPLICITE, Y COMPRIS QUELQUE GARANTIE
IMPLICITE DE QUALITÉ MARCHANDE OU D’ADAPTATION À UN USAG E PA RTICULIER QUE CE SOIT. DE PLUS, CE PRODUIT EST STRICTEMENT VENDU « TEL QUEL » ET
« AVEC TOUS SES DÉFAUTS ÉVENTUELS ».
Pioneer DJ NE PEUT PAS ÊTRE TENU RESPONSABLE DES DOMMAGES INDIRECTS ET/OU ACCESSOIRES ÉVENTUELS.
LA PRÉSENTE GARANTIE NE S’APPLIQUE PA S SI LE PRODUIT A ÉTÉ SOUMIS À UNE PUISSANCE NOMINALE EXCÉDANT LA PUISSANCE INDIQUÉE DANS LES
SPÉCIFICATIONS FOURNIES.
LA PRÉSENTE GARANTIE NE COUVRE PAS LE BOÎTIER OU LES ÉLÉMENTS ESTHÉTIQUES, LES ANTENNES INSTALLÉES PAR L’UTILISATEUR, LES DOMMAGES AUX DISQUES OU
AUX RUBANS OU DISQUES D’ENREGISTREMENT, LES DOMMAGES AU PRODUIT DÉCOULANT D’UNE RETOUCHE, D’UNE MODIFICATION NON AUTORISÉE PAR ÉCRIT PAR Pioneer
DJ, D’UN ACCIDENT, D’UN USAGE INAPPROPRIÉ OU D’UN USAGE ABUSIF, LES DOMMAGES PRODUITS PAR LA FOUDRE OU LA SURTENSION, LES DOMMAGES SUBSÉQUENTS
DÉCOULANT DE FUITES, LES DOMMAGES DÉCOULANT DE PILES DÉFECTUEUSES OU DE L’UTILISATION DE PILES NON CONFORMES À CELLES QUI SONT SPÉCIFIÉES DANS LE
MANUEL DE L’UTILISATEUR.
LA PRÉSENTE GARANTIE NE COUVRE PAS LE COÛT DES PIÈCES OU DE LA MAIN-D’OEUVRE QUI SERAIENT AUTREMENT OFFERTES SANS FRAIS EN VERTU DE LA
PRÉSENTE GARANTIE, SI ELLES SONT OBTENUES AUPRÈS D’UNE SOURCE AUTRE QU’UNE SOCIÉTÉ DE SERVICE OU AUTRE AUTORISÉE OU DÉSIGNÉE PAR Pioneer DJ.
LA PRÉSENTE GARANTIE NE COUVRE PAS LES DÉFECTUOSITÉS OU LES DOMMAGES CAUSÉS PAR L’UTILISAT ION D’UNE MAIN-D’OEUVRE OU DE PIÈCES NON AUTORISÉES, ET/
GARANTIE VALABLE UNIQUEMENT AUX ÉTATS-UNIS ET AU CANADA
OU D’UN ENTRETIEN INADÉQUAT.
LES NUMÉROS DE SÉRIE MODIFIÉS
EXCLUSION DE TOUTE AUTRE GARANTIE
Pioneer DJ LIMITE SES OBLIGATIONS EN VERTU DE TOUTE GARANTIE IMPLICITE QUE CE SOIT, Y COMPRIS ENTRE AUTRES LES GARANTIES IMPLICITES DE QUALITÉ
MARCHANDE OU D’ADAPTATION À UN USAGE PARTICULIER, À UNE PÉRIODE N’EXCÉDANT PAS LA PÉRIODE DE GARANTIE. AUCUNE GARANTIE NE S’APPLIQUE APRÈS LA
PÉRIODE DE GARANTIE. CERTAINS ÉTATS NE PERMETTENT PAS LA LIMITATION DE LA DURÉE D’UNE GARANTIE IMPLICITE, ET CERTAINS NE PERMETTENT PAS L’ EXCLUSION
OU LA LIMITATION DES DOMMAGES CONSÉCUTIFS OU INDIRECTS. LES LIMITATIONS ET EXCLUSIONS ÉTABLIES CI-DESSUS PEUVENT DONC NE PAS S’APPLIQUER À VOUS.
LA PRÉSENTE GARANTIE VOUS DONNE DES DROITS LÉGAUX SPÉCIFIQUES. VOUS POUVEZ JOUIR D’AUTRES DROITS, QUI PEUVENT VARIER D’UN ÉTAT À L’AUTRE.
SERVICE APRÈS-VENTE
PDJA a autorisé un certain nombre de sociétés de service après-vente agréées à travers les États-Unis et le Canada pour le cas où votre produit
aurait besoin d’être réparé. Pour profiter d’un tel service en vertu de la garantie, vous devez présenter votre ticket de caisse ou, si vous louez
le produit, votre contrat de location indiquant l’endroit et la date de la transaction par le premier propriétaire. Si vous expédiez le produit, vous
devez l’emballer soigneusement et l’envoyer à une société de service autorisée, en port prépayé et selon une méthode de transport incluant un
suivi et une assurance. Emballez le produit au moyen de matériaux de rembourrage appropriés pour éviter tout dommage pendant le transport.
L’emballage d’origine est idéal pour cela. Indiquez votre nom, votre adresse et un numéro de téléphone où nous pouvons vous joindre pendant les heures de bureau.
Pour toute réclamation et/ou question à l’intérieur des États-Unis ou du Canada, appelez le Service Consommateurs au 1-800-872-4159.
, OBLITÉRÉS OU ENLEVÉS ANNULENT LA PRÉSENTE GARANTIE DANS SA TOTALITÉ.
GARANTIE LIMITÉE
Pièces Main-d’oeuvre
Français
Pour toute question concernant la mise en service ou l’utilisation de votre produit,
ou pour trouver une société de service autorisée, appelez ou écrivez à :
RÉSOLUTION DES LITIGES
Si un litige se produit entre vous et Pioneer DJ après la réponse à une demande initiale faite au Service Consommateurs, vous pouvez avoir recours au Programme de résolution des
plaintes de Pioneer DJ pour résoudre le litige. Le Programme de résolution des plaintes vous est offert gratuitement. Vous devez avoir recours au Programme de résolution des plaintes
avant de vous prévaloir de vos droits ou de chercher réparation en vertu du Titre I de la loi Magnuson-Moss Warranty-Federal Trade Commission Improvement Act, 15 U.S.C. 2301 et seq.
Pour utiliser le Programme de résolution des plaintes, appelez le 1-800-872-4159 et expliquez au représentant du Service Consommateurs
le problème que vous r encontrez ainsi que les démarches que vous avez eff ectuées pour faire réparer le produit pendant la période
de garantie, puis communiquez-lui le nom du distributeur /détaillant autorisé auprès duquel vous avez acheté le produit Pioneer DJ.
Une fois que votre plainte a été expliquée au représentant, un numéro de résolution vous sera communiqué. Pioneer DJ étudiera votre plainte et, dans un délai de quarante (40) jours
après la réception de votre plainte, (1) répondra à votre plainte par écrit pour vous aviser des démarches qui seront entreprises pour résoudre le conflit, et indiquera combien de temps
ces démarches prendront ; ou (2) répondra à votre plainte par écrit pour vous indiquer les raisons pour lesquelles aucune démarche ne sera entreprise.
CUSTOMER SUPPORT
PIONEER ELECTRONICS (USA) INC.
P.O. BOX 1720
LONG BEACH, CALIFORNIA 90801
1-800-872-4159
http://www.pioneerelectronics.com
NOTEZ ET CONSERVER LE LIEU ET LA DATE D’ACHAT POUR RÉFÉRENCE ULTÉRIEURE
N° de modèle : _______________________________________ N° de Série : ________________________________________________________________________
Date d’achat : ________________________________________ Nom du distributeur/détaillant ___________________________________________________________
PRENEZ SOIN DE CONSERVER CES INFORMATIONS ET VOTRE REÇU D’ACHAT EN LIEU SÛR POUR RÉFÉRENCE ULTÉRIEURE
Fr
11
Page 22
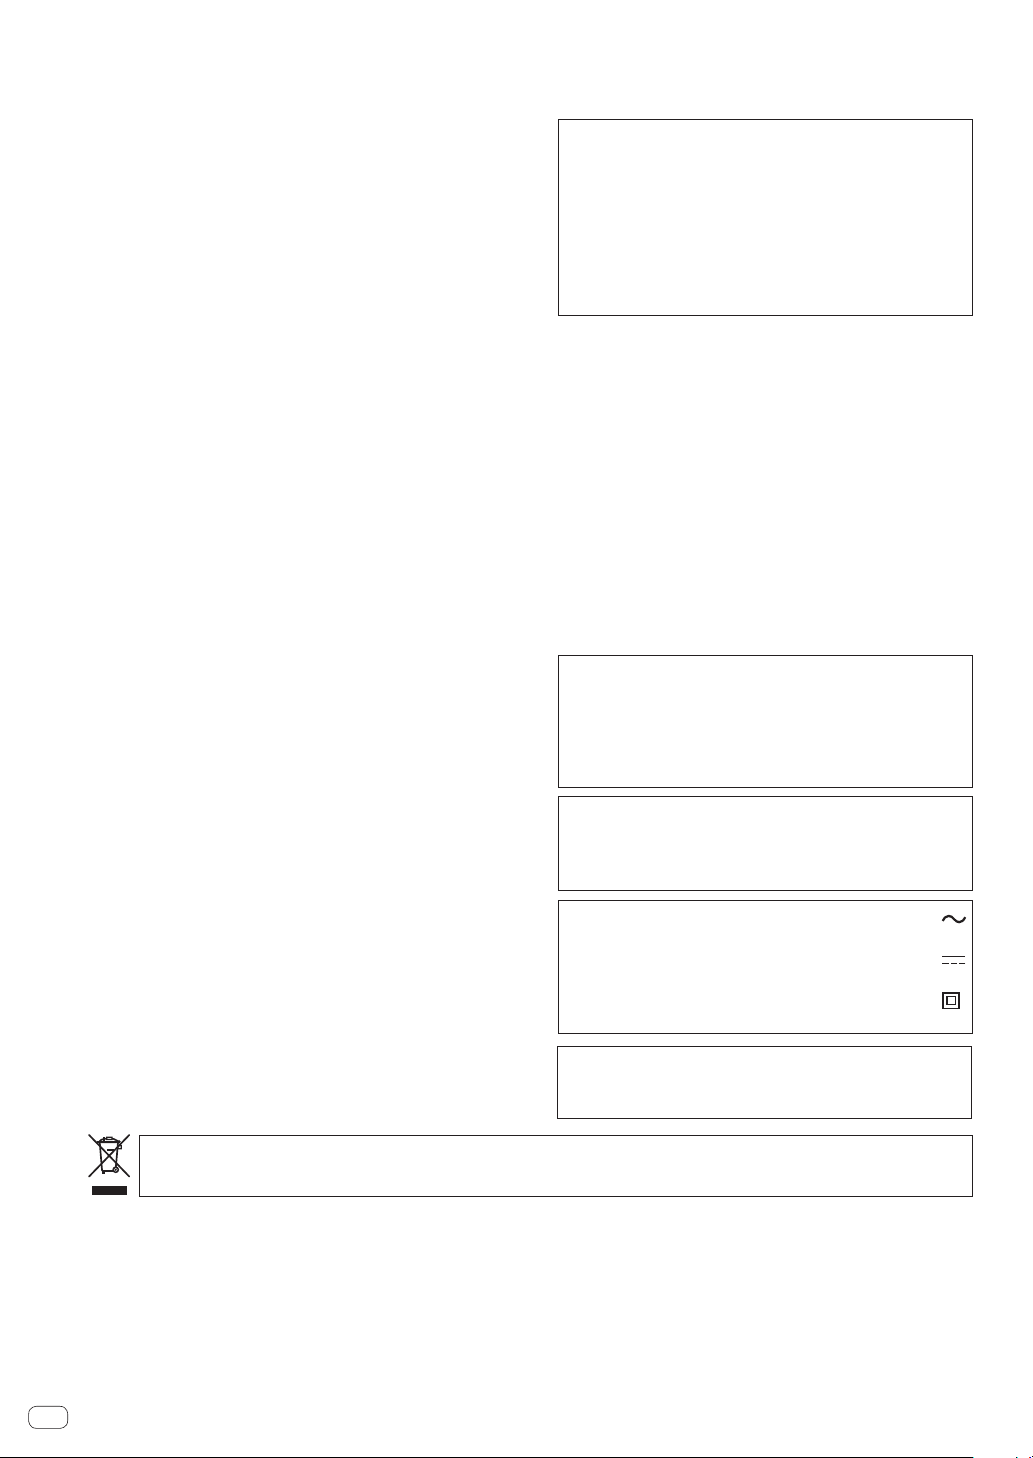
Vielen Dank, dass Sie sich für dieses Pioneer DJ-Produkt entschieden haben.
Bitte lesen Sie diese Bedienungsanleitung gründlich durch, um sich mit derBedienung des Geräts vertraut zu machen
Nachdem Sie die Bedienungsanleitung gelesen habe
n, legen Sie sie griffbereit zum Nachschlagen ab.
ACHTUNG
UM SICH NICHT DER GEF
SCHL
DECKEL (ODER DIE RÜCKSEITE) ENTFERNEN. IM
GERÄTEINNEREN BEFINDEN SICH KEINE VOM
BENUTZER REP
SIE REP
KU
WARNUNG
Dieses Gerät ist nicht wasserdicht. Zur
Gefahr von Brand und Stromschlag keine Behälter mit
Flüssigkeiten (z.B. Blumenvasen und -töpfe) in die
Nähe des Gerätes bringen und dieses vor
Spritzwasse
WARNUNG
Keine Quellen offener Flammen (z.B. eine brennende
Ker
Betriebsumgebung
Betriebstemperatur und Betriebslu
+5 °C bis +35 °C, 85 % rel.
(V
Eine Aufstellung dieses Gerät an einem unzureichend
belü
vermeide
Sonneneinstrahlung noch starken K
ausgesetzt werden
VORSICHTSHINWEIS ZUR BELÜFTUNG
Bei der Aufstellung dieses Gerätes muss für einen
ausreichenden
einwandfreie Wärmeabfuhr zu gewährleisten
(mindestens 15 cm oberhalb des Gerätes, 15 cm hinter
dem Gerät und jeweils 15 cm an der Seite des Gerätes)
WARNUNG
Im Gerätegehäuse sind
Öffnungen vorgesehe
Überhitzung des Gerätes zu verhindern und einen
zuverlässigen Betrieb zu gewährleisten
Brandgefahr auszuschließe
auf keinen
Zeitungen
werde
einem dicken
.
AGES AUSZUSETZEN, DÜRFEN SIE NICHT DEN
ARIERBAREN TEILE. ÜBERLASSEN
ARATUREN DEM QUALIFIZIERTEN
NDENDIENST.
AHR EINES ELEKTRISCHEN
D3-4-2-1-1_B1_De
Vermeidung der
r, Regen und Nässe schützen.
Tropfwasser,
D3-4-2-1-3_A1_De
ze) auf dieses Gerät stellen.
D3-4-2-1-7a_A1_De
entilationsschlitze nicht blockiert)
fteten, sehr feuchten oder heißen Ort ist zu
n, und das Gerät darf weder direkter
.
Freiraum gesorgt werden, um eine
Ventilationsschlitze und andere
n, die dazu dienen, eine
Privathaushalte in den Mitgliedsstaaten der EU, in der Schweiz und in Norwegen können ihre gebrauchten elektronischen Produkte an
vorgesehenen Sammeleinrichtungen kostenfrei zurückgeben oder aber an einen Händler zurückgeben (wenn sie ein ähnliches neues Produkt
kaufen).
Bitte wenden Sie sich in den Ländern, die oben nicht aufgeführt sind, hinsichtlich der korrekten Verfahrensweise der Entsorgung an die örtliche
Kommunalverwaltung.
Auf diese Weise stellen Sie sicher, dass das zu entsorgende Produkt der notwendigen Behandlung, Rückgewinnung und Wiederverwertung
unterzogen wird, und so mögliche negative Einflüsse auf die Umwelt und die menschliche Gesundheit vermieden werden.
Fall blockiert oder mit Gegenständen (z.B.
, Tischdecken und Gardinen) abgedeckt
n, und das Gerät darf beim Betrieb nicht auf
Teppich oder Bett aufgestellt sein.
Mischen Sie dieses Produkt, wenn Sie es entsorgen wollen, nicht mit gewöhnlichen Haushaltsabfällen. Es gibt ein getrenntes
Sammelsystem für gebrauchte elektronische Produkte, über das die richtige Behandlung, Rückgewinnung und Wiederverwertung
gemäß der bestehenden Gesetzgebung gewährleistet wird.
ftfeuchtigkeit:
Feuchte max.
unstlichtquellen
D3-4-2-1-7c*_A1_De
.
D3-4-2-1-7d*_A1_De
. Um
n, dürfen diese Öffnungen
D3-4-2-1-7b*_A1_De
Dieses Gerät ist für den Heimgebrauch vorgesehen.
Falls bei Einsatz zu einem anderem Zweck (z.B.
Langzeitgebrauch zu gewerblichen Zwecken in einem
Restaurant oder Betrieb in einem Fahrzeug bzw.
Schiff) eine Funktionsstörung auftritt, die eine
Reparatur des Gerätes erforderlich macht, werden
die Reparaturkosten dem Kunden selbst dann in
Rechnung gestellt, wenn die Garantiefrist noch nicht
abgelaufen ist.
VORSICHT MIT DEM NETZKABEL
Fassen Sie das Netzkabel immer am Stecker. Ziehen Sie
nicht am Kabel selbst, und fassen Sie das Netzkabel
niemals mit nassen Händen an, da dies einen
Kurzschluss oder elektrischen Schlag verursachen
kann. Stellen Sie nicht das Gerät, Möbelstücke o.ä. auf
das Netzkabel; sehen Sie auch zu, dass es nicht
eingeklemmt wird. Machen Sie niemals einen Knoten
in das Netzkabel, und binden Sie es nicht mit anderen
Kabeln. Das Netzkabel sollte so gelegt werden, dass
niemand darauf tritt. Ein beschädigtes Netzkabel kann
einen Brand oder elektrischen Schlag verursachen.
Prüfen Sie das Netzkabel von Zeit zu Zeit. Sollte es
beschädigt sein, wenden Sie sich an Ihre nächste
Kundendienststelle oder Ihren Händler, um es zu
ersetzen. S002*_A1_De
Vorsichtshinweis für Modell DM-40BT/DM-40BT-W
Diesen Lautsprecher ausschließlich an den
Verstärker im Lieferumfang dieser Anlage
anschließen. Der Anschluss an einen anderen
Verstärker kann Funktionsstörungen oder einen
Brand verursachen. SGK006*_A1_De
Dieser Lautsprecher darf auf keinen Fall an einer
Wand oder der Decke montiert werden, da er
anderenfalls herunterfallen und Verletzungen
verursachen kann. SGK007_A1_De
Das auf diesem Produkt angebrachte Piktogramm
verweist auf Wechselstrom.
Das auf diesem Produkt angebrachte Piktogramm
verweist auf Gleichstrom.
Das auf diesem Produkt angebrachte Piktogramm
verweist auf ein Gerät der Klasse II. D3-8-2-4_A1_De
ACHTUNG
Dieses Produkt wurde unter moderaten
Klimabedingungen getestet. D3-8-2-1-7b_A1_De
K041_A1_De
K058b_A1_De
De
2
Page 23
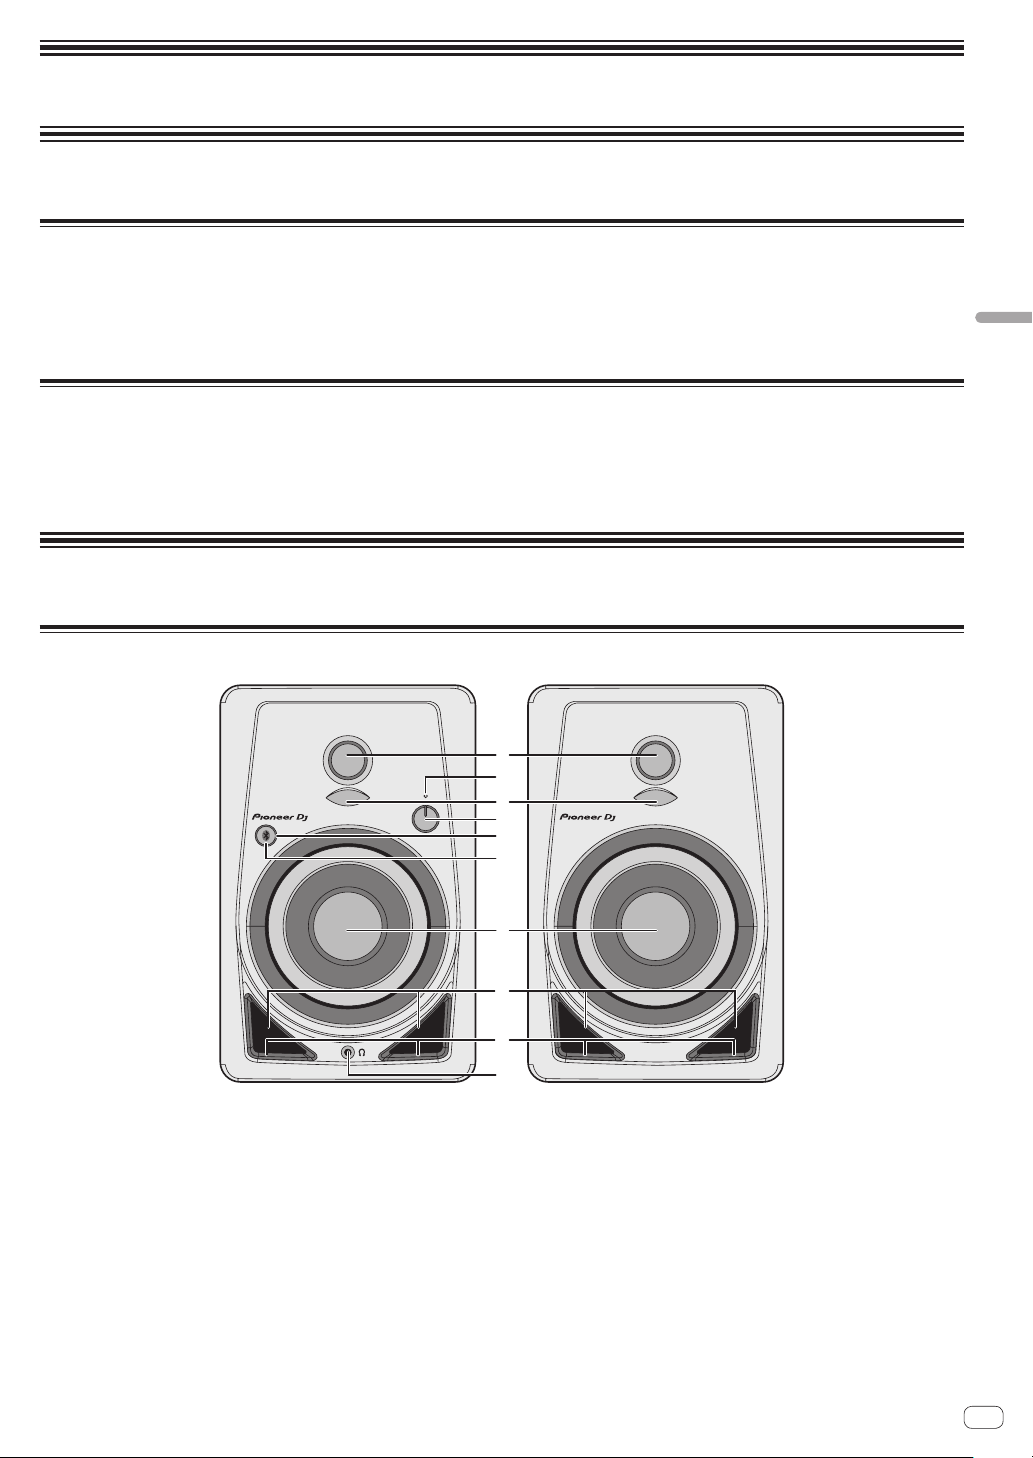
Vor Gebrauch lesen (wichtig)
Vor der Inbetriebnahme
Merkmale
! Ein Bassreflexrohr an der Vorderseite und die Groove-Technologie erzeugen einen kraftvollen Basston.
! Ein konvexer Diffusor auf einem neu geformten Hornvorsatz verbessert die Richtcharakteristik von Hochfrequenztönen und die Klangdiffusion.
! Kraftvoller Basston und klarere Soundqualität trotz seiner platzsparenden, kompakten Größe.
! Kompatibel mit AAC und Qualcomm
! Über die Pairing-Taste an der Vorderseite ist eine Kopplung mit einem Tastendruck möglich.
®
aptX™ für eine hochwertigere Tonwiedergabe über Bluetooth.
Überprüfen des Zubehörs
! Netzkabel x1
! Bedienungsanleitung (dieses Dokument)
! Audio-Wandlerkabel (3,5 mm-Stereo-Miniklinkenstecker zu RCA) x1
! Lautsprecherkabel x1
! Polster für die Unterseite x8
Bezeichnung und Funktion der Teile
Frontplatte
Deutsch
1 3/4 Zoll-Weichkalottenhochtöner
2 POWER-Anzeige
Die Anzeigen leuchten entsprechend des Einschaltzustands. Die
Anzeige leuchtet im Standby-Betrieb nicht.
3 Diffusoren
Verbessern die Richtcharakteristik von Hochfrequenztönen und die
Klangdiffusion.
4 LEVEL-Regler
Zum Einstellen der Lautstärke.
5 Pairing-Taste
Mit dieser Taste kann eine Kopplung mit einem Bluetooth-Gerät
ausgeführt werden. Mit dieser Taste steuern Sie auch die Pause und
die Wiedergabe während einer Musikwiedergabe über Bluetooth.
Weitere Informationen hierzu finden Sie unter „Wiedergabe von
Musik auf einem Bluetooth-Gerät“ (Seite 6).
1
2
3
4
5
6
7
8
9
a
6 Pairing-Anzeige (Seite 6)
Blinkt: Die Kopplung wird ausgeführt oder wartet auf eine Verbindung
Leuchtet: Mit dem Bluetooth-Gerät verbunden
7 4 Zoll-Glasfaser-Subwoofer
8 Bassreflexrohr
9 Öffnungen
Reguliert den Luftstrom im Bassreflexrohr zur gleichmäßigen
Abstrahlung tiefer Frequenzen.
a Kopfhörerbuchse
Das ist die 3,5 mm-Stereo-Miniklinkenstecker-Ausgangsbuchse.
Durch den Anschluss von Kopfhörern wird die Ton der Lautsprecher
stumm geschaltet und der Ton wird nur über die Kopfhörer
ausgegeben.
De
3
Page 24
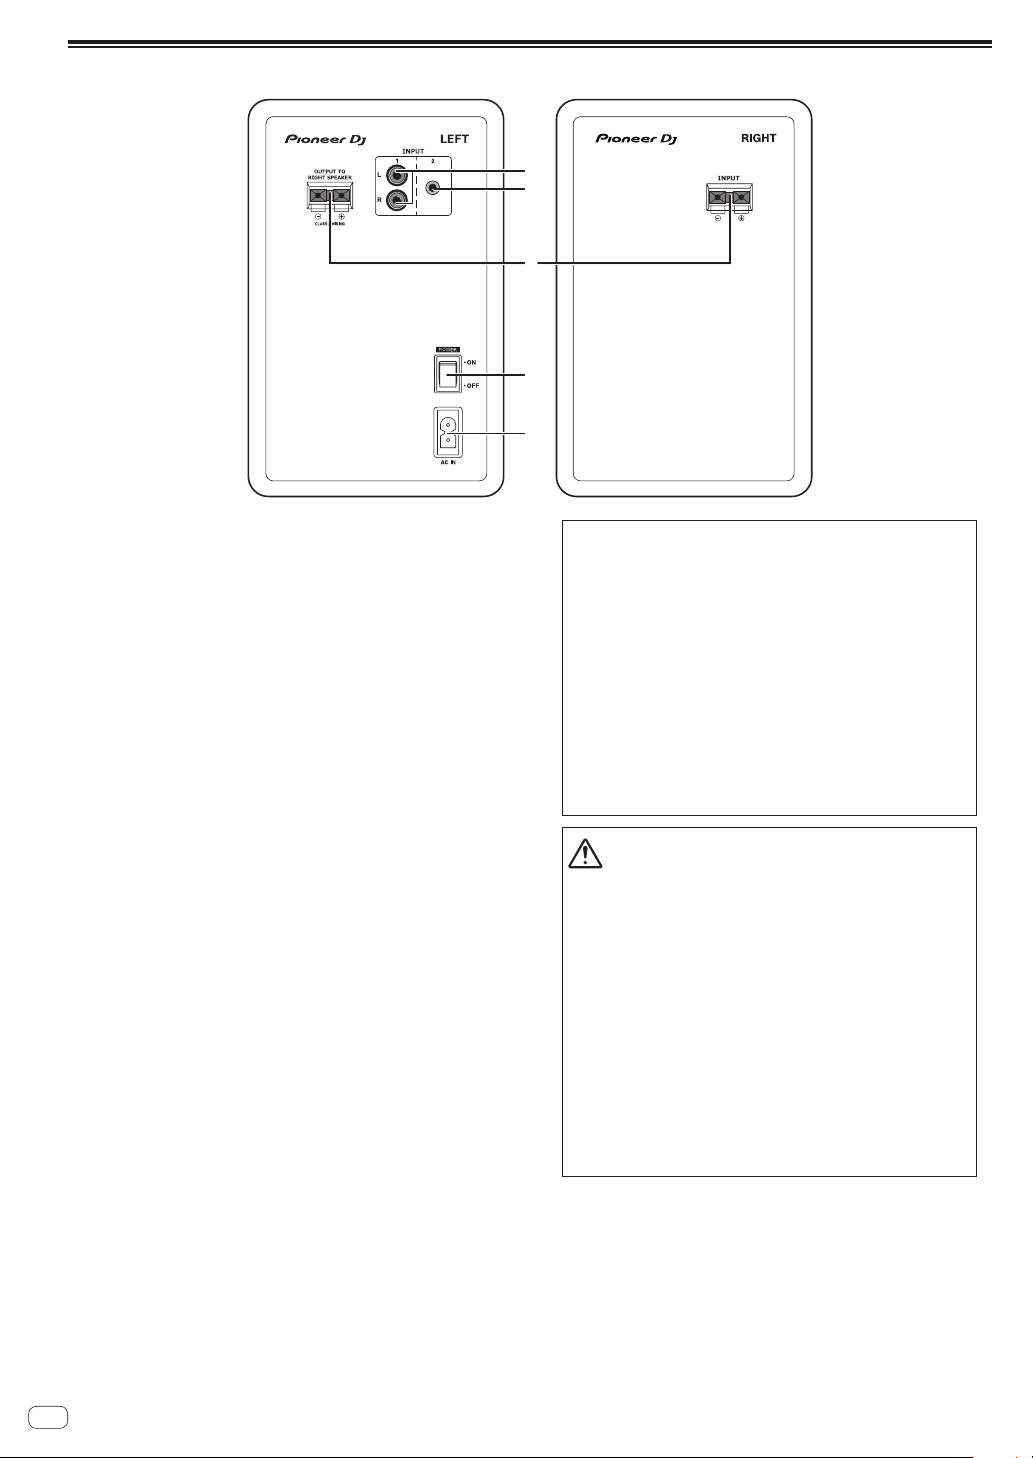
Rückseite
1
2
3
4
5
1 INPUT 1-Buchsen (Stereo)
Bei diesen Chinchbuchsen (RCA) handelt es sich um unsymmetrische Eingangsbuchsen.
2 INPUT 2-Buchsen (Stereo)
Bei dieser 3,5 mm-Stereo-Miniklinkenstecker-Buchse handelt es sich
um eine unsymmetrische Eingangsbuchse.
3 Buchse für den Lautsprecheranschluss
Verbinden Sie den rechten und linken Lautsprecher mit diesem
mitgelieferten Kabel.
Verbinden Sie diese Lautsprecher nur mit einem Verstärker dieses
Systems. Andernfalls kann es zu Beschädigungen oder Brand
kommen.
4 POWER-Schalter
Schalten Sie die Stromversorgung dieses Geräts ein und aus.
5 AC IN
Stecken Sie das Netzkabel in AC IN und dann in die Steckdose.
Schließen Sie das Netzkabel an, nachdem alle Anschlüsse zwischen
den Geräten vorgenommen wurden.
Verwenden Sie immer das mitgelieferte Netzkabel.
ACHTUNG
Der POWER-Schalter dieses Gerätes trennt das Gerät
nicht vollständig vom Stromnetz. Um das Gerät
vollständig vom Netz zu trennen, muss der
Netzstecker aus der Netzsteckdose gezogen werden.
Daher sollte das Gerät so aufgestellt werden, dass
stets ein unbehinderter Zugang zur Netzsteckdose
gewährleistet ist, damit der Netzstecker in einer
Notsituation sofort abgezogen werden kann. Um
Brandgefahr auszuschließen, sollte der Netzstecker
vor einem längeren Nichtgebrauch des Gerätes,
beispielsweise während des Urlaubs, grundsätzlich
von der Netzsteckdose getrennt werden.
D3-4-2-2-2a*_A1_De
ATTENTION
! Dieses Produkt verfügt über eine automatische Standby-
Funktion. Wenn beim Gebrauch für einen bestimmten
Zeitraum (ca. 30 Minuten) kein Ton ausgegeben wird,
schaltet das Produkt automatisch die POWER-Anzeige
aus und wechselt in den Standby-Betrieb mit niedrigem
Stromverbrauch, egal ob gerade eine Bluetooth-Verbindung
besteht oder nicht.
! Wenn das Produkt in den Standby-Betrieb wechselt, wenn
eine Bluetooth-Verbindung besteht, wird die BluetoothVerbindung getrennt und die Bluetooth-Anzeige wird auch
ausgeschaltet.
! Wenn ein Audiosignal im Standby-Betrieb über die
Eingangsbuchsen empfangen wird, wird automatisch der
normale Betrieb fortgesetzt. Das Gerät schaltet auch in
den normalen Betrieb, wenn die Bluetooth-Pairing-Taste im
Standby-Betrieb gedrückt wird.
! Die automatische Standby-Funktion kann nicht deaktiviert
werden.
De
4
Page 25
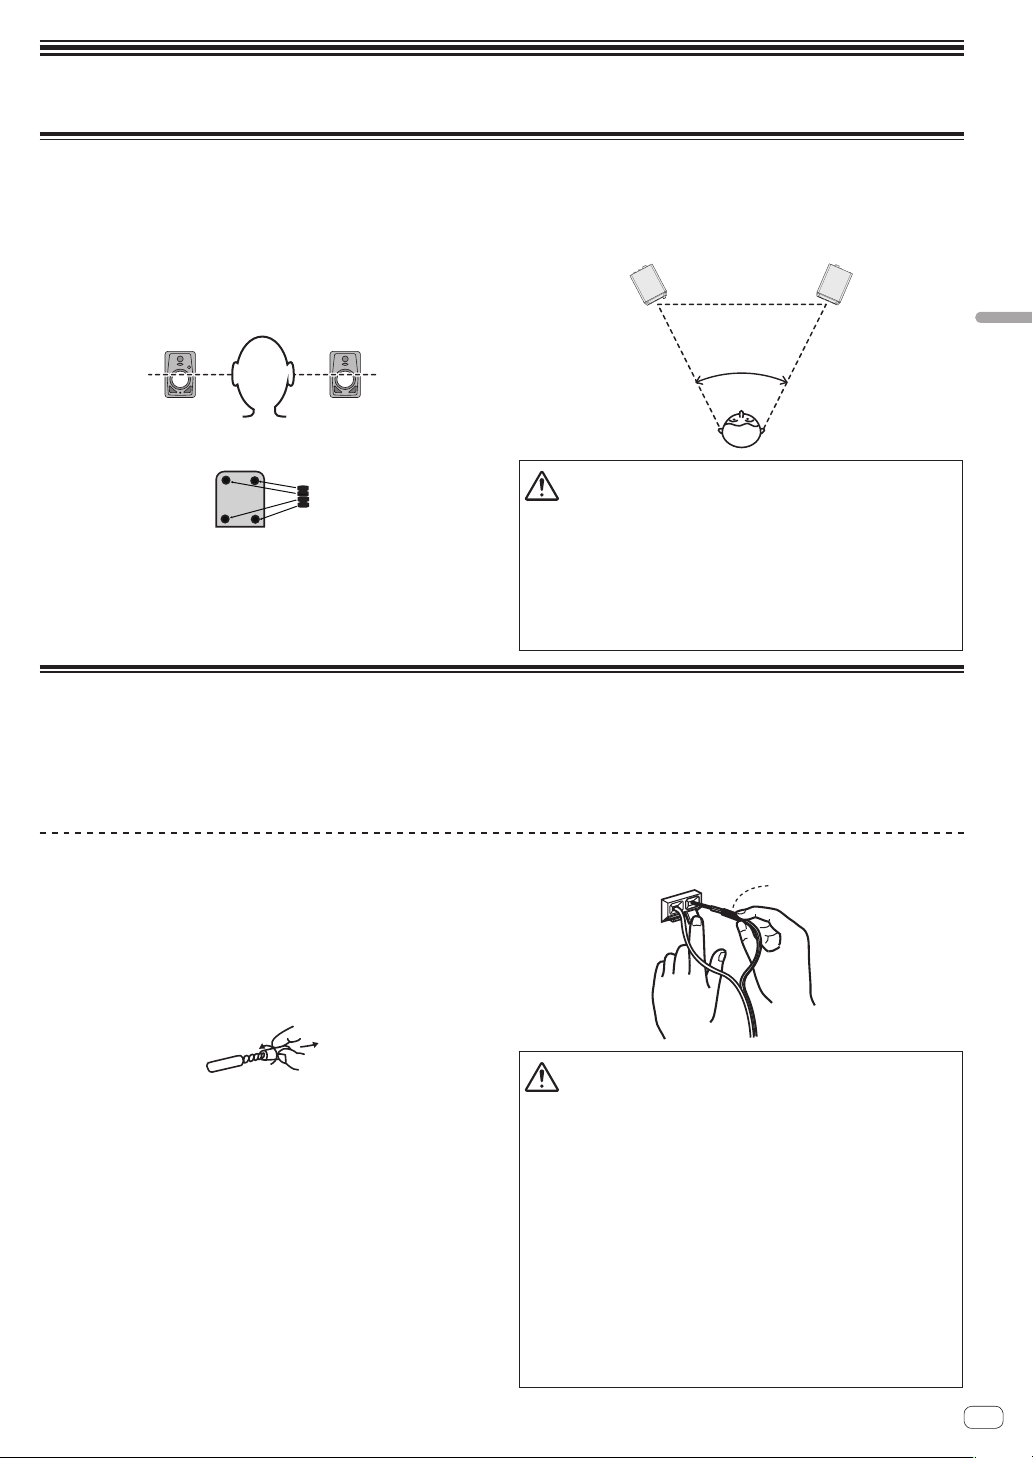
Installation und Anschlüsse
WARNUNG
Kleine
und Kindern aufbewahre
Ve
e
Rot+
Schwarz
Mit der roten Linie
Installationsverfahren
Der Wiedergabeklang eines Lautsprechers wird durch die akustischen
Verhältnisse im Hörraum beeinflusst. Bitte berücksichtigen Sie vor
Beginn der Installation sorgfältig die Bedingungen am Aufstellungsort,
um eine optimale Hörumgebung zu kreieren.
! Stellen Sie die Lautsprecher auf Ohrenhöhe auf.
! Um einen natürlich wirkenden Stereoeffekt zu erzielen,sollten der
rechte und der linke Lautsprecher an einer symmetrischen Position
jeweils im gleichen Abstand von der Hörposition aufgestellt werden.
! Befestigen Sie die mitgelieferten Polster als Schutz vor Rutschen an
der Unterseite des Geräts.
Teile außerhalb der Reichweite von Kleinkindern
n. Bei unbeabsichtigtem
rschlucken ist unverzüglich ein Arzt aufzusuchen.
D41-6-4_A1_D
! Stellen Sie die Lautsprecher so auf, dass diese nach innen zeigen
und insgesamt einen Winkel von 60 Grad von der Hörposition aufweisen, d. h. jeweils in einem Winkel von 30 Grad für den linken und
rechten Lautsprecher.
ACHTUNG
Um eine einwandfreie Wärmeabfuhr zu gewährleisten, sollte ein
ausreichender Abstand zwischen den Lautsprechern und Wänden
und anderen Komponenten eingehalten werden (mindestens jeweils
mindestens 15 cm oberhalb und hinter jedem Lautsprecher sowie
auf beiden Seiten). Falls die Lautsprecher zu nah nebeneinander, an
einer Wand oder anderen Komponenten aufgestellt werden, führt
dies möglicherweise zu einem Anstieg der Innentemperatur, der eine
Funktionsstörung oder Beschädigung zur Folge haben kann.
Deutsch
50 ° bis 60 °
Anschlüsse
! Schalten Sie die Stromversorgung aus und ziehen Sie das Netzkabel
aus der Netzsteckdose, bevor Sie Geräte anschließen oder die
Anschlüsse ändern.
! Beachten Sie die Bedienungsanleitung der angeschlossenen
Komponente.
Kabel anschließen
Verbinden Sie das mitgelieferte Lautsprecherkabel mit den
Lautsprechern.
1 Sie müssen den Anfang des mitgelieferten
Lautsprecherkabels auf ca. 1 cm abisolieren. Entflechten
Sie die freigelegte Isolierung und entfernen Sie diese.
Nachdem Sie die Isolierung entfernt haben, verdrillen Sie sorgfältig die
Kerndrähte.
2 Verbinden Sie das mitgelieferte Lautsprecherkabel
mit den Lautsprecherbuchsen auf der LINKEN und
RECHTEN Seite.
3 Führen Sie die Kerndrähte in die Buchsen ein, indem
Sie auf die Klemme an der Lautsprecherbuchse drücken.
Verbinden Sie das Lautsprecherkabel mit der roten Linie mit der Buchse
+ (rot) und das Lautsprecherkabel ohne die rote Linie mit der Buchse
– (schwarz).
! Schließen Sie das Netzkabel an, nachdem alle Anschlüsse zwischen
den Geräten vorgenommen wurden.
! Verwenden Sie immer das mitgelieferte Netzkabel.
! Stellen Sie die Lautstärke auf einen geeigneten Pegel, da die
Eingangssignale für die [INPUT 1]-Buchse, [INPUT 2]-Buchse und
Bluetooth gemischt werden.
−
ACHTUNG
! Nach dem Anschluss ziehen Sie leicht am Kabel, um sicherzustel-
len, dass der Anfang der Lautsprecherkabel sicher in den Buchsen
befestigt ist. Eine lose Verbindung kann dazu führen, dass die
Audio-Ausgabe unterbrochen wird oder Störgeräusche ausgegeben werden.
! Beim Anschluss des Lautsprecherkabels müssen Sie die
Kerndrähte sorgfältig verdrillen. Achten Sie darauf, dass die
Kerndrähte nicht aus den Lautsprecherbuchsen hervorragen.
Kerndrähte, die aus den Lautsprecherbuchsen hervorragen, können in Kontakt mit der Rückseite kommen oder sich gegenseitig
berühren. Dadurch kann es zu einer übermäßigen Last auf den
Verstärker kommen, so dass der Betrieb unterbrochen wird oder
es zu einer Fehlfunktion kommt.
! Bei einem Fehler der Polarität (+, –) auf der LINKEN und
RECHTEN Seite beim Anschluss der LINKEN und RECHTEN
Lautsprecherkabel kann der normale Stereosound nicht erreicht
werden.
De
5
Page 26
Wiedergabe von Musik auf einem
Bluetooth-Gerät
Über diese Lautsprecher können Sie drahtlos Tracks hören, die auf einem Bluetooth-Gerät gespeichert sind.
Wenn Sie die Lautsprecher zum ersten Mal benutzen oder ein neues Bluetooth-Gerät mit den Lautsprechern verbinden, müssen Sie die Lautsprecher
und das Bluetooth-Gerät koppeln.
Die Kopplung (gegenseitige Geräteregistrierung) ist das Verfahren, mit dem Sie ein Bluetooth-Gerät und die Lautsprecher verbinden.
Kopplungs- und
Verbindungsverfahren
1 Betätigen Sie den [POWER]-Schalter, um die
Lautsprecher einzuschalten.
! Die Bluetooth-Anzeige blinkt ca. 30 Sekunden lang und die
Lautsprecher wechseln in den Kopplungsmodus.
! Wenn die Bluetooth-Anzeige aus ist, drücken Sie die Pairing-Taste
für mindestens 2 Sekunden, um wieder zum Kopplungsmodus zu
wechseln.
2 Führen Sie die Kopplung auf dem Bluetooth-Gerät
aus.
Führen Sie die Kopplung durch, während sich die Lautsprecher
im Kopplungsmodus befinden. Einzelheiten finden Sie in der
Bedienungsanleitung Ihres Bluetooth-Geräts.
3 Wenn die Bluetooth-Anzeige von einem Blinken
zu einem Leuchten wechselt, ist die Kopplung (die
Verbindung) abgeschlossen.
Wenn die Kopplung nicht innerhalb von 30 Sekunden ausgeführt
werden konnte, hört die Bluetooth-Anzeige auf zu blinken und schaltet
sich aus.
! Ein Bluetooth-Gerät, das schon gekoppelt wurde, kann neu verbun-
den werden, indem die Verbindung auf dem Bluetooth-Gerät durchgeführt wird. Dazu müssen die Lautsprecher eingeschaltet sein.
Wiedergabe
Wenn Sie Musik von einem verbundenen Bluetooth-Gerät wiedergeben, wird die Musik, die vom Bluetooth-Gerät abgespielt wird, von den
Lautsprechern ausgegeben.
! Wenn Sie während der Musikwiedergabe auf dem Bluetooth-Gerät
die Pairing-Taste drücken, können Sie die Pause/die Wiedergabe
steuern (dieselbe Funktion wie die Pause-/Wiedergabe-Taste auf
dem Bluetooth-Gerät).
CAUTION
! Stellen Sie beim Koppeln (beim Verbinden) das Bluetooth-Gerät in
die Nähe der Lautsprecher auf.
! Die Lautstärke kann sehr laut sein, wenn die Wiedergabe nach der
erfolgreichen Verbindung das erste Mal gestartet wird, deshalb
empfehlen wir, vor der Wiedergabe eine niedrigere Lautstärke
einzustellen.
! Es ist möglich, dass die Pause/Wiedergabe je nach verwendeter
Anwendung mit der Pairing-Taste nicht ausgeführt werden kann.
! Die Verbindung mit den Lautsprechern kann bei manchen
Bluetooth-Geräten nicht hergestellt werden.
! Wenn Sie eine Verbindung mit einem anderen Bluetooth-Gerät
herstellen möchten, schalten Sie die Bluetooth-Funktion des
derzeit verbundenen Bluetooth-Geräts aus oder trennen Sie die
Verbindung, bevor Sie die Kopplung ausführen.
! Die Lautsprecher speichern die Kopplungsdaten von bis zu acht
Bluetooth-Lautsprechern und versuchen, sich mit dem letzten
gekoppelten Gerät zu verbinden, wenn die Pairing-Taste in dem
Moment gedrückt wird, in dem keine Verbindung zu einem
Bluetooth-Gerät hergestellt ist.
Vorsichtshinweise zu HF-Wellen
Dieses Gerät arbeitet mit einer Rundfunkwellenfrequenz von 2,4 GHz,
wobei es sich um ein von anderen drahtlosen Systemen ebenfalls
verwendetes Frequenzband handelt (siehe die nachstehende Liste).
Um Rauscheinstreuungen oder Unterbrechungen der Kommunikation
zu vermeiden, sollte dieses Gerät nicht in der Nähe derartiger Geräte
betrieben werden, oder die betreffenden Gerät sollten während des
Gebrauchs dieses Gerätes ausgeschaltet werden.
! Drahtlose Telefone
! Drahtlose Faxgeräte
! Mikrowellenherde
! Drahtlose LAN-Geräte (IEEE802.11b/g)
! Drahtlose AV-Geräte
! Drahtlose Steuerungen für Videospielsysteme
! Mit Mikrowellen arbeitende Geräte des Gesundheitswesens
! Bestimmte Baby-Monitoren
Sonstige, weniger weit verbreitete Geräte, die möglicherweise mit der
gleichen Frequenz arbeiten:
! Diebstahlverhütungsanlagen
! Amateur-Rundfunksender (HAM)
! Logistische Verwaltungsanlagen von Lagerhäusern
! Unterscheidungsanlagen für Züge und Fahrzeuge des Notdienstes
ACHTUNG
! Sollte es zu Rauschen auf Ihrem Fernsehbild kommen, besteht
die Möglichkeit, dass ein Bluetooth®-Gerät oder dieses Gerät
(auch Produkte, die von diesem Gerät unterstützt werden) eine
Signalstörung mit dem Antennen-Eingangsanschluss Ihres
Fernsehers, Videogeräts, Satellitentuners etc. verursacht.
Vergrößern Sie in diesem Fall den Abstand zwischen dem
Antennen-Eingangsanschluss und dem Bluetooth-Gerät oder
diesem Gerät (auch der Produkte, die von diesem Gerät unterstützt
werden).
! Wenn sich ein Hindernis auf dem Übertragungsweg zwischen
diesem Gerät (einschließlich von Produkten, die von diesem Gerät
unterstützt werden) und dem mit Bluetooth drahtloser Technologie
ausgestatteten Gerät befindet (z. B. eine Metalltür, Betonwand
oder Staniolfolie enthaltendes Isolationsmaterial), muss der
Aufstellungsort der Anlage möglicherweise verändert werden, um
Signalrauschen und Unterbrechungen zu vermeiden.
De
6
Page 27

Betriebsumfang
Dieses Gerät ist ausschließlich für den Heimgebrauch bestimmt. (Je
nach Kommunikationsgerät kann sich der Übertragungsweg verringern). Bei Betrieb an den folgenden Orten können ungünstige
Bedingungen den Empfang von HF-Wellen unmöglich machen, so dass
Tonunterbrechungen auftreten oder die Tonausgabe vollständig stoppt:
! In Stahlbetongebäuden oder Gebäuden mit Stahl- oder
Eisenrahmen.
! In der Nähe großer Möbelstücke aus Metall.
! In Menschenansammlungen oder in der Nähe eines Gebäudes oder
Hindernisses.
! An einem Ort, der einem Magnetfeld, statischer Elektrizität oder
HFEinstreuungen von einem mit HF-Wellen arbeitenden Gerät
ausgesetzt ist, das das gleiche Frequenzband (2,4 GHz) wie dieses Gerät verwendet, z. B. ein drahtloses 2,4-GHz-LAN-Gerät oder
Mikrowellenherd.
! Wenn Sie an einem dicht bevölkerten Ort (Miethaus, Häuserzeile
usw.) wohnen und sich der Mikrowellenherd eines Nachbars in der
Nähe Ihrer Anlage befindet, können HF-Einstreuungen auftreten. In
einem solchen Fall müssen Sie für einen größeren Abstand sorgen,
indem Sie den Aufstellungsort dieses Gerätes verändern. Derartige
HFEinstreuungen treten nur dann auf, wenn der betreffende
Mikrowellenherd in Betrieb ist.
Reflektierte HF-Wellen
Zu den von diesem Gerät empfangenen HFWellen gehören sowohl die
direkt von dem mit Bluetooth drahtloser Technologie ausgestatteten
Gerät übertragenen HFWellen (direkte Wellen) als auch HFWellen, die
aus verschiedenen Richtungen eintreffen, weil sie von Wänden, Möbeln
und Gebäuden reflektiert werden (reflektierte Wellen). Derartige reflektierte Wellen erzeugen (aufgrund von Hindernissen und reflektierenden
Gegenständen) eine Vielzahl weiterer reflektierter Wellen und können
je nach Aufstellungsort zu Schwankungen der Empfangsbedingungen
führen. Falls ein einwandfreier Tonempfang wegen dieses Phänomens
nicht möglich ist, verändern Sie probeweise den Aufstellungsort des mit
Bluetooth drahtloser Technologie ausgestatteten Gerätes geringfügig.
Bitte beachten Sie außerdem, dass Tonunterbrechungen aufgrund
von reflektierten Wellen auftreten können, wenn eine Person den Weg
zwischen diesem Gerät und dem mit Bluetooth drahtloser Technologie
ausgestatteten Gerät kreuzt oder sich diesem Bereich nähert.
Deutsch
De
7
Page 28

Zusätzliche Informationen
Störungssuche
! Manchmal wird das Problem auch durch ein externes Gerät verursacht. Überprüfen Sie die anderen verwendeten Komponenten und elektrischen
Geräte. Wenn Sie das Problem nicht beheben können, wenden Sie sich an die nächste Pioneer-Kundendienststelle oder an Ihren Händler zum
Ausführen der Reparaturarbeit.
! Dieses Gerät kann möglicherweise aufgrund von statischer Elektrizität oder anderen externen Einflüssen nicht richtig arbeiten. In diesem Fall kann
normaler Betrieb durch Abziehen des Netzsteckers, mindestens 5 Sekunden Warten und erneutes Einstecken wieder hergestellt werden.
Häufige Probleme
Problem Prüfen Abhilfe
Das Gerät schaltet nicht ein. Ist das Netzkabel richtig angeschlossen? Stecken Sie den Netzstecker in eine Netzsteckdose.
Ist das angeschlossene Gerät richtig eingerichtet? Stellen Sie den externen Eingang des Geräts und die Lautstärke richtig ein.
Es wird kein Ton vom angeschlossen
Gerät ausgegeben oder der Ton ist leise.
Die POWER-Anzeige (weiß) leuchtet
nicht auf.
Das Gerät wechselt vom Standby-Betrieb
nicht in den normalen Betrieb.
Verzerrter Ton.
Es wird ständig Ton in hoher Lautstärke
ausgegeben (Oszillation).
Es wird nur Ton vom linken Lautsprecher
ausgegeben.
Das Gerät wird automatisch ausgeschaltet (Standby-Betrieb).
Ist die Lautstärke auf die richtige Position gestellt?
Ist die Stromzufuhr eingeschaltet? Drehen Sie den [POWER]-Schalter an der Rückseite des Geräts.
Ist die Stromzufuhr eingeschaltet? Drehen Sie den [POWER]-Schalter an der Rückseite des Geräts.
Befinden sich die Lautsprecher im
Standby-Betrieb?
Ist der Eingangssignalpegel zu niedrig? Erhöhen Sie den Eingangssignalpegel.
Ist die Lautstärke auf die richtige Position gestellt?
Ist der Eingangspegel des angeschlossenen
Geräts richtig eingestellt?
Ist die Lautstärke auf die richtige Position gestellt?
Ist das Lautsprecherkabel richtig angeschlossen? Schließen Sie den linken und rechten Lautsprecher richtig an.
Wird für eine bestimmte Zeit (ca. 30 Minuten) oder
länger kein Ton ausgegeben?
Ist der Eingangssignalpegel zu niedrig? Erhöhen Sie den Eingangssignalpegel.
Drehen Sie den [LEVEL]-Regler auf der Vorderseite dieses Geräts im
Uhrzeigersinn, um die Lautstärke zu erhöhen.
Schalten Sie den [POWER]-Schalter auf der Vorderseite dieses Geräts einmal
aus und nach einigen Sekunden wieder an.
Drehen Sie den [LEVEL]-Regler auf der Vorderseite dieses Geräts gegen den
Uhrzeigersinn, um die Lautstärke zu verringern.
Stellen Sie den Ausgangspegel des angeschlossenen Geräts richtig ein.
Drehen Sie den [LEVEL]-Regler auf der Vorderseite dieses Geräts gegen den
Uhrzeigersinn, um die Lautstärke zu verringern.
Speisen Sie ein Signal von der Cinch- oder der Stereo-MiniklinkensteckerEingangsbuchse ein.
Oder drücken Sie die Pairing-Taste an der Vorderseite des Geräts.
Bei einer Verbindung zur INPUT 1- oder INPUT 2-Buchse
Problem Prüfen Abhilfe
Es wird kein Ton vom angeschlossen
Gerät ausgegeben oder der Ton ist leise.
Der Ton wird nur von einem Lautsprecher
ausgegeben.
Der Ton wird unterbrochen oder
Rauschen ist zu hören.
Sind die Verbindungskabel richtig angeschlossen? Schließen Sie die Verbindungskabel richtig an.
Sind Buchsen und Stecker verschmutzt? Reinigen Sie Buchsen und Stecker vor dem Herstellen von Verbindungen.
Ist das Gerät richtig angeschlossen? Schließen Sie das Gerät an die linke und rechte Eingangsbuchse an.
Gibt es ein Verbindungsproblem mit den
Verbindungskabeln?
Bei der Verbindung über Bluetooth
Problem Prüfen Abhilfe
Befindet sich ein Gerät in der Nähe, das elektromagnetische Wellen im 2,4-GHz-Bereich produziert (Mikrowellenherd, WLAN-Gerät oder ein
anderes Bluetooth-Gerät etc.)?
Ist die Entfernung zum Bluetooth-Gerät zu weit?
Oder gibt es eine Wand oder ein Hindernis,
Es kann keine Verbindung hergestellt
werden, der Ton wird unterbrochen oder
ein Rauschen ist zu hören.
De
8
durch das das Signal in dem Bereich dazwischen
blockiert wird?
Läuft eine andere Anwendung als eine
Anwendung zur Musikwiedergabe auf dem
Bluetooth-Gerät?
Unterstützt das Bluetooth-Gerät, das Sie verbinden
möchten, A2DP?
Wurde das Pairing mit dem Bluetooth-Gerät
richtig ausgeführt?
Schließen Sie die Verbindungskabel erneut an.
Stellen Sie entweder das Gerät, das elektromagnetische Wellen erzeugt,
weiter weg von diesem Gerät auf oder beenden Sie dessen Verwendung.
Stellen Sie dieses Gerät und das verbundene Bluetooth-Gerät näher zueinander auf. Oder ändern Sie die Position des Bluetooth-Geräts oder dieses
Geräts.
Schließen Sie alle Anwendungen außer der Anwendung zur
Musikwiedergabe auf dem Bluetooth-Gerät.
Benutzen Sie ein Bluetooth-Gerät, das A2DP unterstützt.
Schalten Sie dieses Gerät und das Bluetooth-Gerät aus und wieder ein, und
führen Sie danach die Kopplung erneut aus.
Page 29
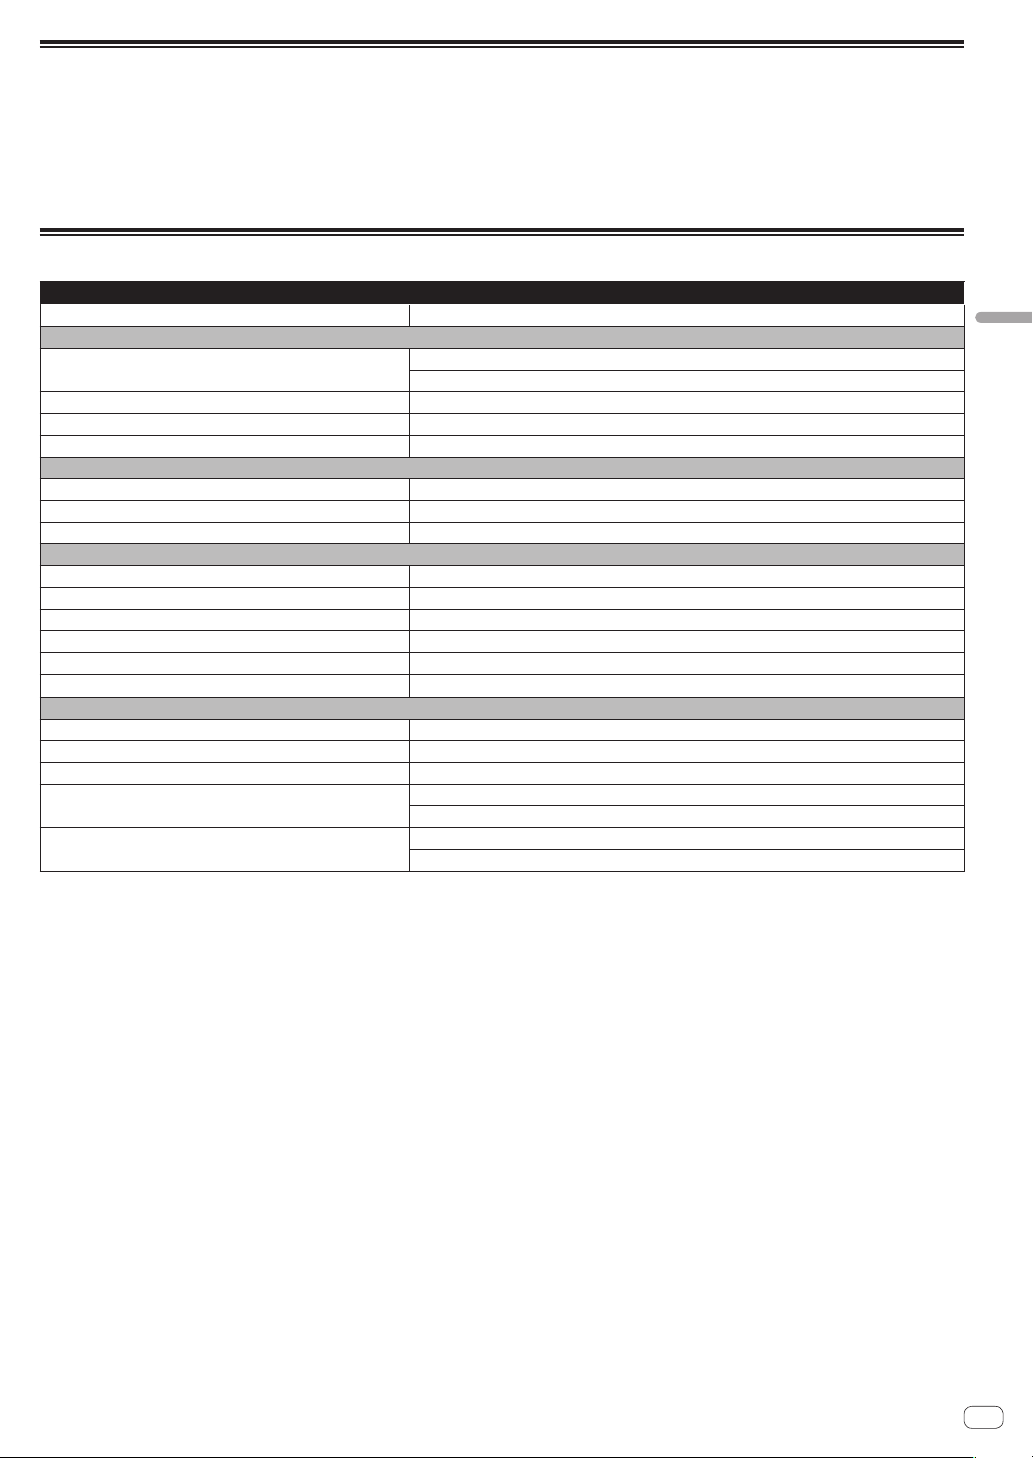
Über Markenzeichen und eingetragene Markenzeichen
! “Pioneer DJ” ist ein Markenzeichen der PIONEER CORPORATION und wird unter Lizenz verwendet.
! Die hier erwähnten Produkt- oder Firmennamen sind Marken oder eingetragene Marken der jeweiligen Eigentümer.
! Die Bluetooth®-Wortmarke und Logos sind registrierte Marken der Bluetooth SIG, Inc. und jegliche Verwendung dieser Marken durch die PIONEER
DJ Corporation erfolgt unter Lizenz. Andere Marken und Markennamen sind das Eigentum ihrer jeweiligen Inhaber.
! Qualcomm aptX ist ein Produkt der Qualcomm Technologies International, Ltd. Qualcomm ist eine Marke der Qualcomm Incorporated, die in den
USA und anderen Ländern registriert ist und mit Genehmigung verwendet wird. aptX ist eine Marke der Qualcomm Technologies International,
Ltd., die in den USA und anderen Ländern registriert ist und mit Genehmigung verwendet wird.
Technische Daten
DM-40BT/DM-40BT-W
Modell 2-Wege-Aktivlautsprecher
Verstärkerbereich
Verstärkerausgang
Eingangsbuchsen RCA × 1, 3,5 mm-Stereo-Miniklinkenstecker × 1
Eingangsimpedanz
Ausgangsbuchsen Kopfhörer × 1
Lautsprecherbereich
Gehäuse Bassreflex/Vinyllaminiertes MDF
Subwoofer (LF-Treiber) 4 Zoll-Konus (102 cm)
Hochtöner (HF-Treiber) 3/4 Zoll-Weichkalotte (19 mm)
Bluetooth-Bereich
Version Bluetooth Spezifikation Ver. 4.2
Output Bluetooth Spezifikation Klasse 2
Verwendete Frequenz 2,4 GHz
Einstellung FH-SS (Frequenzsprungverfahren)
Unterstützte Bluetooth-Profile A2DP, AVRCP
Unterstützter Kodierer-Dekodierer
Stromversorgungsbereich/Sonstiges
Unterstützte Spannungen 110 V bis 240 V Wechselspannung, 50 Hz/60 Hz
Leistungsaufnahme 35 W
Leistungsaufnahme im Standby-Betrieb 0,3 W
Außenabmessungen B x H x T
Gewicht
! Änderungen der technischen Daten und das Design dieses Geräts ohne vorherige Ankündigung bleiben vorbehalten.
! © 2017 Pioneer DJ Corporation. Alle Rechte vorbehalten.
Linker Kanal: 21 W/4 W, Klasse AB
Rechter Kanal: 21 W/4 W, Klasse AB
10 kW
SBC, AAC, Qualcomm
Linker Kanal: 146 mm × 227 mm × 223 mm
Rechter Kanal: 146 mm × 227 mm × 210 mm
Linker Kanal: 2,7 kg
Rechter Kanal: 2,2 kg
®
aptX™, Qualcomm® aptX™ mit niedriger Latenz
Deutsch
De
9
Page 30

Vi ringraziamo per avere acquistato questo prodotto Pioneer DJ.
Vi
preghiamo di leggere queste queste istruzioni per l’uso in modo da sapere usare correttamenteil proprio modello.
Dopo aver letto queste istruzioni, riporle in un luogo sicuro per poterle consultare di nuovo al momento del bisogn
ATTENZIONE
PER EVIT
NON RIMUOVERE IL COPERCHIO (O IL RETRO). NON
CI SONO P
POSSA ESSERE EFFET
DI NECESSITÀ, RIVOLGERSI ESCL
PERSONALE DI SERVIZIO QU
ATTENZIONE
Questo apparecchio non è impermeabile.
pericoli di incendi o folgorazioni, non posizionare nelle
vicinanze di questo apparecchio contenitori pieni di
liquidi (quali vasi da fiori, o simili), e non esporre
l’apparecchio a sgocciolii, schizzi, pioggia o umidità.
ATTENZIONE
Pe
sull’apparecchio dispositivi con fiamme vive (ad
esempio una candela accesa, o simili)
Condizioni ambientali di funzionamento
Gamma ideale della temperatura ed umidità
dell’ambiente di funzionamento:
da +5 °C a +35 °C, umidità relativa inferiore all‘85 %
(fessure di ventilazione non bloccate
Non installare l’apparecchio in luoghi poco ventilati, o
in luoghi esposti ad alte umidità o alla diretta luce del
sole (o a sorgenti di luce artificiale molto forti)
AVVER
Installare l’apparecchio avendo cura di lasciare un
certo spazio all’intorno dello stesso per consentire una
adeguata circolazione dell’aria e migliorare la
dispersione del calore (almeno 15 cm sulla parte
superiore, 15 cm sul retr
I privati cittadini dei paesi membri dell’UE, di Svizzera e Nor
ser
Pe
In questo modo
potenzialmente negativi sull’ambiente e sulla vita dell’uomo
K058b_A1_It
l’unità, oppure dei mobili sopra il filo di alimentazione e
S002*_A1_It
ATTENZIONE
L
di aperture per la ventilazione, allo scopo di garantirne
un funzionamento affidabile, e per proteggerlo dal
surriscaldament
incendi le aperture non devono mai venire bloccate o
coperte con oggetti vari (quali giornali, tovaglie, tende o
tendaggi, ecc.), e l’apparecchio non deve essere
utilizzato appoggiandolo su tappeti spessi o sul letto
ARE IL RISCHIO DI SCOSSE ELETTRICHE,
ARTI INTERNE LA CUI MANUTENZIONE
TUATA DALL’UTENTE. IN CASO
USIVAMENTE A
ALIFICATO.
D3-4-2-1-1_B2_It
Per prevenire
D3-4-2-1-3_A1_It
r evitare il pericolo di incendi, non posizionare
.
D3-4-2-1-7a_A1_It
Questo prodotto è destinato esclusivamente all'uso
domestico. Eventuali disfunzioni dovute ad usi diversi
(quali uso prolungato a scopi commerciali, in
ristoranti, o uso in auto o su navi) e che richiedano
particolari riparazioni, saranno a carico dell'utente,
anche se nel corso del periodo di garanzia.
AVVERTIMENTO RIGUARDANTE IL FILO DI
ALIMENTAZIONE
Prendete sempre il filo di alimentazione per la spina.
Non tiratelo mai agendo per il filo stesso e non toccate
mai il filo con le mani bagnati, perchè questo potrebbe
causare cortocircuiti o scosse elettriche. Non collocate
controllate che lo stesso non sia premuto. Non
annodate mai il filo di alimentazione nè collegatelo con
altri fili. I fili di alimentazione devono essere collocati in
tal modo che non saranno calpestati. Un filo di
alimentazione danneggiato potrebbe causare incendi o
scosse elettriche. Controllate il filo di alimentazione
regolarmente. Quando localizzate un eventuale danno,
rivolgetevi al più vicino centro assistenza oppure al
vostro rivenditore per la sostituzione del filo di
)
TENZA PER LA VENTILAZIONE
’apparecchio è dotato di un certo numero di fessure e
o, e 15 cm su ciascuno dei lati).
.
D3-4-2-1-7c*_A1_It
D3-4-2-1-7d*_A1_It
alimentazione.
Precauzioni per i modelli DM-40BT/DM-40BT-W
Non collegate questo altoparlante ad un
amplificatore che non sia quello fornito assieme a
questo sistema. Il collegamento con amplificatori di
altro tipo può risultare in malfunzionamenti o
incendi.
Non applicare questi diffusori ad un muro o al
soffitto, dato che possono causare ferimenti in caso
di caduta.
Il simbolo grafico stampigliato sul prodotto
o. Per prevenire possibili pericoli di
.
D3-4-2-1-7b*_A1_It
significa corrente alternata.
Il simbolo grafico stampigliato sul prodotto
significa corrente continua.
Il simbolo grafico stampigliato sul prodotto
significa apparecchio di Classe II.
AVVERTENZA
Questo prodotto è stato collaudato in condizioni di
clima moderato.
o.
K041_A1_It
SGK006*_A1_It
SGK007_A1_It
D3-8-2-4_A1_It
D3-8-2-1-7b_A1_It
Se si vuole eliminare questo prodotto, non gettarlo insieme ai rifiuti domestici. Esiste un sistema di raccolta differenziata in conformità
alle leggi che richiedono appositi trattamenti, recupero e riciclo.
vizi di raccolta o a un rivenditore (se si desidera acquistarne uno simile).
2
r i paesi non citati qui sopra, si prega di prendere contatto con le autorità locali per il corretto metodo di smaltimento.
, si è sicuri che il proprio prodotto eliminato subirà il trattamento, il recupero e il riciclo necessari per prevenire gli effetti
It
vegia, possono restituire senza alcun costo i loro prodotti elettronici usati ad appositi
.
Page 31

Da leggere prima dell’uso (Importante)
a
Prima di cominciare
Caratteristiche
! Un condotto bass reflex nella parte anteriore unito alla tecnologia Groove per una grande potenza sonora dei kick.
! La nuova forma a guida d’onda del diffusore convesso migliora la direttività acustica delle alte frequenze e offre una sonorità spaziosa.
! Nonostante le sue dimensioni compatte da scrivania, offre bassi profondi e una qualità sonora più chiara.
! Compatibile con la codifica AAC e la tecnologia Qualcomm® aptX™ per una riproduzione audio di migliore qualità utilizzando l’interfaccia
Bluetooth.
! Un pulsante di accoppiamento sul pannello anteriore consente di eseguire l’accoppiamento con un unico tocco.
Controllo degli accessori
! Cavo di alimentazione x1
! Istruzioni per l’uso (questo documento)
! Cavo adattatore audio (da spina mini stereo da 3,5 mm a RCA) x1
! Cavo diffusore x1
! Cuscinetti per la base x8
Nomi e funzioni delle parti
Italiano
Pannello anteriore
1 Tweeter a cupola morbidi da 3/4 di pollice
2 Indicatore POWER
L’illuminazione è collegata all’attivazione/disattivazione dell’alimentazione. L’indicatore è spento in stato di standby.
3 Diffusori
Migliorano la direttività delle frequenze alte dell’audio e conferiscono
spazialità al suono.
4 Controllo LEVEL
Regola il volume.
5 Pulsante di accoppiamento
Esegue l’accoppiamento con un dispositivo Bluetooth.
Questo pulsante esegue inoltre le operazioni di messa in pausa e
riproduzione durante la riproduzione musicale tramite Bluetooth. Per
dettagli, vedere “Ascolto della musica trasmessa da un dispositivo
Bluetooth” (pagina 6).
1
2
3
4
5
6
7
8
9
6 Indicatore di accoppiamento (pagina 6)
Lampeggiante: Operazione di accoppiamento in corso o in attesa di
collegamento
Acceso: Collegamento stabilito con il dispositivo Bluetooth
7 Woofer in fibra di vetro da 4 pollici
8 Canali bass reflex
9 Scanalature
Regolano il flusso dell’aria dei canali bass reflex per irradiare le
frequenze basse in modo più fluido.
a Terminale per cuffie
Terminale di uscita tipo spina mini stereo da 3,5 mm.
Quando si collegano le cuffie, il suono trasmesso dai diffusori viene
silenziato e l’audio viene trasmesso esclusivamente dalle cuffie.
It
3
Page 32

Pannello posteriore
1
2
3
4
5
1 Terminali INPUT 1 (stereo)
Terminali di ingresso non bilanciati a spinotto RCA.
2 Terminali INPUT 2 (stereo)
Terminale di ingresso non bilanciato tipo spina mini stereo da 3,5
mm.
3 Connettori di collegamento dei diffusori
Collegare i diffusori sinistro e destro utilizzando i cavi acclusi.
Non collegare i diffusori a un amplificatore diverso da quello di questo sistema. Altrimenti, potrebbero verificarsi danni o incendi.
4 Interruttore POWER
Accende e spegne questa unità.
5 AC IN
Collegare il cavo di alimentazione al connettore AC IN e quindi alla
presa di corrente.
Collegare il cavo di alimentazione dopo che tutti i collegamenti fra
dispositivi sono stati fatti.
Usare solo il cavo di alimentazione accluso.
AVVERTENZA
L’interruttore principale (POWER) dell’apparecchio
non stacca completamente il flusso di corrente
elettrica dalla presa di corrente alternata di rete. Dal
momento che il cavo di alimentazione costituisce
l’unico dispositivo di distacco dell’apparecchio dalla
sorgente di alimentazione, il cavo stesso deve essere
staccato dalla presa di corrente alternata di rete per
sospendere completamente qualsiasi flusso di
corrente. Verificare quindi che l’apparecchio sia stato
installato in modo da poter procedere con facilità al
distacco del cavo di alimentazione dalla presa di
corrente, in caso di necessità. Per prevenire pericoli
di incendi, inoltre, il cavo di alimentazione deve
essere staccato dalla presa di corrente alternata di
rete se si pensa di non utilizzare l’apparecchio per
periodi di tempo relativamente lunghi (ad esempio,
durante una vacanza).
D3-4-2-2-2a*_A1_It
ATTENZIONE
! Questo prodotto è dotato di una funzione di standby
automatico. Se l’assenza di audio continua per il periodo
predefinito (circa 30 minuti) durante l’uso, il prodotto
disattiva automaticamente l’indicatore POWER e passa
automaticamente in stato di standby con basso consumo
energetico, indipendentemente da se il collegamento
Bluetooth è attivo.
! Se il prodotto passa in stato di standby con il collegamento
Bluetooth attivo, il collegamento Bluetooth viene disattivato
e l’indicatore Bluetooth si spegne.
! Se dai terminali di ingresso viene ricevuto segnale audio
mentre i diffusori sono in stato di standby, il prodotto si
riaccende automaticamente. Inoltre, il prodotto si riaccende
se durante lo stato di standby si preme il pulsante di
accoppiamento Bluetooth.
! Non è possibile disattivare questa funzione di standby
automatico.
It
4
Page 33

Installazione e collegamenti
ATTENZIONE
Conser
bambini e dei bebé. Se inghiottiti accidentalmente,
recarsi immediatemente dal medico
D41-6-4_A1_It
Rosso+
Nero
Rigato di rosso
Procedura di installazione
La riproduzione di un diffusore viene influenzata dalle condizioni presenti nella stanza di ascolto. Per ottenere condizioni di ascolto ottimali,
tenere in considerazione le caratteristiche di ambiente prima di iniziare l’installazione.
! Posizionare i diffusori a livello degli orecchi.
! Per ottenere un effetto stereo naturale, installare i diffusori di sinistra
e destra in posizioni simmetriche ed equidistanti dalla posizione di
ascolto.
! Applicare i cuscinetti in dotazione nella parte inferiore dell’unità per
prevenire gli scivolamenti.
vare i piccoli ricambi fuori dalla portata dei
.
! Installare i diffusori rivolti verso l’interno, con un’angolazione totale
di 60 gradi rispetto alla posizione di ascolto, ottenuta angolando di
30 gradi i diffusori destro e sinistro.
ATTENZIONE
Per agevolare il corretto raffreddamento, assicurarsi di riservare spazio sufficiente tra i diffusori e le pareti circostanti o gli altri componenti
(minimo 15 cm in alto, indietro, e sul lato destro e sinistro di ciascun
diffusore). Se non si lascia spazio insufficiente tra i diffusori e le pareti
o gli altri componenti, le temperature interne potrebbero salire eccessivamente, provocando malfunzionamenti o danni.
50 ° a 60 °
Italiano
Collegamenti
! Prima di fare o modificare collegamenti, non mancare di spe-
gnere l’apparecchio e di scollegare il cavo di alimentazione.
! Consultare le istruzioni per l’uso del componente da collegare.
! Collegare il cavo di alimentazione dopo che tutti i collegamenti fra
dispositivi sono stati fatti.
Cavi di collegamento
Collegare i cavi di collegamento dei diffusori acclusi ai diffusori.
1 Incidere leggermente per circa 1 cm l’estremità dei
cavi per diffusori, ruotare e rimuovere il rivestimento
isolante.
Dopo aver rimosso il rivestimento isolante, attorcigliare con cura i fili
conduttori.
2 Collegare i cavi di collegamento dei diffusori acclusi ai
terminali dei diffusori sui lati SINISTRO e DESTRO.
3 Inserire i fili conduttori nei terminali mentre si tiene
premuto il fermo sui terminali dei diffusori.
Collegare il cavo del diffusore rigato di rosso al lato del terminale
+ (rosso) e il cavo del diffusore non rigato di rosso al lato del terminale
– (nero).
! Usare solo il cavo di alimentazione accluso.
! Fare attenzione al volume perché i segnali ricevuti dai terminali
[INPUT 1] e [INPUT 2] e dall’interfaccia Bluetooth vengono missati.
−
ATTENZIONE
! Dopo aver collegato i terminali, tirare delicatamente i cavi dei
diffusori per accertarsi che le estremità dei cavi dei diffusori siano
saldamente collegate ai terminali. Un collegamento non saldo
potrebbe provocare interruzioni della trasmissione dell’audio o
emissione di rumore.
! Quando si collegano i cavi dei diffusori, attorcigliare con cura i
fili conduttori e accertarsi che i fili conduttori non sporgano dai
terminali dei diffusori. Se i fili conduttori sporgono dai terminali dei
diffusori, potrebbero entrare in contatto tra di loro o con il pannello
posteriore. Ciò potrebbe sottoporre l’amplificatore a carico eccessivo, con possibili malfunzionamenti o interruzioni dell’audio.
! Se si provocano errori relativi alla polarità (+, –) sui lati SINISTRO
e DESTRO quando si collegano i cavi dei diffusori SINISTRO e
DESTRO, potrebbe non essere possibile ottenere il normale effetto
stereo.
It
5
Page 34

Ascolto della musica trasmessa da un
dispositivo Bluetooth
Questi diffusori consentono di ascoltare in wireless i brani salvati su un dispositivo Bluetooth.
Quando si utilizzano i diffusori per la prima volta o quando si collega un nuovo dispositivo Bluetooth ai diffusori, è necessario accoppiare i diffusori e il
dispositivo Bluetooth.
L’accoppiamento (la registrazione reciproca dei diffusori) è l’operazione necessaria per collegare il dispositivo Bluetooth ai diffusori.
Procedura di accoppiamento e
collegamento
1 Accendere l’interruttore [POWER] per
collegare l’alimentazione ai diffusori.
! L’indicatore Bluetooth lampeggia per circa 30 secondi e i diffusori
passano in stato di accoppiamento.
! Se l’indicatore Bluetooth è spento, premere il pulsante di accop-
piamento per almeno 2 secondi per passare nuovamente in stato di
accoppiamento.
2 Eseguire l’operazione di accoppiamento sul
dispositivo Bluetooth.
Eseguire l’operazione mentre i diffusori sono in stato di accoppiamento.
Per dettagli, vedere le istruzioni per l’uso del dispositivo Bluetooth.
3 Quando l’indicatore Bluetooth smette di lampeggiare
e rimane acceso costantemente, l’accoppiamento (il
collegamento) è completato.
Se non è possibile eseguire l’accoppiamento entro 30
secondi, l’indicatore Bluetooth smette di lampeggiare e si spegne.
! È possibile collegare un dispositivo Bluetooth già accoppiato
in precedenza eseguendo l’operazione dal lato del dispositivo
Bluetooth, se i diffusori sono accesi.
Riproduzione
Se si riproduce musica sul dispositivo Bluetooth collegato, la musica
viene trasmessa dai diffusori.
! Premendo il pulsante di accoppiamento sul dispositivo
Bluetooth durante la riproduzione della musica è possibile eseguire l’operazione di pausa/riproduzione (la stessa funzione eseguita
dal pulsante pausa/riproduzione del dispositivo Bluetooth).
ATTENZIONE
! Durante l’accoppiamento (collegamento), spostare il dispositivo
Bluetooth vicino ai diffusori.
! Al completamento del primo collegamento, l’audio potrebbe
essere emesso a volume eccessivo, pertanto si consiglia di
abbassare il volume prima della riproduzione.
! A seconda dell’applicazione utilizzata, l’operazione di pausa/ripro-
duzione potrebbe non essere possibile.
! A seconda del dispositivo Bluetooth, il collegamento dei diffusori
potrebbe non essere possibile.
! Se si desiderano accoppiare i diffusori a un dispositivo Bluetooth
diverso, disattivare la funzione Bluetooth del dispositivo Bluetooth
correntemente collegato o interrompere il collegamento prima di
eseguire l’operazione di accoppiamento.
! I diffusori memorizzano le informazioni sull’accoppiamento per
un massimo di otto dispositivi Bluetooth e cercano di collegarsi
all’ultimo dispositivo accoppiato se si preme il pulsante di accoppiamento quando i diffusori non sono collegati a nessun dispositivo
Bluetooth.
Avvertenza sulle onde radio
Questa unità impiega frequenze radio da 2,4 GHz, una banda di frequenza usata da altri sistemi wireless (vedi la lista più oltre). Per prevenire i rumori o l’interruzione della comunicazione, non usare questa
unità vicino a simili dispositivi, oppure accertarsi che questi siano spenti
durante l’uso.
! Telefoni cordless
! Telefax cordless
! Forni a microonde
! Dispositivi LAN wireless (IEEE802.11b/g)
! Dispositivi AV wireless
! Controller wireless per sistemi per il gioco
! Attrezzature sanitarie a base di microonde
! Alcuni monitor piccoli
Altre attrezzature, meno comuni, che possono funzionare sulla stessa
frequenza:
! Sistemi antifurto
! Stazioni per radioamatori (HAM)
! Sistemi di gestione logistica per magazzini
! Sistemi di discriminazione per treni e veicoli di emergenza
ATTENZIONE
! Se l’immagine del televisore è disturbata, è possibile che un dispo-
sitivo Bluetooth® o questa unità (inclusi i prodotti supportati da
questa unità) causino interferenze di segnale col connettore d’ingresso dell’antenna del televisore, impianto video, sintonizzatore
satellitare, ecc. In tal caso, aumentare la distanza tra il connettore d’ingresso dell’antenna e il dispositivo Bluetooth o questa
unità (inclusi i prodotti supportati da questa unità).
! Se un oggetto (ad esempio una porta in metallo, un muro in
cemento, o dell’isolamento contenente un foglio fra questa unità
in stagnola) dovesse ostacolare la trasmissione di segnale da
questa unità (compresi i dispositivi che essa supporta) ed il dispositivo dotato di tecnologia wireless Bluetooth, potrebbe essere
necessario cambiare la posizione del sistema per evitare i rumori e
le interruzioni.
It
6
Page 35

Modalità di uso
Questa unità è intesa per l’uso domestico. (Le distanze di trasmissione
possono ridursi in certi ambienti di comunicazione.) Nelle seguenti
posizioni, le condizioni di ricezione scadenti o l’impossibilità di ricevere
onde radio possono causare interruzioni parziali o complete dell’audio:
! In edifici in cemento armato o con travature in acciaio o ferro.
! Vicino a mobile in metallo di grandi dimensioni.
! In mezzo ad una folla o vicino ad un edificio o ostacolo.
! In una posizione esposta a campi magnetici, elettricità statica o
interferenze di frequenza radio da attrezzature per la comunicazione
radio che usino la stessa frequenza (2,4 GHz) usata da questa unità,
ad esempio un dispositivo LAN wireless da 2,4 GHz o un forno a
microonde.
! Se vivete in una zona densamente popolata (area di appartamenti,
di centro città, ecc.) e se il forno a microonde del vostro vicino si
trova vicino al vostro sistema, si possono sentire interferenze radio.
Se questo accade, installare questa unità in una posizione diversa.
Quando il forno a microonde non è in uso, non ci saranno interferenze radio.
Onde radio riflesse
Le onde radio ricevute da questa unità includono le onde provenienti
direttamente da dispositivi dotati di tecnologia wireless Bluetooth
(onde dirette) ed onde provenienti da varie direzioni riflesse da pareti,
mobili ed edifici (onde riflesse). Le onde riflesse (da ostacoli ed oggetti
riflettenti) producono a loro volta altre onde riflesse, che causano una
ricezione differente in posizioni differenti. Se l’audio non viene ricevuto
correttamente a causa di questo fenomeno, provare a spostare il dispositivo dotato di tecnologia wireless Bluetooth. Tenere anche presente
che l’audio potrebbe interrompersi a causa delle onde riflesse quando
una persona attraversa o si avvicina allo spazio fra questa unità ed il
dispositivo dotato di tecnologia wireless Bluetooth.
Italiano
It
7
Page 36

Informazioni aggiuntive
Diagnostica
! A volte il problema risiede in un altro componente. Controllare tutti i componenti ed apparecchi elettronici usati. Se il problema non può venire
eliminato, chiedere assistenza tecnica al più vicino centro assistenza o rivenditore autorizzato Pioneer.
! Questa unità può non funzionare a causa di elettricità statica o altre influenze esterne. In tal caso, essa torna alla normalità scollegando il cavo di
alimentazione, attendendo 5 secondi o più, quindi ricollegando il cavo.
Problemi comuni
Problema Controllare Rimedio
L’apparecchio non è acceso. Il cavo di alimentazione è collegato correttamente? Collegare il cavo di alimentazione ad una presa di c.a.
Non viene emesso alcun suono dai dispositivi collegati o il volume è basso.
L’indicatore POWER (bianco) non si
accende.
L’unità non si riprende dallo stato di
standby (non si riaccende).
Audio distorto.
Oscillazioni (viene emesso continuamente suono rumoroso).
Il suono viene emesso solo dal diffusore
sinistro.
I diffusori si spengono (passano in stato
di standby) automaticamente.
Il dispositivo collegato è configurato
correttamente?
Il volume è in posizione corretta?
L’alimentazione è collegata? Premere l’interruttore [POWER] sul pannello posteriore del diffusore.
L’alimentazione è collegata? Premere l’interruttore [POWER] sul pannello posteriore del diffusore.
I diffusori sono in stato di standby?
Il livello del segnale in ingresso è troppo basso? Aumentare il livello del segnale in ingresso.
Il volume è in posizione corretta?
Il livello del segnale in ingresso dal dispositivo
collegato è corretto?
Il volume è in posizione corretta?
I cavi dei diffusori sono collegati correttamente? Collegare correttamente i diffusori destro e sinistro.
Non è stato emesso alcun suono continuamente
per il periodo predefinito (circa 30 minuti) o più?
Il livello del segnale in ingresso è basso? Aumentare il livello del segnale in ingresso.
Configurare correttamente l’ingresso per il dispositivo esterno e il volume.
Girare in senso orario il comando [LEVEL] sul pannello anteriore di questa
unità per aumentare il volume.
Spegnere l’interruttore [POWER] sul pannello posteriore di questa unità e
quindi riaccenderlo dopo alcuni secondi.
Girare in senso antiorario il comando [LEVEL] sul pannello anteriore di
questa unità per ridurre il volume.
Regolare il livello di uscita del dispositivo collegato.
Girare in senso antiorario il comando [LEVEL] sul pannello anteriore di
questa unità per ridurre il volume.
Inviare segnale ai terminali di ingresso RCA o spina mini stereo.
Oppure premere il pulsante di accoppiamento sul pannello anteriore di
questa unità.
Quando i diffusori sono collegati tramite i terminali INPUT 1 o INPUT 2
Problema Controllare Rimedio
Non viene emesso alcun suono dai dispositivi collegati o il volume è basso.
Il suono viene emesso solo da un
diffusore.
Il suono viene interrotto o si avverte
rumore.
I cavi di collegamento sono collegati
correttamente?
I terminali o gli spinotti sono sporchi? Pulire i terminali e gli spinotti prima di procedere con i collegamenti.
Il dispositivo è collegato correttamente? Collegare il dispositivo ai terminali di ingresso sia destro che sinistro.
Vi è un problema di contatto dei cavi di
collegamento?
Collegare correttamente i cavi di collegamento.
Ricollegare i cavi di collegamento.
Quando i diffusori sono collegati tramite interfaccia Bluetooth
Problema Controllare Rimedio
Nelle vicinanze vi è un dispositivo che produce
Non è possibile stabilire il collegamento
oppure il suono viene interrotto o si
avverte rumore.
onde elettromagnetiche nella banda di 2,4 GHz
(forno a microonde, dispositivo LAN wireless, altro
dispositivo Bluetooth, ecc.)?
La distanza dal dispositivo Bluetooth è eccessiva?
Oppure tra il prodotto e il dispositivo si frappone
un muro o un ostacolo che blocca il segnale?
Sul dispositivo Bluetooth è in esecuzione un’applicazione diversa da quella di riproduzione
musicale?
Il dispositivo Bluetooth che si desidera collegare
supporta i profili A2DP?
L’accoppiamento col dispositivo Bluetooth è stato
eseguito correttamente?
Installare l’unità più lontano dal dispositivo o interrompere l’uso del dispositivo che produce onde elettromagnetiche.
Avvicinare il dispositivo Bluetooth collegato e l’unità. Oppure modificare la
posizione del dispositivo Bluetooth rispetto all’unità.
Sul dispositivo Bluetooth chiudere tutte le applicazioni tranne quella di
riproduzione musicale.
Utilizzare un dispositivo Bluetooth che supporti i profili A2DP.
Spegnere e riaccendere questa unità e il dispositivo Bluetooth, quindi eseguire nuovamente l’accoppiamento.
It
8
Page 37

A proposito del marchi di fabbrica o marchi di fabbrica depositati
! “Pioneer DJ” è un marchio di PIONEER CORPORATION e viene riportato su licenza.
! I nomi delle aziende e dei prodotti menzionati sono marchi di fabbrica o marchi di fabbrica depositati dei rispettivi proprietari.
! Il marchio nominale e i loghi Bluetooth® sono marchi registrati di proprietà di Bluetooth SIG, Inc. e sono utilizzati su licenza da PIONEER DJ
Corporation. Tutti gli altri marchi e nomi commerciali sono di proprietà dei rispettivi titolari.
! Qualcomm aptX è un prodotto di Qualcomm Technologies International, Ltd. Qualcomm è un marchio di Qualcomm Incorporated, registrato negli
Stati Uniti e in altri Paesi ed è utilizzato su licenza. aptX è un marchio di Qualcomm Technologies International, Ltd., registrato negli Stati Uniti e in
altri Paesi ed è utilizzato su licenza.
Dati tecnici
DM-40BT/DM-40BT-W
Modello Diffusore attivo a 2 vie
Sezione amplificatore
Potenza amplificatore
Terminali di ingresso RCA × 1, spina mini stereo da 3,5 mm × 1
Impedenza di ingresso
Terminali di uscita Cuffie × 1
Sezione diffusori
Cassa Tipo bass reflex/MDF in vinile laminato
Woofer (driver LF) Cono da 4 pollici (102 mm)
Tweeter (driver HF) Cupola morbida da 3/4 di pollice (19 mm)
Sezione Bluetooth
Versione Bluetooth versione specifica 4.2
Uscita Bluetooth Classe specifica 2
La frequenza utilizzata 2,4 GHz
Modulazione FH-SS (Espansione di spettro mediante il salto di frequenza)
Profili Bluetooth di supporto A2DP, AVRCP
Codificatore di supporto
Sezione alimentazione / altro
Tensioni supportate CA da 110 V a 240 V, 50 Hz/60 Hz
Consumo di corrente 35 W
Consumo di corrente in sospensione (in stato di standby) 0,3 W
Dimensioni esterne L × A × P
Peso
! I dati tecnici ed il design di questo prodotto sono soggetti a modifiche senza preavviso.
! © 2017 Pioneer DJ Corporation. Tutti i diritti riservati.
C. Sx: 21 W/4 W, Classe AB
C. Dx: 21 W/4 W, Classe AB
10 kW
SBC, AAC, Qualcomm
C. Sx: 146 mm × 227 mm × 223 mm
C. Dx: 146 mm × 227 mm × 210 mm
C. Sx: 2,7 kg
C. Dx: 2,2 kg
®
aptX™, Qualcomm® aptX™ Bassa Latenza
Italiano
It
9
Page 38

Hartelijk dank voor uw aankoop van dit Pioneer DJ product.
Lees deze gebruiksaanwijzing aandachtig door om bekend te raken met de juiste bedieningvan uw apparaat.
WAARSCHUWIN
Dit apparaat is niet waterdicht. Om brand of een
elektrische schok te voor
dat vloeistof bevat in de buurt van het apparaat zetten
(bijvoorbeeld een bloemenvaas) of het apparaat op
andere wijze blootstellen aan waterdruppels,
opspattend water
WAARSCHUWIN
Om brand te voor
een brandende kaars) op de apparatuur zette
Gebruiksomgeving
Te
gebruik:
+5 °C tot +35 °C, minder dan 85 % RH
(ventilatieopeningen niet afgedekt
Zet het apparaat niet op een slecht geventileerde plaats
en stel het apparaat ook niet bloot aan hoge
vochtigheid of direct zonlicht (of sterke kunstmatige
verlichting)
BELANGRIJKE INFORMATIE BETREFFENDE
DE VENTILATI
Let er bij het installeren van het apparaat op dat er
voldoende vrije ruimte rondom het apparaat is om een
goede doorstroming van lucht te waarborgen
(tenminste 15 cm boven
zijkanten van het apparaat).
In de lidstaten van de EU, Zwitserland en Noor
bestemde ver
Indien u zich in een ander dan bovengenoemd land bevindt kunt u contact opnemen met de plaatselijke overheid voor informatie ov
ver
Zodoende zorgt u er
niet schadelijk is voor de gezondheid en het milieu.
Na het doorlezen van de gebruiksaanwijzing dient u deze te bewaren op een veilige plaats, voor latere naslag.
LET OP
OM HET GEVAAR VOOR EEN ELEKTRISCHE SHOCK TE
VOORKOMEN, DEKSEL (OF RUG) NIET
VERWIJDEREN. AAN DE BINNENZIJDE BEVINDEN
ZICH GEEN ELEMENTEN DIE DOOR DE GEBRUIKER
KUNNEN BEDIEND WORDEN. ENKEL DOOR
GEKWALIFICEERD PERSONEEL TE BEDIENEN.
G
komen, mag u geen voorwerp
, regen of vocht.
G
komen, mag u geen open vuur (zoals
mperatuur en vochtigheidsgraad op de plaats van
)
.
E
WAARSCHUWING
De gleuven en openingen in de behuizing van het
apparaat zijn aangebracht voor de ventilatie, zodat een
betrouwbare werking van het apparaat wordt verkregen
en oververhitting wordt voorkomen. Om brand te
voorkomen, moet u ervoor zorgen dat deze openingen
nooit geblokkeerd worden of dat ze afgedekt worden
door voorwerpen (kranten, tafelkleed, gordijn e.d.) of
door gebruik van het apparaat op een dik tapijt of een
bed.
, 15 cm achter en 15 cm aan de
D3-4-2-1-1_B2_Nl
D3-4-2-1-3_A1_Nl
n.
D3-4-2-1-7a_A1_Nl
D3-4-2-1-7c*_A1_Nl
D3-4-2-1-7d*_A1_Nl
D3-4-2-1-7b*_A1_Nl
Dit apparaat is bestemd voor normaal huishoudelijk
gebruik. Indien het apparaat voor andere doeleinden
of op andere plaatsen wordt gebruikt (bijvoorbeeld
langdurig gebruik in een restaurant voor zakelijke
doeleinden, of gebruik in een auto of boot) en als
gevolg hiervan defect zou raken, zullen de reparaties
in rekening gebracht worden, ook als het apparaat
nog in de garantieperiode is.
K041_A1_Nl
WAARSCHUWING NETSNOER
Pak het netsnoer beet bij de stekker. Trek de stekker er
niet uit door aan het snoer te trekken en trek nooit aan
het netsnoer met natte handen aangezien dit
kortsluiting of een elektrische schok tot gevolg kan
hebben. Plaats geen toestel, meubelstuk o.i.d. op het
netsnoer, en klem het niet vast. Maak er nooit een
knoop in en en verbind het evenmin met andere
snoeren. De netsnoeren dienen zo te worden geleid dat
er niet per ongeluk iemand op gaat staan. Een
beschadigd netsnoer kan brand of een elektrische
schok veroorzaken. Kontroleer het netsnoer af en toe.
Wanneer u de indruk krijgt dat het beschadigd is, dient
u bij uw dichtstbijzijnde onderhoudscentrum of uw
dealer een nieuw snoer te kopen.
Voorzorgen voor de DM-40BT/DM-40BT-W
Verbind deze luidspreker niet met een andere dan de
bijgeleverde versterker. Het verbinden met een
andere versterker resulteert in een onjuist
funktioneren en mogelijk brand.
Bevestig de luidspreker niet aan de muur of het
plafond, want dan kan de luidspreker letsel
veroorzaken als deze zou vallen.
Het grafische symbool op het product betekent
wisselstroom.
Het grafische symbool op het product betekent
gelijkstroom.
Het grafische symbool op het product betekent
apparatuur van klasse II.
LET OP
Dit product is beoordeeld onder omstandigheden van
een gematigd klimaat.
S002*_A1_Nl
SGK006*_A1_Nl
SGK007_A1_Nl
D3-8-2-4_A1_Nl
D3-8-2-1-7b_A1_Nl
Deponeer dit product niet bij het gewone huishoudelijk afval wanneer u het wilt verwijderen. Er bestaat een speciaal wettelijk
voorgeschreven verzamelsysteem voor de juiste behandeling, het opnieuw bruikbaar maken en de recycling van gebruikte
elektronische producten.
zamelplaatsen of een verkooppunt (indien u aldaar een gelijkwaardig nieuw product koopt) inleveren.
2
wijdering van het product.
voor dat het verwijderde product op de juiste wijze wordt behandeld, opnieuw bruikbaar wordt gemaakt, t gerecycleerd en het
Nl
wegen kunnen particulieren hun gebruikte elektronische producten gratis bij de daarvoor
er de juiste
K058b_A1_Nl
Page 39

Lees dit voor gebruik (Belangrijk)
a
Alvorens te beginnen
Kenmerken
! Krachtig kickgeluid dankzij een basreflexkanaal aan de voorkant en de groeftechnologie.
! Betere directionaliteit van hoge frequenties en ruimtelijk geluid door een convexe diffusor op een nieuw gevormde golfpijp.
! Rijk basgeluid en heldere geluidskwaliteit in een compact tafelbladformaat.
! Compatibel met AAC en Qualcomm® aptX™ voor weergave van hogere geluidskwaliteit via Bluetooth.
! Via een koppeltoets op het voorpaneel is koppelen met één toets mogelijk.
De accessoires controleren
! Stroomsnoer x1
! Handleiding (dit document)
! Audioconversiekabel (3,5 mm-stereoministekker naar RCA) x1
! Luidsprekerdraad x1
! Bodemkussen x8
Namen en functies van de onderdelen
Voorpaneel
1
2
3
4
5
6
7
8
9
1 3/4 inch-tweeters met zachte conus
2 POWER-indicator
De verlichting is aan het aan- en uitzetten gekoppeld. De indicator is
uit in stand-by.
3 Diffusors
Zorgen voor betere directionaliteit van hoge frequenties en een
ruimtelijk geluid.
4 LEVEL instelling
Hiermee stelt u het volume in.
5 Koppeltoets
Maakt de koppeling met een Bluetooth-apparaat.
Deze knop wordt ook gebruikt voor pauzeren en afspelen tijdens
muziekweergave via Bluetooth.
Raadpleeg voor details het gedeelte “Naar de muziek van een
Bluetooth-apparaat luisteren” (pagina 6).
6 Koppelindicator (pagina 6)
Knippert: Koppelen wordt uitgevoerd of wacht op verbinding
Verlicht: Verbonden met Bluetooth-apparaat
7 4 inch-glasvezelwoofers
8 Basreflexkanalen
9 Groeven
Regelen de luchtstroom van de basreflexkanalen om lage frequenties ongehinderd weer te geven.
a Hoofdtelefoonaansluiting
Dit is een uitgangsaansluiting voor een 3,5 mm-stereoministekker.
Als u een hoofdtelefoon aansluit, wordt het geluid van de luidsprekers gedempt en alleen geluid via de hoofdtelefoon weergegeven.
Nederlands
Nl
3
Page 40

Achterpaneel
1
2
3
4
5
1 INPUT 1-aansluitingen (stereo)
Dit zijn ongebalanceerde ingangen voor een RCA-penaansluiting.
2 INPUT 2-aansluitingen (stereo)
Dit is een ongebalanceerde ingang voor
een 3,5 mm-stereoministekker.
3 Connectors voor luidsprekeraansluiting
Sluit de linker en rechter luidspreker aan met de meegeleverde
kabel.
Sluit deze luidsprekers niet op een andere versterker aan dan die van
dit systeem. Dat kan beschadiging of brand veroorzaken.
4 POWER-schakelaar
Voor aanzetten en uitschakelen van dit apparaat.
5 AC IN
Sluit het netsnoer aan op AC IN en vervolgens op het stopcontact.
Sluit het netnoer pas aan nadat alle aansluitingen tussen de apparatuur volledig zijn gemaakt.
Gebruik het meegeleverde netsnoer.
LET OP
De POWER schakelaar van dit apparaat koppelt het
apparaat niet volledig los van het lichtnet. Aangezien
er na het uitschakelen van het apparaat nog een
kleine hoeveelheid stroom blijft lopen, moet u de
stekker uit het stopcontact halen om het apparaat
volledig van het lichtnet los te koppelen. Plaats het
apparaat zodanig dat de stekker in een noodgeval
gemakkelijk uit het stopcontact kan worden gehaald.
Om brand te voorkomen, moet u de stekker uit het
stopcontact halen wanneer u het apparaat langere
tijd niet denkt te gebruiken (bijv. wanneer u op
vakantie gaat).
D3-4-2-2-2a*_A1_Nl
WAARSCHUWING
! Dit product is voorzien van een automatische stand-byfunctie.
Als gedurende een bepaalde tijd (ongeveer 30 minuten)
geen geluid wordt weergegeven, gaat de indicator POWER
automatisch uit en schakelt het product over naar de
stand-bystand met laag stroomverbruik, ongeacht of er een
Bluetooth-verbinding is.
! Als het product overschakelt naar de stand-bystand wanneer
er een Bluetooth-verbinding is, wordt de Bluetooth-verbinding
verbroken en gaat de Bluetooth-indicator ook uit.
! Als in de stand-bystand via de ingangsaansluitingen een
audiosignaal wordt ingevoerd, wordt het product automatisch
aangezet. Voorts wordt het product aangezet als tijdens de
stand-bystand de Bluetooth-koppeltoets wordt ingedrukt.
! Deze automatische stand-byfunctie kan niet worden
uitgeschakeld.
Nl
4
Page 41

Installatie en aansluitingen
WAARSCHUWING
Berg kleine onderdelen op buiten het bereik van
kinderen en peuters. R
indien kleine onderdelen per ongeluk worden ingeslikt.
l
Rood+
Zwart
Met de rode lijn
Installatieprocedure
Het weergavegeluid van luidsprekers wordt beïnvloed door de omstandigheden in de luisterruimte. Om een optimale luisteromgeving te
creëren, moet u terdege rekening houden met de omstandigheden op de
installatieplaats voordat u met de feitelijke installatie begint.
! Plaats de luidsprekers op oorniveau.
! Voor een natuurlijk stereo-effect moeten de linker en de rechter
luidspreker symmetrisch en op gelijke afstand van de luisterplaats
worden opgesteld.
! Bevestig de meegeleverde kussens aan de onderkant van het toestel
om glijden te voorkomen.
aadpleeg onmiddellijk een arts
D41-6-4_A1_N
! Installeer de luidsprekers naar binnen gericht zodat de hoek op de
luisterpositie in totaal 60 graden bedraagt, 30 graden elk voor de
linker en de rechter luidspreker.
WAARSCHUWING
Voor een goede koeling moet u ervoor zorgen dat er voldoende ruimte
is tussen de luidsprekers en eventuele muren of andere componenten
in de buurt (minimaal 15 cm vrije ruimte boven, achter, en rechts en
links van elke luidspreker). Wanneer er onvoldoende ruimte is tussen
de luidspreker en de muur of andere componenten, kan de interne
temperatuur te hoog oplopen met een defect of beschadiging tot
gevolg.
50 ° tot 60 °
Nederlands
Aansluitingen
! Schakel altijd eerst de stroom uit en trek de stekker uit het stopcon-
tact alvorens u enige aansluiting maakt of verbreekt.
! Zie tevens de gebruiksaanwijzingen van de aan te sluiten apparatuur.
! Sluit het netnoer pas aan nadat alle aansluitingen tussen de appara-
tuur volledig zijn gemaakt.
De kabels aansluiten
Sluit de meegeleverde luidsprekerdraad op de luidsprekers aan.
1 Strip ongeveer 1 cm van het uiteinde van de
meegeleverde luidsprekerdraad, en draai en verwijder
de isolatie.
Draai of vlecht de kerndraden goed nadat u de isolatie hebt verwijderd.
2 Sluit de meegeleverde luidsprekerdraad aan op de
luidsprekeraansluitingen aan de LINKER en de RECHTER
kant.
3 Duw de klem van de luidsprekeraansluiting naar
beneden en steek de kerndraad in de aansluiting.
Sluit de luidsprekerdraad met de rode lijn aan op de + aansluiting
(rood), en de luidsprekerdraad zonder de rode lijn op de – aansluiting
(zwart).
! Gebruik alleen het bijgeleverde netsnoer.
! Wees voorzichtig wat het volume betreft omdat de ingangssignalen
van de aansluitingen [INPUT 1], [INPUT 2] en Bluetooth gemengd
worden.
−
WAARSCHUWING
! Trek na het aansluiten lichtjes aan de luidsprekerdraad om te
controleren of deze met het uiteinde stevig in de aansluitingen
vastzit. Een losse aansluiting kan leiden tot onderbrekingen in de
geluidsweergave of ruis.
! Draai de kerndraden goed in elkaar bij het aansluiten van de
luidsprekerdraad, en zorg ervoor dat de kerndraden niet uit de
luidsprekeraansluitingen naar buiten steken. Als de kerndraden uit
de luidsprekeraansluiting naar buiten steken, kunnen ze het achterpaneel of elkaar raken. Daardoor kan de versterker bovenmatig
belast worden en stoppen of defect raken.
! Als de polariteit (+, –) van de LINKER en RECHTER kant verkeerd
is bij het aansluiten van de LINKER en RECHTER luidsprekerdraad,
kan geen normaal stereo-effect meer worden verkregen.
Nl
5
Page 42

Naar de muziek van een Bluetooth-apparaat
luisteren
Met deze luidsprekers kunt u draadloos naar muziekstukken luisteren die op een Bluetooth-apparaat zijn opgeslagen.
Wanneer u de luidsprekers voor het eerst gebruikt of een nieuw Bluetooth-apparaat op de luidsprekers aansluit, dient u de luidsprekers en het
Bluetooth-apparaat te koppelen.
Koppelen (wederzijdse registratie van de apparaten) is een vereiste handeling om een Bluetooth-apparaat en de luidsprekers te verbinden.
Procedure voor koppelen en
verbinden
1 Zet de [POWER]-schakelaar aan om de luidsprekers
aan te zetten.
! De Bluetooth-indicator knippert ongeveer 30 seconden en de luid-
sprekers schakelen over naar de koppelstand.
! Als de Bluetooth-indicator uitgaat, druk dan minstens 2 seconden op
de koppeltoets om weer over te schakelen naar de koppelstand.
2 Voer het koppelen uit op het Bluetooth-apparaat.
Doe dit terwijl de luidsprekers in de koppelstand staan.
Zie voor details de handleiding van uw Bluetooth-apparaat.
3 Als de Bluetooth-indicator stopt met knipperen en
blijft branden, is het koppelen (verbinden) voltooid.
Als het koppelen niet binnen 30 seconden wordt uitgevoerd, stopt de
Bluetooth-indicator met knipperen en gaat de indicator uit.
! Een Bluetooth-apparaat dat al gekoppeld is, kan verbonden worden
door het verbinden op het Bluetooth-apparaat uit te voeren als de
luidsprekers zijn ingeschakeld.
Weergeven
Als u muziek op een verbonden Bluetooth-apparaat afspeelt, wordt
de op het Bluetooth-apparaat afgespeelde muziek via de luidsprekers
weergegeven.
! Als u tijdens de muziekweergave op het Bluetooth-apparaat op de
koppeltoets drukt, kunt u pauzeren/afspelen (zelfde functie als de
knop voor pauzeren/afspelen van het Bluetooth-apparaat).
ATTENTION
! Verplaats het Bluetooth-apparaat tijdens het koppelen (verbinden)
dicht bij de luidsprekers.
! Er kan luid geluid worden weergegeven wanneer voor de eerste
keer wordt afgespeeld na het verbinden; daarom raden we aan om
vóór het afspelen het volume te verlagen.
! Afhankelijk van de gebruikte applicatie is het mogelijk dat pau-
zeren/afspelen met de koppeltoets niet werkt.
! Afhankelijk van het Bluetooth-apparaat kan mogelijk geen verbind-
ing worden gemaakt met de luidsprekers.
! Als u de luidsprekers met een ander Bluetooth-apparaat wilt kop-
pelen, zet dan de Bluetooth-functie van het momenteel verbonden
Bluetooth-apparaat uit of verbreek de verbinding voordat u het
koppelen uitvoert.
! De luidsprekers bewaren de koppelgegevens van maximaal acht
Bluetooth-apparaten, en proberen verbinding te maken met het
laatst gekoppelde apparaat als de koppeltoets wordt ingedrukt
wanneer er geen verbinding is met een Bluetooth-apparaat.
Waarschuwing betreffende
radiogolven
Dit apparaat maakt gebruik van een radiogolffrequentie van 2,4 GHz, wat
een band is die ook wordt gebruikt door andere draadloze systemen (zie
de onderstaande lijst). Om ruis of onderbrekingen in de communicatie
te voorkomen, dient u dit apparaat niet in de buurt van dergelijke apparatuur te gebruiken, of u dient ervoor te zorgen dat die apparatuur tijdens
het gebruik van dit apparaat uitgeschakeld is.
! Draadloze telefoons
! Draadloze faxmachines
! Magnetrons
! Draadloze LAN-apparaten (IEEE802.11b/g)
! Draadloze AV-apparatuur
! Draadloze regelaars voor spelsystemen
! Gezondheidsapparaten op basis van microgolven
! Bepaalde babyphones
Andere, minder bekende apparatuur die op dezelfde frequentie
werkzaam kan zijn:
! Antidiefstalsystemen
! Amateurradiostations (HAM)
! Logistieke beheersystemen in magazijnen
! Discriminatiesystemen voor trein- of noodhulpvoertuigen
WAARSCHUWING
! Als er ruis verschijnt in het televisiebeeld, is het mogelijk dat een
Bluetooth®-apparaat of dit toestel (met inbegrip van producten
die door dit toestel worden ondersteund) signaalinterferentie
veroorzaakt met de antenne-ingangsaansluiting van uw televisie,
videospeler, satellietontvanger, e.d. Vergroot in dat geval de
afstand tussen de antenne-ingangsaansluiting en het Bluetoothapparaat of dit toestel (met inbegrip van producten die door dit
toestel worden ondersteund).
! Als er iets is dat de baan blokkeert tussen dit apparaat (inclusief de
apparatuur die door dit apparaat wordt ondersteund) en de apparatuur uitgerust met Bluetooth draadloze technologie (zoals een
metalen deur, een betonwand of isolatie waarin aluminiumfolie is
verwerkt), kan het zijn dat u de plaats van uw systeem moet veranderen om signaalruis en andere onderbrekingen te voorkomen.
Nl
6
Page 43

Omvang van de werking
Het gebruik van dit apparaat is beperkt tot thuisgebruik. (Zendafstanden
kunnen kleiner zijn afhankelijk van de communicatieomgeving.) Op
de volgende plaatsen kan het geluid worden onderbroken of volledig
wegvallen als gevolg van slechte omstandigheden of het niet kunnen
ontvangen van radiogolven:
! In gebouwen met gewapend beton of woningen gemaakt met stalen
of ijzeren dragende delen.
! In de buurt van metalen meubilair.
! In een menigte mensen of in de buurt van een gebouw of een
obstakel.
! Op een plaats die is blootgesteld aan het magnetische veld, statische
elektriciteit of radiogolveninterferentie van radiocommunicatieapparatuur die gebruik maakt van dezelfde frequentieband (2,4 GHz)
als dit apparaat, zoals een 2,4 GHz draadloos LAN-apparaat of een
magnetron.
! Wanneer u in een dichtbevolkt woongebied woont (appartement,
rijtjeshuis, enz.) en de magnetron van uw buren in de buurt van
uw systeem is geplaatst, kunt u last hebben van radiogolveninterferentie. Wanneer dit gebeurt, zet u het apparaat op een andere
plaats. Wanneer de magnetron niet wordt gebruikt, is er geen
radiogolveninterferentie.
Reflecties van radiogolven
Dit apparaat ontvangt de radiogolven die rechtstreeks afkomstig zijn
van de apparatuur uitgerust met Bluetooth draadloze technologie
(directe golven) en de golven die vanuit verschillende richtingen komen
als gevolg van weerkaatsingen tegen muren, meubilair en gebouwen
(weerkaatste golven). De weerkaatste golven (als gevolg van obstakels
en reflecterende voorwerpen) produceren opnieuw een verscheidenheid
aan weerkaatste golven alsmede een variatie in ontvangstomstandigheden, afhankelijk van de locatie. Wanneer het geluid als gevolg van
dit fenomeen niet meer correct kan worden ontvangen, dient u de plaats
van de apparatuur uitgerust met Bluetooth draadloze technologie iets te
veranderen. Houd er rekening mee dat het geluid tevens onderbroken
kan worden als gevolg van weerkaatste golven wanneer een persoon
door de ruimte tussen dit apparaat en de apparatuur uitgerust met
Bluetooth draadloze technologie loopt of deze nadert.
Nederlands
Nl
7
Page 44

Aanvullende informatie
Verhelpen van storingen
! Soms ligt de oorzaak van het probleem bij een ander apparaat. Controleer daarom ook de andere componenten en elektrische apparatuur die
gebruikt wordt. Als u het probleem niet kunt verhelpen, verzoekt u dan uw dichtstbijzijnde officiële Pioneer onderhoudsdienst of uw vakhandelaar
om het apparaat te laten repareren.
! Dit apparaat kan soms niet goed werken vanwege statische elektriciteit of andere externe invloeden. In dat geval kunt u de normale werking herstel-
len door de stekker uit het stopcontact te trekken en die na ongeveer 5 seconden of langer weer aan te sluiten.
Algemeen
Probleem Controle Oplossing
De stroom wordt niet ingeschakeld. Is het netsnoer naar behoren aangesloten? Steek de netsnoerstekker in het stopcontact.
Er wordt geen geluid uit het aangesloten
apparaat weergegeven of het geluid is
zwak.
De indicator POWER (wit) licht niet op.
Het toestel komt niet uit de stand-bystand
(gaat niet aan).
Vervorming in het geluid.
Er is oscillatie (er wordt voortdurend luid
geluid uitgevoerd).
Er klinkt alleen geluid uit de linker
luidspreker.
De stroom wordt automatisch uitgeschakeld (stand-bystand).
Is het aangesloten apparaat juist ingesteld? Stel de externe ingang van het apparaat en het volume juist in.
Staat het volume in de juiste stand?
Is de stroom ingeschakeld? Zet de schakelaar [POWER] op het achterpaneel van dit toestel aan.
Is de stroom ingeschakeld? Zet de schakelaar [POWER] op het achterpaneel van dit toestel aan.
Staan de luidsprekers in de stand-bystand?
Is het ingangssignaalniveau laag? Verhoog het ingangssignaalniveau.
Staat het volume in de juiste stand?
Is het niveau voor de ingang van het aangesloten
apparaat juist ingesteld?
Staat het volume in de juiste stand?
Is de luidsprekerdraad juist aangesloten? Sluit de linker en rechter luidspreker juist aan.
Is er gedurende een bepaalde tijd (ongeveer
30 minuten) of langer geen geluid geweest?
Is het ingangssignaalniveau laag? Verhoog het ingangssignaalniveau.
Draai de regelaar [LEVEL] op het voorpaneel van dit toestel met de wijzers
van de klok mee om het volume te verhogen.
Zet de schakelaar [POWER] op het achterpaneel van dit toestel een keer uit
en na een paar seconden weer aan.
Draai de regelaar [LEVEL] op het voorpaneel van dit toestel tegen de wijzers
van de klok in om het volume te verlagen.
Stel het uitgangsniveau van het aangesloten apparaat juist in.
Draai de regelaar [LEVEL] op het voorpaneel van dit toestel tegen de wijzers
van de klok in om het volume te verlagen.
Voer een signaal in via de RCA- of stereoministekker-ingangsaansluiting.
Of druk op de koppeltoets op het voorpaneel van dit toestel.
Indien verbonden met de aansluiting INPUT 1 of INPUT 2
Probleem Controle Oplossing
Er wordt geen geluid uit het aangesloten
apparaat weergegeven of het geluid is
zwak.
Er klinkt alleen geluid uit één luidspreker. Is het apparaat juist aangesloten? Sluit het apparaat aan op zowel de linker als de rechter ingangsaansluiting.
Het geluid wordt onderbroken of er is ruis
hoorbaar.
Zijn de aansluitsnoeren goed aangesloten? Zorg dat de aansluitsnoeren juist zijn aangesloten.
Zijn de aansluitbussen en de stekkers vuil?
Is er een contactprobleem met de
verbindingskabels?
Maak de aansluitbussen en de stekkers schoon voordat u aasluitingen gaat
maken.
Sluit de verbindingskabels weer aan.
Indien verbonden via Bluetooth
Problème Vérification Solution
Is er in de buurt apparatuur die elektromagne-
Kan geen verbinding maken of het geluid
wordt onderbroken of er is ruis hoorbaar.
tische golven in de 2,4 GHz-band produceert
(magnetron, draadloos LAN-apparaat, ander
Bluetooth-apparaat, e.d.)?
Is de afstand vanaf het Bluetooth-apparaat te
groot? Of wordt het signaal geblokkeerd door een
muur of ander obstakel in de tussenruimte?
Wordt op het Bluetooth-apparaat een andere
applicatie dan de applicatie voor muziekweergave
uitgevoerd?
Ondersteunt het Bluetooth-apparaat dat u wilt
verbinden A2DP?
Is het koppelen met het Bluetooth-apparaat correct uitgevoerd?
Installeer dit toestel uit de buurt van die apparatuur of stop de andere apparatuur die elektromagnetische golven afgeeft.
Plaats dit toestel en het verbonden Bluetooth-apparaat dichter bij elkaar. Of
wijzig de positie van het Bluetooth-apparaat of dit toestel.
Sluit andere applicaties dan de applicatie voor muziekweergave op het
Bluetooth-apparaat.
Gebruik een Bluetooth-apparaat dat A2DP ondersteunt.
Zet de stroom van dit toestel en het Bluetooth-apparaat uit en weer aan, en
voer het koppelen opnieuw uit.
Nl
8
Page 45

ver handelsmerken en gedeponeerde handelsmerken
! “Pioneer DJ” is een handelsmerk van PIONEER CORPORATION en wordt in licentie gebruikt.
! De hierin vermelde namen van bedrijven en hun producten zijn de handelsmerken of geregistreerde handelsmerken van hun respectieve eigenaars.
! De naam Bluetooth® en de logo’s daarvan zijn geregistreerde handelsmerken van Bluetooth SIG, Inc. en PIONEER DJ Corporation gebruikt deze
onder licentie. Andere handelsmerken en handelsnamen zijn eigendom van hun respectieve eigenaars.
! Qualcomm aptX is een product van Qualcomm Technologies International, Ltd. Qualcomm is een handelsmerk van Qualcomm Incorporated, gere-
gistreerd in de Verenigde Staten en andere landen, gebruikt met toestemming. aptX is een handelsmerk van Qualcomm Technologies International,
Ltd., geregistreerd in de Verenigde Staten en andere landen, gebruikt met toestemming.
Specificaties
DM-40BT/DM-40BT-W
Model Actieve 2-wegluidspreker
Versterker
Versterkeruitgang
Ingangsaansluitingen RCA × 1, 3,5 mm-stereoministekker × 1
Ingangsimpedantie
Uitgangsaansluitingen Hoofdtelefoon × 1
Luidspreker
Behuizing Basreflextype/vinyl-gelamineerd MDF
Woofer (LF-driver) 4 inch (102 mm) conus
Tweeter (HF-driver) 3/4 inch (19 mm) zachte conus
Bluetooth-gedeelte
Versie Bluetooth Specificatie versie 4.2
Uitvoer Bluetooth Specificatie klasse 2
Gebruikte frequentie 2,4 GHz
Modulatie FH-SS (Frequency Hopping Spread Spectrum)
Ondersteunde Bluetooth-profielen A2DP, AVRCP
Ondersteunde codec
Voeding / andere
Bruikbare spanning 110 V tot 240 V wisselstroom, 50 Hz/60 Hz
Stroomverbruik 35 W
Stroomverbruik tijdens wachten (stand-bystand) 0,3 W
Buitenafmetingen B × H × D
Gewicht
! De technische gegevens en het ontwerp van dit product kunnen vanwege voortgaande verbetering zonder voorafgaande kennisgeving worden
gewijzigd.
! © 2017 Pioneer DJ Corporation. Alle rechten voorbehouden.
Linker kanaal: 21 W/4 W, klasse AB
Rechter kanaal: 21 W/4 W, klasse AB
10 kW
SBC, AAC, Qualcomm
Linker kanaal: 146 mm × 227 mm × 223 mm
Rechter kanaal: 146 mm × 227 mm × 210 mm
Linker kanaal: 2,7 kg
Rechter kanaal: 2,2 kg
®
aptX™, Qualcomm® aptX™ Low Latency
Nederlands
9
Nl
Page 46

Le damos las gracias por la adquisición de este producto Pioneer DJ.
Lea a fondo estas instrucciones de utilización para que aprenda a utilizar correctamente su modelo.
Las viviendas privadas en los estados miembros de la UE, en Suiza y Noruega pueden devolver gratuitamente sus productos electr
en las instalaciones de recolección previstas o bien en las instalaciones de minoristas (si adquieren un producto similar nuevo
En el caso de los países que no se han mencionado en el párrafo anterior
método de eliminación correcto
Al actuar siguiendo estas instrucciones, se asegurará de que el producto de desecho se somete a los procesos de tratamient
reciclaje necesarios, con lo que se previenen los efectos negativos potenciales para el entorno y la salud humana.
dañado podrá causar incendios o descargas eléctricas.
S002*_A1_Es
Después de haber terminado de leer estas instrucciones, guárdelas en un lugar seguro para, en caso de ser necesario,
consultarlas en el futuro.
PRECAUCIÓN
PARA PREVENIR EL PELIGRO DE CHOQUE ELÉCTRICO
NO REMOVER LA TAPA NI LAS PARTES DENTRO NO
UTILIZADAS, LLAMAR UNA PERSONA CUALIFICADA.
D3-4-2-1-1_B2_Es
ADVERTENCIA
Este aparato no es impermeable. Para evitar el riesgo
de incendio y de descargas eléctricas, no ponga ningún
recipiente lleno de líquido (como pueda ser un vaso o
un florero) cerca del aparato ni lo exponga a goteo,
salpicaduras, lluvia o humedad.
D3-4-2-1-3_A1_Es
ADVERTENCIA
Para evitar el peligro de incendio, no ponga nada con
fuego encendido (como pueda ser una vela) encima del
aparato.
D3-4-2-1-7a_A1_Es
Entorno de funcionamiento
Temperatura y humedad del entorno de funcionamiento
+5 °C a +35 °C; menos del 85 % de humedad relativa
(rejillas de refrigeración no obstruidas)
No instale este aparato en un lugar mal ventilado, ni en
lugares expuestos a alta humedad o a la luz directa del
sol (o de otra luz artificial potente).
D3-4-2-1-7c*_A1_Es
PRECAUCIÓN PARA LA VENTILACIÓN
Cuando instale este aparato, asegúrese de dejar
espacio en torno al mismo para la ventilación con el fin
de mejorar la disipación de calor (por lo menos 15 cm
encima, 15 cm detrás, y 15 cm en cada lado).
D3-4-2-1-7d*_A1_Es
ADVERTENCIA
Las ranuras y aberturas de la caja del aparato sirven
para su ventilación para poder asegurar un
funcionamiento fiable del aparato y para protegerlo
contra sobrecalentamiento. Para evitar el peligro de
incendio, las aberturas nunca deberán taparse ni
cubrirse con nada (como por ejemplo, periódicos,
manteles, cortinas) ni ponerse en funcionamiento el
aparato sobre una alfombra gruesas o una cama.
D3-4-2-1-7b*_A1_Es
Este producto es para tareas domésticas generales.
Cualquiera avería debida a otra utilización que tareas
domésticas (tales como el uso a largo plazo para
motivos de negocios en un restaurante o el uso en un
coche o un barco) y que necesita una reparación
hará que cobrarla incluso durante el período de
garantía.
PRECAUCIONES CONCERNIENTES A LA
MANIPULACIÓN DEL CABLE DE
ALIMENTACIÓN
Tome el cable de alimentación por la clavija. No
extraiga la clavija tirando del cable. Nunca toque el
cable de alimentación cuando sus manos estén
mojadas, ya que esto podría causar cortocircuitos o
descargas eléctricas. No coloque la unidad, algún
mueble, etc., sobre el cable de alimentación.
Asegúrese de no hacer nudos en el cable ni de unirlo a
otros cables. Los cables de alimentación deberán ser
dispuestos de tal forma que la probabilidad de que
sean pisados sea mínima. Una cable de alimentación
Revise el cable de alimentación está dañado, solicite el
reemplazo del mismo al centro de servicio más
cercano, o a su distribuidor.
Precauciones para el DM-40BT/DM-40BT-W
No conecte este altavoz a ningún amplificador que
no sea el suministrado con este sistema. La
conexión a cualquier otro amplificador puede
resultar en fallas de funcionamiento o aun incendio.
No fije estos altavoces a una pared ni al techo, ya que
podrían caerse y ocasionar lesiones.
El símbolo gráfico colocado en el producto
significa corriente alterna.
El símbolo gráfico colocado en el producto
significa corriente continua.
El símbolo gráfico colocado en el producto
significa equipo de Clase II.
K041_A1_Es
SGK006*_A1_Es
SGK007_A1_Es
D3-8-2-4_A1_Es
PRECAUCIÓN
Este producto se evalúa en un entorno climático
moderado.
Si desea deshacerse de este producto, no lo mezcle con los residuos generales de su hogar. De conformidad con la legislación
vigente, existe un sistema de recogida distinto para los productos electrónicos que requieren un procedimiento adecuado de
tratamiento, recuperación y reciclado.
.
Es
2
, póngase en contacto con sus autoridades locales a fin de conocer el
D3-8-2-1-7b_A1_Es
ónicos usados
).
o, recuperación y
K058b_A1_Es
Page 47

Léalo antes de usar (Importante)
a
Antes de empezar a usar la unidad
Características
! Un conducto reflector de bajos en la parte frontal y la tecnología Groove crean un potente sonido grave.
! Un difusor convexo en una nueva guía de ondas mejora la directividad del sonido y proporciona un sonido espacioso.
! Se consigue un sonido rico en bajos y una calidad de sonido más nítida a pesar de su tamaño de sobremesa compacto.
! Compatible con AAC y Qualcomm® aptX™ para una reproducción de sonido de mayor calidad mediante Bluetooth.
! Un botón de emparejamiento en el panel frontal permite emparejar dispositivos con un solo toque.
Comprobación de los accesorios
! Cable de alimentación x1
! Manual de Instrucciones (este manual)
! Cable del convertidor de audio (mini-clavija estéreo de 3,5 mm a RCA) x1
! Cable del altavoz x1
! Almohadilla para la parte inferior x8
Nomenclatura y funciones de las partes
Panel frontal
8
1 Tweeters de cúpula blanda de 3/4 pulgada
2 Indicador POWER
La iluminación está vinculada al encendido/apagado. El indicador
está apagado en espera.
3 Difusores
Mejoran la directividad del sonido de altas frecuencias y proporcionan un sonido espacioso.
4 Control LEVEL
Ajusta el volumen.
5 Botón de emparejamiento
Realiza el emparejamiento con un dispositivo Bluetooth.
El botón también permite ejecutar las operaciones de pausa y reproducción durante la reproducción de música mediante Bluetooth.
Para más información, consulte «Cómo escuchar música de un
dispositivo Bluetooth» (página 6).
1
2
3
4
5
6
7
8
9
6 Indicador de emparejamiento (página 6)
Si parpadea: la operación de emparejamiento está en curso o en
espera de conexión
Si está encendido: conexión establecida con el dispositivo Bluetooth
7 Altavoces de graves de fibra de vidrio de 4 pulgadas
8 Conductos de reflejo de graves
9 Ranuras
Ajuste el flujo de aire de los conductos de reflejo de graves para
irradiar bajas frecuencias sin contratiempos.
a Terminal de auriculares
Este es un terminal de salida de tipo de mini-clavija estéreo de 3,5 mm.
La conexión de los auriculares silencia la salida de sonido de los
altavoces y hace que solo se emita sonido desde los auriculares.
Español
Es
3
Page 48

Panel trasero
1
2
3
4
5
1 Terminales INPUT 1 (estéreo)
Se trata de terminales de entrada no equilibrados de tipo de clavija
RCA.
2 Terminales INPUT 2 (estéreo)
Este es un terminal de entrada de tipo de mini-clavija estéreo de 3,5
mm.
3 Conectores para la conexión del altavoz
Conecte los altavoces izquierdo y derecho usando el cable que se
incluye.
No conecte esos altavoces a un amplificador que no sea el de este
sistema. Si lo hace se puede provocar un incendio.
4 Conmutador POWER
Conecta y desconecta la alimentación de esta unidad.
5 AC IN
Conecte el cable de alimentación a AC IN y conecte la clavija de
alimentación a la toma de corriente.
Conecte el cable de alimentación después de terminar las conexiones entre los aparatos.
Asegúrese de usar el cable de alimentación incluido.
PRECAUCIÓN
El interruptor de la alimentación POWER de este
aparato no corta por completo toda la alimentación
de la toma de corriente de CA. Puesto que el cable de
alimentación hace las funciones de dispositivo de
desconexión de la corriente para el aparato, para
desconectar toda la alimentación del aparato deberá
desenchufar el cable de la toma de corriente de CA.
Por lo tanto, asegúrese de instalar el aparato de
modo que el cable de alimentación pueda
desenchufarse con facilidad de la toma de corriente
de CA en caso de un accidente. Para evitar correr el
peligro de incendio, el cable de alimentación también
deberá desenchufarse de la toma de corriente de CA
cuando no se tenga la intención de utilizarlo durante
mucho tiempo seguido (por ejemplo, antes de irse de
vacaciones).
D3-4-2-2-2a*_A1_Es
AVISO
! Este producto se proporciona con una función de espera
automática. Si el estado en el que no se emite ningún
sonido se prolonga durante el período establecido
(aproximadamente 30 minutos) durante el uso, el producto
apaga automáticamente el indicador POWER y entra en
un estado de espera con un bajo consumo de energía,
independientemente de si hay una conexión Bluetooth.
! Si el producto entra en el estado de espera habiendo una
conexión Bluetooth, la conexión Bluetooth se desconecta y el
indicador Bluetooth también se apaga.
! Cuando se recibe una señal de audio de los terminales
de entrada en el estado de espera, el producto entra
automáticamente en el estado encendido. Además, el
producto también entra en el estado encendido si se pulsa el
botón de emparejamiento por Bluetooth estando en espera.
! Esta función de espera automática no se puede deshabilitar.
Es
4
Page 49

Instalación y conexiones
ADVERTENCIA
Guarde las piezas pequeñas fuera del alcance de los
niños. Si las ingirieran accidentalmente, póngase de
inmediato en contacto con un médico
D41-6-4_A1_Es
Rojo+
Negro
Con la línea roja
Procedimiento de instalación
El sonido de reproducción de un altavoz queda ligeramente afectado por
las condiciones de la sala de audición. Para producir las mejores condiciones para la audición, tenga debidamente en cuenta las condiciones
del lugar de instalación antes de comenzar la instalación.
! Coloque los altavoces al nivel de los oídos.
! Para obtener un efecto estéreo natural, los altavoces derecho e
izquierdo deben instalarse simétricamente y en posiciones equidistantes de la posición de audición.
! Fije las almohadillas suministradas en la parte inferior de la unidad
para evitar que resbale.
.
! Instale los altavoces orientados hacia dentro con un ángulo total de
60 grados desde la posición de escucha, 30 grados para cada uno de
los altavoces, izquierdo y derecho.
50 ° a 60 °
AVISO
Para favorecer una refrigeración adecuada asegúrese de que haya
suficiente espacio entre los altavoces, las paredes cercanas y otros
componentes (mínimo de 15 cm o más por encima, detrás, a la derecha y a la izquierda de cada altavoz). Si deja un espacio insuficiente
entre el altavoz y las paredes u otros componentes, puede provocar
que aumente la temperatura interior, lo que puede provocar un mal
funcionamiento o daños.
Conexiones
! Asegúrese de desconectar la alimentación y desenchufar el cable
de alimentación de la toma de corriente siempre que haga o cambie
conexiones.
! Consulte el manual de instrucciones del componente que va a ser
conectado.
Conexión de los cables
Conecte a los altavoces el cable de altavoces que se incluye.
1 Pele 1 cm de la punta del cable que se incluye y
retuerza y retire el aislante expuesto.
Tras retirar el aislante, retuerza los cables.
2 Conecte el cable del altavoz que se incluye con
los terminales del altavoz de los lados IZQUIERDO y
DERECHO.
3 Inserte los cables en los terminales mientras presiona
la pinza del terminal del altavoz.
Conecte el cable del altavoz con la línea roja en el lado del terminal
+ (rojo) y el cable del altavoz sin la línea roja en el lado del terminal
– (negro).
−
! Conecte el cable de alimentación después de terminar las conexio-
nes entre los aparatos.
! Asegúrese de usar el cable de alimentación incluido.
! Tenga cuidado con el volumen porque las señales de entrada del ter-
minal [INPUT 1], del terminal [INPUT 2] y del Bluetooth se mezclan.
AVISO
! Tras conectar los terminales, tire ligeramente del cable del altavoz
para asegurarse de que las puntas del cable del altavoz se hayan
conectado de forma segura con los terminales. Una conexión floja
puede hacer que la salida de audio se interrumpa o se emita ruido.
! Cuando conecte el cable del altavoz, retuerza a fondo los cables
y asegúrese de que no sobresalgan de los terminales del altavoz.
Los cables que sobresalgan de los terminales del altavoz pueden
entrar en contacto con el panel trasero o entre ellos. Esto puede
provocar una carga excesiva en el amplificador, lo que puede
hacer que no funcione o puede provocar una avería.
! Si se comete una equivocación con las polaridades (+, –) en los
lados IZQUIERDO y DERECHO cuando se conecta el cable del
altavoz IZQUIERDO y DERECHO, es posible que ya no se obtenga
el efecto de estéreo normal.
Español
Es
5
Page 50

Cómo escuchar música de un dispositivo
Bluetooth
Estos altavoces permiten disfrutar inalámbricamente de las pistas guardadas en un dispositivo Bluetooth.
Al utilizar los altavoces por primera vez o al conectar un nuevo dispositivo Bluetooth a los altavoces, hay que emparejar los altavoces y el dispositivo
Bluetooth.
El emparejamiento (registro mutuo de dispositivos) es la operación necesaria para conectar un dispositivo Bluetooth y los altavoces.
Procedimiento de emparejamiento
y conexión
1 Encienda el interruptor [POWER] para encender los
altavoces.
! El indicador Bluetooth parpadeará durante aproximadamente 30
segundos y los altavoces entrarán en estado de emparejamiento.
! Si el indicador Bluetooth está apagado, pulse el botón de empareja-
miento durante al menos 2 segundos para volver a cambiar al estado
de emparejamiento.
2 Realice la operación de emparejamiento en el
dispositivo Bluetooth.
Realice la operación mientras los altavoces estén en estado de
emparejamiento.
Para más información, consulte el manual de instrucciones del dispositivo Bluetooth.
3 Cuando el indicador Bluetooth cambie de estar
parpadeando a estar encendido, se habrá completado el
emparejamiento (o conexión).
Si no se ha podido realizar el emparejamiento en 30 segundos, el indicador Bluetooth pasará de parpadear a apagarse.
! Un dispositivo Bluetooth que ya se ha emparejado se puede conec-
tar realizando la operación de conexión en el lado del dispositivo
Bluetooth si los altavoces están encendidos.
Reproducción
Al reproducir música en un dispositivo Bluetooth conectado, la música
reproducida en el dispositivo Bluetooth se emite por los altavoces.
! Si pulsa el botón de emparejamiento durante la reproducción de
música en el dispositivo Bluetooth, podrá ejecutar la operación de
pausa/reproducción (la misma función que la del botón de pausa/
reproducción del dispositivo Bluetooth).
ATTENTION
! Al realizar el emparejamiento (conexión), acerque el dispositivo
Bluetooth a los altavoces.
! El sonido puede emitirse a un volumen alto al reproducir por prim-
era vez tras realizar la conexión, por lo que recomendamos bajar el
volumen antes de reproducir sonido.
! Según la aplicación que se utilice, puede que no funcione la oper-
ación de pausa/reproducción con el botón de emparejamiento.
! Puede que no sea posible establecer una conexión con los altavo-
ces según cuál sea el dispositivo Bluetooth.
! Si desea emparejar los altavoces con otro dispositivo Bluetooth,
desactive la función Bluetooth del dispositivo Bluetooth que esté
ahora conectado o desconecte la conexión antes de realizar el
emparejamiento.
! Los altavoces guardan la información de emparejamiento de
hasta ocho dispositivos Bluetooth, e intentan conectarse al último
dispositivo emparejado si se pulsa el botón de emparejamiento sin
conexión con un dispositivo Bluetooth.
Precauciones con las ondas de radio
Esta unidad emplea una frecuencia de onda de radio de 2,4 GHz, que es
una banda utilizada por otros sistemas inalámbricos (consulte la lista
siguiente). Para evitar ruidos o interrupciones de la comunicación, no
emplee esta unidad cerca de estos dispositivos, o compruebe que tales
dispositivos estén apagados durante la utilización.
! Teléfonos inalámbricos
! Facsímiles inalámbricos
! Hornos de microondas
! Dispositivos LAN inalámbricos (IEEE802.11b/g)
! Equipos audiovisuales inalámbricos
! Controladores inalámbricos para sistemas de juegos
! Equipos médicos por microondas
! Algunos monitores para niños
Otros equipos menos comunes que puedan utilizar la misma frecuencia:
! Sistemas antirrobo
! Emisoras de radioaficionados (HAM)
! Sistemas de gestión logística de almacenes
! Sistemas de discriminación para trenes o vehículos de emergencia
CAUTION
! En caso de que aparezca ruido en la imagen de su televisor, es
posible que un dispositivo Bluetooth® o esta unidad (incluidos
productos compatibles con esta unidad) causen interferencias en
las señales con el conector de entrada de la antena del televisor,
vídeo, sintonizador de satélite, etc. En tal caso, aumente la distancia entre el conector de la entrada de la antena y el dispositivo
Bluetooth o esta unidad (incluyendo productos compatibles con
esta unidad).
! Si hay algo que obstruya el paso entre esta unidad (incluyendo los
productos compatibles con esta unidad) y el dispositivo habilitado
con tecnología inalámbrica Bluetooth (como pueda ser una puerta
metálica, un muro de hormigón o papel de aluminio aislante), es
posible que tenga que cambiar la ubicación del sistema para evitar
ruidos en la señal e interrupciones.
Para los usuarios de México
La operación de este equipo está sujeta a las siguientes dos condiciones: (1) es posible que este equipo o dispositivo no cause interferencia
perjudicial y (2) este equipo o dispositivo debe aceptar cualquier interferencia, incluyendo la que pueda causar su operación no deseada.
Es
6
Page 51

Alcance de funcionamiento
Esta unidad está diseñada para un uso doméstico. (Es posible que se
reduzcan las distancias de transmisión dependiendo de los entornos de
comunicación). En los lugares siguientes, las malas condiciones o la
incapacidad de recibir ondas de radio pueden causar la interrupción o
detención del sonido:
! En edificios de hormigón reforzado o en edificios de estructura de
metal o hierro.
! Muebles metálicos grandes cercanos.
! En una multitud de personas o cerca de un edificio u obstáculo.
! En un lugar expuesto a un campo magnético, electricidad estática
o interferencias de ondas de radio por parte de equipos de radiocomunicaciones que usen la misma banda de frecuencia (2,4 GHz) que
esta unidad, tales como dispositivos LAN inalámbricos de 2,4 GHz u
hornos de microondas.
! Si usted vive en una zona residencial muy poblada (apartamentos,
ciudades residenciales, etc.) y si el horno microondas de su vecino
está colocado cerca de su sistema, es posible que note interferencias de ondas de radio. Si esto sucede, cambie de sitio la unidad.
Cuando el microondas no está en uso, no habrá interferencias de
ondas de radio.
Reflejos de ondas de radio
Las ondas de radio que recibe esta unidad incluyen la onda de radio
que proviene directamente del dispositivo equipado con tecnología
inalámbrica Bluetooth (onda directa) y las ondas procedentes de varias
direcciones por los reflejos en paredes, muebles y edificios (ondas reflejadas). Las ondas reflejadas (por los obstáculos y los objetos reflectores)
producen además una serie de ondas reflejadas, así como una variación
del estado de la recepción según los lugares. Ni no se puede recibir
el sonido correctamente debido a este fenómeno, trate de cambiar un
poco la ubicación del dispositivo equipado con tecnología inalámbrica
Bluetooth. Asimismo, observe que el sonido podría interrumpirse debido
a las ondas reflejadas cuando una persona cruza o se acerca al espacio que hay entre esta unidad y el dispositivo equipado con tecnología
inalámbrica Bluetooth.
Español
Es
7
Page 52

Información adicional
Solución de problemas
! Algunas veces, el problema puede estar en otro componente. Inspeccione los otros componentes y los aparatos eléctricos que esté utilizando. Si
no se puede rectificar el problema, pida al servicio de Pioneer autorizado más cercano o a su concesionario que realice el trabajo de reparación.
! Esta unidad puede no funcionar bien debido a la electricidad estática o a otros factores externos. En este caso, el funcionamiento normal se puede
restaurar desenchufando el cable de alimentación, esperando unos 5 segundos o más, y volviéndolo a enchufar.
Comunes
Problema Verificación Remedio
La alimentación no se conecta. ¿Está bien conectado el cable de alimentación? Enchufe el cable de alimentación a una toma de CA.
¿Se ha ajustado correctamente el dispositivo? Ajusta la entrada y el volumen del dispositivo externo correctamente.
No se emite sonido del dispositivo conectado o el sonido es demasiado bajo.
El indicador POWER (blanco) no se
enciende.
Esta unidad no se recupera (enciende)
del estado de espera.
Sonido distorsionado.
Oscila (se emite continuamente sonido
alto).
Solo se emite sonido del altavoz
izquierdo.
El aparato se apaga (estado de espera)
automáticamente.
¿El volumen está ajustado en la posición correcta?
¿Está conectada la alimentación? Active el conmutador [POWER] en el panel trasero de esta unidad.
¿Está conectada la alimentación? Active el conmutador [POWER] en el panel trasero de esta unidad.
¿Los altavoces están en estado de espera?
¿El nivel de señal de entrada es bajo? Aumente el nivel de señal de entrada.
¿El volumen está ajustado en la posición correcta?
¿El nivel de entrada del dispositivo conectado es
correcto?
¿El volumen está ajustado en la posición correcta?
¿Está bien conectado el cable del altavoz? Conecte los altavoces izquierdo y derecho correctamente.
¿Se ha prolongado el estado en el que no se emite
ningún sonido durante el período establecido
(aproximadamente 30 minutos) o más?
¿Es bajo el nivel de la señal de entrada? Aumente el nivel de la señal de entrada.
Gire el control [LEVEL] del panel frontal de esta unidad en el sentido de las
agujas del reloj para aumentar el volumen.
Desactive el conmutador [POWER] del panel trasero de esta unidad y después vuelva a activarlo tras unos cuantos segundos.
Gire el control [LEVEL] del panel frontal de esta unidad en el sentido contrario a las agujas del reloj para reducir el volumen.
Ajuste el nivel de salida del aparato conectado correctamente.
Gire el control [LEVEL] del panel frontal de esta unidad en el sentido contrario a las agujas del reloj para reducir el volumen.
Introduzca una señal del terminal de entrada RCA o de la mini-clavija
estéreo.
O pulse el botón de emparejamiento del panel frontal de esta unidad.
Al conectarse con los terminales INPUT 1 o INPUT 2
Problema Verificación Remedio
No se emite sonido del dispositivo conectado o el sonido es demasiado bajo.
Solo se emite sonido de un altavoz. ¿Se ha conectado correctamente el dispositivo? Conecte el dispositivo a los terminales de entrada izquierdo y derecho.
Se interrumpe el sonido o se oye ruido.
¿Están bien conectados los cables de conexión? Conecte correctamente los cables de conexión.
¿Están sucios los terminales y las clavijas? Limpie los terminales y las clavijas antes de hacer conexiones.
¿Hay algún problema de contacto con los cables
de conexión?
Reconecte los cables de conexión.
Al conectarse mediante Bluetooth
Problème Vérification Solution
¿Hay cerca algún dispositivo que genere ondas
No se establece la conexión, o bien se
interrumpe el sonido o se oye ruido.
electromagnéticas en la banda de los 2,4 GHz
(horno microondas, dispositivo de LAN inalámbrica, otro dispositivo Bluetooth, etc.)?
¿Hay demasiada distancia con respecto al dispositivo Bluetooth? ¿O hay entremedias una pared u
obstáculo que bloquee la señal?
¿Se está ejecutando en el dispositivo Bluetooth
alguna aplicación que no sea para reproducir
música?
¿Es compatible con A2DP el dispositivo Bluetooth
que desea conectar?
¿Se ha realizado correctamente el emparejamiento con el dispositivo Bluetooth?
Coloque la unidad lejos de dicho dispositivo o deje de utilizar el dispositivo
que genera ondas electromagnéticas.
Acerque entre sí esta unidad y el dispositivo Bluetooth conectado. O bien
cambie la posición del dispositivo Bluetooth o de esta unidad.
Cierre en el dispositivo Bluetooth cualquier aplicación que no sea la de
reproducción de música.
Utilice un dispositivo Bluetooth que sea compatible con A2DP.
Apague esta unidad y el dispositivo Bluetooth, vuélvalos a encender y repita
la operación de emparejamiento.
Es
8
Page 53

Acerca de las marcas de fábrica y marcas registradas
! “Pioneer DJ” es una marca comercial de PIONEER CORPORATION y se usa bajo licencia.
!
Los nombres de compañías y productos mencionados aquí son marcas comerciales o marcas comerciales registradas de sus respectivos propietarios.
!
La marca literal y los logotipos Bluetooth® son marcas comerciales registradas propiedad de Bluetooth SIG, Inc., y cualquier uso de dichas marcas por
PIONEER DJ Corporation se hace bajo licencia. Otras marcas y nombres comerciales son propiedad de sus respectivos propietarios.
!
Qualcomm aptX es un producto de Qualcomm Technologies International, Ltd. Qualcomm es una marca comercial de Qualcomm Incorporated, registrada en los Estados Unidos y en otros países, y utilizada con permiso. aptX es una marca comercial de Qualcomm Technologies International, Ltd.,
registrada en los Estados Unidos y en otros países, y utilizada con permiso.
Especificaciones
DM-40BT/DM-40BT-W
Modelo Altavoz activo de dos vías
Sección del amplificador
Salida del amplificador
Terminales de entrada RCA × 1, mini-clavija estéreo de 3,5 mm × 1
Impedancia de entrada
Terminales de salida Auriculares × 1
Sección del altavoz
Caja acústica Tipo de reflejo de bajos/MDF laminado de vinilo
Altavoz de graves (driver LF) Cono de 4 pulgadas (102 mm)
Tweeter (driver HF) Cúpula blanda de 3/4 pulgada (19 mm)
Seccion Bluetooth
Version Bluetooth Ver. de Especificaciones 4.2
Salida Bluetooth Clase de Especificaciones 2
Frecuencia de uso 2,4 GHz
Modulacion FH-SS (Espectro de Frecuencia Propagada)
Perfiles de Bluetooth suportados A2DP, AVRCP
Codec suportado
Sección de fuente de alimentación / otros
Tensiones admitidas CA 110 V a 240 V, 50 Hz/60 Hz
Consumo de energía 35 W
Consumo de energía durante la espera (estado de espera) 0,3 W
Dimensiones externas An × Al × Prf
Peso
Consumo de energía para México
Modo normal *1 35 Wh/día
Modo de espera *2 6,9 Wh/día
*1 Considerando 1 hora de uso al día
*2 Considerando 23 horas en el modo de espera
! Las especificaciones y diseño de este producto están sujetos a cambios sin previo aviso.
! © 2017 Pioneer DJ Corporation. Todos los derechos reservados.
Canal izq.: 21 W/4 W, Clase AB
Canal der.: 21 W/4 W, Clase AB
10 kW
SBC, AAC, Qualcomm
Canal izq.: 146 mm × 227 mm × 223 mm
Canal der.: 146 mm × 227 mm × 210 mm
Canal izq.: 2,7 kg
Canal der.: 2,2 kg
®
aptX™, Qualcomm® aptX™ Estado Latente Bajo
Español
Es
9
Page 54

Obrigado por adquirir este produto da Pioneer DJ.
Leia atentamente estas instruções de funcionamento de modo a saber como utilizar correctamente oseu modelo.
CUIDADO
P
NÃO REMOV
RIOR). NÃO EXISTEM NO INTERIOR PEÇAS REP
VEIS PE
EFETUADA POR PESSOAL ESPECIALIZAD
AVISO
Pa
de chamas nuas (tais como uma vela acesa) sobre o
aparelho
Após terminar de ler as instruções, coloque-as num local seguro para futura referência.
ARA PREVENIR O PERIGO DE CHOQUE ELÉTRICO,
A A COBERTURA (NEM A PARTE POSTE-
LO UTILIZADOR. A MANUTENÇÃO DEVE SER
AVISO
Este aparelho não é à prova de água. Para prevenir o
perigo de incêndio ou choque elétrico, não coloque
perto dele recipientes contendo líquidos (tais como
uma jarra ou um vaso de flores) nem o exponha a
pingos, salpicos, chuva ou humidade.
ra prevenir o perigo de incêndio, não coloque fontes
.
Ambiente de funcionamento
Temperatura e humidade do ambiente de
funcionamento:
+5 °C a +35 °C; humidade relativa inferior a 85 %
(respiradouros de refrigeração não bloqueados)
Não instale o aparelho num espaço insuficientemente
arejado ou em locais expostos a uma humidade
elevada ou a luz solar direta (ou a iluminação artificial
intensa).
CUIDADOS COM A VENTILAÇÃO
Quando instalar esta unidade, certifique-se de que
deixa espaço em torno da unidade para ventilação de
modo a melhorar a radiação térmica (pelo menos 15
cm na parte superior, 15 cm na parte posterior e 15 cm
em cada um dos lados).
AVISO
As ranhuras e as aberturas da caixa destinam-se a
ventilação, para garantir o funcionamento fiável do
produto e para evitar o seu sobreaquecimento.
Para evitar riscos de incêndio, as aberturas nunca
devem ser bloqueadas ou cobertas com coisas (como
jornais, toalhas de mesa, cortinas) ou através do
funcionamento do equipamento em cima de um tapete
grosso ou uma cama.
ARÁ-
O.
D3-4-2-1-1_B2_Pt
D3-4-2-1-3_A2_Pt
D3-4-2-1-7a_A1_Pt
D3-4-2-1-7c*_A2_Pt
D3-4-2-1-7d*_A1_Pt
D3-4-2-1-7b*_A1_Pt
Este produto destina-se a utilização doméstica geral.
A reparação de qualquer avaria devida a utilizações
fora desse âmbito (como, por exemplo, utilização
prolongada num restaurante, para efeitos comerciais,
ou utilização num automóvel ou num barco) será
cobrada, ainda que dentro da garantia.
K041_A1_Pt
AVISO SOBRE O CABO DE ALIMENTAÇÃO
Manuseie o cabo de alimentação através da ficha. Não
retire a ficha puxando o cabo e nunca toque no cabo
de alimentação com as mãos húmidas, pois pode
provocar um curto-circuito ou choque elétrico. Não
coloque a unidade, um móvel, etc., sobre o cabo de
alimentação nem trilhe o cabo. Nunca faça um nó no
cabo nem o amarre a outros cabos. Os cabos de
alimentação devem ser encaminhados de modo a não
serem pisados. Um cabo de alimentação danificado
pode provocar um incêndio ou um choque elétrico.
Verifique periodicamente o cabo de alimentação.
Quando estiver danificado, solicite um cabo de
alimentação de substituição junto do seu revendedor
ou centro de assistência.
Precauções para o DM-40BT/DM-40BT-W
Não ligue esta coluna de altifalantes a nenhum outro
amplificador além do fornecido com este sistema. A
ligação a um outro amplificador pode resultar em
mau funcionamento ou incêndio.
Não fixe estas colunas em paredes ou no tecto, pois
podem causar ferimentos em caso de queda.
O símbolo gráfico presente no produto significa
corrente alterna.
O símbolo gráfico presente no produto significa
corrente contínua.
O símbolo gráfico presente no produto significa
Equipamento de Classe II.
CUIDADO
Este produto foi avaliado em condições semelhantes
às de um clima temperado.
S002*_A1_Pt
SGK006*_A1_Pt
SGK007_A1_Pt
D3-8-2-4_A1_Pt
D3-8-2-1-7b_A1_Pt
Se quiser eliminar este produto, não o misture com resíduos domésticos gerais. Existe um sistema de recolha separado para produtos
eletrónicos usados de acordo com a legislação que requer tratamento, recuperação e reciclagem adequados.
Os consumidores dos Estados-membros da UE, da Suíça e da Noruega podem entregar equipamentos eletrónicos fora de uso em determinadas
instalações de recolha ou a um retalhista (se adquirirem um equipamento novo similar).
Nos países não mencionados acima, informe-se sobre o método de eliminação correto junto das autoridades locais.
Ao fazê-lo estará a garantir que o produto que já não tem utilidade para si é submetido a processos de tratamento, recuperação e reciclagem
adequados, evitando-se assim potenciais efeitos negativos para o ambiente e a saúde humana.
Pt
2
K058b_A2_Pt
Page 55

Leia Antes de Utilizar (Importante)
a
Antes de começar
Características
! Um tubo de reflexão de graves situado na parte frontal e a tecnologia Groove produzem sons potentes.
! Um difusor convexo numa guia de onda de novo formato aprimora a direcionalidade de som de frequências elevadas e proporciona um som
abrangente.
! Som rico em graves e reprodução ainda mais nítida apesar do tamanho compacto.
! Compatível com AAC e Qualcomm
! Um botão de emparelhamento no painel frontal possibilita emparelhamento com um toque.
®
aptX™ para reprodução de som com mais qualidade através de Bluetooth.
Verificar os acessórios
! Cabo de alimentação x1
! Instruções de operação (este documento)
! Cabo do conversor áudio (minificha estéreo de 3,5 mm para RCA) x1
! Cabo de coluna x1
! Almofada inferior x8
Nomes e funções das peças
Painel frontal
1 Tweeters de cúpula macia de 3/4 polegadas
2 Indicador POWER
Acende-se quando se liga/desliga a alimentação. O indicador fica
apagado em modo de espera.
3 Difusores
Melhoram o direcionamento do som de altas frequências e proporcionam som amplo.
4 Controlo LEVEL
Regula o volume.
5 Botão de emparelhamento
Efetua o emparelhamento com um dispositivo Bluetooth.
O botão também efetua as operações de pausa e reprodução
durante a reprodução de música através de Bluetooth.
Para obter mais informações, consulte “Ouvir a música de um dispositivo Bluetooth” (página 6).
1
2
3
4
5
6
7
8
9
6 Indicador de emparelhamento (página 6)
Intermitente: operação de emparelhamento em curso ou a aguardar
ligação Aceso: ligação estabelecida ao dispositivo Bluetooth
7 Woofers de 4 polegadas em fibra de vidro
8 Túneis bass reflex
9 Ranhuras
Regulam o fluxo de ar dos túneis bass reflex, para difundir suavemente as baixas frequências.
a Terminal de auscultadores
Terminal de saída tipo minificha estéreo de 3,5 mm.
A ligação dos auscultadores corta a saída do som das colunas e
emite som apenas através dos auscultadores.
Pt
Português
3
Page 56

Painel posterior
1
2
3
4
5
1 Terminais INPUT 1 (estéreo)
Terminais de entrada não balanceados tipo pino de RCA.
2 Terminais INPUT 2 (estéreo)
Terminal de entrada não balanceado tipo minificha estéreo de 3,5
mm.
3 Conetores de ligação das colunas
Permitem a ligação das colunas esquerda e direita, utilizando o cabo
incluído.
Não ligue estas colunas a um amplificador diferente do fornecido
com este sistema. Se o fizer pode provocar danos ou um incêndio.
4 Interruptor POWER
Liga ou desliga a alimentação desta unidade.
5 AC IN
Ligue o cabo de alimentação à entrada AC IN e depois ligue-o à
tomada elétrica.
Ligue o fio elétrico depois de terminar de fazer todas as ligações
entre os dispositivos.
Certifique-se de que utiliza o cabo de alimentação incluído.
CUIDADO
O botão POWER do aparelho não o desliga
completamente da energia fornecida pela tomada
CA. Uma vez que o cabo de alimentação serve como
o principal dispositivo de desconexão, será
necessário desligá-lo da tomada para desligar toda a
alimentação. Por isso, verifique se a unidade foi
instalada de forma que o cabo de alimentação possa
ser facilmente desligado da tomada AC, em caso de
acidente. Para prevenir o risco de incêndio, deverá
desligar igualmente o cabo de alimentação de
energia da tomada CA quando o aparelho não for
utilizado durante um período prolongado (por
exemplo, durante um período de férias).
D3-4-2-2-2a*_A1_Pt
ADVERTÊNCIA
! Este produto é fornecido com uma função de espera
automática. Se uma situação “sem som” se prolongar por um
período específico (cerca de 30 minutos) durante a utilização,
o produto desliga automaticamente o indicador POWER e
entra em modo de espera com baixo consumo de energia,
independentemente de existir ou não uma ligação Bluetooth.
! Se o produto entrar no modo de espera quando existir
uma ligação Bluetooth, a ligação Bluetooth é desligada e o
indicador Bluetooth também se apaga.
! Se for recebido um sinal de áudio dos terminais de entrada
no modo de espera, o produto entra automaticamente no
estado de alimentação ligada. O produto também entra no
estado de alimentação ligada se o botão de emparelhamento
Bluetooth for premido durante o modo de espera.
! Não é possível desativar esta função de espera automática.
Pt
4
Page 57

Instalação e ligações
AVISO
Guarde as peças pequenas fora do alcance das
crianças. Se forem engolidas acidentalmente, contacte
imediatamente um médico
D41-6-4_A3_Pt
Vermelho+
Preto
Com a linha vermelha
Procedimento de instalação
O som reproduzido por uma coluna é subtilmente influenciado pelas
condições da sala de audição. Para criar um ambiente de audição ideal,
antes de começar a instalação propriamente dita, tenha em conta as
condições do local que vai ser utilizado.
! Coloque as colunas ao nível dos ouvidos.
! Para obter um efeito de som estéreo natural, deve instalar as colu-
nas direita e esquerda em posições simétricas e equidistantes da
posição de audição.
! Fixe as almofadas fornecidas à parte inferior da unidade para evitar
deslizes.
.
! Instale as colunas voltadas para dentro, fazendo um ângulo total
de 60 graus em relação à posição de audição, 30 graus para cada
coluna esquerda e direita.
50 ° a 60 °
ADVERTÊNCIA
Para garantir um arrefecimento adequado, assegure-se de que há
espaço suficiente entre as colunas e entre estas e paredes ou outros
componentes que estejam nas proximidades (no mínimo, 15 cm ou
mais, acima, atrás e à direita e esquerda de cada coluna). Se deixar
espaço insuficiente entre as colunas e as paredes ou outros componentes, pode ocorrer uma subida da temperatura interior, provocando
danos ou avarias.
Ligações
! Certifique-se de que desliga a energia e o cabo de alimentação da
tomada, sempre que fizer ou alterar ligações.
! Consulte as instruções de funcionamento do componente a ligar.
! Ligue o fio elétrico depois de terminar de fazer todas as ligações
entre os dispositivos.
Ligar cabos
Ligue o cabo de coluna incluído às colunas.
1 Descarne cerca de 1 cm da cabeça do cabo de coluna
incluído e retire o isolante exposto.
Depois de retirar o isolante, torça completamente os fios do núcleo.
2 Ligue o cabo de coluna incluído aos terminais das
colunas nos lados ESQUERDO e DIREITO.
3 Introduza os fios do núcleo nos terminais, ao mesmo
tempo que pressiona a patilha no terminal da coluna.
Ligue o cabo de coluna com a linha vermelha ao terminal + (vermelho) e
o cabo de coluna sem linha vermelha ao terminal – (preto).
−
! Certifique-se de que utiliza o cabo de alimentação incluído.
! Tenha cuidado com a regulação do volume, porque os sinais emi-
tidos a partir do terminal [INPUT 1], do terminal [INPUT 2] e de
Bluetooth são misturados.
Português
ADVERTÊNCIA
! Depois de fazer a ligação aos terminais, puxe ligeiramente o cabo
de coluna para ter a certeza de que as cabeças do cabo estão bem
presas nos terminais. Uma ligação com folga pode provocar emissão de ruído ou interrupções na saída de áudio.
! Quando ligar o cabo de coluna, torça bem os fios do núcleo e
certifique-se de que não ficam a sair dos terminais das colunas. Se
os fios do núcleo ficarem a sair dos terminais das colunas, podem
entrar em contacto entre si ou com o painel posterior. Isso pode
dar origem a carga excessiva no amplificador, o que resulta na
interrupção do funcionamento ou numa avaria.
! Se se enganar nas polaridades (+, –) nos lados ESQUERDO e
DIREITO, quando fizer a ligação do cabo às colunas ESQUERDA e
DIREITA, deixa de obter o efeito de som estéreo normal.
Pt
5
Page 58

Ouvir a música de um dispositivo Bluetooth
Estas colunas permitem-lhe desfrutar de faixas guardadas num dispositivo Bluetooth através de tecnologia sem fios.
Quando utiliza as colunas pela primeira vez ou quando pretende ligar um novo dispositivo Bluetooth às colunas, é necessário emparelhar as colunas e
o dispositivo Bluetooth.
O emparelhamento (registo mútuo de dispositivos) é a operação necessária para estabelecer ligação entre um dispositivo Bluetooth e as colunas
Procedimento de emparelhamento
e ligação
1 Ligue o interruptor [POWER] para ligar as colunas.
! O indicador Bluetooth pisca durante cerca de 30 segundos e as
colunas entram no estado de emparelhamento.
! Se o indicador Bluetooth estiver apagado, prima o botão de emparel-
hamento durante pelo menos 2 segundos para mudar novamente
para o estado de emparelhamento.
2 Efetue a operação de emparelhamento no dispositivo
Bluetooth.
Efetue a operação enquanto as colunas estiverem no estado de
emparelhamento.
Para obter mais informações, consulte o manual de instruções do dispositivo Bluetooth.
3 Quando o indicador Bluetooth mudar do estado
intermitente para aceso, o emparelhamento
(estabelecimento de ligação) está concluído.
Se o emparelhamento não for efetuado no espaço de 30 segundos, o
indicador Bluetooth muda do estado intermitente para apagado.
! É possível ligar um dispositivo Bluetooth que já foi emparelhado
efetuando a operação de ligação no dispositivo Bluetooth se a alimentação das colunas estiver ligada.
Reprodução
Quando reproduz música num dispositivo Bluetooth ligado, a música
que está a ser reproduzida no dispositivo Bluetooth é emitida pelas
colunas.
! Premir o botão de emparelhamento durante a reprodução de música
no dispositivo Bluetooth permite efetuar a operação de pausa/
reprodução (a mesma função do botão de pausa/reprodução do
dispositivo Bluetooth).
Precaução relativa a ondas de rádio
Esta unidade utiliza uma frequência de ondas de rádio de 2,4 GHz, que
é uma banda utilizada por outros sistemas sem fios (consulte a lista
abaixo). Para evitar ruído ou comunicação interrompida, não utilize esta
unidade perto desses dispositivos ou certifique-se de que esses dispositivos estão desligados durante a utilização.
! Telefones sem fio
! Máquinas de fax sem fio
! Micro-ondas
! Dispositivos de LAN sem fios (IEEE 802.11b/g)
! Equipamento de AV sem fios
! Controladores sem fios para sistemas de jogos
! Auxiliares de saúde baseados em micro-ondas
! Alguns monitores de bebés
Outros equipamentos menos comuns que podem funcionar na
mesma frequência:
! Sistemas antirroubo
! Estações de rádio amador (HAM)
! Sistemas de gestão de logística de armazéns
! Sistemas de discriminação para comboios ou veículos de
emergência
ADVERTÊNCIA
! Se aparecer ruído na imagem da televisão, é possível que um
dispositivo Bluetooth® ou esta unidade (incluindo produtos suportados por esta unidade) esteja a causar interferência no sinal com
o conector de entrada da antena do televisor, vídeo, sintonizador
de satélite, etc. Nesse caso, aumente a distância entre o conector
de entrada da antena e o dispositivo Bluetooth ou esta unidade
(incluindo produtos suportados por esta unidade).
! Se existir algum obstáculo entre esta unidade (incluindo disposi-
tivos suportados por esta unidade) e o dispositivo equipado com
tecnologia sem fios Bluetooth (por exemplo, uma porta de metal,
uma parede de betão ou isolamento com folha de alumínio),
poderá ser necessário mudar a localização do sistema para evitar
ruído e interrupções do sinal.
ATTENTION
! Quando pretender fazer o emparelhamento (estabelecimento de
ligação), aproxime o dispositivo Bluetooth das colunas.
! É possível que seja emitido som alto quando a operação de
reprodução for efetuada pela primeira vez após a conclusão da
ligação, sendo por isso aconselhável baixar o volume antes da
reprodução.
! A operação de pausa/reprodução pode não ser possível com o
botão de emparelhamento, dependendo da aplicação utilizada.
! A ligação às colunas pode não ser possível, dependendo do dis-
positivo Bluetooth.
! Se pretender emparelhar as colunas com um dispositivo Bluetooth
diferente, desligue a função Bluetooth do dispositivo Bluetooth que
está ligado ou termine a ligação antes de efetuar a operação de
emparelhamento.
! As colunas guardam as informações de emparelhamento de
até oito dispositivos Bluetooth e tentam estabelecer ligação ao
último dispositivo emparelhado se o botão de emparelhamento for
premido quando não existe ligação a um dispositivo Bluetooth.
Pt
6
Page 59

Âmbito de utilização
Esta unidade destina-se apenas a uso doméstico. (As distâncias de
transmissão poderão ser reduzidas, dependendo do ambiente de
comunicação.)
Nos locais que se seguem, as más condições ou a incapacidade de
receção de ondas de rádio podem causar a interrupção ou paragem do
áudio:
! Em edifícios de betão armado ou edifícios com estrutura de aço ou
ferro.
! Perto de mobiliário metálico de grandes dimensões.
! Numa multidão de pessoas ou perto de um edifício ou obstáculo.
! Num local exposto ao campo magnético, à eletricidade estática ou
a interferências de ondas de rádio de equipamento de comunicação
de rádio que utiliza a mesma banda de frequências (2,4 GHz) desta
unidade, como um dispositivo de LAN sem fios de 2,4 GHz ou um
micro-ondas.
! Se viver numa área residencial muito populosa (apartamento, casa,
etc.) e o micro-ondas do vizinho estiver colocado num local perto
do seu sistema, é possível que ocorram interferências de ondas de
rádio. Se isso acontecer, coloque a sua unidade noutro local. Não
haverá interferências de ondas de rádio quando o micro-ondas não
estiver a ser utilizado.
Reflexão de ondas de rádio
As ondas de rádio recebidas por esta unidade incluem ondas de rádio
provenientes diretamente do dispositivo equipado com tecnologia sem
fios Bluetooth (onda direta) e ondas provenientes de várias direções
devido a reflexão nas paredes, no mobiliário e no edifício (ondas refletidas). As ondas refletidas (devido a obstáculos e objetos refletores)
produzem também uma variedade de ondas refletidas e variação do
estado de receção, dependendo dos locais. Se não for possível receber
o áudio corretamente devido a esse fenómeno, experimente mudar
ligeiramente a localização do dispositivo equipado com tecnologia sem
fios Bluetooth. Tenha também em atenção que o áudio pode ser interrompido devido às ondas refletidas quando uma pessoa atravessa ou
se aproxima do espaço entre esta unidade e o dispositivo equipado com
tecnologia sem fios Bluetooth.
Pt
Português
7
Page 60

Informações adicionais
Resolução de problemas
!
Algumas vezes o problema está relacionado com outro componente. Inspecione os outros componentes e os aparelhos elétricos que estão a ser utilizados. Se o problema não pôde ser resolvido, peça à Assistência Técnica autorizada ou ao revendedor da Pioneer mais próximo para fazer o conserto.
! Esta unidade pode não funcionar corretamente devido a eletricidade estática ou outros fatores externos. Nesse caso, para restaurar o funciona-
mento normal, desligue o cabo de alimentação, aguarde cerca de 5 segundos ou mais e, em seguida, volte a ligar o cabo de alimentação.
Comuns
Problema Verificar Solução
A alimentação não está ligada. O cabo de alimentação está ligado corretamente? Ligue o cabo de alimentação a uma tomada de CA.
O dispositivo ligado está bem regulado? Regule corretamente a entrada externa do dispositivo e o volume.
O dispositivo ligado não emite nenhum
som ou o som está baixo.
O indicador POWER (branco) não se
acende.
Esta unidade não recupera (não se liga) a
partir do modo de espera.
Som distorcido.
Oscilações (som alto emitido
continuamente).
O som é emitido apenas da coluna
esquerda.
A alimentação desliga-se (modo de
espera) automaticamente.
O volume está regulado para a posição correta?
A alimentação está ligada? Ligue o interruptor [POWER] no painel posterior desta unidade.
A alimentação está ligada? Ligue o interruptor [POWER] no painel posterior desta unidade.
As colunas estão em modo de espera?
O nível do sinal de entrada é baixo? Aumente o nível do sinal de entrada.
O volume está regulado para a posição correta?
O nível de entrada a partir do dispositivo ligado é
adequado?
O volume está regulado para a posição correta?
O cabo de coluna está bem ligado? Ligue as colunas esquerda e direita corretamente.
Uma situação “sem som” prolongou-se por um
período específico (cerca de 30 minutos) ou mais
tempo?
O nível do sinal de entrada é baixo? Aumente o nível do sinal de entrada.
Rode o botão [LEVEL] no painel frontal desta unidade no sentido dos ponteiros do relógio para aumentar o volume.
Desligue o interruptor [POWER] no painel posterior desta unidade e volte a
ligá-lo após alguns segundos.
Rode o botão [LEVEL] no painel frontal desta unidade no sentido contrário ao
dos ponteiros do relógio para reduzir o volume.
Ajuste corretamente o nível de saída do dispositivo ligado.
Rode o botão [LEVEL] no painel frontal desta unidade no sentido contrário ao
dos ponteiros do relógio para reduzir o volume.
Emita um sinal do terminal de entrada de RCA ou minificha estéreo.
Em alternativa, prima o botão de emparelhamento no painel frontal desta
unidade.
Quando existe ligação aos terminais INPUT 1 ou INPUT 2
Problema Verificar Solução
O dispositivo ligado não emite nenhum
som ou o som está baixo.
O som é emitido apenas de uma coluna. O dispositivo está bem ligado? Ligue o dispositivo a ambos os terminais de entrada esquerdo e direito.
O som é interrompido ou ouve-se ruído.
Os cabos de ligação estão ligados corretamente? Ligue corretamente os cabos de ligação.
Os terminais e fichas estão sujos? Limpe os terminais e fichas antes de efetuar ligações.
Existe algum problema de contacto nos cabos de
ligação?
Volte a ligar os cabos de ligação.
Quando existe ligação através de Bluetooth
Problème Vérification Solution
Existe algum dispositivo a produzir ondas eletro-
Não é possível estabelecer a ligação, o
som é interrompido ou ouve-se ruído.
magnéticas na banda de 2,4 GHz (micro-ondas,
dispositivos de LAN sem fios, outro dispositivo
Bluetooth, etc.) por perto?
A distância em relação ao dispositivo Bluetooth
é demasiado longa? Existe uma parede ou um
obstáculo a bloquear o sinal no espaço entre a
unidade e o dispositivo?
Uma aplicação sem ser uma aplicação de reprodução de música está em execução no dispositivo
Bluetooth?
O dispositivo Bluetooth que pretende ligar é
compatível com A2DP?
O emparelhamento com o dispositivo Bluetooth foi
efetuado corretamente?
Instale a unidade a alguma distância desse dispositivo ou pare de utilizar o
dispositivo que produz as ondas eletromagnéticas.
Aproxime a unidade do dispositivo Bluetooth ligado. Em alternativa, mude a
posição do dispositivo Bluetooth ou da unidade.
Feche qualquer aplicação no dispositivo Bluetooth que não seja a aplicação
de reprodução de música.
Utilize um dispositivo Bluetooth que seja compatível com A2DP.
Desligue a alimentação da unidade e do dispositivo Bluetooth, volte a ligar a
alimentação e efetue novamente o emparelhamento.
Pt
8
Page 61

Acerca de marcas comerciais e marcas comerciais registadas
! “Pioneer DJ” é uma marca comercial da PIONEER CORPORATION e é utilizada sob licença.
! Os nomes de empresas e produtos aqui mencionados são marcas comerciais ou marcas comerciais registadas dos seus respetivos proprietários.
! A marca nominativa e os logótipos Bluetooth® são marcas comerciais registadas detidas pela Bluetooth SIG, Inc, e qualquer utilização dessas
marcas pela PIONEER DJ Corporation é feita sob licença. Outras marcas comerciais e designações comerciais são propriedade dos respetivos
proprietários.
! Qualcomm aptX é um produto da Qualcomm Technologies International, Ltd. Qualcomm é uma marca comercial da Qualcomm Incorporated,
registada nos Estados Unidos e noutros países, utilizada com autorização. aptX é uma marca comercial da Qualcomm Technologies International,
Ltd., registada nos Estados Unidos e noutros países, utilizada com autorização.
Especificações
DM-40BT/DM-40BT-W
Modelo Coluna ativa de 2 vias
Secção do amplificador
Saída do amplificador
Terminais de entrada Minificha estéreo RCA × 1, 3.5 mm × 1
Impedância de entrada
Terminais de saída Auscultador × 1
Secção das colunas
Caixa Tipo bass reflex/MDF laminada a vinil
Woofer (driver de baixas frequências) Cone de 4 polegadas (102 mm)
Tweeter (driver de altas frequências (HF)) Cúpula macia de 3/4 polegadas (19 mm)
Secção de Bluetooth
Versão Bluetooth Especificação Ver. 4.2
Saída Bluetooth .Especificação Classe 2
Frequência usada 2,4 GHz
Modulação FH-SS (Propragação de espectro por salto de frequência)
Perfis de Bluetooth suportados A2DP, AVRCP
Codec suportados
Secção da fonte de alimentação / outra
Tensões suportadas CA 110 V a 240 V, 50 Hz/60 Hz
Consumo de energia 35 W
Consumo de energia em espera (modo de espera) 0,3 W
Dimensões externas L × A × P
Peso
! As especificações e design deste produto estão sujeitos a alterações sem aviso prévio.
! © 2017 Pioneer DJ Corporation. Todos os direitos reservados.
CnE: 21 W/4 W, Classe AB
CnD: 21 W/4 W, Classe AB
10 kW
SBC, AAC, Qualcomm
CnE: 146 mm × 227 mm × 223 mm
CnD: 146 mm × 227 mm × 210 mm
CnE: 2,7 kg
CnD: 2,2 kg
®
aptX™, Qualcomm® aptX™ Baixa Latência
Português
9
Pt
Page 62

Благодарим вас за покупку данного изделия Pioneer DJ.
По
жалуйста, внимательно изучите данные инструкции по эксплуатации для надлежа-щего использования данной
мо
ВНИМАНИЕ
В
ТО
СТ
ПРЕДНА
ПО
ОБР
С
ПРЕД
Данное обор
во
поражения э
ря
(например,
допу
или
ПРЕД
Во и
обор
(например, зажженные св
Ус
Из
те
+5 °C до +35 °C; в
засл
Не
пров
вл
св
ОБ
При
пространств
повышения
менее 15 см сверху
справ
ПРЕД
В к
для в
раб
Во и
случае не сле
др
шт
то
дели. По завершению изучения инструкций, храните их в надежном месте для справок в будущем.
О ИЗБЕЖАНИЕ ПОРАЖЕНИЯ ЭЛЕКТРИЧЕСКИМ
КОМ НЕ СНИМАЙТЕ КРЫШКУ (ИЛИ ЗАДНЮЮ
ЕНКУ). ВНУТРИ НЕ СОДЕРЖАТСЯ ДЕАТЛИ,
ЗНАЧЕННЫЕ ДЛЯ РЕМОНТА
ЛЬЗОВАТЕЛЕМ. ДЛЯ ОБСЛУЖИВАНИЯ
АТИТЕСЬ К КВАЛИФИЦИРОВАННОМУ
ОТРУДНИКУ СЕРВИСНОЙ СЛУЖБЫ.
УПРЕЖДЕНИЕ
удование не является
донепроницаемым. Во избежание пожара или
лектрическим током не помещайте
дом с оборудованием емкости с жидкостями
вазы, цветочные горшки) и не
скайте попадания на него капель, брызг, дождя
влаги.
УПРЕЖДЕНИЕ
збежание пожара не приближайте к
удованию источники открытого огня
ечи).
ловия эксплуатации
делие эксплуатируется при следующих
мпературе и влажности:
лажность менее 85 % (не
оняйте охлаждающие вентиляторы)
устанавливайте изделие в плохо
етриваемом помещении или в месте с высокой
ажностью, открытом для прямого солнечного
ета (или сильного искусственного света).
D3-4-2-1-7c*_A1_Ru
ЯЗАТЕЛЬНАЯ ВЕНТИЛЯЦИЯ
установке устройства обеспечьте достаточное
о для вентиляции во избежание
температуры внутри устройства (не
, 15 см сзади и по 15 см слева и
а).
D3-4-2-1-7d*_A1_Ru
УПРЕЖДЕНИЕ
орпусе устройства имеются щели и отверстия
ентиляции, обеспечивающие надежную
оту изделия и защищающие его от перегрева.
збежание пожара эти отверстия ни в коем
дует закрывать или заслонять
угими предметами (газетами, скатертями и
орами) или устанавливать оборудование на
лстом ковре или постели.
D3-4-2-1-7b*_A1_Ru
Если вы желаете утилизировать данное изделие, не выбрасывайте его вместе с обычным бытовым мусором. Существует
отдельная система сбора использованных электронных изделий в соответствии с законодательством, которая предполагает
соответствующее обращение, возврат и переработку.
Чacтные клиенты-в странах-членах ЕС, в Швейцарии и Норвегии могут бесплатно возвращать использованные электронные изделия
в соответствующие пункты сбора или дилеру (при покупке сходного нового изделия).
В странах, не перечисленных выше, для получения информации о правильных способах утилизации обращайтесь в cooтветcтвующие
учреждения.
Поступая таким образом, вы можете быть уверены в том, что утилизируемый продукт будет соответствующим образом обработан,
передан в соответствующий пункт и переработан без возможных негативных последствий для окружающей среды и здоровья людей.
D3-4-2-1-1_B1_Ru
D3-4-2-1-3_A1_Ru
D3-4-2-1-7a_A1_Ru
K041_A1_Ru
МЕРЫ ПРЕДОСТОРОЖНОСТИ ПРИ
ОБРАЩЕНИИ С СЕТЕВЫМ ШНУРОМ
Держите сетевой шнур за вилку. Не вытаскивайте
вилку, взявшись за шнур, и никогда не касайтесь
сетевого шнура, если Ваши руки влажные, так как
это может привести к короткому замыканию или
поражению электрическим током. Не ставьте
аппарат, предметы мебели и т.д. на сетевой шнур,
не зажимайте его. Не завязывайте узлов на шнуре
и не связывайте его с другими шнурами. Сетевые
шнуры должны лежать так, чтобы на них нельзя
было наступить. Поврежденный сетевой шнур
может стать причиной возникновения пожара или
поразить Вас электрическим током. Время от
времени проверяйте сетевой шнур. В случае
обнаружения повреждения обратитесь за заменой
в ближайший сервисный центр или к Вашему
дилеру.
Меры предосторожности для DM-40BT/DM-40BT-W
Не подключайте входящие в комплект динамики
к каким-либо усилителям, кроме того, что входит
в комплект поставки. Подключение к любому
другому усилителю может стать причиной
неисправности или пожара.
Не закрепляйте эти колонки на стене или
потолке, поскольку в случае падения они могут
причинить травмы.
Графический символ , нанесенный на
изделие, обозначает переменный ток.
Графический символ , нанесенный на
изделие, обозначает постоянный ток.
Графический символ , нанесенный на
изделие, обозначает оборудование класса
защиты II. D3-8-2-4_A1_Ru
ВНИМАНИЕ
Данное изделие испытывалось в условиях
умеренного климата.
S002*_A1_Ru
SGK006*_A1_Ru
SGK007_A1_Ru
D3-8-2-1-7b_A1_Ru
K058b_A1_Ru
Ru
2
Page 63

Прочитайте перед использованием (Важно)
a
До начала
Свойства
! Сочетание низкочастотного фазоинвертора на передней панели и технологии Groove обеспечивает потрясающее качество звучания.
! Выпуклый диффузор в волноводе новой формы улучшает направленность на высоких частотах и обеспечивает объемное звучание.
! Несмотря на компактность, система удивляет своими насыщенными басами и чистотой звучания.
! Поддерживает форматы AAC и Qualcomm® aptX™ для более качественного воспроизведения звука через Bluetooth.
! Кнопка сопряжения на передней панели позволяет сопрягать устройства одним нажатием.
Проверка комплектности
! Силовой кабель x1
! Инструкции по эксплуатации (данный документ)
! Переходной аудиокабель (стереофонический мини-штекер 3,5 мм – RCA) x1
! Соединительный кабель x1
! Подложки x1
Части системы и их назначение
Фронтальная панель
1 Мягкие купольные высокочастотные динамики
диаметром 3/4 дюйма
2 Индикатор POWER
Подсветка включается/отключается при включении/отключении
питания. В режиме ожидания индикатор не горит.
3 Диффузоры
Улучшают направленность на высоких частотах и обеспечивают объемный звук.
4 Ручка LEVEL
Служит для регулирования громкости.
5 Кнопка сопряжения
Выполняет сопряжение с устройством Bluetooth.
Кнопка также выполняет функции паузы и воспроизведения при
проигрывании музыки через Bluetooth.
Подробную информацию см. в разделе «Прослушивание
музыки с устройства Bluetooth» (стр. 6).
1
2
3
4
5
6
7
8
9
6 Индикатор сопряжения (стр. 6)
Мигает: выполняется или ожидается сопряжение
Горит: подключено к устройству Bluetooth
7 Низкочастотные динамики диаметром 4 дюйма из
стекловолокна
8 Низкочастотные фазоинверторы
9 Канавки
Регулируют воздушный поток через отверстия низкочастотных
фазоинверторов для плавного воспроизведения низких частот.
a Разъем для наушников
Гнездо под стереофонический мини-штекер 3,5 мм.
При подключении наушников динамики отключаются и звук
воспроизводится только через наушники.
Ru
Русский
3
Page 64

Задняя панель
1
2
3
4
5
1 Разъемы INPUT 1 (стерео)
Несбалансированные входы под штекеры типа RCA.
2 Разъемы INPUT 2 (стерео)
Несбалансированный вход под стереофонический мини-штекер 3,5 мм.
3 Соединительные разъемы динамиков
С помощью поставляемого в комплекте кабеля подключите
правый и левый динамики.
Подключайте динамики только к усилителю, входящему в
состав данной системы. Невыполнение этого требования
может привести к повреждению или возгоранию системы.
4 Переключатель POWER
Включение и отключение питания данного аппарата.
5 Разъем питания переменного тока AC IN
Подключите силовой кабель к разъему AC IN, а затем к электрической розетке.
После завершения всех подключений между устройствами
подключите силовой кабель.
Используйте только поставляемый в комплекте силовой
кабель.
ВНИМАНИЕ
Выключатель POWER данного устройства не
полностью отключает его от электросети. Чтобы
полностью отключить питание устройства,
вытащите вилку кабеля питания из
электророзетки. Поэтому устройство следует
устанавливать так, чтобы вилку кабеля питания
можно было легко вытащить из розетки в
чрезвычайных обстоятельствах. Во избежание
пожара следует извлекать вилку кабеля питания
из розетки, если устройство не будет
использоваться в течение долгого времени
(например, если вы уезжаете в отпуск).
D3-4-2-2-2a*_A1_Ru
ПРЕДОСТЕРЕЖЕНИЕ
! Данный продукт оснащен функцией автоматического
перехода в режим ожидания. В отсутствие звукового
сигнала в течение заданного времени (прибл. 30 минут)
индикатор питания гаснет и система переходит в режим
ожидания с низким энергопотреблением независимо от
того, установлено ли соединение Bluetooth.
! Если продукт переходит в режим ожидания при уста-
новленном соединении Bluetooth, соединение Bluetooth
прерывается, а индикатор Bluetooth гаснет.
! При поступлении входного аудиосигнала из входных
терминалов в режиме ожидания система включается
автоматически. Более того, продукт также включается
при нажатии кнопки сопряжения Bluetooth в режиме
ожидания.
! Отключение функции автоматического перехода в режим
ожидания не предусмотрено.
Ru
4
Page 65

Установка и подключение
ПРЕДУПРЕЖДЕНИЕ
Хранит
случайном заг
обращай
D41-6-4_A1_Ru
Красный +
Черный
С красной полосой
Процедура установки
Условия в помещении прослушивания оказывают тонкое влияние
на звучание воспроизводимых колонками звуков.Для достижения
оптимальных условий прослушивания,перед тем как приступить
к установке, обратите надлежащее внимание на условия в месте
установки.
! Устанавливайте колонки на уровне ушей.
! Для получения естественного стереофонического эффекта
левая и правая колонки должны быть установлены симметрично на одинаковом расстоянии от слушателя.
! Прикрепите подложки к днищу аппарата для
противоскольжения.
е небольшие детали вне доступа детей. При
латывании, немедленно
тесь к врачу.
! Устанавливайте динамики на равном расстоянии от предпо-
Обеспечьте достаточное для оптимального охлаждения пространство между динамиками и близлежащими стенами или
другими устройствами (не менее 15 см сверху, сзади, справа и
слева от каждого динамика). Нехватка свободного пространства
между динамиком и стенами или другими устройствами может
привести к повышению температуры внутренних компонентов
системы, что может стать причиной неправильной работы или
повреждения устройства.
лагаемой точки прослушивания, направив их на эту точку так,
чтобы они образовывали угол 60 градусов и развернув друг к
другу примерно на 30 градусов.
50 ° до 60 °
ПРЕДОСТЕРЕЖЕНИЕ
Подключения
! При подключении динамиков обязательно отключайте питание
и отсоединяйте силовой кабель от розетки.
! Смотрите инструкции по эксплуатации к подключаемому
компоненту.
! После завершения всех подключений между устройствами
подключите силовой кабель.
Подключение кабелей
Подключение соединительного кабеля, поставляемого в комплекте, к динамикам.
1 Зачистите конец поставляемого в комплекте
соединительного кабеля длиной примерно 1 см и
удалите с него изоляцию, скручивая при этом жилу
кабеля.
После этого убедитесь, что все проволоки жилы надежно скручены
между собой.
2 Подключите поставляемый в комплекте
соединительный кабель к разъемам левого и
правого динамиков.
3 Прижимая фиксатор, вставьте жилу кабеля в
разъем динамика.
Подключите провод соединительного кабеля с красной полосой к
положительному разъему динамика «+» (красному), а другой провод – к отрицательному разъему динамика «–» (черному).
! Используйте только поставляемый силовой кабель.
! Соблюдайте осторожность при регулировке громкости звука,
поскольку сигналы, передаваемые со входа [INPUT 1],
[INPUT 2] и Bluetooth, смешиваются.
‒
Русский
ПРЕДОСТЕРЕЖЕНИЕ
! Подключив провода к разъемам, слегка потяните соедини-
тельный кабель, чтобы убедиться, что они надежно закреплены. В результате плохого контакта звук может воспроизводиться с прерыванием или шумами.
! Тщательно скручивайте проволоки жилы соединительного
кабеля при его подключении; убедитесь, что они не выступают из разъемов динамика. Выступающие проволоки могут
соприкасаться с задней панелью или друг с другом. Это
может привести к чрезмерной нагрузке на усилитель и стать
причиной неправильной работы или выхода системы из
строя.
! Для достижения нормального стереоэффекта обязательно
соблюдайте полярность (+, –) левого и правого разъемов при
подключении соединительного кабеля к левому и правому
динамикам.
Ru
5
Page 66

Прослушивание музыки с устройства
Bluetooth
Эти динамики позволяют вам воспроизводить дорожки, сохраненные на устройстве Bluetooth, без использования проводов.
Используя динамики в первый раз или подключая новое устройство Bluetooth к динамикам, необходимо выполнить сопряжение динамиков
и устройства Bluetooth.
Сопряжение (взаимная регистрация устройств) – это операция, необходимая для подключения устройства Bluetooth к динамикам.
Процедура сопряжения и
подключения
1 Включите динамики с помощью переключателя
[POWER] (Питание).
! Индикатор Bluetooth будет мигать приблизительно 30 секунд,
после чего динамики перейдут в режим сопряжения.
! Если индикатор Bluetooth не горит, нажмите и удерживайте
кнопку сопряжения не менее 2 секунд, чтобы снова включить
режим сопряжения
2 Выполните сопряжение на устройстве Bluetooth.
Выполните операцию, пока динамики находятся в режиме
сопряжения.
Подробную информацию см. в инструкции по эксплуатации
устройства Bluetooth.
3 Когда индикатор Bluetooth перестанет мигать
и начнет светиться постоянно, это значит, что
сопряжение (подключение) выполнено.
Если сопряжение не удалось выполнить в течение 30 секунд,
индикатор Bluetooth перестанет мигать и погаснет.
! Устройство Bluetooth, которое уже было сопряжено, можно
подсоединить, выполнив операцию подключения со стороны
устройства Bluetooth при условии, что динамики включены.
Воспроизведение
При воспроизведении музыки на подключенном устройстве
Bluetooth она выводится на динамики.
! Нажав кнопку сопряжения во время воспроизведения
музыки на устройстве Bluetooth, вы сможете выполнить
операцию паузы/воспроизведения (функция кнопки паузы/
воспроизведения на устройстве Bluetooth).
ПРЕДОСТЕРЕЖЕНИЕ
! Во время сопряжения (подключения) поднесите устройство
Bluetooth к динамикам.
! Во время первого воспроизведения музыки после
сопряжения звук может выводиться на большой громкости,
поэтому мы рекомендуем снизить ее, прежде чем начать
воспроизведение.
! Пауза/воспроизведение с помощью кнопки сопряжения могут
быть недоступны в зависимости от используемой программы.
! Подключение к динамикам может быть недоступно в
зависимости от устройства Bluetooth.
! Если вы хотите выполнить сопряжение динамиков с другим
устройством Bluetooth, отключите функцию Bluetooth на
подключенном в данный момент устройстве Bluetooth или
отсоедините его от динамиков, прежде чем выполнить
сопряжение.
! Динамики сохраняют информацию о сопряжении с максимум
восемью устройствами Bluetooth и будут выполнять попытку
подсоединиться к последнему сопряженному устройству
при нажатии кнопки сопряжения, если динамики при этом не
подключены ни к одному устройству Bluetooth.
Предупреждение относительно
радиоволн
Данное устройство использует радиоволновую частоту 2,4 ГГц;
эта частотная полоса также используется другими беспроводными
системами (см. список внизу). В целях предупреждения возникновения помех или разрывов в связи не используйте данное устройство вблизи от подобных приборов или отключайте следующие
приборы во время использования устройства:
! Беспроводные телефоны
! Беспроводные факсы
! Микроволновые печи
! Устройства для беспроводных ЛВС (IEEE802.11b/g)
! Беспроводное аудио-/видеооборудование
! Беспроводные контроллеры для игровых систем
! Микроволновые приборы для ухода за здоровьем
! Некоторые детские наблюдатели (радионяни)
Другое, менее распространенное, оборудование может работать
на той же самой частоте:
! Системы защиты от взлома
! Любительские радиостанции (HAM)
! Системы управления складской логистикой
! Системы распознавания для поездов или специальных
автомашин
ПРЕДОСТЕРЕЖЕНИЕ
! Если на экране вашего телевизора появится изображение с
шумом, вероятно, устройство Bluetooth® или данное устройство, а также продукты, поддерживаемые этим устройством,
препятствуют сигналу от входа для антенны на вашем телевизоре, видеопроигрывателе, спутниковом тюнере и т. п.
В таком случае увеличьте расстояние между входом для
антенны и устройством Bluetooth или данным устройством, а
также продуктами, поддерживаемыми этим устройством.
! Если на пути между данным устройством (включая при-
боры, поддерживаемые данным устройством) и прибором,
оснащенным беспроводной технологией Bluetooth, имеется
какое-либо препятствие (например, металлическая дверь,
бетонная стена или оловянная фольга с изоляцией), для
предотвращения помех и пропадания сигнала может потребоваться изменить местоположение системы.
Ru
6
Page 67

Рабочий диапазон
Эксплуатация данного устройства ограничивается бытовым применением. (Дальность передачи может уменьшаться в зависимости от среды связи). В следующих местах плохие условия приема
или невозможность приема радиоволн может вызвать пропадание
или
прекращение звука:
! В железобетонных зданиях или зданиях со стальным или
железным каркасом.
! Вблизи от крупных металлических конструкций.
! В толпе людей или возле здания или препятствия.
! В местах, подверженных воздействию магнитного поля, ста-
тического электричества или радиоволновых помех от оборудования радиосвязи, работающего на одинаковой с данным
устройством частотной полосе (2,4 ГГц), такого как, например,
устройство беспроводной ЛВС 2,4 ГГц или микроволновая
печь.
! Если вы живете в густо заселенном месте (квартира в много-
квартирном доме, городской дом и т. д.), и ваш сосед разместил микроволновую печь вблизи от вашей системы, вы можете
наблюдать радиоволновые помехи. Если это произойдет, переместите устройство в другое место. Когда микроволновая печь
не работает, радиоволновых помех наблюдаться не будет.
Отражение радиоволн
Радиоволны, принимаемые данным устройством, включают в себя
радиоволны, прямо поступающие с прибора, оснащенного беспроводной технологией Bluetooth, (прямые волны) и радиоволны,
поступающие с различных направлений в результате отражения
от стен, мебели и здания (отраженные волны). Отраженные волны
(в результате препятствий и отражающих предметов) в свою очередь создают большое разнообразие отраженных волн, а также
вариации в условиях приема в зависимости от местоположения.
Если в результате этого явления надлежащий прием аудиосигналов окажется невозможным, попробуйте немного переместить
прибор, оснащенный беспроводной технологией Bluetooth. Также
обратите внимание на то, что прием аудиосигналов может прерываться в результате отражения радиоволн при пересечении
человеком пространства между данным устройством и прибором,
оснащенным беспроводной технологией Bluetooth, или приближении человека к этому пространству.
Ru
Русский
7
Page 68

Дополнительная информация
Возможные неисправности и способы их устранения
!
В некоторых случаях неполадка может заключаться на другом компоненте. Проверьте другие компоненты, а также используемые электроприборы.
Если проблему невозможно решить, обратитесь в ближайший авторизованный сервисный центр Pioneer или к дилеру для проведения ремонта.
! Данный аппарат может не срабатьывать соответствующим образом по причине статического электричества или других внешних факто-
ров. В таком случае, обычную работу можно возобновить, отсоединив силовой кабель, подождав примерно 5 секунд или более, затем
снова подключив силовой кабель.
Общие сведения
Неисправность Проверьте Способ устранения
Не включается питание.
Нет звука или недостаточно громкий
звук от подключенного устройства.
Не горит индикатор питания (белый).
Устройство (при включенном питании)
не выходит из режима ожидания.
Искажение звучания.
Звуковые колебания (непрерывное воспроизведение на высокой
громкости).
Звук воспроизводится только через
левый динамик.
Питание автоматически выключится
(переход в режим ожидания).
Подключен-ли силовой кабель соответствующим образом?
Возможно подключенное устройство настроено неправильно?
Возможно регулятор громкости не установлен
в соответствующее положение?
Возможно к устройству не подается питание?
Возможно к устройству не подается питание?
Возможно динамики находятся в режиме
ожидания?
Возможно уровень входного сигнала слишком
низок?
Возможно регулятор громкости не установлен
в соответствующее положение?
Возможно уровень входного сигнала от подключенного устройства выбран неверно?
Возможно регулятор громкости не установлен
в соответствующее положение?
Возможно соединительный кабель подключен
неверно?
Звук отсутствовал в течение установленного
времени (около 30 минут) или дольше?
Уровень входного сигнала слишком низкий? Увеличьте уровень входного сигнала.
Подключите силовой кабель к розетке переменного тока.
Настройте внешний источник сигнала и отрегулируйте уровень
громкости.
Для увеличения громкости поверните ручку [LEVEL] на передней
панели этого устройства по часовой стрелке.
Переведите расположенный на задней панели этого устройства переключатель [POWER] в положение ON.
Переведите расположенный на задней панели этого устройства переключатель [POWER] в положение ON.
Переведите расположенный на задней панели этого устройства переключатель [POWER] в положение OFF, а затем через несколько секунд
снова переведите его в положение ON.
Увеличьте уровень входного сигнала.
Для уменьшения громкости поверните ручку [LEVEL] на передней
панели этого устройства против часовой стрелки.
Отрегулируйте уровень выходного сигнала подключенного устройства.
Для уменьшения громкости поверните ручку [LEVEL] на передней
панели этого устройства против часовой стрелки.
Соедините левый и правый динамики должным образом.
Воспроизведите сигнал через гнездо RCA или через вход под стереофонический мини-штекер.
Либо нажмите кнопку сопряжения на передней панели данного
устройства.
При подключении ко входу INPUT 1 или INPUT 2
Неисправность Проверьте Способ устранения
Нет звука или недостаточно громкий
звук от подключенного устройства.
Звук воспроизводится только через
один динамик.
Звук прерывается, или слышен шум. Надежен ли контакт кабелей подключения? Отсоедините кабели подключения и подсоедините их заново.
Подключены-ли соединительные кабели
соответствующим образом?
Не загрязнены-ли терминалы и штекеры? Перед выполнением подключений очистите терминалы и штекеры.
Возможно устройство подключено неверно? Подключите устройство к правому и левому входному разъему.
Подключите соединительные кабели соответствующим образом.
При подключении через Bluetooth
Неисправность Проверьте Способ устранения
Нет ли поблизости устройства, излучающего
Невозможно подключиться, звук прерывается или слышен шум.
Ru
8
электромагнитные волны в 2,4 ГГц (микроволновая печь, беспроводное устройство LAN,
другое устройство Bluetooth и т. п.)?
Не слишком ли далеко находится устройство
Bluetooth? Возможно, между устройствами
есть стена или другая преграда, блокирующая
сигнал?
Не запущена ли на устройстве Bluetooth другая
программа (не программа воспроизведения
музыки)?
Поддерживает ли устройство Bluetooth, к которому вы хотите подключиться, профиль A2DP?
Правильно ли выполнено сопряжение с
устройством Bluetooth?
Расположите прибор подальше от данного устройства или же выключите устройство, излучающее электромагнитные волны.
Расположите нужное устройство и подключенное устройство Bluetooth
рядом друг с другом. Или же измените положение одного из устройств.
Закройте все программы на устройстве Bluetooth, кроме программы
воспроизведения музыки.
Используйте устройство Bluetooth, которое поддерживает профиль
A2DP.
Выключите и снова включите питание данного устройства и устройства
Bluetooth и выполните сопряжение еще раз.
Page 69

О торговых марках и зарегистрированных торговых марках
! «Pioneer DJ» является зарегистрированным товарным знаком корпорации PIONEER CORPORATION и используется по лицензии.
!
Указанные здесь названия компаний и изделий являются торговыми марками или зарегистрированными торговыми марками соответствующих владельцев.
!
Слово и логотипы Bluetooth® являются зарегистрированными товарными знаками и принадлежат компании Bluetooth SIG, Inc.; использование этих товарных
знаков компанией PIONEER DJ Corporation разрешено соответствующей лицензией. Прочие товарные знаки и торговые наименования принадлежат соответствующим владельцам.
!
Qualcomm aptX – продукт компании Qualcomm Technologies International, Ltd. Qualcomm является товарным знаком Qualcomm Incorporated, зарегистрированным в США и других странах, и используется с соответствующего разрешения. aptX является товарным знаком компании Qualcomm Technologies
International, Ltd., зарегистрированным в США и других странах, и используется с соответствующего разрешения.
Технические характеристики
DM-40BT/DM-40BT-W
Модель Двухполосная активная акустическая система
Усилитель
Выходы усилителя
Входные разъемы RCA – 1 шт.; разъем для мини-штекера 3,5 мм для стереокабеля – 1 шт
Импеданс входа
Выходные разъемы Наушники – 1
Динамики
Корпус
Низкочастотный динамик Диаметр 4 дюйма (102 мм), конический
Высокочастотный динамик Диаметр 3/4 дюйма (19 мм), мягкий купольный
Раздел Bluetooth
Версия Bluetooth Спецификация вер. 4.2
Вывод Bluetooth Спецификация класса 2
Используемая частота 2,4 ГГц
Модуляция FH-SS (расширение спектра скачкообразной сменой частоты)
Поддерживаемые профили Bluetooth A2DP, AVRCP
Поддерживаемый кодек
Блок питания / другие параметры
Поддерживаемые уровни напряжения 110 В до 240 В переменного тока, 50 Гц/60 Гц
Энергопотребление 35 Вт
Энергопотребление в режиме ожидания 0,3 Вт
Габаритные размеры (Ш × В × Г)
Вес
! Технические характеристики и конструкция данного изделия могут изменяться без уведомления.
! © Pioneer DJ Corporation 2017. Все права защищены.
Левый канал: 21 Вт / 4 W, класс AB
Правый канал: 21 Вт / 4 W, класс AB
10 кW
Фазоинверторный / ламинированная древесноволокнистая плита средней плотности с виниловым покрытием
®
SBC, AAC, Qualcomm
Левая колонка: 146 × 227 × 223 мм
Правая колонка: 146 × 227 × 210 мм
Левая колонка: 2,7 кг
Правая колонка: 2,2 кг
aptX™, Qualcomm® aptX™ Низкое значение задержки
Ru
Русский
9
Page 70

Примечание:
Корпорация Пайонир Диджей устанавливает следующую продолжительность срока службы официально
поставляемых на Российский рынок товаров.
Аудио и видеооборудование: 7 лет
Переносное аудиооборудование: 6 лет
Другое оборудование (наушники, микрофон и т.д.): 5 лет
D3-7-10-6b_B1_Ru
Дату изготовления оборудования можно определить по серийному номеру, который содержит информацию о
месяце и годе производства.
Серийный номер
12 цифр
2 цифры
10 цифр
P1 P2
Дата изготовления оборудования
P1 - Год изготовления
Год 2001A2002B2003C2004D2005E2006F2007G2008H2009I2010
Символ
Год
Символ
2011K2012L2013M2014N2015O2016P2017Q2018R2019S2020
J
T
P2 - Месяц изготовления
Месяц 1
Символ
A
2
B
3
C
4
D
5
E
6
F
7
G
8
H
9
10
I
11
J
12
K
D3-7-10-7_A1_Ru
Информация для покупателей в ЕАЭС:
Уполномоченной организацией в соответствии с требованиями ТР ТС 004/2011, 020/2011, 017/2011
является ООО "ПИОНЕР РУС", Россия, 105064, г. Москва, Нижний Сусальный переулок, дом 5, строение
19, т. (495) 9568901
D3-7-10-8b_A1_Ru
L
10
Ru
Page 71

Ru
Русский
11
Page 72

ឍ֚
࣐٪ЦЭدȂ፝Ͻ݃ЭྜȞԄᘉᐾޠ្ᕏȟܺဋܼҐ
ᐡαȄ
ᐈձᕘძ
ᐈձᕘძྤ࡚ᇅྡྷ࡚Ȉ
ĬĶġʨġՎġĬĴĶġʨȞĬĵIJġʩġՎġĬĺĶġʩȟ
ȞϽஈ༭տࠔЍȟ
፝ϽӶϛًȃኹܼାྡྷ࡚ܗӏޣৣȞܗ
ޠആӏྜȟޠൠܛԋ၇ҐᐡȄ
ݨཏٲ
ԋ၇ҐᐡȂ፝ጃۢӶҐᐡѳڻႲ٘ޠޫпւ
ȞദഌIJĶġŤŮȃIJĶġŤŮȃІڎIJĶġŤŮпαȟȄ
ឍ֚
Ґᐡϛ٪ЬȄ࣐٪ЦକЭܗដႬٲࢉȂ፝ϽҐᐡဋܺ
ܼӉե౿၇షᡞޠৡᏣȞԄ߇౮ܗ߇ࣶȟߤߗܗڐኹ
ܼᅔЬȃᘱЬȃߧϜܗዙᕇᕘძϜȄ
ݨཏ
࣐ᗘռដႬӡᓏȂ፝ϽܷڤαίᇑȞܗݗȟȂпᗘ
ռដႬܗڨ།ȂᐡϲณӉեѠٽᆱঔٻңޠႮӈȂሰ
ᆱঔ݉ଡ଼፝ᖓཿᆱঔসȄ
D3-4-2-1-1_B1_Zhtw
፝КࡼඩᓟഌϸႬྜጤȄܧίඩᓟϽܝࡾႬྜጤȂ
йϽңᕇКџႬྜጤȂӱ࣐ኻѠཽᏳၰܗႬ
ᔟȄϽҐ၇ဋȃঢ়ڏܗڐуޑӈᔇӶႬྜጤαȂܗпڐ
уРԓᔡᔇႬྜጤȄϹϽႬྜጤ҉๗ܗڸڐуޠጤဈ
ᑪȄႬྜጤޠոጤᔗ٪ЦೞӶαȄႬྜጤڨѠ
ཽᏳЭدȂܗആԚসដႬȄစளᔯࢦႬྜጤȄԄݏ்
ึ౫ႬྜጤڨȂ፝൸ߗՎӒᎣŅŋϵѨ௳᠍ᆱঔϜЗܗ
S002*_A1_Zhtw
ࡥᄠঌࢭࠝEKٛ൰ȃ!ขޚቂངಖ༚ˈமׁᄲܿጸฬغᏮߴߟȃ!ޚፇˈขဢນ
֦܃ˈᇵֻ๊دૣȃ
D3-4-2-1-7b*_A1_Zhtw
մѓ౦ႬݱᒮৣܓႬᐡᆔ౪ᒳݳ
စԓᇰᜍӬϟմѓ౦ৣᓝႬᐡȂߩစ೩ѠȂϵѨȃ
୧ဵܗٻңְϛூՍᡑᓝ౦ȃђτѓ౦ܗᡑ
೪ϟܓІѓȄ
մѓ౦ৣᓝႬᐡϟٻңϛூኈԋӓІϔᘚӬݳ
߭ȇစึ౫ԥϔᘚ౫ຬȂᔗҴ֊ңȂٯՎณϔ
ᘚРூ៊ٻңȄ
ࠊӬݳ߭ȂࡿٸႬ߭ݳۢձཿϟณጤႬ߭Ȅ
մѓ౦ৣᓝႬᐡףڨӬݳ߭ܗϏཿȃᏱІᚃᕜң
ႬݱᒮৣܓႬᐡ೪റϟϔᘚȄ
Ⴌྜጤݨཏٲ
D3-4-2-1-3_A1_Zhtw
୶୧ໍඳȄġ
ŅŎĮĵıŃŕİŅŎĮĵıŃŕĮŘݨཏٲ
D3-4-2-1-7a_A1_Zhtw
ȇϊܼĹĶġĦœʼn
D3-4-2-1-7c*_A1_Zhtw
D3-4-2-1-7d*_A1_Zhtw
ġ
ࠣߤԥġœŰʼnŔġዀଅȂхߓ၏ࠣಓӬᇄᢋɆႬᐡႬφ೪റմңϾᏱޑ፵֥໕ዀྦĩńŏŔġIJĶķķĴĪɇį
ዀྦϜۢϟɆңޑ፵֥ԥݸዀұɇϲৡȂѠໍΤпίᆪ֮ڦூġ
URL: http://www.pioneer-twn.com.tw/p7-download2.asp
፝Ͻᖓ௦ژߩҐඵᖑᏣପറޠӉեڐуܺτᏣȄᖓ௦ژ
ӉեڐуܺτᏣѠཽആԚࢉሬܗѷЭȄ
SGK006*_A1_Zhtw
፝ϽٳඵᖑᏣ௯ӶᕔᏪܗЉ߇ݗαȂпռӱ௭ဤ
ՅᏳڨ།Ȅ
ҐࠣѬᎍۤΚૢঢ়৴ңഋȄԄݏҦܼᔗңӶڐу
ߩঢ়৴ңഋĩԄ࣐୧ཿңഋՅߞٻңܼᓢᢉϜȂܗ
ٻңܼآٚܗ಼ϜĪՅᏳึҢࢉሬٯሰঔ౪ȂӶ
ߴң҇ܜᐋঔ౪ຳңȄ
ឍ֚
ᐡ෧αڏԥϟᖂራІπңܼȂпጃߴҐࠣϟҔ
ளᐈձٯ٪ЦႇዦȄ࣐ᗘռЭدȂ፝Ͻஈ༭πܗңޑ
ࠣȞԄൣિȃҁȃᛩᄎȟڐ᙮ᇑȂη፝ϽӶࠕ෨ܗ
טαᐈձҐᐡȄ
ҐࠣαޠშұಓဵġġġġġġߓұһࢻႬȄ
ҐࠣαޠშұಓဵġġġġġġߓұޣࢻႬȄ
ҐࠣαޠშұಓဵġġġġġġߓұಒŊŊ೪റȄ
ݨཏ
Ґࠣ߾Ӷྤڸޠӈί௦ڨຠզȄ
D3-8-2-1-7b_A1_Zhtw
D55-11-3_A1_Zhtw
SGK007_A1_Zhtw
K041_A1_Zhtw
D3-8-2-4_A1_Zhtw
Zhtw
2
Page 73

使用前請閱讀 ( 重要 )
開始前
功能與特色
! 前方的低音反射管及 Groove 技術可產生強烈的大鼓音。
! 新型波導上的凸擴散器改善高頻音的指向性並提供渾厚的聲音。
! 雖然是桌上型的精巧尺寸,卻擁有豐富的低音和清澈的聲音品質。
! 支援 AAC 和 Qualcomm® aptXTM,可透過
! 前面板的配對按鈕可進行一鍵配對。
確認配件
! 電源線 x1
! 操作手冊(本手冊)
! 音訊轉換傳輸線(3.5 mm RCA 立體聲迷你插頭) x1
! 喇叭線 x1
! 底部緩衝墊 x8
藍牙
提供優質音效播放。
Zhtw
中文
3
Page 74

各部名稱及功能
a
前面板
1
2
3
4
5
6
7
8
9
1 3/4 吋軟球高音單體
2 POWER 指示燈
燈光連結電源開關。待機時指示燈熄滅。
3 擴散器
改善高頻音的指向性並提供渾厚的聲音。
4 LEVEL 控制鍵
調節音量。
5 配對按鈕
透過
藍牙
裝置進行配對。
配對按鈕在透過
執行暫停與播放功能。
關於詳細內容,請參照「聆聽
音樂」( 第 7 頁 )。
藍牙
播放音樂的期間,也能
藍牙
6 配對指示燈 ( 第 7 頁 )
閃爍時:正在配對中或等待連線
亮燈時: 已和
藍牙
裝置連線
7 4 吋光纖單體
8 低音反射管
9 Grooves
調節低音反射管的氣流,以達到順暢的低頻
輻射。
a 耳機端子
3.5 mm 立體聲迷你插頭型輸出端子。
揚聲器輸出的聲音會在耳機連接後轉為靜
音,留下耳機輸出的聲音。
裝置的
Zhtw
4
Page 75

後面板
1
2
3
4
5
1 INPUT 1 端子(立體聲)
RCA 針式不平衡輸入端子。
2 INPUT 2 端子(立體聲)
3.5 mm 立體聲迷你插頭型不平衡輸入端子。
3 揚聲器連接的連接器
請使用隨附的連接線連接左右揚聲器。
請勿將揚聲器連接至本系統以外的擴大機。
否則可能造損壞或火警。
4 POWER 開關
開啟及關閉本機電源。
5 AC IN
請將電源線連接至 AC IN 然後再插入電源
插座。
完成裝置之間的所有接線後,請連接電源線。
請務必使用隨附的電源線。
ݨཏ
ҐᐡPOWERᜱϛӓႬྜՍһࢻႬඩ৵ϹᘟȄ
ӱႬྜጤ࣐ҐᐡлႬྜϹᘟ၇ဋȂ்ሰඩᓟܧ
ଷпϹᘟܛԥႬΩȄӱԫȂ፝ጃᇰҐᐡԋ၇Ⴌྜጤ
ѠሇܿՍһࢻႬඩ৵ܧଷп٪ЦཏѵȄ࣐٪ЦЭدȂ
࿌ҐᐡܼߞґٻңϟםȞԄϜȟȂ፝
лႬྜඩᓟՍᕔαඩ৵ܧଷпϹᘟႬྜȄ
D3-4-2-2-2a*_A1_Zhtw
注意
! 本產品具有自動待機功能。 使用時若無
聲狀態達到設定的時間(約 30 分鐘),
無論是否有
關閉 POWER 指示燈並進入低功耗的待機
狀態。
! 若產品在有
藍牙
連線會中斷,
! 若在待機狀態中接到來自輸入端子的音
訊信號輸入,本產品就會自動進入通電
狀態。 此外,若在待機狀態時按下
配對按鈕,產品也會進入通電狀態。
! 本自動待機功能無法停用。
藍牙
連線,本產品都會自動
藍牙
連線時進入待機狀態,
藍牙
指示燈也會熄滅。
藍牙
Zhtw
中文
5
Page 76

安裝與連線
ឍ֚
፝ϊႮӈԇܺӶϊࡇᇅᔊڌณݳڦϟȄ
ཏѵ֎ΤȂ፝Ҵ֊ଛᚃȄ
D41-6-4_A1_Zhtw
紅
線
安裝步驟
揚聲器的播放音效會稍微受到聆聽房間環境的
影響。若要產生最佳的聆聽環境,在開始實際
安裝前,請適當考慮您安裝位置的環境。
! 放置於耳部位置。
! 如需天然立體聲效果,可在聆聽位置的對稱
及等距位置上安裝左右揚聲器。
! 將隨附的緩衝墊附著在機器底部以防止滑倒。
連接
! 確定在每次接線或變更接線之前,關閉電源
並從電源插座上拔下電源線。
! 有關已連接元件,請參閱操作手冊。
! 完成裝置之間的所有接線後,請連接電源線。
! 揚聲器的安裝要面朝內並與聽賞位置呈 60
度的總角度,左邊和右邊的揚聲器各為
30 度。
61!ʶՎ!71!ʶ
注意
為促進良好的冷卻,請確保揚聲器與旁邊的牆
面或其他組件間留有足夠的空間(每支揚聲器
的後面、左側和右側最少要有 15 公分以上的
間距)。揚聲器與牆面或其他組件間的間距不
足可能導致內部溫度高升造成故障或損壞。
! 請確定使用隨附電源線。
! 請留意相關音量,因為來自 [INPUT 1] 端
子、 [INPUT 2] 端子與
合式的。
藍牙
的輸入信號是混
連接線
請以隨附的揚聲器線來連接揚聲器。
1 在隨附的揚聲器線的線頭處剝開大約 1 公分
並擰轉及去除掉外露的絕緣層。
去除掉絕緣層後將芯線完全地擰在一起。
2 將隨附的揚聲器線連接至 LEFT 和 RIGHT 邊
的揚聲器端子上。
3 一邊壓下揚聲器端子上的抓片一邊將芯線插入
端子。
將揚聲器線的紅色線連接到 + 端子這邊
(紅色),不是紅色那根則連接到 - 端子這邊
(黑色)。
Zhtw
6
!,
!.
ቂ紅
注意
! 連接上端子後,請輕拉一下揚聲器線,確認
揚聲器線的線頭已與端子連接牢固。鬆弛的
連接可能造成音訊輸出中斷或輸出噪音。
! 連接揚聲器線時,請將芯線完全地擰在一起
並確認沒有芯線會突出揚聲器端子外。突出
到揚聲器外的芯線可能會接觸到後板或彼此
相觸。這可能造成擴大機上的過度負載,導
致作業停止或故障。
! 連接 LEFT 和 RIGHT 邊的揚聲器線時,若
發生 LEFT 和 RIGHT 邊的極性 (+, -) 錯
誤,則不會有正常的立體聲功效。
Page 77

聆聽
藍牙
裝置的音樂
這套揚聲器可讓您以無線方式享受儲存至
第一次使用揚聲器或將其與新的
配對 (裝置相互註冊) 是將
藍牙
藍牙
裝置與揚聲器連線的必要操作。
藍牙
裝置連線時,您必須配對揚聲器與
配對與連線程序
1 開啟 [POWER] 開關使揚聲器進入通電狀態。
!
藍牙
指示燈會閃爍大約 30 秒,揚聲器會進
入配對狀態。
! 若
藍牙
指示燈熄滅,請按下配對按鈕至少 2
秒再次切換至配對狀態。
藍牙
2 在
請在揚聲器進入配對狀態時執行此操作。
關於詳細內容,請參照
3 當
對 ( 連線 ) 已完成。
若 30 秒內未執行配對,
成熄滅狀態。
! 若揚聲器已進入通電狀態,可在
執行連線操作以連線曾配對的
裝置上執行配對。
藍牙
裝置的操作手冊。
藍牙
指示燈從閃爍變成亮燈狀態時,表示配
藍牙
指示燈會從閃爍變
藍牙
藍牙
裝置上
裝置。
播放
當您在連線的
置上播放的音樂會從揚聲器輸出。
! 在
藍牙
讓您執行暫停 / 播放功能 ( 與
停 / 播放按鈕功能相同 )。
注意
! 配對 ( 連線 ) 時,請將
揚聲器處。
! 首次完成連線之後執行播放功能時,輸出音
量可能較大聲,建議您在播放前調低音量。
! 暫停 / 播放操作可能無法透過配對按鈕正常
執行,取決於使用的應用程式。
! 與揚聲器的連線可能會失敗,視
而定。
! 如果您要將揚聲器與不同的
請關閉目前連接之
在執行配對操作前中斷連線。
! 揚聲器能儲存最多八組
訊,並且若在未與
按鈕,揚聲器就會嘗試與上一次配對的裝置
連線。
藍牙
裝置上播放音樂時,
裝置上播放音樂時按下配對按鈕,可
藍牙
裝置移至接近
藍牙
藍牙
裝置的
藍牙
裝置的配對資
藍牙
裝置連線時按下配對
藍牙
藍牙
裝置的暫
藍牙
裝置
裝置配對,
藍牙
功能,或
裝
裝置的音軌。
藍牙
裝置。
無線電波注意事項
本裝置使用 2.4 GHz 無線電波頻率,此頻寬可
用於其他無線系統 ( 請見下方列表 )。為防止雜
訊或干擾通訊,請勿在下列裝置附近使用本裝
置,或在本裝置使用期間務必將這些裝置關閉。
! 無線電話
! 無線傳真機
! 微波爐
! 無線 LAN 裝置 (IEEE802.11b/g)
! 無線 AV 設備
! 遊戲系統的無線控制器
! 微波型醫療設備
! 部分嬰兒監視器
其他可能使用相同頻率的少見設備:
! 防盜系統
! 業餘無線電台 (HAM)
! 倉庫物流管理系統
! 火車或救護車用識別系統
注意
! 若您的電視影像出現雜訊,可能是
置或本裝置 ( 包含本裝置支援產品 ) 對電
視、視訊、衛星調諧器等的天線輸入接頭造
成信號干擾。此時,請拉長天線輸入接頭與
藍牙
裝置或本裝置 ( 包含本裝置支援產品 )
間的距離。
! 若本裝置 ( 包含本裝置支援裝置 ) 與具
備
藍牙
無線技術的裝置之間的路徑有障礙
物 ( 例如金屬門、水泥牆或含有錫箔的絕
緣體 ),您可能需要變更系統的位置,以防
雜訊與干擾。
藍牙
裝
中文
Zhtw
7
Page 78

操作範圍
本裝置使用範圍限於家庭使用。( 傳輸距離可能
會因為通訊環境而縮短。)
在下列無線電波接收狀況不佳或無法接收的地
點中,可能會導致音訊中斷或停止:
! 在強化水泥建築物或鋼構或鐵構建築物中。
大型金屬家具附近。
! 人群眾多處或建築物或障礙物附近。
! 暴露於磁場、靜電或與本裝置使用相同頻寬
(2.4 GHz) 之無線電通訊設備 ( 例如 2.4 GHz
無線 LAN 裝置或微波爐 ) 發出之無線電波干
擾等地點。
! 若您居住在人口稠密的住宅區 ( 公寓、聯建
住宅等 ),且鄰居的微波爐位置接近您的系
統,您可能會受到無線電波干擾。 若發生此
情形,請將裝置移至其他位置。若未使用微
波爐,就不會產生無線電波干擾。
無線電波反射
本裝置接收的無線電波來源包含直接來自具備
藍牙
無線技術之裝置的無線電波 ( 直接電波 ),
以及由於牆壁、家具與建築物之反射而產生來
自各方向的電波 ( 反射電波 )。反射電波 ( 主因
為障礙物與反射體 ) 會進一步產生各種反射
電波,以及取決於位置的各種接收情形。若因
為此現象而無法正常接收無線電,請嘗試稍微
移動具備
意,當有人通過或接近本裝置與具備
技術的裝置中間時,也可能因為反射電波而使
無線電中斷。
藍牙
無線技術的裝置位置。另外請注
藍牙
無線
Zhtw
8
Page 79

其他資訊
故障排除
! 有時問題可能是其他裝置所產生。請檢查其他裝置和使用的電源設備。若無法修正問題,請就近
洽詢先鋒授權維修中心,或要求經銷商進行維修。
! 本機可能會因靜電或其他外在因素導致無法操作。此時,可透過拔下電源線,等待 5 秒或以上,
然後再插回電源線插頭以還原正常操作。
常見
問題 檢查 解決方法
電源是否未開啟。 電源線的連接是否正確? 電源線插頭是否插入 AC 電源插座。
連接設備的設定是否正確? 正確地設定設備的外部輸入以及音量。
連接的設備沒有聲音輸
出或聲音很小。
POWER 指示燈(白色)並
未亮起。
本裝置無法從待機狀態
恢復(電源開啟)。
音效失真。
振盪(持續輸出巨響)。 音量是否設到正確位置?
只有左揚聲器輸出
聲音。
電源會自動關閉
( 待機狀態 )。
音量是否設到正確位置?
電源是否開啟?
電源是否開啟?
揚聲器是否處於待機狀態?
輸入信號的位準是否太低? 增加輸入信號的位準。
音量是否設到正確位置?
從連接設備來的輸入位準是
否正確?
揚聲器連接線的連接是否
正確?
無聲狀態是否持續超過一
定時間 ( 約 30 分鐘 ) 或
以上?
輸入信號的位準是否太低? 增加輸入信號的位準。
與 INPUT 1 或 INPUT 2 端子連線時
順時針方向旋轉本裝置前面板上的
[LEVEL] 控制來增加音量。
請將本裝置後面板上的 [POWER] 開關
開啟。
請將本裝置後面板上的 [POWER] 開關
開啟。
請先關閉本裝置後面板上的 [POWER] 開
關並靜待數秒後再重新開啟一次。
逆時針方向旋轉本裝置前面板上的
[LEVEL] 控制來降低音量。
正確地調節連接設備的輸出位準。
逆時針方向旋轉本裝置前面板上的
[LEVEL] 控制來降低音量。
正確地連接好左邊和右邊的揚聲器。
從 RCA 或立體聲迷你插頭輸入端子輸入
訊號。
或按下本裝置前面板上的配對按鈕。
中文
問題 檢查 解決方法
連接的設備沒有聲音輸
出或聲音很小。
只有一支揚聲器輸出
聲音。
音樂中斷或有噪音。 連接線是否有接觸問題? 重新接上連接線。
連接線的連接是否正確? 正確連接連接線。
端子及插頭是否有污垢? 連接前,請清潔端子及插頭。
設備的連接是否正確? 請將設備連接至左和右的輸入端子。
Zhtw
9
Page 80

透過
藍牙
連線時
問題 檢查 解決方法
附近是否有發出 2.4 GHz 頻
無法連線或音樂中斷或
有噪音。
段電磁波的裝置(微波爐、
無線 LAN 裝置、其他
置等)?
藍牙
距
太遠? 或者兩者間有牆體或
障礙物阻隔信號?
除了音樂播放應用程式外,
是否有其他應用程式在
裝置上執行?
您要連線的
援 A2DP ?
與
正常執行?
裝置的距離是否
藍牙
藍牙
裝置的配對操作是否
藍牙
藍牙
裝置是否支
請將本機遠離該裝置,或停止使用會發出電
裝
磁波的裝置。
移動本裝置與連線的
或變更
藍牙
退出
的所有應用程式。
請使用支援 A2DP 的
關閉本裝置與
並再次執行配對。
藍牙
裝置使兩者靠近。
藍牙
裝置或本裝置的位置。
裝置上除了音樂播放應用程式以外
藍牙
裝置。
藍牙
裝置的電源後再次開啟,
10
Zhtw
Page 81

關於商標及註冊商標
!「Pioneer DJ」是先鋒公司的商標,並在授權下使用。
! 此處提及之公司及產品名稱皆為個別擁有者所有之商標或註冊商標。
! Bluetooth® 文字標記及標誌皆為 Bluetooth SIG, Inc 擁有之註冊商標,而由 PIONEER DJ
CORPORATION 使用的所有此類標記皆經過授權。其他商標及商品名稱皆為個別擁有者所有。
! Qualcomm aptX 為 Qualcomm Technologies International, Ltd. 的產品。Qualcomm 為
Qualcomm Incorporated 的商標,註冊於美國與其他國家,其使用皆獲得授權。aptX 為
Qualcomm Technologies International, Ltd. 的商標,註冊於美國與其他國家,其使用皆獲得
授權。
規格
DM-40BT/DM-40BT-W
機型 2 音路有源揚聲器
擴大機部分
擴大機輸出
輸入端子 RCA × 1, 3.5 mm 立體聲迷你插頭 × 1
輸入阻抗 10 kW
輸出端子 耳機 × 1
揚聲器部分
外殼 低音型/塑膠壓合 MDF
低音喇叭(低頻單元) 4 吋 (102 mm) 圓錐
高音喇叭(高頻單元) 3/4 吋 (19 mm) 軟球
藍牙
部分
版本 4.2版
輸出 2類
使用頻率 2.4 GHz
調變 FH-SS (跳頻展頻)
藍牙
支援的
支援的轉碼器
電源部分/其他
支援電壓 AC 110 V 至 240 V、50 Hz/60 Hz
功耗 35 W
待機狀態的功耗 0.3 W
外尺寸 寬x高x深
重量
規範 A2DP, AVRCP
左聲道:21 W/4 W, Class AB
右聲道:21 W/4 W, Class AB
藍牙
規格
藍牙
規格
SBC, AAC, Qualcomm
左聲道:146 mm × 227 mm × 223 mm
右聲道:146 mm × 227 mm × 210 mm
左聲道:2.7 kg
右聲道:2.2 kg
®
aptX™, Qualcomm® aptX™ 低延遲
中文
! 本產品規格及設計如有變更,恕不另行通知。
! © 2017 Pioneer DJ Corporation. 保留所有權利。
Zhtw
11
Page 82

ご使用の前に ( 重要 )
安全上のご注意
! 安全にお使いいただくために、必ずお守りください。
! ご使用の前にこの「安全上のご注意」をよくお読みのうえ、正しく
お使いください。
この取扱説明書および製品には、製品を安全に正しくお使いいただき、
あなたや他の方々への危害や財産への損害を未然に防止するために、い
ろいろな絵表示をしています。その表示と意味は次のようになってい
ます。内容をよく理解してから本文をお読みください。
警告
この表示を無視して、誤った取り扱いをすると、人が死亡または重傷を
負う可能性が想定される内容を示しています。
注意
この表示を無視して、誤った取り扱いをすると、人が損害を負う可能性
が想定される内容、および物的損害のみの発生が想定される内容を示し
ています。
絵表示の例
△記号は注意( 警告を含む )しなければならない内容であることを示
しています。図の中に具体的な注意内容( 左図の場合は感電注意 )が
描かれています。
9 記号は禁止( やってはいけないこと )を示しています。図の中に具
体的な禁止内容( 左図の場合は分解禁止 )が描かれています。
●記号は行動を強制したり、指示したりする内容を示しています。図
の中に具体的な指示内容( 左図の場合は電源プラグをコンセントから
抜く )が描かれています。
使用環境
放熱をよくするため、他の機器、壁等から間隔をとり、ラックなど
に入れるときはすき間をあけてください。また、次のような使い方
で通風孔をふさがないでください。内部に熱がこもり、火災の原因
となることがあります。
! あおむけや横倒し、逆さまにする。
! 押し入れなど、風通しの悪い狭いところに押し込む。
! じゅうたんやふとんの上に置く。
! テーブルクロスなどをかける。
着脱式の電源コード( インレットタイプ )が付属している場合のご
注意:付属の電源コードはこの機器のみで使用することを目的とし
た専用品です。他の電気製品ではご使用になれません。他の電気製
品で使用した場合、発熱により火災・感電の原因となることがあり
ます。また電源コードは本製品に付属のもの以外は使用しないでく
ださい。他の電源コードを使用した場合、この機器の本来の性能が
出ないことや、電流容量不足による発熱により火災・感電の原因と
なることがあります。
本機に水が入ったり、ぬれたりしないようにご注意ください。火
災・感電の原因となります。雨天、降雪中、海岸、水辺での使用は特
にご注意ください。
風呂場、シャワー室等では使用しないでください。火災・感電の原因
となります。
表示された電源電圧以外の電圧で使用しないでください。火災・感電
の原因となります。
本機を使用できるのは日本国内のみです。船舶などの直流(DC)電源
には接続しないでください。火災の原因となります。
警告
異常時の処置
万一煙が出ている、変なにおいや音がするなどの異常状態のまま使用
すると火災・感電の原因となります。すぐに機器本体の電源スイッチ
を切り、必ず電源プラグをコンセントから抜いてください。煙が出な
くなるのを確認して販売店に修理をご依頼ください。お客様による修
理は危険ですから絶対おやめください。
万一内部に水や異物等が入った場合は、まず機器本体の電源スイッ
チを切り、電源プラグをコンセントから抜いて販売店にご連絡くだ
さい。そのまま使用すると火災・感電の原因となります。
万一本機を落としたり、カバーを破損した場合は、機器本体の電源ス
イッチを切り、電源プラグをコンセントから抜いて販売店にご連絡く
ださい。そのまま使用すると火災・感電の原因となります。
設置
電源プラグの刃および刃の付近にほこりや金属物が付着している場
合は、電源プラグを抜いてから乾いた布で取り除いてください。そ
のまま使用すると火災・感電の原因となります。
電源コードの上に重い物を載せたり、コードが本機の下敷きになら
ないようにしてください。また、電源コードが引っ張られないよう
にしてください。コードが傷ついて、火災・感電の原因となります。
コードの上を敷物などで覆うことにより、それに気付かず、重い物
を載せてしまうことがあります。
使用方法
本機の上に花びん、植木鉢、コップ、化粧品、薬品や水などの入った
容器または小さな金属物を置かないでください。こぼれたり、中に
入った場合、火災・感電の原因となります。
ぬれた手で( 電源 )プラグを抜き差ししないでください。感電の原因
となることがあります。
本機の通風孔などから、内部に金属類や燃えやすいものなどを差し込
んだり、落とし込んだりしないでください。火災・感電の原因となり
ます。特にお子様のいるご家庭ではご注意ください。
本機のカバーを外したり、改造したりしないでください。内部には
電圧の高い部分があり、火災・感電の原因となります。内部の点
検・整備・修理は販売店にご依頼ください。
電源コードを傷つけたり、加工したり、無理に曲げたり、ねじった
り、引っ張ったり、加熱したりしないでください。コードが破損して
火災・感電の原因となります。コードが傷んだら( 芯線の露出、断線
など )、販売店に交換をご依頼ください。
雷が鳴り出したらアンテナ線や電源プラグには触れないでください。
感電の原因となります。
本機は、天井や壁に取り付けないでください。本機が落下し大けがを
することがあり大変危険です。
Ja
2
Page 83

設置
注意
電源プラグは、コンセントに根元まで確実に差し込んでください。差
し込みが不完全ですと発熱したり、ほこりが付着して火災の原因とな
ることがあります。また、電源プラグの刃に触れると感電することが
あります。
電源プラグは、根元まで差し込んでもゆるみがあるコンセントには接
続しないでください。発熱して火災の原因となることがあります。販
売店や電気工事店にコンセントの交換を依頼してください。
ぐらついた台の上や傾いたところなど不安定な場所に置かないでく
ださい。落ちたり、倒れたりしてけがの原因となることがあります。
本機を調理台や加湿器のそばなど油煙、湿気あるいはほこりの多い場
所に置かないでください。火災・感電の原因となることがあります。
次のような場所には設置しないでください。
! 直射日光のあたる場所、暖房器具に近い場所。
! 風通しが悪く、湿気やほこりの多い場所。
! 振動や傾斜のある、不安定な場所。
! アルコール類やスプレー式の殺虫剤など、引火性のものを使用す
る場所。
! カセットデッキなど、磁界に影響される機器の近く。
チューナーのアンテナケーブルから離して設置してください。近くに
置いた場合に雑音が出ることがあります。このようなときはアンテナ
やアンテナケーブルから本機を離してご使用になるか、やむを得ない
場合は本機の電源を切ってください。
テレビ、オーディオ機器、コントローラー等に機器を接続する場合は、
それぞれの機器の取扱説明書をよく読み、電源を切り、説明に従って
接続してください。また、接続は指定のコードを使用してください。
本機の上に重いものや外枠からはみ出るような大きなものを置かな
いでください。バランスがくずれて倒れたり、落下してけがの原因と
なることがあります。
電源プラグを抜く時は、電源コードを引っ張らないでください。
コードが傷つき火災・感電の原因となることがあります。必ずプラグ
を持って抜いてください。
電源コードを熱器具に近づけないでください。コードの被ふくが溶け
て、火災・感電の原因となることがあります。
移動させる場合は、電源スイッチを切り必ず電源プラグをコンセント
から抜き、外部の接続コードを外してから、行ってください。コードが
傷つき火災・感電の原因となることがあります。
窓を閉め切った自動車の中や直射日光が当たる場所など、異常に温度
が高くなる場所に放置しないでください。火災の原因となることがあ
ります。
本機の上に火がついたろうそくなどの裸火を置かないでください。火
災の原因となります。
スタンド等に取り付けてご使用の場合も、ぐらついた台の上や傾いた
ところなど不安定な場所に置かないでください。落ちたり、倒れたり
してけがの原因になることがあります。
取付金具やスタンド等を使用する場合は、十分な安全性を確保できる
だけの強度があることを必ずご確認ください。また不安定なスタンド
を使わないでください。
取り付け後は必ず安全性を確認してください。また、その後も定期的
に安全性を確認してください。
使用方法
本機のダクトやすき間から金属や紙片などの異物を入れないでくだ
さい。感電、ショート、火災や故障の原因になることがあります。
入った場合は、まず機器本体の電源スイッチを切り、電源プラグをコ
ンセントから抜いて販売店にご連絡ください。そのまま使用すると火
災・感電の原因となります。
本機のダクトやすき間に手や指を入れないでください。けがをするお
それがあります。
音が歪んだ状態で長時間使わないでください。スピーカーが発熱し、
火災の原因となることがあります。
本機に乗ったり、ぶら下がったりしないでください。特にお子様はご
注意ください。倒れたり、壊れたりしてけがの原因になることがあり
ます。
電源を入れる前には音量を最小にしてください。突然大きな音が出て
聴力障害などの原因となることがあります。
ヘッドホンをご使用になる時は、音量を上げすぎないようにご注意く
ださい。耳を刺激するような大きな音量で長時間続けて聞くと、聴力
に悪い影響を与えることがあります。
旅行などで長期間ご使用にならないときは、安全のため必ず電源プラ
グをコンセントから抜いてください。
保守・点検
5 年に一度くらいは内部の掃除を販売店などにご相談ください。内部
にほこりがたまったまま、長い間掃除をしないと火災や故障の原因と
なることがあります。特に湿気の多くなる梅雨期の前に行うとより効
果的です。なお、掃除費用については販売店などにご相談ください。
お手入れの際は安全のために電源プラグをコンセントから抜いて
行ってください。
設置場所について
! 熱を発生するアンプなどの上に直接置いたり、スポットライトなど
の近くで長時間使用すると、本体に悪い影響を与えますので、おや
めください。
! チューナーやテレビから離して設置してください。近くに置いた場
合は、雑音や映像の乱れが生じることがあります。なお、雑音や映像
の乱れは室内アンテナをご使用の場合に起こりやすく、このような
ときは、屋外アンテナを使用するか、本機の電源を切ってください。
製品上の図示記号 は交流電流を意味します。
製品上の図示記号 は直流電流を意味します。
製品上の図示記号 はクラス II 機器を意味します。
D3-8-2-4_A1_Ja
日本語
Ja
3
Page 84

製品のお手入れについて
本機の使用環境について
本機の使用環境温度範囲
使用環境湿度
は
風通
た
は
い。
D3-4-2-1-7c_A1_Ja
K021_A1_Ja
特に静か
な夜間には小さな音でも通りやすいものです。夜間
の音楽鑑賞にはとくに気を配りましょう。近所へ音
が漏れないように窓を閉めたり、ヘッドホンで聞く
のも一つの方法です。お互いに心を配
環境を守りましょう。
通常は、柔らかい布でから拭きしてください。汚れがひどい場合は水で
5 〜 6 倍に薄めた中性洗剤に柔らかい布を浸してよく絞ったあと、汚
れを拭き取り、そのあと乾いた布で拭いてください。アルコール、シン
ナー、ベンジン、殺虫剤などが付着すると印刷、塗装などがはげること
がありますのでご注意ください。また、ゴムやビニール製品を長時間触
れさせることも、キャビネットを傷めますので避けてください。化学ぞ
うきんなどをお使いの場合は、化学ぞうきんなどに添付の注意事項をよ
くお読みください。
お手入れの際は、電源プラグをコンセントから抜いて行ってください。
は5℃〜35℃、
85%以下(通風孔が妨げられていないこと)です。
しの悪い所や湿度が高すぎる場所、直射日光(ま
人工の強い光)の当たる場所に設置しないでくださ
愛情点検
長年ご使用のAV機器の点検を!
・電源コードや電源プラグが異常に
熱くなる。
このような症状は
ありませんか
・電源コードにさけめやひび割れが
ある。
・電源が入ったり切れたりする。
・本体から異常な音、熱、臭いがする。
音のエチケット
楽しい音楽も時と場所によっては気
になるものです。隣近所への思いや
りを十分にいたしましょう。ステレ
オの音量はあなたの心がけ次第で大
音のエチケット
本機は一般家庭用機器として作られたものです。一般
家庭用以外(例えば飲食店等での営業用の長時間使
用、車輛、船舶への搭載使用)で使用し、故障した場合
は、保証期間内でも有償修理を承ります。
きくも小さくもなります。
り、快い生活
K041_A1_Ja
ご使用中止
組み立て、取り付けの不備、取り付け強度不足、誤使用、改造、天災
などによる事故損傷については、弊社は一切責任を負いません。
故障や事故防止のため、すぐに電源
を切り、電源プラグをコンセントから
抜き、必ず販売店にご相談ください。
K026*_A1_Ja
Ja
4
Page 85

はじめに
a
本機の特長
! フロントに配置したバスレフダクトと、Groove 技術の採用により、力強いキック音を実現しました。
! 新形状のウェーブガイドに搭載した凸形状ディフューザーによる高音域の指向性改善と広がり感を実現しました。
! 卓上に設置できるコンパクトなサイズでありながら豊かな低音とクリアな音質を両立しました。
! より高音質な Bluetooth 再生が可能な「AAC」と「Qualcomm®aptX™」に対応しました。
! ワンタッチでペアリングが可能なペアリングボタンを本体前面部に搭載しました。
付属品を確認する
! 電源コード× 1
! 取扱説明書( 本書 )
! 日本国内用保証書( 取扱説明書裏表紙に記載 )
! オーディオ変換ケーブル (3.5mmステレオミニプラグ—RCA) × 1
! スピーカーコード× 1
! ボトムクッション× 8
各部の名称と機能
本体前面部
1 3/4 インチ ソフトドームトゥイーター
2 POWER インジケーター
電源のオン / オフに連動して点灯します。スタンバイ時は消灯し
ます。
3 ディフューザー
高音域の指向性を改善し、広がり感を実現します。
4 LEVEL ツマミ
音量を調整します。
5 ペアリングボタン
Bluetooth 機器とのペアリング操作をします。
また、Bluetooth での楽曲再生中は、一時停止 / 再生操作ができます。
詳細は「Bluetooth 機器の音楽を聴く」(8ページ)を参照して
ください。
1
2
3
4
5
6
7
8
9
6 ペアリングインジケーター(8 ページ)
点滅時:ペアリング操作および接続待ち状態
点灯時:Bluetooth 機器と接続されている状態
7 4 インチ グラスファイバーウーファー
8 バスレフダクト
9 グルーブ
バスレフダクトの空気の流れを整え低域音をスムーズに放射し
ます。
a ヘッドフォン端子
3.5mm ステレオミニプラグタイプの出力端子です。
ヘッドフォンを接続すると、スピーカーから出る音がミュートされ
てヘッドフォンからだけ音が出力されます。
日本語
Ja
5
Page 86

本体背面部
1 INPUT 1 端子 ( ステレオ )
RCAピンタイプのアンバランス型入力端子です。
2 INPUT 2 端子 ( ステレオ )
3.5mm ステレオミニプラグタイプのアンバランス型入力端子
です。
3 スピーカー接続コネクター
付属のコードを使って、左右のスピーカーを接続してください。
本スピーカーを本システム以外のアンプに接続して使用しないで
ください。故障・火災の原因となることがあります。
4 POWER スイッチ
本機の電源をオン / オフします。
5 AC IN
電源コードを接続してコンセントに接続します。
電源コードは、機器の接続がすべて終わってから接続してくだ
さい。
必ず付属の電源コードをご使用ください。
1
2
3
4
5
注意
製品の仕様により、本体部やリモコン( 付属の場合 )のスイッチを操
作することで表示部がすべて消えた状態となり、電源プラグをコンセ
ントから抜いた状態と変わらなく見える場合がありますが、電源の供
給は停止していません。製品を電源から完全に遮断するためには、電
源プラグ( 遮断装置 )をコンセントから抜く必要があります。製品は
コンセントの近くで、電源プラグ( 遮断装置 )に簡単に手が届くよう
に設置し、旅行などで長期間ご使用にならないときは電源プラグをコ
ンセントから抜いてください。火災の原因となることがあります。
<D3-7-12-5-2a_A1_Ja>
注意
! この製品にはオートスタンバイ機能が内蔵されております。
Bluetooth 接続中に関わらず、ご使用中に無音状態が一定時間
(約 30 分)継続しますと自動的に POWER インジケーターが消
灯して低消費電力のスタンバイ状態になります。
! Bluetooth 接続中にスタンバイ状態になると、Bluetooth の接続は
解除され、Bluetooth インジケーターも消灯します。
! スタンバイ状態で入力端子から音声信号の入力があると自動的に
電源オン状態になります。また、スタンバイ中に Bluetooth ペア
リングボタンを押した場合も電源オン状態になります。
! オートスタンバイ機能は解除することはできません。
Ja
6
Page 87

設置と接続
赤+
黒−
赤線のある方
設置方法
スピーカーの再生音は、リスニングルームの条件によって微妙な影響を
受けやすいものです。最適な状態でご使用いただくために、スピーカー
を取り付ける前に設置場所を十分検討してください。
! スピーカーは耳の高さに設置してください。
! 左右のスピーカーは、視聴位置に対して等距離で左右対称になるよ
うに設置すると自然なステレオ感が得られます。
! すべり防止のため、付属のクッションを本体の底面に貼ってくだ
さい。
小さな部品は幼児の手の届くところに置かな
いでください。万一飲み込んだ場合にはただ
ちに医師と相談してください。
警告
D41-6-4_A2_Ja
! スピーカーは視聴位置から左右に 30°、計 60°の開き角となる位
置に設置し、内側に向けてください。
50°〜60°
注意
本機を設置する場合は、放熱を良くするため他の機器や壁などから十
分な間隔をとってください ( 天面 15cm 以上、後面 15cm 以上、
右側、左側各 15cm 以上 )。本機と壁および他の機器との間隔がと
れないと、内部に熱がこもり、性能不良や故障の原因になります。
接続する
! 機器の接続を行う場合、または変更を行う場合には、必ず電源を切
り、電源コードをコンセントから抜いてください。
! 接続する機器の取扱説明書もあわせてご覧ください。
! 電源コードは、機器の接続がすべて終わってから接続してくだ
さい。
コードの接続
付属のスピーカーコードをスピーカーに接続します。
1 付属のスピーカーコードの先端の約 1 cm 剥ぎ取られた
絶縁体をねじりながら取り除く
取り除いたあと、芯線をしっかりねじります。
2 LEFT 側と RIGHT 側のスピーカー端子に付属のス
ピーカーコードを接続する
3 スピーカー端子のツメを押しながら芯線を端子に挿し
込む
スピーカーコードはスピーカーコードの赤線のある方を端子の
+側(赤)に、赤線のない方を-側(黒)に接続します。
! 必ず付属の電源コードをお使いください。
![INPUT 1]端子、[INPUT 2]端子および Bluetooth からの入力信号は
ミックスされますので、音量にご注意ください。
注意
! 端子に接続したあとスピーカーコードを軽く引いて、スピーカー
コードの先端が端子へ確実に接続されていることを確かめてくだ
さい。不完全な接続は、音がとぎれたり、雑音が出たりする原因
となります。
! スピーカーコードを接続するときは、芯線をしっかりねじり、ス
ピーカー端子からはみ出していないことを確認してください。芯
線がはみ出して、リアパネルに接触したり、芯線どうしが接触す
るとアンプに過大な負荷が加わって動作が停止したり、故障する
ことがあります。
! LEFT 側と RIGHT 側スピーカー端子を接続時、LEFT 側と
RIGHT 側の極性(+、-)を間違えてつないだ場合、正常なステ
レオ効果が得られなくなります。
日本語
Ja
7
Page 88

Bluetooth 機器の音楽を聴く
2.4FH1
①
②
③
本スピーカーでは Bluetooth 機器に保存された楽曲をワイヤレスでお楽しみいただけます。
本スピーカーを初めて使用する場合、または新しい Bluetooth 機器を本スピーカーに接続する場合は、本スピーカーと Bluetooth 機器をペアリング
する必要があります。
ペアリング(機器相互登録)とは、Bluetooth 機器と本機を接続するために必要な操作です。
ペアリングと接続方法
1 POWER スイッチを ON にして本スピーカーの電源を入
れる
! Bluetooth インジケーターが約 30 秒点滅しペアリング状態になり
ます。
! Bluetooth インジケーターが消灯している場合は、ペアリングボタン
を 2 秒以上押して再度ペアリング状態にしてください。
2 Bluetooth 機器側でペアリング操作を行う
本スピーカーがペアリング状態の間に操作を行ってください。
詳しくは、お使いの Bluetooth 機器の取扱説明書をご覧ください。
3 Bluetooth インジケーターが点滅から点灯状態に変われ
ばペアリング(接続)完了です
30 秒以内にペアリングできなかった場合、Bluetooth インジケーター
は点滅から消灯になります。
! すでにペアリング済みの Bluetooth 機器は、本機の電源 ON の状態
であれば、Bluetooth 機器側の接続操作で接続できます。
再生
接続している Bluetooth 機器で音楽を再生すると、本スピーカーから
Bluetooth 機器で再生している音楽を出力します。
! Bluetooth 機器の音楽再生中にペアリングボタンを押すと、一時停
止 / 再生操作できます(Bluetooth 機器の一時停止 / 再生ボタンと同
じ機能)。
注意
! ペアリング(接続)する時は、Bluetooth 機器を本スピーカーに近
づけてください。
! 接続完了後、初回再生操作時に、大音量で出力されることがあり
ますので、再生前に音量を下げておくことをおすすめします。
! 使用するアプリケーションによって、ペアリングボタンで一時停
止 / 再生操作ができない場合があります。
! Bluetooth 機器によっては、本スピーカーと接続できない場合があ
ります。
! 別の Bluetooth 機器とペアリングしたい場合、現在接続中の
Bluetooth 機器の Bluetooth 機能をオフまたは接続を切断してか
ら、ペアリング操作を行ってください。
! 本機は最大8台までのペアリング情報を記憶し、Bluetooth 機器と
未接続の状態でペアリングボタンを押すと、最後にペアリングし
た Bluetooth 機器に接続しようとします。
電波に関するご注意
本機は、2.4GHz の周波数帯の電波を利用しています。この周波数の
電波は、下記①に示すようにいろいろな機器が使用しています。また、
お客様に存在がわかりにくい機器として下記②に示すような機器もあ
ります。
① 2.4 GHz を使用する主な機器の例
! コードレスフォン
! コードレスファクシミリ
! 電子レンジ
! 無線 LAN 機器
! ワイヤレス AV 機器
! ゲーム機のワイヤレスコントローラー
! マイクロ波治療機器類
② 存在がわかりにくい 2.4 GHz を使用する主な機器の例
! 万引き防止システム
! アマチュア無線局
! 工場や倉庫などの物流管理システム
! 鉄道車両や緊急車両の識別システム
これらの機器と本機を同時に使用すると、電波の干渉により、音がとぎ
れて雑音のように聞こえたり、音が出なくなることがあります。
受信状況の改善方法としては以下の方法があります。
! 電波を発生している相手機器の電源を切る
! 干渉している機器の距離を離して設置する
次の場所では本機を使用しないでください。ノイズが出たり、送信 / 受
信ができなくなる場合があります。
! 2.4GHz を利用する無線 LAN、また電子レンジなどの機器の磁場、
静電気、電波障害が発生するところ。(環境により電波が届かない場
合があります)
! ラジオから離してお使いください。(ノイズが出る場合があります)
! テレビにノイズが出た場合、Bluetooth 機能搭載機器や本機がテレ
ビ、ビデオ、BS チューナー、CS チューナーなどのアンテナ入力
端子に影響を及ぼしている可能性があります。Bluetooth 機能搭載機
器や本機をアンテナ入力端子から遠ざけて設置してください。
電波法に基づく認証について
本機は電波法に基づく小電力データ通信の無線設備として認証を受け
ています。したがって、本製品を使用するときに無線局の免許は必要あ
りません。また、本製品は、日本国内のみで使用できます。ただし、以
下の行為をすると法律により罰せられることがあります。
! 本機を分解/改造すること。
! 本機に貼られている証明ラベルをはがすこと。
周波数について
周波数表示の見かた
(本機の背面のラベルに記載)
8
①「1」想定される与干渉距離(約 10m)を表します
②「FH」変調方式を表します
③「2.4」GHz 帯を使用する無線設備を表します
Ja
Page 89

使用範囲について
ご家庭内での使用に限ります(通信の環境により伝送距離が短くなるこ
とがあります)。
次のような場合、電波状態が悪くなったり電波が届かなくなることが原
因で、音声がとぎれたり停止したりします。
! 鉄筋コンクリートや金属の使われている壁や床を通して使用する
場合。
! 大型の金属製家具の近くなど。
! 人混みの中や、建物障害物の近くなど。
! 2.4GHz を利用する無線 LAN、また電子レンジなどの機器の磁場、
静電気、電波障害が発生するところ。
! 集合住宅(アパート・マンションなど)にお住まいで、お隣で使用
している電子レンジ設置場所が本機に近い場合。なお、電子レンジ
は、使用していなければ電波干渉は起こりません。
電波の反射について
本機が通信する電波には、直接届く電波(直接波)と、壁や家具、建物
などに反射してさまざまな方向から届く電波(反射波)があります。こ
れにより、障害物と反射物とのさまざまな反射波が発生し、電波状態の
良い位置と悪い位置が生じ、音声がうまく受信できなくなることがあり
ます。
このようなときは、Bluetooth 機能搭載機器の場所を少し動かしてみて
ください。Bluetooth 機能搭載機器と本機の間を人間が横切ったり、近
づいたりすることによっても、反射波の影響で音声がとぎれたりするこ
とがあります。
注意
! 本機の使用によって発生した損害については、法令上賠償責任が
認められる場合を除き、当社は一切の責任を負いませんので、あ
らかじめご了承ください。
! 本機は、すべての Bluetooth 機能搭載機器との接続動作を保証す
るものではありません。
安全にお使いいただくために
! 医療用電気機器(ペースメーカーなど)や自動制御機器(火災報知
機など)といった微弱な信号を取り扱う電子機器の近くでは使用し
ないでください。電子機器に誤動作するなどの影響を与え、事故の
原因となる恐れがあります。
ご注意いただきたい電子機器の例
補聴器、ペースメーカー、その他医療用電気機器、火災報知器、自動ド
ア、その他自動制御機器など。
ペースメーカー、その他医療用電気機器をご使用される方は、該当の各
医療用電気機器メーカーまたは販売業者に電波による影響についてご
確認ください。
本機の使用周波数は、2.4GHz 帯です。この周波数帯では電子レ
ンジ等の産業・科学・医療用機器のほか、他の同種無線局、工場の
製造ライン等で使用されている免許を要する移動体識別用の構内
無線局、アマチュア無線局(以下「他の無線局」と略す)が運用さ
れています。
1. 本機を使用する前に、近くで「他の無線局」が運用されていな
いことを確認してください。
2. 万一、本機と「他の無線局」との間に電波干渉が発生した場合
には、速やかに本機の使用場所を変えるか、本機の運用を停止
(電波の発射を停止)してください。
3. その他、お困りのことが起きたときは、弊社ご相談窓口
(13ページ)へお問い合わせください。
日本語
Ja
9
Page 90

その他
故障かな?と思ったら
! 故障かな?と思ったら、下記の項目を確認してください。また、本機と接続している機器もあわせて確認してください。それでも正常に動作し
ないときは、11ページの「保証とアフターサービス」をお読みのうえ、販売店にお問い合わせください。
! 静電気など、外部からの影響により本機が正常に動作しないことがあります。このようなときは、電源コードを一度抜いて 5 秒以上経ってから
再び差し込むことで正常に動作することがあります。
共通
こんなときは ここを確認してください 対応の仕方
電源が入らない。 電源コードが正しく接続されていますか? 電源コードをコンセントへ接続してください。
接続している機器の音が出ない、または
音が小さい。
POWER インジケーター ( 白色 ) が点灯
しない。
スタンバイ状態から復帰 ( 電源オン ) し
ない。
音がひずむ。
発振 ( 大きな音が連続的に出る ) する。 音量が正しい位置に設定されていますか? 本体前面部の [LEVEL]ツマミを左に回して、音量を下げてください。
左側のスピーカーからしか音が出ない。 スピーカーコードは接続されていますか? 左右のスピーカーを正しく接続してください。
電源が自動的にオフ(スタンバイ状態)に
なる。
接続している機器は正しく設定されていますか? 機器の外部入力や音量を正しく設定してください。
音量が正しい位置に設定されていますか? 本体前面部の [LEVEL]ツマミを右に回して、音量を上げてください。
電源がオンになっていますか? 本体背面部の [POWER]スイッチをオンにしてください。
電源がオンになっていますか? 本体背面部の [POWER]スイッチをオンにしてください。
スタンバイ状態になっていませんか?
入力信号のレベルが低くありませんか? 入力信号のレベルを大きくしてください。
音量が正しい位置に設定されていますか? 本体前面部の [LEVEL]ツマミを左に回して、音量を下げてください。
接続している機器からの入力レベルは適切で
すか?
無音状態が一定時間(約 30 分)以上継続してい
ませんか?
入力信号のレベルが低くありませんか? 入力信号のレベルを大きくしてください。
本体背面部の [POWER]スイッチを一旦オフにして、数秒後にオンにしてく
ださい。または本体前面部のペアリングボタンを押してください。
接続している機器の出力レベルを正しく調整してください。
RCA またはステレオミニプラグ入力端子から信号を入力してください。
または本体前面部のペアリングボタンを押してください。
INPUT1 もしくは INPUT2 で接続時
こんなときは ここを確認してください 対応の仕方
接続している機器の音が出ない、または
音が小さい。
片側のスピーカーからしか音が出ない。 機器を正しく接続していますか? L と R 両方の入力端子に機器を接続してください。
音が途切れたり、雑音がする。 接続ケーブルが接触不良になっていませんか? 接続ケーブルを接続し直してください。
接続ケーブルが正しく接続されていますか? 接続ケーブルを正しく接続してください。
端子やプラグが汚れていませんか? 端子やプラグの汚れを拭き取ってから接続してください。
Bluetooth 接続時
こんなときは ここを確認してください 対応の仕方
接続できない、あるいは、音が途切れた
り、雑音がする。
2.4GHz 帯の電磁波を発する機器(電子レンジ、
無線 LAN、他の Bluetooth 機器など)が近くにあ
りませんか?
Bluetooth 機器との距離が離れすぎていませ
んか?あるいは、間が壁や障害物等でさえぎられ
ていませんか?
Bluetooth 機器で音楽再生以外のアプリケーショ
ンが動作していませんか?
接続したい Bluetooth 機器は A2DP に対応してい
ますか?
Bluetooth 機器とのペアリングが正しく行われて
いますか?
これらの機器から本機を離して設置するか、電磁波を発する他の機器の使
用をお止めください。
本機と接続している Bluetooth 機器を近づけてください。また、Bluetooth 機
器や本機の位置を変えてください。
Bluetooth 機器の音楽再生以外のアプリケーションの動作を止めてくだ
さい。
A2DP に対応した Bluetooth 機器を使用してください。
本機と Bluetooth 機器の電源を一度切り、再び電源を入れて、再度ペアリン
グの操作を行ってください。
10
Ja
Page 91

保証とアフターサービス
修理に関するご質問、ご相談
13ページに記載の修理受付窓口、またはお買い求めの販売店にご
相談ください。
保証書 ( 裏表紙に記載 )
保証書は必ず「販売店名・購入日」などの記入を確かめて販売店から受
け取り、内容をよく読んで大切に保管してください。
保証書に販売店名や購入日の記載がない場合は、本製品のご購入の際に
受け取られた、購入日が明記されている購入証明書( レシート、納品書、
受注メールなど )が必要となります。保証書とともに大切に保管してく
ださい。
保証期間は購入日から 1年間です。
補修用性能部品の最低保有期間
当社はこの製品の補修用性能部品を製造打ち切り後、8 年間保有してい
ます。性能部品とは、その製品の機能を維持するために必要な部品です。
修理を依頼されるとき
本書の 10ページの「故障かな?と思ったら」をお読みいただき、故
障かどうかをご確認ください。それでも正常に動作しないときは、必ず
電源プラグを抜いてから、次の要領で修理を依頼してください。
連絡していただきたい内容
! ご住所
! お名前
! お電話番号
! 製品名:アクティブモニタースピーカー
! 型番:DM-40BT/DM-40BT-W
! お買い上げ日
! 故障または異常の内容
「いつ、どのくらいの頻度で、どのような操作で、どうなる」といっ
た詳細
保証期間中は
修理に際しましては、保証書をご提示ください。保証書に記載されてい
る弊社保証規定に基づき修理いたします。
保証期間を過ぎているときは
修理すれば使用できる製品については、ご希望により有料で修理いたし
ます。
商標および登録商標について
! 「PioneerDJ」は、パイオニア株式会社の商標であり、ライセンス
に基づき使用されています。
! その他記載されている会社名および製品名等は、各社の登録商標ま
たは商標です。
! Bluetooth®ワードマークおよびロゴは、BluetoothSIG,Inc.が所
有する登録商標であり、PioneerDJ 株式会社は、これら商標を使
用する許可を受けています。他のトレードマークおよび商号は、各
所有権者が所有する財産です。
! QualcommaptXは、QualcommTechnologiesInternational,
Ltd.の製品です。Qualcommは、QualcommIncorporatedの
米国ならびに他の国における登録商標であり、許可のもとに使用さ
れています。aptXは、QualcommTechnologiesInternational,
Ltd.の米国ならびに他の国における登録商標であり、許可のもとに
使用されています。
日本語
Ja
11
Page 92

仕様
DM-40BT/DM-40BT-W
形式 2 ウェイアクティブスピーカー
アンプ部
アンプ出力
入力端子 RCA × 1、3.5mm ステレオミニプラグ× 1
入力インピーダンス 10kW
出力端子 ヘッドフォン× 1
スピーカー部
エンクロージャー バスレフ型 /MDF ビニールラミネート
ウーファー (LF ドライバー ) 4インチ (102mm) コーン
トゥイーター (HF ドライバー ) 3/4インチ (19mm) ソフトドーム
Bluetooth 部
バージョン
出力
使用周波数帯域 2.4GHz 帯
変調方式 FH-SS(周波数ホッピングスペクトラム拡散方式)
対応 Bluetooth プロファイル A2DP、AVRCP
対応コーデック SBC、AAC、Qualcomm®aptX™、Qualcomm®aptX™LowLatency
電源部・その他
対応電圧 AC100V、50Hz/60Hz
消費電力 35W
待機時消費電力( スタンバイ状態 ) 0.3W
外形寸法W×H×D
質量
! 本機の仕様および外観は、改良のため予告なく変更することがあります。
! ©2017PioneerDJ 株式会社 禁無断転載
Lch:21W/4W、ClassAB
Rch:21W/4W、ClassAB
Bluetooth 標準規格Ver.4.2
Bluetooth 標準規格Class2
Lch:146mm×227mm×223mm
Rch:146mm×227mm×210mm
Lch:2.7kg
Rch:2.2kg
12
Ja
Page 93

<各窓口へお問い合わせ時のご注意>
VOL.003平成29年3月現在 記載内容は、予告なく変更させていただくことがありますので予めご了承ください。
PioneerDJ商品の取り付け・組み合わせなどについては、お買い求めの販売店様へお問い合わせください。
「0120」で始まる電話番号は、携帯電話・PHS・一部のIP電話などからはご使用になれません。
ナビダイヤルは、携帯電話・PHSなどからご利用可能ですが、通話料がかかります。また一部の
IP電話などからはご使用になれません。
正確なご相談対応のために折り返しお電話をさせていただくことがございますので発信者番号の通知に
ご協力いただきますようお願いいたします。
商品についてのご相談窓口
●商品のご購入や取り扱い、故障かどうかのご相談窓口およびカタログのご請求について
※番号をよくお確かめの上でおかけいただきますようお願いいたします
PioneerDJサポートセンター
受付時間 月曜〜金曜9:30〜18:00、土曜9:30〜12:00、13:00〜17:00(日曜・祝日・弊社休業日は除く)
■電話
■ファックス
■インターネットホームページ
修理についてのご相談窓口
修理をご依頼される場合は、取扱説明書の『故障かな?と思ったら』を一度ご覧になり、故障かどうかご確認
ください。それでも正常に動作しない場合は、①型名②ご購入日③故障症状を具体的に、ご連絡ください。
【固定電話から】
【携帯電話・PHSから】
0120−545−676(無料)
0570−057−134(ナビダイヤル・有料)
0570−057−135(ナビダイヤル・有料)
pioneerdj.com/support/
※商品についてよくあるお問い合わせ、ソフトウェアダウンロードなど
※番号をよくお確かめの上でおかけいただきますようお願いいたします
修理受付窓口
受付時間 月曜〜金曜9:30〜18:00、土曜9:30〜12:00、13:00〜17:00(日曜・祝日・弊社休業日は除く)
■電話
■ファックス
■インターネットホームページ
【固定電話から】
【携帯電話・PHSから】
0120−5−81028(無料)
0570−037−610(ナビダイヤル・有料)
0120−5−81029(無料)
pioneerdj.com/support/purpose/repair/
※インターネットによる修理のお申し込みを受け付けております
部品のご購入についてのご相談窓口※番号をよくお確かめの上でおかけいただきますようお願いいたします
●部品(付属品、取扱説明書など)のご購入について
部品受注センター
受付時間 月曜〜金曜9:30〜18:00、土曜9:30〜12:00、13:00〜17:00(日曜・祝日・弊社休業日は除く)
■電話
■ファックス
【固定電話から】
【携帯電話・PHSから】
0120−5−81095(無料)
0570−057−140(ナビダイヤル・有料)
0120−5−81096(無料)
日本語
Ja
13
Page 94

To register your product, find the nearest authorized service location, to
purchase replacement parts, operating instructions, or accessories,
please go to one of following URLs :
Pour enregistrer votre produit, trouver le service après-vente agréé le plus
proche et pour acheter des pièces de rechange, des modes d’emploi ou
des accessoires, reportez-vous aux URL suivantes :
In the USA/Aux Etats-Unis or In Canada/Aux Canada
http://www.pioneerelectronics.com
S018_PDJ_C1_EnFr
Page 95

Português:
Čeština:
Eesti:
Declaration of Conformity with regard to the Radio Equipment Directive 2014/53/EU
English:
[*]
DM-40BT/DM-40BT-W
Suomi:
Nederlands:
Français:
Svenska:
Dansk:
Deutsch:
Ελληνικά:
Italiano:
Español:
Manufacturer:
Pioneer DJ Corporation
6F, Yokohama i-Mark Place, 4-4-5 Minatomirai,
Nishi-ku, Yokohama, Kanagawa 220-0012 Japan
Hereby, Pioneer DJ declares that the radio equipment type [*] is in compliance with
Directive 2014/53/EU.
The full text of the EU declaration of conformity is available at the following internet
address: https://pioneerdj.com/en/support/product-compliance-documents
Pioneer DJ vakuuttaa, että radiolaitetyyppi [*] on direktiivin 2014/53/EU mukainen.
EU-vaatimustenmukaisuusvakuutuksen täysimittainen teksti on
saatavilla seuraavassa internetosoitteessa:
https://pioneerdj.com/en/support/product-compliance-documents
Hierbij verklaar ik, Pioneer DJ, dat het type radioapparatuur [*] conform
is met Richtlijn 2014/53/EU.
De volledige tekst van de EU-conformiteitsverklaring kan worden
geraadpleegd op het volgende internetadres:
https://pioneerdj.com/en/support/product-compliance-documents
Le soussigné, Pioneer DJ, déclare que l’équipement radioélectrique du
type [*] est conforme à la directive 2014/53/UE.
Le texte complet de la déclaration UE de conformité est disponible à l’adresse internet
suivante: https://pioneerdj.com/en/support/product-compliance-documents
Härmed försäkrar Pioneer DJ att denna typ av radioutrustning [*]
överensstämmer med direktiv 2014/53/EU.
Den fullständiga texten till EU-försäkran om överensstämmelse finns på följande
webbadress: https://pioneerdj.com/en/support/product-compliance-documents
Hermed erklærer Pioneer DJ, at radioudstyrstypen [*] er I
overensstemmelse med direktiv 2014/53/EU.
EU-overensstemmelseserklæringens fulde tekst kan findes på
følgende internetadresse:
https://pioneerdj.com/en/support/product-compliance-documents
Hiermit erklärt Pioneer DJ, dass der Funkanlagentyp [*] der Richtlinie
2014/53/EU entspricht.
Der vollständige Text der EU-Konformitätserklärung ist unter der folgenden
Internetadresse verfügbar:
https://pioneerdj.com/en/support/product-compliance-documents
Με την παρούσα ο/η Pioneer DJ, δηλώνει ότι ο ραδιοεξοπλισμόσ [*] πληροί την
οδηγία 2014/53/ΕΕ.
Το πλήρεσ κείμενο τησ δήλωσησ συμμόρφωσησ ΕΕ διατίθεται στην
ακόλουθη ιστοσελίδα στο διαδίκτυο:
https://pioneerdj.com/en/support/product-compliance-documents
Il fabbricante, Pioneer DJ, dichiara che il tipo di apparecchiatura radio [*] è conforme
alla direttiva 2014/53/UE.
Il testo completo della dichiarazione di conformità UE è disponibile al seguente
indirizzo Internet: https://pioneerdj.com/en/support/product-compliance-documents
Por la presente, Pioneer DJ declara que el tipo de equipo radioeléctrico [*] es
conforme con la Directiva 2014/53/UE.
El texto completo de la declaración UE de conformidad está disponible en la dirección
Internet siguiente: https://pioneerdj.com/en/support/product-compliance-documents
O(a) abaixo assinado(a) Pioneer DJ declara que o presente tipo de equipamento de
rádio [*] está em conformidade com a Diretiva 2014/53/UE.
O texto integral da declaração de conformidade está disponível no
seguinte endereço de Internet:
https://pioneerdj.com/en/support/product-compliance-documents
Tímto Pioneer DJ prohlašuje, že typ rádiového zařízení [*] je v souladu
se směrnicí 2014/53/EU.
Úplné znění EU prohlášení o shodě je k dispozici na této internetové adrese:
https://pioneerdj.com/en/support/product-compliance-documents
Käesolevaga deklareerib Pioneer DJ, et käesolev raadioseadme tüüp [*] vastab
direktiivi 2014/53/EL nõuetele.
ELi vastavusdeklaratsiooni täielik tekst on kättesaadav järgmisel internetiaadressil:
https://pioneerdj.com/en/support/product-compliance-documents
Importer:
Pioneer DJ Europe Limited
Anteros Building, Odyssey Business Park,
West End Road, South Ruislip, Middlesex, HA4 6QQ, U.K.
EU Representative's:
Pioneer Europe NV
Haven 1087,Keetberglaan 1, 9120 Melsele,
Belgium
http://www.pioneer.eu
Magyar:
Pioneer DJ igazolja, hogy a [*] típusú rádióberendezés megfelel a
2014/53/EU irányelvnek.
Az EU-megfelelőségi nyilatkozat teljes szövege elérhető a következő
internetes címen:
https://pioneerdj.com/en/support/product-compliance-documents
Latviešu valoda:
Ar šo Pioneer DJ deklarē, ka radioiekārta [*] atbilst Direktīvai 2014/53/ES.
Pilns ES atbilstības deklarācijas teksts ir pieejams šādā interneta
vietnē: https://pioneerdj.com/en/support/product-compliance-documents
Lietuvių kalba:
Aš, Pioneer DJ, patvirtinu, kad radijo įrenginių tipas [*] atitinka Direktyvą
2014/53/ES.
Visas ES atitikties deklaracijos tekstas prieinamas šiuo interneto
adresu: https://pioneerdj.com/en/support/product-compliance-documents
Malti
B’dan, Pioneer DJ, niddikjara li dan it-tip ta’ tagħmir tar-radju [*] huwa
konformi mad-Direttiva 2014/53/UE.
It-test kollu tad-dikjarazzjoni ta’ konformità tal-UE huwa disponibbli
f’dan l-indirizz tal-Internet li ġej:
https://pioneerdj.com/en/support/product-compliance-documents
Slovenčina:
Pioneer DJ týmto vyhlasuje, že rádiové zariadenie typu [*] je v súlade so
smernicou 2014/53/EÚ.
Úplné EÚ vyhlásenie o zhode je k dispozícii na tejto internetovej
adrese: https://pioneerdj.com/en/support/product-compliance-documents
Slovenščina:
Pioneer DJ potrjuje, da je tip radijske opreme [*] skladen z Direktivo
2014/53/EU.
Celotno besedilo izjave EU o skladnosti je na voljo na naslednjem
spletnem naslovu:
https://pioneerdj.com/en/support/product-compliance-documents
Română:
Prin prezenta, Pioneer DJ declară că tipul de echipamente radio [*] este
în conformitate cu Directiva 2014/53/UE.
Textul integral al declarației UE de conformitate este disponibil la
următoarea adresă internet:
https://pioneerdj.com/en/support/product-compliance-documents
български:
С настоящото Pioneer DJ декларира, че този тип радиосъоръжение
[*] е в съответствие с Директива 2014/53/ЕС.
Цялостният текст на ЕС декларацията за съответствие може
да се намери на следния интернет адрес:
https://pioneerdj.com/en/support/product-compliance-documents
Polski:
Pioneer DJ niniejszym oświadcza, że typ urządzenia radiowego [*] jest
zgodny z dyrektywą 2014/53/UE.
Pełny tekst deklaracji zgodności UE jest dostępny pod następującym
adresem internetowym:
https://pioneerdj.com/en/support/product-compliance-documents
Norsk:
Herved Pioneer DJ erklærer at radioutstyr type [*] er i samsvar med
direktiv 2014/53/EU.
Den fullstendige teksten i EU-samsvarserklæringen er tilgjengelig på
følgende internettadresse:
https://pioneerdj.com/en/support/product-compliance-documents
Íslenska:
Hér með Pioneer DJ lýsir yfir að tegund þráðlausan búnað [*] er í
samræmi við tilskipun 2014/53/ESB.
The fullur texti af ESB-samræmisyfirlýsingu er í boði á eftirfarandi
veffangi: https://pioneerdj.com/en/support/product-compliance-documents
Hrvatski:
Pioneer DJ ovime izjavljuje da je radijska oprema tipa [*] u skladu s
Direktivom 2014/53/EU.
Cjeloviti tekst EU izjave o sukladnosti dostupan je na sljedećoj
internetskoj adresi:
https://pioneerdj.com/en/support/product-compliance-documents
Türk:
Burada. Pioneer DJ radyo ekipmani turunun [*] 2014/53/EU direktiflerine
uyumlu oldugunu beyan eder.
Avrupa uyumluluk beyaninin tam metni belirtilen internet sitesinde
mevcuttur: https://pioneerdj.com/en/support/product-compliance-documents
Bluetooth:
Output power ...........+ 4 dBm Max.
Frequency band(s).... 2402 - 2480 MHz
Page 96

6F
Корпорация Пайонир Дидж
6F
Anteros Building, Odysse
6QQ, U
2050
PIONEER ELECTR
2 J
PIONEER ELECTR
5 Arco Lane
商品相談・修理受付・付属品購入窓口のご案内
〜
お取り扱いにお困りのとき、前項をご覧ください。
ᑐࡍࡿ࠾ᐈᵝࡢἲᚊୖࡢᶒࢆไ㝈ࡍࡿࡶࡢ࡛ࡣ࠶ࡾࡲࡏࢇࠋ
<DRC1407-A>
ed.
s.
SAMPLE
㡢㡪ീᶵჾಖド᭩
DM-40BT/DM-40BT-W
࠾㈙࠸ୖࡆ᪥
ಖドᮇ㛫࠾㈙࠸ୖࡆ᪥ࡼࡾ
ࠑ↓ᩱಟ⌮つᐃࠒ
㸯㸬ྲྀᢅㄝ᭩ࠊᮏయ㈞ࣛ࣋ࣝ➼ࡢὀពࡋࡓࡀࡗࡓ⏝≧ែ
࡛ᨾ㞀ࡋࡓሙྜࡣࠊ࠾㈙࠸ୖࡆࡢ㈍ᗑࡲࡓࡣᘢ♫ࡀ↓ᩱ
ಟ⌮࠸ࡓࡋࡲࡍࠋ
㸰㸬ಖドᮇ㛫ෆᨾ㞀ࡋ࡚↓ᩱಟ⌮ࢆ࠾ཷࡅ࡞ࡿሙྜࡣࠊ࠾
㈙࠸ୖࡆࡢ㈍ᗑࡈ౫㢗ࡃࡔࡉ࠸ࠋࡑࡢ㝿ࡣᮏ᭩ࢆࡈᥦ
♧ࡃࡔࡉ࠸ࠋ࡞࠾ࠊ㞳ᓥཬࡧ㞳ᓥ‽ࡎࡿ㐲㝸ᆅࡢฟᙇಟ
⌮ࢆ⾜ࡗࡓሙྜࡣࠊฟᙇせࡍࡿᐇ㈝ࢆ⏦ࡋཷࡅࡲࡍࠋ
㸱㸬ࡈ㌿ᒃࠊࡈ㉗⟅ရ➼࡛ᮏಖド᭩グධࡋ࡚࠶ࡿ࠾㈙࠸ୖࡆࡢ
㈍ᗑಟ⌮ࡀ౫㢗࡛ࡁ࡞࠸ሙྜࡣࠊࣃ࢜ࢽಟ⌮ཷ
❆ཱྀ㸦ྲྀᢅㄝ᭩ࢆࡈཧ↷㸧ࡈ┦ㄯࡃࡔࡉ࠸ࠋ
㸲㸬ಖドᮇ㛫ෆ࡛ࡶḟࡢሙྜࡣ᭷ᩱಟ⌮࡞ࡾࡲࡍࠋ
⏝ୖࡢㄗࡾࡲࡓࡣᙜ࡞ಟ⌮ࡸᨵ㐀ࡼࡿᨾ㞀࠾ࡼࡧᦆയ
࠾㈙࠸ୖࡆᚋࡢྲྀሙᡤࡢ⛣ື䚸ⴠୗ➼ࡼࡿᨾ㞀࠾ࡼࡧᦆയ
ⅆ⅏䚸ᆅ㟈䚸Ỉᐖ䚸ⴠ㞾ࡑࡢࡢኳ⅏ᆅኚ䚸බᐖ䚸ሷᐖ䚸
␗ᖖ㟁ᅽࠊỈࡾ➼ࡼࡿᨾ㞀࠾ࡼࡧᦆയ
ᾘ⪖ရྛ㒊ࢦ࣒䚸㟁ụ䚸ࣆࢵࢡࢵࣉ䚸ࢫࣆࣥࢻ࣮ࣝࣔ
ࢱ࣮䚸ࢫࣛࢲ࣮࣮ࣔࢱ࣮➼ࡢ
ᮏ᭩ࡢᥦ♧ࡀ࡞࠸ሙྜ
࠾㈙࠸ୖࡆࡢᖺ᭶᪥ࠊ㈍ᗑࡀ☜ㄆ࡛ࡁ࡞࠸ሙྜ
ᮏ᭩ࡢ࠾㈙࠸ୖࡆࡢᖺ᭶᪥ࠊ࠾ᐈᵝྡࠊ㈍ᗑྡࢆ᭩ࡁ
࠼ࡓሙྜ
ᨾ㞀ࡢཎᅉࡀᮏ〇ရ௨እࡢ♫〇ရ࠶ࡿሙྜ
ຎᝏ࡞タ⨨᮲௳㸦Ἔ↮ࠊ⇕ࠊሻࠊỈࠊ┤ᑕ᪥ග➼㸧࡚
⏝ࡋᨾ㞀ࡋࡓሙྜ
, Yokohama i-Mark Place, 4-4-5 Minatomirai, Nishi-ku, Yokohama, Kanagawa 220-0012 JAPA N
220-0012神奈川県横浜市西区みなとみらい4丁目4番5号横浜アイマークプレイス6階
, Йокогама i-Mark Place, 4-4-5 Минатомирай, Ниси-ку, Йокогама, Канагава 220-0012 ЯПОНИЯ
.K.TEL: +44-203-7617-220
W. 190th Street, Suite 109, Torrance, CA 90504, U.S.A. TEL: +1 (424) 488-0480
alan Kilang Barat, #07-01, Singapore 159346 TEL: +65-6378-7888
, Heatherton, Victoria, 3202, Australia, TEL: +61-3-9586-6300
y Business Park, West End Road,South Ruislip, Middlesex, HA4
ONICS ASIACENTRE PTE. LTD.
ONICS AUSTRALIA PTY. LT D.
ей
ە࠾ᐈᵝ࠾㢪࠸
࠾ᡭᩘ࡛ࡍࡀࠊࡈఫᡤࠊ࠾ྡ๓ࠊ㟁ヰ
ࠉ␒ྕࢆࢃࡾࡸࡍࡃࡈグධࡃࡔࡉ࠸ࠋ
ࠉ࠾ᐈᵝࡈグධ࠸ࡓࡔ࠸ࡓಖド᭩ࡣࠊ
ࠉಖドᮇ㛫ෆࡢࢧ࣮ࣅࢫάືཬࡧ
ࠉࡑࡢᚋࡢᏳⅬ᳨άືࡢࡓࡵグ㍕ෆ
ᐜࢆ⏝ࡉࡏ࡚㡬ࡃሙྜࡀࡈࡊ࠸ࡲࡍ
ࠉࡢ࡛ࠊࡈᢎࡃࡔࡉ࠸ࠋ
ࠉࠉࠉ
ەࡈ㈍ᗑᵝ
ࠉ࠾㈙࠸ୖࡆ᪥ࠊ㈗ᗑྡࠊఫᡤࠊ㟁ヰ␒
ࠉྕࢆグධࡢ࠺࠼ࠊಖド᭩ࢆ࠾ᐈᵝ࠾
ࠉΏࡋࡃࡔࡉ࠸ࠋࠉࠉࠉࠉࠉࠉ
ࠛ
⚄ዉᕝ┴ᶓᕷす༊ࡳ࡞ࡳࡽ࠸┠␒ྕࠉ
ᶓ࣐࣮ࢡࣉࣞࢫ㝵
Pioneer DJࢧ࣏࣮ࢺࢭࣥࢱ࣮
0120-545-676
㸳㸬ᮏ᭩ࡣ᪥ᮏᅜෆ࠾࠸࡚ࡢࡳ᭷ຠ࡛ࡍࠋ
ࠉࠉ7KLVZDUUDQW\LVYDOLGRQO\LQ-DSDQ
㸴㸬ᮏ᭩ࡣⓎ⾜࠸ࡓࡋࡲࡏࢇࡢ࡛⣮ኻࡋ࡞࠸ࡼ࠺ษಖ⟶
ࠉࠉࡋ࡚ࡃࡔࡉ࠸ࠋ
㸵㸬ࡑࡢ
ᨾ㞀ࡑࡢࡼࡿႠᴗୖࡢᶵᦆኻ㸦㐓ኻ┈㸧ࡣ⿵ൾ
ࠉࠉࠉࠉ࠸ࡓࡋࡲࡏࢇࡢ࡛ࡈᢎࡃࡔࡉ࠸ࠋ
㧗ᢏ⾡〇ရࡣᣢࡕᖐࡾಟ⌮࡞ࡿሙྜࡀ࠶ࡾࡲࡍࠋ
≉Ṧ࡞ࢭࢵࢸࣥࢢ㓄⥺ࡢᘬᅇࡋ䚸Ჴࡢタ⨨➼䚸䛂ྲྀᴗ⪅
ࠉࠉࠉࠉᣦᐃၟရ䛃䛾ྲྀ䛡ྲྀእ䛧䛿ᑓ㛛䛾ᕤᗑ䛻䛤౫㢗䛟䛰䛥䛔䚹
ಟ⌮࣓ࣔ
ࡇࡢಖド᭩ࡣࠊᮏ᭩♧ࡋࡓᮇ㛫ࠊ᮲௳ࡢࡶ࠾࠸࡚↓ᩱ
ࠉಟ⌮ࢆ࠾⣙᮰ࡍࡿࡶࡢ࡛ࡍࠋࡋࡓࡀࡗ࡚ࡇࡢಖド᭩ࡼࡗ࡚ಖ
ド᭩ࢆⓎ⾜ࡋ࡚࠸ࡿ⪅㸦ಖド㈐௵⪅㸧ࠊཬࡧࡑࢀ௨እࡢᴗ⪅
ࠉಖドᮇ㛫⤒㐣ᚋࡢಟ⌮➼ࡘ࠸࡚ࡈࡢሙྜࡣࠊ࠾㈙࠸ୖࡆ
ࡢ㈍ᗑ࠾ၥ࠸ྜࢃࡏࡃࡔࡉ࠸ࠋ
ಖドᮇ㛫⤒㐣ᚋࡢಟ⌮ࠊ⿵ಟ⏝ᛶ⬟㒊ရࡢಖ᭷ᮇ㛫ࡘ࠸࡚ヲ
ࡋࡃࡣྲྀᢅㄝ᭩ࢆࡈぴࡃࡔࡉ࠸ࠋ
© 2017 Pioneer DJ Corporation.Tous droits de reproduction et de traduction réservé
PIONEER ELECTRONICS (THAILAND) CO., LTD.
17th Fl., KPN Tower, 719 Rama 9 Road, Bangkapi, Huaykwang, Bangkok 10310
TEL: +66-2-717-0777
PIONEER TECHNOLOGY (MALAYSIA) SDN. BHD
16th Floor, Menara Uni. Asia 1008 Jalan Sultan Ismail 50250 Kuala Lumpur
TEL: +60-3-2697-2920
ӒᎣӌԥϵѨ
ѯᢋѯіҀϲୣ࿆ӏၰ ĵıĸ ဵĹዃ
ӒᎣႬφȞ෬ȟԥϵѨ
෬Οᓹߞؔᢋၿ ĺıĺġဵ Ķġዃ
PIONEER ELECTRONICS DE MEXICO S.A. DE C.V.
Blvd.Manuel Avila Camacho 138 10 piso Col.Lomas de Chapultepec,
Mexico, D.F. 11000 TEL: +52-55-9178-4270
PIONEER INDIA ELECTRONICS PRIVATE LTD.
216, Second Floor, Time Tower, M.G. Road, Sector 28, Gurgaon 122001,
Haryana, India TEL: +91-124-463-6100
Сделано в Китае
Printed in China / Imprimé en Chine
© 2017 Pioneer DJ Corporation.All rights reserv
TEL: +886-(0)2-2657-3588
TEL: +852-2848-6488
PDJ_001_all
 Loading...