

Page 1

Operation Manual
Руководство по эксплуатации
CD Receiver
CD-ресивер
DEH-3910MP
English Русский
Page 2
Contents
Thank you for buying this Pioneer product.
Please read through these operating instructions so you will know how to operate
your model properly. After you have finished reading the instructions, keep this man-
ual in a safe place for future reference.
Before You Start
About this unit 3
About WMA 3
About MP3 3
Visit our website 3
Protecting your unit from theft 4
– Removing the front panel 4
– Attaching the front panel 4
Operating this unit
What’s What 5
– Head unit 5
– LCD display 6
Basic Operations 6
– Turning the unit on and selecting a
source 6
– Adjusting the volume 6
– Turning the unit off 7
Tuner 7
– Listening to the radio 7
– Storing and recalling broadcast
frequencies 7
– Tuning in strong signals 7
– Storing the strongest broadcast
frequencies 7
Built-in Player 7
– Playing a disc 7
– Repeating play 8
– Playing tracks in random order 8
– Scanning tracks or folders 9
– Pausing disc playback 9
– Searching every 10 tracks in the current
disc or folder 9
– Using compression and BMX 9
– Displaying text information on disc 9
Audio Adjustments 10
– Introduction of audio adjustments 10
– Using balance adjustment 10
– Using the equalizer 10
– Adjusting loudness 11
– Front image enhancer (F.I.E.) 11
– Adjusting source levels 12
Other Functions 12
– Setting the clock 12
– Sound muting 13
Additional Information
Error messages 14
Handling guideline of discs and player 14
Dual Discs 15
WMA, MP3 and WAV files 15
– Example of a hierarchy 16
– Compressed audio compatibility 16
Specifications 17
2
En
Page 3
Before You Start
Section
01
English
About this unit
The tuner frequencies on this unit are allocated for use in Europe, Asia, the Middle East,
Africa and Oceania. Use in other areas may result in improper reception.
CAUTION
! Do not allow this unit to come into contact
with liquids. Electrical shock could result.
Also, this unit damage, smoke, and overheat
could result from contact with liquids.
! Keep this manual handy as a reference for op-
erating procedures and precautions.
! Always keep the volume low enough so that
you can hear sounds from outside the vehicle.
! Protect this unit from moisture.
! If the battery is disconnected or discharged,
the preset memory will be erased and must be
reprogrammed.
! Should this product fail to operate properly,
contact your dealer or nearest authorized
Pioneer Service Station.
About WMA
Corporation in the United States and/or other
countries.
Note
This unit may not operate correctly depending on
the application used to encode WMA files.
About MP3
Supply of this product only conveys a license
for private, non-commercial use and does not
convey a license nor imply any right to use
this product in any commercial (i.e. revenuegenerating) real time broadcasting (terrestrial,
satellite, cable and/or any other media), broadcasting/streaming via internet, intranets and/
or other networks or in other electronic content distribution systems, such as pay-audio or
audio-on-demand applications. An independent license for such use is required. For details, please visit
http://www.mp3licensing.com.
Visit our website
Visit us at the following site:
The Windows Media™ logo printed on the box
indicates that this unit can play back WMA
data.
WMA is short for Windows Media Audio and
refers to an audio compression technology
that is developed by Microsoft Corporation.
WMA data can be encoded by using Windows
Media Player version 7 or later.
Windows Media and the Windows logo are trademarks or registered trademarks of Microsoft
! Register your product. We will keep the de-
tails of your purchase on file to help you
refer to this information in the event of an
insurance claim such as loss or theft.
! We offer the latest information about
Pioneer Corporation on our website.
En
3
Page 4
Section
01
Before You Start
Protecting your unit from
theft
The front panel can be detached to deter theft.
Important
! Handle gently when removing or attaching
the front panel.
! Avoid subjecting the front panel to excessive
shocks.
! Keep the front panel out of direct sunlight and
high temperatures.
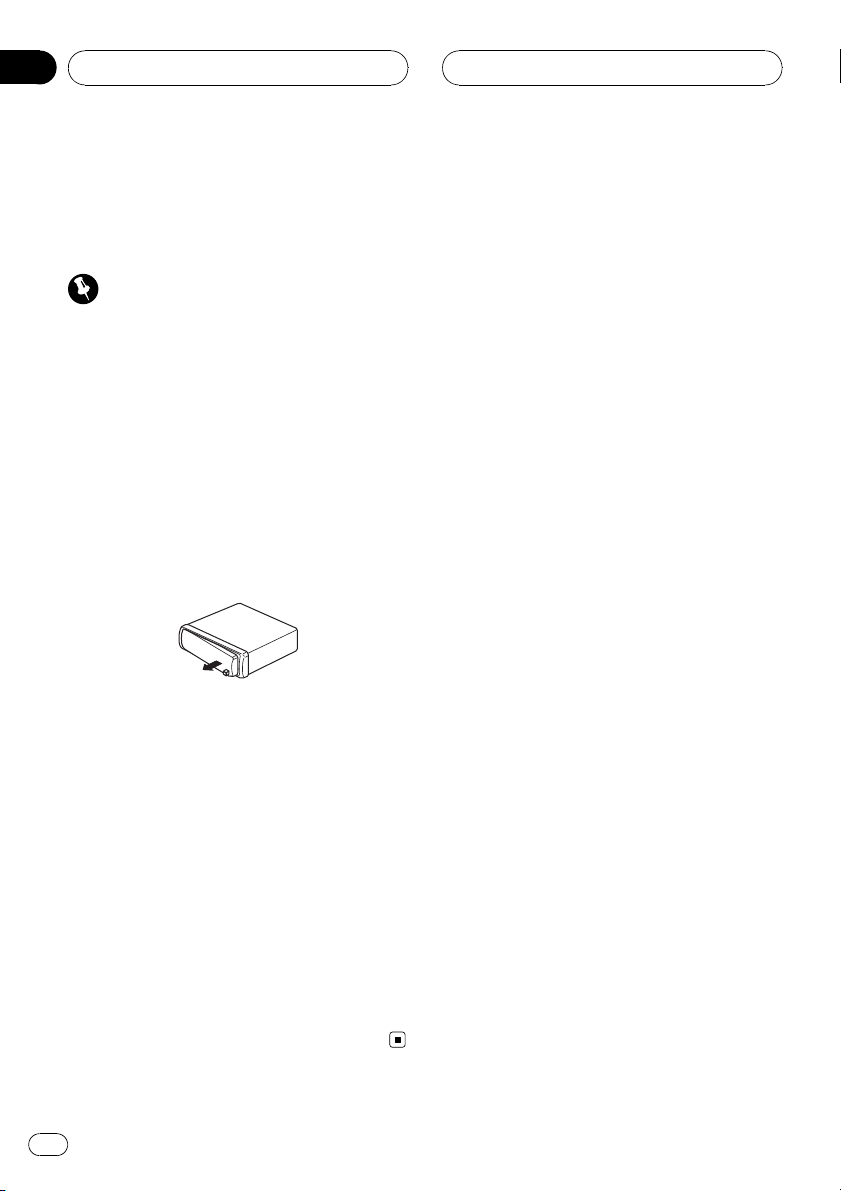
Removing the front panel
1 Press DETACH to release the front
panel.
2 Grab the front panel and remove.
3 Put the front panel into provided protective case for safe keeping.
Attaching the front panel
1 Slide the front panel to the left until it
clicks.
Front panel and the head unit are jointed on
the left side. Make sure that the front panel
has been jointed to the head unit.
2 Press the right side of the front panel
until it is firmly seated.
# If you can’t attach the front panel to the head
unit successfully, try again. Front panel may be
damaged if you attach the front panel forcedly.
4
En
Page 5
145
6
789ab
2
3
c
d
Operating this unit
Section
02
English
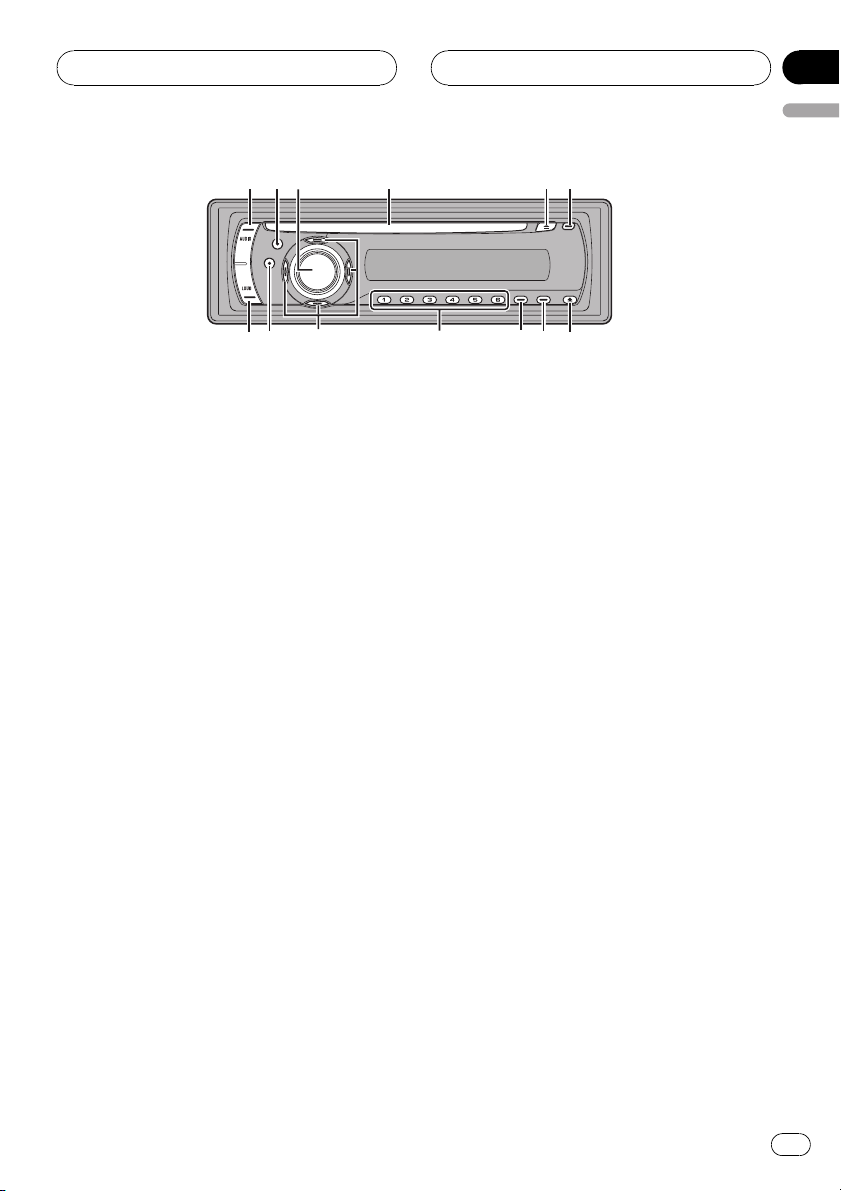
What’s What
Head unit
1 AUDIO button
Press to select various sound quality controls.
2 EQ button
Press to select various equalizer curves.
3 SOURCE button, VOLUME
This unit is turned on by selecting a source.
Press to cycle through all the available
sources.
Press and hold to recall the initial setting
menu when the sources are off.
Rotate it to increase or decrease the volume.
4 Disc loading slot
Insert a disc to play.
5 EJECT button
Press to eject a CD from your built-in CD
player.
6 CLOCK button
Press to change to the clock display.
8 DISPLAY button
Press to select different displays.
9 LOCAL/BSM button
Press to turn local function on or off.
Press and hold to turn BSM function on or
off.
a 1 to 6 buttons
Press for preset tuning.
b a/b/c/d buttons
Press to perform manual seek tuning, fast
forward, reverse and track search controls.
Also used for controlling functions.
c BAND button
Press to select among three FM bands and
MW/LW bands and to cancel the control
mode of functions.
d LOUDNESS button
Press to turn loudness on or off.
7 DETACH button
Press to remove the front panel from the
head unit.
En
5
Page 6
Section
02
Operating this unit
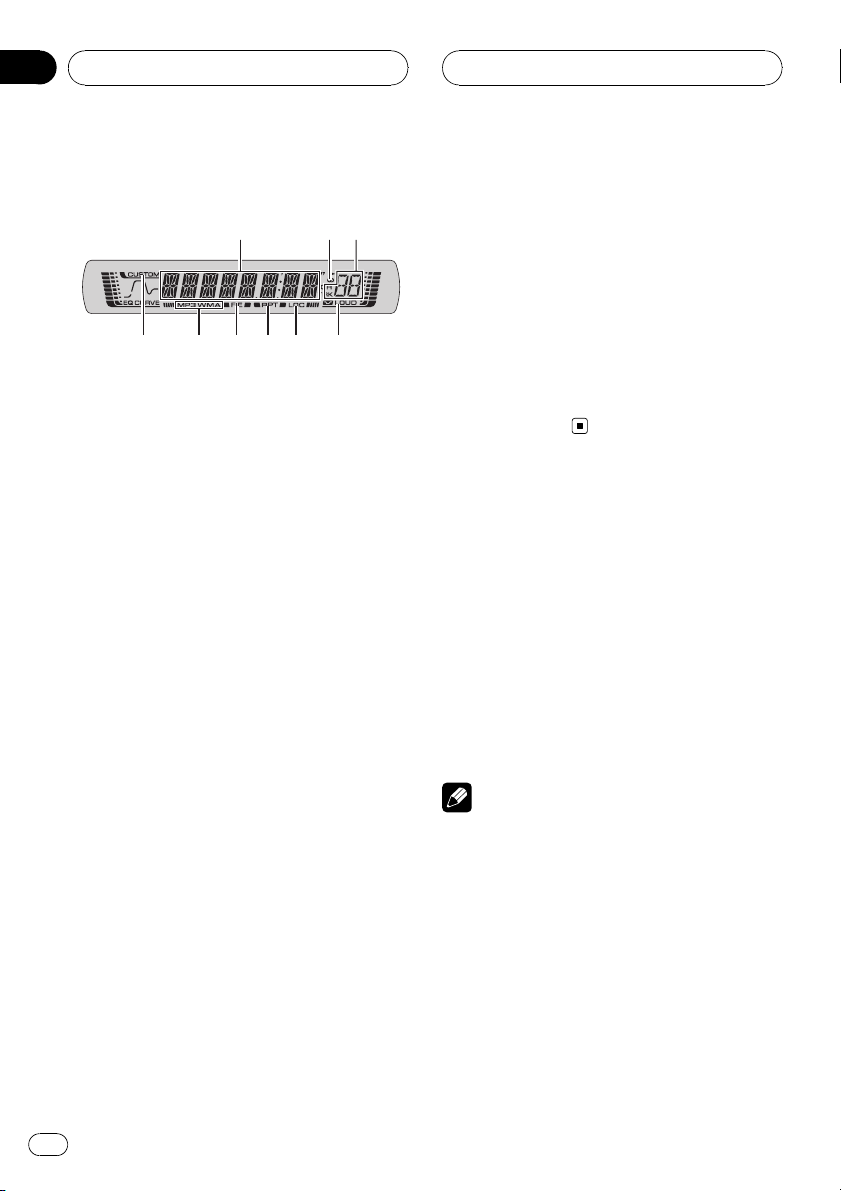
LCD display
1
9
1 Main display section
Shows the various information such as
band, play time, and other setting.
! Tuner
Band and frequency are displayed.
! Built-in CD Player (Audio CD)
Erapsed play time is displayed.
! Built-in CD Player (WMA/MP3/WAV disc)
Folder number and erapsed play time are
displayed.
! Audio and initial setup
Function names and setup status are displayed.
2 Stereo (5) indicator
Shows when the selected frequency is
being broadcast in stereo.
3 Preset number/track number indicator
Shows the track number or preset number.
! If a track number 100 to 199 is selected,
d on the left of the track number indicator will light.
! If a track number 200 or more is selected,
d on the left of the track number indicator will blink.
4 LOUD indicator
Appears in the display when loudness is
turned on.
5 LOC indicator
Shows when local seek tuning is on.
2
3
45678
6 RPT indicator
Shows when repeat play is turned on.
7 FIE indicator
Shows when the front image enhancer is
turned on.
8 MP3/WMA indicator
Shows the type of the currently playing disc.
9 CUSTOM indicator
Shows when custom equalizer curve is currently selected.
Basic Operations
Turning the unit on and
selecting a source
You can select a source you want to listen to.
To switch to the built-in CD player, load a disc
in the unit (refer to the next page).
% Press SOURCE to select a source.
Press SOURCE repeatedly to switch between
the following sources:
Built-in CD player—Tuner
Notes
! When no disc has been set in the unit, the
source will not switch to the built-in CD player.
! When this unit’s blue/white lead is connected
to the vehicle’s auto-antenna relay control
terminal, the vehicle’s antenna extends when
this unit’s source is turned on. To retract the
antenna, turn the source off.
Adjusting the volume
% Use VOLUME to adjust the sound level.
6
En
Page 7

Operating this unit
Section
02
English
Turning the unit off
% Press SOURCE and hold until the unit
turns off.
Tuner
Listening to the radio
1 Press SOURCE to select the tuner.
2 Press BAND to select a band.
Press BAND until the desired band is displayed, F1, F2, F3 for FM or MW/LW.
! The FM bands cover different frequency
ranges as below:
F1: 65 MHz to 74 MHz
F2, F3: 87.5 MHz to 108 MHz
3 To perform manual tuning, briefly press
c or d.
4 To perform seek tuning, press and hold
c or d for about one second and release.
The tuner will scan the frequencies until a
broadcast strong enough for good reception is
found.
# You can cancel seek tuning by briefly pressing
c or d.
# If you press and hold c or d you can skip sta-
tions. Seek tuning starts as soon as you release
the button.
# Up to 18 FM stations, six for each of the three
FM bands, and six MW/LW stations can be stored
in memory.
# Press a or b to recall radio station frequen-
cies.
Tuning in strong signals
Local seek tuning lets you tune in only those
radio stations with sufficiently strong signals
for good reception.
% Press LOCAL/BSM repeatedly to turn
local seek tuning on or off.
Storing the strongest broadcast
frequencies
BSM (best stations memory) lets you automatically store the six strongest broadcast frequencies under preset tuning buttons 1 to 6.
Once stored you can tune in to those frequencies with the touch of button.
! Storing broadcast frequencies with BSM
may replace broadcast frequencies you
have saved using buttons 1 to 6.
% Press LOCAL/BSM and hold until the
BSM turns on.
Six strongest broadcast frequencies will be
stored in the order of their signal strength.
# To cancel the storage process, press
LOCAL/BSM.
Storing and recalling broadcast
frequencies
% When you find a frequency that you
want to store in memory, press one of preset tuning buttons 1 to 6 and hold until the
preset number stops flashing.
Memorized radio station frequency can be recalled by pressing the preset tuning button.
Built-in Player
Playing a disc
1 Insert a CD (CD-ROM) into the disc loading slot.
Playback will automatically start.
En
7
Page 8

Section
02
Operating this unit
# Be sure to turn up the label side of a disc.
# After a CD (CD-ROM) has been inserted, press
SOURCE to select the built-in CD player.
# You can eject a CD (CD-ROM) by pressing
EJECT.
2 Press a or b to select a folder when
playing a WMA/MP3/WAV disc.
# You cannot select a folder that does not have
a WMA/MP3/WAV file recorded in it.
# To return to folder 01 (ROOT), press and hold
BAND. However, if folder 01 (ROOT) contains no
files, playback commences with folder 02.
3 To perform fast forward or reverse,
press and hold c or d.
# If you select ROUGH, pressing and holding c
or d enables you to search every 10 tracks in the
current disc (folder). (Refer to Searching every 10
tracks in the current disc or folder on the next
page.)
4 To skip back or forward to another
track, press c or d.
Notes
! Read the precautions with discs and player on
page 14.
! If an error message such as ERROR-11 is dis-
played, refer to Error messages on page 14.
! There is sometimes a delay between starting
up disc playback and the sound being issued.
When being read, FRMTREAD is displayed.
! When playing CD-EXTRA or MIXED-MODE
CDs, WMA/MP3/WAV and CD-DA can be
switched by pressing BAND.
! If you have switched between WMA/MP3/
WAV files and audio CD-DA, playback starts at
the first track on the disc.
! The built-in CD player can play back a WMA/
MP3/WAV file recorded on CD-ROM. (Refer to
page 15 for files that can be played back.)
! When playing back VBR (variable bit rate) re-
corded files, erapsed play time may not be displayed correctly.
! When playing WMA/MP3/WAV disc, there is
no sound on fast forward or reverse.
Repeating play
Repeat play plays the same track/folder within
the selected repeat play range.
% Press 5 to select the repeat range.
Press 5 until the desired repeat range appears
in the display.
! Play time (e.g., 01’23”) – Repeat all tracks
! RPT – Repeat just the current track
! FRPT – Repeat the current folder
# If you select another folder during repeat play,
the repeat play range changes to disc repeat.
# When playing CD, performing track search or
fast forward/reverse cancels the repeat play automatically.
# When playing WMA/MP3/WAV disc, performing track search or fast forward/reverse during
RPT (track repeat) changes the repeat play range
to folder repeat.
# When FRPT (folder repeat) is selected, it is not
possible to play back a subfolder of that folder.
Playing tracks in random order
Random play plays tracks in a random order
within the selected repeat range.
1 Select the repeat range.
Refer to Repeating play on this page.
2 Press 4 repeatedly to turn random play
on or off.
When random play is on, RDM appears in the
display.
# If you turn random play on during FRPT,
FRDM appears in the display.
8
En
Page 9

Operating this unit
Section
02
English
Scanning tracks or folders
Scan play searches the song within the selected repeat range.
1 Select the repeat range.
Refer to Repeating play on the previous page.
2 Press 3 to turn scan play on.
SCAN appears in the display. The first 10 sec-
onds of each track is played.
# If you turn scan play on during FRPT, FSCN ap-
pears in the display.
3 When you find the desired track (or
folder) press 3 to turn scan play off.
# After scanning of a disc (folder) is finished,
normal playback of the tracks will begin again.
Pausing disc playback
Pause lets you temporarily stop playback of
the disc.
% Press 6 repeatedly to turn pause on or
off.
When pause is on, PAUSE appears in the display.
Searching every 10 tracks in the
current disc or folder
You can switch the search method between
fast forward/reverse and searching every 10
tracks. Selecting ROUGH enables you to
search every 10 tracks.
2 Press and hold c or d to search every
10 tracks on a disc (folder).
# If the rest of track number is less than 10,
press and hold c or d recalls the first (last) one.
Using compression and BMX
Using the COMP (compression) and BMX
functions let you adjust the sound playback
quality of this unit.
% Press 1 to select your favorite setting.
Press 1 repeatedly to switch between the following settings:
COMP OFF—COMP 1—COMP 2—
COMP OFF—BMX 1—BMX 2
Displaying text information on
disc
% Press DISPLAY.
Press DISPLAY repeatedly to switch between
the following settings:
For CD TEXT discs
Play time—DISC TTL (disc title)—ART NAME
(disc artist name)—TRK TTL (track title)—
ART NAME (track artist name)
For WMA/MP3 discs
Play time—FOLDER (folder name)—FILE (file
name)—TRK TTL (track title)—ART NAME (artist name)—ALBM TTL (album title)—
COMMENT (comment)—Bit rate
For WAV discs
Play time—FOLDER (folder name)—FILE (file
name)—Sampling frequency
1 Press 2 to select ROUGH.
! FF/REV – Fast forward and reverse
! ROUGH – Searching every 10 tracks
# To select FF/REV, press 2 again.
Notes
! You can scroll to the left of the title by pressing
and holding DISPLAY.
! Audio CD that contains certain information
such as text and/or number is CD TEXT.
En
9
Page 10
Section
02
Operating this unit
! If specific information has not been recorded
on a disc, NO XXXX will be displayed (e.g.,
NO T-TTL).
! When playing back VBR-recorded WMA files,
the average bit rate value is displayed.
! When playing back VBR (variable bit rate)-re-
corded MP3 files, VBR is displayed instead of
bit rate value.
! Depending on the version of iTunes
write MP3 files onto a disc, comment information may not be correctly displayed.
— iTunes is a trademark of Apple Computer,
Inc., registered in the U.S. and other countries.
! The sampling frequency shown in the display
may be abbreviated.
®
used to
Audio Adjustments
Introduction of audio adjustments
% Press AUDIO to display the audio function names.
Press AUDIO repeatedly to switch between
the following audio functions:
FAD (balance adjustment)—EQ (equalizer)—
LOUD (loudness)—FIE (front image enhancer)
—SLA (source level adjustment)
# When selecting the FM tuner as the source,
you cannot switch to SLA.
# If you do not operate the audio function within
about 30 seconds, the display is automatically returned to the source display.
# To return to the display of each source, press
BAND.
Using balance adjustment
Fader/balance setting creates an ideal listening environment in all occupied seats.
1 Press AUDIO to select FAD.
# If the balance setting has been previously adjusted, BAL will be displayed.
2 Press a or b to adjust front/rear speaker balance.
FAD F15 to FAD R15 is displayed.
# FAD 0 is the proper setting when only two
speakers are used.
3 Press c or d to adjust left/right speaker
balance.
BAL L 9 to BAL R 9 is displayed.
Using the equalizer
The equalizer lets you adjust the equalization
to match car interior acoustic characteristics
as desired.
Recalling equalizer curves
There are six stored equalizer curves which
you can easily recall at any time. Here is a list
of the equalizer curves:
Display Equalizer curve
SPR-BASS Super bass
POWERFUL Powerful
NATURAL Natural
VOCAL Voca l
CUSTOM Custom
FLAT Flat
! CUSTOM is an adjusted equalizer curve
that you create.
! When FLAT is selected no supplement or
correction is made to the sound. This is
useful to check the effect of the equalizer
curves by switching alternatively between
FLAT and a set equalizer curve.
10
En
Page 11

Operating this unit
Section
02
English
% Press EQ to select the equalizer.
Press EQ repeatedly to switch between the following equalizers:
SPR-BASS—POWERFUL—NATURAL—
VOCAL—CUSTOM—FLAT
Adjusting equalizer curves
You can adjust the currently selected equalizer
curve setting as desired. Adjusted equalizer
curve settings are memorized in CUSTOM.
! If you make adjustments, CUSTOM curve
is updated.
1 Press AUDIO to select EQ.
2 Press c or d to select the equalizer
band to adjust.
EQ-L (low)—EQ-M (mid)—EQ-H (high)
3 Press a or b to adjust the level of the
equalizer band.
+6 to –6 is displayed as the level is increased
or decreased.
# You can then select another band and adjust
the level.
Fine-adjusting equalizer curve
You can adjust the center frequency and the Q
factor (curve characteristics) of each currently
selected curve band (EQ-L/EQ-M/EQ-H).
Level (dB)
Q=2W
Q=2N
Center frequency
! If you make adjustments, CUSTOM curve
is updated.
Frequency (Hz)
1 Press AUDIO and hold until frequency
and the Q factor (e.g., F- 80 Q 1W) appears
in the display.
2 Press AUDIO to select the desired band
for adjustment.
Low—Mid—High
3 Press c or d to select the desired frequency.
Low: 40—80—100—160 (Hz)
Mid: 200—500—1k—2k (Hz)
High: 3k—8k—10k—12k (Hz)
4 Press a or b to select the desired Q factor.
2N—1N—1W—2W
Adjusting loudness
Loudness compensates for deficiencies in the
low- and high-sound ranges at low volume.
1 Press AUDIO to select LOUD.
2 Press a to turn loudness on.
LOUD indicator is displayed.
# To turn loudness off, press b.
# You can also turn loudness on or off by press-
ing LOUDNESS.
3 Press c or d to select a desired level.
LOW (low)—MID (mid)—HI (high)
Front image enhancer (F.I.E.)
The F.I.E. (Front Image Enhancer) function is a
simple method of enhancing front imaging by
cutting mid- and high-range frequency output
from the rear speakers, limiting their output to
low-range frequencies. You can select the frequency you want to cut.
En
11
Page 12
Section
02
Operating this unit
Precaution
When the F.I.E. function is deactivated, the rear
speakers output sound of all frequencies, not just
bass sounds. Reduce the volume before disengaging F.I.E. to prevent a sudden increase in volume.
1 Press AUDIO to select FIE.
2 Press a to turn F.I.E. on.
# To turn F.I.E. off, press b.
3 Press c or d to select a desired frequency.
100—160—250 (Hz)
Notes
! After turning the F.I.E. function on, use the bal-
ance adjustment (refer to page 10) and adjust
front and rear speaker volume levels until they
are balanced.
! Turn the F.I.E. function off when using a 2-
speaker system.
Adjusting source levels
SLA (source level adjustment) lets you adjust
the volume level of each source to prevent radical changes in volume when switching between sources.
! Settings are based on the FM tuner volume
level, which remains unchanged.
! The MW/LW tuner volume level can also be
adjusted with source level adjustments.
1 Compare the FM tuner volume level
with the level of the source you wish to adjust.
2 Press AUDIO to select SLA.
3 Press a or b to adjust the source volume.
SLA +4 to SLA –4 is displayed as the source
volume is increased or decreased.
Other Functions
Setting the clock
Use these instructions to set the clock.
1 Press SOURCE and hold until the unit
turns off.
2 Press AUDIO and hold until clock appears in the display.
3 Press c or d to select the segment of
the clock display you wish to set.
Hour—Minute
As you select segments of the clock display
the segment selected will blink.
4 Press a or b to set the clock.
Pressing a will increase the selected hour or
minute. Pressing b will decrease the selected
hour or minute.
# To cancel clock settings, press BAND.
# You can also cancel clock settings by holding
down AUDIO until the unit turns off.
Turning the clock display on or off
You can turn the clock display on or off.
% Press CLOCK to turn the clock display
on or off.
Each press of CLOCK turns the clock display
on or off.
# The clock display disappears temporarily
when you perform other operations, but the clock
display appears again after 20 seconds.
12
En
Page 13

Operating this unit
Sound muting
Sound from this unit is muted automatically in
the following cases:
! When a call is made or received using a
cellular telephone connected to this unit.
! When the voice guidance is output from a
Pioneer navigation unit connected to this
unit.
The sound is turned off, MUTE is displayed
and no audio adjustments, except volume control, are possible. Operation returns to normal
when the phone connection or the voice guidance is ended.
Section
02
English
En
13
Page 14

Appendix
Additional Information
Error messages
When you contact your dealer or your nearest
Pioneer Service Center, be sure to record the
error message.
Message Cause Action
ERROR-11, 12,
17, 30
ERROR-11, 12,
17, 30
ERROR-10, 11,
12, 17, 30, A0
ERROR-22, 23 The CD format
ERROR-44 All tracks are
NO AUDIO The inserted disc
PROTECT All the files on
SKIPPED The inserted disc
Dirty disc Clean disc.
Scratched disc Replace disc.
Electrical or mechanical
cannot be played
back
skip tracks
does not contain
any files that can
be played back
the inserted disc
are secured by
DRM
contains WMA
files that are protected by DRM
Turn the ignition
ON and OFF, or
switch to a different source, then
back to the CD
player.
Replace disc.
Replace disc.
Replace disc.
Replace disc.
Replace disc.
Handling guideline of discs
and player
! Use only discs featuring either of following
two logos.
! Use only conventional, fully circular discs.
Do not use shaped discs.
! Use 12-cm or 8-cm CD. Do not use an
adapter when playing 8-cm CDs.
! Do not insert anything other than a CD into
the CD loading slot.
! Do not use cracked, chipped, warped, or
otherwise damaged discs as they may damage the player.
! Unfinalized CD-R/CD-RW disc playback is
not possible.
! This unit conforms to the track skip func-
tion of the CD-R/CD-RW disc. The tracks
containing the track skip information are
skipped automatically (in case of audio
data (CD-DA)).
! If you insert a CD-RW disc into this unit,
time to playback will be longer than when
you insert a conventional CD or CD-R disc.
! Do not touch the recorded surface of the
discs.
! Store discs in their cases when not in use.
! Avoid leaving discs in excessively hot envir-
onments including under direct sunlight.
! Do not attach labels, write on or apply che-
micals to the surface of the discs.
! To clean a CD, wipe the disc with a soft
cloth outward from the center.
14
En
Page 15

Additional Information
Appendix
English
! Condensation may temporarily impair the
player’s performance. Leave it to adjust to
the warmer temperature for about one
hour. Also, wipe any dump discs with a soft
cloth.
! Playback of discs may not be possible be-
cause of disc characteristics, disc format,
recorded application, playback environment, storage conditions and so on.
! Text information may not be correctly dis-
played depending on the recorded environment.
! Road shocks may interrupt disc playback.
! Read the precautions with discs before
using them.
Dual Discs
! Dual Discs are two-sided discs that have a
recordable CD for audio on one side and a
recordable DVD for video on the other.
! Since the CD side of Dual Discs is not phy-
sically compatible with the general CD
standard, it may not be possible to play the
CD side with this unit.
! Frequent loading and ejecting of a Dual
Disc may result in scratches on the disc.
Serious scratches can lead to playback problems on this unit. In some cases, a Dual
Disc may become stuck in the disc loading
slot and will not eject. To prevent this, we
recommend you refrain from using Dual
Disc with this unit.
! Please refer to the information from the
disc manufacturer for more detailed information about Dual Discs.
album names and other text information
may not be correctly displayed.
! Depending on the software (or the version
of the software) used to encode the audio
files, this unit may not operate properly.
! There may be a slight delay when starting
playback of WMA files encoded with image
data.
! ISO 9660 Level 1 and 2 compliant. Romeo
and Joliet file systems are both compatible
with this player.
! Multi-session playback is possible.
! WMA/MP3/WAV files are not compatible
with packet write data transfer.
! Only 64 characters from the beginning can
be displayed as a file name (including the
extension such as .wma, .mp3 or .wav) or a
folder name.
! Folder selection sequence or other opera-
tion may be altered depending on the encoding or writing software.
! Regardless of the length of blank section
between the songs of original recording,
WMA/MP3/WAV discs will play with a short
pause between songs.
! File extensions such as .wma, .mp3 or .wav
must be used properly.
WMA, MP3 and WAV files
! Depending on the version of Windows
Media Player used to encode WMA files,
En
15
Page 16

1
2
5
6
Appendix
Additional Information
Example of a hierarchy
: Folder
: File
3
4
Level 1 Level 2 Level 3 Level 4
! This unit assigns folder numbers. The user
cannot assign folder numbers.
! Folder hierarchy is allowed up to eight tiers.
However, practical hierarchy of folder is
less than two tiers.
! Up to 99 folders on a disc can be played
back.
Compressed audio compatibility
WMA
! Compatible format: WMA encoded by
Windows Media Player Ver. 7, 7.1, 8, 9 or 10
! Bit rate: 48 kbps to 320 kbps (CBR), 48 kbps
to 384 kbps (VBR)
! Sampling frequency: 32 kHz to 48 kHz
! Windows Media Audio 9 Professional, Loss-
less, Voice: No
WAV
! Compatible format: Linear PCM (LPCM),
MS ADPCM
! Quantization bits: 8 and 16 (LPCM), 4 (MS
ADPCM)
! Sampling frequency: 16 kHz to 48 kHz
(LPCM), 22.05 kHz to 44.1 kHz (MS ADPCM)
MP3
! Bit rate: 8 kbps to 320 kbps
! Sampling frequency: 16 kHz to 48 kHz (32,
44.1, 48 kHz for emphasis)
! Compatible ID3 tag version: 1.0, 1.1, 2.2,
2.3, 2.4 (ID3 tag Version 2.x is given priority
than Version 1.x.)
! M3u playlist: No
! MP3i (MP3 interactive), mp3 PRO: No
16
En
Page 17

Additional Information
Appendix
English
Specifications
General
Power s ource ............................. 14.4 V DC (10.8 V to 15.1 V
allowable)
Grounding system ................... N egative type
Max. current consumption
..................................................... 10.0 A
Dimensions (W × H × D):
DIN
Chassis ..................... 178 × 50 × 16 2 mm
Nos e ........................... 188 × 58 × 14 mm
D
Chassis ..................... 178 × 50 × 16 2 mm
Nos e ........................... 170 × 47.4 × 14 mm
Weight .......................................... 1.46 kg
Audio
Maximum power output ....... 50 W × 4
Continuous power output ...22 W × 4 (50 Hz to 15 000
Hz, 5% THD, 4 W load, both
channels driven)
Load impedance ...................... 4 W to 8 W ×4
4 W to 8 W ×2+2W ×1
Preout max output level/output impedance
..................................................... 2.2 V/1 kW
Equalizer (3-Band Parametric Equalizer):
Low
Freq ue nc y ................ 40/80/100/160 Hz
Q Fac to r .................... 0.35/0.59/0.95/1.15 (+6 dB
when boosted)
Gai n ............................ ±12 dB
Mid
Freq ue nc y ................ 200/500/1k/2k Hz
Q Fac to r .................... 0.35/0.59/0.95/1.15 (+6 dB
when boosted)
Gai n ............................ ±12 dB
High
Freq ue nc y ................ 3.15k/8k/10k/12.5k Hz
Q Fac to r .................... 0.35/0.59/0.95/1.15 (+6 dB
when boosted)
Gai n ............................ ±12 dB
Loudness contour:
Low ....................................... +3.5 d B ( 100 Hz ), +3 dB ( 10
kHz)
Mid ....................................... +10 dB (100 Hz ), +6. 5 d B
(10 kHz)
Hig h ..................................... +11 dB (100 H z) , +11 d B
(10 kHz)
(volume: –30 dB)
CD player
System .......................................... Compact disc audio system
Usa bl e discs .............................. Compact disc
Signal format:
Sam pl in g freque nc y ..... 44.1 kHz
Number of quantization bits
........................................... 16; linear
Frequency characteristics ...5 Hz to 20 000 Hz (±1 dB)
Signal-to-noise ratio ............... 94 d B (1 kH z) (IEC -A ne t-
work)
Dyn am ic range ......................... 92 dB (1 k Hz )
Number of channels .............. 2 (st er eo )
WMA decoding format ......... Ver. 7, 7.1, 8, 9, 10 (2ch
audio)
(Windows Media Player)
MP3 de coding f or ma t ........... MPEG-1 & 2 Audio Layer 3
WAV s ig na l format .................. Linear PC M & MS A DP CM
FM tuner
Freq ue nc y range ...................... 65 M Hz to 74 M Hz
87.5 MHz to 108.0 MHz
Usable sensitivity ..................... 1 0 dBf (0.9 µV/75 W, mono,
S/N: 30 dB)
Signal-to-noise ratio ............... 75 d B (IEC -A network)
Distortion ..................................... 0.3 % (at 65 dBf, 1 k Hz ,
stereo)
0.1 % (at 65 dBf, 1 kHz,
mono)
Freq ue nc y response ............... 30 Hz t o 15 000 H z (±3 d B)
Stereo separation .................... 45 d B (at 6 5 d Bf, 1 kH z)
MW tuner
Freq ue nc y range ...................... 531 kH z to 1 602 kH z (9 kH z)
Usable sensitivity ..................... 1 8 µV (S /N : 20 dB )
Signal-to-noise ratio ............... 65 d B (IEC -A network)
LW tuner
Freq ue nc y range ...................... 153 kH z to 28 1 k Hz
Usable sensitivity ..................... 3 0 µV (S /N : 20 dB )
Signal-to-noise ratio ............... 65 d B (IEC -A network)
Note
Specifications and the design are subject to possible modifications without notice due to improvements.
En
17
Page 18

Содержание
Благодарим Вас
за покупку этого изделия компании Pioneer.
Прочтите, пожалуйста, полностью эту инструкцию по эксплуатации, чтобы узнать, как
правильно пользоваться Вашей моделью адаптера.
После прочтения инструкций хра-
ните это руководство в надежном месте для просмотра в будущем.
Перед началом эксплуатации
Сведения об этом устройстве 19
О формате WMA 19
О формате MP3 20
Посетите наш сайт 20
Защита Вашего устройства от кражи 20
– Снятие передней панели 20
– Установка передней панели 20
Эксплуатация данного устройства
Описание элементов устройства 21
– Основное устройство 21
– Жидкокристаллический
дисплей 22
Основные операции 22
– Включение устройства и выбор
источника сигнала 22
– Регулировка громкости 23
– Выключение устройства 23
Тюнер 23
– Прослушивание
радиоприемника 23
– Запоминание и повторный вызов
радиочастот 23
– Настройка на мощные сигналы 23
– Запоминание частот самых мощных
трансляций 24
Встроенный проигрыватель 24
– Воспроизведение диска 24
– Повторное воспроизведение 25
– Воспроизведение дорожек в
произвольной
последовательности 25
– Сканирование дорожек и папок 26
– Приостановка воспроизведения
диска 26
– Поиск каждой 10-й дорожки на
текущем диске или в текущей
папке 26
– Использование компрессии и
BMX 26
– Отображение текстовой
информации диска 26
Регулировки аудиопараметров 27
– Знакомство с регулировками
аудиопараметров 27
– Использование регулировки
баланса 27
– Использование эквалайзера 28
– Регулировка тонкомпенсации 29
– Функция улучшения переднего
звукового образа (F.I.E.) 29
– Регулировка уровней входных
сигналов 30
Другие функции 30
– Установка часов 30
– Приглушение звука 31
Дополнительная информация
Сообщения об ошибках 32
Рекомендации по обращению с дисками и
проигрывателем 32
Двойные диски 33
Файлы WMA, MP3 и WAV 33
– Пример иерархии 34
– Совместимость с форматами сжатия
данных 34
Технические характеристики 35
18
Ru
Page 19

Перед началом
эксплуатации
Раздел
01
О формате WMA
Русский
Сведения об этом устройстве
Частоты тюнера в этом устройстве распределены для использования в Европе,
Азии, на Среднем Востоке, Африке и Океании. При использовании в других регионах
качество приема может быть плохим.
ВНИМАНИЕ
! Не допускайте попадания жидкости на
данное устройство. Это может повлечь поражение электрическим током. Кроме того,
попадание жидкости может повлечь повреждение этого устройства, появление
дыма и перегрев.
! Держите это руководство под рукой в
качестве справочника по правилам эксплуатации и мерам предосторожности.
! Всегда сохраняйте уровень громкости до-
статочно низким, чтобы Вы могли слышать
звуки снаружи машины.
! Оберегайте это устройство от воздействия
влажности.
! При отключении или разряде батареи пам-
ять предварительных настроек будет
стерта, и потребуется ее повторное программирование.
! При неполадках в работе этого изделия
свяжитесь с торговым представителем
компании-производителя или с ближайшим сервисным пунктом Pioneer.
Логотип Windows Media™, напечатанный
на коробке, указывает на возможность воспроизведения данных в формате WMA.
WMA, сокращение от Windows Media Audio
– это технология сжатия аудиоданных, разработанная корпорацией Microsoft. Преобразовать данные в формат WMA можно с
помощью Windows Media Player 7 или
более поздней версии.
Windows Media и логотип Windows являются товарными знаками или зарегистрированными товарными знаками Microsoft
Corporation в Соединенных Штатах и/или
других странах.
Примечание
Это устройство может неверно воспроизводить некоторые файлы формата WMA взависимости от приложений, использованных
для их записи.
Ru
19
Page 20

Раздел
01
Перед началом
эксплуатации
О формате MP3
Поставка этого изделия дает право только
на его частное и некоммерческое использование и не предоставляет лицензии и не
подразумевает право использования этого
изделия в любых коммерческих (т.е. приносящих прибыль) прямых трансляциях
(телевизионных, спутниковых, кабельных
и/или любых других), вещании/потоковой
передаче через Интернет, локальных сетях
и/или других сетях или в других электронных системах распространения, таких как
системы платного аудио и аудио по запросу. Для такого использования необходима
специальная лицензия. Для получения дополнительной информации посетите
http://www.mp3licensing.com.
Посетите наш сайт
Посетите наш сайт:
! Зарегистрируйте приобретенное
изделие. Мы сохраним сведения о
Вашей покупке, что поможет Вам ссылаться на эту информацию в случае
страхового требования по причине
потери или кражи.
! Самую свежую информацию о Pioneer
Corporation можно получить на нашем
веб-сайте.
Защита Вашего устройства
от кражи
Переднюю панель в целях предотвращения кражи можно снимать.
Важно
! Соблюдайте осторожность при снятии и
установке передней панели.
! Не подвергайте переднюю панель силь-
ным ударам.
! Предохраняйте переднюю панель от воз-
действия прямого солнечного света и высоких температур.
Снятие передней панели
1 Нажмите кнопку DETACH, чтобы отсоединить переднюю панель.
2 Возьмитесь за переднюю панель и
снимите ее.
3 Поместите переднюю панель в прилагающийся защитный футляр для
безопасного хранения.
Установка передней панели
1 Переместите переднюю панель
влево до щелчка.
Передняя панель и основное устройство
соединяются с левой стороны. Убедитесь,
что передняя панель соединена с основным устройством.
2 Нажмите на правый край передней
панели и зафиксируйте ее.
# Если прикрепить переднюю панель к основному устройству не удается, попробуйте
еще раз. В случае приложения излишнего
усилия при прикреплении передней панели
она может быть повреждена.
20
Ru
Page 21

145
6
789ab
2
3
c
d
Эксплуатация данного
устройства
Раздел
02
Русский
Описание элементов
устройства
Основное устройство
1 Кнопка AUDIO
Нажмите, чтобы выбрать различные
регулировки качества звука.
2 Кнопка EQ
Нажмите, чтобы выбрать различные
кривые эквалайзера.
3 SOURCE кнопка, VOLUME
Это устройство включается при выборе
источника сигнала. Нажмите, чтобы
перебрать все доступные источники сигнала.
Нажмите и удерживайте для вызова
меню начальных настроек при выключенных источниках сигнала.
Поверните, чтобы увеличить или уменьшить громкость.
4 Щель для загрузки диска
Вставьте диск для воспроизведения.
5 Кнопка EJECT
Нажмите, чтобы извлечь компакт-диск из
Вашего встроенного проигрывателя компакт-дисков.
6 Кнопка CLOCK
Нажмите, чтобы перейти в режим отображения дисплея часов.
7 Кнопка DETACH
Нажмите, чтобы снять переднюю панель
с основного устройства.
8 Кнопка DISPLAY
Нажмите, чтобы выбрать различные
режимы дисплея.
9 Кнопка LOCAL/BSM
Нажмите, чтобы включить или выключить функцию местного поиска.
Нажмите и удерживайте, чтобы включить
или выключить функцию BSM (запоминание лучших станций).
a Кнопки 1 - 6
Нажмите для выбора предварительной
настройки.
b Кнопки a/b/c/d
Нажмите, чтобы произвести ручную настройку с поиском, ускоренную перемотку вперед, перемотку назад и
использовать функции поиска дорожки.
Также используется для управления
функциями.
c Кнопка BAND
Нажмите, чтобы выбрать из трех FMдиапазонов и MW/LW-диапазонов, а
также чтобы отменить режим управления функциями.
d Кнопка LOUDNESS
Нажмите, чтобы включить или выключить тонкомпенсацию.
Ru
21
Page 22

Раздел
02
Эксплуатация данного
устройства
Жидкокристаллический дисплей
1
9
1 Основной сектор дисплея
Отображает различную информацию,
такую как диапазон, время воспроизведения и другие настройки.
! Тюнер
На дисплее отображаются диапазон и
частота.
! Встроенный проигрыватель компакт-
дисков (Audio CD)
На дисплее отображается прошедшее
время воспроизведения.
! Встроенный проигрыватель компакт-
дисков (диски формата WMA/MP3/
WAV)
Отображаются номер папки и время,
прошедшее с начала воспроизведения.
! Аудио- и первоначальные установки
На дисплее отображаются наименования функций и состояние установок.
2 Индикатор режима стерео (5)
Показывает, когда вещание на выбран-
ной частоте ведется в режиме стерео.
3 Индикатор номера предварительной
настройки/номера дорожки
Показывает номер дорожки или номер
предварительной настройки.
! Если выбрана дорожка с номером от
100 до 199, с левой стороны индикатора номера дорожки будет отображаться символ d.
! Если выбрана дорожка с номером от
200 и более, с левой стороны индика-
2
3
45678
тора номера дорожки будет мигать
символ d.
4 Индикатор LOUD
Появляется на дисплее при включении
функции тонкомпенсации.
5 Индикатор LOC
Показывает, что настройка с местным
поиском включена.
6 Индикатор RPT
Показывает, когда включено повторное
воспроизведение.
7 Индикатор FIE
Обозначает, что включена функция
улучшения переднего звукового образа.
8 Индикатор MP3/WMA
Показывает тип текущего диска.
9 Индикатор CUSTOM
Обозначает, что в настоящий момент вы-
брана особая кривая эквалайзера.
Основные операции
Включение устройства и
выбор источника сигнала
Вы можете выбрать источник сигнала, который Вы хотите прослушать. Чтобы
переключиться на встроенный проигрыватель компакт-дисков, загрузите диск в
это устройство (см. стр. 24).
% Нажмите кнопку SOURCE, чтобы выбрать источник сигнала.
Нажмите SOURCE несколько раз, чтобы выбрать один из следующих источников сигнала:
Встроенный проигрыватель компактдисков—Тюнер
22
Ru
Page 23

Эксплуатация данного
устройства
Раздел
02
Примечания
! Если в устройство не загружен диск, источ-
ник сигнала не переключится на встроенный проигрыватель компакт-дисков.
! Когда голубой/белый провод этого устрой-
ства подключен к реле панели управления
автомобильной антенной, антенна на автомобиле выдвигается при включении источника сигнала этого устройства. Чтобы
втянуть антенну, выключите источник сигнала.
Регулировка громкости
% Используйте кнопку VOLUME для
регулирования уровня звука.
Выключение устройства
% Нажмите и удерживайте кнопку
SOURCE, пока устройство не выключится.
Тюнер
Прослушивание радиоприемника
1 Нажмите кнопку SOURCE, чтобы выбрать тюнер в качестве источника сигнала.
2 Нажмите кнопку BAND, чтобы выбрать диапазон.
Нажимайте BAND, пока не отобразится
нужный диапазон: F1, F2, F3 для FM или
MW/LW.
! FM-диапазоны охватывают следующие
диапазоны частот:
F1: от 65 МГц до 74 МГц
F2, F3: от 87,5 МГц до 108 МГц
3 Чтобы произвести ручную настройку, быстро нажмите кнопку c или d.
4 Чтобы осуществить настройку с поиском, нажмите и удерживайте кнопку c
или d примерно одну секунду, а затем
отпустите ее.
Тюнер будет сканировать частоты, пока не
обнаружит трансляцию с достаточно высоким уровнем сигнала для качественного
приема.
# Вы можете отменить настройку с поиском
быстрым нажатием кнопки c или d.
# Если Вы нажмете и будете удерживать
кнопку c или d, Вы можете пропускать радиостанции. Настройка с поиском начнется, как
только Вы отпустите кнопку.
Запоминание и повторный
вызов радиочастот
% Если Вы нашли частоту, которую
хотели бы сохранить в памяти, нажмите
одну из кнопок предварительной настройки с 1 по 6 и удерживайте ее, пока
номер предварительной настройки не
прекратит мигать.
Сохраненную в памяти частоту радиостанции можно вызвать нажатием кнопки предварительной настройки.
# В памяти можно сохранить до 18 FM-станций, по 6 для каждого из трех FM-диапазонов,
и 6 MW/LW-станций.
# Для вызова частот радиостанций нажмите
a или b.
Настройка на мощные сигналы
Настройка с местным поиском позволяет
Вам настраиваться только на радиостанции с достаточно мощными сигналами для
качественного приема.
% Нажмите кнопку LOCAL/BSM несколько раз подряд, чтобы включить или выключить настройку с местным поиском.
Русский
Ru
23
Page 24

Раздел
02
Эксплуатация данного
устройства
Запоминание частот самых
мощных трансляций
Функция BSM (запоминание лучших станций) позволяет автоматически сохранять
шесть самых мощных радиочастот, назначая их кнопкам предварительной настройки с 1 по 6. Сохранив частоты, можно
настроить тюнер на эти частоты одним нажатием кнопки.
! Сохранение радиочастот при помощи
функции BSM может заменить радиочастоты, которые Вы сохранили при помощи кнопок с 1 по 6.
% Нажмите и удерживайте кнопку
LOCAL/BSM, пока не включится функция
BSM.
В памяти устройства будут сохранены
шесть самых мощных радиочастот в порядке мощности их сигнала.
# Чтобы отменить процесс сохранения настроек, нажмите кнопку LOCAL/BSM.
Встроенный проигрыватель
Воспроизведение диска
1 Вставьте компакт-диск (CD-ROM) в
щель для загрузки компакт-диска.
Воспроизведение начнется автоматически.
# Вставляйте диск маркированной стороной вверх.
# После загрузки компакт-диска (CD-ROM)
нажмите SOURCE, чтобы выбрать встроенный
проигрыватель компакт-дисков.
# Нажав кнопку EJECT, Вы можете извлечь
компакт-диск (CD-ROM).
2 Нажимайте a или b, чтобы выбрать
папку при воспроизведении диска формата WMA/MP3/WAV.
# Вы не можете выбрать папку, не содержащую файлов WMA/MP3/WAV.
# Для перехода в папку 01 (КОРНЕВУЮ) нажмите и удерживайте кнопку BAND. Тем не
менее, если папка 01 (КОРНЕВАЯ) не содержит файлов, воспроизведение начнется с
папки 02.
3 Чтобы осуществить ускоренную
перемотку вперед или назад, нажмите и
удерживайте кнопку c или d.
# Если Вы выберете ROUGH, а затем
нажмете и будете удерживать кнопку c или d,
будет происходить поиск каждой 10-й дорожки
на текущем диске (в текущей папке). (См. в
Поиск каждой 10-й дорожки на текущем диске
или в текущей папке
на стр. 26.)
24
4 Чтобы перейти вперед или назад к
другой дорожке, нажмите кнопку c или
d.
Примечания
! Меры предосторожности при работе с ди-
сками и проигрывателем см. на стр. 32.
Ru
Page 25

Эксплуатация данного
устройства
Раздел
02
! Если сообщение об ошибке, такое как
ERROR-11, появляется на дисплее, смо-
трите в
Сообщения об ошибках
! Иногда происходит задержка между нача-
лом воспроизведения диска и появлением
звука. При считывании данных с диска отображается надпись FRMTREAD.
! При воспроизведении дисков формата CD-
EXTRA или MIXED-MODE CD режимы
WMA/MP3/WAV и CD-DA можно переключать нажатием BAND.
! При переключении между файлами MP3/
WMA/WAV и аудиодисками CD-DA вос-
произведение начинается с первой дорожки диска.
! Встроенный проигрыватель компакт-дис-
ков может воспроизводить файлы WMA/
MP3/WAV, записанные на компакт-диск
CD-ROM. (Список воспроизводимых файлов см. в разделе стр. 33.)
! При воспроизведении файлов VBR
(переменная скорость передачи данных)
время, прошедшее с начала воспроизведения, может отображаться неправильно.
! При воспроизведении диска формата
WMA/MP3/WAV во время ускоренной
перемотки вперед или назад звук не воспроизводится.
на стр. 32.
! FRPT – Повтор текущей папки
# Если Вы выберете другую папку во время
повторного воспроизведения, диапазон повторного воспроизведения сменится на повтор диска.
# В режиме воспроизведения компакт-диска
выполнение операции поиска дорожки или ускоренной перемотки вперед/назад автоматически отменяет повторное
воспроизведение.
# При воспроизведении диска WMA/MP3/
WAV выполнение операции поиска дорожки
или ускоренной перемотки вперед/назад во
время RPT (повтор дорожки) автоматически
меняет диапазон повторного воспроизведения на повторное воспроизведение папки.
# При выборе FRPT (повтор папки) воспроизведение вложенных папок этой папки невозможно.
Воспроизведение дорожек в
произвольной
последовательности
В режиме произвольного воспроизведения
дорожки воспроизводятся в случайной последовательности в пределах выбранного
диапазона воспроизведения.
Русский
Повторное воспроизведение
При повторном воспроизведении выполняется повтор дорожки/папки из выбранного диапазона повторного воспроизведения.
% Нажмите кнопку 5, чтобы выбрать
диапазон повторного воспроизведения.
Нажимайте кнопку 5, пока на дисплее не
отобразится символ требуемого диапазона
повторного воспроизведения.
! Время воспроизведения (например,
01’23”) – повтор всех дорожек
! RPT – повтор только текущей дорожки
1 Выберите диапазон повторного воспроизведения.
Смотрите в
Повторное воспроизведение
на стр. 25.
2 Нажмите кнопку 4 несколько раз,
чтобы выключить воспроизведение в
произвольной последовательности.
Когда воспроизведение в произвольной последовательности включено, RDM появляется на дисплее.
# Если включить воспроизведение в произвольной последовательности при выбранном
диапазоне повтора FRPT, на дисплее появится
надпись FRDM.
Ru
25
Page 26

Раздел
02
Эксплуатация данного
устройства
Сканирование дорожек и папок
В режиме сканирования выполняется
поиск композиции в пределах выбранного
диапазона повторного воспроизведения.
1 Выберите диапазон повторного воспроизведения.
Смотрите в
на стр. 25.
2 Нажмите кнопку 3, чтобы включить
сканирующее воспроизведение.
На дисплее появится надпись SCAN. Будут
воспроизводиться первые 10 секунд каждой дорожки.
# Если включить сканирующее воспроизведение в режиме FRPT, на дисплее появляется надпись FSCN.
3 Нажмите кнопку 3 для выключения
воспроизведения со сканированием,
когда Вы найдете нужную дорожку (или
папку).
# После завершения сканирования диска
(папки) снова начнется обычное воспроизведение дорожек.
Повторное воспроизведение
Приостановка
воспроизведения диска
Пауза позволяет Вам временно остановить
воспроизведение диска.
% Нажмите 6 несколько раз, чтобы
включить или выключить паузу.
Когда пауза включена, на дисплее появляется надпись PAUSE.
Поиск каждой 10-й дорожки
на текущем диске или в
текущей папке
Можно выбрать один из следующих способов поиска: ускоренную перемотку вперед/
назад и поиск каждой 10-й дорожки. Выбор
ROUGH позволяет осуществить поиск каждой 10-й дорожки.
1 Нажмите кнопку 2, чтобы выбрать
функцию ROUGH.
! FF/REV – ускоренная перемотка вперед
и назад
! ROUGH– поиск каждой 10-й дорожки
# Чтобы выбрать FF/REV, нажмите 2 еще
раз.
2 Нажмите и удерживайте кнопку c
или d для поиска каждой 10-й дорожки
на диске (в папке).
# Если остается менее 10 дорожек, то при
нажатии и удержании кнопки c или d вызывается соответственно первая или последняя.
Использование компрессии и BMX
Функции COMP (компрессия) и BMX позволяют регулировать качество воспроизведения звука этого устройства.
% Нажмите кнопку 1, чтобы выбрать
предпочитаемый режим.
Нажмите кнопку 1 несколько раз для выбора следующих настроек:
COMP OFF—COMP 1—COMP 2—
COMP OFF—BMX 1—BMX 2
26
Отображение текстовой
информации диска
% Нажмите DISPLAY.
Нажмите DISPLAY несколько раз для выбора следующих настроек:
Ru
Page 27

Эксплуатация данного
устройства
Раздел
02
Для дисков формата CD TEXT
Время воспроизведения—DISC TTL (название диска)—ART NAME (имя исполнителя
на диске)—TRK TTL (название дорожки)—
ART NAME (имя исполнителя на дорожке)
Для дисков формата WMA/MP3
Время воспроизведения—FOLDER (название папки)—FILE (название файла)—
TRK TTL (название дорожки)—ART NAME
(имя исполнителя)—ALBM TTL (название
альбома)—COMMENT (комментарий)
—Скорость передачи данных
Для дисков формата WAV
Время воспроизведения—FOLDER (название папки)—FILE (название файла)—частота дискретизации
Примечания
! Вы можете прокручивать название влево,
нажимая и удерживая кнопку DISPLAY.
! Диски Audio CD, содержащие определен-
ную информацию (например, текст и/или
численные данные), относятся к категории
CD TEXT.
! Если специальная информация не была
записана на диск, будет отображаться надпись NO XXXX (например, NO T-TTL).
! При воспроизведении файлов WMA, запи-
санных в режиме VBR (переменной скорости передачи данных), отображается
среднее значение скорости передачи данных.
! При воспроизведении файлов МР3, запи-
санных в режиме VBR (переменной скоро-
сти передачи данных), вместо значения
скорости передачи данных отображается
VBR.
! В зависимости от версии iTunes
зованной для записи файлов МР3 на диск,
комментарии могут отображаться неправильно.
— iTunes является товарным знаком ком-
пании Apple Computer, Inc., зарегистрированным в США и других странах.
®
, исполь-
! Частота дискретизации, отображающаяся
на дисплее, может быть округлена.
Русский
Регулировки
аудиопараметров
Знакомство с регулировками
аудиопараметров
% Нажмите кнопку AUDIO, чтобы отобразить названия аудиофункций.
Нажмите кнопку AUDIO несколько раз для
выбора следующих аудиофункций:
FAD (регулировка баланса)—EQ (эквалайзер)—LOUD (тонкомпенсация)—FIE
(функция улучшения переднего звукового
образа)—SLA (регулировка уровня входного сигнала)
# При выборе FM-тюнера в качестве источника сигнала функция SLA недоступна.
# Если Вы не воспользуетесь аудиофункцией в течение 30 секунд, дисплей автоматически возвратится к отображению
источника сигнала.
# Чтобы вернуться к отображению каждого
источника сигнала, нажмите кнопку BAND.
Использование регулировки
баланса
Настройка баланса/уровня сигнала позволяет создавать идеальную среду прослушивания для всех занятых мест в
автомобиле.
1 Нажмите кнопку AUDIO , чтобы выбрать функцию FAD.
# Если настройка баланса была предварительно отрегулирована, отобразится надпись BAL.
Ru
27
Page 28

Раздел
02
Эксплуатация данного
устройства
2 Нажмите кнопку a или b, чтобы отрегулировать баланс передних и задних
громкоговорителей.
На дисплее отображается значение от
FAD F15 до FAD R15.
# Когда используются только два громкоговорителя, правильной настройкой является
FAD 0.
3 Нажмите кнопку c или d, чтобы отрегулировать баланс левого и правого
громкоговорителей.
На дисплее отображается значение от
BAL L 9 до BAL R 9.
Использование эквалайзера
Эквалайзер позволяет Вам регулировать
коррекцию звука, чтобы звучание соответствовало требуемым внутренним акустическим характеристикам автомобиля.
Вызов кривых эквалайзера из памяти
В памяти устройства хранится пять кривых
эквалайзера, которые Вы можете вызвать
в любое время. Вот перечень кривых эквалайзера:
Дисплей Кривая эквалайзера
SPR-BASS Супербас
POWERFUL Мощный
NATURAL Естественный
VOCAL Вокальный
CUSTOM Особый
FLAT Ровный
! CUSTOM – это регулируемая кривая
эквалайзера, которую Вы создаете
сами.
! При выборе кривой FLAT звук не подвер-
гается никаким дополнительным преобразованиям или коррекции. Эта
настройка полезна для проверки
эффекта от применения кривых эквалайзера при помощи переключения кривой FLAT и установленной кривой
эквалайзера.
% Нажмите кнопку EQ, чтобы выбрать
кривую эквалайзера.
Нажмите кнопку EQ несколько раз для выбора следующих настроек эквалайзера:
SPR-BASS—POWERFUL—NATURAL—
VOCAL—CUSTOM—FLAT
Регулировка кривых эквалайзера
Вы можете отрегулировать текущую выбранную кривую эквалайзера по своему усмотрению. Отрегулированные настройки
кривой эквалайзера запоминаются в
CUSTOM.
! Если Вы производите регулировку, кри-
вая CUSTOM обновляется.
1 Нажмите кнопку AUDIO , чтобы выбрать функцию EQ.
2 Нажмите кнопку c или d, чтобы выбрать полосу эквалайзера для настройки.
EQ-L (низкий)—EQ-M (средний)—EQ-H (вы-
сокий)
3 Нажмите кнопку a или b, чтобы отрегулировать уровень полосы эквалайзера.
При повышении или понижении уровня отображаются надписи с +6 до –6.
# Затем Вы можете выбрать другую полосу и
отрегулировать ее уровень.
28
Ru
Page 29

Эксплуатация данного
устройства
Раздел
02
Точная регулировка кривой
эквалайзера
Вы можете отрегулировать среднюю частоту и коэффициент Q – резонанс (характеристики кривой) каждой текущей
выбранной полосы (EQ-L/EQ-M/EQ-H).
! Если Вы производите регулировку, кри-
вая CUSTOM обновляется.
1 Нажмите кнопку AUDIO и удерживайте ее, пока на дисплее не появятся
частота и коэффициент Q-резонанс
(например, F- 80 Q 1W).
2 Нажмите кнопку AUDIO , чтобы вы-
брать требуемую полосу для регулировки.
Нижние—Средние—Верхние
3 Нажмите кнопку c или d, чтобы выбрать требуемую частоту.
Нижние: 40—80—100—160 (Гц)
Средние: 200—500—1k—2k (Гц)
Верхние: 3k—8k—10k—12k (Гц)
4 Нажмите кнопку a или b, чтобы выбрать требуемый коэффициент Q-резонанс.
2N—1N—1W—2W
1 Нажмите кнопку AUDIO , чтобы выбрать функцию LOUD.
2 Нажмите кнопку a, чтобы включить
тонкомпенсацию.
Отобразится индикатор LOUD.
# Чтобы выключить тонкомпенсацию, нажмите кнопку b.
# Вы также можете включить или выключить
тонкомпенсацию, нажав кнопку LOUDNESS.
3 Нажмите кнопку c или d, чтобы выбрать требуемый уровень тонкомпенсации.
LOW (низкий)—MID (средний)—HI (высо-
кий)
Функция улучшения переднего
звукового образа (F.I.E.)
Применение функции F.I.E. (улучшение
переднего звукового образа) является простым способом улучшения переднего звукового образа путем среза выходных
частот задних громкоговорителей в
среднем и верхнем диапазонах, ограничивая их выходной сигнал частотами нижнего
диапазона. Вы можете выбрать требуемую
частоту среза.
Меры предосторожности
При отключении функции F.I.E. задние громкоговорители воспроизводят все звуковые частоты, а не только нижние звуковые частоты.
Уменьшите громкость перед отключением
функции F.I.E., чтобы предотвратить внезапное повышение громкости.
Русский
Регулировка тонкомпенсации
Тонкомпенсация компенсирует недостаточное звуковое давление в нижнем и
верхнем диапазонах звуковых частот на
низкой громкости.
1 Нажмите кнопку AUDIO , чтобы выбрать функцию FIE.
Ru
29
Page 30

Раздел
02
Эксплуатация данного
устройства
2 Нажмите кнопку a, чтобы включить
функцию F.I.E.
# Чтобы выключить функцию F.I.E., нажмите
кнопку b.
3 Нажмите кнопку c или d, чтобы выбрать требуемую частоту.
100—160—250 (Гц)
Примечания
! После включения функции F.I.E. исполь-
зуйте регулировку баланса (см. стр. 27) и
отрегулируйте уровни громкости переднего и заднего громкоговорителей, пока
они не будут сбалансированы.
! При использовании системы с двумя гром-
коговорителями выключите функцию F.I.E.
Регулировка уровней входных
сигналов
Функция SLA (настройка уровня входного
сигнала) позволяет Вам регулировать
уровень громкости каждого источника сигнала, чтобы предотвратить резкие изменения громкости при переключении
источников сигнала.
! Настройки основываются на уровне
громкости FM-тюнера, который остается
неизменным.
! Также можно произвести регулировку
уровня громкости MW/LW-тюнера при
помощи регулировки уровня входного
сигнала.
1 Сравните уровень громкости FMтюнера с уровнем источника сигнала,
который Вы хотите настроить.
2 Нажмите кнопку AUDIO , чтобы выбрать функцию SLA.
3 Нажмите кнопку a или b, чтобы отрегулировать громкость источника сигнала.
При увеличении или уменьшении громкости источника сигнала отображаются значения с SLA +4 по SLA –4.
Другие функции
Установка часов
Используйте эти указания для установки
часов.
1 Нажмите и удерживайте кнопку
SOURCE, пока устройство не выключится.
2 Нажмите кнопку AUDIO и удерживайте ее, пока на дисплее не появятся
часы.
3 Нажимайте кнопку c или d, чтобы
выбрать сегмент дисплея часов, который Вы хотите установить.
Часы—Минуты
При выборе сегментов дисплея часов выбранный сегмент будет мигать.
4 Нажмите кнопку a или b, чтобы установить часы.
При нажатии кнопки a происходит
увеличение выбранного значения часов
или минут. При нажатии кнопки b происходит уменьшение выбранного значения
часов или минут.
# Чтобы отменить установку часов, нажмите
кнопку BAND.
# Вы также можете отменить установку
часов, удерживая кнопку AUDIO до тех пор,
пока устройство не выключится.
30
Ru
Page 31

Эксплуатация данного
устройства
Включение или выключение
дисплея часов
Вы можете включить или выключить дисплей часов.
% Нажмите кнопку CLOCK, чтобы включить или выключить дисплей часов.
Каждое нажатие на кнопку CLOCK, включает или выключает дисплей часов.
# Дисплей часов временно исчезает, когда
Вы осуществляете другие операции, но он
снова появляется по истечении 20 секунд.
Приглушение звука
Звук этого устройства приглушается автоматически в следующих случаях:
! Когда производится исходящий или
входящий звонок с сотового телефона,
подключенного к этому устройству.
! Когда голосовое управление выводится
из навигационного устройства Pioneer,
подключенного к этому устройству.
Звук выключается, отображается надпись
MUTE, и становится невозможно осуществить никаких регулировок звука, кроме
управления громкостью. Функционирование приходит в норму, когда телефонное
соединение или голосовое управление
завершено.
Раздел
02
Русский
Ru
31
Page 32

Приложение
Дополнительная
информация
Сообщения об ошибках
Когда Вы обращаетесь к торговому представителю или в ближайший Сервисный
центр Pioneer, убедитесь, что Вы записали
сообщение об ошибке.
Сообщение Причина Действие
ERROR-11, 12,
17, 30
ERROR-11, 12,
17, 30
ERROR-10, 11,
12, 17, 30, A0
ERROR-22, 23 Компакт-диск
ERROR-44 Все дорожки
NO AUDIO Установленный
PROTECT Все файлы на
Грязный диск Очистите диск.
Поцарапанный
диск
Электрическая
или механическая неполадка
данного формата не может
быть воспроизведен
являются дорожками для
пропуска
диск не содержит файлов, которые могут
быть воспроизведены
установленном
диске защищены системой
DRM (цифровой
системой
управления
правами)
Замените диск.
Включите и выключите зажигание или
переключитесь
на другой источник сигнала, а
затем обратно на
проигрыватель
компакт-дисков.
Замените диск.
Замените диск.
Замените диск.
Замените диск.
Сообщение Причина Действие
SKIPPED Установленный
диск содержит
файлы формата WMA, защищенные
системой DRM
(цифровой
системой
управления
правами)
Замените диск.
Рекомендации по обращению
с дисками и проигрывателем
! Используйте только диски, имеющие
один из следующих логотипов.
! Используйте только обычные круглые
диски. Не используйте диски необычной
формы.
! Используйте компакт-диски диаметра
12 см или 8 см. Не используйте адаптер
при воспроизведении 8-сантиметровых
компакт-дисков.
! Не вставляйте в щель для загрузки ком-
пакт-диска ничего, кроме компакт-диска.
! Не используйте диски с трещинами, от-
колотыми краями, деформированные
диски или диски с другими повреждениями, поскольку такие диски могут повредить проигрыватель.
! Воспроизведение незакрытых для запи-
си дисков формата CD-R и CD-RW
невозможно.
32
Ru
Page 33

Дополнительная
информация
Приложение
! Это устройство совместимо с функцией
пропуска дорожки, поддерживаемой дисками CD-R/CD-RW. Дорожки, содержащие информацию о пропуске дорожки,
автоматически пропускаются (в случае
аудиоданных (CD-DA)).
! Если Вы вставите в это устройство диск
CD-RW, время до воспроизведения
будет дольше, чем при установке обычного компакт-диска или диска CD-R.
! Не прикасайтесь к записанной по-
верхности дисков.
! Когда диски не используются, храните
их в футлярах.
! Не оставляйте диски в местах с по-
вышенной температурой и под прямым
солнечным светом.
! Не приклеивайте этикеток, не пишите и
не наносите химических веществ на поверхность дисков.
! Для очистки компакт-диска протрите
диск мягкой тканью от центра к краю.
! Конденсация может временно ухудшить
работу проигрывателя. Оставьте его для
адаптации к более высокой температуре примерно на час. Кроме того, протирайте влажные диски мягкой тканью.
! Воспроизведение дисков может быть
невозможно из-за характеристик диска,
формата диска, приложения, при помощи которого выполнялась запись, условий воспроизведения, условий
хранения и других факторов.
! Текстовая информация может отобра-
жаться неправильно в зависимости от
условий записи.
! Толчки от неровностей дороги могут вы-
звать прерывание воспроизведения
диска.
! Перед использованием дисков озна-
комьтесь с мерами предосторожности
при обращении с ними.
Двойные диски
! Двойные диски – это двусторонние
диски для записи аудиоданных на CD с
одной стороны и для записи видеоданных на DVD – с другой.
! Поскольку сторона CD двойных дисков
физически несовместима с общим стандартом компакт-дисков, её воспроизведение на данном устройстве может
быть невозможным.
! Частая загрузка и извлечение двойного
диска может привести к появлению царапин на диске. Глубокие царапины
могут создать проблемы при воспроизведении диска на данном устройстве. В
некоторых случаях двойной диск может
застревать в щели загрузки дисков, изза чего его становится невозможно
извлечь. Во избежание такой ситуации
мы рекомендуем воздержаться от использования двойных дисков в данном
устройстве.
! Пожалуйста, обратитесь за более по-
дробной информацией о двойных дисках к соответствующим
производителям.
Файлы WMA, MP3 и WAV
! В зависимости от используемой для
преобразования файлов в формат WMA
версии Windows Media Player названия
альбомов и другая текстовая информация может отображаться неправильно.
! В зависимости от программного обе-
спечения (версии программного обеспечения), использованного для
преобразования аудиофайлов, это устройство может работать некорректно.
! При запуске воспроизведения файлов
WMA, содержащих изображения, может
произойти небольшая задержка.
! Проигрыватель совместим со стандар-
тами записи ISO 9660 уровня 1 и 2. Проигрыватель поддерживает файловые
системы Romeo и Joliet.
Русский
Ru
33
Page 34

1
2
5
6
Приложение
Дополнительная
информация
! Возможно воспроизведение дисков,
содержащих несколько сессий записи.
! Файлы WMA/MP3/WAV несовместимы с
пакетным форматом записи.
! В качестве имени файла или папки
может отображаться до 64 первых символов (включая расширение, например,
.wma, .mp3 или .wav).
! Последовательность выбора папок и
других действий может изменяться в зависимости от кодировки или программного обеспечения, использованного для
записи.
! Независимо от продолжительности
паузы между песнями в изначальной записи диски формата WMA/MP3/WAV
будут воспроизводиться с короткой паузой между песнями.
! Необходимо правильно использовать
расширения файлов, такие как .wma,
.mp3 или .wav.
Пример иерархии
: Папка
: Файл
3
4
! Это устройство назначает номера
папок. Пользователь не может назначать номера папок.
! Максимально допустимая иерархия
папок составляет восемь уровней. Однако реальная иерархия папок составляет менее двух уровней.
! Проигрыватель позволяет воспроиз-
водить до 99 папок на диске.
Совместимость с форматами
сжатия данных
WMA
! Совместимый формат: WMA, преобра-
зованный при помощи Windows Media
Player версии 7, 7.1, 8, 9 или 10
! Скорость передачи данных: от 48 кбит/с
до 320 кбит/с (постоянная скорость
передачи данных), от 48 кбит/сдо384
кбит/с (переменная скорость передачи
данных)
! Частота дискретизации: от 32 кГц до 48
кГц
! Windows Media Audio 9 Professional, Los-
sless, Voice: не поддерживается
MP3
! Скорость передачи данных: от 8 кбит/с
до 320 кбит/с
! Частота дискретизации: от 16 кГц до 48
кГц (32, 44,1, 48 кГц пиковая)
! Совместимая версия тегов ID3: 1.0, 1.1,
2.2, 2.3, 2.4 (теги ID3 версии 2.x имеют
приоритет перед версией 1.x.)
! Списки воспроизведения M3u: не по-
ддерживается
! MP3i (интерактивный MP3), mp3 PRO:
не поддерживается
WAV
! Совместимый формат: Linear PCM (Ли-
нейная ИКМ – LPCM), MS ADPCM
! Разрядность квантования:8и 16
(LPCM), 4 (MS ADPCM)
! Частота дискретизации: от 16 кГц до 48
кГц (LPCM), от 22,05 кГц до 44,1 кГц (MS
ADPCM)
34
Ru
Page 35

Дополнительная
информация
Приложение
Технические характеристики
Общие
Источник питания ................. 14, 4 В постоянного тока
(допустимый диапазон от
10,8 Вдо15,1 В)
Система заземления .......... Заземление отрицатель-
ного полюса
Максимальный потребляемый ток
..................................................... 10, 0 А
Размеры (Ш × В × Г):
DIN
Шасси ....................... 1 78 × 50 × 16 2 мм
Передняя панель
................................. 188 × 5 8 × 1 4 мм
D
Шасси ....................... 1 78 × 50 × 16 2 мм
Передняя панель
................................. 170 × 4 7,4 × 1 4 мм
Масса ........................................... 1, 46 кг
Аудио
Максимальная выходная мощность
..................................................... 50 Вт ×4
Номинальная выходная мощность
..................................................... 22 Вт × 4 (50 Гц до 15 000
Гц, суммарное значение
коэффициента нелинейных искажений 5%, нагрузка 4 W для обоих
каналов)
Сопротивление нагрузки
..................................................... от 4 W до 8 W ×4
от 4 W до 8 W ×2+2W ×1
Максимальные выходная мощность/выходное сопротивление предварительного усилителя
..................................................... 2,2 В/1 кW
Эквалайзер (3-полосный параметрический эквалайзер):
Нижние частоты
Частота ................... 40/ 80/ 100/160 Гц
Коэффициент Q-резонанс
................................. 0,3 5/0 ,59 /0, 95/ 1,1 5 ( + 6 дБ
при усилении)
Усиление ................ ±12 дБ
Средние частоты
Частота ................... 200/500/1к/2кГц
Коэффициент Q-резонанс
................................. 0,3 5/0 ,59 /0, 95/ 1,1 5 ( + 6 дБ
при усилении)
Усиление ................ ±12 дБ
Верхние частоты
Частота ................... 3,1 5к/8к/10к/12,5кГц
Коэффициент Q-резонанс
................................. 0,3 5/0 ,59 /0, 95/ 1,1 5 ( + 6 дБ
при усилении)
Усиление ................ ±12 дБ
Контур громкости:
Низкий ............................... +3,5 дБ (100 Гц), +3 дБ (10
кГц)
Средний ............................ +10 дБ (100 Гц), +6,5 дБ
(10 кГц)
Высокий ............................ +11 дБ (100 Гц), +11 дБ
(10 кГц)
(громкость: –30 дБ)
Проигрыватель компакт-дисков
Система ...................................... Аудиосистема с компакт-
диском
Используемые диски .......... Компакт-диск
Формат сигнала:
Частота дискретизации
........................................... 44, 1 кГц
Разрядность квантования
........................................... 16; линейная
Частотные характеристики
..................................................... от 5 Гц до 20 000 Гц (±1
дБ)
Отношение сигнал/шум .... 9 4 дБ (1 кГц)(сеть IEC-A)
Динамический диапазон
..................................................... 92 дБ (1 кГц)
Число каналов ........................ 2 (стерео)
Формат декодирования файлов WMA
..................................................... Версии 7, 7.1, 8, 9, 10 (2-х
канальный звук)
(Windows Media Player)
Формат декодирования файлов MP3
..................................................... MPEG-1 и 2 Audio Layer 3
Формат сигнала WAV ......... Linear PCM и MS ADPCM
FM-тюнер
Диапазон частот .................... от 65 МГц до 74 МГц
от 87,5 МГц до 108,0 МГц
Полезная чувствительность
..................................................... 10 дБф (0,9 мкВ/75 W,
моно, отношение сигнал/
шум:30дБ)
Отношение сигнал/шум .... 7 5 дБ (сеть IEC-A)
Искажения ................................ 0, 3 % ( при 65 дБф,1кГц,
стерео)
0,1 % (при 65 дБф,1кГц,
моно)
Русский
Ru
35
Page 36

Приложение
Дополнительная
информация
Амплитудно-частотная характеристика
..................................................... от 30 Гц до 15 000 Гц (±3
Разделение каналов .......... 45 дБ (при 65 дБф,1кГц)
MW-тюнер
Диапазон частот .................... от 531 кГц до 1 602 кГц (9
Полезная чувствительность
..................................................... 18 мкВ (отношение сиг-
Отношение сигнал/шум .... 6 5 дБ (сеть IEC-A)
LW-тюнер
Диапазон частот .................... от 153 кГц до 281 кГц
Полезная чувствительность
..................................................... 30 мкВ (отношение сиг-
Отношение сигнал/шум .... 6 5 дБ (сеть IEC-A)
Примечание:
В соответствии со статьей 5 закона Российской Федерации “О защите прав потребителей” и постановлением
правительства Российской Федерации №
720 от 16.06.97 компания Pioneer Europe
NV оговаривает следующий срок службы
изделий, официально поставляемых на
российский рынок.
Автомобильная электроника:6лет
Другие изделия (наушники, микрофоны и
т.п.): 5 лет
дБ)
кГц)
нал/шум:20дБ)
нал/шум:20дБ)
Примечание
Характеристики и конструкция могут быть изменены для их улучшения без
уведомления.
36
Ru
Page 37

PIONEER CORPORATION
4-1, MEGURO 1-CHOME, MEGURO-KU
TOKYO 153-8654, JAPAN
PIONEER ELECTRONICS (USA) INC.
P.O. Box 1540, Long Beach, California 90801-1540, U.S.A.
TEL: (800) 421-1404
PIONEER EUROPE NV
Haven 1087, Keetberglaan 1, B-9120 Melsele, Belgium
TEL: (0) 3/570.05.11
PIONEER ELECTRONICS ASIACENTRE PTE. LTD.
253 Alexandra Road, #04-01, Singapore 159936
TEL: 65-6472-7555
PIONEER ELECTRONICS AUSTRALIA PTY. LTD.
178-184 Boundary Road, Braeside, Victoria 3195, Australia
TEL: (03) 9586-6300
PIONEER ELECTRONICS OF CANADA, INC.
300 Allstate Parkway, Markham, Ontario L3R OP2, Canada
TEL: 1-877-283-5901
PIONEER ELECTRONICS DE MEXICO, S.A. de C.V.
Blvd.Manuel Avila Camacho 138 10 piso
Col.Lomas de Chapultepec, Mexico, D.F. 11000
TEL: 55-9178-4270
先鋒股份有限公司
總公司 : 台北市中山北路二段44 號 13樓
電話 : (02) 2521-3588
先鋒電子(香港)有限公司
香港九龍尖沙咀海港城世界商業中心
9樓901-6室
電話 : (0852) 2848-6488
<KOKZX> <06I00000>
Published by Pioneer Corporation.
Copyright © 2006 by Pioneer Corporation.
All rights reserved.
Издано Pioneer Corporation. Авторские
права © 2006 Pioneer Corporation. Все
права защищены.
Printed in China
Отпечатано в Китае
<YRD5117-A/U> EE
 Loading...