

Page 1
DJ Controller
Controlador DJ
Ņŋ ښᏣ
DDJ-S1
http://www.prodjnet.com/support/
The Pioneer website shown above offers FAQs, information on software and various other types of information
and services to allow you to use your product in greater comfort.
El sitio Web de Pioneer indicado más arriba tiene una sección con las preguntas más frecuentes, y además
ofrece información del software y varios tipos de información y servicios para que usted pueda usar su
producto con la mayor comodidad.
αРᡘұޠӒᎣᆪયණٽŇłŒȃᡞၦଊІөԓڐуޠၦଊᇅ݉ଡ଼ȂѠᡲ்Р߰ޠٻңࠣȄ
Operating Instructions
Manual de instrucciones
ᐈձКь
Page 2
Thank you for buying this Pioneer product. Please read through these operating instructions so you will know how to operate your model properly. After
Before making or changing the connections,
switch off the power and disconnect the AC
adapter from the AC outlet.
D44-9-3_A1_En
Information to User
Alterations or modifications carried out without appropriate authorization may invalidate the user’s right to operate
the equipment.
D8-10-2_A1_En
FEDERAL COMMUNICATIONS COMMISSION DECLARATION OF CONFORMITY
This device complies with part 15 of the FCC Rules. Operation is subject to the following two conditions: (1) This
device may not cause harmful interference, and (2) this device must accept any interference received, including
interference that may cause undesired operation.
Product Name: DJ CONTROLLER
Model Number: DDJ-S1
Responsible Party Name: PIONEER ELECTRONICS (USA) INC.
SERVICE SUPPORT DIVISION
Address: 1925 E. DOMINGUEZ ST. LONG BEACH, CA 90810-1003, U.S.A.
Phone: 1-800-421-1404
URL: http://www.pioneerelectronics.com
D8-10-4*_C1_En
NOTE:
This equipment has been tested and found to comply with the limits for a Class B digital device, pursuant to Part 15
of the FCC Rules. These limits are designed to provide reasonable protection against harmful interference in a
residential installation. This equipment generates, uses, and can radiate radio frequency energy and, if not installed
and used in accordance with the instructions, may cause harmful interference to radio communications. However,
there is no guarantee that interference will not occur in a particular installation. If this equipment does cause
harmful interference to radio or television reception, which can be determined by turning the equipment off and on,
the user is encouraged to try to correct the interference by one or more of the following measures:
— Reorient or relocate the receiving antenna.
— Increase the separation between the equipment and receiver.
— Connect the equipment into an outlet on a circuit different from that to which the receiver is connected.
— Consult the dealer or an experienced radio/TV technician for help.
D8-10-1-2_A1_En
CAUTION
This product satisfies FCC regulations when shielded cables (with Ferrite-cores attached) and connectors are used to
connect the unit to other equipment. To prevent electromagnetic interference with electric appliances such as radios
and televisions, use shielded cables (with Ferrite-cores attached) and connectors for connections.
D8-10-3b_A1_En
This product is for general household purposes. Any
failure due to use for other than household purposes
(such as long-term use for business purposes in a
restaurant or use in a car or ship) and which requires
repair will be charged for even during the warranty
period.
K041_A1_En
For PLUGGABLE EQUIPMENT, the socket–outlet shall
be installed near the equipment and shall be easily
accessible.
D28-9-3-2_A1_En
you have finished reading the instructions, put them away in a safe place for future reference.
In some countries or regions, the shape of the power plug and power outlet may sometimes differ from that shown in the explanatory drawings.
However the method of connecting and operating the unit is the same.
2
En
Page 3

Contents
How to read this manual
! In this manual, names of screens and menus displayed on the
product and on the computer screen, as well as names of buttons
and terminals, etc., are indicated within brackets. (e.g.: [CUE] button,
[FILES] panel, [VINYL] mode, [AUX IN] terminal)
! Please note that the screens and specifications of the software
described in this manual as well as the external appearance and
specifications of the hardware are currently under development and
may differ from the final specifications.
Before you start
Features .......................................................................................................4
What’s in the box .........................................................................................4
About the AC adapter ................................................................................. 4
Installing the software ................................................................................ 6
Launching ITCH...........................................................................................9
About the driver software and setting utility software
Connections and part names
Connecting the input/ output terminals .................................................. 11
Part names and functions ........................................................................ 12
Operation
ITCH software screen ................................................................................ 16
Starting the system ................................................................................... 19
Quitting the system ................................................................................... 19
Operating the Library ................................................................................19
Loading tracks to decks ............................................................................ 23
Playing and pausing ................................................................................. 23
Adjusting the playing speed (Tempo control) ........................................ 24
Playing in reverse ...................................................................................... 24
Operating the jog dial ............................................................................... 24
Specifying the position to be played instantly (NEEDLE SEARCH) ......24
Setting a temporary cue point .................................................................24
Loop operations ......................................................................................... 25
Setting Hot Cue ......................................................................................... 26
Using the slip mode ..................................................................................26
Synchronizing the playing speed.............................................................27
Editing the beat grid..................................................................................27
Using the mixer functions ........................................................................28
Using a microphone ................................................................................. 29
Using an external device .......................................................................... 29
Recording ..................................................................................................29
Outputting the microphone and AUX sound directly ............................30
Using the effect function .......................................................................... 30
Changing the settings ..............................................................................31
............................ 10
English
Additional information
Troubleshooting ........................................................................................33
File corruption messages .........................................................................34
Using as a controller for other DJ software ............................................35
Disclaimer .................................................................................................. 35
Cautions on copyrights.............................................................................35
Specifications ............................................................................................ 36
En
3
Page 4

Before you start
Features
This unit is an all-in-one DJ system combining the high operability hardware of Pioneer professional DJ players and DJ mixers that has achieved
an excellent reputation among many professional DJs and clubs with
the ITCH DJ software by Serato Audio Research. It is also equipped with
audio interface, and allows full-fledged DJ performances without requiring other DJ equipment.
LAYOUT
This unit uses the same layout as Pioneer professional models, allowing
intuitive and accurate performances with simple 2-channel mixing and
effects.
MIC/ AUX INPUT, XLR OUTPUT
This unit is equipped with a microphone/ auxiliary input allowing connection of a microphone or external device (sampler, portable audio device,
etc.). For output, it has XLR and RCA terminals supporting professional
PA equipment. In this way, this unit supports all types of situations and
DJing styles.
ITCH
The included ITCH software is a DJ software application that has been
optimized for this unit. In addition to the 2-channel mixer and effector,
a number of new functions, including slip mode, alphabet search, and
hot cue fader start, enable creative and comfortable DJ performances.
Furthermore, all the buttons and knobs are preset to operate in association with the software, so DJ performances can be enjoyed immediately
simply by connecting this unit to the computer.
LAPTOP DOCK
The computer’s keyboard section can be stowed under this unit. Docking
the computer with this unit into a single unit allows you to create an
efficient DJ system.
Playing address/ Level meter
The player section is equipped with a “playing address” indicator letting you grasp the track’s progress at a glance by the position of the
LED display and get the sense of touching the track directly when the
[NEEDLE SEARCH (ALPHABET SEARCH)] pad is touched with a finger.
Furthermore, the mixer section is equipped with a master level meter and
channel level meters. This increases affinity with the computer for even
more comfortable DJ performances.
HIGH SOUND QUALITY
The sound quality technology developed for Pioneer professional models
is used to achieve a high level of sound quality for a DJ controller.
What’s in the box
! CD-ROM
! AC adapter
! Power plug
! USB cable
! Operating instructions (this document)
About the AC adapter
Cautions on use
Safety instructions
To ensure your personal safety and to maximize the full operating potential of your unit, read and follow these safety instructions.
Read & Retain Instructions
Read all operating and user information provided with this product.
Cleaning
Use a damp cloth to clean the exterior housing. Avoid using any fluids
including liquid, aerosol or alcohol-based cleaning products.
Water or Moisture
Avoid operating or locating this product near water or other sources of
fluid.
Accessories
Do not place this product on an unstable cart, stand, or table. The product may fall and be seriously damaged.
Ventilation
Do not block or cover this product in use. This unit should not be placed
in a built-in installation unless properly ventilated.
Environment
Avoid placing this product in a location with exposure to large quantities
of dust, high temperatures, high humidity, or subject to excessive vibrations or shocks.
Power Sources
Operate this product only from the recommended power sources. If
you are unsure of the power source, consult an authorized Pioneer
representative.
Power-Cord Protection
When unplugging the unit, pull on the plug – not on the cord. Do not
handle the cord or plug with wet hands; doing so could cause an electric
short or shock. Do not allow anything to pinch or rest on the power cord
and do not place in a walkway.
Power
Turn OFF the system before installing this or any other hardware device.
Overloading
Avoid connecting too many devices to a single wall socket or power
source as this can cause fires or short circuits.
Object & Liquid Entry
Never push inappropriate objects in to the device. Avoid spilling any
liquids in to or on the outside of the device.
Servicing
Opening or removing the cover exposes you to possible electrical shock
or other danger. Contact a Pioneer authorized service representative for
repairing this product (refer to the enclosed Service & Support Card).
Damage Requiring Service
Unplug the unit and refer servicing to qualified service personnel in the
following situations:
! When the power cord, plug, or chassis is damaged.
! If liquid has been spilled, or objects have fallen into the product.
! If the product has been exposed to rain or water.
En
4
Page 5
! If the product does not operate normally when the operating instruc-
PUSH
PUSH
PUSH
PUSH
tions are followed. Adjust only those controls that are covered by the
operating instructions. Improper adjustment of other controls may
result in damage and can require extensive work by a qualified technician to restore the unit to its normal operation.
! When the product exhibits a distinct change in performance – this
indicates a need for service.
Check that there are no irregularities with the AC adapter or power plug,
then insert the power plug into the specified position of the AC adapter
using the specified procedure until a click is heard. For details, see
Mounting the power plug on page 5.
If there are irregularities with the AC adapter or power plug, ask your
nearest Pioneer authorized service center or your dealer to carry out
repair work.
! Do not use this unit with a coin, paper clip or other metal object stuck
between the AC adapter and power plug. Doing so could cause a short
circuit, leading to fire or electric shock.
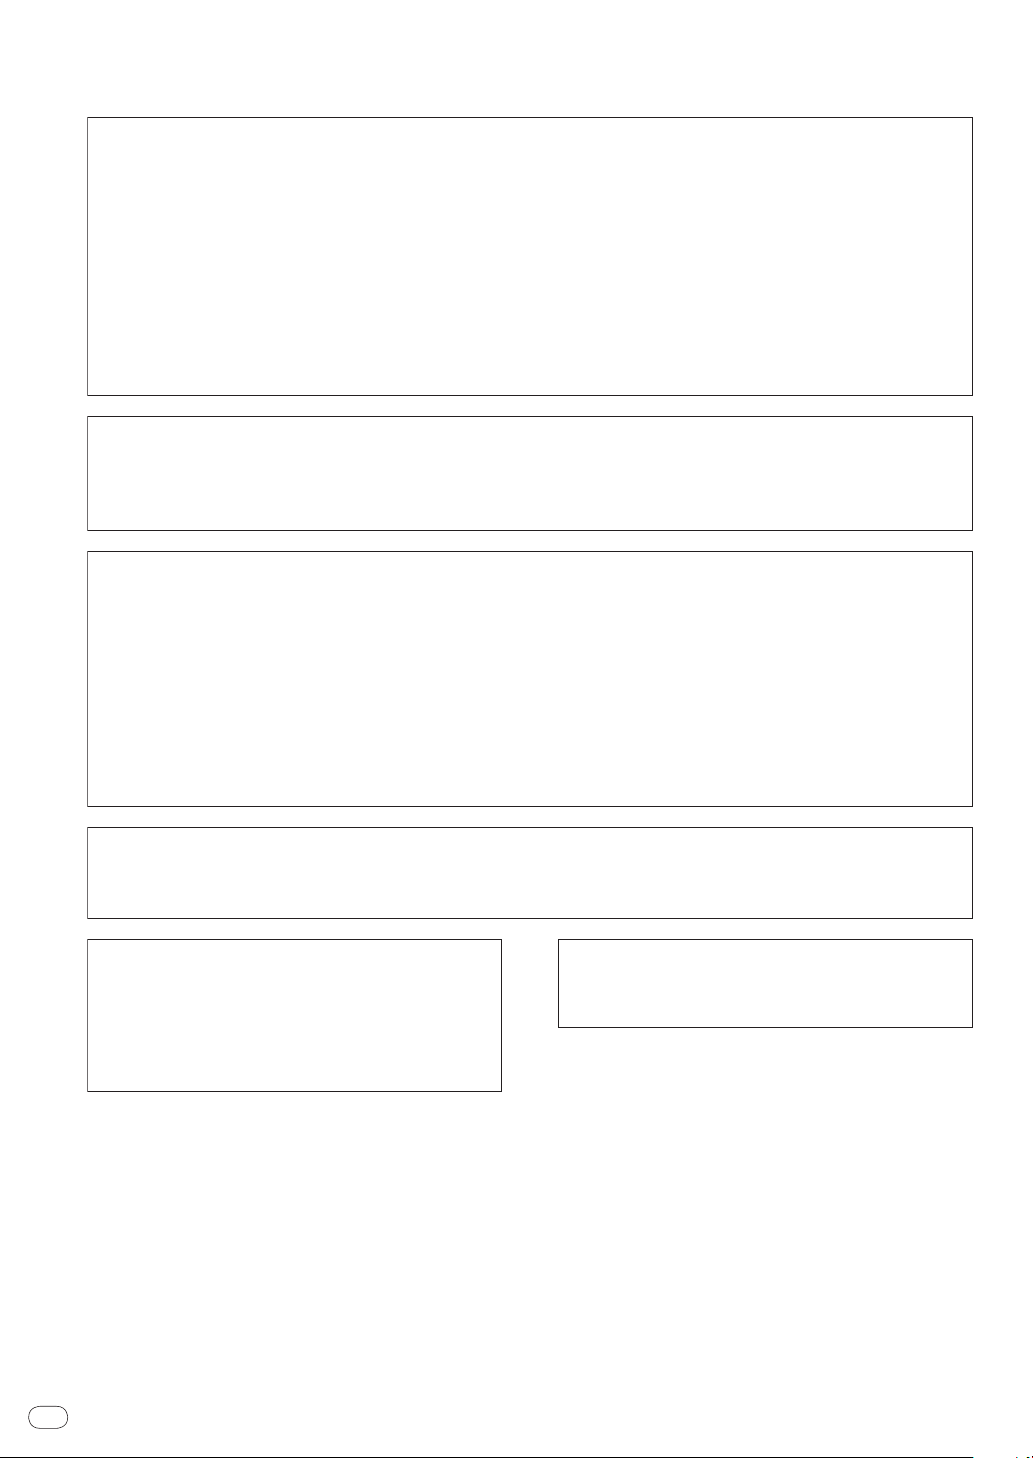
Mounting the power plug
Slide the power plug along the guide rails in the AC
adapter unit as shown on the diagram below, then press
in until a click is heard.
Removing the power plug
English
! When mounting the AC adapter on a wall outlet, make sure there is no
space between the AC adapter and the wall outlet. Faulty contact or a
coin, paper clip or other metal object getting stuck in the space could
cause a short circuit, leading to fire or electric shock.
Coin, paper clip or other metal object
Side
! The power plug could come detached from the AC adapter and remain
in the power outlet if someone trips on the AC adapter’s power cord
or if something hits the AC adapter. If this happens, remove the power
plug remaining in the outlet with dry hands, holding it as shown on the
diagram below and without touching metal parts. Do not use any tools
to remove it.
Top
While pressing the [PUSH] button on the AC adapter
unit, slide the power plug away from the adapter as
shown on the diagram below to remove it.
Once the power plug is mounted, there is no need to remove it.
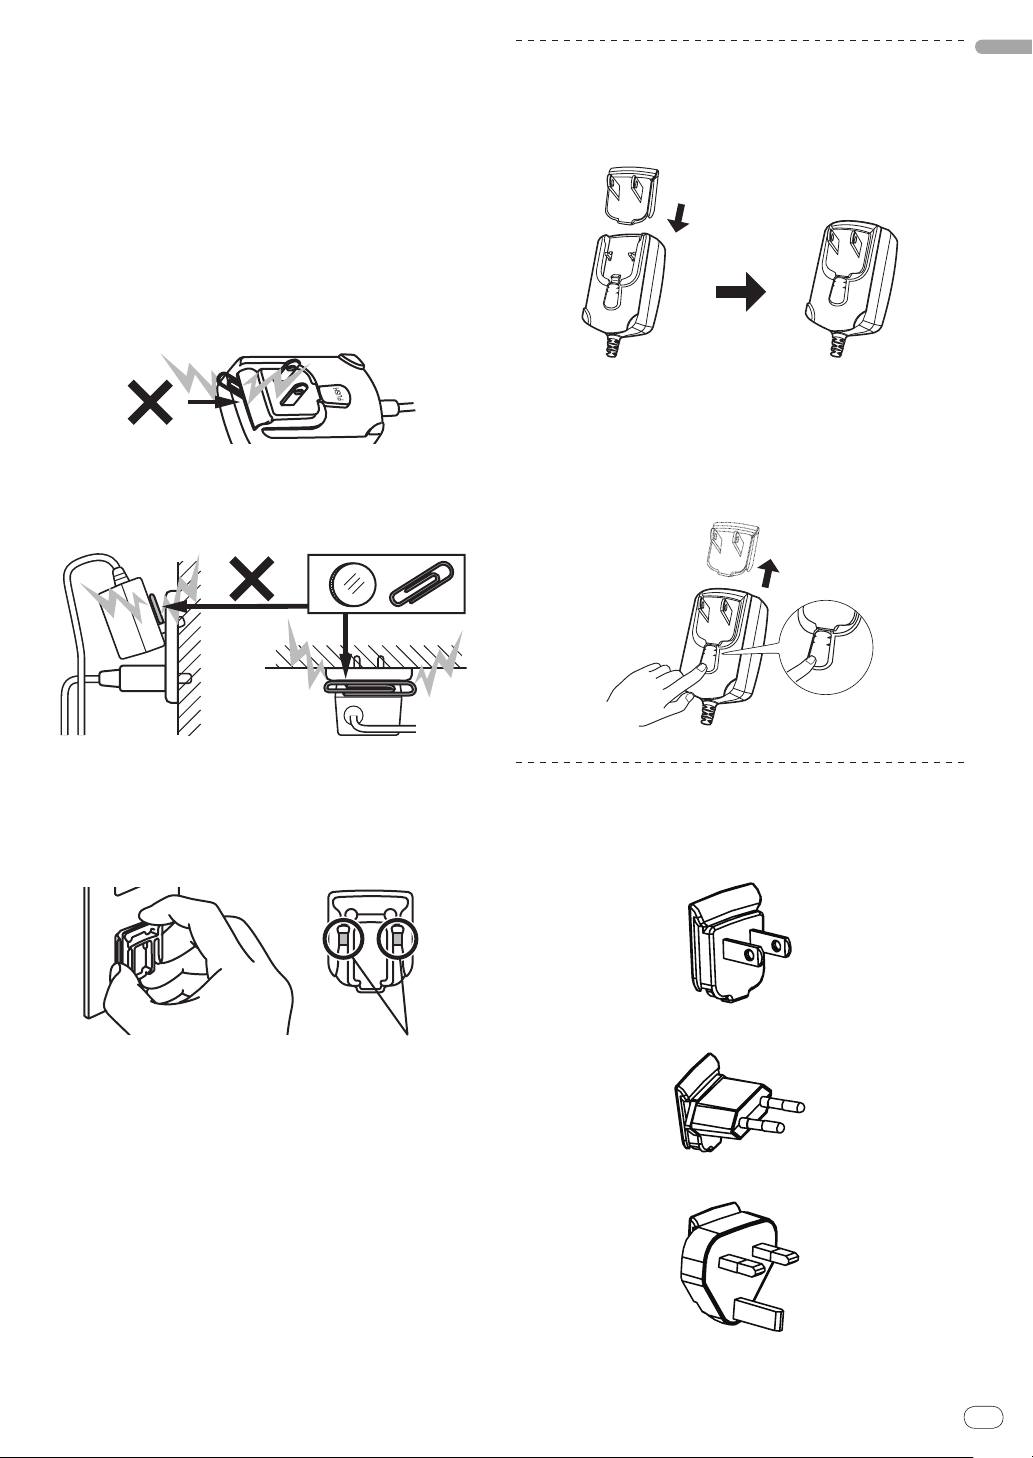
Power plug
This product comes with the types of power plugs shown below. Use the
appropriate power plug for the country or region you are in.
Type 1 (for Japan and North America)
Do not touch metal parts.
Type 2 (for Europe)
Type 3 (for the UK)
En
5
Page 6
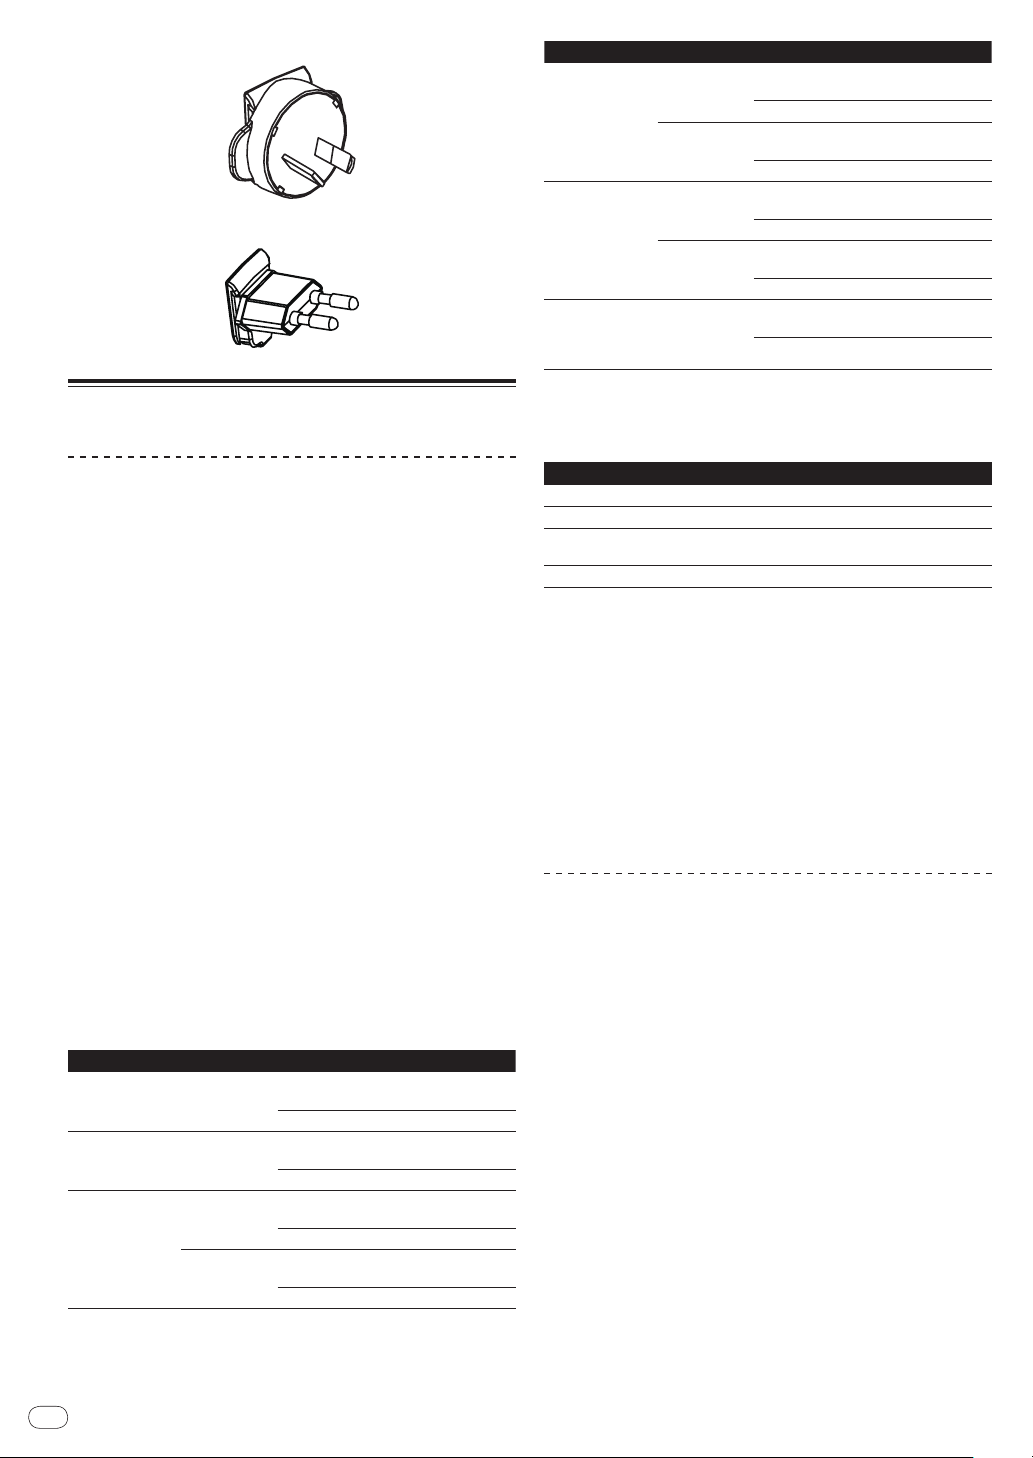
Type 4 (for Australia)
Type 5 (for Thailand and Korea)
Installing the software
Supported operating systems CPU and required memory
XP
®
32-bit version
64-bit version
32-bit version
64-bit version
32-bit version
Windows® 7
Home Premium/
Professional/
Ultimate
Windows Vista
Home Basic/
Home Premium/
Business/ Ultimate
®
Windows
Home Edition/
Professional (SP2
or later)
For the latest information on the operating environment and compatibility, and
to acquire the latest operating system, please visit the following Serato Audio
Research website:
http://serato.com
®
Intel
processor, Core™ 2 Duo 1.8 GHz
or better
2 GB or more of RAM
®
processor, Core™ 2 Duo 2.4 GHz
Intel
or better
4 GB or more of RAM
®
Intel
processor, Core™ 2 Duo 1.8 GHz
or better
2 GB or more of RAM
®
processor, Core™ 2 Duo 2.2 GHz
Intel
or better
4 GB or more of RAM
Intel® processor, Core™ 2 Duo 1.8 GHz
or better
1 GB or more of RAM
Before installing the software
About the software to be installed
The software to be installed differs according to the computer you are
using.
For Windows
After the ITCH software is installed, the driver software is also installed.
! Carefully read the user license agreements below.
— SERATO — USER LICENSE AGREEMENT (“License Agreement”)
(Refer to About the ITCH software.)
— Software end user license agreement (Refer to About the driver
software (Windows).)
! To install or uninstall the driver software, you need to be authorized
by the administrator of your computer. Log on as the administrator of
your computer before proceeding with the installation.
! If you connect this unit to your computer without installing the driver
software first, an error may occur on your computer depending on
the system environment.
! If installation of the driver software is interrupted after it has started,
start the installation procedure over again from the beginning.
For Mac OS X
Only the ITCH software is installed.
! Carefully read the user license agreements below.
— SERATO — USER LICENSE AGREEMENT (“License Agreement”)
(Refer to About the ITCH software.)
Minimum operating environment
Supported operating systems CPU and required memory
Mac OS X 10.4.11
Mac OS X 10.5.8
32-bit version
Mac OS X 10.6
64-bit version
®
Intel
processor, Core™ Duo 1.8 GHz or
better
1 GB or more of RAM
®
processor, Core™ Duo 1.8 GHz or
Intel
better
1 GB or more of RAM
®
processor, Core™ Duo 1.8 GHz or
Intel
better
1 GB or more of RAM
®
processor, Core™ Duo 2.4 GHz or
Intel
better
4 GB or more of RAM
Others
Hard disk Sufficient free hard disk space for music data
CD drive Optical disc drive on which the CD-ROM can be read
USB port
Display resolution Resolution of 1 024 x 768 or greater
! Full functionality is not guaranteed on all computers, even those meeting the
operating environment requirements described above.
! Even with the required memory indicated for the operating environment above,
lack of memory due to resident programs, the number of services, etc., could
prevent the software from offering optimal functionality and performance. In
such cases, free up sufficient memory. We recommend installing additional
memory for stable operation.
! Depending on the computer’s power-saving settings, etc., the CPU and hard
disk may not provide sufficient processing capabilities. For notebook computers in particular, make sure the computer is in the proper conditions to provide
constant high performance (for example by keeping the AC power connected)
when using ITCH.
! Note that problems may arise with the functionality of ITCH depending on
other software running on your computer.
! Operation of ITCH is not guaranteed with AMD brand CPUs.
A USB 2.0 port is required to connect the computer
with this unit.
About the ITCH software
ITCH is a DJ software application by Serato Audio Research. DJ performances are possible by connecting the computer on which this software
is installed to this unit.
Checking the latest information on the ITCH software
Free updates of ITCH can be downloaded from the Internet. Check the
website below and keep the software updated to the latest version.
http://serato.com
SERATO — USER LICENSE AGREEMENT (“License
Agreement”)
Serato Inc LP (“Serato”) and its licensor(s) own the Software, being any
and all Serato applications, and intellectual property in the Software. By
installing or using the Software, you agree to the terms of this License
Agreement.
1 Grant of License:
Serato grants you a perpetual, non-exclusive, personal license
(“License”) to install and use the Software on the terms of this License
Agreement.
The License as it applies to any and all Software which is authorized
solely via a license code (with no hardware component) (“Single
Instance Software”) only permits you to authorize and use Single
Instance Software on one computer at a time with that license code.
En
6
Page 7

If you wish to authorize and use Single Instance Software on another
computer you must first deauthorize any prior installation.
Where, as part of the Software installation process, software owned by
third parties (“Third Party Software”) is installed on your computer,
the relevant third party license agreement or terms will apply, and this
License Agreement does not apply to it.
2 Ownership:
You acknowledge that Serato and its licensor(s) are and remain the
owners of the intellectual property in the Software. You are granted no
other rights to the Software other than those expressly conferred by this
License Agreement.
3 Copying and Disposal of Software:
You must not copy, alter, modify, reproduce, reverse engineer, reverse
assemble or reverse compile the Software or any part of it or any related
materials, or permit any other person to do so, except that you may make
one copy of the Software for genuine back-up purposes
You may transfer your License in its entirety to another person provided
that, prior to transfer, you deauthorize any prior installation of Single
Instance Software; and where the relevant Serato application operates as
a bundle with hardware, you transfer ownership of the relevant hardware
to that person. Any person to whom the License is transferred agrees to
the terms of this License Agreement by virtue of clause 1.
4 No Implied Warranties:
Except for any written representation, warranty, term or condition
addressed to you and signed by Serato, you acknowledge that Serato
gives no warranties in relation to the Software, either express or implied,
including but not limited to, any implied warranties relating to quality,
fitness for any particular purpose or ability to achieve a particular result.
You acknowledge that:
a you do not enter into this License Agreement in reliance on any
representation, warranty, term or condition, except for any written representation, warranty, term or condition addressed to you
and signed by Serato; and
b any conditions, warranties or other terms implied by statute or
common law are excluded from this License Agreement to the
fullest extent permitted by law.
5 Exclusion of liability:
In no event will Serato be liable (whether in contract, tort including negligence, or otherwise) to you for:
a any claim for damages, or any other monetary remedy, under
this License Agreement or relating to the Software, including but
not limited to a claim for:
i loss of revenue and/
of goodwill or opportunity, loss of production, loss or corruption of data or wasted management or staff time; or
ii loss, damage, cost or expense of any kind whatsoever that is
indirect, consequential, or of a special nature, arising directly
or indirectly out of this License or the Software, even if Serato
had been advised of the possibility of such damages, and
even if such loss, damage, cost or expense was reasonably
foreseeable by Serato;
b any loss whatsoever brought about through your installation or
use of Third Party Software.
or profit, loss of anticipated savings, loss
6 Exclusions subject to law:
Nothing in this License Agreement will operate, or is intended to operate,
to limit or exclude any liability or obligation of Serato to the extent that
such liability or obligation cannot be limited or excluded under applicable law.
7 Updates:
Where you operate the feature of the Software that checks for updates,
you agree that:
a the terms of this License Agreement will also apply to the
updates and/
or the Software as modified by the updates; and
b the feature may send information, including information about
the configuration of the Software, to Serato’s servers, and Serato
may collect and use that information for its business purposes.
The Serato Websites Privacy Policy (located at http://serato.com/legal/
website-privacy-policy and subject to revision by Serato from time to
time) will apply to your use of the feature of the Software that checks for
updates.
8 Governing law:
This License Agreement will take effect as a contract made under, and
be governed by, New Zealand law. The United Nations Convention on
Contracts for the International Sale of Goods shall not apply to this
License Agreement or the Software. You submit to the non-exclusive
jurisdiction of the New Zealand courts.
9 License for bundled digital media files:
Where digital media files are provided with the Software (“Bundled
Media”), you may use them only within the Software through its normal
operation. Serato does not warrant that it holds and does not grant any
license or rights whatsoever in relation to the Bundled Media or any of
the copyright works embodied in them. In particular and without limitation, you are responsible for any and all applicable ASCAP, BMI, SESAC
and other similar license fees arising from your public performance,
broadcast, or other communication of or reproduction of or other dealing
with any of the Bundled Media in your territory.
Should you have any questions concerning this License Agreement, or
if you desire to contact Serato for any reason, please write to: Serato Inc
LP, Private Bag 92015, AMSC, Auckland 1142, New Zealand or email
Serato at eula@serato.com
About the driver software (Windows)
This driver software is an exclusive ASIO driver for outputting audio
signals from the computer.
! There is no need to install the driver software when using Mac OS X.
Checking the latest information on the driver software
For the latest information on the driver software for exclusive use with
this unit, visit our website shown below.
http://www.prodjnet.com/support/
Software end user license agreement
This Software End User License Agreement (“Agreement”) is between
you (both the individual installing the Program and any single legal
entity for which the individual is acting) (“You” or “Your”) and PIONEER
CORPORATION (“Pioneer”).
TAKING ANY STEP TO SET UP OR INSTALL THE PROGRAM MEANS
THAT YOU ACCEPT ALL OF THE TERMS OF THIS LICENSE AGREEMENT.
PERMISSION TO DOWNLOAD AND/ OR USE THE PROGRAM IS
EXPRESSLY CONDITIONED ON YOUR FOLLOWING THESE TERMS.
WRITTEN OR ELECTRONIC APPROVAL IS NOT REQUIRED TO MAKE
THIS AGREEMENT VALID AND ENFORCEABLE. IF YOU DO NOT
AGREE TO ALL OF THE TERMS OF THIS AGREEMENT, YOU ARE NOT
AUTHORIZED TO USE THE PROGRAM AND MUST STOP INSTALLING IT
OR UNINSTALL IT, AS APPLICABLE.
1 Definitions
1 “Documentation” means written documentation, specifications
and help content made generally available by Pioneer to aid in
installing and using the Program.
2 “Program” means all or any part of Pioneer’s software licensed
to You by Pioneer under this Agreement.
2 Program license
1 Limited License. Subject to this Agreement’s restrictions,
Pioneer grants to You a limited, non-exclusive, nontransferable,
license (without the right to sublicense):
a To install a single copy of the Program on the hard disk
drive of Your computer, to use the Program only for Your
personal purpose complying with this Agreement and the
Documentation (“Authorized Use”);
English
En
7
Page 8
b To use the Documentation in support of Your Authorized
Use; and
c To make one copy of the Program solely for backup pur-
poses, provided that all titles and trademark, copyright and
restricted rights notices are reproduced on the copy.
2 Restrictions. You will not copy or use the Program or
Documentation except as expressly permitted by this
Agreement. You will not transfer, sublicense, rent, lease or lend
the Program, or use it for third-party training, commercial timesharing or service bureau use. You will not Yourself or through
any third party modify, reverse engineer, disassemble or decompile the Program, except to the extent expressly permitted by
applicable law, and then only after You have notified Pioneer in
writing of Your intended activities. You will not use the Program
on multiple processors without Pioneer’s prior written consent.
3 Ownership. Pioneer or its licensor retains all right, title and
interest in and to all patent, copyright, trademark, trade secret
and other intellectual property rights in the Program and
Documentation, and any derivative works thereof. You do not
acquire any other rights, express or implied, beyond the limited
license set forth in this Agreement.
4 No Support. Pioneer has no obligation to provide support,
maintenance, upgrades, modifications or new releases for the
Program or Documentation under this Agreement.
3 Warranty disclaimer
THE PROGRAM AND DOCUMENTATION ARE PROVIDED “AS IS”
WITHOUT ANY REPRESENTATIONS OR WARRANTIES, AND YOU
AGREE TO USE THEM AT YOUR SOLE RISK. TO THE FULLEST EXTENT
PERMISSIBLE BY LAW, PIONEER EXPRESSLY DISCLAIMS ALL
WARRANTIES OF ANY KIND WITH RESPECT TO THE PROGRAM AND
DOCUMENTATION, WHETHER EXPRESS, IMPLIED, STATUTORY,
OR ARISING OUT OF COURSE OF PERFORMANCE, COURSE OF
DEALING OR USAGE OF TRADE, INCLUDING ANY WARRANTIES
OF MERCHANTABILITY, FITNESS FOR A PARTICULAR PURPOSE,
SATISFACTORY QUALITY, ACCURACY, TITLE OR NON-INFRINGEMENT.
4 Damages and remedies for breach
You agree that any breach of this Agreement’s restrictions would cause
Pioneer irreparable harm for which money damages alone would be
inadequate. In addition to damages and any other remedies to which
Pioneer may be entitled, You agree that Pioneer may seek injunctive relief
to prevent the actual, threatened or continued breach of this Agreement.
5 Termination
Pioneer may terminate this Agreement at any time upon Your breach of
any provision. If this Agreement is terminated, You will stop using the
Program, permanently delete it from the computer where it resides, and
destroy all copies of the Program and Documentation in Your possession, confirming to Pioneer in writing that You have done so. Sections
2.2, 2.3, 2.4, 3, 4, 5 and 6 will continue in effect after this Agreement’s
termination.
6 General terms
1 Limitation of Liability. In no event will Pioneer or its subsidiaries
be liable in connection with this Agreement or its subject matter,
under any theory of liability, for any indirect, incidental, special,
consequential or punitive damages, or damages for lost profits,
revenue, business, savings, data, use, or cost of substitute procurement, even if advised of the possibility of such damages or if
such damages are foreseeable. In no event will Pioneer’s liability
for all damages exceed the amounts actually paid by You to
Pioneer or its subsidiaries for the Program. The parties acknowledge that the liability limits and risk allocation in this Agreement
are reflected in the Program price and are essential elements of
the bargain between the parties, without which Pioneer would
not have provided the Program or entered into this Agreement.
2 The limitations or exclusions of warranties and liability contained
in this Agreement do not affect or prejudice Your statutory rights
as consumer and shall apply to You only to the extent such
limitations or exclusions are permitted under the laws of the
jurisdiction where You are located.
3 Severability and Waiver. If any provision of this Agreement is held
to be illegal, invalid or otherwise unenforceable, that provision will
be enforced to the extent possible or, if incapable of enforcement,
deemed to be severed and deleted from this Agreement, and the
remainder will continue in full force and effect. The waiver by either
party of any default or breach of this Agreement will not waive any
other or subsequent default or breach.
4 No Assignment. You may not assign, sell, transfer, delegate or
otherwise dispose of this Agreement or any rights or obligations
under it, whether voluntarily or involuntarily, by operation of law
or otherwise, without Pioneer’s prior written consent. Any purported assignment, transfer or delegation by You will be null and
void. Subject to the foregoing, this Agreement will be binding
upon and will inure to the benefit of the parties and their respective successors and assigns.
5 Entire Agreement. This Agreement constitutes the entire agree-
ment between the parties and supersedes all prior or contemporaneous agreements or representations, whether written or
oral, concerning its subject matter. This Agreement may not be
modified or amended without Pioneer’s prior and express written
consent, and no other act, document, usage or custom will be
deemed to amend or modify this Agreement.
6 You agree that this Agreement shall be governed and construed
by and under the laws of Japan.
About the installation procedure
(Windows)
1 Connect this unit to your computer via a USB cable.
For details about connections, see Connections and part names on page 11.
2 Slide the [ON/OFF] switch to the [ON] side.
Turn on the power of this unit.
! When this unit is connected to your computer for the first time,
the standard driver provided in Windows® is also installed.
Proceed to the next step after installation of the driver is
completed.
3 Insert the included CD-ROM into the computer’s CD
drive.
4 From the Windows [Start] menu, double-click the
[Computer (or My Computer)] > [ITCH CD] icon.
The contents of the CD-ROM are displayed.
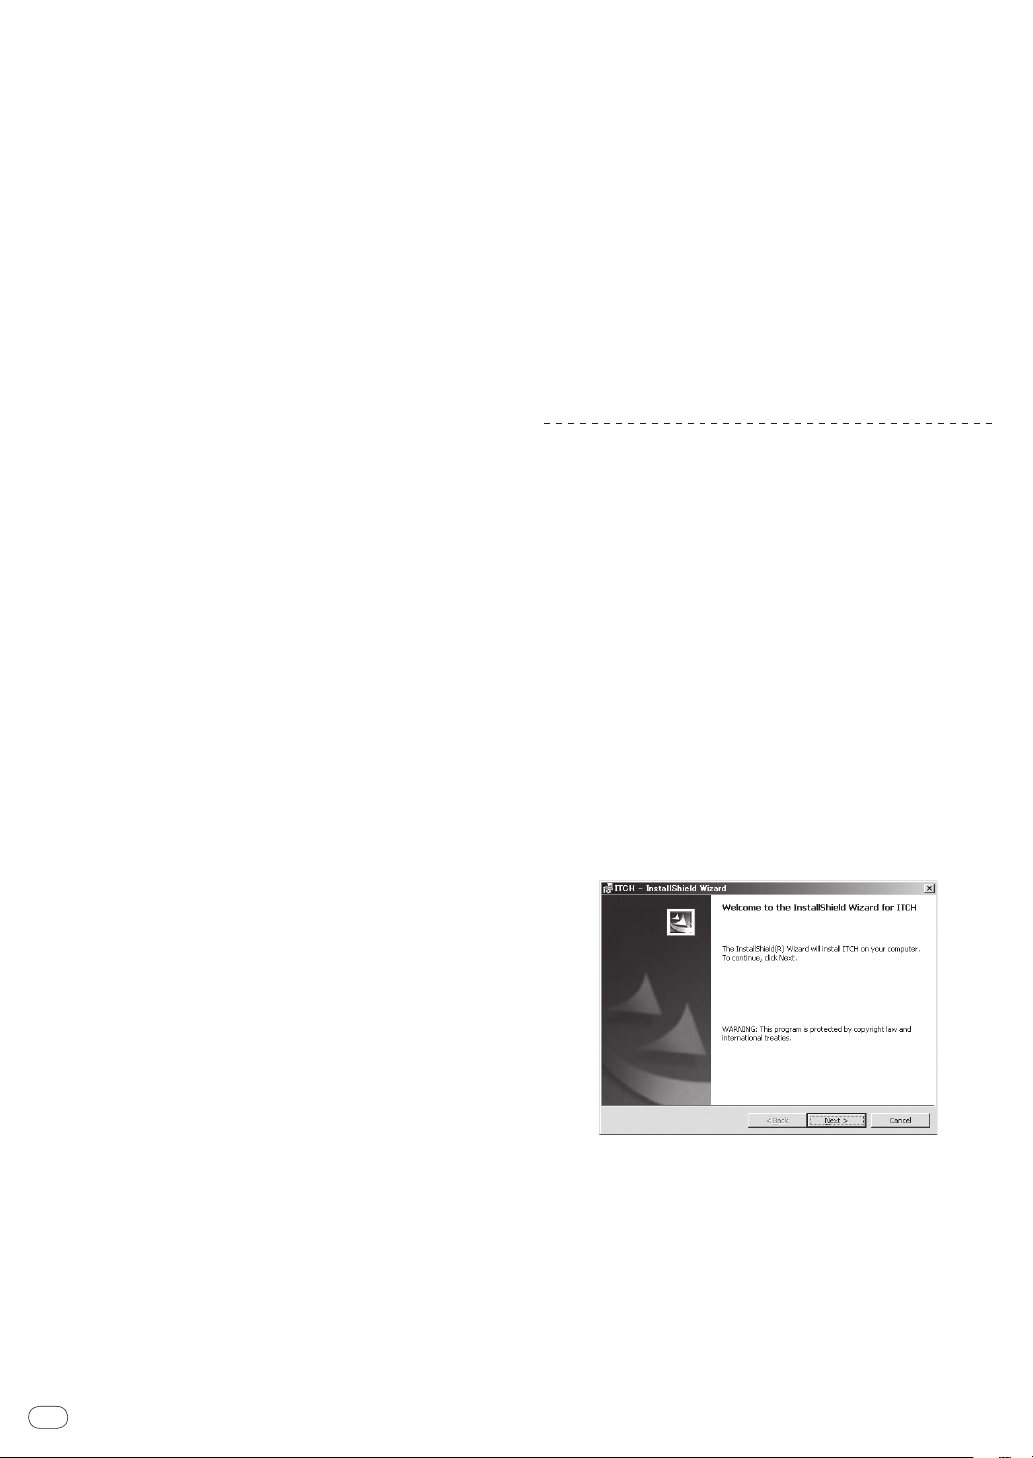
5 Double-click [ITCH_installer.exe].
The ITCH installer is launched.
6 Once the ITCH installer is launched, click [Next].
En
8
Page 9
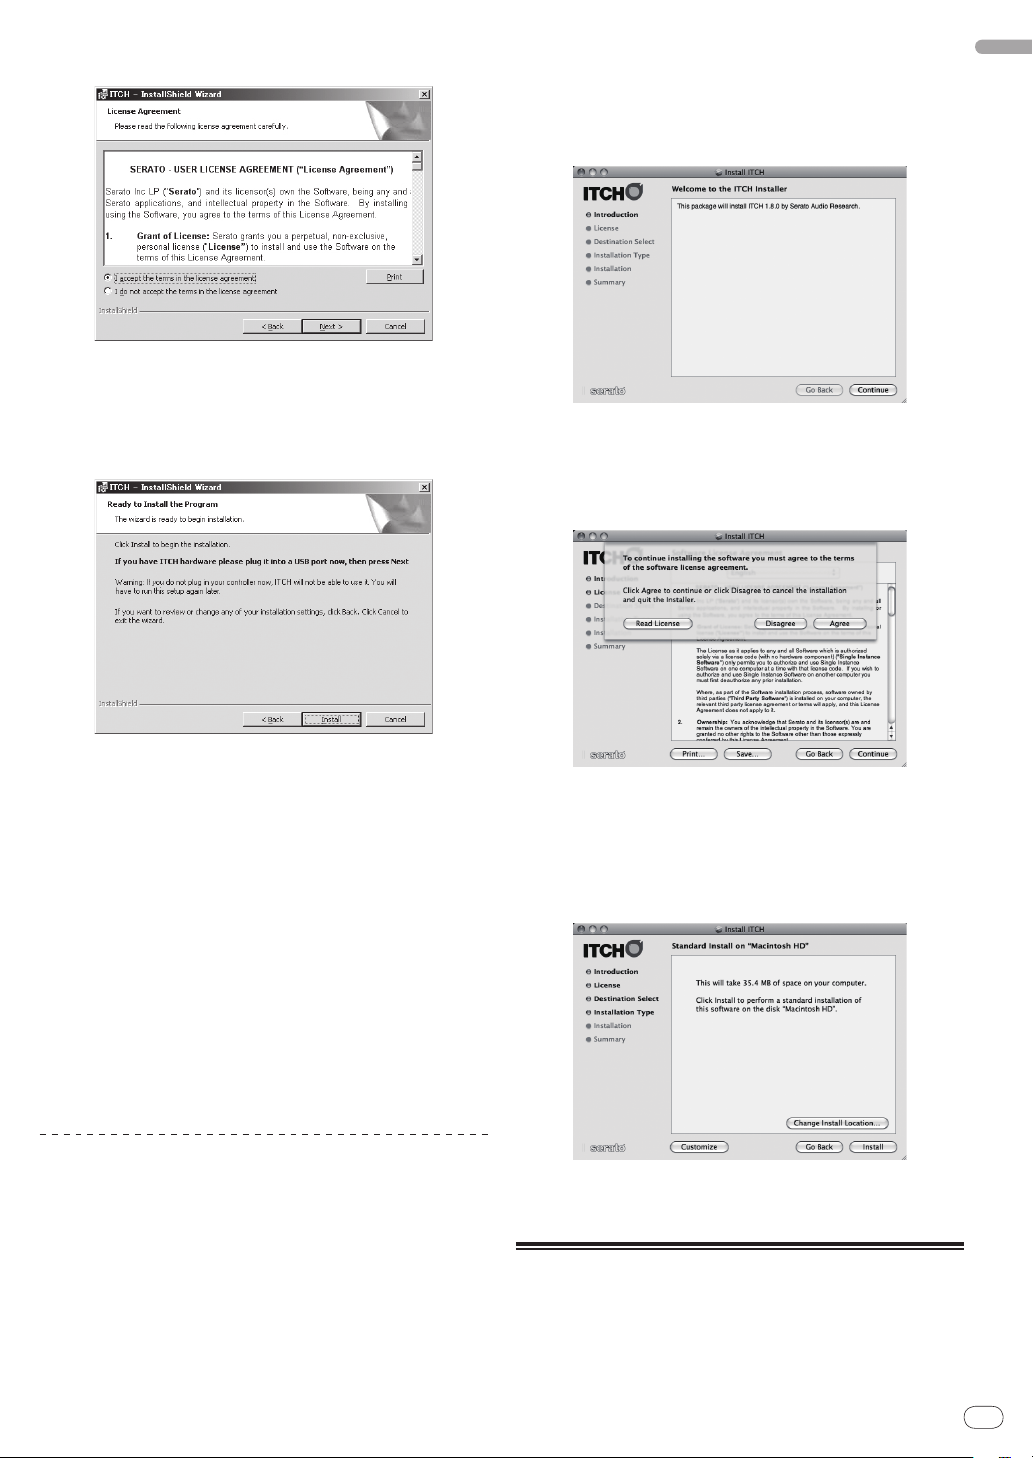
7 Accept the license agreement (select [I accept the
terms in the license agreement]), and then click [Next].
If you do not agree, select [I do not accept the terms in the license
agreement].
8 Select the folder in which you want to install ITCH,
then click [Next].
9 Click [Install].
4 Double-click the [ITCH CD] icon.
The contents of the CD-ROM are displayed.
5 Double-click [ITCH_installer.mpkg].
The ITCH installer is launched.
6 Once the ITCH installer is launched, click [Continue].
7 Read the contents of the license agreement carefully,
click [Continue] and then click [Agree] to accept the
license agreement.
If you do not agree to the license agreement, click [Disagree] to cancel
installation.
English
Installation begins.
After installation of the ITCH software is completed, installation of the
driver software begins.
10 Select the language that you want from the pulldown menu.
11 Accept the license agreement (select [Agree]) and
then click [Install].
If you do not agree, select [Disagree].
Once [Install] is clicked, Installation begins.
The installation completed screen appears once installation is
completed.
12 Click [Close].
13 Click [Finish] to quit the ITCH installer.
A screen advising you to restart the computer appears.
14 Click [Yes].
The computer is restarted.
About the installation procedure
(Macintosh)
1 Connect this unit to your computer via a USB cable.
For details about connections, see Connections and part names on page 11.
2 Slide the [ON/OFF] switch to the [ON] side.
Turn on the power of this unit.
3 Insert the included CD-ROM in the computer’s CD
drive.
The [ITCH CD] icon appears on the screen.
8 Select the folder in which you want to install ITCH,
then click [Continue].
9 Click [Install].
Installation begins.
The installation completed screen appears once installation is
completed.
10 Click [Restart].
The computer is restarted.
Launching ITCH
For Windows
From the Windows [Start] menu, open [All Programs] > [Serato] >
[ITCH], then click the [ITCH] icon.
En
9
Page 10

For Mac OS X
In Finder, open the [Application] folder, next open [Serato] > [ITCH],
then double-click the [ITCH] icon.
About the driver software and
setting utility software
Adjusting the buffer size
This unit functions as an audio device conforming to the ASIO standards.
! If an application using this unit as the default audio device (DJ soft-
ware, etc.) is running, quit that application before adjusting the buffer
size.
Click the Windows [Start] menu> [All Programs] >
[Pioneer] > [DDJ] > [Pioneer DDJ ASIO Settings Utility].
! If the buffer size is made large, drops in audio data (breaks in the
sound) occur less easily, but the time lag due to the delay in the
transfer of the audio data (latency) increases.
Checking the version of the driver
software
Click the Windows [Start] menu> [All Programs] >
[Pioneer] > [DDJ] > [Pioneer DDJ Version Display Utility].
! You can check the firmware version of this unit on the screen.
! The firmware version is not displayed when this unit is not connected
to the computer or when this unit and computer are not properly
communicating.
10
En
Page 11
Connections and part names
PHONES
MIC 2
MIC/AUX THRU
ONOFF
PHONES
MIC 2
MIC/AUX THRU
ONOFF
123
Headphones
Microphone
Headphones
cord
Toheadphones
Microphone
cable
Tomicrophone
VOLAUX INMASTER OUT 2MASTER OUT 1MASTER ATT.
MAX
LRLL
1GND
2 HOT
3 COLD
RR
-12 dB-6 dB 0 dB
MIN
ONUSBOFF DC IN
5 V
VOLAUX INMASTER OUT 2MASTER OUT 1MASTER ATT.
MAX
LRLL
1GND
2 HOT
3 COLD
RR
-12 dB -6 dB 0 dB
MIN
R
L
R
L
51
2
3 4
ONUSB OFF DC IN
5 V
ITCH
8 9 a6 7
To audio input
terminals
To audio output
terminals
Portable
audio
device
Component,
amplifier,
powered speaker, etc.
Computer
AC adapter
(included)
To power outlet
! Wait until all connections between devices have been completed
before connecting the AC adapter.
Be sure to turn off the power and unplug the AC adapter from the
power outlet before making or changing connections between
devices.
Refer to the operating instructions for the component to be
connected.
! Only use the AC adapter included with this unit.
! Power to this unit is supplied by the AC adapter or by USB bus power.
This unit can be used by connecting it to a computer using a USB
cable, even without connecting the AC adapter.
! Connect this unit and the computer directly using the included USB
cable.
! A USB hub cannot be used.
Notes on running this unit with USB bus power
! When using this unit on USB bus power, supply power to the con-
nected computer from the AC power supply. Do not run the computer
on its battery.
! In cases like the ones below, the power may be insufficient and this
unit may not operate on USB bus power.
— When the computer’s USB power supply capacity is insufficient.
— When other USB devices are connected to the computer.
If this unit does not operate on USB bus power, connect the included
AC adapter.
! The following limitations apply when operating on USB bus power:
— The jog dial indicator will not light.
— The [MASTER OUT 1] (XLR output) channel is not output.
— The [MIC1], [MIC2] and [AUX IN] terminals cannot be used.
— The indicators are dimmer than when using the AC adapter.
To use the unit without these limitations, connect the included AC
adapter.
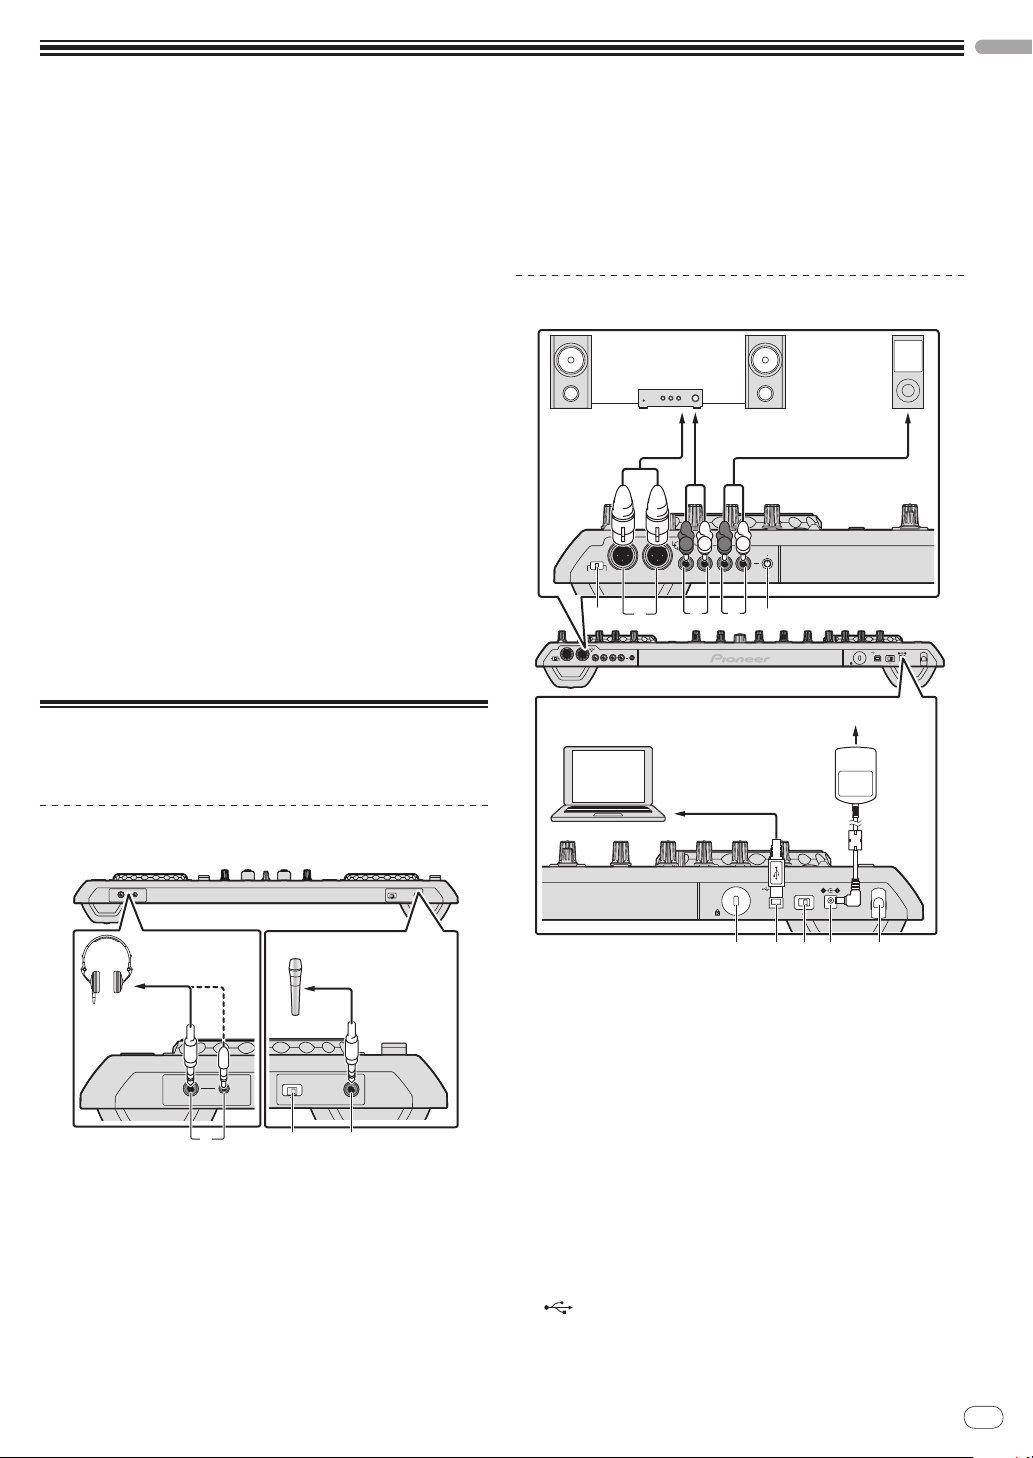
2 MIC/AUX THRU selector switch
Set this to [ON] if you want to output the [MIC2] and [AUX] channels
directly.
= Outputting the microphone and AUX sound directly (p.30)
3 MIC2 terminal
Connect a microphone here.
= Using a microphone (p.29)
Rear panel
English
Connecting the input/ output
terminals
Front panel
1 PHONES jacks
Connect headphones here.
Both stereo phone plugs (Ø 6.3 mm) and stereo mini phone plugs (Ø
3.5 mm) can be used.
For details, see Monitoring sound with headphones on page 28.
! There are two input jacks, both a stereo phones jack and a
mini phones jack, but do not use both simultaneously. If both
are used simultaneously, when one is disconnected and/ or
connected, the volume of the other may increase or decrease
suddenly.
1 MASTER ATT.
Sets the attenuation level of the sound output from the [MASTER1]
terminal.
2 MASTER OUT 1 terminal
Connect powered speakers, etc., here.
3 MASTER OUT 2 terminal
Connect to a power amplifier, etc.
4 AUX IN terminal
Connect to the output terminal of an external device (sampler, portable audio device, etc.)
5 VOL control
Adjusts the audio level input to the [AUX IN] terminals.
6 Kensington security slot
USB terminal
7
Connect to a computer.
! Connect this unit and the computer directly using the included
USB cable.
! A USB hub cannot be used.
En
11
Page 12
8 ON/OFF switch
ONUSB OFF DC IN
5 V
DELETE
ALPHABET SEARCH
INST.DOUBLES
HOT CUE
NEEDLE SEARCH /
2
1
A
VINYL
SPEED ADJUST
LOAD
JOG MODE
ON
LEVEL
MAXMIN
OFFON
TALK
OVER
OFF
MIC 1
LOW
MAXMIN
MID
EQ
MAXMINHIMAXMIN
CRATES
FX CH
S
EFFECT
PARA
M
A
B
MIC 1
ON
LEVEL
MAXMIN
OFF ON
TALK
OVER
OFF
MIC 1
LOW
MAXMIN
MID
EQ
MIN
MIC 1
1
Microphone
or
5
SYNC
SET TAP CLEAR LOCK
SYNC OFF
SLIDE
DELETE
ALPHABET SEARCH
INST.DOUBLES
REC MODE
HOT CUE
LOOP/ GRID
NEEDLE SEARCH /
IN
4
3
2
1
REV
A
SLIP
VINYL
MASTER
TEMPO
TEMPO
RANGE
VINYL
SPEED ADJUST
LOAD
JOG MODE
SHIFT
OUT
TEMPO
0
ON
LEVEL
MAXMIN
OFFON
TALK
OVER
OFF
MIC 1
RELOOP /EXIT SELECT AUTO
FWDREV
PHONES
PLAY/PAUSE
CUE
G
R
I
D
A
D
J
U
S
T
LOW
MAXMIN
MID
EQ
MAXMIN
HI
MAX
2X1/2X
MIN
MIC 1
1 2
3
4
6
8
9
b
a
7
5
c
def
g
h
i
j
k
l
m
ILLUMINATION
Turns this unit’s power on and off.
9 DC IN terminal
Connect to a power outlet using the included AC adapter (with the
power plug mounted).
! Wait until connection of all equipment is completed before con-
necting the AC adapter.
! Only use the included AC adapter.
a Cord hook
Catch the AC adapter’s power cord and USB cable on this hook when
using this unit.
! The sound will be interrupted if the AC adapter or USB cable is
disconnected during playback.
Cord hook
Hook the AC adapter’s power cord in the top of the cord
hook, the USB cable in the bottom.
Fasten the AC adapter’s power cord and USB cable in place by hooking
them on the cord hook. This prevents the power cord and USB cable from
being accidentally pulled and the plugs from being disconnected from
the terminals.
! The sound will be interrupted if the AC adapter or USB cable is
disconnected during playback.
AC adapter’s power cord
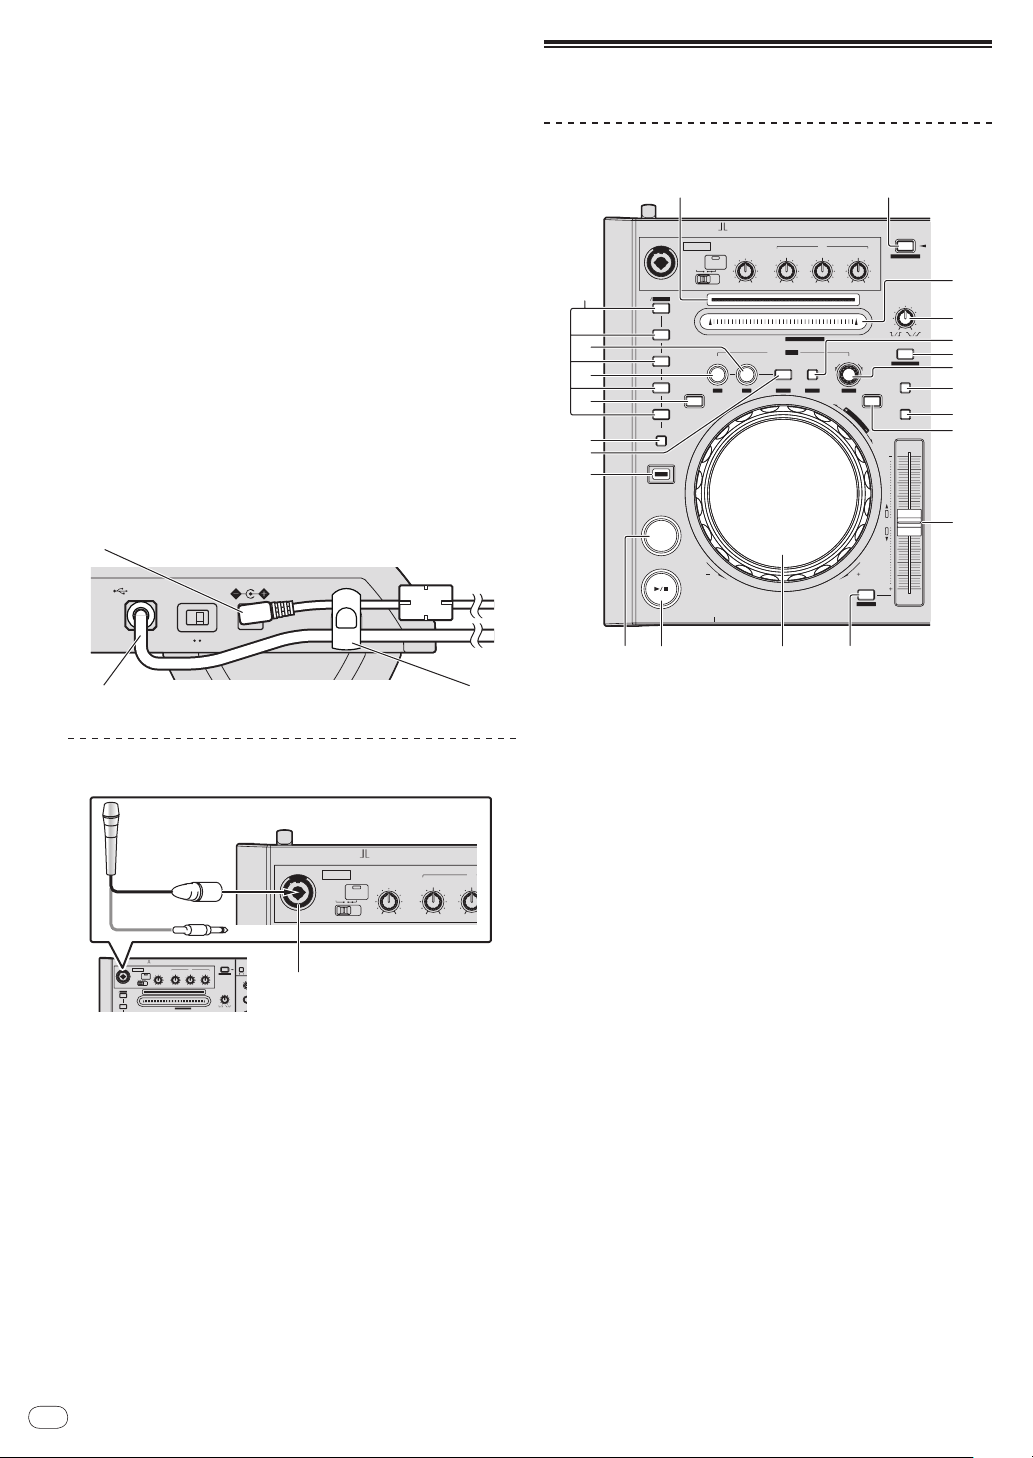
Part names and functions
Deck section
USB cable
Upper left of control panel
1 MIC1 terminal
En
12
Connect a microphone here.
= Using a microphone (p.29)
! Either an XLR connector or a phones plug (Ø 6.3 mm) can be
used.
Cord hook
1 Playing address indicator
The position in the track is displayed in 10 steps, with the beginning
of the track at the left edge, the end of the track at the right edge. The
indicator lights in sync with the elapsed playing time or remaining
time display in the “ITCH” software.
2 LOAD (INST. DOUBLES) button
The selected tracks are loaded to the respective decks.
= Loading tracks to decks (p.23)
When the [LOAD (INST. DOUBLES)] button is pressed while pressing
the [SHIFT] button, the track being played is doubled.
= Instant Doubles (p.23)
3 NEEDLE SEARCH (ALPHABET SEARCH) pad
! The sound is played from the position at which the pad is
touched.
! The alphabet search function can be used.
= Searching using the
4 VINYL SPEED ADJUST control
5 LOOP SELECT (GRID LOCK) button
[NEEDLE SEARCH (ALPHABET SEARCH)] pad (“Alphabet
Search”) (p.22)
For track playing and stopping, this adjusts the speed at which playback slows until it stops and the speed at which the normal playback
speed is reached from the stop mode.
The loop you want to play can be selected from the loops that have
been pre-registered in the loop bank.
The loop bank number switches each time the button is pressed.
= Using the loop bank (p.25)
When the [LOOP SELECT (GRID LOCK)] button is pressed while
pressing the [SHIFT] button, the overall beat grid is locked so that it
cannot be edited.
6 VINYL (ILLUMINATION) button
This switches the [VINYL] mode on/ off.
= Switching the jog dial mode (p.24)
Page 13
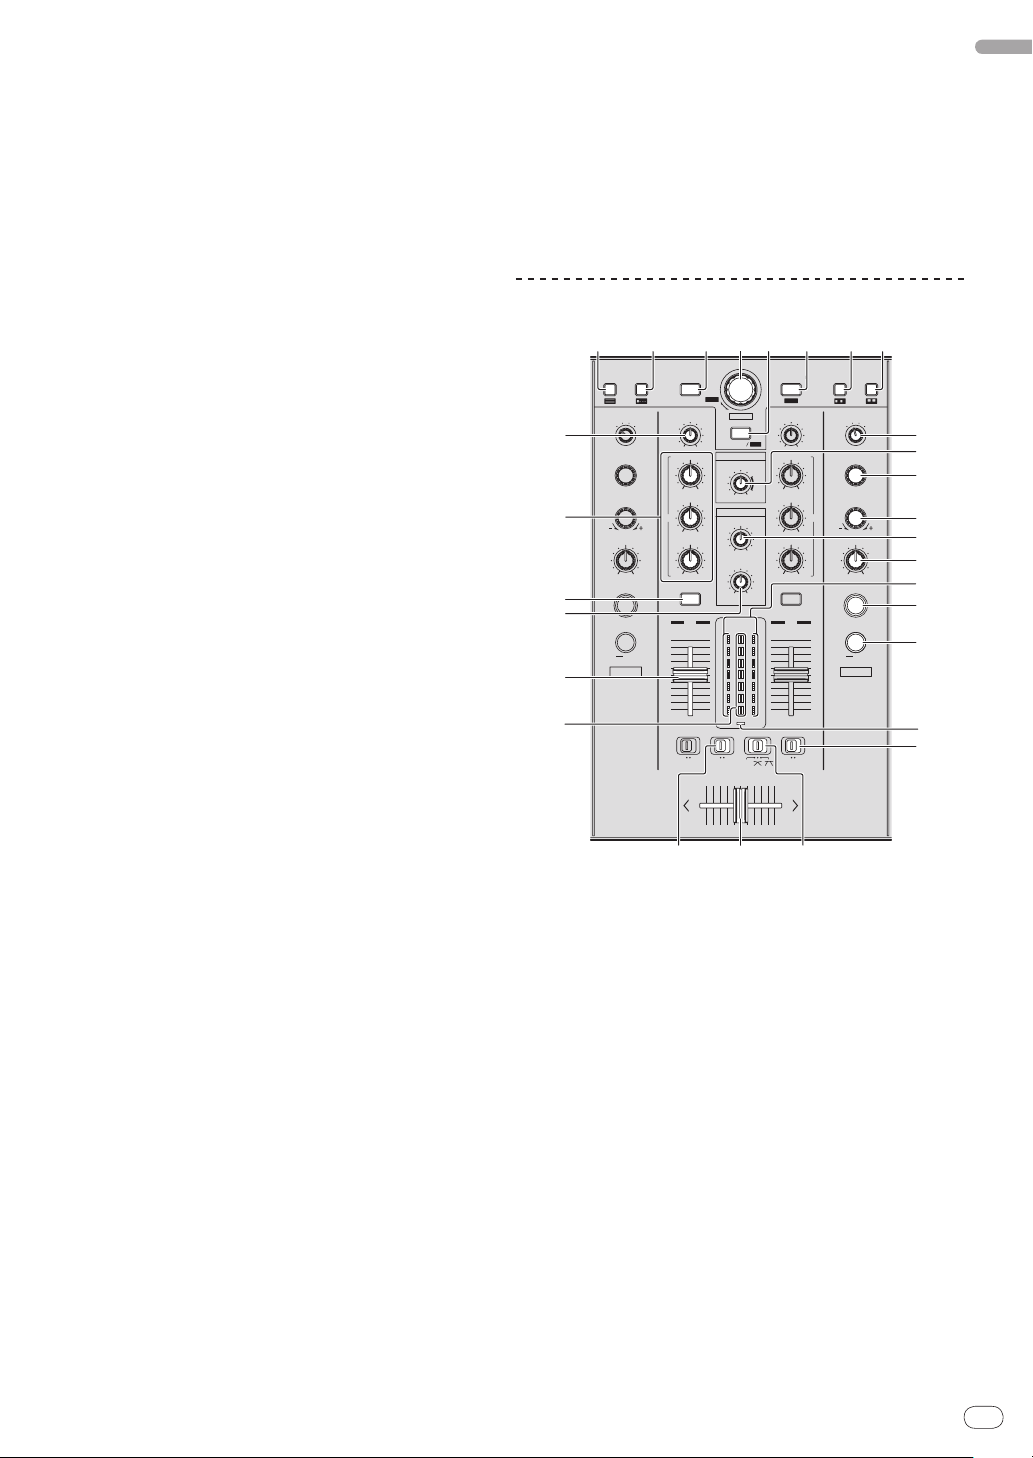
7 AUTO LOOP (GRID SLIDE) control
CUE
CRATES FILES BROWSE PREPAREBACK
TRIM
FX CH SELECT
EFFECT SELECT
PARAMETER
MAXMIN
A
BMASTER
MIC
/AUX
LOAD PREPARE
BROWSE
SAVE
JUMP
RECAREA MOVE
MIXING
MASTERCUE
MASTER
ON / OFF
TAP
FX1
LEVEL / DEPTH
MINMAX
HI
MINMAX
MID
MINMAX
LOW
MINMAX
AUTO
FX CH SELECT
EFFECT SELECT
PARAMETER
A
BMASTER
MIC
/AUX
LEVEL / DEPTH
ON / OFF
TAP
FX2
MINMAX
AUTO
EQ EQ
A
CUE
TRIM
MAXMIN
HI
MINMAX
MID
MINMAX
LOW
MINMAX
B
10
9
8
7
6
5
4
3
2
1
0
10
9
8
7
6
5
4
3
2
1
0
FADER START
ONOFF
FADER START
ONOFFONOFF
THRU
C.F.REV
HEADPHONES
MAXMIN
LEVEL
MAXMIN
LEVEL
LEVEL
MASTER
C.F.REV
AB
12 7 83 64 5
9
b
c
e
g
h
j
d
a
kl
o
p
q
m
r
s
i
n
f
This sets auto loops.
= Setting loops automatically (Auto loop) (p.25)
! The beat grid can be adjusted by turning the [AUTO LOOP
(GRID SLIDE)] control while pressing the [SHIFT] button.
8 TEMPO RANGE button
This switches the [TEMPO] slider’s adjustment range.
= Selecting the range for adjusting the playing speed (p.24)
9 MASTER TEMPO button
Use this to turn the master tempo function on and off.
= Adjusting the playing speed without changing the pitch (Master
Tempo) (p.24)
a SLIP button
This turns the slip mode on/ off.
= Using the slip mode (p.26)
b TEMPO slider
Use this to adjust the track playing speed.
= Changing the playing speed (p.24)
c SYNC (SYNC OFF) button
When this button is pressed, the track on the deck whose button was
pressed is synchronized to the BPM and beat grid of the track loaded
in the other deck.
= Synchronizing the playing speed (p.27)
d Jog dial
This can be used for such operations as scratching, pitch bending,
etc.
= Operating the jog dial (p.24)
! The top of the jog dial has an embedded switch. Do not place
objects on the jog dial or subject it to strong forces. Also note
that water or other liquids getting into the set will lead to
malfunction.
e PLAY/PAUSE f button
Use this to play/ pause tracks.
= Playing and pausing (p.23)
f CUE button
This is used to set, play and call out temporary cue points.
= Setting a temporary cue point (p.24)
g SHIFT button
When another button is pressed while pressing the [SHIFT] button, a
different function is called out.
h RELOOP/EXIT (GRID CLEAR) button
Use this to return to loop playback (reloop) or cancel loop playback
(loop exit).
= Returning to Loop playback (Reloop) (p.25)
= Canceling Loop playback (Loop Exit) (p.25)
The beat grid can be cleared by pressing the
[RELOOP/EXIT (GRID CLEAR)] button while pressing the [SHIFT]
button.
i REC MODE button
This switches the function of the [HOT CUE (DELETE)] button (set/
call-out).
! When the power is turned on, the button is set to the call-out
mode.
= Setting Hot Cue (p.26)
j REV button
Use this to turn reverse playback on and off.
= Playing in reverse (p.24)
k LOOP IN (GRID SET) button
When this button is pressed during playback at the position at which
you want to start loop playback (the loop in point), the loop in point
is set.
= Loop operations (p.25)
The beat grid can be set by pressing the [LOOP IN (GRID SET)] but-
ton while pressing the [SHIFT] button.
l LOOP OUT (GRID TAP) button
When this button is pressed during playback at the position at which
you want to end loop playback (the loop out point), the loop out point
is set, playback returns to the loop in point and loop playback starts.
= Loop operations (p.25)
When the [LOOP OUT (GRID TAP)] button is pressed while pressing
the [SHIFT] button, the beat grid can be adjusted during playback by
tapping the button.
m HOT CUE (DELETE) button
This is used to set and call out hot cues.
= Setting Hot Cue (p.26)
Mixer/ Effect section
1 CRATES button
Moves the cursor to the crate list panel.
2 FILES button
Turns the display of the [FILES] panel on/ off.
3 BACK button
Moves the cursor focus back one level.
4 Rotary selector
Moves the cursor within the panel. Use this to select files or tracks.
= Selecting items (p.20)
5 AREA MOVE (REC) button
Moves the cursor to a different panel.
= Selecting items (p.20)
6 LOAD PREPARE (SAVE) button
Loads tracks to the [PREPARE] panel.
= Using the [PREPARE] list (p.22)
7 BROWSE button
Turns the display of the [BROWSE] panel on/ off.
8 PREPARE button
Turns the display of the [PREPARE] panel on/ off.
9 FX CH SELECT control
Switches the channel to which the effect is applied.
English
En
13
Page 14
= Using the effect function (p.30)
LEVEL
MAXMIN
OFFON
TALK
OVER
MIC 1
LOW
MAXMIN
MID
EQ
MAXMIN
HI
MAXMIN
MIC 1
LEVEL
MAXMIN
OFFON
TALK
OVER
MIC 2 / AUX
LOW
MAXMIN
MID
EQ
MAXMIN
HI
INPUT
SELECT
MAXMIN
AUXMIC 2
1 23 4
a MASTER LEVEL control
Adjusts the master sound level output.
b EFFECT SELECT control
Selects the type of effect.
= Using the effect function (p.30)
c PARAMETER control
Adjusts the parameters provided for the various effects (time, harmonics etc.).
= Using the effect function (p.30)
d HEADPHONES MIXING control
Adjusts the monitor volume balance between the sound of channels
for which the headphones [CUE] button is pressed and the sound of
[MASTER OUT 1] and [MASTER OUT 2].
= Monitoring sound with headphones (p.28)
e LEVEL/DEPTH control
Adjusts the quantitative parameter of the effect.
= Using the effect function (p.30)
f Channel level indicator
g FX ON/OFF button
Turns the effect on/ off.
= Using the effect function (p.30)
h TAP button
The BPM used as the base value for the effect is calculated by the
interval at which the button is tapped with a finger.
= Setting the BPM manually (p.30)
i C.F. REV indicator
Lights when the [C.F. REV] switch is set to [ON].
j FADER START switch
These turn the fader start function on/ off.
= Starting playback using the fader (Fader Start) (p.29)
k Crossfader curve selector switch
This switches the crossfader curve characteristics.
= Selecting the crossfader curve characteristics (p.29)
l Crossfader
Switches between the audio output of the left and right decks.
= Outputting sound (p.28)
m C.F. REV switch
Reverses the deck to which the crossfader is assigned from right to
left and vice versa.
= Using the crossfader reverse function (p.29)
n Master level indicator
o Channel fader
Adjusts the sound level output from the various decks.
= Outputting sound (p.28)
p HEADPHONES LEVEL control
Adjusts the audio level output from the [PHONES] terminal.
q Headphones CUE button
The sound of decks for which the headphones [CUE] button is
pressed can be monitored over headphones.
= Monitoring sound with headphones (p.28)
r EQ (HI, MID, LOW) controls
Boosts or cuts frequencies for the different channels.
= Equalization (p.28)
s TRIM control
Adjusts the individual channel output gain.
= Outputting sound (p.28)
14
En
Do not pull on the channel fader and crossfader knobs with excessive
force. The knobs are not designed to be removed. Pulling the knobs
strongly may result in damaging the unit.
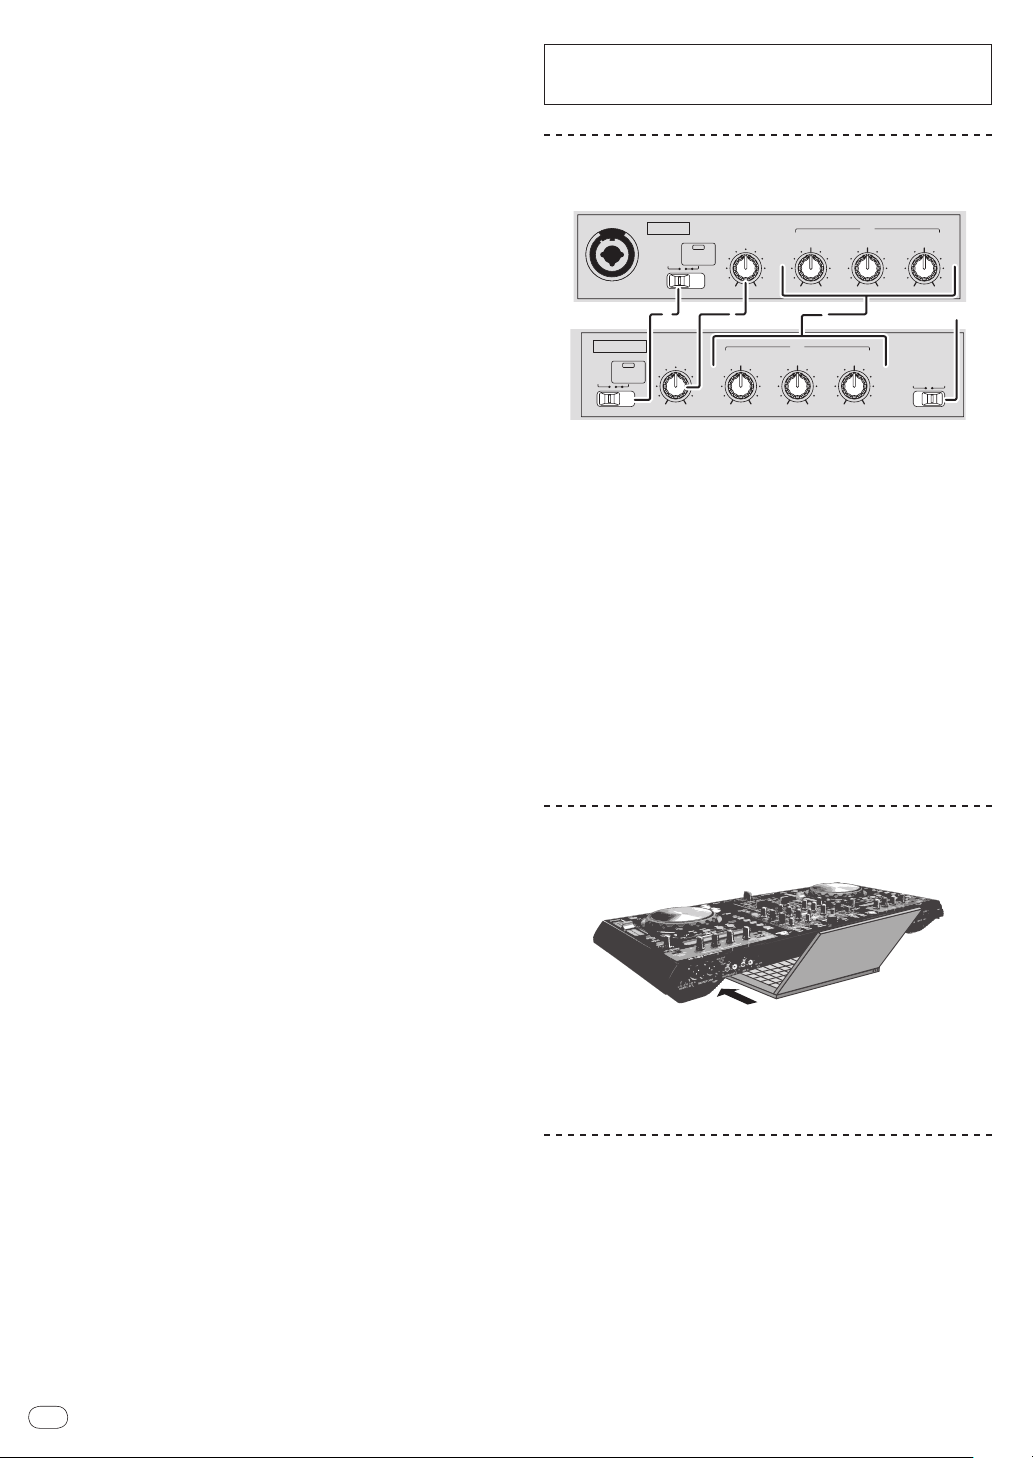
Microphone/ External input control
section
1 OFF, ON, TALK OVER selector switch
Turns the microphone on/ off.
2 LEVEL control
Adjusts the level of the output sound.
3 EQ (HI, MID, LOW) controls
Boosts or cuts frequencies in order to change the quality of the
sound.
4 MIC2/ AUX selector switch
Switches the audio input between the microphone and the external
device.
! [MIC2]: Selects the microphone connected to the [MIC2]
terminal.
! [AUX]: Selects the external device connected to the [AUX IN]
terminals.
= Using a microphone (p.29)
= Using an external device (p.29)
Using the LAPTOP DOCK
The computer’s keyboard section can be stowed under this unit.
! Depending on the size of your (notebook) computer, the keyboard
section may not fit in the LAPTOP DOCK.
! Install in such a way that the computer unit does not touch this unit.
! Install in such a way that the cables connected to the computer are
not stuck under this unit.
Using with the feet removed
This unit’s two feet can be removed.
Page 15
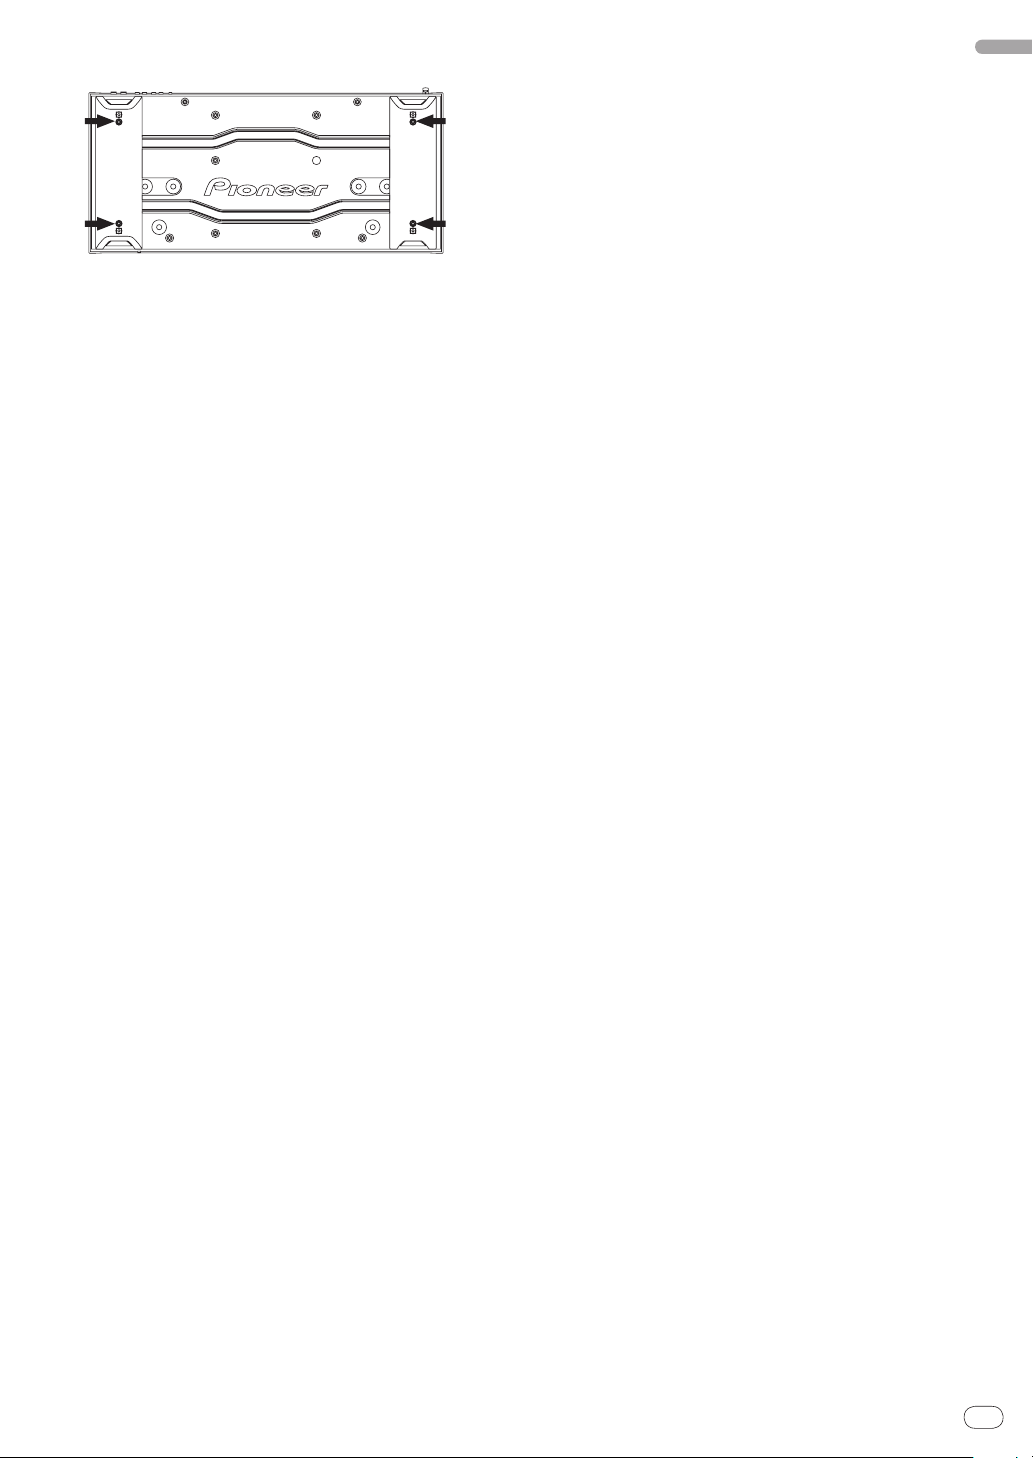
Use a Phillips screwdriver to remove the screws from the
DJ CONTROLLER
DDJ-S1
left and right feet (2 screws each).
! The screws you have removed will be needed when mounting
the feet. Be careful not to lose them. The feet cannot be properly
mounted using other screws.
English
En
15
Page 16
Operation
mkkl
c
d
1234 5 6 7 9a b8
e
f
h
j
g
i
p
o
h
g
n
i
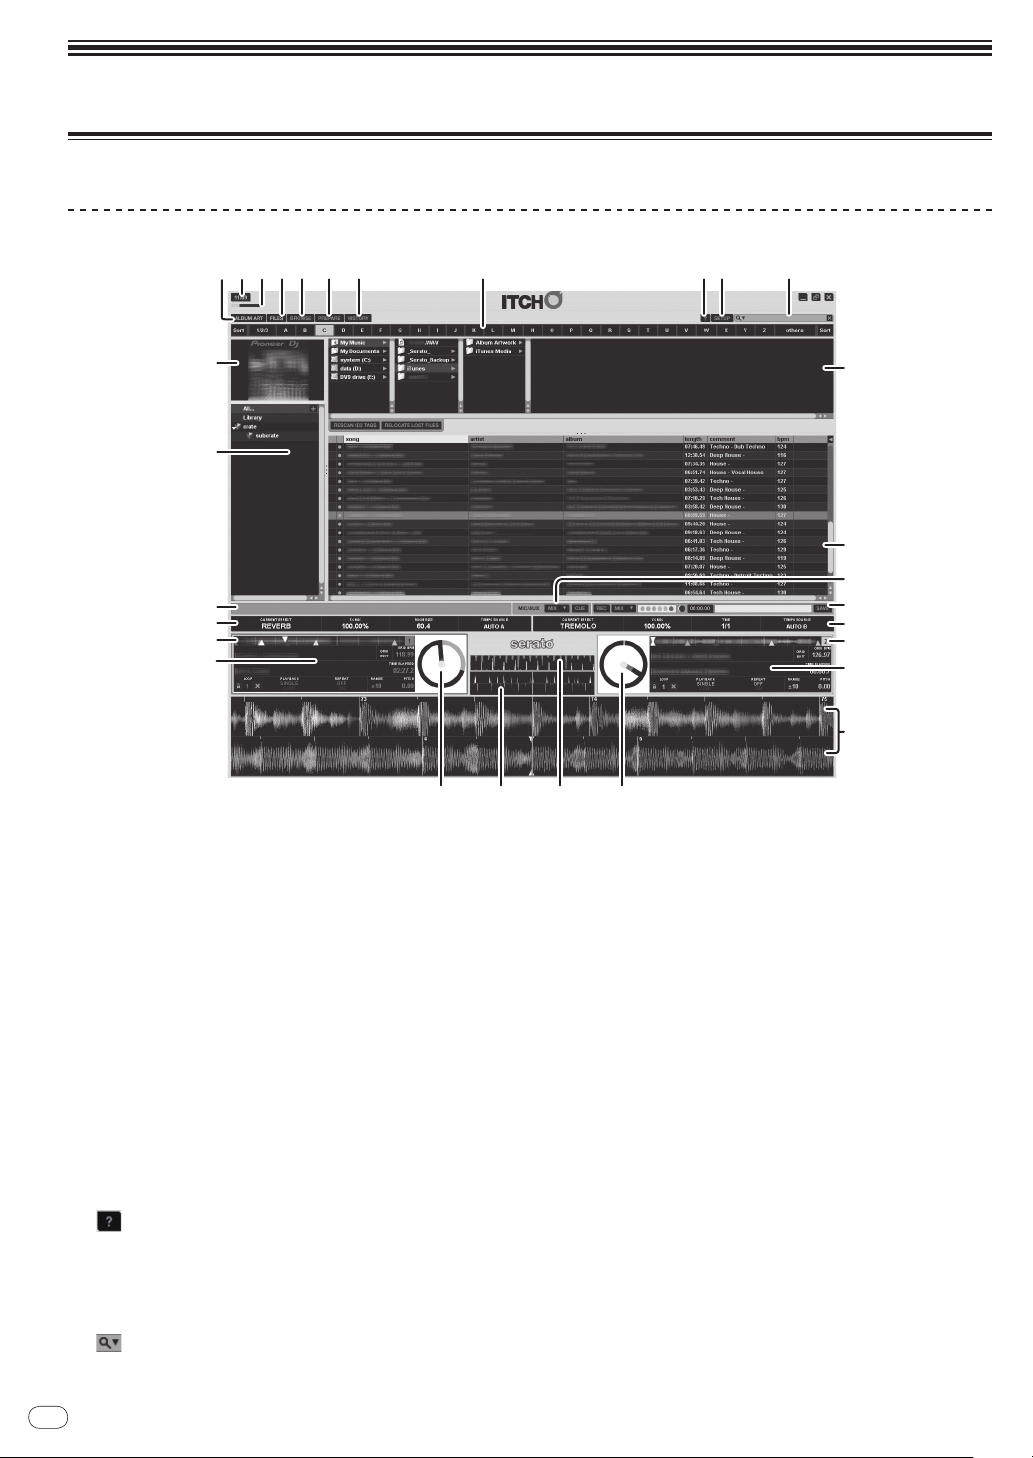
ITCH software screen
Screen when this unit is connected
1 ALBUM ART tab
Switches the display of the album art on/ off.
2 Current time display
3 Simple display of CPU usage rate
4 FILES tab
Switches the display of the [FILES] panel on/ off.
5 BROWSE tab
Switches the display of the [BROWSE] panel on/ off.
6 PREPARE tab
Switches the display of the [PREPARE] panel on/ off.
7 HISTORY tab
Switches the display of the [HISTORY] panel on/ off.
8 Alphabet search panel
= Searching using the [NEEDLE SEARCH (ALPHABET SEARCH)]
pad (“Alphabet Search”) (p.22)
9 (TOOL TIPS)
Switches tooltips on/ off
a SETUP
Displays the setup screen.
= Changing the settings (p.31)
b (SEARCH)
Searches your library for the text input into this field.
En
16
c Sub panel
The contents displayed here are switched and turned on or off by
clicking the tabs (FILES/ BROWSE/ PREPARE/ HISTORY) at the top of
the screen.
= Switching the sub panel (p.20)
d Track list
Displays tracks with the contents corresponding to the items
selected in the crate list panel.
! When the [BROWSE] panel is displayed, only tracks meeting the
conditions narrowed down according to the genre are displayed.
e MIC/ AUX monitor control panel
= MIC/ AUX monitor control panel (p.18)
f Recording panel
= Recording panel (p.18)
g Effect panel
= Using the effect function (p.30)
h Track overview
Displays the frequency bands of the track’s sound on a waveform, in
blue for the treble range, green for the midrange and red for the bass
range. The playback point is displayed as [b] (white). The temporary
cue point is displayed as [a] (white) and the hot cue points are displayed as [a] in another color.
! Click to move the playing position to that position.
! Thin vertical gray lines are displayed in 1 minute intervals, thick
lines are displayed in 5 minute intervals.
Page 17
i Track information display
1
2
8 9 a b c
d
e
3 4 5 6 7
3
1
2
5
3
4
2
1
Displays the details of the tracks loaded in the deck.
1 The track name is displayed here (only when information is
available).
2 The artist name is displayed here (only when information is
available).
3 When clicked, the icon is highlighted and the loop cannot be
overwritten. Click again to turn the protect mode off.
4 The currently selected loop bank number is displayed here.
(Where there are loop bank slots where nothing is saved, the first
loop in the track will be displayed.)
5 When clicked, the loop saved at the currently selected bank
number is deleted.
6 When clicked, the currently set loop is saved in the loop bank.
7 Displays the loop length set with the auto loop function.
8 Used to select the play mode.
[SINGLE]: The deck stops once playback of the track ends.
[CONT]: When playback of the track ends, the next track on the
list is automatically played.
9 When this function is turned on, once the track finishes playing,
playback returns to the start position and repeats.
a When clicked, the grid edit mode is activated and the key
flashes. Click again to save the edited grid data and quit the grid
edit mode.
b Displays the possible range of adjustment of the playing speed
with respect to the playing speed at which the track was originally recorded.
c Displays the pitch value relative to the position of the [TEMPO]
slider.
d Displays the track’s playing position by time.
When clicked, the display switches between time elapsed and
time remaining.
e Displays the current BPM of the currently playing track.
! The BPM can be set manually by either clicking here in time
with the beat or by pressing the computer’s space key (only if
beat grid is not enabled).
j Waveform display
Displays detailed waveform data for the area around the point of the
track that is playing.
Displays the frequency bands of the track’s sound on a waveform, in
blue for the treble range, green for the midrange and red for the bass
range. The playback point is at the center of the display. The temporary cue point is displayed as [b] and [a] in white, and the hot cue
points are displayed as [b] and [a] in other colors.
! Click to move the playing position to that position.
! When the waveform is clicked while pressing the computer’s
[Ctrl] key, the waveform is displayed divided in three ranges: the
treble, mid and bass.
! When the waveform is clicked while pressing the computer’s
[Shift] key, the height of the display section becomes narrower.
! The waveform display can be zoomed in and out using the [+]
and [–] keys on the computer.
k Virtual deck
Displays the track’s playing position and playing speed.
1 Displays the track’s length. The position being played is dis-
played with a gray gauge.
2 Turns white when a track is loaded. (When a color label is set,
this changes to the set color.)
3 Turns according to the platter speed. When a point at which a
hot cue is set approaches, this shifts in steps to the color of that
hot cue to notify that the hot cue is approaching. When moving
away from the hot cue, the color shifts back to the original color
in steps.
! The needle flashes when the point 20 seconds before the end
of the track is reached to notify that the end of the track is
approaching.
l Tempo match display
This indicates the tempo of the tracks on decks (A) and (B) by measure, and is designed to help you match the tempo.
The red waveform indicates the tempo of the track in deck A (1), the
orange waveform the tempo of the track in deck B (2). When the tempos of the tracks in the two decks match, the positions of the peaks of
the red and orange waveforms match.
! Even if the beat is not synchronized, the positions of the peaks of
the waveforms on the display match when the tempos of the left
and right tracks match.
m Beat match display
This view shows the position of beats within the track. When the
peaks shown in this window are aligned, the two tracks’ beats are
matched.
The beat match display indicates the beat positions of the tracks
currently playing on decks (A) and (B) and is designed to help you
match the beat. When the beats of the tracks on decks (A) and (B)
match, the positions of the peaks of the waveforms at the top and
bottom match.
n Status bar
Displays the current information (mainly analysis, errors, etc.).
o Crate list
With ITCH, tracks are classified and arranged in folders called
“Crate”.
The crate list panel can also be opened by pressing the [CRATES]
button on this unit.
= Crate list (p.17)
p ALBUM ART
Displays album art (when available).
Crate list
1 All...
All the tracks that have been imported or loaded to the decks are
displayed. When tracks that have not been imported are loaded to a
deck, they are added to [All...].
2 Library
Displays the iTunes library.
! To display the iTunes library, change the settings at the [SETUP]
menu.
= Show iTunes library (p.32)
3 Crates
ITCH uses digital crates for quick access to your favorite collections.
There is no limit to the number of crates you can create, and any
given track can be placed in multiple crates. The crate area is on the
left hand side of the library.
4 Subcrates
Crates can be placed within other crates. These crates are called
“Subcrates”.
5 “+”
Click this to create a new crate.
En
English
17
Page 18
! When a crate is dragged and dropped into another crate, it
4
1
2
3
1234
12 345 76
12
1
5
2
34
becomes a subcrate. Repeat this operation to increase the number of layers.
! A track or group of tracks can be dragged on to “+” and a crate
will be created containing these.
! If there are multiple layers, the layer below can be opened or
closed by clicking on the respective item.
Track list
1 Column header
The selected item name is displayed here. When the item name is
clicked, the order of display can be changed (sorted).
The items below can be displayed in the area in which the track
information is displayed.
Date added (date added to the library), album, artist, bitrate, BPM,
comment, composer, filename, genre, group, key, label, track time,
place stored, remixer, sampling rate, file size, track, year
! The order of the tracks in the track list is indicated by the num-
bers displayed in the “#” column.
2 Track
Displays the tracks included in the item selected at the crate list
panel.
3 Color label
Colors can be set to differentiate the tracks.
4 Status icon
The status of tracks are indicated by icons.
Recording panel
1 Click this to start/ stop recording.
2 Click this to select the source to be recorded.
3 This displays the sound level input from the source being recorded.
4 This adjusts the recording level.
5 This displays the elapsed recording time.
6 Input the name of the recorded data file here.
7 Click this to save the recorded data.
MIC/ AUX monitor control panel
1 Click this to select the output channel for the connected microphone
and external device. This setting only affects the [MASTER] channel.
! [MIX]: Outputs regardless of the position of the crossfader.
! [X-F A]: Outputs when the crossfader is to left of the right edge.
! [X-F B]: Outputs when the crossfader is to right of the left edge.
! [Mute]: Sound is not output.
2 Click this to monitor over the headphones. While the key is high-
lighted, the sound of the connected microphone and external device
is output to the headphones [CUE] channel.
Screen when this unit is not connected
Icon Meaning
None Tracks that have been directly imported into the ITCH library.
Tracks imported from an iTunes library.
Tracks whose files are damaged. Such tracks must be re-encoded.
Displayed when the file cannot be found in its original position.
Indicates read-only tracks that cannot be edited.
Effect panel
1 The name of the selected effect is displayed.
2 Displays the value adjusted with the [LEVEL/DEPTH] control.
3 Displays the value adjusted with the [PARAMETER] control.
4 When [A] or [B] is selected, [AUTO A] or [AUTO B] is displayed
and the effect is synchronized with the BPM set for the deck. When
another channel is selected, [MANUAL] is displayed and the setting
can be made manually with the [TAP] button.
1 Status bar
Displays the current information (mainly analysis, errors, etc.).
2 ANALYZE FILES
Used to analyze tracks.
The analyze files function processes the tracks in your library to
detect file corruption, prepare the waveform overviews, and if enabled
calculate the BPM values.
3 Set auto bpm
When [Set auto bpm] is checked, the BPM is automatically analyzed
when the track is analyzed.
4 range
Used to specify the BPM analysis range when [Set auto bpm] is
operating.
5 Offline player
The offline player is available when your ITCH hardware is not connected and will output through the current default audio device. In
most cases, this will be from your computer speakers.
! Load a track to the offline player by dragging and dropping onto
the offline player or by pressing the computer’s [shift] key and
[c] key. If the end of the loaded track is reached, the next track
in the current playlist will automatically play next.
The offline player is a useful tool for preparing crates, audition-
ing tracks, and setting cue and loop points.
En
18
Page 19
Starting the system
1 Turn on the connected microphone and external
equipment.
2 Connect the USB cable between this unit and the
computer.
3 Boot up the connected computer.
4 Slide the [ON/OFF] switch to the [ON] side.
5 After this unit’s indicators light, launch ITCH.
If the computer and this unit are linked properly, two virtual decks will
appear on the screen.
Quitting the system
1 Turn off the connected microphone and external
equipment.
2 Quit ITCH.
3 Slide the [ON/OFF] switch to the [OFF] side.
4 Disconnect the USB cable from your computer.
Operating the Library
Within the library, tracks can be imported and managed easily.
Adding music files to the library
! When adding music files stored on an external device to the library,
connect this device before launching ITCH.
! Tracks can also be added from an iTunes library.
To display the iTunes library, change the settings at the [SETUP]
menu.
For details on the settings, see Show iTunes library on page 32.
! To add tracks recorded on discs to the library, first import the tracks
to the computer and convert them into a file type that can be played
with ITCH.
The playing performance may decrease if tracks recorded on discs
are played directly.
When converting tracks into music files, we recommend converting
them into MP3 format (320 kbps/ MPEG-1 Audio Layer-3) for high
sound quality with a low CPU usage rate.
1 Press the [FILES] button.
The contents of your computer or the peripheral connected to the computer are displayed in the [FILES] panel.
2 Select the desired folder using the computer’s mouse.
With the computer’s mouse, click the folder containing the track you
want to add to the library in the [FILES] panel.
3 Drag and drop the selected folder to the crate list
panel using the computer’s mouse.
! When a folder in which music files are stored is dragged and
dropped in the crate list panel, that folder becomes a crate
including all the tracks in it and the tracks are also added to the
library.
! There are several ways to add tracks to your ITCH library.
— When tracks that have not been added to the library are
loaded directly into a deck, they are automatically added to
[All...] on the crate list panel.
— Files and folders can also be added from Explorer or Finder
by dragging and dropping them to the track list or crate list
on the ITCH screen.
— To add the music file to the desired crates, drag and drop the
music file to the position at which you want to add it on the
ITCH screen.
— A track or group of tracks can be dragged on to the crate list
panel and a crate will be created containing these.
Playable music file formats
MP3, OGG (Vorbis format), AAC, ALAC (Apple Lossless), AIF, WAV and
WL.MP3 (Whitelabel.MP3)
About MP3 files
MP3 files can have a constant bit rate (CBR) or a variable bit rate (VBR).
Both types of files can be played on the DDJ-S1, but the search and super
fast search functions are slower with VBR files. If your priority is operability, we recommend recording MP3 files in CBR.
About AAC files
! AAC is the abbreviation of “Advanced Audio Coding”, a basic format
of audio compression technology used for MPEG-2 and MPEG-4.
! The file format and extension of AAC data depends on the application
used to create the data.
! In addition to AAC files with the extension “.m4a” encoded with
iTunes®, files with the extensions “.aac” and “.mp4” can also be
played. Note, however, that copyright-protected AAC files purchased
for example at the iTunes Music Store cannot be played. Also, some
files may not be playable, depending on the version of iTunes used for
encoding.
About WL.MP3
Whitelabel MP3 (file extension “.wl.mp3”), is a custom MP3 format
developed by Serato Audio Research for promotional release purposes
and can be acquired from Whitelabel.net. Files in Whitelabel MP3 format
are specifically for use with Serato Audio Research DJ software, have
preinstalled overviews, and the track, artist, BPM and album art data is
tagged as far as possible. These files are played with a low quality of 32
kbps on regular MP3 players (including when played independently on
ITCH software without using this unit), but with a high quality equivalent
to 320 kbps when played on ITCH software connected to this unit.
For details, see the URL below.
http://whitelabel.net/
Analyzing files
This function is operated not on the DDJ-S1 but on the computer.
Before you play your music in ITCH it is very important to analyze your
files first. The analyze files function processes the tracks in your library
to detect file corruption, prepare the waveform overviews, and if enabled
calculate the BPM values.
! This is function is performed in ITCH while in the offline player.
! For details on the positions of keys, see Screen when this unit is not
connected on page 18.
Setting the BPM automatically when analyzing
tracks
1 Click [Set auto bpm] to check it.
When [Set auto bpm] is checked, the BPM is automatically analyzed
when the track is analyzed.
When ITCH determines that the analyzed BPM information is accurate,
the BPM information is written into the music file.
2 Click [range] to display the pull-down menu.
3 Click the BPM analysis range you want to set.
Specifying the BPM analysis range from the [range] pull-down menu
avoids having the track analyzed with an erroneous BPM value. When
[Set auto bpm] is checked, set the BPM analysis range if you know more
or less the BPM value of the track you want to analyze.
Analyzing all tracks
English
1 Disconnect this unit from the computer.
En
19
Page 20

2 Click [ANALYZE FILES].
All the tracks in the library are analyzed.
! [HISTORY] panel
The track playing history is recorded and displayed here.
To re-analyze all the tracks, click [ANALYZE FILES] while pressing the
computer’s [Ctrl] key.
Analyzing individual tracks or crates
1 Disconnect this unit from the computer.
2 Drag and drop the track or crate to [ANALYZE FILES].
! Even music files that have not been added to the library can be
analyzed by dragging and dropping them. Once analysis is completed, the music files are automatically added to [All...] in the
crate list panel.
! Tracks and crates that have already been analyzed can be re-
analyzed by dragging and dropping them to [ANALYZE FILES].
If a file is damaged or an error occurs
Status icons are displayed to the left of the tracks displayed in the library.
When the cursor is hovered over that icon, there will be an error message
displayed in the status bar.
! For details on the contents of the displayed errors, see File corruption
messages on page 34.
Selecting items
! To select the item, you can also use the computer’s mouse and
keyboard.
Moving the cursor between panels
Editing crates
Creating a crate
Click “+” in the upper right of the crate list panel.
A new crate is added to the crate list panel.
! When a folder in which music files are stored is dragged and
dropped in the crate list panel, that folder becomes a crate
including all the tracks in it and the tracks are also added to the
library.
! A track or group of tracks can be dragged on to the crate list
panel and a crate will be created containing these.
! A track or group of tracks can be dragged on to “+” and a crate
will be created containing these.
Changing the crate layer
Crates and subcrates can be move to different layers.
Drag and drop crate in another crate.
When a crate is dragged and dropped in another crate, it becomes a
subcrate.
! Crate with the same name cannot be placed on the same layer.
Editing crate names
Double-click the crate’s name.
You can now rename this crate.
Press the [AREA MOVE (REC)] button.
When the [AREA MOVE (REC)] button on this unit is pressed, the cursor
moves from panel to panel.
! The cursor can also be moved between panels by pressing the
computer’s [Tab] key.
Moving the cursor up and down
Turn the rotary selector.
The cursor moves up and down when this unit’s rotary selector is turned.
! When the rotary selector is turned while pressing the [SHIFT]
button, the cursor skips over several items at a time.
! The cursor can also be moved up and down by pressing the [a]
or [b] key on the computer.
Moving between layers
Press the rotary selector.
If there are further layers under the currently selected item, the cursor
moves down to the next layer down when this unit’s rotary selector is
pressed.
Press the [BACK] button to move back to the layer above.
! The cursor can also be moved using the [c] and [d] keys on
the computer.
Switching the sub panel
Press the [FILES] button (or one of the [BROWSE],
[PREPARE] or [CRATES] buttons).
! [FILES] panel
Used when importing tracks.
! [BROWSE] panel
Used to narrow down imported tracks by genre, BPM, etc.
! [PREPARE] panel
Used to select and prepare tracks you want to play ahead of
time.
Deleting crate
1 Turn the rotary selector.
Select the crate you want to delete.
2 On the computer’s keyboard, press the [Delete] key
while pressing the [Ctrl] key.
Crate is deleted.
! This operation will delete the crate but not the contents. If you
press the [Delete] key while pressing the [Shift] key and [Ctrl] key
on the computer’s keyboard, the contents of the crate will also
be deleted.
Changing the display of item names in
the track list
The display of column headers can be turned on and off and their order
can be changed.
Changing the order of the item names
Drag the column header to the left or to the right.
The arrangement of the column is changed.
Showing and hiding a column
Click [c] at the right edge of the row of item names, then
select the item name from the pop-up menu and click it.
The selection shows items on or hides them from the header column.
Editing the track list
The playing order of tracks displayed in the track list, the titles of tracks
and other information can be edited.
20
En
Page 21

! When a track is selected and another track is clicked while press-
ing the computer’s [Shift] key, those two tracks and all the tracks
between them are selected. When a track is selected and other tracks
are clicked while pressing the computer’s [Ctrl] key, only the tracks
that are clicked are selected.
Changing the order of the tracks
1 Click the [#] on the column header.
When clicked, [#] is highlighted, indicating that it is selected.
2 Drag and drop the track to the position to which you
want to move it.
The track order changes.
! The order of the tracks in the track list is indicated by the num-
bers displayed in the “#” column.
Relocating lost files
If you have moved the location of files which are already in your library,
they will show up as not found and be displayed in red. Doing this relocation of files will update the database with their new location.
1 Press the [FILES] button.
The [FILES] panel is displayed.
2 Drag and drop a folder (including any sub-folders) or
lost files onto [RELOCATE LOST FILES].
For searching a folder (including any sub-folders), drag them from
Explorer or Finder. For seaching for lost files, drag them from your library.
Searching begins.
! Clicking [RELOCATE LOST FILES] will search all attached drives
for missing files and can take some time.
English
Deleting tracks
1 Turn the rotary selector.
Select the track you want to delete.
2 On the computer’s keyboard, press the [Delete] key
while pressing the [Ctrl] key.
! If you press the [Delete] key while pressing the [Shift] key and
[Ctrl] key on the computer’s keyboard, the tracks will be deleted
from both the ITCH library and your computer’s hard drive.
Editing the track information
! It may not be possible to edit some system-related items, such as
filenames.
is displayed for read-only tracks that cannot be edited.
!
1 Turn the rotary selector.
Select the track to be edited.
2 Double-click the item to be edited.
Text can now be input.
3 Input the text.
Edit the item’s contents on the computer.
! On the computer’s keyboard, press an arrow key while pressing
the [Ctrl] key to move the cursor to a different item and edit items
consecutively.
! When an item is edited while multiple tracks are selected, the
editing is applied to all the selected tracks.
Setting colors for tracks
1 Turn the rotary selector.
Select the track to be edited.
2 Click the color label.
The color palette is displayed.
3 Select the desired color from the color palette.
The track is colored with the selected color.
Reloading the track information
This procedure reloads all the tags for the tracks in the library and
updates the track information. Update the track information after editing
it with other software.
1 Press the [FILES] button.
The [FILES] panel is displayed.
2 Click [RESCAN ID3 TAGS].
The track information is updated.
Searching for tracks
It is possible to quickly search among many tracks imported onto the
track list for the track you want to play. There are several search methods.
Searching by inputting characters
Tracks can be searched for by inputting characters and searching for the
tracks containing those characters.
1 Click in the search box.
A pull-down menu for selecting the item to be included in the search is
displayed.
2 Click the item to be included in the search.
3 Press the [CRATES] button.
Moves the cursor to the crate list panel.
4 Turn the rotary selector.
Select the item to be searched from the crate list panel.
Searching is performed within the selected item.
! To search all the tracks, select [All...].
5 Click the search box and input the characters.
The tracks applicable to the characters you have input are displayed.
! The characters you have input are cleared by clicking [×] at
the right of the search box or by pressing the [Esc] key on the
computer’s keyboard. You can delete one character at a time by
pressing the [Back Space] key on the computer’s keyboard.
! The characters being input are cleared if a different item is
selected from the crate list panel.
Using the [BROWSE] panel
The [BROWSE] panel can be used to narrow down your tracks in the ITCH
library by genre, BPM etc.
1 Press the [CRATES] button.
Moves the cursor to the crate list panel.
2 Turn the rotary selector.
Select the item to be searched from the crate list panel.
! To search all the tracks, select [All...].
3 Press the [BROWSE] button.
The [BROWSE] panel is displayed.
4 Turn the rotary selector.
Select the genre to which you want to narrow down the search.
5 Press the rotary selector.
The tracks applicable to the selected genre are displayed in the track list.
Next, narrow down by the BPM, the artist and the album items, in that
order. Only the tracks matching the selected contents are displayed in
the track list.
! Press the [BACK] button to move back to the layer above.
En
21
Page 22
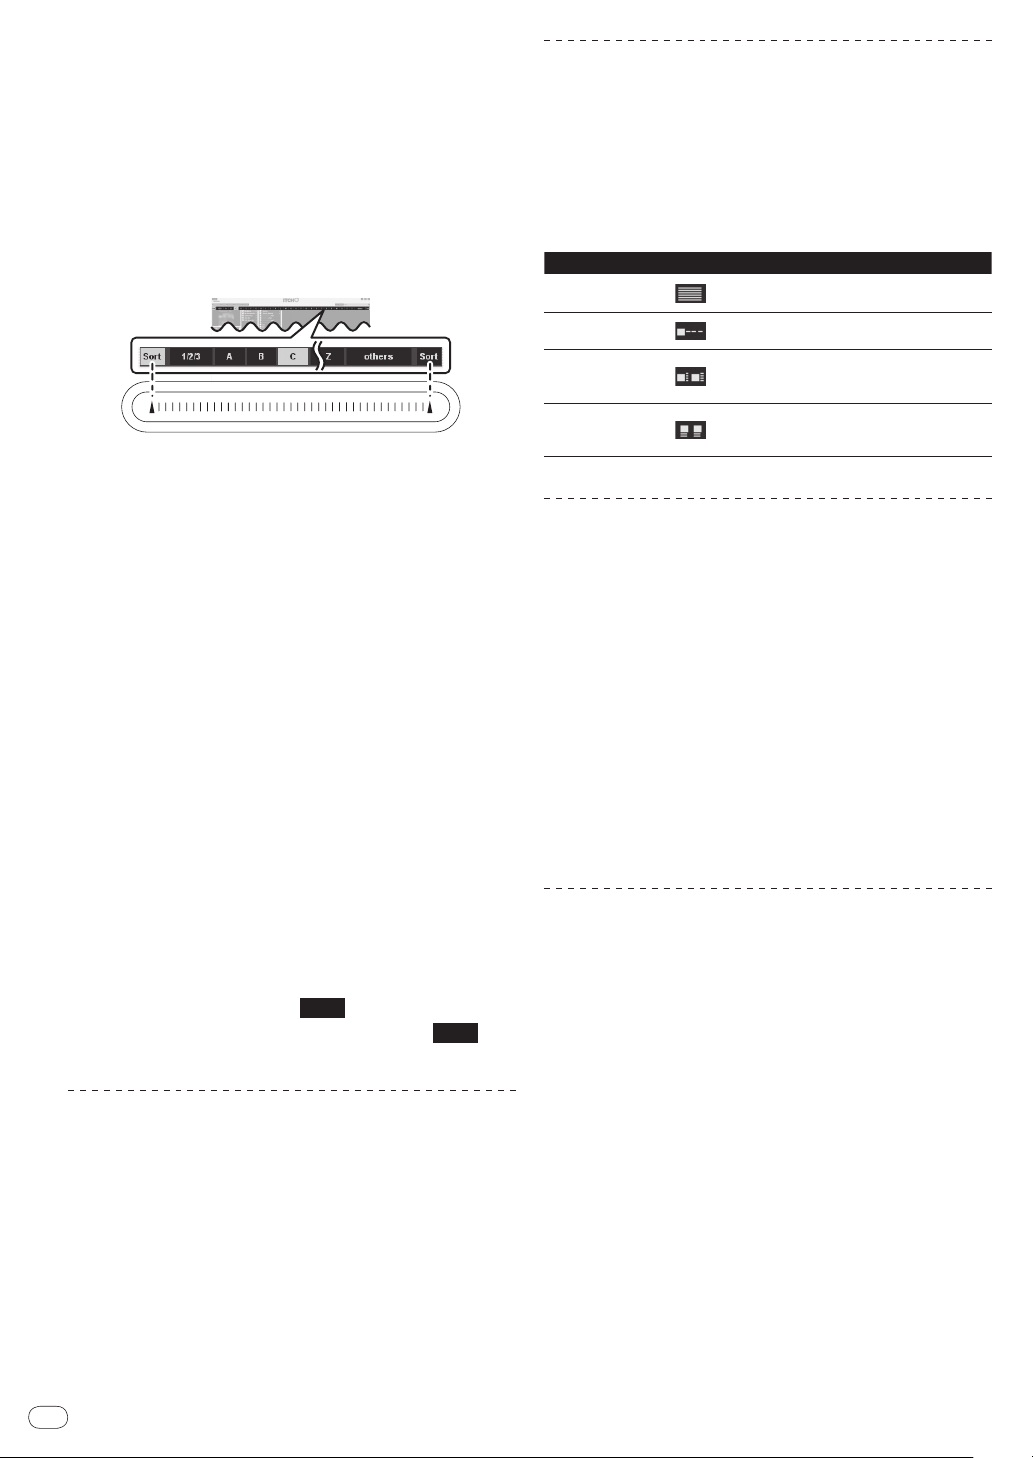
Searching using the
1/2/3
others
[NEEDLE SEARCH (ALPHABET SEARCH)] pad
(“Alphabet Search”)
Alphabet search allows you to quickly sort your tracks alphanumerically
using the [NEEDLE SEARCH (ALPHABET SEARCH)] pad.
! Alphabet search sorting is applied to your library or currently selected
crate.
Relationship between the alphabet search panel and
[NEEDLE SEARCH (ALPHABET SEARCH)] pad
The section on the screen with the alphabet search letters and the
[NEEDLE SEARCH (ALPHABET SEARCH)] pad have the same positional
relationship.
1 Press the [CRATES] button.
Moves the cursor to the crate list panel.
2 Turn the rotary selector.
Select the item to be searched from the crate list panel.
! To search all the tracks, select [All...].
3 Tap any position on the
[NEEDLE SEARCH (ALPHABET SEARCH)] pad while
pressing the [SHIFT] button.
Alphabet search panel is displayed on the top of screen. While the
[SHIFT] button is pressed, the alphabet search function is active.
4 Tap [a] at the left or right edge of the
[NEEDLE SEARCH (ALPHABET SEARCH)] pad while
pressing the [SHIFT] button.
The focus on the column header moves left or right each time left or right
[a] is tapped. The column header in bright gray shows that the column is
currently selected.
5 Slide your finger while holding in the [SHIFT] button.
Once you have selected the column you wish to sort by, move your finger
along the [NEEDLE SEARCH (ALPHABET SEARCH)] pad and you'll see
the cursor in the alphabet search display follow.
Tracks corresponding to the currently selected letter are displayed in the
track list.
6 Release your finger from the
[NEEDLE SEARCH (ALPHABET SEARCH)] pad and the
[SHIFT] button.
! Numbers are searched when
other than letters and numbers are searched when
selected.
is selected, characters
is
Switching the display of the album art on
and off
If the file includes an image of the album, the image can be displayed.
! Use a general-purpose application to load the album art image into
the track.
Click [ALBUM ART].
When clicked, the [ALBUM ART] panel is displayed.
! When clicked again, the panel closes.
Displaying the album images in the track
list
The album images can be displayed in the track list. The layout of the
track information and album images can be changed as desired.
While pressing the [SHIFT] button, press the [FILES]
button (or one of the [BROWSE], [PREPARE] or [CRATES]
buttons).
The track list display switches.
Button Layout
CRATES button
FILES button
BROWSE button
PREPARE button
A simply display consisting only of text
(default). Album art is not displayed.
A column of album art is displayed at the very
left, followed by text.
The tracks are arranged in a grid, with the
album art displayed on the left side, the track
information on the right side.
The tracks are arranged in a grid, with the
album art displayed above, the track information below.
Using the [PREPARE] list
The [PREPARE] list is a list for selecting the tracks you want to prepare
ahead of time for playback.
1 Press the [PREPARE] button.
The [PREPARE] panel is displayed.
2 Drag and drop the track or crate to the [PREPARE]
panel.
The track or crate is added to the [PREPARE] list.
! Tracks or crate can also be added to the [PREPARE] list by drag-
ging and dropping them on the [PREPARE] tab at the top of the
screen.
! Tracks or crate can also be added to the [PREPARE] list by select-
ing them then pressing the [LOAD PREPARE (SAVE)] button.
! When tracks on the [PREPARE] list are loaded into a deck, those
tracks are deleted from the [PREPARE] list.
! When ITCH is quit, the tracks in the [PREPARE] panel are
cleared.
Using the [HISTORY] panel
Browsing the history
The [HISTORY] tab opens a complete log of all the tracks you have played
and allows exporting ITCH session information as a data file.
1 Play tracks.
The history of the tracks that have been played is displayed in the
[HISTORY] panel by session.
2 Click the [HISTORY] tab on the computer’s screen.
The [HISTORY] panel is displayed.
! Only the tracks you actually play are listed in history. This is done
using an A-B algorithm, meaning a track on deck (A) is only
listed once the track on deck (B) has been changed or ejected.
You can choose to show tracks which you have auditioned, but
not actually played, by checking [Show Unplayed Tracks]. The
session will then also list these tracks in gray, along with actual
played tracks. Alternatively, you can mark or unmark tracks as
played manually. Select a track (or a group of tracks) and click
[MARK PLAYED] or [MARK UNPLAYED]. Tracks that you have
played are marked as orange in your library. Click [CLEAR] to
reset the list of recently played tracks and turn the color of your
library back to white.
22
En
Page 23

About sessions
“Session” refers to one unit of playback. A new session will be created
each time ITCH is re-opened or a new session is started manually.
When [d] at the left of an item in the [period] column is clicked, the different sessions recorded in the history are displayed.
When [d] to the left of the individual sessions is clicked, the tracks and
artists played in that session are displayed.
! The editing operations below can be performed on sessions.
— START SESSION: Starts a new session.
— END SESSION: Ends the session.
— INSERT TRACK: Adds information for a track that has not been
played into the session (manual input).
— EXPORT: Exports and saves the session information.
Inputting the track information manually
You can add information for tracks not played in ITCH into your session
(e.g., if you played one of your favorite vinyl or music CD).
1 Select the position at which you want to input the
track information, then click [INSERT TRACK].
A new row is added below the selected position.
2 Double-click the inserted track fields and edit your
information accordingly.
The session name and artist name can be input.
Exporting sessions
The [HISTORY] panel data can be exported.
1 Select the name of the session you want to export.
2 Click the tab to the right of [EXPORT].
Select the format in which the data is to be saved.
— text: Text file format. This can be opened without using special
software.
— CSV: A file format used for spreadsheet software, etc.
— m3u: A file format that can be imported to music file playback
software, etc. The audio data is not included; information on the
location where the files is stored is recorded.
(Track information inserted into the session by clicking [INSERT
TRACK] is not included in files of this format.)
3 Click [EXPORT].
The data export starts.
! The exported data is stored in the following directory.
Windows: My Music > _Serato_ > History Export
Macintosh: Music > _Serato_ > History Export
Copying sessions into the crate list panel
Session information can be copied as one of the items in the crate list
panel.
Drag and drop the name of the session you want to copy
to the crate list panel.
Macintosh: Users > Music > _Serato_
! When tracks are added to the library from an external hard disk, for
example, the [_Serato_] folder is also created on the hard disk.
When ITCH is quit the first time after installing it, a confirmation message concerning the creation of a backup library is displayed.
When you check [Backup library] on the confirmation message screen,
click [Yes], then close the software, the [_Serato_Backup] folder is created in the [My Music] folder (in the [Music] folder for Macintosh) and
the library information is backed up.
After this, whenever you check [Backup library] on the confirmation
message screen, click [Yes], then close the software, the information is
backed up and the previous backup is overwritten.
! The confirmation message concerning the creation of a backup is
again displayed in the following cases.
— When over 1 week has passed since the last backup
— When there is no backup
Loading tracks to decks
1 Select the track you want to load.
Set the cursor to the track you want to load to the deck.
! For details, see Selecting items on page 20.
2 Press the [LOAD (INST. DOUBLES)] buttons for the
decks into which you want to load the tracks.
The selected tracks are loaded to the respective decks.
! When tracks that have not been added to the library are loaded
directly into a deck, they are automatically added to [All...] on
the crate list panel.
! With tracks selected, the tracks can be loaded into deck (A) or
deck (B) by pressing [c] or [d] while pressing the [Shift] key on
the computer’s keyboard.
! Tracks can also be loaded into decks by dragging and dropping
them.
! When [c] or [d] is pressed while pressing the [Shift] and [Alt]
buttons on the computer, the decks are emptied.
! When a new track is loaded into a deck, the headphones [CUE]
button for the deck in which it is loaded lights and the sound is
output from the headphones [CUE] channel.
Instant Doubles
During playback on one of the decks, the track loaded in that deck can
be loaded to the other deck and played from the same position. (Instant
Doubles)
The following example describes the operation for playing the deck (A)
track on deck (B) as well.
1 Load a track into deck (A) and play it.
2 While pressing the [SHIFT] button on deck (B), press
the [LOAD (INST. DOUBLES)] button on deck (B).
The track loaded in deck (A) is also loaded into deck (B) and played from
the same position.
! When deck (A) is in the pause mode, the pause mode is set at
the same position for the track on deck (B).
English
A note for users who have installed other
Serato Audio Research DJ software
ITCH shares its library with Scratch Live. The loop and cue points of
tracks set with Scratch Live can be used as such with ITCH, and information set with ITCH can likewise be used with Scratch Live. If you use both
software programs alternately, note that their libraries will have the same
contents.
About backing up library information
When ITCH is installed, the [_Serato_] folder is created at the location
in the computer shown below, and the library and crate information is
stored in this folder.
Windows: My Documents > My Music > _Serato_
Playing and pausing
Playback
1 Load a track in deck.
! For details on operation, see Loading tracks to decks on page 23.
2 Press the [PLAY/PAUSE f] button.
En
23
Page 24
Pausing
[
±6%
][
±10%
][
±16%
][
±100%
]
During playback, press the [PLAY/PAUSE f] button.
! Playback resumes when the [PLAY/PAUSE f] button is pressed
again.
Adjusting the playing speed (Tempo
control)
Changing the playing speed
Move the [TEMPO] slider forward or backward.
The playing speed increases when the slider is moved to the [+] side
(towards you), decreases when the slider is moved to the [–] side (away
from you).
Selecting the range for adjusting the
playing speed
Press the [TEMPO RANGE] button.
The playing speed adjustment range switches each time the button is
pressed. The setting after the change is displayed in ITCH.
Adjusting the playing speed without
changing the pitch (Master Tempo)
1 Press the [MASTER TEMPO] button.
The pitch no longer changes even when the playing speed is changed
with the [TEMPO] slider.
! The sound is digitally processed, so the sound quality decreases.
! The master tempo tolerance range is ±50 %.
2 Move the [TEMPO] slider forward or backward.
Playing in reverse
Press the [REV] button.
The track is played in the reverse direction.
! The direction in which the playing speed is increased or decreased
according to the direction in which the jog dial is turned is reversed.
Operating the jog dial
Switching the jog dial mode
The jog dial has two modes.
! [VINYL] mode: When the top of the jog dial is pressed during play-
back, playback pauses, and when the jog dial is spun at this time the
sound is output according to how the jog dial is spun.
! Normal mode: Pressing the top of the jog dial during playback does
not pause playback. Also, such operations as scratching are not
possible.
Press the [VINYL (ILLUMINATION)] button.
The jog mode switches to the [VINYL] mode and the
[VINYL (ILLUMINATION)] button lights.
Scratch
When the jog mode is set to the [VINYL] mode and the jog dial is spun
while pressing on its top, the track can be played according to the direction in and speed at which the jog dial is being spun.
1 Press the [VINYL (ILLUMINATION)] button.
Set the jog mode to the [VINYL] mode.
2 During playback, press the top of the jog dial.
Playback stops.
3 While pressing the top of jog dial, spin the jog dial in
the desired direction and at the desired speed.
The sound is played according to the spinning direction and speed of the
jog dial.
4 Release your hand from the top of the jog dial.
Normal playback resumes.
Pitch bend
During playback, spin the outer section of the jog dial.
The playing speed increases when spun clockwise, decreases when spun
counterclockwise. When spinning is stopped, playback returns to the
normal speed.
! When the jog mode is set to the normal mode, the same operation is
possible by spinning the top of the jog dial.
Switching the jog dial illumination
The way the jog dial illumination lights can be selected from one of two
types.
! The same setting is applied to the jog dials for both decks (A) and (B).
Press the [VINYL (ILLUMINATION)] button while pressing
the [SHIFT] button.
The setting switches each time the button is pressed.
Specifying the position to be played
instantly (NEEDLE SEARCH)
The sound at the position at which the
[NEEDLE SEARCH (ALPHABET SEARCH)] pad is touched can easily be
played.
The left edge of the [NEEDLE SEARCH (ALPHABET SEARCH)] pad indi-
cates the beginning of the track, the right edge the end of the track.
1 Touch the [NEEDLE SEARCH (ALPHABET SEARCH)]
pad.
The track’s playing position changes instantly according to the position
on the pad that is touched.
2 While touching the
[NEEDLE SEARCH (ALPHABET SEARCH)] pad, slide your
finger along the pad.
The track’s playing position moves as you slide your finger.
Setting a temporary cue point
1 During playback, press the [PLAY/PAUSE f]
button.
Playback is paused.
! Adjust the position by spinnig the jog dial during pause, if
desired. (To move the playback position during pause, other
methods also can be used.)
24
En
Page 25
2 Press the [CUE] button.
A temporary cue point is set at the position at which the track was
paused.
! When a new temporary cue point is set, the point previously set is
canceled.
! The loop out point’s adjustable range is any point before the loop in
point.
3 Press the [LOOP OUT (GRID TAP)] button.
Normal loop playback resumes.
English
Returning to the temporary cue point
(Back cue)
During playback, press the [CUE] button.
The playback position immediately returns to the currently set temporary
cue point and pauses.
! When the [PLAY/PAUSE f] button is pressed, playback starts
from the temporary cue point.
Checking the temporary cue point (Cue
sampler)
Keep pressing the [CUE] button after returning to the
temporary cue point.
Playback starts from the temporary cue point. Playback continues while
the [CUE] button is pressed.
! When the [PLAY/PAUSE f] button is pressed during cue sam-
pling, playback continues from that point.
Loop operations
Setting Loop
1 During playback, press the [LOOP IN (GRID SET)]
button at the point at which you want loop playback to
start (the loop in point).
Loop In Point is set.
2 Press the [LOOP OUT (GRID TAP)] button at the point
at which you want loop playback to end (the loop out
point).
The Loop Out Point is set, and Loop playback starts from the Loop In
Point.
Canceling Loop playback (Loop Exit)
During loop playback, press the
[RELOOP/EXIT (GRID CLEAR)] button.
Playback continues beyond the Loop Out Point without returning to the
Loop In Point.
Returning to Loop playback (Reloop)
After canceling loop playback, press the
[RELOOP/EXIT (GRID CLEAR)] button during playback.
Playback returns to the previously set Loop In Point, and Loop playback
resumes.
Setting loops automatically (Auto loop)
1 During playback, turn the [AUTO LOOP (GRID SLIDE)]
control.
Sets the loop length by the specified number of beats.
2 Press the [AUTO LOOP (GRID SLIDE)] control.
A loop with the set number of beats is created automatically according to
the BPM of the currently playing track and loop playback begins.
! Even during auto looping, the loop length can be adjusted by
turning the [AUTO LOOP (GRID SLIDE)] control.
Canceling auto looping
During auto looping, press the [AUTO LOOP
(GRID SLIDE)] control.
Playback continues beyond the Loop Out Point without returning to the
Loop In Point.
Splitting loops (Loop Halving)
Fine-adjusting the loop in point (loop in
adjust)
1 During loop playback, press the [LOOP IN (GRID SET)]
button.
2 Spin the jog dial.
The loop in point can be fine-adjusted.
! The loop in point’s adjustable range is any point before the loop out
point.
3 Press the [LOOP IN (GRID SET)] button.
Normal loop playback resumes.
Fine-adjusting the loop out point (loop
out adjust)
1 During loop playback, press the
[LOOP OUT (GRID TAP)] button.
2 Spin the jog dial.
The loop out point can be fine-adjusted.
During loop playback, turn the [AUTO LOOP
(GRID SLIDE)] control counterclockwise.
The length of the loop is split in half each time the control is turned
counterclockwise.
Doubling the loop (Loop Doubling)
During loop playback, turn the [AUTO LOOP
(GRID SLIDE)] control clockwise.
The length of the loop is doubled each time the control is turned
clockwise.
Using the loop bank
Saving loop points
Loops can be saved beforehand and called out later.
1 Press the [LOOP SELECT (GRID LOCK)] button to select
the loop bank number at which you want to save the
loop.
The loop bank number switches each time the button is pressed.
En
25
Page 26

! If no loop has ever been set for the currently loaded track, bank
number 1 is assigned.
2 Set the loop.
For details on setting loops, Loop operations on page 25.
When a loop is set, it is automatically saved in the currently selected loop
bank.
! Up to 9 loop banks can be set.
! When a loop is set while a bank number at which a loop is
already saved is selected, the loop saved at that loop bank is
overwritten.
Calling out loop points
1 Press the [LOOP SELECT (GRID LOCK)] button.
The loop bank number switches each time the button is pressed.
Select the loop bank at which the loop point is saved.
2 Press the [RELOOP/EXIT (GRID CLEAR)] button.
Loop playback starts from the saved loop in point.
Hot cue sampler
In the pause mode or when pausing at a
temporary hot cue point, press and hold one of the
[HOT CUE (DELETE) 1] – [HOT CUE (DELETE) 5] buttons at
which a hot cue is set.
The playing position moves to that hot cue point and the hot cue is played
while the hot cue button is being pressed.
! When the [PLAY/PAUSE f] button is pressed during hot cue
sampling, playback continues from that point.
Deleting hot cues
Press one of hot cue buttons [HOT CUE (DELETE) 1] –
[HOT CUE (DELETE) 5] while pressing the [SHIFT] button.
The hot cue button ([HOT CUE (DELETE) 1] – [HOT CUE (DELETE) 5])
whose hot cue has been deleted turns off.
Deleting loop points
Click [×] on the right of the loop bank number display.
The loop point saved at the currently selected loop bank is deleted.
Protecting loop points (Loop lock)
Click
on the left of the loop bank number display.
Operations that overwrite or delete the loop point saved in the selected
loop bank are disabled.
When
is pressed again, protection is canceled.
Setting Hot Cue
When a hot cue is set, that point can be called out and played instantaneously. Up to 5 hot cues can be set per music track.
1 Press the [REC MODE] button.
The mode switches to the hot cue recording mode. The [REC MODE]
button flashes.
! For hot cue buttons at which no hot cue is set, hot cues can be
set even without pressing the [REC MODE] button to switch to
the hot cue recording mode.
2 During playback, in the pause mode or when
pausing at a cue point, press one of hot cue buttons
[HOT CUE (DELETE) 1] – [HOT CUE (DELETE) 5].
A hot cue is set at the position at which the button was pressed.
Hot cue buttons at which hot cues are set ([HOT CUE (DELETE) 1] –
[HOT CUE (DELETE) 5]) light.
! The position where the hot cue has been set is displayed at the
track overview.
! The direction of playback is not recorded for hot cues.
Playing hot cues
! When the [REC MODE] button is flashing, the hot cue recording
mode is set. In this case, press the [REC MODE] button to switch to
the hot cue playing mode. The [REC MODE] button is off when in the
hot cue playing mode.
Press one of the hot cue buttons ([HOT CUE (DELETE) 1] –
[HOT CUE (DELETE) 5]) at which a hot cue is set.
Playback starts instantaneously from the point recorded in the button.
! Hot cue buttons at which no hot cues are set do not light. If one
of these hot cue buttons is pressed, the position at which the
button is pressed is set as the hot cue point for that button.
Using the slip mode
Slip mode is a performance tool which allows you to temporarily manipulate the audio as normal by scratching, looping or reverse playing. As
you are doing this, the playhead continues to move inaudibly through
the track in the background, keeping it's place as if you were just playing
the track normally. Once you have finished manipulating, playback then
resumes from the current position of the playhead in the track.
! The [SLIP] button lights when the [SLIP] mode is turned on and
flashes while normal playback is continuing in the background.
Slip looping
1 Press the [SLIP] button.
The mode switches to the slip mode.
2 Press the [LOOP IN (GRID SET)] button, then press
[LOOP OUT (GRID TAP)] button.
Loop playback starts.
Normal playback continues in the background even during loop
playback.
3 Press the [RELOOP/EXIT (GRID CLEAR)] button.
Looping is canceled, and normal playback of the sound that was playing
in the background resumes.
! To cancel the slip mode, press the [SLIP] button again.
Auto beat slip looping
1 Press the [SLIP] button.
The mode switches to the slip mode.
2 Turn the [AUTO LOOP (GRID SLIDE)] control to set the
beat.
3 Press the [AUTO LOOP (GRID SLIDE)] control.
A loop with the set number of beats is created automatically according to
the BPM of the currently playing track and loop playback begins.
Normal playback continues in the background even during loop
playback.
4 Press the [RELOOP/EXIT (GRID CLEAR)] button.
Looping is canceled, and normal playback of the sound that was playing
in the background resumes.
! To cancel the slip mode, press the [SLIP] button again.
26
En
Page 27
Slip reverse
1 Press the [SLIP] button.
The mode switches to the slip mode.
2 Press the [REV] button.
The track is played in the reverse direction.
Normal playback continues in the background even during reverse
playback.
! To cancel the slip mode, press the [SLIP] button again.
Slip scratching
1 Press the [VINYL (ILLUMINATION)] button.
Set the jog mode to the [VINYL] mode.
2 Press the [SLIP] button.
The mode switches to the slip mode.
3 During playback, press the top of the jog dial.
Performs scratching.
Normal playback continues in the background even while scratching.
! The slip loop and slip reverse operations cannot be performed during
slip scratch play.
4 Release your hand from the top of the jog dial.
Normal playback of the sound that was playing in the background
resumes.
! To cancel the slip mode, press the [SLIP] button again.
Slip hot cue
1 Set the hot cue.
For details, see Setting Hot Cue on page 26.
2 Press the [SLIP] button.
The mode switches to the slip mode.
3 Keep pressing the hot cue button.
Playback starts from the hot cue point. Playback continues while the hot
cue button is pressed.
4 Release your finger from the hot cue button.
Normal playback of the sound that was playing in the background
resumes.
! To cancel the slip mode, press the [SLIP] button again.
Synchronizing the playing speed
— The beat grid can also be aligned manually with looking at the
beat match display by using the jog dial.
Editing the beat grid
The beat grid is set automatically from the average value of the BPM
when tracks are analyzed.
If the beat grid does not match the track’s actual beat, the tracks in the
left and right decks are synchronized more accurately after the beat grid
is edited.
! To edit the beat grid, enable the [Enable beat grid] setting in the
[SETUP] menu.
The beat grid can also be edited through operations on the computer. To
do so, the operations below must be performed.
! Either press the [Alt] and space keys simultaneously on the com-
puter’s keyboard, or click [GRID EDIT] on the computer’s screen to
set the beat grid edit mode.
! Once you finish editing the beat grid, press the computer’s [Enter]
key to save. (The beat grid editing mode is also canceled.)
— If you do not want to save the edited beat grid, click the com-
puter’s [Esc] key.
Setting the beat marker
1 Select the position at which you want to set the beat
marker.
Operate the [NEEDLE SEARCH (ALPHABET SEARCH)] pad or jog dial to
move the position at which you want to set the beat marker to the center
of the waveform display.
! The position can also be moved by dragging the waveform display on
the computer’s screen.
2 Press the [LOOP IN (GRID SET)] button while pressing
the [SHIFT] button.
The beat marker is set. (Beat markers can be set at multiple points.)
! When in the beat grid editing mode, beat markers can also be set by
either pressing the [X] key on the computer’s keyboard or by double-
clicking while pressing the [Alt] key.
Sliding the entire beat grid left and right
Turn the [AUTO LOOP (GRID SLIDE)] control clockwise or
counterclockwise while pressing the [SHIFT] button.
When turned clockwise, the entire beat grid slides to the right. When
turned counterclockwise, the entire beat grid slides to the left.
! When in the beat grid editing mode, sliding is also possible by press-
ing the computer’s [c] or [d] key while pressing the [Ctrl] key.
! When in the beat grid editing mode, the beat grid slides faster when
the computer’s [c] or [d] key is pressed while pressing the [Ctrl]
and [Shift] keys.
English
Synchronizing the beats of 2 tracks (Beat
Sync)
The tempo (BPM) and beat grid of the track can be automatically synchronized with the track on the opposite deck.
! When using the beat sync function, operate the [TEMPO] sliders
beforehand to set them so that the BPMs of the tracks on the two
decks are near each other.
! If the setting of [Enable beat grid] on the [SETUP] menu is enabled,
both the tempo (BPM) and beat grid is fully syncronized. If the setting
is disabled, only the tempo (BPM) is syncronized.
Press the [SYNC (SYNC OFF)] button on the deck you
want to synchronize.
To synchronize the track on the deck (A) with the track playing on the
deck (B), press the [SYNC (SYNC OFF)] button on the deck (B).
! To cancel the synchronizing, press the [SYNC (SYNC OFF)] button
while pressing the [SHIFT] button.
Adjusting the spacing of the entire beat
grid
Turn the jog dial clockwise or counterclockwise while
pressing the [SHIFT] button.
When turned clockwise, the beat grid’s spacing widens, and when
turned counterclockwise, the beat grid’s spacing narrows.
! When in the beat grid editing mode, the beat grid’s spacing can also
be adjusted by pressing the computer’s [c] or [d] key or by drag-
ging while pressing the [Alt] key.
! When in the beat grid editing mode, the spacing can be adjusted
faster by pressing the computer’s [c] or [d] key while pressing the
[Shift] key.
En
27
Page 28
Adjusting the entire beat grid’s spacing
by tapping the button
While playing the track, the beat grid’s width can be adjusted by tapping
the button.
At the beginning of one of the track’s measures, press
the [LOOP OUT (GRID TAP)] repeatedly while pressing
the [SHIFT] button.
The interval at which the [LOOP OUT (GRID TAP)] is pressed is set as the
beat grid’s spacing.
! When in the beat grid editing mode, the beat grid’s spacing can also
be adjusted by tapping the computer’s space key.
Deleting beat markers
1 Select the beat marker you want to delete.
Operate the [NEEDLE SEARCH (ALPHABET SEARCH)] pad or jog dial to
move the beat marker you want to delete to the center of the waveform
display.
! The position can also be moved by dragging the waveform display on
the computer’s screen.
2 Press the [RELOOP/EXIT (GRID CLEAR)] button while
pressing the [SHIFT] button.
! When in the beat grid editing mode, beat markers can also be deleted
by selecting them then either pressing the computer’s [Delete] key or
double-clicking while pressing the [Alt] and [Shift] keys.
! When in the beat grid editing mode, the entire beat grid can be
deleted by pressing the computer’s [Delete] key while pressing the
[Shift] key.
Locking beat grids
This protects the entire grid so that it cannot be edited in units of individual tracks.
Press the [LOOP SELECT (GRID LOCK)] button while
pressing the [SHIFT] button.
Using the mixer functions
Outputting sound
Set the volume of the power amplifiers connected to the [MASTER
OUT 1, MASTER OUT 2] terminals to an appropriate level. Note that
very loud sounds will be output if the volume is set too high.
1 Turn the [TRIM] control.
Adjusts the sound level input to the various decks.
2 Move the channel fader away from you.
Adjusts the sound level output from the various decks.
3 Move the crossfader.
Switch the deck whose sound is to be output from the speakers.
— This operation is not necessary when the crossfader curve selec-
tor switch is set to [THRU].
! Left edge: Only the sound of the channel assigned to the left of
the crossfader is output.
! Center position: The sound of the two decks is mixed and output.
! Right edge: Only the sound of the channel assigned to the right
of the crossfader is output.
! The deck assignments can be reversed from right to left and vice
versa with the [C.F. REV] button.
4 Turn the [MASTER LEVEL] control.
Audio signals are output from the [MASTER1] and [MASTER2] terminals.
Equalization
Turn the [EQ (HI, MID, LOW) ] controls on the respective
decks.
These adjust the [HI] (high range), [MID] (middle range) and [LOW] (low
range), respectively.
Monitoring sound with headphones
The channel for monitoring over the headphones is called the [CUE]
channel. The sound of this channel is output from the headphones
regardless of the positions of the crossfader and channel fader.
! To monitor the sound of deck (A) or deck (B) over the headphones
without outputting it from the [MASTER] channel, use one of the
procedures below.
— Move the channel fader for the channel you do not want to output
from the [MASTER] channel to the nearest position towards you.
— Move the crossfader all the way to the side opposite the channel
you do not want to output.
! To monitor the sound of the microphone or external device (AUX)
without outputting it from the [MASTER] channel, select [Mute] on
the MIC/ AUX monitor control panel.
= MIC/ AUX monitor control panel (p.18)
1 Connect headphones to one of the [PHONES]
terminals.
2 Press the headphones [CUE] button for the channel
you want to monitor.
The headphones [CUE] button lights and the sound is output to the headphones [CUE] channel.
! If you want to monitor the sound of both channels simultane-
ously, press both headphones [CUE] buttons simultaneously.
3 Click the [CUE] key for the microphone or external
device you want to monitor.
The [CUE] key is highlighted and the sound is output to the headphones
[CUE] channel.
! For details on the positions of keys, see Switching the jog dial
illumination on page 24.
4 Turn the [HEADPHONES MIXING] control.
Adjust the monitor volume balance between the sound of the [CUE]
channel and the sound of the [MASTER] channel.
! Turn counterclockwise: The relative volume of the [CUE] chan-
nel increases. When turned all the way counterclockwise, the
sound of the [MASTER] channel cannot be heard through the
headphones.
! Center position: The sound of the [CUE] channel and the sound
of the [MASTER] channel have the same volume.
! Turn clockwise: The relative volume of the [MASTER] channel
increases. When turned all the way clockwise, the sound of the
[CUE] channel cannot be heard through the headphones.
5 Turn the [HEADPHONES LEVEL] control.
The volume of the headphones is adjusted.
When multiple headphones [CUE] buttons are pressed, the sound of the
decks for which the buttons are pressed is mixed and output from the
headphones.
! When the headphones [CUE] button is pressed again, monitoring of
the deck’s sound is canceled.
! When the [CUE] key on the MIC/
again, monitoring of the sound of the microphone or external device
is canceled.
AUX monitor control panel is clicked
28
En
Page 29
Selecting the crossfader curve
characteristics
Switch the crossfader curve selector switch.
! [ ]: Makes a sharply increasing curve (if the crossfader is
moved away from the [A] side, audio signals are immediately
output from the [B] side).
! [
]: Makes a gradually increasing curve (if the crossfader is
moved away from the [A] side, the sound on the [B] side gradually increases, while the sound on the [A] gradually decreases).
! [THRU]: Choose this when you do not want to use the crossfader.
Using the crossfader reverse function
Switch the [C.F. REV] switch.
! [ON]: The left side of the crossfader is set to deck (B), the right
side to deck (A).
! [OFF]: The left side of the crossfader is set to deck (A), the right
side to deck (B).
Using a microphone
English
1 Connect a microphone to the [MIC1] or [MIC2]
terminal.
! To use the [MIC2] terminal, set the [MIC2/ AUX] selector switch
to [MIC2].
2 Set the [OFF, ON, TALK OVER] selector switch to [ON]
or [TALK OVER].
! [ON]: The indicator lights.
! [TALK OVER]: The indicator flashes.
! When set to [TALK OVER], the volume level of the currently playing
track is automatically decreased when sound is input to the microphone. (The volume level of the sound input to the [AUX IN] terminals
is not decreased.)
3 Turn the [LEVEL] control.
Adjust the sound level output from [MIC1] and [MIC2].
! Pay attention that rotating to the extreme right position outputs a very
loud sound.
4 Input audio signals to the microphone.
Starting playback using the fader (Fader
Start)
Starting playback using the crossfader
1 Set the [FADER START] switch to [ON].
2 Move the crossfader.
Set to the edge opposite the side on which the channel you want to use
with the fader start function is set.
3 Set the temporary cue point.
Playback pauses at the temporary cue point.
! If a temporary cue point is already set, press the [CUE] button to
move the playback position back to that point.
4 Move the crossfader.
Playback starts.
! If you set the crossfader back to the original position, the player
immediately returns to the temporary cue point and pauses playback
(Back cue).
Starting hot cue playback using the fader
(Hot cue fader start)
Starting playback using the crossfader
1 Set the [FADER START] switch to [ON].
2 Move the crossfader.
Set to the edge opposite the side on which the channel you want to use
with the fader start function is set.
3 Select one of hot cues.
Playback pauses at the hot cue point.
! If no hot cue is set, set the hot cue first.
For details, see Setting Hot Cue on page 26.
4 Move the crossfader.
Playback starts.
! If you set the crossfader back to the original position, the player
instantaneously returns to the hot cue point already set and pauses
playback.
Equalization
Turn the [EQ (HI, MID, LOW)] controls for [MIC1] or
[MIC2].
Using an external device
1 Set the [MIC2/ AUX] selector switch to [AUX].
2 Turn clockwise the [LEVEL] control in the
microphone/
Adjusts the level of the output sound.
! If the volume level cannot be adjusted enough with the [LEVEL]
AUX section.
control in the microphone/ AUX section alone, adjust by turning
the [VOL] control on the rear panel.
Equalization
Turn the [EQ (HI, MID, LOW)] controls in the microphone/
AUX section.
Recording
! For details of relative screen on the computer, see Recording panel on
page 18.
! Recording of the input sound is not possible with ITCH when the
[MIC/AUX THRU] selector switch is set to [ON].
1 Select the channel to be recorded.
Perform this operation on the computer’s screen.
! [MIX]: The sound output from the [MASTER OUT 1] and
[MASTER OUT 2] terminals can be recorded.
! [AUX]: The sound of the [MIC/ AUX] channel can be recorded
alone.
2 Adjust the recording level.
Adjust the recording level using the appropriate controls for the source
being recorded. The recording meter in the software shows the signal
level that will be recorded to disk. We recommend that you set your levels
so the loudest part of the mix causes the meter to enter the red zone only
briefly.
En
29
Page 30
3 Press the [AREA MOVE (REC)] button while pressing
the [SHIFT] button.
Recording starts.
The [AREA MOVE (REC)] button flashes.
4 Press the [AREA MOVE (REC)] button while pressing
the [SHIFT] button.
The [AREA MOVE (REC)] button turns off and recording stops.
5 Operate the computer to input the filename.
6 Press the [LOAD PREPARE (SAVE)] button while
pressing the [SHIFT] button.
The recorded sound is saved.
! If no filename is input, a file with the name “Serato Recording
<serial no.>” is created.
! Recorded data is stored in the following directory.
Windows: My Music > _Serato_ > Recording
Macintosh: Music > _Serato_ > Recording
Outputting the microphone and
AUX sound directly
When the [MIC/AUX THRU] selector switch is set to [ON], the audio
signals of the connected external device and microphone are output
directly without passing through the computer. Normally use with the
switch set to [OFF].
1 Set the [MIC/AUX THRU] selector switch to [ON].
2 Input audio signals to the microphone or output
audio signals from the external device.
! No effect is applied to the connected microphone and auxiliary
equipment when the [MIC/AUX THRU] selector switch is set to
[ON].
Using the effect function
This function lets you instantaneously set various effects according to
the tempo (BPM = Beats Per Minute) of the currently playing track.
The effect is applied to the selected channel.
1 Turn the [FX CH SELECT] control.
This selects the channel to which the effect is applied.
2 Turn the [EFFECT SELECT] control.
This selects the type of effect.
For the types of effects, see Types of effects on page 30.
3 Press the [FX ON/OFF] button.
When the effect is on, the selected effect is applied to the sound.
! When the button is pressed again, the effect is turned off.
— The effect parameters can be adjusted by turning the
[LEVEL/DEPTH] and [PARAMETER] controls.
— When the [FX CH SELECT] control is set to [MASTER] or
[MIC/AUX], the output of the microphone or AUX channel may
seem to be out of sync. In this case, either turn the effect off or
set the [FX CH SELECT] control to [A] or [B].
Setting the BPM manually
The BPM used as the base value for the effect can be set manually.
! When [A] or [B] is selected in the [FX CH SELECT] control, the auto mode
corresponding to the BPM of the track loaded in the deck is set.
Use the [TAP] button if you want to set the BPM manually.
! When [MASTER] or [MIC/AUX] is selected in the [FX CH SELECT]
control, the mode is always set to the manual mode.
Press the [TAP] button.
The interval at which the [TAP] button is tapped with a finger is set as the
BPM.
! When [A] or [B] is selected in the [FX CH SELECT] control, the BPM
can be set back to the auto mode by pressing and holding the [TAP]
button.
Types of effects
! In the descriptions in the section, the “set beat” refers to the beat set
with the [PARAMETER] control.
REVERB
Reverb is a series of small natural delays or reverberations of the audio
signal, creating a spacious atmospheric trail such as you would hear
in a cave or in an enclosed space. These reverb “reflections” are audio
ripples that sound like the music is bouncing around from wall to wall.
As a digital effect, reverb can allow you to create a sense of space and
atmosphere. As the reverb depth becomes fully wet, the original sound
gradually disappears.
PARAMETER control Adjusts the degree of the reverb effect.
DEPTH control Adjusts the reverb level.
LEVEL/
DELAY
A delay is when a part of the audio signal is repeated at a later stage.
Increasing the level of [FX MIX] will blend the delay level into the original
level, until you have 100 % delay blended into the original signal.
PARAMETER control
DEPTH control
LEVEL/
ECHO
Similar to the Delay, the Echo effect will repeat the original signal at a
later stage for a set number of times before the echo trail dissipates.
Echo emulates classic Tape Echo effect units, with a warmer, more analogue sound, where the user is able to control the warmth/ colour of the
effected signal, rather than a clean digital delay. The level will increase
as the effect wetness is increased, until only the full wet delay is playing
with no original signal.
PARAMETER control
DEPTH control
LEVEL/
LPF
The low pass filter acts like an equalizer that cuts the top end out of
the frequency spectrum, allowing only the audio below the filter cut
off point to pass through, sweeping down towards the low end of the
signal. Resonance can be added, making the effect cut off point more
pronounced.
PARAMETER control Adjusts the resonance.
DEPTH control
LEVEL/
HPF
The high pass filter acts like an equalizer that cuts the bass out of the frequency spectrum, allowing only the audio above the filter cut off point to
pass through, sweeping up towards the top end of the signal. Resonance
can be added, making the effect cut off point more pronounced.
PARAMETER control Adjusts the resonance.
DEPTH control
LEVEL/
Use these to set a time delay of 1/16 – 8/1 with
respect to the time of one beat of the BPM.
Sets the balance between the original sound and the
effect sound.
Use these to set a time delay of 1/16 – 8/1 with
respect to the time of one beat of the BPM.
Sets the balance between the original sound and the
effect sound.
The further the control is turned clockwise, the more
the effect is stressed.
The further the control is turned clockwise, the more
the effect is stressed.
30
En
Page 31

PHASER
The phaser uses filters to shift the frequency spectrum to create a sweeping effect on the audio source. A low frequency oscillator will alter the
speed of the sweep. [FX MIX] will change the depth and feedback of the
effect.
PARAMETER control
DEPTH control
LEVEL/
Use these to set the cycle for moving the phaser
effect as of time of 1/6 – 32/1 with respect to the time
of one beat of the BPM.
The further the control is turned clockwise, the more
the effect is stressed.
When turned all the way counterclockwise, only the
original sound is output.
FLANGER
The flanger effect is when two identical sound sources are mixed
together at slightly different times, creating a more natural sounding
audio sweep up and down the frequency spectrum as you change the
parameter of [TIME]. [FX MIX] will change the depth and feedback of the
effect.
PARAMETER control
DEPTH control
LEVEL/
Sets an effect time of 1/6 – 32/1 with respect to the
time of one beat of the BPM.
The further the control is turned clockwise, the more
the effect is stressed.
When turned all the way counterclockwise, only the
original sound is output.
CRUSHER
Crusher adds distortion and lowers the bit rate resolution of the audio
source. This effect can either sound glitchy or overdriven depending on
what point your bit depth is set to.
PARAMETER control Adjusts the degree of the effect.
LEVEL/
DEPTH control
The further the control is turned clockwise, the more
the effect is stressed.
at which the audio section will be repeated for, and the time of the audio
division to be repeated.
PARAMETER control
DEPTH control
LEVEL/
Use these to set a repeat time of 1/16 – 8/1 with
respect to the time of one beat of the BPM.
Sets the frequency at which the repeated sound is
applied.
REVERSER
This effect reverses a section of the audio signal, mixing it with the original audio. You can control the length of the audio stream to be reversed,
and the “Chance” of repeating audio.
PARAMETER control
DEPTH control
LEVEL/
Use these to set a reverse time of 1/16 – 8/1 with
respect to the time of one beat of the BPM.
Sets the frequency at which the reversed sound is
applied.
Changing the settings
ITCH’s environmental settings can be changed according to the usage
conditions.
1 On the computer screen, click [SETUP].
The ITCH setup menu opens.
2 Click the tab for the item you want to set.
The details of the setting items are displayed.
English
TREMOLO
The Tremolo modulates the signal volume, lowering and increasing it
rhythmically to the set time divisions, as if you were performing a series
of cuts on the mixer’s crossfader. [TIME] determines the rate of the volume drop, while [FX MIX] modifies the modulation on the signal volume.
The depth of the cut is determined by the wet/
dry amount, with 100 %
being a cut to silence.
PARAMETER control
DEPTH control
LEVEL/
Use these to set a cut time of 1/16 – 8/1 with respect
to the time of one beat of the BPM.
Sets the balance between the original sound and the
effect sound.
BRAKER
The braker acts like a classic turntable styled “stop” braking function,
where the audio winds down to a complete stop before resuming playback once again. Depending on the length of [TIME] set this effect can
sound like a quick fire stop button brake all the way through to the classic “turning the turntable off” technique, allowing the audio to slow down
to a complete stop.
PARAMETER control
DEPTH control
LEVEL/
Sets a brake time of 1/16 to 8/1 with respect to one
beat of the BPM.
Sets the frequency at which the brake sound is
applied.
REPEATER
This effect repeats audio chunks similar to a loop roll function. You can
control the “chance” the playing audio stream will be repeated, the count
For details of the various tabs, see the individual explanations described
later.
! The ITCH version information is displayed at the bottom left of
the [SETUP] menu.
! If the computer is connected to the Internet, click [CHECK FOR
UPDATES] to check whether more recent software is available.
[SETUP] menu setting items
HARDWARE
FIRMWARE
This unit’s firmware version can be checked here.
! When [Update Available] is displayed, a newer version of the
firmware is available. Click [UPDATE FIRMWARE] to update the
firmware. If [Up to Date] is displayed, there is no need to update the
firmware.
GENERAL
The USB buffer size “usb buffer size (latency)” setting can be changed
here.
ITCH divides the audio data into small packets for playback. This packet
size can be adjusted here.
! If the buffer size is made small, the operation of the jog dial is trans-
mitted accurately and the system’s transmission delay (latency)
decreases, but dropouts in the audio data (interruptions in the
sound), etc., may occur.
En
31
Page 32

! If the buffer size is made large, dropouts in the audio data (interrup-
tions in the sound), etc., tend to occur less, but the time lag due to
the transmission delay (latency) of the audio data may increase.
PLATTER SPEED
The playing speed of the virtual deck can be set to 33 or 45 RPM.
PLAYBACK
GENERAL
! Playback keys use shift
This disables operations using the computer keyboard when the
keyboard’s [Shift] key is not pressed or when Caps Lock is off.
! Lock playing deck
This disables loading of new tracks on decks on which a track is
playing.
This disables operations of the
[NEEDLE SEARCH (ALPHABET SEARCH)] pad when a track is
playing.
! Hi-fi resampler
This reduces digital distortion generated when tracks are played
at low or high speed. When enabled, however, the load of the CPU
increases slightly.
! Use auto gain
This sets the volume (gain) for the tracks automatically when the
software creates the track overviews. The volume is set with respect
to the reference volume selected from the drop-down list on the right.
! Enable beat grid
This option turns on/ off Beatgrids.
ON SONG LOAD
! play from start
When a track is loaded, playback starts from the beginning of the
track. If there is a blank section at the beginning of the track, play-
back starts from the position at which the sound starts.
— When a track is loaded with this setting disabled, playback starts
from the position played last on the track that was playing the
previous time.
! instant doubles
The same track is played on both tracks (doubled).
— For example, when the track currently playing on deck (A) is
also loaded in deck (B), the playing position of the track on
deck (B) is automatically synchronized to deck (B) and playback
begins. At this time, the master tempo and loop settings are also
synchronized.
! play from first cue point
When a track is loaded, playback start position is set on the low-
numbered hot cue within set hot cues.
— If no hot cue has been set for the track, playback starts from the
beginning of the track.
! Those settings are prioritized in the following order.
[instant doubles], [play from first cue point], [play from start]
RECORDING
! Bit depth
Select 16 bits or 24 bits for the bitrate when recording with ITCH.
! File format
Select AIFF or WAV for the file format when recording with ITCH.
LIBRARY
Show iTunes library
The iTunes library and playlists are displayed in ITCH.
Protect library
The following operations in the library are disabled.
! Editing of filenames and character information
! Moving or deleting of files and crates
Custom crate columns
The column header of the tracks list be set individually for different
crates. When this is disabled, the column header for all track lists is
displayed in common.
Center on selected song
This enables you to scroll the lists up and down with the cursor remaining fixed to the center when operating this unit to browse the library.
Show all file types
When importing music files, all the files on the hard disk are displayed.
! When this setting is disabled, only files that can be played with ITCH
are displayed.
include subcrate tracks
Tracks within subcrates are displayed within the parent crate.
DISPLAY
Maximum screen Updates
This slider allows you to lower ITCH’s screen refresh rate and potentially
use less CPU. Users with slower computers or those running a recording
program at the same time might like to do this if they are having performance issues. The default setting is 60 Hz, or refreshed 60 times per
second. This setting applies to the entire ITCH user interface; the virtual
decks, the waveforms, the library, and the setup screen.
Horizontal waveforms
The waveform display section is displayed horizontally at the bottom of
the screen.
Left vertical waveforms
The waveform display section is displayed vertically at the left of the
screen.
Right vertical waveforms
The waveform display section is displayed vertically at the right of the
screen.
MIXER
GENERAL
! EQ
— 6 dB
The equalizer gain is set to 6 dB.
— 12 dB
The equalizer gain is set to 12 dB.
! OUTPUT
— Mono
The external output is set to monaural.
— Stereo
The external output is set to stereo.
! HEADROOM
Adjusts the output from the respective decks. Decrease the number
if the sound is broken or distorted, increase it if the input is low and
noise is conspicuous.
CUE
! OVERDRIVE
This adjusts the sound level output from the headphones channel.
— The sound quality may decrease if the level is raised too high.
UPFADERS
! U/ F CURVE
This sets the abruptness of the increase or decrease in volume when
the channel fader is moved.
CROSSFADER
For the crossfader’s curve characteristics, the sound overlaps when the
channel is switched can be adjusted in detail.
!
The curve characteristics when is selected with the crossfader
curve selector switch can be adjusted.
!
The curve characteristics when is selected with the crossfader
curve selector switch can be adjusted.
32
En
Page 33
Additional information
Troubleshooting
! Incorrect operation is often mistaken for trouble or malfunction. If you think that there is something wrong with this component, check the points
below. Sometimes the trouble may lie in another component. Inspect the other components and electrical appliances being used. If the trouble
cannot be rectified after checking the items below, ask your nearest Pioneer authorized service center or your dealer to carry out repair work.
! This unit may not operate properly due to static electricity or other external influences. In this case, proper operation may be restored by turning the
power off, waiting 1 minute, then turning the power back on.
Problem Check Remedy
The power is not turned on.
None of the indicators light.
The jog dial indicator does not light.
[MASTER OUT 1] (XLR output) volume is low,
sound quality is poor or no sound is output.
[MIC1], [MIC2] and [AUX IN] terminals cannot
be used.
The indicators are dim.
This unit is not recognized. Is the [ON/
This unit operates on USB bus power even when
the included AC adapter is used.
Power does not turn on when operating on USB
bus power.
This unit cannot be operated. Is the driver software properly set? Set the driver software properly. (page 7)
Music files cannot be played. Are the music files damaged? Play music files that are not damaged.
Tracks are not displayed on track list. Have the music files been properly imported? Import the music files properly. (page 19)
Recording is not possible. Is the external device or microphone properly
Sound of an external device or microphone
cannot be output.
Volume of device connected to [AUX IN] terminals is low.
Distorted sound. Are the [MASTER LEVEL] and [TRIM] controls set to
Sound being played is interrupted. Are the included AC adapter and included USB
Is the [ON/ OFF] switch for power supply set to [ON]? Set the [ON/ OFF] switch for power supply to [ON].
Are you operating on USB bus power? There are limitations when operating on USB bus power.
OFF] switch for power supply set to [ON]? Set the [ON/ OFF] switch for power supply to [ON].
Is the included USB cable properly connected? Connect the included USB cable properly. (page 11)
Is the included AC adapter properly connected? Mount the power plug properly on the included AC adapter.
Is the included USB cable properly connected? Connect the computer and this unit directly using the included USB
The computer’s USB power supply capacity may be
insufficient.
Are you using a USB hub? USB hubs cannot be used. Connect the computer and this unit
Are you using a commercially available USB cable? Use the included USB cable.
Is a crate or subcrate that does not contain any
tracks selected?
connected?
Is the channel you want to record properly selected? Select the channel you want to record properly. (page 29)
Is the [MIC2/
Is the MIC/
Are you operating on USB bus power? There are limitations when operating on USB bus power.
Is the [AUX IN] terminals’ [VOL] control set to the
proper position?
the proper position?
Is the audio level being input to the [AUX IN] and
[MIC] terminals set to a suitable level?
Is [HEADROOM] in the [SETUP] menu properly set? Set the level properly.
cable properly connected?
Is the driver software’s latency value suitable? Set the driver software’s latency to a suitable value. (page 10)
AUX] selector switch properly set? Set the [MIC2/ AUX] selector switch properly. (page 29)
AUX monitor control panel properly set? Depending on the settings, the master sound may not be output. Set
To use the unit without these limitations, connect the included AC
adapter. (page 11)
Connect the included AC adapter properly to the power outlet.
(page 5)
Connect the included AC adapter’s DC plug properly to this unit.
(page 11)
cable. USB hubs cannot be used. (page 11)
Use the included AC adapter. (page 11)
directly using the included USB cable. (page 11)
Either select a crate or subcrate that contains any tracks or add
tracks to the crate or subcrate.
Check the connection of the external device or microphone. (page 11)
the output method properly. (page 18)
To use the unit without these limitations, connect the included AC
adapter. (page 11)
Set the audio level to a suitable level for the connected device. (page 29)
Adjust the [MASTER LEVEL] and [TRIM] controls.
Set the audio level input to the terminals to a suitable level for the
connected devices.
The sound will be interrupted if the included AC adapter’s power
cord or included USB cable is disconnected from this unit during
playback.
Properly fasten the included AC adapter’s power cord and the
included USB cable to this unit’s cord hook. (page 11)
Set the DJ software’s latency to a suitable value. (page 31)
English
En
33
Page 34
Problem Check Remedy
No sound is produced. Are the connection cables properly connected? Connect the connection cables properly. (page 11)
Is the included USB cable properly connected? Connect the computer and this unit directly using the included USB
Are terminals or plugs dirty? Wipe any dirt off terminals and plugs before connecting.
Is the driver software properly set? Set the driver software properly. (page 7)
Is ITCH properly set? Set ITCH properly.
Are the connected components and amplifiers
properly set?
Are you operating on USB bus power?
Is the [MIC/
No sound is produced, or sound is distorted or
noisy.
The beat grid is not displayed. Has the music file been analyzed? Analyze the file.
[SYNC] function does not work. Have the music files been properly imported? Reimport the music files and load them in the decks. (page 19)
[SYNC] function does not work even when files
are analyzed.
Fader starting is not possible. Are you in standby with a cue set? Set the cue. (page 24)
Sound is interrupted when the ASIO driver is set. Has the ASIO driver been set with ITCH running? Set the ASIO driver before launching ITCH. (page 7)
Back cue function does not work. Is a temporary cue point set? Set a temporary cue point. (page 24)
Reloop function does not work. Has a loop been set in the current playback? If no loop has been set in the current playback, the reloop function
Indicator flashes and power does not turn on. — Normal operation can sometimes be restored by unplugging the
Library cannot be edited. Is [Protect library] in [SETUP] enabled? Disable [Protect library]. (page 32)
ITCH operation is unstable. Are you using the latest version of the software? Free updates of ITCH can be downloaded from the Internet. Check
Is this unit placed near a TV? Turn the TV’s power off or install this unit and TV away from each
Has the music file been analyzed? Analyze the file.
Is the beat grid irregular?
Is the beat grid properly tapped?
Are the BPMs of the tracks in the two decks too
different?
Are you scratching? The [SYNC] function is disabled when scratching.
Are you using softwares other than ITCH at the
same time?
The computer’s USB power supply capacity may be
insufficient.
When other USB devices are connected to the
computer.
Are you using a USB hub? USB hubs cannot be used. Connect the computer and this unit
There is a problem with the USB port to which this
unit is connected.
Is this unit connected to a notebook computer running on its battery?
The USB buffer size is too small. Raise the USB buffer size. (page 31)
AUX THRU] selector switch set to [ON]? Set the [MIC/ AUX THRU] selector switch to [OFF]. If the [MIC/ AUX
cable. USB hubs cannot be used. (page 11)
Check the [MIXER] setting in the [SETUP]. (page 32)
Set the external input selection and volume on the components and
amplifiers properly.
When operating on USB bus power, the [MASTER OUT 1] volume
decreases, the sound quality decreases, sound may not be output, etc.
To use the unit without these limitations, connect the included AC
adapter. (page 11)
THRU] selector switch is set to [ON], only the sound of the micro-
phone or external device is output. (page 30)
other.
If music files cannot be analyzed automatically, click [GRID EDIT] in
the ITCH software and input the beat grids manually.
Set the beat grid properly.
The [SYNC] function will not work properly if the BPM of the track
on the deck for which the [SYNC (SYNC OFF)] button is pressed
is outside the adjustable tempo range of the track on the deck for
which the [SYNC (SYNC OFF)] button is not pressed.
does not work. Set a loop once. (page 24)
power cord, waiting at least 1 minute, then plugging the power cord
back in.
If the symptom persists, unplug the power cord and request repairs.
the website below and keep the software updated to the latest
version. (page 6)
Quit other applications to decrease the load on the computer.
If operation continues to be unstable, try disabling the wireless network or other wireless connections, antivirus software, the screen
saver, the low power mode, etc.
(page 6)
Use the included AC adapter. (page 11)
Disconnect other USB devices from the computer.
When another USB audio device is connected to the computer at the
same time, it may not operate or be recognized normally. (page 11)
directly using the included USB cable. (page 11)
If your computer has multiple USB ports, try connecting this unit to
a different USB port. (page 11)
Supply power to the notebook computer from an AC power supply.
(Depending on the notebook computer’s settings, the low power
mode may be set when the computer is running on its battery, automatically reducing the performance of the computer itself.) (page 6)
File corruption messages
An error code is displayed on the screen if this unit cannot operate properly. Check the error on the table below and take the appropriate action.
En
34
Page 35
Error code Description of error Cause and action
Corrupt file : This MP3 contains
invalid frames
Corrupt file : This file contains
corrupt frames that may result in
audible glitches
Corrupt file : This file has been
split. You should check the
beginning for audio glitches
Corrupt file : This MP3 contains
frames with corrupt data
Corrupt file : This MP3 file lost
synchronization between the
frame index and the frame
Corrupt file : This MP3 is
completely invalid and is not
playable
Corrupt file : This file contains
invalid audio data
Corrupt file : This MP3 contains
no valid frames
Unsupported file : This MP3
contains multiple layers
Unsupported file : This file is
more than 2GB in size
Unsupported file : This file had
data blocks greater than 2GB size
Corrupt file : This WAV contains
no valid chunks
Unsupport file : This file’s data is
not in PCM format
Unsupported file : This file has
a sampling rate greater than
48kHz
Unsupported file : This file uses
more than 24bits per sample
Corrupt file : This WAV is incomplete
Corrupt file : This file contains
corrupt blocks
Corrupt file : This song contains
no audio data
Corrupt file : This song contains
invalid samples
This file contains frames not conforming to formal
MP3 standards.
This file contains consecutive corrupt frames.
The sound that should be at the first MPEG audio
frame in the file has been lost.
An old MP3 overview edited with a different editing
program is loaded.
This file contains invalid data and cannot be played.
The cause could be a bad sector, a corrupt system file,
use of an erroneous file format or extension, etc.
Large quantities of invalid data were found when
searching the audio data.
The file cannot be played because no audio data was
found.
Multiple layers of MPEG frames were found when
scanning the file.
The file exceeds the limit size of 2 GB.
There are data blocks exceeding the limit size of 2 GB
in the file.
There is no recognizable WAV data in the file. This may
not be a WAV file.
The WAV data is not in PCM format so the file cannot
be played.
The file cannot be played because the sampling rate
exceeds 48 kHz.
The file cannot be played because the bitrate exceeds
24 bits.
The amount of data is under the anticipated file size.
Either the data is corrupt or it has not been properly
edited, so ITCH cannot properly determine the amount
of data in the file.
This file contains block data whose size is 0 (zero).
No audio data can be found in the file, so it cannot be
played.
This file contains audio samples whose size is too
small.
Normal playback is not guaranteed.
We recommend that you remake the file.
We recommend that you remake the file.
Corrupt frames are played with no sound, so the sound will seem to be interrupted.
This could be due to irregular MP3 editing. Because corrupt frames are played
with no sound and because many tracks start with no sound, it may be difficult
to notice this, but we recommend listening carefully to check.
As with other corrupt files, the corrupt section is played with no sound.
We recommend that you remake the file.
Remake the overview.
We recommend that you remake the file.
Check whether or not this is a legitimate music file.
MP3 files containing multiple layers of frames cannot be played. Depending on
the frames, they may be played with no sound.
Files exceeding 2 GB in size are not supported.
We recommend that you remake the file.
Files exceeding 2 GB in size are not supported.
We recommend that you remake the file.
Use a music file format that can be played.
Only WAV files in PCM format can be played.
Resample the file at 48 kHz and save it.
We recommend that you remake the file.
A maximum of 24 bits per audio sample data is supported.
We recommend that you remake the file.
We recommend that you remake the file.
Continued use could cause ITCH to become unstable or freeze.
Check whether the file contains audio data.
If the size is too small, it may be identified as 0 (zero). This does not particularly
affect playback, but the sound may be interrupted.
English
Using as a controller for other DJ
software
The DDJ-S1 also outputs the operating data for the buttons and dials in
MIDI format. If you connect a computer with a built-in MIDI-compatible
DJ software via a USB cable, you can operate the DJ software on this
unit. The sound of music files being played on the computer can also be
output from the DDJ-S1.
To use as a controller for other DJ software, first make the DJ software’s
audio and MIDI related settings.
For details, see your DJ software’s operating instructions.
For details of the MIDI messages on this unit, see the website below.
http:/ / www.prodjnet.com/ support/
Disclaimer
! Pioneer is a registered trademark of Pioneer Corporation.
! Microsoft®, Windows Vista®, Windows® and Internet Explorer® are
either registered trademarks or trademarks of Microsoft Corporation
in the United States and/ or other countries.
! Apple, Macintosh, Mac OS, Safari, iTunes, and Finder are trademarks
of Apple Inc., registered in the U.S. and other countries.
! Intel and Intel Core are trademarks of Intel Corporation in the U.S.
and other countries.
! ASIO is a trademark of Steinberg Media Technologies GmbH.
! AMD is a trademark of Advanced Micro Devices, Inc.
! “ITCH” is a registered trademark of Serato Audio Research.
The names of companies and products mentioned herein are the trademarks of their respective owners.
This product has been licensed for nonprofit use. This product has not
been licensed for commercial purposes (for profit-making use), such
as broadcasting (terrestrial, satellite, cable or other types of broadcasting), streaming on the Internet, Intranet (a corporate network) or other
types of networks or distributing of electronic information (online digital music distribution service). You need to acquire the corresponding
licenses for such uses. For details, see http://www.mp3licensing.com.
Cautions on copyrights
Recordings you have made are for your personal enjoyment and according to copyright laws may not be used without the consent of the copyright holder.
! Music recorded from CDs, etc., is protected by the copyright laws of
individual countries and by international treaties. It is the full responsibility of the person who has recorded the music to ensure that it is
used legally.
En
35
Page 36

! When handling music downloaded from the Internet, etc., it is the full
responsibility of the person who has downloaded the music to ensure
that it is used in accordance with the contract concluded with the
download site.
Specifications
AC adapter
Power .............................................................AC 100 V to 240 V, 50 Hz/ 60 Hz
Rated current ......................................................................................300 mA
Rated output .................................................................................. DC 5 V, 2 A
General – Main Unit
Power consumption (when using AC adapter) ..................................... 1.4 A
Main unit weight ....................................................................................5.0 kg
Max. external dimensions ...680 mm (width) x 95.2 mm (height) x 318 mm
Tolerable operating temperature ......................................... +5 °C to +35 °C
Tolerable operating humidity .......................5 % to 85 % (no condensation)
Audio Section (when using AC adapter/ when playing on
computer)
Rated output level
MASTER OUT 1 .........................................................................16 Vrms
MASTER OUT 2 ...........................................................................3 Vrms
Total harmonic distortion
MASTER OUT 1 ..........................................................................0.006 %
MASTER OUT 2 ..........................................................................0.006 %
Frequency characteristic
MASTER OUT 1 .............................................................20 Hz to 20 kHz
MASTER OUT 2 .............................................................20 Hz to 20 kHz
S/ N ratio
MASTER OUT 1 ............................. 101 dB or greater (at rated output)
MASTER OUT 2 ............................. 101 dB or greater (at rated output)
Input / Output terminals
USB terminal
B type ........................................................................................1 set
MASTER OUT 1 output terminal
XLR connector ..........................................................................1 set
MASTER OUT 2 output terminal
RCA pin jacks ...........................................................................1 set
PHONES output terminal
Stereo phone jack (Ø 6.3 mm) .................................................1 set
Stereo mini phone jack (Ø 3.5 mm) .........................................1 set
AUX input terminal
RCA pin jacks ...........................................................................1 set
MIC1 terminal
XLR connector/ phone jack (Ø 6.3 mm) ...................................1 set
MIC2 terminal
Phone jack (Ø 6.3 mm) .............................................................1 set
(depth)
! For improvement purposes, specifications and design of this unit and
the included software are subject to change without notice.
! Published by Pioneer Corporation. Copyright © 2011 Pioneer
Corporation. All rights reserved.
En
36
Page 37

Page 38

Le damos las gracias por la adquisición de este producto Pioneer. Lea a fondo estas instrucciones de utilización para que aprenda a utilizar correcta-
Este producto es para tareas domésticas generales.
Cualquiera avería debida a otra utilización que tareas
domésticas (tales como el uso a largo plazo para
motivos de negocios en un restaurante o el uso en un
coche o un barco) y que necesita una reparación
hará que cobrarla incluso durante el período de
garantía.
K041_A1_Es
Antes de hacer o cambiar las conexiones,
desconecte la alimentación de esta unidad y luego
desconecte el adaptador de CA de la toma de CA.
D44-9-3_A1_Es
Para el EQUIPO ENCHUFABLE, la toma de corriente deberá estar
instalada cerca del equipo, y deberá poder accederse a ella
fácilmente.
D28-9-3-2_A1_Es
mente su modelo. Después de haber terminado de leer estas instrucciones, guárdelas en un lugar seguro para, en caso de ser necesario, consultarlas
en el futuro.
En algunos países o regiones, la forma de la clavija de alimentación y de la toma de corriente pueden ser algunas veces diferentes de la mostrada en
las ilustraciones explicativas. Sin embargo, el método de conexión y funcionamiento de la unidad es el mismo.
Es
2
Page 39

Contenido
Cómo leer este manual
! En este manual, los nombres de las pantallas y de los menús
mostrados en el producto y en la pantalla del ordenador, así como
también los nombres de los botones, de los terminales, etc., se indican
entre paréntesis. (Ejemplo: Botón [CUE], panel [FILES], modo [VINYL],
terminal [AUX IN])
! Note que las pantallas y las especificaciones del software descritas
en este manual, así como también la apariencia externa y las
especificaciones del hardware, están actualmente en fase de
desarrollo y pueden ser distintas de las especificaciones finales.
Antes de comenzar
Características ............................................................................................4
Contenido de la caja ................................................................................... 4
Acerca del adaptador de CA ......................................................................4
Instalación del software .............................................................................6
Inicio de ITCH ............................................................................................10
Acerca del software controlador y el software de utilidad de ajustes . . 10
Conexiones y nombres de partes
Conexión de los terminales de entrada/ salida ....................................... 11
Nombres y funciones de los controles .................................................... 12
Operación
Pantalla de software ITCH ........................................................................ 16
Inicio del sistema ...................................................................................... 19
Salida del sistema ..................................................................................... 19
Utilización de la librería ............................................................................ 19
Carga de pistas en decks .........................................................................24
Reproducción y pausa .............................................................................. 24
Ajuste de la velocidad de reproducción (Control de tempo) ................24
Reproducción en retroceso......................................................................24
Operación del dial jog ............................................................................... 25
Especificación instantánea de la posición que se va a reproducir
(NEEDLE SEARCH) ................................................................................... 25
Ajuste de un punto cue temporal ............................................................25
Operación con el bucle.............................................................................25
Configuración de hot cue ......................................................................... 27
Uso del modo slip......................................................................................27
Sincronización de la velocidad de reproducción ................................... 28
Edición del beat grid ................................................................................. 28
Uso de las funciones del mezclador .......................................................29
Uso de un micrófono ................................................................................ 30
Uso de un aparato externo ....................................................................... 30
Grabación ..................................................................................................30
Salida directa del sonido del micrófono y de AUX ................................. 31
Uso de la función de efecto ...................................................................... 31
Cambio de los ajustes...............................................................................32
Español
Información adicional
Solución de problemas ............................................................................. 35
Mensajes de daños en archivos .............................................................. 37
Uso como controlador para otro software DJ ........................................38
Descargo de responsabilidad .................................................................. 38
Cuidados para los derechos de autor .....................................................38
Especificaciones .......................................................................................38
Es
3
Page 40

Antes de comenzar
Características
Esta unidad es un sistema DJ todo en uno que combina la alta operabilidad de los reproductores DJ y de los mezcladores DJ profesionales de
Pioneer, unidades que se han ganado una reputación excelente entre
muchos DJ profesionales y clubs, con el software DJ ITCH de Serato
Audio Research. Esta unidad también está equipada con interfaz de
audio, y permite realizar actuaciones de DJ completas sin emplear otro
equipo DJ.
DISPOSICIÓN
Esta unidad usa la misma disposición que los modelos profesionales de
Pioneer, lo que permite realizar actuaciones intuitivas con la mezcla de 2
canales y con efectos.
MIC/ AUX INPUT, XLR OUTPUT
Esta unidad está equipada con una entrada de micrófono/ equipo auxiliar
que permite conectar un micrófono o un aparato externo (muestreador,
aparato de audio portátil, etc.). Para la salida tiene terminales XLR y RCA
compatibles con equipos PA profesionales. De esta forma, esta unidad
es compatible con todos los tipos de situaciones y estilos de DJing.
ITCH
El software ITCH incluido es una aplicación de software DJ que ha sido
optimizada para esta unidad. Además del mezclador de 2 canales y el
efector, una variedad de funciones nuevas, incluyendo el modo slip, la
búsqueda alfabética y el inicio de fader de hot cue, permiten realizar
cómodamente actuaciones de DJ. Además, todos los botones y controles
están preajustados para funcionar en asociación con el software, por lo
que las actuaciones de DJ pueden disfrutarse conectando simplemente
esta unidad al ordenador.
ACOPLADOR PARA ORDENADOR PORTÁTIL
La sección del teclado del ordenador se puede guardar debajo de esta
unidad. El acoplamiento del ordenador y esta unidad, formando una sola
unidad, le permite crear un sistema DJ eficiente.
Dirección de reproduccción/ medidor de
nivel
La sección del reproductor está equipada con un indicador de
“dirección de reproducción” que le permite apreciar de un vistazo el
progreso de la pista mediante la posición del display de LED, y sentir la sensación de tocar la pista directamente cuando toca el pad
[NEEDLE SEARCH (ALPHABET SEARCH)] con un dedo. Además, la
sección del mezclador está equipada con un medidor de nivel maestro y
medidores de nivel de canales. Esto aumenta la afinidad con el ordenador para realizar unas actuaciones de DJ aún más confortables.
HIGH SOUND QUALITY
La tecnología de calidad de sonido desarrollada para los modelos profesionales de Pioneer se usa para alcanzar una calidad de sonido de alto
nivel para el controlador DJ.
Contenido de la caja
! CD-ROM
Es
4
! Adaptador de CA
! Clavija de alimentación
! Cable USB
! Manual de Instrucciones (este manual)
Acerca del adaptador de CA
Cuidados para el uso
Instrucciones de seguridad
Para garantizar su seguridad personal y maximizar todo el potencial
operativo de su unidad, lea y siga estas instrucciones de seguridad.
Lea y guarde las instrucciones
Lea toda la información del funcionamiento y del usuario provista con
este producto.
Limpieza
Use un paño húmedo para limpiar la caja exterior. Evite usar cualquier
líquido, aerosoles o productos de limpieza con base de alcohol.
Agua o humedad
Evite usar o colocar este producto cerca del agua u otras fuentes de
líquidos.
Accesorios
No ponga este producto en una mesita de ruedas, soporte o mesa inestable. El producto puede caerse y estropearse seriamente.
Ventilación
No bloquee ni tape este producto cuando lo use. Esta unidad no debería colocarse en una instalación empotrada a menos que esté bien
ventilada.
Medio ambiente
Evite colocar este producto en un lugar expuesto a mucho polvo,
temperaturas altas, humedad alta, o sometido a vibraciones o golpes
excesivos.
Fuentes de alimentación
Utilice este producto sólo con las fuentes de alimentación recomendadas. Si no está seguro de la fuente de alimentación, consulte al representante autorizado de Pioneer.
Protección del cable de alimentación
Cuando desenchufe la unidad, tire de la clavija, no del cable. No maneje
el cable con las manos mojadas porque podría causar un cortocircuito o
sufrir una descarga eléctrica. No deje que nada pellizque ni se apoye en
el cable de alimentación, y no lo coloque en un pasillo.
Alimentación
Apague el sistema antes de instalar éste o cualquier otro hardware.
Sobrecarga
Evite conectar demasiados aparatos a una sola toma de corriente
o fuente de alimentación, porque esto podría causar incendios o
cortocircuitos.
Entrada de objetos y líquidos
No meta nunca objetos inadecuados en el aparato. Evite derramar cualquier líquido en el interior o exterior del aparato.
Servicio
Al abrir o quitar la cubierta usted se expone a una posible descarga
eléctrica u otros peligros. Contacte con un representante de servicio
Page 41

autorizado por Pioneer para reparar este producto (consulte la Tarjeta de
PUSH
PUSH
PUSH
PUSH
servicio y asistencia adjunta).
Daños que necesitan reparaciones
Desenchufe la unidad y solicite las reparaciones al personal de servicio
cualificado en las situaciones siguientes:
! Cuando el cable de alimentación, la clavija de alimentación o el
chasis estén dañados.
! Si se han derramado líquidos o han caído objetos dentro del
producto.
! Si el producto ha estado expuesto a la lluvia o al agua.
! Si el producto no funciona normalmente cuando se siguen las indi-
caciones del manual de instrucciones. Ajuste sólo aquellos controles
indicados en el manual de instrucciones. Los ajustes mal hechos de
otros controles pueden causar daños y pueden requerir un trabajo
extensivo por parte de un técnico cualificado para que la unidad
vuelva a funcionar normalmente.
! Cuando el producto muestre un cambio bien definido en su funciona-
miento – esto indica la necesidad de reparaciones.
Verifique que no haya irregularidades con el adaptador de CA o la clavija
de alimentación, luego inserte hasta oír un clic la clavija de alimentación
en la posición especificada del adaptador de CA siguiendo el procedimiento especificado. Para conocer detalles, vea Montaje de la clavija de
alimentación en la página 5.
Si hay irregularidades con el adaptador de CA o la clavija de alimentación, pida a su centro de servicio autorizado por Pioneer más cercano o a
su concesionario que realice el trabajo de reparación.
! No use esta unidad con una moneda, clip para papel u otro objeto de
metal metido entre el adaptador de CA y la clavija de alimentación.
Hacer esto podría causar un cortocircuito, lo que podría producir un
incendio o una descarga eléctrica.
Montaje de la clavija de alimentación
Deslice la clavija de alimentación a lo largo de los raíles
guía de la unidad del adaptador de CA como se muestra
en el diagrama de abajo, y luego presione hasta que se
oiga un clic.
Español
Desconexión de la clavija de alimentación
Mientras pulsa el botón [PUSH] de la unidad del
adaptador de CA, deslice la clavija de alimentación
alejándola del adaptador como se muestra en el
diagrama de abajo para desconectarla.
Una vez montada la clavija de alimentación no es necesario
desconectarla.
! Cuando monte el adaptador de CA en una toma de corriente de pared,
asegúrese de que quede espacio entre el adaptador de CA y la toma de
corriente. Un contacto defectuoso o una moneda, clip para papel u otro
objeto metálico metido en el espacio podría causar un cortocircuito, lo
que podría producir un incendio o una descarga eléctrica.
Moneda, clip para papel u otro objeto metálico
Cara
! La clavija de alimentación podría separarse del adaptador de CA y
quedar en la toma de corriente si alguien tropieza con el cable de
alimentación del adaptador de CA o si algo golpea el adaptador de
CA. Si pasa esto, desconecte la clavija de alimentación de la toma de
corriente con las manos secas, sujetándola como se muesta en el
diagrama de abajo y sin tocar las partes metálicas. No use ninguna
herramienta para desconectarla.
Superior
Clavija de alimentación
Este producto viene con los tipos de clavijas de alimentación mostrados
más abajo. Use la clavija de alimentación apropiada para el país o región
en que usted se encuentre.
Tipo 1 (para Japón y Norteamérica)
Tipo 2 (para Europa)
No toque piezas de metal.
Es
5
Page 42

Tipo 3 (para el Reino Unido)
Tipo 4 (para Australia)
Tipo 5 (para Tailandia y Corea)
Instalación del software
Sistemas operativos
compatibles
Mac OS X 10.5.8
versión de 32
bits
Mac OS X 10.6
versión de 64
bits
7
XP
®
versión de 32
bits
versión de 64
bits
versión de 32
bits
versión de 64
bits
versión de 32
bits
®
Windows
Home Premium/
Professional/
Ultimate
Windows Vista
Home Basic/
Home Premium/
Business/ Ultimate
®
Windows
Home Edition/ Professional Edition
(SP2 o posterior)
Para tener la información más reciente del ambiente de operación y la compatibilidad, y para adquirir el último sistema operativo, visite el sitio web Serato Audio
Research siguiente:
http://serato.com
CPU y memoria necesaria
Procesador Intel
o mejor
RAM de 1 GB o más
Procesador Intel
o mejor
RAM de 1 GB o más
Procesador Intel
o mejor
RAM de 4 GB o más
Procesador Intel
o mejor
RAM de 2 GB o más
Procesador Intel
o mejor
RAM de 4 GB o más
Procesador Intel
o mejor
RAM de 2 GB o más
Procesador Intel
o mejor
RAM de 4 GB o más
Procesador Intel®, Core™ 2 Duo a 1,8 GHz
o mejor
RAM de 1 GB o más
®
, Core™ Duo a 1,8 GHz
®
, Core™ Duo a 1,8 GHz
®
, Core™ Duo a 2,4 GHz
®
, Core™ 2 Duo a 1,8 GHz
®
, Core™ 2 Duo a 2,4 GHz
®
, Core™ 2 Duo a 1,8 GHz
®
, Core™ 2 Duo a 2,2 GHz
Antes de instalar el software
Acerca del software que se va a instalar
El software que se va a instalar cambia según el ordenador que se está
usando.
Para Windows
Después de instalar el software ITCH también se instala el software
controlador.
! Lea cuidadosamente los acuerdos de licencia indicados más abajo.
— SERATO – CONTRATO DE LICENCIA DE USUARIO (“Contrato de
Licencia”) (Consulte Acerca del software ITCH.)
— Contrato de Licencia del Software (Consulte Acerca del software
controlador (Windows).)
! Para instalar o desinstalar el software controlador necesitará la auto-
rización del administrador de su ordenador. Inicie la sesión como el
administrador de su ordenador antes de proseguir con la instalación.
! Si conecta esta unidad a su ordenador sin instalar primero el soft-
ware controlador puede que se produzca un error en su ordenador
dependiendo del ambiente del sistema.
! Si se interrumpe la instalación del software controlador después de
empezar, reinicie el procedimiento de instalación desde el principio.
Para Mac OS X
Sólo se instala el software ITCH.
! Lea cuidadosamente los acuerdos de licencia indicados más abajo.
— SERATO – CONTRATO DE LICENCIA DE USUARIO (“Contrato de
Licencia”) (Consulte Acerca del software ITCH.)
Ambiente de operación mínimo
Sistemas operativos
compatibles
Mac OS X 10.4.11
CPU y memoria necesaria
Procesador Intel
o mejor
RAM de 1 GB o más
®
, Core™ Duo a 1,8 GHz
Otros
Disco duro
Unidad CD
Puerto USB
Resolución de la
pantalla
! La funcionalidad total no está garantizada en todos los ordenadores, ni en los
que cumplen con los requerimientos ambientales descritos anteriormente.
! Incluso con la memoria requerida para el ambiente de operación indicado
anteriormente, la falta de memoria debido a programas residentes, el número
de servicios, etc., podría impedir que el software proveyera una funcionalidad y
un rendimiento óptimos. En tales casos, deje suficiente memoria libre. Recomendamos instalar más memoria para que la operación sea estable.
! Dependiendo de la configuración de ahorro de energía del ordenador, etc., la
CPU y el disco duro pueden no proveer la capacidad de procesamiento suficiente. Para los ordenadores portátiles en particular, asegúrese de que estén
en condiciones apropiadas para ofrecer un alto rendimiento constante (por
ejemplo, manteniendo la alimentación de CA conectada) cuando se usa ITCH.
! Note que pueden producirse problemas con la funcionalidad del ITCH depen-
diendo de los otros software usados en su ordenador.
! El funcionamiento del ITCH no está garantizado con una CPU de la marca
AMD.
Suficiente espacio libre en el disco duro para datos de
música
Unida de disco óptico en la que se puedan leer discos
CD-ROM
Para conectar el ordenador con esta unidad se requiere
un puerto USB 2.0.
Resolución de 1 024 x 768 o más
Acerca del software ITCH
ITCH es una aplicación de software DJ de Serato Audio Research. Las
actuaciones de DJ son posibles conectando a esta unidad el ordenador
en el que está instalado este software.
Verificación de la información más reciente en el
software ITCH
Se pueden descargar actualizaciones gratis de ITCH en Internet. Visite el
sitio web de abajo y mantenga actualizado el softare con la versión más
reciente.
http://serato.com
Es
6
Page 43

SERATO – CONTRATO DE LICENCIA DE USUARIO
(“Contrato de Licencia”)
Serato Inc LP (“Serato”) y su licenciante o licenciantes son propietarios
del Software, que comprende todas y cualquiera de las aplicaciones
de Serato, y de la propiedad intelectual del Software. Cuando se instala
o se usa el Software, se acuerda cumplir con las condiciones de este
Contrato de Licencia.
1 Concesión de la licencia:
Serato le concede una licencia personal perpetua y no exclusiva
(“Licencia”) para instalar y usar el Software de acuerdo con las condiciones de este Contrato de Licencia.
La Licencia, puesto que se aplica a cualquier y a todo Software -autorizado éste únicamente mediante un código de licencia (sin ningún componente de hardware) ("software de instancia única")-, sólo le permite
autorizar y usar software de instancia única con dicho código de licencia
en un ordenador por vez. Si desea autorizar y usar software de instancia
única en otro ordenador tiene que desautorizar en primer lugar toda
instalación previa.
En el caso de que, como parte del proceso de instalación de Software,
el software perteneciente a terceros (“software de terceros”) sea instalado en su ordenador, el contrato de licencia de terceros pertinente será
aplicable, o las condiciones del mismo, y no se aplicará a dicho software
el presente Contrato de Licencia.
2 Propiedad:
usted reconoce que Serato y su licenciante o licenciantes son y permanecen siendo los propietarios de la propiedad intelectual del Software.
No se le concede ningún otro derecho que los expresamente conferidos
en el presente Contrato de Licencia.
3 Copia y traspaso del Software:
no debe copiar, alterar, modificar, reproducir, realizar ingeniería inversa,
desensamblar o descompilar el Software o cualquiera de sus partes o
cualquier material relacionado, ni permitir que cualquier otra persona
realice cualquiera de estas acciones, excepto que podrá hacer una copia
del Software con la finalidad legítima de tener una copia de respaldo.
Podrá transferir su Licencia íntegramente a otra persona siempre que,
previamente a la transferencia, desautorice toda instalación previa del
Software de instancia única; y en el caso de que la aplicación de Serato
en cuestión opere como parte de un paquete con el hardware, se tendrá
que transferir la propiedad de dicho hardware a dicha persona. Toda
persona a la que se le haya transferido la Licencia aceptará las condiciones del presente Contrato de Licencia en virtud de lo expuesto en la
cláusula 1.
4 Sin garantías implícitas:
excepto en el caso de cualquier representación, garantía, término
o condición por escrito que haya sido dirigida a usted y firmada por
Serato, usted reconoce que Serato no da garantía alguna en relación al
Software, bien expresa o implícita, incluyendo entre otras cosas cualquier garantía implícita relacionada con la calidad del mismo, su idoneidad para cualquier objetivo en particular o su capacidad para conseguir
un resultado en particular. Usted reconoce que:
a no celebra este Contrato de Licencia basándose en cualquier
representación, garantía, término o condición, excepto en el
caso de ser una representación, garantía, término o condición
por escrito que haya sido dirigida a usted y firmada por Serato; y
b se excluye de este Contrato de Licencia en la mayor medida
permitida por la ley cualquier condición, garantía u otro término
tácitos por ley o por derecho consuetudinario.
5 Exclusión de responsabilidad:
en ningún caso Serato será responsable (ni por contrato, ni por responsabilidad extracontractual incluyendo negligencia, ni de ningún otro
modo) de:
a cualquier demanda por daños y perjuicios, o cualquier otro
recurso monetario, bajo este Contrato de Licencia o relacionado
con el Software, incluyendo entre otros una reclamación por:
i pérdida de ingresos y/
cipados, pérdida de fondo de comercio o de oportunidad,
o ganancias, pérdida de ahorros anti-
pérdida de producción, pérdida o corrupción de datos o
desaprovechamiento de gestión o de tiempo de personal; o
ii pérdida, daños, coste o gasto de cualquier tipo que sea indi-
recto, inmaterial o de naturaleza especial, que surjan directa
o indirectamente de esta Licencia o del Software, incluso si
Serato hubiera sido avisada con respecto a la posibilidad de
dichos daños, e incluso si dicha pérdida, daño, coste o gasto
hubiera podido ser razonablemente previsto por Serato;
b cualquier pérdida que se produjo como consecuencia de su
instalación o uso del software de terceros.
6 Exclusiones sujetas a la ley:
no hay nada en este Contrato de Licencia que funcione, o esté diseñado
para que funcione, para limitar o excluir toda responsabilidad u obligación de Serato hasta el punto de que dicha responsabilidad u obligación
no pueda ser limitada o excluida bajo la ley aplicable.
7 Actualizaciones:
en el caso de que utilice la función del Software que busca actualizaciones, usted acepta que:
a las condiciones de este Contrato de Licencia también se aplica-
rán a las actualizaciones y/
por las actualizaciones; y
b dicha función puede que envíe información, incluyendo infor-
mación sobre la configuración del Software a los servidores de
Serato, y Serato podrá recoger y usar esa información a efectos
comerciales.
La política de privacidad de sitios Web (que encontrará en http:/
com/ legal/ website-privacy-policy y está sujeta a modificaciones de
cuando en cuando por parte de Serato) se aplica al uso por su parte de la
función del Software que busca actualizaciones.
o el Software según sea modificado
/
serato.
8 Ley vigente:
este Contrato de Licencia entrará en vigor como contrato celebrado conforme a la ley de Nueva Zelanda y regido por la misma. La Convención
de Naciones Unidas sobre los Contratos de Compraventa Internacional
de Mercaderías no se aplicará a este Contrato de Licencia o al Software.
Usted se somete a la jurisdicción no exclusiva de los tribunales de Nueva
Zelanda.
9 Licencia para paquete de archivos de medios
digitales:
en el caso de que se suministren archivos de medios digitales junto con
el Software (“paquete de medios”), los podrá usar únicamente dentro
del Software a través de su funcionamiento normal. Serato no da garantías de que posea o conceda licencia o derecho alguno en relación con
el paquete de medios o cualquiera de los trabajos de derecho intelectual
incluidos en el mismo. En particular y sin limitación, usted es responsable de todas las tasas aplicables ASCAP, BMI, SESAC y cualquier otra
tasa de licencia similar que se derive de su actuación pública, transmisión, u otra comunicación, reproducción o trato alguno de cualquier
parte del paquete de medios en su territorio.
Si tiene alguna pregunta con respecto a este Contrato de Licencia, o si
desea ponerse en contacto con Serato por cualquier razón, diríjase a:
Serato Inc LP, Private Bag 92015, AMSC, Auckland 1142, Nueva Zelanda
o mande un correo electrónico a Serato a eula@serato.com
Acerca del software controlador
(Windows)
Este software controlador es un controlador ASIO exclusivo que se usa
para enviar señales de audio desde el ordenador.
! Cuando se usa Mac OS X no es necesario instalar el software
controlador.
Verificación de la información más reciente en el
software controlador
Visite nuestro sitio web indicado abajo para conocer la información más
reciente del software controlador que se va a usar exclusivamente con
esta unidad.
Es
Español
7
Page 44

http://www.prodjnet.com/support/
Contrato de Licencia del Software
El presente Contrato de Licencia del Software (en lo sucesivo “Contrato”)
se formaliza entre usted (tanto la persona que instala el Programa como
cualquier entidad legal para la cual actúe dicha persona) (en lo sucesivo
“Usted” o “Su”) y PIONEER CORPORATION (en lo sucesivo “Pioneer”).
LA REALIZACIÓN DE CUALQUIER PASO PARA CONFIGURAR O
INSTALAR EL PROGRAMA IMPLICA QUE USTED ACEPTA LAS
CONDICIONES DEL PRESENTE CONTRATO DE LICENCIA. EL
PERMISO PARA DESCARGAR Y/
EXPRESAMENTE CONDICIONADO A LOS SIGUIENTES TÉRMINOS.
NO SE REQUIERE LA AUTORIZACIÓN ESCRITA O POR MEDIOS
ELECTRÓNICOS PARA QUE EL PRESENTE CONTRATO TENGA VALIDEZ
LEGAL Y FUERZA EJECUTORIA. EN CASO DE NO ACEPTAR LAS
CONDICIONES DEL PRESENTE CONTRATO, NO ESTARÁ AUTORIZADO
A UTILIZAR EL PROGRAMA Y DEBERÁ INTERRUMPIR LA INSTALACIÓN
O DESINSTALACIÓN, SEGÚN CORRESPONDA.
O UTILIZAR EL PROGRAMA ESTÁ
1 Definiciones
1 “Documentación” significa la documentación, especificaciones
y contenido de ayuda por escrito que Pioneer normalmente
facilita para ayudar en la instalación y utilización del programa.
2 “Programa” significa todas y cada una de las partes del software
con licencia de Pioneer para su uso según lo estipulado en el
presente Contrato.
2 Licencia de programa
1 Licencia limitada. Sujeto a las limitaciones del presente
Contrato, Pioneer le otorga una licencia limitada, no exclusiva e
intransferible (sin derecho a sublicenciar):
a Instalar una única copia del programa en la unidad de disco
duro de su ordenador, utilizar el programa exclusivamente
para fines personales en cumplimiento de lo establecido
en el presente Contrato y en la Documentación (“Uso
autorizado”);
b Utilizar la Documentación en beneficio de su Uso autorizado; y
c Realizar una copia del programa exclusivamente a efectos
de copia de seguridad, siempre y cuando todos los títulos y
marcas registradas, derechos de autor y avisos de derechos
limitados sean reproducidos en la copia.
2 Limitaciones. Usted no podrá copiar ni utilizar el Programa o
Documentación salvo en la medida que esté expresamente permitido por el presente Contrato. No podrá ceder, sublicenciar, alquilar,
arrendar ni prestar el Programa, ni utilizarlo para formar a terceros,
para multipropiedad comercial u oficina de servicios. Usted no
podrá modificar, aplicar ingeniería inversa, descompilar o desensamblar el Programa, ni a través de terceros, salvo en la medida en
que lo permita de forma expresa la legislación vigente, y sólo tras
haber notificado a Pioneer por escrito de sus actividades previstas.
No podrá utilizar el Programa en múltiples procesadores son el
previo consentimiento por escrito de Pioneer.
3 Propiedad. Pioneer o su otorgante de licencia se reserva cual-
quier derecho, título o interés en todas las patentes, derechos de
autor, marcas registradas, secretos comerciales y otros derechos de propiedad intelectual del Programa y Documentación, y
cualquier obra derivada de los mismos. No podrá adquirir otros
derechos, expresa o implícitamente, fuera del alcance de la
licencia limitada estipulada en el presente Contrato.
4 Soporte excluido. Pioneer no está obligado a ofrecer soporte,
mantenimiento, actualizaciones, modificaciones o nuevas
publicaciones del Programa o Documentación estipulados en el
presente Contrato.
3 Exclusión de garantías
EL PROGRAMA Y LA DOCUMENTACIÓN SE OFRECEN “TAL CUAL” SIN
REPRESENTACIONES NI GARANTÍAS, Y USTED ACEPTA UTILIZARLOS
BAJO SU PROPIO RIESGO. HASTA EL MÁXIMO GRADO PERMITIDO
POR LA LEY, PIONEER RENUNCIA DE FORMA EXPRESA A TODA
GARANTÍA DE CUALQUIER CLASE EN RELACIÓN AL PROGRAMA Y
DOCUMENTACIÓN, YA SEA DE FORMA EXPRESA, IMPLÍCITA, POR
LEY O QUE SURJAN COMO CONSECUENCIA DEL RENDIMIENTO,
TRANSACCIÓN O USO COMERCIAL, INCLUYENDO SIN LIMITACIÓN
LAS GARANTÍAS DE COMERCIABILIDAD O IDONEIDAD PARA UN FIN
DETERMINADO, PROPÓSITO, CALIDAD SATISFACTORIA, PRECISIÓN,
TITULARIDAD O DE NO VIOLACIÓN.
4 Indemnizaciones y recursos ante incumplimiento
contractual
Usted acepta que cualquier incumplimiento de las limitaciones del presente Contrato originarán daños irreparables a Pioneer que no podrán
verse compensados únicamente con una indemnización por daños y
perjuicios. Además de indemnizaciones y otros recursos a los cuales
Pioneer pueda tener derecho, usted acepta que Pioneer pueda tomar
medidas cautelares para impedir el incumplimiento real, inminente o
continuado del presente Contrato.
5 Terminación
Pioneer puede dar por finalizado el presente Contrato en cualquier
momento por incumplimiento de una cláusula. Si el presente Contrato
queda rescindido, usted dejará de utilizar el Programa, lo eliminará
permanentemente del equipo donde esté instalado y destruirá todas las
copias del Programa y Documentación que estén en su posesión, y lo
confirmará a Pioneer por escrito. Los apartados 2.2, 2.3, 2.4, 3, 4, 5 y 6
seguirán vigentes tras la rescisión del presente Contrato.
6 Términos generales
1 Limitaciones de responsabilidad. En ningún caso Pioneer o
alguna de sus filiales será responsable en relación al presente
Contrato o en cuanto a su contenido, bajo ninguna teoría de
responsabilidad, por los daños indirectos, cuantificables,
accesorios, consecuentes o punitivos, o daños por pérdida de
beneficios, ingresos, negocios, ahorros, datos, uso o gastos de
adquisición sustitutiva, incluso si se advirtió de la posibilidad de
tales daños o éstos estaban previstos. En ningún caso Pioneer
será responsable de aquellos daños que superen los importes
abonados por usted a Pioneer o a sus filiales para el Programa.
Las partes reconocen que los límites de responsabilidad y la
asignación de riesgos del presente Contrato se reflejan en el precio del Programa y constituyen elementos esenciales de la venta
entre ambas partes, sin los cuales Pioneer no hubiera ofrecido el
Programa ni formalizado el presente Contrato.
2 Las limitaciones o exclusiones de la garantía y responsabilidad
que se incluyen en el presente Contrato no perjudican ni afectan
a sus derechos legales como consumidor y le serán de aplicación sólo en la medida en que dichas limitaciones o exclusiones
estén permitidas por la legislación vigente de su territorio.
3 Divisibilidad y renuncia. Si se determina que cualquier cláu-
sula del presente Contrato es ilegal, inválida o inaplicable, esa
cláusula se aplicará en la medida que sea posible o, en caso de
que sea incapaz de ser aplicada, se considerará anulada y eliminada del presente Contrato, y las cláusulas restantes seguirán
vigentes y válidas. La renuncia de cualquiera de las partes a los
derechos que les correspondieren en virtud del incumplimiento
del presente Contrato no se interpretará como una renuncia a
ningún otro derecho que les pudiere corresponder en virtud de
incumplimientos futuros.
4 Sin asignación. Usted no debe asignar, vender, ceder, delegar
o hacer un uso distinto del presente Contrato o cualesquiera
derechos u obligaciones en relación al mismo, voluntaria o
involuntariamente, por efecto de la ley u otra forma, sin el previo
consentimiento por escrito de Pioneer. Cualquier supuesta
asignación, transferencia o delegación por su parte quedará sin
efecto. Sujeto a lo precedente, el presente Contrato será vinculante y redundará en beneficio de las partes y sus respectivos
sucesores y designados.
5 Indivisibilidad del contrato. El presente Contrato constituye el
contrato íntegro entre las partes y reemplaza todos los acuerdos
o representaciones anteriores o actuales, orales o escritos, en
cuanto al contenido del mismo. El presente Contrato no debe
modificarse sin el previo consentimiento por escrito de Pioneer,
y ningún documento, uso, costumbre o ley tendrán capacidad
para modificar el presente Contrato.
6 Usted está de acuerdo con que este Contrato se regulará y
constituirá por las leyes de Japón.
Es
8
Page 45
Acerca del procedimiento de instalación
(Windows)
1 Conecte esta unidad a su ordenador con un cable
USB.
Para conocer detalles de las conexiones, vea Conexiones y nombres de
partes en la página 11.
2 Deslice el conmutador [ON/OFF] hacia el lado [ON].
Conecte la alimentación de esta unidad.
! Cuando esta unidad se conecte a su ordenador por primera
vez, también se instalará el controlador estándar provisto en
®
Windows
lación del controlador.
3 Inserte el CD-ROM incluido en la unidad de CD del
ordenador.
4 Desde el menú [Iniciar] de Windows, haga doble clic
en el icono [Equipo (o Mi PC)] > [ITCH CD].
El contenido del CD-ROM se visualiza.
5 Haga doble clic en [ITCH_installer.exe].
El instalador ITCH se inicia.
6 Una vez iniciado el instalador ITCH, haga clic en
[Next].
. Vaya al paso siguiente después de terminar la insta-
9 Haga clic en [Instalar].
Español
La instalación empieza.
Después de terminar la instalación del software ITCH empieza la instalación del software controlador.
10 Seleccione el idioma que quiera desde el menú
desplegable.
11 Acepte el acuerdo de licencia (seleccione [De
acuerdo]) y luego haga clic en [Instalar].
Si no está de acuerdo, seleccione [En desacuerdo].
Una vez que se ha hecho clic en [Instalar] empieza la instalación.
La pantalla de instalación terminada aparece al terminar la instalación.
12 Haga clic en [Cerrar].
13 Haga clic en [Finish] para salir del instalador ITCH.
Aparece una pantalla avisándole que reinicie el ordenador.
14 Haga clic en [Yes].
El ordenador se reinicia.
7 Acepte el acuerdo de licencia (seleccione [I accept
the terms in the license agreement]) y luego haga clic en
[Next].
Si no está de acuerdo, seleccione [I do not accept the terms in the
license agreement].
8 Seleccione la carpeta en la que quiere instalar ITCH y
luego haga clic en [Next].
Acerca del procedimiento de instalación
(Macintosh)
1 Conecte esta unidad a su ordenador con un cable
USB.
Para conocer detalles de las conexiones, vea Conexiones y nombres de
partes en la página 11.
2 Deslice el conmutador [ON/OFF] hacia el lado [ON].
Conecte la alimentación de esta unidad.
3 Inserte el CD-ROM incluido en la unidad de CD del
ordenador.
El icono [ITCH CD] aparece en la pantalla.
4 Haga doble clic en el icono [ITCH CD].
El contenido del CD-ROM se visualiza.
5 Haga doble clic en [ITCH_installer.mpkg].
El instalador ITCH se inicia.
6 Una vez iniciado el instalador ITCH, haga clic en
[Continuar].
Es
9
Page 46

7 Lea cuidadosamente el acuerdo de licencia, haga
clic en [Continuar] y luego haga clic en [Acepto] para
aceptarlo.
Si no acepta el acuerdo de licencia, haga clic en [No acepto] para cancelar la instalación.
8 Seleccione la carpeta en la que quiere instalar ITCH y
luego haga clic en [Continuar].
9 Haga clic en [Instalar].
La instalación empieza.
La pantalla de instalación terminada aparece al terminar la instalación.
Haga clic en el menú [Iniciar] de Windows > [Todos los
programas)] > [Pioneer] > [DDJ] > [Utilidad de configuración
ASIO del Pioneer DDJ].
! Una memoria intermedia lo suficientemente grande reduce la posibi-
lidad de que se pierda sonido (interrupción de sonido) pero aumenta
el retardo de transmisión de la señal de audio (latencia).
Verificación de la versión del software
controlador
Haga clic en el menú [Iniciar] de Windows > [Todos los
programas)] > [Pioneer] > [DDJ] > [Utilidad de visualización
de la versión del Pioneer DDJ].
! Puede verificar la versión del firmware de esta unidad en la pantalla.
! La versión de firmware no se visualiza cuando esta unidad no está
conectada al ordenador o cuando esta unidad y el ordenador no se
comunican bien.
10 Haga clic en [Reinciar].
El ordenador se reinicia.
Inicio de ITCH
Para Windows
Desde el menú [Iniciar] de Windows, abra [Todos los programas] >
[Serato] > [ITCH] y luego haga clic en el icono [ITCH].
Para Mac OS X
En Finder, abra la carpeta [Aplicación] y luego abra [Serato] > [ITCH] y
haga doble clic en el icono [ITCH].
Acerca del software controlador y el
software de utilidad de ajustes
Ajuste del tamaño de la memoria
intermedia
Esta unidad funcione como un aparato de audio conforme a las normas
ASIO.
! Si está ejecutándose una aplicación usando esta unidad como apa-
rato de audio predeterminado (software de DJ, etc.), salga de esa
aplicación antes de ajustar la capacidad de la memoria intermedia.
10
Es
Page 47

Conexiones y nombres de partes
PHONES
MIC 2
MIC/AUX THRU
ONOFF
PHONES
MIC 2
MIC/AUX THRU
ONOFF
123
Auriculares
Micrófono
Cablede
auriculares
Alosauriculares
Cablede
micrófono
Almicrófono
VOLAUX INMASTER OUT 2MASTER OUT 1MASTER ATT.
MAX
LRLL
1GND
2 HOT
3 COLD
RR
-12 dB-6 dB 0 dB
MIN
ONUSBOFF DC IN
5 V
VOLAUX INMASTER OUT 2MASTER OUT 1MASTER ATT.
MAX
LRLL
1GND
2 HOT
3 COLD
RR
-12 dB -6 dB 0 dB
MIN
R
L
R
L
51
2
3 4
ONUSB OFF DC IN
5 V
ITCH
8 9 a6 7
A los terminales
de entrada de audio
A los terminales
de salida de audio
Aparato
de audio
portátil
Componentes,
amplificadores,
altavoces con amplificador,
etc.
Ordenador
Adaptador de CA
(incluido)
A la toma de corriente
! Espere hasta que todas las conexiones entre los aparatos estén
terminadas antes de conectar el adaptador de CA.
Asegúrese de desconectar la alimentación y desenchufar el adapta-
dor de CA de la toma de corriente antes de hacer o cambiar conexiones entre aparatos.
Consulte el manual de instrucciones del componente que va a ser
conectado.
! Use sólo el adaptador de CA incluido con esta unidad.
! La alimentación de esta unidad se suministra mediante el adaptador
de CA o la alimentación de bus USB.
Esta unidad se puede usar conectándola a un ordenador con un
cable USB, aunque no se conecte el adaptador de CA.
! Conecte directamente esta unidad y el ordenador con el cable USB
incluido.
! No se puede usar un concentrador USB.
Notas sobre el funcionamiento de esta unidad con
alimentación de bus USB
! Cuando use esta unidad con alimentación de bus USB, suministre
alimentación al ordenador conectado desde una fuente de alimentación de CA. No use el ordenador con su batería.
! En casos como los de abajo, la alimentación puede que no sea sufi-
ciente y esta unidad no funcione con la alimentación de bus USB.
— Cuando la capacidad de suministro de alimentación USB del
ordenador no es suficiente.
— Cuando otros aparatos USB estén conectados al ordenador.
Si esta unidad no funciona con alimentación de bus USB, conecte el
adaptador de CA incluido.
! Las limitaciones siguientes se aplican al funcionamiento con alimen-
tación de bus USB:
— El indicador del dial del jog no se encenderá.
— El canal [MASTER OUT 1] (salida XLR) no sale.
— Los terminales [MIC1], [MIC2] y [AUX IN] no se pueden usar.
— Los indicadores están menos iluminados que cuando se usa el
adaptador de CA.
Para usar la unidad sin estas limitaciones, conecte el adaptador de
CA incluido.
! Hay dos conectores de entrada, uno del tipo para auriculares
estéreo y uno del tipo de miniconector para auriculares, pero no
los use simultáneamente. Si los usa simultáneamente, cuando
se desconecta y/ o conecta uno, el volumen del otro puede que
suba o baja repentinamente.
2 Conmutador selector MIC/AUX THRU
Ponga esto en [ON] si quiere dar salida directamente a los canales
[MIC2] y [AUX].
= Salida directa del sonido del micrófono y de AUX (pág.31)
3 Terminal MIC2
Conecte a un micrófono.
= Uso de un micrófono (pág.30)
Panel trasero
Español
Conexión de los terminales de
entrada/ salida
Panel frontal
1 Conectores PHONES
Conecte aquí los auriculares.
Se pueden usar clavijas de auriculares estéreo (Ø 6,3 mm) y miniclavijas de auriculares estéreo (Ø 3,5 mm).
Para conocer detalles, vea Monitoreo de sonido con auriculares en la
página 29.
1 MASTER ATT.
Establece el nivel de atenuación del sonido que sale del terminal
[MASTER1].
2 Terminal MASTER OUT 1
Conecte aquí altavoces con amplificador, etc.
3 Terminal MASTER OUT 2
Conecte a un amplificador de potencia, etc.
4 Terminal AUX IN
Conecte al terminal de salida de un aparato externo (muestreador,
aparato de audio portátil, etc.)
5 Control VOL
Ajusta la entrada de nivel de audio a los terminales [AUX IN].
6 Ranura de seguridad Kensington
Es
11
Page 48

7 Terminal USB
ONUSB OFF DC IN
5 V
DELETE
ALPHABET SEARCH
INST.DOUBLES
HOT CUE
NEEDLE SEARCH /
2
1
A
VINYL
SPEED ADJUST
LOAD
JOG MODE
ON
LEVEL
MAXMIN
OFFON
TALK
OVER
OFF
MIC 1
LOW
MAXMIN
MID
EQ
MAXMINHIMAXMIN
CRATES
FX CH
S
EFFECT
PARA
M
A
B
MIC 1
ON
LEVEL
MAXMIN
OFF ON
TALK
OVER
OFF
MIC 1
LOW
MAXMIN
MID
EQ
MIN
MIC 1
1
Micrófono
o
5
SYNC
SET TAP CLEAR LOCK
SYNC OFF
SLIDE
DELETE
ALPHABET SEARCH
INST.DOUBLES
REC MODE
HOT CUE
LOOP/ GRID
NEEDLE SEARCH /
IN
4
3
2
1
REV
A
SLIP
VINYL
MASTER
TEMPO
TEMPO
RANGE
VINYL
SPEED ADJUST
LOAD
JOG MODE
SHIFT
OUT
TEMPO
0
ON
LEVEL
MAXMIN
OFFON
TALK
OVER
OFF
MIC 1
RELOOP /EXIT SELECT AUTO
FWDREV
PHONES
PLAY/PAUSE
CUE
G
R
I
D
A
D
J
U
S
T
LOW
MAXMIN
MID
EQ
MAXMIN
HI
MAX
2X1/2X
MIN
MIC 1
1 2
3
4
6
8
9
b
a
7
5
c
def
g
h
i
j
k
l
m
ILLUMINATION
Conecte a un ordenador.
! Conecte directamente esta unidad y el ordenador con el cable
USB incluido.
! No se puede usar un concentrador USB.
8 Interruptor ON/OFF
Conecta y desconecta la alimentación de esta unidad.
9 Terminal DC IN
Conecte a una toma de corriente con el adaptador de CA incluido
(con la clavija de alimentación montada).
! Espere hasta que las conexiones de todos los aparatos estén
terminadas antes de conectar el adaptador de CA.
! Use sólo el adaptador de CA incluido.
a Gancho de cables
Sujete el cable de alimentación del adaptador de CA y el cable USB
en este gancho cuando use esta unidad.
! El sonido se interrumpirá si el cable del adaptador de CA o de
USB se desconecta durante la reproducción.
Gancho de cables
Ponga el cable de alimentación del adaptador de CA en
la parte superior del gancho, y el cable USB en la parte
inferior.
Sujete el cable de alimentación del adaptador de CA y el cable USB en
su lugar enganchándolos en el gancho de cables. Esto impide que pueda
tirarse por error del cable de alimentación y del cable USB, y que las
clavijas puedan desconectarse de sus terminales.
! El sonido se interrumpirá si el cable del adaptador de CA o de
USB se desconecta durante la reproducción.
Cable de alimentación del adaptador de CA
Nombres y funciones de los
controles
Sección de deck
Cable USB
Parte superior izquierda del panel de
control
1 Terminal MIC1
Es
12
Conecte a un micrófono.
= Uso de un micrófono (pág.30)
! Se puede usar un conector XLR o una clavija de auriculares (Ø
6,3 mm).
1 Indicador de la dirección de reproducción
La posición en la pista se visualiza en 10 pasos, con el comienzo de
la pista en el borde izquierdo y el final de la pista en el borde derecho.
El indicador se enciende en sincronización con el tiempo de repro-
Gancho de cables
ducción transcurrido o con la visualización del tiempo restante en el
software “ITCH”.
2 Botón LOAD (INST. DOUBLES)
Las pistas seleccionadas se cargan en los decks respectivos.
= Carga de pistas en decks (pág.24)
Cuando se pulsa el botón [LOAD (INST. DOUBLES)] mientras se
pulsa el botón [SHIFT], la pista que está reproduciéndose se duplica.
= Duplicación instantánea (pág.24)
3 Pad NEEDLE SEARCH (ALPHABET SEARCH)
! El sonido se reproduce desde la posición en la que se tocó la
tecla.
! Se puede usar la función de búsqueda alfabética.
= Búsqueda usando el pad
4 Control VINYL SPEED ADJUST
5 Botón LOOP SELECT (GRID LOCK)
[NEEDLE SEARCH (ALPHABET SEARCH)] (“Búsqueda alfabética”) (pág.22)
Para la reproducción y la parada de pistas, esto ajusta la velocidad a
la que la reproducción se va haciendo más lenta hasta que se para y
la velocidad a la que se alcanza la reproducción normal partiendo del
modo de parada.
El bucle que quiera reproducir podrá seleccionarlo de entre los
bucles que han sido prerregistrados en el banco de bucles.
El número del banco de bucles cambia cada vez que se pulsa el
botón.
= Uso del banco de bucles (pág.26)
Cuando se pulsa el botón [LOOP SELECT (GRID LOCK)] mientras se
pulsa el botón [SHIFT], el beat grid general se bloquea de forma que
no se puede editar.
Page 49

6 Botón VINYL (ILLUMINATION)
CUE
CRATES FILES BROWSE PREPAREBACK
TRIM
FX CH SELECT
EFFECT SELECT
PARAMETER
MAXMIN
A
BMASTER
MIC
/AUX
LOAD PREPARE
BROWSE
SAVE
JUMP
RECAREA MOVE
MIXING
MASTERCUE
MASTER
ON / OFF
TAP
FX1
LEVEL / DEPTH
MINMAX
HI
MINMAX
MID
MINMAX
LOW
MINMAX
AUTO
FX CH SELECT
EFFECT SELECT
PARAMETER
A
BMASTER
MIC
/AUX
LEVEL / DEPTH
ON / OFF
TAP
FX2
MINMAX
AUTO
EQ EQ
A
CUE
TRIM
MAXMIN
HI
MINMAX
MID
MINMAX
LOW
MINMAX
B
10
9
8
7
6
5
4
3
2
1
0
10
9
8
7
6
5
4
3
2
1
0
FADER START
ONOFF
FADER START
ONOFFONOFF
THRU
C.F.REV
HEADPHONES
MAXMIN
LEVEL
MAXMIN
LEVEL
LEVEL
MASTER
C.F.REV
AB
12 7 83 64 5
9
b
c
e
g
h
j
d
a
kl
o
p
q
m
r
s
i
n
f
Esto activa/ desactiva el modo [VINYL].
= Cambio del modo del dial jog (pág.25)
7 Control AUTO LOOP (GRID SLIDE)
Esto establece bucles automáticos.
= Configuración automática de bucle (Bucle automático) (pág.26)
! El beat grid se puede ajustar girando el control [AUTO LOOP
(GRID SLIDE)] mientras se pulsa el botón [SHIFT].
8 Botón TEMPO RANGE
Esto cambia el margen de ajuste de la barra deslizante [TEMPO].
= Selección del margen para ajustar la velocidad de reproducción
(pág.24)
9 Botón MASTER TEMPO
Use esto para activar y desactivar la función de tempo maestro.
= Ajuste de la velocidad de reproducción sin cambiar el tono (Master
Tempo) (pág.24)
a Botón SLIP
Esto activa/ desactiva el modo slip.
= Uso del modo slip (pág.27)
b Barra deslizante TEMPO
Use esto para ajustar la velocidad de reproducción de pistas.
= Cambio de la velocidad de reproducción (pág.24)
c Botón SYNC (SYNC OFF)
Cuando se pulsa este botón, la pista del deck cuyo botón fue pulsado
se sincroniza con el BPM y el beat grid de la pista cargada en el otro
deck.
= Sincronización de la velocidad de reproducción (pág.28)
d Dial jog
Esto se puede usar para operaciones tales como scratching, pitch
bending, etc.
= Operación del dial jog (pág.25)
! La parte superior del dial jog tiene un conmutador embebido. No
ponga objetos encima del dial jog ni lo exponga a fuerzas intensas. Note también que el agua u otros líquidos que entren en el
aparato pueden causar fallos en el funcionamiento.
e Botón PLAY/PAUSE f
Use esto para reproducir pistas/ hacer pausas en pistas.
= Reproducción y pausa (pág.24)
f Botón CUE
Esto se usa para poner puntos cue temporales, reproducirlos y
llamarlos.
= Ajuste de un punto cue temporal (pág.25)
g Botón SHIFT
Cuando se pulsa otro botón mientras se pulsa el botón [SHIFT] se
llama a una función diferente.
h Botón RELOOP/EXIT (GRID CLEAR)
Use esto para volver a la reproducción de bucle (rebucle) o para
cancelar la reproducción de bucle (salida de bucle).
= Vuelva a la reproducción de bucle (Rebucle) (pág.26)
= Cancelación de la reproducción de bucle (Salida de bucle) (pág.26)
El beat grid se puede borrar pulsando el botón
[RELOOP/EXIT (GRID CLEAR)] mientras se pulsa el botón [SHIFT].
i Botón REC MODE
Esto cambia la función del botón [HOT CUE (DELETE)] (establecer/
llamar).
! Cuando se conecta la alimentación, el botón se pone en el modo
de llamada.
= Configuración de hot cue (pág.27)
j Botón REV
Use esto para activar y desactivar la reproducción en retroceso.
= Reproducción en retroceso (pág.24)
k Botón LOOP IN (GRID SET)
Cuando se pulsa este botón durante la reproducción en la posición
donde quiera iniciar la reproducción de bucle (el punto de entrada de
bucle), el punto de entrada de bucle se establece.
= Operación con el bucle (pág.25)
El beat grid se puede poner pulsando el botón [LOOP IN (GRID SET)]
mientras se pulsa el botón [SHIFT].
l Botón LOOP OUT (GRID TAP)
Cuando se pulsa este botón durante la reproducción en la posición
donde quiera finalizar la reproducción de bucle (el punto de salida
de bucle), el punto de salida de bucle se establece, la reproducción
vuelve al punto de entrada de bucle y la reproducción de bucle
empieza.
= Operación con el bucle (pág.25)
Cuando se pulsa el botón [LOOP OUT (GRID TAP)] mientras se pulsa
el botón [SHIFT], el beat grid se puede ajustar durante la reproducción pulsando brevemente el botón.
m Botón HOT CUE (DELETE)
Esto se usa para poner hot cues y llamarlos.
= Configuración de hot cue (pág.27)
Sección de mezclador/ efectos
1 Botón CRATES
Mueve el cursor al panel de listas de crates.
2 Botón FILES
Enciende/ apaga la visualización del panel [FILES].
3 Botón BACK
Mueva el enfoque del cursor hacia atrás un nivel.
4 Selector giratorio
Mueve el cursor dentro del panel. Use esto para seleccionar archivos
o pistas.
= Selección de elementos (pág.20)
5 Botón AREA MOVE (REC)
Mueve el cursor a un panel diferente.
= Selección de elementos (pág.20)
Español
Es
13
Page 50

6 Botón LOAD PREPARE (SAVE)
LEVEL
MAXMIN
OFFON
TALK
OVER
MIC 1
LOW
MAXMIN
MID
EQ
MAXMIN
HI
MAXMIN
MIC 1
LEVEL
MAXMIN
OFFON
TALK
OVER
MIC 2 / AUX
LOW
MAXMIN
MID
EQ
MAXMIN
HI
INPUT
SELECT
MAXMIN
AUXMIC 2
1 23 4
Carga pistas en el panel [PREPARE].
= Uso de la lista [PREPARE] (pág.23)
7 Botón BROWSE
Enciende/ apaga la visualización del panel [BROWSE].
8 Botón PREPARE
Enciende/ apaga la visualización del panel [PREPARE].
9 Control FX CH SELECT
Cambia el canal al que se aplica el efecto.
= Uso de la función de efecto (pág.31)
a Control MASTER LEVEL
Ajusta la salida de nivel del sonido maestro.
b Control EFFECT SELECT
Seleccione el tipo de efecto.
= Uso de la función de efecto (pág.31)
c Control PARAMETER
Ajusta los parámetros provistos para los varios efectos (tiempo,
harmónicas, etc.).
= Uso de la función de efecto (pág.31)
d Control HEADPHONES MIXING
Ajusta el balance del volumen de monitoreo entre el sonido de los
canales para los que se ha pulsado el botón [CUE] de auriculares y el
sonido de [MASTER OUT 1] y [MASTER OUT 2].
= Monitoreo de sonido con auriculares (pág.29)
e Control LEVEL/DEPTH
Ajusta los parámetros cuantitativos del efecto.
= Uso de la función de efecto (pág.31)
f Indicador de nivel de canales
g Botón FX ON/OFF
Enciende/ apaga el efecto.
= Uso de la función de efecto (pág.31)
h Botón TAP
El BPM usado como valor de base para el efecto se calcula mediante
el intervalo con que se pulsa rápida y brevemente el botón con un
dedo.
= Ajuste manual del BPM (pág.31)
i Indicador C.F. REV
Se enciende cuando el conmutador [C.F. REV] se pone en [ON].
j Conmutador FADER START
Éstos activan/ desactivan la función de inicio del fader.
= Inicio de reproducción usando el fader (Inicio de fader) (pág.30)
k Conmutador selector de curva de crossfader
Cambia las características de curva de crossfader.
= Selección de las características de curva de crossfader (pág.29)
l Crossfader
Cambia entre la salida de audio de los decks derecho e izquierdo.
= Salida de sonido (pág.29)
m Conmutador C.F. REV
Invierte el deck al que se ha asignado el crossfader de derecha a
izquierda y viceversa.
= Uso de la función de inversión de crossfader (pág.30)
n Indicador de nivel maestro
o Fader de canal
Ajusta la salida de nivel de sonido desde varios decks.
= Salida de sonido (pág.29)
p Control HEADPHONES LEVEL
Ajusta la salida de nivel de audio del terminal [PHONES].
14
Es
q Botón CUE de auriculares
El sonido de los decks para los que se pulsa el botón [CUE] de auriculares se puede monitorear con los auriculares.
= Monitoreo de sonido con auriculares (pág.29)
r Controles EQ (HI, MID, LOW)
Refuerza o corta frecuencias de canales diferentes.
= Ecualización (pág.29)
s Control TRIM
Ajusta la ganancia de salida de canales individuales.
= Salida de sonido (pág.29)
No tire del fader de canales ni de los controles crossfader con una
fuerza excesiva. Los controles no han sido diseñados para ser retirados. Tirar con fuerza de los controles podría dañar la unidad.
Sección de control de entrada de
micrófono/ externa
1 Conmutador selector OFF, ON, TALK OVER
Enciende/ apaga el micrófono.
2 Control LEVEL
Ajusta el nivel del sonido de salida.
3 Controles EQ (HI, MID, LOW)
Refuerza o corta frecuencias para cambiar la calidad del sonido.
4 Conmutador selector MIC2/ AUX
Cambia la entrada de audio entre el micrófono y el aparato externo.
! [MIC2]: Selecciona el micrófono conectado al terminal [MIC2].
! [AUX]: Selecciona el aparato externo conectado a los terminales
[AUX IN].
= Uso de un micrófono (pág.30)
= Uso de un aparato externo (pág.30)
Uso del ACOPLADOR PARA ORDENADOR
PORTÁTIL
La sección del teclado del ordenador se puede guardar debajo de esta
unidad.
! Según el tamaño de su ordenador portátil, la sección del teclado
puede que no quepa en el ACOPLADOR PARA ORDENADOR
PORTÁTIL.
! Instale de forma que el ordenador no toque esta unidad.
! Instale de forma que los cables conectados al ordenador no queden
atrapados debajo de esta unidad.
Page 51

Uso con las patas quitadas
DJ CONTROLLER
DDJ-S1
Las dos patas de esta unidad se pueden quitar.
Use un destornillador Phillips para quitar los tornillos de
las patas derecha e izquierda (2 tornillos en cada una).
! Los tornillos que ha quitado los necesitará para montar las patas.
Tenga cuidado para no perderlos. Las patas no se pueden montar
bien usando otros tornillos.
Español
Es
15
Page 52

Operación
mkkl
c
d
1234 5 6 7 9a b8
e
f
h
j
g
i
p
o
h
g
n
i
Pantalla de software ITCH
Pantalla cuando se conecta esta unidad
1 Ficha ALBUM ART
Enciende/ apaga la visualización del arte de álbum.
2 Visualización de la hora actual
3 Visualización sencilla del porcentaje de uso de la CPU
4 Ficha FILES
Enciende/ apaga la visualización del panel [FILES].
5 Ficha BROWSE
Enciende/ apaga la visualización del panel [BROWSE].
6 Ficha PREPARE
Enciende/ apaga la visualización del panel [PREPARE].
7 Ficha HISTORY
Enciende/ apaga la visualización del panel [HISTORY].
8 Panel de búsqueda alfabética
= Búsqueda usando el pad
[NEEDLE SEARCH (ALPHABET SEARCH)] (“Búsqueda alfabética”) (pág.22)
9 (TOOL TIPS)
Activa/ desactiva los tooltips
a SETUP
Visualiza la pantalla de configuración.
= Cambio de los ajustes (pág.32)
b (SEARCH)
Busca en su librería el texto introducido en este campo.
Es
16
c Panel secundario
El contenido visualizado aquí se cambia y enciende o apaga
haciendo clic en las fichas (FILES/ BROWSE/ PREPARE/ HISTORY) de
la parte superior de la pantalla.
= Cambio del subpanel (pág.20)
d Lista de pistas
Visualiza pistas con contenido correspondiente a los elementos
seleccionados en el panel de listas de crates.
! Cuando se visualiza el panel [BROWSE] sólo se visualizarán las
pistas que cumplen las condiciones limitadas según el género.
e Panel de control de monitoreo MIC/ AUX
= Panel de control de monitoreo MIC/ AUX (pág.18)
f Panel de grabación
= Panel de grabación (pág.18)
g Panel de efectos
= Uso de la función de efecto (pág.31)
h Perspectiva general de las pistas
Visualiza las bandas de frecuencia del sonido de las pistas mediante
una forma de onda, en azul para la gama de agudos, en verde para la
gama media y en rojo para la gama de graves. El punto de reproducción se visualiza como [b] (blanco). El punto cue temporal se visualiza como [a] (blanco) y los puntos de hot cue se visualizan como [a ]
en otro color.
! Haga clic para mover la posición de reproducción a esa
posición.
Page 53

! Las líneas grises verticales se visualizan a intervalos de 1
1
2
8 9 a b c
d
e
3 4 5 6 7
3
1
2
5
3
4
2
1
minuto, y las líneas gruesas se visualizan a intervalos de 5
minutos.
i Visualización de información de pistas
Visualiza los detalles de las pistas cargadas en el deck.
1 El nombre de la pista se visualiza aquí (sólo cuando hay informa-
ción disponible).
2 El nombre del artista se visualiza aquí (sólo cuando hay informa-
ción disponible).
3 Cuando se hace clic, el icono resalta y no se puede escribir
sobre el bucle. Haga clic de nuevo para desactivar el modo de
protección.
4 El número del banco de bucles seleccionado actualmente se
visualiza aquí. (Donde hay ranuras de bancos de bucles sin nada
guardado se visualizará el primer bucle de la pista.)
5 Cuando se hace clic se elimina el bucle guardado en el número
de banco de bucles seleccionado actualmente.
6 Cuando se hace clic, el bucle establecido actualmente se
guarda en el banco de bucles.
7 Visualiza la duración del bucle establecida con la función de
bucle automático.
8 Se usa para seleccionar el modo de reproducción.
[SINGLE]: El deck se para una vez que termina la reproducción
de la pista.
[CONT]: Cuando termina la reproducción de la pista, la próxima
pista de la lista se reproduce automáticamente.
9 Cuando se activa esta función, una vez terminada la reproduc-
ción de la pista, la reproducción vuelve al punto de inicio y se
repite.
a Cuando se hace clic, el modo de edición de grid se activa y la
tecla parpadea. Haga de nuevo clic para guardar los datos de
grid editados y salir del modo de edición de grid.
b Visualiza el margen de ajuste posible de la velocidad de repro-
ducción con respecto a la velocidad de reproducción con que se
grabó originalmente la pista.
c Visualiza el valor de pitch relativo a la posición de la barra desli-
zante [TEMPO].
d Visualiza la posición de reproducción de la pista mediante
tiempo.
Cuando se hace clic, la visualización cambia entre el tiempo
transcurrido y el tiempo restante.
e Visualiza el BPM actual de la pista que está reproduciéndose.
! El BPM se puede establecer manualmente haciendo clic
aquí a tiempo con el beat o pulsando la tecla espaciadora del
ordenador (sólo si el beat grid no está activado).
j Display de forma de onda
Visualiza datos de forma de onda detallados para la zona situada
alrededor del punto de la pista que está reproduciéndose.
Visualiza las bandas de frecuencia del sonido de las pistas mediante
una forma de onda, en azul para la gama de agudos, en verde para la
gama media y en rojo para la gama de graves. El punto de reproducción está en el centro del display. El punto cue temporal se visualiza
como [b] y [a] en blanco, y los puntos de hot cue se visualizan como
[b] y [a] en otros colores.
! Haga clic para mover la posición de reproducción a esa
posición.
! Cuando se hace clic en la forma de onda mientras se pulsa la
tecla [Ctrl] del ordenador, la forma de onda se visualiza dividida
en tres gamas: de agudos, media y de graves.
! Cuando se hace clic en la forma de onda mientras se pulsa la
tecla [Shift] del ordenador, la altura de la sección de visualización se estrecha.
! El display de forma de onda se puede acercar o alejar usando las
teclas [+] y [–] del ordenador.
k Deck virtual
Visualiza la posición de reproducción de la pista y la velocidad de
reproducción.
1 Visualiza la duración de la pista. La posición que está reprodu-
ciéndose se visualiza con un calibrador gris.
2 Cambia a blanco cuando se carga una pista. (Cuando se esta-
blece una etiqueta de color, esto cambia al color establecido.)
3 Gira según la velocidad del plato. Cuando se aproxima un punto
en el que está establecido un hot cue, esto se desplaza en pasos
hacia el color de ese hot cue para avisar de que el hot cue se
aproxima. Cuando se aleja del hot cue, el color vuelve al color
original en pasos.
! La aguja parpadea cuando se alcanza el punto situado 20 segun-
dos antes del final de la pista para avisar que el final de la pista
se aproxima.
l Display de coincidencia de tempos
Éste indica el tempo de las pistas de los decks (A) y (B) mediante
medición, y ha sido diseñado para ayudarle a hacer que coincida el
tempo.
La forma de onda roja indica el tempo de la pista del deck A (1) y la
forma de onda naranja indica el tempo de la pista del deck B (2).
Cuando coinciden los tempos de las pistas en los dos decks, las posiciones de los picos de las formas de onda roja y naranja coinciden.
! Aunque el beat no esté sincronizado, las posiciones de los picos
de las formas de onda en el display coinciden cuando los tempos de las pistas derecha e izquierda coinciden también.
m Display de coincidencia de beat
Esta vista muestra la posición de los beat dentro de la pista. Cuando
se alinean los picos mostrados en esta ventana, los beat de las dos
pistas concuerdan.
El display de coincidencia de beat indica las posiciones de beat de
las pistas que están reproduciéndose actualmente en los deck (A) y
(B), y ha sido diseñado para ayudarle a que coincida el beat. Cuando
coinciden los beats de las pistas de los deck (A) y (B), las posiciones
de los picos de las formas de onda en la parte superior e inferior
coinciden.
n Barra de estado
Visualiza la información actual (principalmente análisis, errores,
etc.).
o Lista de crates
Con ITCH, las pistas se clasifican y ordenan en carpetas llamadas
“crate”.
El panel de listas de crates también se puede abrir pulsando el botón
[CRATES] de esta unidad.
= Lista de crates (pág.17)
p ALBUM ART
Visualiza arte de álbum (cuando está disponible).
Lista de crates
1 All...
Se visualizan todas las pistas que han sido importadas o cargadas
en los decks. Cuando se cargan en un deck pistas que no han sido
importadas, éstas se añaden a [All...].
2 Library
Visualiza la librería de iTunes.
Español
Es
17
Page 54

! Para visualizar la librería de iTunes, cambie los ajustes en el
4
1
2
3
1234
12 345 76
12
1
5
2
34
menú [SETUP].
= Show iTunes library (pág.33)
3 Crates
ITCH usa crates digitales para acceder rápidamente a sus colecciones favoritas. No hay límites en el número de crates que puede crear,
y cualquier pista se puede colocar en múltiples crates. El área de
crates está en el lado izquierdo de la librería.
4 Subcrates
Los crates se pueden colocar dentro de otros crates. A estos crates
se les llama “subcrates”.
5 “+”
Haga clic aquí para crear un crate nuevo.
! Cuando un crate se arrastra y coloca en otro, éste se convierte
en un subcrate. Repita esta operación para aumentar el número
de capas.
! Una pista o un grupo de pistas se pueden arrastrar hasta “+” y
se creará un crate con ellas dentro.
! Si hay múltiples capas, la caja de abajo se puede abrir o cerrar
haciendo clic en el elemento respectivo.
Lista de pistas
Panel de efectos
1 El nombre del efecto seleccionado se visualiza.
2 Visualiza el valor ajustado con el control [LEVEL/DEPTH].
3 Visualiza el valor ajustado con el control [PARAMETER].
4 Cuando se selecciona [A] o [B] se visualiza [AUTO A] o [AUTO B], y
el efecto se sincroniza con el BPM establecido para el deck. Cuando
se selecciona otro canal se visualiza [MANUAL] y el ajuste se puede
hacer manualmente con el botón [TAP].
Panel de grabación
1 Haga clic en esto para iniciar/ parar la grabación.
2 Haga clic en esto para seleccionar la fuente que va a grabar.
3 Esto visualiza la entrada del nivel de sonido de la fuente que está
siendo grabada.
4 Esto ajusta el nivel de grabación.
5 Esto visualiza el tiempo de grabación transcurrido.
6 Introduzca aquí el nombre del archivo de datos grabados.
7 Haga clic en esto para guardar los datos grabados.
Panel de control de monitoreo MIC/ AUX
1 Encabezamiento de columna
El nombre del elemento seleccionado se visualiza aquí. Cuando se
hace clic en el nombre del elemento, el orden de visualización se
puede cambiar (clasificar).
Los elementos de abajo se pueden visualizar en el área donde se
visualiza la información de pistas.
Fecha añadida (a la librería), álbum, artista, velocidad de bits, BPM,
comentario, compositor, nombre de archivo, género, grupo, tono,
etiqueta, tiempo de pista, lugar guardado, remezclador, frecuencia
de muestreo, tamaño de archivo, pista, año
! El orden de las pistas de la lista de pistas se indica mediante los
números visualizados en la columna “#”.
2 Pista
Visualiza las pistas incluidas en el elemento seleccionado en el panel
de listas de crates.
3 Etiqueta de color
Se pueden usar colores para diferenciar las pistas.
4 Icono de estado
El estado de las pistas se indica mediante iconos.
Icono Significado
Ninguno Pistas que han sido importadas directamente a la librería ITCH.
Es
18
Pistas importadas de una librería de iTunes.
Pistas cuyos archivos están dañados. Esas pistas deberán codificarse de nuevo.
Visualizado cuando el archivo no se puede encontrar en su posición original.
Indica pistas de sólo lectura que no se pueden editar.
1 Haga clic en esto para seleccionar el canal de salida para el micró-
fono y el aparato externo conectados. Este ajuste sólo afecta al canal
[MASTER].
! [MIX]: Sale sonido independientemente de la posición del
crossfader.
! [X-F A]: Sale sonido cuando el crossfader está a la izquierda del
borde derecho.
! [X-F B]: Sale sonido cuando el crossfader está a la derecha del
borde izquierdo.
! [Mute]: No sale sonido.
2 Haga clic en esto para monitorear el sonido con los auriculares.
Mientras la tecla está resaltada, el sonido del micrófono y del aparato
externo conectados sale por el canal de los auriculares [CUE].
Pantalla cuando no se conecta esta
unidad
1 Barra de estado
Visualiza la información actual (principalmente análisis, errores,
etc.).
2 ANALYZE FILES
Se usa para analizar pistas.
Page 55

La función de análisis de archivos procesa las pistas de su librería
para detectar daños en archivos, preparar la información general de
formas de onda y, si se activa, calcular los valores del BPM.
3 Set auto bpm
Cuando se verifica [Set auto bpm], el BPM se analiza automática-
mente cuando se analiza la pista.
4 range
Se usa para especificar el margen de análisis del BPM cuando está
funcionando [Set auto bpm].
5 Reproductor fuera de línea
El reproductor fuera de línea está disponible cuando su hardware
ITCH no está conectado y dará salida al sonido a través del aparato
de audio actualmente predeterminado. En la mayoría de los casos,
éste procederá de los altavoces de su ordenador.
! Cargue una pista en el reproductor fuera de línea arrastrándola
y colocándola en él o pulsando la tecla [shift] y la tecla [c]
del ordenador. Si se llega al final de la pista cargada, la pista
siguiente de la lista de reproducción actual se reproducirá automáticamente a continuación.
El reproductor fuera de línea es una herramienta útil para prepa-
rar crates, audicionar pistas y poner puntos de cue y de bucle.
Inicio del sistema
1 Encienda el micrófono y el equipo externo
conectados.
2 Conecte el cable USB entre esta unidad y el
ordenador.
3 Inicie el ordenador conectado.
4 Deslice el conmutador [ON/OFF] hacia el lado [ON].
5 Después de encenderse los indicadores de esta
unidad, inicie ITCH.
Si el ordenador y esta unidad están bien enlazados aparecerán dos decks
virtuales en la pantalla.
Salida del sistema
1 Apague el micrófono y el equipo externo conectados.
2 Salga de ITCH.
3 Deslice el conmutador [ON/OFF] hacia el lado [OFF].
4 Desconecte el cable USB de su ordenador.
Utilización de la librería
Dentro de la librería, las pistas se pueden importar y administrar
fácilmente.
Adición de archivos de música a la librería
! Cuando se añaden archivos de música guardados en un aparato
externo a la librería, conecte este aparato antes de iniciar ITCH.
! Las pistas también se pueden añadir desde la librería de iTunes.
Para visualizar la librería de iTunes, cambie los ajustes en el menú
[SETUP].
Para conocer detalles de los ajustes, vea Show iTunes library en la
página 33.
! Para añadir pistas grabadas en discos a la librería, importe primero
las pistas al ordenador y conviértalas en un tipo de archivo que se
pueda reproducir con ITCH.
El rendimiento de la reproducción puede disminuir si las pistas
grabadas en discos se reproducen directamente.
Cuando se conviertan pistas en archivos de música recomendamos
convertirlas al formato MP3 (320 kbps/
obtener una calidad de sonido alta con una frecuencia de uso baja de
la CPU.
MPEG-1 Audio Layer-3) para
1 Pulse el botón [FILES].
El contenido de su ordenador o del periférico conectado al ordenador se
visualiza en el panel [FILES].
2 Seleccione la carpeta deseada con el ratón del
ordenador.
Con el ratón del ordenador, haga clic en la carpeta que tiene la pista que
quiere añadir a la librería en el panel [FILES].
3 Arrastre y coloque la carpeta seleccionada en el panel
de listas de crates con el ratón del ordenador.
! Cuando una carpeta que tiene archivos de música guardados se
arrastra y coloca en el panel de listas de crates, esa carpeta se
convierte en un crate que incluye todas las pistas que están en
ella, y las pistas también se añaden a la librería.
! Hay varias formas de añadir pistas a su librería ITCH.
— Cuando las pistas que no se han añadido a la librería se
cargan directamente en un deck, éstas se añaden automáticamente a [All...] en el panel de listas de crates.
— Los archivos y las carpetas también se pueden añadir desde
Explorador o Finder arrastrándolas y colocándolas en la lista
de pistas o en la lista de crates en la pantalla ITCH.
— Para añadir el archivo de música a los crates deseados,
arrastre y coloque el archivo de música en la posición en la
que quiera añadirlo en la pantalla ITCH.
— Una pista o un grupo de pistas se pueden arrastrar hasta
el panel de listas de crates y se creará un crate con ellas
dentro.
Formatos de archivos de música reproducibles
MP3, OGG (formato Vorbis), AAC, ALAC (Apple Lossless), AIF, WAV y
WL.MP3 (Whitelabel.MP3)
Acerca de los archivos MP3
Los archivos MP3 pueden tener una velocidad de bits constante (CBR) o
variable (VBR). En el DDJ-S1 se pueden reproducir ambos tipos de archivos, pero las funciones de búsqueda y búsqueda superrápida son más
lentas con los archivos VBR. Si su prioridad es la operabilidad recomendamos grabar archivos MP3 con CBR.
Acerca de los archivos AAC
! AAC es una sigla de “Codificación de audio avanzada”, un formato
básico de tecnología de compresión de audio usado por MPEG-2 y
MPEG-4.
! El formato de archivo y la extensión de los datos AAC dependen de la
aplicación usada para crear los datos.
! Además de los archivos AAC con la extensión “.m4a” codificados con
iTunes®, también se pueden reproducir archivos con las extensiones
“.aac” y “.mp4”. Note, sin embargo, que los archivos AAC protegidos por derechos de autor que han sido adquiridos en la Tienda de
Música iTunes no se pueden reproducir. Además, algunos archivos
tal vez no se puedan reproducir, dependiendo de la versión de iTunes
usada para codificar.
Acerca de WL.MP3
Whitelabel MP3 (extensión de archivo “.wl.mp3”) es un formato MP3
personalizado desarrollado por Serato Audio Research con fines de promoción y se puede adquirir en Whitelabel.net. Los archivos en el formato
Whitelabel MP3 han sido preparados específicamente para ser usados
con el software DJ Serato Audio Research, tienen sobrevistas preinstaladas, y los datos de la pista, el artista, el BPM y el arte de álbum están
etiquetados todo lo posible. Estos archivos se reproducen con una calidad baja de 32 kbps en reproductores MP3 convencionales (incluyendo
cuando se reproducen independientemente con software ITCH sin usar
esta unidad), pero con una calidad alta equivalente a 320 kbps cuando se
reproducen con software ITCH conectado a esta unidad.
Para conocer detalles, vea el URL de abajo.
http://whitelabel.net/
Español
Es
19
Page 56
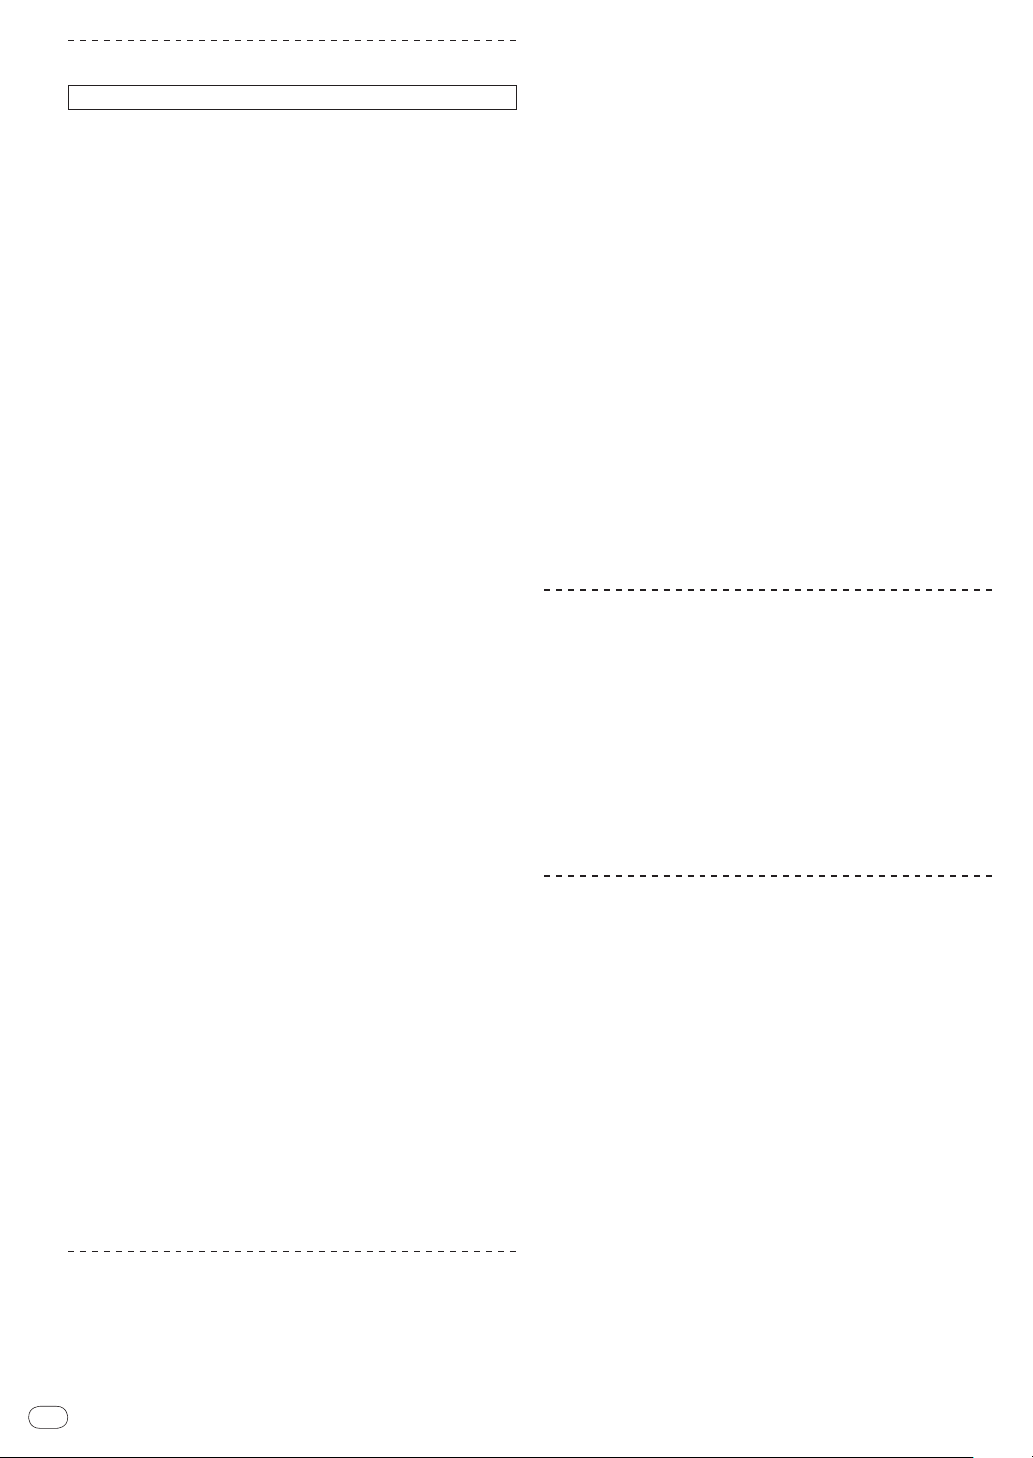
Análisis de archivos
Esta función no se realiza en el DDJ-S1, sino en el ordenador.
Antes de reproducir su música en ITCH es muy importante analizar primero sus archivos. La función de análisis de archivos procesa las pistas
de su librería para detectar daños en archivos, preparar la información
general de formas de onda y, si se activa, calcular los valores del BPM.
! Esta función se realiza en ITCH mientras se usa el reproductor fuera
de línea.
! Para conocer detalles de las posiciones de las teclas, vea Pantalla
cuando no se conecta esta unidad en la página 18.
Ajuste automático de BPM cuando se analizan las
pistas
1 Haga clic en [Set auto bpm] para verificarlo.
Cuando se verifica [Set auto bpm], el BPM se analiza automáticamente
cuando se analiza la pista.
Cuando ITCH determina que la información de BPM analizada es precisa, esta información se escribe en el archivo de música.
2 Haga clic en [range] para visualizar el menú
desplegable.
3 Haga clic en la gama de análisis BPM que quiera
establecer.
Especificar la gama de análisis de BPM desde el menú desplegable
[range] evita tener que analizar pistas con un valor de BPM erróneo.
Cuando se verifica [Set auto bpm], establezca la gama de análisis de
BPM si conoce más o menos el valor de BPM de la pista que quiere
analizar.
Análisis de todas las pistas
1 Desconecte esta unidad del ordenador.
2 Haga clic en [ANALYZE FILES].
Todas las pistas de la librería se analizan.
Para volver a analizar todas las pistas, haga clic en [ANALYZE FILES]
mientras pulsa la tecla [Ctrl] del ordenador.
Análisis de pistas o crates individuales
1 Desconecte esta unidad del ordenador.
2 Arrastre y coloque la pista o crate en [ANALYZE
FILES].
! Hasta los archivos de música que no han sido añadidos a la
librería pueden analizarse arrastrándolos y colocándolos. Una
vez terminado el análisis, los archivos de música se añaden
automáticamente a [All...] en el panel de listas de crates.
! Las pistas y crates que ya han sido analizadas pueden volver a
analizarse arrastrándolas y colocándolas en [ANALYZE FILES].
Si se daña un archivo o se produce un error
Los iconos de estado se visualizan a la izquierda de las pistas visualizadas en la librería. Cuando el cursor se coloca encima de ese icono se
visualizará un mensaje de error en la barra de estado.
! Para conocer detalles del contenido de los errores visualizados, vea
Mensajes de daños en archivos en la página 37.
Selección de elementos
! Para seleccionar el elemento puede usar el ratón y el teclado del
ordenador.
Movimiento del cursor entre paneles
Pulse el botón [AREA MOVE (REC)].
Cuando se pulsa el botón [AREA MOVE (REC)] en esta unidad, el cursor
se traslada de panel a panel.
! El cursor también se puede mover entre paneles pulsando la
tecla [Tab] del ordenador.
Movimiento del cursor hacia arriba y hacia abajo
Gire el selector giratorio.
El cursor se mueve hacia arriba y hacia abajo cuando se gira el selector
giratorio de esta unidad.
! Cuando se gira el selector giratorio mientras se pulsa el botón
[SHIFT], el cursor salta sobre varios elementos de una vez.
! El cursor también se puede mover hacia arriba y hacia abajo
pulsando la tecla [a] o [b] del ordenador.
Movimiento entre capas
Pulse el selector giratorio.
Si hay más capas debajo del elemento actualmente seleccionado, el
cursor se moverá hacia abajo, hacia la siguiente capa inferior, cuando se
pulse el selector giratorio de la unidad.
Pulse el botón [BACK] para retroceder a la capa superior.
! El cursor también se puede mover usando las teclas [c] y [d]
del ordenador.
Cambio del subpanel
Pulse el botón [FILES] (o uno de los botones [BROWSE],
[PREPARE] o [CRATES]).
! Panel [FILES]
Se usa cuando se importan pistas.
! Panel [BROWSE]
Se usa para limitar las pistas importadas por género, BPM, etc.
! Panel [PREPARE]
Se usa para seleccionar y preparar pistas que usted quiere
reproducir antes de tiempo.
! Panel [HISTORY]
El historial de reproducción de pistas se graba y visualiza aquí.
Edición de crates
Creación de un crate
Haga clic en “+” en la parte superior derecha del panel de
listas de crates.
Se añade un crate nuevo al panel de listas de crates.
! Cuando una carpeta que tiene archivos de música guardados se
arrastra y coloca en el panel de listas de crates, esa carpeta se
convierte en un crate que incluye todas las pistas que están en
ella, y las pistas también se añaden a la librería.
! Una pista o un grupo de pistas se pueden arrastrar hasta el
panel de listas de crates y se creará un crate con ellas dentro.
! Una pista o un grupo de pistas se pueden arrastrar hasta “+” y
se creará un crate con ellas dentro.
Cambio de la capa de crate
Los crates y subcrates se pueden trasladar a capas diferentes.
Arrastre y coloque un crate en otro.
Cuando un crate se arrastra y coloca en otro, éste se convierte en un
subcrate.
! Un crate con el mismo nombre no se puede colocar en la misma
capa.
20
Es
Page 57

Edición de nombres de crates
Haga doble clic en el nombre del crate.
Ahora puede cambiar el nombre de este crate.
Eliminación de crates
1 Gire el selector giratorio.
Seleccione el crate que quiera eliminar.
2 En el teclado del ordenador, pulse la tecla [Delete]
mientras pulsa la tecla [Ctrl].
El crate se elimina.
! Esta operación eliminará el crate pero no el contenido. Si
pulsa la tecla [Delete] mientras pulsa las teclas [Shift] y [Ctrl]
del teclado del ordenador, el contenido del crate también se
eliminará.
Cambio de la visualización de nombres de
elementos de la lista de pistas
La visualización de los encabezamientos de columnas se puede encender y apagar, y su orden se puede cambiar.
2 En el teclado del ordenador, pulse la tecla [Delete]
mientras pulsa la tecla [Ctrl].
! Si pulsa la tecla [Delete] mientras pulsa las teclas [Shift] y [Ctrl]
del teclado del ordenador, las pistas se eliminarán de la librería
ITCH y del disco duro de su ordenador.
Edición de la información de pistas
! Puede que no sea posible editar algunos elementos relacionados con
el sistema como, por ejemplo, nombres de archivos.
se visualiza para pistas de sólo lectura que no se pueden editar.
!
1 Gire el selector giratorio.
Seleccione la pista que va a editar.
2 Haga doble clic en el elemento que va a editar.
El texto se puede introducir ahora.
3 Introduzca el texto.
Edite el contenido del elemento en el ordenador.
! En el teclado del ordenador, pulse una tecla de flecha mientras
pulsa la tecla [Ctrl] para trasladar el cursor a un elemento diferente y editar elementos consecutivamente.
! Cuando se edita un elemento mientras hay múltiples pis-
tas seleccionadas, la edición se aplicará a todas las pistas
seleccionadas.
Español
Cambio del orden de los nombres de los
elementos
Arrastre el encabezamiento de columnas a derecha o a
izquierda.
La disposición de las columnas cambia.
Para mostrar y ocultar una columna
Haga clic en [c] en el borde derecho de la fila de
nombres de elementos, y luego seleccione el nombre del
elemento en el menú emergente y haga clic en él.
La selección muestra elementos en la columna de encabezamiento o los
oculta de la misma.
Edición de la lista de pistas
El orden de reproducción de las pistas visualizadas en la lista de pistas,
los títulos de las pistas y otra información se pueden editar.
! Cuando está seleccionada una pista y se hace clic en otra pista
mientras se pulsa la tecla [Shift] del ordenador, serán seleccionadas
esas dos pistas y todas las demás pistas entre ellas. Cuando está
seleccionada una pista y se hace clic en otras pistas mientras se
pulsa la tecla [Ctrl] del ordenador, sólo se seleccionarán las pistas en
las que se hace clic.
Cambio del orden de las pistas
1 Haga clic en [#] en el encabezamiento de la columna.
Cuando se haga clic, [#] resalta, indicando que ha sido seleccionado.
2 Arrastre y coloque la pista en la posición donde
quiera dejarla.
El orden de las pistas cambia.
! El orden de las pistas de la lista de pistas se indica mediante los
números visualizados en la columna “#”.
Eliminación de pistas
1 Gire el selector giratorio.
Seleccione la pista que quiera eliminar.
Ajuste de colores para pistas
1 Gire el selector giratorio.
Seleccione la pista que va a editar.
2 Haga clic en la etiqueta de colores.
La paleta de colores se visualiza.
3 Seleccione el color deseado en la paleta de colores.
La pista se colorea con el color seleccionado.
Recarga de información de pistas
Este procedimiento recarga todas las fichas para las pistas de la librería
y actualiza la información de las pistas. Actualice la información de las
pistas después de editarla con otro software.
1 Pulse el botón [FILES].
Se visualiza el panel [FILES].
2 Haga clic en [RESCAN ID3 TAGS].
La información de pistas se actualiza.
Reubicación de archivos perdidos
Si ha movido la ubicación de los archivos que ya están en su librería,
estos se mostrarán como no encontrados y se visualizarán en rojo. Hacer
esta reubicación de archivos actualizará la base de datos con su nueva
ubicación.
1 Pulse el botón [FILES].
Se visualiza el panel [FILES].
2 Arrastre y coloque una carpeta (incluyendo cualquier
subcarpeta) o archivos perdidos a [RELOCATE LOST
FILES].
Para buscar una carpeta (incluyendo cualquier subcarpeta), arrástrela
desde Explorador o Finder. Para buscar archivos perdidos, arrástrelos
desde su librería.
La búsqueda empieza.
! Al hacer clic en [RELOCATE LOST FILES] se buscarán archi-
vos perdidos en todas las unidades adjuntadas y esto tardará
tiempo.
Es
21
Page 58

Búsqueda de pistas
1/2/3
others
La pista que usted quiere reproducir es posible que la encuentre rápidamente entre las muchas pistas importadas a la lista de pistas. Hay varios
métodos de búsqueda.
Búsqueda introduciendo caracteres
Las pistas se pueden encontrar introduciendo caracteres y buscando las
pistas que tienen esos caracteres.
1 Haga clic en en el cuadro de búsqueda.
Se visualiza un menú desplegable para seleccionar el elemento que va a
ser incluido en la búsqueda.
2 Haga clic en el elemento que va a ser incluido en la
búsqueda.
3 Pulse el botón [CRATES].
Mueve el cursor al panel de listas de crates.
4 Gire el selector giratorio.
Seleccione el elemento que va a buscar desde el panel de listas de
crates.
La búsqueda se realiza dentro del elemento seleccionado.
! Para buscar todas las pistas, seleccione [All...].
5 Haga clic en el cuadro de búsqueda e introduzca los
caracteres.
Sólo se visualizan las pistas que incluyen el carácter que usted ha
introducido.
! Los caracteres que han sido introducidos se borran haciendo
clic en [×] a la derecha del cuadro de búsqueda o pulsando la
tecla [Esc] del teclado del ordenador. Puede eliminar los caracteres uno a uno pulsando la tecla [Back Space] en el teclado del
ordenador.
! Los caracteres que se introducen se borran si se selecciona un
elemento diferente desde el panel de listas de crates.
Uso del panel [BROWSE]
El panel [BROWSE] se puede usar para clasificar sus pistas en la librería
ITCH por género, BPM, etc.
1 Pulse el botón [CRATES].
Mueve el cursor al panel de listas de crates.
2 Gire el selector giratorio.
Seleccione el elemento que va a buscar desde el panel de listas de
crates.
! Para buscar todas las pistas, seleccione [All...].
3 Pulse el botón [BROWSE].
Se visualiza el panel [BROWSE].
4 Gire el selector giratorio.
Seleccione el género en el que quiera limitar la búsqueda.
5 Pulse el selector giratorio.
Las pistas correspondientes al género seleccionado se visualizan en la
lista de pistas.
A continuación, limite la búsqueda mediante BPM, el artista y elementos
de álbumes, en ese orden. Sólo las pistas que coinciden con el contenido
seleccionado se visualizan en la lista de pistas.
! Pulse el botón [BACK] para retroceder a la capa superior.
Búsqueda usando el pad
[NEEDLE SEARCH (ALPHABET SEARCH)] (“Búsqueda
alfabética”)
La búsqueda alfabética le permite clasificar pistas alfanuméricamente
usando el pad [NEEDLE SEARCH (ALPHABET SEARCH)].
! La clasificación de búsqueda alfabética se aplica a su librería o al
crate seleccionado actualmente.
Relación entre el panel de búsqueda alfabética y el pad
[NEEDLE SEARCH (ALPHABET SEARCH)]
La sección de la pantalla con las letras de la búsqueda alfabética y el
pad [NEEDLE SEARCH (ALPHABET SEARCH)] tienen la misma relación
posicional.
1 Pulse el botón [CRATES].
Mueve el cursor al panel de listas de crates.
2 Gire el selector giratorio.
Seleccione el elemento que va a buscar desde el panel de listas de
crates.
! Para buscar todas las pistas, seleccione [All...].
3 Pulse cualquier posición del pad
[NEEDLE SEARCH (ALPHABET SEARCH)] mientras pulsa el
botón [SHIFT].
El panel de búsqueda alfabética se visualiza en la parte superior de la
pantalla. La función de búsqueda alfabética se activa mientras se pulsa
el botón [SHIFT].
4 Pulse [a] en el borde derecho o izquierdo del pad
[NEEDLE SEARCH (ALPHABET SEARCH)] mientras pulsa el
botón [SHIFT].
El enfoque del encabezamiento de columnas se mueve a derecha o
izquierda cada vez que se pulsa [a] derecha o izquierda. El encabezamiento de columna en gris brillante muestra que la columna está actualmente seleccionada.
5 Deslice su dedo mientras mantiene pulsado el botón
[SHIFT].
Una vez seleccionada la columna mediante la cual quiere
hacer la clasificación, pase su dedo a lo largo del pad
[NEEDLE SEARCH (ALPHABET SEARCH)] y verá el cursor del display de
búsqueda desplazándose.
Las pistas correspondientes a la letra actualmente seleccionada se
visualizan en la lista de pistas.
6 Retire su dedo del pad
[NEEDLE SEARCH (ALPHABET SEARCH)] y del botón
[SHIFT].
! Cuando se selecciona
selecciona
ni números.
se buscan otros caracteres que no son letras
se buscan números, cuando se
Encendido y apagado de la visualización
del arte de álbum
Si el archivo incluye una imagen del álbum, la imagen se puede
visualizar.
! Use una aplicación para propósitos generales para cargar la imagen
de arte de álbum en la pista.
Haga clic en [ALBUM ART].
Cuando se hace clic se visualiza el panel [ALBUM ART].
! Cuando se hace clic de nuevo, el panel se cierra.
Visualización de imágenes de álbumes en
la lista de pistas
Las imágenes de álbumes se pueden visualizar en la lista de pistas. La
disposición de la información de pistas e imágenes de álbumes se puede
cambiar según se desee.
22
Es
Page 59

Mientras se pulsa el botón [SHIFT], pulse el botón [FILES]
(o uno de los botones [BROWSE], [PREPARE] o [CRATES]).
La visualización de la lista de pistas cambia.
Botón Disposición
Botón CRATES
Botón FILES
Botón BROWSE
Botón PREPARE
Una visualización que sólo consiste en texto
(predeterminada). El arte de álbum no se
visualiza.
Una columna de arte de álbum se visualiza a la
izquierda seguida de texto.
Las pistas se disponen en una rejilla, con el
arte de álbum visualizado en el lado izquierdo y
la información de pistas en el lado derecho.
Las pistas se disponen en una rejilla, con el
arte de álbum visualizado arriba y la información de pistas debajo.
Uso de la lista [PREPARE]
La lista [PREPARE] es una lista para seleccionar las pistas que usted
quiere preparar de antemano para la reproducción.
1 Pulse el botón [PREPARE].
Se visualiza el panel [PREPARE].
2 Arrastre y coloque la pista o crate en el panel
[PREPARE].
La pista o crate se añade a la lista [PREPARE].
! Las pistas o crates también se pueden añadir a la lista
[PREPARE] arrastrándolas y colocándolas en la ficha [PREPARE]
de la parte superior de la pantalla.
! Las pistas o crates también se pueden añadir a la lista
[PREPARE] seleccionándolas y luego pulsando el botón
[LOAD PREPARE (SAVE)].
! Cuando las pistas de la lista [PREPARE] se cargan en un deck,
esas pistas se eliminan de la lista [PREPARE].
! Cuando se sale de ITCH, las pistas del panel [PREPARE] se
borran.
Uso del panel [HISTORY]
Exploración del historial
La ficha [HISTORY] abre un registro completo de todas las pistas que
usted ha reproducido y permite exportar información de sesión ITCH
como un archivo de datos.
1 Reproduzca pistas.
El historial de las pistas que han sido reproducidas se visualiza en el
panel [HISTORY] por sesión.
2 Haga clic en la ficha [HISTORY] en la pantalla del
ordenador.
Se visualiza el panel [HISTORY].
! En el historial solo se enumeran las pistas que usted ha repro-
ducido realmente. Esto se hace usando el algoritmo A-B, lo
que significa que una pista del deck (A) sólo se enumera una
vez que la pista del deck (B) ha sido cambiada o rechazada.
Puede elegir mostrar pistas que ha audicionado, pero que no ha
reproducido realmente, marcando [Show Unplayed Tracks]. La
sesión enumerará luego estas pistas en gris, junto con las pistas
reproducidas realmente. De forma alternativa puede marcar o
desmarcar pistas como reproducidas manualmente. Seleccione
una pista (o grupo de pistas) y haga clic en [MARK PLAYED] o
[MARK UNPLAYED]. Las pistas que ha reproducido se marcan
con color naranja en su librería. Haga clic en [CLEAR] para restablecer la lista de pistas reproducidas recientemente y cambiar
el color de su librería a blanco.
Acerca de las sesiones
“Sesión” se refiere a una unidad de reproducción. Se creará una sesión
nueva cada vez que se vuelva a abrir ITCH o se inicie manualmente una
sesión nueva.
Cuando se hace clic en [d] a la izquierda de un elemento de la columna
[period] se visualizan las diferentes sesiones grabadas en el historial.
Cuando se hace clic en [d] a la izquierda de las sesiones individuales se
visualizan las pistas y los artistas de esa sesión.
! Las operaciones de edición de abajo se pueden realizar en sesiones.
— START SESSION: Inicia una sesión nueva.
— END SESSION: Termina la sesión.
— INSERT TRACK: Añade información para una pista que no ha
sido reproducida en la sesión (entrada manual).
— EXPORT: Exporta y guarda la información de la sesión.
Introducción manual de información de pistas
Puede añadir a su sesión información para pistas no reproducidas
en ITCH (por ejemplo, si reproduce uno de sus discos de vinilo o CD
favoritos).
1 Seleccione la posición en la que quiera insertar la
información de pistas pista y luego haga clic en [INSERT
TRACK].
Se añade una fila nueva debajo de la posición seleccionada.
2 Haga doble clic en los campos de pistas insertadas y
edite su información en consecuencia.
El nombre de la sesión y del artista se pueden introducir.
Exportación de sesiones
Los datos del panel [HISTORY] se pueden exportar.
1 Seleccione el nombre de la sesión que quiera
exportar.
2 Haga clic en la ficha de la derecha de [EXPORT].
Seleccione el formato en el que se van a guardar los datos.
— text: Formato de archivo de texto. Esto se puede abrir sin usar
software especial.
— CSV: Un formato de archivo usado para software de hojas de
cálculo, etc.
— m3u: Un formato de archivo que se puede importar a software
de reproducción de archivos de música, etc. No se incluyen
datos de audio; la información de la ubicación donde están guardados los archivos se graba.
(La información de pistas insertada en la sesión haciendo clic en
[INSERT TRACK] no se incluye en archivos de este formato.)
3 Haga clic en [EXPORT].
La exportación de datos empieza.
! Los datos exportados se guardan en el directorio siguiente.
Windows: Mi música > _Serato_ > History Export
Macintosh: Música > _Serato_ > History Export
Copia de sesiones en el panel de listas de crates
La información de sesión se puede copiar como uno de los elementos en
el panel de listas de crates.
Arrastre y coloque el nombre de la sesión que quiere
copiar en el panel de listas de crates.
Nota para los usuarios que han instalado
otro software DJ Serato Audio Research
ITCH comparte su librería con Scratch Live. El bucle y los puntos cue
de las pistas establecidas con Scratch Live se pueden usar como tales
con ITCH, y la información establecida con ITCH se puede usar de igual
forma con Scratch Live. Si usa ambos softwares alternativamente, note
que sus librerías tendrán el mismo contenido.
Español
Es
23
Page 60

Información acerca de la copia de
[
±6%
][
±10%
][
±16%
][
±100%
]
seguridad de librerías
Cuando se instala ITCH, la carpeta [_Serato_] se crea en la ubicación del
ordenador mostrada abajo, y la información de la librería y de crate se
guarda en esta carpeta.
Windows: Mis documentos > Mi música > _Serato_
Macintosh: Usuarios > Música > _Serato_
! Cuando las pistas se añaden a la librería desde un disco duro
externo, por ejemplo, la carpeta [_Serato_] también se crea en el
disco duro.
Cuando se sale de ITCH la primera vez después de instalarlo se visualiza
un mensaje de confirmación relacionado con la creación de una copia
de seguridad de librería.
Cuando verifica [Backup library] en la pantalla del mensaje de confirmación, haga clic en [Yes] y luego cierre el software, la carpeta [_Serato_
Backup] se crea en la carpeta [Mi música] (en la carpeta [Música] para
Macintosh) y se hace una copia de seguridad de la información de la
librería.
Después, siempre que verifique [Backup library] en la pantalla del mensaje de confirmación, haga clic en [Yes] y luego cierre el software, se
hará una copia de seguridad de la información que se escribirá sobre la
copia de seguridad anterior.
! El mensaje de confirmación relacionado con la creación de una
copia de seguridad se visualiza de nuevo en los casos siguientes.
— Cuando ha pasado más de 1 semana desde la última copia de
seguridad
— Cuando no haya copia de seguridad
Carga de pistas en decks
1 Seleccione la pista que quiera cargar.
Ponga el cursor en la pista que quiera cargar en el deck.
! Para conocer detalles, vea Selección de elementos en la página 20.
2 Pulse los botones [LOAD (INST. DOUBLES)] para los
decks en los que quiera cargar las pistas.
Las pistas seleccionadas se cargan en los decks respectivos.
! Cuando las pistas que no se han añadido a la librería se cargan
directamente en un deck, éstas se añaden automáticamente a
[All...] en el panel de listas de crates.
! Con pistas seleccionadas, las pistas se pueden cargar en el deck
(A) o (B) pulsando [c] o [d] mientras se pulsa la tecla [Shift]
del teclado del ordenador.
! Las pistas también se pueden cargar en los decks arrastrándo-
las y colocándolas.
! Cuando se pulsa [c] o [d] mientras se pulsan los botones
[Shift] y [Alt] en el ordenador, los decks se vacían.
! Cuando se carga una pista nueva en un deck, el botón [CUE] de
los auriculares para el deck en que se carga la pista se enciende
y el sonido sale por el canal [CUE] de los auriculares.
Duplicación instantánea
Durante la reproducción en uno de los decks, la pista cargada en ese
deck se puede cargar en el otro deck y reproducirse desde la misma posición. (Duplicación instantánea)
El ejemplo siguiente describe la operación para reproducir la pista del
deck (A) en el deck (B) también.
1 Cargue una pista en el deck (A) y reprodúzcala.
2 Mientras pulsa el botón [SHIFT] del deck (B), pulse el
botón [LOAD (INST. DOUBLES)] del deck (B).
La pista cargada en el deck (A) también se carga en el deck (B) y se
reproduce desde la misma posición.
! Cuando el deck (A) está en el modo de pausa, el modo de pausa
se establece en la misma posición para la pista del deck (B).
Reproducción y pausa
Reproducción
1 Cargue una pista en el deck.
! Para conocer detalles del funcionamiento, vea Carga de pistas en
decks en la página 24.
2 Pulse el botón [PLAY/PAUSE f].
Pausa
Durante la reproducción, pulse el botón [PLAY/PAUSE f].
! La reproducción se reanuda cuando se vuelve a pulsar [PLAY/PAUSE f].
Ajuste de la velocidad de
reproducción (Control de tempo)
Cambio de la velocidad de reproducción
Mueva la barra deslizante [TEMPO] hacia delante o hacia
atrás.
La velocidad de reproducción aumenta cuando la barra deslizante se
mueve al lado [+] (hacia usted) y disminuye cuando la barra deslizante se
mueve hacia el lado [–] (lejos de usted).
Selección del margen para ajustar la
velocidad de reproducción
Pulse el botón [TEMPO RANGE].
El margen de ajuste de la velocidad de reproducción cambia cada vez
que se pulsa el botón. El ajuste tras el cambio se visualiza en ITCH.
Ajuste de la velocidad de reproducción
sin cambiar el tono (Master Tempo)
1 Pulse el botón [MASTER TEMPO].
El pitch no cambia más aunque se cambie la velocidad de reproducción
con la barra deslizante [TEMPO].
! El sonido se procesa digitalmente, por lo que su calidad disminuye.
! El margen de tolerancia del tempo maestro es de ±50 %.
2 Mueva la barra deslizante [TEMPO] hacia delante o
hacia atrás.
Reproducción en retroceso
Pulse el botón [REV].
La pista se reproduce en el sentido de retroceso.
! El sentido en el que la velocidad de reproducción aumenta o dismi-
nuye según el sentido en que se gira el dial jog se invierte.
24
Es
Page 61

Operación del dial jog
Cambio del modo del dial jog
El dial jog tiene dos modos.
! Modo [VINYL]: Cuando se pulsa la parte superior del dial de jog
durante la reproducción, ésta hace una pausa, y cuando se gira
ahora el dial de jog, el sonido sale según cómo se gire el dial de jog.
! Modo normal: Pulsar la parte superior del dial de jog durante la
reproducción no activa la pausa de reproducción. Además, no se
pueden hacer operaciones tales como scratching.
Pulse el botón [VINYL (ILLUMINATION)].
El modo de jog cambia al modo [VINYL] y el botón
[VINYL (ILLUMINATION)] se enciende.
Scratch
Cuando el modo de jog se pone en el modo [VINYL] y el dial de jog se
gira mientras se pulsa su parte superior, la pista se puede reproducir
según el sentido y la velocidad a la que se gira el dial de jog.
1 Pulse el botón [VINYL (ILLUMINATION)].
Ponga el modo de jog en el modo [VINYL].
2 Durante la reproducción, pulse la parte superior del
dial jog.
La reproducción se para.
3 Mientras pulsa la parte superior del dial de jog, gírelo
en el sentido y a la velocidad deseados.
El sonido se reproduce según el sentido de giro y la velocidad del dial de
jog.
4 Retire su mano de la parte superior del dial jog.
La reproducción normal se reanuda.
Pitch bend
Durante la reproducción, gire la sección exterior del dial
jog.
La velocidad de reproducción aumenta cuando se gira a la derecha, y
disminuye cuando se gira a la izquierda. La reproducción vuelve a la
velocidad normal cuando se deja de girar.
! Cuando el modo de jog se pone en el modo normal, la misma opera-
ción se puede hacer girando la parte superior del dial de jog.
Cambio de iluminación del dial jog
La iluminación del dial jog se puede seleccionar de entre dos tipos.
! El mismo ajuste se aplica para los dial jog de los decks (A) y (B).
Pulse el botón [VINYL (ILLUMINATION)] mientras pulsa el
botón [SHIFT].
El ajuste cambia cada vez que se pulsa el botón.
Especificación instantánea de la
posición que se va a reproducir
(NEEDLE SEARCH)
El sonido en la posición en la que se toca el pad
[NEEDLE SEARCH (ALPHABET SEARCH)] se puede reproducir
fácilmente.
El borde izquierdo del pad [NEEDLE SEARCH (ALPHABET SEARCH)]
indica el comienzo de la pista, y el borde derecho el final de la pista.
1 Toque la barra
[NEEDLE SEARCH (ALPHABET SEARCH)].
La posición de reproducción de la pista cambia instantáneamente según
la posición del pad que se toca.
2 Mientras toca el pad
[NEEDLE SEARCH (ALPHABET SEARCH)], deslice su dedo a
lo largo del mismo.
La posición de reproducción de la pista se desplaza según desliza su
dedo.
Ajuste de un punto cue temporal
1 Durante la reproducción, pulse el botón [PLAY/PAUSE
f].
La reproducción hace una pausa.
! Si lo desea, ajuste la posición girando el dial jog durante la
pausa. (Para desplazar la posición de reproducción durante la
pausa también se pueden usar otros métodos.)
2 Pulse el botón [CUE].
Se establece un punto cue temporal en la posición en la que se hizo la
pausa en la pista.
! Cuando se establece un punto cue temporal nuevo, el punto estable-
cido previamente se cancela.
Vuelta al punto cue temporal (Vuelta cue)
Durante la reproducción, pulse el botón [CUE].
La posición de reproducción vuelve inmediatamente al punto cue temporal actualmente establecido y hace una pausa.
! Cuando se pulsa el botón [PLAY/PAUSE f], la reproducción
empieza desde el punto cue temporal.
Verificación del punto cue temporal
(Muestreador cue)
Mantenga pulsado el botón [CUE] después de volver al
punto cue temporal.
La reproducción empieza desde el punto cue temporal. La reproducción
continúa mientras se pulsa el botón [CUE].
! Cuando se pulsa el botón [PLAY/PAUSE f] durante el muestreo
de cue, la reproducción continúa desde ese punto.
Operación con el bucle
Configuración de bucle
1 Durante la reproducción, pulse el botón
[LOOP IN (GRID SET)] en la posición donde quiera iniciar
la reproducción de bucle (el punto de entrada de bucle).
El punto de entrada de bucle queda establecido.
2 Pulse el botón [LOOP OUT (GRID TAP)] en el punto
donde quiera finalizar la reproducción de bucle (el punto
de salida de bucle).
El punto de salida de bucle se establece y la reproducción de bucle
empieza desde el punto de entrada de bucle.
Español
Es
25
Page 62

Ajuste preciso del punto de entrada de
bucle (ajuste de entrada de bucle)
1 Durante la reproducción de bucle, pulse el botón
[LOOP IN (GRID SET)].
2 Gire el dial de jog.
El punto de entrada de bucle se puede ajustar de forma precisa.
! El margen de ajuste del punto de entrada de bucle se encuentra en
cualquier punto anterior al punto de salida de bucle.
3 Pulse el botón [LOOP IN (GRID SET)].
La reproducción normal de bucle se reanuda.
Ajuste preciso del punto de salida de
bucle (ajuste de salida de bucle)
1 Durante la reproducción de bucle, pulse el botón
[LOOP OUT (GRID TAP)].
2 Gire el dial de jog.
El punto de salida de bucle se puede ajustar de forma precisa.
! El margen de ajuste del punto de salida de bucle se encuentra en
cualquier punto anterior al punto de salida de bucle.
3 Pulse el botón [LOOP OUT (GRID TAP)].
La reproducción normal de bucle se reanuda.
Cancelación de la reproducción de bucle
(Salida de bucle)
Durante la reproducción de bucle, pulse el botón
[RELOOP/EXIT (GRID CLEAR)].
La reproducción continúa más allá del punto de salida de bucle sin
volver al punto de entrada de bucle.
Vuelva a la reproducción de bucle
(Rebucle)
Después de cancelar la reproducción de bucle, pulse
[RELOOP/EXIT (GRID CLEAR)] durante la reproducción.
La reproducción vuelve al punto de entrada de bucle previamente establecido, y la reproducción de bucle se reanuda.
Cancelación de bucle automático
Durante el bucle automático, pulse el control
[AUTO LOOP (GRID SLIDE)].
La reproducción continúa más allá del punto de salida de bucle sin
volver al punto de entrada de bucle.
División de bucles (División de bucles por
la mitad)
Durante la reproducción de bucle, gire el control
[AUTO LOOP (GRID SLIDE)] hacia la izquierda.
La duración del bucle se divide por la mitad cada vez que el control se
gira hacia la izquierda.
Duplicación de bucle (Loop Doubling)
Durante la reproducción de bucle, gire el control
[AUTO LOOP (GRID SLIDE)] hacia la derecha.
La duración del bucle se duplica cada vez que el control se gira hacia la
derecha.
Uso del banco de bucles
Para guardar puntos de bucle
Los bucles se pueden guardar de antemano y llamarlos posteriormente.
1 Pulse el botón [LOOP SELECT (GRID LOCK)] para
seleccionar el número del banco de bucles donde quiere
guardar el bucle.
El número del banco de bucles cambia cada vez que se pulsa el botón.
! Si no se ha establecido nunca un bucle para la pista actual-
mente cargada se asigna el número de banco 1.
2 Establezca el bucle.
Para conocer sobre cómo poner los bucles, Operación con el bucle en la
página 25.
Cuando se establece un bucle, éste se guarda automáticamente en el
banco de bucles actualmente seleccionado.
! Se puede establecer un máximo de 9 bancos de bucles.
! Cuando se establece un bucle estando seleccionado un número
de banco en el que ya se ha guardado un bucle, se escribe sobre
el bucle guardado en ese banco de bucles.
Configuración automática de bucle (Bucle
automático)
1 Durante la reproducción, gire el control [AUTO LOOP
(GRID SLIDE)].
Establece la longitud de bucle mediante el número especificado de
tiempos de compás.
2 Pulse el control [AUTO LOOP (GRID SLIDE)].
Según el BPM de la pista de reproducción actual se crea automáticamente un bucle con el número establecido de beats y la reproducción de
bucle empieza.
! Incluso durante el bucle automático, la duracion del bucle se
puede ajustar girando el control [AUTO LOOP (GRID SLIDE)].
Es
26
Llamada a puntos de bucle
1 Pulse el botón [LOOP SELECT (GRID LOCK)].
El número del banco de bucles cambia cada vez que se pulsa el botón.
Seleccione el banco de bucles donde está guardado el punto de bucle.
2 Pulse el botón [RELOOP/EXIT (GRID CLEAR)].
La reproducción de bucle empieza desde el punto de entrada de bucle
guardado.
Eliminación de puntos de bucle
Haga clic en [×] a la derecha de la visualización del
número del banco de bucles.
El punto de bucle guardado en el banco de bucles actualmente seleccionado se elimina.
Page 63

Protección de puntos de bucle (Bloqueo de bucle)
Haga clic en
a la izquierda de la visualización del
número del banco de bucles.
Las operaciones que sobreescriben o eliminan el punto de bucle guardado en el banco de bucles seleccionado se desactivan.
Cuando se pulsa de nuevo
, la protección se cancela.
Configuración de hot cue
Cuando se establece un hot cue, ese punto se puede llamar y reproducirse instantáneamente. Se puede establecer un máximo de 5 hot cues
por pista de música.
1 Pulse el botón [REC MODE].
El modo cambia al modo de grabación de hot cue. El botón [REC MODE]
parpadea.
! Para los botones de hot cue en los que no se han establecido hot
cues, los hot cues se pueden establecer hasta sin pulsar el botón
[REC MODE] para cambiar al modo de grabación de hot cue.
2 Durante la reproducción, en el modo de pausa
o cuando se hace una pausa en un punto cue, pulse
uno de los botones de hot cue [HOT CUE (DELETE) 1] –
[HOT CUE (DELETE) 5].
Se establece un hot cue en la posición en la que se pulsó el botón.
Los botones de hot cue en los que se han establecido hot cues
([HOT CUE (DELETE) 1] – [HOT CUE (DELETE) 5]) se encienden.
! La posición donde se ha establecido el hot cue se visualiza en la
vista general de la pista.
! El sentido de reproducción no se graba para hot cues.
Uso del modo slip
El modo slip es una herramienta que le permite manipular temporalmente el audio de forma normal mediante scratching, bucles y reproducción en retroceso. Según hace esto, la cabeza reproductora continua
moviéndose de forma inaudible por la pista del fondo, manteniendo su
lugar como si usted estuviera reproduciendo la pista normalmente. Una
vez finalizada la manipulación, la reproducción se reanuda desde la
posición actual de la cabeza reproductora en la pista.
! El botón [SLIP] se enciende cuando se activa el modo [SLIP] y parpa-
dea mientras la reproducción normal continúa en el fondo.
Bucle de deslizamiento
1 Pulse el botón [SLIP].
El modo cambia al modo de deslizamiento.
2 Pulse el botón [LOOP IN (GRID SET)] y luego pulse el
botón [LOOP OUT (GRID TAP)].
La reproducción de bucle empieza.
La reproducción normal continúa en el fondo incluso durante la reproducción de bucle.
3 Pulse el botón [RELOOP/EXIT (GRID CLEAR)].
El bucle se cancela, y la reproducción normal del sonido que se reproducía en el fondo se reanuda.
! Para cancelar el modo slip, pulse de nuevo el botón [SLIP].
Bucle de deslizamiento de pulsación
automático
Español
Reproducción de hot cues
! Cuando el botón [REC MODE] está parpadeando, el modo de
grabación de hot cue se establece. En este caso, pulse el botón
[REC MODE] para cambiar al modo de reproducción de hot cue. El
botón [REC MODE] se apaga en el modo de reproducción de hot cue.
Pulse uno de los botones de hot cue
([HOT CUE (DELETE) 1] – [HOT CUE (DELETE) 5]) en el que
se ha establecido un hot cue.
La reproducción empieza instantáneamente desde el punto grabado en
el botón.
! Los botones de hot cue en los que no se han establecido hot
cues no se encienden. Si se pulsa uno de estos botones de hot
cue, la posición en la que se pulsa el botón se establece como
punto hot cue para ese botón.
Muestreador de hot cue
En el modo de pausa o cuando se hace una pausa en un
punto hot cue temporal, pulse y mantenga pulsado uno de
los botones [HOT CUE (DELETE) 1] – [HOT CUE (DELETE) 5] en
los que esta establecido un hot cue.
La posición de reproducción se traslada a ese punto hot cue y el hot cue
se reproduce mientras se mantiene pulsado el botón de hot cue.
! Cuando se pulsa el botón [PLAY/PAUSE f] durante el muestreo
de hot cue, la reproducción continúa desde ese punto.
Eliminación de hot cues
Pulse uno de los botones de hot cue
[HOT CUE (DELETE) 1] – [HOT CUE (DELETE) 5] mientras
pulsa el botón [SHIFT].
El botón de hot cue ([HOT CUE (DELETE) 1] – [HOT CUE (DELETE) 5])
cuyo hot cue ha sido eliminado se apaga.
1 Pulse el botón [SLIP].
El modo cambia al modo de deslizamiento.
2 Gire el control [AUTO LOOP (GRID SLIDE)] para
establecer el beat.
3 Pulse el control [AUTO LOOP (GRID SLIDE)].
Según el BPM de la pista de reproducción actual se crea automáticamente un bucle con el número establecido de beats y la reproducción de
bucle empieza.
La reproducción normal continúa en el fondo incluso durante la reproducción de bucle.
4 Pulse el botón [RELOOP/EXIT (GRID CLEAR)].
El bucle se cancela, y la reproducción normal del sonido que se reproducía en el fondo se reanuda.
! Para cancelar el modo slip, pulse de nuevo el botón [SLIP].
Retroceso de deslizamiento
1 Pulse el botón [SLIP].
El modo cambia al modo de deslizamiento.
2 Pulse el botón [REV].
La pista se reproduce en el sentido de retroceso.
La reproducción normal continúa en el fondo incluso durante la reproducción en retroceso.
! Para cancelar el modo slip, pulse de nuevo el botón [SLIP].
Scratching de slip
1 Pulse el botón [VINYL (ILLUMINATION)].
Ponga el modo de jog en el modo [VINYL].
2 Pulse el botón [SLIP].
El modo cambia al modo de deslizamiento.
Es
27
Page 64

3 Durante la reproducción, pulse la parte superior del
dial jog.
Realiza el scratching.
La reproducción normal continúa en el fondo incluso durante el
scratching.
! Las operaciones de bucle de deslizamiento y retroceso de desliza-
miento se realizan durante la reproducción scratch de deslizamiento.
4 Retire su mano de la parte superior del dial jog.
La reproducción normal del sonido que se reproducía en el fondo se
reanuda.
! Para cancelar el modo slip, pulse de nuevo el botón [SLIP].
Slip hot cue
1 Establezca el hot cue.
Para conocer detalles, vea Configuración de hot cue en la página 27.
2 Pulse el botón [SLIP].
El modo cambia al modo de deslizamiento.
3 Mantenga pulsado el botón de hot cue.
La reproducción empieza desde el punto hot cue. La reproducción continúa mientras se pulsa el botón de hot cue.
4 Retire su dedo del botón de hot cue.
La reproducción normal del sonido que se reproducía en el fondo se
reanuda.
! Para cancelar el modo slip, pulse de nuevo el botón [SLIP].
Sincronización de la velocidad de
reproducción
Sincronización de los beats de 2 pistas
(Sincronización de beats)
El tempo (BPM) y el beat grid de la pista se pueden sincronizar automáticamente con la pista del deck opuesto.
! Cuando use la función de sincronización de beats, use de antemano
las barras deslizantes [TEMPO] para ajustarlas de forma que los
BPM de las pistas de los dos decks estén próximos entre sí.
! Si se activa el ajuste de [Enable beat grid] en el menú [SETUP], el
tempo (BPM) y el beat grid se sincronizarán totalmente. Si se desac-
tiva el ajuste sólo se sincroniza el tempo (BPM).
Pulse el botón [SYNC (SYNC OFF)] del deck que quiera
sincronizar.
Para sincronizar la pista del deck (A) con la reproducción de la pista del
deck (B), pulse el botón [SYNC (SYNC OFF)] en el deck (B).
! Para cancelar la sincronización, pulse el botón [SYNC (SYNC OFF)]
mientras pulsa el botón [SHIFT].
— El beat grid también se puede alinear manualmente observando
la visualización de coincidencia de beat usando el dial de jog.
! Una vez terminada la edición del beat grid, pulse la tecla [Enter] del
ordenador para guardar. (El modo de edición del beat grid también
se cancela.)
— Si no quiere guardar el beat grid editado, haga clic en la tecla
[Esc] del ordenador.
Ajuste del marcador de beat
1 Seleccione la posición donde quiera establecer el
marcador de beat.
Use el pad [NEEDLE SEARCH (ALPHABET SEARCH)] o el dial jog para
desplazar la posición donde quiera poner el marcador de beat al centro
del display de forma de onda.
! La posición también se puede desplazar arrastrando el display de
forma de onda en la pantalla del ordenador.
2 Pulse el botón [LOOP IN (GRID SET)] mientras pulsa el
botón [SHIFT].
El marcador de beat se establece. (Los marcadores de beat se pueden
poner en múltiples puntos.)
! En el modo de edición de beat grid, los marcadores de beat también
se pueden establecer pulsando la tecla [X] del teclado del ordenador
o haciendo doble clic mientras se pulsa la tecla [Alt].
Deslizamiento de todo el beat grid a
derecha o izquierda
Gire el control [AUTO LOOP (GRID SLIDE)] a la derecha o a
la izquierda mientras pulsa el botón [SHIFT].
Cuando se gira a la derecha, todo el beat grid se desliza a la derecha.
Cuando se gira a la izquierda, todo el beat grid se desliza a la izquierda.
! En el modo de edición del beat grid, el deslizamiento también es
posible pulsando la tecla [c] o [d] del ordenador mientras se pulsa
la tecla [Ctrl].
! En el modo de edición del beat grid, el beat grid se desliza más rápi-
damente cuando se pulsa la tecla [c] o [d] del ordenador mientras
se pulsan las teclas [Ctrl] y [Shift].
Ajuste del espaciamiento de todo el beat
grid
Gire el dial jog a la derecha o a la izquierda mientras
pulsa el botón [SHIFT].
Cuando se gira a la derecha, el espaciamiento del beat grid se ensancha, y cuando se gira a la izquierda, el espaciamiento del beat grid se
estrecha.
! En el modo de edición del beat grid, el espaciamiento del beat grid
también se puede ajustar pulsando la tecla [c] o [d] del ordenador
o arrastrando mientras se pulsa la tecla [Alt].
! En el modo de edición del beat grid, el espaciamiento se puede
ajustar más rápidamente pulsando la tecla [c] o [d] del ordenador
mientras se pulsa la tecla [Shift].
Edición del beat grid
El beat grid se establece automáticamente según el valor promedio del
BPM cuando se analizan pistas.
Si el beat grid no coincide con el beat real de la pista, las pistas de los
deck derecho e izquierdo se sincronizan con más precisión después de
editar el beat grid.
! Para editar el beat grid, active el ajuste [Enable beat grid] en el
menú [SETUP].
El beat grid también se puede editar mediante operaciones en el ordenador. Para ello, deberán hacerse las operaciones de abajo.
! Pulse simultáneamente [Alt] y las teclas espaciadoras del teclado del
ordenador o haga clic en [GRID EDIT] en la pantalla del ordenador
para establecer el modo de edición del beat grid.
Es
28
Ajuste del espaciamiento de todo el beat
grid pulsando el botón
Mientras reproduce la pista, la anchura del beat grid se puede ajustar
pulsando el botón.
Al principio de las mediciones de una de las pistas, pulse
repetidamente [LOOP OUT (GRID TAP)] mientras pulsa el
botón [SHIFT].
El intervalo con que se pulsa [LOOP OUT (GRID TAP)] se establece
como espaciamiento del beat grid.
! En el modo de edición del beat grid, el espaciamiento del beat
grid también se puede ajustar pulsando la tecla espaciadora del
ordenador.
Page 65

Eliminación de marcadores de beat
1 Seleccione el marcador de beat que quiera eliminar.
Use el pad [NEEDLE SEARCH (ALPHABET SEARCH)] o el dial jog para
desplazar el marcador de beat que quiera eliminar al centro del display
de forma de onda.
! La posición también se puede desplazar arrastrando el display de
forma de onda en la pantalla del ordenador.
2 Pulse el botón [RELOOP/EXIT (GRID CLEAR)] mientras
pulsa el botón [SHIFT].
! En el modo de edición del beat grid, los marcadores de beat tam-
bién se pueden eliminar seleccionándolos y luego pulsando la tecla
[Delete] del teclado del ordenador o haciendo doble clic mientras se
pulsan las teclas [Alt] y [Shift].
! En el modo de edición del beat grid, el beat grid completo se puede
eliminar pulsando la tecla [Delete] del ordenador mientras se pulsa
la tecla [Shift].
Bloqueo de beat grids
Esto protege todo el grid para que no se pueda editar en unidades de
pistas individuales.
Pulse el botón [LOOP SELECT (GRID LOCK)] mientras
pulsa el botón [SHIFT].
Uso de las funciones del mezclador
Salida de sonido
Ajuste a un nivel apropiado el volumen de los amplificadores de potencia conectados a los terminales [MASTER OUT 1, MASTER OUT 2].
Note que si se ajusta un volumen demasiado alto se producirán sonido
muy altos.
1 Gire el control [TRIM].
Ajusta la entrada de nivel de audio a varios decks.
2 Mueva el fader de canal alejándolo de usted.
Ajusta la salida de nivel de sonido desde varios decks.
3 Mueva el crossfader.
Cambie el deck cuyo sonido va a salir por los altavoces.
— Esta operación no es necesaria cuando el conmutador selector
de curva de crossfader esté en [THRU].
! Borde izquierdo: Sólo sale el sonido del canal asignado a la
izquierda del crossfader.
! Posición central: El sonido de los dos decks se mezcla y sale.
! Borde derecho: Sólo sale el sonido del canal asignado a la dere-
cha del crossfader.
! Las asignaciones de los decks se pueden cambiar de derecha a
izquiera y viceversa con el botón [C.F. REV].
4 Gire el control [MASTER LEVEL].
Las señales de audio salen por los terminales [MASTER1] y [MASTER2].
Monitoreo de sonido con auriculares
El canal para monitorear por los auriculares se llama canal [CUE]. El
sonido de este canal sale por los auriculares independientemente de las
posiciones del crossfader y del fader de canal.
! Para monitorear el sonido del deck (A) o del deck (B) por los auricula-
res sin darlo salida desde el canal [MASTER], use uno de los procedimientos de abajo.
— Mueva el fader de canal para el canal que no quiera que salga
desde el canal [MASTER] a la posición más próxima hacia
usted.
— Mueva completamente el crossfacer hasta el lado opuesto al
canal que no quiere que salga.
! Para monitorear el sonido del micrófono o del aparato externo (AUX)
sin darlo salida desde el canal [MASTER], seleccione [Mute] en el
panel de control de monitoreo MIC/ AUX.
= Panel de control de monitoreo MIC/ AUX (pág.18)
1 Conecte auriculares a uno de los terminales
[PHONES].
2 Pulse el botón [CUE] de auriculares para el canal que
quiera monitorear.
El botón [CUE] de auriculares se enciende y el sonido sale al canal [CUE]
de auriculares.
! Si quiere monitorear el sonido de ambos canales simultá-
neamente, pulse simultáneamente ambos botones [CUE] de
auriculares.
3 Haga clic en la tecla [CUE] para el micrófono o
aparato externo que quiera monitorear.
La tecla [CUE] resalta y el sonido sale al canal [CUE] de auriculares.
! Para conocer detalles de las posiciones de las teclas, vea
Cambio de iluminación del dial jog en la página 25.
4 Gire el control [HEADPHONES MIXING].
Ajuste el balance del volumen de monitoreo entre el sonido del canal
[CUE] y el sonido del canal [MASTER].
! Gire hacia la izquierda: El volumen relativo del canal [CUE]
aumenta. Cuando se gira completamente a la izquierda, el
sonido del canal [MASTER] no se puede oír por los auriculares.
! Posición central: El sonido del canal [CUE] y el sonido del canal
[MASTER] tienen el mismo volumen.
! Giro hacia la derecha: El volumen relativo del canal [MASTER]
aumenta. Cuando se gira completamente a la derecha, el sonido
del canal [CUE] no se puede oír por los auriculares.
5 Gire el control [HEADPHONES LEVEL].
El volumen de los auriculares se ajusta.
Cuando se pulsan múltiples botones [CUE] de auriculares, el sonido de
los decks para los que se pulsan los botones se mezcla y sale por los
auriculares.
! Cuando se pulsa de nuevo el botón [CUE] de auriculares, el monito-
reo del sonido del deck se cancela.
! Cuando se hace de nuevo clic en la tecla [CUE] del panel de control
de monitoreo MIC/ AUX, el monitoreo del sonido del micrófono o del
aparato externo se cancela.
Selección de las características de curva
de crossfader
Español
Ecualización
Gire los controles [EQ (HI, MID, LOW) ] de los respectivos
decks.
Éstos ajustan respectivamente [HI] (gama alta), [MID] (gama media) y
[LOW] (gama baja).
Cambie el conmutador selector de curva de crossfader.
! [ ]: Hace una curva que aumenta bruscamente (si el crossfa-
der se separa del lado [A] salen inmediatamente señales de
audio desde el lado [B]).
! [
]: Hace una curva que aumenta gradualmente (si el crossfader se separa del lado [A], el sonido del lado [B] aumenta
gradualmente, mientras que el sonido del lado [A] se reduce
gradualmente).
! [THRU]: Elija esto cuando no quiera usar el crossfader.
Es
29
Page 66

Uso de la función de inversión de
crossfader
Cambie el conmutador [C.F. REV].
! [ON]: El lado izquierdo del crossfader se establece para el deck
(B) y el lado derecho para el deck (A).
! [OFF]: El lado izquierdo del crossfader se establece para el deck
(A) y el lado derecho para el deck (B).
Inicio de reproducción usando el fader
(Inicio de fader)
Inicio de la reproducción usando el crossfader
1 Ponga el conmutador [FADER START] en [ON].
2 Mueva el crossfader.
Póngalo en el borde opuesto al lado en el que está establecido el canal
que quiera usar con la función de inicio de fader.
3 Establezca el punto cue temporal.
La reproducción hace una pausa en el punto cue temporal.
! Si ya se ha establecido un punto cue temporal, pulse el botón
[CUE] para mover la posición de reproducción de vuelta a ese
punto.
4 Mueva el crossfader.
La reproducción empieza.
! Si vuelve a ajustar el crossfader en la posición original, el reproductor
vuelve inmediatamente al punto cue temporal y hace una pausa en la
reproducción (vuelta a punto cue).
al micrófono. (El volumen del sonido introducido a los terminales
[AUX IN] no disminuye.)
3 Gire el control [LEVEL].
Ajuste la salida del nivel de sonido de [MIC1] y [MIC2].
! Tenga en cuenta que girar hasta la posición del extremo derecho da
salida a un sonido muy alto.
4 Introduzca señales de audio en el micrófono
Ecualización
Gire los controles [EQ (HI, MID, LOW)] para [MIC1] o
[MIC2].
Uso de un aparato externo
1 Ponga el conmutador selector [MIC2/ AUX] en [AUX].
2 Gire a la derecha el control [LEVEL] de la sección del
micrófono/
Ajusta el nivel del sonido de salida.
Ecualización
Gire los controles [EQ (HI, MID, LOW)] de la sección del
micrófono/ AUX.
AUX.
! Si el volumen no se puede ajustar lo suficiente con el control
[LEVEL] de la sección del micrófono/ AUX solamente, ajústelo
girando el control [VOL] del panel trasero.
Inicio de reproducción de hot cue usando
el fader (Inicio de fader de hot cue)
Inicio de la reproducción usando el crossfader
1 Ponga el conmutador [FADER START] en [ON].
2 Mueva el crossfader.
Póngalo en el borde opuesto al lado en el que está establecido el canal
que quiera usar con la función de inicio de fader.
3 Seleccione uno de los hot cues.
La reproducción hace una pausa en el punto hot cue.
! Si no hay un hot cue establecido, establézcalo primero.
Para conocer detalles, vea Configuración de hot cue en la página 27.
4 Mueva el crossfader.
La reproducción empieza.
! Si vuelve a ajustar el crossfader en la posición original, el reproductor
vuelve instantáneamente al punto hot cue ya establecido y hace una
pausa en la reproducción.
Uso de un micrófono
1 Conecte un micrófono al terminal [MIC1] o [MIC2].
! Para usar el terminal [MIC2], ponga el conmutador selector
[MIC2/ AUX] en [MIC2].
2 Ponga el conmutador selector [OFF, ON, TALK OVER]
en [ON] o [TALK OVER].
! [ON]: El indicador se enciende.
! [TALK OVER]: El indicador parpadea.
! Cuando se pone en [TALK OVER], el volumen de la pista que se
reproduce disminuye automáticamente cuando se introduce sonido
Grabación
! Para conocer detalles de la pantalla relacionada en el ordenador, vea
Panel de grabación en la página 18.
! La grabación del sonido de entrada no es posible con ITCH incluso
cuando el conmutador selector [MIC/AUX THRU] está en [ON].
1 Seleccione el canal que va a grabar.
Haga esta operación en la pantalla del ordenador.
! [MIX]: La salida de sonido de los terminales [MASTER OUT 1] y
[MASTER OUT 2] se puede grabar.
! [AUX]: El sonido del canal [MIC/ AUX] se puede grabar solo.
2 Ajuste el nivel de grabación.
Ajuste el nivel de grabación usando los controles apropiados para la
fuente que está siendo grabada. El medidor de grabación del software
muestra el nivel de señal que será grabado en el disco. Le recomendamos ajustar sus niveles de forma que la parte con el sonido más alto de
la mezcla haga que el medidor entre en la zona roja sólo brevemente.
3 Pulse el botón [AREA MOVE (REC)] mientras pulsa el
botón [SHIFT].
La grabación empieza.
El botón [AREA MOVE (REC)] parpadea.
4 Pulse el botón [AREA MOVE (REC)] mientras pulsa el
botón [SHIFT].
El botón [AREA MOVE (REC)] se apaga y se detiene la grabación.
5 Utilice el ordenador para introducir el nombre de
archivo.
6 Pulse el botón [LOAD PREPARE (SAVE)] mientras
pulsa el botón [SHIFT].
El sonido grabado se guarda.
! Si no se introduce nombre de archivo se crea un archivo con el
nombre “Serato Recording <número de serie>”.
! Los datos grabados se guardan en el directorio siguiente.
30
Es
Page 67
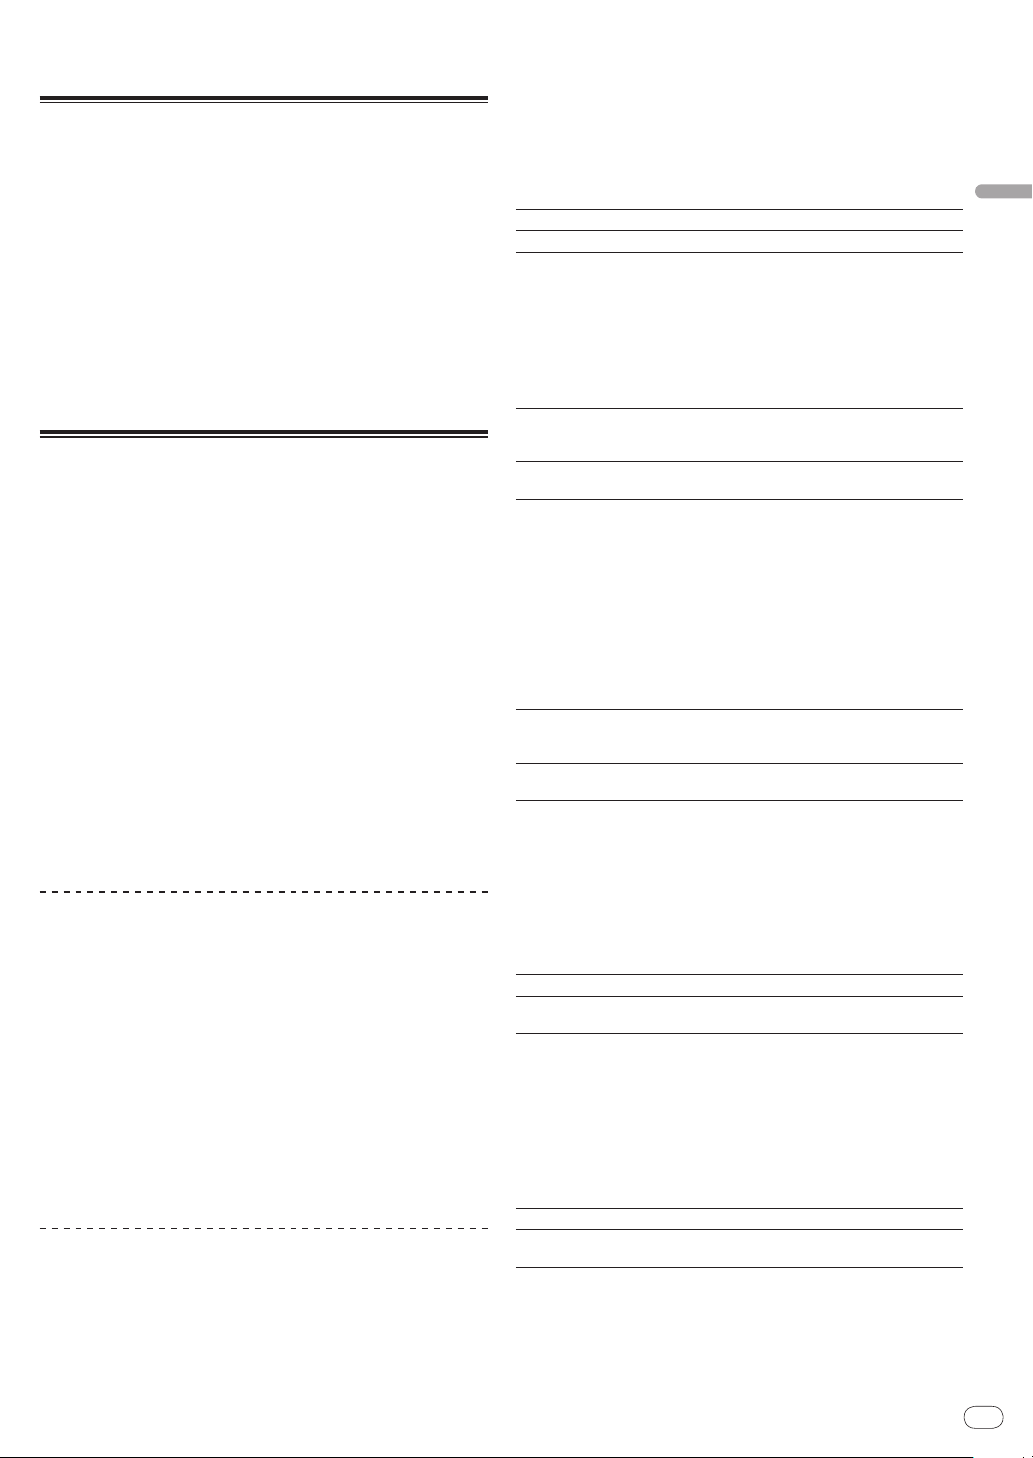
Windows: Mi música > _Serato_ > Recording
Macintosh: Música > _Serato_ > Recording
Salida directa del sonido del
micrófono y de AUX
Cuando el conmutador selector [MIC/AUX THRU] se pone en [ON], las
señales de audio del aparato externo y del micrófono conectados salen
directamente sin pasar por el ordenador. Ponga normalmente el conmutador en [OFF].
1 Ponga el conmutador selector [MIC/AUX THRU] en
[ON].
2 Introduzca señales de audio en el micrófono o dé
salida a señales de audio desde el aparato externo.
! Cuando el conmutador selector [MIC/AUX THRU] está en [ON]
no se aplica ningún efecto al micrófono ni al equipo auxiliar
conectado.
Uso de la función de efecto
Esta función le permite establecer instantáneamente varios efectos
según el tempo (BPM = pulsaciones por minuto) de la pista que está
reproduciéndose.
El efecto se aplica al canal seleccionado.
1 Gire el control [FX CH SELECT].
Esto selecciona el canal al que se aplica el efecto.
2 Gire el control [EFFECT SELECT].
Esto selecciona el tipo de efecto.
Para conocer los tipos de efectos, vea Tipos de efectos en la página 31.
3 Pulse el botón [FX ON/OFF].
Cuando el efecto está encendido, el efecto seleccionado se aplica al
sonido.
! Cuando se pulsa de nuevo un botón, el efecto se apaga.
— Los parámetros de efectos se pueden ajustar girando los contro-
les [LEVEL/DEPTH] y [PARAMETER].
— Cuando el control [FX CH SELECT] se pone en [MASTER] o
[MIC/AUX], la salida del micrófono o del canal AUX puede
parecer que está desincronizada. En este caso, apague el efecto
o ponga el control [FX CH SELECT] en [A] o [B].
Ajuste manual del BPM
El BPM usado como valor básico para el efecto se puede ajustar
manualmente.
! Cuando se selecciona [A] o [B] en el control [FX CH SELECT] se
ajusta el modo de audio correspondiente al BPM de la pista cargada
en el deck.
Use el botón [TAP] si quiere ajustar manualmente el BPM.
! Cuando se selecciona [MASTER] o [MIC/AUX] en el control
[FX CH SELECT], el modo se ajusta siempre en manual.
Pulse el botón [TAP].
El intervalo con el que se pulsa repetidamente el botón [TAP] con un
dedo se establece como BPM.
! Cuando se selecciona [A] o [B] en el control [FX CH SELECT], el BPM
se puede volver a poner en el modo automático pulsando y mante-
niendo pulsado el botón [TAP].
Tipos de efectos
! En la descripción de la sección, “beat establecido” se refiere al beat
establecido con el control [PARAMETER].
REVERB
La reverb es una serie de pequeños delays naturales o reverberaciones
de la señal de audio que crea un efecto atmosférico espacioso como el
que se puede oír en una cueva o en un espacio cerrado. Estos “reflejos”
de reverb son ondas de audio que suenan como si la música rebotase de
pared a pared. Como efecto digital, la reverb le permite crear una sensación de espacio y ambiente. Al convertirse la profundidad de reverb en
completamente wet, el sonido original desaparece gradualmente.
Control PARAMETER Ajusta el grado del efecto de reverb.
Control LEVEL/
DEPTH Ajusta el nivel de reverberación.
DELAY
Un delay es cuando una parte de la señal de audio se repite en una etapa
posterior. Al aumentar el nivel de [FX MIX] se mezclará el nivel de delay
con el nivel original, hasta que usted tenga un delay del 100 % mezclado
con el sonido original.
Control PARAMETER
Control LEVEL/
DEPTH
Use éstos para establecer un tiempo de retardo de
1/16 – 8/1 con respecto al tiempo de un tiempo de
compás de las BPM.
Ajusta el balance entre el sonido original y el sonido
de efecto.
ECHO
Similar al delay, el efecto echo repetirá la señal original en una etapa
posterior durante un número establecido de veces antes de que el efecto
de echo desaparezca. El echo emula las unidades de eco de cinta clásicas, con un sonido más cálido y más análogo, donde el usuario puede
controlar la calidez/ color de la señal con efectos, en vez del delay digital
limpio. El nivel aumentará al aumentar el wet del efecto, hasta que sólo
el delay totalmente wet esté reproduciendo sin señal original.
Control PARAMETER
Control LEVEL/
DEPTH
Use éstos para establecer un tiempo de retardo de
1/16 – 8/1 con respecto al tiempo de un tiempo de
compás de las BPM.
Ajusta el balance entre el sonido original y el sonido
de efecto.
LPF
El filtro pasabajos actúa como un ecualizador que corta el extremo superior del espectro de frecuencias, permitiendo sólo el paso del audio que
está por debajo del punto de corte del filtro, barriendo hacia abajo hacia
el extremo inferior de la señal. Se puede añadir resonancia, haciendo
que el punto de corte de efecto sea más pronunciado.
Control PARAMETER Ajusta la resonancia.
Control LEVEL/
DEPTH
Cuanto más se gira el control a la derecha más se
aplica el efecto.
HPF
El filtro pasaalto actúa como un ecualizador que corta los graves del
espectro de frecuencias, permitiendo sólo el paso del audio que está
por encima del punto de corte del filtro, barriendo hacia arriba hacia el
extremo superior de la señal. Se puede añadir resonancia, haciendo que
el punto de corte de efecto sea más pronunciado.
Control PARAMETER Ajusta la resonancia.
Control LEVEL/
DEPTH
Cuanto más se gira el control a la derecha más se
aplica el efecto.
PHASER
El phaser usa filtros para desplazar el espectro de frecuencias para crear
un efecto de barrido en la fuente de audio. Un oscilador de baja frecuen-
Español
Es
31
Page 68
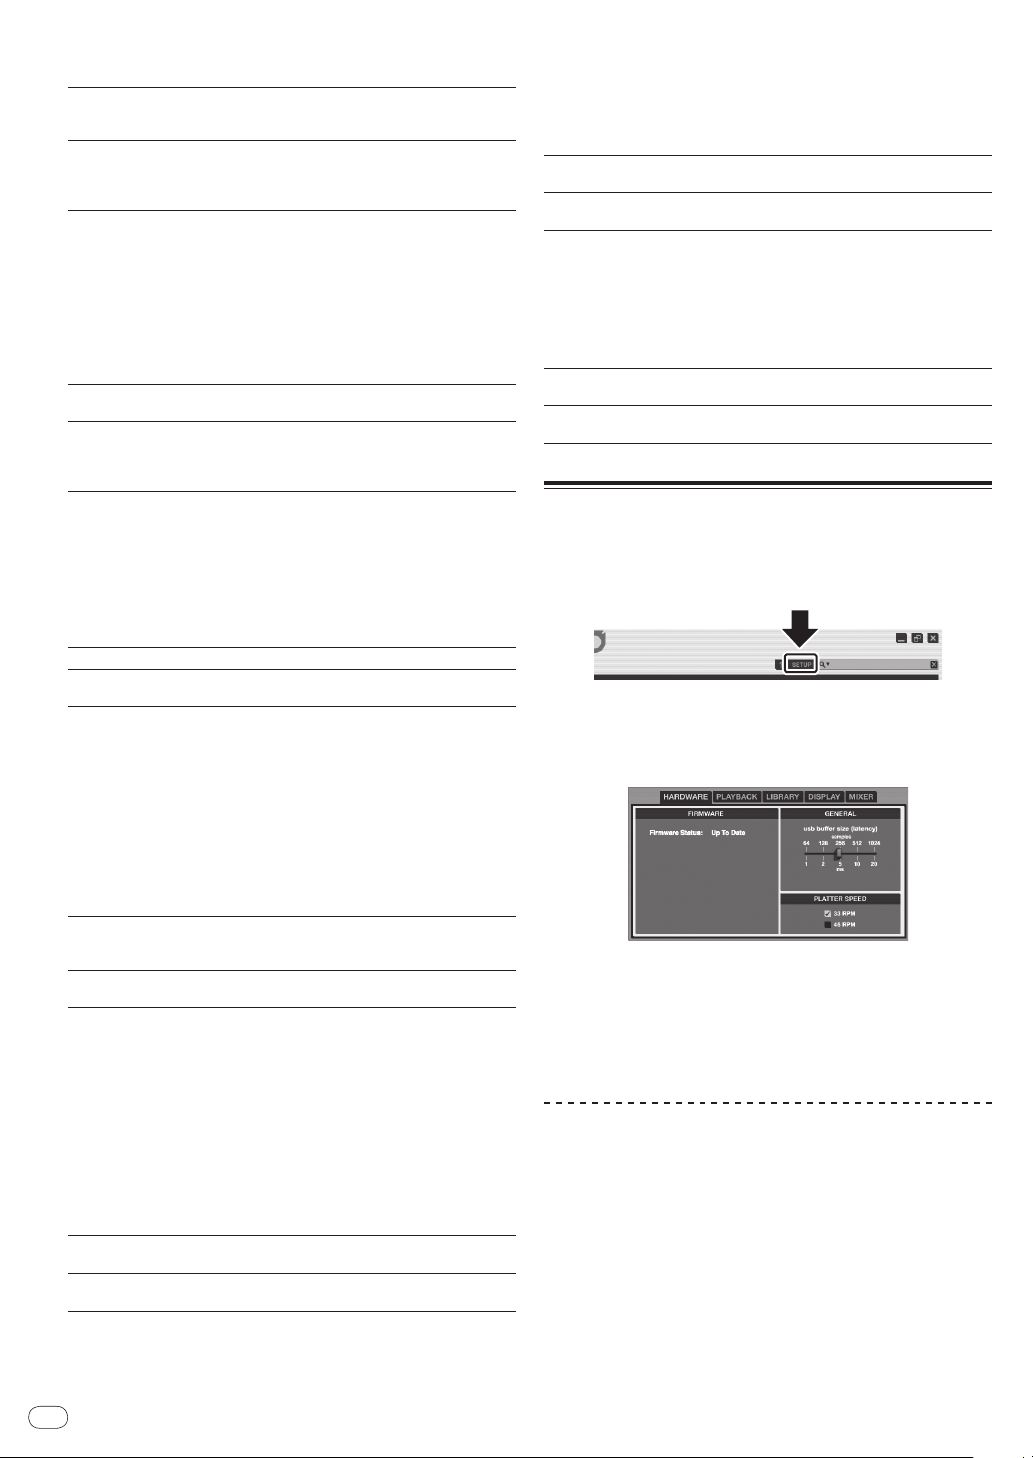
cia alterará la velocidad del barrido. [FX MIX] cambiará la profundidad y
la retroalimentación del efecto.
Control PARAMETER
Control LEVEL/ DEPTH
Use éstos para establecer el ciclo para mover el efecto
de phaser como un tiempo de 1/6 – 32/1 con respecto al
tiempo de un tiempo de compás de las BPM.
Cuanto más se gira el control a la derecha más se
aplica el efecto.
Cuando se gira completamente a la izquierda sólo
sale el sonido original.
REPEATER
Este efecto repite partes de audio similares a una función de enrollado
de bucle. Puede controlar la “oportunidad” de que la reproducción de
streaming de audio se repita, la cuenta con la que se repetirá la sección
de audio y el tiempo de la división de audio que va a ser repetida.
Control PARAMETER
Control LEVEL/ DEPTH
Use éstos para establecer un tiempo de repetición de
1/16 – 8/1 con respecto al tiempo de un beat del BPM.
Establece la frecuencia con la que se aplica el
sonido repetido.
FLANGER
El efecto de flanger se produce cuando dos fuentes de sonido idénticas
se mezclan en momentos ligeramente diferentes, creando un barrido de
audio que suena más natural hacia arriba y hacia abajo del espectro de
frecuencias según usted cambia el parámetro de [TIME]. [FX MIX] cambiará la profundidad y la retroalimentación del efecto.
Control PARAMETER
Control LEVEL/
DEPTH
Establece un tiempo de efecto de 1/6 – 32/1 con
respecto al tiempo de un beat del BPM.
Cuanto más se gira el control a la derecha más se
aplica el efecto.
Cuando se gira completamente a la izquierda sólo
sale el sonido original.
CRUSHER
Crusher añade distorsión y reduce la resolución de la velocidad de bits
de la fuente de audio. Este efecto puede sonar como si hubiera interferencia o sobreexcitación dependiendo del punto en que se ha establecido la profundidad de bits.
Control PARAMETER Ajusta el grado del efecto.
Control LEVEL/
DEPTH
Cuanto más se gira el control a la derecha más se
aplica el efecto.
TREMOLO
El tremolo modula el volumen de la señal, bajándolo y subiéndolo rítmicamente para establecer divisiones de tiempo, como si usted estuviera
haciendo una serie de cortes en el crossfader del mezclador. [TIME]
determina el porcentaje de la caída del volumen, mientras que [FX MIX]
modifica la modulación en el volumen de la señal. La profundidad del
corte se determina mediante la cantidad de wet/ dry, con 100 % siendo un
corte a silencio.
Control PARAMETER
Control LEVEL/
DEPTH
Use éstos para establecer un tiempo de corte de
1/16 – 8/1 con respecto al tiempo de un tiempo de
compás de las BPM.
Ajusta el balance entre el sonido original y el sonido
de efecto.
BRAKER
El braker actúa como una función de frenado “parada” de un giradiscos
clásico, donde el audio se para paulatinamente, hasta pararse completamente, antes de reanudarse la reproducción una vez más. Dependiendo
de la duración de [TIME], este efecto puede sonar dentro de una gama
que va del sonido similar a un freno de botón de parada de disparo
rápido al sonido de la técnica clásica de “apagado de un giradiscos”,
permitiendo que el audio se detenga paulatinamente hasta llegar a la
parada total.
Control PARAMETER
Control LEVEL/
DEPTH
Establece un tiempo de frenado de 1/16 a 8/1 con
respecto a un beat del BPM.
Establece la frecuencia con la que se aplica el
sonido de frenado.
REVERSER
Este efecto invierte una sección de la señal de audio, mezclándola con el
audio original. Puede controlar la duración del streaming de audio que
va a invertir y la “oportunidad” de repetir audio.
Control PARAMETER
Control LEVEL/ DEPTH
Use éstos para establecer un tiempo de inversión de
1/16 – 8/1 con respecto al tiempo de un beat del BPM.
Establece la frecuencia con la que se aplica el
sonido invertido.
Cambio de los ajustes
Los ajustes ambientales del ITCH se pueden cambiar según las condiciones de uso.
1 En la pantalla del ordenador, haga clic en [SETUP].
El menú de configuración ITCH se abre.
2 Haga clic en la ficha para el elemento que quiera
establecer.
Los detalles de los elementos de ajuste se visualizan.
Para conocer detalles de las diversas fichas, consulte las explicaciones
individuales descritas más adelante.
! La información de versión del ITCH se visualiza en la parte infe-
rior izquierda del menú [SETUP].
! Si el ordenador está conectado a Internet, haga clic en [CHECK
FOR UPDATES] para ver si hay disponible un software más
reciente.
Elementos de ajuste del menú [SETUP]
HARDWARE
FIRMWARE
La versión del firmware de esta unidad se puede verificar aquí.
! Cuando se visualiza [Update Available] se encuentra disponible
una versión del firmware más reciente. Haga clic en [UPDATE
FIRMWARE] para actualizar el firmware. Si se visualiza [Up to Date]
no es necesario actualizar el firmware.
GENERAL
El ajuste del tamaño de la memoria intermedia USB “usb buffer size
(latency)” se puede cambiar aquí.
32
Es
Page 69

ITCH divide los datos de audio en pequeños paquetes para reproducirlos.
Este tamaño de los paquetes se puede ajustar aquí.
! Si el tamaño de la memoria intermedia se reduce, la operación del
dial de jog se transmitirá con precisión y el retraso (latencia) de la
transmisión del sistema disminuirá, pero puede que se produzcan
pérdidas de datos de audio (interrupciones en el sonido), etc.
! Si el tamaño de la memoria intermedia se aumenta, las pérdidas
de datos de audio (interrupciones en el sonido), etc. tenderán a ser
menos, pero puede que aumente el retraso (latencia) de los datos de
audio.
PLATTER SPEED
La velocidad de reproducción del deck virtual se puede ajustar a 33 ó 45
rpm.
PLAYBACK
GENERAL
! Playback keys use shift
Esto desactiva las operaciones usando el teclado del ordenador
cuando no se pulsa la tecla [Shift] del teclado o cuando el bloqueo de
mayúsculas está desactivado.
! Lock playing deck
Esto desactiva la carga de pistas nuevas en decks en los que está
reproduciéndose una pista.
Esto desactiva las operaciones del pad
[NEEDLE SEARCH (ALPHABET SEARCH)] cuando está reproducién-
dose una pista.
! Hi-fi resampler
Esto reduce la distorsión general generada cuando las pistas se
reproducen a velocidad baja o alta. Sin embargo, cuando se activa, la
carga de la CPU aumenta ligeramente.
! Use auto gain
Esto ajusta automáticamente el volumen (ganancia) para las pistas
cuando el software crea la información general. El volumen se ajusta
con respecto al volumen de referencia seleccionado desde la lista
desplegable de la derecha.
! Enable beat grid
Esta opción activa/ desactiva los beat grids.
ON SONG LOAD
! play from start
Cuando se carga una pista, la reproducción empieza desde el
comienzo de la misma. Si hay una sección en blanco al comienzo
de la pista, la reproducción empieza desde la posición en la que
empieza el sonido.
— Cuando se carga una pista con este ajuste desactivado, la repro-
ducción empieza desde la última posición reproducida en la
pista que estaba reproduciéndose la vez anterior.
! instant doubles
La misma pista se reproduce en ambas pistas (duplicada).
— Por ejemplo, cuando la pista que está reproduciéndose en el
deck (A) se carga también en el deck (B), la posición de repro-
ducción de la pista del deck (B) se sincroniza automáticamente
con el deck (B) y empieza la reproducción. Los ajustes del tempo
maestro y de bucle se sintonización también.
! play from first cue point
Cuando se carga una pista, la posición de inicio de reproducción se
establece en el hot cue de número más bajo de los que forman el
juego de hot cues.
— Si no se ha establecido un hot cue para la pista, la reproducción
empieza desde el comienzo de la pista.
! Estos ajustes tienen prioridad en el orden siguiente.
[instant doubles], [play from first cue point], [play from start]
RECORDING
! Bit depth
Seleccione la velocidad de bits de 16 bits o 24 bits cuando grabe con
ITCH.
! File format
Seleccione el formato de archivo AIFF o WAV cuando grabe con
ITCH.
LIBRARY
Show iTunes library
La librería de iTunes y las listas de reproducción se visualizan en ITCH.
Protect library
Las operaciones siguientes en la librería se desactivan.
! Edición de nombres de archivos e información de caracteres
! Movimiento o eliminación de archivos y crates
Custom crate columns
El encabezamiento de la columna de la lista de pistas se puede poner
individualmente para crates diferentes. Cuando se desactiva esto, el
encabezamiento de la columna para todas las listas de pistas se visualiza
en común.
Center on selected song
Esto le permite desplazar las listas hacia arriba y hacia abajo con el cursor fijo en el centro cuando utiliza esta unidad para examinar la librería.
Show all file types
Cuando importa archivos de música, todos los archivos del disco duro
se visualizan.
! Cuando se desactiva este ajuste sólo se visualizan los archivos que
se pueden reproducir con ITCH.
include subcrate tracks
Las pistas con subcrates se visualizan dentro del crate principal.
DISPLAY
Maximum screen Updates
La barra deslizante le ayuda a reducir la frecuencia de regeneración de
la pantalla ITCH y usa menos la CPU. Los usuarios con ordenadores más
lentos o que ejecutan un programa de grabación al mismo tiempo puede
que quieran hacer esto si tiene problemas de rendimiento. El ajuste
predeterminado es de 60 Hz, o 60 regeneraciones por segundo. Este
ajuste se aplica a toda la interfaz del usuario ITCH; los decks virtuales,
las formas de onda, la librería y la pantalla de configuración.
Horizontal waveforms
La sección de visualización de forma de onda se visualiza horizontalmente en la parte inferior de la pantalla.
Left vertical waveforms
La sección de visualización de forma de onda se visualiza verticalmente a
la izquierda de la pantalla.
Right vertical waveforms
La sección de visualización de forma de onda se visualiza verticalmente a
la derecha de la pantalla.
MIXER
GENERAL
! EQ
— 6 dB
La ganancia del ecualizador se ajusta en 6 dB.
— 12 dB
La ganancia del ecualizador se ajusta en 12 dB.
! OUTPUT
— Mono
La salida externa se ajusta en mono.
— Stereo
La salida externa se ajusta en estéreo.
! HEADROOM
Ajusta la salida de los respectivos decks. Disminuye el número si el
sonido se interrumpe o distorsiona, aumenta el número si la entrada
es baja y se nota ruido.
CUE
! OVERDRIVE
Esto ajusta la salida del nivel de sonido procedente del canal de los
auriculares.
Español
Es
33
Page 70

— La calidad del sonido puede disminir si el nivel se sube
demasiado.
UPFADERS
! U/ F CURVE
Esto establece lo repentino del aumento o de la disminución del
volumen cuando se mueve el fader de canales.
CROSSFADER
Para las características de la curva del crossfader, el sonido que se
superpone cuando se cambia el canal se puede ajustar con precisión.
!
Las características de curvas cuando se selecciona con el con-
mutador selector de curvas de crossfader se pueden ajustar.
!
Las características de curvas cuando se selecciona con el con-
mutador selector de curvas de crossfader se pueden ajustar.
34
Es
Page 71

Información adicional
Solución de problemas
! La operación incorrecta se confunde a menudo con un problema o un fallo de funcionamiento. Si piensa que algo funciona mal con este com-
ponente, compruebe los puntos de abajo. Algunas veces, el problema puede estar en otro componente. Inspeccione los otros componentes y los
aparatos eléctricos que esté utilizando. Si no se puede corregir el problema después de comprobar los elementos de abajo, pida al servicio de
Pioneer autorizado más cercano o a su concesionario que realice el trabajo de reparación.
! Esta unidad puede no funcionar bien debido a la electricidad estática o a otras influencias externas. En este caso, el funcionamiento apropiado se
puede restaurar desconectando la alimentación, esperando 1 minuto y volviendo a conectar la alimentación.
Problema Verificación Remedio
La alimentación no se conecta.
Ninguno de los indicadores se enciende.
El indicador del dial jog no se encenderá.
El volumen de [MASTER OUT 1] (salida XLR)
está bajo, la calidad del sonido es mala o no
sale sonido.
Los terminales [MIC1], [MIC2] y [AUX IN] no se
pueden usar.
Los indicadores están oscuros.
No se reconoce esta unidad. Está el interruptor de la alimentación [ON/
Esta unidad funciona con la alimentación de
bus USB incluso cuando se usa el adaptador de
CA incluido.
No se conecta la alimentación al utilizar la
alimentación de bus USB.
Esta unidad no se puede utilizar. ¿Está bien establecido el software controlador? Establezca bien el software controlador. (página 7)
No se puede reproducir archivos de música. ¿Están dañados los archivos de música? Reproduzca archivos de música que no estén dañados.
Las pistas no se visualizan en la lista de pistas. ¿Se han importado bien los archivos de música? Importe bien los archivos de música. (página 19)
No es posible la grabación. ¿Está bien conectado el aparato externo o el micró-
El sonido de un aparato externo o micrófono no
puede salir.
El volumen del aparato conectado a los terminales [AUX IN] está bajo.
Sonido distorsionado. ¿Están los controles [MASTER LEVEL] y [TRIM] en
Está el interruptor de la alimentación [ON/ OFF]
en [ON]?
¿Está utilizando la alimentación de bus USB? Hay limitaciones al funcionamiento con alimentación de bus USB.
en [ON]?
¿Está bien conectado el cable USB incluido? Conecte bien el cable USB incluido. (página 11)
¿Está bien conectado el adaptador de CA incluido? Monte bien la clavija de alimentación en el adaptador de CA
¿Está bien conectado el cable USB incluido? Conecte directamente el ordenador y esta unidad con el cable USB
La capacidad de suministro de alimentación USB
del ordenador puede no ser suficiente.
¿Está usando un concentrador USB? No se pueden usar concentradores USB. Conecte directamente el
¿Está usando un cable USB de venta en el comercio?
¿Está seleccionado un crate o subcrate que no tiene
ninguna pista?
fono?
¿Está bien seleccionado el canal que quiere grabar? Seleccione bien el canal que quiera grabar. (página 30)
¿Está bien ajustado el conmutador selector [MIC2/
AUX]?
¿Está el panel del control de monitoreo MIC/
bien ajustado?
¿Está utilizando la alimentación de bus USB? Hay limitaciones al funcionamiento con alimentación de bus USB.
¿Está el control [VOL] de los terminales [AUX IN] en
la posición apropiada?
la posición apropiada?
¿Está ajustado a un nivel adecuado el audio que
entra a los terminales [AUX IN] y [MIC]?
¿Está bien ajustado [HEADROOM] en el menú
[SETUP]?
OFF]
Ponga el interruptor de la alimentación [ON/ OFF] en [ON].
Para usar la unidad sin estas limitaciones, conecte el adaptador de
CA incluido. (página 11)
Ponga el interruptor de la alimentación [ON/ OFF] en [ON].
incluido.
Conecte bien el adaptador de CA incluido a la toma de corriente.
(página 5)
Conecte bien a esta unidad la clavija de CC del adaptador de CA
incluido. (página 11)
incluido. No se pueden usar concentradores USB. (página 11)
Use el adaptador de CA incluido. (página 11)
ordenador y esta unidad con el cable USB incluido. (página 11)
Use el cable USB incluido.
Seleccione un crate o subcrate que tenga alguna pista o añada
pistas al crate o subcrate.
Compruebe la conexión del aparato externo o el micrófono. (página 11)
Ajuste bien el conmutador selector [MIC2/ AUX]. (página 30)
AUX
Dependiendo de los ajustes, el sonido maestro puede que no salga.
Ajuste bien el método de salida. (página 18)
Para usar la unidad sin estas limitaciones, conecte el adaptador de
CA incluido. (página 11)
Ajuste un nivel de audio adecuado para el aparato conectado.
(página 30)
Ajuste los controles [MASTER LEVEL] y [TRIM].
Ajuste el nivel de audio que entra por los terminales a un nivel
adecuado para los aparatos conectados.
Establezca bien el nivel.
Español
Es
35
Page 72
Problema Verificación Remedio
El sonido que está siendo reproducido se interrumpe.
No se produce sonido. ¿Están bien conectados los cables de conexión? Conecte correctamente los cables de conexión. (página 11)
No se produce sonido, o éste está distorsionado
o tiene ruido.
El beat grid no se visualiza. ¿Se ha analizado el archivo de música? Analice el archivo.
La función [SYNC] no funciona. ¿Se han importado bien los archivos de música?
La función [SYNC] no se activa incluso cuando
los archivos están analizados.
El inicio de fader no es posible. ¿Está en espera con un cue establecido? Establezca el cue. (página 25)
El sonido se interrumpe cuando se establece el
controlador ASIO.
La función de retroceso de cue no funciona. ¿Está establecido un punto cue temporal? Establezca un punto cue temporal. (página 25)
La función de rebucle no funciona. ¿Se ha establecido un bucle en la reproducción
El indicador parpadea y no se conecta la alimentación.
No se puede editar la librería. ¿Está activado [Protect library] en [SETUP]? Desactive [Protect library]. (página 33)
¿Están bien conectados el adaptador de CA incluido
y el cable USB incluido?
¿Es adecuado el valor de latencia del software
controlador?
¿Está bien conectado el cable USB incluido? Conecte directamente el ordenador y esta unidad con el cable USB
¿Están sucios los terminales o las clavijas? Limpie los terminales y clavijas antes de conectar.
¿Está bien establecido el software controlador? Establezca bien el software controlador. (página 7)
¿Está bien establecido ITCH? Establezca bien ITCH.
¿Están bien preparados los componentes y amplificadores conectados?
¿Está utilizando la alimentación de bus USB? Cuando se usa la alimentación de bus USB, el volumen [MASTER
¿Está el conmutador selector [MIC/
en [ON]?
¿Está esta unidad cerca de un TV? Apague el TV o instale esta unidad y el TV alejados el uno del otro.
¿Se ha analizado el archivo de música? Analice el archivo.
¿Es irregular el beat grid?
¿Está bien establecido el beat grid?
¿Son demasiado diferentes los BPM de las pistas de
los dos decks?
¿Está haiendo scratching? La función [SYNC] se desactiva cuando se hace scratching.
¿Se ha establecido el controlador ASIO mientras se
ejecutaba ITCH?
actual?
— El funcionamiento normal se puede restaurar algunas veces desen-
AUX THRU]
El sonido se interrumpirá si el cable de alimentación del adaptador
de CA incluido o el cable USB incluido se desconectan de esta
unidad durante la reproducción.
Apriete bien el cable de alimentación del adaptador de CA incluido
o el cable USB incluido al gancho para cables de esta unidad.
(página 11)
Ajuste la latencia del software controlador a un valor adecuado.
(página 10)
Ajuste la latencia del software DJ a un valor adecuado. (página 32)
incluido. No se pueden usar concentradores USB. (página 11)
Verifique el ajuste [MIXER] en [SETUP]. (página 33)
Ajuste bien la selección de entrada externa y el volumen de los
componentes y amplificadores.
OUT 1] baja, la calidad del sonido disminuye, el sonido puede que
no salga, etc.
Para usar la unidad sin estas limitaciones, conecte el adaptador de
CA incluido. (página 11)
Ponga el conmutador selector [MIC/ AUX THRU] en [OFF]. Si el
conmutador selector [MIC/ AUX THRU] se pone en [ON] sólo sale el
sonido del micrófono o del aparato externo. (página 31)
Si los archivos de música no se pueden analizar automáticamente,
haga clic en [GRID EDIT] en el ITCH software e introduzca manualmente los beat grids.
Reimporte los archivos de música y cárguelos en los decks. (página 19)
Establezca bien el beat grid.
La función [SYNC] no trabajará bien si el BPM de la pista del deck
para el que se ha pulsado el botón [SYNC (SYNC OFF)] está fuera
del margen de tempo ajustable de la pista del deck para el que no
se ha pulsado el botón [SYNC (SYNC OFF)].
Establezca el controlador ASIO antes de iniciar ITCH. (página 7)
Si no se ha establecido un bucle en la reproducción actual, la
función de rebucle no se activará. Establezca un bucle una vez.
(página 25)
chufando el cable de alimentación, esperando 1 minuto y volviendo
a conectar el cable de alimentación.
Si el síntoma persiste, desconecte el cable de alimentación y
solicite reparaciones.
36
Es
Page 73
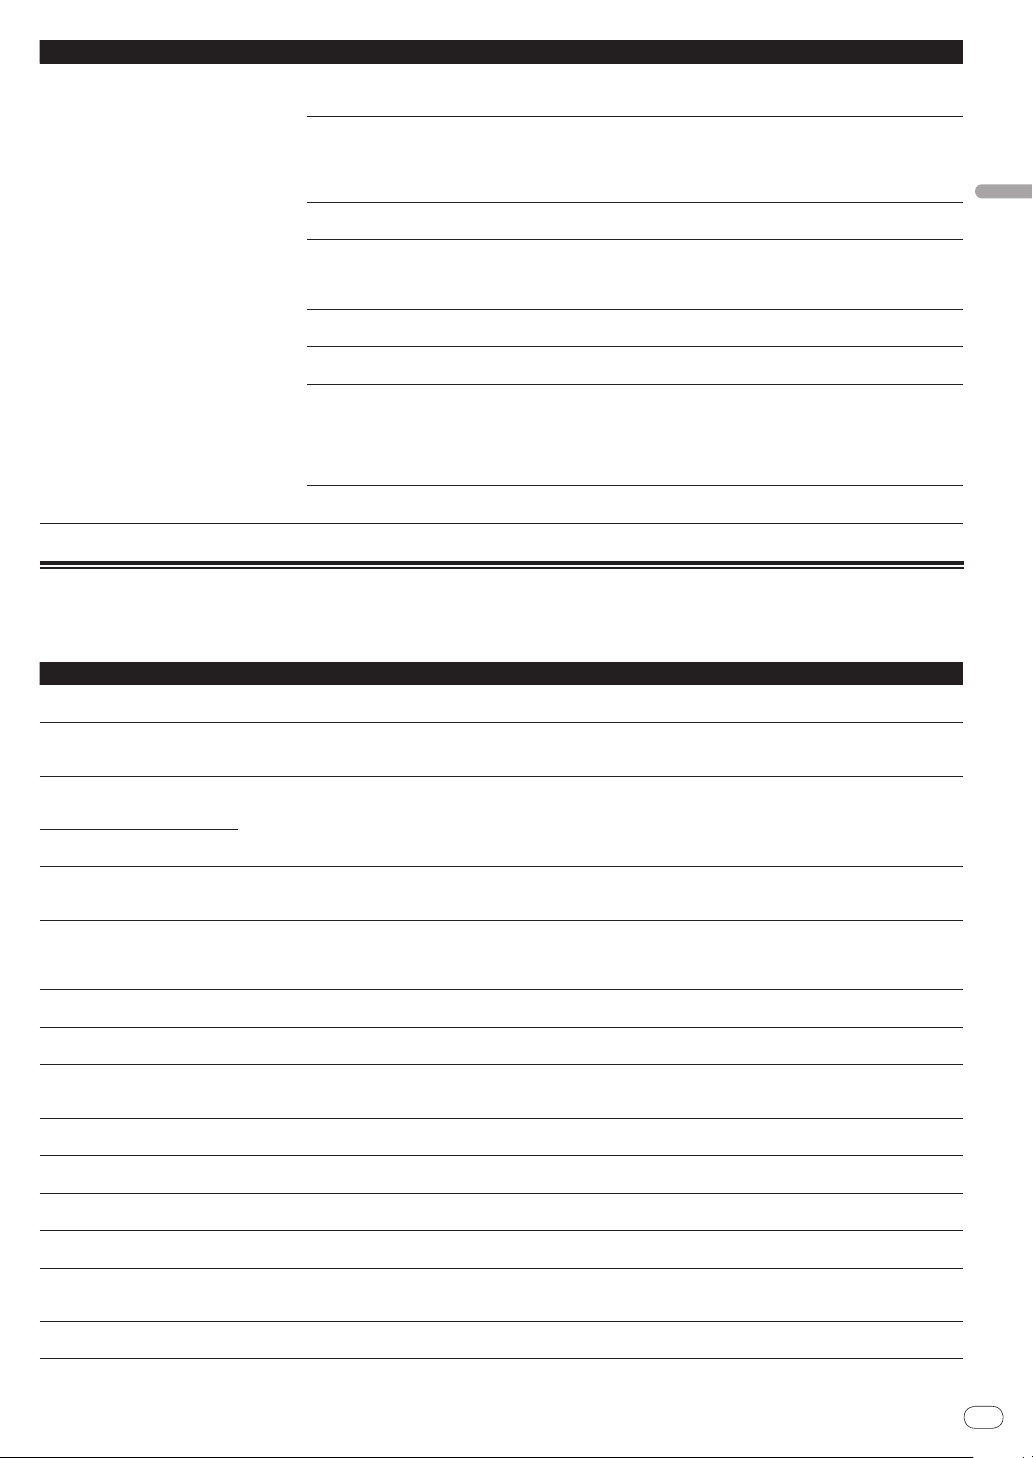
Problema Verificación Remedio
La operación ITCH no es estable. ¿Está usando la versión más reciente del software? Se pueden descargar actualizaciones gratis de ITCH en Internet.
¿Está usando al mismo tiempo otros softwares que
no son el ITCH?
La capacidad de suministro de alimentación USB
del ordenador puede no ser suficiente.
Cuando otros aparatos USB estén conectados al
ordenador.
¿Está usando un concentrador USB? No se pueden usar concentradores USB. Conecte directamente el
Hay un problema con el puerto USB al que está
conectada esta unidad.
¿Está esta unidad conectada a un ordenador portátil
que funciona con su batería?
El tamaño de la memoria intermedia USB es demasiado pequeño.
Visite el sitio web de abajo y mantenga actualizado el softare con la
versión más reciente. (página 6)
Salga de otras aplicaciones para reducir la carga del ordenador.
Si la operación sigue siendo inestable, intente desactivar la red
inalámbrica u otras conexiones inalambricas, software antivirus, el
protector de pantalla, el modo de bajo consumo, etc.
(página 6)
Use el adaptador de CA incluido. (página 11)
Desconecte otros aparatos USB del ordenador.
Cuando esté conectado otro aparato de audio USB al ordenador al
mismo tiempo, puede que éste no funcione o no sea reconocido
normalmente. (página 11)
ordenador y esta unidad con el cable USB incluido. (página 11)
Si su ordenador tiene múltiples puertos USB, pruebe conectando
esta unidad a un puerto USB diferente. (página 11)
Suministre alimentación al ordenador portátil desde una fuente de
alimentación de CA.
(Dependiendo de los ajustes del ordenador portátil, puede que el
modo de bajo consumo se establezca cuando el ordenador funcione
con su batería, lo que reducirá automáticamente el rendimiento del
propio ordenador.) (página 6)
Aumente el tamaño de la memoria intermedia. (página 32)
Mensajes de daños en archivos
Si esta unidad no puede funcionar bien se visualiza un código de error en la pantalla. Verifique el error en la tabla de abajo y tome las medidas
apropiadas.
Español
Código de error Descripción del error Causa y medidas a tomar
Corrupt file : This MP3 contains
invalid frames
Corrupt file : This file contains
corrupt frames that may result in
audible glitches
Corrupt file : This file has been
split. You should check the
beginning for audio glitches
Corrupt file : This MP3 contains
frames with corrupt data
Corrupt file : This MP3 file lost
synchronization between the
frame index and the frame
Corrupt file : This MP3 is completely invalid and is not playable
Corrupt file : This file contains
invalid audio data
Corrupt file : This MP3 contains
no valid frames
Unsupported file : This MP3
contains multiple layers
Unsupported file : This file is
more than 2GB in size
Unsupported file : This file had
data blocks greater than 2GB size
Corrupt file : This WAV contains
no valid chunks
Unsupport file : This file’s data is
not in PCM format
Unsupported file : This file has
a sampling rate greater than
48kHz
Unsupported file : This file uses
more than 24bits per sample
Este archivo contiene cuadros que no cumplen con las
normas MP3.
Este archivo contiene cuadros dañados consecutivos.
El sonido que debería estar en el primer cuadro de
audio MPEG en el archivo se ha perdido.
Se ha cargado una información general MP3 antigua
editada con un programa de edición diferente.
Este archivo contiene datos no válidos y no se puede
reproducir. La causa puede ser un sector en mal
estado, un archivo del sistema dañado, el uso de un
formato o extensión de archivo erróneo, etc.
Cuando se buscaban datos de audio se encontraron
grandes cantidades de datos no válidos.
El archivo no se puede reproducir porque no se encontraron datos de audio.
Al explorar el archivo se encontraron múltiples capas
de cuadros MPEG.
El archivo sobrepasa el tamaño límite de 2 GB.
Hay bloques de datos que sobrepasan el tamaño límite
de 2 GB.
No hay datos WAV reconocibles en el archivo. Puede
que éste no sea un archivo WAV.
Los datos WAV no están en el formato PCM y el
archivo no se puede reproducir.
El archivo no se puede reproducir porque la frecuencia
de muestreo sobrepasa 48 kHz.
El archivo no se puede reproducir porque la velocidad
de bits sobrepasa 24 bits.
La reproducción normal no está garantizada.
Le recomendamos rehacer el archivo.
Le recomendamos rehacer el archivo.
Los cuadros dañados se reproducen sin sonido, por lo que parecerá que el
sonido se interrumpe.
Esto podría deberse a una edición MP3 irregular. Como los cuadros dañados
se reproducen sin sonido, y como muchas pistas empiezan sin sonido, puede
que sea difícil notar esto, pero recomendadmos escuchar con atención para
comprobarlo.
Como con los archivos dañados, la sección dañada se reproduce sin sonido.
Le recomendamos rehacer el archivo.
Rehaga la información general.
Le recomendamos rehacer el archivo.
Verifique si éste es un archivo de música legítimo o no.
Los archivos MP3 que contienen múltiples capas de cuadros no se pueden
reproducir. Dependiendo de los cuadros, puede que los archivos se reproduzcan sin sonido.
Los archivos de más de 2 GB no son compatibles.
Le recomendamos rehacer el archivo.
Los archivos de más de 2 GB no son compatibles.
Le recomendamos rehacer el archivo.
Use un formato de archivo de música que se pueda reproducir.
Sólo se pueden reproducir los archivos WAV en el formato PCM.
Remuestree el archivo a 48 kHz y guárdelo.
Le recomendamos rehacer el archivo.
Es compatible un máximo de 24 bits por datos muestreados de audio.
Es
37
Page 74

Código de error Descripción del error Causa y medidas a tomar
Corrupt file : This WAV is incomplete
Corrupt file : This file contains
corrupt blocks
Corrupt file : This song contains
no audio data
Corrupt file : This song contains
invalid samples
La cantidad de datos es inferior al tamaño de archivo
anticipado. Los datos están dañados o no han sido
editados bien, así que ITCH no puede determinar bien
la cantidad de datos del archivo.
Este archivo contiene datos de bloque cuyo tamaño
es 0 (cero).
No se pueden encontrar datos de audio en el archivo,
así que éste no se puede reproducir.
Este archivo contiene muestras de audio cuyo tamaño
es demasiado pequeño.
Le recomendamos rehacer el archivo.
Le recomendamos rehacer el archivo.
El uso continuado puede causar que el ITCH se desestabilice o se pare.
Verifique si el archivo contiene datos de audio.
Si el tamaño es demasiado pequeño, puede que éste se identifique como 0
(cero). Esto no afecta particularmente a la reproducción, pero puede que se
interrumpa el sonido.
Uso como controlador para otro
software DJ
El DDJ-S1 envía también los datos de operación para los botones y diales
en el formato MIDI. Si conecta un ordenador con un software DJ compatible con MIDI incorporado a través de un cable USB, usted podrá utilizar
el software DJ en esta unidad. El sonido de los archivos de música que
se reproducen en el ordenador también puede salir del DDJ-S1.
Para usar como un controlador para otro software DJ, haga primero los
ajustes relacionados con el audio y MIDI del software DJ.
Para conocer detalles, vea el manual de instrucciones del software DJ.
Para conocer detalles de los mensajes MIDI de esta unidad, consulte el
sitio web indicado más abajo.
http:/ / www.prodjnet.com/ support/
Descargo de responsabilidad
! Pioneer es una marca registrada de Pioneer Corporation.
! Microsoft®, Windows Vista®, Windows® e Internet Explorer® son
marcas registradas o marcas de fábrica de Microsoft Corporation en
los Estados Unidos y/ o en otros países.
! Apple, Macintosh, Mac OS, Safari, iTunes y Finder son marcas regis-
tradas de Apple Inc. en los Estados Unidos y en otros países.
! Intel e Intel Core son marcas registradas de Intel Corporation en los
Estados Unidos y en otros países.
! ASIO es una marca de fábrica de Steinberg Media Technologies
GmbH.
! AMD es una marca comercial de Advanced Micro Devices, Inc.
! “ITCH” es una marca registrada de Serato Audio Research.
Los nombres de compañías y productos mencionados aquí son marcas
de fábrica de sus respectivos propietarios.
Este producto cuenta con licencia para se usado sin fines de lucro.
Este producto no tiene licencia para ser usado con fines comerciales
(con fines de lucro) como, por ejemplo, en emisiones (terrestres, por
satélite, por cable u otros tipos de emisiones), streaming en Internet,
Intranet (un red corporativa) u otros tipos de redes, ni para distribuir
información electrónica (servicio de distribución de música digital en
línea). Para tales usos necesita adquirir las licencias correspondientes. Para conocer detalles, visite http:/
/
www.mp3licensing.com.
Cuidados para los derechos de autor
Las grabaciones que usted ha hecho son para su uso personal y, según
las leyes de los derechos de autor, no se pueden usar sin el consentimiento del propietario de tales derechos.
! La música grabada de CD, etc., está protegida por las leyes de los
derechos de autor de países individuales, y también por tratados
internacionales. La persona que ha grabado la música es la respon-
sable de asegurar que ésta se use legalmente.
! Cuando maneje música descargada de Internet, etc., la persona que
la haya descargado será la responsable de asegurar que ésta se use
según el contrato concluido con el sitio de la descarga.
Especificaciones
Adaptador de CA
Alimentación .................................................. CA 100 V a 240 V, 50 Hz/ 60 Hz
Corriente nominal ...............................................................................300 mA
Salida nominal .............................................................................. CC 5 V, 2 A
General – Unidad principal
Consumo de energía (cuando se usa el adaptador de CA) .................. 1,4 A
Peso de la unidad principal ..................................................................5,0 kg
Dimensiones máximas ..........680 mm (An) × 95,2 mm (Al) × 318 mm (Pr)
Temperatura de funcionamiento tolerable ...........................+5 °C a +35 °C
Humedad de funcionamiento tolerable ......5 % a 85 % (sin condensación)
Sección de audio (cuando se usa adaptador de CA/
cuando se reproduce en un ordenador)
Nivel de salida nominal
MASTER OUT 1 .........................................................................16 Vrms
MASTER OUT 2 ...........................................................................3 Vrms
Distorsión armónica total
MASTER OUT 1 ..........................................................................0,006 %
MASTER OUT 2 ..........................................................................0,006 %
Características de frecuencia
MASTER OUT 1 .............................................................. 20 Hz a 20 kHz
MASTER OUT 2 .............................................................. 20 Hz a 20 kHz
Relación señal/ ruido
MASTER OUT 1 .............................101 dB o más (a la salida nominal)
MASTER OUT 2 .............................101 dB o más (a la salida nominal)
Terminales entrada / salida
Terminal USB
Tipo B ...................................................................................1 juego
Terminal de salida MASTER OUT 1
Conector XLR ....................................................................... 1 juego
Terminal de salida MASTER OUT 2
Conectores de contactos RCA............................................1 juego
Terminal de salida PHONES
Conector de auriculares estéreo (Ø 6,3 mm)..................... 1 juego
Miniconector de auriculares estéreo (Ø 3,5 mm) .............1 juego
Terminal de entrada AUX
Conectores de contactos RCA............................................1 juego
Terminal MIC1
Conector XLR/ Conector fonográfico (Ø 6,3 mm) .............. 1 juego
Terminal MIC2
Conector fonográfico (Ø 6,3 mm) ....................................... 1 juego
! Por motivos de mejoras, las especificaciones y diseño de esta unidad y
del software incluido están sujetos a cambios sin previo aviso.
! Publicado por Pioneer Corporation. Copyright © 2011 Pioneer
Corporation. Todos los derechos reservados.
38
Es
Page 75

Page 76

感謝您購買先鋒產品。 請詳閱操作手冊以瞭解正確操作購買機型的方式。 閱畢手冊後,請妥善收藏以便未來參考。
K041_A1_Zhtw
ҐࠣѬᎍۤΚૢঢ়৴ңഋȄԄݏҦܼᔗңӶڐу
ߩঢ়৴ңഋĩԄ࣐୧ཿңഋՅߞٻңܼᓢᢉϜȂܗ
ٻңܼآٚܗ಼ϜĪՅᏳึҢࢉሬٯሰঔ౪ȂӶ
ߴң҇ܜᐋঔ౪ຳңȄ
Ԅ࣐ԥඩ৵ޠ೪റȂᔗӶ၏೪റߤߗԋ၇Ѡሇᚭٻң
ޠႬᏣඩ৵Ȅ
D28-9-3-2_A1_Zhtw
Ӷໍܗᡑഀ௦ࠊȂ፝ӒᜱഗٯϜᘟłńᡑᔇᏣᇅ
łńඩ৵ޠഀ௦Ȅ
D44-9-3_A1_Zhtw_PSV
在部分國家或地區中,電源插頭與插座的形狀有時會和圖示不同。不過本機的連接及操作方式完全相同。
Zhtw
2
Page 77

目錄
閱讀本手冊的方式
! 在本手冊中,顯示在產品和電腦畫面上的畫面及選單名稱,以
及按鍵和端子名稱等,皆加上括號表示。 (例如: [CUE]按
鍵、[FILES] 面板、[VINYL] 模式、[AUX IN] 端子)
! 請注意,本手冊中描述的軟體畫面及規格和硬體外觀與規格目
前仍處於開發狀態,可能會與最終規格有所不同。
使用前
功能與特色.......................................... 4
包裝內容物.......................................... 4
關於 AC 變壓器....................................... 4
安裝軟體............................................ 6
啟動 ITCH........................................... 9
關於驅動程式軟體及設定公用程式軟體................ 10
連接及零件名稱
連接輸入/輸出端子................................. 11
零件名稱與功能..................................... 12
操作
ITCH軟體畫面 ...................................... 16
啟動系統........................................... 19
結束系統........................................... 19
操作資料庫......................................... 19
載入曲目至唱盤..................................... 23
播放及暫停......................................... 24
調節播放速度 ( 節拍控制 )........................... 24
反向播放........................................... 24
操作緩動盤......................................... 24
指定立即播放的位置(NEEDLE SEARCH)................. 24
設定暫時指令點..................................... 24
循環操作........................................... 25
設定熱指令......................................... 26
使用滑動模式....................................... 26
同步化播放速度..................................... 27
編輯節拍網格....................................... 27
使用混音器功能..................................... 28
使用麥克風......................................... 29
使用外接裝置....................................... 29
錄製............................................... 29
直接輸出麥克風與 AUX 聲音........................... 29
使用音效功能....................................... 29
變更設定........................................... 31
中文
其他資訊
故障排除........................................... 33
檔案損毀訊息....................................... 34
當成其他 DJ 軟體的控制程式使用..................... 35
免責聲明........................................... 35
版權注意事項....................................... 36
規格............................................... 36
Zhtw
3
Page 78

使用前
功能與特色
本機屬多合一 DJ 系統,結合獲眾多專業 DJ 一致好評的先鋒
專業 DJ 播放機與 DJ 混音器的高操作性硬體,並搭配 Serato
Audio Research的 ITCHDJ 軟體。 本機也配備音訊介面,不
需要其他 DJ 設備就能讓 DJ 展現全方位的表演。
配置
本機使用與先鋒專業機型相同的配置,利用簡單的 2 聲道混
音及音效即可完成人性化且精準的表演。
MIC/ AUX INPUT、XLR OUTPUT
本機配備麥克風/輔助裝置輸入,可連接麥克風或外接裝置
(範本、可攜式音訊裝置等)。 在輸出方面,本機擁有支援專
業 PA 設備的 XLR 及 RCA 端子。 如此一來,本機即可支援各
種情形與 DJ 表演類型。
ITCH
隨附的 ITCH軟體是一套經過優化並專門供本機使用的 DJ 軟
體應用程式。 除了 2 聲道混音器與效果器外,大量的新功能
還包括滑動模式、字母搜尋及熱指令推桿啟動,展現創意且
自在的 DJ 表演。 此外,所有按鍵及旋鈕預設皆與軟體相關,
因此只需連接本機和電腦就能立即享受 DJ 表演。
膝上型電腦底座
電腦的鍵盤部分可容納在本機下方。 將電腦整合本機至單一
裝置中,可讓您建立有效率的 DJ 系統。
關於 AC 變壓器
使用注意事項
安全說明
若要確保您的個人安全並將本機完整操作潛能發揮至最大,
請詳閱並遵循這些安全說明。
閱讀 & 保留說明
閱讀本產品隨附的所有操作及使用者資訊。
清潔
使用沾濕的布清潔外表機殼。 避免使用任何包含液體、噴霧
或酒精成分的流質清潔產品。
水或濕氣
避免靠近水或其他液體來源操作或放置本產品。
配件
請勿將本產品放置在不穩定的推車、架子或桌上。 本產品可
能會掉落並造成嚴重受損。
通風
使用本產品時請勿阻塞或覆蓋本產品。 除非有適當通風,否
則本機不得採密閉式安裝放置。
環境
避免將本產品放置在暴露大量灰塵、高溫、高濕度或易遭受
過度振動或撞擊的位置。
播放位址/位準計
播放機部分配備有「播放位址」指示燈,可讓您由 LED
顯示幕的位置一目了然曲目的進度,並在以手指觸碰
[NEEDLE SEARCH (ALPHABET SEARCH)] 觸控板時獲得曲目
的直接觸感。 另外,混音器部分則配備有主要位準計及聲道位
準計。 此功能可增加電腦的親和力,讓 DJ 表演更加自在。
高音質
採用專為先鋒專業機型開發的音質技術,可讓 DJ 控制者達到
高水準的音質。
包裝內容物
! CD-ROM
! AC 變壓器
! 電源插頭
! USB 連接線
! 操作手冊(本手冊)
Zhtw
4
電源
只能使用建議的電源操作本產品。 若您無法確定電源,請向
授權的先鋒代表洽詢。
電源線防護
拔下本機插頭時,請拉住插頭,而非線材。 請勿以潮濕的手
握住線材或插頭;否則可能會導致短路或觸電。 請勿讓任何
物體夾住或放在電源線上,也不要將電源線放在走道上。
電力
安裝本機或其他硬體裝置前,請關閉系統電源。
超載
避免連接太多裝置至單一牆壁插座或電源,因為這可能會導
致起火或短路。
物體 & 液體項目
切勿將不適當的物體塞入裝置中。 避免讓任何液體濺入裝置
或裝置外側。
維修
開啟或取下外蓋可能會讓您觸電或產生其他危險。 如需維修本產
品,請向先鋒授權服務代表洽詢(請參閱隨附的服務 & 支援卡)。
Page 79

受損要求維修
PUSH
PUSH
PUSH
PUSH
在下列情況,請拔下本機插頭,並向合格的維修人員請求維修:
! 電源線、插頭或機殼受損時。
! 若已濺入液體或物體已掉入本產品中。
! 若本產品已接觸雨水或水。
! 若在遵守操作手冊的情況下本產品無法正常操作。 僅調
整操作手冊提及的控制鍵。 錯誤調整其他控制鍵可能會
導致產品受損,並需要合格技師花費更長的時間才能將
本機還原回正常操作。
! 當本產品在效能上出現明顯的變化時 – 代表本產品需
要維修。
請檢查 AC 變壓器或電源插頭是否合乎規格,然後利用指定的
程序將電源插頭插入 AV 變壓器指定的位置,直到聽見卡嗒
聲。 關於詳細資訊,請參閱第 5頁上
安裝電源插頭
。
若 AC 變壓器或電源插頭的規格不符,請向最近的先鋒授權服
務中心或經銷商要求進行維修。
! AC 變壓器與電源插頭間塞住硬幣、迴紋針或其他金屬物體時,
請勿使用本機。 否則可能會導致短路,並造成起火或觸電。
! 在牆壁插座安裝 AC 變壓器時,請確定 AC 變壓器與牆壁插座間
已無空間。 接觸不良或硬幣、迴紋針或其他金屬物體卡在該
空間時,可能會導致短路並造成起火或觸電。
硬幣、迴紋針或其他金屬物體
安裝電源插頭
如下圖所示,將電源插頭沿導軌滑進 AC 變壓器中,然後
再按下直到聽見卡嗒聲。
取出電源插頭
按下 AC 變壓器上的 [PUSH] 按鍵時,如下圖所示將電源插
頭滑離變壓器以取出。
只要安裝電源插頭,就無須取出。
中文
側邊
頂端
! 若有人遭 AC 變壓器的電源線絆倒或有東西擊中 AC 變壓器,電源
插頭可能會從 AC 變壓器上脫落且仍插入電源插座。 若發生此現
象,請以乾燥的手取下仍插在插座中的電源插頭,請如下圖所示
握住插頭,且不要觸碰金屬部位。 請勿使用任何工具取出。
請勿觸碰金屬部分。
電源插頭
本產品隨附的電源插頭類型如下所示。 請使用適合您所在國
家或地區的電源插頭。
類型 1(適用日本及北美)
類型 2(適用歐洲)
Zhtw
5
Page 80

類型 3(適用英國)
類型 4(適用澳洲)
類型 5(適用泰國及韓國)
安裝軟體
支援的作業系統 CPU 及所需記憶體
Mac OS X 10.5.8
32 位元版本
Mac OS X 10.6
64 位元版本
7
32 位元版本
64 位元版本
32 位元版本
64 位元版本
32 位元版本
®
Windows
Home Premium/
Professional/
Ultimate
Windows Vista®
Home Basic/
Home Premium/
Business/
Ultimate
Windows® XP
Home Edition/
Professional
(SP2 或以上)
有關操作環境及相容性的最新資訊,以及取得最新作業系統的資訊,請
參訪下列 Serato Audio Research網站:
http://serato.com
Intel®處理器,Core™ Duo 1.8 GHz 以上
1 GB 或以上的 RAM
Intel®處理器,Core™ Duo 1.8 GHz 以上
1 GB 或以上的 RAM
Intel®處理器,Core™ Duo 2.4 GHz 以上
4 GB 或以上的 RAM
®
處理器,Core™ 2 Duo
Intel
1.8 GHz 以上
2 GB 或以上的 RAM
Intel®處理器,Core™ 2 Duo
2.4 GHz 以上
4 GB 或以上的 RAM
®
處理器,Core™ 2 Duo
Intel
1.8 GHz 以上
2 GB 或以上的 RAM
Intel®處理器,Core™ 2 Duo
2.2 GHz 以上
4 GB 或以上的 RAM
®
處理器,Core™ 2 Duo
Intel
1.8 GHz 以上
1 GB 或以上的 RAM
安裝軟體前
關於要安裝的軟體
要安裝的軟體會根據您使用的電腦而有不同。
適用 Windows
安裝 ITCH軟體後,也要安裝驅動程式軟體。
! 請詳閱以下使用者授權協議。
—
Serato – 使用者許可協定 ( 簡稱許可協定 )
關於 ITCH軟體
閱
—
軟體使用權授契約書
(Windows)
。)
。)
(請參閱
關於驅動程式軟體
! 若要安裝或解除安裝驅動程式軟體,必須獲得電腦系統
管理員的授權。 在繼續安裝程序前,請以電腦系統管理
員身份登入。
! 若您不先安裝驅動程式軟體就連接本裝置與電腦,則視
系統環境而定,電腦可能會發生錯誤。
! 若在開始安裝驅動程式後遭中斷,請再次重新開始安裝程序。
適用 Mac OS X
只需安裝 ITCH軟體。
! 請詳閱以下使用者授權協議。
—
Serato – 使用者許可協定 ( 簡稱許可協定 )
關於 ITCH軟體
閱
最低操作環境
支援的作業系統 CPU 及所需記憶體
Mac OS X 10.4.11
。)
Intel®處理器,Core™ Duo 1.8 GHz 以上
1 GB 或以上的 RAM
(請參
(請參
其他
硬碟 可供音樂資料使用的足夠可用硬碟空間
光碟機 可讀取 CD-ROM的光碟機
USB 連接埠 需 USB2.0 連接埠才能連接電腦與本機。
顯示幕解析度 解析度 1024 x 768 或以上
! 即使符合上述操作環境需求,也不保證所有電腦上的完整功能。
! 即使擁有以上操作環境所需的記憶體,但由於常駐程式、服務數量等
而欠缺記憶體,卻可能會影響軟體提供優化的功能及效能。 在此情況
下,需釋放足夠的記憶體。 建議安裝額外記憶體讓操作更為穩定。
! 視電腦的省電設定而定,CPU 及硬碟的處理能力有可能不足。 尤其
是筆記型電腦,在使用 ITCH時,請確定該電腦為具備固定高效能
的正常狀態(例如維持連接 AC 電源)。
! 請注意,視您電腦上執行的其他軟體而定,ITCH的功能可能會發生問題。
! 不保證使用 AMD 品牌 CPU 的 ITCH操作。
關於 ITCH軟體
ITCH是 Serato Audio Research的 DJ 軟體應用程式。 透過
連接安裝本軟體的電腦與本機即可進行 DJ 表演。
檢查 ITCH軟體上的最新資訊
免費 ITCH更新可自網際網路上下載。 請至以下網站確認,
並維持軟體更新至最新版本。
http://serato.com
Serato – 使用者許可協定 ( 簡稱許可協定 )
Serato 公司 ( 簡稱 Serato) 及授權方擁有軟體的所有 Serato
應用程式及其智慧財產權。安裝或使用此軟體,您需要同意
遵守此授權協定的條款。
Zhtw
6
Page 81

1 許可授權:
Serato 在您同意此許可協定的基礎上,授予您永久性、非排
他性的個人用許可 ( 簡稱許可 )。
此許可僅適用於通過許可代碼 ( 不含硬體元件 ) 授權的所有
軟體 ( 簡稱單一實例軟體 ),因此同一時間您只能在一台電
腦的單一實例軟體中使用此許可代碼。如果您想要在另一台
電腦上使用單一實例軟體,必須先註銷所有以前的安裝。
如果軟體安裝過程中您的電腦需要安裝第三方擁有的軟體
( 簡稱第三方軟體 ),則需要遵守第三方的許可協定或條款,
本許可協定不適用於第三方的許可協定或條款。
2 所有權:
您同意 Serato 及其授權方是本軟體智慧財產權的所有人。授
予您使用此軟體的權利僅限本許可協定中明文規定的權利。
3 複製和處置軟體:
禁止複製、改寫、修改、翻印、重設、重裝、重訂本軟體全
部或部分內容以及任何相關的材料,亦不得允許任何他人進
行上述操作,若出於真實目的需要複製一份做備份者除外。
若符合前提條件,您可以把自己的許可全部轉讓給另外一個
人,即:轉讓前,您已經註銷單一實例軟體的安裝;而且如
果在此安裝中 Serato 應用程式作為一個整體與硬體配合運
行,您得把相關硬體的所有權也轉讓給此人;任何接受此許
可的轉讓人必須同意遵守此許可協定的第一條規定。
b 軟體功能可能發送資訊 ( 包括軟體的配置資訊 ) 給
Serato 伺服器,Serato 出於業務目的可能收集和使
用這些資訊。
在您使用不斷更新的軟體功能時,同樣適用 Serato 網站隱私
/
政策 ( 網址:http:/
policy,Serato 保留隨時修改的權利 )。
serato.com/ legal/ website-privacy-
8 管治法規:
此許可協定在紐西蘭的法規範圍內以合同形式生效,且受紐
西蘭法律管轄。此許可協定或軟體不適用聯合國國際商品銷
售合同公約。使用者需呈交給紐西蘭法院的非專屬管轄區。
9 捆綁數碼媒體檔許可證:
隨此軟體一同提供的數碼媒體檔 ( 捆綁媒體 ),您只能在此
軟體範圍內通過其正常運行使用這些媒體檔。Serato 不保證
此軟體支援或不授予此捆綁媒體任何許可或許可權或者媒體
檔內嵌入的任何受版權保護的內容。特別需要注意的是 ( 但
不僅限於此 ),您對自己使用範圍內的媒體檔的公開應用、
傳播、交流、複製或處理而產生的所有相關的 ASCAP、BMI、
SESAC 或其他類似許可證的費用承擔責任。
若對此許可協定有疑問,或因其他原因需聯繫 Serato,請致函:
Serato Inc LP, Private Bag 92015, AMSC, Auckland 1142, New
Zealand,或者發送電子郵件至:Serato at eula@serato.com。
中文
4 無隱含保證:
除了 Serato 向您闡述和簽署的書面檔、保證、條款或條件之
外,您同意 Serato 不提供任何與軟體有關的明文或隱含的保
證,這包括但不限於與品質、能達到特定要求的健全性或者
獲得特定結果的功能等有關的隱含保證。您同意以下內容:
a 履行此許可協定,除了 Serato 闡述和簽署的書面檔、
保證、條款或條件外,不得依賴任何其他書面檔、保
證、條款或條件。
b 在法律最大允許範圍內,憲法或普通法隱含的任何條
款、保證或其他條款皆不在本許可協定範圍內。
5 免責條款:
任何情況下,Serato 不承擔以下責任 ( 合同、包括過失在內
的侵權或其他形式 ):
a 本許可協定範圍內或與此軟體有關的任何損壞賠償、
任何金錢賠償,其中包括但不限於如下賠償:
i 銷售收入和 /
或商機的損失、生產損失、資料損壞損失或管理
或人員浪費;
ii 損失、損壞、任何因此許可或軟體的使用而直接或間
接導致的間接性、後續性、特殊性成本或支出,即使
Serato 已經說明此類損壞的可能性或者即使 Serato 已
經合理地預見此類損失、損壞、成本或支出;
b 因安裝或使用第三方軟體而導致的損失。
或利潤損失、預計儲蓄損失、商譽
6 法律免責:
本許可協定中,Serato 不主張、限制或排除任何適用法律規
定不可限制或排除的義務或責任。
7 更新:
使用本軟體進行更新時,您必須同意:
a 本許可協定的條款也適用于更新和 / 或更新後的軟體;
關於驅動程式軟體(Windows)
驅動軟體是一款專用的 AISO 驅動程式,用來從電腦中輸出音
頻信號。
! 使用 Mac OS X 時,不需要安裝驅動程式軟體。
檢查驅動程式軟體上的最新資訊
如需本裝置專用驅動程式軟體的最新資訊,請瀏覽本公司網
站,如下所示。
http://www.prodjnet.com/support/
軟體使用權授契約書
軟體使用權授契約書(以下簡稱「契約」)是由您(安裝程式的個
人及安裝程式之個人所代表的任一法律個體)(以下簡稱「您」)
及 PIONEER CORPORATION(以下簡稱「先鋒」)共同簽署。
若您採取任何步驟設定或安裝程式時,即表示已接受此權授契
約中之所有條款。允許下載及/或使用此程式,係依您是否遵循
契約中之條款約定而定,因此無需以任何書面或電子形式之核
准,證明此契約之有效性及強制性。若您不同意契約中之所有條
款,即不被授權使用此程式,且必須適時停止安裝或解除安裝。
1 定義
1 「使用說明」係指先鋒所提供用以協助安裝及使用該
軟體之書面文件、說明書以及說明目錄。
2 「程式」係指基於此契約,由先鋒授權予您之先鋒軟
體之全部或任一部分。
2 程式授權
1 有限授權。依據此契約之約定,先鋒授與您有限的、非
專屬的且不可轉讓之使用權(不包括再授權之權利)。
a 您必須遵循此契約及使用之明文規定,僅得為個
人使用之目的,安裝一份程式於您的電腦硬碟上
(授權使用)。
b 在授權使用之範圍內使用使用說明。
c 單純以備份為目的而拷貝此程式時,需將所有權、
商標、著作權以及版權限制之說明,同時複製於
備份版本上。
Zhtw
7
Page 82
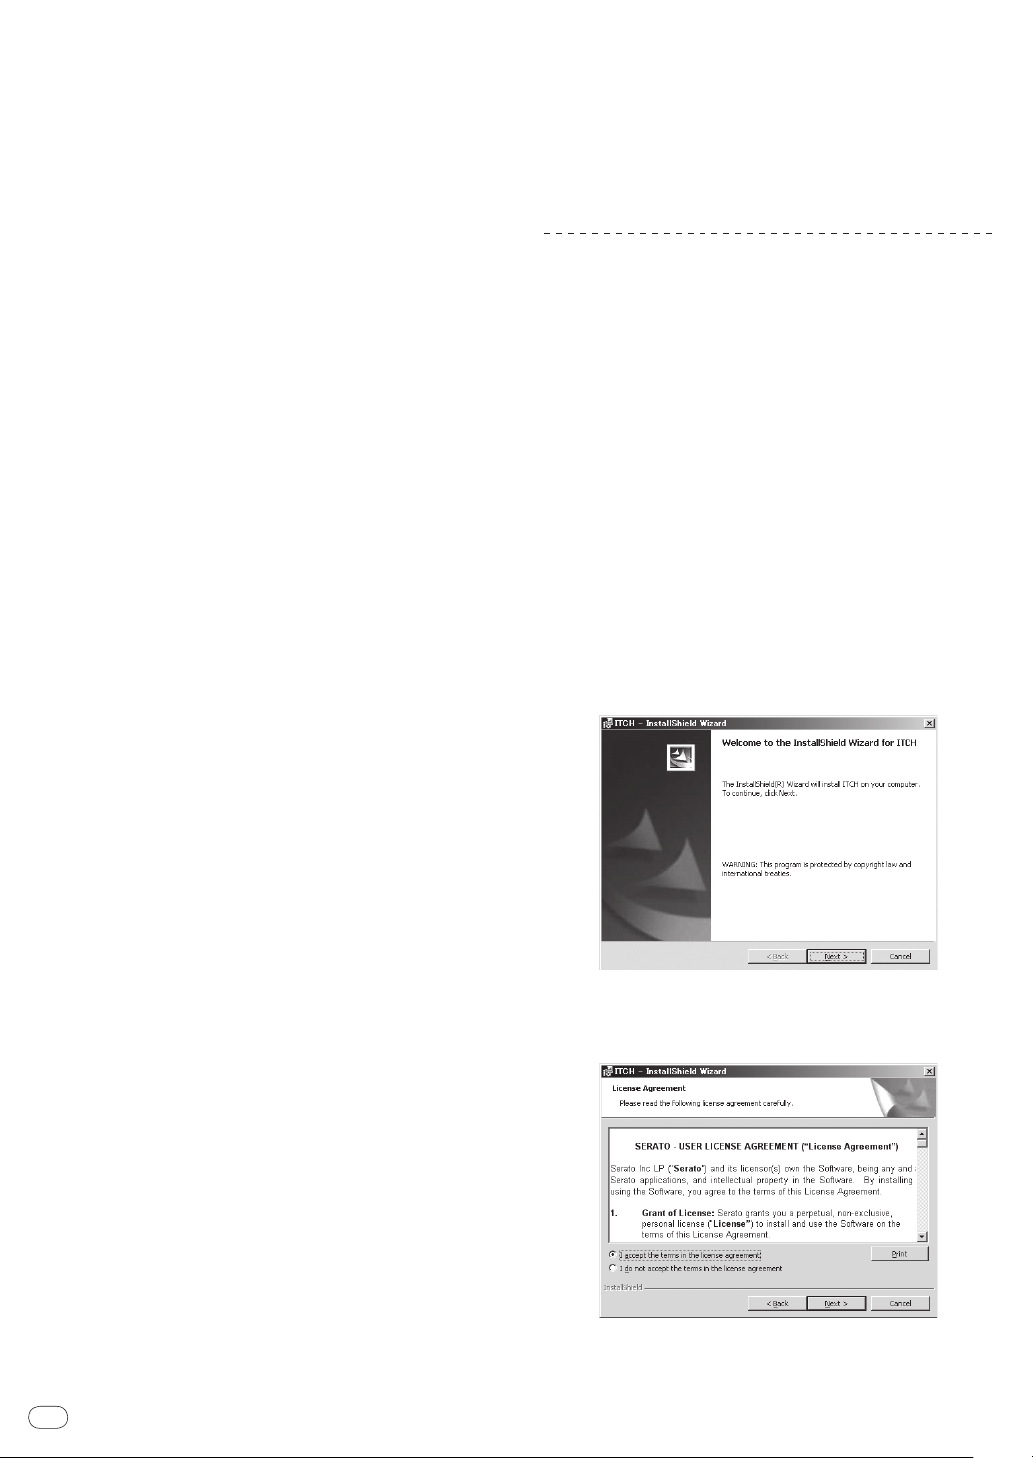
2 限制。除非此契約明確許可,否則您不可拷貝或使用此
程式或使用說明書,亦不可轉讓、再授權、出租、租賃或
出借此程式,或為第三方提供訓練之目的而使用、與商
業共用使用時數,或供公共部門使用。除非在適用法律
明確允許之範圍內,且已書面通知先鋒欲進行之舉動,
否則您不可自己或經由第三方修改、變更、進行逆向工
程,以及拆卸或解譯此電腦程式。除非有先鋒事先書面
之同意,否則您不可將此程式用於多個處理器上。
3 所有權。程式、使用說明書及其一切複製品,以及任
何衍生的工作之所有專利權、著作權、商標權、營業
秘密以及其他權利,均歸先鋒或其供應者所有。您並
未取得除了本契約所明確授權以外的任何其他權利。
4 不提供支援。就本契約之程式或使用說明書,先鋒並
無提供支援、維護、升級、修改或新版本之義務。
委派,均將無效與失效。因為前述約定,本契約將對簽
約雙方及其相關繼承人與受讓人亦具有拘束力。
5 契約之完整性。無論是書面或口頭議定,本契約代表
簽約雙方間之協議且其效力優於所有之前或同時間
存在之契約或協議。在沒有先鋒事先的、明確的書面
同意下,此份契約不得修改或調整,且沒有任一法條、
文件、用途或慣例可被引用修改此契約。
6 您同意本合約受日本法律管轄並依日本法律解釋。
關於安裝程序(Windows)
1 使用 USB 連接線連接本裝置與電腦。
如需連線的詳細資料,請參閱第 11頁上
連接及零件名稱
。
3 免責聲明
先鋒不就該程式與使用說明書之相關部分,提供任何形式之
保證,包括任何行銷保證、特定目的之適用程度保證、品質
滿意保證、精確性、所有權或是不侵害保證,且不論是明白、
隱含、法令規定,或是因工作所導致、因商業往來或使用導
致。您應自行負擔有關程式及使用說明品質之全部風險,並
自行負擔所有修護所需之費用。
4 違約的賠償與補償
您同意因任何違反本契約約定之行為,將導致先鋒發生無法
挽回之損害,且該等損害無法以金錢加以賠償,因此除了賠
償以及任何先鋒有權取得之其他補償之外,您同意先鋒得尋
求任何法令之救濟,包括假扣押或假處分等保全方式,以避
免發生於本契約實際上的、具威脅性的或持續的違約行為。
5 契約終止
先鋒有權在您違反任一條款時,隨時終止本契約。當本契約終
止後,您必須停止使用該程式,並將其從安裝之電腦中永久
刪除,以及銷毀您以任何形式所持有的程式與使用說明書及
其複本,並以書面向先鋒確認您已經從事前述行為。第 2.2,
2.3,2.4,3,4,5 及 6 條將會在本契約終止後持續有效。
6 一般條款
1 責任之限制。在任何情況下,先鋒或其子公司將不會就
與本契約或本契約之主要事項相關之任何事宜,以及不
論在任何責任理論下,就利潤之損失、收益、業務、儲
蓄、資料、使用或替代採購成本,負擔任何責任,即使已
被告知此類損失之可能性,或即使此類損失為可預見,
亦同。在任何情況下,先鋒對於所有損失之責任,將不
會超過您就此程式所支付給先鋒或其子公司之金額,此
為先鋒或其子公司唯一應負之責任。簽約雙方確認本契
約中所記載之責任上限,以及風險分攤已反映於程式價
格上,且係簽約雙方間議價之主要要素,如非在此前提
之下,先鋒將不會提供此程式或簽訂此契約。
2 本契約中有關限制或排除保證與責任之相關規定,均
不影響或損害您身為消費者所享有之法律強制賦予
之權利,且此等有關保證與責任之相關規定亦僅在您
所在地區的法律允許之前提下始有適用。
3 失效與免除。若本契約之任何條款變成非法、無效或
是無法執行時,該條款將會在其可能限度內繼續執
行,或若無法執行,則視為失效並從本契約中刪除,
但契約剩餘部分將會繼續執行並有效。任一方對於本
契約之任何不履行或違約行為責任之免除,將不會免
除任何其他或後續的不履行或違約行為之責任。
4 不可讓渡。在未取得先鋒事前書面同意的情況下, 您不
可讓渡、出售、移轉、委任或是處分此契約,或任何本
契約之權利或義務,不管是自願或非自願、係因法令要
求或其他因素,因此任何您所意圖進行之讓渡、移轉或
2 將 [ON/OFF] 開關滑至 [ON] 端。
開啟本裝置的電源。
! 首次連接本機至您的電腦時,也需要安裝 Windows
隨附的標準驅動程式。 完成安裝驅動程式後請繼續
下一個步驟。
®
3 將隨附的 CD-ROM光碟插入電腦的光碟機。
4 在 Windows [ 開始 ] 功能表中,按兩下 [ 電腦(或我的
電腦)] > [ITCH CD] 圖示。
便會顯示 CD-ROM裝置的內容。
5 按兩下 [ITCH_installer.exe]。
ITCH安裝程式已啟動。
6 一啟動 ITCH安裝程式後,請按一下 [ Next]。
7 同意授權協議(選擇 [I accept the terms in the license
agreement]),然後按一下 [Next]。
若您不同意,請選擇 [I do not accept the terms in the license
agreement]。
Zhtw
8
Page 83
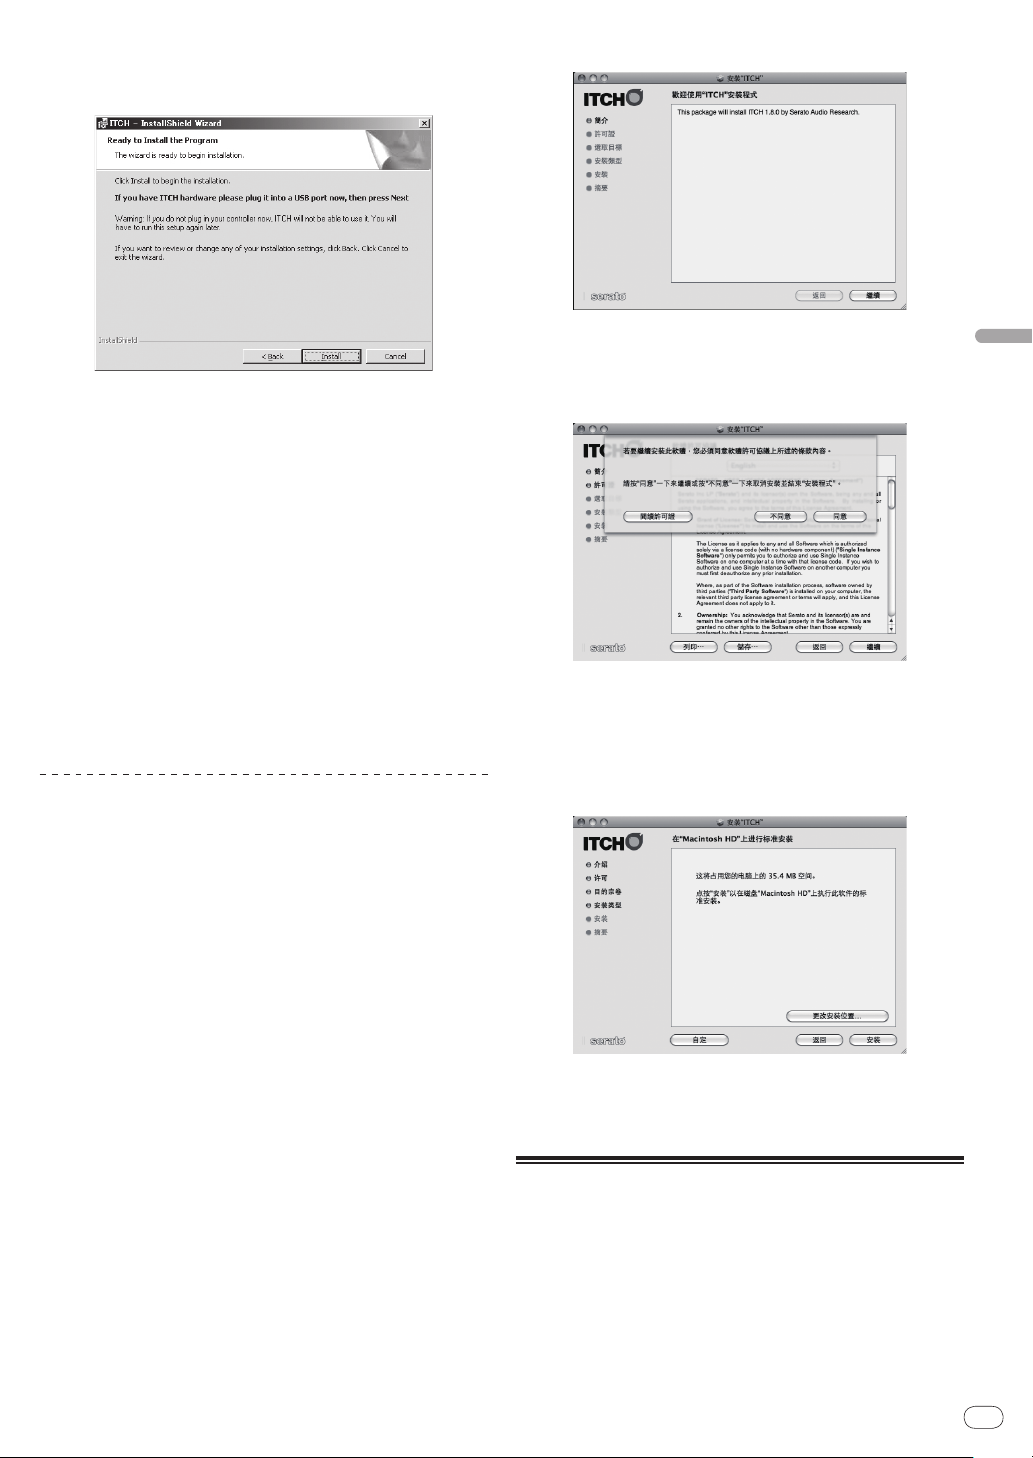
8 選擇您要安裝 ITCH的資料夾後,按一下 [ Next]。
9 按一下 [ 安裝 ]。
6 一啟動 ITCH安裝程式後,請按一下 [ 繼續 ]。
開始安裝。
完成 ITCH軟體安裝後,即開始驅動程式軟體安裝。
10 在下拉式選單中選擇您要的語言。
11 同意授權協議(選擇 [ 同意 ]),然後按一下 [ 安裝 ]。
若您不同意,請選擇 [ 不同意 ]。
按一下 [ 安裝 ] 後,即開始安裝。
一完成安裝後,安裝完成畫面就會出現。
12 按一下 [ 關閉 ]。
13 按一下 [Finish] 以結束 ITCH安裝程式。
出現建議您重新啟動電腦的畫面。
14 按一下 [Yes]。
重新啟動電腦。
關於安裝程序(Macintosh)
1 使用 USB 連接線連接本裝置與電腦。
如需連線的詳細資料,請參閱第 11頁上
2 將 [ON/OFF] 開關滑至 [ON] 端。
開啟本裝置的電源。
連接及零件名稱
。
7 請詳閱授權協議內容,然後按一下 [ 繼續 ]及[同意 ]
以同意授權協議。
若您不同意授權協議,請按一下 [ 不同意 ] 取消安裝。
8 選擇您要安裝 ITCH的資料夾後,按一下 [ 繼續 ]。
9 按一下 [ 安裝 ]。
開始安裝。
一完成安裝後,安裝完成畫面就會出現。
中文
3 將隨附的 CD-ROM光碟插入電腦的光碟機。
畫面上會出現 [ITCH CD] 圖示。
4 按兩下 [ITCH CD] 圖示。
便會顯示 CD-ROM裝置的內容。
5 按兩下 [ITCH_installer.mpkg]。
ITCH安裝程式已啟動。
10 按一下 [ 重新啟動 ]。
重新啟動電腦。
啟動 ITCH
適用 Windows
在 Windows [ 開始 ] 功能表中,開啟 [ 所有程式 ] > [Serato]
> [ITCH],然後再按一下 [ITCH] 圖示。
適用 Mac OS X
在 Finder 中,開啟 [ 應用程式 ] 資料夾,然後開啟 [Serato]
> [ITCH],再按兩下 [ITCH] 圖示。
Zhtw
9
Page 84

關於驅動程式軟體及設定公用程式軟體
調整緩衝區大小
本裝置功能運作有如符合 ASIO 標準的音訊裝置。
! 若應用程式將本機當作正在運作的預設音訊裝置(DJ 軟
體等)使用,在調整緩衝區大小前請離開這些應用程式。
按一下 Windows [ 開始 ] 功能表 > [ 所有程式 ] > [Pioneer] >
[DDJ] > [Pioneer DDJ ASIO 設定公用程式 ]。
! 夠大的緩衝區大小可降低音效遺失(音效中斷)的機會,但
卻會增加音訊訊號傳輸延遲(等待時間)。
檢查驅動程式軟體的版本
按一下 Windows [ 開始 ] 功能表 > [ 所有程式 ] > [Pioneer] >
[DDJ] > [Pioneer DDJ 版本顯示公用程式 ]。
! 您可在畫面上檢查本裝置的韌體版本。
! 本機未連接電腦或本機與電腦未正確通訊時,不會顯示韌體版本。
10
Zhtw
Page 85
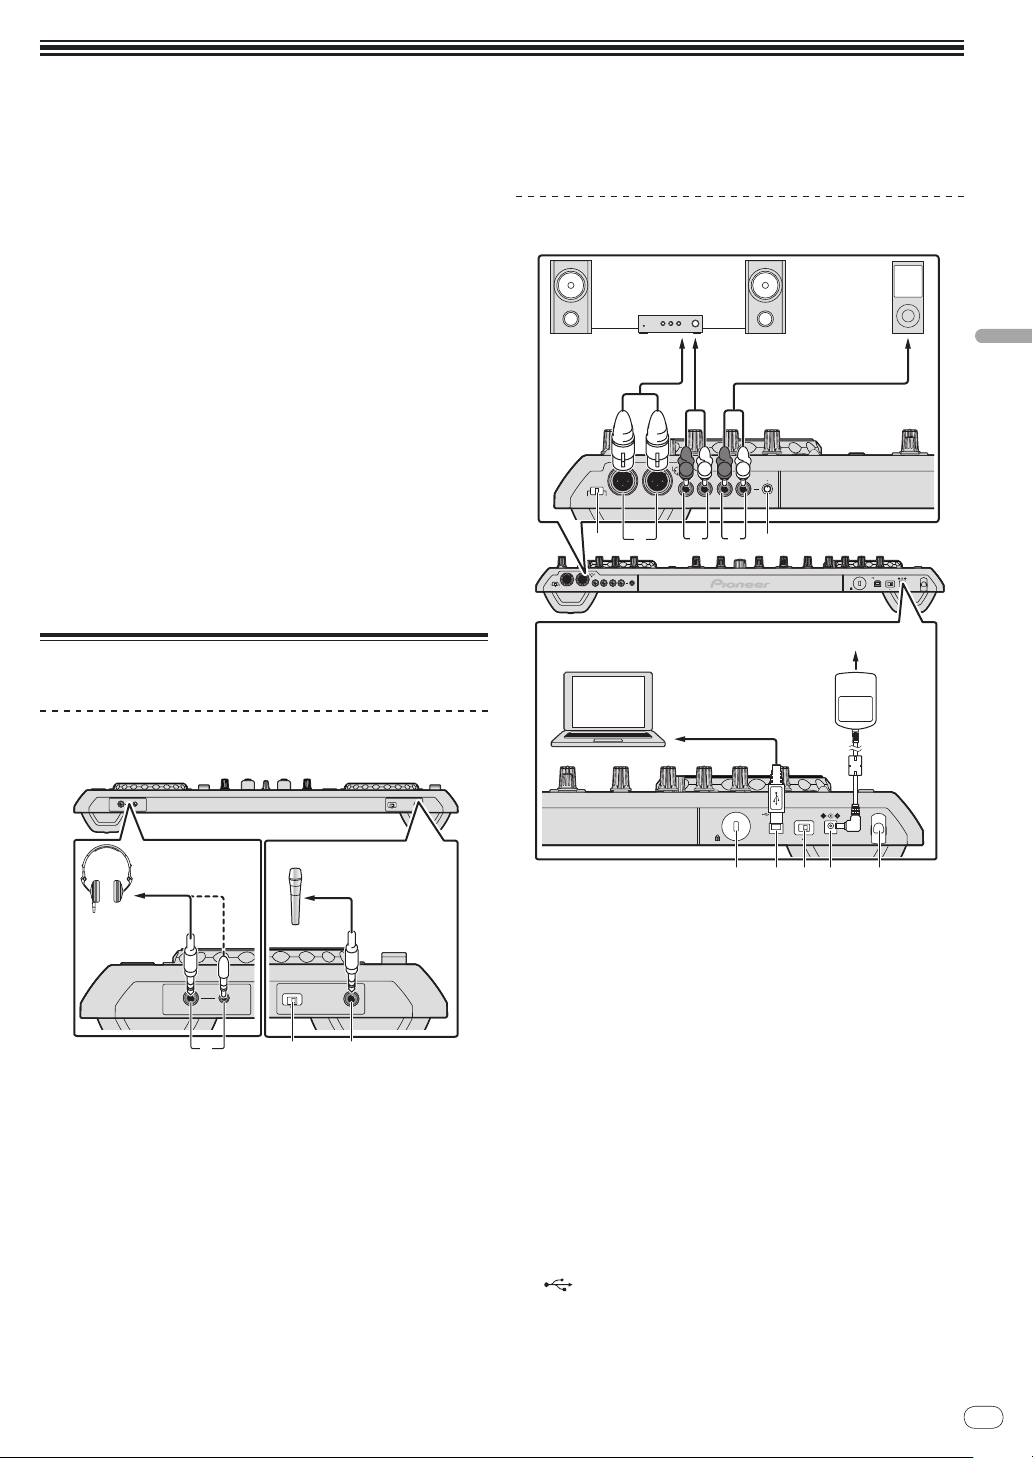
連接及零件名稱
PHONES
MIC 2
MIC/AUX THRU
ONOFF
PHONES
MIC 2
MIC/AUX THRU
ONOFF
123
Շᐡ
ബջ
Շᐡጤ
ՎՇᐡ
ബջᢠጤ
Վബջ
VOLAUX INMASTER OUT 2MASTER OUT 1MASTER ATT.
MAX
LRLL
1GND
2 HOT
3 COLD
RR
-12 dB-6 dB 0 dB
MIN
ONUSBOFF DC IN
5 V
VOLAUX INMASTER OUT 2MASTER OUT 1MASTER ATT.
MAX
LRLL
1GND
2 HOT
3 COLD
RR
-12 dB -6 dB 0 dB
MIN
R
L
R
L
51
2
3 4
ONUSB OFF DC IN
5 V
ITCH
8 9 a6 7
ՎଊᒰΤᆓφ
Վଊᒰяᆓφ
Ѡឺԓ
ଊ၇ဋ
೪റȃᘘτᐡȃ
ѓ౦ඵᖑᏣ๊Ȅ
Ⴌဟ
łń ᡑᔇᏣ
Ȟᓎߤȟ
ՎႬྜඩ৵
! 在連接 AC 變壓器前,請等候至完成裝置間的所有連線為止。
在裝置間連接或變更連線前,請確定關閉電源並從插座
上拔下 AC 變壓器插頭。
有關已連接元件,請參閱操作手冊。
! 只能使用本機隨附的 AC 變壓器。
! 本機供電裝置為 AC 變壓器或 USB 匯流排電源。
本機可透過以 USB 纜線連接本機與電腦使用,無 AC 變壓器亦可。
! 使用隨附的 USB 纜線可直接連接本機與電腦。
! 無法使用 USB 集線器。
3 MIC2端子
連接至麥克風。
使用麥克風
=
後面板
(第 29頁)
執行以 USB 匯流排供電本機的注意事項
! 以 USB 匯流排供電使用本機時,會從 AC 電源供應器供電
給連接的電腦。 請勿使用本機的電池來執行電腦。
! 在類似以下情形時,供電可能會不足,且本機無法倚賴
USB 匯流排電源操作。
— 電腦的 USB 電源供應器電容不足時。
— 其他 USB 裝置連接至電腦時。
若本機無法使用 USB 匯流排電源操作,請連接隨附的 AC 變壓器。
! 本機使用 USB 匯流排電源操作時,請注意下列限制:
— 轉輪指示燈將不會亮起。
— [MASTER OUT 1](XLR 輸出)聲道不會輸出。
— 無法使用 [MIC1]、[MIC2]及[AUX IN] 端子。
— 指示燈比使用 AC 變壓器時還暗。
若要避免這些限制並使用本機,請連接隨附的 AC 變壓器。
連接輸入/輸出端子
前面板
中文
(第 29頁)
以耳機監控音效
1 PHONES插孔
在此連接耳機。
立體聲電話插頭(Ø 6.3 mm)及立體聲迷你電話插頭(Ø
3.5 mm)皆可使用。
關於詳細資訊,請參閱第 28頁上
! 本機的兩個輸入插孔皆屬於立體聲插孔及迷你音訊插孔,
但無法同時使用。 若同時使用,則在其中一個中斷連接或
連接時,另一個插孔的音量可能會突然增加或降低。
2 MIC/AUX THRU選擇器開關
若您要直接輸出 [MIC2]及[AUX] 聲道,請將此設為
[ON]。
直接輸出麥克風與 AUX 聲音
=
。
1 MASTER ATT.
設定 [MASTER1] 端子中聲音輸出的衰減位準。
2 MASTER OUT 1端子
在此連接通電的揚聲器等設備。
3 MASTER OUT 2端子
連接至功率放大器等。
4 AUX IN端子
連接至外接裝置的輸出端子(範本、可攜式音訊裝置等。)
5 VOL控制鍵
調整 [AUX IN] 端子的音訊位準輸入。
6 Kensington 安全槽
USB端子
7
連接至電腦。
! 使用隨附的 USB 纜線可直接連接本機與電腦。
! 無法使用 USB 集線器。
Zhtw
11
Page 86
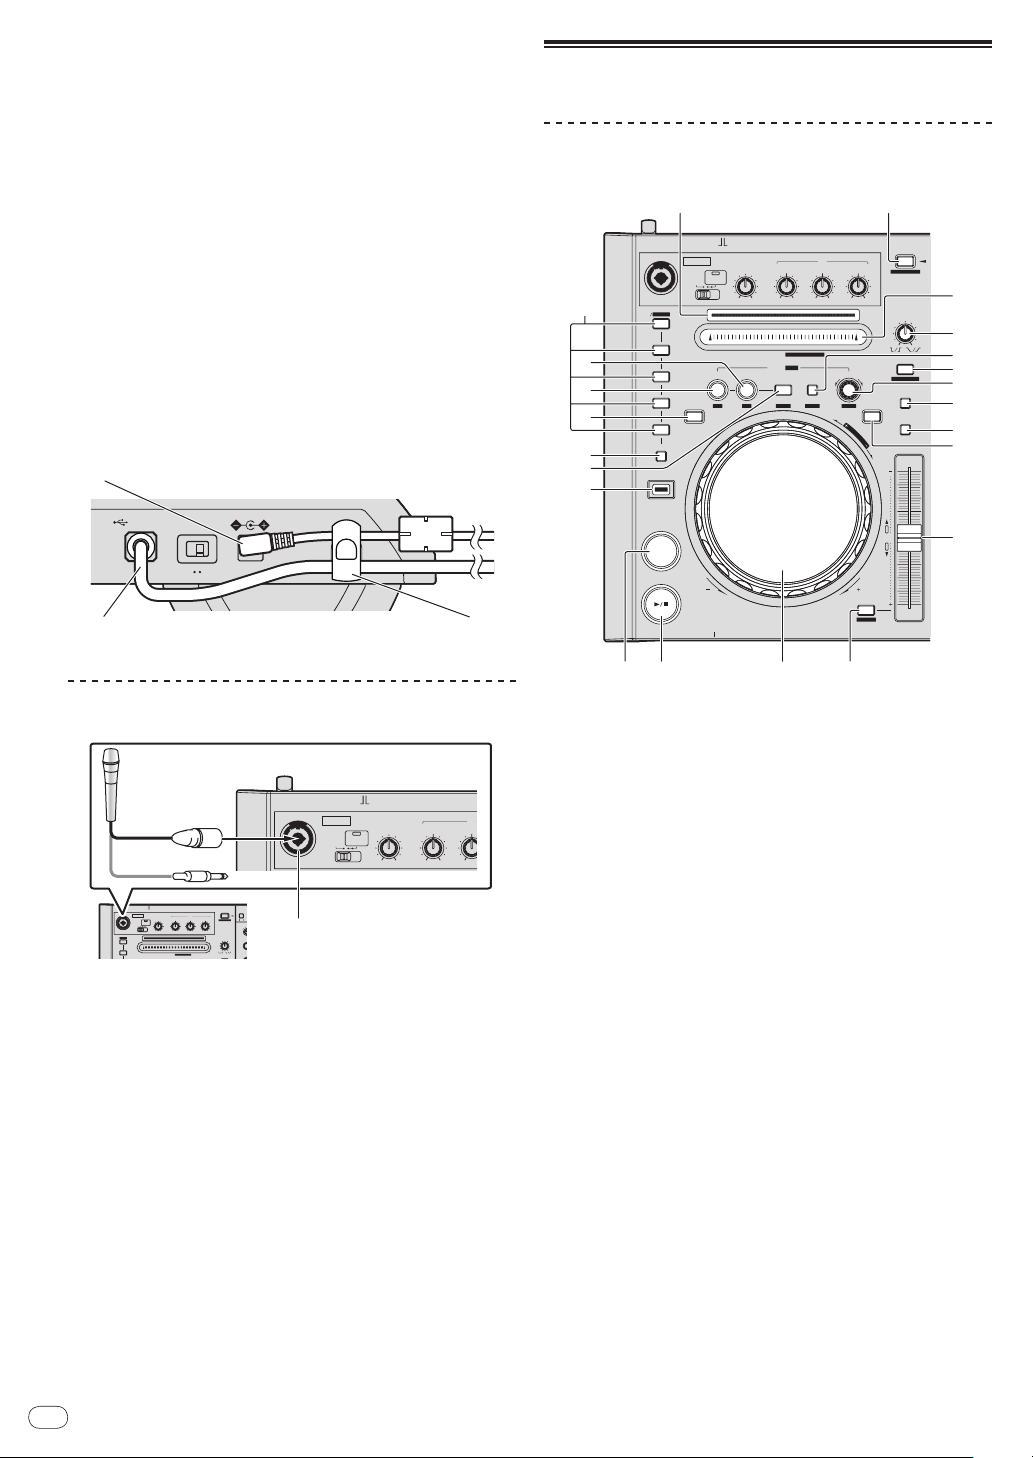
8 ON/OFF開關
ONUSB OFF DC IN
5 V
DELETE
ALPHABET SEARCH
INST.DOUBLES
HOT CUE
NEEDLE SEARCH /
2
1
A
VINYL
SPEED ADJUST
LOAD
JOG MODE
ON
LEVEL
MAXMIN
OFFON
TALK
OVER
OFF
MIC 1
LOW
MAXMIN
MID
EQ
MAXMINHIMAXMIN
CRATES
FX CH
S
EFFECT
PARA
M
A
B
MIC 1
ON
LEVEL
MAXMIN
OFF ON
TALK
OVER
OFF
MIC 1
LOW
MAXMIN
MID
EQ
MIN
MIC 1
1
ബջ
ܗ
5
SYNC
SET TAP CLEAR LOCK
SYNC OFF
SLIDE
DELETE
ALPHABET SEARCH
INST.DOUBLES
REC MODE
HOT CUE
LOOP/ GRID
NEEDLE SEARCH /
IN
4
3
2
1
REV
A
SLIP
VINYL
MASTER
TEMPO
TEMPO
RANGE
VINYL
SPEED ADJUST
LOAD
JOG MODE
SHIFT
OUT
TEMPO
0
ON
LEVEL
MAXMIN
OFFON
TALK
OVER
OFF
MIC 1
RELOOP /EXIT SELECT AUTO
FWDREV
PHONES
PLAY/PAUSE
CUE
G
R
I
D
A
D
J
U
S
T
LOW
MAXMIN
MID
EQ
MAXMIN
HI
MAX
2X1/2X
MIN
MIC 1
1 2
3
4
6
8
9
b
a
7
5
c
def
g
h
i
j
k
l
m
ILLUMINATION
開啟及關閉本機電源。
9 DC IN端子
使用隨附的 AC 變壓器(含安裝的電源插頭)連接電源插座。
! 在連接 AC 變壓器前,請等候至完成所有設備連線為止。
! 僅能使用隨附的 AC 變壓器。
a 線鉤
使用本機時此鉤可鉤住 AC 變壓器電源線及 USB 纜線。
! 若 AC 變壓器或 USB 纜線在播放時中斷連接,聲音將會中斷。
線鉤
將 AC 變壓器的電源線掛在線鉤頂端,而將 USB 纜線掛在底部。
將電源線及 USB 纜線掛在線鉤上,以纏緊 AC 變壓器的電源
線與 USB 纜線至定位。 這可防止電源線與 USB 纜線遭意外拉
扯,以及防止插頭與端子中斷連接。
! 若 AC 變壓器或 USB 纜線在播放時中斷連接,聲音將會中斷。
AC 變壓器的電源線
零件名稱與功能
唱盤部分
USB 連接線
控制面板左上方
1 MIC1端子
12
Zhtw
連接至麥克風。
使用麥克風
=
! 可使用 XLR 接頭或耳機插頭(Ø 6.3 mm)。
(第 29頁)
線鉤
1 播放位址指示燈
曲目中的位置會顯示為 10 階,曲目的開始處位於最左側,
結束位置則位於最右側。 指示燈會與「ITCH」軟體中顯
示的經過播放時間與剩餘播放時間同步亮起。
2 LOAD (INST. DOUBLES)按鍵
已選取的曲目會載入至個別唱盤。
載入曲目至唱盤
=
(第 23頁)
按下 [LOAD (INST. DOUBLES)] 按鍵的同時按下
[SHIFT] 按鍵,播放的曲目就會加倍。
快速加倍
=
(第 23頁)
3 NEEDLE SEARCH (ALPHABET SEARCH)墊
! 音效會從觸碰面板墊時的位置播放。
! 可使用字母搜尋功能。
使用 [
=
NEEDLE SEARCH (ALPHABET SEARCH)
觸控板(「字母搜尋」)進行搜尋
4 VINYL SPEED ADJUST控制鍵
若需播放及停止曲目,此功能可調整播放減緩直到停止
的速度,以及從停止模式到正常播放的速度。
5 LOOP SELECT (GRID LOCK)按鍵
您要播放的循環點可自循環庫中預先登錄的循環點選擇。
每次按下按鍵,會切換循環庫編號。
=
使用循環庫
(第 25頁)
在按下 [LOOP SELECT (GRID LOCK)] 按鍵的同時按下
[SHIFT] 按鍵後,會鎖定整體節拍網格導致無法編輯。
6 VINYL (ILLUMINATION)按鍵
可開/關 [VINYL] 模式。
切換轉輪模式
=
(第 24頁)
(第 22頁)
]
Page 87
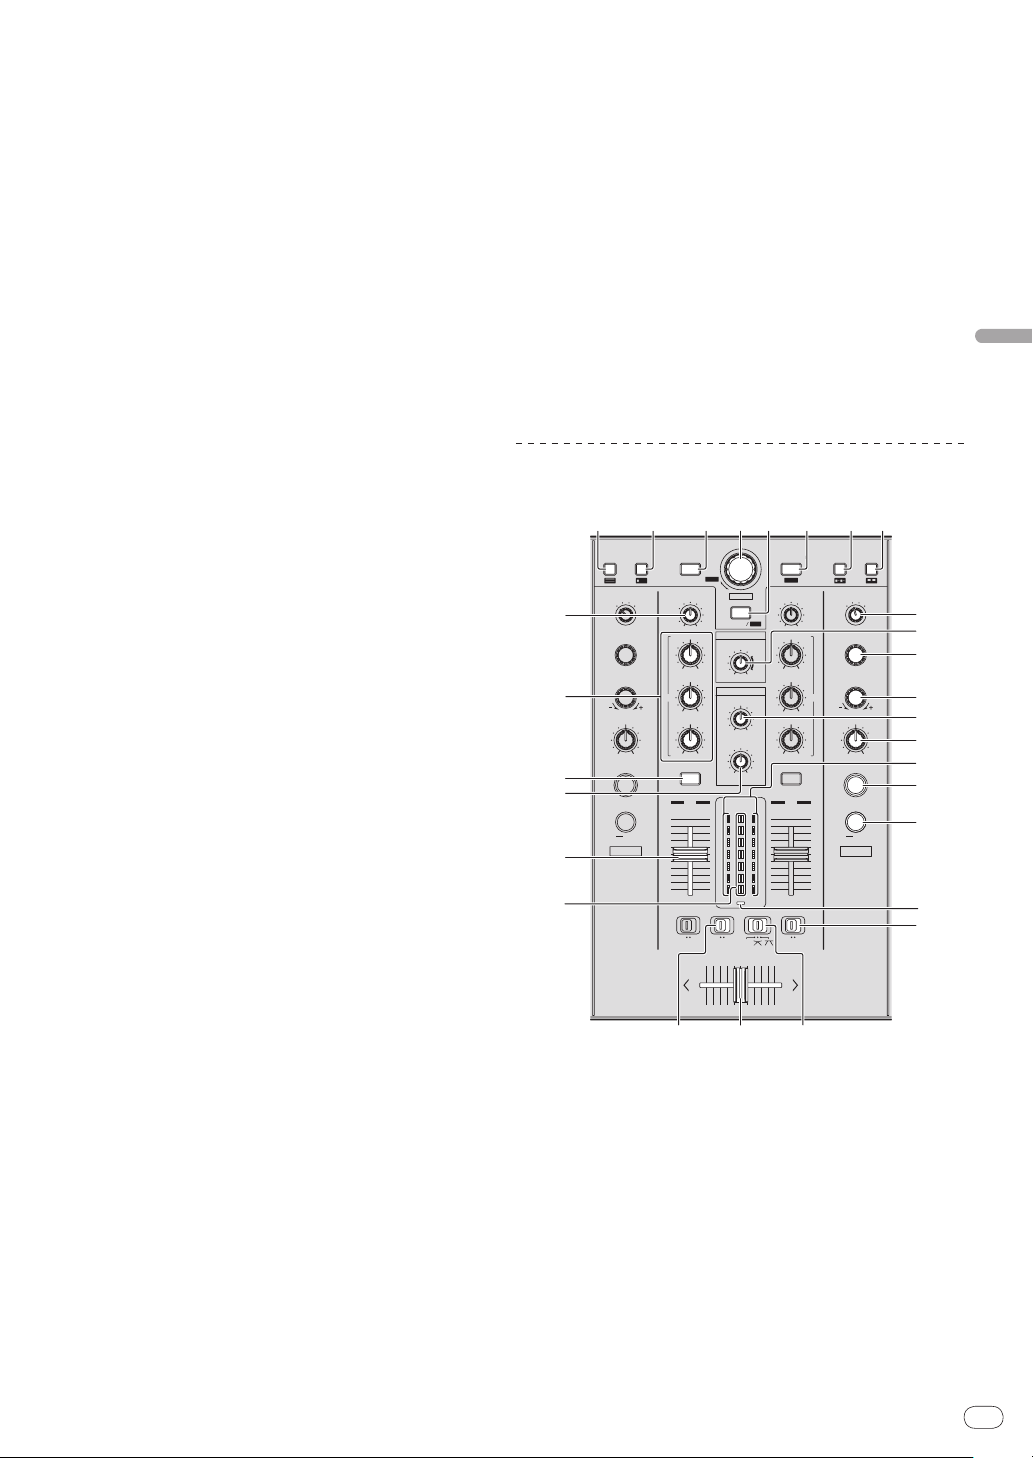
7 AUTO LOOP(GRID SLIDE)控制鍵
CUE
CRATES FILES BROWSE PREPAREBACK
TRIM
FX CH SELECT
EFFECT SELECT
PARAMETER
MAXMIN
A
BMASTER
MIC
/AUX
LOAD PREPARE
BROWSE
SAVE
JUMP
RECAREA MOVE
MIXING
MASTERCUE
MASTER
ON / OFF
TAP
FX1
LEVEL / DEPTH
MINMAX
HI
MINMAX
MID
MINMAX
LOW
MINMAX
AUTO
FX CH SELECT
EFFECT SELECT
PARAMETER
A
BMASTER
MIC
/AUX
LEVEL / DEPTH
ON / OFF
TAP
FX2
MINMAX
AUTO
EQ EQ
A
CUE
TRIM
MAXMIN
HI
MINMAX
MID
MINMAX
LOW
MINMAX
B
10
9
8
7
6
5
4
3
2
1
0
10
9
8
7
6
5
4
3
2
1
0
FADER START
ONOFF
FADER START
ONOFFONOFF
THRU
C.F.REV
HEADPHONES
MAXMIN
LEVEL
MAXMIN
LEVEL
LEVEL
MASTER
C.F.REV
AB
12 7 83 64 5
9
b
c
e
g
h
j
d
a
kl
o
p
q
m
r
s
i
n
f
可設定自動循環。
自動設定循環(自動循環)
=
(第 25頁)
! 轉動 [AUTO LOOP (GRID SLIDE)] 控制鍵同時按下
[SHIFT] 按鍵即可調整節拍網格。
8 TEMPO RANGE按鍵
可切換 [TEMPO] 滑桿的調整範圍。
選擇調整播放速度的範圍
=
(第 24頁)
9 MASTER TEMPO按鍵
利用此按鍵可開啟及關閉主節拍功能。
調節播放速度而不改變音程 ( 主節拍 )
=
(第 24頁)
a SLIP按鍵
可開/關滑動模式。
使用滑動模式
=
(第 26頁)
b TEMPO滑桿
利用此按鍵可調整音軌播放速度。
變更播放速度
=
(第 24頁)
c SYNC (SYNC OFF)按鍵
按下此按鍵後,唱盤上按下按鍵的曲目會與載入其他唱
盤曲目的 BPM 及節拍網格同步化。
同步化播放速度
=
(第 27頁)
d 轉輪
可用於如刮盤、移音等操作。
操作緩動盤
=
(第 24頁)
! 緩動盤的頂面鑲嵌有開關。不要在緩動盤上放置物
品,也不要對其施加強力。還請注意,水或其他液體
進入本機會引起故障。
k LOOP IN (GRID SET)按鍵
在播放期間於您想要開始循環播放(進入循環點)的位
置按下此按鍵後,會設定進入循環點。
=
循環操作
(第 25頁)
按下 [LOOP IN (GRID SET)] 按鍵並同時按下 [SHIFT]按
鍵即可設定節拍網格。
l LOOP OUT (GRID TAP)按鍵
在播放期間於您想要結束循環播放(離開循環點)的位
置按下此按鍵後,會設定離開循環點,且播放返回進入
循環點並開始循環播放。
=
循環操作
(第 25頁)
在按下 [LOOP OUT (GRID TAP)] 按鍵的同時按下
[SHIFT] 按鍵後,可在播放期間輕按按鍵調整節拍網格。
m HOT CUE (DELETE)按鍵
此功能可用於設定及叫出熱指令點。
設定熱指令
=
(第 26頁)
混音器/音效部分
中文
e PLAY/PAUSE f按鍵
使用此按鍵可播放/暫停音軌。
播放及暫停
=
(第 24頁)
f CUE按鍵
此功能可用於設定、播放及叫出暫時指令點。
設定暫時指令點
=
g SHIFT按鍵
在按下 [SHIFT] 按鍵時按下其他按鍵後,會叫出不同功能。
h RELOOP/EXIT (GRID CLEAR)按鍵
利用此功能可返回循環播放(重新循環)或取消循環播
放(離開循環)。
=
=
按下 [RELOOP/EXIT (GRID CLEAR)] 按鍵並同時按下
[SHIFT] 按鍵即可清除節拍網格。
i REC MODE按鍵
可切換 [HOT CUE (DELETE)] 按鍵的功能(設定/叫出)。
! 開啟電源時,按鍵會設為叫出模式。
j REV按鍵
利用此功能可開啟及關閉倒轉播放。
=
返回循環播放(重新循環)
取消循環播放(離開循環)
反向播放
設定熱指令
=
(第 24頁)
(第 26頁)
(第 24頁)
(第 25頁)
(第 25頁)
1 CRATES按鍵
移動 crate 清單面板中的游標。
2 FILES按鍵
開/關顯示 [FILES] 面板。
3 BACK按鍵
將游標焦點移回一層。
4 旋轉選擇器
移動面板中的游標。 使用游標可選擇檔案或曲目。
選擇項目
=
(第 20頁)
Zhtw
13
Page 88
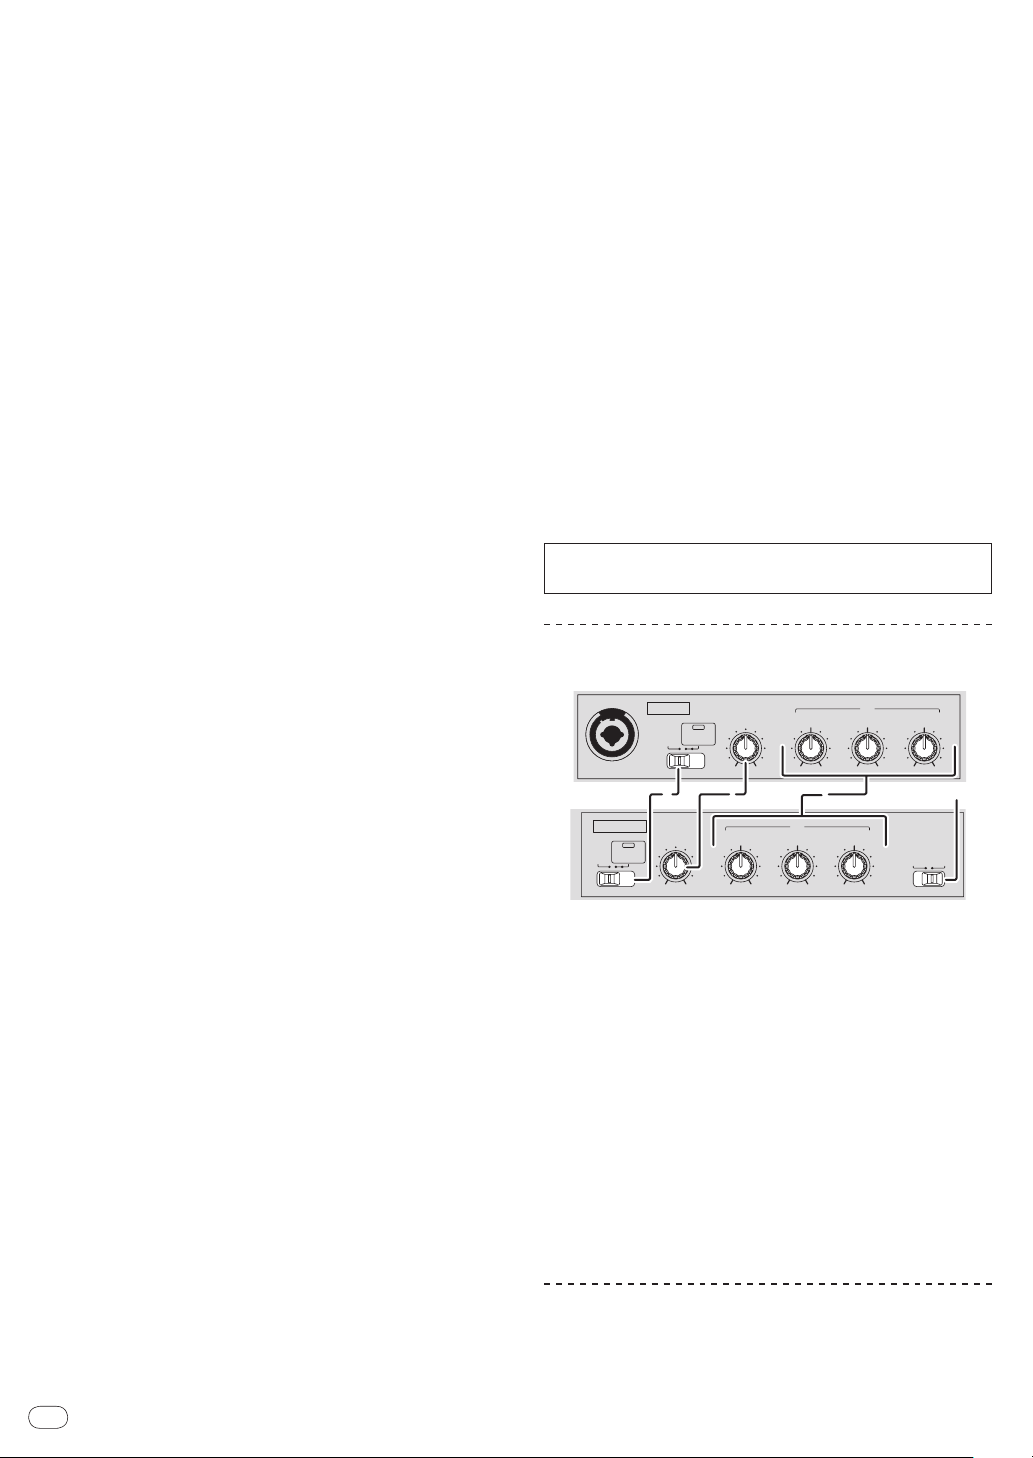
5 AREA MOVE (REC)按鍵
LEVEL
MAXMIN
OFFON
TALK
OVER
MIC 1
LOW
MAXMIN
MID
EQ
MAXMIN
HI
MAXMIN
MIC 1
LEVEL
MAXMIN
OFFON
TALK
OVER
MIC 2 / AUX
LOW
MAXMIN
MID
EQ
MAXMIN
HI
INPUT
SELECT
MAXMIN
AUXMIC 2
1 23 4
移動游標至不同的面板。
選擇項目
=
(第 20頁)
m C.F. REV開關
讓指定交互推桿從右到左的的唱盤反轉,反之亦然。
使用交互推桿反向功能
=
(第 28頁)
6 LOAD PREPARE (SAVE)按鍵
載入曲目至 [PREPARE] 面板。
使用 [
=
PREPARE
] 清單
(第 22頁)
7 BROWSE按鍵
開/關顯示 [BROWSE] 面板。
8 PREPARE按鍵
開/關顯示 [PREPARE] 面板。
9 FX CH SELECT控制鍵
切換要套用音效的聲道。
使用音效功能
=
(第 29頁)
a MASTER LEVEL控制鍵
調整主要音量輸出。
b EFFECT SELECT控制鍵
選擇音效類型。
使用音效功能
=
(第 29頁)
c PARAMETER控制鍵
調整各種音效(時間、諧波等)的參數。
使用音效功能
=
(第 29頁)
d HEADPHONES MIXING控制鍵
調整按下 [CUE] 按鍵後的耳機聲道聲音與 [MASTER
OUT 1]及[MASTER OUT 2] 聲音間的螢幕音量平衡。
以耳機監控音效
=
(第 28頁)
n 主要音量指示燈
o 頻道音量滑鈕
調整不同唱盤的輸出聲音位準。
輸出音效
=
(第 28頁)
p HEADPHONES LEVEL控制鍵
調整從 [PHONES] 端子輸出的音訊位準。
q 耳機 CUE按鍵
按下耳機 [CUE] 按鍵產生的唱盤聲音可在耳機上監控。
以耳機監控音效
=
(第 28頁)
r EQ(HI、MID、LOW)控制鍵
增加或減少不同聲道的頻率。
等化
=
(第 28頁)
s TRIM控制鍵
調整獨立聲道的輸出增益。
輸出音效
=
(第 28頁)
請勿用力拉扯聲道推桿及交互推桿旋鈕。 旋鈕的設計並無法
取下。 強力拉扯旋鈕可能會導致本機受損。
麥克風/外接輸入控制部分
e LEVEL/DEPTH控制鍵
調整音效的數量參數。
使用音效功能
=
f 聲道位準指示燈
g FX ON/OFF按鍵
開/關音效。
使用音效功能
=
h TAP 按鍵
BPM 可作為依手指輕按按鍵時間間隔計算的音效基值。
手動設定 BPM
=
i C.F. REV指示燈
[C.F. REV] 開關設為 [ON] 時亮起。
j FADER START開關
可開/關推桿啟動功能。
使用推桿開始播放(推桿啟動)
=
k 交互推桿曲線選擇器開關
可切換交互推桿曲線特性。
選擇交互推桿曲線特性
=
l 交叉音控器
切換左右唱盤的音訊輸出。
=
輸出音效
14
Zhtw
(第 29頁)
(第 29頁)
(第 30頁)
(第 28頁)
(第 28頁)
(第 28頁)
1 OFF、ON、TALK OVER選擇器開關
開/關麥克風。
2 LEVEL控制鍵
調整輸出聲音位準。
3 EQ(HI、MID、LOW)控制鍵
增加或減少頻率,以變更音質。
4 MIC2/
AUX選擇器開關
切換麥克風與外接裝置之間的音訊輸入。
! [MIC2]:選擇連接至 [MIC2] 端子的麥克風。
! [AUX]:選擇連接至 [AUX IN] 端子的外接裝置。
使用麥克風
=
=
使用外接裝置
(第 29頁)
(第 29頁)
使用膝上型電腦底座
電腦的鍵盤部分可容納在本機下方。
Page 89
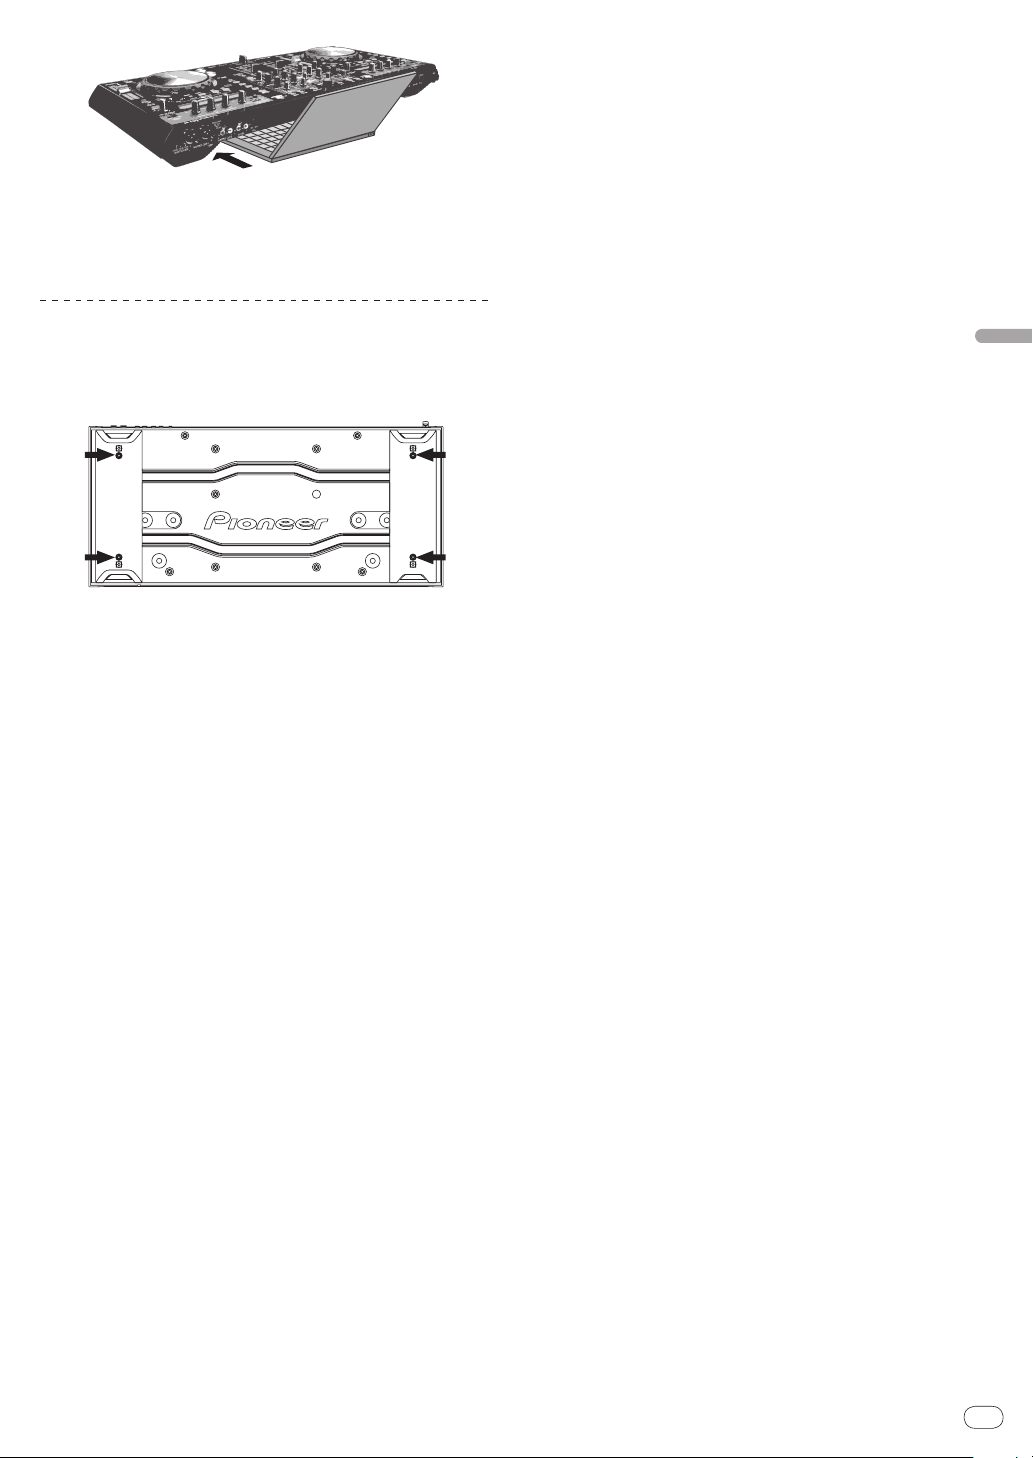
! 視您(筆記型電腦)電腦的大小而定,鍵盤部分可能與
DJ CONTROLLER
DDJ-S1
LAPTOP DOCK 不符。
! 此安裝方式可讓電腦不觸碰本機。
! 此安裝方式可讓連接電腦的纜線不會在本機下打結。
取下雙腳使用
本機的雙腳可取下。
使用十字螺絲起子取下左右腳(各 2 顆螺絲)的螺絲。
! 安裝雙腳時,將需要您之前取下的螺絲。 請小心不要遺失。
無法使用其他螺絲來正確安裝雙腳。
中文
Zhtw
15
Page 90

操作
mkkl
c
d
1234 5 6 7 9a b8
e
f
h
j
g
i
p
o
h
g
n
i
ITCH軟體畫面
連接本機時的畫面
1 ALBUM ART標籤
開/關顯示專輯插圖。
2 目前時間顯示
3 僅顯示 CPU 使用率
4 FILES標籤
開/關顯示 [FILES] 面板。
5 BROWSE標籤
開/關顯示 [BROWSE] 面板。
6 PREPARE標籤
開/關顯示 [PREPARE] 面板。
7 HISTORY標籤
開/關顯示 [HISTORY] 面板。
8 字母搜尋面板
使用 [
=
9
開啟/關閉工具提示
Zhtw
16
NEEDLE SEARCH (ALPHABET SEARCH)
板(「字母搜尋」)進行搜尋
(TOOL TIPS)
(第 22頁)
] 觸控
a SETUP
顯示設定畫面。
變更設定
=
(SEARCH)
b
在資料庫中搜尋此欄位輸入的文字。
c 子面板
按一下畫面最上方的標籤(FILES/
HISTORY)可切換及開關在此顯示的內容。
=
切換子面板
d 曲目清單
顯示有對應 crate 清單面板中選取項目內容的曲目。
! 顯示 [BROWSE] 面板時,只會顯示符合類別縮小範
圍條件的曲目。
e MIC/
MIC/ AUX 監聽控制面板
=
(第 31頁)
(第 20頁)
AUX 監聽控制面板
BROWSE/ PREPARE/
(第 18頁)
f 錄製面板
錄製面板
=
g 音效面板
使用音效功能
=
(第 18頁)
(第 29頁)
Page 91

h 曲目一覽
1
2
8 9 a b c
d
e
3 4 5 6 7
3
1
2
5
3
4
2
1
顯示波形上的曲目聲音頻率頻段,藍色代表高音範圍,綠
色則代表中音範圍,而紅色代表低音範圍。 播放點會顯
示為 [b](白色)。 暫時的指令點會顯示為白色的 [a]
(白色),而熱指令點則會顯示為其他色彩的 [a]。
! 按一下可移動播放位置至該位置。
! 細垂直灰線的顯示間隔為 1 分鐘,粗線的顯示間隔為
5 分鐘。
i 曲目資訊顯示
顯示唱盤中載入的曲目詳細資訊。
1 曲目名稱顯示於此(只有在有此資訊時才會顯示)
2 歌手名稱顯示於此(只有在有此資訊時才會顯示)
3 按下後,將反白圖示且無法寫入循環點。 再按一次
即可關閉保護模式。
4 目前選取的循環庫編號會顯示於此。 (循環庫內未儲
存任何項目時,將會顯示曲目中的第一個循環。)
5 按下後,會刪除目前選取庫號所儲存的循環點。
6 按下後,會在循環庫中儲存目前設定的循環點。
7 顯示以自動循環功能設定的循環長度。
8 用於選取播放模式。
[SINGLE]:曲目播放一結束,唱盤即停止。
[CONT]:曲目結束播放後,自動播放清單上的下一首曲目。
9 開啟此功能時,只要曲目一完成播放,就會返回開始
位置並重新播放。
a 按下後,將啟動網格編輯模式且按鍵會閃爍。 再按
一下可儲存編輯的網格資料並結束網格編輯模式。
b 顯示曲目原始錄製播放速度的可能調整範圍。
c 顯示與 [TEMPO] 滑桿位置相對的音高值。
d 根據時間顯示曲目播放位置。
按下後,顯示幕會切換經過時間與剩餘時間。
e 顯示目前播放曲目的 BPM。
! 按一下這裡的節拍或按下電腦的空格鍵(僅限未
啟用節拍網格時)可手動設定 BPM。
2 載入曲目時會變白色。 (設定色彩標籤後,會變更為
設定的色彩。)
3 依碟盤速度轉動。 接近設定的熱指令點時,會逐步轉
變為該熱指令點的色彩,以告知接近熱指令點。 遠
離熱指令點時,色彩會逐步轉變為原始色彩。
! 到達曲目結束前的 20 秒時間點時,指針會閃爍以告
知曲目即將結束。
l 節拍相符顯示
代表測量唱盤(A)與(B)上的曲目節拍,而此功能設
計可協助您讓節拍相符。
紅色波形代表唱盤 A (1)中的曲目節拍,而橘色波形則代
表唱盤 B (2)中的曲目節拍。 兩個唱盤中的曲目節拍相
符時,紅色及橘色波形的尖峰位置會相符。
! 即使未同步化節奏, 左右曲目的節拍相符時,顯示幕
上的波形尖峰位置會相符。
m 節奏相符顯示
此圖顯示曲目內的節拍位置。 尖峰顯示在此視窗時,兩
個曲目的節拍會互相符合。
節奏相符顯示代表目前在唱盤(A)與(B)上播放的曲
目節奏位置,而此功能設計可協助您讓節奏相符。 唱盤
(A)與(B)上的曲目節奏相符時,最上方與最下方的波
形尖峰位置會相符。
n 狀態列
顯示目前資訊(主要分析、錯誤等)。
o Crate 清單
使用 ITCH時,會在稱為「Crate」的資料夾中分類及排列曲目。
按下本機上的 [CRATES] 按鍵也可開啟 crate 清單面板。
=
Crate 清單
p ALBUM ART
顯示專輯插圖(如有)。
Crate 清單
(第 17頁)
中文
j 波形顯示
顯示正在播放曲目時間點附近區域的詳細資料。
顯示波形上的曲目聲音頻率頻段,藍色代表高音範圍,綠
色則代表中音範圍,而紅色代表低音範圍。 播放時間點
位於顯示幕中央。 暫時的指令點會顯示為白色的 [b]與
[a],而熱指令點則會顯示為其他色彩的 [b]與[a]。
! 按一下可移動播放位置至該位置。
! 按下波形的同時按下電腦的 [Ctrl] 鍵後,波形會區
分為三個範圍顯示: 高音、中音與低音。
! 按下波形的同時按下電腦的 [Shift] 鍵後,顯示部分
的高度會變得更窄。
! 波形顯示可使用電腦上的 [+] 及 [–] 鍵縮放。
k 虛擬唱盤
顯示曲目的播放位置及播放速度。
1 顯示曲目的長度。 正在播放的位置會顯示為灰色的
量測計。
1 All...
已匯入或載入至唱盤的所有曲目都會顯示。 將尚未匯入
的曲目載入唱盤時,會新增至 [All...]。
2 Library
顯示 iTunes 資料庫。
! 若要顯示 iTunes 資料庫,請於 [SETUP] 選單變更設定。
= Show iTunes library(第 32頁)
3 Crates
ITCH使用數位 crates,可快速存取您喜愛的集合。 您
可建立的 crates 沒有數量限制, 而所有指定的曲目皆可
放在多個 crates 中。 crate 區域位在資料庫的左側。
Zhtw
17
Page 92

4 Subcrates
4
1
2
3
1234
12 345 76
12
1
5
2
34
Crates 可放在其他的 crates 中。 這些 crates 項目稱為
「Subcrates」。
5 “+”
按一下此鍵可建立新的 crate。
! 將 crate 拖放至其他 crate 時,會變為 subcrate。
重複此項操作即可增加層數。
! 單一曲目或群組曲目可拖曳至「+」上,並將建立包
含所有曲目的 crate。
! 若有多層,按一下個別項目即可開啟或關閉較低層。
曲目清單
1 欄標題
選取的項目名稱顯示於此。 按一下項目名稱時,可能會
變更顯示順序(已排序)。
以下項目會顯示在顯示曲目資訊的區域中。
新增日期(新增至資料庫的日期)、專輯、歌手、位元率、
BPM、註解、作曲人、檔案名稱、類別、群組、重要音高、
標籤、曲目時間、存放位置、混音器、取樣率、檔案大
小、曲目、年份
! 曲目清單中的曲目順序由「#」欄位顯示的數字代表。
2 曲目
顯示在 crate 清單面板選取項目中包含的曲目。
3 色彩標籤
可設定色彩以區分曲目。
2 顯示以 [LEVEL/DEPTH] 控制鍵調整的數值。
3 顯示以 [PARAMETER] 控制鍵調整的數值。
4 選擇 [A]或[B] 後,會顯示 [AUTO A]或[AUTO B]且
音效與唱盤設定的 BPM 同步。 選擇其他聲道後,會顯示
[MANUAL] 且可利用 [TAP] 按鍵手動完成設定。
錄製面板
1 按一下此鍵以開始/停止錄製。
2 按一下此鍵以選擇要錄製的來源。
3 顯示錄製來源的音量輸入。
4 可調整錄製音量。
5 顯示經過的錄製時間。
6 在此輸入錄製資料檔案的名稱。
7 按一下此鍵以儲存錄製的資料。
MIC/
AUX 監聽控制面板
1 按一下此項目以選擇連接麥克風及外部裝置的輸出聲
道。 此設定只會影響 [MASTER] 聲道。
! [MIX]:不管交互推桿的位置,直接輸出。
! [X-F A]:交互推桿在右邊的左側時輸出。
! [X-F B]:交互推桿在左邊的右側時輸出。
! [Mute]:不輸出聲音。
2 按一下此鍵可監聽耳機。 按鍵反白時,連接麥克風與外
部裝置的聲音會輸出至耳機 [CUE] 聲道。
未連接本機時的畫面
4 狀態圖示
曲目狀態以圖示代表。
圖示 意義
無 已直接匯入至 ITCH資料庫的曲目。
音效面板
1 顯示選取音效的名稱。
Zhtw
18
從 iTunes 資料庫中匯入的曲目。
檔案受損的曲目。 此類曲目必須重新編碼。
在檔案原始位置找不到檔案時顯示。
代表無法編輯的唯讀曲目。
1 狀態列
顯示目前資訊(主要分析、錯誤等)。
2 ANALYZE FILES
用於分析曲目。
分析檔案功能會在您的資料庫中處理曲目,以偵測檔案
損毀、準備波形一覽及計算 BPM 數值。
3 Set auto bpm
檢查 [Set auto bpm] 後,會在分析曲目時自動分析 BPM。
4 range
操作 [Set auto bpm] 時可用來指定 BPM 分析範圍。
Page 93

5 離線播放機
未連接 ITCH硬體時可使用離線播放機,並透過目前預設音訊裝
置輸出。 在多數情況下,聲音會從您的電腦揚聲器中輸出。
! 拖放曲目至離線播放機上或按下電腦的 [shift] 鍵與
[c] 鍵,皆可將曲目載入至離線播放機。 若到達載入曲
目的結尾,將自動播放目前播放清單中的下一首曲目。
離線播放機是一套相當實用的工具,適合準備
crates、試聽曲目及設定指令點與循環點。
啟動系統
1 開啟連接麥克風及外部設備電源。
2 連接本機與電腦間的 USB 連接線。
3 啟動連接的電腦。
3 使用電腦滑鼠將選取資料夾拖放至 crate 清單面板。
! 拖放儲存音樂檔案的資料夾至 crate 清單面板時,該
資料夾會變為包含所有曲目的 crate,且這些曲目也
會新增至資料庫中。
! 新增曲目至 ITCH資料庫有多種方式。
— 將尚未新增至資料庫的曲目直接載入唱盤時,會
自動新增至 crate 清單面板上的 [All...]。
— 拖放檔案與資料夾至曲目清單或 ITCH畫面上的 crate
清單,也可從檔案總管或 Finder新增檔案與資料夾。
— 若要新增音樂檔案至所需的 crates 中,請拖放音
樂檔案至您要在 ITCH畫面上新增的位置。
— 單一曲目或群組曲目可拖曳至 crate 清單面板
上,並將建立包含所有曲目的 crate。
可播放的音樂檔案格式
MP3、OGG(Vorbis 格式)、AAC、ALAC(Apple Lossless)、
AIF、WAV 及 WL.MP3(Whitelabel.MP3)
中文
4 將 [ON/OFF] 開關滑至 [ON] 端。
5 在本機指示燈亮起後啟動 ITCH。
若電腦及本機皆正確連結,在畫面上會出現兩個虛擬唱盤。
結束系統
1 關閉連接麥克風及外部設備電源。
2 結束 ITCH。
3 將 [ON/OFF] 開關滑至 [OFF] 端。
4 中斷與電腦連接的 USB 連接線。
操作資料庫
在資料庫中,可輕鬆匯入與管理曲目。
新增音樂檔案至資料庫
! 新增儲存在外部裝置的音樂檔案至資料庫時,請在啟動
ITCH前連接本裝置。
! 也可從 iTunes 資料庫中新增曲目。
若要顯示 iTunes 資料庫,請於 [SETUP] 選單變更設定。
有關設定的詳細資訊,請參閱第 32頁上 Show iTunes
library。
! 若要新增光碟上錄製的曲目至資料庫,請先匯入曲目至
電腦,然後再轉換成可使用 ITCH播放的檔案類型。
若直接播放光碟上錄製的曲目,播放效能可能會降低。
將曲目轉換為音樂檔案時,建議轉換為 MP3 格式
(320 kbps/ MPEG-1 Audio Layer-3),以獲得高音質且低
CPU 使用率的效果。
1 按下 [FILES] 按鍵。
您電腦或連接電腦周邊裝置的內容都會顯示在 [FILES] 面板中。
2 使用電腦滑鼠來選擇所需資料夾。
使用電腦滑鼠按一下包含要新增至 [FILES] 面板資料庫的曲
目的資料夾。
關於 MP3 檔案
MP3 檔案可以具有固定位元率 (CBR) 或可變位元率 (VBR)。兩
種類型的檔案都可在 DDJ-S1上使用,但是搜索和超快搜索功
能在 VBR 檔案上將要慢一些。如果您旨在追求操作性,我們
建議您使用 CBR 錄製 MP3 檔案。
關於 AAC 檔案
! AAC 是“Advanced Audio Coding”的縮寫,是用于 MPEG-2
和 MPEG-4的音頻壓縮技術的基本格式。
! AAC 數據的檔案格式和擴展名取決於產生該數據的應用軟體。
! 除了以 iTunes®編碼並有「.m4a」副檔名的 AAC 檔案外,
也可播放有副檔名「.aac」及「.mp4」的檔案。不過請注
意,無法播放在外購買(例如 iTunes Music Store)受
版權保護的 AAC 檔案。此外,視檔案採用的 iTunes 編碼
版本而定,有些檔案可能也無法播放。
關於 WL.MP3
Whitelabel MP3(副檔名“.wl.mp3”)是一種由 Serato Audio
Research為推廣而開發的自訂MP3 格式,您可至 Whitelabel.
net 取得。採用 Whitelabel MP3 格式的檔案都是特別為搭配
Serato Audio Research DJ 軟體而使用,並已預先安裝一覽,
且盡可能標記曲目、歌手、BPM 及專輯插圖資料。 這些檔案
會以 32 kbps 低音質在一般 MP3 播放機(包括在 ITCH軟體上
獨立播放而不使用本機)上播放,但在連接本機的 ITCH軟體
上播放時會採用相同於 320 kbps 的高音質。
有關詳細資訊,請參閱以下網址。
http://whitelabel.net/
分析檔案
此功能無法在 DDJ-S1上操作,但可於電腦上使用。
在您於 ITCH中播放音樂前,優先分析檔案是非常重要的步
驟。分析檔案功能會在您的資料庫中處理曲目,以偵測檔案
損毀、準備波形一覽及計算 BPM 數值。
! 此功能會同時在離線播放機的 ITCH中執行。
! 有關按鍵位置的詳細資訊,請參閱第 18頁上
時的畫面
分析曲目時自動設定 BPM
。
1 按一下 [Set auto bpm] 以勾選。
檢查 [Set auto bpm] 後,會在分析曲目時自動分析 BPM。
當 ITCH判斷分析的 BPM 資訊正確無誤時,BPM 資訊會寫入音樂檔案。
未連接本機
Zhtw
19
Page 94

2 按一下 [range] 以顯示下拉式選單。
3 按一下您要設定的 BPM 分析範圍。
在[range] 下拉式選單中指定 BPM 分析範圍,避免讓分析的曲
目出現錯誤的 BPM 值。 勾選 [Set auto bpm] 後,若您知道更
多或不太清楚要分析的曲目 BPM 值,請設定 BPM 分析範圍。
分析所有曲目
1 中斷連接本機與電腦。
2 按一下 [ANALYZE FILES]。
資料庫中的所有曲目都會進行分析。
切換子面板
按下 [FILES] 按鍵(或其中一個 [BROWSE] 、[ PREPARE]或
[CRATES] 按鍵)。
! [FILES] 面板
匯入曲目時顯示。
! [BROWSE] 面板
用於依照類別、BPM 等縮小匯入曲目的範圍。
! [PREPARE] 面板
用於選取及準備您要預先播放的曲目。
! [HISTORY] 面板
曲目播放記錄會在此記錄及播放。
若要重新分析所有曲目,按一下 [ANALYZE FILES] 同時再按下
電腦的 [Ctrl] 鍵。
分析個別曲目或 crates
1 中斷連接本機與電腦。
2 拖放曲目或 crate 至 [ANALYZE FILES]。
! 就連未新增至資料庫的音樂檔案也可以透過拖放的
方式進行分析。 一完成分析後,音樂檔案會自動新
增至 crate 清單面板中的 [All...]。
! 已分析過的曲目及 crates 可透過拖放至 [ANALYZE
FILES] 進行重新分析。
若檔案受損或發生錯誤
狀態圖示會顯示在資料庫中顯示曲目的左側。 游標停留在該
圖示上時,錯誤訊息會顯示在狀態列中。
! 有關顯示內容錯誤的詳細資訊,請參閱第 34頁上
毀訊息
.
檔案損
選擇項目
! 若要選擇項目,您也可使用電腦的滑鼠與鍵盤。
在面板間移動游標
按下 [AREA MOVE (REC)] 按鍵。
按下本機上的 [AREA MOVE (REC)] 按鍵時,游標會在面板
之間移動。
! 按下電腦的 [Tab] 鍵也可在面板中移動游標。
向上及向下移動游標
轉動旋轉選擇器。
轉動本機的選擇轉盤時,游標會向上及向下移動。
! 在按下 [SHIFT] 按鍵時轉動選擇轉盤後,游標會一次
跳過多個項目。
! 按下電腦上的 [a]或[b] 鍵也可向上及向下移動游標。
在多層之間移動
編輯 crates
建立 crate
按一下 crate 清單面板右上方的「+」。
新的 crate 已新增至 crate 清單面板。
! 拖放儲存音樂檔案的資料夾至 crate 清單面板時,該
資料夾會變為包含所有曲目的 crate,且這些曲目也
會新增至資料庫中。
! 單一曲目或群組曲目可拖曳至 crate 清單面板上,並
將建立包含所有曲目的 crate。
! 單一曲目或群組曲目可拖曳至「+」上,並將建立包
含所有曲目的 crate。
變更 crate 層
Crate 與 subcrate 可移動至不同層。
拖放 crate 至其他 crate。
將 crate 拖放至其他 crate 時,會變為 subcrate。
! 有相同名稱的 crate 無法放在同一層。
編輯 crate 名稱
按兩下 crate 的名稱。
您現在可重新命名此 crate。
刪除 crate
1 轉動旋轉選擇器。
選擇您要刪除的 crate。
2 在電腦的鍵盤上,同時按下 [Delete] 鍵與 [Ctrl] 鍵。
即刪除 crate。
! 此操作會刪除 crate,但不會刪除內容。 若您在按下
[Delete] 鍵的同時按下電腦鍵盤上的 [Shift] 鍵與
[Ctrl] 鍵,則 crate 的內容也將刪除。
變更曲目清單中的項目名稱顯示
可開啟及關閉欄位標頭顯示畫面,以及變更其順序。
按旋轉選擇器。
若目前選取項目下有其他層,按下本機的旋轉選擇轉盤時,
游標會下移至下一層。
按下 [BACK] 按鍵可移回上一層。
! 使用電腦上的 [c]與[d] 鍵也可移動游標。
Zhtw
20
變更項目名稱順序
拖曳欄位標頭至左側或右側。
隨即變更欄位的排列。
Page 95

顯示及隱藏欄位
按一下項目名稱列最右側的 [c],然後選擇快顯選單中的
項目名稱並按一下。
選項會在標頭欄位中顯示或隱藏項目。
重新載入曲目資訊
此程序會重新載入資料庫中所有曲目的標籤,並更新曲目資
訊。 在使用其他軟體編輯曲目資訊後,即更新曲目資訊。
1 按下 [FILES] 按鍵。
顯示 [FILES] 面板。
編輯曲目清單
顯示在曲目清單中的曲目播放順序、曲目標題及其他資訊皆
可進行編輯。
! 選擇曲目並按下其他曲目的同時按下電腦的 [Shift] 鍵
後,會選擇這兩個曲目及兩個曲目之間的所有曲目。 選
擇曲目並按下其他曲目的同時按下電腦的 [Ctrl] 鍵後,
只會選擇按下的曲目。
變更音軌順序
1 按一下欄位標頭上的 [#]。
按下後,即反白 [#],表示已選擇。
2 拖放曲目至您要移動的位置。
音軌順序變更。
! 曲目清單中的曲目順序由「#」欄位顯示的數字代表。
刪除曲目
1 轉動旋轉選擇器。
選擇您要刪除的曲目。
2 在電腦的鍵盤上,同時按下 [Delete] 鍵與 [Ctrl] 鍵。
! 若您同時按下電腦鍵盤上的 [Delete] 鍵、[Shift] 鍵與
[Ctrl] 鍵,將刪除 ITCH資料庫和電腦硬碟中的曲目。
編輯曲目資訊
! 可能無法編輯部分系統相關項目,如檔案名稱。
!
會顯示無法編輯的唯讀曲目。
1 轉動旋轉選擇器。
選擇要編輯的曲目。
2 按兩下要編輯的項目。
現在可以輸入文字。
3 輸入文字。
編輯電腦上的項目內容。
! 在電腦鍵盤上,按下方向鍵的同時按下 [Ctrl] 鍵即
可移動游標至不同的項目並連續編輯項目。
! 在編輯項目的同時選擇多個曲目後,編輯內容會套用
至所有選擇的曲目。
設定曲目色彩
1 轉動旋轉選擇器。
選擇要編輯的曲目。
2 按一下色彩標籤。
顯示調色盤。
3 在調色盤中選擇所需的色彩。
曲目即變為選取色彩的曲目。
2 按一下 [RESCAN ID3 TAGS]。
更新曲目資訊。
重新找出遺失檔案
若您移動已存在資料庫中的檔案位置,可能會顯示為找不到
並顯示為紅色。 進行檔案重新配置時,將會以檔案的新位置
更新資料庫。
1 按下 [FILES] 按鍵。
顯示 [FILES] 面板。
2 將資料夾(包括所有子資料夾)或遺失檔案拖放至
[RELOCATE LOST FILES]。
如需搜尋資料夾(包括所有子資料夾),請從檔案總管或
Finder拖曳。 如需搜尋遺失檔案,請從您的資料庫中拖曳。
開始搜尋。
! 按一下 [RELOCATE LOST FILES] 將搜尋所有連接磁
碟的遺失檔案,而這會花費一些時間。
搜尋音軌
可在匯入至曲目清單的眾多曲目中進行快速搜尋,以找出您
要播放的曲目。 搜尋方式有許多種。
透過輸入字元進行搜尋
可透過輸入字元及搜尋內含這些字元的曲目來搜尋這些曲目。
1 在搜尋方塊中按一下 。
顯示可選擇要在搜尋中加入項目的下拉式選單。
2 在搜尋中按一下要加入的項目。
3 按下 [CRATES] 按鍵。
移動 crate 清單面板中的游標。
4 轉動旋轉選擇器。
選擇要在 crate 清單面板中搜尋的項目。
搜尋會在選擇的項目中執行。
! 若要搜尋所有曲目,請選擇 [All...]。
5 按一下搜尋方塊並輸入字元。
顯示符合您輸入字元的曲目。
! 按一下搜尋方塊右側的 [×] 或按下電腦鍵盤上的
[Esc] 鍵可清除您輸入的字元。 按下電腦鍵盤上的
[ 退格 ] 鍵可一次刪除一個字元。
! 若在 crate 清單面板中選擇不同的項目,則可清除輸
入的字元。
使用 [BROWSE] 面板
[BROWSE] 面板可用來依類別、BPM 等,縮小 ITCH資料庫中
的曲目範圍。
1 按下 [CRATES] 按鍵。
移動 crate 清單面板中的游標。
中文
Zhtw
21
Page 96
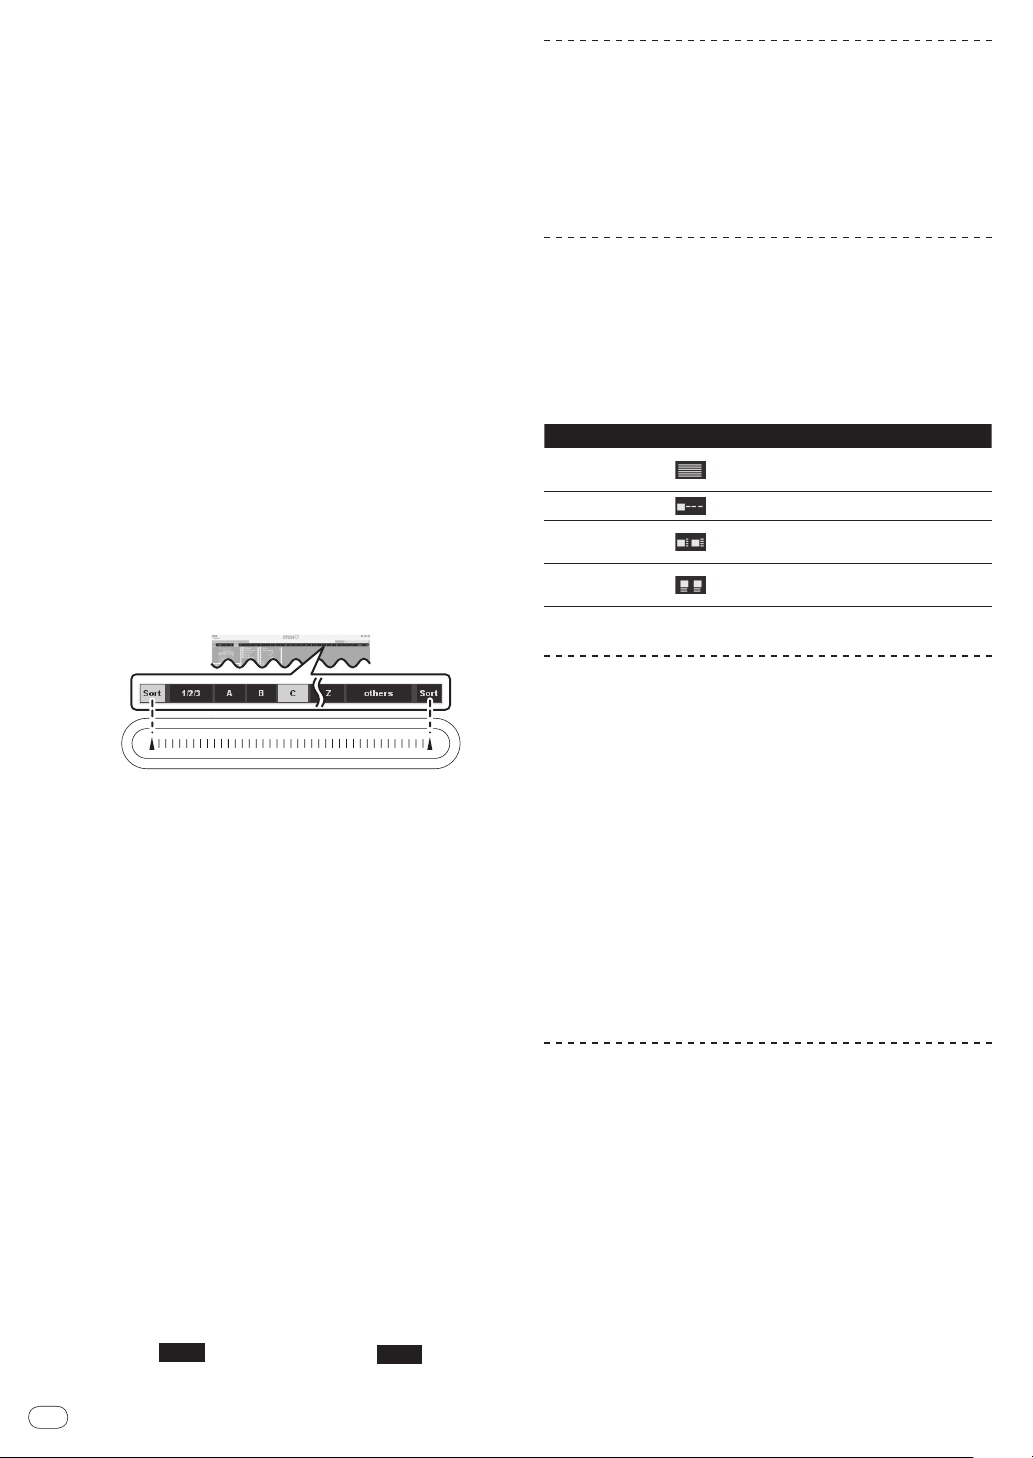
2 轉動旋轉選擇器。
1/2/3
others
選擇要在 crate 清單面板中搜尋的項目。
! 若要搜尋所有曲目,請選擇 [All...]。
3 按下 [BROWSE] 按鍵。
顯示 [BROWSE] 面板。
4 轉動旋轉選擇器。
選擇您要縮小搜尋的類別。
開/關顯示專輯插圖
若檔案有專輯影像,就會顯示影像。
! 使用一般用途的應用程式將專輯插圖影像載入至曲目。
按一下 [ALBUM ART]。
按下後會顯示 [ALBUM ART] 面板。
! 再次按下後,面板會關閉。
5 按旋轉選擇器。
符合選取類別的曲目會顯示在曲目清單中。
接著,以該順序縮小 BPM、歌手及專輯項目範圍。 只有符合
選取內容的曲目會顯示在曲目清單中。
! 按下 [BACK] 按鍵可移回上一層。
使用 [NEEDLE SEARCH (ALPHABET SEARCH)]觸控板(「字
母搜尋」)進行搜尋
您可使用 [NEEDLE SEARCH (ALPHABET SEARCH)] 觸控板
以字母搜尋依字母數字快速排序曲目。
! 字母搜尋排序會套用至您的資料庫或目前選擇的 crate。
字母搜尋面板與 [NEEDLE SEARCH (ALPHABET SEARCH)]觸
控板之間的關係
字母搜尋的字母與
[NEEDLE SEARCH (ALPHABET SEARCH)] 觸控板的畫面部
分有相同的位置關係。
1 按下 [CRATES] 按鍵。
移動 crate 清單面板中的游標。
2 轉動旋轉選擇器。
選擇要在 crate 清單面板中搜尋的項目。
! 若要搜尋所有曲目,請選擇 [All...]。
3 輕按 [NEEDLE SEARCH (ALPHABET SEARCH)] 觸控板
上的任意位置,同時按下 [SHIFT] 按鍵。
字母搜尋面板顯示在畫面最上方。 按下 [SHIFT] 按鍵時,字
母搜尋功能就會啟動。
4 輕按 [NEEDLE SEARCH (ALPHABET SEARCH)] 觸控板
左邊或右邊的 [a],並同時按下 [SHIFT] 按鍵。
每次輕按左右 [a] 時欄位標題上的焦點會向左或右移動。 亮
灰色的欄位標題表示目前已選擇該欄位。
5 滑動手指同時按住 [SHIFT] 按鍵。
選擇要排序的欄位後,在
[NEEDLE SEARCH (ALPHABET SEARCH)] 觸控板上移動手
指,而您 ' 將會看見字母搜尋顯示幕遵循的游標。
符合目前選取字母的曲目會顯示在曲目清單中。
6 放開 [NEEDLE SEARCH (ALPHABET SEARCH)] 觸控板
上的手指及 [SHIFT] 按鍵。
! 選擇
時會搜尋數字,而選擇
時則會搜尋
字母及數字以外的字元。
Zhtw
22
在曲目清單中顯示專輯影像
專輯影像可在曲目清單中顯示。 曲目資訊及專輯影像的配置
可視需要變更。
按下 [SHIFT] 按鍵的同時按下 [FILES] 按鍵(或其中一個
[BROWSE]、[PREPARE]或[CRATES] 按鍵)。
曲目清單顯示隨即切換。
按鍵 配置
CRATES按鍵
FILES按鍵
BROWSE按鍵
PREPARE按鍵
僅由文字組成(預設)的簡單顯示畫面。
專輯插圖未顯示。
專輯插圖欄位顯示在最左側,後接文字。
曲目配置在網格中,而專輯插圖顯示在
左側,曲目資訊顯示在右側。
曲目配置在網格中,而專輯插圖顯示在
上方,曲目資訊顯示在下方。
使用 [PREPARE] 清單
[PREPARE] 清單是一個用來選擇要事先準備播放曲目的清單。
1 按下 [PREPARE] 按鍵。
顯示 [PREPARE] 面板。
2 拖放曲目或 crate 至 [PREPARE] 面板。
曲目或 crate 新增至 [PREPARE] 清單。
! 曲目或 crate 也可透過拖放至畫面最上方的
[PREPARE] 標籤來新增至 [PREPARE] 清單。
! 曲目或 crate 也可透過選擇,然後按下
[LOAD PREPARE (SAVE)]按鍵來新增至 [PREPARE]
清單。
! 將[PREPARE] 清單上的曲目載入唱盤時,會從
[PREPARE] 清單刪除這些曲目。
! 離開 ITCH後,[ PREPARE] 面板中的曲目都將清除。
使用 [HISTORY] 面板
瀏覽記錄
[HISTORY] 標籤會開啟已播放曲目的完整記錄,並可將 ITCH
階段資訊匯出為資料檔案。
1 播放曲目。
已播放曲目的記錄會按階段顯示在 [HISTORY] 面板中。
2 在電腦畫面上按一下 [HISTORY] 標籤。
顯示 [HISTORY] 面板。
! 在記錄中只會列出您實際播放的曲目。 您可使用 A-B
演算法來完成,即一旦已變更或退出唱盤(B)上的
曲目,便只會列出唱盤(A)上的曲目。 您可透過勾
選[Show Unplayed Tracks],來選擇顯示已試聽但
Page 97

未實際播放的曲目。 之後該階段也會以灰色反白列
出這些曲目,以及實際播放的曲目。 另外,您可以
標記或取消標記手動播放的曲目。 選擇曲目(或群
組曲目)然後按一下 [MARK PLAYED]或[MARK
UNPLAYED]。 您已播放的曲目會在資料庫中標記為
橘色。 按一下 [CLEAR] 可重設最近播放曲目的清單,
並將您資料庫的色彩變回白色。
關於階段
「階段」代表一個播放單位。 每次重新開啟 ITCH或手動啟動
新階段時,都會建立新階段。
按下 [period] 欄位中項目左側的 [d] 後,會顯示記錄中記
錄的不同階段。
按下個別階段左側的 [d] 時,會顯示該階段中播放的曲目及歌手。
! 以下的編輯操作可在階段中執行。
— START SESSION:開始新階段。
— END SESSION:結束階段。
— INSERT TRACK:新增尚未在階段(手動輸入)中播
放的曲目資訊。
— EXPORT:匯出並儲存階段資訊。
手動輸入曲目資訊
您可在階段中新增未於 ITCH中播放的曲目資訊(如若您播放
其中一個喜愛的黑膠唱片或音樂 CD)。
1 選擇您要輸入曲目資訊的位置,然後按一下 [INSERT
TRACK]。
在選擇位置下方會新增空白列。
2 按兩下插入曲目的欄位,並編輯您的資訊。
階段名稱與歌手名稱皆可輸入。
匯出階段
[HISTORY] 面板資料可匯出。
1 選擇您要匯出的階段名稱。
2 按一下 [EXPORT] 右側的標籤。
選擇要儲存資料的格式。
— text:文字檔案格式。 不需要特殊軟體即可開啟。
— CSV:用於試算表等軟體的檔案格式。
— m3u:可匯入至音樂檔案等播放軟體的檔案格式。不
包括音訊資料;儲存檔案位置的資訊也會記錄。
(按一下 [INSERT TRACK] 插入階段中的曲目資訊不
包括在此格式的檔案中。)
3 按一下 [EXPORT]。
開始匯出資料。
! 匯出資料會儲存在下列目錄。
Windows: 我的音樂 > _Serato_ > History Export
Macintosh: 音樂 > _Serato_ > History Export
複製階段至 crate 清單面板
階段資訊可複製為 crate 清單面板的其中一個項目。
已安裝其他 Serato Audio Research DJ軟體使用者
的注意事項
ITCH會與 Scratch Live共用本身的資料庫。 以 Scratch
Live設定的曲目循環及指令點可當成 ITCH使用,而以 ITCH
設定的資訊也可如 Scratch Live般使用。 若您交替使用兩
種軟體程式,請注意兩者的資料庫會擁有相同的內容。
關於備份資料庫資訊
安裝 ITCH後,會在以下所示的電腦位置建立 [ _Serato_]資
料夾,而資料庫及 crate 資訊則會儲存在此資料夾中。
Windows: 我的文件 > 我的音樂 > _Serato_
Macintosh: 使用者 > 音樂 > _Serato_
! 從外接硬碟新增曲目至資料庫時,例如也在硬碟上建立
[_Serato_] 資料夾。
在安裝後首次離開 ITCH時,會顯示有關建立備份資料庫的確
認訊息。
檢查確認訊息畫面上的 [Backup library] 時,按一下 [Yes],
然後關閉軟體,就會在 [ 我的音樂 ] 資料夾(Macintosh 電
腦是在 [ 音樂 ] 資料夾中)建立 [_Serato_Backup] 資料夾,
並備份資料夾資訊。
之後,每當您檢查確認訊息畫面上的 [Backup library] 時,按
一下 [Ye s],然後關閉軟體,就會備份資訊並覆寫之前的備份。
! 在下列情況下,將再次顯示有關建立備份的確認訊息。
— 自上次備份後超過 1 星期時
— 沒有備份時
載入曲目至唱盤
1 選擇您要載入的曲目。
設定游標至您要載入唱盤的曲目。
! 關於詳細資訊,請參閱第 20頁上
2 按下 [LOAD (INST. DOUBLES)] 按鍵以載入曲目至想要
的唱盤。
已選取的曲目會載入至個別唱盤。
! 將尚未新增至資料庫的曲目直接載入唱盤時,會自動
新增至 crate 清單面板上的 [All...]。
! 選取曲目後,按下 [c]或[d] 的同時按下電腦鍵盤上
的 [Shift] 鍵,即可將曲目載入唱盤(A)或唱盤(B)。
! 曲目也可透過拖放載入至唱盤。
! 按下 [c]或[d] 的同時按下電腦鍵盤上的 [Shift]
與 [Alt] 按鍵,唱盤將會清空。
! 新曲目載入至唱盤時,載入唱盤的耳機 [CUE] 按鍵
會亮起,且會從耳機 [CUE] 聲道輸出聲音。
快速加倍
在播放其中一個唱盤期間,載入該唱盤的曲目可載入至其他
唱盤,並從相同的位置播放。 (快速加倍)
下列範例說明在唱盤(B)上播放唱盤(A)曲目的操作。
1 將曲目載入至唱盤(A)並播放。
選擇項目
。
中文
拖放您要複製到 crate 清單面板的階段名稱。
2 按下唱盤(B)上的 [SHIFT] 按鍵時,按下唱盤(B)上
的[LOAD (INST. DOUBLES)] 按鍵。
載入唱盤(A)的曲目也會載入唱盤(B),並從相同的位置播放。
! 唱盤(A)進入暫停模式時,唱盤(B)上曲目的暫停
模式也會設為相同的位置。
Zhtw
23
Page 98
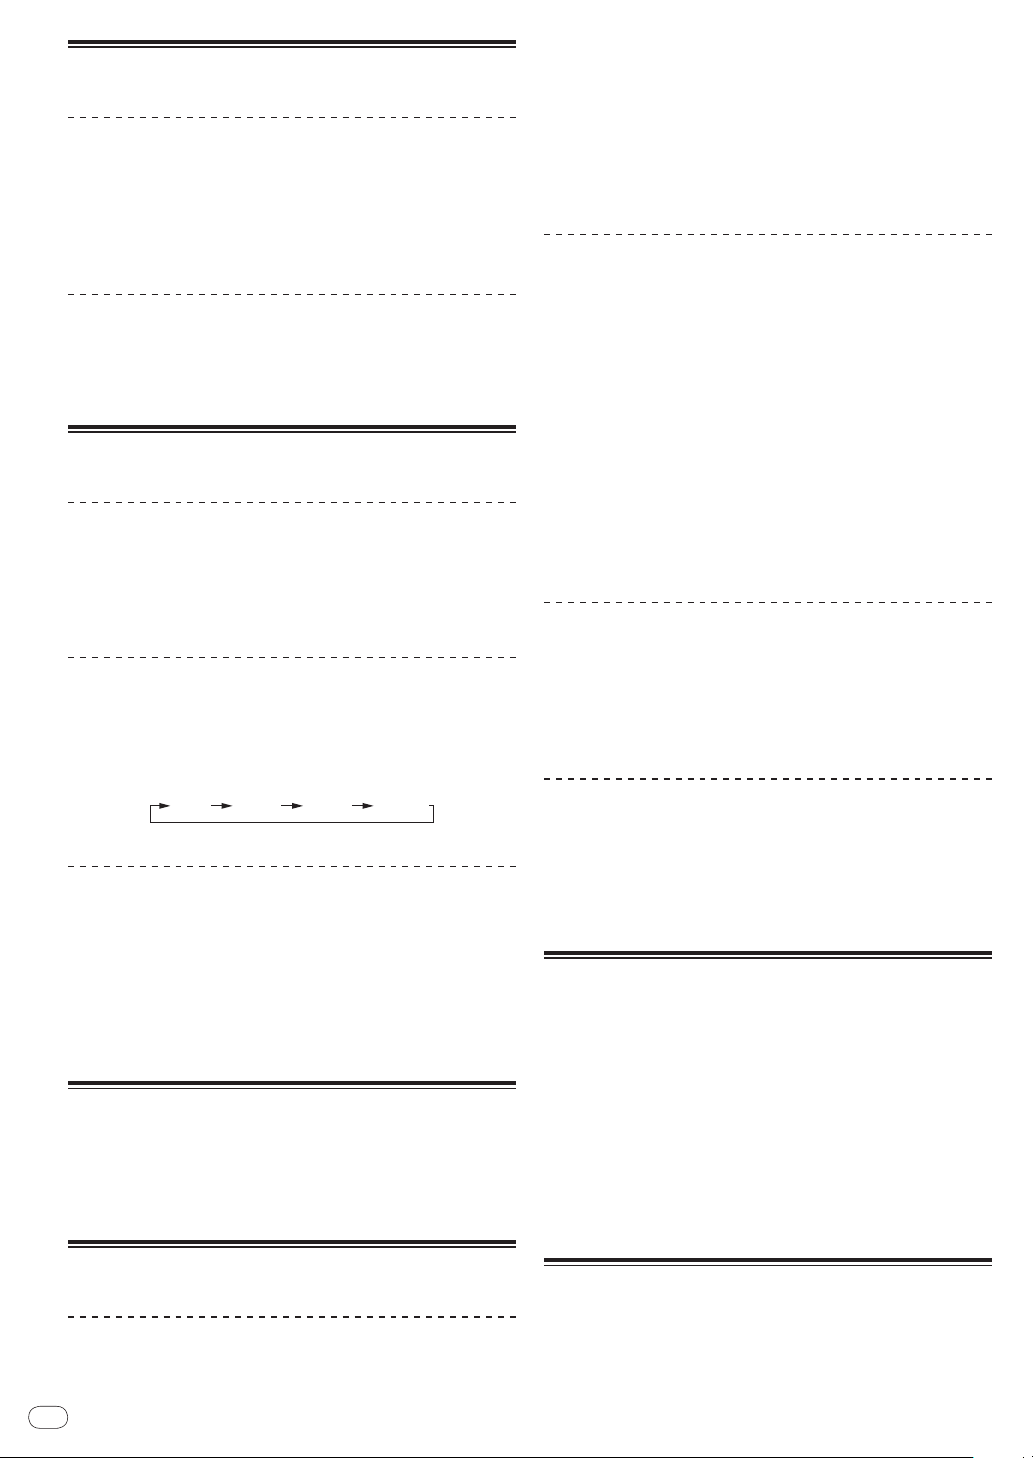
播放及暫停
[
±6%
][
±10%
][
±16%
][
±100%
]
播放
1 載入曲目至唱盤。
! 有關操作的詳細資訊,請參閱第 23頁上
載入曲目至唱盤
! [VINYL] 模式: 在播放時按下轉輪上方後,播放會暫停,而
當轉輪在此時轉動時,聲音會依據轉輪轉動的方式輸出。
! 一般模式: 在播放時按下轉輪上方不會暫停播放。 此外,
無法進行刮盤操作。
按下 [VINYL (ILLUMINATION)] 按鍵。
Jog 模式切換為 [VINYL]模式,且 [VINYL (ILLUMINATION)]
按鍵亮起。
。
2 按下 [PLAY/PAUSE f] 按鍵。
暫停
播放時,按下 [PLAY/PAUSE f] 按鍵。
! 再按下 [PLAY/PAUSE f] 按鍵後,將恢復播放。
調節播放速度 ( 節拍控制 )
變更播放速度
向前或向後移動 [TEMPO] 滑桿。
滑桿移至 [+] 端(朝向您)時播放速度會增加,而滑桿移至
[–] 端時(離開您)時速度會降低。
選擇調整播放速度的範圍
按下 [TEMPO RANGE] 按鍵。
每次按下按鍵都會切換播放速度調整範圍。 變更後的設定會
顯示在 ITCH。
調節播放速度而不改變音程 ( 主節拍 )
1 按下 [MASTER TEMPO] 按鍵。
即使在以 [TEMPO] 滑桿變更播放速度後,音高也不會變更。
! 對聲音要進行數字處理,所以音質會降低。
! 主要節拍的誤差範圍為 ±50 %。
2 向前或向後移動 [TEMPO] 滑桿。
反向播放
按下 [REV] 按鍵。
以反方向播放曲目。
! 播放速度的增減與緩動盤的旋轉方向的關係也被反轉。
刮盤
當 Jog 模式設為 [VINYL] 模式,且轉輪轉動的同時按下轉輪
上方,曲目會依據轉輪轉動的方向及速度進行播放。
1 按下 [VINYL (ILLUMINATION)] 按鍵。
將 Jog 模式設為 [VINYL] 模式。
2 在播放模式,按緩動盤的頂面。
播放停止。
3 按下轉輪上方時,以所需方向及速度轉動轉輪。
聲音會根據轉輪旋轉的方向及速度播放。
4 將手從緩動盤的頂面移開。
恢復正常播放。
滑音
在播放模式,旋轉緩動盤的外圈。
順時針旋轉時播放速度增加;逆時針旋轉時速度減小。當停
止旋轉時,播放恢復到正常速度。
! Jog 模式設為一般模式後,轉動轉輪上方即可進行相同操作。
切換轉輪燈光
轉輪燈光亮起的方式共有兩種類型可供選擇。
! 相同設定可套用至唱盤(A)及(B)的轉輪。
按下 [VINYL (ILLUMINATION)] 按鍵的同時按下 [SHIFT] 按鍵。
每按一下按鍵就會切換設定。
指定立即播放的位置(NEEDLE SEARCH)
可輕易播放觸碰 [NEEDLE SEARCH (ALPHABET SEARCH)]
墊位置的聲音。
[NEEDLE SEARCH (ALPHABET SEARCH)] 觸控板的左緣代
表曲目的開頭,右緣則代表曲目結尾。
1 觸摸 [NEEDLE SEARCH (ALPHABET SEARCH)] 板。
曲目的播放位置會隨觸碰觸控板的位置迅速變更。
2 觸碰 [NEEDLE SEARCH (ALPHABET SEARCH)] 觸控板
時,請沿著觸控板滑動您的手指。
曲目的播放位置會跟隨您滑動的手指移動。
操作緩動盤
切換轉輪模式
緩動盤有兩種模式。
Zhtw
24
設定暫時指令點
1 播放時,按下 [PLAY/PAUSE f] 按鍵。
即暫停播放。
Page 99

! 如有需要,在暫停時旋轉轉輪以調整位置。 (若要在
暫停時移動播放位置,也可使用其他方式。)
取消循環播放(離開循環)
2 按下 [CUE] 按鍵。
暫時指令點設為曲目暫停的位置。
! 設定新的暫時指令點時,將取消之前設定的指令點。
返回暫時指令點(回到指令)
播放時,按下 [CUE] 按鍵。
播放位置會立即返回目前設定的暫時指令點並暫停。
! 按下 [PLAY/PAUSE f] 按鍵時,會從暫時指令點開始播放。
檢查暫時指令點(指令點範本)
在返回暫時指令點後繼續按下 [CUE] 按鍵。
即從暫時指令點處開始播放。 按下 [CUE] 按鍵時即繼續播放。
! 在指令點取樣期間按下 [PLAY/PAUSE f] 按鍵時,即會
從該時間點繼續播放。
循環操作
設定循環
1 在播放期間於您要開始循環播放的時間點按下
[LOOP IN (GRID SET)] 按鍵(進入循環點)。
隨即設定進入循環點。
2 在您要結束循環播放的時間點按下
[LOOP OUT (GRID TAP)] 按鍵(離開循環點)。
離開循環點已設定,且循環記憶會從進入循環點開始播放。
在循環播放期間按下 [RELOOP/EXIT (GRID CLEAR)] 按鍵。
超出離開循環點仍會繼續播放,而不會返回進入循環點。
返回循環播放(重新循環)
取消循環播放後,在播放時按下
[RELOOP/EXIT (GRID CLEAR)] 按鍵。
即返回之前設定的進入循環點播放,且恢復循環記憶播放。
自動設定循環(自動循環)
1 在播放時轉動 [AUTO LOOP(GRID SLIDE)] 控制鍵。
藉由指定的節拍數量來設定循環長度。
2 按下 [AUTO LOOP(GRID SLIDE)] 控制鍵。
含節奏設定數量的循環點會根據目前播放曲目的 BPM 自動建
立,並開始循環播放。
! 即使在自動循環期間,仍可轉動 [AUTO LOOP
(GRID SLIDE)] 控制鍵調整循環長度。
取消自動循環
在自動循環期間,按下 [AUTO LOOP(GRID SLIDE)] 控制鍵。
超出離開循環點仍會繼續播放,而不會返回進入循環點。
分割循環(循環等分)
在循環播放時逆時鐘轉動 [AUTO LOOP(GRID SLIDE)] 控制鍵。
每次逆時鐘轉動控制鍵都會將循環長度分割為一半。
中文
微調循環起點 ( 循環起點調節 )
1 在循環播放期間按下 [LOOP IN (GRID SET)] 按鍵。
2 轉動轉輪。
循環播放起始點可進行微調。
! 進入循環點的可調整範圍可以是離開循環點之前的任何時間點。
3 按下 [LOOP IN (GRID SET)] 按鍵。
正常循環播放恢復。
微調循環終點 ( 循環終點調節 )
1 在循環播放期間按下 [LOOP OUT (GRID TAP)] 按鍵。
2 轉動轉輪。
循環播放結束點可進行微調。
! 離開循環點的可調整範圍可以是進入循環點之前的任何時間點。
3 按下 [LOOP OUT (GRID TAP)] 按鍵。
正常循環播放恢復。
加倍循環(循環加倍)
在循環播放時順時鐘轉動 [AUTO LOOP(GRID SLIDE)] 控制鍵。
每次順時鐘轉動控制鍵都會將循環長度加倍。
使用循環庫
儲存循環點
循環點可事先儲存,並在稍後叫出。
1 按下 [LOOP SELECT (GRID LOCK)] 按鍵以選擇您要儲
存循環點的循環庫編號。
每次按下按鍵,會切換循環庫編號。
! 若目前載入的曲目不曾設定循環點,則會指定庫號 1。
2 設定循環。
有關設定循環點的詳細資訊,請參閱第 25頁上
設定循環時,會自動儲存在目前選擇的循環庫中。
! 最多可設定 9個循環庫。
! 設定循環點的同時選擇已儲存循環點的庫號後,將覆
寫儲存在該循環庫的循環點。
循環操作
Zhtw
。
25
Page 100

叫出循環點
1 按下 [LOOP SELECT (GRID LOCK)] 按鍵。
每次按下按鍵,會切換循環庫編號。
在儲存循環點處選擇循環庫。
! 在熱指令點取樣期間按下 [PLAY/PAUSE f] 按鍵時,即
會從該時間點繼續播放。
刪除熱指令點
2 按下 [RELOOP/EXIT (GRID CLEAR)] 按鍵。
循環播放會從儲存的進入循環點處開始。
刪除循環點
按一下循環庫號顯示幕右側的 [×]。
刪除在目前選取循環庫位置儲存的循環點。
保護循環點(循環鎖定)
按一下循環庫號顯示幕左側的 。
停用覆寫或刪除儲存在選取循環庫的循環點操作。
再次按下
後,即取消保護。
設定熱指令
設定熱指令點時,可叫出該指令點並立即播放。 每個音樂曲
目最多可設定 5個熱指令點。
1 按下 [REC MODE] 按鍵。
模式切換為熱指令點記錄模式。 [REC MODE] 按鍵閃爍。
! 對於未設定熱指令點位置的熱指令點按鍵而言,即使
無須按下 [REC MODE] 按鍵來切換為熱指令記錄模
式,也可以設定熱指令點。
2 播放期間在暫停模式或在指令點暫停時,按一
下其中一個熱指令點按鍵 [HOT CUE (DELETE) 1]-
[HOT CUE (DELETE) 5]。
熱指令點設為按鍵按下的位置。
設定熱指令點([HOT CUE (DELETE) 1]-
[HOT CUE (DELETE) 5])的熱指令按鍵會亮起。
! 設定熱指令點的位置會顯示在曲目一覽中。
! 熱指令點不會記錄播放的方向。
按下其中一個熱指令點按鍵 [HOT CUE (DELETE) 1]-
[HOT CUE (DELETE) 5] 同時按下 [SHIFT] 按鍵。
關閉已刪除熱指令點的熱指令點按鍵
([HOT CUE (DELETE) 1]-[HOT CUE (DELETE) 5] )。
使用滑動模式
滑動模式是一種效能工具,您可透過刮盤、循環或倒轉播放來暫
時如常操控音訊。 當您使用此工具時,播放頭會持續在背景無
聲移動通過曲目,並會保留其空間如同您正常播放曲目。' 一結
束操控後,播放功能會恢復播放頭在曲目中的目前位置。
! 開啟 [SLIP] 模式時 [SLIP] 按鍵會亮起,並於背景繼續正
常播放時閃爍。
滑移循環
1 按下 [SLIP] 按鍵。
切換到滑移模式。
2 按下 [LOOP IN (GRID SET)] 按鍵,然後再按
[LOOP OUT (GRID TAP)] 按鍵。
開始循環記憶播放。
即使在循環播放期間,也會在背景繼續正常播放。
3 按下 [RELOOP/EXIT (GRID CLEAR)] 按鍵。
循環被取消,在背景進行的播放恢復到正常播放。
! 若要取消滑動模式,請再按下 [SLIP] 按鍵。
自動節拍滑移循環
1 按下 [SLIP] 按鍵。
切換到滑移模式。
播放熱指令點
! [REC MODE] 按鍵閃爍時,將設定熱指令點記錄模式。 在
此情況下,按下 [REC MODE] 按鍵可切換為熱指令播放模
式。 進入熱指令點播放模式時,[REC MODE] 按鍵會關閉。
在設定熱指令點的位置按下其中一個熱指令按鍵
([HOT CUE (DELETE) 1]-[HOT CUE (DELETE) 5] )。
立即開始從按鍵中錄製的時間點播放。
! 未設定熱指令點的熱指令按鍵不會亮起。 若按下其
中一個熱指令點按鍵,按下按鍵的位置會設為該按鍵
的熱指令點。
熱指令點範本
在暫停模式或在暫時熱指令點處暫停時,按住其
中一個設定熱指令點的 [HOT CUE (DELETE) 1]-
[HOT CUE (DELETE) 5] 按鍵。
播放位置會移至該熱指令點,並在按下該熱指令按鍵時播放
熱指令點。
Zhtw
26
2 轉動 [AUTO LOOP(GRID SLIDE)] 控制鍵以設定節奏。
3 按下 [AUTO LOOP(GRID SLIDE)] 控制鍵。
含節奏設定數量的循環點會根據目前播放曲目的 BPM 自動建
立,並開始循環播放。
即使在循環播放期間,也會在背景繼續正常播放。
4 按下 [RELOOP/EXIT (GRID CLEAR)] 按鍵。
循環被取消,在背景進行的播放恢復到正常播放。
! 若要取消滑動模式,請再按下 [SLIP] 按鍵。
滑移反向
1 按下 [SLIP] 按鍵。
切換到滑移模式。
2 按下 [REV] 按鍵。
以反方向播放曲目。
即使在倒轉播放期間,也會在背景繼續正常播放。
! 若要取消滑動模式,請再按下 [SLIP] 按鍵。
 Loading...