

Page 1
pioneerdj.com/support/
serato.com
For FAQ and other support information for this product, visit the websites above.
DJ Controller
DDJ-FLX6
Instruction Manual
rekordbox.com
Page 2

How to read this manual
Thank you for choosing this Pioneer DJ product.
Be sure to read this manual, the “Quick Start Guide” and the
“Precautions for use” which are included with this product. These
documents include important information that you should understand
before using the unit. In particular, be sure to read the IMPORTANT
SAFETY INSTRUCTIONS.
• In this manual, the names of buttons, knobs, and terminals that
appear on the product, and the names of buttons, menus, etc. in the
software on your PC/Mac or mobile device, are indicated within
square brackets ([ ]). (e.g. [File], [CUE] button)
• Please note that the software screens and their specifications, as
well as the external appearance and specifications of the hardware,
are subject to change without notice.
• Please note that depending on the operating system version, web
browser settings, etc. operation may differ from the ways described
in this manual.
• Please note that the language on the screens of the software
described in this manual may differ from the language on your
screen.
2
En
Page 3

Contents
How to read this manual ............................................................... 2
Before you start......................................................................... 5
What’s in the box .......................................................................... 5
User guides................................................................................... 5
DJ software................................................................................... 6
Part names and functions ........................................................ 8
Top panel...................................................................................... 8
Browser section ............................................................................ 9
Deck section ............................................................................... 12
Mixer section............................................................................... 21
Effects section ............................................................................ 23
Rear panel .................................................................................. 25
Front panel.................................................................................. 26
Connections............................................................................. 27
Connection examples ................................................................. 28
rekordbox................................................................................. 31
Installing rekordbox..................................................................... 31
Basic use .................................................................................... 34
Advanced use ............................................................................. 40
Changing the settings in rekordbox ............................................ 68
Serato DJ Pro...........................................................................70
Installing Serato DJ Pro .............................................................. 70
Activating FX Pack and Pitch ’n Time DJ ................................... 73
Basic use .................................................................................... 75
Advanced use ............................................................................. 82
3
En
Page 4

Changing the settings........................................................... 104
Launching Utilities mode........................................................... 104
Utilities mode settings............................................................... 105
Additional information .......................................................... 108
Troubleshooting ........................................................................ 108
Specifications............................................................................ 116
Using the unit as a controller for other DJ applications ............ 118
Trademarks and registered trademarks.................................... 119
Cautions on copyrights ............................................................. 120
4
En
Page 5
Before you start
What’s in the box
• USB cable
• Warranty (for some regions)
• Quick Start Guide
• Precautions for use
• Serato Pitch’n Time DJ voucher
• Serato FX Pack voucher
1
Only products in Europe.
Products in North America and Japan include warranty information in
the “Precautions for use.”
2
The voucher codes needed to activate functions can’t be reissued.
Keep them in a safe place to be sure you don’t lose them.
1
2
2
User guides
rekordbox Introduction, Instruction Manual
Refer to the “rekordbox Introduction” to find out how to set up
rekordbox, and see the “rekordbox Instruction Manual” to find out how
to use rekordbox.
rekordbox.com/manual
Serato DJ Pro software manual
Visit the Serato DJ Pro website.
serato.com/dj/pro/downloads
En
5
Page 6

Before you start
DJ software
rekordbox
• rekordbox is a complete DJ application you can use to manage your
music and perform.
• Even if you don’t have a paid subscription plan, you can use
Performance mode by connecting this unit to your PC/Mac with
rekordbox installed. This is called Hardware Unlock.
• You’ll find details of the functions available via Hardware Unlock on
the rekordbox website.
rekordbox.com
• The rekordbox software is not included with the unit. Download the
software from the URL below.
rekordbox.com
• For information on the latest system requirements, compatibility, and
supported operating systems of rekordbox, check [System
requirements] under [Support] at rekordbox.com
• Operation isn’t guaranteed on all PC/Mac models, even if the system
requirements are met.
• Depending on power-saving settings and other conditions of the PC/
Mac, the CPU and hard disk may not provide sufficient processing
capabilities. For laptops in particular, make sure the PC/Mac is in the
best condition to provide constant high-level performance when
using rekordbox (for example by keeping the AC power connected).
• To use the internet, you need a separate contract with an internet
service provider, which you may have to pay for.
• Operating system support always assumes you’re using the latest
point release for that version.
.
6
En
Page 7

Before you start
Serato DJ Pro
Serato DJ Pro is DJ software from Serato Limited.
This unit unlocks the software, which you can download from the
Serato website.
serato.com/dj/pro/downloads
• For information on the latest system requirements, compatibility, and
supported operating systems of Serato DJ Pro, visit the website
below.
serato.com/dj/pro/downloads
• Operation isn’t guaranteed on all PC/Mac models, even if the system
requirements are met.
• Depending on power-saving settings and other conditions of the PC/
Mac, the CPU and hard disk may not provide sufficient processing
capabilities. For laptops in particular, make sure the PC/Mac is in the
best condition to provide constant high-level performance when
using Serato DJ Pro (for example by keeping the AC power
connected).
7
En
Page 8
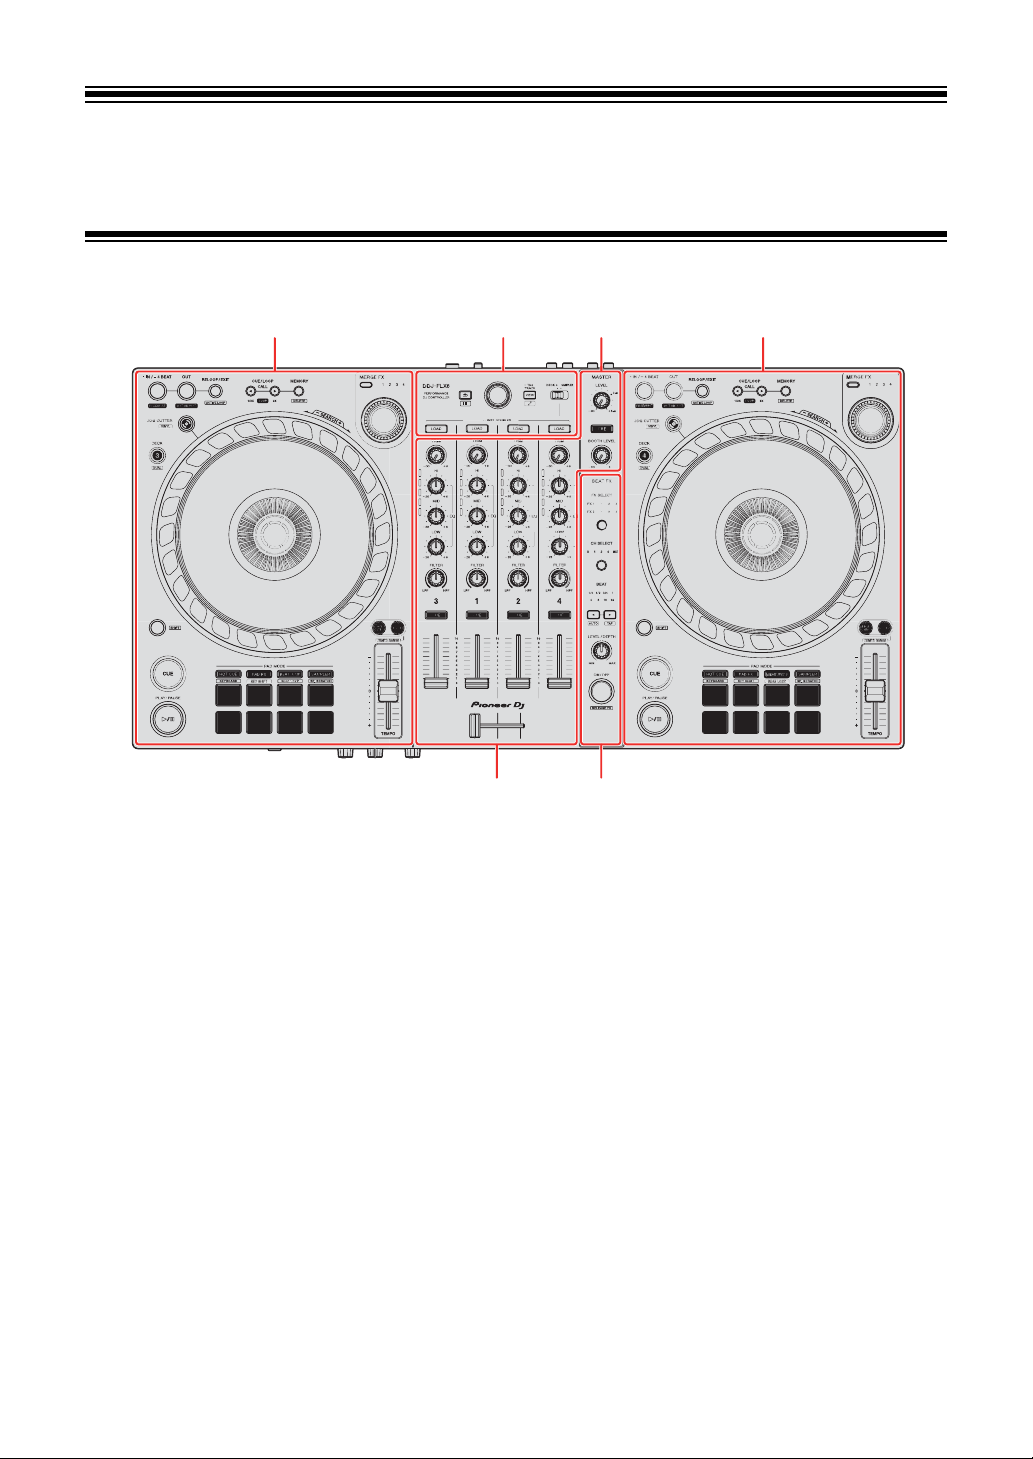
Part names and functions
32 1 2
3 4
Top panel
1 Browser section
Selects tracks and loads them to the decks.
2 Deck sections
Control each deck. There are knobs and buttons on the left side to control deck
1 and deck 3, and on the right side to control deck 2 and deck 4.
3 Mixer section
Controls the level adjustment for each channel, track mixing, etc.
4 Effects section
Controls the effect units.
En
8
Page 9
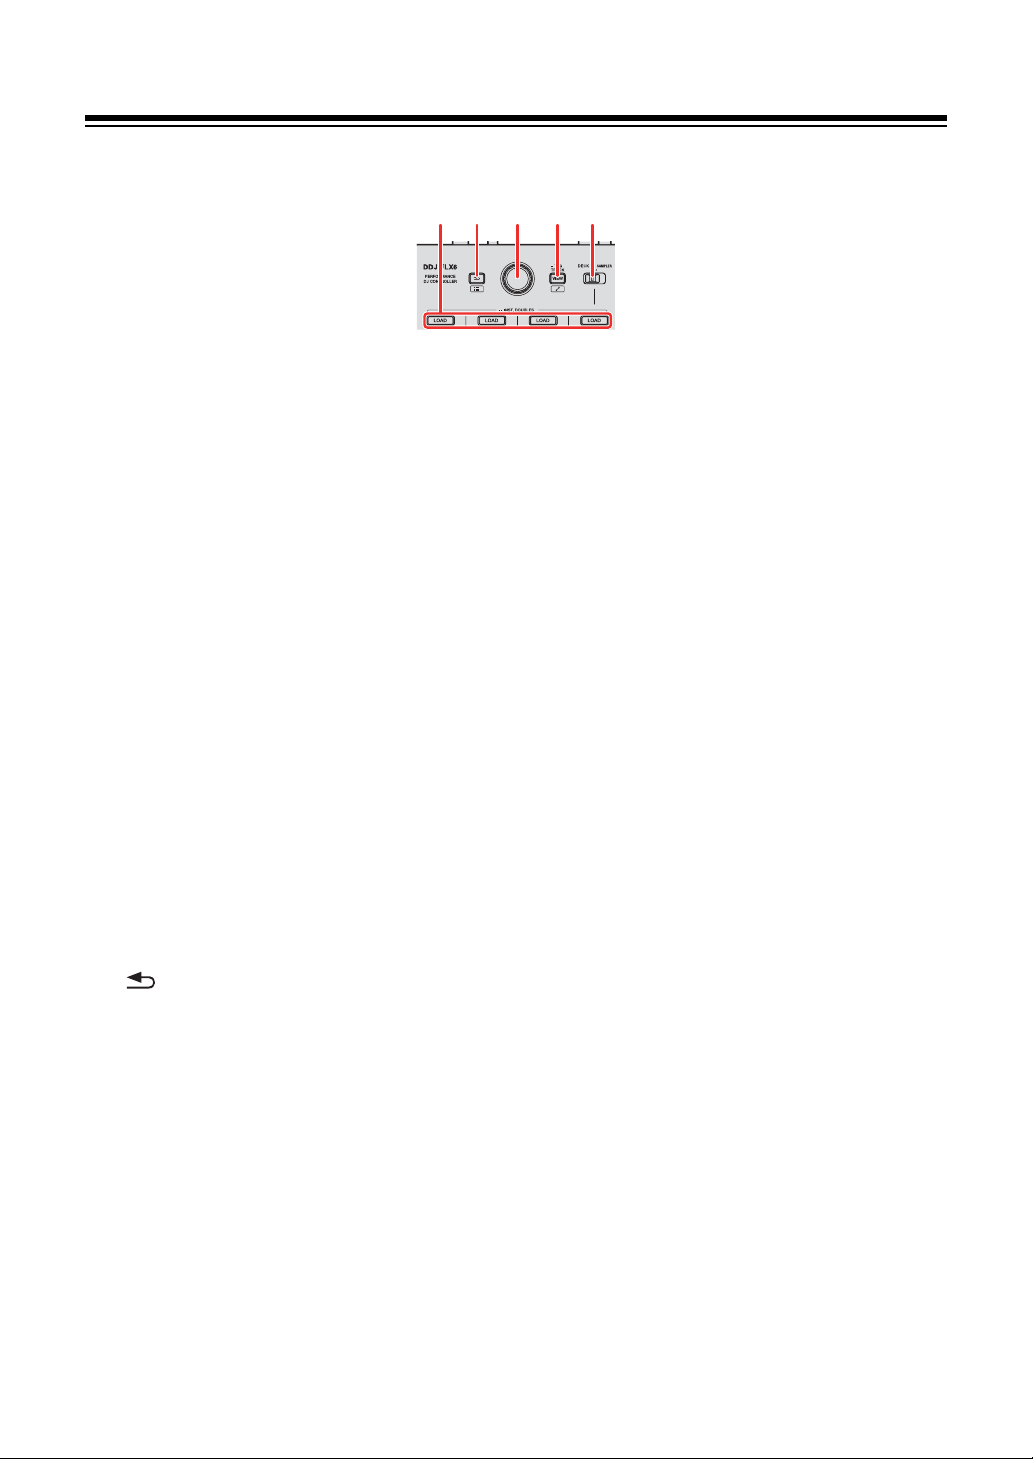
Part names and functions
1 2 4 53
Browser section
1 LOAD buttons
Press:
Load the selected track to the respective deck.
Press twice:
Load the track from the deck that isn’t playing onto the deck that is playing. If
you do this while the track is playing, it plays from the same position (Instant
Doubles).
[SHIFT] + press:
Sort the track list in the library as follows, depending on the [LOAD] button you
press:
Deck 1: Sorts by BPM.
Deck 2: Sorts by track title/song.
Deck 3: Sorts by keys.
Deck 4: Sorts by artist names.
2 (back) button
(rekordbox)
Press:
Moves the cursor between the tree view and track list each time you press the
button.
• If the playlist palette is displayed, you can also move the cursor to the
playlist.
• The tree view, track list, and playlist palette are displayed in the browse
section of rekordbox. For details on each, read the “rekordbox Instruction
Manual”.
9
En
Page 10

Part names and functions
[SHIFT] + press:
Displays/hides the playlist palette.
(Serato DJ Pro)
Press:
Moves the cursor between the library and [crates] panel each time you press
the button.
[SHIFT] + press:
Changes the screen layout of Serato DJ Pro.
3 Rotary selector
(rekordbox)
Turn:
Moves the cursor in rekordbox.
[SHIFT] + turn:
Enlarges or shrinks the enlarged waveform in rekordbox.
Turn to the right to enlarge, or the left to shrink it.
Press:
Moves the cursor between the tree view and track list each time you press the
button. If the cursor is pointed to a folder, the folder opens.
• If the playlist palette is displayed, you can also move the cursor to the
playlist.
• The tree view, track list, and playlist palette are displayed in the browse
section of rekordbox. For details on each, read the “rekordbox Instruction
Manual”.
[SHIFT] + press:
Moves the cursor between the tree view and track list each time you press the
button. If the cursor is pointed to a folder, the folder closes.
10
En
Page 11

Part names and functions
(Serato DJ Pro)
Turn:
Moves the cursor up or down in the library or in the [crates] panel.
Press:
Moves the cursor between the library and [crates] panel each time you press
the button.
4 VIEW button
(rekordbox)
Press:
Shrinks the deck display and enlarges the browse area. Press the button again
to return to the original display status.
Press for at least a second:
Registers or deletes the selected track to/from [Tag List].
[SHIFT] + press:
Moves the cursor into [Related Tracks] in the tree view.
(Serato DJ Pro)
Press:
Changes the screen layout of Serato DJ Pro.
5 DECK4/SAMPLER selector switch
Selects whether channel 4 plays the sampler sound or the sound from deck 4.
11
En
Page 12
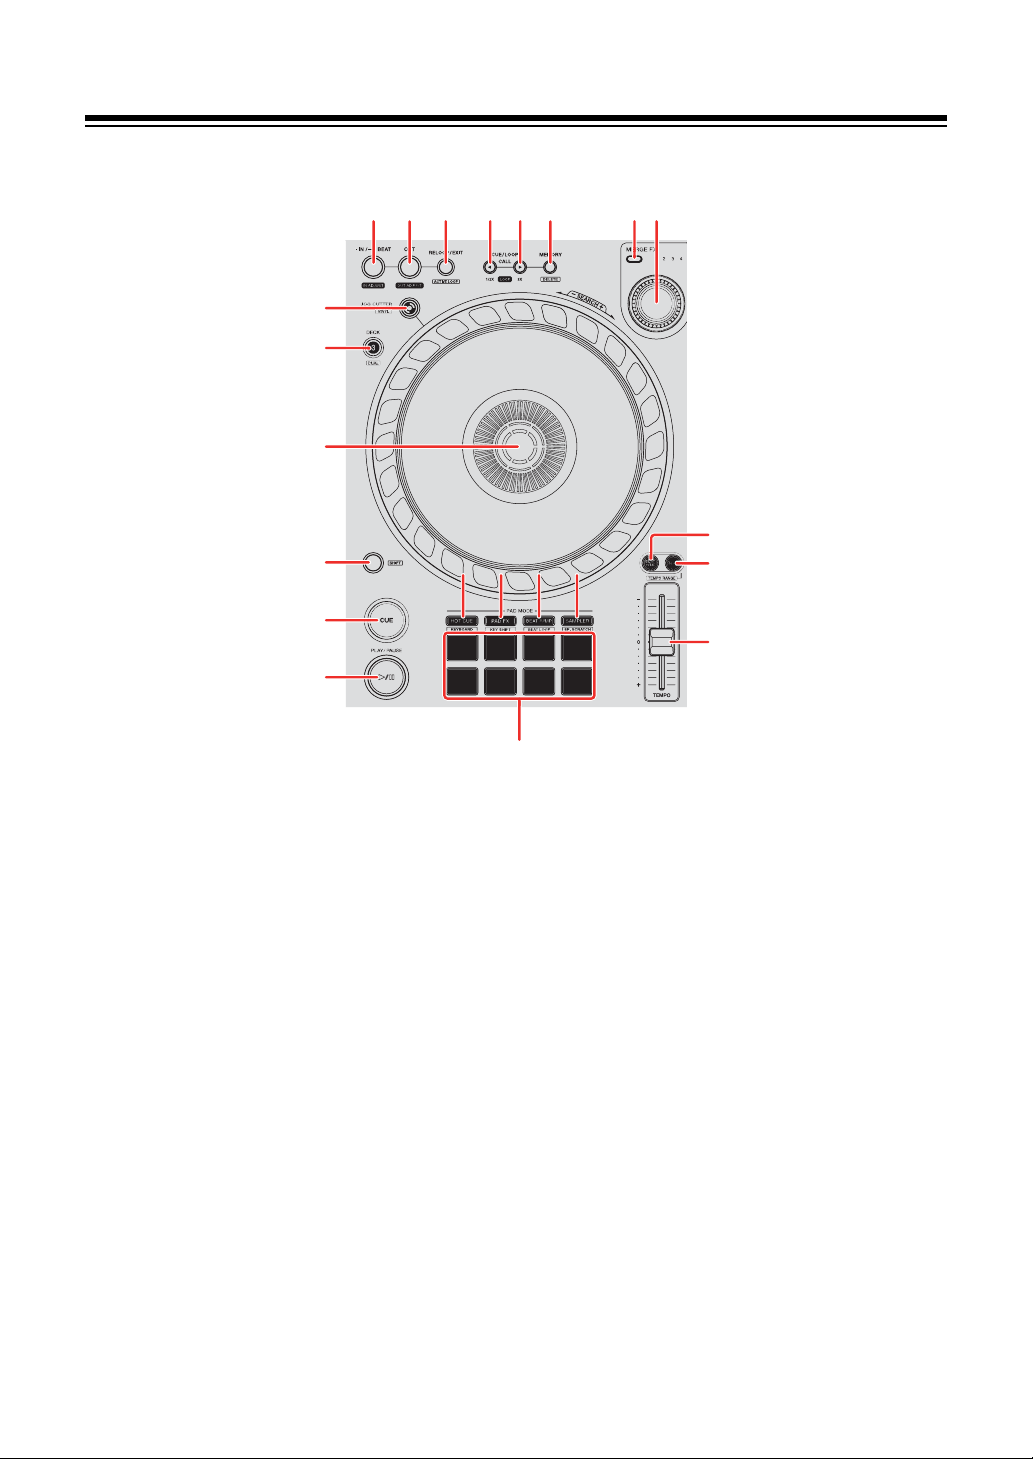
Deck section
1
22
21
9
10
11
19
18
17
20
121212 131313 141414 151515
2 4165 6 7 83
Part names and functions
1 IN/4BEAT button
Press:
Sets the loop in point.
Press (during loop playback):
Adjusts the loop in point using the jog wheel.
Press for at least a second:
Starts Auto Beat Loop of 4 beats.
2 OUT button
Press:
Sets the loop out point, and loop playback begins.
12
En
Page 13

Part names and functions
Press (during loop playback):
Adjusts loop out point using the jog wheel.
3 RELOOP/EXIT button
Press:
Playback returns to the previously set loop in point and loop playback resumes.
Press (during loop playback):
Cancels loop playback.
(rekordbox)
[SHIFT] + press:
Switches the active/non-active status of the loop. (Active Loop)
• During playback, the loop nearest the playback position is set to active.
• When you call up the loop, the loop is set to active or non-active.
(Serato DJ Pro)
[SHIFT] + press:
Switches the active/non-active status of the loop.
4 CUE/LOOP CALL button
(rekordbox)
Press:
Selects and calls up the cue point or loop point.
Press (during loop playback):
Halves the loop playback length.
• When paused at the loop in point, the loop playback length isn’t changed.
(Serato DJ Pro)
Press:
Selects the loop slot.
Press (during loop playback):
Halves the loop playback length.
13
En
Page 14

Part names and functions
5 CUE/LOOP CALL button
(rekordbox)
Press:
Selects and calls up the cue point or loop point.
Press (during loop playback):
Doubles the loop playback length.
• When paused at the loop in point, the loop playback length isn’t changed.
(Serato DJ Pro)
Press:
Selects the loop slot.
Press (during loop playback):
Doubles the loop playback length.
6 CUE/LOOP MEMORY button
(rekordbox)
Press:
Saves a cue or loop.
[SHIFT] + press:
Deletes a cue or loop.
(Serato DJ Pro)
Press:
Locks the loop slot.
[SHIFT] + press:
Deletes the loop slot.
14
En
Page 15

Part names and functions
7 MERGE FX select button
Press:
Changes the Merge FX type, cycling through types in the following order:
Merge FX1, 2, 3, 4.
[SHIFT] + press:
Changes the Merge FX type, cycling through types in the reverse order.
8 MERGE FX knob
(rekordbox)
Press:
Turns the selected Merge FX on/off.
[SHIFT] + press:
Cancels Merge FX.
Turn:
The effect of the selected Merge FX changes.
[SHIFT] + turn:
Adjusts the volume of sample sound/oscillator sound of Merge FX.
(Serato DJ Pro)
Press:
Turns on the selected Merge FX.
Press while the selected Merge FX is turned on:
The effect changes.
To turn off the selected Merge FX, see “Using Merge FX” (page 97).
Turn:
The effect of the selected Merge FX changes.
15
En
Page 16

Part names and functions
9 BEAT SYNC button
(rekordbox)
Press:
Automatically synchronizes the tempo (BPM) and beatgrid with the deck set as
the master.
Press (during Beat Sync):
Cancels Beat Sync.
(Serato DJ Pro)
Press:
The tempo (BPM) and beatgrid of multiple decks are automatically
synchronized.
[SHIFT] + press:
Cancels Sync mode.
10 MASTER button
(rekordbox)
Press:
Sets the relevant deck as the master.
[SHIFT] + press:
Switches the range of the [TEMPO] slider each time the button is pressed
while holding the [SHIFT] button.
Switch between [±6%] [±10%] [±16%] [WIDE] [±6%].
(Serato DJ Pro)
Press:
Cancels Sync mode.
16
En
Page 17

Part names and functions
[SHIFT] + press:
Switches the range of the [TEMPO] slider each time the button is pressed
while holding the [SHIFT] button.
Switch between [±6%] [±10%] [±16%] [±100%] [±6%].
11 TEMPO slider
Adjusts the playing speed of the track.
12 HOT CUE mode button
Press:
Enters Hot Cue mode.
Read more: Using Hot Cues (page 42)(page 84)
(rekordbox)
[SHIFT] + press:
Enters Keyboard mode.
Read more: Using Keyboard mode (page 48)
(Serato DJ Pro)
[SHIFT] + press:
Enters Cue Loop mode.
Read more: Using Cue Loop (page 87)
13 PAD FX mode button
(rekordbox)
Press:
Enters Pad FX mode.
Read more: Using Pad FX (page 50)
[SHIFT] + press:
Enters Key Shift mode.
Read more: Using Key Shift (page 52)
17
En
Page 18

Part names and functions
(Serato DJ Pro)
Press:
Enters Roll mode.
[SHIFT] + press:
Enters Saved Loop mode.
14 BEAT JUMP mode button
(rekordbox)
Press:
Enters Beat Jump mode.
Read more: Using Beat Jump (page 44)
[SHIFT] + press:
Enters Beat Loop mode.
Read more: Using Beat Loop (page 44)
(Serato DJ Pro)
Press:
Enters Auto Loop mode.
Read more: Using Auto Loop (page 86)
[SHIFT] + press:
Enters Slicer Loop mode.
15 SAMPLER mode button
Press:
Enters Sampler mode.
Read more: Using Sampler (page 46)(page 86)
(rekordbox)
[SHIFT] + press:
Enters Sample Scratch mode.
Read more: Using Sample Scratch (page 53)
En
18
Page 19

Part names and functions
(Serato DJ Pro)
[SHIFT] + press:
Enters Scratch Bank mode.
Read more: Using Scratch Bank mode (page 92)
16 Performance Pads
Press:
You can use Performance Pads to trigger various features.
Read more: Using the Performance Pads (page 42)(page 84)
17 PLAY/PAUSE button
Press:
Plays/pauses a track.
(Serato DJ Pro)
[SHIFT] + press:
Returns to the temporary cue point and playback starts. (Stutter)
18 CUE button
Press:
Sets, calls up, and plays a cue point.
• Press the button when the track is paused to set the cue point.
• Press the button when the track is playing to return to the cue point and
pause. (Back Cue)
• Press the button and hold it after the track returns to the cue point and
playback will continue until you release the button. (Cue Point Sampler)
[SHIFT] + press:
Returns the playback position to the beginning of the track.
19 SHIFT button
Press another button while holding the [SHIFT] button to use a different feature
assigned to the button.
19
En
Page 20

Part names and functions
20 Jog wheel
Turn the top when Vinyl mode is on:
Scratches the track.
Turn the outer section or turn the top when Vinyl mode is off:
Bends the pitch (Pitch Bend – slows down or speeds up the track).
(rekordbox)
[SHIFT] + turn the top:
Fast-forward or fast-reverse the track with extra speed.
(Serato DJ Pro)
[SHIFT] + turn the top:
The playback position skips in sync with the beat. (Skip mode)
• Skip mode can’t be used with tracks that have no beatgrid set. For details
on setting beatgrids, see the Serato DJ Pro software manual.
• To use Skip mode, open the [SETUP] menu in Serato DJ Pro > [SYNC
PREFERENCES] and select [Smart Sync].
21 DECK SELECT button
Press:
Switches the deck to be used.
[SHIFT] + press:
Turns Dual Deck mode on/off.
22 JOG CUTTER button
Press:
Turns Jog Cutter mode on/off.
[SHIFT] + press:
Turns Vinyl mode on/off.
20
En
Page 21
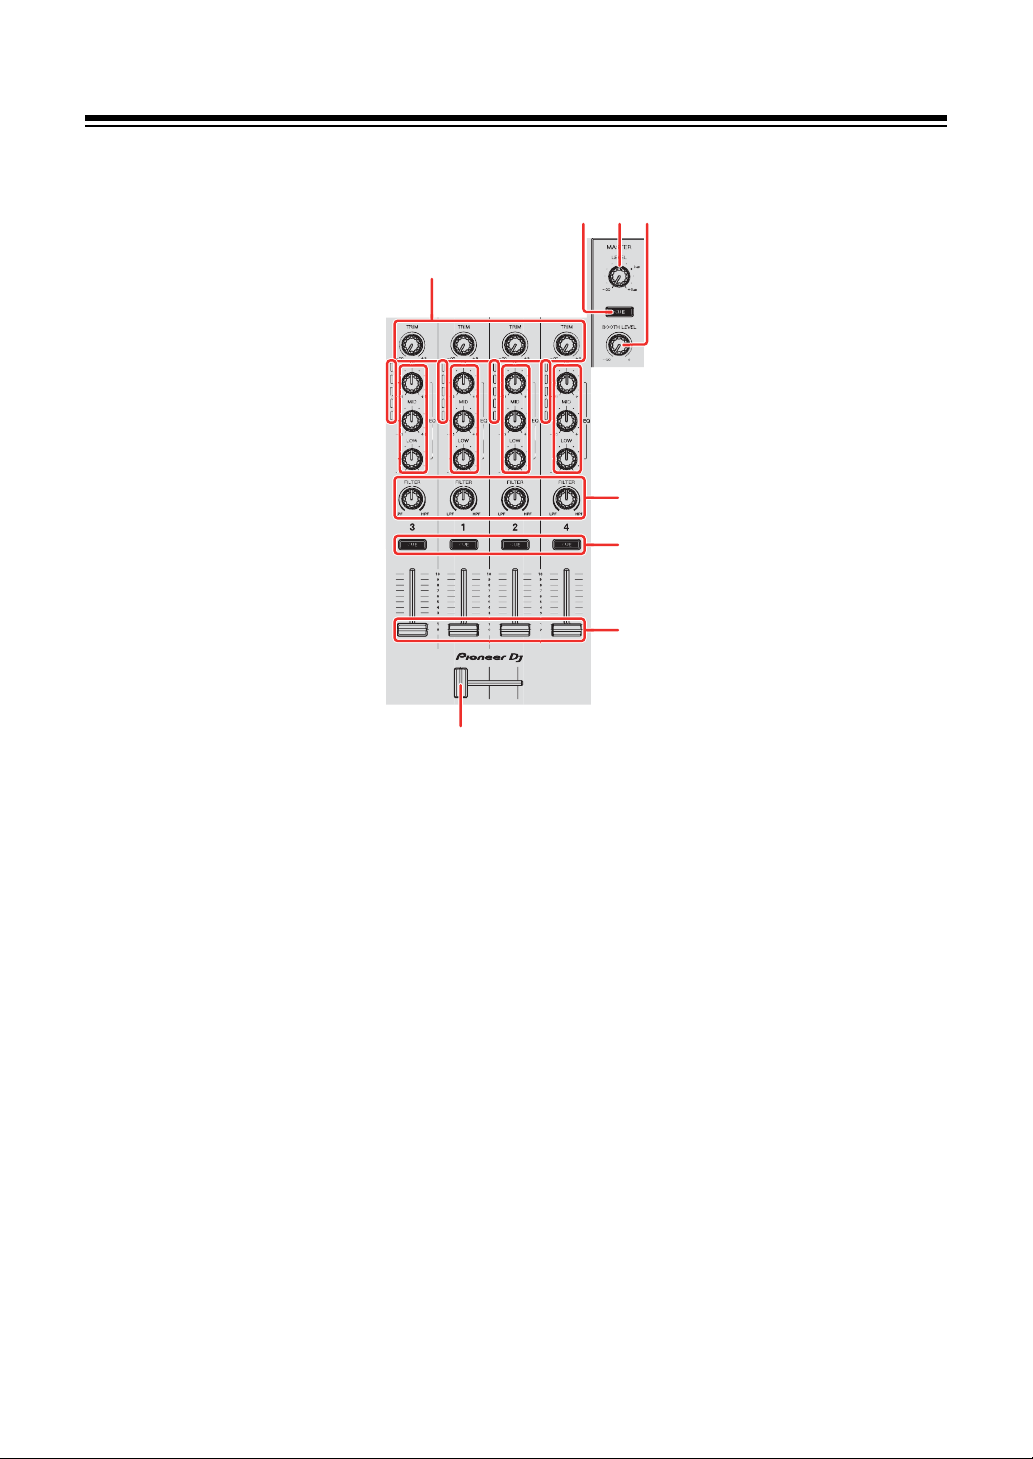
Mixer section
5
6
5
6
5
6
5
6
Part names and functions
2 43
1
5
5
5
5
6
5
6
6
6
7
8
9
10
1TRIM knobs
Adjust the volume of each channel’s sound.
2 Headphone CUE button (master)
Press:
Plays the master sound through your headphones.
3 MASTER LEVEL knob
Adjusts the volume of the master output sound.
4 BOOTH LEVEL knob
Adjusts the volume of the sound output from the [BOOTH] terminal.
5 Channel level indicators
Indicate the volume of the sound of the respective channels before it passes
through the channel faders.
21
En
Page 22

Part names and functions
6 EQ (HI, MID, LOW) knobs
Boost or reduce the relevant frequency for the selected channel.
7FILTER knobs
Turn on the filter effect for each channel.
When a knob is set to the center position, the sound is unchanged.
Turn counterclockwise:
Gradually decreases the low-pass filter’s cutoff frequency.
Turn clockwise:
Gradually increases the high-pass filter’s cut-off frequency.
8 Headphone CUE buttons (channel)
Press:
Play the sound of the relevant channel through your headphones.
[SHIFT] + press:
Hold the [SHIFT] button and tap the headphone [CUE] button to set the tempo
of the respective deck in time with your tapping. (Tapping function)
9 Channel faders
Adjust the volume of the sound for each channel.
10 Crossfader
Adjusts the sound balance between the left and right channels depending on
the crossfader curve setting.
22
En
Page 23
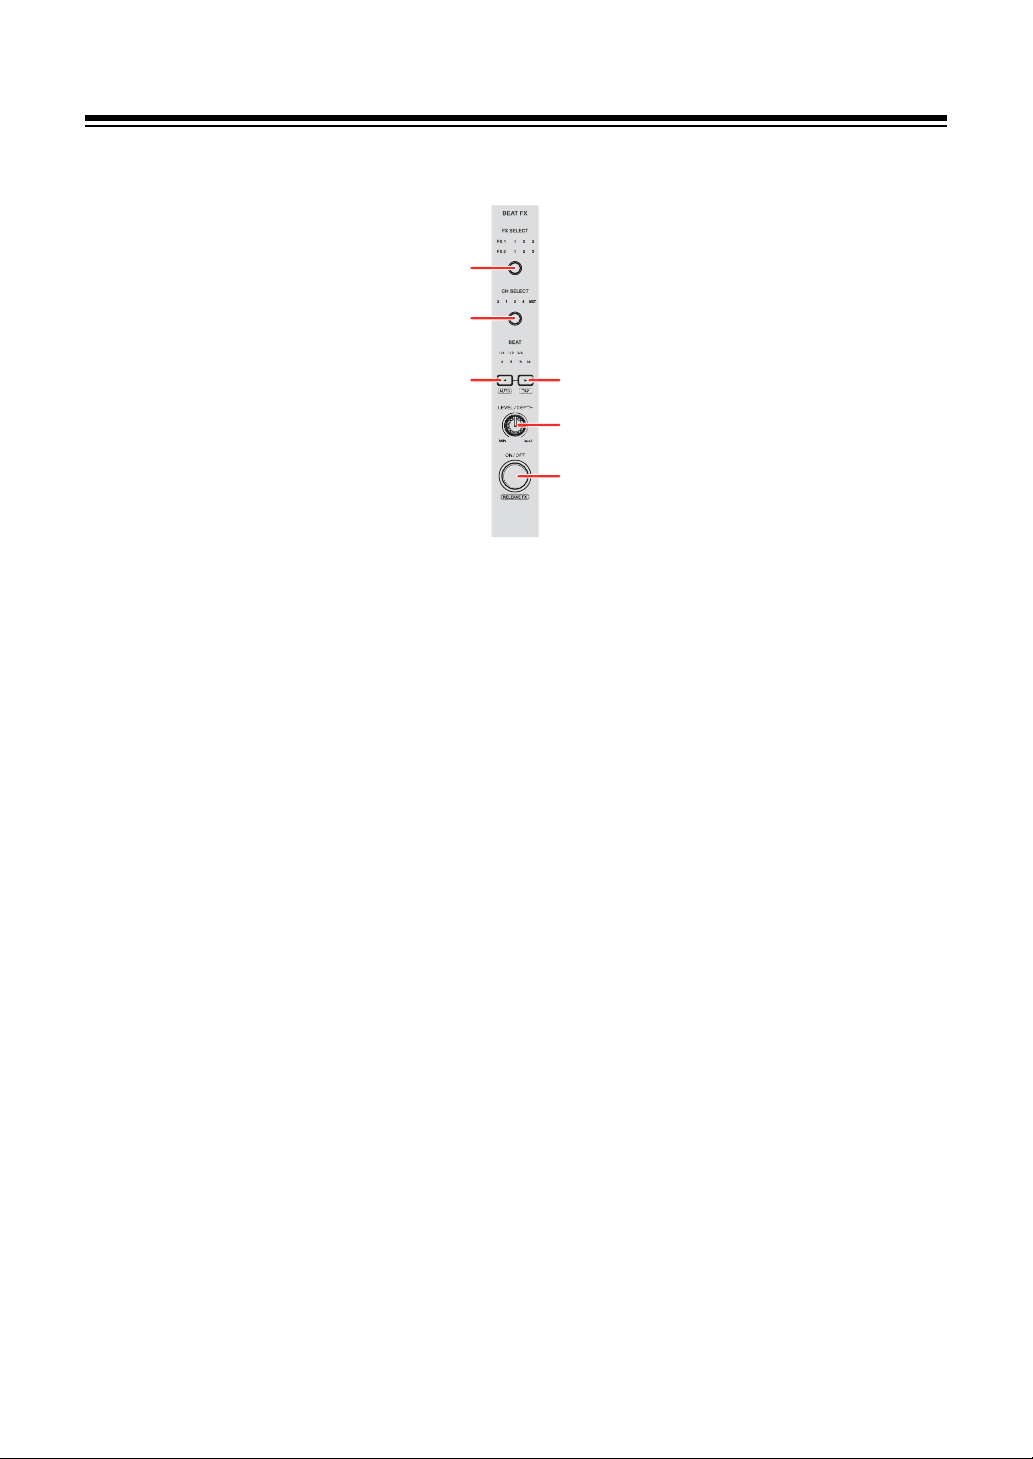
Part names and functions
1
2
3 4
5
6
Effects section
1 BEAT FX SELECT button
Press:
Changes the Beat FX slot each time the button is pressed.
[SHIFT] + press:
Changes the Beat FX slot in the reverse order each time the button is pressed.
2 BEAT FX CH SELECT button
Press:
Changes the channel each time the button is pressed.
[SHIFT] + press:
Changes the channel in the reverse order each time the button is pressed.
3BEAT button
Press:
Decreases the beat fraction for synchronizing the Beat FX sound each time the
button is pressed.
23
En
Page 24

Part names and functions
[SHIFT] + press:
Sets the Beat FX Tempo mode to BPM Auto mode. The track’s BPM is used as
the basis for the Beat FX tempo.
4BEAT button
Press:
Increases the beat fraction for synchronizing the Beat FX sound each time the
button is pressed.
[SHIFT] + press:
Sets the Beat FX Tempo mode to BPM Tap mode. The BPM used as the basis
for Beat FX is set in time with your tapping of the button.
5 BEAT FX LEVEL/DEPTH knob
Adjusts the parameter of Beat FX.
6 BEAT FX ON/OFF button
Press:
Turns Beat FX on/off.
(rekordbox)
[SHIFT] + press:
Turns Release FX on/off.
24
En
Page 25
Part names and functions
1 4 5 632
Rear panel
1 MASTER output terminals (RCA pin jack type)
Connection for a powered speaker, a power amplifier, etc.
• Compatible with RCA pin jack-type unbalanced outputs.
2 BOOTH output terminals (RCA pin jack type)
Connection for a powered speaker, a power amplifier, etc.
• Compatible with RCA pin jack-type unbalanced outputs.
3 MIC ATT. (Attenuator) knob
Adjusts the volume of input sound from the [MIC] input terminal.
• Depending on the microphone, the gain of microphone sound differs. Use
this knob to adjust the volume for your microphone before using it. While
DJing, use the [MIC LEVEL] knob on the front panel to adjust the
microphone volume.
4 MIC input terminal (1/4" TRS Jack)
Connection for a microphone.
• Only a phone plug (1/4") can be used.
5USB port
Connection for a PC/Mac.
• Be sure to use the supplied USB cable.
• A USB hub can’t be used with the unit.
• If your PC/Mac has only a USB Type-C port, you’ll need to use a USB Type-
C male to USB Type-A female cable.
6 Kensington security slot
Connection for a cable lock for security.
25
En
Page 26
Part names and functions
1 2 43
Front panel
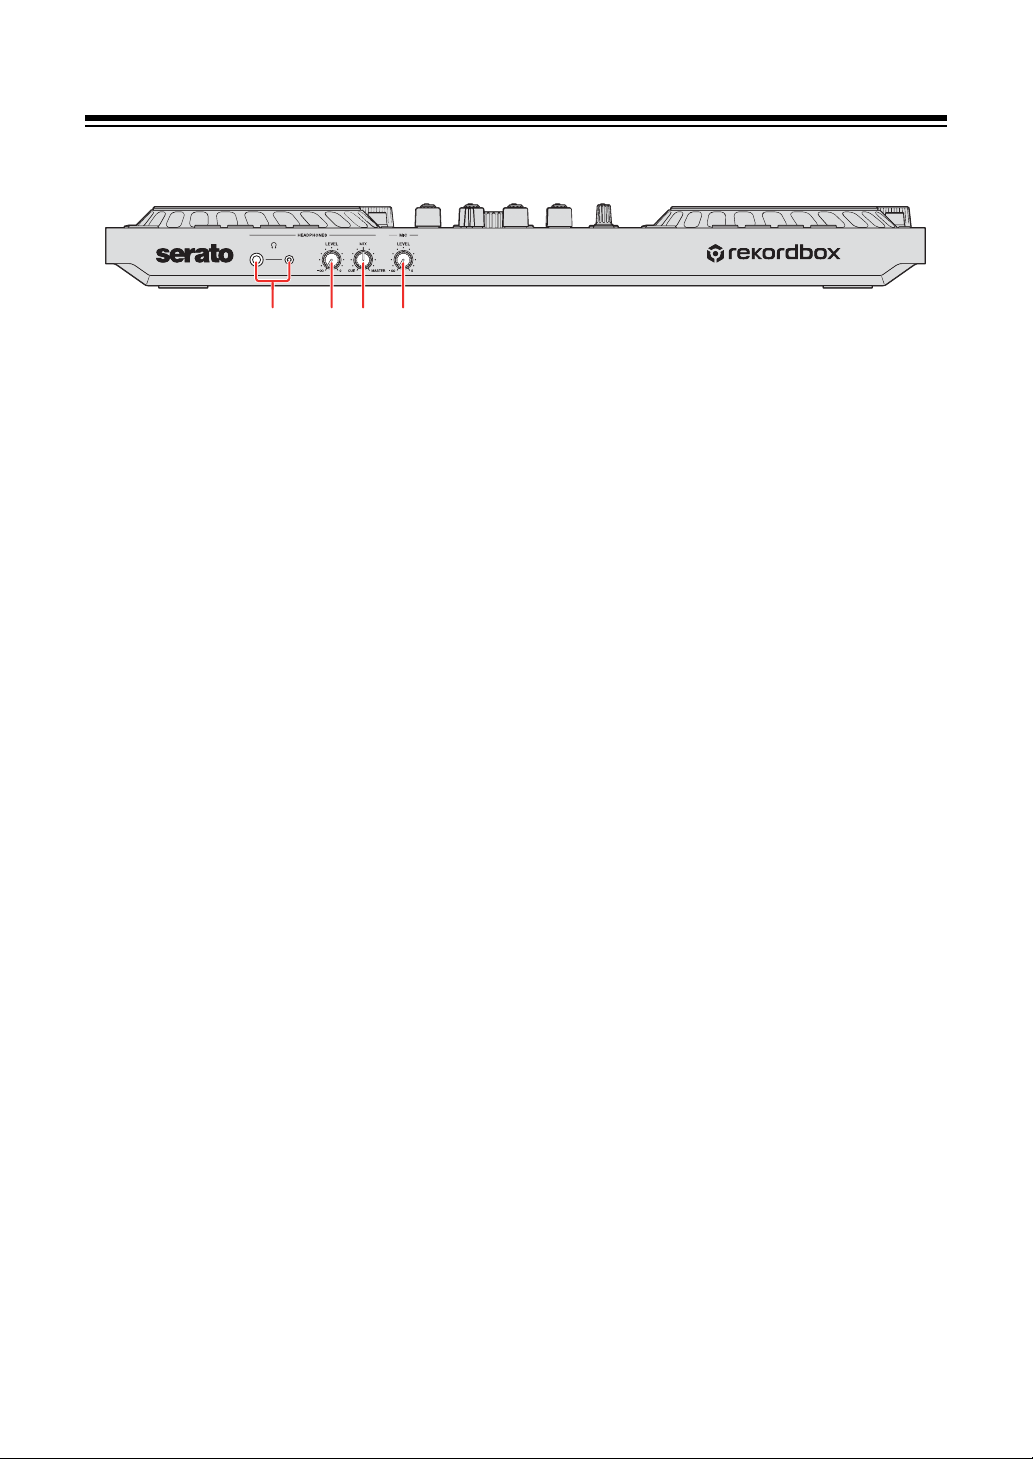
1 PHONES output terminals
Connection for your headphones.
Stereo phone plugs (1/4") and stereo mini phone plugs (ø 3.5 mm) can be used
with the unit.
• Only use headphones with 32 Ω or more impedance. Headphones with
impedance lower than 32 Ω won’t work with the unit.
2 HEADPHONES LEVEL knob
Adjusts the level of the headphones sound.
3 HEADPHONES MIX knob
Adjusts the monitor volume balance between sounds from the channels which
have the headphone [CUE] button pressed, and the master channel.
4 MIC LEVEL knob
Adjusts the level of sound input to the [MIC] input terminal.
26
En
Page 27

Connections
• Disconnect the USB cable before connecting different devices or
changing connections.
Refer to the instruction manuals for devices to be connected.
• Power is supplied via USB bus power. You can use the unit with a
single connection to your PC/Mac.
• Be sure to use the supplied USB cable.
• A USB hub can’t be used with the unit.
• This unit can’t be used with USB bus power in the following
situations:
– The power supply capacity of the USB port on your PC/Mac is too
low.
– Your PC/Mac is connected with other devices.
– Impedance of the connected headphones is lower than 32 Ω.
–The [PHONES] output terminal is connected with a mono jack.
27
En
Page 28
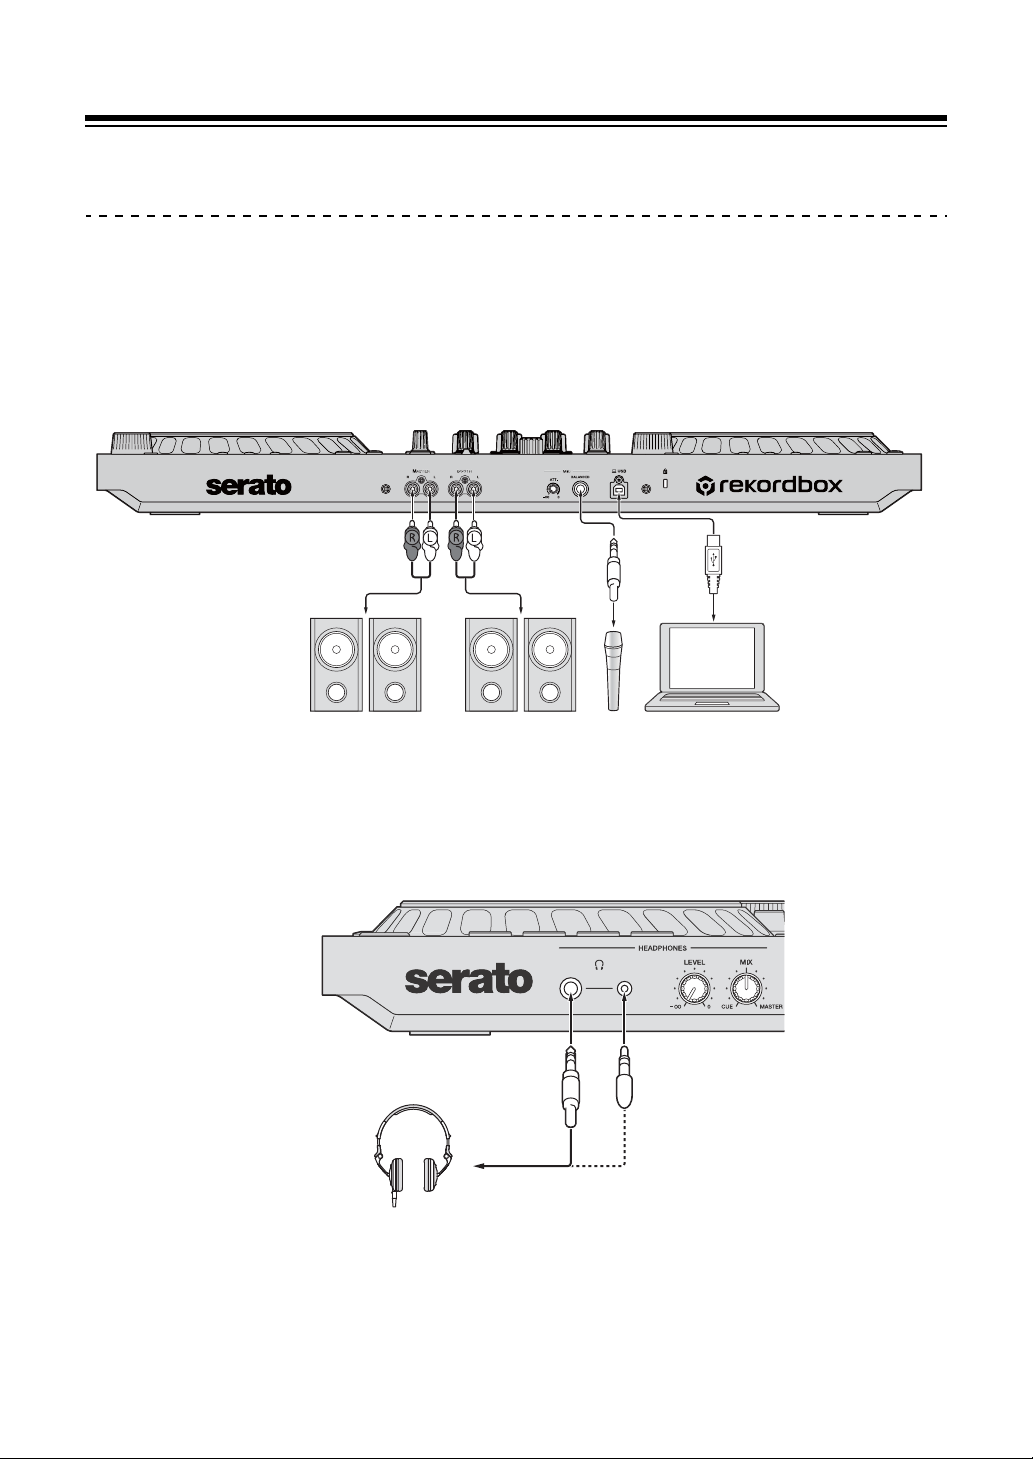
Connections
Connection examples
Connecting input terminals
Rear panel
(1) & (2) Powered speakers, power amplifier, etc.,
(3) Microphone, (4) PC/Mac
Front panel
(1) Headphones
(1) (2)
(1)
(4)(3)
28
En
Page 29
Connections
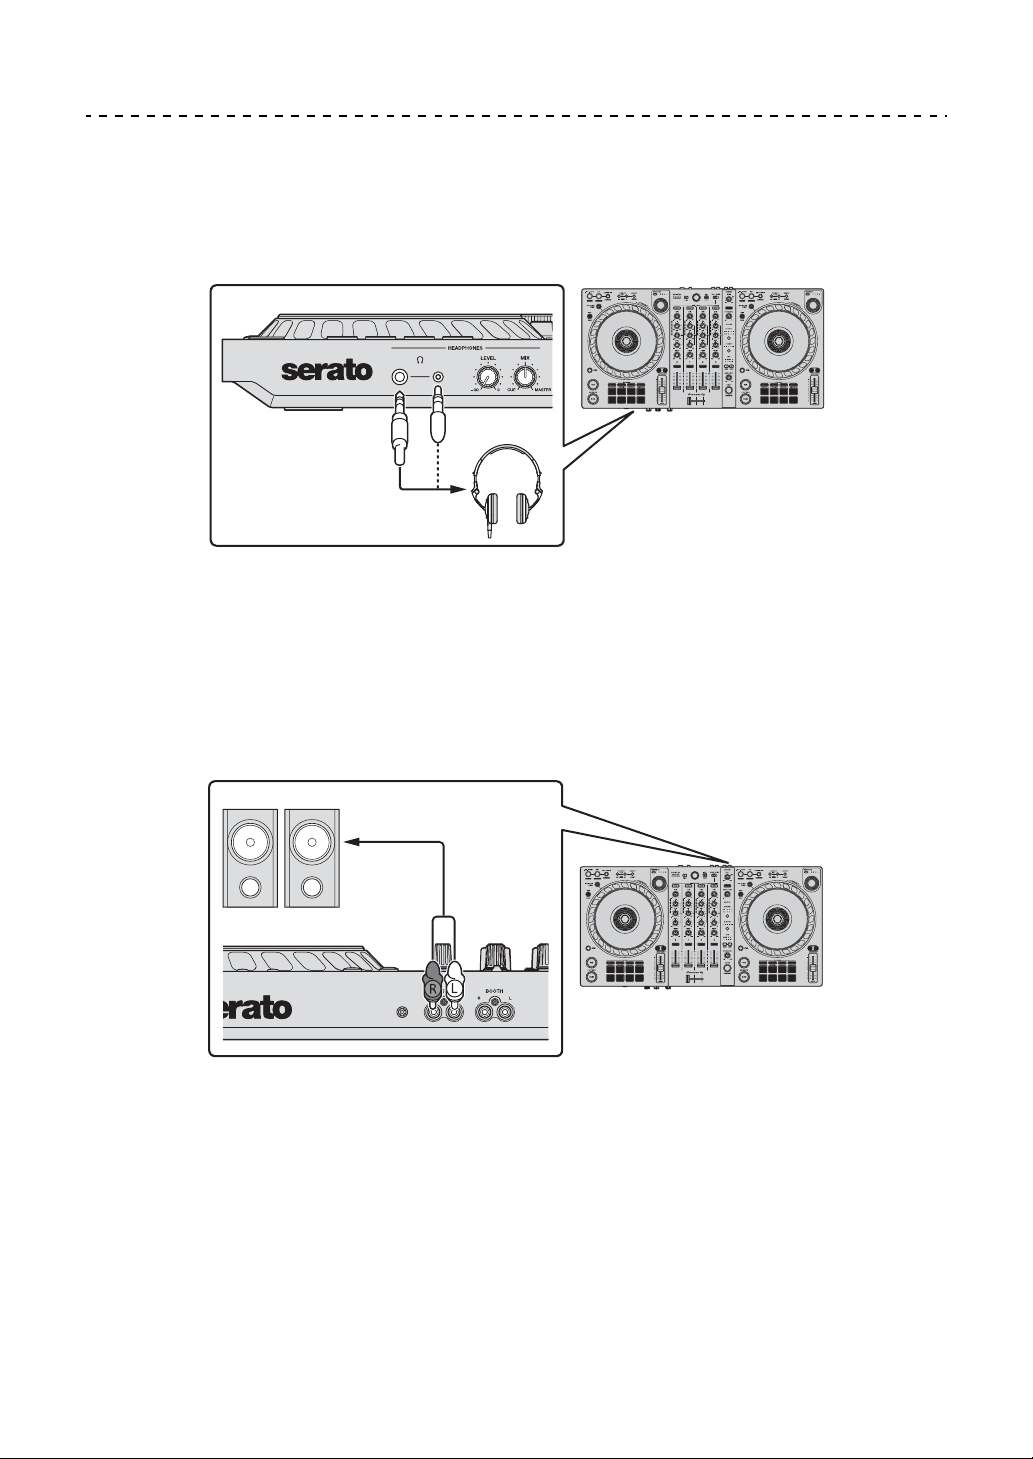
Connecting
1 Connect your headphones to one of the [PHONES] output
terminals.
.
• Only connect headphones with 32 Ω or more impedance. Headphones with
impedance lower than 32 Ω won’t work with the unit.
2 Connect powered speakers, a power amplifier, etc. to the
[MASTER] output terminals.
• To output the sound from the [BOOTH] output terminals, connect speakers
or other devices to the [BOOTH] output terminals.
29
En
Page 30
Connections
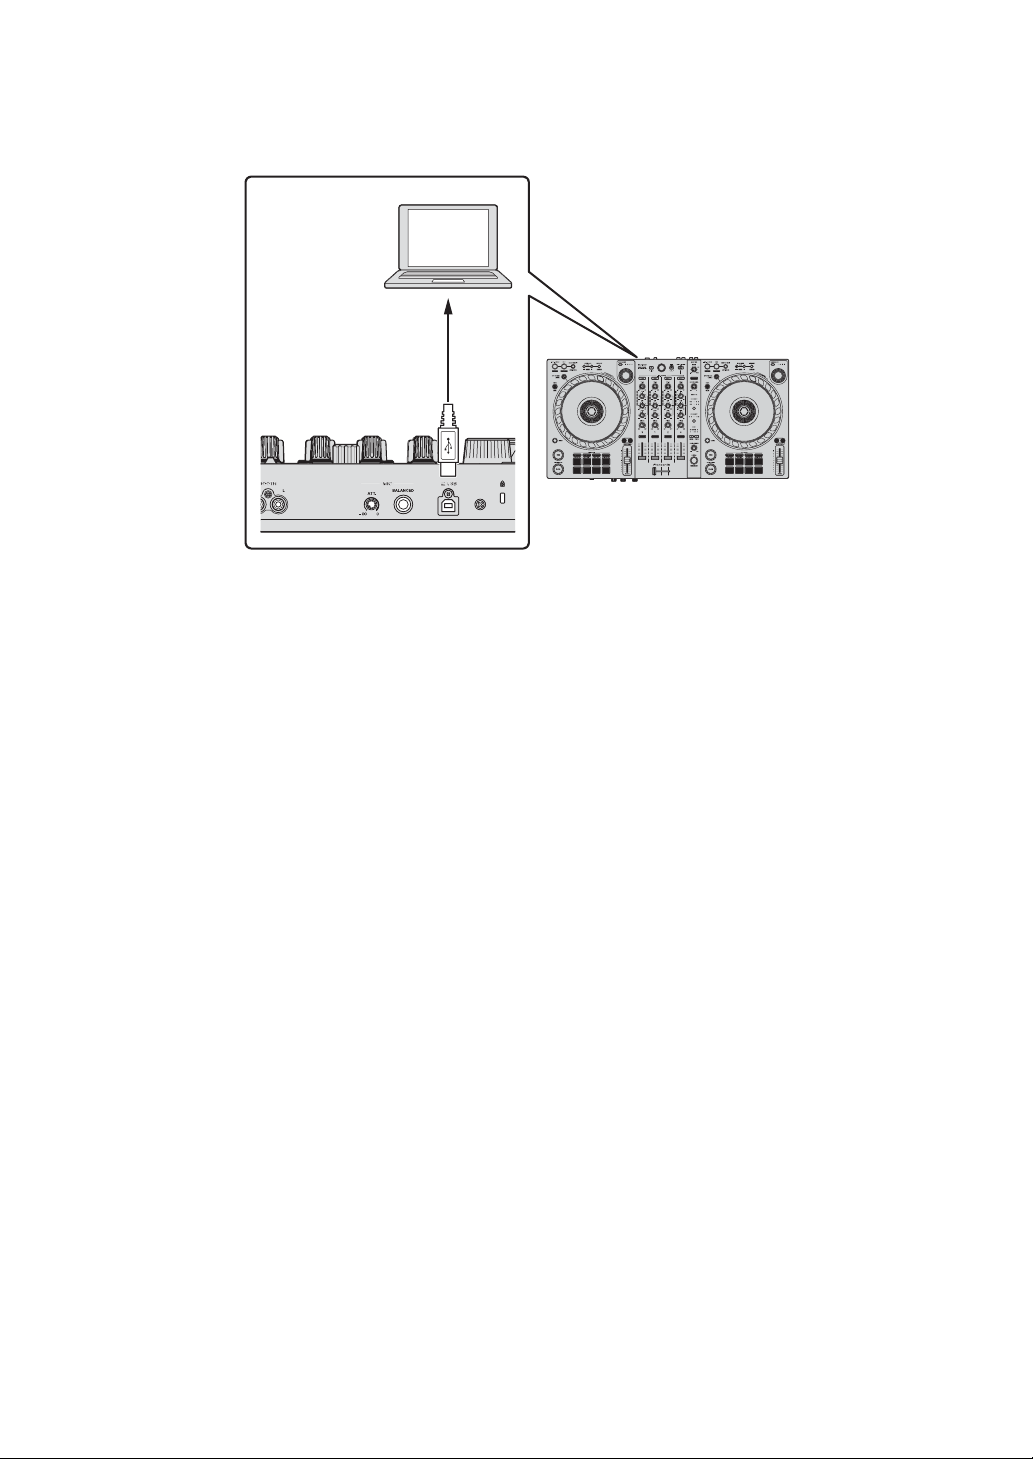
3 Connect the unit to your PC/Mac via a USB cable.
4 Turn on your PC/Mac.
5 Turn on the devices connected to the terminals (powered speakers,
microphone, etc.).
30
En
Page 31

rekordbox
Installing rekordbox
Getting started with rekordbox
If you’re using rekordbox for the first time, download the latest version
from rekordbox.com and install it in the following way.
If you already have rekordbox installed, update to the latest version
using the Update Manager which you’ll see when you start rekordbox.
• You are responsible for preparing your PC/Mac, network devices,
and other elements needed to connect to the internet.
Installing rekordbox
Procedures may differ depending on the operating system (OS) of your
PC/Mac.
Installing (Mac)
Do not connect the unit to your Mac until installation is complete.
• Close all programs on your Mac.
1 Unzip the downloaded rekordbox software file.
2 Double-click the unzipped software file to launch the installer.
31
En
Page 32

rekordbox
3 Read the terms of the License Agreement carefully and if you agree
to them, click [Agree].
• If you do not agree to the contents of the License Agreement, click
[Disagree] to cancel the installation.
4 When the screen for completing the installation appears, click
[Close] to end the installation.
Installing (Windows)
Do not connect the unit to your PC until installation is complete.
• Log into your PC as an administrator before starting the installation.
• Close all programs on your PC.
1 Unzip the downloaded rekordbox software file.
2 Double-click the unzipped software file to launch the installer.
En
32
Page 33

rekordbox
3 Read the terms of the License Agreement carefully and if you agree
to them, select [Agree], then click [Next].
• If you do not agree to the contents of the license agreement, click [Cancel]
to cancel the installation.
• After specifying the destination, the installation will start.
When the installation is finished, a completion message will be displayed.
4Click [Finish] to complete the installation.
Installation is complete.
33
En
Page 34

rekordbox
Basic use
Starting rekordbox
You need to register an account to use rekordbox.
For Mac
In Finder, open the [Applications] folder, then double-click the
[rekordbox 6] > [rekordbox.app] icon.
For Windows 10
In the [Start] menu, click the [rekordbox 6] icon under [Pioneer].
For Windows 8.1
In [Apps view], click the [rekordbox 6] icon.
34
En
Page 35

rekordbox
Checking audio setup
Check that the [Audio] settings in [Preferences] in rekordbox are set
as follows:
For Mac
[Audio]: [DDJ-FLX6]
[Output channels]:
[Master Output]: [DDJ-FLX6 : MASTER + audio device name on
Mac]
[Headphones Output]: [DDJ-FLX6 : PHONES]
• When PC MASTER OUT is off, [Master Output] in the [Audio]
setting is [DDJ-FLX6 : MASTER].
For Windows
[Audio]: [DDJ-FLX6 WASAPI]
[Output channels]:
[Master Output]: [DDJ-FLX6 WASAPI : MASTER + audio device
name on PC]
[Headphones Output]: [DDJ-FLX6 WASAPI : PHONES]
• When PC MASTER OUT is off, [Master Output] in the [Audio]
setting is [DDJ-FLX6 WASAPI : MASTER].
• PC Master Out is a function that can output the master sound of
rekordbox from the speaker(s) of the connected PC/Mac. By default,
PC Master Out is set to on.
• To cancel outputting the master sound of rekordbox from the
speaker(s) of the connected PC/Mac, click in the top-right area
of the rekordbox screen so its light switches off.
35
En
Page 36

rekordbox
Adding music files into your Collection
The [Collection] screen contains a list of music files managed by
rekordbox.
Add music files on your PC/Mac to your Collection so the software can
analyze them and they can be used in rekordbox.
1Click [Collection] on the tree view.
A list of tracks in your [Collection] is displayed.
2 Open Finder (Mac) or Explorer (Windows) and drag music files, or
folders containing music files, into the track list.
Music files are added into the [Collection] and analysis of waveform
information for the music files begins. Wait until analysis of all music files is
complete.
Loading an audio track onto a deck
The following explains how to load a track onto deck 1 as an example.
Turn the rotary selector to select a track in your [Collection] and press
the [LOAD] button for deck 1 (second from the left).
The track loads onto deck 1.
36
En
Page 37

rekordbox
Playing a track
This section explains how to play sound from deck 1 (left) as an
example.
1 Set the positions of the knobs, etc. as follows:
•[TRIM] knob: turned fully counterclockwise
• [EQ (HI/MID/LOW)] knobs: center position (12 o’clock)
•[FILTER] knob: center position
• Channel fader: bottom position
• [MASTER LEVEL] knob: turned fully counterclockwise
• Crossfader: center position
2 Press the [PLAY/PAUSE ] button to play the track.
3 Turn the [TRIM] knob.
Adjust the [TRIM] knob so the channel level indicator lights up orange at the
loudest part of the track.
En
37
Page 38

rekordbox
4 Move the channel fader to the top.
5 Turn the [MASTER LEVEL] knob to adjust the volume of the
speakers to a level you’re happy with.
• If you’re outputting sound from the speaker of your PC/Mac, adjust the
speaker volume on the PC/Mac instead of using the [MASTER LEVEL]
knob.
• If you can’t output sound from the [MASTER] output terminals or the unit isn’t
recognized by your PC/Mac, refer to the [FAQ] on the Pioneer DJ support
website.
pioneerdj.com/support/
38
En
Page 39

rekordbox
Monitoring with headphones
This section explains how to play sound from deck 1 (left) as an
example.
1 Set the positions of knobs, etc. as shown below.
• [HEADPHONES MIX] knob: Center
• [HEADPHONES LEVEL] knob: Turned fully counterclockwise
2 Press the headphone [CUE] button for channel 1.
3 Turn the [HEADPHONES LEVEL] knob.
Adjust the headphones volume to a level you’re happy with.
Quitting rekordbox
Click the [x] button or select [Exit] from the [File] menu.
Turning off the unit
Disconnect the USB cable to turn off the unit.
39
En
Page 40

rekordbox
Advanced use
Using 4 Beat Loop
While a track is playing, press and hold the [IN/4BEAT] button for at
least a second.
Loop playback starts with 4 beats from the point where you press the
button.
• When the Quantize function is turned on, you might notice a slight
delay as the loop synchronizes to the beat.
Canceling loop playback
Press the [RELOOP/EXIT] button.
When the loop out point is reached, the rest of the track continues to
play without returning to the loop in point.
Using Manual Loop
You can use Manual Loop to choose the section you want to loop in a
track.
• When the Quantize function is turned on, you might notice a slight
delay as the loop synchronizes to the beat.
1 During playback, press the [IN/4BEAT] button at the point you want
to start looping (the loop in point).
2 Press the [OUT] button at the point you want the loop to end (the
loop out point).
Loop playback starts.
40
En
Page 41

rekordbox
Cutting the loop
Press the [CUE/LOOP CALL ] button.
Each time you press the button, the loop cuts in half.
• You can cut the loop length in half even during 4 Beat Loop playback.
Extending the loop
Press the [CUE/LOOP CALL ] button.
Each time you press the button, the loop doubles in length.
• You can double the loop length even during 4 Beat Loop playback.
Canceling a loop
Press the [RELOOP/EXIT] button.
The rest of the track continues to play without returning to the loop in
point.
Changing the loop in point
Press the [IN/4BEAT] button and turn the jog wheel during loop
playback.
The loop in point changes.
Changing the loop out point
Press the [OUT] button and turn the jog wheel during loop playback.
The loop out point changes.
41
En
Page 42

rekordbox
1234
5678
Using the Performance Pads
Using Hot Cues
You can start playback instantly from the position where a Hot Cue is
set. Loops can also be set and called up instantly.
• Up to 16 Hot Cues can be set and saved for each track in rekordbox.
On the unit, up to 8 Hot Cues can be set and saved per track.
Setting and calling up a Hot Cue
1 Press the [HOT CUE] mode button.
The unit enters Hot Cue mode.
2 If the track is playing or paused, press a Performance Pad to set a
Hot Cue.
Hot Cues are set to Performance Pads as follows:
1: Hot Cue A, 2: Hot Cue B, 3: Hot Cue C, 4: Hot Cue D,
5: Hot Cue E, 6: Hot Cue F, 7: Hot Cue G, 8: Hot Cue H
3 Press a Performance Pad you’ve set a Hot Cue for.
Playback starts from the Hot Cue point.
• You can clear Hot Cues by pressing a Performance Pad while holding the
[SHIFT] button.
42
En
Page 43

rekordbox
Setting and calling up 4 Beat Loop
1 Press the [HOT CUE] mode button.
The unit enters Hot Cue mode.
2 Press and hold the [IN/4BEAT] button for at least a second during
playback.
A loop with 4 beats is set at the position where you pressed the button, and
loop playback starts.
3 Press a Performance Pad to set a loop during loop playback.
4 Press the Performance Pad.
Loop playback starts from the loop in point.
• You can clear the loop by pressing the Performance Pad while holding the
[SHIFT] button.
Setting and calling up Manual Loop
1 Press the [HOT CUE] mode button.
The unit enters Hot Cue mode.
2Press the [IN/4BEAT] button during playback, and press the [OUT]
button.
Loop playback starts.
3 Press a Performance Pad to set a loop during the loop playback.
4 Press the Performance Pad.
Loop playback starts from the loop in point.
• You can clear the loop by pressing the Performance Pad while holding the
[SHIFT] button.
43
En
Page 44

rekordbox
1234
5678
Using Beat Loop
If you press a Performance Pad, a loop with the number of beats
assigned to the pad is set. The loop keeps playing after you remove
your finger from the pad.
1 Press the [BEAT JUMP] mode button while holding the [SHIFT]
button.
The unit enters Beat Loop mode.
The number of beats set to the Performance Pads are as follows:
1: Beat Loop 1/4 beat, 2: Beat Loop 1/2 beat, 3: Beat Loop 1 beat,
4: Beat Loop 2 beats, 5: Beat Loop 4 beats, 6: Beat Loop 8 beats,
7: Beat Loop 16 beats, 8: Beat Loop 32 beats
2 Press a Performance Pad.
The loop plays with the number of beats set on that pad.
3 Press the same Performance Pad again.
The loop is canceled and the rest of the track continues to play.
Using Beat Jump
You can move the playback position instantly, without breaking the
rhythm of the track that’s playing.
1 Press the [BEAT JUMP] mode button.
The unit enters Beat Jump mode.
44
En
Page 45

rekordbox
1234
5678
78
The number of beats set to the Performance Pads are as follows (Default):
1: 1 beat (left direction), 2: 1 beat (right direction), 3: 2 beats (left direction),
4: 2 beats (right direction), 5: 4 beats (left direction), 6: 4 beats (right direction),
7: 8 beats (left direction), 8: 8 beats (right direction)
2 Press Performance Pad 7 or 8 while holding the [SHIFT] button to
change the number of beats set to the Performance Pad.
When pressing Performance Pad 7 while holding the [SHIFT] button, the
number of beats decreases.
When pressing Performance Pad 8 while holding the [SHIFT] button, the
number of beats increases.
7: Number of beats goes down, 8: Number of beats goes up
3 Press a Performance Pad.
• Pad 1, 3, 5 or 7: The playback position is moved to the left by the number of
beats set on the pad.
• Pad 2, 4, 6 or 8: The playback position is moved to the right by the number
of beats set on the pad.
45
En
Page 46

rekordbox
Using Sampler
You can use the Performance Pads to play tracks or sounds assigned
to the Sampler slots.
Preparing to use Sampler
Click the button at the top-left of the rekordbox screen to display
the [SAMPLER] panel.
Loading a track into a Sampler slot
1 Press the [SAMPLER] mode button.
The unit enters Sampler mode.
2 Click the button at the right of [BANK] on the [SAMPLER] panel in
rekordbox to change the Sampler bank.
In rekordbox, the sampler has 4 banks, and each bank has 16 slots.
3 Press the rotary selector to move the cursor to the track list.
4 Turn the rotary selector.
Select a track you want to load into a Sampler slot.
5 Press a Performance Pad while holding the [SHIFT] button.
The selected track is loaded into the Sampler slot.
• Loading a sound into a slot that already has a sound loaded may not be
possible depending on the [Preferences] settings in rekordbox. You may
need to clear the slot before loading the new sound.
46
En
Page 47

rekordbox
1234
5678
Playing Sampler sounds with Performance Pads
1 Press the [SAMPLER] mode button.
The unit enters Sampler mode.
2 Click the button to the right of [BANK] on the [SAMPLER] panel in
rekordbox to change the Sampler bank.
3 Turn the [GAIN] on the [SAMPLER] panel to adjust the Sampler
volume.
4 Press a Performance Pad.
The track or sound assigned to the relevant slot is played.
• Sampler slots are set to Performance Pads as follows. (The slots in brackets
are for when the Pad mode of deck 2 is set to Sampler mode.)
1: Slot 1 (slot 9), 2: Slot 2 (slot 10), 3: Slot 3 (slot 11), 4: Slot 4 (slot 12),
5: Slot 5 (slot 13), 6: Slot 6 (slot 14), 7: Slot 7 (slot 15), 8: Slot 8 (slot 16)
5 During Sampler playback, press the Performance Pad again.
The sound plays from the beginning again.
6 Press a Performance Pad while holding the [SHIFT] button during
Sampler playback.
The sound of the slot that is currently playing stops.
En
47
Page 48

rekordbox
1234
5678
Using Keyboard mode
Use Performance Pads to play a Hot Cue in different pitches, as if
you’re using a keyboard.
1 Press the [HOT CUE] mode button while holding the [SHIFT]
button.
The unit enters Keyboard mode.
2 Press a Performance Pad.
Select the Hot Cue you want to use with Keyboard mode.
• If no Hot Cue is set, the current playback position is set as a Hot Cue. After
selecting the Hot Cue which you set, the Hot Cue is used with Keyboard
mode.
• To reselect a Hot Cue, press the [HOT CUE] mode button while holding the
[SHIFT] button.
When the Hot Cue is selected, the various pitches are set to the Performance
Pads as follows (Default):
1: +4 Semitones, 2: +5 Semitones, 3: +6 Semitones, 4: +7 Semitones,
5: ±0 Semitones, 6: +1 Semitone, 7: +2 Semitones, 8: +3 Semitones
A semitone is a unit used to determine the pitch of a sound. +1 semitone
means the sound is higher in pitch than the original sound by half.
3 Press Performance Pad 7 or 8 while holding the [SHIFT] button to
change the pitch set to the Performance Pad.
• Pad 7: The pitch of the sound rises.
• Pad 8: The pitch of the sound falls.
48
En
Page 49

rekordbox
1234
5678
1 through 6: Delete Hot Cue, 7: Semitone up, 8: Semitone down
4 Press a Performance Pad.
Playback starts from the Hot Cue point, with the sound pitch assigned to that
pad.
• To delete the Hot Cue, press Performance Pad 1 through 6 while holding the
[SHIFT] button.
49
En
Page 50

rekordbox
1234
5678
Using Pad FX
You can add a wide range of effects to your performances simply by
pressing and releasing the Performance Pads.
1 Press the [PAD FX] mode button.
The unit enters Pad FX mode.
Effects are set to the Performance Pads as follows:
Without holding the [SHIFT] button (Pad FX mode)
1: Effect A, 2: Effect B, 3: Effect C, 4: Effect D,
5: Effect E, 6: Effect F, 7: Effect G, 8: Effect H
While holding the [SHIFT] button (Pad FX mode)
1: Effect I, 2: Effect J, 3: Effect K, 4: Effect L,
5: Effect M, 6: Effect N, 7: Effect O, 8: Effect P
2 Press and hold down a Performance Pad, or press and hold down
a Performance Pad while holding the [SHIFT] button.
The effect turns on. The sound changes according to the type of effect and the
number of beats in the settings assigned to that pad.
3 Release the Performance Pad.
The effect turns off.
50
En
Page 51

rekordbox
Using Release FX of Pad FX
You need to assign a Release FX to a Performance Pad in advance.
1 Press and hold down a Performance Pad that has an effect other
than a Release FX assigned to it, or press and hold down a
Performance Pad while holding the [SHIFT] button.
The effect turns on. The sound changes according to the type of effect and the
number of beats in the settings assigned to that pad.
2 Press the Performance Pad that has a Release FX assigned to it,
and release it.
Or, press a Performance Pad while holding the [SHIFT] button, and
release it.
The effect turns off, and the Release FX is added.
51
En
Page 52

rekordbox
1234
5678
78
Using Key Shift
When you press a Performance Pad in Key Shift mode, the key of the
track that’s currently playing is changed to the pitch set to the pressed
pad.
1 Press the [PAD FX] mode button while holding the [SHIFT] button.
The unit enters Key Shift mode.
The various pitches are set to the Performance Pads as follows (Default):
1: +4 Semitones, 2: +5 Semitones, 3: +6 Semitones, 4: +7 Semitones,
5: ±0 Semitones, 6: +1 Semitone, 7: +2 Semitones, 8: +3 Semitones
A semitone is a unit used to determine the pitch of a sound. +1 semitone
means the sound is higher in pitch than the original sound by half.
2 Press Performance Pad 7 or 8 while holding the [SHIFT] button to
change the pitch set to the Performance Pad.
• Pad 7: The pitch of the sound rises.
• Pad 8: The pitch of the sound falls.
7: Semitone up, 8: Semitone down
3 Press a Performance Pad.
The track’s key is changed to the pitch assigned to the pad.
52
En
Page 53

rekordbox
1234
5678
Using Sample Scratch
Use this feature to take the track loaded into the sampler slot and load
it onto a deck.
1 Press the [SAMPLER] mode button while holding the [SHIFT]
button.
The unit enters Sample Scratch mode.
2 Press a Performance Pad.
The sound loaded in the sampler slot assigned to the pad is loaded onto the
deck so you can scratch with it and bend the pitch, etc.
• If the Play mode of the sampler slot is set to Oneshot, playback starts when
the sound is loaded to the deck.
• If the Play mode of the sampler slot is set to loop, manual loop is set on the
deck and playback starts when the sound is loaded to the deck.
• If the sampler slot is set to Gate, the sound plays as Cue Point Sampler while
holding the pad when the sound is loaded to the deck.
Sampler slots are set to the Performance Pads as follows. (The slots in
brackets are for when the Pad mode of deck 2 is set to Sample Scratch mode.)
1: Slot 1 (slot 9), 2: Slot 2 (slot 10), 3: Slot 3 (slot 11), 4: Slot 4 (slot 12),
5: Slot 5 (slot 13), 6: Slot 6 (slot 14), 7: Slot 7 (slot 15), 8: Slot 8 (slot 16)
To unload the track, press the Performance Pad while holding the [SHIFT]
button.
53
En
Page 54

rekordbox
Setting and calling up a cue point or loop point
Setting a cue point or loop point
1 Pause the track and move the playback position to where you want
to set a cue point or loop point.
2 Press the [CUE] button while the track is paused.
3 Press the [CUE/LOOP MEMORY] button.
The cue point or loop point is saved.
Calling up the cue point or loop point
Press the [CUE/LOOP CALL ] or [CUE/LOOP CALL ] button.
The cue point or loop point is called up.
Deleting the cue point or loop point
1 Press the [CUE/LOOP CALL ] or [CUE/LOOP CALL ] button.
The cue point or loop point is called up.
2 Press the [CUE/LOOP MEMORY] button while holding the [SHIFT]
button.
The cue point or loop point is deleted.
54
En
Page 55

rekordbox
Using Fader Start
Using Channel Fader Start
1 Set the cue point.
Pause the track at the position you want to start playback from, then press the
[CUE] button on that deck.
2 While holding the [SHIFT] button, move the channel fader from the
bottom to the top.
Playback starts from the cue point.
• If you move the channel fader back to the bottom while holding the [SHIFT]
button during playback, the track instantly jumps back to the cue point and
playback pauses. (Back Cue)
When no cue point is set, playback starts from the beginning of the track.
Using Crossfader Start
1 Set the cue point.
Pause the track at the position you want to start playback from, then press the
[CUE] button on that deck.
2 Move the crossfader all the way to the left or right side.
If you want to use Crossfader Start to trigger playback on channel 2, set the
crossfader to the left side, and vice versa.
3 While holding the [SHIFT] button, move the crossfader towards the
opposite side from where it’s set.
Playback starts from the cue point.
• If you move the crossfader back while holding the [SHIFT] button during
playback, the playback position instantly jumps back to the cue point and
pauses. (Back Cue)
When no cue point is set, playback starts from the beginning of the track.
55
En
Page 56

rekordbox
Analyzing tracks
Track analysis starts when you drag and drop a music file, or a folder
containing music files, into the Track List in rekordbox.
• If a track is loaded to a deck before analysis is complete, it may take
some time to display its BPM and waveform.
• Depending on the number of tracks, analysis may take some time.
Using Beat FX
You can apply effects that match the tempo (BPM) of the track loaded
on the deck.
1 Click in the top-left of the rekordbox screen to display the FX
panel, and click to choose settings for Multi mode.
2 Press the [BEAT FX SELECT] button on the unit.
The selected Beat FX change as follows each time you press the button:
FX1-1 FX1-2 FX1-3 FX2-1 FX2-2 FX2-3 FX1-1
If you press the [BEAT FX SELECT] button while holding the [SHIFT] button,
the selected Beat FX change in the reverse order.
Beat FX are displayed on the FX panel in rekordbox as follows:
• FX1-1
– [FX SELECT] indicators:
FX1 1 2 3
FX2 1 2 3
56
En
Page 57

– [FX] panel:
• FX1-2
– [FX SELECT] indicators:
FX1 1 2 3
FX2 1 2 3
– [FX] panel:
• FX1-3
– [FX SELECT] indicators:
FX1 1 2 3
FX2 1 2 3
– [FX] panel:
rekordbox
• FX2-1
– [FX SELECT] indicators:
FX1 1 2 3
FX2 1 2 3
– [FX] panel:
• FX2-2
– [FX SELECT] indicators:
FX1 1 2 3
FX2 1 2 3
57
En
Page 58

rekordbox
– [FX] panel:
• FX2-3
– [FX SELECT] indicators:
FX1 1 2 3
FX2 1 2 3
– [FX] panel:
3 Press the [BEAT FX CH SELECT] button.
The channel that Beat FX will be applied to changes each time you press the
button.
– [1]: Applies Beat FX to the sound of channel 1.
– [2]: Applies Beat FX to the sound of channel 2.
– [3]: Applies Beat FX to the sound of channel 3.
– [4]: Applies Beat FX to the sound of channel 4.
– [MST]: Applies Beat FX to the sound of the [MASTER] channel.
4 Press the [BEAT ] or [BEAT ] button.
Set the number of beats (or parameters) synchronized to the effect sound.
• When set to 2 beats, 1and 4 flash.
• When set to more than 16 beats, 16 flashes.
• When set to less than 1/4 beat, 1/4 flashes.
• When the set number of beats is a minus number, the number flashes
rapidly.
• When the parameter is in %, no numbers are lit.
5 Press the [BEAT FX ON/OFF] button.
The Beat FX is applied to the sound of the channel you set in step 3.
You can adjust the parameter of Beat FX by turning the [BEAT FX LEVEL/
DEPTH] knob.
En
58
Page 59

rekordbox
When Beat FX is turned on, the button flashes.
• Press the [BEAT FX ON/OFF] button again to turn off Beat FX.
6 Press the [BEAT FX ON/OFF] button and release it while holding
the [SHIFT] button.
Beat FX is turned off, and Release FX is applied.
Switching Beat FX Tempo mode
To set the tempo for Beat FX, there are 2 modes you can use: BPM
Auto mode and BPM Tap mode.
• The default setting is BPM Auto mode.
BPM Auto mode
The track’s BPM is used as the base for the effect’s tempo.
BPM Tap mode
The BPM used as the base for Beat FX is set to match the tempo at
which you tap the [BEAT ] button while holding the [SHIFT] button.
Setting to BPM Tap mode
Press the [BEAT ] button while holding the [SHIFT] button.
• To return to BPM Auto mode, press the [BEAT ] button while
holding the [SHIFT] button.
59
En
Page 60

rekordbox
Using Merge FX
You can use the [MERGE FX] knob to apply effects for mixing from the
current track to the next.
1 Press the [MERGE FX] select button.
The selected Merge FX type changes in order of Merge FX1, 2, 3, 4 each time
you press the button.
If you press the [MERGE FX] select button while holding the [SHIFT] button,
the effect type changes in the reverse order.
• You can also change the Merge FX type from the menu in the [MFX] panel
in rekordbox.
2 Press the [MERGE FX] knob.
Merge FX turns on.
The effect is applied to the track that’s currently playing.
At the same time, sample sound or oscillator sound starts playing.
• Depending on the selected Merge FX type, the effect is applied as you turn
the [MERGE FX] knob.
60
En
Page 61

rekordbox
• You can also turn Merge FX on by clicking the MERGE FX On/Off button in
the [MFX] panel in rekordbox.
3 Turn the [MERGE FX] knob.
The effect is applied to the track that’s currently playing.
The effect sound and the sample sound/oscillator sound change.
• You can also change the effect sound and the sample sound/oscillator sound
by turning the Merge FX parameter knob in the [MFX] panel in rekordbox.
4 Press the [MERGE FX] knob again.
Merge FX turns off.
Release FX is applied to the track, the effect sound, and the sample sound/
oscillator sound, then the second sample sound plays after a set amount of
time.
• If [Preferences] > [Controller] > [Effect] tab > [MERGE FX] > [Stop
playing the operating deck after MERGE FX finishes] is set, playback
stops.
• You can also turn Merge FX off by clicking the MERGE FX On/Off button in
the [MFX] panel in rekordbox.
• The Merge FX parameter knob on the [MFX] panel in rekordbox
automatically moves to the center position when you turn off Merge FX.
• Depending on various settings, the action of the effect may differ.
• To turn Merge FX off, press the [MERGE FX] knob while holding the [SHIFT]
button. You can also turn Merge FX off by clicking the MERGE FX On/Off
button in the [MFX] panel in rekordbox while holding the [SHIFT] button.
En
61
Page 62

rekordbox
• To adjust the volume of sample sound/oscillator sound, turn the [MERGE
FX] knob while holding the [SHIFT] button. You can also adjust the sound
level by turning the MERGE FX SAMPLE VOL knob in the [MFX] panel.
• When you use a Hot Cue after turning off Merge FX, sample playback or
pausing the deck will be canceled and the playback position will jump to the
Hot Cue point to continue playback.
(Sample sounds that are already playing will not be canceled.)
62
En
Page 63

rekordbox
Changing the Merge FX settings
1 Click in the [MFX] panel in rekordbox.
The [MERGE FX Settings] screen is displayed, and you can change the
settings.
• Change the settings below.
– [PRESET]: Changes the preset for Merge FX.
– [BUILD FX]: Changes the type of effect applied to the track when Merge
FX is turned on.
– [BUILD SAMPLE]: Changes the sample sound/oscillator sound triggered
when Merge FX is turned on.
– [RELEASE FX]: Changes the Release FX applied when Merge FX is
turned off.
– [DROP SAMPLE]: Changes the sample sound triggered after the Release
FX applied when Merge FX is turned off.
• You need to select the sample sound when you make the following settings.
Click the [?] icon to select the sample sound.
(You need to load the sample sound into the sampler slot before you do this.)
– [BUILD SAMPLE] > [REPEAT SAMPLE]
– [BUILD SAMPLE] > [REPEAT UP SAMPLE]
– [DROP SAMPLE] > [SAMPLER]
63
En
Page 64

rekordbox
2Click .
Settings can be locked. Lock/unlock will be switched by each time you click.
• If you click [RESET] after changing the preset, the default setting of the
preset is restored.
3 Click the [x] button.
The [MERGE FX Settings] screen closes.
Recording
rekordbox has a recording feature that you can use to capture your
performances. For detailed instructions on recording, see the
rekordbox Instruction Manual.
1 Click the button at the top-left of the rekordbox screen to display
the [REC] panel.
2 Click on the [REC] panel in rekordbox to start recording.
• If you click again, recording stops.
• When recording is complete, the file is automatically saved.
• You can change the saving destination of files in the [Preferences] >
[Controller] > [Recordings] tab in rekordbox.
• You can’t record sound from the [MIC] input terminal.
En
64
Page 65

rekordbox
Using a microphone
1 Connect a microphone to the [MIC] input terminal.
2 Turn the [MIC LEVEL] knob.
Adjust the volume of the sound output from the [MIC] input terminal.
• The sound comes out at a high volume if the knob is turned all the way to the
right.
3 Input audio to the microphone.
• You can’t affect the microphone sound input to the unit using rekordbox.
• Sound input from the [MIC] input terminal can’t be output from the speaker(s)
of your PC/Mac even if PC Master Out is turned on.
Using Jog Cutter
Turn on [JOG CUTTER] and move the jog wheel to create
professional-sounding scratch effects (“scratch play”) with a section of
a track (or a sample, when using Sample Scratch).
1 Set a Hot Cue or a cue point.
In Hot Cue mode, press the Performance Pad to set a Hot Cue. Or, press the
[CUE] button to set a cue point when playback is paused.
• If you’ve already set Hot Cues, call up the one you want to “scratch” with.
En
65
Page 66

rekordbox
• When using Jog Cutter without setting Hot Cues or a cue point, “scratch play”
starts from the cue point which is set at loading.
• Even if a Hot Cue or a cue point is set, “scratch play” starts from the current
playback position if [Jumps to the last played HOT CUE/CUE point.] isn’t
selected in [Preferences] > [Controller] > [Deck] > [JOG CUTTER].
• You can also use a Hot Loop instead of a Hot Cue or a cue point.
2 Press the [JOG CUTTER] button.
Jog Cutter mode turns on.
• If Vinyl mode isn’t turned on, turn it on before you press the [JOG CUTTER]
button.
• Jog Cutter mode can’t be used on multiple decks at the same time. If you
press one [JOG CUTTER] button and then the other, the button that is
previously turned on will be turned off.
3 Hold the top of the jog wheel.
The playback position moves to the Hot Cue or cue point and “scratch play”
starts.
4 Move the jog wheel to start “scratch play”.
When you move the jog wheel back and forth, you’ll hear a professional-
sounding scratch effect applied to the sound.
• Different scratch effects are assigned to 6 areas of the jog wheel as follows.
The type of “scratch play” changes as you change the scratch area by
checking the indicator that appears when you touch the top of the jog wheel.
1
26
35
4
• When BPM is 150 or more, the scratch speed is halved. If you don’t select
[While scratching, scratch tempo is half tempo if BPM is over
En
66
Page 67

rekordbox
threshold.] in rekordbox under [Controller] > [Deck] > [JOG CUTTER] in
[Preferences], the scratch speed will be same as BPM. You can change the
BPM threshold to halve the scratch playback speed in [Preferences].
5 Release your hand from the top of the jog wheel.
“Scratch play” stops and the track continues to play as normal from the Hot
Cue/cue point/Hot Loop/playback position.
6 Press the [JOG CUTTER] button again.
Jog Cutter mode turns off.
Playing Sampler sound on channel 4
Set the [DECK4/SAMPLER] selector switch to [SAMPLER].
The input to channel 4 changes to the sampler sound, and you can
adjust the Trim, EQ, Filter, channel fader, and crossfader to affect the
sound.
• Sound from deck 4 can’t be output from channel 4 while the [DECK4/
SAMPLER] selector switch is set to [SAMPLER].
En
67
Page 68

rekordbox
Changing the settings in rekordbox
You can change the settings of the unit in rekordbox under [Controller]
in [Preferences].
When you connect the unit to rekordbox, you can change the following
settings:
[Controller] > [Deck] tab:
[JOG CUTTER] setting
• [Jumps to the last played HOT CUE/CUE point.]:
The playback position moves to the Hot Cue or cue point you’ve
called, or the one you last set, when you use Jog Cutter.
When this setting isn’t selected, Jog Cutter starts from the current
playback position.
• [While scratching, scratch tempo is half tempo if BPM is over
threshold.]:
If BPM is over threshold, scratch tempo is halved. If you don’t select
this setting, the scratch speed is same speed as BPM. The threshold
can be selected from 140, 150, 160, 170, or 180. The default setting
is 150.
[Back Spin Length] setting
When using the Back Spin feature with the jog wheel, the length of the
Back Spin is different from the length of the jog wheel rotation.
You can choose the length of the Back Spin from 3 options: short,
normal, or long.
• [short]: Back Spin length short
•[normal]: Back Spin length normal
•[long]: Back Spin length long
[Controller] > [Mixer] tab:
[Fader Start] setting
Change the setting of the Fader Start function.
En
68
Page 69

rekordbox
Select [Activate the fader start when moving a channel fader or the
crossfader while pressing the SHIFT button.] to turn the setting on.
[CROSSFADER] > [Cut Lag] setting
Adjust the amount of Cut Lag at both edges of the crossfader.
You can make adjustments in increments of 0.1 mm within a range of
0.3 mm to 5.5 mm.
• The default Cut Lag amount is 1.0 mm.
• The setting amount for the Cut Lag is a guide, and may not be exact.
[Booth Output] setting
Change whether or not the microphone sound comes out of the booth
channel.
If you don’t select [Don’t output microphone sound to the Booth
output.], the microphone sound comes out of the booth channel. If you
select the setting, microphone sound doesn’t come out of the booth
channel.
[Controller] > [Effect] tab:
• [Enable MERGE FX]:
Merge FX is enabled and the [MFX] panel is displayed on the FX
panel.
When the unit is connected, this setting is enabled.
• [Stop playing the operating deck after MERGE FX finishes.]:
When you select this, playback automatically stops on the deck after
Merge FX is canceled.
69
En
Page 70

Serato DJ Pro
Installing Serato DJ Pro
Installing (Mac)
Do not connect the unit to your Mac until installation is complete.
• Close all programs on your Mac.
1 Unzip the downloaded Serato DJ Pro software file.
2 Double-click the unzipped software file to launch the installer.
3 Read the terms of the License Agreement carefully and if you
agree, click [Agree].
• If you don’t agree to the contents of the License Agreement, click [Disagree]
to cancel the installation.
4Click [Install].
5 Follow the on-screen instructions to install the software.
En
70
Page 71

Serato DJ Pro
6Click [Close] to quit the installer.
Installing (Windows)
Do not connect the unit to your PC until installation is complete.
• Log into your PC as an administrator before starting the installation.
• Close all programs on your PC.
1 Unzip the downloaded Serato DJ Pro software file.
2 Double-click the unzipped software file to launch the installer.
3 Read the terms of the License Agreement carefully and if you
agree, select [I agree to the license terms and conditions], then
click [Install].
• If you don’t agree to the contents of the License Agreement, click [Close] to
cancel the installation.
71
En
Page 72

Serato DJ Pro
A message indicating successful installation appears when installation is
complete.
4Click [Close] to quit the Serato DJ Pro installer.
72
En
Page 73

Serato DJ Pro
Activating FX Pack and Pitch ’n Time DJ
* If FX Pack is not activated, you can’t use Merge FX. Before using
Merge FX, be sure to activate FX Pack.
Activate FX Pack and Pitch’n Time DJ on the My Serato screen.
You’ll need an internet connection to do this. (A separate contract with
an internet service provider is needed, which you may have to pay for.)
For support information about FX Pack and Pitch’n Time DJ, visit the
Serato website.
serato.com/
Activating FX Pack
1 Connect the unit to your PC/Mac using the USB cable.
2 Launch Serato DJ Pro.
3Click [My Serato].
4 Log in with account credentials you’ve registered on.
serato.com
5Click [Enter Voucher Code].
6 Enter the supplied voucher code, then click [Activate].
7 Reboot Serato DJ Pro.
.
73
En
Page 74

Serato DJ Pro
Activating Pitch’n Time DJ
1 Connect the unit to your PC/Mac using the USB cable.
2 Launch Serato DJ Pro.
3Click [My Serato].
4 Log in with account credentials you’ve registered on.
serato.com
5Click [Enter Voucher Code].
6 Enter the supplied voucher code, then click [Activate].
7 Click the [SETUP] icon in the top-right corner of the screen.
8 Double-click the [Expansion Packs] tab.
9Select [Pitch’n Time DJ].
10 Mark the [Enable Pitch’n Time DJ] check box.
11 Click the [SETUP] icon to close the SETUP screen.
12 Reboot Serato DJ Pro.
.
74
En
Page 75

Serato DJ Pro
Basic use
Starting Serato DJ Pro
This manual mainly focuses on explaining the hardware functions of
the unit. For detailed instructions on using the Serato DJ Pro software,
see the Serato DJ Pro software manual.
For Mac
In Finder, open the [Applications] folder, then click the [Serato DJ
Pro] icon.
For Windows 10
From the [Start] menu, click [Serato] > [Serato DJ Pro] icon.
The following screen shows after Serato DJ Pro launches:
• The [BUY/ACTIVATE] icon may appear on the right side of the
screen when you launch Serato DJ Pro for the first time. However,
you don’t need a license to use the software with this unit.
75
En
Page 76

Serato DJ Pro
The following screen shows when tracks are loaded onto decks
in Serato DJ Pro:
Click [Library] in the top-left corner of the screen, then select
[Vertical] or [Horizontal] from the pull-down menu to change the
screen layout.
A Deck section
Track information (track name, artist name, BPM, etc.), the overall
waveform, and other information about the loaded track is displayed.
B Waveform display
The waveform of the loaded track is displayed.
C Browser section
Tracks in the library, or crates containing multiple tracks, are displayed.
76
En
Page 77

Serato DJ Pro
a
b
Importing music files (tracks)
• There are various ways to import tracks into Serato DJ Pro. For
details, see the Serato DJ Pro software manual.
• If you’re already using Serato Limited’s DJ software (e.g. Scratch
Live, ITCH, or Serato DJ Intro) and you’ve already created track
libraries, you can use these libraries with Serato DJ Pro.
• If you’re using Serato DJ Intro and you’ve already created track
libraries, you may need to reanalyze tracks to use them with Serato
DJ Pro.
The typical way to import music files (tracks) is as follows:
1 Click the [Files] button in the Serato DJ Pro screen to open the
[Files] panel.
The contents of your PC/Mac or the hard drive/device connected to the PC/
Mac are displayed in the [Files] panel.
2 Click the folder containing the tracks you want to add to your library.
3 Drag and drop the selected folder to the crates panel.
A crate is created and the tracks are added to your library.
a [Files] panel
b Crates panel
En
77
Page 78

Serato DJ Pro
Loading a track onto a deck
The following explains how to load a track onto deck [1] as an example:
Turn the rotary selector to select a track from [Collection], then press
the [LOAD] button for deck 1 (second from the left).
The track is loaded onto the deck.
78
En
Page 79

Serato DJ Pro
Playing a track
This section explains how to play sound from deck 1 (left) as an
example.
1 Set the positions of the knobs etc. as shown below.
•[TRIM] knob: turned fully counterclockwise
• [EQ (HI/MID/LOW)] knobs: center position (12 o’clock)
•[FILTER] knob: center position
• Channel fader: bottom position
• [MASTER LEVEL] knob: turned fully counterclockwise
• Crossfader: center position
2 Press the [PLAY/PAUSE ] button to play the track.
3 Turn the [TRIM] knob.
Adjust the [TRIM] knob so the channel level indicator lights up orange at the
loudest part of the track.
79
En
Page 80

Serato DJ Pro
4 Move the channel fader to the top.
5 Turn the [MASTER LEVEL] knob to adjust the volume of the
speakers to a level you’re happy with.
• If you can’t output sound from the [MASTER] output terminals or the unit isn’t
recognized by your PC/Mac, refer to the [FAQ] on the Pioneer DJ support
website.
pioneerdj.com/support/
80
En
Page 81

Serato DJ Pro
Monitoring with headphones
This section explains how to play sound from deck 1 (left) as an
example.
1 Set the positions of knobs etc. as shown below.
• [HEADPHONES MIX] knob: Center
• [HEADPHONES LEVEL] knob: Turned fully counterclockwise
2 Press the headphone [CUE] button for channel 1.
3 Turn the [HEADPHONES LEVEL] knob.
Adjust the headphones volume to a level you’re happy with.
Quitting Serato DJ Pro
Click the [x] button.
Turning off the unit
Disconnect the USB cable to turn off the unit.
81
En
Page 82

Serato DJ Pro
Advanced use
Using 4 Beat Loop
While a track is playing, press and hold the [IN/4BEAT] button for at
least a second.
Loop playback starts with 4 beats from the point where you press the
button.
Canceling loop playback
Press the [RELOOP/EXIT] button.
When the loop out point is reached, the rest of the track continues to
play without returning to the loop in point.
Using Manual Loop
You can use Manual Loop to choose the section you want to loop in a
track.
1 During playback, press the [IN/4BEAT] button at the point you want
to start looping (the loop in point).
2 Press the [OUT] button at the point you want the loop to end (the
loop out point).
Loop playback starts.
82
En
Page 83

Serato DJ Pro
Cutting the loop
Press the [CUE/LOOP CALL ] button during loop playback.
Each time you press the button, the loop cuts in half.
• The loop length can be cut in half even during 4 Beat Loop playback.
Extending the loop
Press the [CUE/LOOP CALL ] button during loop playback.
Each time you press the button, the loop doubles in length.
• The loop length can be doubled even during 4 Beat Loop playback.
Canceling a loop
Press the [RELOOP/EXIT] button.
The rest of the track continues to play without returning to the loop in
point.
Changing the loop in point
Press the [IN/4BEAT] button and turn the jog wheel during loop
playback.
The loop in point changes.
Changing the loop out point
Press the [OUT] button and turn the jog wheel during loop playback.
The loop out point changes.
83
En
Page 84

Serato DJ Pro
1234
5678
Using the Performance Pads
You can switch functions using the respective Pad mode buttons (the
[HOT CUE] mode button, [PAD FX] mode button, [BEAT JUMP] mode
button, and [SAMPLER] mode button).
Using Hot Cues
You can start playback instantly from the position where a Hot Cue is
set.
• Up to 8 Hot Cues can be set and saved for each track in Serato DJ
Pro.
1 Press the [HOT CUE] mode button.
The unit enters Hot Cue mode.
2 When the track is playing or paused, press a Performance Pad to
set a Hot Cue.
Hot Cues are set to Performance Pads as follows:
1: Hot Cue A, 2: Hot Cue B, 3: Hot Cue C, 4: Hot Cue D,
5: Hot Cue E, 6: Hot Cue F, 7: Hot Cue G, 8: Hot Cue H
3 Press a Performance Pad you’ve set a Hot Cue for.
Playback starts from the Hot Cue point.
• You can clear Hot Cues by pressing a Performance Pad while holding the
[SHIFT] button.
84
En
Page 85

Serato DJ Pro
1234
5678
Using Roll
If you press a Performance Pad when the unit is in Roll mode, a loop
with the number of beats assigned to the pad is set and the loop plays
until you release the pad.
During Loop Roll playback, normal playback with the original rhythm
continues in the background (but you can only hear the Loop Roll).
When you cancel Loop Roll, playback resumes from the position
reached in the background.
1 Press the [PAD FX] mode button.
The unit enters Roll mode.
2 Press and hold down a Performance Pad (1 through 8).
Loop Roll playback starts with the number of beats in the settings assigned to
that pad.
Playback continues in the background during Loop Roll playback (but you can
only hear the Loop Roll).
• Press the [CUE/LOOP CALL ] or [CUE/LOOP CALL ] button during
Loop Roll to change the number of beats for the Loop Roll that’s currently
playing.
For example, when you set the pads to 1/8 – 16 beats, the pad’s settings are
as shown below.
1: 1/8 beat, 2: 1/4 beat, 3: 1/2 beat, 4: 1 beat,
5: 2 beats, 6: 4 beats, 7: 8 beats, 8: 16 beats
The range of beats set for Loop Roll is shown on the Serato DJ Pro screen.
3 Release the Performance Pad.
Loop Roll is canceled, and playback resumes from the position reached in the
background.
85
En
Page 86

Serato DJ Pro
Using Auto Loop
When you press a Performance Pad, a loop with the number of beats
assigned to the pad is set and the loop plays until you release the pad.
1 Press the [BEAT JUMP] mode button.
The unit enters Auto Loop mode.
2 Press a Performance Pad during playback.
Loop playback starts with the number of beats in the setting assigned to that
pad.
• When you press the same Performance Pad again, loop playback is
canceled.
Using Sampler
You can use the Performance Pads to play tracks or sounds assigned
to the Sampler slots.
1 Open the [SAMPLER] panel in Serato DJ Pro.
2 Press the [SAMPLER] mode button on the unit.
The unit enters Sampler mode.
3 Choose a Sampler bank on the Serato DJ Pro screen.
The sampler has 4 banks, A, B, C, and D, and each bank has 8 slots.
4 Drag and drop tracks or sounds to load them into the [SAMPLER]
panel’s slots.
The sampler settings and loaded tracks are saved.
5 Press a Performance Pad.
The track or sound assigned to the relevant slot is played.
86
En
Page 87

Serato DJ Pro
1234
5678
1234
5678
• The playback method differs depending on the Sampler mode in Serato DJ
Pro. For details, see the Serato DJ Pro software manual.
1: Slot 1, 2: Slot 2, 3: Slot 3, 4: Slot 4,
5: Slot 5, 6: Slot 6, 7: Slot 7, 8: Slot 8
• When you press a Performance Pad while holding the [SHIFT] button, the
sound of the slot that is currently playing stops.
Using Cue Loop
1 Press the [HOT CUE] mode button while holding the [SHIFT]
button.
The unit enters Cue Loop mode.
2 Press a Performance Pad while a track is playing.
The loop in point is set on the Hot Cue slot and loop playback starts.
• The loop length depends on the number of beats set for Auto Loop.
Loop in points are assigned to the Performance Pads as follows:
1: Loop 1, 2: Loop 2, 3: Loop 3, 4: Loop 4,
5: Loop 5, 6: Loop 6, 7: Loop 7, 8: Loop 8
87
En
Page 88

Serato DJ Pro
• With the Cue Loop function, the Hot Cue point is used as the loop in point.
If you press a Performance Pad which has a Hot Cue set, a loop starts from
that Hot Cue point.
Cutting the loop
Press the [CUE/LOOP CALL ] button during loop playback.
Each time you press the button, the loop cuts in half.
Extending the loop
Press the [CUE/LOOP CALL ] button during loop playback.
Each time you press the button, the loop doubles in length.
Returning to the loop in point
Press the same Performance Pad while holding the [SHIFT] button.
The playback position returns to the set loop in point and the loop
keeps playing.
Canceling a loop
Press the same Performance Pad again.
The rest of the track continues to play without returning to the loop in
point.
Using Saved Loop
You can save a loop to a loop slot in Serato DJ Pro and call it up when
you want to.
1 Press the [PAD FX] mode button while holding the [SHIFT] button.
The unit enters Saved Loop mode.
2 Press a Performance Pad during loop playback.
En
88
Page 89

Serato DJ Pro
1234
5678
• The loop is assigned to the relevant loop slot in Serato DJ Pro.
1: Slot 1, 2: Slot 2, 3: Slot 3, 4: Slot 4,
5: Slot 5, 6: Slot 6, 7: Slot 7, 8: Slot 8
3 Press a Performance Pad while holding the [SHIFT] button.
The playback position returns to the set loop in point and the loop keeps
playing.
Cutting the loop
Press the [CUE/LOOP CALL ] button during loop playback.
Each time you press the button, the loop cuts in half.
Extending the loop
Press the [CUE/LOOP CALL ] button during loop playback.
Each time you press the button, the loop doubles in length.
Returning to the loop in point
Press the same Performance Pad while holding the [SHIFT] button.
The playback position returns to the loop in point and loop playback
continues.
Canceling a loop
Press the same Performance Pad again.
The rest of the track continues to play without returning to the loop in
point.
89
En
Page 90

Serato DJ Pro
Using Slicer Loop
Slicer Loop takes a section of the track that’s currently playing (known
as a domain and defined by a specified number of beats) and divides
it into 8 equal sections. These 8 sliced sections are assigned to the
respective Performance Pads. While you hold down a Performance
Pad, the sound for the section assigned to that pad plays in a loop.
While playing a loop of the pad’s sound, normal playback of the track
with the original rhythm continues in the background (but you only hear
the loop). When you release the Performance Pad and loop playback
ends, track playback resumes from the position reached by that time.
• You can’t use the Slicer function with tracks that have no beatgrid set.
For details on setting beatgrids, read the Serato DJ Pro software
manual.
1 Press the [BEAT JUMP] mode button while holding the [SHIFT]
button.
The unit enters Slicer Loop mode.
2 Set the number of beats in [DOMAIN].
You can choose from 6 settings: 2 beats, 4 beats, 8 beats, 16 beats, 32 beats,
or 64 beats.
90
En
Page 91

Serato DJ Pro
DOMAIN
Sliced section 1 to 8
1234
5678
The domain is divided equally into 8 sliced sections, which are assigned to the
Performance Pads as shown below.
1234 5 6 7 8
1: Section 1, 2: Section 2, 3: Section 3, 4: Section 4,
5: Section 5, 6: Section 6, 7: Section 7, 8: Section 8
3 Set the quantization for Slicer.
You can choose from 4 settings: 1/8, 1/4, 1/2 and 1.
The quantization setting determines the length of the loop that plays while you
hold the pad. For example, when quantization is set to 1, the entire section
assigned to the pad plays in a loop, and when quantization is set to 1/2, only
the first half of the section assigned to the pad plays in a loop.
4 Press and hold down a Performance Pad.
While holding down the pad, playback continues in a loop.
• The length of the loop depends on the quantization setting.
When you release the pad, playback resumes from the position the track would
have reached by that time.
91
En
Page 92

Serato DJ Pro
1234
5678
When playback reaches the end of the domain (the section sliced into
8 equal sections) the playback position returns to the beginning of the
domain.
12345678
Using Scratch Bank mode
You can load Scratch Bank sounds onto a deck so you can manipulate
them with controls such as the jog wheel.
1 Open the [SCRATCH BANK] panel on Serato DJ Pro.
2 Press the [SAMPLER] mode button while holding the [SHIFT]
button.
The unit enters Scratch Bank mode.
3 Press a Performance Pad assigned with the Scratch Bank sound
you want to load.
The Scratch Bank sound is loaded onto the deck.
• The Scratch Bank slots are assigned to the Performance Pads as follows:
1: Slot 1, 2: Slot 2, 3: Slot 3, 4: Slot 4,
5: Slot 5, 6: Slot 6, 7: Slot 7, 8: Slot 8
4 Press the Performance Pad while holding the [SHIFT] button.
The previous loaded track is loaded again.
92
En
Page 93

Serato DJ Pro
Using Fader Start
Using Channel Fader Start
1 Set the cue point.
Pause the track at the position you want to start playback from, then press the
[CUE] button on that deck.
2 While holding the [SHIFT] button, move the channel fader from the
bottom to the top.
Playback starts from the cue point.
• If you move the channel fader back to the bottom while holding the [SHIFT]
button during playback, the track instantly jumps back to the cue point and
playback pauses. (Back Cue)
When no cue point is set, playback starts from the beginning of the track.
Using Crossfader Start
1 Set the cue point.
Pause the track at the position you want to start playback from, then press the
[CUE] button on that deck.
2 Move the crossfader all the way to the left or right side.
If you want to use Crossfader Start to trigger playback on channel 2, set the
crossfader to the left side, and vice versa.
(When you select [Reverse] on the Serato DJ Pro screen:
If you want to use Crossfader Start to trigger playback on channel 2, set the
crossfader to the right side, and vice versa.)
3 While holding the [SHIFT] button, move the crossfader towards the
opposite side from where it’s set.
Playback starts from the cue point.
• If you move the crossfader back while holding the [SHIFT] button during
playback, the playback position instantly jumps back to the cue point and
pauses. (Back Cue)
93
En
Page 94

Serato DJ Pro
When no cue point is set, playback starts from the beginning of the track.
Analyzing tracks
Track analysis starts when you drag and drop a music file, or a folder
containing music files, into the Track List in Serato DJ Pro.
• If a track is loaded to a deck before analysis is complete, it may take
some time to display its BPM and waveform.
• Depending on the number of tracks, analysis may take some time.
94
En
Page 95

Serato DJ Pro
2221 3
555 666
4
Using effects
The unit is equipped with 2 types of effects: FX1 and FX2.
1 Configure Multi FX mode in Serato DJ Pro.
Display the [FX] panel, and click Multi FX mode.
1: Multi FX mode selector, 2: Type of effect, 3: Beats of effect,
4: Channel for the effect, 5: Effect level, 6: Effect ON/OFF
2 Press the [BEAT FX SELECT] button on the unit.
The selected effect changes as follows each time you press the button:
FX1-1 FX1-2 FX1-3 FX2-1 FX2-2 FX2-3 FX1-1
If you press the [BEAT FX SELECT] button while holding the [SHIFT] button,
the selected effect changes in the reverse order.
3 Press the [BEAT FX CH SELECT] button.
The channel that the selected effect will be applied to changes each time you
press the button.
– [1]: Applies the effect to the sound of channel 1.
– [2]: Applies the effect to the sound of channel 2.
95
En
Page 96

Serato DJ Pro
– [3]: Applies the effect to the sound of channel 3.
– [4]: Applies the effect to the sound of channel 4.
– [MST]: Applies the effect to the sound of the [MASTER] channel.
4 Press the [BEAT ] or [BEAT ] button.
Set the number of beats synchronized to the effect sound.
• If the number of beats is less than 1/4, 1/4 flashes.
• If the number of beats is 2, 1 and 4 light up.
5 Press the [BEAT FX ON/OFF] button.
The effect is applied to the sound from the channel you set in Step 3.
You can adjust the parameter of the effect by turning the [BEAT FX LEVEL/
DEPTH] knob.
When the effect is on, the button flashes.
• Press the [BEAT FX ON/OFF] button again to turn off the effects.
96
En
Page 97

Serato DJ Pro
Using Merge FX
* Before using Merge FX, be sure to activate FX Pack with the included
license key.
You can use the [MERGE FX] knob to apply effects for mixing from the
current track to the next.
1 Press the [MERGE FX] select button.
The selected Merge FX type changes in order of Merge FX, 2, 3, 4 each time
you press the button.
If you press the [MERGE FX] select button while holding the [SHIFT] button,
the effect type changes in the reverse order.
2 Press the [MERGE FX] knob.
Merge FX turns on.
The effect is applied to the track that’s currently playing.
• Depending on the selected Merge FX type, the effect is applied as you turn
the [MERGE FX] knob.
• Settings for FX1 and FX2 are automatically changed.
3 Turn the [MERGE FX] knob.
The effect is applied to the track that’s currently playing.
The effect sound changes the more you turn the knob.
97
En
Page 98

Serato DJ Pro
4 Press the [MERGE FX] knob again.
The effect sound changes.
5 Turn Merge FX off.
You can turn Merge FX off in any of the following ways:
• Press the [PLAY/PAUSE ] button.
• Press a Performance Pad while the unit is in Hot Cue mode.
• Press the [MERGE FX] select button.
• Press the [CUE] button during cue standby.
• Touch the jog wheel.
When Merge FX is turned off, settings for FX1 and FX2 return to their previous
state.
Recording
Serato DJ Pro has a recording feature that you can use to capture your
performances. For detailed instructions on recording, see the Serato
DJ Pro software manual.
1Click [REC] in the upper area of the Serato DJ Pro screen.
The [REC] panel is displayed.
2Click [REC] in the [REC] panel to start recording.
• If you click [REC] again, recording stops.
• When recording is complete, the file is automatically saved.
• You can’t record sound from the [MIC] input terminal.
98
En
Page 99

Serato DJ Pro
Using a microphone
1 Connect a microphone to the [MIC] input terminal.
2 Turn the [MIC LEVEL] knob.
Adjust the volume of the sound output from the [MIC] channel.
• The sound comes out at a high volume if the knob is turned all the way to the
right.
3 Input audio to the microphone.
• You can’t affect the microphone sound input to the unit.
99
En
Page 100

Serato DJ Pro
Using Jog Cutter
Turn on [JOG CUTTER] and move the jog wheel to create
professional-sounding scratch effects (“scratch play”) with a section of
a track (or a sample, when using Sample Scratch).
1Set a Hot Cue.
In Hot Cue mode, press the Performance Pad to set a Hot Cue.
• If you’ve already set Hot Cues, call up the one you want to “scratch” with.
• When using Jog Cutter without setting Hot Cues, “scratch play” starts from
the current playback position.
2 Press the [JOG CUTTER] button.
Jog Cutter mode turns on.
• If Vinyl mode isn’t turned on, turn it on before you press the [JOG CUTTER]
button.
• Jog Cutter mode can’t be used on multiple decks at the same time. If you
press one [JOG CUTTER] button and then the other, the button that is
previously turned on will be turned off.
3 Hold the top of the jog wheel.
The playback position moves to the Hot Cue point, and “scratch play” starts.
• Set the Pad mode to the Hot Cue mode.
• Regardless the crossfader position, playback sound outputs from both
decks.
En
100
 Loading...