

Page 1
DJ Controller
DDJ-1000
pioneerdj.com/support/
rekordbox.com
For FAQs and other support information for this product, visit the above site.
Operating Instructions
Page 2

Contents
How to read this manual
! Thank you for purchasing this Pioneer DJ product.
Be sure to read this manual and the “Operating Instructions (Quick
Start Guide)” included with the unit. Both documents include
important information that you should understand before using this
product.
! In this manual, names of buttons and terminals, menus of this prod-
uct and your computer, etc., are enclosed in square brackets ([ ])
(e.g. [FILE], [CUE] button, [PHONES] output terminal).
! Screens, external appearance, and software and hardware specifica-
tions described in this manual are based on the product that is still
under development and may differ from the final specifications.
! Depending on your operating system, the web browser settings,
etc., the procedures described in this manual may differ from actual
operations.
This manual consists mainly of explanations of functions of this unit
as hardware. For detailed instructions on operating the rekordbox
software, see the rekordbox Manual.
The rekordbox Operating Instructions can be downloaded from the
!
following site.
rekordbox.com/manual
Before start
Features ....................................................................................................... 3
Accessories ................................................................................................. 3
Viewing the rekordbox introduction .......................................................... 3
rekordbox ..................................................................................................... 3
Installing rekordbox .................................................................................... 4
Cautions on copyrights
............................................................................ 33
Part names and functions
Top panel of the unit ................................................................................... 5
Browser section .......................................................................................... 5
Deck sections .............................................................................................. 6
Jog dial display section .............................................................................. 8
Mixer section ............................................................................................... 8
Rear panel ................................................................................................. 10
Front panel ................................................................................................ 11
Basic operation
Example of connections ........................................................................... 12
Starting the system ................................................................................... 15
Turning off the system .............................................................................. 16
Advanced operation
Using 4 beat loops .................................................................................... 17
Using manual loops ................................................................................. 17
Using the performance pads ................................................................... 17
Using slip mode
Using the fader start function.................................................................. 21
Using effects ............................................................................................. 21
Using the BEAT FX function .................................................................... 21
Types of BEAT FX ...................................................................................... 22
Using the SOUND COLOR FX function
Using a microphone ................................................................................. 24
Using external inputs ............................................................................... 25
........................................................................................ 20
.................................................. 24
Changing the settings
Launching utilities mode ......................................................................... 26
Changing the settings with rekordbox .................................................... 26
Setting utility software .............................................................................. 28
Additional information
Troubleshooting ........................................................................................ 29
Liquid crystal display ................................................................................ 30
Signal flow
Using this unit as a controller for other DJ software ............................. 31
Trademarks and registered trademarks ................................................. 33
En
2
................................................................................................. 31
Page 3
Before start
Before start
Features
This unit is an all-in-one DJ controller designed specifically for rekordbox dj. Its interfaces incorporating various controls such as “BIG JOG”,
“PERFORMANCE PADS”, and “4-CHANNEL MIXER” are positioned with
room to spare to allow for more individualistic DJ performances using
rekordbox dj. Also, numerous input and output terminals support a variety of DJ styles, and the design makes the unit look high quality, which is
appropriate in a variety of scenes such as nightclubs and home parties.
Accessories
! AC adapter
! Power cord
! USB cable
! Warranty (for some regions only)
1
2
! Operating Instructions (Quick Start Guide)
! rekordbox dj license key card
1 One USB cable is included with this unit.
To connect two units, separately prepare a cable that conforms to
the USB 2.0 standard.
2 Products for Europe only. (The corresponding information is pro-
vided on the back cover of the “Operating Instructions (Quick Start
Guide)” for Japan, and on the last page of the English and French
versions of the “Operating Instructions (Quick Start Guide)” for the
North American region.)
Cautions
The license key cannot be reissued. Be careful not to lose it.
Viewing the rekordbox introduction
1 Launch a web browser on the computer and access
the site below.
rekordbox.com/manual
2 Click the required language of the rekordbox
introduction.
rekordbox
! rekordbox
rekordbox is music management software for DJs to prepare tracks
and perform DJ play.
rekordbox dj
!
The DJ performance functions of rekordbox are called rekordbox dj.
Enter the license key on the rekordbox dj license key card included
with this product to use rekordbox dj.
Operating environment
Supported operating
systems
Mac: macOS High Sierra 10.13/
Sierra 10.12 (latest update), OS
X 10.11/10.10 (latest update)
Windows: 32-bit version or
64-bit version of Windows 10,
Windows 8.1, or Windows 7
(latest service pack)
Others
USB port
Display resolution 1 280 x 768 or greater
Internet connection
!
For information on the latest system requirements, compatibility, and supported
operating systems of rekordbox, see the site below.
rekordbox.com/system
! Operation on all computers is not guaranteed, even if the computers meet the
required operating environment.
The CPU and hard disc may not provide sufficient processing capabilities
!
depending on the power-saving setting, etc. on the computer. Confirm that
the computer meets the conditions to provide constant high-performance (for
example, connecting the computer to a power outlet to maintain a stable power
supply) especially when using rekordbox on a laptop.
A separate contract with an Internet service provider and payment of the utiliza-
!
tion fee are required to access the Internet.
!
Use the latest version/service pack of the operating system.
CPU and required memory
®
Intel
processor Core™ i7, i5, i3
Intel® processor Core™ 2 Duo 2.0 GHz or better
4 GB or more of RAM
®
Intel
processor Core™ i7, i5, i3
Intel® processor Core™ 2 Duo 2.0 GHz or better
4 GB or more of RAM
A USB 2.0 port is required to connect a computer to
this unit.
An Internet connection is required for registering the
rekordbox user account and downloading the software.
En
3
Page 4

Installing rekordbox
Preparing rekordbox
Install the software by following the procedure below when you use
rekordbox for the first time or if you are using rekordbox 4.x or an
earlier version.
If you have already installed rekordbox Ver. 5.x, update it to the latest
version from rekordbox Update Manager. In this case, the following
installation procedure is not required. For details on the update procedure, access the site below and see “ rekordbox Introduction”.
rekordbox.com/manual
! The user is responsible for preparing the computer, network
devices, and other elements of the Internet usage environment
required for a connection to the Internet.
Installation procedure
The installation procedure differs depending on the operating system
(OS) of your computer.
Installation (Mac)
Do not connect this unit and the computer until the installation is
completed.
Close all the applications running on the computer before installing
!
the software.
1 Unzip the downloaded rekordbox software file.
2 Double-click the rekordbox software to launch the
installer.
3 Read the license agreement, and select [Agree] if you
agree to the terms.
Installation (for Windows)
Do not connect this unit and the computer until the installation is
completed.
Log in to the computer as the administrator before installation.
!
! Close all the applications running on the computer before installing
the software.
1 Unzip the downloaded rekordbox software file.
2 Double-click the rekordbox software to launch the
installer.
3 Read the license agreement, select [Agree] if you
agree to the terms, and click [Next].
! If you do not agree to the license agreement, click [Cancel] to cancel
the installation.
After the installation destination is specified, the installation starts.
! If you do not agree to the contents of the license agreement, click
[Disagree] to cancel the installation.
4 If the installation completion screen appears, click
[Close] to close the rekordbox installer.
En
4
When the installation is completed, an installation successful mes-
sage appears.
4 Click [Finish] to close the rekordbox installer.
The installation is completed.
Page 5
Part names and functions
1
2
3
Part names and functions
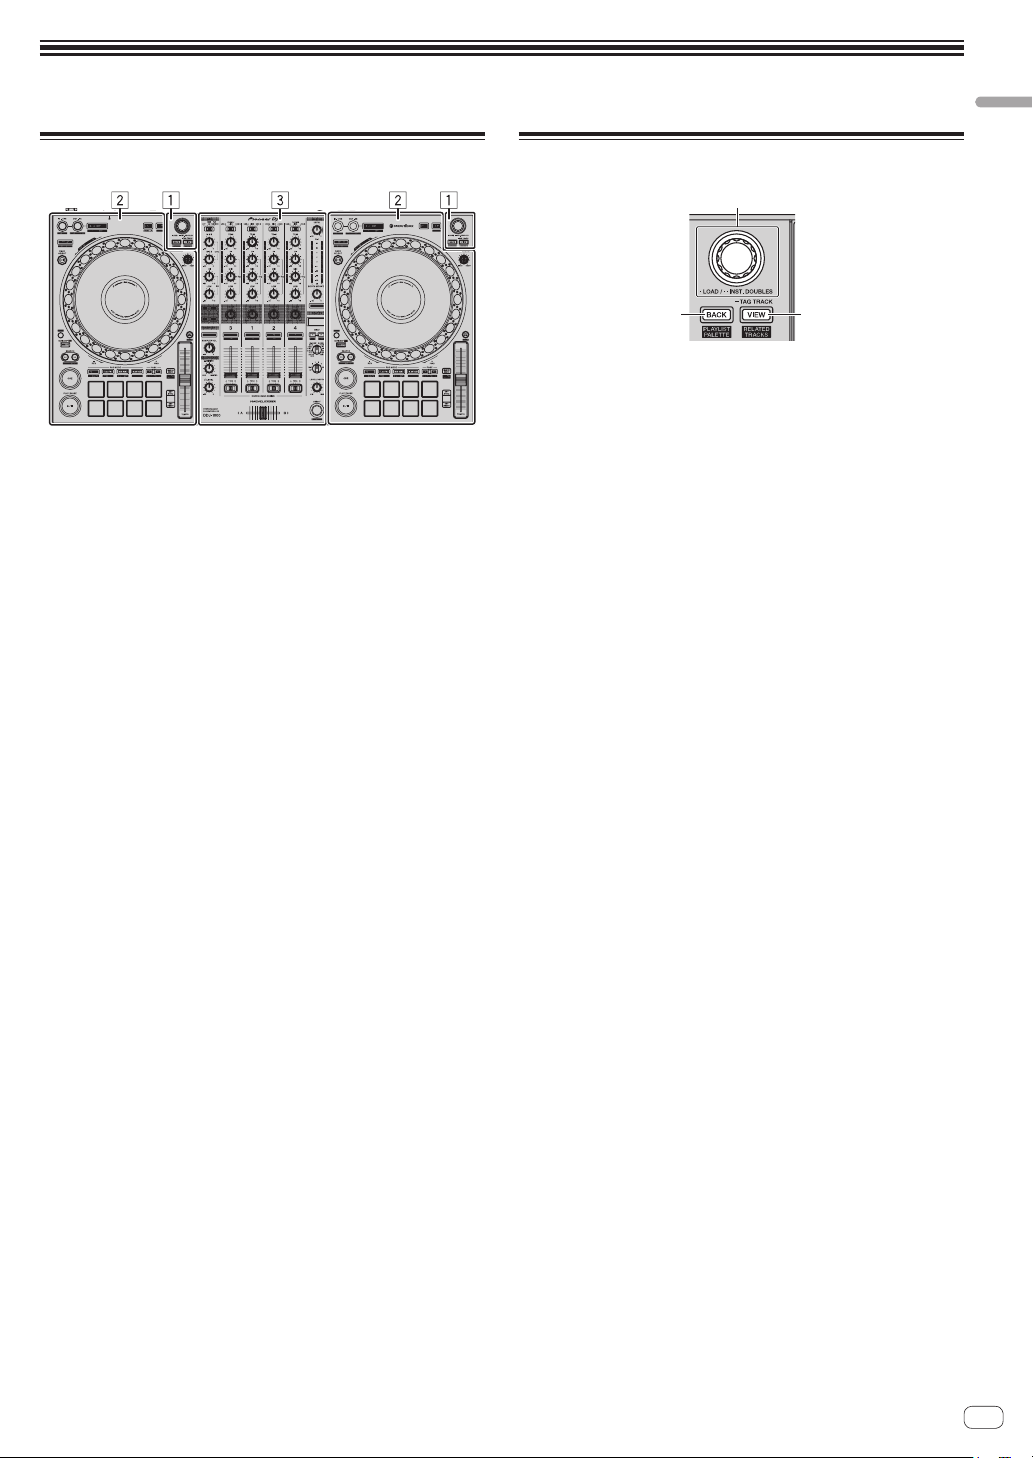
Top panel of the unit
1 Browser section
2 Deck sections
3 Mixer section
Browser section
1 Rotary selector
Rotate:
Moves the selection cursor in rekordbox dj.
[SHIFT] + Rotate:
Enlarges or reduces the enlarged waveform display of rekordbox dj.
Rotate to the right to enlarge the waveform display, and rotate to the
left to reduce.
Press:
If this selector is pressed when the cursor is on a track, that track is
loaded to the deck. If the rotary selector is pressed when the cursor
is on a folder or playlist, the cursor moves from the tree view to the
track list.
! If the playlist palette is displayed, the cursor can be moved
among the tree view, the track list, and the playlist.
! The tree view, the track list, and the playlist palette are in the
browser section of rekordbox dj. For details on the functions of
each section, see the rekordbox Manual.
Press twice:
Loads the track loaded on the deck that is not being operated to the
deck that is being operated. The track is loaded with the playback
position unchanged.
2 BACK button
Press:
Moves the cursor between the tree view and track list each time the
button is pressed.
If the playlist palette is displayed, the cursor can be moved
!
among the tree view, the track list, and the playlist.
!
The tree view, the track list, and the playlist palette are in the
browser section of rekordbox dj. For details on the functions of
each section, see the rekordbox Manual.
[SHIFT] + Press:
Displays or hides the rekordbox dj playlist palette.
3 VIEW button
Press:
Reduces the size of the rekordbox dj deck display and expands the
browser area display. Press again to undo the change.
[SHIFT] + Press:
Moves the cursor to [Related Tracks] in the tree view area.
Press + Hold:
Registers or deletes the selected track to [Tag List].
En
5
Page 6
Deck sections
4
[
±6%
][
±10%
][
±16%
][
WIDE
]
The deck sections are used to control the four decks. The buttons and
controls for operating decks 1 and 3 are located on the left side of the
controller, and those for operating decks 2 and 4 are located on the right
side of the controller.
4 SLIP button
Press:
Turns slip mode on and off.
= Using slip mode (p. 20 )
[SHIFT] + Press:
Turns VINYL mode on and off.
5 JOG FEELING ADJUST control
Adjusts the load applied when the jog dial is rotated.
Rotate clockwise to increase the load, and rotate counterclockwise
to decrease the load.
6 BEAT SYNC button
Press:
Automatically synchronizes with the tempos (pitches) and beat grids
of the deck set as the master for synchronization.
[SHIFT] + Press:
Sets the deck whose button is pressed as the master deck for
synchronization.
7 MASTER TEMPO button
Press:
Turns the master tempo function on and off.
When the master tempo function is on, the key does not change even
if the playback speed is changed with the [TEMPO] slider.
[SHIFT] + Press:
Changes the [TEMPO] slider’s range of variation each time the button is pressed.
1 Jog dial display section
= Jog dial display section (p. 8 )
2 Jog dial
Rotate the top of the jog dial when VINYL mode is on:
Performs scratching.
Rotate the outer section or rotate the top of the jog dial when VINYL
mode is off:
Performs pitch bending (adjustment of the playing speed).
[SHIFT] + Rotate top section:
The beat grid interval for the loaded track can be adjusted.
[SHIFT] + Rotate the outer section:
The entire beat grid of the loaded track can be slid to the left or right.
[SEARCH] + Rotate the top:
The track is advanced at high speed in the direction in which the jog
dial is turned.
3 QUANTIZE button
Press:
Turns the quantize function on.
If the quantize function is turned on when a hot cue is set, the point
is automatically set to the nearest beat position.
! The resolution of the quantized beat can be selected in
[Preferences] of rekordbox.
Press (in standby mode):
Cancels standby mode.
! This function is only available for the button on the left side of
the deck.
En
6
8 TEMPO slider
Adjusts the playing speed of tracks.
9 HOT CUE mode button
Press:
Sets hot cue mode.
= Using hot cues (p. 17 )
[SHIFT] + Press:
Sets keyboard mode.
= Using the keyboard (p. 19 )
a PAD FX1 mode button
Press:
Sets pad FX mode 1.
= Using the pad FX (p. 18 )
[SHIFT] + Press:
Sets pad FX mode 2.
= Using the pad FX (p. 18 )
b BEAT JUMP mode button
Press:
Sets beat jump mode.
= Using beat jump (p. 18 )
[SHIFT] + Press:
Sets beat loop mode.
= Using beat loops(p. 19 )
c SAMPLER mode button
Press:
Sets sampler mode.
= Using the sampler function (p. 19 )
[SHIFT] + Press:
Sets key shift mode.
Using the key shift function (p. 19 )
=
d PAGE c, d button
Press:
Switches the page of the pad in each pad mode.
= Using the performance pads (p. 17 )
Page 7

[SHIFT] + Press:
Switches the sampler bank.
e KEY SYNC button
Shifts the key of the track playing on the selected deck to the same
key as the source track, to a dominant key (5 degrees higher), or to a
subdominant key (4 degrees higher).
f KEY RESET button
Resets the key of the track playing on the selected deck to its original
key.
g Performance pads
Achieves various performances.
= Using the performance pads (p. 17 )
h PLAY/PAUSE f button
Plays or pauses the track.
i CUE button
Sets, calls out, and plays cue points.
! Press the [CUE] button while paused to set a cue point.
! During playback, press the [CUE] button to return to the cue
point and pause playback. (Back Cue)
! When the [CUE] button is pressed after playback returns to the
cue point, playback continues while the button is kept pressed.
(Cue Sampler)
j SEARCH m, n buttons
Press:
Searches for the beginning of a track.
Press + Hold:
Fast-forwards or rewinds the track while the button is kept pressed.
[SHIFT] + Press:
Calls out stored cue and loop points.
k MEMORY button
Press:
Stores cue and loop points.
[SHIFT] + Press:
Deletes stored cue and loop points.
l SHIFT button
Calls out another function if this button is pressed while a button is
pressed.
m DECK selector button
Switches the deck to be operated.
n SLIP REVERSE button
Press:
Plays a track in the reverse direction while this button is pressed,
and resumes normal playback when the button is released.
Normal playback continues in the background of the reverse
!
playback. If the button is released, normal playback resumes
from the current point playing in the background.
! Slip reverse play is automatically canceled after 8 beats and
normal playback resumes even if the [SLIP REVERSE] button is
kept pressed.
[SHIFT] + Press:
Plays a track in the reverse direction. Reverse playback is canceled
and normal playback resumes when the [SHIFT] and [SLIP REVERSE]
buttons are pressed again.
o LOOP IN, LOOP 1/2X (IN•1/2X) button
Press:
During normal playback, sets the loop-in point. During loop playback, shortens the length of loop playback to half.
[SHIFT] + Press:
During loop playback, press this button while pressing the [SHIFT]
button to fine-tune the loop-in point using the jog dial.
p LOOP OUT, LOOP 2X (OUT•2X) button
Press:
During normal playback, sets the loop-out point and starts loop play-
back. During loop playback, doubles the length of loop playback.
[SHIFT] + Press:
During loop playback, press this button while pressing the [SHIFT]
button to fine-tune the loop-out point using the jog dial. Press this
button while pressing the [SHIFT] button when loop playback is
canceled to return to the loop-in point that was previously set and
start loop playback.
q 4 BEAT LOOP/EXIT button
Press:
During normal playback, sets the auto beat loop for 4 beats and
starts loop playback. During loop playback, cancels loop playback.
[SHIFT] + Press:
Switches the status of the loop stored in the track between active
and non-active. (Active Loop)
! If this button is pressed while the [SHIFT] button is pressed in
playback mode, of the loops stored in that track, the loop closest
to the playback position becomes active.
! When a loop that is stored in a track is called out, and this button
is pressed while the [SHIFT] button is pressed, the loop that is
called out becomes active or non-active.
Part names and functions
En
7
Page 8
Jog dial display section
1
5
2
4
7
8
h
g
e
c
3
6
9
a
b
d
f
4
4
u
When a track from rekordbox is loaded, the following information is
displayed on the jog dial display section.
setting in [Preferences] of rekordbox. For details on the procedure
for changing the setting, see the rekordbox Manual.
c Cue/loop/hot cue point memory display
Displays with indicator marks the cue points, loop points, and hot
cue points set in the loaded track.
d Playback position display
Displays the current playback position.
e Time display (minutes, seconds)
Displays the remaining time or elapsed time.
You can change the displayed information in [Preferences] of
rekordbox.
= Changing the settings with rekordbox (p. 26 )
! The loop beat is displayed in the time display during loop
playback.
f MASTER display
Lights up when the deck being operated is set as the master.
g Operation display
Displays the current playback position.
Rotates during playback, and stops when paused.
h SYNC display
Lights up when [BEAT SYNC] is turned on.
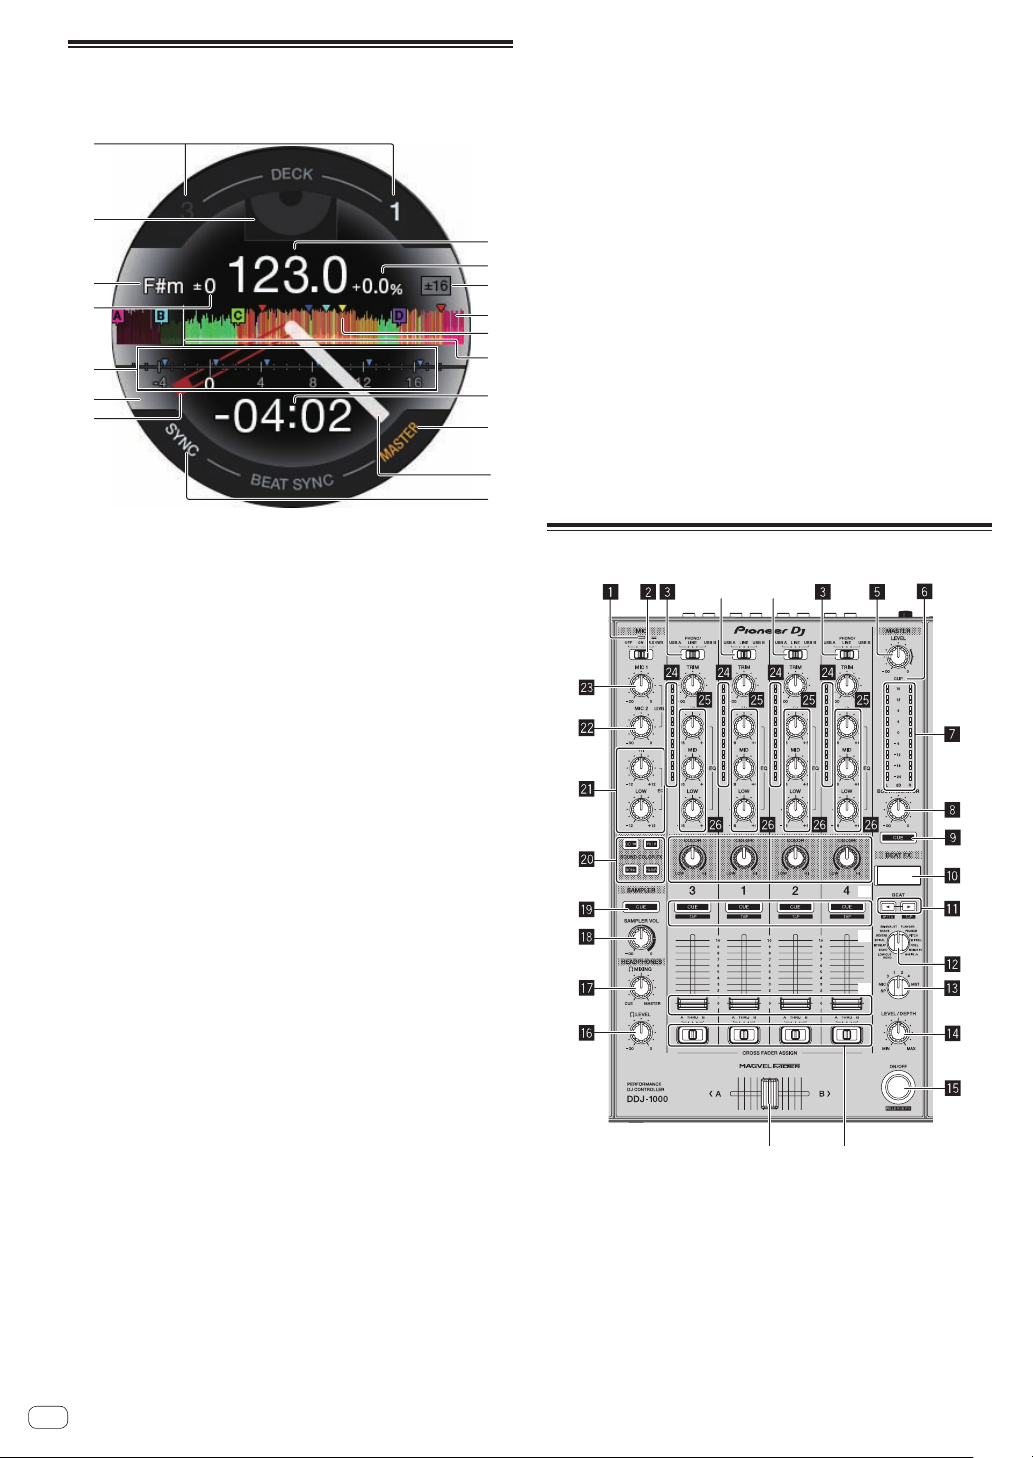
1 Deck number display
The number of the deck currently being operated lights up.
2 Artwork display
Displays the artwork for the loaded track. You can change whether to
display or hide the artwork in [Preferences] of rekordbox.
= Changing the settings with rekordbox (p. 26 )
3 Key display
Displays the current key.
4 Key variation display
Displays the variation between the track’s original key and the current key.
5 Display CUE SCOPE
Displays with indicator marks the cue points, loop points, and hot
cue points set in the interval from 4 bars before and 16 bars after the
current playback position. Displays indicator marks in 4-bar intervals
with the position of the set and called out cue or loop as a reference
point. You can change whether to display or hide the CUE SCOPE in
[Preferences] of rekordbox.
= Changing the settings with rekordbox (p. 26 )
6 Deck status display
The current status of the deck is indicated by the background color.
White (bright): On-air with deck 1 or deck 2 selected
White (dark): Off-air with deck 1 or deck 2 selected
Blue (bright): On-air with deck 3 or deck 4 selected
Blue (dark): Off-air with deck 3 or deck 4 selected
Red (bright): Slip playback
The display for slip playback has priority regardless of the
!
deck’s on-air status.
7 Cue point display
Displays the position of the set and called out cue point.
8 BPM display
The current BPM is displayed.
9 Playing speed display
The value changes according to the position of the [TEMPO] slider.
a Playing speed adjustment range display
Displays the range that the playing speed can be adjusted.
b Waveform display
Displays the waveform of the sound.
You can switch the color and format ([Full Waveform]/[Half
Waveform]) of the waveform in association with the [Waveform]
En
8
Mixer section
r
s
t
v
1 Microphone indicator
= Using a microphone (p. 24 )
2 OFF, ON, TALK OVER selector switch
Turns the microphone on and off.
= Using a microphone (p. 24 )
3 USB A, PHONO/LINE, USB B selector switch
Selects the input source for each channel from the components
connected to this unit.
! [USB A]: Uses the track loaded in the rekordbox dj deck.
Page 9

! [PHONO/LINE]: Uses a phono level (for MM cartridges) output
device (analog player, etc.) connected to the [LINE/PHONO]
input terminals.
= Using external inputs (p. 25 )
! [USB B]: Uses the track loaded in the rekordbox dj deck.
4 USB A, LINE, USB B selector switch
Selects the input source for each channel from the components
connected to this unit.
! [USB A]: Uses the track loaded in the rekordbox dj deck.
! [LINE]: Uses a line level output device (DJ player, etc.) connected
to the [LINE] input terminals.
= Using external inputs (p. 25 )
! [USB B]: Uses the track loaded in the rekordbox dj deck.
5 MASTER LEVEL control
Adjusts the level of sound output to the master channel.
6 CLIP indicator
[CLIP] blinks when the output level is too high.
— Blinking slowly: indicates that the sound is about to be distorted.
— Blinking quickly: Indicates that the sound is distorted.
7 Master level indicator
Displays the level of sound output to the master channel.
8 BOOTH MONITOR LEVEL control
Adjusts the level of sound output to the booth channel.
9 MASTER CUE button
Outputs the sound of the master channel to the headphones.
a Effect section display
Displays the effect name, BPM, effect parameter, etc.
b BEAT c, d buttons
Press:
Set the beat fraction to synchronize the effect sound with.
Press [SHIFT] + [BEAT c]:
Sets the mode for automatically measuring the BPM from the input
audio signal.
Press [SHIFT] + [BEAT d]:
Sets the mode for inputting the BPM manually.
c BEAT FX SELECT control
Sets the BEAT FX type.
d BEAT FX CH SELECT control
Switches the channel to which the BEAT FX is to be applied.
e BEAT FX LEVEL/DEPTH control
Adjusts the BEAT FX quantitative parameter.
f BEAT FX ON/OFF button
Press:
Turns BEAT FX on and off.
[SHIFT] + Press:
Turns release FX on for rekordbox.
= Using the BEAT FX function (p. 21 )
g HEADPHONES LEVEL control
Adjusts the level of sound output to the headphones.
h HEADPHONES MIXING control
Adjusts the balance of the monitor volume between the sound of the
channels for which the headphones [CUE] button is pressed and the
sound of the master channel.
i SAMPLER VOL control
Adjusts the sound level of the sampler.
j SAMPLER CUE button
Outputs the sound of the sampler to the headphones.
k SOUND COLOR FX SELECT buttons
Turns on and off SOUND COLOR FX.
= Using the SOUND COLOR FX function (p. 24 )
l MIC EQ (HI, LOW)controls
Adjusts the tone quality of the [MIC1] and [MIC2] channels.
m MIC2 LEVEL control
Adjusts the level of sound output from the [MIC2] channel.
n MIC1 LEVEL control
Adjusts the level of sound output from the [MIC1] channel.
o Channel level indicator
Displays the sound level of each channel before it passes through
the channel faders.
p TRIM control
Adjusts the level of sound output from each channel.
q EQ (HI, MID, LOW) control
Boosts or cuts frequencies for the different channels.
r COLOR control
Changes the parameters of the SOUND COLOR FX of the different
channels.
s Headphones CUE button
Press:
Outputs the sound of the channel for which this button is pressed to
the headphones.
[SHIFT] + Press:
The tempo for each deck can be set by tapping this button. (Tap
function)
t Channel fader
Adjusts the level of sound output from each channel.
u Crossfader assign selector switch
Assigns the channel output to the crossfader.
[A]: Outputs to [A] (left) of the crossfader.
[B]: Outputs to [B] (right) of the crossfader.
[THRU]: Select when not using the crossfader. The signals do not
pass through the crossfader.
v Crossfader
Outputs the sound assigned by the crossfader assign switch.
Do not pull the channel fader and crossfader knobs with excessive
force. The knobs are not detachable. Pulling the knobs with excessive
force may break the unit.
Part names and functions
En
9
Page 10
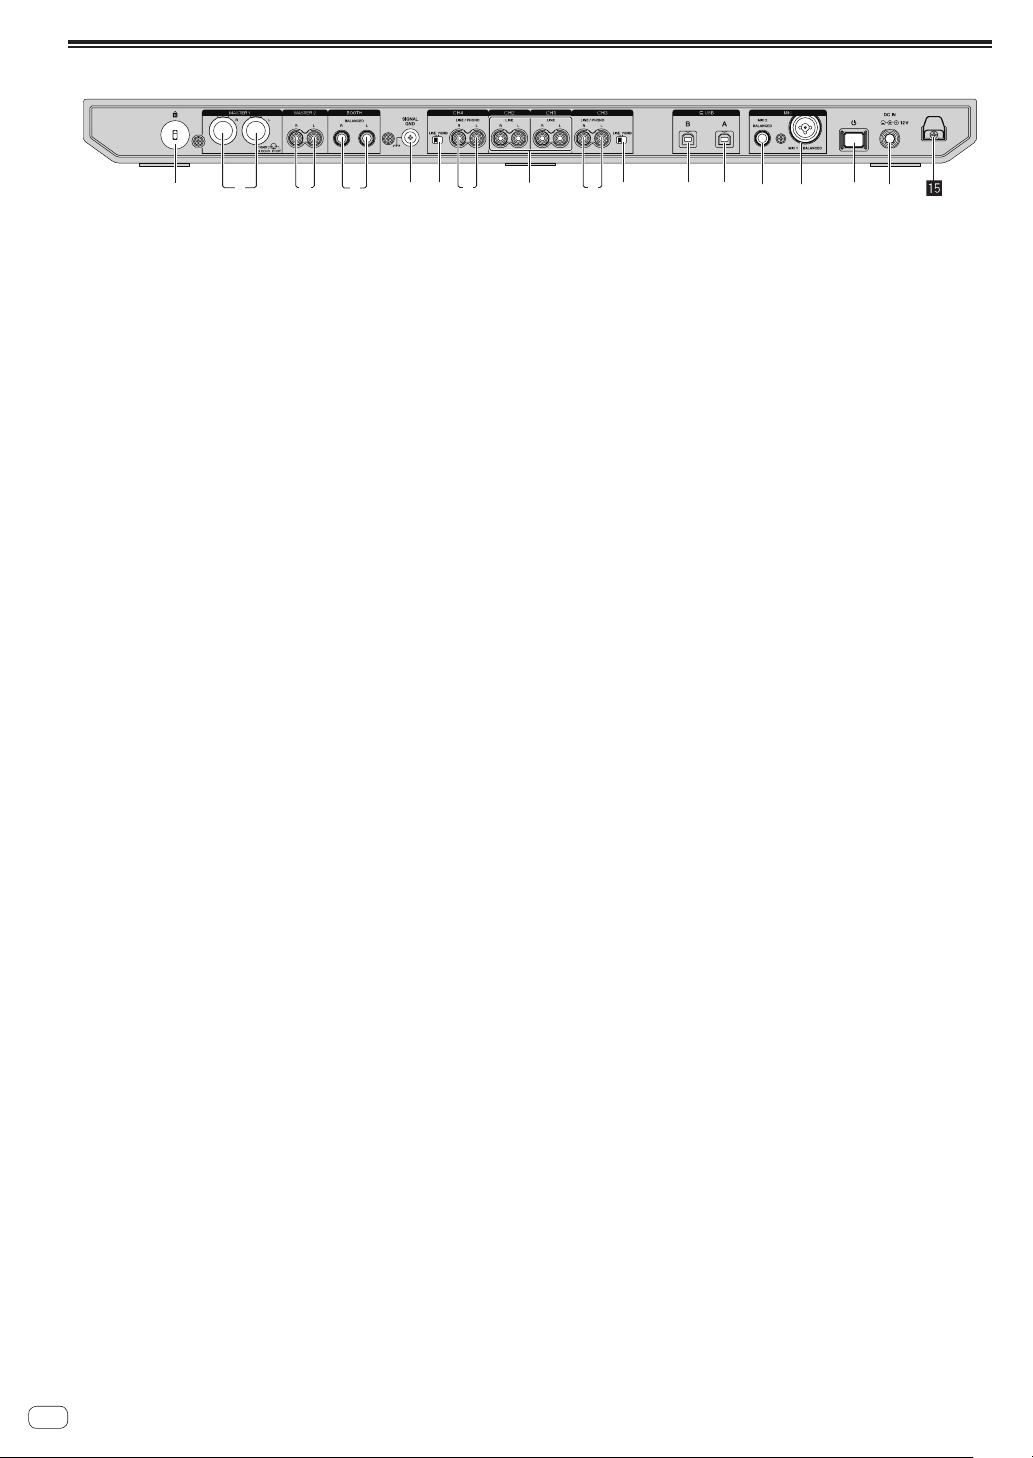
Rear panel
2 7 731 4 66 89abcde5
1 Kensington security slot
2 MASTER 1 output terminal
Connect a powered speaker, a power amp, etc.
! Compatible with XLR connector type balanced outputs.
Be sure to use these as balanced outputs.
! Be careful not to accidentally insert the power cord of
another unit.
! Do not connect a terminal that can supply phantom power.
3 MASTER 2 output terminal
Connect a powered speaker, a power amp, etc.
! Compatible with RCA pin-jack type unbalanced outputs.
4 BOOTH output terminal
Output terminals for a booth monitor.
! Compatible with TRS connector type balanced outputs.
Be sure to use these as balanced outputs.
! The master channel sound can be output from the [BOOTH]
output terminals regardless of the audio level set for the master
channel.
The sound level can be adjusted using the
[BOOTH MONITOR LEVEL] control.
5 SIGNAL GND terminal
Connect a ground wire of an analog player to reduce noise that
occurs when an analog player is connected.
6 LINE/PHONO switch
Selects the input source for each channel from the components
connected to this unit.
! [LINE]: Uses a line level output device (DJ player, etc.) connected
to the [LINE/PHONO] input terminals.
! [PHONO]: Uses a phono level (for MM cartridges) output device
(analog player, etc.) connected to the [LINE/PHONO] input
terminals.
7 LINE/PHONO input terminals
Connect a phono level (for MM cartridges) output device (analog
player, etc.) or a line level output device (DJ player, etc.). Switch
the input source according to the connected device using the
[LINE/PHONO] switch on the rear panel of this unit.
! Set the [USB A, PHONO/LINE, USB B] selector switch on top of
the unit to [PHONO/LINE] beforehand.
8 LINE input terminals
Connect to a DJ player or other line level device.
! Set the [USB A, LINE, USB B] selector switch on top of the unit to
[LINE] beforehand.
9 USB terminals (USB B)
Connect to a computer.
! Connect this unit to your computer directly via the USB cable
included with this product or one that conforms to USB 2.0.
! Do not use a USB hub.
a USB terminals (USB A)
Connect to a computer.
! Connect this unit to your computer directly via the USB cable
included with this product or one that conforms to USB 2.0.
! Do not use a USB hub.
b MIC2 input terminals
Connect a microphone.
! Only phone plugs (Ø 6.3 mm) can be used.
c MIC1 input terminals
Connect a microphone.
! Either an XLR connector or a phones plug (Ø 6.3 mm) can be
used.
d u switch
Turns this unit on or puts this unit into standby mode.
e DC IN terminal
Connect to a power outlet using the included AC adapter (with the
included power cord connected).
Connect the AC adapter after all the connections between
!
devices are completed.
! Use the included AC adapter.
f DC cord hook
Hook for the AC adapter power cord.
! If the AC adapter is disconnected during playback, the sound will
be interrupted.
10
En
Page 11

Front panel
1
1 PHONES output terminals
Connect headphones.
Stereo phone plugs (ø 6.3 mm) and stereo mini phone plugs
(ø 3.5 mm) can be used.
Part names and functions
En
11
Page 12

Basic operation
device
To power outlet
R
! Connect the power cord to a power outlet after all the connections are completed.
Turn off this unit and disconnect the power cord from the power outlet before connecting components or changing the connections.
Refer to the operating instructions for the components to be connected.
! Be sure to use the included power cord and AC adapter.
! Be sure to use the USB cable included with this product or one that conforms to USB 2.0.
! A USB hub cannot be used.
Example of connections
Connecting input terminals
Rear panel
*1
Analog player
*2
DJ player
AUDIO OUT
R L
DJ player
CONT
Portable audio
device
Power cord
㸦
included
AC adapter
(included)
㸧
Portable audio
DJ player
R
*1
Analog player
L
R
L
R
L
R
*2
DJ player
L
Computer
*1 When connecting an analog player, switch the [LINE/PHONO] switch beside the terminals to [PHONO].
*2 When connecting a DJ player, switch the [LINE/PHONO] switch beside the terminals to [LINE].
Cord hook
% Hooking the AC adapter power cord onto the cord
hook
Fasten the AC adapter power cord into place by hooking it onto the cord
hook. This prevents the power cord from being accidentally pulled and
causing the plug to get disconnected from the terminal.
! Do not fasten with the base of the AC adapter power cord bent. If
used continuously under these conditions, the power cord may be
damaged, resulting in faulty contact.
! If the AC adapter is disconnected during playback, the sound will be
interrupted.
DC IN
Microphone
12V
12
En
Page 13

Connecting output terminals
powered speakers, etc.
Headphones
Rear panel
Component, amplifier,
powered speaker, etc.
Power amplifier,
powered speakers, etc.
Front panel
Basic operation
L
R
Power amplifier
(for booth monitor),
1 Be sure to use the [MASTER 1] output terminals for a balanced
output. If they are connected to an unbalanced input (such as RCA)
using an XLR to RCA converter cable (or converter adapter), etc., the
sound quality may be lowered or noise may occur.
For connection with an unbalanced input (such as RCA), use the
[MASTER 2] output terminals.
2 Be careful not to accidentally insert the power cord plug of
another unit into a [MASTER 1] output terminals.
Do not connect terminals capable of supplying phantom power
to the [MASTER 1] output terminals.
3 Be sure to use the [BOOTH] output terminals for a balanced output.
If they are connected to an unbalanced input (such as an RCA or TS
terminal) with an TRS to RCA converter cable (or converter adapter),
TS cable, etc., the sound quality may be lowered or noise may occur.
En
13
Page 14

Connections
1 Connect headphones to the [PHONES] output
terminals.
2 Connect devices such as powered speakers, a power
amplifier, and components to the [MASTER 1] or
[MASTER 2] output terminals.
Powered speakers, etc.
! To output the sound from the [BOOTH] output terminals, con-
nect devices such as speakers to the [BOOTH] output terminals.
3 Connect this unit to your computer using a USB cable.
6 Press the [u] switch on the rear panel of this unit to
turn this unit on.
This unit turns on.
! For Windows
[Installing device driver software] may appear when this unit
is connected to the computer for the first time or connected to a
different USB port on the computer. Wait for a while until [Your
devices are ready for use] appears.
7 Turn on the devices connected to the output
terminals (powered speakers, power amplifier,
components, etc.).
! If a microphone, DJ player or other external device is connected
to the input terminals, turn on the connected device.
USB cable
㸦
included
㸧
4 Turn the computer on.
5 Connect the AC adapter.
To power outlet
Power cord
㸦
AC adapter
(included)
included
㸧
14
En
Page 15

Starting the system
Launching rekordbox
Account registration and activation work for rekordbox dj are required at
first startup. For details on each work procedure, access the site below
and see “rekordbox Introduction”.
rekordbox.com/manual
For Mac
Open the [Applications] folder in Finder, and double-click the [rekordbox] icon.
For Windows 10
From the [Start] menu, click [Pioneer] > [rekordbox] icon.
For Windows 8.1
Click the [rekordbox] icon in [Apps view].
For Windows 7
Click the [Start] menu > [All Programs] > [Pioneer] > [rekordbox
X.X.X X.X.X] > the [rekordbox X.X.X] icon in order.
Checking audio settings
Check that the [Audio] settings in [Preferences] of rekordbox are set as
follows.
For Mac
[Audio]: [DDJ-1000]
[Output channels]:
[Master Output]: [DDJ-1000: MASTER]
[Headphones Output]: [DDJ-1000: HEADPHONES]
For Windows
[Audio]: [DDJ-1000 ASIO]
[Output channels]:
[Master Output]: [DDJ-1000 ASIO: MASTER]
[Headphones Output]: [DDJ-1000 ASIO:HEADPHONES]
If PC MASTER OUT is enabled, the “+ Name of audio device in computer” information will also be displayed after [MASTER] of the [Master
Output] item in the [Audio] settings.
Loading tracks into a deck
The following describes the procedure for loading tracks into deck 1 (left
side) as an example.
1
1 Rotary selector
Turn the rotary selector of deck 1 (left side) to select a
%
track in [Collection] and then press the rotary selector.
The track is loaded into deck 1.
Basic operation
Adding music files to [Collection]
A list of track files managed by rekordbox is displayed on the
[Collection] screen.
Register the track files on the computer as the collection of music for
rekordbox and analyze them to enable those tracks to be used with
rekordbox.
1 Click [Collection] in the tree view.
A list of the tracks registered in [Collection] is displayed.
2 Open Finder or Windows Explorer, and drag and drop
track files or folders containing track files to the track
list.
The track files are added to [Collection], and the waveform analysis
of the track files starts. Wait until the analysis of all the track files is
finished.
En
15
Page 16

4
Playing a music file
The following describes the procedure for outputting the sound of deck 1
(left side) as an example.
1 USB A, LINE, USB B selector switch
2 TRIM control
3 EQ (HI, MID, LOW) control
4 Headphones CUE button
5 Channel fader
6 HEADPHONES MIXING control
7 HEADPHONES LEVEL control
8 Crossfader assign selector switch
9 Crossfader
a MASTER LEVEL control
b BOOTH MONITOR LEVEL control
c MASTER CUE button
1 Set the following as specified.
Part Operation
USB A, LINE, USB B selector switch
TRIM control
EQ (HI, MID, LOW) control Center position
COLOR control Center position
Channel fader Move it forward.
MASTER LEVEL control
Crossfader Center position
Crossfader assign selector switch [THRU] position
USB A
Rotate it clockwise until it
stops.
Rotate it clockwise until it
stops.
2 Press the [PLAY/PAUSE f] button to play the track.
3 Rotate the [TRIM] control.
Adjust the [TRIM] control to confirm that the channel level indicator
lights up in orange at the highest volume.
4 Move the channel fader forward.
5 Rotate the [MASTER LEVEL] control to adjust the
sound level of the speakers.
Adjust the level of the sound output from the [MASTER 1] and
[MASTER 2] output terminals to an appropriate level.
! To output sound from the computer’s speaker, adjust the vol-
ume of the computer’s speaker instead of the [MASTER LEVEL]
control.
Monitoring sound with headphones
Set the following as specified.
Part Operation
HEADPHONES MIXING control Center position
HEADPHONES LEVEL control
Rotate it clockwise until it
stops.
1 Press the headphones [CUE] button for channel 1.
2 Rotate the [HEADPHONES LEVEL] control.
Adjust the level of sound output from the headphones to an appropriate
level.
Note
This unit and rekordbox dj include many functions to allow for more
individualistic DJ performances. For details on each function, access the
site below and see the “rekordbox Manual”.
rekordbox.com/manual
Turning off the system
1 Close rekordbox.
2 Press the [u] switch on the rear panel of this unit to
set the unit to standby.
3 Disconnect the USB cable from the computer.
16
En
Page 17

Advanced operation
[PAGE ]
[PAGE
Using 4 beat loops
% During loop playback, press the [4 BEAT LOOP/EXIT]
button.
A 4 beat loop automatically starts from the point where the button is
pressed, and loop playback starts.
! When the quantize function is on, there may be a slight delay in
operation of this function to synchronize the beat.
Canceling loop playback
% Press the [4 BEAT LOOP/EXIT] button again.
Playback continues beyond the loop-out point without returning to the
loop-in point.
Using manual loops
Use this function to play specific sections repeatedly.
! When the quantize function is on, there may be a slight delay in
operation of this function to synchronize the beat.
1 During playback, press the [IN•1/2X] button at the
point where you want to start loop playback (the loop-in
point).
The loop-out point is set.
2 Press the [OUT•2X] button at the point where you
want to end loop playback (the loop out point).
Cutting loops
Changing the point where loop playback
ends
% Press the [OUT•2X] button while pressing the [SHIFT]
button, and rotate the jog dial.
Moves the position of the loop-out point.
Using the performance pads
Using hot cues
You can start playback from the position where a hot cue is set. In addition to hot cues, loops can be set to call out a playback point.
! Up to 16 hot cue points can be set and stored in one track.
Setting and calling out a hot cue
1 Press the [HOT CUE] mode button.
This unit enters hot cue mode.
! For the registered 16 hot cues, you can switch to hot cues A to H
by pressing the [PAGE c] button, and hot cues I to P by pressing
the [PAGE d] button. The content of the hot cue display area
within the rekordbox dj deck screen can also be switched by
performing the same operation.
2 During playback or in pause mode, press a
performance pad to set a hot cue point.
The hot cue points are assigned to the respective performance pads as
shown below.
Advanced operation
% During loop playback, press the [IN•1/2X] button.
Each time the button is pressed, the length of the loop playback is cut
in half.
! The length of the loop can be cut in half even during 4 beat loop
playback.
Extending loops
% During loop playback, press the [OUT•2X] button.
Each time the button is pressed, the length of the loop playback is
doubled.
! The length of the loop can be doubled even during 4 beat loop
playback.
Canceling loop playback
% Press the [4 BEAT LOOP/EXIT] button.
Playback continues beyond the loop-out point without returning to the
loop-in point.
Changing the point where loop playback
starts
% Press the [IN•1/2X] button while pressing the [SHIFT]
button, and rotate the jog dial.
Moves the position of the loop-in point.
Hot cue AHot cue BHot cue CHot cue D
Hot cue EHot cue FHot cue GHot cue H
]
Hot cue IHot cue JHot cue KHot cue L
Hot cue MHot cue NHot cue OHot cue P
3 Press the performance pad to which the hot cue point
is set.
Playback starts from the hot cue point.
! Press a performance pad while pressing the [SHIFT] button to clear
the hot cue point.
Setting and calling out a 4 beat loop
1 Press the [HOT CUE] mode button.
This unit enters hot cue mode.
En
17
Page 18

2 During loop playback, press the [4 BEAT LOOP/EXIT]
[PAGE ]
[PAGE ]
button.
Sets a 4 beat loop at the point where the button is pressed, and loop
playback starts.
3 During loop playback, press a performance pad to set
a loop during loop playback.
4 Press the performance pad to which the loop is set.
Loop playback starts from the point where the loop is set.
Press a performance pad while pressing the [SHIFT] button to clear
!
the loop.
the rekordbox dj deck screen can also be switched by performing the
same operation.
Effect Q Effect R
Effect U Effect V
Effect S Effect T
Effect W Effect X
Setting and calling out a manual loop
1 Press the [HOT CUE] mode button.
This unit enters hot cue mode.
2 During playback, press the [IN•1/2X] button, and
press the [OUT•2X] button.
Loop playback starts.
3 During loop playback, press a performance pad to set
a loop during loop playback.
4 Press the performance pad to which the loop is set.
Loop playback starts from the point where the loop is set.
! Press a performance pad while pressing the [SHIFT] button to clear
the loop.
Using the pad FX
Various performances are possible with the simple operation of pressing
and releasing performance pads.
1 Press the [PAD FX1] mode button.
This unit enters pad FX mode 1.
Effects are assigned to the performance pads as shown below.
For the effects assigned to the pads, you can switch to effects A to H
by pressing the [PAGE c] button, and effects I to P by pressing the
[PAGE d] button. The content of the pad FX display area within the
rekordbox dj deck screen can also be switched by performing the same
operation.
Effect A Effect B
Effect E Effect F
[PAGE ]
Effect I Effect J
Effect C Effect D
Effect G Effect H
Effect K Effect L
[PAGE ]
Effect Y Effect Z
Effect AC Effect AD
Effect AA Effect AB
Effect AE Effect AF
2 Press and hold a performance pad.
The effect turns on according to the effect and number of beats assigned
to the pad.
3 Release the performance pad.
The effect turns off.
Using the release FX of the pad FX
Release FX must be assigned to a performance pad beforehand.
1 Press and hold a performance pad to which an effect
other than release FX is assigned.
The effect turns on according to the effect and number of beats assigned
to the pad.
2 Press the performance pad to which release FX is
assigned.
The effect that was on turns off, and the release FX effect is added.
Using beat jump
You can move the playback position instantly without breaking the
rhythm of the track currently playing.
1 Press the [BEAT JUMP] mode button.
This unit enters beat jump mode.
The number of beats or number of bars skipped is assigned to the
respective performance pads as shown below. (Default value)
! Press the [PAGE c] button or the [PAGE d] button to switch the
number of beats or number of bars assigned to the performance
pad.
1 beat
(reverse
direction)
1 beat
(forward
direction)
2 beat
(reverse
direction)
2 beat
(forward
direction)
Effect M Effect N
! Press the [PAD FX1] mode button while pressing the [SHIFT] button
to switch to pad FX mode 2.
Effects are assigned to the performance pads as shown below.
For the effects assigned to the pads, you can switch to effects Q to
X by pressing the [PAGE c] button, and effects Y to AF by pressing
the [PAGE d] button. The content of the pad FX display area within
En
18
Effect O Effect P
4 beat
(reverse
direction)
4 beat
(forward
direction)
8 beat
(reverse
direction)
8 beat
(forward
direction)
2 Press pad 1, pad 3, pad 5, or pad 7.
The playback position moves to the left by the number of beats or number of bars assigned to the pressed pad.
3 Press pad 2, pad 4, pad 6, or pad 8.
The playback position moves to the right by the number of beats or
number of bars assigned to the pressed pad.
Page 19

Using the sampler function
You can play the tracks loaded in the sampler slots of the sampler using
the performance buttons.
Preparing to use the sampler
Select the [SAMPLER] check box at the upper part of the
rekordbox dj screen.
The sampler panel appears on the rekordbox dj screen.
Loading a track into a sampler slot
1 Press the [SAMPLER] mode button.
This unit enters sampler mode.
2 Press the [PAGE c] button or the [PAGE d] button
while pressing the [SHIFT] button.
The sampler bank is switched. The sampler has four banks and each
bank has sixteen slots.
3 Press the rotary selector to move the cursor to the
track list.
4 Rotate the rotary selector.
Select the track to be loaded in a sampler slot.
5 Press the performance pad while pressing the [SHIFT]
button.
The selected track is loaded into the sampler slot.
! Loading by overwriting an already loaded sampler slot may not be
possible depending on the [Preferences] setting of rekordbox.
1 Press the [HOT CUE] mode button while pressing the
[SHIFT] button.
This unit enters keyboard mode.
! Press the [PAGE c] button or the [PAGE d] button to switch the
pitch of the sound assigned to the performance pad.
2 Press a performance pad.
Select the hot cue to use in keyboard mode.
! If there are no hot cues set, the currently playback position is set
as a hot cue and is used in keyboard mode.
! If you want to reselect the hot cue to use in keyboard mode, press
the [HOT CUE] mode button while pressing the [SHIFT] button.
3 Press a performance pad.
The hot cue is played in the pitch assigned to the pressed pad.
Using beat loops
When a performance pad is pressed, a loop with the number of beats or
number of bars assigned to that pad is set, and loop playback continues
even if the pad is released.
1 Press the [BEAT JUMP] mode button while pressing
the [SHIFT] button.
This unit enters beat loop mode.
The number of beats or number of bars for beat loop mode is assigned to
the respective performance pads as shown below.
! Press the [PAGE c] button or the [PAGE d] button to switch the
number of beats or number of bars assigned to the performance
pad.
Beat Loop
1/64 beat
Beat Loop
1/32 beat
Beat Loop
1/16 beat
Beat Loop
1/8 beat
Advanced operation
Using the performance pads to play the sampler
1 Press the [SAMPLER] mode button.
This unit enters sampler mode.
2 Press the [PAGE c] button or the [PAGE d] button
while pressing the [SHIFT] button.
Switches the sampler bank.
3 Adjusting the sampler gain on the rekordbox dj
screen
4 Press a performance pad.
The sound for the slot assigned to the pad is played.
! Sampler slots are assigned to the respective performance pads
as shown below.
Slot 1 Slot 2 Slot 3 Slot 4
Slot 7 Slot 8Slot 5 Slot 6
5 During sampler playback, press a performance pad.
Playback continues by returning to the beginning.
6 During sampler playback, press the performance pad
while pressing the [SHIFT] button.
The sound of the slot that is currently playing stops.
Using the keyboard
You can use the performance pads as a keyboard, assigning a musical
scale to the hot cues.
Beat Loop
1/4 beat
Beat Loop
1/2 beat
Beat Loop
1 beat
Beat Loop
2 beats
2 Press a performance pad.
Loop playback is performed for a loop with the number of beats or number of bars assigned to the pressed pad.
3 Press the same performance pad again.
Loop playback is canceled.
Using the key shift function
When a performance pad is pressed, the key of the track being played
changes to the pitch assigned to that pad.
1 Press the [SAMPLER] mode button while pressing the
[SHIFT] button.
This unit enters key shift mode.
! Press the [PAGE c] button or the [PAGE d] button to switch the
pitch of the sound assigned to the performance pad.
2 Press a performance pad.
The key of the track being played changes to the pitch assigned to the
pad that is pressed.
3 Press the [KEY RESET] button.
The key of the track being played changes to the pitch assigned to the
pad that is pressed.
Setting cue points
Cue points or loop points can be set in the loaded track.
1 Move the playback position to the point where you
want to set a cue point.
En
19
Page 20

2 Press the [CUE] button in the pause mode.
3 Press [MEMORY].
The cue point set in step 2 is stored.
Press the [MEMORY] button while looping to store the loop point.
Calling out cue points
Set cue points or loop points can be called out.
% While pressing the [SHIFT] button, press the
[SEARCH m] button or the [SEARCH n] button.
Calls out the set cue points or loop points.
Deleting cue points
Set cue points or loop points can be deleted.
1 While pressing the [SHIFT] button, press the
[SEARCH m] button or the [SEARCH n] button.
Call out the cue point that you want to delete.
2 Press the [MEMORY] button while pressing the
[SHIFT] button.
The cue point called out is deleted.
Using slip mode
When slip mode is turned on, normal playback with the original rhythm
continues in the background during scratching, looping and hot cue
playback. When scratching, looping or hot cue playback is canceled,
normal playback resumes from the position where the operation was
canceled.
Various performances can be achieved without breaking the rhythm.
! The [SLIP] button lights up when slip mode is set and flashes while
playing the sound in the background.
Slip scratching
1 Turn VINYL mode on.
Press the [SHIFT] button to check if the [SLIP] button lights up.
2 Press the [SLIP] button.
This unit enters slip mode.
3 During playback, perform scratching using the top of
the jog dial.
Normal playback continues in the background while scratching is
performed.
4 Release the top of the jog dial.
Playback starts from the current position playing in the background
playback.
! Press the [SLIP] button again to cancel slip mode.
How to check VINYL mode on/off
VINYL mode is turned on by default, and scratching is available. You can
check the current status based on the light status of the [SLIP] button
while the [SHIFT] button is pressed.
When VINYL mode is on, the [SLIP] button lights up while the [SHIFT]
!
button is pressed.
! When VINYL mode is off, the [SLIP] button does not light up while the
[SHIFT] button is pressed.
Press the [SLIP] button while pressing the [SHIFT] button to switch
VINYL mode on and off.
Slip hot cue
1 Press the [HOT CUE] mode button.
This unit enters hot cue mode.
2 Set the hot cue.
Press a performance pad to set a hot cue.
3 Press the [SLIP] button.
This unit enters slip mode.
4 During playback, press and hold a performance pad.
Playback starts from the position where the hot cue is set. Playback
continues while the performance pad is pressed.
Normal playback continues in the background while playing the hot cue.
5 Release the performance pad.
Playback starts from the current position playing in the background
playback.
! Press the [SLIP] button again to cancel slip mode.
Slip braking
1 Adjust the setting for [Vinyl Speed Adjust] [Touch/Brake] in the [Deck] tab of [Preferences] >
[Controller] menu for rekordbox.
Adjusts the speed, etc., at which track playback stops with
[Vinyl Speed Adjust].
When using slip braking, adjust the [Touch/Brake] control of
[Vinyl Speed Adjust] on the computer screen and set to stop the sound
slowly.
2 Press the [SLIP] button.
This unit enters slip mode.
3 During playback, press the [PLAY/PAUSE f] button.
Playback slowly stops while normal playback continues in the
background.
4 Press the [PLAY/PAUSE f] button again.
Playback starts from the current position playing in the background
playback.
! Press the [SLIP] button again to cancel slip mode.
Slip auto beat loop
1 Press the [SLIP] button.
This unit enters slip mode.
2 Press the [4 BEAT LOOP/EXIT] button.
A loop with the specified number of beats is set and loop playback starts.
Normal playback continues in the background even during loop
playback.
3 Press the [4 BEAT LOOP/EXIT] button again.
Loop playback is canceled and playback starts from the current position
playing in the background playback.
! Press the [SLIP] button again to cancel slip mode.
Manual slip looping
1 Press the [SLIP] button.
This unit enters slip mode.
2 Press the [IN•1/2X] button, and press the [OUT•2X]
button.
Loop playback starts.
Normal playback continues in the background even during loop
playback.
20
En
Page 21

3 Press the [4 BEAT LOOP/EXIT] button.
1
5
2
3
4
Loop playback is canceled and playback starts from the current position
playing in the background playback.
! Press the [SLIP] button again to cancel slip mode.
Using the fader start function
Using the BEAT FX function
You can set various effects according to the tempo (BPM = Beats Per
Minute) of the track currently playing using the BEAT FX function.
Main display
Using the channel fader start function
1 Set a cue point.
Pause playback at the position where you want to set a cue point (playback start point), and press the [CUE] button for the corresponding deck.
! Cue points can also be set by moving the channel fader from the
back to the position nearest you while pressing the [SHIFT] button in
the pause mode.
2 Move the channel fader from the position nearest
you towards the back while pressing the [SHIFT] button.
Playback of the track starts from the set cue point.
! When the channel fader is moved back to the position nearest you
while pressing the [SHIFT] button during playback, the track moves
back to the set cue point and playback is paused (back cue).
If a cue point is not set, playback starts from the beginning of the
track.
When the channel fader is moved from the back to the position near-
est you while pressing the [SHIFT] buttonwhen a cue is in standby,
playback starts from the set cue point.
Using the crossfader start function
To use the crossfader start function, set the crossfader assign selector
switch of the channel to [A] or [B].
1 Set a cue point.
Pause playback at the position where you want to set a cue point (playback start point), and press the [CUE] button for the corresponding deck.
! Cue points can also be set by moving the crossfader to the far left or
the far right while pressing the [SHIFT] button in pause mode.
2 Move the crossfader to the far-left or far-right
position.
Set the crossfader to the far end of the channel to be used with the fader
start function.
3 Move the crossfader to the opposite direction while
pressing the [SHIFT] button.
Playback of the track starts from the set cue point.
! When the crossfader is returned to the original position while press-
ing the [SHIFT] button during playback, the track moves instantaneously back to the set cue point and pause mode is set (Back Cue).
If a cue point is not set, playback starts from the beginning of the
track.
When the crossfader is moved from the left edge to the right edge (or
from the right edge to the left edge) while pressing the [SHIFT] button when a cue is in standby, playback starts from the set cue point.
Using effects
This product is equipped with two types of effect functions, BEAT FX and
SOUND COLOR FX.
For details on operating these effects using the performance pads, see
Using the pad FX
(p. 18 ).
Effect name Displays the name of the selected effect.
1
2
3
4
5
AUTO (TAP)
BPM value display (3 digits)
Beat/parameter
display section
Selected
channel display
section
When the BPM measurement mode is auto mode,
[AUTO] is displayed. When it is manual input mode,
[TAP] is displayed.
Displays the automatically detected BPM in auto mode.
If the BPM cannot be detected, the previously detected
BPM value flashes.
Displays the manually input BPM value in manual input
mode.
Displays the selected number of beats.
Displays parameters when the [BEAT c, d] buttons are
pressed for some effects. Blinks when outside the parameter limits.
Displays the channel to which the effect is to be applied.
Displays SP (SAMPLER), MIC, CH 1, CH 2, CH 3, CH 4, or
MST (MASTER), depending on what is selected.
1 Press the [BEAT c] or [BEAT d] button while pressing
the [SHIFT] button.
Select the BPM measurement mode.
— [AUTO]: Press the [BEAT c] button while pressing the [SHIFT]
button.
The BPM is automatically measured from the input audio signal.
— [TAP]: Press the [BEAT c] button while pressing the [SHIFT] but-
ton.
Enter the BPM manually. For information on manual input, refer
to Inputting the BPM manually (p. 21 ).
! The BPM measurement range for the [AUTO] setting is 70 to 180.
BPM cannot be correctly measured for some tracks. If the BPM
cannot be measured, the BPM value on the display flashes. In such
cases, use the [TAP] button to input the BPM manually.
2 Rotate the [BEAT FX SELECT] control.
Selects the type of effect.
! For information on the types of effects, refer to Types of BEAT FX
(p. 22 ).
3 Rotate the [BEAT FX CH SELECT] control.
Selects the channel to apply the effect to.
— [SP]: Applies the effect to the sound of [SAMPLER] for rekordbox.
— [MIC]: Applies the effect to the sound of the [MIC] channel.
— [1] – [4]:Applies the effect to the sound of the respective channel.
— [MST]: Applies the effect to the sound of the [MASTER] channel.
4 Press the [BEAT c, d] button.
Set the beat fraction to synchronize the effect sound with.
The effect time corresponding to the beat fraction is set automatically.
5 Press the [BEAT FX ON/OFF] button.
The effect is applied to the sound.
The effect’s quantitative parameter can be adjusted by turning the
[BEAT FX LEVEL/DEPTH] control.
The [ON/OFF] button flashes when the effect is on.
! Press the [ON/OFF] button again to turn the effect off.
Inputting the BPM manually
While pressing the [SHIFT] button, tap the [BEAT d]
button more than two times with your finger in time
with the beat (quarter notes) of the sound being played.
The average value of the interval that the [BEAT d] button is tapped
while the [SHIFT] button is pressed is displayed in the BPM (EFFECT)
display section.
! You can return to AUTO mode, press the [BEAT c] button while
pressing the [SHIFT] button.
En
Advanced operation
21
Page 22

Types of BEAT FX
Input sound turned off
1 beat
Input sound turned off
1 beat
MI
MI
MI
1/8 beat
e
Input sound turned off
1 beat
Direct sound
1%
100%
Time
1/1 beat
Time
LOW CUT ECHO
A delayed sound with the low frequency range reduced is output several
times and gradually attenuated according to the beat fraction set with
the [BEAT c, d] buttons.
! Lowering the channel faders and cutting the input volume leaves an
echo sound, producing a fade out.
1
SPIRAL
1
A reverberation effect is applied to the input sound.
The pitch changes simultaneously if the delay time is changed.
! Lowering the channel faders and cutting the input volume leaves an
effect sound.
Fade-out
Time
Fade-out
Time
BEAT c, d buttons
LEVEL/DEPTH control
1
ECHO
Sets the delay time between 1/16 and 16 beats with
respect to 1 beat of BPM time.
Sets the balance between the original sound and the
echo sound.
A delayed sound is output several times and gradually attenuated
according to the beat fraction set with the [BEAT c, d] buttons.
! Lowering the channel faders and cutting the input volume leaves an
echo sound, producing a fade out.
Fade-out
Time
BEAT c, d buttons
LEVEL/DEPTH control
MULTI TAP DELAY
Sets the delay time between 1/16 and 16 beats with
respect to 1 beat of BPM time.
Sets the balance between the original sound and the
echo sound.
1
A delayed sound is output up to 7 times in 1/8 beat intervals according to
the beat fraction set with the [BEAT c, d] buttons.
! Lowering the channel faders and cutting the input volume leaves a
delayed sound.
BEAT c, d buttons
LEVEL/DEPTH control
REVERB
1
Sets the delay time between 1/16 and 16 beats with
respect to 1 beat of BPM time.
Sets feedback, and the balance between the original
sound and the effect sound.
A reverberation effect is applied to the input sound.
! Lowering the channel faders and cutting the input volume leaves a
delay sound.
Level
BEAT c, d buttons
LEVEL/DEPTH control
Early reflected sound
Reverberations
Sets the extent of the reverberation effect between 1
and 100
%.
Sets the balance between the original sound and the
effect sound.
TRANS
The sound is cut according to the beat fraction set with the [BEAT c, d]
buttons.
Cut Cut
NMAX
NMAX
NMAX
LEVEL/DEPTH
BEAT c, d buttons
LEVEL/DEPTH control
En
22
1/1 beat
1/4 beat
Sets the effect time between 1/16 and 16 beats with
respect to 1 beat of BPM time.
Sets the volume to an odd-number delay from the
[MIN] position to the center position, and an evennumber delay from the center position to the [MAX]
position.
Tim
BEAT c, d buttons
LEVEL/DEPTH control
Sets the beat fraction between 1/16 and 16 with
respect to 1 beat of BPM time.
Sets the duty ratio and balance between the original
sound and effect sound.
ENIGMA JET
A flanger effect is produced according to the beat fraction set with the
[BEAT c, d] buttons. The pitch sounds as if it continues to ascend or
descend.
Sets the beat fraction between 1/16 and 64 beats or
between -64 and -1/16 beats, with respect to 1 beat
BEAT c, d buttons
LEVEL/DEPTH control
of BPM time. The pitch ascends for beat fractions
between 1/16 and 64 beats. The pitch descends for
beat fractions between -64 and -1/16.
The further the control is turned clockwise, the more
the effect is stressed.
When turned all the way counterclockwise, only the
original sound is output.
Page 23

FLANGER
Short delay
Time
Phase shift
e
1/2Repeated 1/1Repeated
Effect turned on
Repeated
Original
1/1 roll
A 1-cycle flanger effect is produced according to the beat fraction set
with the [BEAT c, d] buttons.
ROLL
The sound being input at the point when the [ON/OFF] button is pressed
is recorded, and the recorded sound is output repeatedly according to
the beat fraction set with the [BEAT c, d] buttons.
Cycle
BEAT c, d buttons
LEVEL/DEPTH control
PHASER
1
Sets the effect time between 1/16 and 64 beats with
respect to 1 beat of BPM time.
The further the control is turned clockwise, the more
the effect is stressed.
When turned all the way counterclockwise, only the
original sound is output.
The phaser effect changes according to the beat fraction set with the
[BEAT c, d] buttons.
Cycle
Tim
The phaser effect changes according to the beat button fraction.
Sets the cycle for moving the phaser effect with
BEAT c, d buttons
LEVEL/DEPTH control
respect to 1 beat of BPM between 1/16 and 64
beats.
The further the control is turned clockwise, the more
the effect is stressed.
When turned all the way counterclockwise, only the
original sound is output.
PITCH
The pitch of the source sound is changed.
BEAT c, d buttons
LEVEL/DEPTH control
Sets the pitch of the effect sound between -50 and
100%.
-50 to 100 (%)
Sets the pitch of the effect sound. When rotated all
the way counterclockwise, the setting returns to the
pitch of the original sound.
SLIP ROLL
The sound being input at the point when the [ON/OFF] button is pressed
is recorded, and the recorded sound is output repeatedly according to
the beat fraction set with the [BEAT c, d] buttons.
When the effect time changes, the input sound is recorded again.
Original
Effect turned on
BEAT c, d buttons
LEVEL/DEPTH control
Sets the effect time between 1/16 and 16 beats with
respect to 1 beat of BPM time.
Sets the balance between the original sound and
ROLL.
MOBIUS (SAW)
Sawtooth wave sound is produced according to the beat fraction set with
the [BEAT c, d] buttons. The pitch sounds as if it continues to ascend
or descend.
This sound is mixed with the input sound, and the resulting sound is
output. Oscillation is possible even if sound is not input.
Sets the beat fraction between 1/16 and 64 beats or
between -64 and -1/16 beats, with respect to 1 beat
BEAT c, d buttons
LEVEL/DEPTH control
of BPM time. The pitch ascends for beat fractions
between 1/16 and 64 beats. The pitch descends for
beat fractions between -64 and -1/16.
Adjusts the volume of the sawtooth wave sound to
be mixed.
MOBIUS (TRI)
Triangular wave sound is produced according to the beat fraction set
with the [BEAT c, d] buttons. The pitch sounds as if it continues to
ascend or descend.
This sound is mixed with the input sound, and the resulting sound is
output. Oscillation is possible even if sound is not input.
Sets the beat fraction between 1/16 and 64 beats or
between -64 and -1/16 beats, with respect to 1 beat
BEAT c, d buttons
LEVEL/DEPTH control
1 When [1] to [4] is selected with the effect channel selector switch,
the effect sound cannot be monitored even if the [CUE] button of the
selected channel is pressed.
of BPM time. The pitch ascends for beat fractions
between 1/16 and 64 beats. The pitch descends for
beat fractions between -64 and -1/16.
Adjusts the volume of the sawtooth wave sound to
be mixed.
Advanced operation
Roll
BEAT c, d buttons
LEVEL/DEPTH control
Changed from 1/2 to 1/1
Sets the effect time between 1/16 and 16 beats with
respect to 1 beat of BPM time.
Sets the balance between the original sound and
ROLL.
En
23
Page 24

Using the SOUND COLOR FX function
These effects change in association with the [COLOR] controls for the
different channels.
When the unit is connected with rekordbox dj, the SOUND COLOR FX
function of rekordbox dj can be used.
The SOUND COLOR FX function of the unit can be used with external
input.
1 Press a [SOUND COLOR FX SELECT] button.
Selects the type of effect.
The pressed button flashes.
! If a [SOUND COLOR FX SELECT] button is pressed when a
[SOUND COLOR FX SELECT] button is already selected, the newly
pressed button is selected.
The same effect is set for all channels.
!
2 Rotate the [COLOR] control.
The effect is applied to the channel for which the control is rotated.
Canceling the SOUND COLOR FX effect
Press the flashing [SOUND COLOR FX SELECT] button.
The effect is canceled.
Types of SOUND COLOR FX effects
rekordbox dj supports various SOUND COLOR FX.
When the software is used with the unit DUB ECHO, PITCH, NOISE and
FILTER are selected by default.
Effects other than these can be used by changing the SOUND COLOR
FX settings in rekordbox dj.
Switch SOUND COLOR FX of rekordbox dj to the [USER] mode to change
the SOUND COLOR FX setting. You can set each effect to the desired
effect.
Effect
name
DUB
ECHO
PITCH
NOISE
FILTER
Descriptions [COLOR] control
Outputs delayed
sounds repeatedly
after the original
sound and gradually attenuates the
delayed sounds to
achieve an echo
effect.
Changes the sound
pitch.
White noise generated inside this unit
is mixed in to the
sound of the channel via the filter and
output.
Outputs sound that
has passed through
a filter.
Turn counterclockwise: Applies the echo
effect to the mid-range only.
Turn clockwise: Applies the echo effect to the
high-range only.
Turn counterclockwise: The pitch descends.
Turn clockwise: The pitch rises.
Turn counterclockwise: Gradually decreases
the cut-off frequency of the filter through
which the white noise passes.
Turn clockwise: Gradually increases the cutoff frequency of the filter through which the
white noise passes.
Turn counterclockwise: Gradually decreases
the low-pass filter’s cut-off frequency.
Turn clockwise: Gradually increases the highpass filter’s cut-off frequency.
Using a microphone
1 Connect a microphone to the [MIC1] input terminal or
the [MIC2] input terminal.
2 Set the [OFF, ON, TALK OVER] selector switch to [ON]
or [TALK OVER].
— [ON]: The indicator lights up.
— [TALK OVER]: The indicator flashes.
! When set to [TALK OVER], the sound of channels other than
the [MIC1] channel and the [MIC2] channel is attenuated by -18
dB (default) when a sound of -10 dB or greater is input to the
microphone.
! The level of attenuation applied when [TALK OVER] is selected can
be changed in the utility screen. For information on how to change
this setting, refer to Microphone Talkover Level setting (p. 27 ).
! The talkover mode can be switched between normal mode and
advanced mode. For information on how to change this setting, refer
to Microphone Talkover Mode setting (p. 27 ).
3 Rotate the [MIC1 LEVEL] or [MIC2 LEVEL] control.
Adjusts the level of sound output from the [MIC1] channel or the [MIC2]
channel.
! The sound is output at a loud volume if the control is rotated to the
extreme right.
4 Input audio to the microphone.
Adjusting the sound quality
Rotate the [EQ (HI and LOW)] controls.
— [HI]: –12 dB to +12 dB (10 kHz)
— [LOW]: –12 dB to +12 dB (100 Hz)
Using MIC FX
1 Select the [MIXER/MIC] check box on rekordbox dj.
The MIC FX graphical user interface is displayed on rekordbox dj.
2 Adjust [LEVEL] on rekordbox dj.
3 Click the [ON] button on rekordbox dj.
The REVERB effect is applied to the MIC sound.
The MIC FX effect is fixed to REVERB.
Quitting MIC FX
Click the [ON] button for MIC FX on rekordbox dj.
MIC FX is canceled.
The MIC FX effect is also canceled if rekordbox is disconnected when
the effect is being applied.
24
En
Page 25

Using external inputs
This unit is equipped with four sets of external inputs for connecting CD
players, analog turntables, etc. The 4-channel mixer of this unit can be
used to mix input sound without passing through a computer.
Notes
! For details on the respective items, see Connections (p. 14 ) and
Part names and functions (p. 5 ).
! The functions of rekordbox dj cannot be used for external input.
! The values adjusted with the various controls for rekordbox dj differ
from the values adjusted with the various controls for external input.
Mixing the sound of a DJ player, etc.
1 Connect a DJ player or other line level output device
to the [LINE] input terminal or the [LINE/PHONO] input
terminal.
2 Set the [LINE/PHONO] switch on the rear panel of this
unit to [LINE].
3 Set the [USB A, LINE, USB B] selector switch or the
[USB A, PHONO/LINE, USB B] selector switch on the top
panel of this unit to [LINE] or [PHONO/LINE].
4 Adjust the level of sound output from each channel
with the [TRIM] control and channel fader.
Advanced operation
Mixing the sound of an analog turntable,
etc.
1 Connect an analog player or other phono level (for
MM cartridges) output device to the [LINE/PHONO] input
terminals of CH3 or CH4.
! CH1 and CH2 are input terminals for [LINE] only.
! Connect the ground wire of an analog player to the [SIGNAL GND]
terminal of this unit.
2 Set the [LINE/PHONO] switch on the rear panel of this
unit to [PHONO].
3 Set the [USB A, PHONO/LINE, USB B] switch on the
top panel of this unit to [PHONO/LINE].
4 Adjust the level of sound output from each channel
with the [TRIM] control and channel fader.
Using SOUND COLOR FX with external
input
The four SOUND COLOR FX SELECT types use the unit can be used with
external input.
For how to use SOUND COLOR FX SELECT, see Using the SOUND
COLOR FX function (p. 24 ).
The volume when the NOISE effect is used depends on the [TRIM] control of each channel.
En
25
Page 26

Changing the settings
Launching utilities mode
If utilities mode is launched while the unit and a computer are connected by a USB cable, the set status may not be displayed properly.
The “MIDI Controller Settings” can be set in the utilities mode.
This unit automatically switches operation as shown below depending
on whether or not rekordbox dj is running.
When rekordbox is running, controller operation depends on the
!
rekordbox dj functions.
!
When rekordbox dj is not running, this controller operates as a gen-
eral MIDI controller.
Even if rekordbox dj is running, this controller can forcibly be operated
as a general MIDI controller.
1 Disconnect the USB cable from the computer.
2 Press the [u] switch on the rear panel of this unit to
set the unit to standby.
This unit enters standby mode.
3 While pressing both the [SHIFT] and
[PLAY/PAUSE f] buttons on the left deck, press the
[u] switch on the rear panel of this unit.
Utilities mode is launched.
4 Press the [SLIP REVERSE] button on the left deck.
! [SLIP REVERSE] button (not lit): Automatically switches operation
depending on whether or not rekordbox is running.
! [SLIP REVERSE] button (lit): Forcibly operates as a general MIDI
controller regardless of whether or not rekordbox is running.
5 Press the [u] switch on the rear panel of this unit to
set the unit to standby.
To save the settings, set the [u] switch on the rear panel of this unit to
standby and quit utilities mode.
Display setting for the jog display
You can change the information displayed in the jog display section.
Display Artwork
When the [Display Artwork] check box is selected, the display is
enabled and the artwork for the track loaded from rekordbox is displayed
on the jog display.
Display CUE SCOPE
When the [Display CUE SCOPE] check box is selected, the display is
enabled and the CUE SCOPE is displayed on the jog display.
Time Mode
The information displayed for the time display can be switched with
[Time Mode].
! Elapsed: With 0:00 as the starting point of the track, displays the
time elapsed from the beginning to the current playback position.
! Remaining: With 0:00 as the end of the track, displays the time
remaining to the end from the current playback position.
Slip Mode Flashing
Changes the slip mode flashing setting.
— Enable: The buttons that can be operated only while slip mode is
on flash (the [HOT CUE] button, the [4 BEAT LOOP/EXIT] button,
etc.).
— Disable: The buttons that can be operated only while slip mode is
on do not flash.
Slip button LED while slip mode is on
Sets the lighting operation of the [SLIP] button for when slip mode is on.
— Light is On: The [SLIP] button lights up when slip mode is on,
and flashes while slip mode is being operated.
— Blink: The [SLIP] button does not light up when slip mode is on.
Changing the settings with rekordbox
The settings required for the DJ player can be changed with rekordbox.
Change the setting items in [Controller] of [Preferences].
! The following settings can be changed only when rekordbox and this
unit are connected.
Setting items in the [Deck] tab of
[Controller]
Ring Brightness setting
Sets the brightness of the JOG RING illumination.
You can switch the setting from a level of 1 to 3. The jog ring does not
illuminate when set to Off.
!
Set to 1 for the darkest illumination, and 3 for the brightest
illumination.
Jog > Brightness of the display setting
Sets the brightness of the jog display section.
5 levels from 1 to 5 are available for this setting.
! Set to 1 for the darkest illumination, and 5 for the brightest
illumination.
Setting items in the [Mixer] tab of
[Controller]
Fader Start setting
Changes the fader start function setting.
! By default, this is enabled.
When the [Activate the fader start when moving a channel fader
or the cross fader while pressing the SHIFT button.] check box is
selected, the function is enabled.
Cross Fader Curve setting
Switches the characteristics of the crossfader curve.
! The further the control is turned clockwise, the sharper the curve
rises.
! The further the control is turned counterclockwise, the more gradu-
ally the curve rises.
Cross Fader Cut Lag setting
Adjust the play (cut lag) of both ends of the crossfader.
Adjustment can be made from 0.3 mm to 5.5 mm in 0.1 mm increments.
! By default, the level is set to 1.0 mm.
26
En
Page 27

Output setting of the microphone to the booth
dB
Frequency
dB
Frequency
monitor
Changes whether or not the microphone sound is output from the booth
channel.
When the [Mic Output On Booth] check box is unselected, the microphone sound is output from the booth channel. When the check box is
selected, the microphone sound is not output from the booth channel.
Mixer > Brightness of the display setting
Sets the brightness of the mixer display section.
3 levels from 1 to 3 are available for this setting.
Set to 1 for the darkest illumination, and 3 for the brightest illumination.
Microphone Talkover Mode setting
Switches the talkover mode.
— Advanced Talkover Mode: Sound from channels other than the
microphone channel is output with only the mid-range attenuated
according to the talkover level setting.
Peak Limiter setting for Master Output
Lessens sudden, unpleasant digital clipping of the master output.
— Enable: Enables the peak limiter for master output.
Disable: Disables the peak limiter for master output.
—
Microphone sound limiter setting added to
Master Output
Lessens sudden, unpleasant digital clipping of the microphone sound
that is added to the master output.
—
Enable: Enables the peak limiter
— Disable: Disables the peak limiter
Microphone sound limiter setting added to
Booth Output
Lessens sudden, unpleasant digital clipping of the microphone sound
that is added to the booth output.
— Enable: Enables the peak limiter
—
Disable: Disables the peak limiter
SHIFT Function List setting
Changes the display setting for the SHIFT function list.
! By default, this is enabled.
When the [Display SHIFT Function List while pressing the SHIFT
button.] check box is selected, the SHIFT function list is displayed on
rekordbox while the [SHIFT] button is pressed.
Changing the settings
— Normal Talkover Mode: Sound from channels other than the
microphone channel is output with the sound attenuated according
to the talkover level setting.
Microphone Talkover Level setting
Sets the talk over function’s sound attenuation level.
Setting values: –6 dB / –12 dB / –18 dB / –24 dB
Setting items of [DDJ-1000] tab in
[Controller]
Master Attenuator Level setting
Sets the master output attenuator level.
Setting values: 0 dB / –6 dB / –12 dB
Monaural/Stereo Selection for Master Output
Switches the monaural/stereo setting for the master output sound.
— Monaural: Outputs the master sound in monaural.
— Stereo: Outputs the master sound in stereo.
Demo/Screen saver setting
Sets the screen saver function and the time for when to start demo
mode.
! By default, demo mode starts when there is no operation for 10
minutes.
! Demo mode is canceled if any of the controls or buttons of the unit
are operated during demo mode.
! When the screen saver function is enabled, it starts up when there is
no operation for 30 minutes.
— Demo (1 minute): Demo mode starts when there is no operation on
this unit for 1 minute.
— Demo (5 minutes): Demo mode starts when there is no operation on
this unit for 5 minutes.
— Demo (10 minutes): Demo mode starts when there is no operation
on this unit for 10 minutes.
— Screen saver: Enables the screen saver function.
— Disable: Demo mode and the screen saver function do not start.
Auto Standby setting
Changes the auto standby function setting.
When this setting is enabled, this unit enters standby automatically after
4 hours if any of the following conditions are met.
— None of this unit’s buttons or controls are operated.
— No audio signal of –18 dB or greater is input to an input terminal of
this unit.
! Standby status is canceled when the [QUANTIZE] button on the left
deck is pressed.
Booth Attenuator Level setting
Sets the booth output attenuator level.
Setting values: 0 dB / –6 dB / –12 dB
Monaural/Stereo Selection for Booth Output
Switches the monaural/stereo setting for the booth output sound.
Monaural: Outputs the booth sound in monaural.
—
— Stereo: Outputs the booth sound in stereo.
En
27
Page 28

Setting utility software
The setting utility can be used to perform the checks and settings
described below.
— Adjusting the buffer size (when ASIO is used)
— Checking the version of the driver software
Displaying the setting utility
For Mac
Click [Macintosh HD] icon > [Application] > [Pioneer] > [DDJ-1000]
> [DDJ-1000 driver version display utility].
For Windows 10
Click [Pioneer] > [DDJ-1000 Settings Utility] from the [Start] menu.
For Windows 8.1
From [Apps view], click [Pioneer] > [DDJ-1000 Settings Utility].
For Windows 7
Click [All Programs] > [Pioneer] > [DDJ-1000] > [DDJ-1000 Settings
Utility] from the Windows [Start] menu.
Adjusting the buffer size (when ASIO is
used)
This function can only be used by those using a Windows operating
system.
If an application using this unit as the default audio device (DJ software,
etc.) is running, quit the application before adjusting the buffer size.
Display the setting utility before starting.
% Click the [ASIO] tab.
% Click the [About] tab.
! You can check the firmware version of this unit on the screen.
! The firmware version is not displayed when this unit is not connected
to the computer or when this unit and computer are not properly
communicating.
! If a large buffer size is set, drops in audio data (breaks in the sound)
occur less easily, but the time lag due to the delay in the transfer of
the audio data (latency) increases.
Checking the version of the driver
software
Display the setting utility before starting.
En
28
Page 29

Additional information
Troubleshooting
! If you think that there is something wrong with this unit, access the Pioneer DJ support site and check [FAQ].
pioneerdj.com/support/
Some problems occur due to the connected components. If the problem cannot be resolved after checking the connected components, contact the
service center or your dealer for repairs.
! The player may not operate properly due to static electricity or other external influences. In such cases, normal operation may become possible if
you turn the power off and then back on.
Problem Check Remedy
The unit does not turn on.
The unit is not recognized. Is the included USB cable properly connected? Connect the included USB cable properly.
Sound is not output, or sound is too
small.
Sound is distorted. Is the [MASTER LEVEL] control set to the proper
Sound is interrupted when the DJ
software is used.
Cannot output the microphone sound. Are the [OFF, ON, TALK OVER] selector switches
Cannot output the sound of the
external device.
Sound is interrupted when the ASIO
driver is set.
Is the [u] switch of the power on the rear panel of
the unit on?
Is the included AC adapter properly connected? Connect the included AC adapter correctly.
Are you using a USB hub? USB hubs cannot be used. Connect the computer and this unit directly using
Is the driver software properly set?
Is your computer recognizing the unit? Windows: Check if the firmware version of this unit is displayed on the [About]
Are other applications running? Quit the other applications including screen savers and resident software.
Are USB devices other than this unit connected? Remove external hard disks and the keyboard (for some models), etc. to check
— If your computer has more than one USB terminal, check using a different USB
Are multiple ASIO drivers for units other than this
unit installed on the computer?
Is the sound setting on the computer set properly? Mac: Disconnect the USB cable connecting the unit and the computer, launch
Are the [TRIM] control, the channel fader, the
cross fader, the [USB A, PHONO/LINE, USB B]
selector switch (or the [USB A, LINE, USB B]
selector switch), the [LINE/PHONO] switch and
the [MASTER LEVEL] control set to the proper
positions?
Are the connected powered speakers, etc., properly set?
Are the connection cables properly connected? Connect the connection cables properly.
Are the terminals and plugs dirty? Clean the terminals and plugs before connecting them to the unit.
Is the driver software properly set?
position?
Is the [TRIM] control set to the proper position? Adjust the [TRIM] control so that the channel level indicator lights up in orange
Is the [LINE/PHONO] switch set to the proper
position?
Is the buffer size (latency) value appropriate? On a Windows operating system, use the setting utility to set an appropriate
set to the proper position?
Is the [USB A, PHONO/LINE, USB B] selector
switch (or the [USB A, LINE, USB B] selector
switch) set to the proper position?
Has the ASIO driver been set with rekordbox
running?
Turn on the [u] switch.
the included USB cable.
Set the driver software properly. (Page 31 )
tab of [DDJ-1000 Settings Utility]. (page 28 )
Mac: Check if the firmware version of this unit is displayed on the [About] tab of
[DDJ-1000 driver version display utility]. (page 28 )
(When quitting antivirus security software, before doing so, disable the Internet
connection to ensure the security of your computer.)
the status with only the built-in hard disc.
terminal.
Uninstall unnecessary ASIO drivers.
For details on how to uninstall ASIO drivers, check with the manufacturer of the
respective ASIO driver.
[Audio MIDI Setup] (the utility software for macOS or OS X), and the [MIDI
Window] or [MIDI studio] will be displayed. Select the [DDJ-1000] icon, and
click [Remove Device]. (The [USB MIDI Device] icon may be displayed instead
of the [DDJ-1000] icon. In that case, select [USB MIDI Device].) If this unit is
connected to the computer using the USB cable again, the [DDJ-1000] icon will
appear.
Set the [TRIM] control, the channel fader, the cross fader, the [USB A, PHONO/
LINE, USB B] selector switch (or the [USB A, LINE, USB B] selector switch), the
[LINE/PHONO] switch and the [MASTER LEVEL] control to the proper positions.
Properly set the external input selection, volume, etc., on the powered speakers,
etc.
Set the driver software properly. (Page 31 )
Adjust the [MASTER LEVEL] control to confirm that the master level indicator
lights up in orange at the highest volume.
at the peak level.
Set the [LINE/PHONO] switch to the proper position.
buffer size value. (page 28 )
On a Macintosh, set the appropriate buffer size (latency) value for the DJ
software.
Set the [OFF, ON, TALK OVER] selector switches to the proper position.
Set the [USB A, PHONO/LINE, USB B] selector switch (or the [USB A, LINE,
USB B] selector switch) to the proper position.
Set the ASIO driver before launching rekordbox. (page 28 )
Additional information
En
29
Page 30

Problem Check Remedy
The indicator flashes and operation
is strange.
Operation of rekordbox dj becomes
unstable.
The jog dial illumination does not turn
during playback. (It does turn when
scratching.)
The [TEMPO] slider does not work
when the deck is switched during
BEAT SYNC.
The fader start function does not work. Is a cue set? Set a cue. (page 21 )
Only one track deck is display on the
screen.
The platter is not displayed on the
track deck.
The sound of the sampler deck cannot
be monitored with headphones.
— Normal operation can be restored by disconnecting the AC adapter, waiting at
Are you using the latest version of the software? Free updates of rekordbox can be downloaded from the website. Use the most
Are you using software other than rekordbox at the
same time?
Are there other USB devices connected to the
computer?
Are you using a USB hub? USB hubs cannot be used. Connect the computer and this unit directly using
Is there a problem with the USB port to which this
unit is connected?
Is this unit connected to a notebook computer
running on its battery?
Is the USB buffer size too small? Raise the USB buffer size. (page 28 )
Is the utility mode setting correct? In utility mode, check that the unit is not set to be forcefully operated as a gen-
Is the fader start setting incorrect? To enable the fader start setting, select the [Mixer] tab of [Preferences]
Is rekordbox set to [EXPORT] mode? Click the area indicated by [EXPORT] at the upper left of the screen, and then
Has rekordbox dj been activated? Enter the rekordbox dj license key included with this unit on the [Preferences] >
Is [SAMPLER CUE] selected? Press the [SAMPLER CUE] button to turn on the monitor of the sampler deck.
Is the position of the [SAMPLER VOL] control still
turned counterclockwise?
least 1 minute, and then reconnecting the AC adapter.
If the same symptom persists, disconnect the AC adapter, and then make a
request for repairs.
recent version. (page 4 )
Quit the other applications to decrease the load on the computer.
If operation continues to be unstable, try disabling the wireless network or other
wireless connections, antivirus software, the screen saver, the low power mode,
etc. ( page 3 )
Disconnect the other USB devices from the computer.
When another USB audio device is connected to the computer at the same time,
this unit may not operate or be recognized normally.
the included USB cable.
If your computer has multiple USB ports, try connecting this unit to a different
USB port.
Supply power to the notebook computer from an AC power supply.
(Depending on the notebook computer’s settings, low power mode may be set
when the computer is running on its battery, automatically reducing the performance of the computer itself.) ( page 3 )
eral MIDI controller. (page 26 )
> [Controller] in rekordbox and then select the [Fader Start] check box.
(page 26 )
select [PERFORMANCE].
[License] screen of rekordbox. For details on how to activate the license key, see
“rekordbox Introduction”.
Set the [SAMPLER VOL] control to an appropriate position.
Liquid crystal display
! Small black or shining points may appear on the liquid crystal display. This is a phenomenon inherent to liquid crystal displays; this is not a
malfunction.
! When this unit is used in cold places, the liquid crystal display may be dark for a while after this unit is turned on. It will reach the normal bright-
ness after a while.
! When the liquid crystal display is exposed to direct sunlight, the light will reflect off it, making it difficult to see. Block the direct sunlight.
En
30
Page 31

Signal flow
CH1-4 Common
PHONO
LINE
USB A
USB B
CHx
Input
Select
USB:CHx Control Tone
TRIM
Detect CHx BPM
SOUND
COLOR FX
CHx
BEAT FX
CHx
USB SEND/RETURN
CHx
LEVEL METER CHx
SOUND
EQ
COLOR FX
BEAT FX
CHx
CHx
USB SEND/RETURN
USB : CUE CHx
CUE
Monitor
CHx
CH FADER
CUE CHx
Thru
A
B
CROSS FADER
CURVE switch
CROSS FADER
ASSIGN switch
CROSS
FADER
SOUND
COLOR FX
BEAT FX
CHx
USB:FX RETURN CHx
USB SEND/RETURN
USB:FX SEND CHx
CHx
MIC to BOOTH
Detect
MIC
HEADPHONE
CUE CHx
CUE MASTER
USB : MASTER OUT
LOWCUT
FILTER
CUE On/Off
MIC EQ
HEADPHONE
MIXING
MASTER BPM
USB:FX SEND MASTER
BEAT FX
MASTER
USB:FX RETURN MASTER
MIC ON/OFF
HEADPHONE LEVEL
USB SEND/RETURN
Detect
MIC BPM
USB:FX SEND MIC
BEAT FX
MIC
USB:FX RETURN MIC
TALK OVER ON/OFF
Talk Over
Mode
Advanced
/Normal
USB SEND/RETURN
HEADPHONE OUT
Using this unit as a controller for other DJ software
This unit also outputs the operating data for the buttons and controls in
MIDI format. If you connect a computer with built-in MIDI-compatible
DJ software via a USB cable, you can operate the DJ software from this
unit. The sound of music files being played on the computer can also be
output from the DDJ-1000.
To use this unit as a controller to operate DJ software other than rekordbox, switch to the setting for using software other than rekordbox in
the utilities screen. Also, set the DJ software’s audio and MIDI related
settings.
!
For details, see your DJ software’s operating instructions.
MIDI messages
For details on the MIDI messages on this unit, see “List of MIDI
Messages”.
! “List of MIDI Messages” can be acquired from the following Pioneer
DJ site.
pioneerdj.com/
Driver software
Dedicated driver software is required for outputting audio signals from
a computer.
MIC to
BOOTH
ON/OFF
TALK OVER
Talk Over
MIC
REVERB
Level
MIC
PEAK
LIMITER
MIC
Level Detect
BOOTH
MONO/
STEREO
MIC
PEAK
LIMITER
MIC to BOOTH
TALK OVER ON/OFF
BOOTH LEVEL
BOOTH
USB:MIX (REC OUT)
MASTER
LEVEL
CUE
Monitor
MASTER
CUE MASTER
ATT.
LEVEL METER MASTER
CLIP MASTER
MASTER
MATER
MONO/
STEREO
PEAK
LIMITER
! First read the Software end user license agreement on page 32
carefully.
Operating environment
Supported operating systems
Mac: macOS High Sierra 10.13/Sierra 10.12 (latest
update), OS X 10.11/10.10 (latest update)
Windows: Windows
(latest service pack)
®
10, Windows® 8.1, Windows® 7
32-bit version
64-bit version
Checking the latest information on the driver
software
For the latest information on the dedicated driver software for this unit,
see the following Pioneer DJ support site.
! pioneerdj.com/
Obtaining the driver software
1 Launch a web browser on a computer and access the
following Pioneer DJ site.
pioneerdj.com/
2 Click [Support].
3 Click [Software & firmware updates].
BOOTH OUT
Additional information
MASTER OUT
1
1
1
En
31
Page 32

4 Click [DDJ-1000] in the [DJ CONTROLLER] category.
5 After clicking [Drivers], download the latest driver
software from the download page.
Download the driver software for either Mac or Windows from the download page.
Installation (Mac)
Do not connect this unit and the computer until the installation is
completed.
Close all the applications running on the computer before installing
!
the software.
1 Unzip the driver software for Mac
(DDJ1000MXXXdmg.zip) downloaded in Obtaining the
driver software.
2 Double-click [DDJ-1000_M_X.X.X.dmg].
3 Double-click [DDJ-1000AudioDriver.pkg].
The driver software installation screen appears.
4 Check the details on the screen and click [Continue
Anyway].
5 When the end user license agreement appears, read
the Software end user license agreement carefully, and
then click [Continue Anyway].
6 If you consent to the provisions of the Software end
user license agreement, click [Agree].
If you do not consent to the provisions of the Software end user license
agreement, click [Disagree] and stop installation.
7 Complete the installation by following the
instructions on the screen.
Installation procedure (Windows)
Do not connect this unit and the computer until the installation is
completed.
Log in to the computer as the administrator before installation.
!
! Close all the applications running on the computer before installing
the software.
1 Unzip the driver software for Windows
(DDJ1000XXXexe.zip) downloaded in Obtaining the
driver software.
2 Double-click [DDJ-1000_X.XXX.exe].
The driver software installation screen appears.
3 Carefully read the Software end user license
agreement and if you consent to the provisions, put a
check mark in [I agree.] and click [OK].
If you do not consent to the provisions of the Software end user license
agreement, click [Cancel] and stop installation.
4 Complete the installation by following the
instructions on the screen.
If [Windows Security] appears on the screen while the installation is in
progress, click [Install this driver software anyway] to continue the
installation.
When the installation is completed, a completion message appears.
Software end user license agreement
This Software End User License Agreement (“Agreement”) is between
you (both the individual installing the Program and any single legal
entity for which the individual is acting) (“You” or “Your”) and Pioneer DJ
Corporation (“Pioneer DJ”).
TAKING ANY STEP TO SET UP OR INSTALL THE PROGRAM MEANS
THAT YOU ACCEPT ALL OF THE TERMS OF THIS LICENSE AGREEMENT.
PERMISSION TO DOWNLOAD AND/OR USE THE PROGRAM IS
EXPRESSLY CONDITIONED ON YOUR FOLLOWING THESE TERMS.
WRITTEN OR ELECTRONIC APPROVAL IS NOT REQUIRED TO MAKE
THIS AGREEMENT VALID AND ENFORCEABLE. IF YOU DO NOT
AGREE TO ALL OF THE TERMS OF THIS AGREEMENT, YOU ARE NOT
AUTHORIZED TO USE THE PROGRAM AND MUST STOP INSTALLING IT
OR UNINSTALL IT, AS APPLICABLE.
1 DEFINITIONS
1 “Documentation” means written documentation, specifications
and help content made generally available by Pioneer DJ to aid in
installing and using the Program.
2 “Program” means all or any part of Pioneer DJ’s software
licensed to You by Pioneer DJ under this Agreement.
2 PROGRAM LICENSE
1 Limited License. Subject to this Agreement’s restrictions,
Pioneer DJ grants to You a limited, non-exclusive, non-transferable, license (without the right to sublicense):
a To install a single copy of the Program in Your computer or
mobile device, to use the Program only for Your personal purpose complying with this Agreement and the Documentation
(“Authorized Use”);
b To use the Documentation in support of Your Authorized Use;
and
c To make one copy of the Program solely for backup pur-
poses, provided that all titles and trademark, copyright and
restricted rights notices are reproduced on the copy.
2 Restrictions. You will not copy or use the Program or
Documentation except as expressly permitted by this Agreement.
You will not transfer, sublicense, rent, lease or lend the Program,
or use it for third-party training, commercial time-sharing or
service bureau use. You will not Yourself or through any third
party modify, reverse engineer, disassemble or decompile the
Program, except to the extent expressly permitted by applicable
law, and then only after You have notified Pioneer DJ in writing of
Your intended activities.
3 Ownership. Pioneer DJ or its licensor retains all right, title
and interest in and to all patent, copyright, trademark, trade
secret and other intellectual property rights in the Program and
Documentation, and any derivative works thereof. You do not
acquire any other rights, express or implied, beyond the limited
license set forth in this Agreement.
4 No Support. Pioneer DJ has no obligation to provide support,
maintenance, upgrades, modifications or new releases for the
Program or Documentation under this Agreement.
3 WARRANTY DISCLAIMER
THE PROGRAM AND DOCUMENTATION ARE PROVIDED “AS IS”
WITHOUT ANY REPRESENTATIONS OR WARRANTIES, AND YOU
AGREE TO USE THEM AT YOUR SOLE RISK. TO THE FULLEST EXTENT
PERMISSIBLE BY LAW, PIONEER DJ EXPRESSLY DISCLAIMS ALL
WARRANTIES OF ANY KIND WITH RESPECT TO THE PROGRAM AND
DOCUMENTATION, WHETHER EXPRESS, IMPLIED, STATUTORY,
OR ARISING OUT OF COURSE OF PERFORMANCE, COURSE OF
DEALING OR USAGE OF TRADE, INCLUDING ANY WARRANTIES
OF MERCHANTABILITY, FITNESS FOR A PARTICULAR PURPOSE,
SATISFACTORY QUALITY, ACCURACY, TITLE OR NON-INFRINGEMENT.
4 EXPORT CONTROL AND COMPLIANCE WITH LAWS
AND REGULATIONS
You may not use or otherwise export or re-export the Program except as
authorized by United States law and the laws of the jurisdiction in which
the Program was obtained. In particular, but without limitation, the
Program may not be exported or re-exported (a) into any U.S.-embargoed
countries or (b) to anyone on the U.S. Treasury Department’s Specially
Designated Nationals List or the U.S. Department of Commerce Denied
Persons List or Entity List. By using the Program, you represent and warrant that you are not located in any such country or on any such list. You
also agree that you will not use the Program for any purposes prohibited
by United States law, including, without limitation, the development,
32
En
Page 33

design, manufacture, or production of nuclear, missile, or chemical or
biological weapons.
5 U.S. GOVERNMENT RESTRICTED RIGHTS
The Program and Documentations are “commercial computer software”
and “commercial computer software documentation” as those terms are
defined in 48 C.F.R. §252.227-7014 (a) (1) (2007) and 252.227-7014 (a) (5)
(2007). The U.S. Government’s rights with respect to the Program and
Documentations are limited by this license pursuant to 48 C.F.R. §12.212
(Computer software) (1995) and 48 C.F.R. §12.211 (Technical data) (1995)
and/or 48 C.F.R. §227.7202-3, as applicable. As such, the Program and
Documentations are being licensed to the U.S. Government end users:
(a) only as “commercial items” as that term is defined in 48 C.F.R. §2.101
generally and as incorporated in DFAR 212.102; and (b) with only those
limited rights as are granted to the public pursuant to this license. Under
no circumstance will the U.S. Government or its end users be granted
any greater rights than we grant to other users, as provided for in this
license. Manufacturer is Pioneer DJ Corporation, 6F, Yokohama i-Mark
Place, 4-4-5 Minatomirai, Nishi-ku, Yokohama, Kanagawa, 220-0012
Japan
6 DAMAGES AND REMEDIES FOR BREACH
You agree that any breach of this Agreement’s restrictions would cause
Pioneer DJ irreparable harm for which money damages alone would be
inadequate. In addition to damages and any other remedies to which
Pioneer DJ may be entitled, You agree that Pioneer DJ may seek injunctive relief to prevent the actual, threatened or continued breach of this
Agreement.
7 TERMINATION
Pioneer DJ may terminate this Agreement at any time upon Your breach
of any provision. If this Agreement is terminated, You will stop using
the Program, permanently delete it from your computer or mobile
device where it resides, and destroy all copies of the Program and
Documentation in Your possession, confirming to Pioneer DJ in writing
that You have done so. Sections 2.2, 2.3, 2.4, 3, 4, 5, 6, 7 and 8 will continue in effect after this Agreement’s termination.
8 GENERAL TERMS
1 Limitation of Liability. In no event will Pioneer DJ or its subsidiar-
ies be liable in connection with this Agreement or its subject
matter, under any theory of liability, for any indirect, incidental,
special, consequential or punitive damages, or damages for lost
profits, revenue, business, savings, data, use, or cost of substitute procurement, even if advised of the possibility of such damages or if such damages are foreseeable. In no event will Pioneer
DJ’s liability for all damages exceed the amounts actually paid by
You to Pioneer DJ or its subsidiaries for the Program. The parties
acknowledge that the liability limits and risk allocation in this
Agreement are reflected in the Program price and are essential
elements of the bargain between the parties, without which
Pioneer DJ would not have provided the Program or entered into
this Agreement.
2 The limitations or exclusions of warranties and liability contained
in this Agreement do not affect or prejudice Your statutory rights
as consumer and shall apply to You only to the extent such limitations or exclusions are permitted under the laws of the jurisdiction where You are located.
3 Severability and Waiver. If any provision of this Agreement is held
to be illegal, invalid or otherwise unenforceable, that provision
will be enforced to the extent possible or, if incapable of enforcement, deemed to be severed and deleted from this Agreement,
and the remainder will continue in full force and effect. The
waiver by either party of any default or breach of this Agreement
will not waive any other or subsequent default or breach.
4 No Assignment. You may not assign, sell, transfer, delegate or
otherwise dispose of this Agreement or any rights or obligations
under it, whether voluntarily or involuntarily, by operation of law
or otherwise, without Pioneer DJ’s prior written consent. Any
purported assignment, transfer or delegation by You will be null
and void. Subject to the foregoing, this Agreement will be binding
upon and will inure to the benefit of the parties and their respective successors and assigns.
5 Entire Agreement. This Agreement constitutes the entire agree-
ment between the parties and supersedes all prior or contemporaneous agreements or representations, whether written or oral,
concerning its subject matter. This Agreement may not be modified or amended without Pioneer DJ’s prior and express written
consent, and no other act, document, usage or custom will be
deemed to amend or modify this Agreement.
6 You agree that this Agreement shall be governed and construed
by and under the laws of Japan.
Trademarks and registered trademarks
! Pioneer DJ is a trademark of the PIONEER CORPORATION and is
used under license.
! rekordbox is a trademark or registered trademark of the Pioneer DJ
Corporation.
! Windows is a registered trademark of Microsoft Corporation in the
United States and other countries.
! Mac, macOS, OS X, and Finder are trademarks of Apple Inc., regis-
tered in the U.S. and other countries.
! Intel and Intel Core are trademarks of Intel Corporation in the U.S.
and/or other countries.
! ASIO is a trademark of Steinberg Media Technologies GmbH.
The names of companies and products mentioned herein are trademarks or registered trademarks of their respective owners.
This product has been licensed for nonprofit use. This product has not
been licensed for commercial purposes (for profit-making use), such
as broadcasting (terrestrial, satellite, cable or other types of broadcasting), streaming on the Internet, Intranet (corporate networks) or other
types of networks or distributing of electronic information (online digital music distribution services). You need to acquire the corresponding
licenses for such uses. For details, see http://www.mp3licensing.com.
Cautions on copyrights
rekordbox restricts playback and duplication of copyright-protected
music contents.
When coded data, etc., for protecting the copyright is embedded in
!
the music contents, it may not be possible to operate the program
normally.
! When rekordbox detects that coded data, etc., for protecting the
copyright is embedded in the music contents, processing (playback,
reading, etc.) may stop.
Recordings you have made are for your personal enjoyment and according to copyright laws may not be used without the consent of the copyright holder.
Music recorded from CDs, etc., is protected by the copyright laws of
!
individual countries and by international treaties. It is the full respon-
sibility of the person who has recorded the music to ensure that it is
used legally.
! When handling music downloaded from the Internet, etc., it is the
full responsibility of the person who has downloaded the music to
ensure that it is used in accordance with the contract concluded
with the download site.
— The specifications and design of this product are subject to change
without notice.
© 2017 Pioneer DJ Corporation. All rights reserved.
<DRI1516-A>
Additional information
En
33
 Loading...