


User’s Guide
Revision A - English
Pinnacle Systems, Inc. 280 N. Bernardo Ave Mountain View, CA 94043 www.pinnaclesys.com

License Agreement
This End User License Agreement (“License”) is a legal agreement between you and Pinnacle Systems (“Pinnacle”) regarding Pinnacle’s software and the accompanying documentation (collectively, the “Software”). CAREFULLY READ THE FOLLOWING LICENSE. USING THIS SOFTWARE INDICATES YOUR ACCEPTANCE OF THIS LICENSE. IF YOU DO NOT ACCEPT OR UNDERSTAND THE TERMS OF THIS LICENSE, YOU SHOULD NOT INSTALL THE SOFTWARE AND PROMPTLY RETURN THIS PRODUCT TO YOUR VALUE-ADDED RESELLER.
1. License Grant. Subject to the restrictions set forth below, this License grants you a nonexclusive, perpetual license to (a) install the Software on only one computer; (b) use or authorize use of the Software on only one computer; (c) make one copy of the Software, in machine-readable form, solely for backup purposes; provided you include all copyright and other proprietary rights notices on the copy and (d) transfer the Software and this License to another party if the other party agrees to accept the terms and conditions of this License. If you transfer the Software, you must at the same time either transfer all copies to the same party or destroy any copies not transferred. If you transfer possession of any copy of the Software to another party, your License is automatically terminated.
2. License Restrictions. You may not, or allow any third party to, (a) rent, lease, sell, loan or otherwise transfer the Software or any of your rights and obligations under this License; (b) install the Software on a network for use by multiple users, unless each user has purchased a license; (c) reverse-engineer, decompile or disassemble the Software or hardware in whole or in part; (d) remove or destroy any copyright notices or other proprietary markings of the Software or any third-party software; (e) modify or adapt the Software, merge the Software into another program or create derivative works based on the Software; (f) make copies of or distribute, for profit or otherwise, the Software, except as expressly provided above; (g) make any alteration, modification, connection, disconnection, improvement or adjustment of any kind to or use the Software except as explicitly contemplated in the enclosed documentation and in this License and (h) sublicense, transfer or assign this License or any of the rights and obligations granted under this License, except as explicitly contemplated in this License. Any purported transfer or assignment will be void.
3. Export Restrictions. The export and re-export of Pinnacle software products are controlled by the United States Export Administration Regulations and such software may not be exported or re-exported to any country to which the United States embargoes goods. In addition, Pinnacle software may not be distributed to persons on the Table of Denial Orders, the Entity List, or the List of Specially Designated Nationals. By downloading or using a Pinnacle software product you are certifying that you are not a national of any country to which the United States embargoes goods and that you are not a person on the Table of Denial Orders, the Entity List, or the List of Specially Designated Nationals.
4. Ownership. The license granted hereunder does not constitute a transfer or sale of ownership rights in or to the Software. Except for the license rights granted above, Pinnacle retains all right title and interest in and to the Software including all intellectual property rights therein. The Software is protected by applicable intellectual property laws, including United States copyright laws and international treaties.
5. Third Party Proprietary Property. This Software may contain the proprietary property of others, which has been licensed to Pinnacle, your use of the Software is expressly conditioned on your agreement not to remove any copyright notices or other proprietary markings of the third party software.
6. Security. You acknowledge and agree that in order to protect the integrity of certain third party content, Pinnacle and/or its licensors may provide for Software security related updates that will be automatically downloaded and installed on your computer. Such security related updates may
impair the Software (and any other software on your computer which specifically depends on the Software) including disabling your ability to copy and/or play "secure" content, i.e. content protected by digital rights management. In such an event, Pinnacle and/or its licensors shall use reasonable efforts to promptly post notices on Pinnacle’s web site explaining the security update and providing instructions to end-users for obtaining new versions or further updates of the Software that restore access to secure content and related features.
7. Term and Termination. This License shall be effective upon installation of the Software and shall terminate upon the earlier of (a) your failure to comply with any term of this License; (b) return, destruction or deletion of all copies of the Software in your possession or (c) transfer of the Software and this License to another party in accordance with Section 1(d). Pinnacle’s rights and your obligations shall survive termination of this License.
8. Limited Warranty. Pinnacle warrants to the original licensee that the Software, as delivered, will perform in accordance with the accompanying documentation for a period of 30 days from the date of the original purchase (“Limited Warranty”). Pinnacle’s entire liability and your exclusive remedy for breach of the preceding Limited Warranty shall be, at Pinnacle’s sole option, repair or replacement of the Software that does not meet the warranty set forth herein and that is returned to Pinnacle. This limited warranty shall be void if failure of the Software has resulted from any accident, abuse, misuse or misapplication by you. Any replacement Software will be warranted for the remainder of the original warranty period or 30 days, whichever is longer.
9. NO OTHER WARRANTIES. EXCEPT AS SET FORTH ABOVE, THE SOFTWARE IS PROVIDED ON AN “AS IS” BASIS. YOU ASSUME ALL RESPONSIBILITIES FOR THE QUALITY AND PERFORMANCE OF THE SOFTWARE. TO THE MAXIMUM EXTENT PERMITTED BY APPLICABLE LAW, PINNACLE DISCLAIMS ALL WARRANTIES, EITHER EXPRESS OR IMPLIED, INCLUDING BUT NOT LIMITED TO IMPLIED WARRANTIES OF MERCHANTABILITY, NONINFRINGEMENT, AND FITNESS FOR A PARTICULAR PURPOSE. LICENSOR DOES NOT WARRANT THAT THE FUNCTIONS CONTAINED IN THE SOFTWARE WILL MEET YOUR REQUIREMENTS, BE UNINTERRUPTED OR ERROR FREE.
10. LIMITATION OF LIABILITY. YOU AGREE THAT IN NO EVENT WILL PINNACLE BE LIABLE FOR ANY CONSEQUENTIAL, SPECIAL, INDIRECT, INCIDENTAL OR PUNITIVE DAMAGES WHATSOEVER, EVEN IF PINNACLE HAS BEEN ADVISED OF THE POSSIBILITY OF SUCH DAMAGES. IN NO EVENT SHALL PINNACLE’S LIABILITY EXCEED THE TOTAL AMOUNT OF THE FEES PAID FOR THE SOFTWARE. Some states/jurisdictions do not allow the limitation or exclusion of incidental or consequential damages in certain circumstances, so the above limitations may not apply in some circumstances.
11. General. This License is governed by the laws of the State of California and by the federal laws of the United States, without reference to conflict of laws principles. The federal and state courts within the County of Santa Clara, California shall have excusive jurisdiction to adjudicate any dispute arising out of this License and you hereby consent to the personal jurisdiction of the federal and state courts within the County of Santa Clara, California. This License is the entire agreement between you and Pinnacle and supersedes any other communication with respect to the Software. No modification of or amendment to this License will be effectiv e unless in writing signed by both parties. If any provision of this License is held invalid or unenforceable, the remainder of this License will continue in full force and effect.
Table Of Contents
LICENSE AGREEMENT........................................................ |
3 |
TABLE OF CONTENTS ........................................................ |
5 |
INTRODUCTION.................................................................. |
9 |
What is Hollywood FX?.................................................................. |
9 |
Hollywood FX Levels................................................................... |
10 |
Before You Start.......................................................................... |
11 |
Installing Hollywood FX............................................................... |
12 |
Licensing and Registration.......................................................... |
13 |
Customer Support....................................................................... |
14 |
GETTING STARTED .......................................................... |
15 |
Pinnacle Studio........................................................................... |
16 |
Pinnacle Edition and Liquid ......................................................... |
19 |
Adobe Premiere .......................................................................... |
22 |
Avid AVX .................................................................................... |
25 |
TUTORIALS ..................................................................... |
29 |
Transitions & Options.................................................................. |
29 |
Transition+ ................................................................................. |
33 |
MultiWindow FX .......................................................................... |
35 |
PINNACLE ONLINE ........................................................... |
39 |
TROUBLESHOOTING ........................................................ |
41 |
PERFORMANCE ............................................................... |
43 |
CPU Speed, Bus Speed, and Memory ........................................... |
43 |
Graphic Card Drivers................................................................... |
43 |
Preview Performance .................................................................. |
43 |
Final Rendering Performance....................................................... |
44 |
ADVANCED TUTORIALS.................................................... |
45 |
Keyframe Editing with Envelopes Plus PRO ...................................... |
45 |
Flight Path Editing Plus PRO ........................................................... |
49 |
Creating New FX from Existing FX PRO ......................................... |
54 |
Warp Plugins PRO ........................................................................ |
59 |
5
Hollywood FX User’s Guide
3D Text Generation PRO ............................................................... |
62 |
REFERENCE GUIDE .......................................................... |
63 |
THE HOLLYWOOD FX DIALOG ........................................... |
65 |
The Hollywood FX Dialog ............................................................ |
65 |
The Control Panel....................................................................... |
66 |
The Monitor Panel ...................................................................... |
71 |
The Item Panel............................................................................ |
73 |
The Envelope Editor Panel Plus PRO ............................................... |
73 |
The Buttons Panel...................................................................... |
73 |
THE FX CATALOG............................................................. |
75 |
Organizing FX ............................................................................ |
75 |
BASIC OPTIONS ............................................................... |
77 |
Easy Flight Controls ................................................................... |
77 |
Easy Lighting Controls ............................................................... |
78 |
Easy Options Controls ................................................................ |
78 |
ADVANCED OPTIONS PLUS PRO ............................................. |
81 |
Shadow Controls ........................................................................ |
81 |
Trail Count................................................................................. |
82 |
Motion Blur Controls................................................................... |
82 |
Hold Times................................................................................. |
82 |
MEDIA OPTIONS ............................................................... |
85 |
Media Selection.......................................................................... |
85 |
Preview and Trimming Plus PRO ..................................................... |
86 |
Information ................................................................................ |
86 |
Playback Control........................................................................ |
86 |
Cropping Controls Plus PRO ........................................................... |
87 |
OBJECT OPTIONS PLUS PRO .................................................. |
89 |
Object Hierarchies...................................................................... |
89 |
Select File…............................................................................... |
90 |
Positioning Controls ................................................................... |
90 |
Morph & Dissolve ....................................................................... |
91 |
Parent Object ............................................................................. |
92 |
Object Flags............................................................................... |
92 |
SURFACE OPTIONS PLUS PRO ............................................... |
93 |
6
Table Of Contents
Texture Options .......................................................................... |
93 |
Color Options ............................................................................. |
94 |
THE ENVELOPE EDITOR PLUS PRO ......................................... |
97 |
The Single Value Envelope .......................................................... |
97 |
Multiple Value Envelope .............................................................. |
98 |
The Envelope Window................................................................. |
98 |
The Envelope Buttons ................................................................. |
99 |
Key Type Controls..................................................................... |
100 |
Keyframe Controls .................................................................... |
100 |
Spline Controls ......................................................................... |
104 |
PLUGINS PRO .................................................................. |
105 |
Managing Plugins...................................................................... |
105 |
Filter - Blur................................................................................ |
107 |
Filter - Chroma Key ................................................................... |
108 |
Filter - Luma Key....................................................................... |
109 |
Filter - Directional Wipe ............................................................. |
110 |
Filter – Edge Wipe..................................................................... |
111 |
Filter - Gradient Wipe................................................................. |
112 |
Warp – AlphaParticles ............................................................... |
113 |
Warp – Displacement Map.......................................................... |
115 |
Warp – Explode......................................................................... |
116 |
Warp – Peel............................................................................... |
118 |
Warp – PolyShrink..................................................................... |
120 |
Warp – Ripple ........................................................................... |
121 |
Warp – Swirl ............................................................................. |
123 |
Warp - Twist.............................................................................. |
124 |
EXPORT HFZ PRO ............................................................ |
125 |
IMPORT 3D PRO ............................................................... |
127 |
3D TEXT PRO ................................................................... |
129 |
THE SETTINGS DIALOG .................................................. |
131 |
Preview Settings ....................................................................... |
131 |
Edit Settings............................................................................. |
132 |
Render Performance.................................................................. |
133 |
7

Introduction
Thank you for purchasing Hollywood FX. Hollywood FX gives you an incredible collection of 3D transitions that you can quickly add to your video productions, and customize completely for your needs. This chapter will introduce you to Hollywood FX, provide instructions for installation and give contact information for customer support.
This is a general guide to using Hollywood FX. If you received Hollywood FX as part of a complete Pinnacle Systems’ solution, then you should first read the Hollywood FX chapter in the guide that came with that solution.
What is Hollywood FX?
Hollywood FX is an incredible collection of real 3D transitions and effects that you can add to any video production. Hollywood FX works as an integrated plugin to your video editing software (host application). Hollywood FX is:
∙Real 3D. Hollywood FX uses OpenGL to provide hardware accelerated, high quality 3D rendering.
∙Easy To Use. Simply drag-and-drop Hollywood FX into your timeline like any other transition. The Hollywood FX dialog will appear and you can select a transition, change your options, or customize an effect.
∙Organized. Transitions are organized into convenient categories with icons that let you find the transition you want quickly.
∙Convenient. With every transition you can change the flight direction, lighting, shadows, shine and antialiasing with the click of your mouse.
∙MultiWindow Excitement. Hollywood FX supports unlimited video sources to create multi-layer 3D composites. Create cubes with different video sources on each side, and much more.
∙Expandable. Additional theme packs of 3D transitions are available through Pinnacle Online at hollywoodfx.pinnaclesys.com, and Hollywood FX PRO lets you share your own creations with other users.
9

Hollywood FX User’s Guide
Hollywood FX Levels
There are three levels of Hollywood FX:
∙Basic. Includes 100 transitions and simple control over flight direction, lighting, shadows shine, motion blur, trails, and antialiasing (Basic for Pinnacle Studio includes 16 sample transitions and limited control).
∙Plus. Enables 188 additional transitions (288 total) plus advanced control over lighting, light direction, shadows, shine, motion blur, trails, antialiasing and more. Plus lets you customize any transition with full keyframe editing of flight paths, object shape (morphing) and transparency of objects.
∙PRO. Enables 96 additional transitions (384 total) and gives you complete control over all 3D rendering options. Pro provides a complete suite of 3D tools to create your own 3D transitions and effects:
oComplete keyframe editing of all object, surface, light and camera attributes in a full 3D editing environment.
oIncludes a suite of image filters including: Blurs, Directional Wipe, Edge Wipe, Gradient Wipe and Luma and Chroma key.
oIncludes a powerful suite of 3D warp plugins including: Alpha Particles, Displace, Explode, Peel, PolyShrink, Swirl and Twirl.
oAdds an incredible 3D text generator that lets you create amazing 3D text fly-ons.
oImport your own 3D objects (Lightwave 5 format) to create completely unique 3D effects.
oShare your customized effects with others by exporting a simple self-installing compressed file that contains the effect and all objects and images needed for that effect.
You can easily and instantly upgrade between these levels over the Internet at Pinnacle Online or purchased packaged upgrades from your video reseller.
This is a complete guide for all levels of Hollywood FX. Sections and features that are available in Plus and Pro are marked with  and features are only available in Pro are marked with PRO .
10
Introduction
Before You Start
Before getting started with Hollywood FX you should have a good working knowledge of your Windows system. You should be able to use the mouse to select menu options and should understand and be able to use the common controls.
You should also be thoroughly familiar with your video editing software. You should be able to use clips in the timeline and understand how to add and modify transitions and filters.
Throughout this document we use the term FX to refer to the transitions and effects in Hollywood FX. This term generically describes the following types of transitions and effects:
∙Transition. These are standard A-B transitions, where one video source transitions into a second.
∙Transition+. These are also A-B transitions; however, they may have additional video channels that can be mapped with video. For example, the FlipOver FX features the first video source flipping over like a card to reveal the second video source. There is a third video source that is visible in the background as the “card” flips over.
∙MultiWindow. These effects are not transitions at all. Instead, windows of video may fly on or off the screen into various positions while playing your video.
11

Hollywood FX User’s Guide
Installing Hollywood FX
If Hollywood FX was included in a Pinnacle Systems’ solution, it will be installed automatically with that product, and you can skip this section.
Before installing Hollywood FX, verify that you have the correct minimum requirements:
∙PC compatible computer with at least a 300 MHz (Intel Celeron/Pentium II, or AMD Duron/Athlon class processor)
∙Windows 98 Second Edition, Windows ME, Windows 2000, or Windows XP.
∙64 MB RAM (more may be required by your video editing software). For multi-window effects, 128 to 256 MB (or more) is recommended.
∙At least 200 MB Hard Disk space.
∙16 or 24 bit display adapter. 3D OpenGL accelerator recommended.
·To install Hollywood FX:
FInsert the Hollywood FX CD into your CD-ROM drive. The Main Installation menu for your software will appear.
FSelect Install Hollywood FX. The Language Selection dialog will appear.
FSelect your preferred language then click Ok. The Serial Number dialog will appear.
FEnter the serial number that came with your software (it normally can be found on the first page of this guide or on the CD-ROM sleeve). Enter the serial number exactly as shown, including dashes, then click
Ok.
FClick Next to continue. The Setup Path dialog will appear.
FNormally you should accept the default path for installation. Do not select your non-linear editor’s plug-in path for installation; the installer will automatically install the files needed into your non-linear editor’s folders. Click Next to continue. Hollywood FX will be installed on your system.
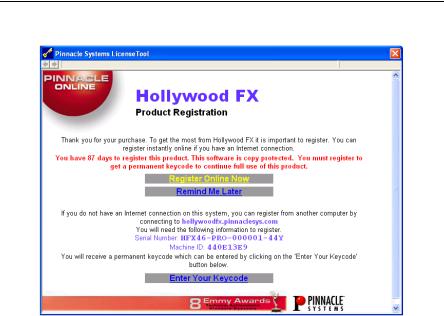
FAfter installation, the LicenseTool dialog will appear. You have the option to register online immediately (see Licensing and Registration).
FAfter installation, you may be required to restart your system.
12
Introduction
Licensing and Registration
The License Tool
Registering your software gives you access to important benefits including current updates, support, upgrade promotions, and information on exciting new products from Pinnacle Systems.
Hollywood FX Basic and Plus do not require registration, but will continue to remind you until you have registered your software.
Hollywood FX PRO is copy protected, and users must register within 90 days to continue using the software.
When you register a Hollywood FX product, you will receive a permanent keycode that fully enables Hollywood FX on a particular computer and stops the registration reminders.
You can register from any Internet-enabled computer by connecting to hollywoodfx.pinnaclesys.com. If you do not have your own Internetenabled computer, you can register from any computer that is connected to the Internet (from a Library or Internet café for example).
If you reformat your system drive and reinstall the operating system or move Hollywood FX to a new computer, you will need to get a new permanent keycode, which you can do quickly at hollywoodfx.pinnaclesys.com.
13

Hollywood FX User’s Guide
Customer Support
Pinnacle Systems is dedicated to providing the best products and the best customer support.
For fastest support, point your browser to
www.pinnaclesys.com/support.
Please note Pinnacle Systems cannot provide support for using your nonPinnacle video editing software. You should first make sure you fully understand the operation of your other software before calling. You should also look through the Readme file and the Troubleshooting section of this guide before contacting customer support.
Instant Online Support: www.pinnaclesys.com/support
Phone (North & South America): 1-317-577-8788
Austria & Switzerland = +31-411-619-919
Belgium = 0902-88-101
France = 0836-687-512
Germany = 0190 510 083 or +31 411 619 577
Italy = 02 754 19 604
Netherlands = 0900 202 8 202
Scandinavia = +31 411 619 069
Spain = 91 375 4511
United Kingdom = 0640 701 111
14

Getting Started
This chapter provides quick-start documentation for each video editor (host application) that Hollywood FX plugs into. For each host application, the basic procedure is described for adding and modifying Hollywood FX transitions and filters, as well as hints and tips specific to that video editor. After reading the section describing your video editor, you should continue to the tutorials in the following chapter.
15
Hollywood FX User’s Guide
Pinnacle Studio
Hollywood FX transitions can be applied between video clips and titles within Pinnacle Studio 7 and higher.
Adding a Hollywood FX Transition
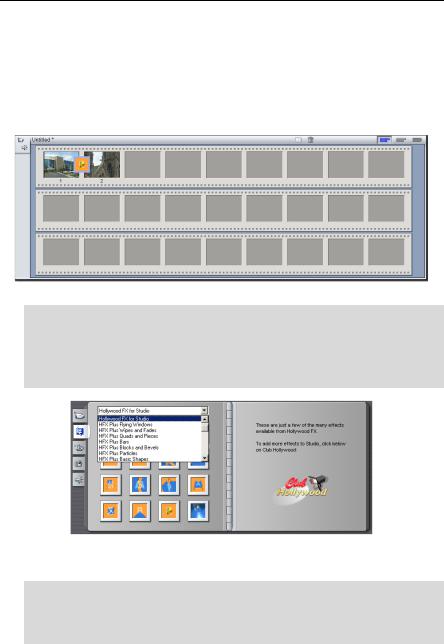
To use Hollywood FX, first prepare two video sources into the storyboard.
Two video clips ready with a Hollywood FX transition in the storyboard
· To add a transition to the storyboard or timeline:
FMake sure the Transitions tab in the Album is visible.
FSelect the Hollywood FX For Studio group from the drop down menu.
FDrag the desired transition to the storyboard or timeline between the two video clips.
The Hollywood FX for Studio transition group
Changing a Hollywood FX Transition
· To reverse or edit a transition:
FGo to the desired transition in the storyboard.
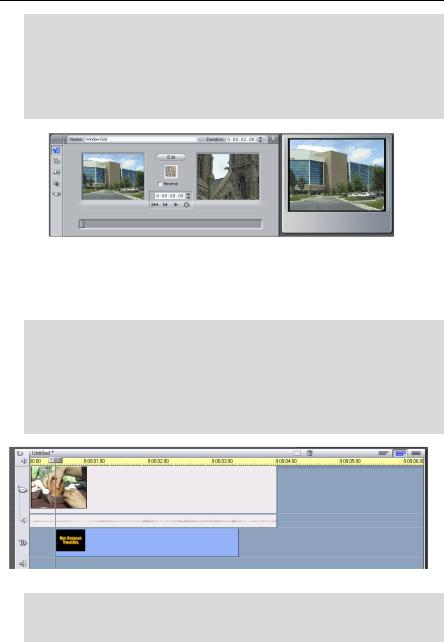
FDouble-click on the transition block. The Transition Toolbox should appear.
16
Getting Started
FYou can quickly reverse the direction by checking the Reverse check box.
FYou can also type in a specific duration for the effect.
FIf you have Hollywood FX Plus or PRO, you will see the Edit button. When you click the Edit button, the Hollywood FX dialog will appear, letting you choose a specific transition, and change options for your transition.
The Studio Transition Toolbox where you can edit your selection.
Using Hollywood FX With Titles
You can use Hollywood FX to fly titles on and off over video and creating incredible results.
· To prepare:
FStart a new project
FSwitch to timeline view in Studio.
FAdd a video clip to the Video track on the timeline.
FNow drag a title from the Album into the Title track, and adjust the start and end time of the title so that it starts slightly after the video starts and ends before the video ends.
The title and video ready for Hollywood FX
· Make the title Fly On
FMake sure the Transitions tab in the Album is visible.
FSelect the Hollywood FX For Studio group from the dropdown menu.
17
Hollywood FX User’s Guide
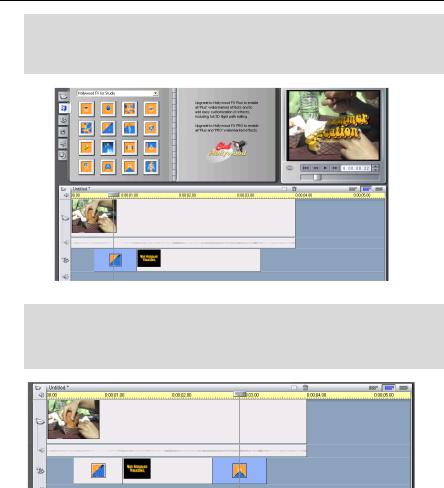
FDrag BAS-Page Peel from the album (when you stop the mouse pointer over an icon, the effect name will appear) into the timeline at the beginning of the title.
FAdjust the length of the transition as desired.
Hollywood FX flies the title on
· Make the title Fly Off
FClose the toolbox if it is still open.
FFrom the Hollywood FX For Studio group in the Transition Album, drag and drop PLS-Warp into the timeline at the end of the title.
Hollywood FX flies the title off
Notes
Hollywood FX Basic for Studio includes the 16 effects in the Hollywood FX For Studio effect group. The additional HFX effect groups contain effects that are available by upgrading to Plus and Pro. You can try out these effects, but each one is rendered with a watermark that indicates which level of HFX is needed to fully use that effect. You can instantly upgrade to Plus or Pro through Pinnacle Online at hollywoodfx.pinnaclesys.com. When you do so, the watermarks will be removed.
18
Getting Started
Pinnacle Edition and Liquid
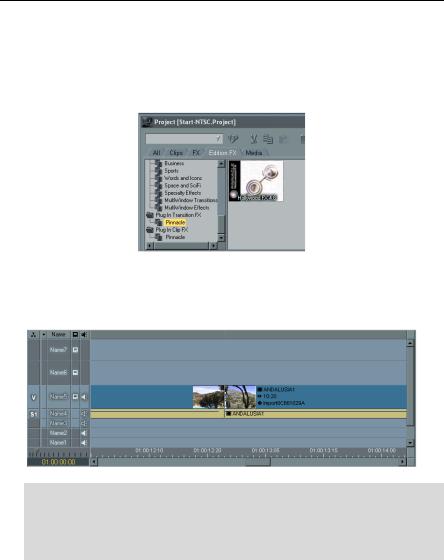
The Hollywood FX effects can be found under PlugIn Transition FX and Plugin Clip Fx folders under the Edition.FX tab in the Project window.
Adding a Hollywood Transition
Before adding a Hollywood FX transition, prepare two video sources on the A and B tracks of the timeline, so that there is some overlap between the two video clips.
· To add a transition to the timeline:
FClick on the Edition.FX tab in the Project window, then double-click on the Plugin Transition FX folder, and the Pinnacle group.
FDrag Hollywood FX from the Project window into the timeline, between the two video clips.
19
Hollywood FX User’s Guide
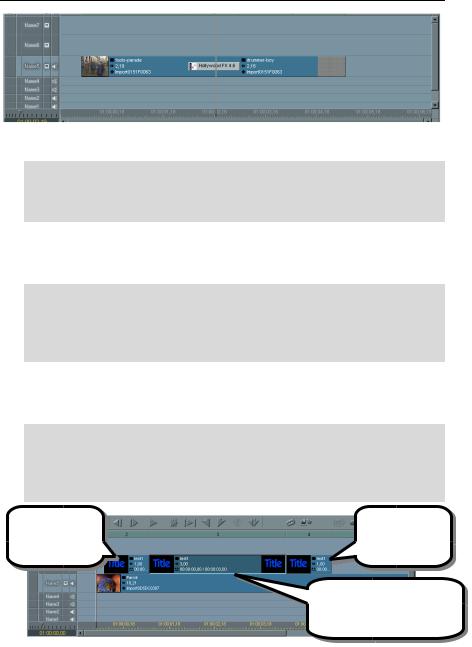
A Hollywood FX Transition in the timeline
FDouble-click on the transition block or Right-click on the transition and choose the Edit... command from the popup menu.
FThe Hollywood FX dialog will appear, letting you choose a specific transition, and change options for your transition.
Changing an Existing HFX Transition
You can modify a transition that is already in the timeline, changing the selected effect or any options at any time.
· To change an existing transition in the timeline:
FDouble-click on the transition block or Right-click on the transition and choose the Edit... command from the popup menu.
FThe Hollywood FX dialog will appear, letting you choose a specific transition, and change options for your transition.
Using Hollywood FX As a Filter
Hollywood FX can also be used as a filter on a graphic, title, or video clip. Hollywood FX is great for flying on or off titles over video.
· Prepare video and a graphic:
FStart a new sequence and drag a video clip into the first video track.
FSelect a title, and drag that same title three (3) times into the timeline, on the video track immediately above the video clip you dragged into the first track.
The first copy of |
The last copy of |
the title will fly on |
the title will fly |
over the video clip. |
offscreen. |
The second copy of the title will simply be overlayed on the video clip.
The Timeline, ready for a Hollywood FX Filter
20
Getting Started
· Fly on the title with Hollywood FX:
FIn the Project window, click on the Edition.FX tab, then double-click on the Plug In Clip Fx folder.
FDrag the Hollywood FX 4.6 Filter from the Project window into the timeline on top of the first copy of the title.
Click on this icon to display the Hollywood FX dialog.
Hollywood FX Filter added to first title clip
FDouble-click on the asterisk (*) icon on the title clip to display the Hollywood FX dialog.
FClick on the Domino effect in the first row of the FX Catalog.
FClick on Basic Options in the Control panel on the left.
FCheck the Reverse Flight checkbox (this will make the effect fly on instead of fly off).
FClick Ok to close the Hollywood FX dialog.
After background rendering is complete, you can playback the sequence and see the title fly on with the effect selected.
· Fly off with Hollywood FX:
FDrag the Hollywood FX 4.6 Filter from the Project window into the timeline on top of the last copy of the title.
FDouble-click on the asterisk (*) icon on the title clip to display the Hollywood FX dialog.
FSelect the Dive Off effect from the first row of the FX Catalog.
FClick Ok to close the Hollywood FX dialog.
When background rendering is complete, you can playback the sequence, and you will now see the title fly on, hold, then fly off.
21

Hollywood FX User’s Guide
Adobe Premiere
Hollywood FX appears in the Pinnacle Folder in Adobe Premiere. If it does not appear see Troubleshooting for more information.
Adding a New HFX Transition
Before adding a Hollywood FX transition, prepare two video sources on the A and B tracks of the timeline, so that there is some overlap between the two video clips.
Two video clips ready for a Hollywood FX transition
· To add a transition to the timeline:
FMake sure the Transitions window is visible. If not, select Transitions from the Windows menu.
FDrag Hollywood FX from the Transitions window into the Transition track of the Construction window so that it is between the two video clips (the transition should automatically snap to fill the time between the two clips.
A Hollywood FX transition in the timeline
FDouble-click on the transition block. The Hollywood FX dialog should appear.
22

Getting Started
The Hollywood FX dialog lets you choose a specific transition, and change options for your transition (and will be described in full detail later).
FClick on Dive Off in the first row of icons in the FX Catalog.
FClick Ok to close the Hollywood FX dialog.
FRender that section of your project in Premiere to see the results.
Changing an Existing Transition
You can modify a transition that is already in the timeline, changing the selected gradient or any options.
· To change a transition in the timeline:
FDouble-click on the representation of the transition in the Transition track to display the Hollywood FX dialog.
FMake your changes in the Hollywood FX dialog then click Ok to close.
Using Hollywood FX As a Filter
Another way to use Hollywood FX is as a Filter. As a filter you can perform multi-layer transitions within Premieres timeline. One great use of Hollywood FX as a filter is to use it to fly titles around over video clips and other transitions.
· To prepare for the tutorial:
FStart a new project.
FPlace a video clip on Video 1A
FCreate a title and place two copies of it in Video 2 as shown in the picture below.
Two copies of the title placed above the video clip
FRight-click on the second title in the timeline and select Video Options- >Transparency from the popup menu.
23

Hollywood FX User’s Guide
FIn the Transparency Settings dialog change the key type to Alpha Channel, click Ok.
Premiere’s Transparency Dialog
FFrom the Video Tab, drag and drop the Hollywood FX 4.6 filter onto
the second title.
The Hollywood FX 4.6 filter
FNow click the Setup button next to the Hollywood FX in the Effect Control panel (the name of the specific effect selected will be listed); the Hollywood FX dialog will appear.
Access to the Hollywood FX dialog from the Effect Controls palette
FClick on the Domino effect in the first row of icons in the FX Catalog.
FClick Ok to close Hollywood FX.
FSave and render the Premiere project to see the results.
24

Getting Started
Avid AVX
Avid’s AVX plugin structure allows for flexibility with Hollywood FX. Hollywood FX can be used as a single image filter, a transition, or for MultiWindow effects directly within the timeline. The following sections describe the process for using Hollywood FX in Avid AVX compatible products.
Adding A Hollywood FX Transition
To add a Hollywood FX transition to the Avid timeline, first add two video sources that you want to transition between, and trim as necessary to create time for the transition.
· To add a transition to the timeline:
FOpen the Effect Palette (Ctrl-8).
FSelect the Pinnacle Hollywood FX group from the left side of the Effect Palette.
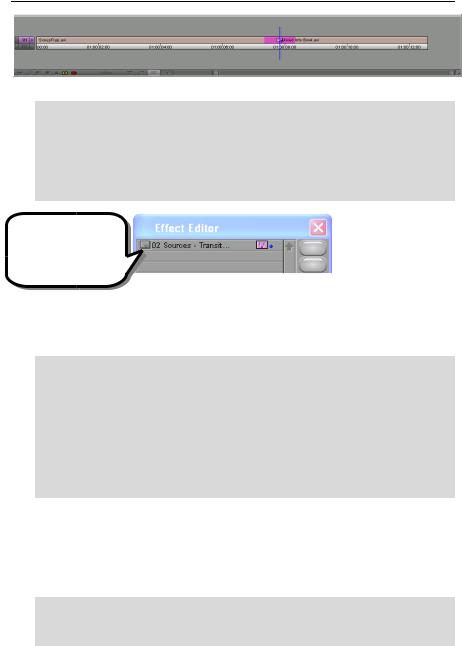
FDrag 02 Sources – Transition from the right side of the Effect Palette into the timeline, between the two video clips.
FOnce dropped into the timeline, switch to Effect Mode (so that the Effect Editor window is open, and click on the small button icon to the left of
02 Sources - Transition.
Hollywood FX in the Avid Effect Palette
The Hollywood FX dialog will appear, letting you choose a specific FX, and set the options for rendering that FX.
Changing an Existing Transition
You can modify a transition that is already in the timeline, changing the selected FX or any options.
25
Hollywood FX User’s Guide
A Hollywood FX transition in the Avid Timeline
· To change a transition in the timeline:
FSwitch to Effect Mode.
FClick on the plugin icon in timeline.
FClick on the button to the left of 02 Sources - Transition in the Effect Editor window.
FMake your changes in the Hollywood FX Selection dialog.
Click here to display the
Hollywood FX dialog.
Hollywood FX in the Avid Effect Editor
Adding A Hollywood FX Filter
Hollywood FX can also be used as a filter for a single video source in Avid AVX compatible products.
· To add a filter to the timeline:
FOpen the Effect Palette (Ctrl-8).
FSelect the Pinnacle Hollywood FX group from the left side of the Effect Palette.
FDrag 01 Source - Filter from the right side of the Effect Palette into the timeline, on top of the video you wish to filter.
FOnce dropped into the timeline, make sure the Effect Editor window is open, and click on the small button icon to the left of 01 Source - Filter.
The Hollywood FX dialog will appear, letting you choose a specific FX, and set the options for rendering that FX.
Changing an Existing Filter
You can modify a filter that is already in the timeline, changing the selected FX or any options.
· To change a filter in the timeline:
FSwitch to Effect Mode (opening the Effect Editor window).
FClick on the plug icon that represents the filter in the timeline.
26

Getting Started
FClick on the button to the left of 01 Source - Filter in the Effect Editor window.
FMake your changes in the Hollywood FX Selection dialog.
Adding A Hollywood FX MultiWindow Effect
Avid’s nested track capability makes it simple to use Hollywood FX’s MultiWindow effects in your projects.
· To add a MultiWindow to the timeline:
FOpen the Effect Palette (Ctrl-8).
FSelect the Pinnacle Hollywood FX group from the left side of the Effect Palette.
FDrag XX Source - MultiWindow which matches the number of sources in the effect you will use from the right side of the Effect Palette into the timeline, on top of a piece of video in timeline which will serve as the backdrop of the effect. For example, if you wanted to create the Box6srce effect, you would drag the 07 Source effect onto your video clip.
FOnce dropped into the timeline, make sure the Effect Editor window is open, and click on the small button icon to the left of XX Source - MultiWindow.
FThe Hollywood FX Selection dialog will appear. Select the effect you wish to use and set any rendering options, then click Ok.
FNext, double-click on the plugin icon in the timeline to open up the nested tracks.
FSwitch to Source/Record mode or Trim mode, then drag additional video clips into the nested tracks. The nested track number corresponds to the Source number in HFX.
Hollywood FX in the Avid Effect Editor
27
Tutorials
Transitions & Options
This tutorial will take you through the basics of selecting a Transition FX and setting Effect Options.
· To prepare for this tutorial:
FSet up two video clips in your host application and add Hollywood FX as described in Getting Started.
FWhen the Hollywood FX dialog appears, you are ready to begin.
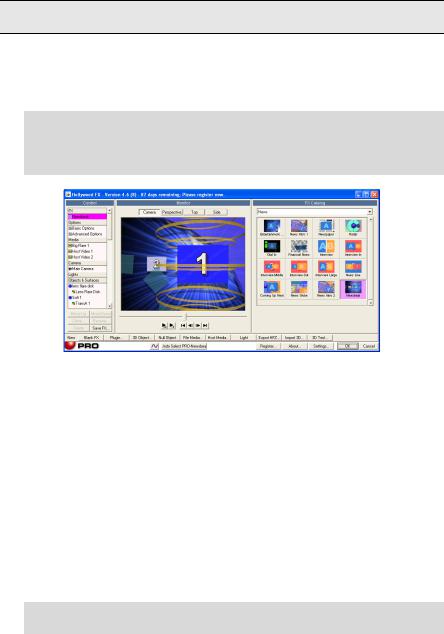
The Hollywood FX dialog
The Hollywood FX dialog is organized into panels. The first panel is the Control panel, which is the central control for working with FX. Selecting items in the Control panel brings up different Item panels on the right side of the dialog. The second panel is the Monitor panel that displays the preview of the current FX. Finally, the Item panel changes to show different options for the selected item in the Control panel.
Selecting An FX
When the Hollywood FX dialog is displayed, you will immediately see the FX Catalog (this is displayed when the current FX name is selected in the Control panel). The FX Catalog has two major controls. The FX Group popup list at the top of the page allows you to select one of the many groups of FX. Below the FX Group list are the icons for each FX in the group. For this tutorial you will select an interesting transition called Ball Split. This FX is in the Basic Shape Transitions group.
· To select the Ball Split FX:
FSelect Basic Shapes from the FX Group popup list.
29
Hollywood FX User’s Guide
FClick on the Ball Split FX icon.
When you select this FX, hints and tips for that effect appear at the bottom of the FX Catalog panel.
The Monitor Panel
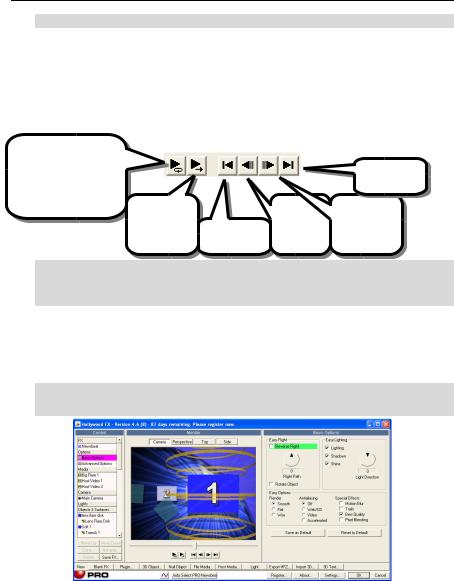
Whenever you make changes in Hollywood FX, the preview window in the Monitor panel is updated. Try dragging the slider directly below the preview to view different frames of the preview.
Press loop play to |
|
|
preview continuously as |
|
Jump to the |
you work. |
|
|
Press again to stop |
|
last frame |
|
|
|
preview. |
Step |
Step forward |
Play entire FX |
||
preview once. |
backward |
one frame |
Jump to first |
one frame |
|
frame. |
|
|
· To turn on continuous playback of the preview:
FClick on the Loop Play button below the preview window in the Monitor panel.
Basic Effect Options
Hollywood FX gives you quick and easy control over many FX options. You can create new and exciting results without having to re-keyframe the entire FX.
· To view the Basic Effect Options:
FClick on the Basic Effect Options item in the Control panel.
The Effect Options panel selected
Easy Flight Options
You can quickly change the flight path of an object in useful ways using the Easy Flight controls.
30
 Loading...