

Page 1
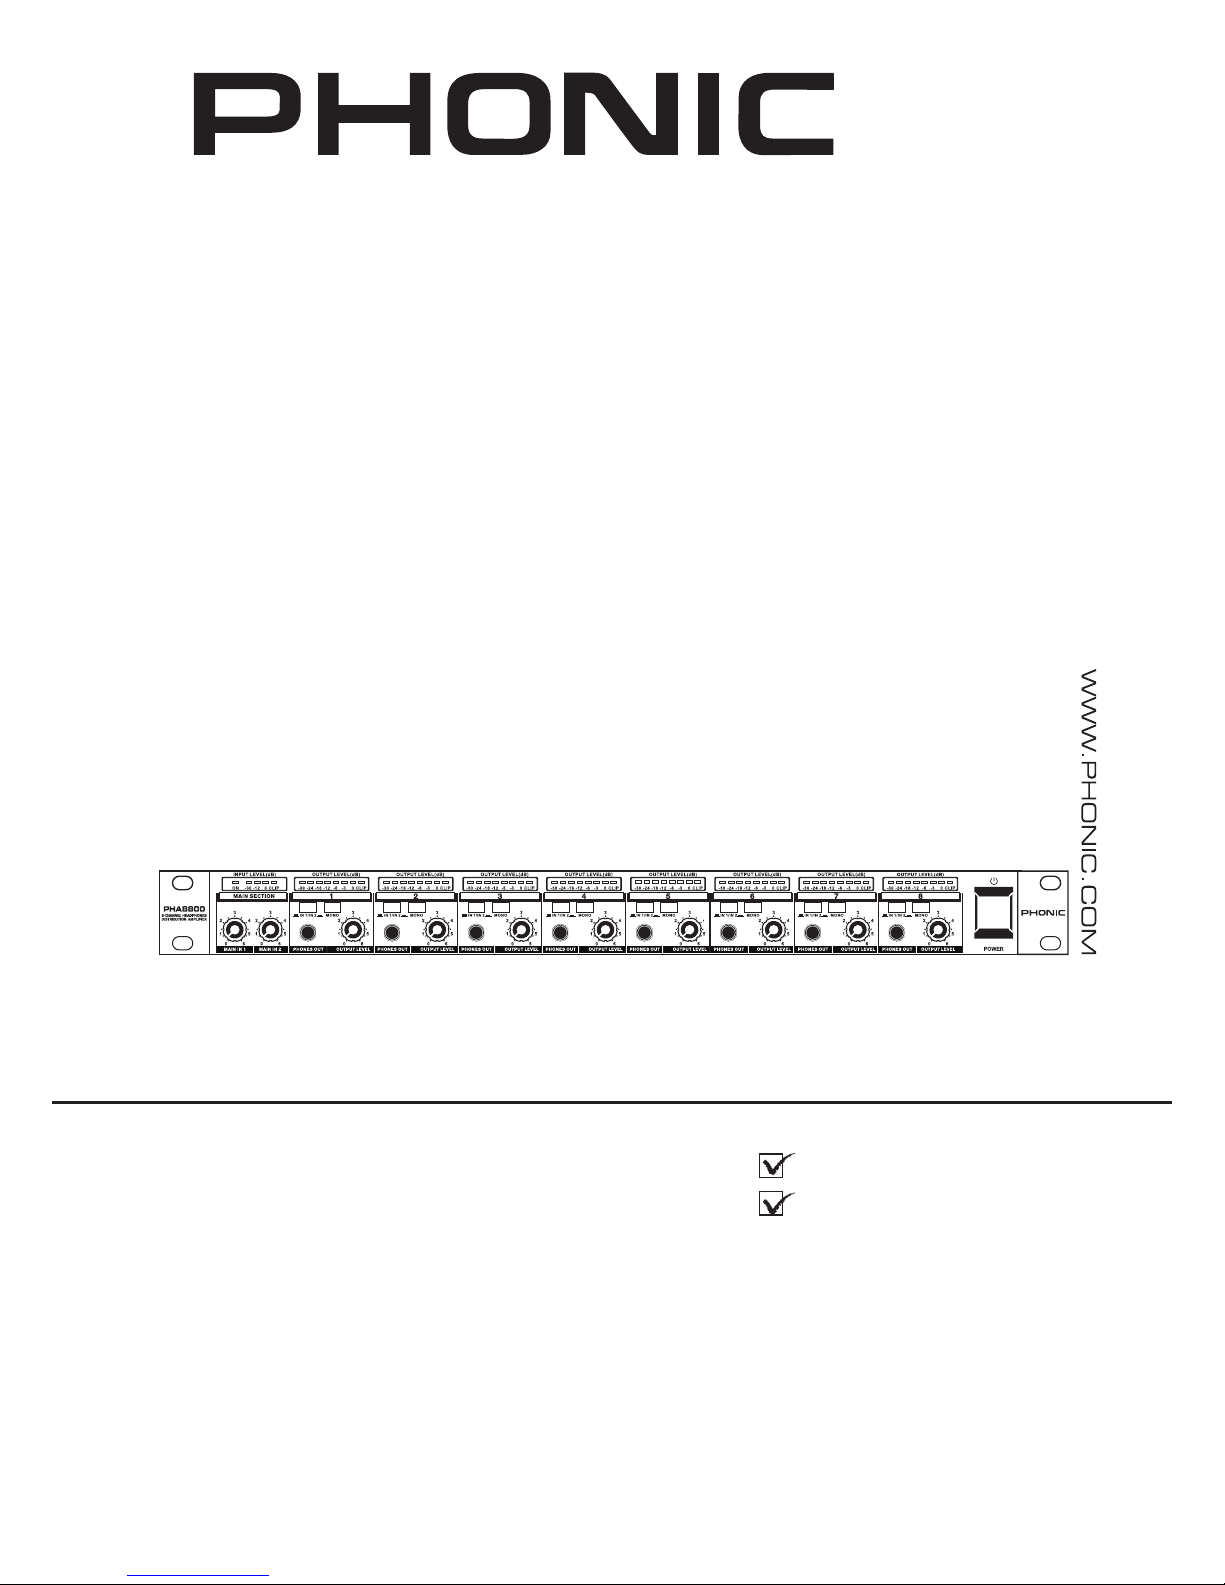
PHA 8800
User's Manual
Manual del Usuario
Page 2

ENGLISH ..................................................I
ESPAÑOL ..................................................II
V1.1 06/07/2012
HEADPHONE DISTRIBUTION AMPLIFIER
AMPLIFICADOR DE DISTRIBUCIÓN DE AURICULAR
PHA 8800
English Español
Page 3

3
English
PHA 8800
INTRODUCTION 1
FEATURES 1
INITIAL SETUP 1
UNIT OVERVIEW 1
Front Panel 1
Rear Pane 2
SPECIFICATIONS 3
APPENDIX
APPLICATION 1
DIMENSIONS 2
BLOCK DIAGRAM 3
CONTENTS
USER'S MANUAL
Phonic preserves the right to improve or alter any information within this
document without prior notice
Page 4

4
English
PHA 8800
1. Read these instructions before operating this
apparatus.
2. Keep these instructions for future reference.
3. Heed all warnings to ensure safe operation.
4. Follow all instructions provided in this document.
5. Do not use this apparatus near water or in locations
where condensation may occur.
6. Clean only with dry cloth. Do not use aerosol or liquid
cleaners. Unplug this apparatus before cleaning.
7. Do not block any of the ventilation openings. Install
in accordance with the manufacturer’s instructions.
8. Do not install near any heat sources such as radiators,
heat registers, stoves, or other apparatus (including
.
9. Do not defeat the safety purpose of the polarized or
grounding-type plug. A polarized plug has two blades
with one wider than the other. A grounding type plug
has two blades and a third grounding prong. The wide
blade or the third prong is provided for your safety. If
the provided plug does not into your outlet, consult
an electrician for replacement of the obsolete outlet.
10. Protect the power cord from being walked on or
pinched particularly at plug, convenience receptacles,
and the point where they exit from the apparatus.
11. Only use attachments/accessories by the
manufacturer.
12. Use only with a cart, stand, tripod, bracket, or
table by the manufacturer, or sold with
the apparatus. When a cart is used, use caution
when moving the cart/apparatus
combination to avoid injury from tipover.
13. Unplug this apparatus during lighting
storms or when unused for long
periods of time.
14. Refer all servicing to service personnel.
Servicing is required when the apparatus has been
damaged in any way, such as power-supply cord or
plug is damaged, liquid has been spilled or objects
have fallen into the apparatus, the apparatus has
been exposed to rain or moisture, does not operate
normally, or has been dropped.
IMPORTANT SAFETY INSTRUCTIONS
CAUTION: TO REDUCE THE RISK OF ELECTRIC SHOCK,
DO NOT REMOVE COVER (OR BACK)
NO USER SERVICEABLE PARTS INSIDE
REFER SERVICING TO QUALIFIED PERSONNEL
The lightning flash with arrowhead symbol, within an
equilateral triangle, is intended to alert the user to the
presence of uninsulated “dangerous voltage” within the
product
’
magnitude to constitute a risk of electric shock to persons.
The exclamation point within an equilateral triangle is intended to alert the user to the presence of important operating and maintenance (servicing) instructions in the literature
accompanying the appliance.
WARNING: To reduce the risk of or electric shock, do
not expose this apparatus to rain or moisture.
CAUTION: Use of controls or adjustments or performance
of procedures other than those may result in
hazardous radiation exposure.
The apparatus shall not be exposed to dripping or splashing and that no objects with liquids, such as vases,
shall be placed on the apparatus. The MAINS plug is used as the disconnect device, the disconnect device shall
remain readily operable.
Warning: the user shall not place this apparatus in the area during the operation so that the mains switch
can be easily accessible.
CAUTION
RISK OF ELECTRIC SHOCK
DO NOT OPEN
Page 5
1
English
PHA 8800
INTRODUCTION
Congratulations on your purchase of another quality
product! We hope your PHA8800 headphone distribution
amplifier proves itself to be a worthwhile investment
and provides you with years of dependable use. These
units were meticulously designed by skilled engineers to
provide you with up to 4 unique monitoring mixes, sent to
up to 16 sets of headphones simultaneously.
We know how eager you are to get started, however
we advise that you take the time to read through this
manual before storing it in an easy to remember place
for future reference. Within this manual you’ll nd helpful
information on the operation and treatment of your PHA
unit.
FEATURES
l
Professional multi-purpose headphones amplifier
system for stage and studio application
l
Eight totally independent stereo high-power amplier
sections in one rack space
l
Two stereo main inputs for two independent mixes,
accessible from all eight channels
l
Eight independent direct inputs provide up to eight
individual stereo mixes
l
Highest sonic quality with virtually all types of
headphones even at maximum volume
l
Output level control and accurate LED output meter
per channel
l
Mono/stereo switch per channel for more exibility
l
One front and one rear 1/4” TRS phones connector
for each channel
l
Direct input connector on each channel for easy
connection of any sound source
l
Servo-balanced 1/4” TRS inputs and outputs
l
Ultra low-noise operational ampliers for outstanding
audio performance
l
High-quality potentiometers and illuminated switches
l
High-quality components and exceptionally rugged
construction for long life and durability
l
Toroidal transformer for noiseless operation and low
magnetic interference
INITIAL SETUP
1. After opening and unpacking the PHA, inspect the unit
for any noticeable damage. Though we attempt to
take every precaution possible in preventing damage
occurring to our products in transit, it is sometimes
unavoidable. If the product is noticeably damaged,
users are advised to contact the dealer at which they
purchased the product.
2. If you wish to mount the PHA into a 19” rack, ensure it
is not positioned above power ampliers and that the
unit has plenty of ventilation, as to avoid overheating.
3. Plug any required devices into the PHA’s inputs and
outputs. For example, a mixer’s Phones or Control
Room signal could be sent to the Main Inputs, and
headphones plugged into the phones outputs on the
rear or on the front of the unit.
4. Set the Main 1 / Main 2 Button to the correct position
(In/Out) to enable the required signal to be sent
through to your required outputs.
5. Plug the provided power cord into the power connector
and into an appropriate AC power source. Be sure
to check local voltage levels before connecting the
unit. Do not under any circumstances defeat the
ground-pin of the cord, as it is provided for your own
protection. When plugged in, push the power button.
UNIT OVERVIEW
Front Panel
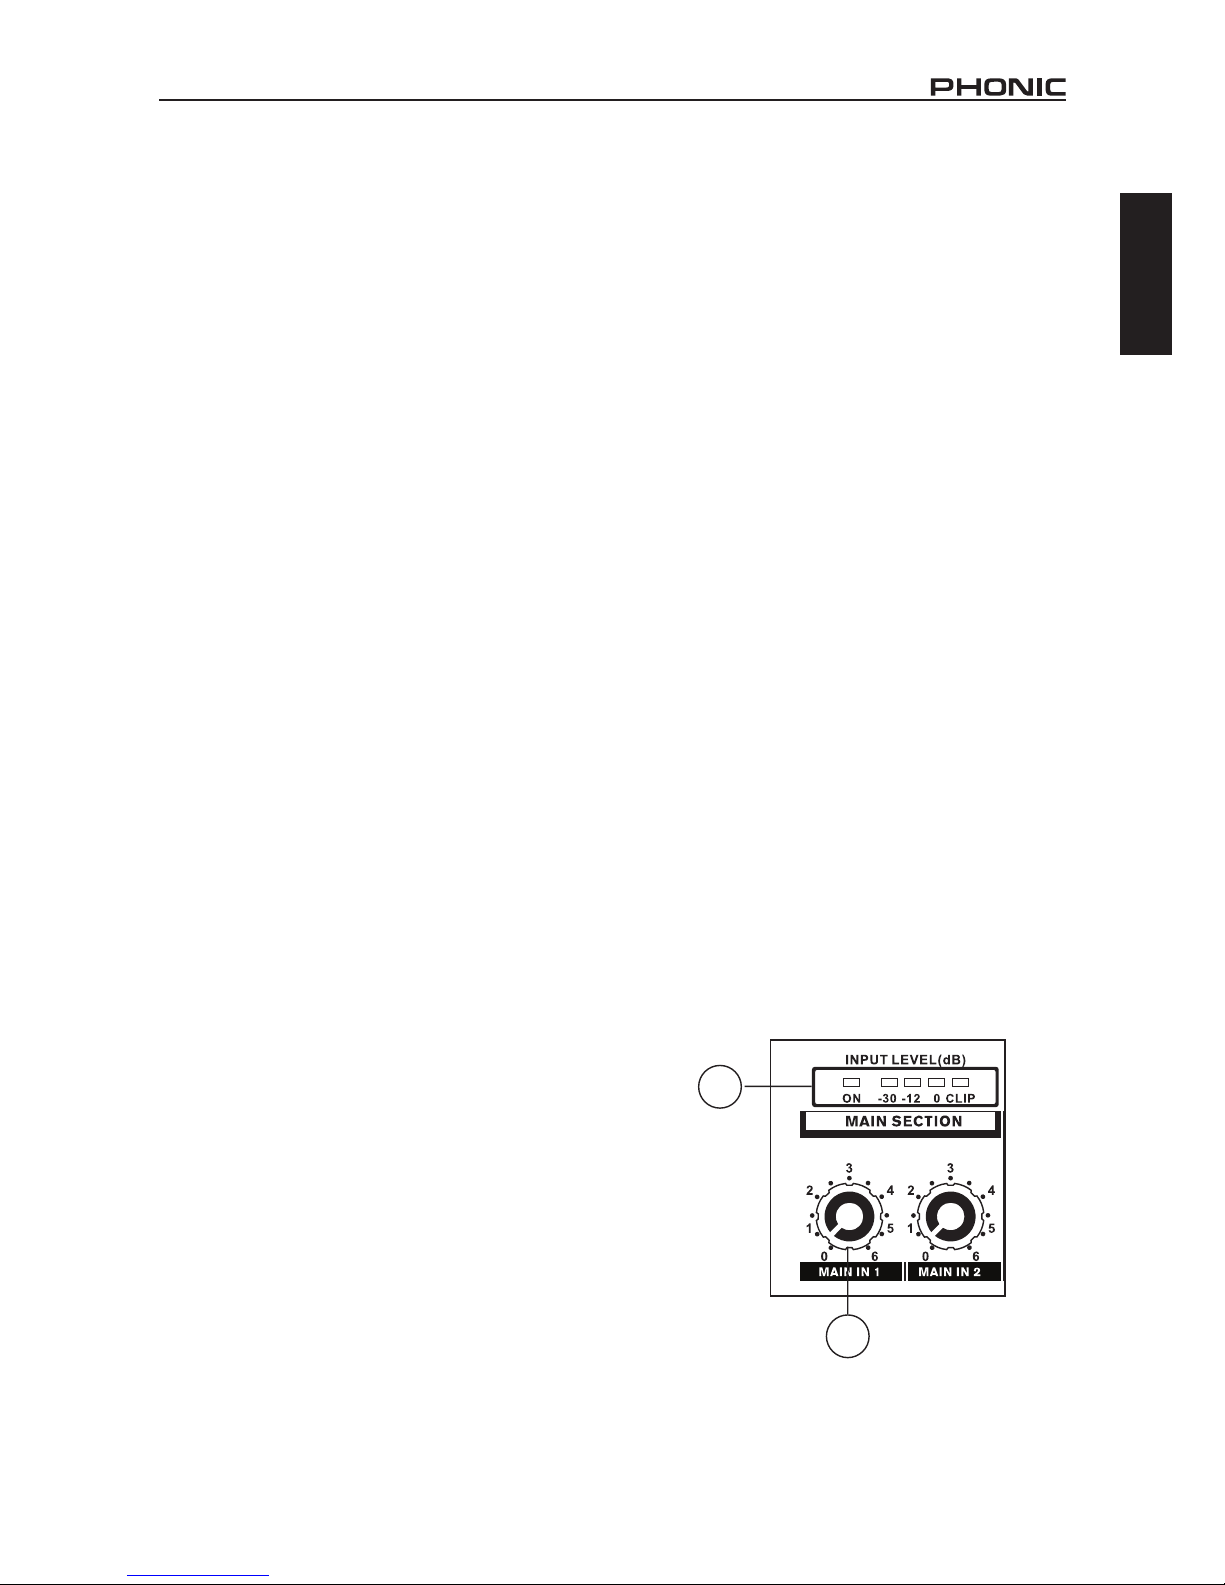
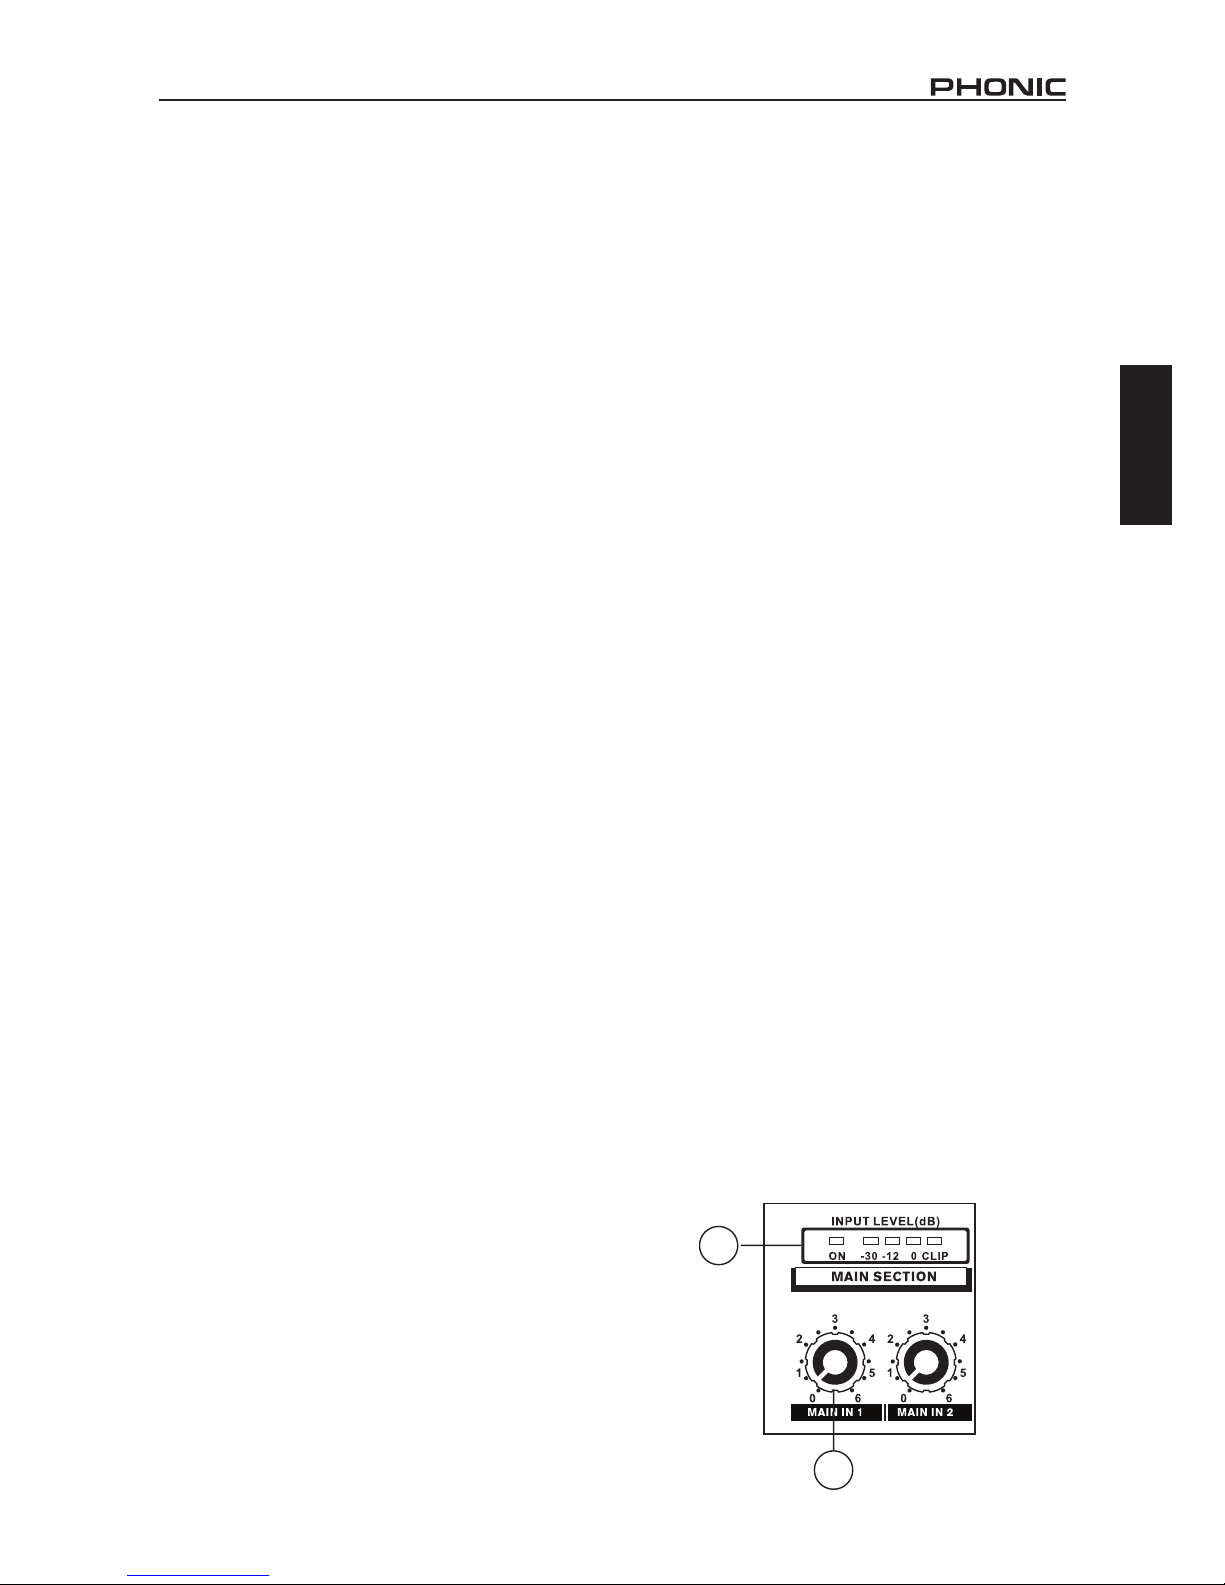
1. Master Level Control
These controls adjust the level of their corresponding
main inputs on the rear of the device.
2. Input Level Meter and ON LED
This 4-segment input meter gives users a visual
representation of the signals received by the PHA’s
inputs. When the power is on, the ON LED will illuminate.
To make the most of your audio, set the level so this
meter sits just below the clip LED.
1
2
Page 6
2
English
PHA 8800
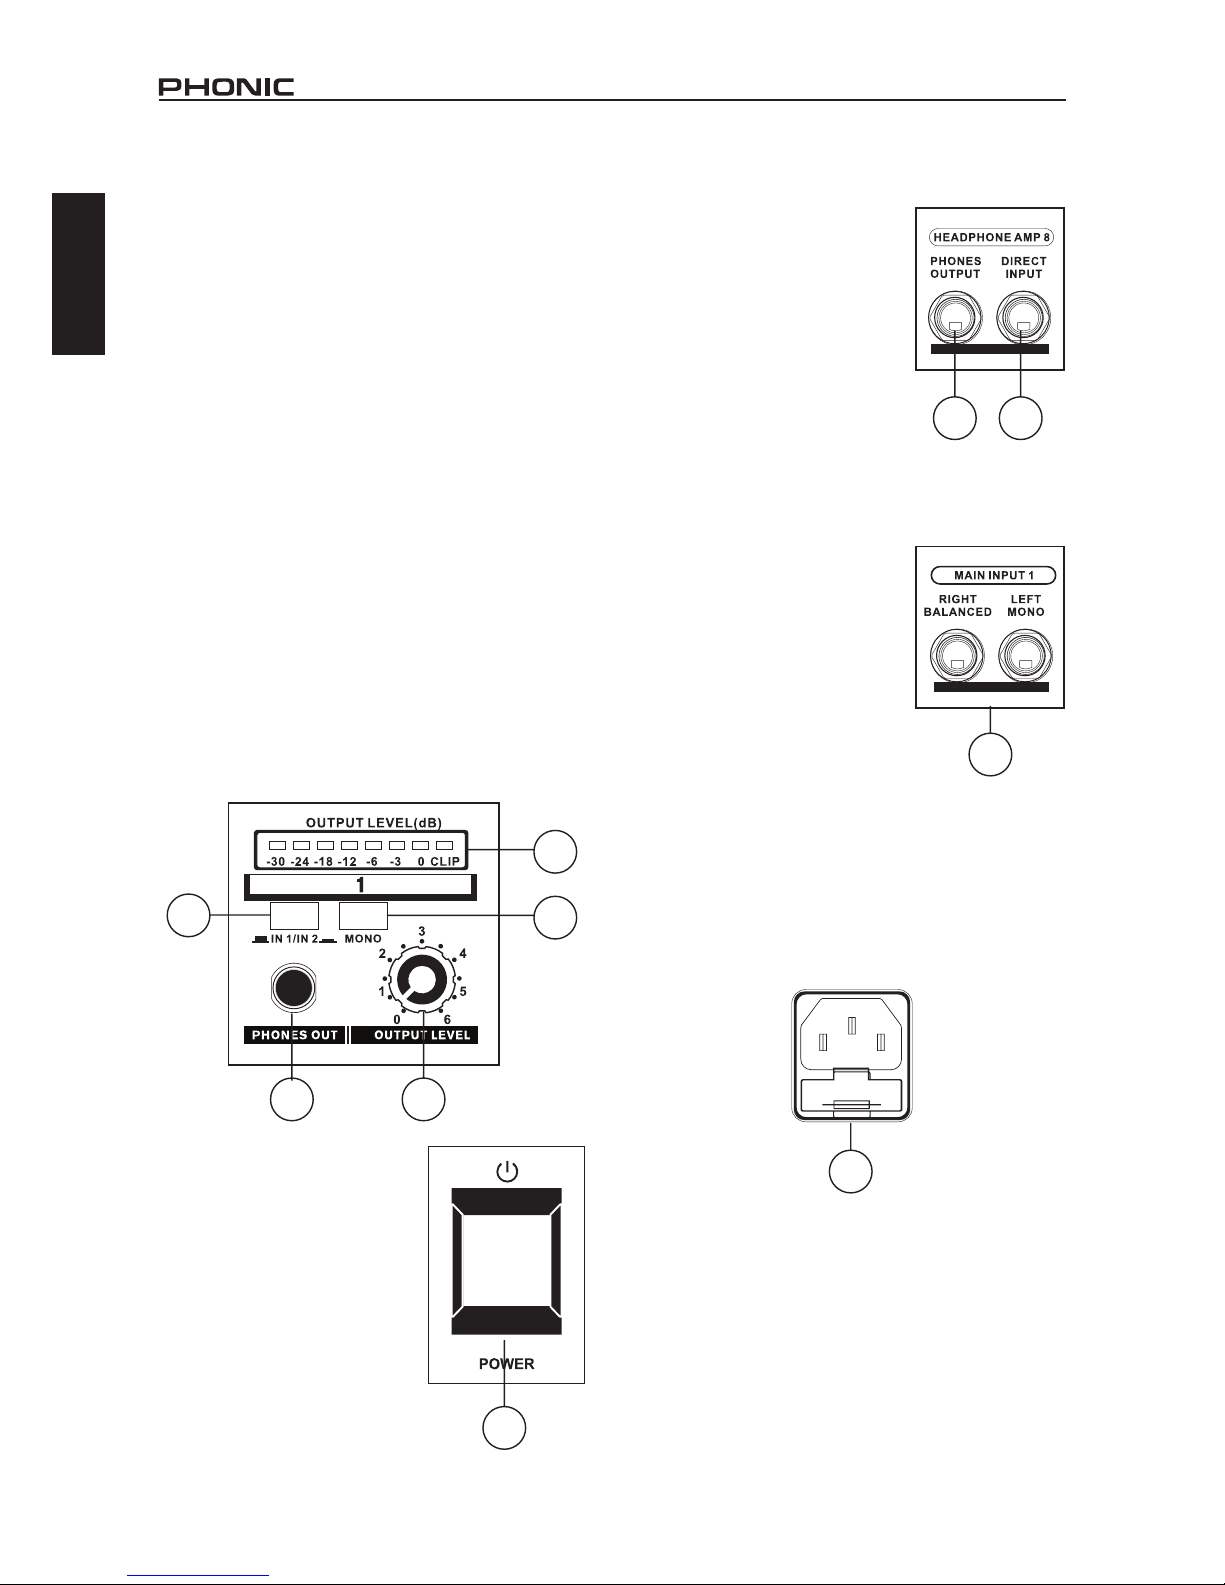
3. Output Level Meter
These 8-segment meters, located on each of the eight
output section, will allow you to see your channel’s
output signal level between -30 and 0 dB. The red clip
LED lights up a few dB before overload occurs, therefore
users are advised to turn the output level control down
slightly to help keep the integrity of their audio.
4. In 1 / In 2 Buttons
These buttons will allow you to select the corresponding
output channel’s signal between Main Input 1 (released)
and Main Input 2 (pushed-in).
5. Mono Button
This button will swap that particular channel’s incoming
signal between a stereo (released) signal and a mono
(pushed-in) signal. When mono is selected, the left and
right channels of the signal will be combined into a mono
signal.
6. Headphone Outputs
This output, located on every headphone amp channel,
is used to connect to headphones to monitor that
particular channel’s audio signal.
7. Output Level Control
This control adjusts the outgoing left and right signal
level from each channel, which is sent to the headphone
outputs.
Rear Panel
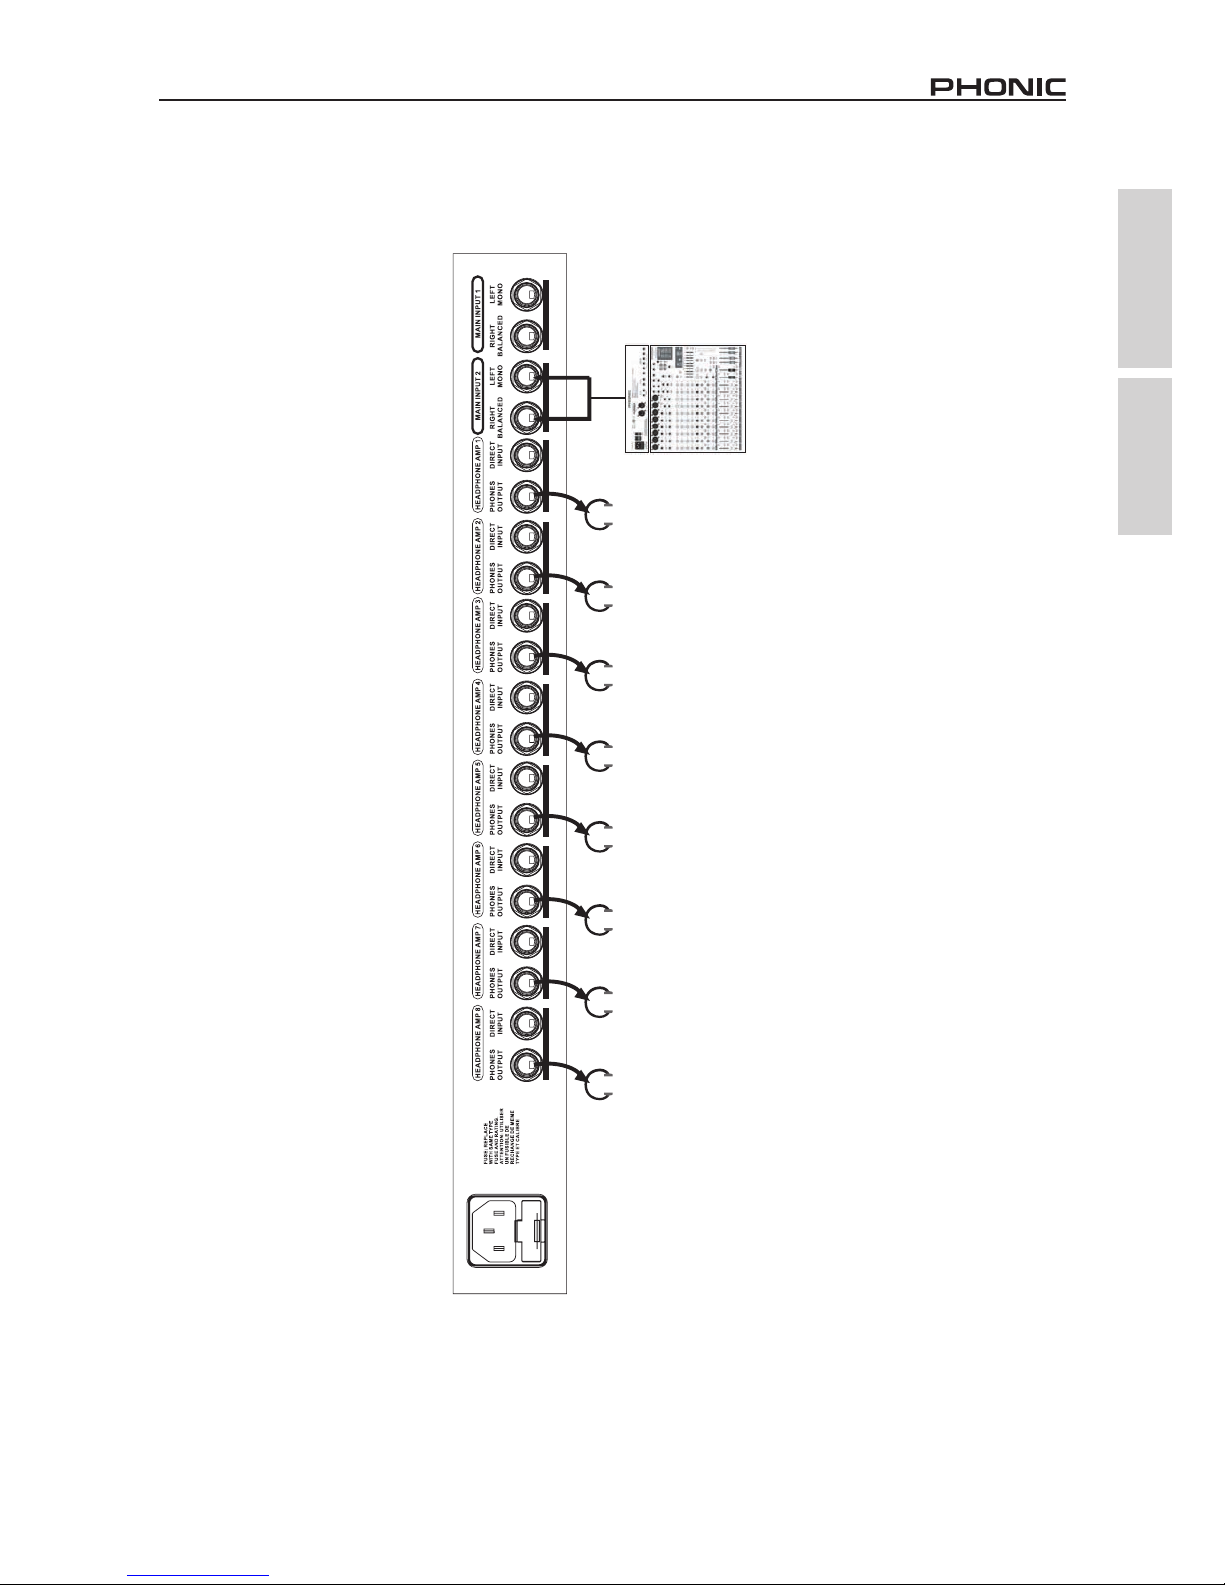
9. Headphone Outputs
These outputs are used to connect
to headphones with a loading
of 100 ohms or greater. The
signal sent through these outputs
will be from the corresponding
headphone amp channels.
10. Direct Inputs
Connecting any device’s output
to these 1/4” TRS inputs will allow
you to feed in an external stereo
device to the corresponding output
channel. When a connection is made to the direct input,
it will have priority over the main input signal.
11. Main Inputs
These balanced 1/4” inputs accept
signals from external devices,
the signal of which can be used
for monitoring using the PHA
headphone distribution amp.
Plugging a mono device into the
left input jack while leaving the
right jack free will allow the mono
signal to be doubled over to the
right input also.
12. AC Power Inlet
This inlet is used to connect the provided AC power
cable, the other end of which is connected to a suitable
power source. Check local voltage levels are compatible
before attempting to use this device. The power supply’
s fuse is imbedded in this socket. If for some reason the
fuse blows, please remove the fuse cover and replace it
with another suitable fuse.
4
6 7
3
5
8
8. Power Button
This button will turn the PHA8800
on and off. Make sure the
unit is off when connecting or
disconnecting the mains power.
9
10
11
12
Page 7

3
English
PHA 8800
SPECIFICATIONS
Audio Inputs
Main In HF-ltered, servo-balanced, 1/4" TRS connectors
Input Impedance 40 kΩ balanced, 20 kΩ unbalanced
Maximum input level +16 dBu balanced and unbalanced
CMRR typically 40 dB, >55 dB @1 kHz
DIRECT In 1/4" TRS connector (stereo)
Input Impedance 15 kΩ
Audio Outputs
Phones Outputs 1/4" TRS connector (stereo)
Power Amplier
Maximum Output Level +24 dBm (load impedance 100 Ω)
Minimum Output Load Impedance 100 Ω
System Specications
Frequency Response 10 Hz to 150 kHz, +/-3 dB
Noise 22 Hz to 22 kHz, < -90 dBu @ unit gain
Dynamic Range 22 Hz to 22 kHz: 110 dB
Distortion (THD) 0.006 % typical @ +4 dBu, 1 kHz @ unit gain
Function Controls
Input Level Variable
Output Level per Channel Variable
Function Switches
Main In 1 / Main In 2 Switches between Mian Input 1 and Main Input 2
Mono Swtiches this section to mono
Displays
Input Level 4-segment LED-display: -30/-12/0 dB/CLIP
Output Level 8-segment LED-display: -30/-24/-18/-12/-6/-3/0 dB/CLIP
Power Supply
Mains Voltage
USA/Canada 120V ~, 60 Hz
Europe/U.K./Australia 230V ~, 50 Hz
Japan 100V ~, 50-60 Hz
Power Consumption 30 W
Fuses
100-120 V ~, T630 mA H
200-240V ~, T315 mA H
Mains Connection Standard IEC receptacle
Dimensions 483 x 44 x 206 mm (19" x 1.7" x 8.1")
Net Weight 2.35 kg (5.19 lbs)
Page 8

4
English
PHA 8800
SERVICE AND REPAIR
For replacement parts, service and repairs please contact the Phonic distributor in your
country. Phonic does not release service manuals to consumers, and advice users to not
attempt any self repairs, as doing so voids all warranties. You can locate a dealer near you at
http://www.phonic.com/where/.
WARRANTY INFORMATION
Phonic stands behind every product we make with a no-hassles warranty. Warranty coverage
may be extended, depending on your region. Phonic Corporation warrants this product for a
minimum of one year from the original date of purchase against defects in material and
workmanship under use as instructed by the user’s manual. Phonic, at its option, shall repair
or replace the defective unit covered by this warranty. Please retain the dated sales receipt as
evidence of the date of purchase. You will need it for any warranty service. No returns or repairs
will be accepted without a proper RMA number (return merchandise authorization). In order to
keep this warranty in effect, the product must have been handled and used as prescribed in the
instructions accompanying this warranty. Any tampering of the product or attempts of self repair
voids all warranty. This warranty does not cover any damage due to accident, misuse, abuse,
or negligence. This warranty is valid only if the product was purchased new from an authorized
Phonic dealer/distributor. For complete warranty policy information, please visit
http://www.phonic.com/warranty/.
CUSTOMER SERVICE AND TECHNICAL SUPPORT
We encourage you to visit our online help at http://www.phonic.com/support/. There you can find
answers to frequently asked questions, tech tips, driver downloads, returns instruction and other
helpful information. We make every effort to answer your questions within one business day.
http://www.phonic.com
Page 9

5
English Español
PHA 8800
Manual del Usuario
Phonic se reserva el derecho de mejorar o alterar cualquier información
provista dentro de este documento sin previo aviso.
INTRODUCCIÓN 1
CARACTERÍSTICAS 1
CONFIGURACIÓN INICIAL 1
VISTA GENERAL DE LA UNIDAD 1
Panel Fronta 1
Panel Posterior 2
ESPECIFICACIONES 3
APPENDIX
APLICACIONES 1
DIMENSIONES 2
DIAGRAMA DE BLOQUES 3
CONTENIDO
Page 10
6
English Español
PHA 8800
Page 11
1
English Español
PHA 8800
INTRODUCCIÓN
Felicidades por su compra de otro producto de calidad!
Esperemos que su amplificador de distribución de
auricular PHA8800 demuestre por sí mismo ser
una inversión que valga la pena y le provee a usted
de años de uso confiable. Estas unidades fueron
meticulosamente diseñadas por los ingenieros expertos
para proporcionarle hasta 4 mezclas de monitoreo
únicas, enviadas a hasta16 juegos de auriculares
simultáneamente.
Sabemos cuán impaciente está usted de querer
comenzar, sin embargo, le aconsejamoes que tome un
tiempo para leer este manual antes de guardarlo en un
lugar de fácil recordar para la futura referencia. Dentro
de este manual usted encontrará información útil sobre
la operación y el tratamiento de su unidad PHA.
CARACTERÍSTICAS
●
Sistema de amplificador de auriculares profesional
de múltiples propósitos para aplicación de escenario
y estudio.
●
Ocho secciones de amplificador totalmente
independientes estéreas de alta potencia en un
espacio de rack.
●
Dos entradas estéreas principales para dos mezclas
independientes, accesibles desde los ocho canales.
●
Ocho entradas independientes directas proveen
hasta octavas mezclas individuales estéreas.
●
Acústico de calidad más alta con prácticamente todos
los tipos de auriculares aún en volumen máximo.
●
Control de nivel de salida y medidor de salida LED
exacto por canal.
●
Interruptor mono/estéreo por canal para más
exibilidad.
●
Un conector de audífonos 1/4” TRS frontal y uno de
dorso para cada canal.
●
Conector de entrada directo en cada canal para
conexión fácil de cualquier fuente de sonido.
●
Entradas y salidas servo-balanceadas 1/4” TRS
●
Amplicadores operacionales de ruido ultra bajo para
funcionamiento excepcional de audio.
●
Potenciómetros de alta calidad e interruptores
iluminados.
●
Componentes de alta calidad y construcción
excepcionalmente resistente para vida larga y
durabilidad.
●
Transformador toroidal para operación silenciosa e
baja interferencia magnética.
CONFIGURACIÓN INICIAL
1. Después de abrir y desempaquetar el PHA,
inspeccione la unidad por cualquier daño notable.
Aunque intentamos tomar toda precaución posible
en la prevención del daño que pueda ocurrir a sus
productos en el tranporte, a veces es inevitable. Si el
producto es perceptiblemente dañado, se aconseja
a que los usuarios se pongan en contacto con el
distribuidor en el cual compraron el producto.
2. Si usted desea montar el PHA en el estante de
19”, asegúrese de que no esté colocado encima
de los amplificadores de potencia y que la
unidad tenga ventilación suficiente para evitar el
sobrecalentamiento.
3. Enchufe cualquier dispositivo requerido en las
entradas y salidas de PHA. Por ejemplo, los
audífonos de una mezcladora o la señal de Sala
de Control podrían ser enviados a las Entradas
Principales, y los auriculares enchufados a las
salidas de audífonos sobre el reverso o el frente de
la unidad.
4. Setée Botón Principal 1/ Principal 2 a la posición
correcta (Entrada/Salida) para permitir que la señal
requerida sea enviada a sus salidas requeridas.
5. Enchufe el cable eléctrico proporcionado en el
conector de energía y en una fuente de corriente
alterna apropiada. Asegúrese de comprobar los
niveles de voltaje locales antes de la conexión de la
unidad. No rechace bajo ninguna circunstancia el pin
a tierra de cable, es proporcionado para su propia
protección. Cuando está enchufado, pulse el botón
de energía.
VISTA GENERAL DE LA UNIDAD
Panel Frontal
1. Control de Nivel Maestro
Estos controles ajustan el nivel de sus entradas
principales correspondientes en el reverso del
dispositivo.
2. Medidor de Nivel de Entrada y ON LED
Este medidor de entrada de 4 segmentos proporciona
a los usuarios una representación visual de las señales
recibidas por las entradas del PHA. Cuando la energía
está encendida, el ON LED se iluminará. Para aprovechar
al máximo su audio, congure el nivel de este medidor
tal que se sitúa justo debajo de LED de clip.
1
2
Page 12

2
English Español
PHA 8800
3. Medidor de Nivel de Salida
Estos medidores de 8 segmentos, localizados en cada
una de las ocho secciones de salida, le permitirán ver
el nivel de señal de salida de su canal entre-30 y 0 dB.
El clip LED rojo se enciende unos dB antes de que la
sobrecarga ocurra, por lo tanto se aconsejan que los
usuarios bajen el control de nivel de salida ligeramente
para ayudar a mantener la integridad de su de audio.
4. Botones In 1 / In 2
Estos botones le permitirán para seleccionar la señal del
canal de salida correspondiente entre la Entrada Principal
1 (liberada) y Entrada Principal 2 (pulsada).
5. Botón Mono
Este botón cambiará la señal entrante de canal particular
entre una señal estérea (liberada) y una señal mono
(pulsada). Cuando mono es seleccionado, los canales
izquierdos y derechos de la señal serán combinados en
una señal mono.
6. Salidas de Auriculares
Esta salida, localizada sobre cada canal de amplicador
de auricular, es usada para conectar a auriculares para
monitorear la señal de audio de canal particular.
7. Control de Nivel de Salida
Este control ajusta el nivel de señal saliente izquierdo y
derecho de cada canal, que es enviado a las salidas de
auricular.
8. Botón de Energía
Este botón encenderá y apagará
el PHA8800. Asegúrese que la
unidad esté apagada cuando
conecte o desconecte la energía
de red eléctrica.
Panel Posterior
9. Salidas de Auriculares
Estas salidas son usadas para
conectar a auriculares con una
carga de 100 ohmios o mayor. La
señal enviada por estas salidas
será de los canales de amplicador
de auricular correspondientes.
10. Entradas Directas
La conexión de cualquier salida de
dispositivo a estas entradas 1/4"
TRS le permitirá alimentar en un
dispositivo de estéreo externo al
canal de salida correspondiente. Cuando una conexión
está hecha a la entrada directa, tendrá prioridad sobre la
señal de entrada principal.
11. Entradas Principales
Estas entradas balanceadas 1/4”
aceptan señales de dispositivos
externos, la señal puede ser
usada para monitorear usando
el amplificador de distribución de
auricular PHA. Enchufando un
dispositivo mono en la toma de
entrada izquierda dejando libre la
derecha permitirá a la señal mono
ser doblada a la entrada derecha
también.
12. Entrada de Corriente Alterna
Esta entrada es usada para conectar el cable de corriente
alterna proporcionado, en el otro quema del cual se
conecta a una fuente de energía compatible. Compruebe
que los niveles de voltaje locales sean compatibles antes
de usar este dispositivo. El fusible de la fuente de energía
está incrustado en este enchufe. Si por alguna razón el
fusible se queme, por favor quite la cubierta del fusible y
reemplacelo por otro fusible compatible.
4
6 7
3
5
8
9
10
11
12
Page 13

3
English Español
PHA 8800
ESPECIFICACIONES
Entradas de Audio
Entrada Principal HF-ltrado, servo-balanceado, conectores 1/4" TRS
Impedancia de Entrada 40 kΩ balanceado, 20 kΩ desbalanceado
Nivel de entrada máximo +16 dBu balanceado y desbalanceado
CMRR típicamente 40 dB, >55dB@1 kHz
Entrada DIRECT Conector 1/4" TRS (estéreo)
Impedancia de Entrada 15 kΩ
Salidas de Audio
Salidas de Auriculares Conector 1/4" TRS (estéreo)
Amplicador de Potencia
Nivel de Salida Máximo +24 dBm (impedancia de carga 100 Ω)
Impedancia de Carga de Salida Mínima 100 Ω
Especicaciones de Sistema
Respuesta en Frecuencia 10 Hz a 150 kHz, +/-3dB
Ruido 22 Hz a 22 kHz < -90 dBu @ ganancia de unidad
Gama Dinámico 22 Hz a 22 kHz: 110 dB
Distorsión (THD) 0.006 % típico @ +4 dBu, 1 kHz @ ganancia de unidad
Controles de Función
Nivel de Entrada Variable
Nivel de Salida por Canal Variable
Interruptores de Función
Entrada Principal 1 / Entrada Principal 2 Cambia entre Entrada Principal 1 y Entrada Principal 2
Mono Cambia esta sección a mono
Displays
Nivel de Entrada 4-segmentos LED-display: -30/-12/0dB/CLIP
Nivel de Salida 8-segmentos LED-display: -30/-24/-18/-12/-6/-3/0 dB/CLIP
Suministro de Energía
Voltajes Principales
USA/Canadá 120V ~, 60 Hz
Europa/U.K./Australia 230V ~, 50 Hz
Japón 100V ~, 50-60 Hz
Consumo de Energía 30 W
Fusibles
100-120 V ~, T630 mA H
200-240V ~, T315 mA H
Conexiones Principales Receptáculo Estándar IEC
Dimensiones 483 x 44 x 206 mm (19" x 1.7" x 8.1")
Peso Neto 2.35 kg (5.19 lbs)
Page 14

4
English Español
PHA 8800
SERVICIO Y REPARACIÓN
Para refacciones de reemplazo y reparaciones, por favor póngase en contacto con nuestro
distribuidor de Phonic en su país. Phonic no distribuye manuales de servicio directamente a los
consumidores y, avisa a los usuarios que no intenten hacer cualquier reparación por si mismo,
haciendo ésto invalidará todas las garantías del equipo. Puede encontrar un distribuidor cerca
de usted en http://www.phonic.com/where/.
INFORMACIÓN DE LA GARANTIA
Phonic respalda cada producto que hacemos con una garantía sin enredo. La cobertura de
garantía podría ser ampliada dependiendo de su región. Phonic Corporation garantiza este
producto por un mínimo de un año desde la fecha original de su compra, contra defectos en
materiales y mano de obra bajo el uso que se instruya en el manual del usuario. Phonic, a su
propia opinión, reparará o cambiará la unidad defectuosa que se encuentra dentro de esta
garantía. Por favor, guarde los recibos de venta con la fecha de compra como evidencia de la
fecha de compra. Va a necesitar este comprobante para cualquier servicio de garantía. No se
aceptarán reparaciones o devoluciones sin un número RMA apropiado (return merchandise
autorization). En orden de tener esta garantía válida, el producto deberá de haber sido
manejado y utilizado como se describe en las instrucciones que acompañan esta garantía.
Cualquier atentado hacia el producto o cualquier intento de repararlo por usted mismo,
cancelará completamente esta garantía. Esta garantía no cubre daños ocasionados por
accidentes, mal uso, abuso o negligencia. Esta garantía es válida solamente si el producto fue
comprado nuevo de un representante/distribuidor autorizado de Phonic. Para la información
completa acerca de la política de garantía, por favor visite http://www.phonic.com/warranty/.
SERVICIO AL CLIENTE Y SOPORTE TÉCNICO
Le invitamos a que visite nuestro sistema de ayuda en línea en www.phonic.com/support/. Ahí
podrá encontrar respuestas a las preguntas más frecuentes, consejos técnicos, descarga de
drivers, instrucciones de devolución de equipos y más información de mucho interés. Nosotros
haremos todo el esfuerzo para contestar sus preguntas lo antes posible.
http://www.phonic.com
Page 15
1PHA 8800
Appendix Apéndice
APPLICATION APLICACIONES
headphones
Mixer
Auriculares
Mezcladoras
headphones
Auriculares
headphones
Auriculares
headphones
Auriculares
Page 16
2 PHA 8800
Appendix Apéndice
DIMENSIONS DIMENSIONES
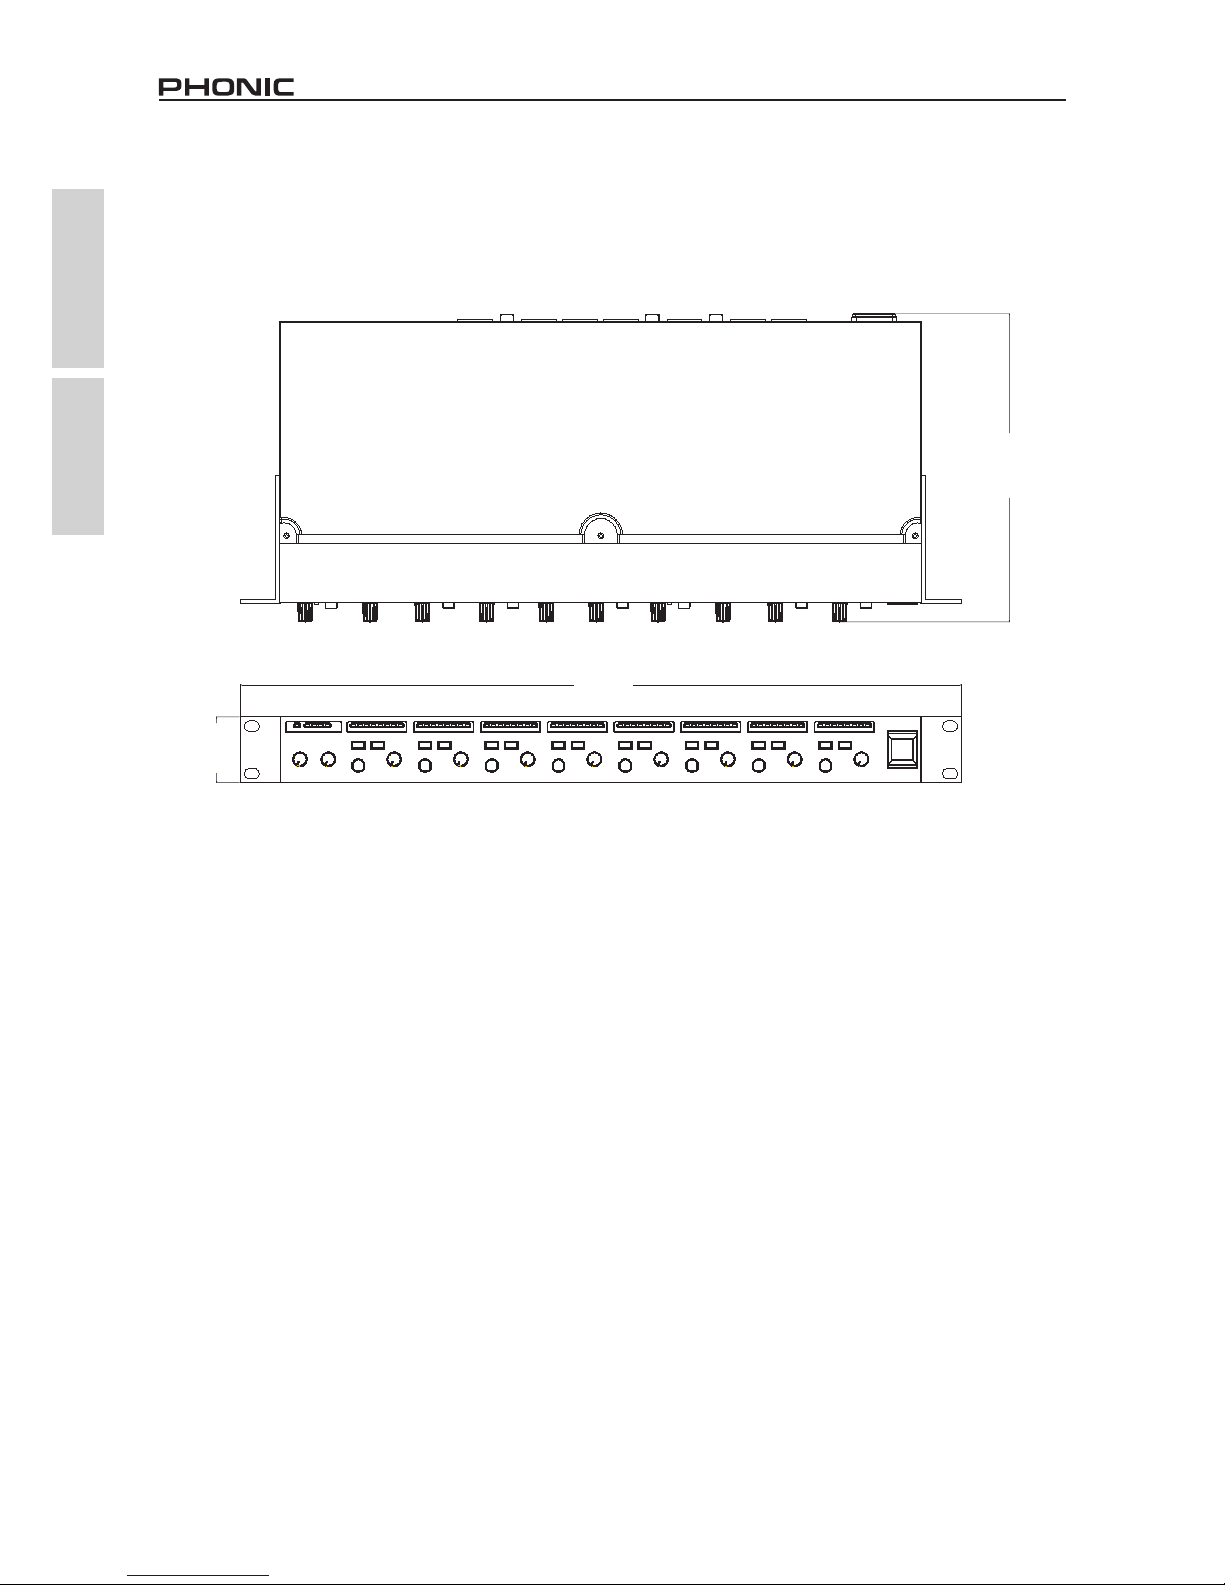
All measurements are shown in mm/inches.
Todas las medidas están mostradas en mm/pulgadas.
"
1.8/
3
.602
"
5
7
.
1/
4
4
482.6/19"
All measurements are shown in mm/inches.
Page 17
3PHA 8800
Appendix Apéndice
BLOCK DIAGRAM DIAGRAMA DE BLOQUES
Page 18

 Loading...