

Page 1
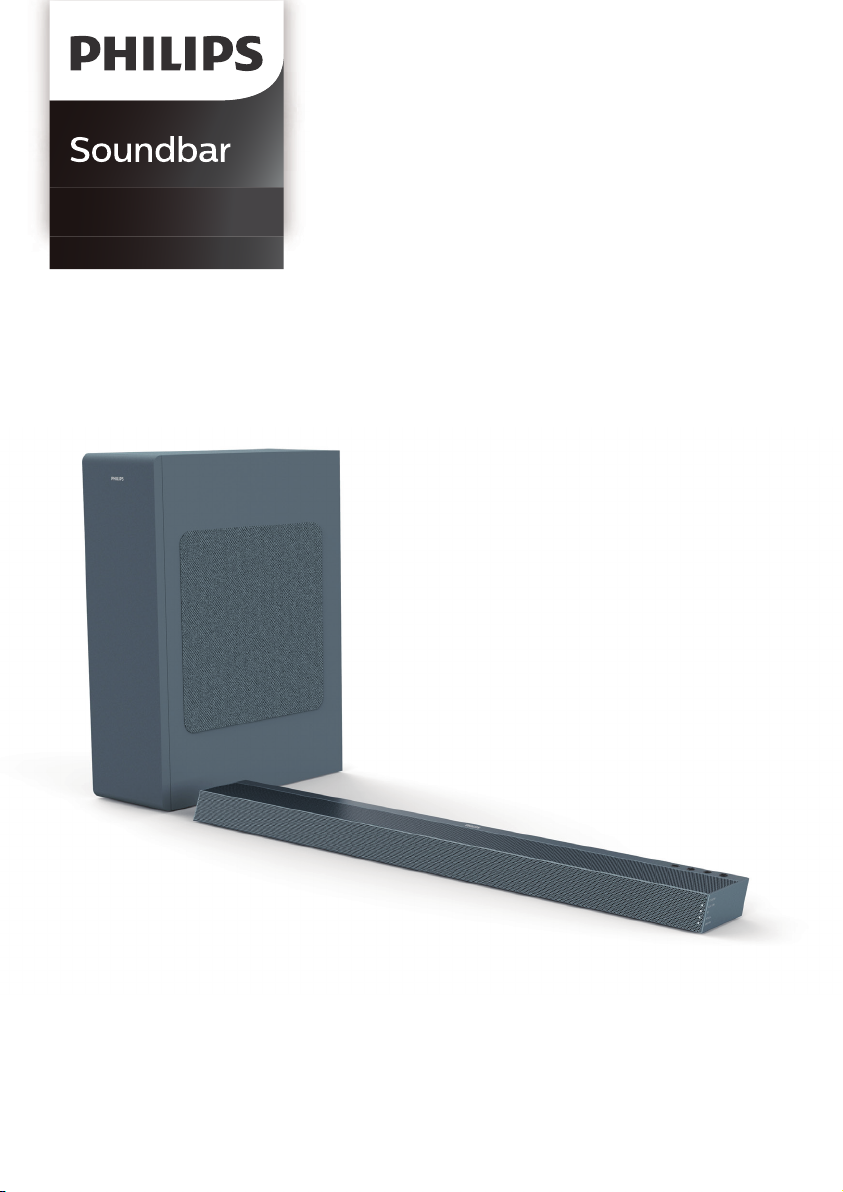
6000 series
TAB6305
User manual
Register your product and get support at
www.philips.com/support
Page 2

Page 3

Contents
1 Important 2
Help and support 2
Safety 2
Care for your product 3
Care of the environment 3
Caution FCC and IC statement for
Users (USA and Canada only) 4
Compliance 4
What’s in the Box 5
2 Your Soundbar 6
Main unit 6
Connectors 6
Wireless subwoofer 7
Remote control 7
Prepare the Remote Control 8
Placement 8
English
4 Use your Soundbar 12
Turn ON and OFF 12
Select Modes 12
Select Equalizer (EQ) Eect 12
Adjust the Volume 13
Bluetooth Operation 13
AUX / OPTICAL / HDMI ARC Operation 14
USB Operation 14
5 Wall mount 15
6 Product specifications 16
7 Troubleshooting 17
3 Connect 9
Connect to HDMI ARC Socket 9
Connect to Optical Socket 9
Connect to AUX Socket 9
Connect the IR pass-through cable 10
Connect to Power 10
Pair up with the subwoofer 11
1
Page 4

1 Important
Read and understand all instructions before you
use your product. If damage is caused by failure
to follow instructions, the warranty does not
apply.
Help and support
For extensive online support, visit
www.philips.com/support to:
• download the user manual and the quick
start guide
• watch video tutorials (available only for
selected models)
• find answers to frequently answered
questions (FAQs)
• email us a question
• chat with our support representative.
Follow the instructions on the website to select
your language, and then enter your product
model number.
Alternatively, you can contact Consumer Care
in your country. Before you contact, note down
the model number and serial number of your
product. You can find this information on the
back or bottom of your product.
Safety
Risk of electric shock or fire!
• Before you make or change any
connections, make sure that all devices are
disconnected from the power outlet.
• Never expose the product and accessories
to rain or water. Never place liquid
containers, such as vases, near the product.
If liquids are spilt on or into the product,
disconnect it from the power outlet
immediately. Contact Consumer Care to
have the product checked before use.
• Never place the product and accessories
near naked flames or other heat sources,
including direct sunlight.
• Never insert objects into the ventilation
slots or other openings on the product.
• Where the mains plug or an appliance
coupler is used as the disconnect device,
the disconnect device shall remain readily
operable.
• Battery (battery pack or batteries installed)
shall not be exposed to excessive heat such
as sunshine, fire or the like.
• Disconnect the product from the power
outlet before lightning storms.
• When you disconnect the power cord,
always pull the plug, never the cable.
Risk of short circuit or fire!
• For identification and supply ratings, see
the type plate at the back or bottom of the
product.
• Before you connect the product to the
power outlet, ensure that the power
voltage matches the value printed on the
back or bottom of the product. Never
connect the product to the power outlet if
the voltage is dierent.
Risk of injury or damage to this product!
• For wall mounting, this product must be
securely attached to the wall in accordance
with the installation instructions. Use
only the supplied wall mount bracket (if
available). Improper wall mounting may
result in accident, injury or damage. If you
have any query, contact Consumer Care in
your country.
• Never place the product or any objects
on power cords or on other electrical
equipment.
• If the product is transported in
temperatures below 5°C, unpack the
product and wait until its temperature
matches room temperature before
connecting it to the power outlet.
• Parts of this product can be made of
glass. Handle with care to avoid injury and
damage.
2
Page 5

Risk of overheating!
• Never install this product in a confined
space. Always leave a space of at least four
inches around the product for ventilation.
Ensure curtains or other objects never
cover the ventilation slots on the product.
Risk of contamination!
• Do not mix batteries (old and new or
carbon and alkaine, etc.).
• CAUTION: Danger of explosion if
batteries are incorrectly replaced. Replace
only with the same or equivalent type.
• Remove batteries if they are exhausted or
if the remote control is not to be used for
a long time.
• Batteries contain chemical substances, they
should be disposed of properly.
Risk of swallowing batteries!
• The product/remote control may contain
a coin/button type battery, which can be
swallowed. Keep the battery out of reach
of children at all times! If swallowed, the
battery can cause serious injury or death.
Severe internal burns can occur within two
hours of ingestion.
• If you suspect that a battery has been
swallowed or placed inside any part of the
body, seek immediate medical attention.
• When you change the batteries, always
keep all new and used batteries out of
reach of children. Ensure that the battery
compartment is completely secure after
you replace the battery.
• If the battery compartment cannot be
completely secured, discontinue use of the
product. Keep out of reach of children and
contact the manufacturer.
This is CLASS II apparatus with double insulation,
and no protective earth provided.
Care for your product
Use only microfiber cloth to clean the product.
Care of the environment
Disposal of your old product and battery
Your product is designed and manufactured with
high quality materials and components, which
can be recycled and reused.
This symbol on a product means that the
product is covered by European Directive
2012/19/EU.
This symbol means that the product contains
batteries covered by European Directive
2013/56/EU which cannot be disposed of with
normal household waste.
Inform yourself about the local separate
collection system for electrical and electronic
products and batteries. Follow local rules and
never dispose of the product and batteries
with normal household waste. Correct disposal
of old products and batteries helps prevent
negative consequences for the environment and
human health.
Removing the disposable batteries
To remove the disposable batteries, see battery
installation section.
English
3
Page 6

Caution FCC and IC statement for Users (USA and Canada only)
FCC INFORMATION
Warning:
• This equipment should be installed and
operated with minimum distance 20cm
between the radiator & your body.
• Changes or modifications to this unit not
expressly approved by the party responsible
for compliance could void the user’s authority
to operate the equipment. ”
NOTE: This equipment has been tested
and found to comply with the limits for a
Class B digital device, pursuant to Part 15 of
the FCC Rules. These limits are designed to
provide reasonable protection against harmful
interference in a residential installation. This
equipment generates, uses and can radiate radio
frequency energy and, if not installed and used
in accordance with the instructions, may cause
harmful interference to radio communications.
However, there is no guarantee that interference
will not occur in a particular installation. If this
equipment does cause harmful interference
to radio or television reception, which can be
determined by turning the equipment off and
on, the user is encouraged to try to correct the
interference by one or more of the following
measures:
• Reorient or relocate the receiving
antenna.
• Increase the separation between the
equipment and receiver.
• Connect the equipment into an outlet on
a circuit dierent from that to which the
receiver is connected.
• Consult the dealer or an experienced
radio / TV technician for help.
This device contains licence-exempt
transmitter(s)/receiver(s) that comply with
Innovation, Science and Economic Development
Canada’s licence-exempt RSS(s). Operation is
subject to the following two conditions:
1. This device may not cause interference.
2. This device must accept any interference,
including interference that may cause
undesired operation of the device.
Compliance
This product complies with the radio
interference requirements of the European
Community.
Hereby, TP Vision Europe B.V. declares that this
product is in compliance with the essential
requirements and other relevant provisions of
Directive 2014/53/EU.
You can find the Declaration of Conformity on
www.p4c.philips.com.
4
Page 7
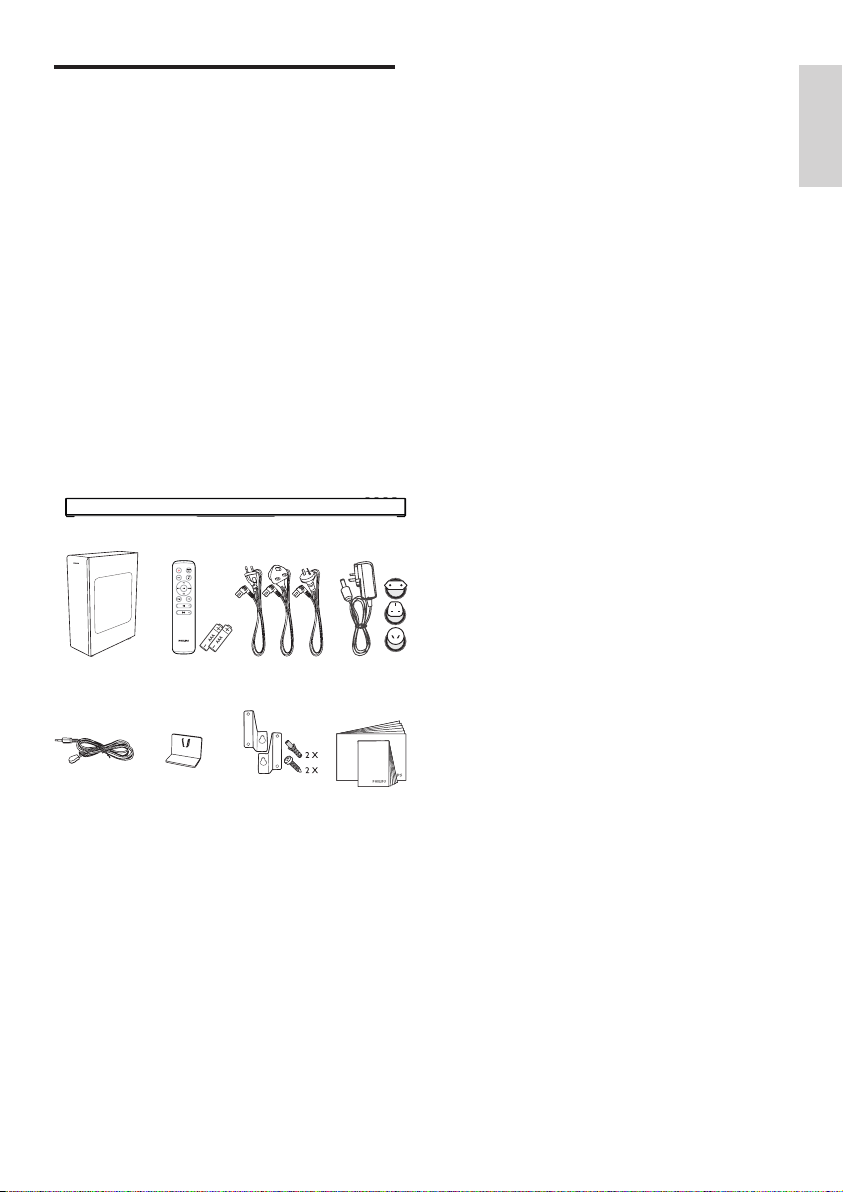
What’s in the Box
Check and identify the items in the package:
• Soundbar x 1
• Wireless Subwoofer x 1
• Remote Control x 1
(AAA Batteries x 2)
• Power Cord (for Subwoofer) x 3
• DC Adapter (for Soundbar) x 3
• IR pass-through Cable x 1
• IR Bracket x 1
• Wall Mount kit x 1
(Wall Brackets x2, Screws x2, Dowels x2)
• Quick Start Guide / Warranty Card /
Safety Sheet x 1
Wireless Subwoofer Remote Control
(AAA Batteries x 2)
Power Cord *
(for subwoofer)
DC adapter *
English
IR pass-through
Cable
IR Bracket Wall Bracket
Gum Cover
Screws (for wall)
Quick start guide
Warranty Card
Safety Sheet
* Power cord quantity and plug type vary by regions.
5
Page 8
2 Your Soundbar
Congratulations on your purchase, and welcome
to Philips! To fully benefit from the support
that Philips oers, register your Soundbar at
www.philips.com/support.
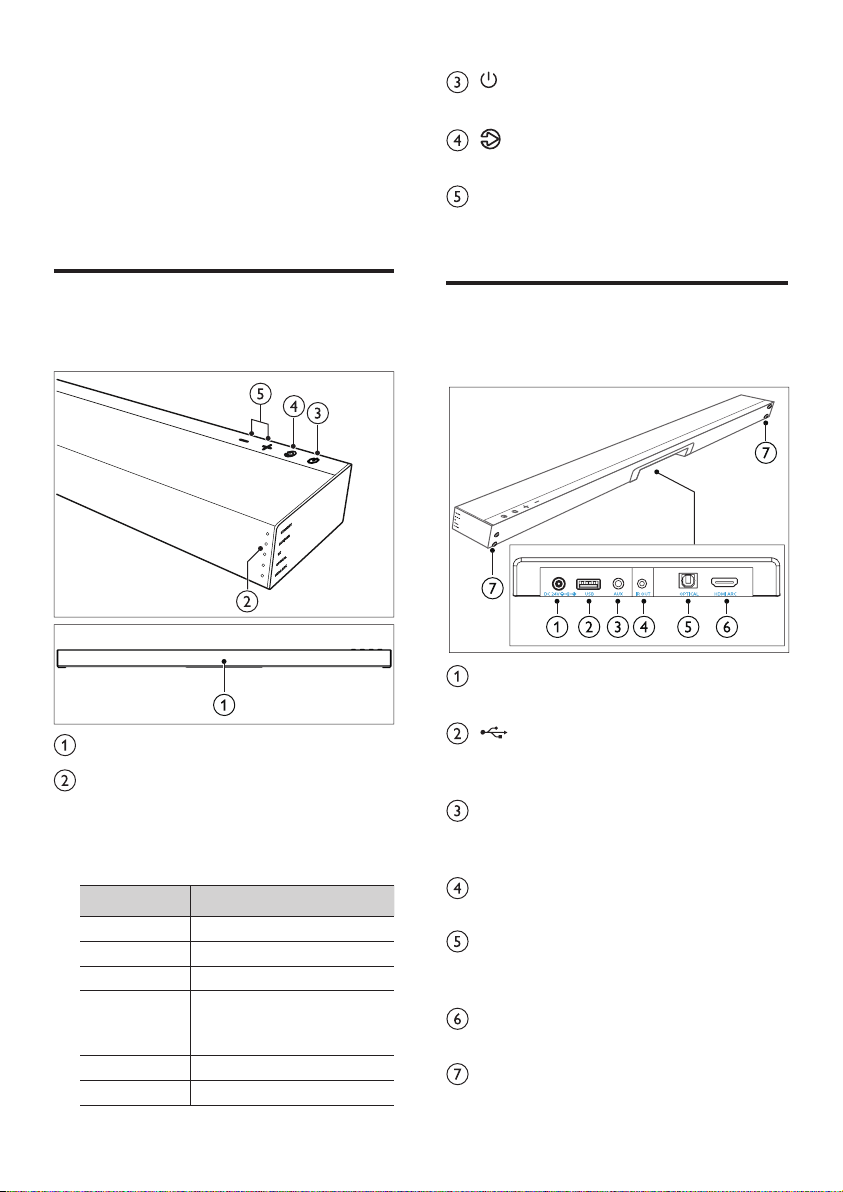
(St andby- O n)
Switch the Soundbar On or to Standby.
(Source)
Select an input source for the Soundbar.
+/- (Volume)
Increase or decrease volume.
Main unit
This section includes an overview of the main
unit.
Remote Control Sensor
Soundbar’s LED indicator
Switch the playback source and the front
indicator lights up accordingly. You may
refer to the text on the right for the
corresponding source.
Status
Standby [Standby] Solid red
AUX [AUX/USB] Solid white
USB [AUX/USB] Blinking white
BT (Bluetooth)
• Connected
• Connection
OPTICAL [OPTICAL] Solid white
HDMI ARC [HDMI ARC] Solid white
LED State
[BT] Solid white
[BT] Blinking white
Connectors
This section includes an overview of the
connectors available on your Soundbar.
DC 24V
Connect to adapter.
USB
• Audio input from a USB storage device.
• Upgrade software of this product.
AUX
Audio input from, for example, an
MP3 player (3.5mm jack).
IR OUT
IR pass-through cable connector.
OPTICAL
Connect to an optical audio output on the
TV or a digital device.
HDMI ARC
Connect to the HDMI input on the TV.
Wall Bracket Screws
6
Page 9
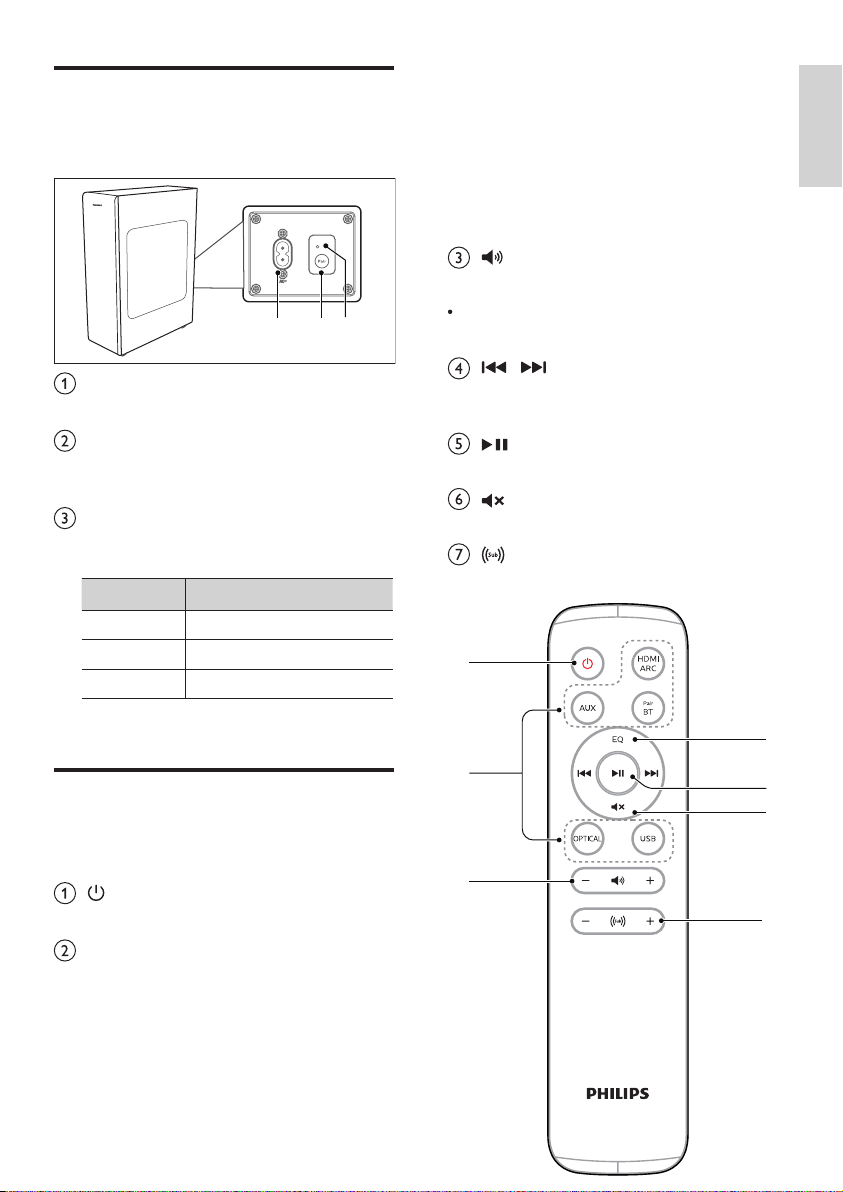
Wireless subwoofer
b
c
a
f
This section includes an overview of the
Wireless subwoofer.
AC~ Socket
Connect to the power supply.
Pair button
Press and hold to enter the pairing mode
for the subwoofer.
Subwoofer indicator
Determine the status based on the wireless
subwoofer indicator.
LED State Status
Fast blink Subwoofer in pairing mode
Constant on Connected / Pairing successful
Slow blink Connection / Pairing Failed
abc
Press and hold to activate the pairing
function in Bluetooth mode or disconnect
the existing paired Bluetooth device.
OPTICAL: Switch your audio source to
the optical connection.
HDMI ARC: Switch your source to HDMI
ARC connection.
USB: Switch to USB mode.
+/- (Soundbar’s Volume)
Increase / decrease the soundbar’s volume.
EQ
Select Equalizer (EQ) eect.
/ (Previous/Next)
Skip to the previous or next track in USB/
BT mode.
(Play/Pause)
Start, pause or resume play in USB/BT mode.
(Mute)
Mute or restore volume.
+/- (Subwoofer’s Volume)
Increase / decrease the subwoofer’s volume.
English
Remote control
This section includes an overview of the remote
control.
(St andby- O n)
Switch the Soundbar on or to standby.
Source buttons
AUX: Switch your audio source to the
AUX connection (3.5mm jack).
BT / Pair: Switch to Bluetooth mode.
d
e
g
7
Page 10
Prepare the Remote Control
• The provided Remote Control allows the
unit to be operated from a distance.
• Even if the Remote Control is operated
within the eective range 19.7 feet
(6m), remote control operation may
be impossible if there are any obstacles
between the unit and the remote control.
• If the Remote Control is operated near
other products which generate infrared
rays, or if other remote control devices
using infra-red rays are used near the unit,
it may operate incorrectly. Conversely, the
other products may operate incorrectly.
Replace the Remote Control
Battery
• Either rechargeable or non-rechargeable
batteries can be used. Refer to the
precautions on their labels.
• Be aware of your fingernails when removing
the battery cover and the battery.
• Do not drop the remote control.
• Do not allow anything to impact the
remote control.
• Do not spill water or any liquid on the
remote control.
• Do not place the remote control on a wet
object.
• Do not place the remote control under
direct sunlight or near sources of excessive
heat.
• Remove the battery from the remote
control when not in use for a long period
of time, as corrosion or battery leakage
may occur and result in physical injury, and/
or property damage, and/or fire.
• Do not use any batteries other than those
specified.
• Do not mix new batteries with old ones.
• Never recharge a battery unless it is
confirmed to be a rechargeable type.
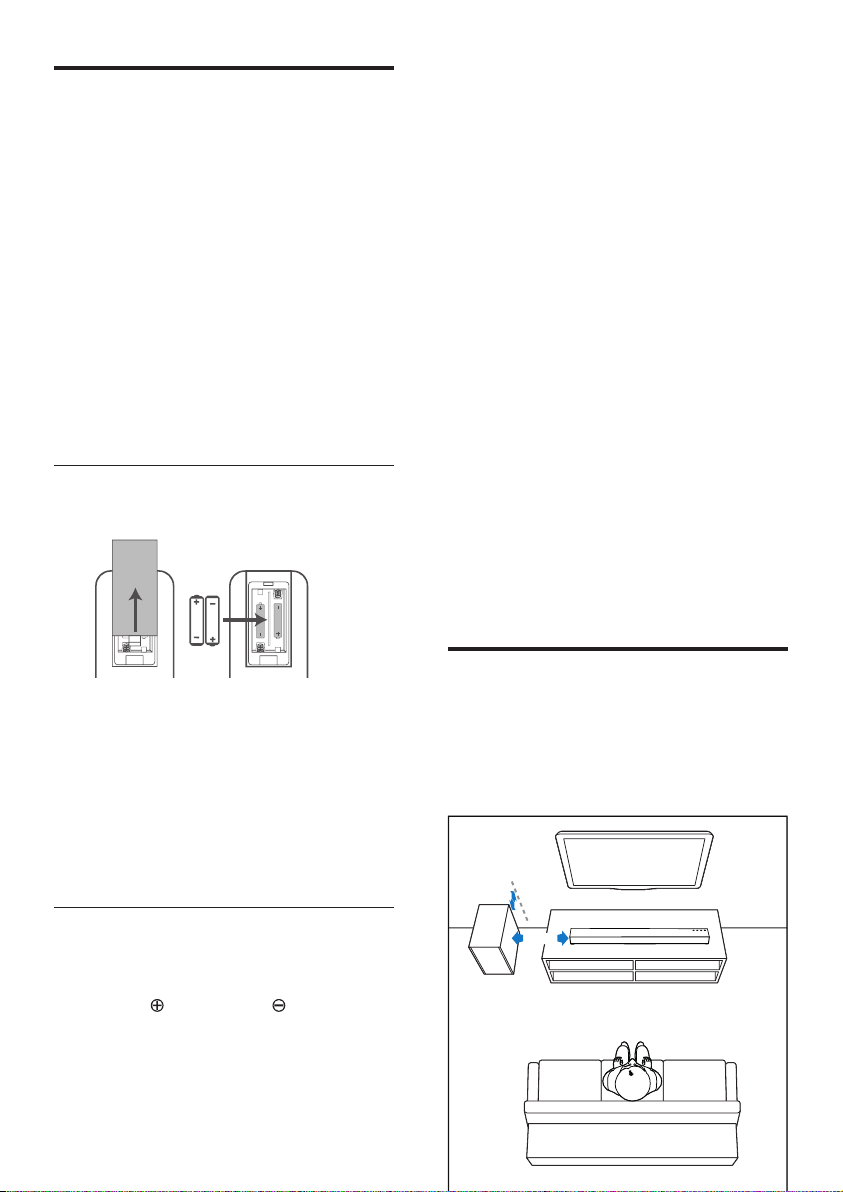
1 Press and slide the back cover to open
the battery compartment of the remote
control.
2 Insert two AAA size batteries (included).
Make sure the (+) and (–) ends of the
batteries match the (+) and (–) ends
indicated in the battery compartment.
3 Close the battery compartment cover.
Precautions Concerning
Batteries
• Be sure to insert the batteries with correct
positive “ ” and negative “ ” polarities.
• Use batteries of the same type. Never use
different types of batteries together.
8
Placement
Place the subwoofer at least 1 meter (3 feet)
away from your Soundbar, and ten centimeters
away from the wall.
For best results, place your subwoofer as shown
below.
10 cm/4"
1 m/3 ft
Page 11
3 Connect
This section helps you connect your Soundbar
to a TV and other devices, and then set it up.
For information about the basic connections of
your Soundbar and accessories, see the quick
start guide.
Note
• Your TV must support the HDMI-CEC and ARC
function. HDMI-CEC and ARC must be set to On.
• The setting method of HDMI-CEC and ARC may dier
depending on the TV. For details about ARC function,
please refer to your TV owner’s manual.
• Only HDMI 1.4 compatible cables can support the ARC
function.
English
Note
• For identification and supply ratings, see the type plate at
the back or bottom of the product.
• Before you make or change any connections, make sure
that all devices are disconnected from the power outlet.
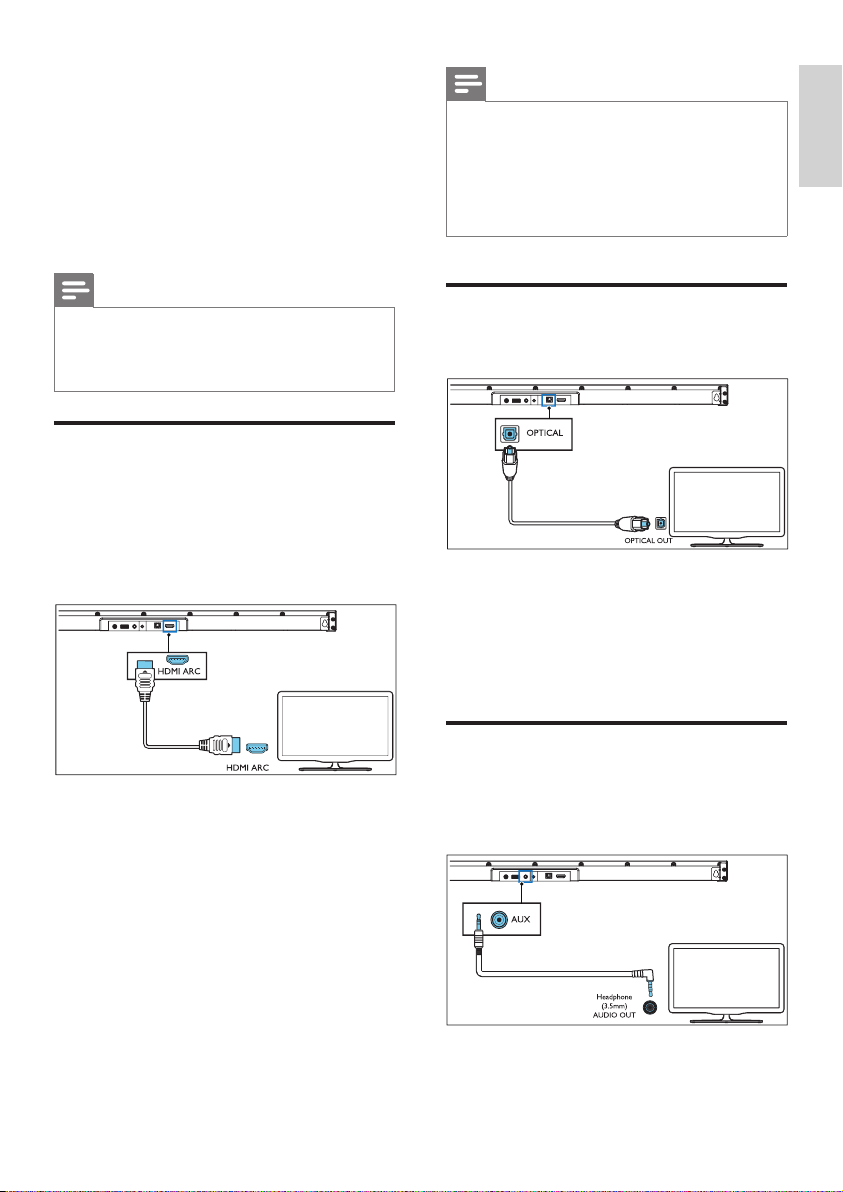
Connect to HDMI ARC Socket
Your Soundbar supports HDMI with Audio
Return Channel (ARC). If your TV is HDMI ARC
compliant, you can hear the TV audio through
your Soundbar by using a single HDMI cable.
1 Using a HDMI cable, connect the
HDMI ARC connector on your Soundbar
to the HDMI ARC connector on the TV.
• The HDMI ARC connector on the TV
might be labeled dierently. For details,
see the TV user manual.
2 On your TV, turn on HDMI-CEC operations.
For details, see the TV user manual.
Connect to Optical Socket
1 Using an optical cable, connect the
OPTICAL connector on your Soundbar
to the OPTICAL OUT connector on
the TV or other device.
• The digital optical connector might be
labeled SPDIF or SPDIF OUT.
Connect to AUX Socket
• Use a 3.5mm to 3.5mm audio cable to
connect the TV’s headphone socket to the
AUX socket on the unit.
9
Page 12
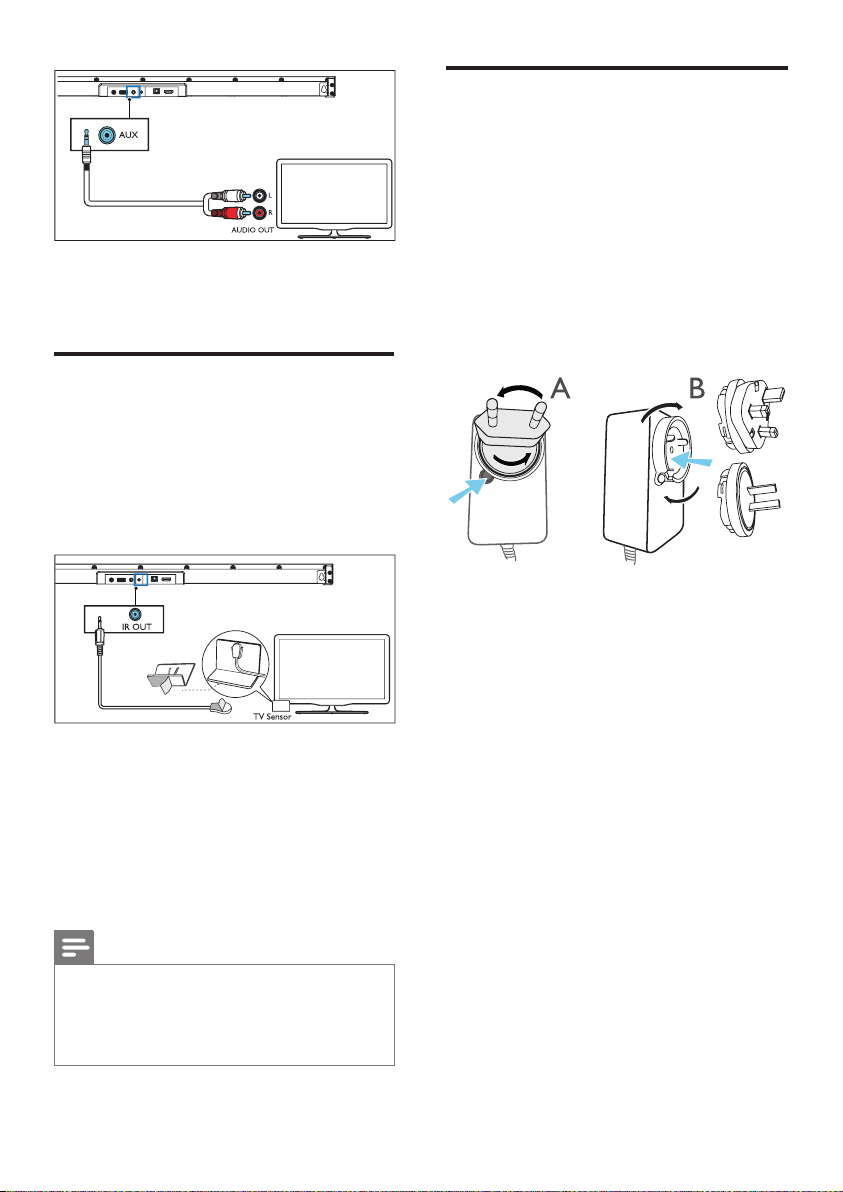
• Use a RCA to 3.5mm audio cable to
connect the TV’s audio output sockets to
the AUX socket on the unit.
Connect the IR passthrough cable
If the Soundbar blocks the IR receiver of the
TV when placing directly in front of it, you can
connect the Soundbar and TV with the supplied
IR pass-through cable so that it can receive signal
from the remote control of your TV.
1 Connect the 2.5mm end of the IR pass-
through cable to the IR OUT connector on
your Soundbar.
2 Then, place the other end with the IR
blaster close to the TV sensor.
For information, check the user manual of
your TV.
Connect to Power
• Before connecting the AC power cord,
ensure you have completed all other
connections.
• Risk of product damage! Ensure that
the power supply voltage corresponds
to the voltage printed on the back or the
underside of the unit.
Conversion plug
Choose the adapter for your region.
If needed, snap on the adapter for your region.
Soundbar
1 Unwind the mains adapter and mains cable to
their full length. Connect the mains adapter to
the DC IN 24V socket of the soundbar.
2 Then connect the mains adapter into a mains
socket.
Subwoofer
3 Connect the mains cable to the AC~
socket of the Subwoofer and then into a
mains socket.
• Power cord quantity and plug type vary by
regions.
Note
• Before you start using IR pass-through, make sure the
TV’s remote sensing area is completely blocked.
• If you find that the TV’s remote control receiver is not
blocked and still works, you can cancel the connection of
the IR pass-through cable.
10
Page 13
Pair up with the subwoofer
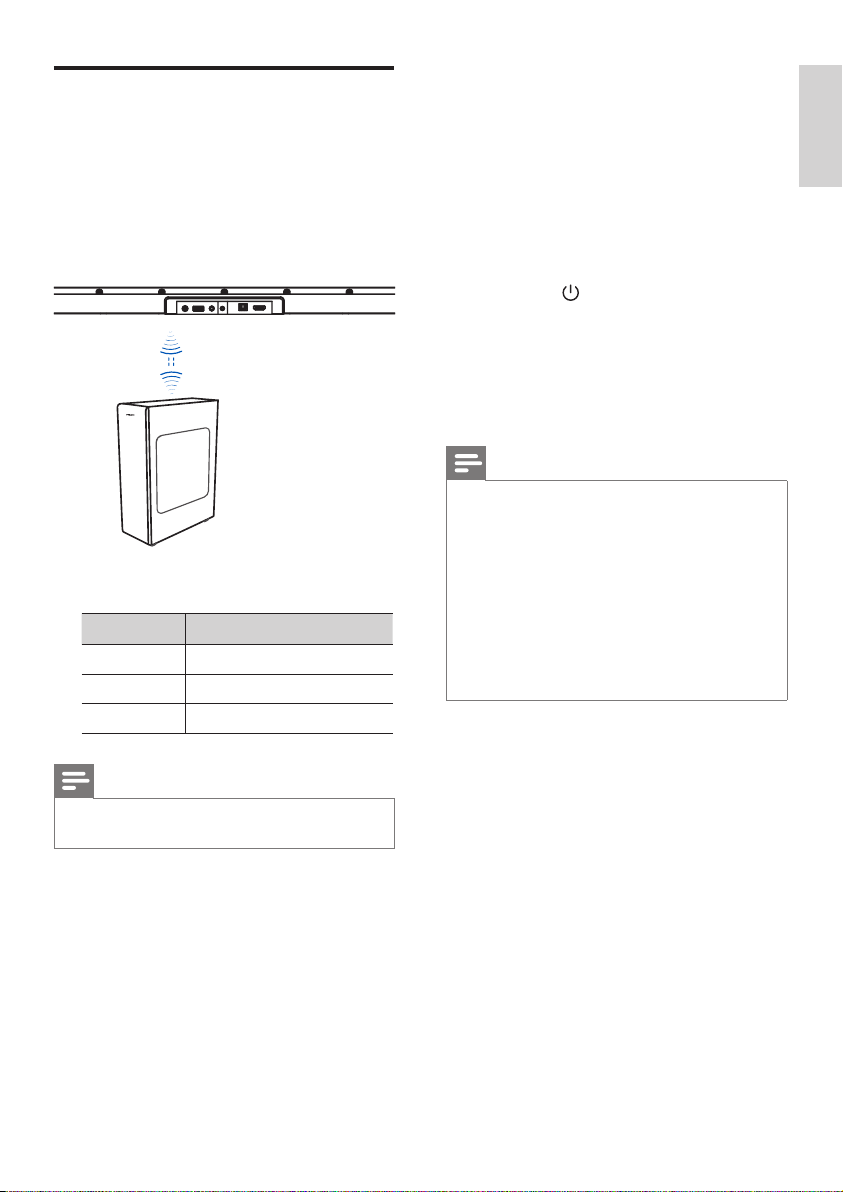
Automatic Pairing
Plug the Soundbar and the subwoofer into the
mains sockets and then press on the unit or
remote control to switch the unit to ON mode.
The subwoofer and Soundbar will automatically
pair.
Determine the status based on the
wireless subwoofer indicator.
LED State Status
Fast blink Subwoofer in pairing mode
Constant on Connected / Pairing successful
Slow blink Connection / Pairing Failed
Manual Pairing
If no audio from the wireless subwoofer can be
heard, manually pair up the subwoofer.
1 Unplug both units from the mains sockets
again, then plug them in again after 3 minutes.
2 Press and hold the Pair button on the rear
of the subwoofer for a few seconds.
The Pair indicator on the subwoofer
will rapidly blink.
3 Then press on the unit or remote
control to switch the unit ON.
The Pair indicator on the subwoofer
will become solid when successful.
4 If the Pair indicator still keeps blinking,
repeat step 1-3.
Tips
• The subwoofer should be within 6 m of the Soundbar in
an open area (the closer the better).
• Remove any objects between the subwoofer and the
Soundbar.
• If the wireless connection fails again, check if there is a
conflict or strong interference (e. g. interference from
an electronic device) around the location. Remove these
conflicts or strong interferences and repeat the above
procedures.
• If the main unit is not connected with the subwoofer
and it is in ON mode, the unit’s STANDBY indicator
will flash.
English
Tips
• Do not press Pair on the rear of the subwoofer, except
for manual pairing.
11
Page 14
4 Use your
Select Modes
Soundbar
This section helps you use the Soundbar to play
audio from connected devices.
Before you start
• Make the necessary connections described
in the user manual.
• Switch the Soundbar to the correct source
for other devices.
Turn ON and OFF
• When you first connect the unit to the
main socket, the unit will be in STANDBY
mode. The Standby indicator will light up.
• Press the button on the remote control
to switch the main unit ON or OFF.
• Disconnect the main plug from the main
socket if you want to switch the unit o
completely.
Auto wake up
• If a TV or an external device (only for AUX
socket) is connected, the unit will switch on
automatically when the TV or the external
device is switched on.
1 Press the button repeatedly on the unit
or press the AUX, OPTICAL, HDMI
ARC, BT/Pair, USB buttons on the remote
control to select the desired mode.
The indicator light on the Soundbar will
show which mode is currently in use.
Status
AUX [AUX/USB] white light is constant on
USB [AUX/USB] white light is blink
BT (Bluetooth)
• Connected
• Connection
OPTICAL [OPTICAL] white light is constant on
HDMI ARC [HDMI ARC] white light is constant on
LED State
[BT] white light is constant on
[BT] white light is blink
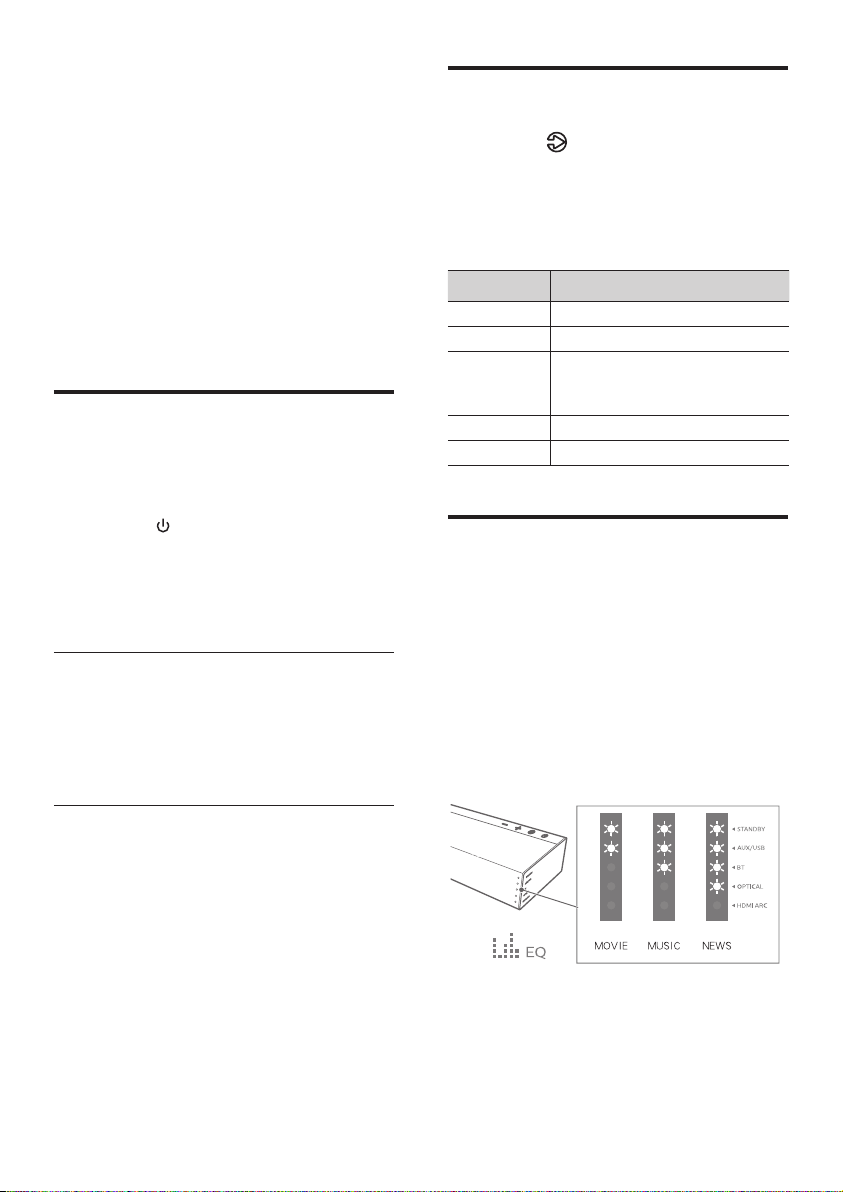
Select Equalizer (EQ)
Eect
Select predefined sound modes to suit your
video or music.
1 Press the EQ button on the remote
control to select your desired preset
equalizer eects.
LEDs blink for 3 sec to show current
EQ mode according to the EQ mode
definition (Fig).
Auto Standby
The unit automatically turns to Standby mode
after about 15 minutes if the TV or the external
unit is disconnected, switched o.
• To switch the unit o completely, remove
the mains plug from the mains socket.
• Please turn the unit o completely to save
energy when not in use.
12
Movie: recommended for viewing Movies
Music: recommended for listening to Music
News: recommended for listening to News
Page 15
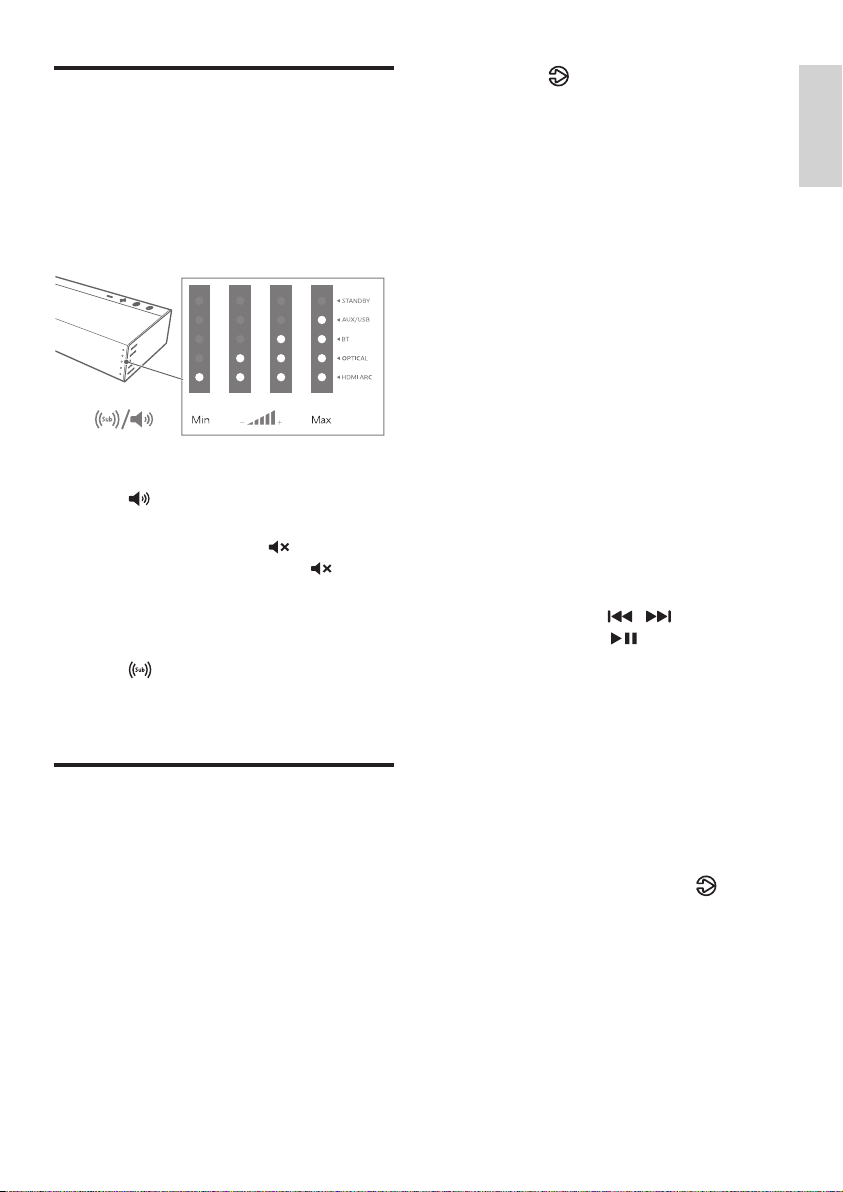
Adjust the Volume
When adjusting the volume of the soundbar
and subwoofer, the status indicator will increase
/ decrease the amount of light. According to
the corresponding light display / blinking (Fig),
determine the current volume level of the
soundbar and subwoofer.
Adjust the Soundbar’s Volume
1 Press +/- (Volume) to increase or
decrease the soundbar’s volume level.
• To mute sound, press (Mute).
• To restore the sound, press (Mute)
again or press Vol+/Vol- (Volume).
Adjust the Subwoofer’s Volume
1 Press +/- (subwoofer) to increase or
decrease the subwoofer’s volume level.
Bluetooth Operation
Through Bluetooth, connect the Soundbar with
your Bluetooth device (such as an iPad, iPhone,
iPod touch, Android phone, or laptop), and then
you can listen to the audio files stored on the
device through your Soundbar speakers.
What you need
• A Bluetooth device which supports
Bluetooth profile A2DP, AVRCP and with
Bluetooth version as 4.2 + EDR.
• The maximum operational range between
the Soundbar and a Bluetooth device is
approximately 10 meters (30 feet).
1 Press the button repeatedly on the
unit or press BT/Pair button on the
remote control to switch the Soundbar to
Bluetooth mode.
The BT indicator will blink.
2 On the Bluetooth device, switch on
Bluetooth, search for and select
Philips TAB6305 to start connection
(see the user manual of the Bluetooth
device on how to enable Bluetooth).
During connection, the BT indicator
will blink.
3 Wait until you hear voice prompt from the
Soundbar.
If the successfully connected, the BT
indicator will light up solidly.
4 Select and play audio files or music on your
Bluetooth device.
• During play, if a call is coming, music play
is paused. Play resumes when the call
ends.
• If your Bluetooth device supports
AVRCP profile, on the remote control
you can press / to skip to a
track, or press to pause/resume
play.
5 To exit Bluetooth, you can:
• Switch the unit to another source.
• Disable the function from your
Bluetooth device. Or place your
Bluetooth device out of the maximum
operational range. The Bluetooth device
will be disconnected from the unit after
the voice prompt.
• Press and hold the BT/Pair button on
the remote control or the button
on the unit.
English
13
Page 16
Note
• The music streaming may be interrupted by obstacles
between the device and Soundbar, such as wall, metallic
casing that covers the device, or other devices nearby
that operate in the same frequency.
• If you want to connect your Soundbar with another
Bluetooth device, press and hold BT/Pair on the
remote control to disconnect the currently connected
Bluetooth device.
AUX / OPTICAL / HDMI ARC Operation
Ensure that the unit is connected to the TV or
audio device.
1 Press the button repeatedly on the unit
or press the AUX, OPTICAL, HDMI
ARC buttons on the remote to select the
desired mode.
The indicator light on the Soundbar will
show which mode is currently in use.
Status
AUX [AUX/USB] Solid white
OPTICAL [OPTICAL] Solid white
HDMI ARC [HDMI ARC] Solid white
LED State
2 Operate your audio device directly for
playback features.
3 Press the +/- (Volume) buttons to adjust
the volume to your desired level.
USB Operation
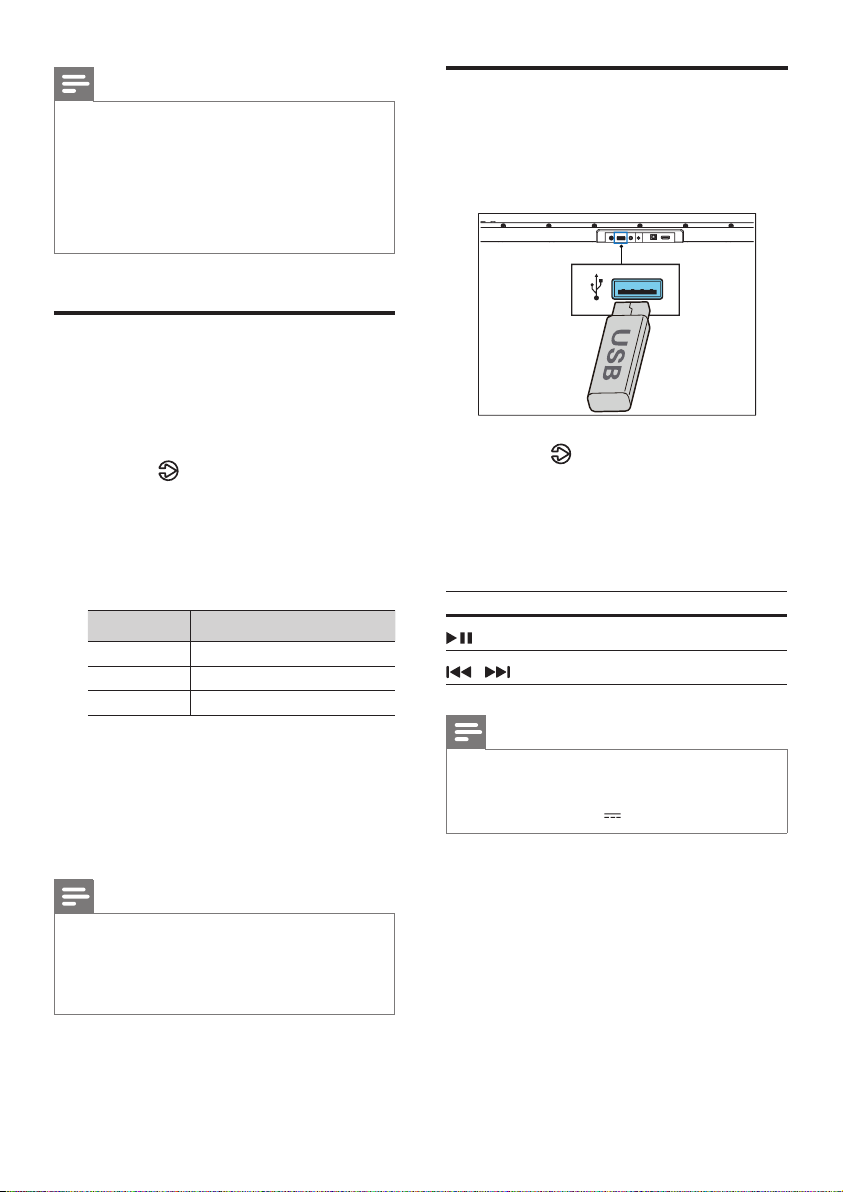
Enjoy audio on a USB storage device, such as an
MP3 player and USB flash memory, etc.
1 Insert the USB device.
2 Press the button repeatedly on the unit
or press the USB button on the remote
control to select USB mode.
[AUX/USB] LED indicator blinks white.
3 During playback:
Button Action
Start, pause or resume play.
/
• The unit can support USB devices with up to 32 GB of
memory.
• This unit can play MP3 / WAV / FLAC.
• Support a USB port: 5V , 500mA .
Skip to the previous or next track.
Tips
Tip
• While in OPTICAL/HDMI ARC mode, if there’s no
sound output from the unit and the status Indicator
flashes, you may need to activate PCM or Dolby Digital
Signal output on your source device (e.g. TV, DVD or
Blu-ray player).
14
Page 17
5 Wall mount
Note
• Improper wall mounting may result in accident, injury or
damage. If you have any query, contact Consumer Care
in your country.
• Before wall mounting, make sure the wall can support
the weight of your Soundbar.
• Before wall mount, you need not remove the rubber
feet at the bottom of the Soundbar, otherwise the
rubber feet cannot be fixed back.
• Depending on the type of wall mounting your Soundbar,
make sure that you use screws of a suitable length and
diameter.
• Please check whether the USB port on the back of the
Soundbar is connected to a USB device. If it is found
that the connected USB device aects the wall-mount,
you need to use another USB device of the appropriate
size.
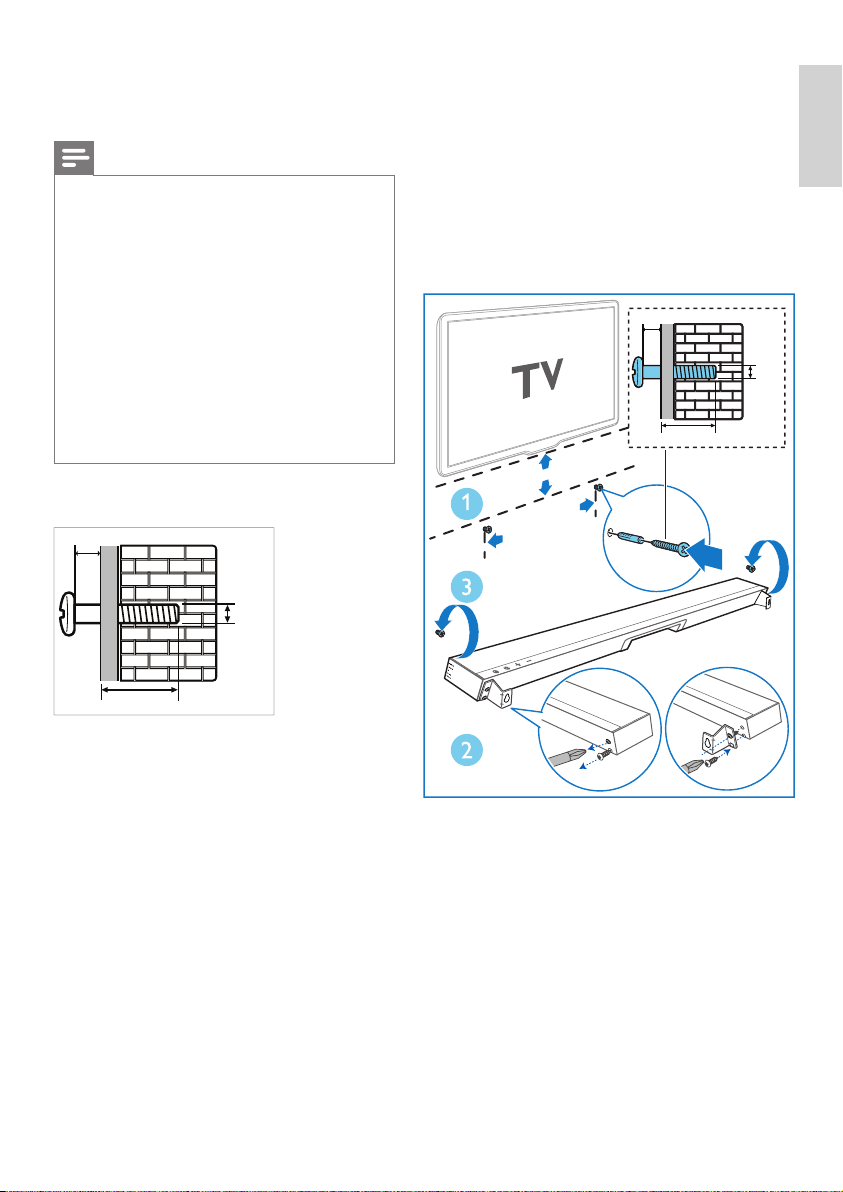
Attach the wall brackets (x2) to the
main unit with the screws removed
from the main unit.
3 Hang the Soundbar on the fastening screws.
3.5-4 mm/0.14"-0.16"
4 mm/
0.16"
> 25 mm/0.98"
English
Screw length/diameter
3.5-4 mm
4 mm
> 25 mm
Suggested wall mounting height
You are recommended to install the TV first
before wall mounting the soundbar. With a
TV preinstalled, wall mount the soundbar
50mm/2.0’’ in distance from the bottom of the
TV.
1 Drill 2 parallel holes (Ø 3-8mm each
according to wall type) on the wall. The
distance between the holes should be
611mm / 24”.
Secure the dowels and screws in the
holes.
2 Remove the screws (x4) from the main
unit.
~ 50 mm/2.0"
611 mm / 24"
15
Page 18

6 Product
specifications
Note
• Specifications and design are subject to change without
notice.
Bluetooth
• Bluetooth profiles: A2DP, AVRCP
• Bluetooth version: 4.2 + EDR
• Frequency band/Output power:
2402 MHz ~ 2480 MHz / ≤ 5 dBm
• 2.4G wireless frequency range:
2400 MHz ~ 2483 MHz
• 2.4G wireless maximum power: 6dBm
Subwoofer
• Power Supply: 100-240 V~, 50-60 Hz
• Output Power: 60 W
• Power Consumption: 20 W
• Standby Power Consumption: < 0.5 W
• Frequency Response: 40Hz - 180Hz
• Impedance: 4 Ω
• Dimensions (W x H x D):
120 x 402 x 300 mm
• Weight: 4.8 kg
• Operating Temperature: 0°C - 45°C
Remote control
• Distance/Angle: 6m/30°
• Battery Type: AAA (1.5V X 2)
Supported Audio formats
Main unit
• Power Supply: DC 24V 1.5A
• Adapter for Main Unit:
Model : KA3601A-2401500DE
Interchangeable 3 Pin BS
1363-1 and 2 pin (EN 50075)
Input : 100-240V~ 50-60Hz 1.0A Max
Output : 24V 1.5A
• Power Consumption: 18.0W
• MAX Output Power by Speaker: 20W x 4
• Standby Consumption: < 0.5 W
• USB: 5V 500mA
• Frequency Response: 180Hz - 20KHz
• Audio Input Sensitivity (AUX): 500mV
• Speakers Impedance: 8Ω x 2
• Dimension (W x H x D ):
650 x 35 x 81 mm
• Weight: 1.0 kg
• Operating Temperature: 0°C - 45°C
16
• HDMI ARC
Dolby Digital, LPCM 2ch
• OPTICAL
Dolby Digital, LPCM 2ch
• BLUETOOTH
SBC
• USB
MP3, WAV, FLAC
Page 19

7 Trouble-
shooting
Warning
• Risk of electric shock. Never remove the casing of the
product.
To keep the warranty valid, never try to repair
the product yourself.
If you have problems using this product, check
the following points before you request service.
If you still have a problem, get support at
www.philips.com/support.
No power
• Ensure that the AC cord is properly
connected.
• Ensure that there is power at the AC outlet.
• Press standby button on the remote
control or Soundbar to turn the Soundbar
on.
No sound
• Increase the volume. Press Volume Up on
the remote control or on the Soundbar.
• Press MUTE on the remote control to
ensure the Soundbar is not muted.
• Press source buttons to select a dierent
input source.
• When using either of the Digital input, if
there is no audio:
- Try setting the TV output to PCM or
- Connect directly to your Blu-ray/other
source, some TVs do not pass through
digital audio.
• Your TV may be set to variable audio
output. Confirm that the audio output
setting is set to FIXED or STANDARD, not
VARIABLE. Consult your TV’s user manual
for more detailed information.
• If using Bluetooth, ensure that the volume
on your source device is turned up and that
the device is not muted.
English
Remote control does not work
• Before you press any playback control
button, first select the correct source.
• Reduce the distance between the remote
control and the unit.
• Insert the battery with its polarities (+/-)
aligned as indicated.
• Replace the battery.
• Aim the remote control directly at the
sensor on the front of the unit.
I can’t find the Bluetooth name
of this unit on my Bluetooth
device
• Ensure the Bluetooth function is activated
on your Bluetooth device.
• Re-pair the unit with your Bluetooth device.
This is a 15 mins power o
function, one of the ERPII
standard requirement for saving
power
• When the unit’s external input signal
level is too low, the unit will be turned o
automatically in 15 minutes. Please increase
the volume level of your external device.
The subwoofer is idle or the
indicator of subwoofer do not
light up
• Please unplug power cord from the mains
sockect, and plug it in again after 3 minutes
to resent the subwoofer.
17
Page 20

Dolby, Dolby Audio, and the double-D symbol are trademarks of Dolby Laboratories Licensing Corporation. Dolby Audio
Speaker System is a trademark of Dolby Laboratories Licensing Corporation. Manufactured under license from Dolby
Laboratories. Confidential unpublished works. Copyright © 2012–2020 Dolby Laboratories. All rights reserved.
The Adopted Trademarks HDMI, HDMI High-Definition Multimedia Interface, and the HDMI Logo are trademarks or
registered trademarks of HDMI Licensing Administrator, Inc. in the United States and other countries.
The Bluetooth® word mark and logos are registered trademarks owned by Bluetooth SIG, Inc. and any use of such
marks by MMD Hong Kong Holding Limited is under license. Other trademarks and trade names are those of their
respective owners.
Specifications are subject to change without notice.
Please visit www.philips.com/support for the latest updates and documents.
Philips and the Philips Shield Emblem are registered trademarks of Koninklijke Philips N.V.
and are used under license. This product has been manufactured by and is sold under
the responsibility of MMD Hong Kong Holding Limited. or one of its aliates, and
MMD Hong Kong Holding Limited. is the warrantor in relation to this product.
 Loading...