

Philips SL400i-37 User Manual

Wifi Wireless Multimedia Link SL400i
Instructions for use
English 4
2 3 4 5 7
61
8
9 10 1613 14
11 12 15
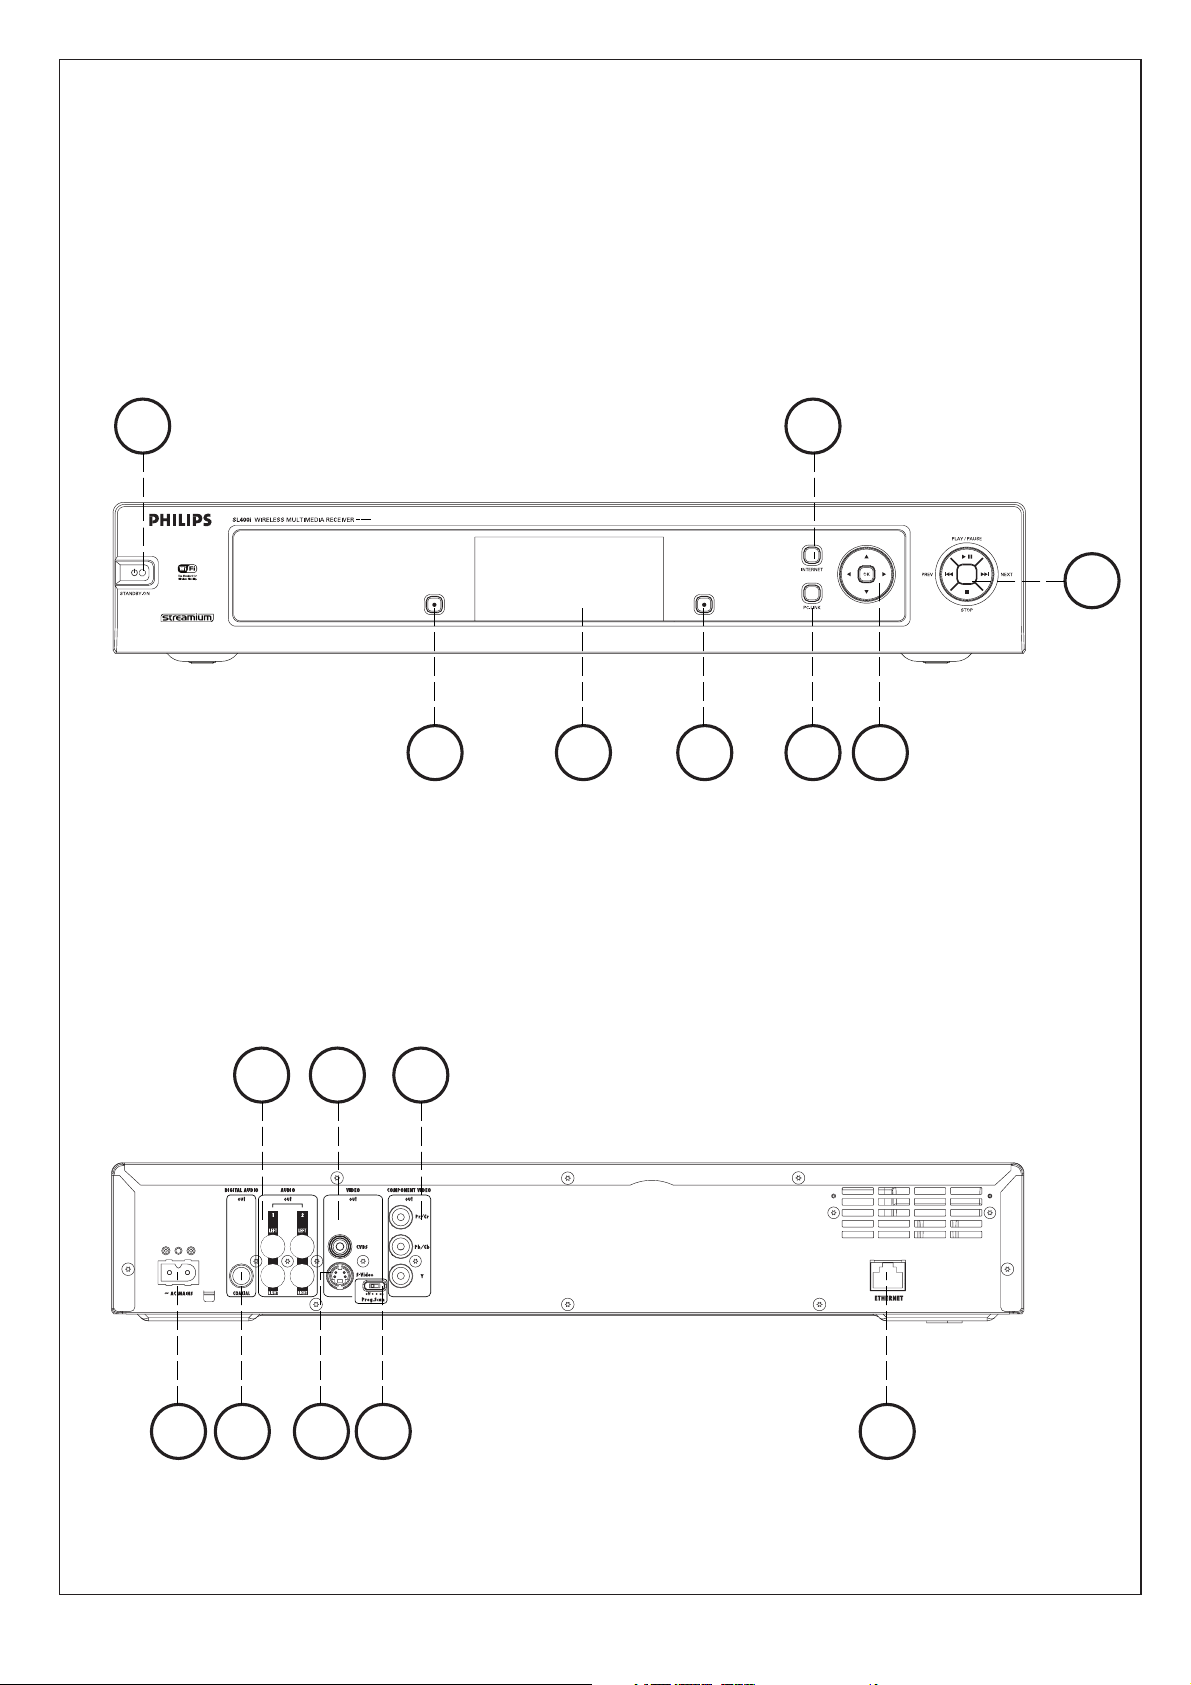
A) Front view
B) Rear view

Helpline
☎
USA
800-441-0613
Canada
1 800-441-0613
www.philips.com/streamium
4 ENGLISH
I
n
s
t
a
l
l
a
t
i
o
n
C
D
Warranty Card
How to use...
I
n
s
t
a
l
l
a
t
i
o
n
C
D
User Manual
Introduction
SL400i
Your SL400i gives you wireless access to multimedia content stored on PCs and brings live
streaming Internet entertainment to your existing TV set and/or audio system.
This is what this manual will help you to do:
• Install the Philips Media Manager software.
• Connect your SL400i and prepare it for use.
• Learn how to use the basic functions of your SL400i.
The most recent information on this product will be available through our website
www.philips.com/streamium
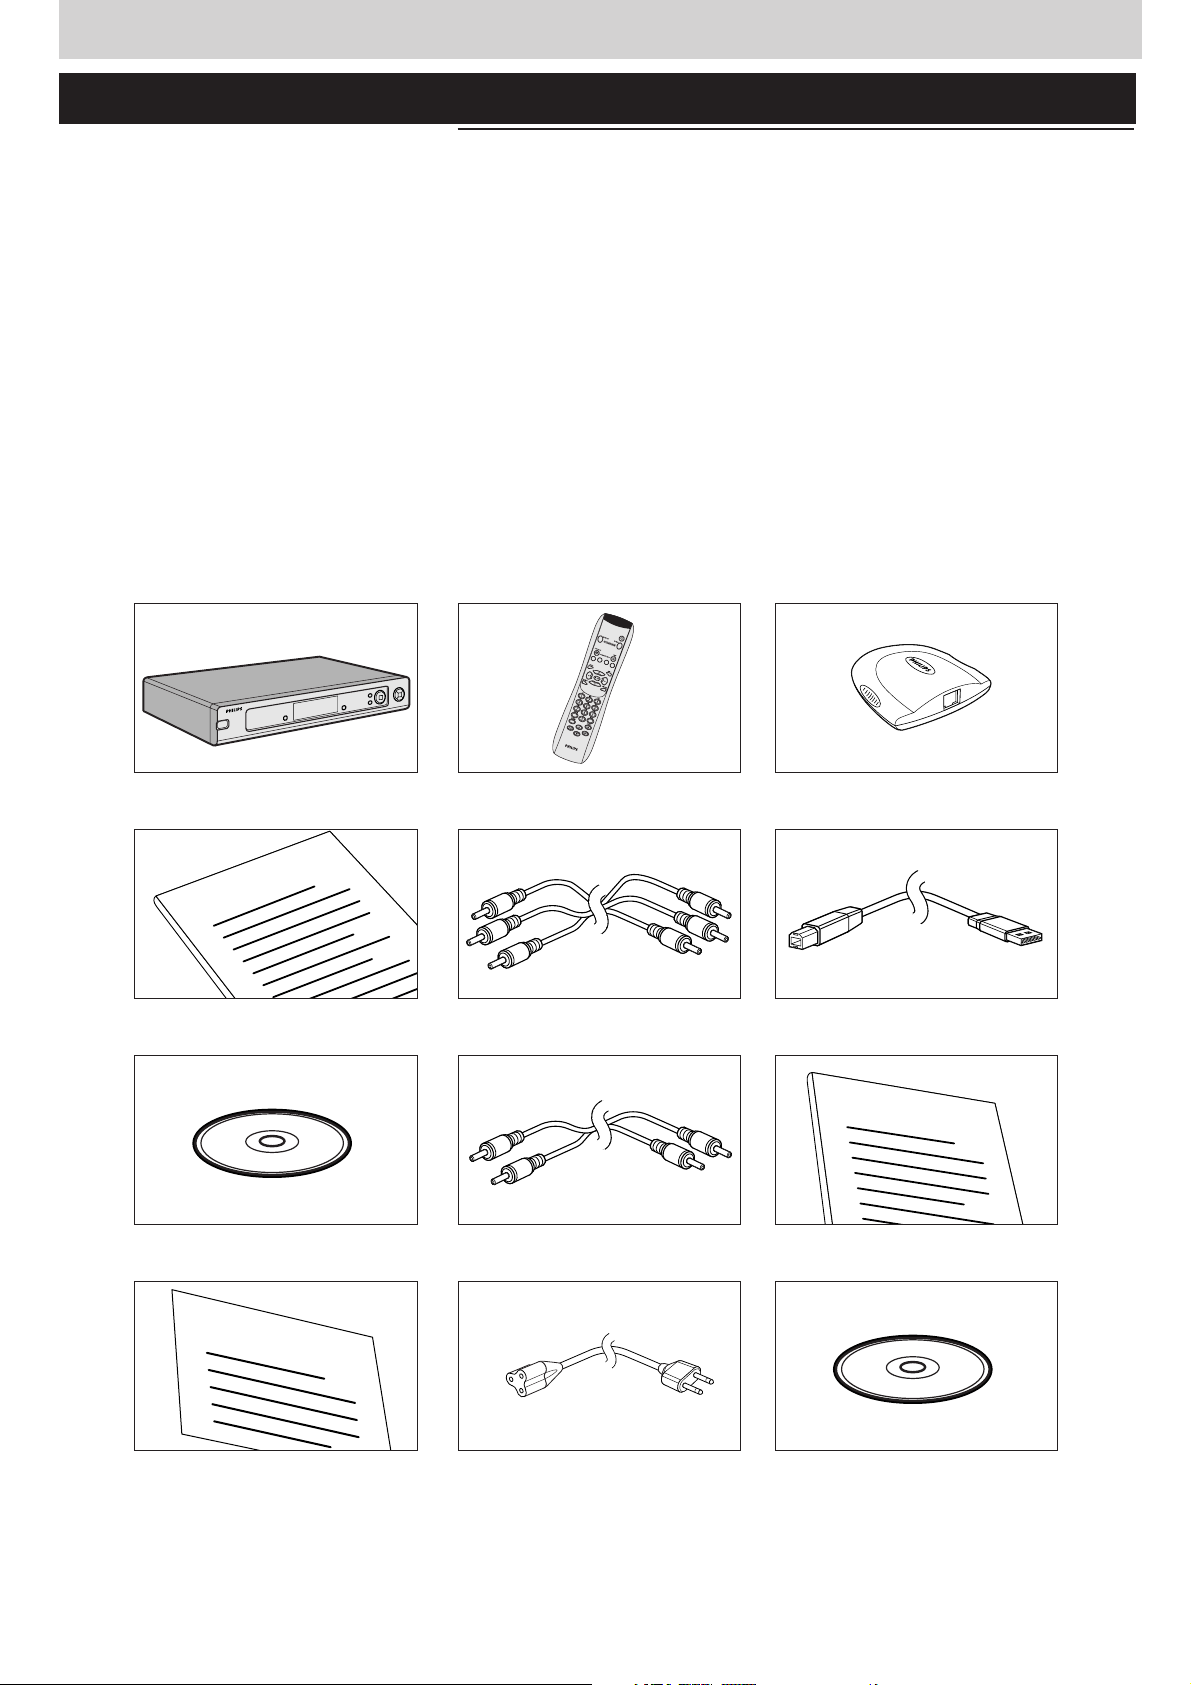
Packaging contents
Please check whether the following items are present in the box of the WiFi Wireless
Multimedia Link.
They are provided to help you set up and use your SL400i.
SL400i Remote control Wireless USB Adapter
(including batteries)
User Manual Audio + Composite Video cable USB cable
(red/white/yellow)
Philips Media Manager Stereo audio cable Wireless USB Adapter User Manual
Installation CD
Warranty Card Mains cable Wireless USB Adapter
Installation CD
Please contact your Philips retailer if any items are missing from the box.

ENGLISH 5
Legend of illustration (inside flap)
A) Front view
1 Power/standby button
Switches the SL400i off (to standby) and on.
– The indicator in the Power button lights up red if the SL400i is on standby.
2 Left menu button
Selects or activates the menu option in the lower left corner of the integrated display or
shown in red on the TV screen.
3 Display
For controlling the SL400i through its user menus.Very useful if you have no TV
connected or switched on (e.g. if you want to listen to Internet radio or PC Audio only).
4
Right menu button
Selects or activates the menu option in the lower right corner of the integrated display or
shown in green on the TV screen
5 PC Link source button
Select PC(s) connected to your home network as source for streaming music, photos,
and movies.
6 Internet source button
Selects the Internet as your source of multimedia entertainment.
– Requires broadband Internet access 256 kbps minimum (downstream).
7 Menu navigation buttons:left/right/up/down/OK
Used for navigating through menus (1234) and confirming your choices (OK).
8 Playback control buttons:Play/Pause, Previous/Next and Stop
Playback control functions for multimedia content.
B) Rear view
9
AC Mains
For connecting the SL400i to the mains.
– The indicator in the Power button lights up red when the SL400i is connected to the
mains.
10 Digital audio output
Optional digital audio connection (coaxial) to connect the SL400i to the input of your
TV set or Audio system.
If PCM coded signals are available for the media content being played, this output will
provide them.
11 Audio L/R output (stereo)
To connect the SL400i to the left and right audio inputs of your Audio system.
12 VIDEO OUT / CVBS
To connect the SL400i to the Composite video input of your TV.
13 VIDEO OUT / S-VIDEO
To connect the SL400i to the S-Video input of your TV.
14 P-SCAN (Prog Scan)
To switch on or off progressive scan.
Only if you connect the SL400i’s Component Video output to a Progressive Scan TV
(TV must indicate Progressive Scan or ProScan capability), then you may set the P-SCAN switch
to ON. Otherwise, set it to OFF.
15 COMPONENT VIDEO OUT (Pr/Cr, Pb/Cb,Y)
To connect the SL400i to the corresponding Component Video inputs of your TV.
16 Ethernet connector RJ-45
Optional Ethernet connection for a wired home network.
Use a CAT.5 shielded Ethernet cable (STP).

6 ENGLISH
Index
Introduction .........................................................................................................4-7
WiFi Wireless Multimedia Link....................................................................................................................................4
Legend of illustration.........................................................................................................................................................5
Index...........................................................................................................................................................................................6
Important information......................................................................................................................................................7
Chapter 1 – Installing the software ......................................................................................................8
Chapter 2 – Connecting the SL400i...............................................................................................9-17
2.1 If you do not have a wireless computer network. .....................................................................10-11
2.2 If you already have a wireless computer network......................................................................12-14
2.3 If you want to make a wired connection.........................................................................................15-17
Chapter 3 – Enabling broadband Internet entertainment.......................................................18-20
3.1 How does your computer connect to the Internet?........................................................................18
3.2 Pressing the INTERNET button for the first time..............................................................................19
3.3 Registration. .......................................................................................................................................................19-20
Chapter 4 – Using the SL400i..............................................................................................................21
4.1 INTERNET.................................................................................................................................................................21
4.2 PC LINK ......................................................................................................................................................................21
Chapter 5 – Basic navigation................................................................................................................22
Additional information...................................................................................................................................................23
Chapter 6 – Problem solving. ........................................................................................................24-26
The next chapters are only available in the extended User Manual version
on the CD-ROM.
Chapter 7 – Remote Control..........................................................................................................................27-28
Chapter 8 – Entering and editing numeric and text information
Chapter 9 – Advanced navigation and advanced SL400i functions
Chapter 10 – Advanced Philips Media Manager uses
Chapter 11 – Overview of SL400i connections
Chapter 12 – Options menu
................................................................................................................................35-39
Chapter 13 – What you need to know about networks
Chapter 14 – Advanced wireless network information
Chapter 15 – Entering an encryption key
Chapter 16 – Internet Connection Sharing
..................................................................................................44-45
..............................................................................................46-50
Chapter 17 – Advanced (network) problemsolving
Chapter 18 – Glossary
Chapter 19 – Technical specifications
.....................................................................................................................................................53
....................................................................................................................54
................................................................................33
............................................................................................34
................................................................40-41
...................................................................42-43
............................................................................51-52
..................................................29
.......................................30-32

ENGLISH 7
Important information
• Please install and connect the product in the order as described in this manual only.
This assures best installation results with the least technical hassles.
• Please read this guide carefully before using the SL400i; and keep it for future reference.
• The most recent downloads and information on this product will be available through our
website www.philips.com/streamium.
• Broadband Internet access (min. 256 kbps) is required if you want to use the Internet
functions of the SL400i.
• Please check whether your Internet service provider charges extra fees for exceeding a
certain limit of transferred data.
When using Internet media services on a daily basis, you may exceed such a limit.
For example:When you listen to Internet radio (at 64 kbps) for about 36 hours,
1 GB (gigabyte) of data will be transferred to your streamium system.
Watching Internet video at 700 kbps exceeds a 1 GB limit in 3 hours.
• During set-up and installation, it may be helpful to have the instructions for your TV set,
audio system and wireless base station or other wireless network components
(if appropriate) at hand.
Safety Precautions
• NEVER MAKE OR CHANGE CONNECTIONS WITH THE POWER SWITCHED ON.
• Before operating the system, check that the operating voltage indicated on the nameplate
(or the voltage indication beside the voltage selector) of your system is identical with the
voltage of your local power supply. If not, please consult your dealer.
• Radio equipment for wireless applications is not protected against disturbance from other
radio services.
• The product should not be exposed to dripping or splashing.
No object filled with liquids, such as vases, should be placed on the product.
• Do not expose the system to excessive moisture, rain, sand or heat sources caused by
heating equipment or direct sunlight.
• Allow a sufficient amount of free space all around the SL400i for adequate ventilation.
• Do not open this product. Contact your Philips retailer if you experience technical
difficulties.
• Place the system on a flat, hard and stable surface.When the system is switched to
standby mode, it is still consuming some power.To disconnect the system from the power
supply completely, remove the AC power plug from the wall outlet.
• Make sure the air around the SL400i can circulate to prevent the SL400i from overheating
internally. Also, avoid putting any heat sources (e.g. a power amplifier) underneath.
The SL400i has a thermal shutdown that shuts down the set when the internal
temperature exceeds a certain threshold. If this happens, the set switches to standby with
the Power-LED flashing on and off.To remedy this situation: disconnect the mains, let the
set cool down, improve ventilation, and reconnect the set to the mains.

8 ENGLISH
Chapter 1 - Installing the software
Start by installing Philips Media Manager
This software makes the music, photo, and movie files on your computer available for transfer
from your computer to your television.
1 Place the Philips Media Manager CD in your CD or DVD’s drive and install the Philips
Media Manager software.
The CD starts automatically. If it does not, double-click ‘My Computer’,
then the CD-ROM drive icon and finally ‘Setup.exe’ to start the CD.
2 In the menu that appears on your computer screen,click on ‘Install Philips Media Manager’,
and follow the on-screen instructions.
Start the program by clicking Start > Programs > Philips Media Manager.
When opening the Philips Media Manager for the first time, you will be asked if you want
to add a folder and scan for media files. Open a drive or a folder with music, photos, or
movies in it. (For example: the My Documents folder, if you have stored media files there.)
– You can always add more files and folders at a later time.
3 Adding files to the Media Manager.
Only the files that you see in the Media Manager will be accessible from the SL400i.
A) Click one of the media categories: Music, Photos, or Movies.
In this example, click 'Music'.
B) First, click the 'Add Music' button below the media categories,
then click 'Add Files or Folders...'.
C) Select a folder or one or more media files and click the 'Open' button to add the
selected folder or files to the Media Manager window.
> From now on, the media files you added may be accessed from the SL400i.
4 Opening and closing the Media Manager window.
You can close the Media Manager window, but its icon will remain active in the lower right
corner of your computer monitor.This icon needs to remain visible, otherwise the SL400i
will not be able to access the media files on that computer.
Double-clicking the icon opens the Media Manager window.

Chapter 2 – Connecting the SL400i
INTERNET
Choose the scenario that best fits your situation for installing the SL400i.
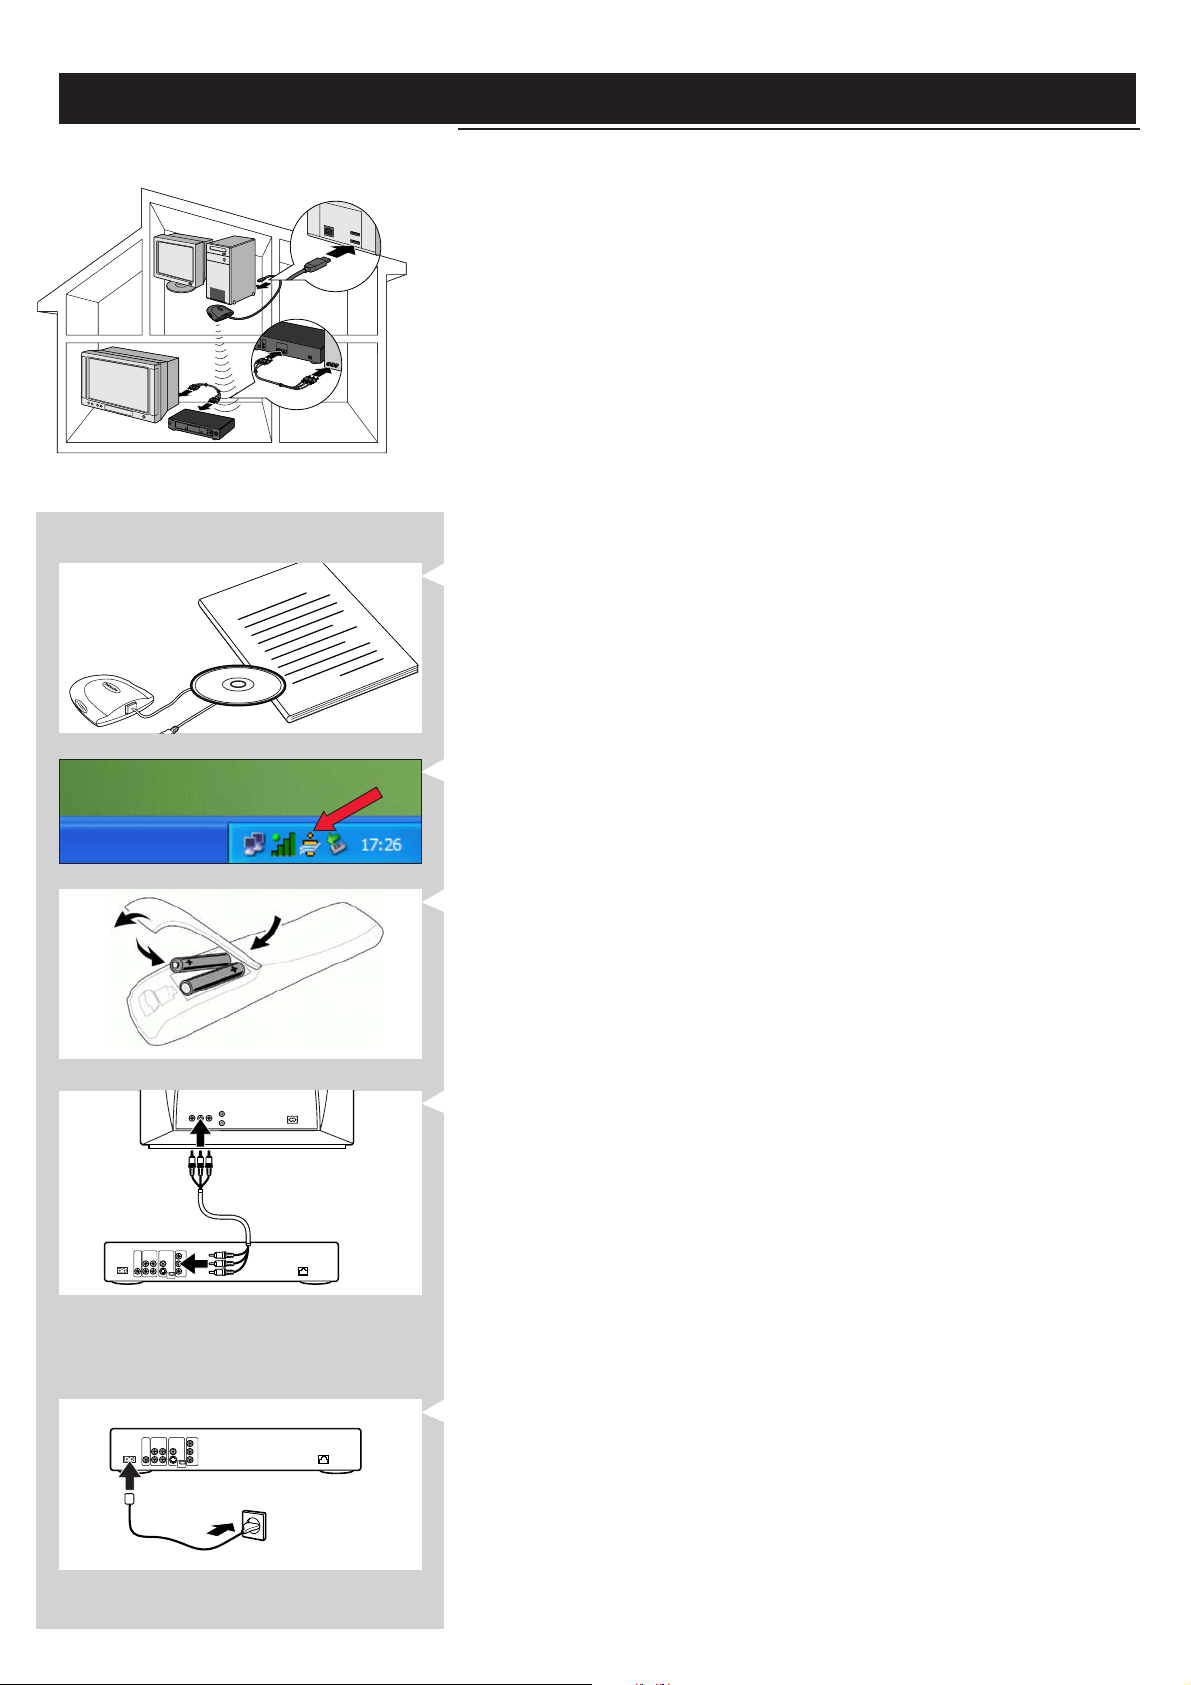
Option A: If you do not have a wireless computer network:
In this configuration you only have a computer and a TV.
•You will install the Wireless USB Adapter on your
computer.
•You will connect the SL400i to the TV.
➜ Go to chapter 2.1 on page 10-11.
ENGLISH 9
or Option B:
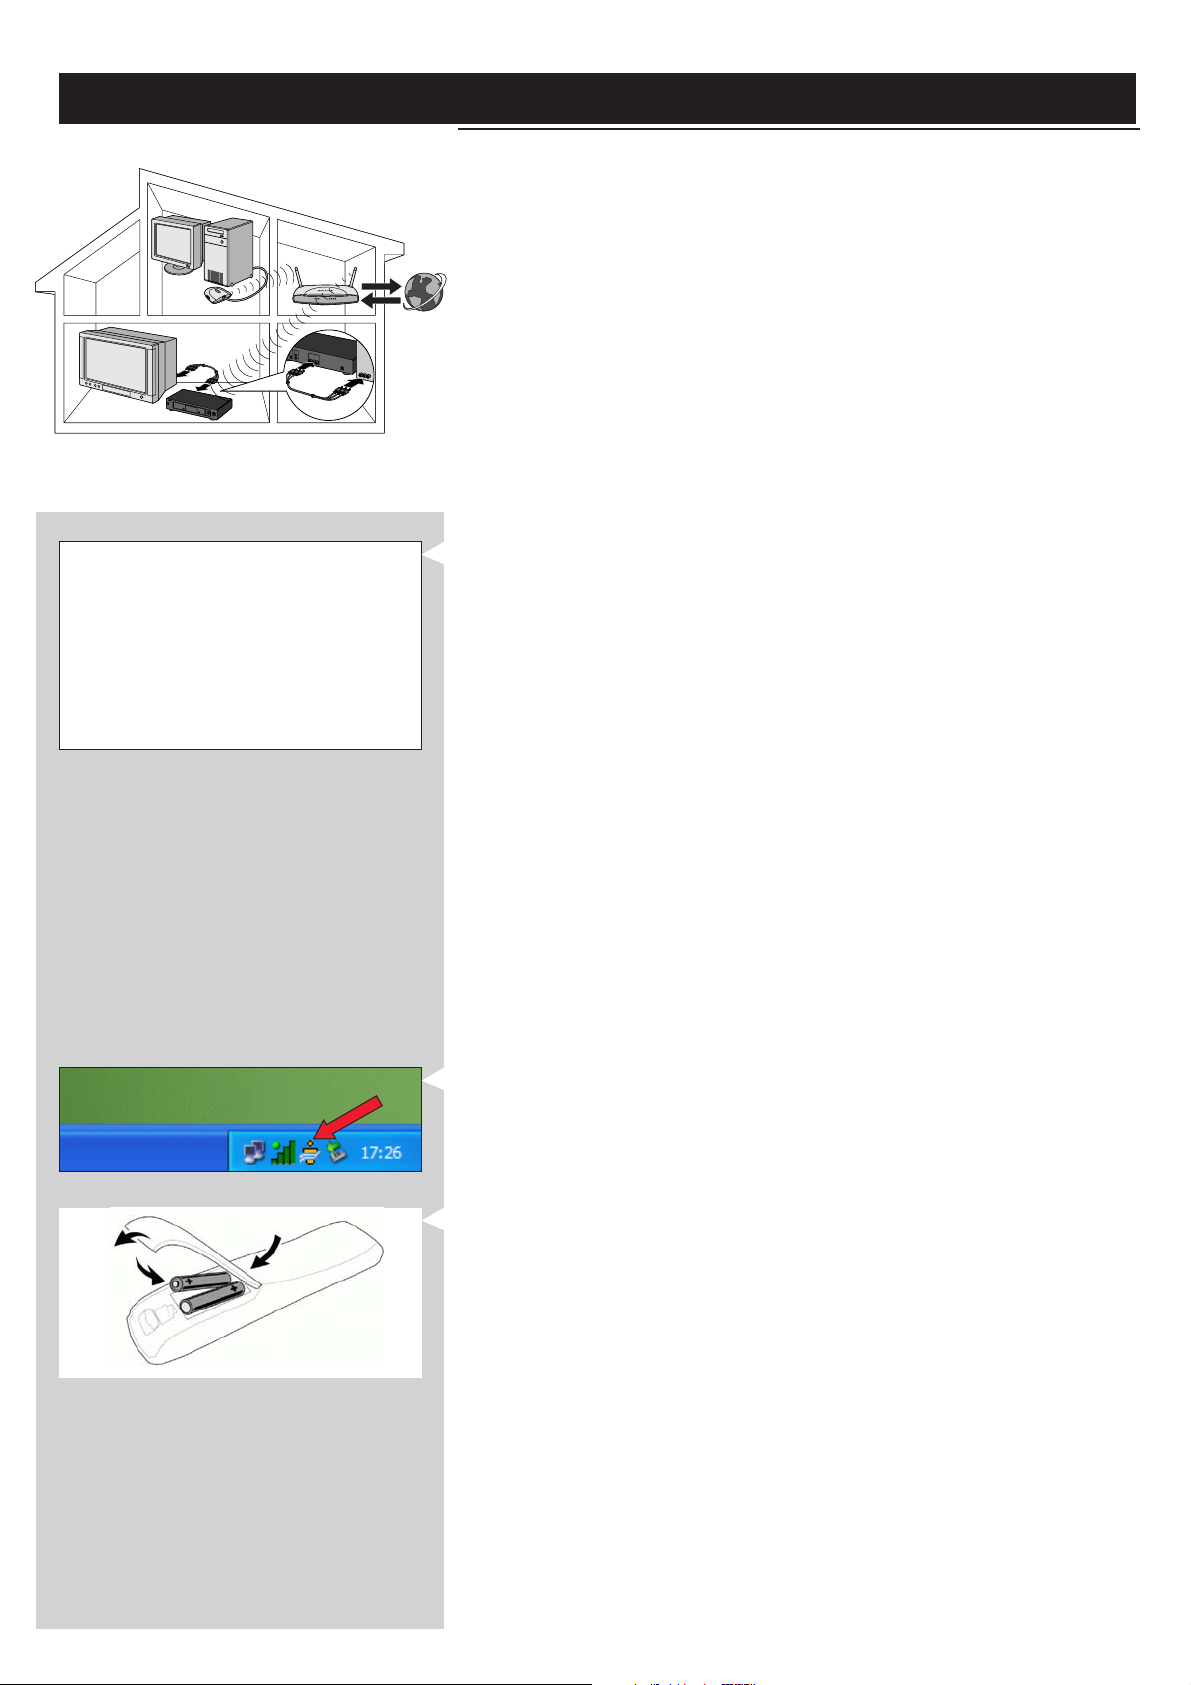
If you already have a wireless computer network:
In this configuration you already have a wireless computer
network, and a TV.
•You will check the settings of your existing wireless
computer network.
•You will connect the SL400i to the TV and adapt its
settings to match your network.
➜ Go to chapter 2.2 on page 12-14.
or Option C: If you want to connect a network cable between the SL400i and
your PC or wired network:
In this configuration you already have a TV, and a computer
with a free ethernet connector (or a wired network with a
free ethernet connector).
•You will be connecting an Ethernet network cable
between the SL400i and your computer or wired network.
•You will connect the SL400i to the TV.
➜ Go to chapter 2.3 on page 15-17.
10 ENGLISH
How to use...
Installing
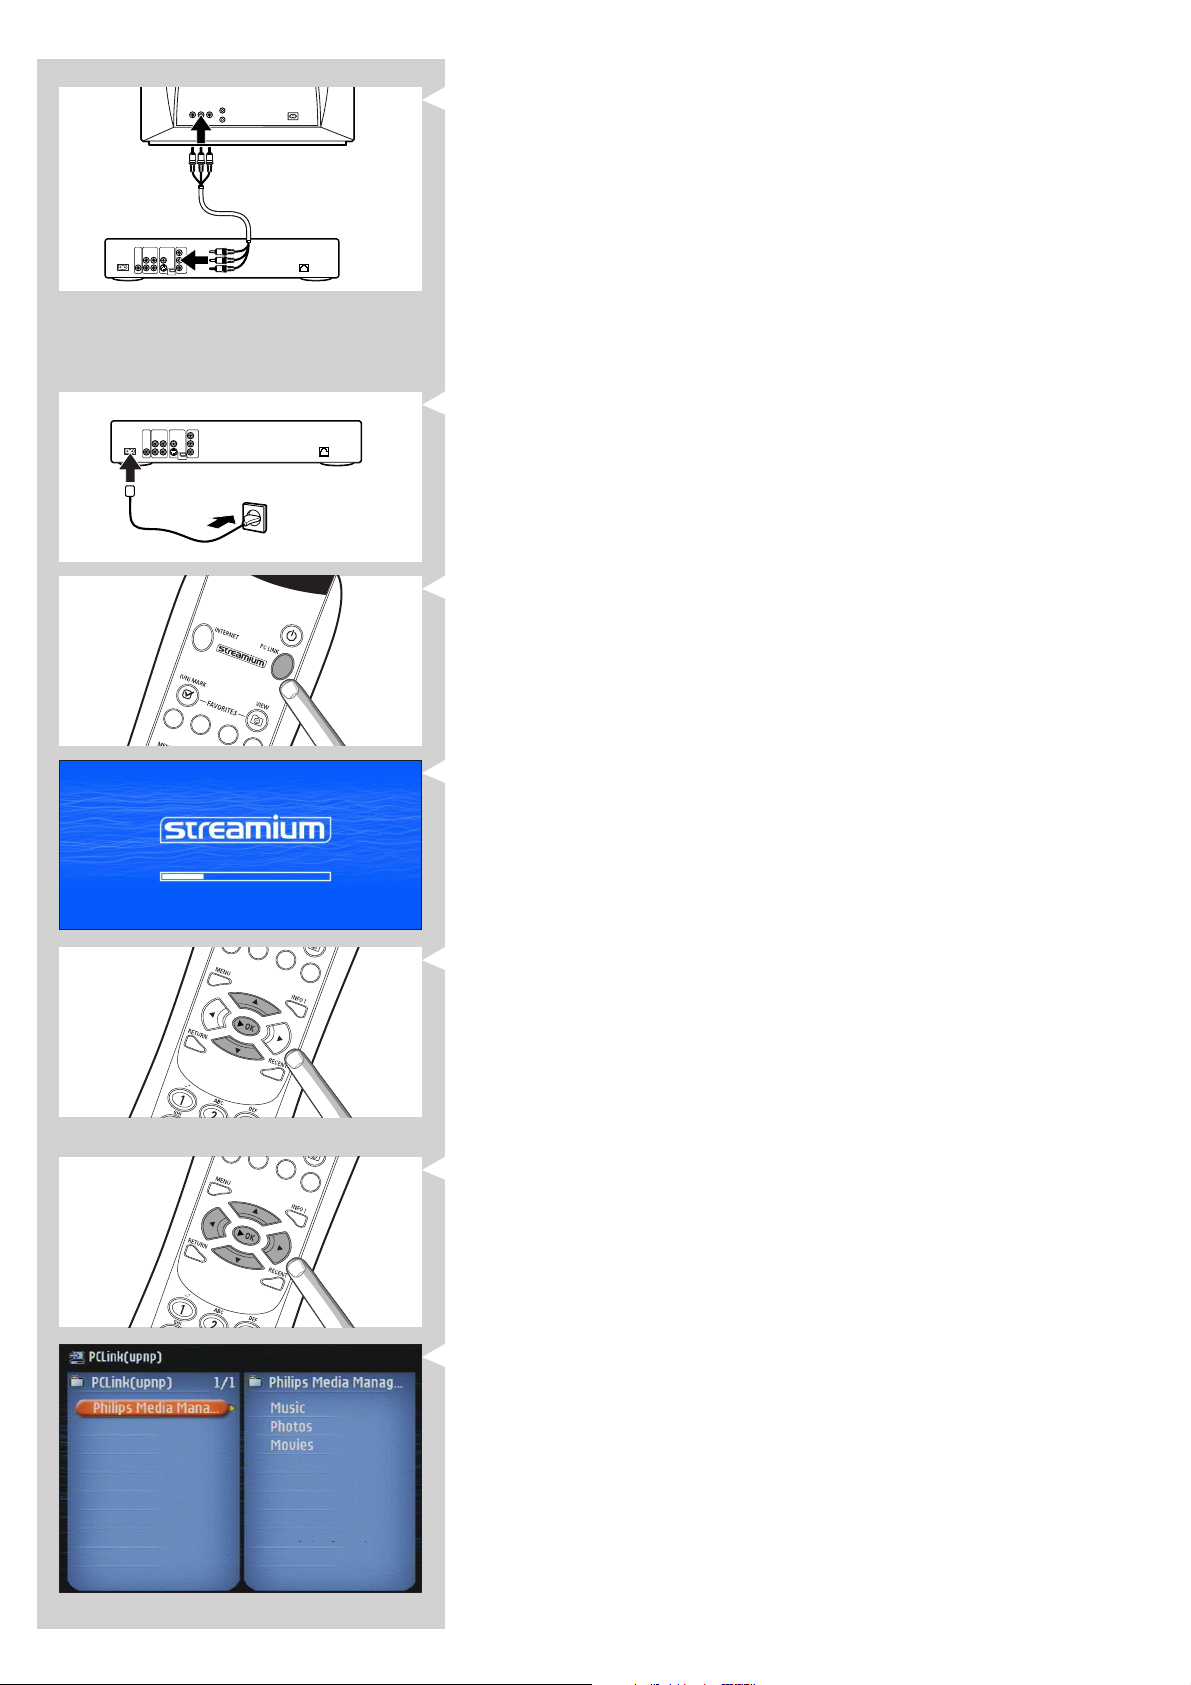
2.1 If you do not have a wireless computer network Option A
In this configuration you only have a computer and a TV.
•You will install the Wireless USB Adapter on your computer.
•You will connect the SL400i to the TV.
At the end, you will be able to send music, movies, and pictures from your computer to
your TV or stereo.
1 Install the Wireless USB Adapter included in the box.
See the separate instructions and CD-ROM of the Wireless USB Adapter
included in the box on how to install the adapter on your PC.
I
n
D
s
t
C
a
l
l
n
a
o
t
i
Note: Choose ‘Ad-Hoc’ as your network type during installation.
After the Wireless USB Adapter has been installed successfully, continue below.
2 Make sure the Philips Media Manager you installed in chapter 1 is active.
Double-click the Media Manager icon in the lower right corner of your monitor.
Or click Start / Programs / Philips Media Manager.
Leave the Media Manager window open to be sure it is active.
3 Put the batteries into the remote control.
See ‘Remote Control - Placing batteries’ on page 28 in the extended User Manual on
CD-ROM if you need more information on how to do this.
4 Connect the Audio + Composite video cable to the audio and video outputs % of the
SL400i and to your TV.
Use the yellow connectors of the Audio +Composite Video cable to connect the CBVS
Video output of the SL400i to the Composite Video (CBVS) input of your TV.
Note: set the P-SCAN switch $ (on the back of the SL400i) to OFF.
> This will enable you to view the user menus and multimedia content on the television
screen.
Use the white and red connectors of the Audio + Composite Video cable to connect the
Left/Right Audio output of the SL400i to the Audio inputs of your TV (white for left, red
for right).
Option: connect the SL400i to an audio set using the second audio outputs ! or the digital
audio output 0.
5 Connect the mains cable between the AC mains input 9 of the SL400i and a mains
socket.
> The indicator in the Power button lights up red when the SL400i is connected to the
mains.

ENGLISH 11
6 Switch on the SL400i by pressing the PC LINK button on the remote control.
Do not press the INTERNET button at this time, only the PC LINK button.
> After about five seconds, a ‘Streamium’ welcoming message appears on the television
screen.
If you do not see any messages on the TV screen:
– make sure the Video connectors are firmly connected, and
– that you have selected the correct external input on your TV.
7 If asked, select ‘philips’ from the list of wireless network names (SSID) presented to you
on the TV screen.
Use the navigation buttons (34) on the remote control to select ‘philips’ as the network
name to use and press OK to confirm.
Note: If there is only one wireless network available, it will be selected for you and you will not
be asked to select one.
INTERNET
> After about 30 seconds, you will see the PC Link menu appear on your TV screen.
If you see the text ‘Philips Media Manager’ appear on your TV screen, the installation has
succeeded. Should the PC Link menu stay empty, see the ‘Problem solving’ section on page
24-26.
8 Explore the PC Link menu on the TV screen.
Use the navigation buttons (3412) and the OK button on the remote control to
explore the multimedia content you made available on your PC.
For example: press the 2 button on the remote control several times until you have selected a
music track, a photo or a movie, and press OK to play it on your television...
Have fun!
9 How to enable INTERNET for the SL400i.
(For playing Internet Radio, Movie Trailers, etc., on your TV.)
See the section on ‘Enabling broadband Internet enter tainment’ on page 18-20 for
information on how to make your broadband Internet connection (provided you have
one) available to the SL400i.
If you encounter problems during installation or should you need additional help, then:
a) see Problem solving on page 24-26, or
b) visit our website www.philips.com/streamium, and click on Support and FAQs, or
c) contact our help-line.
Tip: Enable the encryption key to secure your wireless computer network from intruders.
Philips advises you to set an encryption key to secure your wireless network.
Please, read the text on ‘Securing your wireless network’ on page 42 in the extended
version of the User Manual on the CD-ROM.
12 ENGLISH
Installing
2.2 If you already have a wireless computer network Option B
In this configuration you already have a wireless computer network, and a TV.
•You will check the settings of your existing wireless computer network.
•You will connect the SL400i to the TV and adapt its settings to match your network.
At the end, you will be able to send music, photos, and movies from your computer to your TV
INTERNET
Check the:
NETWORK NAME (SSID)
...............
and
ENCRYPTION KEY
...............
of your wireless network
1 Check your existing wireless network settings so you are able to enter them in STEP 7
of this procedure.
Find out the wireless network name (SSID) and the encryption key you used for securing
your wireless network.
Wireless Network Name (SSID):
Usually, you can find the wireless network name in the options menu of your Wireless
Network Adapter or Wireless Base Station.To check this, open the program that came
with your network adapter.
Encryption key:
The wireless encryption key is a 64 or 128 bit WEP code that secures your wireless
network communications.
– 64-bit: 5 characters ASCII, or 10 characters HEX, or
– 128 bit: 13 characters ASCII, or 26 characters HEX.
Note:The encryption key is case sensitive, meaning that ‘ABC’ is not the same as ‘aBc’. Always
input characters in the correct case to avoid problems.
Basically, you will have to try and remember what you set it to. If you cannot remember
the encryption key, you will either have to disable it completely for your entire wireless
network, or set a new one that you can remember.
2 Make sure the Philips Media Manager you installed in chapter 1 is active.
Double-click the Media Manager icon in the lower right corner of your monitor or click
Start / Programs / Philips Media Manager.
Leave the Media Manager window open to be sure it is active.
3 Put the batteries into the remote control.
See ‘Remote Control - Placing batteries’ on page 28 in the extended User Manual on
CD-ROM if you need more information on how to do this.
ENGLISH 13
4 Connect the Audio + Composite video cable to the audio and video outputs % of the
SL400i and to your TV.
Use the yellow connectors of the Audio +Composite Video cable to connect the CBVS
Video output of the SL400i to the Composite Video (CBVS) input of your TV.
Note: set the P-SCAN switch $ (on the back of the SL400i) to OFF.
> This will enable you to view the user menus and multimedia content on the television
screen.
Use the white and red connectors of the Audio + Composite Video cable to connect the
Left/Right Audio output of the SL400i to the Audio inputs of your TV (white for left, red
for right).
Option: connect the SL400i to an audio set using the second audio outputs ! or the digital
audio output 0.
5 Connect the mains cable between the AC Mains input 9 of the SL400i and a mains
socket.
> The indicator in the Power button lights up red after connecting the SL400i to the
mains.
6 Switch on the SL400i by pressing the PC LINK button on the remote control.
Do not press the INTERNET button at this time, only the PC LINK button.
> After about five seconds, a ‘Streamium’ welcoming message appears on the television
screen.
If you do not see any messages on the TV screen:
– make sure the Video connectors are firmly connected, and
– that you have selected the correct external input on your TV.
7 Select your wireless network name, and input the encryption key you found in step 1.
A) If asked, select the wireless network name from the list of wireless network names (SSID)
presented to you on the TV screen.
Use the navigation buttons (34) on the remote control to select the correct network
name and press OK to confirm.
Note: If there is only one wireless network, it will be selected for you and you will not be asked
to select one.
B) If asked, also input the encryption key.
Use the navigation buttons (3412) on the remote control to choose your type of
encryption and to input the key itself. Press OK to confirm.
Please remember that the encryption key is case sensitive, meaning that ‘ABC’ is not the
same as ‘aBc’. Always input characters in the correct case to avoid problems.
Note: If the wireless network is not encrypted, you will not be asked to input an encryption key.
> After about 30 seconds, you will see the PC Link menu appear on your TV screen.
If you see the text ‘Philips Media Manager’ appear on your TV screen, the installation has
succeeded.

14 ENGLISH
INTERNET
8 Explore the PC Link menu on the TV screen.
Use the navigation buttons (3412) and the OK button on the remote control to
explore the multimedia content you made available on your PC.
For example: press the 2 button on the remote control several times until you have selected a
music track, a photo or a movie, and press OK to play it on your television...
Have fun!
9 How to enable INTERNET for the SL400i.
(For playing Internet Radio, Movie Trailers, etc., on your TV.)
See the section on ‘Enabling broadband Internet enter tainment’ on
page 18-20 for information on how to make your broadband Internet connection
(provided you have one) available to the SL400i.
If you encounter problems during installation or should you need additional help, then:
a) see Problem solving on page 24-26, or
b) visit our website www.philips.com/streamium, and click on Support and FAQs, or
c) contact our help-line.
ENGLISH 15
Installing
2.3 If you want to make a wired connection Option C
In this configuration you already have a TV, and a computer with a free ethernet connector (or
a wired network with a free ethernet connector).
•You will be connecting an Ethernet network cable between the SL400i and your computer
or network.
•You will connect the SL400i to the TV.
At the end, you will be able to send music, photos, and movies from your computer to your TV.
Ethernet ports and cables look just like telephone connections and lines, but are thicker and
wider. Ethernet (RJ-45) connectors have eight contacts, whereas standard telephone line (RJ-11)
connectors have four or six.
Important: only use CAT.5 shielded Ethernet cable (STP).
Ethernet port required
OR
1a Use a crossover Ethernet cable if you want to connect the SL400i directly to your
computer.
In a crossover Ethernet cable, the arrangement of the colored wires changes between the
two ends.
– Push one end of the Ethernet cable into the connector marked 'Ethernet' on the back
of the SL400i.
– Push the other end into the Ethernet connector of your computer.
Note:Your computer needs to have an Ethernet connector available.
OR
1b Use a straight-through Ethernet cable if you want to connect the SL400i to an existing
computer network.
Network hub
In a straight-through Ethernet cable, both ends have the same arrangement of colored
wires.
– Push one end of the Ethernet cable into the connector marked 'Ethernet' on the back
of the SL400i.
– Push the other end into a free Ethernet connector on your central network device, like
a hub, switch or router.
Note:Your network needs to have an Ethernet connector available.

16 ENGLISH
2 Make sure the Philips Media Manager you installed in chapter 1 is active.
Double-click the Media Manager icon in the lower right corner of your screen.
Or click Start / Programs / Philips Media Manager.
Leave the Media Manager window open to be sure it is active.
3 Put the batteries into the remote control.
See ‘Remote Control - Placing batteries’ on page 28 in the extended User Manual on
CD-ROM if you need more information on how to do this.
4 Connect the Audio + Composite video cable to the audio and video outputs % of the
SL400i and to your TV.
Use the yellow connectors of the Audio +Composite Video cable to connect the CBVS
Video output of the SL400i to the Composite Video (CBVS) input of your TV.
Note: set the P-SCAN switch $ (on the back of the SL400i) to OFF.
> This will enable you to view the user menus and multimedia content on the television
screen.
Use the white and red connectors of the Audio + Composite Video cable to connect the
Left/Right Audio output of the SL400i to the Audio inputs of your TV (white for left, red
for right).
Option: connect the SL400i to an audio set using the second audio outputs ! or the digital
audio output 0.
5 Connect the mains cable between the AC Mains input 9 of the SL400i and a mains
socket.
> The indicator in the Power button lights up red when the SL400i is connected to the
mains.
6 Switch on the SL400i by pressing the PC LINK button on the remote control.
Please, do not press the INTERNET button at this time,
only the PC LINK button.
> After about five seconds, a ‘Streamium’ welcoming message appears on the television
screen.
If you do not see any messages on the TV screen:
– make sure the Video connectors are firmly connected, and
– that you have selected the correct external input on your TV.
> After about 30 seconds, you will see the PC Link menu appear on your
TV screen.
If you see the text ‘Philips Media Manager’ appear on your TV screen,
the installation has succeeded.

INTERNET
ENGLISH 17
7 Explore the PC Link menu on the TV screen.
Use the navigation buttons (1234) and the OK button on the
remote control to explore the multimedia content you made available on your PC.
For example: press the 2 button on the remote control several times until you have selected a
music track, a photo or a movie, and press OK to play it on your television...
Have fun!
8 How to enable INTERNET for the SL400i. (For playing Internet Radio,
Movie Trailers, etc., on your TV.)
See the section on ‘Enabling broadband Internet enter tainment’ on
page 18-20 for information on how to make your broadband Internet connection (if you
have one) available to the SL400i.
If you encounter problems during installation or should you need additional help, then:
a) see Problem solving on page 24-26, or
b) visit our website www.philips.com/streamium, and click on Support and FAQs, or
c) contact our help-line.
 Loading...