

Page 1
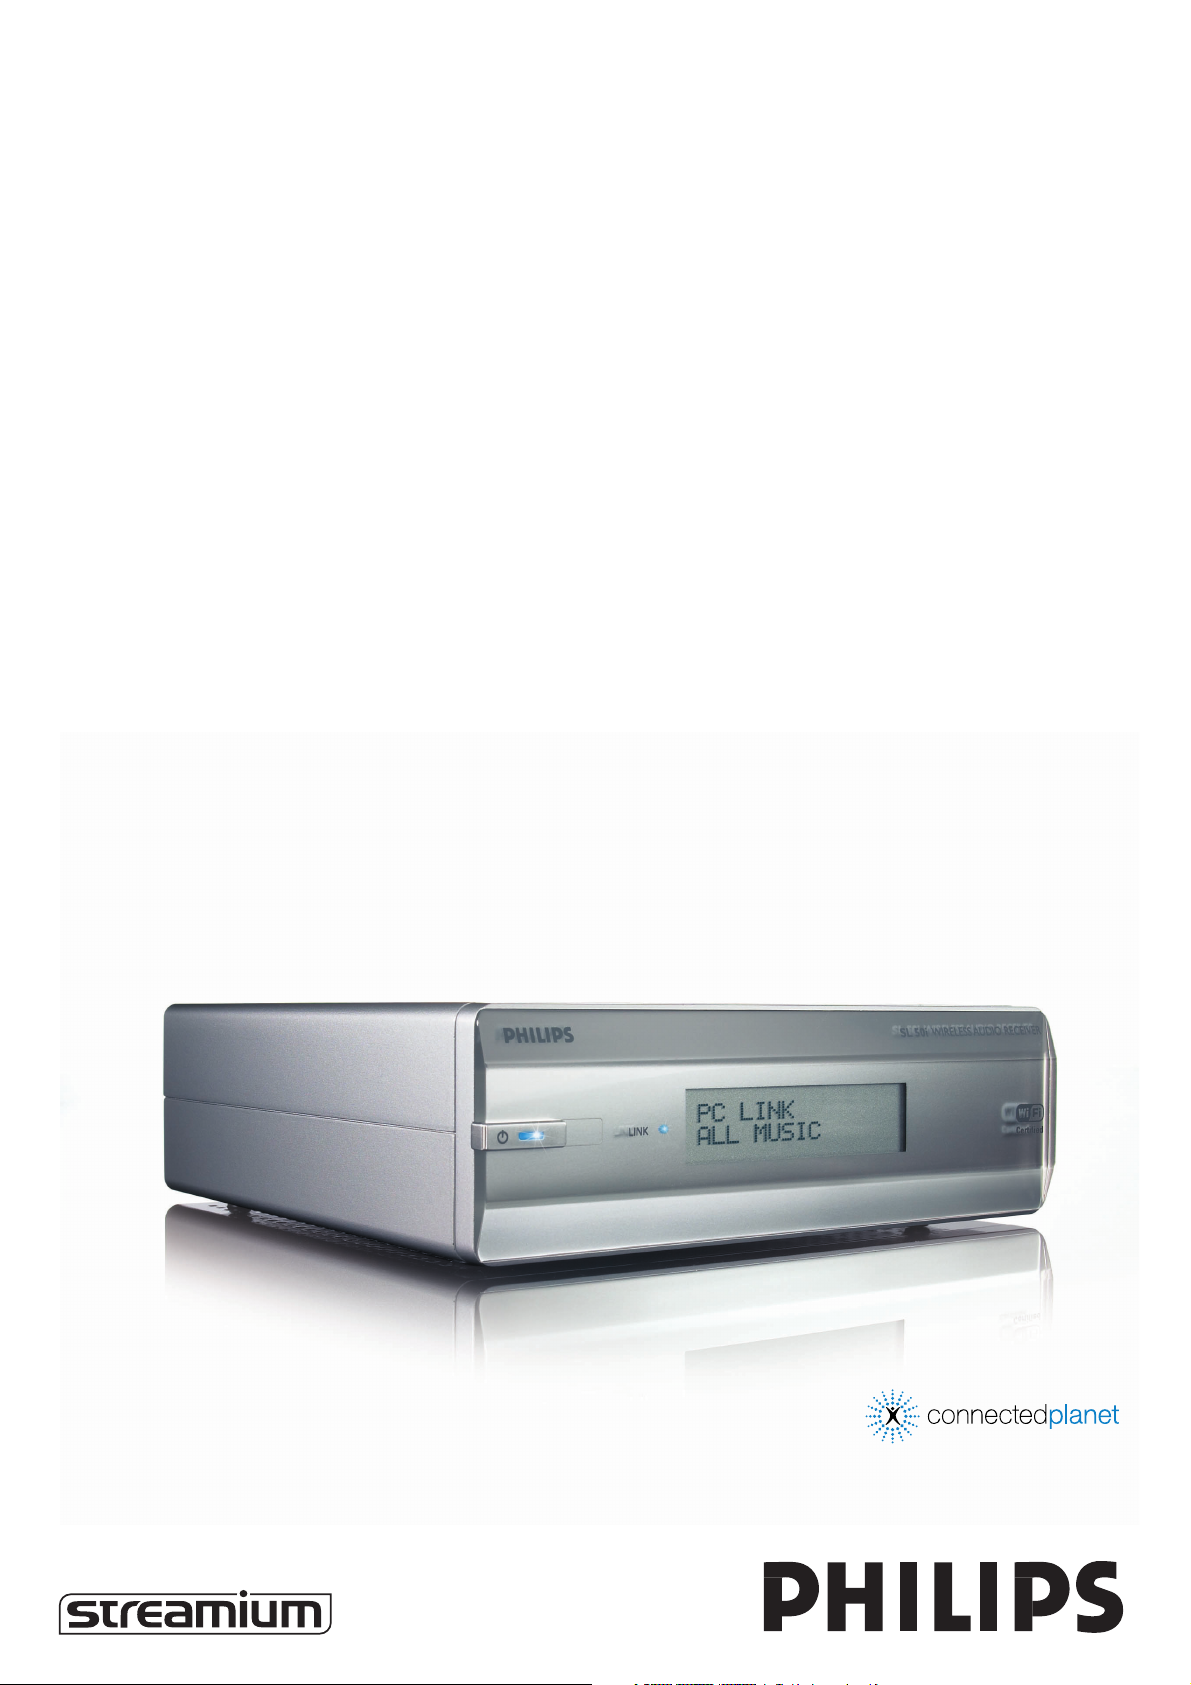
Instructions for use
SL50i
Page 2
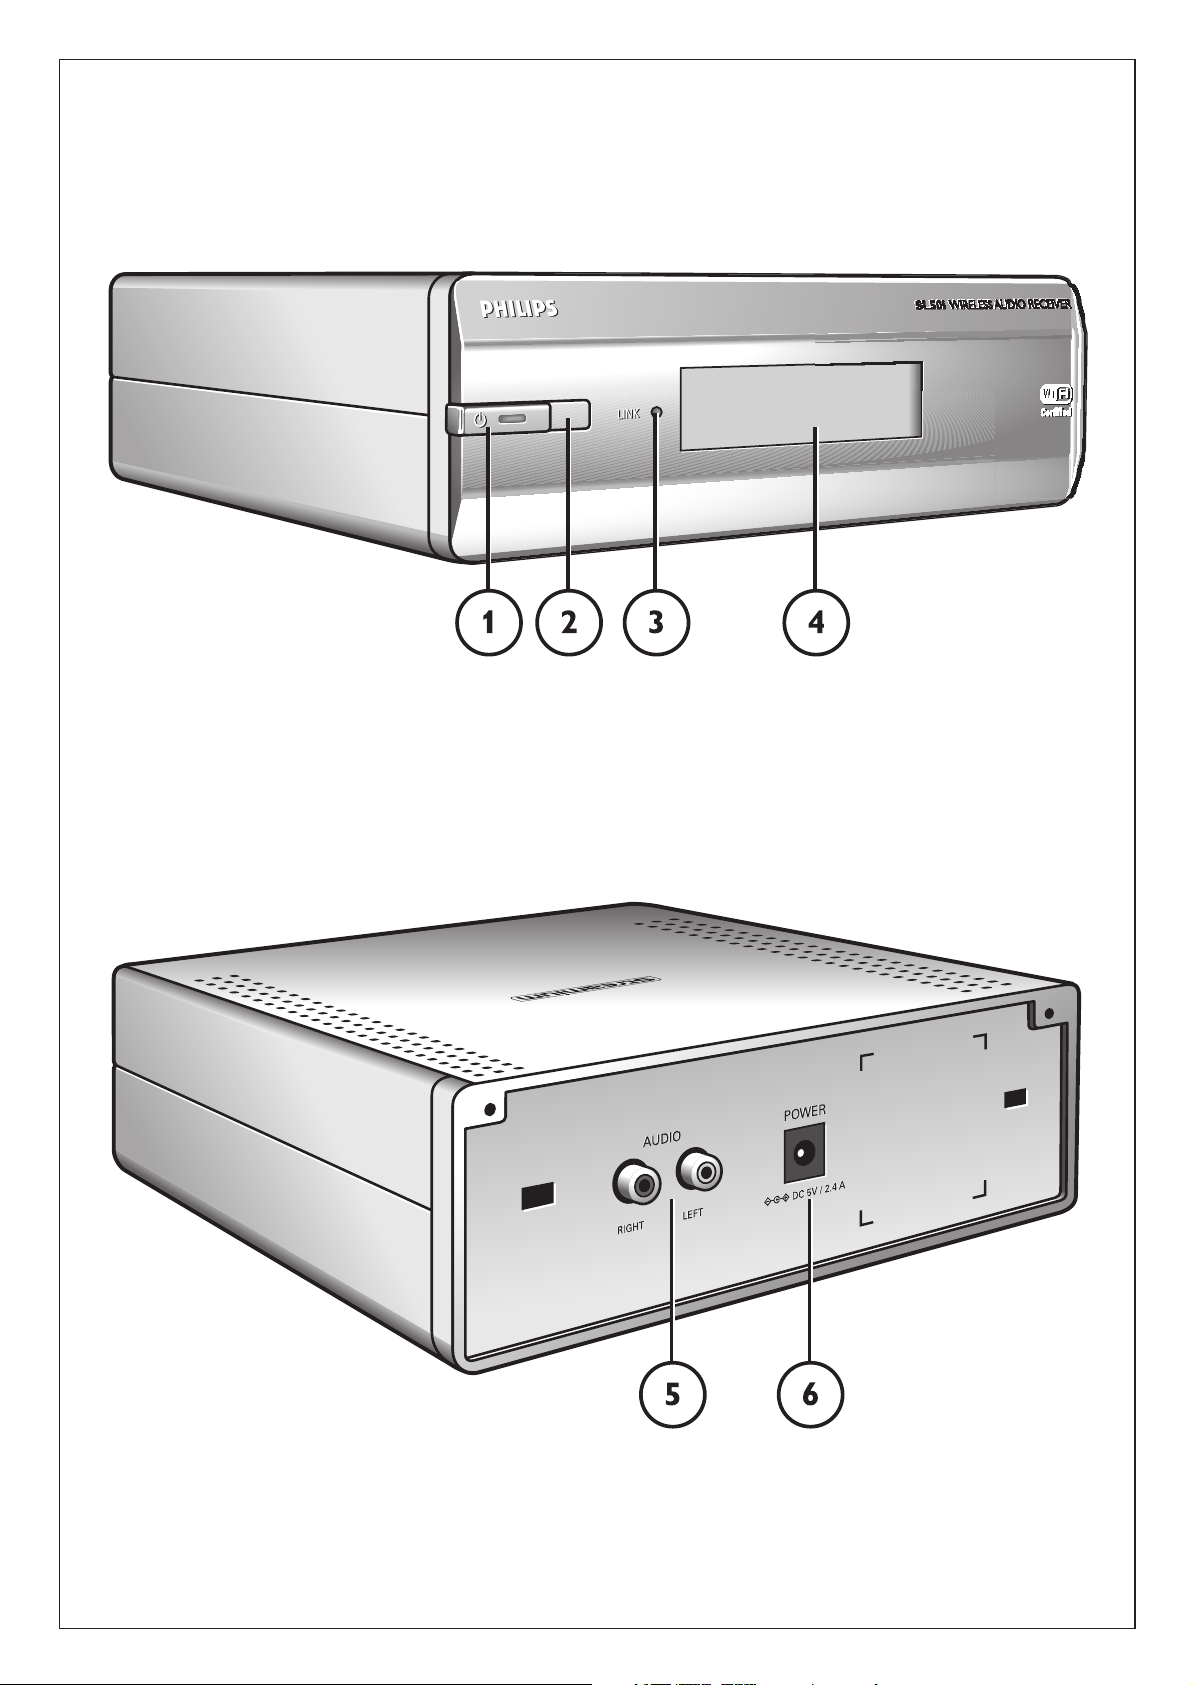
A) Front view
B) Rear view
Page 3

Helpline
☎
USA
800-441-0613
Canada
1 800-441-0613
www.philips.com/streamium
CAUTION:
RISK OF EXPLOSION IF BATTERY IS REPLACED BY AN INCORRECT TYPE
PLEASE OBSERVE THE LOCAL REGULATIONS REGARDING THE DISPOSAL OF BATTERIES
Page 4
4 ENGLISH
I
n
s
t
a
l
l
a
t
i
o
n
C
D
Introduction
SL50i
Your SL50i gives you wireless access to audio content stored on PCs and brings live streaming
Internet entertainment to your audio system.
This is what this manual will help you to do:
• Install the Philips Media Manager software.
• Connect your SL50i and prepare it for use.
• Learn how to use the basic functions of your SL50i.
The most recent information on this product will be available through our website
www.philips.com/streamium
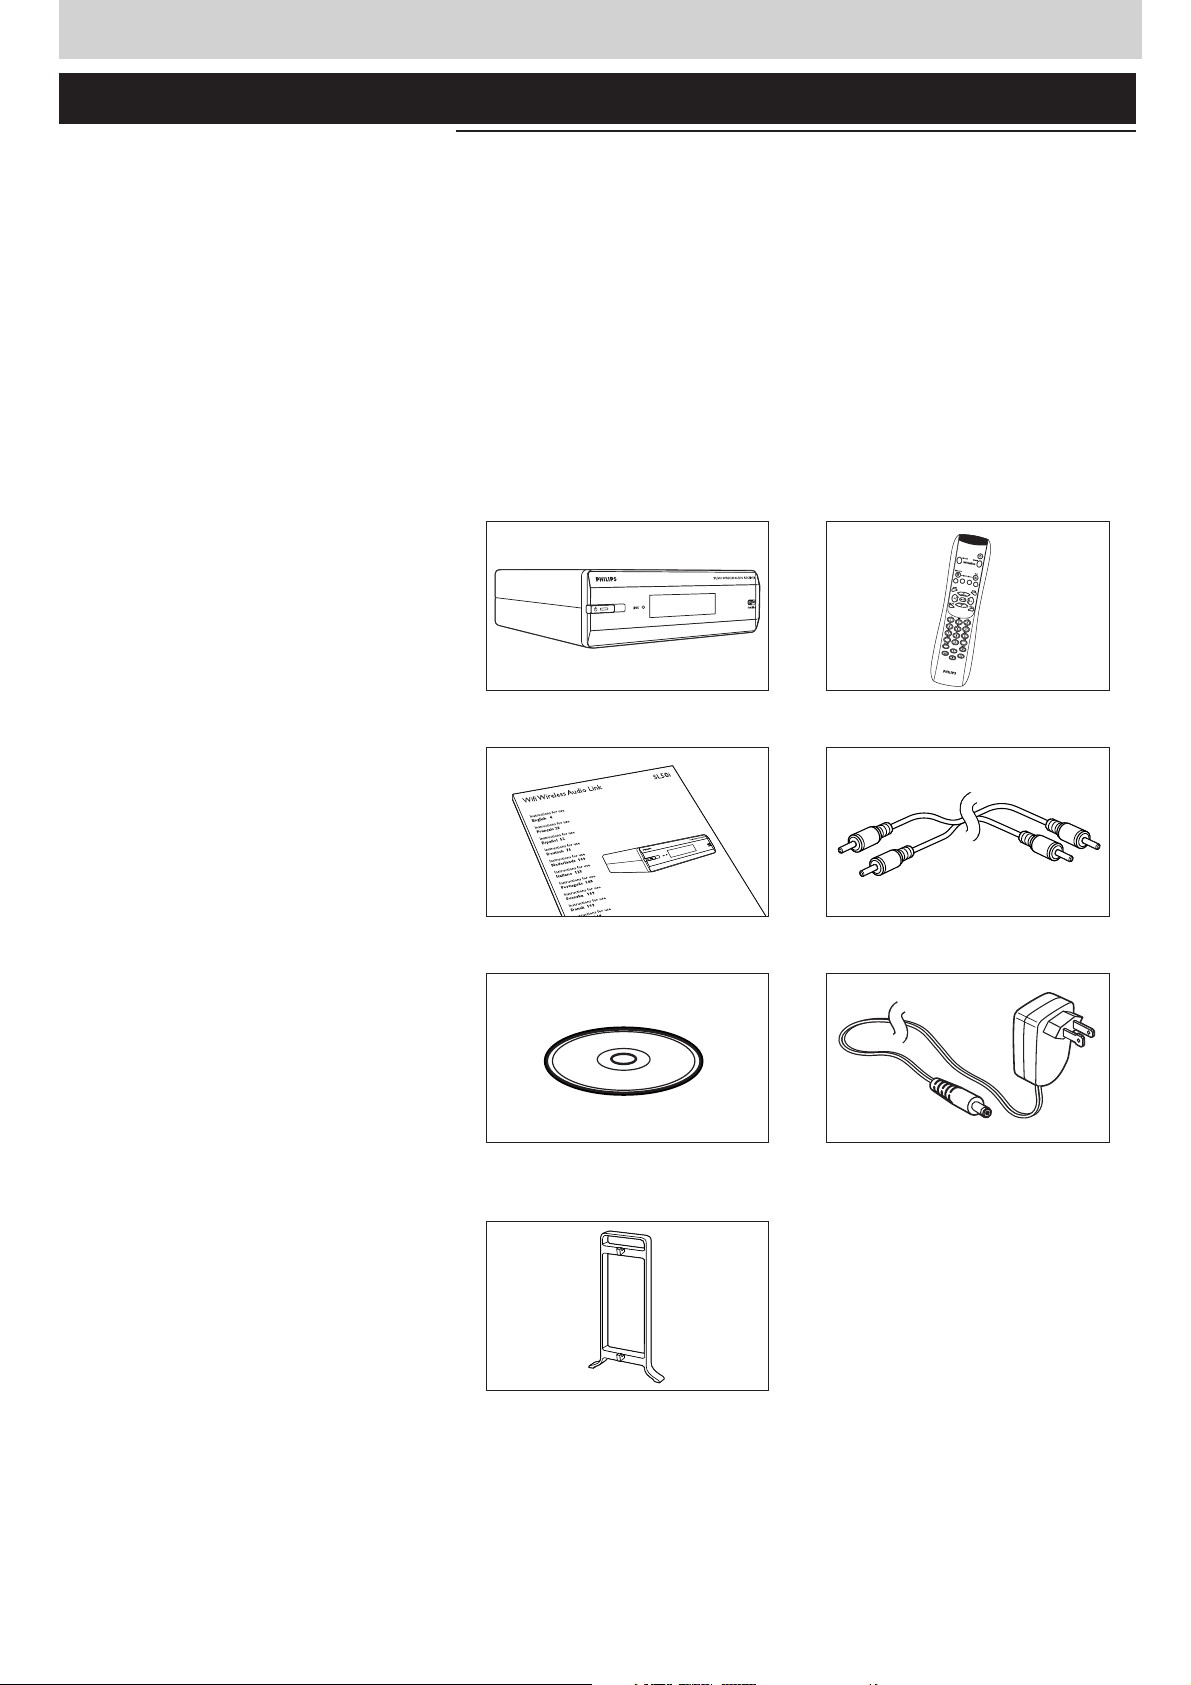
Packaging contents
Please check whether the following items are present in the box of the WiFi Wireless
Multimedia Link.They are provided to help you set up and use your SL50i.
SL50i Remote control
(including batteries)
User Manual Stereo audio cable
Philips Media Manager Power adapter
Installation CD
Click on foot
Please contact your Philips retailer if any items are missing from the box.
Page 5

Legend of illustration (inside flap)
A) Front view
1 Power/standby button
Switches the SL50i off, to standby.
Standby/On LED (indicator in the Power/standby button). See table below.
2 IR receiver
Receives the signals from the remote control.
3
Network link activity LED
See table below.
4
Display
– Indicates the present status of the SL50i.
– Informs you on how to install and operate the SL50i.
– Helps you navigate through the audio content on your PC and the Internet.
B) Rear view
5
Audio L/R output (stereo)
To connect the SL50i to the left and right audio inputs of your audio system.
ENGLISH 5
6
Power
For connecting the SL50i's power adapter.
SL50i LED behavior
LED Status Explanation
Standby/On LED Off No power on SL50i
Blue (lights) SL50i in active mode.
Red (lights) SL50i in standby mode.
Red (blinks) Thermal shutdown. Let your SL50i
cool down.
Network link Blue Connection with network
activity LED available.
Blue (blinks slowly) - No server found.
- Bad connection
(bandwidth too low)
Blue (blinks fast) - Searching for connection.
- No wireless connection available.
Page 6

6 ENGLISH
Index
Introduction .........................................................................................................4-7
WiFi Wireless Audio Link...............................................................................................................................................4
Legend of illustrations.......................................................................................................................................................5
Index...........................................................................................................................................................................................6
Important information......................................................................................................................................................7
Chapter 1 – Preparing your PC.........................................................................................................8-9
1.1 Start by installing Philips Media Manager......................................................................................................8
1.2 A If you already have a wireless computer network. ............................................................................9
1.2 B If you do not have a wireless computer network..............................................................................9
Chapter 2 – Installing your SL50i..................................................................................................10-11
2.1 Before you start........................................................................................................................................................10
2.2 Installing - General procedure ..................................................................................................................10-11
Chapter 3 – Enabling broadband Internet entertainment.......................................................12-13
3.1 How does your computer connect to the Internet?........................................................................12
3.2 Registration (for free Internet services)...................................................................................................13
Chapter 4 – Using your SL50i .......................................................................................................14-15
4.1 Basic menu navigation.........................................................................................................................................14.
4.2 PC Link example.............................................................................................................................................14-15
4.2 Internet example....................................................................................................................................................15
Chapter 5 – Additional information....................................................................................................16
Chapter 6 – Problem solving. ........................................................................................................17-19
Chapter 7 – Glossary.............................................................................................................................20
The next chapters are only available in the extended User Manual version
on the CD-ROM.
Chapter 8 – Remote Control..........................................................................................................................21-22
Chapter 9 – Entering or editing numeric and text information
Chapter 10 – Advanced navigation
Chapter 11 – Advanced Philips Media Manager uses
Chapter 12 – Menu
.....................................................................................................................................................26-31
..........................................................................................................................24
................................................................................25
Chapter 13 – What you need to know about networks
Chapter 14 – Advanced wireless network information
Chapter 15 – Entering an encryption key
Chapter 16 – Internet Connection Sharing
..................................................................................................36-37
..............................................................................................38-42
Chapter 17 – Advanced (network) Problem Solving
Chapter 18 – Technical specifications
....................................................................................................................44
...................................................................34-35
.................................................................................43
.....................................................23
................................................................32-33
Page 7

ENGLISH 7
Important information
•A wireless network adapter or a wireless base station is required when integrating your
SL50i in a wireless computer network.
• Please install and connect the product in the order described in this manual only.
This assures best installation results with the least technical hassles.
• Please read this guide carefully before using your SL50i and keep it for future reference.
• The most recent downloads and information on this product will be available through our
website www.philips.com/streamium.
• Broadband Internet access is required if you want to use the Internet functions of your
SL50i. A bitrate of at least 256 kbps is preferred, but depending on the Internet
radiostations you listen to, lower bitrates may be sufficient.
• Please check whether your Internet service provider charges extra fees for exceeding a
certain limit of transferred data.
When using Internet media services on a daily basis, you may exceed such a limit.
For example:When you listen to Internet radio (at 64 kbps) for about 36 hours,
1 GB (gigabyte) of data will be transferred to your Streamium system.
• During set-up and installation, it may be helpful to have the instructions for your audio
system, wireless base station or other wireless network components at hand.
Safety Precautions
• NEVER MAKE OR CHANGE CONNECTIONS WITH THE POWER OF YOUR AUDIO
SYSTEM SWITCHED ON OR YOUR SL50i CONNECTED TO THE ELECTRICAL
POWER SUPPLY.
• Before operating the system, check that the operating voltage indicated on the nameplate
(or the voltage indication beside the voltage selector) of your system is identical with the
voltage of your local power supply. If not, please consult your dealer.
• Radio equipment for wireless applications is not protected against disturbance from other
radio services.
• The product should not be exposed to dripping or splashing.
No object filled with liquids, such as vases, should be placed on the product.
• Do not expose the system to excessive moisture, rain, sand or heat sources caused by
heating equipment or direct sunlight.
• Allow a sufficient amount of free space all around your SL50i for adequate ventilation.
• Do not open this product. Contact your Philips retailer if you experience technical
difficulties.
• Place the system on a flat, hard and stable surface.When the system is switched to standby
mode, it is still consuming some power. To disconnect the system from the power supply
completely, remove the AC power plug from the wall socket.
• Make sure the air around your SL50i can circulate to prevent your SL50i from overheating
internally. Also, avoid putting any heat sources (e.g. a power amplifier) underneath.
Your SL50i has a thermal shutdown that shuts down the set when the internal
temperature exceeds a certain threshold. If this happens, the set switches to standby with
the Power-LED flashing on and off.To remedy this situation: disconnect the power supply,
let the set cool down, improve the ventilation, and reconnect the set to the power supply.
•To prevent your SL50i from overheating internally, never place anything on top of it.
Page 8
8 ENGLISH
Chapter 1 - Preparing your PC
1.1 Start by installing Philips Media Manager
This software makes the audio files on your computer available for transfer from your computer
to your audio system. If you also wish to transfer photo and movie files to your television, check
www.philips.com/streamium for other Philips products that can.Your SL50i only allows transfer
of audio files.
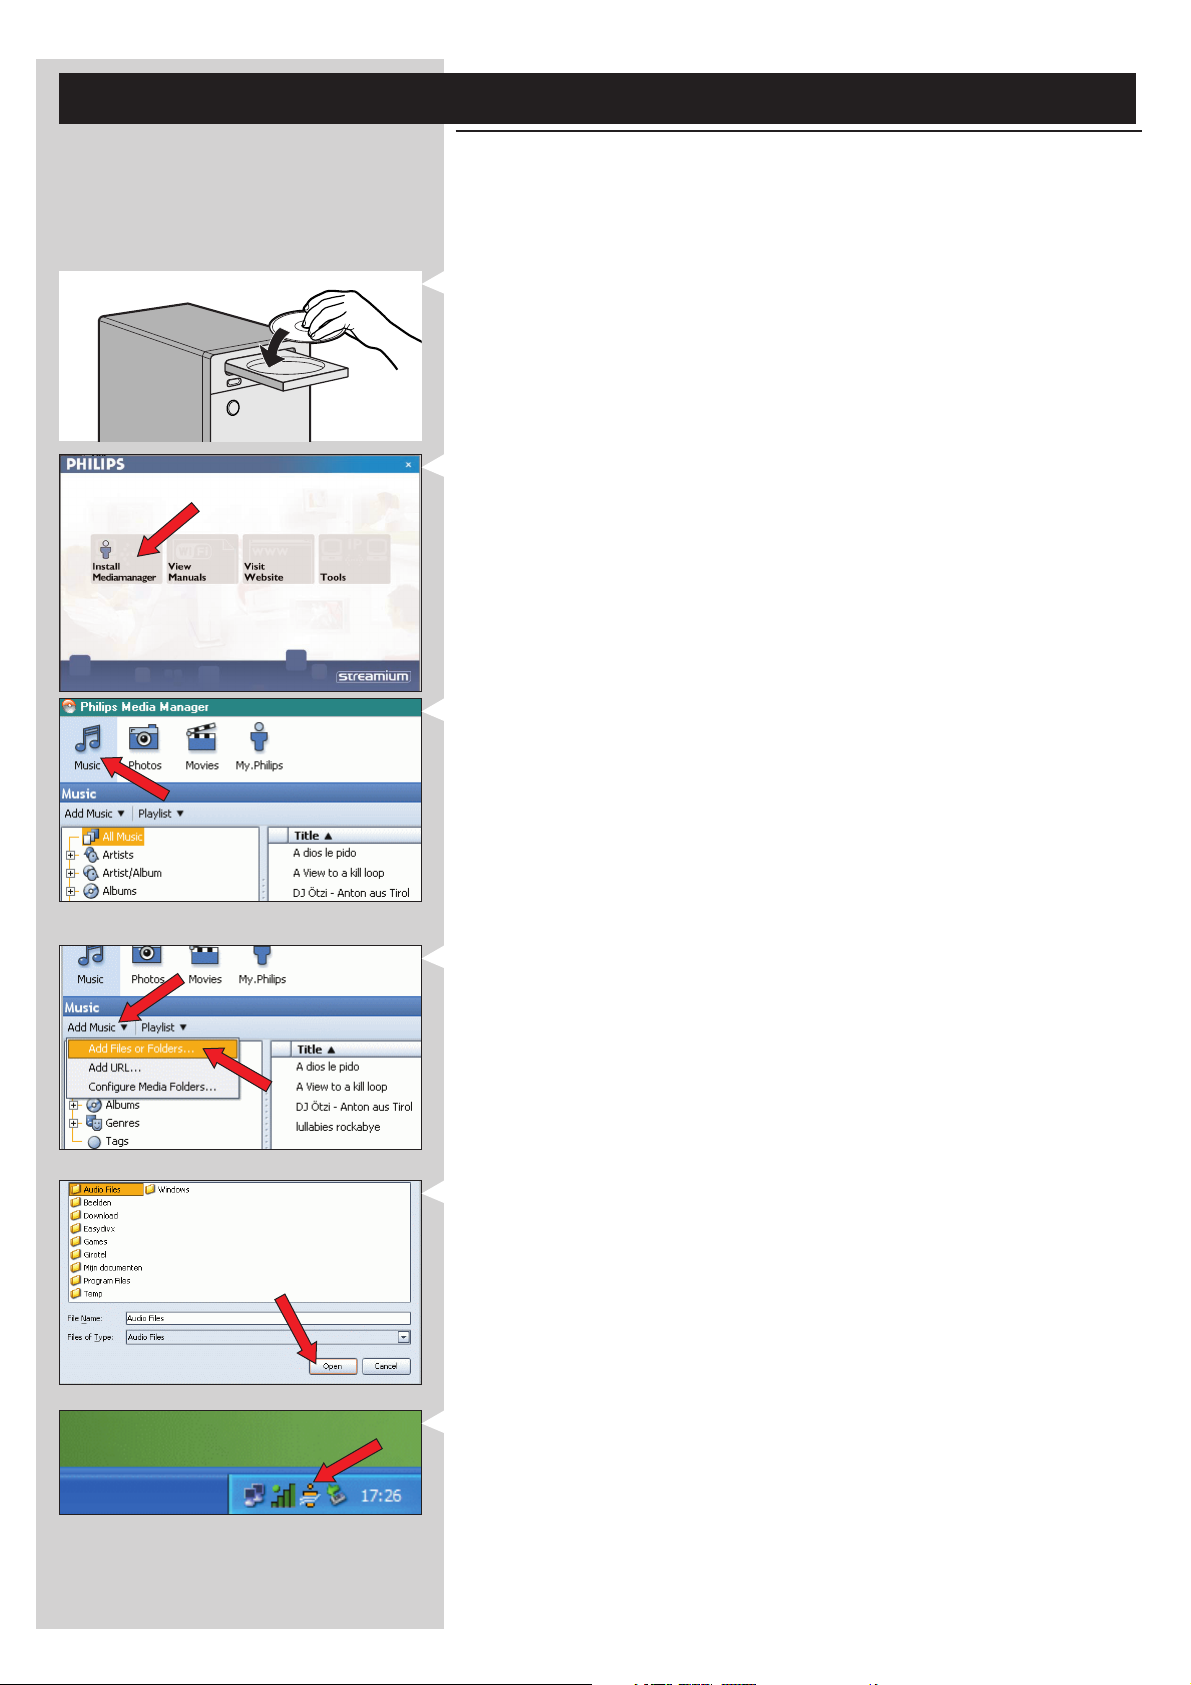
1 Place the Philips Media Manager CD in your CD or DVD drive and install the Philips
Media Manager software.
The CD starts automatically. If it does not, double-click ‘My Computer’,
then the CD-ROM drive icon and finally ‘Setup.exe’ to start the CD.
2 In the menu that appears on your computer screen, click on ‘Install Philips Media
Manager’, and follow the on-screen instructions.
Start the program by clicking Start > Programs > Philips Media Manager.
When opening the Philips Media Manager for the first time, you will be asked if you want
to add a folder and scan for audio files. Open a drive or a folder with audio files in it. (For
example: the My Documents folder, if you have stored audio files there.)
– You can always add more files and folders later.
3 Adding files to the Media Manager.
Only the files that you see in the Media Manager will be accessible from your SL50i and
only the files that are supported by your SL50i will be available for your audio system.
A) Click 'Music'.
B) First, click the 'Add Music' button below the media categories,
then click 'Add Files or Folders...'.
C) Select a folder or one or more audio files and click the 'Open' button to add the
selected folder or files to the Media Manager window.
> From now on, the audio files you added may be accessed from the SL50i.
Note: Photos and movies can be accessed via other Philips Wireless Multimedia products such
as the SL300i and SL400i Wireless Multimedia Links.
4 Opening and closing the Media Manager window.
You can close the Media Manager window, but its icon will remain active in the lower right
corner of your computer monitor.This icon needs to remain visible, otherwise the SL50i
will not be able to access the media files on that computer.
Double-clicking the icon opens the Media Manager window.
5 If you already have a wireless network, continue with chapter 1.2 A.
If you do not have a wireless network, continue with chapter 1.2 B.
Page 9
Check the:
NETWORK NAME (SSID)
...............
and
ENCRYPTION KEY
...............
of your wireless network
ENGLISH 9
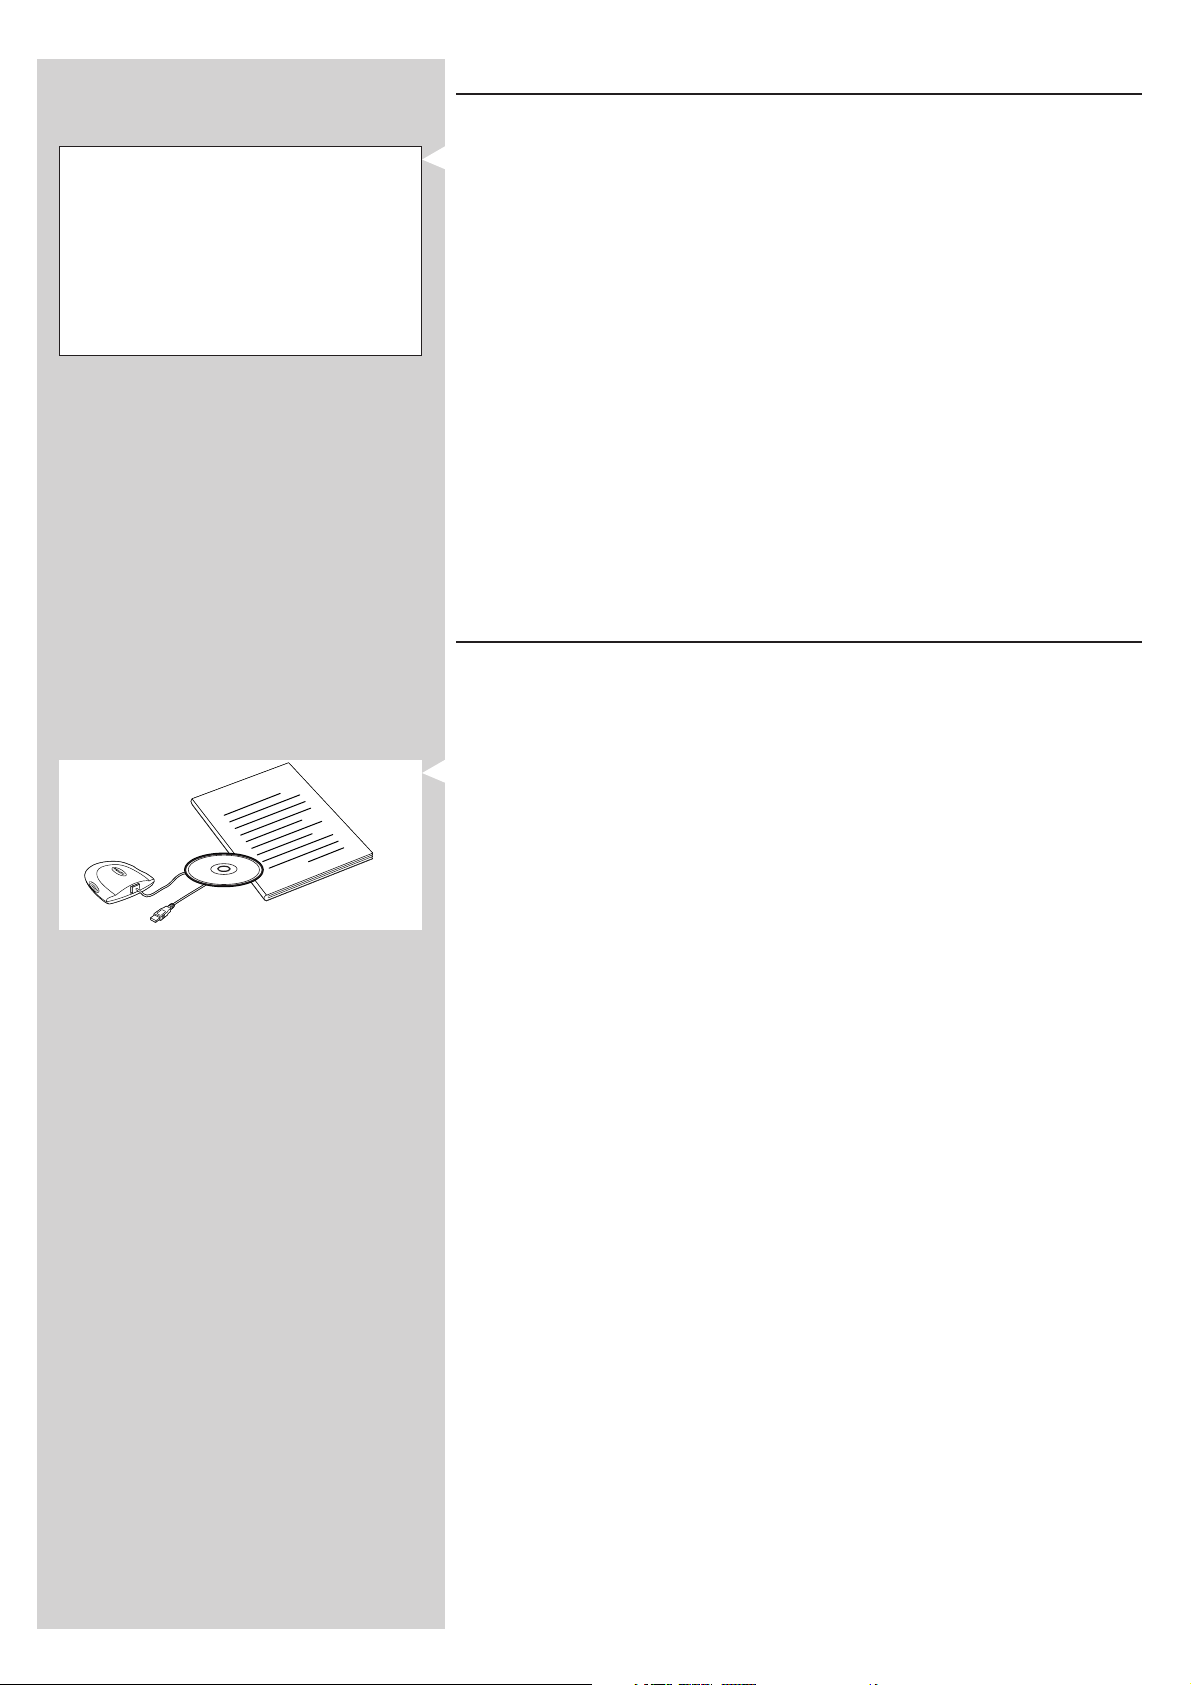
1.2 A If you already have a wireless computer network
•
Check your existing wireless network settings so you are able to enter them in steps 9
and 11 of chapter 2.2 ‘Installing - General procedure’ (page 10).
Find out the wireless network name (SSID) and the encryption key(s) you used for
securing your wireless network.
Wireless Network Name (SSID):
Usually, you can find the wireless network name in the options menu of your Wireless
Network Adapter or Wireless Base Station.To check this, open the program that came
with your network adapter.
Encryption key:
The wireless encryption key is a 64 or 128 bit WEP code that secures your wireless
network communications.
– 64-bit: 5 characters ASCII, or 10 characters HEX, or
– 128 bit: 13 characters ASCII, or 26 characters HEX.
Note:The encryption key is case sensitive, meaning that ‘ABC’ is not the same as ‘aBc’. Always
input characters in the correct case to avoid problems.
Please write down your encryption key(s) and SSID.You will need them when you install
your SL50i.
How to use...
I
n
D
s
t
C
a
l
l
n
a
o
t
i
1.2 B If you do not have a wireless computer network
•
Install a Wireless Network Adapter (not included, you will have to buy one separately.
E.g. the Philips CPWUA054.)
See the separate instructions of the Wireless Network Adapter on how to
install the adapter on your PC.
Notes:
– Choose ‘Ad-Hoc’ as your network type during installation, and set ‘philips’ as your wireless
network name (SSID).
– Philips advises you to set an encryption key to secure your wireless network. Please read the
text on ‘Securing your wireless network’ on page 34 of the extended version of the User
Manual on the CD-ROM.
Page 10
10 ENGLISH
Chapter 2 - Installing your SL50i
2.1 Before you start
In this chapter we describe how to install your SL50i in your wireless computer network.
•
How to make broadband Internet connection available to the SL50i is described in chapter
3 ‘Enabling broadband Internet enter tainment’ on page 12.
• For information on how to operate your SL50i, see chapter 4 ‘Using your SL50i’
(page 14). For information on the menu options when playing music in PC LINK- or
INTERNET mode, see chapter 12 ‘Menu’ (page 26 of the extended User Manual on the
CD-ROM).
• The number of steps you have to take during the installation process depends on your
network settings. In the next chapters we describe the most relevant installation steps
(settings). If you are asked to adjust settings that are not described in the next chapters,
just follow the instructions on the display.
• If you encounter problems during installation or should you need additional help, then:
a) see Problem solving on page 17, or
b) visit our website www.philips.com/streamium, and click on Support and FAQs, or
c) contact our help line.
2.2 Installing - General procedure
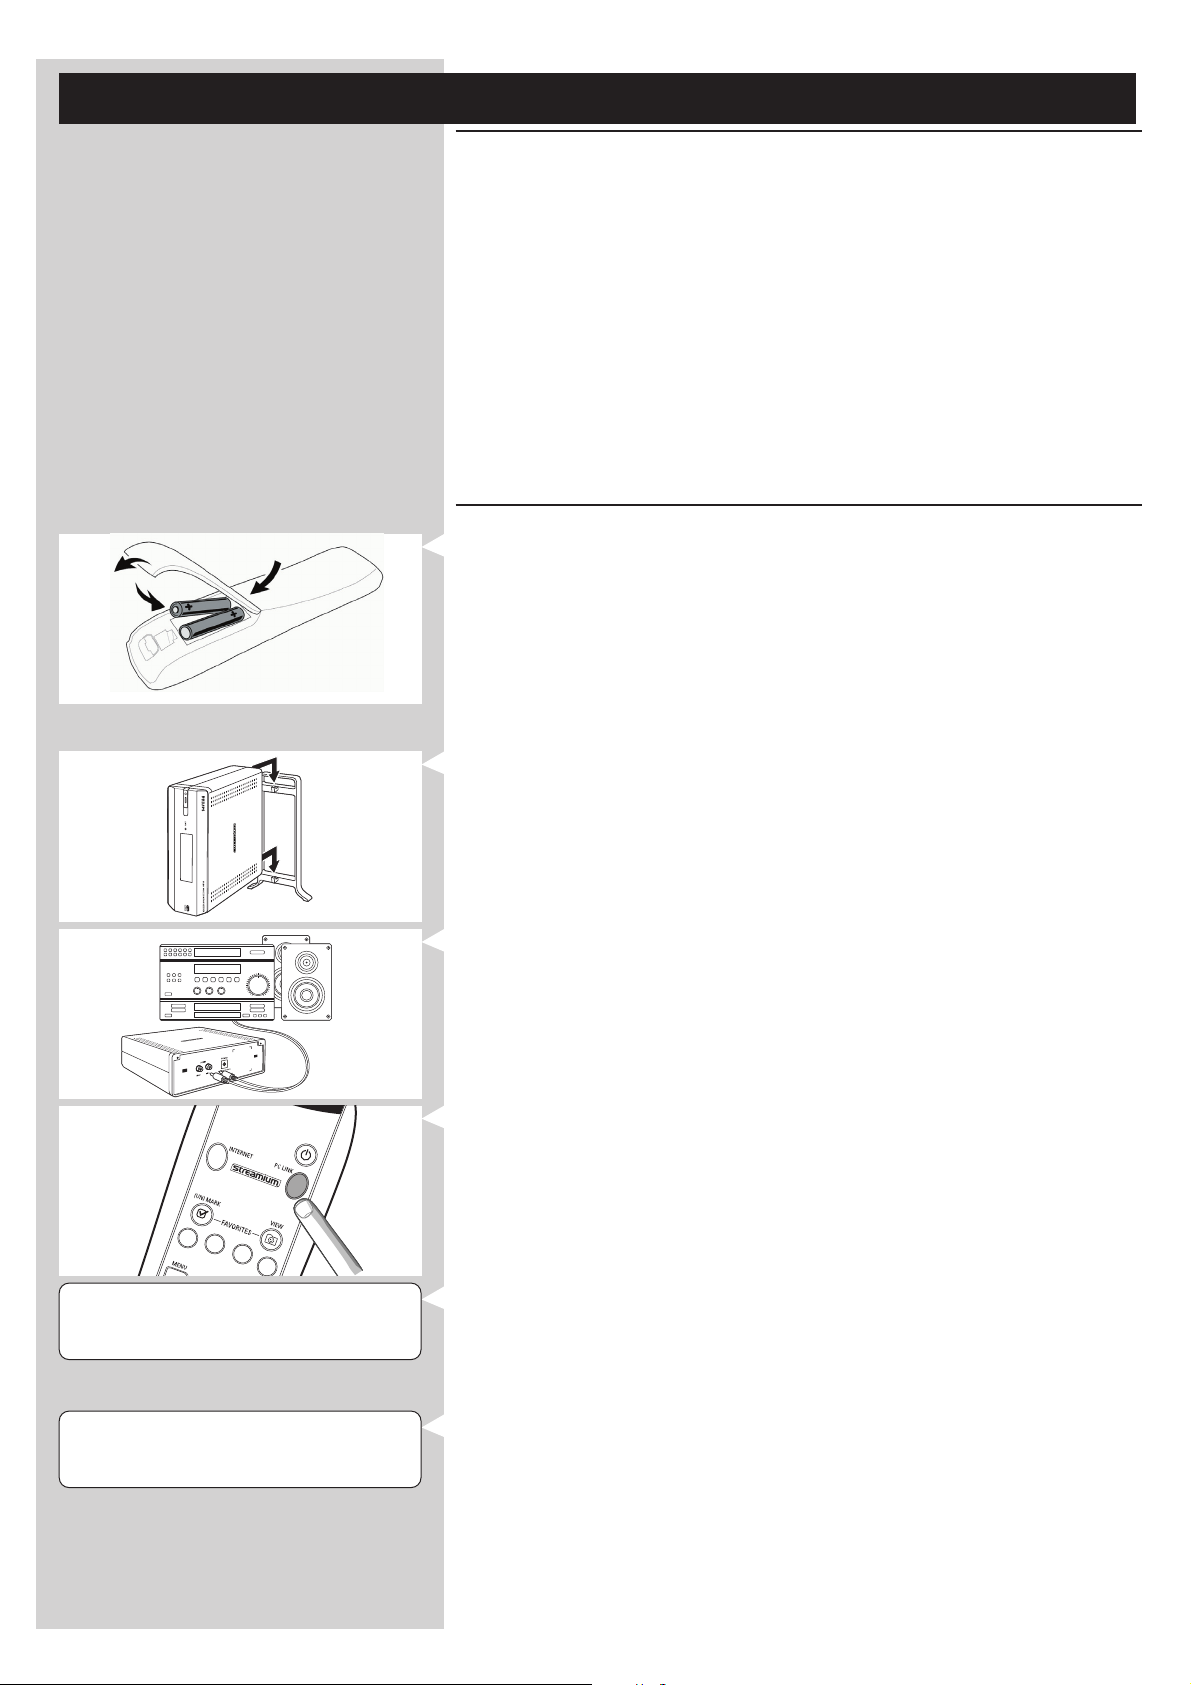
Place the batteries in the remote control:
1
• Remove battery cover
• Position batteries
• Close battery cover
WELCOME TO
STREAMIUM
2 Place your SL50i on a stable, level surface, out of direct sunlight and away from sources
of excessive dust, dirt, heat, water, moisture, vibration and strong magnetic fields.
• If desired, you can place your SL50i in vertical position by attaching it to the click-on
foot.
Slide the recesses in the rear panel over the hooks on the click-on foot and gently press
your SL50i down until it clicks into position.
3 Connect the stereo/audio cable supplied between the Audio L/R-output 5 of your
SL50i and a free Line input of your audio system (e.g.AUX).
4 Connect the power adapter between the DC-in input 6 of your SL50i and power
outlet.
> The Standby / On LED lights up red.Your SL50i is now ready to be installed in your
wireless computer network.
5 Switch on the SL50i by pressing the PC LINK button on the remote control.
Do not press the INTERNET button at this time, only the PC LINK button.
> After about five seconds you will hear the ‘Streamium’ welcoming tune and a ‘Streamium’
welcoming message appears on the display.
• If the Streamium welcoming message does not appear, make sure the power adapter is
properly connected between the DC-in input 6 of the SL50i and the power outlet
LANGUAGE 3
ENGLISH 4
> ‘LANGUAGE’ appears on the display, together with the default language (English).
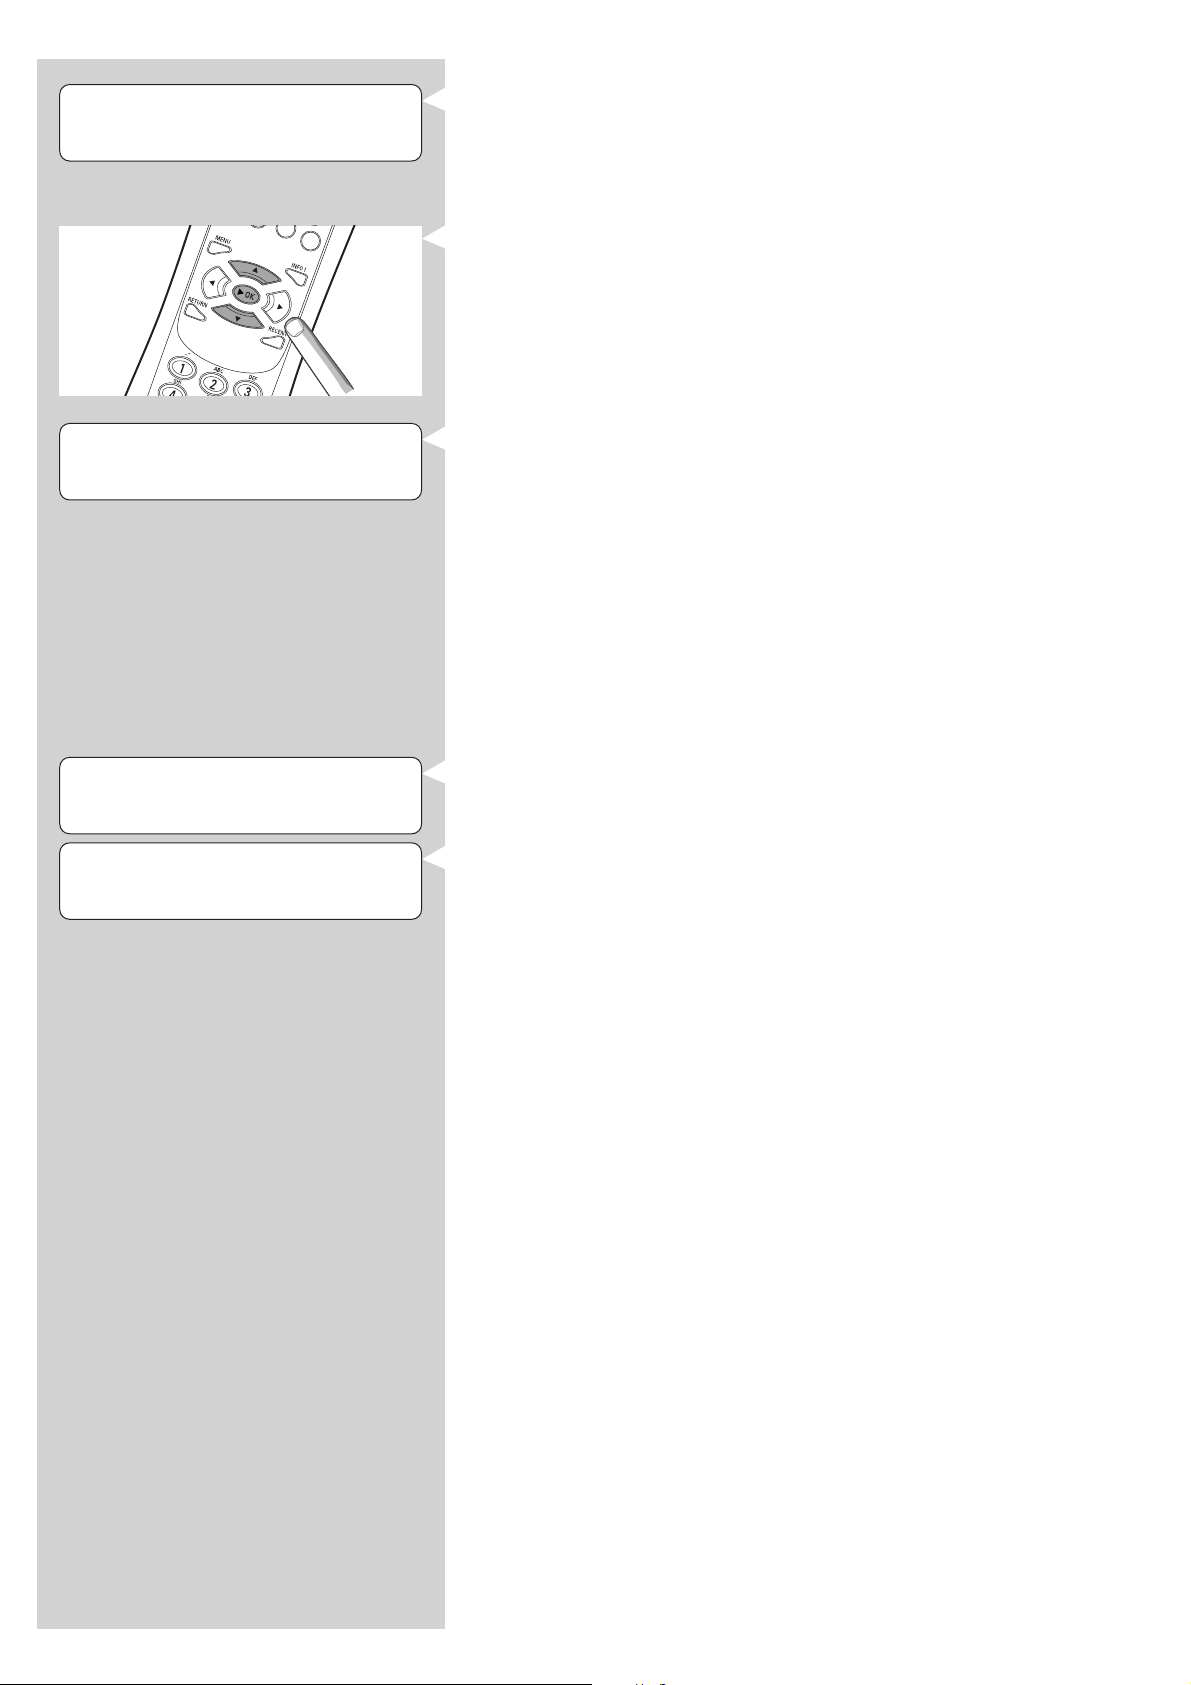
6 Use the 4 and 3 buttons on the remote control to select the desired language (English,
German, French, Spanish or Italian) and confirm with OK.
> Both display messages and spoken feedback will be in the selected language from now
on.
Page 11
ENGLISH 11
SELECT NETWORK 3
SSID 1 4
ENCRYPTION
WEP
7 If asked, select the wireless network name from the list of wireless network names
(SSID) presented to you on the display.
• If you already had a wireless network, select the network name found in chapter
1.2 A (page 9).
• If you just installed your wireless network, select the network name you entered in
chapter 1.2 B (page 9).
• Use the navigation buttons (34) on the remote control to select the correct network
name and press OK to confirm.
• If your wireless network name (SSID) is not mentioned in the list, select ‘Manual’ and
press OK to confirm.
> You will now be asked to type in your network name (SSID).
Note: If there is only one wireless network, it will be selected for you and you will not be asked
to select one.
8 If asked, also enter the encryption key.
• If you already had a wireless network, enter the encryption key found in chapter
1.2 A (page 9).
• If you just installed your wireless network, enter the encryption key entered in chapter
1.2 B (page 9).
• Use the navigation buttons (3412) on the remote control to choose your type of
encryption and to input the key itself. Press OK to confirm.
• Please remember that the encryption key is case sensitive, meaning that ‘ABC’ is not the
same as ‘aBc’. Always input characters in the correct case to avoid problems.
Notes
– If the wireless network is not encrypted, you will not be asked to input an encryption key.
– If you are asked to adjust settings that are not described in this chapters, just follow the
instructions on the display
INSTALL WIZARD
COMPLETED
PC-LINK
SELECT SERVER
> ‘INSTALL WIZARD COMPLETED’ appears on the display.Your SL50i will now store all
network settings.
> After about 90 seconds, you will see the PC Link menu appear on the display and you
are asked to select the PC (server) from which you wish to play music.
> If you see the text ‘ALL MUSIC’ appear on the display, the installation has succeeded
and your SL50i is now ready to play music from your PC on your audio system.
9 Select the PC (server) from which you wish to play music on your audio system.
> You will hear the message ‘Finding PC’, followed by ‘Connecting to PC’ as soon as a PC
has been found.
Notes:
– How to make broadband Internet connection available to the SL50i, will be described in chapter 3
‘Enabling broadband Internet entertainment’ on page 12.
– For information on how to operate your SL50i, see chapter 4 ‘Using your SL50i’ (page 14). For
information on the menu options when playing music in PC LINK- or INTERNET mode, see chapter
12 ‘Menu’ (page 26 of the extended User Manual on the CD-ROM).
Page 12
12 ENGLISH
Chapter 3 - Enabling broadband Internet entertainment
If you have a broadband Internet connection (preferably 256 kpbs), you can stream Internet radio stations live from the Internet to the SL50i for free.
Broadband internet also provides the on-line upgrades for the SL50i.
The Internet entertainment offering is constantly being improved and new functions are added.
Visit www.philips.com/streamium for the latest possibilities.
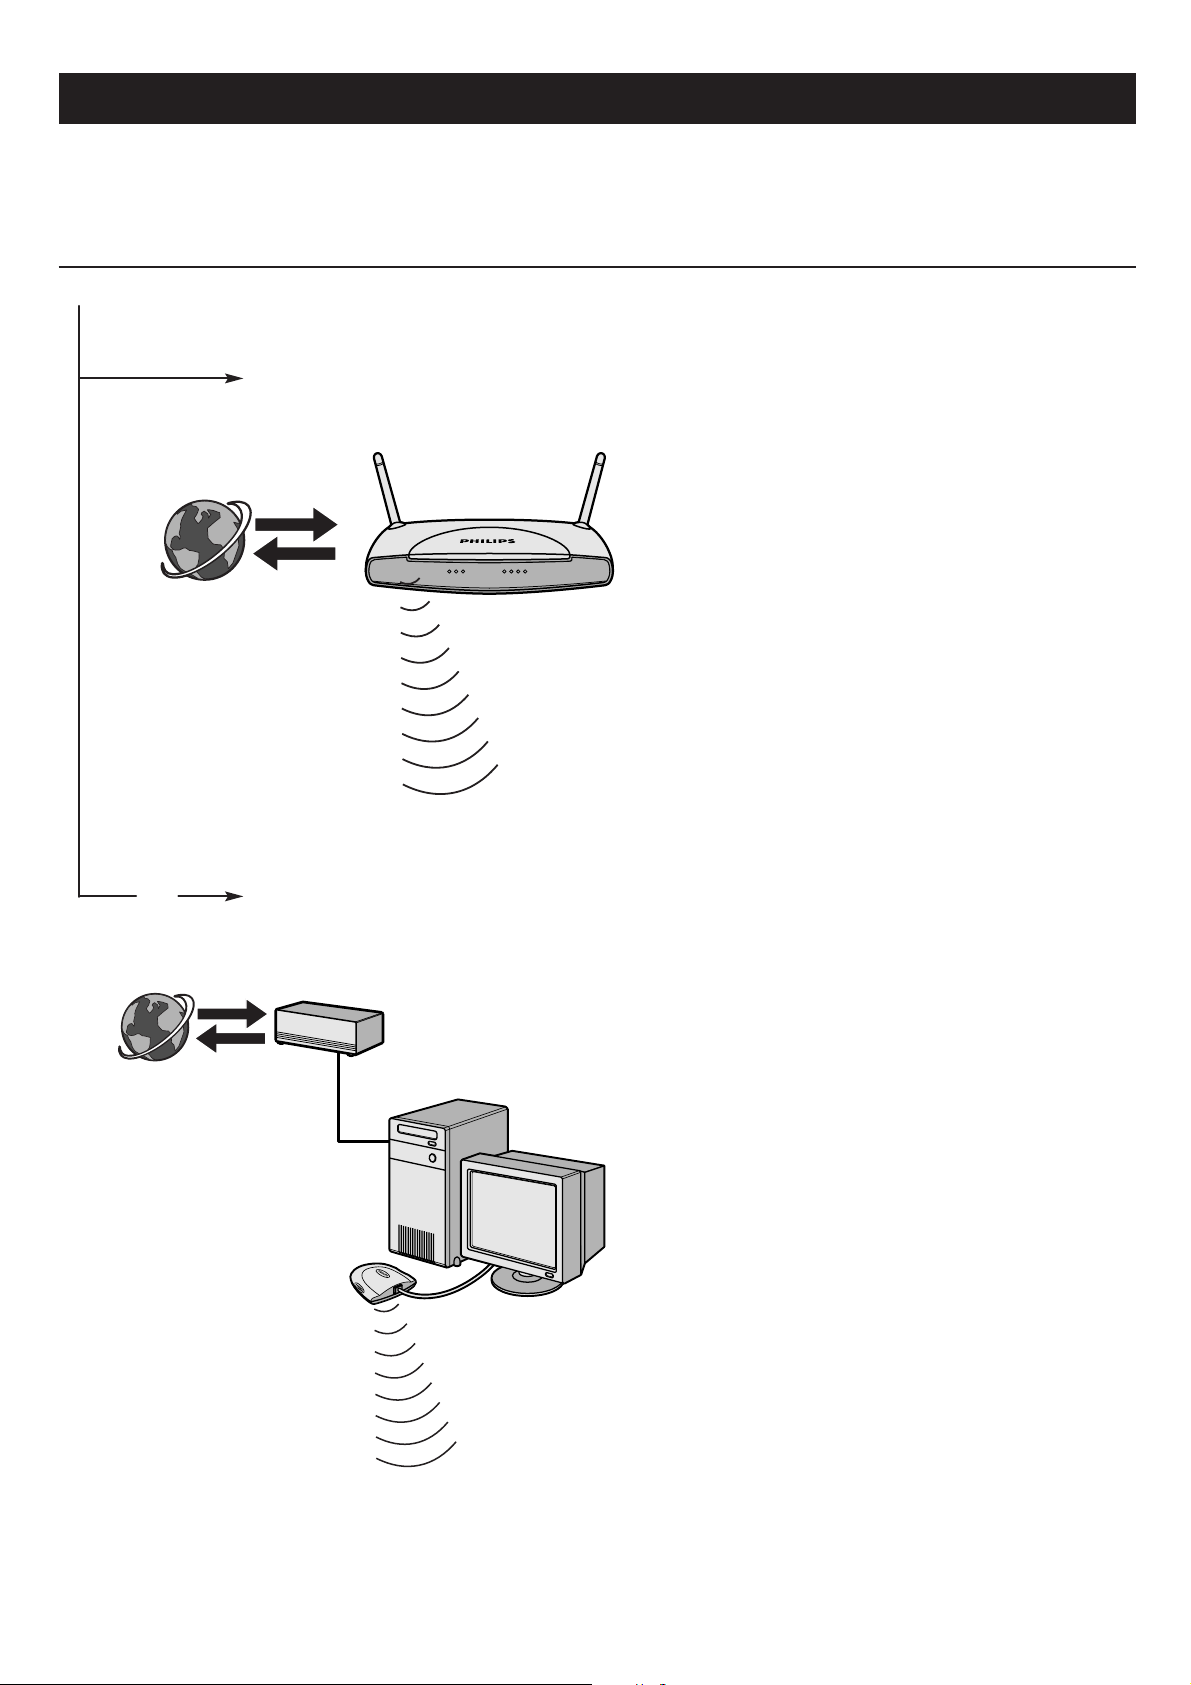
3.1 How does your computer connect to the Internet?
Option A: Through a wireless base station:
Wireless base stations share their broadband Internet access
automatically within the network.
>The SL50i will be able to access the Internet just like your
other wireless or wired network computer(s).
• Continue with chapter 3.2.
INTERNET
or
INTERNET
Option B: Through the Internet, connected directly to your PC or via a
wired router:
If you have a PC with a broadband Internet connection,
you will have to make that Internet connection available to the
wireless network that connects to the SL50i.
To do this, install router/gateway software on the PC for
bridging the broadband Internet connection to the wireless or
wired network.
As an example we have included a chapter on page 38-42 of
the extended User Manual on the Philips Media Manager CD
on how to enable Internet Connection Sharing from your
Microsoft
other operating systems, third party router/gateway software is
readily available on the market.
®
Windows®operating system. For Microsoft®and
Note: Additional wireless equipment not supplied with the SL50i.
For more information on sharing an Internet connection, read
the documentation that came with the software or with your
operating system.
> After bridging the internet connection to your wireless
(or wired) network, you will be able to use the SL50i to
access the Internet just like your computer.
• Continue with chapter 3.2.
Page 13
ENGLISH 13
3.2 Registration (for free Internet services)
When the SL50i connects to the Internet for the first time, or after you have reset all menu
settings, the SL50i will ask you to register your email address.
Also, each new user you add will have to register an email address.
1 Check whether the PC on which you are running Philips Media Manager has Internet
access by opening a website on the Internet with your Internet browser program (e.g.
www.philips.com).
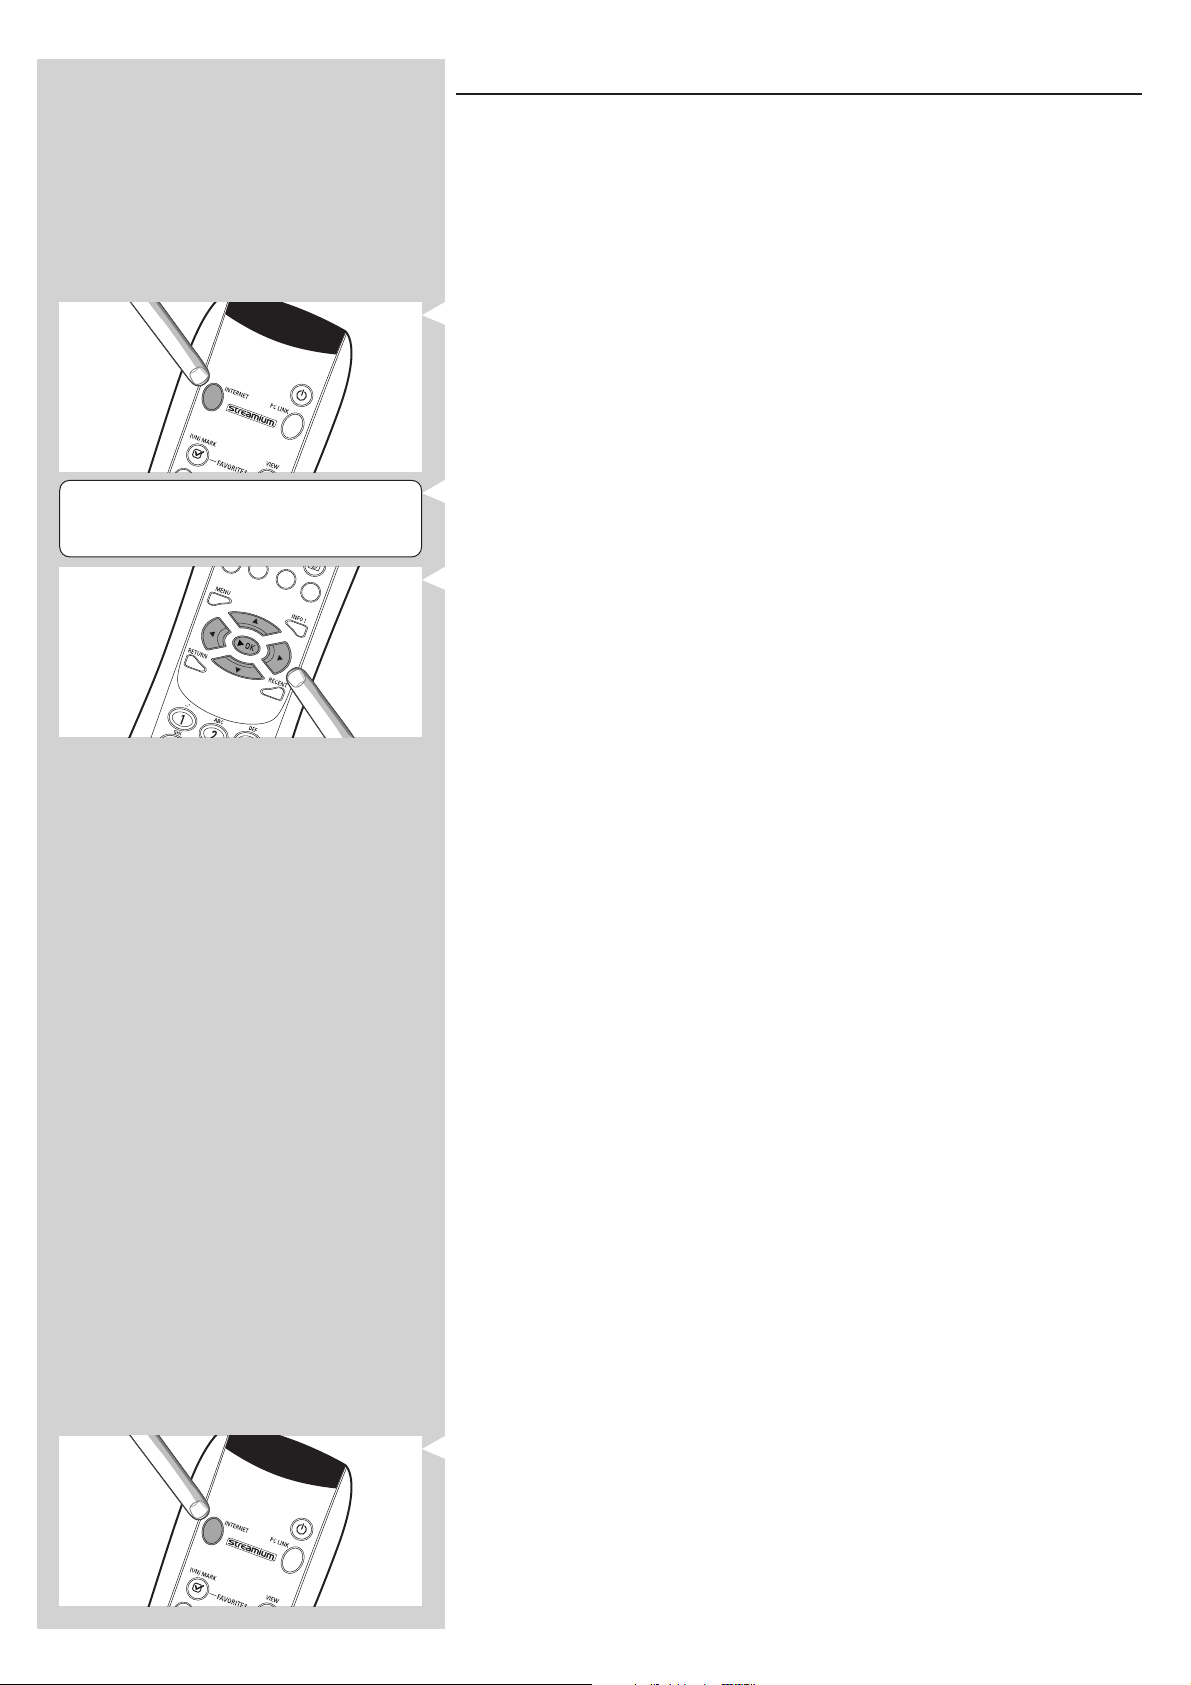
2 Next, press the INTERNET button to start registration on the Internet for your SL50i.
> You will hear the message ‘Connecting to Internet Radio’.
ENTER E-MAIL
See if the text ‘ENTER E-MAIL’ appears on the display.
Note: Internet services will only be available if you register.
3 Use SMS TEXT-style keys for inputting your email address. SMS TEXT-style entry can be
used to enter alphanumeric information. In this mode, text is entered by a method similar
to that used for entering text messages on a mobile telephone.
For example: pressing the ‘2’ key several times will cycle through the following characters:
a – b – c – A – B – C – 2... etc
RC Key SMS-style alphanumeric entry order
1_ - 1 _ - 1 (etc.)
2a b c A B C 2 a b c (etc.)
3d e f D E F 3 d e f (etc.)
4g h i G H I 4 g h i (etc.)
5j k l J K L 5 j k l (etc.)
6m n o M N O 6 m n o (etc.)
7p q r s P Q R S 7 p q r s (etc.)
8t u v T U V 8 t u v (etc.)
9w x y z W X Y Z 9 w x y z (etc.)
0.@ 0 . @ 0 (etc.)
Tip:The period, and the @ sign are under the 0 key.
The space, hyphen, and underscore are under the 1 key.
Alternatively:
Use the 3, 4 and 2 keys on your remote control to enter your email address.
If you mistyped, press ∞ to delete the character you have entered.
Next, press OK to send your email address to My.Philips.com.
(See also: Chapter 8 - Entering or editing information in the extended user manual on the CDROM.)
> Within a short time, you will receive an email with instructions on how to create an
account at my.philips.com.
4 Double-click the website address that is in the email.
5 Fill in the requested data to create an account.
6 After registration you can access the INTERNET service of the SL50i, and you can
manage your user account at ‘my.philips.com’ by opening this website in your Internet
browser program or by clicking the My.Philips button in Philips Media Manager.
Please make note of your password, as you will need it if you want to re-register after resetting
the SL50i.
7 After creating a My.Philips account, press the INTERNET button again.
> The SL50i will now have access to the Internet services of your My.Philips account. Have
fun!
Note: For information on how to operate your SL50i, see chapter 4 ‘Using your SL50i’ (page 14).
For information on the menu options when playing music in PC LINK- or INTERNET mode, see
chapter 12 ‘Menu’ (page 26 of the extended User Manual on the CD-ROM).
Page 14
14 ENGLISH
Chapter 4 - Using the SL50i
The SL50i receiver either connects to your wireless home network (PC LINK) and plays music,
stored on your PC(s), or to the Internet (INTERNET) for accessing internet radio.
All receiver features are operated via the remote control and the receiver menu.There are
different menus for playing music via PC or Internet (PC Link menu and Internet menu).The
System menu allows viewing and adjusting the various SL50i settings. For an overview and
explanation of all menus see chapter 12 ‘Menu’ (page 24). For an overview of remote control
functions see Chapter 7 ‘Remote control’ (page 21). Both chapters can be found in the
extended User Manual on the Philips Media Manager CD.
Note: Install the Philips Media Manager software, the Wireless Network Adapter and the SL50i
before you attempt to use the SL50i.Also, make sure the Philips Media Manager icon is
present in the lower right corner of your computer screen. Internet services requires a
broadband Internet connection.
4.1 Basic menu navigation
1
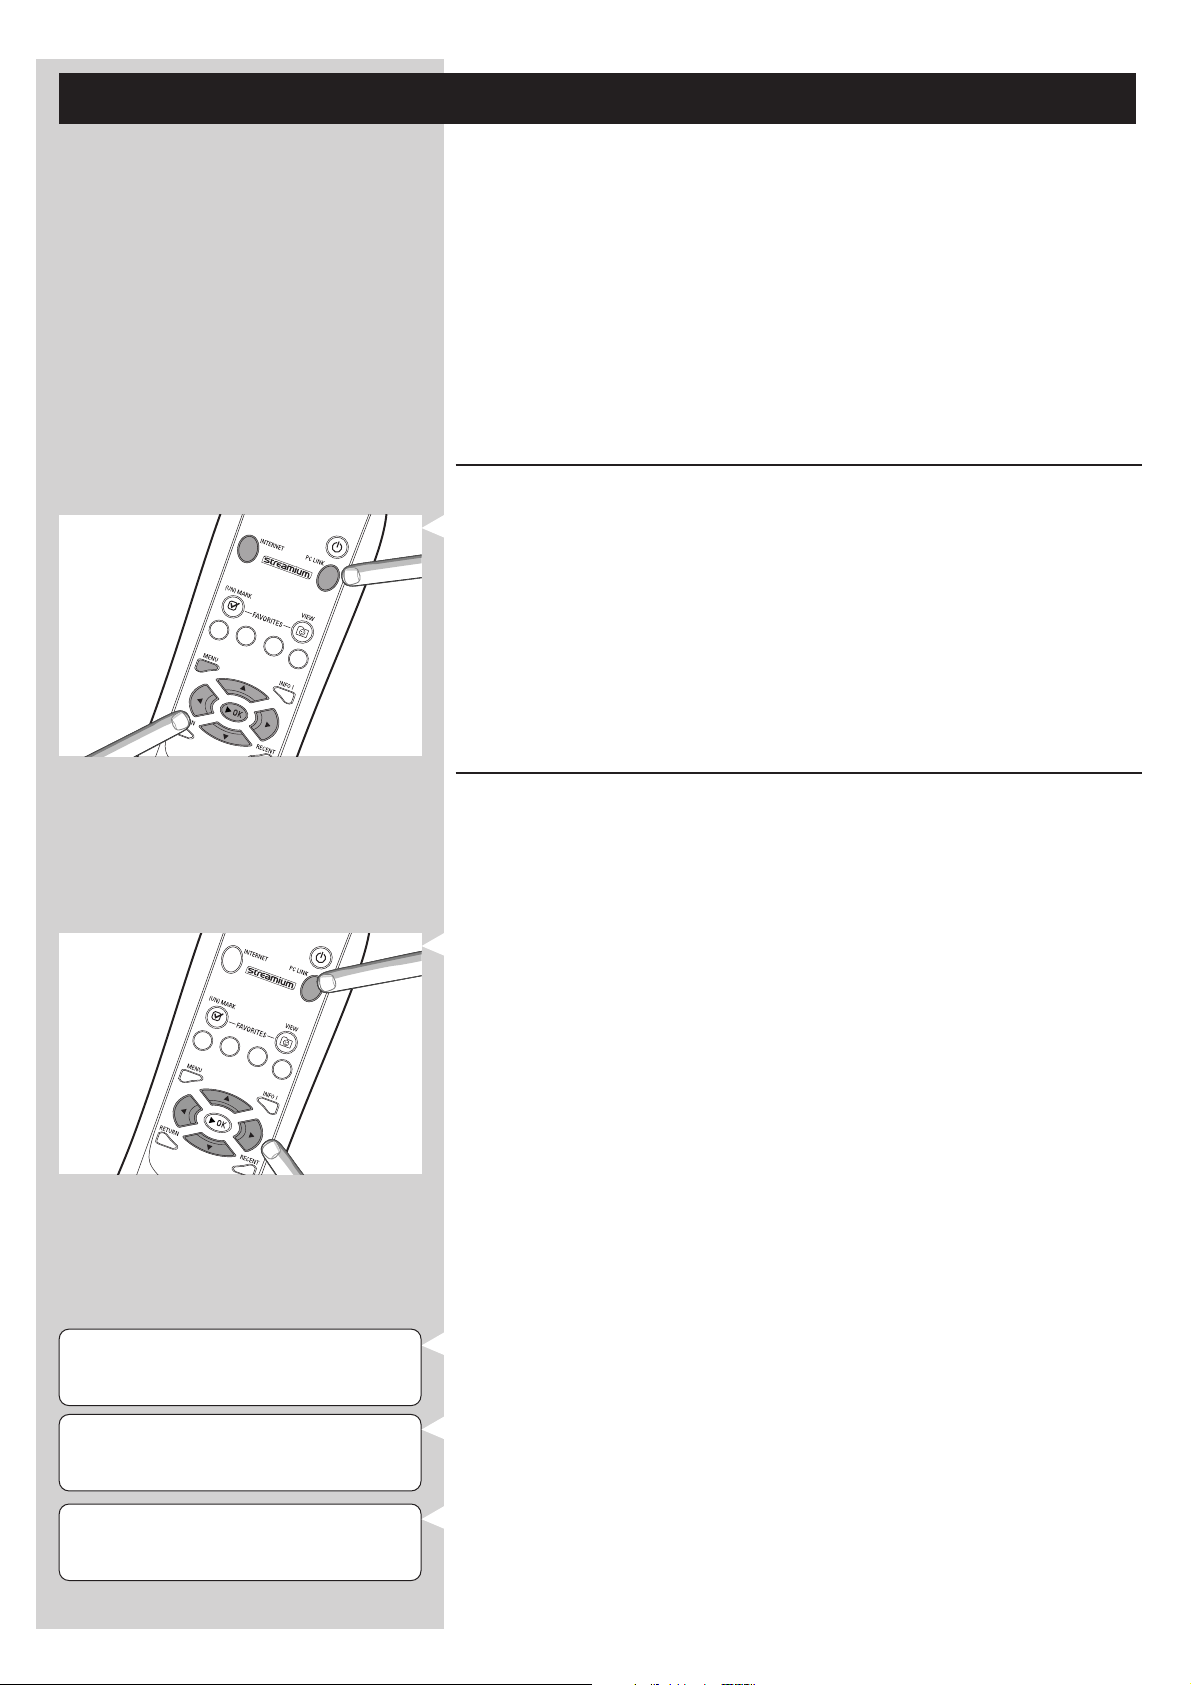
Press MENU, INTERNET or PC LINK to open the various menus (System Menu,
Internet menu or PC Link menu).
> Depending on the menu you opened, you will hear one of the following messages:
– ‘System menu’ (MENU);
– ‘Connecting to Internet Radio’ (INTERNET);
– ‘Finding PC’, followed by ‘Connecting to PC’ (PC LINK).
> The buttons that can be used for navigating through the menu are indicated on the right
hand side of the display.
2 Use 1 and 2 to navigate through the submenus and submenu items.
3 Use 3 and 4 to make selections.
4 Press OK or 2 to confirm selections.
PC-LINK
ALL MUSIC
4.2 PC Link example
With PC LINK you can make the SL50i play audio files that are stored on your PC(s).
The example below shows you how to play an album from your PC on your audio system via
the SL50i.The instructions are generally the same for operating all other features and adjusting
settings.
1 Press the PC LINK button on the remote control to open the ‘PC Link’ menu on the
display.
> After about 90 seconds, you will see the PC Link menu appear on the display and you
are asked to select the PC (Server) from which you wish to play music.
2 Select the PC (Server) from which you wish to play music on your audio system.
> You will hear the message ‘Finding PC’, followed by ‘Connecting to PC’ as soon as a PC
has been found.
> If only one PC is found this will immediately be selected and the SL50i automatically
selects ‘ALL MUSIC’.
PC LINK 3
ALBUMS 1 4
ALBUMS 3
ALBUM 1 1 4
3 Use 4 to select ‘ALBUMS’ and confirm with OK.
4 Use 4 to select the desired album.
5 Press OK or B (PLAY) to confirm and start playback of the selected album.
Page 15
ENGLISH 15
4.3 Internet example
With INTERNET you can make the SL50i play Internet radio stations on your audio system.
The example below shows you how to play an Internet radio station on your audio system via
the SL50i.The instructions are generally the same for operating all other features and adjusting
settings.
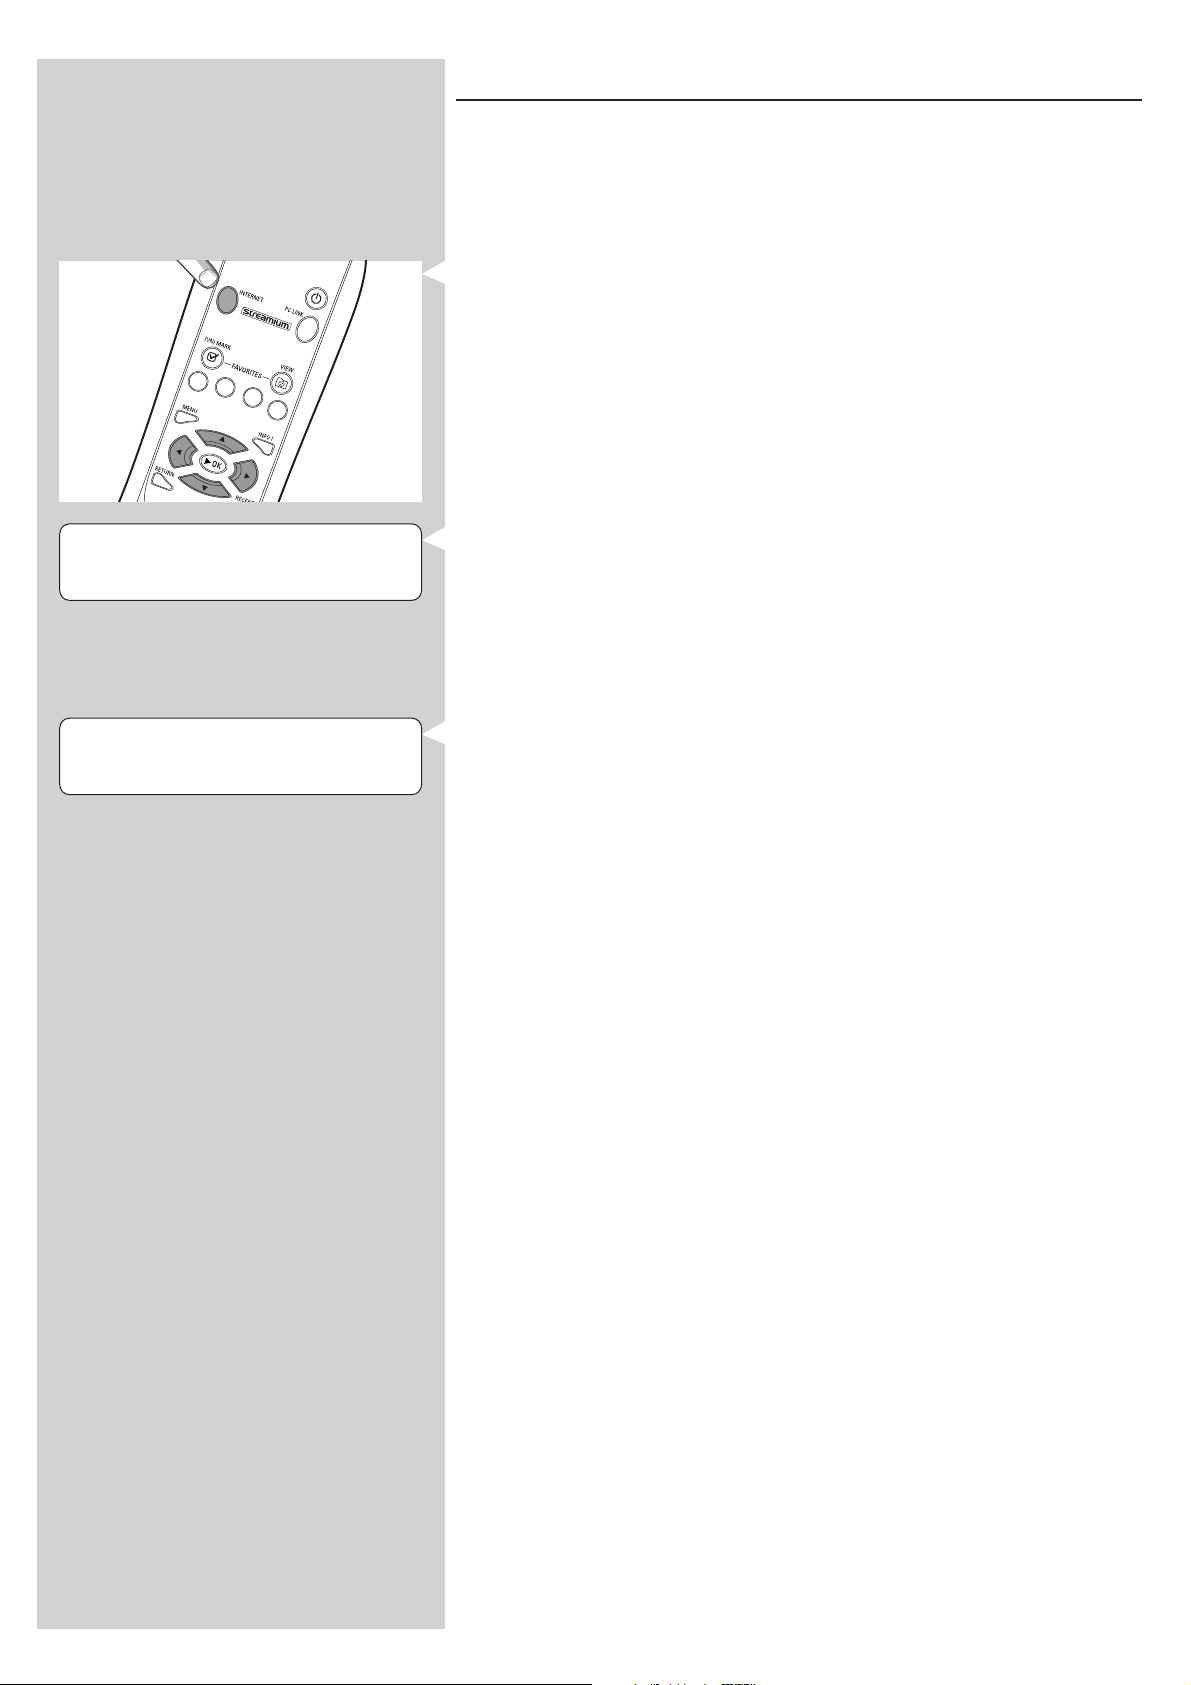
1 Press the INTERNET button* on the remote control to open the Internet menu on the
display.
> You will hear the message ‘Connecting to Internet Radio’.
*) When the SL50i connects to the Internet for the first time and after resetting, the SL50i
will ask you to register. See the chapter ‘Enabling broadband Internet entertainment’ on
page 12.
INTERNET
CONTENT PROVIDER 1
CLASSIC 3
RADIO STATION 4 1 2 4
> After about 90 seconds, you will see the INTERNET menu appear on the display.
2 Use 3 and 4 to select a content provider and confirm with OK or 2.
3 Use 4 to select a sort method (e.g. ‘Genre’) and confirm with OK or 2
4 Use 4 to select the desired ‘Genre’ and confirm with OK or 2
5 Use 4 to select the desired radio station Press OK or B (PLAY) to confirm and start
playback
Note: Internet performance depends on the Internet subscription and content provider chosen.
Page 16

16 ENGLISH
Chapter 5 - Additional information
Environmental information
All redundant packing material has been omitted. We have done our utmost to make the
packaging easily separable into three mono materials: cardboard (box), polystyrene foam (buffer)
and polyethylene (bags, protective foam sheet).
Your set consists of materials that can be recycled if disassembled by a specialized company.
Please observe the local regulations regarding the disposal of packing materials, exhausted
batteries and old equipment.
Disclaimer
This product is provided by Philips ‘as is’ and without any express or implied warranties of any
kind, including, but not limited to, the implied warranties of merchantability and suitability for a
particular purpose are disclaimed.
In no event shall Philips be liable for any direct, indirect, incidental, special, exemplary,
or consequential damages (including, but not limited to, procurement of substitute goods or
services; loss of information, data, or profits; or business interruption) howsoever caused and on
any theory of liability, whether in contract, strict liability, or tort (including negligence or
otherwise) arising in any way out of the use or inability to use this product, even if the
possibility of such damages has been mentioned.
Furthermore, Philips does not guarantee the accuracy or completeness of the information, text,
graphics, links or other items transmitted by this product.
Upgradeability
Both the SL50i and the Philips Media Manager software are upgradeable through your
broadband Internet connection. From time to time, new features will be available and the
functionality of this system will change.Therefore, this manual can only offer a rough overview
of the internet and PC Link functionality. Please visit www.philips.com/streamium for the latest
information on the availability of services and new functions.
Trademarks
All trademarks acknowledged. Microsoft and Windows are trademarks, or registered trademarks
of Microsoft Corporation in the United States and/or other countries. Mac OS is a trademark
of Apple Computer, Inc., registered in the U.S. and other countries. DivX
trademark of DivXNetworks, Inc.
All other brands and product names are registered trademarks of their respective owners.
®
is a registered
Page 17

ENGLISH 17
Chapter 6 - Problem solving
6.1 SL50i problems
Check the Support section on www.philips.com/streamium for the latest information on
problem solving.
Problem Possible cause Solution
Power light does not light up. No connection to power supply. Connect the power adapter to the SL50i and to a
mains outlet that provides electrical power.
No sound from the audio system. Audio system is switched off. Switch on your audio system.
Volume too low. Increase volume or switch off mute of your audio set.
Wrong cable connections. Check your cable connections; see chapter 2 ‘Installing
your SL50i’ (page 10-11).
Wrong audio input. On your audio system, select the audio input
you connected the SL50i to.
No music or in poor quality only. Incompatible codec (media format). Comply with the supported codecs. Go to
www.philips.com/streamium to see which codecs are
currently supported.
Correct codec, but still low quality Most PC media formats use heavy data compression
audio. techniques that lower the audio quality, e.g. compared
to CD. Lower quality display is normal.
Firewall software blocks streaming. Disable firewall software to test whether it interferes
with streaming audio. Go to www.philips.com/streamium
to see what ports you need to open for streaming
(49153 and 49154 TCP and UDP)
Digital recording may be SL50i is not allowed to ignore copy protection.
copy protected.
The remote control does not function properly. Out of range. Move closer to the SL50i and point the remote
control directly at the IR sensor on the front of the
SL50i.
Batteries low. Replace the batteries.
There is no Ethernet connection on your Your SL50i is only equipped with a A wireless (computer) network is required for
SL50i rear panel. built-in wireless network connection. operating your SL50i.
The PMM (Philips Media Manager) shows PMM has these options for To enjoy our full range of wireless possibilities, you
the options ‘Photos and ‘Movies’. Philips Wireless Multimedia Links. will need an SL300i or SL400i Wireless Multimedia Link
that gives you access to photos and movies.
The SL50i does not respond to any of the Internal error. Unplug it from the outlet and wait at least 10 seconds
buttons, including the standby button. before reconnecting it.
The SL50i switches to standby with the Your SL50i has a thermal shutdown Disconnect from the power supply, , let the set cool
Power LED flashing on and off. that shuts down the set when down, improve ventilation, and reconnect the set
the internal temperature to the power supply.
exceeds a certain threshold. (If the problem persists, return the set to your dealer.)
Not all remote control buttons can be used for The buttons you pressed have Functionality of the remote control buttons depends
operating your SL50i. no function in the current menu. on the menu the buttons are used in.
Page 18

18 ENGLISH
6.2 PC / Network problems
Check the Support section on www.philips.com/streamium for the latest information on
problem solving.
Problem Possible cause Solution
The Installation CD will not start. Autorun disabled for your drive. Double-click ‘My Computer’, then the CD-ROM
drive icon and finally ‘Setup.exe’ to start the CD.
The software will not install. Wrong operating system. Go to www.philips.com/streamium to see which
operating systems are supported.
No wireless connection or intermittent drop-out Wireless signal range, speed, and Switch off wireless devices that interfere with your
of the wireless connection. strength can be affected by wireless network connection.
interference from neighbouring
wireless networks and devices.
Electro-magnetic devices such as
televisions, radios, microwave ovens,
and cordless telephones, especially
those with frequencies in the
2.4 GHz range, may also interfere
with wireless transmission.
Not all drivers or firmware of your Install the latest drivers and firmware for all your
networking products are up to date. networking products.
Some technologies that improve Disable all ‘doubling technologies’ (e.g. 22 MBps instead
your networking speed may cause of 11 MBps or 108 MBps instead of 54 MBps).This can
in compatabilities. be done in the advanced settings of your Wireless
USB adapter or Wireless base station.
No display information after pressing the PC LINK PC is switched off. Switch on your PC.
button.
The Media Manager software is not Start the Media Manager software.
running.
No wireless network adapter Connect the wireless network adapter to your PC or
connected or range too long reposition your wireless adapter.You may check
(weak radio signal). the link quality by pressing the MENU button and
selecting Network > Wireless Info > Signal Level.
Network host (PC) or wireless base Make sure your home network is operational before
you
station is switched off. try to contact a networked computer with the SL50i.
Your wireless base station/network Add the SL50i MAC address to the list of devices that
router employs MAC filtering and may connect to your base station/gateway router. (See
prevents the SL50i from connecting its user manual for how to do this.) Press the MENU
to your network. button and select: Network > Wireless Info > NIC
MAC Address to see the wireless MAC address.
Not enough USB bandwidth available If you share the USB bandwidth with other heavy
for a wireless USB adapter. USB bandwidth users (like USB cameras, scanners or
rewritable drives, etc.), the remaining bandwidth may
not be enough.
Radio interference from other Check whether a wireless connection can be
(wireless) devices. established with other devices switched off.
(e.g. microwave ovens, other wireless devices, etc.)
(Wireless) network problems. See ‘Advanced network problem solving’ on page
43 of the extended User Manual on CD-ROM.
Page 19

ENGLISH 19
Problem Possible cause Solution
No display information after pressing the Check whether the SL50i can First, check whether the SL50i can connect
INTERNET button. connect to your PC. to a PC by pressing the PC LINK button.
If not, see above.
No broadband Internet connection Broadband Internet means at least a 128 kbps always-
on
available. Internet connection. Dial-up ISDN/ telephone
connections will not work.
Not enough broadband Internet If you share the broadband bandwidth with other users,
bandwidth available. it may fall below the minimum requirements.
Network host (PC) or wireless base Make sure your home network is operational before
station is switched off. you try to contact a networked computer with the
SL50i.
Internet access not working. Make sure you can access the Internet from your
computer.
Internet Connection Sharing (ICS) is In this manual, read the chapters on networking.
not working. Go to Windows Help. Alternatively, visit
www.microsoft.com, click Suppor t, and search on ‘ICS’.
Internet or network problems. See ‘Advanced network problem solving’ on page 43 of
the extended User Manual on CD-ROM.
New features as advertised on the Internet You are using an older software Upgrade the SL50i and the software.
are not available. version that does not have those Upgrade the SL50i by pressing the MENU button.
features. Then select Online Upgrade.
Go to www.philips.com/streamium for the latest version
of the Philips Media Manager software.
Internet radio services are slow or do Your Internet bandwidth might be Check for Internet congestion. Do not download
not respond. (temporarily) too low. (large) files while listening to Internet radio.
Firewall software and Anti-Virus software may diminish
the bandwidth effectively available to your PC.You may
test whether this is the case by disabling the software
temporarily.
It says ‘System Recovery’ on the content The internal memory of the SL50i Press the OK button on the remote control to
screen on the display, and I am asked to has been corrupted e.g. during start the emergency bootloader.
press 'Continue'.What's wrong? dowloading new software from
the Internet and it needs to start 1. It will try to recover as many of the existing settings
the emergency bootloader program as possible for your wireless network and the
that connects to the Internet Internet.
to restore the SL50i to a 2. It will ask you for any additional settings it needs to
working state automatically. connect to the Internet. See the chapter about the
System menu on page 27 for reference.
3. Once the emergency bootloader has been able to
connect to the Internet and has downloaded a valid
software version, it will display ‘Restarting system...’.
The SL50i should be working again.
If not, check your settings by pressing the MENU
button.
No PC content is found on the SL50i or it takes Windows® prevents the network Use the ‘Auto IP Network Utility’ tool on the
at least. 90 seconds before content is found. from automatic configuration. CD-ROM, accessible via the Setup menu or in the
(In a point-to-point set-up, consisting of a Wireless ‘Tools’ directory.
USB adapter, connected to a PC and the SL50i.) Note: Do not use the ‘Auto IP Network Utility’ tool
if you use a wireless base station or router in your
network or if you have ‘Internet Connection Sharing’
(ICS) enabled.
Page 20

20 ENGLISH
Chapter 7 - Glossary
Access Point See ‘Wireless Base Station’
Ad-Hoc Network A direct network connection between two devices (two computers, or a PC and the SL50i).
Base Station See ‘Wireless Base Station’
Broadband The Internet bandwidth determines the speed of your Internet connection. Broadband Internet
is everything above 256 kbps.
Codec A software format for compressing and de-compressing media.
DHCP If a network has a central host computer,Wireless Base Station or router that acts as a
DHCP server, this server allocates IP addresses, netmasks, and the gateway address to all
DHCP client computers and devices in the network automatically.
Ethernet The most popular type of wired home network.
Firewall A firewall acts as a barrier that helps protect your network from intruders from the Internet.
The firewall specifies what information can be communicated from the computers on your
network to the Internet, and from the Internet to the computers on your network.
Gateway The computer or network device that provides access to the Internet.
Infrastructure network A network connection between two or more devices (computers, or PCs and the SL50i)
with a central network host (router, base station or PC).Also see ‘Wireless Base Station’.
MAC address The unique 12-character hardware address of the (wireless) network adapter.
Sometimes used for identifying network hardware.
NAT (network address translation) A security feature implemented in most Internet gateway routers to keep your home network
safe from intrusions from the Internet.
Router See ‘wireless base station’
Peer-to-peer network See ‘ad-hoc network’
Philips Media Manager The software you need to install and have active on your computer to be able to use PC Link
for sending music files from the PC to the SL50i.
Proxy address The address of an intermediate computer, provided to you by your Internet Service Provider.
Sometimes needed for accessing the Internet.
SSID Service Set Identifier.The wireless network name (this is not the same as your computer
network name).
Streaming Playing media content from the Internet while it is downloading is called 'streaming'.
Streamium The Philips range of Internet enabled products.
WEP / WPA Designate a type of wireless encryption.
wireless base station (wireless router) A hardware device that interconnects your (wireless) home network to the Internet.
Wireless USB adapter (wireless network adapter) A hardware device that enables your PC for wireless transmission.
Page 21
Chapter 8 - Remote control
8.1 Remote control buttons
ENGLISH 21
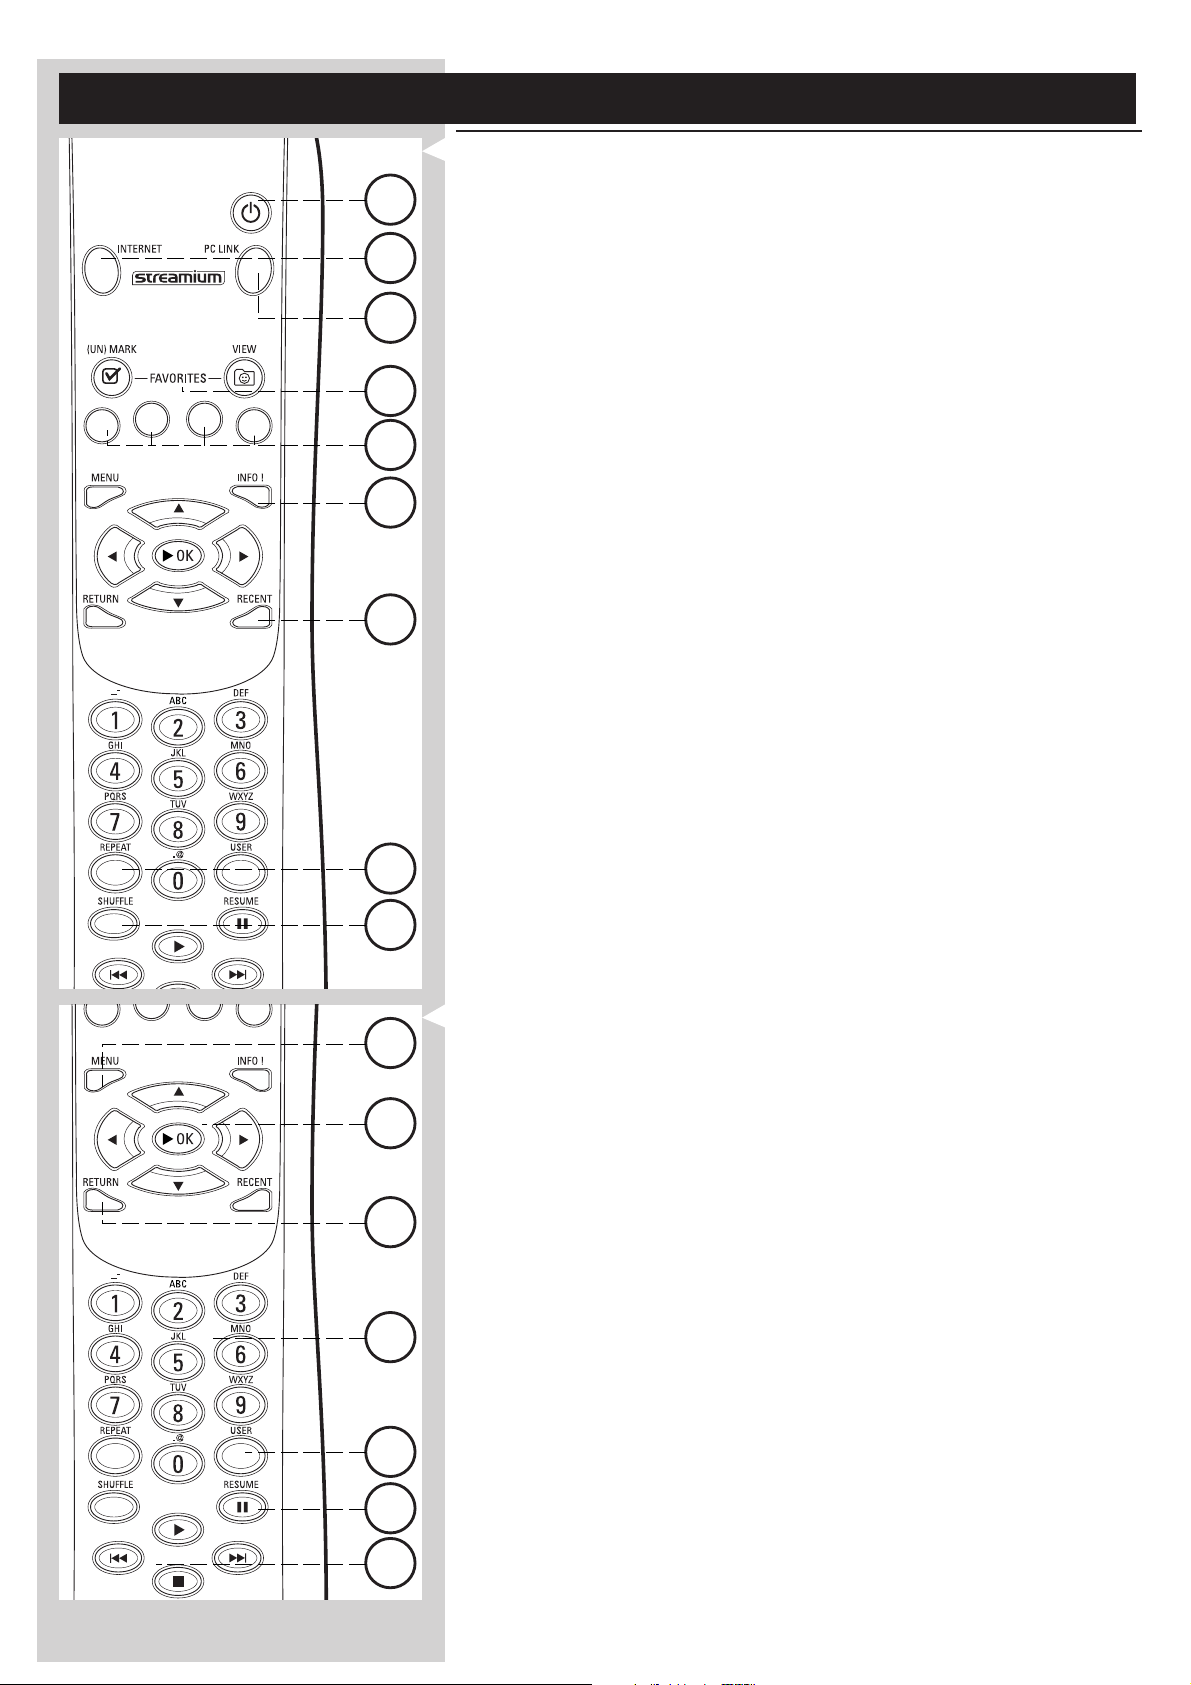
1
1 Power/standby button
Switches SL50i off (to standby).
– Switch on the SL50i with the INTERNET or PC LINK source button
2
2 INTERNET source button
6
Selects the Internet as your source of music content.
– Requires a broadband Internet access of at least 128 kbps, higher recommended
3 FAVORITES
3
9
5
Buttons for marking, unmarking and viewing your favorites.
4 RECENT (Internet only)
Overview of recently played content.
5 INFO! (select Internet services only)
Request information on content.
6 PC LINK source button
Selects PC Link as your source of music content.
4
7 REPEAT (PC Link only)
Selects the repeat mode.
8 SHUFFLE (PC Link only)
Selects the shuffle mode.
9 Coloured buttons
Offer direct access to favourites of:
– Playlist (red);
– Genre (green);
7
– Artist (yellow);
– Album (blue).
8
10
14
11
12
15
10 MENU
Accesses the SL50i System menu.
11 RETURN
For switching from Play view to Navigation view and vice versa.
12 Number/Text buttons
For inputting numbers and SMS-style TEXT.
13 Playback control buttons: Play/Pause, Previous/Next and Stop
Playback control functions for music content.
14 Menu navigation buttons: up/down/left/right/OK
Used for navigating through menus and for making selections.
15 USER
Selects one of the available users.
16 RESUME
For resuming paused playback.
16
13
Page 22
22 ENGLISH
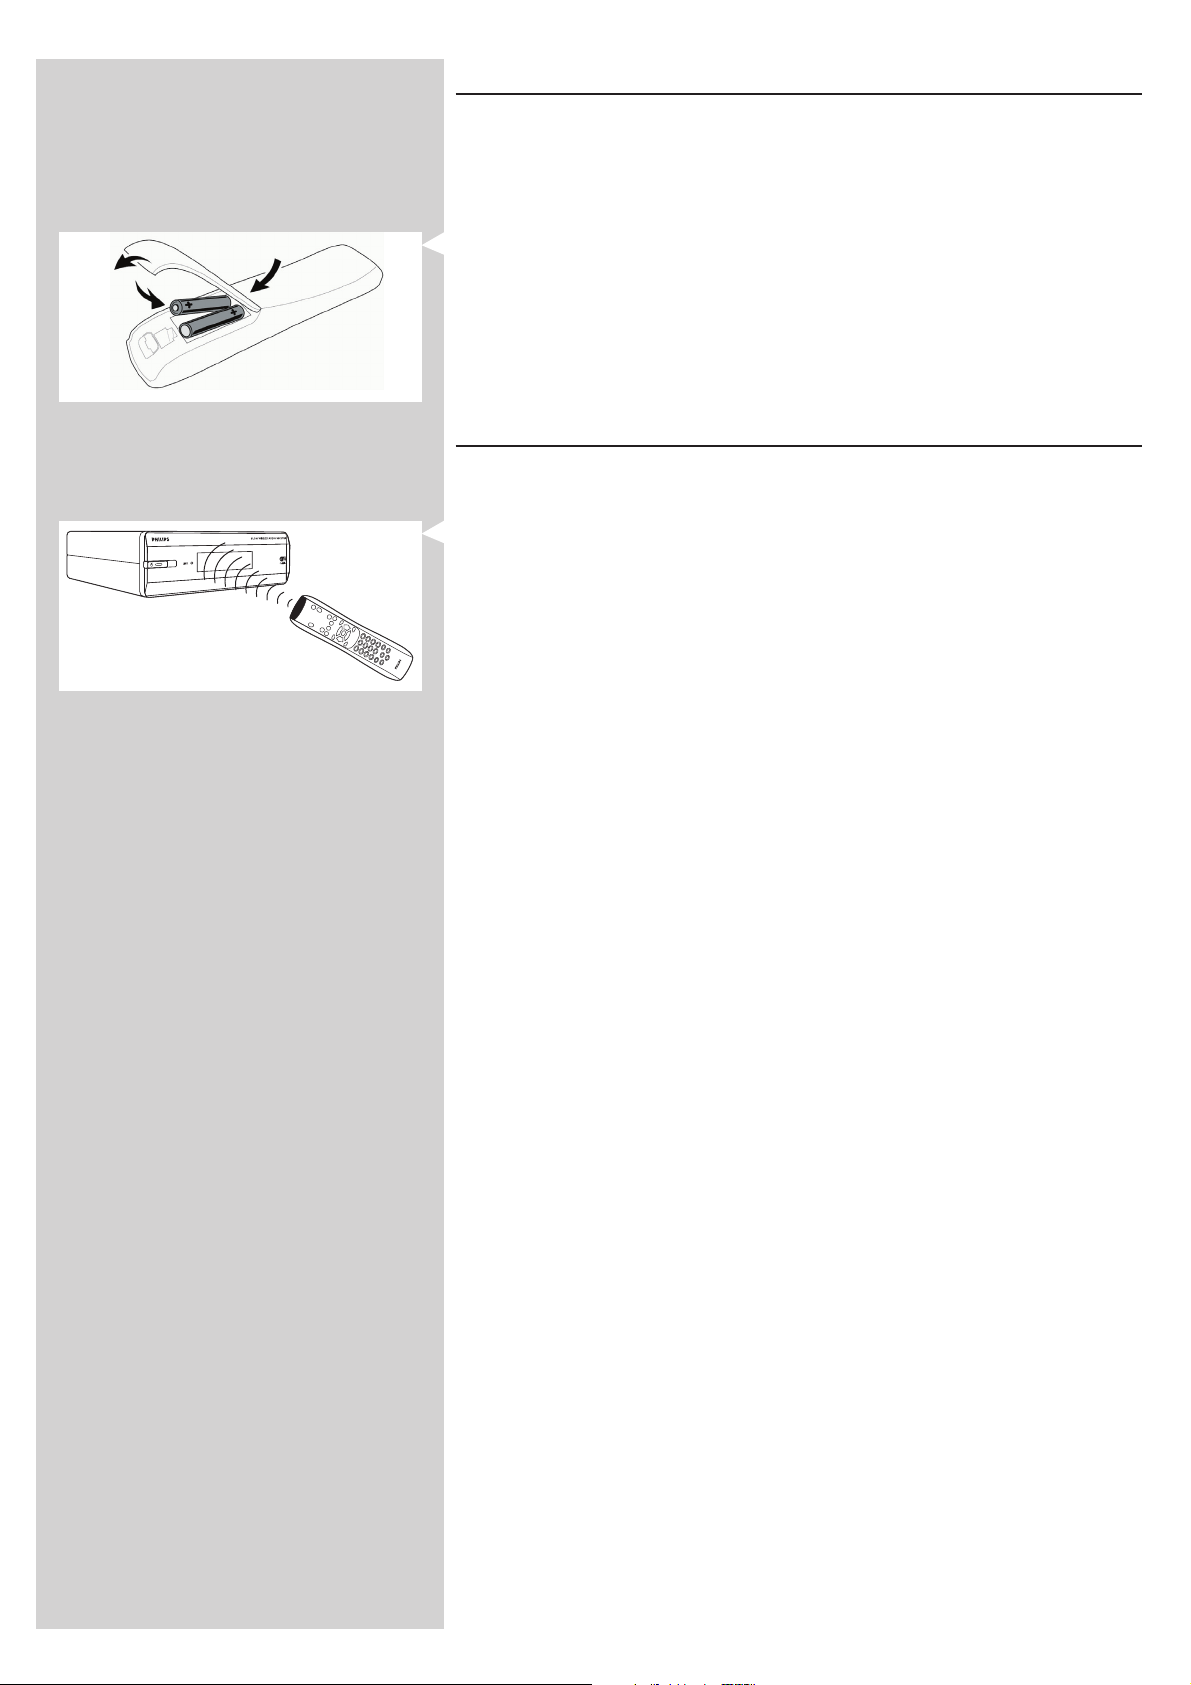
8.2 Placing batteries
• Use only R6 AA 1.5V non-rechargeable carbon-zinc or alkaline batteries.
• Do not mix old and new batteries.
•Never mix different types of battery (standard, alkaline, etc.).
This may reduce the life of the batteries.
1 Remove battery cover.
Lift tag on back of remote control upwards.
2 Position batteries
Place batteries as shown inside battery compartment.
3 Close battery cover.
8.3 Using the remote control
• Be sure to place fresh batteries in the remote control before use.
•Always point the remote control directly at the infrared receiver eye on the front of the
player; making sure there are no obstructions in the path of the infrared beam.
• The distance between the remote control and the infrared receiver eye should be no
more than 23 feet directly in front of the player and no more than 16 feet at an angle of
30 degrees to either side.
Page 23
ENGLISH 23
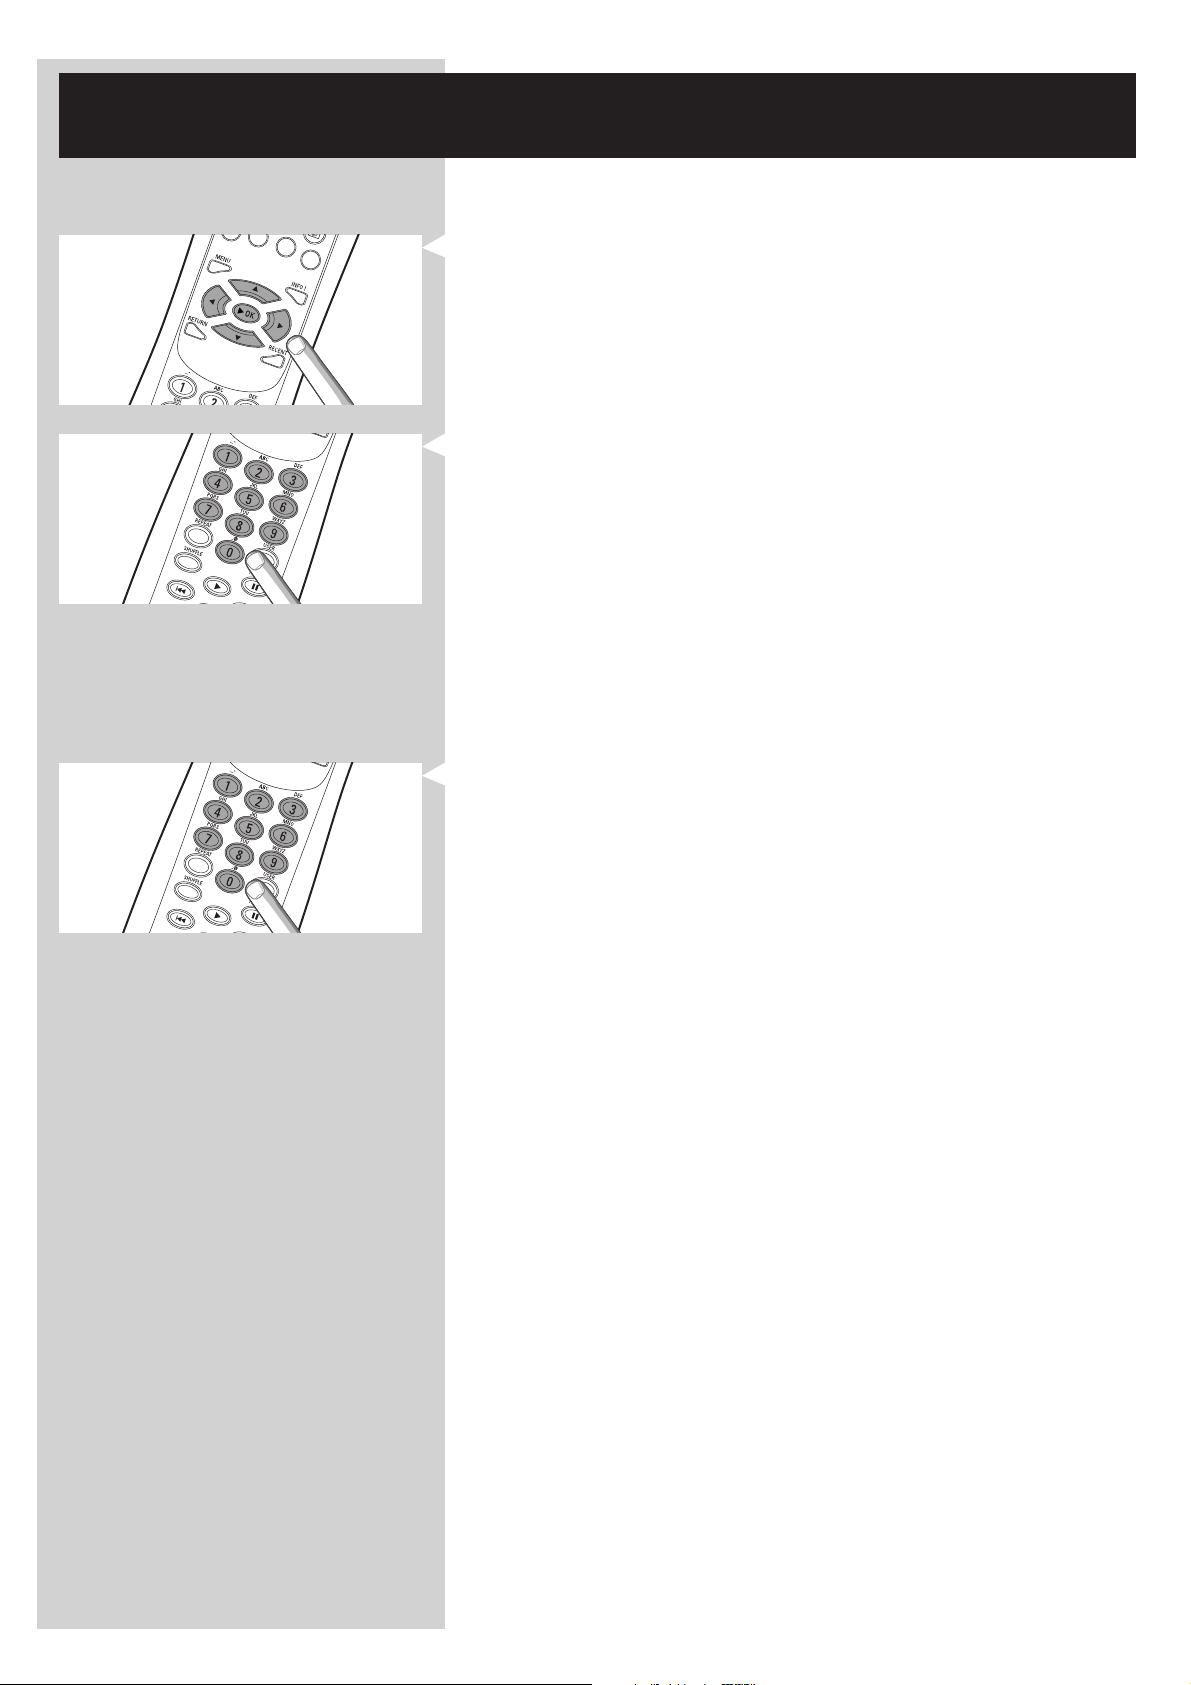
Chapter 9 - Entering or editing numeric and
text information
You can enter numbers and text into the SL50i in several ways.
Using the navigation keys on the remote control
1 Press 4 or 3 to browse through the characters available.
Note that there are two sets of characters to browse through, uppercase and lowercase
characters.
2 Press 1 or 2 to go to the next or previous character.
3 Press OK or the green color key to accept the entry.
• ∞ can be used to remove the previous character.
Direct number key entry
• You may input numbers by direct key input from the remote control.Just press the
number keys for the number you need.
• ∞ can be used to remove the previous character.
SMS TEXT-style keys
SMS TEXT-style entry can be used to enter alphanumeric information.
In this mode, text is entered by a method similar to that used for entering text messages on a
cellular telephone.
For example: pressing the ‘2’ key several times will cycle through the following characters:
a – b – c – A – B – C – 2... etc
RC Key SMS-style alphanumeric entry order
1_ - 1 _ - 1 (etc.)
2a b c A B C 2 a b c (etc.)
3d e f D E F 3 d e f (etc.)
4g h i G H I 4 g h i (etc.)
5j k l J K L 5 j k l (etc.)
6m n o M N O 6 m n o (etc.)
7p q r s P Q R S 7 p q r s (etc.)
8t u v T U V 8 t u v (etc.)
9w x y z W X Y Z 9 w x y z (etc.)
0.@ 0 . @ 0 (etc.)
Notes:
– Some text input is case sensitive, meaning that ‘ABC’ is not the same as ‘aBc’. Always input
characters in the correct case to avoid problems.
– ∞ can be used to remove the previous character.
Page 24
24 ENGLISH
Chapter 10 - Advanced navigation
10.1 Navigation view
The view shown on the display is called the 'Navigation View'. It helps you operate the SL50i via
the menu as described in section 4.1 ‘Basic menu navigation’.There are however some advanced
ways of navigating through the menus and menu items which we describe in the next chapters.
10.1.1 Jump To (number keys on the remote control)
Use the remote control number buttons to access an item in a list directly by entering the first
letter(s) or number(s) of the desired item.
If the list is sorted alphabetically, you do this by pressing the number buttons on the remote
control in SMS TEXT style.
For example: pressing the ‘2’ key several times will cycle through the following characters:
A – B – C – 2... etc.
If the list is sorted numerically, items can be selected by entering numbers directly (not in SMS
TEXT style). Press OK to confirm your selection.
10.1.2 Smart Navigation
Smart Navigation helps you to navigate 'intelligently' through the menus by remembering the
menu path(s) you have taken previously (during the same session). Smart Navigation must be
enabled in the Preferences submenu.
3
5
4
11
If you have backed out of a menu path by pressing the 1 button repeatedly, Smar t Navigation
will remember that path for the duration of the current session.
By pressing 2 repeatedly, you will follow the same path through the menus.
At any time, you may deviate from your path and follow a new one (this new branch will also
be remembered by the Smart Navigation feature).
Switch Smart Navigation off (see ‘System menu’ on page 27) to always select the first menu
item on a new page.
If you would like to quickly access content you previously visited, the Favorites and Recent
features (see below) are better suited for this purpose.
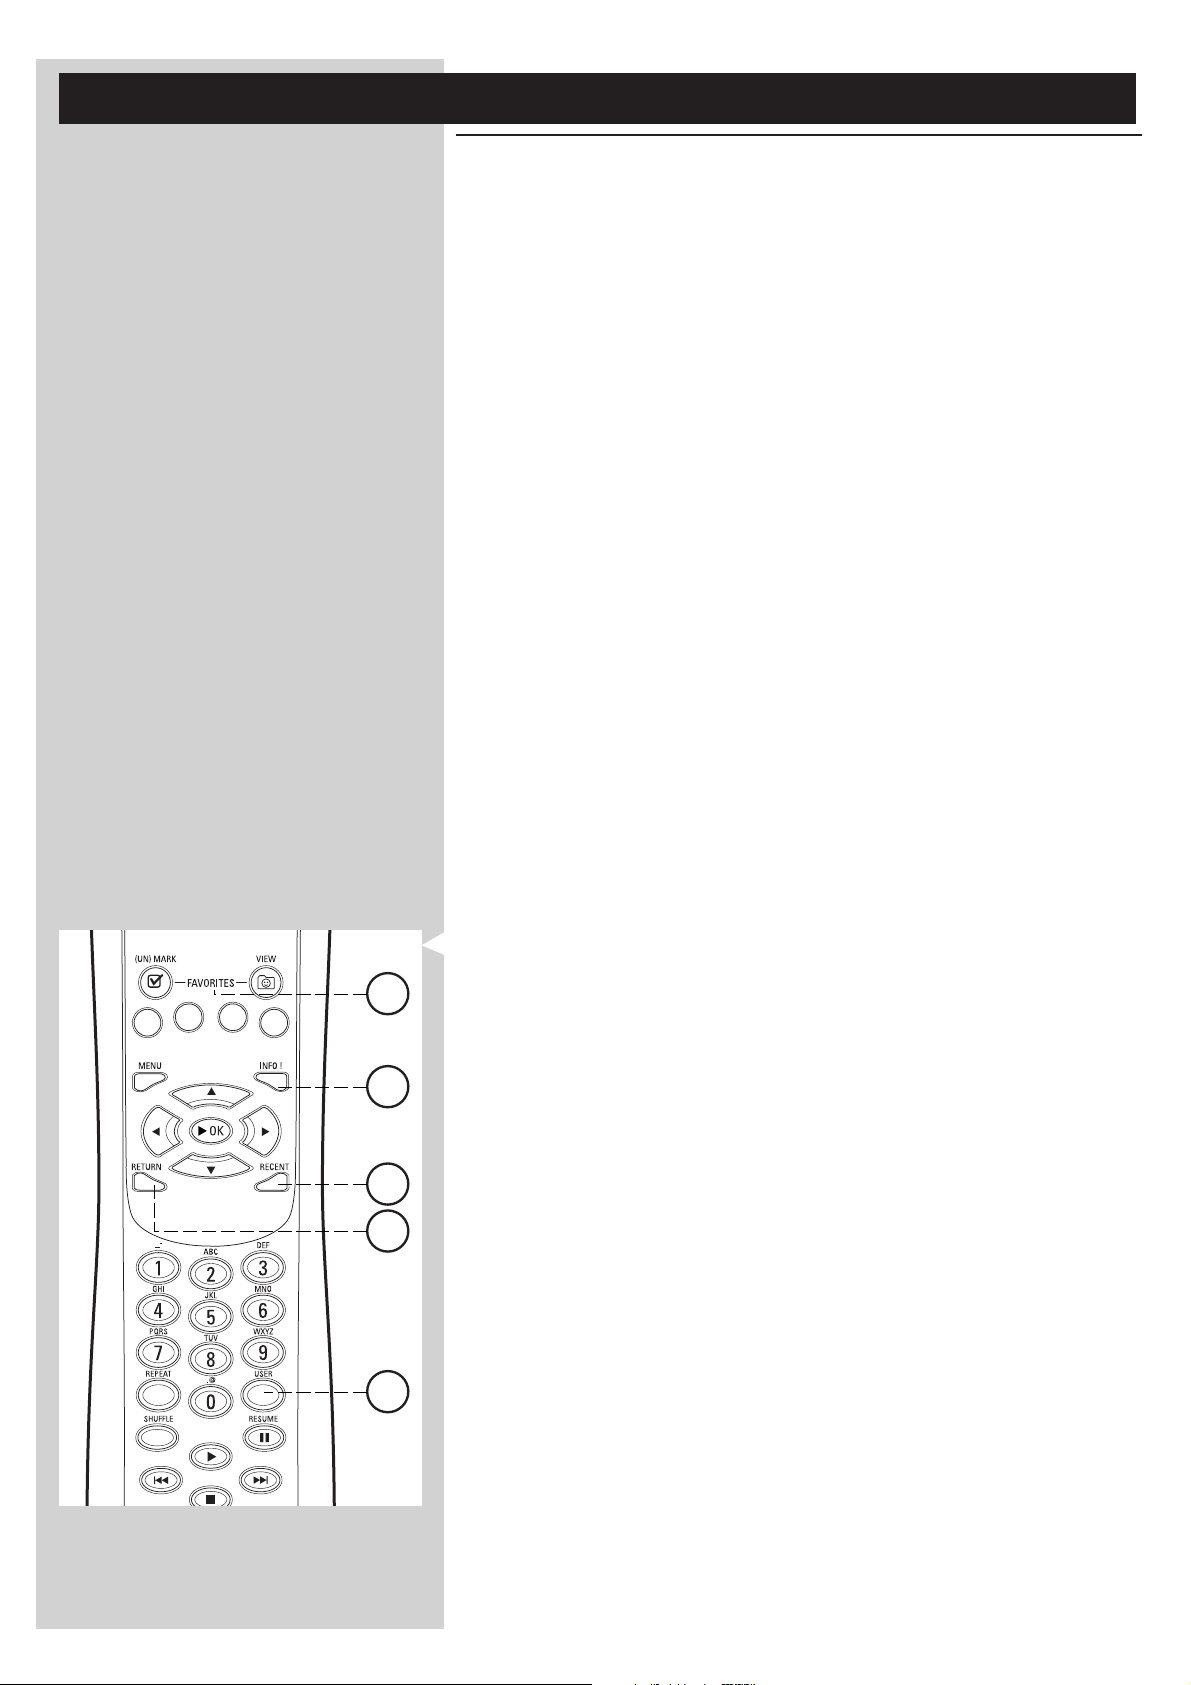
10.1.3 FAVORITES, RETURN, INFO!, RECENT
FAVORITES 3
Press the FAVORITES VIEW button to open an overview of the items you have marked as your
favorites.
Use the FAVORITES (UN)MARK button to mark or unmark an item as a favorite.
RETURN button !
Press the RETURN button to toggle between Play view and Navigation view.
INFO! button 5
If an item is currently playing, press INFO! to receive an email with information about the item
playing, or to collect the information at your My.Philips Streamium account.
15
RECENT (for INTERNET only) 4
Press the RECENT button to go directly to the items you have opened recently.
The overview of recent items will be cleared every time if you switch the SL50i to stand-by.
USER button %
For selecting and editing users.
Every user has his or her own Favorites list & access to Internet services.
Press MENU for setting up users.
Page 25
ENGLISH 25
Chapter 11 - Advanced Philips Media Manager
uses
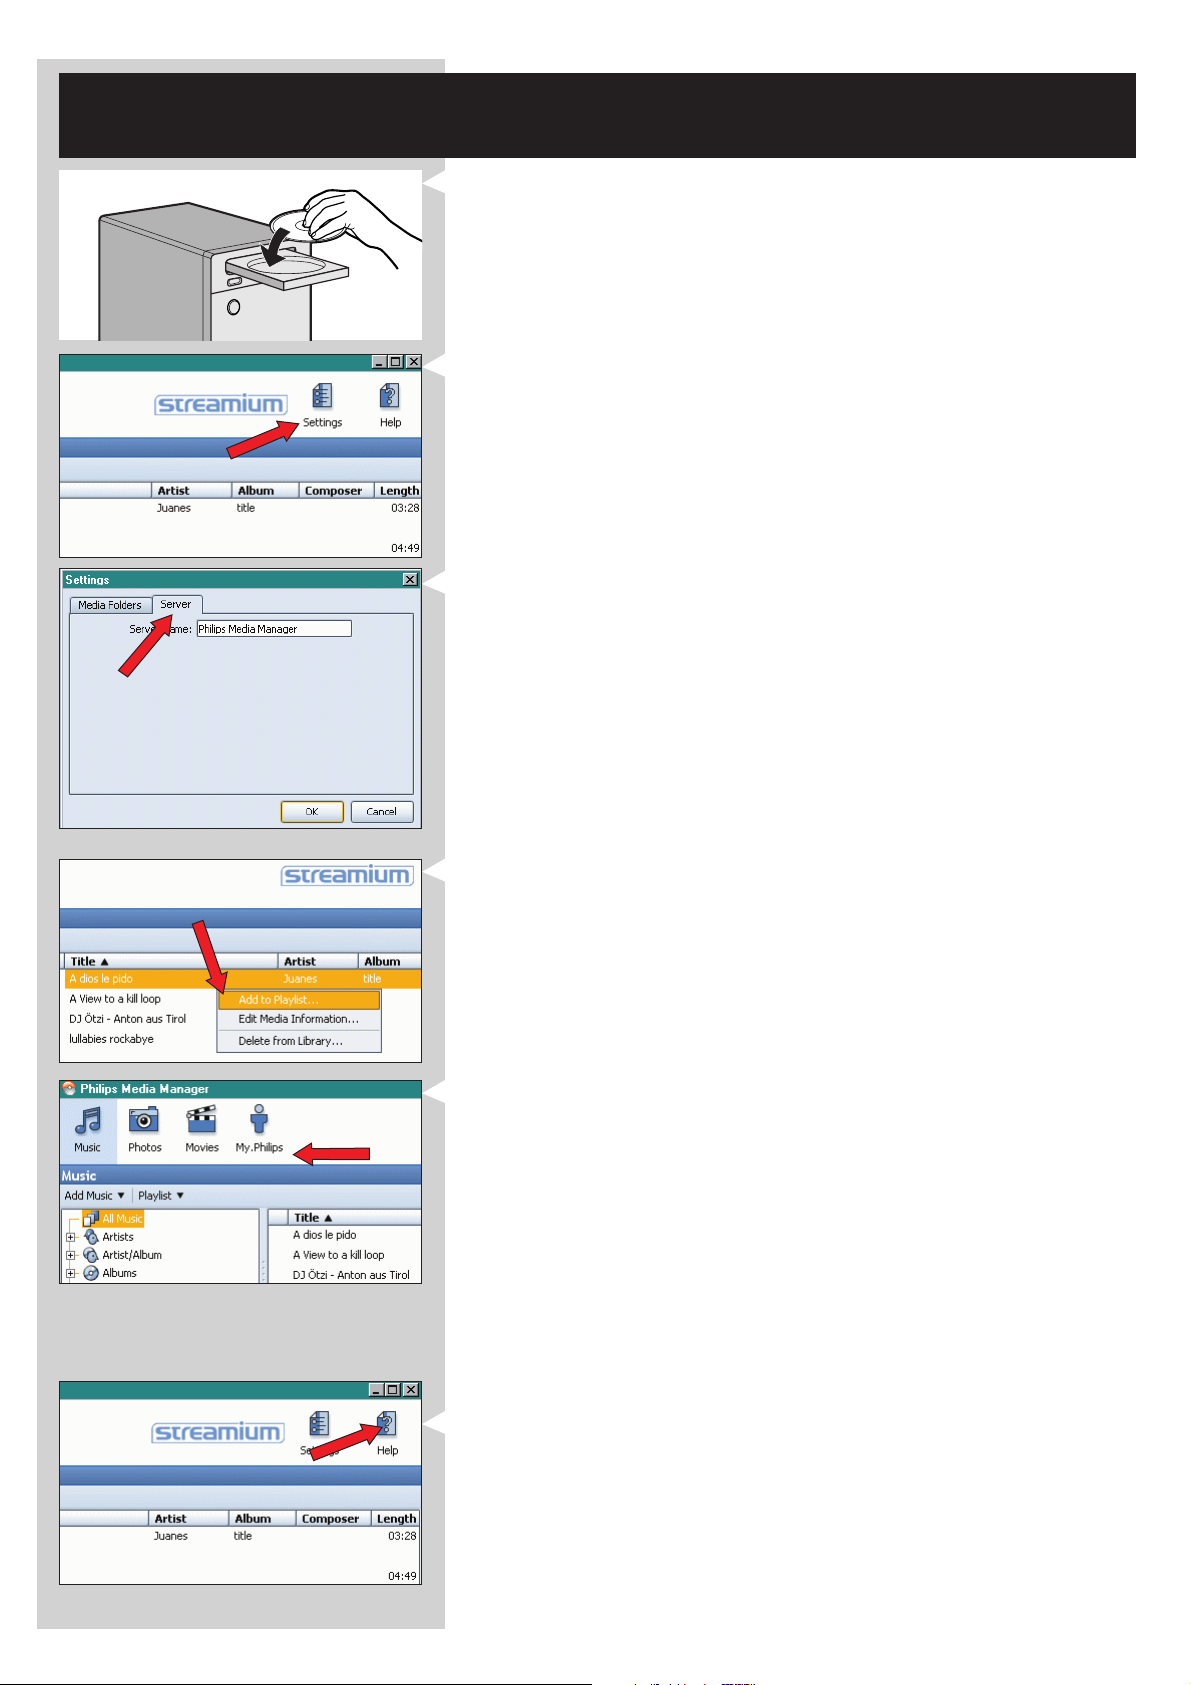
11. 1 Running the Philips Media Manager program on more than one
computer at the same time.
If more than one computer has access to the wireless network, you can also run Media
Manager on more than one computer at the same time to make the music files on that
computer available to the SL50i.
1 Install the Philips Media Manager the same way as the first computer (see page 8).
2 In the Media Manager window,click 'Settings'.
3 Click the 'Server' tab, and change the Server Name.
(e.g. to 'My laptop')
> This 'Server Name' will be shown on the SL50i displaywhen you press the PC LINK
button on the remote control.
This way you keep separate all the computers in the network that are running the
Philips Media Manager at the same time.
11.2 Editing music information and creating playlists.
• Right-click a music track to open a context menu.
In this menu:
– edit music information which will help you organize and sort your music files,
or
– add the music file to an existing or new playlist.
11.3 Managing your Streamium account.
• After installing the SL50i and connecting it to the Internet, you may click 'My.Philips' to
open your personal Streamium account, or open the website ‘my.philips.com’ in your
Internet browser.
Use the Streamium account window to manage your Internet settings and preferences.
About ‘My.Philips.com’
‘My.Philips.com’ lets you organize your music services online.
For example:
–Personalize and manage music and preferences
(e.g. favorites, user info)
– Subscribe to PREMIUM Internet services
– Add internet radio stations which are not available yet
(currently only for MP3/pro radio streams).
– Get additional information and links about artists and music tracks by pressing the INFO! key.
11.4 Learning more about the Philips Media Manager program.
• Click 'Help' to find out more on how to use and configure Philips Media Manager.
Page 26
26 ENGLISH
Chapter 12 - Menu
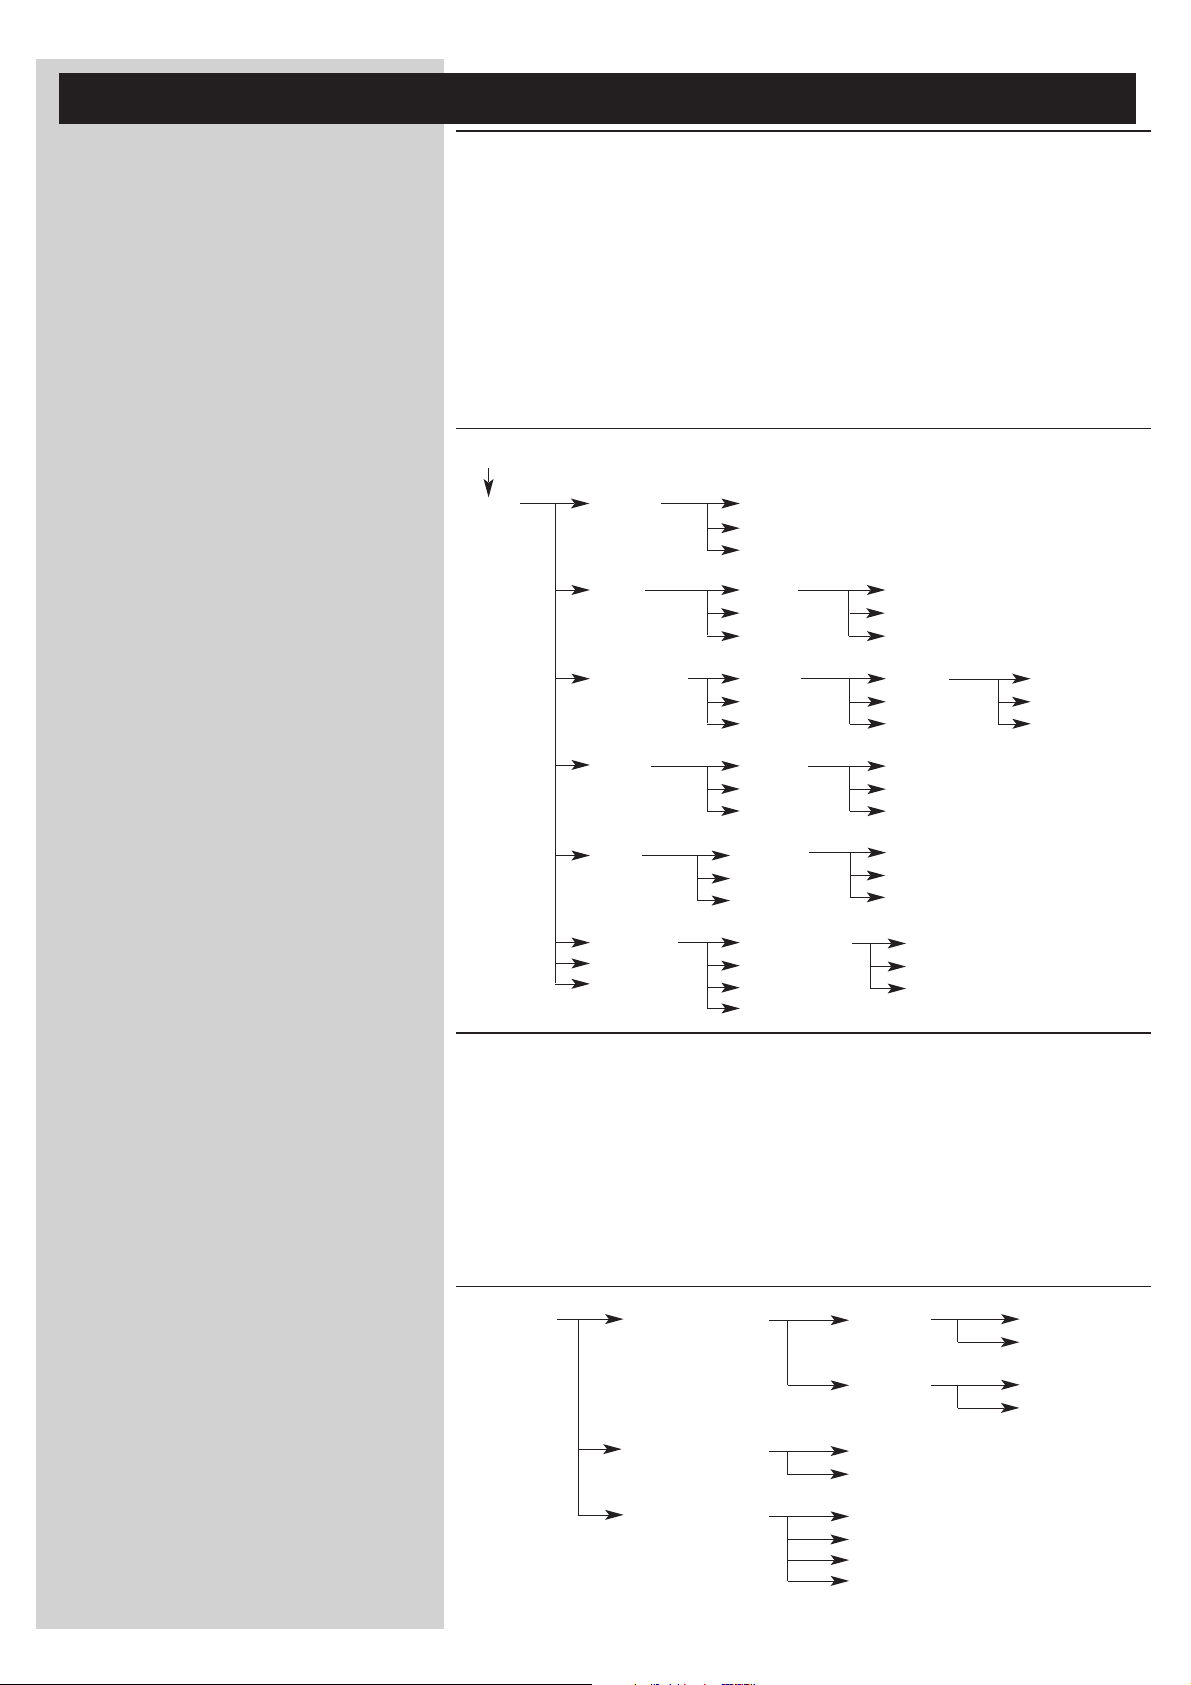
12.1 PC Link menu
The PC Link menu is used to play audio files that are stored on your PC(s). See below for an
overview of PC Link menu items.
• The PC Link menu is accessed by pressing PC LINK on the remote control.
> After pressing PC LINK, you are asked to select a server.
• Select the server from which you wish to play music and confirm with OK.
• Select the various items by pressing 1, 2, 3, or 4 on the remote control and press OK
or B (PLAY) to confirm and start playback.
> During playback the display gives information on the track, artist, album, etc. being played.
• Use the colored buttons on the remote control to get direct access to favorites of
Playlist (red), Genre (green),Artist (yellow) and Album (blue).
Main menu Submenu Selection
PC LINK
Server 1 All Music Track 1
Server 2 Track 2
Server 3 Track 3
Artists Artist 1 Track 1
Artist 2 Track 2
Artist 2 Track 3
Artist/Album Ar tist 1 Album 1 Track 1
Artist 2 Album 2 Track 2
Artist 3 Album 3 Track 3
Albums Album 1 Track 1
Album 2 Track 2
Album 3 Track 3
Genre Genre 1 Track 1
Genre 2 Track 2
Genre 3 Track 3
PC folder 1 PC subfolder 1 Track 1
PC folder 2 PC subfolder 2 Track 2
PC folder 3 Track 1 Track 3
Tr ack 2
12.2 Internet menu
The Internet menu is used to play music from Internet radio stations. It is not possible to give an
exact overview of the Internet menu items as they differ per content provider and are constantly
subject to change.The overview below is merely an example of what you can expect after
accessing the Internet menu.
• The Internet menu is accessed by pressing INTERNET on the remote control.
• Select the various items by pressing 1, 2, 3, or 4 on the remote control and press OK
or B (PLAY) to confirm and start playback.
• Press the INFO button on the remote control for information on the track being played.
Main menu Submenu Selection
INTERNET Content provider 1 Country 1 Radio station 1
Radio station 2
Country 2 Radio station 1
Radio station 2
Content provider 2 Genre 1
Genre 2
Content provider 3 Concert
Composer
Ensemble
Provider
Page 27
ENGLISH 27
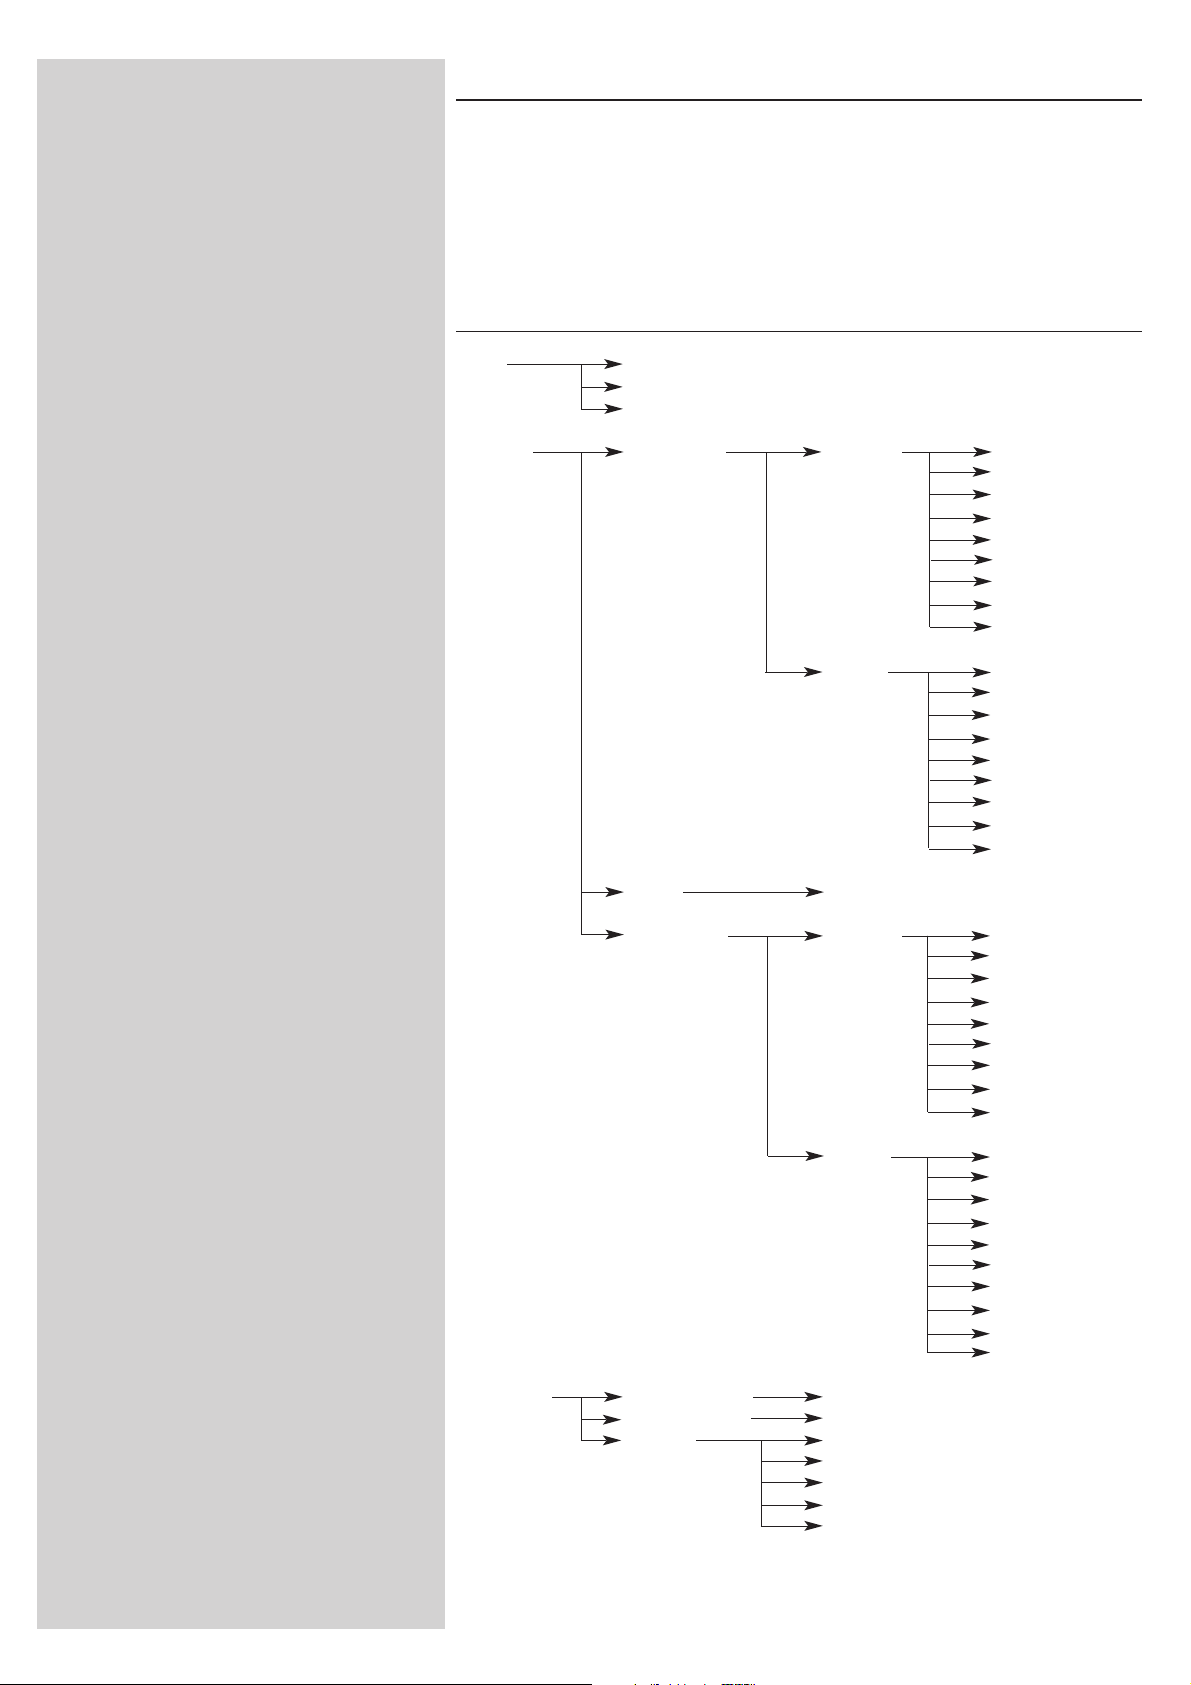
12.3 System menu
The System Menu is the top-level menu through which all settings are accessible. It is divided
into submenus that address different categories of settings. See below for an overview of submenus and settings. On the following pages you will find more detailed information on the
various submenus and settings.
• The System menu is accessed by pressing MENU on the remote control.
• Select submenus and settings by pressing 1, 2, 3, or 4, and select by pressing OK or 2.
• Close the System menu by pressing RETURN on the remote control.
Main menu Submenu Settings
Users Select user
Add user
Remove user
Network View Settings IP Settings Network Mode
IP address
Netmask
Gateway
DNS 1
DNS 2
Proxy Status
Proxy address
Proxy port
Wireless Status
Wireless Mode
Wireless SSID
Channel NO
Signal Level
Encryption
NIC MAC
Firmware
Driver
Wizard Star ts the Connection Wizard
CHG Settings IP Settings Network Mode
IP address
Net Mask
Gateway
DNS 1
DNS 2
Proxy Status
Proxy address
Proxy port
Wireless Wireless Mode
Wireless SSID
Channel No
Encryption
Wep key 1
Wep key 2
Wep key 3
Wep key 4
Active key
WPA Pass
Preferences Smart Navigation On/Off
Voice annotation On/Off
Language English
Deutsch
Français
Italiano
Español
Product Info
Upgrade
Reset
About
Page 28

28 ENGLISH
SYSTEM MENU
USERS 1 4
SYSTEM MENU
NETWORK 1 4
SYSTEM MENU 3
PREFERENCES 1 4
SYSTEM MENU 3
PRODUCT INFO 1 4
SYTEM MENU 3
UPGRADE 1 4
SYSTEM MENU 3
RESET 1 4
Users For selecting a user from the list of existing users. Also, for adding
or removing users from the list.
Add user: You will be asked to enter a new user's email address.
Remove user: To remove a user the primary user must enter his or
her password.
Network See 12.3.1 for details.
For information on and changing:
Network Settings,Wireless, Encryption and Proxy Settings
Preferences see 12.3.3 for details
For setting and changing: Smart Navigation, Voice Annotation and
Language.
Product Info Gives you information on product type, product ID, and version
numbers.
Upgrade For checking the availability of firmware upgrades.You need a
broadband Internet connection for this to work.
Reset For resetting all Options menu settings to their default values.
After resetting, the SL50i will restart, and you will be asked to
reconnect to your network and to re-enter your primary user name
and password.
SYSTEM MENU 3
ABOUT 1 4
About Provides you with general information.
Page 29

ENGLISH 29
12.3.1 Network menu
The Network menu gives you access to network and wireless settings. See below for an
overview.
Note: If you just want to see what the settings are, open View Network Settings or View Wireless; not
Change Network Settings or Change Wireless.
NETWORK
VIEW SETTINGS 1 4
NETWORK 3
WIZARD 1 4
NETWORK 3
CHG SETTINGS 1 4
CHG SETTINGS 3
WIRELESS 1 4
WIRELESS 3
ENCRYPTION 1 4
View Settings
IP Settings For viewing the Network settings.
Wireless For viewing the Wireless settings, including the physical
NIC MAC Address you may sometimes need for identifying the
Wireless network adapter of the SL50i. Go to Signal Level to check
the wireless signal quality.
Wizard Starts the Connection Wizard.
CHG Settings
IP Settings Network Mode Choose Dynamic for automatic network
configuration by your network host.
(preferred).
Choose Static (IP) for manually entering a
static network configuration.
IP Address, Netmask, Only Static (IP) requires you to fill in values
Gateway, DNS 1 and for IP Address, Netmask, Gateway address,
DNS 2 and DNS address.
See next chapter for an explanation.
Proxy Status, First, select whether or not to use a proxy:
Proxy Address and Proxy Status Disable/Enable.Then you may
Proxy Port enter a Proxy Address and a Proxy Port.
These may be provided by your Internet
Service Provider (ISP).
Wireless Wireless Mode Choose whether your wireless network has
a wireless base station (Infrastructure) or is
a peer-to-peer network (Ad-Hoc).
Wireless SSID Enter the name (SSID) of the wireless
(Network Name) network you want to join.
Note: the SSID is case-sensitive, meaning that ‘philips’ is not the same as
‘PHILIPS’ or ‘Philips’.
Channel No Choose one of the available WiFi channels
in your region. (Select 0 for automatic
channel assignment.)
Encryption First, select whether or not to use wireless
network encryption: WEP Status Off/On.
Then, you may enter up to four WEP Keys
to choose from. Enter five ASCII or 10 HEX
characters to use a
64-bit WEP-key; enter 13 ASCII or 26 HEX
characters to use a 128-bit WEP-key.The
number of characters determines the type
of key you use. Finally, choose which of the
four keys to use:
WEP Transmit Key.
Important:You must use the same
encryption key throughout your wireless
network.
WPA Pass First check that every wireless device on
your network has WPA capabilities.Then,
select whether or not to use wireless
network encryption: WPA Status On/Off.
Then, you may enter your WPA passphrase.
Page 30

30 ENGLISH
12.3.2 Static (IP) settings
If you select Static (IP) as your Network Mode in Network > Change Network Settings >
Network Mode, you will need to provide the SL50i with the following manual settings for its
wireless network:
IP ADDRESS
192168 XXX
NETMASK INPUT
255 255 255 000
GATEWAY INPUT
192 168 0 1
DNS INPUT
192 168 0 1
IP Address This is the fixed IP Address you want the SL50i to have in your
network. Preferably, choose one from the range 192.168.000.xxx.
Netmask Enter the same netmask throughout your network. E.g.:
255.255.255.000
Gateway Enter the IP Address of your Internet gateway router,Wireless Base
Station, or network host computer. (E.g.: 192.168.0.1 for the host
computer that provides Internet Connection Sharing.)
DNS 1 Usually, this would be the same address as the Gateway Address
above. However, some Internet Service Providers (ISP) provide you
with separate Dynamic Name Server addresses you need to use.
This should be a valid IP Address, like xxx.xxx.xxx.xxx
DNS 2 See DNS 1.
Page 31

ENGLISH 31
12.3.3 Preferences menu
The Preferences menu gives you access to preferred settings. See below for an overview.
PREFERENCES
SMART NAVIGATION1 4
PREFERENCES
VOICE ANNOTATION1 4
PREFERENCES
LANGUAGE 1 4
Smart Navigation For turning on/off Smart Navigation.
See Advanced Navigation on page 24.
Voice annotation For switching spoken feedback (voice annotation) On or Off.
Language For selecting the language for visual feedback (display) and spoken
feedback (voice annotation).
Page 32
32 ENGLISH
Ethernet
Chapter 13 - What you need to know about
networks
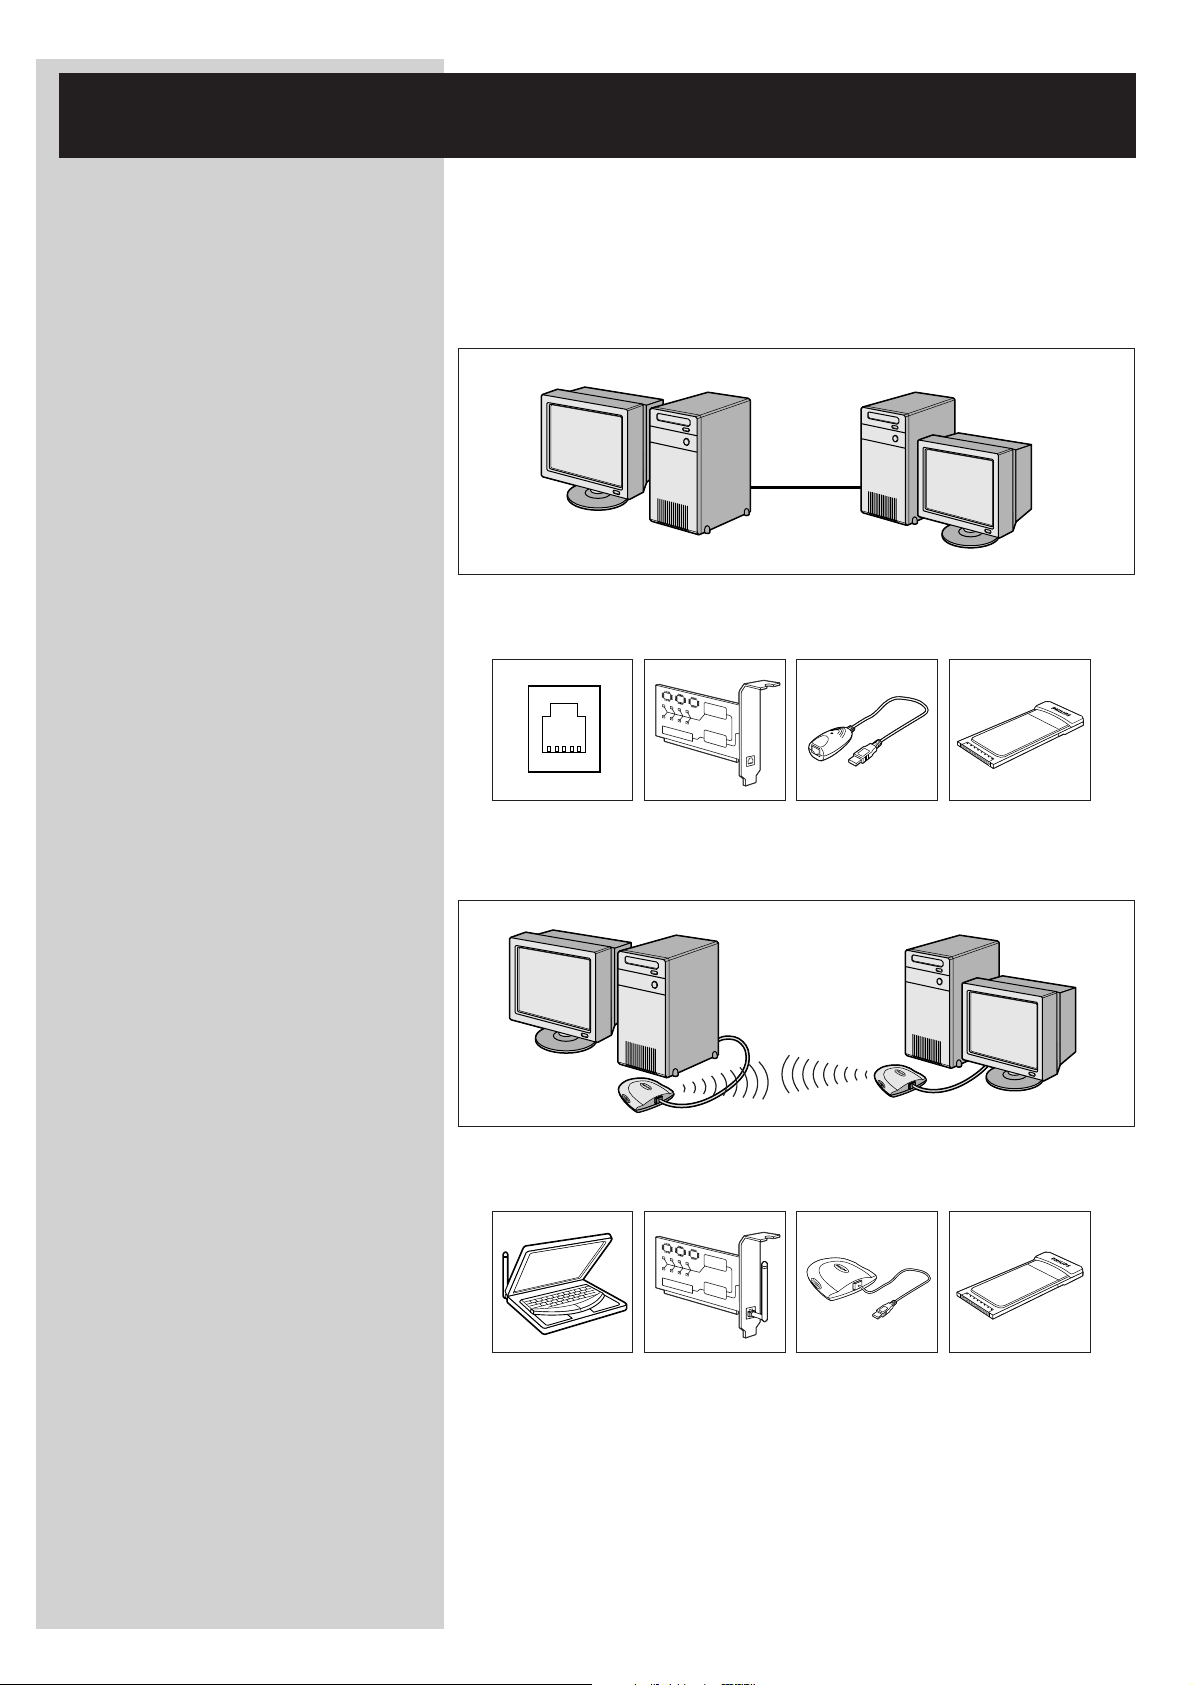
Important note:The SL50i has a built-in wireless network adapter and is a wireless
network device exactly like the PCs with a wireless network adapter
in the illustrations below.
A network provides a means of communication between two or more computers (and other
devices) that are connected to each other through wired or wireless means.
WIRED
At each computer, you will need a network adapter or Network Interface Card (NIC) to be
able to connect the computer to the network cable. Examples are:
Already built-in PCI expansion card USB/Ethernet cable Ethernet notebook
adapter
WIRELESS
At each computer, you will need to install a WiFi wireless network adapter to be able to
connect to another wireless network device. Examples are:
Already built-in Wireless PCI Wireless USB Wireless notebook
expansion card adapter adapter
You do not need to open your PC to connect a wireless USB/notebook adapter (available from
Philips) or USB/Ethernet cable to your PC.
Page 33
INTERNET
ENGLISH 33
In a network, the computers need to be able to connect to each other physically.Therefore,
another important network property is how the computers connect to each other, either
directly or through a central device.
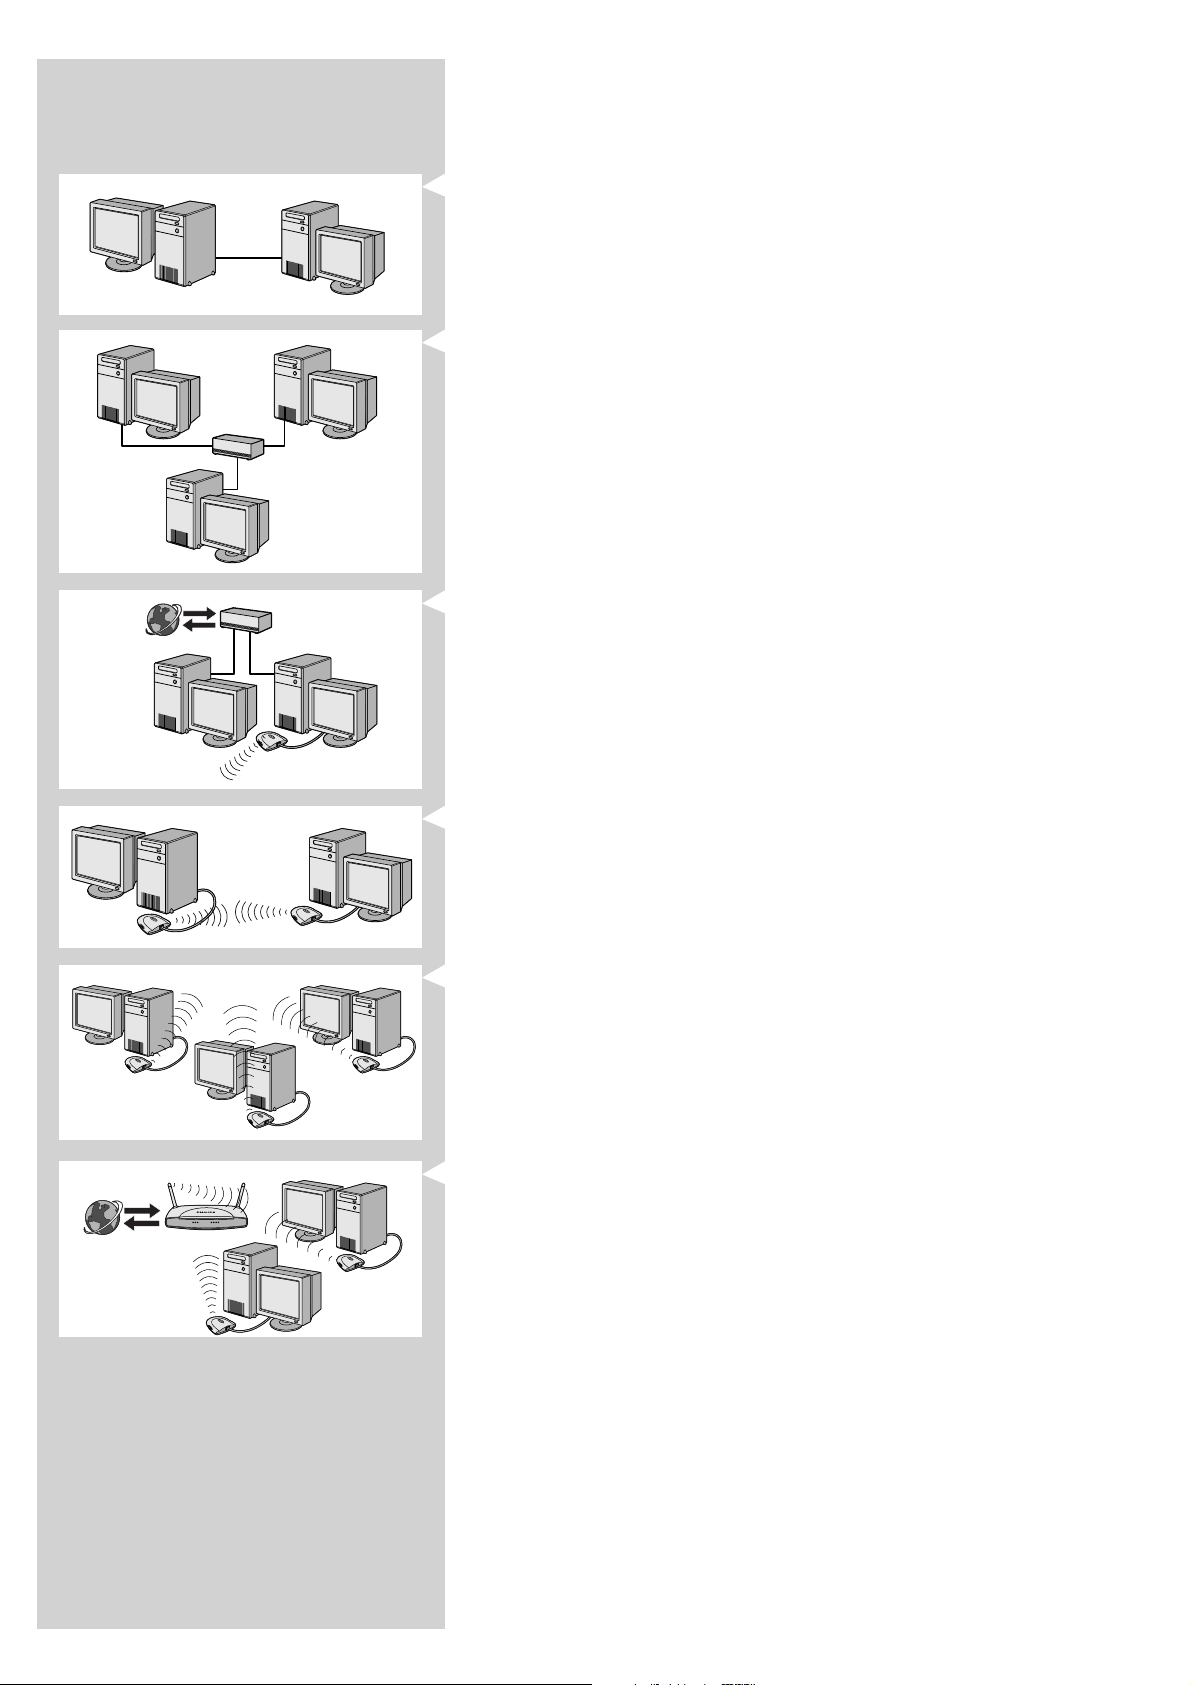
ONE-ON-ONE WIRED NETWORK
also known as: Direct connection network (max. two PCs)
Note: Use a crossover Ethernet cable to connect two computers directly to each other.
WIRED NETWORK WITH MORE THAN TWO PCs
Use a hub or switch to connect more than two PCs to each other.
Note: Use straight-through Ethernet cables to connect the computers to the central device
(hub/switch).
HOW TO INTERCONNECT WIRED NETWORKS
Use a gateway router to connect one network to another (e.g. to the Internet,
also known as WAN).
INTERNET
ONE-ON-ONE WIRELESS NETWORK
also known as: ad-hoc / peer-to-peer
WIRELESS NETWORK WITH MORE THAN TWO PCs
The wireless medium forms a hub in and of itself.
No hardware hub is needed.
Note: For very small networks only.
BRIDGING WIRELESS NETWORKS TO THE INTERNET
(e.g. the Internet, also known as WAN) also known as: infrastructure / access point.
Use a wireless access point or base station.
Central devices, like a hub, switch, router or wireless base station may be stand-alone devices or
built into a computer.
• A hub has multiple ports and serves as a central connection point for communication lines
from all computers on a wired network. It copies all data arriving at one port to the other
ports. A switch is similar to a hub, but is able to handle different network speeds at each
port.
• Gateway routers and wireless base stations route network traffic from one network to
another (e.g. from a wired network to the Internet, or from a wireless network to a wired
network or to the Internet).
Important: Wired and wireless components may be linked together to provide a variety of network
layouts/topologies.
Page 34

34 ENGLISH
Chapter 14 - Advanced wireless network
information
What are wireless network connections?
Your wireless network adapter uses a wireless protocol (called IEEE 802.11b/g or WiFi) to
communicate with the SL50i by means of radio transmissions. WiFi radio waves travel outwards
from the antenna in all directions, and can transmit through walls and floors. WiFi can
theoretically reach up to 656 feet in an open environment and reach speeds of up to 11 (b) or
54 (g) megabits per second (Mbps) at close range. However, the actual network range and data
throughput rate will always be less, depending on the wireless signal quality.
Factors determining your network range and network speed
• Wireless signals travel farther outside of buildings, and when the wireless components are
in direct line of sight to one another. Putting wireless components high up helps avoid
physical obstacles and provides better coverage.
• Building construction such as metal framing and concrete or masonry walls and floors will
reduce radio signal strength. Avoid putting wireless components next to walls and other
large, solid objects; or next to large metal objects such as computers, monitors, and
appliances.
• Wireless signal range, speed, and strength can be affected by interference from neighboring
wireless networks and devices. Electromagnetic devices such as televisions, radios,
microwave ovens, and cordless telephones, especially those with frequencies in the 2.4 GHz
range, may also interfere with wireless transmission.
• Standing or sitting too close to wireless equipment can also affect radio signal quality.
• Adjusting the antennas: Certain areas, such as directly below the antenna, get relatively
poor reception. Moving the antenna slightly may improve your reception.
Note: Pointing the antenna toward another wireless component will not improve reception.
Securing your wireless network
Since wireless computer networks use radio signals, it is possible for other wireless network
devices outside your immediate area to pick up the wireless signals and either connect to your
network or to capture the network traffic.Therefore, you should always enable a network
encryption key to help prevent unauthorised connections or the possibility of eavesdroppers
listening in on your network traffic. For the SL50i you can enable either the WEP (Wired
Equivalent Privacy) encryption key or the WPA (Wi-Fi Protected Access) encryption key.
What is WEP?
WEP is a 64-bit or 128 bit encryption key for securing your wireless network communication.
Preferably, you should use the highest encryption strength available. Always enter the same key
with the same length for all your home network computers and for the SL50i.
What is WPA?
WPA is a Wi-Fi standard that is designed to improve the security features of WEP.WPA
technology is designed to work with Wi-Fi products that have been enabled with WEP (as a
software upgrade to existing hardware).Through improved data encryption WPA ensures that
only authorized network users can access the network.
Securing your network from Internet access
Check in the documentation of your Wireless Base Station or gateway router whether it
provides you with a built-in firewall and network address translation (NAT), providing security
for an ‘always-on’ broadband Internet connection that is being shared among the computers and
devices on your home network.
Computers on an ad-hoc network may share an Internet connection that is set up on one of
the computers (ICS). However, a firewall is usually not built-in and you should install one on the
computer that is sharing the Internet connection.
What is a firewall?
A firewall acts as a barrier that helps protect your network from outside intruders.The firewall
specifies what information can be communicated from the computers on your network to the
Internet, and from the Internet to the computers on your network.
Page 35

ENGLISH 35
The DOs and DON'Ts of securing your wireless network
DO
Enable the highest WEP key level that your hardware provides for. Upgrade your hardware, if
possible. If you do not protect your wireless network, all data from your PC might be accessible
by,for example, your neighbors or passers-by.
Use a wireless base station or router with network address translation (NAT) and firewall
enabled for sharing your Internet connection.
Change the default passwords for your network devices. Leaving these at default makes it easy
for an outsider to gain access.
Position wireless access points away from windows and toward the center of your home.
This decreases the strength of the signal outside your home.
Some wireless access points allow you to control access based on the unique Media Access
Control (MAC) address of the network adapter trying to associate with it. If a MAC address has
not been registered in the wireless access point, it will not associate with it. If your access point
has this feature, enable it and add the MAC addresses of the network adapters including the
one from the SL50i.
The Wireless MAC address of the SL50i can be found in the Options menu by pressing the
MENU button on the remote control.Then select Network > Wireless Info.
Just use common sense: Install an anti-virus program on each computer on your network and
use it regularly to check your computers for viruses. Remember to update the anti-virus
program regularly.
DON'T
Do not rely on radio transmission range limitations to secure your network. Enable wireless
security (WEP) to protect your network from unwanted access.
Do not use WEP keys and passwords that are easy to guess. Do not change passwords to
reflect your name, address, or anything that would be easy to guess.
Never open attachments to email messages that you are not expecting. In addition, scan all
diskettes and homemade CDs for viruses before opening files from them, or before starting
your computer from them.
Do not load a program from an unknown source onto one of your network computers.
Do not ignore the common signs of viruses: unusual messages that appear on your screen,
decreased system performance, missing data, and inability to access your hard drive. If you
notice any of these problems on your computer, run your anti-virus program immediately to
minimize the chances of losing data.
Do not connect your home network to broadband Internet without taking security measures:
If you do not have a wireless base station installed on your network and you are sharing
Internet access through one of the computers, you may want to consider installing firewall
software.
Page 36

36 ENGLISH
Chapter 15 - Entering an encryption key
A WEP encryption key protects your wireless network against intrusion by encrypting the data
sent through your network. Its setting must be the same for all PCs and devices in your wireless
network. (Default: Disabled.)
WEP key conversion table
ASCII HEX
030
131
232
333
434
535
636
737
838
939
A41
B42
C43
D44
E 45
F46
G47
H48
I49
J4A
K4B
The WEP (Wired Equivalent Privacy) implemented in this SL50i is based on the RC4
encryption algorithm. Please enter the key in either Hex or ASCII.
– If the key type is Hex, the security keys are four 10 digit keys for the 64-bit WEP setting
and four 26-digit keys for the 128-bit WEP setting (the hexadecimal digits can be 0~9 &
A~F, e.g. D7 0A 9C 7F E5).
– If the key type is ASCII, the security keys are four 5-digit keys for the 64-bit WEP setting
and four 13-digit keys for the 128-bit WEP setting.
– Consult the ASCII/HEX conversion table if you need to translate a (case-sensitive) ASCII
key into HEX notation. Example: MNode (ASCII) = 4D 4E 6F 64 65 (HEX).
ASCII HEX
L4C
M4D
N4E
O4F
P50
Q51
R52
S53
T 54
U55
V56
W57
X58
Y59
Z5A
a61
b62
c63
d64
e65
f66
ASCII HEX
g67
h68
i 69
j6A
k6B
l6C
m6D
n6E
o6F
p70
q71
r72
s73
t74
u75
v76
w77
x78
y79
z7A
Note: Some wireless network devices allow you to type in a passphrase instead of an encryption key.
Do not use passphrases with the SL50i, since passphrases are not supported.
Tip: Enable the encryption key to secure your wireless computer network from intruders.
Use an encryption key to secure your wireless network. The encryption key is like a
password that you have to set for your Wireless Network Adapter and for the SL50i.
a) Setting the encryption key for the SL50i:
1 Press the MENU button on the remote control,then
2 select ‘Network’, and
3 select ‘WEP encryption’ or ‘WPA encryption’.
4 Enter a 5, 10, 13 or 26 character password (see above) for WEP encryption or a
passphrase for WPA encryption.
5 Press the OK button.
> The SL50i will try to reconnect to the wireless network and will lose its connection with
your computer.
Note that the encryption key is case sensitive, meaning that ‘HELLO’ is not the same password
as ‘hello’ or ‘Hello’.
Page 37
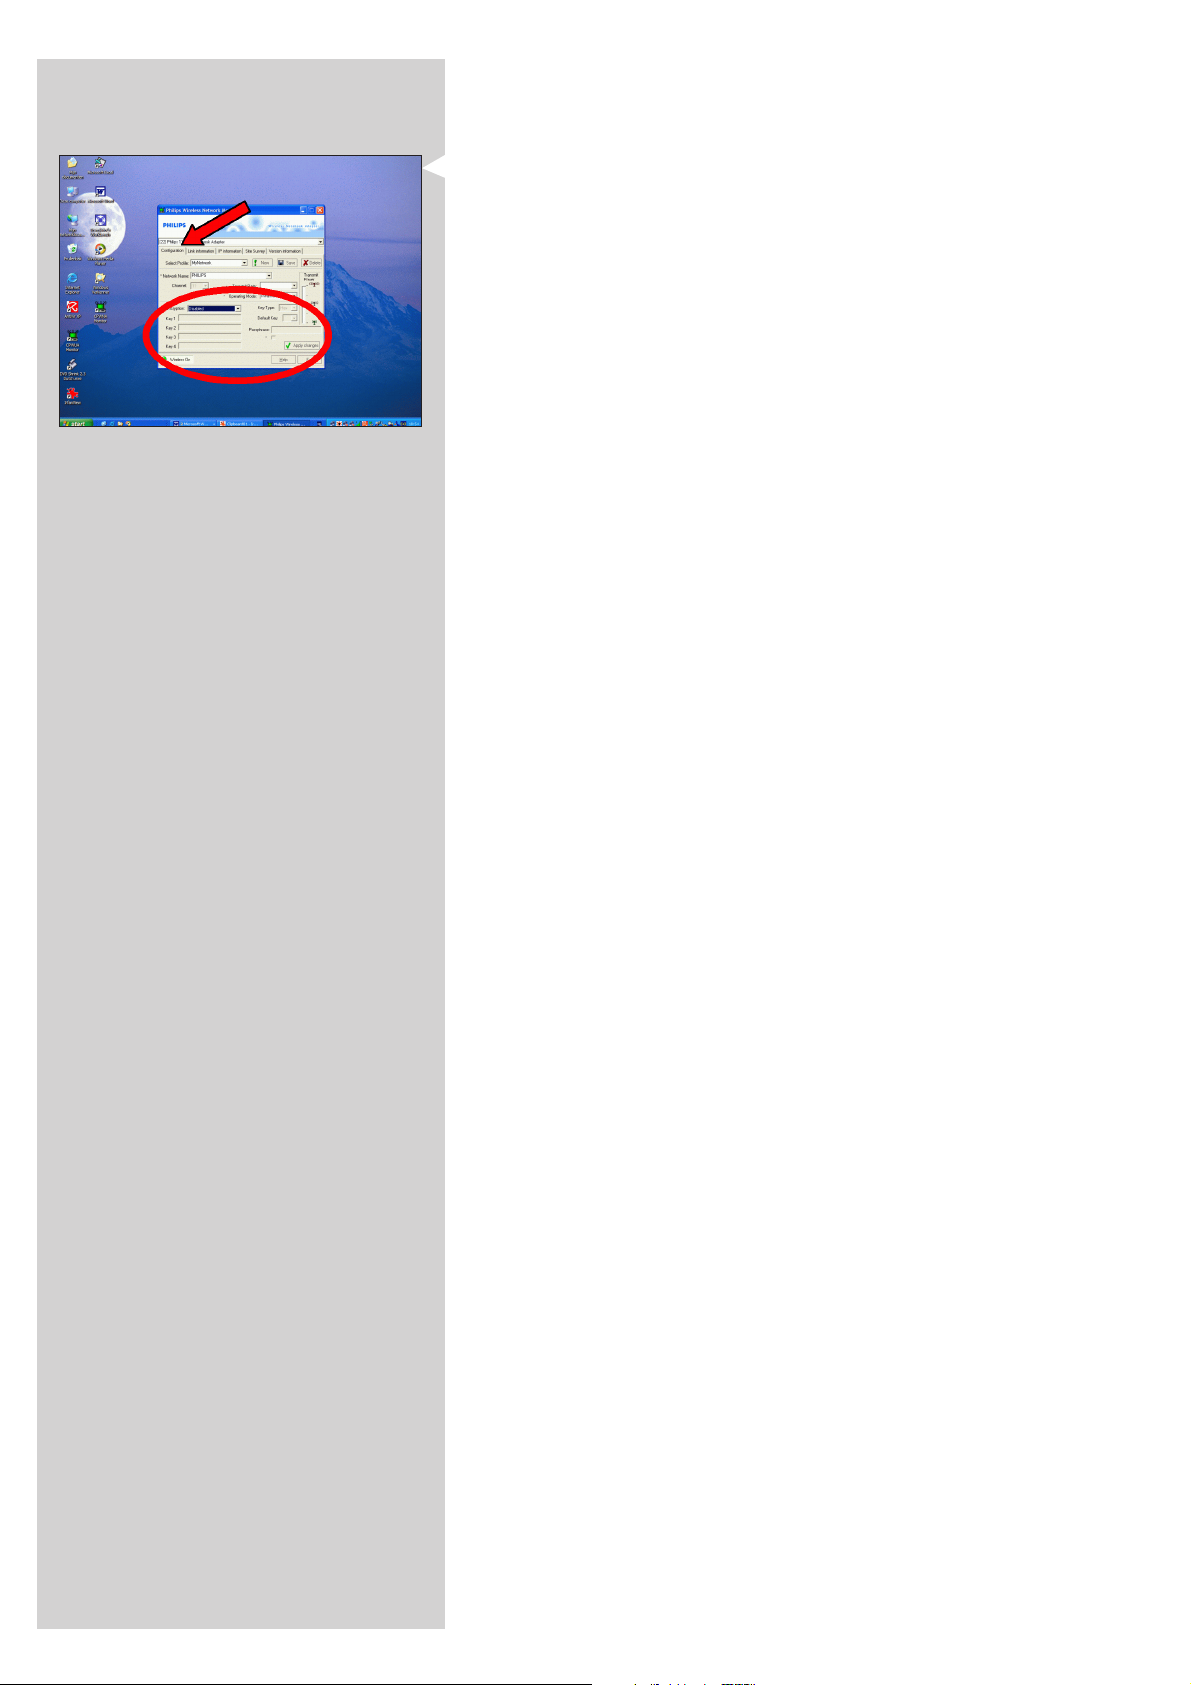
ENGLISH 37
b) Setting the encryption key for your Wireless Network Adapter:
Enter the same encryption key for the Wireless Network Adapter.
See the User Manual of the Wireless Network Adapter on how to do this.
> Once you have activated the same encryption key for the Wireless Network Adapter,
the connection between the SL50i and your computer will be re-established.
Example, for the Philips Wireless USB Adapter:
1 Double-click the CPWUA Monitor icon in the lower right corner of your computer
monitor.
2 Click the 'Configuration' tab.
3 Adapt the 'Encryption' settings in the lower part of this window to match the
encryption settings of the SL50i.
4 Click 'Apply' and 'Save' to finish.
> The connection will be re-established.
Note: If you have forgotten your encryption key, switch off encryption or set a new encryption key for
your entire wireless network and for the SL50i.
Page 38
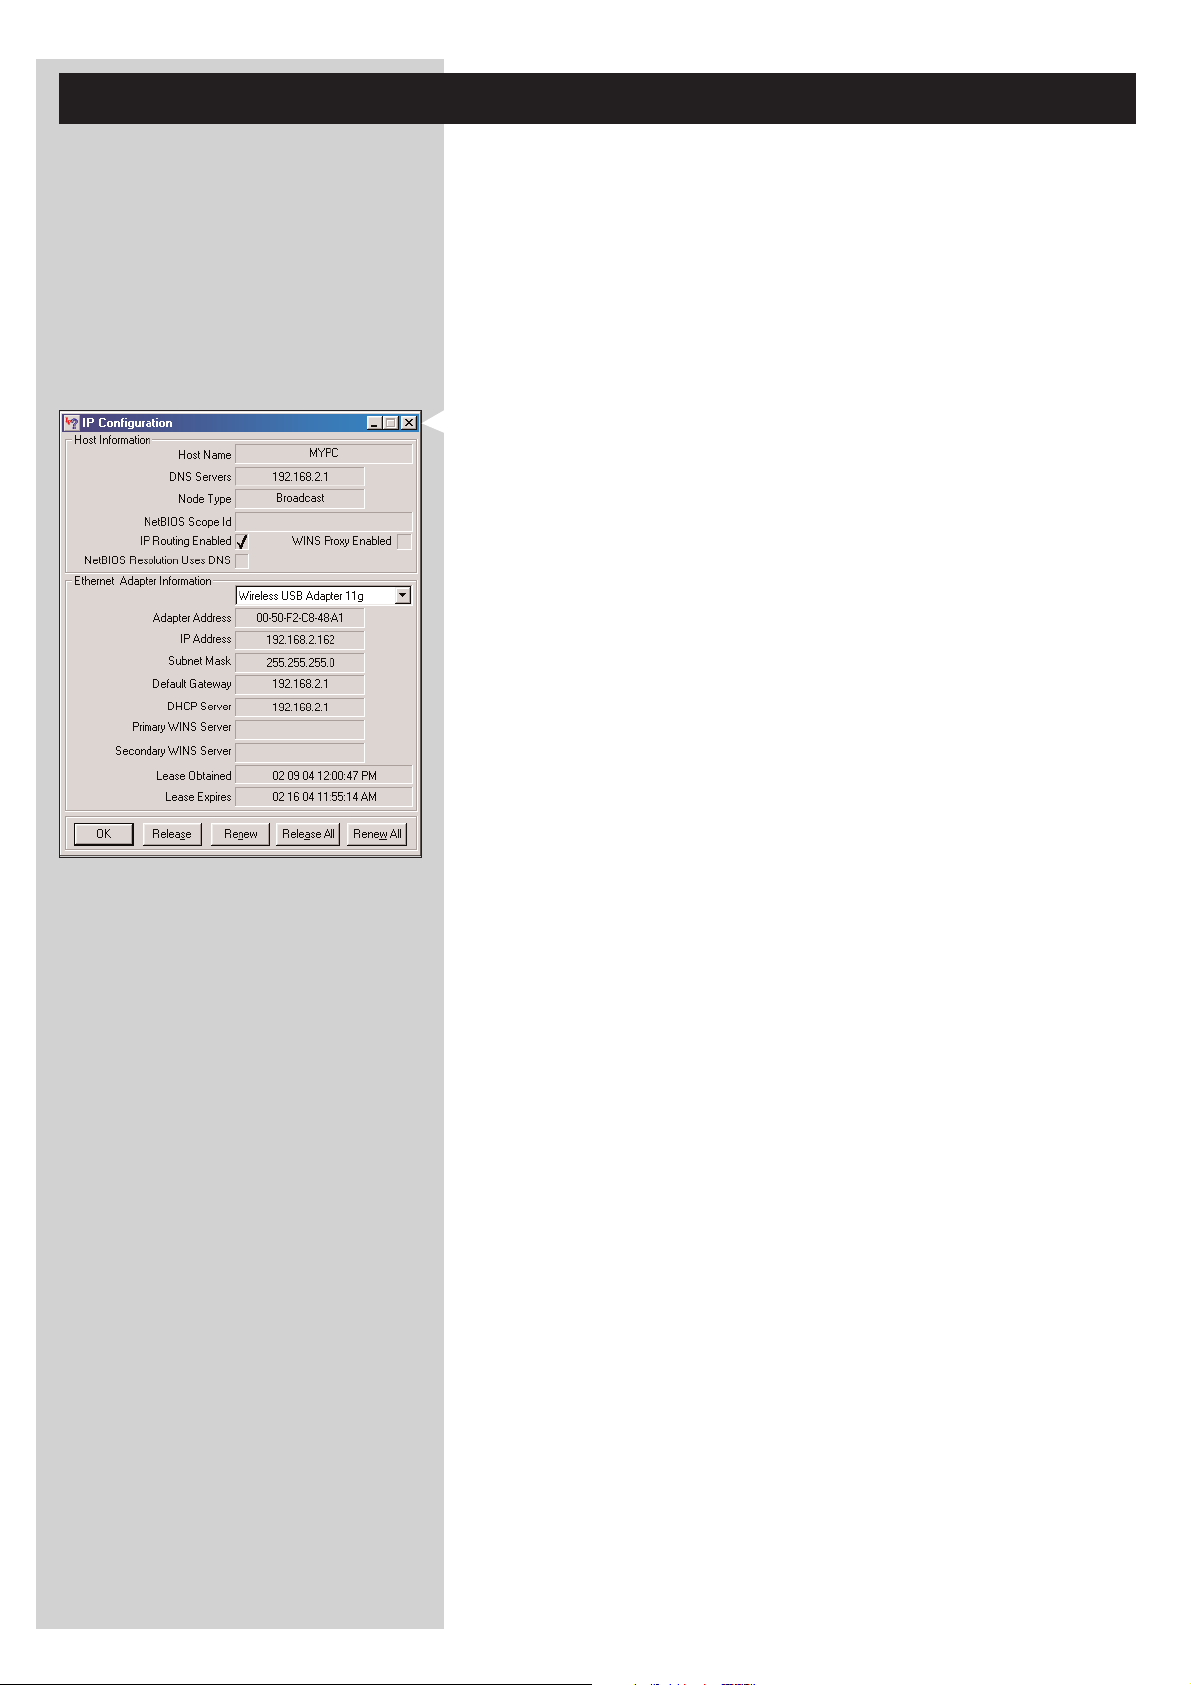
38 ENGLISH
Chapter 16 - Internet Connection Sharing
Before you press the INTERNET button for the first time, you need to make sure that the
SL50i has Internet access, either directly through a wireless base station, or indirectly through a
PC with Internet access and router/gateway software (e.g. ICS from the Windows OS) installed
and running.
If you connect the SL50i to an existing network host with Internet access:
Preferred solution:
If you have an existing home network with centrally shared broadband Internet access for all
connected computers, you can connect the SL50i directly to your central network device: the
router/gateway. That way, the SL50i can access the Internet just like your other computers and
you do not need to install ICS to make Internet access available to your SL50i.
If you connect the SL50i to a stand-alone or client PC with Internet access:
If you connect the Wireless Network adapter to a stand-alone or client PC with an existing
broadband Internet connection, you will need to bridge - within that PC - the wireless or wired
connection that connects to the SL50i, to the existing network adapter that connects to the
Internet.You do this by enabling Internet Connection Sharing (ICS) from your
Microsoft
broadband Internet connection with the SL50i.
ICS configuration and usage issues
ICS is intended for use in small networks in which the network configuration and the Internet
connection are managed by the Windows-based computer on which the shared connection
resides (the ‘host’ computer). It is assumed that this computer is the only Internet connection on
its network, that it is the only gateway to the Internet, and that it sets up all internal network
addresses (this means it is the DHCP server for the network).
®
Windows®operating system for that PC. This makes the PC share its existing
If a network has a central host computer or router that acts as a DHCP server, this server
automatically allocates IP addresses, netmasks, and the gateway address to all DHCP client
computers and devices in the network.
Important notes:
– Only Microsoft Windows98 SE (Second Edition) or higher provides ICS, other operating systems
are not supported.You may tr y to use other router/gateway software at your own discretion.
–You should only install Internet Connection Sharing on the computer that you use to connect to
the Internet.
– The host computer must remain switched on during Internet access sharing.
– ICS is router/gateway software with Dynamic Host Control Protocol server (DHCP) functionality.
The ICS host computer must be the only DHCP server on the network.
Before installing ICS, first disable any DHCP services that are provided on the network
(e.g. by a hardware router/gateway or base station).
Refer to the router/gateway manufacturer's instructions on how to disable its DHCP services.
Page 39
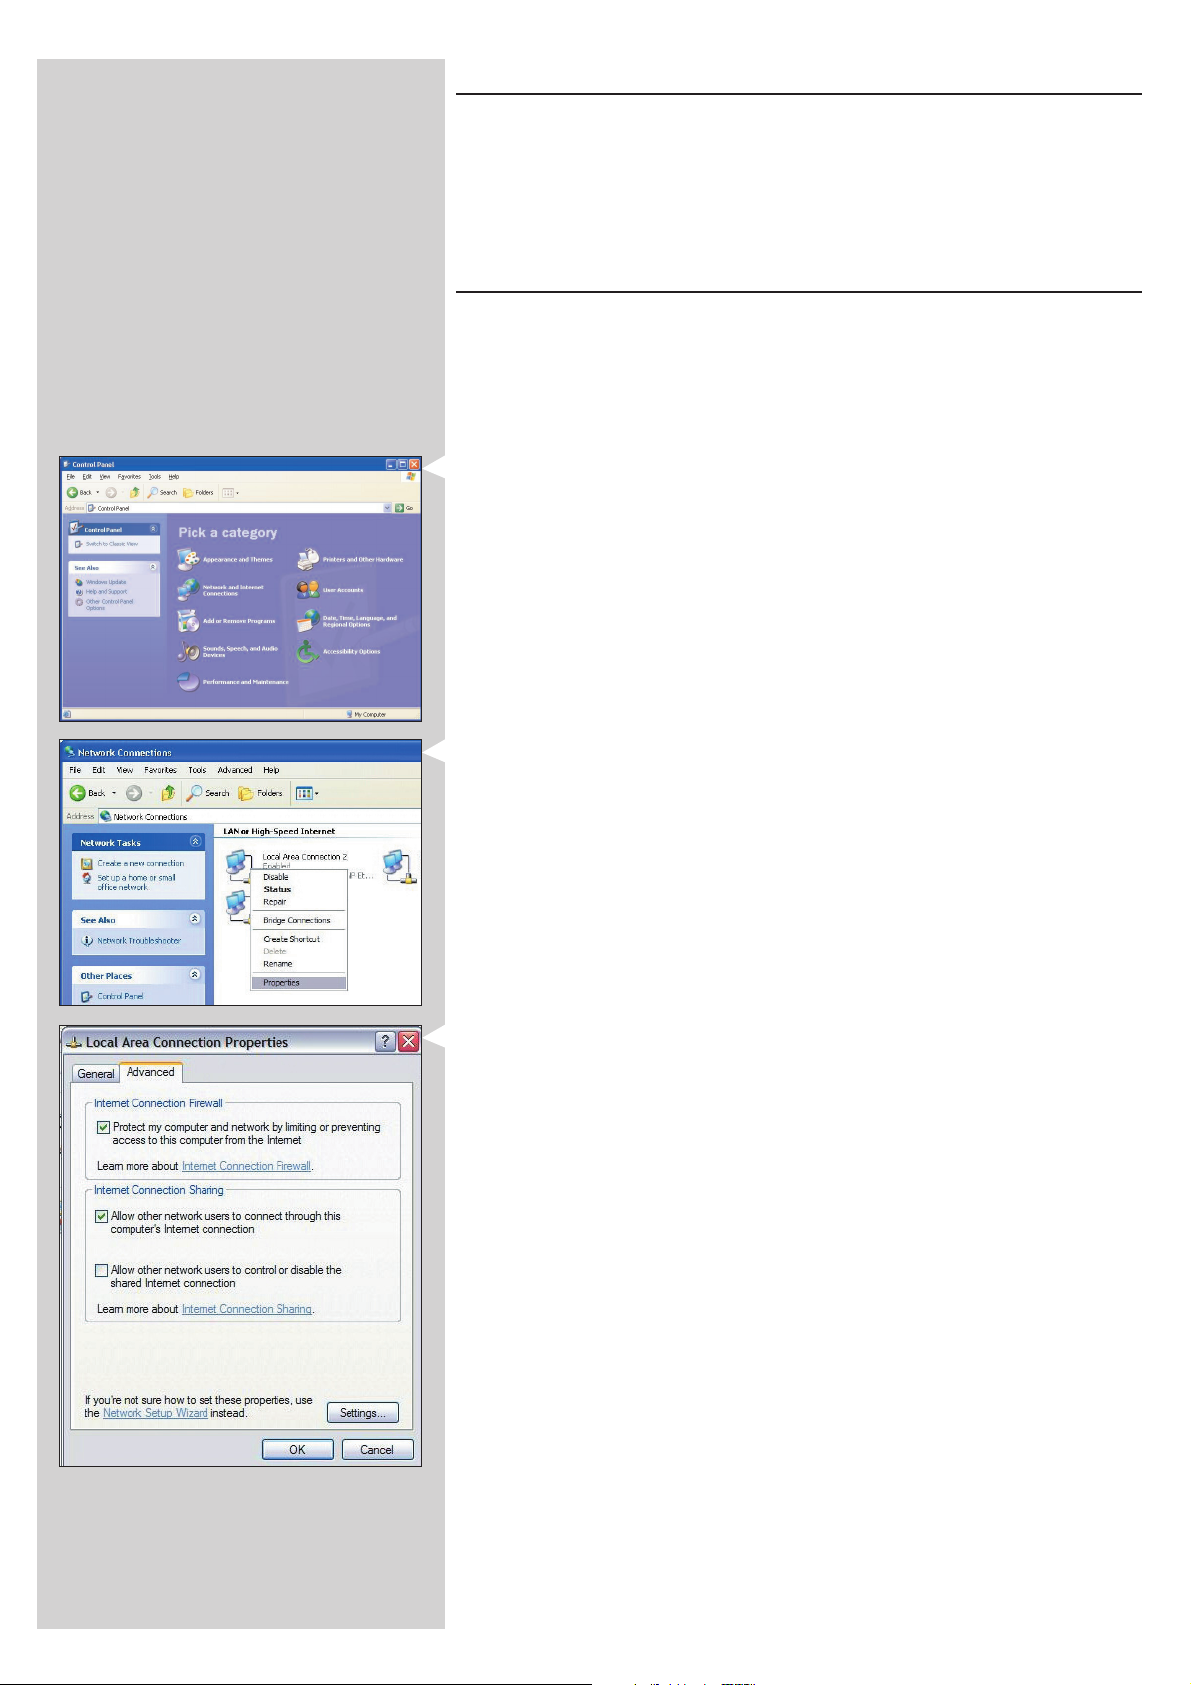
ENGLISH 39
Enabling Internet Connection Sharing (ICS)
Though ICS works similarly for all operating systems, each version of Microsoft®Windows
activates Internet Connection Sharing in its own way. Please see below for the operating system
you are using.
In case of trouble, check Windows Help and the Microsoft website for information on Internet
Connection Sharing.
®
Enabling Internet Connection Sharing for Windows XP
You must have administrative rights to enable ICS in Windows XP.
1 Before you begin, check if you have a working Internet connection and if your home
network is working properly (if you have one)
• Check the Internet connection by opening a web page with your browser.
2 Click Start, Settings, and Control Panel.Then double-click 'Network and Internet
Connections'. Finally, click 'Network Connections'.
> This will open an overview of your network connections.
3 In this overview of network connections, right-click on the network connection with
which your computer connects to broadband Internet.
> This will open the context menu of that network connection.
Note: Do not right-click the wireless network connection that connects to your Streamium product
(e.g. the Philips Wireless USB adapter 11g).
Right-click the network connection that provides you with broadband Internet access.
4 Click 'Properties' at the bottom of this context menu.
> This will open the connection properties menu.
5 In the connection properties menu, click the 'Advanced' tab.
> This will give you access to the options for sharing your Internet Connection.
Next:
a) In the 'Internet Connection Sharing' section, check the box to allow other users to connect
through this computer's Internet connection.
b) Uncheck the box that allows other network users to control or disable the shared Internet
connection.
Note: For extra security, enable the Internet Connection Firewall at the top of this menu to protect
your computer and your network from malicious access through the Internet.
Click 'OK' to accept the changed settings.
> This will share your Internet connection with other network connections,
including the one that connects your computer to your Streamium system.
Page 40
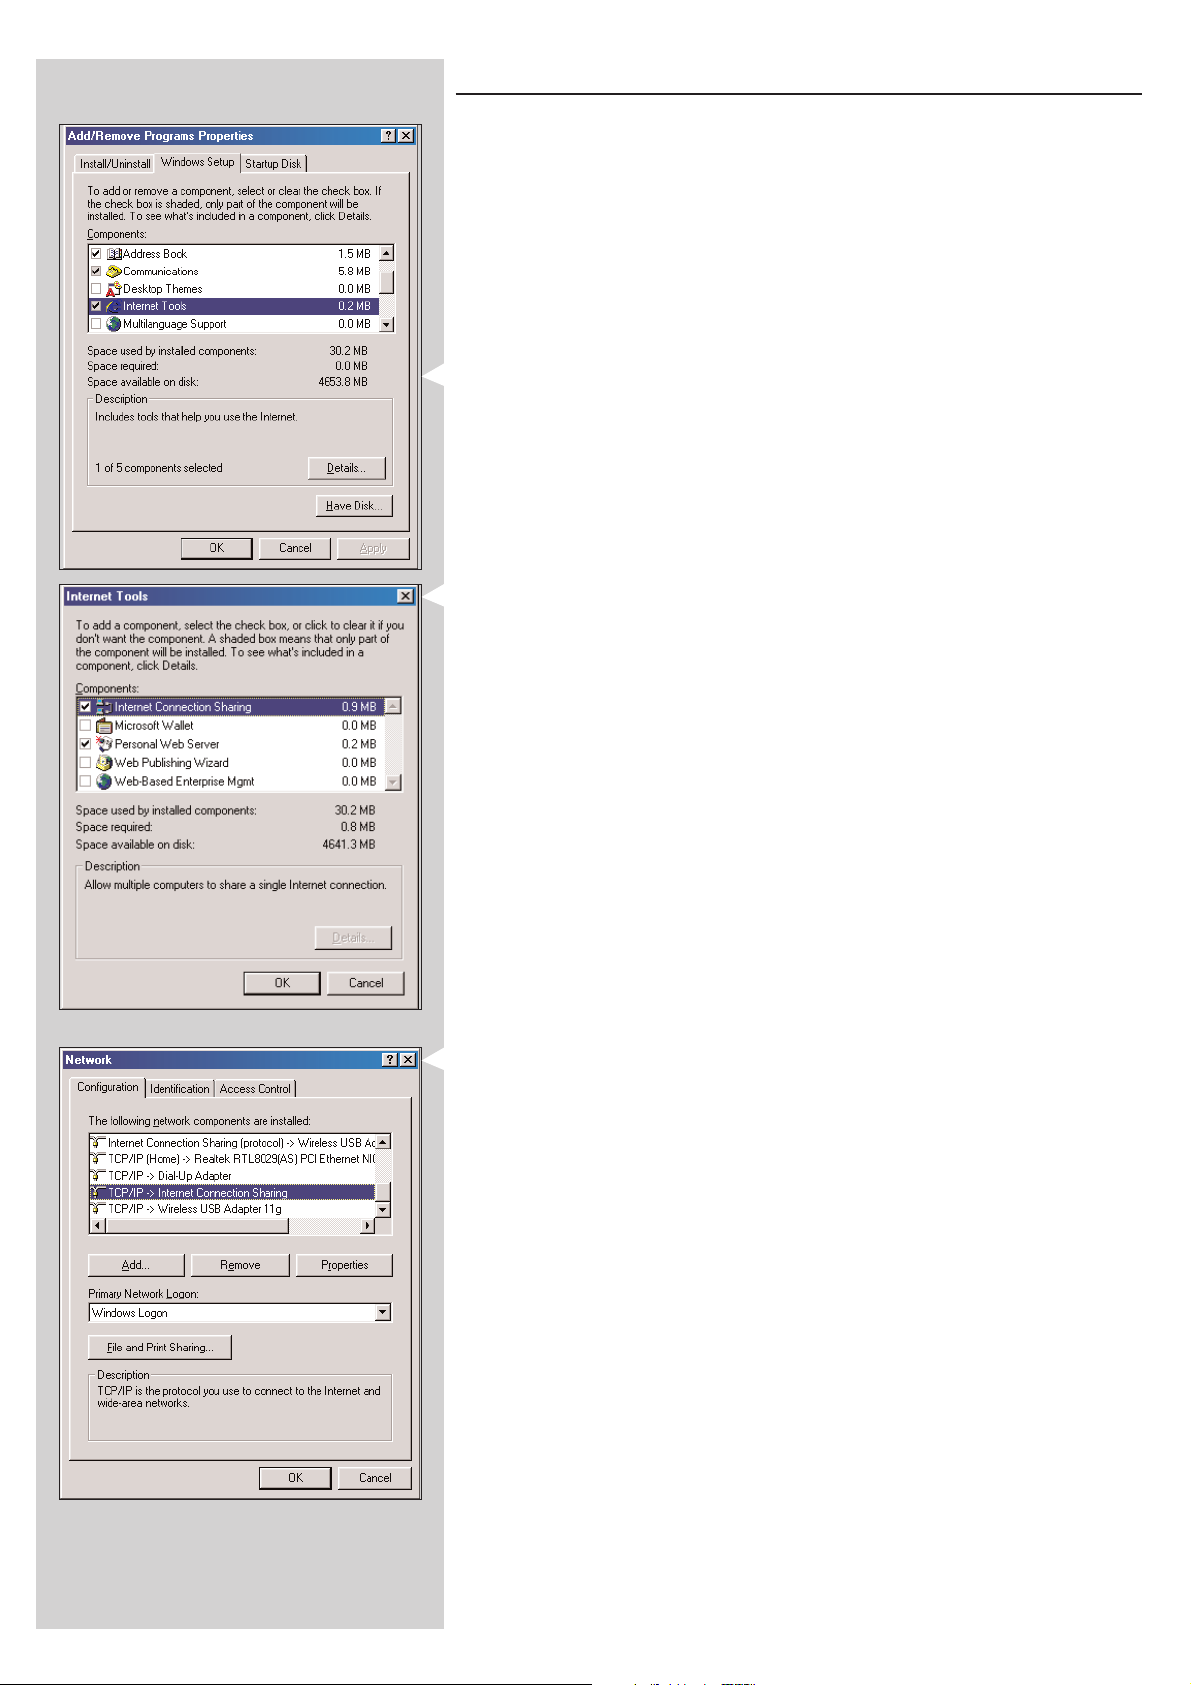
40 ENGLISH
Enabling Internet Connection Sharing for Windows 98SE
While installing, you may be asked for the Windows Installation CD.
Please keep it at hand.
1 Before you begin, check if you have a working Internet connection and if your home
network is working properly (if you have one).
• Check the Internet connection by opening a web page with your browser.
2 Click Start, Settings, and Control Panel.
Then double-click Add/Remove Programs and click the Windows Setup tab.
> The window to the left will appear.
3 Double-click on Internet Tools
> The next window will appear.
4 In this window,check the box for Internet Connection Sharing and then click OK.
Then click OK again.
> The Internet Connection Sharing wizard will appear.
5 Follow the instructions on the screen, in each screen click Next to continue the wizard
until it is finished. In the wizard you need to:
- Select 'High-speed connection' for your type of connection to the Internet.
- Choose the network adapter that provides you with Internet access to the PC.
- Choose the network adapter that connects your PC to the SL50i.
- You may click 'Cancel' when asked if you want to make a Client Configuration disk.
> This concludes the wizard.
6 Next, check your Network properties as follows:
a) Click Star t, Settings, Control Panel, and then double-click Network.
b) On the Configuration tab, browse the 'The following network components are installed'
box. It should now include 'Internet Connection Sharing adapter' and 'TCP/IP->Internet
Connection Sharing adapter'.
c) Double-click 'TCP/IP->Internet Connection Sharing adapter'.
d) In the IP Address tab, select 'Obtain an IP Address automatically'.
e) In the WINS Configuration tab, select 'Use DHCP for WINS resolution'.
f) In the Gateway tab, remove any gateways that are listed.
g) In the DNS Configuration tab, select 'Disable DNS'.
h) In the Bindings tab, for security reasons you must de-select all bindings.
(Please, do the same for 'TCP/IP (Shared)->External access network adapter'.)
i) Click OK to accept the new TCP/IP settings.
j) Select 'Windows Logon' as the Primary Network Logon.
Any changes to the network configuration will require a restart of the computer.
Page 41
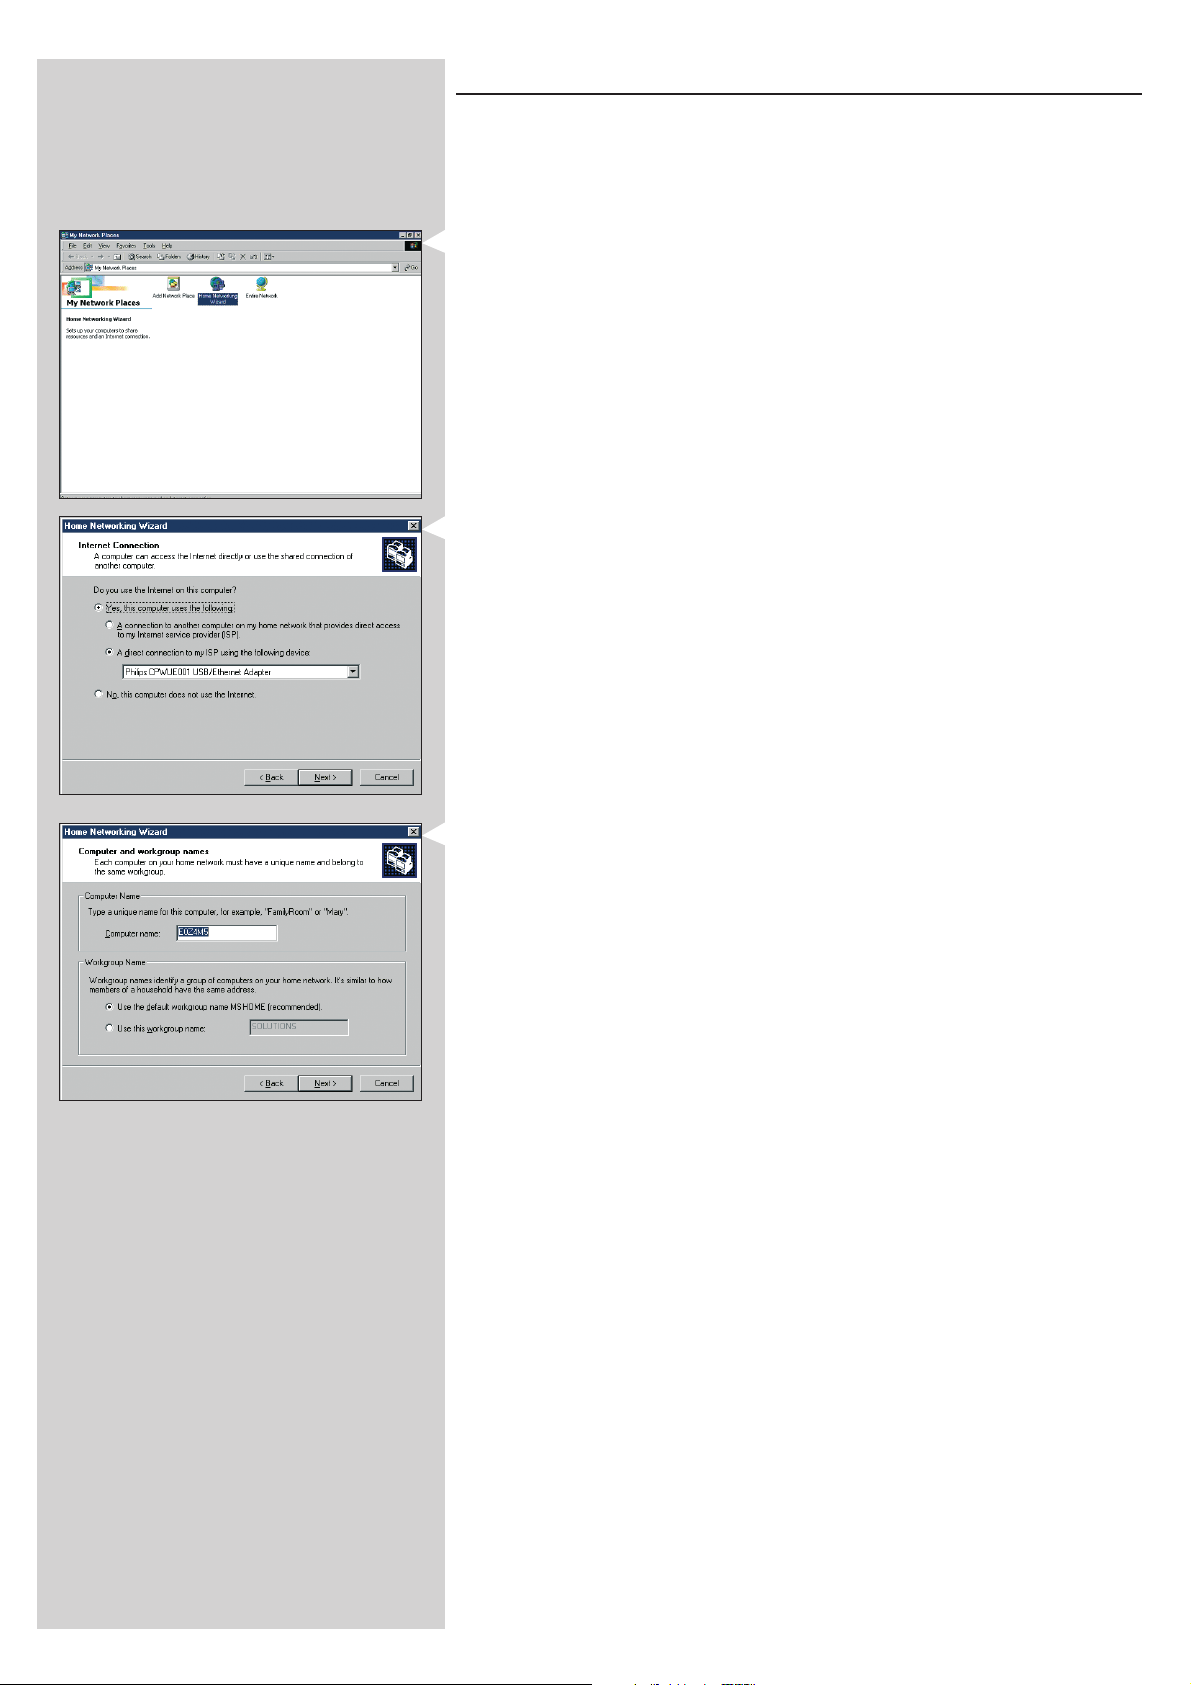
ENGLISH 41
Enabling Internet Connection Sharing for Windows Me
1
Before you begin, check if you have a working Internet connection and if your home
network is working properly (if you have one)
• Check the Internet connection by opening a web page with your browser.
2 On the desktop, double-click 'My Network Places' and then double-click
'Home Networking Wizard'.
> The Home Networking wizard will appear.
3 In each screen, click Next to continue the wizard until it is finished.
In the wizard you need to select 'Yes' (you are using Internet on this computer) and select
'A direct connection to my ISP using the following device:' and choose the network
adapter you use to make contact with the Internet from the list.
4 In the next screen, select 'Yes' when asked 'if you want other computers on your home
network to use the Internet connection on this computer'.
Choose the network adapter that connects your PC to the SL50i.
5 Follow the instructions on the screen, and enter:
- a computer name (unique for each computer, e.g. STUDY or DAD)
- a workgroup name
(the same for all computers in the network, e.g. HOMENET)
Note: these names are not the SSID or network name.
You do not need to share your files and printers
You do not have to make a Home Networking Setup disk.
> This concludes the wizard.
Page 42
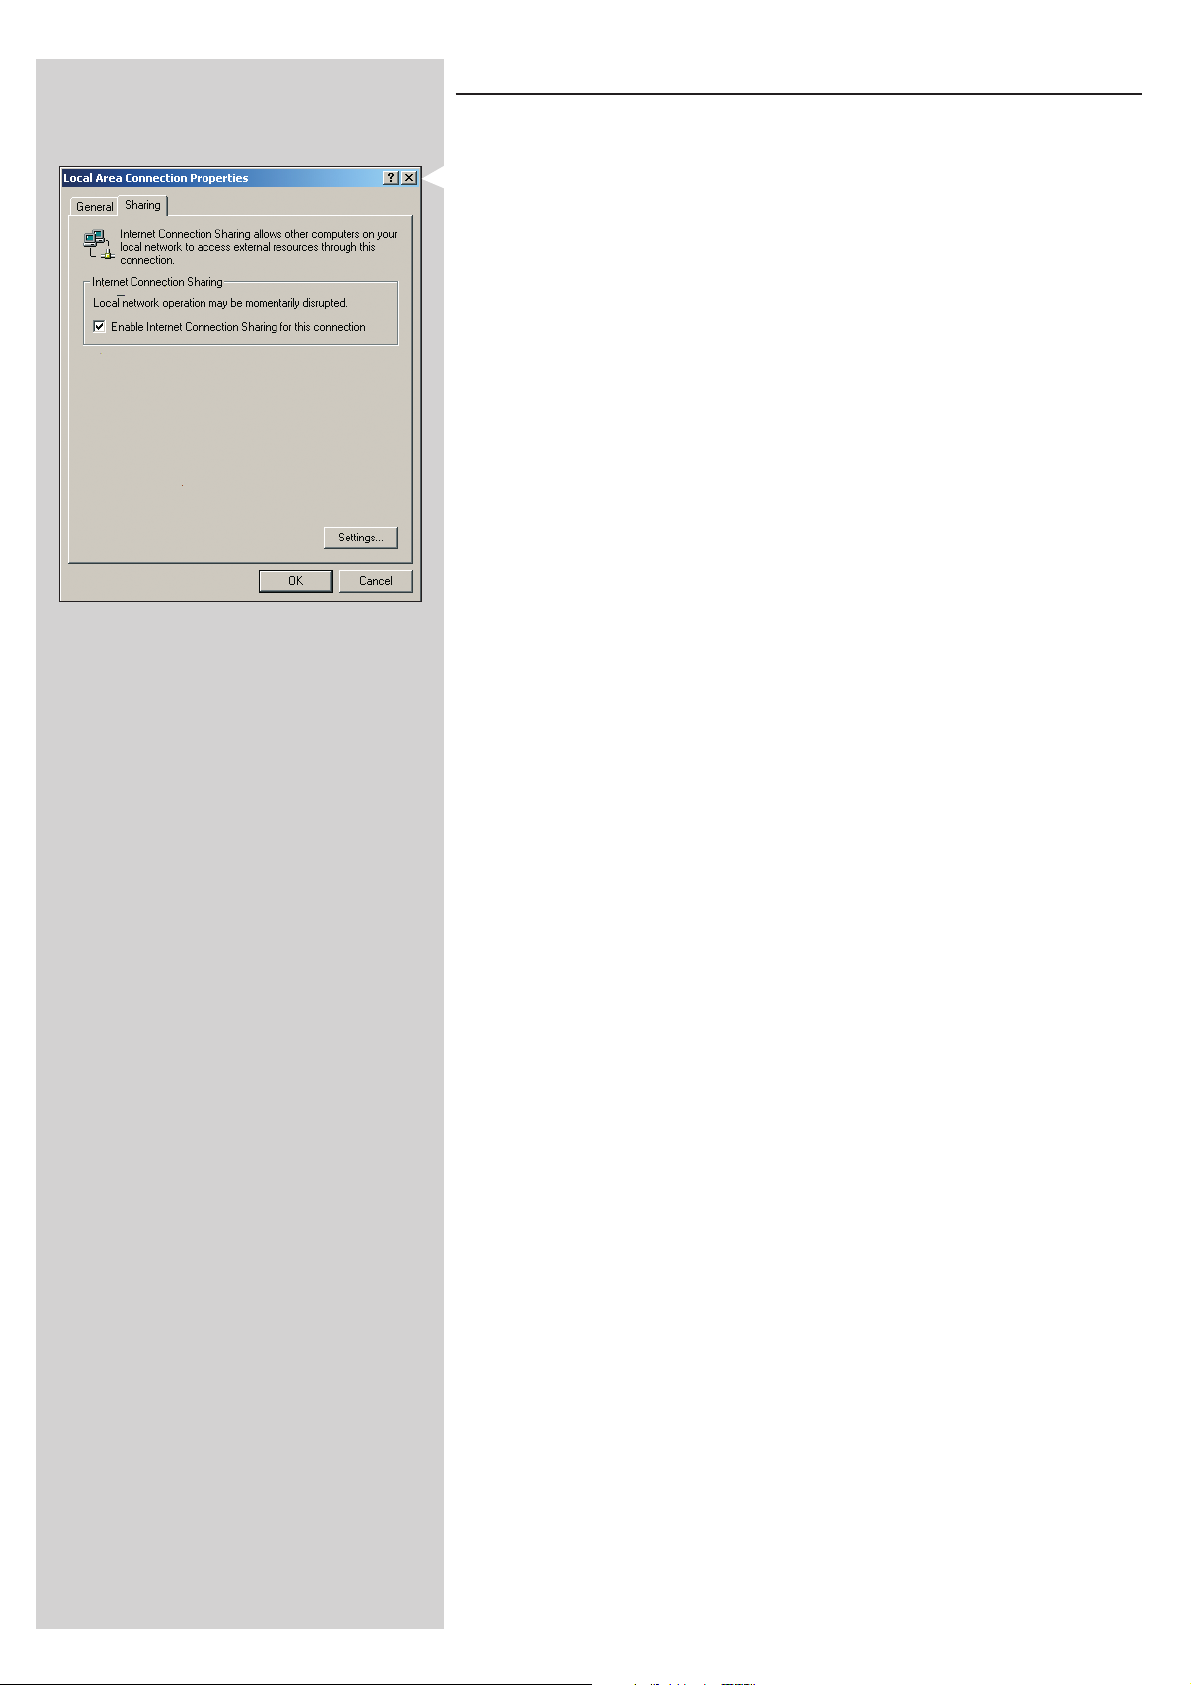
42 ENGLISH
Enabling Internet Connection Sharing for Windows 2000
You must have administrative rights to enable ICS in Windows 2000.
1 Before you begin, check if you have a working Internet connection and if your home
network is working properly (if you have one)
• Check the Internet connection by opening a web page with your browser.
2 Click Start, Settings, and Control Panel.Then double-click 'Network and Dial-Up
Connections' and then double-click 'Home Networking Wizard'.
3 Right-click the connection you want to share.
Then, click Properties.
> The Properties window for this network connection will appear.
4 Click the Sharing tab, and then select 'Enable Internet Connection Sharing for this
connection'.
> This enables the ICS feature.
Page 43
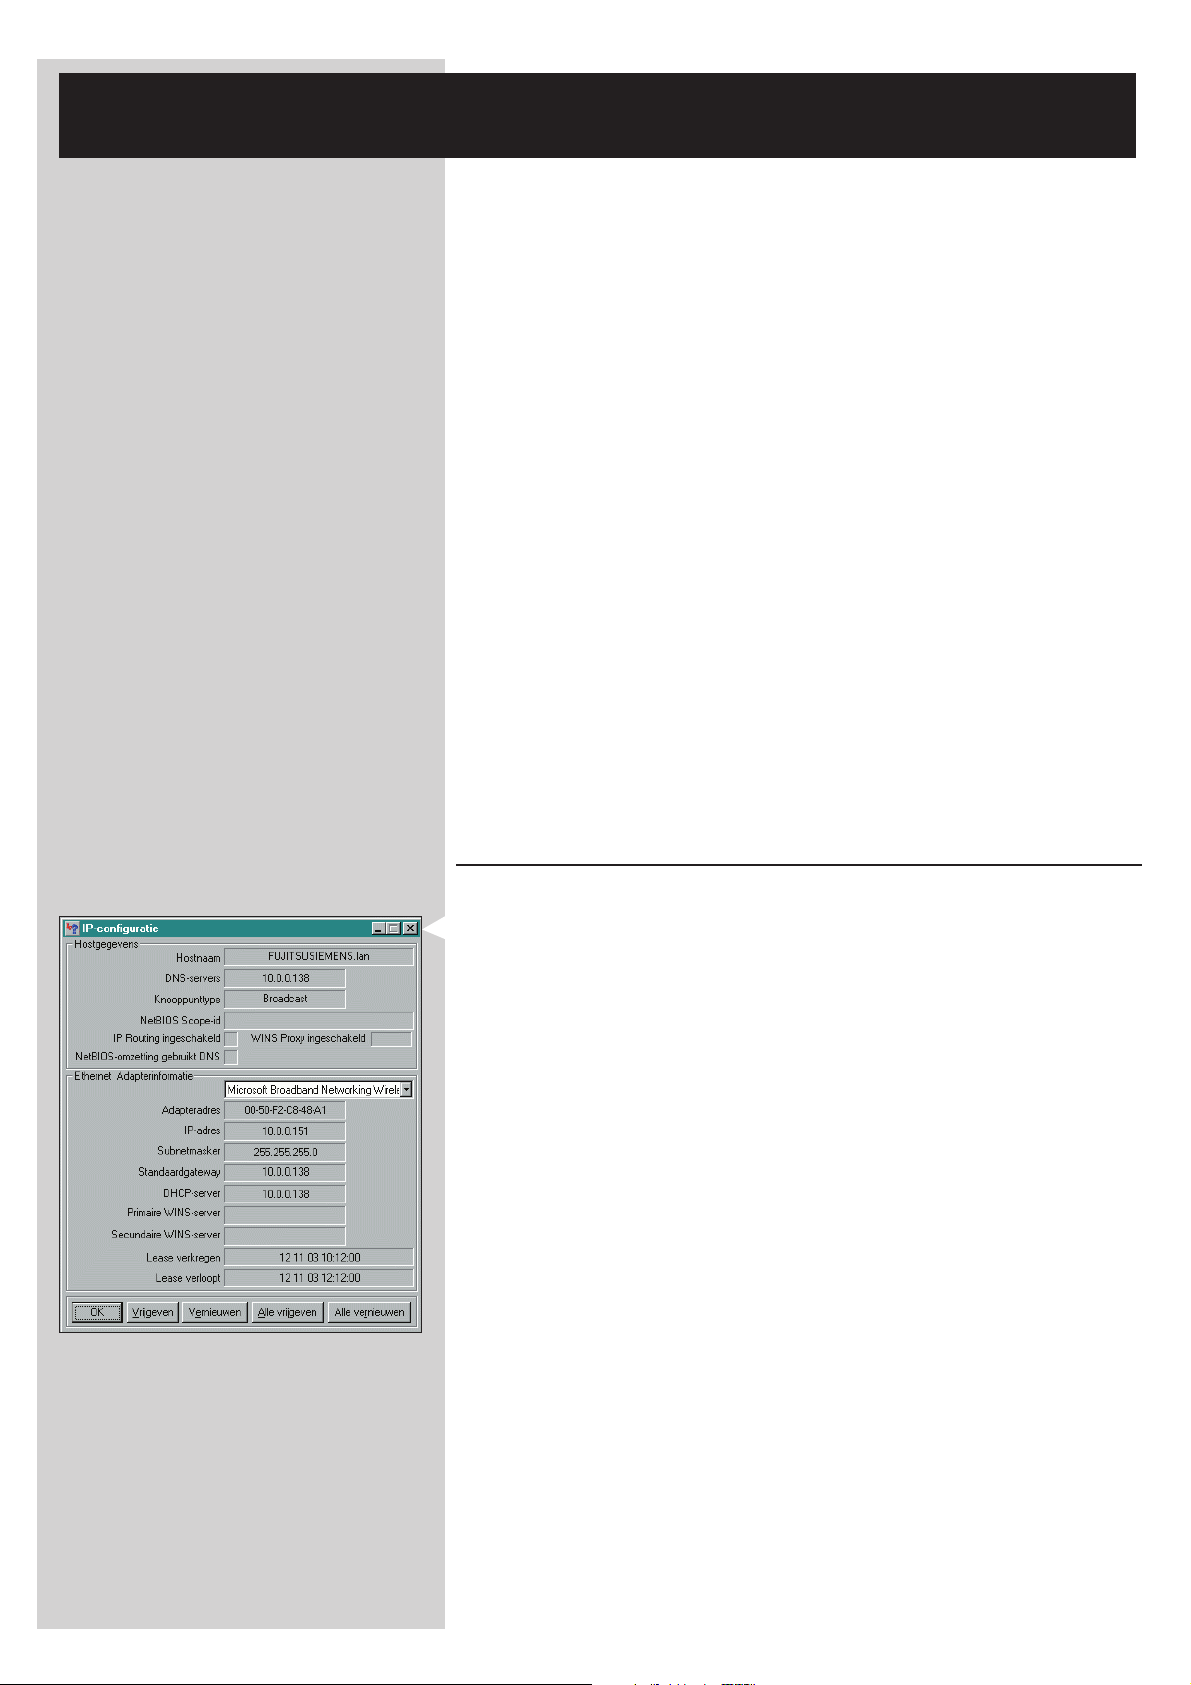
ENGLISH 43
Chapter 17 - Advanced (Network) Problem
Solving
Go to www.philips.com/streamium for the latest information on problem solving.
Check your broadband Internet speed
At www.2wire.com/meter/bm.html you can check your broadband Internet speed.
This should be more than 240 kbps for the SL50i's Internet function to work.
Check with your Internet Service Provider:
– Whether you may connect more than one device (computers and the Streamium system) to
the internet connection.
– Whether your ISP allows only devices with registered MAC addresses to connect to the
Internet.
– Whether or not you need to set-up proxy servers for HTTP and/or RTSP.
Check whether you have activated the same wireless encryption key
throughout your wireless network:
If you have forgotten your Encryption key, switch off encryption or set a new encryption key for
your entire wireless network and for the SL50i.
If you are using a firewall, check whether you have opened the ports
49153 and 9154,TCP and UDP:
Some ports need to be opened, check at www.philips.com/streamium for the latest information
on which ports need to be open.
Check your network's IP configuration:
Check the Options menu of the SL50i. In the Network > Network Info menu a gateway
address should be present.This should be the IP address of the PC or network device that
connects to the Internet.You can check the network gateway address through your network
adapter program or with IPCONFIG (see below).
Note: Philips Wireless USB/Notebook Adapter users may click the 'Link information' tab in the
CPWUA/CPWNA Monitor program.
Check your computer's IP configuration as follows:
For Windows 98SE / Windows Me:
1 Click 'Start', 'Run...', and enter ‘winipcfg’.
2 Click 'OK' to view the IP settings.
3 In this window, select your wireless network adapter.
4 Click 'More Info>>' to expand.
For Windows XP / Windows 2000:
1 Click 'Start', 'Run...', and enter ‘command’.
2 In the DOS box, type ‘ipconfig /all’ and press Enter.
3 For each network adapter, you will see results similar to the window on the left.
• If your network uses static IP addressing that you have set manually, then you will also need
to choose a unique IP address for the SL50i in the same range as the network's IP
addresses (e.g. 192.168.2.xxx). Use the same subnet mask as your network
(e.g. 255.255.255.000), and write down the IP address of the network device that connects
you to the Internet (the Gateway IP address).
• Sometimes your Internet Service Provider requires you to use a proxy address. Check this
with your Internet Service Provider. Alternatively, check the proxy settings of your Internet
browser software for more information.
Page 44

44 ENGLISH
Chapter 18 - Technical specifications
Check for the product specifications of the latest upgrade on www.philips.com/streamium.
Dimensions (h x w x d): • 1.73 x 5.91 x 6.14 in.(6.5 incl. foot)
Power supply: • 5V / 2.4 ampere
Power consumption / standby power: • Approx. 10 watts / less than 2 watts
Weight: • Approx. 5 oz.
Supported codecs: • Audio: MP3, MP3pro
Output connectors: • Audio: 2 x L/R stereo (Cinch)
Wireless: • 802.11b
Networking: • Universal Plug & Play
Temperature operating range of the product: • 40° F - 95° F / 5° C - 35° C
Page 45
Certificat de garantie
Certificado de garantia
Garantibevis
Certificat de garantie
Certificado de garantia
Garantibevis
Garantieschein
Certificato di garanzia
Garanticertifikat
Takuutodistus
year warranty
année garantie
Jahr Garantie
jaar garantie
año garantia
anno garanzia
år garanti
år garanti
år garanti
vuosi takuu
año garantia
11
Type: SL50i
Serial nr: _____________________________________________________________________
Date of purchase - Date de la vente - Verkaufsdatum - Aankoopdatum - Fecha de compra - Date d’acquisito -
Data da adquirição - G - Inköpsdatum - Anskaffelsesdato - Kjøpedato - Oatopäivä -
Dealer’s name, address and signature
Nom, adresse et signature du revendeur
Name,Anschrift und Unterschrift des Händlers
Naam, adres en handtekening v.d. handelaar
Nombre, direccion y firma del distribudor
Nome, indirizzo e firma del fornitore
www.philips.com
This document is printed on chlorine free produced paper
Data subject to change without notice
Printed in The Netherlands
3122 377 0002.1
, .
Återförsäljarens namn, adress och signatur
Forhandlerens navn,adresse og unterskrift
Forhandlerens navn,adresse og unterskrift
Jälleenmyyjän nimi, osoite ja allekirjoitus
Nome, morada e assinature da loja
0682
 Loading...