

Page 1
3
H
I
J
K
L
M
N
B
A
E
C
D
F
G
R
Q
P
O
1
Page 2

4
Page 3

ENGLISH 6
DEUTSCH
ESPAÑOL 52
FRANÇAIS
ITALIANO
NEDERLANDS 124
PORTUGUÊS 148
TÜRKÇE
28
76
100
171
RQ1095, RQ1085, RQ1075
Page 4

6
ENGLISH
Introduction
Thank you for buying this Philips shaver. Please read
this user manual, as it contains information about the
wonderful features of this shaver as well as some tips
to make shaving easier and more enjoyable.
Important
Read this user manual carefully before you use the
shaver, the Jet Clean System and the Power Pod.
Save the user manual for future reference.
Danger
Make sure the adapter does not get wet.
-
Warning
Be careful with hot water. Always check if the
water is not too hot, to prevent your hands from
getting burnt.
The adapter contains a transformer. Do not cut
off the adapter to replace it with another plug, as
this causes a hazardous situation.
These appliances are not intended for use
by persons (including children) with reduced
physical, sensory or mental capabilities, or lack of
experience and knowledge, unless they have been
given supervision or instruction concerning use of
the appliances by a person responsible for their
safety.
Children should be supervised to ensure that they
do not play with the appliances.
Caution
Do not use the shaver, the Jet Clean System, the
Power Pod or the adapter if it is damaged.
Charge and store the shaver at a temperature
between 5°C and 35°C.
Page 5

ENGLISH 7
Always put the protection cap on the shaver
to protect the shaving heads when you are
travelling.
Never use scouring pads, abrasive cleaning agents
or aggressive liquids such as petrol or acetone to
clean the appliance.
Only use the adapter supplied.
If the adapter is damaged, always have it replaced
with one of the original type in order to avoid a
hazard.
Only use the Jet Clean System with the original
-
HQ200 cleaning uid.
Never immerse the Jet Clean System in water nor
rinse it under the tap.
Use and store the Jet Clean System at a
temperature between 5°C and 35°C.
Always place the Jet Clean System on a stable,
level and horizontal surface to prevent leakage.
Empty the cleaning chamber and clean it
thoroughly by rinsing it with hot tap water every
15 days.
Always place the Jet Clean System on a uid-
resistant surface.
The Jet Clean System thoroughly cleans but does
not disinfect your shaver, therefore do not share
the shaver with others.
The cleaning chamber of the Jet Clean System is
not dishwasher-proof.
When the Jet Clean System is ready for use, do
-
not move it to prevent leakage of cleaning uid.
Never immerse the Power Pod in water, nor rinse
it under the tap.
Page 6
ENGLISH8
Compliance with standards
The shaver complies with the internationally
approved IEC safety regulations and can be safely
cleaned under the tap.
These Philips appliances comply with all standards
-
regarding electromagnetic elds (EMF). If handled
properly and according to the instructions in this
user manual, the appliances are safe to use based
on scientic evidence available today.
General
The adapter transforms 100-240 volts to a safe
low voltage of less than 24 volts.
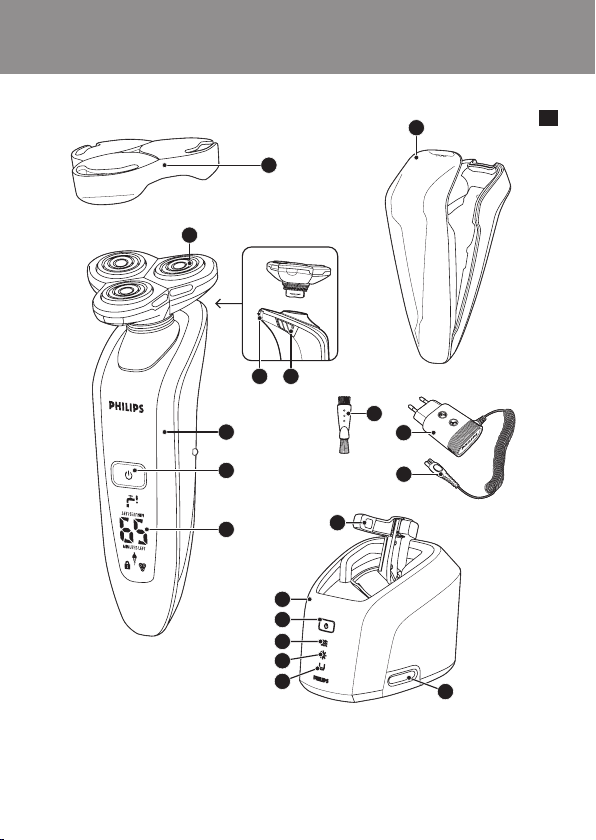
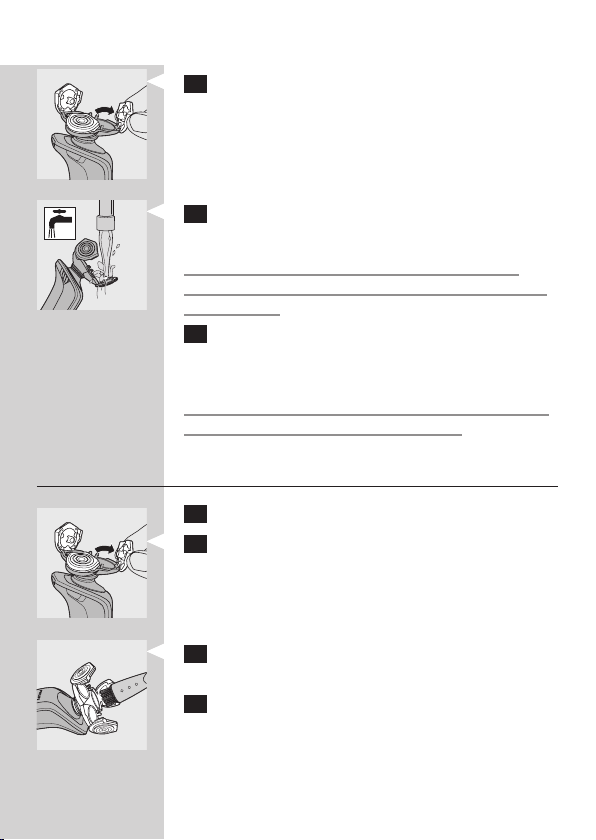
Overview (Fig. 1)
A Protection cap
B Shaving unit
C Trimmer
D Trimmer on/off slide
E Shaver (RQ1090/RQ1060/RQ1050)
F Shaver on/off button
G Display
H Shaver holder
I Jet Clean System (RQ1005/RQ1000)
J Jet Clean System on/off button
K Cleaning symbol
L Drying symbol
M ’Cleaning chamber empty’ symbol
N Cleaning chamber
O Power Pod
P Cleaning brush
Q Adapter
R Small plug
Page 7

ENGLISH 9
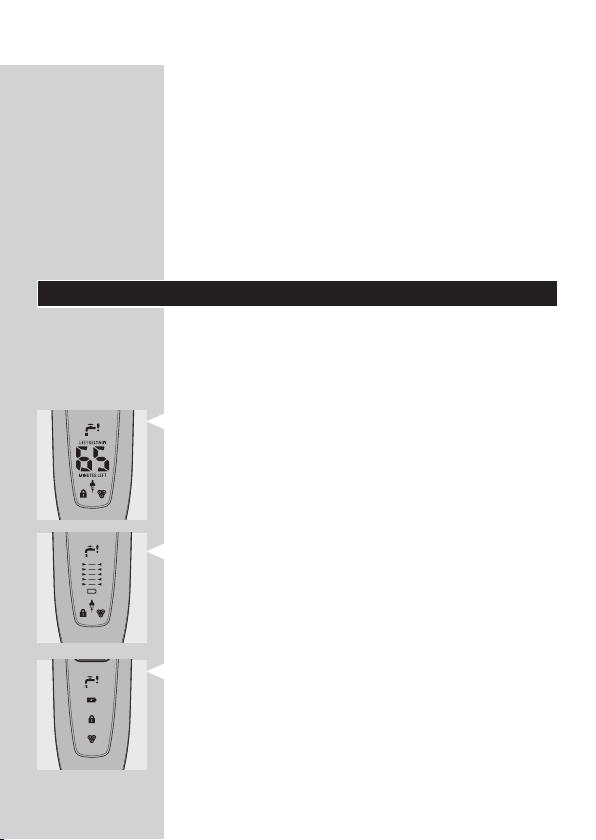
The display
Before you use the shaver for the rst time, remove
the protective foil from the display.
The three shaver types (RQ1090, RQ1060 and
RQ1050) have different displays, which are shown in
the gures below.
RQ1090
-
RQ1060
-
RQ1050
-
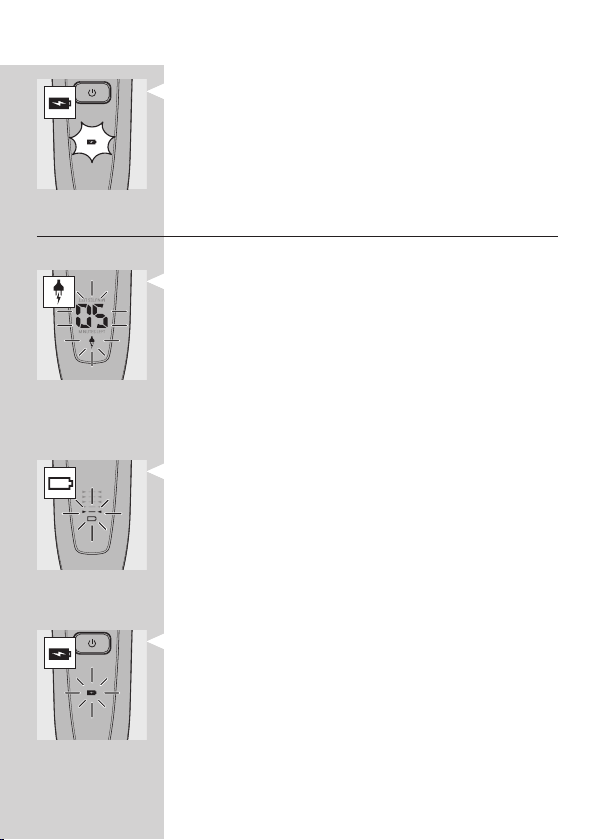
Charging
Charging takes approx. 1 hour.
When you place the shaver in the Jet
Clean System or in the Power Pod, the
display automatically switches off after approx.
5 hours.
RQ1090
When the shaver is charging, the minutes
-
indication and the plug symbol ash.
The shaving minutes increase until the shaver is
fully charged.
Page 8

ENGLISH10
RQ1060
When the shaver is charging, the plug
-
symbol ashes.
First the arrowheads of the bottom charge level
-
ash, then the arrowheads of the second level
ash, and so on until the shaver is fully charged.
RQ1050
When the shaver is charging, the battery symbol
-
ashes blue.
Battery fully charged
RQ1090
When the battery is fully charged, the minutes
indication is visible on the display and the plug
symbol disappears from the display.
RQ1060
When the battery is fully charged, all arrowheads
and all charge level lights light up blue continuously
and the plug symbol disappears from the display.
When you remove the shaver from the Jet Clean
System or the Power Pod, the arrowheads of the
top charge level light up blue to indicate that the
battery is full.
Page 9
ENGLISH 11
RQ1050
When the battery is fully charged, the battery
symbol lights up blue continuously.
Battery low
RQ1090
When the battery is almost empty (when there
are only 5 or fewer shaving minutes left), the
minutes indication and the plug symbol start to
ash.
When you switch off the shaver, the shaving
-
minutes and the plug symbol continue to ash for
a few more seconds. You hear a beep when there
are no minutes left.
RQ1060
When the battery is almost empty (when there
are only 5 or fewer shaving minutes left), the
battery symbol ashes red and the arrowheads of
the bottom charge level ash blue.
When you switch off the shaver, the battery
symbol and the arrowheads of the bottom charge
level continue to ash for a few seconds.
RQ1050
When the battery is almost empty (when there
are only 5 or fewer shaving minutes left), the
battery symbol lights up red.
When you switch off the shaver, the battery
-
symbol starts to ash for a few seconds.
Page 10

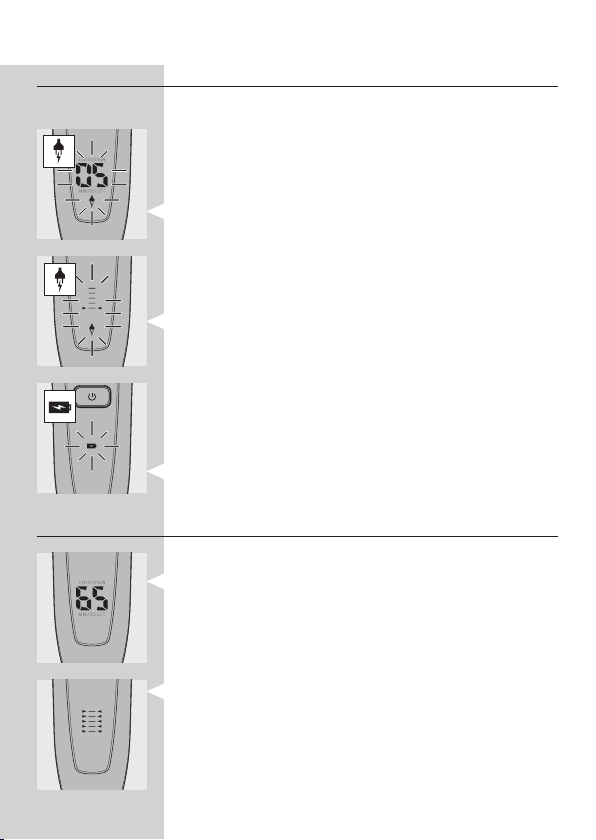
ENGLISH12
Remaining battery capacity
RQ1090
The remaining battery capacity is indicated by the
number of shaving minutes shown on the display.
RQ1060
The remaining battery capacity is indicated by the
-
ashing arrowheads of a particular charge level
Clean shaver
For optimal shaving performance, we advise you to
clean the shaver after every use.
The tap symbol ashes to remind you to clean the
shaver.
Note: The displays of types RQ1060 and RQ1050 look
different but show the same indication.
Replace shaving unit
For maximum shaving performance, we advise you
to replace the shaving unit every two years.
To remind you to replace the shaving unit, the
-
shaving unit symbol ashes (all types) and you
hear a beep when you switch off the shaver
(RQ1090 only). This happens at the end of 7
successive shaves to remind you to replace the
shaving unit.
Note: The displays of types RQ1060 and RQ1050 look
different but show the same indication.
Page 11
ENGLISH 13
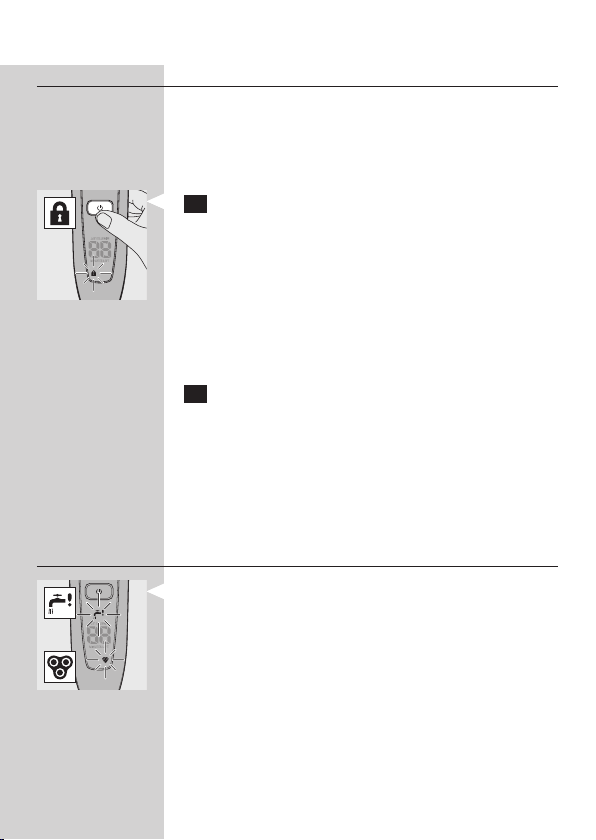
Travel lock
You can lock the shaver when you are going to
travel. The travel lock prevents the shaver from being
switched on by accident.
Activating the travel lock
1 Press the on/off button for 3 seconds to enter
the travel lock mode.
The lock symbol appears on the display (all
,
types) and you hear a beep (RQ1090 only) to
indicate that the travel lock has been activated.
Note: The displays of types RQ1060 and RQ1050 look
different but show the same indication.
Deactivating the travel lock
1 Press the on/off button for 3 seconds.
The motor starts running to indicate that the
,
travel lock has been deactivated.
The shaver is now ready for use again.
Note: When you place the shaver in the plugged-in
Power Pod or Jet Clean System, the travel lock is
automatically deactivated.
Blocked shaving heads
If the shaving heads are blocked, the shaving unit
symbol and the tap symbol with exclamation mark
ash. In this case, the motor cannot run because
the shaving heads are soiled or damaged.
Note: The displays of types RQ1060 and RQ1050 look
different show the same indication.
When this happens, you have to clean the shaving
unit or replace it.
Page 12
ENGLISH14
The shaving unit symbol and the tap symbol
-
with exclamation mark continue to ash until you
unblock the shaving heads.
Charging
Charging takes approx. 1 hour.
A fully charged shaver has a shaving time of up to
65 minutes, which is enough for approx. 21 shaves.
The actual shaving time is calculated by the shaver.
If you have a heavy beard, the shaving time may be
less than 65 minutes. The shaving time may also vary
over time, depending on your shaving behaviour and
beard type.
Quick charge
After the shaver has charged for 5 minutes,
it contains enough energy for one shave.
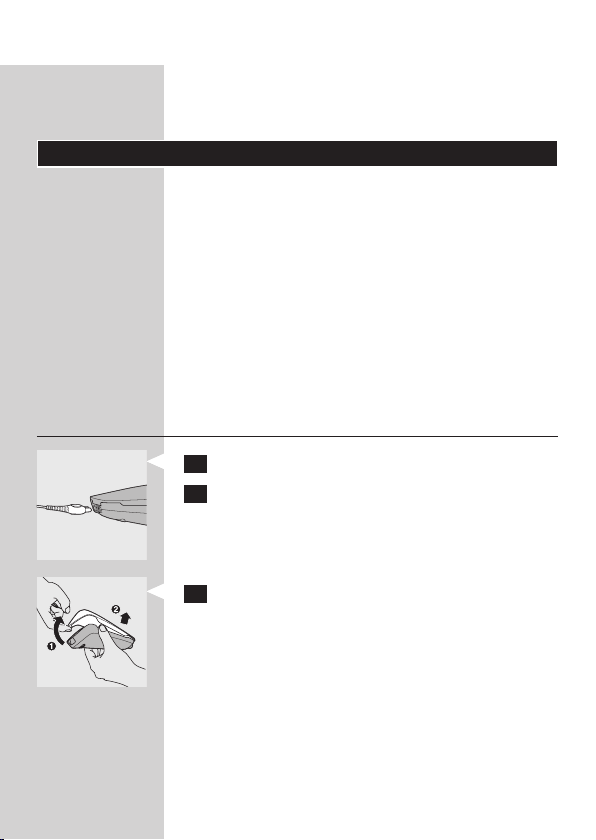
Charging in the Power Pod
1 Put the small plug in the Power Pod.
2 Put the adapter in the wall socket.
3 Pull at the top of the lid (1) and remove it (2).
Page 13
ENGLISH 15
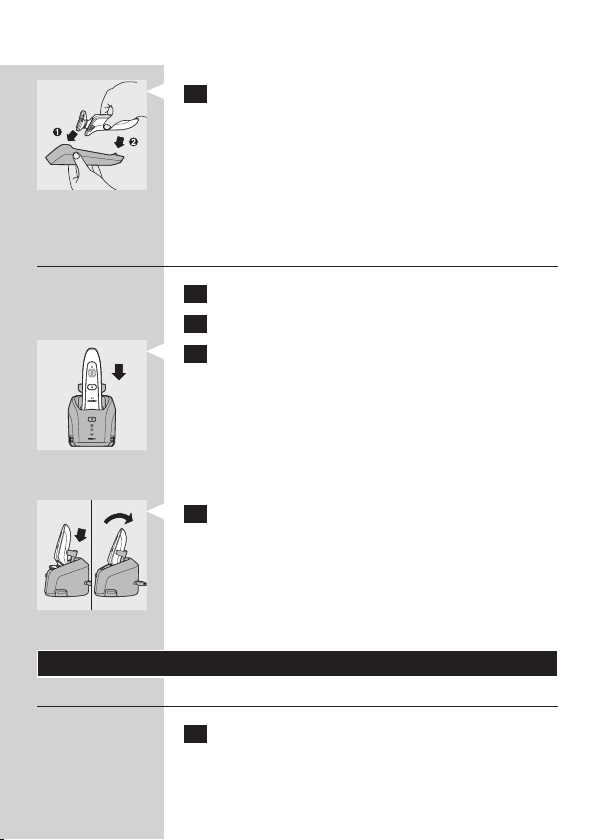
4 First insert the top of the shaver into the
Power Pod (1) and then press the bottom part
into the Power Pod (2).
Note: The shaver cannot be placed in the Power Pod
when the protection cap is on the shaving unit.
,
The display shows that the shaver is charging
(see chapter ‘The display’).
Charging in the Jet Clean System
1 Put the small plug in the Jet Clean System.
2 Put the adapter in the wall socket.
3 Place the shaver upside down in the holder
with the display pointing towards the front of
the Jet Clean System.
Note: RQ1090,RQ1060 only: when you turn the shaver
upside down, the indications on the display are also
turned upside down so you can still see the remaining
battery capacity.
4 Press the shaver tightly into the holder to lock
it into place.
Note: The shaver cannot be placed in the Jet Clean
System when the protection cap is on the shaving unit.
The display shows that the shaver is charging
,
(see chapter ‘The display’).
Using the shaver
Shaving
1 Press the on/off button once to switch on the
shaver.
,
The display lights up for a few seconds.
Page 14
ENGLISH16
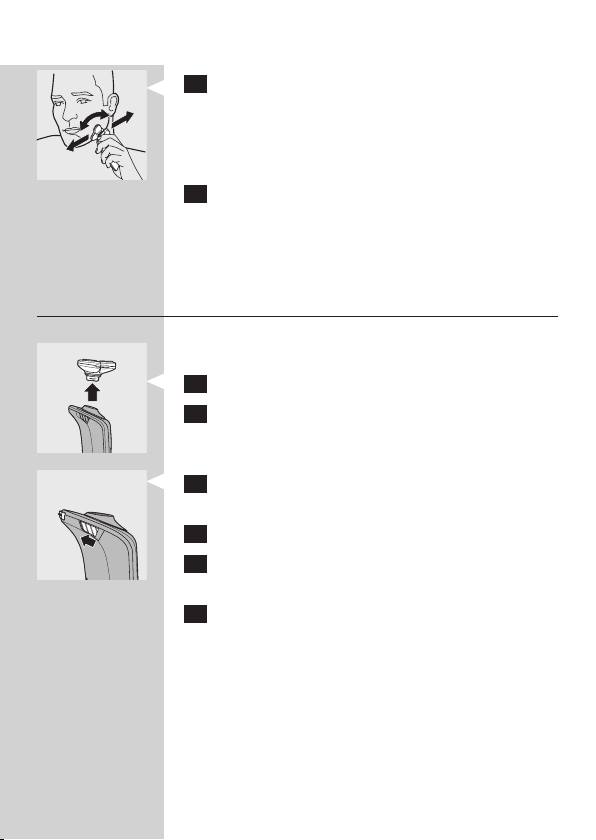
2 Move the shaving heads over your skin. Make
both straight and circular movements.
-
Shaving on a dry face gives the best results.
-
Your skin may need 2 or 3 weeks to get
accustomed to the Philips shaving system.
3 Press the on/off button once to switch off the
shaver.
,
The display lights up for a few seconds and then
shows the remaining battery capacity (RQ1090/
RQ1060 only).
Trimming
You can use the trimmer to groom your sideburns
and moustache.
1 Pull the shaving unit off the shaver.
2 Press the on/off button once to switch on the
shaver.
,
The display lights up for a few seconds.
3 Press the trimmer slide forwards to slide out
the trimmer.
4 You can now start trimming.
5 Press the trimmer slide backwards to retract
the trimmer.
6 Press the on/off button once to switch off the
shaver.
,
The display lights up for a few seconds and then
shows the remaining battery capacity (RQ1090/
RQ1060 only).
Page 15

ENGLISH 17
7 Insert the lug of the shaving unit into the slot
in the top of the shaver (1). Then press the
shaving unit downwards (2) to attach it to the
shaver (‘click’).
Cleaning and maintenance
Never use scouring pads, abrasive cleaning agents
or aggressive liquids such as petrol or acetone to
clean the appliance.
The best and most hygienic way to clean the
-
shaver is in the Jet Clean System. You can also
rinse the shaver under the tap or clean it with the
brush supplied.
Be careful with hot water. Always check if the
-
water is not too hot, to prevent your hands from
getting burnt.
Clean the shaver after every shave for optimal
-
shaving performance.
You can clean the outside of the shaver with a
-
damp cloth.
Regular cleaning guarantees better shaving
-
performance.
Cleaning the shaving unit in the Jet Clean System
The Jet Clean System has three cleaning programs:
the eco program, the normal program and the
intensive program. The shaver automatically chooses
the appropriate cleaning program.
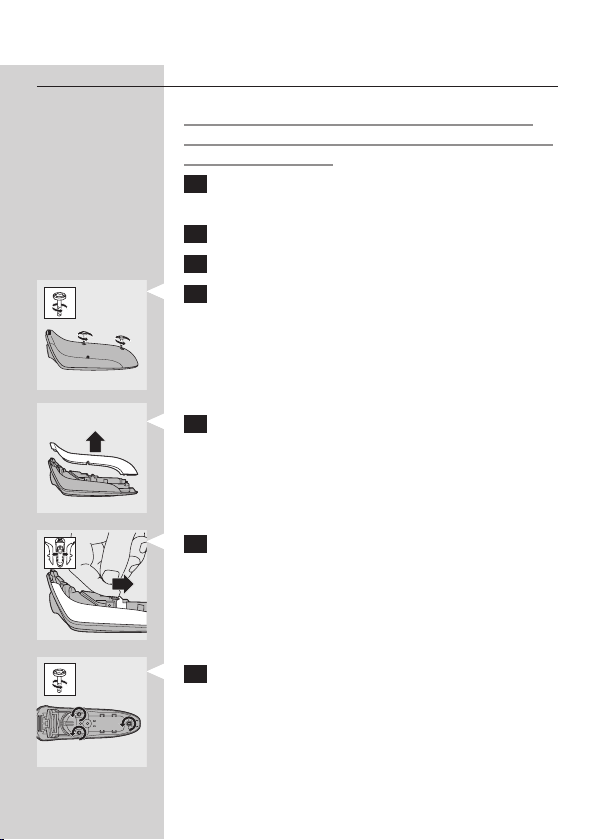
Preparing the Jet Clean System for use
Fill the cleaning chamber before rst use.
1 Put the small plug in the Jet Clean System.
Page 16

ENGLISH18
2 Put the adapter in the wall socket.
The holder automatically moves to the highest
,
position.
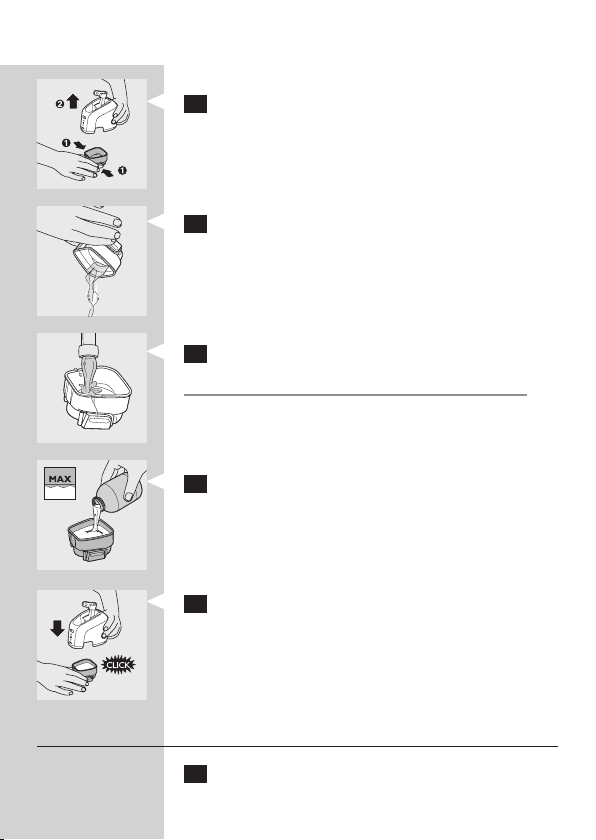
3 Simultaneously press the release buttons on
both sides of the cleaning chamber (1). Then lift
the Jet Clean System off the cleaning chamber
(2).
The cleaning chamber remains behind.
,
4 Unscrew the cap from the bottle with cleaning
uid and remove the airtight seal.
5 Fill the cleaning chamber with HQ200 cleaning
uid up to the MAX indication.
6 Place the Jet Clean System back onto the
cleaning chamber.
Make sure the release buttons click back into place.
Using the Jet Clean System
1 Place the shaver in the holder.
The display shows that the shaver is charging
,
(see chapter ‘The display’).
2 Press the on/off button on the Jet Clean
System to start the cleaning program.
The shaver display stops showing the charging
,
indication.
Page 17

ENGLISH 19
,
The cleaning light starts to ash and the shaver is
automatically lowered into the cleaning uid.
The cleaning light ashes throughout the
,
cleaning program, which takes 4 to 6 minutes,
depending on the cleaning program.
During the rst phase of the cleaning program,
,
the shaver automatically switches on and off
several times and moves up and down.
During the second phase of the cleaning
,
program, the shaver is placed in the drying
position, indicated by a ashing drying symbol.
This phase takes approx. 2 hours. The shaver
stays in this position until the end of the
program.
After the cleaning program, the charging
,
indication appears on the shaver display (see
chapter ‘The display’).
Note: If you press the on/off button of the Jet
Clean System during the cleaning program, the
program aborts and resets. In this case, the cleaning or
drying light stops ashing and the holder returns to its
starting position.
Note: If you remove the adapter from the wall socket
during the cleaning program, the program aborts. The
holder remains in its current position. When you put
the adapter back into the wall socket, the holder moves
to the highest position.
When the uid level drops below the minimum
-
level, the cleaning light and the ‘cleaning chamber
empty’ symbol start to ash and the holder
returns to its starting position.
If you use the washing machine to clean your
-
shaver every day, you need to rell the cleaning
chamber approx. every 15 days.
Page 18
ENGLISH20
Cleaning the Jet Clean System
1 Simultaneously press the release buttons on
both sides of the Jet Clean System (1). Then lift
the Jet Clean System off the cleaning chamber
(2).
The cleaning chamber remains behind.
,
2 Pour any remaining cleaning uid out of the
cleaning chamber.
You can simply pour the cleaning uid down the sink.
3 Rinse the cleaning chamber under the tap.
The cleaning chamber is not dishwasher-proof.
4 Fill the cleaning chamber with HQ200 cleaning
uid up to the MAX indication.
5 Place the Jet Clean System back onto the
cleaning chamber.
Make sure the release buttons click back into place.
You can clean the Jet Clean System with a moist
-
cloth.
Clean the cleaning chamber every 15 days.
-
Cleaning the shaving unit under the tap
1 Switch off the shaver.
Page 19
ENGLISH 21
2 Pull open the three shaving heads one by one.
3 Rinse all three shaving heads and all three hair
chambers under a hot tap for 30 seconds.
Be careful with hot water. Always check if the
water is not too hot, to prevent your hands from
getting burnt.
4 Carefully shake off excess water and leave the
shaving heads open to let the shaving unit dry
completely.
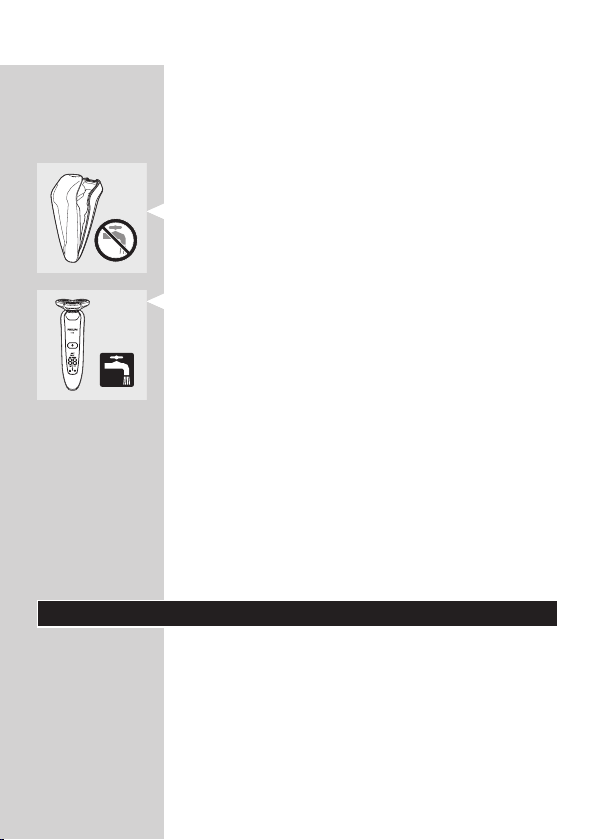
Never dry the shaving unit with a towel or tissue,
as this may damage the shaving heads.
Cleaning the shaving unit with the brush supplied
1 Switch off the shaver.
2 Pull open the three shaving heads one by one.
3 Clean the shaving heads and the hair chambers
with the brush supplied.
4 Close the shaving heads.
Page 20

ENGLISH22
Cleaning the trimmer with the brush supplied
Clean the trimmer every time you have used it.
1 Switch off the shaver.
2 Press the trimmer slide forwards to slide out
the trimmer.
3 Clean the trimmer with the short-bristled side
of the brush supplied. Brush up and down along
the trimmer teeth.
4 Switch the shaver on and off and repeat step 3.
5 Press the trimmer slide backwards to retract
the trimmer.
Tip: For optimal trimmer performance, lubricate the
trimmer teeth with a drop of sewing machine oil every
six months.
Storage
There are two ways to store the shaver or to take it
with you when you travel:
put the shaver in the Power Pod or in the Jet
-
Clean system. Make sure the protection cap is not
on the shaving unit.
slide the protection cap onto the shaving unit to
-
prevent damage to the shaving heads.
Replacement
Replace the shaving unit when the shaving unit
symbol appears on the display. Replace a damaged
shaving unit right away.
Page 21

ENGLISH 23
For maximum shaving performance, we advise you
to replace the shaving unit every two years.
Only replace the shaving unit with an original RQ10
Philips arcitec Shaving Unit.
1 Pull the old shaving unit off the shaver.
2 Insert the lug of the new shaving unit into the
slot in the top of the shaver (1). Then press the
shaving unit downwards (2) to attach it to the
shaver (‘click’).
Ordering parts
The following parts are available:
HQ8500 adapter
-
RQ10 Philips arcitec Shaving Unit
-
HQ110 Philips Shaving Head Cleaning Spray
-
HQ200 Philips Cleaning Fluid
-
Environment
Do not throw away the appliances with the
-
normal household waste at the end of their life,
but hand them in at an ofcial collection point for
recycling. By doing this, you help to preserve the
environment.
The built-in rechargeable shaver battery contains
-
substances that may pollute the environment.
Always remove the battery before you discard or
hand in the shaver at an ofcial collection point.
Dispose of the battery at an ofcial collection
point for batteries. If you have trouble removing
the battery, you can also take the appliance to a
Philips service centre. The staff of this centre will
remove the battery for you and will dispose of it
in an environmentally safe way.
Page 22
ENGLISH24
Disposal of the shaver battery
Only remove the battery when you discard the
shaver. Make sure the battery is completely empty
when you remove it.
1 Remove the shaver from the Power Pod or the
Jet Clean System.
2 Let the shaver run until it stops.
3 Pull the shaving unit off the shaver.
4 Undo the 2 screws on the back of the shaver.
5 Insert a screwdriver between the front and
back panel to open the shaver.
6 Remove the side panels.
7 Unscrew the 3 screws on the inside of the
shaver and remove the back cover.
Page 23

ENGLISH 25
8 Pull the wires out of the motor unit and
remove the battery.
Be careful, the battery strips are sharp.
Do not put the shaver back into the plugged-in
Power Pod or Jet Clean System after you have
removed the battery.
Guarantee & service
If you need information or if you have a problem, please
visit the Philips website at www.philips.com or contact
the Philips Customer Care Centre in your country
(you nd its phone number in the worldwide
guarantee leaet). If there is no Customer Care
Centre in your country, go to your local Philips
dealer or contact the Service Depar tment of Philips
Domestic Appliances and Personal Care BV.
Guarantee restrictions
The shaving heads (cutters and guards) are not
covered by the terms of the international guarantee
because they are subject to wear.
Page 24

ENGLISH26
Frequently asked questions
1
Why doesn’t the shaver shave as well as it used
to?
The Jet Clean System may not have cleaned the
-
shaver properly, because the cleaning uid in the
cleaning chamber is soiled or the cleaning uid
level is too low. Clean the shaver thoroughly
before you continue shaving. If necessary, clean
and rell the cleaning chamber (see chapter
‘Cleaning and maintenance’).
The shaving heads may be damaged or
-
worn. Replace the shaving unit (see chapter
‘Replacement’).
2 Why doesn’t the shaver work when I press the
on/off button?
The battery may be empty. Recharge the battery
-
(see chapter ‘Charging’).
The travel lock may be activated. Press the on/off
-
button for 3 seconds to deactivate the travel lock.
The shaving unit is soiled or damaged to such an
-
extent that the motor cannot run. In this case,
the shaving unit symbol, the tap symbol and the
exclamation mark ash. When this happens, you
have to clean the shaving unit or replace it.
The temperature of the shaver may be too high.
-
In this case, the shaver does not work and the
exclamation mark on the display ashes. As soon
as the temperature of the shaver has dropped
sufciently, you can switch on the shaver again.
3 Why isn’t the shaver entirely clean after I
cleaned it in the Jet Clean System?
The cleaning uid in the cleaning chamber may be
-
soiled. Empty and rinse the cleaning chamber.
Page 25

ENGLISH 27
The cleaning uid level may be too low. If the
-
uid volume in the cleaning chamber drops below
the minimum level during the cleaning program,
the program aborts.The cleaning light and the
‘cleaning chamber empty’ symbol ash at intervals
and the holder returns to its starting position.
Rell the cleaning chamber with cleaning uid up
to the MAX indication (see chapter ‘Cleaning and
maintenance’).
You may have used another cleaning uid than
-
the original Philips cleaning uid. Only use HQ200
cleaning uid.
4 Why doesn’t the Jet Clean System work when
I press the on/off button?
The Jet Clean System may not be connected to
-
the mains. Put the small plug into the Jet Clean
System and put the adapter in the wall socket.
There may not be an electrical connection
-
between the Jet Clean System and the
shaver. Press the shaver tightly into the holder to
lock it into place.
5 Why does the operating time of the Jet Clean
System vary?
The Jet Clean System has three cleaning programs:
-
the eco program, the normal program and the
intensive program. Each of these programs has a
different operating time. The shaver automatically
chooses the appropriate cleaning program.
6 Why is the shaver not fully charged after I
charged it in the Power Pod/Jet Clean System?
You may not have placed the shaver in the Power
-
Pod/Jet Clean System properly. Make sure you
press the shaver until it locks into place.
Page 26

28
DEUTSCH
Einführung
Herzlichen Glückwunsch zu Ihrem neuen Philips
Rasierer! Lesen Sie bitte diese Bedienungsanleitung
sorgfältig durch, da sie nützliche Informationen zu
den Funktionen dieses Rasierers sowie Tipps für eine
noch einfachere und angenehmere Rasur enthält.
Wichtig
Lesen Sie diese Bedienungsanleitung vor dem
Gebrauch des Rasierers, des JetClean Systems und
des PowerPod aufmerksam durch, und bewahren Sie
sie für eine spätere Verwendung auf.
Gefahr
Achten Sie darauf, dass der Adapter nicht nass
-
wird.
Warnhinweis
Gehen Sie vorsichtig mit heißem Wasser um.
-
Achten Sie darauf, dass das Wasser nicht zu heiß
ist und Sie sich nicht die Hände verbrühen.
Der Adapter enthält einen Transformator. Ersetzen
-
Sie den Adapter keinesfalls durch einen anderen
Stecker, da dies den Benutzer gefährden kann.
Diese Geräte sind für Benutzer (einschl. Kinder)
-
mit eingeschränkten physischen, sensorischen
oder psychischen Fähigkeiten bzw. ohne jegliche
Erfahrung oder Vorwissen nur dann geeignet, wenn
eine angemessene Aufsicht oder ausführliche
Anleitung zur Benutzung der Geräte durch eine
verantwortliche Person sichergestellt ist.
Achten Sie darauf, dass Kinder nicht mit den
-
Geräten spielen.
Page 27

DEUTSCH 29
Achtung
Benutzen Sie den Rasierer, das JetClean System,
-
den PowerPod und den Adapter nicht, wenn
Beschädigungen erkennbar sind.
Laden und verwahren Sie den Rasierer bei
-
Temperaturen zwischen 5°C und 35°C.
Um eine Beschädigung der Scherköpfe zu
-
vermeiden, sollten Sie auf Reisen immer die
Schutzkappe auf den Rasierer setzen.
Benutzen Sie zum Reinigen des Geräts keine
-
Scheuerschwämme und -mittel oder aggressive
Flüssigkeiten wie Benzin oder Azeton.
Verwenden Sie ausschließlich den
-
mitgelieferten Adapter.
Wenn der Adapter defekt oder beschädigt ist, darf
-
er nur durch ein Original-Ersatzteil ausgetauscht
werden, um Gefährdungen zu vermeiden.
Verwenden Sie das JetClean System nur mit der
-
HQ200 Original-Reinigungsüssigkeit.
Tauchen Sie das JetClean System niemals in
-
Wasser. Spülen Sie es auch nicht unter ießendem
Wasser ab.
Verwenden Sie das JetClean System bei einer
-
Temperatur zwischen 5 °C und 35 °C. Bewahren
Sie es auch in diesem Temperaturbereich auf.
Stellen Sie das JetClean System stets auf eine
-
stabile, ebene und waagerechte Unterlage, um
Auslaufen von Flüssigkeit zu vermeiden.
Entleeren Sie die Reinigungskammer alle 2 Wochen
-
und spülen Sie sie gründlich unter ießendem
heißen Wasser aus.
Stellen Sie das JetClean System immer auf eine
-
wasserundurchlässige Oberäche.
Das JetClean System reinigt Ihren Rasierer
-
gründlich, desinziert ihn jedoch nicht. Deshalb
Page 28
DEUTSCH30
sollten Sie Ihren Rasierer nicht gemeinsam mit
anderen Personen verwenden.
Die Reinigungskammer des JetClean Systems ist
-
nicht spülmaschinenfest.
Wenn das JetClean System betriebsbereit
-
ist, darf es nicht bewegt werden, damit keine
Reinigungsüssigkeit ausläuft.
Tauchen Sie den PowerPod keinesfalls in Wasser.
-
Spülen Sie ihn auch nicht unter ießendem
Wasser ab.
Normerfüllung
Der Rasierer erfüllt die internationalen IEC-
-
Sicherheitsvorschriften und kann ohne Bedenken
unter ießendem Wasser gereinigt werden.
Diese Philips Geräte erfüllen sämtliche Normen
-
bezüglich elektromagnetischer Felder (EMF).
Nach aktuellen wissenschaftlichen Erkenntnissen
sind die Geräte sicher im Gebrauch, sofern
sie ordnungsgemäß und entsprechend den
Anweisungen in dieser Bedienungsanleitung
gehandhabt werden.
Allgemeines
Der Adapter wandelt Netzspannungen von 100
-
bis 240 Volt in eine sichere Betriebsspannung von
unter 24 Volt um.
Übersicht (Abb. 1)
A Schutzkappe
B Schereinheit
C Langhaarschneider
D Ein-/Ausschalter Langhaarschneider
E Rasierer (RQ1090/RQ1060/RQ1050)
F Ein-/Ausschalter Rasierer
G Display
H Halterung für den Rasierer
Page 29
DEUTSCH 31
I JetClean System (RQ1005/RQ1000)
J Ein-/Ausschalter des JetClean Systems
K Reinigungssymbol
L Trocknungssymbol
M Symbol ‘Reinigungskammer leer’
N Reinigungskammer
O PowerPod
P Reinigungsbürste
Q Adapter
R Kleiner Stecker
Das Display
Entfernen Sie vor dem ersten Gebrauch des
Rasierers die Schutzfolie vom Display.
Die drei Rasierermodelle (RQ1090, RQ1060 and
RQ1050) verfügen über unterschiedliche Displays,
wie auf den nachstehenden Abbildungen dargestellt.
-
RQ1090
-
RQ1060
RQ1050
-
Page 30
DEUTSCH32
Laden
-
Die Ladedauer beträgt ca. 1 Stunde.
-
Wenn Sie den Rasierer ins JetClean System oder
in den PowerPod setzen, schaltet sich das Display
automatisch nach ca. 5 Stunden ab.
RQ1090
-
Während des Ladevorgangs blinken
die Minutenanzeige und das Steckersymbol.
-
Die in Minuten angegebene Rasierzeit verlängert
sich, bis der Rasierer vollständig aufgeladen ist.
RQ1060
Das Steckersymbol blinkt während des
-
Ladevorgangs.
Zunächst blinkt die unterste Reihe der
-
Pfeilsymbole der Ladestandsanzeige, dann die
zweite und so weiter, bis der Rasierer vollständig
aufgeladen ist.
RQ1050
Während des Ladevorgangs blinkt das
-
Batteriesymbol blau.
Akku voll aufgeladen
RQ1090
-
Bei voll geladenem Akku gibt das Display
die verfügbare Rasierzeit in Minuten an, das
Steckersymbol erlischt.
RQ1060
Bei voll geladenem Akku leuchten alle Pfeile
-
und alle Ladestandsanzeigen konstant blau, das
Steckersymbol im Display erlischt.
Page 31

DEUTSCH 33
Wenn Sie den Rasierer aus dem JetClean System
-
oder dem PowerPod herausnehmen, leuchtet die
oberste Pfeilreihe der Ladestandsanzeige blau.
Daran erkennen Sie, dass der Akku vollständig
geladen ist.
RQ1050
-
Ist der Akku vollständig geladen, leuchtet das
Batteriesymbol konstant blau.
Akku fast leer
RQ1090
Ist der Akku fast leer (es verbleiben nur noch
-
5 Minuten oder weniger an Rasierzeit), beginnen
die Minutenanzeige und das Steckersymbol zu
blinken.
Wenn Sie den Rasierer ausschalten, blinken die
-
Minutenanzeige und das Steckersymbol einige
Sekunden lang weiter. Sind keine weiteren
Rasierminuten übrig, ertönt ein akustisches Signal.
RQ1060
-
Ist der Akku fast leer (es verbleiben nur noch
5 Minuten oder weniger an Rasierzeit), blinkt das
Batteriesymbol rot und die unterste Pfeilreihe der
Ladestandsanzeige blau.
Wenn Sie den Rasierer ausschalten, blinken das
-
Batteriesymbol und die unterste Pfeilreihe der
Ladestandsanzeige einige Sekunden lang weiter.
Page 32

DEUTSCH34
RQ1050
-
Ist der Akku fast leer (es verbleiben nur noch 5
Minuten oder weniger an Rasierzeit), leuchtet das
Batteriesymbol rot.
-
Wenn Sie den Rasierer ausschalten, blinkt das
Batteriesymbol einige Sekunden lang.
Verbleibende Akkukapazität
RQ1090
-
Die verbleibende Akkukapazität ist anhand der
Rasierzeit erkennbar, die im Display in Minuten
angegeben ist.
RQ1060
Die verbleibende Akkukapazität erkennen Sie
-
daran, welche Pfeilreihe der Ladestandsanzeige
blinkt.
Den Rasierer reinigen
Für eine optimale Rasierleistung empfehlen wir, den
Rasierer nach jedem Gebrauch zu reinigen.
Das blinkende Wasserhahnsymbol erinnert
-
Sie daran, dass der Rasierer gereinigt werden muss.
Hinweis: Die Displays der Modelle RQ1060 und
RQ1050 sehen zwar etwas anders aus, bieten aber die
gleichen Anzeigen.
Die Schereinheit auswechseln
Für eine optimale Rasierleistung empfehlen wir, die
Schereinheit alle zwei Jahre auszuwechseln.
Page 33

DEUTSCH 35
Wenn es an der Zeit ist, die Schereinheit
-
auszuwechseln, blinkt das Schereinheitssymbol
(alle Modelle), und beim Ausschalten des Rasierers
ertönt ein akustisches Signal (nur RQ1090). Dies
geschieht nach jeweils 7 aufeinander folgenden
Rasuren, um Sie an das Austauschen der
Schereinheit zu erinnern.
Hinweis: Die Displays der Modelle RQ1060 und
RQ1050 sehen zwar etwas anders aus, bieten aber die
gleichen Anzeigen.
Reisesicherung
Sie können den Rasierer für die Reise sichern.
Dadurch verhindern Sie ein versehentliches
Einschalten des Geräts.
Die Reisesicherung aktivieren
1 Halten Sie den Ein-/Ausschalter 3 Sekunden
lang gedrückt, um in den Reisesicherungsmodus
zu gelangen.
Das Sicherungssymbol erscheint im Display (alle
,
Modelle), ein akustisches Signal (nur RQ1090)
zeigt Ihnen an, dass die Reisesicherung aktiviert
wurde.
Hinweis: Die Displays der Modelle RQ1060 und
RQ1050 sehen zwar etwas anders aus, haben aber die
gleichen Anzeigen.
Die Reisesicherung deaktivieren
1 Halten Sie den Ein-/Ausschalter 3 Sekunden
lang gedrückt.
Der Motor beginnt zu laufen. Daran erkennen
,
Sie, dass die Reisesicherung deaktiviert ist.
Der Rasierer ist nun wieder einsatzbereit.
Page 34

DEUTSCH36
Hinweis: Wenn Sie den Rasierer in den eingesteckten
PowerPod oder in das JetClean System stecken, wird die
Reisesicherung automatisch deaktiviert.
Blockierte Scherköpfe
Wenn die Scherköpfe blockiert sind,
-
blinken das Schereinheitssymbol und
das Wasserhahnsymbol mit Ausrufezeichen. Dies
zeigt an, dass der Motor nicht laufen kann, weil die
Scherköpfe verschmutzt oder beschädigt sind.
Hinweis: Die Displays der Modelle RQ1060 und
RQ1050 sehen zwar etwas anders aus, bieten aber die
gleichen Anzeigen.
In diesem Fall müssen Sie die Schereinheit reinigen
-
oder auswechseln.
Das Schereinheitssymbol und das
-
Wasserhahnsymbol mit dem Ausrufezeichen
blinken weiter, bis Sie die Blockade der Scherköpfe
gelöst haben.
Laden
Die Ladedauer beträgt ca. 1 Stunde.
Ein voll aufgeladener Rasierer hat eine Rasierzeit von
bis zu 65 Minuten. Das reicht für etwa 21 Rasuren.
Die tatsächliche Rasierzeit wird vom Rasierer
berechnet. Bei starkem Bartwuchs beträgt sie unter
Umständen weniger als 65 Minuten. Zudem kann sie
je nach Rasierverhalten oder Barttyp im Laufe der
Zeit variieren.
Schnellauadung
Nachdem das Gerät 5 Minuten lang aufgeladen
wurde, reicht die Akkukapazität für eine Rasur.
Page 35

DEUTSCH 37
Im PowerPod auaden
1 Stecken Sie den kleinen Stecker in den
PowerPod.
2 Stecken Sie den Adapter in die Steckdose.
3 Heben Sie die Oberseite des Deckels (1) an
und nehmen Sie diesen ab (2).
4 Setzen Sie den Rasierer erst mit der Oberseite
in den PowerPod (1) und drücken Sie ihn dann
mit der Unterseite hinein (2).
Hinweis: Der Rasierer passt nicht mit aufgesetzter
Schutzkappe in den PowerPod.
Das Display zeigt an, dass der Rasierer geladen
,
wird (siehe Kapitel “Das Display”).
Im Jet Clean System laden
1 Stecken Sie den kleinen Stecker in das Jet
Clean System.
2 Stecken Sie den Adapter in die Steckdose.
3 Stellen Sie den Rasierer kopfüber in die
Halterung, so dass das Display in Richtung der
Vorderseite des JetClean Systems zeigt.
Hinweis: Nur Modelle RQ1090, RQ1060: Wenn Sie den
Rasierer auf den Kopf stellen, werden die Anzeigen auf
Page 36

DEUTSCH38
dem Display auch umgedreht, so dass Sie weiterhin die
verbleibende Akkukapazität sehen können.
4 Drücken Sie den Rasierer fest in die Halterung,
bis er einrastet.
Hinweis: Der Rasierer passt nicht mit aufgesetzter
Schutzkappe in das JetClean System.
Das Display zeigt an, dass der Rasierer geladen
,
wird (siehe Kapitel “Das Display”).
Den Rasierer benutzen
Rasieren
1 Drücken Sie den Ein-/Ausschalter einmal, um
den Rasierer einzuschalten.
Das Display leuchtet für einige Sekunden auf.
,
2 Führen Sie die Scherköpfe mit geraden und
kreisenden Bewegungen über die Haut.
Die beste Rasur erzielen Sie bei trockener Haut.
-
Es kann 2 bis 3 Wochen dauern, bis sich Ihre Haut
-
an das Philips Schersystem gewöhnt hat.
3 Drücken Sie den Ein-/Ausschalter einmal, um
den Rasierer auszuschalten.
Das Display leuchtet einige Sekunden lang auf
,
und zeigt dann die verbleibende Akkukapazität
an (nur RQ1090/RQ1060).
Schneiden
Der Langhaarschneider eignet sich zum Schneiden
von Koteletten und Schnurrbart.
Page 37

DEUTSCH 39
1 Ziehen Sie die Schereinheit vom Rasierer ab.
2 Drücken Sie den Ein-/Ausschalter einmal, um
den Rasierer einzuschalten.
Das Display leuchtet für einige Sekunden auf.
,
3 Schieben Sie den Schiebeschalter für
den Langhaarschneider nach vorne. Der
Langhaarschneider wird herausgeschoben.
4 Nun können Sie mit dem Schneiden beginnen.
5 Schieben Sie den Schiebeschalter zurück, um
den Langhaarschneider wieder einzuziehen.
6 Drücken Sie den Ein-/Ausschalter einmal, um
den Rasierer auszuschalten.
Das Display leuchtet einige Sekunden lang auf
,
und zeigt dann die verbleibende Akkukapazität
an (nur RQ1090/RQ1060).
7 Stecken Sie die Führung der Schereinheit in
den Schlitz oben am Rasierer (1). Drücken
Sie die Schereinheit dann nach unten (2), so
dass sie mit einem “Klick” auf dem Rasierer
einrastet.
Reinigung und Wartung
Benutzen Sie zum Reinigen des Geräts keine
Scheuerschwämme und -mittel oder aggressive
Flüssigkeiten wie Benzin oder Azeton.
Der Rasierer lässt sich am einfachsten und
-
hygienischsten im JetClean System reinigen. Sie
können ihn jedoch auch unter ießendem Wasser
oder mit der im Lieferumfang enthaltenen Bürste
reinigen.
Page 38

DEUTSCH40
Gehen Sie vorsichtig mit heißem Wasser um.
-
Achten Sie darauf, dass das Wasser nicht zu heiß
ist und Sie sich nicht die Hände verbrühen.
Für eine optimale Rasierleistung empfehlen wir,
-
den Rasierer nach jedem Gebrauch zu reinigen.
Sie können den Rasierer von außen mit einem
-
feuchten Tuch reinigen.
Regelmäßige Reinigung sorgt für eine bessere
-
Leistung des Geräts.
Den Rasierer im Jet Clean System reinigen
Das JetClean System verfügt über drei
Reinigungsprogramme: Eco, Normal und Intensiv.
Der Rasierer wählt automatisch das passende
Reinigungsprogramm aus.
Das JetClean System für den Gebrauch
vorbereiten
Füllen Sie die Reinigungskammer vor dem ersten
Gebrauch auf.
1 Stecken Sie den kleinen Stecker in das Jet
Clean System.
2 Stecken Sie den Adapter in die Steckdose.
Die Halterung bewegt sich automatisch in die
,
oberste Position.
3 Drücken Sie die Entriegelungstasten auf beiden
Seiten der Reinigungskammer (1) gleichzeitig,
und heben Sie dann das JetClean System von
der Reinigungskammer (2).
Die Reinigungskammer bleibt stehen.
,
4 Schrauben Sie die Kappe von der Flasche mit
Reinigungsüssigkeit ab, und entfernen Sie das
Frischesiegel.
Page 39

DEUTSCH 41
5 Füllen Sie die Reinigungskammer bis
zur Markierung MAX mit HQ200
Reinigungsüssigkeit.
6 Stellen Sie das JetClean System auf die
Reinigungskammer zurück.
Achten Sie darauf, dass die Entriegelungstasten
wieder einrasten.
Das JetClean System verwenden
1 Stellen Sie den Rasierer in die Halterung.
Das Display zeigt an, dass der Rasierer geladen
,
wird (siehe Kapitel “Das Display”).
2 Drücken Sie den Ein-/Ausschalter am JetClean
System, um das Reinigungsprogramm zu
starten.
Das Display am Rasierer zeigt die Ladeanzeige
,
nicht mehr an.
Die Reinigungsanzeige blinkt, und der Rasierer
,
wird automatisch in die Reinigungsüssigkeit
getaucht.
Die Reinigungsanzeige blinkt während des
,
gesamten Reinigungsprogramms, was je nach
Reinigungsprogramm 4 bis 6 Minuten dauern
kann.
Während der ersten Phase des
,
Reinigungsprogramms schaltet sich der Rasierer
Page 40

DEUTSCH42
mehrmals ein und wieder aus und bewegt sich
auf und ab.
Während der zweiten Phase des
,
Reinigungsprogramms bendet sich der Rasierer
in der Trockenposition, was durch das blinkende
Trocknungssymbol angezeigt wird. Die Phase
dauert ca. 2 Stunden. Der Rasierer verbleibt bis
zum Ende des Programms in dieser Position.
Nach dem Reinigungsprogramm leuchtet die
,
Ladeanzeige auf dem Display des Rasierers (siehe
Kapitel “Das Display”).
Hinweis: Sollten Sie während des Reinigungsvorgangs
den Ein-/Ausschalter am JetClean System drücken,
wird das Reinigungsprogramm abgebrochen und
zurückgesetzt. In diesem Fall hört die Reinigungs- oder
Trocknungsanzeige auf zu blinken und die Halterung
geht zurück in die Ausgangsposition.
Hinweis: Wenn Sie während des Reinigungsprogramms
den Adapter aus der Steckdose ziehen, wird das
Programm abgebrochen. Die Halterung bleibt in der
aktuellen Position. Sobald Sie den Adapter wieder in die
Steckdose stecken, bewegt sich die Halterung in die
oberste Position.
Sinkt der Füllstand unter das vorgegebene
-
Minimum, beginnt das Symbol ‘Reinigungskammer
leer’ zu blinken und die Halterung kehrt in ihre
Ausgangsposition zurück.
Wenn Sie das Reinigungsgerät zur täglichen
-
Pege Ihres Rasierers benutzen, sollten Sie die
Reinigungskammer etwa alle zwei Wochen
auffüllen.
Page 41

DEUTSCH 43
Das JetClean System reinigen
1 Drücken Sie die Entriegelungstasten auf beiden
Seiten des JetClean Systems (1) gleichzeitig,
und heben Sie dann das JetClean System von
der Reinigungskammer (2).
Die Reinigungskammer bleibt stehen.
,
2 Gießen Sie noch verbleibende
Reinigungsüssigkeit aus.
Sie können die Reinigungsüssigkeit einfach über
dem Spülbecken ausgießen.
3 Spülen Sie die Reinigungskammer unter
ießendem Wasser aus.
Die Reinigungskammer ist nicht spülmaschinenfest.
4 Füllen Sie die Reinigungskammer bis
zur Markierung MAX mit HQ200
Reinigungsüssigkeit.
5 Stellen Sie das JetClean Systemauf die
Reinigungskammer zurück.
Achten Sie darauf, dass die Entriegelungstasten
wieder einrasten.
-
Das JetClean System lässt sich mit einem feuchten
Tuch reinigen.
Reinigen Sie die Reinigungskammer alle 14 Tage.
-
Page 42

DEUTSCH44
Die Schereinheit unter ießendem Wasser
reinigen
1 Schalten Sie den Rasierer aus.
2 Öffnen Sie die drei Scherköpfe nacheinander,
indem Sie daran ziehen.
3 Spülen Sie alle drei Scherköpfe sowie alle drei
Haarauffangkammern unter ießendem heißem
Wasser 30 Sekunden lang aus.
Gehen Sie vorsichtig mit heißem Wasser um.
Achten Sie darauf, dass das Wasser nicht zu heiß ist
und Sie sich nicht die Hände verbrühen.
4 Schütteln Sie überschüssiges Wasser sorgfältig
ab und lassen Sie die Scherköpfe offen, bis die
Schereinheit vollständig getrocknet ist.
Trocknen Sie die Schereinheit niemals mit einem
Tuch ab, um Beschädigungen der Scherköpfe zu
vermeiden.
Die Schereinheit mit der mitgelieferten
Bürste reinigen
1 Schalten Sie den Rasierer aus.
2 Öffnen Sie die drei Scherköpfe nacheinander,
indem Sie daran ziehen.
Page 43

DEUTSCH 45
3 Reinigen Sie die Scherköpfe und die
Haarauffangkammern mit der mitgelieferten
Bürste.
4 Schließen Sie die Scherköpfe.
Den Langhaarschneider mit der
mitgelieferten Bürste reinigen
Reinigen Sie den Langhaarschneider nach jedem
Gebrauch.
1 Schalten Sie den Rasierer aus.
2 Schieben Sie den Schiebeschalter für
den Langhaarschneider nach vorne. Der
Langhaarschneider wird herausgeschoben.
3 Reinigen Sie den Langhaarschneider mit den
kurzen Borsten der mitgelieferten Bürste.
Führen Sie dabei die Bürste auf und ab den
Zähnen entlang.
4 Schalten Sie den Rasierer ein und aus und
wiederholen Sie Schritt 3.
5 Schieben Sie den Schiebeschalter zurück, um
den Langhaarschneider wieder einzuziehen.
Tipp: Ölen Sie die Zähne des Langhaarschneiders alle
sechs Monate mit einem Tropfen Nähmaschinenöl.
Aufbewahrung
Sie können Ihren Rasierer auf zwei Arten
aufbewahren oder auf Reisen mitnehmen:
Stellen Sie den Rasierer in den PowerPod oder in
-
das JetClean System. Achten Sie darauf, dass die
Schutzkappe nicht auf der Schereinheit sitzt.
Page 44

DEUTSCH46
Setzen Sie die Schutzkappe auf die Schereinheit,
-
um eine Beschädigung der Scherköpfe zu
vermeiden.
Ersatz
Wechseln Sie die Schereinheit aus, wenn das
Schereinheitssymbol im Display erscheint. Eine
beschädigte Schereinheit sollte unverzüglich
ausgewechselt werden.
Für eine optimale Rasierleistung empfehlen wir, die
Schereinheit alle zwei Jahre auszuwechseln.
Tauschen Sie die Schereinheit nur durch eine RQ10
Philips arcitec Schereinheit aus.
1 Ziehen Sie die alte Schereinheit vom Rasierer
ab.
2 Stecken Sie die Führung der neuen
Schereinheit in den Schlitz oben am Rasierer
(1). Drücken Sie die Schereinheit dann nach
unten (2), so dass sie mit einem “Klick” auf
dem Rasierer einrastet.
Teile bestellen
Die folgenden Teile sind erhältlich:
Adapter HQ8500
-
Schereinheit RQ10 Philips arcitec
-
Philips Reinigungsspray für Scherköpfe HQ110
-
Philips Reinigungsüssigkeit HQ200
-
Page 45

DEUTSCH 47
Umweltschutz
Werfen Sie die Geräte am Ende der Lebensdauer
-
nicht in den normalen Hausmüll. Bringen Sie sie
zum Recycling zu einer ofziellen Sammelstelle.
Auf diese Weise helfen Sie, die Umwelt zu
schonen.
Der integrierte Rasierer-Akku enthält Substanzen,
-
die die Umwelt verschmutzen können. Entfernen
Sie den Akku, bevor Sie den Rasierer an einer
ofziellen Recyclingstelle abgeben. Geben Sie
den gebrauchten Akku bei einer ofziellen
Batteriesammelstelle ab. Falls Sie beim Entfernen
des Akkus Probleme haben, können Sie den
Rasierer auch an ein Philips Service-Center geben.
Dort wird der Akku herausgenommen und
umweltgerecht entsorgt.
Den Rasierer-Akku entsorgen
Nehmen Sie den Akku nur zur Entsorgung des
Rasierers heraus. Vergewissern Sie sich, dass der
Akku beim Herausnehmen vollständig entladen ist.
1 Nehmen Sie den Rasierer aus dem PowerPod
oder dem JetClean System heraus.
2 Lassen Sie den Rasierer laufen, bis er stillsteht.
3 Ziehen Sie die Schereinheit vom Rasierer ab.
4 Lösen Sie die zwei Schrauben auf der Rückseite
des Rasierers.
5 Öffnen Sie den Rasierer, indem Sie die vordere
und rückwärtige Abdeckung mithilfe eines
Schraubenziehers voneinander trennen.
Page 46

DEUTSCH48
6 Nehmen Sie die seitlichen Abdeckungen ab.
7 Lösen Sie die drei Schrauben innen im Rasierer
und nehmen Sie die Rückseite ab.
8 Ziehen Sie die Drähte aus der Motoreinheit
und nehmen Sie den Akku heraus.
Vorsicht: Die Schienen am Akku sind scharf!
Stellen Sie den Rasierer nicht mehr in den
eingesteckten PowerPod oder das JetClean System,
nachdem Sie den Akku herausgenommen haben.
Garantie und Kundendienst
Benötigen Sie weitere Informationen oder treten
Probleme auf, wenden Sie sich bitte an Ihren PhilipsHändler oder setzen Sie sich mit einem Philips ServiceCenter in Ihrem Land in Verbindung (Telefonnummer
siehe Garantieschrift). Besuchen Sie auch die Philips
Website (www.philips.com). Sie können auch direkt die
Service-Abteilung von Philips Domestic Appliances and
Personal Care BV kontaktieren.
Garantieeinschränkungen
Die Scherköpfe (Schermesser und Scherkörbe)
unterliegen nicht den Bedingungen der internationalen
Garantie, da sie einem normalen Verschleiß
ausgesetzt sind.
Page 47

DEUTSCH 49
Häug gestellte Fragen
1
Weshalb rasiert der Rasierer nicht mehr so gut
wie bisher?
Möglicherweise hat das JetClean System
-
den Rasierer nicht richtig gereinigt, weil die
Reinigungsüssigkeit in der Kammer verunreinigt
oder der Flüssigkeitsstand zu niedrig ist. Reinigen
Sie den Rasierer gründlich, bevor Sie die
Rasur fortsetzen. Falls nötig, reinigen Sie die
Reinigungskammer, und füllen Sie Flüssigkeit nach
(siehe Kapitel “Reinigung und Wartung”).
Möglicherweise sind die Scherköpfe beschädigt
-
oder abgenutzt. Wechseln Sie sie aus (siehe Kapitel
“Ersatz”).
2 Warum funktioniert der Rasierer nicht, wenn
ich den Ein-/Ausschalter drücke?
Möglicherweise ist der Akku leer. Laden Sie ihn
-
wieder auf (siehe Kapitel “Laden”).
Möglicherweise ist die Reisesicherung aktiviert.
-
Halten Sie den Ein-/Ausschalter drei Sekunden
lang gedrückt, um die Reisesicherung zu
deaktivieren.
Die Schereinheit ist so stark verschmutzt oder
-
beschädigt, dass der Motor nicht mehr laufen kann.
In diesem Fall blinken das Schereinheits- und das
Wasserhahnsymbol sowie das Ausrufezeichen.
Sie müssen dann die Schereinheit reinigen oder
auswechseln.
Möglicherweise ist der Rasierer heiß gelaufen.
-
Dann funktioniert er nicht, und das Ausrufezeichen
im Display blinkt. Nach entsprechender Abkühlung
können Sie den Rasierer wieder einschalten.
Page 48

DEUTSCH50
3 Weshalb ist der Rasierer nach dem Reinigen im
JetClean System nicht völlig sauber?
Möglicherweise ist die Flüssigkeit in der
-
Reinigungskammer verunreinigt. Entleeren Sie die
Kammer und spülen Sie sie aus.
Möglicherweise bendet sich zu wenig
-
Reinigungsüssigkeit in der Kammer.
Sinkt der Flüssigkeitsstand während des
Reinigungsprogramms unter das Minimum,
wird das Programm abgebrochen. Die
Reinigungsanzeige und das Symbol
‘Reinigungskammer leer’ blinken in Abständen
und die Halterung kehrt in ihre Ausgangsstellung
zurück. Füllen Sie Reinigungsüssigkeit bis zur
Markierung MAX nach (siehe Kapitel “Reinigung
und Wartung”).
Möglicherweise haben Sie eine andere
-
Reinigungsüssigkeit als die Philips OriginalReinigungsüssigkeit verwendet. Verwenden Sie
ausschließlich die HQ200 Reinigungsüssigkeit.
4 Warum funktioniert das JetClean System nicht,
wenn ich den Ein-/Ausschalter drücke?
Das JetClean System ist möglicherweise nicht
-
an das Stromnetz angeschlossen. Stecken Sie
den kleinen Stecker in die Buchse des JetClean
Systems und den Adapter in die Steckdose.
Möglicherweise besteht keine elektrische
-
Verbindung zwischen dem JetClean System und
dem Rasierer. Drücken Sie den Rasierer fest in die
Halterung, damit er fest sitzt.
5 Warum variiert die Betriebsdauer des JetClean
Systems?
Das JetClean System verfügt über drei
-
Reinigungsprogramme: Eco, Normal und Intensiv.
Jedes dieser Programme hat eine andere
Page 49

DEUTSCH 51
Betriebsdauer. Der Rasierer wählt automatisch das
passende Reinigungsprogramm aus.
6 Warum ist der Rasierer nicht vollständig
geladen, nachdem ich ihn über den PowerPod/
das JetClean System aufgeladen habe?
Sie haben den Rasierer ggf. nicht richtig in den
-
PowerPod/das JetClean System eingesetzt.
Drücken Sie den Rasierer hinein, bis er einrastet.
Page 50

52
ESPAÑOL
Introducción
Gracias por adquirir esta afeitadora Philips. Lea
atentamente este manual del usuario, en el cual
encontrará información sobre las excelentes
características de esta afeitadora, así como algunos
consejos para que el afeitado resulte más fácil y
agradable.
Importante
Antes de usar la afeitadora, el sistema Jet Clean y el
Power Pod, lea atentamente este manual del usuario
y consérvelo por si necesitara consultarlo en el
futuro.
Peligro
Asegúrese de que el adaptador no se moje.
-
Advertencia
Tenga cuidado con el agua caliente. Compruebe
-
siempre que el agua no esté demasiado caliente
para evitar quemarse las manos.
El adaptador incorpora un transformador. No
-
corte el adaptador para sustituirlo por otra clavija,
ya que podría provocar situaciones de peligro.
Estos aparatos no deben ser usados por personas
-
(adultos o niños) con su capacidad física, psíquica
o sensorial reducida, ni por quienes no tengan
los conocimientos y la experiencia necesarios,
a menos que sean supervisados o instruidos
acerca del uso de los aparatos por una persona
responsable de su seguridad.
Asegúrese de que los niños no jueguen con estos
-
aparatos.
Precaución
No utilice la afeitadora, el sistema Jet Clean, el
-
Power Pod ni el adaptador si están dañados.
Page 51

ESPAÑOL 53
Cargue y guarde la afeitadora a una temperatura
-
entre 5 °C y 35 °C.
Para proteger los cabezales de afeitado cuando
-
vaya de viaje, coloque siempre la tapa protectora
en la afeitadora.
No utilice estropajos, agentes abrasivos ni líquidos
-
agresivos, como gasolina o acetona, para limpiar el
aparato.
Utilice únicamente el adaptador que se suministra.
-
Si el adaptador está dañado, sustitúyalo siempre
-
por otro del modelo original para evitar
situaciones de peligro.
Utilice únicamente el líquido limpiador original
-
HQ200 con el sistema Jet Clean.
No sumerja nunca el sistema Jet Clean en agua ni
-
lo enjuague bajo el grifo.
Utilice y guarde el sistema Jet Clean a una
-
temperatura entre 5 °C y 35 °C.
Coloque siempre el sistema Jet Clean sobre una
-
supercie horizontal, plana y estable para evitar
que el líquido se derrame.
Vacíe la cámara de limpieza y enjuáguela bien con
-
agua caliente del grifo cada 15 días.
Coloque siempre el sistema Jet Clean sobre una
-
supercie resistente a los líquidos.
El sistema Jet Clean limpia a fondo pero no
-
desinfecta la afeitadora, por lo que no debe
compartirla con otras personas.
La cámara de limpieza del sistema Jet Clean no
-
puede lavarse en el lavavajillas.
Cuando el sistema Jet Clean esté listo parar usar,
-
no lo mueva para evitar que el líquido limpiador
se derrame.
Page 52

ESPAÑOL54
No sumerja nunca el Power Pod en agua ni lo
-
enjuague bajo el grifo.
Cumplimiento de normas
La afeitadora cumple las normas de seguridad IEC
-
aprobadas internacionalmente y se puede limpiar
bajo el grifo de forma segura.
Estos aparatos Philips cumplen todos los
-
estándares sobre campos electromagnéticos
(CEM). Si se utilizan correctamente y de acuerdo
con las instrucciones de este manual, los aparatos
se pueden usar de forma segura según los
conocimientos cientícos disponibles hoy en día.
General
El adaptador transforma la corriente de 100
-
- 240 voltios en un bajo voltaje de seguridad
inferior a 24 voltios.
Vista general (g. 1)
A Tapa protectora
B Unidad de afeitado
C Cortapatillas
D Botón de encendido/apagado del cortapatillas
E Afeitadora (RQ1090/RQ1060/RQ1050)
F Botón de encendido/apagado de la afeitadora
G Display
H Soporte para la afeitadora
I Sistema Jet Clean (RQ1005/RQ1000)
J Botón de encendido/apagado del sistema Jet
Clean
K Símbolo de limpieza
L Símbolo de secado
Page 53

ESPAÑOL 55
M Símbolo de “cámara de limpieza vacía”
N Cámara de limpieza
O Power Pod
P Cepillo de limpieza
Q Adaptador
R Clavija pequeña
El display
Antes de utilizar la afeitadora por primera vez, quite
la lámina protectora del display.
El display de los tres modelos de afeitadora
(RQ1090, RQ1060 y RQ1050) es diferente, tal y
como muestran los siguientes dibujos.
RQ1090
-
RQ1060
-
RQ1050
-
Carga
La afeitadora tarda aproximadamente 1 hora en
-
cargarse.
Cuando se coloca la afeitadora en el sistema
-
Jet Clean o en el Power Pod, el display se apaga
automáticamente después de aproximadamente
5 horas.
Page 54

ESPAÑOL56
RQ1090
Mientras la afeitadora se está cargando, la
-
indicación de minutos y el símbolo de la clavija
parpadean.
Los minutos de afeitado aumentan hasta que la
-
afeitadora está completamente cargada.
RQ1060
Mientras la afeitadora se está cargando, el símbolo
-
de la clavija parpadea.
Primero parpadean las puntas de echa del nivel
-
inferior de carga, luego las del segundo nivel, y
así sucesivamente hasta que la afeitadora esté
completamente cargada.
RQ1050
Mientras la afeitadora se está cargando, el símbolo
-
de la batería parpadea en azul.
Batería completamente cargada
RQ1090
Cuando la batería está completamente cargada,
-
el símbolo de la clavija desaparece del display y se
muestra la indicación de minutos.
RQ1060
Cuando la batería está completamente cargada,
-
todas las puntas de echa y todos los pilotos de
nivel de carga se iluminan en color azul de forma
continua, y el símbolo de la clavija desaparece del
display.
Page 55

ESPAÑOL 57
Cuando quite la afeitadora del sistema Jet Clean
-
o del Power Pod, las puntas de echa del nivel
superior de carga se iluminarán en color azul para
indicar que la batería está completamente cargada.
RQ1050
Cuando la batería está completamente cargada, el
-
símbolo de la misma se ilumina en color azul de
forma continua.
Batería baja
RQ1090
Cuando la batería está casi descargada (cuando
-
quedan 5 minutos o menos de afeitado), la
indicación de minutos y el símbolo de la clavija
comienzan a parpadear.
Al apagar la afeitadora, la indicación de minutos
-
de afeitado y el símbolo de la clavija continúan
parpadeando durante unos segundos. Cuando no
quedan más minutos de afeitado se oye un pitido.
RQ1060
Cuando la batería está casi descargada (cuando
-
quedan 5 minutos o menos de afeitado), el
símbolo de la batería parpadea en rojo y las
puntas de echa del nivel inferior de carga
parpadean en azul.
Al apagar la afeitadora, el símbolo de la batería
-
y las puntas de echa del nivel inferior de carga
continúan parpadeando durante unos segundos.
Page 56

ESPAÑOL58
RQ1050
Cuando la batería está casi descargada (cuando
-
quedan 5 minutos o menos de afeitado), el
símbolo de la batería se ilumina en rojo.
Al apagar la afeitadora, el símbolo de la batería
-
comienza a parpadear durante unos segundos.
Carga disponible en la batería
RQ1090
El número de minutos de afeitado que se muestra
-
en el display indica la carga disponible en la
batería.
RQ1060
Las puntas de echa que parpadean en un
-
determinado nivel de carga indican la carga
disponible en la batería.
Limpieza de la afeitadora
Para conseguir un rendimiento de afeitado óptimo,
le aconsejamos que limpie la afeitadora después de
cada uso.
El símbolo del grifo parpadea para recordarle que
-
debe limpiar la afeitadora.
Nota: Los displays de los modelos RQ1060 y RQ1050
son diferentes, pero muestran la misma indicación.
Sustituya la unidad de afeitado
Para un rendimiento de afeitado óptimo, le
aconsejamos que sustituya la unidad de afeitado
cada dos años.
Page 57

ESPAÑOL 59
El símbolo de la unidad de afeitado parpadea
-
(en todos los modelos) y se oye un pitido al
apagar la afeitadora (sólo en el modelo RQ1090)
para recordarle que debe cambiar la unidad
de afeitado. Esto ocurrirá al nal de 7 afeitados
consecutivos.
Nota: Los displays de los modelos RQ1060 y RQ1050
son diferentes, pero muestran la misma indicación.
Bloqueo para viajes
Puede bloquear la afeitadora cuando vaya de viaje.
Con ello evitará que la afeitadora se encienda
accidentalmente.
Activación del bloqueo para viajes
1 Para activar el modo de bloqueo para viajes,
mantenga pulsado el botón de encendido/
apagado durante 3 segundos.
,
El símbolo de bloqueo aparecerá en el display
(en todos los modelos) y se oirá un pitido (sólo
en el modelo RQ1090) para indicar que se ha
activado el modo de bloqueo para viajes.
Nota: Los displays de los modelos RQ1060 y RQ1050
son diferentes, pero muestran la misma indicación.
Desactivación del bloqueo para viajes
1 Pulse el botón de encendido/apagado durante
3 segundos.
El motor comienza a funcionar para indicar que
,
se ha desactivado el bloqueo para viajes.
La afeitadora está lista para usar de nuevo.
Nota: El bloqueo para viajes se desactiva
automáticamente al colocar la afeitadora en el Power
Pod o en el sistema Jet Clean si éstos están enchufados.
Page 58

ESPAÑOL60
Cabezales de afeitado bloqueados
El símbolo de la unidad de afeitado y el
-
símbolo del grifo con un signo de exclamación
parpadean cuando los cabezales de afeitado están
bloqueados. En ese caso, el motor no funciona
porque los cabezales están sucios o dañados.
Nota: Los displays de los modelos RQ1060 y RQ1050
son diferentes, pero muestran la misma indicación.
Si esto sucede, deberá limpiar o sustituir la unidad
-
de afeitado.
El símbolo de la unidad de afeitado y el símbolo
-
del grifo con un signo de exclamación continuarán
parpadeando hasta que se desbloqueen los
cabezales.
Carga
La afeitadora tarda aproximadamente 1 hora en
cargarse.
Una afeitadora completamente cargada proporciona
un tiempo de afeitado de hasta 65 minutos,
suciente para aproximadamente 21 afeitados.
La afeitadora calcula el tiempo de afeitado real. Si su
barba es muy fuerte, el tiempo de afeitado puede
ser inferior a 65 minutos. Este tiempo es variable,
dependiendo de cómo se afeite y del tipo de barba.
Carga rápida
Tras un tiempo de carga de 5 minutos, la afeitadora
dispone de energía suciente para un afeitado.
Page 59

ESPAÑOL 61
Carga mediante el Power Pod
1 Enchufe la clavija pequeña al Power Pod.
2 Enchufe el adaptador a la toma de corriente.
3 Tire de la parte superior de la tapa (1) y
quítela (2).
4 Introduzca primero la parte superior de
la afeitadora en el Power Pod (1) y luego
presione la parte inferior para introducirla en
el Power Pod (2).
Nota: La afeitadora no puede introducirse en el Power
Pod con la tapa protectora puesta en la unidad de
afeitado.
El display indica que la afeitadora se está
,
cargando (consulte el capítulo “El display”).
Carga mediante el sistema Jet Clean
1 Enchufe la clavija pequeña al sistema Jet Clean.
2 Enchufe el adaptador a la toma de corriente.
3 Coloque la afeitadora boca abajo en el soporte
con el display orientado hacia la parte frontal
del sistema Jet Clean.
Nota: Sólo los modelos RQ1090 y RQ1060: cuando
coloque la afeitadora boca abajo, las indicaciones del
Page 60

ESPAÑOL62
display también se invierten para que pueda seguir
viendo la carga disponible en la batería.
4 Presione la afeitadora con rmeza en el
soporte para jarla correctamente.
Nota: La afeitadora no puede colocarse en el sistema
Jet Clean con la tapa protectora puesta en la unidad
de afeitado.
El display indica que la afeitadora se está
,
cargando (consulte el capítulo “El display”).
Utilización de la afeitadora
Afeitado
1 Pulse el botón de encendido/apagado una vez
para encender la afeitadora.
El display se ilumina durante unos segundos.
,
2 Desplace los cabezales de afeitado sobre la piel,
haciendo movimientos rectos y circulares.
Para obtener los mejores resultados, aféitese con
-
la piel seca.
Puede que su piel necesite de 2 a 3 semanas para
-
acostumbrarse al sistema de afeitado Philips.
3 Pulse el botón de encendido/apagado una vez
para apagar la afeitadora.
El display se ilumina durante unos segundos y
,
luego muestra la carga disponible en la batería
(sólo en los modelos RQ1090 y RQ1060).
Cortapatillas
Puede utilizar el cortapatillas para recortar las patillas
y el bigote.
Page 61

ESPAÑOL 63
1 Quite la unidad de afeitado de la afeitadora.
2 Pulse el botón de encendido/apagado una vez
para encender la afeitadora.
El display se ilumina durante unos segundos.
,
3 Deslice el botón del cortapatillas hacia delante
para sacarlo.
4 Ya puede comenzar a utilizar el cortapatillas.
5 Deslice el botón del cortapatillas hacia atrás
para retraerlo.
6 Pulse el botón de encendido/apagado una vez
para apagar la afeitadora.
El display se ilumina durante unos segundos y
,
luego muestra la carga disponible en la batería
(sólo en los modelos RQ1090 y RQ1060).
7 Inserte el saliente de la unidad de afeitado en la
ranura de la parte superior de la afeitadora (1).
Luego presione la unidad de afeitado hacia
abajo (2) para jarla a la afeitadora (“clic”).
Limpieza y mantenimiento
No utilice estropajos, agentes abrasivos ni líquidos
agresivos, como gasolina o acetona, para limpiar el
aparato.
La mejor manera de limpiar la afeitadora, y la más
-
higiénica, es en el sistema Jet Clean. No obstante,
también puede enjuagarla bajo el grifo o limpiarla
con el cepillo que se suministra.
Tenga cuidado con el agua caliente. Compruebe
-
siempre que el agua no esté demasiado caliente
para evitar quemarse las manos.
Page 62

ESPAÑOL64
Para conseguir un rendimiento de afeitado óptimo,
-
limpie la afeitadora después de cada uso.
Puede limpiar el exterior de la afeitadora con un
-
paño húmedo.
Una limpieza frecuente garantiza mejores
-
resultados en el afeitado.
Limpieza de la unidad de afeitado con el
sistema Jet Clean
El sistema Jet Clean cuenta con tres programas
de limpieza: el programa eco, el programa normal
y el programa intensivo. La afeitadora selecciona
automáticamente el programa de limpieza adecuado.
Preparación del sistema Jet Clean para su
uso
Llene la cámara de limpieza antes de utilizarla por
primera vez.
1 Enchufe la clavija pequeña al sistema Jet Clean.
2 Enchufe el adaptador a la toma de corriente.
El soporte se desplazará automáticamente a su
,
posición más alta.
3 Pulse simultáneamente los botones de
liberación situados a ambos lados de la cámara
de limpieza (1). Luego levante y separe el
sistema Jet Clean de la cámara (2).
La cámara de limpieza se queda en su sitio.
,
4 Desenrosque el tapón de la botella de líquido
limpiador y quite el cierre hermético.
5 Llene la cámara de limpieza con líquido
limpiador HQ200 hasta la indicación MAX.
Page 63

ESPAÑOL 65
6 Vuelva a colocar el sistema Jet Clean sobre la
cámara de limpieza.
Asegúrese de que los botones de liberación vuelven
a encajarse.
Uso del sistema Jet Clean
1 Coloque la afeitadora en el soporte.
El display indica que la afeitadora se está
,
cargando (consulte el capítulo “El display”).
2 Pulse el botón de encendido/apagado del
sistema Jet Clean para iniciar el programa de
limpieza.
La indicación de carga desaparece del display de
,
la afeitadora.
El piloto de limpieza empieza a parpadear y la
,
afeitadora se sumerge automáticamente en el
líquido limpiador.
El piloto de limpieza parpadea durante todo
,
el programa, que dura de 4 a 6 minutos
dependiendo del programa de limpieza
seleccionado.
Durante la primera fase del programa de
,
limpieza, la afeitadora se enciende y apaga varias
veces de forma automática, y se mueve hacia
arriba y hacia abajo.
Page 64

ESPAÑOL66
Durante la segunda fase del programa de
,
limpieza, la afeitadora se coloca en la posición de
secado, que se indica mediante el parpadeo del
símbolo de secado. Esta fase dura unas 2 horas y
la afeitadora permanece en esta posición hasta el
nal del programa.
Tras el programa de limpieza, el display de
,
la afeitadora mostrará la indicación de carga
(consulte el capítulo “El display”).
Nota: Si pulsa el botón de encendido/apagado del
sistema Jet Clean durante el programa de limpieza,
éste se interrumpirá y se pondrá a cero. En ese caso, el
piloto de limpieza o secado dejará de parpadear y el
soporte volverá a su posición inicial.
Nota: Si desenchufa el adaptador de la toma de
corriente durante el programa de limpieza, éste se
interrumpirá. El soporte no cambiará de posición hasta
que vuelva a enchufar el adaptador a la toma de
corriente. Entonces se desplazará a su posición más
alta.
Cuando el nivel de líquido está por debajo del
-
nivel mínimo, el piloto de limpieza y el símbolo de
“cámara de limpieza vacía” comienzan a parpadear,
y el soporte vuelve a su posición inicial.
Si utiliza el dispositivo de limpieza para limpiar la
-
afeitadora todos los días, deberá rellenar la cámara
de limpieza aproximadamente cada 15 días.
Limpieza del sistema Jet Clean
1 Pulse simultáneamente los botones situados a
ambos lados del sistema Jet Clean (1). Luego
levante y separe el sistema Jet Clean de la
cámara (2).
La cámara de limpieza se queda en su sitio.
,
Page 65

ESPAÑOL 67
2 Vacíe los restos de líquido limpiador de la
cámara de limpieza.
Puede vaciar el líquido limpiador en el fregadero.
3 Enjuague la cámara de limpieza bajo el grifo.
La cámara de limpieza no puede lavarse en el
lavavajillas.
4 Llene la cámara de limpieza con líquido
limpiador HQ200 hasta la indicación MAX.
5 Vuelva a colocar el sistema Jet Clean sobre la
cámara de limpieza.
Asegúrese de que los botones de liberación vuelven
a encajarse.
Puede utilizar un paño húmedo para limpiar el
-
sistema Jet Clean.
Limpie la cámara de limpieza cada 15 días.
-
Limpieza de la unidad de afeitado bajo el
grifo
1 Apague la afeitadora.
2 Abra los tres cabezales de afeitado de uno en
uno.
Page 66

ESPAÑOL68
3 Enjuague los tres cabezales de afeitado y las
tres cámaras de recogida del pelo bajo el grifo
con agua caliente durante 30 segundos.
Tenga cuidado con el agua caliente. Compruebe
siempre que el agua no esté demasiado caliente
para evitar quemarse las manos.
4 Sacuda el exceso de agua y deje los cabezales
de afeitado abiertos para que la unidad de
afeitado se seque completamente.
No seque nunca la unidad de afeitado con una
toalla o un paño, ya que esto podría dañar los
cabezales de afeitado.
Limpieza de la unidad de afeitado con el
cepillo que se suministra
1 Apague la afeitadora.
2 Abra los tres cabezales de afeitado de uno en
uno.
3 Limpie los cabezales de afeitado y las cámaras
de recogida del pelo con el cepillo que se
suministra.
4 Cierre los cabezales de afeitado.
Limpieza del cortapatillas con el cepillo que
se suministra
Limpie el cortapatillas cada vez que lo utilice.
1 Apague la afeitadora.
Page 67

ESPAÑOL 69
2 Deslice el botón del cortapatillas hacia delante
para sacarlo.
3 Limpie el cortapatillas con el lado de cerdas
cortas del cepillo que se suministra. Cepille
hacia arriba y hacia abajo a lo largo de los
dientes del cortapatillas.
4 Encienda y apague la afeitadora y repita el
paso 3.
5 Deslice el botón del cortapatillas hacia atrás
para retraerlo.
Consejo: Para conseguir unos resultados óptimos,
lubrique los dientes del cortapatillas con una gota de
aceite de máquina de coser cada seis meses.
Almacenamiento
Hay dos modos de guardar la afeitadora o llevársela
de viaje:
-
Coloque la afeitadora en el Power Pod o en
el sistema Jet Clean. Asegúrese de que la tapa
protectora no esté puesta en la unidad de
afeitado.
-
Coloque la tapa protectora en la unidad de
afeitado para evitar que se deterioren los
cabezales de afeitado.
Page 68

ESPAÑOL70
Sustitución
Sustituya la unidad de afeitado cuando el símbolo de
la unidad de afeitado aparezca en el display. Sustituya
una unidad de afeitado dañada de forma inmediata.
Para un rendimiento de afeitado óptimo, le
aconsejamos que sustituya la unidad de afeitado
cada dos años.
Sustituya la unidad de afeitado únicamente por una
unidad de afeitado original Philips arcitec RQ10.
1 Quite la unidad de afeitado usada de la
afeitadora.
2 Inserte el saliente de la nueva unidad de
afeitado en la ranura de la parte superior de
la afeitadora (1). Luego presione la unidad
de afeitado hacia abajo (2) para jarla a la
afeitadora (“clic”).
Solicitud de repuestos
Las siguientes piezas de repuesto están disponibles:
Adaptador HQ8500
-
Unidad de afeitado Philips arcitec RQ10
-
Spray limpiador para cabezales de afeitado Philips
-
HQ110
Líquido limpiador Philips HQ200
-
Medio ambiente
Al nal de su vida útil, no tire los aparatos junto
-
con la basura normal del hogar. Llévelos a un
punto de recogida ocial para su reciclado.
De esta manera ayudará a conservar el medio
ambiente.
La batería recargable de la afeitadora contiene
-
sustancias que pueden contaminar el medio
ambiente. Quite siempre la batería antes de
Page 69

ESPAÑOL 71
deshacerse de la afeitadora o de llevarla a un
punto de recogida ocial. Deposite la batería en
un lugar de recogida ocial. Si no puede quitar la
batería, puede llevar la afeitadora a un centro de
servicio de Philips. El personal del mismo extraerá
la batería y se deshará de ella de forma no
perjudicial para el medio ambiente.
Cómo deshacerse de la batería
Quite la batería únicamente cuando deseche
la afeitadora. Asegúrese de que la batería esté
completamente descargada cuando la quite del
aparato.
1 Saque la afeitadora del Power Pod o del
sistema Jet Clean.
2 Deje que la afeitadora funcione hasta que se
pare.
3 Quite la unidad de afeitado de la afeitadora.
4 Desenrosque los dos tornillos de la parte
posterior de la afeitadora.
5 Inserte un destornillador entre el panel frontal
y el posterior para abrir la afeitadora.
6 Quite los paneles laterales.
Page 70

ESPAÑOL72
7 Desenrosque los tres tronillos del interior de
la afeitadora y quite la tapa trasera.
8 Extraiga los cables de la unidad motora y quite
la batería.
Tenga cuidado con las tiras de la batería ya que
están aladas.
No vuelva a poner la afeitadora en el Power Pod o
el sistema Jet Clean enchufados tras haber quitado
la batería.
Garantía y servicio
Si necesita información o tiene algún problema, visite
la página Web de Philips en www.philips.com, o
póngase en contacto con el Servicio de Atención al
Cliente de Philips en su país (hallará el número de
teléfono en el folleto de la garantía mundial). Si no
hay Servicio de Atención al Cliente de Philips en su
país, diríjase a su distribuidor local Philips o póngase
en contacto con el Service Depar tment de Philips
Domestic Appliances and Personal Care BV.
Restricciones de la garantía
Los cabezales de afeitado (cuchillas y protectores)
no están cubiertos por las condiciones de la garantía
internacional debido a que están sujetos a desgaste.
Page 71

ESPAÑOL 73
Preguntas más frecuentes
1
¿Por qué la afeitadora no afeita igual de bien
que antes?
Es posible que el sistema Jet Clean no haya
-
limpiado la afeitadora correctamente porque
el líquido de la cámara de limpieza esté sucio
o el nivel de líquido limpiador sea demasiado
bajo. Limpie bien la afeitadora antes de seguir
afeitándose. Si es necesario, limpie y vuelva a
llenar la cámara de limpieza (consulte el capítulo
“Limpieza y mantenimiento”).
Es posible que los cabezales de afeitado estén
-
dañados o gastados. Sustituya la unidad de
afeitado (consulte el capítulo “Sustitución”).
2 ¿Por qué no funciona la afeitadora al pulsar el
botón de encendido/apagado?
Puede que la batería esté descargada. Vuelva a
-
cargarla (consulte el capítulo “Carga”).
El bloqueo para viajes podría estar activado.
-
Mantenga pulsado el botón de encendido/
apagado durante 3 segundos para desactivar el
bloqueo.
La unidad de afeitado está tan sucia o dañada que
-
el motor no funciona. En ese caso, el símbolo de
la unidad de afeitado y el símbolo del grifo con un
signo de exclamación parpadearán. Cuando esto
ocurra, será necesario limpiar o sustituir la unidad
de afeitado.
Es posible que la temperatura de la afeitadora
-
sea demasiado elevada. En ese caso, la afeitadora
no funciona y en el display se muestra un signo
de exclamación parpadeando. Podrá encender
de nuevo la afeitadora tan pronto como su
temperatura haya bajado lo suciente.
Page 72

ESPAÑOL74
3 ¿Por qué no está totalmente limpia la
afeitadora después de haberla limpiado en el
sistema Jet Clean?
Es posible que el líquido limpiador de la cámara
-
de limpieza esté sucio. Vacíe y enjuague la cámara
de limpieza.
Puede que el nivel de líquido limpiador sea
-
demasiado bajo. Si el volumen de líquido de la
cámara de limpieza está por debajo del nivel
mínimo durante el programa de limpieza, éste se
interrumpe. El piloto de limpieza y el símbolo de
“cámara de limpieza vacía” comienzan a parpadear
a intervalos y el sopor te vuelve a su posición
inicial. Rellene la cámara de limpieza con líquido
limpiador hasta la indicación MAX (consulte el
capítulo “Limpieza y mantenimiento”).
Es posible que haya empleado un líquido
-
limpiador distinto al original de Philips. Utilice
únicamente el líquido limpiador HQ200.
4 ¿Por qué no funciona el sistema Jet Clean al
pulsar el botón de encendido/apagado?
Es posible que el sistema Jet Clean no esté
-
conectado a la toma de corriente. Conecte la
clavija pequeña al sistema Jet Clean y enchufe el
adaptador a toma de corriente.
Quizá no haya conexión eléctrica entre el sistema
-
Jet Clean y la afeitadora. Presione la afeitadora
rmemente en el soporte para jarla bien.
5 ¿Por qué varía el tiempo de funcionamiento del
sistema Jet Clean?
El sistema Jet Clean cuenta con tres programas de
-
limpieza: el programa eco, el programa normal y
el programa intensivo. Cada uno de ellos tiene un
tiempo de funcionamiento distinto. La afeitadora
Page 73

ESPAÑOL 75
selecciona automáticamente el programa de
limpieza adecuado.
6 ¿Por qué la afeitadora no está completamente
cargada tras haberla cargado en el Power Pod
o en el sistema Jet Clean?
Quizá no haya colocado correctamente la
-
afeitadora en el Power Pod o en el sistema Jet
Clean. Asegúrese de presionar bien la afeitadora
hasta que encaje en su sitio.
Page 74

76
FRANÇAIS
Introduction
Merci d’avoir acheté un rasoir Philips. Veuillez lire ce
mode d’emploi, qui contient des informations sur
les fonctionnalités remarquables de ce rasoir, ainsi
que des conseils pour un rasage plus facile et plus
agréable.
Important
Lisez ce mode d’emploi attentivement avant d’utiliser
le rasoir, le système Jet Clean et le Power Pod.
Conservez-le pour un usage ultérieur.
Danger
Veillez à ce que l’adaptateur ne soit pas en contact
-
avec de l’eau.
Avertissement
Veillez à ce que l’eau ne soit pas trop chaude pour
-
ne pas vous brûler.
L’adaptateur contient un transformateur. N’essayez
-
pas de remplacer la che de l’adaptateur pour
éviter tout accident.
Ces appareils ne sont pas destinés à être utilisés
-
par des personnes (notamment des enfants)
dont les capacités physiques, sensorielles ou
intellectuelles sont réduites, ou par des personnes
manquant d’expérience ou de connaissances, à
moins que celles-ci ne soient sous surveillance
ou qu’elles aient reçu des instructions quant
à l’utilisation des appareils par une personne
responsable de leur sécurité.
Veillez à ce que les enfants ne puissent pas jouer
-
avec les appareils.
Attention
N’utilisez pas le rasoir, le système Jet Clean, le
-
Power Pod ou l’adaptateur s’il est endommagé.
Page 75

FRANÇAIS 77
Chargez et conservez le rasoir à une température
-
comprise entre 5 °C et 35 °C.
Placez toujours le capot de protection sur le
-
rasoir an de protéger les têtes de rasage lorsque
vous êtes en voyage.
N’utilisez jamais de tampons à récurer, de produits
-
abrasifs ou de détergents agressifs tels que de
l’essence ou de l’acétone pour nettoyer l’appareil.
Utilisez exclusivement l’adaptateur fourni.
-
Si l’adaptateur est endommagé, remplacez-le
-
toujours par un adaptateur de même type pour
éviter tout accident.
Utilisez le système Jet Clean uniquement avec le
-
liquide de nettoyage HQ200.
Ne plongez jamais le système Jet Clean dans l’eau
-
et ne le rincez pas sous le robinet.
Utilisez et conservez le système Jet Clean à une
-
température comprise entre 5 °C et 35 °C.
Placez toujours le système Jet Clean sur une
-
surface stable et horizontale pour éviter toute
fuite de liquide.
Videz la cuve et nettoyez-la soigneusement à l’eau
-
chaude tous les 15 jours.
Placez toujours le système Jet Clean sur une
-
surface imperméable.
Le système Jet Clean nettoie le rasoir en
-
profondeur mais ne le désinfecte pas. Il est donc
préférable que le rasoir ne soit utilisé que par une
seule personne.
La cuve du système Jet Clean ne peut pas être
-
nettoyée au lave-vaisselle.
Lorsque le système Jet Clean est prêt à l’emploi,
-
ne le déplacez pas pour éviter toute fuite.
Page 76

FRANÇAIS78
Ne plongez jamais le Power Pod dans l’eau et ne
-
le rincez pas sous le robinet.
Conformité aux normes
Ce rasoir est conforme aux normes
-
internationales CEI et peut être nettoyé à l’eau en
toute sécurité.
Ces appareils Philips sont conformes à toutes les
-
normes relatives aux champs électromagnétiques
(CEM). Ils répondent aux règles de sécurité
établies sur la base des connaissances scientiques
actuelles s’ils sont manipulés correctement et
conformément aux instructions de ce mode
d’emploi.
Général
-
L’adaptateur transforme la tension de 100-240 V
en une tension de sécurité de moins de 24 V.
Aperçu (g. 1)
A Capot de protection
B Unité de rasage
C Tondeuse
D Bouton coulissant marche/arrêt de la tondeuse
E Rasoir (RQ1090/RQ1060/RQ1050)
F Bouton marche/arrêt du rasoir
G Afcheur
H Support du rasoir
I Système Jet Clean (RQ1005/RQ1000)
J Bouton marche/arrêt du système Jet Clean
K Symbole de nettoyage
L Symbole de séchage
M Symbole « cuve vide »
Page 77

FRANÇAIS 79
N Cuve
O Power Pod
P Brosse de nettoyage
Q Adaptateur
R Petite che
Afcheur
Avant d’utiliser le rasoir pour la première fois, retirez
le lm de protection de l’afcheur.
Les trois types de rasoir (RQ1090, RQ1060 et
RQ1050) possèdent des afcheurs différents, illustrés
sur les gures ci-dessous.
RQ1090
-
RQ1060
-
RQ1050
-
Charge
-
La charge dure environ 1 heure.
Lorsque vous placez le rasoir dans le système
-
Jet Clean ou le Power Pod, l’afcheur s’éteint
automatiquement au bout d’environ 5 heures.
Page 78

FRANÇAIS80
RQ1090
-
Lorsque le rasoir est en charge, le nombre de
minutes et le symbole de la che clignotent.
-
Le nombre de minutes de rasage augmente
jusqu’à ce que le rasoir soit entièrement chargé.
RQ1060
-
Lorsque le rasoir est en charge, le symbole de la
che clignote.
Les èches du niveau de charge inférieur
-
clignotent, puis celles du second niveau de charge,
et ainsi de suite jusqu’à ce que le rasoir soit
entièrement chargé.
RQ1050
-
Lorsque le rasoir est en charge, le symbole de la
batterie clignote en bleu.
Batterie entièrement chargée
RQ1090
Lorsque la batterie est entièrement chargée, le
-
nombre de minutes apparaît sur l’afcheur et le
symbole de la che disparaît de l’afcheur.
RQ1060
-
Lorsque la batterie est entièrement chargée,
toutes les èches et tous les témoins de niveau de
charge s’allument en bleu et restent allumés, et le
symbole de la che disparaît de l’afcheur.
Page 79

FRANÇAIS 81
Lorsque vous retirez le rasoir du système Jet
-
Clean ou du Power Pod, les èches du niveau de
charge supérieur s’allument en bleu pour indiquer
que la batterie est entièrement chargée.
RQ1050
Lorsque la batterie est entièrement chargée, le
-
symbole de la batterie s’allume en bleu et reste
allumé.
Batterie faible
RQ1090
Lorsque la batterie est presque vide (5 minutes
-
ou moins de rasage restantes), le nombre de
minutes et le symbole de la che se mettent à
clignoter.
Lorsque vous éteignez le rasoir, le nombre de
-
minutes de rasage et le symbole de la che
continuent à clignoter pendant quelques secondes.
Vous entendez un bip lorsque le nombre de
minutes de rasage arrive à zéro.
RQ1060
Lorsque la batterie est presque vide (5 minutes
-
ou moins de rasage restantes), le symbole de la
batterie clignote en rouge et les èches du niveau
de charge inférieur clignotent en bleu.
Lorsque vous éteignez le rasoir, le symbole de
-
la batterie et les èches du niveau de charge
inférieur continuent à clignoter pendant quelques
secondes.
Page 80

FRANÇAIS82
RQ1050
Lorsque la batterie est presque vide (5 minutes
-
ou moins de rasage restantes), le symbole de la
batterie s’allume en rouge.
-
Lorsque vous éteignez le rasoir, le symbole de
la batterie se met à clignoter pendant quelques
secondes.
Niveau de charge de la batterie
RQ1090
-
Le niveau de charge de la batterie est indiqué par
le nombre de minutes de rasage restantes gurant
sur l’afcheur.
RQ1060
Le niveau de charge de la batterie est indiqué
-
par les èches clignotantes d’un niveau de charge
donné.
Nettoyage du rasoir
Pour garantir des performances de rasage optimales,
nous vous recommandons de nettoyer le rasoir
après chaque utilisation.
-
Le symbole du robinet clignote pour vous
rappeler de nettoyer le rasoir.
Remarque: Les afcheurs des rasoirs de type RQ1060
et RQ1050 se présentent différemment, mais afchent
les mêmes informations.
Page 81

FRANÇAIS 83
Remplacement de l’unité de rasage
Pour garantir des performances de rasage optimales,
nous vous recommandons de remplacer l’unité de
rasage tous les deux ans.
Pour vous rappeler de remplacer l’unité de
-
rasage, le symbole de l’unité de rasage clignote
(tous types) et vous entendez un bip lorsque
vous éteignez le rasoir (RQ1090 seulement). Ce
signal vous avertit au bout de 7 séances de rasage
successives pour vous rappeler de remplacer
l’unité de rasage.
Remarque: Les afcheurs des rasoirs de type RQ1060
et RQ1050 se présentent différemment, mais afchent
les mêmes informations.
Verrouillage
Vous pouvez verrouiller le rasoir si vous partez en
voyage. Le verrouillage empêche le rasoir de se
mettre en marche accidentellement.
Activation du verrouillage
1 Appuyez sur le bouton marche/arrêt pendant
3 secondes pour activer le verrouillage.
Le symbole de la clé apparaît sur l’afcheur
,
(tous types) et vous entendez un bip (RQ1090
seulement), signalant que le verrouillage a été
activé.
Remarque: Les afcheurs des rasoirs de type RQ1060
et RQ1050 se présentent différemment, mais afchent
les mêmes informations.
Désactivation du verrouillage
1 Maintenez enfoncé le bouton marche/arrêt
pendant 3 secondes.
Page 82

FRANÇAIS84
Le moteur commence à fonctionner pour
,
indiquer que le verrouillage a été désactivé.
Le rasoir est de nouveau prêt à l’emploi.
Remarque: Lorsque vous placez le rasoir sur le Power
Pod ou dans le système Jet Clean, le verrouillage est
automatiquement désactivé.
Têtes de rasage bloquées
Si les têtes de rasage sont bloquées, le symbole
-
de l’unité de rasage et le symbole du robinet avec
un point d’exclamation clignotent. Dans ce cas, le
moteur ne peut pas fonctionner car les têtes de
rasage sont sales ou endommagées.
Remarque Les afcheurs des rasoirs de type RQ1060
et RQ1050 se présentent différemment, mais afchent
les mêmes informations.
Vous devez alors nettoyer l’unité de rasage ou la
-
remplacer.
Le symbole de l’unité de rasage et le symbole du
-
robinet avec un point d’exclamation continuent
de clignoter jusqu’à ce que vous déverrouilliez les
têtes de rasage.
Charge
La charge dure environ 1 heure.
Un rasoir entièrement chargé offre une autonomie
de rasage de 65 minutes, ce qui permet d’effectuer
environ 21 séances de rasage.
L’autonomie de rasage réelle est calculée par le
rasoir. Si vous avez une barbe fournie, l’autonomie
de rasage peut être inférieure à 65 minutes.
L’autonomie de rasage peut également varier au l
du temps, selon votre style de rasage et votre type
de barbe.
Page 83

FRANÇAIS 85
Charge rapide
Après 5 minutes de charge, le rasoir est
sufsamment chargé pour une séance de rasage.
Charge à l’aide du Power Pod
1 Insérez la petite che dans le Power Pod.
2 Branchez l’adaptateur sur la prise secteur.
3 Tirez sur la partie supérieure du couvercle (1)
et retirez-le (2).
4 Commencez par insérer la partie supérieure
du rasoir sur le Power Pod (1), puis exercez
une pression sur la partie inférieure pour la
positionner dans le Power Pod (2).
Remarque: Le rasoir ne doit pas être placé sur le Power
Pod tant que le capot de protection est installé sur
l’unité de rasage.
L’afcheur indique que le rasoir est en cours de
,
charge (voir la section « Afcheur »).
Charge à l’aide du système Jet Clean
1 Insérez la petite che dans le système Jet
Clean.
2 Branchez l’adaptateur sur la prise secteur.
Page 84

FRANÇAIS86
3 Placez le rasoir à l’envers sur le support avec
l’afcheur dirigé vers l’avant du système Jet
Clean.
Remarque: RQ1090, RQ1060 seulement : lorsque
vous retournez le rasoir, les indications gurant sur
l’afcheur sont également inversées, de sorte que vous
pouvez toujours consulter le niveau de charge de la
batterie.
4 Appuyez fermement sur le rasoir pour le
positionner sur le support.
Remarque: Le rasoir ne doit pas être placé dans le
système Jet Clean tant que le capot de protection est
installé sur l’unité de rasage.
L’afcheur indique que le rasoir est en cours de
,
charge (voir la section « Afcheur »).
Utilisation du rasoir
Rasoir
1 Mettez le rasoir en marche en appuyant sur le
bouton marche/arrêt.
L’afcheur s’allume pendant quelques secondes.
,
2 Déplacez les têtes de rasage sur la peau en
effectuant des mouvements rectilignes et
circulaires.
Vous obtiendrez de meilleurs résultats de rasage
-
sur peau sèche.
Votre peau pourrait avoir besoin de 2 ou
-
3 semaines pour s’habituer au système de rasage
Philips.
3 Arrêtez le rasoir en appuyant sur le bouton
marche/arrêt.
Page 85

FRANÇAIS 87
L’afcheur s’allume pendant quelques secondes,
,
puis afche le niveau de charge de la batterie
(RQ1090/RQ1060 uniquement).
Tondeuse
Vous pouvez utiliser la tondeuse pour tailler les
favoris et la moustache.
1 Détachez l’unité de rasage du rasoir.
2 Mettez le rasoir en marche en appuyant sur le
bouton marche/arrêt.
L’afcheur s’allume pendant quelques secondes.
,
3 Faites glisser le taquet vers l’avant pour
dégager la tondeuse.
4 Vous pouvez commencer à vous tondre.
5 Faites glisser le taquet vers l’arrière pour
replier la tondeuse.
6 Arrêtez le rasoir en appuyant sur le bouton
marche/arrêt.
L’afcheur s’allume pendant quelques secondes,
,
puis afche le niveau de charge de la batterie
(RQ1090/RQ1060 uniquement).
7 Insérez la languette de l’unité de rasage dans la
fente située sur la partie supérieure du rasoir
(1). Rattachez ensuite l’unité de rasage au
rasoir en la faisant glisser vers le bas (2) (clic).
Nettoyage et entretien
N’utilisez jamais de tampons à récurer, de produits
abrasifs ou de détergents agressifs tels que de
l’essence ou de l’acétone pour nettoyer l’appareil.
La meilleure manière et la manière la plus
-
hygiénique de nettoyer le rasoir est d’utiliser le
Page 86

FRANÇAIS88
système Jet Clean. Vous pouvez toutefois vous
contenter de le rincer sous le robinet ou de le
nettoyer à l’aide de la brosse fournie.
Veillez à ce que l’eau ne soit pas trop chaude pour
-
ne pas vous brûler.
Pour garantir des performances de rasage
-
optimales, nettoyez le rasoir après chaque
utilisation.
Vous pouvez utiliser un chiffon humide pour
-
nettoyer l’extérieur du rasoir.
Nettoyez régulièrement l’appareil pour obtenir
-
des résultats de rasage optimaux.
Nettoyage de l’unité de rasage à l’aide du système Jet Clean
Le système Jet Clean propose trois programmes
de nettoyage: le programme économique, le
programme standard et le programme intensif. Le
rasoir détermine automatiquement le programme
de nettoyage approprié.
Avant la première utilisation du système Jet Clean
Avant d’utiliser le système pour la première fois,
remplissez la cuve.
1 Insérez la petite che dans le système Jet
Clean.
2 Branchez l’adaptateur sur la prise secteur.
Le support se place automatiquement sur la
,
position la plus élevée.
3 Appuyez simultanément sur les deux boutons
situés sur les côtés de la cuve (1). Retirez
ensuite le système Jet Clean de la cuve (2).
La cuve se détache.
,
Page 87

FRANÇAIS 89
4 Dévissez le bouchon du acon de liquide de
nettoyage et retirez le joint étanche.
5 Remplissez la cuve de liquide de nettoyage
HQ200 jusqu’au niveau maximal (MAX).
6 Placez le système Jet Clean sur la cuve.
Assurez-vous que les boutons de déverrouillage se
remettent en place.
Utilisation du système Jet Clean
1 Placez le rasoir sur le support.
L’afcheur indique que le rasoir est en cours de
,
charge (voir la section « Afcheur »).
2 Appuyez sur le bouton marche/arrêt du
système Jet Clean pour lancer le programme
de nettoyage.
L’afcheur du rasoir cesse d’afcher le témoin
,
de charge.
Le voyant de nettoyage clignote et le rasoir
,
est automatiquement plongé dans le liquide de
nettoyage.
Le voyant de nettoyage clignote pendant
,
le programme de nettoyage (la durée du
programme varie entre 4 et 6 minutes, en
fonction du programme de nettoyage).
Au cours de la première phase du programme
,
de nettoyage, le rasoir s’allume et s’éteint
Page 88

FRANÇAIS90
automatiquement à plusieurs reprises, et se
déplace de haut en bas.
Au cours de la deuxième phase du programme
,
de nettoyage, le rasoir est en position de
séchage : le symbole de séchage clignote. Cette
phase dure environ 2 heures. Le rasoir reste
dans cette position jusqu’a la n du programme.
Une fois le programme de nettoyage terminé, le
,
témoin de charge apparaît sur l’afcheur (voir la
section « Afcheur »).
Remarque: Si vous appuyez sur le bouton marche/
arrêt du système Jet Clean pendant le programme de
nettoyage, le programme est arrêté, puis remis à zéro.
Le cas échéant, le voyant de nettoyage ou de séchage
s’arrête de clignoter et le support reprend sa position
initiale.
Remarque: Si vous retirez l’adaptateur de la prise
secteur pendant le programme de nettoyage, le
programme s’interrompt. Lorsque vous remettez
l’adaptateur dans la prise secteur, le support adopte la
position la plus élevée.
Lorsque le niveau du liquide est trop bas, le
-
voyant de nettoyage et le symbole « cuve vide »
clignotent et le support reprend sa position
initiale.
Si vous utilisez le kit de nettoyage tous les jours,
-
remplissez la cuve tous les 15 jours environ.
Nettoyage du système Jet Clean
1 Appuyez simultanément sur les boutons
de déverrouillage situés de chaque côté du
système Jet Clean (1). Détachez ensuite le
système Jet Clean de la cuve (2).
La cuve se détache.
,
Page 89

FRANÇAIS 91
2 Videz le liquide de nettoyage qui reste dans la
cuve.
Vous pouvez simplement verser le liquide de
nettoyage dans le lavabo.
3 Rincez la cuve sous le robinet.
La cuve ne peut pas être nettoyée au lave-vaisselle.
4 Remplissez la cuve de liquide de nettoyage
HQ200 jusqu’au niveau maximal (MAX).
5 Replacez le système Jet Cleansur la cuve.
Assurez-vous que les boutons de déverrouillage se
remettent en place.
Vous pouvez nettoyer le système Jet Clean à l’aide
-
d’un chiffon humide.
Nettoyez la cuve tous les 15 jours.
-
Nettoyage de l’unité de rasage à l’eau
courante
1 Éteignez le rasoir.
2 Ouvrez les trois têtes de rasage une à une.
Page 90

FRANÇAIS92
3 Rincez à l’eau chaude les trois têtes de rasage
et les trois compartiments à poils pendant
30 secondes.
Veillez à ce que l’eau ne soit pas trop chaude pour
ne pas vous brûler.
4 Secouez les têtes de rasage pour en retirer
l’excès d’eau, puis laissez-les sécher à l’air libre
pour obtenir une unité de rasage parfaitement
sèche.
Ne séchez jamais l’unité de rasage à l’aide d’une
serviette au risque d’endommager les têtes de
rasage.
Nettoyage de l’unité de rasage à l’aide de la brosse fournie
1 Éteignez le rasoir.
2 Ouvrez les trois têtes de rasage une à une.
3 Nettoyez les têtes de rasage et les
compartiments à poils à l’aide de la brosse
fournie.
4 Fermez les têtes de rasage.
Nettoyage de la tondeuse à l’aide de la
brosse fournie
Nettoyez la tondeuse après chaque utilisation.
1 Éteignez le rasoir.
Page 91

FRANÇAIS 93
2 Faites glisser le taquet vers l’avant pour
dégager la tondeuse.
3 Nettoyez la tondeuse avec le côté à poils
courts de la brosse fournie. Brossez les dents
de la tondeuse de haut en bas.
4 Mettez le rasoir en marche, arrêtez-le, puis
répétez l’étape 3.
5 Faites glisser le taquet vers l’arrière pour
replier la tondeuse.
Conseil: Pour garantir des performances de rasage
optimales, appliquez une goutte d’huile pour machine
à coudre sur la tondeuse sous les six mois.
Rangement
Le rasoir peut se ranger de deux manières lorsque
vous l’emportez avec vous en voyage :
-
Placez le rasoir sur le Power Pod ou dans le
système Jet Clean. Assurez-vous que le capot de
protection n’est pas installé sur l’unité de rasage.
-
Faites glisser le capot de protection sur l’unité de
rasage pour éviter d’endommager les têtes de
rasage.
Page 92

FRANÇAIS94
Remplacement
Remplacez l’unité de rasage lorsque le symbole
de l’unité de rasage apparaît sur l’afcheur.
N’attendez pas pour remplacer une unité de rasage
endommagée.
Pour garantir des performances de rasage optimales,
nous vous recommandons de remplacer l’unité de
rasage tous les deux ans.
L’unité de rasage ne peut être remplacée que par
une unité de rasage arcitec RQ10 Philips.
1 Détachez l’ancienne unité de rasage du rasoir.
2 Insérez la languette de la nouvelle unité de
rasage dans la fente du rasoir prévue à cet effet
(1). Attachez ensuite l’unité de rasage au rasoir
en faisant glisser le taquet vers le bas (2) (clic).
Commande de pièces
Les pièces suivantes sont disponibles :
Adaptateur HQ8500
-
Unité de rasage arcitec RQ10 Philips
-
Spray Philips Shaving Head Cleaner HQ110
-
Liquide de nettoyage Philips HQ200
-
Environnement
Lorsqu’il ne fonctionnera plus, ne jetez pas
-
l’appareil avec les ordures ménagères, mais
déposez-le à un endroit assigné à cet effet, où il
pourra être recyclé. Vous contribuerez ainsi à la
protection de l’environnement.
La batterie intégrée contient des substances qui
-
peuvent nuire à l’environnement. Veillez à toujours
retirer la batterie avant de mettre le rasoir au
rebut ou de le déposer à un endroit assigné à
Page 93

FRANÇAIS 95
cet effet. Déposez la batterie usagée à un endroit
assigné à cet effet. Si vous n’arrivez pas à retirer
la batterie, vous pouvez apporter l’appareil dans
un Centre Service Agréé Philips qui prendra
toute l’opération en charge pour préserver
l’environnement.
Mise au rebut de la batterie du rasoir
Retirez la batterie uniquement lorsque vous
mettez le rasoir au rebut. Assurez-vous que la
batterie est complètement déchargée lorsque vous
la jetez.
1 Retirez le rasoir du Power Pod ou du système
Jet Clean.
2 Laissez le rasoir fonctionner jusqu’à l’arrêt du
moteur.
3 Détachez l’unité de rasage du rasoir.
4 Dévissez les 2 vis à l’arrière du rasoir.
5 Pour ouvrir le rasoir, insérez un tournevis
entre le panneau avant et le panneau arrière.
6 Retirez les panneaux latéraux.
Page 94

FRANÇAIS96
7 Dévissez les 3 vis situées à l’intérieur du rasoir,
et retirez la plaque de protection arrière.
8 Sortez les ls du bloc moteur et retirez la
batterie.
Soyez prudent car les languettes de la batterie sont
coupantes.
Ne replacez pas le rasoir sur le Power Pod ou dans
le système Jet Clean après avoir retiré la batterie.
Garantie et service
Si vous souhaitez obtenir des informations
supplémentaires ou si vous rencontrez un problème,
visitez le site Web de Philips à l’adresse
www.philips.com ou contactez le
Service Consommateurs Philips de votre pays (vous
trouverez le numéro de téléphone correspondant
sur le dépliant de garantie internationale). S’il n’existe
pas de Service Consommateurs Philips dans votre
pays, renseignez-vous auprès de votre revendeur
Philips local ou contactez le « Service Depar tment
of Philips Domestic Appliances and
Personal Care BV ».
Limitation de garantie
Étant susceptibles de s’user, les têtes de rasage
(lames et grilles) ne sont pas couvertes par la
garantie internationale.
Page 95

FRANÇAIS 97
Foire aux questions
1
Pourquoi les résultats de rasage ne sont-ils pas
aussi satisfaisants que d’habitude ?
Peut-être le rasoir a-t-il été mal nettoyé dans
-
le système Jet Clean parce que le liquide de
nettoyage est sale ou le niveau du liquide de
nettoyage trop bas. Nettoyez complètement le
rasoir avant de continuer à vous raser.
Si nécessaire, nettoyez et remplissez la cuve (voir
le chapitre « Nettoyage et entretien »).
Les têtes de rasage sont peut-être endommagées
-
ou usées. Remplacez l’unité de rasage (voir le
chapitre « Remplacement »).
2 Pourquoi le rasoir ne fonctionne-t-il pas
lorsque j’appuie sur le bouton marche/arrêt ?
La batterie est peut-être vide. Rechargez la
-
batterie (voir le chapitre « Charge »).
Le verrouillage est peut-être activé. Appuyez sur
-
le bouton marche/arrêt pendant 3 secondes pour
désactiver le verrouillage.
L’unité de rasage est sale ou endommagée de
-
sorte que le moteur ne peut pas fonctionner.
Le cas échéant, le symbole de l’unité de rasage,
le symbole du robinet et le point d’exclamation
clignotent. Dans ce cas, nettoyez l’unité de rasage
ou remplacez-la.
La température du rasoir est peut-être trop
-
élevée. Le cas échéant, le rasoir ne fonctionne
pas et le point d’exclamation clignote sur
l’afcheur. Dès que la température du rasoir est
sufsamment basse, vous pouvez rallumer le rasoir.
3 Pourquoi le rasoir n’est-il pas tout à fait propre
après avoir été nettoyé à l’aide du système Jet
Clean ?
Page 96

FRANÇAIS98
Le liquide de nettoyage présent dans la cuve est
-
peut-être sale. Videz la cuve et rincez-la.
Le niveau de liquide de nettoyage est peut-être
-
trop bas. Si la quantité de liquide de nettoyage
descend sous le niveau minimum au cours du
programme de nettoyage, celui-ci s’interrompt.
Le voyant de nettoyage et le symbole « cuve
vide » clignotent et le support revient à sa
position initiale. Remplissez la cuve de liquide de
nettoyage jusqu’au niveau MAX (voir le chapitre
« Nettoyage et entretien »).
Peut-être avez-vous utilisé un liquide de nettoyage
-
autre que le liquide de nettoyage Philips. Utilisez
uniquement le liquide de nettoyage HQ200.
4 Pourquoi le système Jet Clean ne fonctionne-
t-il pas lorsque j’appuie sur le bouton marche/
arrêt ?
Le système Jet Clean n’est peut-être pas
-
connecté au secteur. Insérez la petite che dans
le système Jet Clean et branchez l’adaptateur sur
une prise secteur.
Le système Jet Clean et le rasoir sont peut-être
-
mal connectés. Appuyez fortement sur le support
pour l’enclencher.
5 Comment se fait-il que le temps de
fonctionnement du système Jet Clean varie?
Le système Jet Clean propose trois programmes
-
de nettoyage : le programme économique, le
programme standard et le programme intensif. Le
temps de fonctionnement de chaque programme
varie. Le rasoir détermine automatiquement le
programme de nettoyage approprié.
6 Pourquoi le rasoir n’est-il pas entièrement
chargé lorsqu’il vient d’être chargé à l’aide du
Power Pod/du système Jet Clean ?
Page 97

FRANÇAIS 99
Peut-être n’avez-vous pas correctement placé
-
le rasoir sur le Power Pod/le système Jet Clean.
Assurez-vous que le rasoir y est bien enclenché.
Page 98

100
ITALIANO
Introduzione
Grazie per aver acquistato questo rasoio Philips.
Leggete questo manuale utente contenente
informazioni sulle straordinarie funzioni di questo
rasoio e utili suggerimenti per rendere la rasatura più
semplice e agevole.
Importante
Prima di utilizzare il rasoio, il sistema Jet Clean e
l’astuccio di ricarica, leggete attentamente il presente
manuale utente e conservatelo per eventuali
riferimenti futuri.
Pericolo
Evitate assolutamente il contatto della spina con
-
l’acqua.
Avviso
Prestate particolare attenzione quando utilizzate
-
l’acqua calda: vericate sempre che non sia troppo
calda per evitare di scottarvi.
L’adattatore contiene un trasformatore. Non
-
tagliate l’adattatore per sostituirlo con un’altra
spina onde evitare situazioni pericolose.
Questi apparecchi non sono destinati a persone
-
(inclusi bambini) con capacità mentali, siche o
sensoriali ridotte, fatti salvi i casi in cui tali persone
abbiano ricevuto assistenza o formazione per l’uso
degli apparecchi da una persona responsabile della
loro sicurezza.
Adottate le dovute precauzioni per evitare che i
-
bambini giochino con questi apparecchi.
Attenzione
Non utilizzate il rasoio, il sistema Jet Clean,
-
l’astuccio di ricarica o l’adattatore se danneggiati.
Page 99

ITALIANO 101
Ricaricate e riponete il rasoio a una temperatura
-
tra 5°C e 35°C.
Riponete sempre il cappuccio di protezione
-
sul rasoio per proteggere le testine di rasatura
durante gli spostamenti.
non usate prodotti o sostanze abrasive o
-
detergenti aggressivi, come benzina o acetone, per
pulire l’apparecchio.
Utilizzate esclusivamente l’adattatore in dotazione.
-
Nel caso in cui l’adattatore fosse danneggiato,
-
dovrà essere sostituito esclusivamente con un
adattatore originale al ne di evitare situazioni
pericolose.
Utilizzate il sistema Jet Clean esclusivamente con il
-
liquido detergente originale HQ200.
Non immergete mai il sistema Jet Clean nell’acqua
-
e non sciacquatelo sotto l’acqua corrente.
Utilizzate e riponete il sistema Jet Clean a una
-
temperatura compresa tra 5°C e 35°C.
Posizionate sempre il sistema Jet Clean su una
-
supercie stabile e orizzontale per evitare la
fuoriuscita di liquido.
Svuotate la vaschetta del detergente e lavatela
-
accuratamente sotto l’acqua calda ogni 2
settimane.
Appoggiate sempre il sistema Jet Clean su una
-
supercie non intaccabile dai liquidi.
Il sistema Jet Clean consente di lavare
-
accuratamente il rasoio, ma non esegue la
disinfezione. È pertanto opportuno non
condividere il rasoio con altre persone.
Non lavate in lavastoviglie la vaschetta del
-
detergente del sistema Jet Clean.
Quando il sistema Jet Clean è pronto per l’uso,
-
non muovetelo, per evitare la fuoriuscita del
liquido detergente.
Page 100

ITALIANO102
Non immergete mai lo spinotto di ricarica
-
nell’acqua e non sciacquatelo sotto l’acqua
corrente.
Conformità agli standard
Il rasoio è conforme alle norme di sicurezza IEC
-
approvate a livello internazionale e può essere
lavato tranquillamente sotto l’acqua corrente.
Questi apparecchi Philips sono conformi a tutti gli
-
standard relativi ai campi elettromagnetici (EMF).
Se utilizzati in modo appropriato seguendo le
istruzioni contenute nel presente manuale utente,
gli apparecchi consentono un utilizzo sicuro come
confermato dai risultati scientici attualmente
disponibili.
Indicazioni generali
L’adattatore trasforma la tensione a 100-240 volt
-
in una tensione più bassa e sicura inferiore ai
24 volt.
Panoramica (g. 1)
A Cappuccio di protezione
B Unità di rasatura
C Tagliabasette
D Cursore tagliabasette on/off
E Rasoio (RQ1090/RQ1060/RQ1050)
F Pulsante on/off rasoio
G Display
H Supporto per rasoio
I Sistema Jet Clean (RQ1005/RQ1000)
J Pulsante on/off sistema Jet Clean
K Simbolo di lavaggio
L Simbolo di asciugatura
 Loading...